

Page 1

Venue 8
7000 Series
User’s Manual
Tablet model: Venue 7840
Regulatory model: T02E
Regulatory type: T02E001
Page 2
Notes, Cautions, and Warnings
NOTE: A NOTE indicates important information that helps you
make better use of your tablet PC.
CAUTION: A CAUTION indicates potential damage to hardware
or loss of data if instructions are not followed.
WARNING: A WARNING indicates a potential for property
damage, personal injury, or death.
_______________________
Copyright © 2014 Dell Inc. All rights reserved.
This product is protected by U.S. and international copyright and intellectual property
laws.
Dell™ and the Dell logo are trademarks of Dell Inc. in the United States and/or other
jurisdictions. All other marks and names mentioned herein may be trademarks of their
respective companies.
October 2014 Rev. A00
Page 3

Contents | 3
Contents
Features ........................................................................... 5
Accessories ..................................................................... 8
Setting Up Your Tablet ................................................. 9
Charging the Tablet .................................................................... 9
TurningOnYourTablet .............................................................12
TurningOffYourTablet .............................................................13
Locking your tablet ....................................................................13
Unlocking your tablet ...............................................................14
Inserting a MicroSD Card .........................................................15
Removing the MicroSD Card ...................................................16
Using Headphones ....................................................................17
Using Your Tablet ........................................................ 18
Wi‑FiSetting ................................................................................18
BluetoothSetting .......................................................................19
Gestures ...................................................................................... 20
Screen Orientation ................................................................... 23
Android Home Screen ............................................................. 24
IntelRealSenseSnapshot ........................................................ 29
Synchronizing Your Tablet .......................................................31
Resetting Your Tablet ............................................................... 32
Cleaning Your Tablet ................................................................ 32
Troubleshooting .......................................................... 33
Contacting Dell ........................................................... 36
Page 4

4 | Contents
Locating Your Service Tag and
ExpressServiceCode ................................................. 37
Specifications ............................................................... 38
Glossary ........................................................................40
Index .............................................................................43
Page 5
Features | 5
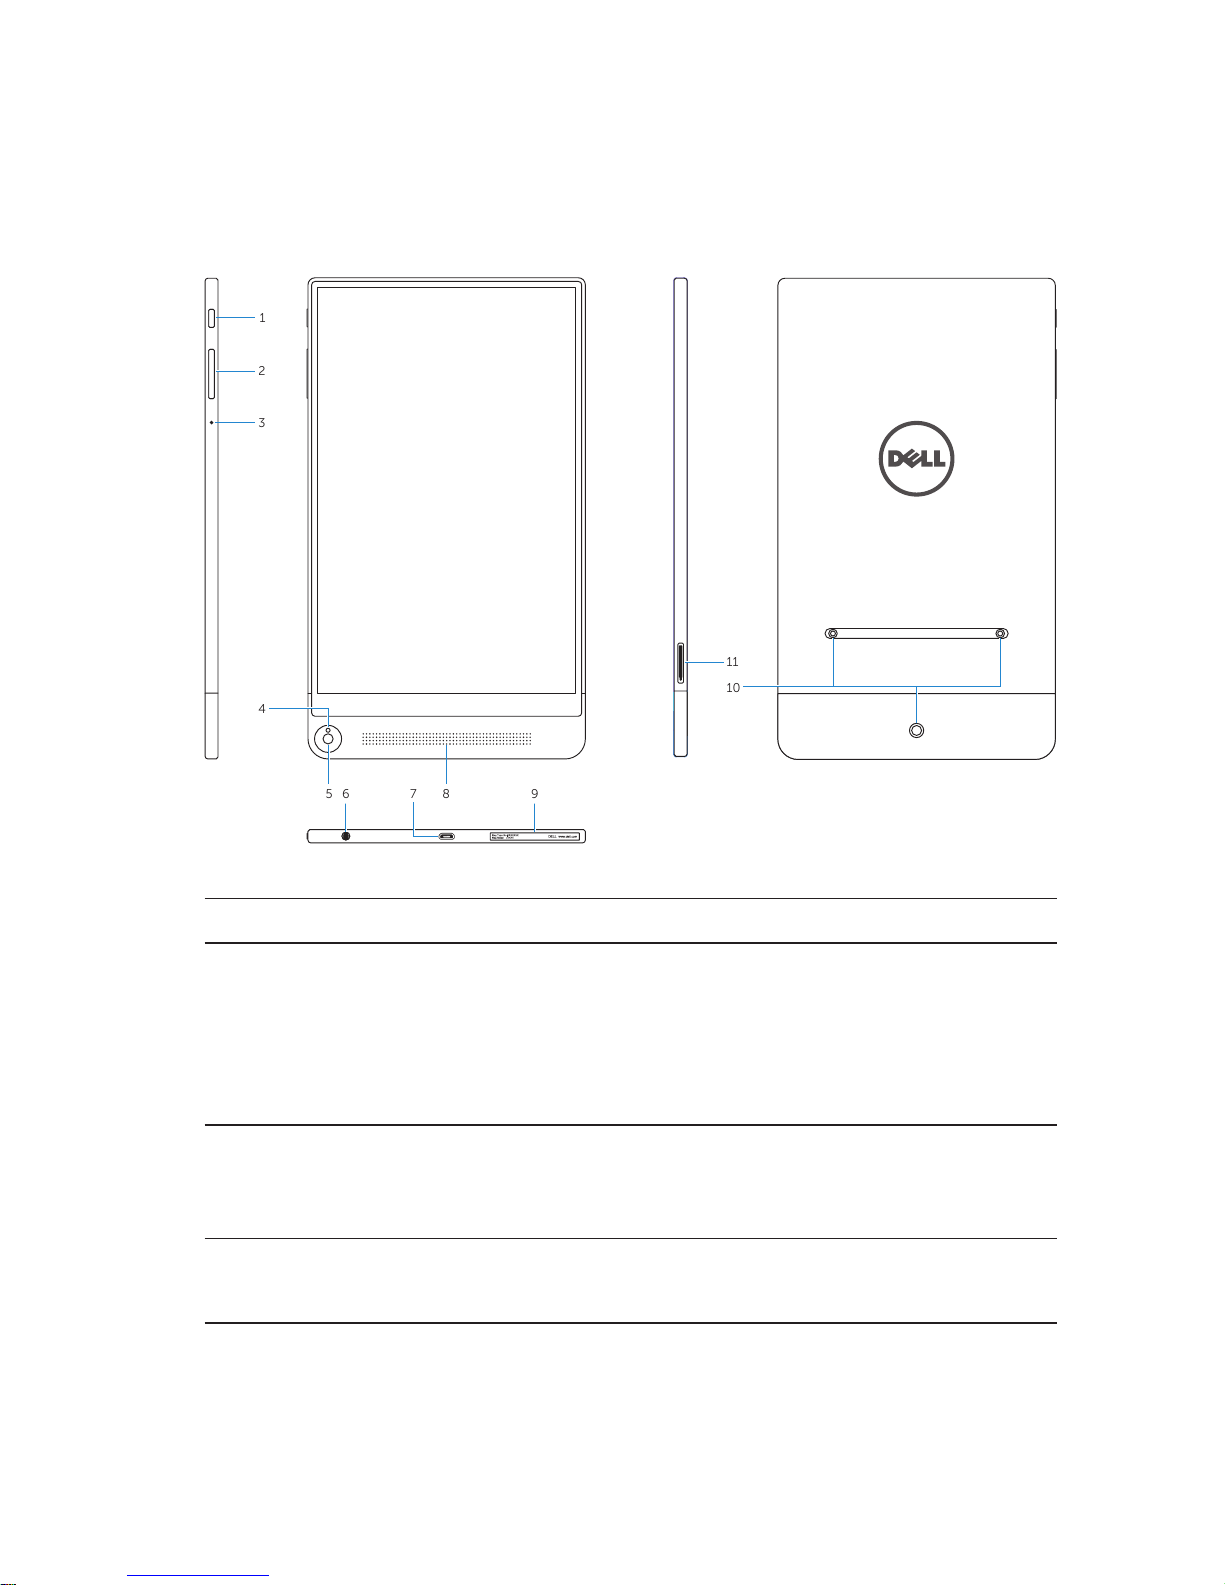
Features
1
2
3
5 8
4
67 9
11
10
Feature Functionality
1 Power button • Press and hold to turn the tablet on
or off.
• Press to turn the display on or off.
• In standby mode, press and hold to
open the options menu.
2 Volume button • Press to increase or decrease volume.
• Press and hold to continuously increase
or decrease the volume.
3 Microphone • Records sound.
• Provides sound input while using calls.
Page 6
6 | Features
Feature Functionality
4 Ambient‑light sensor Automatically adjusts the brightness
of the display’s backlight based on the
surrounding light intensity.
5 Front camera
• Captures pictures or records videos.
• Use while making video calls.
6 Headset port Connect a headset, headphones,
microphone, or other audio equipment
to listen to stereo sound, record audio, or
make calls.
7 Micro‑USB/Charging port • Connect the supplied power adapter
and micro‑USB cable to provide power
to the tablet and charge the battery.
• Connect the micro‑USB cable to a
computer to trickle charge the battery.
• Connect the micro‑USB cable to
a computer or USB devices, for
transferring data, music, photos, and
videos.
8 Speaker Provides audio output.
9 Service Tag label Provides the Service Tag and Express
Service Code needed for contacting Dell
for customer service or technical support.
10 Intel RealSense Snapshot Captures pictures or records videos.
Pictures taken with the Intel RealSense
Snapshot can feature depth or motion
effects, see “IntelRealSenseSnapshot”.
11 MicroSD‑card slot Insert a microSD card to expand the
tablet’s storage capacity. Your tablet
supports a microSDcard with capacity up
to 512 GB.
Page 7

Features | 7
NOTE: The front camera supports zoom, but does not support
the face tracking, continuous auto‑focus, or touch‑to‑focus
feature.
NOTE: The Intel RealSense Snapshot supports continuous
auto‑focus, touch‑to‑focus, and zoom, but does not support the
face tracking feature.
NOTE: The micro‑USB/charging port supports connecting to a
computer and power sharing to connected USB devices.
Page 8
8 | Accessories
Accessories
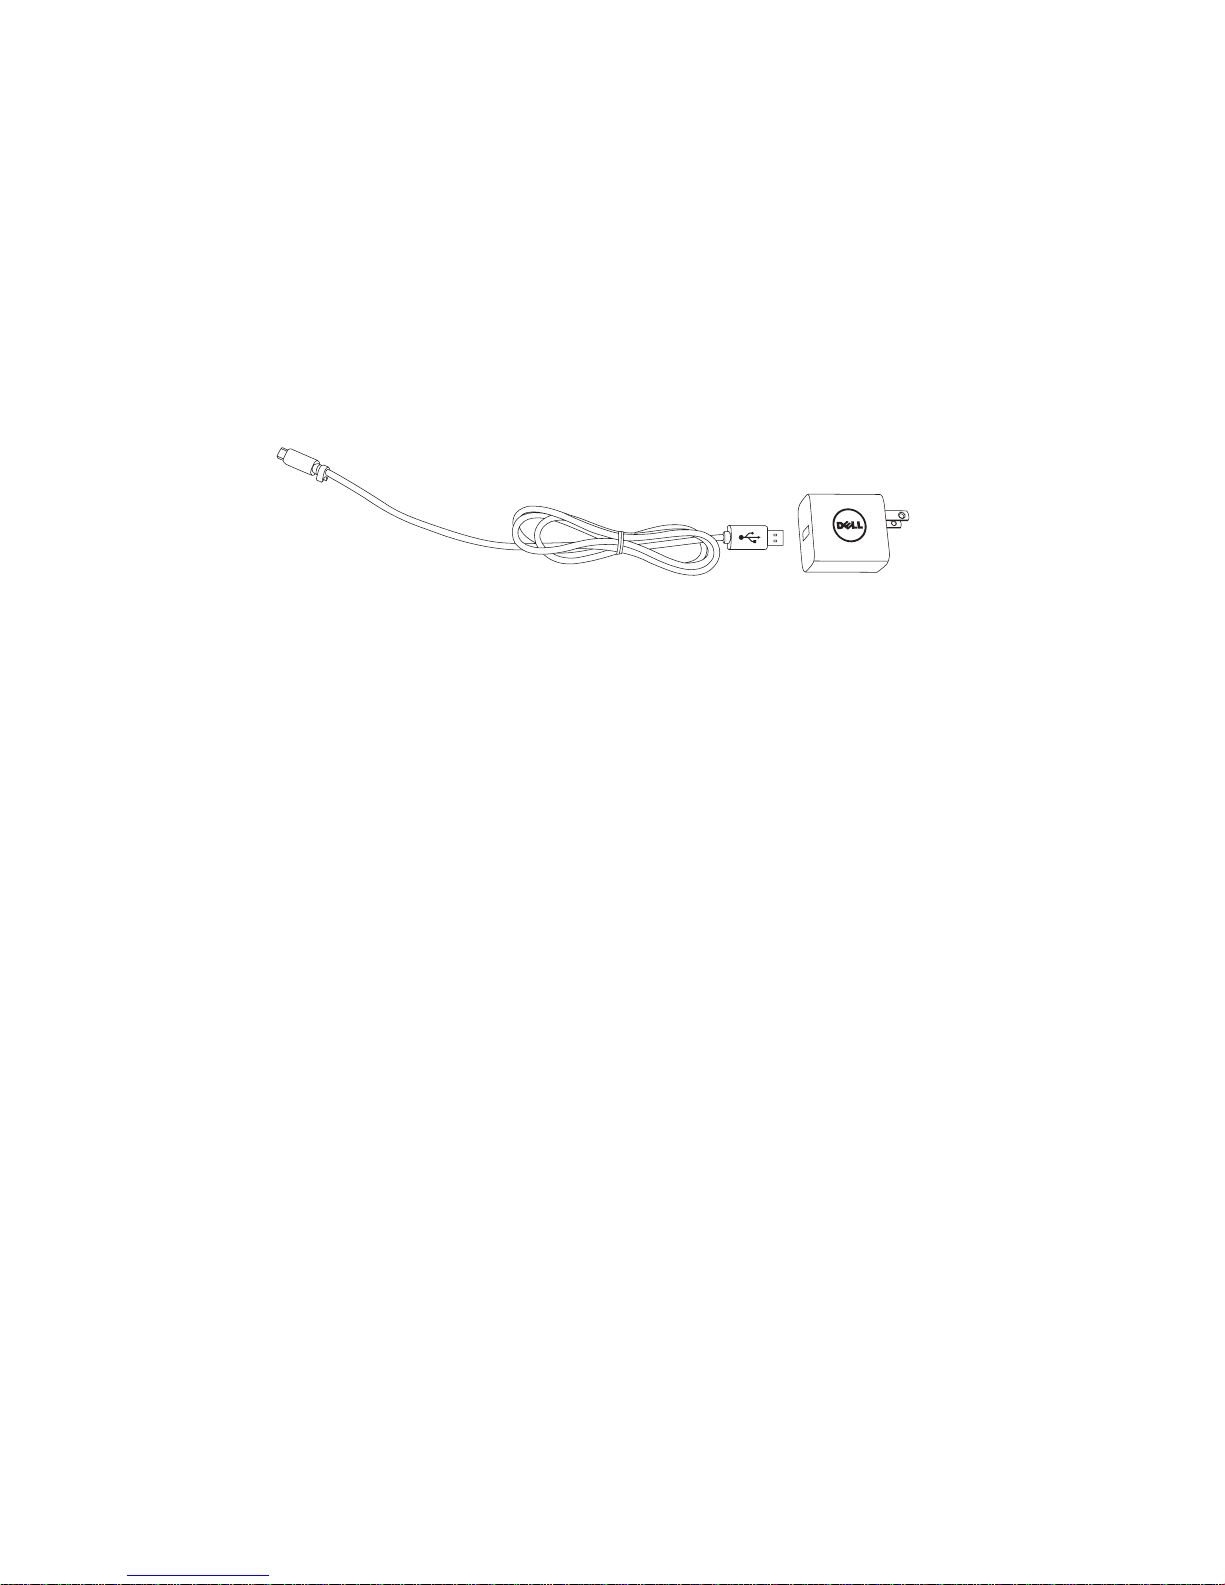
Your tablet supports the following accessories:
10 W power adapter and micro-USB cable
Provides power to your tablet and charges the battery.
Page 9

Setting Up Your Tablet | 9
Setting Up Your Tablet
WARNING: Before you begin any of the procedures in this
section, read the safety information that shipped with your
tablet. For additional best practices information, go to
dell.com/regulatory_compliance.
Charging the Tablet
CAUTION: Charge the battery in an ambient temperature of
0°C to 35°C (32°F to 95°F).
CAUTION: Use only the supplied power adapter to charge
your tablet. Using unauthorized power adapters or micro-USB
cables may severely damage your tablet.
NOTE: The battery is not fully charged when you unpack your
tablet.
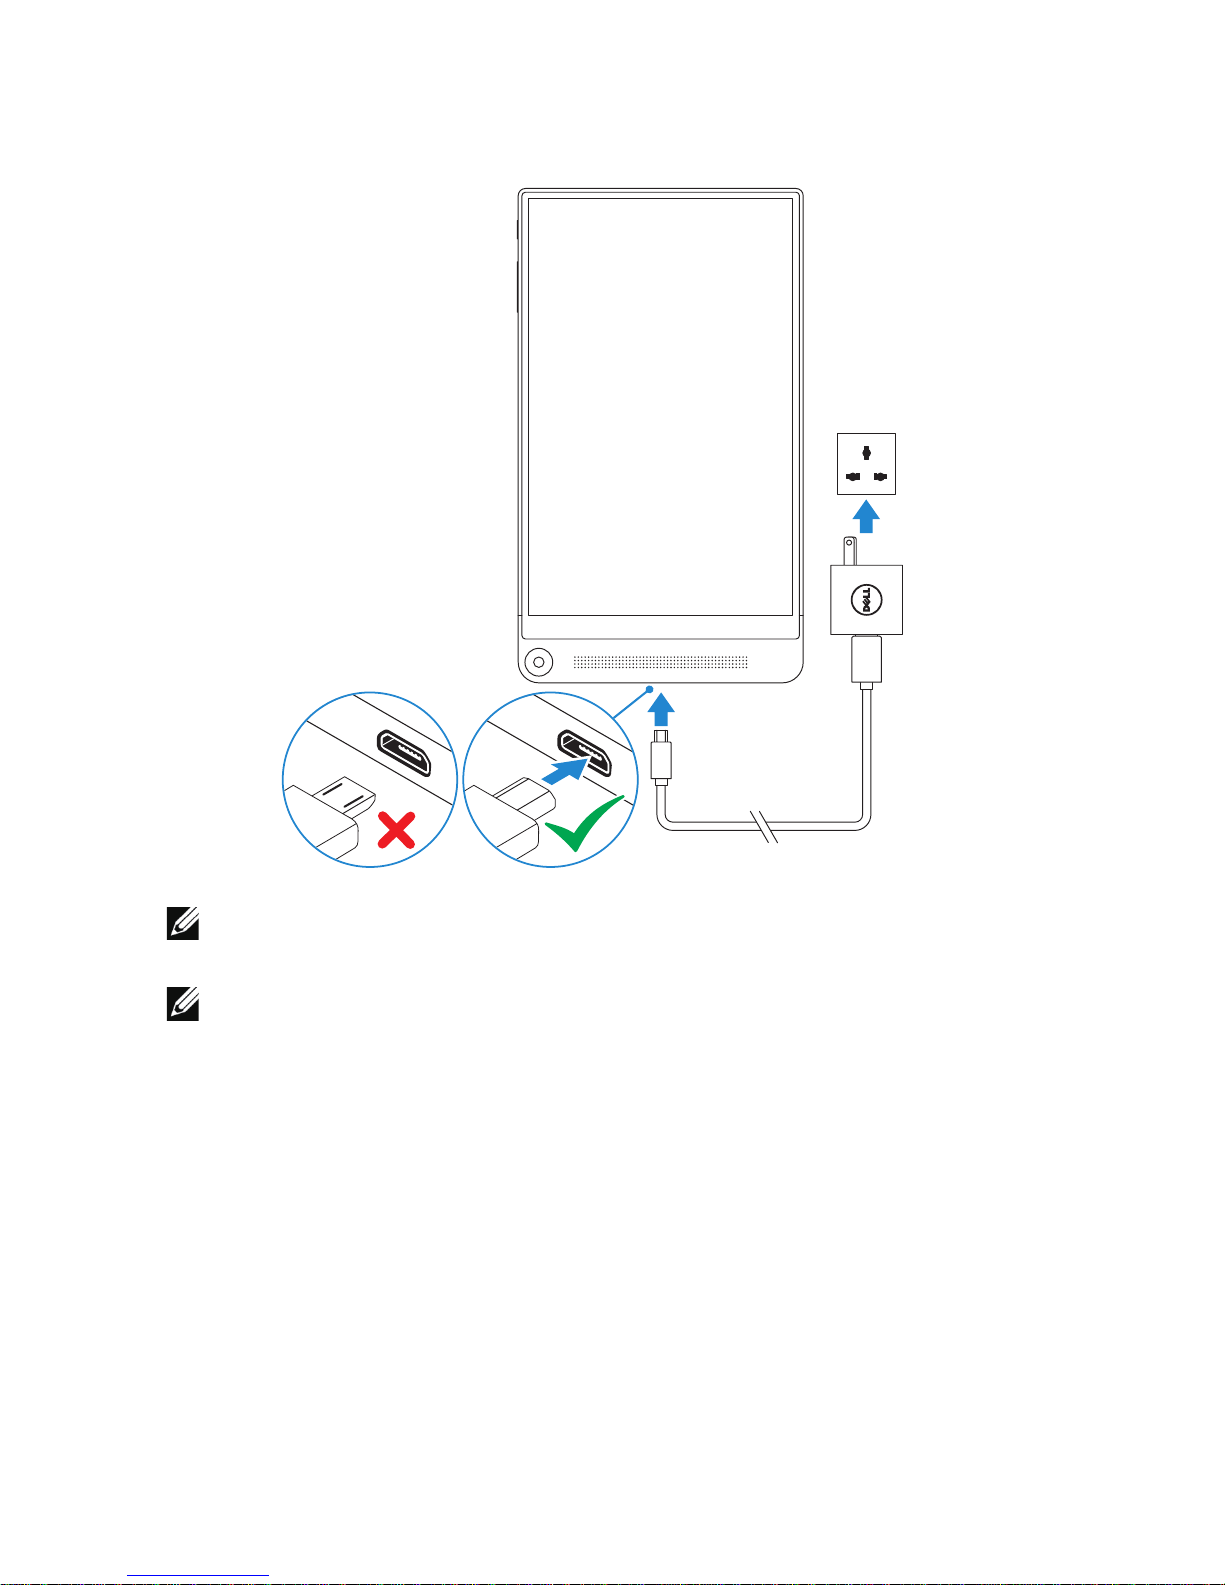
1 Connect the micro‑USB cable into the power adapter.
2 Connect the micro‑USB cable to the micro‑USB/charging port on
the tablet.
3 Connect the power adapter to an electrical outlet and charge the
tablet until the battery is fully charged.
Page 10
10 | Setting Up Your Tablet
NOTE: A fully discharged battery takes up to 4 hours to fully
charge.
NOTE: You can also trickle charge the tablet via a computer’s
USB port using the micro‑USB cable. When connected to
a computer, the battery charges slowly as the charge time
depends on the power output of the USB port. The tablet may
not charge if it is connected to a computer that is turned off or in
sleep mode, to a USB hub, or to the USB port of a keyboard.
Page 11
Setting Up Your Tablet | 11
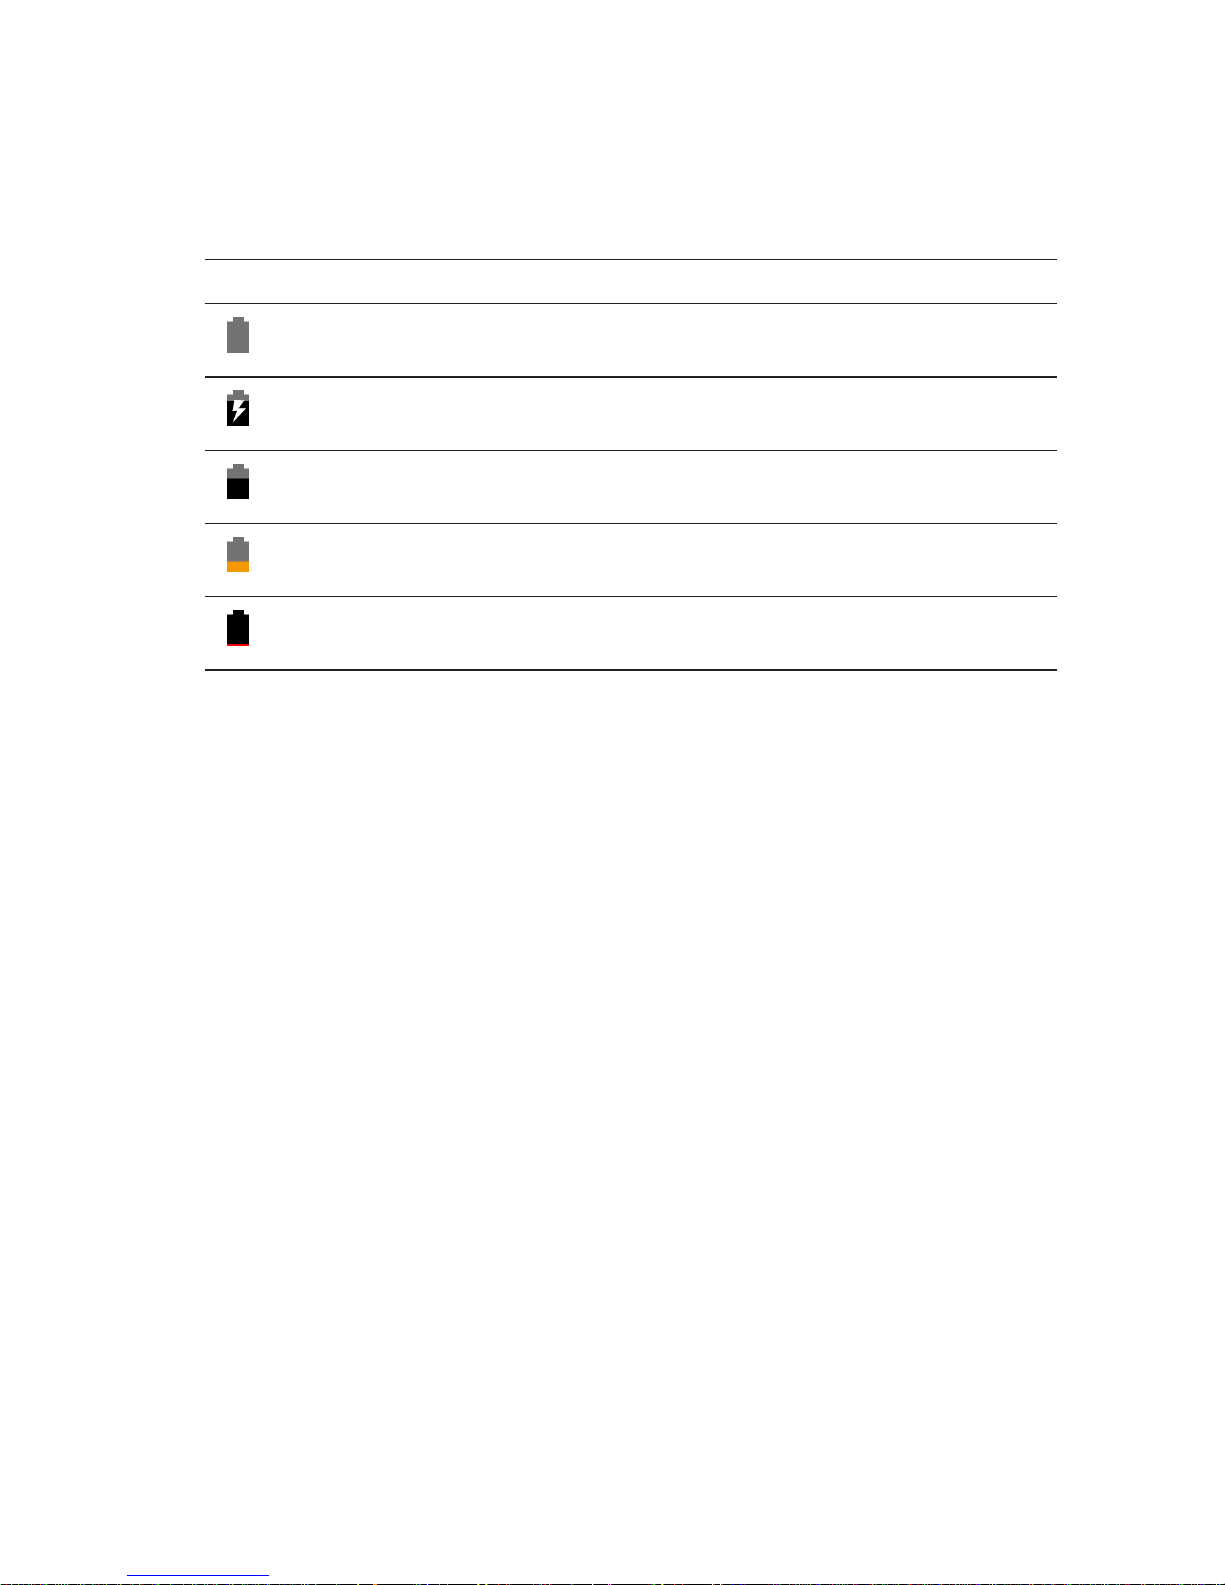
You can check the tablet’s battery charge status from the battery icon
displayed at the top of the screen:
Battery icon Description
Tablet is connected to a power supply and the battery is
fully charged.
Tablet is connected to a power supply and the battery is
charging.
Tablet is running on the battery power and the battery is
discharging.
Tablet is running on the battery power and the battery
charge is low.
Tablet is running on the battery power and the battery
charge is critically low.
Page 12
12 | Setting Up Your Tablet
TurningOnYourTablet
When you turn on the tablet for the first time, you must finish Android
setup to start using your tablet. For more information, see the
Quick
Start Guide
that shipped with your tablet.
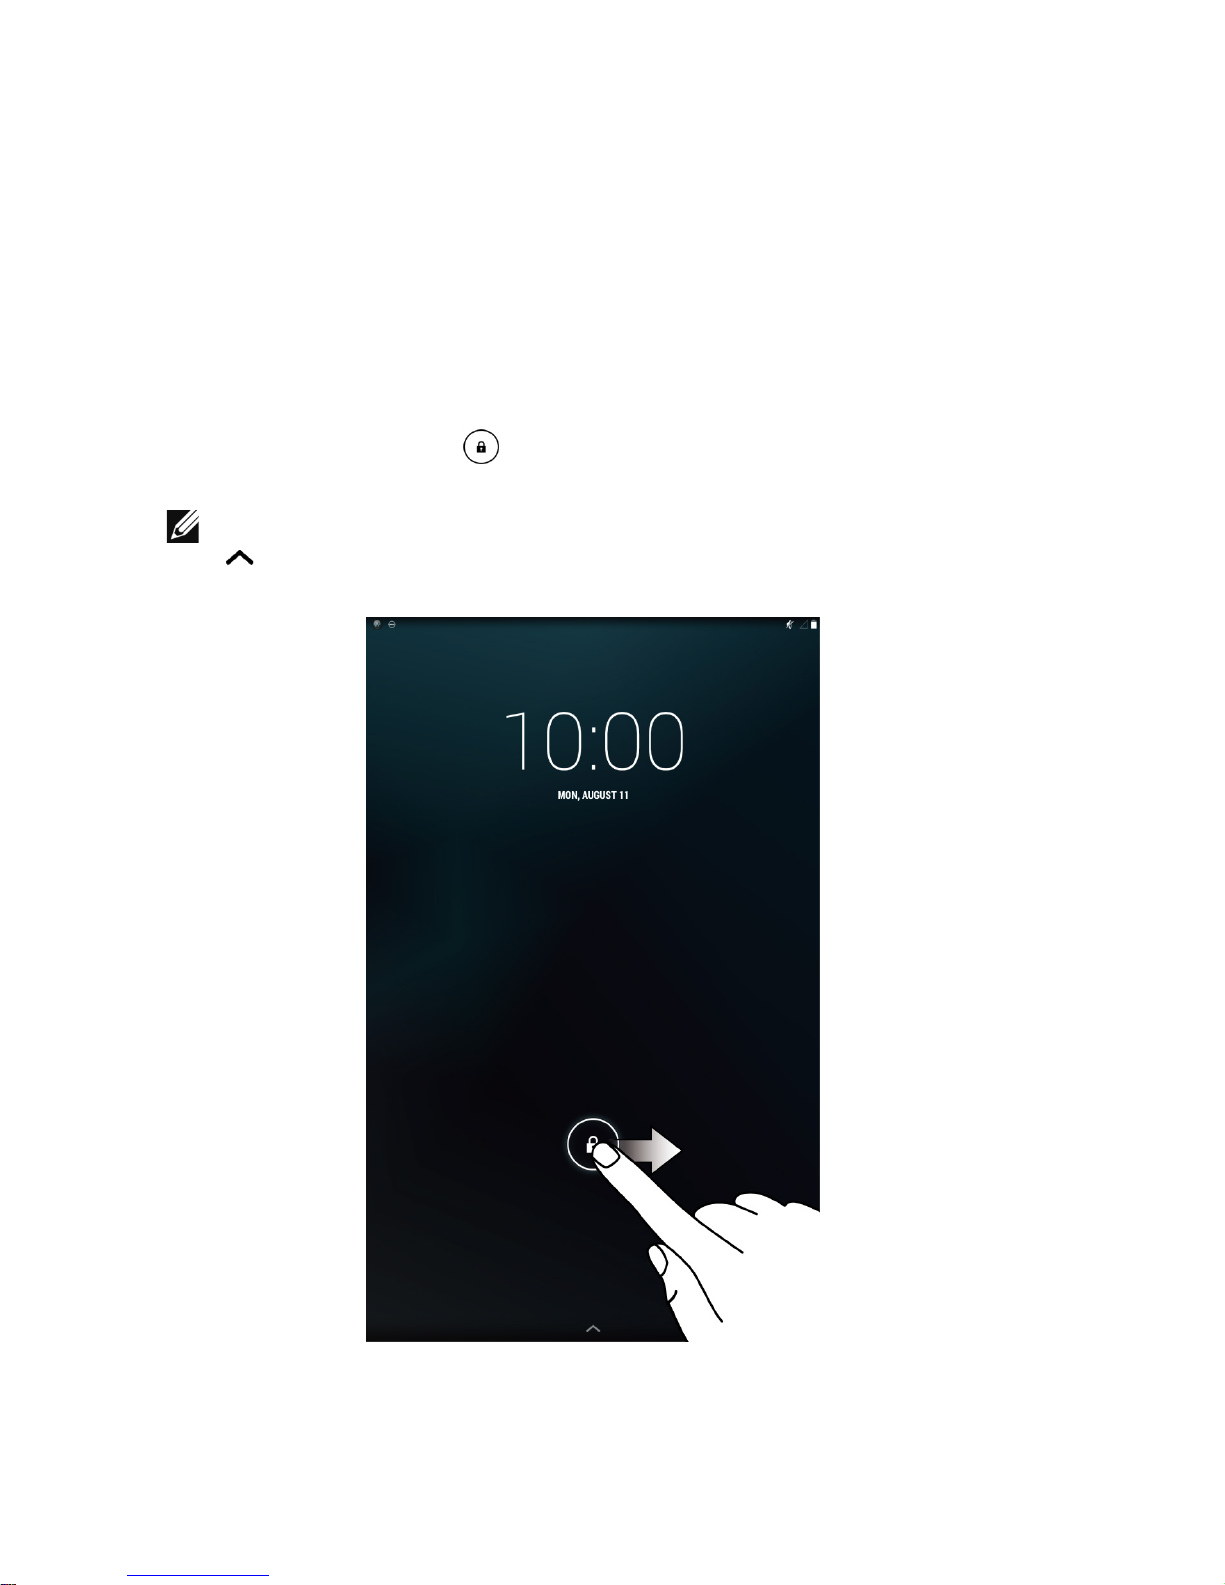
1 Press and hold the power button for 7 seconds to turn on your
tablet. The lock screen appears.
2 Swipe the lock icon in any direction to enter the Android
Home screen.
NOTE: Swipe your finger up from the bottom of the lock screen
to access Google Now.
The tablet is ready for use when the Android Home screen is displayed.
Page 13

Setting Up Your Tablet | 13
TurningOYourTablet
To turn off your tablet, press and hold the power button for at least 2
seconds and then touch Power off.
Locking your tablet
Press the power button to turn off the screen and lock your tablet.
Your tablet provides several screen locks including Slide, Pattern,
PIN, Password, and Face Unlock to protect your tablet against
unauthorized access. To configure the type of the screen lock used
for your tablet:
1 Touch → Settings→ Security→ Screen lock.
2 Select the screen lock you want to use for your tablet and follow
the instructions on the screen.
NOTE: It is strongly recommended that you choose at least one
of the screen locks to protect your tablet.
Page 14
14 | Setting Up Your Tablet
Unlocking your tablet
When the screen goes dark and a screen lock is set, you must unlock
your tablet to enter the Home screen.
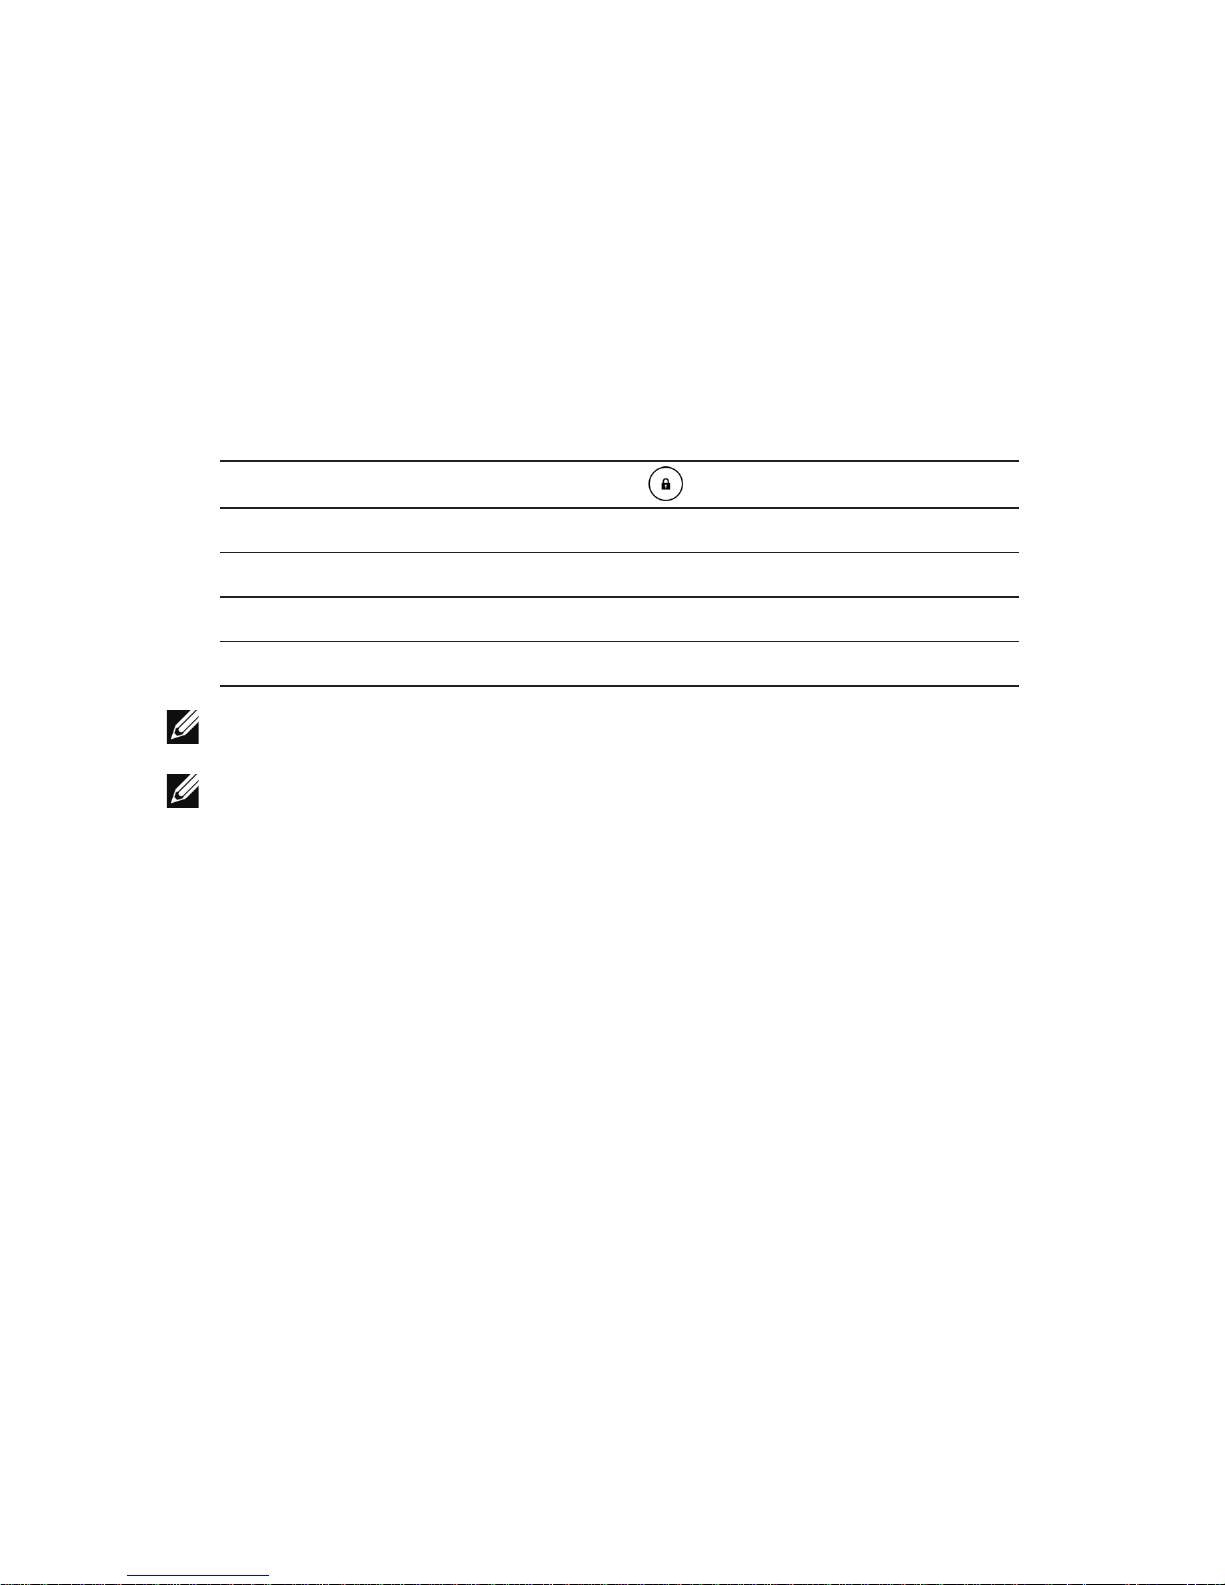
To unlock your tablet:
1 Press the power button to wake up the screen.
2 Unlock the screen lock using one of the following methods:
Slide
Swipe the lock icon in any direction.
Pattern Draw the correct pattern.
PIN Enter the correct PIN.
Password Enter the correct password.
Face Unlock Capture your face using the front camera.
NOTE: The default screen lock is set to Slide.
NOTE: If a screen lock is not enabled, your tablet enters the
Home screen after pressing the power button.
Page 15
Setting Up Your Tablet | 15
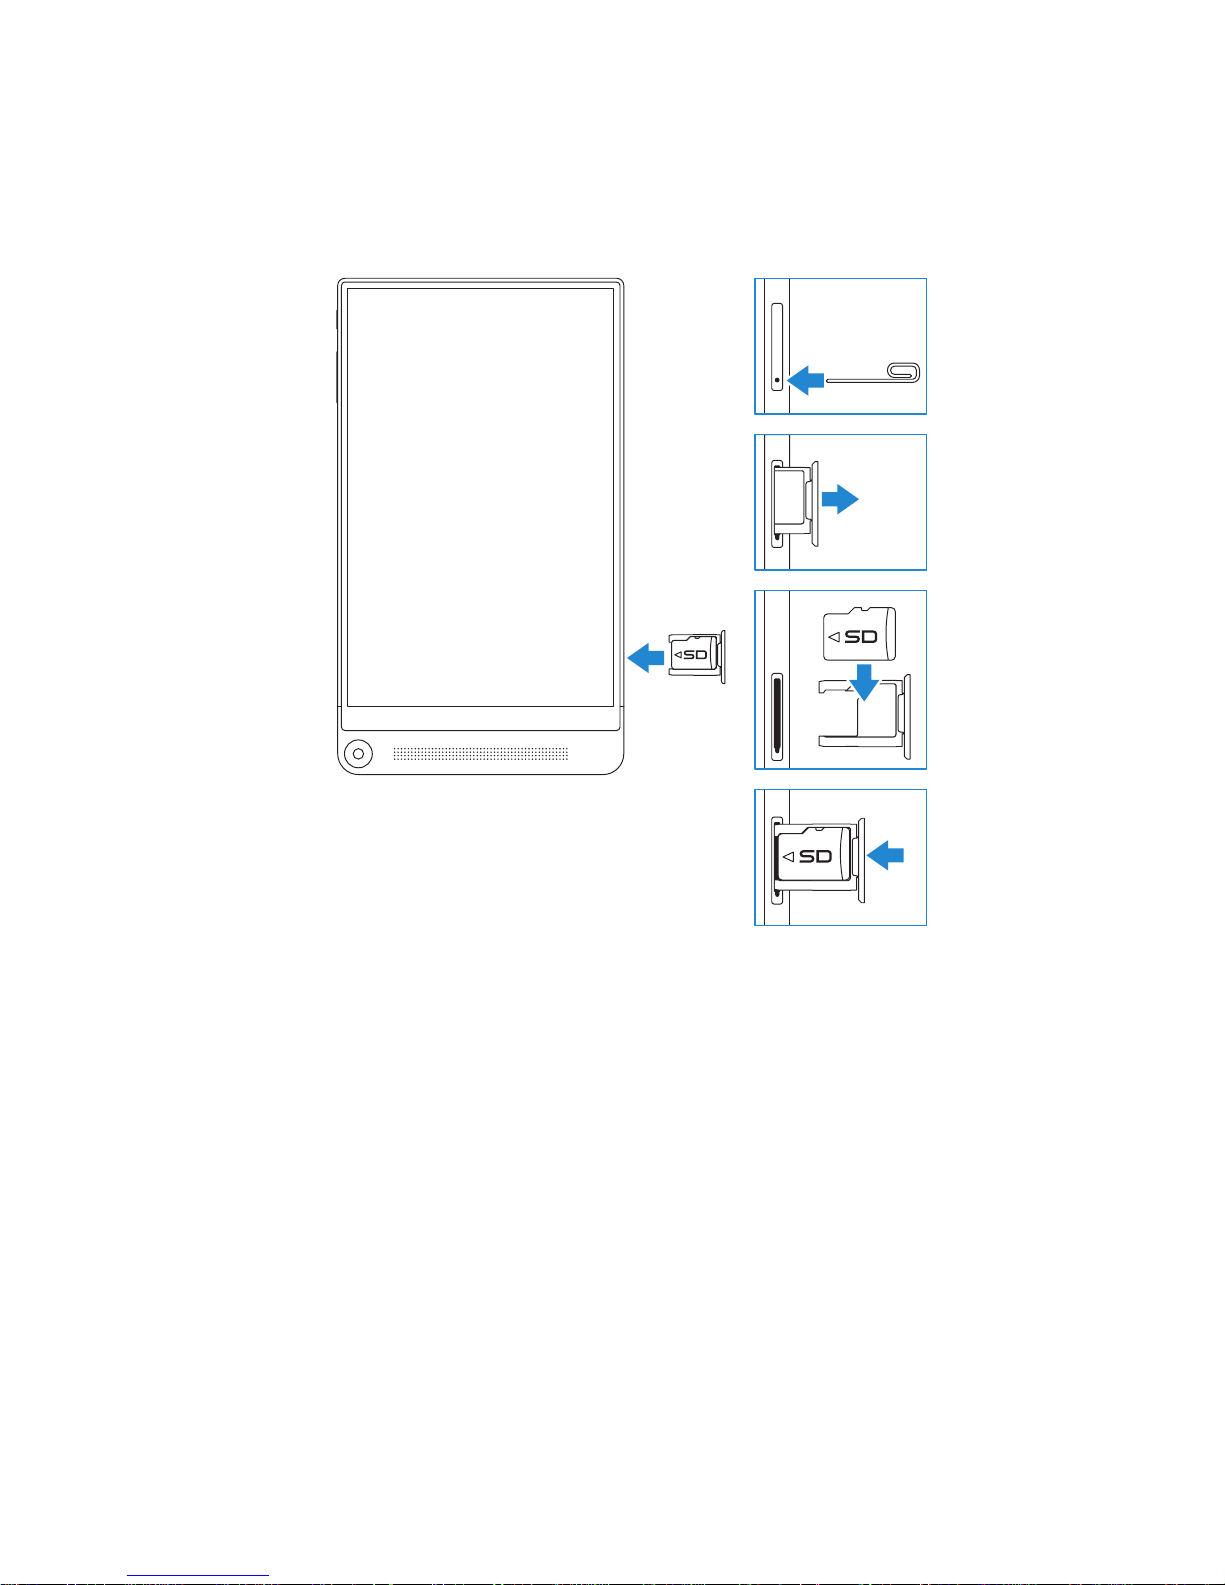
Inserting a MicroSD Card
1 Insert a pin or paper clip into the pinhole on the microSD‑card
tray so that the microSD‑card tray pops out.
2 Remove the microSD‑card tray.
3 Align the microSD card so that the pins are pointed toward the
card slot and are facing toward the rear of the tablet.
4 Place the microSD card into the microSD‑card tray.
5 Push the microSD‑card tray into the card slot until it locks into
place.
Page 16
16 | Setting Up Your Tablet
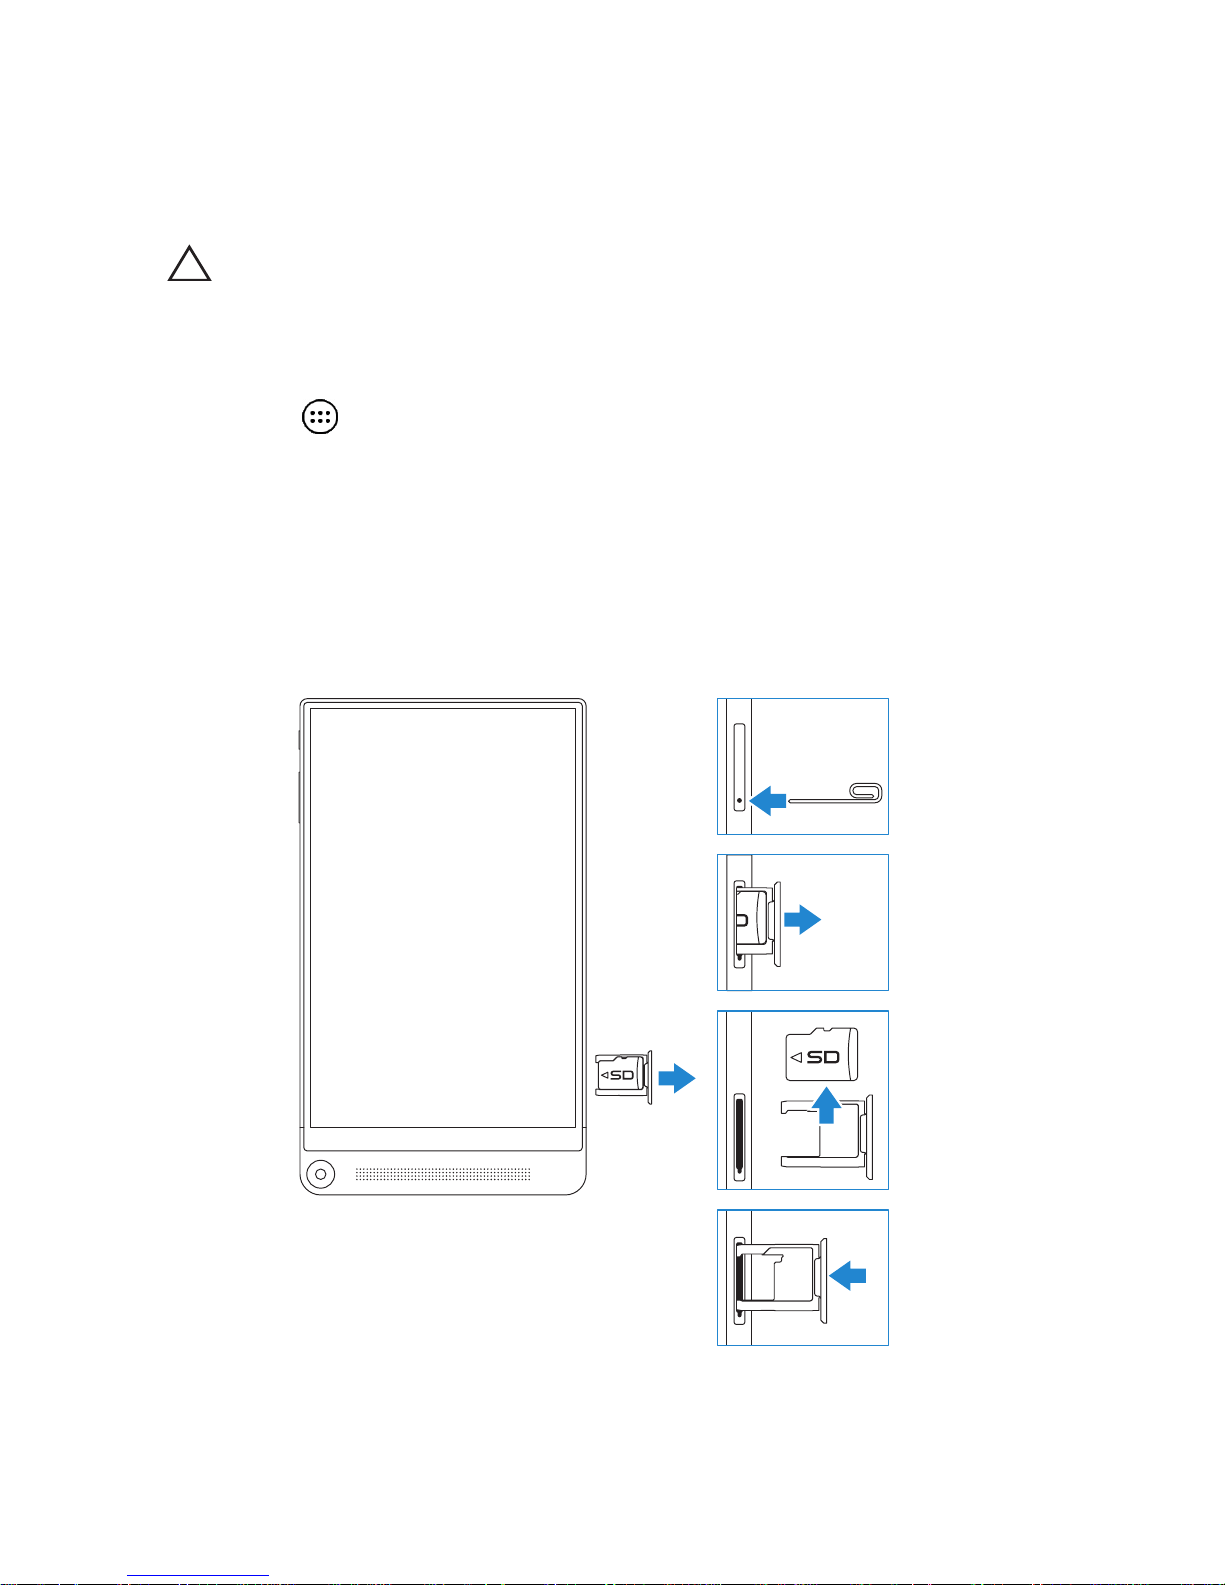
Removing the MicroSD Card
CAUTION: Removing the microSD card while it is in use may
cause data loss or result in application errors. Ensure all save
operations to the microSD card are complete before removing
the microSD card.
1 Touch → Settings→ Storage→ Unmount.
2 Confirm that you want to unmount the microSD card.
3 Insert a pin or paper clip into the hole on the microSD‑card tray
so that the microSD‑card tray pops out.
4 Remove the microSD‑card tray.
5 Remove the microSD card from the tray and push the tray back
into the card slot until it locks into place.
Page 17
Setting Up Your Tablet | 17
Using Headphones
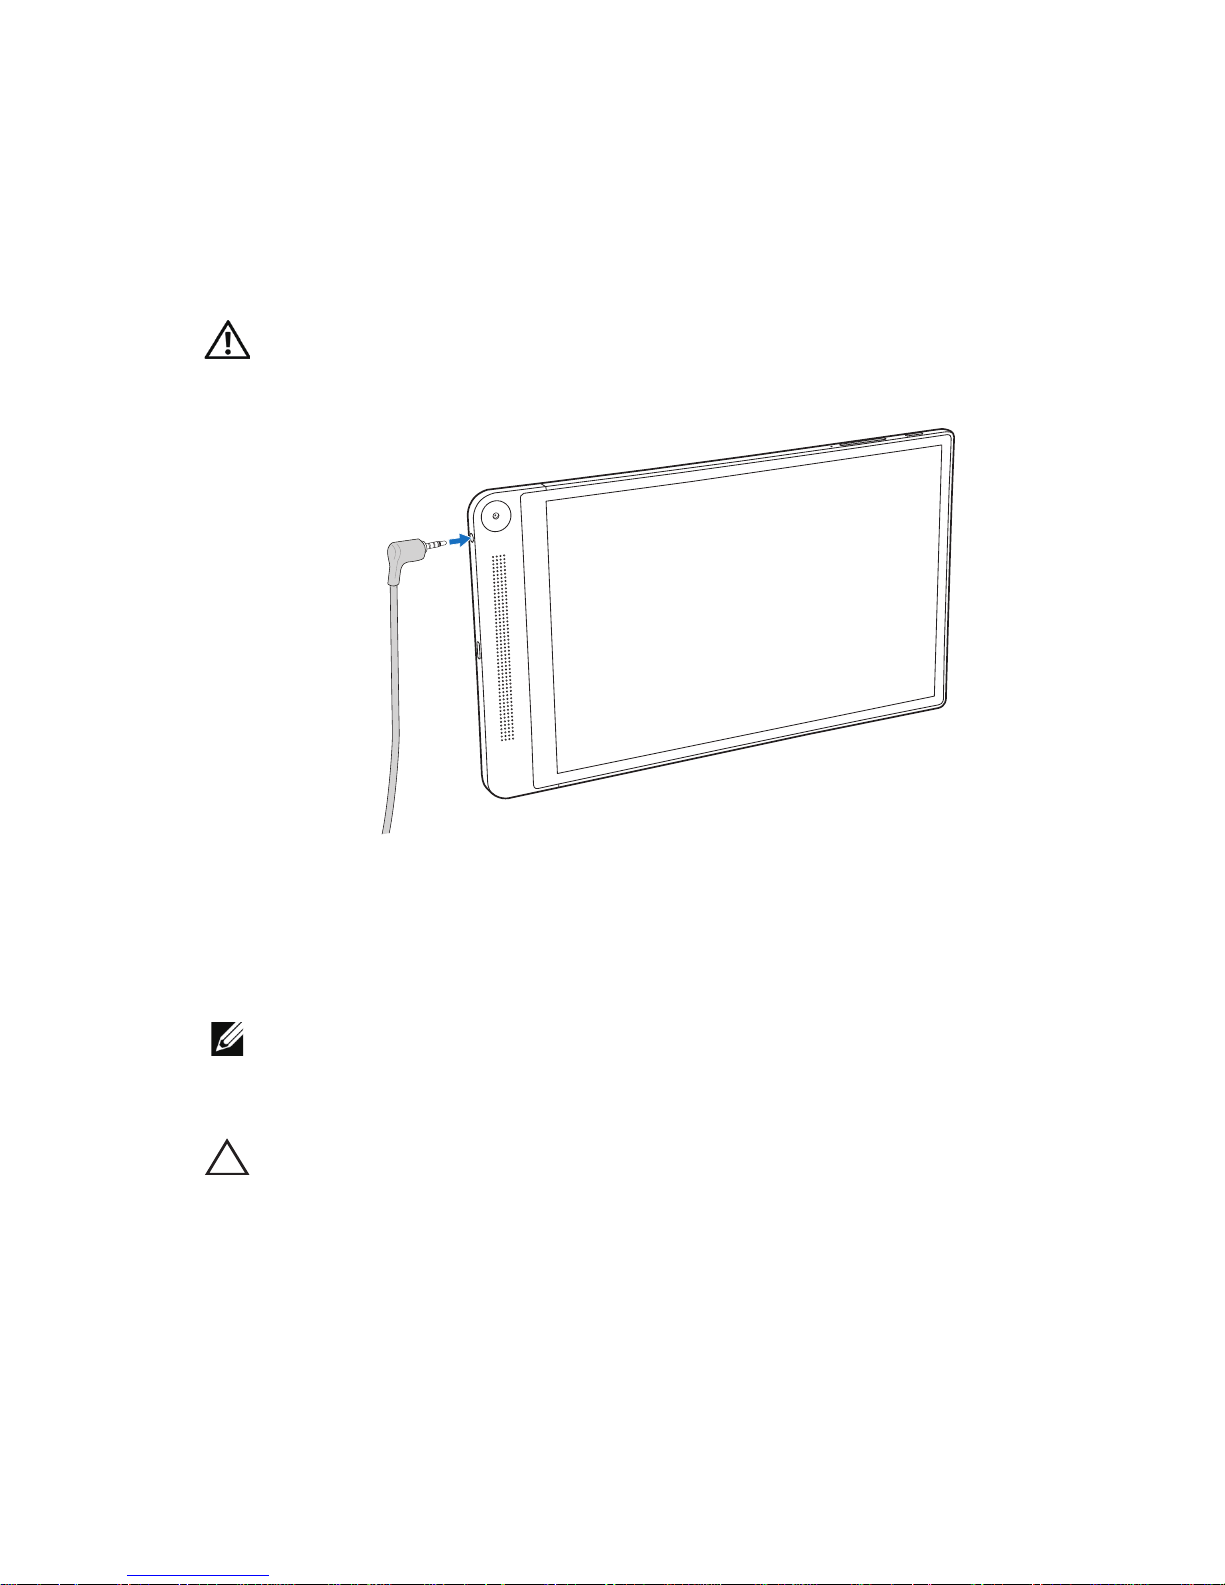
You can connect a headset, headphones, microphone, or other audio
equipment to the headset port of your tablet.
WARNING: Listening to loud music for an extended period of
time can lead to hearing loss.
1 Connect headphones to the headset port (3.5 mm) on the tablet.
2 Insert the earbuds in your ears, or wear the over‑ear headphones
over your head, and then adjust the volume to a comfortable
level.
NOTE: When you connect an audio device to the 3.5 mm
headset port, the integrated speakers on your tablet are muted
automatically.
CAUTION: To prevent damaging your headphones when
disconnecting it from the tablet, pull the connector and not the
cable.
Page 18
18 | Using Your Tablet
Using Your Tablet
Wi-FiSetting
Turningon/off Wi‑Fi:
1 Touch → Settings.
2 In the Wi-Fi option, touch the Wi‑Fi slider to turn Wi‑Fi on or
off.
NOTE: You can also swipe down from the top‑right edge of the
display to access the Wi‑Fi setting in the Quick Settings menu.
Connecting to a network:
1 Turn on Wi‑Fi. For information on turning on Wi‑Fi, see
“Turningon/off Wi‑Fi”. A list of available Wi‑Fi networks is
displayed on the screen.
NOTE: To refresh the list of available Wi‑Fi networks, touch
→ Scan at the top‑right corner of the Wi‑Fi menu to scan for all
available Wi‑Fi networks within range.
2 Touch the network you want to connect to.
NOTE: If you are connecting to a secured wireless network, enter
the password for the wireless network access when prompted
and touch Connect.
NOTE: Your tablet connects to the internet only via a Wi‑Fi
network.
Page 19
Using Your Tablet | 19
BluetoothSetting
Turning on/off Bluetooth:
1 Touch → Settings.
2 In the Bluetooth option, touch the Bluetooth slider to turn
Bluetooth on or off.
Pairing with Bluetooth‑enabled devices:
1 Turn on Bluetooth. For information on turning on Bluetooth, see
“Turning on/off Bluetooth“.
2 Touch → Settings.
3 Touch Bluetooth to detect all the available Bluetooth devices
within range.
4 Touch the Bluetooth device you want to pair within the list of
available devices and touch Pair.
5 If prompted, verify that the Bluetooth passcode that appears on
both the tablet and the Bluetooth‑enabled device are the same.
6 Confirm the pairing process on both the tablet and device.
NOTE: Once a device is successfully paired with the tablet
it automatically connects with the tablet when Bluetooth is
enabled on both tablet and device.
NOTE: To refresh the list of available Bluetooth devices, touch
SEARCH FOR DEVICES at the top‑right edge of the Bluetooth
menu.
Page 20
20 | Using Your Tablet
Gestures
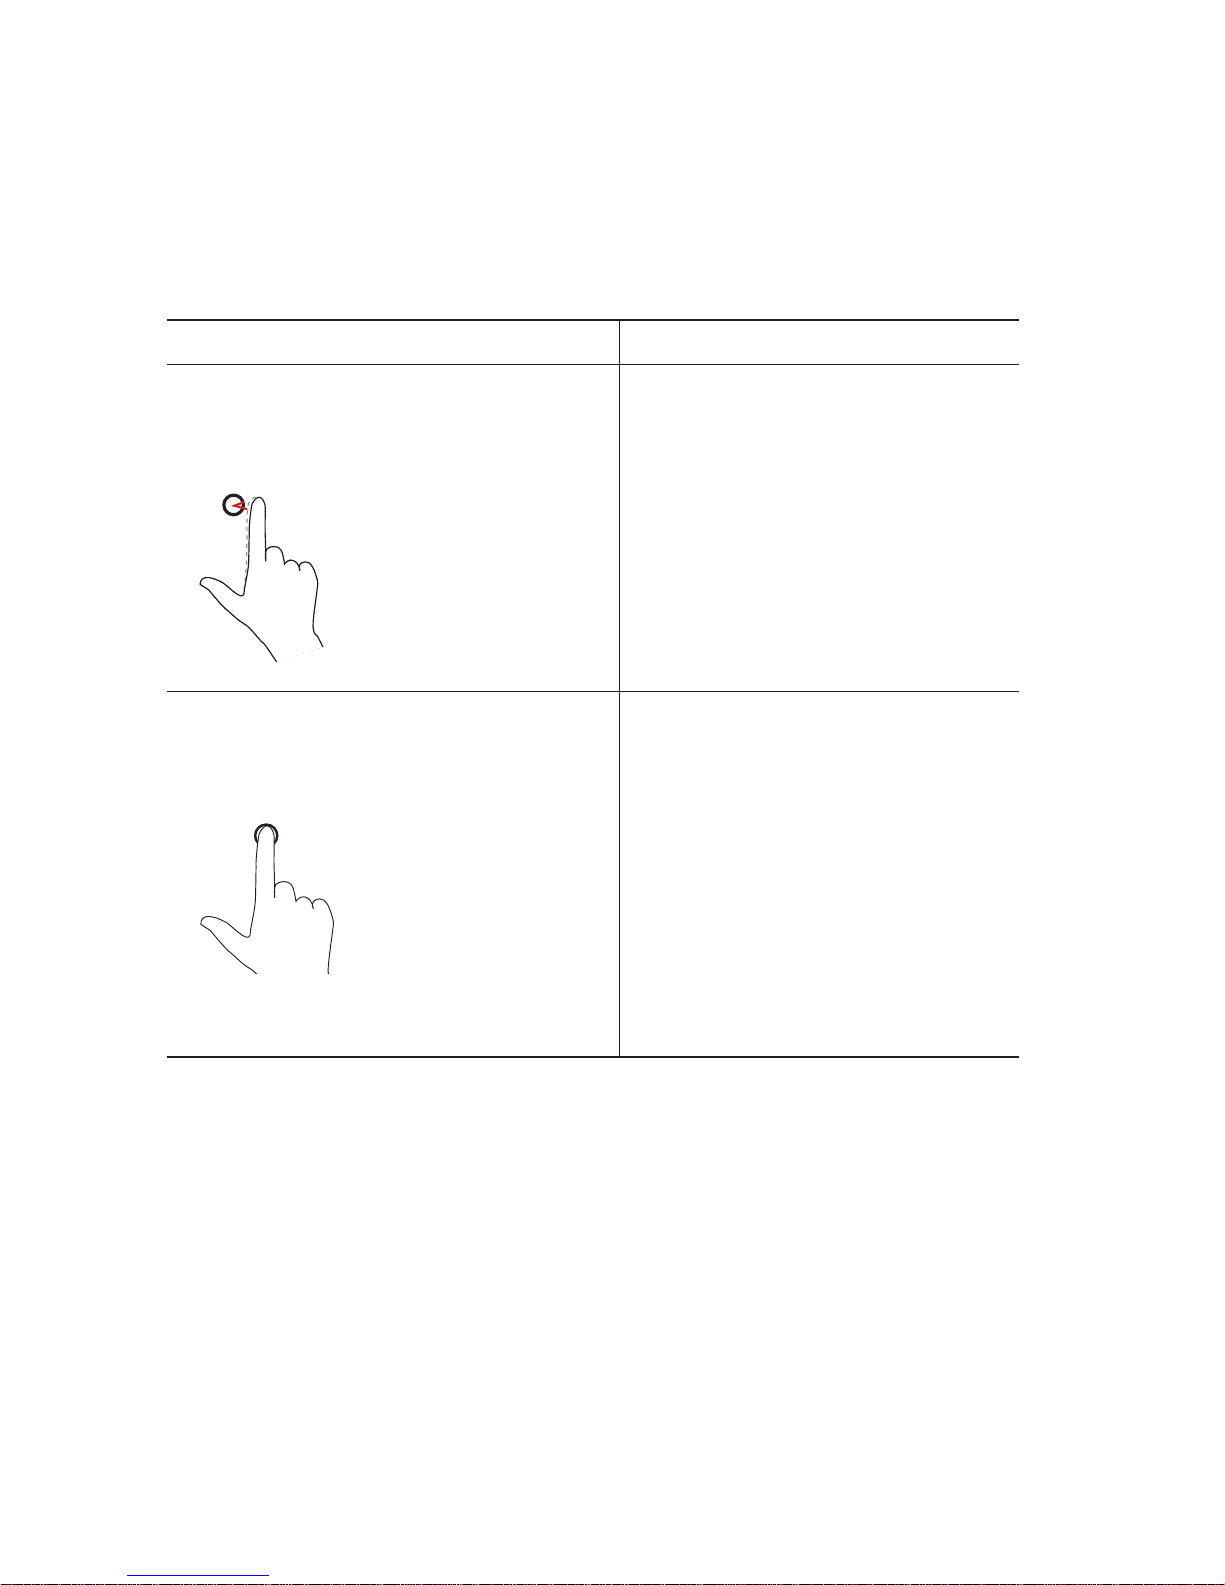
Your tablet has a multitouch display. You can touch the screen to
operate the tablet.
Finger gestures Allows you to:
Touch
Touch gently on the display with your
fingertip.
• Select items on the screen
including options, entries,
images, and icons.
• Start apps.
• Touch buttons on the screen.
• Input text using the on‑screen
keyboard.
Touch and Hold
Touch and hold your finger on the
display.
• Open the Wallpaper menu
when touching and holding
the background of the Home
screen.
• Move or remove an app or a
widget from the Home screen.
• Add an app icon on the Home
screen.
• Uninstall an app, or view app
information from the All Apps
screen.
Page 21
Using Your Tablet | 21
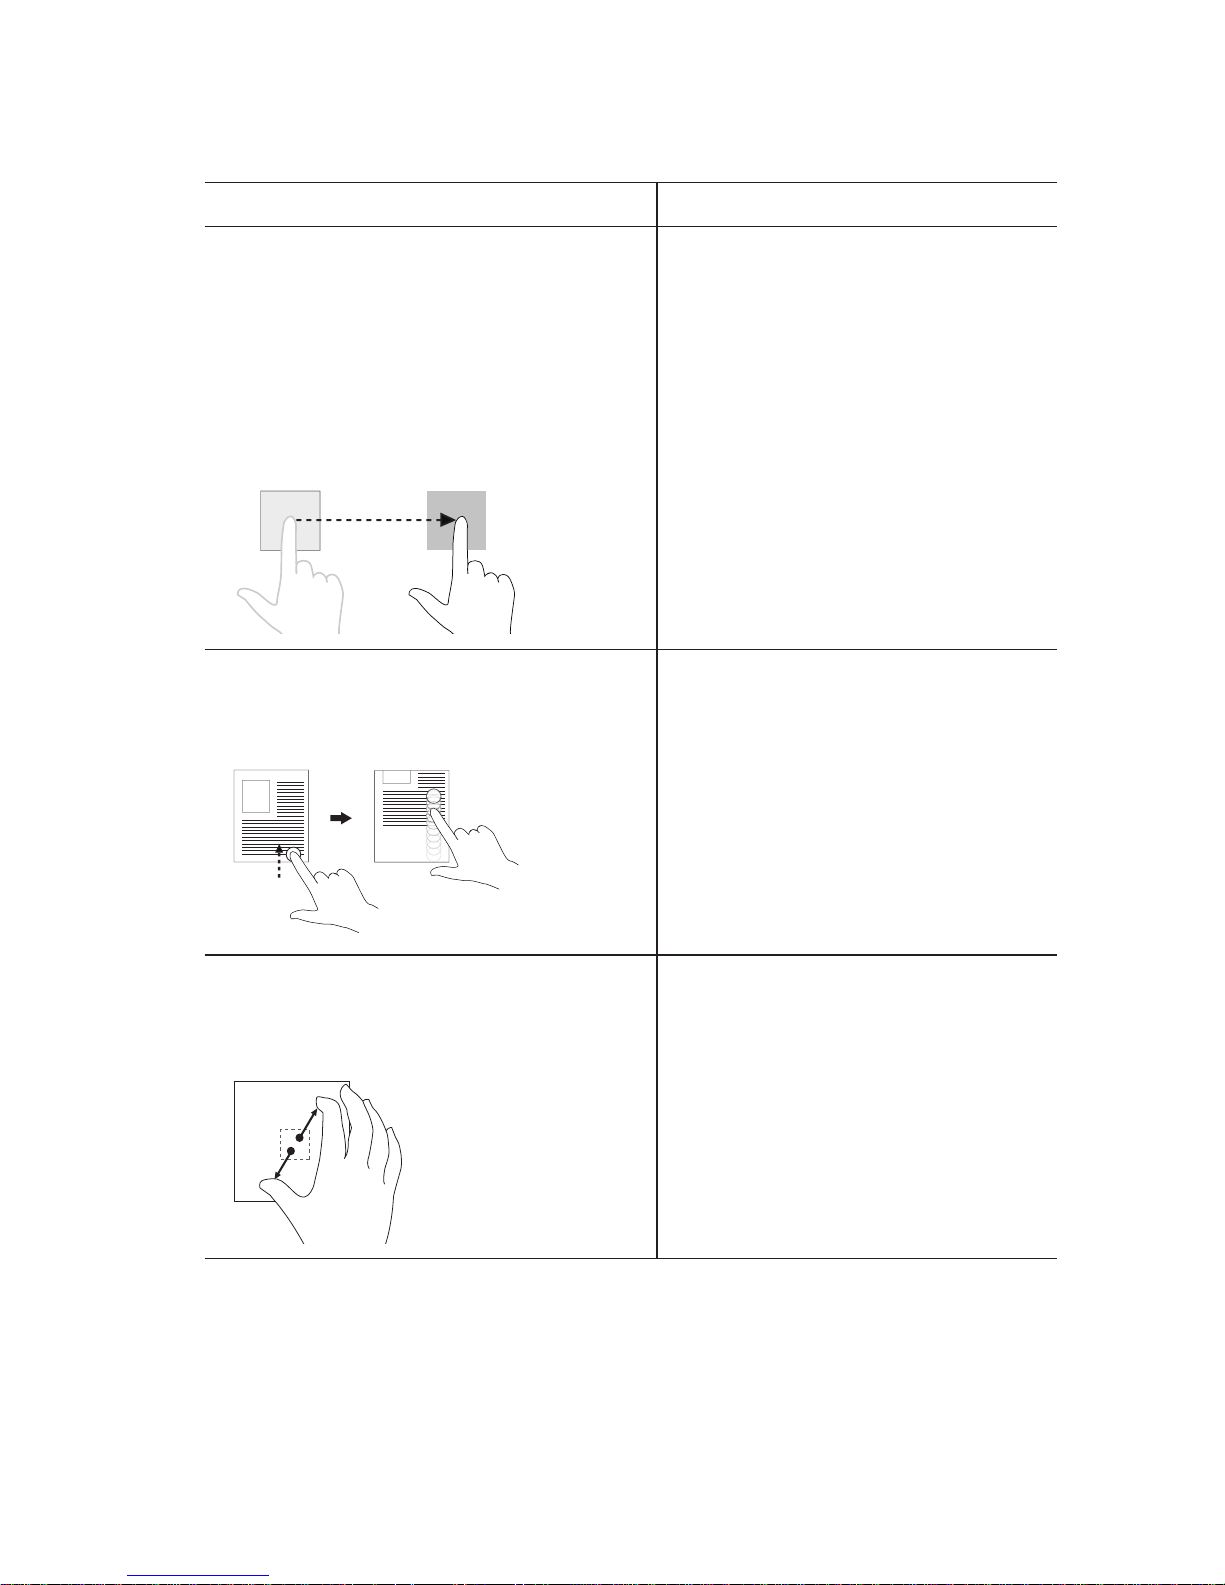
Finger gestures Allows you to:
Drag
1 Touch and hold your finger on an
item on the screen.
2 Keeping your finger in contact with
the display, move your fingertip to
the desired location.
3 Take your finger off the display to
drop the item in the desired location.
Move items such as images, apps,
and icons on the screen.
Swipe or Slide
Move your finger in a vertical or
horizontal direction on the display.
Scroll through the Home screens,
apps, web pages, lists, entries,
photos, contacts, and so on.
Zoom in
Touch the display with two fingers and
then move the fingers apart.
Enlarge the view of an image or
web page.
Page 22
22 | Using Your Tablet
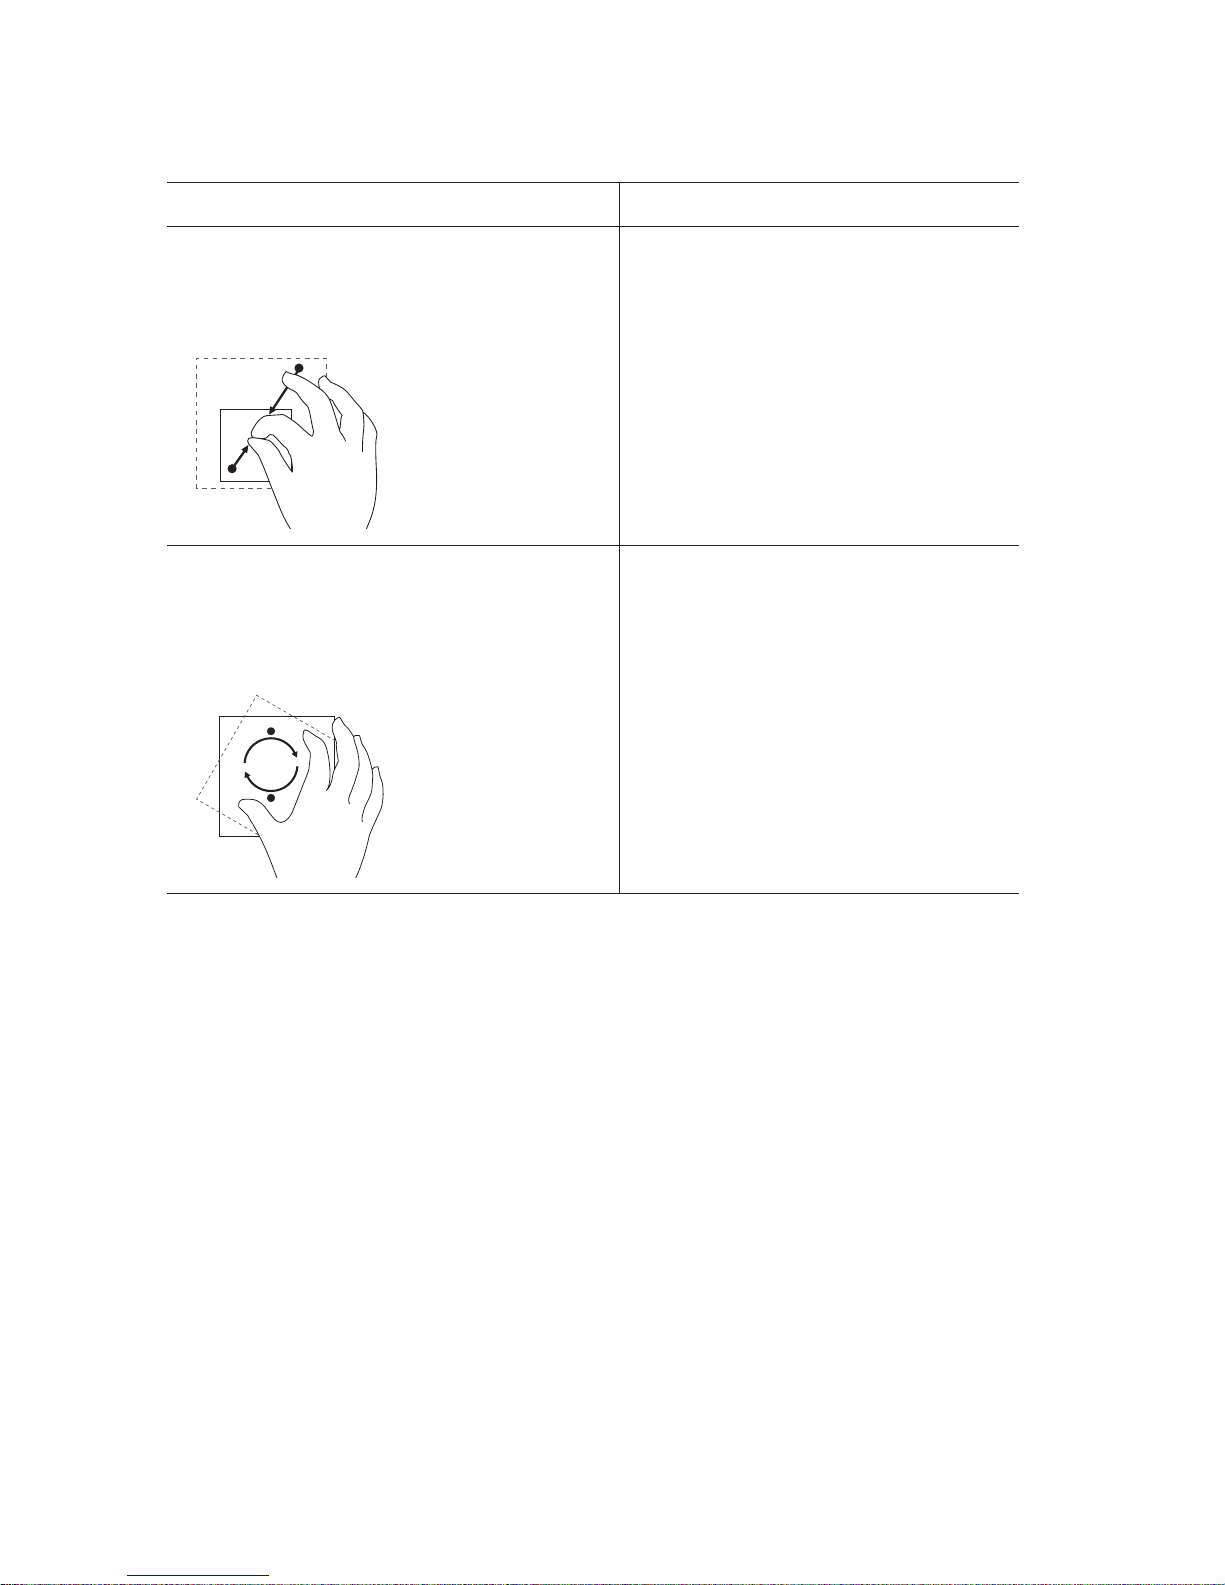
Finger gestures Allows you to:
Zoom out
Touch the display with two fingers and
then move the fingers closer.
Reduce the view of an image or
web page.
Rotate
Touch the display with two or more
fingers and then move the fingers in a
clockwise or counter‑clockwise arc.
Rotate objects within apps.
Page 23
Using Your Tablet | 23
Screen Orientation
For optimal viewing experience, the screen orientation changes
automatically to portrait or landscape depending on how you hold the
tablet. You can disable automatic screen rotation and lock the screen
in portrait or landscape mode.
NOTE: Some apps may not support automatic screen rotation
and are designed to work only in one orientation.
Locking and unlocking the screen orientation
1 Change the screen to the desired orientation.
2 Swipe down from the top‑right edge of the display to access the
Quick Settings menu.
3 Touch AUTO ROTATE to lock the screen orientation, or touch
ROTATION LOCKED to unlock the screen orientation.
Page 24
24 | Using Your Tablet
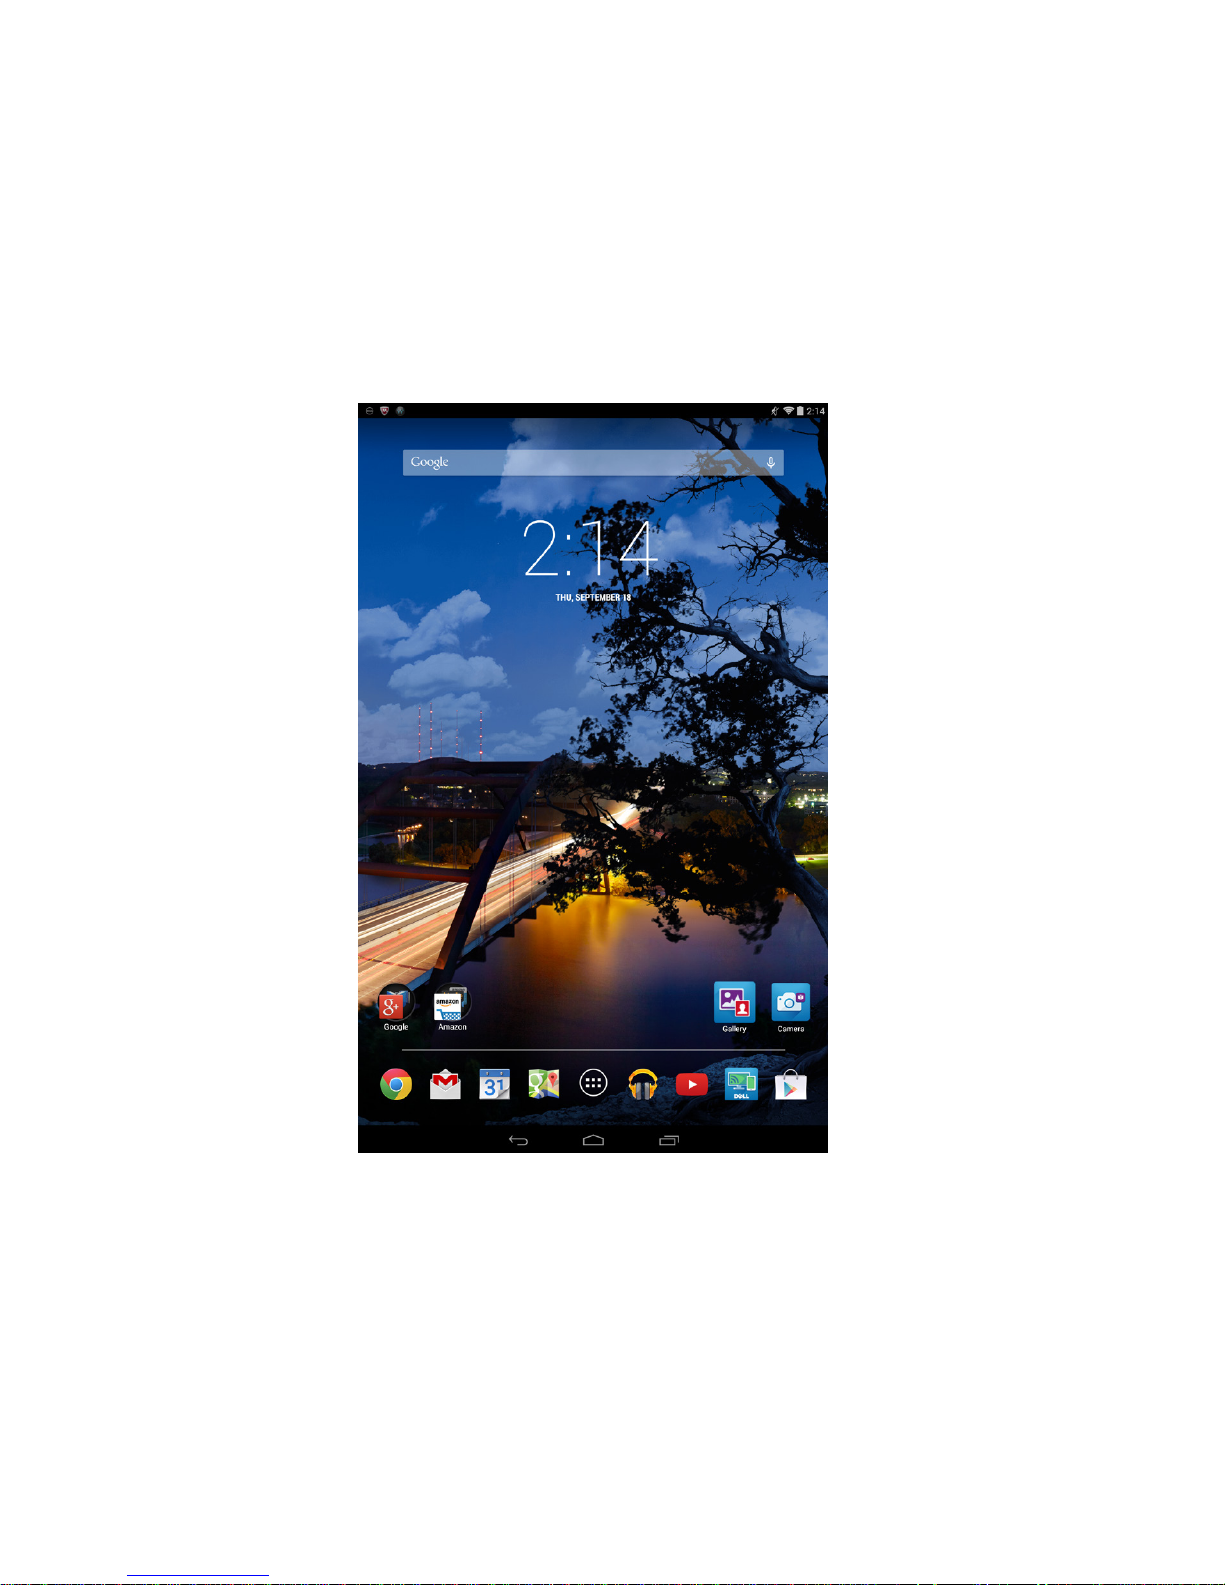
Android Home Screen
When you turn on your tablet and unlock the screen, you will enter
the Android Home screen. The Home screen consists of a variety
of apps, a notification menu, status icons, a Favorites tray, and a
navigation bar.
Page 25
Using Your Tablet | 25
Navigation bar
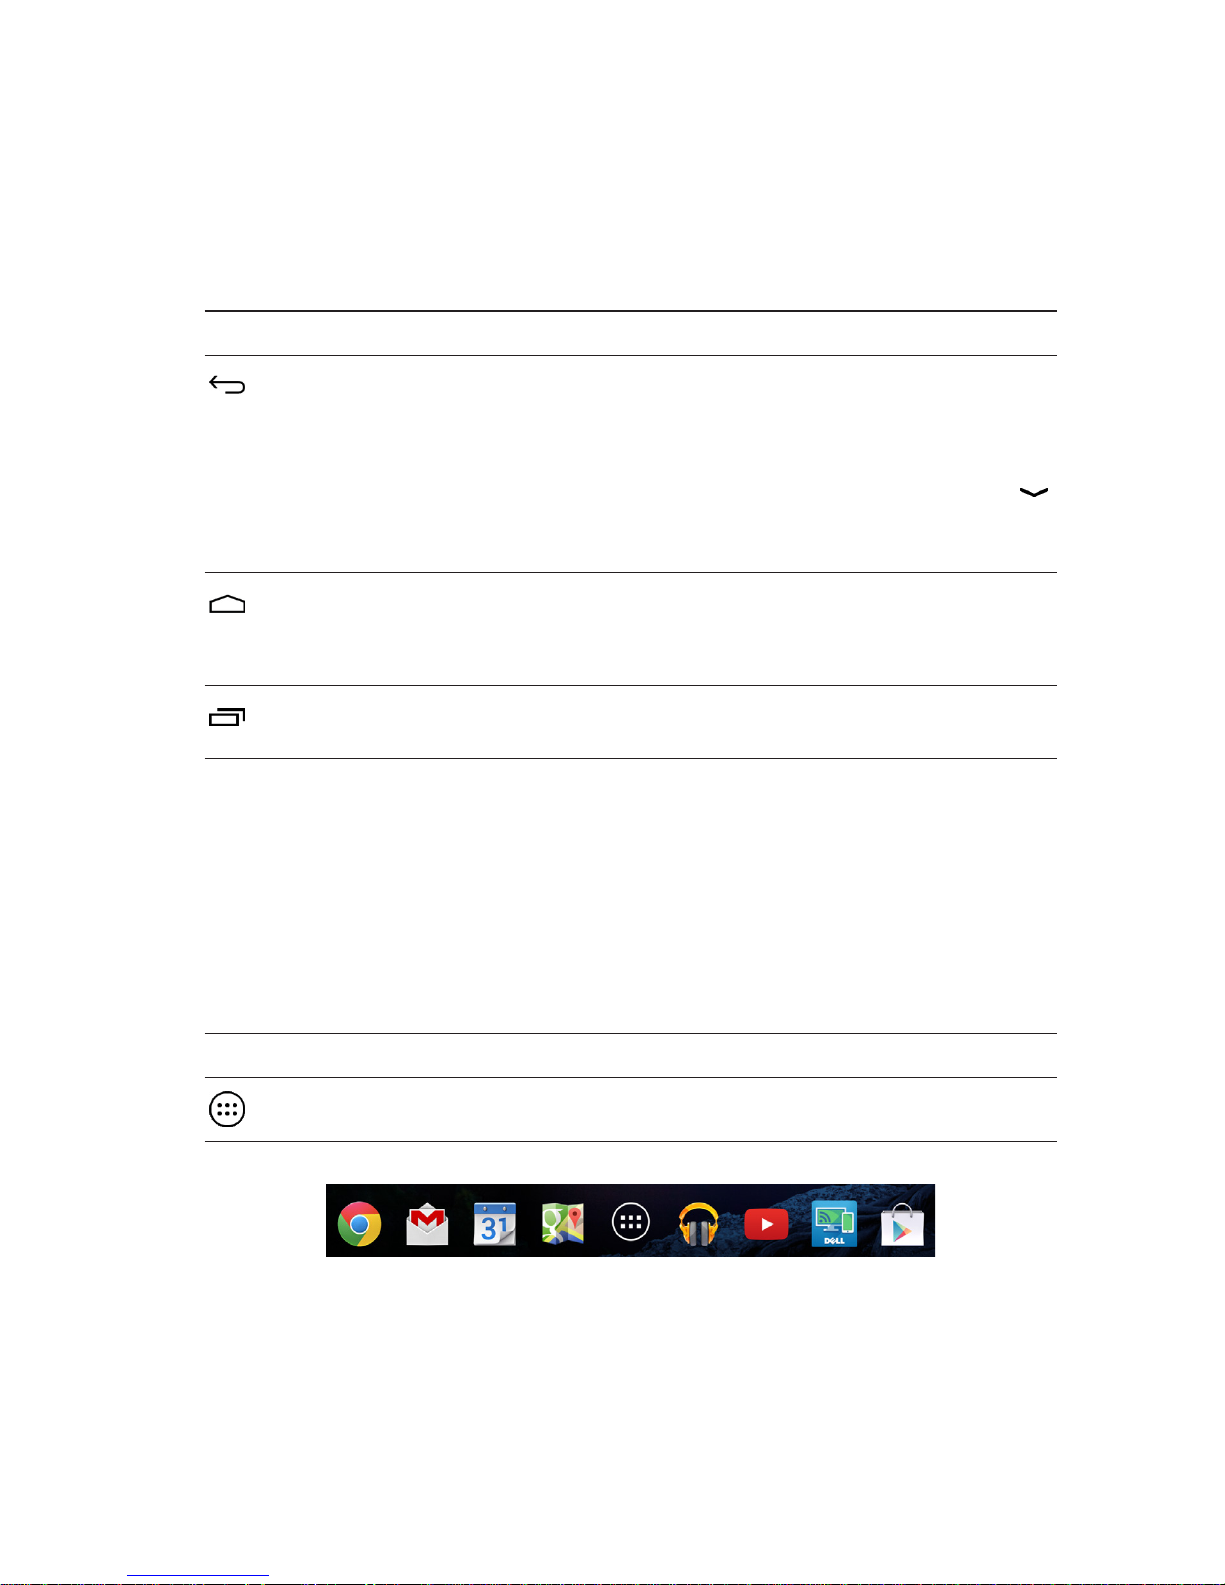
At the bottom of your tablet’s screen, you can find the navigation bar
which features three buttons.
Icon Item Description
Back button Touch to return to the previous screen or exit the
running application.
NOTE: When the on‑screen keyboard is opened,
the back button is changed to the hide button .
Touch to hide the on‑screen keyboard in the text
input mode.
Home button • Touch to return to the Home screen.
• Touch and hold, then swipe up to open
Google Now.
Recent apps button Touch to show a list of the most recently used
apps.
Favorites tray
At the bottom of the Home screen, you can find the Favorites tray
and the All Apps icon. The Favorites tray gives you quick access to
your favorite apps no matter which Home screen you are on. You can
place eight different apps or app folders in the Favorites tray.
Icon Item Description
All Apps icon Touch to open the All Apps screen.
Page 26

26 | Using Your Tablet
To add an app to the Favorites tray:
1 Touch .
2 Touch and hold the app you want to add to the Favorites tray.
3 Move the app into the position you want to place it in and release
your finger.
NOTE: If you want to create an app folder, move the app on top
of another app on the Favorites tray and release your finger.
Apps
Customize your tablet by adding apps to your Home screen for quick
access to these apps.
To add an app to the Home screen:
1 Touch .
2 Touch and hold the app you want to add to the Home screen.
3 Move the app to the area you want to place it in and release your
finger.
NOTE: If there is an app or widget in the area you want to place
the app, Android will automatically move that app or widget to a
nearby area.
NOTE: If you want to create an app folder, move the app on top
of another app on the Home screen and release your finger.
Wallpapers and widgets
To change the wallpaper for the Home screen:
1 Touch and hold the background of the Home screen. A list of
wallpaper options appears.
2 Select a wallpaper option and then follow the instructions on the
screen to set a wallpaper.
Page 27
Using Your Tablet | 27
To add a widget to the Home screen:
1 Touch .
2 Touch the WIDGETS tab at the top of the menu.
3 Touch and hold the widget you want to add to the Home screen.
4 Move the widget to the area you want to place it in and release
your finger.
NOTE: If there is an app or widget in the area you want to place
the widget, Android will automatically move that app or widget to
a nearby area.
Notifications
At the top‑left of the Home screen, you can find the notification
menu. Swipe down from the notification menu to access notification
alerts including the arrival of new messages, calendar events, ongoing
downloads, and so on.
To show more information for an individual notification alert, slowly
swipe down the notification to expand it. To access the related‑app,
touch the notification. To remove a notification, swipe it away.
NOTE: To clear all notification alerts, touch Clear all notifications
on the top‑right corner of the notification menu.
Page 28
28 | Using Your Tablet
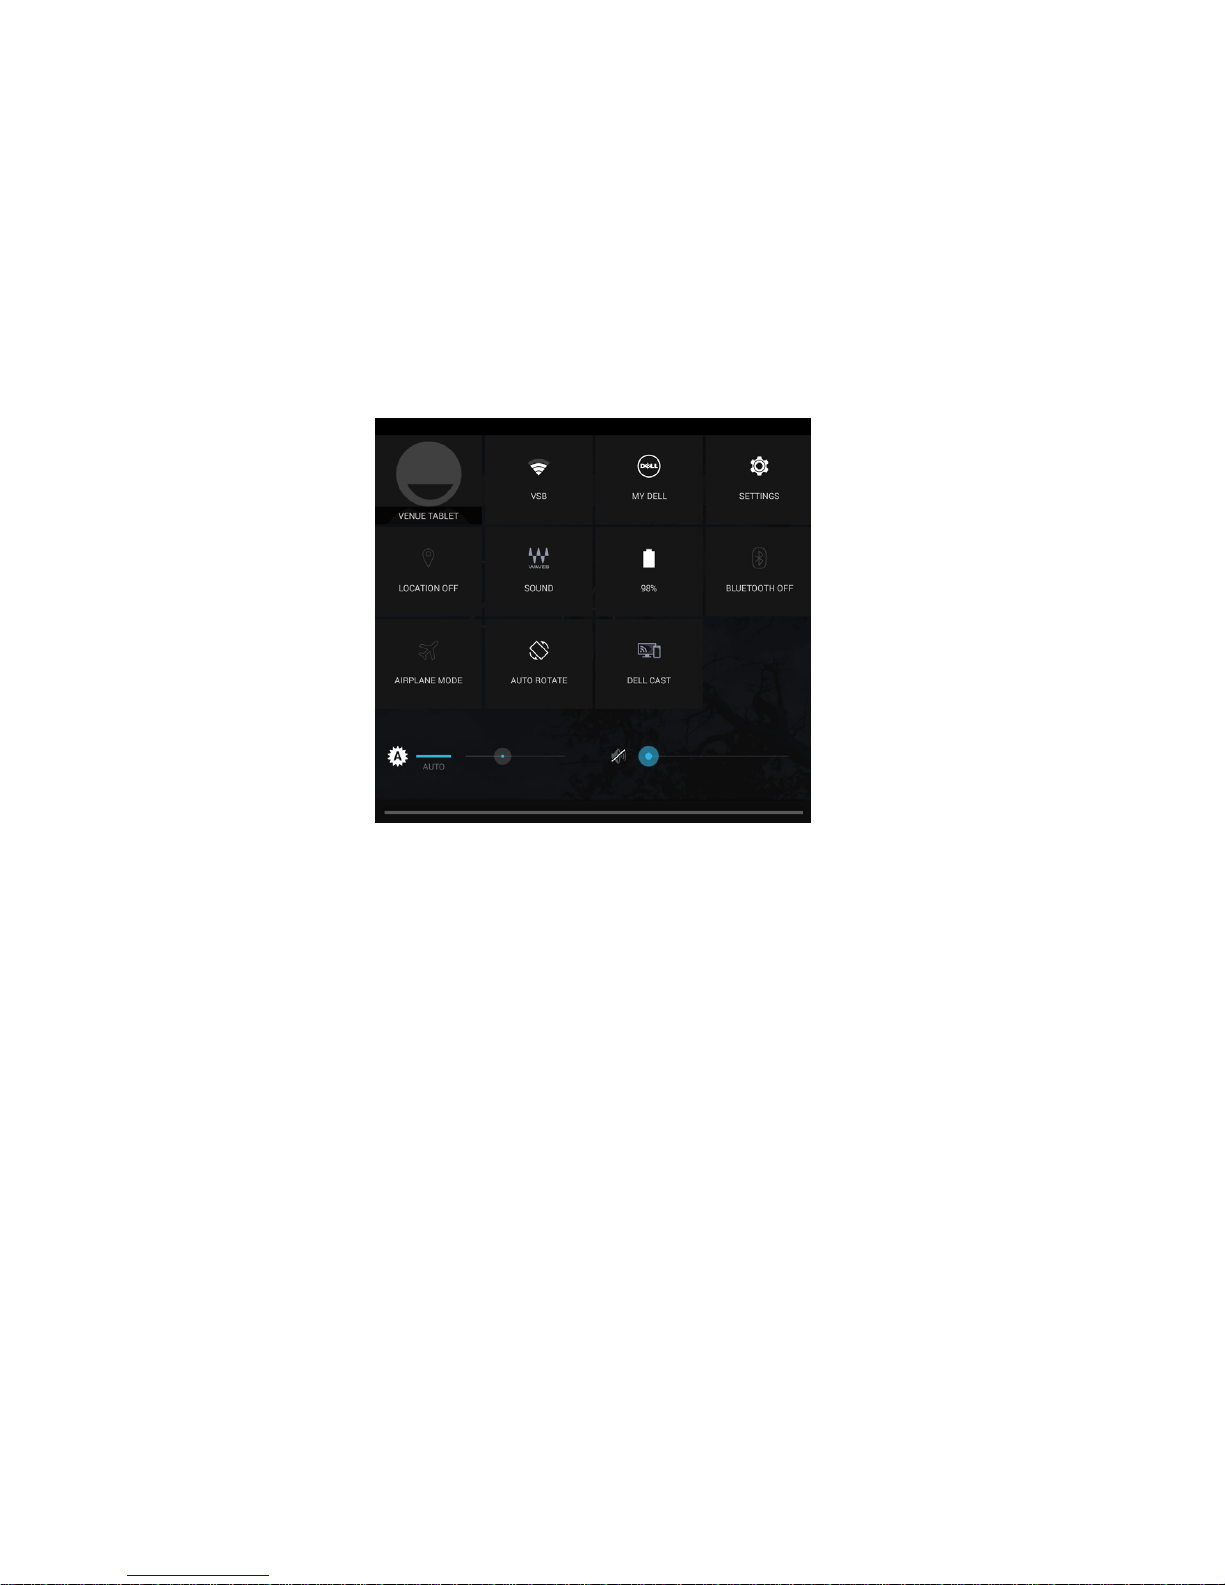
Quick Settings
At the top‑right of the Home screen, you can find the status icons.
Swipe down from the top‑right of the Home screen to access the
Quick Settings menu. The Quick Settings menu gives you quick
access to current settings for your tablet, such as Wi‑Fi setting, battery
status, settings menu, and so on.
For more information on using the Android Home screen, go to
support.google.com/android.
Page 29
Using Your Tablet | 29
IntelRealSenseSnapshot
Intel RealSense Snapshot is a depth‑capturing technology allowing
you to capture high‑resolution pictures and videos with depth
perception using the Camera app. You can change the color,
exposure, effects, and focus settings for the photos and share with
your friends using the Gallery app.
Taking Intel RealSense Snapshot photos
1 Touch → .
2 Touch the mode button next to the shutter button. A list of
camera modes is displayed.
3 Touch Depth Snapshot .
4 Touch the shutter button to take a photo.
To view the captured photo, touch the thumbnail on the camera
screen or launch the Gallery app .
Editing Intel RealSense Snapshot photos
1 Touch → .
2 Touch the thumbnail of the photo you want to edit.
NOTE: Intel RealSense Snapshot photos feature a 3D icon on
the top‑left corner of the thumbnail.
Page 30
30 | Using Your Tablet
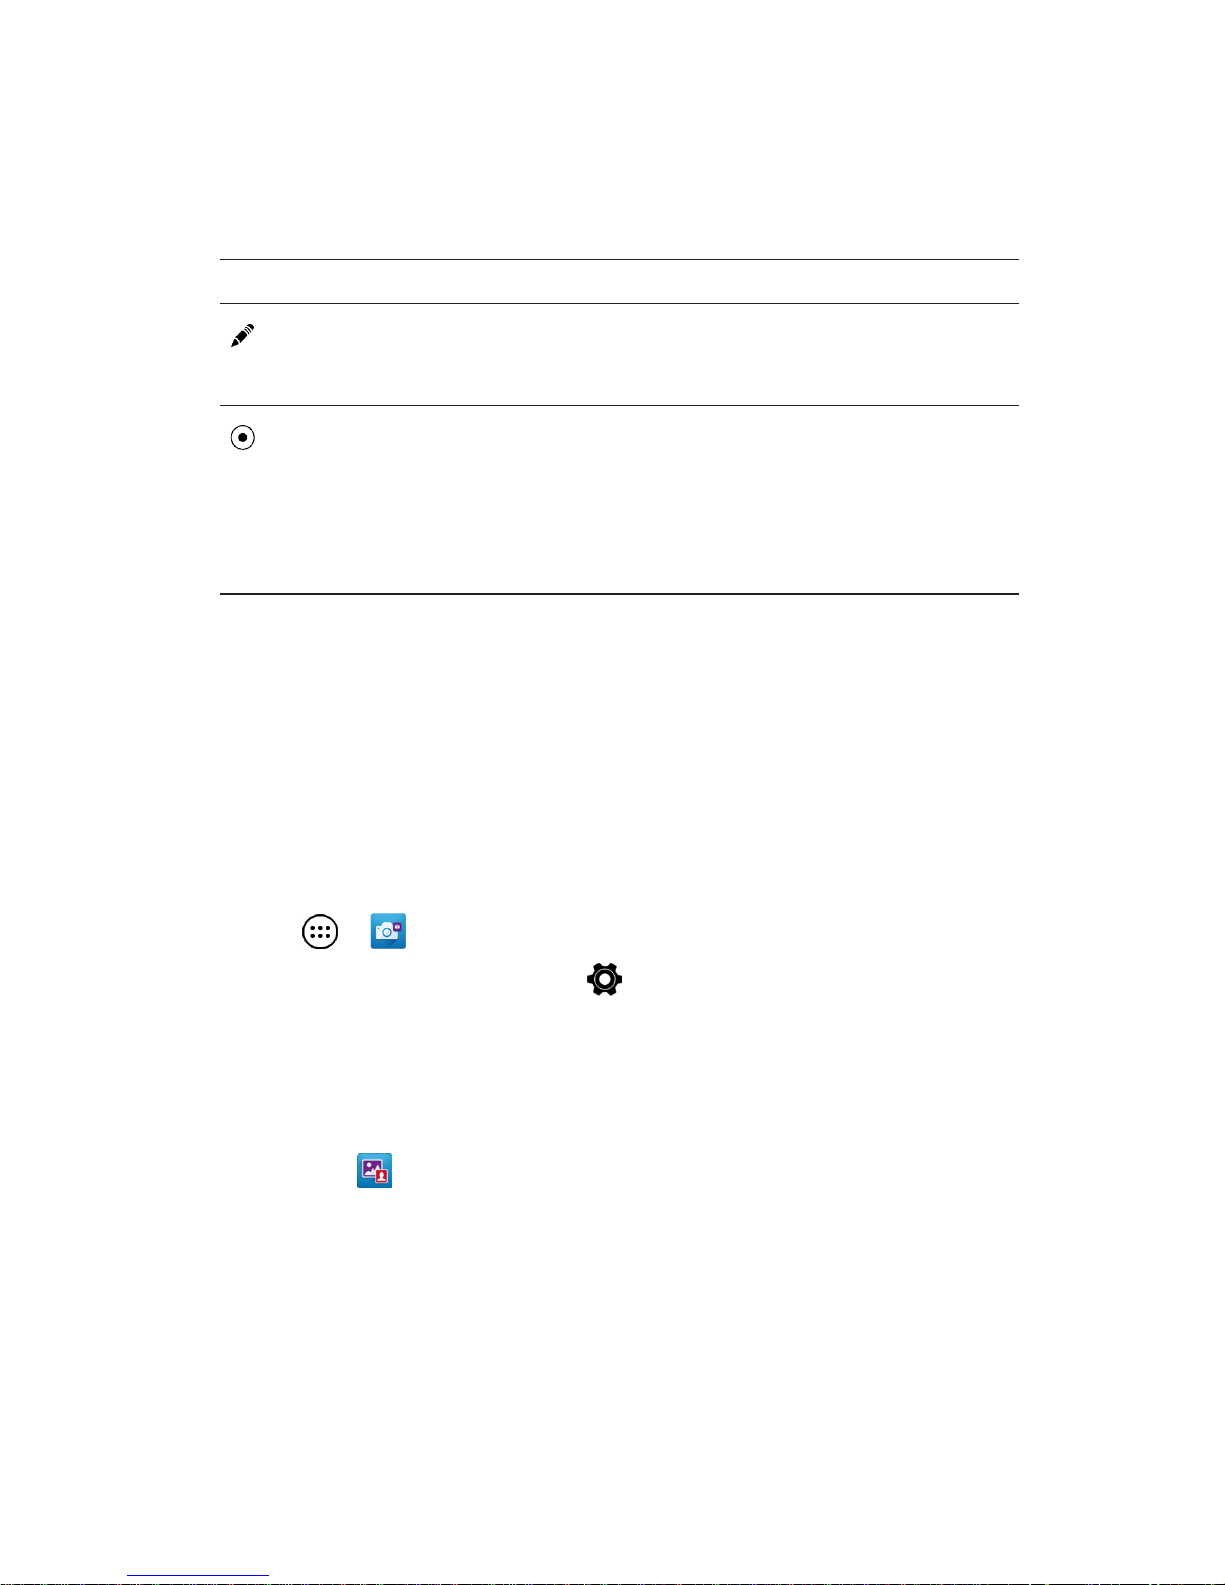
3 At the top‑left corner of the photo, you can find two buttons for
editing Intel RealSense Snapshot photos.
Icon Item Description
Edit button Allows you to edit the photos by adding
filters or frames, changing the dimensions or
orientation, or adjusting color settings.
Focus button Allows you to determine the focal point of a
photo by touching a point within the photo
to reset the focal point, or by swiping up
or down within a photo to change the area
of focus. Swipe left or right to decrease or
increase the range of focus.
Shortcut buttons
The three shortcut buttons located under the shutter button allow
you to quickly toggle between various camera settings. You can
customize these three shortcut buttons by choosing from a list of
buttons in the camera settings menu.
To customize the shortcut buttons:
1 Touch → .
2 Touch the settings menu icon .
3 Touch the button you want to set as your shortcut button
in the Shortcut Button tab. The shortcut buttons is updated
automatically.
For more information on taking or editing photos, see the tutorial in
the Gallery app .
Page 31

Using Your Tablet | 31
Synchronizing Your Tablet
Using a Google account
During the Android setup process, you can sign in with your Google
account or create a new Google account. When you sign in with
your existing Google account on your tablet, your settings including
contacts, emails, calendar events, and data associated with your
account are automatically synchronized with the tablets or computers
on which you use the same Google account.
To add an account:
1 Touch → Settings→ Add account→ Google.
2 Follow the instructions on the screen.
Copy music, photos, and videos
1 Connect your tablet to a computer using the supplied USB cable,
then transfer files to or from the computer.
2 After transferring files, use the Safely Remove Hardware and
Eject Media wizard to remove your tablet from the computer.
NOTE: Files can also be shared with another device via Bluetooth.
Before transferring files, ensure that Bluetooth is enabled on both
the tablet and the paired device, and that the tablet is compatible
with the Bluetooth‑enabled device. For information on pairing
with Bluetooth devices, see “BluetoothSetting”. For file transfer
details and Bluetooth compatibility, please refer to the software
documentation on both devices.
Page 32
32 | Using Your Tablet
Resetting Your Tablet
CAUTION: Resetting your tablet erases all data from your
tablet’s internal storage, including your Google account,
system app data, system settings, downloaded apps, music,
photos, and other user data. Ensure that you back up all the
required data before you proceed.
To reset your tablet:
1 Touch → Settings→ Backup & reset→ Factory data reset.
2 Read the warning and touch Reset tablet.
Cleaning Your Tablet
CAUTION: Before you clean your tablet, disconnect all the
cables and turn off the tablet. Clean your tablet with a soft
cloth dampened with water. Do not use liquid or aerosol
cleaners which may contain flammable substances.
CAUTION: To avoid damaging the tablet or display, do not
spray cleaning solution directly onto the display. Only use
products specifically designed for cleaning displays and follow
the instructions included with the product.
CAUTION: Do not clean the keyboard (sold separately) with a
moist cloth.
1 Turn off your tablet. For information on turning off your tablet,
see “TurningOffYourTablet”.
2 Disconnect any attached devices, headphones, and speakers
from the tablet and from their electrical outlets.
3 Moisten a soft, lint‑free cloth with either water or a display
cleaner, and wipe the surface of the tablet until it is clean. Do not
allow water from the cloth to seep down to the tablet ports or
buttons.
Page 33
Troubleshooting | 33
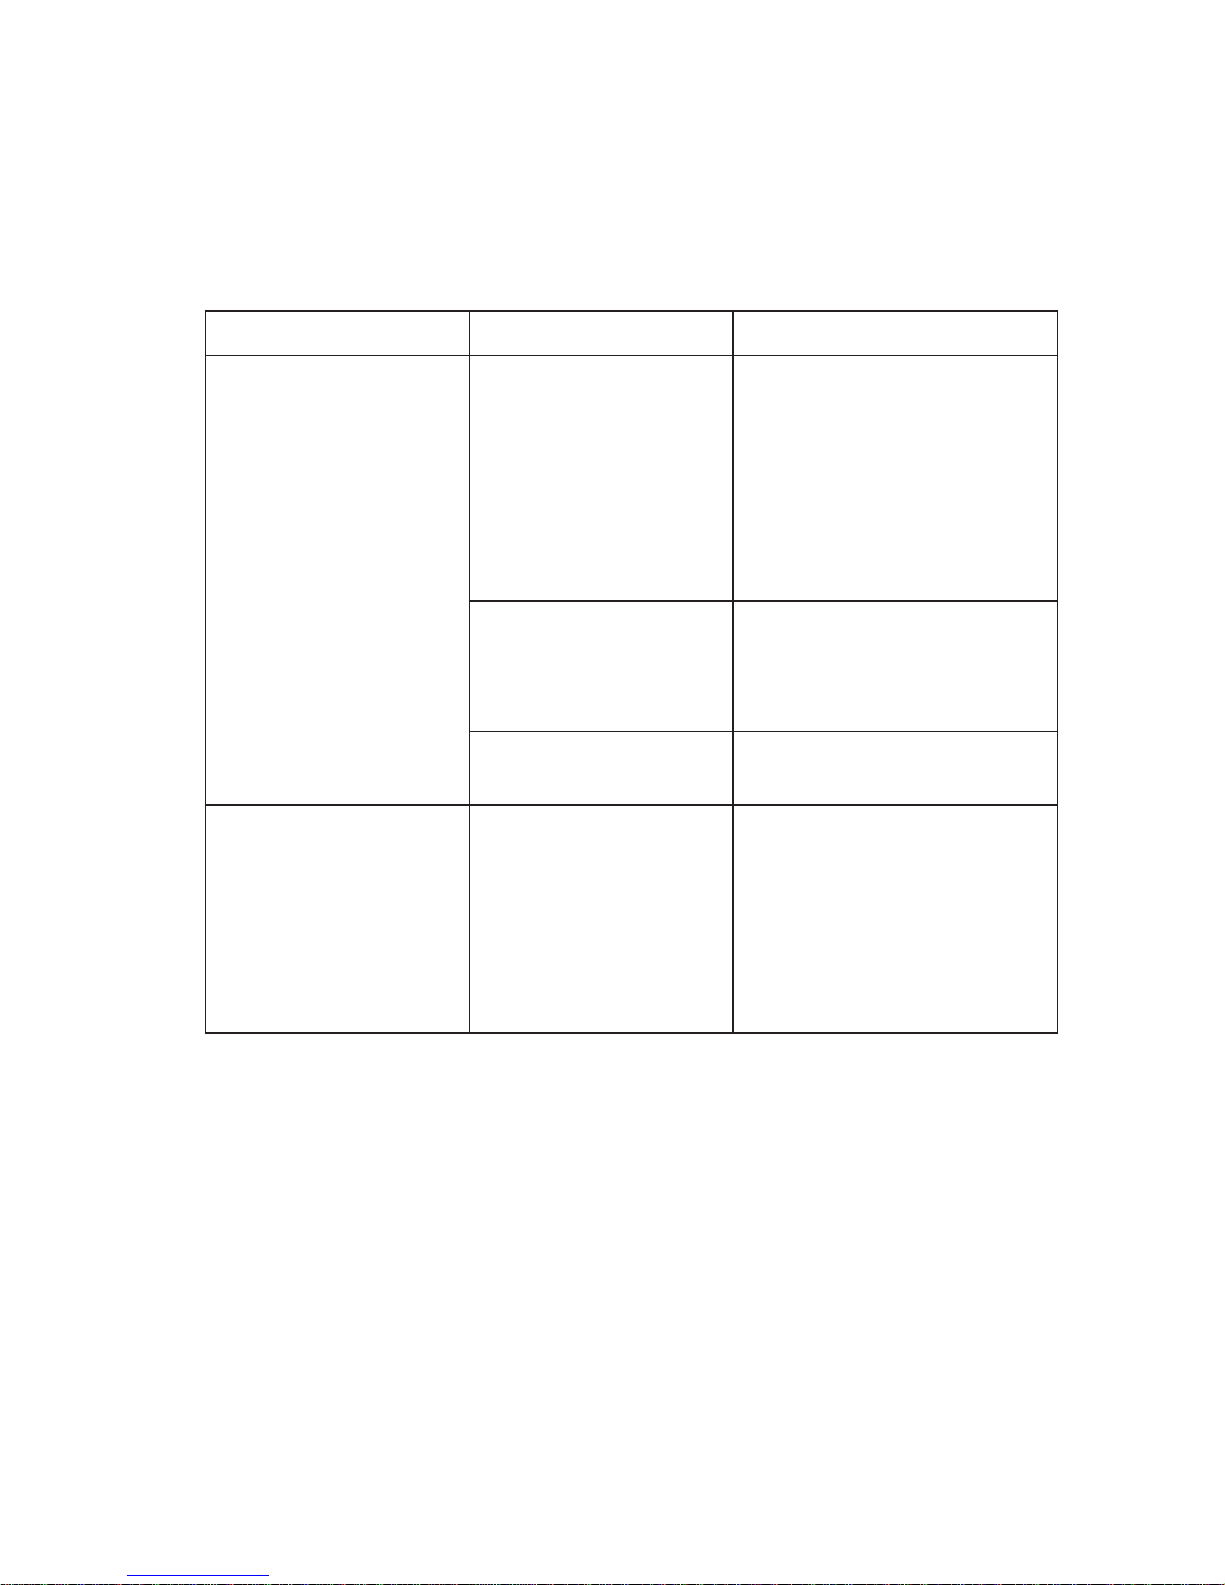
Troubleshooting
Battery problem
Problems
Possible causes Possible solutions
Battery does not
charge
1 Check the cable,
connectors, and Dell
power adapter to ensure
proper connectivity.
2 Verify that the wall
outlet is functioning
by connecting another
device.
The tablet's
temperature is below
0°C (32°F) or higher
than 35°C (95°F).
Charge the battery in an
ambient temperature
between 0°C to 35°C (32°F
to 95°F).
The battery or power
adapter is damaged.
Contact Dell.
Go to dell.com/support.
Battery drains quickly
even when the tablet is
in standby mode
If the tablet is not in
the range of a network
it can connect to, the
tablet continues to
send out signals to
locate a base station
and drains the battery.
• Temporarily turn off the
tablet.
• Move the tablet in range of
a network it can connect
to or temporarily turn off
the wireless connection on
your tablet.
Page 34
34 | Troubleshooting
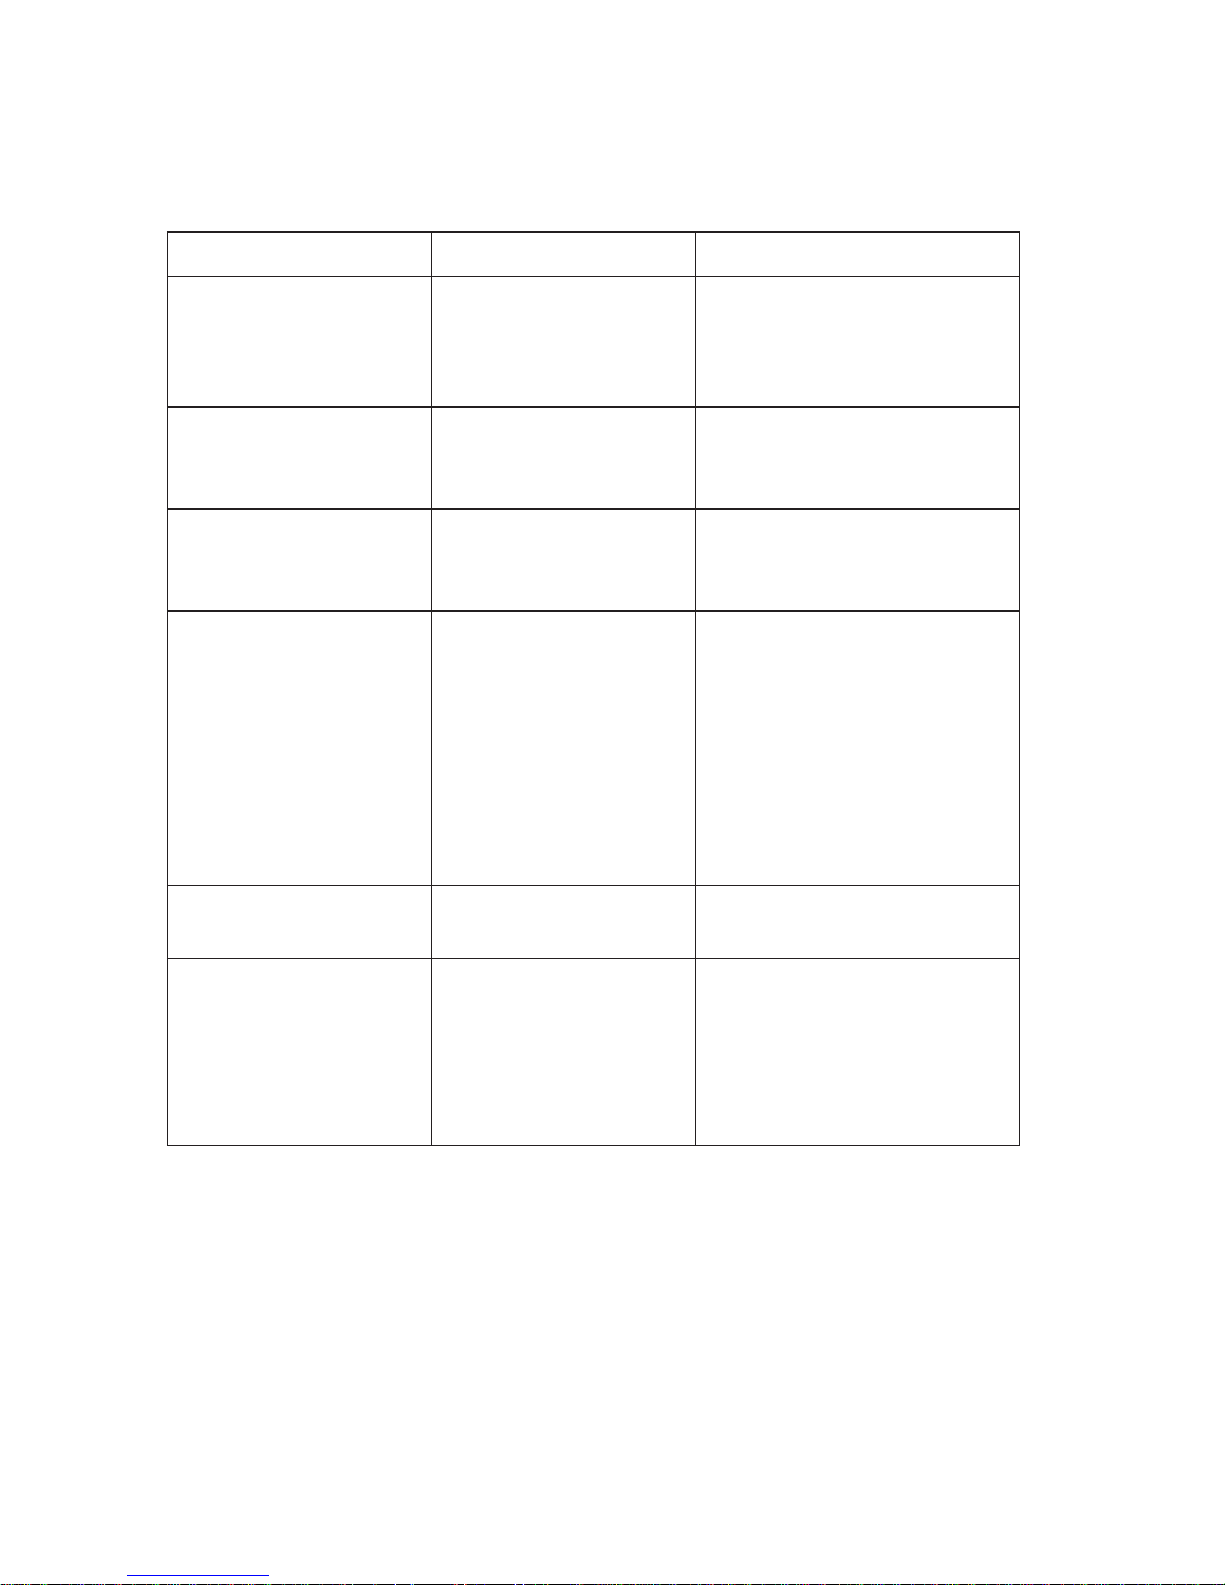
System problem
Problems Possible causes Possible solutions
Tablet does not turn onThe battery is
completely discharged.
1 Charge the tablet for at
least 4 hours.
2 Press and hold the power
button for 7seconds.
Tablet does not turn
off
Press and hold the power
button for 10 seconds to
forcefully turn off the tablet.
Tablet locks up Press and hold the power
button for 10 seconds to
forcefully turn off the tablet.
Tablet is not
responding or behaving
unexpectedly
1 Restart the tablet. See
“TurningOffYourTablet”
and
“TurningOnYourTablet”.
2 Reset the tablet. See
“Resetting Your Tablet”.
3 If the issue is unresolved,
contact Dell. Go to
dell.com/support.
Tablet cannot boot
into Android
Contact Dell. Go to
dell.com/support.
Software or feature
is not working as
expected
Software updates may
have been downloaded
in the background.
Restart your tablet, see
“TurningOffYourTablet” and
“TurningOnYourTablet”.
Page 35
Troubleshooting | 35
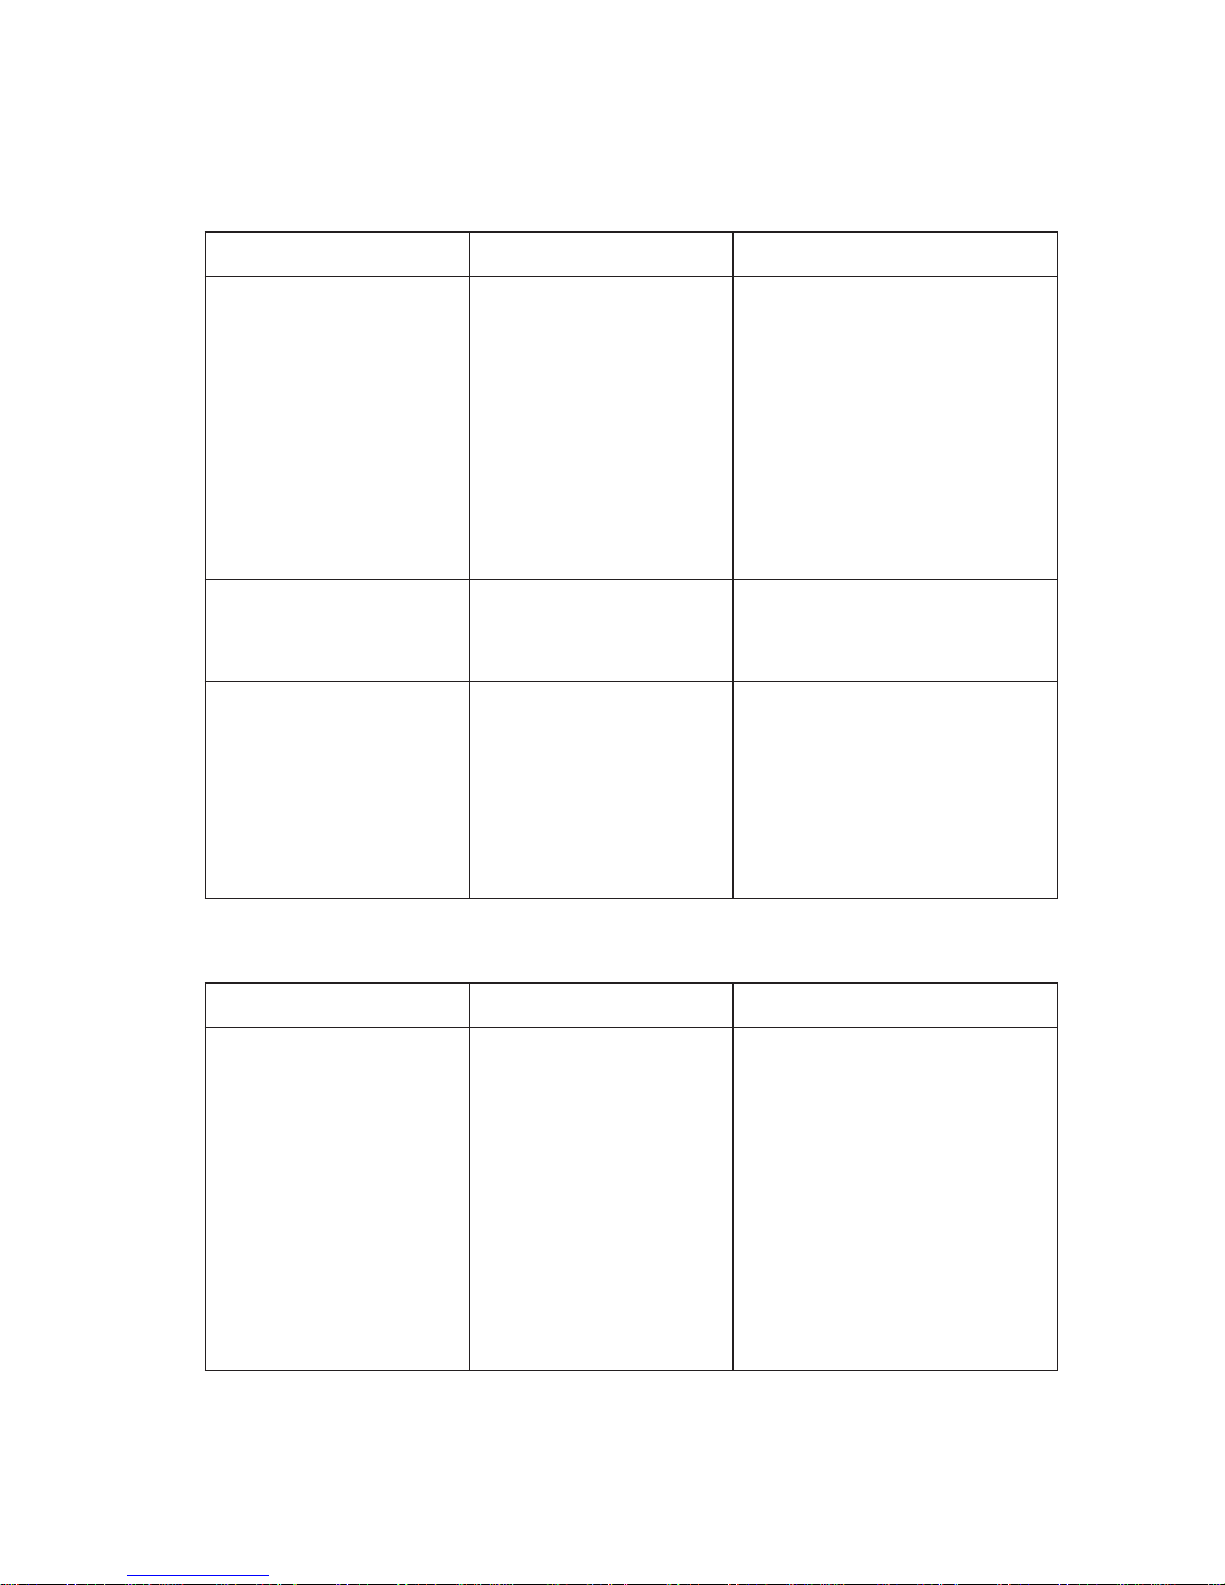
Network problem
Problems Possible causes Possible solutions
No wireless
connection
1 Check if the wireless
radio is on. See
“Wi‑FiSetting”.
2 Try to get closer to the
wireless access point.
3 Reset the wireless router
if using a private network;
open the browser to view
the home page if using a
public network.
Slow internet
connections
The signal strength is
not strong enough.
Move your tablet to a
different location for better
signal reception.
Unable to pair with a
Bluetooth device
1 Ensure Bluetooth is
on and follow proper
Bluetooth pairing
instructions. See
“BluetoothSetting”.
2 Contact Dell. Go to
dell.com/support.
Touchscreen problem
Problems Possible causes Possible solutions
Touchscreen responds
slowly or improperly
• The screen is dirty.
• A protective cover
may prevent
the tablet from
recognizing your
inputs.
• Moisten a soft, lint‑free
cloth with either water
or a display cleaner, and
wipe the surface of the
tablet until it is clean. Do
not allow water from the
cloth to seep down to the
tablet ports or buttons.
• Remove any protective
covers from the
touchscreen.
Page 36

36 | Contacting Dell
Contacting Dell
To contact Dell for sales, technical support, or customer service
issues:
1 Have the Service Tag and Express Service Code information
of your tablet ready. To locate the Service Tag and Express
Service Code information, see “Locating Your Service Tag and
ExpressServiceCode”.
2 Go to dell.com/contactdell.
3 Select the appropriate service or support link based on your
requirement or choose the method of contacting Dell that is
convenient for you.
Dell provides several online and telephone‑based support and service
options. Availability varies by country and product, and some services
may not be available in your area.
NOTE: If you do not have an active internet connection, you can
find contact information on your purchase invoice, packing slip,
bill, or Dell product catalog.
Page 37
Locating Your Service Tag and ExpressServiceCode | 37
Locating Your Service Tag and
ExpressServiceCode
You must provide the Service Tag and Express Service Code of your
tablet when contacting Dell for customer service or technical support.
NOTE: The telephone system prompts you to enter the Express
Service Code that helps in routing your call efficiently.
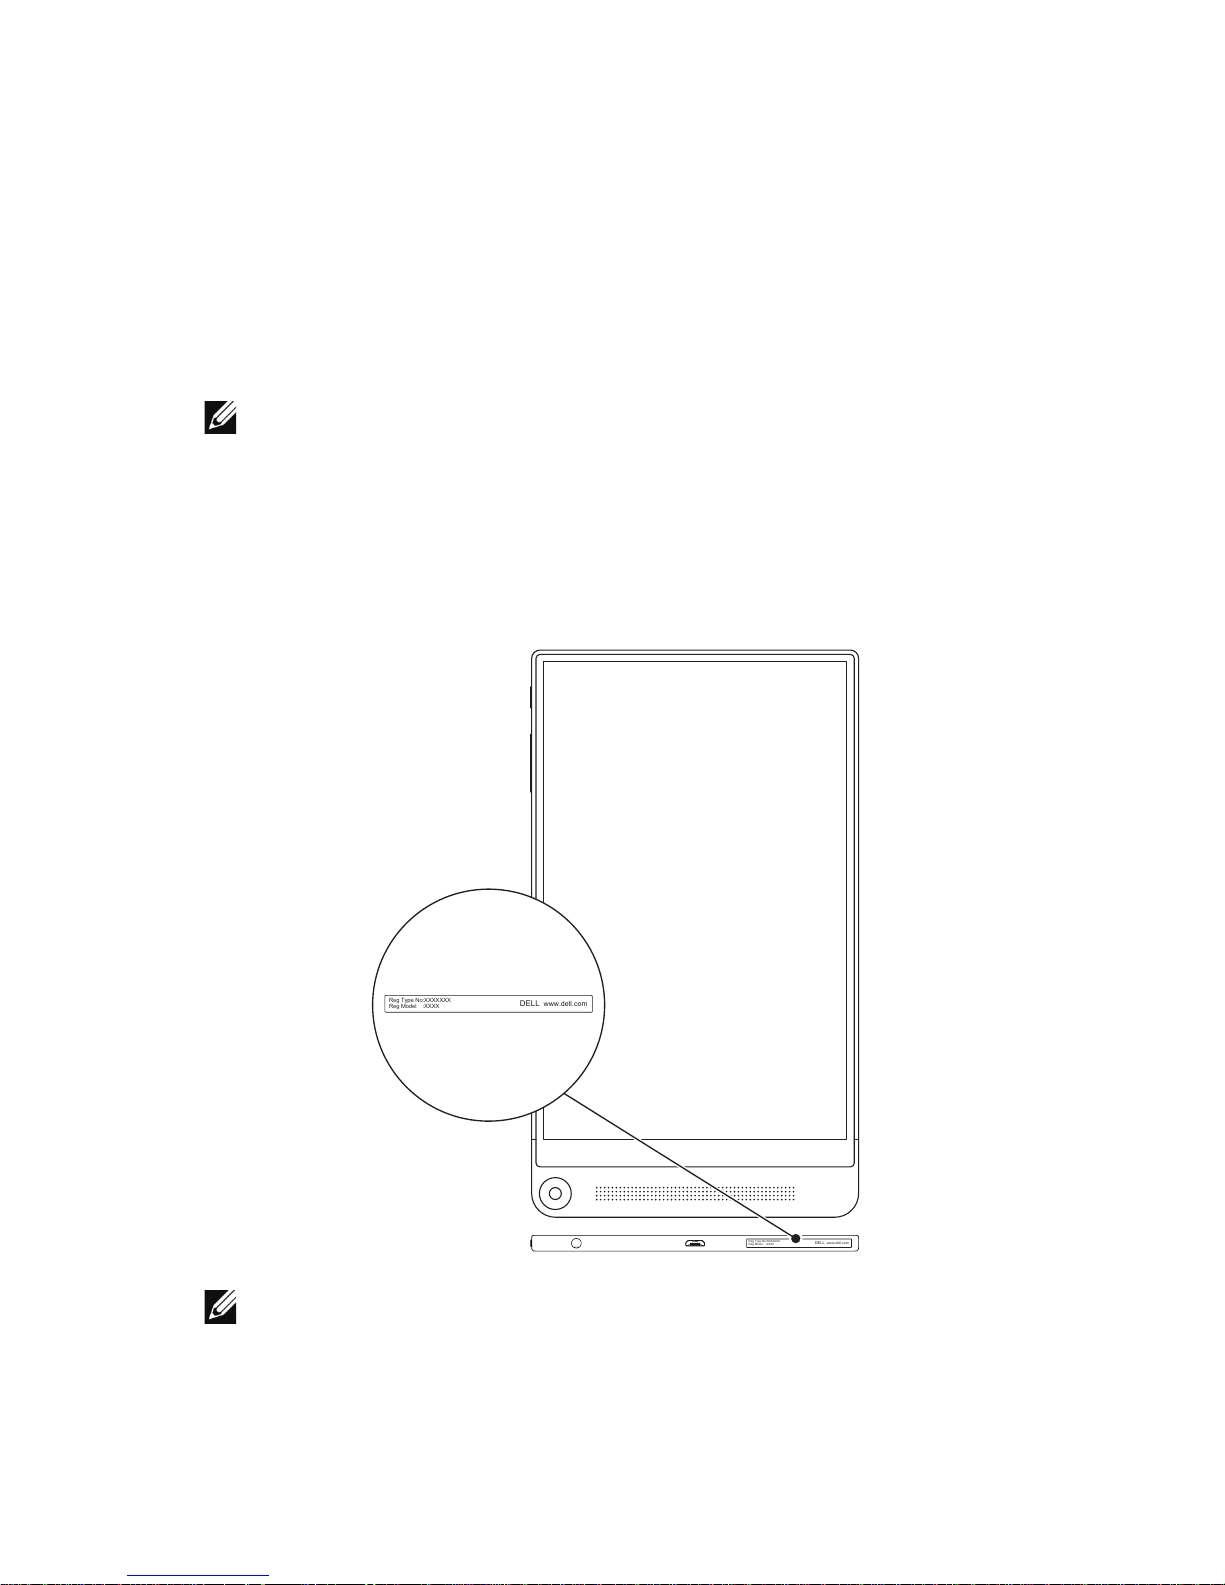
The Service Tag and Express Service Code for your tablet are located
on a label at the bottom of the tablet. Example of the Service Tag and
Express Service Code label is as shown in the image below:
DELL www.dell.com
Reg Type No:XXXXXXX
Reg Model :XXXX
DELL www.dell.com
Reg Type No:XXXXXXX
Reg Model :XXXX
NOTE: Your Service Tag and Express Service Code information
can also be seen in the My Dell app, along with other system
information.
Page 38

38 | Specifications
Specifications
Dimensions and Weight
Height 215.8 mm (8.50 inches)
Width 124.4 mm (4.90 inches)
Thickness 6.0 mm (0.24 inch)
Weight 305 g +/– 5 g (0.67 lb +/– 0.01 lb)
Tablet Environment
Temperature range:
Operating 0°C to 35°C (32°F to 95°F)
Non‑operating –40°C to 65°C (–40°F to 149°F)
Relative humidity (maximum):
Operating 10% to 90% (non‑condensing)
Non‑operating 5% to 95% (non‑condensing)
Altitude (maximum, unpressurized):
Operating –15.20 m to 3048 m (–50 ft to 10,000 ft)
Storage –15.20 m to 10,668 m (–50 ft to 35,000 ft)
Ports and Connectors
Audio One headset port (audio in and audio out
supported)
MicroSD card One microSD‑card slot
NOTE: Your tablet supports a microSD
card with capacity up to 512 GB.
USB One micro‑USB 2.0 port
Page 39
Specifications | 39
Display
Type 8.4‑inch WXGA display with multi‑point
capacitive touch
Resolution (maximum) 2560 x 1600
Aspect ratio 16:10
Brightness (maximum) 300 nits
Viewing angle Over 80 degrees
Contrast ratio 10000:1
Color depth 24 bit/pixel
Power Adapter
Input voltage 100‑240 VAC
Input current (maximum) 0.5 A
Input frequency 50‑60 Hz
Output power 10 W
Output current 2.0 A
Rated output voltage 5 VDC
Temperature range:
Operating 0°C to 40°C (32°F to 104°F)
Storage –40°C to 70°C (–40°F to 158°F)
Camera
Resolution:
Front camera 1.2 MP (16:9)
Rear camera 8 MP (16:9)
Depth cameras (2) 720p
Page 40

40 | Glossary
Glossary
This section provides information about the terms used in this
document that is for informational purposes only and may or may not
describe features included with your tablet.
A
A ‑ ampere—A measure of the amount of electric charge passing a
point in an electric circuit.
AC ‑ alternating current—The form of electricity that powers your
tablet when you plug the AC adapter power cable into an electrical
outlet.
Ambient light sensor ‑ A feature that helps to control the display
brightness.
Apps ‑ Software that allows you to perform a specific task. Your tablet
is preloaded with a variety of applications, and additional applications
can be downloaded from Google Play.
B
Bluetooth ‑ a wireless technology for exchanging data,
communicating with a keyboard or mouse, listening to music and
creating a wireless personal area network over a short distance
between devices. The connection may be restricted according to
the Bluetooth profiles of each device. To be marketed as a Bluetooth
device, it must be qualified to standards defined by the Bluetooth SIG.
D
Device ‑ Hardware such as a disk drive, printer, or keyboard that is
installed in or connected to your tablet.
E
Email ‑ Electronic mail—a method of exchanging digital messages
from an author to one or more recipients via the internet. Email
servers accept, forward, deliver, and store messages, and neither the
users nor their computers are required to be online simultaneously.
Page 41

Glossary | 41
G
Google Now ‑ An intelligent personal assistant developed by Google
that works on a tablet or smartphone that runs Android. It serves as a
day planner.
GRMS ‑ A unit of acceleration caused by the force of gravity. The
grms value is typically used to express the overall energy of a
particular random vibration event and is a statistical value used in
mechanical engineering for structural design and analysis purposes.
H
Hz ‑ Hertz—A unit of frequency measurement that equals 1 cycle per
second. Computers and electronic devices are often measured in
kilohertz (KHz), megahertz (MHz), gigahertz (GHz), or terahertz (THz).
M
MicroSD ‑ micro‑Secure Digital—A smaller size of SD which is
a removable flash memory card used for storing information in
portable devices, such as mobile phones, digital cameras, and tablet
computers. The standard size of SD is 32 x 24 x 2.1 mm (1.260 x
0.945x 0.083 inches) and microSD is 15 x 11 x 1.0 mm (0.591 x 0.433 x
0.039 inches).
Micro-USB ‑ micro‑universal serial bus—A hardware interface for a
low‑speed device such as a USB‑compatible scanner, set of speakers,
printer, broadband devices, imaging devices, or storage devices.
Devices are plugged directly in to a 5‑pin socket on your tablet, both
to communicate and to supply electric power. The micro‑USB port
can be connected to a standard USB port using micro‑USB to USB
cable.
R
Resolution ‑ The sharpness and clarity of an image produced by
a printer or displayed on a monitor. The higher the resolution, the
sharper the image.
Page 42

42 | Glossary
S
Service Tag ‑ A bar code label on your tablet that identifies your tablet
when you call Dell for customer service or technical support.
Shortcut ‑ An icon that provides quick access to frequently used
programs, files, folders, and drives. When you place a shortcut on
your Android Home screen, touch the icon to open its corresponding
folder or file without having to find it first. Shortcut icons do not
change the location of files.
Sleep mode ‑ A power management mode that shuts down all
unnecessary computer operations to save energy.
V
V ‑ volt—The measurement of electric potential or electromotive
force. 1 volt appears across a resistance of 1 ohm when a current of 1
ampere flows through that resistance.
VAC ‑ voltage in alternating current—A mathematics of AC voltages,
as alternating currents are caused by alternating voltages.
VDC ‑ voltage in direct current—A measurement in a DC system. The
current flows directly, in one direction in the circuit, and flows at a
specific, constant voltage.
W
W ‑ watt—The measurement of electrical power. 1 watt is 1 ampere of
current flowing at 1 volt.
Wallpaper ‑ The background pattern or picture on the Home screen.
Wi-Fi ‑ A technology as a synonym for WLAN (wireless local area
network) connects to the internet when within range of a wireless
network.
Widgets ‑ A small application which resides on the Home screen and
provides quick and easy access to information.
WXGA ‑ wide‑aspect extended graphics array—A video standard for
video cards and controllers that supports resolutions up to 1280 x 800.
Page 43

Index | 43
A
Accessory
Micro‑USB cable, 8
Power adapter, 8
B
Battery
Tablet battery status, 11
Tablet charge, 9
Bluetooth setting, 19
Button
Power, 5
Volume up/down, 5
C
Charging
Tablet, 9
Connection
Bluetooth, 19
Wi‑Fi, 18
F
Favorites tray, 25
G
Gestures
Drag, 21
Rotate, 22
Swipe or Slide, 21
Touch, 20
Touch and Hold, 20
Zoom in, 21
Zoom out, 22
H
Home screen, 24
I
Intel RealSense Snapshot, 29
L
Lock screen, 12
M
MicroSD card
Insert, 15
Remove, 16
Index
Page 44

44 | Index
N
Navigation bar, 25
Notification, 27
Q
Quick Settings menu, 28
S
Screen
Home screen, 24
Lock screen, 12
Service tag
Locating, 37
Status icons, 28
Synchronize with computer, 31
T
Tablet
Charge, 9
Clean, 32
Lock, 13
Overview, 5
Reset, 32
Setting, 9
Turn off, 13
Turn on, 12
Unlock, 14
Touchscreen Display
Orientation, 23
Troubleshooting
Battery, 33
Network, 35
System, 34
Touchscreen, 35
W
Wallpapers, 26
Widgets, 26
Wi‑Fi
Connection, 18
 Loading...