

Dell ST2010B, STB2010 Setup Manual
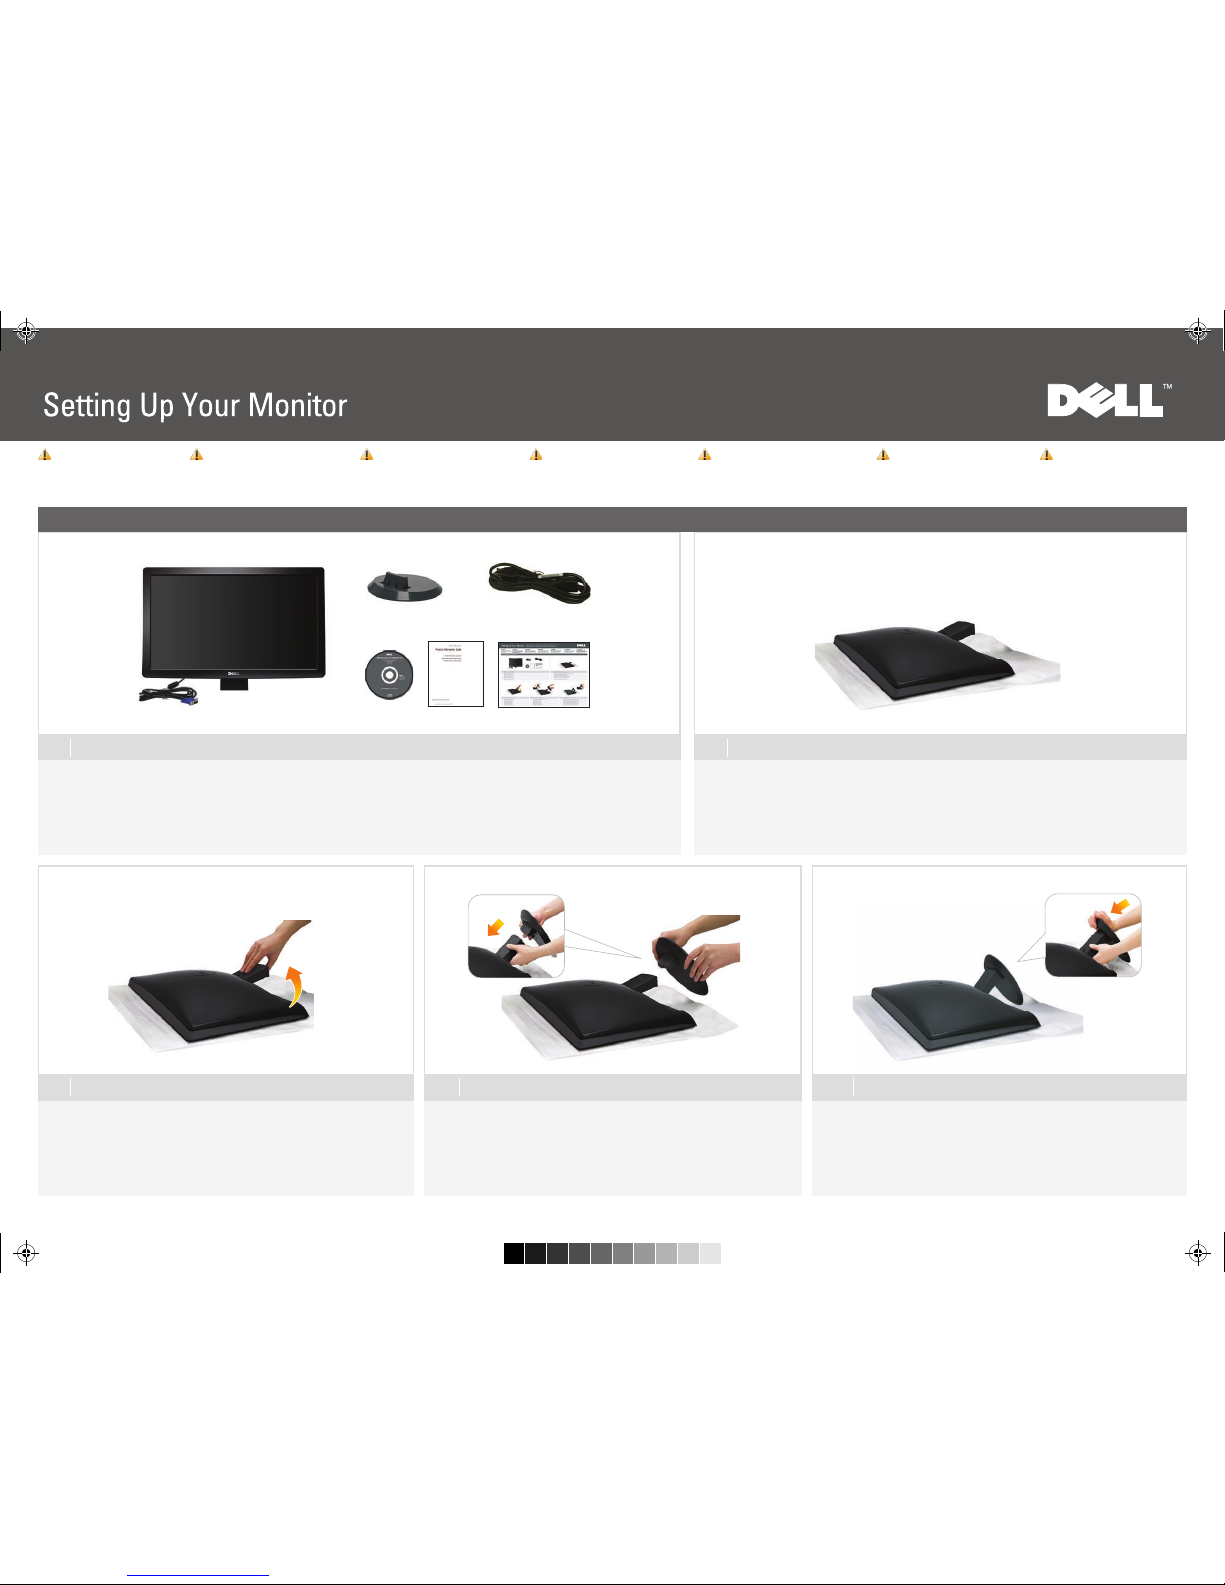
Verify the contents of the box
Dell™ ST2010B Flat Panel Monitor
1
Lift the monitor stand
3
Attach the base to the stand
4
Push the hook to lock the stand base
5
2
Remove the cover and place the monitor on it
Set up I hres Monitor s | In stallat ion de votre m oniteur | Inst alac ión de su moni tor |
Ins tala ção d o monit or | Im postazi one del monito r |
Нас трой ка мони тор а
PRECAUCIÓN:
Antes de configurar y utilizar su equipo
Dell™, consulte las instrucciones de
seguridad que se entregan con el mismo.
CAUTION:
Before setting up your Dell™ monitor,
see the safety instructions that shipped
with your monitor.
CUIDADO:
Antes de você ajustar e operar seu computador
Dell™, veja as instruções de segurança
que são enviadas com seu monitor.
ATTENZIONE:
Prima di installare ed usare il computer
Dell™, leggere le istruzioni di sicurezza
fornite in dotazione al monitor.
VORSICHT:
Bevor Sie Ihren Dell™-Computer einrichten
und in Betrieb nehmen, beachten Sie bitte
die Sicherheitsanweisungen, die mit Ihrem
Computer mitgeliefert werden.
ATTENTION :
Avant de configurer et d'utiliser votre
ordinateur Dell™, consultez les précautions
de sécurité livrées avec votre moniteur.
Heben Sie den Monitorständer an
Soulevez l'embase du moniteur
Levante el soporte del monitor
Levante o suporte do monitor
Sollevare la base del monitor
Поднимите подставку монитора
Überprüfen Sie den Lieferumfang
Vérifiez le contenu de la boîte
Verifique los contenidos de la caja
Verifique o conteúdo da caixa
Verificare il contenuto della scatola
Проверьте содержимое коробки
Nehmen Sie die Abdeckung ab, und stellen Sie den Monitor darauf
Enlevez le cache et placez le moniteur dessus
Extraiga la cubierta y coloque el monitor sobre ella
Retire a cobert
ų
ra e coloque o monitor sobre a mesma
Rimuovere la copertura e collocarvi spora il monitor
Снимите крышку и поставьте на нее монитор
Befestigen Sie die Unterseite am Ständer
Fixez l'embase sur le support
Coloque la base en el soporte
Prenda a base no suporte
Attaccare la base al supporto
Подсоедините основание к стойке
Zum Fixieren der Fußbasis Verriegelung niederdrücken
Enfoncez le crochet pour verrouiller l'embase du support
Presione el gancho para bloquear la base del soporte
Pressione o gancho para bloquear a base do suporte
Premere il gancio per bloccare la base del supporto
Потяните крюк для фиксации основания стойки
ОСТОРОЖНО:
Перед настройкой монитора Dell™
ознакомьтесь с инструкциями по безопаснос
ти,
поставляемыми с монитором.
語言順序:
West- English, German, French, Spanish, Portuguese Brazil, Italian, Russian.
East- English, 簡中, 繁中, 日文, 韓文, 泰文,Indonesia
(A) 091014: First release.(由ST2310的白後殼改為黑後殼)
DELL-INL-ST2010B-QSG (WF-A)-091014.pdf 2009/10/14 上午 10:38:10DELL-INL-ST2010B-QSG (WF-A)-091014.pdf 2009/10/14 上午 10:38:10
w w w . d e l l . c o m | s u p p o r t . d e l l . c o m
Information in this document is subject to
change without notice.
© 2009 Dell Inc. All rights reserved.
Reproduction of these materials in any manner
whatsoever without the written permission of
Dell Inc. is strictly forbidden.
Dell and the DELL logo are trademarks of Dell Inc.
Dell disclaims proprietary interest in the marks and
names of others.
November 2009
Änderung der Informationen in diesem Dokument
jederzeit vorbehalten.
© 2009 Dell Inc. Alle Rechte vorbehalten.
Die Reproduzierung dieser Materialien unter irgendeiner
Form ohre die schriftliche Erlaubnis von Dell Inc. ist
strengstens verboten.
Dell und das DELL Logo sind Warenzeichen von Dell Inc.
Dell hat keine Eigentumsrechte über Marken und
Namen anderer Inhaber.
November 2009
Les informations contenues dans ce document
sont sujettes à modifications sans préavis.
© 2009 Dell Inc. tous droits réservés.
La reproduction de ces contenus de quelque
façon sans la permission écrite de Dell Inc.
est strictement interdite.
Dell et le logo DELL sont des marques déposées
de Dell Inc.
Dell renonce à tout intérêt de propriété dans les
marques et noms des autres.
Novembre 2009
La reproducción de dichos materiales sin permiso por
escrito de Dell Inc. queda terminantemente prohibida.
© 2009 Dell Inc. Todos los derechos reservados.
La reproducción de dichos materiales sin permiso por
escrito de Dell Inc. queda terminantemente prohibida.
Dell et le logo DELL sont des marques déposées de
Dell Inc.
Dell renonce à tout intérêt de propriété dans les
marques et noms des autres.
Noviembre 2009
Информация, содержащаяся в настоящем документе,
подлежит изменению без предварительного уведомления.
©
2009 Dell Inc. Все права защищены.
Воспроизведение данных материалов в любом виде без
письменного согласия компании Dell Inc. запрещено.
Dell и логотип Dell являются товарными знаками компании
Dell Inc. Компания Dell не претендует на право собственности
других товарных знаков.
Ноябрь 2009
As informações neste documento estão sujeitas
a alteração sem aviso.
© 2009 Dell Inc. Todo os direitos reservados.
A reprodução destes materiais em qualquer maneira
sem a permissão escrita da Dell Inc. é estritamente
proibida.
Dell e o logotipo DELL são marcas comerciais da Dell Inc.
A Dell nega qualquer interesse de propriedade em
marcas e nomes de terceiros.
Novembro 2009
Le informazioni di questo documento sono soggette
a cambiamenti senza preavviso.
© 2009 Dell Inc. Tutti i diritti sono riservati..
Qualsiasi tipo di riproduzione di questi materiali, senza
l’autorizzazione scritta della Dell Inc. è severamente proibita.
Dell ed il logo DELL sono marchi di fabbrica registrati
della Dell Inc.
Dell nega ogni interesse di proprietà in marchi e nomi diversi
dal proprio.
Novembre 2009
NOTE: For more information see the User’s
Guide in the Drivers and Documentation
media that shipped with your monitor.
6
7
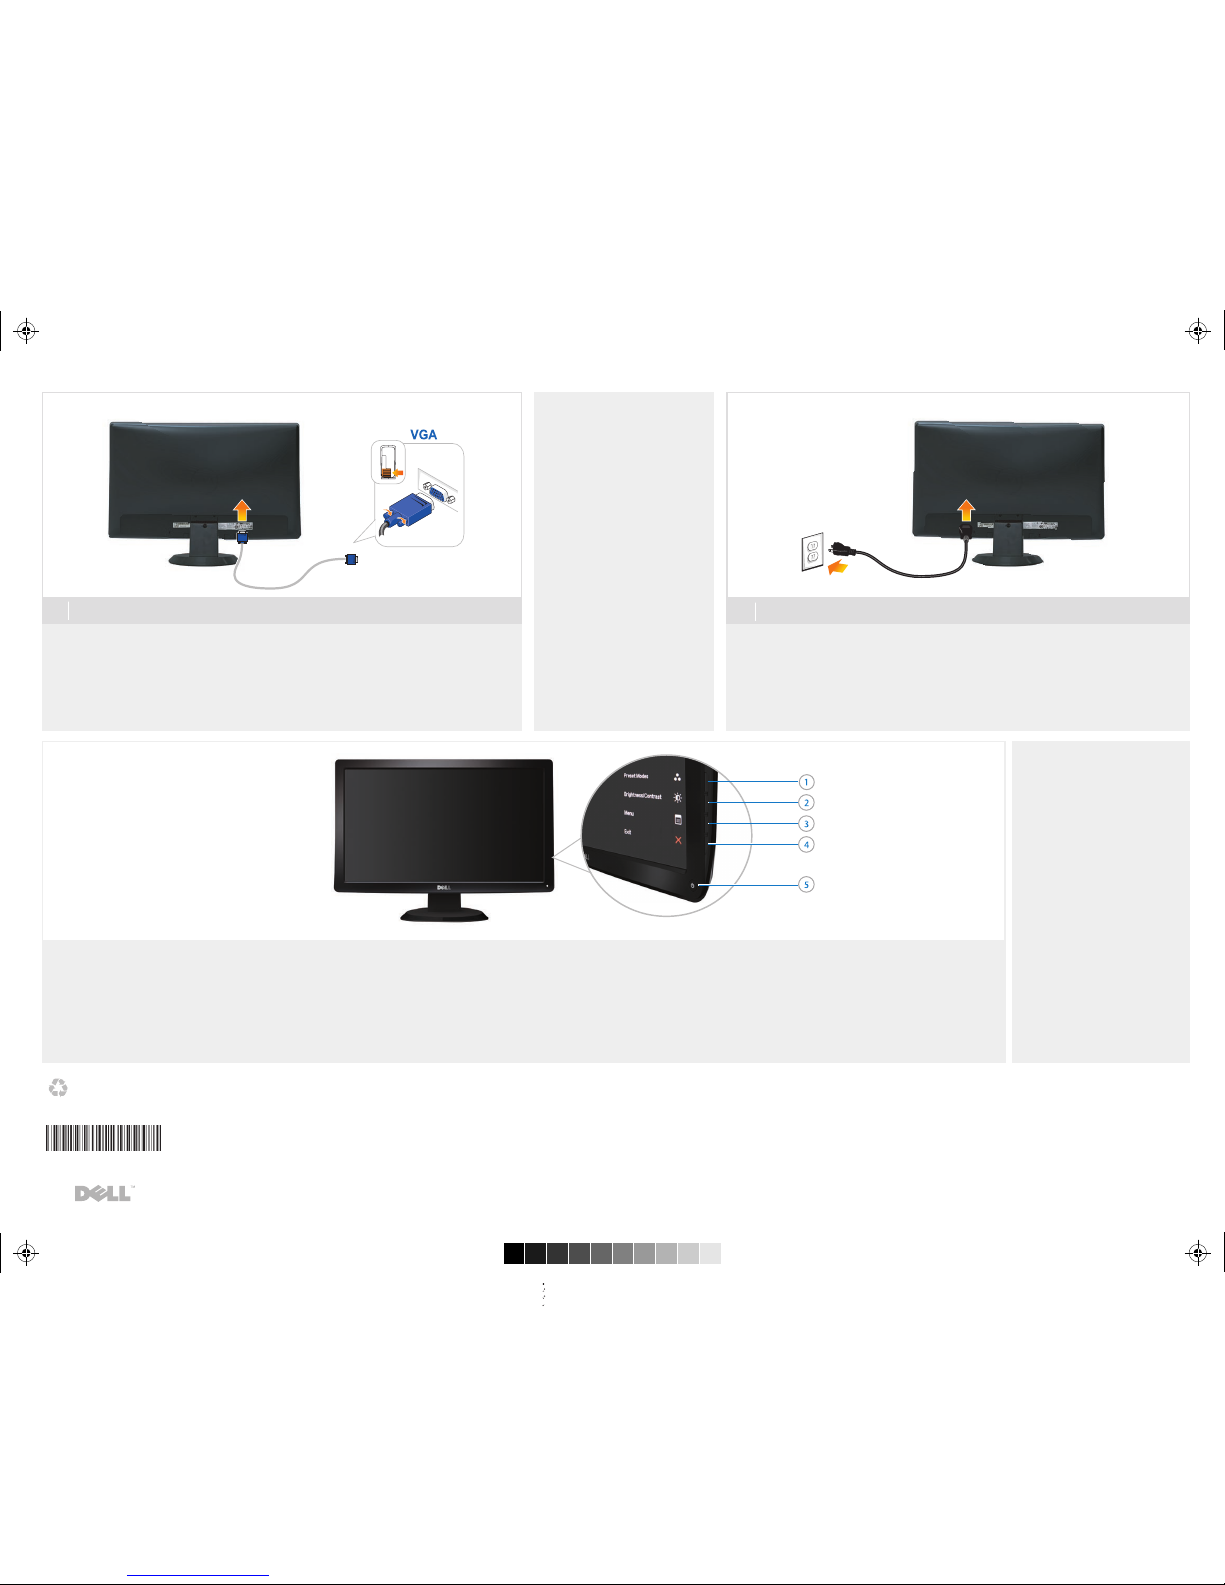
Connect the monitor using the blue VGA cable
Connect the power cable and press the power button
Printed in China.
Printed on recycled paper.
Schließen Sie das Netzkabel an, und drücken Sie den Netzschalter.
Branchez le câble d'alimentation et appuyez sur le bouton d'alimentation
Conecte el cable de alimentación y presione el botón de encendido
Conecte o cabo de energia e pressione o botão de energia
Collegare il cavo d'alimentazione e premere il tasto d’accensione
Подсоедините кабель питания и нажмите кнопку питания
HINWEIS: Weitere Informationen finden Sie
im Benutzerhandbuch im Medium "Treiber
und Dokumentation", das mit Ihrem Monitor
mitgeliefert wird.
REMARQUE : Pour plus d'informations consultez
le Guide Utilisateur sur le support Pilotes et
documentation livré avec votre moniteur.
NOTA: para más información, consulte el
Manual del usuario en el medio de Documentación
y controladores que incluye su monitor.
ПРИМЕЧАНИЕ: Для получения дополнительной
информации см. Руководство пользователя на
диске "Драйверы и документация",
поставляемом с монитором.
OBSERVAÇÃO.: Para mais informações veja
Guia do Usuário na mídia Drivers e
Documentação que é enviada junto ao seu monitor.
NOTA: Per altre informazioni, fare riferimento
alla Guida all’uso, del supporto Drivers and
User Documentation (Driver e Documentazione)
fornito in dotazione al monitor.
1. Modes de préréglage*
2. Luminosité/Contraste*
3. Menu OSD
4. Quitter
5. Alimentation
(avec témoin lumineux d'alimentation)
* Il s’agit du réglage par défaut, il peut être changé sur
"Réglage auto" ou "Source d’entrée".
1. Modos predefinidos*
2. Brillo y Contraste *
3. OSD menu
4. Salir
5. Encendido
(con indicador luminoso de encendido)
* Esta es la configuración predeterminada, aunque puede
cambiarse a "Ajuste automático" o "Fuente de entrada".
1. Modos pré-definidos *
2. Brilho e Contraste*
3. Menu OSD
4. Saída
5. Liga/desliga
(com luz indicadora de funcionamento)
* Este é um ajuste padrão, ele pode ser modificado para
"Auto Ajuste" ou "Inserir Fonte".
1. Modalità predefinite*
2. Luminosità/Contrasto*
3. Menu OSD
4. Esci
5. Tasto d’alimentazione
(con indicatore luminoso)
* Questa è l'impostazione predefinita che può essere
modificata su "Auto Adjust" (Regolazione automatica) o
"Input Source" (Origine d'input)
1. Voreingestellte Modi*
2. Helligkeit / Kontrast*
3. OSD-Menü
4. Verlassen
5. Ein/Aus
(mit Betriebsanzeige)
* Dies ist die Standardeinstellung. Sie kann auf "Autom.
Justieren" oder auf "Eingabequelle" abgeändert werden.
1. Предустановленные режимы*
2. Яркость/Контрастность*
3. Экранное меню
4. Выход
5. Кнопка питания
(с индикатором питания)
* Это настройка по умолчанию, ее можно изменить на
параметр "Автоматическая регулировка" или "Источник входа".
(A) 091014: First release.(由ST2010-BLK的白後殼改為黑後殼)
Verbinden Sie das blaue VGA-Kabel mit Ihrem Computer
Reliez le câble VGA bleu à l'ordinateur
Conecte el cable VGA azul al equipo
Conecte o cabo VGA azul ao computador
Collegare il cavo blu VGAal computer
Подсоедините монитор с помощью синего кабеля VGA
1. Preset Modes *
2. Brightness/Contrast *
3. OSD Menu
4. Exit
5. Power button
(with power light indicator)
*
This is default setting, it can be changed to
“Auto Adjust” or “Input Source”.
NOTE: It is recommended that you connect
the monitor using the HDMI cable
(optional purchase) for better performace.
HINWEIS: Wir empfehlen, dass Sie Ihren
Bildschirm mit dem HDMI-Kabel
(optional Kauf) anschließen,
um bessere Leistung zu erzielen.
REMARQUE: il est recommandé de brancher
votre moniteur en utilisant le câble HDMI
(achat facultatif) pour de meilleures
performances.
NOTA:
Se recomienda conectar el monitor
utilizando el cable HDMI (compra opcional)
para obtener el máximo rendimiento.
OBS.: É recomendado que você conecte o
monitor usando o cabo HDMI (compra opcional)
para um melhor desempenho.
NOTA:
Si raccomanda di collegare il monitor
usando il cavo HDMI (acquisto facoltativo)
per ottenere prestazioni migliori.
ПРИМЕЧАНИЕ: Для обеспечения
эффективной работы монитора рекомендуется
подключать его с помощью кабеля HDMI
(опционная покупка).
語言順序:
West- English, German, French, Spanish, Portuguese Brazil, Italian, Russian.
East- English, 簡中, 繁中, 日文, 韓文, 泰文,Indonesia
ST2010B QSG:
INL P/N: 50650E20Y600R(A) POSTER,QUICK SETUP,WEST, LE20Y6B
DELL P/N: HHM1G PLCMT,STUP,ST2010B,WEST
Date: 2009/11
(DELL P/N: HHM1G Rev.A00)
50650E20Y600R(A)XX
DELL-INL-ST2010B-QSG (WB-A)-091014.pdf 2009/10/14 上午 10:39:24DELL-INL-ST2010B-QSG (WB-A)-091014.pdf 2009/10/14 上午 10:39:24
 Loading...