

Page 1

SRA 7.0
User Guide
| 1
Page 2

Notes, Cautions, and Warnings
NOTE: A NOTE indicates important information that helps you make better use of your system.
CAUTION: A CAUTION indicates potential damage to hardware or loss of data if instructions are
not followed.
WARNING: A WARNING indicates a potential for property damage, personal injury, or death.
2 | SRA 7.0 User Guide
© 2013 Dell Inc.
Trademarks: Dell™, the DELL logo, SonicW ALL™, SonicWALL ViewPoint™, Reassembly-Free
Deep Packet Inspection™, Dynamic Security for the Global Network™, SonicWALL Clean
VPN™, SonicWALL Clean Wireless™, SonicWALL Global Response Intelligent Defense
(GRID) Network™, SonicWALL Mobile Connect™, and all other SonicWALL product and
service names and slogans are trademarks of Dell Inc.
2013 – 4 P/N 232-002179-00 Rev. A
Page 3

Table of Contents
Chapter 1. Using This Guide . . . . . . . . . . . . . . . . . . . . . . . . . . . . . . . . . . . . . . . . . . . . . 7
About this Guide. . . . . . . . . . . . . . . . . . . . . . . . . . . . . . . . . . . . . . . . . . . . . . . . . . . . . . . 7
Organization of this Guide . . . . . . . . . . . . . . . . . . . . . . . . . . . . . . . . . . . . . . . . . . . . . . 7
Guide Conventions. . . . . . . . . . . . . . . . . . . . . . . . . . . . . . . . . . . . . . . . . . . . . . . . . . . . . 8
Current Documentation. . . . . . . . . . . . . . . . . . . . . . . . . . . . . . . . . . . . . . . . . . . . . . . . . 8
Quick Access Work Sheet . . . . . . . . . . . . . . . . . . . . . . . . . . . . . . . . . . . . . . . . . . . . . . 8
Chapter 2. Virtual Office Overview . . . . . . . . . . . . . . . . . . . . . . . . . . . . . . . . . . . . . . . . 9
Virtual Office Overview . . . . . . . . . . . . . . . . . . . . . . . . . . . . . . . . . . . . . . . . . . . . . . . . . 9
Accessing Virtual Office Resources . . . . . . . . . . . . . . . . . . . . . . . . . . . . . . . . . . . 9
Browser Requirements . . . . . . . . . . . . . . . . . . . . . . . . . . . . . . . . . . . . . . . . . . . . . . . . 10
Web Management Interface Overview . . . . . . . . . . . . . . . . . . . . . . . . . . . . . . . . . . . 12
Certificates . . . . . . . . . . . . . . . . . . . . . . . . . . . . . . . . . . . . . . . . . . . . . . . . . . . . . . . 15
Logging Out of the Virtual Office . . . . . . . . . . . . . . . . . . . . . . . . . . . . . . . . . . . . . . . . 15
Chapter 3. Using Virtual Office Features. . . . . . . . . . . . . . . . . . . . . . . . . . . . . . . . . . 17
Importing Certificates. . . . . . . . . . . . . . . . . . . . . . . . . . . . . . . . . . . . . . . . . . . . . . . . . . 17
Using Two-Factor Authentication. . . . . . . . . . . . . . . . . . . . . . . . . . . . . . . . . . . . . . . . 17
User Prerequisites. . . . . . . . . . . . . . . . . . . . . . . . . . . . . . . . . . . . . . . . . . . . . . . . . 18
User Configuration Tasks. . . . . . . . . . . . . . . . . . . . . . . . . . . . . . . . . . . . . . . . . . . 18
Using One-Time Passwords. . . . . . . . . . . . . . . . . . . . . . . . . . . . . . . . . . . . . . . . . . . . 22
User Prerequisites. . . . . . . . . . . . . . . . . . . . . . . . . . . . . . . . . . . . . . . . . . . . . . . . . 22
User Configuration Tasks. . . . . . . . . . . . . . . . . . . . . . . . . . . . . . . . . . . . . . . . . . . 23
Verifying User One-Time Password Configuration. . . . . . . . . . . . . . . . . . . . . . 24
Chapter 4. Using NetExtender . . . . . . . . . . . . . . . . . . . . . . . . . . . . . . . . . . . . . . . . . . 25
User Prerequisites . . . . . . . . . . . . . . . . . . . . . . . . . . . . . . . . . . . . . . . . . . . . . . . . . . . . 25
Prerequisites for MacOS Clients: . . . . . . . . . . . . . . . . . . . . . . . . . . . . . . . . . . . . 25
Prerequisites for Linux Clients: . . . . . . . . . . . . . . . . . . . . . . . . . . . . . . . . . . . . . . 26
Using Mobile Connect . . . . . . . . . . . . . . . . . . . . . . . . . . . . . . . . . . . . . . . . . . . . . . . . . 26
Prerequisites for Apple iOS Clients. . . . . . . . . . . . . . . . . . . . . . . . . . . . . . . . . . . 26
Prerequisites for Android Smartphone Clients . . . . . . . . . . . . . . . . . . . . . . . . . 27
User Configuration Tasks . . . . . . . . . . . . . . . . . . . . . . . . . . . . . . . . . . . . . . . . . . . . . . 27
Table of Contents | 3
Page 4

Installing NetExtender Using the Mozilla Firefox Browser . . . . . . . . . . . . . . . . 28
Installing NetExtender Using the Internet Explorer Browser . . . . . . . . . . . . . . 30
Installing NetExtender Using the Chrome Browser. . . . . . . . . . . . . . . . . . . . . . 32
Launching NetExtender Directly from Your Computer . . . . . . . . . . . . . . . . . . . 33
Configuring NetExtender Properties . . . . . . . . . . . . . . . . . . . . . . . . . . . . . . . . . . 35
Configuring NetExtender Connection Scripts. . . . . . . . . . . . . . . . . . . . . . . . . . . 37
Configuring Batch File Commands . . . . . . . . . . . . . . . . . . . . . . . . . . . . . . . . . . . 38
Configuring Proxy Settings . . . . . . . . . . . . . . . . . . . . . . . . . . . . . . . . . . . . . . . . . . 39
Configuring NetExtender Log Properties . . . . . . . . . . . . . . . . . . . . . . . . . . . . . . 40
Configuring NetExtender Advanced Properties. . . . . . . . . . . . . . . . . . . . . . . . . 41
Configuring NetExtender Packet Capture Properties . . . . . . . . . . . . . . . . . . . . 42
Viewing the NetExtender Log. . . . . . . . . . . . . . . . . . . . . . . . . . . . . . . . . . . . . . . . 43
Disconnecting NetExtender . . . . . . . . . . . . . . . . . . . . . . . . . . . . . . . . . . . . . . . . . 44
Upgrading NetExtender. . . . . . . . . . . . . . . . . . . . . . . . . . . . . . . . . . . . . . . . . . . . . 44
Changing Passwords. . . . . . . . . . . . . . . . . . . . . . . . . . . . . . . . . . . . . . . . . . . . . . . 44
Authentication Methods. . . . . . . . . . . . . . . . . . . . . . . . . . . . . . . . . . . . . . . . . . . . . 45
Uninstalling NetExtender. . . . . . . . . . . . . . . . . . . . . . . . . . . . . . . . . . . . . . . . . . . . 46
Verifying NetExtender Operation from the System Tray . . . . . . . . . . . . . . . . . 46
Using the NetExtender Command Line Interface . . . . . . . . . . . . . . . . . . . . . . . 47
Installing NetExtender on MacOS . . . . . . . . . . . . . . . . . . . . . . . . . . . . . . . . . . . . 48
Using NetExtender on MacOS. . . . . . . . . . . . . . . . . . . . . . . . . . . . . . . . . . . . . . . 50
Installing NetExtender on Linux . . . . . . . . . . . . . . . . . . . . . . . . . . . . . . . . . . . . . . 51
Using NetExtender on Linux. . . . . . . . . . . . . . . . . . . . . . . . . . . . . . . . . . . . . . . . . 53
Installing and Using NetExtender for Windows Mobile. . . . . . . . . . . . . . . . . . . 56
Passwords in NetExtender Mobile. . . . . . . . . . . . . . . . . . . . . . . . . . . . . . . . . . . . 60
Installing NetExtender on Android Smartphones. . . . . . . . . . . . . . . . . . . . . . . . . . . 60
Using NetExtender on Android Smartphones. . . . . . . . . . . . . . . . . . . . . . . . . . . . . . 63
Connecting to NetExtender. . . . . . . . . . . . . . . . . . . . . . . . . . . . . . . . . . . . . . . . . . 64
Exiting or Disconnecting from NetExtender . . . . . . . . . . . . . . . . . . . . . . . . . . . . 68
Checking Status, Routes, and DNS Settings. . . . . . . . . . . . . . . . . . . . . . . . . . . 69
Configuring Profiles, Preferences, and Proxy Servers . . . . . . . . . . . . . . . . . . . 71
Changing Your Password . . . . . . . . . . . . . . . . . . . . . . . . . . . . . . . . . . . . . . . . . . . 75
Related Documents . . . . . . . . . . . . . . . . . . . . . . . . . . . . . . . . . . . . . . . . . . . . . . . . . . . 76
Chapter 5. Using Secure Virtual Assist. . . . . . . . . . . . . . . . . . . . . . . . . . . . . . . . . . . 77
Using Secure Virtual Assist. . . . . . . . . . . . . . . . . . . . . . . . . . . . . . . . . . . . . . . . . . . . . 77
Installing and Launching Secure Virtual Assist . . . . . . . . . . . . . . . . . . . . . . . . . 78
Configuring Secure Virtual Assist Settings. . . . . . . . . . . . . . . . . . . . . . . . . . . . . 79
Selecting a Secure Virtual Assist Mode . . . . . . . . . . . . . . . . . . . . . . . . . . . . . . . 81
Launching a Secure Virtual Assist Technician Session . . . . . . . . . . . . . . . . . . 81
Performing Secure Virtual Assist Technician Tasks . . . . . . . . . . . . . . . . . . . . . 83
Initiating a Secure Virtual Assist Session from the Customer View . . . . . . . . 89
4 | SRA 7.0 User Guide
Page 5

Initiating Secure Virtual Assist on a Linux Client . . . . . . . . . . . . . . . . . . . . . . . . 96
Using Secure Virtual Assist. . . . . . . . . . . . . . . . . . . . . . . . . . . . . . . . . . . . . . . . . . 99
Using Secure Virtual Assist in Unattended Mode . . . . . . . . . . . . . . . . . . . . . . 100
Enabling a System for Secure Virtual Access . . . . . . . . . . . . . . . . . . . . . . . . . 101
Using the Request Assistance Feature. . . . . . . . . . . . . . . . . . . . . . . . . . . . . . . 104
Using Secure Virtual Meeting . . . . . . . . . . . . . . . . . . . . . . . . . . . . . . . . . . . . . . . . . . 104
User Roles. . . . . . . . . . . . . . . . . . . . . . . . . . . . . . . . . . . . . . . . . . . . . . . . . . . . . . . 104
Coordinator Role . . . . . . . . . . . . . . . . . . . . . . . . . . . . . . . . . . . . . . . . . . . . . . . . . 106
Participant Role. . . . . . . . . . . . . . . . . . . . . . . . . . . . . . . . . . . . . . . . . . . . . . . . . . 122
Chapter 6. Using File Shares. . . . . . . . . . . . . . . . . . . . . . . . . . . . . . . . . . . . . . . . . . . 125
Using the File Shares Applet. . . . . . . . . . . . . . . . . . . . . . . . . . . . . . . . . . . . . . . . . . . 125
User Prerequisites . . . . . . . . . . . . . . . . . . . . . . . . . . . . . . . . . . . . . . . . . . . . . . . . 125
Configuration Overview. . . . . . . . . . . . . . . . . . . . . . . . . . . . . . . . . . . . . . . . . . . . 126
Configuration Examples . . . . . . . . . . . . . . . . . . . . . . . . . . . . . . . . . . . . . . . . . . . 131
Using HTML-Based File Shares. . . . . . . . . . . . . . . . . . . . . . . . . . . . . . . . . . . . . . . . 136
Chapter 7. Managing Bookmarks . . . . . . . . . . . . . . . . . . . . . . . . . . . . . . . . . . . . . . . 139
Adding Bookmarks . . . . . . . . . . . . . . . . . . . . . . . . . . . . . . . . . . . . . . . . . . . . . . . . . . . 140
Citrix Bookmarks . . . . . . . . . . . . . . . . . . . . . . . . . . . . . . . . . . . . . . . . . . . . . . . . . 141
RDP ActiveX and Java Bookmarks . . . . . . . . . . . . . . . . . . . . . . . . . . . . . . . . . . 143
Web Bookmarks. . . . . . . . . . . . . . . . . . . . . . . . . . . . . . . . . . . . . . . . . . . . . . . . . . 146
FTP Bookmarks . . . . . . . . . . . . . . . . . . . . . . . . . . . . . . . . . . . . . . . . . . . . . . . . . . 147
SSHv2 Bookmarks. . . . . . . . . . . . . . . . . . . . . . . . . . . . . . . . . . . . . . . . . . . . . . . . 147
Editing Bookmarks . . . . . . . . . . . . . . . . . . . . . . . . . . . . . . . . . . . . . . . . . . . . . . . . . . . 147
Removing Bookmarks . . . . . . . . . . . . . . . . . . . . . . . . . . . . . . . . . . . . . . . . . . . . . . . . 148
Using Bookmarks . . . . . . . . . . . . . . . . . . . . . . . . . . . . . . . . . . . . . . . . . . . . . . . . . . . . 148
Using Remote Desktop Bookmarks. . . . . . . . . . . . . . . . . . . . . . . . . . . . . . . . . . 148
Using VNC Bookmarks . . . . . . . . . . . . . . . . . . . . . . . . . . . . . . . . . . . . . . . . . . . . 151
Using FTP Bookmarks. . . . . . . . . . . . . . . . . . . . . . . . . . . . . . . . . . . . . . . . . . . . . 153
Using Telnet Bookmarks. . . . . . . . . . . . . . . . . . . . . . . . . . . . . . . . . . . . . . . . . . . 156
Using SSHv1 Bookmarks . . . . . . . . . . . . . . . . . . . . . . . . . . . . . . . . . . . . . . . . . . 156
Using SSHv2 Bookmarks . . . . . . . . . . . . . . . . . . . . . . . . . . . . . . . . . . . . . . . . . . 157
Using Web Bookmarks . . . . . . . . . . . . . . . . . . . . . . . . . . . . . . . . . . . . . . . . . . . . 158
Using File Share Bookmarks . . . . . . . . . . . . . . . . . . . . . . . . . . . . . . . . . . . . . . . 158
Using Citrix Bookmarks. . . . . . . . . . . . . . . . . . . . . . . . . . . . . . . . . . . . . . . . . . . . 159
Global Bookmark Single Sign-On Options . . . . . . . . . . . . . . . . . . . . . . . . . . . . 164
Per-Bookmark Single Sign-On Options. . . . . . . . . . . . . . . . . . . . . . . . . . . . . . . 164
Appendix A. Support Information . . . . . . . . . . . . . . . . . . . . . . . . . . . . . . . . . . . . . . . 167
Contact Information . . . . . . . . . . . . . . . . . . . . . . . . . . . . . . . . . . . . . . . . . . . . . . . . . . 167
GNU General Public License (GPL) Source Code . . . . . . . . . . . . . . . . . . . . . . . . 167
Limited Hardware Warranty. . . . . . . . . . . . . . . . . . . . . . . . . . . . . . . . . . . . . . . . . . . . 167
End User Licensing Agreement . . . . . . . . . . . . . . . . . . . . . . . . . . . . . . . . . . . . . . . . 168
Table of Contents | 5
Page 6

6 | SRA 7.0 User Guide
Page 7

About this Guide
Welcome to the Dell SonicWALL SRA User Guide. It provides information on using the Dell
SonicWALL SRA user portal called Virtual Office that allows you to create bookmarks and run
services over the Dell SonicWALL SRA appliance.
Always check http://www.sonicwall.com/us/Support.html for the latest version of this manual as
well as other Dell SonicWALL products and services documentation.
Organization of this Guide
The Dell SonicWALL SRA User Guide organization is structured into the following parts:
Chapter 1 Using this Guide
This chapter provides helpful information for using this guide. It.includes conventions used in
this guide, information on how to obtain additional product information, and a Quick Access
Worksheet that you should complete before using the SRA appliance.
Chapter 1
Using This Guide
Chapter 2 Virtual Office Overview
This chapter provides an overview of new Dell SonicWALL SRA appliance user features,
NetExtender, File Shares, Secure V irtual Assist, Secure Virtual Access, Secure Virtual Meeting,
services, sessions, bookmarks, and service tray menu options.
Chapter 3 Using Virtual Office Features
This chapter provides procedures on importing certificates, using Two-Factor authentication,
and using One-Time Passwords.
Chapter 4 Using NetExtender
This chapter provides procedures on installing, configuring, and using NetExtender.
Chapter 5 Using Virtual Assist
This chapter provides procedures on installing and using Virtual Assist and Virtual Meeting.
Chapter 6 Using File Shares
This chapter provides procedures on using file shares.
Chapter 7 Managing Bookmarks
This chapter provides procedures on configuring bookmarks.
Appendix A Support Information
This appendix provides the Limited Hardware Warranty, End User Licensing Agreement, and
Dell SonicWALL Support contact information.
Using This Guide | 7
Page 8

Guide Conventions
The following conventions used in this guide are as follows:
Convention Use
Bold Highlights dialog box, window, and screen names. Also highlights
buttons. Also used for file names and text or values you are being
instructed to type into the interface.
Italic Indicates the name of a technical manual. Also indicates emphasis
on certain words in a sentence. Sometimes indicates the first
instance of a significant term or concept.
Current Documentation
Check the Dell SonicWALL documentation Web site for the latest versions of all Dell
SonicWALL product documentation at http://www.sonicwall.com/us/Support.html
Quick Access Work Sheet
Use the Quick Access Work Sheet to collect important information that you will need and should
be completed by your network Administrator to allow remote users SSL VPN access.
IP Address:___________________________________________________
User Name:___________________________________________________
Password:___________________________________________________
Domain:_____________________________________________________
8 | SRA 7.0 User Guide
Page 9

This chapter provides an overview of the Dell SonicWALL SSL VPN user portal. It also includes
an introduction to the SRA appliance and its features and applications. This chapter contains
the following sections:
• “Virtual Office Overview” section on page 9
• “Browser Requirements” section on page 10
• “Web Management Interface Overview” section on page 12
Virtual Office Overview
Dell SonicWALL SSL VPN Virtual Of fice provides secure remote access to network resources,
such as applications, files, intranet Web sites, and email through Web access interface such as
Microsoft Outlook Web Access (OWA). The underly ing protocol used for these sessions is SSL.
With SSL VPN, mobile workers, telecommuters, partners, and customers can access
information and applications on your intranet or extranet. What information should be
accessible to the user is determined by access policies configured by the Dell SonicWAL L SSL
VPN Administrator.
Chapter 2
Virtual Office Overview
Accessing Virtual Office Resources
Remote network resources can be accessed in the following ways:
• Using a standard Web browser - To access network resources, you must log into the SSL
VPN portal. Once authenticated, you may access intranet HTTP and HTTPS sites,
offloaded portals, Web-based applications, and Web-based email. In addition, you may
upload and download files using FTP or Windows Network File Sharing. All access is
performed through a standard Web browser and does not require any client applications to
be downloaded to remote users’ machines.
• Using Java thin-client access to corporate desktops and applications – The Dell
SonicWALL SRA security appliance includes several Java or ActiveX thin-client programs
that can be launched from within the Dell SonicWALL SRA security appliance. Terminal
Services and VNC Java clients allow remote users to access corporate servers and
desktops, open files, edit and store data as if they were at the office. Terminal Services
provides the ability to open individual applications and support remote sound and print
services. In addition, users may access Telnet and SSH servers for SSH version 1 (SSHv1)
and SSH version 2 (SSHv2), from the SSL VPN portal.
• Using the NetExtender SSL VPN client – The Dell SonicWALL SSL VPN network
extension client, NetExtender, is available through the SSL VPN V irtual Of fice port al via an
ActiveX control or through stand-alone applications for Windows, Linux, MacOS, Windows
Mobile, and Android smartphone platforms. To connect using the SSL VPN client, log into
the portal, download the installer application and then launch the NetExtender connector to
establish the SSL VPN tunnel. The NetExtender Android client has a different installation
process, described in this guide. Once you have set up the SSL VPN tunnel, you can
access network resources as if you were on the local network.
Virtual Office Overview | 9
Page 10

The NetExtender standalone applications are automatically installed on a client system the
first time you click the NetExtender link in the Virtual Office portal. The standalone client
can be launched directly from users’ computers without requiring them to log in to the SSL
VPN portal first.
• Using the SonicWALL Mobile Connect app – SonicWALL Mobile Connect is an app for
iPhone and iPad that, like NetExtender, uses SSL VPN to enable secure, mobile
connections to private networks protected by Dell SonicWALL security appliances. For
information about installing and using SonicWALL Mobile Connect, see the SonicWALL
Mobile Connect User Guide available on www.sonicwall.com, at:
http://www.sonicwall.com/app/projects/file_downloader/document_lib.php?t=PG&id=482
For SSL VPN to work as described in this guide, the SonicW ALL SRA security appliance must
be installed and configured according to the directions provided in the SonicWALL SRA Getting
Started Guide for your model.
Browser Requirements
The following Web browsers are supported for the SSL VPN Virtual Office portal:
• Internet Explorer 8.0+, 9.0+
• Firefox 16.0+
• Safari 5.0+
• Chrome 22.0+
For Administrator management interface Web browser compatibility, refer to the SonicWALL
SSL VPN Administrator Guide.
10 | SRA 7.0 User Guide
Page 11
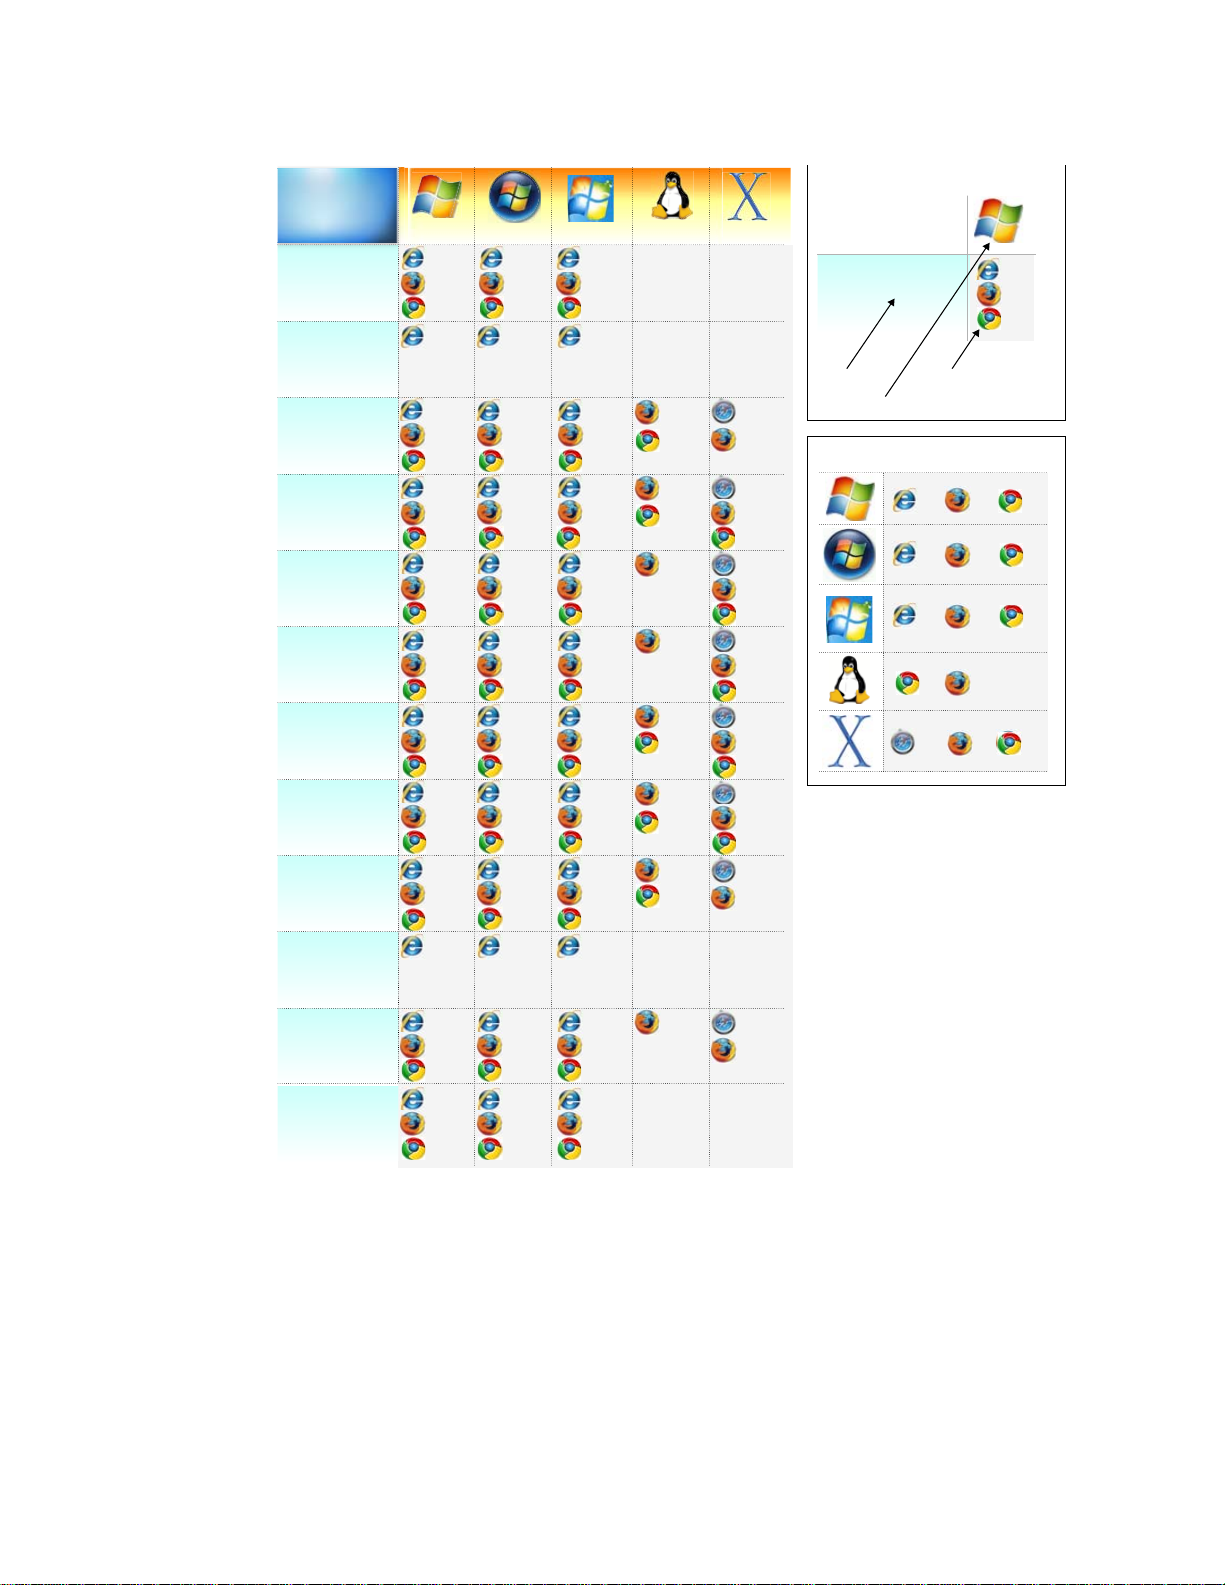
The following table provides specific browser requirements.
plication Proxy
atures and Browser
Requirements
NetExtender
RDP5 (ActiveX)
RDP5 (Java 1.6.0_10+)
VNC (Java 1.6.0_10+)
Telnet (Java 1.6.0_10+)
, SSHv2 ( Java 1.6.0_10+)
, HTTPS, FTP (Browser)
Windows XP Windows Vista Windows 7 Linux MacOS X
browser
independent
(Java 1.6.0_10+)
browser
independent
(Java 1.6.0_10+)
How to read this table:
RDP5 (Java 1.6.0_10)
Feature
OS Platform
Minimum Recommended
Browser
Browser Versions:
8
8
81622
8
5
16
16
16
16
22
22
22
File Sharing (Browser)
haring (Java 1.6.0_10+)
Citrix (ActiveX)
Citrix (Java 1.6.0_10+)
Virtual Assist
(Java not required)
browser
independent
(Java 1.6.0_10+)
browser
1
independent
(Java 1.6.0_10+)
Notes:
1 MacOS and Linux supports Virtual Assist on the clientside only. Technician must be running a supported
version of Windows operating system.
1
To configure SonicOS SSL VPN firmware, an Administrator must use a Web browser with
JavaScript, cookies, and SSL enabled.
Virtual Assist is fully supported on Windows platforms. Virtual Assist is certified to work on
Windows 7, Windows Vista and Windows XP. Limited functionality is supported on Mac OS
where customers can request for assistance via web-requests.
Virtual Office Overview | 11
Page 12
Web Management Interface Overview
From your workstation at your remote location, launch an approved Web browser and browse
to your SRA appliance at the URL provided to you by your network Administrator.
Step 1 Open a Web browser and enter https://192.168.200.1 (the default LAN management IP
address) in the Location or Address field.
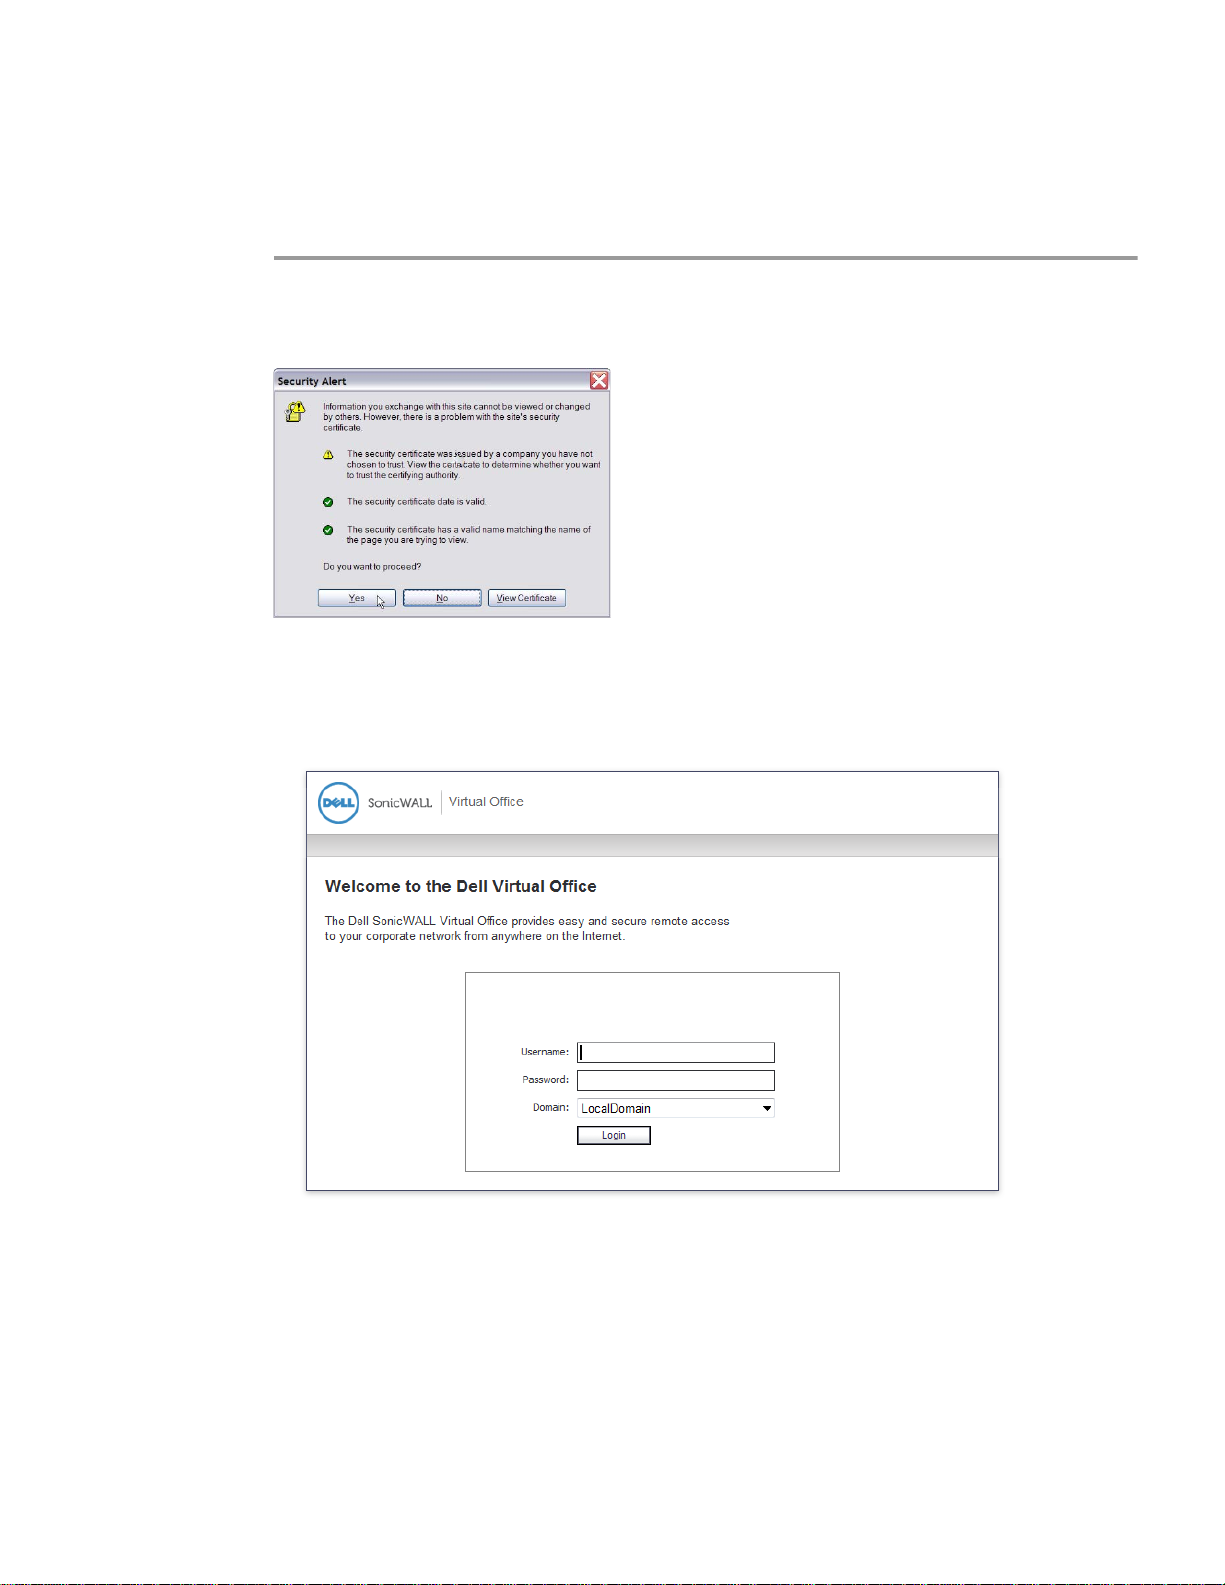
Step 2 A security warning may appear. Click the Yes button to continue.
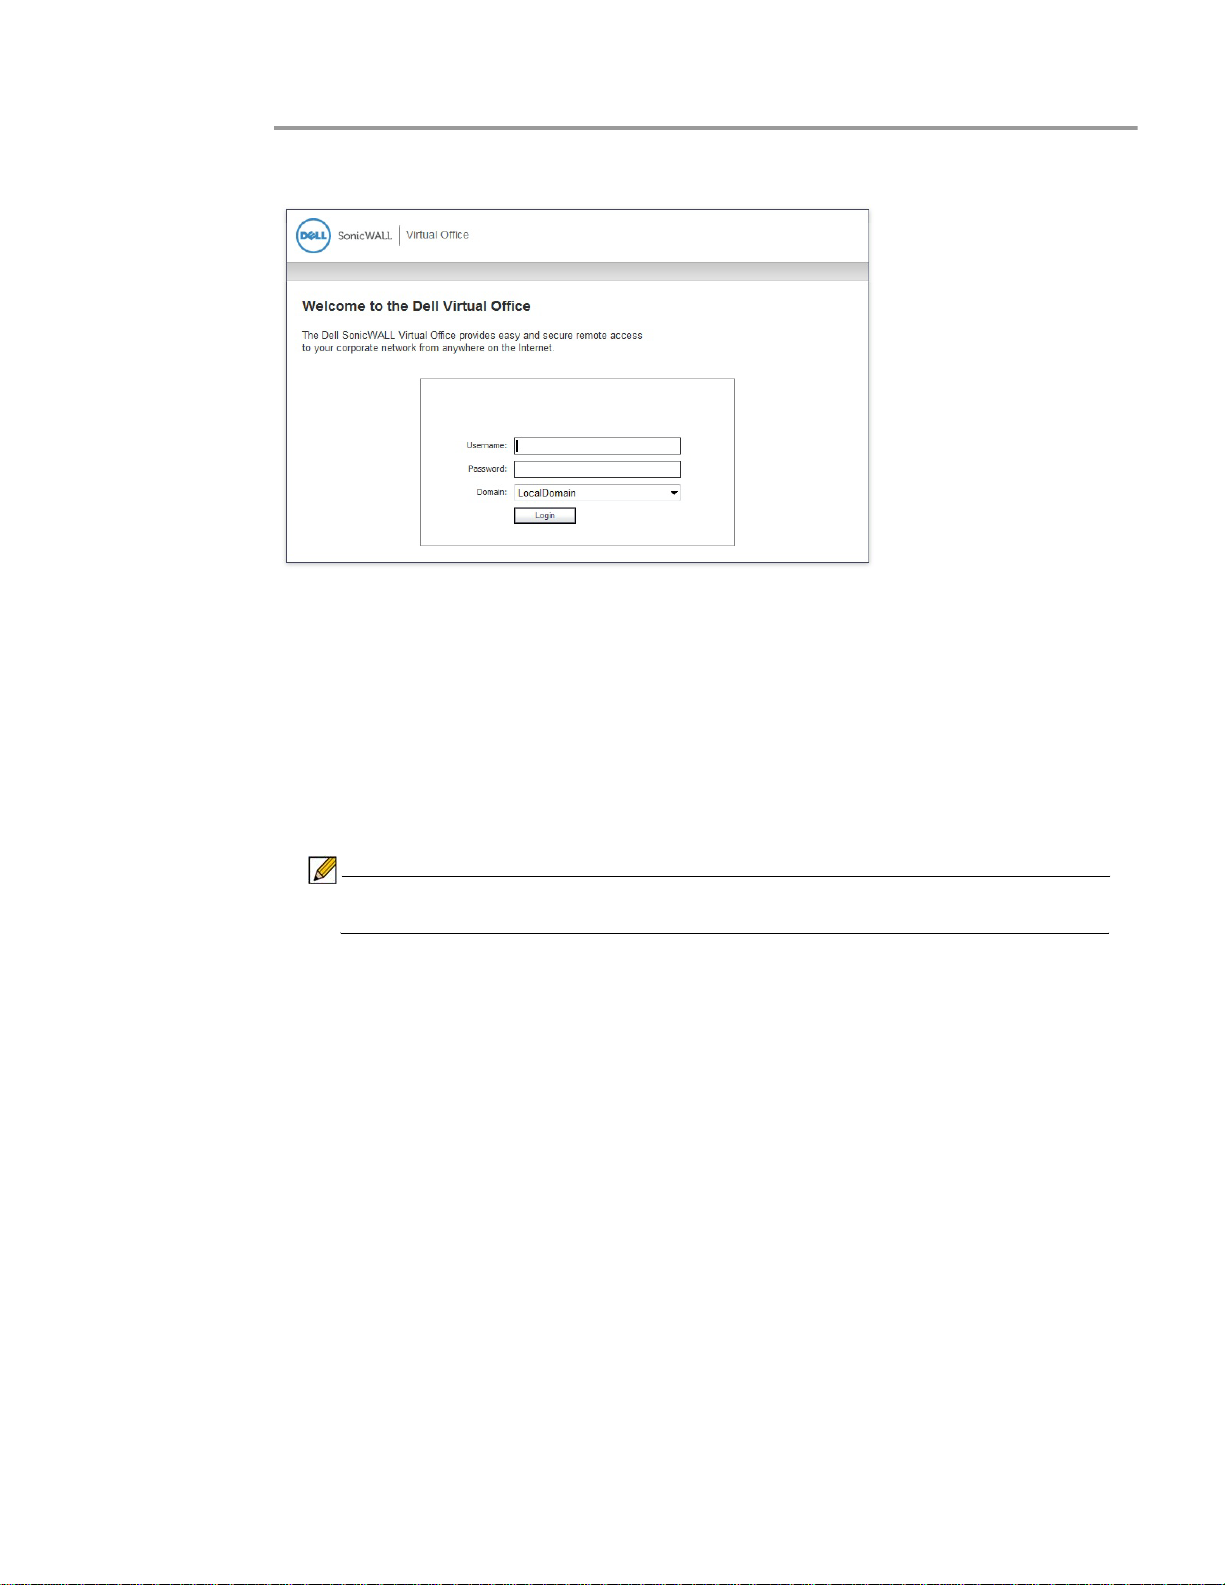
Step 3 The SonicWALL SSL VPN Management Interface displays and prompts you to enter your
user name and password. As a default value, enter admin in the User Name field, password
in the Password field, and select a domain from the Domain drop-down list and click the Login
button. Only LocalDomain allows Administrator privileges. Note that your Administrator may
have set up another login and password for you that has only user privileges.
12 | SRA 7.0 User Guide
The default page displayed is the Virtual Office home page. The default version of this page
shows a SonicWALL logo, although your company’s system Administrator may have
customized this page to contain a logo and look and feel of your company. Go to the Virtual
Office Overview, page 9 to learn more about the Virtual Office home page.
From the Virtual Office portal home page, you cannot navigate to the Administrator’s
environment. If you have Administrator’s privileges and want to enter the Administrator
environment, you need to go back to the login page and enter a username and password that
Page 13
have Administrator privileges, and login again using the LocalDomain domain. Only the
LocalDomain allows Administrator access to the management interface. Also note that the
domain is independent of the privileges set up for the user.
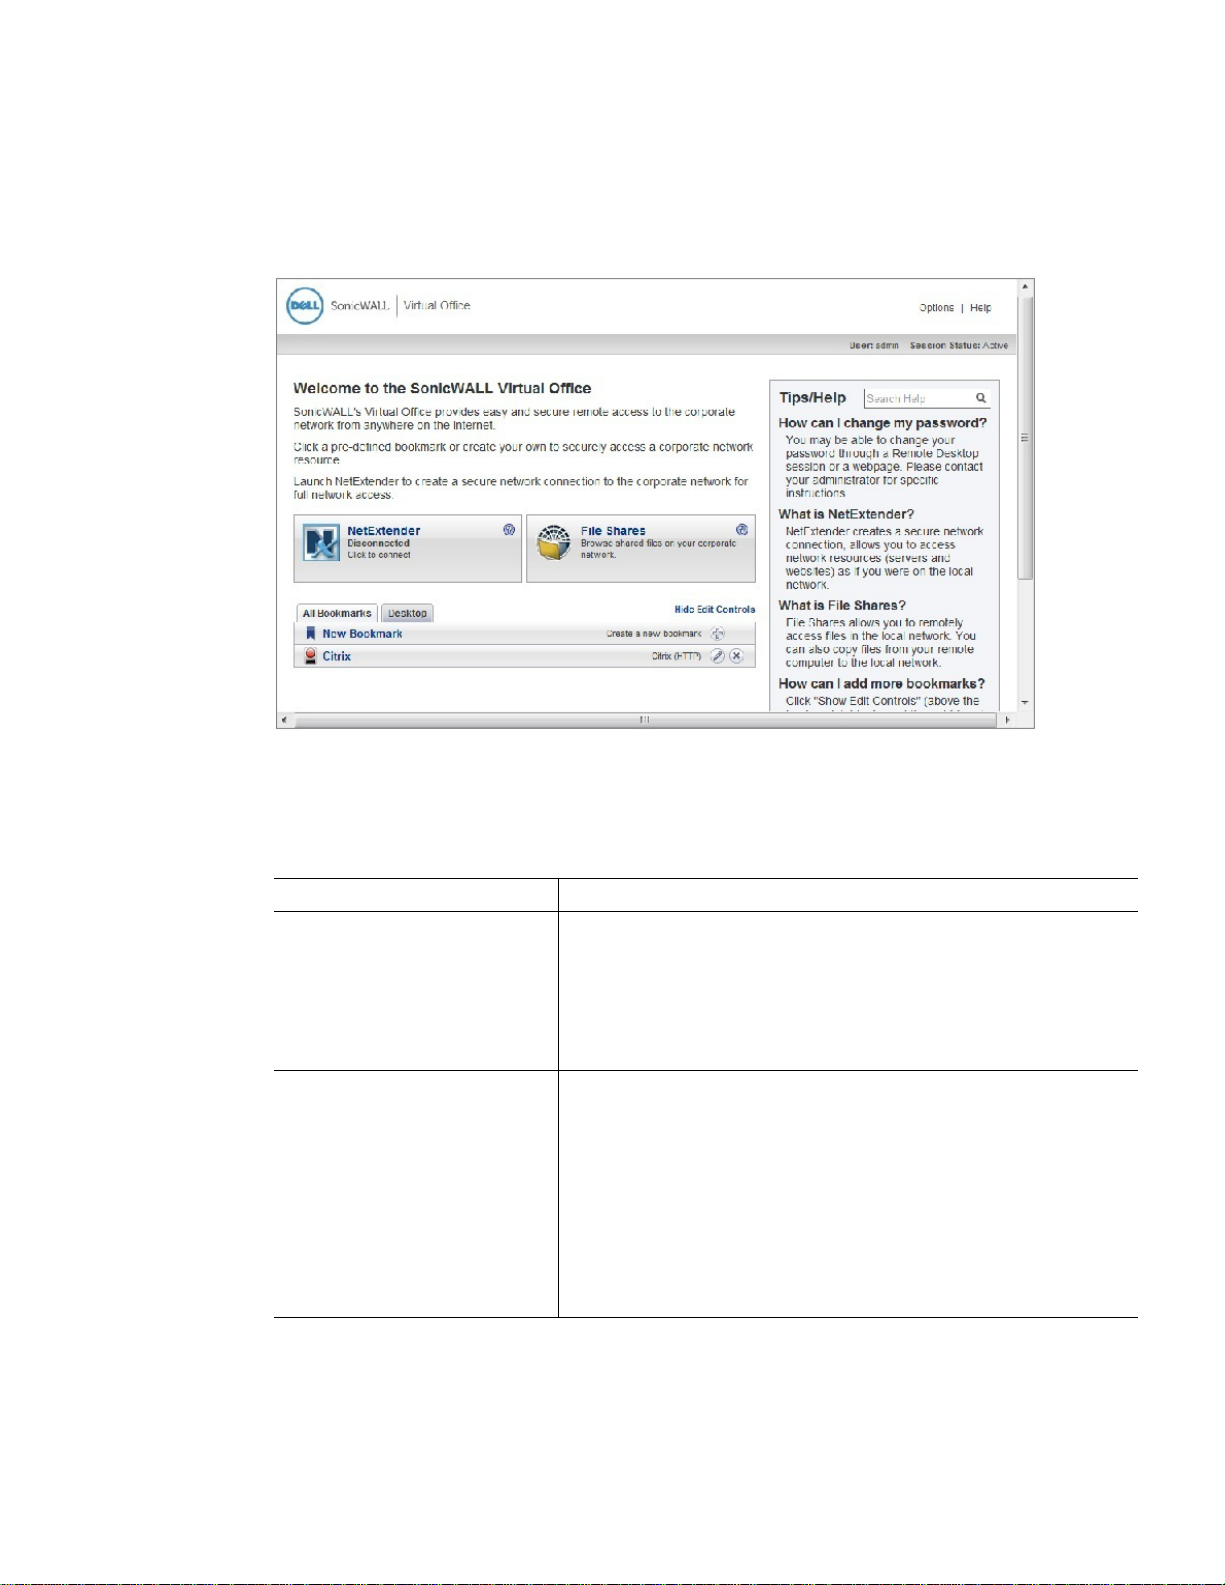
Logging in as a user takes you directly to Virtual Office. The Virtual Of fice Home p age displays
as shown here.
The Virtual Office content will vary based on the configuration of your network Administrator.
Some bookmarks and services described in the SonicWALL SSL VPN User Guide may not be
displayed when you log into the SonicWALL SRA security appliance.
The Virtual Office consists of the nodes described in the following table.
Node Description
File Shares Provides access to the File Shares utility, which gives remote users with
a secure Web interface access to Microsoft File Shares using the CIFS
(Common Internet File System) or SMB (Server Message Block) protocols. Using a Web interface similar in style to Microsoft’s familiar Network Neighborhood or My Network Places, File Shares allow users with
appropriate permissions to browse network shares, rename, delete,
retrieve, and upload files, and to create bookmarks for later recall.
NetExtender Provides access to the NetExtender utility, a transparent SSL VPN cli-
ent for Windows, MacOS, Linux, Windows Mobile, or Android smartphone users that allows you to run any application securely on the
remote network. It acts as an IP-level mechanism provided by the virtual interface that negotiates the ActiveX component (on Windows with
IE), using a Point-to-Point Protocol (PPP) adapter instance. On nonWindows platforms except Android, Java controls are used to automatically install NetExtender from the Virtual Office portal. After installation,
NetExtender automatically launches and connects a virtual adapter for
SSL secure NetExtender point-to-point access to permitted hosts and
subnets on the internal network.
Virtual Office Overview | 13
Page 14

Node Description
Secure Virtual Assist Provides access to Virtual Assist, an easy to use tool that allows Sonic-
WALL SSL VPN users to remotely support customers by taking control
of their computers while the customer observes. Virtual Assist is a lightweight, thin client that installs automatically using Java from the SonicWALL SSL VPN Virtual Office without requiring the installation of any
external software. For computers that do not support Java, Virtual
Assist can be manually installed by downloading an executable file from
the Virtual Office.
Secure Virtual Meeting Provides access to Virtual Meeting, which allows multiple users to view
a desktop and interactively participate in a meeting from virtually anywhere with an Internet connection. Virtual Meeting is similar to the oneto-one desktop sharing provided by Virtual Assist except multiple users
can share a desktop.
Secure Virtual Access (if configured by Administrator
Bookmarks Provides a list of available bookmarks which are objects that enable
Options Provides the option to change user password and use single sign-on, if
Online Help Launches online help for Virtual Office.
Tips/Help Provides a short list of common questions and tips about the Virtual
Logout Logs you out of the Virtual Office environment.
Secure Virtual Access allows Technicians to gain access to systems
outside the LAN of the SRA appliance. After downloading and installing
the thin client for Secure Virtual Access mode, the system will appear
only on that Technician’s Virtual Assist support queue, within the SRA ’s
management interface.
you to connect to a location or application conveniently and quickly.
enabled by the Administrator.
Office.
The Home page provides customized content and links to network resources. The Home Page
may contain support contact information, VPN instructions, company news, or technical
updates.
Only a Web browser is required to access intranet Web sites, File Shares, and FTP sites. VNC,
Telnet and SSHv1 require Java. SSHv2 provides stronger encryption than SSHv1, requires
SUN JRE 1.4 or above and can only connect to servers that support SSHv2. T ermina l Services
requires either Java or ActiveX on the client machine.
As examples of tasks you can perform and environments you can reach through V i rtual Of fice,
you can connect to:
• Intranet Web or HTTPS sites – If your organization supports Web-based email, such as
Outlook Web Access, you can also access Web-based email
• The entire network by launching the NetExtender client
• FTP servers for uploading and downloading files
• The corporate network neighborhood for file sharing
• Telnet and SSH servers
• Desktops and desktop applications using Terminal Services or VNC.
• Email servers via the NetExtender client.
The Administrator determines what resources are available to users from the SonicWALL SSL
VPN Virtual Office. The Administrator can create user, group, and global policies that disable
access to certain machines or applications on the corporate network.
The Administrator may also define bookmarks, or preconfigured links, to Web sites or
computers on the intranet. Additional bookmarks may be defined by the end user.
14 | SRA 7.0 User Guide
Page 15

SonicWALL NetExtender is a software application that enables remote users to securely
connect to the remote network. With NetExtender, remote users can virtually join the remote
network. Users can mount network drives, upload and download files, and access resources in
the same way as if they were on the local network.
Certificates
If the SRA appliance uses a self-signed SSL certificate for HTTPS authentication, then it is
recommended to install the certificate before establishing a NetExtender connection. If you are
unsure whether the certificate is self-signed or generated by a trusted root Certificate Authority ,
SonicWALL recommends that you import the certificate. The easiest way to import the
certificate is to click the Import Certificate button at the bottom of the Virtual Of fice home page.
If the certificate is not issued by an authorized organization, a message is displayed warning
users of the risk. A user can then view detailed information and choose to continue or end the
connection.
Logging Out of the Virtual Office
T o end your session, simply return to the V irtual Office home page from wherever you are within
the portal and click the Logout button.
When using the Virtual Office with the admin username, the Logout button is not displayed.
This is a security measure to ensure that Administrators log out of the administrative interface,
and not the Virtual Office.
Virtual Office Overview | 15
Page 16

16 | SRA 7.0 User Guide
Page 17
This chapter provides details on how to use the features in the Dell SonicWALL SSL VPN user
portal. This chapter contains the following sections:
• “Importing Certificates” section on page 17
• “Using Two-Factor Authentication” section on page 17
• “Using One-Time Passwords” section on page 22
Importing Certificates
If the SSL VPN gateway uses a self-signed SSL certificate for HTTPS authentication, then it is
recommended to install the certificate before establishing a NetExtender connection. If you are
unsure whether the certificate is self-signed or generated by a trusted root Certificate Authority ,
Dell SonicWALL recommends that you import the certificate.
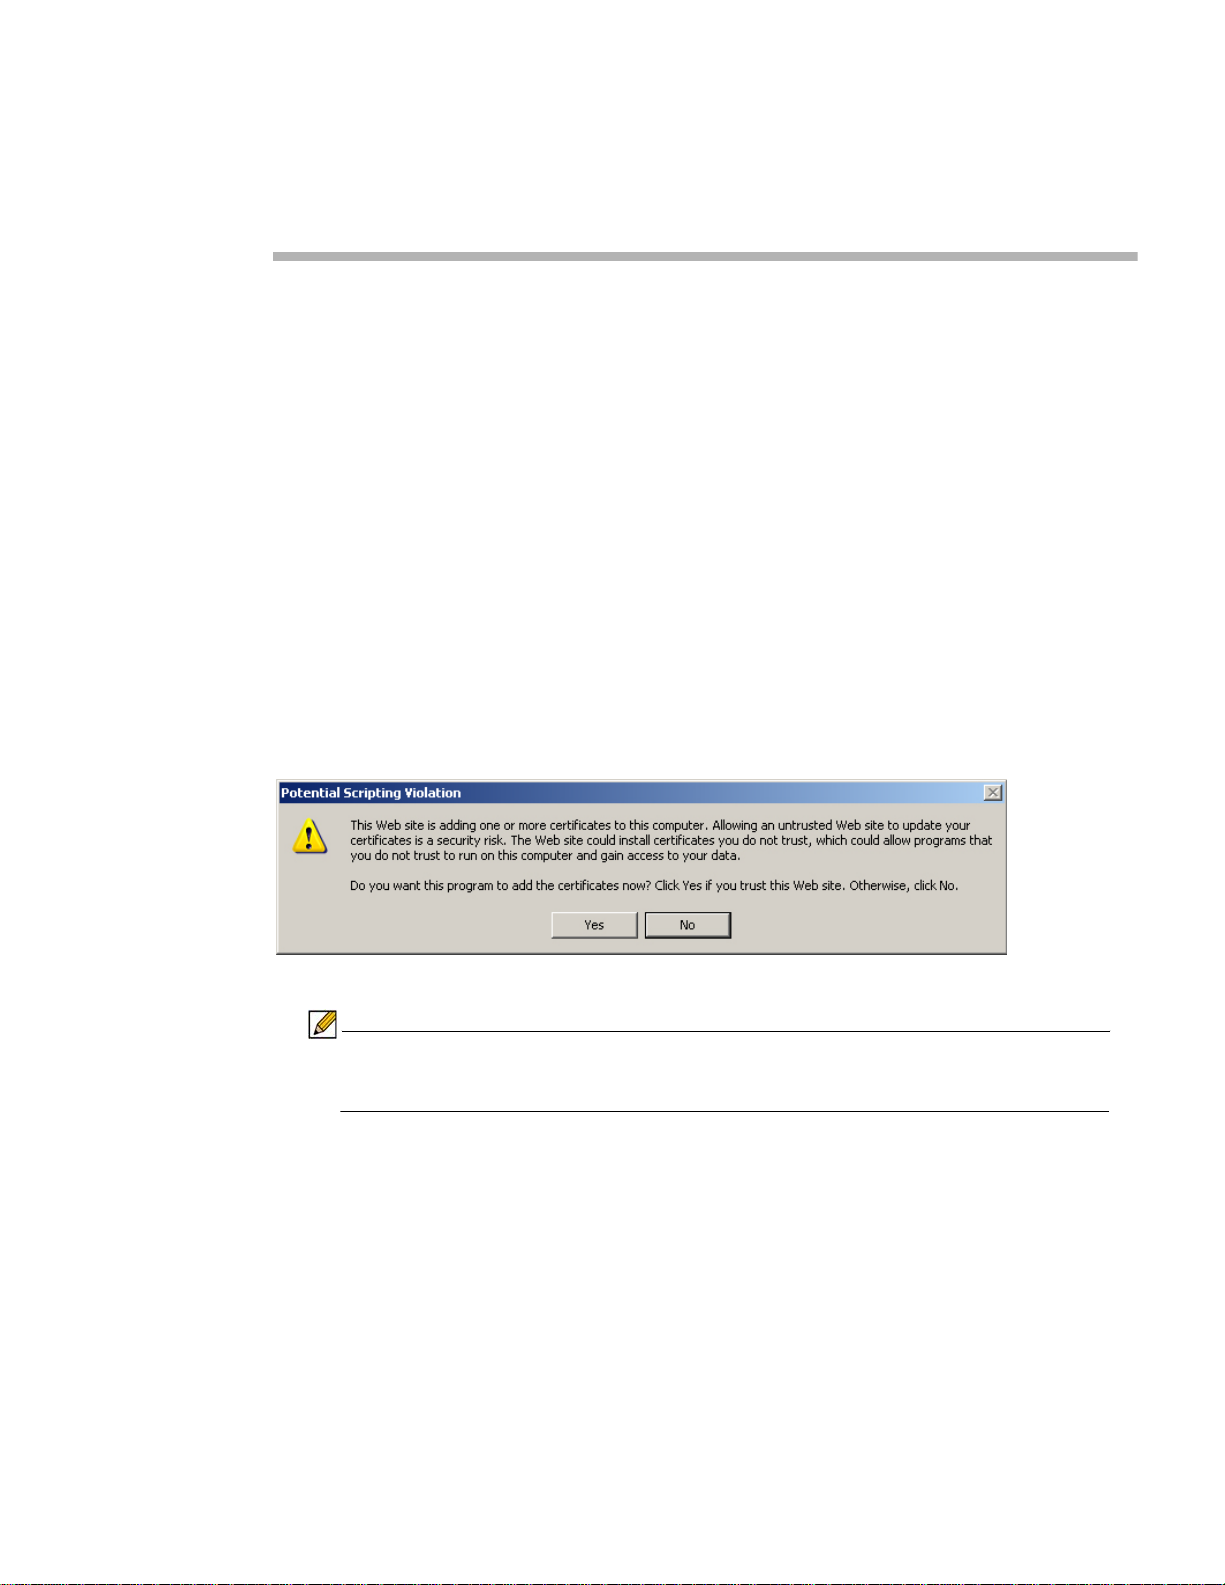
If using Internet Explorer, the easiest way to import the certificate is to click the Import
Certificate button at the bottom of the Virtual Office home page. The following warning
messages may be displayed:
Chapter 3
Using Virtual Office Features
Click Yes. The certificate will be imported.
Note Certificates can only be imported through this method if you are using Internet
Explorer. Certificates for other browsers such as Chrome or Firefox must be
imported manually.
Using Two-Factor Authentication
The following sections describe how to log in to the SSL VPN Virtual Office portal using twofactor authentication:
• “User Prerequisites” on page 18
• “User Configuration Tasks” on page 18
Using Virtual Office Features | 17
Page 18

User Prerequisites
Before you can log in using two-factor authentication, you must meet the following
prerequisites:
• Your Administrator has created your user account.
• You have an account with a two-factor authentication server that conforms to the RFC
standard.
User Configuration Tasks
The following sections describe how users log in to the Dell SonicWALL SRA appliance using
the two types of two-factor authentication:
• “RSA Two-Factor User Authentication Process” on page 18
• “VASCO Two-Factor User Authentication Process” on page 20
• “Other RADIUS Server Two-Factor Authentication Process” on page 21
RSA Two-Factor User Authentication Process
The following sections describe user tasks when using RSA two-factor authentication to log in
to the Dell SonicWALL SSL VPN Virtual Office:
• “Logging into the SSL VPN Virtual Office Using RSA Two-Factor Authentication” on
page 18
• “Creating a New PIN” on page 19
• “Waiting for the Next Token Mode” on page 20
Logging into the SSL VPN Virtual Office Using RSA Two-Factor Authentication
To log in to the Dell SonicWALL SSL VPN Virtual Office using RSA two-factor authentication,
perform the following steps.
18 | SRA 7.0 User Guide
Page 19
Step 1 Enter the IP address of the SRA appliance in your computers browser. The authentication
window is displayed.
Step 2 Enter your username in the Username field.
Step 3 The first time you log in to the Virtual office, your entry in the password field depends on
whether your system requires a PIN:
–
If you already have a PIN, enter the passcode in the Password field. The passcode is
the user PIN and the SecurID token code. For example, if the user’s PIN is 8675 and
the token code is 30966673, then the passcode is 867530966673.
–
If a PIN is required, but you do not yet have a PIN, enter the SecurID token code in the
Password field. You will be prompted to create a PIN.
–
If the RSA server does not require a PIN, simply enter the SecurID token code.
Step 4 Select the appropriate Domain. If manually entering the Domain, it is case-sensitive.
Step 5 Click Login.
Creating a New PIN
Note Consult with your network Administrator to determine if your configuration requires
a PIN.
The RSA Authentication Manager automatically determines when users are required to create
a new PIN. will determines that user associated with a particular token requires a new PIN. The
SRA appliance prompts the user to enter new PIN.
Using Virtual Office Features | 19
Page 20
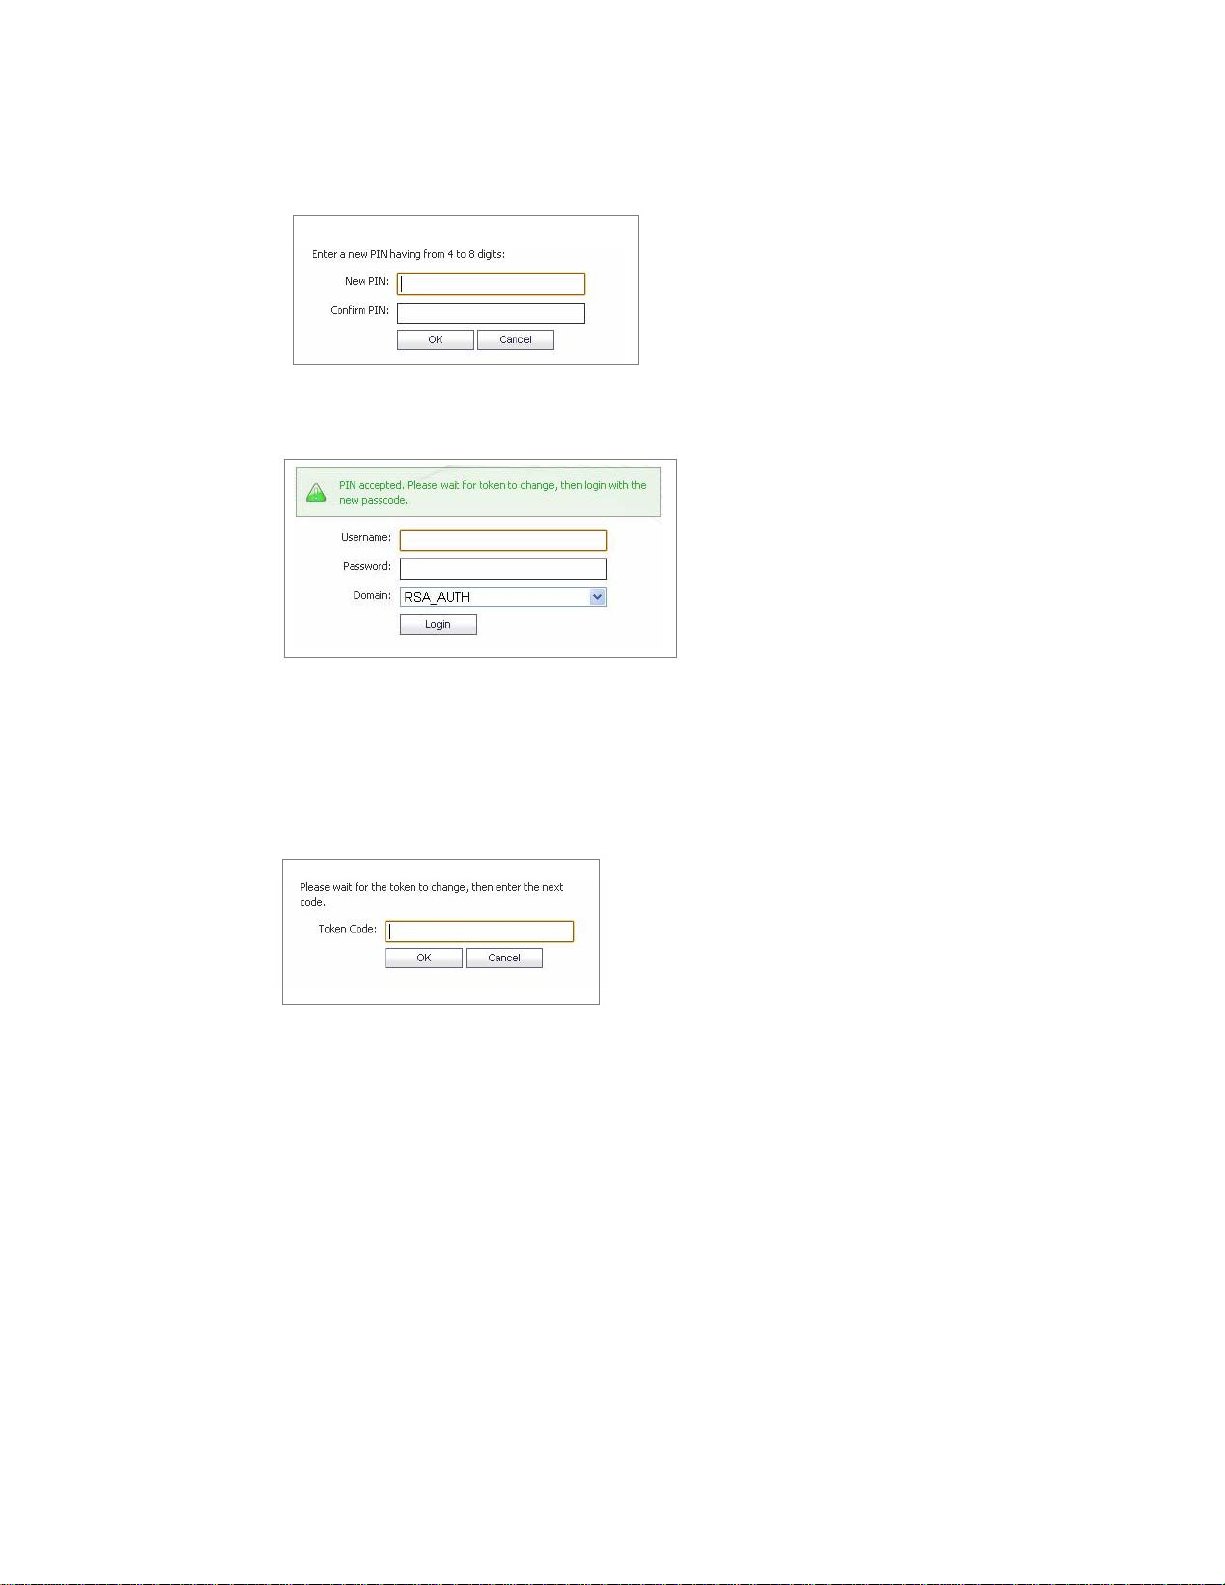
Enter the PIN in the New PIN field and again in the Confirm PIN field and click OK. The PIN
must be between 4 and 8 characters long.
Step 6 The RSA Authentication Manager verifies that the new PIN is an acceptable PIN. If the PIN is
accepted, the user is prompted to log in with the new passcode.
Waiting for the Next Token Mode
If user authentication fails three consecutive times, the RSA server requires the user to
generate and enter a new token. To complete authentication, the user is prompted to wait for
the token to change and enter the next token.
VASCO Two-Factor User Authentication Process
The following sections describe user tasks when using RSA two-factor authentication:
• “Logging into the SSL VPN Virtual Office Using VASCO Two-Factor Authentication” on
page 21
• “Creating a New PIN” on page 19
20 | SRA 7.0 User Guide
Page 21
Logging into the SSL VPN Virtual Office Using VASCO Two-Factor Authentication
T o log in to the Dell SonicW ALL SSL VPN Virtual Of fice using V ASCO two-factor authentication,
perform the following steps:
Step 1 Enter the IP address of the SRA appliance in your computer’s browser. The authentication
window is displayed.
Step 2 Enter your username in the Username field.
Step 3 Enter the passcode in the Password field. Y our entry in the p assword field depends on whether
your system requires a PIN:
–
If you already have a PIN, enter the passcode in the Password field. The passcode is
the user PIN and the VASCO Digipass token code. For example, if the user’s PIN is
8675 and the token code is 30966673, then the passcode is 867530966673.
–
If a PIN is required, but you do not yet have a PIN, enter the VASCO Digipass code in
the Password field. You will be prompted to create a PIN.
–
If the RSA server does not require a PIN, simply enter the VASCO Digipass code.
Note Consult with your network Administrator to determine if your configuration requires
a PIN.
Step 4 Select the appropriate Domain. If manually entering the Domain, it is case-sensitive.
Step 5 Click Login.
Other RADIUS Server Two-Factor Authentication Process
T o log in to the Virtual Of fice using another type of RADIUS server for two-factor authentication,
perform the following steps:
Step 1 Enter the IP address of the SRA appliance in your computers browser. The authentication
window is displayed.
Step 2 Enter your username in the Username field.
Step 3 Enter your password in the Password field.
Step 4 Select the appropriate Domain. If manually entering the Domain, it is case-sensitive.
Step 5 Click Login.
Using Virtual Office Features | 21
Page 22
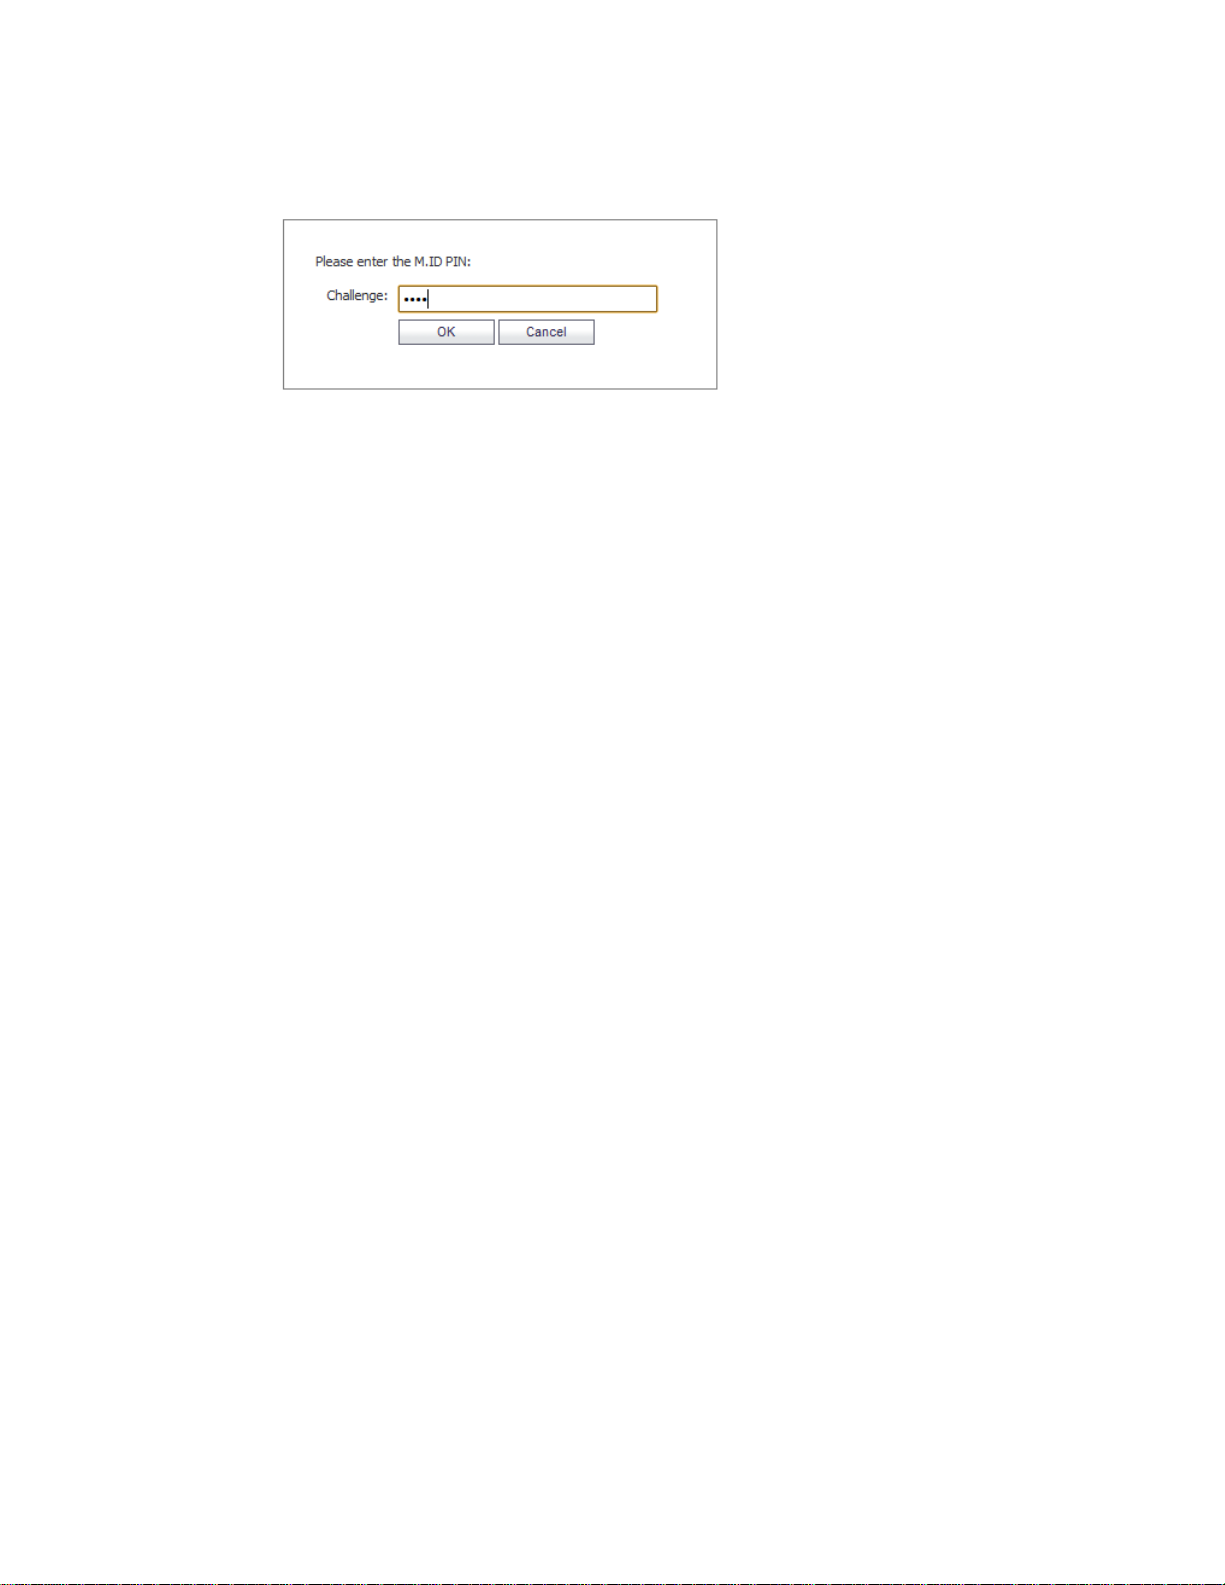
Step 6 Y ou will be prompted to enter additional information, the det ails of which will depend on the type
of RADIUS server used. The example below shows an M.ID RADIUS server, which first prompt s
you to “Please enter the M.ID PIN.” Enter the PIN in the Challenge field and click OK.
Step 7 You will then be prompted to “Please enter the M.ID Passcode.” Enter the passcode received
through email or text message in the Challenge field and click OK.
Using One-Time Passwords
The following sections describe how to use one-time passwords:
• User Prerequisites, page 22
• User Configuration Tasks, page 23
• Verifying User One-Time Password Configuration, page 24
User Prerequisites
Users must have a user account enabled in the SSL VPN management interface. Only users
enabled by the Administrator to use the One-Time Password feature will need to perform the
following configuration tasks. The Administrator must enable a correct email address that is
accessible by the user . Users cannot enable the One-T ime Password feature and they must be
able to access the SSL VPN Virtual Office portal.
22 | SRA 7.0 User Guide
Page 23
User Configuration Tasks
To use the One-Time Password feature, perform the following steps:
Step 1 If you are not logged into the SSL VPN Virtual Office user interface, open a Web browser and
type the Virtual Office interface URL in the Location or Address bar and press Enter. Type in
your user name in the User Name field and your password in the Password field, then select
the appropriate domain from the Domain drop-down menu. Click Login.
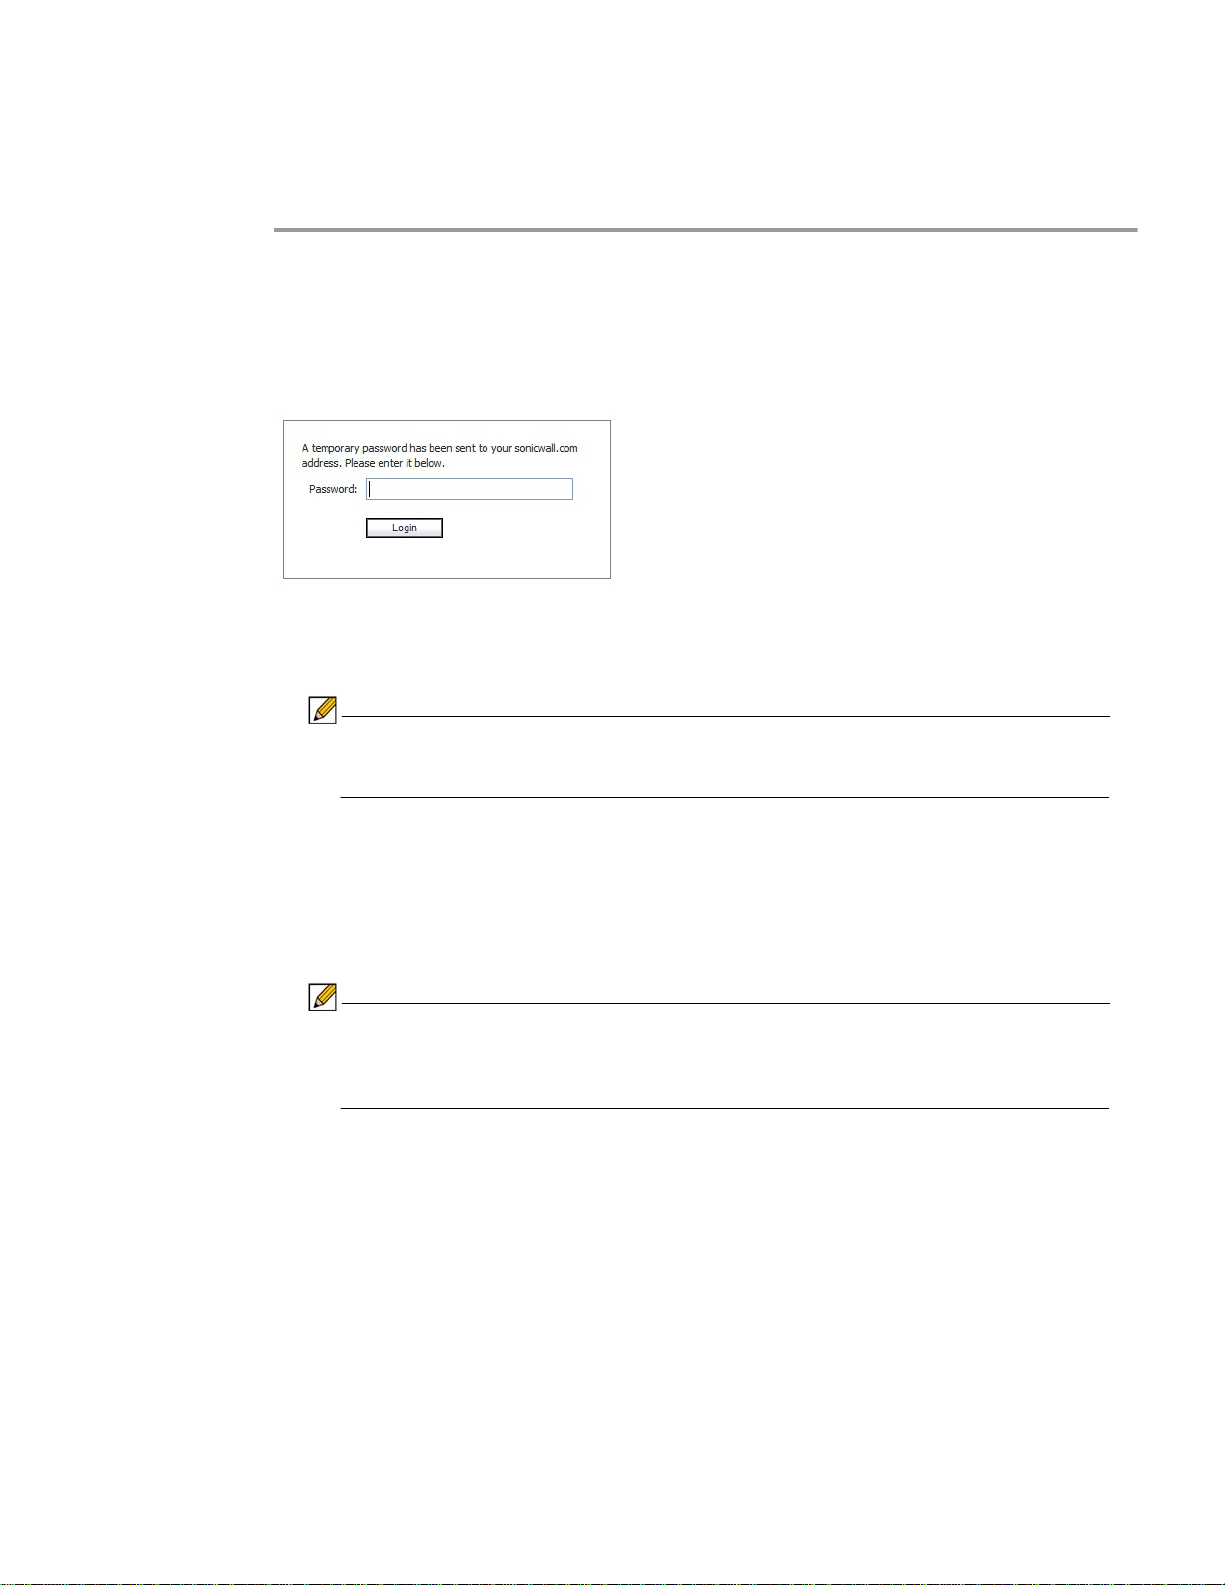
Step 2 The prompt “A temporary password has been sent to user@email.com” will appear, displaying
your pre-configured email account.
Step 3 Login to your email account to retrieve the one-time password.
Step 4 Type or p aste the one-time password into the Password: field where prompted and click Login.
Step 5 You will be logged in to the Virtual Office.
Note One-time passwords are immediately deleted after a successful login, and cannot
be used again. Unused one-time passwords will expire according to each user’s
timeout policy.
Configuring One-Time Passwords for SMS-Capable Phones
One-Time Passwords can be configured to be sent via email directly to SMS-capable phones.
Contact your cell phone service provider for further information about enabling SMS.
Below is a list of SMS email formats for selected major carriers, where 4085551212 represents
a 10-digit telephone number and area code.
Note These SMS email formats are for reference only . These email formats are subject to
change and may vary. You may need additional service or information from your
provider before using SMS. Contact the SMS provider directly to verify these format s
and for further information on SMS services, options, and capabilities.
• Verizon: 4085551212@vtext.com
• Sprint: 4085551212@messaging.sprintpcs.com
• AT&T: 4085551212@mobile.att.net
• Cingular: 4085551212@mobile.mycingular.com
• T-Mobile: 4085551212@tmomail.net
• Nextel: 4085551212@messaging.nextel.com
• Virgin Mobile: 4085551212@vmobl.com
• Qwest: 4085551212@qwestmp.com
For a more complete list, see the Dell SonicWALL SSL VPN Administrator's Guide.
Using Virtual Office Features | 23
Page 24

Verifying User One-Time Password Configuration
If you are successfully logged in to Virtual Office, you have correctly used the One-Time
Password feature.
If you cannot login using the One-Time Password feature, verify the following:
• Are you able to login to the Virtual Office without being prompted to check your email for a
one-time password? You have not been enabled to use the One-Time Password feature.
Contact your SSL VPN Administrator.
• Is your email address correct? If your email address has been entered incorrectly, contact
your SSL VPN Administrator to correct it.
• Is there no email with a one-time password? Wait a few minutes and refresh your email
inbox. Check your spam filter. If there is no email after several minutes, try to login again
to generate a new one-time password.
• Have you accurately typed the one-time password in the correct field? Re-type or copy and
paste the one-time password.
24 | SRA 7.0 User Guide
Page 25
This chapter explains how to configure and use Dell SonicWALL NetExtender and includes the
following sections:
• “User Prerequisites” section on page 25
• “User Configuration Tasks” section on page 27
• “Verifying NetExtender Operation from the System Tray” section on page 46
User Prerequisites
Prerequisites for Windows Clients:
Windows clients must meet the following prerequisites in order to use NetExtender:
• One of the following platforms:
–
Windows 7 Services Pack 1
–
Windows Vista Service Pack 2 (32-bit & 64-bit)
–
Windows XP Home or Professional, Windows XP Service Pack 3
Chapter 4
Using NetExtender
• One of the following browsers:
–
Internet Explorer 8.0 and higher
–
Mozilla Firefox 16.0 and higher
–
Google Chrome 22.0 and higher
• To initially install the NetExtender client, the user must be logged in to the PC with
administrative privileges.
• Downloading and running scripted ActiveX files must be enabled on Internet Explorer.
• If the SSL VPN gateway uses a self-signed SSL certificate for HTTPS authentication, it is
necessary to install the certificate before establishing a NetExtender connection. If you are
unsure if the certificate is self-signed or generated by a trusted root Certificate Authority,
Dell SonicWALL recommends that you import the certificate. The easiest way to import the
certificate is to click the Import Certificate button on the Virtual Office home page.
Note Import Certificate is available from the Virtual Office port al only when using Internet
Explorer on Windows 2000 or Windows XP.
Prerequisites for MacOS Clients:
MacOS clients meet the following prerequisites in order to use NetExtender:
• MacOS 10.5 and higher
• Java 1.5 and higher
• Both PowerPC and Intel Macs are supported.
Using NetExtender | 25
Page 26
Prerequisites for Linux Clients:
Linux 32-bit or 64-bit clients are supported for NetExtender when running one of the following
distributions (32-bit or 64-bit):
• Linux Fedora Core 15 or higher, Ubuntu 11.10 or higher, or OpenSUSE 10.3 or higher
• Java 1.5 and higher is required for using the NetExtender GUI.
The NetExtender client has been known to work on other distributions as well, but these are not
officially supported.
Note Open source Java Virtual Machines (VMs) are not currently supported. If you do not
have Java 1.5 or higher, you can use the command-line interface version of
NetExtender.
Using Mobile Connect
SonicWALL Mobile Connect serves the same function as NetExtender on Apple iOS devices
and Android devices, as listed below.
Prerequisites for Apple iOS Clients
SonicWALL Mobile Connect is supported on Apple iPhone, iPad, and iPod Touch devices
running Apple iOS:
• iPhone 4S – running Apple iOS 5 or higher
• iPhone 4 – running Apple iOS 4.2 or higher
• iPhone 3GS – running Apple iOS 4.2 or higher
• iPhone 3G – running Apple iOS 4.2 or higher
• iPad 3 – running Apple iOS 4.2 or higher
• iPad 2 – running Apple iOS 4.2 or higher
• iPad – running Apple iOS 4.2 or higher
• iPod Touch (2nd Generation or later) – running Apple iOS 4.2 or higher
Mobile Connect acts as a NetExtender client when connecting to the Dell SonicWALL SRA. For
Mobile Connect access to succeed, the portal must be set to allow NetExtender connections
and the user account and group must be authorized to use NetExtender.
SonicWALL Mobile Connect is an app for iPhone and iPad that, like NetExtender, uses SSL
VPN to enable secure, mobile connections to private networks protected by Dell SonicWALL
security appliances. For information about installing and using SonicWALL Mobile Connect,
see the SonicWALL Mobile Connect User Guide at:
http://www.sonicwall.com/app/projects/file_downloader/document_lib.php?t=PG&id=482
Mobile Connect is compatible with SRA and is a free download from iOS and Android (4.0+)
app stores.
26 | SRA 7.0 User Guide
Page 27
Prerequisites for Android Smartphone Clients
The NetExtender Android client is supported on rooted smartphones running the following
versions of the Android operating system:
• 1.6 or higher
The NetExtender Android client is compatible with any Dell SonicWALL SSL VPN firmware
version that supports the NetExtender Linux client, specifically:
• SSL VPN 4.0 and higher
As new features are added, users must install the updated client to access all the features
supported by the new firmware. Likewise, if a new client is used with older firmware, some
client features may not be functional. For best results, the latest firmware should always be
used with the latest client.
Note Only rooted devices are supported for NetExtender Android in Dell SonicWALL
SRA.
The rooting requirement is due to limitations and restrictions of the Android platform.
A layer 3 VPN client like NetExtender requires root permission for certain necessary
OS level operations.
Warning Rooting your phone may void your warranty. Consult your contract or User Guide, or call
your service provider for more information.
Alternatively, the SonicWALL Mobile Connect client can be used for smartphones running
Android version 4.0 or higher.
User Configuration Tasks
Dell SonicWALL NetExtender is a software application that enables remote users to securely
connect to the remote network. With NetExtender, remote users can virtually join the remote
network. Users can mount network drives, upload and download files, and access resources in
the same way as if they were on the local network.
The following sections describe how to use NetExtender on the various supported platforms:
Windows Platform Installation
• “Installing NetExtender Using the Mozilla Firefox Browser” section on page 28
• “Installing NetExtender Using the Internet Explorer Browser” section on page 30
Windows Platform Usage
• “Launching NetExtender Directly from Your Computer” section on page 33
• “Configuring NetExtender Properties” section on page 35
• “Configuring NetExtender Connection Scripts” section on page 37
• “Configuring Proxy Settings” section on page 39
• “Configuring NetExtender Log Properties” section on page 40
• “Disconnecting NetExtender” section on page 44
• “Upgrading NetExtender” section on page 44
• “Authentication Methods” section on page 45
• “Verifying NetExtender Operation from the System Tray” section on page 46
Using NetExtender | 27
Page 28
• “Using the NetExtender Command Line Interface” section on page 47
MacOS Platform
• “Installing NetExtender on MacOS” section on page 48
• “Using NetExtender on MacOS” section on page 50
Linux Platform
• “Installing NetExtender on Linux” section on page 51
• “Using NetExtender on Linux” section on page 53
Windows Mobile Platform
• “Installing and Using NetExtender for Windows Mobile” section on page 56
Android Smartphone Platform
• “Installing NetExtender on Android Smartphones” section on page 60
• “Using NetExtender on Android Smartphones” section on page 63
Installing NetExtender Using the Mozilla Firefox Browser
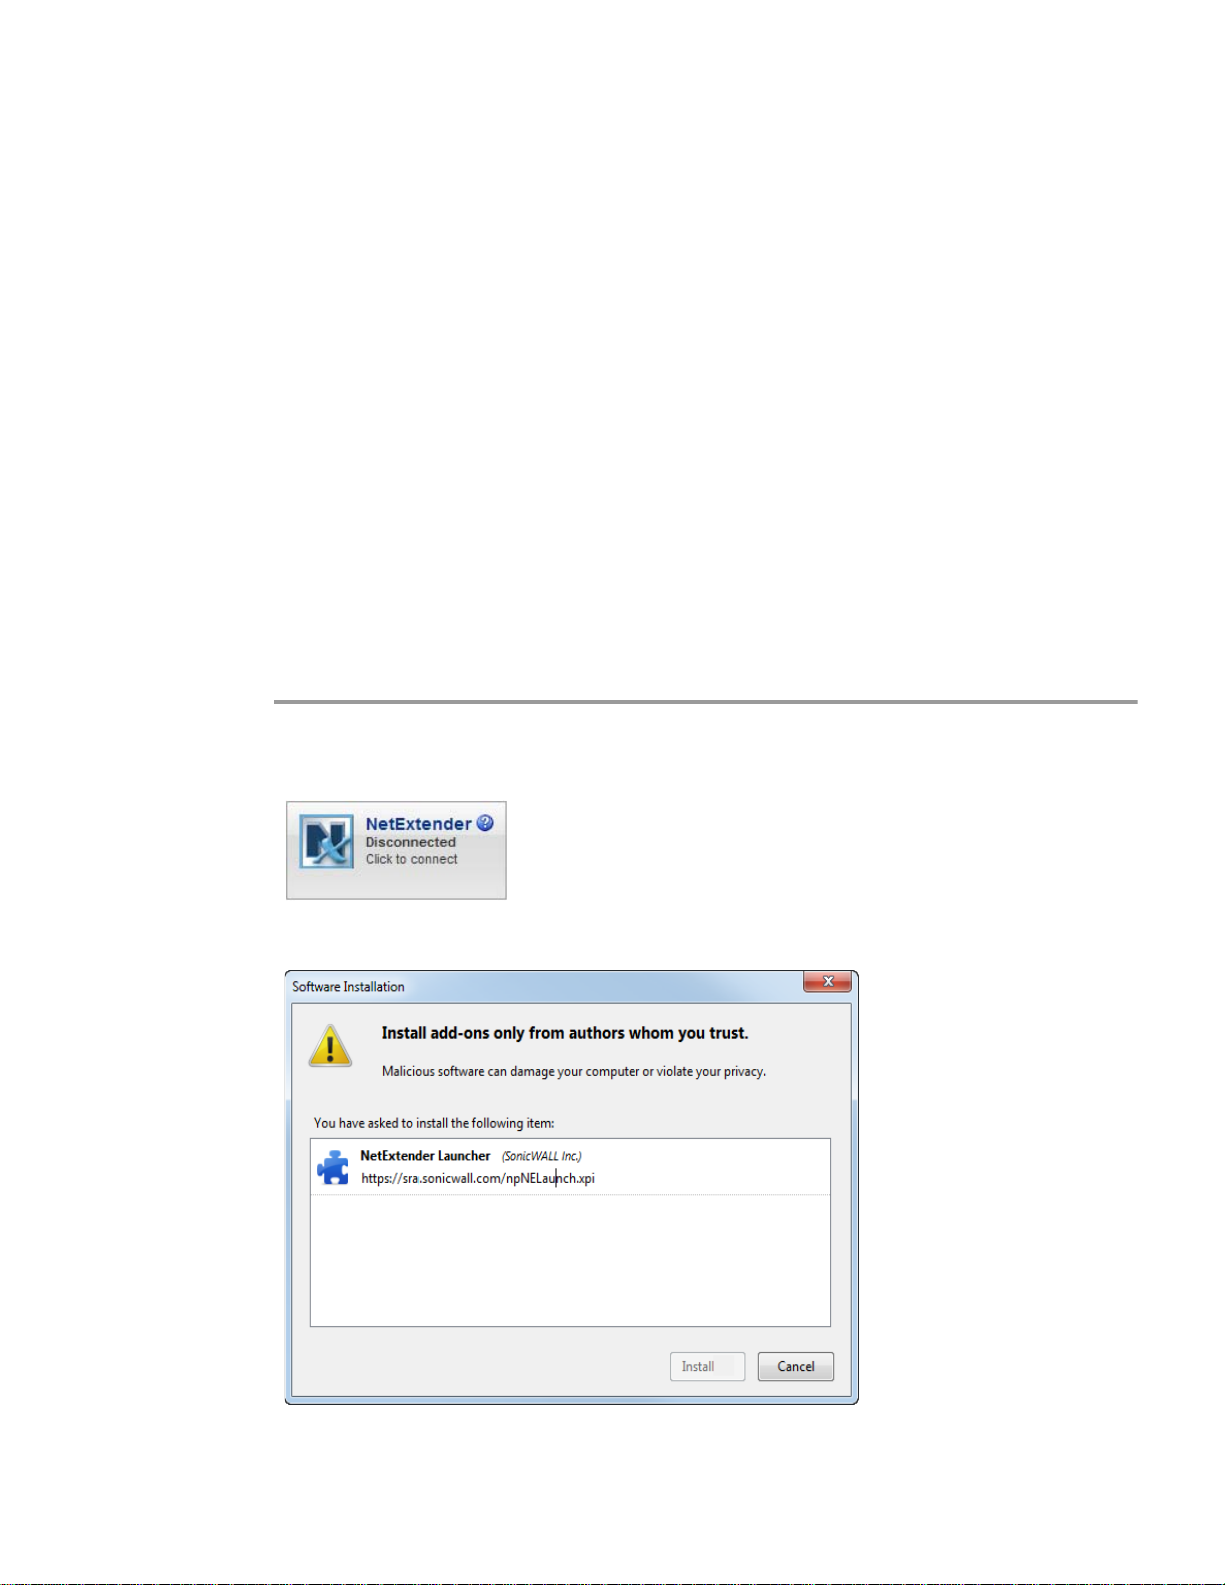
To use NetExtender for the first time using the Firefox browser, perform the following:
Step 1 To launch NetExtender, first log in to the SSL VPN portal.
Step 2 Click the NetExtender button.
Step 3 The first time you launch NetExtender, it will automatically add an add-on to Firefox.
28 | SRA 7.0 User Guide
Page 29
Step 4 Click the Install button. The portal will automatically install the NetExtender stand-alone
application on your computer. If an older version of NetExtender is installed on the computer,
the NetExtender launcher removes the old version and installs the new version.
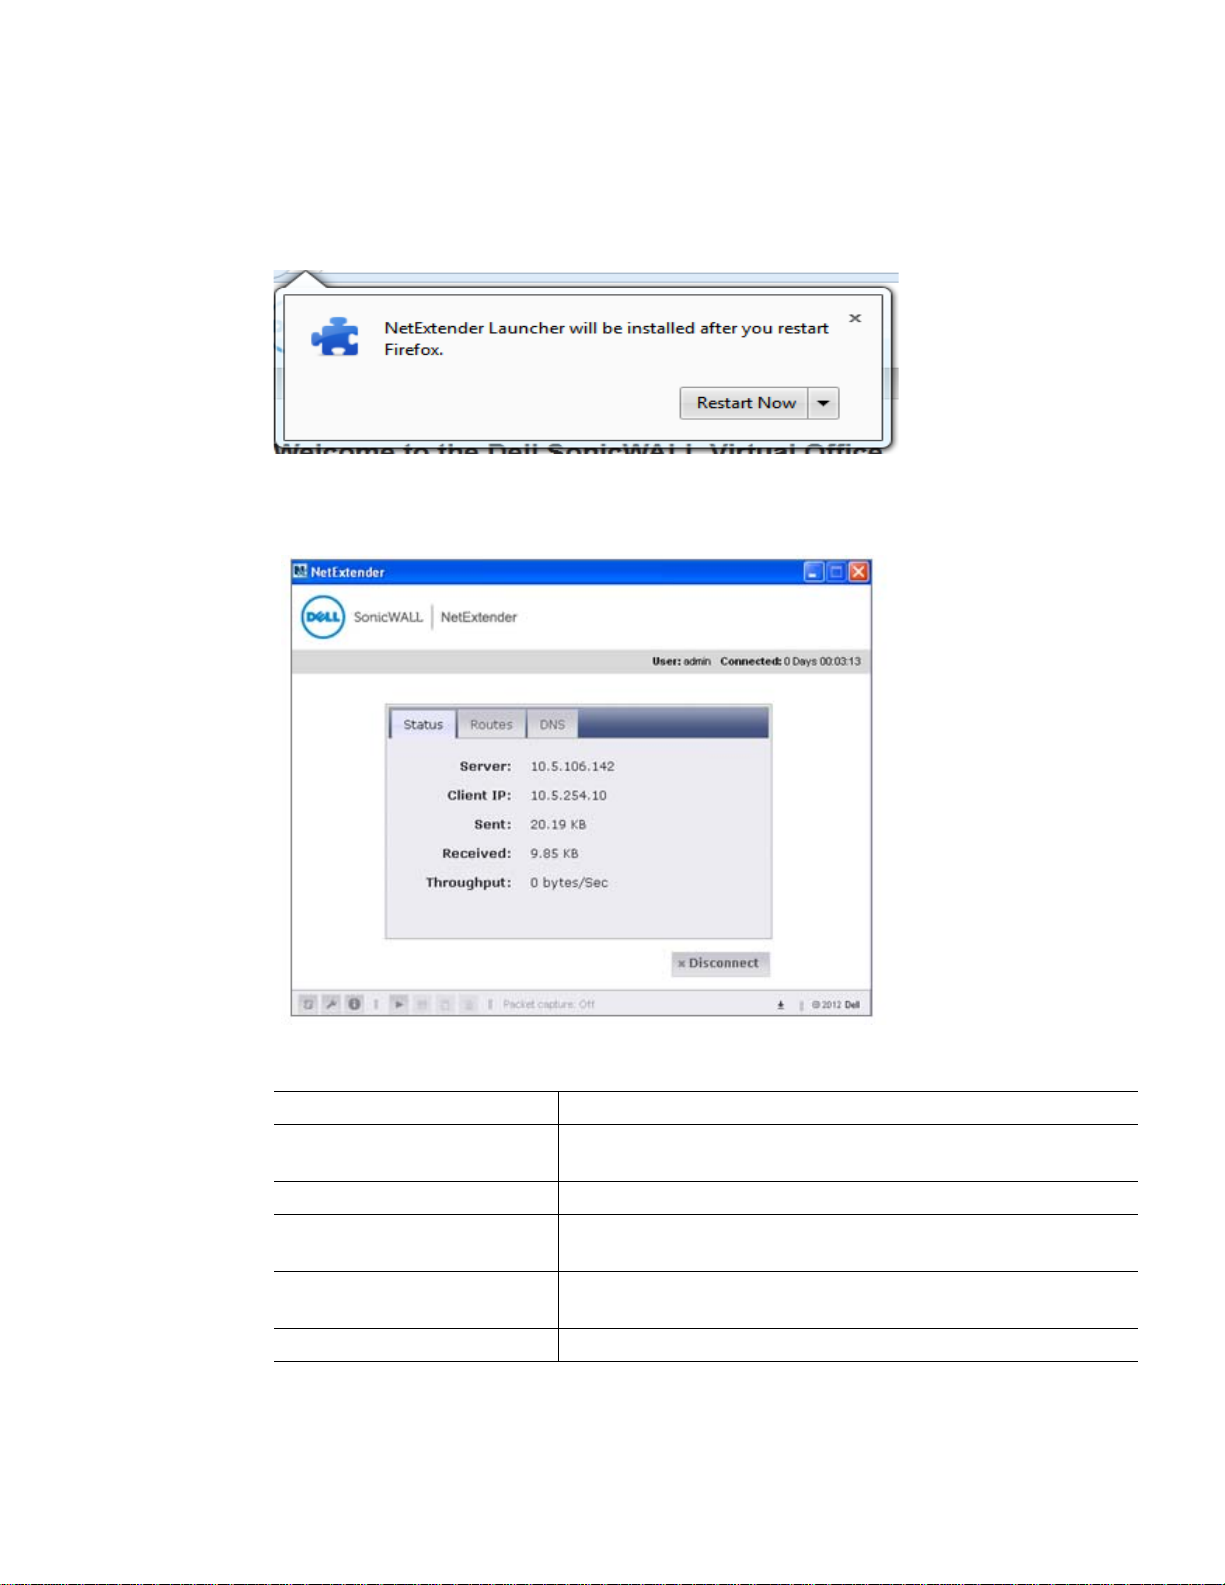
Step 5 Once the NetExtender application is installed, a message appears instructing you to restart
Firefox. Click the Restart Now button.
Step 6 When Firefox restarts, the NetExtender Status window displays, indicating that NetExtender
successfully connected.
The Status tab provides the following information:
Field Description
Server Indicates the name of the server to which the NetExtender
client is connected.
Client IP Indicates the IP address assigned to the NetExtender client.
Sent Indicates the amount of traffic the NetExtender client has
transmitted since initial connection.
Received Indicates the amount of traffic the NetExtender client has
received since initial connection.
Throughput Indicates the current NetExtender throughput rate.
Using NetExtender | 29
Page 30
Closing the window (clicking the x icon in the upper right corner of the window) does not close
the NetExtender session, but minimizes it to the system tray for continued operation. Also, a
balloon icon in the system tray appears, indicating NetExtender has successfully installed.
Step 7 The NetExtender icon is displayed in the task bar.
Installing NetExtender Using the Internet Explorer Browser
Dell SonicWALL SSL VPN NetExtender is fully compatible with Microsof t Windows 7 32-bit and
64-bit, and supports the same functionality as with other Windows operating systems.
NetExtender is also compatible with the Mac OS X Lion 10.7.
Note It may be necessary to restart your computer when installing NetExtender Windows 7.
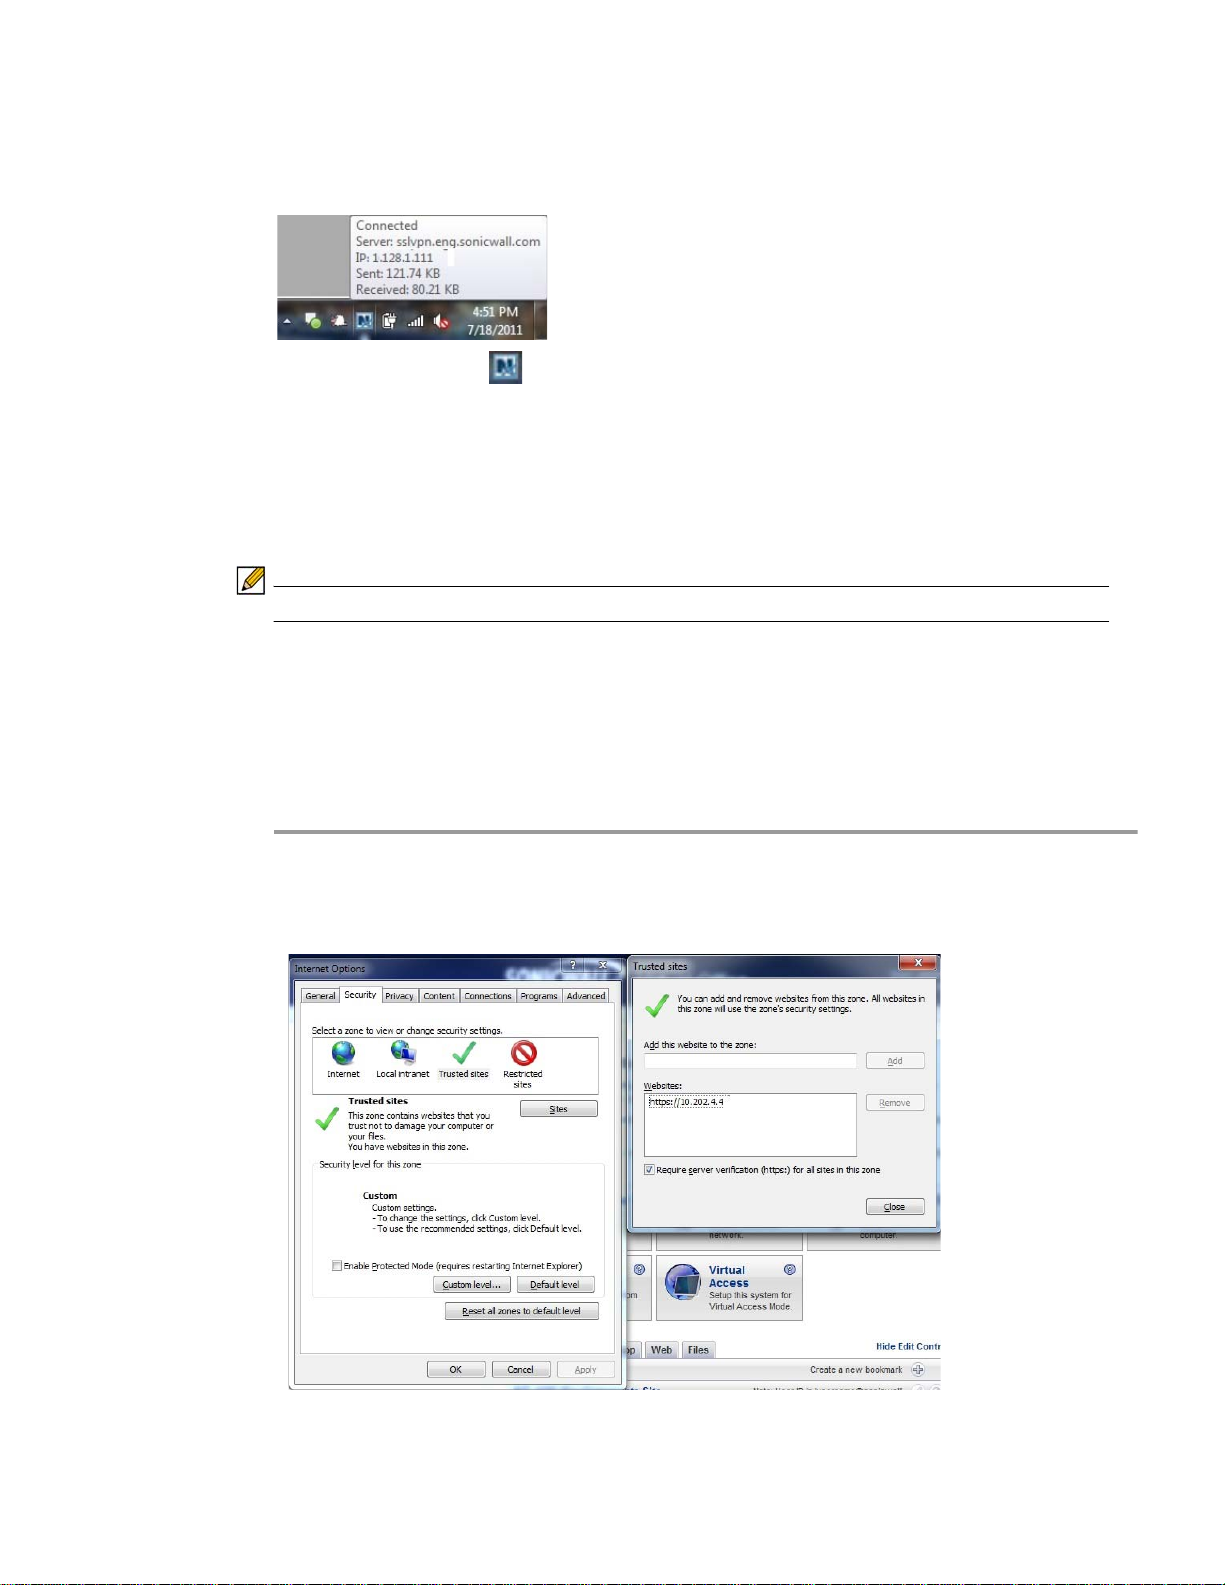
Internet Explorer Prerequisites
It is recommended that you add the URL or domain name of your SSL VPN server to Internet
Explorer’s trusted sites list. This will simplify the process of installing NetExtender and logging
in, by reducing the number of security warnings you will receive. To add a site to Internet
Explorer’s trusted sites list, complete the following procedure:
Step 1 In Internet Explorer, go to Tools > Internet Options.
Step 2 Click the Security tab.
Step 3 Click the Trusted Sites icon and click the Sites... button to open the Trusted sites window.
30 | SRA 7.0 User Guide
Page 31

Step 4 Enter the URL or domain name of your SSL VPN server in the Add this Web site to the zone
field and click Add.
Step 5 Click Ok in the Trusted Sites and Internet Options windows.
Installing NetExtender from Internet Explorer
To install and launch NetExtender for the first time using the Internet Explorer browser, perform
the following:
Step 1 Log in to the SSL VPN Virtual Office portal.
Step 2 Click the NetExtender button.
Step 3 A User Account Control window may appear asking “Do you want to allow this program to make
changes to this computer?” Click Yes.
Step 4 The first time you launch NetExtender, you must first add the SSL VPN portal to your list of
trusted sites. If you have not done so, the follow message will display.
Step 5 For details on how to add the Virtual Office as a trusted site, see the “Internet Explorer
Prerequisites” section on page 30.
Step 6 Return to the SRA portal and click the NetExtender button. The portal automatically installs the
NetExtender stand-alone application on the computer, and the NetExtender installer opens.
Using NetExtender | 31
Page 32

If an older version of NetExtender is installed on the computer, the NetExtender launcher will
remove the old version and then install the new version.
Step 7 When NetExtender completes installing, the NetExtender Status window displays, indicating
that NetExtender successfully connected.
The information provided in the NetExtender Status window is described in the table on
“Installing NetExtender Using the Mozilla Firefox Browser” on page 28.
Installing NetExtender Using the Chrome Browser
To install and launch NetExtender for the first time using the Chrome browser, perform the
following:
Step 1 Log in to the SSL VPN Virtual Office portal.
Step 2 Click the NetExtender button.
Step 3 Pull the NetExtender plug-in to Chrome Extensions.
32 | SRA 7.0 User Guide
Page 33

Step 4 Return to the SSL VPN portal and click the NetExtender button. The portal will automatically
install the NetExtender stand-alone application on your computer. The NetExtender installer
window opens.
If an older version of NetExtender is installed on the computer, the NetExtender launcher will
remove the old version and then install the new version.
Step 5 When NetExtender completes installing, the NetExtender Status window displays, indicating
that NetExtender successfully connected.
The information provided in the NetExtender Status window is described in the table on
“Installing NetExtender Using the Mozilla Firefox Browser” on page 28.
Launching NetExtender Directly from Your Computer
After the first access and installation of NetExtender , you can launch NetExtender directly from
your computer without first navigating to the SSL VPN portal. To launch NetExtender, complete
the following procedure:
Step 1 Navigate to Start > All Programs.
Step 2 Select the Dell SonicWALL Net Extender folder , and then click SonicW ALL NetExtender. The
NetExtender login window is displayed.
Using NetExtender | 33
Page 34

Step 3 The IP address of the last SSL VPN server you connected to is displayed in the SSL VPN
Server field. T o display a list of recent SSL VPN servers you have connected to, click the arrow.
Step 4 Enter your username and password.
Step 5 The last domain you connected to is displayed in the Domain field.
Note The NetExtender client will report an error message if the provided domain is invalid
when you attempt to connect. Please keep in mind that domain names are casesensitive.
Step 6 The drop-down menu at the bottom of the window provides three options for remembering your
username and password:
–
Save user name & password if server allows
–
Save user name only if server allows
–
Always ask for user name & password
Tip Having NetExtender save your user name and password can be a security risk and should
not be enabled if there is a chance that other people could use your computer to access
sensitive information on the network.
34 | SRA 7.0 User Guide
Page 35

Configuring NetExtender Properties
Complete the following procedure to configure NetExtender properties:
Step 1 Right click the icon in the system tray and click Properties... The NetExtender Properties
window is displayed.
Step 2 The Connection Profiles tab displays the SSL VPN connection profiles you have used,
including the IP address of the SSL VPN server, the domain, and the username.
Step 3 To create a shortcut on your desktop that will launch NetExtender with the specified profile,
highlight the profile and click Create Shortcut.
Step 4 To delete a profile, highlight it by clicking on it and then click the Remove buttons. Click the
Remove All buttons to delete all connection profiles.
Step 5 The Settings tab allows you to customize the behavior of NetExtender.
Using NetExtender | 35
Page 36

Step 6 To have NetExtender launch when you log in to your computer, check the Automatically start
NetExtender UI. NetExtender will start, but will only be displayed in the system tray. To have
the NetExtender log-in window display, check the Display NetExtender UI check box.
Step 7 Select Minimize to the tray icon when NetExtender window is closed to have the
NetExtender icon display in the system tray. If this option is not checked, you will only be able
to access the NetExtender UI through Window’s program menu.
Step 8 Select Display Connect/Disconnect Tips from the System T ray to have NetExtender display
tips when you mouse over the NetExtender icon.
Step 9 Select Automatically reconnect when the connection is terminated to have NetExtender
attempt to reconnect when it loses connection.
Step 10 Select Display precise number in connection status to display precise byte value
information in the connection status.
Step 11 Select the Enable UI animations check box to enable the sliding animation effects in the UI.
Step 12 Select Uninstall NetExtender automatically to have NetExtender uninstall every time you end
a session.
Step 13 Select Disconnect an active connection to have NetExtender log out of all of your SSL VPN
sessions when you exit a NetExtender session
Step 14 Click Apply.
36 | SRA 7.0 User Guide
Page 37

Configuring NetExtender Connection Scripts
Dell SonicWALL SSL VPN provides users with the ability to run batch file scripts when
NetExtender connects and disconnects. The scripts can be used to map or disconnect network
drives and printers, launch applications, or open files or Web sites. To configure NetExtender
Connection Scripts, perform the following tasks.
Step 1 Right click the icon in the task bar and click Properties... The NetExtender Preferences
window is displayed.
Step 2 Click Connection Scripts.
Step 3 To enable the domain login script, select the Attempt to execute domain logon script check
box. When enabled, NetExtender will attempt to contact the domain controller and execute the
login script. Optionally , you may now also select to Hide the console window . If this check box
is not selected, the DOS console window will remain open while the script runs.
Note Enabling this feature may cause connection delays while remote client’s printers
and drives are mapped. Make sure the domain controller and any machines in the
logon script are accessible via NetExtender routes.
Step 4 To enable the script that runs when NetExtender connects, select the Automatically execute
the batch file “NxConnect.bat” check box. Optionally, you may now also select to Hide the
console window. If this check box is not selected, the DOS console window will remain open
while the script runs.
Step 5 To enable the script that runs when NetExtender disconnects, select the Automatically
execute the batch file “NxDisconnect.bat” check box.
Step 6 Click Apply.
Using NetExtender | 37
Page 38

Configuring Batch File Commands
NetExtender Connection Scripts can support any valid batch file commands. For more
information on batch files, see the following Wikipedia entry: http://en.wikipedia.org/wiki/.bat.
The following tasks provide an introduction to some commonly used batch file commands.
Step 1 To configure the script that runs when NetExtender connects, click the Edit “NxConnect.bat”
button. The NxConnect.bat file is displayed.
Step 2 To configure the script that runs when NetExtender disconnects, click the Edit
“NxDisconnect.bat” button. The NxConnect.bat file is displayed.
Step 3 By default, the NxConnect.bat file contains examples of commands that can be configured, but
no actual commands. Too add commands, scroll to the bottom of the file.
Step 4 To map a network drive, enter a command in the following format:
net use drive-letter\\server\share password /user:Domain\name
For example to if the drive letter is z, the server name is engineering, the share is docs, the
password is 1234, the user’s domain is eng and the username is admin, the command would
be the following:
net use z\\engineering\docs 1234 /user:eng\admin
Step 5
Step 6
Step 7
Step 8
Step 9
Step 10
Step 11
Step 12
To disconnect a network drive, enter a command in the following format:
net use drive-letter: /delete
For example, to disconnect network drive z, enter the following command:
net use z: /delete
To map a network printer, enter a command in the following format:
net use LPT1 \\ServerName\PrinterName /user:Domain\name
For example, if the server name is engineering, the printer name is color-print1, the domain
name is eng, and the username is admin, the command would be the following:
net use LPT1 \\engineering\color-print1 /user:eng\admin
To disconnect a network printer, enter a command in the following format:
net use LPT1 /delete
To launch an application enter a command in the following format:
C:\Path-to-Application\Application.exe
For example, to launch Microsoft Outlook, enter the following command:
C:\Program Files\Microsoft Office\OFFICE11\outlook.exe
To open a Web site in your default browser, enter a command in the following format:
start http://www.website.com
To open a file on your computer, enter a command in the following format:
C:\Path-to-file\myFile.doc
When you have finished editing the scripts, save the file and close it.
38 | SRA 7.0 User Guide
Page 39

Configuring Proxy Settings
Dell SonicWALL SSL VPN supports NetExtender sessions using proxy configurations.
Currently, only HTTPS proxy is supported. When launching NetExtender from the Web portal,
if your browser is already configured for proxy access, NetExtender automatically inherits the
proxy settings.
To manually configure NetExtender proxy settings, perform the following tasks.
Step 1 Right click the icon in the task bar and click Preferences... The NetExtender Preferences
window is displayed.
Step 2 Click Proxy.
Step 3 Select the Enable proxy settings check box.
Step 4 NetExtender provides three options for configuring proxy settings:
–
Automatically detect settings - To use this setting, the proxy server must support
Web Proxy Auto Discovery Protocol (WPAD)), which can push the proxy settings script
to the client automatically.
–
Use automatic configuration script - If you know the location of the proxy settings
script, select this option and enter the URL of the scrip in the Address field.
–
Use proxy server - Select this option to enter the Address and Port of the proxy
server. Optionally, you can enter an IP address or domain in the BypassProxy field to
allow direct connections to those addresses that bypass the proxy server. If required,
enter a User name and Password for the proxy server. If the proxy server requires a
username and password, but you do not specify them in the Properties window, a
NetExtender pop-up window will prompt you to enter them when you first connect.
Step 5 Click the Internet Explorer proxy settings button to open Internet Explorer’s proxy settings.
Using NetExtender | 39
Page 40

Configuring NetExtender Log Properties
Within the NetExtender Properties dialog box, click the Log heading in the menu on the left
panel. The available options provide basic control over the NetExtender Log and Debug Log.
Step 1 To establish the size of the NetExtender Log, select either the Unlimited log file size radio
button or the Set maximum log file size to radio button. If you choose to set a maximum size,
use the adjoining arrows. To clear the NetExtender Log, select the Clear NetExtender Log
button.
Step 2 To Enable the NetExtender Debug Log, select the corresponding check box. To clear the
debug log, select the Clear Debug Log button.
Step 3 Click the Log Viewer... button to view the current NetExtender log.
Step 4 Click Apply.
40 | SRA 7.0 User Guide
Page 41

Configuring NetExtender Advanced Properties
Within the NetExtender Properties dialog box, click the Advanced heading in the menu on the
left panel. The available options allow you to adjust advanced settings on NetExtender network
properties and protocols.
NetExtender allows users to customize the link speed that the NetExtender adapter reports to
the operating system.
Step 1 To select a virtual link speed to report, select either the Report the underlying network speed
to OS radio button, or select the Report a fixed speed radio button and designate a speed.
Note Users can click the Advanced Network Properties button to make adjustments.
However, modifying these settings may impact NetExtender performance and/or
functionality. It is recommended to only make changes here if advised to do so by
Dell SonicWALL support.
Step 2 Users may enable or disable Framing and Caching optimizations using the check box under
NetExtender Protocol Settings. This option is only effective when connecting to a SSL VPN
server running on 3.5 or later firmware.
Using NetExtender | 41
Page 42

Configuring NetExtender Packet Capture Properties
Within the NetExtender Properties dialog box, click the Packet Capture heading in the menu
on the left panel. The available options allow you to enable and disable packet capture and dat a
compression on NetExtender.
Note You must have Administrator privileges to change packet capture settings.
Step 1 To enable packet capture, check the Enable NetExtender packet capture check box.
Step 2 If packet capture is enabled, clear all captured packet data when NetExtender exits by checking
the Clear the capture when NetExtender exits check box. To disable packet capture, uncheck
this check box.
Step 3 If packet capture is enabled, clear all captured packet data when NetExtender exits by checking
the Clear the capture when Ne tExtender exits check box. To retain packet data, uncheck this
check box.
Step 4 To enable data compression of captured packets, check the Enable data compression check
box. To disable data compression the next time NetExtender is connected, uncheck this box. If
packet capture is enabled when NetExtender connects and you want to disable data
compression immediately (instead of waiting until the next time NetExtender is connected),
check the Attempt to disable data compression during packet capture check box.
Step 5 Click Apply to save your changes.
42 | SRA 7.0 User Guide
Page 43

Viewing the NetExtender Log
The NetExtender log displays information on NetExtender session events. The log is a file
named NetExtender.dbg. It is stored in the directory: C:\Program Files\SonicWALL\SSL
VPN\NetExtender. To view the NetExtender log, right click the NetExtender icon in the system
tray, and click View Log, click the Log icon on the main status page.
To view details of a log message, double-click a log entry, or go to View > Log Detail to open
the Log Detail pane.
To save the log, either click the Export icon or go to Log > Export.
To filter the log to display entries from a specific duration of time, go to the Filter menu and
select the cutoff threshold.
To filter the log by type of entry, go to Filter > Level and select one of the level categories. The
available options are Fatal, Error, Warning, and Info, in descending order of severity. The log
displays all entries that match or exceed the severity level. For example, when selecting the
Error level, the log displays all Error and Fatal entries, but not Warning or Info entries.
Using NetExtender | 43
Page 44

To view the Debug Log, either click the Debug Log icon or go to Log > Debug Log.
Note It may take several minutes for the Debug Log to load. During this time, the Log
window will not be accessible, although you can open a new Log window while the
Debug Log is loading.
To clear the log, click Log > Clear Log.
Disconnecting NetExtender
To disconnect NetExtender, perform the following steps:
Step 1 Right click the NetExtender icon in the system tray to display the NetExtender icon menu and
click Disconnect.
Step 2 Wait several seconds. The NetExtender session disconnects.
You can also disconnect by double-clicking on the NetExtender icon to open the NetExtender
window and then clicking the Disconnect button.
When NetExtender becomes disconnected, the NetExtender window displays and gives you
the option to either Reconnect or Close NetExtender.
Upgrading NetExtender
NetExtender automatically notifies users when an updated version of NetExtender is available.
Users are prompted to click OK and NetExtender downloads and installs the update from the
Dell SonicWALL SRA security appliance.
When using releases prior to 2.5, users should periodically launch NetExtender from the Dell
SonicWALL Virtual Office to ensure they have the latest version. Prior to release 2.5, the
standalone NetExtender does not check for updates when it is launched directly from a user’s
computer.
Changing Passwords
Before connecting to the new version of NetExtender, users may be required to reset their
password by suppling their old password, along with providing and re-verifying a new one.
44 | SRA 7.0 User Guide
Page 45

Authentication Methods
NetExtender supports various two factor authentication methods, including one-time password,
RSA, and Vasco. If an Administrator has configured one-time passwords to be required to
connect through NetExtender, you will be asked to provide this information before connecting.
If an Administrator has configured RSA pin-mode authentication to be required to connect
through NetExtender, user s will be asked whether they want to create their own pin, or receive
one that is system-generated.
Once the pin has been accepted, you must wait for the token to change before logging in to
NetExtender with the new passcode.
During authentication, the SSL VPN server may be configured by the Administrator to request
a client certificate. In this case, users must select a client certificate to use when connecting.
Using NetExtender | 45
Page 46

Uninstalling NetExtender
The NetExtender utility is automatically installed on your computer. To remove NetExtender,
click Start > All Programs, click Dell SonicWALL NetExtender, and then click Uninstall.
You can also configure NetExtender to automatically uninstall when your session is
disconnected. To do so, perform the following steps:
Step 1 Right click the NetExtender icon in the system tray and click Properties... The
NetExtender Properties window is displayed.
Step 2 Click the Settings tab.
Step 3 Select Uninstall NetExtender automatically to have NetExtender uninstall every time you end
a session.
Step 4 Click Apply.
Verifying NetExtender Operation from the System Tray
To view options in the NetExtender system tray, right click the NetExtender icon in the system
tray. The following are some tasks you can perform with the system tray.
Displaying Route Information
To display the routes that NetExtender has installed on your system, click the Route
Information option in the system tray menu. The system tray menu displays the default route
and the associated subnet mask.
Displaying Connection Information
You can display connection information by mousing over the NetExtender icon in the system
tray.
46 | SRA 7.0 User Guide
Page 47

Using the NetExtender Command Line Interface
Note The NetExtender command line interface is only available on Windows platforms.
To launch the NetExtender CLI, perform the following tasks:
Step 1 Launch the Windows Command Prompt by going to the Start menu, select Run, enter cmd,
and click OK.
Step 2 Change directory to where NetExtender is installed. To do this, you first must move up to the
root drive by entering the cd .. command. Repeat this command until you are at the root drive.
Then enter cd Program Files\SonicWALL\SSL-VPN\NetExtender.
Note The specific command directory may be different on your computer. Use Windows
Explorer to find the directory path where NetExtender is located.
The following table describes the commands available in the NetExtender CLI and their options.
Table 1 NetExtender CLI Commands
Command Option Description
NECLI addprofile Creates a NetExtender profile
-s server The IP address or hostname of the SSL VPN
server.
-u user-name The username for the account.
-p password The password for the account.
-d domain-name The domain to connect to.
NECLI connect Initiates a NetExtender session.
-s server The IP address or hostname of the SSL VPN
server.
-u user-name The username for the account.
-p password The password for the account.
-d domain-name The domain to connect to.
- clientcertificatethumb
thumb
- clientcertificatename
name
NECLI deleteprofile Deletes a saved NetExtender profile.
-s server The IP address or hostname of the SSL VPN
-u user-name The username for the account.
-d domain-name The domain to connect to.
The SSL Client Certificate thumbprint value.
The SSL Client Certificate name.
server.
NECLI disconnect Disconnects
timeout (Optional) Timeout duration, after which the session
is disconnected.
Using NetExtender | 47
Page 48

Table 1 NetExtender CLI Commands
Command Option Description
NECLI displayprofile Displays all NetExtender profiles.
NECLI queryproxy Checks the connect to the proxy server.
NECLI reconnect Attempts to reconnect to the server.
NECLI showstatus Displays the status of the current NetExtender ses-
NECLI setproxy Configures proxy settings for NetExtender.
NECLI viewlog Displays the NetExtender log.
-s server (Optional) Displays only the profiles that are saved
for the specified server.
-u user-name (Optional) Displays only the profiles that are saved
for the specified user name.
-d domain-name (Optional) Displays only the profiles that are saved
for the specified domain name.
sion.
-t [0 |1 | 2 | 3] There are three options for setting proxy settings:
0 - Disable proxy.
1 - Automatically detects proxy settings. The proxy
server must support Web Proxy Auto Discovery
Protocol (WPAD).
2 - Uses a proxy configuration script.
3 - Manually configure the proxy server.
-s proxy address The address of the proxy script or proxy server.
-o port The port number.
-u user name The user name for the proxy server.
-p password The password name for the proxy server.
-b bypass-proxy Bypasses the previously configured proxy settings.
-save Saves the proxy settings.
Installing NetExtender on MacOS
Dell SonicWALL SSL VPN supports NetExtender on MacOS. To use NetExtender on your
MacOS system, your system must meet the following prerequisites:
• Mac OS 10.6 and higher
• Java 1.5 and higher
• Both PowerPC and Intel Macs are supported.
To install NetExtender on your MacOS system, perform the following tasks:
Step 1 Log in to the Dell SonicWALL Virtual Office.
Step 2 Click the NetExtender button.
48 | SRA 7.0 User Guide
Page 49

Step 3 The Virtual Office displays the status of NetExtender inst allation. A pop-up window may appear,
prompting you to accept a certificate. Click Trust.
Step 4 A second pop-up window may appear, prompting you to accept a certificate. Click Trust.
Step 5 When NetExtender is successfully installed and connected, the NetExtender status window
displays.
Using NetExtender | 49
Page 50

Using NetExtender on MacOS
Step 1 To launch NetExtender, go the Applications folder in the Finder and double-click
NetExtender.app.
Step 2 The first time you connect, you must enter the Dell SonicWALL SSL VPN server name in the
SSL VPN Server field.
Step 3 Enter your username and password.
Step 4 The first time you connect, you must enter the domain name. The domain name is case-
sensitive.
Step 5 Click Connect.
Step 6 You can instruct NetExtender remember your profile server name in the future. In the Save
profile drop-down menu you can select Save name and password (if allowed), Save
username only (if allowed), or Do not save profile.
Step 7 When NetExtender is connected, the NetExtender icon is displayed in the status bar at the top
right of your display. Click the icon to display NetExtender options.
Step 8 To display a summary of your NetExtender session, click Connection Status.
Step 9 To view the routes that NetExtender has installed, select the Routes tab in the main
NetExtender window.
50 | SRA 7.0 User Guide
Page 51

Step 10 To view the NetExtender Log, go to Window > Log.
Step 11 To generate a diagnostic report with detailed information on NetExtender performance, go to
Help > Generate diagnostic report.
Step 12 Click Save to save the diagnostic report using the default nxdiag.txt file name in your
NetExtender directory.
Installing NetExtender on Linux
Dell SonicWALL SSL VPN supports NetExtender on Linux. To use NetExtender on your Linux
system, your system must meet the following prerequisites:
• i386-compatible distribution of Linux
• Linux Fedora Core 15 or higher, Ubuntu 11.10 or higher, or OpenSUSE 10.3 or higher
• Java 1.5 and higher is required for using the NetExtender GUI.
Note Open source Java Virtual Machines (VMs) are not currently supported. If you do not
have Java 1.5, you can use the command-line interface version of NetExtender.
Using NetExtender | 51
Page 52

To install NetExtender on your Linux system, perform the following tasks:
Step 1 Log in to the Dell SonicWALL Virtual Office.
Step 2 Click the NetExtender button. A pop-up window indicates that you have chosen to open a .tgz
file. Click OK to save it to your default download directory.
Note You must be logged in as root to install NetExtender, although many Linux systems
will allow the sudo ./install command to be used if you are not logged in as root.
Step 3 To install NetExtender from the CLI, navigate to the directory where you saved the .tgz file and
enter the tar -zxf NetExtender.tgz command.
Step 4 Enter the cd netExtenderClient/ command.
52 | SRA 7.0 User Guide
Page 53

Step 5 Enter su -C “ ./install” to install NetExtender.
Step 6 Enter your system password.
Step 7 The installer will ask if you want non-root users to be able to run NetExtender . Enter either y for
yes or n for no.
Note To allow non-root users to run NetExtender, the installer will set PPPD to run as root.
This may be considered a security risk.
Using NetExtender on Linux
To use NetExtender on a Linux computer, perform the following tasks:
Step 1 After NetExtender is installed, there are two methods to launch it:
–
Click the NetExtender icon in the Applications menu, under either the Internet or
Network category.
–
Enter the netExtenderGui command.
Using NetExtender | 53
Page 54

Step 2 The first time you connect, you must enter the Dell SonicWALL SSL VPN server name in the
SSL VPN Server field. NetExtender will remember the server name in the future.
Step 3 Enter your username and password.
Step 4 The first time you connect, you must enter the domain name. The domain name is case-
sensitive. NetExtender will remember the domain name in the future.
Step 5 To view the NetExtender routes, select the Routes tab in the main NetExtender window.
54 | SRA 7.0 User Guide
Page 55

Step 6 To view the NetExtender DNS server information, select the DNS tab in the main NetExtender
window.
Step 7 To configure NetExtender Preferences, select NetExtender > Preferences.
Step 8 The following NetExtender settings can be configured:
• Automatically reconnect when the connection is terminated
• Uninstall NetExtender automatically when exiting the application
• DNS server options:
–
Try remote DNS servers first, then try local DNS servers
–
Only use remote DNS servers
–
Only use local DNS servers
Step 9 The Advanced tab of the NetExtender Preferences window provides two additional options:
• MTU - Sets the Maximum Transmission Unit (MTU) size, which is the largest packet size
that a router can forward without needing to fragment the packet.
Using NetExtender | 55
Page 56

• PPP Sync Mode - Specifies synchronous PPP. By default, this option is disabled and
asynchronous PPP is used.
Step 10 To view the NetExtender Log, go to NetExtender > Log.
Step 11 To generate a diagnostic report with detailed information on NetExtender performance, go to
Help > Generate diagnostic report.
Step 12 Click Save to save the diagnostic report using the default nxdiag.txt file name in your
NetExtender directory.
Installing and Using NetExtender for Windows Mobile
Dell SonicWALL SSL VPN now supports NetExtender for the Windows Mobile platform.
NetExtender for Windows Mobile provides the following features:
• One-time passwords
• Two-factor authentication
• HTTP proxy
• Connection profiles
56 | SRA 7.0 User Guide
Page 57

NetExtender supports the following Windows Mobile platforms:
• Windows Mobile 5 PocketPC version
• Windows Mobile 6 Professional/Classic version
Note Windows Mobile 5 Smart Phone version and Windows Mobile 6 Standard version
are not currently supported.
To use NetExtender on your Windows Mobile device, perform the following tasks:
Step 1 Navigate to the URL or IP address for your SSL VPN Virtual Office using the browser in your
Windows Mobile device.
Step 2 Log in with your username and password.
Step 3 Click the NetExtender icon.
Step 4 Follow the on-screen instructions to install NetExtender. When NetExtender is installed, you
may be prompted to restart your device. Click Yes.
Step 5 From your Windows Mobile device, launch NetExtender. The NetExtender login screen
displays.
Step 6 Enter the IP address or domain name for your SSL VPN server in the Server field. The IP
address of the last SSL VPN server you connected to is displayed by default. To display a list
of recent SSL VPN servers you have connected to, click the arrow.
Step 7 Enter your username and password.
Step 8 The last domain you connected to is displayed in the Domain field.
Step 9 The drop-down menu at the bottom of the window provides three options for remembering your
username and password:
–
Save user name & password if server allows
–
Save user name only if server allows
–
Always ask for user name & password
Step 10 Click Connect. When NetExtender successfully connects, the NetExtender Status window
displays. Select the Show NetExtender Routes check box to see routes.
Using NetExtender | 57
Page 58

Step 11 Click the Menu button to see the NetExtender properties menu.
Step 12 Select the Sent & Received menu tab to adjust the metric used for sent and received statistics
on the status window . Select the Throughput menu tab to adjust the throughput measurement
displayed on the status window.
Step 13 To configure NetExtender options, click the Menu button. The following options are displayed:
• Connection Profiles - Displays all of the NetExtender connections that you have used on
this device. T o remove a Connection Profile, highlight the profile, click the Menu button, and
click Remove.
58 | SRA 7.0 User Guide
• System Settings - Provides several configuration options.
Page 59

–
Hide NetExtender when closing window - Hides NetExtender when you click the ok
button.
–
Display precise number in status - Displays the exact numbers of sent and receive
data.
–
Automatically establish the underlying connection - Uses the Windows Mobile
Connection Manager to establish the device’s connection to the mobile network. The
Connection Manage is designed to determine the optimum network type (such as 3g or
wi-fi). If this option is disabled, the user manages the connection manually.
–
Connection Manager compatibility mode - This mode is enabled by default to make
NetExtender Mobile work with applications calling the Microsoft Connection Manager
API. In limited cases, server applications may not work properly through NetExtender
Mobile, so users can use this selection to disable the compatibility mode
Note If a user disables the Connection Manager compatibility mode, a confirmation
message will prompt the user that this may cause some applications using the
Connection Manager API to not work properly.
–
Enable Framing & Caching optimizations - This setting increases the performance
of NetExtender Mobile when it is under a heavy load, such as when downloading big
files over NetExtender.
–
Enable NetExtender log - Records log entries for NetExtender events.
–
Overwrite the previous log when NetExtender starts - Maintains a single
NetExtender log file that is overwritten with each new NetExtender session. Disabling
this option will create a separate log file for each NetExtender session.
• Proxy Settings - Provides the ability to manually specify a proxy server.
Using NetExtender | 59
Page 60

Passwords in NetExtender Mobile
NetExtender Mobile supports the ability for users to change passwords. Also, if configured by
an Administrator, users can be alerted that the th eir p assword is scheduled to expire soon. If a
user must change their password, a screen prompt will ask for the user’s old password, along
with a new password and re-verification of the new password.
Another screen prompt will be presented to the user, if their password is scheduled to expire
within a configured number of days by the Administrator. Click Yes to enter updated password
information.
The process for updating password information is the same as above.
Installing NetExtender on Android Smartphones
Dell SonicWALL SSL VPN supports NetExtender on smartphones running the Android
operating system. The NetExtender Android client supports the following features:
• One-time passwords
• Two-factor authentication
• HTTP/HTTPS proxy
• Connection profiles
The NetExtender Android installer is available on MySonicWALL in the standard apk package
format. The installer is also available from Play Store as the NetExtender Technology Preview.
60 | SRA 7.0 User Guide
Page 61

The following features are not supported or not applicable on NetExtender Android in Dell
SonicWALL SSL VPN:
• Automatic connection of NetExtender before Windows login
• Automatic proxy support and Internet Explorer proxy synchronization
• Connection scripts
• IPv6 support
• Client certificate support
• Exit client after disconnect
To install NetExtender on an Android smartphone using the apk package from MySonicWALL,
perform the following tasks:
Step 1 On a computer, log in to http://mySonicWALL.com.
Step 2 Click Downloads.
Step 3 In the Software Type drop-down menu, select one of the following:
• SRA 4200 Firmware
• SRA 1200 Firmware
• SRA VM
Step 4 Click the NetExtender (Android) link.
Step 5 Save the .apk file onto your computer.
Step 6 Using the USB cable, connect your computer to the Android smartphone.
Step 7 On the Android smartphone, pull down the notifications.
Using NetExtender | 61
Page 62

Step 8 Tap USB connected to connect to the computer. The next screen shows the connection.
Step 9 Tap Turn on USB storage to prepare for copying the apk installer to the Android smartphone.
Step 10 On the computer, copy the apk file to the Android SD card.
Step 11 Unmount the Android SD card from your computer. On Windows, it will show up under “My
Step 12 After unmounting the Android SD card from your computer, tap Turn off USB storage.
Step 13 On your Android smartphone, launch a file browser application.
62 | SRA 7.0 User Guide
Computer” as a new drive. On Mac, a new drive will show up on the desktop.
Page 63

Step 14 Using the file browser, locate the apk file and run it to install NetExtender Android. After
installation, the NetExtender icon appears on the applications page of the smartphone.
Using NetExtender on Android Smartphones
Instructions for using NetExtender on your Android smartphone are available in the following
sections:
• “Connecting to NetExtender” on page 64
• “Exiting or Disconnecting from NetExtender” on page 68
• “Checking Status, Routes, and DNS Settings” on page 69
• “Configuring Profiles, Preferences, and Proxy Servers” on page 71
• “Changing Your Password” on page 75
Using NetExtender | 63
Page 64

Connecting to NetExtender
To launch NetExtender on your Android smartphone and connect to the network through the
Dell SonicWALL SRA appliance, perform the following steps:
Step 1 On your Android smartphone, start NetExtender by tapping the application icon. The
NetExtender connection options screen displays. Enter the information into the Server, User,
Password, and Domain fields.
Step 2 Tap Connect to accept the default option (Save user name & password) or select a Save...
or Always ask... option from the drop-down list. The available profile options depend on how
NetExtender is configured on the Dell SonicWALL appliance.
Step 3 The smartphone displays the Login - Initializing engine screen.
64 | SRA 7.0 User Guide
Page 65

After a successful connection, the entered values are saved as a profile that you can select
when starting NetExtender. NetExtender saves the information in a secure file on the
smartphone.
Step 4 If One Time Password is enabled on the Dell SonicWALL SRA appliance, the One Time
Password prompt is displayed. Enter the temporary password that was emailed to your
configured account, and tap OK.
If your smartphone is synchronized to your email account, you can pull down the email
notification from the top bar, or switch to your home page and access your email from there.
After viewing the temporary password in your email or copying it to your clipboard, tap the
NetExtender application icon to return directly to this screen.
To use the clipboard, press the password in your email and select Select Text. Press the
selected text again and select Copy. Then in the OTP screen, press the field and select Paste.
Some Android smartphones require you to hold the OK button for clipboard access.
Step 5 If Two Factor Authentication is enabled on the Dell SonicWALL SRA appliance, you may be
prompted to update your PIN (Personal Identification Number) or create a new one.
Using NetExtender | 65
Page 66

If no PIN has yet been configured, or if the Administrator has reset the account, the following
screen asks if the system should generate a new PIN. To allow the system to generate it, tap
Yes. To type in a PIN yourself, tap No and skip to Step 7.
Step 6 If you chose to allow the system to generate the PIN, the display then prompts you to accept
the generated PIN. Tap Yes to accept it, or tap No to have the system generate a different PIN.
You are prompted each time until you tap Yes.
Step 7 If you chose to generate the PIN yourself, type a PIN into the PIN field and again in the second
66 | SRA 7.0 User Guide
field to confirm it. Typically, PINs are required to be 4 to 8 digits. Tap OK.
Page 67

Step 8 After entering the PIN or creating a new PIN, the Tw o Factor Authentication process requires
you to enter the token code shown on your token device. Wait for the token code to change on
the device, and then type the code into the field on your smartphone and tap OK.
Step 9 If a proxy server is configured in the smartphone (via Preferences), the Proxy Authentication
screen is displayed next. Enter the username and password for the proxy and tap OK.
Step 10 NetExtender will connect at this point, unless there is a problem or error. You will see the
NetExtender traffic indicator appear in the notification bar at the top of the display, unless it is
disabled in Preferences.
The up and down arrows appear white when data is passing through the VPN tunnel. When no
data is currently passing, the arrows appear gray. Control traffic does not affect the arrow
colors.
The up arrow indicates that data is being sent from the smartphone to the network, and the
down arrow indicates that data is being received from the network by the smartphone.
Using NetExtender | 67
Page 68

Step 11 If the NetExtender service running on the smartphone has a problem or has stopped running,
the following screen is displayed. Tap Exit to quit the application. You may need to restart the
service, possibly by turning the phone off and on again, or you may need to re-install
NetExtender.
Exiting or Disconnecting from NetExtender
EXIT
Exiting and restarting NetExtender is useful when NetExtender cannot connect, possibly after
a long period of disuse. To exit from NetExtender, perform the following steps:
Step 1 To access the Exit option, press the options or menu button while on the NetExtender screen.
The options are displayed at the bottom of the screen.
Step 2 To cause NetExtender to exit completely, including the services component, select the Exit
option and tap OK. You can restart NetExtender by clicking its icon on your smartphone.
DISCONNECT
To disconnect NetExtender, perform the following steps:
Step 1 Pull down the notification bar and click NetExtender to open the NetExtender user interface.
68 | SRA 7.0 User Guide
Page 69

Step 2 In the NetExtender user interface, tap the Disconnect button and tap OK to confirm.
NetExtender notifies you while disconnecting.
Checking Status, Routes, and DNS Settings
While NetExtender is connected, you can view status information, routes, and DNS settings on
your smartphone.
Step 1 To open the NetExtender user interface, pull down the notification bar and tap NetExtender.
Using NetExtender | 69
Page 70

Step 2 To view status information, tap the Status tab. You can tap on the Sent, Received, or
Throughput fields to change the units between bytes and packets.
If you are connected to a Dell SonicWALL SRA appliance running 5.0 or higher, and you have
an Active Directory account, the User field contains your display name, such as
“Sonia Eng”. If you are connected to an appliance running the 4.0 release or you do not have
an Active Directory account, the User field displays the login name, such as “seng”.
Step 3 To view NetExtender routes, tap the Routes tab. The display shows all subnets currently
available from the smartphone.
70 | SRA 7.0 User Guide
Page 71

Step 4 To view the configured DNS servers, tap the DNS tab.
NetExtender Android supports DNS only; WINS or DNS suffix are not supported.
Configuring Profiles, Preferences, and Proxy Servers
To configure NetExtender profiles and preferences, including proxy servers, on your Android
smartphone, perform the following steps:
Step 1 To display NetExtender options, start NetExtender and then press the options or menu button
on the smartphone. The options are displayed at the bottom of the screen.
PROFILES
Step 2 To display the NetExtender Profiles screen, start NetExtender and then press the options or
menu button on the smartphone and tap Profiles.
Using NetExtender | 71
Page 72
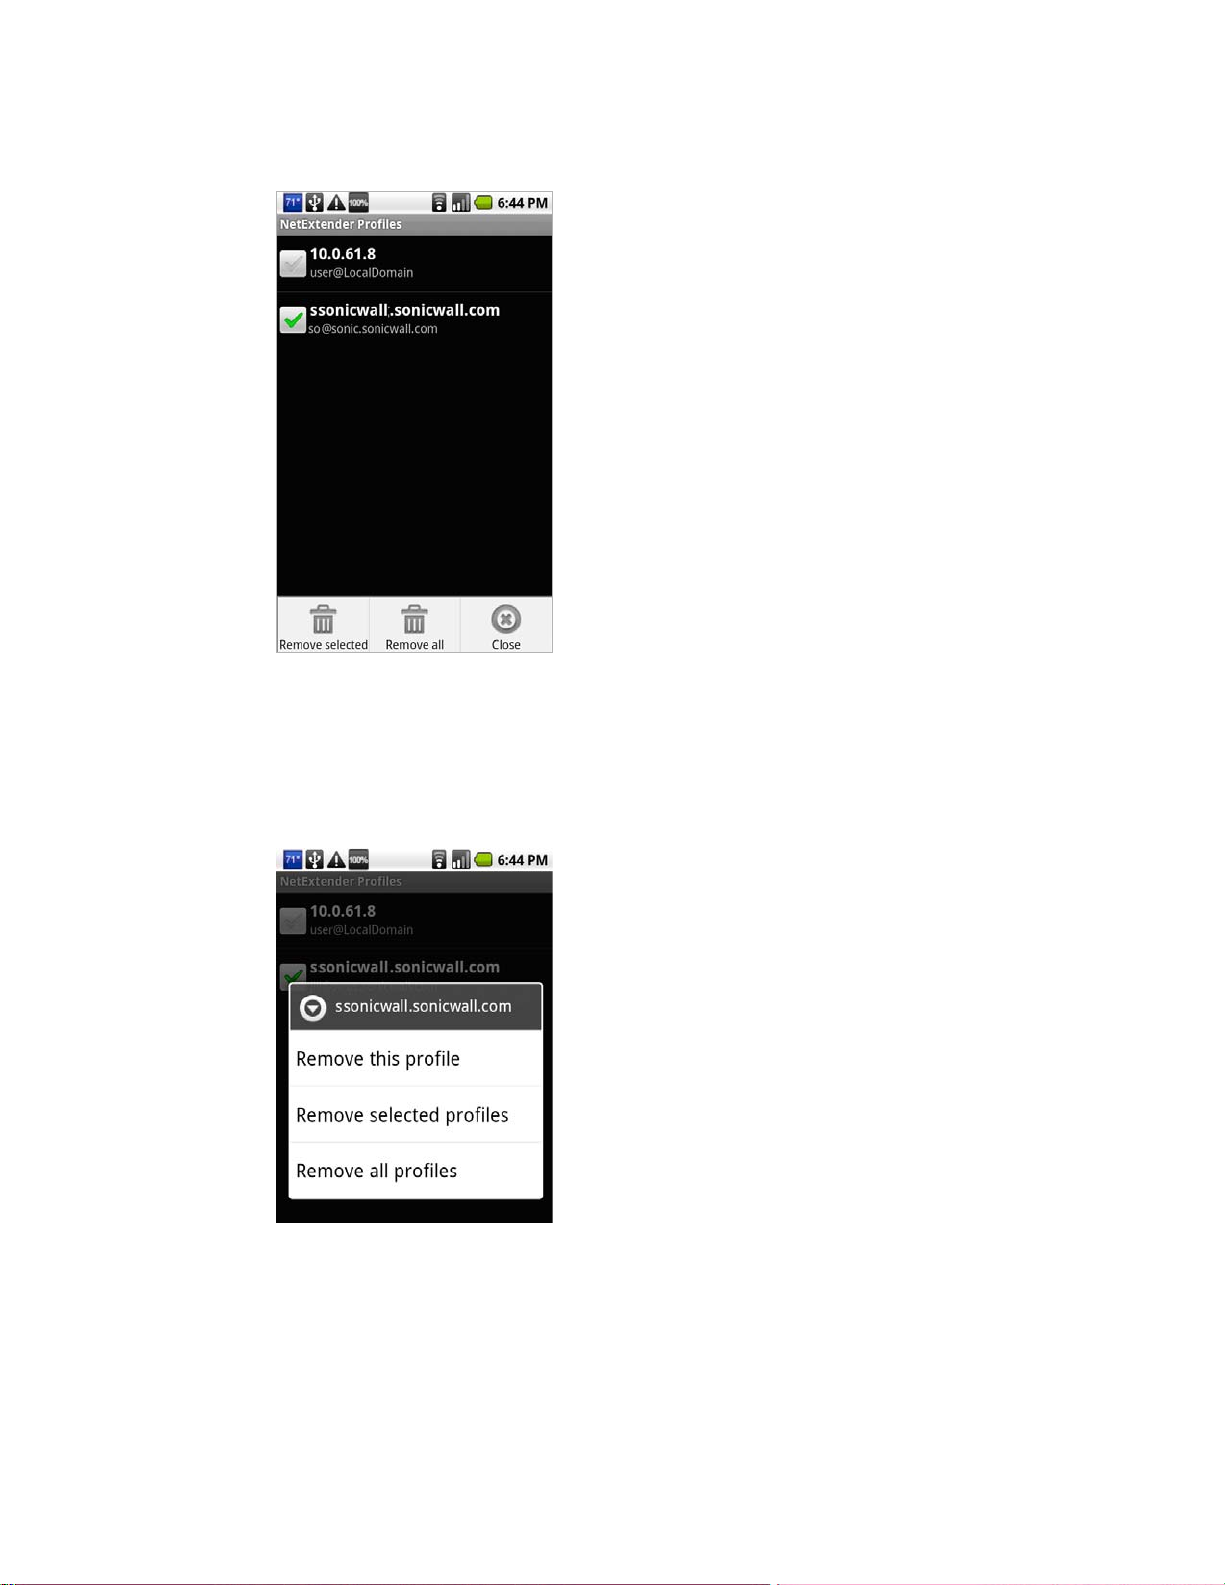
Step 3 To display the Remove selected, Remove all, and Close options on this NetExtender
Profiles screen, press the options button while on the screen.
Step 4 Tap Remove selected to remove the profiles that have check marks next to them.
Step 5 Tap Remove all to remove all profiles from the smartphone.
Step 6 Tap Close to close the option display on this screen.
Step 7 To display the Remove this profile, Remove selected profiles, and Remove all profiles
options, press and hold the NetExtender Profiles screen.
Step 8 Tap Remove this profile to remove the profile that you pressed on to bring up this screen.
Step 9 Tap Remove selected to remove the profiles that have check marks next to them.
Step 10 Tap Remove all to remove all profiles from the smartphone.
Step 11 Tap Close to close the option display on this screen.
72 | SRA 7.0 User Guide
Page 73

EXPORT LOG
Step 12 To export the log file of NetExtender Android activity, select the Export Log option and enter
the requested information.
ABOUT
Step 13 To view NetExtender version information, select the About option.
PREFERENCES / PROXY SETTINGS
Step 14 To configure NetExtender preferences including proxy and notification settings, select the
Preferences option.
Step 15 Under General settings, select the Connection notification check box to display the
NetExtender traffic indicator in the notification bar.
Clear the check box to prevent the indicator from being displayed.
Step 16 Under Proxy, select the Use Proxy check box to configure NetExtender Android to access
external networks through a proxy server.
A proxy server is often used for access to the Internet if the initial connection is made to a local
zone, such as LAN or WLAN.
Using NetExtender | 73
Page 74

Step 17 After selecting the Use Proxy check box, tap Proxy settings to open the configuration screen
for the proxy server.
Step 18 Type the IP address of the proxy server into the Server field. Type the port number of the port
that the server listens on into the Port field. This field displays “8080” by default, but there is
no standard listening port for a proxy server.
Step 19 Optionally enter your login credentials for the server in the User and Password fields. Entering
your credentials here causes NetExtender to save them, so that you can automatically connect
to the proxy server during subsequent logins without being prompted for credentials.
NetExtender Android supports basic authentication using a username and password for proxy
servers. Microsoft NTLM authentication is not currently supported.
Step 20 When finished configuring the proxy server settings, tap OK.
74 | SRA 7.0 User Guide
Page 75

Changing Your Password
To change your password when prompted by NetExtender, perform the following steps:
Step 1 After connecting, a password expiration notice may be displayed on your Android smartphone.
Tap Yes to change your password, or No to delay until a later time. NetExtender will remind you
each time you connect.
Step 2 If you select Yes, the Change password screen is displayed. Type your password into the
Current Password field, then type a new password into the New p assword field and again into
the Type it again field. Tap OK.
Using NetExtender | 75
Page 76

Step 3 If your password expires before you change it, the Change password screen is displayed when
you connect, with the message “Login failed – you must change your password.”
Type your old password into the Current Password field, then type a new password into the
New password field and again into the Type it again field. Tap OK.
Related Documents
The following Technical Notes provide more information on advanced NetExtender scenarios:
• Running NetExtender on a Different TCP Port:
http://www.sonicwall.com/us/support/2134_3154.html
• Using the Dell SonicWALL CDP Agent over a Dell SonicWALL NetExtender Connection
http://www.sonicwall.com/us/support/2134_3487.html
• Using Dell SonicWALL NetExtender to Access FTP Servers
http://www.sonicwall.com/us/support/2134_3465.html
• Resolving NetExtender Error With McAfee Enterprise 8.5
http://www.sonicwall.com/us/support/2134_6813.html
76 | SRA 7.0 User Guide
Page 77

Using Secure Virtual Assist
Secure Virtual Assist provides remote assistance and virtual meeting capabilities. Secure
Virtual Assist is an easy to use tool that allows Dell SonicWALL SSL VPN users to remotely
support customers by taking control of their computers while the customer observes. Secure
Virtual Meeting allows Dell SonicWALL SSL VPN users to p articipate in virtual meetings via the
internet.
Secure Virtual Assist is a lightweight, thin client that installs automatically using the Dell
SonicWALL SSL VPN Virtual Office. Secure Virtual Assist can also be installed as a standalone client that can be launched directly from the client’s computer.
The following sections describe how to use Secure Virtual Assist and Secure Virtual Meeting:
• “Using Secure Virtual Assist” section on page 77
• “Using Secure Virtual Meeting” section on page 104
Using Secure Virtual Assist
Chapter 5
The following sections describe how to use Secure Virtual Assist:
• “Installing and Launching Secure Virtual Assist” section on page 78
• “Configuring Secure Virtual Assist Settings” section on page 79
• “Selecting a Secure Virtual Assist Mode” section on page 81
• “Launching a Secure Virtual Assist Technician Session” section on page 81
• “Performing Secure Virtual Assist Technician Tasks” section on page 83
• “Initiating a Secure Virtual Assist Session from the Customer View” section on page 89
• “Using Secure Virtual Assist” section on page 99
• “Using Secure Virtual Assist in Unattended Mode” section on page 100
• “Enabling a System for Secure Virtual Access” section on page 101
• “Using the Request Assistance Feature” section on page 104
Secure Virtual Assist is fully supported on Windows platforms. Secure V irtual Assist is certified
to work on Windows 8, Windows 7, Windows Vista and Windows XP. The Secure Virtual Assist
client is also available for Linux and Mac OS.
Note When a user requests service as a customer, Virtual Assist can be run while
connected to the system over an RDP session for Windows 7 and Windows Vista
platforms; however, Virtual Assist over RDP will have a limited set of features.
There are two sides to a Virtual Assist session: the customer view and the Technician view. The
customer is the person requesting assistance on their computer. The Technician is the person
providing assistance. A Virtual Assist session consists of the following sequence of events:
1. The Technician launches Virtual Assist from the Dell SonicWALL SSL VPN Virtual Office.
2. The Technician monitors the Assistance Queue for customers requesting assistance.
Using Secure Virtual Assist | 77
Page 78

3. The customer requests assistance by one of these methods:
–
Logs into the Dell SonicWALL SSL VPN Virtual Office and clicks on the Virtual Assist
link.
–
Receives an email invitation from the Technician and clicks on the link to launch Virtual
Assist.
–
Navigate directly to the URL of the Virtual Assist home page that is provided by the
Technician.
4. The Secure Virtual Assist application installs and runs on the customer’s system.
5. The customer appears in the Virtual Assist Assistance Queue.
6. The Technician clicks on the customers name and launches a Virtual Assist session.
7. The Technician’s Virtual Assist window now displays the customers entire display. The
Technician has complete control of the customer computer’s mouse and keyboard. The
customer sees all of the actions that the Technician performs.
8. If at anytime the customer wants to end the session, they can take control and click the End
Virtual Assist button in the bottom right corner of the screen.
9. When the session ends, the customer resumes sole control of the computer.
Installing and Launching Secure Virtual Assist
To install and launch a Virtual Assist session, perform the following steps.
Step 1 Log in to the Dell SonicWALL SRA security appliance Virtual Office. If you are already logged
in to the Dell SonicWALL SSL VPN customer interface, click the Virtual Office button.
Step 2 Click the Virtual Assist button.
Step 3 The first time you launch Virtual Assist, you will be prompted to install the Secure Vir tual Assist
plugin and client.
Step 4 Click the Allow button. A plugin installation window displays. Click Install Now. The Secure
Virtual Assist plugin and client installs. You may be prompted to restart your browser.
Step 5 You can now launch Virtual Assist either from the Virtual Office window or from a shortcut that
is added to your Programs list under Window’s start button.
78 | SRA 7.0 User Guide
Page 79

Configuring Secure Virtual Assist Settings
The Secure Virtual Assist Settings window can be accessed either by clicking the Settings
button in the top left corner of the application window or by right-clicking on the Virtual Assist
icon in the taskbar and selecting Settings.
The Virtual Assist Settings window has three panes:
• Proxy Settings - Allows users to configure a Proxy server to access the SRA appliance.
There are three options for configuring proxy settings.
–
Automatically detect settings - To use this setting, the proxy server must support
Web Proxy Auto Discovery Protocol (WPAD)), which can push the proxy settings script
to the client automatically.
–
Use automatic configuration script - If you know the location of the proxy settings
script, select this option and enter the URL of the scrip in the Address field.
–
Use proxy server - Select this option to enter the Address and Port of the proxy
server. Optionally, you can enter an IP address or domain in the BypassProxy field to
allow direct connections to those addresses that bypass the proxy server. If required,
enter a User name and Password for the proxy server. If the proxy server requires a
username and password, but you do not specify them in the Properties window, a
NetExtender pop-up window will prompt you to enter them when you first connect.
–
Optionally , you can click the Internet Explorer proxy settings button to open Internet
Explorer’s proxy settings page.
Using Secure Virtual Assist | 79
Page 80

• Connection Profiles - Displays all of the Virtual Assist connection profiles that have been
used on this computer. To remove a profile, select it and click the Remove button.
• Connection Settings - Allows users to customize how they are identified in Virtual Assist
and the default settings of Virtual Assist customer sessions.
80 | SRA 7.0 User Guide
–
Display Name - The name that will be displayed in the user queue. By default, the
users SSL VPN username is displayed.
–
Additional Information - Optional field to provide additional information.
–
Auto View Only - Specifies that Virtual Assist sessions will initially l aunch in View-Only
mode instead of Trusted mode, which is the default.
–
Active Mode - Specifies that Virtual Assist sessions will initially launch in Active mode
instead of Trusted mode, which is the default.
Page 81

Selecting a Secure Virtual Assist Mode
When you first launch Secure Virtual Assist, by default it will be in customer mode. To change
the mode, perform the following steps.
Step 1 Click Change Mode to select one of four possible modes.
Step 2 Select one of the following four Virtual Assist modes:
• Customer - Select this mode to request support. For information on customer mode, see
the “Initiating a Secure V irtual Assist Session from the Customer View” section on page 89.
• Unattended - Select this mode to receive support help while you are away from your
computer. You will be prompted to enter a password, which the Technician can then enter
and assume control of your system without further confirmation from you. For information
on unattended mode, see the “Using Secure Virtual Assist in Unattended Mode” section on
page 100.
• Technician - Select this mode to service customers by remotely controlling their systems.
For information on T echnician mode, see the “Launching a Secure Virtual Assist Technician
Session” section on page 81.
• Virtual Access - Select this mode to make your computer remotely accessible at all times
from the SSL VPN appliance. For information on Secure Virtual Access mode, see the
“Enabling a System for Secure Virtual Access” section on page 101.
Step 3 Click Change Mode again to login with the selected mode.
Launching a Secure Virtual Assist Technician Session
To launch a Virtual Assist Technician session to remotely assist customers, perform the
following steps.
Step 1 Launch Virtual Assist and select the Technician Mode.
Using Secure Virtual Assist | 81
Page 82

Step 2 In the Server drop-down menu, select the IP address or domain name of the Dell SonicWALL
SRA appliance.
Step 3 Enter the Username and Password for the Technician account on the appliance.
Step 4 Click Login.The Select Domain window displays.
Step 5 Select the Domain that the username is configured for and click OK.
Step 6 The Secure Virtual Assist standalone application launches.
82 | SRA 7.0 User Guide
The Technician is now ready to assist customers.
Page 83

Performing Secure Virtual Assist Technician Tasks
To get started, the Technician logs into the Dell SonicWALL SRA appliance and launches the
Secure Virtual Assist application.
Note Each Technician can only assist one customer at a time.
By default, the Virtual Assist window launches with the Virtual Assist toolbar at the top and the
rest of the window dedicated to the customer’s screen.To display the most common panes,
either click Expand or click View > Classic Layout. This will display the following panes:
• Email Invite
• Logging
• Chat
• Service
Once the Technician has launched the Virtual Assist application, the Technician can assist
customers by performing the following tasks:
• “Inviting Customers by Email” on page 83
• “Assisting Customers” on page 84
• “Using the Virtual Assist Taskbar and Tab Controls” on page 85
• “Using the Secure Virtual Assist File Transfer” on page 88
• “Changing the Secure Virtual Assist Level of Control” on page 99
• “Ending a Virtual Assist Session” on page 100
• “Ending a Virtual Assist Session” on page 100
Inviting Customers by Email
Step 1 To invite a customer to Virtual Assist, use the email invitation form on the left of the Virtual
Assist window. If it is not displayed, click the Invite button in the toolbar.
Note Customers who launch Virtual Assist from an email invitation can only be assisted
by the Technician who sent the invitation. Customers who manually launch Virtual
Assist can be assisted by any Technician.
Step 2 Enter the customer’s email address in the Customer Email field.
Step 3 Optionally, enter Technician Email to use a different return email address than the default
Technician email. Some mail servers require that an email address be entered, and that it be
on a valid domain.
Step 4 Optionally, enter an Additional Message to the customer.
Step 5 Click Invite. The customer will receive an email with an HTML link to launch Virtual Assist.
Customers requesting assistance will appear in the Assistance Queue, and the duration of time
they have been waiting will be displayed.
Using Secure Virtual Assist | 83
Page 84

Assisting Customers
A pop-up window in the bottom right task bar alerts the Technician when a customer is in the
assistance queue. The customer queue is also displayed in the Service window.
Step 1 Double-click a customer’s user name to begin assisting the customer.
Note Return a customer to the queue by right-clicking the user name on the Service List and
selecting Requeue. Someone else in a Technician role can then service this user. This is
useful if one Technician needs to hand off the user to another Technician, because of
differing areas of expertise or the end of shift.
Step 2 The customer’s entire desktop is displayed in the bottom right window of the Secure Virtual
Assist application.
84 | SRA 7.0 User Guide
Page 85

The Technician now has complete control of the customer’s keyboard and mouse. The
customer can see all of the actions that the Technician performs.
During a Virtual Assist session, the customer is not locked out of their computer. Both the
Technician and customer can control the computer, although this may cause confusion and
consternation if they both attempt “to drive” at the same time.
The small tool bar in the bottom right of the screen provides options during a Virtual Assist
session:
• Trusted/Active - Toggles to the View Only mode, where the Technician can view the
customer’s computer but cannot control the computer.
• Chat - Initiates a chat window with the Technician.
• End Virtual Assist - Terminates the session.
Using the Virtual Assist Taskbar and Tab Controls
The Technician’s view of Virtual Assist includes a Taskbar with a number of options.
• Invite - Displays the Email Invite pane.
• Chat - Displays the chat window to communicate with the customer.
• Service - Displays the service queue of customers awaiting service.
• Logging - Displays the log window.
• Viewer - Displays or hides the entire Virtual Assist window.
• Options - Displays Connection Profile and Connection Settings options.
• Expand - Displays the Email Invite, Service, Logging, and Chat panes.
• About - Displays the version information for the Secure Virtual Assist client.
Note Clicking the _ button in the bottom right corner of the Taskbar will minimize the view so only
the titles of the buttons are displayed, and not the icons. Clicking the x button in the top right
of the corner will close Virtual Assist.
You can also display additional shortcuts and controls by selecting View > Tab Controls for
Current Customer.
The following options appear at the top of the Virtual Assist window.
• Full Screen - Expands the Virtual Assist window to the Technicians entire monitor.
• Auto Scaling - Fits the customer’s screen to the Virtual Assist window.
• Zoom - Customizes the zoom of the customer’s screen.
• True Siz e - Zooms to the actual size of the customer’s monitor resolution.
• Gray Scale - Change the display to gray scale instead of full color.
• Refresh - Refreshes the customer’s screen.
• File Transfer - Opens the File T ransfer utility. See the “Using the Secure Virtual Assist File
Transfer” on page 88 for more information.
• Chat - Opens a chat window with the customer.
Using Secure Virtual Assist | 85
Page 86

• Record - Records the Virtual Assist session in a .wmv file that can be shared with other
customers. The file is automatically named with the user name and the date and time the
recording was started (for example, Sue_EST_2013-2-12_09h47m43s.wmv). The file
location can be set on the Connection Settings window.
• System Info -Provides detailed information to the Technician about the customer ’s
computer.
• Reboot Customer - Reboot the customer’s computer. Unless you have Requested full
control, the customer will be warned about and given the opportunity to deny the reboot.
You can select either a basic reboot or to reboot into Safe Mode with Networking.
Note When rebooting, you will be prompted to enter the login credentials for the computer.
• Active Screens - Allows the Technician to switch to a second monitor if the customer’s
computer has more than one monitor configured, or display all monitors.
86 | SRA 7.0 User Guide
Page 87

• Request Full Control - Technicians can request full c ontrol of a customer ’s desktop,
allowing them to reboot the system, delete files, or over-write files on the customer ’s
computer without the customer being repeatedly prompted for permission. Select Request
Full Control under the Commands menu to issue a request that will appear on the
customer’s desktop.
Using Additional Secure Virtual Assist Technician Commands
The Commands drop-down menu in the top left of the Virtual Assist window provides access
to several of the options described above along with additional options.
• Open Remote System Info Window - Opens the System Info Window on the customer’s
computer.
• Open Remote Task Manager Window - Opens the Task Manager on the customer’s
computer.
• Send Ctrl+Alt+Del - Enters Control-Alt-Delete on the customer’s computer.
• Open Remote Run Menu - Opens the Run menu on the customer’s computer.
• Open Remote Start Menu - Opens the Start menu on the customer’s computer.
• Send Alt+Tab to Remote - Enters Alt-Tab on the customer’s computer to toggle between
open windows.
• Ctrl Key Down - Engages the Control key on the customer’s computer.
• Ctrl Key Up - Disengages the Control key on the customer’s computer.
• Alt Key Down - Engages the Alt key on the customer’s computer.
• Alt Key Up - Disengages the Alt key on the customer’s computer.
Using Secure Virtual Assist | 87
Page 88

Viewing Secure Virtual Assist Session Log
The Secure Virtual Assist Session Log window can be displayed by clicking the Logging button
in the Taskbar. The log displays a history of timestamped events for the session, such as
opening Chat or File Transfer, requesting Full Control, etc.
Using the Secure Virtual Assist File Transfer
The File Transfer window is used to transfer files to and from the customer’s computer. The file
directory of the Technician’s computer is shown on the left and the customer’s computer on the
right.
88 | SRA 7.0 User Guide
The File Transfer window functions in much the same manner as Windows Explorer or an FTP
program. Navigate the File Transfer window by double-clicking on folders and selecting files.
The File Transfer window includes the following controls:
• Desktop jumps to the desktop of the Technician’s or customer’s computer.
• Up navigates up one directory on either the Technician’s or customer’s computer.
• Download transfers the selected file or files from the Technician’s computer to the
customer’s computer.
• Upload transfers the selected file or files from the customer ’s computer to the
Technician’s computer.
• Delete deletes the selected file or files.
Page 89

Note When deleting or overwriting files, the customer is warned and must give the
Technician permission unless the T echnician has clicked the Request Full Control
button and the customer has confirmed.
• New folder creates a new folder in the selected directory.
• Rename renames the selected file or directory.
When a file is transferring, the transfer progress is displayed at the bottom of the File Transfer
window. Click the Exit button to cancel a transfer in progress.
Note File T ransfer supports the transfer of single or multiple files. It does not currently support the
transfer of directories. T o select multiple files, hold down the Ctrl button while clicking on the
files.
Initiating a Secure Virtual Assist Session from the Customer View
The following sections describe how to initiate and use Virtual Assist on the three supported
client platforms:
• “Initiating Secure Virtual Assist on a Windows Client” section on page 89
• “Initiating Secure Virtual Assist on a MacOS Client” section on page 93
• “Initiating Secure Virtual Assist on a Linux Client” section on page 96
• “Using Secure Virtual Assist” section on page 99
• “Using Secure Virtual Assist in Unattended Mode” section on page 100
• “Enabling a System for Secure Virtual Access” section on page 101
• “Using the Request Assistance Feature” section on page 104
Initiating Secure Virtual Assist on a Windows Client
To launch a Virtual Assist customer session to request help on your Windows computer,
perform the following steps:
Step 1 There are several methods for accessing Virtual Assist:
• Navigate to the Virtual Assist home page using the URL provided by your Administrator or
support Technician.
• If you received an email invitation, click the link in the email or paste the URL into yo ur Web
browser.
Using Secure Virtual Assist | 89
Page 90

• The login page of your Virtual Office may include a direct link to Virtual Assist as shown
below.
• Login to the Virtual Office and click the Request Assistance button.
• If Secure Virtual Assist has already been installed, select the Secure Virtual Assist shortcut
from the Programs list under Window’s start button
Step 2 The first time you launch Secure Virtual Assist, you will be prompted to install the Secure V irtual
Assist plugin and client.
Step 3 Click the Allow button. A plugin installation window displays. Click Install Now. The Secure
Virtual Assist plugin and client installs. You may be prompted to restart your browser.
90 | SRA 7.0 User Guide
Page 91

Step 4 You can launch Virtual Assist either from the Virtual Office window or from a shortcut that is
added to your Programs list under Window’s start button. If the Server address is not autopropagated in the login window , enter the Server address. The server address can be either an
IP address, IPv6 address, or hostname of the Dell SonicWALL SRA appliance. IPv6 addresses
must be enclosed in brackets (the [ and ] symbols).
Step 5 Click Request Support to request assistance or Appoint Technician to request assistance
from a specific Technician.
Step 6 If you receive the following security alert, click Unblock to allow Virtual Assist traffic through
the Windows firewall.
Step 7 If you selected Appoint Technician, a window listing all Technicians on duty appears. Select
the Technician you would like to assist you and click Requ est Support.
Your service request will be displayed to all Technicians if you do not select a specific
Technician. When you request a specific T echnician, only that Technician will see your request.
Step 8 Select the portal for the requested Technician and click OK. If you do not select a portal, you
will be assisted by any Technician.
Using Secure Virtual Assist | 91
Page 92

After selecting a portal, a certificate prompt appears, followed by an assistance code and/or
disclaimer if configured by the Administrator.
Step 9 A pop-up window indicates that you are in the Virtual Assist queue. The Technician will be
alerted that you are ready. Click Cancel to cancel the Virtual Assist request.
Step 10 The Virtual Assist queue window provides two options:
• Click the information to provide the Technician with information about your issue.
• Click the icon next to the Change Name line in the queue window to specify your name. By
default, the computer name is used unless the customer responded to an email invite which
displays the customer’s email address.
92 | SRA 7.0 User Guide
Page 93

Step 11 When the T echnician initiates the session, the Virtual Assist toolba r appears in the bottom right
of your screen. The Technician now has control of your computer.
Step 12 For information on using Virtual Assist once the session is active, see “Using Secure Virtual
Assist” section on page 99.
Initiating Secure Virtual Assist on a MacOS Client
To launch a Virtual Assist customer session to request help on your MacOS computer, perform
the following steps:
Step 1 There are several methods for accessing Virtual Assist:
• Navigate to the URL of the Virtual Assist home page that is provided by your support
Technician.
• If you received an email invitation, click the link in the email or paste the URL into yo ur Web
browser.
• The login page of your Virtual Office may include a direct link to Virtual Assist as shown
below.
• Or you may need to login to the Virtual Office and click the Request Assistance button.
Using Secure Virtual Assist | 93
Page 94

Step 2 The first time you launch Virtual Assist, you will be prompted to allow the Secure V irtual Assist
applet to be installed on your computer. Click Allow.
Step 3 The Secure Virtual Assist client installs and launches. In the future, you can either launch
Virtual Assist either by navigating to the Virtual Office window in your browser, or you can
launch it directly from your Applications folder.
Step 4 If the Server address is not auto-propagated in the login window , enter the Server address and
click Request Support. The server address can be either an IP address, IPv6 address, or
hostname of the Dell SonicWALL SRA appliance. IPv6 addresses must be enclosed in brackets
(the [ and ] symbols).
Step 5 The list of Available Portals is displayed. To connect to a specific portal, select it and click OK.
To have your request be serviceable by all of the portals, click OK without selecting a specific
portal.
Your service request will be displayed to all Technicians if you do not select a specific
Technician. When you request a specific T echnician, only that Technician will see your request.
94 | SRA 7.0 User Guide
Page 95

Step 6 You may be prompted to enter an Assistance Code.
Step 7 If prompted to read and accept a disclaimer, click OK.
Step 8 A pop-up window indicates that you are in the Virtual Assist queue. The Technician will be
alerted that you are ready. Click Cancel to cancel the Virtual Assist request.
Step 9 The Virtual Assist queue window provides two options:
• Click Add information to provide the Technician with information about your issue.
• Click the icon next to the Request Name line in the queue window to specify your name.
By default, the computer name is used.
Step 10 When the Technician initiates the session, the Virtual Assist toolbar appears in the bottom right
of your screen. The Technician now has control of your computer.
Step 11 For information on using Virtual Assist once the session is active, see “Using Secure Virtual
Assist” section on page 99.
Using Secure Virtual Assist | 95
Page 96

Initiating Secure Virtual Assist on a Linux Client
Note Dell SonicWALL Secure Virtual Assist is fully tested on the Ubuntu distribution of Linux. It
has not been tested on other Linux distributions.
To launch a Virtual Assist customer session to request help on your Linux computer, perform
the following steps:
Step 1 There are several methods for accessing Virtual Assist:
• Navigate to the URL of the Virtual Assist home page that is provided by your support
Technician.
• If you received an email invitation, click the link in the email or paste the URL into yo ur Web
browser.
• The login page of your Virtual Office may include a direct link to Virtual Assist as shown
below.
Step 2 You will be prompted to click the Virtual Assist Client Download for Linux button. It will
96 | SRA 7.0 User Guide
• Or you may need to login to the Virtual Office and click the Request Assistance button.
prompt you to download the “VACLinux.x86.tgz” file. Unpackage the file and run the “Install”
file. You can now launch Virtual Assist either from a shortcut on your desktop or by typing
VirtualAssistGui in the Terminal window.
Page 97

Step 3 Optionally , you can enter your name and a summary of your issue and click Request Support.
You will then be prompted to install the Secure Virtual Assist client. After the installation is
complete, the Secure Virtual Assist client will launch automatically.
Step 4 You can now launch Virtual Assist either from a shortcut on your desktop or by typing
VirtualAssistGui in the Terminal window.
Step 5 If the Server address is not auto-propagated in the login window , enter the Server address and
click Request Support. The server address can be either an IP address, IPv6 address, or
hostname of the Dell SonicWALL SRA appliance. IPv6 addresses must be enclosed in brackets
(the [ and ] symbols).
Step 6 The list of Available Portals is displayed. To connect to a specific portal, select it and click OK.
To have your request be serviceable by all of the portals, select All Portals and click OK.
Using Secure Virtual Assist | 97
Page 98

Step 7 You may be prompted to enter an Assistance Code.
Step 8 If prompted to read and accept a disclaimer, click OK.
Step 9 A pop-up window indicates that you are in the Virtual Assist queue. The Technician will be
alerted that you are ready. Click Cancel to cancel the Virtual Assist request.
Step 10 The Virtual Assist queue window provides two options:
• Click Add information to provide the Technician with information about your issue.
• Click the icon next to the Request Name line in the queue window to specify your name.
By default, the computer name is used.
98 | SRA 7.0 User Guide
Page 99

Step 11 When the T echnician initiates the session, the Virtual Assist toolba r appears in the bottom right
of your screen. The Technician now has control of your computer.
Step 12 For information on using Virtual Assist once the session is active, see “Using Secure Virtual
Assist” section on page 99.
Using Secure Virtual Assist
During a Virtual Assist session, you are not completely locked out of your computer. Both the
Technician and customer can control the computer, although this may cause confusion and
consternation if they both attempt to “drive” at the same time. You can resume control when the
Technician is not actively typing or moving the mouse. And you can end the session at any time
by clicking the End Virtual Assist button in the bottom right corner.
Chatting with the Technician
To start chatting with the Technician assisting you, click the Chat button or enter Alt-c, which
opens an instant message chat session with the Technician. The Technician can also open a
Chat window to communicate with you.
To chat, type text in the Chat window and type Enter or click Send.
Changing the Secure Virtual Assist Level of Control
There are three levels of control that a customer can grant to the Technician:
• View Only - The Technician can view the customer’s computer but cannot control it. To
switch to View Only mode, click the Status (Active) button. The Status switches to (View
Only).
• Active - The Technician can control the customer ’s computer, but the customer must give
permission for certain action—such as allowing the Technician to reboot the system, delete
files, or over-write files on the customer’s computer without the customer being repeatedly
prompted for permission. To switch from View Only mode to Active mode, click the Status
(View Only) button.
Using Secure Virtual Assist | 99
Page 100

• Trusted - The Technician has complete control of the customer’s computer. To toggle
between Trusted mode and Active mode, enter Ctrl-Alt-T.
Note By default, Virtual Assist sessions are launched in Trusted mode. To modify this mode:
1. Click the Settings button on the top left corner of the window.
2. Select the Connection Settings tab.
3. Select either Auto View Only or Active Mode.
Ending a Virtual Assist Session
You can end the Virtual Assist session at anytime by clicking on the Exit Virtual Assist button
in the bottom right corner of the screen, or by entering Alt-q. This will end the Technician’s
control of your computer.
Using Secure Virtual Assist in Unattended Mode
Note Unattended Mode is supported only on Windows clients.
Unattended Mode allows customers to set their computer to be accessible by a Technician at
a later time when the customer will not be available to click to confirm their consent. To set your
computer for Secure Virtual Assist Unattended Mode, perform the following tasks:
Step 1 Launch Virtual Assist.
Step 2 Click Change Mode, select Unattended, and click Change Mode again.
Step 3 Select or enter the IP address or domain name of the SSL VPN server.
100 | SRA 7.0 User Guide
 Loading...