


Dell EMC NetWorker Module for Microsoft
for SQL VDI
Version 19.2
User Guide
REV 01
November 2019

Copyright © 2007-2019 Dell Inc. or its subsidiaries. All rights reserved.
Dell believes the information in this publication is accurate as of its publication date. The information is subject to change without notice.
THE INFORMATION IN THIS PUBLICATION IS PROVIDED “AS-IS.” DELL MAKES NO REPRESENTATIONS OR WARRANTIES OF ANY KIND
WITH RESPECT TO THE INFORMATION IN THIS PUBLICATION, AND SPECIFICALLY DISCLAIMS IMPLIED WARRANTIES OF
MERCHANTABILITY OR FITNESS FOR A PARTICULAR PURPOSE. USE, COPYING, AND DISTRIBUTION OF ANY DELL SOFTWARE DESCRIBED
IN THIS PUBLICATION REQUIRES AN APPLICABLE SOFTWARE LICENSE.
Dell Technologies, Dell, EMC, Dell EMC and other trademarks are trademarks of Dell Inc. or its subsidiaries. Other trademarks may be the property
of their respective owners. Published in the USA.
Dell EMC
Hopkinton, Massachusetts 01748-9103
1-508-435-1000 In North America 1-866-464-7381
www.DellEMC.com
2 Dell EMC NetWorker Module for Microsoft for SQL VDI User Guide

CONTENTS
Figures
Tables
Preface
Chapter 1
7
9
11
Overview 15
Using NMM with Virtual Device Interface API................................................... 16
SQL Server backup and restore workflow......................................................... 18
Traditional backup workflow (stand-alone backup over a storage node)..
18
Federated backup workflow (AlwaysOn Availability Group
configuration).......................................................................................19
Recovery workflow.............................................................................. 20
SQL Server cluster environments..................................................................... 22
SQL Server backups......................................................................................... 23
Types of supported backups................................................................ 23
Setting backup levels........................................................................... 24
Backup promotion................................................................................ 27
SQL Server recovery........................................................................................ 29
Types of supported recovery............................................................... 29
Recovery modes.................................................................................. 30
Recovery time...................................................................................... 31
Recovery window restrictions.............................................................. 32
The recovery process...........................................................................32
SQL Server instance and database names for backup and recovery................. 33
Named and default instances of SQL Server........................................33
Supported special characters in database names for NMM backup and
recovery ..............................................................................................34
Chapter 2
Configuration 37
Configuring NMM in a SQL VDI environment.................................................... 38
Supported Windows Server and SQL Server versions..........................38
Migrating from VSS solution to VDI solution for SQL Server data
protection............................................................................................ 38
Multi-stream Data Domain Boost......................................................... 38
Microsoft SQL Server Always On Availability Group feature ............... 38
Availability group listeners....................................................................39
Clusterless availability group listeners..................................................39
SQL Client Direct to AFTD or DD devices............................................ 40
Microsoft SQL Server named log marks...............................................40
Database consistency checks............................................................... 41
Microsoft hybrid cloud environments...................................................42
Transparent data encryption................................................................ 42
Setting the MAXTRANSFERSIZE environment variable.......................43
Dell EMC NetWorker Module for Microsoft for SQL VDI User Guide 3

Contents
Configuring permissions to perform NMM backup and recovery of Microsoft
SQL Server....................................................................................................... 44
Access privileges for backup and recovery...........................................44
Assign SQL server roles for backup and recovery operations...............44
Assigning Windows user privileges for backup and recovery operations...
45
Chapter 3
Chapter 4
Chapter 5
Graphical User Interfaces 49
User interfaces for backup and restore.............................................................50
NMM Microsoft SQL Server Management Studio plug-in GUI..........................50
Views of the NMM SQL Server Management Studio plug-in GUI...................... 51
Manual Backups 53
Manual backup overview...................................................................................54
Federated backup preferences for Availability Group databases.......................54
Specifying a retention policy for manual backups............................................. 55
Performing manual backups by using the NMM SSMS plug-in GUI.................. 56
Performing manual backups from the command prompt................................... 61
Command syntax for nsrsqlsv.............................................................. 62
Command options for nsrsqlsv............................................................. 63
Backup and recovery command syntax for SQL Server data................68
Example backup command syntax........................................................72
Scheduled Backups 75
Overview of scheduled backup..........................................................................76
Prerequisites.....................................................................................................76
Federated backup preferences for Availability Group databases....................... 76
Excluding incompatible databases in backups................................................... 78
Configuring scheduled backups.........................................................................78
Setting up backup levels...................................................................... 79
Configuring a client resource............................................................... 80
Setting data protection policies........................................................... 93
Monitoring scheduled backups .........................................................................98
Chapter 6
Chapter 7
4 Dell EMC NetWorker Module for Microsoft for SQL VDI User Guide
Data Restore 101
Overview......................................................................................................... 102
Prerequisites................................................................................................... 102
Restoring data by using the NMM SSMS plug-in GUI......................................103
Restoring data by using the CLI....................................................................... 110
Command syntax for nsrsqlrc.............................................................. 111
Command options for nsrsqlrc.............................................................112
Backup and recovery command syntax for SQL Server data............... 121
Example recovery command syntax ...................................................125
Granular Level Recovery 127
Overview......................................................................................................... 128
Considerations.................................................................................................128
Performing Granular Level Recovery............................................................... 133
Dismounting backups after performing GLR.................................................... 136
Using the Mount system tray icon...................................................... 137

Contents
Chapter 8
Chapter 9
Chapter 10
Striped Backup and Recovery 139
Overview of striped backups........................................................................... 140
Performance considerations............................................................................140
Performing striped backups............................................................................. 141
Performing striped recovery............................................................................142
Optimal striped recovery operations................................................... 142
Fail-safe striped recovery operations..................................................142
Disaster Recovery 145
Overview of disaster recovery......................................................................... 146
Disaster recovery features.............................................................................. 146
Performing disaster recovery...........................................................................147
When not to reinstall the SQL Server................................................. 147
Restoring a damaged primary disk...................................................... 148
Restoring a damaged binary disk........................................................ 149
Restoring SQL Server and NetWorker server..................................... 150
Restoring the SQL Server without reinstallation................................. 151
Restoring the SQL Server...................................................................152
Bare Metal Recovery 155
Planning bare-metal recovery..........................................................................156
Overview............................................................................................ 156
System requirements..........................................................................156
Protecting an environment before a disaster...................................... 158
BMR by using NetWorker and NMM.................................................. 159
SQL Server in a cluster environment............................................................... 159
Backing up a SQL Server for BMR......................................................159
Performing BMR of a SQL Server cluster............................................161
SQL Server in a stand-alone environment........................................................163
Backing up a SQL Server for BMR......................................................163
Performing BMR of a stand-alone SQL Server................................... 165
Chapter 11
Troubleshooting 167
Error logs for backup and recovery..................................................................168
SQL savegroup notifications............................................................................168
Troubleshooting general issues........................................................................169
Troubleshooting GLR.......................................................................................169
Dell EMC NetWorker Module for Microsoft for SQL VDI User Guide 5

Contents
6 Dell EMC NetWorker Module for Microsoft for SQL VDI User Guide

FIGURES
1
2
3
4
5
6
7
8
9
10
11
12
13
14
15
16
17
18
19
20
21
22
23
24
25
26
27
28
29
30
31
32
33
34
35
36
VDI backup process between NMM and SQL Server......................................................... 17
VDI recovery process between NMM and SQL Server.......................................................18
Traditional backup workflow..............................................................................................19
Federated backup workflow..............................................................................................20
Traditional recovery workflow........................................................................................... 21
Message showing DBCC was successful...........................................................................42
Assigning SQL Server privileges........................................................................................45
Adding a user to Windows User Groups............................................................................ 47
The NetWorker window in the NMM SMSS plug-in GUI ...................................................51
NetWorker Backup General page...................................................................................... 57
NetWorker Backup Options page......................................................................................58
NetWorker Backup Monitor page...................................................................................... 61
Starting the Client Configuration wizard........................................................................... 81
Specify Client Information page........................................................................................82
Specify Backup Configuration Type page..........................................................................83
Specify the Backup Options page..................................................................................... 85
Viewing clients in the Protection tab.................................................................................86
Create Policy window....................................................................................................... 94
Creating a workflow for the policy.................................................................................... 95
Specifying action information in the Policy Action wizard.................................................96
Adding a group to a policy from the Protection pane........................................................ 97
Specifying workflow and client in the Create Group window.............................................98
Successful backup messages............................................................................................99
Failed backup messages....................................................................................................99
NetWorker dialog box—Database Restore tab General page.......................................... 104
NetWorker dialog box—Database Restore tab General page for copy restore................ 105
NetWorker dialog box—Database Restore Files/Filegroups page................................... 106
NetWorker dialog box—Database Restore Options page.................................................107
NetWorker dialog box—Database Restore Monitor page.................................................110
NetWorker dialog box—Table Restore General page.......................................................134
NetWorker dialog box—Table Restore Options page...................................................... 135
NetWorker dialog box—Table Restore Monitor page...................................................... 136
Mount system tray menu................................................................................................. 137
Mount Details window......................................................................................................137
SQL Server Properties dialog box....................................................................................163
Example of SQL savegroup notification........................................................................... 169
Dell EMC NetWorker Module for Microsoft for SQL VDI User Guide 7

Figures
8 Dell EMC NetWorker Module for Microsoft for SQL VDI User Guide

TABLES
1
2
3
4
5
6
7
8
9
10
11
12
13
14
15
16
17
18
19
20
21
22
23
24
25
26
27
28
29
30
31
32
33
34
35
36
37
38
39
40
41
42
43
Revision history................................................................................................................. 12
Style conventions.............................................................................................................. 12
Backup levels for SQL Server data....................................................................................25
Full backup every 1 to 2 weeks..........................................................................................25
Logs-only backup after a full backup.................................................................................26
Backup level advantages and disadvantages..................................................................... 26
Creating additional backup levels with data objects.......................................................... 26
Backup level promotion process ....................................................................................... 27
Types of recovery for SQL Server VDI ............................................................................. 29
Recovery modes ............................................................................................................... 31
Supported special characters in database names..............................................................34
Access privileges required for backup and recovery operations........................................ 44
Where to start backup operations.....................................................................................50
Where to start restore operations.....................................................................................50
Command options for nsrsqlsv ......................................................................................... 63
Command syntax for SQL Server data..............................................................................68
Command syntax for names containing a period................................................................ 71
Command syntax for names containing a backslash...........................................................71
Command syntax for names containing a colon................................................................. 71
Tasks for configuring SQL Server VDI backups ................................................................ 79
Backup levels for SQL Server data....................................................................................80
Save sets in a standalone environment..............................................................................87
Save sets in a cluster environment....................................................................................87
Application Information field values...................................................................................88
Save sets...........................................................................................................................91
Application Information field values................................................................................... 91
Advanced restore options................................................................................................108
Command options for nsrsqlrc .........................................................................................112
Command syntax for SQL Server data.............................................................................122
Command syntax for names containing a period..............................................................124
Command syntax for names containing a backslash........................................................ 124
Command syntax for names containing a colon............................................................... 124
ItemPoint for SQL Server requirements.......................................................................... 128
Guidelines for fail-safe striped recovery.......................................................................... 142
Disaster recovery features...............................................................................................146
Rebuilding SQL Server system databases........................................................................148
Rebuilding SQL Server system databases........................................................................149
Rebuilding SQL Server system databases........................................................................150
Rebuilding SQL Server system databases........................................................................ 151
Rebuilding SQL Server system databases........................................................................162
Rebuilding SQL Server system databases........................................................................165
Program and log file names without debug logging enabled.............................................168
Program and log file names with debug logging enabled..................................................168
Dell EMC NetWorker Module for Microsoft for SQL VDI User Guide 9

Tables
10 Dell EMC NetWorker Module for Microsoft for SQL VDI User Guide

Preface
As part of an effort to improve product lines, periodic revisions of software and hardware are
released. Therefore, all versions of the software or hardware currently in use might not support
some functions that are described in this document. The product release notes provide the most
up-to-date information on product features.
If a product does not function correctly or does not function as described in this document,
contact a technical support professional.
Note: This document was accurate at publication time. To ensure that you are using the latest
version of this document, go to the Support website https://www.dell.com/support.
Purpose
This guide contains information about using the NetWorker Module for Microsoft (NMM) 19.2
software to back up and recover SQL Server using the Virtual Device Interface (VDI) technology.
Note: The
recovery procedures described in this guide and must be referred to when performing
application-specific tasks. Ensure to download a copy of the
Administration Guide
guide.
Audience
This guide is part of the NetWorker Module for Microsoft documentation set and is intended for
use by system administrators during the setup and maintenance of the product. Readers should be
familiar with the following technologies used in backup and recovery:
l
NetWorker software
l
Microsoft Virtual Device Interface (VDI) technology
NetWorker Module for Microsoft Administration Guide
from the Support website at https://support.emc.com before using this
supplements the backup and
NetWorker Module for Microsoft
Dell EMC NetWorker Module for Microsoft for SQL VDI User Guide
11

Preface
Revision history
The following table presents the revision history of this document.
Table 1 Revision history
Revision Date Description
01 November, 2019 First release of this document for the NetWorker
Module for Microsoft 19.2 release.
Related documentation
The NMM documentation set includes the following publications:
l
NetWorker Module for Microsoft Release Notes
l
NetWorker Module for Microsoft Administration Guide
l
NetWorker Module for Microsoft Installation Guide
l
NetWorker Module for Microsoft for SQL and SharePoint VSS User Guide
l
NetWorker Module for Microsoft for SQL VDI User Guide
l
NetWorker Module for Microsoft for Exchange VSS User Guide
l
NetWorker Module for Microsoft for Hyper-V User Guide
l
ItemPoint for Microsoft SQL Server User Guide
l
ItemPoint for Microsoft Exchange Server User Guide
l
ItemPoint for Microsoft SharePoint Server User Guide
l
NetWorker documentation set
Special notice conventions that are used in this document
The following conventions are used for special notices:
NOTICE
Identifies content that warns of potential business or data loss.
Note: Contains information that is incidental, but not essential, to the topic.
Typographical conventions
The following type style conventions are used in this document:
Table 2
Style conventions
Bold Used for interface elements that a user specifically selects or clicks,
for example, names of buttons, fields, tab names, and menu paths.
Also used for the name of a dialog box, page, pane, screen area with
title, table label, and window.
Italic
Monospace
Used for full titles of publications that are referenced in text.
Used for:
l
System code
l
System output, such as an error message or script
l
Pathnames, file names, file name extensions, prompts, and
syntax
l
Commands and options
12 Dell EMC NetWorker Module for Microsoft for SQL VDI User Guide

Table 2 Style conventions (continued)
Preface
Monospace italic
Monospace bold
[ ] Square brackets enclose optional values.
| Vertical line indicates alternate selections. The vertical line means or
{ } Braces enclose content that the user must specify, such as x, y, or z.
... Ellipses indicate non-essential information that is omitted from the
Used for variables.
Used for user input.
for the alternate selections.
example.
You can use the following resources to find more information about this product, obtain support,
and provide feedback.
Where to find product documentation
l
https://www.dell.com/support
l
https://community.emc.com
Where to get support
The Support website https://www.dell.com/support provides access to product licensing,
documentation, advisories, downloads, and how-to and troubleshooting information. The
information can enable you to resolve a product issue before you contact Support.
To access a product-specific page:
1. Go to https://www.dell.com/support.
2. In the search box, type a product name, and then from the list that appears, select the
product.
Knowledgebase
The Knowledgebase contains applicable solutions that you can search for either by solution
number (for example, KB000xxxxxx) or by keyword.
To search the Knowledgebase:
1. Go to https://www.dell.com/support.
2. On the Support tab, click Knowledge Base.
3. In the search box, type either the solution number or keywords. Optionally, you can limit the
search to specific products by typing a product name in the search box, and then selecting the
product from the list that appears.
Live chat
To participate in a live interactive chat with a support agent:
1. Go to https://www.dell.com/support.
2. On the Support tab, click Contact Support.
3. On the Contact Information page, click the relevant support, and then proceed.
Service requests
To obtain in-depth help from Licensing, submit a service request. To submit a service request:
1. Go to https://www.dell.com/support.
Dell EMC NetWorker Module for Microsoft for SQL VDI User Guide 13

Preface
2. On the Support tab, click Service Requests.
Note: To create a service request, you must have a valid support agreement. For details about
either an account or obtaining a valid support agreement, contact a sales representative. To
find the details of a service request, in the Service Request Number field, type the
service request number, and then click the right arrow.
To review an open service request:
1. Go to https://www.dell.com/support.
2. On the Support tab, click Service Requests.
3. On the Service Requests page, under Manage Your Service Requests, click View All Dell
Service Requests.
Online communities
For peer contacts, conversations, and content on product support and solutions, go to the
Community Network https://community.emc.com. Interactively engage with customers, partners,
and certified professionals online.
How to provide feedback
Feedback helps to improve the accuracy, organization, and overall quality of publications. You can
send feedback to DPAD.Doc.Feedback@emc.com.
14 Dell EMC NetWorker Module for Microsoft for SQL VDI User Guide

CHAPTER 1
Overview
This chapter includes the following sections:
l
Using NMM with Virtual Device Interface API........................................................................16
l
SQL Server backup and restore workflow..............................................................................18
l
SQL Server cluster environments..........................................................................................22
l
SQL Server backups..............................................................................................................23
l
SQL Server recovery.............................................................................................................29
l
SQL Server instance and database names for backup and recovery......................................33
Dell EMC NetWorker Module for Microsoft for SQL VDI User Guide 15

Overview
Using NMM with Virtual Device Interface API
You can use the NetWorker Module for Microsoft (NMM) software to back up and recover
Microsoft SQL Server data. NMM uses Virtual Device Interface (VDI), an API that Microsoft SQL
Server provides, to integrate with the SQL Server and enable the NetWorker software to back up
and recover SQL Server data.
Note: Any references to the Data Domain systems and the Data Domain devices in the product
also apply to the PowerProtect Data Domain systems.
When you install NMM, you can run the System Configuration Checker from the Installation
wizard. It is recommended that you run the System Configuration Checker to ensure that the
setup is correctly configured for backup and recovery. The
Installation Guide
Note: If you are a NetWorker Module for SQL Server (NMSQL) user and are migrating to
NMM VDI, perform a full backup of the SQL Server data after you install NMM VDI. NMM VDI
cannot recover SQL snapshot data backed up with NMSQL.
The following figure describes the backup process that takes place between NMM and the SQL
Server using VDI:
provides details.
NetWorker Module for Microsoft
1. The user starts the backup process with NMM.
2. The backup command is sent to the SQL Server. This interaction is performed through the VDI
API.
3. NMM reads the data from SQL Server and stores it on the NetWorker server.
4. NMM sends the backup status to the NetWorker Server and notifies the user when the backup
is complete.
16 Dell EMC NetWorker Module for Microsoft for SQL VDI User Guide
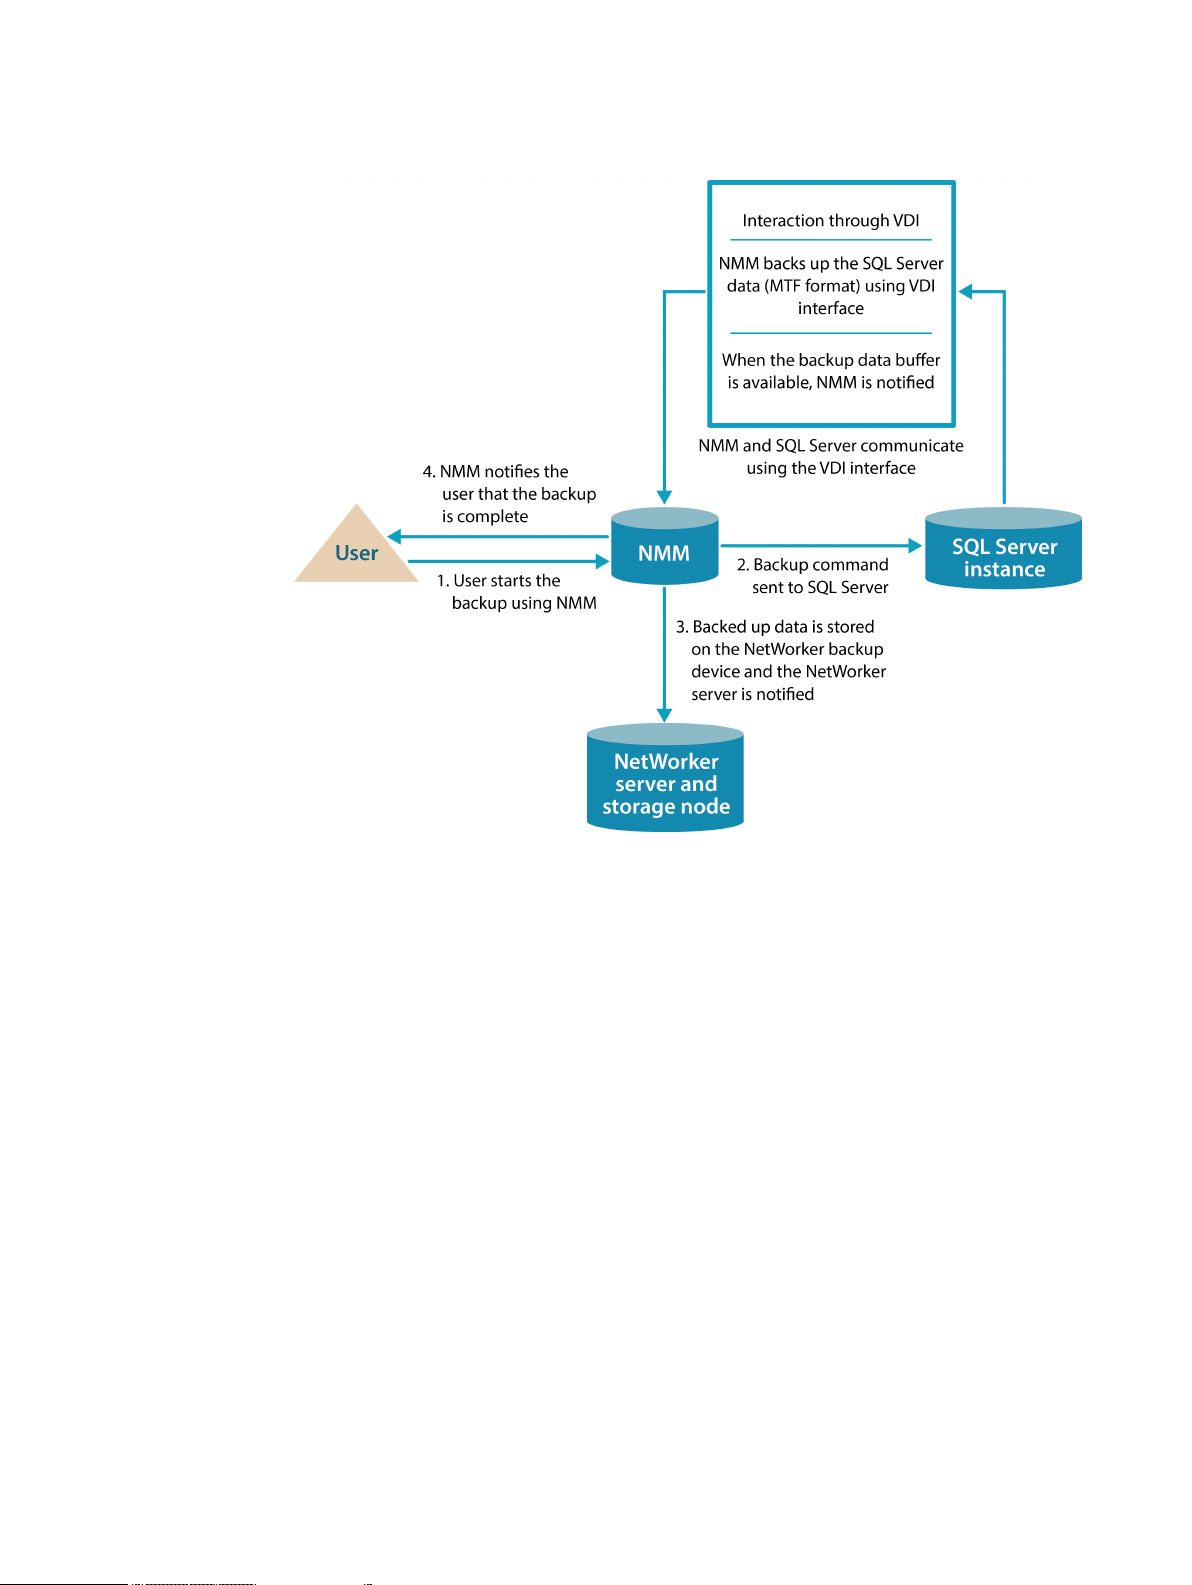
Figure 1 VDI backup process between NMM and SQL Server
Overview
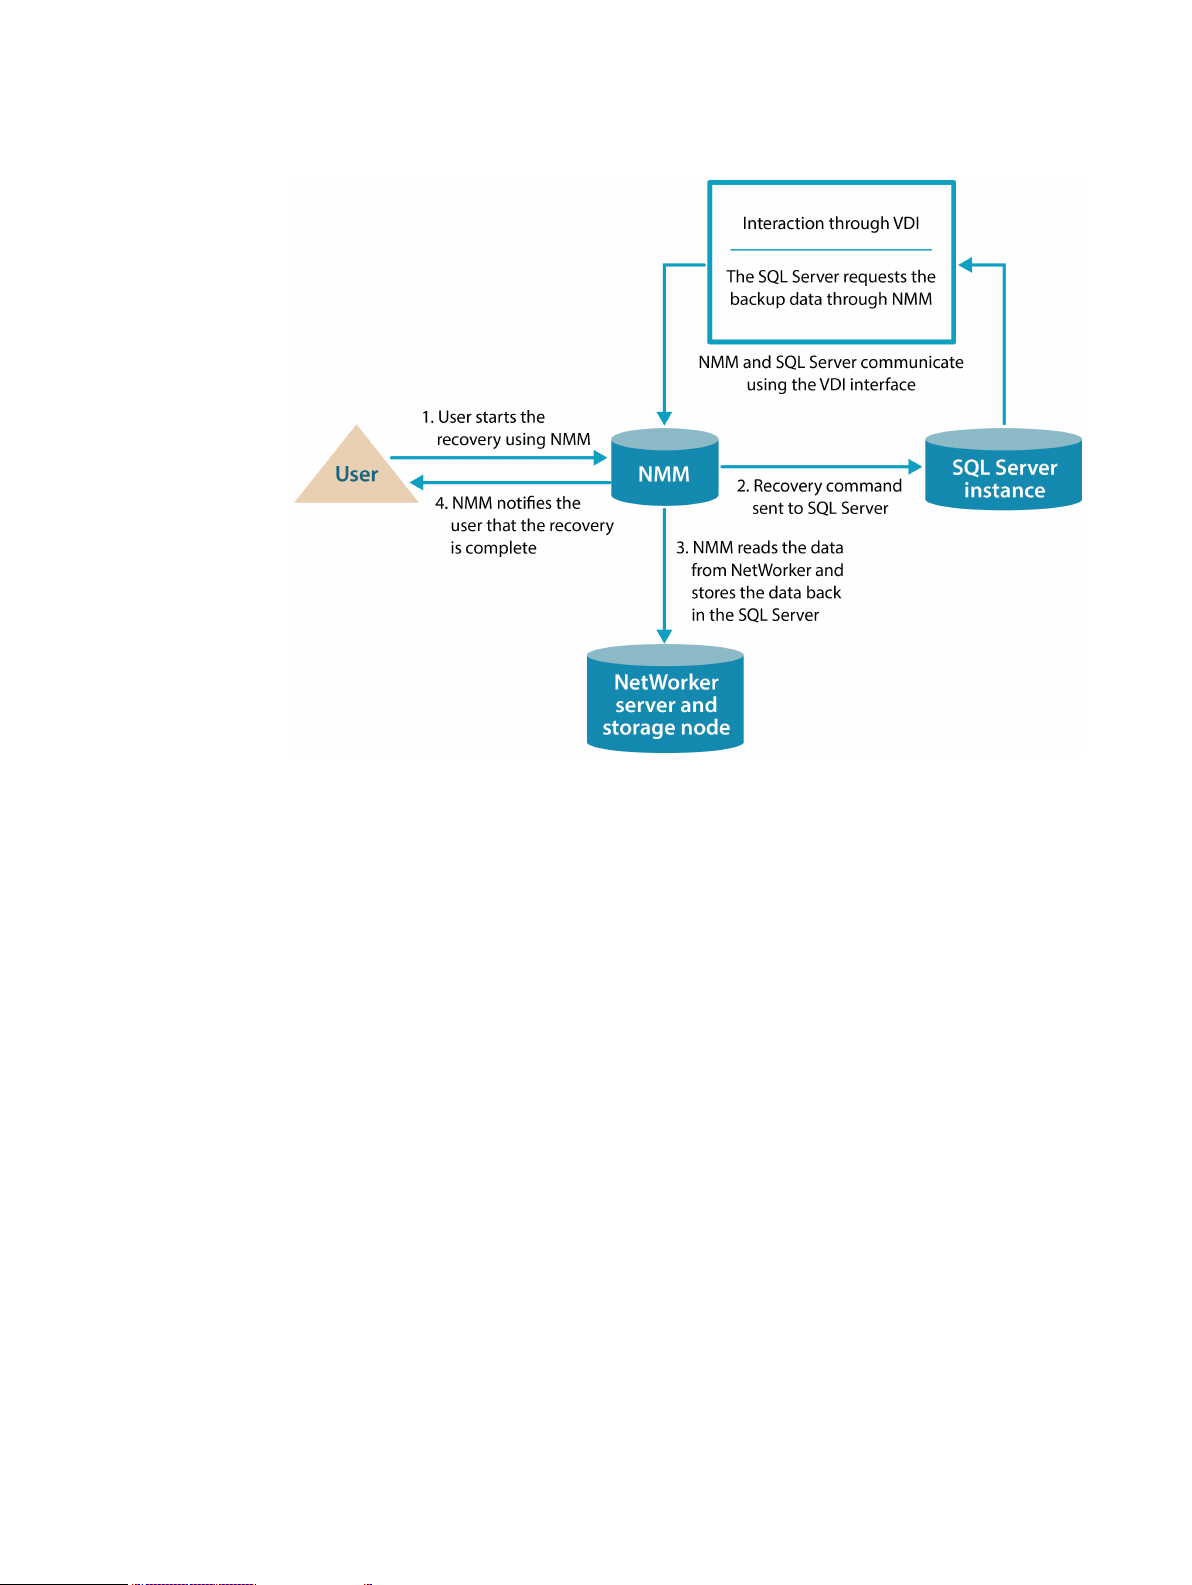
The following figure describes the recovery process that takes place between NMM and the SQL
Server using VDI:
1. The user starts the recovery process with NMM.
2. The restore command is sent to the SQL Server. This interaction is performed through the VDI
API.
3. NMM reads the data from the NetWorker server and passes the data to the SQL Server using
VDI.
4. NMM notifies the user when the recovery is complete.
Dell EMC NetWorker Module for Microsoft for SQL VDI User Guide 17
Overview
Figure 2 VDI recovery process between NMM and SQL Server
SQL Server backup and restore workflow
This section provides information about SQL Server backup and restore workflows.
Traditional backup workflow (stand-alone backup over a storage node)
During a backup in a traditional environment, processes interact between the NetWorker client
(that is, NMM), the NetWorker server, and the SQL Server.
During a traditional backup, the backup starts from the nsrsqlsv program, which is started by
using one of the following:
l
Command prompt
l
NMM plug-in for the Microsoft SQL Server Management Studio
The following process occurs in a traditional backup:
1. The nsrd program starts the backup nsrworkflow on the NetWorker server.
2. The nsrworkflow starts the savegrp program.
3. The savegrp program runs the NMM backup command (nsrsqlsv) on the client instead of
performing a standard NetWorker save.
4. The nsrsqlsv program passes the backup data from SQL Server to the NetWorker server
through an X-Open Backup Services application programming interface (XBSA).
The NetWorker server schedules and performs all storage management tasks.
The following figure shows the traditional backup workflow.
18 Dell EMC NetWorker Module for Microsoft for SQL VDI User Guide

Figure 3 Traditional backup workflow
Overview
The
NetWorker Administration Guide
provides information about the NetWorker services and
operations.
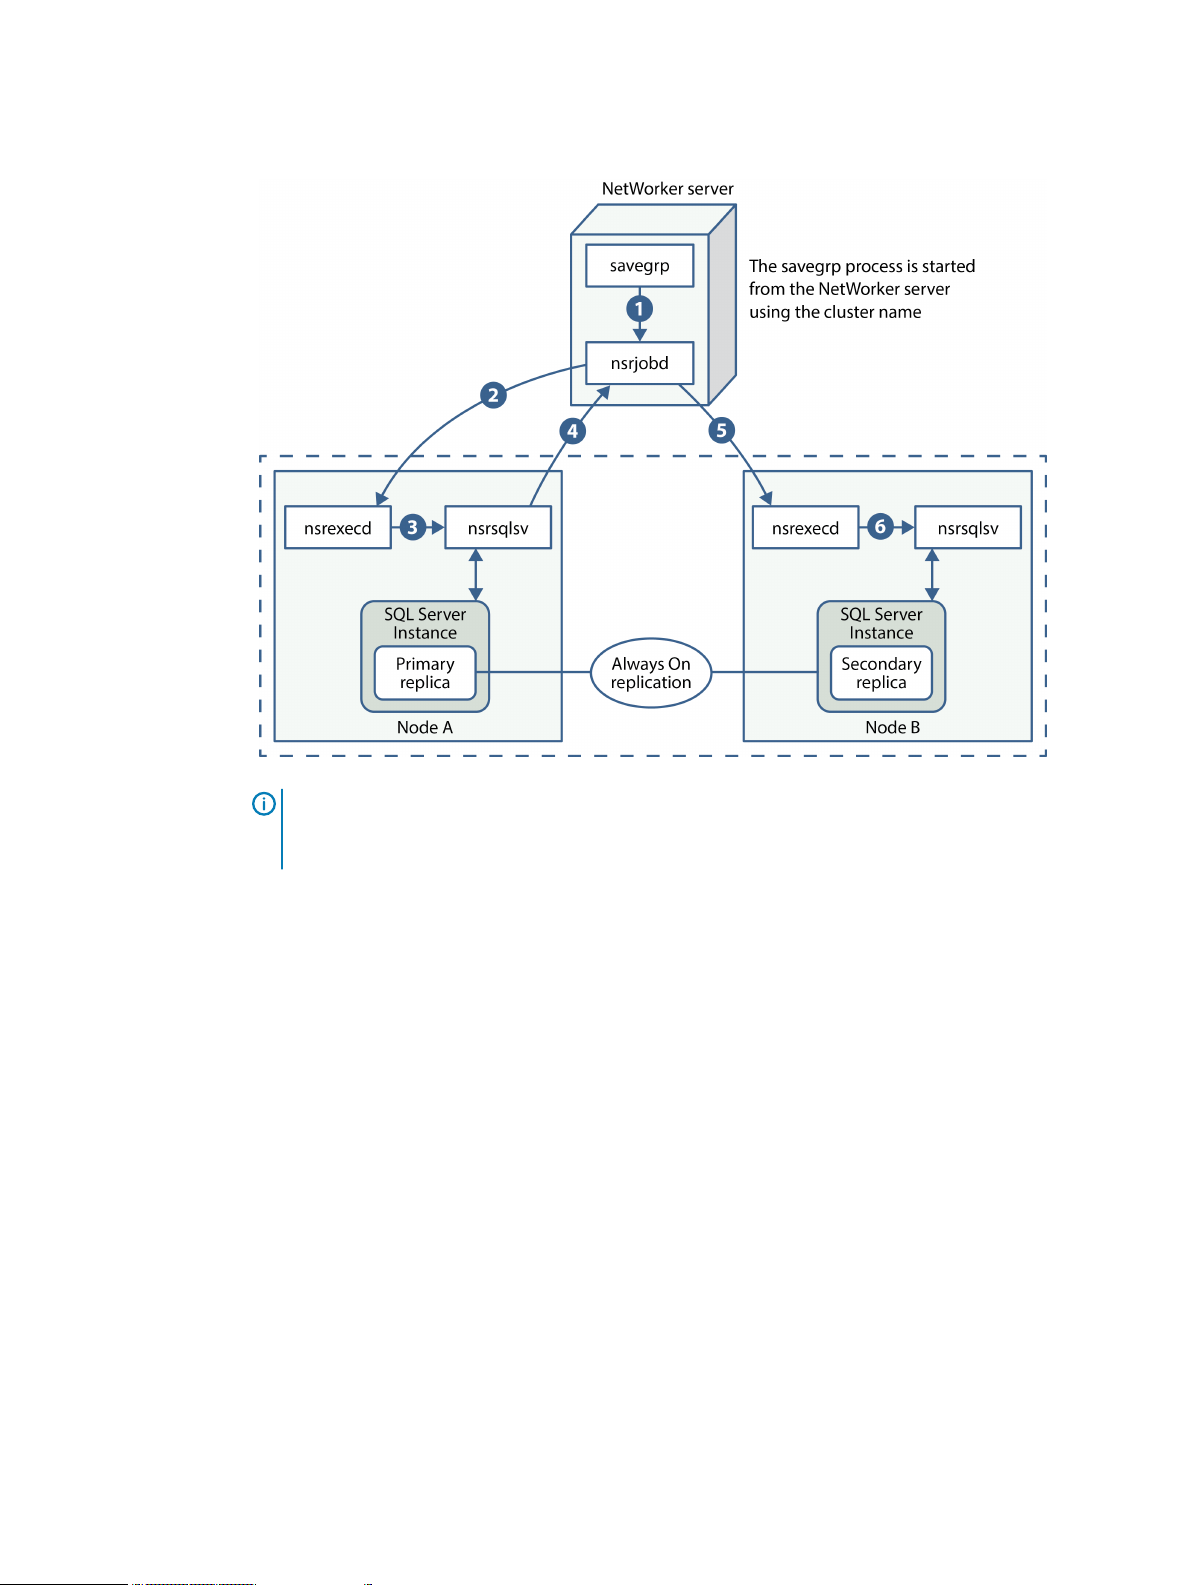
Federated backup workflow (AlwaysOn Availability Group configuration)
During a federated backup, processes interact between the NetWorker client (that is, NMM), the
NetWorker server, and the SQL Server.
Note:
NMM supports federated backups of any SQL Server with support for AlwaysOn
Availability Groups (SQL Server 2012 and later).
The backup starts from the nsrsqlsv program, which is started by using one of the following:
l
Command prompt
l
NMM plug-in for the Microsoft SQL Server Management Studio
The following process occurs during a federated backup:
1. The NetWorker server starts the nsrsqlsv program in the active node of the Windows
cluster (called the coordinator process).
2. The coordinator process queries the SQL Server and detects the Backup Preference and
priority from the Availability group, and starts the worker process on the detected preferred
node.
3. The backup is configured with and stored under the Windows cluster name on the Availability
Group.
The following figure shows the federated backup workflow.
Dell EMC NetWorker Module for Microsoft for SQL VDI User Guide 19
Overview
Figure 4 Federated backup workflow
Note: The coordinator process always goes through the nsrjobd service to start the worker
process on the secondary nodes to ensure that the NetWorker server and nsrjobd can
communicate with secondary nodes.
Recovery workflow
During a traditional recovery operation that uses a storage node without the Client Direct feature,
process interactions occur between the NetWorker client (that is, NMM), the NetWorker server,
and the SQL Server.
The following process occurs in a traditional recovery operation:
1. The nsrsqlrc program starts the recovery.
2. The NetWorker XBSA API translates the object names that NMM requests into a format that
NetWorker understands and forwards the translated object names to the NetWorker server
nsrd service.
3. The nsrmmd media service, contacts the nsrmmdbd service to search the NetWorker server’s
media database for the volumes that contain the requested objects.
4. After the media is mounted, the nsrmmd program sends the data through the NetWorker
XBSA API to nsrsqlrc, which then sends data to the SQL Server.
The following figure shows the traditional recovery workflow.
20 Dell EMC NetWorker Module for Microsoft for SQL VDI User Guide
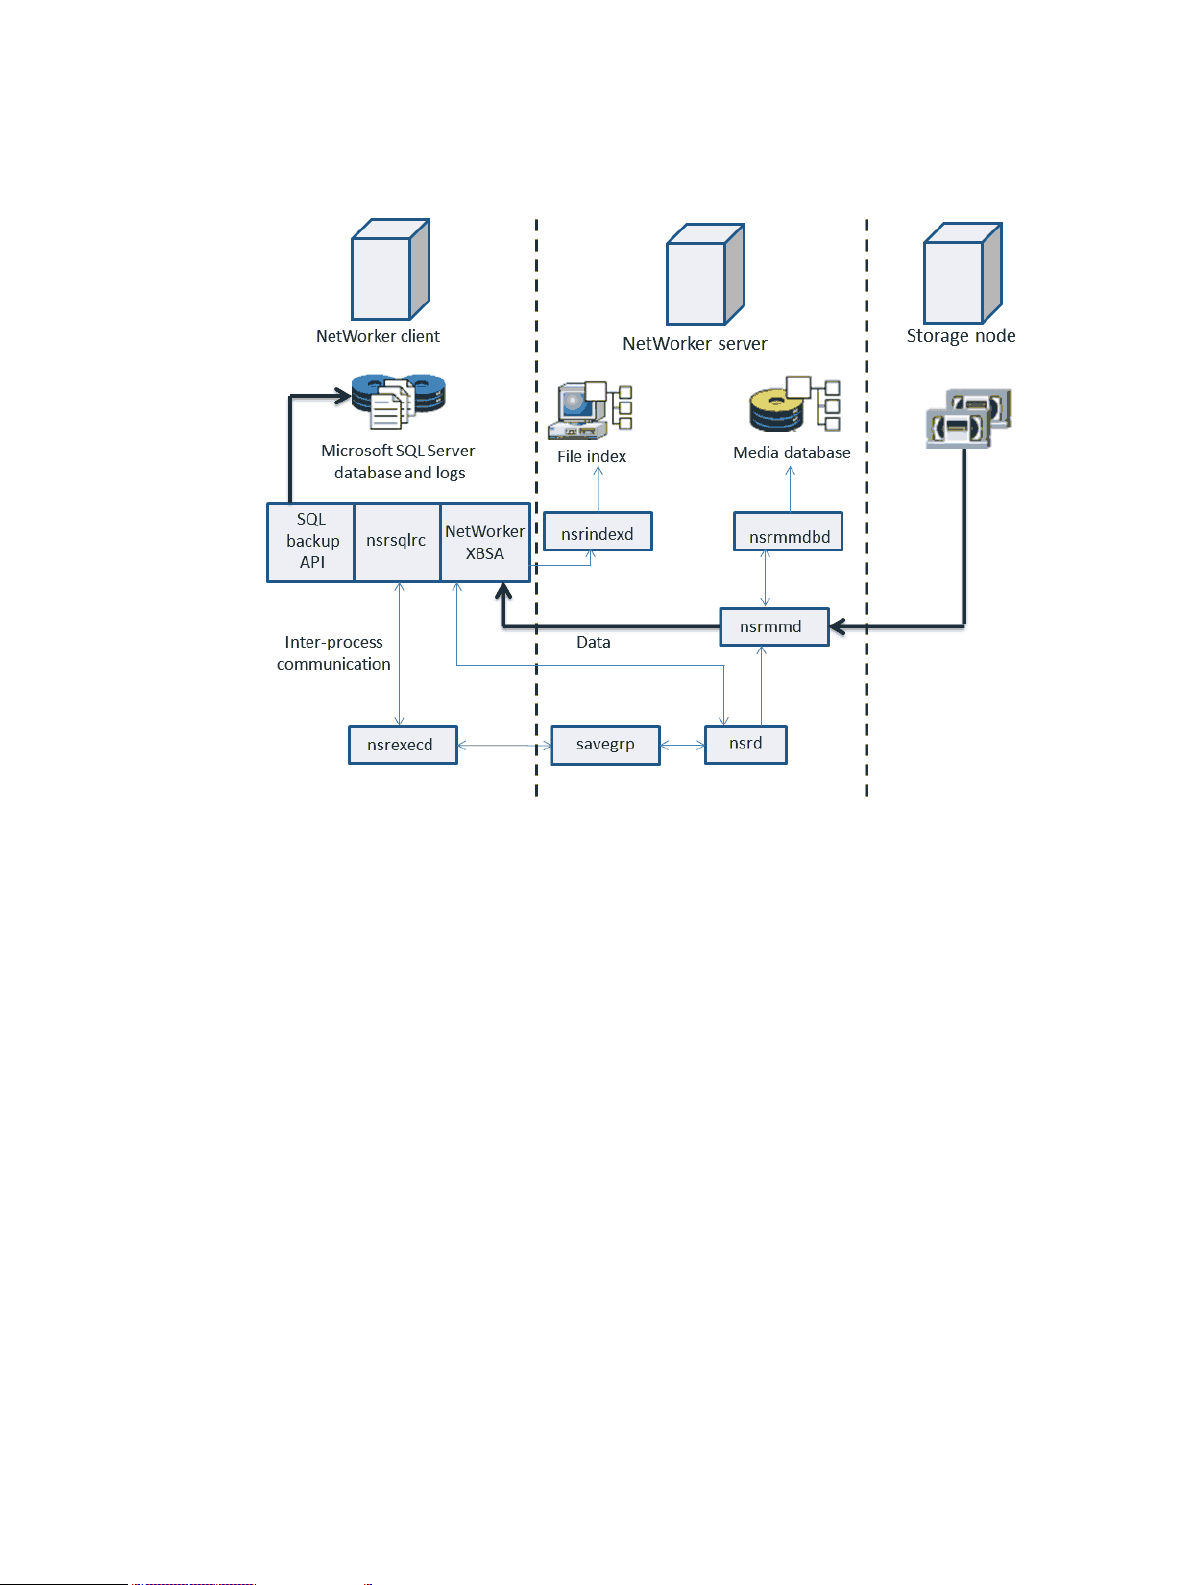
Figure 5 Traditional recovery workflow
Overview
NMM recovery interactions with the SQL Server
When a SQL instance-level recovery occurs, NMM stops and starts the SQL Server and
dependent services.
When you want to recover the SQL Server system database types like master and msdb, the
nsrsqlrc program automatically stops and restarts the SQL Server services appropriately, as
follows:
1. Before the recovery process begins, NMM stops the SQL Server and other dependent
services.
When the SQL Server Analysis Services (SSAS) is running, it might use the only available
database connection if the SQL Server is in a single-user mode. Stop the Analysis Services
before restoring the master database.
2. NMM starts the SQL Server in single-user mode.
3. NMM performs the recovery.
4. After the recovery process finishes, NMM waits for the SQL Server to shut down.
5. For stand-alone and cluster environments, NMM restarts the SSAS.
When you recover a master database, there can be timing issues related to stopping and starting
of services. If you are recovering a master database, it is recommended that before you start the
recovery, you manually stop all SQL Server services except for the SQL Server.
Dell EMC NetWorker Module for Microsoft for SQL VDI User Guide 21

Overview
SQL Server cluster environments
NMM can back up or restore data from an SQL server that is running as a SQL virtual server in a
Windows Server Failover Cluster (WSFC). The SQL Server instance that is running in this
configuration is called Failover Cluster Instance (FCI).
NMM requires the SQL virtual server name so it can perform the following tasks:
l
Connect to the SQL Server instance.
l
Accept data from or deliver data to the SQL Server in the cluster, and to initialize the SQL
Server VDI.
l
Create entries in the NetWorker client file index.
NMM creates index entries under the virtual server name in the NetWorker client file index.
Note: Backup and restore of SQL Server data in a cluster with NMM requires Cluster Client
Connection licenses on the NetWorker server host. A separate Cluster Client Connection
license is required for each node in the cluster.
NMM detects SQL Server instances
NMM automatically detects all the SQL Servers in a WSFC, including the SQL virtual servers.
NMM detects the SQL Servers only on the active nodes, whenever the following conditions occur:
l
You open the NMM plug-in for the Microsoft SQL Server Management Studio.
l
You start a backup or restore operation.
Named instances in failover cluster configurations
NMM provides failover cluster support by using the multiple instance features provided in the SQL
Server. In a failover configuration, the SQL virtual servers run as either default instances or as
named instances. Only one default instance of a SQL virtual server can be installed. Additional SQL
virtual servers might be installed as named instances, where each instance name must be unique
within the cluster.
Multiple named instances are supported as SQL virtual servers in a cluster configuration. The
number of instances that are supported depends on the SQL Server version that is used in the
setup. The
NetWorker Module for Microsoft Installation Guide
and the Microsoft SQL Server
documentation provide more information.
Each named SQL virtual server instance has the following qualities:
l
A unique IP address, network name, and instance name
l
Datafile files that are installed on a clustered drive that belongs to the same cluster group as
the associated virtual server for that named instance
Active and passive cluster configurations
When the NMM SSMS plug-in GUI is started on the active node, NMM automatically uses the SQL
virtual server as the client name. The client name is used for reading or writing to the NetWorker
media database and client file index. The NMM SSMS plug-in GUI can be used only on the active
node.
When you use the command line interface, use the nsrsqlsv -A <SQL virtual server> backup
command when the target database is a SQL cluster.
The NMM SSMS plug-in GUI shows all active clusters that are running on the host in the SQl
Server Instance list.
22 Dell EMC NetWorker Module for Microsoft for SQL VDI User Guide

If each SQL virtual server is running on a different physical node in the cluster, an active or active
cluster configuration exists, and no failover occurs, NMM automatically communicates with the
SQL virtual server that is running on the same physical node.
Multi-subnet cluster configurations
NMM supports SQL AlwaysOn Availability Groups in a multi-subnet cluster. You can back up and
restore the AlwaysOn Availability Group data in a multi-subnet cluster by using the Availability
Group Listener client resource. The following sections provide information:
l
Availability group listeners on page 39
l
Clusterless availability group listeners on page 39
l
Configuring a client resource on page 80
SQL Server backups
This section introduces NMM as a tool to back up an SQL Server.
Types of supported backups
NMM supports manual and scheduled backups of SQL Server data.
Overview
Manual (traditional) backup
NMM supports traditional backups, which are often referred to as manual backups. A traditional
backup of SQL data can be performed at any time and is independent of any scheduled backup.
NMM supports traditional backup of the following items:
l
Database
l
File
l
File group
l
Filestream data
l
Transaction log
Also, NMM for SQL Server supports file group differential, file differential, and copy-only backups.
A file group differential backup can reduce both media requirements and recovery time because
data is stored across more than one disk or disk partition, so recovery time is reduced. A
differential backup can substitute for any logs-only backups performed between the full and
differential backups. A full backup must be performed first.
Note:
NMM can recover a full backup of SQL Server data (including files and file groups) that
were created with NMSQL. However, NMM cannot recover snapshot (PowerSnap based)
backups that were created with NMSQL.
Scheduled backup
The most reliable way of protecting SQL data is to ensure that backups of the SQL Server are run
at regular intervals, that is, scheduled backups. Scheduled backups ensure that all SQL Server
data, including the NetWorker server’s client indexes and bootstrap file, is automatically saved. If a
disaster occurs, the client indexes and bootstrap file are vital for restoring data to the SQL Server.
Backup limitations
Due to SQL Server behavior, the following limitations apply to SQL Server backups:
l
For simple recovery model databases, only full backups (including copy-only full backups) are
supported.
Dell EMC NetWorker Module for Microsoft for SQL VDI User Guide 23

Overview
Backup levels
l
For full backups of a secondary replica, SQL Server supports only copy-only backups.
Learn about the backup levels that NMM supports
Note: NetWorker 8.2.x defines backup levels differently than NMM 19.2. If you are using
NetWorker 8.2.3 or 8.2.4 server with the NMM 19.2 client, refer to the
Microsoft for SQL VDI User Guide
version 8.2 SP1 for information about backup levels.
NetWorker Module for
NMM supports the following three levels of backup.
Full backups
Entire database backup, including all file groups or files in the database.
Cumulative incremental backups
A cumulative incremental backup captures all changes since the last full backup.
Logs-only backups
A logs-only backup that corresponds to a SQL Server transaction log backup. A log file backup
cannot be used to recover a database.
A log file backup is used after a database recovery to restore the database to the point of the
original failure.
The logs only backup option appears in the NetWorker Management Console. When using the
command prompt to perform a logs-only backup, use the txnlogs -l command.
Note:
entry is the database save set, which lists the backup level as txnlog. The second entry is a
cover set entry, which lists the backup level as incr. Both entries are required for cloning and
restore operations.
Copy-only backups
You can take a manual SQL Server copy-only backup at any time without affecting the backup
schedule or log chain. You can perform copy-only backups at the full or logs-only backup level.
Copy-only backups are not promoted to a different backup level, which allows other backups to
run without disrupting the backup chain.
Copy-only full backups are not considered level full backups during promotion. Having a copy-only
full backup does not prevent subsequent backups from being promoted to a full backup.
Setting backup levels
NMM enables you to specify backup levels to logs only, cumulative incremental, and full.
The availability of a backup level depends on the type of data selected for backup and any SQL
Server settings on those objects, as listed in the following table.
Note:
NetWorker 8.2.3 or 8.2.4 server with the NMM 19.2 client, refer to the
Microsoft for SQL VDI User Guide
When a logs-only backup is taken, NMM records two entries in the media database. One
NetWorker 8.2.x defines backup levels differently than NMM 19.2. If you are using
NetWorker Module for
version 8.2 SP1 for information about backup levels.
24 Dell EMC NetWorker Module for Microsoft for SQL VDI User Guide

Table 3 Backup levels for SQL Server data
SQL Server data objects Supported SQL Server backup levels
Full Cumulative incremental Logs only
Overview
All databases of SQL
default or named instances
Specified databases Yes Yes Yes
All filegroups in specified
databases
Filestream data in specified
databases
Specified filegroups in
specified database
Specified files in filegroups
in specified databases
Yes Yes Yes
Yes Yes Not applicable
Yes Yes Yes
Yes Yes Not applicable
Yes Yes Not applicable
When you perform a logs-only backup for SQL Server data objects, ensure that the SQL Server
database options are correctly configured. The Microsoft SQL Server documentation provides
more information. Individual items are subject to promotion.
Example strategies for backing up SQL Server data
This section describes example strategies for backing up SQL Server data.
Example 1
If the SQL Server manages a significant amount of data, schedule a backup of the
databases every 1 to 2 weeks, as shown in the following table.
Backup strategy one
Table 4 Full backup every 1 to 2 weeks
Fri Sat Sun Mon Tues Wed Thurs
Full Logs-only Logs-only Logs-only Logs-only Cumulative
incremental
Logs-only Logs-only Logs-only Cumulative
incremental
Full Repeat
Example 2 Backup strategy two
Logs-only Logs-only Logs-only
Logs-only
Another backup strategy is to schedule logs-only backups on several successive days
immediately following a full backup, as shown in the following table. This schedule
backs up all data that has changed since the previous logs-only backup.
A level 1 cumulative incremental backup can also be scheduled after several days of
logs-only backups, as shown in the following table. This schedule backs up all data
since the previous full backup.
Dell EMC NetWorker Module for Microsoft for SQL VDI User Guide 25

Overview
Example 2 Backup strategy two (continued)
NOTICE If a database is read-only, perform a full backup of the database. A read-
only database cannot be restored from an existing transaction log backup.
Table 5 Logs-only backup after a full backup
Fri Sat Sun Mon Tues Wed Thurs
Full Logs-only Logs-only Logs-only Cumulative
incremental
Repeat
Using backup levels
Because it is not practical or efficient to run full backups every day, you can specify different
backup levels for scheduled backups. Limiting the frequency of full backups can decrease server
load while ensuring complete data protection.
Differences between backup levels
The following table outlines the differences between backup levels.
Table 6
Backup level Advantages Disadvantages
Full Fastest restore time.
Logs only
l
l
l
Backup level advantages and disadvantages
Faster backup time than a full backup.
Decreases the load on server and uses the
least volume of space.
Enables point-in-time restore.
l
Slow backup.
l
Increases load on client, server, and
network.
l
Uses the most volume space.
l
Slow restore.
l
Data can spread across multiple volumes.
l
Multiple transaction logs can spread
across multiple volumes.
Logs-only Logs-only
Cumulative
incremental
l
Faster backup time than a full backup.
l
Captures all changes since the last full
Generally more time-consuming than a logsonly backup (depending on the backup
schedule strategy).
backup.
Combining data objects to create backup levels
NMM enables the selection of SQL Server data objects in various combinations to create
scheduled backups of different levels, as shown in the following table.
Table 7
Backup level Database objects
Full database To create a level full database backup of the selected databases and their
26 Dell EMC NetWorker Module for Microsoft for SQL VDI User Guide
Creating additional backup levels with data objects
transaction log files, select one or more databases.

Table 7 Creating additional backup levels with data objects (continued)
Backup level Database objects
Full file or file group To create a level full file or file group backup of the selected files or file
group, but not their transaction logs, select one or more files or one or
more filegroups.
Database logs only To create a database logs only level backup of only the logs only for the
selected database, select one or more databases.
The SQL database must be previously configured to enable logs only
backups.
Database cumulative incremental (level1)To create a database level cumulative incremental backup of only the
changes that are made to the selected databases since the last full level
backup was created, select one or more databases.
Overview
File or file group cumulative
incremental
Backup promotion
Guidelines for Microsoft SQL Server best practices indicate that a full database backup should be
the first step in implementing a restore strategy for a database. In adhering to these guidelines,
NMM supports backup level promotion. Backup level promotion is based on data on the NetWorker
server and the SQL Server.
Note:
The following table explains the scenarios which cause backup promotion to occur.
Table 8
Backup item Requested
backup level
Database Cumulative
incremental
To create a file or file group level cumulative incremental backup, select
one or more files or one or more filegroups. This backup only includes the
changes that are made to the selected files or filegroups since the last full
level backup.
NMM does not support backup promotion during copy-only backups.
Backup level promotion process
Level of
promotion
Database full
Reason for promotion
l
A full database backup does not exist.
l
A restore was done after the most recent full
database backup.
l
The last database backup was not performed with
NMM.
l
The database name is "master" or "msdb."
l
In the case of Always On Availability Groups, the last
full backup was performed on a different node.
l
Either the mirror partner has a more recent backup
or its backup status cannot be determined.
Logs only Database full
l
A full database backup does not exist.
l
A restore was done after the most recent full
database backup.
Dell EMC NetWorker Module for Microsoft for SQL VDI User Guide 27

Overview
Table 8 Backup level promotion process (continued)
Backup item Requested
backup level
Level of
promotion
File/Filegroup Full Database full
Cumulative
Database full
incremental
Logs only Database full
Reason for promotion
l
The last database backup was not performed with
NMM.
l
The database name is "master" or "msdb."
l
In the case of Always On Availability Groups, the last
full backup was performed on a different node.
l
Either the mirror partner has a more recent backup
or its backup status cannot be determined.
l
The database model changed from simple to full or
to bulk logged.
l
The database is using the simple restore model.
l
The database is in emergency mode.
l
A full database backup does not exist.
l
A restore was done after the most recent full
database backup.
l
The last database backup was not performed with
NMM.
l
The database name is "master" or "msdb."
l
Either the mirror partner has a more recent backup
or its backup status cannot be determined.
Logs-only backups of files or filegroups are not
Logs only Filegroup/file full
supported.
Toggling backup promotion functionality
You can toggle backup promotion for both scheduled and manual backups using the following
tools:
l
Scheduled backup:
n
In the Client Backup Configuration wizard, select Turn off backup promotion to turn off
backup promotion.
n
In the Client Properties dialog box, type the NSR_BACKUP_PROMOTION application
information variable with a valid value.
l
Manual backup:
n
At a command prompt, use the BACKUP_PROMOTION flag with a valid value with the
nsrsqlsv command.
n
In the NMM SSMS plug-in, on the Options page, select an option from the Backup
Promotion list.
Note:
Consider the following when you disable backup promotion:
l
When backing up the 'msbd' and 'master' databases, the backup level is always set to full
and the backup promotion setting is ignored.
l
The first backup of a database is always set to level full and the backup promotion setting
is ignored.
28 Dell EMC NetWorker Module for Microsoft for SQL VDI User Guide

l
If you disable backup promotion, data loss may occur if the backup chain is broken. For
example, if a transaction logs backup is taken with a third party software or SQL native
backup tools in between two NMM logs only backups for the same database, NMM may be
unable to restore the database using the logs only backup.
The Manual Backups chapter and the Scheduled Backups chapter provide more information about
changing backup promotion settings.
SQL Server recovery
This section introduces NMM as a tool to recover an Microsoft SQL Server.
Types of supported recovery
This section lists the types of supported recovery for SQL Server VDI.
NOTICE NMM supports recovery of a SQL Server 2012 or later database only after the Always
On Availability Group replication has been removed for the corresponding database.
The following table lists the types of recovery for SQL Server VDI in NMM.
Table 9 Types of recovery for SQL Server VDI
Overview
Type of recovery When used Description
Traditional recovery For data that was backed up by
traditional backup, NMM supports
traditional recovery.
Normal recovery NMM uses the normal restore type
as the default.
Data recovery from a traditional
backup can be performed:
l
At any time with NMM.
l
By running NMM recover
command (nsrsqlrc) from the
command prompt.
Traditional recovery operations
recover files, file groups,
databases, and transaction log
backups.
The normal restore type restores:
l
The entire set of data that is
associated with one or more SQL
Server backups, including full,
logs only, and cumulative
incremental backups.
l
A file, file group, or a database to
the database originally backed
up.
l
Level full, level 1 (cumulative
incremental), and level logs only
backups in the order required by
SQL Server.
NMM can back up and restore
specified files and file groups.
Also, a single file group, or
multiple file groups or files, can
Dell EMC NetWorker Module for Microsoft for SQL VDI User Guide 29

Overview
Table 9 Types of recovery for SQL Server VDI (continued)
Type of recovery When used Description
be restored from a full database
backup.
Copy recovery A copy recovery is an operation in
which data is recovered to a SQL
Server host other than the one from
which it was backed up. A copy
restore from and to the same SQL
Server instance can also be done.
Flat file recovery Flat file recovery allows you to
restore the backup to a file.
Granular-level recovery (GLR) Granular-level recovery allows you to
recover SQL server data at the table
level.
The copy recovery type creates a
copy of a database by restoring a
SQL Server database to a new
location, or with a new database
name. The copy recovery type makes
it easy to duplicate a database that
was previously backed up. You can
only mark a single item for this
operation. Also, you can copy a
system database, but you cannot
overwrite it.
NMM does not support copy
recovery of filestream databases.
When you perform a flat file
recovery, NMM writes the backup to
files instead of directly to the SQL
database. This feature allows you to
restore the recovery files later
without access to the network by
using the standard T-SQL file restore
command.
By using GLR with SQL Server, you
can recover individual tables to the
production database. This feature
reduces the space requirements on
local system storage during a restore
operation. Depending on the size of
the content database, GLR may also
reduce recovery time. Granular-level
recovery is performed using NMM
and ItemPoint for Microsoft SQL
Server.
Recovery modes
To recover a database, you must specify a recovery mode. A recovery mode instructs the SQL
Server how to interact with the database after the recovery operation completes. For instance,
recovery modes can leave the database in an intermediate state, so additional transaction logs can
be applied.
The following table shows how the recovery modes correspond to SQL Server database restore
options.
30 Dell EMC NetWorker Module for Microsoft for SQL VDI User Guide

Table 10 Recovery modes
Types of recovery mode Description
Normal The normal restore mode instructs SQL
Server to leave the database in an operational
state after the restore completes. This state
then enables database reads and writes. The
normal restore mode is the default mode
NMM uses when restoring a database.
No-recovery The no-recovery restore mode activates the
SQL Server NORECOVERY database restore
option for the last stage that was restored.
The no-recovery restore mode places the
database in a state that cannot be loaded
after the restore, but it is still able to process
additional transaction log restore operations.
Standby The standby restore mode activates the SQL
Server STANDBY database restore option for
the last stage that is restored, which forces
the database to be in a read-only state
between transaction log restore operations.
The standby restore mode provides an undo
file for SQL Server to use when rolling back
the transactions.
Overview
Recovery time
Online SQL Server provides the ability to perform a
restore operation while a SQL Server
database is active. The database is completely
offline only while the primary file group is
being restored. After the primary file group is
restored, the database can be brought online
while the rest of the file groups are being
restored, and then only the data that is being
restored is unavailable. The rest of the
database remains available during this type of
restore. Earlier versions of SQL Server require
that you bring a database offline before you
restore the database.
Backups can be recovered to a specific time. The recovery time controls which backup data should
be reinstated when a database is recovered. The recovery time also controls the portions of a logs
only backup that must be recovered when NMM is instructed to discard transactions that are
performed after a particular time.
The default or current recovery time for each database comes from the create time of the marked
item. By default, the most recent backup is recovered. If the most recent backup is logs only level
or 1, dependent backups are recovered first. User-specified recovery times can restore older
backup versions or perform point-in-time recovery operations. For example, a point-in-time
recovery is specified by using a recovery time that is earlier than the create time of the transaction
log backup, but later than the create time of the previous backup.
NMM provides three methods for recovering to a specific time:
Dell EMC NetWorker Module for Microsoft for SQL VDI User Guide 31

Overview
l
Database backup versions
l
Point-in-time recovery of a transaction log (level logs only) backup
l
Recovering to a named log mark
Recovery window restrictions
In the Recovery window, the rules for marking an item are based on the selected restore type. The
normal restore type does not restrict marking in any way. All restorable objects (file, file group,
filestream data, database) can be marked. When the copy restore type is chosen, only one
database object can be marked. Marking the root SQL Server item is not permitted, the file groups
and files of the selected database are automatically marked and restored as part of the full
database restore.
The recovery process
A recovery uses the following process.
1. NMM recovers the most recent full backup, and then recovers the most recent differential
(level 1) backup (if any).
If a full database backup is removed from the NetWorker server, and an incremental backup is
tried, the recovery fails. NMM checks the SQL Server instance to determine if a full database
backup was performed, but does not verify if a full backup still exists on the NetWorker server.
2. NMM recovers all the transaction log backups that ran after the most recent differential
backup (or that ran after the last full backup, if there was no differential backup). To correctly
recover uncommitted transactions, the SQL Server NORECOVERY mode is specified for all
intermediate transaction logs.
The recovery of the final transaction log specifies the restore mode if STANDBY or
NORECOVERY is selected. The default selection is Normal.
For example, if you selected a restore mode of NORECOVERY, that specification appears in
the output for a database restore as follows:
nsrsqlrc -s NetWorker_server_name my_database
nsrsqlrc: Restoring database my_database...
nsrsqlrc: RESTORE database my_database FROM
virtual_device='BSMSQL' WITH norecovery, stats
nsrsqlrc: RESTORE database my_database from
virtual_device='BSMSQL' WITH norecovery (differential)
nsrsqlrc: RESTORE transaction my_database FROM
virtual_device='BSMSQL' WITH norecovery
nsrsqlrc: RESTORE transaction my_database FROM
virtual_device='BSMSQL' WITH norecovery
Received 1.0 MB 4 files from NSR server
Database file relocation restrictions
NMM imposes the following restrictions on database file relocation:
l
Only database backups can be relocated. Individual file and file group backups cannot be
relocated without relocating the database that contains those files.
l
If the configuration of a database has changed since the most recent, level full database back
up was created, you cannot relocate the database. Configuration changes include the deletion
or addition of files, file groups, or transaction log files.
l
A system database might not be the destination database of a relocation.
32 Dell EMC NetWorker Module for Microsoft for SQL VDI User Guide

l
The relocation fails if the destination does not have sufficient space to create a database.
SQL Server instance and database names for backup and recovery
SQL Server instance, database, and filegroup names are not case-sensitive. In other words, NMM
does not distinguish the difference between upper and lowercase letters in SQL Server instance
and database names.
Note: If there are two or more databases with the same name but with different capitalization,
such as DB1 and db1, NMM views these databases as the same and by default backs up only
one of the databases.
Named and default instances of SQL Server
NMM supports backup and recovery of named and default instances.
NMM supports recovery from the SQL Server default instance or named instances by using a copy
restore to any instance of a SQL Server. This support includes recovery operations when the
destination server is different from the source.
Each named instance has a unique instance name in the following format:
Overview
computerName\instanceName
where:
l
computerName
l
instanceName
Note:
Consider the following information when naming a SQL database or an instance:
l
Use unique names.
l
Do not use the name that the SQL Server uses to identify itself (MSSQL:).
l
Do not use the names of SQL instances that you have installed.
is the network name of the computer.
is the logical name of the named instance.
Use the following syntax to specify a SQL stand-alone named instance of SQL Server at a
command prompt:
MSSQL$Standalone_Named_Instance:[dbName ...][.fgName ...][.fileName ...]
An entry of MSSQL: for the Save Set attribute during the client resource configuration yields a
backup of all databases for the default instance.
When running multiple instances, the nsrsqlsv and nsrsqlrc commands support specification
of only one instance at a time. If save sets for more than one instance are specified, the backup or
restore operation fails.
Index entries for stand-alone named instances are created by using the local host on which the
instance is running. Index entries for clustered named instances are created with the SQL virtual
server name. To differentiate backups for the default instance and named instances, the index
name has been extended to logically partition the index for a client.
All running named instances, except clustered instances and the default instance, are maintained in
the client file index directory. This named instance directory is created at the end of each
traditional backup. Run the nsrinfo command after a backup to verify that this directory was
created. For example, type:
%SystemDrive% nsrinfo -V -L -n mssql client_name
Dell EMC NetWorker Module for Microsoft for SQL VDI User Guide 33

Overview
Supported special characters in database names for NMM backup and recovery
The following table lists the special characters that may be used in SQL Server database names
when performing backup and recovery in stand-alone, cluster, Always On Availability Group, and
federated configurations.
Table 11 Supported special characters in database names
Special characters Stand-alone and cluster
configurations (Databaselevel and Instance-level
backup and recovery)
~ Tilde Successful Successful
- Hyphen Successful Successful
! Exclamation mark Successful Successful
{ Open curly
bracket
% Percentage Successful Successful
} Close curly
bracket
) Close parenthesis Successful Successful
( Open parenthesis Successful Successful
` Accent grave Successful Successful
@ At the rate Successful Successful
# Hash Successful Fails
Successful Successful
Successful Successful
Always On Availability
Group and federated
configurations (availability
group level backup and
recovery)
Note: Hash is an
availability group
identifier.
_ Underscore Successful Successful
& Ampersand Successful Successful
^ Caret Successful Successful
. Period Successful Successful
\ Backslash Successful Successful
' Apostrophe Successful
Note: Backup and
recovery operations are
successful but warnings
are displayed when
performing recovery.
$ Dollar Fails
Note: Dollar is a SQL
instance identifier.
34 Dell EMC NetWorker Module for Microsoft for SQL VDI User Guide
Successful
Note: Backup and
recovery operations are
successful but warnings
are displayed when
performing recovery.
Fails
Note: Dollar is a SQL
instance identifier.

Table 11 Supported special characters in database names (continued)
Overview
Special characters Stand-alone and cluster
configurations (Databaselevel and Instance-level
backup and recovery)
: Colon Fails
Note: Colon is a database
name identifier.
Always On Availability
Group and federated
configurations (availability
group level backup and
recovery)
Fails
Note: Colon is a database
name identifier.
Dell EMC NetWorker Module for Microsoft for SQL VDI User Guide 35

Overview
36 Dell EMC NetWorker Module for Microsoft for SQL VDI User Guide

CHAPTER 2
Configuration
This chapter contains the following sections:
l
Configuring NMM in a SQL VDI environment........................................................................ 38
l
Configuring permissions to perform NMM backup and recovery of Microsoft SQL Server....44
Dell EMC NetWorker Module for Microsoft for SQL VDI User Guide 37

Configuration
Configuring NMM in a SQL VDI environment
This section provides information about configuring NMM in a SQL VDI environment.
Supported Windows Server and SQL Server versions
The
NetWorker E-LAB Navigator
elnhome, provides the most up-to-date information about supported Windows Server and SQL
Server versions.
Migrating from VSS solution to VDI solution for SQL Server data protection
Review this section if you are using an NMM version earlier than NMM 2.4 to recover SQL Server
data with VSS technology and want to use NMM 8.2 or later to back up and recover SQL Server
data with VDI technology.
l
If you are using NetWorker 8.2.3 or 8.2.4 server with NMM 19.2 client, in the Backup Group
Properties window, clear the Snapshot option.
l
Assign a backup schedule to the backup.
l
In the Client Properties dialog box for each client resource:
n
In the Backup Command field, type nsrsqlsv. For SQL virtual server in a cluster
environment, specify nsrsqlsv -A SQL virtual server.
n
Leave the Application Information field empty.
n
Change the save set to MSSQL: for SQL default instance-level backup or MSSQL:dbname for
database-level backup on a SQL default instance.
, which is available at https://elabnavigator.emc.com/eln/
Multi-stream Data Domain Boost
NMM supports multi-stream backups for a SQL Server to a Data Domain device. This support
leverages the Data Domain Boost feature. SQL Server multi-stream backups over Data Domain
Boost enhance the performance by running the backups much faster.
Microsoft SQL Server Always On Availability Group feature
NMM supports federated backups, during which NMM detects the SQL Server preferred backup
setting for the Availability Group and performs the backup at the preferred node.
The Microsoft website describes the Always On Availability Group feature in SQL Server 2012 or
later and provides detailed information about how to configure the setup for this support. This
feature allows multiple replicas of a database.
An availability group is a logical group of databases that has the Always On capability. An
availability group is failed over to other nodes as a group, meaning that all the databases that are
part of the availability group are failed over together during a failover.
An availability replica hosts each set of availability databases.
Two types of availability replicas exist:
l
A single primary replica, which hosts the primary databases.
l
One or more secondary replicas, each of which hosts a set of secondary databases and serves
as a potential failover target for the availability group. You can configure the following number
of secondary replicas depending on the SQL Server version:
n
One to four secondary replicas for SQL Server 2012.
38 Dell EMC NetWorker Module for Microsoft for SQL VDI User Guide

Configuration
n
One to eight secondary replicas for SQL Server 2014 or later.
The secondary replicas can be configured in either synchronous or asynchronous mode.
Consider the following points when you use Always On Availability Groups with NMM:
l
To back up secondary replicas with NMM, in the Availability Group Properties window, set
the Readable Secondary configuration option to either Yes or Read-intent only for each of
the primary and secondary replicas. This option allows NMM to connect to the secondary
replica to gather information about the secondary replica (for example, database file location,
which can be different from the other replicas).
l
To restore an Always On Availability Group database, suspend replication before you restore
the database. You can use either the NMM Microsoft SQL Server Management Studio plug-in
GUI or the T-SQL query window for this task.
It is recommended that you back up an Always On Availability Group with a federated backup
workflow, and that you use the Windows cluster name as the client name.
Always On Availability Group failover cluster instance support
NMM supports Always On Availability Groups over two normal SQL clusters. This configuration
protects data with both SQL cluster instance-level failover and availability group database-level
failover.
Note: When you configure a federated backup of an Availability Group that is configured with
multiple SQL server instances and one of these instances is a failover cluster instance, use the
Client Properties dialog box to configure the backup. This situation exists when there is a
SQL virtual server instance in the cluster. This configuration is not available from the Client
Backup Configuration wizard.
Availability group listeners
NMM supports scheduled and manual federated backups of SQL availability groups through the
availability group listener.
Availability group listeners are virtual networks that provide access to an AlwaysOn Availability
Group and all of its databases. You can use NMM to backup and recover an availability group using
the listener name instead of the cluster name.
Unlike a cluster, when you use the listener name as the backup client name, NMM backs up only
the availability group that the listener is configured for.
NOTICE
When you configure backups of an availability group using the listener name, if you
later decide to configure a client for the availability group using either the cluster name or a
different listener name, take a full backup with the new client. The same is true in reverse if
you decide to change a client using the cluster name to the listener name. NMM cannot
restore log-only backups that are taken after the client name changes.
Clusterless availability group listeners
NMM 19.2 and later supports clusterless availability group listeners to perform SQL Server data
backups and restores. A clusterless availability group listener enables you to offload secondary
copies.
NMM supports SQL clusterless availability group listeners in the following environment and
configuration:
l
SQL Server 2017 or later
l
SQL Server Management Studio 2017 or later
l
Windows Server 2012 or later
Dell EMC NetWorker Module for Microsoft for SQL VDI User Guide 39

Configuration
l
NMM 19.2 or later
l
Clusters of the type None—the value set while creating AlwaysOn Availability Groups
Note: When you create AlwaysOn Availability Groups, do not set the cluster type to
External. NMM does not support this type of clusters for backups and restores.
Ensure that you meet the following requirements in a clusterless availability group client
environment:
l
There must not be any duplicate client IDs.
l
Do not use the nsrclientfix tool to perform any operations.
Ensure that you perform the following tasks when you configure or use a clusterless availability
group listener:
l
Assign the IP address of the primary node to the clusterless availability group listener that you
use to perform backups or restores.
l
In the case of a failover, assign the IP address of the new primary node to the AG listener.
To perform an AlwaysOn Availability Group backup by using a clusterless availability group listener,
you must create client resources for the listener and the physical nodes of the AlwaysOn
Availability Group. To create the client resources, use the Client Properties dialog box of the
NetWorker Administration window. Configuring client resources for clusterless availability group
listener and physical nodes of an AlwaysOn Availability Group on page 90 provides information.
Note: NMM does not support the Client Backup Configuration wizard to create a client
resource for a clusterless availability group listener.
Also, configure a Data Domain device or an AFTD according to your requirement.
SQL Client Direct to AFTD or DD devices
The NetWorker client software enables clients with network access to Advanced File Type Device
(AFTD) or Data Domain devices to send their backup data directly to the devices. This
functionality uses the Client Direct feature to allow the client to bypass the NetWorker storage
node.
The Client Direct feature is enabled by default, but it can be disabled on each client by clearing the
Client Direct attribute on the client resource in NMC. When a Client Direct backup is not
performed, a traditional storage node backup is performed instead.
The nsrsqlsv.log backup log file displays details about the Client Direct activity for the SQL
Server.
Microsoft SQL Server named log marks
Microsoft SQL Server enables enhanced point-in-time restore operations because it allows named
log marks to be specified during transactions.
Database applications create named log marks when transactions are performed. The marks enable
you to access to specific transaction points in a database transaction log backup. NMM allows you
to select a named log mark during a restore operation and restores to the beginning or end of a
named log mark during a database restore operation. Restoring data through named log marks is
an improvement over point-in-time restore because the time that is associated with restoring to a
specific transaction can be more accurately determined.
When a named log mark is created in the SQL Server database, the log mark time is saved to the
millisecond. However, NetWorker’s time format, which is used to specify point-in-time restore,
supports granularity only to the second. If log marks with duplicate names are created within a
second of each other, NMM restores to the most recently named log mark.
40 Dell EMC NetWorker Module for Microsoft for SQL VDI User Guide

Managing SQL Server database transaction logs
NMM provides implicit management of the SQL Server database transaction logs.
Implicit management uses SQL database transaction log backups to manage log space. This
management can occur when:
l
A backup schedule is implemented that is level logs only.
l
You run the nsrsqlsv command with the -l txnlog option.
Note: If you are using NetWorker server 8.2.x, the backup level is incremental and the -l
incr option is used with the nsrsqlsv command.
Prevent log overflow
In Windows, prevent database logs from overflowing available log space by creating an alert in the
SQL Server Performance Monitor. The alert forces a log to backup only when the database’s log
space reaches a certain capacity (for example, 80% full). An alert is a user-defined response to a
SQL Server event. Backups truncate the logs and clear disk space.
Database consistency checks
NMM can provide database consistency checks (DBCC) before a backup operation is performed.
A DBCC examines all tables in the database to detect whether index and data pages are correctly
linked and indexes are in proper-sorted order. A DBCC also checks that pointers are consistent and
that the data information on each page and page offsets are reasonable. It helps recognize
problems early, which prevents problem escalation and possible data loss.
Configuration
Note:
DBCC can be performed for database-level, multiple database-level, and instance-level
save sets on cluster and stand-alone configurations. For federated configurations, DBCC can
be performed for database-level save set, but DBCC cannot be performed for Always On
Group level backups.
You can configure a DBCC through the following methods:
l
For manual backups—From the NMM Microsoft SQL Server Management Studio (SSMS)
plug-in GUI, in the NetWorker window.
Performing manual backups by using the NMM SSMS plug-in GUI on page 56 provides more
information.
l
For scheduled and federated backups—In the NetWorker Management Console, in the Client
Properties dialog box for the SQL Server host client resource:
n
In the Application Information field, type
NSR_CONSISTENCY_CHECKS=database1,datbase2 where
database1
and
database2
database names for which you want to run a consistency check, for example:
NSR_CONSISTENCY_CHECKS=testdb3,CopyOfDB010,test4
Ensure that there are no spaces between the database names. For example,
NSR_CONSISTENCY_CHECKS=testdb3, CopyOfDB010,test4 is incorrect.
n
To specify that you want to run a consistency check on all the databases in an instance, in
the Application Information field, type NSR_CONSISTENCY_CHECKS=ALL.
l
In the Client Backup Configuration wizard, select Perform DBCC consistency check when
you configure the client resource, and then select one of the following:
n
To perform DBCC for all the databases in an instance, select All.
n
To perform DBCC for specific databases in an instance, specify the databases for which
you want to run the DBCC checks.
l
From the command prompt, type the nsrsqlsv command with the various backup command
options as follows:
are the
Dell EMC NetWorker Module for Microsoft for SQL VDI User Guide 41

Configuration
n
To perform DBCC checks for databases in an instance, type the command option -j
testdb3,CopyOfDB010,test4.
Where
testdb3, CopyOfDB010
, and
test4
are the names of the databases in the instance.
Ensure that there are no spaces between the database names. For example, using
testdb3, CopyOfDB010,test4 is incorrect.
n
To perform DBCC checks for all the databases in an instance, type the command option -j
ALL.
If the DBCC runs successfully for a database, a message appears in the NMM logs or backup
output page.
The following figure shows an example of the message that appears when the DBCC is successful.
Figure 6 Message showing DBCC was successful
If DBCC for a database fails, the failure status appears as part of the policy notification and the
database backup is omitted. The DBCC failure is reported in the NMM logs or backup output page.
Microsoft hybrid cloud environments
NMM supports SQL Server 2014 and later VDI backups and recoveries in Microsoft hybrid cloud
environments.
NMM supports stand-alone, and federated backup workflows for both private and hybrid cloud
environments.
Backup and recovery operations in a cloud environment are only supported for onsite databases.
The onsite backup workflow is the same as the SQL Server 2012 or later Always On Availability
Group workflow.
Note:
NMM does not support backup and recovery of SQL Server data directly from the
hybrid cloud. If you are using the SQL Server 2016 Stretch Database feature, ensure the data
that you must back up and recover is onsite, otherwise the operation fails.
Transparent data encryption
Microsoft SQL transparent data encryption (TDE) is a feature that performs realtime I/O
encryption and decryption of the data and log files.
TDE uses a database encryption key (DEK), which is stored in the database boot record for
availability during recovery. Encryption of the database file is performed at the page level. The
pages in an encrypted database are encrypted before they are written to disk and decrypted when
42 Dell EMC NetWorker Module for Microsoft for SQL VDI User Guide

read into memory. When using this feature, ensure that the certificate and private key are backed
up with the encrypted data.
Note: NMM does not support third party transparent data encryption for SQL VDI.
Microsoft SQL Server 2008 and later introduce the TDE database-level encryption feature. This
feature provides protection for the entire database at rest, without affecting existing applications.
NMM supports SQL data encryption at the cell level, at the full database level by using TDE, or at
the file-level with encryption options provided by Microsoft.
The Microsoft SQL Server product documentation provides more information about TDE, enabling
data encryption, and protecting the encryption keys.
Note: When enabling TDE, back up the certificate and the private key associated with the
certificate. If the certificate becomes unavailable or if the database is restored on another
server, backups of both the certificate and the private key must be available to open the
database.
Setting the MAXTRANSFERSIZE environment variable
MAXTRANSFERSIZE is a data transfer option that specifies the largest unit of transfer in bytes to
be used between SQL Server and the backup media or VDI backup application. This option applies
to both backup and recovery operations.
Configuration
About this task
The MAXTRANSFERSIZE value is set through the NSR_VDI_MAXTRANSFERSIZE environment
variable. Setting the NSR_VDI_MAXTRANSFERSIZE variable determines the MAXTRANSFERSIZE
value as follows:
MAXTRANSFERSIZE= 1024 x
NSR_VDI_MAXTRANSFERSIZE
The valid values of the NSR_VDI_MAXTRANSFERSIZE variable range from 64 to 4096. The
resulting values of the MAXTRANSFERSIZE variable range from 65,536 bytes to 4,194,304 bytes.
Use the following procedure to change the MAXTRANSFERSIZE from the default value of
4,194,304 bytes.
Procedure
1. Open Control Panel > System.
2. Click Advanced system settings.
The System Properties window opens.
3. Click Environment Variables...
The Environment Variables window opens.
4. In the User variables section, perform one of the following:
l
If an NSR_VDI_MAXTRANSFERSIZE variable is not listed, click New to create and define
the NSR_VDI_MAXTRANSFERSIZE variable.
l
If an NSR_VDI_MAXTRANSFERSIZE variable is listed, click Edit to edit the variable.
5. Click OK.
Results
After this parameter is set in the registry, subsequent NMM backups use the registry setting. For
SQL cluster environments, set the key on all cluster nodes where backups might run.
Dell EMC NetWorker Module for Microsoft for SQL VDI User Guide 43

Configuration
Configuring permissions to perform NMM backup and recovery of Microsoft SQL Server
Review the privileges that are required to perform Microsoft SQL Server backup and recovery
operations with NetWorker Module for Microsoft (NMM).
Access privileges for backup and recovery
NMM for Microsoft SQL Server VDI requires that the user starting backup and recovery
operations is assigned certain privileges from the Microsoft SQL Server, the Windows application
host, and the NetWorker server.
These privileges are required for both scheduled and manual backups:
l
For manual backups, the user starting the backup must be granted the required privileges.
l
For scheduled backups, the remote user who is assigned to the client resource must be
granted the required privileges.
Microsoft documentation provides additional information on how to configure user accounts.
Table 12 Access privileges required for backup and recovery operations
Microsoft SQL Server user
roles
Assign the user to the
following server roles with the
Microsoft SQL Server Studio
Management (SSMS) GUI:
l
sysadmin
l
public
Assign the NT AUTHORITY
\SYSTEM user to the
following server roles with the
Microsoft SSMS GUI:
l
sysadmin
l
public
Windows user groups NetWorker user roles
Assign the user to the
following user groups on the
Windows application host on
all SQL nodes:
l
Backup Operators
l
Administrators
Note: The user must be a
domain user for failover
cluster or availability
group backups. You can
use a local user for
standalone backups.
Assign the user to the
Operators role in the
NetWorker Administration
GUI.
The
NetWorker Administration
Guide
provides more
information about assigning
NetWorker User roles.
Assign SQL server roles for backup and recovery operations
Assign the required privileges on the SQL Server to perform SQL Server backup and recovery
operations.
Before you begin
A user account must exist on the SQL Server.
Procedure
1. Launch the SQL Server Management Studio.
2. In the Connect to Server window, specify the details for the SQL Server that you want to
backup and recover. Ensure that you select Windows Authentication.
3. From the Object Explorer pane, expand the folder for the SQL Server that you want to
backup and recover, then expand the Security folder, and then expand the Logins folder.
44 Dell EMC NetWorker Module for Microsoft for SQL VDI User Guide

Configuration
4. Right-click the name of the user that you want to assign backup and recovery privileges to,
and then click Properties.
The Login Properties window appears.
5. On the Server Roles page, ensure that sysadmin and public are selected, and then click
OK.
Figure 7 Assigning SQL Server privileges
6. Return to the Logins folder.
7. Right-click the "NT AUTHORITY\SYSTEM" user, and then click Properties.
The Login Properties window appears.
8. On the Server Roles page, ensure that sysadmin and public are selected, and then click
OK.
Assigning Windows user privileges for backup and recovery operations
Assign the required user privileges on the Windows application host to perform SQL Server backup
and recovery operations with NMM.
There are two types of users of which access privileges can be modified:
l
Local User
This type of user is used for standalone server and Always On Availability Group databases.
l
Domain User
This type of user is used for Always On Availability Group and Failover Cluster Instance
databases.
Dell EMC NetWorker Module for Microsoft for SQL VDI User Guide 45

Configuration
Assign user privileges to a Local User
Local user privileges are modified using the Local Users and Groups window.
Procedure
1. On each SQL Server node that you want to back up and recover, click Start > Programs >
Administrative Tools > Computer Management > Local Users and Groups.
2. In the left pane, under Local Users and Groups (Local), perform one of the following action
sequences.
l
To assign privileges to an existing user, use the following steps:
a. Click Users.
b. From the list of Local Users, right-click the user, and then click Properties.
l
To assign privileges to a new user, use the following steps:
a. Select and right-click Users, and then click New User.
b. In the New User window, specify the details for the new user, and then click Create.
The user appears in the list of Local Users in the Users folder.
c. Right-click the newly created user, and then click Properties.
The User Properties window appears.
3. On the Member Of tab, add the user to the Backup Operators and Administrators user
groups, and then click Apply.
4. Click OK.
Assign user privileges to a Domain User
Domain user privileges are modified using the Active Directory Users and Computers window.
Procedure
1. On the domain controller, click Start > Programs > Administrative Tools > Active
Directory Users and Computers.
2. In the left pane, under Active Directory Users and Computers, expand the Active
Directory domain name, and then perform one of the following action sequences:
l
To verify that an existing user is a domain user, use the following steps:
a. Click Users.
b. From the list of Active Directory users, right-click the user, and then click
Properties.
c. On the Member Of tab, verify that the user is listed as a member of the Active
Directory domain.
l
To create a new domain user, use the following steps:
a. Select and right-click Users, and then click New > User.
The New Object - User window appears.
b. In the New Object - User window, select the Active Directory domain for the
account and specify the details for the new user, and then click Next.
The user appears in the list of Active Directory users in the Users folder.
3. In the Users folder, right-click the user that you want to use for NMM backup and recovery,
and then click Properties.
4. In the user Properties window, on the Member Of tab, click Add.
46 Dell EMC NetWorker Module for Microsoft for SQL VDI User Guide

Configuration
5. Add the user to the Backup Operators and Administrators user groups, and then click
Apply.
The user groups are listed on the Member Of tab.
Figure 8 Adding a user to Windows User Groups
Enable user access for NMM when User Access Control (UAC) is used
Grant the Windows "Log on as a batch job" privilege to the remote user that performs NMM
operations. This privilege allows the user to log in with a privileged security token
About this task
Note:
These steps must be performed on each node in the SQL Server cluster.
Procedure
1. Open the Local Security Policy (secpol.msc) on the client
2. Browse to Local Policies > User Rights Assignment.
3. Add the Backup Operators and Administrators user groups to the Log on as a batch job
privilege.
4. Click OK.
Dell EMC NetWorker Module for Microsoft for SQL VDI User Guide 47

Configuration
48 Dell EMC NetWorker Module for Microsoft for SQL VDI User Guide

CHAPTER 3
Graphical User Interfaces
This chapter includes the following sections:
l
User interfaces for backup and restore................................................................................. 50
l
NMM Microsoft SQL Server Management Studio plug-in GUI.............................................. 50
l
Views of the NMM SQL Server Management Studio plug-in GUI...........................................51
Dell EMC NetWorker Module for Microsoft for SQL VDI User Guide 49

Graphical User Interfaces
User interfaces for backup and restore
This section describes the graphical user interfaces (GUIs) where you can perform backup and
restore operations.
l
The NetWorker Administration GUI on the NetWorker server: Start NMC on the NetWorker
server and open the NetWorker Administration GUI to configure, perform, monitor, and report
on scheduled backups.
l
NetWorker window in the NMM Microsoft SQL Server Management Studio plug-in GUI: Start
the NMM Microsoft SQL Server Management Studio (NMM SSMS) plug-in GUI to view the
NetWorker window. You can use the NetWorker window to perform manual backup and
restore operations.
The following table summarizes the locations from which you can start backup operations, and the
backup levels that are supported for each interface.
Table 13 Where to start backup operations
Backup type Backup started
from
Scheduled The NetWorker
Administration
GUI on the
NetWorker
server
Manual Command
prompt on the
SQL Server,
which is the
client
In the NMM
SSMS plug-in
GUI, in the
NetWorker
window
Available backup levels
Full txnlog Diff
Yes Yes Yes
Yes Yes Yes
Yes Yes Yes
The following table summarizes the locations, from which you can start restore operations.
Table 14
Restore type Restore started from
Where to start restore operations
Full In the NMM SSMS plug-in GUI, in the
NetWorker window
NMM Microsoft SQL Server Management Studio plug-in GUI
You can use the NMM Microsoft SQL Server Management Studio (SSMS) plug-in GUI to perform
manual backup and restore operations.
Perform backup and restore operations by using the NetWorker window, with the Backup,
Database Restore, and optional Table Restore tabs in the NetWorker window.
50 Dell EMC NetWorker Module for Microsoft for SQL VDI User Guide

Graphical User Interfaces
To use this feature, select the NMM SSMS plug-in GUI option during NMM installation. To enable
the Table Restore tab, select the SQL Granular Level Recovery option whenever you install NMM.
Note: If you have not installed the SSMS option and want to launch the NMM SSMS plug-in
GUI, navigate to the <install_path>\nsr\bin\ folder, and then double-click the
nwssmsaddinapp.exe file.
Views of the NMM SQL Server Management Studio plug-in GUI
The NetWorker window in the NMM SMSS plug-in GUI has two main tabs and a third optional tab
with multiple pages in each.
The following figure shows the NetWorker window in the NMM SMSS plug-in GUI.
Figure 9 The NetWorker window in the NMM SMSS plug-in GUI
Backup tab
In the NetWorker window, click the Backup tab to see the following pages which must be used to
perform backup operations:
l
General
l
Options
l
Monitor
Dell EMC NetWorker Module for Microsoft for SQL VDI User Guide 51

Graphical User Interfaces
Database Restore tab
In the NetWorker window, click the Database Restore tab to see the following pages which must
be used to perform recovery operations:
l
General
l
Files/Filegroups
l
Options
l
Monitor
Table Restore tab
If you installed the SQL Granular Recovery functionality, from the NetWorker Backup window
select the Table Restore tab to see the following pages which must be used to perform table-level
recovery:
l
General
l
Options
l
Monitor
52 Dell EMC NetWorker Module for Microsoft for SQL VDI User Guide

CHAPTER 4
Manual Backups
This chapter includes the following sections:
l
Manual backup overview....................................................................................................... 54
l
Federated backup preferences for Availability Group databases........................................... 54
l
Specifying a retention policy for manual backups..................................................................55
l
Performing manual backups by using the NMM SSMS plug-in GUI.......................................56
l
Performing manual backups from the command prompt........................................................61
Dell EMC NetWorker Module for Microsoft for SQL VDI User Guide 53

Manual Backups
Manual backup overview
You can start a manual backup of SQL data at any time. A manual (unscheduled) backup can be
immediately started.
Manual backups are generally performed under special circumstances, such as NMM setup.
Before performing a manual backup, ensure that the user starting the backup is assigned the
required user privileges as defined in the section Access privileges for backup and recovery on
page 44.
For manual backups of SQL Server cluster environments, the backup operation must be run from
the active host in the cluster.
The following combinations of data objects can be backed up manually with NMM:
l
The entire SQL Server storage hierarchy
l
One or more entire databases
l
One or more file groups
l
One or more files in a file group
l
A heterogeneous collection of files, file groups, and databases
l
Transaction log backups
Note:
Filestream data, which are stored in SQL Server 2008 or later databases, is displayed in
the backup window as a single file group folder without subordinate objects.
The storage hierarchy is defined as the database storage components the SQL Server Storage
Engine exposes to third-party backup vendors. The storage components include files, file groups,
databases, and transaction logs.
When performing a manual full backup of a file or file group, also perform a database logs-only
level backup to maintain the validity of the transaction log. You can perform logs-only backups only
through the NMM Microsoft SQL Server Management Studio plug-in GUI, in the NetWorker
window.
Note:
Manual backups of SQL data do not back up the client indexes and bootstrap file. If you
are using NetWorker 8.2.3 or 8.2.4 server with NMM 19.2, follow the instructions provided in
the "Backing up client indexes and a bootstrap file" section of the
Microsoft for SQL VDI Release User Guide
version 8.2 SP1 to back up the client indexes and
NetWorker Module for
bootstrap file. NetWorker server 9.x and later have a built-in protection policy to back up the
client indexes and bootstrap file.
Federated backup preferences for Availability Group databases
You can configure the SQL Server backup preference for Availability Group databases by using
either the Microsoft SSMS GUI or the Transact-SQL command.
NMM supports federated backups, during which NMM detects the SQL Server preferred backup
setting for the Availability Group and performs the backup at the preferred node. The database
administrator can set the backup priority for the Availability Group or a database in the Availability
Group and nominate a particular replica for the backup. This feature improves backup
performance.
SQL Server 2012 or later provides the following options that determine where backups run for a
specific Availability Group replica:
54 Dell EMC NetWorker Module for Microsoft for SQL VDI User Guide

Manual Backups
l
AUTOMATED_BACKUP_PREFERENCE—Specify any one of the following options:
n
PRIMARY—Specifies that the backups will always occur on the primary replica. This option
is useful if you need backup features, such as creating differential backups, that are not
supported when backup operations run on a secondary replica.
n
SECONDARY_ONLY—Specifies that backups will never be performed on the primary replica. If
the primary replica is the only replica that is online, the backup will not occur.
n
SECONDARY (Prefer Secondary)—Specifies that backups should occur on the secondary
replica. If the primary replica is the only replica online, the backup is performed using the
primary replica. This is the default option.
n
NONE (Any replica)—Specifies that you prefer that backup jobs ignore the role of the
availability replicas when choosing the replica on which to perform backups. Note backup
jobs might evaluate other factors such as backup priority of each availability replica in
combination with its operational state and connected state.
l
BACKUP_PRIORITY =n—Specifies your priority for performing backups on this replica relative
to the other replicas in the same availability group. The value is an integer in the range of 0 -
100. These values have the following meanings:
n
0 indicates that this availability replica will never be chosen for performing backups.
This choice is useful for a remote availability replica for which you never want backups to
fail over.
n
1 indicates the lowest priority that an availability replica could be chosen for a backup
operation.
If BACKUP_PRIORITY = 1, the availability replica will be chosen only if no higher priority
availability replicas are available.
n
100 indicates the highest priority that an availability replica could be chosen for a backup
operation.
Follow the procedures provided in the article “Configure Backup on Availability Replicas (SQL
Server)” on the Microsoft MSDN website http://msdn.microsoft.com/en-us/library/
hh710053.aspx to decide which replica the backups will be run on.
Note:
Federated backup operations fail if a replica has the Readable Secondary field set to
No. For backups to succeed, in the Availability Group Properties window, set the Readable
Secondary configuration option to either Yes or Read-intent only for each of the primary and
secondary replicas.
Note: The following limitations apply to SQL Server backups of a secondary SQL Server replica
in an Availability Group:
l
For full backups of a secondary replica, SQL Server supports only copy-only backups.
l
Backup promotion is not supported for copy-only backups, including copy-only transaction
log backups.
l
SQL Server does not support differential backups on secondary SQL Server replicas.
Specifying a retention policy for manual backups
A retention policy defines the length of time that a backup or clone save set is retained and
browsable.
Note:
NetWorker 8.2.x uses separate policies for browse and retention. Refer to the
NetWorker Module for Microsoft for SQL VDI User Guide
browse and retention policies for NetWorker 8.2.x.
version 8.2 SP1 for information on the
Dell EMC NetWorker Module for Microsoft for SQL VDI User Guide 55

Manual Backups
If you specify a retention policy with a manual backup from the command prompt, the retention
policy takes effect for all the save sets in the manual backup. To specify a retention policy with a
manual backup at the command prompt, type the following command:
nsrsqlsv -y
The retention policy value must be typed in time and date formats accepted by the nsr_getdate
program.
The
NetWorker Command Reference Guide
the nsr_getdate program. Refer to the "Command Prompt" chapter for information about using
the nsrsqlsv command for manual backups.
If you do not specify a retention policy for a manual backup, the save sets in a manual backup
adopt the browse policy of the client resource. If multiple client resources exist for the NetWorker
host, the client resource with the longest retention policy is adopted. However, if a retention
policy is set up for the media pool to which the backup is directed, the retention policy is the
longer of either:
l
The client resource retention policy
l
The media pool retention policy
The
NetWorker Administration Guide
or the UNIX man pages provide more information about
provides more information about retention policies.
Performing manual backups by using the NMM SSMS plug-in GUI
It is recommended that you use the NMM SQL Server Management Studio (SSMS) plug-in GUI to
perform SQL Server VDI manual backup operations.
About this task
In the NetWorker window, the Script view is available in each page. Click Script to generate a
command prompt equivalent script, which you can use to create a .bat file to perform scheduled
backups, automation, and other tasks.
Procedure
1. In the SQL Server Management Studio, select the SQL Server instance that you want to
manually back up and open the NetWorker window.
2. In the NetWorker window, on the Backup tab, under Select a page, click General.
The General page appears.
The following figure shows the NetWorker window open to the Backup tab, on the General
page.
56 Dell EMC NetWorker Module for Microsoft for SQL VDI User Guide

Figure 10 NetWorker Backup General page
Manual Backups
3. Under Source, make the following selections:
a. In the SQL Server Instance field, select the SQL Server instance that you want to back
up.
b. In the Database Filter list, filter the databases by selecting one of the following:
l
Select Non AAG Databases to show all databases that are not part of an Always On
Availability Group (AG).
l
Select the name of an AG to show all databases that are within that AG.
The list is populated with databases available for backup. If an AG is selected from the
list, under Connections, the Cluster and the Backup Preference appear.
c. Select one or more databases that you want to back up.
d. Under Client type, perform one of the following actions for availability groups:
l
To use the cluster name, select Cluster.
l
To use an availability group listener, select Listener, and then select a listener from
the list.
Note:
The Client type setting can be modified only for availability group backups. In
non-availability group environments, it is greyed out.
e. In the Backup type list, select the backup type.
Dell EMC NetWorker Module for Microsoft for SQL VDI User Guide 57

Manual Backups
Note: The backup levels are the same regardless of the version of the NetWorker
server you are using.
f. (Optional) To perform a copy-only backup, select Copy-only backup.
A copy-only backup backs up the SQL server without interrupting the existing backup
schedule or log chain.
4. Under Destination, make the following selections:
a. In the NetWorker Server list, select the destination NetWorker Server for the backup.
You can select a NetWorker server from the available list. Click Update to force an
update of the list of available NetWorker servers.
b. In the Debug level box, select the level of troubleshooting information to be sent to the
backup status window during the backup operation.
Levels range 0–9, with 0 representing no information and 9 representing the most
amount of information.
5. (Optional) To specify additional backup options, under Select a page, click Options.
The Options page appears.
The following figure shows the NetWorker window open to the Backup tab, on the Options
page.
Figure 11
NetWorker Backup Options page
6. (Optional) Under Reliability, select the following options as required:
l
To perform a thorough check of the entire database before the backup is performed,
select Perform DBCC consistency check.
58 Dell EMC NetWorker Module for Microsoft for SQL VDI User Guide

Note: When Perform DBCC consistency check is selected in the SSMS plug-in, the
script generated contains -j ALL even when specific databases are selected. This
does not affect functionality.
l
To perform a checksum operation with the backup and save the information to the
backup media, select Perform checksum before writing to media. Another checksum
is performed before a restore to ensure that it matches the backup.
A checksum detects a partial backup or restore state. The SQL Server verifies the
checksum by calculating a local result and comparing the local value with the stored
value.
l
To continue with backup and restore even if errors are discovered during the checksum,
select Continue on error.
7. (Optional) Under Stripes, select the following options as required:
a. To enable the SQL Striped feature, select Create a striped backup.
b. In the Stripes box, type or select the number of stripes to use during the backup.
NMM supports a maximum of 32 stripes. However, the number of stripes cannot exceed
the value set for NetWorker client parallelism.
The section Striped Backup and Recovery provides more information about striping.
Manual Backups
8. (Optional) Under Pool, select the following options as required:
a. To select the pool where the backup is stored, select Select backup pool.
b. From the Full backup pool list, select the pool that you want to back up to.
The pools that are listed are populated from the NetWorker server.
9. (Optional) Under Deduplication, select the following options as required:
a. To enable deduplication for the backup, select Deduplication.
b. To use a Data Domain device to store the backup, select Data Domain.
10. (Optional) Under Others, select the following options as required:
Note:
It is recommended that no form of encryption or compression be used with Data
Domain because these reduce the deduplication ratio.
l
To back up the data with AES encryption, select Use Encryption.
Data is encrypted with the default or current pass phrase which is provided by the
NetWorker Server. If the NetWorker Server has a different pass phrase during restore,
you must specify the pass phrase that was used at the time of backup. The
Administration Guide
provides complete information about AES encryption, and setting
the pass phrase.
l
To apply XBSA compression to all marked databases before the backup data is written to
the storage device, select Compress the backup content using NetWorker.
In the same manual backup, you cannot back up some databases with compression and
others without.
Compressing data for a backup generates less network traffic and uses less backup
media space, but it consumes additional CPU resources. Most tape devices perform
compression, which makes software compression unnecessary.
l
To compress the backup using SQL Server, select Compress the backup content using
SQL Server.
The Microsoft SQL Server product documentation provides more information.
l
To specify backup promotion options, select one of the following values from the
Backup Promotion list:
NetWorker
Dell EMC NetWorker Module for Microsoft for SQL VDI User Guide 59

Manual Backups
n
ALL: Enables backup promotion to occur in any applicable scenario.
n
NONE: Disables backup promotion. Logs a warning when backup promotion would
normally occur.
n
NONE_WITH_WARNINGS: Disables backup promotion. Logs a warning when backup
promotion would normally occur.
n
SKIP_RECOVERY_MODEL: Disables database restore model change detection. Backup
promotion as a result of restore model change will not occur, but backup promotion in
other scenarios will still occur.
Note: If you leave the Backup Promotion field on the client side blank and the client
resource for the server has backup promotion set to NONE, then backup promotion
will not occur. However, if you select an option from the Backup Promotion list on
the client side, the option will override the server setting.
l
To apply advanced options to the backup operation, in the Advanced options field, type
or select advanced options. Separate multiple entries with a comma, for example:
BUFFERCOUNT=2, READ_WRITE_FILEGROUPS
NMM supports the following advanced backup options:
n
BUFFERCOUNT=number_of_IO_buffers: Specifies the total number of IO buffers that
can be used during the backup operation.
n
READ_WRITE_FILEGROUPS: Backs up only the read/write (active) filegroups within the
database.
11. To start the backup, click Run.
Results
The backup operation runs.
To view the status of the backup operation, open the Monitor page.
The following figure shows the NetWorker window open to the Backup tab, on the Monitor page.
60 Dell EMC NetWorker Module for Microsoft for SQL VDI User Guide

Figure 12 NetWorker Backup Monitor page
Manual Backups
Performing manual backups from the command prompt
The nsrsqlsv command is used to back up SQL Server data objects, which consist of files, file
groups, and databases.
About this task
To start a backup, specify the nsrsqlsv command and its options from a Windows command
prompt.
Before you use the backup command, review the following considerations:
l
Ensure that each command option is either lowercase or uppercase and, frequently both the
cases of a letter are in the set of command options. Case is very important when specifying
command-line flags.
For example, -c specifies the NetWorker client name, while -C copies the database that is
being restored to either the same SQL Server or a different SQL Server.
l
Ensure that you use correct spacing. Depending on the command option, the space separator
between an option and its corresponding argument can be optional, required, or not allowed.
For example, both of the following expressions are valid:
-l backup_level
-lbackup_level
The following expression is invalid because a space is not allowed between the + argument and
log_mark_name
:
Dell EMC NetWorker Module for Microsoft for SQL VDI User Guide 61

Manual Backups
-M + log_mark_name
l
Ensure that you use brackets ([ ]) to denote the optional portions of a command. When
starting an actual backup or recovery operation, do not include brackets.
l
Ensure that data items follow all other command options and parameters at the command
prompt.
Command syntax for nsrsqlsv
The nsrsqlsv command syntax is:
nsrsqlsv [-CGjqRTvkuHXZ]
[-a "option_key=value"]
[-A virtual-server]
[-b pool]
[-c client]
[-C]
[-D debug_level]
[-f aes]
[-g group]
[-G]
[-h "database_name"]
[-H]
[-I text_file]
[-k]
[-j database names]
[-l backup_level]
[-m masquerade]
[-N name]
[-O "Option1, Option2, Option3"]
[-P password]
[-q]
[-R]
[-s networker_server]
[-S number_of_stripes]
[-T]
[-u]
[-U username]
[-v]
[-w browse]
[-X]
[-y retention_period]
[-z federated backup options]
62 Dell EMC NetWorker Module for Microsoft for SQL VDI User Guide

[-Z]
Command options for nsrsqlsv
The following table outlines the list of options available for the nsrsqlsv command.
Table 15 Command options for nsrsqlsv
Command options Descriptions
Manual Backups
-a
"NSR_INCLUDE_AAG_DATABASE=N
one"
-a
"SKIP_SIMPLE_DATABASE={TRUE
| FALSE}"
-a
"NSR_SKIP_NON_BACKUPABLE_ST
ATE_DB={TRUE | FALSE}"
-a "NSR_COPY_ONLY={TRUE |
FALSE}"
Excludes Always On Availability Group databases from instance-level
backups.
Specifies whether to exclude simple restore model databases from a logs
only backup. The default value is FALSE.
This option is useful when SIMPLE restore model databases are part of a
logs only backup. SIMPLE restore model databases do not support logs only
backups and the backups are promoted to level full by default.
However, this option does not affect the backup of system databases, such
as master and msdb, which are promoted to level full during a logs only
backup and cannot be omitted from the backup.
This option does not apply to full and cumulative incremental backups.
Specifies whether to check the status of the selected databases and ignore
the databases that are not ready or available to be backed up. If the status of
a database is online, the database is ready and available to be backed up. If
the status of a database is offline, emergency (single user mode), suspect,
restoring, recovering, or recovery pending, the database is not ready or
available to be backed up.
The default value is FALSE.
Performs a copy-only backup from the SQL Server. Copy-only backups do
not disturb the SQL Server backup chain and do not affect backup-level
promotion and log truncation. This option works only if you specify either full
or transaction log as the backup type in the -l <Backup_Type> option.
The default value is FALSE.
-a
"SKIP_SYSTEM_DATABASE={TRUE
| FALSE}"
-a "BACKUP_PROMOTION={ALL|
NONE|NONE_WITH_WARNINGS|
SKIP_RECOVERY_MODEL}"
You rarely need to perform copy-only transaction log backups because they
are generally required only to perform online restores.
Specifies whether to skip the system databases during the instance-level
transaction log backups.
The default value is False.
Specifies backup promotion options. The following values are valid:
l
ALL (Default): Enables backup promotion to occur in any applicable
scenario.
l
NONE: Disables backup promotion. Logs a warning when backup
promotion would normally occur.
l
NONE_WITH_WARNINGS: Disables backup promotion. Logs a warning
when backup promotion would normally occur.
l
SKIP_RECOVERY_MODEL: Disables database recovery model change
detection. Backup promotion as a result of recovery model change will
not occur, but backup promotion in other scenarios will still occur.
Dell EMC NetWorker Module for Microsoft for SQL VDI User Guide 63

Manual Backups
Table 15 Command options for nsrsqlsv (continued)
Command options Descriptions
The setting specified with this option applies to every database in the SQL
instance when this setting is specified along with the SQL instance level save
set MSSQL: or MSSQL$<instance name>.
Similarly, the setting specified with this option applies only to specified
databases when this setting is specified with a database level save set
MSSQL: <database name> or MSSQL$<instance name>:
<database name>.
-a "Deduplication
backup=yes"
-a "Device interface={data
domain | avamar}"
-a "Deduplication
node=node_name"
-a "Deduplication client
name=client"
-A virtual_server
-b pool_name
-c client
-C
-D <debug_level>
Enables backup deduplication.
Specifies whether data deduplication should be set with Data Domain or
Avamar.
Specifies the deduplication node to use for the backup.
Specifies the deduplication client to use for the backup.
Specifies the virtual server name when a SQL Server is configured to run in
an MSCS cluster.
Assigns a destination pool for a save set. Specifying -b pool_name
overrides all other pool-selection criteria that is provided by the NetWorker
client. The pool must be created with a corresponding label template before
a command that includes the -b option runs.
Specifies the NetWorker client name for which the SQL Server data is to be
backed up.
Specifies compression of the backup data before the NetWorker client sends
the data to the NetWorker server.
Generates detailed logs that you can use to troubleshoot backup issues. The
default value is 0 (zero). If you want to enable debug logs, specify a level
between 1 and 9.
-f aes
-g group
Enables the NetWorker server to back up data using AES encryption.
Specifies the savegroup. The NetWorker server and the savegrp command
use the group parameter to select the media pool.
-G
Specifies a NO_LOG transaction log backup before backing up the database.
This command option is valid only for level full backups.
This option is deprecated in SQL Server 2008 or later.
-h
<“db_name_with_optional_wil
Excludes databases from only the client-initiated backups.
Note: Do not use this option for the server-initiated backups.
dcard”>
You can use this option to specify exact database names or use wildcard
characters.
Two wildcard characters are supported:
l
Question mark (?): Matches any single character
l
Asterisk (*): Matches zero to unlimited characters
64 Dell EMC NetWorker Module for Microsoft for SQL VDI User Guide

Table 15 Command options for nsrsqlsv (continued)
Command options Descriptions
When you use wildcards you must enclose the database name in square
brackets, for example,
For example, consider the following scenarios:
l
To exclude only DB_1 and DB_2 from the backup, type the following
command:
nsrsqlsv -s bv-customer.belred.emc.com -h "DB_1" -h
"DB_2" MSSQL:
l
To exclude all databases that are named with the format of DB_x, such
as DB_9 and DB_a, type the following command:
nsrsqlsv -s bv-customer.belred.emc.com -h ["DB_?"]
MSSQL:
l
To exclude all databases with names ending in DB, type the following
command:
nsrsqlsv -s bv-customer.belred.emc.com -h ["*DB"]
MSSQL:
["DB?"]
Manual Backups
.
-H
-I text_file
-k
-j database_name
-l backup_level
Specifies the NORECOVERY option when backing up transaction logs. This
option leaves the database in Restoring state.
Specifies a text file that lists multiple SQL Server save sets. The -I option
can also be specified with the nsrsqlsv command for the Backup
Command field in the NetWorker Administration GUI.
Performs checksum before writing to media.
Performs a database consistency check (DBCC) before the backup is
performed.
For example, -j testdb3,CopyOfDB010,test4 runs a consistency
check for databases testdb3, CopyOfDB010, and test4.
Note: When Perform DBCC consistency check is selected in the SSMS
plug-in, the script generated contains -j ALL even when specific
databases are selected. This does not affect functionality.
Specifies the backup level. The following values are valid:
l
full
l
diff
l
txnlog
The "Combining data objects to create backup levels" section provides
more information about which backup levels are supported for various
SQL Server data objects.
The -l option is valid only for manual backups that are initiated from a
Windows command prompt on a client host. For scheduled backups, set
the backup level in the Set Level dialog box of the schedule resource in
the NetWorker Administration GUI. Do not use the -l option when you
start a backup in the NetWorker Administration GUI.
Sample outputs for each of the three different levels of backups follow:
l
Full backup of the database to a specified NetWorker server:
Dell EMC NetWorker Module for Microsoft for SQL VDI User Guide 65

Manual Backups
Table 15 Command options for nsrsqlsv (continued)
Command options Descriptions
nsrsqlsv -s server -c client -b poolname -l full
MSSQL:dbname
nsrsqlsv -s swraj -c SQL2012RC1Named -b Sub9VDI -l
full MSSQL:5
43708:(pid 6004):Start time: Sat Jan 28 09:07:42 2012
43621:(pid 6004):Computer Name: SQL2012-NODE3 User Name:
Administrator
NSR_BACKUP_LEVEL: full;
NSR_CLIENT: SQL2012RC1Named.joy.com;
NSR_DATA_VOLUME_POOL: Sub9VDI;
NSR_LOG_VOLUME_POOL: Sub9VDI;
NSR_SAVESET_NAME: "MSSQL:5";
NSR_SERVER: Swraj.joy.com;
37994:(pid 6004):Backing up 5...
4690:(pid 6004):BACKUP database [5] TO
virtual_device='EMC#4018d580-f511-4457-abc3-a62c4c3f0ff9'
WITH name=N'EMCNWMSQL'
53085:(pid 6004):Backing up of 5 succeeded.
nsrsqlsv: MSSQL: 5 level=full, 2261 KB 00:00:02 1 file(s)
43709:(pid 6004):Stop time: Sat Jan 28 09:07:49 2012
l
Cumulative incremental backup:
nsrsqlsv -s NetWorker_server_name -l diff
MSSQL:dbname
-m name
-N name
Output similar to the following appears for a backup of a database
named my_database:
nsrsqlsv: Backing up my_database...
nsrsqlsv: BACKUP database my_database TO
virtual_device='BSMSQL' WITH differential, stats
nsrsqlsv: my_database level=diff, 719 KB 00:00:05 1 file(s)
l
Logs-only backup:
nsrsqlsv -s NetWorker_server_name -l txnlog
MSSQL:dbname
Output similar to the following appears for a backup of a database
named my_database:
nsrsqlsv: Backing up my_database...
nsrsqlsv: BACKUP log my_database TO virtual_device
=’BSMSQL’
nsrsqlsv: my_database level=txnlog, 61 MB 00:00:05 1
file(s)
At least one SQL Server data item (file, file group, or database) must be
specified, and the data items and list of data objects must follow all
other command options and parameters at the command prompt.
Specifies the cluster or availability group listener name.
Specifies the symbolic name of the save set. By default, the most common
prefix of the path arguments is used as the save set name.
When performing a federated backup of an availability group, you must
specify the save set name with -N.
-O "option1, option2"
Specifies advanced backup options.
You can specify the following advanced backup options:
66 Dell EMC NetWorker Module for Microsoft for SQL VDI User Guide

Table 15 Command options for nsrsqlsv (continued)
Command options Descriptions
Manual Backups
-P password
-q
l
BUFFERCOUNT=
number_of_IO_buffers
This option specifies the total number of IO buffers that can be used
during a backup operation.
l
READ_WRITE_FILEGROUPS
This option backs up only the read/write (active) filegroups within the
database.
If you are specifying multiple options, separate each argument with a
comma. For example:
nsrsqlsv -s NetWorker_server_name -O
"BUFFERCOUNT=number_of_IO_buffers,
READ_WRITE_FILEGROUPS" MSSQL:
Specifies the SQL Server user password. When the -U user name command
option is specified, the password command option must also be provided, as
follows:
nsrsqlsv -s NetWorker_server_name -U username -P
password MSSQL:
Use the SQL Server username and password to log in to SQL Server with
SQL server authentication.
Displays nsrsqlsv messages in quiet mode; only summary information and
error messages appear.
-R
-s NetWorker_server_name
-S number_of_stripes
-T
-u
-U username
-v
-X
Specifies the NO_TRUNCATE option when backing up transaction logs.
Specifies the name of the NetWorker server that will be used for the backup
operation.
Backs up the specified data items using stripes.
To use backup and restore striping successfully, see the striping
configuration described in Striped Backup and Recovery.
Performs a TRUNCATE_ONLY transaction log backup before backing up the
database and is valid for only full backups.
Note: This flag is deprecated in SQL Server 2008 or later.
Continues the backup even in the event of a checksum error.
Specifies the SQL Server username. When this command option is specified,
the -P password command option must also be provided, as follows:
nsrsqlsv -s NetWorker_server_name -U username-P password
MSSQL:
Use the SQL Server username and password to log in to SQL Server with
SQL server authentication.
Displays the nsrsqlsv command messages in verbose mode, providing
detailed information about the progress of the backup operation.
Indicates that SQL Server internal backup compression is used.
Dell EMC NetWorker Module for Microsoft for SQL VDI User Guide 67

Manual Backups
Table 15 Command options for nsrsqlsv (continued)
Command options Descriptions
-y retention_period
-Z
-z federated_backup_option
Specifies the retention period of the backup. The value must be typed in
time and date formats accepted by the nsr_getdate program. The
NetWorker Command Reference Guide
or the UNIX man pages provide more
information about the nsr_getdate program.
Applies to the backup of up databases for a SQL Server 2005, and is usually
used in the online restore scenario from the command prompt. The -Z option
specifies that the logs-only (transaction log) backup after restore is not
promoted to full backup. Without the -Z option, the backup is promoted to
full.
Specifies federated backup options. Use the following values with the -z
option:
l
-z FEDERATED_SLAVE=true
This option denotes that the process is SQL Federated secondary
process.
l
-z FEDINDEX_NAME =SQL instance name under which the
backups are browsable
For example, MSSQL or MSSQL$InstanceName
l
-z FEDCLIENT_NAME =Windows cluster client name
This option is useful for cluster federated backups.
When you use the -z option, you must also use the -N option to specify the
save set name.
For example, to perform an incremental federated backup, type the following
command:
nsrsqlsv.exe -s mars.jupiter.com -m WIN-FED-3 -a device
interface=device interface -a device interface data domain a Data Domain interface=IP -b Default -l incr -q -z
FEDERATED_SLAVE=true -z FEDINDEX_NAME=MSSQL -z
FEDCLIENT_NAME=cluster_fed -N MSSQL#MARS:MARSDB MSSQL:MARSDB
Backup and recovery command syntax for SQL Server data
Use the additional command syntax that is shown in the following table to back up or restore SQL
Server data with the nsrsqlsv and nsrsqlrc backup and recovery commands.
You can specify more than one data object and can combine different types of data. You must
specify the SQL data objects with the syntax shown in the following table.
Table 16
SQL Server data Syntax for SQL Server data objects
All databases in the SQL Server
storage hierarchy (optional)
Command syntax for SQL Server data
MSSQL:
Typing MSSQL: yields an instance-level backup of all databases on the SQL
Server host.
68 Dell EMC NetWorker Module for Microsoft for SQL VDI User Guide

Table 16 Command syntax for SQL Server data (continued)
SQL Server data Syntax for SQL Server data objects
Manual Backups
Specified databases
All file groups in specified databases
Specified file groups in specified
database
Specified files in specified file groups
in specified databases
MSSQL:dbName
or
[MSSQL:dbName MSSQL:dbName2 ...]
MSSQL:dbName
or
[MSSQL:dbName. MSSQL:dbName2 ...]
MSSQL:dbName.fgName
or
[MSSQL:dbName.fgName MSSQL:dbName.fgName2
MSSQL:dbName2.fgName MSSQL:dbName2.fgName2 ...]
MSSQL:dbName.fgName.filename
or
[MSSQL:dbName.fgName.filename
MSSQL:dbName.fgName2.filename
MSSQL:dbName2.fgName.filename
MSSQL:dbName2.fgName2.filename ...]
Specifying MSSQL before each data object name is optional and does not affect the expression or
the resulting operation. However, when MSSQL is specified, it must be followed by a colon (:).
For example, the following two commands are equivalent:
nsrsqlsv -s NetWorker_server_name dbName.fgName
nsrsqlsv -s NetWorker_server_name MSSQL:dbName.fgName
In a non-clustered, named instance configuration, MSSQL$ is required, followed by the instance
name and a colon. For example:
nsrsqlsv -s NetWorker_server_name MSSQL$instanceName:dbName.fgName
Syntax for a named instance configuration
When a configuration contains non-clustered named instances of the SQL Server, you must
specify the name of the instance before the data.
MSSQL$instanceName:[dbName ...] [.fgName ...] [.fileName ...]
Note:
The nsrsqlsv and nsrsqlrc commands support specification of only a single
instance. If save sets for more than one instance are specified, the backup fails. The
nsrsqlrc command supports mixing instances for a copy restore operation.
Example 3 Back up all databases in an instance
To back up all the databases for instanceOne, type the following:
nsrsqlsv -s NetWorker_server_name MSSQL$instanceOne:
Dell EMC NetWorker Module for Microsoft for SQL VDI User Guide 69

Manual Backups
Example 4 Recover several file groups in an instance
To recover several file groups for instanceTwo, type the following:
nsrsqlrc -s NetWorker_server_name MSSQL$instanceTwo:dbName.fgName
MSSQL$instanceTwo:dbName.fgName2
Example 5 Using clustered instance SQL Server virtual server names with -A or -c
Instead of using clustered named instances in this syntax, use clustered instance SQL
Server virtual server names with -A or -c options, as shown in the following command:
nsrsqlsv -s NetWorker_server_name -A SQL_virtual_server_DNS_name -c
SQL_virtual_server_DNS_name MSSQL:
where:
l
NetWorker_server_name
l
SQL_virtual_server_DNS_name
is the hostname of the NetWorker server.
is the Domain Name System (DNS) name for the
SQL Server virtual server.
Create a client resource under the SQL Server virtual server DNS name.
For scheduled backups of a SQL Server virtual server client, you do not need to
specify the -A or -c option with the SQL Server virtual server name. The savegrp
process automatically specifies the virtual server name to the nsrsqlsv process by
using the -m option.
Syntax for names containing a period, backslash, or colon
NMM provides command line syntax that enables you to back up and recover file names, file
groups, and databases containing a period (.), backslash (\), or colon (:). By typing a backslash
before the period or backslash, the nsrsqlsv and nsrsqlrc commands interpret the period or
backslash as a literal character.
The tables in this section list the syntax for file names, file groups, and databases containing a
period, backslash, colon, or any combination of the three.
The following notes apply to the information in the tables:
l
The syntax that is shown in the right column applies to both the nsrsqlsv and nsrsqlrc
commands.
l
The notation MSSQL: is optional only for the nsrsqlsv command.
l
A single period (.) continues to delimit SQL identifiers.
l
The syntax also applies to named instances.
l
The backslash period (\.) character sequence replaces each literal period in the SQL identifier.
l
The double backslash (\\) character sequence replaces each literal backslash in the SQL
identifier.
The following table lists the syntax for file names, file groups, and databases containing a period.
70 Dell EMC NetWorker Module for Microsoft for SQL VDI User Guide

Table 17 Command syntax for names containing a period
Name visible from SQL utilities Equivalent command-line syntax
Manual Backups
SQL database named MyDatabase.COM
SQL file group named MyFileGroup.2 for the SQL
database named MyDatabase.COM
SQL file named MyFile.2, which is a member of the SQL
file group named MyFileGroup.2 for the SQL database
named MyDatabase.COM
MSSQL:MyDatabase\.COM
MSSQL$MyInstance:MyDatabase\.COM
MyDatabase\.COM.MyFileGroup\.2
MSSQL:MyDatabase\.COM.MyFileGroup\.2
MSSQL$MyInstance:MyDatabase
\.COM.MyFileGroup\.2
MyDatabase\.COM.MyFileGroup\.2.MyFile\.2
MSSQL:MyDatabase\.COM.MyFileGroup
\.2.MyFile\.2
MSSQL$MyInstance:MyDatabase\
\COM.MyFileGroup\\2.MyFile\\2
The following table lists the syntax for file names, file groups, and databases containing a
backslash.
Table 18 Command syntax for names containing a backslash
Name visible from SQL utilities Equivalent command-line syntax
The SQL database named MyDatabase\COM
MyDatabase\\COM
MSSQL:MyDatabase\\COM
MSSQL$MyInstance:MyDatabase\\COM
The SQL file group named MyFileGroup\2 for the SQL
database named MyDatabase\COM
MyDatabase\\COM.MyFileGroup\\2
MSSQL$MyInstance:MyDatabase\
\COM.MyFileGroup\\2
The following table lists the syntax for file names, file groups, and databases containing a colon.
Table 19
Name visible from SQL utilities Equivalent command-line syntax
SQL database named MyDatabase:COM
SQL file group named MyFileGroup:2 for the SQL
database named MyDatabase:COM
SQL file named MyFile, which is a member of the SQL
file group named MyFileGroup:2 for the SQL database
named MyDatabase:COM
Command syntax for names containing a colon
MyDatabase:COM
MSSQL:MyDatabase:COM
MSSQL$MyInstance:MyDatabase:COM
MyDatabase:COM.MyFileGroup:2
MSSQL:MyDatabase:COM.MyFileGroup:2
MSSQL
$MyInstance:MyDatabase:COM.MyFileGroup:2
MSSQL
$MyInstance:Mydatabase:com.MyFileGroup:2.
MyFile
Dell EMC NetWorker Module for Microsoft for SQL VDI User Guide 71

Manual Backups
Example backup command syntax
Back up a WSFC cluster
The Windows account that you use to back up the cluster must have WSFC administrator
privileges. To determine which accounts have WSFC administrator privileges, refer to the WSFC
online help. If the Windows account does not have WSFC administrator privileges, NMM cannot
communicate with WSFC and the various WSFC cluster resources, including the SQL Server
virtual servers.
To back up a SQL virtual server database, type the following:
nsrsqlsv -A SQL_virtual_server_name -c SQL_virtual_server_name -s
NetWorker_server_name MSSQL:dbName
where:
l
SQL_virtual_server_name
in a WSFC cluster.
l
NetWorker_server_name
l
dbName
Specifying -A SQL_virtual_server_name starts the following actions:
is the name of the SQL Server database that is to be backed up.
is the virtual server name when the SQL Server is configured to run
is the NetWorker server that is designated for the backup.
l
Contacts the SQL virtual server.
l
Creates save set entries under
SQL_virtual_server_name
in the NetWorker client index.
Perform a full backup of an Always On Availability Group
nsrsqlsv.exe -s nwsrvr -m automation -a device interface="data domain" -b
Default "MSSQL$SQ12INST4#sql2012-aag3:"
where:
l
nwsrvr is the NetWorker server
l
automation is the Windows cluster name
l
MSSQL$SQ12INST4#sql2012-aag3: is the save set name:
n
MSSQL is a mandatory term.
n
SQ12INST4 is the SQL Server instance name.
If you use a named instance, ensure that you perform the backup by using the same
instance name, even if the SQL Server has failed over to another node in the Always On
Availability Group.
n
# indicates a federated backup.
n
sql2012-aag3 is the Always On Availability Group name.
l
MSSQL$SQ12INST4#sql2012-aag3: is the backup object name, where all the databases of the
sql2012-aag3 Always On Availability Group are backed up.
Back up a specific database in an Always On availability group
To restrict the backup to specific databases, specify the database names. For example, to back up
database1 only, type "MSSQL$SQ12INST4#sql2012- aag3:database1" "MSSQL
$SQ12INST4#sql2012-aag3:database1"
Back up multiple instances on multiple nodes
When you have multiple instances on multiple nodes in an Always On availability group, select one
instance name to use as the save set name and target for the Always On availability group backup.
72 Dell EMC NetWorker Module for Microsoft for SQL VDI User Guide

Manual Backups
Use that same instance name when naming the backup object, regardless of which node in the
availability group the backup is started on.
For example, consider the following scenario:
l
There are two instances, SQ12INST4 and SQ12INST5, are present on Node 1 and Node 2
respectively.
l
You want to use SQ12INST4 for the backup.
l
Node 1 is down, and as the result, the SQ12INST4 instance is down.
l
You must perform the backup on Node 2 because Node 1 is down.
In this scenario, to use SQ12INST4, you must specify the save set and the backup object as
"MSSQL$SQ12INST4#sql2012-aag3:" "MSSQL$SQ12INST4#sql2012- aag3:" instead of "MSSQL
$SQ12INST5#sql2012-aag3:" "MSSQL $SQ12INST5#sql2012-aag3:".
Dell EMC NetWorker Module for Microsoft for SQL VDI User Guide 73

Manual Backups
74 Dell EMC NetWorker Module for Microsoft for SQL VDI User Guide

CHAPTER 5
Scheduled Backups
This chapter includes the following sections:
l
Overview of scheduled backup.............................................................................................. 76
l
Prerequisites......................................................................................................................... 76
l
Federated backup preferences for Availability Group databases............................................76
l
Excluding incompatible databases in backups........................................................................78
l
Configuring scheduled backups............................................................................................. 78
l
Monitoring scheduled backups ............................................................................................. 98
Dell EMC NetWorker Module for Microsoft for SQL VDI User Guide 75

Scheduled Backups
Overview of scheduled backup
The most reliable way to protect SQL Server data is to schedule backups of the SQL Server at
regular intervals. Scheduled backups ensure that all SQL Server data is automatically saved.
Scheduled backups can be set for backup levels full, logs only, or cumulative incremental, and they
can be configured to run at any time.
Review the
NetWorker Administration Guide
Prerequisites
Before you perform scheduled database backups with a SQL virtual server, you must meet several
prerequisites.
Ensure that the following prerequisites are met before you perform scheduled backups:
l
The NetWorker interface displays diagnostic attributes. In the Administration window, click
View > Diagnostic Mode.
l
When backing up filestream data, in the SQL Server Configuration Manager, on the Properties
page of the SQL Server instance, select Allow Remote Clients Access to Filestream Data.
This action is a requirement for backups to be successful. The SQL Server documentation
provides details about the SQL Server Configuration Manager.
before reviewing the information in this chapter.
Prerequisites for cluster environments
You must meet additional prerequisites for cluster environments:
l
Create a NetWorker client that is configured for database backups for each SQL virtual server
that you want to protect.
l
Configure the NetWorker client to either:
n
Back up all databases with MSSQL:.
n
Back up specific databases with MSSQL:User_Database.
Add more databases to an existing NetWorker client or create a new database client when
additional databases are added to an existing NetWorker client or a new database client is
created.
l
Specify virtual servers by typing the following command at the command prompt:
–A SQL_virtual_server
Use the fully qualified domain name for the client configuration and the –A option to specify
the SQL virtual server, as in the following example:
nsrsqlsv -sservername -ASQL_virtual_server
Federated backup preferences for Availability Group databases
You can configure the SQL Server backup preference for Availability Group databases by using
either the Microsoft SSMS GUI or the Transact-SQL command.
NMM supports federated backups, during which NMM detects the SQL Server preferred backup
setting for the Availability Group and performs the backup at the preferred node. The database
administrator can set the backup priority for the Availability Group or a database in the Availability
Group and nominate a particular replica for the backup. This feature improves backup
performance.
76 Dell EMC NetWorker Module for Microsoft for SQL VDI User Guide

Scheduled Backups
SQL Server 2012 or later provides the following options that determine where backups run for a
specific Availability Group replica:
l
AUTOMATED_BACKUP_PREFERENCE—Specify any one of the following options:
n
PRIMARY—Specifies that the backups will always occur on the primary replica. This option
is useful if you need backup features, such as creating differential backups, that are not
supported when backup operations run on a secondary replica.
n
SECONDARY_ONLY—Specifies that backups will never be performed on the primary replica. If
the primary replica is the only replica that is online, the backup will not occur.
n
SECONDARY (Prefer Secondary)—Specifies that backups should occur on the secondary
replica. If the primary replica is the only replica online, the backup is performed using the
primary replica. This is the default option.
n
NONE (Any replica)—Specifies that you prefer that backup jobs ignore the role of the
availability replicas when choosing the replica on which to perform backups. Note backup
jobs might evaluate other factors such as backup priority of each availability replica in
combination with its operational state and connected state.
l
BACKUP_PRIORITY =n—Specifies your priority for performing backups on this replica relative
to the other replicas in the same availability group. The value is an integer in the range of 0 -
100. These values have the following meanings:
n
0 indicates that this availability replica will never be chosen for performing backups.
This choice is useful for a remote availability replica for which you never want backups to
fail over.
n
1 indicates the lowest priority that an availability replica could be chosen for a backup
operation.
If BACKUP_PRIORITY = 1, the availability replica will be chosen only if no higher priority
availability replicas are available.
n
100 indicates the highest priority that an availability replica could be chosen for a backup
operation.
Follow the procedures provided in the article “Configure Backup on Availability Replicas (SQL
Server)” on the Microsoft MSDN website http://msdn.microsoft.com/en-us/library/
hh710053.aspx to decide which replica the backups will be run on.
Note:
Federated backup operations fail if a replica has the Readable Secondary field set to
No. For backups to succeed, in the Availability Group Properties window, set the Readable
Secondary configuration option to either Yes or Read-intent only for each of the primary and
secondary replicas.
Note: The following limitations apply to SQL Server backups of a secondary SQL Server replica
in an Availability Group:
l
For full backups of a secondary replica, SQL Server supports only copy-only backups.
l
Backup promotion is not supported for copy-only backups, including copy-only transaction
log backups.
l
SQL Server does not support differential backups on secondary SQL Server replicas.
Dell EMC NetWorker Module for Microsoft for SQL VDI User Guide 77

Scheduled Backups
Excluding incompatible databases in backups
If you schedule a backup of a client with the MSSQL: save set or named instance save set, and if
any of the databases in the protection group are incompatible, the scheduled backup fails.
Note: Incompatible databases are silently omitted during manual (non-scheduled) backups that
are started from NMM on the client computer.
A database that is in any of the following states causes a scheduled backup to fail because the
database is part of a previously configured backup:
l
Standby
l
Mirror copy
l
Recovering
l
Restoring
l
Recovery Pending
l
Suspect
l
Offline
l
Not recovered
l
Loading
l
Prerecovery
Definitive results about incompatible databases are available in the daemon.log file on the
NetWorker server and in the nsrsqlsv.log file on the client computer. Examples of error
messages listed in the daemon.log file after a backup failure:
l
Database 'Acme' cannot be opened because it is offline.
l
Processing Acme failed, the item will be skipped.
l
Database 'Acme' is in warm-standby state (set by executing RESTORE
WITH STANDBY) and cannot be backed up until the entire load sequence
is completed.
l
Processing Acme failed, the item will be skipped.
To exclude databases that are not in a state that can be backed up, perform either of the following
steps during client resource configuration:
l
In the Client Backup Configuration wizard on the Specify the Backups Options page, select
Skip databases that are in an incompatible state.
l
In the NetWorker Administrator GUI, in the Client Properties dialog box, in the Application
Information field, type NSR_SKIP_NON_BACKUPABLE_STATE_DB=TRUE.
Configuring scheduled backups
To configure a client resource, you must set up backup levels, configure a client resource, and then
assign data protection policies.
All the procedures that are described in the following table must be performed on a NetWorker
server through the NetWorker Administration GUI. Review the
details.
NetWorker Administration Guide
for
78 Dell EMC NetWorker Module for Microsoft for SQL VDI User Guide

Table 20 Tasks for configuring SQL Server VDI backups
Tasks Considerations
Setting up backup levels The availability of a backup level depends on
the type of data that are selected for backup
and any SQL Server settings on those objects.
You can specify any of the following backup
levels:
l
Full
l
Logs-only
l
Cumulative incremental
Configuring a client resource You can use either of the following methods
to configure the client resource:
l
Client Backup Configuration wizard
l
Client Properties dialog box
Setting data protection policies To set up the required data protection
policies, complete the following tasks:
Scheduled Backups
Setting up backup levels
l
Create a protection group—The type of
group that you create depends on the
actions that you plan to perform for the
group.
l
Create a policy—When you create a
policy, you specify the name and
notification settings for the policy.
l
Within the policy, create a workflow—
When you create a workflow, you specify
the name of the workflow, the schedule
for running the workflow, notification
settings for the workflow, and the
protection group to which the workflow
applies.
l
Create one or more actions for the
workflow.
The
NetWorker Administration Guide
provides
more information about data protection
policies.
You can specify backup levels other than database full, database cumulative incremental, and
database logs only.
The availability of a backup level depends on the type of data that are selected for backup and any
SQL Server settings on those objects, as listed in the following table.
Dell EMC NetWorker Module for Microsoft for SQL VDI User Guide 79

Scheduled Backups
Table 21 Backup levels for SQL Server data
SQL Server data objects Supported SQL Server backup levels
Full Cumulative incremental Logs only
All databases of SQL
default or named instances
Specified databases Yes Yes Yes
All file groups in specified
databases
Filestream data in specified
databases
Specified file groups in
specified database
Specified files in file groups
in specified databases
Yes Yes Yes
Yes Yes N/A
Yes Yes Yes
Yes Yes N/A
Yes Yes N/A
For SQL Server data objects for which logs only backup can be performed, ensure that the SQL
Server database options are correctly configured. The Microsoft SQL Server documentation
provides more information. Individual items are subject to promotion.
Configuring a client resource
Use NMC to configure each SQL Server host that is to be backed up as a NetWorker client
resource. Multiple SQL Server databases that exist on the same SQL Server host can be
configured as separate NetWorker client resources.
By default, the system account that is the nsrexecd service account does not have the system
administrator (sysadmin) role for the SQL server. Therefore, when you configure a client resource,
you must set the username and password of a Windows account that can back up the SQL server.
The required privileges are explained in the section Access privileges for backup and recovery on
page 44.
You can configure a client resource for scheduled backups in NMC using either of the following
tools:
l
The Client Backup Configuration wizard
l
The Client Properties dialog box
Client resources for SQL Server clusters
For federated backups using NMM to succeed, there must be a client resource for the Windows
cluster name from which the backup is performed and dummy client resources for the other
participating nodes in the cluster.
It is recommended that you use the Client Backup Configuration wizard to configure client
resources for cluster environments. The Client Backup Configuration wizard simplifies configuring
client resources for SQL Server 2012 or later scheduled backups in a Windows cluster environment
by creating dummy client resources for the participating cluster nodes. To use the Client Backup
Configuration wizard in a federated environment, ensure that the active node of the Windows
cluster contains a SQL Server 2012 or later instance.
If you create the client resources manually using the Client Properties dialog box, you must
manually create dummy client resources for each participating node in the cluster.
80 Dell EMC NetWorker Module for Microsoft for SQL VDI User Guide

NOTICE NMM supports configuring federated backups of an AG that is configured with
multiple SQL server instances, including server instances in a failover cluster. You must use the
Client Properties dialog box to configure this type of backup.
Configuring a client resource by using the Client Backup Configuration wizard
You must complete the required steps to configure a client resource with the Client Backup
Configuration wizard. Click the question mark icon at the lower left of each page of the Client
Backup Configuration wizard for details about each field on the page.
About this task
When you configure a client resource for a SQL Server cluster, remember the following points:
l
Do not use a short name alias for a virtual server node that is not registered on the NetWorker
server with a fully qualified domain client name.
l
Select the SQL Server cluster instance or individual databases for backup. Do not select
databases from two instances for backup. Databases that are in offline, restoring, or loading
state are unavailable for selection.
Note: If you are using NetWorker server 8.2.3 or 8.2.4 and NMM 19.2:
l
Configure a regular NetWorker backup group instead of configuring a data protection
policy. Do not enable the Snapshot option.
l
For the Client Backup Configuration wizard to function correctly, ensure that JRE 8 is
installed on the system where NMC is used. While the NMC for NetWorker 8.2.3 and later
is compiled with JRE 7, the NMM 19.2 Java plug-in for NMC is compiled with JRE 8.
l
The procedure to create a client resource is different between NetWorer server 8.2.3 and
NetWorker server 19.2. Follow the procedure provided in the
Microsoft for SQL VDI User Guide
version 8.2 SP1 when you are using NetWorker server
8.2.3 or later.
NetWorker Module for
Scheduled Backups
Procedure
1. In the NetWorker Administration window, click the Protection tab.
2. In the expanded left pane, right-click Clients and select New Client Wizard.
The following figure shows the NetWorker Administration window menu option to start the
Client Configuration wizard.
Figure 13
Starting the Client Configuration wizard
The Client Backup Configuration window opens to the Specify Client Information page.
Dell EMC NetWorker Module for Microsoft for SQL VDI User Guide 81

Scheduled Backups
3. On the Specify Client Information page, specify the following information:
l
In the Client Name field, type the hostname or fully qualified domain name (FQDN) of
the SQL Server, Windows cluster, or availability group listener.
Note: Do not type the IP address as the client name.
l
In the Comment field, type a description for the client resource.
l
In the Tag field, type one or more tags to identify this client resource for the creation of
dynamic client groups for data protection policies. Dynamic client groups automatically
generate a list of clients for a data protection policy that is based on the tags assigned to
the client and group.
l
In the Group field, select the group that was previously created for the required backup
type.
l
In the Type area, select Traditional.
The following figure shows the Client Configuration wizard Specify Client Information
page.
Figure 14 Specify Client Information page
4. Click Next.
5. On the Specify Backup Configuration Type page, specify the following information:
l
In the Client Operating System field, the client operating system that is used during the
configuration setup is automatically displayed.
l
In the NetWorker Version field, the NetWorker version that is used during the
configuration setup is automatically displayed.
l
From the Available Application list, select SQL Server.
l
Do not select Enable NetWorker Snapshot Management on the selected application.
The following figure shows the Client Configuration wizard Specify Backup Configuration
Type page.
82 Dell EMC NetWorker Module for Microsoft for SQL VDI User Guide

Figure 15 Specify Backup Configuration Type page
Scheduled Backups
6. Click Next.
7. On the Select the NetWorker Client Properties page, specify the following information:
l
In the Priority field, select the priority level.
l
In the Parallelism field, select the level of parallelism.
l
In the Remote Access field, type the required attributes.
During the client resource configuration, you can control client recover access with the
attributes in the Remote Access field. The Remote Access attribute displays a list of
the users that can recover save sets for a client. Depending on the level of security that
the files require, add or remove user names.
l
In the Data Domain Interface field, select the device type from the list.
l
In the Block Based Backup field, leave this option clear. This feature is not supported
for SQL Server VDI.
l
The Client Direct field, selected by default, enables the client to bypass the storage
node and send backup data directly to the storage device.
Note:
To use the default NetWorker Client settings, do not update the options that are
provided on the page.
8. Click Next.
9. On the Select the Backup Objects page, from the prepopulated list, select the SQL Server
instance at root level or individual databases for backup.
Note:
databases that are in offline, restoring, or loading state are unavailable for selection.
10. Click Next.
Do not select databases from two or separate instances for backup. Also,
Dell EMC NetWorker Module for Microsoft for SQL VDI User Guide 83

Scheduled Backups
11. On the Specify the Virtual Server Credentials page, in the Remote User Name and
Password fields, type the login information for a Windows account that can backup the
SQL server.
Note: Before performing this step, ensure that the User Account Control for Windows
Server 2008 R2 is disabled for administrators.Access privileges for backup and recovery
on page 44 provides details.
12. Click Next.
The Specify the Backup Options page appears.
13. (Optional) On the Specify the Backup Options page, select the following optional settings
as required:
l
Select NetWorker compression to use NetWorker compression during the backup.
l
Select 256-bit AES software encryption to use 256-bit AES software encryption.
l
Select SQL server compression if you are using SQL Server 2008 or later.
l
Select Perform checksum before writing to media to perform a checksum operation
with the backup and save the information to the backup media, and then, if required,
select Continue to backup even on checksum error.
l
Select Do not truncate log contents when backing up transaction logs when you are
backing up transaction logs for a SQL server 2005.
l
Select Skip simple databases during incremental backup to omit user-created simple
databases during a logs only backup.
The Microsoft SQL Server does not support logs only backups for simple restore model
databases. During a logs only backup that includes simple restore model databases, the
simple databases are backed up at level full. This option does not affect the backup of
system databases, such as master and msdb, which are promoted to level full during a
logs only backup and cannot be omitted from the backup.
This option does not apply to full and cumulative incremental backups.
l
Select Turn off backup promotion to disable backup promotion.
l
Select Skip databases that are in an incompatible state—Select to skip databases
that are not compatible for backup.
l
In the DBCC Consistency Check Options area, select the appropriate options:
n
Select Select all databases to run database consistency checks (DBCC) on all of the
databases. If the DBCC check fails, the database backup is skipped and backup status
of the group appears as failed. This action ensures that all backed-up databases are
suitable for restore.
n
In the Databases box, select specific databases for the DBCC check.
l
In the Striping Options area, specify striping options:
a. To enable striping during a backup, select Enable Striping.
b. In the Specify the number of stripes field, type or select the number of stripes.
The following figure shows the Client Configuration wizard Specify the Backup Options
page.
84 Dell EMC NetWorker Module for Microsoft for SQL VDI User Guide

Figure 16 Specify the Backup Options page
Scheduled Backups
14. Click Next.
The Client Configuration Summary page appears.
15. On the Client Configuration Summary page, check to ensure that the configuration
choices are correct. Click Back to make changes, or click Create to configure the client
resources.
The Check Results page appears.
16. On the Check Results page, review the messages to ensure that the client was successfully
created. You should see the following message:
Successfully added new client "client_name"
17. Click Finish to exit the wizard.
After you finish
Open the NetWorker Administration window to the Protection tab. Click Clients in the expanded
left pane and ensure that the newly created client is listed.
The following figure shows the NetWorker Administration window open to the Protection tab.
Dell EMC NetWorker Module for Microsoft for SQL VDI User Guide 85

Scheduled Backups
Figure 17 Viewing clients in the Protection tab
Note: To make updates to an existing client resource, right-click the client resource and select
Client Backup Configuration > Modify Client Wizard.
Configuring a client resource by using the Client Properties dialog box
You can manually create a client resource by using the Client Properties dialog box of the
NetWorker Administration window. The
Module for Microsoft Administration Guide
information in these guides before manually creating the client resources.
NetWorker Administration Guide
provide details about data protection policy. Review the
and the
NetWorker
About this task
When you manually create client resources for cluster configurations, ensure that a client resource
is created for Windows cluster name and that dummy client resources are created for the other
participating nodes in the cluster. If you do not create dummy clients for each of the nodes in the
cluster, the backup fails. Do not assign a group for the dummy clients.
Click the question mark icon at the lower left of each page for details about each field in the
page.
Procedure
1. In the Administration window, click Protection.
2. In the expanded left pane, select Clients.
3. From the File menu, select New.
4. On the General tab:
l
In the Name field, type the fully qualified domain name (FQDN) of the SQL Server,
Windows cluster, or availability group listener. If you create multiple client resources for
the same SQL Server, use the same name for each.
Note:
Do not type the IP address as the client name.
l
In the Comment field, type a description. If you create multiple client resources for the
same NetWorker client host computer, use this attribute to differentiate each resource's
purpose.
l
In the Tag field, type one or more tags to identify this client resource for dynamic client
groups in data protection policies.
l
In the Retention Policy field, select a retention policy from the list.
The retention policy determines the time period during which the rolled-over data is
available.
86 Dell EMC NetWorker Module for Microsoft for SQL VDI User Guide

l
Leave the Block based backup option clear. This feature is not supported for SQL
Server VDI.
l
From the Directive list, select an option.
Directives are resources that contains special instructions that control how the
NetWorker server processes files and directories during backup.
l
Select Scheduled Backups.
The Backup type field displays the SQL Server.
l
In the Save Set field, specify the components to be backed up as listed in the following
tables.
Note: When nodes within an availability group (AG) reside on SQL server instances
with different names, any instance name can be used. NMM will automatically detect
the AG that resides on the instance name.
Table 22 Save sets in a standalone environment
Save set Description
Scheduled Backups
All
MSSQL:
MSSQL$<SQL_named_instance>:
MSSQL
Default value.
Backs up all the databases on the SQL Server host or the SQL default instance.
Backs up the specified SQL named instance.
Backs up the database of the specified SQL named instance.
$<SQL_named_instance>:dbName
MSSQL:dbName1 [MSSQL:dbName2
Backs up the specified databases from the SQL default instance.
MSSQL:dbName3 ...]
Table 23 Save sets in a cluster environment
Save set Description
All
MSSQL#<AlwaysOn_Availability_Group_name>:
This save set for the physical nodes is the default value.
This save set for the listener client backs up all the databases
of the AlwaysOn Availability Group that is configured with the
SQL default instance.
MSSQL
$<SQL_named_instance>#<AlwaysOn_Availabili
ty_Group_name>:
l
Select the appropriate option in the Protection group list field.
This save set for the listener client backs up all the databases
of the AlwaysOn Availability Group that is configured with the
SQL named instance.
If client resources for the same NMM host are added to different backup groups, ensure
that the Start Time field for each backup group is spaced such that the backups for the
host’s client resources do not overlap.
l
In the Schedule field, select a backup schedule.
5. On the Apps & Modules tab:
l
In the Remote user and Password fields respectively:
n
For SQL Server 2012 or later, type the remote username and password in the Remote
User and Password fields. To enable NMM to back up the SQL Server virtual server
or a mirrored server, type the username for a Windows user account that has SQL
Server administrator privileges.
n
For other SQL Server versions, leave the fields empty.
Dell EMC NetWorker Module for Microsoft for SQL VDI User Guide 87

Scheduled Backups
l
In the Backup command field, type the nsrsqlsv command and any necessary
command options.
Command options for nsrsqlsv on page 63 provides the supported backup command
options.
l
For Application Information field, type the required values. The following table
describes the available application information variables.
Table 24 Application Information field values
Values Default and valid values
ENABLE_GLR
NSR_INCLUDE_AAG_DATABASE
NSR_SKIP_SIMPLE_DB
NSR_SKIP_NON_BACKUPABLE_STATE
_DB
l
TRUE (Default): Enables granular-level recovery (GLR) capable backups.
l
FALSE: Prevents the backup from being GLR-capable. This setting is useful if
you are using technology that is not supported for GLR (such as compression,
encryption, or tape-type devices) and want to avoid error messages in the
operation logs.
l
AAG_ANYREPLICA (Default): Includes Always On availability group databases
in instance-level backup operations.
l
None: Omits Always On availability group databases from instance-level
backup operations.
l
TRUE: Omits user-created simple databases during a logs only backup.
This option does not affect the backup of system databases, such as master
and msdb, which are promoted to level full during a logs only backup and
cannot be omitted from the backup.
l
FALSE (Default): Includes simple databases in the backup. During a logs only
backup that includes simple recovery model databases, the simple databases
are backed up at level full.
This option does not apply to full and cumulative incremental backups.
l
TRUE: Omits databases that are in not in a state to be backed up from the
backup operation. The savegroup reports success for the SQL instance level
backups.
l
FALSE (Default): Includes databases that are in not in a state to be backed up
from the backup operation. The backup of these databases fail and the
savegroup reports failure of the SQL instance level backups.
NSR_BACKUP_PROMOTION
l
ALL: Enables backup promotion to occur in any applicable scenario.
l
NONE: Disables backup promotion. Logs a warning when backup promotion
would normally occur.
l
NONE_WITH_WARNINGS: Disables backup promotion. Logs a warning when
backup promotion would normally occur.
l
SKIP_RECOVERY_MODEL: Disables database recovery model change
detection. Backup promotion as a result of recovery model change will not
occur, but backup promotion in other scenarios will still occur.
NSR_MIRROR_INSTANCE_PORT=<por
t number>
l
Select None in Proxy Backup.
88 Dell EMC NetWorker Module for Microsoft for SQL VDI User Guide
Specifies the port number when a SQL mirror database is configured with custom
TCP port.

Scheduled Backups
l
For data deduplication using a Data Domain device, under Deduplication, select Data
Domain backup.
6. On the Globals (1 of 2) tab, complete fields, as required.
7. For federated backups, type all known aliases for the SQL Server host as in the following
example:
mars mars.emc.com
Include both the DNS short name and long name for the SQL Server host.
8. On the Globals (2 of 2) tab, in the Remote Access field, type the user IDs or hostnames of
other clients.
This field grants copy restore type permissions, which enables the named hosts to access
the NetWorker server and receive directed recover data. If this field is empty, only
administrators and users who are logged in to the SQL Server host have access.
For mirroring, this should be the same user account and password that you used to set up
the mirroring relationship. If multiple accounts have been set up, only one must be specified.
According to Microsoft SQL documentation, a domain account must be used to set up the
mirroring relationship.
9. Click OK.
10. Run the backup from the savegroup.
Configuring cluster client resources with the Client Properties dialog box
When you create client resources manually for cluster configurations, ensure that a client resource
is created for Windows cluster name and that dummy client resources are created for the other
participating nodes in the cluster. If you do not create dummy clients for each of the nodes in the
cluster, the backup fails. Do not assign a group for the dummy clients.
Creating client resources for each cluster node
When you create client resources, edit the client resource for each physical node of the cluster. In
the NetWorker Administration GUI, in the left pane, select Clients, and then in the right pane,
right-click to create a new resource.
About this task
On the General tab, in the Name field, type the fully qualified domain name for the cluster node
name. For example:
wash-2k.belred.emc.com
Creating client resources for a virtual server
You must create client resources for each virtual server in the cluster.
Procedure
1. Open the NetWorker Management Console.
The NMC Enterprise window appears.
2. Right-click the server and select Launch Application.
The NetWorker Administration GUI appears.
3. In the NetWorker Administration GUI, click Protection.
4. In the left pane, select Clients.
5. From the File menu, select New.
6. Click the General tab.
Dell EMC NetWorker Module for Microsoft for SQL VDI User Guide 89

Scheduled Backups
7. In the Name field of the client resource, type the short name for the SQL virtual server
without the domain specification. This field should contain the name of the virtual server,
not a node name.
8. On the Apps & Modules tab (for NetWorker), in the Backup command field, type the
nsrsqlsv command with the necessary options.
For virtual server backups, the -A SQL_virtual_server_name command option is required.
9. On the Globals (2 of 2) tab, in the Remote Access field, add entries similar to the following
one to grant access to all physical nodes in the cluster.
RemoteUser@physicalnode_hostname
where:
l
RemoteUser
l
physicalnode_hostname
is the account under which the backup will run.
is the fully qualified domain name of the physical node.
The Remote Access field enables the NMM server to access the cluster node to
authenticate the computer (on which the virtual server is running) as an NMM client before
any backup or restore operation begins. Follow this step for each virtual server client
resource in the cluster.
10. On the Apps & Modules tab, in the User Name and Password fields, add the username and
password, respectively, for a Windows user account that has both SQL Server administrator
privileges and Windows administrator privileges. The User Name and Password fields
enable NMM to back up the SQL Server virtual server. Follow these steps for each virtual
server Client resource in the cluster.
11. Use NMC to start the backup group manually, or wait for the next scheduled backup to
occur.
Configuring client resources for clusterless availability group listener and physical nodes of an
AlwaysOn Availability Group
To perform AlwaysOn Availability Group backups by using a clusterless availability group listener,
you must manually create client resources for the listener and the physical nodes of the AlwaysOn
Availability Group by using the Client Properties dialog box of the NetWorker Administration
window.
About this task
Note:
Before you configure a client resource for the clusterless availability group listener,
ensure that you review the basic information and the requirements in the Clusterless
availability group listeners on page 39 section.
Procedure
1. In the Administration window, click Protection.
2. In the expanded left panel, select Clients.
3. From the File menu, select New.
4. On the General tab:
l
In the Name field, type the short name of the clusterless availability group listener client.
l
In the Comment field, type a description.
l
In the Tag field, type one or more tags to identify this client resource for dynamic client
groups in data protection policies.
l
In the Retention Policy field, select a retention policy from the list.
90 Dell EMC NetWorker Module for Microsoft for SQL VDI User Guide

The retention policy determines the time period during which the rolled-over data is
available.
l
Leave the Block based backup option clear. NMM does not support block based
backups of SQL Server VDI data.
l
From the Directive list, select an option.
Directives are resources that contains special instructions that control how the
NetWorker server processes files and directories during a backup.
l
Select Scheduled Backups.
The Backup type field displays the SQL Server.
l
In the Save Set field, type the AlwaysOn Availability Group save set as the following
table lists:
Table 25 Save sets
Save set Description
Scheduled Backups
All
MSSQL#<AlwaysOn_Availability_Group_name>:
MSSQL
$<SQL_named_instance>#<AlwaysOn_Availabili
ty_Group_name>:
l
From the Protection group list field, select the appropriate option.
If client resources for the same NMM host are added to different backup groups, ensure
that the Start Time field for each backup group is spaced such that the backups for the
host’s client resources do not overlap.
l
In the Schedule field, select a backup schedule.
5. On the Apps & Modules tab:
l
In the Remote user and Password fields, type the remote username and password
respectively.
l
In the Backup command field, type nsrsqlsv.
Command options for nsrsqlsv on page 63 provides the supported backup command
options.
l
In Application Information field, type the required application information variable. The
following table lists the available application information variables.
This save set for the physical nodes is the default value.
This save set for the listener client backs up all the databases
of the AlwaysOn Availability Group that is configured with the
SQL default instance.
This save set for the listener client backs up all the databases
of the AlwaysOn Availability Group that is configured with the
SQL named instance.
Table 26
Application Information field values
Values Default and valid values
ENABLE_GLR
l
TRUE (Default): Enables granular-level recovery (GLR) capable
backups.
l
FALSE: Prevents the backup from being GLR-capable. This setting
is useful if you are using technology that is not supported for GLR
(such as compression, encryption, or tape-type devices) and want
to avoid error messages in the operation logs.
Dell EMC NetWorker Module for Microsoft for SQL VDI User Guide 91

Scheduled Backups
Table 26 Application Information field values (continued)
Values Default and valid values
NSR_INCLUDE_AAG_DATABASE
NSR_SKIP_SIMPLE_DB
NSR_SKIP_NON_BACKUPABLE_STATE_DB
l
AAG_ANYREPLICA (Default): Includes Always On availability group
databases in instance-level backup operations.
l
None: Omits Always On availability group databases from instancelevel backup operations.
l
TRUE: Omits user-created simple databases during a logs only
backup.
This option does not affect the backup of system databases, such
as master and msdb, which are promoted to level full during a logs
only backup and cannot be omitted from the backup.
l
FALSE (Default): Includes simple databases in the backup. During a
logs only backup that includes simple recovery model databases,
the simple databases are backed up at level full.
This option does not apply to full and cumulative incremental backups.
l
TRUE: Omits databases that are in not in a state to be backed up
from the backup operation. The savegroup reports success for the
SQL instance level backups.
l
FALSE (Default): Includes databases that are in not in a state to be
backed up from the backup operation. The backup of these
databases fail and the save group reports failure of the SQL
instance level backups.
NSR_BACKUP_PROMOTION
NSR_MIRROR_INSTANCE_PORT=<port
number>
NSR_PS_DEBUG_LEVEL=<number_1_through
_9>
l
Select None in Proxy Backup.
l
For data deduplication using a Data Domain device, under Deduplication, select Data
Domain backup.
6. On the Globals (1 of 2) tab, in the Aliases field, type the DNS short name and the FQDN of
the clusterless availability group listener each in a separate line.
l
ALL: Enables backup promotion to occur in any applicable scenario.
l
NONE: Disables backup promotion. Logs a warning when backup
promotion would normally occur.
l
NONE_WITH_WARNINGS: Disables backup promotion. Logs a
warning when backup promotion would normally occur.
l
SKIP_RECOVERY_MODEL: Disables database recovery model
change detection. Backup promotion as a result of recovery model
change will not occur, but backup promotion in other scenarios will
still occur.
Specifies the port number when a SQL mirror database is configured
with custom TCP port.
Generates detailed logs that you can use to troubleshoot the backup
issues. You can specify a value 1 through 9. The default value is 0
(zero).
Note:
Example entries of the DNS short name and the FQDN of the clusterless
availability group listener:
92 Dell EMC NetWorker Module for Microsoft for SQL VDI User Guide

Scheduled Backups
mars
mars.emc.com
7. On the Globals (2 of 2) tab, in the Remote Access field, add entries similar to the following
to grant access to all physical nodes in the AlwaysOn Availability Group.
RemoteUser@physicalnode_hostname
where:
l
RemoteUser
l
physicalnode_hostname
is the account, under which the backup is performed.
is the FQDN of the physical node.
The Remote Access field enables the NMM server to access the physical node that is
configured with the clusterless availability group listener in the AlwaysOn Availability Group,
and authenticates the node as an NMM client before any backup or restore operation
begins.
8. Specify the fields on the other tabs according to your requirement, and then click OK.
9. Configure client resources for the physical nodes in the AlwaysOn Availability Group.
To configure a client resource for each physical node, repeat steps 1 through 8, but with the
following changes:
a. In step 4:
l
In the Name field, type the short name of the physical node.
l
In the Save Set field, type All.
b. In step 6, in the Aliases field, type the DNS short name and the FQDN of the physical
node each in a separate line.
10. Create a policy, a workflow, an action, and a group for the listener client that you have
created.
Setting data protection policies on page 93 provides information.
11. Start the workflow.
Setting data protection policies
About this task
Note:
NetWorker 8.2.x does not use data protection policies. If you are using NetWorker
server 8.2.x and NMM 19.2, follow the steps provided in the
for SQL VDI User Guide
Complete the following tasks to set data protection policies for scheduled backups:
l
Create a protection policy
l
Create a workflow
l
Create an action
l
Create a protection group
NetWorker Module for Microsoft
version 8.2 SP1 to configure a NetWorker Group.
Dell EMC NetWorker Module for Microsoft for SQL VDI User Guide 93

Scheduled Backups
Creating a policy
Policies provide an organizational container for the workflows, actions, and groups that support
and define the backup, management, and system maintenance actions that you want to perform.
Procedure
1. Open the NetWorker Administration GUI. From the Protection tab, right-click Policies from
the expanded left pane, and then click New.
The Create Policy window appears.
2. In the Name field, type a name for the policy.
The following figure shows the Create Policy window.
Figure 18 Create Policy window
3. Click OK.
Results
The policy is created and the NetWorker Administration GUI opens to the page for the newly
created policy.
After you finish
Add workflows, actions, and protection groups to the policy.
Creating a workflow
Workflows define the start time for a series of actions, the frequency in which the actions run, the
order of actions in a sequence, and the protection group to which the workflow applies.
Before you begin
Create a policy.
Procedure
1. Open the NetWorker Administration GUI.
94 Dell EMC NetWorker Module for Microsoft for SQL VDI User Guide

2. From the Protection tab, click the policy that you must create a workflow for.
The Policy page opens.
3. Click Create a new Workflow.
The New Workflow window opens.
The following figure shows the New Workflow window.
Figure 19 Creating a workflow for the policy
Scheduled Backups
4. In the Name field, type a name for the workflow and either specify the workflow settings or
accept the default settings.
5. Click OK.
Results
The workflow is created and the NetWorker Administration GUI opens to the page for the newly
created workflow.
Creating an action within a workflow
Actions are the key resources in a workflow for a data protection policy and define a specific task,
for example, a backup, clone, or snapshot.
Before you begin
Create a policy and a workflow within that policy.
Procedure
1. Open the NetWorker Administration GUI and click the Protection tab. Click the policy that
you must create a workflow for.
2. Expand the policy in the left pane that contains the workflow you must create an action in,
and click the workflow.
The Workflow page opens.
3. Click Create a new Action.
The Policy Action wizard opens.
Dell EMC NetWorker Module for Microsoft for SQL VDI User Guide 95

Scheduled Backups
4. On the Specify the Action Information page, in the Name field, type a name for the action.
5. In the Comment field, type a description for the action.
6. To ensure that the action runs when the policy or workflow that contains the action is
started, select Enabled. To prevent the action from running when the policy or workflow
that contains the action is started, clear this option.
7. From the Action Type list, select the action.
8. In the Workflow area, assign the action to a policy and workflow.
9. In the Period area, specify the backup schedule.
Note: NetWorker supports backup levels full, logs-only, and cumulative incremental with
SQL Server VDI.
The following figure shows the Policy Action wizard.
Figure 20 Specifying action information in the Policy Action wizard
10. Click Next.
11. On the Specify the Backup Options page, specify backup properties for the action or
accept the default properties, and click Next.
12. On the Specify the Advanced Options page, set the Retries field to 0, and then click Next.
13. On the Action Configuration Summary page, ensure that the correct selections are
displayed.
l
If you must change any specifications, click Back.
l
If you are satisfied with the summary, click Configure to create the action.
14. Review the messages on the Action Wizard Results page and ensure that the action was
successfully created.
15. Click Finish to exit the wizard.
Results
The action is created within the specified workflow and is displayed in the NetWorker
Administration GUI, on the Workflow page.
96 Dell EMC NetWorker Module for Microsoft for SQL VDI User Guide

Creating a protection group
Basic client groups define a static list of client resources for an action.
Before you begin
Create a policy, workflow, and action.
Procedure
1. Open the NetWorker Administration GUI. From the Protection pane, click the policy that
you must create a protection group within.
The Policy page opens.
2. Click the Groups tab. Right-click within the tab, and then select New.
The following figure illustrates adding a group to a policy from the Protection pane.
Figure 21 Adding a group to a policy from the Protection pane
Scheduled Backups
The Create Group dialog box opens.
3. In the Name field, type a name for the group.
4. From the Group Type list, leave the default selection of Clients.
5. In the Comment field, type a description of the group.
6. Select the workflow in which to assign the group from the Policy-Workflow list.
The following figure illustrates specifying a workflow and client in the Create Group
window.
Dell EMC NetWorker Module for Microsoft for SQL VDI User Guide 97

Scheduled Backups
Figure 22 Specifying workflow and client in the Create Group window
7. Click OK.
Results
The group is created and appears in the Group tab of the policy in the NetWorker Administration
GUI.
Monitoring scheduled backups
During a backup, you can check for status messages in the NetWorker Administration GUI.
About this task
The NetWorker server reports the successful and failed database backups, including the databases
in an Always On Availability Group. To monitor the success of a backup, use the following
procedure:
Procedure
1. From the NMC, open the NetWorker Administration GUI.
2. Click the Monitoring tab.
3. Right-click a backup in the Policies pane, and then select Show Details.
The Show Messages window appears.
Results
The Show Messages window displays successful and failed backup reports.
The following figure shows as example of a successful backup message.
98 Dell EMC NetWorker Module for Microsoft for SQL VDI User Guide

Figure 23 Successful backup messages
The following figure shows as example of a failed backup message.
Figure 24 Failed backup messages
Scheduled Backups
Dell EMC NetWorker Module for Microsoft for SQL VDI User Guide 99

Scheduled Backups
100 Dell EMC NetWorker Module for Microsoft for SQL VDI User Guide
 Loading...