

Page 1

23" LCD Color Monitor Dell SP2309Wc
Service
Service
Service
Horizontal Frequency
30 kHz to 83 kHz
Table Of Contents
Description Page Description Page
Table Of Contents.......…….................……...........…........1
Revision List.….........................………................……......2
ECN History.….......................………..................……......3
Important Safety Notice.….……….…..................……......4
1.Monitor Specifications.....…........................………........5
2.LCD Monitor Description…………………………….......6
3.Operation Instructions……………...............……...........7
3.1. Using the Front Panel Controls……………………….7
3.2.Control Buttons……………...............……...............8
3.3 Adjusting the Picture...........…………….........………..9
4.Input/Output Specification.............……………........…20
4.1.Input Signal Connector............………….................20
4.2.Factory Preset Display Modes...…..…......................21
4.3.Power Supply Requirements..........……...................22
4.4.Panel Specification…….....……………..................23
4.5.Definition of Pixel Defects…………...............……….25
5.Block Diagram…….…...................…………................27
5.1.Software Flow Chart………..………………....….......27
5.2.Electrical Block Diagram………………..…..….......29
6.Mechanical Instruction………………..…..….......31
7.Schematic Diagram………..................................….....36
7.1Main Board......………......................................36
7.2 Power Board……..…….……....................................44
7.3 USB Board……………………………………………..46
7.4 Key Board………………………...…………………….47
8.PCB Layout..……...………….......................................48
8.1.Main Board……………..…........................................48
8.2.Power Board……………........................................50
8.3.USB Board………………….....................................51
9.Maintainability………….......................................52
9.1.Equipments and Tools Requirement..…….…...........52
9.2.Trouble Shooting………………….............................53
10.White-Balance, Luminance adjustment...………......60
11.ISP Instruction…………….…….................................61
12.Monitor Exploded View…………….…………............65
13.BOM List………….....................................................67
14.Different Parts List…………………….……………...89
SAFETY NOTICE
ANY PERSON ATTEMPTING TO SERVICE THIS CHASSIS MUST FAMILIARIZE HIMSELF WITH THE
CHASSIS AND BE AWARE OF THE NECESSARY SAFETY PRECAUTIONS TO BE USED WHEN SERVICING
ELECTRONIC EQUIPMENT CONTAINING HIGH VOLTAGES.
1
Page 2
23" LCD Color Monitor Dell SP2309Wc
Revision List
Revision Release Date Revise history TPV model
HDRSA3NKWMDYPN
HDRSA3NKWMDYPC
A00 Sep.-18-2008 Initial Release
HDRSA3NMWMDLPN
HDRSA3NLWMDYPN
HDRSA3NMWMDLPC
HDRSA3NLWMDYPC
HDRSA3NJWMDYPC
A01 Oct.-27-2008 Add new BOM in item 14
HDRSA3NBWMDYPC
HDRSA3NFWMDYPC
HDRSA3NFWMDYPN
HDRSA3NBWMDYPN
A02 Dec.-2-2008 Add new BOM in item 14
Add new BOM in item 14 HDRSA3NMWMDDPC
A03 Dec.-22-2008
Change Y value to Ymin (min
HDRSA3NBWMDY5C
HDRSA3NJWMDYPN
ALL
luminance value)in item 10
2
Page 3
23" LCD Color Monitor Dell SP2309Wc
ECN History
ECN No. Change Description Service Deposition Cut-in date MSR
3
Page 4

23" LCD Color Monitor Dell SP2309Wc
Important Safety Notice
Proper service and repair is important to the safe, reliable operation of all AOC Company Equipment. The service
procedures recommended by AOC and described in this service manual are effective methods of performing
service operations. Some of these service operations require the use of tools specially designed for the purpose.
The special tools should be used when and as recommended.
It is important to note that this manual contains various CAUTIONS and NOTICES which should be carefully read
in order to minimize the risk of personal injury to service personnel. The possibility exists that improper service
methods may damage the equipment. It is also important to understand that these CAUTIONS and NOTICES ARE
NOT EXHAUSTIVE. AOC could not possibly know, evaluate and advise the service trade of all conceivable ways in
which service might be done or of the possible hazardous consequences of each way. Consequently, AOC has not
undertaken any such broad evaluation. Accordingly, a servicer who uses a service procedure or tool which is not
recommended by AOC must first satisfy himself thoroughly that neither his safety nor the safe operation of the
equipment will be jeopardized by the service method selected.
Hereafter throughout this manual, AOC Company will be referred to as AOC.
WARNING
Use of substitute replacement parts, which do not have the same, specified safety characteristics may create
shock, fire, or other hazards.
Under no circumstances should the original design be modified or altered without written permission from AOC.
AOC assumes no liability, express or implied, arising out of any unauthorized modification of design.
Servicer assumes all liability.
FOR PRODUCTS CONTAINING LASER:
DANGER-Invisible laser radiation when open. AVOID DIRECT EXPOSURE TO BEAM.
CAUTION-Use of controls or adjustments or performance of procedures other than those specified herein may
result in hazardous radiation exposure.
CAUTION -The use of optical instruments with this product will increase eye hazard.
TO ENSURE THE CONTINUED RELIABILITY OF THIS PRODUCT, USE ONLY ORIGINAL MANUFACTURER'S
REPLACEMENT PARTS, WHICH ARE LISTED WITH THEIR PART NUMBERS IN THE PARTS LIST SECTION
OF THIS SERVICE MANUAL.
Take care during handling the LCD module with backlight unit
-Must mount the module using mounting holes arranged in four corners.
-Do not press on the panel, edge of the frame strongly or electric shock as this will result in damage to the screen.
-Do not scratch or press on the panel with any sharp objects, such as pencil or pen as this may result in damage to
the panel.
-Protect the module from the ESD as it may damage the electronic circuit (C-MOS).
-Make certain that treatment person’s body is grounded through wristband.
-Do not leave the module in high temperature and in areas of high humidity for a long time.
-Avoid contact with water as it may a short circuit within the module.
-If the surface of panel becomes dirty, please wipe it off with a soft material. (Cleaning with a dirty or rough cloth
may damage the panel.)
4
Page 5
23" LCD Color Monitor Dell SP2309Wc
1. Monitor Specifications
Screen type Active matrix - TFT LCD
Panel Type
Size
LCD Panel
Pixel pitch
Viewable angle
Response time 2 ms typical (Grey to Grey)
Separate Sync H/V TTL
Input
Dynamic contrast ratio 1000:1 (typical)
Signal cable type
H-Frequency 30kHz – 83kHz
V-Frequency 56 - 76Hz
LTM230TT02 C01 KR SEC
23 inches (23-inch viewable image size)
0.249 mm mm (H) x 0.249 mm mm(V)
160° (vertical) typ, 160° (horizontal) typ
Digital: Detachable, DVI-D, Solid pins, shipped detached from the
monitor
Analog: Detachable, D-Sub, 15pins, shipped attached to the monitor
HDMI: Detachable, HDMI-A, Solid pins, shipped without cable
Luminance output 300 CD/m ²(typical)
Max. Resolution
Plug & Play VESA DDC
EPA ENERGY
®
STAR
Dimensions (with stand)
Power Source
Video display capabilities (DVI
playback)
Environmental
Considerations
ON Mode <75W
OFF Mode <1W
2048 x 1152 at 60 Hz
Height : 440.10 mm
Width: 558.00 mm
Depth:265.30 mm
100 to 240 VAC / 50 or 60 Hz +
480i/480p/576i/576p/1080i/1080p (Supports HDCP)
Operating Temp: 5° to 35°C
Operating Humidity: 10% to 80%
Storage Temp.: -20° to 60°C
3 Hz / 1.5A
Weight
Weight with packaging:
Weight with stand assembly and cables:
Weight without stand assembly:
Weight of stand assembly:
5
25.80 Lbs (11.724kg)
10.96 Lbs (4.98kg)
6.12 Lbs (2.78kg)
17.33 Lbs (7.874kg)
Page 6
23" LCD Color Monitor Dell SP2309Wc
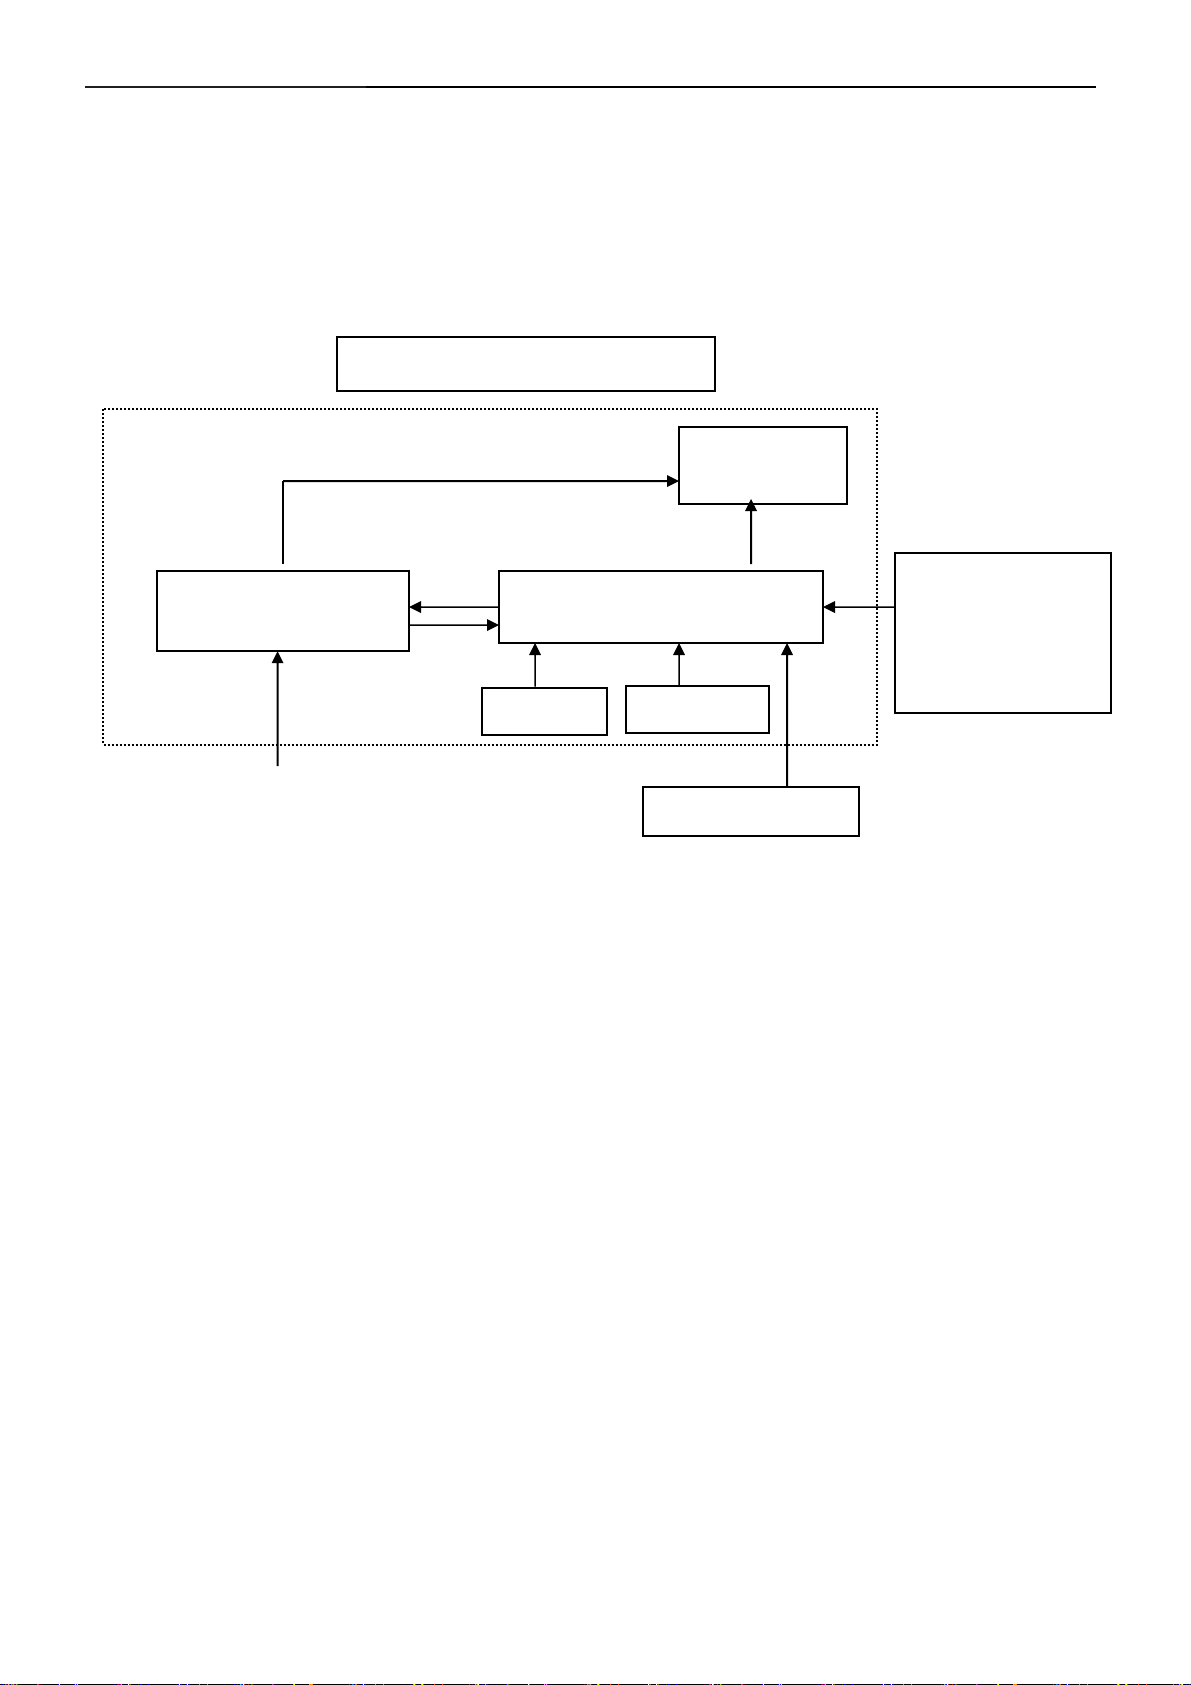
2. LCD Monitor Description
The LCD monitor will contain a main board, power board, key board and a USB board which house the flat
panel control logic, brightness control logic and DDC.
The power board will provide AC to DC Inverter voltage to drive the backlight of panel and the main board
chips each voltage.
Monitor Block Diagram
CCFL Drive.
Flat Panel and
CCFL backlight
Power board
Main Board
Key board
AC-IN
100-240V
USB board
Video signal, DDC
Host Computer
RS232 Connector
For white balance
adjustment in factory
mode
6
Page 7
23" LCD Color Monitor Dell SP2309Wc
3. Operation instructions
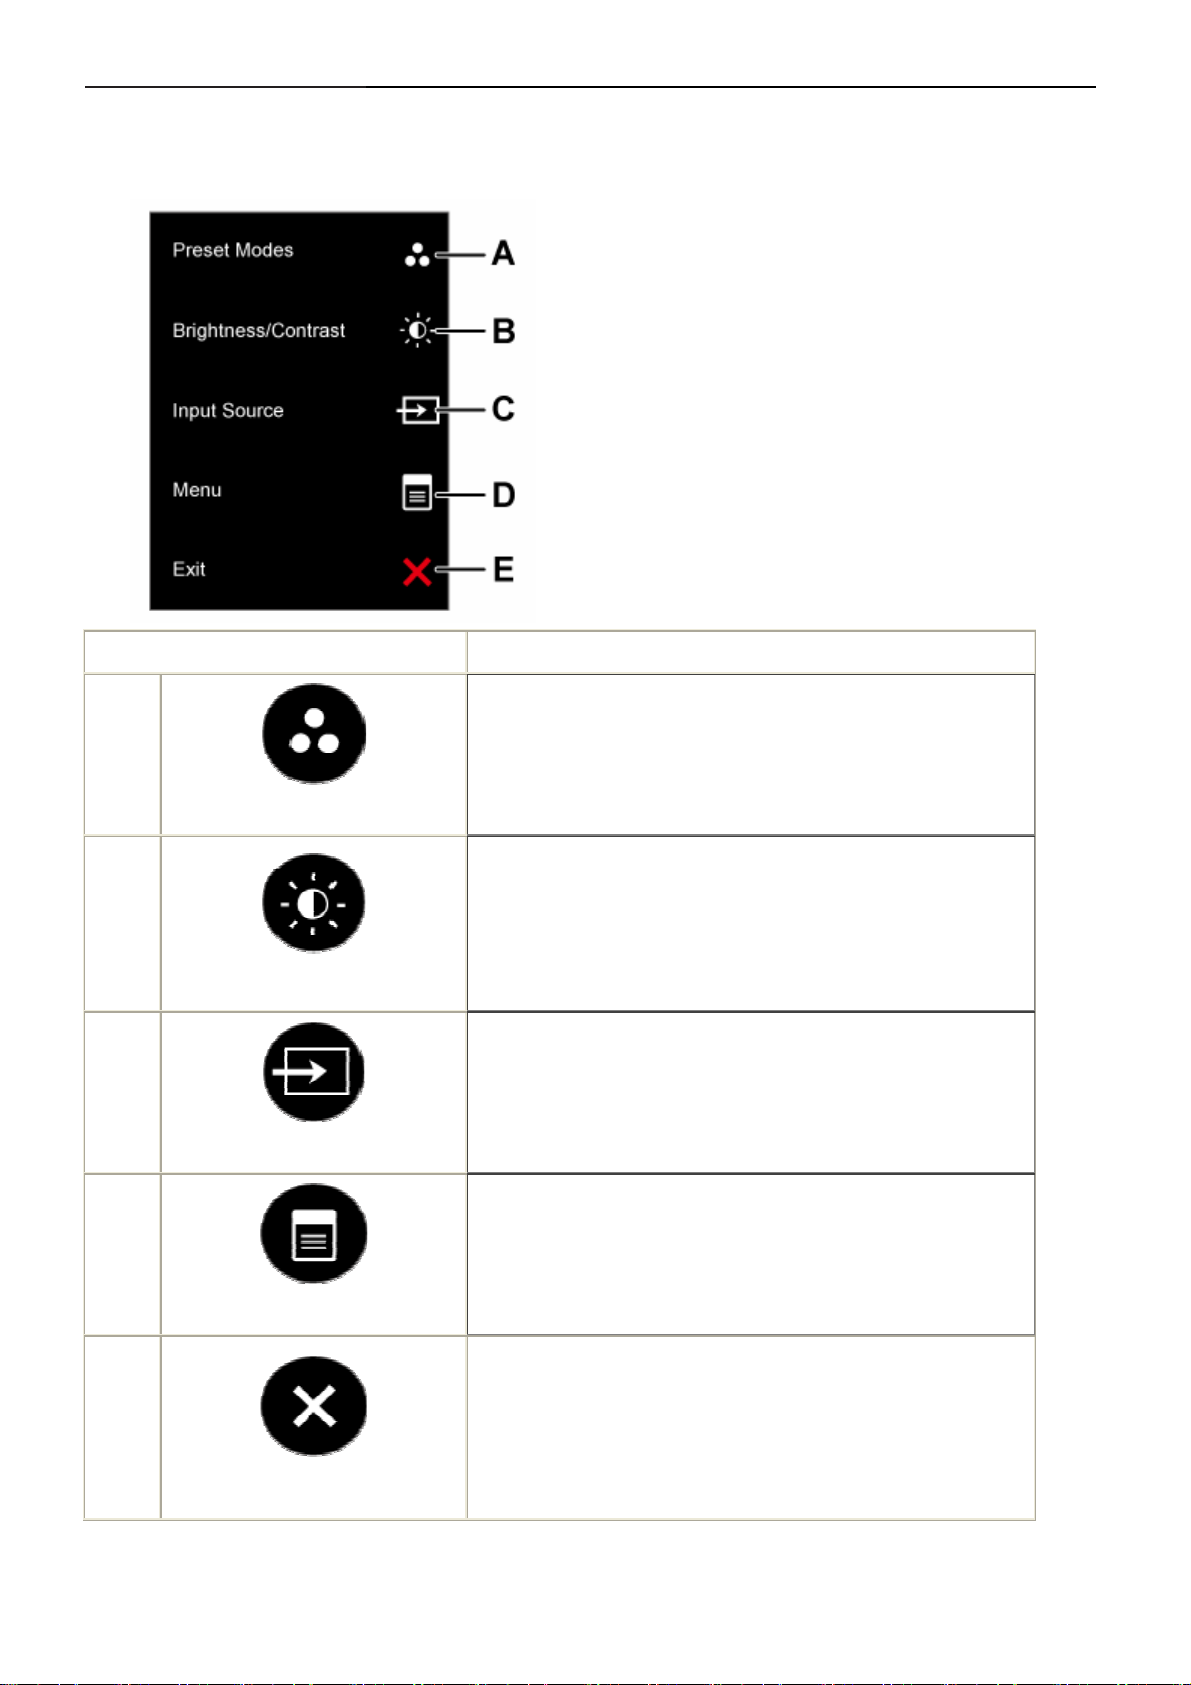
3.1 Using the Front Panel Controls
Use the buttons on the front of the monitor to adjust the image settings.
Front panel Button Description
A
B
C
D
Preset modes
Brightness / Contrast
Input source
Use the Preset modes button to choose from a list of preset color
modes.
Use the Brightness / Contrast button to direct access to the
"Brightness" and "Contrast" control menu.
Use the Input source button to select different video signals that may be
connected to your monitor.
Use the Menu button to open the on-screen display(OSD).
Menu
E
Exit
Use the buttons on the front of the monitor to adjust the image settings.
Use the Exit button to exit on-screen display(OSD) from menu and
sub-menus.
7
Page 8
23" LCD Color Monitor Dell SP2309Wc
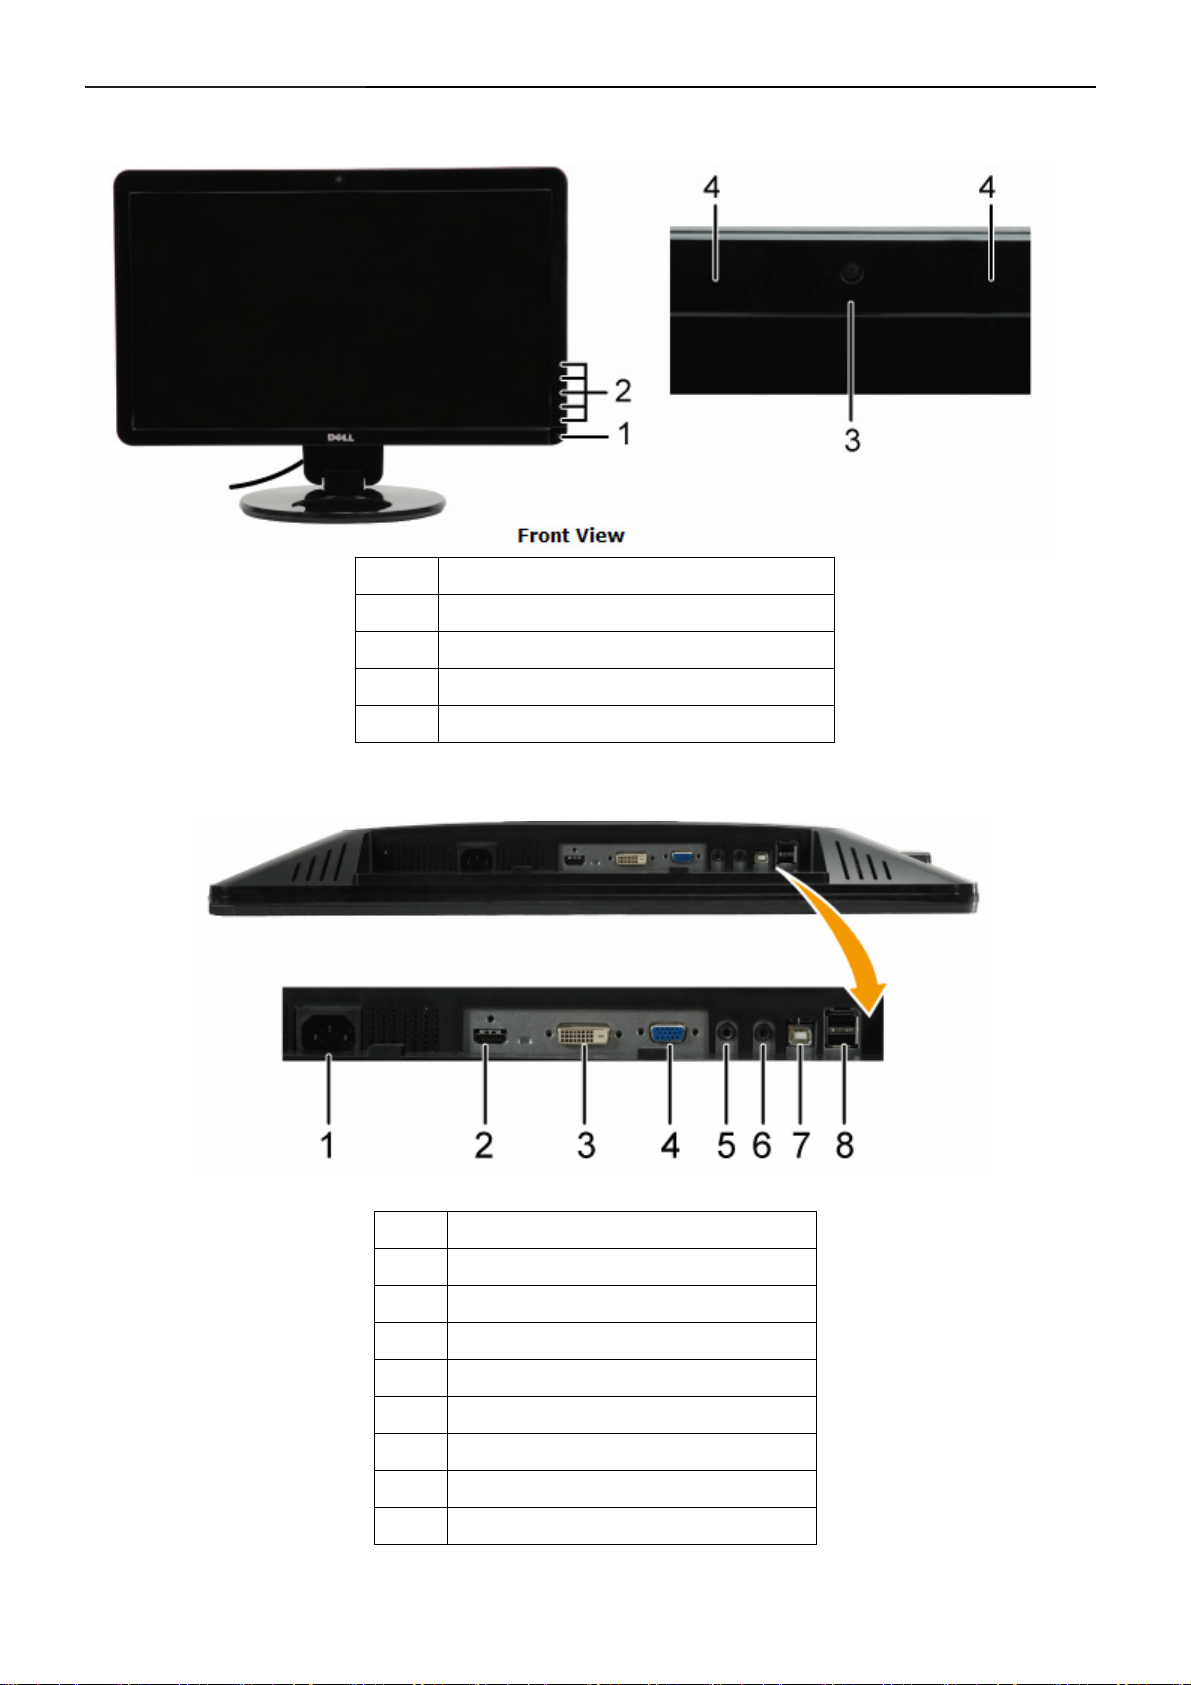
3.2 Control Buttons
Label Description
1 Power Control (Touch Sensor)
2 Capacitive touch buttons
3 Webcam
4 Microphone
Label Description
1 AC power cord connector
2 HDMI connector
3 DVI connector
4 VGA connector
5 Audio Line-in
6 Audio Line-out
7 USB upstream port
8 USB downstream ports(2)
8
Page 9
23" LCD Color Monitor Dell SP2309Wc
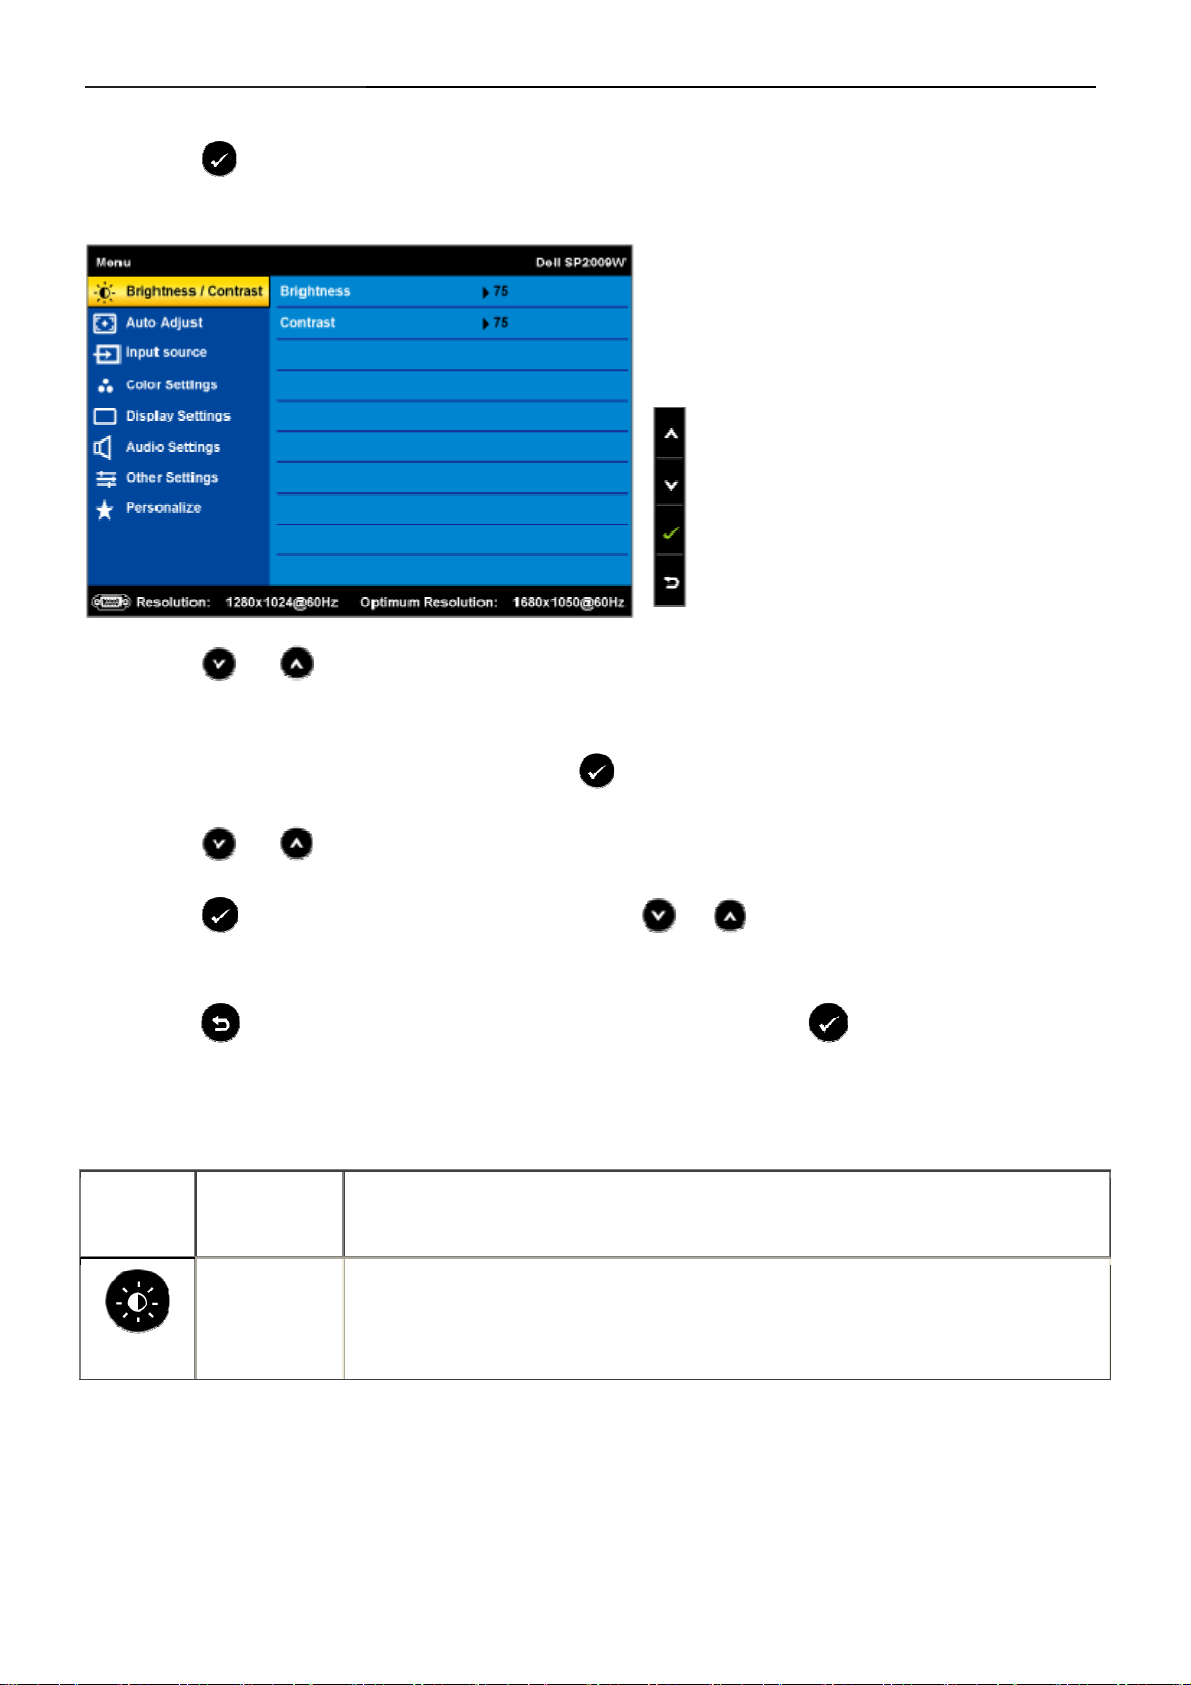
3.3 Adjusting the Picture
1. Press the button to open the OSD menu and display the main menu.
Main Menu
2. Press the
the option name is highlighted.
3. To select the highlighted item on the menu press the
4. Press the
5. Press the
the menu, to make your changes.
6.Select the
previous menu.
The table below provides a list of all the OSD menu options and their functions.
and buttons to toggle between options in the Menu. As you move from one icon to another,
again.
and buttons to select the desired parameter.
button to enter the slide bar and then use the or button, according to the indicators on
to return to previous menu without accepting current settings or to accept and return to
Icon Menu and
Submenus
Description
BRIGHTNESS
/CONTRAST
Use the Brightness and Contrast menu to adjust the Brightness/Contrast.
9
Page 10
23" LCD Color Monitor Dell SP2309Wc
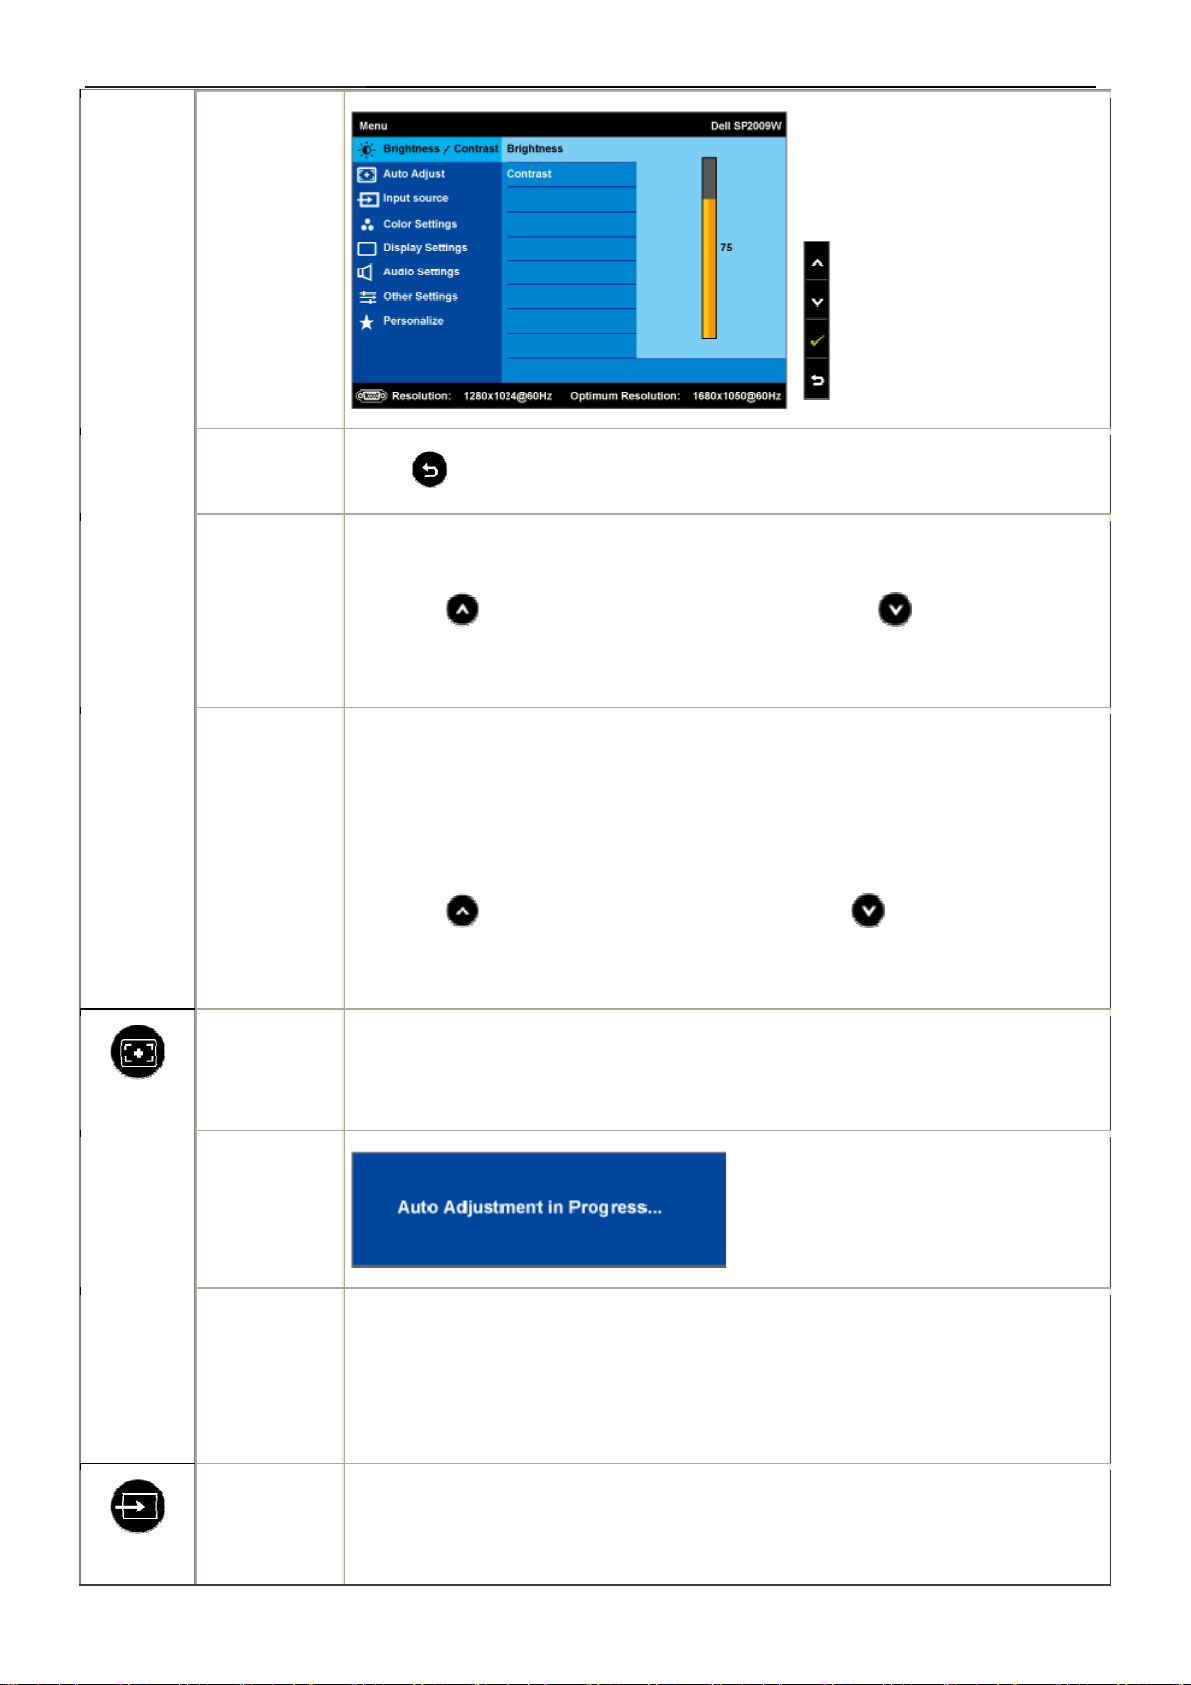
Back
Brightness
Contrast
Press
Allows you to adjust the brightness or luminance of the backlight.
Press the
decrease brightness (min 0 ~ max 100).
Allows you to adjust the contrast or the degree of difference between
darkness and lightness on the monitor screen. Adjust brightness first, and
adjust contrast only if you need further adjustment.
Press the
to decrease contrast (min 0 ~ max 100).
to go back to the main menu.
button to increase brightness and press the button to
button to increase contrast and press the button
Auto Adjust
Auto Adjustment allows the monitor to self-adjust to the incoming video signal.
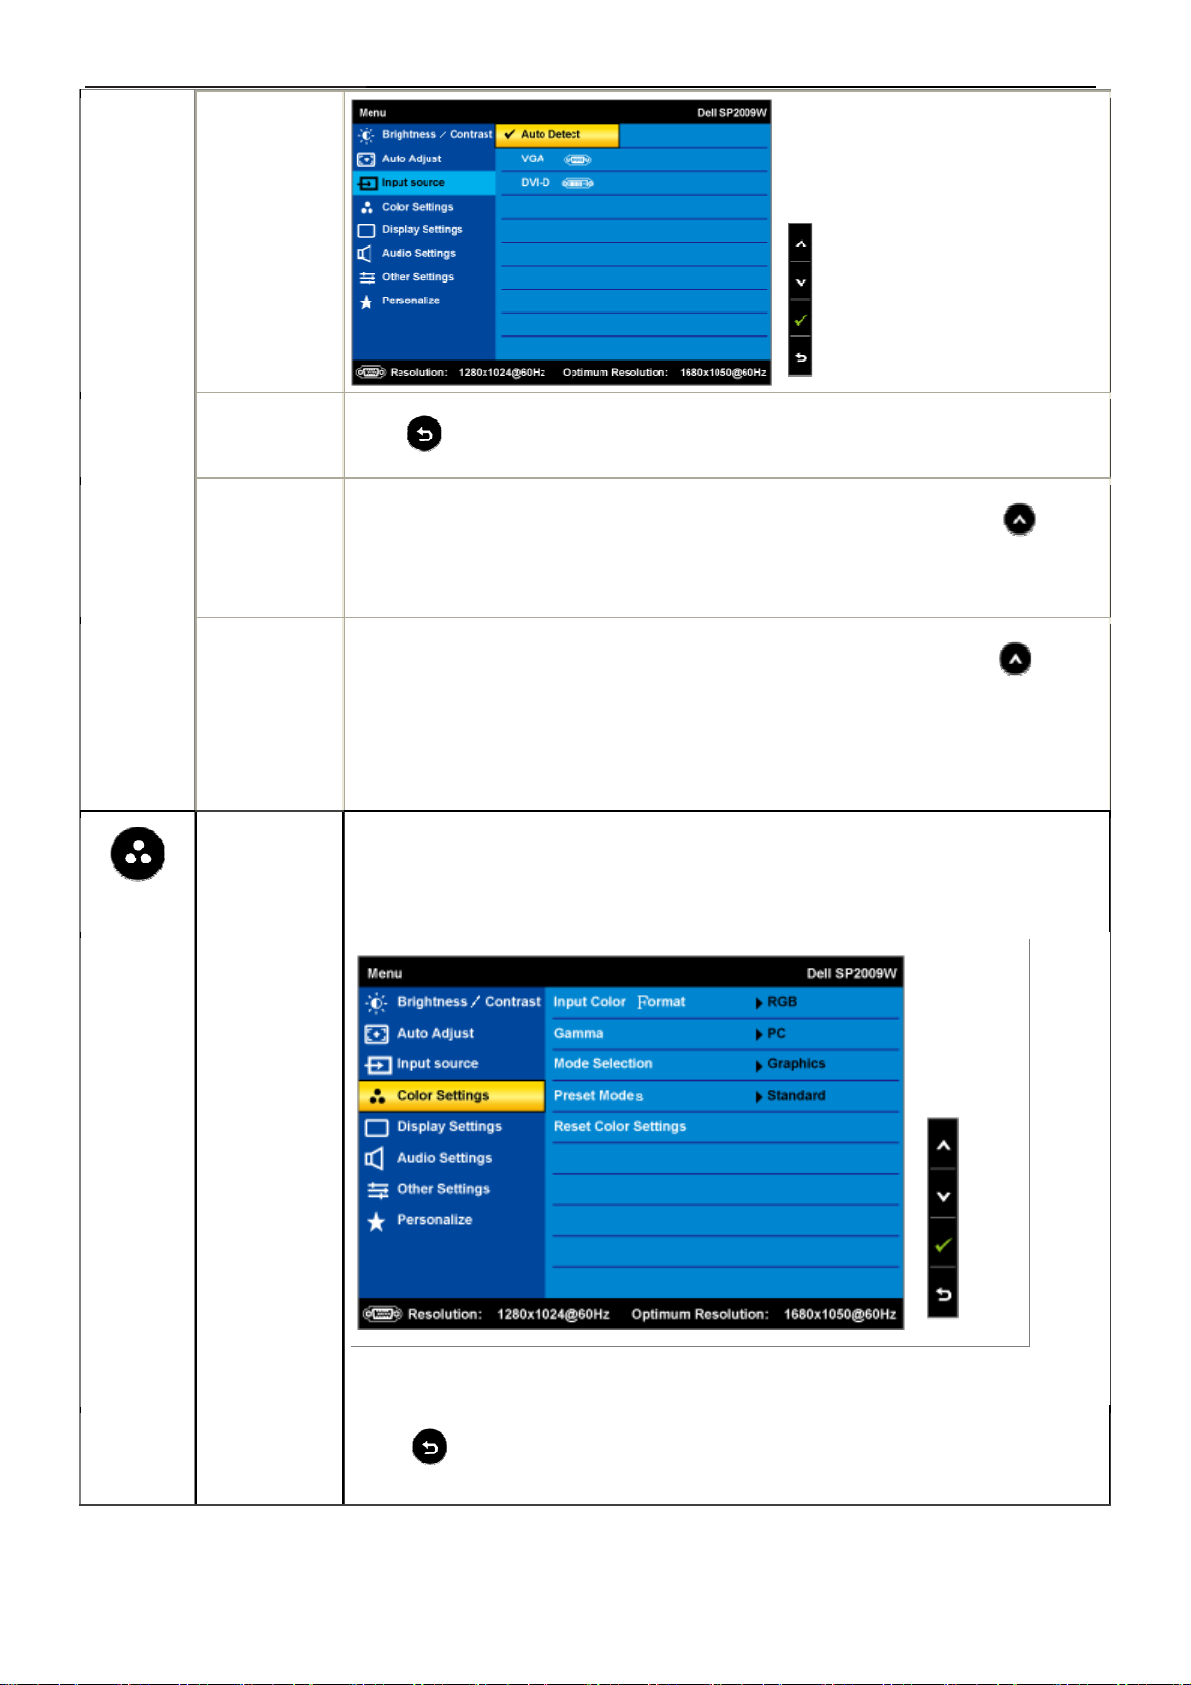
Input Source
Use this button to activate automatic setup and adjust menu. The following dialog
appears on a black screen as the monitor self-adjusts to the current input:
After using Auto Adjustment, you can further tune your monitor by using the Pixel
Clock (Coarse) and Phase (Fine) controls under Image Settings.
Use the Input Source menu to select different video signals that may be connected
to your monitor.
10
Page 11
23" LCD Color Monitor Dell SP2309Wc
COLOR
SETTINGS
Color setting
Push
Select VGA input when you are using the analog (VGA) connector. Push
select the VGA input source.
Select DVI-D input when you are using the digital (DVI) connector. Push
select the DVI input source.
Select Auto select to let the monitor search for available input signals.
Use the Color Setting menu to adjust the monitor's color settings.
to go back to the main menu
to
to
mode
submenu
Back
Press
to go back to the main menu.
11
Page 12
23" LCD Color Monitor Dell SP2309Wc
Input Color
Format
Mode
Selection
Preset Mode
Allows you to set the video input mode to.
• RGB: Select this option if your monitor is connected to a computer or DVD
• player using the HDMI cable or the HDMI to DVI adapter.
• YPbPr: Select this option if the your DVD player supports only YPbPr output.
Allows you to set the display mode to:
• Graphics: Select this mode if your monitor is connected to your computer.
• Video: Select this mode if you monitor is connected to a DVD player.
Allows you to choose from a list of preset color modes.
In the Graphics mode, you can set the color to the following preset values:
• Standard: Loads the monitor's default color settings. This is the default
preset mode.
• Multimedia: Loads color settings ideal for multimedia applications.
• Game: Loads color settings ideal for most gaming applications.
• Warm: Increase the color temperature. The screen appears warmer with
a red/yellow tint.
• Cool: Decreases the color temperature. The screen appears cooler with
• a blue tint.
• Custom (RGB): Allows you to manually adjust the color settings. Press
the
Blue values and create your own preset color mode.
In the Video mode, you can set the color to the following preset values:
• Movie: Loads color settings ideal for movies. This is the default preset mode.
and buttons to adjust the Red, Green, and
• Game: Loads color settings ideal for most gaming applications.
• Sports: Loads color settings ideal for sports.
• Nature: Loads color settings ideal for nature.
Hue
Allows you to adjust the skin tone of the image. Use
12
or to adjust the hue
Page 13
23" LCD Color Monitor Dell SP2309Wc
from '0' to '100'.
NOTE: Hue adjustment is available only in the Video mode.
Saturation
Color Reset
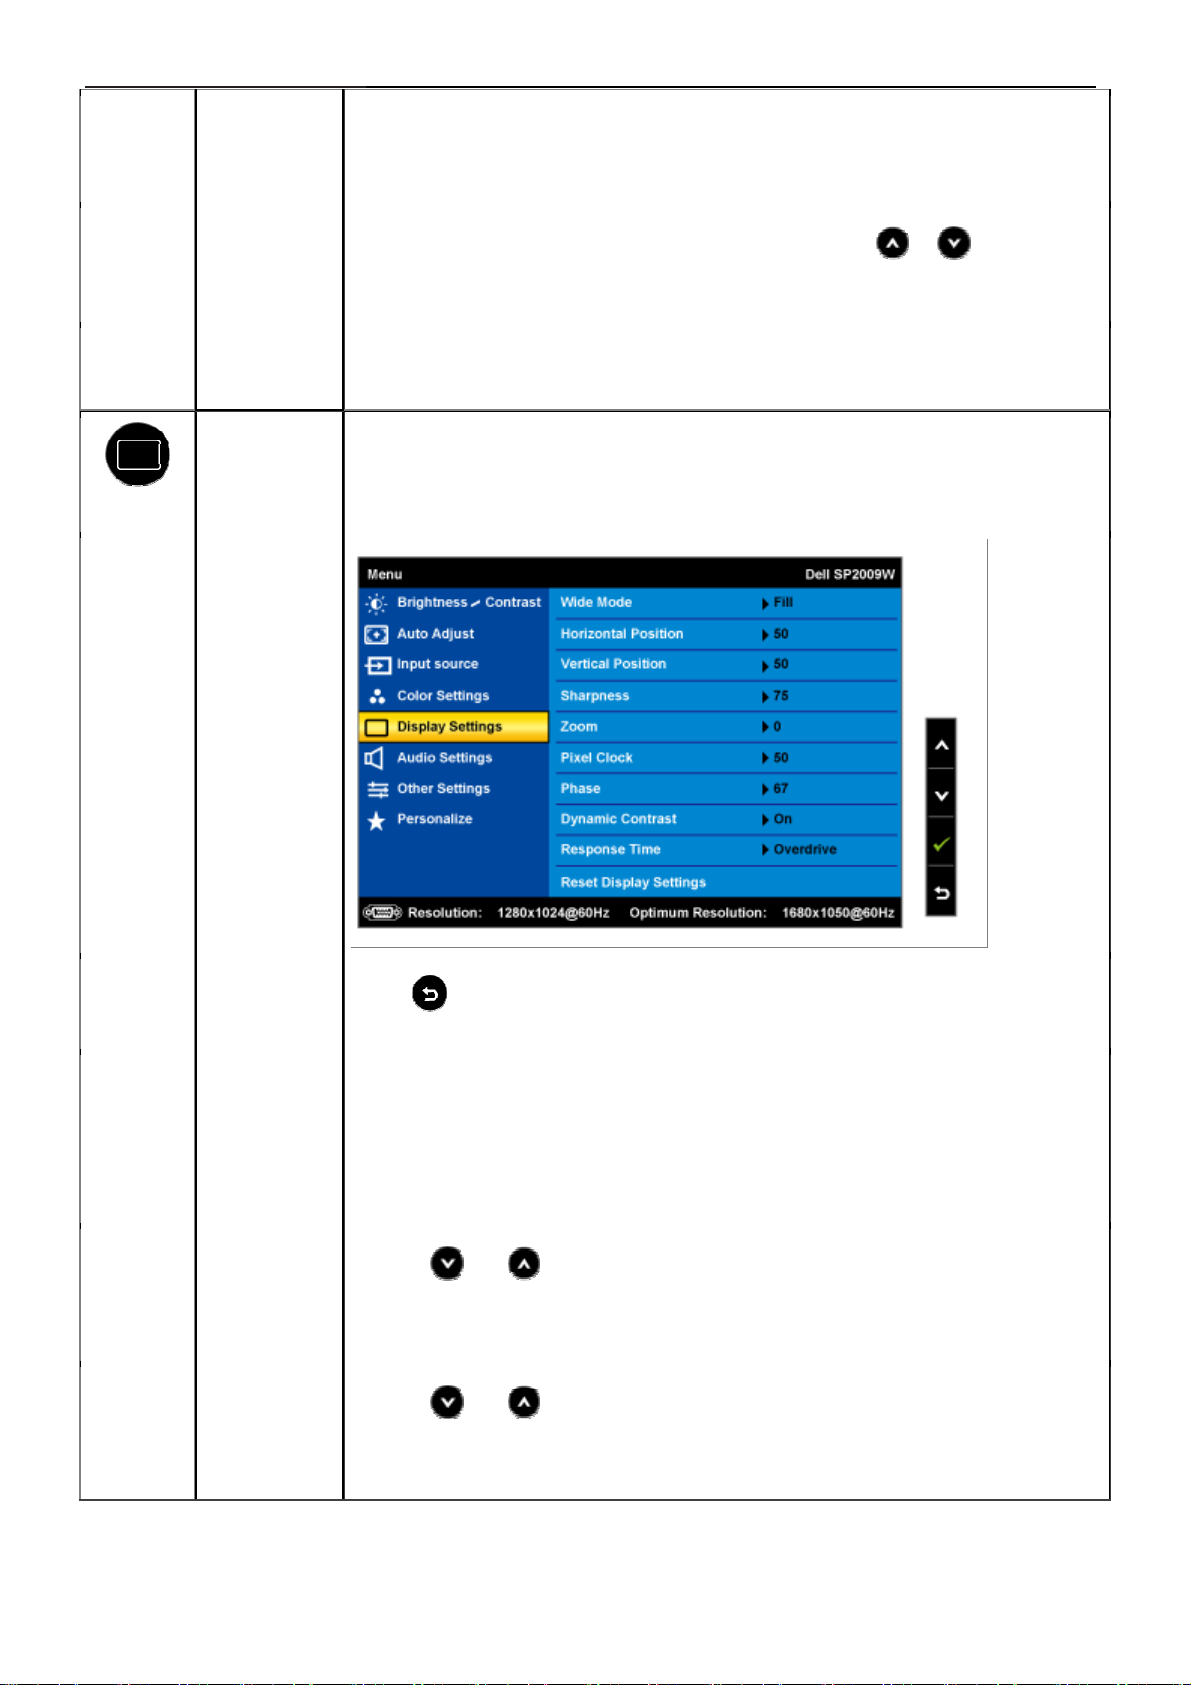
DISPLAY
SETTINGS
Display
setting mode
submenu
Allows you to adjust the color saturation of the image. Use
the saturation from '0' to '100'.
Resets your monitor's color settings to the factory defaults.
Use the Displays Settings menu to adjust the sharpness, dynamic contrast,
response time, and zoom.
or to adjust
Back
Wide Mode
Horizontal po
sition
Vertical Posit
ion
Press
Allows you to change the image scale with various default settings.
NOTE: Wide Mode is not available at video resolutions greater than 1680x1050.
However, 16:9 and Fill will be available for video timing.
Use the and buttons to adjust image left and right (min 0 ~ max 100).
NOTE: When using DVI source, the Horizontal Position setting is not available.
Use the and buttons to adjust image up and down (min 0 ~ max 100).
NOTE: When using DVI source, the Vertical Position setting is not available.
to go back to the main menu.
13
Page 14
23" LCD Color Monitor Dell SP2309Wc
Zoom
Phase
Sharpness
Allows you to zoom in to specific area of interest on your monitor.
Use
NOTE: Zoom will reset to default after power cycling or after power save recovery.
NOTE: Zoom default setting will be zero when using PC format (RGB color space)
and 10 when using the video format from DVD players (YPbPr color space).
If satisfactory results are not obtained using the phase adjustmenu, use the
Pixel Clock (coarse) adjustmenu and then use Phase (fine).
NOTE: Pixel Clock and Phade Adjustments are only available for "VGA" input.
Allows you to increase or decrease the sharpness of the image.
Use
and buttons to adjust the zoom from '0' to '100'.
and buttons to adjust the sharpness from '0' to '100'.
Dynamic
Contrast
Response
Time
The dynamic contrast helps get a higher contrast if you choose Game preset,
Movie Preset, Sports Preset and Nature Preset.
Use the
Use the
NOTE: Brightness control is disabled in Dynamic Contrast mode.
Response time is the time required for an LCD pixel to change from fully
active (black) to fully inactive (white), then back to fully active again.
You can set the response time to:
• Normal
button to enable the Dynamic Contrast adjustment.
button to disable the Dynamic Contrast adjustment.
• Overdrive (default).
Display Reset
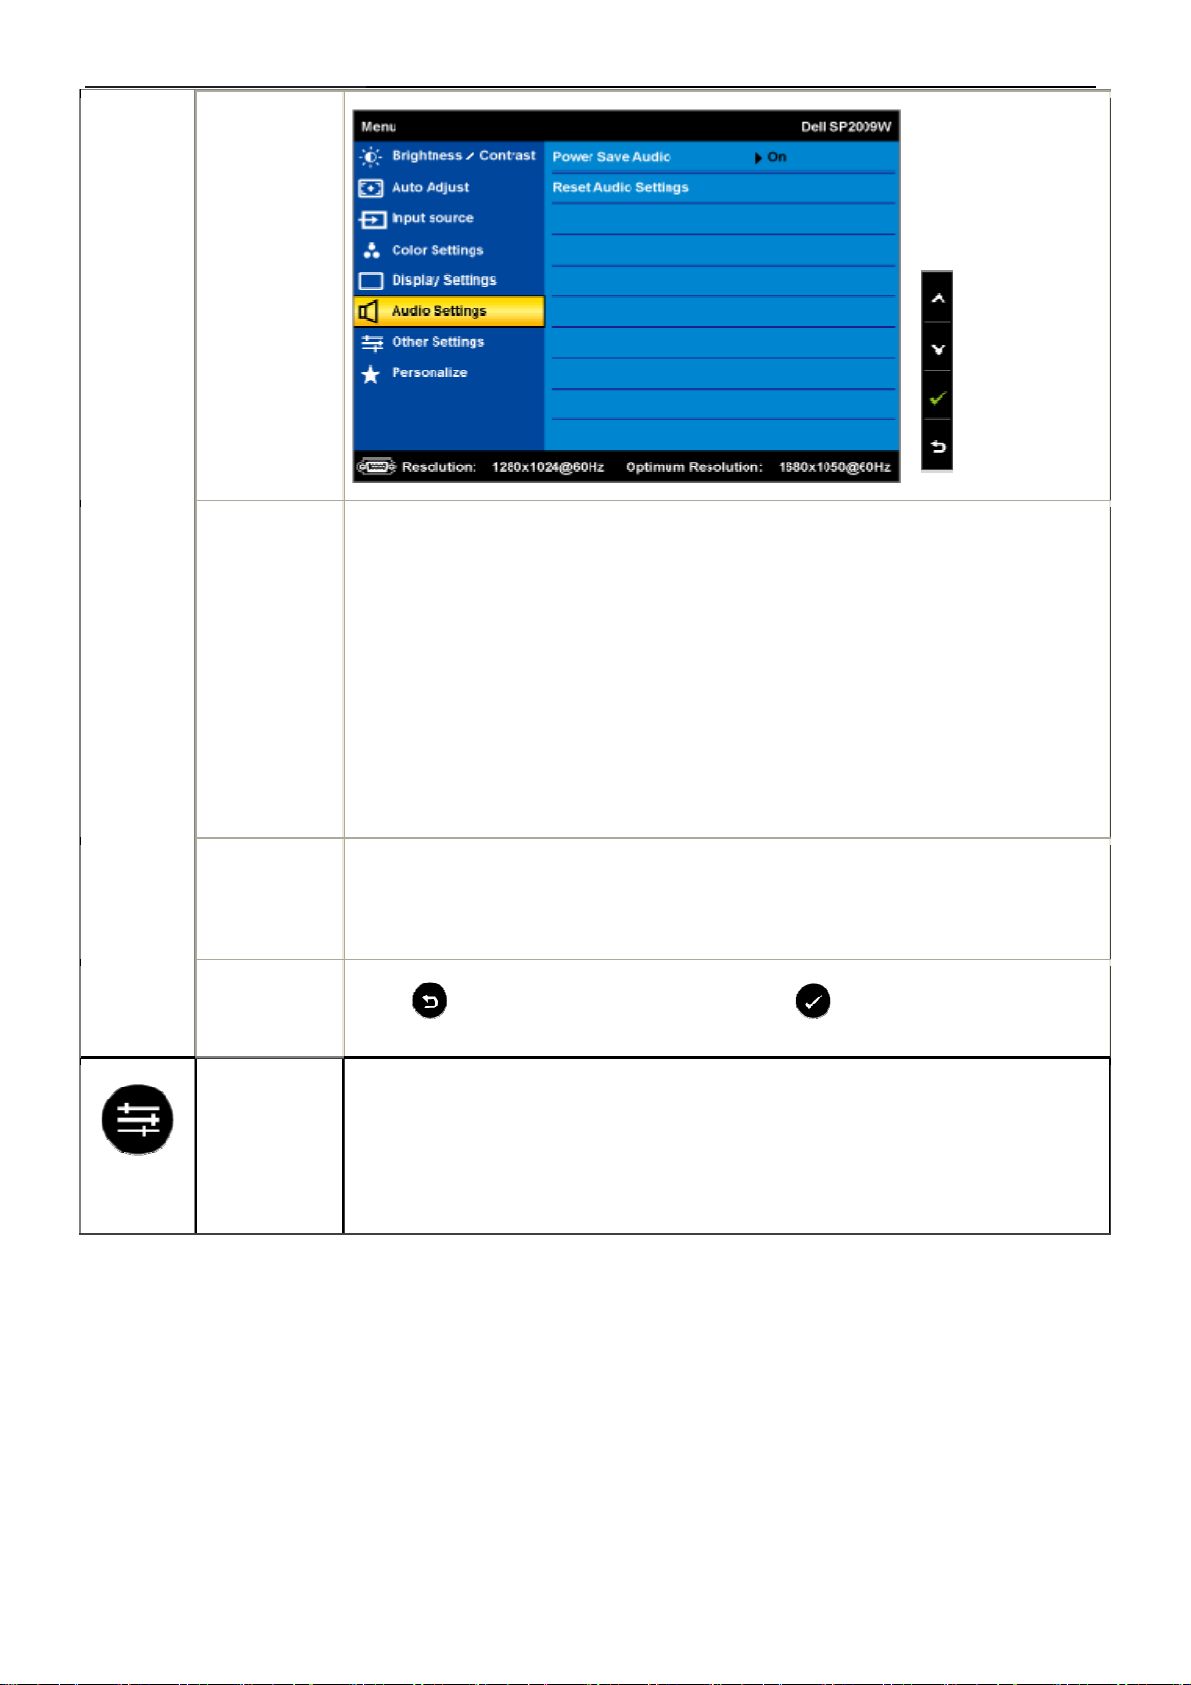
AUDIO
SETTINGS
Resets the monitor's display settings to the factory defaults.
Use the Audio Settings to adjust the audio settings.
14
Page 15
23" LCD Color Monitor Dell SP2309Wc
Audio Setting
mode
submenu
Power Save
Audio
Allows you to turn on or off the power to the audio during the audio
power save
mode.
Default is "On".
On — Allows you to turn off the power to the sound bar during monitor standby.
Off — Allows you to turn on the power to the sound bar during monitor standby.
Reset Audio
Setting
Exit Menu
OTHER
SETTINGS
Resets your monitor audio settings to the factory defaults.
Press
to exit the OSD main menu and press to accept changes.
15
Page 16

23" LCD Color Monitor Dell SP2309Wc
Back
Language
Menu
Transparency
Menu Timer
Menu Lock
Press
Allows you to set the OSD display to one of five languages: English, Espanol,
Francais, Deutsch, or Japanese.
Allows you to adjust the OSD background from opaque to transparent.
Allows you to set the time for which the OSD remains active after you press a
button on the monitor.
Use the
5 to 60 seconds.
Controls user access to adjustments. When Lock is selected, no user
to go back to the main menu.
and buttons to adjust the slider in 1 second increments, from
adjustments are allowed. All buttons are locked except
Button Sound
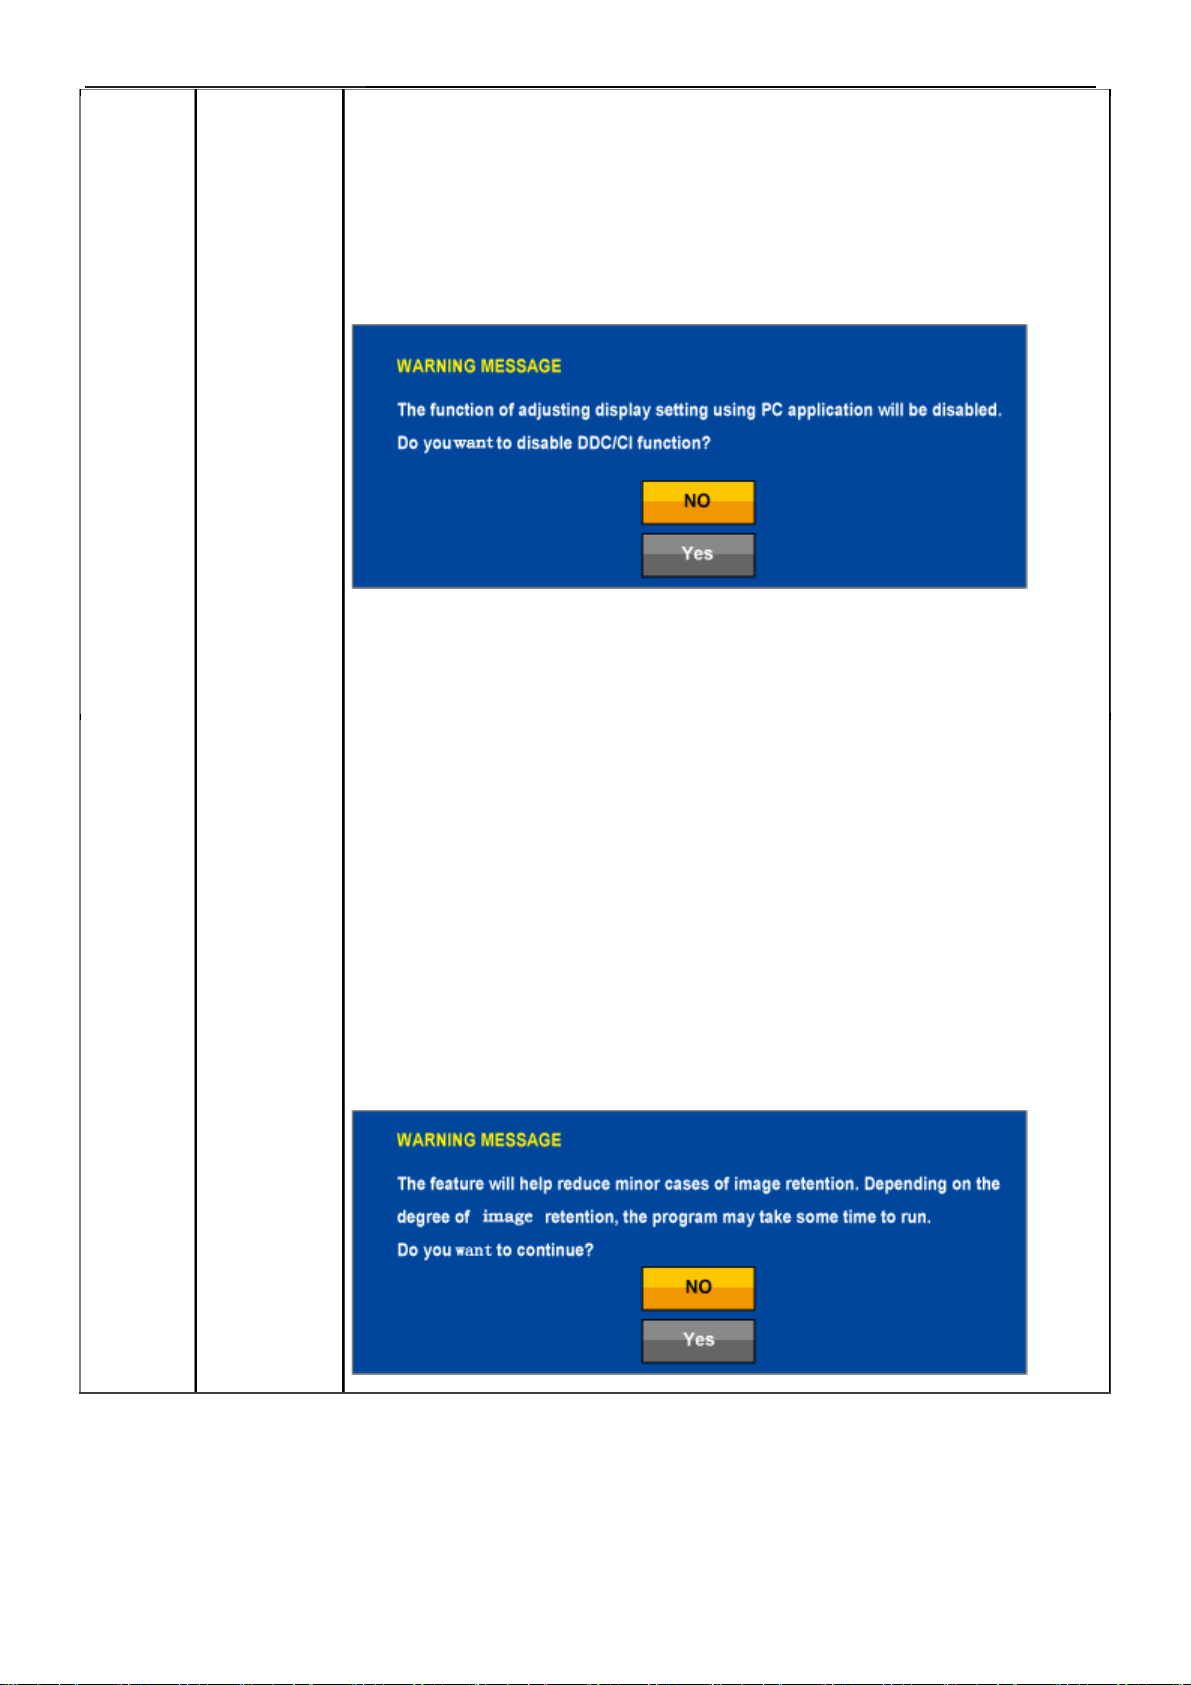
DDC/CI
Turns on or off the button sound.
DDC/CI (Display Data Channel/Command Interface) allows a software on your
computer to adjust the monitor display settings like the brightness, color balance etc.
Enable (Default): Optimizes the performance of your monitor and provides a better
16
button.
Page 17
23" LCD Color Monitor Dell SP2309Wc
customer experience.
Disable: Disables the DDC/CI option and the following message appears
on the screen.
Select Yes to disable DDC/CI or No to return.
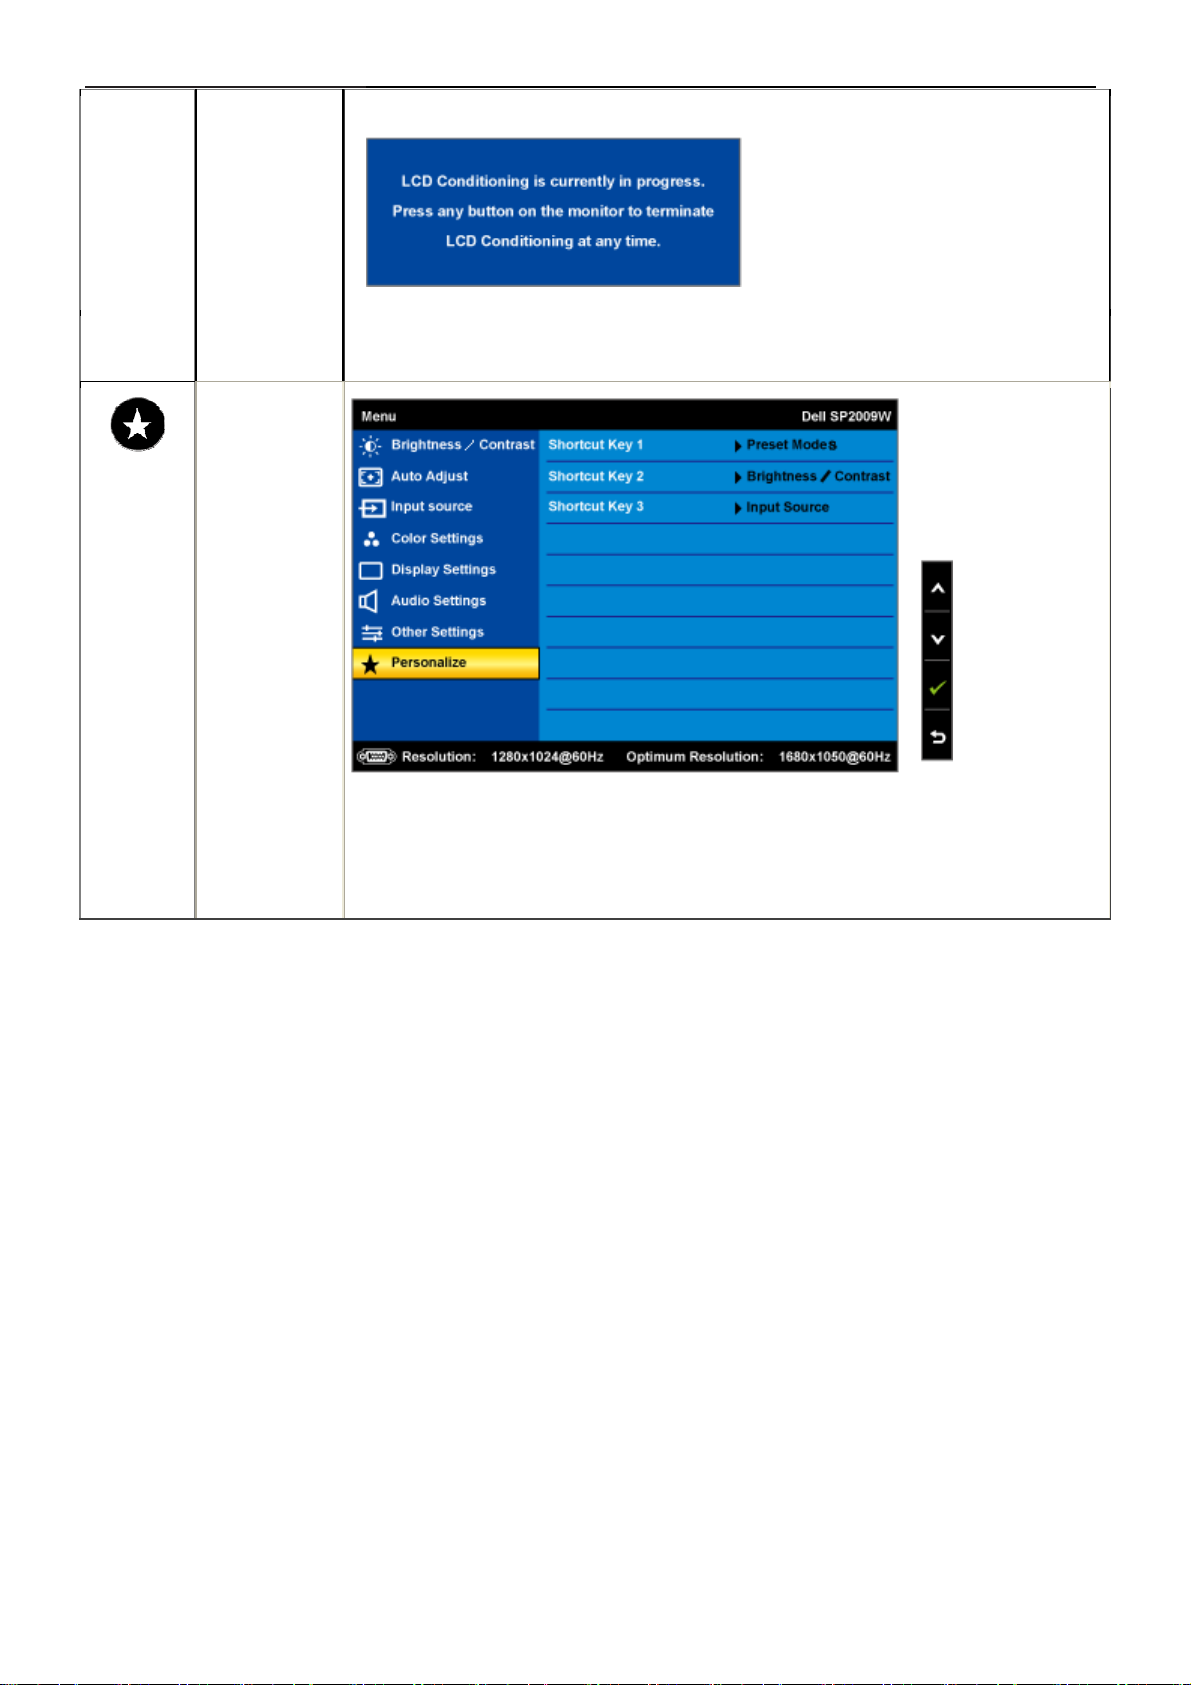
LCD
Conditioning
LCD conditioning helps eliminate any image retention and may take several hours.
NOTE: Severe cases of image retention are known as burn-in. LCD Conditioning
does not remove burn-in.
Disable: This is the default option.
Enable: Enables LCD conditioning and the following message appears on the
screen.
Select Yes to proceed and No to return.
17
Page 18
23" LCD Color Monitor Dell SP2309Wc
Factory Reset
Personalize
Resets all OSD settings to the factory preset values.
Allow you to adjust shortcut key button for preset mode. Brightness & Contrast
Auto Adjust and Input source.
18
Page 19
23" LCD Color Monitor Dell SP2309Wc
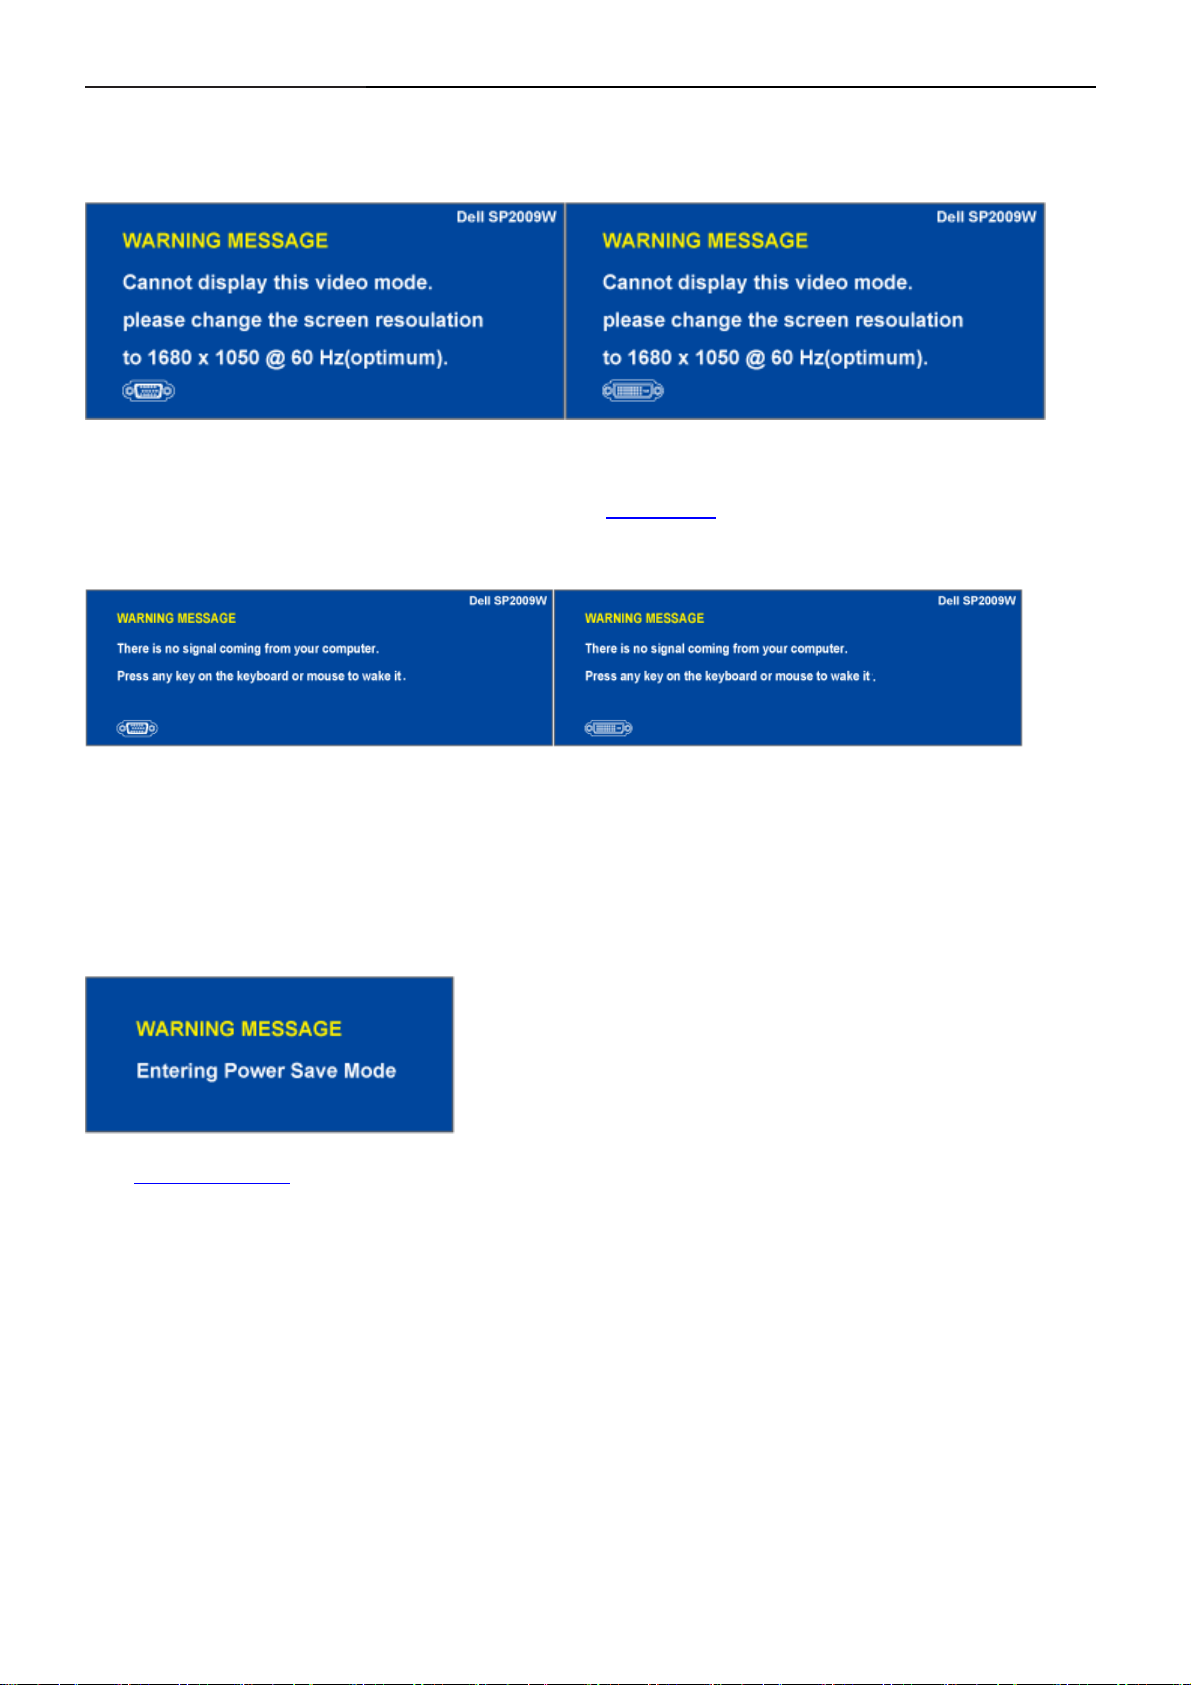
OSD Warning Messages
The following warning messages may appear on the screen to indicate that the monitor is out of synchronization.
This means that the monitor cannot synchronize with the signal that it is receiving from the computer.
Either the signal is too high or too low for the monitor to use. See Specifications for the Horizontal and
Vertical frequency ranges addressable by this monitor. Recommended mode is 1680 X 1050 at 60Hz.
If you press any button other than the power button one of the following messages will appear depending on
the selected input:
When monitor enters Power Save mode, the following message appears :
See Solving Problems for more information.
19
Page 20
23" LCD Color Monitor Dell SP2309Wc
4. Input/Output Specification
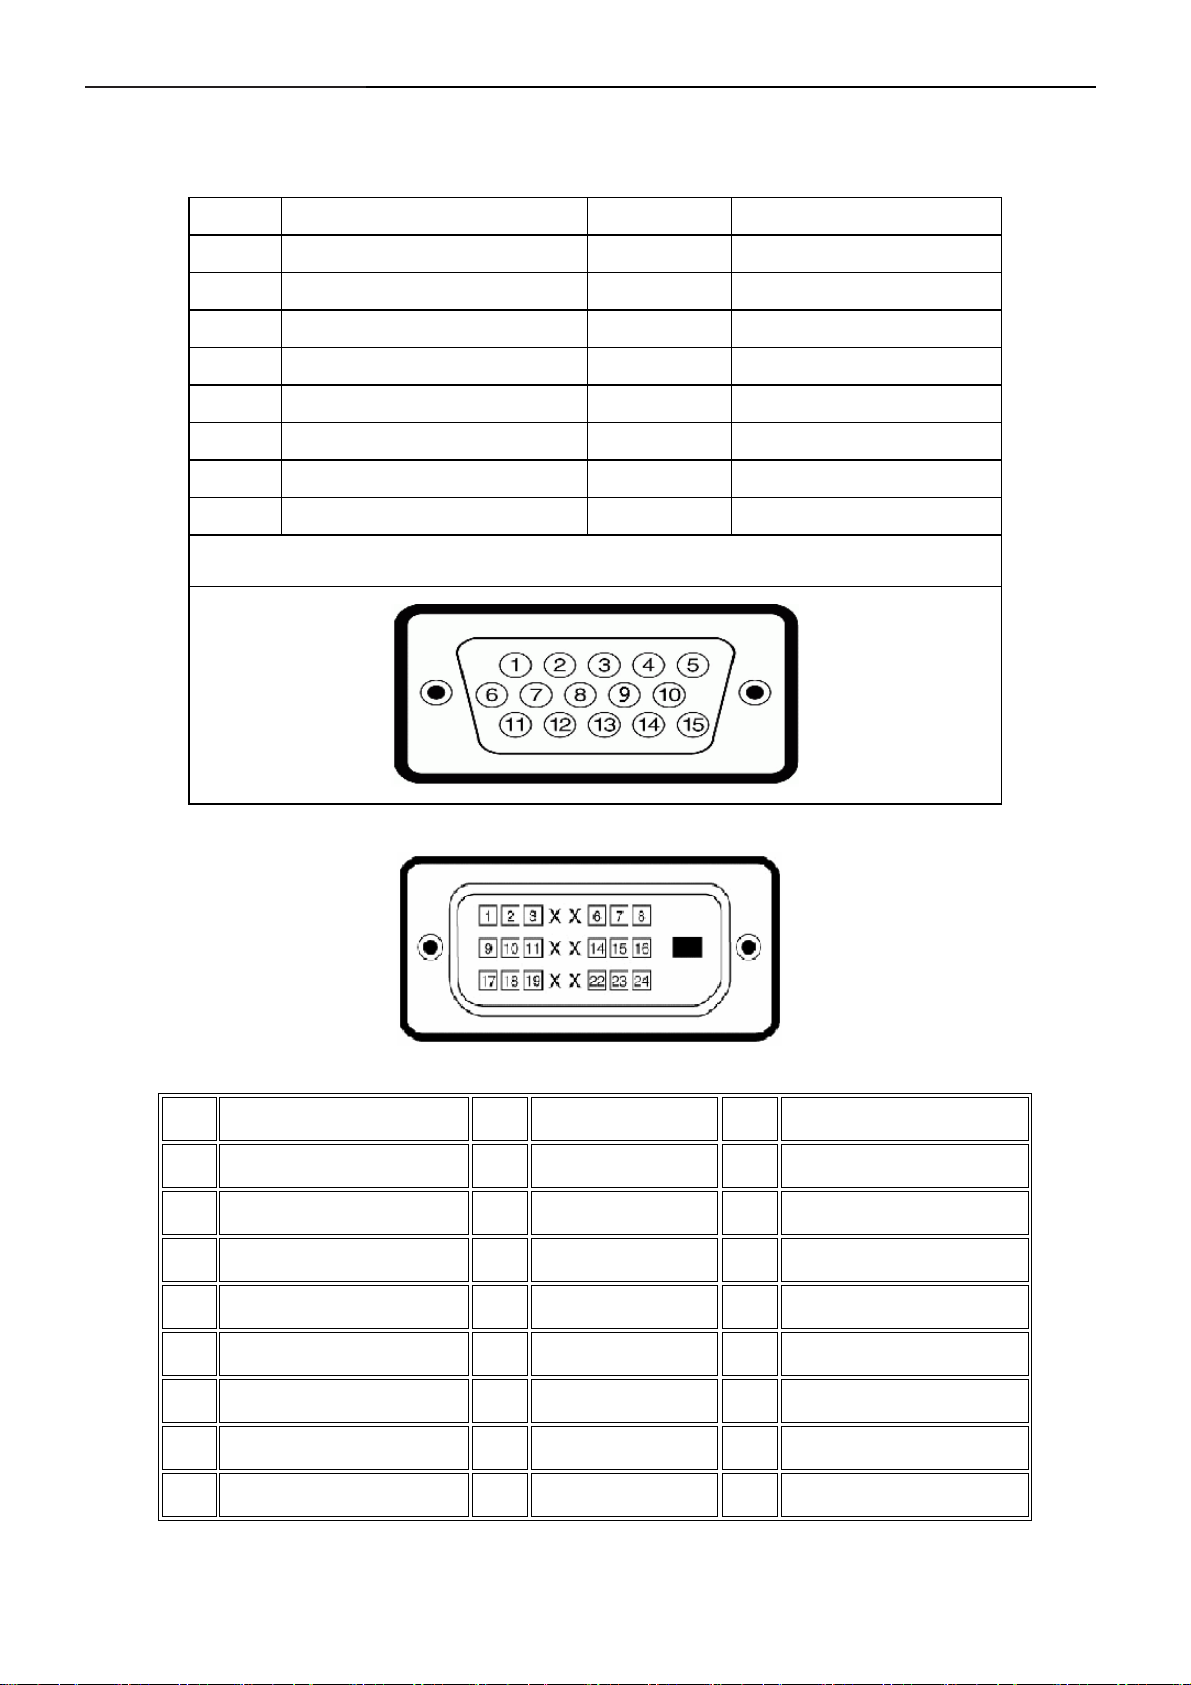
4.1 Input Signal Connector
VGA Connector:
Pin No. Description Pin No. Description
1. Red Video 9. DDC +5V
2. Green Video 10. GND-sync
3. Blue Video 11. GND
4. GND 12. DDC data
5. Self-test 13. H-Sync
6. R-Ground 14. V-Sync
7. G-Ground 15. DDC clock
8. B-Ground
VGA Connector layout
DVI Connector:
Note: Pin 1 is at the top right.
Pin Signal Assignment Pin Signal Assignment Pin Signal Assignment
T.M.D.S. Data 2-
1
T.M.D.S. Data 2+
2
TMDS Ground
3
4 Floating 12 Floating 20 Floating
5 Floating 13 Floating 21 Floating
9 TMDS RX1- 17 TMDS RX0-
10 TMDS RX1+ 18 TMDS RX0+
11
TMDS Ground 19 TMDS Ground
DDC Clock 14 +5V Power
6
DDC Data 15
7
8
Floating
16 Hot Plug Detect
22 TMDS Ground
Self test 23 TMDS Clock+
24 TMDS Clock-
20
Page 21
23" LCD Color Monitor Dell SP2309Wc
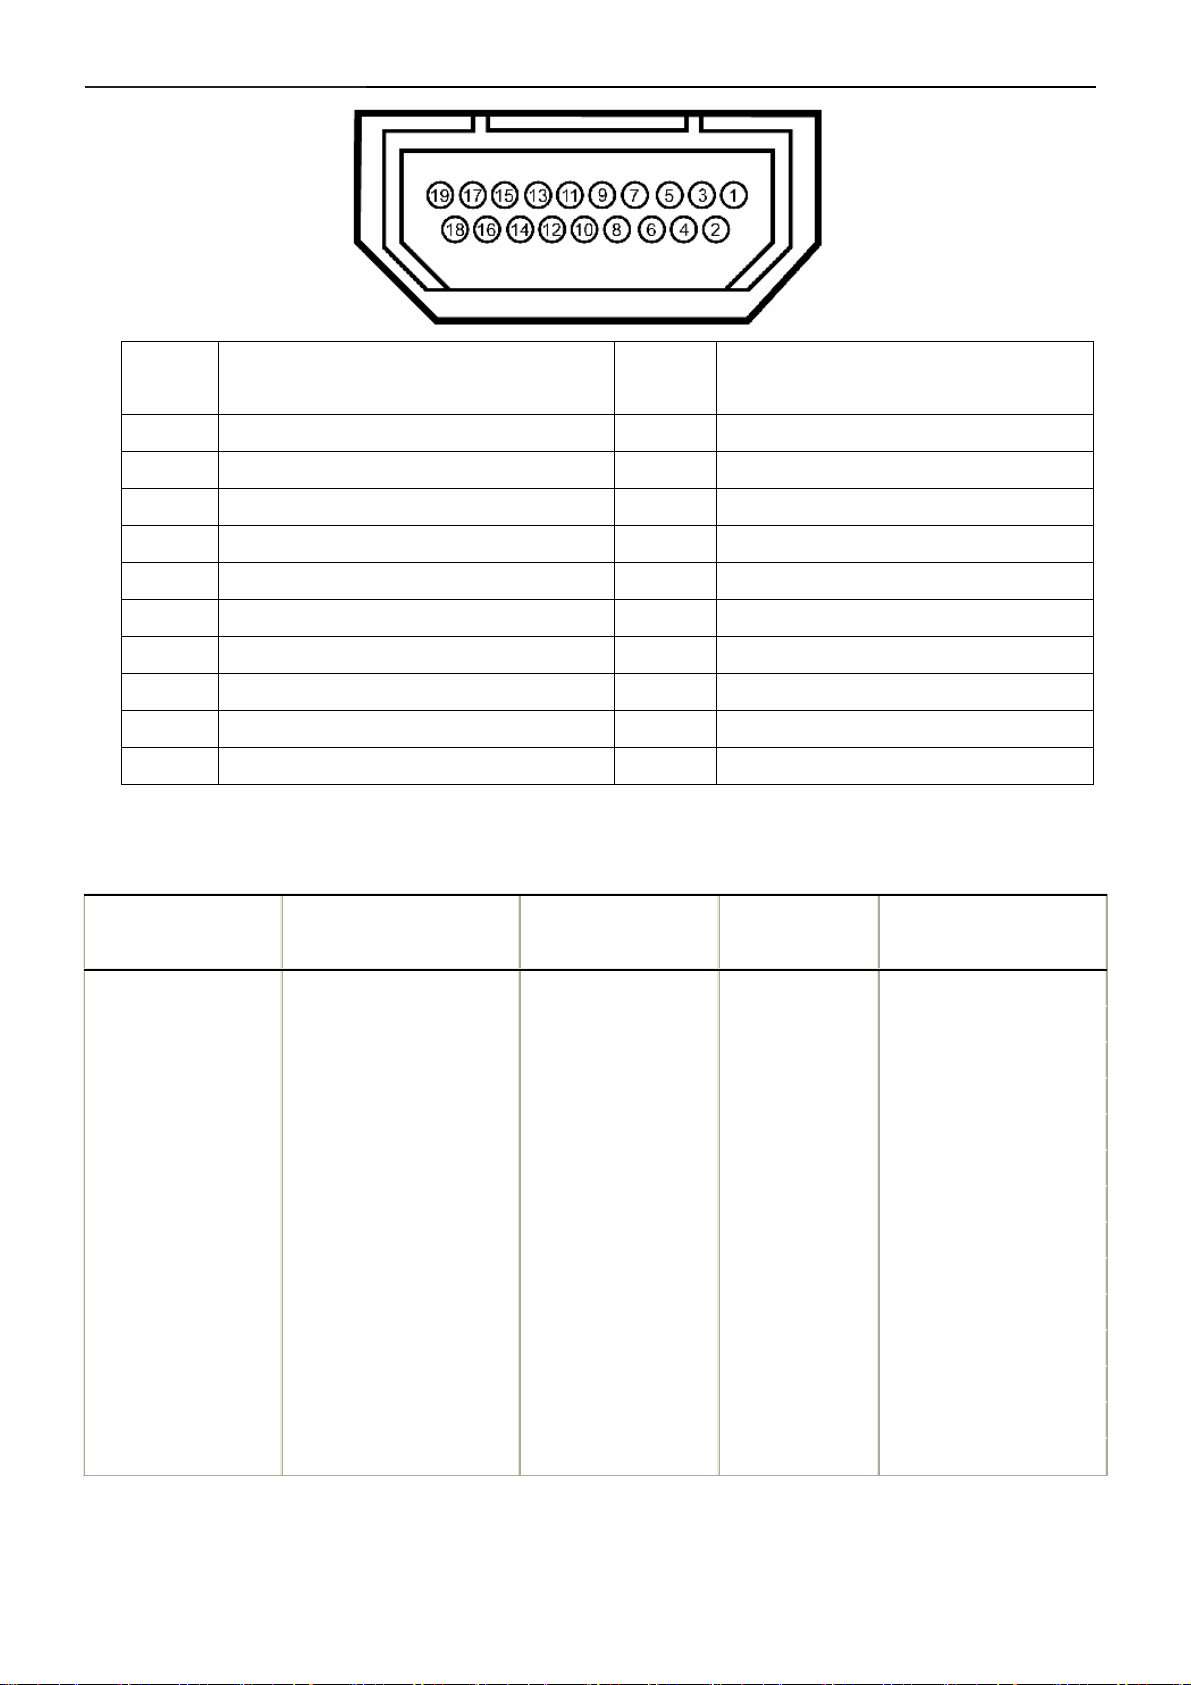
Pin
Number
1
2
3
4
5
6
7
8
9
10
19-pin Side of the Connected Signal
Cable
T.M.D.S. Data 2-
T.M.D.S. Data 2 Shield
T.M.D.S. Data 2+
T.M.D.S. Data 1+
T.M.D.S. Data 1 Shield
T.M.D.S. Data 1-
T.M.D.S. Data 0+
T.M.D.S. Data 0 Shield
T.M.D.S. Data 0-
T.M.D.S. Clock +
4.2 Factory Preset Display Modes
Display Mode Horizontal Frequency (kHz)
Pin
Number
11
12
13
14
15
16
17
18
19
Vertical Frequency
(Hz)
19-pin Side of the Connected Signal
Cable
T.M.D.S. Clock Shield
T.M.D.S. Clock -
CEC
Reserved(N.C. on device)
SCL
SDA
DDC/CEC Ground
+5V Power
Hot Plug Detect
Pixel Clock
(MHz)
Sync Polarity
(Horizontal/Vertical)
VESA, 720 x 400 31.5 70.0 28.3 -/+
VESA, 640 x 480 31.5 60.0 25.2 -/-
VESA, 640 x 480 37.5 75.0 31.5 -/-
VESA, 800 x 600 37.9 60.3 40.0 +/+
VESA, 800 x 600 46.9 75.0 49.5 +/+
VESA, 1024 x 768 48.4 60.0 65.0 -/-
VESA, 1024 x 768 60.0 75.0 78.8 +/+
VESA, 1152 x 864 67.5 75.0 108.0 +/+
VESA, 1280 x 1024 64.0 60.0 108.0 +/+
VESA, 1280 x 1024 80.0 75.0 135.0 +/+
VESA, 1680 x 1050 65.3 60.0 146.3 -/+
VESA, 1680 x 1050 64.7 59.9 119.0 +/-
VESA, 1920 x 1200 74.04 59.9 154.0 +/-
VESA, 2048 x 1152 70.99 59.9 156.75 +/-
21
Page 22

23" LCD Color Monitor Dell SP2309Wc
4.3 Power Supply Requirements
A/C Line voltage range : 100 V ~ 240 V
A/C Line frequency range
Current : 1.5A max at 100V; 0.8A max at 240 V
Peak surge current : < 60A peak at 240 VAC and cold starting
Leakage current : < 3.5mA
Power line surge : No advance effects (no loss of information or defect)
DC output Voltage
: 50 ± 3Hz, 60 ± 3Hz
with a maximum of 1 half-wave missing per second
: 5VDC ± 5%; 12VDC± 5%
22
Page 23
23" LCD Color Monitor Dell SP2309Wc
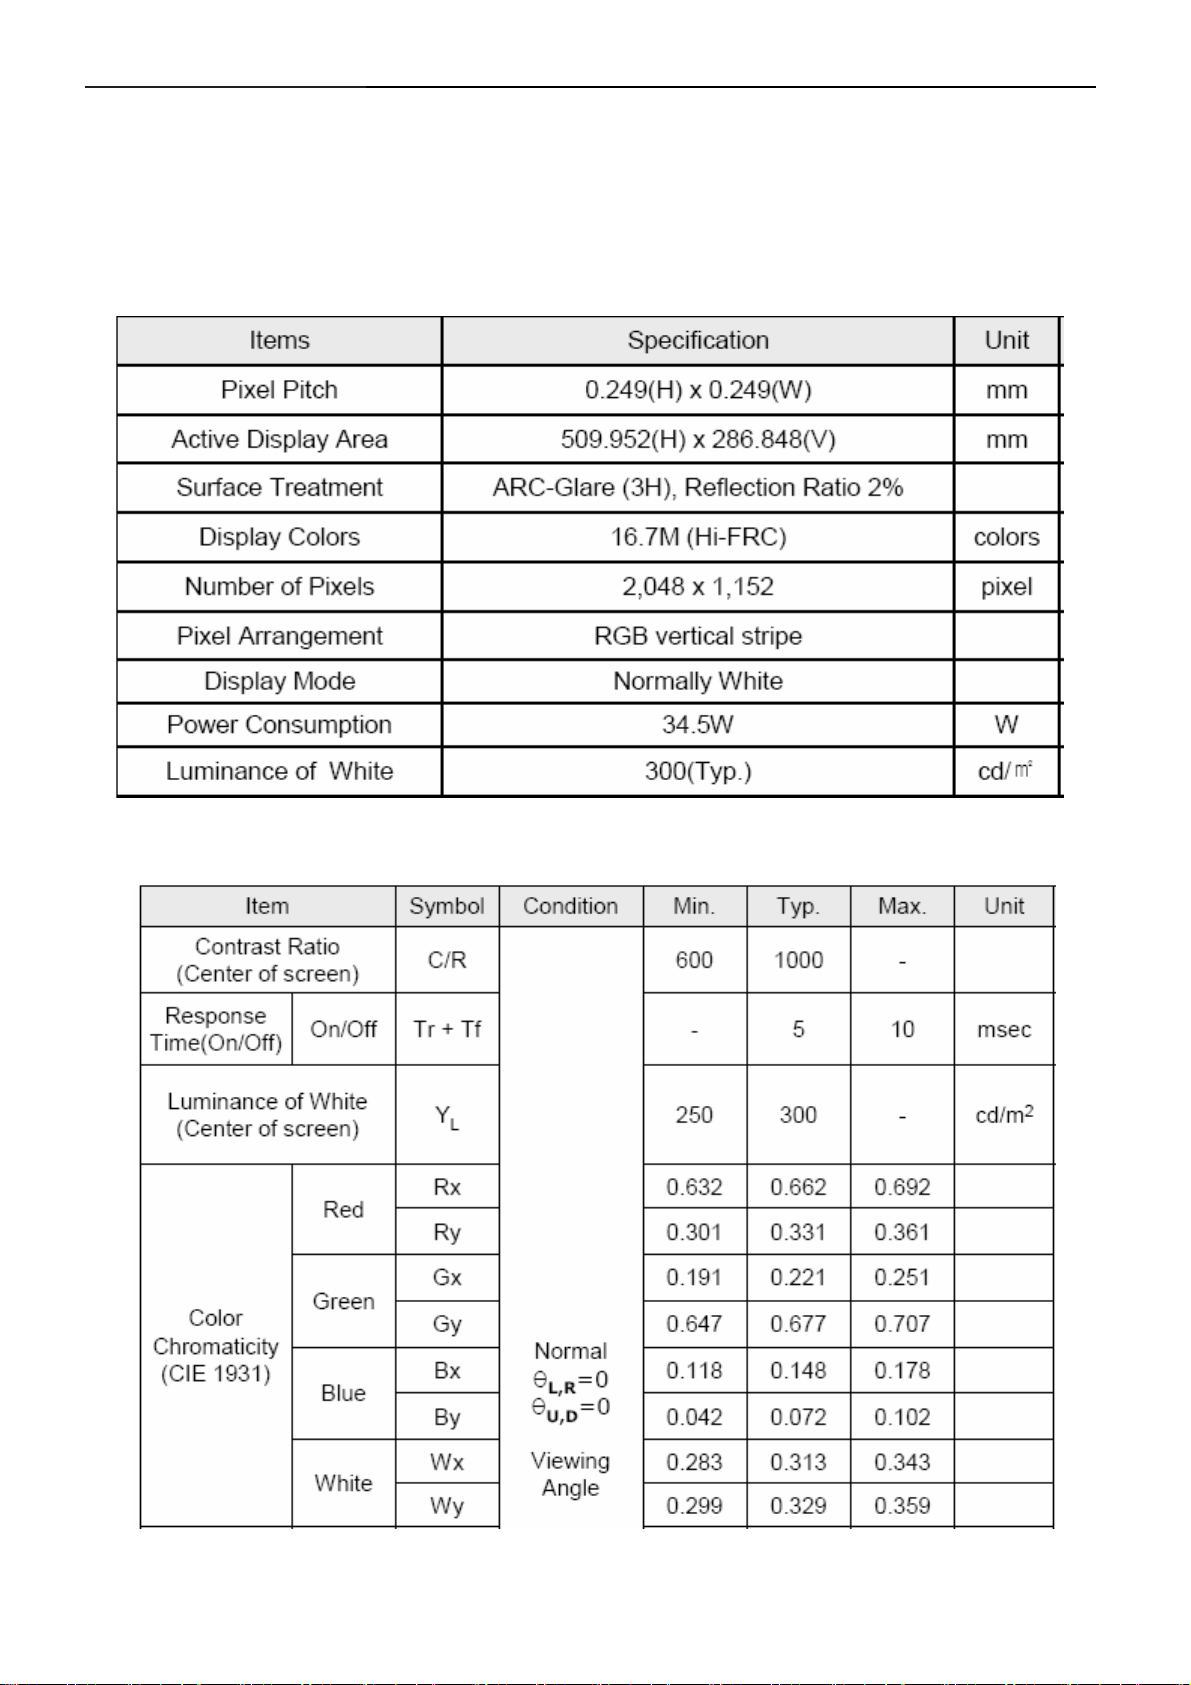
4.4 Panel Specification
LTM230TT02 is a color active matrix liquid crystal display(LCD)that uses amorphous silicon TFT(Thin Flim
Transitor) as switching components. This Model is compose of a TFT LCD panel, a driver circuit and a back light
unit. The resolution of a 23”is 2048X1152 and this model can display up to 16.7 millions colors.
4.4.1 Display Characteristics
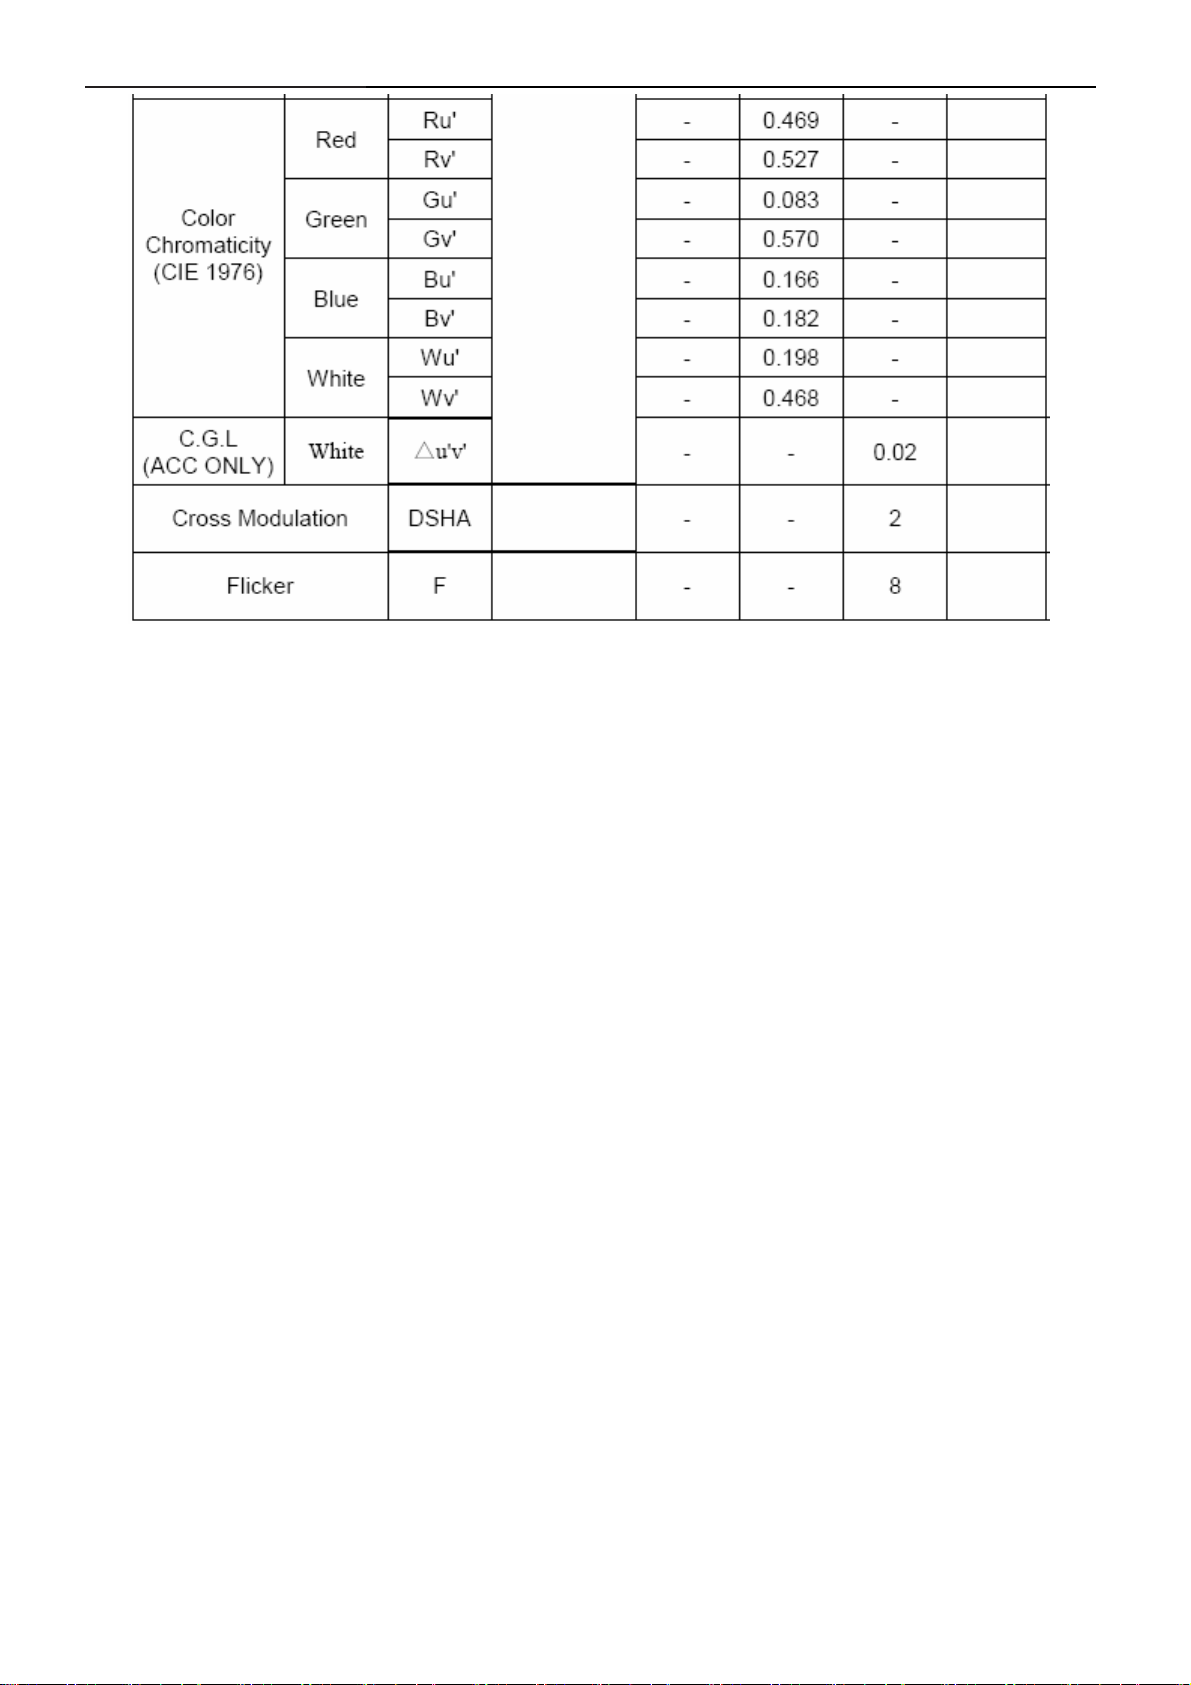
4.4.2 Optical Characteristics
The optical characteristics are measured under stable conditions at 25℃:
23
Page 24
23" LCD Color Monitor Dell SP2309Wc
24
Page 25
23" LCD Color Monitor Dell SP2309Wc
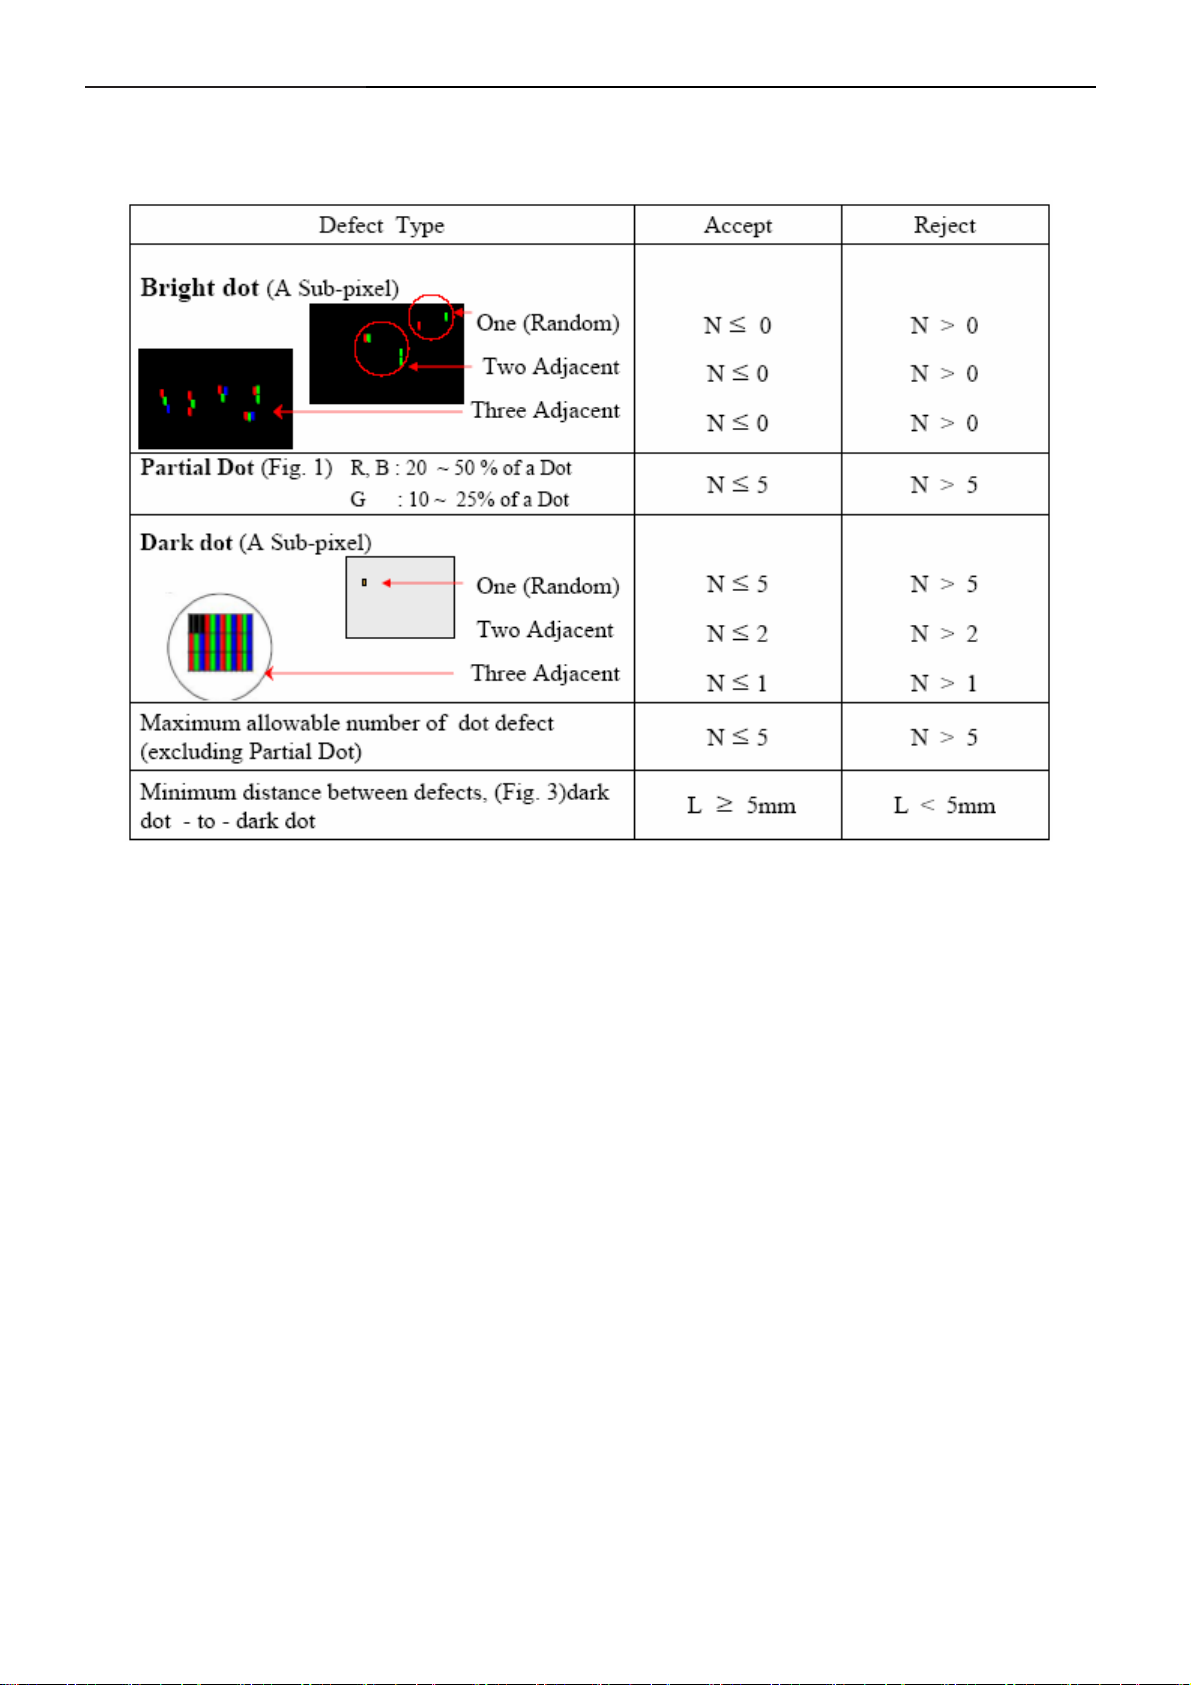
4.5 Definition of Pixel Defects
4.5.1 Spec.of Pixel Defect
25
Page 26

23" LCD Color Monitor Dell SP2309Wc
4.5.2 Optical Characteristics Failure Criteria
4.5.3 FOS Spec.
26
Page 27
23" LCD Color Monitor Dell SP2309Wc
5. Block Diagram
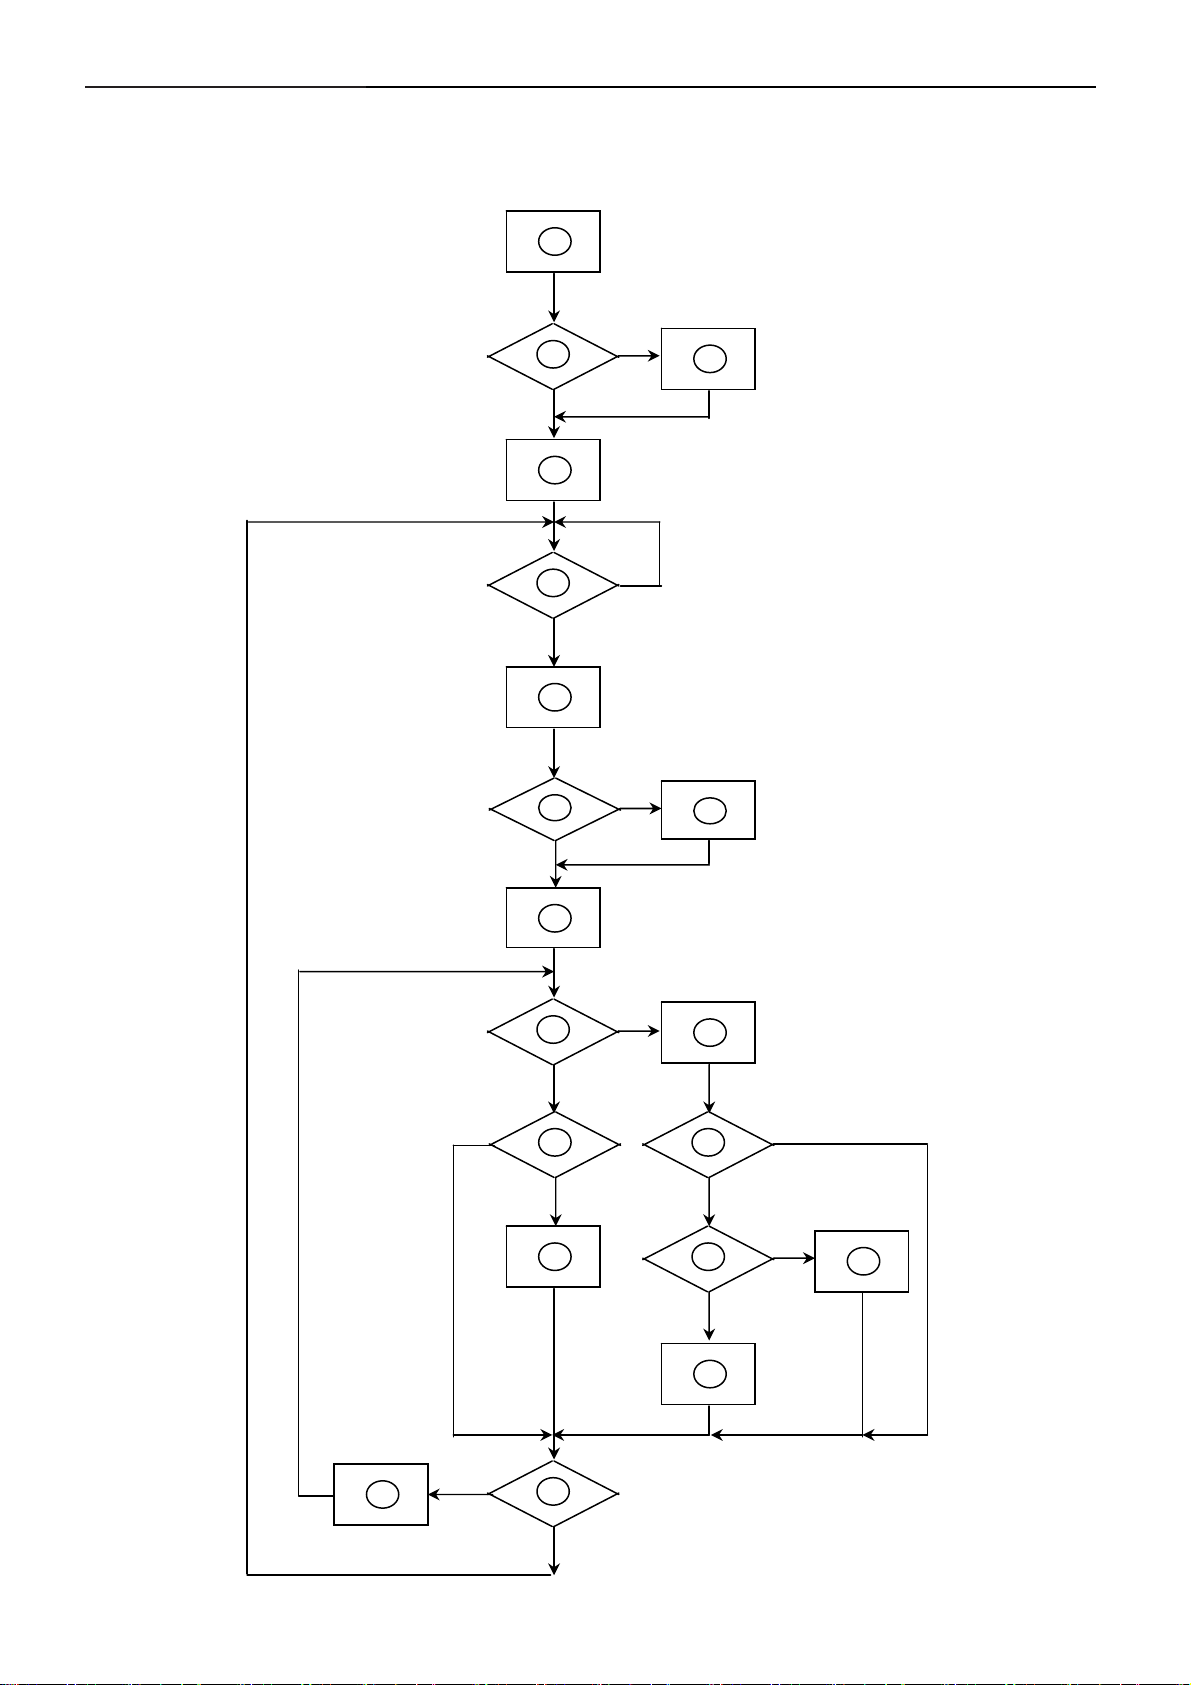
5.1 Software Flow Chart
1
2
4
Y
N
3
N
10
12
5
Y
6
7
9
Y
N
N
Y
N
11
13
8
N
Y
14
18
N
19
Y
27
15
17
Y
N
16
Y
Page 28

23" LCD Color Monitor Dell SP2309Wc
1) MCU Initializes.
2) Is the EEprom blank?
3) Program the EEprom by default values.
4) Get the PWM value of brightness from EEprom.
5) Is the power key pressed?
6) Clear all global flags.
7) Are the AUTO and SELECT keys pressed?
8) Enter factory mode.
9) Save the power key status into EEprom. Turn on the LED and set it to green color. Scalar initializes.
10) In standby mode?
11) Update the lifetime of back light.
12) Check the analog port, are there any signals coming?
13) Does the scalar send out an interrupt request?
14) Wake up the scalar.
15) Are there any signals coming from analog port?
16) Display "No connection Check Signal Cable" message. And go into standby mode after the message
disappears.
17) Program the scalar to be able to show the coming mode.
18) Process the OSD display.
19) Read the keyboard. Is the power key pressed?
28
Page 29

23" LCD Color Monitor Dell SP2309Wc
5.2 Electrical Block Diagram
5.2.1 Main Board
PANEL
D-SUB
DVI
HDMI
USB IN
DM
DP
RGB
TMDS
TMDS
USB 2512
LVDS
SCALER
MST6588CL
AMDR[0..12]
AMDATA [0..15]
DDR SDRAM
256Mb
HY5PS561621BFP
CAM/M IC
CTRL
I2S da ta
Audio DAC
PCM1754DBQR
SW
Phone Jack OUT
Phone Jack IN
FSA2257MTCX
USB 2514
USB PORT 1
USB PORT 2
USB PORT 3
USB PORT 4
29
Page 30

23" LCD Color Monitor Dell SP2309Wc
5.2.2 Inverter and Power Board
AC input
Lamp
EMI
Start Circuit
R932, R904, R933
Control
Rectify and
Output
Feedback
Circuit
Bridge
Rectifier
PWM
IC
Over
Voltage
Protect
DC Convert
Circuit
Transformer
Over
Voltage
MOSFET
PWM
Control IC
Rectifier
diodes
CN902
5V
Feedback
Circuit
12V
ON/OFF
ON/OFF
Control
DIM
30
Page 31

23" LCD Color Monitor Dell SP2309Wc
6. Mechanical Instruction
Tools: 2 Power screwdrivers(φ=5mm、L=60mm); 1 small cross screwdriver; turnbuckle driver;
Setting: Power screwdriver torque A=11 kgF. Cm; torque B=6 kgF. Cm
Fig Remark
Lay LCD on a flat, soft and
clean surface.
Remove stand:
Remove the two screws
and remove the stand by
Torque A.
1. Pull out the hinge cover
follow the arrowhead
direction and remove it, then
remove the hinge.
Remove the two screws
and remove the base by
Torque A.
31
Page 32

23" LCD Color Monitor Dell SP2309Wc
Remove the rear cover:
Pry the monitor up then find
out the hooks’ position, use
the tool (like the picture or
other card) to insert into the
gap of bezel and rear cover,
then turn over the monitor
and take off the rear cover.
Remove USB board:
Remove the screws by
torque B in red then remove
the shield which cover the
USB board,
,disconnect connector
remarked in green.
Remove shield:
Disconnect connector
remarked in green.
Cable connect main board and
camera glass
32
Page 33

23" LCD Color Monitor Dell SP2309Wc
Key board
cable
Remove shield:
Remove the screws by
Torque B or by manual, and
disconnect connector
remarked in green.
then remove the shield.
Remove the screws and
remove the main frame by
manual or torque =
3kgF.Cm.
33
Page 34

23" LCD Color Monitor Dell SP2309Wc
Disconnect connector
remarked in green.
Install:
Note: Make LVDS
connector’s metal side
adown
USB
cable
Remove the Power
Board, Main Board:
Remove the screws by
torque B and disconnect
connector remarked in
green.
34
Page 35

23" LCD Color Monitor Dell SP2309Wc
The panel
35
Page 36

23" LCD Color Monitor Dell SP2309Wc
7. Schematic Diagram
7.1 Main Board
+V_KEY
R487 0R05 1/16 W
Ve r.B 1. add fo r Pr oximit y
Te st and ESD 2008.5.30
+5V
FB413
300OHM
4K7 1/16W 5%
4K7 1/16W 5%
C467
0.1uF 16V
FB411
300OHM
R459
C468
0.1uF 16V
+3V3
R456
4K7 1/16W 5%
R457
KEY_SC L3
KEY_SD A3
PWR_SW #3
PWR_LED3
KEY_I NT3
R460 100R 1/16W 5%
R461 100R 1/16W 5%
R462 100R 1/16W 5%
R458
4K7 1/16W 5%
C466
0.1uF 16V
GND
+V_KE Y_S
10uF/50V
ZD401
RLZ5.6B
C464
+
GND
ZD402
RLZ5.6B
+V_KEY
C465
0.1uF 16V
GND
7
6
5
4
3
2
1
CN402
CONN
Q406
2N3906S-RTK/PS
Q405
2N3904S-RTK/PS
GND
+V_KEY_S
R485
10K 1/16W 5%
R484 4K7 1/16W 5%
R486
4K7 1/16W 5%
KEY_VC C_ON 3
T P V ( Top Victory Electronics Co . , Ltd. )
絬 隔 瓜 絪 腹
Key Component
G3178-F-X-X-1-080831
2. Key Connector
Date
36
OEM MODEL Size
TPV MODEL
PCB NAME
DELL SP2309W
SP2309W B
715G3178
214Sunday, August 31, 2008
Sheet
of
Rev
称爹
B
<
称爹
>
Page 37

23" LCD Color Monitor Dell SP2309Wc
VDDIO_DATA
+1V8
+1V2
VDDC
+5V
R425
R426
10K 1/16W 5%
10K 1/16W 5%
VGA_SCL
VGA_SDA
C456
10nF16V
GND
D401
LL4148
SPEAKER
2N3904S-RTK/PS
+5V_AUDI O
R431 4K7 1/16W 5%
+3V3
R430 4K7 1/16W 5%
R432 4K7 1/16W 5%
R433 4K7 1/16W 5%
R434 4K7 1/16W 5%
R435 4K7 1/16W 5%
R436 4K7 1/16W 5%
R437 4K7 1/16W 5%
R438 4K7 1/16W 5%
R475 4K7 1/16W 5%
R478 4K7 1/16W 5%
R479 4K7 1/16W 5%
R488 4K7 1/16W 5%
R495 4K7 1/16W 5%
P228 Test Mode, Low: Mode 1, High: Mode2
P229 Test Mode Enable, Low:Enable , High: Disable
P230 Power Management, Low :Enable, High:
Disa bl e
R496 0R 05 1/16W
R497 0R 05 1/16W
C457
1uF/16V
FB412
300OHM
GND
Ver .B 10.add
for int. Audio
2008.5.30 P.3
+V_BUZ
+
1
Q401
GND
AUCOM
AUVRM
AUVAG
C458
BZ401
2
Ver.D 3.Add
jump er f or Deb ug
2008.7.17 P.3
4U7 10V
Close to IC
LOUTMST_R7
LOUTMST_L7
10K 1/16W 5%
4K7 1/16W 5%
DAC_MUTE
CAM_DIAG
DSUB_DET
DVI_DET
LCD_EN
P_228
USB_DET
BKLT_EN
P_230
CODE_WP
P_229
BKLT_ADJ
KEY_VCC_ON
HDMI_DET_C#
Ver .B 4.corre ct
for pin out error
2008.5.30 P.3
VGA_SCL_DBG
VGA_SDA_DBG
with width
trace
Ver .B 6.corre ct
for chip limitation
2008.5.30 P.3
+3V3
R439
R440
R476 10K 1/ 16W 5%
Ver.C 1.Unique
Code_WP
2008.6.13 P.3
CODE_WP
R492
C4712200pF 50V
22K 1/16W 5%
GND
U403(NC)
G690H293T73
3
Vcc
C450
NC
HDMI_CK-6
HDMI_CK+6
HDMI_D0-6
HDMI_D0+6
HDMI_D1-6
HDMI_D1+6
HDMI_D2-6
HDMI_D2+6
AVDD_DVI
HPD_HDMI6
HDMI_SDA6
HDMI_SCL6
DVI_DET5
DSUB_DET5
USB_DET9
HDMI_DET6
DAC_MUTE7
R493
22K 1/16W 5%
RESET
GND
CEC6
DVI_RXC-5
DVI_RXC+5
DVI_RX0-5
DVI_RX0+5
DVI_RX1-5
DVI_RX1+5
DVI_RX2-5
DVI_RX2+5
HPD_DVI5
DVI_SDA5
DVI_SCL5
VGA_SDA5
VGA_SCL5
BIN0M5
BIN0P5
GIN0M5
GIN0P5
SOG5
RIN0M5
RIN0P5
HSYNC05
VSYNC05
R494
0R05 1/16W
R490 100R 1/ 16W 5%
R491 100R 1/ 16W 5%
C4722200pF 50V
BKLT_ADJ8
LCD_EN8
BKLT_EN8
OFF8
1V2_EN8
CODE_WP
FB401
120 OHM
590mA
10uF/50V
+3V3
+
10uF/50V
2
1
D402
R423
4K7 1/16W 5%
LL4148
GND
R424 390 OHM 1/16W
VGA_SDA
VGA_SCL
Ver.B 5.correct
for pin out error
2008.5.30 P.3
C451(NC)
C453(NC)
C454
GND
KEY_SCL2
KEY_SDA2
GND
LINMST_R7
LINMST_L7
Ver .B 7.correct
for chip lim itation
2008.5.30 P.3
R445 22R 1/1 6W 5%
SPI_CZ
R446 22R 1/16W 5%
SPI_DO
R447 100R 1/ 16W 5%
+
C425
C401
0.1uF 16V
GND
C445
0.1uF 16V
0.1uF 16V
0.1uF 16V
KEY_INT2
PWR_SW#2
R429 10K 1/16W 5%
+3V3
R472 0R05 1/16W
R473 0R05 1/16W
R477
10K 1/16W 5%
TP
TP28
TP
TP29
C623 0.1uF 16V
C624 0.1uF 16V
C626 0.1uF 16V
C625 0.1uF 16V
TP63
R489 4K7 1/16W 5%
R442 4K7 1/16W 5%
Ver.B 9.correct
for chip limitation
2008.5.30 P.3
R449
10K 1/16W 5%
C427
C426
0.1uF 16V
0.1uF 16V
C444 22pF
C446 22pF
GND
TP16
TP17
TP18
TP19
TP20
TP21
VGA_SDA_DB G
VGA_SCL_DB G
C452
0.1uF 16V
KEY_INT
PWR_SW#
SPI_CZ
SPI_DI
SPI_DO
SPI_CK
DVI_DET
DSUB_DET
USB_DET
DAC_MUTE
AUVRM
AUCOM
AUVAG
MSDA
MSCL
P_229
P_230
TP
BKLT_ADJ
V_BUZ_PWM
BUZZ_PWM
LCD_EN
BKLT_EN
1
2
3
4
GND
TP71
C428
C442
0.1uF 16V
0.1uF 16V
X401
1 2
TP
TP
TP
TP
TP
TP
TP
TP24
242
241
240
239
238
TP
237
236
235
234
253
252
247
246
244
243
250
245
249
215
214
229
230
173
174
175
176
TP
TP66
GND
U404
8
CS#
VCC
7
SO
HOLD#
6
W#
SCK
5
GND
SI
MX25L4005AM2C-12G
+3V3
FB406
300OHM
20mA
R401 22R 1/ 16W 5%
R422 22R 1/ 16W 5%
64
255
XOUT
RESET
62
CEC
6
RXH_CLKN
7
RXH_CLKP
8
RXH_0N
9
RXH_0P
11
RXH_1N
12
RXH_1P
14
RXH_2N
RXH_2P
2
HPD_A
3
DDCDA_SDA
4
DDCDA_SCL
63
CEC2
17
RXB_CLKN
18
RXB_CLKP
20
RXB_0N
21
RXB_0P
23
RXB_1N
24
RXB_1P
26
RXB_2N
27
RXB_2P
28
HPD_B
DDCDB_SDA
16
DDCDB_SCL
31
BIN1P
33
GIN1P
32
SOGIN1
34
RIN1P
29
HSYNC_A
30
VSYNC_A
66
DDCAA_ SDA
67
DDCAA_ SCL
35
BIN0M
36
BIN0P
37
GIN0M
38
GIN0P
39
SOGIN0
40
RIN0M
41
RIN0P
47
HSYNC0
VSYNC0
68
DDCAB_ SDA
69
DDCAB_ SCL
45
REFM
46
REFP
44
RMID
74
SAR0
75
SAR1
76
SAR2
77
SAR3
78
GPIO_A / SPI_CZ
79
GPIO_B / SPI_DI
80
GPIO_C / SPI_DO
81
GPIO_D / SPI_CK
65
IRIN
VD7 / DI27
VD6 / DI26
VD5 / DI25
VD4 / DI24
VD3 / DI23
VD2 / DI22
VD1 / DI21
VD0 / DI20
ICLK2
LINE_OUT_0R
LINE_OUT_0L
LINE_OUT_1R
LINE_OUT_1L
LINE_IN _0R
LINE_IN _0L
AURVM
AUCOM
AUVAG
GPIOB[7]
GPIOB[6]
INT
PWM
PWM2
PWM3
PWM4
PWM5
PWRGPIO2
PWRGPIO0
PWRGPIO1
PWRGPIO3
84
72
70
71
+3V3
C459
0.1uF 16V
R448 22R 1/16W 5%
R450 22R 1/16W 5%
AVDD_ADC
C431
10uF/50V
GND
256
XIN
GPIO02
GND
GND
160
154
GND
TP
TP43
TP
TP45
TP
TP47
TP
TP49
TP
TP51
TP
TP53
TP
TP55
TP
TP57
TP
TP58
TP
TP59
TP
TP60
TP
TP61
TP
TP62
SPI_CK
SPI_DI
166
+
GND
0.1uF 16V
FB404
VDDP
+3V3
300OHM
70mA
C443
VDDC
1
88
49
233
VDDC
VDDC
VDDC
153
VDDC
VDDC
Ver .B 3.add for
Int. Aud io
2008.5.30 P.3
AVDD_ADC
43
AVDD_ADC
10uF/50V
+
C432
C429
0.1uF 16V
GND
VDDP
217
172
51
86
VDDP
VDDP
VDDP
AVDD_TP / VDDP
C436
C435
+3V3
C434
0.1uF 16V
AVDD_DVI
13
AVDD_DVI
FB414
300OHM
AVDD_DVI
0.1uF 16V
0.1uF 16V
254
C437
0.1uF 16V
AVDD_AUSDM
248
AVDD_MPLL
AVDD_AUSDM
C433
0.1uF 16V
196
151
231
VDDP
VDDP
VDDP
U401
MST6588CL_256PIN
GPIOB[3]
GPIOB[1]
GPIOB[2]
GPIOB[5]
GPIOB[4]
NCNCNC
NC
NC
NC
NC
NC
169
168
167
165
164
159
15815157
162
161
C463
0.1uF 16V
1
A0
2
A1
3
A2
4 5
GND SDA
U405
24LC16B/SNG
GND
NC
NC
NC
NC
NC
NC
NC
NC
163
156
155
15019149
0R05 1/16W
GND
+3V3
10K 1/16W 5%
8
VCC
7
EE_WP
WP
6
SCL
21325212
170
211
R474
R451
10K 1/16W 5%
R454 100R 1/ 16W 5%
R455 100R 1/ 16W 5%
GPIOB[0]
209
210
208
Ver.C 2.Unique
Code_WP
2008.6.13 P.3
R452
37
C438
0.1uF 16V
GND
GPIOB[8]
GPIOR[7]
216
219
KEY_VCC_ON
C462
0.1uF 16V
GPIO00
GPIO01
82
83
MUTE
EE_WP
HDMI_DET_C#
CAM_DIAG
Power_LED#
+3V3
86mA
GPIOM[0]
GPIOM[3]
GPIOM[1]
TP
177
180
17973178
TP
TP
TP
TP
TP
R453
10K 1/16W 5%
MSCL
MSDA
+
10uF/50V
GPIOM[2]
TP39
TP40
TP41
TP42
TP44
TP48
FB405
300OHM
C473
AVSS_DVI
AVSS_DVI
42
22
10
EDID_W P 5
KEY_VCC_ON 2
MUTE 7
HDMI_DET_C# 3
CAM_MIC_DIAG 9
USB_EN 9
10uF/50V
AVSS_ADC
218
AVDD_DVI
+
C439
C430
C440
0.1uF 16V
GND
59
85
60
61
NC
NC
NC
GPIO05 / SDCDZ
VSSC
AVSS_AU
AVSS_TP
VSSP / VSSC
AVSS_DDR
VSSP
VSSS
VSSC
VSSS
VSSS
251
207
232
108
50
171
1524887
195
GND
Power_LED#
30mA
C441
0.1uF 16V
0.1uF 16V
TP
TP
TP
TP
TP
TP
TP
TP
TP
TP
TP
58
53
52
54
555657
NC
NC
NCNCNC
NC
R0P_F / LVD S0P_A
R0N_F / LVDS0N_A
R1P_F / LVD S1P_A
R1N_F / LVDS1N_A
R2P_F / LVD S2P_A
R2N_F / LVDS2N_A
R3P_F / LVDSCLKP_A
R3N_F / LVDSCLKN_AREXT
G0P_F / LVDS3P _A
G0N_F / LVD S3N_A
G1P_F / LVDS4P _A
G1N_F / LVD S4N_A
G3P_F / LVDS0P _B
G3N_F / LVD S0N_B
B0P_F / LVDS1P_B
B0N_F / LVD S1N_B
B1P_F / LVDS2P_B
B1N_F / LVD S2N_B
B3P_F / LVDSCLKP_B
B3N_F / LVDSCLKN_B
R0P_S / LVDS3P _B
R0N_S / LVD S3N_B
R1P_S / LVDS4P_B
R1N_S / LVD S4N_B
DDR2_A12
DDR2_A11
DDR2_A10
DDR2_BADR[1]
DDR2_BADR[0]
DDR2_RAS Z
DDR2_WEZ
DDR2_CAS Z
DDR2_MCLKE
DDR2_ODT
DDR2_DQSB[1]
DDR2_DQS [1]
DDR2_DQSB[0]
DDR2_DQS [0]
DDR2_DQM[0]
DDR2_DQM[1]
MDATA[15]
MDATA[14]
MDATA[13]
MDATA[12]
MDATA[11]
MDATA[10]
AVDD_DDR
AVDD_DDR
AVDD_DDR
AVDD_DDR
AVDD_DDR
AVDD _MEMP LL
VDDIO_CMD
GPIOR[06]
GPIOR[05]
GPIOR[04]
GPIOR[03]
GPIOR[02]
AVSS_DDR
AVSS_DDR
AVSS_DDR
AVSS_DDR
AVSS_DDR
AVSS_DDR
91
124
103
133
97
119
Ver.D 2.Add
HDMI re ad
Control
2008.7.15 P.3
R441
10K 1/16W 5%
R443
4K7 1/16W 5%
NC
DDR2_A9
DDR2_A8
DDR2_A7
DDR2_A6
DDR2_A5
DDR2_A4
DDR2_A3
DDR2_A2
DDR2_A1
DDR2_A0
MCLKZ
MVREF
MDATA[9]
MDATA[8]
MDATA[7]
MDATA[6]
MDATA[5]
MDATA[4]
MDATA[3]
MDATA[2]
MDATA[1]
MDATA[0]
GPIOR[1]
GPIOR[0]
AU_MUTE
TEST_PIN
+3V3
TP1
TP2
TP3
TP4
TP5
TP6
TP7
TP8
TP9
TP10
TP11
MCLK
VDDP
FB403
300OHM
+3V3
42mA
206
205
204
203
202
201
200
1995
198
197
194
193
192
191
190
189
188
187
186
185
184
183
182
181
145
136
141
144
135
146
134
143
132
147
131
140
130
138
139
128
137
129
148
127
110
109
105
104
102
101
123
122
126
112
99
115
96
95
114
98
113
117
93
121
89
90
120
92
118
107
116
106
100
111
94
125
FB409 0R05 1/8W
142
220
TP
TP
221
TP
222
223
TP
TP
224
TP
225
TP
226
228
227
R463
10K 1/16W 5%
GND
+
C419
C420
C421
10uF/50V
0.1uF 16V
0.1uF 16V
GND
AVDD_MEMPLL
FB407
300OHM
C447
10uF/50V
GND
TP
TP12
TP
TP13
TP
TP14
TP
TP15
A_M AD R 1 2
A_M AD R 1 1
For DDR2_16
A_M AD R 1 0
Address
A_M AD R 9
A_M AD R 8
used
A_M AD R 7
A_M AD R 6
A_M AD R 5
A_M AD R 4
A_M AD R 3
A_M AD R 2
A_M AD R 1
A_M AD R 0
A_B A 1
A_B A 0
A_R A S Z
A_W E Z
A_C A S Z
A_C K E
A_O D T
A_DQS1M
A_DQS1P
A_DQS0M
A_DQS0P
A_DQM0
A_DQM1
A_MCLKZ
A_MCLK
MVREF
A_M D AT A1 5
A_M D AT A1 4
A_M D AT A1 3
A_M D AT A1 2
A_M D AT A1 1
A_M D AT A1 0
A_M D AT A9
A_M D AT A8
A_M D AT A7
A_M D AT A6
A_M D AT A5
A_M D AT A4
A_M D AT A3
A_M D AT A2
A_M D AT A1
A_M D AT A0
AVDD_MEMPLL
VDDIO_DATA
TP67
TP68
TP69
TP70
TP34
TP35
TP36
P_228
Q402
2N3906S-RTK/PS
R444
75R 1/16W 5%
T P V ( Top Victory Electronics Co . , Ltd. )
絬 隔 瓜 絪 腹
Key Component
Date
C422
0.1uF 16V
+
0.1uF 16V
AVDD_MEMPLL
PWR_LED 2
C424
C423
0.1uF 16V
0.1uF 16V
C449
C448
0.1uF 16V
LVB0M
LVB0P
LVB1M
LVB1P
LVB2M
LVB2P
LVBCKM
LVBCKP
LVB3M
LVB3P
LVA0M
LVA0P
LVA1M
LVA1P
LVA2M
LVA2P
LVACKM
LVACKP
LVA3M
LVA3P
A_MADR[12..0] 4
A_BA1 4
A_BA0 4
A_RASZ 4
A_WEZ 4
A_CASZ 4
A_CKE 4
A_ODT 4
A_DQS1M 4
A_DQS1P 4
A_DQS0M 4
A_DQS0P 4
A_DQM0 4
A_DQM1 4
A_MCLKZ 4
A_MCLK 4
A_MDATA[15..0] 4
+1V8
G3178-F-X-X-1-080831
3. Scaler
C475
Ver.D 6.add
C475 for EMI
2008.7.17 P.3
0.1uF 16V
Ver.D 5.add
C474
C474 for EMI
2008.7.17 P.3
0.1uF 16V
LVB0P
LVB1P
LVB2P
LVBCKM
LVB3M
LVA0M
LVA1P
LVA2M
LVACKM
LVA3M
VCC_LCD2
VDDIO_DATA
R427
1K 1/16W 1%
C455
R428
0.1uF 16V
1K 1/16W 1%
GND
Ver .B 8.add for
buzzer volume
adjustm ent
2008.5.30 P.3
10uF/50V
OEM MODEL Size
TPV MODEL
PCB NAME
Sheet
C470
+V_BUZ
DELL SP2309W
SP22309W
715G3178
314Sunday, A ugust 31, 2008
CN403
29
27
25
23
21
19
17
15
13
11
9
7
5
3
1
GND
R483 0R 05 1/16W
Q403
2N3906S-RTK/PS
+
Q404
2N3904S-RTK/PS
of
CONN
GND
R481
10K 1/16W 5%
LVB0M
30
28
LVB1M
LVB2M
26
24
22
LVBCKP
LVB3P
20
18
LVA0P
LVA1M
16
14
LVA2P
12
LVACKP
10
LVA3P
8
6
4
2
GND
+5V
R482
4K7 1/16W 5%
V_BUZ_PWM
R480 4K7 1/16W 5%
Rev
称爹
Custom
B
称爹
>
<
Page 38

23" LCD Color Monitor Dell SP2309Wc
A-MADR1
A-MADR10
A-MADR5
A-MADR9
A-MADR12
A-MADR7
A-MADR3
A-MADR0
A-MADR2
A-MADR4
A-MADR6
A_MADR8
A_MADR11
A_BA0
A_BA1
A_MCLK
A_MCLKZ
A_CKE
+1V8
114m A
4
5
3
6
2
7
1
8
RP401 22R 1/1 6W 5%
RP402 22R 1/1 6W 5%
RP403 22R 1/ 16W 5%
R411 22R 1/1 6W 5%
R413 10R 1/ 16W 5%
FB402
300OHM
C403
10uF/5 0V
4
5
3
6
2
7
1
8
4
5
3
6
2
7
1
8
R407 22R 1/16W 5%
R408 22R 1/16W 5%
R409 22R 1/ 16W 5%
R410 22R 1/ 16W 5%
R414 10R 1/16W 5%
A_RASZ
A_CASZ
A_WEZ
A_ODT
DDR18V
+
0.1uF 16V
GND
C404
R418 22R 1/16W 5%
R419 22R 1/16W 5%
R420 22R 1/16W 5%
R421 22R 1/16W 5%
C405
0.1uF 16V
R412
150OHM1/16W
C406
0.1uF 16V
A_MADR1
A_MADR10
A_MADR5
A_MADR9
A_MADR12
A_MADR7
A_MADR3
A_MADR0
A_MADR2
A_MADR4
A_MADR6
C407
0.1uF 16V
A-MADR0
A-MADR1
A-MADR2
A-MADR3
A-MADR4
A-MADR5
A-MADR6
A-MADR7
A-MADR8
A-MADR9
A-MADR10
A-MADR11
A-MADR12
M0-B A0
M0-B A1
M0_C LK +
M0_C LK M0-C KE
C408
C409
0.1uF 16V
0.1uF 16V
RASZM0
CASZM0
WEZM0
A-ODT
M8
A0
M3
A1
M7
A2
N2
A3
N8
A4
N3
A5
N7
A6
P2
A7
P8
A8
P3
A9
M2
A10
P7
A11
R2
A12
L2
BA0
L3
BA1
J8
CK
K8
CK
K2
CKE
C410
0.1uF 16V
RAS
CAS
K7L7K3
C411
C412
0.1uF 16V
0.1uF 1 6V
DDR18V
VDD
WE
CS
ODT VDD
L8
A1A3A9
E1
R1
VDD
VDD
VDD
VDDQ
HY 5PS561621BFP-25
VSSQ
VSSQ VDDQ
VSSQ
VSSDL
B8
B2 C1
D2
J7J9K9 M9
GND
C414
C413
0.1uF 16V
0.1uF 16V
0.1uF 16V
C3
VDDQ
VSSQ
D8
C7
C9
VDDQ
VDDQ
U402
VSSQ
VSSQ
E7F2F8 G1
C415
G3G7G9
VDDQ
VDDQ
VSSQ VDDQ
VSSQ
VSSQ
H2
H8
C416
0.1uF 16V
E9
VDDQ
VDDQ
VSS
VSSQ
J3
A7
C417
0.1uF 16V
J1
J2
VDDL
VSS
N1
P9
VREF
VSS
VSS
VSS
E3
C418
0.1uF 16V
UDQS
UDQS
DDR18V
R403
1K 1/16W 1%
GND
F7
LDQS
E8
LDQS
F3
LDM
G8
DQ0
G2
DQ1
H7
DQ2
H3
DQ3
H1
DQ4
H9
DQ5
F1
DQ6
F9
DQ7
C8
DQ8
C2
DQ9
D7
DQ10
D3
DQ11
D1
DQ12
D9
DQ13
B1
DQ14
B9
DQ15
B7
A8
B3
UDM
C476
0.1uF 16V
Ve r.D 7.add
C476 for EMI
2008.7.17 P.4
R402
1K 1/16W 1%
C402
0.1uF 16V
A-DQS0P
A-DQS0M
A-DQM0
A-MDATA0
A-MDATA1
A-MDATA2
A-MDATA3
A-MDATA4
A-MDATA5
A-MDATA6
A-MDATA7
A-MDATA8
A-MDATA9
A-MDATA10
A-MDATA11
A-MDATA12
A-MDATA13
A-MDATA14
A-MDATA15
A-DQS1P
A-DQS1M
A-DQM1
R404 22R 1/ 16W 5%
R405 22R 1/ 16W 5%
R406 22R 1/ 16W 5%
R415 22R 1/ 16W 5%
R416 22R 1/ 16W 5%
R417 22R 1/ 16W 5%
A-MDATA11
A-MDATA12
A-MDATA9
A-MDATA14
A-MDATA4
A-MDATA3
A-MDATA1
A-MDATA6
A-MDATA15
A-MDATA8
A-MDATA10
A-MDATA13
A-MDATA7
A-MDATA0
A-MDATA2
A-MDATA5
A_DQS0P
A_DQS0M
A_DQM0
A_DQS1P
A_DQS1M
A_DQM1
4
5
3
6
2
7
1
8
RP404 22R 1/16W 5%
RP405 22R 1/ 16W 5%
RP406
RP407
4
5
3
6
2
7
1
8
4
5
3
6
2
7
1
8
22R 1/16W 5%
4
5
3
6
2
7
1
8
22R 1/16W 5%
A_MDATA11
A_MDATA12
A_MDATA9
A_MDATA14
A_MDATA4
A_MDATA3
A_MDATA1
A_MDATA6
A_MDATA15
A_MDATA8
A_MDATA10
A_MDATA13
A_MDATA7
A_MDATA0
A_MDATA2
A_MDATA5
A_ M AD R 1 2
A_ M AD R 1 1
A_ M AD R 1 0
A_ M AD R 9
A_ M AD R 8
A_ M AD R 7
A_ M AD R 6
A_ M AD R 5
A_ M AD R 4
A_ M AD R 3
A_ M AD R 2
A_ M AD R 1
A_ M AD R 0
A_ B A1
A_ B A0
A_ R AS Z
A_ W E Z
A_ C AS Z
A_ C K E
A_ O D T
A_DQS1M
A_DQS1P
A_DQS0M
A_DQS0P
A_DQM0
A_DQM1
A_MCLKZ
A_MCLK
A_ M D AT A1 5
A_ M D AT A1 4
A_ M D AT A1 3
A_ M D AT A1 2
A_ M D AT A1 1
A_ M D AT A1 0
A_ M D AT A9
A_ M D AT A8
A_ M D AT A7
A_ M D AT A6
A_ M D AT A5
A_ M D AT A4
A_ M D AT A3
A_ M D AT A2
A_ M D AT A1
A_ M D AT A0
A_MADR[12..0] 3
A_BA1 3
A_BA0 3
A_RASZ 3
A_WEZ 3
A_CASZ 3
A_CKE 3
A_ODT 3
A_DQS1M 3
A_DQS1P 3
A_DQS0M 3
A_DQS0P 3
A_DQM0 3
A_DQM1 3
A_MCLKZ 3
A_MCLK 3
A_MDATA[15.. 0] 3
T P V ( Top Victory Electronics Co . , Ltd. )
絬 隔 瓜 絪 腹
Key Component
38
G3178-F-X-X-1-080831
4. DDRII SDRAM
Date
OEM MODEL Size
TPV MOD EL
PCB NAME
DELL SP2309W
SP2309W B
715G3178
Sheet of
414Sunday , Augus t 31, 2008
Rev
称爹
B
称爹
>
<
Page 39

23" LCD Color Monitor Dell SP2309Wc
CN102
JACK
VSYN C
SYN C GND
DDC SCL
DDC SDA
1/3shield
2/4shield
0/5shield
clk shield
GND
GND
GND
262527
28
+5V
HPD
DAT0+
DAT0-
DAT1+
DAT1-
DAT2+
DAT2-
DAT3+
DAT3-
DAT4+
DAT4-
DAT5+
DAT5-
clk+
GND
clk-
1716
11
12
13
14
15
CN101 DB15
DSUB_DET3
HSI
FB105 120 OHM
VSI
ZD104
RLZ5.6B
GND
ZD106
RLZ5.6B
GND
8
15
6
7
14
16
HPD
11
3
19
22
18
17
10
9
2
1
13
12
5
4
21
20
23
24
GND
RED+
1
GND
RED-
6
GREEN+
2
GREEN-
7
BLUE+
3
8
BLUE-
4
9
PC5V
5
10
ZD101
RLZ5.6B
GND
GND
ZD105
RLZ5.6B
GND
ZD107
RLZ5.6B
GND
Ver.C 7.EMI Request
2008.6.13 P.5
FB502 300OHM
ZD111
RLZ5.6B
GND
ESD
D107
GND
C116
0.1uF 16V
2
0.1uF 16V
GND
3
C117
1
PC5V
GND
ZD103
RLZ5.6B
2K2 1/16W 5%
GND
R127 100R 1/16W 5%
+5V_D VI
R136
ZD108
RLZ5.6B
NC
GND
3
D108
BAV99
C118
1
2
0.1uF 16V
2
C109
0.1uF 16V
R114
BAV99
2
3
D101
BAV99
1
GND
3
C119
0.1uF 16V
ZD109
RLZ5.6B
1
2
C112
22pF
D109
BAV99
2
3
D102
BAV99
GND
ZD110
GND
3
C120
0.1uF 16V
D104
1
RLZ5.6B
1
2
LL4148
GND
R115
2K2 1/16W 5%
DSUB-SCL
DSUB-SDA
100R 1/16W 5%
R128 100R 1/16W 5%
R129 100R 1/16W 5%
R133 1K 1/16W 5%
R139 10R 1/16W 5%
R140 10R 1/16W 5%
R141 10R 1/16W 5%
R142 10R 1/16W 5%
3
D110
BAV99
C121
1
2
0.1uF 16V
FB101 0R05 1/16W
FB102 0R05 1/16W
FB104 0R05 1/16W
3
D103
BAV99
1
ESD
R112 1K 1/16W 5%
R113 1K 1/16W 5%
C113
22pF
R124
DDC_SCL_D1
DDC_SDA_D1
R143 10R 1/16W 5%
R144 10R 1/16W 5%
3
3
BAV99
2
0.1uF 16V
C122
D112
BAV99
C123
1
2
0.1uF 16V
1
D111
R10675R 1/16W 5%
R121 100R 1/16W 5%
R122 100R 1/16W 5%
R125
100R 1/16W 5%
D113
BAV99
2
R10875R 1/16W 5%
R10775R 1/16W 5%
GND
HSYNC0 3
VSYNC 0 3
VGA_SDA 3
VGA_SCL 3
DVI_DET 3
R145 10R 1/16W 5%
R146 10R 1/16W 5%
3
D114
BAV99
C124
1
0.1uF 16V
GND
R101 56 OHM 1/16W
R102 56 OHM 1/16W
R103 56 OHM 1/16W
R104 470R 1/16W 5%
R109 100R 1/16W 5%
R110 100R 1/16W 5%
R111 100R 1/16W 5%
+5V
R117
4K7 1/16W 5%
DDC_WP6
DVI_RX0+
DVI_RX0DVI_RX1+
DVI_RX1DVI_RX2+
DVI_RX2-
4K7 1/16W 5%
R118
DVI_RX0+ 3
DVI_RX0- 3
DVI_RX1+ 3
DVI_RX1- 3
DVI_RX2+ 3
DVI_RX2- 3
DVI_RXC+
DVI_RXC-
絬 隔 瓜 絪 腹
Key Component
R116
C101 0.047uF
C102 0.047uF
C103 0.047uF
C104 1000pF
C106 0.047uF
C107 0.047uF
C108 0.047uF
PC5V
1
2
D105
BAV70
3
U101
8
4K7 1/16W 5%
VCC
7
WP
6
SCL
VSSSD A
M24C02-WMN6TP
DDC_WP
DVI_RXC+ 3
DVI_RXC- 3
T P V ( Top Victory Electronics Co . , Ltd. )
G3178-F-X-X-1-080831
5. VGA&DVI input
Date
A0
A1
A2
RIN0P 3
GIN0P 3
BIN0P 3
SOG 3
RIN0M 3
GIN0M 3
BIN0M 3
1
2
3
45
GND
2N3904S-RTK/PS
+3V3
R135
47K 1/16W 5%
C114
0.22uF
Q102
GND
HPD_DVI 3
FB103
+5V
300OHM
GND
4K7 1/16W 5%
R131
4K7 1/16W 5%
DVI_SCL 3
DVI_SDA 3
R105
1K 1/16W 5%
ESD
ZD102
C105
0.1uF 16V
GND
+3V3
R119
10K 1/16W 5%
R126
4K7 1/16W 5%
DDC_SCL_D1
DDC_SDA_D1
0R05 1/16W
OEM MO DE L Size
TPV MO DE L
PCB NAME
Sheet
R120
47K 1/16W 5%
R123
4K7 1/16W 5%
Q101
2N3906S-RTK/PS
4K7 1/16W 5%
R130
R138
R137
0R05 1/16W
DELL SP2309W
SP2309W B
715G3178
of
59Sunday , August 31, 2008
RLZ5.6B
EDID _WP 3
+5V
+5V_D VI
2
3
R132
8
7
6
DDC_WP
1
D106
BAV70
U102
A0
VCC
A1
WP
A2
SCL
VSSSD A
M24C02-WMN6TP
Rev
称爹
C115
0.22uF
1
2
3
45
GND
C
称爹
>
<
39
Page 40

23" LCD Color Monitor Dell SP2309Wc
20
SHELL1
22
SHELL3
23
SHELL4
21
SHELL2
D2+
D2 Shield
D2D1+
D1 Shield
D1D0+
D0 Shield
D0-
CK+
CK Shield
CK-
CE Remote
DDC CLK
DDC DATA
GND
+5V
HP DET
HDMI
CN501
NC
FB501
GND
HDMI1_D2+
HDMI_DET_G
HDMI1_D2HDMI1_D1+
HDMI1_D1HDMI1_D0+
HDMI1_D0-
HDMI1_CK-
FB503
300OHM
DDC CLK
DDC DATA
300OHM
HDMI_HOTPLUG
HDMI_+5V
R501
1K 1/16W 5%
CEC_HDMI
Ver.C 6.EMI Request
2008.6.13 P.6
+5V
R507
10K 1/16W 5%
Q501
2N3904S-R TK/PS
Q502
2N3904S-RTK/PS
GND
GND
Ve r.C 8.HDMI ATC
Reque st 2008.6.16
P.6
R510 22K 1/ 16W 5%
+3V3
R502
10K 1/16W 5%
R506 100R 1/16W 5%
HPD_HDMI 3
+3V3
R508 100R 1/16W 5%
1
2
3
4
5
6
7
8
9
10
11
12
13
14
15
16
17
18
19
U501
RClamp0524P. TCT
1
2
4
5 6
U502
RClamp0524P. TCT
1
2
4
5 6
OUT1
IN1
OUT2
IN2
IN3
OUT3
IN4 OUT4
GND
GND
3
8
GND
OUT1
IN1
OUT2
IN2
IN3
OUT3
IN4 OUT4
GND
GND
3
8
GND
10
9
7
10
9
7
HDMI_SCL
HDMI_SDAR509 100R 1/16W 5%
HDMI_D2+ 3
HDMI_D2- 3
HDMI_D1+ 3
HDMI_D1- 3
HDMI_D0+ 3
HDMI_D0- 3
HDMI_CK+ 3
HDMI_CK- 3
CEC 3
HDMI_SCL 3
HDMI_SDA 3
HDMI1_+5V
HDMI_+5V
R503 4K7 1/ 16W 5%
3
DDC_WP
+5V
2
U503
M24C02-WMN6TP
8
VCC
7
WP
6
SCL
1
A0
2
A1
3
A2
45
VSSSDA
DDC_WP 5
GND
C501
0.22uF
D501
BAT54C
1
R505 4K7 1/ 16W 5%
R504 4K7 1/ 16W 5%
HDMI_HOTPLUG
DDC DATA
6
I/O4
I/O1
123 4
GND
5
VDD
GND
CEC_HDMI
U504
AZC099-04S
I/O2 I/O3
DDC CLK
HDMI_DET_G
R513
100R 1/ 16W 5%
Q503
RK7002
R514
10K 1/16W 5%
GND
R516 10K 1/16W 5%
R515
22K 1/16W 5%
40
HDMI_DET 3
HDMI_DET_C# 3
V e r .D 1.A d d HDM I r e ad
Cont ro l 2008.7.15 P.6
T P V ( Top Victory Electronics Co . , Ltd. )
絬 隔 瓜 絪 腹
Key Component
G3178-F-X-X-1-080831
6. HDMI INPUT
Date
OEM MO DEL Size
TPV MODEL
PCB NAME
DELL SP2309W
SP2309W B
715G3178-C
Sheet
of
69Sunday, August 31, 2008
Rev
称爹
B
称爹
>
<
Page 41

23" LCD Color Monitor Dell SP2309Wc
+5V_AUDIO
CN602
PHONEJ ACK
LINE
OUT
100K 1/16W 5%
C638(NC)
LOUT_EAR_L
LOUT_EAR_R
0.1uF 16V
U601
1
BYP
2
GND
3
SD
4 5
IN2 VO2
TPA6110A2DGNRG4
R631(NC) 10K 1/ 16W 5%
LOUTMST_R
+5V
D601
LOUTMST_L3
4
5
3
2
1
C6301000pF
R621
FB601 120 OHM
SR34
DAC_MUTE7
LOUTMST_L
FB604
300OHM
300OHM
C6311000pF
R622
100K 1/16W 5%
+5V_AUDI O
C637(NC) 2.2uF/10V
DAC_MUTE
R628 10K 1/16W 5%
R623 100R 1/16W 5%
+
C635 10uF/50V Q603
+
C636 10uF/50VFB605
R624 100R 1/16W 5%
+
VO1
VDD
LOUTMST_L
2N3904S-RTK/PS
Q602
2N3904S-RTK/PS
C639(NC )
10uF/50V
IN1
Q601
R629 10K 1/16W 5%
8
R630(NC ) 10K 1/16W 5%
7
6
LOUT_EAR_L
R633 10K 1/16W 5%
R634 10K 1/16W 5%
LOUT_EAR_R
R637
10K 1/16W 5%
R638
10K 1/16W 5%
LOUTMST_R
Q604
2N3904S-RTK/PS
LOUTMST_R 3
2N3906S-RTK/PS
R635
10K 1/16W 5%
+5V_AUDI O
R636
DAC_MUTE
2K2 1/16W 5%
+5V_AUDI O
R632
10K 1/16W 5%
MUTE 7
CN603
PHONEJ ACK
LINE IN
L
4
5
3
2
R
1
R616 22K 1/16W 5%
R617 22K 1/16W 5%
C632330pF 50V
C633330pF 50V
LINMST_L 3
LINMST_R 3
C622560P 50V X7R +/-10%
R618
C621560P 50V X7R +/-10%
R619
12K 1/16W 5%
12K 1/16W 5%
T P V ( Top Victory Electronics Co . , Ltd. )
絬 隔 瓜 絪 腹
Key Component
G3178-F-X-X-1-080831
7. Audio
Date
OEM MODEL Size
TPV MO DEL
PCB NAME
Sheet
GND
DELL SP2309W
SP2309W B
715G3178
714Sunday , August 31, 2008
of
Rev
称爹
B
<
称爹
>
41
Page 42

23" LCD Color Monitor Dell SP2309Wc
CN701
1
BKLT_EN
2
BKLT_ADJ
3
4
5
GND
6
GND
7
+5.1V
8
+5.1V
9
GND
10
GND
11
AUDI O_EN
12
AUDI O_DET
CONN
+3V3
C790
2.2uF/ 10V
R784
1K 1/16W 5%
LCD_EN3
+5V
FB704 120 OH M
C712
100uF25V
Ver.B
12.corr ect for
chip limitation
2008.5.30 P.8
1V2_EN3
4K7 1/16W 5%
GND
VCC_LC D1
R713
4K7 1/16W 5%
+
0.1uF 16V
R781
100uF/16V
C716
C705
GND
220m A
R714
3K1/16W
C720
0.01uF/ 25V
100K 1/16W 5%
Q710
2N3904S-RTK/PS
C7011000pF
+
C702
0.1uF 16V
R710
10K 1/16W 5%
R712
47K 1/16W 5%
Q705
2N3904S-RTK/P S
GND
R716
+
R707
10K 1/16W 5%
C722
1uF 10V
FB717 120 OH M
FB701 120 OH M
FB702 120 OH M
C787
220uF/16V
GND
C788
0.1uF 16V
R711 47K 1/16W 5%
D701 LL4148
Q704
2N3904S-RTK/PS
1.2V Core Power
U702
4 5
VCC OUTPUT
3
OCSET
OUTPUT
2
EN
1
FB
AP1510SA
R718
1.2K OHM 1/16W
R720
2KOHM +-5% 1/16W
RB
0.1uF 16V
VSS
VSS
R701 100R 1/16W 5%
R702 100R 1/16W 5%
C703
0.1uF 16V
1
S1
2
S1
3
S1
4
C707
G1
6
7
8
RA
Q701
AO4403
D1
D1
D1
D1
L706
D702
SR34
+5V
VCC_L CD1
C704
0.1uF 16V
FB703 120 OHM
8
7
6
5
100uF25V
33uH
C706
+
590m A
+
C713
100uF/16V
Q702
2N3904S-RTK/ PS
1600m A
C708
0.1uF 16V
+1V2
C717
0.1uF 16V
+3V3
R703
2K2 1/16W 5%
GND
VCC_LCD2
VCC_LC D2
R708
220 OHM 1/4W
GND
+3V3
R705
4K7 1/16W 5%
R709
220 OHM 1/4W
FB705 120 OH M
OFF3
4K7 1/16W 5%
BKLT_ADJ 3
R717
100K 1/16W 5%
R782
T P V ( Top Victory Electronics Co . , Ltd. )
絬 隔 瓜 絪 腹
Key Component
G3178-F-X-X-1-080831
8. Power
Date
2N3904S-RTK/PS
C709
100uF/16V
Q712 AO3401
100uF/16V
R785 47K 1/16W 5%
Q711
2N3904S-RTK/ PS
+3V3
C789
R704
10K 1/16W 5%
Q703
GND
+5V
+
U701AIC1084-33PE
C711
0.1uF 16V
220m A
2.2uF/ 10V
R783
1K 1/16W 5%
Ve r.C 4.cor re ct
for chip Reset
st ate 2008.6.13
P.8
23
Vo2Vin
ADJ
1
GND
R706
4K7 1/16W 5%
+3V3
C710
100uF/16V
1.8V DDRII Power
U711 AIC 1084-18PE
23
OUTIN
+
C714
0.1uF 16V
OEM MO DE L S ize
TPV MODEL
PCB NA ME
Sheet
GND
C795
1
DELL SP2309W
SP2309W B
715G3178
of
89Sunday , August 31, 2008
+
200m A
+
C715
100uF/16V
BKLT_EN 3
+1V8
C719
0.1uF 16V
Rev
称爹
B
称爹
>
<
42
Page 43

23" LCD Color Monitor Dell SP2309Wc
R726 NC
L702
3
USB_5V
12
t
GND
DM1
DP1
DM2Q709
DP2
ZD707
ZD708
1 2
EGA10603V05A1-B
ZD709
1 2
EGA10603V05A1-B
F703
PTCR
R768
10K 1/16W 5%
R772
15K 1/16W 5%
R778 NC
L708
124
R779
100R 1/16W 5%
R780(NC)
3
124
90 ohm
R729 NC
R734 NC
L704
124
R736 NC
VBUS4
1 2
EGA10603V05A1-B
GND
VBUS3
ZD710
1 2
VBUS3
12
+
GND
3
90 ohm
NC
0.1uF 16V
OEM MODEL Size
TPV MO DEL
PCB NAME
Sheet
EGA10603V05A1-B
3
90 ohm
1 2
EGA10603V05A1-B
C745
0.1uF 16V
C746
0.1uF 16V
EGA10603V05A1-B
GND
FB711
120 OHM
C752
100uF/16V
C793
0.1uF 16V
Ver.C 5.EMI Request
2008.6.13 P.9
C781
GND
GND
DELL SP2309W
SP2309W B
715G3178
of
99Sunday, August 31, 2008
1 2
ZD705
/OC4
CAM_Vcc
DIAG_LOOP
12
FB716
120 OHM
VBUS1
CN703
USB CONNECTOR
C738
0.1uF 16V
ZD702
ZD701
1 2
ZD706
1 2
1
2
3
4
5
6
7
8
EGA10603V05A1-B
VBUS2
EGA10603V05A1-B
CN704
CONN
USB_5V
12
GND
C743
0.1uF 16V
F704
PTCR
t
R770
10K 1/16W 5%
R773
15K 1/16W 5%
1
2
3
4
5
123
4
1234
10
5678
9
657
8
GND
VBUS4
12
FB712
+
C753
100uF/16V
GND
Ver.C 5.EMI Request
2008.6.13 P.9
CN705
CONN
Rev
称爹
12
11
GND
120 OHM
0.1uF 16V
Custom
<
称爹
C794
>
USB_EN3
GND
GND
OC1
+U3V3
R771
100K 1/16W 5%
GND
C760 33pF
1M 1/16W 5%
C771 33pF
C744
1uF 10V
USB_5V
R742
10K 1/16W 5%
R743
15K 1/16W 5%
GND
100K 1/16W 5%
R762
10K 1/16W 5%
R776
R732
47K 1/16W 5%
VBUS0
R737
100K 1/16W 5%
VBUS_DET
R739
100K 1/16W 5%
+U3V3
R752
C749
0.1uF 16V
GND
Ver.B 15.add
fo r USB IF
2008.5.30 P.9
+3V3
R725
47K 1/16W 5%
U707 USB2512-AEZG
27
VBUS_DET
13
OC1
OCS1
17
OCS2
19
NC
21
NC
26
RESET
28
LOCAL_PWR/NON_REM0/SUSP_IND
11
TEST
GND
33
XTAL1/CLKIN
12
X701
24mhz
32
XTAL2/CLKIN_EN
37
VSS(FLAG)
GND
+
C786
220uF/16V
Q708
2N3906S-RTK/PS
R735
47K 1/16W 5%
Ups tr e am
Downs tream 1
Downs tream 2
Downs tream 3
Downs tream 4
EEPROM/ Co n f i g
SDA/SMBDATA/N ON_REM1
+5V
R728
C730
10K 1/16W 5%
0.1uF 16V
GND
2N3904S-RTK/PS
GND
USBUP_DM
USBUP_DP
USBDN1_DM
USBDN1_D P
PRTPWR1
USBDN2_DM
USBDN2_D P
PRTPWR2
SCL/SMBCLK/CFG_SEL0
HS_IND/CFG_SEL1
Commo n
RBIAS
VDD33
VDD33CR
VDDA33
VDDA33
VDDA33
VDDA33/VDD33PLL
VDD18
VDDA18PLL
R731
100K 1/16W 5%
D705 LL4148
2512_DM0
30
31
2512_DP0
1
2512_DM1
2
2512_DP1
12
DM
3
DP
4
16
2514_DET
6
NC
7
NC
18
NC
8
NC
9
NC
20
NC
22
24
25
10K 1/16W 5%
35
RBIAS R755
R763
12KOHM +-0.5% 1/16W
23
15
5
10
29
36
14
34
USDA
USCL
C763
0.1uF 16V
C772
0.1uF 16V
C777
C733
0.1uF 16V
R746
NC
R754
GND
0.1uF 16V
Q706
AO4403
1
S1
D1
2
S1
D1
3
S1
D1
4
G1
D1
C762
U710
1
2
3
4 5
NC/M24C02-WMN6TP
GND
R747
NC
10K 1/16W 5%
C755
0.1uF 16V
GND
C764
0.1uF 16V
C773
4.7uF/ 16V
GND
C778
4.7uF/16V
GND
8
7
6
5
A0
VCC
A1
WP
A2
SCL
VSS SDA
+U3V3
R748
10K 1/16W 5%
R756
NC
GND
160mA
C756
0.1uF 16V
C765
0.1uF 16V
Close
to
U707
USB_5V
C734
0.1uF 16V
GND
+U3V3
NC
8
7
6
GND
FB708
300OHM
C766
0.1uF 16V
GND
Ve r.B 16.add
for USB IF
2008.5.30 P.9
USCL
USDA
C735
0.1uF 16V
R774
+U3V3
GND
C784
4.7uF/16V
2514_DET
NC
C754
0.1uF 16V
GND
+
C731
220uF/16V
R775
NC
+U3V3
R765
10K 1/16W 5%
GND
C761 33pF
1M 1/16W 5%
C774 33pF
R738
100K 1/16W 5%
100K 1/16W 5%
R769
100K 1/16W 5%
R777
/OC1
/OC2
/OC3
/OC4
+U3V3
R753
C750
0.1uF 16V
GND
GND
12
X702
24mhz
GND
Ve r.D 4.Chand Packag e
for d erating 2008.7.17 P.9
USB_5V
280mA
C739
0.1uF 16V
USB_5V
170mA
+
C741
100uF/16V
U708 USB2514-AEZG
Upstream
27
VBUS_DET
Dow ns tr eam 1
13
OCS1
Dow ns tr eam 2
17
OCS2
Dow ns tr eam 3
19
OCS3
Dow ns tr eam 4
21
OCS4
EEPROM/ Co n f i g
SDA/SMBDATA/N ON_REM1
SCL/SMBCLK/C FG_SEL0
26
Common
RESET
28
LOCAL_PWR/NON _REM0/SUSP_IND
11
TEST
33
XTAL 1/ C L KI N
32
XTAL2/CLKIN_EN
37
VSS(FLAG)
U705AIC1084-33PE
+
C736
100uF/16V
U706AIC1084-33PE
HS_IND/CFG_SEL1
VDDA33/VDD33PLL
ADJ
1
GND
1
GND
USBUP_DM
USBUP_DP
USBDN1_DM
USBDN1_DP
PRTPWR1
USBDN2_DM
USBDN2_DP
PRTPWR2
USBDN3_DM
USBDN3_DP
PRTPWR3
USBDN4_DM
USBDN4_DP
PRTPWR4
RBIAS
VDD33
VDD33CR
VDDA33
VDDA33
VDDA33
VDD18
VDDA18PLL
Vo2Vin
Vo2Vin
ADJ
23
C737
0.1uF 16V
23
30
31
1
2
12
3
4
16
6
7
18
8
9
20
22
24
25
10K 1/16W 5%
35
23
15
5
10
29
36
0.1uF 16V
14
0.1uF 16V
34
0.1uF 16V
Close
to U708
DM3
DP3
DM4
DP4
C767
+U3V3
+
+C3V3
DM
DP
DM1
DP1
DM2
DP2
R749
NC
R757
R764
12KOHM +-0.5% 1/16W
GND
C796
0.1uF 16V
C768
0.1uF 16V
C775
C779
P.S. GND, UGND must be connected.
C732
100uF/16V
+
C742
100uF/16V
R750
NC
R758
10K 1/16W 5%
C759
GND
C769
0.1uF 16V
C776
4.7uF/ 16V
GND
C780
4.7uF/ 16V
GND
0.1uF 16V
0.1uF 16V
+U3V3
R751
NC
R759
10K 1/16W 5%
GND
165mA
C770
GND
FB713
300OHM
Ve r.B 17.add
for USB IF
2008.5.30 P.9
CN702
21
6 5
GND
/OC1
GND
U709
1
A0
VCC
2
A1
WP
3
A2
SCL
4 5
VSS SDA
NC/M24C02-WMN6TP
GND
+U3V3
C758
0.1uF 16V
C785
4.7uF/ 16V
VBUS0
CONN
1
34
2
3
4
VBUS1
USB_5V
12
F701
PTCR
t
R786
10K 1/16W 5%
R787
15K 1/16W 5%
GND
8
7
6
Ver.B 18.delete for
space saving 2008 .5.30
P.9
+C3V3
R727
10K 1/16W 5%
C740
GND
12
FB718
120 OHM
+
C751
100uF/16V
Ver.C 5.EMI Request
2008.6.13 P.9
+U3V3
C747(NC)
0.1uF 16V
GND
FB715 120 OHM
170mA
0.1uF 16V
1 2
C791
0.1uF 16V
D704
LL4148
ZD703
USB_DET 3
Q707
2N3904S-RTK/PS
GND
R730 NC
L703
2
3
2512_DM0
2512_DP0
1
4
ZD704
1 2
EGA10603V05A1-B
/OC2
GND
90 ohm
R733 NC
EGA10603V05A1-B
USB_5V
VBUS2
12
12
FB709
F702
120 OHM
PTCR
t
R760
+
10K 1/16W 5%
C748
100uF/16V
R766
GND
15K 1/16W 5%
Ver.C 5.EMI Request
2008.6.13 P.9
GND
CAM_Vcc
+
C783
C782
100uF/16V
0.1uF 16V
GND
T P V ( Top Victory Electronics Co . , Ltd. )
絬 隔 瓜 絪 腹
Key Component
Date
R740 NC
L701
DM3
124
DP3
R741 NC
DM4
124
DP4
C792
0.1uF 16V
2512_DM1
2512_DP1
CAM_MIC_DIAG3
G3178-F-X-X-1-080831
9. USB and CAM/MIC output
90 ohm
R744 NC
L705
R745 NC
/OC3
3
90 ohm
43
Page 44

23" LCD Color Monitor Dell SP2309Wc
7.2 Power Board
3
R900
330K 1/4W
1
+
-
4
4
3
4
1
C900
0.047UF
R901
330K 1/4W
CN901
SOCKET
1
L902
L
2
3
L901
4.0mH
2
330K 1/4W
3
BD901
2
D3SB80
0.0022uF/250V
0.0022uF/250V
R902
NR901
NTCR
12
C902
C901
t
F901
FUSE
180UF450V
C903
+
NC
C909
R903
430K OHM 1/4W
R904
430K OHM 1/4W
R905
430K OHM 1/4W
IC901
1
GND
OUT
2
COMP
VCC
3
VCC
CS
4 5
RT NC
LD7552BPS
R911
100K OHM 1% 1/8W
R906
NC
R907
NC
R908
NC
8
7
6
R914
NC
C934
0.022uF/25V
HS1
1
2
HEAT SINK(Q900)
FR103
0.1uF
C905
100R 1/8W
C907
220pF25V
D902
+
C908
10uF/50V
R912
10R 1/4W 5%
R913
C904
2200PF2KV
D901
FR103
+
C906
22uF/50V
1
R915
10K 1/8W
1
2
R909
51KOHM2W
D900
BA159GPT
R910
2R2 1/4W
12
FB901
BEAD
2
3
R916
0.33 OHM +-5%
HS2
HEAT SINK(D921)
Q900
STP10NK80ZFP
NC
C910
150R 1/4W
T901
1
2
3
5
6
43
KIA431A-AT/P
HS3
1
2
HEAT SINK(D920)
150R 1/4W
8
7
9
10
12
11
C932
0.0047U F/400V
C933
NC
12
IC902
PC123X2YFZOF
IC921
R936150R 1/4W
R937150R 1/4W
100 OHM 1/4W
R938
R940
100 OHM 1/4W
3
1
R934
R935
C920
0.001uF
D920
3
FME-220B
2
C922
1000uF/25V
1
0.001uF
C921
R939100 OHM 1/4W
D921
SBT150-10LST
2
1000uF/25V
R922
220 OHM 1/4W
ZD921
MTZJ T-72 15B
R925
1K 1/8W
C930
0.1uF
R928
2.4K OHM 1% 1/ 8W
C923
+
+
1 2
1000uF/25V
C911
+
1000uF/25V
C919
+
1000uF/2 5V
IN4148
D922
R927
1K 1/8W
C912
1 2
+
+
ZD922
GDZJ 5.1B
IN4148
D923
L921
1.1uH
+
C925
NC
C924
470uF/25 V
L922
1.1uH
+
C926
470uF/25 V
R923
R924
NC
8K2 1/8W 1%
R926
39KOHM +-1% 1/8W
R948
8K2 1/8W 1%
C929
NC
R929
2.4K OHM 1% 1/ 8W
T P V ( Top Victory Electronics Co . , Ltd. )
G3173-1-X-X-1-080903
絬 隔 瓜 絪 腹
Key Component
01.POWER
Date
CN902
CON
R930
NC
F902
FUSE
R946
250OHM2W
Q903
SST2222A
NC
IC922
1 2
Vin Vo
3
GND
4
Vdis
R931
NC
1
2
3
4
5
6
7
8
9
10
11
12
13
C931
0.1uF
ON/OFF
DIM
+5V
C928
F903
FUSE
1 2
NC
C935
+
NC
Q921
NC
+13V
C927
0.1uF
OEM MO DEL Size
DELL SP2309
PWPC8D42EAB9
TPV MOD EL
715G3173-1-HF
PCB NAME
Sheet
23Tuesday, September 23, 2008
0.001uF
FB902
LB902
NC
Q922
NC
of
+5V
C939
NC
MTZJ T-72 15B
ZD902
1 2
R943
1K 1/8W
R920
N.C
LB903
NC
LB901
NC
C936
NC
C938
NC
+13V
Rev
称爹
C937
NC
CN903
3
2
1
NC
Custom
D
<
称爹
>
44
Page 45

23" LCD Color Monitor Dell SP2309Wc
CN801
1
2
2
200mH
3
CONN
CN802
1
2
CONN
CN803
1
2
2
200mH
3
CONN
CN804
1
2
CONN
Q808
RK7002
+13V
ON/OF F
DIM
R827
1K 1/10W 1%
C814
0.01uF
R836
NC
47K 1/10W
D807
IN4148
R808
10K 1/10W
R813
100 1/10W
R828
R809
NC
PDTC144WK
C819
R816
NC
47K 1/10W 1%
1M 1/10W 5%
R820
D811
IN4148
D806
BAW56
3
C
D808
BAW56
3
C
Q802
R821 1M 1/10W 5%
C802
1UF25V
B
E
B
E
1
2
1
2
C808 2.2uF/ 16V
R818
NC
D803
IN4148
Q803
PMBS3904
R822 47K 1/10W
R823 NC
R829
47K 1/10W 1%
C815
0.0022uF
C818
0.0022uF
R802
100R 1/8W
Q801
PDTA144WK
C806
1UF25V
R854
0R05 1/ 4W
R824 2.4K 1/10W
R817
91KOHM +-1% 1/10W
R819
10K 1/10W
C807
0.033uF
C809 680pF
R831
10K 1/10W
R833
10K 1/10W
C813
0.0022uF
R838
10K 1/10W
R840
10K 1/10W
C817
0.0022uF
8K2 1/10W
R825 15K OHM 1% 1/ 8W
OLP1
OLP2
OLP3
OLP4
R815
DTC
R842
0OHM 1/10W
R843 NC
C820
NC
DTC
R814
68K 1% 1/10W
C804
0.01uF/16V
R826
51KOHM1/8W
Q807
PMBS3904
D813
IN4148
FB
IC801
1
1IN+
2
1IN-
3
FEEDBAC K
4
DTC
5
CT
6
RT
7
GND
8 9
C1 E1
TL494IDR
2IN+
2INREF
OUTPUT CTRL
VCC
Q812
RK7002
C2
E2
16
15
14
13
12
11
10
R805
10K 1/10W
R855
10K 1/4W
R803
3K6 1/10W 5%
R853
10K 1/10W
C810
0.1uF/25V
R852
9K1 1/10W 1%
D804
NC
Q810
SST2222A
23
MMBT29 07A K
1
Q805
R844
39R 1/10W 5%
R848
1K 1/10W 1%
D814
NC
R850
C821
2200pF50V
P5506HVG
Q809
30 OHM 1/4W
30 OHM 1/4W
R857 30 OHM 1/4W
R856
678
D2D1D1
S1G1S2
G2 D2
123
4 5
SST2222A
R845
22R 1/10W 5%
123
45
S1G1S2
D2D1D1
678
30 OHM 1/4W
R810
C803
2200pF50V
Q804
P5506HVG
Q811
30 OHM 1/4W
G2D2
D805
NC
C805
470UF/25V
C823
0.1uF/25V
MMBT2907AK
23
1
Q806
R846
22R 1/10W 5%
C816
2200pF50V
R837
D815 NC
R85930 OHM 1/4W
+
R847
39R 1/1 0W 5%
R849
1K 1/10W 1%
30 OHM 1/4W
R858
+
C824
0.1uF/25V
30 OHM 1/4W
R851
C822
2200pF50V
200mH
3
4
1 8
200mH
3
4
1 8
C811
470UF/ 25V
T801
T802
FB
76
D801
BAV99
76
D809
BAV99
NC
R801
L801
1
D802
BAV99
D810
BAV99
2
2
4
R807
1K 1/10W 1%
3
1
1
4
R835
1K 1/10W 1%
3
1
NC
L802
NC
NC
R830
R804
OLP2
R812
1K5 1/10W 1%
R832
OLP4
R841
1K5 1/10W 1%
C801
5pF/6KV
R806
1K 1/10W 1%
OLP1
3
R811
1K5 1/10W 1%
1
2
C812
5pF/6KV
R834
1K 1/10W 1%
OLP3
3
R839
1K5 1/10W 1%
1
2
T P V ( Top Victory Electronics Co . , Ltd. )
G3173-1-X-X-1-080903
絬 隔 瓜 絪 腹
Key Component
01.IN VERTER
Date
OEM MODEL Size
DELL SP2309
PWPC8D 42EAB9
TPV MODEL
715G3173-1-HF
PCB NAME
23Tuesday, September 23, 2008
Sheet
of
Rev
称爹
A3
D
<
称爹
>
45
FB
Page 46

23" LCD Color Monitor Dell SP2309Wc
7.3 USB Board
123 4
1
2
3
4
C732
0.1uF
CN707
1
2
3
4
5
6
7
8
CN705
CONNNECTOR
6 5
1
2
3
4
123 4
CN706
CONNNECTOR
CONN
C733
0.1uF
T P V ( Top Victory Electronics Co . , Ltd. )
絬 隔 瓜 絪 腹
Key Component
Date
G2727-D-X-X-1-080421
1. USB
6 5
<
称爹
A
>
OEM MOD EL Si ze
TPV MOD EL
PCB NAME
Sheet
DELL SP2309W
SP2309W A
715G2727-C
of
19Monday , April 21, 2008
Rev
称爹
46
Page 47

23" LCD Color Monitor Dell SP2309Wc
7.4 Key Board
Buttons
S6
S4
S3
S2
S1
S0
Test Points
S0
S1
S2
S3
S4
S6
P_SENSOR1
GPIO0
GPIO1
GPIO2
GPIO3
GPIO4
GPIO5
GPIO6
SDA
SCL
ATTN
VCC
VDD
XC AP
AGND
GND
LED
SHLD
S6
?
S4
?
S3
?
S2
?
S1
?
S0
?
T1
T2
T3
T4
T5
T6
T8
T9
T10
T11
T12
T13
T14
T15
T16
T17
T18
T19
T20
T22
T23
T24
T25
T26
GPIO3
SDA
SCL
ATTN
GPIO6
GPIO5
GPIO4
GPIO3
GPIO2
GPIO1
GND
GND
VCC
GPIO0
VCC
VCC
12
12
LED002
LED001
LED
LED
GPIO0
VCC
VCC
4
Yellow
1
2 3
R155
LED
LED1
100R05 1/ 10W 5%
White
LED
C130
0.1U F
LED003
LED
GPIO1
12
LED004
LED
GPIO2
R151
0R05 1/ 10W 5%
GPIO5
VCC
SCL
SDA
GND
LED
ATTN
12
LED005
LED
GPIO6
12
GPIO4
1
2
3
4
5
6
7
8
CN1
FFC CABLE
1
2
3
4
5
6
25
R152
47R 1/10W 5%
GPIO6
GPIO5
GPIO4
GPIO3
GPIO2
GPIO1
DIE
C129
150pF
GND
GND
SCL
SDA
ATTN
U110
GPIO0
SHLDS0S1S2S3
S0
SHLD
S1
C128
C127
5pF
NC
1920212223
GND
AGND
12
S2
24
SO380001-24QFN
7891011
50V 4PF
VDD
XC AP
C132
3PF50V
VDD
C121
C122
0.001uF
1uF/16V
GND
GND
XC AP
C124
C123
18
17
16
S7
15
14
13
C131
2PF
S6
S4
S6
S5
S4
S3
AGND
C126
50V 4PF
200PF
C125
5.6PF
1uF/16V
P_SENSOR1
<
称爹
Custom
>
T P V ( Top Victory Electronics Co . , Ltd. )
絬 隔 瓜 絪 腹
Key Component
Date
G3096-1-HF -X-2-080831
2. CTRL BD
47
OEM MO D EL Size
TPV MO D EL
PCB NAME
Sheet
DELL SP2309W
SP2309W A
715G3096-1-HF
19Monday , Sept ember 01, 2008
of
Rev
称爹
Page 48

23" LCD Color Monitor Dell SP2309Wc
8. PCB Layout
8.1 Main Board
48
Page 49

23" LCD Color Monitor Dell SP2309Wc
49
Page 50

23" LCD Color Monitor Dell SP2309Wc
8.2 Power Board
50
Page 51

23" LCD Color Monitor Dell SP2309Wc
8.3 USB Board
51
Page 52

23" LCD Color Monitor Dell SP2309Wc
9. Maintainability
9.1 Equipments and Tools Requirement
1. Voltage meter
2. Oscilloscope
3. Pattern Generator
4. LCD Color Analyzer
5. Service Manual
6. User Manual
52
Page 53

23" LCD Color Monitor Dell SP2309Wc
9.2 Trouble shooting
9.2.1 Main Board
No power
No power
Press power key and look
if the picture is normal
OK
Please reinsert and make sure
the AC of 100-240 is normal
OK
NG
Measure U701 PIN2=3V
U711 PIN2=1V
Reinsert or check the
Adapter/Inverter
section
OK
NG
Check CN701 or replace
U701, U711
X401 oscillate waveforms
are normal
OK
NG
Check U401
Replace X401
53
Page 54

23" LCD Color Monitor Dell SP2309Wc
No picture (LED orange)
Mea Measure U701 PIN2=3V
U711 PIN2=1V
No picture
The button if
under control
OK
NG
OK
NG
Replace
U701, U711
X401oscillate
waveform is normal
OK
Check reset circuit of
U401 is normal
OK
Replace U401
NG
NG
Replace X401
Check Correspondent
component
X401 oscillate
waveform is normal
OK
NG
Replace X401
Check HS/VS from
Replace U401
CN101is normal
OK
Replace U401
NG
Check Correspondent
component
54
Page 55

23" LCD Color Monitor Dell SP2309Wc
White screen
White screen
Measure Q705 base
is high level?
OK
NG
X401 oscillate
waveform is normal
OK
NG
Replace X401
Check Q704, Q705, Q701
is broken or CN403 solder?
NG
Check Correspondent
component.
OK
Replace PANEL
Check reset circuit of
U401 is normal
NG
Check Correspondent
component.
OK
Replace U401
55
Page 56

23" LCD Color Monitor Dell SP2309Wc
)
9.2.2 Power/Inverter Board
No power
Check CN902 pin7,8,9= 5V
NG
Check AC line volt 110V or 220V
OK
NG
Check the voltage of C903(+)
OK
NG
Check start voltage for the pin3 of IC901
OK
NG
Check AC input
Check bridge rectified circuit and F901 circut
Check R903,R904,R905 and Change IC901
Check the auxiliary voltage is bigger than
10V and smaller than 20V
OK
NG
Check IC901 pin8 PWM wave
OK
NG
Check Q900, T901, D920, D921, IC902,IC921,
Q923,L922,L921, ZD922, ZD921
1) Check IC901
2
Check IC901 over current protect circuit
Check IC901,D901,D902
56
Page 57

23" LCD Color Monitor Dell SP2309Wc
No Backlight
Check R802 =13V
Check IC801 PIN12=13V
OK
Check ON/OFF signal
OK
OK
NG
NG
Check adapter or MB
NG
Check Interface board
Change Q804, Q803
Check IC801 PIN10, 9 have the output of square wave at short time
NG
Change IC801
OK
Check Q803,Q809 PIN5, 6, 7, 8 have the output of square wave at short time.
NG
Check Q802, Q809,Q810, Q811, Q805 ,Q806
OK
Check the output of T801,T802
NG
Change T801,T802
OK
Check connecter & lamp
57
Page 58

23" LCD Color Monitor Dell SP2309Wc
9.2.3 Key Board
OSD is unstable or not working
Is Key Pad Board connecting normally?
N
Connect Key Pad Board
Is Button Switch normally?
Y
N
Replace Button Switch
Is Key Pad Board normally?
Y
N
Replace Key Pad Board
Y
Check Main Board
58
Page 59

23" LCD Color Monitor Dell SP2309Wc
10.White balance, Luminance adjustment
Approximately 2 Hours should be allowed for warm up before proceeding White-Balance
adjustment.
Before started adjust white balance, please setting the Chroma-7120 MEM. Channel 3 to 65000K colors, MEM.
Channel 4 to 9300
180 cd/m
2
, 6500 parameter is x =313±28, y=329±28, Ymin = 200 cd/m2, and 5700 parameter is x = 328 ±28, y =
344 ±28, Ymin = 200 cd/m
How to setting MEM.channel you can reference to chroma 7120 user guide or simple use “ SC” key and “ NEXT”
key to modify x, y, Y value and use “ID” key to modify the TEXT description Following is the procedure to do
white-balance adjust
Enter into the factory mode:
Press MENU and + button during press Power button will activate the factory mode,
0
K colors, MEM. Channel 9 to 57000K (our 9300 parameter is x=283±28, y=297±28, Ymin =
2
)
Gain adjustment:
Move cursor to “-Factory Setting-” and press MENU key to enter this sub-menu.
Move cursor to “ Factory” and press MENU key.
Move cursor to “ Auto Level” and press MENU key to adjust Gain and Offset automatically;
0
a. Adjust sRGB (6500
K) color-temperature
1. Switch the chroma-7120 to RGB-mode (with press “MODE” button)
2. Switch the MEM.channel to Channel 3 (with up or down arrow on chroma 7120)
3.The LCD-indicator on chroma 7120 will show x = 313 ±28, y = 329 ±28, Ymin =200cd/m
2
4. Adjust the RED on OSD window until chroma 7120 indicator reached the value R=100
5. Adjust the GREEN on OSD, until chroma 7120 indicator reached G=100
6. Adjust the BLUE on OSD, until chroma 7120 indicator reached B=100
7. Repeat above procedure (item 5,6,7) until chroma 7120 RGB value meet the tolerance =100±2
0
b. Adjust Color1 (9300
K) color-temperature
8. Switch the chroma-7120 to RGB-mode (with press “MODE” button)
9. Switch the MEM.channel to Channel 4 (with up or down arrow on chroma 7120)
2
10. The LCD-indicator on chroma 7120 will show x = 283 ±28, y = 297 ±28, Ymin= 180 cd/m
11. Adjust the RED on OSD window until chroma 7120 indicator reached the value R=100
12. Adjust the GREEN on OSD, until chroma 7120 indicator reached G=100
13. Adjust the BLUE on OSD, until chroma 7120 indicator reached B=100
14. Repeat above procedure (item 5,6,7) until chroma 7120 RGB value meet the tolerance =100±2
0
c. Adjust Color2 (5700
K) color-temperature
15. Switch the chroma-7120 to RGB-mode (with press “MODE” button)
16. Switch the MEM.channel to Channel 9 (with up or down arrow on chroma 7120)
2
17. The LCD-indicator on chroma 7120 will show x = 328 ±28, y = 344 ±28, Ymin = 200 cd/m
18. Adjust the RED on OSD window until chroma 7120 indicator reached the value R=100
59
Page 60

23" LCD Color Monitor Dell SP2309Wc
19. Adjust the GREEN on OSD, until chroma 7120 indicator reached G=100
20. Adjust the BLUE on OSD, until chroma 7120 indicator reached B=100
21. Repeat above procedure (item 5,6,7) until chroma 7120 RGB value meet the tolerance =100±2
22. Move cursor to “ Exit/Save” sub-menu and press MENU key to save adjust value and exit.
Turn the POWER-button off to on to quit from factory mode.
Max. BRIGHTNESS:>250 cd/m2
Test conditions: -Center of display (1)
- Video input (RGB) = 0.700V
- Brightness control is set to max
- Contrast control is set to max.
MIN. BRIGHTNESS
< 40% of max Luminance (max Luminance = set the brightness and contrast to max value)
Test conditions: - Center of display (1)
- Video input (RGB) = 0.700V
- Brightness control is set to min.
- Contrast control is set to min.
60
Page 61

23" LCD Color Monitor Dell SP2309Wc
11. ISP Instruction
Configure and procedure
It is a windows-based program, which cannot be run in MS-DOS.
System and equipment requirements
(1). An i486 (or above) personal computer or computer or compatible.
(2). Microsoft operation system Window 95/98/2000/XP.
(3). ISP Tool: ISP board/printer cable/VGA cable as shown in Fig.1
Link to Dell
VGA connector
Connect to PC LPT
Fig.1
(4). ISP software checklist
(5). Update the firmware
Step 1: Double click the ISP_Tool v3.772.exe icon and click Connect, bring up Fig.2
Fig.2
61
Page 62

23" LCD Color Monitor Dell SP2309Wc
Step 2: click Load, select program Bin file, bring up Fig.4
Fig.3
Fig.4
62
Page 63

23" LCD Color Monitor Dell SP2309Wc
Step3: Click run, it’s successful if shown as below.
Fig.5
Step 4: Click Auto and Run, bring up Fig.6
Fig.6
63
Page 64

23" LCD Color Monitor Dell SP2309Wc
Step 5: When appear Verify OK, writer finished as shown Fig.7
Fig.7
64
Page 65

23" LCD Color Monitor Dell SP2309Wc
12. Exploded View
65
Page 66

23" LCD Color Monitor Dell SP2309Wc
item Description item Description
1 BEZEL L23W-8DELL2 14 SCREW
2 CAMERA GLASS 15 PANEL
3 POWER BUTTON 16 SCREW
4 FUNCTION LENS 17 USB BOARD
5 N/A 18 USB STEAM SHIELD
6 LED LENS 19 SCREW
7 N/A 20 N/A
8 SCREW 21 REAR COVER L23W-8DELL2
9 MAIN FRAME 22 MIDDLE RING
10 POWER BOARD 23 SCREW
11 SCREW 24 STAND ASSEMBLY
12 MAIN BOARD 25 SCREW
13 SCREW
66
Page 67

23" LCD Color Monitor Dell SP2309Wc
13. BOM List
HDRSA3NKWMDYPN
Location Part No. Description Remark
012G6059 1 RUBBER
017G WCM502 LO Dell-Assign Webcam 08P202 (SP2309W)
050G 600 1 W WHITE STRAP
052G 1150 C INSULATING TAPE
052G 1186 SMALL TAPE
052G 1211500 ALUMINUM FOIL TAPE
052G6019 1 INSULATING TAPE
052G6022 1500 SMALL TAPE
070GHDCP500HDC HDCP CODE
089G 175523 G USB CABLE 1.8M
E08902 089G 728GAA 2D SIGNAL CABLE 2nd source
E08902 089G 728HAA 2D SIGNAL CABLE
E08902 089G 728LAA 2D SIGNAL CABLE 2nd source
E08903 089G1748GAA 1D DVI CABLE 2nd source
E08903 089G1748HAA 1D DVI CABLE
E08903 089G1748LAA 1D DVI CABLE 2nd source
089G402A18NISD POWER CORD
095G8014 5DH03 WIRE HARNESS 5P(PLUG)-5P
095G8018 3XH47 LVDS CABLE 30P-30P 160MM
0M1G 130 6120 SCREW M3X6
0M1G 330 6120 SCREW 42A9930014
0M1G1730 6120 SCREW,42-D020523
0M1G1730 6120 SCREW,42-D020523
0M1G1730 6120 SCREW,42-D020523
0M1G2940 10225 CR3 SCREW
0M1G2940 10225 CR3 SCREW
0Q1G 330 5120 SCREW 42-D003574
750GLS230TT211Z0DL PANEL LTM230TT02 C01 KR SEC
756GQ8CB DL003 MAIN BOARD-CBPCRSA3DYA1
SMTCR-U404 100GDMSD000NT1 MCU ASS'Y-056G1133923
A15G0422201 MAIN FRAME
A33G0421BCTA1L0100 Power Button
A33G0428BCK 1C0130 FUNCTION LENS
A33G0431BCK 1C0100 LED LENS
A34G0784 VH 1M0130 Bezel L23W-8DELL2
A34G0785 VH 1B0130 REAR Cover L23W-8DELL2
A34G0786 VH 1B0100 Middle Ring
67
Page 68

23" LCD Color Monitor Dell SP2309Wc
A37G0079011 STAND ASSEMBLY
A85G0099101 USB Steam Shield
CN705 033G3802 5B YH W WAFER
CN701 033G380212B YH wafer 12P 2.0 DIP
CN402 033G8019 7C JH FFC CONNECTOR 7P
CN403 033G804330B F CONNECTOR 2.0pitch 30P
BZ401 078G BUZ 1 V BUZZER 5V
CN603 088G 30232C PHONE JACK 3.5mm BLACK 5PIN
CN602 088G 30232C PHONE JACK 3.5mm BLACK 5PIN
CN602 088G 30232N GP PHONE JACK
CN603 088G 30232N GP PHONE JACK
CN703 088G 350 1 CL USB CONN AX2
CN703 088G 350 1 TN USB CONN
CN702 088G 3512B1 CL USB CONN BLACK
CN101 088G 35315F H D-SUB 15PIN
CN101 088G 35315F HD D-SUB CONN F ATTACHED SCREW
CN102 088G 35424F HN DVI CONN + SHIELD 24P F WITH SCREW
X701 093G 22 45 H 24MHZ/30PF/49US
X702 093G 22 45 H 24MHZ/30PF/49US
X401 093G 22 53 H 14.31818MHZ/30PF/49US
X401 093G 22 53 J 14.31818MHZ/32PF/49US
CN704 095G 820 8X504 WIRE HARNESS 8P(SAN)-8P(PLUG)
C706 067G 2151014RT EC 105 CAP 100UF M 25V℃
C712 067G 2151014RT EC 105 CAP 100UF M 25V℃
C731 067G 305221 3T 220uf/16V
C786 067G 305221 3T 220uf/16V
C787 067G 305221 3T 220uf/16V
C742 067G305M101 3T 105C RADIAL E-CAPACTOR 100uF 16V
C782 067G305M101 3T 105C RADIAL E-CAPACTOR 100uF 16V
C741 067G305M101 3T 105C RADIAL E-CAPACTOR 100uF 16V
C736 067G305M101 3T 105C RADIAL E-CAPACTOR 100uF 16V
C732 067G305M101 3T 105C RADIAL E-CAPACTOR 100uF 16V
C714 067G305M101 3T 105C RADIAL E-CAPACTOR 100uF 16V
C710 067G305M101 3T 105C RADIAL E-CAPACTOR 100uF 16V
C709 067G305M101 3T 105C RADIAL E-CAPACTOR 100uF 16V
C705 067G305M101 3T 105C RADIAL E-CAPACTOR 100uF 16V
C753 067G305M101 3T 105C RADIAL E-CAPACTOR 100uF 16V
C752 067G305M101 3T 105C RADIAL E-CAPACTOR 100uF 16V
C751 067G305M101 3T 105C RADIAL E-CAPACTOR 100uF 16V
C748 067G305M101 3T 105C RADIAL E-CAPACTOR 100uF 16V
68
Page 69

23" LCD Color Monitor Dell SP2309Wc
C715 067G305M101 3T 105C RADIAL E-CAPACTOR 100uF 16V
C713 067G305M101 3T 105C RADIAL E-CAPACTOR 100uF 16V
U401 056G 562216 IC MST6588CL-LF LQFP-256
U701 056G 563 25 IC A1C1084-33PETR-R AIC
U705 056G 563 25 IC A1C1084-33PETR-R AIC
U706 056G 563 25 IC A1C1084-33PETR-R AIC
U711 056G 563 33 AIC1084-18PE
U702 056G 563 57 AP1510SA
U402 056G 615 66 IC NT5TU16M16AG-25D 256MB BGA-84
U402 056G 615 75 IC HY5PS561621BFP-25 256Mb BGA-84
U708 056G 659 9 IC USB2514-AEZG QFN-36
U707 056G 659 10 IC USB2512-AEZG QFN-36
U101 056G1133 34 M24C02-WMN6TP
U102 056G1133 34 M24C02-WMN6TP
U503 056G1133 34 M24C02-WMN6TP
U405 056G113356A 24LC16B/SNG SOIC-8PIN
U404 056G1133923 IC MX25L4005AM2C-12G SOP-8
Q102 057G 417 12 T KEC 2N3904S-RTK/PS
Q604 057G 417 12 T KEC 2N3904S-RTK/PS
Q602 057G 417 12 T KEC 2N3904S-RTK/PS
Q601 057G 417 12 T KEC 2N3904S-RTK/PS
Q711 057G 417 12 T KEC 2N3904S-RTK/PS
Q710 057G 417 12 T KEC 2N3904S-RTK/PS
Q709 057G 417 12 T KEC 2N3904S-RTK/PS
Q707 057G 417 12 T KEC 2N3904S-RTK/PS
Q401 057G 417 12 T KEC 2N3904S-RTK/PS
Q501 057G 417 12 T KEC 2N3904S-RTK/PS
Q502 057G 417 12 T KEC 2N3904S-RTK/PS
Q702 057G 417 12 T KEC 2N3904S-RTK/PS
Q705 057G 417 12 T KEC 2N3904S-RTK/PS
Q704 057G 417 12 T KEC 2N3904S-RTK/PS
Q703 057G 417 12 T KEC 2N3904S-RTK/PS
Q708 057G 417 13 T KEC 2N3906S-RTK/PS
Q603 057G 417 13 T KEC 2N3906S-RTK/PS
Q402 057G 417 13 T KEC 2N3906S-RTK/PS
Q101 057G 417 13 T KEC 2N3906S-RTK/PS
Q503 057G 759 2 RK7002
Q712 057G 763 1 A03401 SOT23 BY AOS(A1)
Q701 057G 763 2 A04403L
Q706 057G 763 2 A04403L
69
Page 70

23" LCD Color Monitor Dell SP2309Wc
RP403 061G 125220 8 RST CHIP AR 8P4R 22 OHM +-5% 1/16W
RP407 061G 125220 8 RST CHIP AR 8P4R 22 OHM +-5% 1/16W
RP406 061G 125220 8 RST CHIP AR 8P4R 22 OHM +-5% 1/16W
RP405 061G 125220 8 RST CHIP AR 8P4R 22 OHM +-5% 1/16W
RP404 061G 125220 8 RST CHIP AR 8P4R 22 OHM +-5% 1/16W
RP402 061G 125220 8 RST CHIP AR 8P4R 22 OHM +-5% 1/16W
RP401 061G 125220 8 RST CHIP AR 8P4R 22 OHM +-5% 1/16W
F704 061G 56A075 LT SMD PTC 0.75A 1206L075.WR 1206
F703 061G 56A075 LT SMD PTC 0.75A 1206L075.WR 1206
F702 061G 56A075 LT SMD PTC 0.75A 1206L075.WR 1206
F701 061G 56A075 LT SMD PTC 0.75A 1206L075.WR 1206
R483 061G0402000 RST CHIPR 0 OHM +-5% 1/16W
R473 061G0402000 RST CHIPR 0 OHM +-5% 1/16W
R472 061G0402000 RST CHIPR 0 OHM +-5% 1/16W
R494 061G0402000 RST CHIPR 0 OHM +-5% 1/16W
R487 061G0402000 RST CHIPR 0 OHM +-5% 1/16W
R474 061G0402000 RST CHIPR 0 OHM +-5% 1/16W
R138 061G0402000 RST CHIPR 0 OHM +-5% 1/16W
R137 061G0402000 RST CHIPR 0 OHM +-5% 1/16W
FB104 061G0402000 RST CHIPR 0 OHM +-5% 1/16W
FB102 061G0402000 RST CHIPR 0 OHM +-5% 1/16W
FB101 061G0402000 RST CHIPR 0 OHM +-5% 1/16W
R413 061G0402100 RST CHIPR 10 OHM +-5% 1/16W
R146 061G0402100 RST CHIPR 10 OHM +-5% 1/16W
R145 061G0402100 RST CHIPR 10 OHM +-5% 1/16W
R144 061G0402100 RST CHIPR 10 OHM +-5% 1/16W
R143 061G0402100 RST CHIPR 10 OHM +-5% 1/16W
R142 061G0402100 RST CHIPR 10 OHM +-5% 1/16W
R141 061G0402100 RST CHIPR 10 OHM +-5% 1/16W
R140 061G0402100 RST CHIPR 10 OHM +-5% 1/16W
R139 061G0402100 RST CHIPR 10 OHM +-5% 1/16W
R414 061G0402100 RST CHIPR 10 OHM +-5% 1/16W
R402 061G0402100 1F RST CHIPR 1KOHM +-1% 1/16W
R403 061G0402100 1F RST CHIPR 1KOHM +-1% 1/16W
R427 061G0402100 1F RST CHIPR 1KOHM +-1% 1/16W
R428 061G0402100 1F RST CHIPR 1KOHM +-1% 1/16W
R462 061G0402101 RST CHIPR 100 OHM +-5% 1/16W
R508 061G0402101 RST CHIPR 100 OHM +-5% 1/16W
R509 061G0402101 RST CHIPR 100 OHM +-5% 1/16W
R701 061G0402101 RST CHIPR 100 OHM +-5% 1/16W
70
Page 71

23" LCD Color Monitor Dell SP2309Wc
R702 061G0402101 RST CHIPR 100 OHM +-5% 1/16W
R490 061G0402101 RST CHIPR 100 OHM +-5% 1/16W
R491 061G0402101 RST CHIPR 100 OHM +-5% 1/16W
R623 061G0402101 RST CHIPR 100 OHM +-5% 1/16W
R624 061G0402101 RST CHIPR 100 OHM +-5% 1/16W
R124 061G0402101 RST CHIPR 100 OHM +-5% 1/16W
R125 061G0402101 RST CHIPR 100 OHM +-5% 1/16W
R513 061G0402101 RST CHIPR 100 OHM +-5% 1/16W
R461 061G0402101 RST CHIPR 100 OHM +-5% 1/16W
R109 061G0402101 RST CHIPR 100 OHM +-5% 1/16W
R110 061G0402101 RST CHIPR 100 OHM +-5% 1/16W
R111 061G0402101 RST CHIPR 100 OHM +-5% 1/16W
R121 061G0402101 RST CHIPR 100 OHM +-5% 1/16W
R122 061G0402101 RST CHIPR 100 OHM +-5% 1/16W
R127 061G0402101 RST CHIPR 100 OHM +-5% 1/16W
R128 061G0402101 RST CHIPR 100 OHM +-5% 1/16W
R129 061G0402101 RST CHIPR 100 OHM +-5% 1/16W
R447 061G0402101 RST CHIPR 100 OHM +-5% 1/16W
R454 061G0402101 RST CHIPR 100 OHM +-5% 1/16W
R455 061G0402101 RST CHIPR 100 OHM +-5% 1/16W
R460 061G0402101 RST CHIPR 100 OHM +-5% 1/16W
R784 061G0402102 RST CHIPR 1 KOHM +-5% 1/16W
R783 061G0402102 RST CHIPR 1 KOHM +-5% 1/16W
R501 061G0402102 RST CHIPR 1 KOHM +-5% 1/16W
R133 061G0402102 RST CHIPR 1 KOHM +-5% 1/16W
R113 061G0402102 RST CHIPR 1 KOHM +-5% 1/16W
R112 061G0402102 RST CHIPR 1 KOHM +-5% 1/16W
R105 061G0402102 RST CHIPR 1 KOHM +-5% 1/16W
R758 061G0402103 RST CHIPR 10 KOHM +-5% 1/16W
R759 061G0402103 RST CHIPR 10 KOHM +-5% 1/16W
R760 061G0402103 RST CHIPR 10 KOHM +-5% 1/16W
R762 061G0402103 RST CHIPR 10 KOHM +-5% 1/16W
R765 061G0402103 RST CHIPR 10 KOHM +-5% 1/16W
R768 061G0402103 RST CHIPR 10 KOHM +-5% 1/16W
R770 061G0402103 RST CHIPR 10 KOHM +-5% 1/16W
R477 061G0402103 RST CHIPR 10 KOHM +-5% 1/16W
R514 061G0402103 RST CHIPR 10 KOHM +-5% 1/16W
R516 061G0402103 RST CHIPR 10 KOHM +-5% 1/16W
R632 061G0402103 RST CHIPR 10 KOHM +-5% 1/16W
R633 061G0402103 RST CHIPR 10 KOHM +-5% 1/16W
71
Page 72

23" LCD Color Monitor Dell SP2309Wc
R634 061G0402103 RST CHIPR 10 KOHM +-5% 1/16W
R635 061G0402103 RST CHIPR 10 KOHM +-5% 1/16W
R637 061G0402103 RST CHIPR 10 KOHM +-5% 1/16W
R638 061G0402103 RST CHIPR 10 KOHM +-5% 1/16W
R786 061G0402103 RST CHIPR 10 KOHM +-5% 1/16W
R449 061G0402103 RST CHIPR 10 KOHM +-5% 1/16W
R757 061G0402103 RST CHIPR 10 KOHM +-5% 1/16W
R425 061G0402103 RST CHIPR 10 KOHM +-5% 1/16W
R426 061G0402103 RST CHIPR 10 KOHM +-5% 1/16W
R429 061G0402103 RST CHIPR 10 KOHM +-5% 1/16W
R441 061G0402103 RST CHIPR 10 KOHM +-5% 1/16W
R451 061G0402103 RST CHIPR 10 KOHM +-5% 1/16W
R452 061G0402103 RST CHIPR 10 KOHM +-5% 1/16W
R453 061G0402103 RST CHIPR 10 KOHM +-5% 1/16W
R463 061G0402103 RST CHIPR 10 KOHM +-5% 1/16W
R507 061G0402103 RST CHIPR 10 KOHM +-5% 1/16W
R704 061G0402103 RST CHIPR 10 KOHM +-5% 1/16W
R707 061G0402103 RST CHIPR 10 KOHM +-5% 1/16W
R710 061G0402103 RST CHIPR 10 KOHM +-5% 1/16W
R727 061G0402103 RST CHIPR 10 KOHM +-5% 1/16W
R728 061G0402103 RST CHIPR 10 KOHM +-5% 1/16W
R742 061G0402103 RST CHIPR 10 KOHM +-5% 1/16W
R748 061G0402103 RST CHIPR 10 KOHM +-5% 1/16W
R754 061G0402103 RST CHIPR 10 KOHM +-5% 1/16W
R755 061G0402103 RST CHIPR 10 KOHM +-5% 1/16W
R119 061G0402103 RST CHIPR 10 KOHM +-5% 1/16W
R716 061G0402104 RST CHIPR 100 KOHM +-5% 1/16W
R717 061G0402104 RST CHIPR 100 KOHM +-5% 1/16W
R737 061G0402104 RST CHIPR 100 KOHM +-5% 1/16W
R738 061G0402104 RST CHIPR 100 KOHM +-5% 1/16W
R739 061G0402104 RST CHIPR 100 KOHM +-5% 1/16W
R752 061G0402104 RST CHIPR 100 KOHM +-5% 1/16W
R753 061G0402104 RST CHIPR 100 KOHM +-5% 1/16W
R769 061G0402104 RST CHIPR 100 KOHM +-5% 1/16W
R771 061G0402104 RST CHIPR 100 KOHM +-5% 1/16W
R621 061G0402104 RST CHIPR 100 KOHM +-5% 1/16W
R622 061G0402104 RST CHIPR 100 KOHM +-5% 1/16W
R731 061G0402104 RST CHIPR 100 KOHM +-5% 1/16W
R777 061G0402105 RST CHIPR 1MOHM +-5% 1/16W
R776 061G0402105 RST CHIPR 1MOHM +-5% 1/16W
72
Page 73

23" LCD Color Monitor Dell SP2309Wc
R764 061G0402120 2D RST CHIPR 12KOHM +-0.5% 1/16W
R763 061G0402120 2D RST CHIPR 12KOHM +-0.5% 1/16W
R718 061G0402122 RST CHIP 1K2 1/16W 5%
R619 061G0402123 RST CHIPR 12KOHM +-5% 1/16W
R618 061G0402123 RST CHIPR 12KOHM +-5% 1/16W
R412 061G0402150 0D RST CHIPR 150 OHM +-0.5% 1/16W
R787 061G0402153 RST CHIP 15K 1/16W 5%
R773 061G0402153 RST CHIP 15K 1/16W 5%
R772 061G0402153 RST CHIP 15K 1/16W 5%
R766 061G0402153 RST CHIP 15K 1/16W 5%
R743 061G0402153 RST CHIP 15K 1/16W 5%
R720 061G0402202 Y RST CHIPR 2KOHM +-5% 1/16W YAGEO
R421 061G0402220 RST CHIPR 22 OHM +-5% 1/16W
R420 061G0402220 RST CHIPR 22 OHM +-5% 1/16W
R419 061G0402220 RST CHIPR 22 OHM +-5% 1/16W
R418 061G0402220 RST CHIPR 22 OHM +-5% 1/16W
R417 061G0402220 RST CHIPR 22 OHM +-5% 1/16W
R416 061G0402220 RST CHIPR 22 OHM +-5% 1/16W
R415 061G0402220 RST CHIPR 22 OHM +-5% 1/16W
R411 061G0402220 RST CHIPR 22 OHM +-5% 1/16W
R410 061G0402220 RST CHIPR 22 OHM +-5% 1/16W
R409 061G0402220 RST CHIPR 22 OHM +-5% 1/16W
R408 061G0402220 RST CHIPR 22 OHM +-5% 1/16W
R407 061G0402220 RST CHIPR 22 OHM +-5% 1/16W
R406 061G0402220 RST CHIPR 22 OHM +-5% 1/16W
R405 061G0402220 RST CHIPR 22 OHM +-5% 1/16W
R404 061G0402220 RST CHIPR 22 OHM +-5% 1/16W
R401 061G0402220 RST CHIPR 22 OHM +-5% 1/16W
R422 061G0402220 RST CHIPR 22 OHM +-5% 1/16W
R445 061G0402220 RST CHIPR 22 OHM +-5% 1/16W
R446 061G0402220 RST CHIPR 22 OHM +-5% 1/16W
R448 061G0402220 RST CHIPR 22 OHM +-5% 1/16W
R450 061G0402220 RST CHIPR 22 OHM +-5% 1/16W
R114 061G0402222 RST CHIPR 2.2 KOHM +-5% 1/16W
R115 061G0402222 RST CHIPR 2.2 KOHM +-5% 1/16W
R636 061G0402222 RST CHIPR 2.2 KOHM +-5% 1/16W
R703 061G0402222 RST CHIPR 2.2 KOHM +-5% 1/16W
R617 061G0402223 RST CHIPR 22 KOHM +-5% 1/16W
R616 061G0402223 RST CHIPR 22 KOHM +-5% 1/16W
R515 061G0402223 RST CHIPR 22 KOHM +-5% 1/16W
73
Page 74

23" LCD Color Monitor Dell SP2309Wc
R493 061G0402223 RST CHIPR 22 KOHM +-5% 1/16W
R492 061G0402223 RST CHIPR 22 KOHM +-5% 1/16W
R510 061G0402223 RST CHIPR 22 KOHM +-5% 1/16W
R714 061G0402302 RST CHIP 3K 1/16W 5%
R424 061G0402390 0F RST CHIP 390R 1/16W 1%
R104 061G0402471 RST CHIPR 470 OHM +-5% 1/16W
R456 061G0402472 RST CHIPR 4.7 KOHM +-5% 1/16W
R132 061G0402472 RST CHIPR 4.7 KOHM +-5% 1/16W
R423 061G0402472 RST CHIPR 4.7 KOHM +-5% 1/16W
R430 061G0402472 RST CHIPR 4.7 KOHM +-5% 1/16W
R431 061G0402472 RST CHIPR 4.7 KOHM +-5% 1/16W
R432 061G0402472 RST CHIPR 4.7 KOHM +-5% 1/16W
R433 061G0402472 RST CHIPR 4.7 KOHM +-5% 1/16W
R442 061G0402472 RST CHIPR 4.7 KOHM +-5% 1/16W
R495 061G0402472 RST CHIPR 4.7 KOHM +-5% 1/16W
R782 061G0402472 RST CHIPR 4.7 KOHM +-5% 1/16W
R781 061G0402472 RST CHIPR 4.7 KOHM +-5% 1/16W
R489 061G0402472 RST CHIPR 4.7 KOHM +-5% 1/16W
R488 061G0402472 RST CHIPR 4.7 KOHM +-5% 1/16W
R479 061G0402472 RST CHIPR 4.7 KOHM +-5% 1/16W
R478 061G0402472 RST CHIPR 4.7 KOHM +-5% 1/16W
R713 061G0402472 RST CHIPR 4.7 KOHM +-5% 1/16W
R706 061G0402472 RST CHIPR 4.7 KOHM +-5% 1/16W
R705 061G0402472 RST CHIPR 4.7 KOHM +-5% 1/16W
R505 061G0402472 RST CHIPR 4.7 KOHM +-5% 1/16W
R457 061G0402472 RST CHIPR 4.7 KOHM +-5% 1/16W
R458 061G0402472 RST CHIPR 4.7 KOHM +-5% 1/16W
R459 061G0402472 RST CHIPR 4.7 KOHM +-5% 1/16W
R503 061G0402472 RST CHIPR 4.7 KOHM +-5% 1/16W
R504 061G0402472 RST CHIPR 4.7 KOHM +-5% 1/16W
R434 061G0402472 RST CHIPR 4.7 KOHM +-5% 1/16W
R435 061G0402472 RST CHIPR 4.7 KOHM +-5% 1/16W
R436 061G0402472 RST CHIPR 4.7 KOHM +-5% 1/16W
R437 061G0402472 RST CHIPR 4.7 KOHM +-5% 1/16W
R438 061G0402472 RST CHIPR 4.7 KOHM +-5% 1/16W
R440 061G0402472 RST CHIPR 4.7 KOHM +-5% 1/16W
R443 061G0402472 RST CHIPR 4.7 KOHM +-5% 1/16W
R117 061G0402472 RST CHIPR 4.7 KOHM +-5% 1/16W
R118 061G0402472 RST CHIPR 4.7 KOHM +-5% 1/16W
R123 061G0402472 RST CHIPR 4.7 KOHM +-5% 1/16W
74
Page 75

23" LCD Color Monitor Dell SP2309Wc
R126 061G0402472 RST CHIPR 4.7 KOHM +-5% 1/16W
R130 061G0402472 RST CHIPR 4.7 KOHM +-5% 1/16W
R131 061G0402472 RST CHIPR 4.7 KOHM +-5% 1/16W
R116 061G0402472 RST CHIPR 4.7 KOHM +-5% 1/16W
R120 061G0402473 RST CHIPR 47 KOHM +-5% 1/16W
R135 061G0402473 RST CHIPR 47 KOHM +-5% 1/16W
R712 061G0402473 RST CHIPR 47 KOHM +-5% 1/16W
R725 061G0402473 RST CHIPR 47 KOHM +-5% 1/16W
R732 061G0402473 RST CHIPR 47 KOHM +-5% 1/16W
R735 061G0402473 RST CHIPR 47 KOHM +-5% 1/16W
R711 061G0402473 RST CHIPR 47 KOHM +-5% 1/16W
R785 061G0402473 RST CHIPR 47 KOHM +-5% 1/16W
R101 061G0402560 RST CHIP 56R 1/16W 5%
R102 061G0402560 RST CHIP 56R 1/16W 5%
R103 061G0402560 RST CHIP 56R 1/16W 5%
R106 061G0402750 RST CHIPR 75 OHM +-5% 1/16W
R107 061G0402750 RST CHIPR 75 OHM +-5% 1/16W
R108 061G0402750 RST CHIPR 75 OHM +-5% 1/16W
R444 061G0402750 RST CHIPR 75 OHM +-5% 1/16W
FB409 061G0805000 RST CHIPR 0 OHM +-5% 1/8W
R709 061G1206221 RST CHIPR 220 OHM +-5% 1/4W
R708 061G1206221 RST CHIPR 220 OHM +-5% 1/4W
C701 065G0402102 32 1000PF +-10% 50V X7R
C631 065G0402102 32 1000PF +-10% 50V X7R
C630 065G0402102 32 1000PF +-10% 50V X7R
C104 065G0402102 32 1000PF +-10% 50V X7R
C456 065G0402103 12 CAP CHIP 0402 10N 16V X7R
C720 065G0402103 22 CHIP 0.01UF 25V X7R
C467 065G0402104 12 CAP CHIP 0402 0.1UF 16V X7R
C468 065G0402104 12 CAP CHIP 0402 0.1UF 16V X7R
C702 065G0402104 12 CAP CHIP 0402 0.1UF 16V X7R
C703 065G0402104 12 CAP CHIP 0402 0.1UF 16V X7R
C704 065G0402104 12 CAP CHIP 0402 0.1UF 16V X7R
C707 065G0402104 12 CAP CHIP 0402 0.1UF 16V X7R
C708 065G0402104 12 CAP CHIP 0402 0.1UF 16V X7R
C711 065G0402104 12 CAP CHIP 0402 0.1UF 16V X7R
C716 065G0402104 12 CAP CHIP 0402 0.1UF 16V X7R
C717 065G0402104 12 CAP CHIP 0402 0.1UF 16V X7R
C719 065G0402104 12 CAP CHIP 0402 0.1UF 16V X7R
C730 065G0402104 12 CAP CHIP 0402 0.1UF 16V X7R
75
Page 76

23" LCD Color Monitor Dell SP2309Wc
C733 065G0402104 12 CAP CHIP 0402 0.1UF 16V X7R
C734 065G0402104 12 CAP CHIP 0402 0.1UF 16V X7R
C735 065G0402104 12 CAP CHIP 0402 0.1UF 16V X7R
C737 065G0402104 12 CAP CHIP 0402 0.1UF 16V X7R
C738 065G0402104 12 CAP CHIP 0402 0.1UF 16V X7R
C739 065G0402104 12 CAP CHIP 0402 0.1UF 16V X7R
C740 065G0402104 12 CAP CHIP 0402 0.1UF 16V X7R
C435 065G0402104 12 CAP CHIP 0402 0.1UF 16V X7R
C436 065G0402104 12 CAP CHIP 0402 0.1UF 16V X7R
C437 065G0402104 12 CAP CHIP 0402 0.1UF 16V X7R
C438 065G0402104 12 CAP CHIP 0402 0.1UF 16V X7R
C439 065G0402104 12 CAP CHIP 0402 0.1UF 16V X7R
C440 065G0402104 12 CAP CHIP 0402 0.1UF 16V X7R
C441 065G0402104 12 CAP CHIP 0402 0.1UF 16V X7R
C442 065G0402104 12 CAP CHIP 0402 0.1UF 16V X7R
C443 065G0402104 12 CAP CHIP 0402 0.1UF 16V X7R
C448 065G0402104 12 CAP CHIP 0402 0.1UF 16V X7R
C449 065G0402104 12 CAP CHIP 0402 0.1UF 16V X7R
C452 065G0402104 12 CAP CHIP 0402 0.1UF 16V X7R
C454 065G0402104 12 CAP CHIP 0402 0.1UF 16V X7R
C455 065G0402104 12 CAP CHIP 0402 0.1UF 16V X7R
C459 065G0402104 12 CAP CHIP 0402 0.1UF 16V X7R
C462 065G0402104 12 CAP CHIP 0402 0.1UF 16V X7R
C463 065G0402104 12 CAP CHIP 0402 0.1UF 16V X7R
C465 065G0402104 12 CAP CHIP 0402 0.1UF 16V X7R
C466 065G0402104 12 CAP CHIP 0402 0.1UF 16V X7R
C763 065G0402104 12 CAP CHIP 0402 0.1UF 16V X7R
C764 065G0402104 12 CAP CHIP 0402 0.1UF 16V X7R
C765 065G0402104 12 CAP CHIP 0402 0.1UF 16V X7R
C766 065G0402104 12 CAP CHIP 0402 0.1UF 16V X7R
C767 065G0402104 12 CAP CHIP 0402 0.1UF 16V X7R
C768 065G0402104 12 CAP CHIP 0402 0.1UF 16V X7R
C626 065G0402104 12 CAP CHIP 0402 0.1UF 16V X7R
C625 065G0402104 12 CAP CHIP 0402 0.1UF 16V X7R
C624 065G0402104 12 CAP CHIP 0402 0.1UF 16V X7R
C623 065G0402104 12 CAP CHIP 0402 0.1UF 16V X7R
C796 065G0402104 12 CAP CHIP 0402 0.1UF 16V X7R
C795 065G0402104 12 CAP CHIP 0402 0.1UF 16V X7R
C476 065G0402104 12 CAP CHIP 0402 0.1UF 16V X7R
C475 065G0402104 12 CAP CHIP 0402 0.1UF 16V X7R
76
Page 77

23" LCD Color Monitor Dell SP2309Wc
C474 065G0402104 12 CAP CHIP 0402 0.1UF 16V X7R
C794 065G0402104 12 CAP CHIP 0402 0.1UF 16V X7R
C793 065G0402104 12 CAP CHIP 0402 0.1UF 16V X7R
C792 065G0402104 12 CAP CHIP 0402 0.1UF 16V X7R
C791 065G0402104 12 CAP CHIP 0402 0.1UF 16V X7R
C743 065G0402104 12 CAP CHIP 0402 0.1UF 16V X7R
C783 065G0402104 12 CAP CHIP 0402 0.1UF 16V X7R
C788 065G0402104 12 CAP CHIP 0402 0.1UF 16V X7R
C769 065G0402104 12 CAP CHIP 0402 0.1UF 16V X7R
C770 065G0402104 12 CAP CHIP 0402 0.1UF 16V X7R
C772 065G0402104 12 CAP CHIP 0402 0.1UF 16V X7R
C775 065G0402104 12 CAP CHIP 0402 0.1UF 16V X7R
C777 065G0402104 12 CAP CHIP 0402 0.1UF 16V X7R
C779 065G0402104 12 CAP CHIP 0402 0.1UF 16V X7R
C781 065G0402104 12 CAP CHIP 0402 0.1UF 16V X7R
C745 065G0402104 12 CAP CHIP 0402 0.1UF 16V X7R
C746 065G0402104 12 CAP CHIP 0402 0.1UF 16V X7R
C749 065G0402104 12 CAP CHIP 0402 0.1UF 16V X7R
C750 065G0402104 12 CAP CHIP 0402 0.1UF 16V X7R
C754 065G0402104 12 CAP CHIP 0402 0.1UF 16V X7R
C755 065G0402104 12 CAP CHIP 0402 0.1UF 16V X7R
C756 065G0402104 12 CAP CHIP 0402 0.1UF 16V X7R
C758 065G0402104 12 CAP CHIP 0402 0.1UF 16V X7R
C759 065G0402104 12 CAP CHIP 0402 0.1UF 16V X7R
C410 065G0402104 12 CAP CHIP 0402 0.1UF 16V X7R
C409 065G0402104 12 CAP CHIP 0402 0.1UF 16V X7R
C408 065G0402104 12 CAP CHIP 0402 0.1UF 16V X7R
C407 065G0402104 12 CAP CHIP 0402 0.1UF 16V X7R
C406 065G0402104 12 CAP CHIP 0402 0.1UF 16V X7R
C405 065G0402104 12 CAP CHIP 0402 0.1UF 16V X7R
C404 065G0402104 12 CAP CHIP 0402 0.1UF 16V X7R
C402 065G0402104 12 CAP CHIP 0402 0.1UF 16V X7R
C124 065G0402104 12 CAP CHIP 0402 0.1UF 16V X7R
C123 065G0402104 12 CAP CHIP 0402 0.1UF 16V X7R
C122 065G0402104 12 CAP CHIP 0402 0.1UF 16V X7R
C121 065G0402104 12 CAP CHIP 0402 0.1UF 16V X7R
C120 065G0402104 12 CAP CHIP 0402 0.1UF 16V X7R
C119 065G0402104 12 CAP CHIP 0402 0.1UF 16V X7R
C118 065G0402104 12 CAP CHIP 0402 0.1UF 16V X7R
C117 065G0402104 12 CAP CHIP 0402 0.1UF 16V X7R
77
Page 78

23" LCD Color Monitor Dell SP2309Wc
C116 065G0402104 12 CAP CHIP 0402 0.1UF 16V X7R
C109 065G0402104 12 CAP CHIP 0402 0.1UF 16V X7R
C105 065G0402104 12 CAP CHIP 0402 0.1UF 16V X7R
C411 065G0402104 12 CAP CHIP 0402 0.1UF 16V X7R
C434 065G0402104 12 CAP CHIP 0402 0.1UF 16V X7R
C433 065G0402104 12 CAP CHIP 0402 0.1UF 16V X7R
C432 065G0402104 12 CAP CHIP 0402 0.1UF 16V X7R
C428 065G0402104 12 CAP CHIP 0402 0.1UF 16V X7R
C427 065G0402104 12 CAP CHIP 0402 0.1UF 16V X7R
C426 065G0402104 12 CAP CHIP 0402 0.1UF 16V X7R
C425 065G0402104 12 CAP CHIP 0402 0.1UF 16V X7R
C424 065G0402104 12 CAP CHIP 0402 0.1UF 16V X7R
C423 065G0402104 12 CAP CHIP 0402 0.1UF 16V X7R
C422 065G0402104 12 CAP CHIP 0402 0.1UF 16V X7R
C412 065G0402104 12 CAP CHIP 0402 0.1UF 16V X7R
C413 065G0402104 12 CAP CHIP 0402 0.1UF 16V X7R
C414 065G0402104 12 CAP CHIP 0402 0.1UF 16V X7R
C415 065G0402104 12 CAP CHIP 0402 0.1UF 16V X7R
C416 065G0402104 12 CAP CHIP 0402 0.1UF 16V X7R
C417 065G0402104 12 CAP CHIP 0402 0.1UF 16V X7R
C418 065G0402104 12 CAP CHIP 0402 0.1UF 16V X7R
C420 065G0402104 12 CAP CHIP 0402 0.1UF 16V X7R
C421 065G0402104 12 CAP CHIP 0402 0.1UF 16V X7R
C722 065G0402105 A5 CAP 0402 1UF K 10V X5R
C744 065G0402105 A5 CAP 0402 1UF K 10V X5R
C446 065G0402220 31 CHIP 22PF 50V NPO
C444 065G0402220 31 CHIP 22PF 50V NPO
C113 065G0402220 31 CHIP 22PF 50V NPO
C112 065G0402220 31 CHIP 22PF 50V NPO
C471 065G0402222 32 CAP CHIP 0402 2N2 50V X7R
C472 065G0402222 32 CAP CHIP 0402 2N2 50V X7R
C114 065G0402224A5T MLCC 0402 0.22UF K 10V X
C115 065G0402224A5T MLCC 0402 0.22UF K 10V X
C501 065G0402224A5T MLCC 0402 0.22UF K 10V X
C760 065G0402330 31 CHIP CAP 0402 33pF J 50V NPO
C761 065G0402330 31 CHIP CAP 0402 33pF J 50V NPO
C771 065G0402330 31 CHIP CAP 0402 33pF J 50V NPO
C774 065G0402330 31 CHIP CAP 0402 33pF J 50V NPO
C632 065G0402331 32 CHIP 330PF 50V X7R
C633 065G0402331 32 CHIP 330PF 50V X7R
78
Page 79

23" LCD Color Monitor Dell SP2309Wc
C101 065G0402473 12 CHIP 0.047uF 16V X7R
C102 065G0402473 12 CHIP 0.047uF 16V X7R
C103 065G0402473 12 CHIP 0.047uF 16V X7R
C106 065G0402473 12 CHIP 0.047uF 16V X7R
C107 065G0402473 12 CHIP 0.047uF 16V X7R
C108 065G0402473 12 CHIP 0.047uF 16V X7R
C621 065G040256132K Y CAP CHIP 0402 560P 50V X7R +/-10%
C622 065G040256132K Y CAP CHIP 0402 560P 50V X7R +/-10%
C457 065G0603105 12 CHIP 1UF 16VX7R 0603
C458 065G0603475 A7 CAP CHIP 0603 4.7uF Z 10V Y5V
C784 065G0805475 17 0805 4.7UF +80%~-20% 16V Y5V
C785 065G0805475 17 0805 4.7UF +80%~-20% 16V Y5V
C773 065G0805475 17 0805 4.7UF +80%~-20% 16V Y5V
C776 065G0805475 17 0805 4.7UF +80%~-20% 16V Y5V
C778 065G0805475 17 0805 4.7UF +80%~-20% 16V Y5V
C780 065G0805475 17 0805 4.7UF +80%~-20% 16V Y5V
C790 065T0603225 A5 CHIP 2.2uF 10V X5R
C789 065T0603225 A5 CHIP 2.2uF 10V X5R
FB701 071G 56K121 CHIP BEAD
FB702 071G 56K121 CHIP BEAD
FB703 071G 56K121 CHIP BEAD
FB704 071G 56K121 CHIP BEAD
FB705 071G 56K121 CHIP BEAD
FB709 071G 56K121 CHIP BEAD
FB711 071G 56K121 CHIP BEAD
FB712 071G 56K121 CHIP BEAD
FB716 071G 56K121 CHIP BEAD
FB717 071G 56K121 CHIP BEAD
FB401 071G 56K121 CHIP BEAD
FB715 071G 56K121 CHIP BEAD
FB601 071G 56K121 CHIP BEAD
FB718 071G 56K121 CHIP BEAD
FB708 071G 56V301 B CHIP BEAD FCM2012VF-301T07 bullwill
FB713 071G 56V301 B CHIP BEAD FCM2012VF-301T07 bullwill
FB412 071G 56V301 B CHIP BEAD FCM2012VF-301T07 bullwill
FB414 071G 56V301 B CHIP BEAD FCM2012VF-301T07 bullwill
FB604 071G 56V301 B CHIP BEAD FCM2012VF-301T07 bullwill
FB605 071G 56V301 B CHIP BEAD FCM2012VF-301T07 bullwill
FB501 071G 56V301 B CHIP BEAD FCM2012VF-301T07 bullwill
FB502 071G 56V301 B CHIP BEAD FCM2012VF-301T07 bullwill
79
Page 80

23" LCD Color Monitor Dell SP2309Wc
FB411 071G 56V301 B CHIP BEAD FCM2012VF-301T07 bullwill
FB407 071G 56V301 B CHIP BEAD FCM2012VF-301T07 bullwill
FB406 071G 56V301 B CHIP BEAD FCM2012VF-301T07 bullwill
FB405 071G 56V301 B CHIP BEAD FCM2012VF-301T07 bullwill
FB404 071G 56V301 B CHIP BEAD FCM2012VF-301T07 bullwill
FB403 071G 56V301 B CHIP BEAD FCM2012VF-301T07 bullwill
FB402 071G 56V301 B CHIP BEAD FCM2012VF-301T07 bullwill
FB103 071G 56V301 B CHIP BEAD FCM2012VF-301T07 bullwill
FB105 071G 59B121 TB160808B
L708 073G253S 6 T IND SMD CHOKE 90 oHM TDK
L705 073G253S 6 T IND SMD CHOKE 90 oHM TDK
L704 073G253S 6 T IND SMD CHOKE 90 oHM TDK
L703 073G253S 6 T IND SMD CHOKE 90 oHM TDK
L702 073G253S 6 T IND SMD CHOKE 90 oHM TDK
L701 073G253S 6 T IND SMD CHOKE 90 oHM TDK
CN501 088G 340 19 AV HDMI HEADER 19P +SCREW HOLE
D501 093G 60505 DIO SIG SM BAT54C(PHSE)R
D106 093G 64 42 P BAV70 SOT23 BY PAN JIT
D105 093G 64 42 P BAV70 SOT23 BY PAN JIT
ZD710 093G 64 49 SU DIODE ESD EGA 10603V05A1-B INPAQ
ZD709 093G 64 49 SU DIODE ESD EGA 10603V05A1-B INPAQ
ZD708 093G 64 49 SU DIODE ESD EGA 10603V05A1-B INPAQ
ZD707 093G 64 49 SU DIODE ESD EGA 10603V05A1-B INPAQ
ZD706 093G 64 49 SU DIODE ESD EGA 10603V05A1-B INPAQ
ZD705 093G 64 49 SU DIODE ESD EGA 10603V05A1-B INPAQ
ZD704 093G 64 49 SU DIODE ESD EGA 10603V05A1-B INPAQ
ZD703 093G 64 49 SU DIODE ESD EGA 10603V05A1-B INPAQ
ZD702 093G 64 49 SU DIODE ESD EGA 10603V05A1-B INPAQ
ZD701 093G 64 49 SU DIODE ESD EGA 10603V05A1-B INPAQ
D104 093G 6432P LL4148
D401 093G 6432P LL4148
D402 093G 6432P LL4148
D701 093G 6432P LL4148
D704 093G 6432P LL4148
D705 093G 6432P LL4148
D114 093G 6433P BAV99
D113 093G 6433P BAV99
D112 093G 6433P BAV99
D111 093G 6433P BAV99
D110 093G 6433P BAV99
80
Page 81

23" LCD Color Monitor Dell SP2309Wc
D109 093G 6433P BAV99
D108 093G 6433P BAV99
D101 093G 6433P BAV99
D102 093G 6433P BAV99
D103 093G 6433P BAV99
D107 093G 6433P BAV99
ZD102 093G 39S 24 T RLZ 5.6B LLDS
ZD101 093G 39S 24 T RLZ 5.6B LLDS
ZD108 093G 39S 24 T RLZ 5.6B LLDS
ZD107 093G 39S 24 T RLZ 5.6B LLDS
ZD106 093G 39S 24 T RLZ 5.6B LLDS
ZD105 093G 39S 24 T RLZ 5.6B LLDS
ZD104 093G 39S 24 T RLZ 5.6B LLDS
ZD103 093G 39S 24 T RLZ 5.6B LLDS
ZD109 093G 39S 24 T RLZ 5.6B LLDS
ZD110 093G 39S 24 T RLZ 5.6B LLDS
ZD111 093G 39S 24 T RLZ 5.6B LLDS
ZD401 093G 39S 24 T RLZ 5.6B LLDS
ZD402 093G 39S 24 T RLZ 5.6B LLDS
D702 093G3004 2 SR34 PAN JIT
D601 093G3004 2 SR34 PAN JIT
715G3178 1 HF MAIN PCB 340X200X1.6MM FR-4 4-LAYS 1OZ
L706 073G 259902 T CHOKE 33uH 10% TSL0808RA-330K1R4
KEPC8QDL KEY BOARD G3096-1-HF-X-2-080831
CN1 089G 76J 7502 FFC CABLE 7P
Q05G6084 1 wahser
U110 056G 665 37 IC SO380001-24QFN QFN-24
R155 061G0603101 RST CHIPR 100 OHM +-5% 1/10W
R152 061G0603470 RST CHIPR 47 OHM +-5% 1/10W
C121 065G0603102 32 1000PF +-10% 50V X7R
C130 065G0603104 12 CER2 0603 X7R 16V 100N P
C123 065G0603105 12 CHIP 1UF 16VX7R 0603
C122 065G0603105 12 CHIP 1UF 16VX7R 0603
C129 065G0603151 31 CHIP CAP 150PF 50V NPO
C124 065G0603201 31 CHIP 200PF 50V NPO
C131 065G0603209 21 CHIP 2PF 25V NPO
C132 065G0603309 31 CAP CHIP 0603 3pF J 50V NPO
C126 065G0603409 31 CAP CHIP 0603 4pF J 50V NPO
C128 065G0603409 31 CAP CHIP 0603 4pF J 50V NPO
C127 065G0603509 31 CHIP 5PF +-0.5PF 50V NPO
81
Page 82

23" LCD Color Monitor Dell SP2309Wc
C125 065G0603569 31 CHIP 5.6PF 50V NPO
LED1 081G 14 30 EL CHIP LED YELLOW / WHITE
LED001 081G 14 31 EL CHIP LED WHITE
LED002 081G 14 31 EL CHIP LED WHITE
LED003 081G 14 31 EL CHIP LED WHITE
LED004 081G 14 31 EL CHIP LED WHITE
LED005 081G 14 31 EL CHIP LED WHITE
715G3096 2 HF KEY PCB FR-4 104x16.75x0.8mm DS
PWPC8D42EAB9 POWER BOARD G3173-D-X-X-1-080903
040G 45762412B CBPC LABEL
CN801 033G8021 2E F WAFER
CN802 033G8021 2E F WAFER
CN803 033G8021 2E F WAFER
CN804 033G8021 2E F WAFER
CN801 033G8021 2E AC WAFER 2nd source
CN802 033G8021 2E AC WAFER 2nd source
CN803 033G8021 2E AC WAFER 2nd source
CN804 033G8021 2E AC WAFER 2nd source
IC902 056G 139 3A IC PC123Y22FZ0F
NR901 061G 58080 WT 8 OHM NCT
C900 063G107K474 US 0.47UF +-10%
C812 065G 6J5096ET CAP CER 5PF J 6KV
C801 065G 6J5096ET CAP CER 5PF J 6KV
C902 065G305M2222EM 2200PF+-20% 250VAC/400VAC
C901 065G305M2222EM 2200PF+-20% 250VAC/400VAC
C932 065G306M4722BM 4700PF +-20% 400VAC
C932 065G306M4722BP 4700PF +-20% 400VAC
C903 067G 40Z18115K CAP 105¡æ 180UF M 450V
C811 067G215D4714KV E.C 105 CAP 470UF M 25V ED SERIES℃
C805 067G215D4714KV E.C 105 CAP 470UF M 25V ED SERIES℃
C923 067G215V102 4N
EC 1000UF 25V KY25VB1000M-CC3
12.5*20mm
C922 067G215V102 4N
C919 067G215V102 4N
C912 067G215V102 4N
C911 067G215V102 4N
EC 1000UF 25V KY25VB1000M-CC3
12.5*20mm
EC 1000UF 25V KY25VB1000M-CC3
12.5*20mm
EC 1000UF 25V KY25VB1000M-CC3
12.5*20mm
EC 1000UF 25V KY25VB1000M-CC3
12.5*20mm
82
Page 83

23" LCD Color Monitor Dell SP2309Wc
C911 067G215V102 4R LOW E.S.R 1000UF +/-20% 25V
C912 067G215V102 4R LOW E.S.R 1000UF +/-20% 25V
C919 067G215V102 4R LOW E.S.R 1000UF +/-20% 25V
C922 067G215V102 4R LOW E.S.R 1000UF +/-20% 25V
C923 067G215V102 4R LOW E.S.R 1000UF +/-20% 25V
C925 067G215V471 4R LOW E.S.R 470UF +/-20% 25V
C926 067G215V471 4R LOW E.S.R 470UF +/-20% 25V
L801 073G 174 35DNA FILTER 200mH±25%
L802 073G 174 35DNA FILTER 200mH±25%
L921 073G 253191 H IND CHOKE 1.1uH DADON
L922 073G 253191 H IND CHOKE 1.1uH DADON
L902 073L 174 40 HG GBQM4.778.391
T901 080GL19T 35 N1 X'FMR 550uH
T801 080GL26T 10DN1 INVERTER X'FMR 64uH VOC
T802 080GL26T 10DN1 INVERTER X'FMR 64uH VOC
CN901 087G 501 32 S AC SOCKET
CN902 095G 82514E508 HARNESS 14P(SCN)-12P(PLUG) 2nd source
CN902 095G 82514X508 HARNESS 14P(SCN)-12P(PLUG)
705GQ893016 D920 ASS'Y
HS3 090G6280 1 HEAT SINK
D920 093G 60258 DIODE FME-220B TO-220 SANKEN
0M1G1730 8120 SCREW
705GQ893021 D921 ASS'Y
HS2 090G6275 1 N HEAT SINK
D921 093G 60276 DIODE SBT150-10LST SANYO
0M1G1730 8120 SCREW
705GQ893063 BD901/Q900 ASS'Y
Q900 057G 667 32 MOSFET_9A/800V_STP10NK80ZFP_TO-220FP
HS1 090G6281 1 HEAT SINK
BD901 093G 50460 36 BRIDGE D3SB80 4A/800V 3S
0M1G1730 10120 SCREW 42A9930016
IC801 056G 379 22 IC TL494IDR SOIC-16
IC901 056G 379 76 IC LD7552BPS SOP-8
Q807 057G 417 4 PMBS3904/PHILIPS-SMT(04)
Q803 057G 417 4 PMBS3904/PHILIPS-SMT(04)
Q806 057G 417 16 T MMBT2907
Q805 057G 417 16 T MMBT2907
Q804 057G 600 55 P5506 HVG SO-8
Q809 057G 600 55 P5506 HVG SO-8
Q808 057G 759 2 RK7002
83
Page 84

23" LCD Color Monitor Dell SP2309Wc
Q812 057G 759 2 RK7002
Q801 057G 760 4B PDTA144WK SOT346
Q802 057G 760 5B PDTC144WK SOT346
Q810 057G 761 18 T TRA SST2222A SST3 ROHM
Q811 057G 761 18 T TRA SST2222A SST3 ROHM
Q903 057G 761 18 T TRA SST2222A SST3 ROHM
Q804 057G 763 14 AM9945N
Q809 057G 763 14 AM9945N
R842 061G0603000 RST CHIPR 0 OHM +-5% 1/10W
R806 061G0603100 1F RST CHIPR 1 KOHM +-1% 1/10W
R807 061G0603100 1F RST CHIPR 1 KOHM +-1% 1/10W
R827 061G0603100 1F RST CHIPR 1 KOHM +-1% 1/10W
R834 061G0603100 1F RST CHIPR 1 KOHM +-1% 1/10W
R835 061G0603100 1F RST CHIPR 1 KOHM +-1% 1/10W
R848 061G0603100 1F RST CHIPR 1 KOHM +-1% 1/10W
R849 061G0603100 1F RST CHIPR 1 KOHM +-1% 1/10W
R853 061G0603100 2F RST CHIPR 10K OHM +-1% 1/10W
R840 061G0603100 2F RST CHIPR 10K OHM +-1% 1/10W
R838 061G0603100 2F RST CHIPR 10K OHM +-1% 1/10W
R833 061G0603100 2F RST CHIPR 10K OHM +-1% 1/10W
R831 061G0603100 2F RST CHIPR 10K OHM +-1% 1/10W
R819 061G0603100 2F RST CHIPR 10K OHM +-1% 1/10W
R808 061G0603100 2F RST CHIPR 10K OHM +-1% 1/10W
R805 061G0603100 2F RST CHIPR 10K OHM +-1% 1/10W
R813 061G0603101 RST CHIPR 100 OHM +-5% 1/10W
R820 061G0603105 RST CHIPR 1M OHM +-5% 1/10W
R821 061G0603105 RST CHIPR 1M OHM +-5% 1/10W
R811 061G0603150 1F RST CHIPR 1.5 KOHM +-1% 1/10W
R812 061G0603150 1F RST CHIPR 1.5 KOHM +-1% 1/10W
R839 061G0603150 1F RST CHIPR 1.5 KOHM +-1% 1/10W
R841 061G0603150 1F RST CHIPR 1.5 KOHM +-1% 1/10W
R845 061G0603220 RST CHIPR 22 OHM +-5% 1/10W
R846 061G0603220 RST CHIPR 22 OHM +-5% 1/10W
R824 061G0603240 1F RST CHIPR 2.4 KOHM +-1% 1/10W
R803 061G0603362 RST CHIPR 3.6 KOHM +-5% 1/10W
R844 061G0603390 RST CHIPR 39 OHM +-5% 1/10W
R847 061G0603390 RST CHIPR 39 OHM +-5% 1/10W
R828 061G0603470 2F RST CHIPR 47 KOHM +-1% 1/10W
R816 061G0603470 2F RST CHIPR 47 KOHM +-1% 1/10W
R829 061G0603470 2F RST CHIPR 47 KOHM +-1% 1/10W
84
Page 85

23" LCD Color Monitor Dell SP2309Wc
R822 061G0603473 RST CHIPR 47 KOHM +-5% 1/10W
R814 061G0603680 2F RST CHIPR 68K OHM +-1% 1/10W
R815 061G0603820 1F RST CHIPR 8.2 KOHM +-1% 1/10W
R852 061G0603910 1F RST CHIPR 9.1 KOHM +-1% 1/10W
R817 061G0603910 2F RST CHIPR 91K OHM +-1% 1/10W
RJ801 061G0805000 RST CHIPR 0 OHM +-5% 1/8W
RJ802 061G0805000 RST CHIPR 0 OHM +-5% 1/8W
R911 061G0805100 3F RST CHIPR 100KOHM +-1% 1/8W
R802 061G0805101 1ST CHIPR 100 OHM +-5% 1/8W
R913 061G0805101 1ST CHIPR 100 OHM +-5% 1/8W
R920 061G0805102 RST CHIPR 1K OHM +-5% 1/8W
R925 061G0805102 RST CHIPR 1K OHM +-5% 1/8W
R927 061G0805102 RST CHIPR 1K OHM +-5% 1/8W
R943 061G0805102 RST CHIPR 1K OHM +-5% 1/8W
R915 061G0805103 RST CHIPR 10K OHM +-5% 1/8W
R825 061G0805150 2F RST CHIPR 15 KOHM +-1% 1/8W
R929 061G0805240 1F RST CHIPR 2.4K OHM +-1% 1/8W
R928 061G0805390 1F RST CHIPR 3.9 KOHM +-1% 1/8W
R926 061G0805390 2F RST CHIPR 39 KOHM +-1% 1/8W
R826 061G0805510 2F RST CHIPR 51K OHM +-1% 1/8W
R854 061G1206000 RST CHIPR 0 OHM +-5% 1/4W
R912 061G1206100 RST CHIPR 10 OHM +-5% 1/4W
R940 061G1206101 RST CHIPR 100 OHM +-5% 1/4W
R939 061G1206101 RST CHIPR 100 OHM +-5% 1/4W
R938 061G1206101 RST CHIPR 100 OHM +-5% 1/4W
R855 061G1206103 RST CHIPR 10K OHM +-5% 1/4W
R937 061G1206151 RST CHIPR 150 OHM +-5% 1/4W
R936 061G1206151 RST CHIPR 150 OHM +-5% 1/4W
R935 061G1206151 RST CHIPR 150 OHM +-5% 1/4W
R934 061G1206151 RST CHIPR 150 OHM +-5% 1/4W
R910 061G1206229 RST CHIPR 2.2 OHM +-5% 1/4W
R859 061G1206300 RST CHIPR 30 OHM +-5% 1/4W
R858 061G1206300 RST CHIPR 30 OHM +-5% 1/4W
R857 061G1206300 RST CHIPR 30 OHM +-5% 1/4W
R856 061G1206300 RST CHIPR 30 OHM +-5% 1/4W
R851 061G1206300 RST CHIPR 30 OHM +-5% 1/4W
R837 061G1206300 RST CHIPR 30 OHM +-5% 1/4W
R810 061G1206300 RST CHIPR 30 OHM +-5% 1/4W
R850 061G1206300 RST CHIPR 30 OHM +-5% 1/4W
R902 061G1206334 RST CHIPR 330KOHM +-5% 1/4W
85
Page 86

23" LCD Color Monitor Dell SP2309Wc
R901 061G1206334 RST CHIPR 330KOHM +-5% 1/4W
R900 061G1206334 RST CHIPR 330KOHM +-5% 1/4W
R903 061G1206434 RST CHIPR 430 KOHM +-5% 1/4W
R904 061G1206434 RST CHIPR 430 KOHM +-5% 1/4W
R905 061G1206434 RST CHIPR 430 KOHM +-5% 1/4W
C804 065G0603103 12 chip 0.01uf 16v x7r
C814 065G0603103 32 CAP CHIP 0603 0.01UF K 50V X7R
C810 065G0603104 22 CAP CHIP 0603 0.1UF K 25V X7R
C802 065G0603105 22 CHIP 1UF 25V X7R 0603
C806 065G0603105 22 CHIP 1UF 25V X7R 0603
C815 065G0603222 22 CHIP 2200PF 25V X7R
C813 065G0603222 22 CHIP 2200PF 25V X7R
C817 065G0603222 22 CHIP 2200PF 25V X7R
C818 065G0603222 22 CHIP 2200PF 25V X7R
C808 065G0603225 17 MLCC 0603 2.2UF Z 16V Y5V
C807 065G0603333 32 0.033UF/50V
C928 065G0805102 32 CHIP 1000P 50VX7R 0805
C823 065G0805104 22 0.1UF +-10% 25V X7R 080
C824 065G0805104 22 0.1UF +-10% 25V X7R 080
C905 065G0805104 32 CAP CHIP 0805 0.1uF K 50V X7R
C930 065G0805104 32 CAP CHIP 0805 0.1uF K 50V X7R
C931 065G0805104 32 CAP CHIP 0805 0.1uF K 50V X7R
C927 065G0805104 32 CAP CHIP 0805 0.1uF K 50V X7R
C907 065G0805221 21 220PF 25V 5%
C803 065G0805222 31 0805 2200PF
C816 065G0805222 31 0805 2200PF
C821 065G0805222 31 0805 2200PF
C822 065G0805222 31 0805 2200PF
C934 065G0805223 22 CHIP 0.022UF 25V X7R 080
C809 065G0805681 31 CHIP 680PF 50V NPO 0805
C920 065G1206102 72 CAP CHIP 1206 1000PF K 500V X7R
C921 065G1206102 72 CAP CHIP 1206 1000PF K 500V X7R
D801 093G 64 33 DIO SIG SM BAV99 (PHSE)R
D802 093G 64 33 DIO SIG SM BAV99 (PHSE)R
D809 093G 64 33 DIO SIG SM BAV99 (PHSE)R
D810 093G 64 33 DIO SIG SM BAV99 (PHSE)R
D806 093G 64 38 D DIODE BAW56 DIODES
D808 093G 64 38 D DIODE BAW56 DIODES
CN901 006G 31500 EYELET
IC921 056G 158 12 KIA431A-AT/P TO-92
86
Page 87

23" LCD Color Monitor Dell SP2309Wc
R922 061G 17222152T 220 OHM 5% 1/4W
R916 061G152M33852T RST MOFR 0.33 OHM +-5% 2WS
R909 061G152M51352T RST MOFR 51 kOHM +-5% 2WS
C904 065G 2K222 2T6921 CAP CER 2200PF K 2KV Y5P
C908 067G 2151007NT KY50VB10M-TP5 5*11.5
C906 067G 2152207NT KY50VB22M-TP5 5*11
FB901 071G 55 9 T FERRITE BEAD
F903 084G 55 4 FUSE 382-5A 250V WICKMANN
F902 084G 56 4W FUSE 4.0A 250V
F901 084G 56 4W FUSE 4.0A 250V
ZD921 093G 3916652T MTZJ15B (13.89-14.62)
ZD902 093G 3916652T MTZJ15B (13.89-14.62)
ZD922 093G 3957652T GDZJ5.1B BY PANJIT
D902 093G 6038T52T FR103
D901 093G 6038T52T FR103
D923 093G 64 1152T 1N4148
D922 093G 64 1152T 1N4148
D813 093G 64 1152T 1N4148
D803 093G 64 1152T 1N4148
D807 093G 64 1152T 1N4148
D811 093G 64 1152T 1N4148
D900 093G1100 1152T DIODE PR1007R 1A/1000V DO-41
715G3173 1 HF POWER PCB FR-1 S/S 173X178MM
R946 061G152M25152T RST MOFR 250 OHM +-5% 2WS
R924 061G0805820 1F RST CHIPR 8.2KOHM +-1% 1/8W
R948 061G0805820 1F RST CHIPR 8.2KOHM +-1% 1/8W
Q51G 6 4509 GLUE_RTV
L901 S73L17450VH LINE FILTER ASS'Y
034FP17450V H
040FP174 50 H
Q23G3178700 9A DELL LOGO
半成品
标签 S73L17450VH
Q35G0037 1 CAMERA GLASS
Q40G0001700 7A S/N LABEL
Q41G7800700A53 SP2309W WEST QSG
Q41G7800700A60 SP2309W TEACH SHEET
Q41G7800700A62 PIG FOR DAO
Q41G7800700A74 SP2309W INSTALLATION SHEET
Q44GD001101 EPS L
Q44GD001201 EPS R
Q44GD001700 1A 23 LCD CARTON
87
Page 88

23" LCD Color Monitor Dell SP2309Wc
Q45G 77 5 PE PACKING
Q45G 88609168 epe bag
Q50G 505 25 belt
Q50G 505 26 PE RING
Q52G 1185 76 REWORK TAPE FOR DELL CARTON
Q52G 1185 91 BIG TAPE FOR DELL CARTON
Q52G 3 69 3M double face tape
Q52G6020135 protect film
Q70G9002700 3A SP2309W CD MANUAL
USB8QD1 USB BOARD G2727-D-X-X-1-080421
CN707 033G3802 8B YH CONNECTOR 8PIN 2.0PITCH
CN707 033G3802 8B YH W WAFER 2nd source
CN705 088G 352 7A ST USB CONNECTOR A TYPE REVERSE
CN706 088G 352 7A ST USB CONNECTOR A TYPE REVERSE
C732 065G601M104 7T 0.1UF +-20% 50V Y5V
C733 065G601M104 7T 0.1UF +-20% 50V Y5V
715G2727 1 HF USB PCB FR-1 25x48x1.6mm SS
Q40G 23N700 1A RATING LABEL
Q40G0001700 4A DELL carton label
88
Page 89

23" LCD Color Monitor Dell SP2309Wc
14. Different Parts List
Diversity of HDRSA3NKWMDYPC compared with HDRSA3NKWMDYPN
Location Part No. Description Remark
750GLS230TT211D0DL PANEL LTM230TT02 C01 KR SEC
Diversity of HDRSA3NMWMDLPN compared with HDRSA3NKWMDYPN
Location Part No. Description Remark
Q41G7800700A52 SP2309W EAST QSG
Q41G7800700A61 PIG FOR APCC
Diversity of HDRSA3NLWMDYPN compared with HDRSA3NKWMDYPN
Location Part No. Description Remark
089G412A18NIS3 POWER CORD/32E1818058
Q41G7800700A52 SP2309W EAST QSG
Q41G7800700A61 PIG FOR APCC
Diversity of HDRSA3NMWMDLPC compared with HDRSA3NKWMDYPN
Location Part No. Description Remark
750GLS230TT221D0DL PANEL LTM230TT02 C03 KR SEC
Q41G7800700A52 SP2309W EAST QSG
Q41G7800700A61 PIG FOR APCC
Q52G6019 26 TAPE_INSULATING
Diversity of HDRSA3NLWMDYPC compared with HDRSA3NKWMDYPN
Location Part No. Description Remark
089G412A18NIS3 POWER CORD/32E1818058
750GLS230TT221D0DL PANEL LTM230TT02 C03 KR SEC
Q41G7800700A52 SP2309W EAST QSG
Q41G7800700A61 PIG FOR APCC
Q52G6019 26 TAPE_INSULATING
89
Page 90

23" LCD Color Monitor Dell SP2309Wc
Diversity of HDRSA3NJWMDYPC compared with HDRSA3NKWMDYPN
Location Part No. Description Remark
089G401A18NHRA POWER CORD
750GLS230TT221D0DL PANEL LTM230TT02 C03 KR SEC
Q07G 1 5V83 X WOODEN PALLET
Q07G 1 5V84 X WOODEN PALLET
Q41G7800700A52 SP2309W EAST QSG
Q41G7800700A61 PIG FOR APCC
Q44G9003220 corner paper
Q52G6019 26 TAPE_INSULATING
Diversity of HDRSA3NBWMDYPC Compared with HDRSA3NKWMDYPN
Location Part No. Description Remark
750GLS230TT221D0DL PANEL LTM230TT02 C03 KR SEC
Q41G7800700A63 PIG FOR EMEA
Diversity of HDRSA3NFWMDYPC Compared with HDRSA3NKWMDYPN
Location Part No. Description Remark
750GLS230TT221D0DL PANEL LTM230TT02 C03 KR SEC
Q41G7800700A52 SP2309W EAST QSG
Q41G7800700A61 PIG FOR APCC
Q52G6019 26 TAPE_INSULATING
Diversity of HDRSA3NFWMDYPN Compared with HDRSA3NKWMDYPN
Location Part No. Description Remark
Q41G7800700A52 SP2309W EAST QSG
Q41G7800700A61 PIG FOR APCC
Diversity of HDRSA3NBWMDYPN Compared with HDRSA3NKWMDYPN
Location Part No. Description Remark
Q41G7800700A63 PIG FOR EMEA
90
Page 91

23" LCD Color Monitor Dell SP2309Wc
Diversity of HDRSA3NBWMDY5C Compared with HDRSA3NKWMDYPN
Location Part No. Description Remark
Q07G 7 T235 COMPOUND PALLET
Q07G 8 5201 COMPOUND PALLET
Q44G600024H 3A SKD CARTON
Q45G 88609168 EPE BAG
Q50G 500517 CABLE TIE
Q52G6022 28 TAPE
040G 581654 3A CARTON LABEL
040G 581654 3A CARTON LABEL
Q40G 582813 3A S/N LABEL
705GQ8SK102 23" DELL SKD ASS'Y
0M1G2940 10225 CR3 SCREW
Q44GD001700 5A 23 LCD CARTON
705GQ8SK103 23" DELL BEZEL SKD ASS'Y
750GLS230TT221D0DL PANEL LTM230TT02 C03 KR SEC
Q07G 8 1 11 COMPOUND PALLET
Q40G 23N700 2A RATING LABEL
Q40G000162410A S/N LABEL
Q41G7800700A63 PIG FOR EMEA
Q44G600024D 3A CARTON
Q44G600027V 9A CARTON
Diversity of HDRSA3NJWMDYPN Compared with HDRSA3NKWMDYPN
Location Part No. Description Remark
089G401A18NHRA POWER CORD
Q07G 1 5V83 X WOODEN PALLET
Q07G 1 5V84 X WOODEN PALLET
Q41G7800700A52 SP2309W EAST QSG
Q41G7800700A61 PIG FOR APCC
Q44G9003220 CORNER PAPER
91
Page 92

23" LCD Color Monitor Dell SP2309Wc
Diversity of HDRSA3NMWMDDPC Compared with HDRSA3NKWMDYPN
Location Part No. Description Remark
041G 68623 1A CERTIFICATED CARD
052G 2191 A PAPER TAPE
750GLS230TT221D0DL PANEL LTM230TT02 C03 KR SEC
Q07G 1 5V83 WOODEN PALLET
Q07G 1 5V84 WOODEN PALLET
Q40G0002700 5A CEL LABEL FOR SP2309Wc
Q41G7800700A52 SP2309W EAST QSG
Q41G7800700A56 PIG FOR APCC
Q44G9003220 CORNER PAPER
Q44GD001700 2A 23 LCD CARTON
92
 Loading...