

Dell SonicWall SRA 4200/1200, SonicWALL SRA 1600, SonicWALL SRA 4600 Getting Started Manual

Getting Started Guide
Secure Remote Access Appliances
Secure Remote Access
SRA 4200/1200 Getting Started Guide
Notes, Cautions, and Warnings
© 2012 Dell Inc.
Trademarks: Dell™, the DELL logo, SonicWALL™, SonicWALL GMS™, SonicWALL ViewPoint™, Aventail™, Reassembly-Free Deep
Packet Inspection™, Dynamic Security for the Global Network™, SonicWALL Aventail Advanced End Point Control™ (EPC™),
SonicWALL Aventail Advanced Reporting™, SonicWALL Aventail Connect Mobile™, SonicWALL Aventail Connect™, SonicWALL
Aventail Native Access Modules™, SonicWALL Aventail Policy Zones™, SonicWALL Aventail Smart Access™, SonicWALL Aventail
Unified Policy™, SonicWALL Aventail™ A dvanced EPC™, SonicW ALL Clean VPN™, SonicW ALL Clean Wireless™, SonicW ALL Global
Response Intelligent Defense (GRID) Network™, SonicWALL Mobile Connect™, SonicWALL SuperMassive™ E10000 Series, and all
other SonicWALL product and service names and slogans are trademarks of Dell Inc.
2012 – 11 P/N 232-002122-00 Rev. C
NOTE: A NOTE indicates important information that helps you make better use of your system.
CAUTION: A CAUTION indicates potential damage to hardware or loss of data if instructions are not followed.
WARNING: A WARNING indicates a potential for property damage, personal injury, or death.

3
Dell SonicWALL
SRA 4200/1200
Getting Started Guide
This Getting Started Guide contains installation procedures and configuration guidelines for deploying a Dell SonicWALL SRA 1200/4200
appliance into an existing or new network. This document addresses the most common use-case scenarios and network topologies in
which the Dell SonicWALL SRA 1200/4200 appliance can be deployed.
Document Contents
This document contains the following sections:
Setting Up Your Network - page 5
Connecting Your SRA 1200/4200 - page 21
Registering Your Appliance - page 23
Network Configuration - page 29
Upgrading Your Appliance - page 41
Support and Training Options - page 45
Safety and Regulatory Information - page 51
1
1
2
3
3
4
567

4

Dell SonicWALL SRA 4200/1200 Getting Started Guide 5
Setting Up Your Network
In this Section
This section provides pre-configuration information. Review this section before setting up your Dell SonicWALL SRA 1200/4200
appliance.
• SRA 1200 Package Contents - page 6
• SRA 4200 Package Contents - page 7
• What You Need to Begin - page 8
• Selecting a Deployment Scenario - page 9
• Installing the SRA Appliance - page 11
• Accessing the Management Interface - page 1 2
• T roubleshooting - page 13
1
Dell SonicWALL SRA 4200/1200 Getting Started Guide 6
SRA 1200 Package Contents
Before you begin the setup process, verify that your package
contains the following parts:
• One SRA 1200 appliance
• One SRA 4200/1200 Getting Started Guide
• One Ethernet cable
• One serial CLI cable
• One rack-mount kit
• One or more power cord(s)*
* The included power cord(s) is approved for use only in spe-
cific countries or regions. Before using a po wer cord, v erify
that it is rated and approved for use in your location.
Missing Items?
If any items are missing from your package, contact Dell
SonicWALL Support:
Web: http://www.sonicwall.com/us/Support.html
Email: customer_service@sonicwall.com
(x6)
(x2)
1200
SRA
Secure Remote Access
X0X1
CONSOLE
PWR TEST ALARM
Dell SonicWALL SRA 4200/1200 Getting Started Guide 7
SRA 4200 Package Contents
Before you begin the setup process, verify that your package
contains the following parts:
• One SRA 4200 appliance
• One SRA 4200/1200 Getting Started Guide
• One Ethernet cable
• One serial CLI cable
• One rack-mount kit
• One or more power cord(s)*
* The included power cord(s) is approved for use only in spe-
cific countries or regions. Before using a po wer cord, v erify
that it is rated and approved for use in your location.
Missing Items?
If any items are missing from your package, contact Dell
SonicWALL Support:
Web: http://www.sonicwall.com/us/Support.html
Email: customer_service@sonicwall.com
(x6)
(x2)
Secure Remote Access
SRA 4200
Dell SonicWALL SRA 4200/1200 Getting Started Guide 8
What You Need to Begin
Before you install your SRA 1200 or 4200, ensure the following
are available:
• Administrative access to the network gateway device
• A Windows, Linux, or MacOS computer to use as a
management station for initial configuration of the
Dell SonicWALL SRA 1200/4200
• An Internet connection
• A Web browser supporting Java Script and HTTP uploads.
Supported browsers include the following:
• The following configuration information to use during the
setup process and for future reference:
Registration Information
Administrator Information
Network Configuration Information
Collect the following information about your current network
configuration:
Primary DNS:
Secondary DNS (optional):
DNS Search List (in order):
WINS server(s) (optional):
Supported Browsers Browser Version
Internet Explorer 8.0 or higher
Firefox 16.0 or higher
Safari 5.0 or higher for
Mac OS 10.0
Chrome 22.0 or higher
Serial Number:
Record the serial number found on the
bottom panel of your Dell SonicWALL
appliance.
Authentication Code:
Record the authentication code found on
the bottom panel of your Dell SonicW ALL
appliance.
Admin Name:
Select an administrator account name.
(default is admin)
Admin Password:
Select an administrator password.
(default is password)
Dell SonicWALL SRA 4200/1200 Getting Started Guide 9
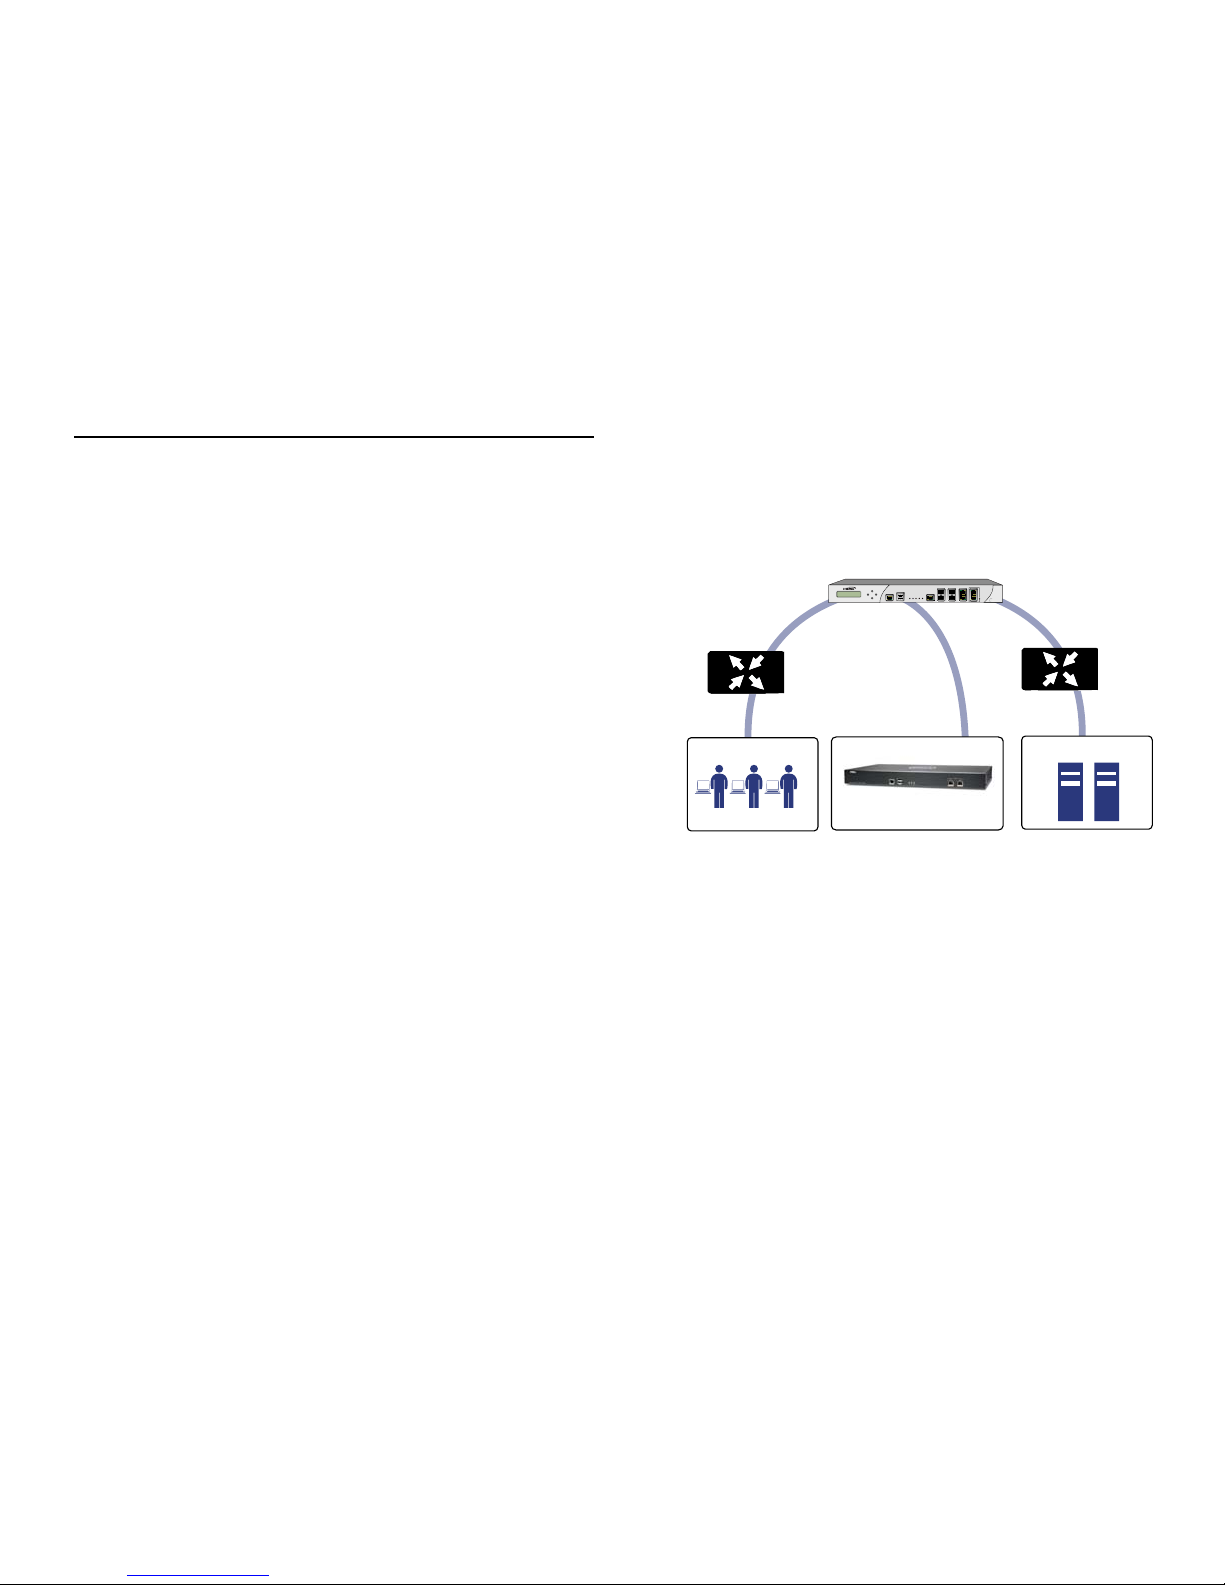
Selecting a Deployment Scenario
The deployment scenarios described in this section are based
on actual customer deployments and are Dell SonicWALLrecommended deployment best practices for SRA appliances.
A SRA appliance is commonly deployed in “one-arm” mode
over the DMZ or Opt interface on an accompanying gateway
appliance, such as a Dell SonicWALL NSA E7500. This method
of deployment offers additional layers of security control, plus
the ability to use Dell SonicWALL’s UTM services, including
Gateway Anti-Virus, Anti-S pyware, Content Filtering, Intrusion
Prevention Service, and Comprehensive Anti-Spam Service, to
scan all incoming and outgoing NetExtender traffic.
The primary interface (X0) on the Dell SonicWALL SRA
connects to an available segment on the gateway device. The
encrypted user session is passed through the gateway to the
SRA appliance. The Dell SonicWALL SRA appliance decrypts
the session and determines the requested resource.
The session traffic then traverses the gateway appliance to
reach the internal network resources. The gateway appliance
applies security services, such as Intrusion Prevention,
Gateway Anti-Virus, and Anti-Spyware inspection as data
traverses the gateway. The internal network resource then
returns the requested content to the Dell SonicWALL SRA
appliance through the gateway, where it is encrypted and sent
to the client.
Scenario Overviews
Scenario A: SRA on a New DMZ
WAN DMZ LAN
SRA Appliance
OPT, X2, etc
X1
X0
X0
Remote Users
Switch
Router
Network Nodes
Dell SonicWALL UTM Appliance
E7500
Network Security Appliance
Dell SonicWALL SRA 4200/1200 Getting Started Guide 10
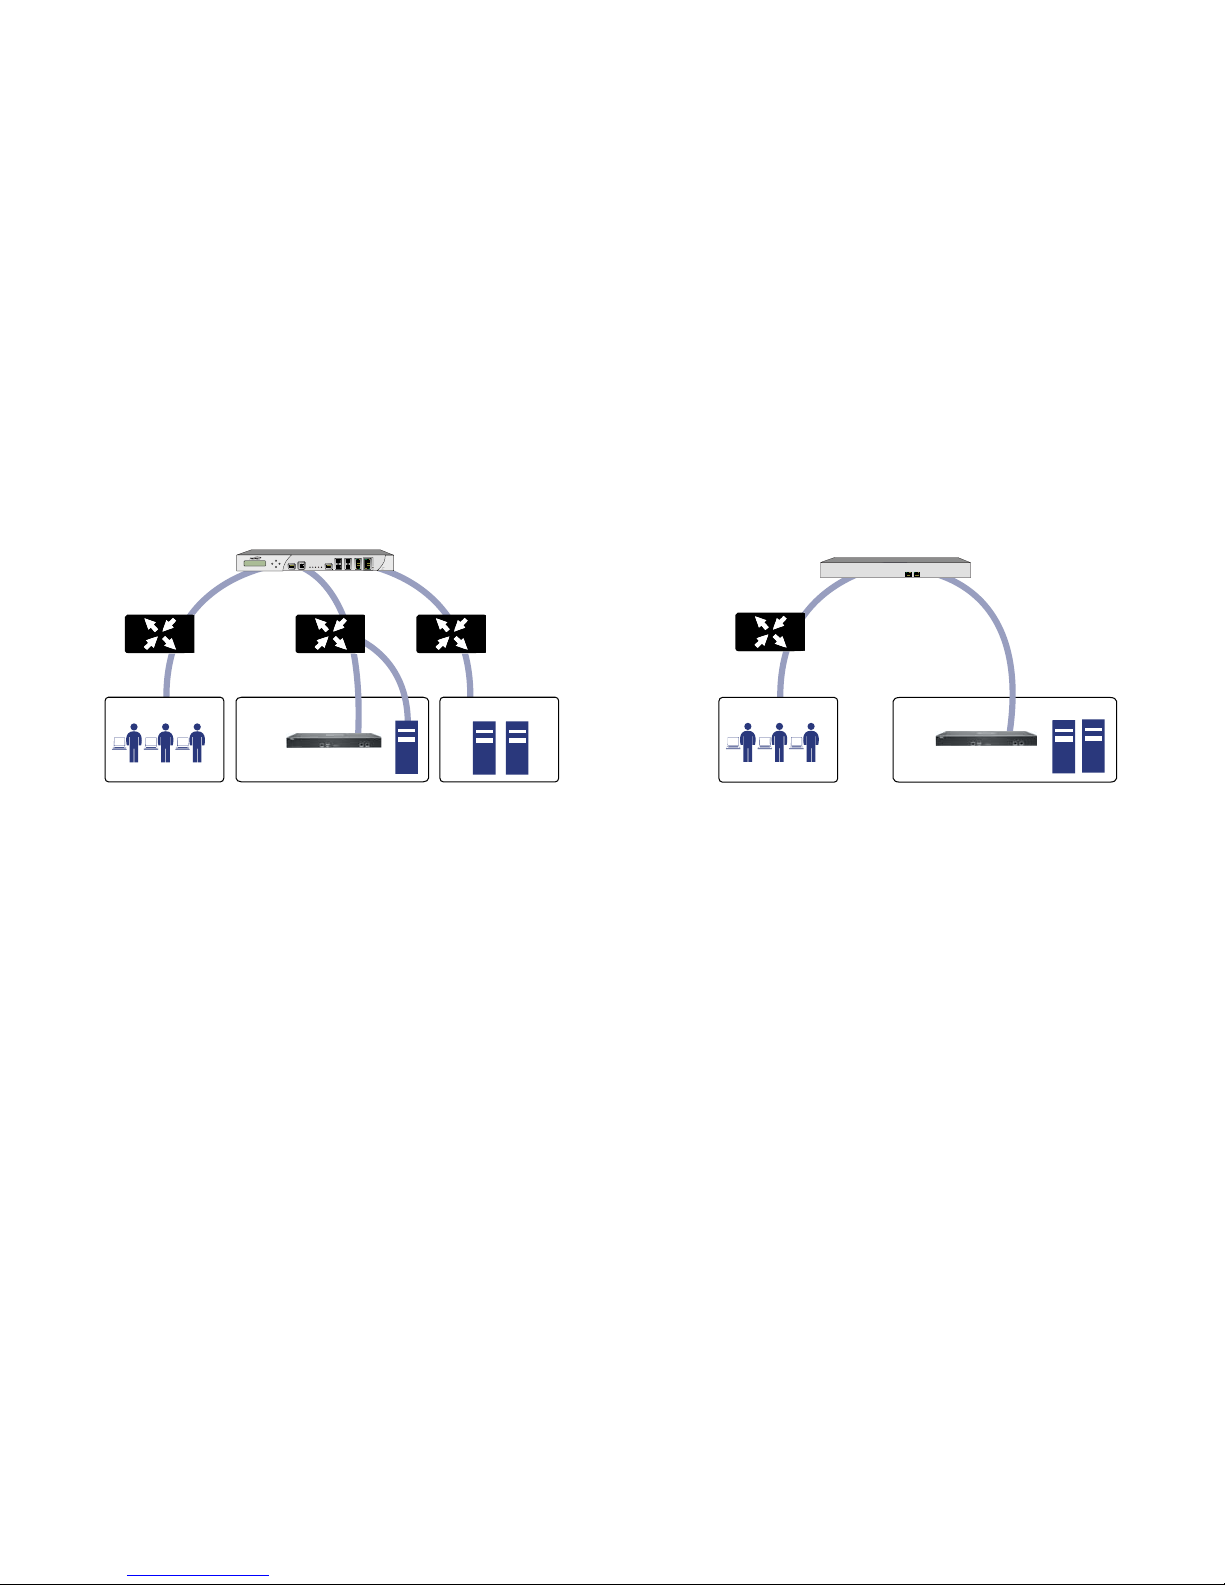
Scenario B: SRA on an Existing DMZ Scenario C: SRA on the LAN
DMZ
LANWAN
OPT, X2, etc
X1
X0
X0
Remote Users
Network Nodes
Dell SonicWALL UTM Appliance
E7500
Network Security Appliance
SwitchSwitch
Router
SRA Appliance
LAN
WAN
LAN Port
X0
Remote Users
Existing Gateway Device
or Switch / Hub
Internet
Router
SRA Appliance
Dell SonicWALL SRA 4200/1200 Getting Started Guide 11
SRA 4200/1200 Deployment Scenarios
Installing the SRA Appliance
1. Plug one end of the power cord into the
Dell SonicWALL SRA 1200/4200 and the other into an
appropriate power outlet.
2. Turn on the power switch located on the rear of the
appliance next to the power cord.
The 'PWR' LED on the front panel lights up blue when the
appliance is turned on. The 'TEST' LED lights up yellow
and may blink for up to a minute while the appliance
performs a series of diagnostic tests. When the 'TEST' LED
is no longer lit, the Dell SonicWALL SRA 1200/4200 is
ready for configuration.
If the 'TEST' or 'ALARM' LEDs remain lit, or if the 'TEST'
LED blinks red after the Dell SonicWALL SRA 1200/4200
has booted, restart the appliance. For more troubleshooting
information, refer to the Dell SonicWALL SRA
Administrator’s Guide.
3. Connect one end of an Ethernet cable into the ‘X0’ port of
your Dell SonicWALL SRA 1200/4200. Connect the other
end of the cable into the computer you are using to
manage the Dell SonicWALL SRA 1200/4200.
Gateway
Device
Deployment
Scenario
Conditions or
Requirements
SonicOS Enhanced
3.1 or higher:
•TZ Series
•PRO Series
• NSA E-Class
(SonicOS 5.0+)
• NSA Series
(SonicOS 5.0+)
SRA on New DMZ • OPT or unused interface
• New DMZ configured for NAT
or Transparent Mode
SRA on Existing
DMZ
• No unused interfaces
• One dedicated interface in use
as an existing DMZ
SRA on LAN • No unused interfaces
• No dedicated interface for a
DMZ
SonicOS Stan dard
3.1 or higher:
• TZ Series
• PRO Series
SRA on a New DMZ • Open OPT or X2 interface
• New DMZ configured for either
NAT or Transparent Mo d e
• Provide Dell SonicWALL deep
packet inspection security
services (optional)
SRA on Existing
DMZ
• OPT or X2 interface in use with
an existing DMZ
• Provide Dell SonicWALL deep
packet inspection security
services (optional)
SonicOS Stan dard
3.1 or higher:
•TZ Series
•PRO Series
Dell SonicWALLs
with legacy firmware
Third-Party Gateway
Device
SRA on the LAN • Not planning to use Dell
SonicWALL deep packet
inspection security services
• Interoperability with a thirdparty gateway device
PWR TEST ALARM
Dell SonicWALL SRA 4200/1200 Getting Started Guide 12
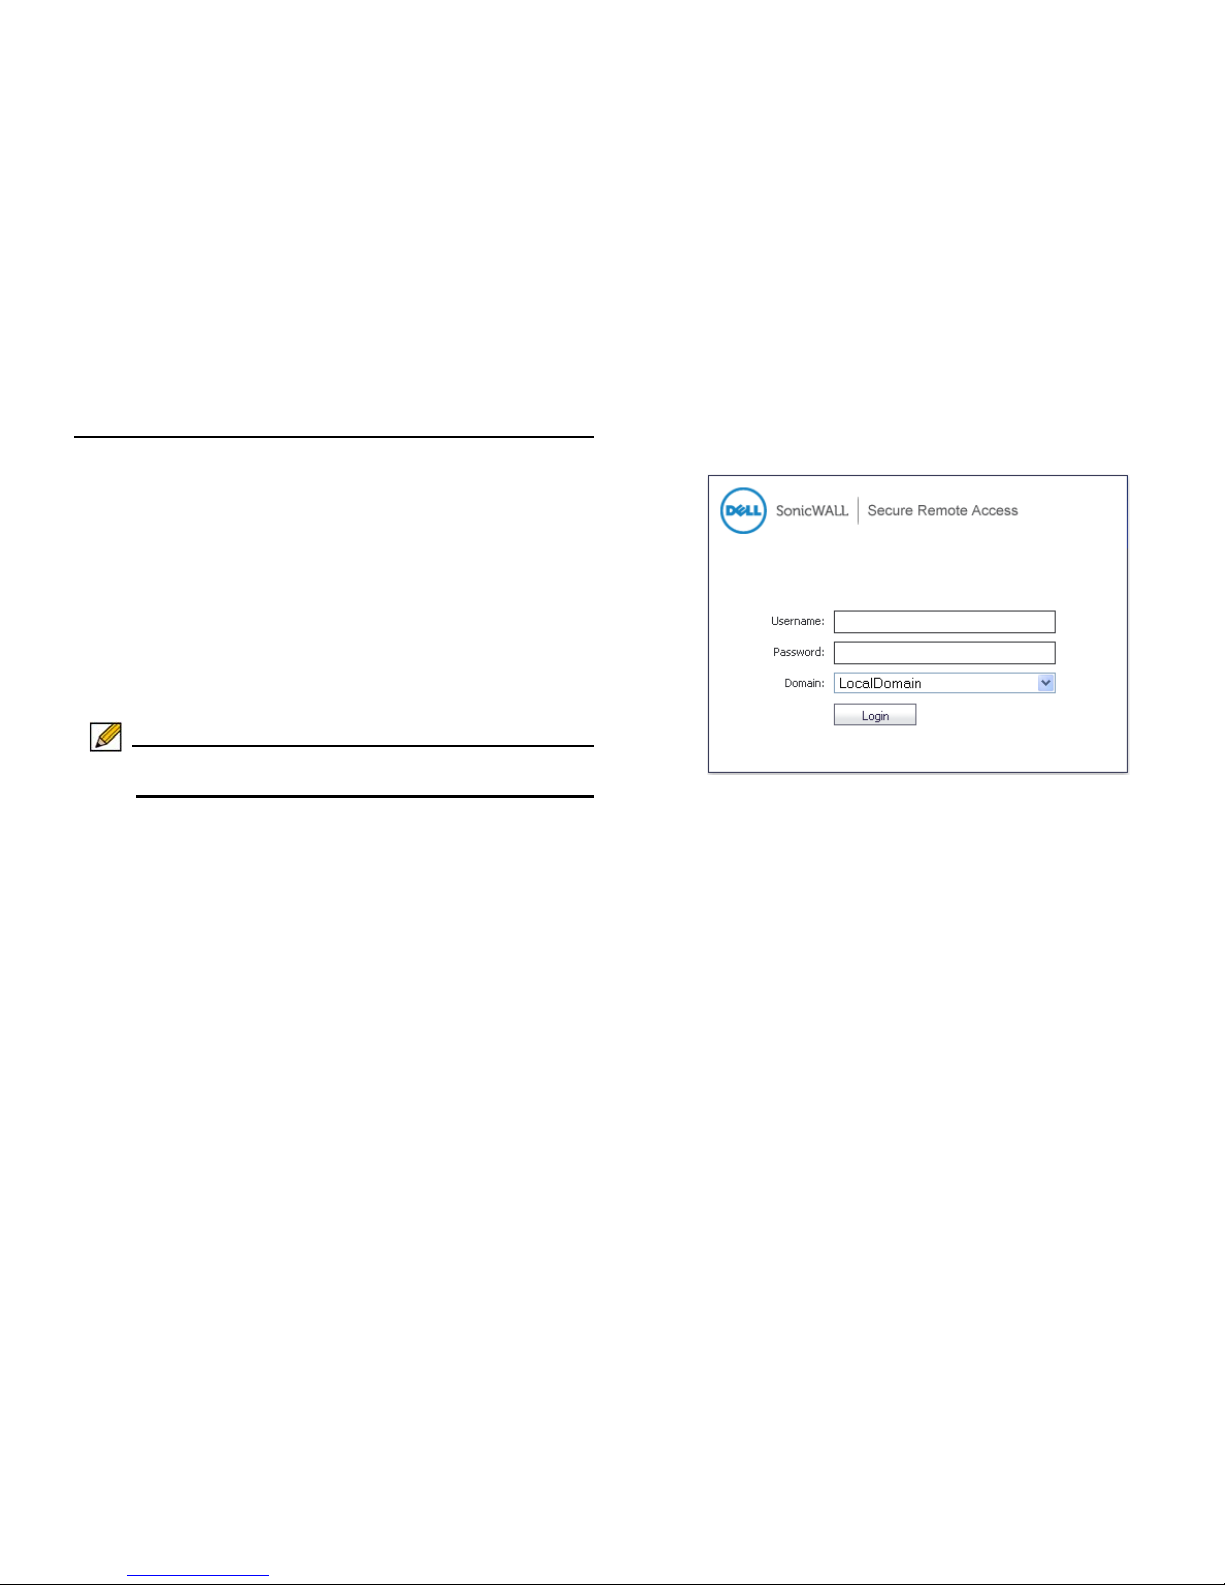
Accessing the Management Interface
To access the Web-based management interface of the
Dell SonicWALL SRA 1200/4200:
1. Set the computer you use to manage the
Dell SonicWALL SRA 1200/4200 to have a static IP
address in the 192.168.200.x/24 subnet, such as
192.168.200.20. However, do not use 192.168.200.1, as
this address will conflict with the appliance.
2. Open a Web browser, and enter http://192.168.200.1 (the
default X0 management IP address) in the Location or
Address field.
Note: A security warning may appear. Click Continue to this
website or OK to accept the certificate and continue.
3. The ‘Dell SonicWALL SRA Management Interface Login’
displays and prompts you to enter your user name and
password. Enter “admin” in the User Name field,
“password” in the Password field, select “LocalDomain”
from the Domain drop-down list, and click the Login button.
You are now successfully connected to the SRA
Management Interface.
4. Change the admin password to a unique password, as
explained in Setting Your Administrator Password section,
on page 15.

Dell SonicWALL SRA 4200/1200 Getting Started Guide 13
Troubleshooting
If you cannot connect to the Dell SonicWALL SRA 1200/4200,
verify the following configurations:
• Did you plug your management workstation into the interface
X0 on the SRA appliance?
Management can only be performed through X0.
• Is the link light illuminated on both the management station
and the SRA appliance?
• Did you correctly enter the SRA appliance management IP
address in your Web browser?
• Is your computer set to a static IP address of 192.168.200.20?
• Is your Domain set to LocalDomain on the login screen?
If you are still unable to connect to the SRA appliance, contact
Dell SonicWALL Support:
Web: http://www.sonicwall.com/us/Support.html
Email: customer_service@sonicwall.com

Dell SonicWALL SRA 4200/1200 Getting Started Guide 14
Connecting Your Appliance
In this Section
This section provides procedures for connecting your Dell SonicWALL SRA 1200/4200 appliance.
• Configuring Your SRA 4200/1200 - page 15
• Connecting Your SRA 1200/4200 - page 21
2

Dell SonicWALL SRA 4200/1200 Getting Started Guide 15
Configuring Your SRA 4200/1200
Once your Dell SonicWALL SRA 1200/4200 is connected to a
computer through the management port (X0), it can be
configured through the Web-based management interface.
Setting Your Administrator Password
1. From the management interface, select the Users > Local
Users page.
2. Click the Configure button corresponding to the
“admin” account.
Note: Changing your password from the factory default is
strongly recommended. If you change your password,
be sure to keep it in a safe place. If you lose your
password, you will have to reset the SRA appliance to
factory settings losing your configuration.
3. Enter a password for the “admin” account in the Password
field. Re-enter the password in the Confirm Password
field.
4. Click Accept to apply changes.
Dell SonicWALL SRA 4200/1200 Getting Started Guide 16
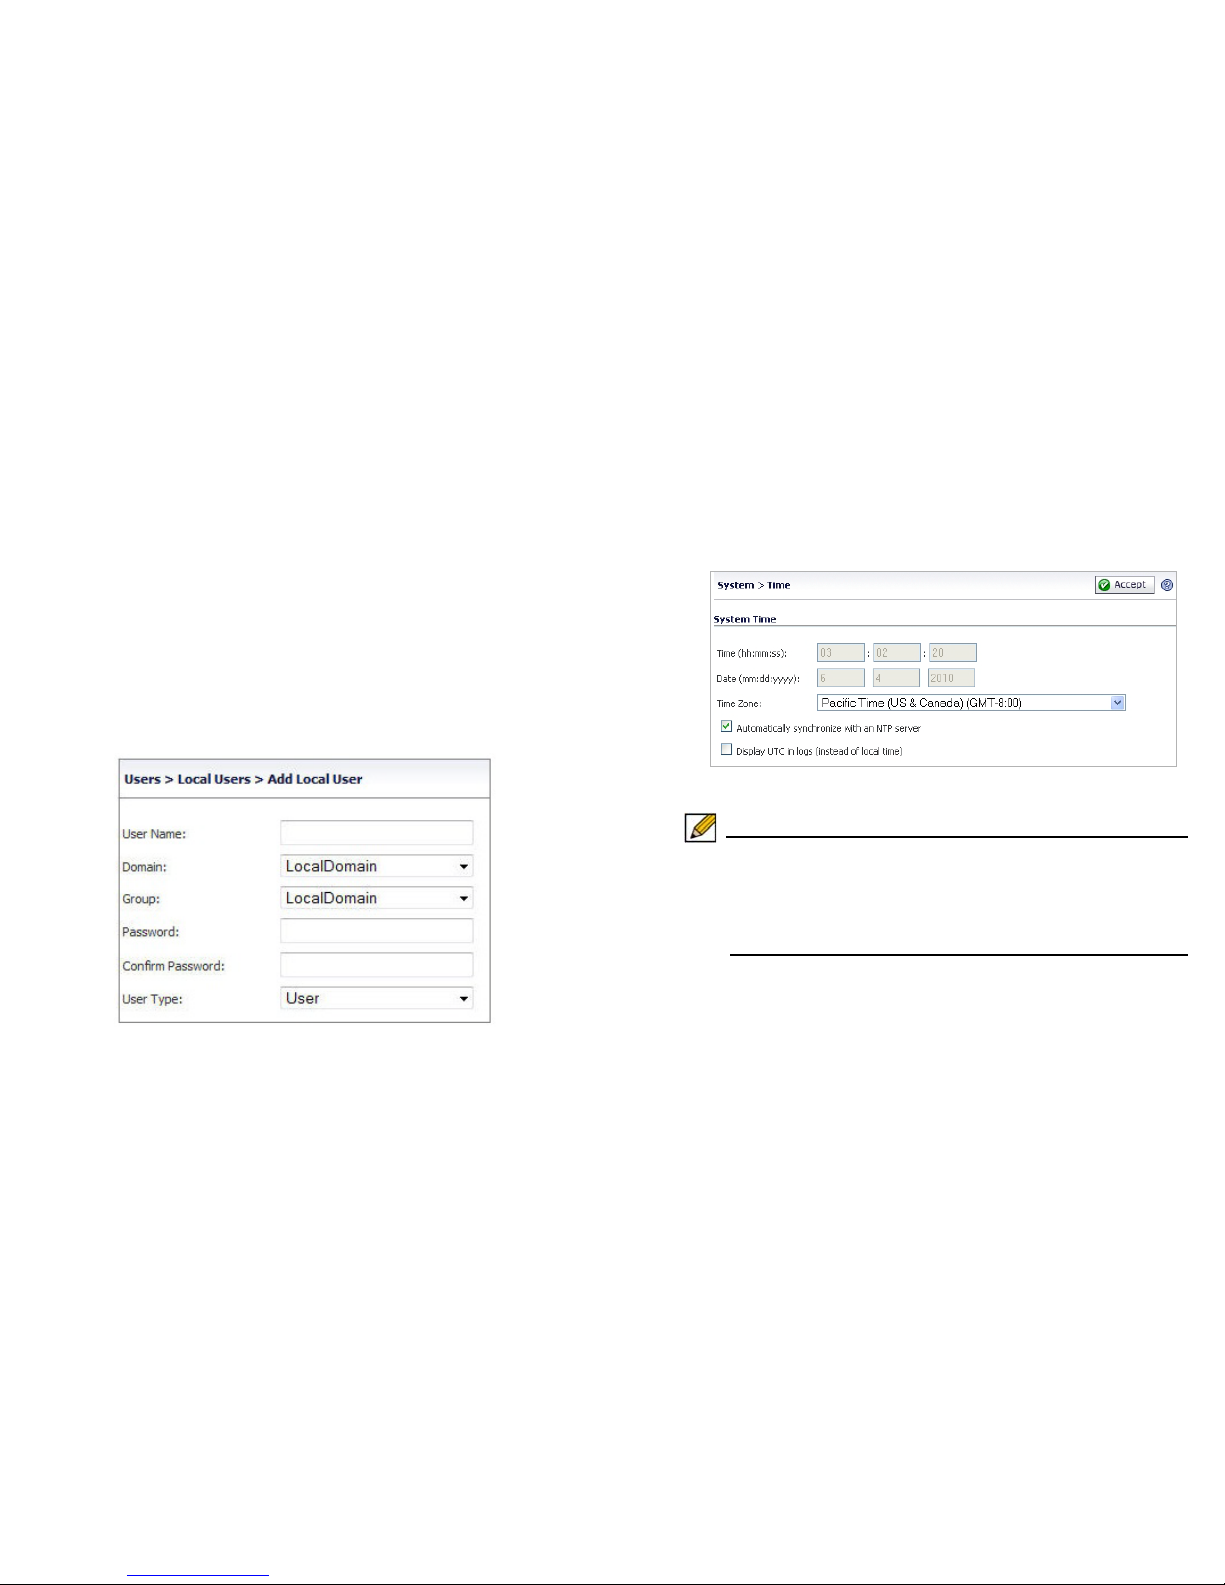
Adding a Local User
Create a local user account and map it to the local
authentication repository. This local user account will be used
for testing purposes.
1. Navigate to Users > Local Users page.
2. Click the Add User button.
3. Enter a User Name.
4. Select LocalDomain from the Domain and Group
drop-down menus.
5. Enter a Password for the user. Confirm the new password.
6. Select User from the User Type drop-down menu.
7. Click Accept to finish adding a local user.
Setting the Time Zone
1. Navigate to the System > Time page.
2. Select the appropriate Time Zone from the drop-down
menu.
3. Click Accept to save changes to the time settings.
Note: Setting the correct time is essential to operations of the
Dell SonicWALL SRA 1200/4200. Be sure to set the
time zone correctly. Automatic synchronization with an
NTP server (default setting) is encouraged for
accuracy.
Dell SonicWALL SRA 4200/1200 Getting Started Guide 17
Configuring SRA Network Settings
You will now configure your SRA 4200/1200 network settings.
Refer to the notes you took in the “What You Need to Begin” on
page 8 to complete this section.
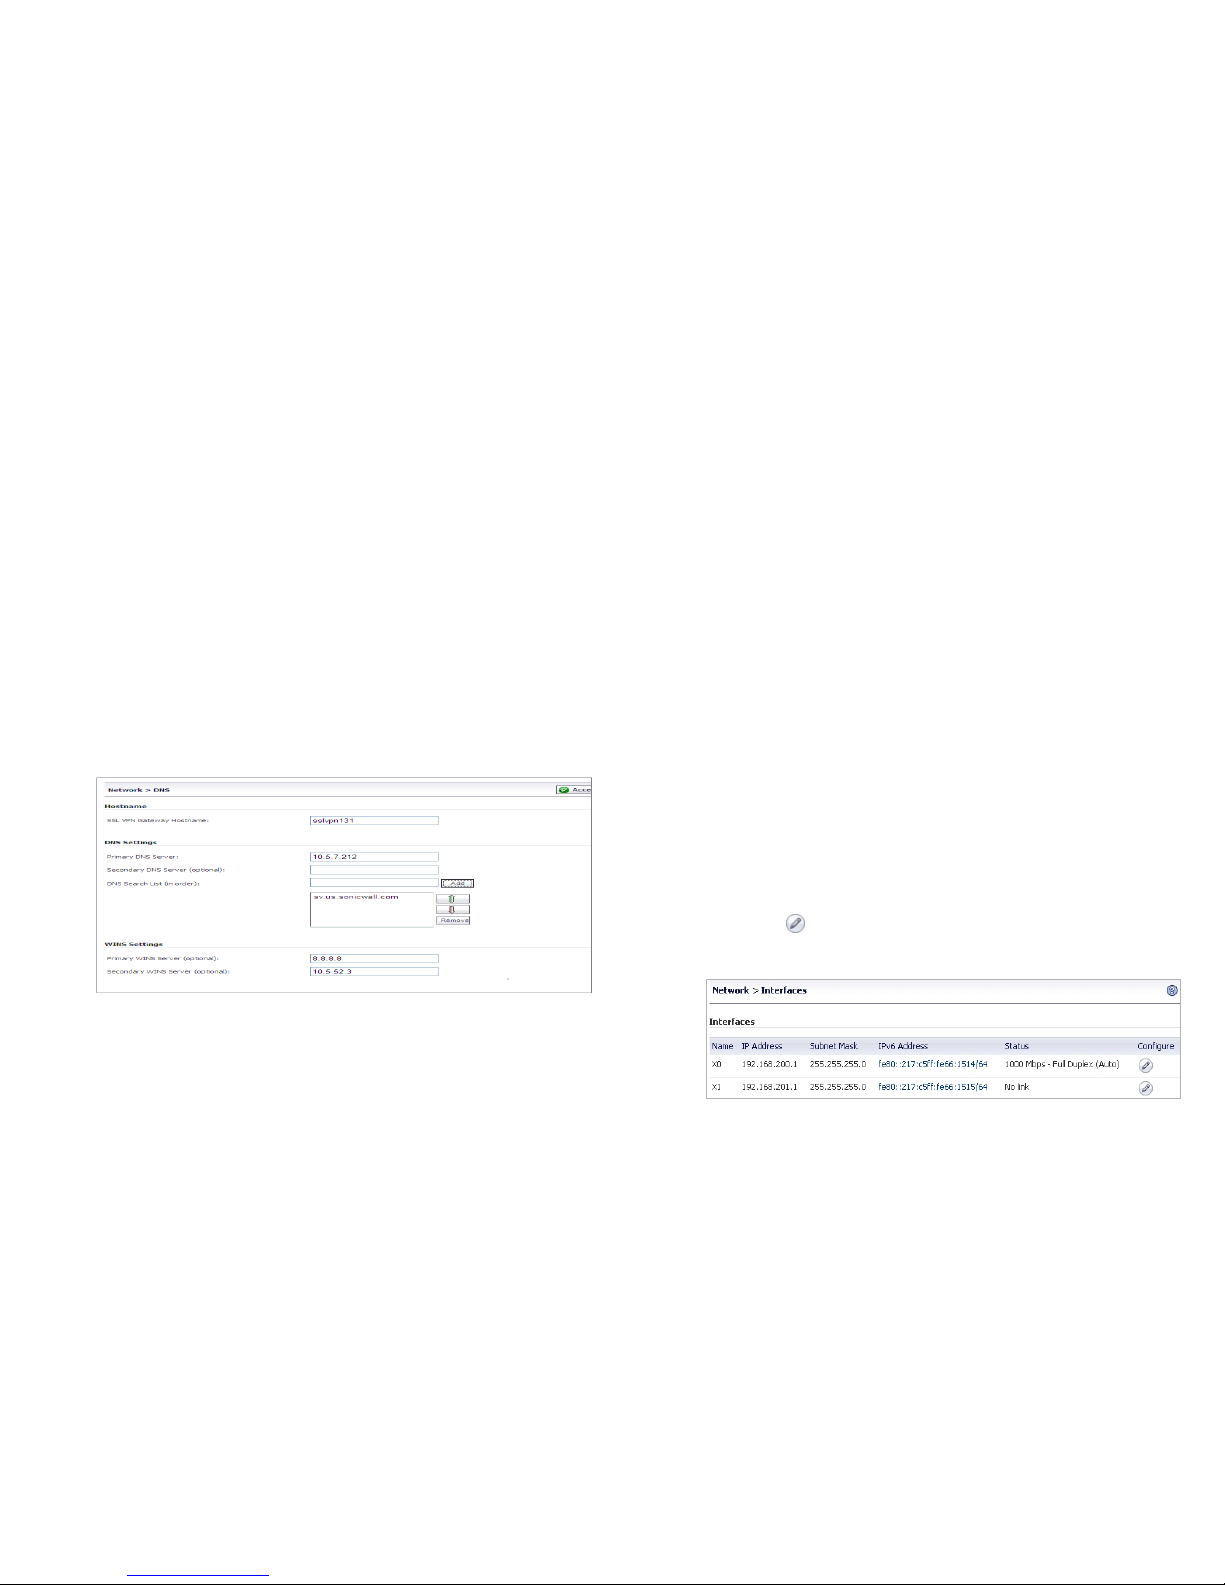
Configuring DNS / WINS
1. Navigate to the Network > DNS page in the management
interface.
2. Enter a unique name for your SRA appliance in the SSLVPN Gateway Hostname field.
3. Enter your Primary DNS Server information.
4. (Optional) Enter a Secondary DNS Server in the
Secondary DNS Server field.
5. (Optional) Enter domain suffixes in the DNS Search List:
a. Type each domain suffix and click Add.
b. Use the up and down arrow keys to arrange the DNS
suffixes in order of priority.
The first suffix in the list is appended to the host name
to create a FQDN, which is used to resolve names. If
the name is not resolved, the next suffix in the list is
used.
3. (Optional) Enter your WINS servers in the Primary WINS
Server and Secondary WINS Server fields.
4. Click Accept.
Configuring the X0 IP Address for Scenario B and
Scenario C
If deploying the SRA in either Scenario B, SRA on an Existing
DMZ or Scenario C, SRA on the LAN as shown in Selecting a
Deployment Scenario section, on page 9, you need to reset the
IP address of the X0 interface on the SRA to an address within
the range of the existing DMZ or the existing LAN.
To configure the X0 IP address for either of these scenarios:
1. Navigate to the Network > Interfaces page.
2. Click the Configure icon for the X0 interface from the
Interfaces table.
Dell SonicWALL SRA 4200/1200 Getting Started Guide 18
3. In the Interface Settings dialog box, set the IP Address
and Subnet Mask to:
4. Click Accept. Note that you will lose connection to the
SRA.
5. Reset the management computer to have a static IP
address in the range you just set for the X0 interface, for
example, 10.1.1.20 or 192.168.200.20.
6. Log into the SRA management interface again, using the
IP address you just configured for the X0 interface. For
example, point your browser to
http://192.168.168.200.
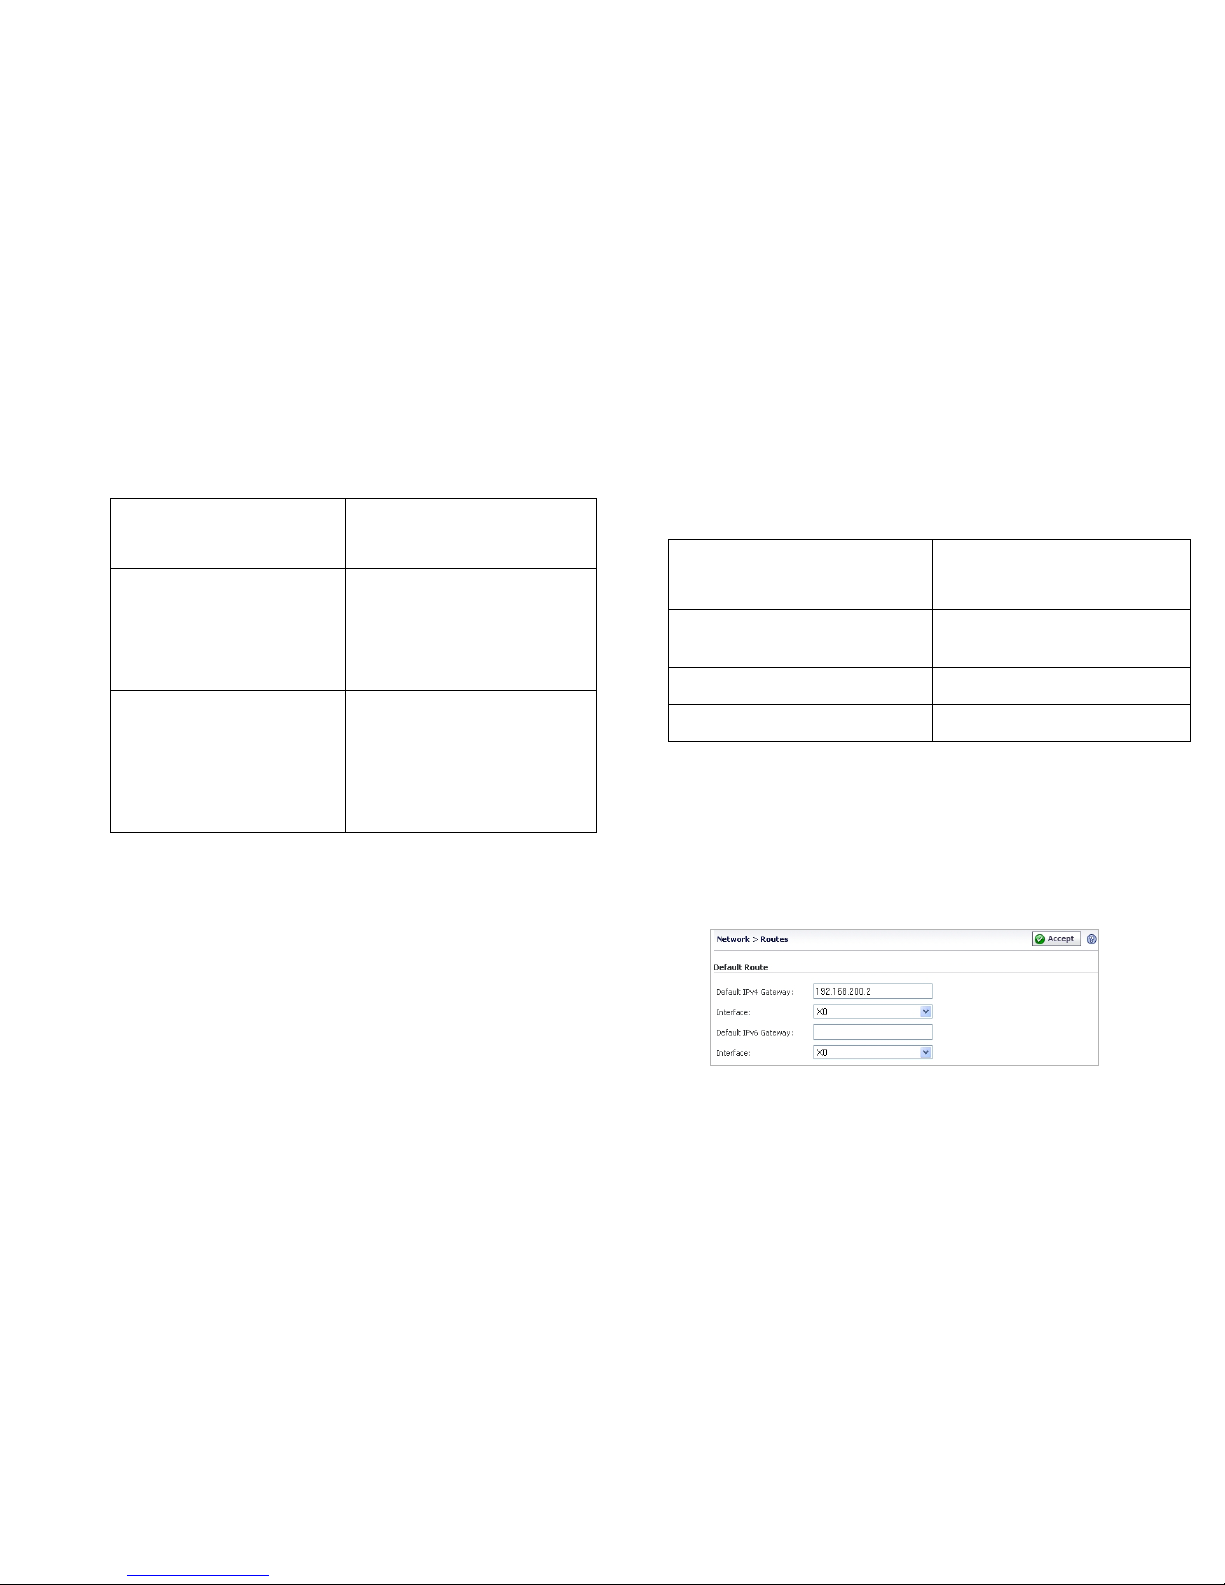
Configuring a Default Route
Refer to the following table to correctly configure your default
route for the scenario you selected.
To configure a default route:
1. Navigate to the Network > Routes page.
2. Enter the IPv4 or IPv6 address of your upstream gateway
device in the Default Gateway field. Enter the IPv6 address
if the gateway is configured accordingly.
3. Select X0 in the Interfaces drop-down list.
4. Click Accept.
If you are using
scenario:
Set the X0 interface to:
B - SRA on an Existing DMZ IP Address: An unused
address within your DMZ
subnet, for example: 10.1.1.240
Subnet Mask: Must match your
DMZ subnet mask
C - SRA on the LAN IP Address: An unused
address within your LAN
subnet, for example:
192.168.168.200
Subnet Mask: Must match your
LAN subnet mask
If you are using scenario:
Your upstream gateway
device will be:
A - SRA on a New DMZ The DMZ interface you will
create
B - SRA on an Existing DMZ The existing DMZ interface
C - SRA on the LAN The LAN gateway
 Loading...