

Dell SonicWall SRA 4200, SonicWall SRA 1200, SonicWall SRA 4600, SonicWall SRA 1600, 4200 Administrator's Manual

SRA 6.0
Administrator’s Guide
| 1

Notes, Cautions, and Warnings
NOTE: A NOTE indicates important information that helps you make better use of your system.
CAUTION: A CAUTION indicates potential damage to hardware or loss of data if instructions are
not followed.
WARNING: A WARNING indicates a potential for property damage, personal injury, or death.
© 2012 Dell Inc.
Trademarks: Dell™, the DELL logo, SonicWALL™, SonicWALL GMS™, SonicWALL
ViewPoint™, Aventail™, Reassembly-Free Deep Packet Inspection™, Dynamic Security for
the Global Network™, SonicWALL Aventail Advanced End Point Control™ (EPC™),
SonicWALL Aventail Advanced Reporting™, SonicWALL Aventail Connect Mobile™,
SonicWALL Aventail Connect™, SonicWALL Aventail Native Access Modules™, SonicWALL
Aventail Policy Zones™, SonicWALL Aventail Smart Access™, SonicWALL Aventail Unified
Policy™, SonicWALL Aventail™ Advanced EPC™, SonicWALL Clean VPN™, SonicWALL
Clean Wireless™, SonicWALL Global Response Intelligent Defense (GRID) Network™,
SonicWALL Mobile Connect™, SonicWALL SuperMassive™ E10000 Series, and all other
SonicWALL product and service names and slogans are trademarks of Dell Inc.
2012 – 11 P/N 232-002120-00 Rev. D
2 | SRA 6.0 Administrator’s Guide

Table of Contents
Table of Contents . . . . . . . . . . . . . . . . . . . . . . . . . . . . . . . . . . . . . . . . . . . . . . . . . .3
Chapter 1 About This Guide . . . . . . . . . . . . . . . . . . . . . . . . . . . . . . . . . . . . . . . . . .9
Guide Conventions . . . . . . . . . . . . . . . . . . . . . . . . . . . . . . . . . . . . . . . . . . . . . . . . . . . . . . 9
Chapter 2 SRA Overview . . . . . . . . . . . . . . . . . . . . . . . . . . . . . . . . . . . . . . . . . . . 11
Overview of Dell SonicWALL SRA . . . . . . . . . . . . . . . . . . . . . . . . . . . . . . . . . . . . . . . . . 11
SSL for Virtual Private Networking (VPN). . . . . . . . . . . . . . . . . . . . . . . . . . . . . . . . . 11
SRA Virtual Appliance. . . . . . . . . . . . . . . . . . . . . . . . . . . . . . . . . . . . . . . . . . . . . . . . 12
SRA Software Components . . . . . . . . . . . . . . . . . . . . . . . . . . . . . . . . . . . . . . . . . . . 12
SRA Hardware Components. . . . . . . . . . . . . . . . . . . . . . . . . . . . . . . . . . . . . . . . . . . 13
Concepts for Dell SonicWALL SRA. . . . . . . . . . . . . . . . . . . . . . . . . . . . . . . . . . . . . . . . . 18
Encryption Overview. . . . . . . . . . . . . . . . . . . . . . . . . . . . . . . . . . . . . . . . . . . . . . . . . 18
SSL Handshake Procedure . . . . . . . . . . . . . . . . . . . . . . . . . . . . . . . . . . . . . . . . . . . 19
IPv6 Support Overview. . . . . . . . . . . . . . . . . . . . . . . . . . . . . . . . . . . . . . . . . . . . . . . 19
Browser Requirements for the SRA Administrator . . . . . . . . . . . . . . . . . . . . . . . . . . 22
Browser Requirements for the SRA End User . . . . . . . . . . . . . . . . . . . . . . . . . . . . . 22
Portals Overview. . . . . . . . . . . . . . . . . . . . . . . . . . . . . . . . . . . . . . . . . . . . . . . . . . . . 23
Domains Overview . . . . . . . . . . . . . . . . . . . . . . . . . . . . . . . . . . . . . . . . . . . . . . . . . . 23
Application Offloading and HTTP(S) Bookmarks Overview . . . . . . . . . . . . . . . . . . . 23
Cross Domain Single Sign-On . . . . . . . . . . . . . . . . . . . . . . . . . . . . . . . . . . . . . . . . . 28
ActiveSync Authentication . . . . . . . . . . . . . . . . . . . . . . . . . . . . . . . . . . . . . . . . . . . . 28
Network Resources Overview. . . . . . . . . . . . . . . . . . . . . . . . . . . . . . . . . . . . . . . . . . 33
SNMP Overview . . . . . . . . . . . . . . . . . . . . . . . . . . . . . . . . . . . . . . . . . . . . . . . . . . . . 39
DNS Overview . . . . . . . . . . . . . . . . . . . . . . . . . . . . . . . . . . . . . . . . . . . . . . . . . . . . . 39
Network Routes Overview . . . . . . . . . . . . . . . . . . . . . . . . . . . . . . . . . . . . . . . . . . . . 39
NetExtender Overview . . . . . . . . . . . . . . . . . . . . . . . . . . . . . . . . . . . . . . . . . . . . . . . 39
Two-Factor Authentication Overview . . . . . . . . . . . . . . . . . . . . . . . . . . . . . . . . . . . . 43
One Time Password Overview . . . . . . . . . . . . . . . . . . . . . . . . . . . . . . . . . . . . . . . . . 46
End Point Control Overview . . . . . . . . . . . . . . . . . . . . . . . . . . . . . . . . . . . . . . . . . . . 48
Secure Virtual Assist Overview. . . . . . . . . . . . . . . . . . . . . . . . . . . . . . . . . . . . . . . . . 49
Web Application Firewall Overview. . . . . . . . . . . . . . . . . . . . . . . . . . . . . . . . . . . . . . 60
Navigating the SRA Management Interface . . . . . . . . . . . . . . . . . . . . . . . . . . . . . . . . . . 71
Management Interface Introduction . . . . . . . . . . . . . . . . . . . . . . . . . . . . . . . . . . . . . 72
Navigating the Management Interface . . . . . . . . . . . . . . . . . . . . . . . . . . . . . . . . . . . 73
Navigation Bar . . . . . . . . . . . . . . . . . . . . . . . . . . . . . . . . . . . . . . . . . . . . . . . . . . . . . 77
Deployment Guidelines . . . . . . . . . . . . . . . . . . . . . . . . . . . . . . . . . . . . . . . . . . . . . . . . . . 79
Support for Numbers of User Connections. . . . . . . . . . . . . . . . . . . . . . . . . . . . . . . . 80
Resource Type Support . . . . . . . . . . . . . . . . . . . . . . . . . . . . . . . . . . . . . . . . . . . . . . 80
Integration with Dell SonicWALL Products . . . . . . . . . . . . . . . . . . . . . . . . . . . . . . . . 81
Typical Deployment . . . . . . . . . . . . . . . . . . . . . . . . . . . . . . . . . . . . . . . . . . . . . . . . . 81
Two-armed Deployment . . . . . . . . . . . . . . . . . . . . . . . . . . . . . . . . . . . . . . . . . . . . . . 82
Chapter 3 System Configuration . . . . . . . . . . . . . . . . . . . . . . . . . . . . . . . . . . . . . . 83
System > Status . . . . . . . . . . . . . . . . . . . . . . . . . . . . . . . . . . . . . . . . . . . . . . . . . . . . . . . 83
Table of Contents | 3

System > Status Overview . . . . . . . . . . . . . . . . . . . . . . . . . . . . . . . . . . . . . . . . . . . . 84
Registering Your SRA Appliance from System Status . . . . . . . . . . . . . . . . . . . . . . . 85
Configuring Network Interfaces. . . . . . . . . . . . . . . . . . . . . . . . . . . . . . . . . . . . . . . . . 88
System > Licenses . . . . . . . . . . . . . . . . . . . . . . . . . . . . . . . . . . . . . . . . . . . . . . . . . . . . . 88
System > Licenses Overview . . . . . . . . . . . . . . . . . . . . . . . . . . . . . . . . . . . . . . . . . . 88
Registering the SRA Appliance from System > Licenses. . . . . . . . . . . . . . . . . . . . . 90
Activating or Upgrading Licenses . . . . . . . . . . . . . . . . . . . . . . . . . . . . . . . . . . . . . . . 92
System > Time . . . . . . . . . . . . . . . . . . . . . . . . . . . . . . . . . . . . . . . . . . . . . . . . . . . . . . . . 96
System > Time Overview . . . . . . . . . . . . . . . . . . . . . . . . . . . . . . . . . . . . . . . . . . . . . 96
Setting the Time . . . . . . . . . . . . . . . . . . . . . . . . . . . . . . . . . . . . . . . . . . . . . . . . . . . . 97
Enabling Network Time Protocol. . . . . . . . . . . . . . . . . . . . . . . . . . . . . . . . . . . . . . . . 97
System > Settings . . . . . . . . . . . . . . . . . . . . . . . . . . . . . . . . . . . . . . . . . . . . . . . . . . . . . . 98
System > Settings Overview. . . . . . . . . . . . . . . . . . . . . . . . . . . . . . . . . . . . . . . . . . . 98
Managing Configuration Files. . . . . . . . . . . . . . . . . . . . . . . . . . . . . . . . . . . . . . . . . . 99
Managing Firmware . . . . . . . . . . . . . . . . . . . . . . . . . . . . . . . . . . . . . . . . . . . . . . . . 101
System > Administration . . . . . . . . . . . . . . . . . . . . . . . . . . . . . . . . . . . . . . . . . . . . . . . . 102
System > Administration Overview. . . . . . . . . . . . . . . . . . . . . . . . . . . . . . . . . . . . . 103
Configuring Login Security . . . . . . . . . . . . . . . . . . . . . . . . . . . . . . . . . . . . . . . . . . . 104
Configuring Web Management Settings. . . . . . . . . . . . . . . . . . . . . . . . . . . . . . . . . 105
Configuring SNMP Settings . . . . . . . . . . . . . . . . . . . . . . . . . . . . . . . . . . . . . . . . . . 105
Enabling GMS Management. . . . . . . . . . . . . . . . . . . . . . . . . . . . . . . . . . . . . . . . . . 105
System > Certificates . . . . . . . . . . . . . . . . . . . . . . . . . . . . . . . . . . . . . . . . . . . . . . . . . . 106
System > Certificates Overview . . . . . . . . . . . . . . . . . . . . . . . . . . . . . . . . . . . . . . . 106
Certificate Management . . . . . . . . . . . . . . . . . . . . . . . . . . . . . . . . . . . . . . . . . . . . . 107
Generating a Certificate Signing Request. . . . . . . . . . . . . . . . . . . . . . . . . . . . . . . . 108
Viewing and Editing Certificate Information . . . . . . . . . . . . . . . . . . . . . . . . . . . . . . 108
Importing a Certificate. . . . . . . . . . . . . . . . . . . . . . . . . . . . . . . . . . . . . . . . . . . . . . . 109
Adding Additional CA Certificates. . . . . . . . . . . . . . . . . . . . . . . . . . . . . . . . . . . . . . 110
System > Monitoring . . . . . . . . . . . . . . . . . . . . . . . . . . . . . . . . . . . . . . . . . . . . . . . . . . . 110
System > Monitoring Overview. . . . . . . . . . . . . . . . . . . . . . . . . . . . . . . . . . . . . . . . 110
Setting The Monitoring Period . . . . . . . . . . . . . . . . . . . . . . . . . . . . . . . . . . . . . . . . 112
Refreshing the Monitors . . . . . . . . . . . . . . . . . . . . . . . . . . . . . . . . . . . . . . . . . . . . . 112
System > Diagnostics . . . . . . . . . . . . . . . . . . . . . . . . . . . . . . . . . . . . . . . . . . . . . . . . . . 112
System > Diagnostics Overview . . . . . . . . . . . . . . . . . . . . . . . . . . . . . . . . . . . . . . . 112
Downloading the Tech Support Report. . . . . . . . . . . . . . . . . . . . . . . . . . . . . . . . . . 113
Performing Diagnostic Tests. . . . . . . . . . . . . . . . . . . . . . . . . . . . . . . . . . . . . . . . . . 113
System > Restart. . . . . . . . . . . . . . . . . . . . . . . . . . . . . . . . . . . . . . . . . . . . . . . . . . . . . . 114
System > Restart Overview . . . . . . . . . . . . . . . . . . . . . . . . . . . . . . . . . . . . . . . . . . 114
Restarting the SRA Appliance . . . . . . . . . . . . . . . . . . . . . . . . . . . . . . . . . . . . . . . . 114
Chapter 4 Network Configuration . . . . . . . . . . . . . . . . . . . . . . . . . . . . . . . . . . . . 115
Network > Interfaces . . . . . . . . . . . . . . . . . . . . . . . . . . . . . . . . . . . . . . . . . . . . . . . . . . . 115
Network > Interfaces Overview. . . . . . . . . . . . . . . . . . . . . . . . . . . . . . . . . . . . . . . . 116
Configuring Network Interfaces. . . . . . . . . . . . . . . . . . . . . . . . . . . . . . . . . . . . . . . . 116
Network > DNS . . . . . . . . . . . . . . . . . . . . . . . . . . . . . . . . . . . . . . . . . . . . . . . . . . . . . . . 118
Network > DNS Overview. . . . . . . . . . . . . . . . . . . . . . . . . . . . . . . . . . . . . . . . . . . . 118
Configuring Hostname Settings . . . . . . . . . . . . . . . . . . . . . . . . . . . . . . . . . . . . . . . 119
Configuring DNS Settings. . . . . . . . . . . . . . . . . . . . . . . . . . . . . . . . . . . . . . . . . . . . 119
4 | SRA 6.0 Administrator’s Guide

Configuring WINS Settings. . . . . . . . . . . . . . . . . . . . . . . . . . . . . . . . . . . . . . . . . . . 120
Network > Routes . . . . . . . . . . . . . . . . . . . . . . . . . . . . . . . . . . . . . . . . . . . . . . . . . . . . . 120
Network > Routes Overview. . . . . . . . . . . . . . . . . . . . . . . . . . . . . . . . . . . . . . . . . . 121
Configuring a Default Route for the SRA Appliance. . . . . . . . . . . . . . . . . . . . . . . . 121
Configuring Static Routes for the Appliance. . . . . . . . . . . . . . . . . . . . . . . . . . . . . . 122
Network > Host Resolution . . . . . . . . . . . . . . . . . . . . . . . . . . . . . . . . . . . . . . . . . . . . . . 123
Network > Host Resolution Overview . . . . . . . . . . . . . . . . . . . . . . . . . . . . . . . . . . . 123
Configuring Host Resolution. . . . . . . . . . . . . . . . . . . . . . . . . . . . . . . . . . . . . . . . . . 123
Network > Network Objects. . . . . . . . . . . . . . . . . . . . . . . . . . . . . . . . . . . . . . . . . . . . . . 124
Network > Network Objects Overview . . . . . . . . . . . . . . . . . . . . . . . . . . . . . . . . . . 124
Adding Network Objects . . . . . . . . . . . . . . . . . . . . . . . . . . . . . . . . . . . . . . . . . . . . . 125
Editing Network Objects . . . . . . . . . . . . . . . . . . . . . . . . . . . . . . . . . . . . . . . . . . . . . 125
Chapter 5 Portals Configuration . . . . . . . . . . . . . . . . . . . . . . . . . . . . . . . . . . . . . 129
Portals > Portals . . . . . . . . . . . . . . . . . . . . . . . . . . . . . . . . . . . . . . . . . . . . . . . . . . . . . . 129
Portals > Portals Overview . . . . . . . . . . . . . . . . . . . . . . . . . . . . . . . . . . . . . . . . . . . 130
Adding Portals. . . . . . . . . . . . . . . . . . . . . . . . . . . . . . . . . . . . . . . . . . . . . . . . . . . . . 131
Configuring General Portal Settings . . . . . . . . . . . . . . . . . . . . . . . . . . . . . . . . . . . . 132
Configuring the Home Page . . . . . . . . . . . . . . . . . . . . . . . . . . . . . . . . . . . . . . . . . . 134
Configuring Per-Portal Virtual Assist Settings. . . . . . . . . . . . . . . . . . . . . . . . . . . . . 138
Configuring Virtual Host Settings . . . . . . . . . . . . . . . . . . . . . . . . . . . . . . . . . . . . . . 139
Adding a Custom Portal Logo. . . . . . . . . . . . . . . . . . . . . . . . . . . . . . . . . . . . . . . . . 141
Portals > Application Offloading . . . . . . . . . . . . . . . . . . . . . . . . . . . . . . . . . . . . . . . . . . 142
Application Offloading Overview. . . . . . . . . . . . . . . . . . . . . . . . . . . . . . . . . . . . . . . 142
Configuring an HTTP/HTTPS Application Offloading Portal. . . . . . . . . . . . . . . . . . 143
Configuring Generic SSL Offloading. . . . . . . . . . . . . . . . . . . . . . . . . . . . . . . . . . . . 146
Portals > Domains. . . . . . . . . . . . . . . . . . . . . . . . . . . . . . . . . . . . . . . . . . . . . . . . . . . . . 148
Portals > Domains Overview. . . . . . . . . . . . . . . . . . . . . . . . . . . . . . . . . . . . . . . . . . 148
Viewing the Domains Table . . . . . . . . . . . . . . . . . . . . . . . . . . . . . . . . . . . . . . . . . . 149
Removing a Domain . . . . . . . . . . . . . . . . . . . . . . . . . . . . . . . . . . . . . . . . . . . . . . . . 149
Adding or Editing a Domain . . . . . . . . . . . . . . . . . . . . . . . . . . . . . . . . . . . . . . . . . . 150
Adding or Editing a Domain with Local User Authentication. . . . . . . . . . . . . . . . . . 151
Adding or Editing a Domain with Active Directory Authentication. . . . . . . . . . . . . . 152
Adding or Editing a Domain with LDAP Authentication. . . . . . . . . . . . . . . . . . . . . . 156
Adding or Editing a Domain with NT Domain Authentication . . . . . . . . . . . . . . . . . 159
Adding or Editing a Domain with RADIUS Authentication . . . . . . . . . . . . . . . . . . . 160
Configuring Two-Factor Authentication. . . . . . . . . . . . . . . . . . . . . . . . . . . . . . . . . . 162
Portals > Custom Logo . . . . . . . . . . . . . . . . . . . . . . . . . . . . . . . . . . . . . . . . . . . . . . . . . 170
Portals > Load Balancing . . . . . . . . . . . . . . . . . . . . . . . . . . . . . . . . . . . . . . . . . . . . . . . 171
Portals > Load Balancing Overview . . . . . . . . . . . . . . . . . . . . . . . . . . . . . . . . . . . . 171
Configuring a Load Balancing Group . . . . . . . . . . . . . . . . . . . . . . . . . . . . . . . . . . . 172
Chapter 6 Services Configuration . . . . . . . . . . . . . . . . . . . . . . . . . . . . . . . . . . . . 177
Services > Settings . . . . . . . . . . . . . . . . . . . . . . . . . . . . . . . . . . . . . . . . . . . . . . . . . . . . 177
Services > Bookmarks. . . . . . . . . . . . . . . . . . . . . . . . . . . . . . . . . . . . . . . . . . . . . . . . . . 180
Services > Policies . . . . . . . . . . . . . . . . . . . . . . . . . . . . . . . . . . . . . . . . . . . . . . . . . . . . 187
Adding a Policy. . . . . . . . . . . . . . . . . . . . . . . . . . . . . . . . . . . . . . . . . . . . . . . . . . . . 187
Editing a Policy . . . . . . . . . . . . . . . . . . . . . . . . . . . . . . . . . . . . . . . . . . . . . . . . . . . . 188
Deleting a Policy. . . . . . . . . . . . . . . . . . . . . . . . . . . . . . . . . . . . . . . . . . . . . . . . . . . 189
Table of Contents | 5

Chapter 7 NetExtender Configuration. . . . . . . . . . . . . . . . . . . . . . . . . . . . . . . . . 191
NetExtender > Status . . . . . . . . . . . . . . . . . . . . . . . . . . . . . . . . . . . . . . . . . . . . . . . . . . 192
NetExtender > Status Overview . . . . . . . . . . . . . . . . . . . . . . . . . . . . . . . . . . . . . . . 192
Viewing NetExtender Status. . . . . . . . . . . . . . . . . . . . . . . . . . . . . . . . . . . . . . . . . . 192
NetExtender > Client Settings. . . . . . . . . . . . . . . . . . . . . . . . . . . . . . . . . . . . . . . . . . . . 193
NetExtender > Client Settings Overview. . . . . . . . . . . . . . . . . . . . . . . . . . . . . . . . . 193
Configuring the Global NetExtender IP Address Range. . . . . . . . . . . . . . . . . . . . . 193
Configuring Global NetExtender Settings. . . . . . . . . . . . . . . . . . . . . . . . . . . . . . . . 194
NetExtender > Client Routes . . . . . . . . . . . . . . . . . . . . . . . . . . . . . . . . . . . . . . . . . . . . . 195
NetExtender > Client Routes Overview . . . . . . . . . . . . . . . . . . . . . . . . . . . . . . . . . 195
Adding NetExtender Client Routes. . . . . . . . . . . . . . . . . . . . . . . . . . . . . . . . . . . . . 195
NetExtender User and Group Settings . . . . . . . . . . . . . . . . . . . . . . . . . . . . . . . . . . . . . 196
Configuring User-Level NetExtender Settings . . . . . . . . . . . . . . . . . . . . . . . . . . . . 196
Configuring Group-Level NetExtender Settings . . . . . . . . . . . . . . . . . . . . . . . . . . . 200
Chapter 8 End Point Control . . . . . . . . . . . . . . . . . . . . . . . . . . . . . . . . . . . . . . . . 203
End Point Control > Device Profiles . . . . . . . . . . . . . . . . . . . . . . . . . . . . . . . . . . . . . . . 204
Users > Local Groups > Edit EPC Settings. . . . . . . . . . . . . . . . . . . . . . . . . . . . . . . . . . 205
Users > Local Users > Edit EPC Settings . . . . . . . . . . . . . . . . . . . . . . . . . . . . . . . . . . . 208
End Point Control > Settings. . . . . . . . . . . . . . . . . . . . . . . . . . . . . . . . . . . . . . . . . . . . . 210
End Point Control > Log . . . . . . . . . . . . . . . . . . . . . . . . . . . . . . . . . . . . . . . . . . . . . . . . 211
Chapter 9 Secure Virtual Assist Configuration . . . . . . . . . . . . . . . . . . . . . . . . . 213
Secure Virtual Assist > Status. . . . . . . . . . . . . . . . . . . . . . . . . . . . . . . . . . . . . . . . . . . . 213
Secure Virtual Assist > Status. . . . . . . . . . . . . . . . . . . . . . . . . . . . . . . . . . . . . . . . . 214
Secure Virtual Assist > Settings . . . . . . . . . . . . . . . . . . . . . . . . . . . . . . . . . . . . . . . . . . 214
General Settings. . . . . . . . . . . . . . . . . . . . . . . . . . . . . . . . . . . . . . . . . . . . . . . . . . . 215
Request Settings. . . . . . . . . . . . . . . . . . . . . . . . . . . . . . . . . . . . . . . . . . . . . . . . . . . 216
Notification Settings . . . . . . . . . . . . . . . . . . . . . . . . . . . . . . . . . . . . . . . . . . . . . . . . 217
Customer Portal Settings . . . . . . . . . . . . . . . . . . . . . . . . . . . . . . . . . . . . . . . . . . . . 218
Restriction Settings. . . . . . . . . . . . . . . . . . . . . . . . . . . . . . . . . . . . . . . . . . . . . . . . . 219
Secure Virtual Assist > Log. . . . . . . . . . . . . . . . . . . . . . . . . . . . . . . . . . . . . . . . . . . . . . 220
Secure Virtual Assist > Licensing . . . . . . . . . . . . . . . . . . . . . . . . . . . . . . . . . . . . . . . . . 221
Secure Virtual Assist > Licensing Overview . . . . . . . . . . . . . . . . . . . . . . . . . . . . . . 221
Chapter 10 Secure Virtual Meeting . . . . . . . . . . . . . . . . . . . . . . . . . . . . . . . . . . . 223
Secure Virtual Meeting > Status . . . . . . . . . . . . . . . . . . . . . . . . . . . . . . . . . . . . . . . . 223
Secure Virtual Meeting > Settings . . . . . . . . . . . . . . . . . . . . . . . . . . . . . . . . . . . . . . . . 224
General Settings. . . . . . . . . . . . . . . . . . . . . . . . . . . . . . . . . . . . . . . . . . . . . . . . . . . 224
Secure Virtual Meeting > Log . . . . . . . . . . . . . . . . . . . . . . . . . . . . . . . . . . . . . . . . . . . . 226
Secure Virtual Meeting > Licensing. . . . . . . . . . . . . . . . . . . . . . . . . . . . . . . . . . . . . . . . 227
Licensing Overview. . . . . . . . . . . . . . . . . . . . . . . . . . . . . . . . . . . . . . . . . . . . . . . . . 227
Licensing Information . . . . . . . . . . . . . . . . . . . . . . . . . . . . . . . . . . . . . . . . . . . . . . . 227
Chapter 11 High Availability Configuration . . . . . . . . . . . . . . . . . . . . . . . . . . . . 229
High Availability Overview. . . . . . . . . . . . . . . . . . . . . . . . . . . . . . . . . . . . . . . . . . . . . . . 229
Supported Platforms . . . . . . . . . . . . . . . . . . . . . . . . . . . . . . . . . . . . . . . . . . . . . . . . 229
Configuring High Availability . . . . . . . . . . . . . . . . . . . . . . . . . . . . . . . . . . . . . . . . . . . . . 230
Physical Connectivity . . . . . . . . . . . . . . . . . . . . . . . . . . . . . . . . . . . . . . . . . . . . . . . 231
Preparing for High Availability. . . . . . . . . . . . . . . . . . . . . . . . . . . . . . . . . . . . . . . . . 231
6 | SRA 6.0 Administrator’s Guide

Configuring High Availability Settings. . . . . . . . . . . . . . . . . . . . . . . . . . . . . . . . . . . 231
Enabling Interface Monitoring. . . . . . . . . . . . . . . . . . . . . . . . . . . . . . . . . . . . . . . . . 232
Configuring Network Monitoring Addresses . . . . . . . . . . . . . . . . . . . . . . . . . . . . . . 232
Synchronizing Firmware . . . . . . . . . . . . . . . . . . . . . . . . . . . . . . . . . . . . . . . . . . . . . 233
Technical FAQ. . . . . . . . . . . . . . . . . . . . . . . . . . . . . . . . . . . . . . . . . . . . . . . . . . . . . . . . 233
Chapter 12 Web Application Firewall Configuration . . . . . . . . . . . . . . . . . . . . . 235
Licensing Web Application Firewall. . . . . . . . . . . . . . . . . . . . . . . . . . . . . . . . . . . . . . . . 235
Configuring Web Application Firewall . . . . . . . . . . . . . . . . . . . . . . . . . . . . . . . . . . . . . . 239
Viewing and Updating Web Application Firewall Status . . . . . . . . . . . . . . . . . . . . . 239
Configuring Web Application Firewall Settings . . . . . . . . . . . . . . . . . . . . . . . . . . . . 242
Configuring Web Application Firewall Signature Actions . . . . . . . . . . . . . . . . . . . . 250
Determining the Host Entry for Exclusions . . . . . . . . . . . . . . . . . . . . . . . . . . . . . . . 254
Configuring Custom Rules and Application Profiling . . . . . . . . . . . . . . . . . . . . . . . 256
Using Web Application Firewall Monitoring. . . . . . . . . . . . . . . . . . . . . . . . . . . . . . . 274
Using Web Application Firewall Logs . . . . . . . . . . . . . . . . . . . . . . . . . . . . . . . . . . . 282
Verifying and Troubleshooting Web Application Firewall . . . . . . . . . . . . . . . . . . . . . . . 284
Chapter 13 Users Configuration . . . . . . . . . . . . . . . . . . . . . . . . . . . . . . . . . . . . . 287
Users > Status. . . . . . . . . . . . . . . . . . . . . . . . . . . . . . . . . . . . . . . . . . . . . . . . . . . . . . . . 287
Access Policies Concepts. . . . . . . . . . . . . . . . . . . . . . . . . . . . . . . . . . . . . . . . . . . . 288
Access Policy Hierarchy . . . . . . . . . . . . . . . . . . . . . . . . . . . . . . . . . . . . . . . . . . . . . 288
Users > Local Users . . . . . . . . . . . . . . . . . . . . . . . . . . . . . . . . . . . . . . . . . . . . . . . . . . . 289
Users > Local Users Overview . . . . . . . . . . . . . . . . . . . . . . . . . . . . . . . . . . . . . . . . 289
Removing a User . . . . . . . . . . . . . . . . . . . . . . . . . . . . . . . . . . . . . . . . . . . . . . . . . . 290
Adding a Local User . . . . . . . . . . . . . . . . . . . . . . . . . . . . . . . . . . . . . . . . . . . . . . . . 290
Editing User Settings . . . . . . . . . . . . . . . . . . . . . . . . . . . . . . . . . . . . . . . . . . . . . . . 291
Users > Local Groups . . . . . . . . . . . . . . . . . . . . . . . . . . . . . . . . . . . . . . . . . . . . . . . . . . 314
Users > Local Groups Overview. . . . . . . . . . . . . . . . . . . . . . . . . . . . . . . . . . . . . . . 314
Deleting a Group. . . . . . . . . . . . . . . . . . . . . . . . . . . . . . . . . . . . . . . . . . . . . . . . . . . 315
Adding a New Group. . . . . . . . . . . . . . . . . . . . . . . . . . . . . . . . . . . . . . . . . . . . . . . . 315
Editing Group Settings . . . . . . . . . . . . . . . . . . . . . . . . . . . . . . . . . . . . . . . . . . . . . . 316
Group Configuration for LDAP Authentication Domains. . . . . . . . . . . . . . . . . . . . . 329
Group Configuration for Active Directory, NT and RADIUS Domains. . . . . . . . . . . 333
Creating a Citrix Bookmark for a Local Group . . . . . . . . . . . . . . . . . . . . . . . . . . . . 336
Global Configuration . . . . . . . . . . . . . . . . . . . . . . . . . . . . . . . . . . . . . . . . . . . . . . . . . . . 336
Edit Global Settings . . . . . . . . . . . . . . . . . . . . . . . . . . . . . . . . . . . . . . . . . . . . . . . . 337
Edit Global Policies. . . . . . . . . . . . . . . . . . . . . . . . . . . . . . . . . . . . . . . . . . . . . . . . . 339
Edit Global Bookmarks . . . . . . . . . . . . . . . . . . . . . . . . . . . . . . . . . . . . . . . . . . . . . . 341
Edit EPC Settings . . . . . . . . . . . . . . . . . . . . . . . . . . . . . . . . . . . . . . . . . . . . . . . . . . 341
Chapter 14 Log Configuration. . . . . . . . . . . . . . . . . . . . . . . . . . . . . . . . . . . . . . . 343
Log > View. . . . . . . . . . . . . . . . . . . . . . . . . . . . . . . . . . . . . . . . . . . . . . . . . . . . . . . . . . . 343
Log > View Overview . . . . . . . . . . . . . . . . . . . . . . . . . . . . . . . . . . . . . . . . . . . . . . . 344
Viewing Logs. . . . . . . . . . . . . . . . . . . . . . . . . . . . . . . . . . . . . . . . . . . . . . . . . . . . . . 345
Emailing Logs . . . . . . . . . . . . . . . . . . . . . . . . . . . . . . . . . . . . . . . . . . . . . . . . . . . . . 346
Log > Settings . . . . . . . . . . . . . . . . . . . . . . . . . . . . . . . . . . . . . . . . . . . . . . . . . . . . . . . . 347
Log > Settings Overview. . . . . . . . . . . . . . . . . . . . . . . . . . . . . . . . . . . . . . . . . . . . . 347
Configuring Log Settings. . . . . . . . . . . . . . . . . . . . . . . . . . . . . . . . . . . . . . . . . . . . . 348
Configuring the Mail Server . . . . . . . . . . . . . . . . . . . . . . . . . . . . . . . . . . . . . . . . . . 349
Table of Contents | 7

Log > Categories. . . . . . . . . . . . . . . . . . . . . . . . . . . . . . . . . . . . . . . . . . . . . . . . . . . . . . 349
Log > ViewPoint . . . . . . . . . . . . . . . . . . . . . . . . . . . . . . . . . . . . . . . . . . . . . . . . . . . . . . 350
Log > ViewPoint Overview . . . . . . . . . . . . . . . . . . . . . . . . . . . . . . . . . . . . . . . . . . . 350
Adding a ViewPoint Server. . . . . . . . . . . . . . . . . . . . . . . . . . . . . . . . . . . . . . . . . . . 350
Log > Analyzer . . . . . . . . . . . . . . . . . . . . . . . . . . . . . . . . . . . . . . . . . . . . . . . . . . . . . . . 351
Log > Analyzer Overview . . . . . . . . . . . . . . . . . . . . . . . . . . . . . . . . . . . . . . . . . . . . 351
Adding an Analyzer Server. . . . . . . . . . . . . . . . . . . . . . . . . . . . . . . . . . . . . . . . . . . 352
Chapter 15 Virtual Office Configuration . . . . . . . . . . . . . . . . . . . . . . . . . . . . . . . 353
Virtual Office . . . . . . . . . . . . . . . . . . . . . . . . . . . . . . . . . . . . . . . . . . . . . . . . . . . . . . . . . 353
Virtual Office Overview . . . . . . . . . . . . . . . . . . . . . . . . . . . . . . . . . . . . . . . . . . . . . . 353
Using the Virtual Office. . . . . . . . . . . . . . . . . . . . . . . . . . . . . . . . . . . . . . . . . . . . . . 354
Online Help Button . . . . . . . . . . . . . . . . . . . . . . . . . . . . . . . . . . . . . . . . . . . . . . . . . . . . 357
Using Context Sensitive Help . . . . . . . . . . . . . . . . . . . . . . . . . . . . . . . . . . . . . . . . 357
Cisco PIX Configuration for SRA Appliance Deployment . . . . . . . . . . . . . . . . . . . . . . . 359
Before you Begin . . . . . . . . . . . . . . . . . . . . . . . . . . . . . . . . . . . . . . . . . . . . . . . . . . 359
Method One – SRA Appliance on LAN Interface . . . . . . . . . . . . . . . . . . . . . . . . . . 360
Method Two – SRA Appliance on DMZ Interface. . . . . . . . . . . . . . . . . . . . . . . . . . 362
Linksys WRT54GS . . . . . . . . . . . . . . . . . . . . . . . . . . . . . . . . . . . . . . . . . . . . . . . . . . . . 365
WatchGuard Firebox X Edge . . . . . . . . . . . . . . . . . . . . . . . . . . . . . . . . . . . . . . . . . . . . 365
NetGear FVS318. . . . . . . . . . . . . . . . . . . . . . . . . . . . . . . . . . . . . . . . . . . . . . . . . . . . . . 367
Netgear Wireless Router MR814 SSL configuration. . . . . . . . . . . . . . . . . . . . . . . . . . . 369
Check Point AIR 55. . . . . . . . . . . . . . . . . . . . . . . . . . . . . . . . . . . . . . . . . . . . . . . . . . . . 370
Setting up an SRA Appliance with Check Point AIR 55 . . . . . . . . . . . . . . . . . . . . . 370
Static Route . . . . . . . . . . . . . . . . . . . . . . . . . . . . . . . . . . . . . . . . . . . . . . . . . . . . . . 371
ARP. . . . . . . . . . . . . . . . . . . . . . . . . . . . . . . . . . . . . . . . . . . . . . . . . . . . . . . . . . . . . 371
Importing CA Certificates on Windows . . . . . . . . . . . . . . . . . . . . . . . . . . . . . . . . . . . . . 373
Importing a goDaddy Certificate on Windows. . . . . . . . . . . . . . . . . . . . . . . . . . . . . 373
Importing a Server Certificate on Windows. . . . . . . . . . . . . . . . . . . . . . . . . . . . . . . 376
Creating Unique Access Policies for AD Groups. . . . . . . . . . . . . . . . . . . . . . . . . . . . . . 377
Creating the Active Directory Domain. . . . . . . . . . . . . . . . . . . . . . . . . . . . . . . . . . . 378
Adding a Global Deny All Policy . . . . . . . . . . . . . . . . . . . . . . . . . . . . . . . . . . . . . . . 379
Creating Local Groups . . . . . . . . . . . . . . . . . . . . . . . . . . . . . . . . . . . . . . . . . . . . . . 380
Adding the SSHv2 PERMIT Policy . . . . . . . . . . . . . . . . . . . . . . . . . . . . . . . . . . . . . 382
Adding the OWA PERMIT Policies. . . . . . . . . . . . . . . . . . . . . . . . . . . . . . . . . . . . . 383
Verifying the Access Policy Configuration . . . . . . . . . . . . . . . . . . . . . . . . . . . . . . . 384
Hardware FAQ . . . . . . . . . . . . . . . . . . . . . . . . . . . . . . . . . . . . . . . . . . . . . . . . . . . . . . . 396
Digital Certificates and Certificate Authorities FAQ. . . . . . . . . . . . . . . . . . . . . . . . . . . . 399
NetExtender FAQ . . . . . . . . . . . . . . . . . . . . . . . . . . . . . . . . . . . . . . . . . . . . . . . . . . . . . 406
General FAQ. . . . . . . . . . . . . . . . . . . . . . . . . . . . . . . . . . . . . . . . . . . . . . . . . . . . . . . . . 409
Contact Information. . . . . . . . . . . . . . . . . . . . . . . . . . . . . . . . . . . . . . . . . . . . . . . . . . . . 427
GNU General Public License (GPL) Source Code . . . . . . . . . . . . . . . . . . . . . . . . . . . . 427
Limited Hardware Warranty. . . . . . . . . . . . . . . . . . . . . . . . . . . . . . . . . . . . . . . . . . . . . . 427
Limited Hardware Warranty . . . . . . . . . . . . . . . . . . . . . . . . . . . . . . . . . . . . . . . . . . 428
End User Licensing Agreement. . . . . . . . . . . . . . . . . . . . . . . . . . . . . . . . . . . . . . . . . . . 429
8 | SRA 6.0 Administrator’s Guide

The Dell SonicWALL SRA Administrator’s Guide provides network administrators with a highlevel overview of Dell SonicWALL SRA technology, including activation, configuration, and
administration of the Dell SonicWALL SRA management interface and the Dell SonicWALL
SRA appliance.
Always check <http://www.sonicwall.com/support/documentation.html> for the latest version of
this guide as well as other Dell SonicWALL products and services documentation.
Guide Conventions
The following conventions are used in this guide:
Convention Use
Bold Highlights field, button, and tab names. Also highlights
Chapter 1
About This Guide
window, dialog box, and screen names. Also used for file names
and text or values you are being instructed to type into the interface.
Italic Indicates the name of a technical manual, emphasis on certain
words in a sentence, or the first instance of a significant term or
concept.
Menu Item > Menu Item Indicates a multiple step Management Interface menu choice. For
example, System > Status means select the Status page under
the System menu.
About This Guide | 9

10 | SRA 6.0 Administrator’s Guide

This chapter provides an overview of the Dell SonicWALL SRA technology, concepts, basic
navigational elements and standard deployment guidelines. This chapter includes the following
sections:
• “Overview of Dell SonicWALL SRA” section on page 11
• “Concepts for Dell SonicWALL SRA” section on page 18
• “Navigating the SRA Management Interface” section on page 71
• “Deployment Guidelines” section on page 79
Overview of Dell SonicWALL SRA
The Dell SonicWALL SRA appliance provides organizations with a simple, secure and
clientless method of access to applications and network resources specifically for remote and
mobile employees. Organizations can use SRA connections without the need to have a preconfigured, large-installation host. Users can easily and securely access email files, intranet
sites, applications, and other resources on the corporate Local Area Network (LAN) from any
location by accessing a standard Web browser.
Chapter 2
SRA Overview
This section contains the following subsections:
• “SSL for Virtual Private Networking (VPN)” section on page 11
• “SRA Virtual Appliance” section on page 12
• “SRA Software Components” section on page 12
• “SRA Hardware Components” section on page 13
SSL for Virtual Private Networking (VPN)
A Secure Socket Layer-based Virtual Private Network (SSL VPN) allows applications and
private network resources to be accessed remotely through a secure connection. Using SSL
VPN, mobile workers, business partners, and customers can access files or applications on a
company’s intranet or within a private local area network.
Organizations use Virtual Private Networks (VPNs) to establish secure, end-to-end private
network connections over a public networking infrastructure, allowing them to reduce their
communications expenses and to provide private, secure connections between a user and a
site in the organization. By offering Secure Socket Layer (SSL) VPN, without the expense of
special feature licensing, the SRA appliance provides customers with cost-effective
alternatives to deploying parallel remote-access infrastructures.
SRA Overview | 11

SRA Virtual Appliance
The SRA Virtual Appliance is a virtual machine that runs the SRA series software on a VMware
platform. All software components, features, and functionality described in this guide are
supported by the SRA Virtual Appliance, except High Availability and SSL Offloading.
Deploying the SRA as a virtual appliance allows leveraging of shared computing resources to
optimize utilization, easy migration and reduced capital costs. The SRA Virtual Appliance
provides the following benefits:
• Cost savings:
–
Multiple virtual machines can run on a single server, reducing hardware costs, power
consumption, and maintenance costs.
–
Microsoft Windows Server is not required, eliminating the cost of the Windows license.
• Operational ease:
–
In a virtual environment, it is easy to commission new servers or decommission old
ones, or to bring servers up or down.
–
Installation is accomplished by importing a file into the virtual environment, with no
need to run an installer.
• Security:
–
The SRA Virtual Appliance provides the same hardened operating system that comes
with the SRA hardware appliances.
The elements of basic VMware structure must be implemented prior to deploying the SRA
Virtual Appliance. For detailed information about deploying the SRA Virtual Appliance, see the
Dell SonicWALL SRA Virtual Appliance Getting Started Guide, available at:
http://www.sonicwall.com/us/support/3893.html
SRA Software Components
SRA appliances provide clientless identity-based secure remote access to the protected
internal network. Using the Virtual Office environment, SRA appliances can provide users with
secure remote access to your entire private network, or to individual components such as File
Shares, Web servers, FTP servers, remote desktops, or even individual applications hosted on
Citrix or Microsoft Terminal Servers.
Although SRA protocols are described as clientless, the typical SRA portal combines Web,
Java, and ActiveX components that are downloaded from the SRA portal transp arently , allowing
users to connect to a remote network without needing to manually install and configure a VPN
client application. In addition, SRA enables users to connect from a variety of devices, including
Windows, Macintosh, and Linux PCs. ActiveX components are only supported on Windows
platforms.
For administrators, the SRA Web-based management interface provides an end-to-end SSL
VPN solution. This interface can configure SRA users, access policies, authentication methods,
user bookmarks for network resources, and system settings.
For clients, Web-based SRA customizable user portals enable users to access, update, upload,
and download files and use remote applications installed on desktop machines or hosted on an
application server. The platform also supports secure Web-based FTP access, network
neighborhood-like interface for file sharing, Secure Shell versions 1 and 2 (SSHv1) and
(SSHv2), Telnet emulation, VNC (Virtual Network Computing) and RDP (Remote Desktop
Protocol) support, Citrix Web access, bookmarks for offloaded port als (external Web sites), and
Web and HTTPS proxy forwarding.
12 | SRA 6.0 Administrator’s Guide

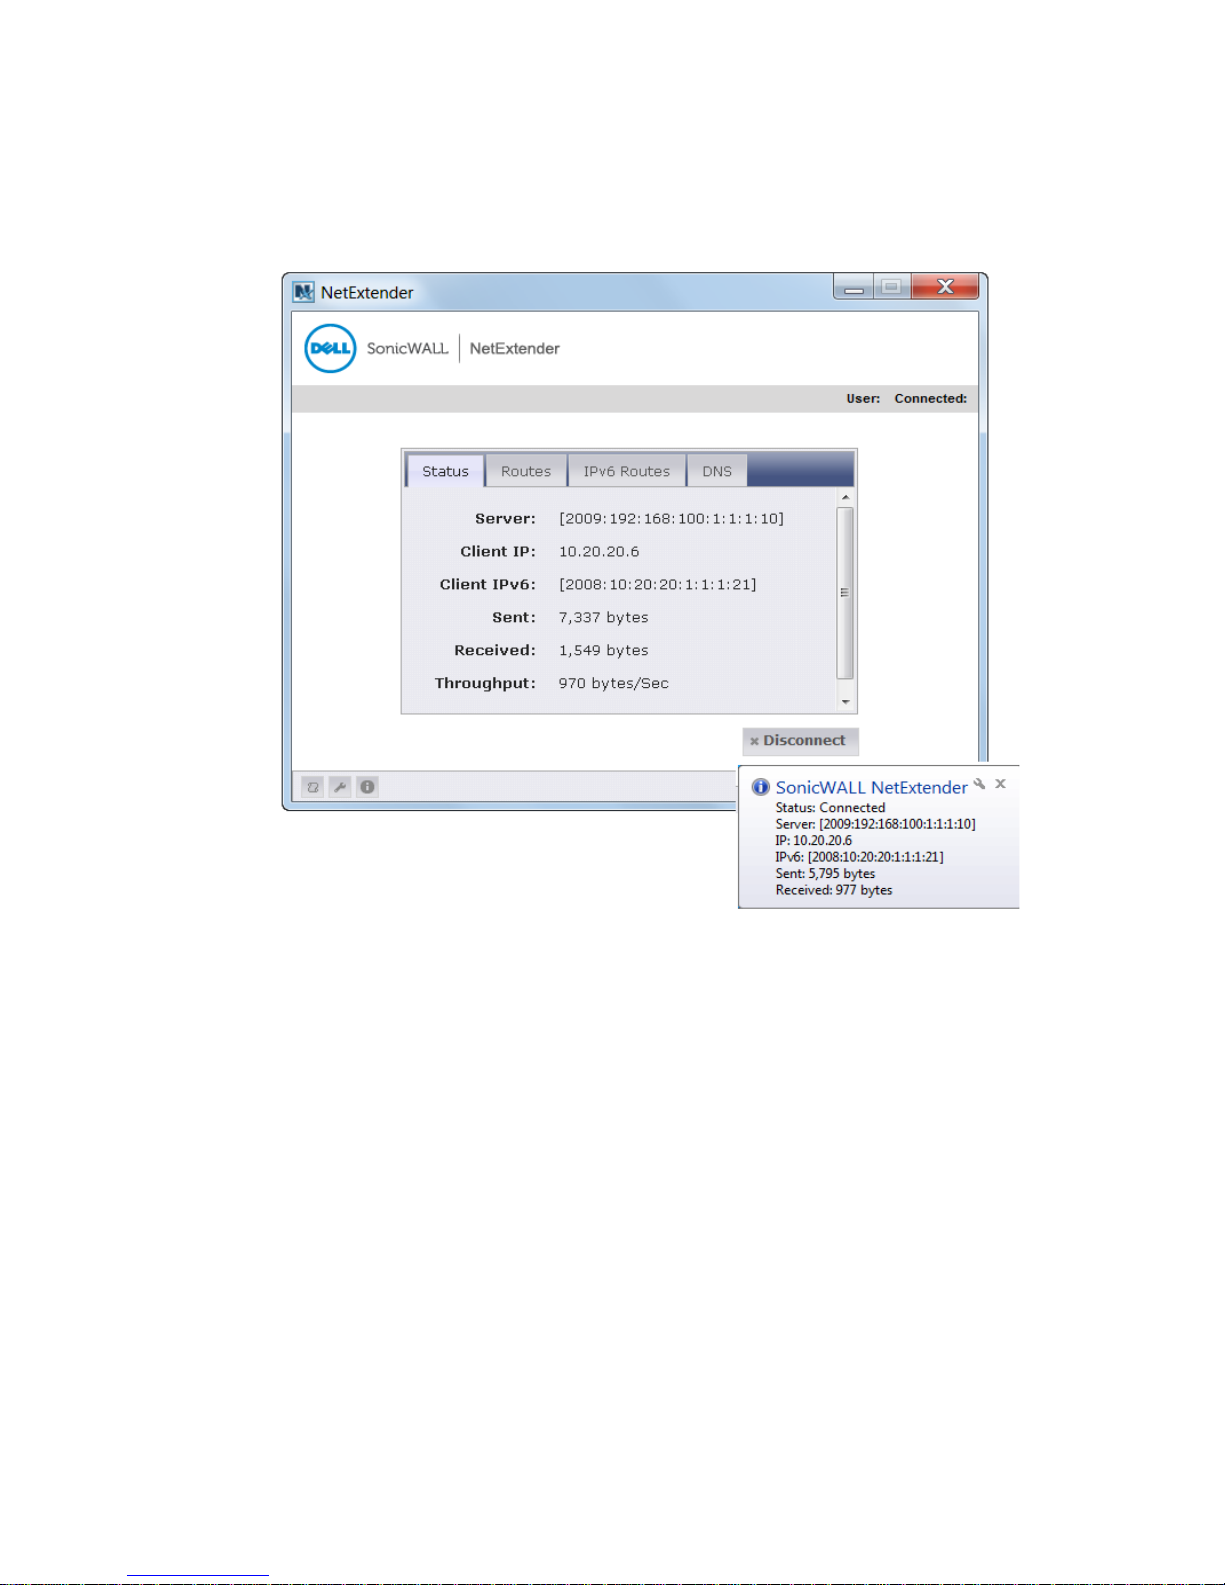
The SRA network extension client, NetExtender, is available through the SRA Web portal via an
ActiveX control on Windows or using Java on MacOS or Linux systems. It is also available through
sta nd -al on e ap pl ic ati on s f or W in dow s, Lin ux , a nd M ac OS p la tf or ms. The NetExtender standalone
applications are automatically installed on a client system the first time the user clicks the
NetExtender link in the Virtual Office portal. SRA NetExtender enables end users to connect to
the remote network without needing to install and configure complex software, providing a
secure means to access any type of data on the remote network. NetExtender supports IPv6
client connections from Windows systems running Vista or newer, and from Linux clients.
Note
The SSHv2 applet requires SUN JRE 1.6.0_10 or higher and can only connect to a server
that supports SSHv2. The RDP Java applet requires SUN JRE 1.6.0_10 or higher. Telnet,
SSHv1 and VNC applets support MS JVM in Internet Explorer, and run on other browsers
with SUN JRE 1.6.0_10 or higher.
SRA Hardware Components
See the following sections for descriptions of the hardware components on SRA appliances:
• “SRA 4600 Front and Back Panels Overview” on page 14
• “SRA 1600 Front and Back Panels Overview” on page 15
• “SRA 4200 Front and Back Panels Overview” on page 16
• “SRA 1200 Front Panel Overview” on page 17
SRA Overview | 13

SRA 4600 Front and Back Panels Overview
Console Port: Provides
serial access to console
messages.
USB Ports:
(for future use)
Reset Button
Power LED
Test LED
Alarm LED
X0: Gigabit Ethernet
Default management port.
Provides connectivity between
the SRA and your gateway.
X1:
Gigabit Ethernet
X2:
Gigabit Ethernet
X3:
Gigabit Ethernet
Exhaust fan
Power plug
Power switch
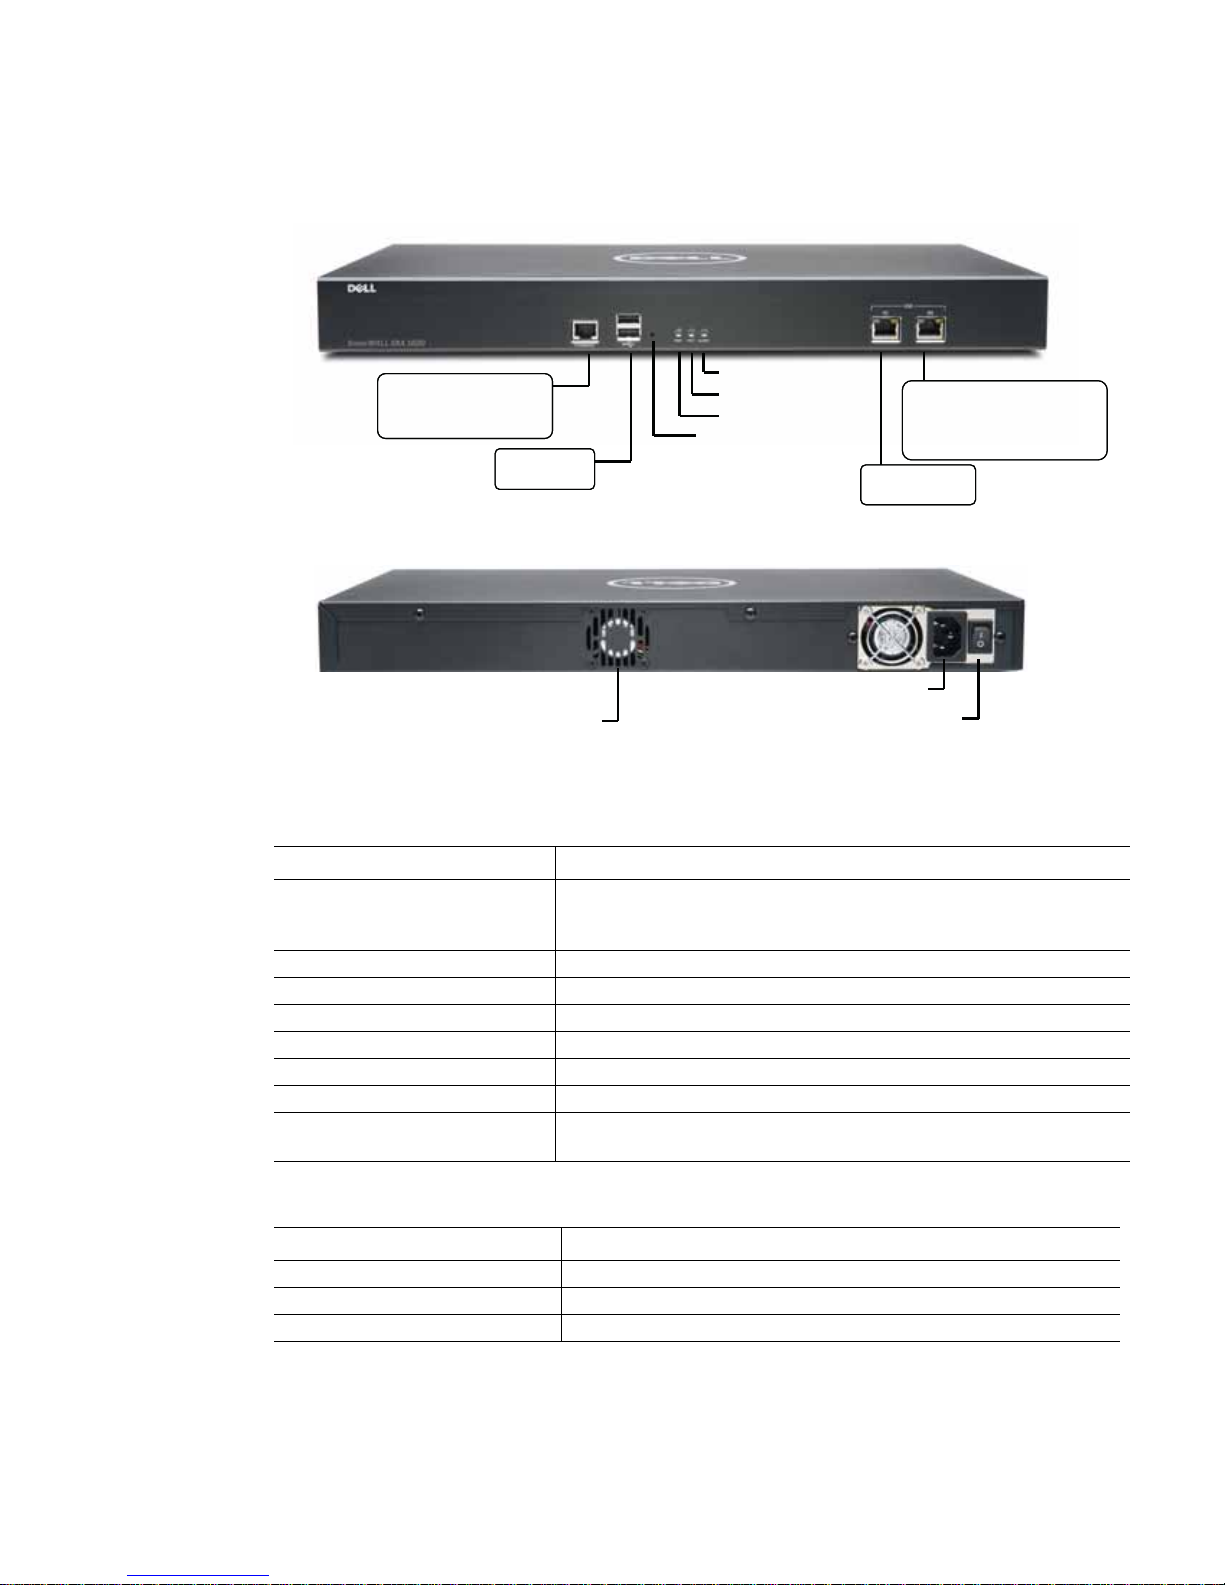
Figure 1 SRA 4600 Front and Back Panels
Table 1 SRA 4600 Front Panel Features
Front Panel Feature Description
Console Port RJ-45 port, provides access to console messages with serial connec-
USB Ports Provides access to USB interface (for future use).
Reset Button Provides access to SafeMode.
Power LED Indicates the SRA 4600 is powered on.
Test LED Indicates the SRA 4600 is in test mode.
Alarm LED Indicates a critical error or failure.
X3 Provides access to the X3 interface and to SRA resources.
X2 Provides access to the X2 interface and to SRA resources.
X1 Provides access to the X1 interface and to SRA resources.
X0 Default management port. Provides connectivity between the SRA
Table 2 SRA 4600 Back Panel Features
14 | SRA 6.0 Administrator’s Guide
Back Panel Feature Description
Exhaust fan Provides optimal cooling for the SRA 4600 appliance.
Power plug Provides power connection using supplied power cord.
Power switch Powers the SRA 4600 on and off.
tion (115200 Baud). Provides access to command line interface (for
future use).
4600 and your gateway.
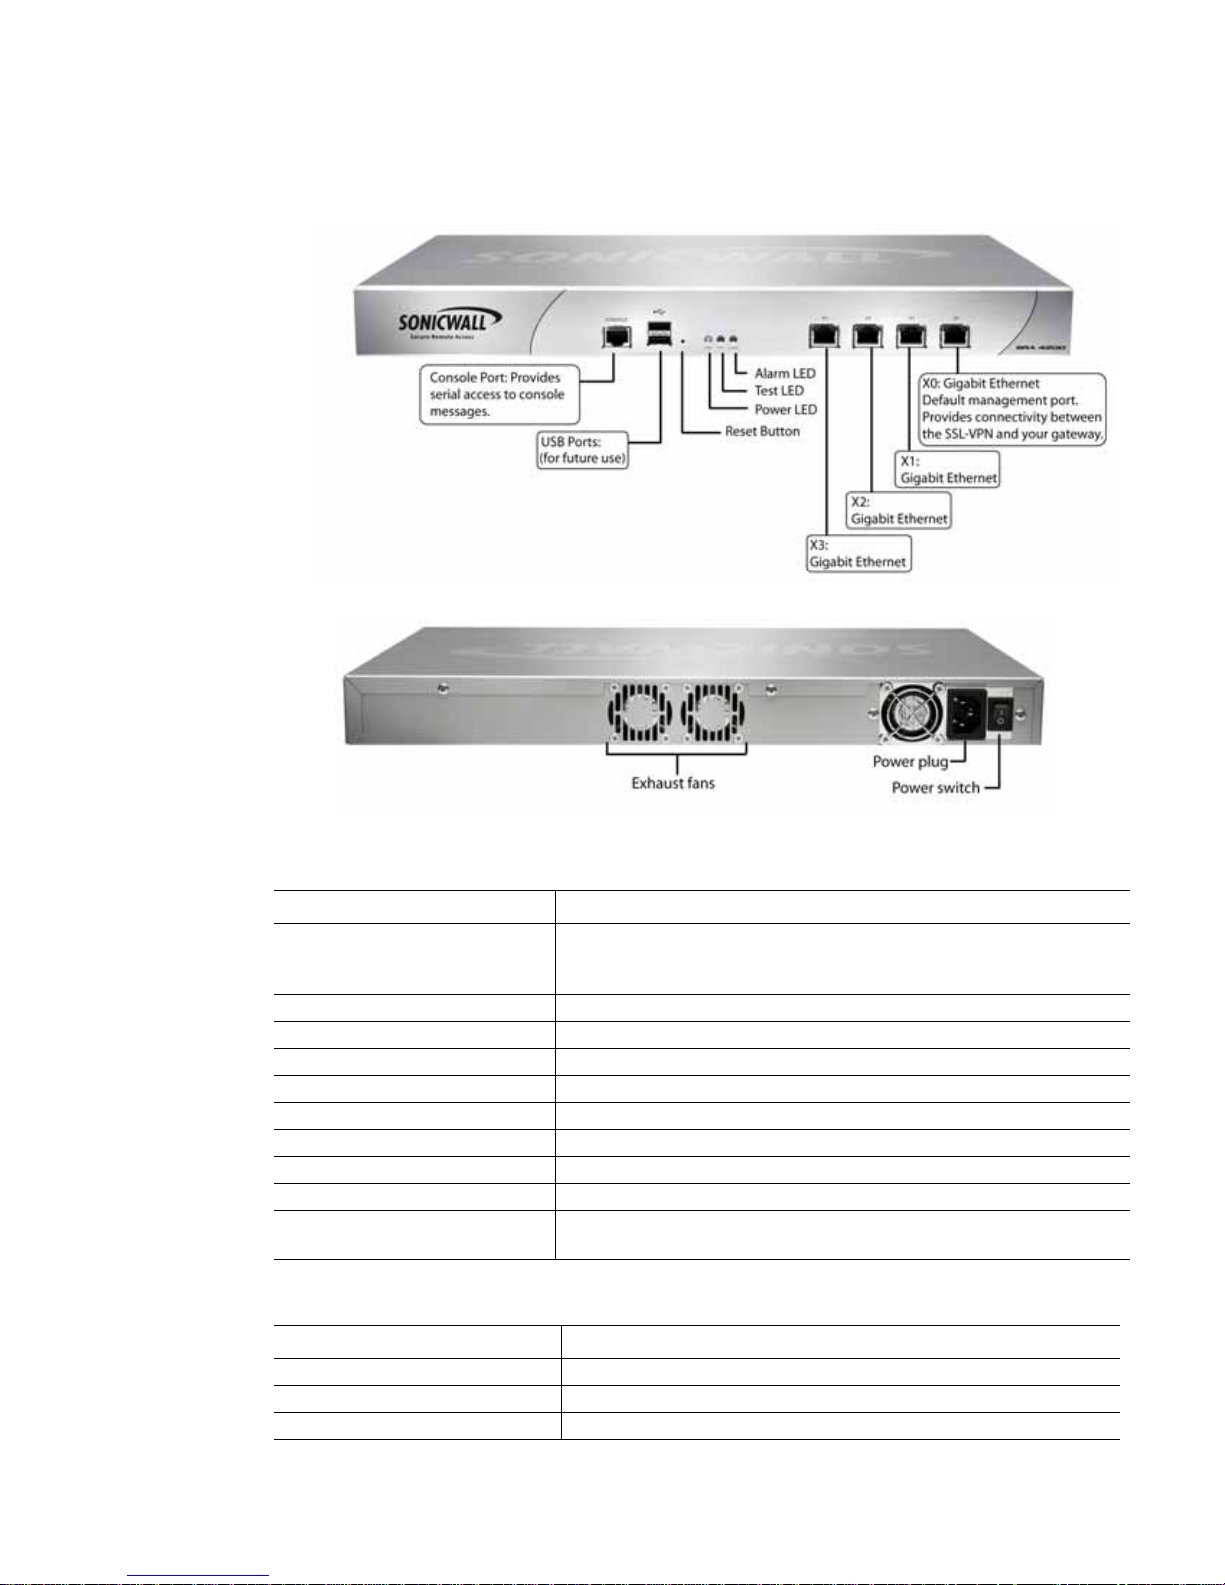
SRA 1600 Front and Back Panels Overview
Console Port: Provides
serial access to console
messages.
USB Ports:
(for future use)
Reset Button
Power LED
Test LED
Alarm LED
X0: Gigabit Ethernet
Default management port.
Provides connectivity between
the SRA and your gateway.
X1:
Gigabit Ethernet
Exhaust fan Power switch
Power plug
Figure 2 SRA 1600 Front and Back Panels
Table 3 SRA 1600 Front Panel Features
Front Panel Feature Description
Console Port RJ-45 port, provides access to console messages with serial connec-
tion (115200 Baud). Provides access to command line interface (for
future use).
USB Ports Provides access to USB interface (for future use).
Reset Button Provides access to SafeMode.
Power LED Indicates the SRA 1600 is powered on.
Test LED Indicates the SRA 1600 is in test mode.
Alarm LED Indicates a critical error or failure.
X1 Provides access to the X1 interface and to SRA resources.
X0 Default management port. Provides connectivity between the SRA
1600 and your gateway.
Table 4 SRA 1600 Back Panel Features
Back Panel Feature Description
Exhaust fan Provides optimal cooling for the SRA 1600 appliance.
Power plug Provides power connection using supplied power cord.
Power switch Powers the SRA 1600 on and off.
SRA Overview | 15
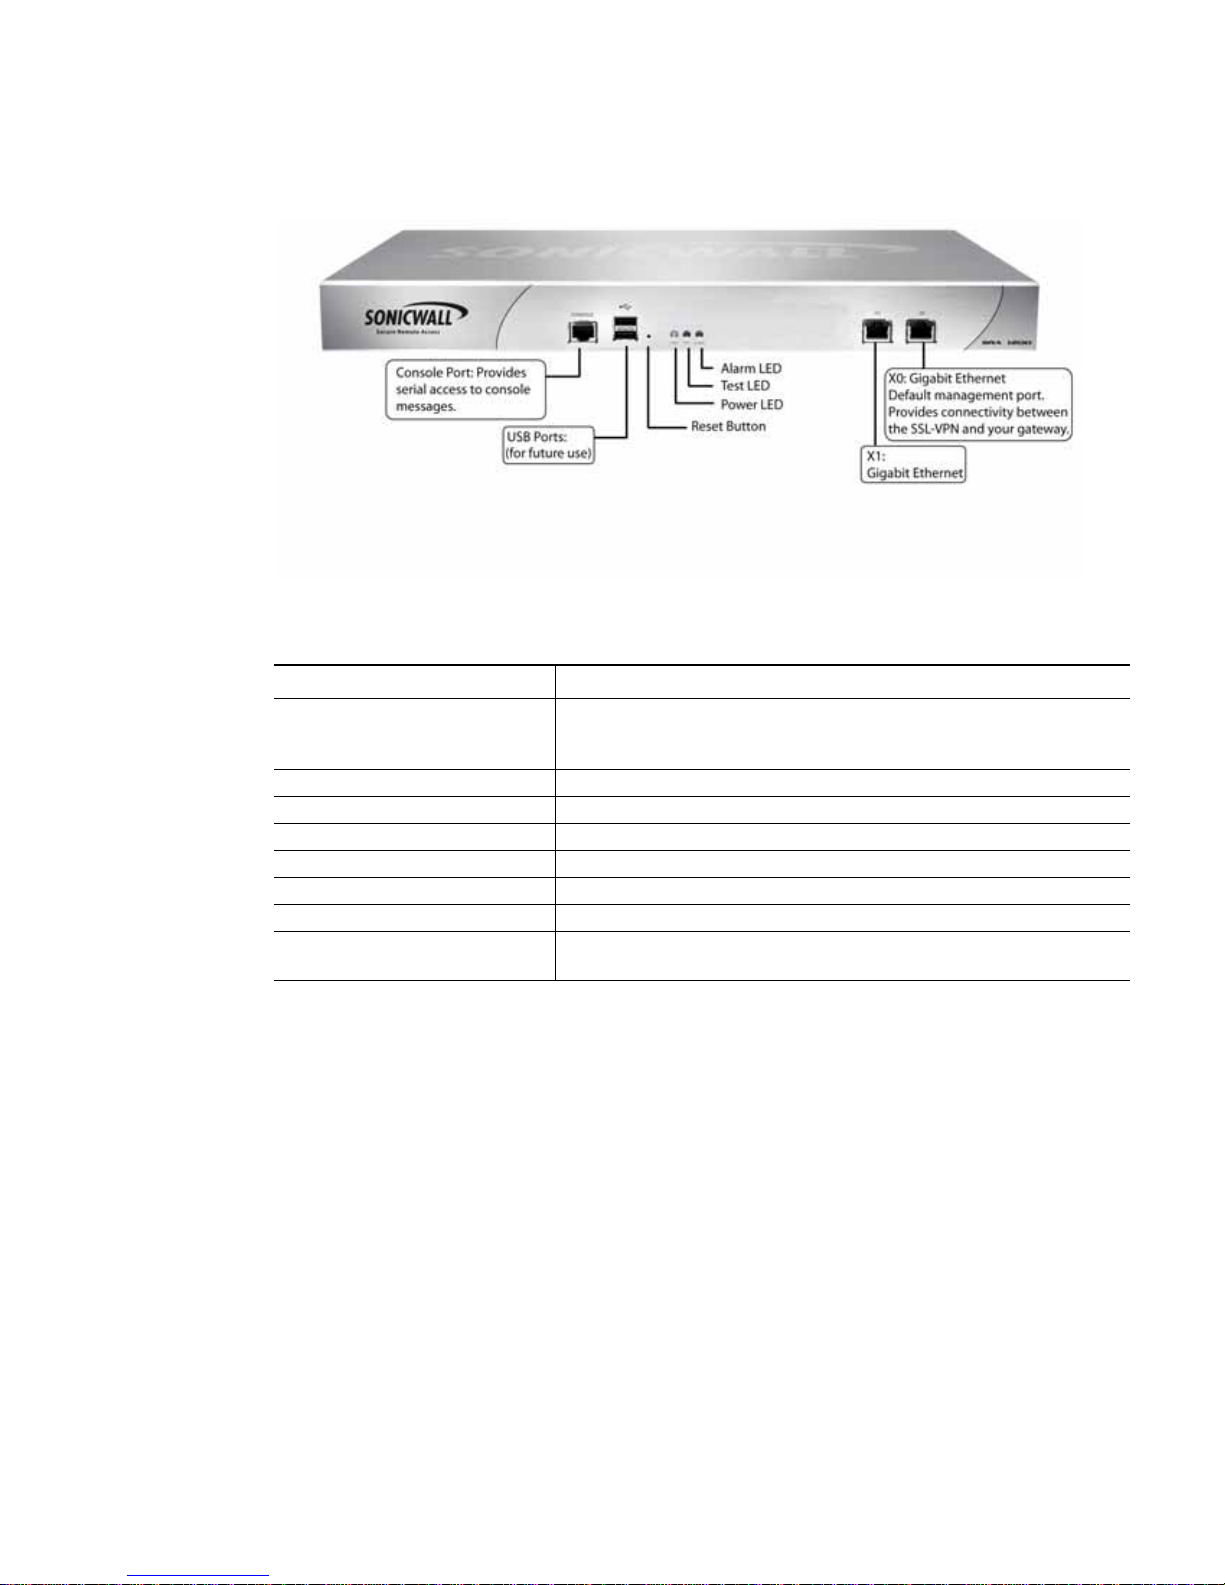
SRA 4200 Front and Back Panels Overview
Figure 3 SRA 4200 Front and Back Panels
Table 5 SRA 4200 Front Panel Features
Front Panel Feature Description
Console Port RJ-45 port, provides access to console messages with serial connec-
tion (115200 Baud). Provides access to command line interface (for
future use).
USB Ports Provides access to USB interface (for future use).
Reset Button Provides access to SafeMode.
Power LED Indicates the SRA 4200 is powered on.
Test LED Indicates the SRA 4200 is in test mode.
Alarm LED Indicates a critical error or failure.
X3 Provides access to the X3 interface and to SRA resources.
X2 Provides access to the X2 interface and to SRA resources.
X1 Provides access to the X1 interface and to SRA resources.
X0 Default management port. Provides connectivity between the SRA
4200 and your gateway.
Table 6 SRA 4200 Back Panel Features
Back Panel Feature Description
Exhaust fans Provides optimal cooling for the SRA 4200 appliance.
Power plug Provides power connection using supplied power cord.
Power switch Powers the SRA 4200 on and off.
16 | SRA 6.0 Administrator’s Guide
SRA 1200 Front Panel Overview
Figure 4 SRA 1200 Front Panel
Table 7 SRA 1200 Front Panel Features
Front Panel Feature Description
Console Port RJ-45 port, provides access to console messages with serial connec-
USB Ports Provides access to USB interface (for future use).
Reset Button Provides access to SafeMode.
Power LED Indicates the SRA 1200 is powered on.
Test LED Indicates the SRA 1200 is in test mode.
Alarm LED Indicates a critical error or failure.
X1 Provides access to the X1 interface and to SRA resources.
X0 Default management port. Provides connectivity between the SRA
tion (115200 Baud). Provides access to command line interface (for
future use).
1200 and your gateway.
SRA Overview | 17

Concepts for Dell SonicWALL SRA
This section provides an overview of the following key concepts, with which the administrator
should be familiar when using the SRA appliance and Web-based management interface:
• “Encryption Overview” section on page 18
• “SSL Handshake Procedure” section on page 19
• “IPv6 Support Overview” section on page 19
• “Browser Requirements for the SRA Administrator” section on page 22
• “Browser Requirements for the SRA End User” section on page 22
• “Portals Overview” section on page 23
• “Domains Overview” section on page 23
• “Application Offloading and HTTP(S) Bookmarks Overview” section on page 23
• “Cross Domain Single Sign-On” section on page 28
• “ActiveSync Authentication” section on page 28
• “Network Resources Overview” section on page 33
• “SNMP Overview” section on page 39
• “DNS Overview” section on page 39
• “Network Routes Overview” section on page 39
• “NetExtender Overview” section on page 39
• “Two-Factor Authentication Overview” section on page 43
• “One Time Password Overview” section on page 46
• “End Point Control Overview” section on page 48
• “Secure Virtual Assist Overview” section on page 49
• “Web Application Firewall Overview” section on page 60
Encryption Overview
Encryption enables users to encode data, making it secure from unauthorized viewers.
Encryption provides a private and secure method of communication over the Internet.
A special type of encryption known as Public Key Encryption (PKE) comprises a public and a
private key for encrypting and decrypting data. With public key encryption, an entity, such as a
secure Web site, generates a public and a private key . A secure W eb server sends a public key
to a user who accesses the Web site. The public key allows the user’s Web browser to decrypt
data that had been encrypted with the private key. The user’s Web browser can also
transparently encrypt data using the public key and this data can only be decrypted by the
secure Web server’s private key.
Public key encryption allows the user to confirm the identity of the Web site through an SSL
certificate. After a user contacts the SRA appliance, the appliance sends the user its own
encryption information, including an SSL certificate with a public encryption key.
18 | SRA 6.0 Administrator’s Guide

SSL Handshake Procedure
The following procedure is an example of the standard steps required to establish an SSL
session between a user and an SRA gateway using the SRA Web-based management
interface:
Step 1 When a user attempts to connect to the SRA appliance, the user’s Web browser sends
information about the types of encryption supported by the browser to the appliance.
Step 2 The appliance sends the user its own encryption information, including an SSL certificate with
a public encryption key.
Step 3 The Web browser validates the SSL certificate with the Certificate Authority identified by the
SSL certificate.
Step 4 The Web browser generates a pre-master encryption key, encrypts the pre-master key using
the public key included with the SSL certificate and sends the encrypted pre-master key to the
SRA gateway.
Step 5 The SRA gateway uses the pre-master key to create a master key and sends the new master
key to the user’s Web browser.
Step 6 The browser and the SRA gateway use the master key and the agreed upon encryption
algorithm to establish an SSL connection. From this point on, the user and the SRA gateway
will encrypt and decrypt data using the same encryption key. This is called symmetric
encryption.
Step 7 Once the SSL connection is established, the SRA gateway will encrypt and send the Web
browser the SRA gateway login page.
Step 8 The user submits his user name, password, and domain name.
Step 9 If the user’s domain name requires authentication through a RADIUS, LDAP, NT Domain, or
Active Directory Server, the SRA gateway forwards the user’s information to the appropriate
server for authentication.
Step 10 Once authenticated, the user can access the SRA portal.
IPv6 Support Overview
Internet Protocol version 6 (IPv6) is a replacement for IPv4 that is becoming more frequently
used on networked devices. IPv6 is a suite of protocols and standards developed by the
Internet Engineering Task Force (IETF) that provides a larger address space than IPv4,
additional functionality and security, and resolves IPv4 design issues. You can use IPv6
without affecting IPv4 communications.
IPv6 supports stateful address configuration, which is used with a DHCPv6 server, and
stateless address configuration, where hosts on a link automatically configure themselves with
IPv6 addresses for the link, called link-local addresses.
In IPv6, source and destination addresses are 128 bits (16 bytes) in length. For reference, the
32-bit IPv4 address is represented in dotted-decimal format, divided by periods along 8-bit
boundaries. The 128-bit IPv6 address is divided by colons along 16-bit boundaries, where each
16-bit block is represented as a 4-digit hexadecimal number . This is called colon-hexadecimal.
The IPv6 address, 2008:0AB1:0000:1E2A:0123:0045:EE37:C9B4 can be simplified by
removing the leading zeros within each 16-bit block, as long as each block has at least one
digit. When suppressing leading zeros, the address representation becomes:
2008:AB1:0:1E2A:123:45:EE37:C9B4
SRA Overview | 19

When addresses contain contiguous sequences of 16-bit blocks set to zeros, the sequence can
be compressed to ::, a double-colon. For example, the link-local address of
2008:0:0:0:B67:89:ABCD:1234 can be compressed to 2008::B67:89:ABCD:1234. The
multicast address 2008:0:0:0:0:0:0:2 can be compressed to 2008::2.
The IPv6 prefix is the part of the address that indicates the bits of the subnet prefix. Prefixes
for IPv6 subnets, routes, and address ranges are written as address/prefix-length, or CIDR
notation. For example, 2008:AA::/48 and 2007:BB:0:89AB::/64 are IPv6 address prefixes.
SonicOS SSL VPN supports IPv6 in the following areas:
Services
• FTP Bookmark – Define a FTP bookmark using an IPv6 address.
• Telnet Bookmark – Define a Telnet bookmark using an IPv6 address.
• SSHv1 / SSHv2 Bookmark – Define an SSHv1 or SSHv2 bookmark using an IPv6 address.
• Reverse proxy for HTTP/HTTPS Bookmark – Define an HTTP or HTTPS bookmark using
an IPv6 address.
• Citrix Bookmark – Define a Citrix bookmark using an IPv6 address.
• RDP Bookmark - Define an RDP bookmark using an IPv6 address.
• VNC Bookmark - Define a VNC bookmark using an IPv6 address.
Note
IPv6 is not supported for File Shares (CIFS).
Settings
• Interface Settings – Define an IPv6 address for the interface. The link-local address is
displayed in a tooltip on Interfaces page.
• Route Settings – Define a static route with IPv6 destination network and gateway.
• Network Object – Define the network object using IPv6. An IPv6 address and IPv6 network
can be attached to this network object.
20 | SRA 6.0 Administrator’s Guide
NetExtender
When a client connects to NetExtender, it can get an IPv6 address from the SRA appliance if
the client machine supports IPv6 and an IPv6 address pool is configured on the SRA.
NetExtender supports IPv6 client connections from Windows systems running Vista or newer,
and from Linux clients.
Secure Virtual Assist
Users and Technicians can request and provide support when using IPv6 addresses.
Rules
• Policy rule – User or Group Policies. Three IPv6 options in the Apply Policy To drop-down
list:
–
IPv6 Address
–
IPv6 Address Range
–
All IPv6 Address
• Login rule – Use IPv6 for address fields:
–
Define Login From Defined Addresses using IPv6
–
Two IPv6 options in the Source Address drop-down list: IPv6 Address / IPv6 Network
Virtual Hosts
An administrator can assign an IPv6 address to a virtual host, and can use this address to
access the virtual host.
SRA Overview | 21
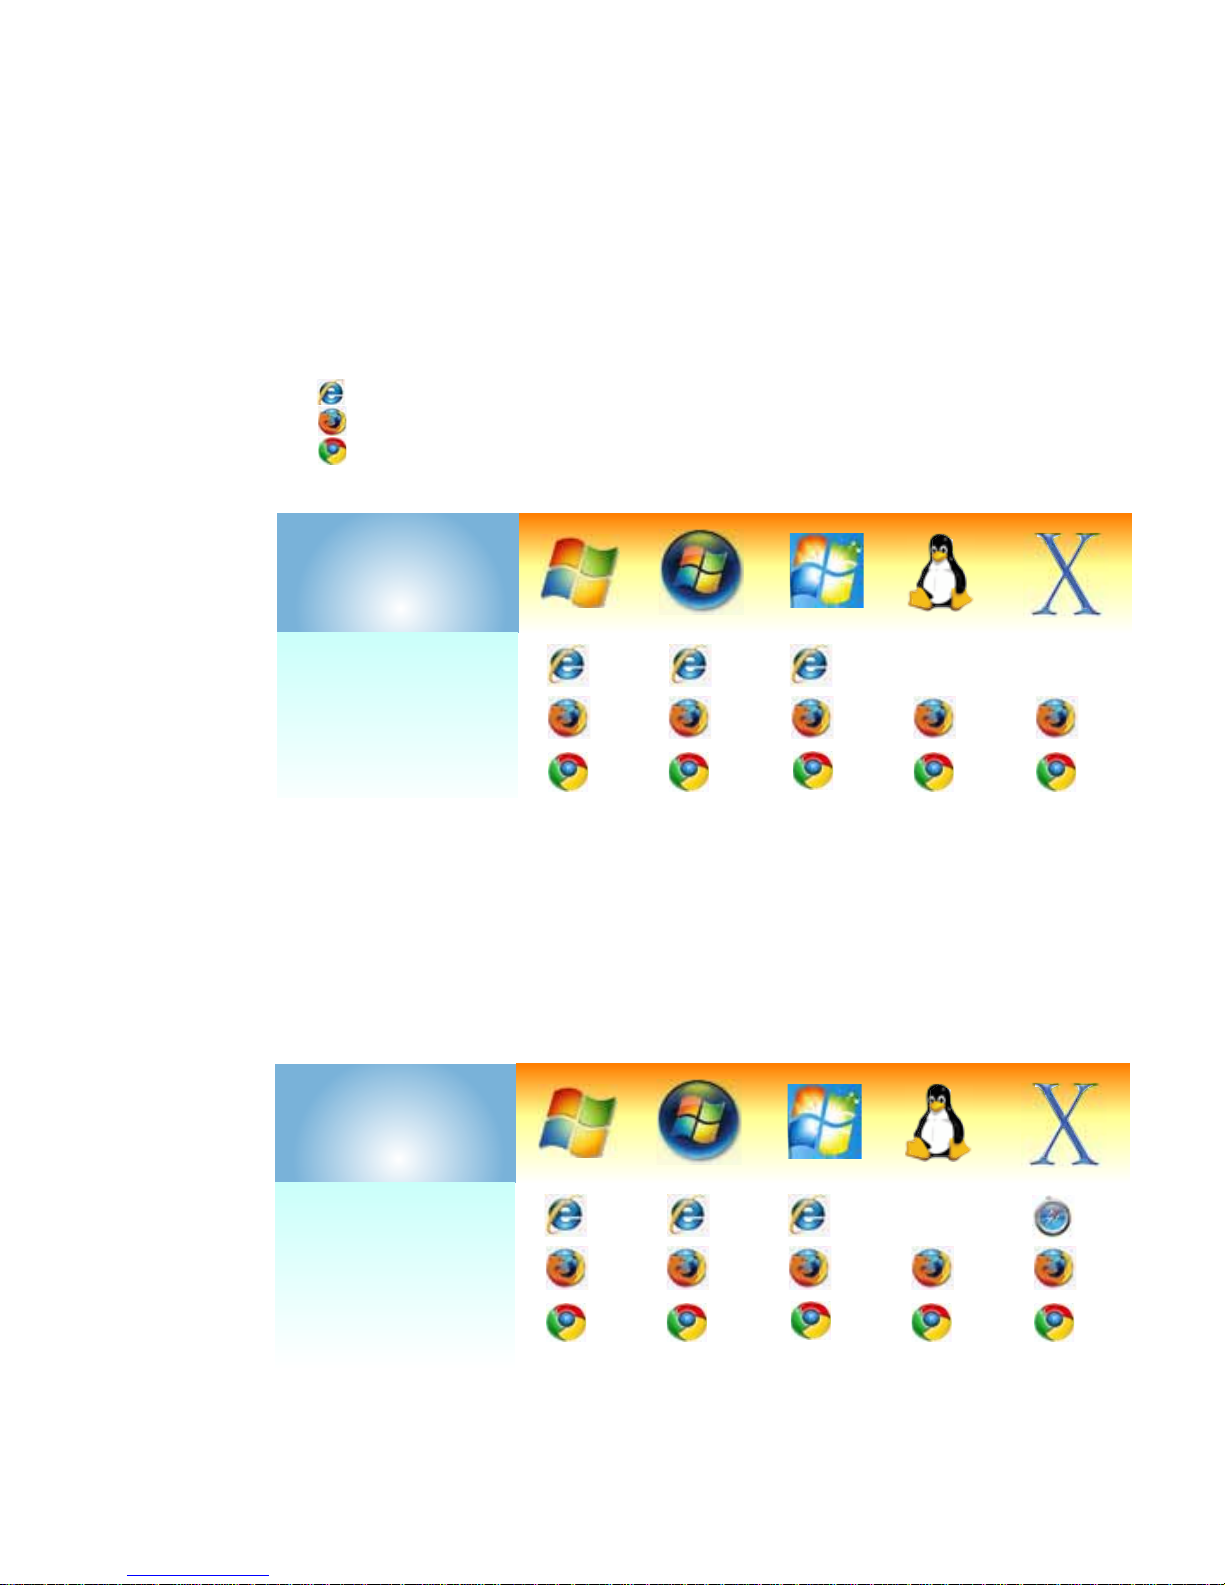
Application Offloading
SSL VPN
Management
Interface
Minimum Browser/Version
Requirements
22 22 22 22 22
1616161616
8
89
Browser
Windows XP
Windows Vista
Windows 7 Linux
MacOS X
An administrator can assign an IPv6 address to an application server used for application
offloading, and can use this address to access the server.
Browser Requirements for the SRA Administrator
The following Web browsers are supported for the SRA Web-based management interface and
the user portal, Virtua l O ff i c e . Java is only required for various aspects of the SRA Virtual
Office, not the management interface.
• Internet Explorer 8.0 or newer
• Firefox 16.0 or newer
• Chrome 22.0 or newer
The following table provides specific browser requirements.
Browser Requirements for the SRA End User
To configure SRA appliance using the Web-based management interface, an administrator
must use a Web browser with Java, JavaScript, ActiveX, cookies, popups, and SSLv3 or TLS
1.0 enabled.
The following is a list of Web browser and operating system support for va rious SRA pro tocols
including NetExtender and various Application Proxy elements. Minimum browser version
requirements are shown for Windows, Windows Vista, Windows 7, Linux, and MacOS.
SSL VPN
User
Interface
Minimum Browser/Version
Requirements
Browser
Windows XP
Windows Vista
8
22 22 22 22 22
Windows 7 Linux
89
161616
MacOS X
5
1616
22 | SRA 6.0 Administrator’s Guide

Portals Overview
The SRA appliance provides a mechanism called Virtual Office, which is a Web-based portal
interface that provides clients with easy access to internal resources in your organization.
Components such as NetExtender, Secure Virtual Assist, and bookmarks to file shares and
other network resources are presented to users through the Virtual Office portal. For
organizations with multiple user types, the SRA appliance allows for multiple customized
portals, each with its own set of shared resource bookmarks. Portals also allow for individual
domain and security certificates on a per-portal basis. The components in a portal are
customized when adding a portal.
File Shares
File shares provide remote users with a secure Web interface to Microsoft File Shares using
the CIFS (Common Internet File System) or SMB (Server Message Block) protocols. Using
a Web interface similar in style to Microsoft’ s familiar Network Neighborhood or My Network
Places, File Shares allow users with appropriate permissions to browse network shares,
rename, delete, retrieve, and upload files, and to create bookmarks for later recall. File
shares can be configured to allow restricted server path access.
Custom Portals
SRA appliances let you configure multiple portals, each with its own title, banner, login
message, logo and set of available resources. Each portal also enables you to set individual
Virtual Hosts/Domain Names to create a unique default portal URL. When a user logs into
a portal, he or she sees a set of pre-configured links and bookmarks that are specific to that
portal. You can configure whether or not NetExtender is displayed on a V irtual Of fice port al,
and if you want NetExtender to automatically launch when users log in to the portal. The
administrator configures which elements each portal displays through the Portal Settings
window. For information on configuring portals, refer to the “Portals > Portals” section on
page 129.
Domains Overview
A domain in the SRA environment is a mechanism that enables authentication of users
attempting to access the network being serviced by the SRA appliance. Domain types include
the SRA internal LocalDomain, and the external platforms Microsoft Active Directory, NT
Auth ent ica tio n, L DAP, and RAD IUS . Often, only one domain will suffice to provide authentication
to your organization, although a larger organization may require distributed domains to handle
multiple nodes or collections of users attempting to access applications through the portal. For
information about configuring domains, refer to the “Portals > Domains” section on page 148.
Application Offloading and HTTP(S) Bookmarks Overview
SRA appliances use HTTP(S) bookmarks and application offloading to provide access to Webbased applications running on servers within the intranet. This includes Sharepoint 2007 and
the enhanced versions of commonly-used Web mail interfaces, such as Microsoft OWA
Premium and Domino Web Access 8.0.1, 8.5.1, and 8.5.2. Sharepoint 2010 is supported with
application offloading, but not with HTTP(S) bookmarks.
SRA Overview | 23

Both application offloading and HTTP(S) bookmarks use an HTTP(S) reverse proxy . A rever se
proxy is a proxy server that is deployed between a remote user outside an intranet and a target
Web server within the intranet. The reverse proxy intercepts and forwards packet s that originate
from outside the intranet. An HTTP(S) reverse proxy specifically intercepts HTTP(S) requests
and responses.
Application Offloading provides secure access to both internal and publicly hosted Web
applications. An application offloading host is created as a special-purpose portal with an
associated virtual host acting as a proxy for the backend Web application.
Unlike HTTP(S) bookmarks, access to offloaded applications is not limited to remote users. The
administrator can enforce strong authentication and access policies for specific users or
groups. For instance, in an organization certain guest users may need Two-factor or Client
Certificate authentication to access Outlook Web Access (OWA), but are not allowed to access
OWA public folders. If authentication is enabled, multiple layers of advanced authentication
features such as One Time Password, Two-factor Authentication, Client Certificate
Authentication and Single Sign-On can be applied on top of each other for the offloaded host.
The offloaded application portal must be configured as a virtual host with a suitable SRA
domain. It is possible to disable authentication and access policy enforcement for such an
offloaded host.
Web transactions can be centrally monitored by viewing the logs. In addition, Web Application
Firewall can protect offloaded application hosts from any unexpected intrusion, such as Crosssite scripting or SQL Injection.
Access to offloaded Web applications happens seamlessly as URLs in the proxied p age are not
rewritten in the manner used by HTTP or HTTPS bookmarks.
For configuration information, see the “Portals > Application Offloading” section on page 142
and the “Adding or Editing User Bookmarks” section on page 302.
Benefits of HTTP(S) Bookmarks
By using HTTP(S) bookmarks, users can access the full-featured versions of Sharepoint 2007,
Microsoft OWA Premium, and Domino Web Access 8.0.1, 8.5.1, and 8.5.2 W eb mail interfaces.
These interfaces are easier to use and provide more enhanced features than their basic
counterparts.
Benefits of Application Offloading
An offloaded Web application has the following advantages over configuring the Web
application as an HTTP(S) bookmark in SRA:
• No URL rewriting is necessary, thereby improving throughput significantly.
• The functionality of the original Web application is retained almost completely, while an
HTTP(S) bookmark is a best-effort solution.
• Application offloading extends SRA security features to publicly hosted Web sites.
Application offloading can be used in any of the following scenarios:
• To function as an SSL offloader and add HTTPS support to the offloaded Web application,
using the integrated SSL accelerator hardware of the SRA appliance.
• In conjunction with the Web Application Firewall subscription service to provide the
offloaded Web application continuous protection from malicious Web attacks.
• To add strong or stacked authentication to the offloaded Web application, including Two-
factor authentication, One Time Passwords and Client Certificate authentication.
• To control granular access to the offloaded Web application using global, group or user
based access policies.
24 | SRA 6.0 Administrator’s Guide

• To support Web applications not currently supported by HTTP/HTTPS bookmarks.
Application Offloading does not require URL rewriting, thereby delivering complete
application functionality without compromising throughput.
• To authenticate ActiveSync Application Offloading technology, which delivers Web
applications using Virtual Hosting and Reverse Proxy. ActiveSync authentication does not
require URL rewriting in order to deliver the Web applications seamlessly. As an example,
the ActiveSync protocol is used by a mobile phone’s email client to synchronize with an
Exchange server, as explained in “ActiveSync Authentication” on page 28.
Supported Platforms
Appliance Platforms
On SRA 6.0, Application Offloading and HTTP(S) bookmarks are supported on the following
SRA appliances:
• SRA 4600
• SRA 4200
• SRA 1600
• SRA 1200
• SRA Virtual Appliance
HTTP Versions
HTTP(S) bookmarks and application offloading portals support both HTTP/1.0 and HTTP/1.1.
Certain performance optimization features, such as caching, compression, SSL hardware
acceleration, HTTP connection persistence, TCP connection multiplexing and transfer-chunk
encoding for proxies are automatically enabled depending on the usage.
Applications
In SRA 6.0, Sharepoint 2010 is supported with application offloading, but not with HTTP(S)
bookmarks. The following features have been tested and verified as working well on the
indicated browsers:
Sharepoint Features Browsers
Add Announcement
Delete Announcement
Download Document
Add Document
Delete Document
Add New Item
Delete Item
Internet Explorer 8 and 9
Firefox 16.0+
Chrome 22.0+
The following Web applications have been tested and verified to work with HTTP(S) bookmarks
and as offloaded applications:
• Microsoft Outlook Web Access 2010
Microsoft Outlook Web Access 2007
Microsoft Outlook Web Access 2003
SRA Overview | 25

Note
In SRA 6.0, Application Offloading supports authentication for ActiveSync. ActiveSync is a
protocol used by a mobile phone’s email client to synchronize with an Exchange server. The
Administrator can create an offloading portal and set the application server host to the
backend Exchange server. Then, a user can use the new virtual host name in a mobile
phone’s email client, and synchronize with the backend Exchange server through the SRA
appliance. Before SRA 6.0, users had to disable authentication for ActiveSync offloading
portals, because ActiveSync requests are different from requests sent from the browser.
Outlook Web Access is supported on the SRA 4600/4200/1600/1200 and SRA Virtual
Appliance platforms.
• Windows Sharepoint 2007
Windows Sharepoint Services 3.0
Windows Sharepoint Services 2.0
The integrated client features of Sharepoint are not supported.
• Lotus Domino Web Access 8.0.1, 8.5.1, and 8.5.2
Domino Web Access is supported on the SRA 4600/4200/1600/1200 and SRA Virtual
Appliance platforms.
• Novell Groupwise Web Access 7.0
• ActiveSync with Microsoft Exchange 2010
ActiveSync with Microsoft Exchange 2007
ActiveSync with Microsoft Exchange 2003
Exchange ActiveSync is supported on the following:
• Apple iPhone
• Apple iPad
• Android 2.3.x (Gingerbread), 4.0.x (ICS) and 4.1 (Jelly Bean) based phones
• Windows Mobile 6.5 based phones
• Windows Mobile 6.0 based phones
Authentication Schemes
The following authentication schemes are supported for use with application offloading and
HTTP(S) bookmarks:
• Basic – Collects credentials in the form of a username and password.
• NTLM (Microsoft NT LAN Manager) – Provides automatic authentication between Active
Directory aware applications.
• Forms-based authentication – Uses a Web form to collect credentials.
Software Prerequisites
The following end-user requirements must be met in order to access the complete set of
application offloading and HTTP(S) bookmarks features:
• Internet Explorer 8.0 or newer
• Windows 7, Windows 2000, Windows XP, or Windows Server 2003 or later
26 | SRA 6.0 Administrator’s Guide

Supported Applications
When using application offloading or HTTP(S) bookmarks to access applications for Webbased clients, full feature sets are accessible to users. SRA 6.0, application offloading and
HTTP(S) bookmarks provide enhanced application support for the following software
applications:
• Sharepoint Server 2007
• Sharepoint Server 2010
• Microsoft Outlook Web Access Premium
• Lotus Domino Web Access 8.0.1, 8.5.1, and 8.5.2
Note • The maximum number of users supported is limited by the number of applications being
accessed and the volume of application traffic being sent.
• Feature support varies based on your hardware and installation, see the respective
sections for more detailed information about specific application support.
Tip If you are using the correct Web browser and operating system, and a supported application
does not work, delete the browser session cookies, close and reopen all instances of your
browser, clear the browser cache, and then try again.
Supported Application Deployment Considerations
Be aware of these installation and general feature caveats when using application offloading
and HTTP(S) bookmarks with the following software applications:
• Sharepoint
–
For features that rely on Windows Sharepoint Services-compatible client programs,
SRA 6.0 application offloading and HTTP(S) bookmarks do not support client
integration capabilities on Internet Explorer.
–
Only forms-based authentication and basic authentication schemes are supported.
–
Single Sign-On is supported only for basic authentication.
–
Sharepoint 2010 is supported with application offloading, but not with HTTP(S)
bookmarks.
• Microsoft OWA
–
S/MIME support and bi-directional layout support for Arabic and Hebrew in Microsoft
OWA Premium are only available using Internet Explorer 8 and later . Gzip compression
supported by Microsoft OWA Premium is not supported through the reverse proxy.
Application Offloading should support any application using HTTP/HTTPS. SRA has limited
support for applications using Web services and no support for non-HTTP protocols wrapped
within HTTP.
The application should not contain hard-coded self-referencing URLs. If these are present, the
Application Offloading proxy must rewrite the URLs. Since Web site development does not
usually conform to HTML standards, the proxy can only do a best-effort translation when
rewriting these URLs. Specifying hard-coded, self-referencing URLs is not recommended when
developing a Web site because content developers must modify the Web pages whenever the
hosting server is moved to a different IP or hostname.
SRA Overview | 27

For example, if the backend application has a hard-coded IP address and scheme within URLs
as follows, Application Offloading must rewrite the URL.
<a href="http://1.1.1.1/doAction.cgi?test=foo
This can be done by enabling the Enable URL Rewriting for self-referenced URLs setting for
the Application Offloading Portal, but all the URLs may not be rewritten, depending on how the
Web application has been developed. (This limitation is usually the same for other WAF/SRA
vendors employing reverse proxy mode.)
Cross Domain Single Sign-On
External Website Bookmarks can be created for application offloading portals to achieve a
single point of access for users. This allows users to automatically log into application
offloading portals after logging into the main portal.
To use Cross Domain Single Sign-on (SSO), perform the following steps:
Step 1 Create two or more portals with the same shared domain (from Virtual Host Domain name) and
that need authentication. One portal should be a regular portal. These portals are also in the
same SRA appliance’s domain so that a user can log in to both of them with the same
credentials. “Adding Portals” on page 131 explains how to create a portal.
Step 2 Log into the portal and create a bookmark, as explained in “Adding or Editing User Bookmarks”
on page 302.
">
Step 3 Set the service to External Web Site, as explained in “External Web Site” on page 309.
Step 4 Enable Automatically log in for the bookmark, which enables Cross Domain SSO for this
bookmark.
Step 5 Specify a Host, which is a portal with the same shared domain name.
Step 6 Save the bookmark and launch it. The new portal is logged in automatically without any
credential.
The shared domain names don’t need to be identical; a sub-domain also works. For example,
one portal is a regular portal whose virtual host domain name is “www.example.com” and its
shared domain name is “.example.com”. The other portal’s virtual host domain name is
“intranet.eng.example.com” and the shared domain name is “.eng.example.com”. If a
bookmark to xyz.eng.example.com is created in the www.example.com
SSO works because “.eng.example.com” is a sub-domain of “.example.com”.
ActiveSync Authentication
Applicat ion Offloading now supports authentication for ActiveSync.Application Offloading
technology delivers Web applications using Virtual Hosting and Reverse Proxy . Users still need
to authenticate with the SRA appliance before accessing the backend Web application.
However, the proxy avoids URL rewriting in order to deliver the Web applications seamlessly.
ActiveSync is a protocol used by a mobile phone’s email client to synchronize with an Exchange
server. The Administrator can create an of floading port al and set the application server host to
the backend Exchange server. Then, a user can use the new virtual host name in a mobile
phone’s email client, and synchronize with the backend Exchange server through the SRA
appliance. Before SRA 6.0, users had to disable authentication for ActiveSync offloading
portals, because ActiveSync requests are different from requests sent from the browser.
portal, Cross Domain
28 | SRA 6.0 Administrator’s Guide
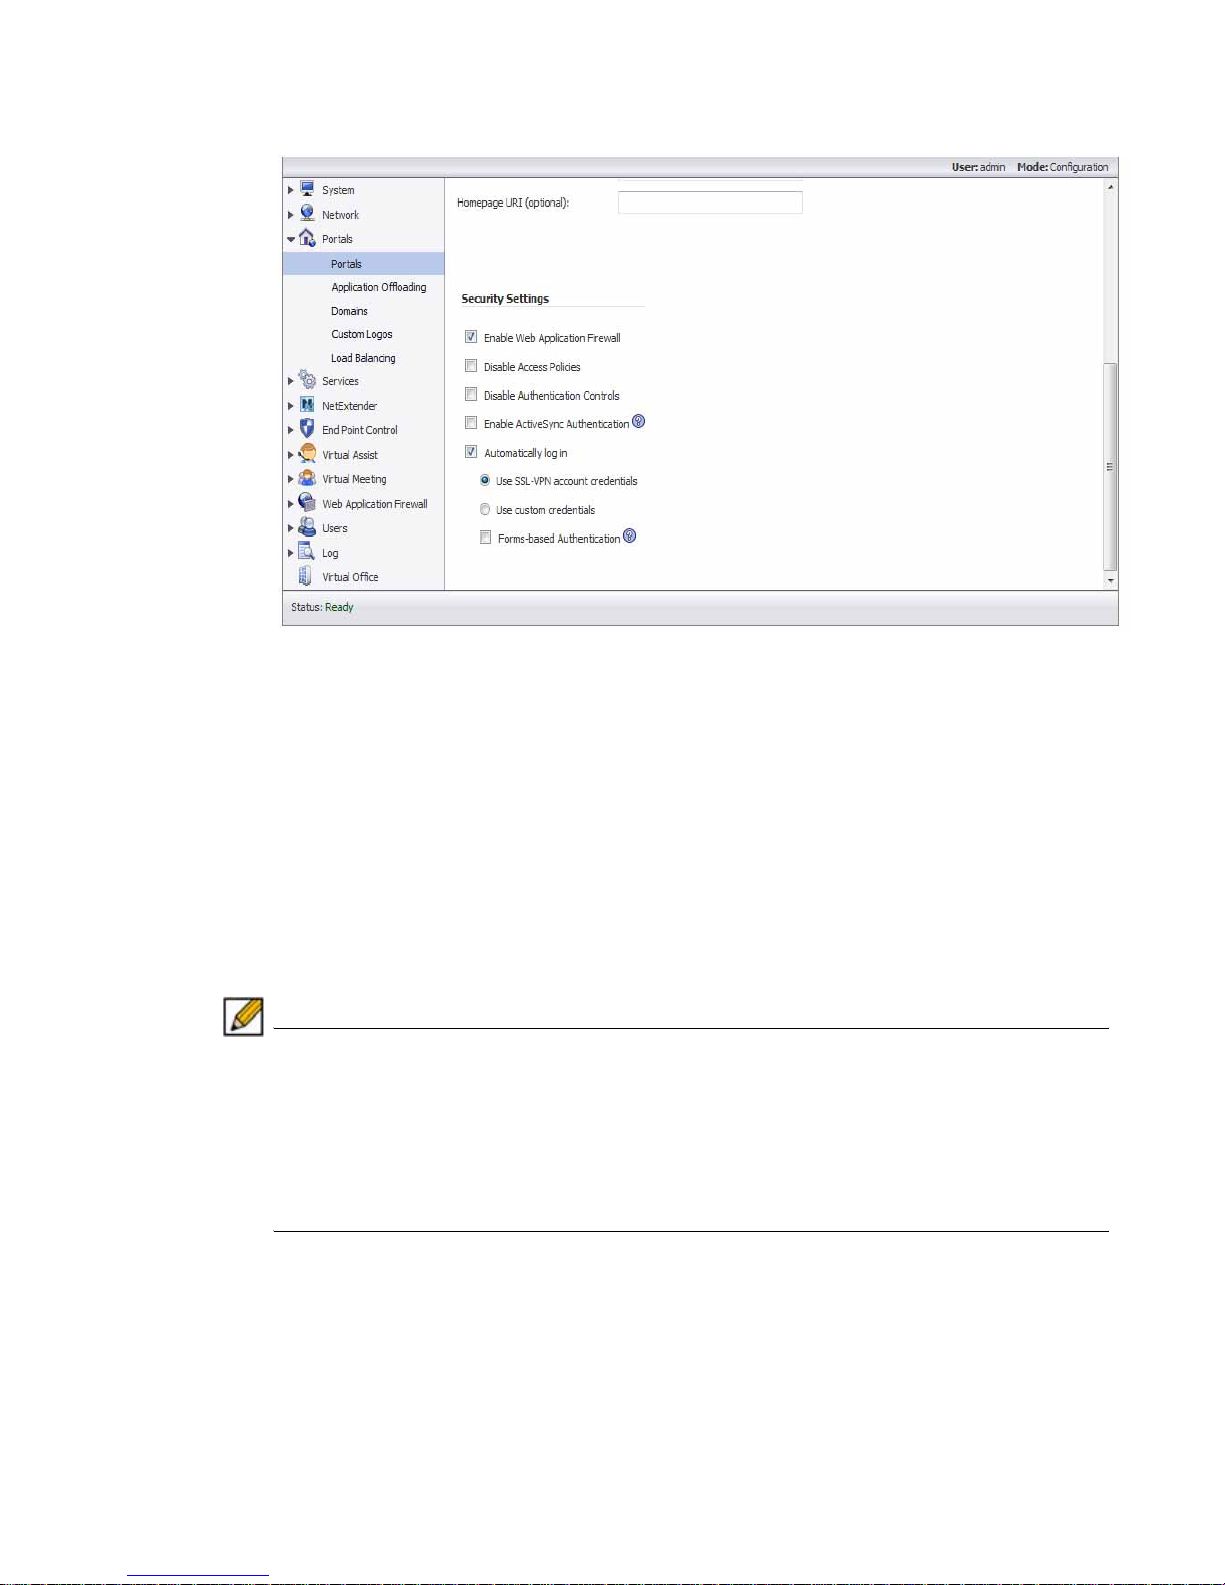
ActiveSync is managed through the Portals > Offloading > Security Settings page:
To configure ActiveSync authentication, clear the Disable Authentication Controls check box
to display the authentication fields. Select the Enable ActiveSync authentication check box
and then type the default domain name. The default domain name will not be used when the
domain name is set in the email client’s setting.
ActiveSync Log Entries
The Log > View page is updated when a Web application is offloaded. Most mobile systems
(iPhone, Android, Windows Mobile, etc.) support ActiveSync. These log entries identify when
the client began to use ActiveSync through the offloading portal. The ActiveSync message
identifies the device ID (ActiveSync: Device Id is…) for an ActiveSync request unless a client
sets up the account and the request does not contain a device ID. The ActiveSync label is not
used in log entries for anonymous users who use ActiveSync.
Note
A user’s credential in the Exchange server must be the same as the one in the SRA. Many
authentication types are available for each domain in the SRA. If using the Local User
Database, make sure the user name and password is the same as the one for the Exchange
server. Fortunately , other authentication types like Active Dire ctory can share credentials for
both the Exchange server and SRA appliance. However , authentication using authentication
types that share credentials may take longer and the first ActiveSync request may time out.
Once authentication succeeds, a session is created and other requests won’t need to be
authenticated again.
Configuring a Portal to Check Email From an Android Device
The following example shows how to set up ActiveSync to check emails from an Android
device. Be sure to replace entries shown in the examples with entries for your environment, and
be careful to input the correct password. Otherwise, the account will be blocked.
SRA Overview | 29
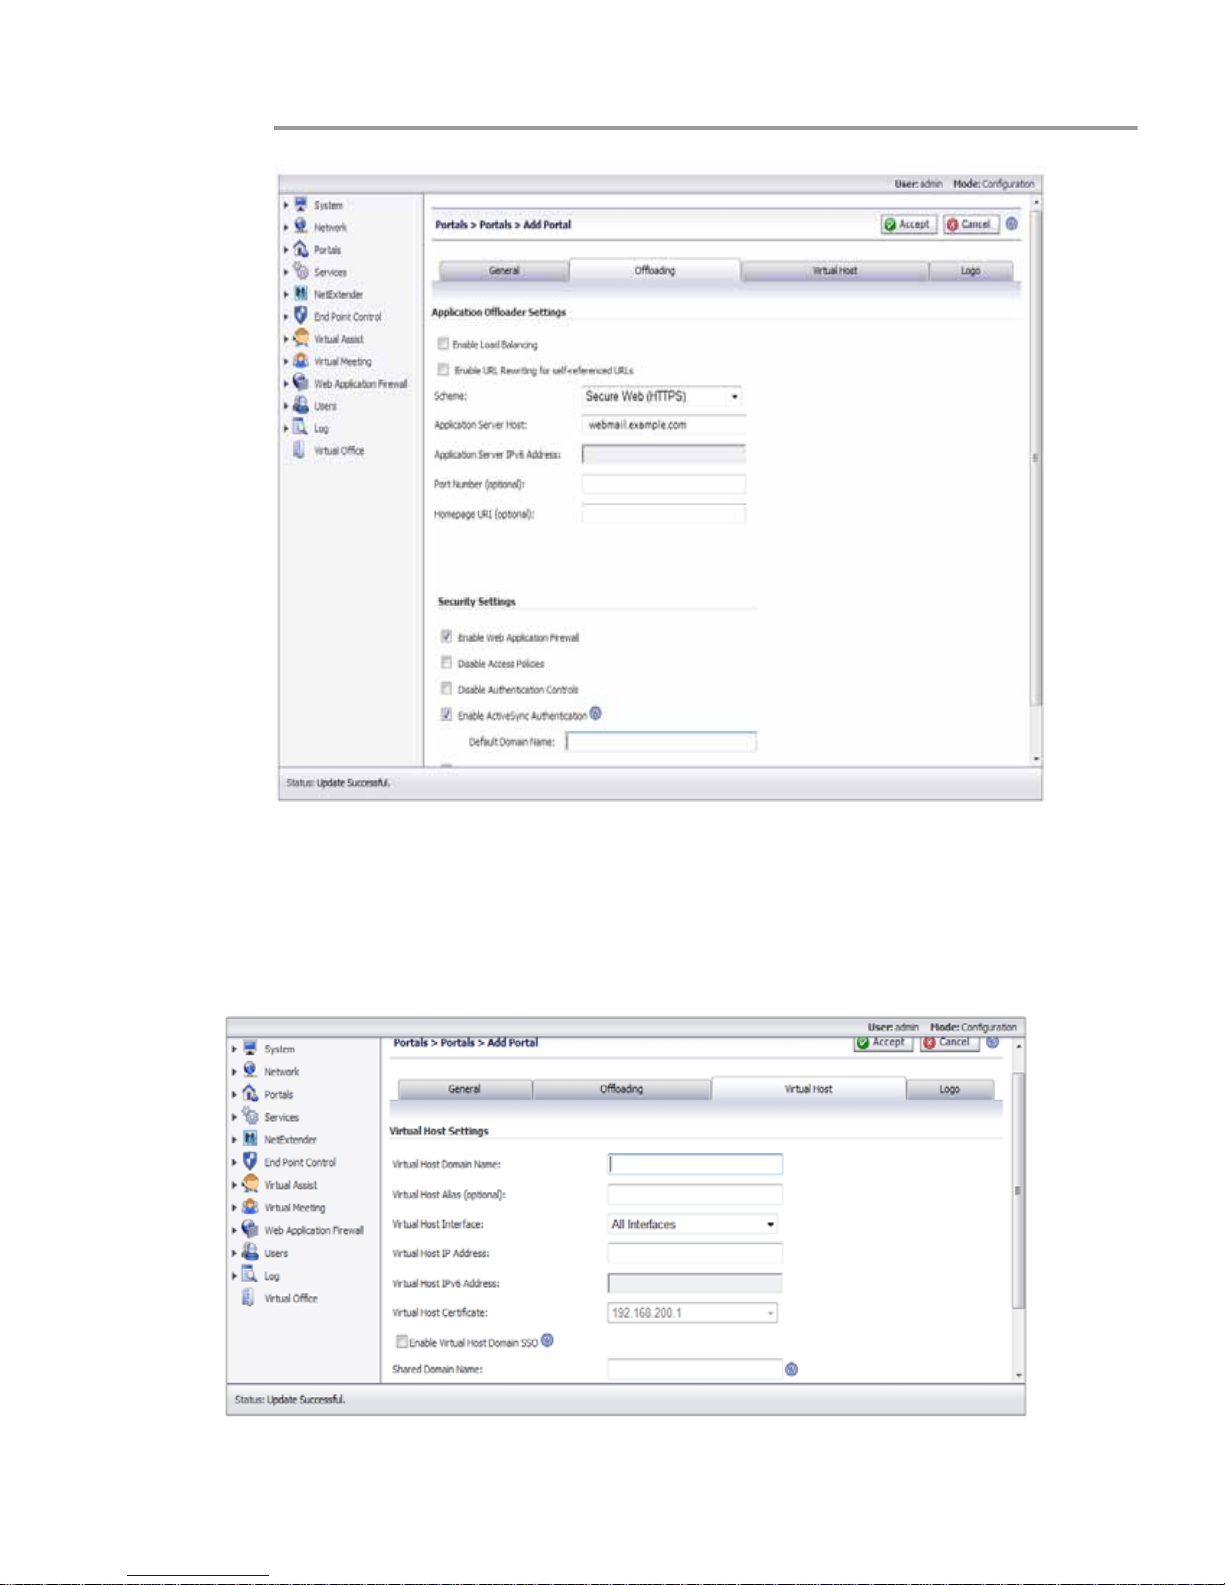
Step 1 In the SRA appliance, create an offloading portal with the name webmail.
Step 2 Set the Scheme to Secure Web (HTTPS).
Step 3 Set the Application Server Host to your Exchange server , for example webmail.example.com.
Step 4 Set the virtual host name, for example, webmail.example.com. The virtual host name should be
resolved by the DNS server. Otherwise, modify the hosts file in the Android phone.
Step 5 Select the Enable ActiveSync Authentication check box. Leave the default domain name
blank or input webmail.example.com.
30 | SRA 6.0 Administrator’s Guide
 Loading...