

Page 1

www.dell.com | support.dell.com
Dell Precision™ Workstation T3400
Quick Reference Guide
Model DCTA
Page 2

Notes, Notices, and Cautions
NOTE: A NOTE indicates important information that helps you make better use of
your computer.
NOTICE: A NOTICE indicates either potential damage to hardware or loss of data
and tells you how to avoid the problem.
CAUTION: A CAUTION indicates a potential for property damage, personal injury,
or death.
____________________
Information in this document is subject to change without notice.
© 2007 Dell Inc. All rights reserved.
Reproduction in any manner whatsoever without the written permission of Dell Inc. is strictly
forbidden.
Trademarks used in this text: Dell, the DELL logo, and Dell Precision are trademarks of Dell Inc.;
Microsoft, Windows, and Windows Vista are either trademarks or registered trademarks of Microsoft
Corporation in the United States and/or other countries.
Other trademarks and trade names may be used in this document to refer to either the entities claiming
the marks and names or their products. Dell Inc. disclaims any proprietary interest in trademarks and
trade names other than its own.
Model DCTA
August 2007 P/N NT505 Rev. A00
Page 3

Contents 3
Contents
Finding Information . . . . . . . . . . . . . . . . . . . . 5
About Your Computer
. . . . . . . . . . . . . . . . . . 11
Front View (Tower Orientation)
. . . . . . . . . . 11
Back View (Tower Orientation)
. . . . . . . . . . 14
Front View (Desktop Orientation)
. . . . . . . . . 15
Back View (Desktop Orientation)
. . . . . . . . . 18
Back Panel Connectors
. . . . . . . . . . . . . . 19
Setting Up Your Computer
. . . . . . . . . . . . . . . . 21
Changing Between Tower and
Desktop Orientations
. . . . . . . . . . . . . . . . 21
Installing Your Computer in an Enclosure
. . . . . 22
Transferring Information to a New Computer
. . . 25
Power Protection Devices
. . . . . . . . . . . . . 28
Cleaning Your Computer
. . . . . . . . . . . . . . . . 30
Computer, Keyboard, and Monitor
. . . . . . . . . 30
Mouse (Non-Optical)
. . . . . . . . . . . . . . . . 30
Floppy Drive
. . . . . . . . . . . . . . . . . . . . 31
CDs and DVDs
. . . . . . . . . . . . . . . . . . . 31
Troubleshooting Tools
. . . . . . . . . . . . . . . . . . 31
Power Lights
. . . . . . . . . . . . . . . . . . . . 31
Diagnostic Lights
. . . . . . . . . . . . . . . . . . 33
Beep Codes
. . . . . . . . . . . . . . . . . . . . 37
System Messages
. . . . . . . . . . . . . . . . . 39
Hardware Troubleshooter
. . . . . . . . . . . . . 41
Dell Diagnostics
. . . . . . . . . . . . . . . . . . 41
Page 4

4 Contents
Troubleshooting . . . . . . . . . . . . . . . . . . . . . 45
Battery Problems
. . . . . . . . . . . . . . . . . . 46
Drive Problems
. . . . . . . . . . . . . . . . . . . 46
E-Mail, Modem, and Internet Problems
. . . . . . 48
Error Messages
. . . . . . . . . . . . . . . . . . 49
IEEE 1394 Device Problems
. . . . . . . . . . . . . 50
Keyboard Problems
. . . . . . . . . . . . . . . . . 51
Lockups and Software Problems
. . . . . . . . . . 51
Memory Problems
. . . . . . . . . . . . . . . . . 53
Mouse Problems
. . . . . . . . . . . . . . . . . . 54
Network Problems
. . . . . . . . . . . . . . . . . 55
Power Problems
. . . . . . . . . . . . . . . . . . 55
Printer Problems
. . . . . . . . . . . . . . . . . . 56
Scanner Problems
. . . . . . . . . . . . . . . . . 57
Sound and Speaker Problems
. . . . . . . . . . . 58
Video and Monitor Problems
. . . . . . . . . . . . 59
Index . . . . . . . . . . . . . . . . . . . . . . . . . . . . . . . 61
Page 5

Quick Reference Guide 5
Finding Information
NOTE: Some features or media may be optional and may not ship with your
computer. Some features or media may not be available in certain countries.
NOTE: Additional information may ship with your computer.
What Are You Looking For? Find It Here
• A diagnostic program for my computer
• Drivers for my computer
• Desktop System Software (DSS)
Drivers and Utilities Disc
NOTE: The Drivers and Utilities disc may
be optional and may not ship with your
computer.
Documentation and drivers are already
installed on your computer. You can use
the Drivers and Utilities disc to reinstall
drivers (see "Reinstalling Drivers and
Utilities" in your User’s Guide), or to run
the Dell Diagnostics (see "Dell Diagnostics"
on page 41).
Readme files may be included on your
disc to provide last-minute updates about
technical changes to your computer or
advanced technical-reference material for
technicians or experienced users.
Drivers and documentation updates can be
found at support.dell.com.
Page 6
6 Quick Reference Guide
• Warranty information
• Terms and Conditions (U.S. only)
• Safety instructions
• Regulatory information
• Ergonomics information
• End User License Agreement
Dell™ Product Information Guide
• How to remove and replace parts
• Specifications
• How to configure system settings
• How to troubleshoot and solve problems
Dell Precision™ User’s Guide
Microsoft
®
Windows® XP and Windows
Vista
™
Help and Support Center
1
Click
Start→
Help and Support→
Dell User and System Guides
→
System Guides
.
2
Click the
User’s Guide
for your
computer.
What Are You Looking For? Find It Here
Page 7
Quick Reference Guide 7
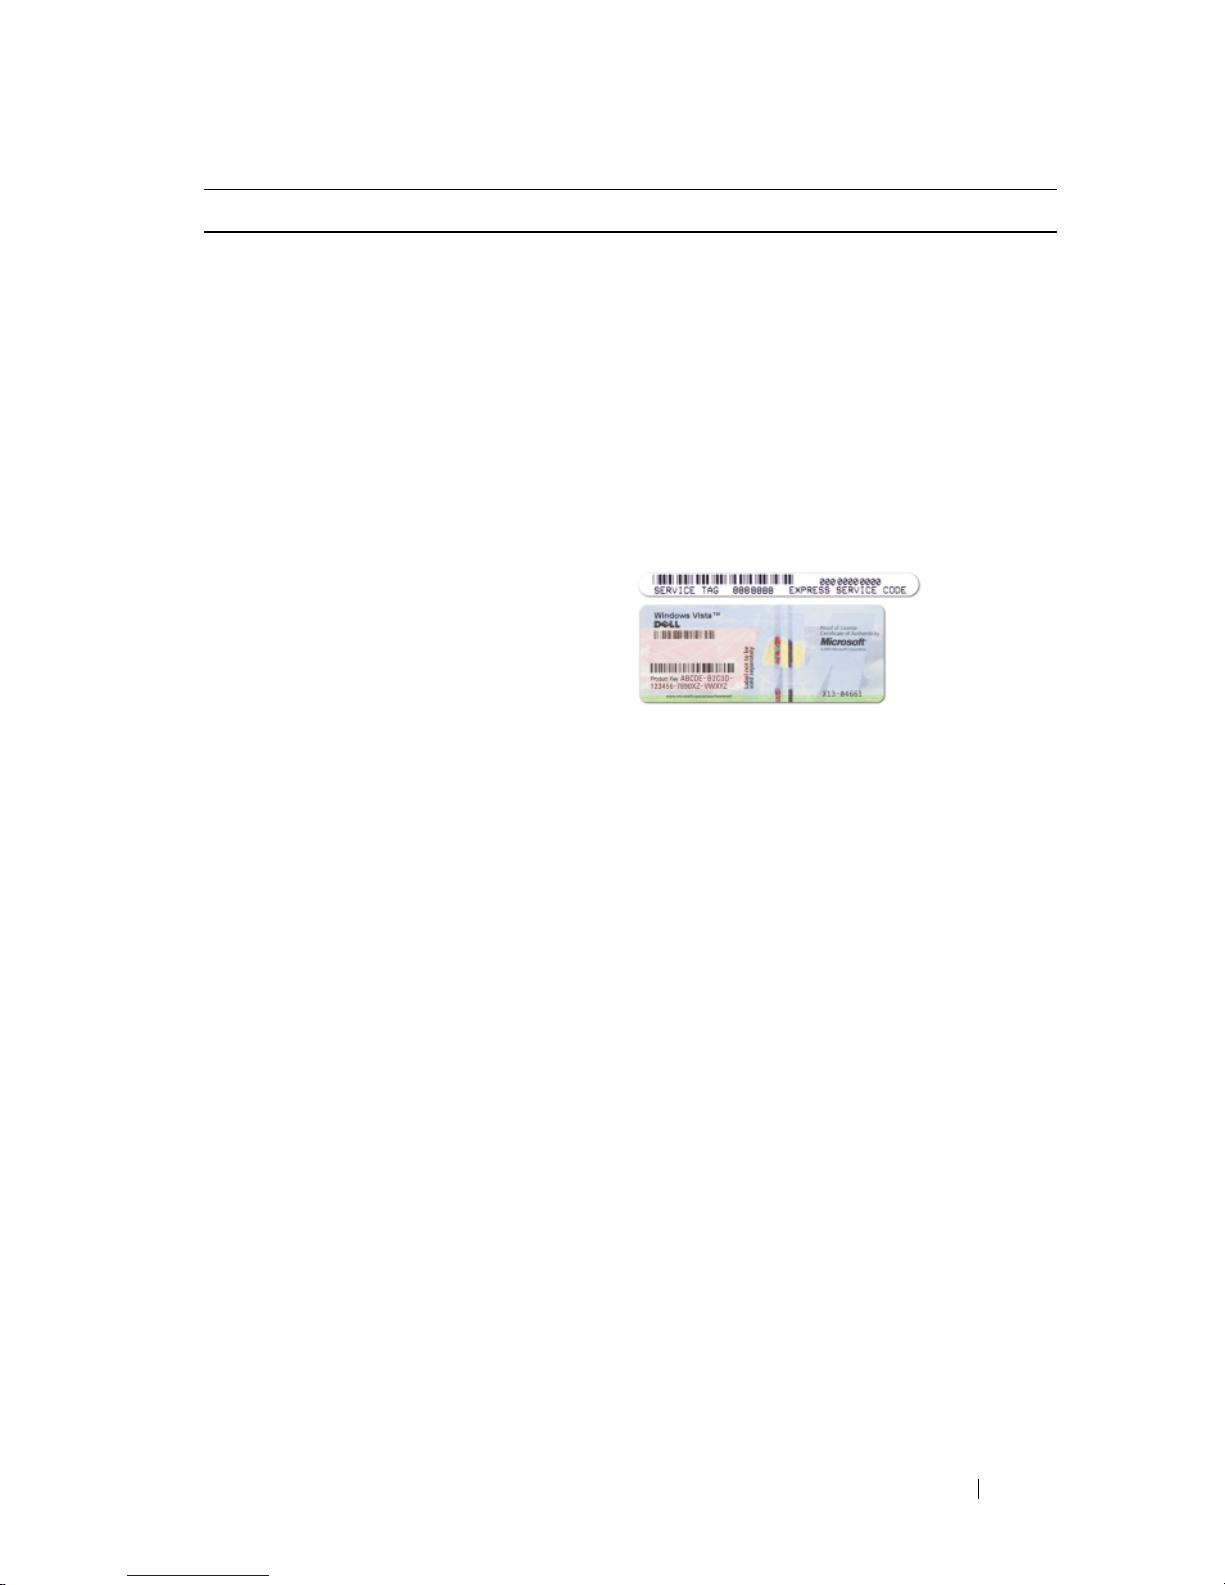
• Service Tag and Express Service Code
• Microsoft Windows Product Key
Service Tag and Microsoft Windows
Product Key
These labels are located on your
computer.
• Use the Service Tag to identify your
computer when you use
support.dell.com
or contact support.
• Enter the Express Service Code to
direct your call when contacting
support.
NOTE: As an increased security measure,
the newly designed Microsoft Windows
license label incorporates a missing
portion, or hole, to discourage removal of
the label.
What Are You Looking For? Find It Here
Page 8

8 Quick Reference Guide
• Solutions — Troubleshooting hints and
tips, articles from technicians, online
courses, and frequently asked questions
• Community — Online discussion with
other Dell customers
• Upgrades — Upgrade information for
components, such as the memory, hard
drive, and operating system
• Customer Care — Contact information,
service call and order status, and
warranty and repair information
• Service and support — Service call
status, support history, service contract,
and online discussions with support
• Dell Technical Update Service —
Proactive e-mail notification of software
and hardware updates for your computer
• Reference — Computer documentation,
details on my computer configuration,
product specifications, and white papers
• Downloads — Certified drivers, patches,
and software updates
Dell Support Website — support.dell.com
NOTE: Select your region or business
segment to view the appropriate support
site.
What Are You Looking For? Find It Here
Page 9

Quick Reference Guide 9
• Desktop System Software (DSS)— If
you reinstall the operating system for
your computer, you should also reinstall
the DSS utility. DSS automatically
detects your computer and operating
system and installs the updates
appropriate for your configuration,
providing critical updates for your
operating system and support for
processors, optical drives, USB devices,
etc. DSS is necessary for correct
operation of your Dell computer.
To download Desktop System Software:
1
Go to
support.dell.com
, select your
country/region, and then click
Drivers
& Downloads
.
2
Click
Select Model
or
Enter a Tag
,
make the appropriate selections or enter
the appropriate information for your
computer, and then click
Confirm
.
3
Scroll down to
System and
Configuration Utilities
→
Desktop
System Software
, and then click
Download Now.
NOTE: The support.dell.com user
interface may vary depending on your
selections.
• How to use Windows XP
• How to use Windows Vista
• How to work with programs and files
• How to personalize my desktop
Windows Help and Support Center
1
Click
Start→
Help and Support
.
2
Type a word or phrase that describes
your problem and click the arrow icon.
3
Click the topic that describes your
problem.
4
Follow the instructions on the screen.
What Are You Looking For? Find It Here
Page 10
10 Quick Reference Guide
• How to reinstall my operating system
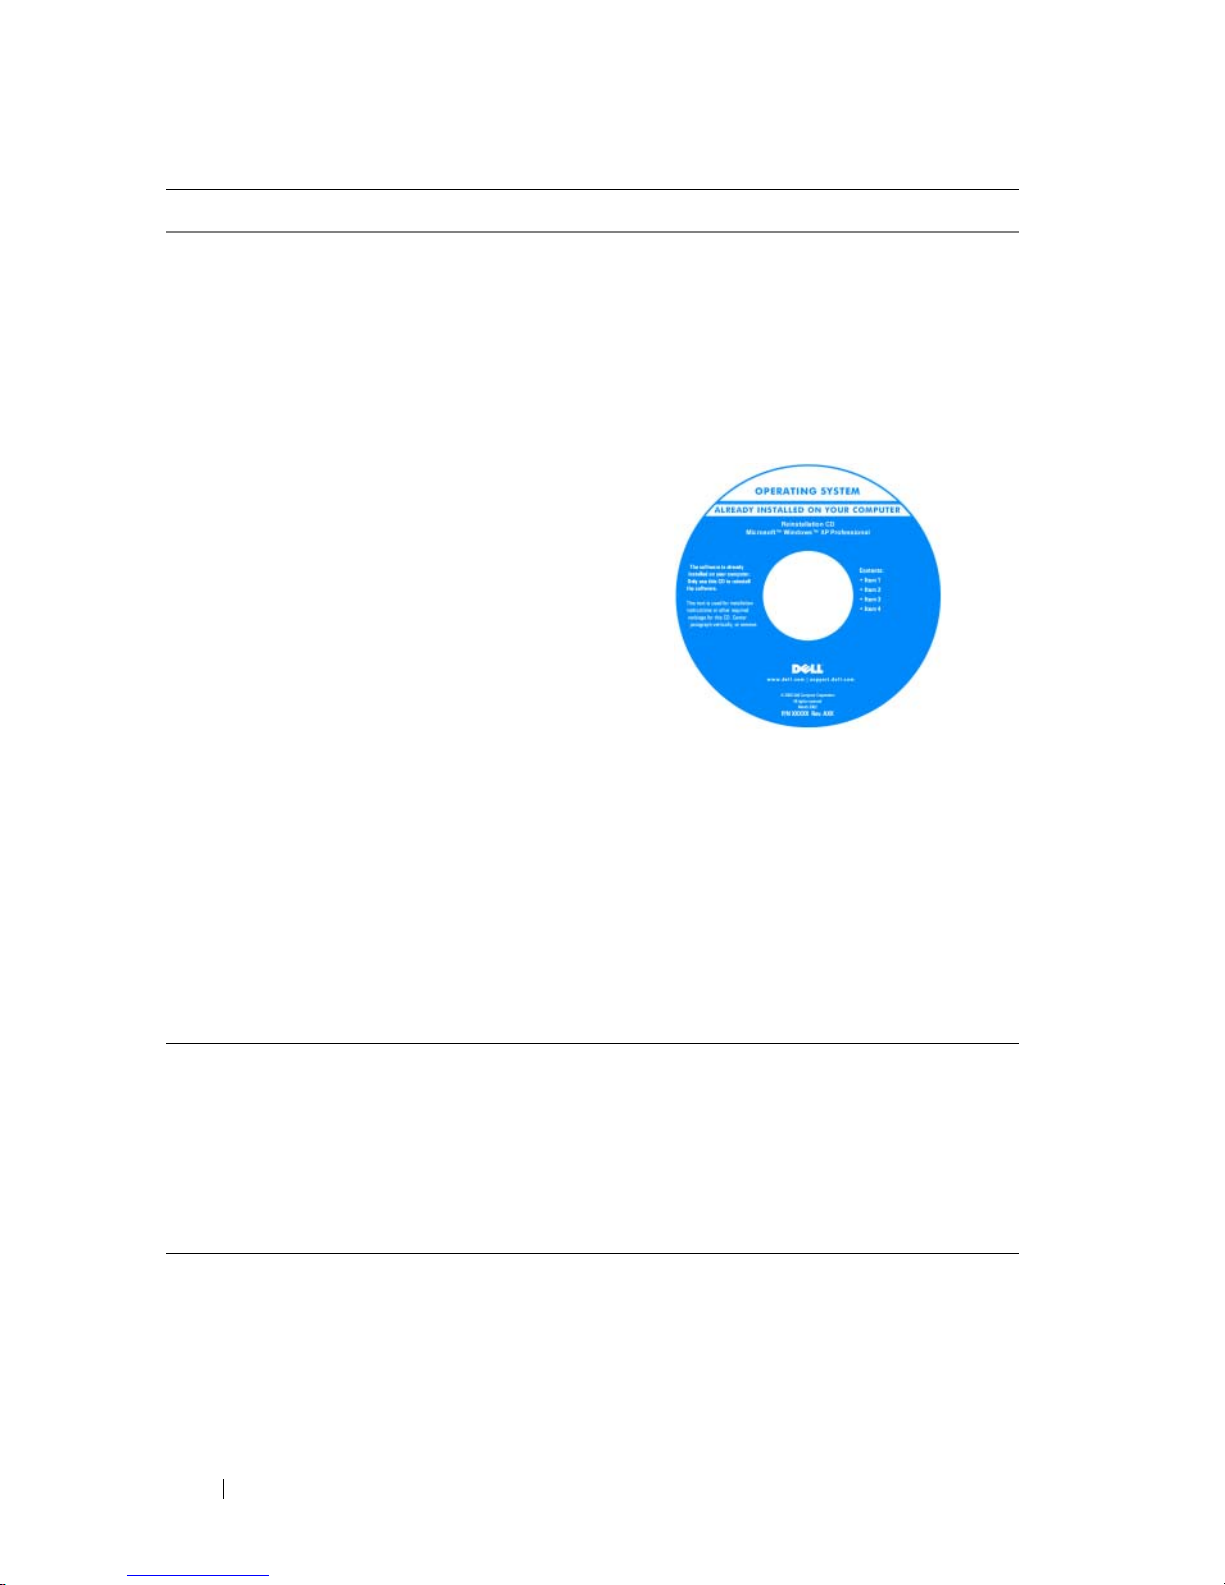
Operating System Media
The operating system is already installed
on your computer. To reinstall your
operating system, use the Operating
System reinstallation media that came
with your computer (see "Restoring Your
Operating System" in your User’s Guide).
After you reinstall your operating system,
use the optional Drivers and Utilities disc
to reinstall drivers for the devices that
came with your computer
Your operating system product key label is
located on your computer.
NOTE: The color of your operating system
installation media varies according to the
operating system you ordered.
• How to use Linux
• E-mail discussions with users of Dell
Precision products and the Linux
operating system
• Additional information regarding Linux
and my Dell Precision computer
Dell Supported Linux Sites
• linux.dell.com
• lists.us.dell.com/mailman/listinfo/linuxprecision
What Are You Looking For? Find It Here
Page 11
Quick Reference Guide 11
About Your Computer
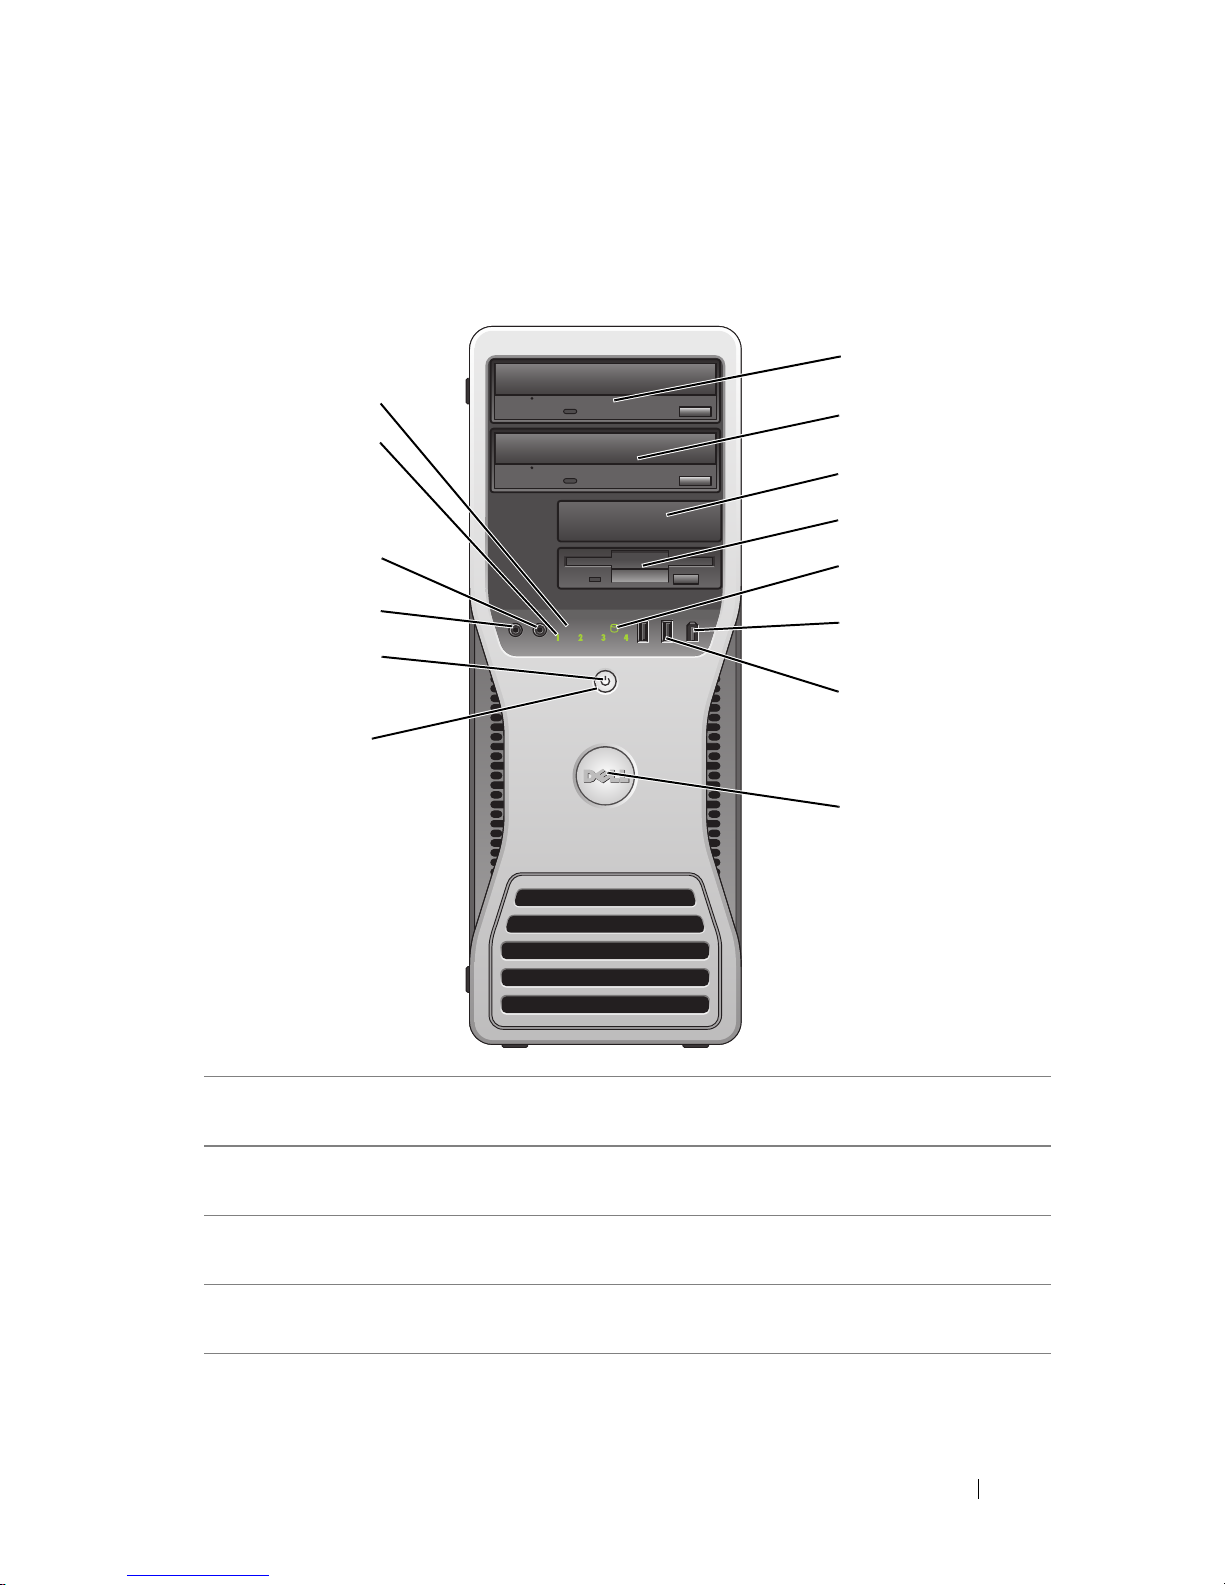
Front View (Tower Orientation)
1 upper 5.25-inch drive
bay
Supports an optical drive.
2 lower 5.25-inch drive
bay
Supports an optical drive or an additional hard drive
(SATA only).
3 upper 3.5-inch drive
bay
Supports a floppy drive, a Media Card Reader, or an
additional hard drive (SATA or SAS).
4 lower 3.5-inch drive
bay
Supports a floppy drive or a Media Card Reader.
1
9
10
11
12
13
14
4
5
6
7
8
3
2
Page 12

12 Quick Reference Guide
5 hard drive activity
light
The hard drive activity light is on when the computer
reads data from or writes data to the hard drive. The
light may also be on when a device such as an optical
drive is in operation.
6 IEEE 1394 connector
(optional)
Use the optional IEEE 1394 connector for high-speed
data devices such as digital video cameras and external
storage devices.
7 USB 2.0 connectors
(2)
Use the front USB connectors for devices that you
connect occasionally, such as flash memory keys or
cameras, or for bootable USB devices (see "System
Setup" in your User’s Guide for more information on
booting to a USB device).
NOTE: It is recommended that you use the back USB
connectors for devices that typically remain connected,
such as printers and keyboards.
8 Dell badge (rotatable) Use the plastic handle on the back of the Dell badge to
rotate the badge for tower-to-desktop or desktop-totower conversion.
9 power button Press to turn on the computer.
NOTICE: To avoid losing data, do not use the
power button to turn off the computer. Instead,
perform an operating system shutdown.
NOTICE: If your operating system has ACPI
enabled, when you press the power button the
computer will perform an operating system
shutdown.
NOTE: The power button can also be used to wake the
system or to place it into a power-saving state (see
"Power Management" in your User’s Guide).
Page 13

Quick Reference Guide 13
10 power light The power light illuminates and blinks or remains solid
to indicate different states:
• No light — The computer is turned off (S4, S5, or
mechanical OFF).
• Steady green — The computer is in a normal
operating state.
• Blinking green — The computer is in a powersaving state (S1 or S3).
• Blinking or solid amber — See "Power Problems" in
your
User’s Guide
.
To exit from a power-saving state, press the power
button or use the keyboard or mouse if it is configured
as a wake device in the Windows Device Manager. For
more information about sleep states and exiting from
a power-saving state, see "Power Management" in your
User’s Guide
.
For a description of diagnostic light codes for
troubleshooting problems with your computer, see
"Diagnostic Lights" on page 33.
11 microphone
connector
Use the microphone connector to attach a personal
computer microphone for voice or musical input into
a sound or telephony program.
12 headphone connector Use the headphone connector to attach headphones.
13 diagnostic lights (4) Use the diagnostic lights to help you troubleshoot
a problem with your computer (see "Diagnostic Lights"
on page 33).
14 network link light The network link light is on when a good connection
exists between a 10-Mbps, 100-Mbps, or 1000-Mbps
(1-Gbps) network and the computer.
Page 14
14 Quick Reference Guide
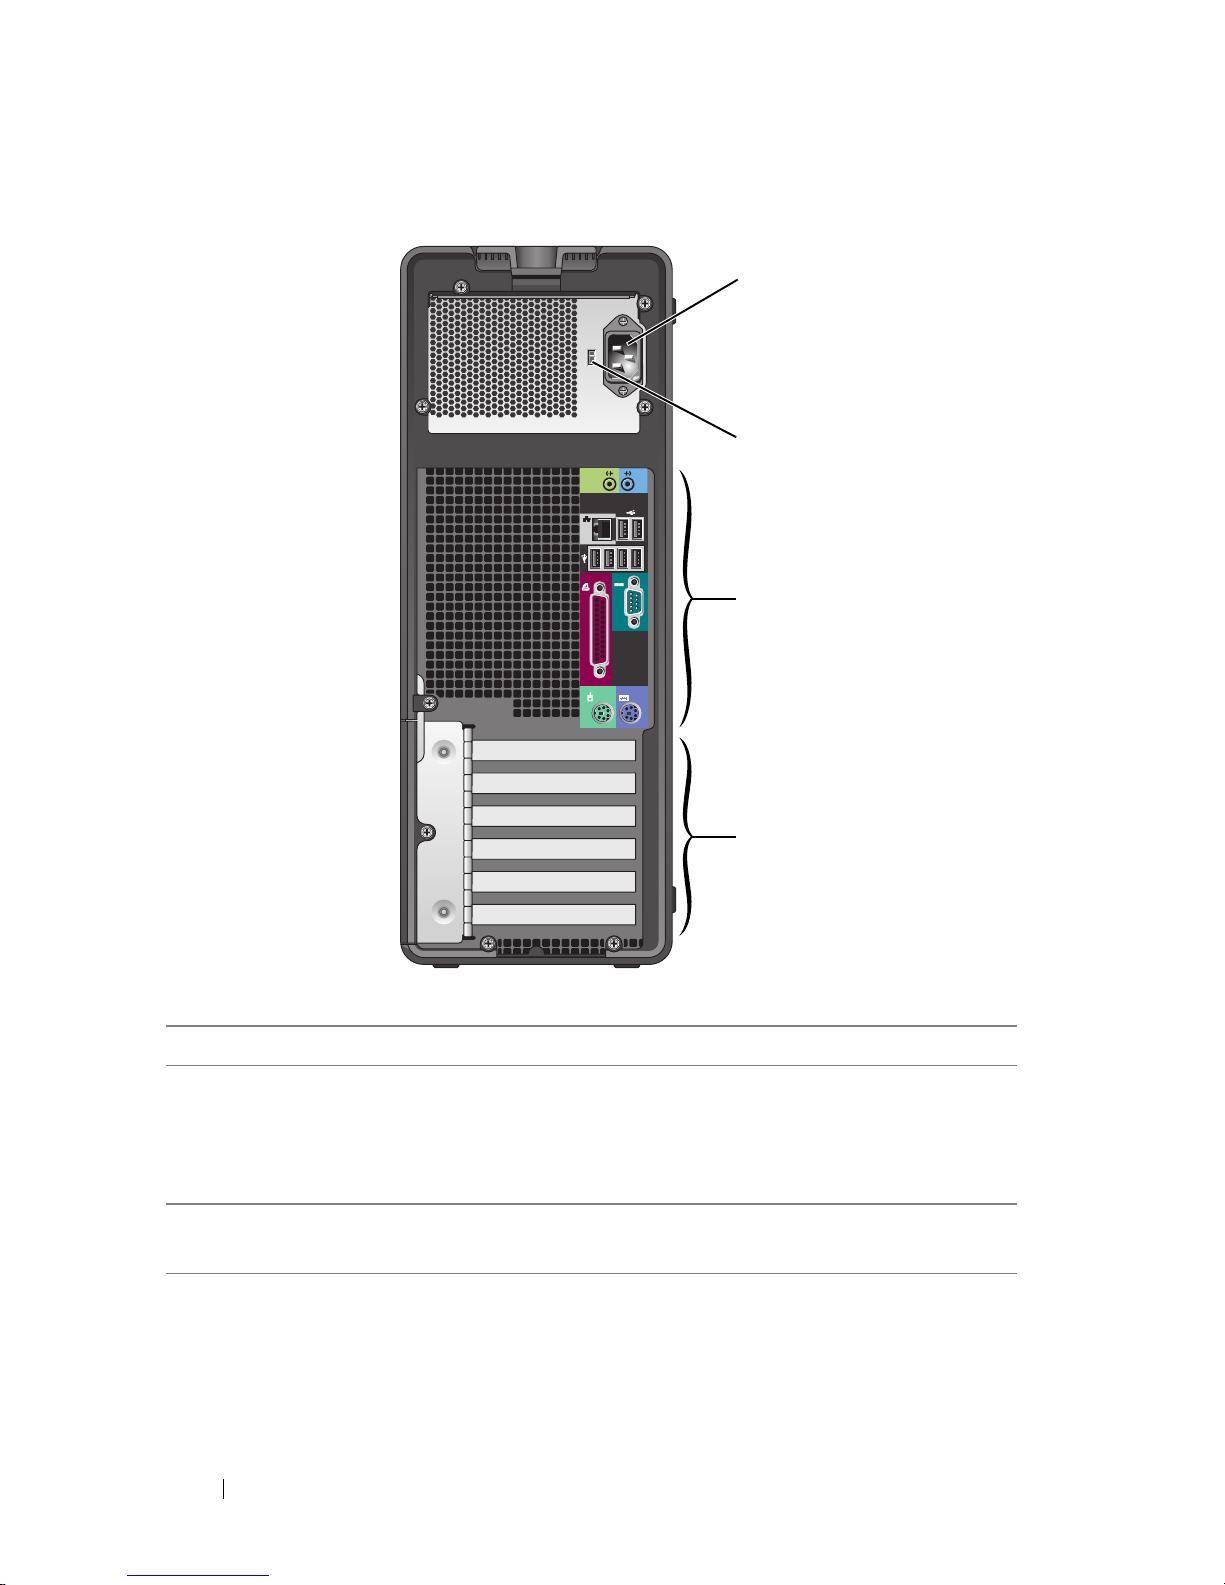
Back View (Tower Orientation)
1 power connector Insert the power cable.
2 voltage selection
switch
See the safety instructions in the Product Information
Guide for more information.
NOTE: The voltage selection switch is available on the 375-W
PSU only.
3 back panel
connectors
Plug serial, USB, and other devices into the appropriate
connector.
1
2
3
4
Page 15
Quick Reference Guide 15
Front View (Desktop Orientation)
4 card slots Access connectors for any installed PCI or PCI Express
cards.
NOTE: The upper five connector slots support full-length
cards; the connector slot at the bottom supports a half-length
card.
NOTE: Check the documentation for cards to ensure that you
can accommodate them in your configuration. Some cards
that require more physical space and power (such as PCI
Express graphics cards) may restrict the use of other cards.
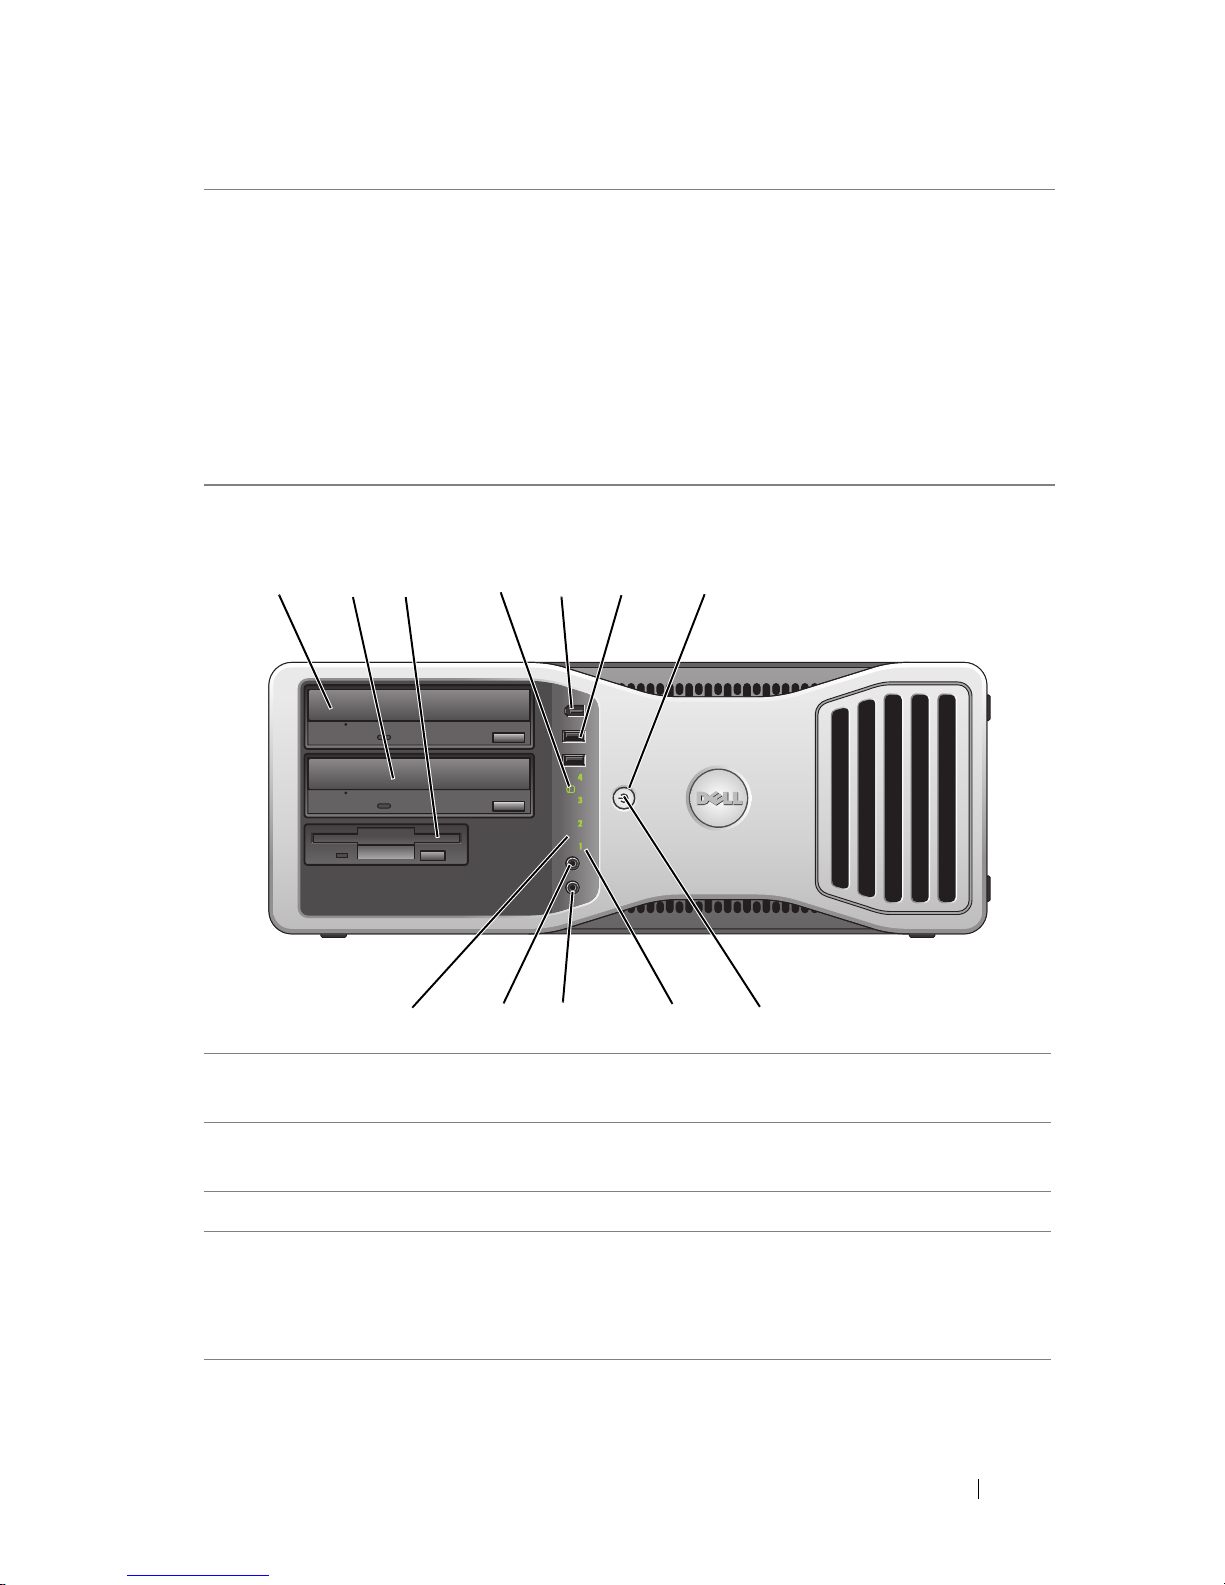
1 upper 5.25-inch drive
bay
Supports an optical drive.
2 lower 5.25-inch drive
bay
Supports an optical drive or an additional hard drive
(SATA only).
3 3.5-inch drive bay Supports a floppy drive or a Media Card Reader.
4 hard drive activity
light
The hard drive activity light is on when the computer
reads data from or writes data to the hard drive. The
light may also be on when a device such as an optical
drive is in operation.
1 2 7
8
9101112
3
4
5 6
Page 16

16 Quick Reference Guide
5 IEEE 1394 connector
(optional)
Use the optional IEEE 1394 connector for high-speed
data devices such as digital video cameras and external
storage devices.
6 USB 2.0 connectors
(2)
Use the front USB connectors for devices that you
connect occasionally, such as flash memory keys or
cameras, or for bootable USB devices (see "System
Setup" in your User’s Guide for more information on
booting to a USB device).
NOTE: It is recommended that you use the back USB
connectors for devices that typically remain connected,
such as printers and keyboards.
7 power button Press to turn on the computer.
NOTICE: To avoid losing data, do not use the
power button to turn off the computer. Instead,
perform an operating system shutdown.
NOTICE: If your operating system has ACPI
enabled, when you press the power button the
computer will perform an operating system
shutdown.
NOTE: The power button can also be used to wake the
system or to place it into a power-saving state (see
"Power Management" in your User’s Guide).
Page 17

Quick Reference Guide 17
8 power light The power light illuminates and blinks or remains solid
to indicate different states:
• No light — The computer is turned off (S4, S5, or
mechanical OFF).
• Steady green — The computer is in a normal
operating state.
• Blinking green — The computer is in a powersaving state (S1 or S3).
• Blinking or solid amber — See "Power Problems"
in
your User’s Guide
.
To exit from a power-saving state, press the power
button or use the keyboard or mouse if it is configured
as a wake device in the Windows Device Manager. For
more information about sleep states and exiting from
a power-saving state, see "Power Management" in your
User’s Guide.
For a description of diagnostic light codes for
troubleshooting problems with your computer, see
"Diagnostic Lights" on page 33.
9 diagnostic lights (4) Use the diagnostic lights to help you troubleshoot
a problem with your computer (see "Diagnostic Lights"
on page 33).
10 microphone
connector
Use the microphone connector to attach a personal
computer microphone for voice or musical input into
a sound or telephony program.
11 headphone connector Use the headphone connector to attach headphones.
12 network link light The network link light is on when a good connection
exists between a 10-Mbps, 100-Mbps, or 1000-Mbps
(or 1-Gbps) network and the computer.
Page 18

18 Quick Reference Guide
Back View (Desktop Orientation)
1 card slots Access connectors for any installed PCI or PCI Express
cards.
NOTE: Check the documentation for cards to ensure that
you can accommodate them in your configuration. Some
cards that require more physical space and power (such
as PCI Express graphics cards) may restrict the use of
other cards.
2 power connector Insert the power cable.
3 voltage selection
switch
See the safety instructions in the Product Information
Guide for more information.
NOTE: The voltage selection switch is available on the
375-W PSU only.
4 back panel connectors Plug serial, USB, and other devices into the
appropriate connector.
32
4
1
Page 19
Quick Reference Guide 19
Back Panel Connectors
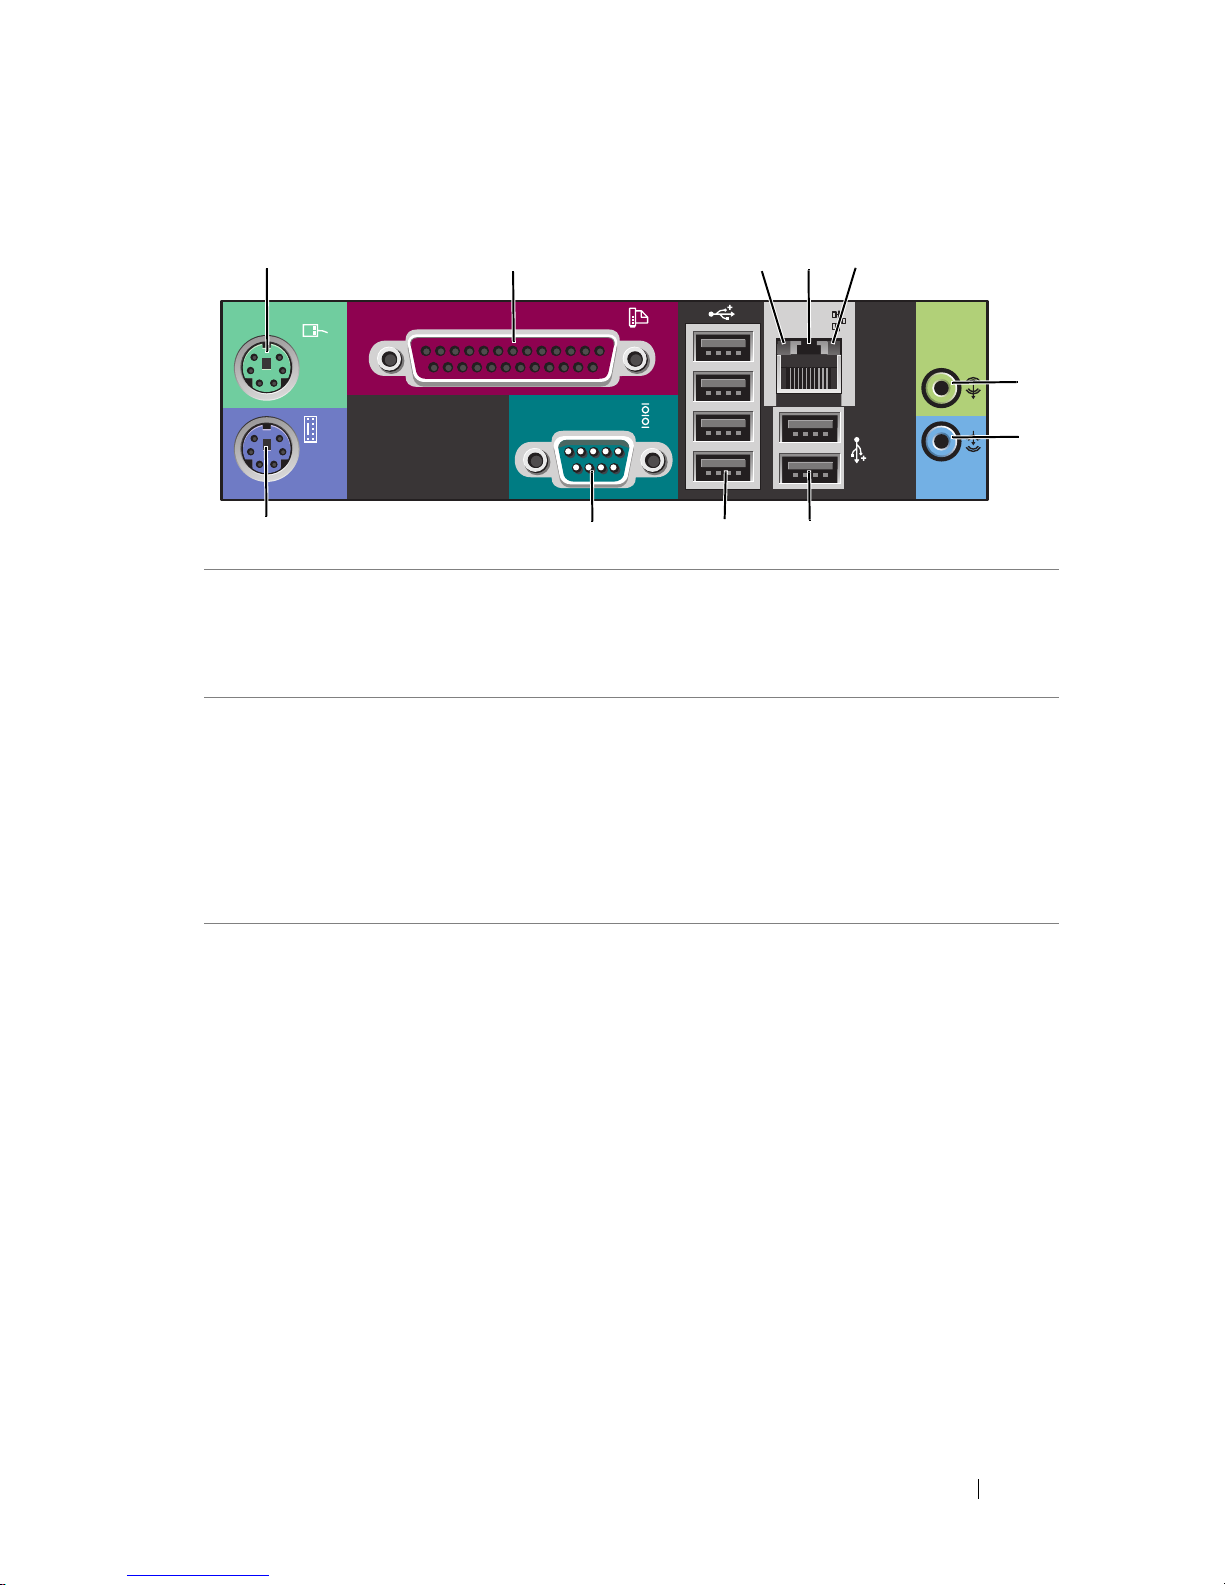
1 mouse connector Plug a PS/2 mouse into the green mouse connector. Turn off
the computer and any attached devices before you connect
a mouse to the computer. If you have a USB mouse, plug it
into a USB connector.
2 parallel
connector
Connect a parallel device, such as a printer, to the parallel
connector. If you have a USB printer, plug it into a USB
connector.
NOTE: The integrated parallel connector is automatically
disabled if the computer detects an installed card containing
a parallel connector configured to the same address. For more
information, see "System Setup Options" in your User’s Guide.
3 link integrity
light
• Green — A good connection exists between a 10-Mbps
network and the computer.
• Orange — A good connection exists between a 100-Mbps
network and the computer.
• Yellow — A good connection exists between a 1000-Mbps
(1-Gbps) network and the computer.
• Off — The computer is not detecting a physical
connection to the network.
1
2 345
891011
6
7
Page 20

20 Quick Reference Guide
4 network adapter
connector
To attach your computer to a network or broadband device,
connect one end of a network cable to either a network jack
or your network or broadband device. Connect the other
end of the network cable to the network adapter connector
on your computer. A click indicates that the network cable
has been securely attached.
NOTICE: Do not plug a telephone cable into the network
connector.
On computers with an additional network connector card,
use the connectors on the card and on the back of the
computer when setting up multiple network connections
(such as a separate intra- and extranet).
It is recommended that you use Category 5 wiring and
connectors for your network. If you must use Category
3 wiring, force the network speed to 10 Mbps to ensure
reliable operation.
5 network activity
light
The network activity light is on (flashing) when the
computer is transmitting or receiving network data. A high
volume of network traffic may make this light appear to be
in a steady on state.
6 line-out
connector
Use the green line-out connector to attach headphones and
most speakers with integrated amplifiers.
On computers with a sound card, use the connector on the
card.
7 line-in connector Use the blue line-in connector to attach a record/playback
device such as a microphone, cassette player, CD player,
or VCR.
On computers with a sound card, use the connector on the
card.
8 Rear Dual USB
2.0 connectors
(2)
Use the back USB connectors for devices that typically
remain connected, such as printers and keyboards.
NOTE: It is recommended that you use the front USB
connectors for devices that you connect occasionally, such as
flash memory keys or cameras, or for bootable USB devices.
Page 21
Quick Reference Guide 21
Setting Up Your Computer
Changing Between Tower and Desktop Orientations
CAUTION: Before you begin any of the procedures in this section, follow the
safety instructions in the
Product Information Guide
.
NOTE: To change your computer to either the tower or the desktop orientation, you
must use an optional kit available from Dell. See "Product Information" in your User’s
Guide for more details on ordering from Dell.
NOTE: The tower computer supports one more 3.5-inch drive in the front than does
the desktop computer.
1
Follow the procedures in "Before You Begin" in your
User’s Guide
.
2
Remove the computer cover (see "Removing the Computer Cover" in your
User’s Guide
).
3
Remove the front panel (see "Removing the Front Panel" in your
User’s
Guide
).
4
Remove the drive panel and prepare the drive panel by adding or removing
inserts, as needed (see "Drive Panel" in your
User’s Guide
).
9 Rear Quad USB
2.0 connectors
(4)
Use the back USB connectors for devices that typically
remain connected, such as printers and keyboards.
NOTE: It is recommended that you use the front USB
connectors for devices that you connect occasionally, such as
flash memory keys or cameras, or for bootable USB devices.
10 serial connector Connect a serial device, such as a handheld device, to the
serial port. The default designations are COM1 for serial
connector 1 and COM2 for the optional serial connector 2.
For more information, see "System Setup Options" in your
User’s Guide.
11 keyboard
connector
If you have a PS/2 keyboard, plug it into the purple keyboard
connector. If you have a USB keyboard, plug it into a USB
connector.
Page 22

22 Quick Reference Guide
Switching From Tower to Desktop Orientation
1
Remove all installed floppy drives or media card readers by following the
steps in "Removing a Floppy Drive or Media Card Reader (Tower
Computer)" in your
User’s Guide
, and then reinstall a single floppy drive or
media card reader by following the steps in "Installing a Floppy Drive or
Media Card Reader (Desktop Computer)" in your
User’s Guide
.
2
Remove all installed optical drives by following the steps in "Removing an
Optical Drive (Tower Computer)" in your
User’s Guide
, and then reinstall
the drives by following the steps in "Installing an Optical Drive (Desktop
Computer)" in your
User’s Guide
.
Switching From Desktop to Tower Orientation
1
Remove the floppy drive or media card reader (if installed) by following
the steps in "Removing a Floppy Drive or a Media Card Reader (Desktop
Computer)" in your
User’s Guide
, and then reinstall the floppy drive or
media card reader by following the steps in "Installing a Floppy Drive or
Media Card Reader (Tower Computer)" in your
User’s Guide
.
2
Remove all installed optical drives by following the steps in "Removing an
Optical Drive (Desktop Computer)" in your
User’s Guide
, and reinstall the
drives by following the steps in "Installing an Optical Drive (Tower
Computer)" in your
User’s Guide
.
Installing Your Computer in an Enclosure
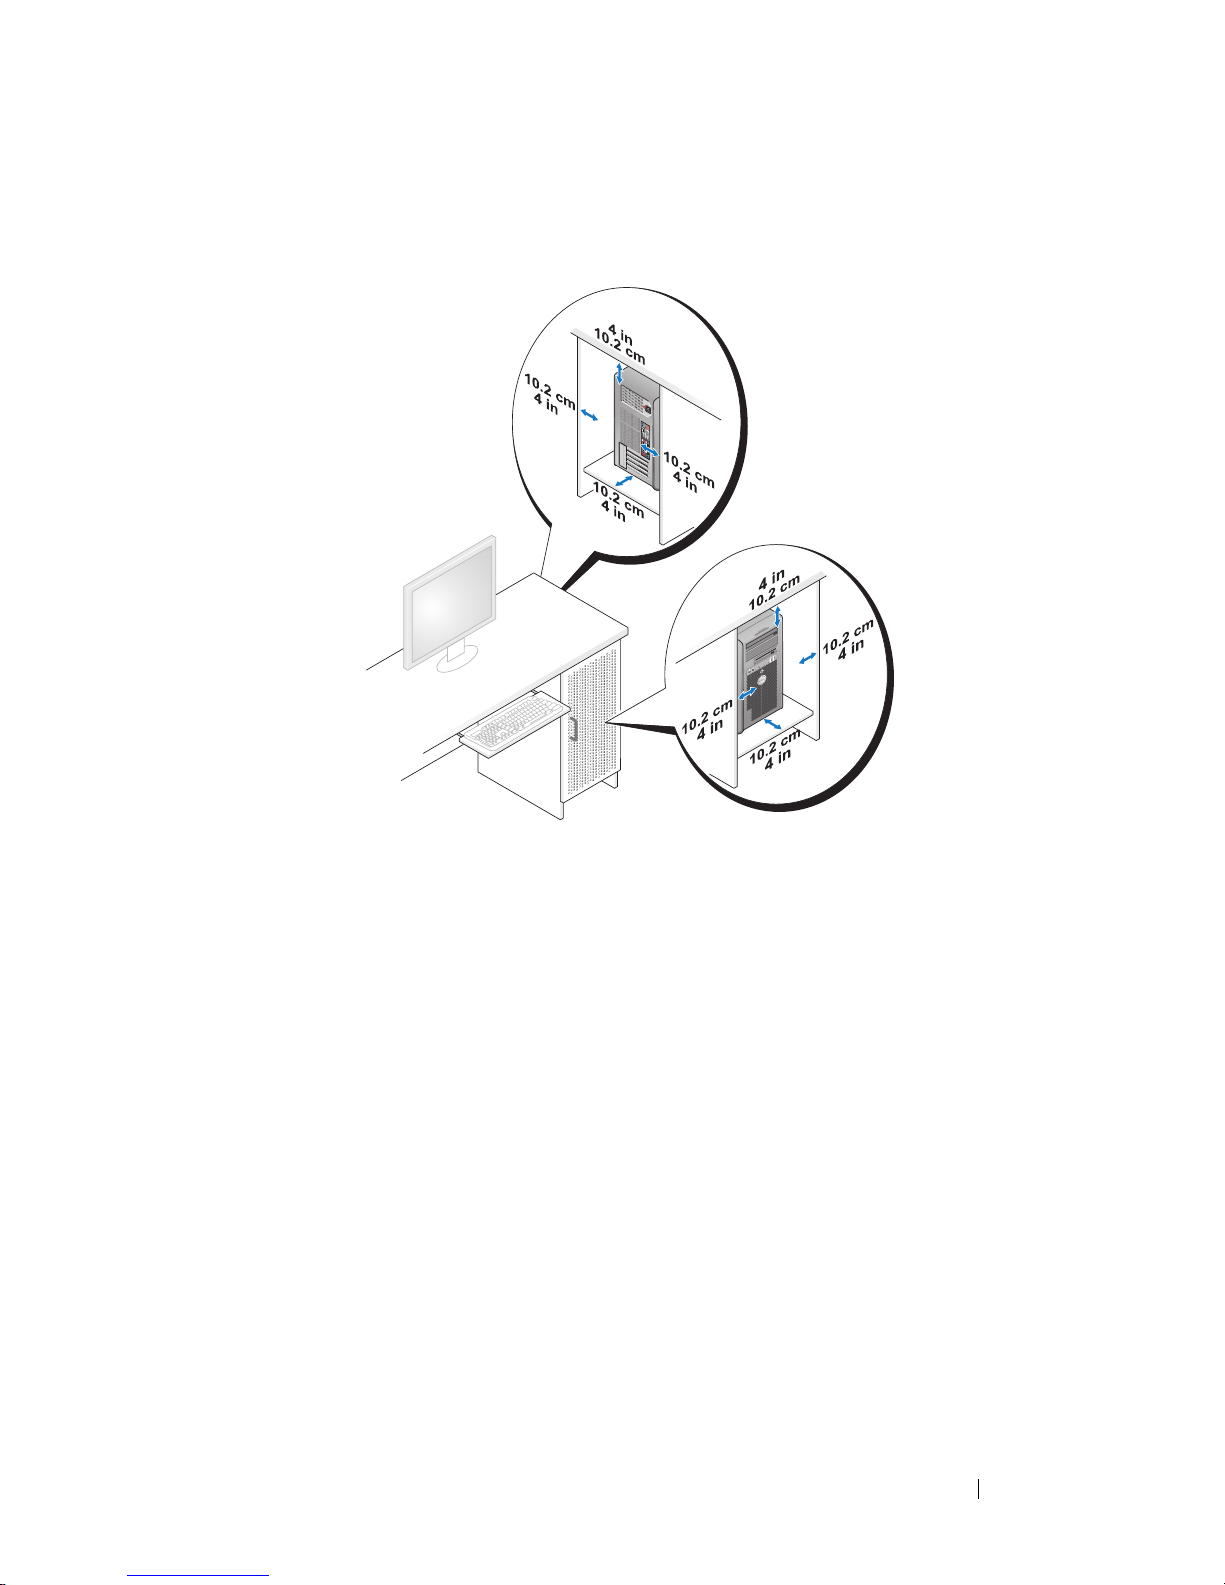
Installing your computer in an enclosure can restrict airflow, can cause your
computer to overheat, and may impact your computer’s performance. Follow
the guidelines below when installing your computer in an enclosure:
NOTICE: The operating temperature specified in this manual reflects the maximum
ambient operating temperature. The ambient room temperature must be a
consideration when installing your computer in an enclosure. For details about your
computer’s specifications, see "
Specifications" in your User’s Guide.
Page 23
Quick Reference Guide 23
• Leave 10.2 cm (4 in) minimum clearance on all vented sides of the
computer to permit the airflow required for proper ventilation.
• If your computer is installed in a corner on or under a desk, leave 5.1 cm
(2 in) minimum clearance from the back of the computer to the wall to
permit the airflow required for proper ventilation.
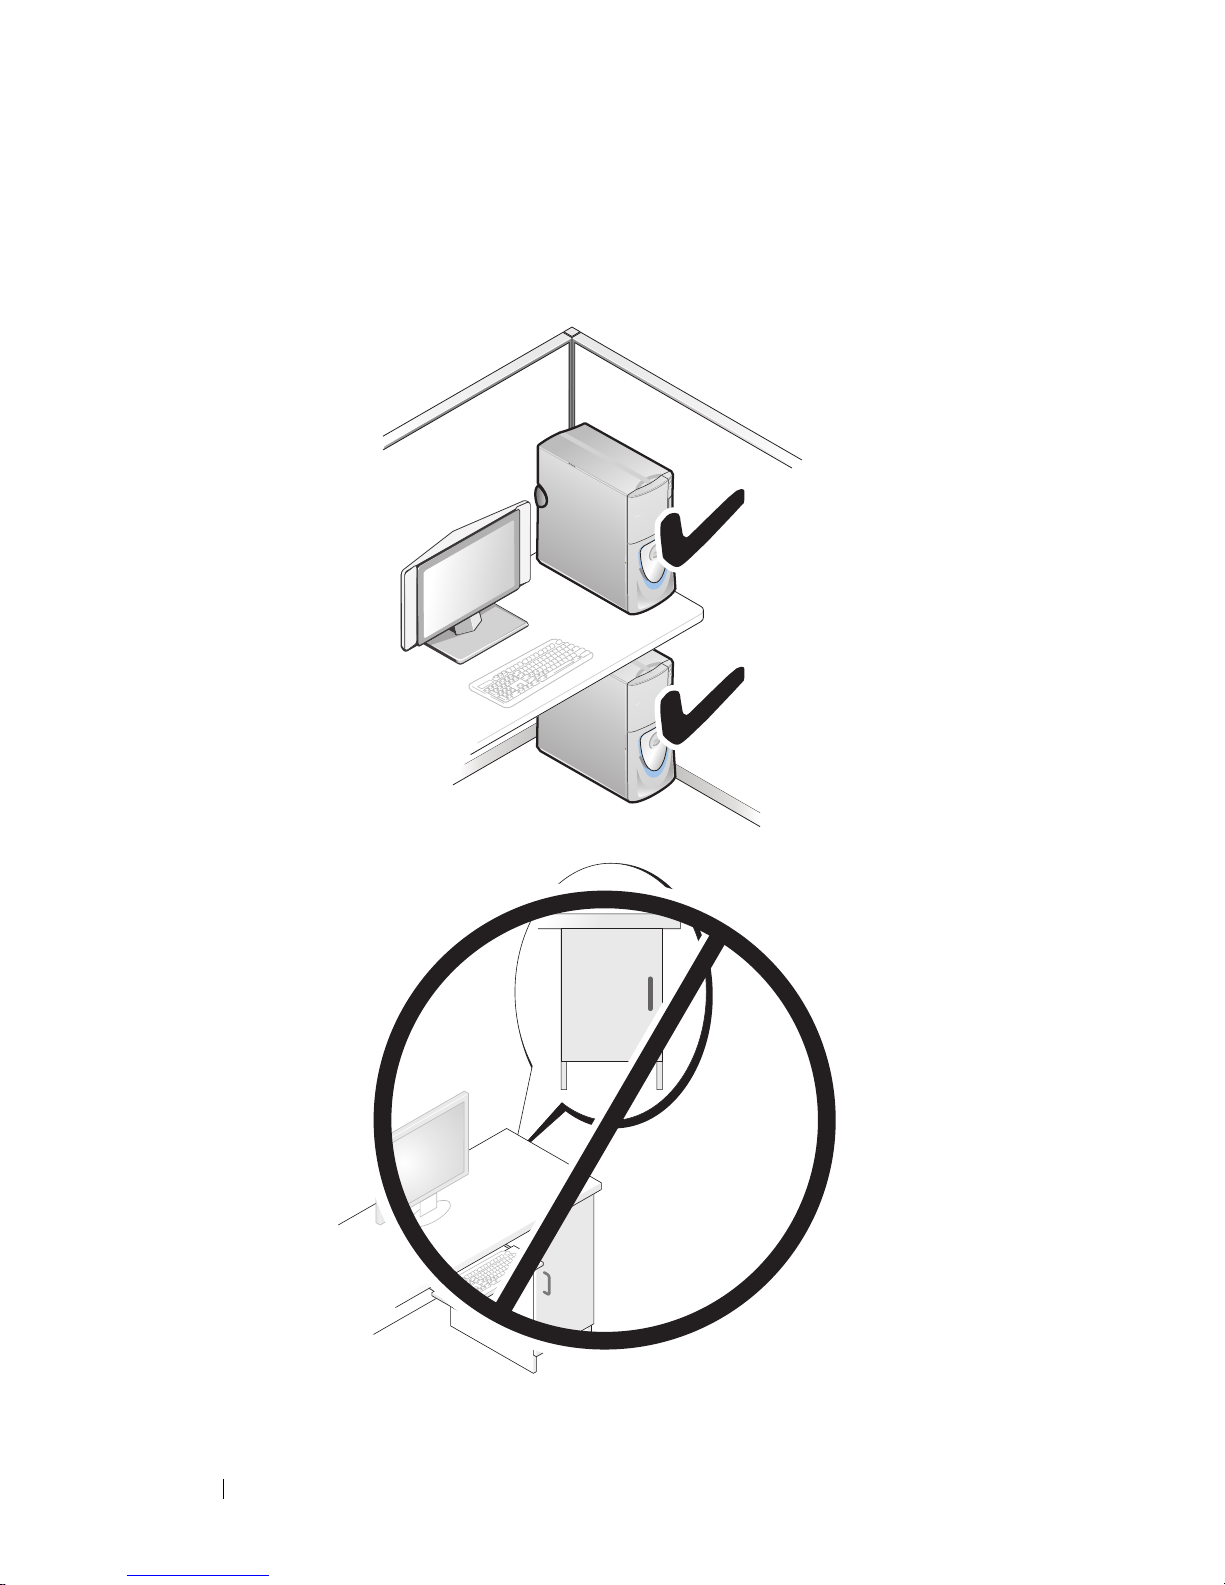
• If your enclosure has doors, ensure that they allow at least thirty percent
airflow through the enclosure (front and back).
Page 24
24 Quick Reference Guide
• Do not install your computer in an enclosure that does not allow airflow.
Restricting the airflow
can cause your computer to overheat, and may
impact your computer’s performance
.
Page 25

Quick Reference Guide 25
Transferring Information to a New Computer
You can use your operating system wizards to help you transfer files and other
data from one computer to another computer.
Microsoft Windows XP
The Microsoft Windows XP operating system provides the Files and Settings
Transfer Wizard to transfer data, such as:
• E-mail messages
• Toolbar settings
•Window sizes
• Internet bookmarks
You can transfer data from one computer to another computer over a network
or serial connection, or by storing the data on removable media, such as
a writable CD or DVD.
NOTE: You can transfer information from one computer to another computer by
directly connecting a serial cable to the input/output (I/O) ports of the two
computers. To transfer data over a serial connection, you must use the Network
Connections utility in the Control Panel to perform additional configuration steps,
such as setting up an advanced connection and designating the host computer and
the guest computer.
For instructions on setting up a direct cable connection between two computers,
see Microsoft Knowledge Base Article #305621, (How to Set Up a Direct Cable
Connection Between Two Computers in Windows XP). This information may not be
available in certain countries.
Using the Files and Settings Transfer Wizard requires the Operating System
installation media that came with your computer or a wizard disk, which the
wizard can create for you.
NOTE: For more information about transferring data, search support.dell.com for
document #154781 (What Are The Different Methods To Transfer Files From My Old
Computer To My New Dell™ Computer Using the Microsoft
®
Windows® XP
Operating System?).
NOTE: Access to the Dell Knowledge Base document may not be available in
certain countries.
Page 26

26 Quick Reference Guide
Files and Settings Transfer Wizard (With the Operating System Media)
NOTE: The Files and Settings Transfer Wizard designates the source computer
from which data is to be transferred as the old computer, and designates the
destination computer to which the data is going to be transferred as the new
computer.
PREPARE THE DESTINATION COMPUTER FOR THE FILE TRANSFER:
1
Click
Start→ All Programs→ Accessories→ System Tools→ Files and
Settings Transfer Wizard
.
2
Under
Which computer is this?
, click
New computer
, then click
Next
.
3
Under
Do you have a Windows XP CD?
, click
I will use the wizard from
the Windows XP CD
, then click
Next
.
4
Review the information under
Now go to your old computer
, and then go
to the source computer. Do
not
click
Next
.
COPY DATA FROM THE SOURCE COMPUTER:
1
Insert the Windows XP
Operating System
installation media into the
source computer.
The
Welcome to Microsoft Windows XP
screen appears.
2
Click
Perform additional tasks
.
3
Under
What do you want to do?
, click
Transfer files and settings
.
The
Files and Settings Transfer Wizard
window appears.
4
Click
Next
.
5
Under
Which computer is this?
, click
Old Computer
, then click
Next
.
6
Under
Select a transfer method
, click the transfer method of your choice,
then click
Next
.
7
Under
What do you want to transfer?
, click to select the data you want to
transfer, then click
Next
.
The selected data is copied and the
Completing the Collection Phase
screen appears.
8
Click
Finish
.
TRANSFER DATA TO THE DESTINATION COMPUTER:
1
Go to the destination computer.
2
Under
Now go to your old computer
, click
Next
.
Page 27

Quick Reference Guide 27
3
Under
Where are the files and settings?
, click to select the method you
chose for transferring your settings and files, then click
Next
.
The wizard reads the collected files and settings and applies them to the
destination computer. When the transfer is complete, the
Finished
screen
appears.
4
Click
Finished
, and then restart the computer.
Files and Settings Transfer Wizard (Without the Operating System Media)
To run the Files and Settings Transfer Wizard without the Operating System
installation media, you must create a wizard disk. The wizard disk allows you
to create a backup image file on removable media.
NOTE: The Files and Settings Transfer Wizard designates the source computer
from which data is to be transferred as the old computer, and designates the
destination computer to which the data is going to be transferred as the new
computer.
CREATE A WIZARD DISK:
1
On the destination computer, click
Start→
All Programs→
Accessories→
System Tools
→
Files and Settings Transfer Wizard
.
2
Under
Which computer is this?
, click
New computer
, then click
Next
.
3
Under
Do you have a Windows XP CD?
, click
I want to create a Wizard
Disk in the following drive
, then click
Next.
4
Insert removable media, such as a writable CD or DVD, then click OK.
5
Review the information under
Now go to your old computer
, and then go
to the source computer. Do
not
click
Next
.
COPY DATA FROM THE SOURCE COMPUTER:
1
Insert the wizard disk into the source computer.
2
Click
Start→
Run
.
3
Click
Browse...
and navigate to
fastwiz
on the wizard disk, then click OK.
4
Under
Which computer is this?
, click
Old Computer
, then click
Next
.
5
Under
Select a transfer method
, click the transfer method of your choice,
then click
Next
.
Page 28

28 Quick Reference Guide
6
Under
What do you want to transfer?
, click to select the data you want to
transfer, then click
Next
.
The selected data is copied and the
Completing the Collection Phase
screen appears.
7
Click
Finish
.
TRANSFER DATA TO THE DESTINATION COMPUTER:
1
Go to the destination computer.
2
Under
Now go to your old computer
, click
Next
.
3
Under
Where are the files and settings?
, click to select the method you
chose for transferring your settings and files, then click
Next
.
The wizard reads the collected files and settings and applies them to the
destination computer. When the transfer is complete, the
Finished
screen
appears.
4
Click
Finished
, and then restart the computer.
Microsoft Windows Vista
1
Click the Windows Vista Start button , and then click
Transfer files
and settings
→
Start Windows Easy Transfer.
2
In the
User Account Control
dialog box, click
Continue
.
3
Click
Start a new transfer
or
Continue a transfer in progress
.
Follow the instructions provided on the screen by the Windows Easy Transfer
wizard.
Power Protection Devices
Several devices are available to protect against power fluctuations and
failures:
• Surge protectors
• Line conditioners
• Uninterruptible power supplies (UPS)
Page 29

Quick Reference Guide 29
Surge Protectors
Surge protectors and power strips equipped with surge protection help
prevent damage to your computer from voltage spikes that can occur during
electrical storms or after power interruptions. Some surge protector
manufacturers include warranty coverage for certain types of damage.
Carefully read the device warranty when choosing a surge protector and
compare joule ratings to determine the relative effectiveness of different
devices. A device with a higher joule rating offers more protection.
NOTICE: Most surge protectors do not protect against power fluctuations or
power interruptions caused by nearby lightning strikes. When lightning occurs in
your area, disconnect the telephone line from the telephone wall jack and
disconnect your computer from the electrical outlet.
Many surge protectors have a telephone jack for modem protection. See the
surge protector documentation for modem connection instructions.
NOTICE: Not all surge protectors offer network adapter protection. Disconnect the
network cable from the network wall jack during electrical storms.
Line Conditioners
NOTICE: Line conditioners do not protect against power interruptions.
Line conditioners are designed to maintain AC voltage at a fairly constant
level.
Uninterruptible Power Supplies (UPS)
NOTICE: Loss of power while data is being saved to the hard drive may result in
data loss or file damage.
NOTE: To ensure maximum battery operating time, connect only your computer to
a UPS. Connect other devices, such as a printer, to a separate power strip that
provides surge protection.
A UPS protects against power fluctuations and interruptions. UPS devices
contain a battery that provides temporary power to connected devices when AC
power is interrupted. The battery charges while AC power is available. See the
UPS manufacturer documentation for information on battery operating time
and to ensure that the device is approved by Underwriters Laboratories (UL).
Page 30

30 Quick Reference Guide
Cleaning Your Computer
CAUTION: Before you begin any of the procedures in this section, follow the
safety instructions in the
Product Information Guide
.
Computer, Keyboard, and Monitor
CAUTION: Before you clean your computer, disconnect the computer from the
electrical outlet. Clean your computer with a soft cloth dampened with water. Do
not use liquid or aerosol cleaners, which may contain flammable substances.
• Use a vacuum cleaner with a brush attachment to gently remove dust from
the slots and holes on your computer and from between the keys on the
keyboard.
NOTICE: Do not wipe the display screen with a soap or alcohol solution. Doing so
may damage the antiglare coating.
• To clean your monitor screen, lightly dampen a soft, clean cloth with water.
If possible, use a special screen-cleaning tissue or solution suitable for the
monitor’s antistatic coating.
• Wipe the keyboard, computer, and plastic part of the monitor with a soft
cleaning cloth moistened with water.
Do not soak the cloth or let water drip inside your computer or keyboard.
Mouse (Non-Optical)
1
Turn the retainer ring on the underside of your mouse counterclockwise,
and then remove the ball.
2
Wipe the ball with a clean, lint-free cloth.
3
Blow carefully into the ball cage to dislodge dust and lint.
4
Clean the rollers inside the ball cage with a cotton swab moistened lightly
with isopropyl alcohol.
5
Recenter the rollers in their channels, as needed. Ensure that fluff from
the swab is not left on the rollers.
6
Replace the ball and retainer ring, and then turn the retainer ring clockwise
until it clicks into place.
Page 31

Quick Reference Guide 31
Floppy Drive
NOTICE: Do not attempt to clean drive heads with a swab. The heads may become
misaligned and prevent the drive from operating.
Clean your floppy drive using a commercially available cleaning kit. These
kits contain pretreated floppy disks to remove contaminants that accumulate
during normal operation.
CDs and DVDs
NOTICE: Always use compressed air to clean the lens in the CD/DVD drive, and
follow the instructions that come with the compressed air. Never touch the lens in
the drive.
1
Hold the disc by its outer edge. You can also touch the inside edge of the
center hole.
NOTICE: To prevent damaging the surface, do not wipe in a circular motion around
the disc.
2
With a soft, lint-free cloth, gently wipe the bottom of the disc (the
unlabeled side) in a straight line from the center to the outer edge of the
disc.
For stubborn dirt, try using water or a diluted solution of water and mild
soap. You can also purchase commercial products that clean discs and
provide some protection from dust, fingerprints, and scratches. Cleaning
products for CDs are safe to use on DVDs.
Troubleshooting Tools
Power Lights
CAUTION: Before you begin any of the procedures in this section, follow the
safety instructions in the
Product Information Guide
.
The power button light located on the front of the computer illuminates and
blinks or remains solid to indicate different states:
• If the power light is green and the computer is not responding, see
"Diagnostic Lights" on page 33
Page 32

32 Quick Reference Guide
• If the power light is blinking green, the computer is in standby mode. Press
a key on the keyboard, move the mouse, or press the power button to
resume normal operation.
• If the power light is off, the computer is either turned off or is not
receiving power.
– Reseat the power cable into both the power connector on the back of
the computer and the electrical outlet.
– If the computer is plugged into a power strip, ensure that the power
strip is plugged into an electrical outlet and that the power strip is
turned on.
– Bypass power protection devices, power strips, and power extension
cables to verify that the computer turns on properly.
– Ensure that the electrical outlet is working by testing it with another
device, such as a lamp.
– Ensure that the main power cable and front panel cable are securely
connected to the system board (see "System Board Components" in
your
User’s Guide
).
• If the power light is blinking amber, the computer is receiving electrical
power, but an internal power problem might exist.
– Ensure that the voltage selection switch is set to match the AC power
at your location, if applicable.
– Ensure that the processor power cable is securely connected to the
system board (see "System Board Components" in your
User’s Guide
).
• If the power light is steady amber, a device may be malfunctioning or
incorrectly installed.
– Remove and then reinstall the memory modules (see "Memory" in
your
User’s Guide
).
– Remove and then reinstall any cards (see "Cards" in your
User’s
Guide
).
• Eliminate interference. Some possible causes of interference are:
– Power, keyboard, and mouse extension cables
– Too many devices on a power strip
– Multiple power strips connected to the same electrical outlet
Page 33
Quick Reference Guide 33
Diagnostic Lights
CAUTION: Before you begin any of the procedures in this section, follow the
safety instructions in the
Product Information Guide
.
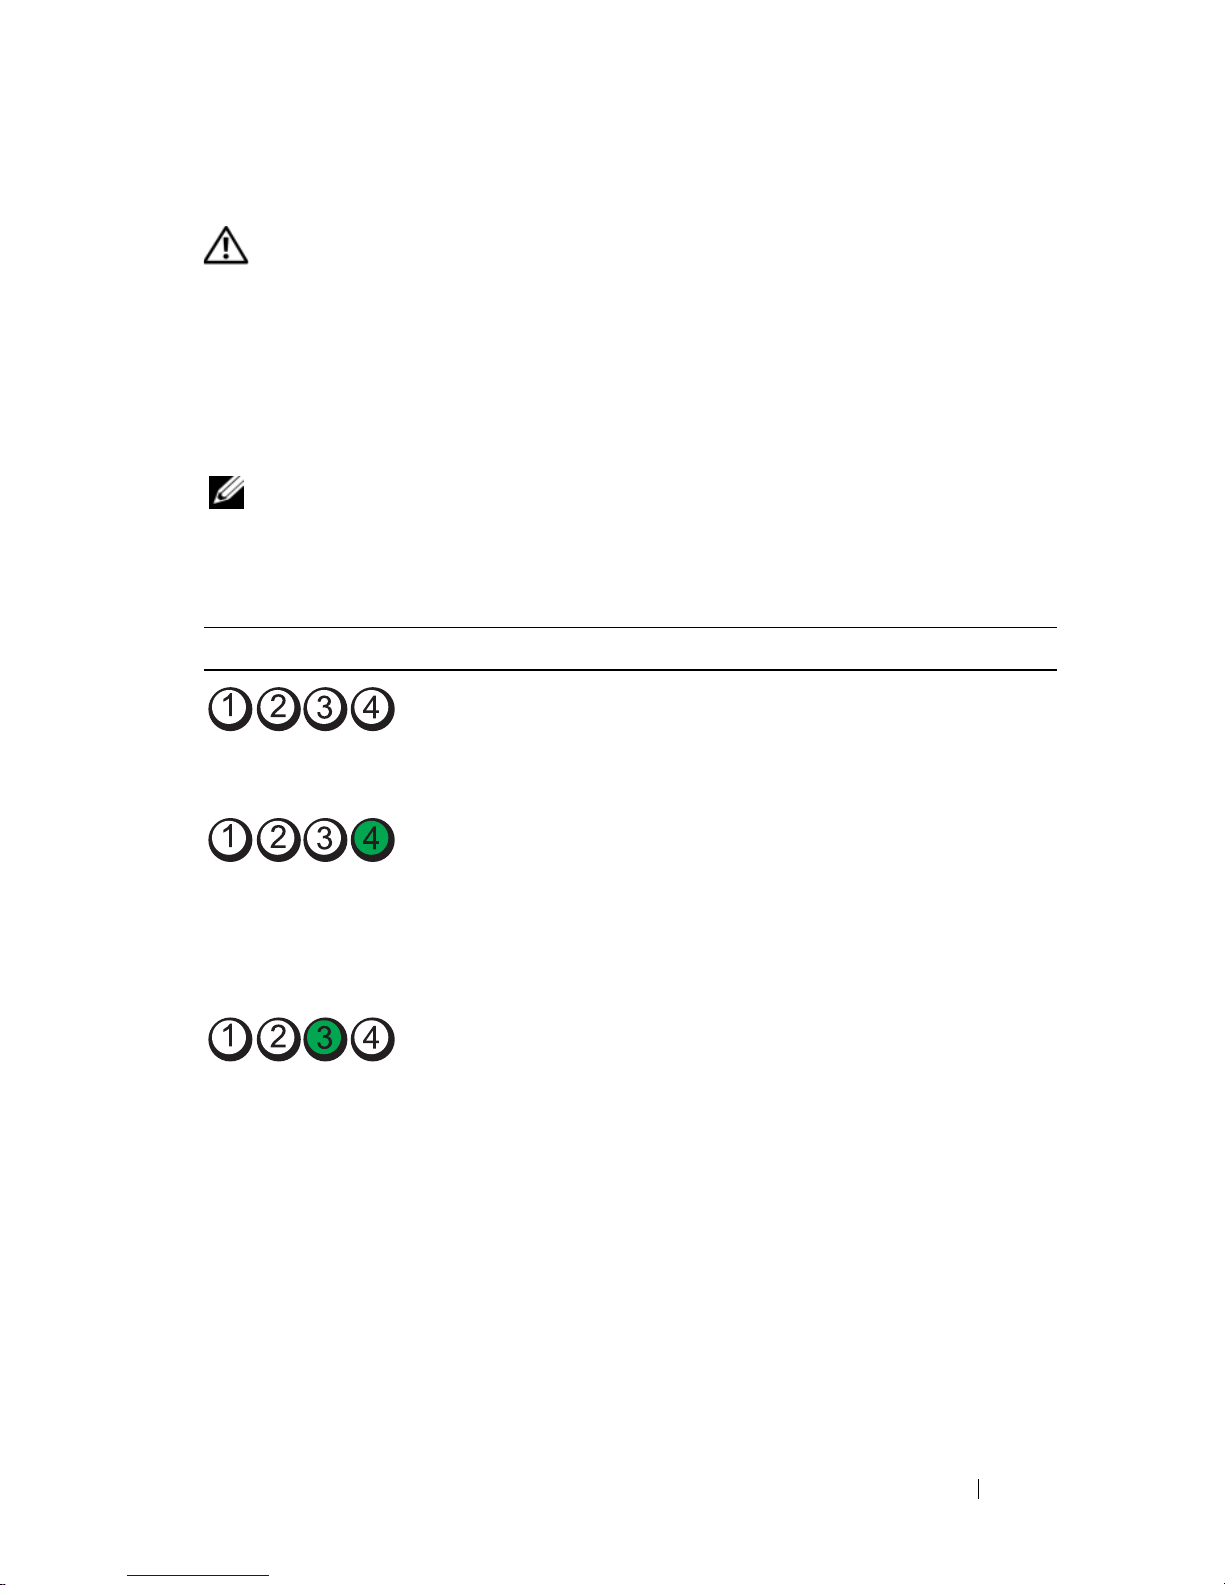
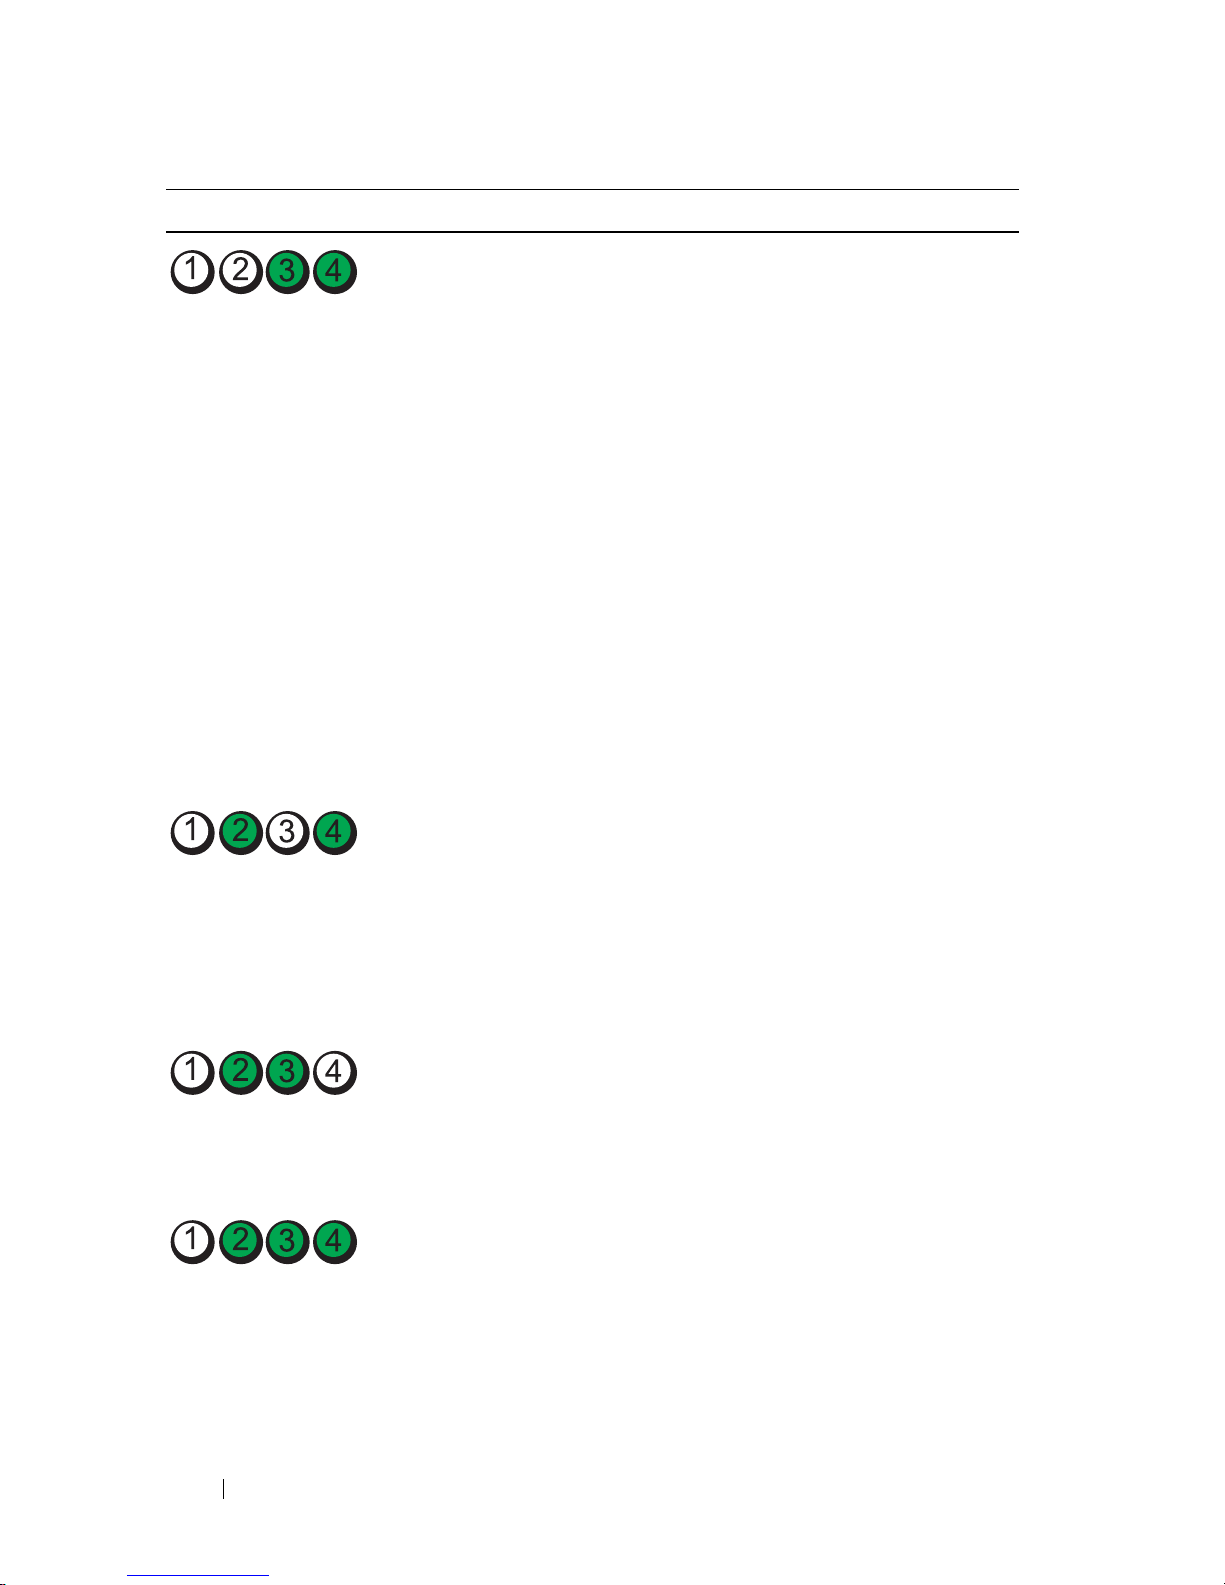
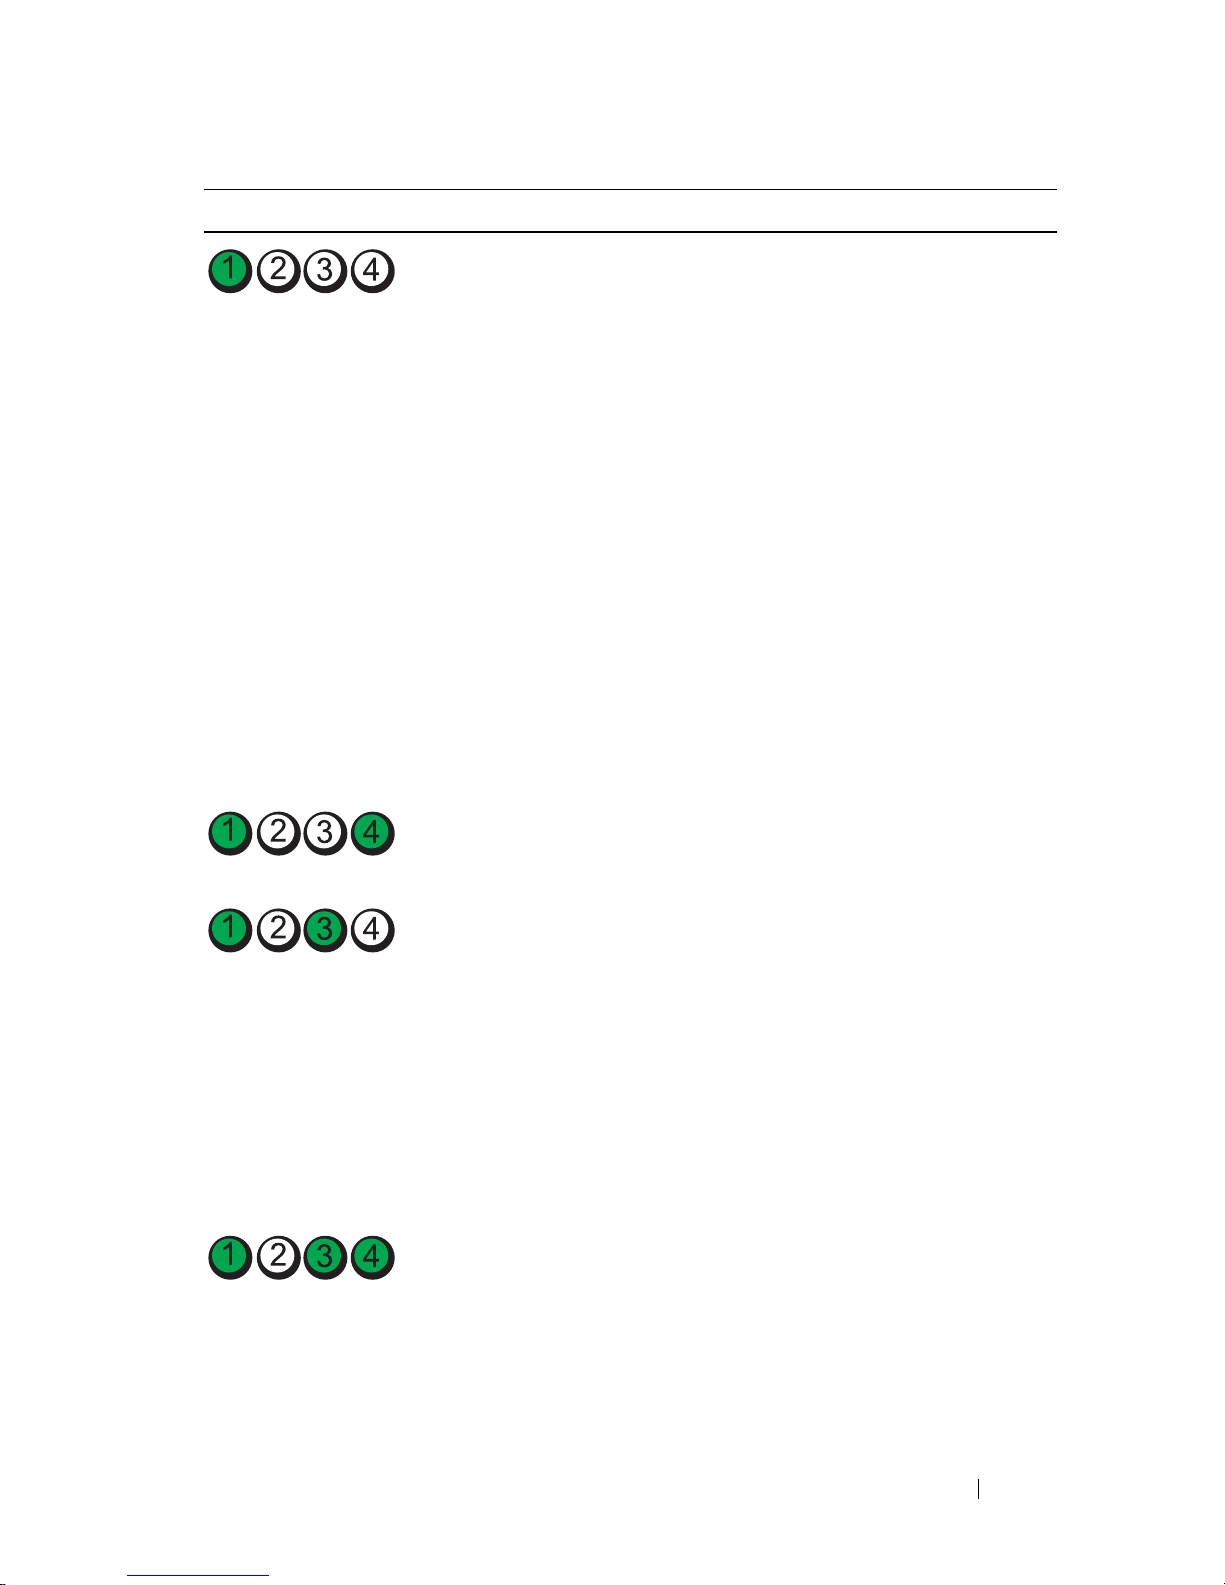
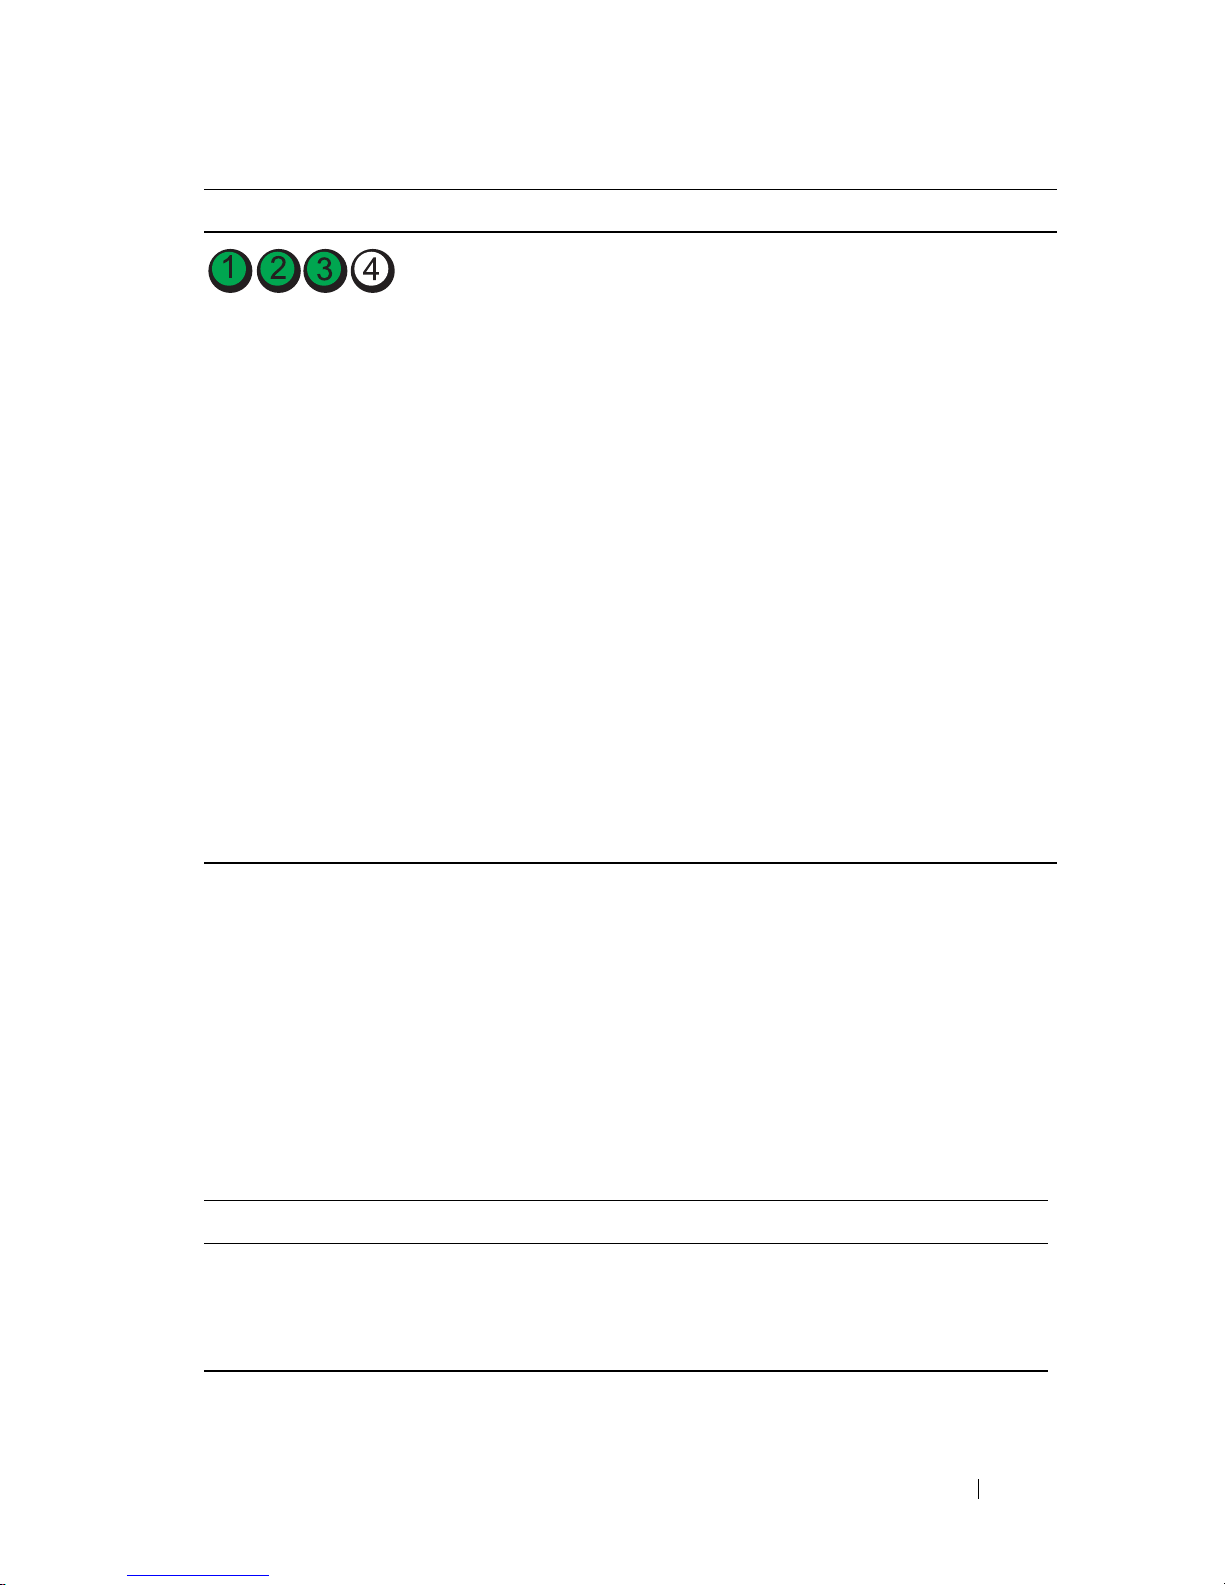
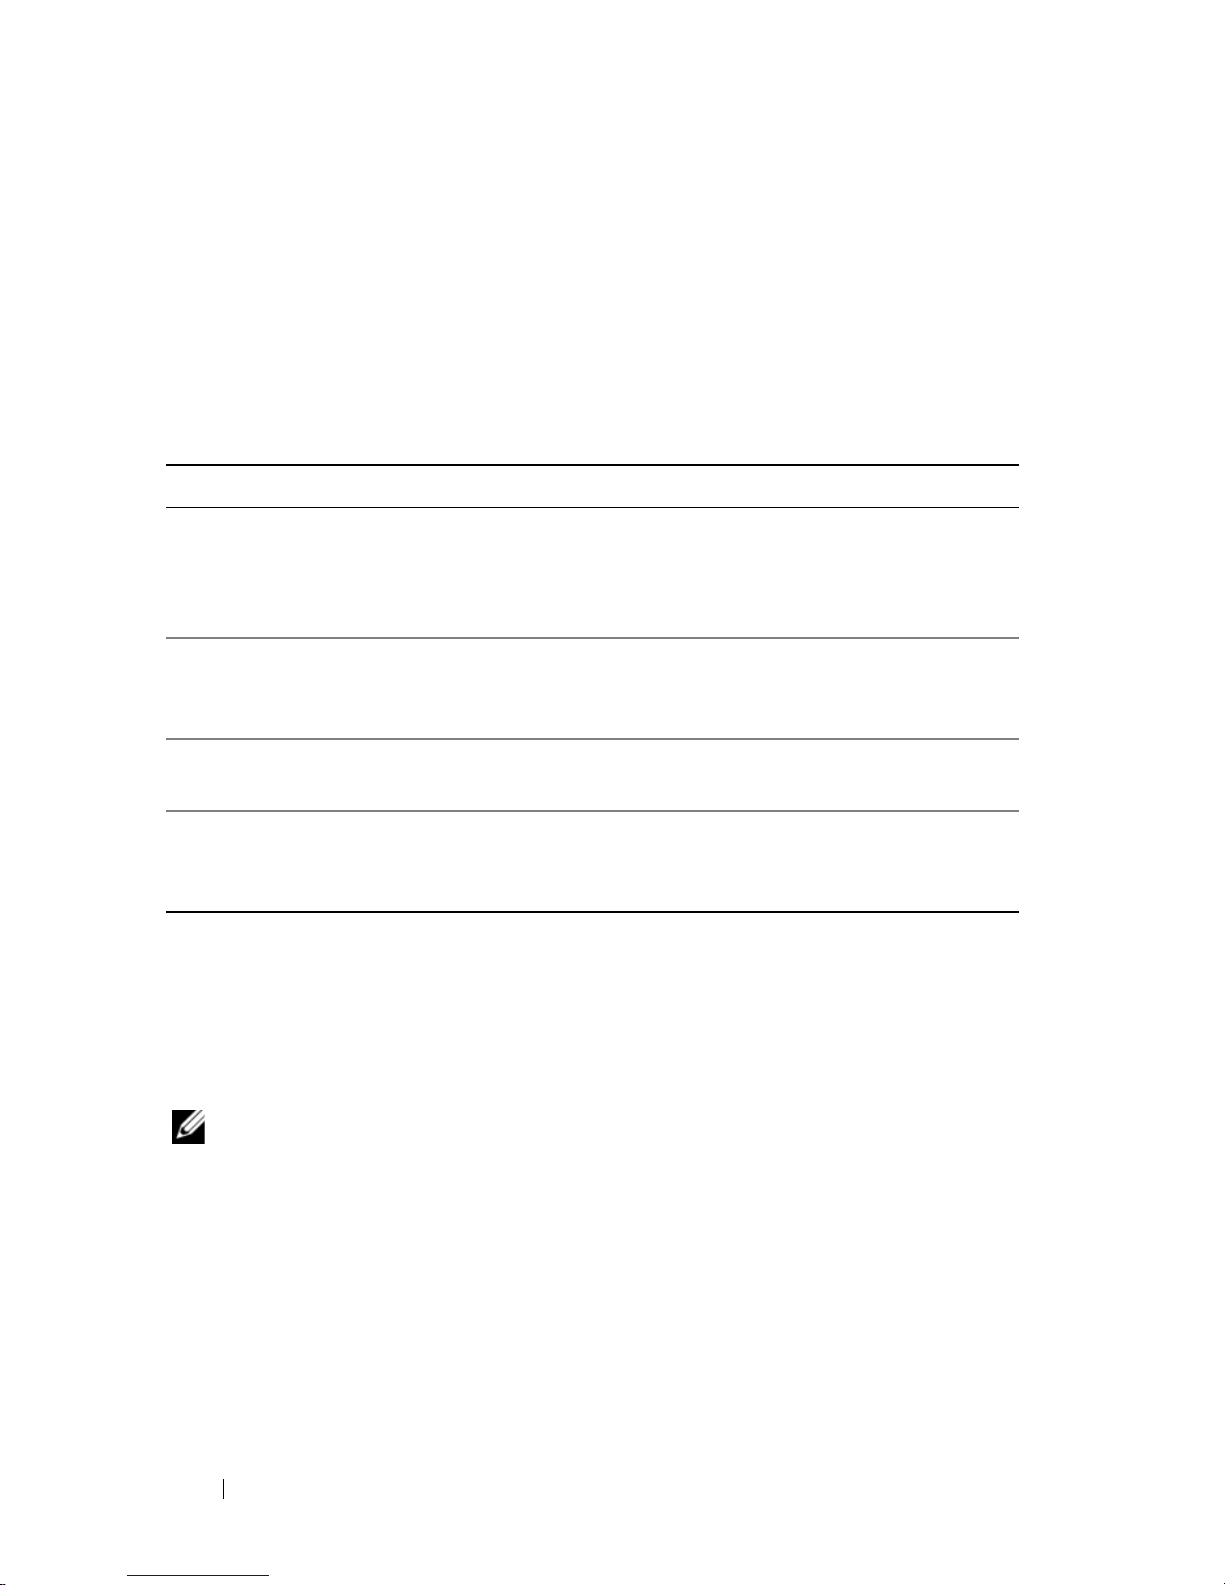
To help troubleshoot a problem, your computer has four lights labeled 1, 2, 3,
and 4 on the front panel (see "Front View (Tower Orientation)" on page 11 or
"Front View (Desktop Orientation)" on page 15). When the computer starts
normally, the lights flash, and then turn off. If the computer malfunctions,
use the sequence of the lights to help identify the problem.
NOTE: After the computer completes POST, all four lights turn off before booting to
the operating system.
Diagnostic Light Codes During POST
Light Pattern Problem Description Suggested Resolution
The computer is in a
normal off condition
or a possible pre-BIOS
failure has occurred.
Plug the computer into a working
electrical outlet and press the power
button.
A possible BIOS
failure has occurred;
the computer is in the
recovery mode.
• Run the BIOS Recovery utility, wait
for recovery completion, and then
restart the computer.
• If the problem persists, contact Dell
(see
"Contacting Dell" in your User’s
Guide
).
A possible processor
failure has occurred.
• Reseat the processor (see "Processor"
in your User’s Guide
).
• If the problem persists, contact Dell
(see
"Contacting Dell" in your User’s
Guide
).
Page 34
34 Quick Reference Guide
Memory modules are
detected, but a
memory failure has
occurred.
• If two or more memory modules are
installed, remove the modules (see
"Removing a Memory Module" in your
User’s Guide
), then reinstall one
module (see "Installing a Memory
Module" in your
User’s Guide
) and
restart the computer. If the computer
starts normally, continue to install
additional memory modules (one at a
time) until you have identified a
faulty module or reinstalled all
modules without error.
• If available, install working memory of
the same type into your computer (see
"Memory" in your
User’s Guide
).
• If the problem persists, contact Dell
(see "Contacting Dell" in your
User’s
Guide
).
A possible graphics
card failure has
occurred.
• Reseat any installed graphics cards
(see "Cards" in your
User’s Guide
).
• If available, install a working graphics
card into your computer.
• If the problem persists, contact Dell
(see "Contacting Dell" in your
User’s
Guide
).
A possible floppy or
hard drive failure has
occurred.
• Reseat all power and data cables and
restart the computer.
• If the problem persists, contact Dell
(see "Contacting Dell" in your
User’s
Guide
).
A possible USB failure
has occurred.
• Reinstall all USB devices, check cable
connections, and then restart the
computer.
• If the problem persists, contact Dell
(see
"Contacting Dell" in your User’s
Guide
).
Light Pattern Problem Description Suggested Resolution
Page 35
Quick Reference Guide 35
No memory modules
are detected.
• If two or more memory modules are
installed, remove the modules (see
"Removing a Memory Module" in your
User’s Guide
), then reinstall one
module (see "Installing a Memory
Module" in your
User’s Guide
) and
restart the computer. If the computer
starts normally, continue to install
additional memory modules (one at a
time) until you have identified a
faulty module or reinstalled all
modules without error.
• If available, install working memory of
the same type into your computer (see
"Memory" in your
User’s Guide
).
• If the problem persists, contact Dell
(see "Contacting Dell" in your
User’s
Guide
).
System board failure
has occurred.
Contact Dell (see "Contacting Dell" in
your User’s Guide).
Memory modules are
detected, but a
memory
configuration or
compatibility error
exists.
• Ensure that no special requirements
for memory module/connector
placement exist (see "Memory" in your
User’s Guide
).
• Ensure that the memory you are using
is supported by your computer (see
"Memory" in your
User’s Guide
).
• If the problem persists, contact Dell
(see "Contacting Dell" in your
User’s
Guide
).
A possible system
board resource and/or
hardware failure has
occurred.
• Perform the procedures in "Restoring
Your Operating System" in your
User’s
Guide
.
• If the problem persists, contact Dell
(see "Contacting Dell" in your
User’s
Guide
).
Light Pattern Problem Description Suggested Resolution
Page 36

36 Quick Reference Guide
A possible expansion
card failure has
occurred.
1
Determine if a conflict exists by
removing an expansion card (not a
graphics card) and restarting the
computer (see "Cards" in your
User’s
Guide
).
2
If the problem persists, reinstall the
card you removed, then remove a
different card and restart the
computer.
3
Repeat this process for each expansion
card installed. If the computer starts
normally, troubleshoot the last card
removed from the computer for
resource conflicts (see "Restoring Your
Operating System" in your
User’s
Guide
).
4
If the problem persists, contact Dell
(see "Contacting Dell" in your
User’s
Guide
).
Light Pattern Problem Description Suggested Resolution
Page 37
Quick Reference Guide 37
Beep Codes
Your computer may emit a series of beeps during start up. The series of beeps
is called a beep code and can be used to help identify a problem with your
computer.
If your computer emits a series of beeps during start-up:
1
Write down the beep code.
2
Run the Dell Diagnostics to identify the cause (see "Dell Diagnostics" on
page 41).
Another failure has
occurred.
• Ensure that all hard drive and
CD/DVD drive cables are properly
connected to the system board (see
"System Board Components" in your
User’s Guide
).
• If there is an error message on the
screen identifying a problem with a
device (such as the floppy drive or
hard drive), check the device to make
sure it is functioning properly.
• If the operating system is attempting
to boot from a device (such as the
floppy drive or CD/DVD drive), check
system setup (see "System Setup" in
your
User’s Guide
) to ensure the boot
sequence is correct for the devices
installed on your computer.
• If the problem persists, contact Dell
(see "Contacting Dell" in your
User’s
Guide
).
Code Cause
2 short, 1 long BIOS checksum error
1 long, 3 short, 2 short Memory error
1 short F12 key pressed
Light Pattern Problem Description Suggested Resolution
Page 38

38 Quick Reference Guide
Code
(repetitive
short beeps)
Description Suggested Remedy
1BIOS checksum
failure. Possible
motherboard failure.
Contact Dell (see "Contacting Dell" in
your User’s Guide).
2 No memory modules
are detected.
• If two or more memory modules are
installed, remove the modules (see
"Removing a Memory Module" in your
User’s Guide
), then reinstall one module
(see "Installing a Memory Module" in
your
User’s Guide
) and restart the
computer. If the computer starts
normally, continue to install additional
memory modules (one at a time) until
you have identified a faulty module or
reinstalled all modules without error.
• If available, install working memory of
the same type into your computer (see
"Memory" in your
User’s Guide
).
• If the problem persists, contact Dell (see
"Contacting Dell" in your
User’s Guide
).
3
Possible motherboard
failure.
Contact Dell (see "Contacting Dell" in
your User’s Guide).
4 RAM Read/Write
failure.
• Ensure that no special requirements for
memory module/connector placement
exist (see "Memory" in your
User’s
Guide
).
• Ensure that the memory you are using is
supported by your computer (see
"Memory"
in your User’s Guide
).
• If the problem persists, contact Dell (see
"Contacting Dell" in your User’s
Guide).
Page 39

Quick Reference Guide 39
System Messages
NOTE: If the message you received is not listed in the table, see the documentation
for either the operating system or the program that was running when the message
appeared.
5 Real time clock failure.
Possible battery failure
or motherboard failure.
• Replace the battery (see "Replacing the
Battery" in your
User’s Guide
).
• If the problem persists, contact Dell (see
"Contacting Dell" in your
User’s Guide
).
6 Video BIOS Test
Failure.
Contact Dell (see "Contacting Dell" in
your User’s Guide).
ALERT! PREVIOUS ATTEMPTS AT BOOTING THIS SYSTEM HAVE FAILED AT
CHECKPOINT [NNNN]. FOR HELP IN RESOLVING THIS PROBLEM, PLEASE NOTE
THIS CHECKPOINT AND CONTACT DELL TECHNICAL SUPPORT — The computer
failed to complete the boot routine three consecutive times for the same error (see
"Contacting Dell" in your User’s Guide for assistance).
CMOS CHECKSUM ERROR — Possible motherboard failure or RTC battery low.
Replace the battery (see "Replacing the Battery" or see "Contacting Dell" in your
User’s Guide for assistance).
CPU FAN FAILURE — CPU fan failure. Replace the CPU fan (see "Removing the
Processor" in your User’s Guide).
FLOPPY DISKETTE SEEK FAILURE — A cable may be loose, or the computer
configuration information may not match the hardware configuration. Check cable
connections (see "Contacting Dell" in your User’s Guide for assistance).
DISKETTE READ FAILURE — The floppy disk may be defective or a cable may be
loose. Replace the floppy disk/check for a loose cable connection.
Code
(repetitive
short beeps)
Description Suggested Remedy
Page 40

40 Quick Reference Guide
HARD-DISK READ FAILURE — Possible HDD failure during HDD boot test (see
"Contacting Dell" in your User’s Guide for assistance).
KEYBOARD FAILURE — Keyboard failure or keyboard cable loose (see "Keyboard
Problems" in your User’s Guide).
NO BOOT DEVICE AVAILABLE — The system cannot detect a bootable device or
partition.
• If the floppy drive is your boot device, ensure that the cables are connected and
that a bootable floppy disk is in the drive.
• If the hard drive is your boot device, ensure that the cables are connected and
that the drive is installed properly and partitioned as a boot device.
• Enter System Setup and ensure that the boot sequence information is correct
(see "Entering System Setup"
in your User’s Guide
).
NO TIMER TICK INTERRUPT — A chip on the system board might be
malfunctioning or motherboard failure (see "Contacting Dell" in your User’s Guide
for assistance).
NON-SYSTEM DISK OR DISK ERROR —Replace the floppy disk with one that
has a bootable operating system or remove the floppy disk from drive A and restart
the computer.
NOT A BOOT DISKETTE —Insert a bootable floppy disk and restart your
computer.
NOTICE - HARD DRIVE SELF MONITORING SYSTEM HAS REPORTED THAT A
PARAMETER HAS EXCEEDED ITS NORMAL OPERATING RANGE. DELL
RECOMMENDS THAT YOU BACK UP YOUR DATA REGULARLY. A PARAMETER OUT
OF RANGE MAY OR MAY NOT INDICATE A POTENTIAL HARD DRIVE PROBLEM.—
S.M.A.R.T error, possible HDD failure. This feature can be enabled or disabled in
BIOS setup.
Page 41

Quick Reference Guide 41
Hardware Troubleshooter
If a device is either not detected during the operating system setup or is
detected, but incorrectly configured, you can use the Hardware Troubleshooter
to resolve the incompatibility.
Windows XP:
1
Click
Start→
Help and Support
.
2
Ty p e
hardware troubleshooter
in the search field and press
<Enter> to start the search.
3
In the
Fix a Problem
section, click
Hardware Troubleshooter
.
4
In the
Hardware Troubleshooter
list, select the option that best describes
the problem and click
Next
to follow the remaining troubleshooting steps.
Windows Vista:
1
Click the Windows Vista Start button
,
and click
Help and Support.
2
Ty p e
hardware troubleshooter
in the search field and press
<Enter> to start the search.
3
In the search results, select the option that best describes the problem and
follow the remaining troubleshooting steps.
Dell Diagnostics
CAUTION: Before you begin any of the procedures in this section, follow the
safety instructions in the
Product Information Guide
.
When to Use the Dell Diagnostics
If you experience a problem with your computer, perform the checks in
Lockups and Software Problems (see "Troubleshooting" in your User’s Guide)
and run the Dell Diagnostics before you contact Dell for assistance.
You can run the Dell Diagnostics from your hard drive or from the Drivers and
Utilities disc.
Page 42

42 Quick Reference Guide
See "System Setup" in your User’s Guide to review your computer’s
configuration information, and ensure that the device that you want to test
displays in System Setup and is active.
NOTE: The Dell Diagnostics works only on Dell computers.
NOTE: Print the following procedures before you run the Dell diagnostics.
Starting the Dell Diagnostics From Your Hard Drive
The Dell Diagnostics is located on a separate diagnostic utility partition on
your hard drive.
NOTE: If your computer cannot display a screen image, see "Contacting Dell" in
your User’s Guide.
1
Turn on (or restart) your computer.
2
When the DELL logo appears, press <F12> immediately.
NOTE: Keyboard failure may result when a key is held down for extended
periods of time. To avoid possible keyboard failure, press and release <F12> in
even intervals to open the Boot Device Menu.
NOTE: If at any time a message appears stating that no diagnostics utility
partition has been found, run the Dell Diagnostics from your Drivers and
Utilities disc
(see "Starting the Dell Diagnostics From the Drivers and
Utilities Disc" on page 43).
If you wait too long and the operating system logo appears, continue to
wait until you see the Microsoft Windows desktop, then shut down your
computer and try again.
3
At the
Boot Device Menu
, use the up- and down-arrow keys or press the
appropriate number on the keyboard to highlight
Boot to Utility Partition
,
and then press <Enter>.
NOTE: The Quickboot feature changes the boot sequence for the current
boot only. Upon restart, the computer boots according to the boot sequence
specified in System Setup.
4
At the Dell Diagnostics
Main Menu
, left-click with the mouse, or press
<Tab> and then <Enter>, to select the test you want to run (see "Dell
Diagnostics Main Menu" on page 44).
NOTE: Write down any error codes and problem descriptions exactly as they
appear and follow the instructions on the screen.
Page 43

Quick Reference Guide 43
5
After all tests have completed, close the test window to return to the Dell
Diagnostics
Main Menu
.
6
Close the
Main Menu
window to exit the Dell Diagnostics and restart the
computer.
Starting the Dell Diagnostics From the Drivers and Utilities Disc
1
Turn on your computer.
2
Press the eject button on the front of the optical drive to open the drive
tray.
3
Place the
Drivers and Utilities
disc in the center of the drive tray, then
press the eject button or gently push on the tray to close it.
4
Restart the computer.
5
When the DELL logo appears, press <F12> immediately.
NOTE: Keyboard failure may result when a key on the keyboard is held down
for extended periods of time. To avoid possible keyboard failure, press and
release <F12> in even intervals until the Boot Device Menu appears.
If you wait too long and the operating system logo appears, continue to
wait until you see the Microsoft Windows desktop, then shut down your
computer and try again.
6
At the
Boot Device Menu
, use the up- and down-arrow keys or press the
appropriate number on the keyboard to highlight
Onboard or USB
CD-ROM
, and then press <Enter>.
NOTE: The Quickboot feature changes the boot sequence for the current
boot only. Upon restart, the computer boots according to the boot sequence
specified in System Setup.
7
Press <1> to select the Dell Diagnostics.
8
At the
Dell Diagnostics Menu
press <1> to select the Dell Diagnostics
for ResourceCD (graphical user interface).
9
At the Dell Diagnostics
Main Menu
, left-click with the mouse, or press
<Tab> and then <Enter>, to select the test you want to run (see "Dell
Diagnostics Main Menu" on page 44).
NOTE: Write down any error codes and problem descriptions exactly as they
appear and follow the instructions on the screen.
Page 44
44 Quick Reference Guide
10
After all tests have completed, close the test window to return to the Dell
Diagnostics
Main Menu
.
11
Remove the
Drivers and Utilities
disc, then close the
Main Menu
window
to exit the Dell Diagnostics and restart the computer.
Dell Diagnostics Main Menu
The following tests can be run from the Dell Diagnostics Main Menu:
For any problem encountered during a test, a message appears with an error
code and a description of the problem. Write down the error code and
problem description exactly as it appears and follow the instructions on the
screen. If you cannot resolve the problem, contact Dell (see "Contacting Dell"
in your User’s Guide).
NOTE: The Service Tag for your computer is located at the top of each test screen.
When contacting Dell support, have your Service Tag ready.
Option Function
Express Test Performs a quick test of system devices. The test typically
takes 10 to 20 minutes and requires no interaction on your
part. Run Express Test first to increase the possibility of
tracing the problem quickly.
Extended Test Performs a thorough check of system devices. The test
typically takes an hour or more and periodically requires
your input to answer specific questions.
Custom Test Tests a specific device in the system and can be used to
customize the tests you want to run.
Symptom Tree Lists a number of common symptoms and allows you to
select a test based on the symptom of the problem you are
having.
Page 45

Quick Reference Guide 45
The following tabs provide additional information for tests run from the
Custom Test or Symptom Tree option:
Troubleshooting
Follow these tips when you troubleshoot your computer:
• If you added or removed a part before the problem started, review the
installation procedures and ensure that the part is correctly installed.
• If a peripheral device does not work, ensure that the device is properly
connected.
• If an error message appears on the screen, write down the exact message.
This message may help support personnel diagnose and fix the problem(s).
• If an error message occurs in a program, see the program’s documentation.
NOTE: The procedures in this document were written for the Windows default
view, and may not apply if you set your Dell computer to the Windows Classic view.
Tab Function
Results Displays the results of the test and any error conditions
encountered.
Errors Displays error conditions encountered, error codes, and the
problem description.
Help Describes the test and any requirements for running the
test.
Configuration
(Custom Test only)
Displays the hardware configuration for the selected device.
The Dell Diagnostics obtains configuration information for
all devices from System Setup, memory, and various
internal tests, and it displays the information in the device
list in the left pane of the screen.
NOTE: The device list may not display the names of all the
components installed on your computer or all devices
attached to your computer.
Parameters
(Custom Test only)
Allows you to customize the test, if applicable, by changing
the test settings.
Page 46

46 Quick Reference Guide
Battery Problems
CAUTION: There is a danger of a new battery exploding if it is incorrectly
installed. Replace the battery only with the same or equivalent type recommended
by the manufacturer. Discard used batteries according to the manufacturer's
instructions.
CAUTION: Before you begin any of the procedures in this section, follow the
safety instructions in the
Product Information Guide
.
R
EPLACE THE BATTERY — If you have to repeatedly reset time and date information
after turning on the computer, or if an incorrect time or date displays during start-up,
replace the battery (see "Replacing the Battery" in your User’s Guide). If the battery still
does not work properly, contact Dell (see "Contacting Dell" in your User’s Guide).
Drive Problems
CAUTION: Before you begin any of the procedures in this section, follow the
safety instructions in the
Product Information Guide
.
E
NSURE THAT MICROSOFT WINDOWS RECOGNIZES THE DRIVE —
Windows XP:
•Click
Start
and click
My Computer
.
Windows Vista:
• Click the Windows Vista Start button and click
Computer
.
If the drive is not listed, perform a full scan with your antivirus software to check for
and remove viruses. Viruses can sometimes prevent Windows from recognizing the
drive.
T
EST THE DRIVE —
• Insert another disc to eliminate the possibility that the original drive is defective.
• Insert a bootable floppy disk and restart the computer.
CLEAN THE DRIVE OR DISK — See
"Cleaning Your Computer" on page 30
.
C
HECK THE CABLE CONNECTIONS
RUN THE HARDWARE TROUBLESHOOTER — See "Hardware Troubleshooter" on
page 41.
R
UN THE DELL DIAGNOSTICS —
See "Dell Diagnostics" on page 41
.
Page 47

Quick Reference Guide 47
Optical drive problems
NOTE: High-speed optical drive vibration is normal and may cause noise, which
does not indicate a defect in the drive or the media.
NOTE: Because of different regions worldwide and different disc formats, not all
DVD titles work in all DVD drives.
A
DJUST THE WINDOWS VOLUME CONTROL —
• Click the speaker icon in the lower-right corner of your screen.
• Ensure that the volume is turned up by clicking the slidebar and dragging it up.
• Ensure that the sound is not muted by clicking any boxes that are checked.
CHECK THE SPEAKERS AND SUBWOOFER — See "Sound and Speaker Problems" on
page 58.
Problems writing to an optical drive
CLOSE OTHER PROGRAMS — The optical drive must receive a steady stream of data
during the writing process. If the stream is interrupted, an error occurs. Try closing all
programs before you write to the optical drive.
T
URN OFF STANDBY MODE IN WINDOWS BEFORE WRITING TO A DISC — Search for
the keyword standby in Windows Help and Support for information on power
management modes.
Hard drive problems
RUN CHECK DISK —
Windows XP:
1
Click
Start and click My Computer
.
2
Right-click
Local Disk C:
.
3
Click
Properties→ Tools→
Check Now
.
4
Click
Scan for and attempt recovery of bad sectors and click Start
.
Windows Vista:
1
Click
Start
and click
Computer
.
2
Right-click
Local Disk C:
.
3
Click
Properties→ Tools→
Check Now
.
The
User Account Control
window may appear. If you are an administrator on the
computer, click
Continue
; otherwise, contact your administrator to continue the
desired action.
4
Follow the instructions on the screen.
Page 48

48 Quick Reference Guide
E-Mail, Modem, and Internet Problems
CAUTION: Before you begin any of the procedures in this section, follow the
safety instructions in the
Product Information Guide
.
NOTE: Connect the modem to an analog telephone jack only. The modem does not
operate while it is connected to a digital telephone network.
NOTE: Do not plug a telephone cable into the network adapter connector (see
"Back Panel Connectors" in your User’s Guide).
C
HECK THE MICROSOFT OUTLOOK
®
EXPRESS SECURITY SETTINGS — If you cannot
open your e-mail attachments:
1
In Outlook Express, click
Tools→
Options→
Security
.
2
Click
Do not allow attachments
to remove the checkmark, as needed.
CHECK THE TELEPHONE LINE CONNECTION
CHECK THE TELEPHONE JACK
CONNECT THE MODEM DIRECTLY TO THE TELEPHONE WALL JACK
USE A DIFFERENT TELEPHONE LINE —
• Verify that the telephone line is connected to the jack on the modem (the jack has
either a green label or a connector-shaped icon next to it).
• Ensure that you hear a click when you insert the telephone line connector into the
modem.
• Disconnect the telephone line from the modem and connect it to a telephone, then
listen for a dial tone.
• If you have other telephone devices sharing the line, such as an answering machine,
fax machine, surge protector, or line splitter, bypass them and use the telephone to
connect the modem directly to the telephone wall jack. If you are using a line that is
3 meters (10 feet) or more in length, try a shorter one.
RUN THE MODEM DIAGNOSTIC TOOL —
Windows XP:
1
Click
Start→
All Programs→
Modem Helper
.
2
Follow the instructions on the screen to identify and resolve modem problems.
Modem Helper is not available on certain computers.
Windows Vista:
1
Click
Start
→
All Programs→ Modem Diagnostic Tool
.
2
Follow the instructions on the screen to identify and resolve modem problems.
Modem diagnostics are not available on all computers.
VERIFY THAT THE MODEM IS COMMUNICATING WITH WINDOWS —
Page 49

Quick Reference Guide 49
Windows XP:
1
Click
Start→
Control Panel→
Printers and Other Hardware→ Phone and Modem
Options
→
Modems
.
2
Click the COM port for your modem→ Properties→ Diagnostics→
Query Modem
to
verify that the modem is communicating with Windows.
If all commands receive responses, the modem is operating properly.
Windows Vista:
1
Click
Start
→
Control Panel→
Hardware and Sound→
Phone and Modem
Options
→
Modems
.
2
Click the COM port for your modem→
Properties
→
Diagnostics→
Query Modem
to verify that the modem is communicating with Windows.
If all commands receive responses, the modem is operating properly.
ENSURE THAT YOU ARE CONNECTED TO THE INTERNET — Ensure that you have
subscribed to an Internet provider. With the Outlook Express e-mail program open,
click File. If Work Offline has a checkmark next to it, click the checkmark to remove it
and connect to the Internet. For help, contact your Internet service provider.
Error Messages
CAUTION: Before you begin any of the procedures in this section, follow the
safety instructions in the
Product Information Guide
.
If the error message is not listed, see the documentation for the operating
system or the program that was running when the message appeared.
A FILENAME CANNOT CONTAIN ANY OF THE FOLLOWING CHARACTERS: \ / : * ? “ <
> | — Do not use these characters in filenames.
A
REQUIRED .DLL FILE WAS NOT FOUND — The program that you are trying to open
is missing an essential file. To remove and then reinstall the program:
Windows XP:
1
Click
Start→
Control Panel→ Add or Remove Programs→ Programs and Features
.
2
Select the program you want to remove.
3
Click
Uninstall
.
4
See the program documentation for installation instructions.
Windows Vista:
1
Click
Start
→
Control Panel→ Programs→ Programs and Features
.
2
Select the program you want to remove.
3
Click
Uninstall
.
4
See the program documentation for installation instructions.
Page 50

50 Quick Reference Guide
drive letter
:\ IS NOT ACCESSIBLE. THE DEVICE IS NOT READY — The drive
cannot read the disk. Insert a disk into the drive and try again.
I
NSERT BOOTABLE MEDIA — Insert a bootable floppy disk, CD, or DVD.
N
ON-SYSTEM DISK ERROR — Remove the floppy disk from the floppy drive and
restart your computer.
N
OT ENOUGH MEMORY OR RESOURCES. CLOSE SOME PROGRAMS AND TRY
AGAIN — Close all windows and open the program that you want to use. In some
cases, you may have to restart your computer to restore computer resources. If so, run
the program that you want to use first.
O
PERATING SYSTEM NOT FOUND — Contact Dell (see "Contacting Dell" in your
User’s Guide).
IEEE 1394 Device Problems
CAUTION: Before you begin any of the procedures in this section, follow the
safety instructions in the
Product Information Guide
.
E
NSURE THAT THE CABLE FOR THE IEEE 1394 DEVICE IS PROPERLY INSERTED INTO
THE DEVICE AND INTO THE CONNECTOR ON THE COMPUTER
ENSURE THAT THE IEEE 1394 DEVICE IS ENABLED IN SYSTEM SETUP — See
"System Setup Options" in your User’s Guide.
E
NSURE THAT THE IEEE 1394 DEVICE IS RECOGNIZED BY WINDOWS —
Windows XP:
1
Click
Start and click Control Panel
.
2
Under
Pick a Category
, click
Performance and Maintenance→
System→
System
Properties
→
Hardware→
Device Manager
.
Windows Vista:
1
Click
Start
→
Control Panel→ Hardware and Sound
.
2
Click
Device Manager.
If your IEEE 1394 device is listed, Windows recognizes the device.
E
NSURE THAT THE IEEE 1394 CARD IS PROPERLY SEATED
ENSURE THAT THE IEEE 1394 CABLE IS CONNECTED SECURELY TO THE SYSTEM
BOARD CONNECTOR AND THE CONNECTOR ON THE FRONT I /O PANEL
IF YOU HAVE PROBLEMS WITH A DELL IEEE 1394 DEVICE — Contact Dell (see
"Contacting Dell" in your User’s Guide).
I
F YOU HAVE PROBLEMS WITH AN IEEE 1394 DEVICE NOT PROVIDED BY DELL —
Contact the IEEE 1394 device manufacturer.
Page 51

Quick Reference Guide 51
Keyboard Problems
CAUTION: Before you begin any of the procedures in this section, follow the
safety instructions in the
Product Information Guide
.
C
HECK THE KEYBOARD CABLE —
• Ensure that the keyboard cable is firmly connected to the computer.
• Shut down the computer (see "Turning Off Your Computer"
in your User’s Guide
),
reconnect the keyboard cable as shown on the setup diagram for your computer, and
then restart the computer.
• Ensure that the cable is not damaged or frayed and check cable connectors for bent or
broken pins. Straighten any bent pins.
• Remove any keyboard extension cables and connect the keyboard directly to the
computer.
TEST THE KEYBOARD — Connect a properly working keyboard to the computer, then
try using the keyboard.
R
UN THE HARDWARE TROUBLESHOOTER — See "Hardware Troubleshooter" on page 41.
Lockups and Software Problems
CAUTION: Before you begin any of the procedures in this section, follow the
safety instructions in the
Product Information Guide
.
The computer does not start up
CHECK THE DIAGNOSTIC LIGHTS — See "Diagnostic Lights" on page 33.
E
NSURE THAT THE POWER CABLE IS FIRMLY CONNECTED TO THE COMPUTER AND TO
THE ELECTRICAL OUTLET
The computer stops responding
NOTICE: You may lose data if you are unable to perform an operating system
shutdown.
T
URN THE COMPUTER OFF — If you are unable to get a response by pressing a key on
your keyboard or moving your mouse, press and hold the power button for at least 8 to
10 seconds (until the computer turns off), and then restart your computer.
Page 52

52 Quick Reference Guide
A program stops responding
END THE PROGRAM —
1
Press <Ctrl><Shift><Esc> simultaneously to access the Task Manager.
2
Click the
Applications
tab.
3
Click to select the program that is no longer responding.
4
Click
End Task
.
A program crashes repeatedly
NOTE: Most software includes installation instructions in its documentation or on
a floppy disk, CD, or DVD.
C
HECK THE SOFTWARE DOCUMENTATION — If necessary, uninstall and then reinstall
the program.
A program is designed for an earlier Windows operating system
RUN THE PROGRAM COMPATIBILITY WIZARD —
Windows XP:
The Program Compatibility Wizard configures a program so that it runs in an
environment similar to non-XP operating system environments.
1
Click
Start→
All Programs→ Accessories→ Program Compatibility Wizard→ Next
.
2
Follow the instructions on the screen.
Windows Vista:
The Program Compatibility Wizard configures a program so that it runs in an
environment similar to non-Windows Vista operating system environments.
1
Click
Start
→
Control Panel→ Programs→ Use an older program with this
version of Windows.
2
In the welcome screen, click
Next
.
3
Follow the instructions on the screen.
A solid blue screen appears
TURN THE COMPUTER OFF — If you are unable to get a response by pressing
a key on your keyboard or moving your mouse, press and hold the power
button for at least 8 to 10 seconds (until the computer turns off), and then
restart your computer.
Page 53

Quick Reference Guide 53
Other software problems
CHECK THE SOFTWARE DOCUMENTATION OR CONTACT THE SOFTWARE
MANUFACTURER FOR TROUBLESHOOTING INFORMATION —
• Ensure that the program is compatible with the operating system installed on your
computer.
• Ensure that your computer meets the minimum hardware requirements needed to run
the software. See the software documentation for information.
• Ensure that the program is installed and configured properly.
• Verify that the device drivers do not conflict with the program.
• If necessary, uninstall and then reinstall the program.
BACK UP YOUR FILES IMMEDIATELY
USE A VIRUS-SCANNING PROGRAM TO CHECK THE HARD DRIVE, FLOPPY DISKS,
CD
S, OR DVDS
SAVE AND CLOSE ANY OPEN FILES OR PROGRAMS AND SHUT DOWN YOUR
COMPUTER THROUGH THE START MENU
Memory Problems
CAUTION: Before you begin any of the procedures in this section, follow the
safety instructions in the
Product Information Guide
.
I
F YOU RECEIVE AN INSUFFICIENT MEMORY MESSAGE —
• Save and close any open files and exit any open programs you are not using to see if
that resolves the problem.
• See the software documentation for minimum memory requirements. If necessary,
install additional memory (see "Installing a Memory Module"
in your User’s Guide
).
• Reseat the memory modules (see "Memory"
in your User’s Guide
) to ensure that your
computer is successfully communicating with the memory.
• Run the Dell Diagnostics (See "Dell Diagnostics" on page 41).
IF YOU EXPERIENCE OTHER MEMORY PROBLEMS —
• Reseat the memory modules (see "Memory"
in your User’s Guide
) to ensure that your
computer is successfully communicating with the memory.
• Ensure that you are following the memory installation guidelines (see "Installing a
Memory Module"
in your User’s Guide
).
Page 54

54 Quick Reference Guide
• Ensure that the memory you are using is supported by your computer. For more
information about the type of memory supported by your computer, see "Memory"
in
your User’s Guide
.
• Run the Dell Diagnostics (See "Dell Diagnostics" on page 41).
Mouse Problems
CAUTION: Before you begin any of the procedures in this section, follow the
safety instructions in the
Product Information Guide
.
C
HECK THE MOUSE CABLE —
• Ensure that the cable is not damaged or frayed and check cable connectors for bent or
broken pins. Straighten any bent pins.
• Remove any mouse extension cables, and connect the mouse directly to the computer.
• Verify that the mouse cable is connected as shown on the setup diagram for your
computer.
RESTART THE COMPUTER —
1
Simultaneously press <Ctrl><Esc> to display the
Start
menu.
2
Press <u>,
press the up- and down-arrow keys
to highlight
Shut down
or
Tu r n
Off
, and then press <Enter>.
3
After the computer turns off, reconnect the mouse cable as shown on the setup
diagram.
4
Turn on the computer.
TEST THE MOUSE — Connect a properly working mouse to the computer, then try
using the mouse.
C
HECK THE MOUSE SETTINGS —
Windows XP:
1
Click
Start→ Control Panel→
Mouse
.
2
Adjust the settings as needed.
Windows Vista:
1
Click
Start
→ Control Panel→ Hardware and Sound→ Mouse
.
2
Adjust the settings as needed.
REINSTALL THE MOUSE DRIVER — See "Drivers" in your User’s Guide.
R
UN THE HARDWARE TROUBLESHOOTER — See "Hardware Troubleshooter" on
page 41.
Page 55

Quick Reference Guide 55
Network Problems
CAUTION: Before you begin any of the procedures in this section, follow the
safety instructions in the
Product Information Guide
.
C
HECK THE NETWORK LIGHT ON THE FRONT OF THE COMPUTER — If the link
integrity light is off (see "Controls and Lights" in your User’s Guide), no network
communication is occurring. Replace the network cable.
C
HECK THE NETWORK CABLE CONNECTOR — Ensure that the network cable is firmly
inserted into the network connector on the back of the computer and the network jack.
R
ESTART THE COMPUTER AND ATTEMPT TO LOG ON TO THE NETWORK AGAIN
CHECK YOUR NETWORK SETTINGS — Contact your network administrator or the
person who set up your network to verify that your network settings are correct and
that the network is functioning.
R
UN THE HARDWARE TROUBLESHOOTER — See "Hardware Troubleshooter" on page 41.
Power Problems
CAUTION: Before you begin any of the procedures in this section, follow the
safety instructions in the
Product Information Guide
.
I
F THE POWER LIGHT IS GREEN AND THE COMPUTER IS NOT RESPONDING — See
"Diagnostic Lights" on page 33.
I
F THE POWER LIGHT IS BLINKING GREEN — The computer is in standby mode.
Press a key on the keyboard, move the mouse, or press the power button to resume
normal operation.
I
F THE POWER LIGHT IS OFF — The computer is either turned off or is not receiving
power.
• Reseat the power cable in the power connector on the back of the computer and the
electrical outlet.
• Bypass power strips, power extension cables, and other power protection devices to
verify that the computer turns on properly.
• Ensure that any power strips being used are plugged into an electrical outlet and are
turned on.
• Ensure that the electrical outlet is working by testing it with another device, such as a
lamp.
• Ensure that the main power cable and front panel cable are securely connected to the
system board (see "System Board Components"
in your User’s Guide
).
Page 56

56 Quick Reference Guide
IF THE POWER LIGHT IS BLINKING AMBER — The computer is receiving electrical
power, but an internal power problem may exist.
• Ensure that the voltage selection switch is set to match the AC power at your location
(if applicable).
• Ensure that all components and cables are properly installed and securely connected
to the system board (see "System Board Components"
in your User’s Guide
).
IF THE POWER LIGHT IS STEADY AMBER — A device may be malfunctioning or
incorrectly installed.
• Remove and then reinstall all memory modules (see "Memory"
in your User’s Guide
).
• Remove and then reinstall any expansion cards, including graphics cards (see "Cards"
in your
User’s Guide
).
ELIMINATE INTERFERENCE — Some possible causes of interference are:
• Power, keyboard, and mouse extension cables.
• Too many devices connected to the same power strip.
• Multiple power strips connected to the same electrical outlet.
Printer Problems
CAUTION: Before you begin any of the procedures in this section, follow the
safety instructions in the
Product Information Guide
.
NOTE: If you need technical assistance for your printer, contact the printer’s
manufacturer.
C
HECK THE PRINTER DOCUMENTATION — See the printer documentation for setup
and troubleshooting information.
E
NSURE THAT THE PRINTER IS TURNED ON
CHECK THE PRINTER CABLE CONNECTIONS —
• See the printer documentation for cable connection information.
• Ensure that the printer cables are securely connected to the printer and the computer.
TEST THE ELECTRICAL OUTLET — Ensure that the electrical outlet is working by
testing it with another device, such as a lamp.
V
ERIFY THAT THE PRINTER IS RECOGNIZED BY WINDOWS —
Windows XP:
1
Click
Start→
Control Panel→
Printers and Other Hardware→
View installed
printers or fax printers
.
2
If the printer is listed, right-click the printer icon.
Page 57

Quick Reference Guide 57
3
Click
Properties→
Ports
. For a parallel printer, ensure that the
Print to the following
port(s):
setting is
LPT1 (Printer Port)
. For a USB printer, ensure that the
Print to the
following port(s):
setting is
USB
.
Windows Vista:
1
Click
Start
→ Control Panel→ Hardware and Sound→ Printer
.
2
If the printer is listed, right-click the printer icon.
3
Click
Properties,
and then click
Ports
.
4
Adjust the settings, as needed.
REINSTALL THE PRINTER DRIVER — See the printer documentation for information
on reinstalling the printer driver.
Scanner Problems
CAUTION: Before you begin any of the procedures in this section, follow the
safety instructions in the
Product Information Guide
.
NOTE: If you need technical assistance for your scanner, contact the scanner’s
manufacturer.
C
HECK THE SCANNER DOCUMENTATION — See the scanner documentation for setup
and troubleshooting information.
U
NLOCK THE SCANNER — Ensure that your scanner is unlocked (if the scanner has a
locking tab or button).
R
ESTART THE COMPUTER AND TRY THE SCANNER AGAIN
CHECK THE CABLE CONNECTIONS —
• See the scanner documentation for information on cable connections.
• Ensure that the scanner cables are securely connected to the scanner and the
computer.
VERIFY THAT THE SCANNER IS RECOGNIZED BY MICROSOFT WINDOWS —
Windows XP:
1
Click
Start→
Control Panel→
Printers and Other Hardware→
Scanners and
Cameras
.
2
If your scanner is listed, Windows recognizes the scanner.
Windows Vista:
1
Click
Start
→ Control Panel→ Hardware and Sound→ Scanners and Cameras
.
2
If the scanner is listed, Windows recognizes the scanner.
REINSTALL THE SCANNER DRIVER — See the scanner documentation for
instructions.
Page 58

58 Quick Reference Guide
Sound and Speaker Problems
CAUTION: Before you begin any of the procedures in this section, follow the
safety instructions in the
Product Information Guide
.
No sound from speakers
NOTE: The volume control in MP3 and other media players may override the
Windows volume setting. Always check to ensure that the volume on the media
player(s) has not been turned down or off.
C
HECK THE SPEAKER CABLE CONNECTIONS — Ensure that the speakers are
connected as shown on the setup diagram supplied with the speakers. If you purchased
a sound card, ensure that the speakers are connected to the card.
E
NSURE THAT THE SUBWOOFER AND THE SPEAKERS ARE TURNED ON — See the
setup diagram supplied with the speakers. If your speakers have volume controls,
adjust the volume, bass, or treble to eliminate distortion.
A
DJUST THE WINDOWS VOLUME CONTROL — Click or double-click the speaker icon
in the lower-right corner of your screen. Ensure that the volume is turned up and that
the sound is not muted.
D
ISCONNECT HEADPHONES FROM THE HEADPHONE CONNECTOR — Sound from the
speakers is automatically disabled when headphones are connected to the computer’s
front-panel headphone connector.
T
EST THE ELECTRICAL OUTLET — Ensure that the electrical outlet is working by
testing it with another device, such as a lamp.
E
LIMINATE POSSIBLE INTERFERENCE — Turn off nearby fans, fluorescent lights, or
halogen lamps to check for interference.
R
UN THE SPEAKER DIAGNOSTICS
REINSTALL THE SOUND DRIVER — See "Drivers" in your User’s Guide.
R
UN THE HARDWARE TROUBLESHOOTER — See "Hardware Troubleshooter" on
page 41.
No sound from headphones
CHECK THE HEADPHONE CABLE CONNECTION — Ensure that the headphone cable is
securely inserted into the headphone connector (see "About Your Computer" on
page 11).
A
DJUST THE WINDOWS VOLUME CONTROL — Click or double-click the speaker icon
in the lower-right corner of your screen. Ensure that the volume is turned up and that
the sound is not muted.
Page 59

Quick Reference Guide 59
Video and Monitor Problems
CAUTION: Before you begin any of the procedures in this section, follow the
safety instructions in the
Product Information Guide
.
NOTICE: If your computer came with a PCI Express graphics card installed,
removal of the card is not necessary when installing additional graphics cards;
however, the card is required for troubleshooting purposes. If you remove the card,
store it in a safe and secure location. For information about your graphics card, go
to support.dell.com.
The screen is blank
NOTE: For troubleshooting procedures, see the monitor’s documentation.
C
HECK THE MONITOR CABLE CONNECTION —
• Ensure that the monitor cable is connected to the correct graphics card (for dual
graphics card configurations).
• If you are using a DVI-to-VGA adapter, ensure that the adapter is correctly attached to
the graphics card and monitor.
• Ensure that the monitor cable is connected as shown on the setup diagram for your
computer.
• Remove any video extension cables and connect the monitor directly to the computer.
• Swap the computer and monitor power cables to determine if the monitor’s power
cable is defective.
• Check the connectors for bent or broken pins (it is normal for monitor cable
connectors to have missing pins).
CHECK THE MONITOR POWER LIGHT —
• If the power light is lit or blinking, the monitor has power.
• If the power light is off, firmly press the button to ensure that the monitor is
turned on.
• If the power light is blinking, press a key on the keyboard or move the mouse to
resume normal operation.
TEST THE ELECTRICAL OUTLET — Ensure that the electrical outlet is working by
testing it with another device, such as a lamp.
C
HECK THE DIAGNOSTIC LIGHTS — See "Diagnostic Lights" on page 33.
Page 60

60 Quick Reference Guide
The screen is difficult to read
CHECK THE MONITOR SETTINGS — See the monitor documentation for instructions
on adjusting the contrast and brightness, demagnetizing (degaussing) the monitor,
and running the monitor self-test.
M
OVE THE SUBWOOFER AWAY FROM THE MONITOR — If your speaker system
includes a subwoofer, ensure that the subwoofer is positioned at least 60 centimeters
(2 feet) away from the monitor.
M
OVE THE MONITOR AWAY FROM EXTERNAL POWER SOURCES — Fans, fluorescent
lights, halogen lamps, and other electrical devices can cause the screen image to
appear shaky. Turn off nearby devices to check for interference.
R
OTATE THE MONITOR TO ELIMINATE SUNLIGHT GLARE AND POSSIBLE
INTERFERENCE
ADJUST THE WINDOWS DISPLAY SETTINGS —
Windows XP:
1
Click
Start→
Control Panel→
Appearance and Themes
.
2
Click the area you want to change or click the
Display
icon.
3
Try different settings for
Color quality
and
Screen resolution
.
Windows Vista:
1
Click
Start
→ Control Panel→ Hardware and Sound→ Personalization
→
Display Settings
.
2
Adjust
Resolution
and
Colors settings,
as needed.
3D image quality is poor
CHECK THE GRAPHICS CARD POWER CABLE CONNECTION — Ensure that the power
cable for the graphics card(s) is correctly attached to the card.
C
HECK THE MONITOR SETTINGS — See the monitor documentation for instructions
on adjusting the contrast and brightness, demagnetizing (degaussing) the monitor,
and running the monitor self-test.
Only part of the screen is readable
TURN ON THE COMPUTER AND THE MONITOR AND ADJUST THE MONITOR
BRIGHTNESS AND CONTRAST CONTROLS — If the monitor works, the graphics
card(s) may be defective.
Contact Dell (see "Contacting Dell"
in your User’s Guide
).
Page 61

Index 61
Index
B
battery
problems, 46
beep codes, 37
C
cards
slots, 15, 18
CD-RW drive
problems, 47
CDs
operating system, 10
Check Disk, 47
computer
beep codes, 37
crashes, 51-52
stops responding, 51
conflicts
software and hardware
incompatibilities, 41
connectors
headphone, 13, 17
IEEE, 12, 16
keyboard, 21
line-in, 20
line-out, 20
mouse, 19
connectors (continued)
network adapter, 20
parallel, 19
power, 14, 18
serial, 21
sound, 20
USB, 12, 16, 20-21
D
Dell Diagnostics, 41
Dell support site, 8
diagnostic lights, 33
diagnostics
beep codes, 37
Dell, 41
lights, 13, 17, 33
display. See monitor
documentation
End User License Agreement, 6
ergonomics, 6
online, 8
Product Information Guide, 6
regulatory, 6
safety, 6
User’s Guide, 6
warranty, 6
drives
problems, 46
Page 62

62 Index
E
e-mail
problems, 48
End User License Agreement, 6
ergonomics information, 6
error messages
beep codes, 37
diagnostic lights, 33
problems, 49
F
Files and Settings Transfer
Wizard, 25
H
hard drive
activity light, 12-13, 15, 17
problems, 47
hardware
beep codes, 37
conflicts, 41
Dell Diagnostics, 41
Hardware Troubleshooter, 41
headphone
connector, 13, 17
Help and Support Center, 9
help file
Windows Help and Support
Center, 9
I
IEEE
connectors, 12, 16
IEEE 1394
problems, 50
Internet
problems, 48
IRQ conflicts, 41
K
keyboard
connector, 21
problems, 51
L
labels
Microsoft Windows, 7
Service Tag, 7
lights
back of computer, 33
diagnostic, 13, 17, 33
hard drive activity, 12-13, 15, 17
link integrity, 19
network, 19-20
network activity, 20
power, 13, 17
Page 63

Index 63
M
memory
problems, 53
messages
error, 49
modem
problems, 48
monitor
blank, 59
hard to read, 60
problems, 59
mouse
connector, 19
problems, 54
N
network
connector, 20
problems, 55
O
operating system
reinstalling, 10
Operating System CD, 10
optical drive
problems, 46-47
P
power
button, 12, 16
connector, 14, 18
light, 13, 17
line conditioners, 28
problems, 55
protection devices, 28
surge protectors, 28
UPS, 28
power light
conditions, 55
printer
connecting, 25
problems, 56
setting up, 25
problems
battery, 46
beep codes, 37
blue screen, 52
CD-RW drive, 47
computer crashes, 51-52
computer stops responding, 51
conflicts, 41
Dell Diagnostics, 41
diagnostic lights, 33
drives, 46
e-mail, 48
error messages, 49
general, 51
hard drive, 47
IEEE 1394, 50
Internet, 48
keyboard, 51
Page 64

64 Index
problems (continued)
memory, 53
modem, 48
monitor hard to read, 60
monitor is blank, 59
mouse, 54
network, 55
optical drive, 46-47
power, 55
power light conditions, 55
printer, 56
program crashes, 52
program stops responding, 52
scanner, 57
screen hard to read, 60
screen is blank, 59
software, 52-53
video and monitor, 59
volume adjusting, 58
Product Information Guide, 6
R
regulatory information, 6
ResourceCD
Dell Diagnostics, 41
S
S.M.A.R.T, 40
safety instructions, 6
scanner
problems, 57
screen. See monitor
Service Tag, 7
software
conflicts, 41
problems, 52-53
sound connectors
line-in, 20
line-out, 20
Starting the Dell Diagnostics
From the Drivers and
Utilities CD, 43
Starting the Dell Diagnostics
From Your Hard Drive, 42
support website, 8
T
transferring information to a new
computer, 25
troubleshooting
conflicts, 41
Dell Diagnostics, 41
diagnostic lights, 33
Hardware Troubleshooter, 41
Help and Support Center, 9
U
uninterruptible power supply.
See UPS,28
UPS, 28
Page 65

Index 65
USB
connector, 20-21
connectors, 12, 16
User’s Guide, 6
V
video
problems, 59
voltage selection switch, 14, 18
volume
adjusting, 58
W
warranty information, 6
Windows XP
Files and Settings Transfer
Wizard, 25
Hardware Troubleshooter, 41
Help and Support Center, 9
reinstalling, 10
wizards
Files and Settings Transfer
Wizard, 25
Page 66

66 Index
Page 67

Dell Precision™ Workstation T3400
Naslaggids
Model DCTA
www.dell.com | support.dell.com
Page 68

Opmerkingen, kennisgevingen en waarschuwingen
OPMERKING: Een OPMERKING duidt belangrijke informatie aan voor een beter
gebruik van de computer.
KENNISGEVING: Een KENNISGEVING duidt potentiële schade aan hardware of
potentieel gegevensverlies aan en vertelt u hoe het probleem kan worden vermeden.
WAARSCHUWING: Een WAARSCHUWING duidt het risico van schade aan
eigendommen, lichamelijk letsel of overlijden aan.
____________________
De informatie in dit document kan zonder voorafgaande kennisgeving worden gewijzigd.
© 2007 Dell Inc. Alle rechten voorbehouden.
Verveelvoudiging op welke wijze dan ook zonder de schriftelijke toestemming van Dell Inc. is strikt verboden.
Merken in dit document: Dell, het DELL-logo en Dell Precision zijn handelsmerken van Dell Inc.;
Microsoft, Windows, en Windows Vista zijn handelsmerken of gedeponeerde handelsmerken van
Microsoft Corporation in de Verenigde Staten en/of andere landen.
Overige handelsmerken en handelsnamen worden in deze tekst gebruikt om te verwijzen of naar de eenheden
van de merken en namen of naar hun producten. Dell Inc. heeft geen eigendomsrechten of -aanspraken op
handelsmerken en handelsnamen anders dan haar eigen merken en namen.
Model DCTA
Augustus 2007 O/N NT505 Rev. A00
Page 69

Inhoud
Informatie zoeken . . . . . . . . . . . . . . . . . . . . 71
Over de computer
Vooraanzicht (towerstand)
. . . . . . . . . . . . . . . . . . . . 77
. . . . . . . . . . . . . 77
Achteraanzicht (towerstand)
Vooraanzicht (desktopstand)
Achteraanzicht (desktopstand)
Connectoren op het achterpaneel
De computer installeren
. . . . . . . . . . . . . . . . 87
Wisselen tussen tower- en desktopstand
De computer in een kast installeren
Gegevens overbrengen naar een
nieuwe computer
. . . . . . . . . . . . . . . . . 91
Voedingsbeschermingsapparaten
De computer reinigen
. . . . . . . . . . . . . . . . . . 96
Computer, toetsenbord en monitor
Muis (niet-optisch)
. . . . . . . . . . . . . . . . . 96
. . . . . . . . . . . 80
. . . . . . . . . . . 81
. . . . . . . . . . 84
. . . . . . . . . 85
. . . . . 87
. . . . . . . . 88
. . . . . . . . . 94
. . . . . . . . . 96
Hulpprogramma's voor probleemoplossing
Diskettestation
Cd's en dvd's
Aan/uit-lampjes
Diagnostische lampjes
Pieptooncodes
Systeemberichten
. . . . . . . . . . . . . . . . . . . 97
. . . . . . . . . . . . . . . . . . . . 97
. . . . . . . . . . . . . . . . . . 97
. . . . . . . . . . . . . . . 99
. . . . . . . . . . . . . . . . . . . 104
. . . . . . . . . . . . . . . . . 106
Probleemoplosser voor hardware
Dell Diagnostics (Dell-diagnostiek)
. . . . . . 97
. . . . . . . . . 108
. . . . . . . . 109
Inhoud 69
Page 70

Problemen oplossen . . . . . . . . . . . . . . . . . . . 113
Problemen met de batterij
Problemen met stations
. . . . . . . . . . . . . 114
. . . . . . . . . . . . . . 114
E-mail-, modem- en internetproblemen
Foutberichten
. . . . . . . . . . . . . . . . . . . . 117
Problemen met IEEE 1394-apparaten
Problemen met het toetsenbord
Vastlopen en softwareproblemen
Problemen met geheugen
Muisproblemen
Netwerkproblemen
Voedingsproblemen
Printerproblemen
Scannerproblemen
. . . . . . . . . . . . . . . . . . 122
. . . . . . . . . . . . . . . . . 123
. . . . . . . . . . . . . . . . 123
. . . . . . . . . . . . . . . . . . 124
. . . . . . . . . . . . . . . . . 125
. . . . . . . . . . 119
. . . . . . . . . 119
. . . . . . . . . . . . . 121
Problemen met geluid en luidsprekers
Video- en monitorproblemen
. . . . . . . . . . . . 127
. . . . . . 116
. . . . . . . 118
. . . . . . . 126
Index . . . . . . . . . . . . . . . . . . . . . . . . . . . . . . 131
70 Inhoud
Page 71
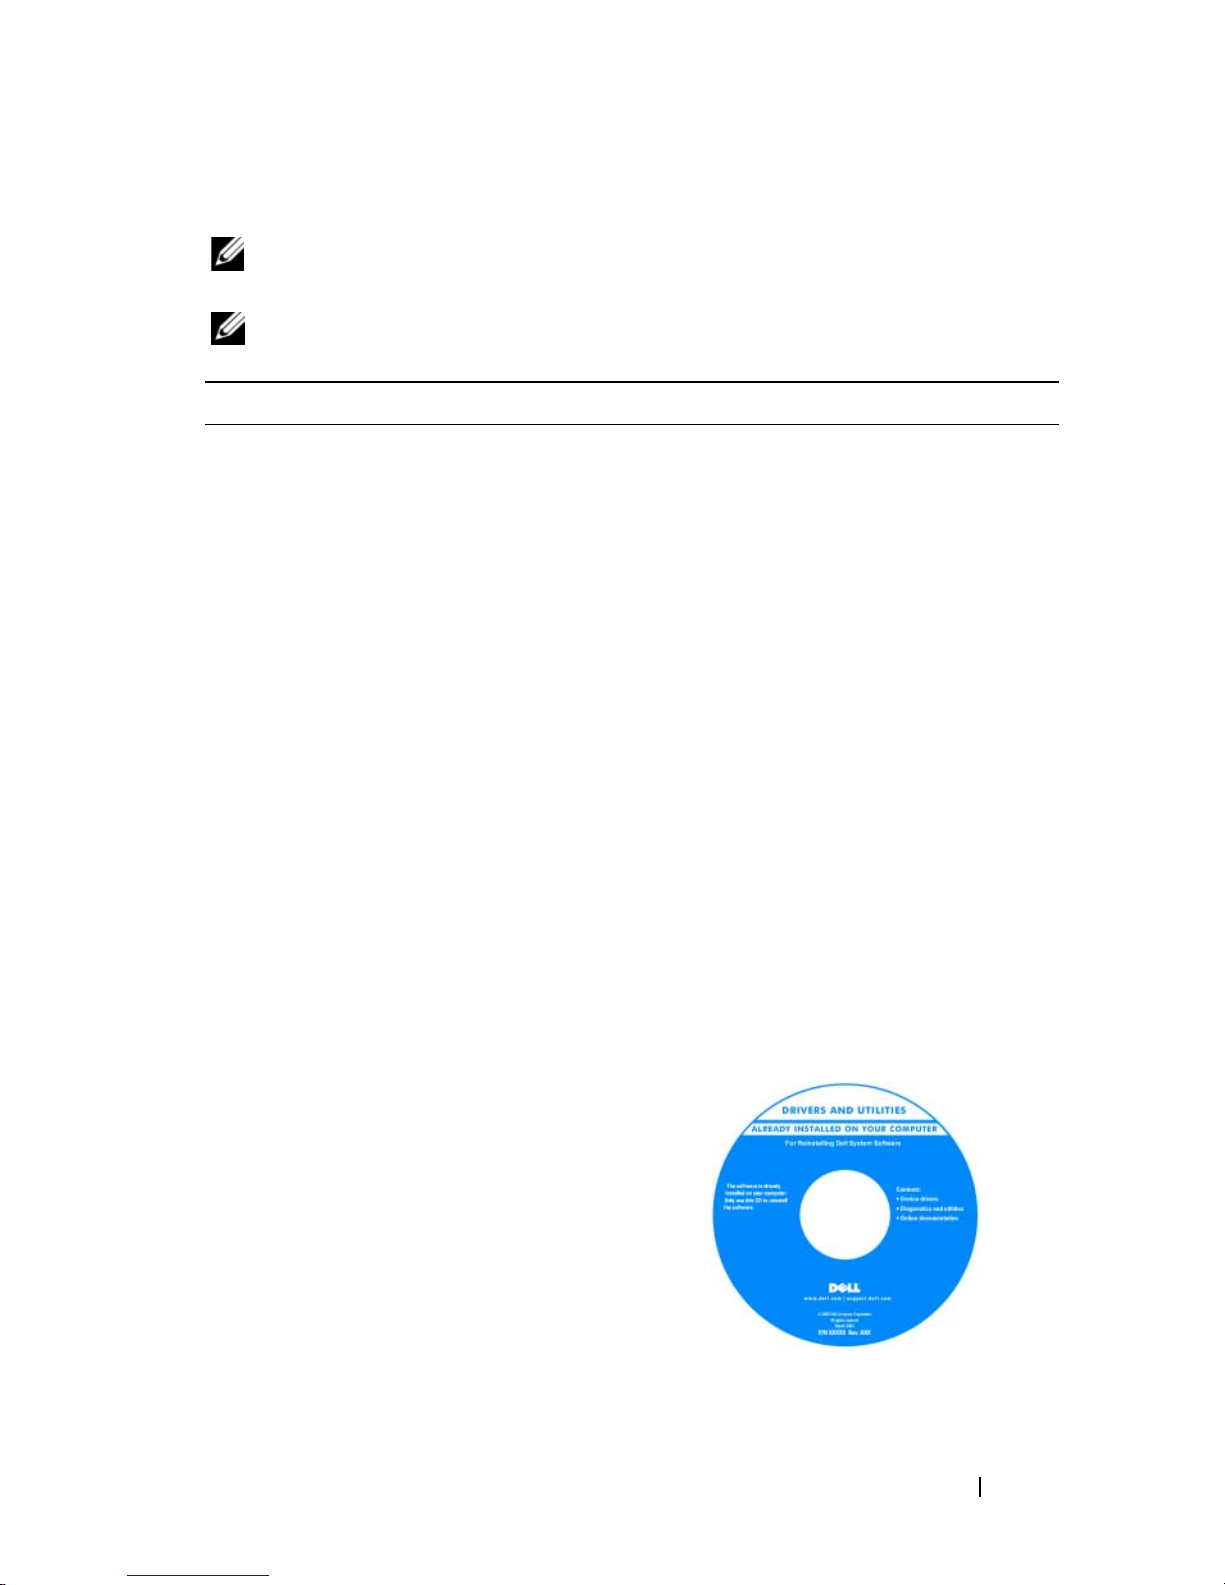
Informatie zoeken
OPMERKING: Sommige functies of media kunnen optioneel zijn en niet bij uw computer
zijn geleverd. Sommige functies of media zijn in bepaalde landen niet beschikbaar.
OPMERKING: Mogelijk is er bij uw computer aanvullende informatie geleverd.
Waarnaar zoekt u? Hier kunt u het vinden
• Een diagnostisch programma voor de
computer
• Stuurprogramma's voor de computer
• Desktop System Software (DSS)
De schijf Drivers and Utilities (stuur- en
hulpprogramma's)
OPMERKING: De cd Drivers and Utilities
(stuur- en hulpprogramma's) is optioneel en
is mogelijk niet bij uw computer geleverd.
De documentatie en stuurprogramma's
zijn reeds op de computer geïnstalleerd.
U kunt de cd Drivers and Utilities (stuuren hulpprogramma's) gebruiken om de
stuurprogramma's opnieuw te installeren
(zie"Stuur- en hulpprogramma's opnieuw
installeren" in de Gebruikshandleiding) of
om Dell Diagnostics (Dell-diagnostiek)
uit te voeren (zie "Dell Diagnostics (Delldiagnostiek)" op pagina 109).
Op uw cd kunnen leesmij-bestanden zijn
opgenomen met daarin de laatste updates
over technische wijzigingen aan de
computer of geavanceerd technisch
naslagmateriaal voor computertechnici
en ervaren gebruikers.
Updates van de stuurprogramma's en
documentatie vindt u op support.dell.com.
Naslaggids 71
Page 72
Waarnaar zoekt u? Hier kunt u het vinden
• Garantie-informatie
• Voorwaarden (alleen V.S.)
• Veiligheidsinstructies
• Informatie over regelgeving
• Ergonomische informatie
• Licentieovereenkomst voor eindgebruikers
• Onderdelen verwijderen en vervangen
• Specificaties
• Systeeminstellingen configureren
• Problemen vaststellen en oplossen
Dell™ Productinformatiegids
Dell Precision™ Gebruikshandleiding
®
Microsoft
Vista
1
Klik op
ondersteuning
System Guides
systeemhandleidingen)
Guides
Windows® XP en Windows
™
Help en ondersteuning
Start→ Help en
→
Dell User's and
(Gebruiks- en
→
(Systeemhandleidingen).
System
2
Klik op de
computer.
Gebruikshandleiding
voor uw
72 Naslaggids
Page 73
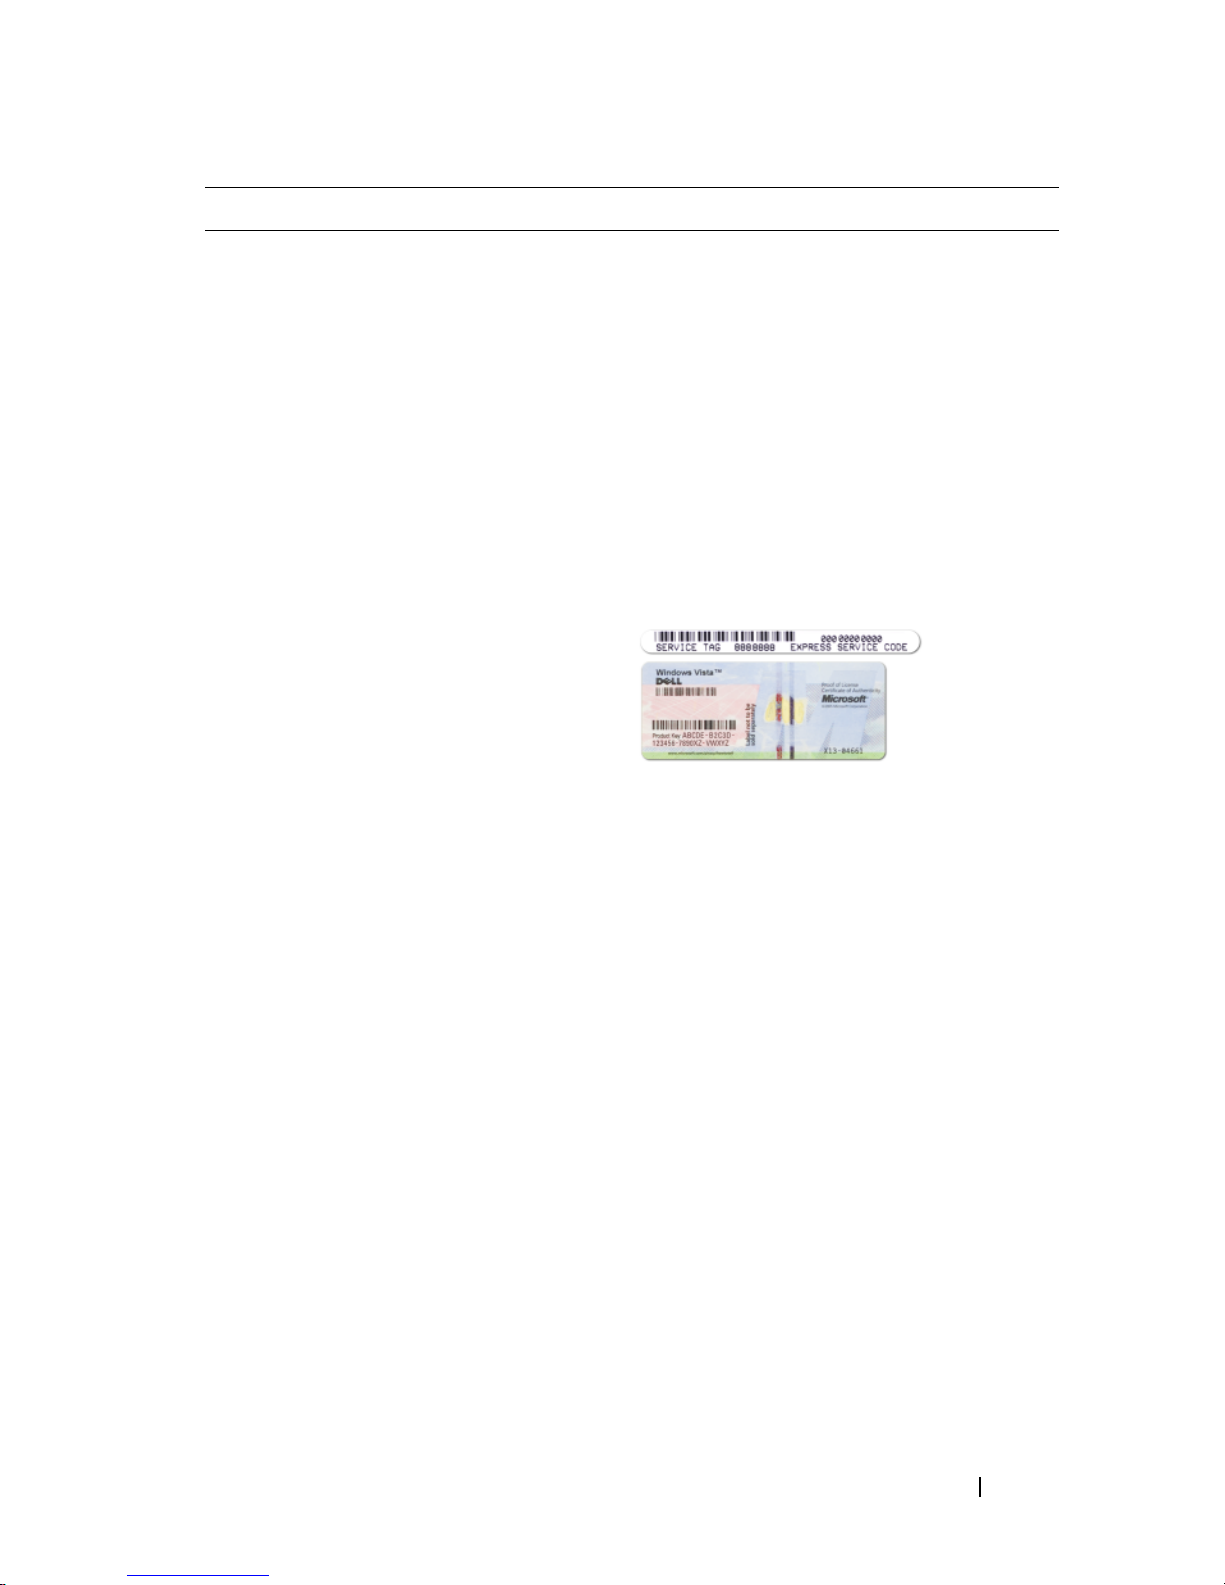
Waarnaar zoekt u? Hier kunt u het vinden
• Serviceplaatje en code voor express-service
• Microsoft Windows-productcode
Serviceplaatje en Microsoft Windowsproductcode
Deze labels bevinden zich op de computer.
• Gebruik het serviceplaatje om de
computer te identificeren als
u gebruikmaakt van
support.dell.com
of contact opneemt met de technische
ondersteuning.
• Voer de code voor de express-service in
zodat uw telefonische verzoek naar de
juiste medewerker van de
ondersteuningsdienst wordt doorgeleid.
OPMERKING: Voor een betere beveiliging
heeft het nieuwe Microsoft Windowslicentielabel nu een ontbrekend gedeelte of
gat om te voorkomen dat het label wordt
verwijderd.
Naslaggids 73
Page 74

Waarnaar zoekt u? Hier kunt u het vinden
• Oplossingen — Hints en tips voor
probleemoplossing, artikelen van
technici, on line cursussen en
veelgestelde vragen
• Community — On line discussies met
andere gebruikers van Dell-producten
• Upgrades — Upgrade-informatie over
onderdelen zoals het geheugen, de vaste
schijf en het besturingssysteem
• Klantenservice — Contactgegevens, de
status van reparatieverzoeken en
bestellingen, informatie over garantie en
reparatie
• Service en ondersteuning — De status van
reparatieverzoeken, ondersteuningshistorie,
het servicecontract, on line discussies met
medewerkers van de ondersteuningsdienst
• De technische updateservice van Dell —
Proactieve meldingen per e-mail van
software- en hardware-updates voor uw
computer
Dell Support-website — support.dell.com
OPMERKING: Selecteer uw regio of
business-segment om bij de juiste
ondersteuning-site te komen.
• Referentiemateriaal —
Computerdocumentatie, details over
mijn computerinstellingen,
productspecificaties en white papers
• Downloads — Geautoriseerde
stuurprogramma's, patches en softwareupdates
74 Naslaggids
Page 75

Waarnaar zoekt u? Hier kunt u het vinden
• Desktop System Software (DSS) — Als
u het besturingsysteem van de computer
opnieuw installeert, moet u het DSShulpprogramma ook opnieuw installeren.
DSS detecteert automatisch de computer
en het besturingssysteem en installeert de
updates die voor uw configuratie van
belang zijn, en biedt daarbij essentiële
updates voor uw besturingssysteem en
ondersteuning voor processors, optische
schijven, USB-apparaten en meer. DSS is
benodigd voor een juiste werking van uw
Dell-computer.
• Met Windows XP werken
Ga als volgt te werk om Desktop System
Software te downloaden:
1
Ga naar
land/regio en klik op
support.dell.com
Drivers & Downloads
, selecteer uw
(stuurprogramma's en downloads).
2
Klik op
op
Select Model
Enter a Tag
(model selecteren) of
(nummer van serviceplaatje
invoeren), maak de juiste selecties of voer
de juiste informatie voor de computer in
en klik op
3
Schuif naar
Confirm
Configuration Utilities
configuratieprogramma's)
System Software
(nu downloaden).
Now
(bevestigen).
System and
en klik op
(systeem- en
→
Desktop
Download
OPMERKING: De gebruikersinterface van
support.dell.com kan verschillen
afhankelijk van uw selecties.
Help en ondersteuning van Windows
• Met Windows Vista werken
• Aan het werk met programma's en
bestanden
• Hoe pas ik mijn bureaublad aan
1
Klik op
2
Geef met een of meer woorden een
Start→ Help en ondersteuning
beschrijving van het probleem en klik
vervolgens op het pijltje.
3
Klik op het onderwerp dat uw probleem
beschrijft.
4
Volg de instructies op het scherm.
.
Naslaggids 75
Page 76
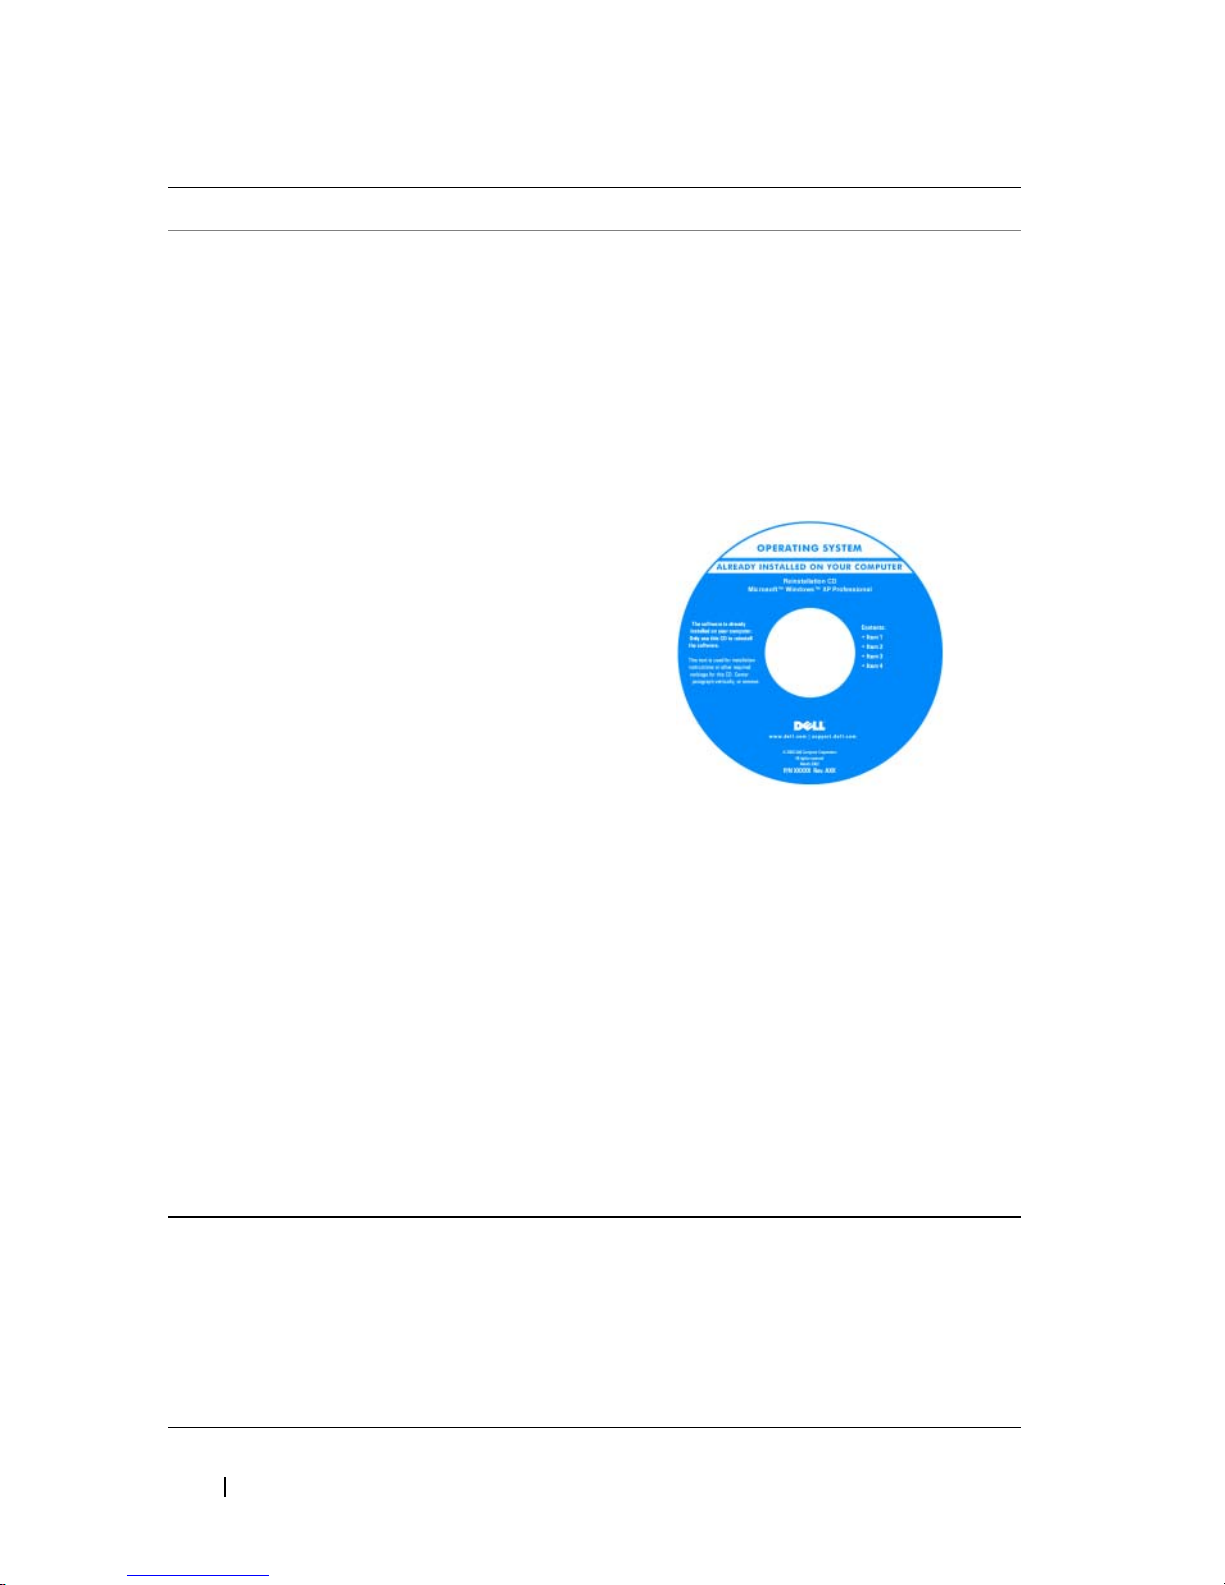
Waarnaar zoekt u? Hier kunt u het vinden
• Het besturingssysteem opnieuw
installeren
Medium met besturingssysteem
Het besturingssysteem is reeds op de
computer geïnstalleerd. Wanneer u het
besturingssysteem opnieuw wilt installeren,
moet u het medium voor het opnieuw
installeren van het besturingssysteem
gebruiken dat bij de computer is geleverd
(raadpleeg "Het besturingssysteem
herstellen" in de Gebruikshandleiding).
Nadat u uw besturingssysteem opnieuw
hebt geïnstalleerd, gebruikt u de
optionele schijf Drivers and Utilities
(stuur- en hulpprogramma's) om de
stuurprogramma's opnieuw te installeren
voor de apparaten die zijn bij de
computer zijn geleverd.
• Met Linus werken
• E-maildiscussies met gebruikers van Dell
Precision-producten en het Linuxbesturingssysteem
• Extra informatie over Linux en mijn
Dell Precision-computer
76 Naslaggids
Het productsleutellabel voor het
besturingssysteem bevindt zich op de
computer.
OPMERKING: De kleur van het
installatiemedium is afhankelijk van het
besturingssysteem dat u hebt besteld.
Door Dell ondersteunde Linux-sites
• linux.dell.com
• lists.us.dell.com/mailman/listinfo/linuxprecision
Page 77
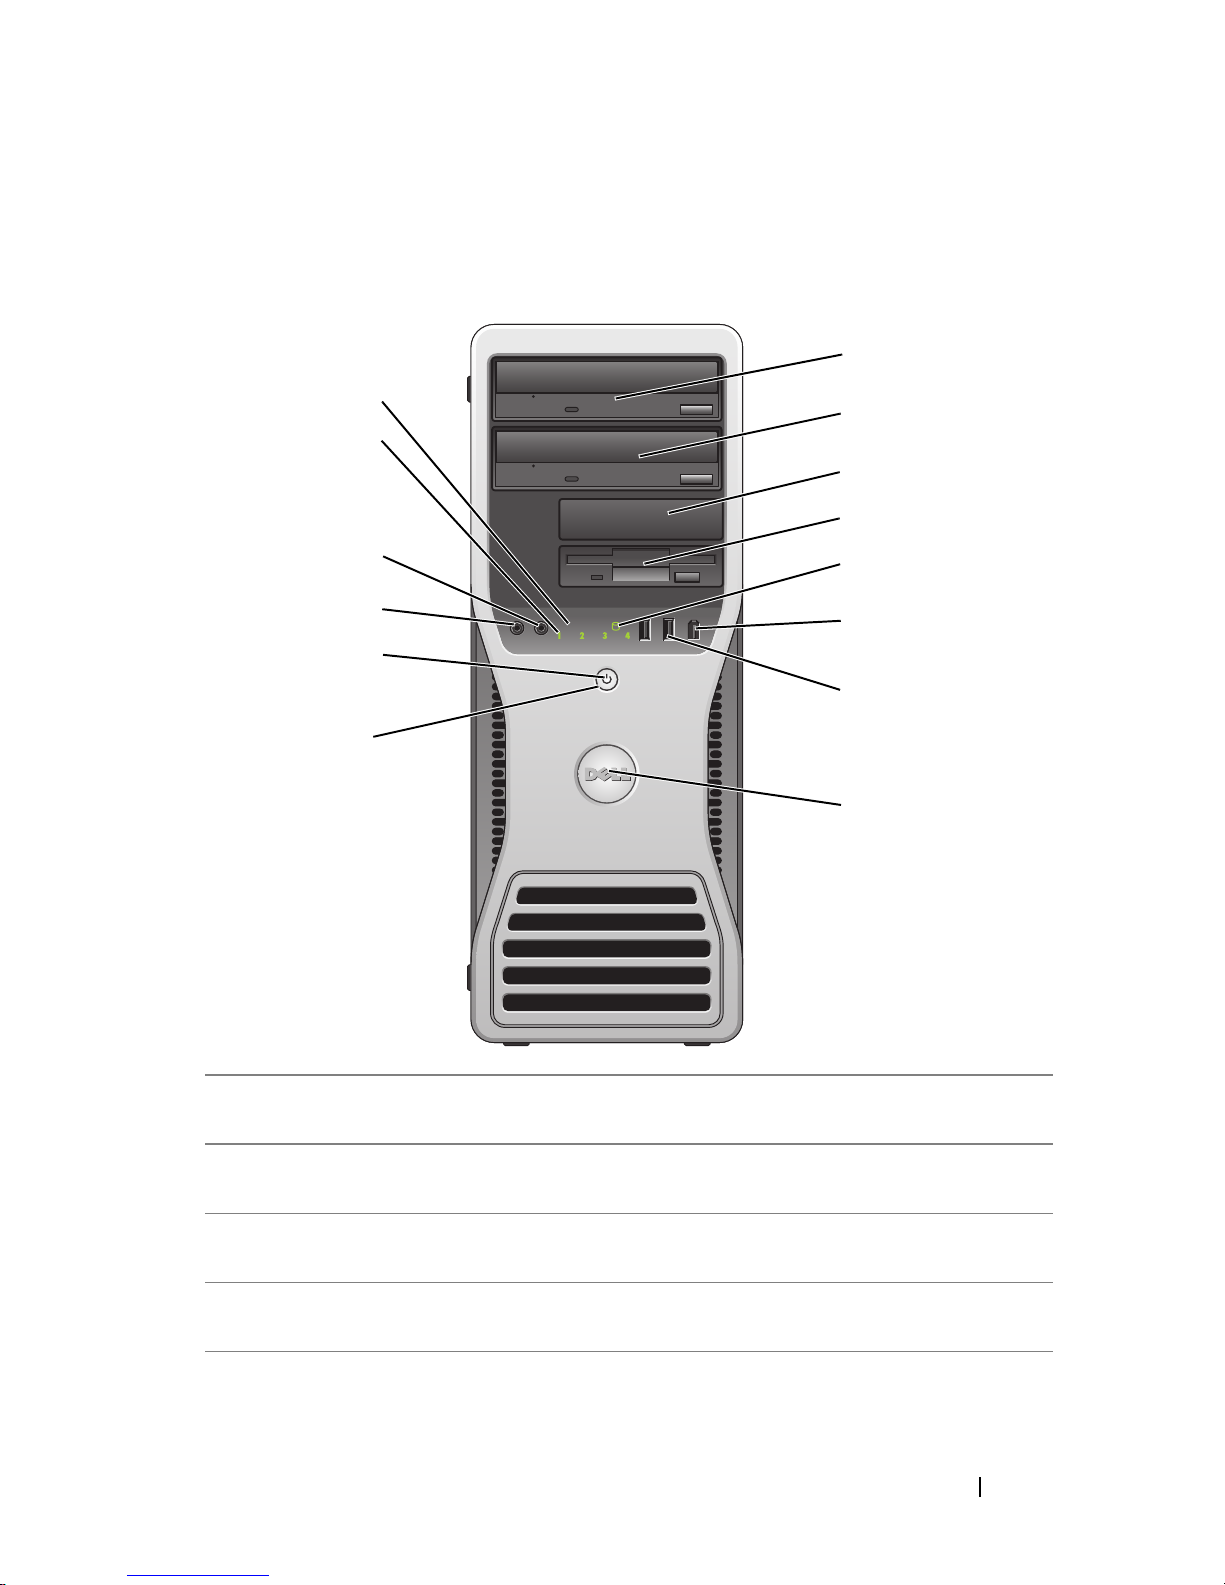
Over de computer
Vooraanzicht (towerstand)
1
14
13
12
11
10
9
2
3
4
5
6
7
8
1 bovenste 5,25-inch
stationscompartiment
2 bovenste 5,25-inch
stationscompartiment
3 bovenste 3,5-inch
stationscompartiment
4 bovenste 3,5-inch
stationscompartiment
Ondersteunt een optisch station.
Ondersteunt een optisch station of een extra vaste
schijf (alleen SATA).
Ondersteunt een diskettestation, een mediakaartlezer
of een extra vaste schijf (SATA of SAS).
Ondersteunt een diskettestation of een mediakaartlezer.
Naslaggids 77
Page 78

5 activiteitenlampje
vaste schijf
Het activiteitenlampje van de vaste schijf brandt
wanneer de computers gegevens van de vaste schijf leest
of ernaar schrijft. Het lampje kan ook branden wanneer
een apparaat zoals een optisch station actief is.
6 IEEE 1394-connector
(optioneel)
7 USB 2.0-connectoren
(2)
Gebruik de optionele IEEE 1394-connector voor
apparaten met hoge gegevenssnelheden, zoals digitale
videocamera's en externe opslagapparaten.
Gebruik de voorste USB-connectoren voor apparaten
die u af en toe aansluit, zoals sleutels met flashgeheugen
of camera's of opstartbare USB-apparaten (zie "System
Setup" in de Gebruikshandleiding voor meer informatie
over het opstarten vanaf een USB-apparaat).
OPMERKING: Het is raadzaam om de USB-connectoren
aan de achterzijde te gebruiken voor apparaten die
normaal gesproken altijd aangesloten zijn, zoals printers
en toetsenborden.
8 Dell-badge
(kantelbaar)
9 aan/uit-knop Druk hierop om de computer in te schakelen.
Gebruik de plastic handgreep aan de achterkant van de
Dell badge om deze te kantelen om deze van een tower
in een desktop of van een desktop in een tower te
veranderen.
KENNISGEVING: Ter voorkoming van
gegevensverlies moet u de computer niet met de
aan/uit-knop uitschakelen. Voer in plaats hiervan
een afsluitproces van het besturingssysteem uit.
78 Naslaggids
KENNISGEVING: Als in uw besturingssysteem
ACPI is ingeschakeld, wordt er een afsluitproces
van het besturingssysteem uitgevoerd wanneer
u op de aan/uit-knop drukt.
OPMERKING: U kunt met de aan/uit-knop ook het
systeem uit een energiebesparende modus halen of in
een energiebesparende modus zetten (zie
"Energiebeheer" in de Gebruikshandleiding).
Page 79

10 aan/uit-lampje Het aan/uit-lampje licht op en knippert of brandt
ononderbroken om verschillende toestanden aan te geven:
• Geen lampje — De computer staat uit (S4, S5 of
mechanisch UIT).
• Aanhoudend groen — De computer bevindt zich in
een normale werkstand.
• Knipperend groen — De computer staat in een
energiebesparende modus (S1 of S3).
• Knipperend of aanhoudend oranje — Zie
"Problemen met de stroomvoorziening" in de
Gebruikshandleiding
.
U haalt de computer uit een energiebesparende modus
door op de aan/uit-knop te drukken of door het
toetsenbord of de muis te gebruiken als deze hiervoor
zijn geconfigureerd in Windows Apparaatbeheer. Meer
informatie over slaapstanden en hoe u de pc uit een
energiebesparende modus haalt, vindt u in het gedeelte
"Energiebeheer" in de
Gebruikshandleiding
.
Zie "Diagnostische lampjes" op pagina 99 voor een
beschrijving van diagnostische lampcodes voor het
oplossen van problemen met de computer.
11 microfoonconnector Gebruik de microfoonconnector voor het aansluiten
van een pc-microfoon voor het invoeren van gesproken
tekst of muziek in een geluids- of telefonieprogramma.
12 hoofdtelefoon-
connector
13 diagnostische
lampjes (4)
Gebruik de hoofdtelefoonconnector om hoofdtelefoons
aan te sluiten.
Gebruik de diagnostische lampjes als hulp bij het
oplossen van een probleem met de computer (zie
"Diagnostische lampjes" op pagina 99).
14 netwerkverbindings-
lampje
Het netwerkverbindingslampje brandt als er een goede
verbinding is tussen een 10-Mbps, 100-Mbps of
1000-Mbps (1-Gbps) netwerk en de computer.
Naslaggids 79
Page 80
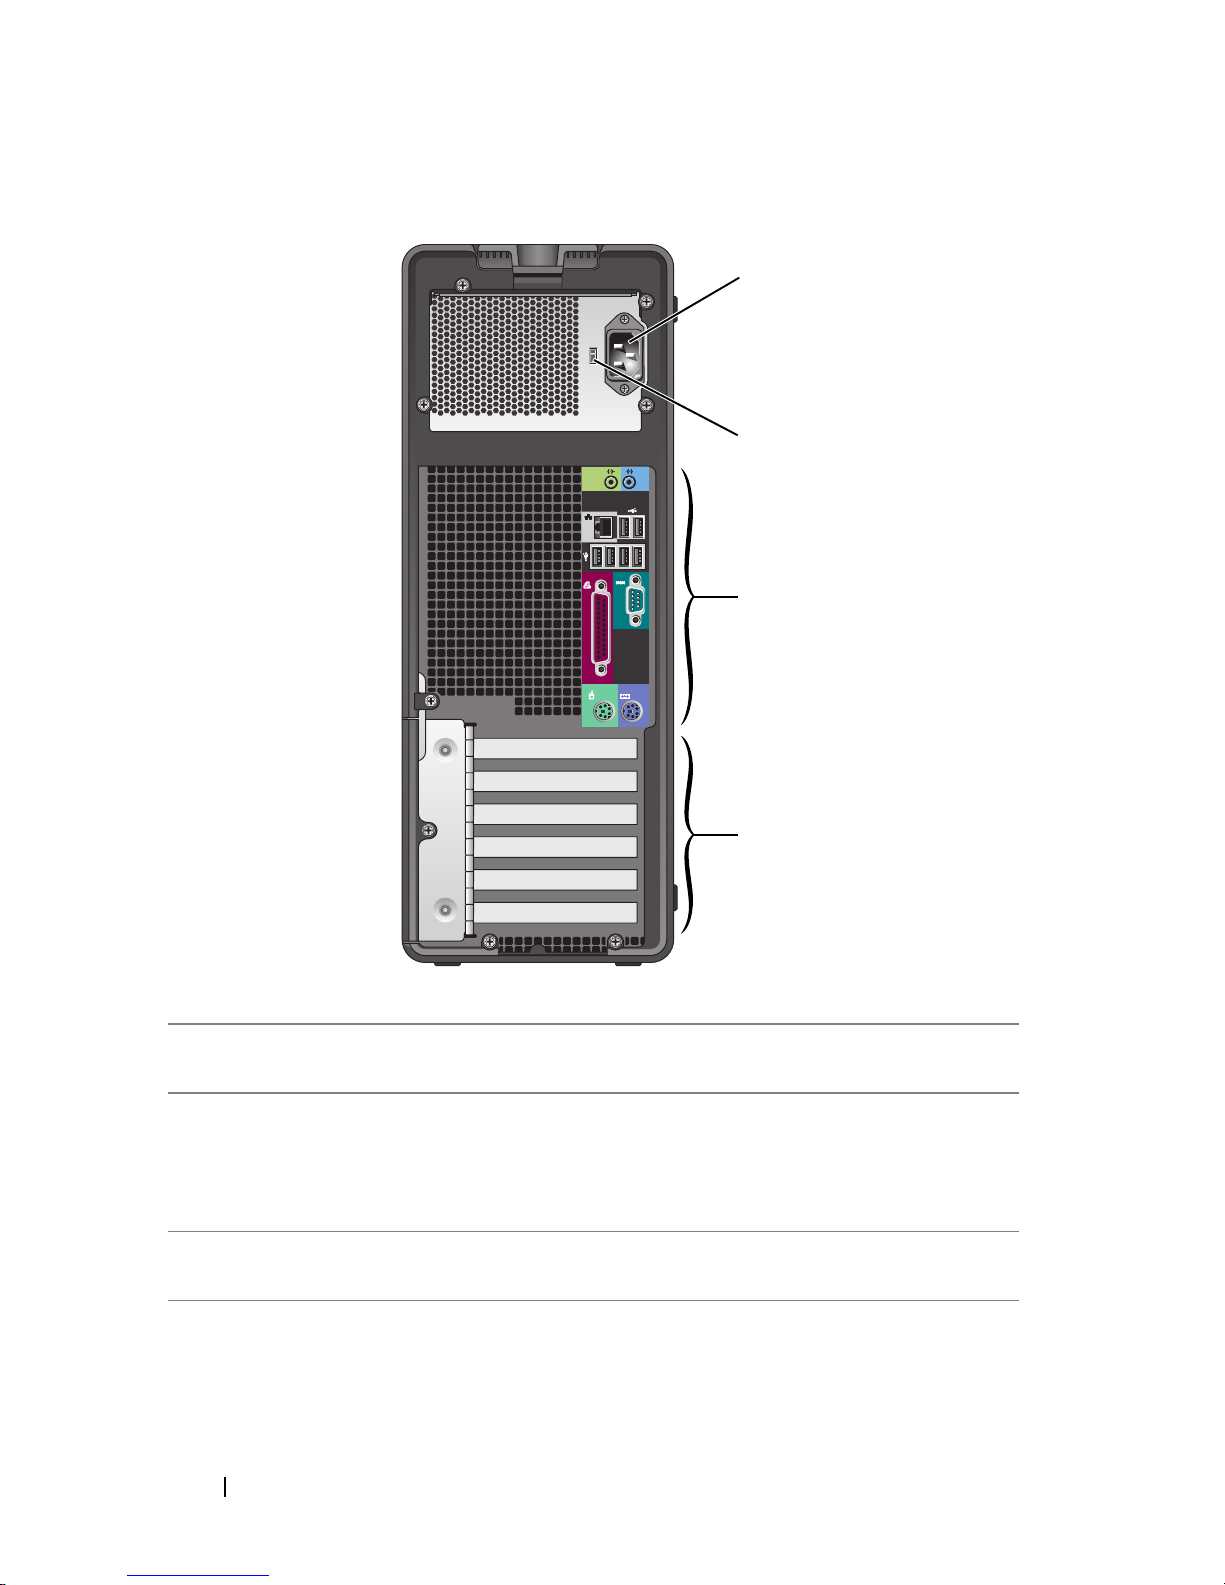
Achteraanzicht (towerstand)
1
2
3
1 stroomkabel-
aansluiting
2 stroomselectie-
schakelaar
3 connectoren op
het achterpaneel
4
Sluit de stroomkabel aan.
Zie de veiligheidsinstructies in de Productinformatiegids
voor meer informatie.
OPMERKING: De stroomselectieschakelaar is alleen
aanwezig op de 375-W PSU.
Steek seriële, USB- en andere apparaten in de juiste
connectoren.
80 Naslaggids
Page 81
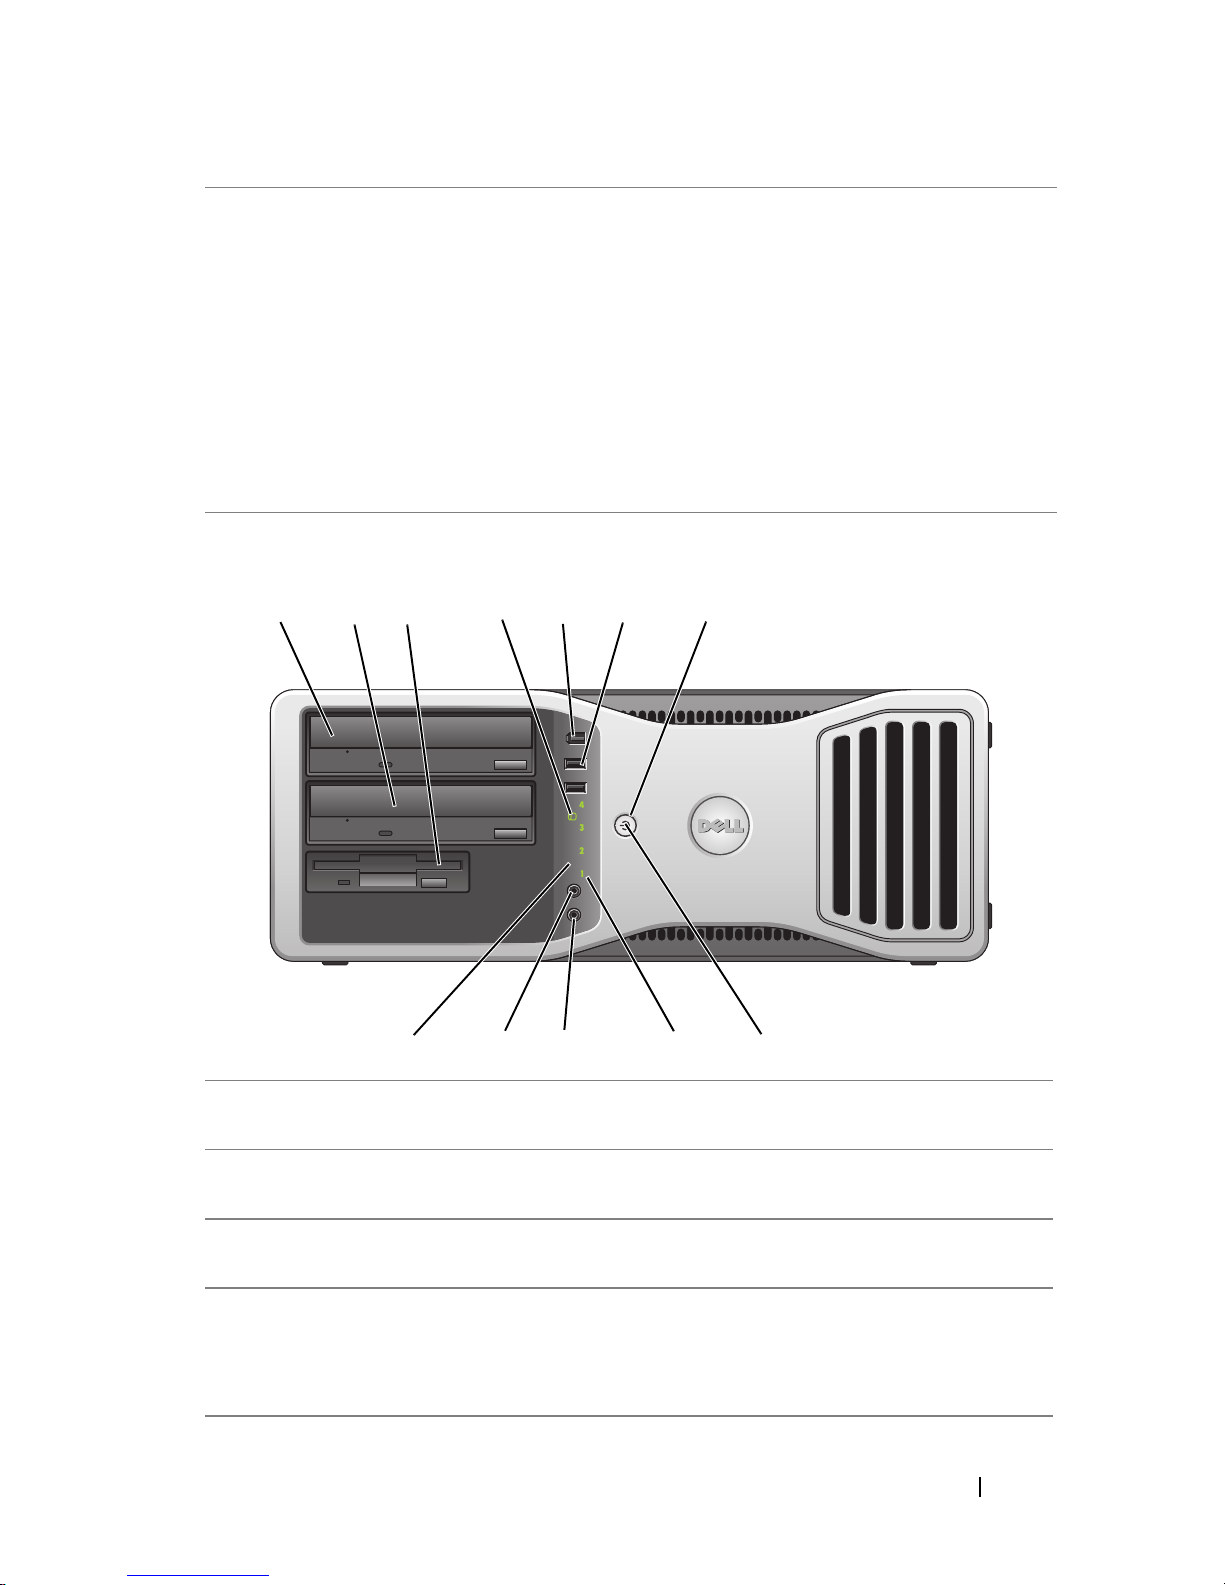
4 kaartsleuven Toegang tot connectoren voor geïnstalleerde PCI- of PCI
Express-kaarten.
OPMERKING: De bovenste vijf connectorsleuven ondersteunen
volle-lengte kaarten; de onderste connectorsleuf ondersteunt
kaarten van halve-lengte kaarten.
OPMERKING: Raadpleeg de documentatie bij de kaarten om
te controleren of ze in uw configuratie passen. Doordat
sommige kaarten meer fysieke ruimte in beslag nemen en
meer stroom verbruiken (zoals PCI Express-kaarten) kan het
gebruik van andere kaarten beperkt worden.
Vooraanzicht (desktopstand)
1 2 7
1 bovenste 5,25-inch
stationscompartiment
2 onderste 5,25-inch
stationscompartiment
3
4
5 6
Ondersteunt een optisch station.
Ondersteunt een optisch station of een extra vaste
schijf (alleen SATA).
9101112
8
3 bovenste 3,5-inch
stationscompartiment
4 activiteitenlampje
vaste schijf
Ondersteunt een diskettestation of een mediakaartlezer.
Het activiteitenlampje van de vaste schijf brandt
wanneer de computers gegevens van de vaste schijf leest
of ernaar schrijft. Het lampje kan ook branden wanneer
een apparaat zoals een optisch station actief is.
Naslaggids 81
Page 82

5 IEEE 1394-connector
(optioneel)
Gebruik de optionele IEEE 1394-connector voor
apparaten met hoge gegevenssnelheden, zoals digitale
videocamera's en externe opslagapparaten.
6 USB 2.0-connectoren
(2)
Gebruik de voorste USB-connectoren voor apparaten
die u af en toe aansluit, zoals sleutels met flashgeheugen
of camera's of opstartbare USB-apparaten (zie "System
Setup" in de Gebruikshandleiding voor meer informatie
over het opstarten vanaf een USB-apparaat).
OPMERKING: Het is raadzaam om de USB-connectoren
aan de achterzijde te gebruiken voor apparaten die
normaal gesproken altijd aangesloten zijn, zoals printers
en toetsenborden.
7 aan/uit-knop Druk hierop om de computer in te schakelen.
KENNISGEVING: Ter voorkoming van
gegevensverlies moet u de computer niet met de
aan/uit-knop uitschakelen. Voer in plaats hiervan
een afsluitproces van het besturingssysteem uit.
KENNISGEVING: Als in uw besturingssysteem
ACPI is ingeschakeld, wordt er een afsluitproces
van het besturingssysteem uitgevoerd wanneer
u op de aan/uit-knop drukt.
OPMERKING: U kunt met de aan/uit-knop ook het
systeem uit een energiebesparende modus halen of in een
energiebesparende modus zetten (zie "Energiebeheer" in
de Gebruikshandleiding).
82 Naslaggids
Page 83

8 aan/uit-lampje Het aan/uit-lampje licht op en knippert of brandt
ononderbroken om verschillende toestanden aan te geven:
• Geen lampje — De computer staat uit (S4, S5 of
mechanisch UIT).
• Aanhoudend groen — De computer bevindt zich in
een normale werkstand.
• Knipperend groen — De computer staat in een
energiebesparende modus (S1 of S3).
• Knipperend of aanhoudend oranje — Zie
"Problemen met de stroomvoorziening"
Gebruikshandleiding
.
in de
U haalt de computer uit een energiebesparende modus
door op de aan/uit-knop te drukken of door het
toetsenbord of de muis te gebruiken als deze hiervoor
zijn geconfigureerd in Windows Apparaatbeheer. Meer
informatie over slaapstanden en hoe u de pc uit een
energiebesparende modus haalt, vindt u in het
gedeelte "Energiebeheer" in de Gebruikshandleiding.
Zie"Diagnostische lampjes" op pagina 99 voor een
beschrijving van diagnostische lampcodes voor het
oplossen van problemen met de computer.
9 diagnostische lampjes
(4)
Gebruik de diagnostische lampjes als hulp bij het
oplossen van een probleem met de computer (zie
"Diagnostische lampjes" op pagina 99).
10 microfoonconnector Gebruik de microfoonconnector voor het aansluiten
van een pc-microfoon voor het invoeren van gesproken
tekst of muziek in een geluids- of telefonieprogramma.
11 hoofdtelefoon-
connector
12 netwerkverbindings-
lampje
Gebruik de hoofdtelefoonconnector om hoofdtelefoons
aan te sluiten.
Het netwerkverbindingslampje brandt als er een goede
verbinding is tussen een 10-Mbps, 100-Mbps of
1000-Mbps (1-Gbps) netwerk en de computer.
Naslaggids 83
Page 84
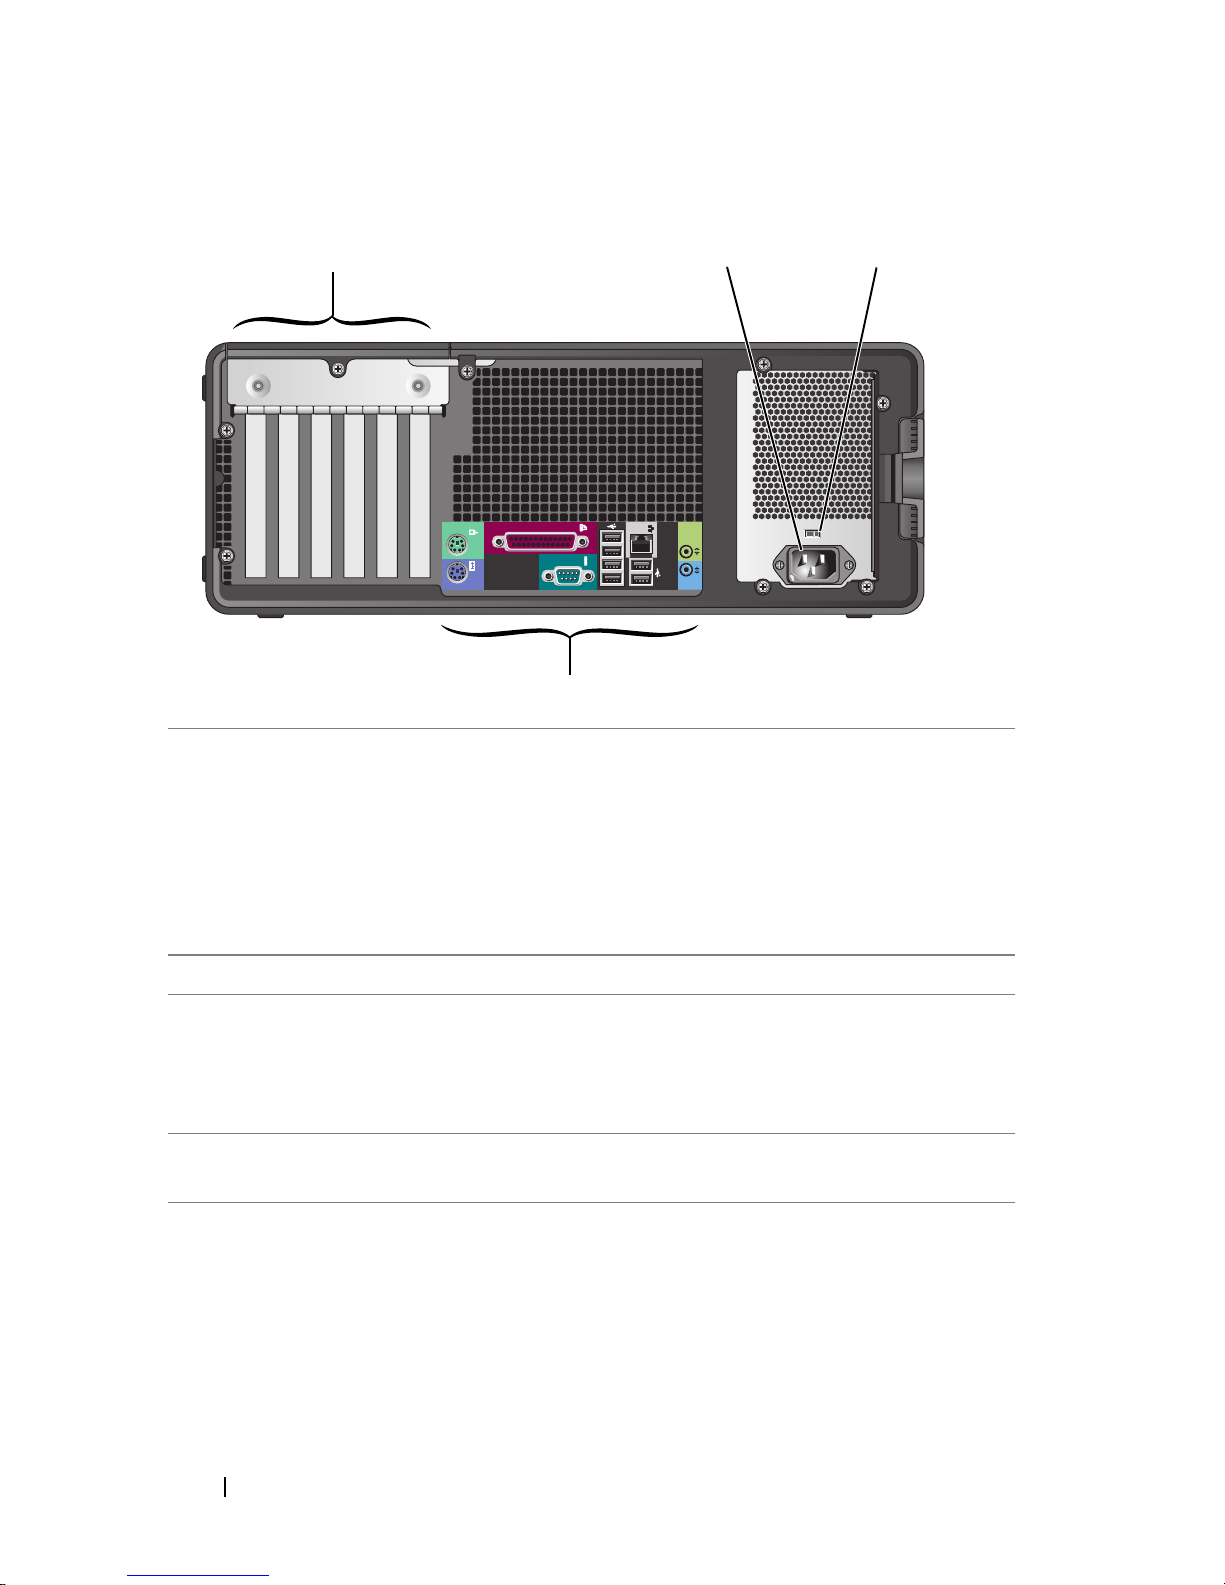
Achteraanzicht (desktopstand)
1
4
1 kaartsleuven Toegang tot connectoren voor geïnstalleerde PCI- of
PCI Express-kaarten.
32
OPMERKING: Raadpleeg de documentatie bij de kaarten
om te controleren of ze in uw configuratie passen. Doordat
sommige kaarten meer fysieke ruimte in beslag nemen en
meer stroom verbruiken (zoals PCI Express-kaarten) kan
het gebruik van andere kaarten beperkt worden.
2 stroomkabelaansluiting Sluit de stroomkabel aan.
3 stroomselectie-
schakelaar
Zie de veiligheidsinstructies in de
Productinformatiegids voor meer informatie.
OPMERKING: De stroomselectieschakelaar is alleen
aanwezig op de 375-W PSU.
4 connectoren op het
achterpaneel
Steek seriële, USB- en andere apparaten in de juiste
connectoren.
84 Naslaggids
Page 85
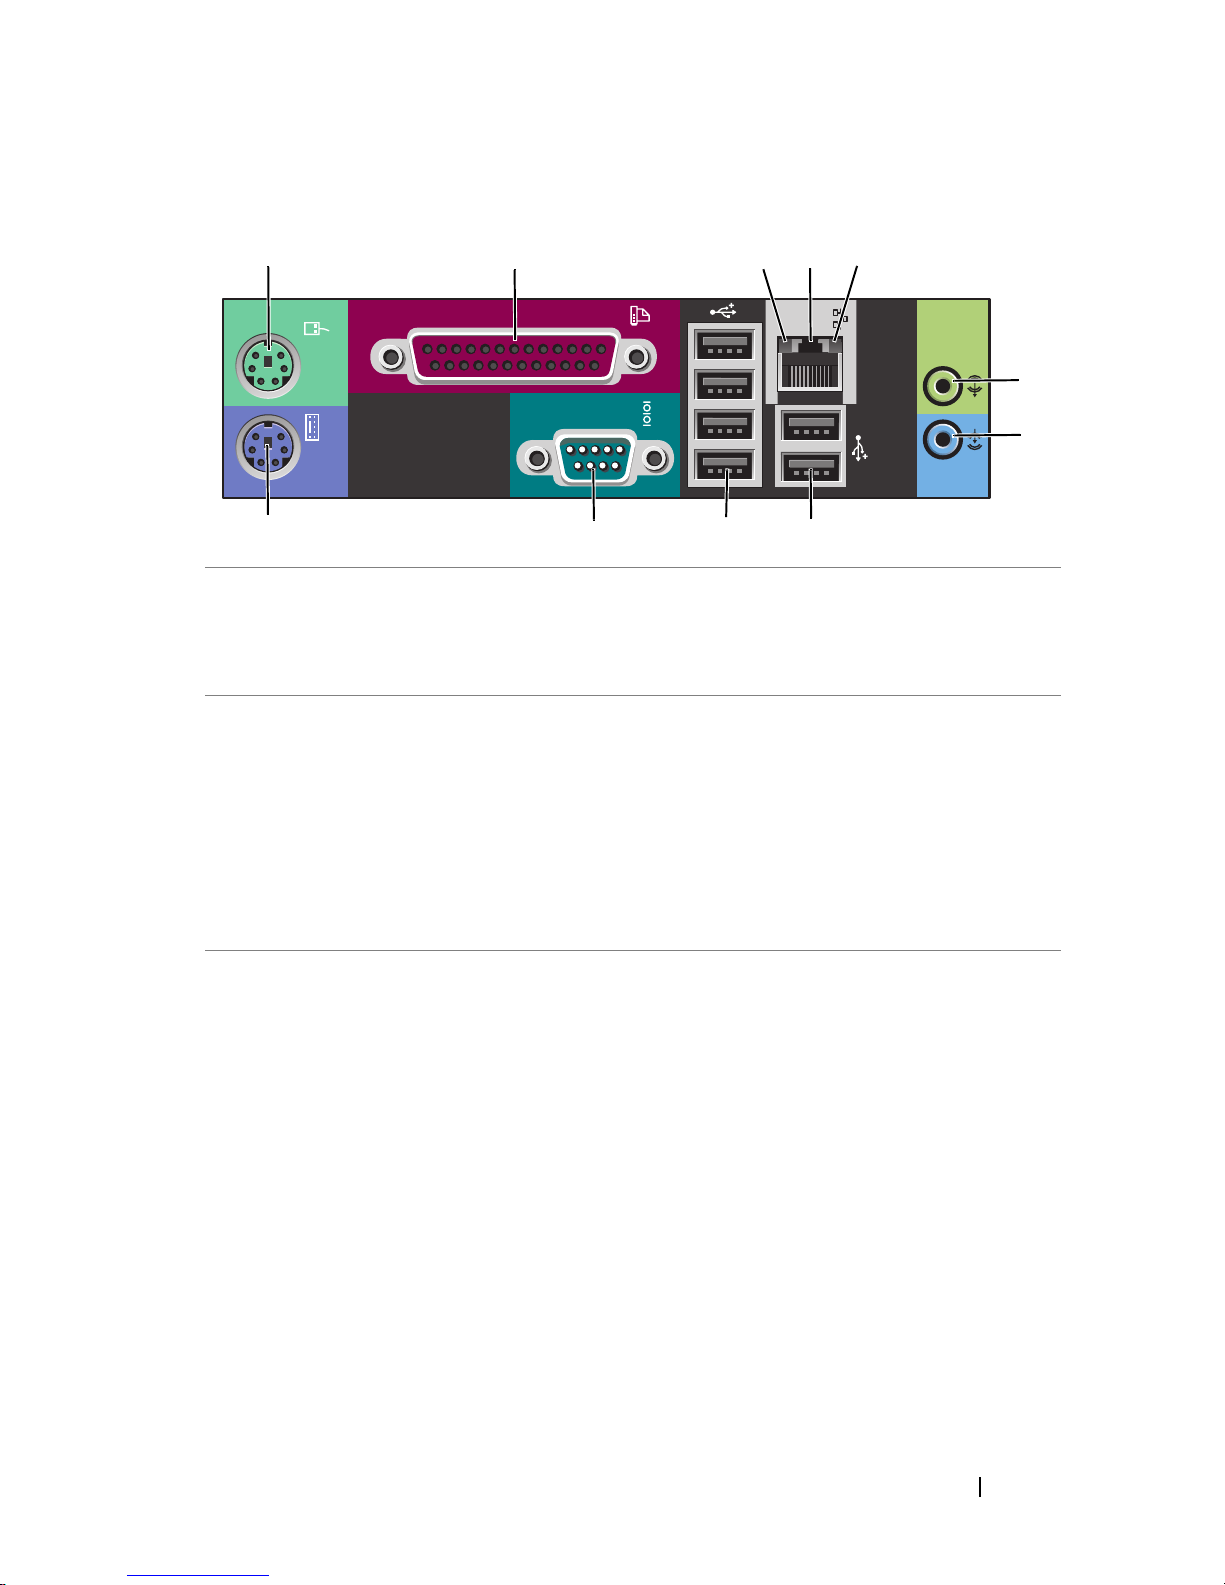
Connectoren op het achterpaneel
1
1 muisconnector U kunt een PS/2-muis op de groene muisconnector
2 parallelle
connector
2 345
891011
aansluiten. Schakel de computer en de aangesloten apparaten
uit voordat u een muis op de computer aansluit. Als u een
USB-muis hebt, sluit u deze aan op een USB-connector.
U kunt een parallel apparaat, zoals een printer, op de
parallelle connector aansluiten. Als u een USB-printer hebt,
sluit u deze aan op een USB-connector.
OPMERKING: De geïntegreerde parallelle connector wordt
automatisch uitgeschakeld als de computer een geïnstalleerde
kaart detecteert met een connector die voor hetzelfde adres is
geconfigureerd. Voor meer informatie raadpleegt u de "System
Setup-opties" in de Gebruikshandleiding.
6
7
3 verbindingsinte-
griteitslampje
• Groen — Er is een goede verbinding tussen een 10-Mbps
netwerk en de computer.
• Oranje — Er is een goede verbinding tussen een 100-Mbps
netwerk en de computer.
• Geel — Er is een goede verbinding tussen een 1000-Mbps
(1-Gbps) netwerk en de computer.
• Uit — De computer detecteert geen fysieke verbinding met
het netwerk.
Naslaggids 85
Page 86

4 connector voor
netwerkadapter
U sluit de computer aan op een netwerk- of
breedbandapparaat door het ene uiteinde van een
netwerkkabel aan te sluiten op een netwerkaansluiting of op
uw netwerk- of breedbandapparaat. Sluit het andere
uiteinde van de netwerkkabel aan op de connector voor de
netwerkadapter op de computer. Een klikgeluid geeft aan
dat de netwerkkabel goed vastzit.
KENNISGEVING: Sluit geen telefoonkabel aan op de
netwerkconnector.
Gebruik voor computers met een extra netwerkconnectorkaart
de connectoren op de kaart en op de achterkant van de
computer wanneer u meerdere netwerkverbindingen instelt
(zoals een apart intra- en extranet).
U wordt aangeraden om Category 5-bedrading en -ingangen
voor uw netwerk te gebruiken. Als u toch gebruikmaakt van
Category 3-bedrading, moet u de netwerksnelheid verhogen
tot 10 Mbps om een betrouwbare werking te garanderen.
5 activiteiten-
lampje netwerk
6 lijnuitgang Op de groene lijnuitgang kunt u een hoofdtelefoon en de
7 lijningang Gebruik de blauwe lijningang om een opname-/afspeelapparaat
8 Achterste Dual
USB 2.0connectoren (2)
Er knippert een geel lampje wanneer de computer gegevens
van het netwerk ontvangt of ernaar verzendt. Bij intensief
netwerkverkeer kan het lijken alsof dit lampje voortdurend
brandt.
meeste speakers met geïntegreerde versterkers aansluiten.
Gebruik op computers met een geluidskaart de connector
op de kaart.
aan te sluiten,zoals een cassettespeler, cd-speler of videorecorder.
Gebruik op computers met een geluidskaart de connector
op de kaart.
Gebruik de achterste USB-connectoren voor apparaten die
normaal gesproken aangesloten blijven, zoals printers en
toetsenborden.
OPMERKING: Gebruik de voorste USB-connectoren voor
apparaten die u af en toe aansluit, zoals sleutels met flashgeheugen
of camera's, of voor opstartbare USB-apparaten.
86 Naslaggids
Page 87
9 Achterste Dual
USB 2.0connectoren (4)
Gebruik de achterste USB-connectoren voor apparaten die
normaal gesproken aangesloten blijven, zoals printers en
toetsenborden.
OPMERKING: Gebruik de voorste USB-connectoren voor
apparaten die u af en toe aansluit, zoals sleutels met flashgeheugen
of camera's, of voor opstartbare USB-apparaten.
10 seriële connector U kunt een serieel apparaat, zoals een handheld-apparaat,
op de seriële poort aansluiten. De standaardtoewijzingen
zijn COM1 voor seriële connector 1 en COM2 voor de
optionele seriële connector 2.
Voor meer informatie raadpleegt u de System Setup-opties
in de Gebruikshandleiding.
11 toetsenbord-
connector
Als u een PS/2-toetsenbord hebt, sluit u dit aan op de paarse
toetsenbordconnector. Als u een USB-printer hebt, sluit
u deze aan op een USB-connector.
De computer installeren
Wisselen tussen tower- en desktopstand
WAARSCHUWING: Voordat u begint met de procedures in dit gedeelte, moet
u de veiligheidsinstructies in de
OPMERKING: Wanneer u de computer in de tower- of desktopstand wilt zetten,
moet u een optionele kit gebruiken die beschikbaar is bij Dell. Zie "Productinformatie"
in de Gebruikshandleiding voor meer gegevens over het bestellen bij Dell.
OPMERKING: De towercomputer heeft één 3.5-inch station aan de voorkant meer
dan de desktopcomputer.
1
Volg de procedures in "Voordat u begint" in de
2
Verwijder de computerkap (zie "De computerkap verwijderen" in de
Gebruikshandleiding
).
Productinformatiegids
volgen.
Gebruikshandleiding
.
3
Verwijder het frontpaneel (zie "Het frontpaneel verwijderen" in de
Gebruikshandleiding
4
Verwijder indien nodig het stationspaneel en maak dit klaar door
inzetstukken toe te voegen of te verwijderen (zie "Stationspaneel" in de
Gebruikshandleiding
).
).
Naslaggids 87
Page 88

Overschakelen van tower- naar desktopstand
1
Verwijder alle geïnstalleerde diskettestations of mediakaartlezers door de
volgende stappen te volgen in "Een diskettestation of mediakaartlezer
verwijderen (towercomputer)" in de
Gebruikshandleiding
, en installeer een
enkel diskettestation of mediakaartlezer door de volgende stappen te
volgen in "Een diskettestation of mediakaartlezer installeren
(desktopcomputer)" in de
2
Verwijder alle geïnstalleerde optische stations door de volgende stappen te
Gebruikshandleiding
.
volgen in "Een optisch station verwijderen (towercomputer)" in de
Gebruikshandleiding
"Een optisch station installeren (desktopcomputer)" in de
Overschakelen van desktop- naar towerstand
1
Verwijder het diskettestation of mediakaartlezer (indien geïnstalleerd)
, en plaats de stations terug door de stappen te volgen in
Gebruikshandleiding
door de volgende stappen te volgen in "Een diskettestation of
mediakaartlezer verwijderen (desktopcomputer)" in de
Gebruikshandleiding
en installeer het diskettestation of de mediakaartlezer opnieuw door de
volgende stappen te volgen in "Een diskettestation of mediakaartlezer
installeren (towercomputer)" in de
Gebruikshandleiding
.
.
,
2
Verwijder alle geïnstalleerde optische stations door de volgende stappen te
volgen in "Een optisch station verwijderen (towercomputer)" in de
Gebruikshandleiding
, en plaats de stations terug door de stappen te volgen
in "Een optisch station installeren (desktopcomputer)" in de
Gebruikshandleiding
.
De computer in een kast installeren
Wanneer u de computer in een kast installeert, kunt u de luchtstroom
beperken, waardoor de computer oververhit raakt en de prestaties van de
computer kunnen verslechteren. Volg de richtlijnen hieronder wanneer u de
computer in een kast installeert:
KENNISGEVING: De bedrijfstemperatuur die in deze handleiding is opgegeven,
geeft de maximale bedrijfstemperatuur van de werkruimte weer. Wanneer u de
computer in een kast installeert, moet u rekening houden met de temperatuur in de
werkruimte. Zie "
computergegevens.
Specificaties" in de Gebruikshandleiding voor meer
88 Naslaggids
Page 89
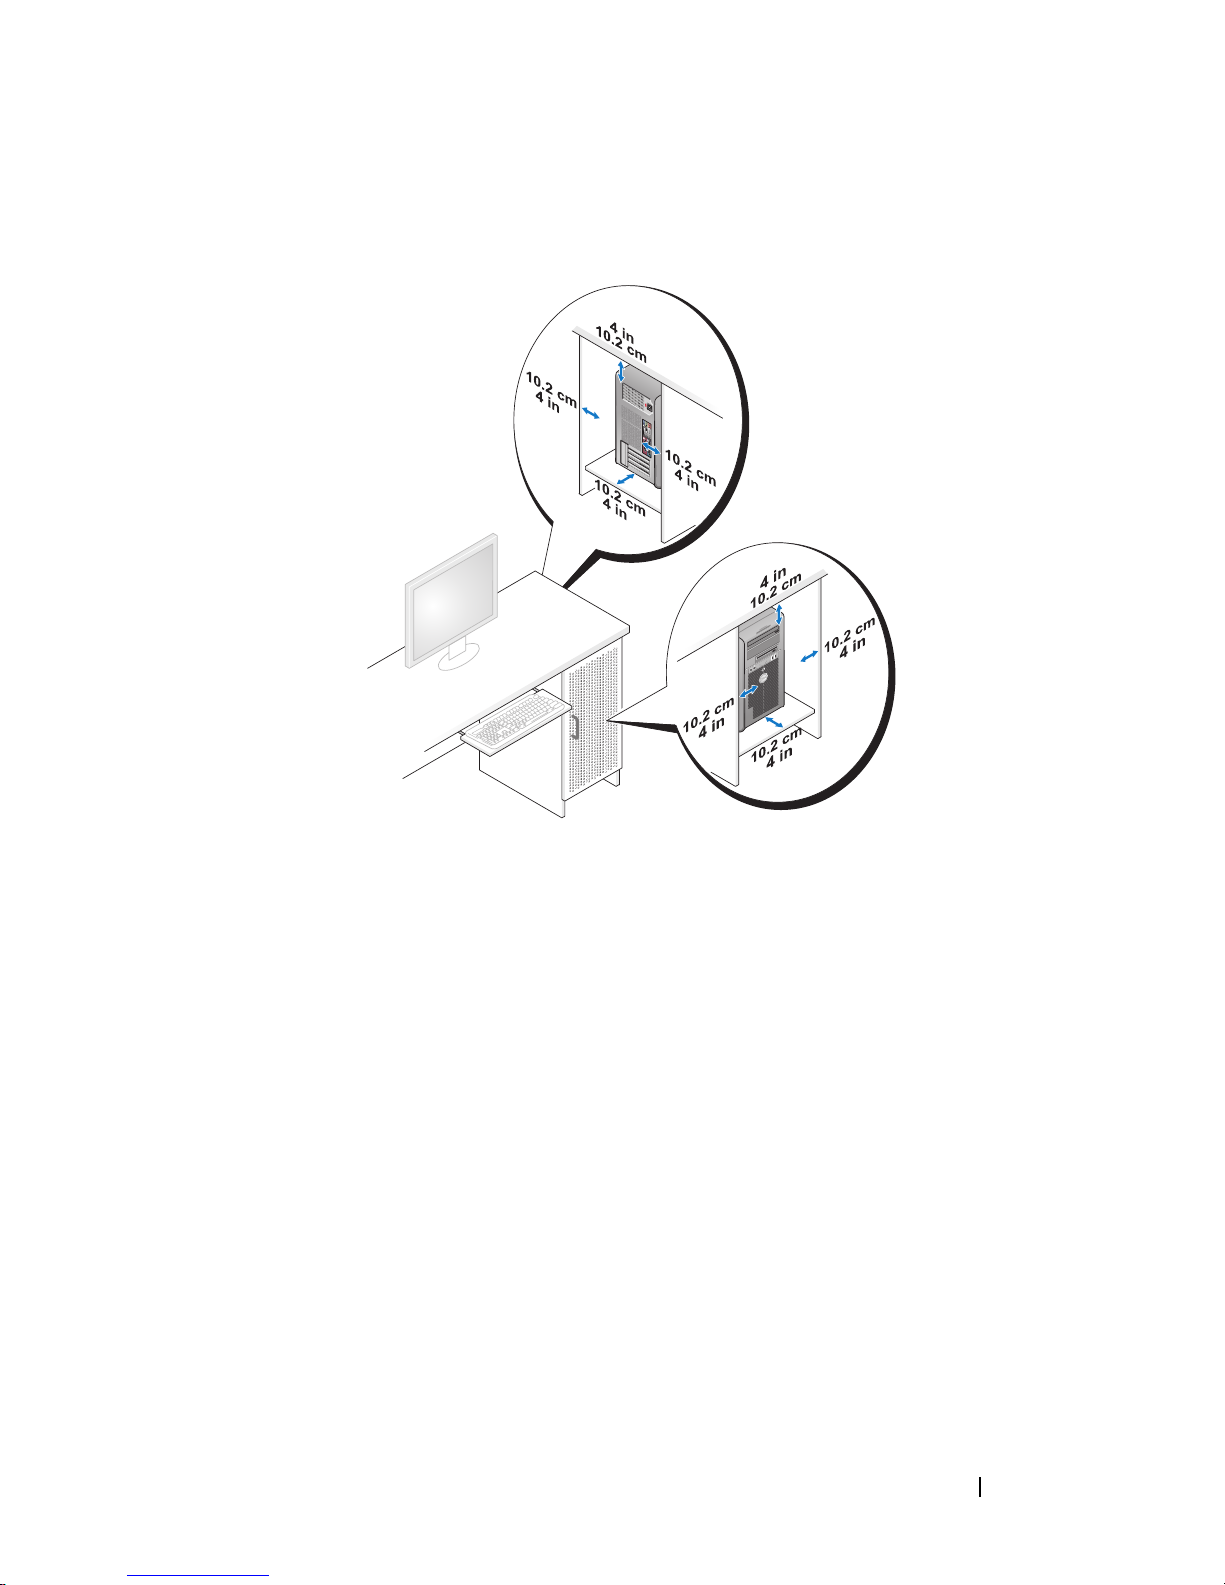
• Houd 10,2 cm ruimte vrij aan alle geventileerde kanten van de computer
om te zorgen dat er genoeg lucht kan worden aangezogen voor ventilatie.
• Als de computer in een hoek wordt geplaatst of onder een bureau, moet
u ervoor zorgen dat er minstens 5,1 cm tussen de achterkant van de
computer en de muur vrij is om te zorgen dat er genoeg lucht kan worden
aangezogen voor ventilatie.
• Als de kast deuren heeft, moeten deze ten minste dertig procent van de
luchtstroom doorlaten (voor- en achterkant).
Naslaggids 89
Page 90
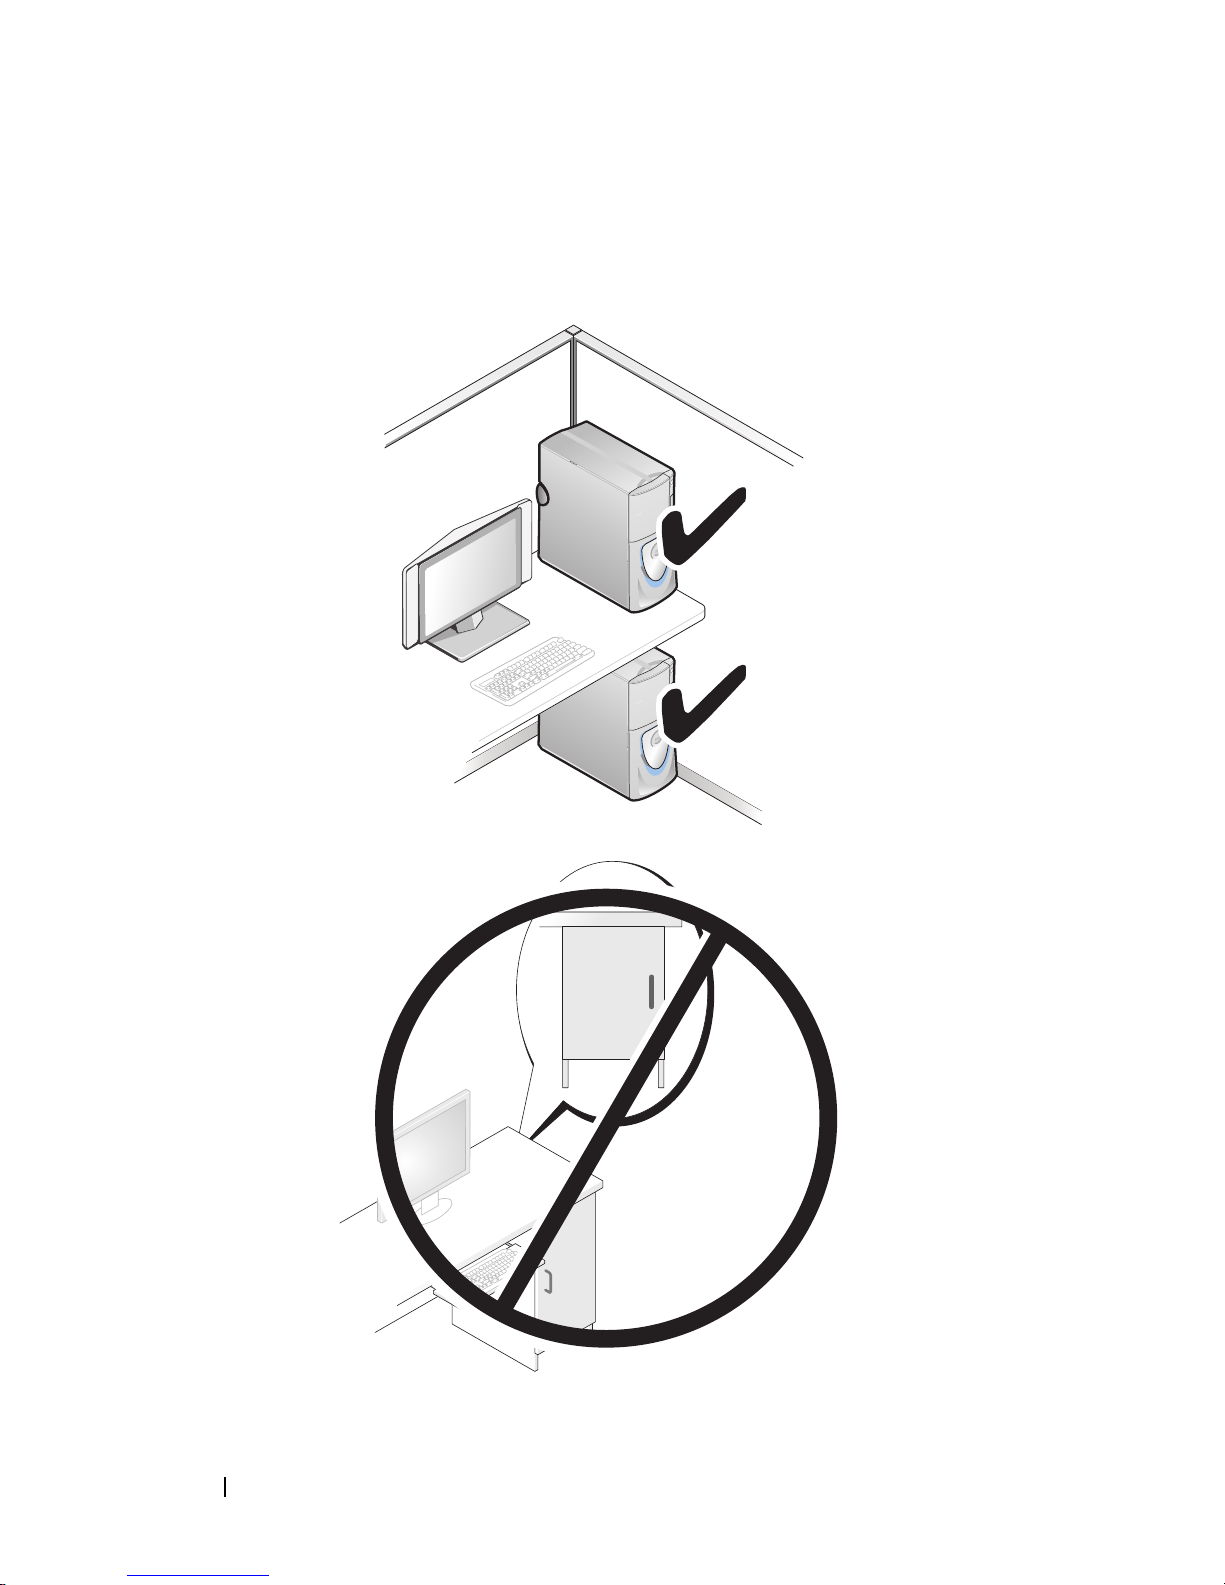
• Installeer de computer niet in een kast zonder luchtstroom. Als u de
luchtstroom tegenhoudt,
de prestaties ervan verslechteren
kan de computer oververhit raken en kunnen
.
90 Naslaggids
Page 91

Gegevens overbrengen naar een nieuwe computer
Met de wizards van het besturingssysteem kunt u bestanden en andere
gegevens van de ene naar de andere computer overbrengen.
Microsoft Windows XP
Het Microsoft Windows XP-besturingssysteem biedt de wizard Bestanden en
instellingen overzetten voor het overbrengen van gegevens, zoals:
• E-mailberichten
• Werkbalkinstellingen
• Vensterformaten
• Internetbladwijzers
U kunt gegevens via een netwerk, een seriële verbinding of een verwisselbaar
medium, zoals een beschrijfbare cd, van de ene naar de andere computer
overbrengen.
OPMERKING: U kunt gegevens van de ene computer naar de andere overzetten
door direct op de in-/uitvoerpoorten (I/O) van de twee computers een seriële kabel
aan te sluiten. Wilt u de gegevens inderdaad via een seriële verbinding overbrengen,
moet u via het Configuratiescherm het hulpprogramma Netwerkverbindingen
gebruiken en extra configuratiestappen uitvoeren, zoals het instellen van een
geavanceerde verbinding en de hostcomputer en de gastcomputer toewijzen.
Zie het artikel #305621 in de Microsoft Knowledge Base genaamd (How to Set Up
a Direct Cable Connection Between Two Computers in Windows XP (Een directe
kabelverbinding instellen tussen twee computers in Windows XP)) voor instructies
over het instellen van een directe kabelverbinding tussen twee computers. Deze
informatie is mogelijk niet in alle landen verkrijgbaar.
Als u de wizard Bestanden en instellingen overzetten gebruikt, hebt u het
installatiemedium met het besturingssysteem nodig dat bij de computer werd
geleverd of een wizardschijf, die u met de wizard kunt maken.
OPMERKING: Zoek voor meer informatie over het overzetten van gegevens in
support.dell.com naar document #154781 (What Are The Different Methods To
Transfer Files From My Old Computer To My New Dell™ Computer Using the
Microsoft
van mijn oude computer naar mijn nieuwe Dell™-computer over te brengen?)).
OPMERKING: Toegang tot het document in de Dell Knowledge Base is niet in alle
landen mogelijk.
®
Windows® XP Operating System? (Welke methoden zijn er om bestanden
Naslaggids 91
Page 92

De wizard Bestanden en instellingen overzetten (met het medium met het
besturingssysteem)
OPMERKING: De wizard Bestanden en instellingen overzetten wijst de
broncomputer, waarvan de gegevens komen, aan als de oude computer en de
doelcomputer, waar de gegevens heengaan, als de nieuwe computer.
E DOELCOMPUTER VOORBEREIDEN OP DE BESTANDSOVERDRACHT:
D
1
Klik op
Systeemwerkset
2
Klik in het scherm
vervolgens op
3
Klik op het scherm
wil de wizard op de cd-rom met Windows XP
4
Bekijk de gegevens onder
broncomputer. Klik
GEGEVENS VANAF DE BRONCOMPUTER KOPIËREN:
1
Plaats het installatiemedium met het Windows XP-
Start→ Alle programma's→ Bureau-accessoires→
→
Wizard Bestanden en instellingen overzetten
Oude of nieuwe computer?
Volgende
.
op
Nieuwe computer
Hebt u de cd-rom met Windows XP bij de hand?
gebruiken en klik op
niet
Ga nu naar de oude computer
op
Vol gend e
.
en ga naar de
besturingssysteem
.
op
Volgende
broncomputer.
en
Ik
.
in de
Het scherm
2
Klik op
3
Klik onder
Het venster
4
Klik op
5
Klik in het scherm
vervolgens op
6
Klik onder
overzetten?
7
Klik in het scherm
overbrengen en klik op
Welkom bij Microsoft Windows XP
Andere taken uitvoeren
Wat wilt u nu doen?
.
op
Bestanden en instellingen overzetten
verschijnt.
Wizard Bestanden en instellingen overzetten
Volgende
.
Oude of nieuwe computer?
Volgende
.
op
Nieuwe computer
Op welke manier wilt u uw bestanden en instellingen
op de gewenste overdrachtsmethode en klik op
Wat wilt u overzetten?
Volgende
.
op de gegevens die u wilt
De geselecteerde gegevens worden gekopieerd en het scherm
verzamelen
8
Klik op
verschijnt.
Voltooien
.
verschijnt.
Volgende
Gegevens
.
en
.
92 Naslaggids
Page 93

GEGEVENS NAAR DE DOELCOMPUTER OVERZETTEN:
1
Ga naar de doelcomputer.
2
Klik onder
3
Selecteer in het scherm
Ga nu naar de oude computer
Waar bevinden zich de bestanden en instellingen?
op
Vol gend e
.
de gewenste methode voor het overbrengen van instellingen en bestanden
en klik op
Volgende
.
De wizard leest de verzamelde bestanden en instellingen en past ze op de
doelcomputer toe. Wanneer de overdracht is voltooid, verschijnt het
scherm
4
Klik op
De wizard Bestanden en instellingen overzetten (met het medium met het
besturingssysteem)
Vol tooi d
Vol tooi d
.
en start de computer opnieuw op.
Wanneer u de wizard Bestanden en instellingen overzetten wilt uitvoeren
zonder het installatiemedium met het besturingssysteem, moet u een
wizardschijf maken. Met de wizardschijf kunt u een reservekopiebestand
maken op een verwisselbaar medium.
OPMERKING: De wizard Bestanden en instellingen overzetten wijst de
broncomputer, waarvan de gegevens komen, aan als de oude computer en de
doelcomputer, waar de gegevens heengaan, als de nieuwe computer.
EN WIZARDDISKETTE MAKEN:
E
1
Klik op de doelcomputer op
Systeemwerkset
2
Klik in het scherm
vervolgens op
3
Klik in het scherm
→
Wizard Bestanden en instellingen overzetten
Oude of nieuwe computer?
Vol gend e
Hebt u de cd-rom met Windows XP bij de hand?
de wizarddiskette in het volgende diskettestation maken
4
Plaats het verwisselbare medium, zoals een schrijfbare cd of dvd, en klik op
5
Bekijk de gegevens onder
broncomputer. Klik
GEGEVENS VANAF DE BRONCOMPUTER KOPIËREN:
1
Plaats de wizardschijf in de broncomputer.
2
Klik op
Start→
niet
Uitvoeren
Start→
Alle programma's→
op
Nieuwe computer
.
Ga nu naar de oude computer
op
Volgende
.
.
Bureau-accessoires→
en klik op
en ga naar de
.
en
op
Ik wil
Vo lg en de
OK
.
.
Naslaggids 93
Page 94

3
Klik op
4
Klik in het scherm
vervolgens op
5
Klik onder
overzetten?
6
Klik in het scherm
Bladeren...
Volgende
Op welke manier wilt u uw bestanden en instellingen
op de gewenste overdrachtsmethode en klik op
overbrengen en klik op
en ga naar
fastwiz
op de wizardschijf en klik op OK.
Oude of nieuwe computer?
.
Wat wilt u overzetten?
Volgende
.
op de gegevens die u wilt
op
Nieuwe computer
Volgende
en
.
De geselecteerde gegevens worden gekopieerd en het scherm
verzamelen
7
Klik op
GEGEVENS NAAR DE DOELCOMPUTER OVERZETTEN:
1
Ga naar de doelcomputer.
2
Klik onder
3
Selecteer in het scherm
verschijnt.
Voltooien
.
Ga nu naar de oude computer
Waar bevinden zich de bestanden en instellingen?
op
Volgende
.
Gegevens
de gewenste methode voor het overbrengen van instellingen en bestanden
en klik op
Vol gend e
.
De wizard leest de verzamelde bestanden en instellingen en past ze op de
doelcomputer toe. Wanneer de overdracht is voltooid, verschijnt het
scherm
4
Klik op
Microsoft Windows Vista
1
Klik op de knop Start van Windows Vista en klik daarna op
Voltooid
Voltooid
en instellingen overzetten
.
en start de computer opnieuw op.
→
Windows Easy Transfer starten.
Bestanden
2
Klik in het dialoogvenster
3
Klik
op Een nieuwe transfer starten
transfer
.
Volg de instructies van de wizard Windows Easy Transfer op het scherm.
Voedingsbeschermingsapparaten
Er zijn een aantal apparaten beschikbaar die beveiligen tegen
stroomschommelingen of -storingen:
• Piekbeveiligers
• Spanningsstabilisatoren
• Continue stroomvoorzieningen (UPS)
94 Naslaggids
Gebruikersaccountbeheer
of
Doorgaan met een reeds gestarte
op
Doorgaan
.
Page 95

Piekbeveiligers
Piekbeveiligers en contactdozen met piekbeveiliging helpen schade aan de
computer door spanningspieken voorkomen die kunnen optreden tijdens
elektrische stormen of na stroomonderbrekingen. Sommige fabrikanten van
piekbeveiligers geven garantie voor bepaalde typen schade. Lees de garantie van
het apparaat zorgvuldig door wanneer u een stroomstootbeveiliging kiest en
vergelijk de joulewaarden om het relatieve effect van verschillende apparaten te
bepalen. Een apparaat met een hogere joulewaarde biedt meer bescherming.
KENNISGEVING: De meeste piekbeveiligers beveiligen niet tegen
stroomschommelingen of -onderbrekingen die zijn veroorzaakt door onweer.
Wanneer het onweert bij u in de buurt, ontkoppelt u de telefoonlijn van het
wandcontact en haalt u de stekker van de computer uit het stopcontact.
Veel piekbeveiligers hebben een telefoonaansluiting voor modembeveiliging.
Zie de documentatie van de piekbeveiliger voor instructies voor een
modemverbinding.
KENNISGEVING: Niet alle piekbeveiligers bieden beveiliging voor netwerkadapters.
Ontkoppel de netwerkkabel tijdens elektrische stormen altijd van de
netwerkwandaansluiting.
Spanningsstabilisatoren
KENNISGEVING: Spanningsstabilisatoren beveiligen niet tegen
stroomonderbrekingen.
Spanningsstabilisatoren zijn ontworpen om netspanning te behouden met
een vrij constant niveau.
Continue stroomvoorzieningen (UPS)
KENNISGEVING: Als de stroom uitvalt terwijl de gegevens op de vaste schijf worden
opgeslagen, kunnen er gegevens verloren gaan of bestanden beschadigd raken.
OPMERKING: Voor een maximale werkingsduur van de batterij moet u alleen de
computer op een UPS aansluiten. Sluit andere apparaten, zoals een printer, op een
aparte contactdoos die is voorzien van een piekbeveiliging.
Een UPS beschermt tegen stroomschommelingen en -onderbrekingen. UPSapparaten bevatten een batterij die tijdelijk stroom levert aan apparaten die erop
zijn aangesloten wanneer de netstroom uitvalt. De batterij wordt opgeladen
wanneer er netstroom beschikbaar is. Raadpleeg de documentatie van de UPSfabrikant voor informatie over de werkingsduur van de batterij en om te controleren
of het apparaat is goedgekeurd door Underwriters Laboratories (UL).
Naslaggids 95
Page 96

De computer reinigen
WAARSCHUWING: Voordat u begint met de procedures in dit gedeelte, moet
u de veiligheidsinstructies in de
Productinformatiegids
Computer, toetsenbord en monitor
WAARSCHUWING: Haal de stekker uit het stopcontact voordat u de computer
schoonmaakt. Maak de computer schoon met een zachte, vochtige doek. Gebruik
geen vloeibare reinigingsmiddelen of reinigingsmiddelen uit een spuitbus die
ontvlambare stoffen kunnen bevatten.
• Gebruik een stofzuiger met borstelhulpstuk om voorzichtig het stof uit de
sleuven en gaten in de computer en van tussen de toetsen op het
toetsenbord te verwijderen.
KENNISGEVING: Veeg het monitorscherm niet schoon met een zeep- of
alcoholoplossing. Anders kan de ontspiegelde coating beschadigd raken.
• U reinigt het monitorscherm door het met een vochtige doek te reinigen.
Gebruik indien mogelijk een speciaal schermdoekje of oplossing die
beschikbaar is voor de antistatische laag.
volgen.
• Veeg het toetsenbord, de computer en het plastic gedeelte van de monitor
schoon met een zacht reinigingsdoekje dat bevochtigd is met water.
Doordrenk de doek niet en zorg dat er geen water in de computer of in het
toetsenbord loopt.
Muis (niet-optisch)
1
Draai de zekeringring aan de onderkant van de muis tegen de klok in en
verwijder het balletje.
2
Veeg het balletje af met een schone, stofvrije doek.
3
Blaas voorzichtig in het balhuis om stof en pluisjes los te maken.
4
Reinig de wieltjes in het balhuis met een wattenstaafje dat licht is
bevochtigd met isopropanol.
5
Plaats de wieltjes indien nodig weer in het midden in de kanalen. Zorg
ervoor dat er geen watten van de wattenstokjes op de wieltjes achterblijven.
6
Plaats het balletje en de zekeringring terug en draai daarna de zekeringring
met de klok mee totdat deze op zijn plaats klikt.
96 Naslaggids
Page 97

Diskettestation
KENNISGEVING: Maak de aandrijfkoppen niet met een wattenstokje schoon. De
koppen kunnen verkeerd uitgelijnd raken waardoor het station niet meer werkt.
Reinig het diskettestation met een in de handel verkrijgbare reinigingsset.
Deze sets bevatten voorbehandelde diskettes die het vuil verwijderen dat zich
tijdens de normale werking ophoopt.
Cd's en dvd's
KENNISGEVING: Gebruik altijd druklucht om de lens in het cd/dvd-station te
reinigen en volg de instructies die met het drukluchtproduct worden meegeleverd.
Raak nooit de lens in het station aan.
1
Houd de schijf tussen duim en wijsvinger vast. U mag ook een vinger in
het gat in het midden steken.
KENNISGEVING: Voorkom schade aan het oppervlak door geen circulaire
beweging te maken bij het reinigen van de schijf.
2
Veeg met een zachte, stofvrije doek in een rechte lijn vanuit het midden
naar de buitenkant van de schijf de onderkant van de schijf schoon (de
niet gelabelde kant).
Gebruik voor hardnekkige vuilresten water of een verdunde oplossing van
milde zeep. Er zijn ook producten in de winkel verkrijgbaar die schijven
reinigen en enige bescherming bieden tegen stof, vingerafdrukken en
krassen. Reinigingsproducten voor cd's zijn veilig te gebruiken voor dvd's.
Hulpprogramma's voor probleemoplossing
Aan/uit-lampjes
WAARSCHUWING: Voordat u begint met de procedures in dit gedeelte, moet
u de veiligheidsinstructies in de
Het lampje van de aan/uit-knop op de voorkant van de computer licht op en
knippert of brandt ononderbroken om verschillende toestanden aan te geven:
• Zie "Diagnostische lampjes" op pagina 99 als het aan/uit-lampje groen is
en de computer niet reageert.
Productinformatiegids
volgen.
Naslaggids 97
Page 98

• Als het aan/uit-lampje groen knippert, staat de computer in de standbymodus. Druk op een toets op het toetsenbord, beweeg de muis of druk
op de aan/uit-knop om de normale werking te hervatten.
• Als het aan/uit-lampje uit is, is de computer uitgeschakeld of krijgt deze
geen stroom.
- Steek de stroomkabel terug in de stroomconnector aan de achterkant
van de computer en het stopcontact.
- Als de computer is aangesloten op een contactdoos, moet u nagaan of
de contactdoos is aangesloten op een stopcontact en of de contactdoos
is ingeschakeld.
- Omzeil voedingsbeschermingsapparaten, contactdozen en
verlengkabels om te controleren of de computer aangaat.
- Controleer of er stroom uit het stopcontact komt door er een ander
apparaat, zoals een lamp, op aan te sluiten.
- Controleer of de hoofdvoedingskabel en de kabel van het frontpaneel
goed op de systeemkaart zijn aangesloten (zie "Systeemkaartcomponenten"
in de
Gebruikshandleiding
).
• Als het aan/uit-lampje oranje knippert, krijgt de computer wel stroom,
maar is er een probleem met de interne stroom.
- Ga na of de stroomselectieschakelaar zo is ingesteld dat deze
overeenkomt met de netstroom op uw locatie, indien van toepassing.
- Controleer of de stroomkabel goed op de systeemkaart is aangesloten
(zie "Systeemkaartcomponenten" in de
Gebruikshandleiding
).
• Als het aan/uit-lampje oranje brandt, is er een apparaat defect of verkeerd
geïnstalleerd.
- Verwijder de geheugenmodules en installeer ze opnieuw (zie "Geheugen"
in de
Gebruikshandleiding
).
- Verwijder alle kaarten en installeer deze opnieuw (zie "Kaarten" in de
Gebruikshandleiding
).
• Hef interferentie op. Een aantal oorzaken hiervan zijn:
- Stroom-, toetsenbord- en muisverlengkabels
- Te veel apparaten aangesloten op een contactdoos
- Meerdere contactdozen aangesloten op hetzelfde stopcontact
98 Naslaggids
Page 99
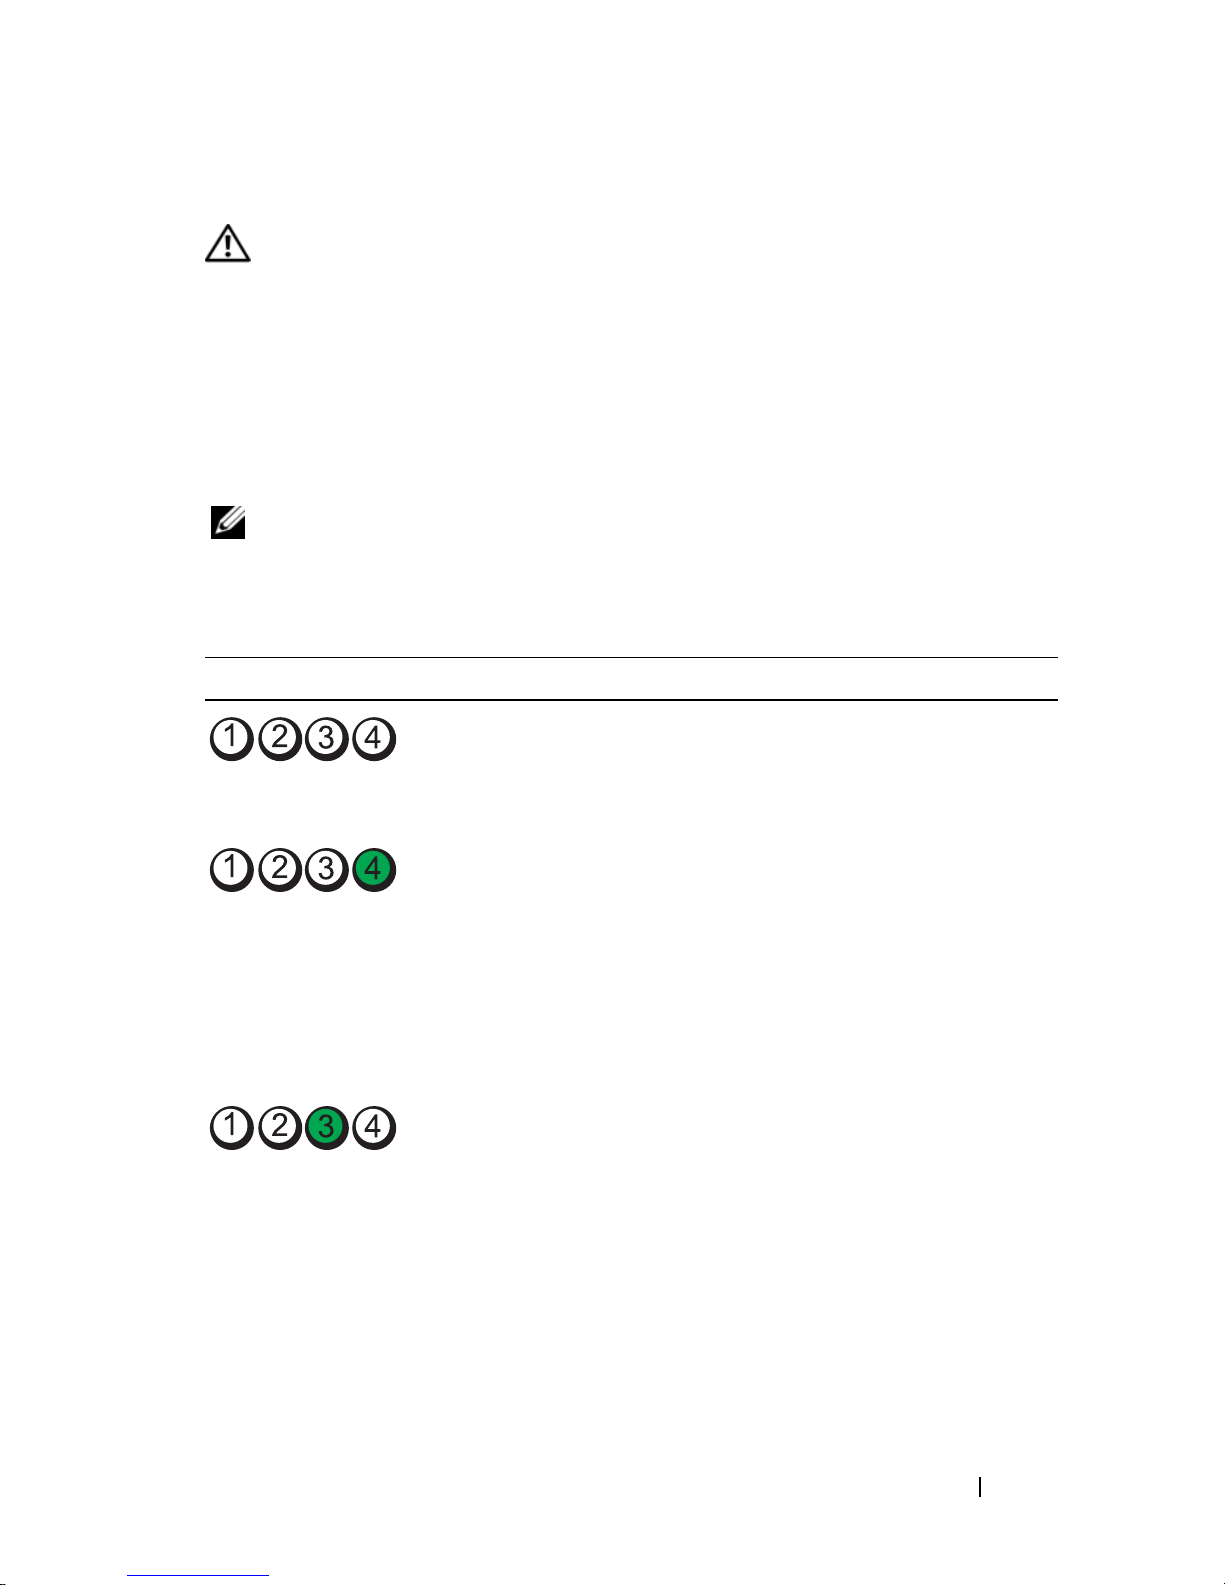
Diagnostische lampjes
WAARSCHUWING: Voordat u begint met de procedures in dit gedeelte, moet
u de veiligheidsinstructies in de
Productinformatiegids
De vier lampjes op het voorpaneel van de computer zijn gelabeld met 1, 2, 3
en 4 om u te helpen het probleem te achterhalen (zie "Vooraanzicht
(towerstand)" op pagina 77 of "Vooraanzicht (desktopstand)" op pagina 81).
Wanneer de computer normaal wordt opgestart, beginnen de lampjes te
knipperen en gaan vervolgens uit. Als de computer defect is, gebruikt u de
volgorde van de lampjes om het probleem te achterhalen.
OPMERKING: Wanneer de computer klaar is met de POST, gaan alle vier de
lampjes uit voordat de computer vanaf het besturingssysteem wordt opgestart.
Diagnostische lampcodes tijdens POST
Lampjespatroon Probleembeschrijving Mogelijke oplossing
volgen.
De computer staat in
een normale uit-stand
of er is een pre-BIOSstoring opgetreden.
Er is mogelijk een
BIOS-storing
opgetreden; de
computer staat in de
herstelmodus.
Er is mogelijk een
processorstoring
opgetreden.
Sluit de computer aan op een werkend
stopcontact en druk op de aan/uit-knop.
• Voer het hulpprogramma BIOSRecovery (BIOS-herstel) uit, wacht
totdat het herstel is voltooid en start
de computer opnieuw op.
• Als het probleem aanhoudt, moet
u contact opnemen met Dell (zie
"Contact met Dell opnemen" in de
Gebruikshandleiding
• Plaats de processor opnieuw (zie
"Processor"
• Als het probleem aanhoudt, moet
u contact opnemen met Dell (zie
"Contact met Dell opnemen" in de
Gebruikshandleiding
in de Gebruikshandleiding
).
).
).
Naslaggids 99
Page 100
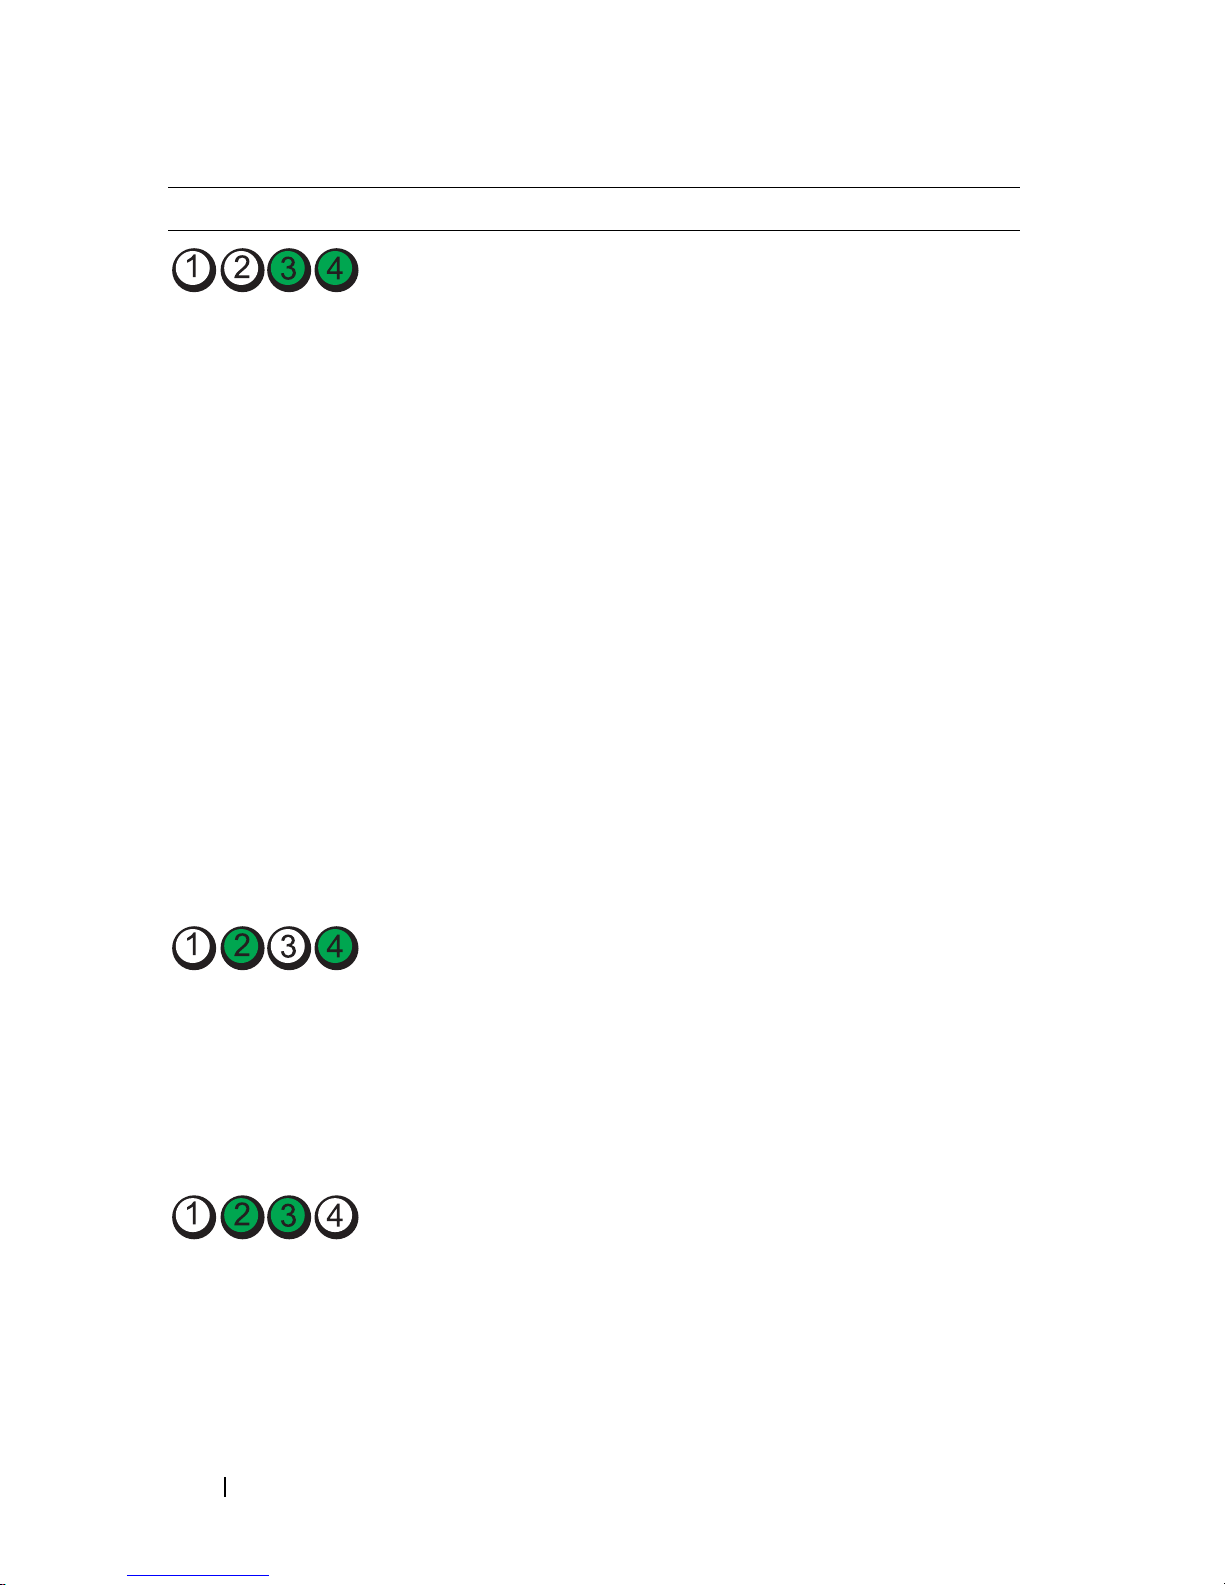
Lampjespatroon Probleembeschrijving Mogelijke oplossing
Er zijn
geheugenmodules
gedetecteerd, maar er is
een geheugenstoring
opgetreden.
• Als er twee of meer geheugenmodules
zijn geïnstalleerd, verwijdert u deze (zie
"Een geheugenmodule verwijderen" in
Gebruikshandleiding
de
). Vervolgens
plaatst u een ervan weer terug (zie "Een
geheugenmodule installeren" in de
Gebruikshandleiding
) en start u de
computer opnieuw op. Als de computer
normaal opstart, gaat u verder met de
installatie van de andere
geheugenmodules (één tegelijk), totdat
u de defecte module hebt opgespoord
of alle modules zonder problemen hebt
geïnstalleerd.
• Installeer een werkend geheugen van
hetzelfde type in de computer, indien
beschikbaar (zie "Geheugen" in de
Gebruikshandleiding
).
• Als het probleem aanhoudt, moet
u contact opnemen met Dell (zie
"Contact met Dell opnemen" in de
Gebruikshandleiding
).
100 Naslaggids
Er is mogelijk een
fout opgetreden met
een grafische kaart.
Er is mogelijk een
fout opgetreden met
een diskette of vaste
schijf.
• Plaats alle geïnstalleerde kaarten opnieuw
(zie"Kaarten" in de
Gebruikshandleiding
).
• Installeer een werkende grafische kaart
in de computer, indien beschikbaar.
• Als het probleem aanhoudt, moet
u contact opnemen met Dell (zie
"Contact met Dell opnemen" in de
Gebruikshandleiding
).
• Sluit alle stroom- en gegevenskabels
opnieuw aan en start de computer
opnieuw.
• Als het probleem aanhoudt, moet
u contact opnemen met Dell (zie
"Contact met Dell opnemen" in de
Gebruikshandleiding
).
 Loading...