

Page 1

Dell Precision™ M90 Mobile
Workstation
Quick Reference Guide
Model PP05XA
www.dell.com | support.dell.com
Page 2

Notes, Notices, and Cautions
NOTE: A NOTE indicates important information that helps you make better use of your computer.
NOTICE: A NOTICE indicates either potential damage to hardware or loss of data and tells you how to avoid the
problem.
CAUTION: A CAUTION indicates a potential for property damage, personal injury, or death.
Abbreviations and Acronyms
For a complete list of abbreviations and acronyms, see Glossary in your
User’s Guide
.
If you purchased a Dell™ n Series computer, any references in this document to Microsoft
operating systems are not applicable.
____________________
®
Windows®
Information in this document is subject to change without notice.
© 2006 Dell Inc. All rights reserved.
Reproduction in any manner whatsoever without the written permission of Dell Inc. is strictly forbidden.
Trademarks used in this text: Dell, the DELL logo, Dell Pr ecision, and ExpressCharg e are trademarks of Dell Inc.; Intel is a registered trademark
of Intel Corporation; Microsoft and Windows are registered trademarks of Microsoft Corporation; Bluetooth is a trademark owned by Bluetooth
SIG, Inc. and is used by Dell Inc. under license.
Other trademarks and trade names may be used in this document to refer to either the entities claiming the marks and names or their products.
Dell Inc. disclaims any proprietary interest in trademarks and trade names other than its own.
Model PP05XA
February 2006 P/N ND243 Rev. A00
Page 3

Contents
Finding Information . . . . . . . . . . . . . . . . . . . . . . . . . . . . . . . . 5
Setting Up Your Computer
About Your Computer
Front View
. . . . . . . . . . . . . . . . . . . . . . . . . . . . . . . . . . . 9
Left Side View
Right Side View
Back View
. . . . . . . . . . . . . . . . . . . . . . . . . . . . . . . . . . 11
Bottom View
Using a Battery
. . . . . . . . . . . . . . . . . . . . . . . . . . . . . . . . . . 13
Battery Performance
Checking the Battery Charge
Charging the Battery
Replacing the Battery
Storing a Battery
Troubleshooting
. . . . . . . . . . . . . . . . . . . . . . . . . . . . . . . . . 17
Lockups and Software Problems
Dell Diagnostics
. . . . . . . . . . . . . . . . . . . . . . . . . . . . . 8
. . . . . . . . . . . . . . . . . . . . . . . . . . . . . . . . 9
. . . . . . . . . . . . . . . . . . . . . . . . . . . . . . . . 10
. . . . . . . . . . . . . . . . . . . . . . . . . . . . . . . 10
. . . . . . . . . . . . . . . . . . . . . . . . . . . . . . . . 12
. . . . . . . . . . . . . . . . . . . . . . . . . . . . 13
. . . . . . . . . . . . . . . . . . . . . . . . 14
. . . . . . . . . . . . . . . . . . . . . . . . . . . . 16
. . . . . . . . . . . . . . . . . . . . . . . . . . . . 16
. . . . . . . . . . . . . . . . . . . . . . . . . . . . . . 17
. . . . . . . . . . . . . . . . . . . . . . 17
. . . . . . . . . . . . . . . . . . . . . . . . . . . . . . . 19
Index . . . . . . . . . . . . . . . . . . . . . . . . . . . . . . . . . . . . . . . . . 23
Contents 3
Page 4

4 Contents
Page 5
Finding Information
NOTE: Some features or media may be optional and may not ship with your computer. Some features or media may
not be available in certain countries.
NOTE: Additional information may ship with your computer.
What Are You Looking For? Find It Here
• A diagnostic program for my computer
• Drivers for my computer
• My computer documentation
• My device documentation
• Notebook System Software (NSS)
• Warranty information
• Terms and Conditions (U.S. only)
• Safety instructions
• Regulatory information
• Ergonomics information
• End User License Agreement
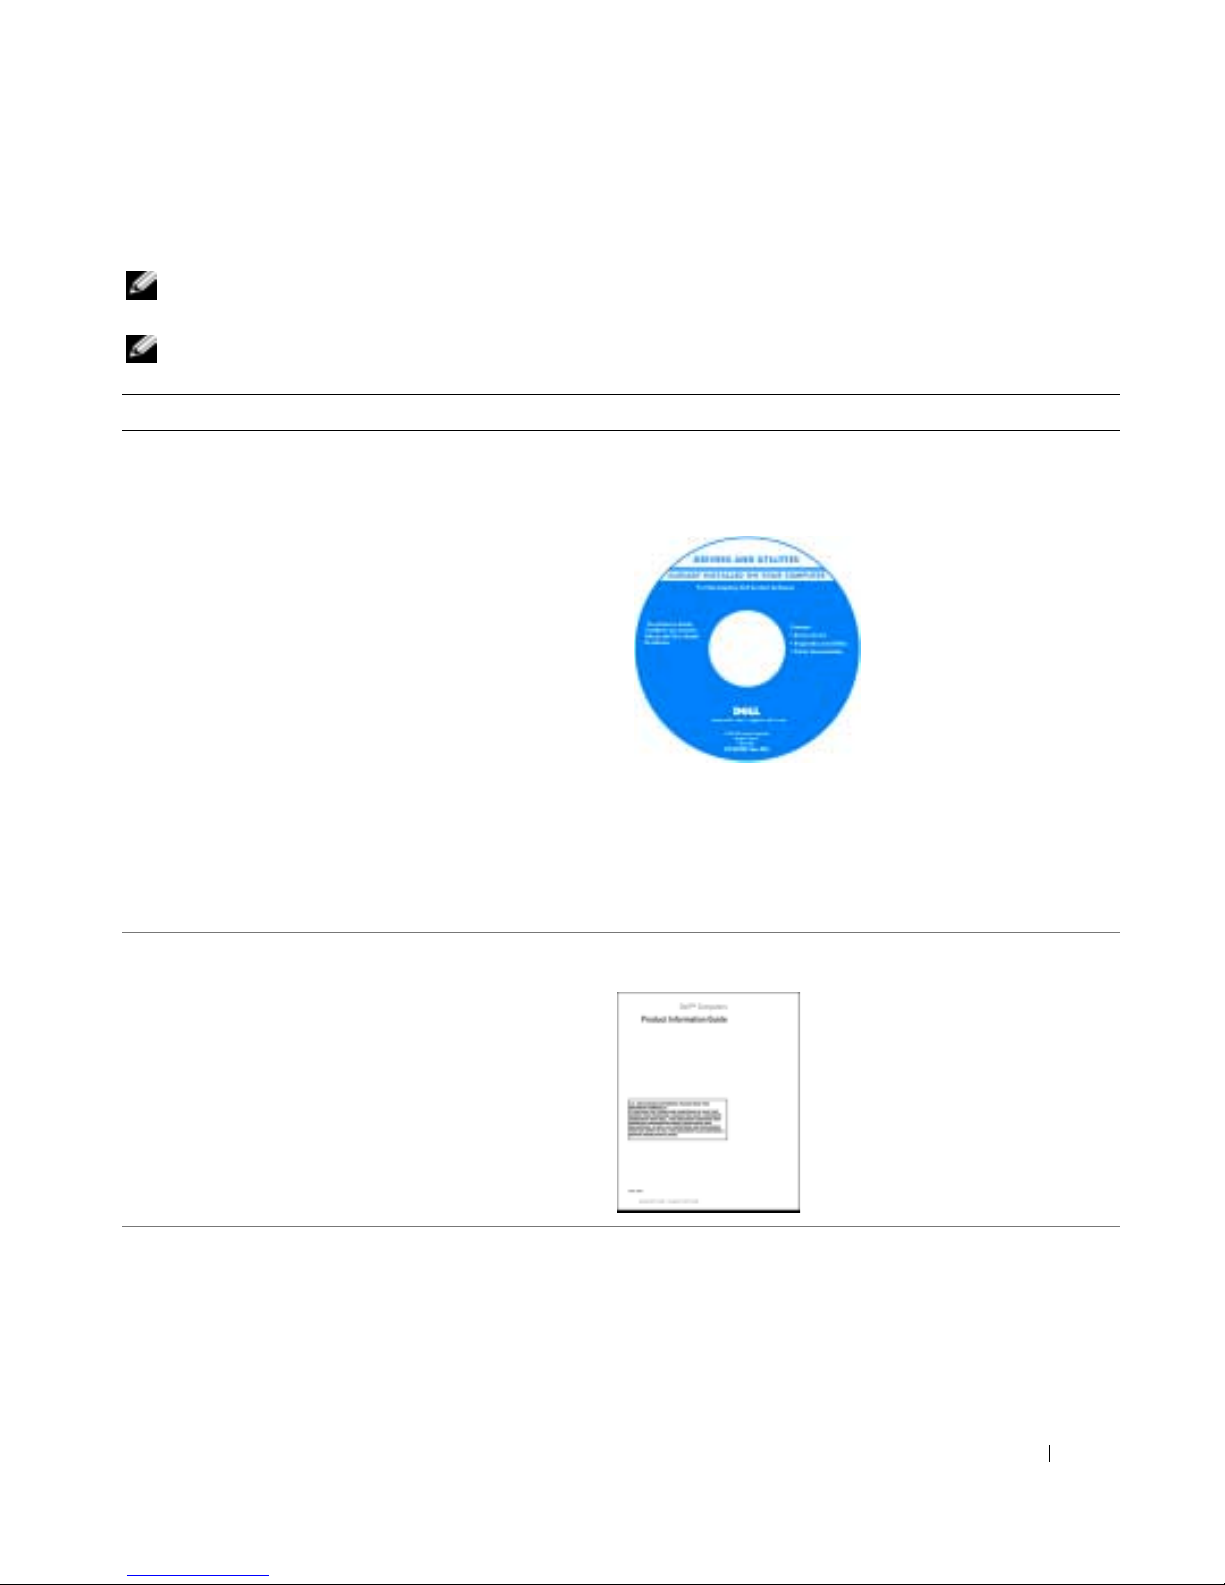
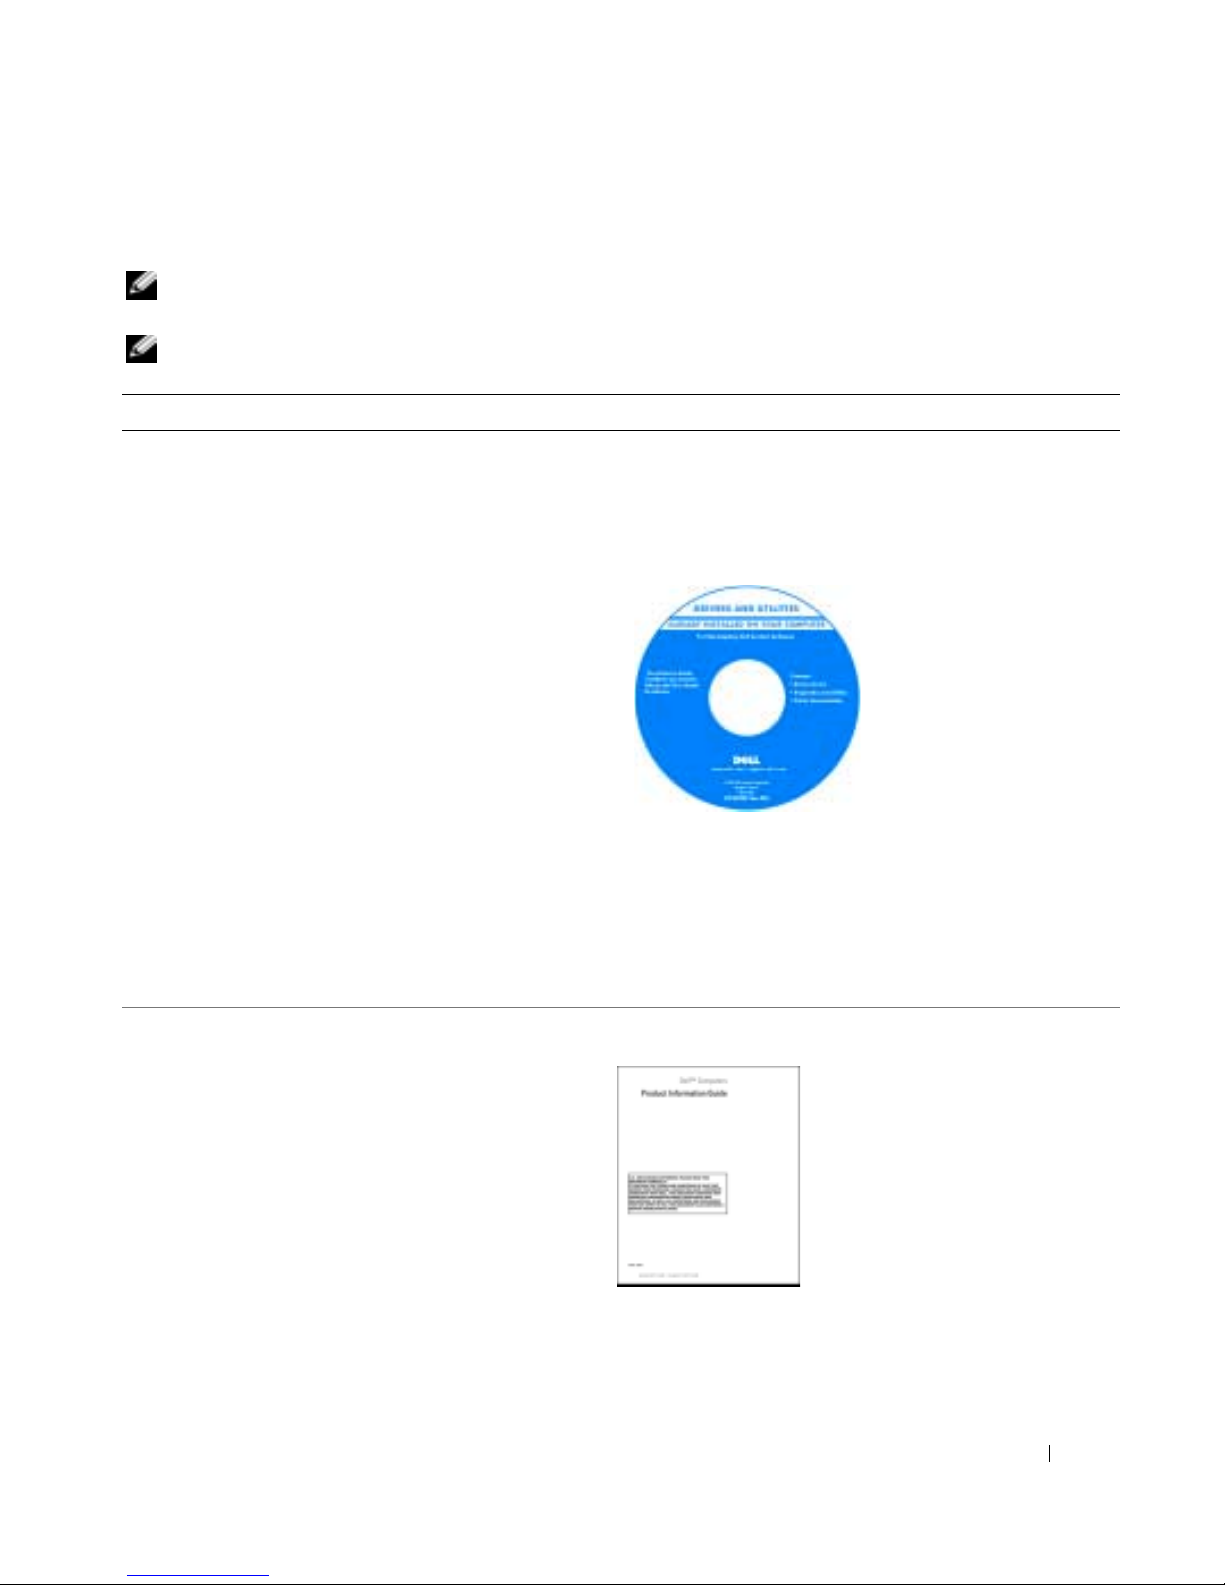
Drivers and Utilities CD (also known as ResourceCD)
NOTE: The Drivers and Utilities CD may be optional and may
not ship with your computer.
Documentation and
drivers are already
installed on your
computer. You can use the
CD to reinstall drivers or
to run the
(See "Dell Diagnostics" on
page 19).
Readme files may be
included on your CD to
provide last-minute
updates about technical changes to your computer or
advanced technical-reference material for technicians or
experienced users.
Dell Diagnostics
NOTE: Drivers and documentation updates can be found at
support.dell.com.
Dell™ Product Information Guide
• How to remove and replace parts
• Specifications
• How to configure system settings
• How to troubleshoot and solve problems
Dell Precision™ User’s Guide
Microsoft Windows XP Help and Support Center
1
Click
Start
→
System Guides
2
Click the
User’s Guide
Help and Support
→
System Guides
for your computer.
Quick Reference Guide 5
→
Dell User and
.
Page 6
What Are You Looking For? Find It Here
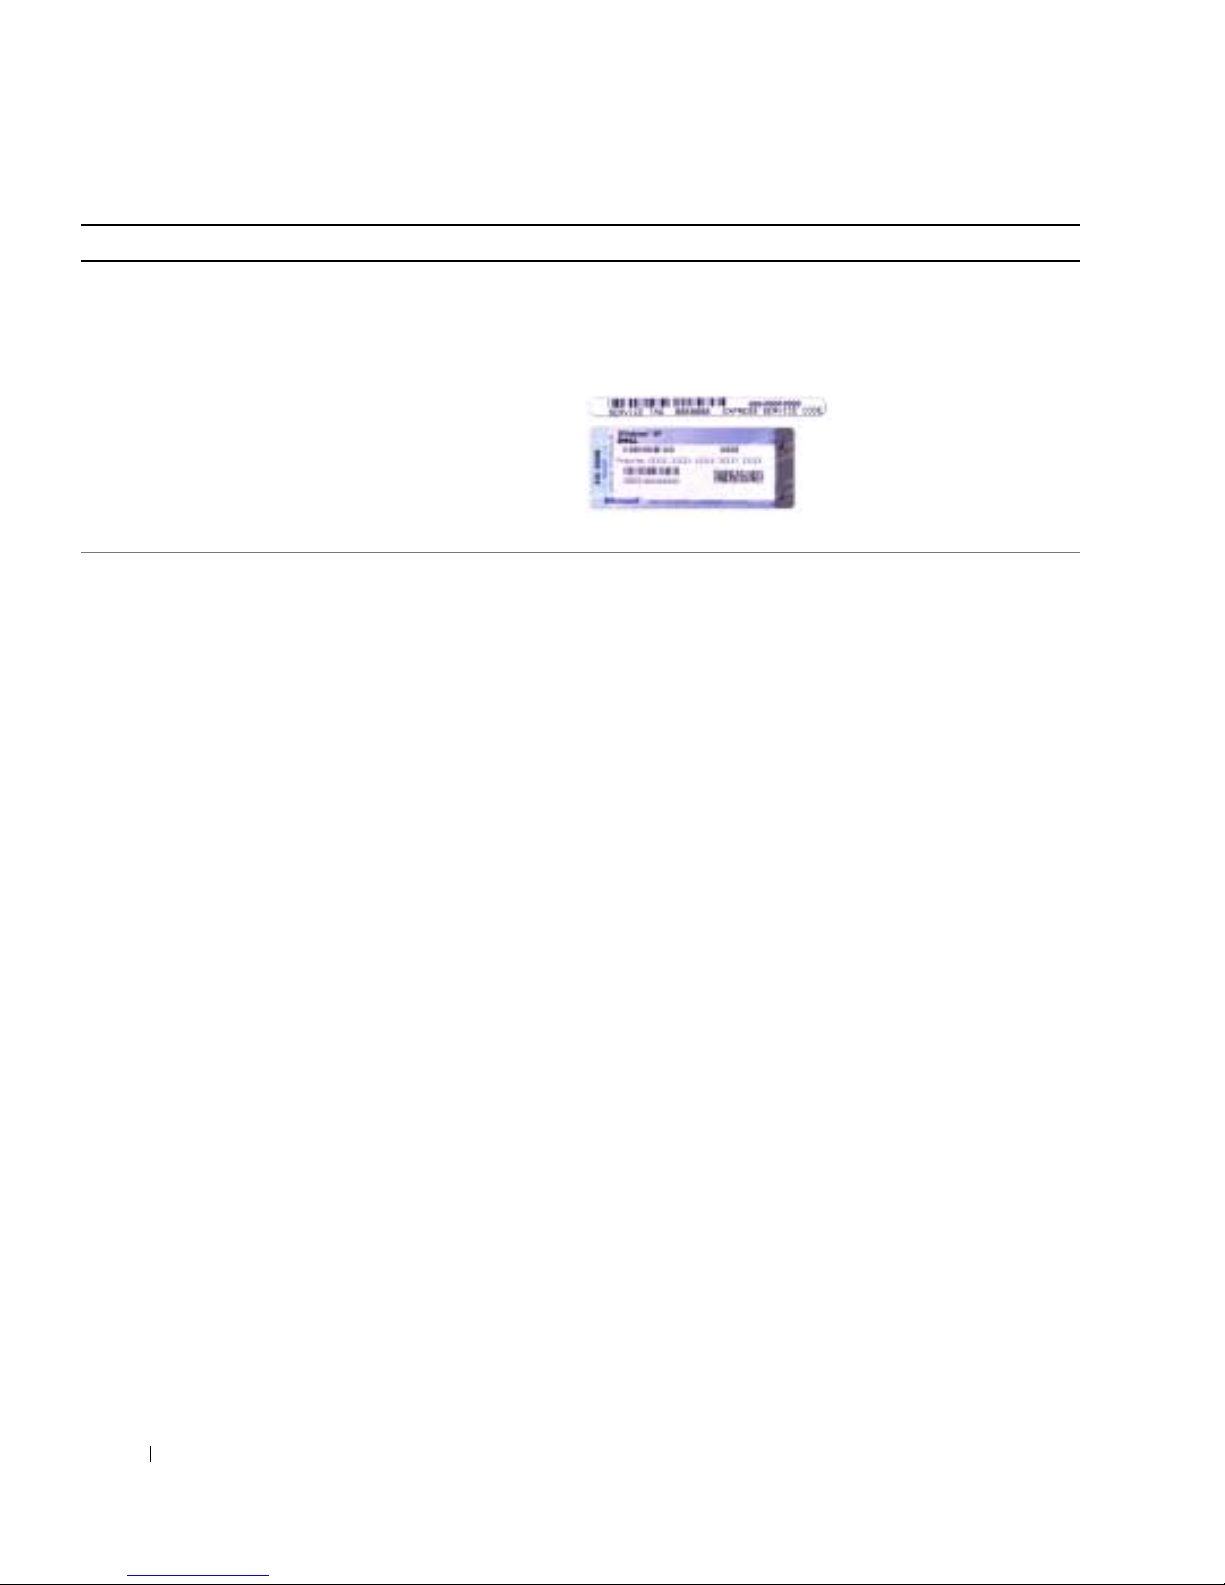
• Service Tag and Express Service Code
• Microsoft Windows License Label
• Solutions — Troubleshooting hints and tips, articles
from technicians, and online courses, frequently asked
questions
• Community — Online discussion with other Dell
customers
• Upgrades — Upgrade information for components, such
as memory, the hard drive, and the operating system
• Customer Care — Contact information, service call and
order status, warranty, and repair information
• Service and support — Service call status and support
history, service contract, online discussions with
technical support
• Reference — Computer documentation, details on my
computer configuration, product specifications, and
white papers
• Downloads — Certified drivers, patches, and software
updates
• Notebook System Software (NSS)— If you reinstall the
operating system for your computer, you should also
reinstall the NSS utility. NSS provides critical updates
for your operating system and support for Dell™
®
3.5-inch USB floppy drives, Intel
processors, optical
drives, and USB devices. NSS is necessary for correct
operation of your Dell computer. The software
automatically detects your computer and operating
system and installs the updates appropriate for your
configuration.
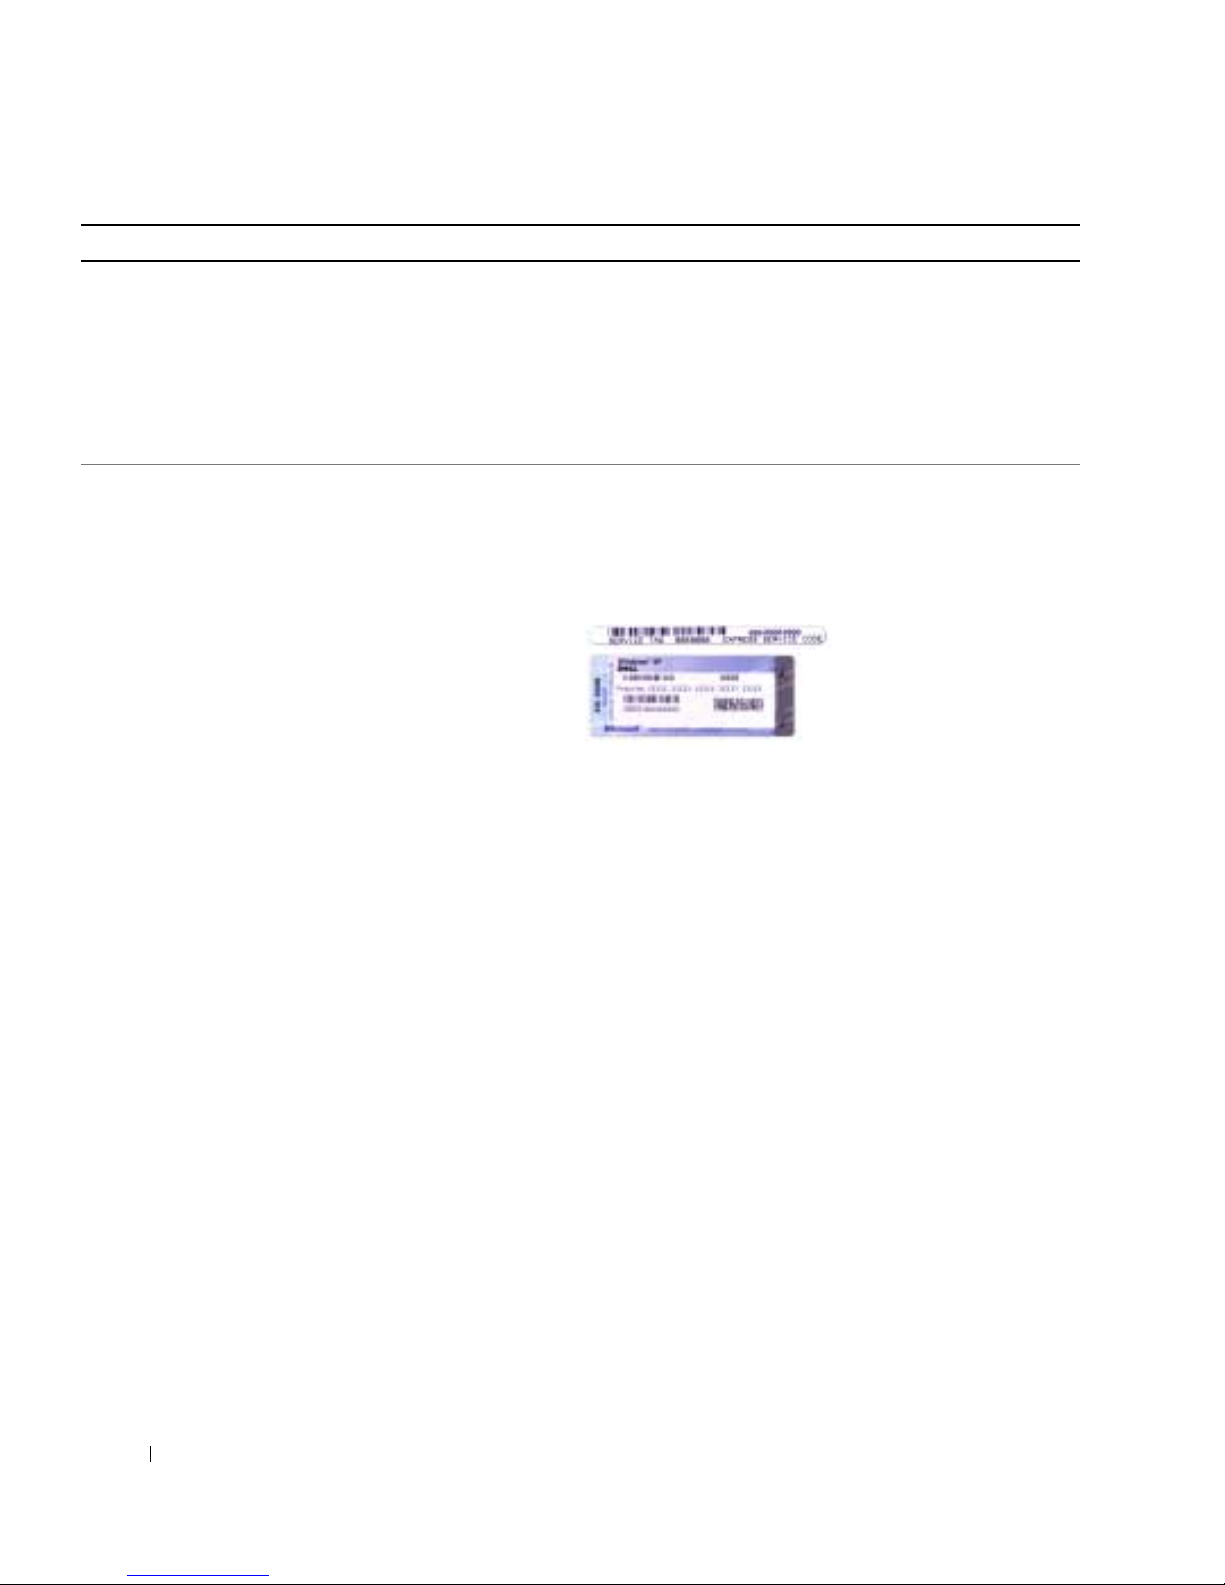
Service Tag and Microsoft® Windows® License
These labels are located on your computer.
• Use the Service Tag to identify your computer when you
use
support.dell.com
or contact technical support.
•Enter the Express Service
Code to direct your call
when contacting technical
support.
Dell Support Website — support.dell.com
NOTE: Select your region to view the appropriate support
site.
To download Notebook System Software:
1
Go to
support.dell.com
, select your region or business
segment, and enter your Service Tag.
2
Select
Drivers & Downloads
3
Click your operating system and search for the keyword
Notebook System Software
and click Go.
.
NOTE: The support.dell.com user interface may vary
depending on your selections.
6 Quick Reference Guide
Page 7
What Are You Looking For? Find It Here
• Software upgrades and troubleshooting hints —
Frequently asked questions, hot topics, and general
health of your computing environment
• How to use Windows XP
• How to work with programs and files
• How to personalize my desktop
• How to reinstall my operating system
Dell Support Utility
The Dell Support Utility is an automated upgrade and
notification system installed on your computer. This
support provides real-time health scans of your computing
environment, software updates, and relevant self-support
information. Access the Dell Support Utility from the
icon in the taskbar. For more information, see "Dell Support
Utility" in your
User’s Guide
.
Windows Help and Support Center
1
Click the
2
Type a word or phrase that describes your problem and
Start
button and click
Help and Support
.
click the arrow icon.
3
Click the topic that describes your problem.
4
Follow the instructions on the screen.
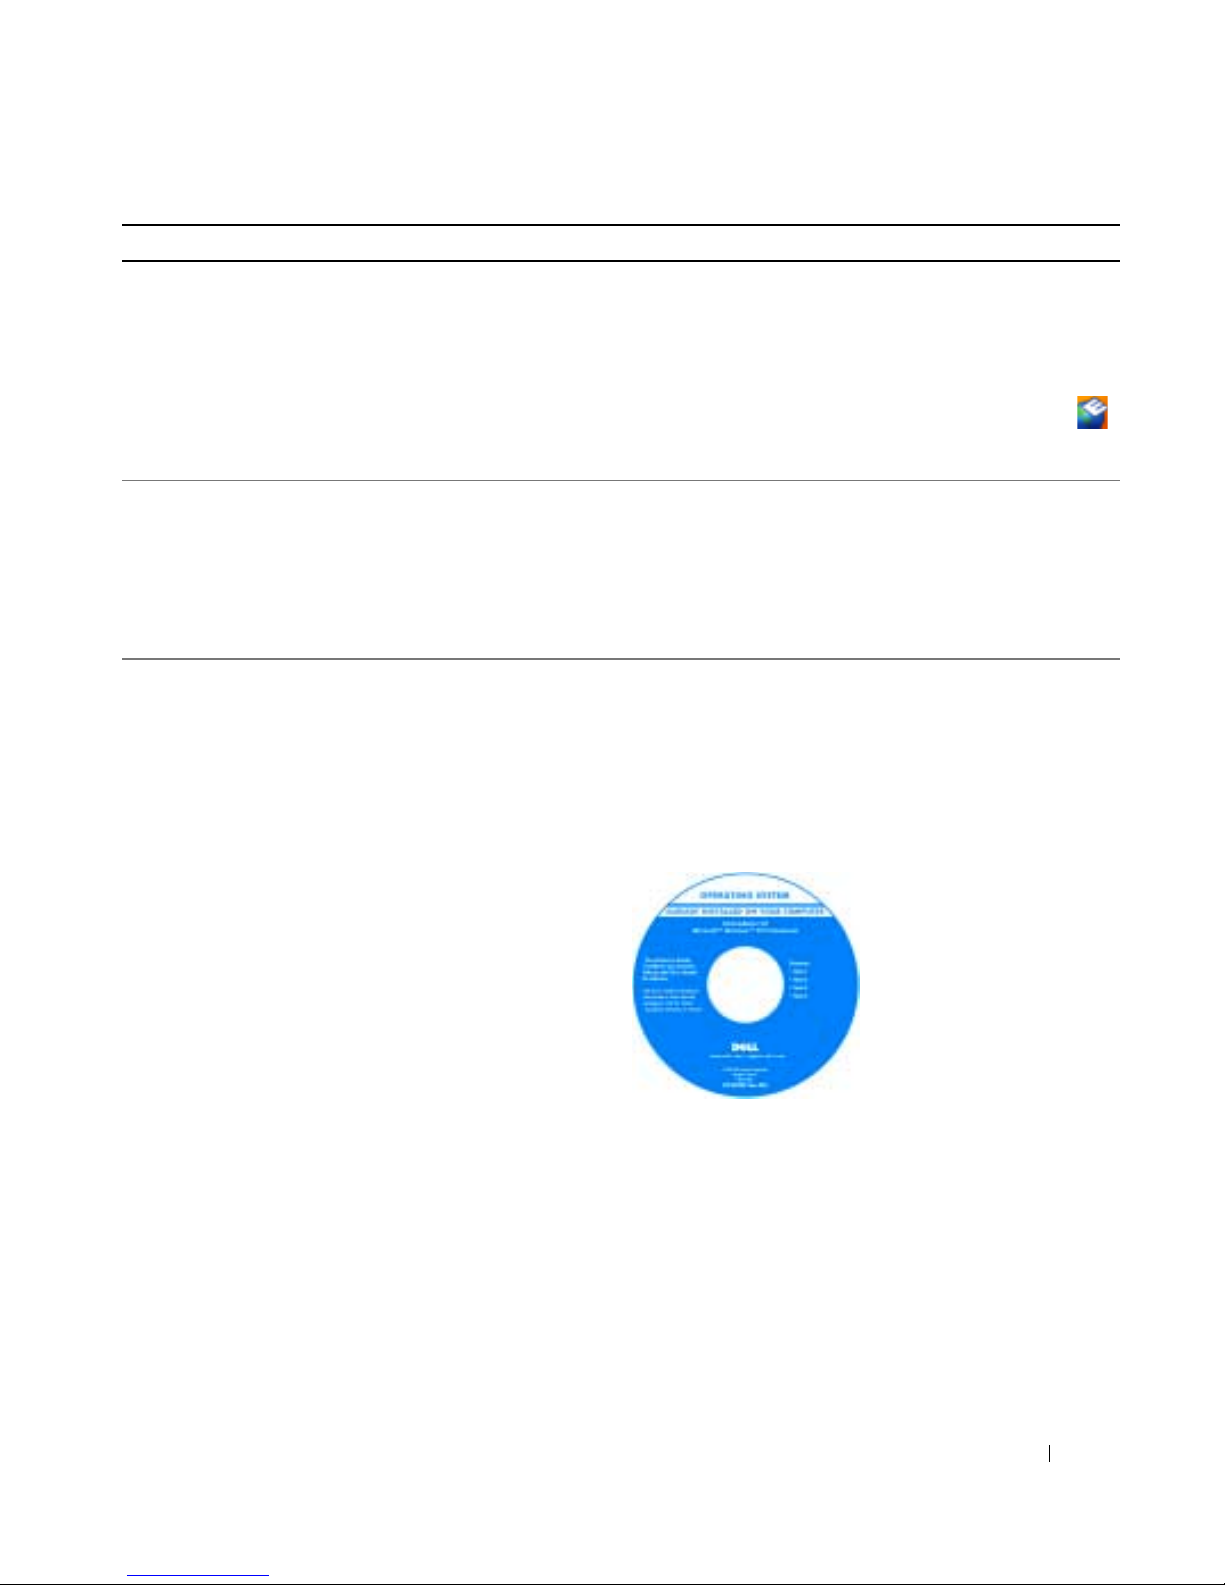
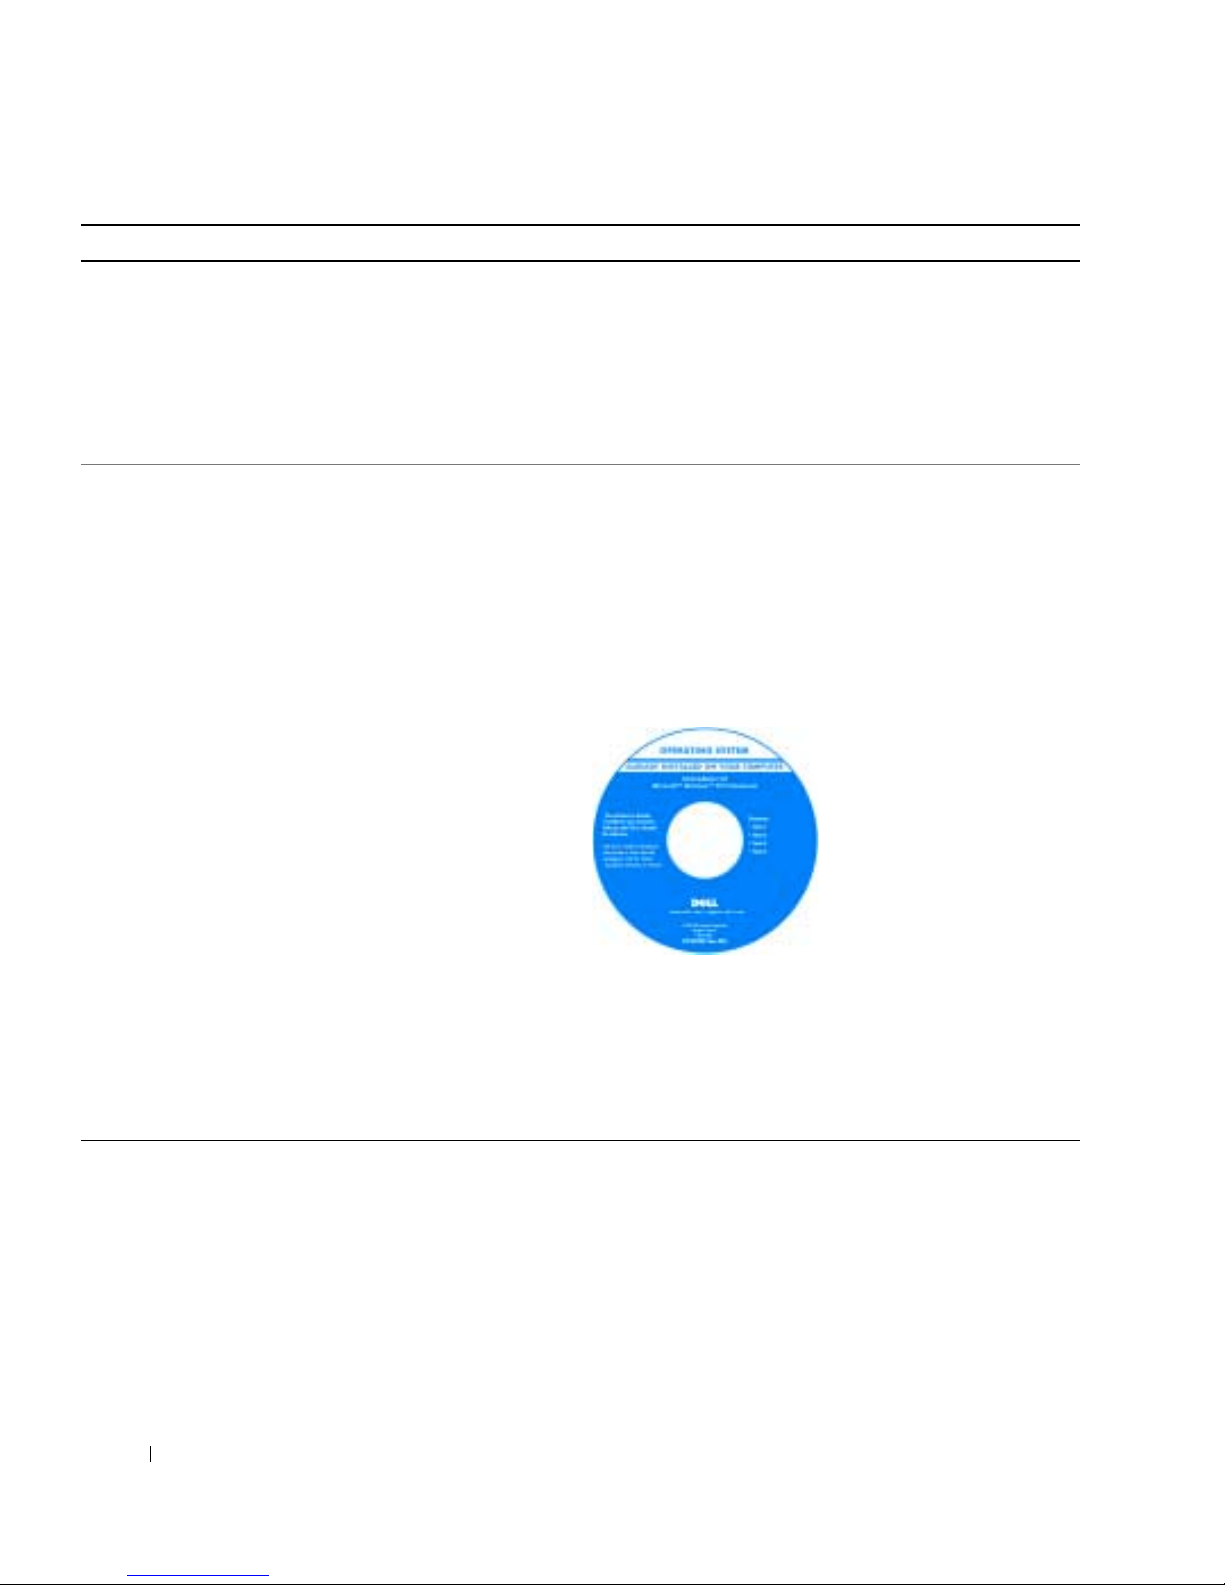
Operating System CD
NOTE: The Operating System CD may be optional and may
not ship with your computer.
The operating system is already installed on your computer.
To reinstall your operating system, use the Operating
System CD. See "Reinstalling Windows XP" in your User’s
Guide.
After you reinstall your
operating system, use the
Drivers and Utilities CD
(ResourceCD) to reinstall
drivers for the devices that
came with your computer.
Your operating system
product key
on your computer.
label is located
NOTE: The color of your CD varies based on the operating
system you ordered.
Quick Reference Guide 7
Page 8
Setting Up Your Computer
CAUTION: Before you begin any of the procedures in this section, follow the safety instructions in the Product
Information Guide.
1
Unpack the accessories box.
2
Set aside the contents of the accessories box, which you will need to complete the setup of your
computer.
The accessories box also contains user documentation and any software or additional hardware (such
as PC Cards, drives, or batteries) that you have ordered.
3
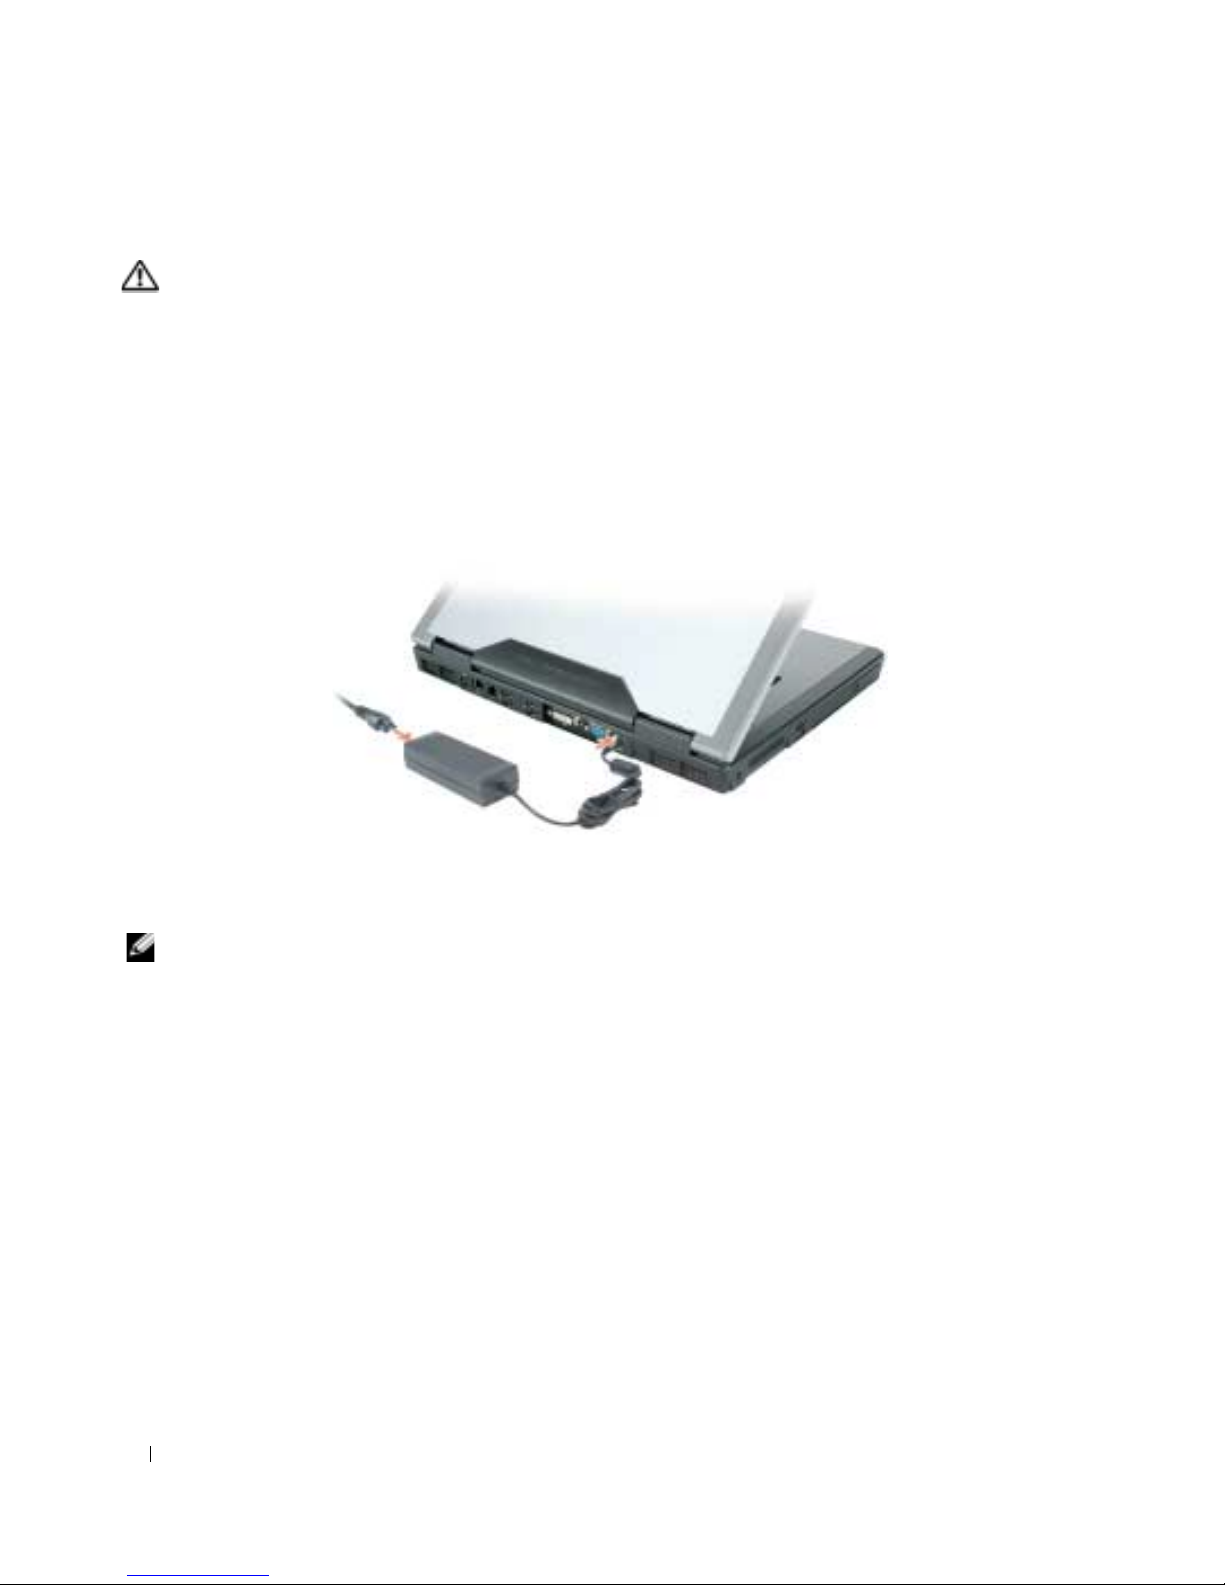
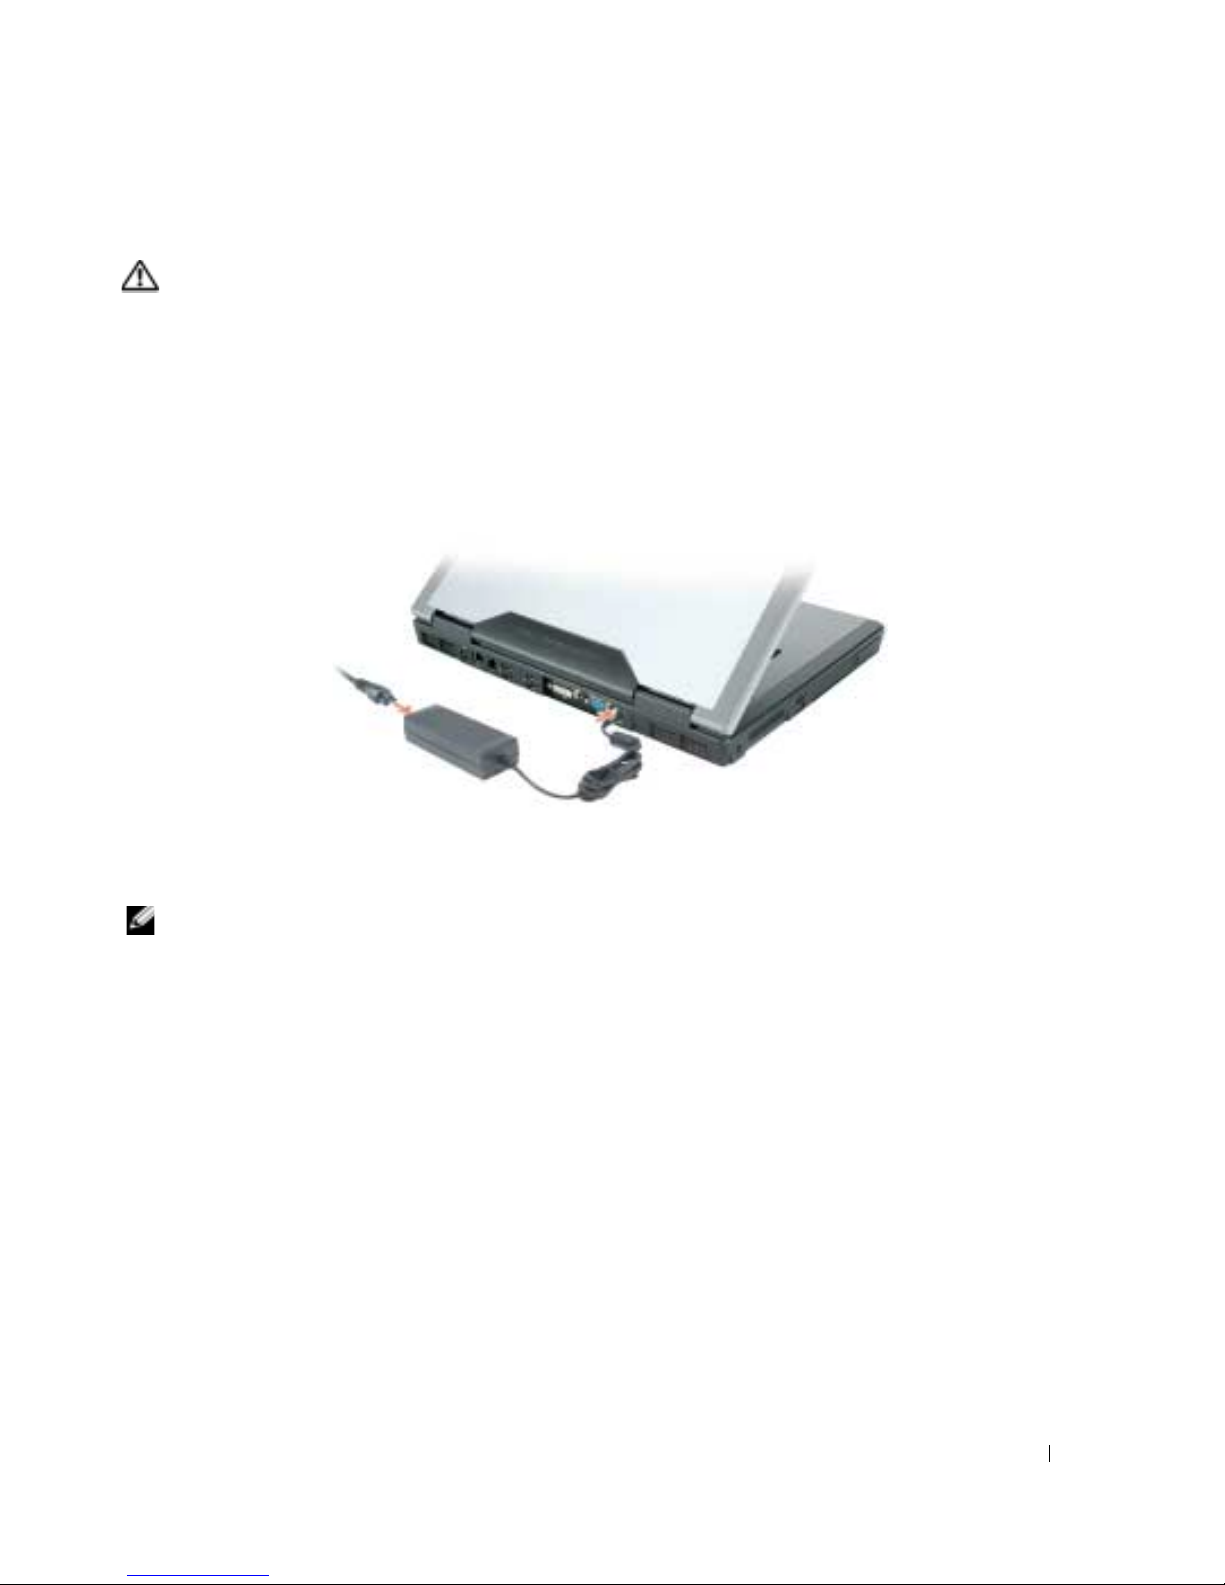
Connect the AC adapter to the AC adapter connector on the computer and to the electrical outlet.
4
Open the computer display and press the power button to turn on the computer (see "Front View" on
page 9).
NOTE: It is recommended that you turn on and shut down your computer at least once before you install any cards
or connect the computer to a docking device or other external device, such as a printer.
8 Quick Reference Guide
Page 9
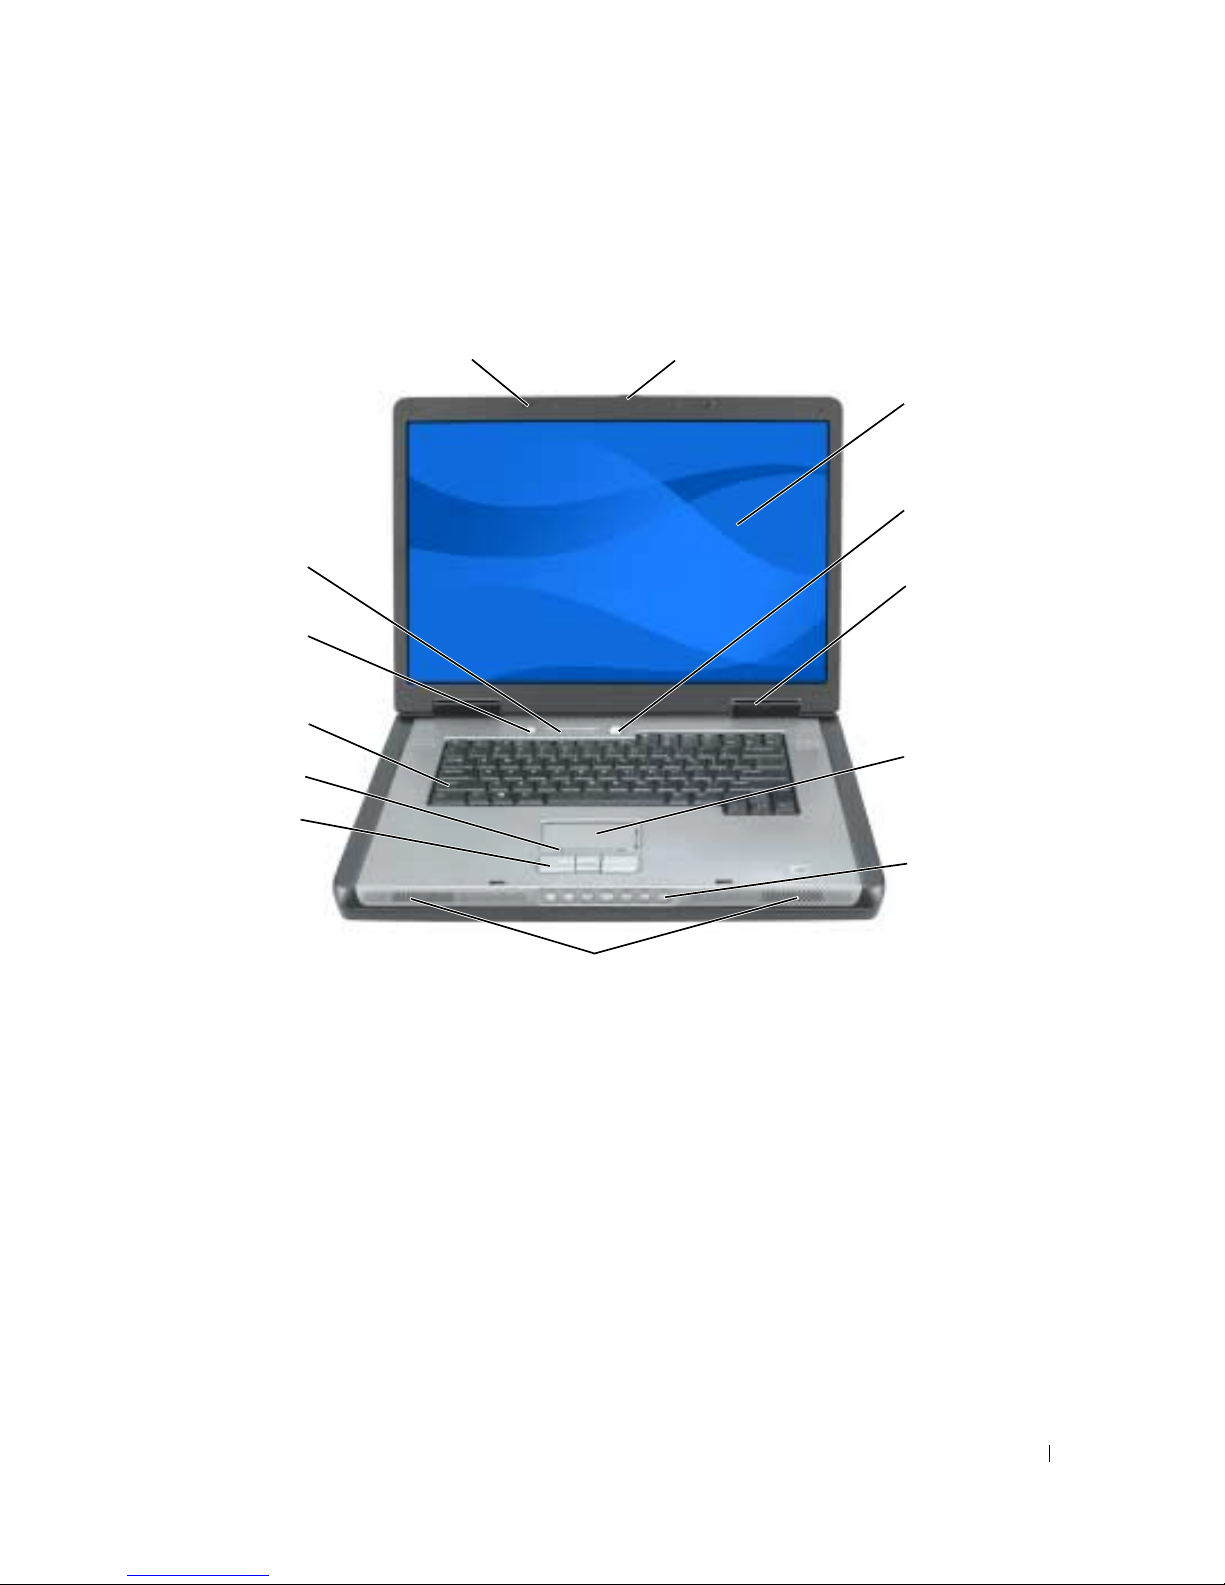
About Your Computer
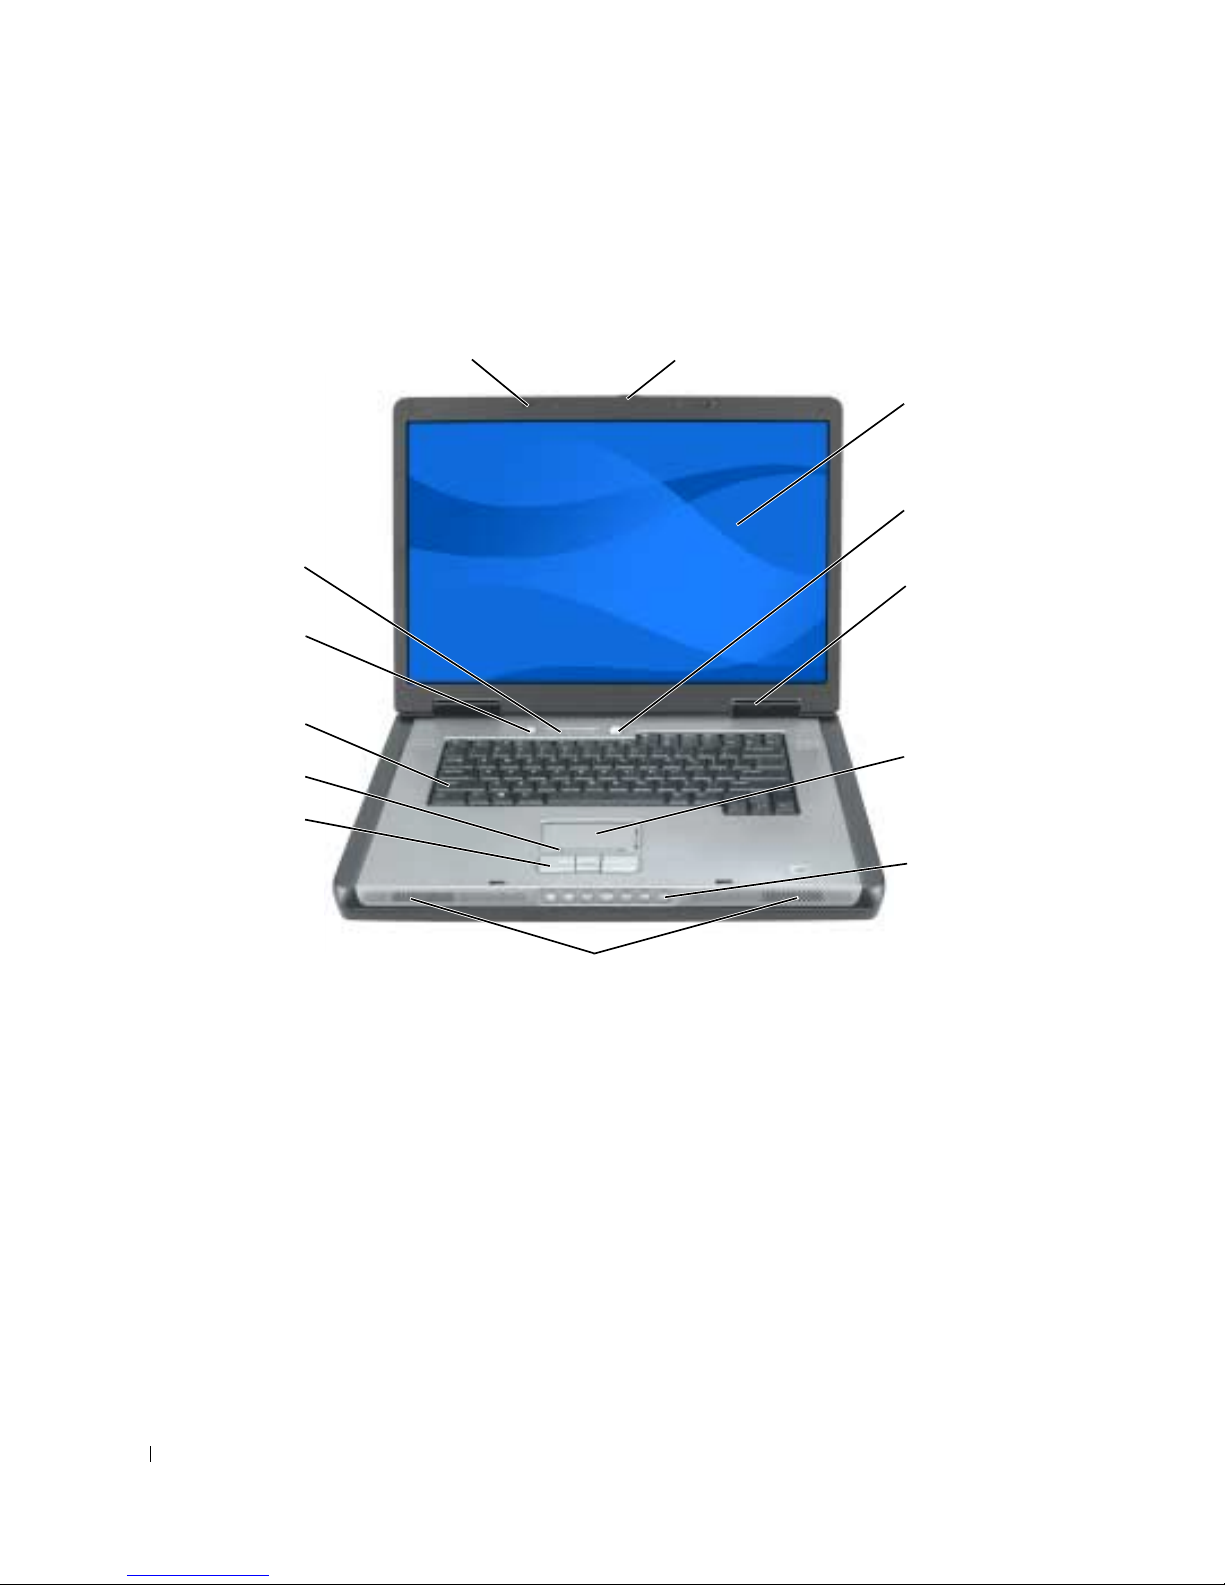
Front View
13
12
11
10
9
1
2
3
4
5
6
7
8
1 display latches (2) 6 touch pad 11 keyboard
2 display latch release 7 media control buttons 12 media button
3 display 8 speakers (2) 13 keyboard and wireless
status lights
4 power button 9 touch pad buttons
5 device status lights 10 touch-pad scroll zone
Quick Reference Guide 9
Page 10
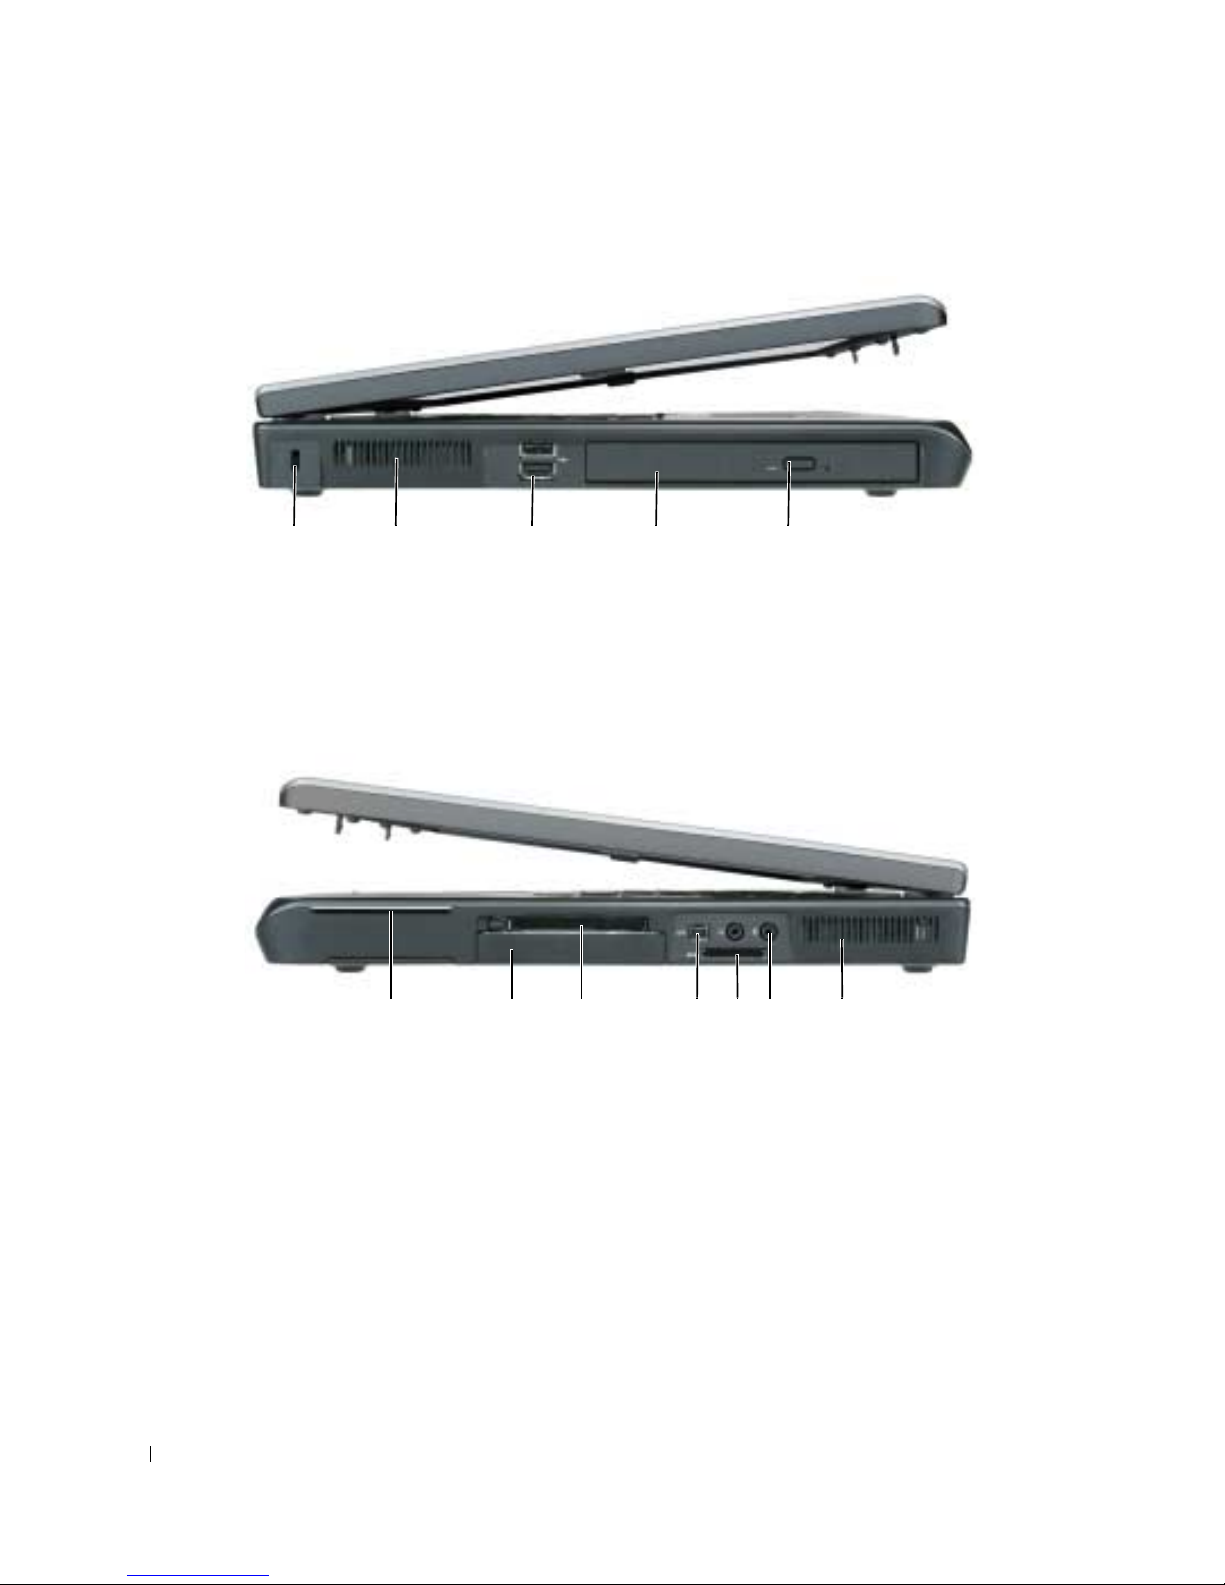
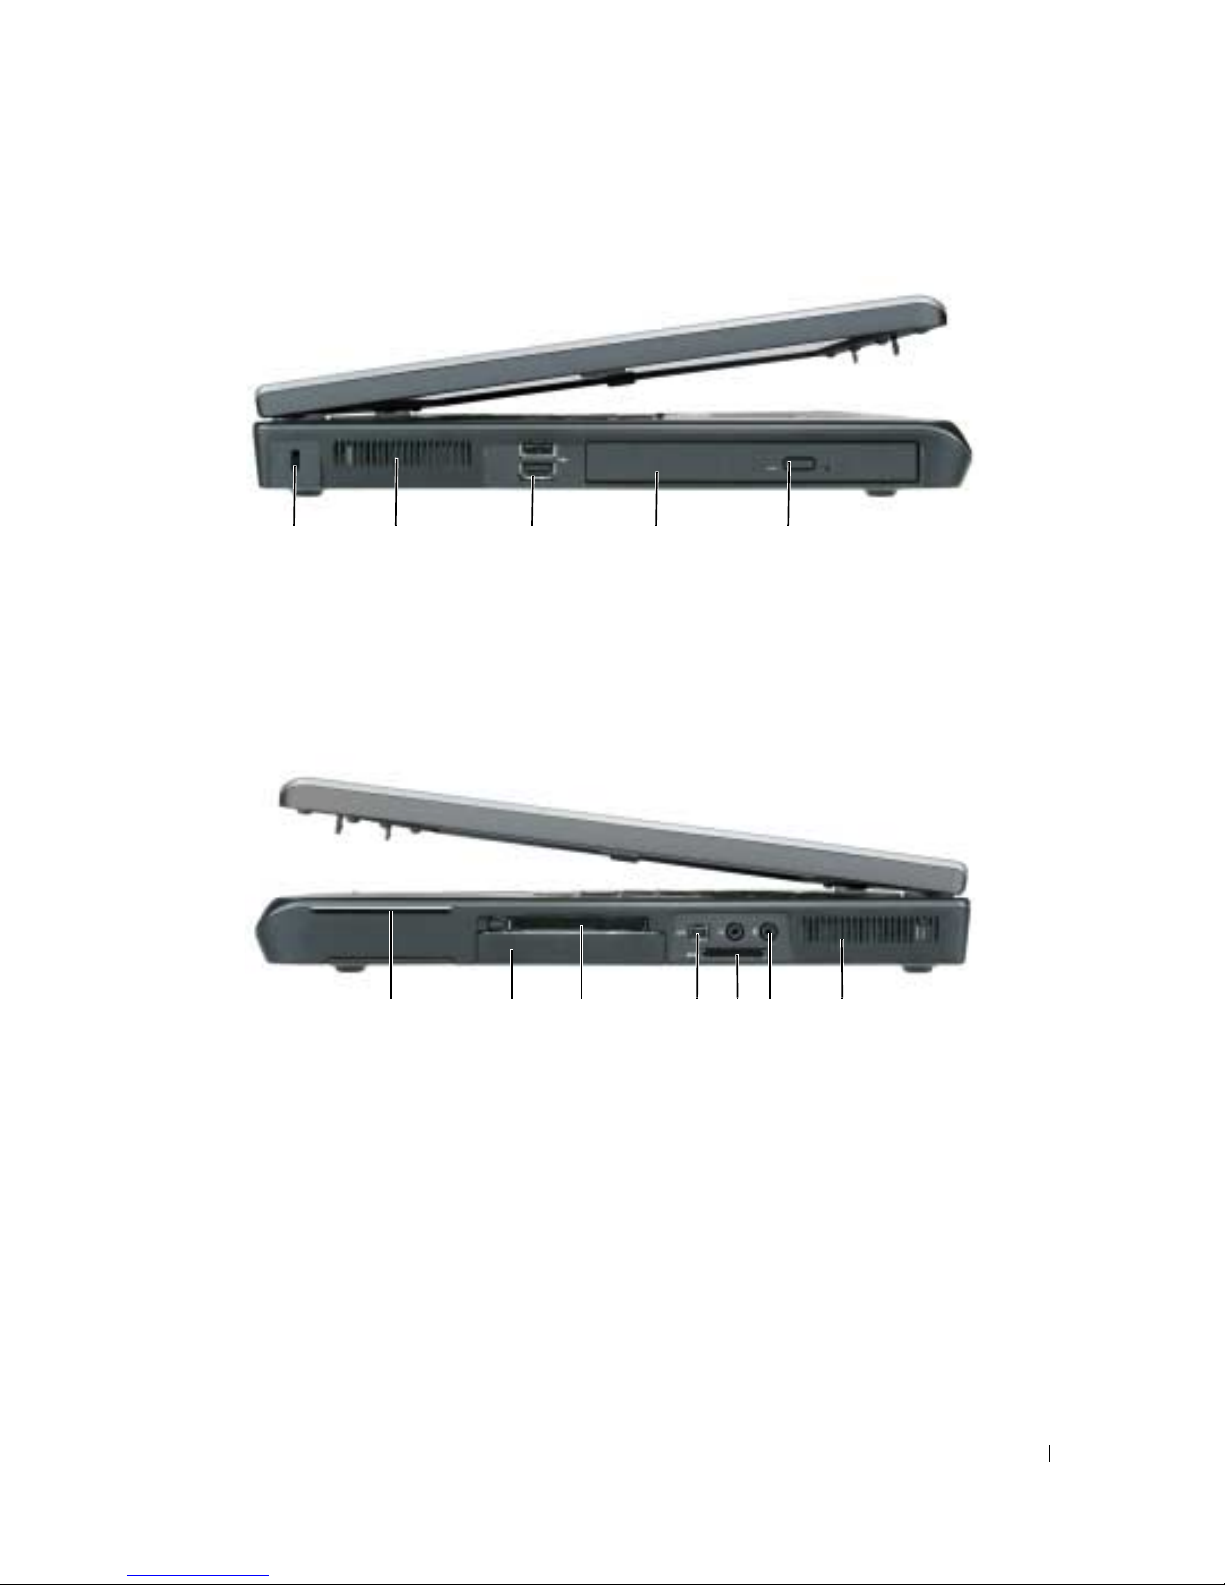
Left Side View
1 security cable slot 3 USB connectors (2) 5 optical-drive-tray eject
2 air vent 4 optical drive
Right Side View
1 2345
button
1 smart card slot 4 IEEE 1394 connector 7 air vent
2 hard drive 5 5-in-1 media memory card
3 ExpressCard slot 6 audio connectors (2)
10 Quick Reference Guide
2 345671
reader
Page 11
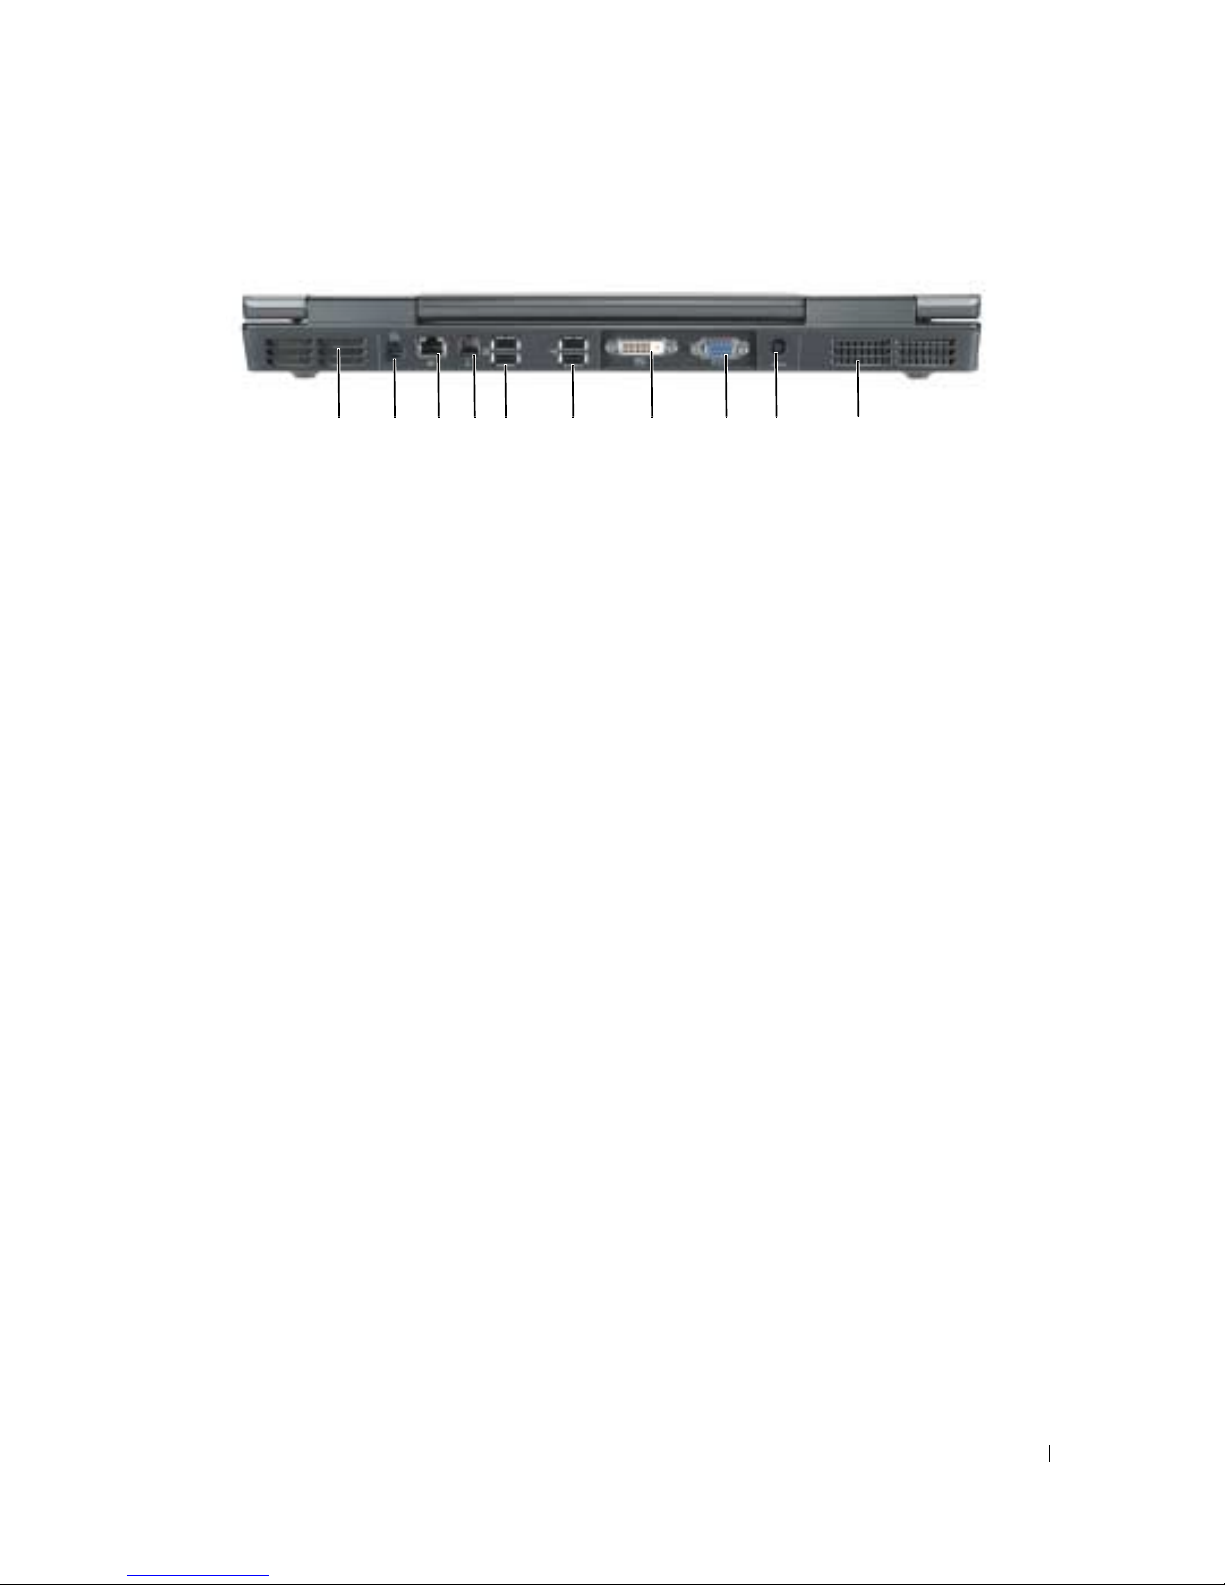
Back View
1 air vent 5 USB connectors (2) 9 AC adapter connector
2 S-video TV-out connector 6 USB connectors (2) 10 air vent
3 network (RJ-45) connector 7 Digital-Video Interface
4 modem (RJ-11) connector 8 video (VGA) connector
1 2345 6 7 8 9 10
(DVI) connector
Quick Reference Guide 11
Page 12
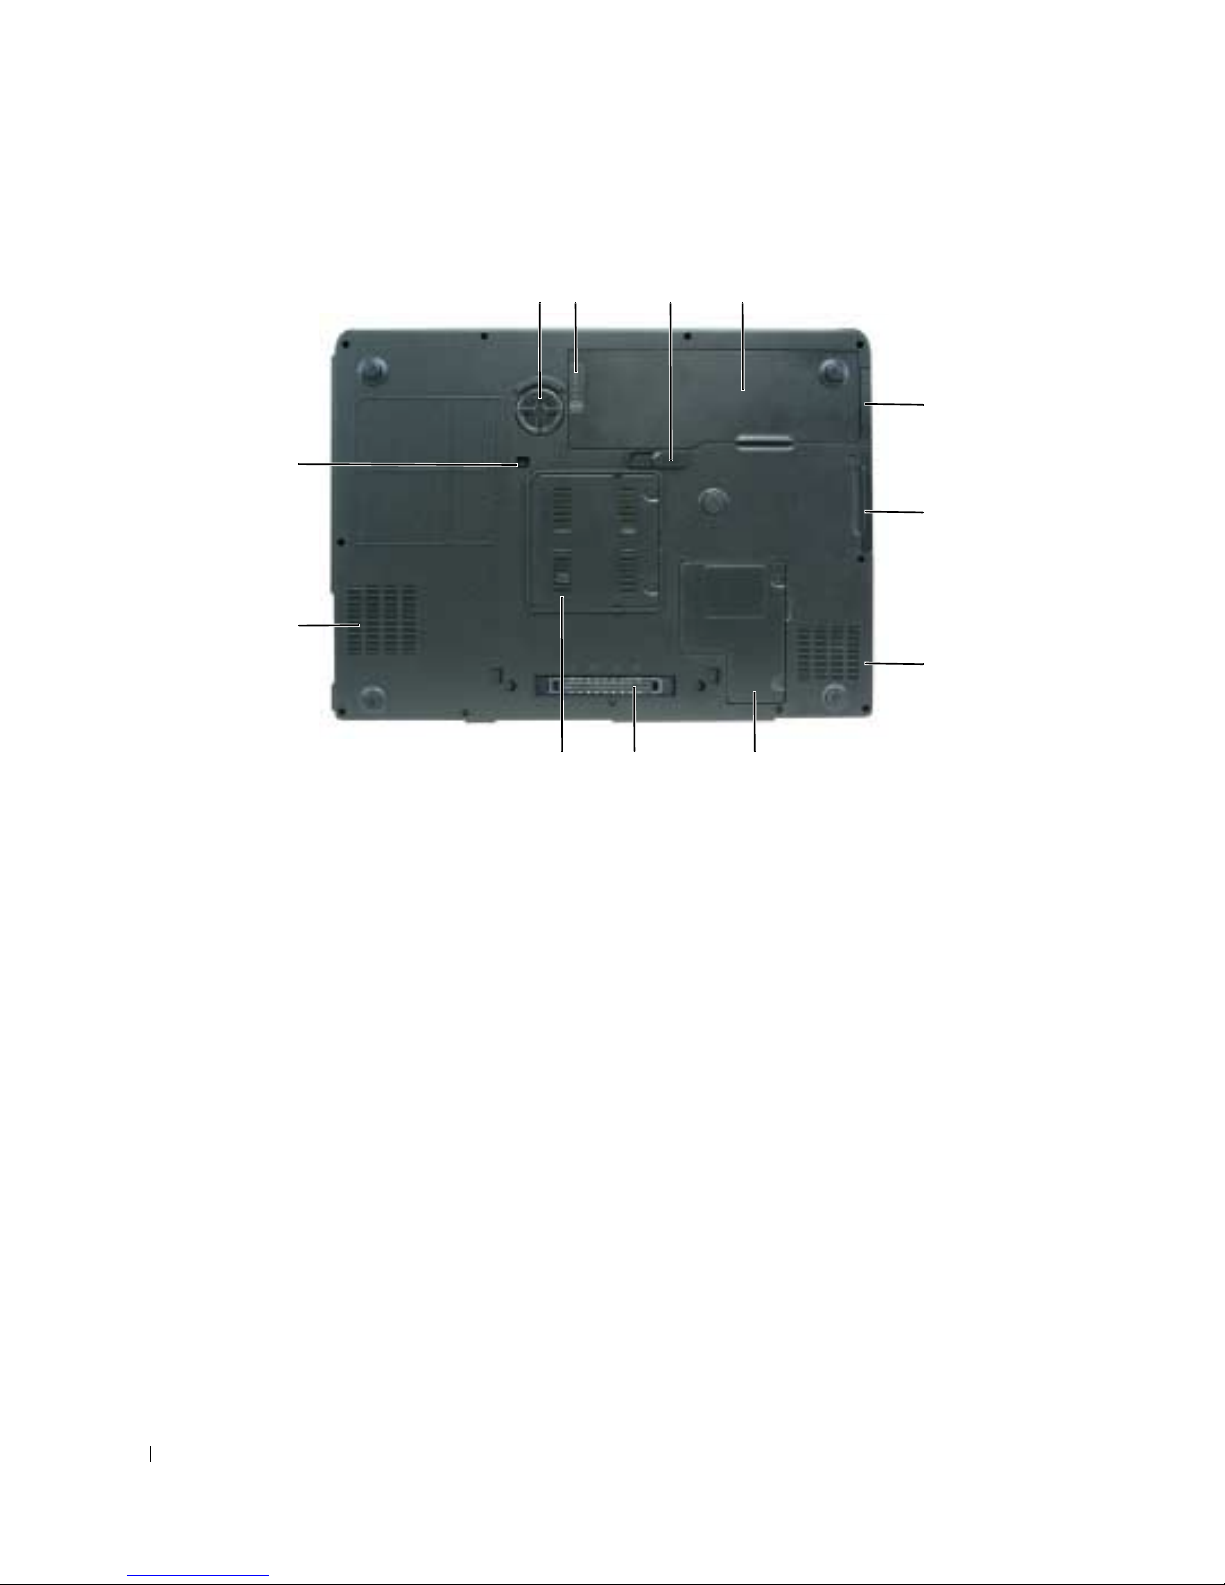
Bottom View
12 3 4
5
12
6
11
7
10
1 subwoofer 5 cover for optional internal
card with Bluetooth
®
89
9 docking-device connector
wireless technology
2 battery charge/health
6 hard drive 10 memory module cover
gauge
3 battery-bay latch release 7 air vent 11 air vent
4 battery 8 Mini-Card/modem cover 12 optical-drive security screw
12 Quick Reference Guide
Page 13

Using a Battery
Battery Performance
NOTE: For information about the Dell warranty for your computer, see the Product Information Guide or separate
paper warranty document that shipped with your computer.
For optimal computer performance and to help preserve BIOS settings, operate your Dell™ portable
computer with the battery installed at all times. One battery is supplied as standard equipment in the
battery bay.
NOTE: Because the battery may not be fully charged, use the AC adapter to connect your new computer to an
electrical outlet the first time you use the computer. For best results, operate the computer with the AC adapter
until the battery is fully charged. To view battery charge status, click Start→ Control Panel→ Power Options, and
click Power Meter tab.
NOTE: Battery operating time (the time the battery can operate the computer) decreases over time. Depending on
how often the battery is used and the conditions under which it is used, you may need to purchase a new battery
during the life of your computer.
Battery operating time varies depending on operating conditions. Operating time is significantly reduced
when you perform operations including, but not limited to, the following:
• Using optical drives.
• Using wireless communications devices, ExpressCards, or USB devices.
• Using high-brightness display settings, 3D screen savers, or other power-intensive programs such as
complex 3D graphics applications.
• Running the computer in maximum performance mode. See "Configuring Power Management
Settings" on in your
User’s Guide
for information about accessing Windows Power Options Properties
or Dell QuickSet, which you can use to configure power management settings.
NOTE: It is recommended that you connect your computer to an electrical outlet when writing to a CD or DVD.
You can check the battery charge before you insert the battery into the computer. You can also set power
management options to alert you when the battery charge is low. For more information, see "Checking
the Battery Charge" on page 14.
CAUTION: Using an incompatible battery may increase the risk of fire or explosion. Replace the battery only
with a compatible battery purchased from Dell. The battery is designed to work with your Dell computer. Do not
use a battery from other computers with your computer.
CAUTION: Do not dispose of batteries with household waste. When your battery no longer holds a charge, call
your local waste disposal or environmental agency for advice on disposing of a lithium-ion battery. See "Battery
Disposal" in the Product Information Guide.
CAUTION: Misuse of the battery may increase the risk of fire or chemical burn. Do not puncture, incinerate,
disassemble, or expose the battery to temperatures above 65°C (149°F). Keep the battery away from children.
Handle damaged or leaking batteries with extreme care. Damaged batteries may leak and cause personal injury
or equipment damage.
Quick Reference Guide 13
Page 14

Checking the Battery Charge
The Dell QuickSet Battery Meter, the Microsoft Windows Power Meter window and icon, the
battery charge gauge and health gauge, and the low-battery warning provide information on the battery
charge.
NOTE: Dell QuickSet may not be available on your computer.
Dell™ QuickSet Battery Meter
If Dell QuickSet is installed, press <Fn><F3> to display the QuickSet Battery Meter. The Battery Meter
displays status, battery health, charge level, and charge completion time for the battery in your computer.
For more information about QuickSet, right-click the icon in the taskbar, and click Help.
Microsoft® Windows® Power Meter
The Windows Power Meter indicates the remaining battery charge. To check the Power Meter, doubleclick the icon on the taskbar.
If the computer is connected to an electrical outlet, a icon appears.
Charge Gauge
By pressing (or pressing and holding) the status button on the charge gauge on the battery, you can check:
• Battery charge (check by pressing and
• Battery health (check by pressing and
releasing
holding
the status button)
the status button)
The battery operating time is largely determined by the number of times it is charged. After hundreds of
charge and discharge cycles, batteries lose some charge capacity—or battery health. That is, a battery can
show a status of "charged" but maintain a reduced charge capacity (health).
Check the Battery Charge
To check the battery charge, press the status button on the battery charge gauge to illuminate the chargelevel lights. Each light represents approximately 20 percent of the total battery charge. For example, if
the battery has 80 percent of its charge remaining, four of the lights are on. If no lights appear, the
battery has no charge.
14 Quick Reference Guide
Page 15

Check the Battery Health
NOTE: You can check battery health either by using the charge gauge on the battery as described below, or by
using the Battery Meter in Dell QuickSet. For information about QuickSet, right-click the icon in the taskbar,
and click Help.
To check the battery health using the charge gauge, press and hold the status button on the battery
charge gauge for at least 3 seconds. If no lights appear, the battery is in good condition, and more than
80 percent of its original charge capacity remains. Each light represents incremental degradation. If five
lights appear, less than 60 percent of the charge capacity remains, and you should consider replacing the
battery. See "Specifications" in your User’s Guide for more information about the battery operating time.
Low-Battery Warning
NOTICE: To avoid losing or corrupting data, save your work immediately after a low-battery warning.
Then connect the computer to an electrical outlet. If the battery runs completely out of power,
hibernate mode begins automatically.
A pop-up window warns you when the battery charge is approximately 90 percent depleted. The
computer enters hibernate mode when the battery charge is at a critically low level.
You can change the settings for the battery alarms in QuickSet or the Power Options Properties window.
See "Configuring Power Management Settings" in your User’s Guide for information about accessing
QuickSet or the Power Options Properties window.
Conserving Battery Power
Perform the following actions to conserve battery power:
• Connect the computer to an electrical outlet when possible because battery life is largely determined
by the number of times the battery is used and recharged.
• Place the computer in standby mode or hibernate mode when you leave the computer unattended for
long periods of time. See "Power Management Modes" in your
User’s Guide
for more information
about standby and hibernate modes.
• Use the Power Management Wizard
to select options to optimize your computer’s power usage. These
options can also be set to change when you press the power button, close the display, or press
<Fn><Esc>. See "Configuring Power Management Settings" in your
User’s Guide
for more
information on using the Power Management Wizard.
NOTE: See "Configuring Power Management Settings" in your User’s Guide.
Quick Reference Guide 15
Page 16

Charging the Battery
NOTE: With Dell™ ExpressCharge™, when the computer is turned off, the AC adapter charges a completely
discharged battery to 80 percent in about 1 hour and to 100 percent in approximately 2 hours. Charge time is longer
with the computer turned on. You can leave the battery in the computer for as long as you like. The battery’s internal
circuitry prevents the battery from overcharging.
When you connect the computer to an electrical outlet or install a battery while the computer is
connected to an electrical outlet, the computer checks the battery charge and temperature. If necessary,
the AC adapter then charges the battery and maintains the battery charge.
If the battery is hot from being used in your computer or being in a hot environment, the battery may
not charge when you connect the computer to an electrical outlet.The battery is too hot to start charging
if the light flashes alternately orange and green. Disconnect the computer from the electrical outlet
and allow the computer and the battery to cool to room temperature. Then connect the computer to an
electrical outlet to continue charging the battery.
For more information about resolving problems with a battery, see "Power Problems" in your
User’s Guide
Replacing the Battery
CAUTION: Before performing these procedures, turn off the computer, disconnect the AC adapter from the
electrical outlet and the computer, disconnect the modem from the wall connector and computer, and remove any
other external cables from the computer.
NOTICE: You must remove all external cables from the computer to avoid possible connector damage.
CAUTION: Using an incompatible battery may increase the risk of fire or explosion. Replace the battery only
with a compatible battery purchased from Dell. The battery is designed to work with your Dell™ computer. Do not
use a battery from other computers with your computer.
To remove the battery:
1
If the computer is connected to a docking device (docked), undock it. See the documentation that
came with your docking device for instructions.
2
Ensure that the computer is turned off.
3
Slide and hold the battery-bay latch release on the bottom of the computer, and then lift the battery
from the bay.
.
16 Quick Reference Guide
Page 17
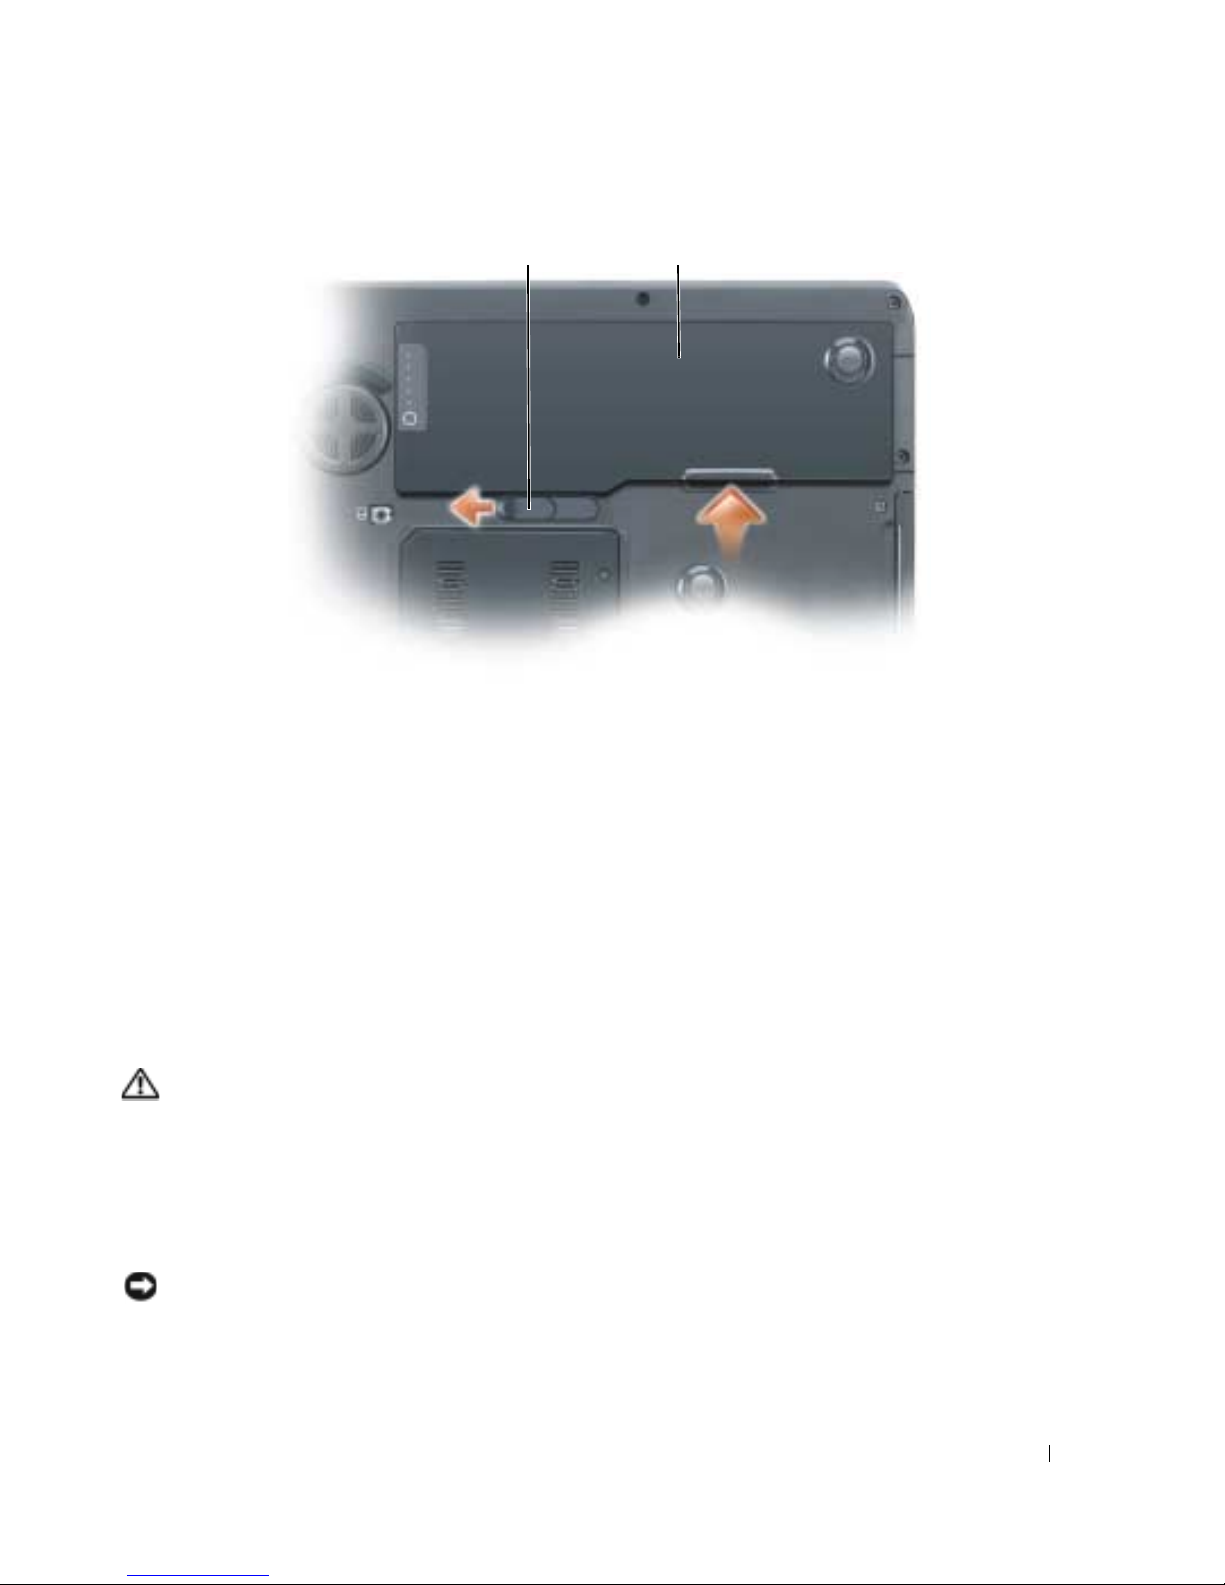
1 2
1 battery-bay latch release 2 battery
To replace the battery, follow the removal procedure in reverse order.
Storing a Battery
Remove the battery when you store your computer for an extended period of time. A battery discharges
during prolonged storage. After a long storage period, recharge the battery fully before you use it. See
"Charging the Battery" on page 16.
Troubleshooting
Lockups and Software Problems
CAUTION: Before you begin any of the procedures in this section, follow the safety instructions in the Product
Information Guide.
The computer does not start up
ENSURE THAT THE AC ADAPTER IS FIRMLY CONNECTED TO THE COMPUTER AND TO THE ELECTRICAL OUTLET
The computer stops responding
NOTICE: You might lose data if you are unable to perform an operating system shutdown.
T
URN THE COMPUTER OFF — If you are unable to get a response by pressing a key on your keyboard or
moving your mouse, press and hold the power button for at least 8 to 10 seconds until the computer
turns off. Then restart your computer.
Quick Reference Guide 17
Page 18

A program stops responding or crashes repeatedly
NOTE: Software usually includes installation instructions in its documentation or on a floppy disk or CD.
ND THE PROGRAM —
E
1
Press <Ctrl><Shift><Esc> simultaneously.
2
Click
Task Manager
3
Click the program that is no longer responding.
4
Click
End Task
CHECK THE SOFTWARE DOCUMENTATION — If necessary, uninstall and then reinstall the program.
A program is designed for an earlier Microsoft® Windows® operating system
RUN THE PROGRAM COMPATIBILITY WIZARD — The Program Compatibility Wizard configures a program
.
.
so it runs in an environment similar to non-Windows XP operating system environments.
1
Click the
Wizard
2
In the welcome screen, click
3
Follow the instructions on the screen.
A solid blue screen appears
.
Start
button, point to
All Programs
Next
.
→
Accessories
, and then click
Program Compatibility
TURN THE COMPUTER OFF — If you are unable to get a response by pressing a key on your keyboard or
moving your mouse, press and hold the power button for at least 8 to 10 seconds until the computer
turns off. Then restart your computer.
Other software problems
CHECK THE SOFTWARE DOCUMENTATION OR CONTACT THE SOFTWARE MANUFACTURER FOR TROUBLESHOOTING
INFORMATION —
• Ensure that the program is compatible with the operating system installed on your computer.
• Ensure that your computer meets the minimum hardware requirements needed to run the software.
See the software documentation for information.
• Ensure that the program is installed and configured properly.
• Verify that the device drivers do not conflict with the program.
• If necessary, uninstall and then reinstall the program.
18 Quick Reference Guide
Page 19

BACK UP YOUR FILES IMMEDIATELY
USE A VIRUS-SCANNING PROGRAM TO CHECK THE HARD DRIVE, FLOPPY DISKS, OR CDS
SAVE AND CLOSE ANY OPEN FILES OR PROGRAMS AND SHUT DOWN YOUR COMPUTER THROUGH THE Start MENU
SCAN THE COMPUTER FOR SPYWARE — If you are experiencing slow computer performance, you frequently
receive pop-up advertisements, or you are having problems connecting to the Internet, your computer
might be infected with spyware. Use an anti-virus program that includes anti-spyware protection (your
program may require an upgrade) to scan the computer and remove spyware. For more information, go to
support.dell.com and search for the keyword spyware.
RUN THE DELL DIAGNOSTICS — See "Dell Diagnostics" on page 19. If all tests run successfully, the error
condition is related to a software problem.
Dell Diagnostics
CAUTION: Before you begin any of the procedures in this section, follow the safety instructions in the Product
Information Guide.
When to Use the Dell Diagnostics
If you experience a problem with your computer, perform the checks in "Lockups and Software
Problems" on page 17 and run the Dell Diagnostics before you contact Dell for technical assistance.
It is recommended that you print these procedures before you begin.
NOTICE: The Dell Diagnostics works only on Dell computers.
NOTE: The Drivers and Utilities CD is optional and may not ship with your computer.
Enter system setup, review your computer’s configuration information, and ensure that the device you
want to test displays in system setup and is active.
Start the Dell Diagnostics from either your hard drive or from the Drivers and Utilities CD (also known
as the ResourceCD).
Starting the Dell Diagnostics From Your Hard Drive
1
Turn on (or restart) your computer.
a
When the DELL™ logo appears, press <F12> immediately. Select
Diagnostics
from the boot
menu and press <Enter>.
NOTE: If you wait too long and the operating system logo appears, continue to wait until you see the
Microsoft
Press and hold the <Fn> key while powering the system on.
b
NOTE: If you see a message stating that no diagnostics utility partition has been found, run the Dell
Diagnostics from the Drivers and Utilities CD.
2
See "Contacting Dell" in your
®
Windows® desktop. Then shut down your computer and try again.
User’s Guide
.
Quick Reference Guide 19
Page 20

Starting the Dell Diagnostics From the Drivers and Utilities CD
1
Insert the
2
Shut down and restart the computer.
Drivers and Utilities
CD.
When the DELL logo appears, press <F12> immediately.
If you wait too long and the Windows logo appears, continue to wait until you see the Windows
desktop. Then shut down your computer and try again.
NOTE: The next steps change the boot sequence for one time only. On the next start-up, the computer boots
according to the devices specified in the system setup program.
3
When the boot device list appears, highlight
4
Select the
5
Ty p e 1 to start the
6
Select
Boot from CD-ROM
ResourceCD
option from the menu that appears and press <Enter>.
menu and press <Enter> to proceed.
Run the 32 Bit Dell Diagnostics
CD/DVD/CD-RW Drive
and press <Enter>.
from the numbered list. If multiple versions are listed, select
the version appropriate for your computer.
7
When the Dell Diagnostics
Dell Diagnostics Main Menu
1
After the Dell Diagnostics loads and the
Main Menu
appears, select the test you want to run.
Main Menu
screen appears, click the button for the option
you want.
Option Function
Express Test Performs a quick test of devices. This test typically takes 10 to
20 minutes and requires no interaction on your part. Run Express Test
first to increase the possibility of tracing the problem quickly.
Extended Test Performs a thorough check of devices. This test typically takes 1 hour or
more and requires you to answer questions periodically.
Custom Test Tests a specific device. You can customize the tests you want to run.
Symptom Tree Lists the most common symptoms encountered and allows you to select
a test based on the symptom of the problem you are having.
2
If a problem is encountered during a test, a message appears with an error code and a description of the
problem. Write down the error code and problem description and follow the instructions on the
screen.
If you cannot resolve the error condition, contact Dell. See "Contacting Dell" in your
NOTE: The Service Tag for your computer is located at the top of each test screen. If you contact Dell,
technical support will ask for your Service Tag.
User’s Guide
.
20 Quick Reference Guide
Page 21

3
If you run a test from the
Custom Test
or
Symptom Tree
option, click the applicable tab described in
the following table for more information.
Tab Function
Results Displays the results of the test and any error conditions encountered.
Errors Displays error conditions encountered, error codes, and the problem
description.
Help Describes the test and may indicate requirements for running the test.
Configuration Displays your hardware configuration for the selected device.
The Dell Diagnostics obtains configuration information for all devices
from the system setup program, memory, and various internal tests,
and it displays the information in the device list in the left pane of the
screen. The device list may not display the names of all the
components installed on your computer or all devices attached to your
computer.
Parameters Allows you to customize the test by changing the test settings.
4
When the tests are completed, if you are running the Dell Diagnostics from the
CD, remove the CD.
5
Close the test screen to return to the
computer, close the
Main Menu
Main Menu
screen.
screen. To exit the Dell Diagnostics and restart the
Drivers and Utilities
Quick Reference Guide 21
Page 22

22 Quick Reference Guide
Page 23

Index
B
battery
charging, 16
checking the charge, 14
performance, 13
power meter, 14
removing, 16
storing, 17
C
CDs
operating system, 7
computer
crashes, 17-18
slow performance, 19
stops responding, 17
D
Dell
support site, 6
Dell Diagnostics
about, 19
starting from the Drivers and
Utilities CD, 20
starting from your hard
drive, 19
diagnostics
Dell, 19
documentation
End User License
Agreement, 5
ergonomics, 5
online, 6
Product Information Guide, 5
regulatory, 5
safety, 5
User’s Guide, 5
warranty, 5
E
End User License
Agreement, 5
ergonomics information, 5
H
hardware
Dell Diagnostics, 19
Help and Support Center, 7
help file
Windows Help and Support
Center, 7
L
labels
Microsoft Windows, 6
Service Tag, 6
M
Microsoft Windows label, 6
O
operating system
CD, 7
reinstalling, 7
Operating System CD, 7
optical drive
description, 10
P
problems
blue screen, 18
computer crashes, 17-18
computer does not start up, 17
computer stops responding, 17
Dell Diagnostics, 19
lockups, 17
program crashes, 18
program stops responding, 18
programs and Windows
compatibility, 18
slow computer
performance, 19
software, 17-18
spyware, 19
Product Information Guide, 5
Index 23
Page 24

R
U
regulatory information, 5
ResourceCD
Dell Diagnostics, 19
S
safety instructions, 5
Service Tag, 6
software
problems, 18
spyware, 19
support website, 6
T
troubleshooting
Dell Diagnostics, 19
Help and Support Center, 7
User’s Guide, 5
W
warranty information, 5
Windows XP
Help and Support Center, 7
Program Compatibility
Wizard, 18
reinstalling, 7
wizards
Program Compatibility
Wizard, 18
24 Index
Page 25

Dell Precision™ M90 Mobiel
werkstation
Snelle Referentiegids
Model PP05XA
www.dell.com | support.dell.com
Page 26

Opmerkingen, kennisgevingen en waarschuwingen
OPMERKING: Een OPMERKING duidt belangrijke informatie aan voor een beter gebruik van de computer.
KENNISGEVING: Een KENNISGEVING duidt mogelijke beschadiging van de hardware of gegevensverlies aan en geeft
aan hoe u dergelijke problemen kunt voorkomen.
LET OP: Een WAARSCHUWING duidt het risico van schade aan eigendommen, lichamelijk letsel of overlijden aan.
Afkortingen en acroniemen
Een volledige lijst met afkortingen en acroniemen vindt u in de Terminologielijst van de
Als u een Dell™ computer uit de n-serie hebt aangeschaft, zijn de verwijzingen naar de Microsoft
Handleiding
®
Windows®
.
besturingssystemen in dit document niet van toepassing.
____________________
De informatie in dit document kan zonder voorafgaande kennisgeving worden gewijzigd.
©2006 Dell Inc. Alle rechten voorbehouden.
Verveelvoudiging van dit materiaal, op welke wijze dan ook, is alleen toegestaan na uitdrukkelijke schriftelijke toestemming van Dell Inc.
Handelsmerken in dit document: Dell, het DELL-logo, Dell Precision, en ExpressCharge zijn handelsmerken van Dell Inc.; Intel is een
gedeponeerd handelsmerk van Intel Corporation; Microsoft en Windows zijn gedeponeerde handelsmerken van Microsoft Corporation;
Bluetooth is een handelsmerk van Bluetooth SIG, Inc. en wordt door Dell Inc. onder licentie gebruikt.
Andere handelsmerken en handelsnamen die mogelijk in dit document worden gebruikt, dienen ter aanduiding van de rechthebbenden met
betrekking tot de merken en namen of ter aanduiding van hun producten. Dell Inc. claimt op geen enkele wijze enig eigendomsrecht ten aanzien
van andere merken of handelsnamen dan haar eigen merken en handelsnamen.
Model PP05XA
Februari 2006 O/N ND243 Rev. A00
Page 27

Inhoud
Informatie zoeken . . . . . . . . . . . . . . . . . . . . . . . . . . . . . . . . 29
De computer uitpakken en installeren
Over de computer
Vooraanzicht
Linkerzijaanzicht
Rechterzijaanzicht
Achteraanzicht
Onderkant
Batterijen gebruiken
Batterijprestatie
. . . . . . . . . . . . . . . . . . . . . . . . . . . . . . . . 34
. . . . . . . . . . . . . . . . . . . . . . . . . . . . . . . . 34
. . . . . . . . . . . . . . . . . . . . . . . . . . . . . . 35
. . . . . . . . . . . . . . . . . . . . . . . . . . . . . 35
. . . . . . . . . . . . . . . . . . . . . . . . . . . . . . . 36
. . . . . . . . . . . . . . . . . . . . . . . . . . . . . . . . . . 37
. . . . . . . . . . . . . . . . . . . . . . . . . . . . . . . 38
. . . . . . . . . . . . . . . . . . . . . . . . . . . . . . . 38
De lading van de batterij controleren
De batterij opladen
De batterij vervangen
Een batterij opslaan
Probleemwijzer
. . . . . . . . . . . . . . . . . . . . . . . . . . . . . 41
. . . . . . . . . . . . . . . . . . . . . . . . . . . . 41
. . . . . . . . . . . . . . . . . . . . . . . . . . . . . 42
. . . . . . . . . . . . . . . . . . . . . . . . . . . . . . . . . 42
Vergrendelingen en softwareproblemen
Dell Diagnostics
. . . . . . . . . . . . . . . . . . . . . . . . . . . . . . . 44
. . . . . . . . . . . . . . . . . . . . . 33
. . . . . . . . . . . . . . . . . . . . 39
. . . . . . . . . . . . . . . . . 42
Register . . . . . . . . . . . . . . . . . . . . . . . . . . . . . . . . . . . . . . . 47
Inhoud 27
Page 28

28 Inhoud
Page 29
Informatie zoeken
OPMERKING: Sommige kenmerken of media zijn optioneel en zijn misschien niet meegeleverd met deze
computer. Sommige kenmerken of media zijn niet beschikbaar in bepaalde landen.
OPMERKING: Mogelijk werd er bij uw computer bijkomende informatie geleverd.
Waar bent u naar op zoek? Hier kunt u het vinden
• Een diagnoseprogramma voor de computer
• Stuurprogramma's voor de computer
• Documentatie over mijn computer
• Documentatie over dit apparaat
• Notebook System Software (NSS)
• Garantie-informatie
• Algemene voorwaarden (alleen Verenigde Staten)
• Veiligheidsinstructies
• Informatie over regelgeving
• Ergonomische informatie
• Licentieovereenkomst voor eindgebruikers
Drivers and Utilities CD (Stuur- en hulpprogramma's-cd)
(ook wel de Resource-cd)
OPMERKING: De Drivers and Utilities CD (Stuur- en
hulpprogramma's-cd) kan optioneel zijn en niet meegeleverd
zijn met deze computer.
De documentatie en
stuurprogramma's zijn
reeds op de computer
geïnstalleerd. U kunt de cd
gebruiken om de
stuurprogramma's
opnieuw te installeren, of
Dell Diagnostics
om de
(Dell-diagnose)
Diagnostics" op pagina 44)
te starten.
Mogelijk bevat de cd leesmij-bestanden met de laatst
beschikbare informatie over technische wijzigingen aan de
computer of geavanceerd technisch naslagmateriaal voor
technici en gevorderde gebruikers.
(zie "Dell
OPMERKING: Updates van de stuurprogramma's en
documentatie vindt u op support.dell.com.
DELL™ Productinformatiegids
Snelle Referentiegids 29
Page 30
Waar bent u naar op zoek? Hier kunt u het vinden
• Onderdelen verwijderen en vervangen
• Specificaties
• Systeeminstellingen configureren
• Problemen vaststellen en oplossen
• Servicelabel en express-servicecode
• Microsoft Windows-licentielabel
Dell Precision™ Handleiding
Microsoft Windows XP Help en Support Center
1
Klik op
ondersteuning)
Gebruikers- en systeeminformatiehandleiding)
Guides
2
Klik op de
Servicelabel en Microsoft® Windows® -licentie
Deze labels bevinden zich op de computer.
• Maak gebruik van het servicelabel om uw computer te
identificeren als u gebruik maakt van
contact opneemt met de technische ondersteuning.
Start
→
Help and Support
→
Dell User and System Guides
(Systeeminformatiehandleiding).
Handleiding
voor deze computer.
(Hulp en
support.dell.com
• Voer de expressservicecode in zodat uw
telefonisch verzoek naar
de juiste medewerker
van de technische
ondersteuning wordt
doorgeleid.
→
(Dell
System
of
30 Snelle Referentiegids
Page 31
Waar bent u naar op zoek? Hier kunt u het vinden
• Oplossingen — Probleemwijzer, tips en advies van
monteurs en online-cursussen, FAQ's
• Community — online-discussies met andere gebruikers
van Dell-producten
• Upgrades — upgrade-informatie voor onderdelen als het
geheugen, de vaste schijf en het besturingssysteem
• Klantendienst — Contactgegevens, de status van
herstellingsverzoeken en bestellingen, informatie over
garanties en herstellingen
• Service en ondersteuning — De status van
herstellingsverzoeken, support-historiek, het
servicecontract, online-discussies met medewerkers van
de technische ondersteuning
• Referentiemateriaal — Computerdocumentatie, details
over mijn computerinstellingen, productspecificaties en
white papers
• Downloads — Geautoriseerde stuurprogramma's,
patches en software-updates
• Notebook System Software (NSS) — Als u het
besturingssysteem herinstalleert, moet u ook de NSS
opnieuw installeren. NSS biedt belangrijke updates voor
het besturingssysteem, en ondersteuning voor Dell™
®
3.5-inch USB-diskettestations, Intel
-processors,
optische schijven en USB-apparaten. NSS is nodig om
uw Dell-computer correct te laten werken. De software
detecteert automatisch de computer en het
besturingssysteem en installeert de updates die voor uw
configuratie van belang zijn.
Dell Support Website — support.dell.com
OPMERKING: Selecteer uw regio om de juiste support-
website weer te geven.
NSS downloaden:
1
Ga naar
support.dell.com
, selecteer uw regio of business-
activiteit, en vul het Servicelabel in.
2
Selecteer
downloads) en klik op
3
Klik op het besturingssysteem van uw computer en zoek
op het trefwoord
Drivers & Downloads
Go
(Ga).
Notebook System Software
(Stuurprogramma's en
.
OPMERKING: De gebruikersinterface van support.dell.com
kan er anders uitzien, afhankelijk van de keuzes die u hebt
gemaakt.
• Software-upgrades en probleemwijzer — FAQ's, nieuws,
en algemene status van uw computeromgeving
Dell Support Utility (Dell Support hulpprogramma)
De Dell Support Utility (Dell Support hulpprogramma) is
een automatisch upgrade- en notificatiesysteem op uw
computer. Dit hulpprogramma biedt real-time scans voor
een gezonde computeromgeving, software-upgrades en
relevante informatie om zelf problemen op te lossen.
Activeer het Dell Support-hulpprogramma via het
pictogram
raadpleeg de sectie "Dell Support Utility" in de
op de taakbalk. Voor meer informatie,
Handleiding
Snelle Referentiegids 31
.
Page 32
Waar bent u naar op zoek? Hier kunt u het vinden
• Met Windows XP werken
• Met programma's en bestanden werken
• Het bureaublad personaliseren
• Het besturingssysteem opnieuw installeren
Windows Help en Support Center
1
Klik op de knop
Support
2
Geef met een of meer woorden een beschrijving van het
(Help en ondersteuning).
Start
en klik vervolgens op
Help and
probleem en klik vervolgens op het pijlpictogram.
3
Klik op het onderwerp dat uw probleem beschrijft.
4
Volg de instructies op het scherm.
Operating System CD (Besturingssysteem-cd)
OPMERKING: De Operating System CD (Besturingssysteem-
cd) kan optioneel zijn en niet meegeleverd zijn met deze
computer.
Het besturingssysteem is reeds op de computer
geïnstalleerd. Gebruik als u het besturingssysteem opnieuw
gaat installeren de Operating System CD
(Besturingssysteem-cd). Zie "Windows XP herinstalleren"
in de Handleiding.
Nadat u het
besturingssysteem
opnieuw hebt
geïnstalleerd, gebruikt u de
Drivers and Utilities CD
(Stuur- en
hulpprogramma's-cd of
Resource-cd) om de
stuurprogramma's voor de
met de computer
meegeleverde apparaten
opnieuw te installeren.
Het label met de product key voor het besturingssysteem
bevindt zich op de computer.
32 Snelle Referentiegids
OPMERKING: De kleur van de cd is afhankelijk van het
besturingssysteem dat u hebt besteld.
Page 33
De computer uitpakken en installeren
LET OP: Voordat u met een van de procedures in dit gedeelte begint, moet u de veiligheidsinstructies in de
Productinformatiegids raadplegen.
1
Haal de onderdelen uit de accessoiredoos.
2
Leg de onderdelen klaar, u hebt deze nodig om de computer te kunnen opstarten.
De accessoiredoos bevat tevens gebruikersdocumentatie en eventuele software of extra hardware die u
hebt besteld (zoals pc-kaarten, stations of batterijen).
3
Sluit de netadapter aan op de connector van de computer en de netspanning.
4
Open de computer en druk op het aan/uit-knopje om de computer op te starten (zie "Vooraanzicht" op
pagina 34).
OPMERKING: Het is aanbevolen om de computer ten minste een keer aan en uit te zetten voor u kaarten
installeert of de computer aansluit op een dockingstation of op een extern apparaat zoals een printer.
Snelle Referentiegids 33
Page 34
Over de computer
Vooraanzicht
13
12
11
10
1
9
2
3
4
5
6
7
1 schermvergrendelingen (2) 6 touchpad 11 toetsenbord
2 schermontgrendeling 7 media-knoppen 12 media-knop
3 beeld 8 luidsprekers (2) 13 statuslampje toetsenbord
4 aan/uit-knop 9 knoppen voor touchpad
5 statuslampjes apparaat 10 touchpad-bladerzone
34 Snelle Referentiegids
8
en draadloze verbinding
Page 35
Linkerzijaanzicht
1 2345
1 sleuf voor
beveiligingskabel
2 ventilatieopeningen 4 mediacompartiment
Rechterzijaanzicht
1 smart card-sleuf 4 IEEE 1394-connector 7 ventilatieopeningen
2 vaste schijf 5 5-in-1 media-
3 ExpressCard-sleuf 6 audioconnectors (2)
3 USB-connectors (2) 5 ontgrendelknop voor
mediacompartiment
2 345671
geheugenkaartleesapparaat
Snelle Referentiegids 35
Page 36
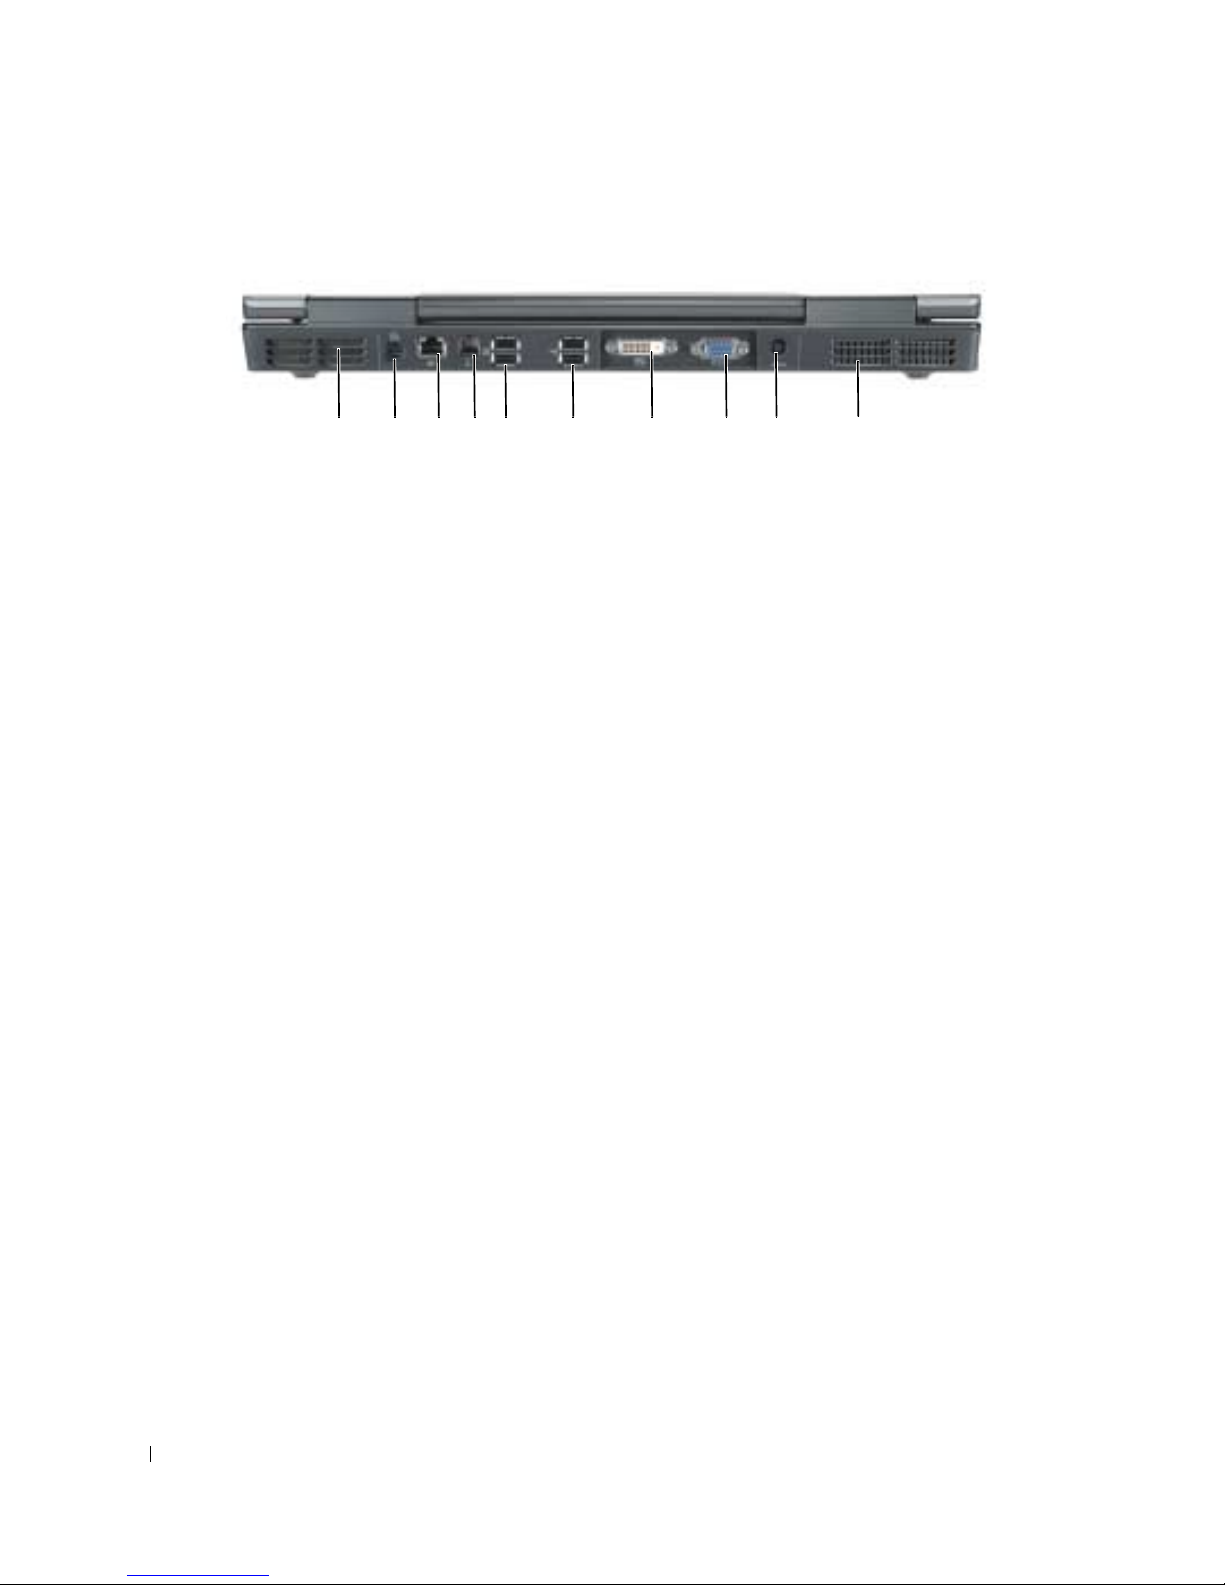
Achteraanzicht
1 luchtopeningen 5 USB-ingangen (2) 9 connector voor netadapter
2 S-video TV-out-aansluiting 6 USB-ingangen (2) 10 ventilatieopeningen
3 netwerk-connector (RJ-45) 7 DVI-connector (Digitale
4 modemconnector (RJ-11) 8 video-connector (VGA)
1 2345 6 7 8 9 10
Video Interface)
36 Snelle Referentiegids
Page 37
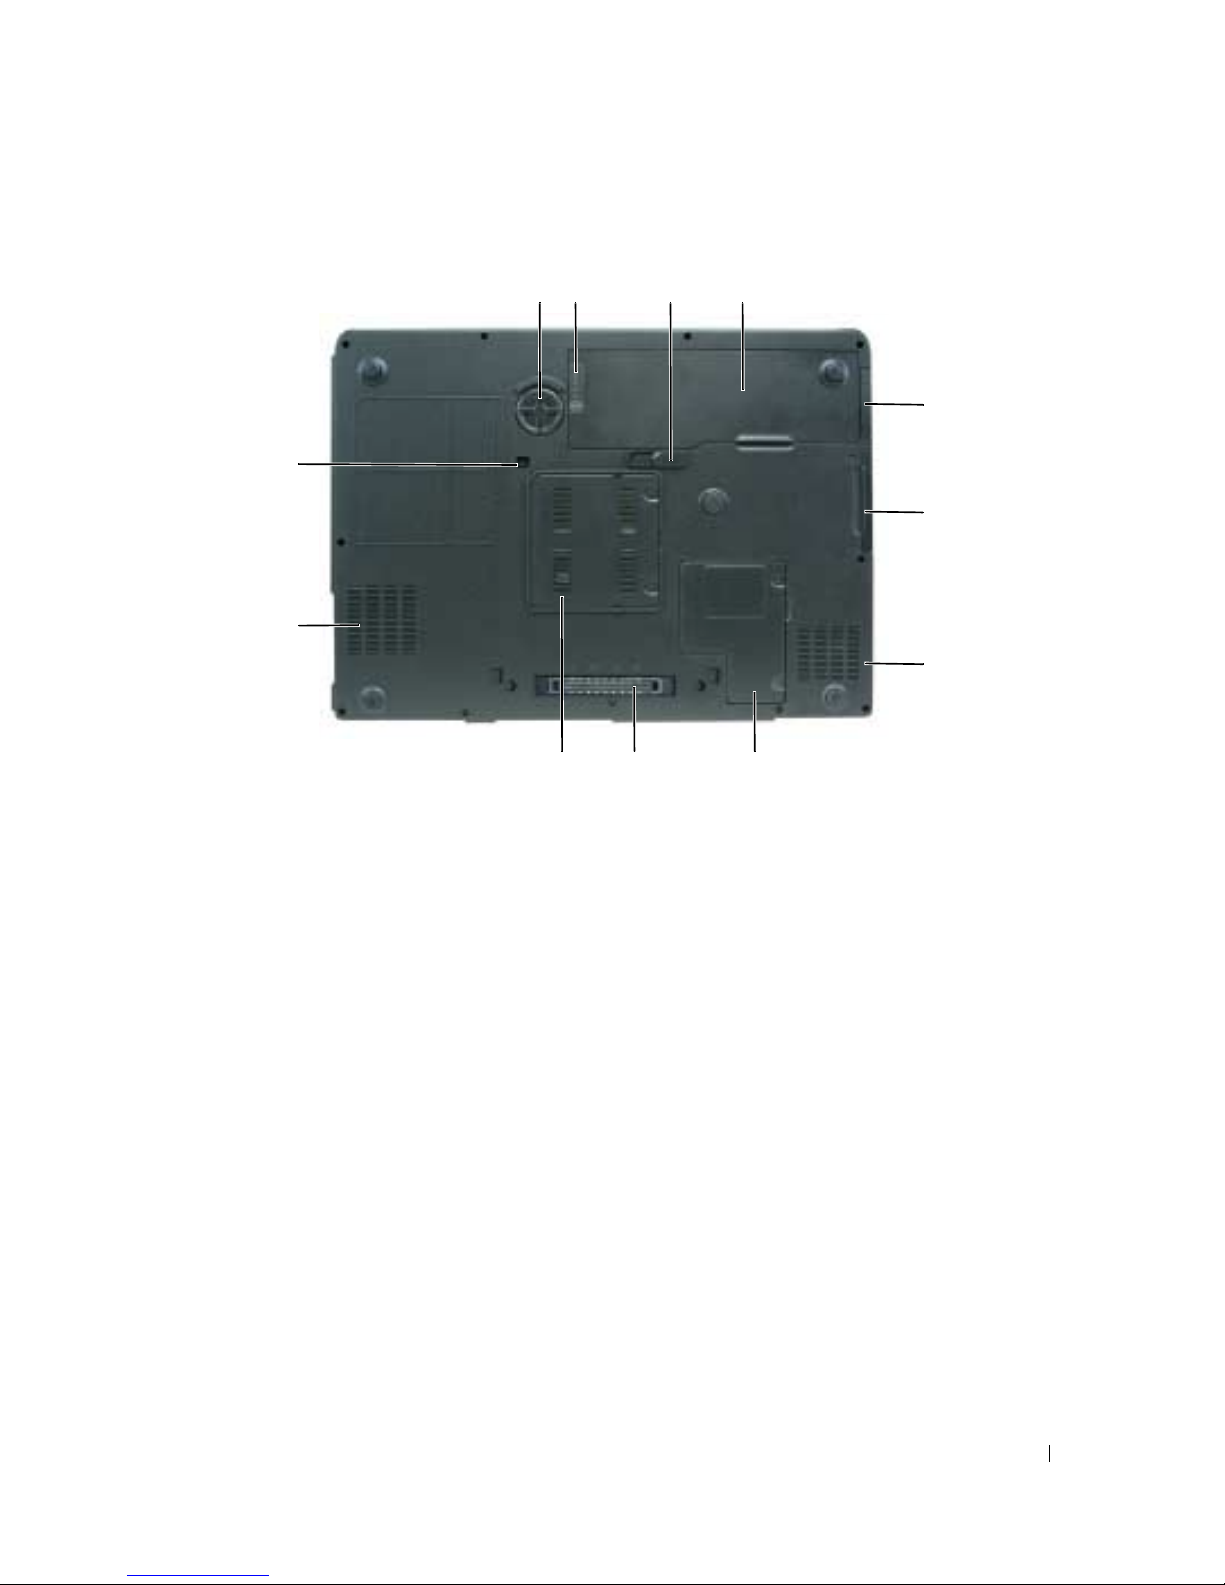
Onderkant
12 3 4
5
12
6
11
7
10
1 basluidspreker 5 afdekplaat voor optionele
interne kaart met Bluetooth
89
9 dockingstation-connector
®
draadloze technologie
2 batterijlader/statusmeter 6 vaste schijf 10 afdekplaat
geheugenmodule
3 ontgrendeling
7 ventilatieopeningen 11 ventilatieopeningen
batterijhouder
4 batterij 8 Minikaart/modem-afdekplaat 12 vergrendelingsschroef
mediacompartiment
Snelle Referentiegids 37
Page 38

Batterijen gebruiken
Batterijprestatie
OPMERKING: Zie de Productinformatigids of het afzonderlijke papieren garantiedocument dat bij de computer is
geleverd voor informatie over de Dell-garantie voor uw computer.
Voor een optimale prestatie van de computer en om de BIOS-instellingen te bewaren is het aanbevolen
om deze draagbare Dell™ -computer altijd te gebruiken met geïnstalleerde batterij. Er wordt standaard
één batterij meegeleverd; deze bevindt zich in het batterijcompartiment.
OPMERKING: Omdat de batterij wellicht niet helemaal opgeladen is, is het aanbevolen om de netadapter van de
computer aan te sluiten op een stopcontact als u de computer voor het eerst gebruikt. Voor de beste resultaten
blijft u de netadapter beter gebruiken tot de batterij helemaal is opgeladen. U kunt de batterijstatus raadplegen: klik
op Start→ Control Panel (Configuratiescherm)→ Power Options (Energieopties), en klik op het tabblad Power
Meter (Energiemeter).
OPMERKING: De werkduur van de batterij (de tijd gedurende welke de batterij stroom kan bieden) wordt met de
tijd minder. Afhankelijk van de frequentie waarmee de batterij wordt gebruikt en de gebruiksomstandigheden kan
het zijn dat u tijdens de levensduur van de computer een nieuwe batterij moet aanschaffen.
De werkduur van de batterij is afhankelijk van de werkomstandigheden. De werkduur wordt aanzienlijk
verminderd door onder andere:
• het gebruik van optische schijven.
• het gebruik van draadloze communicatie-apparaten, ExpressCards, of USB-apparaten.
• het gebruik van zeer heldere weergave-instellingen, 3D-screensavers, of andere energieverbruikende
programma's zoals complexe 3D grafische toepassingen.
• De computer op maximale prestatie laten draaien. Zie "Instellingen voor energiebeheer definiëren" in
de
Handleiding
voor meer informatie over het activeren van de Windows Energiebeheer-
eigenschappen of Dell QuickSet, wat u kunt gebruiken om de energiebeheeropties in te stellen.
OPMERKING: Het wordt aanbevolen dat u de computer op een stopcontact aansluit wanneer u naar een cd of
DVD schrijft.
U kunt de lading van de batterij controleren voordat u deze in de computer plaatst. U kunt de
energiebeheeropties ook zo instellen dat u verwittigd wordt wanneer de batterij bijna leeg is. Raadpleeg
voor meer informatie. "De lading van de batterij controleren" op pagina 39.
LET OP: Het gebruik van een incompatibele batterij kan de kans op brand of een explosie vergroten. Vervang de
batterij uitsluitend met een compatibele batterij die u bij Dell hebt aangeschaft. Deze batterij is speciaal
ontworpen voor gebruik in een Dell-computer. Gebruik geen batterij van een andere computer voor uw Dellcomputer.
LET OP: Gooi batterijen niet met het huisafval weg. Als de batterij geen energie meer bevat, moet u contact
opnemen met de plaatselijke vuilophaal- of milieudienst voor advies over het verwijderen van een lithiumionbatterij. Zie "Batterijen weggooien" in de Productinformatiegids.
38 Snelle Referentiegids
Page 39

LET OP: Misbruik van de batterij kan de kans op brand of chemische brandwonden verhogen. Maak geen gaten
in batterijen, gooi batterijen niet in het vuur, maak batterijen niet open en stel batterijen niet bloot aan een
temperatuur hoger dan 65° C. Houd de batterij buiten bereik van kinderen. Ga uiterst voorzichtig met beschadigde
of lekkende batterijen om. Beschadigde batterijen kunnen lekken en lichamelijke schade of schade aan uw
apparatuur opleveren.
De lading van de batterij controleren
De Dell QuickSet Batterijmeter, de Microsoft Windows Energiemeter en het pictogram , de
batterijladingmeter en de statusmeter, en de waarschuwing dat de batterij bijna leeg is, geven informatie
over de status van de batterij.
OPMERKING: Het is mogelijk dat Dell QuickSet niet beschikbaar is op deze computer.
Dell™ QuickSet-batterijmeter
Als Dell QuickSet
is geïnstalleerd, drukt u op <Fn> <F3> om de QuickSet-batterijmeter weer te geven.
De batterijmeter toont de status, de levensduur, het laadniveau en de laadtijd van de batterij van de
computer.
Voor meer informatie over QuickSet klikt u met de rechtermuisknop op het pictogram in de
taakbalk. Klik vervolgens op Help.
Microsoft® Windows® Energiemeter
De Windows Energiemeter geeft de resterende batterijlading weer. U kunt de energiemeter controleren
door te dubbelklikken op het pictogram in de taakbalk.
Als de computer op een stopcontact is aangesloten, verschijnt het pictogram .
Laadmeter
Klik op de statusknop (of houd de statusknop ingedrukt) van de laadmeter op de batterij om het volgende
te controleren:
• Batterijlading (klik
• Batterijvoortgang (houd de statusknop
kort
op de statusknop)
ingedrukt
)
De werkingsduur van de batterij wordt grotendeels bepaald door het aantal keren dat deze is opgeladen.
Als de batterij al een paar honderd keer is opgeladen en ontladen, gaat iets van de laadcapaciteit — of het
laadvermogen van de batterij verloren. Een batterij kan dus wel een status "geladen" geven, en toch een
beperkte laadcapaciteit (vermogen) hebben.
Batterijlading controleren
Om de batterijlading te controleren, druk op de statusknop van de batterijladingmeter om de lichtjes van
het laadniveau weer te geven. Elk lampje vertegenwoordigt ongeveer 20 procent van de totale
batterijlading. Als bijvoorbeeld tachtig procent van de lading resteert, zullen er vier lampjes branden. Als
er geen lampjes branden, is de batterij leeg.
Snelle Referentiegids 39
Page 40

Batterijvermogen controleren
OPMERKING: U kunt het batterijvermogen controleren met behulp van de laadmeter op de batterij zoals hierna
beschreven, of met behulp van de Batterijmeter in Dell QuickSet. Voor meer informatie over QuickSet, klik met de
rechter muisknop op het pictogram van de taakbalk, en klik vervolgens op Help.
Wilt u het batterijvermogen meten met de laadmeter, houd de statusknop ingedrukt op de
batterijladingmeter gedurende minstens 3 seconden. Als er geen lampjes gaan branden, is de batterij nog
in goede staat, en heeft deze nog meer dan 80 procent van zijn oorspronkelijke oplaadcapaciteit. Hoe
meer lampjes branden, hoe lager het vermogen. Als er vijf lampjes branden, blijft er minder dan
60 procent van de laadcapaciteit van de batterij over en is het raadzaam om deze te vervangen.
Raadpleeg het onderdeel "Specificaties" in de Handleiding voor meer informatie over de werkingsduur
van de batterij.
Waarschuwing batterij bijna leeg
KENNISGEVING: Om te voorkomen dat gegevens beschadigd raken of verloren gaan, moet u uw werk direct
opslaan als u een waarschuwing ontvangt dat de batterij bijna leeg is. Sluit de computer vervolgens op een
stopcontact aan. Als de batterij volledig zonder stroom komt te staan, wordt automatisch de slaapstand
geactiveerd.
U wordt door middel van een pop-upvenster gewaarschuwd als de batterijlading voor ongeveer 90
procent is verbruikt. Zodra een kritiek laag niveau wordt bereikt, gaat de computer automatisch in
slaapstand.
U kunt de instellingen voor de batterijwaarschuwingen definiëren in het venster Power Options
Properties (Energiebeheer-instellingen) van QuickSet. Zie "Energiebeheer-instellingen definiëren" in de
Handleiding voor meer informatie over toegang tot QuickSet of het venster Power Options Properties
(Energiebeheer-instellingen).
Batterijvermogen sparen
Voer de volgende handelingen uit om het batterijvermogen te sparen:
• Sluit de computer aan op een stopcontact telkens als dat mogelijk is, omdat de levensduur van een
batterij in grote mate afhangt van het aantal keer dat de batterij wordt gebruikt en opgeladen.
• Activeer de standby-modus of slaapstand als u de computer langere tijd niet gebruikt. Zie
"Energiebeheer-modi" in de
Handleiding
voor meer informatie over de standby-modus en de
slaapstand.
• Activeer de Energiebeheer-wizard
om opties in te stellen die het stroomverbruik van de computer
optimaliseren. U kunt deze opties zo instellen dat ze wijzigen wanneer u op de aan/uit-knop drukt, het
scherm sluit of <Fn><Esc> indrukt. Zie "Energiebeheer-instellingen definiëren" in de
Handleiding
voor meer informatie over de Energiebeheer-wizard.
OPMERKING: Zie "Energiebeheer-instellingen definiëren" in de Handleiding.
40 Snelle Referentiegids
Page 41

De batterij opladen
OPMERKING: Dankzij Dell™ ExpressCharge™, zal de netadapter als de computer is uitgeschakeld, een volledig
lege batterij tot 80 procent opladen in ongeveer 1 uur, en tot 100 procent in ongeveer 2 uur. De oplaadtijd is langer
als de computer aan staat. U kunt de batterij in de computer laten zolang u wil. De interne circuits van de batterij
voorkomen dat de batterij wordt overladen.
Als u de computer aansluit op een stopcontact of een batterij aanbrengt terwijl de computer op een
stopcontact is aangesloten, zal de computer de lading en temperatuur van de batterij controleren. Indien
nodig zal de wisselstroomadapter de batterij opladen en de batterijlading op peil houden.
Als de batterij verhit is geraakt door gebruik in de computer of omdat de omgevingstemperatuur te hoog
is, is het mogelijk dat de batterij niet oplaadt als u de computer op een stopcontact aansluit. De batterij
is te warm om op te laden als het lichtje afwisselend oranje en groen knippert. Koppel de computer
los van het stopcontact en laat de computer en batterij afkoelen tot kamertemperatuur. Sluit de
computer vervolgens aan op een stopcontact om de batterij op te laden.
Raadpleeg voor meer informatie over het oplossen van problemen met de batterij het onderdeel
"Energieproblemen" in de
Handleiding
.
De batterij vervangen
LET OP: Voordat u deze procedures uitvoert, moet u de computer uitzetten, de netadapter uit het stopcontact
halen, de modemconnectie verbreken en uit de computer halen en alle andere externe kabels uit de computer
verwijderen.
KENNISGEVING: U moet alle externe kabels uit de computer verwijderen om eventuele schade te voorkomen.
LET OP: Het gebruik van een incompatibele batterij kan de kans op brand of een explosie vergroten. Vervang de
batterij uitsluitend met een compatibele batterij die u bij Dell hebt aangeschaft. De batterij is speciaal gemaakt
voor een Dell™-computer. Gebruik geen batterij van een andere computer voor uw Dell-computer.
De batterij verwijderen:
Als de computer is aangesloten op een dockingstation, koppelt u het dockingstation los. Raadpleeg de
1
documentatie bij het dockingstation voor instructies over het loskoppelen.
2
Zorg ervoor dat de computer uitstaat.
3
Verschuif het ontgrendelingsschuifje onderaan de computer, houd vast en til de batterij op om deze uit
de sleuf te halen.
Snelle Referentiegids 41
Page 42
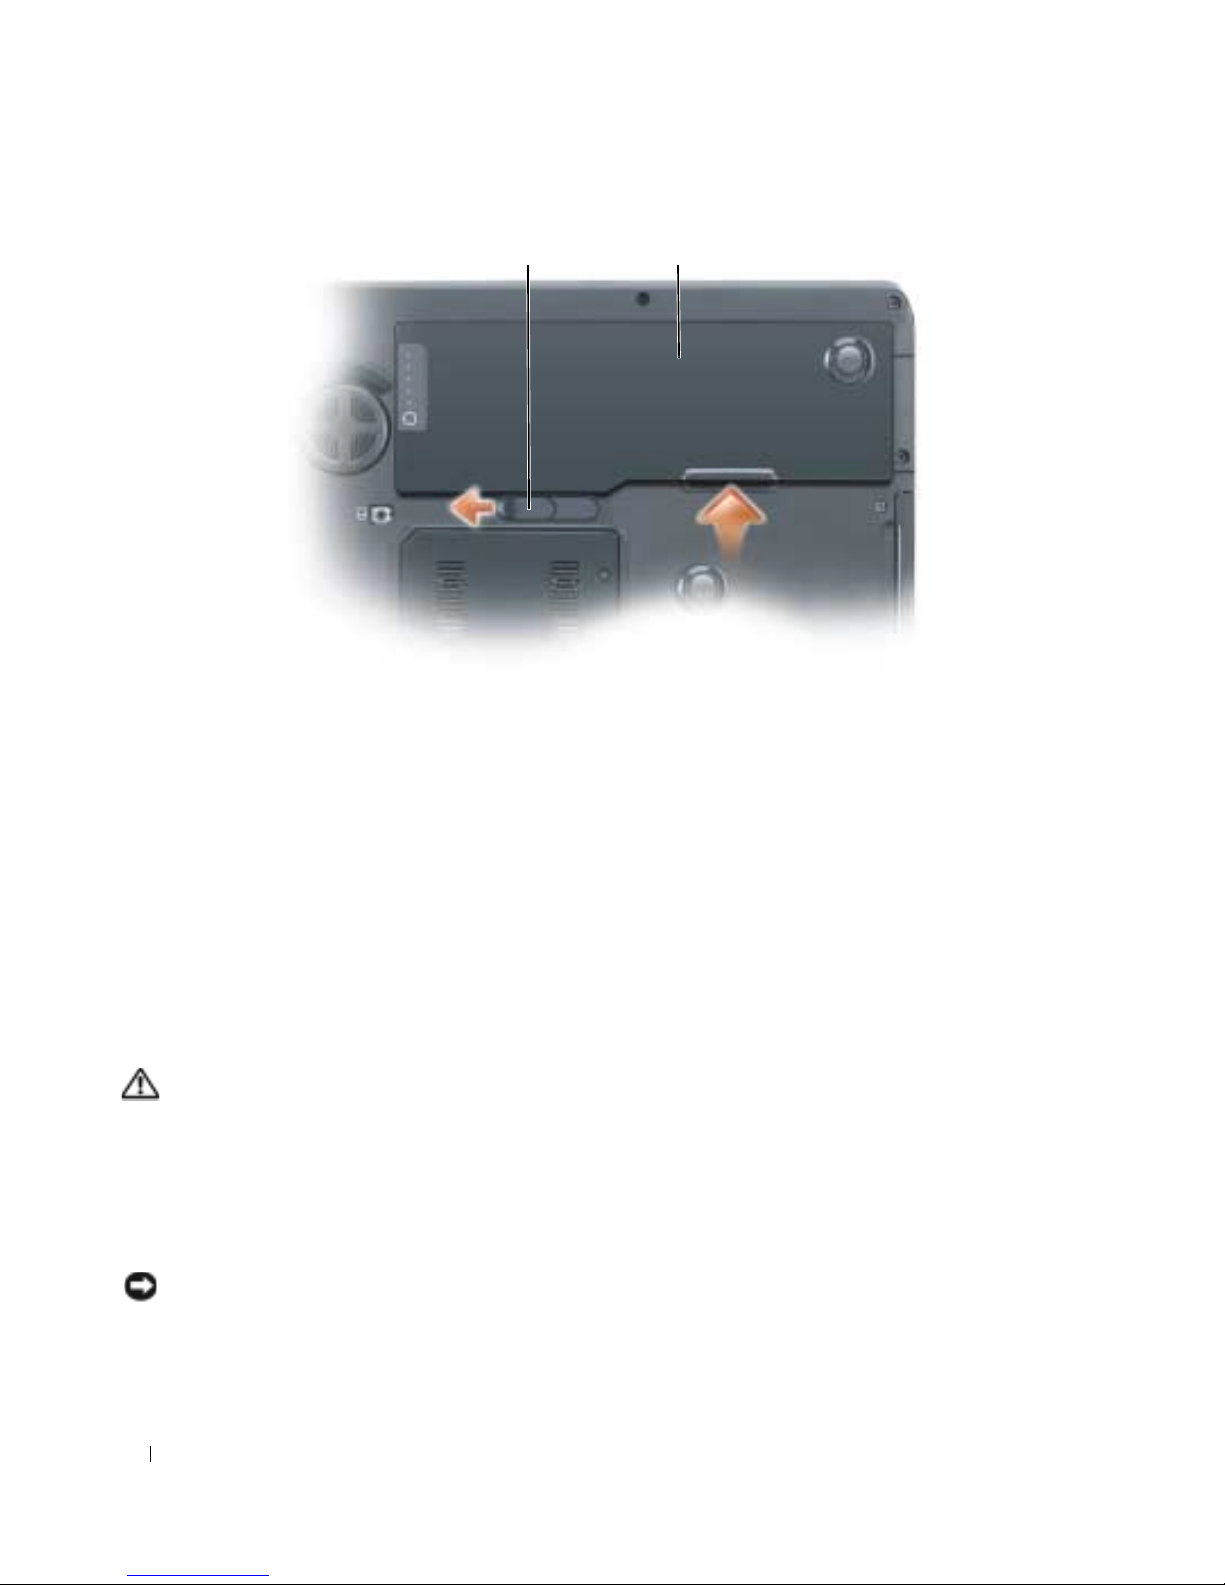
1 2
1 ontgrendelingsschuifje van batterijhouder 2 batterij
Om een andere batterij te plaatsen, volgt u dezelfde procedure in omgekeerde volgorde.
Een batterij opslaan
Verwijder de batterij als u de computer voor langere tijd opslaat. Een batterij verliest zijn lading als deze
gedurende een lange periode niet wordt gebruikt. Na een lange opslagperiode, dient u de batterij volledig
opnieuw te laden voordat u deze gebruikt. Zie "De batterij opladen" op pagina 41.
Probleemwijzer
Vergrendelingen en softwareproblemen
LET OP: Voordat u met een van de procedures in dit gedeelte begint, moet u de veiligheidsinstructies in de
Productinformatiegids raadplegen.
De computer start niet op
CONTROLEER OF DE WISSELSTROOMADAPTER GOED IS AANGESLOTEN OP DE COMPUTER EN HET STOPCONTACT.
De computer reageert niet meer
KENNISGEVING: U loopt het risico gegevens te verliezen als u het besturingssysteem niet afsluit.
Z
ET DE COMPUTER UIT — Als de computer niet reageert zelfs als u een toets op het toetsenbord indrukt of
de muis beweegt, dient u de aan/uit-knop in te drukken en deze minstens 8-10 seconden ingedrukt te
houden tot de computer zichzelf uitschakelt. Herstart vervolgens de computer.
42 Snelle Referentiegids
Page 43

Een programma reageert niet meer of crasht regelmatig
OPMERKING: Bij software worden normaliter installatie-instructies geleverd in de vorm van een
installatiehandleiding of op een floppy disk of cd.
B
EËINDIG HET PROGRAMMA —
1
Druk gelijktijdig op <Ctrl><Shift><Esc>.
2
Klik op
3
Klik op het programma dat niet meer reageert.
4
Klik op
CONTROLEER DE SOFTWAREDOCUMENTATIE — Zo nodig dient u het programma te verwijderen en opnieuw te
installeren.
Een programma is ontwikkeld voor een eerdere versie van het besturingssysteem Microsoft® Windows®
VOER DE WIZARD PROGRAMMACOMPATIBILITEIT UIT — Met de wizard Programmacompatibiliteit
Tas k Ma n ag e r
(Takenbeheer).
Taak beëindigen
.
configureert u een programma zodat het ook werkt in een andere omgeving dan Windows XP (of daarop
gelijkend).
1
Klik op de knop
Wizard Programmacompatibiliteit
2
Klik in het welkomstscherm op
3
Volg de instructies op het scherm.
Start
, kies
All Programs
.
Vol ge nd e
(Alle programma's)
.
→
Accessoires
en klik vervolgens op
Er verschijnt een blauw venster-
ZET DE COMPUTER UIT — Als de computer niet reageert als u op een toets op het toetsenbord drukt of de
muis beweegt, dient u de aan/uit-knop in te drukken en deze minstens 8-10 seconden ingedrukt te
houden tot de computer zichzelf uitschakelt. Herstart vervolgens de computer.
Andere softwareproblemen
CONTROLEER DE SOFTWAREDOCUMENTATIE OF NEEM CONTACT OP MET DE SOFTWAREFABRIKANT VOOR
MOGELIJKE OPLOSSINGEN —
• Ga na of het programma compatibel is met het besturingssysteem dat op de computer is geïnstalleerd.
• Controleer of de computer voldoet aan de minimale hardwarevereisten voor de software. Raadpleeg de
softwarehandleiding voor informatie.
• Controleer of het programma op juiste wijze is geïnstalleerd en geconfigureerd.
• Controleer of de stuurprogramma's voor het apparaat geen conflict hebben met het programma.
• Indien nodig maakt u de installatie van het programma ongedaan en installeert u het opnieuw.
Snelle Referentiegids 43
Page 44

MAAK METEEN EEN RESERVEKOPIE VAN UW BESTANDEN
GEBRUIK EEN ANTIVIRUSPROGRAMMA OM DE VASTE SCHIJF, DE DISKETTESTATIONS OF DE CD'S TE SCANNEN
BEWAAR EN SLUIT ALLE OPEN BESTANDEN OF PROGRAMMA' S EN SLUIT DE COMPUTER AF VIA HET MENU Start
CAN DE COMPUTER OP SPYWARE — Als uw computer zeer traag is, vaak last heeft van pop-upadvertenties
S
of problemen met het opzetten van een internetverbinding, is uw computer mogelijk geïnfecteerd met
spyware. Gebruik een virusscanner met bescherming tegen spyware (mogelijk is voor uw programma een
upgrade nodig) om de computer te scannen en eventuele spyware te verwijderen. Ga voor meer
informatie naar support.dell.com en zoek op het trefwoord spyware.
VOER DE DELL-DIAGNOSTIEK UIT — Zie "Dell Diagnostics" op pagina 44. Als alle tests met succes zijn
afgewerkt, is de foutmelding het gevolg van een softwareprobleem.
Dell Diagnostics
LET OP: Voordat u met een van de procedures in dit gedeelte begint, moet u de veiligheidsinstructies in de
Productinformatiegids raadplegen.
Wanneer het Dell-diagnoseprogramma te gebruiken
Als er zich een probleem voordoet met uw computer, voer dan de controles uit in "Vergrendelingen en
softwareproblemen" op pagina 42 en maak eerst gebruik van Dell Diagnostics (Dell-diagnose) voordat u
contact opneemt met Dell voor technische ondersteuning.
Het verdient aanbeveling om deze procedures af te drukken voordat u begint.
KENNISGEVING: Het Dell-diagnoseprogramma werkt alleen op Dell-computers.
OPMERKING: De Drivers and Utilities CD (Hulp- en stuurprogramma's-cd) is optioneel en wordt mogelijk niet met
uw computer meegeleverd.
Ga naar de systeemsetup, bekijk de configuratiegegevens voor uw computer en ga na of het apparaat dat
u wilt testen, in de systeemsetup wordt weergegeven en actief is.
Start Dell Diagnostics (Dell-diagnose) vanaf de vaste schijf of vanaf de Drivers and Utilities CD (Stuuren hulpprogramma's-cd), ook wel de Resource-cd of bron-cd genoemd.
Dell-diagnoseprogramma starten vanaf vaste schijf
1
Start of herstart de computer.
a
Als het DELL™-logo verschijnt, drukt u direct op <F12>. Selecteer
Diagnostics
(Diagnose) in
het opstartmenu en druk op <Enter>.
OPMERKING: Als u te lang wacht en het logo van het besturingssysteem wordt weergegeven, moet u blijven
wachten tot het bureaublad van Microsoft
en probeer het opnieuw.
Houd <Fn> ingedrukt terwijl u het systeem opstart.
b
OPMERKING: Als er een bericht verschijnt dat er geen diagnoseprogramma wordt gevonden, voert u Dell
Diagnostics (Dell-diagnose) uit vanaf de Drivers and Utilities CD (Stuur- en hulpprogramma's-cd).
2
Zie "Contact opnemen met Dell" in de
®
Windows® wordt weergegeven. Sluit de computer vervolgens af
Handleiding
.
44 Snelle Referentiegids
Page 45

Dell Diagnostics starten vanaf de Drivers and Utilities CD (stuur- en hulpprogramma's-cd)
1
Voer de
2
Zet de computer uit en start deze opnieuw.
Drivers and Utilities CD
(Stuur- en hulpprogramma's-cd) in.
Zodra het DELL-logo verschijnt, drukt u meteen op <F12>.
Als u te lang wacht en het logo van Windows verschijnt, moet u wachten totdat u het bureaublad van
Windows ziet. Sluit de computer vervolgens af en probeer het opnieuw.
OPMERKING: Met de volgende stappen wordt de opstartvolgorde slechts één keer gewijzigd. De volgende
keer dat u de computer start, gebeurt dat volgens de instellingen die zijn gedefinieerd in het systeem-setupprogramma.
3
Als de opstartbronlijst wordt weergegeven, selecteer
4
Selecteer de optie
Boot from CD-ROM
(Opstarten vanaf cd-rom) in het menu en druk vervolgens op
CD/DVD/CD-RW-station
en druk op <Enter>.
<Enter>.
5
Ty p 1 om de
6
Selecteer
Resource-cd
te starten en druk op <Enter> om verder te gaan.
Run the 32 Bit Dell Diagnostics
(32 bit Dell Diagnose opstarten) uit de genummerde lijst.
Als er meerdere versies worden aangegeven, moet u de versie selecteren die voor uw computer van
toepassing is.
7
Als het
Hoofdmenu
van Dell Diagnostics (Dell-diagnose) wordt weergegeven, selecteert u de test die u
wilt uitvoeren.
Hoofdmenu Dell Diagnostics
1
Nadat Dell Diagnostics (Dell-diagnose) is geladen en het scherm met het
weergegeven, klikt u op de knop voor de gewenste optie.
Optie Functie
Express Test (snelle test) Hiermee wordt een snelle test uitgevoerd van apparaten. Deze test
neemt normaliter 10 tot 20 minuten in beslag en vereist geen interactie
van uw kant. Als u de snelle test eerst uitvoert, vergroot u de kans om
het probleem snel op te sporen.
Extended Test
(uitgebreide test)
Custom Test
(aangepaste test)
Symptom Tree
(symptomenstructuur)
Hiermee wordt een grondige controle van apparaten uitgevoerd. Deze
test neemt normaliter 1 uur of meer in beslag. Zo nu en dan zult u
vragen moeten beantwoorden.
Hiermee kunt u een bepaald apparaat testen. U kunt de tests die u wilt
uitvoeren, zelf aanpassen.
Geeft een overzicht van de problemen die het vaakst optreden en stelt u
in staat om een test te selecteren op basis van de symptomen van het
probleem dat u ondervindt.
hoofdmenu
wordt
Snelle Referentiegids 45
Page 46

2
Als er tijdens een test een probleem wordt opgespoord, wordt er een bericht weergegeven met de
foutcode en een beschrijving van het probleem. Noteer de foutcode en de beschrijving van het
probleem en volg de instructies op het scherm.
Neem contact op met Dell, als u de fout niet kunt oplossen. Zie "Contact opnemen met Dell" in de
Handleiding
OPMERKING: Het servicelabel voor de computer bevindt zich bovenaan elk testvenster. Als u contact
opneemt met Dell, zullen de medewerkers van de technische ondersteuning naar het servicelabel vragen.
3
Wanneer u een test uitvoert via de optie
.
Custom Test
(Aangepaste test) of
Symptom Tree
(Symptomenstructuur), kunt u voor meer informatie over de test op een van de tabbladen klikken die
in de volgende tabel worden beschreven.
Tabblad Functie
Results (Resultaten) Hier worden de resultaten van de test weergegeven, samen met
eventuele omstandigheden waarin de fout zich heeft voorgedaan.
Errors (Fouten) Geeft de aangetroffen foutcondities en de foutcodes weer, en een
beschrijving van het probleem.
Help Hier wordt de test beschreven en worden eventuele vereisten voor het
uitvoeren van de test vermeld.
Configuration
(Configuratie)
Parameters Hiermee kunt u de test aanpassen door de testinstellingen te wijzigen.
4
Wanneer de tests zijn voltooid, als u Dell Diagnostics (Dell-diagnose) uitvoert vanaf de
Utilities
5
Sluit het testvenster om terug te keren naar het
CD (Stuur- en hulpprogramma's-cd), verwijder de cd.
verlaten en de computer opnieuw te starten, sluit u het venster
Hier wordt de hardwareconfiguratie beschreven voor het geselecteerde
apparaat.
Het Dell-diagnoseprogramma haalt configuratiegegevens op voor alle
apparaten uit de systeeminstellingen, het geheugen, verschillende
interne tests en geeft de informatie weer in de lijst met apparaten in
het linkervenster van het scherm. Mogelijk worden in het
apparaatoverzicht niet de namen van alle onderdelen weergegeven die
zijn geïnstalleerd in of aangesloten op de computer.
Hoofdvenster
. Om het Dell-diagnoseprogramma te
Hoofdmenu
.
Drivers and
46 Snelle Referentiegids
Page 47

Register
B
batterij
vermogen, 38
energiemeter, 39
lading controleren, 39
opladen, 41
opslaan, 42
besturingssysteem
cd, 32
herinstalleren, 32
C
cd's
besturingssysteem, 32
computer
crasht, 42-43
reageert niet meer
computer crasht, 42
trage prestatie, 44
D
DELL
support-site, 31
Dell Diagnostics
algemeen, 44
starten vanaf Drivers and
Utilities CD (Stuur- en
hulpprogramma's-cd), 45
diagnose
Dell, 44
documentatie
ergonomie, 29
garantie, 29
licentieovereenkomst, 29
productinformatiegids, 29
reglementeringen, 29
veiligheid, 29
gebruikershandleiding, 30
online, 31
E
Eindgebruikers-
licentieovereenkomst, 29
ergonomics information, 29
G
gebruikershandleiding, 30
H
hardware
Dell Diagnostics, 44
Help en Support Center, 32
help-bestand
Windows Help en Support
Center, 32
L
labels
Microsoft Windows, 30
servicelabel, 30
M
Microsoft Windows-label, 30
O
Operating System CD
(Besturingssysteem-
cd), 32
optische schijf
beschrijving, 35
P
probleemwijzer
Dell Diagnostics, 44
problemen
blauw venster, 43
compatibliteit van
programma's met
Windows, 43
computer crasht, 43
computer reageert niet
meer, 42
computer start niet op, 42
Dell Diagnostics, 44
programma crasht, 43
Register 47
Page 48

programma reageert niet, 43
software, 42-43
spyware, 44
trage computerprestatie, 44
vergrendelingen, 42
problemen oplossen
Help en Support Center, 32
Product Information
Guide, 29
R
Reglementeringen, 29
Resource-cd
Dell Diagnostics, 44
S
programmacompatibiliteit, 43
veiligheidsinstructies, 29
servicelabel, 30
software
problemen, 43
spyware, 44
support-website, 31
W
garantie, 29
Windows XP
Help en Support Center, 32
herinstalleren, 32
Wizard Programma-
compatibiliteit, 43
wizards
48 Register
Page 49

Station de travail mobile
Dell Precision™ M90
Guide de référence rapide
Modèle PP05XA
www.dell.com | support.dell.com
Page 50

Remarques, avis et précautions
REMARQUE : Une REMARQUE fournit des informations importantes qui vous aident à mieux utiliser votre ordinateur.
AVIS : Un AVIS vous avertit d’un risque de dommage matériel ou de perte de données et vous indique comment éviter le
problème.
PRÉCAUTION : Une PRÉCAUTION indique un risque potentiel d'endommagement du matériel, de blessure corporelle
ou de mort.
Abréviations et sigles
Pour obtenir une liste complète des abréviations et des sigles, reportez-vous au Glossaire du
Guide d'utilisation
.
Si vous avez acheté un ordinateur Dell™ Série n, les références du présent document concernant les systèmes
d'application Microsoft
®
Windows® ne sont pas applicables.
____________________
Les informations contenues dans ce document sont sujettes à modification sans préavis.
© 2006 Dell Inc. Tous droits réservés.
La reproduction de ce document, de quelque manière que ce soit, sans l'autorisation écrite de Dell Inc. est strictement interdite.
Marques utilisées dans ce document : Dell, le logo DELL, Dell Pr ecision et ExpressChar ge sont des marques de Dell Inc. ; Intel est une marque
déposée d'Intel Corporation ; Microsoft et Windows sont des marques déposées de Microsoft Corporation ; Bluetooth est une marque détenue
par Bluetooth SIG, Inc. et est utilisée par Dell Inc. sous licence.
D'autres marques et noms commerciaux peuvent être utilisés dans ce document pour faire référence aux entités se réclamant de ces marques
et de ces noms ou à leurs produits. Dell Inc. rejette tout intérêt propriétaire dans les marques et les noms commerciaux autres que les siens.
Modèle PP05XA
Février 2006 N/P ND243 Rév. A00
Page 51

Table des matières
Recherche d'informations . . . . . . . . . . . . . . . . . . . . . . . . . . . . 53
Configuration de votre ordinateur
À propos de votre ordinateur
Vue frontale
Vue du côté gauche
Vue du côté droit
Vue arrière
Vue de dessous
Utilisation d'une batterie
. . . . . . . . . . . . . . . . . . . . . . . . . . . . . . . . . 57
. . . . . . . . . . . . . . . . . . . . . . . . . . . . . 58
. . . . . . . . . . . . . . . . . . . . . . . . . . . . . . 58
. . . . . . . . . . . . . . . . . . . . . . . . . . . . . . . . . 59
. . . . . . . . . . . . . . . . . . . . . . . . . . . . . . . 60
. . . . . . . . . . . . . . . . . . . . . . . . . . . . 61
Performances de la batterie
Vérification de la charge de la batterie
Chargement de la batterie
Remplacement de la batterie
Stockage de la batterie
Dépannage
. . . . . . . . . . . . . . . . . . . . . . . . . . . . . . . . . . . . 65
Problèmes de blocage et problèmes logiciels
Dell Diagnostics
. . . . . . . . . . . . . . . . . . . . . . . . . . . . . . . 67
. . . . . . . . . . . . . . . . . . . . . . . . 56
. . . . . . . . . . . . . . . . . . . . . . . . . . 57
. . . . . . . . . . . . . . . . . . . . . . . . 61
. . . . . . . . . . . . . . . . . . . 62
. . . . . . . . . . . . . . . . . . . . . . . . . 64
. . . . . . . . . . . . . . . . . . . . . . . . 64
. . . . . . . . . . . . . . . . . . . . . . . . . . . 65
. . . . . . . . . . . . . . . 65
Index . . . . . . . . . . . . . . . . . . . . . . . . . . . . . . . . . . . . . . . . . 71
Table des matières 51
Page 52

52 Table des matières
Page 53
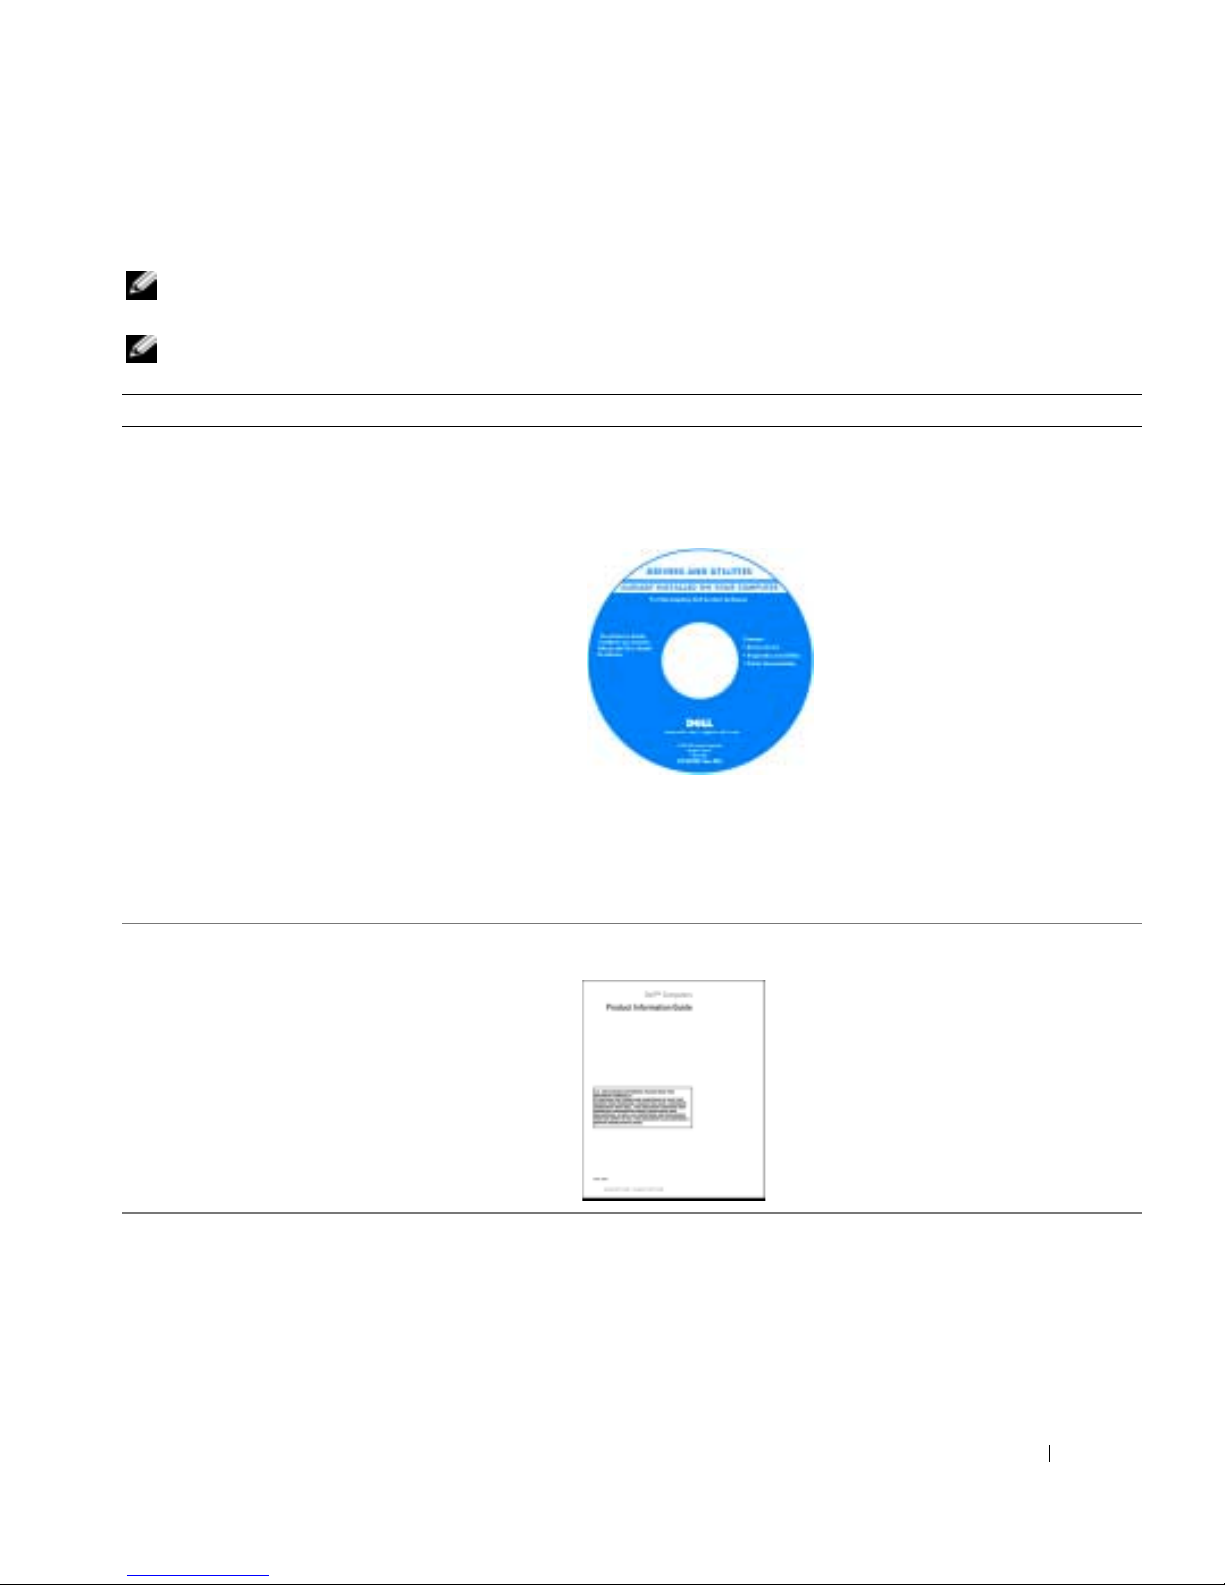
Recherche d'informations
REMARQUE : Il se peut que certaines fonctionnalités et certains supports soient en option et ne soient pas livrés
avec votre ordinateur. Certaines fonctionnalités ne sont pas nécessairement disponibles dans tous les pays.
REMARQUE : Il est possible que des informations supplémentaires soient livrées avec votre ordinateur.
Que recherchez-vous ? Cherchez ici
• Programme de diagnostic pour mon ordinateur
• Pilotes pour mon ordinateur
• Documentation de mon ordinateur
• Documentation concernant mon appareil
• NSS (Notebook System Software)
• Informations sur les garanties
• Termes et Conditions (États-Unis uniquement)
• Consignes de sécurité
• Informations sur les réglementations
• Informations relatives à l'ergonomie
• Contrat de licence pour utilisateur final
CD Drivers and Utilities (également appelé CD ResourceCD)
REMARQUE : Il se peut que le CD Drivers and Utilities (Pilotes et
utilitaires) soit en option et qu'il ne soit pas fourni avec votre
ordinateur.
La documentation et les pilotes
sont déjà installés sur l'ordinateur.
Vous pouvez utiliser le CD pour
réinstaller des pilotes ou exécuter
Dell Diagnostics
section «Dell Diagnostics» à la
page 67).
Des fichiers Lisez-moi,
éventuellement inclus sur votre
CD, fournissent des informations
sur les modifications techniques apportées en dernière minute à
votre système ou des informations de référence destinées aux
techniciens ou aux utilisateurs expérimentés.
(reportez-vous à la
REMARQUE : Les dernières mises à jour des pilotes et de la
documentation se trouvent à l'adresse support.dell.com.
Guide d'information sur le produit Dell™
• Comment retirer et remplacer des pièces
• Caractéristiques
• Comment configurer les paramètres du système
• Comment déterminer et résoudre des problèmes
Guide d'utilisation Dell Precision™
Centre d'aide et de support de Microsoft Windows XP
1
Cliquez sur
System Guides
du système
2
Cliquez sur le
Démarrer→ Aide et support→ Dell User and
(Guides d'utilisation du système Dell)→ Guides
.
Guide d'utilisation
Guide de référence rapide 53
de votre ordinateur.
Page 54
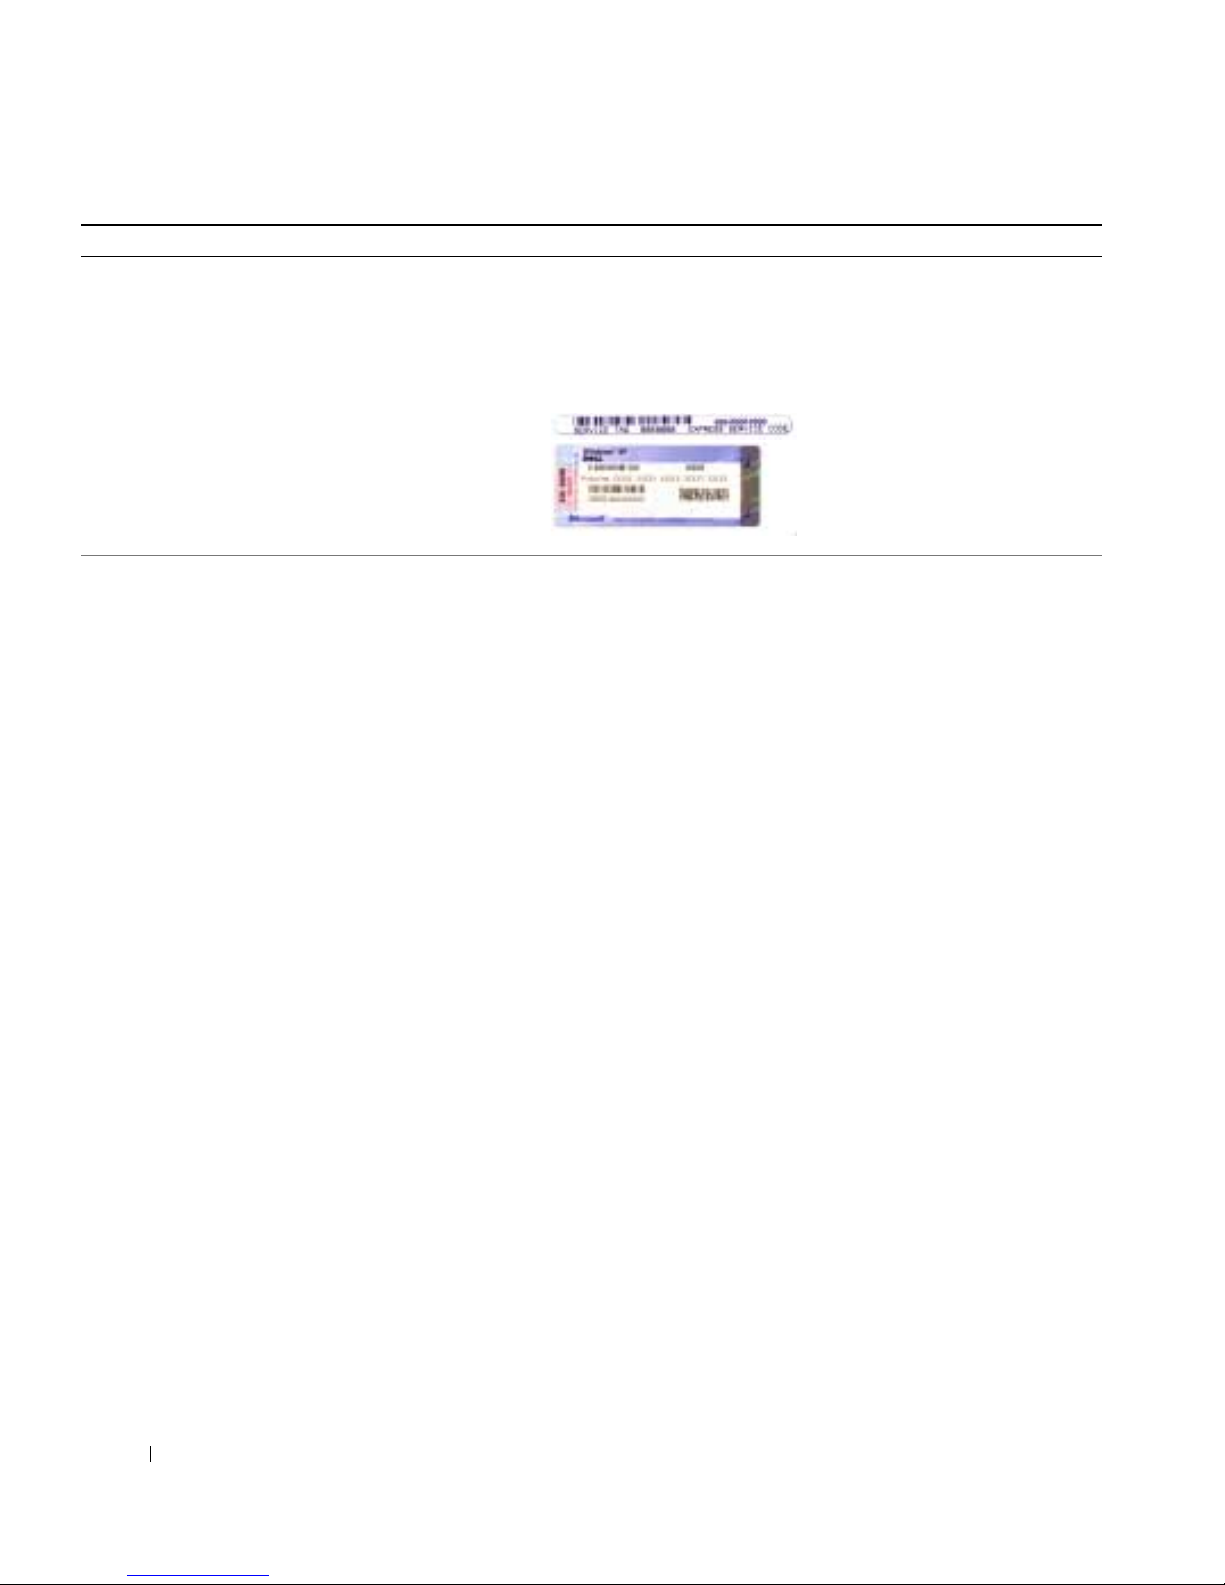
Que recherchez-vous ? Cherchez ici
• Numéro de service et code de service express
• Étiquette de licence Microsoft Windows
Numéro de service et licence Microsoft® Windows
Ces étiquettes sont apposées sur votre ordinateur.
• Utilisez le numéro de service pour identifier votre ordinateur
lorsque vous accédez au site Web
vous appelez le service de support technique.
®
support.dell.com
ou lorsque
• Entrez le code de service
express pour orienter votre
appel lorsque vous contactez le
service de support technique.
• Solutions — Astuces de dépannage, articles de
techniciens et cours en ligne, questions
fréquemment posées
• Forum clients — Discussion en ligne avec d'autres
clients Dell
• Mises à niveau — Informations de mise à niveau
pour les composants, tels que la mémoire, le disque
dur et le système d'exploitation
• Service clientèle — Coordonnées, appels de service
et état des commandes, garantie et informations sur
les réparations
• Service et support — État des appels de service et
historique du support, contrat de service,
discussions en ligne avec le support technique
• Référence — Documentation de l'ordinateur, détails
sur la configuration de l'ordinateur, caractéristiques
de produit et livres blancs
• Téléchargements — Pilotes, correctifs et mises à
jour logicielles agréés
• NSS (Notebook System Software) — Si vous
réinstallez le système d'exploitation de l'ordinateur,
vous devez également réinstaller l'utilitaire NSS.
NSS fournit des mises à jour essentielles pour le
système d'exploitation et la prise en charge des
lecteurs de disquette USB Dell™ 3,5 pouces, des
®
processeurs Intel
, des lecteurs optiques et des
périphériques USB. NSS est requis pour le bon
fonctionnement de votre ordinateur Dell.
Ce logiciel détecte automatiquement votre
ordinateur et son système d'exploitation et installe
les mises à jour appropriées à votre configuration.
Site Web de support de Dell — support.dell.com
REMARQUE : Sélectionnez votre région pour afficher le site de
support approprié.
Pour télécharger NSS :
1
Rendez-vous sur
support.dell.com
, sélectionnez votre région ou
votre secteur d'activité et entrez votre numéro de service.
2
Sélectionnez
et cliquez sur
3
Cliquez sur votre système d'exploitation et lancez une recherche
à l'aide du mot-clé
Drivers & Downloads
Go
.
Notebook System Software (NSS).
(Pilotes et téléchargements)
REMARQUE : L'interface utilisateur support.dell.com peut varier
selon vos sélections.
54 Guide de référence rapide
Page 55
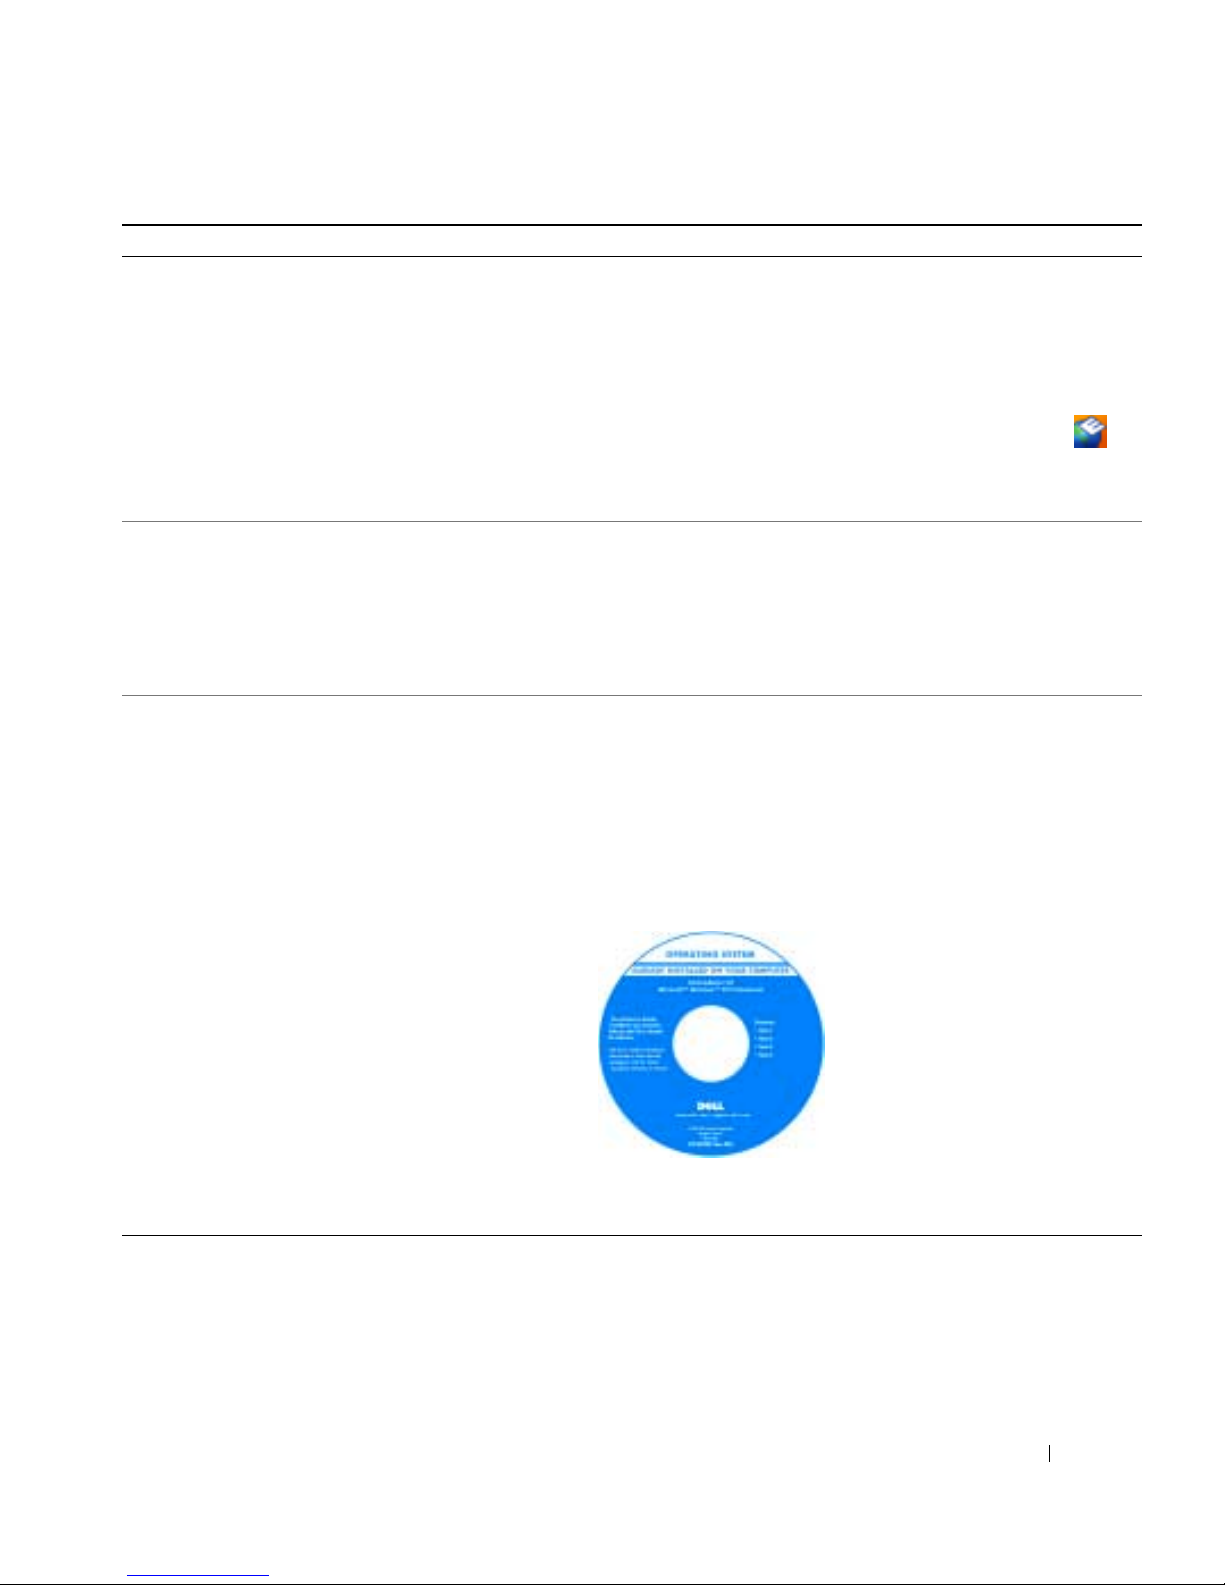
Que recherchez-vous ? Cherchez ici
• Mises à niveau logicielles et astuces de dépannage —
Questions fréquemment posées, sujets d'actualité et
état général de votre environnement informatique
Utilitaire de support de Dell
L'utilitaire de support de Dell est un système de mise à niveau et
de notification automatique installé sur votre ordinateur. Il
permet de réaliser des balayages en temps réel de l'état de votre
environnement informatique et des mises à jour logicielles et
fournit des informations de support automatique appropriées.
Accédez à l'utilitaire de support de Dell à l'aide de l'icône
située dans la barre des tâches. Pour obtenir plus d'informations,
reportez-vous à la section «Utilitaire de support de Dell» du
d'utilisation
• Comment utiliser Windows XP
• Comment utiliser des programmes et des fichiers
• Comment personnaliser mon bureau
Centre d'aide et de support de Windows
1
Cliquez sur le bouton
2
Tapez un mot ou une expression qui décrit votre problème, puis
cliquez sur l'icône représentant une flèche.
3
Cliquez sur la rubrique qui décrit votre problème.
4
Suivez les instructions qui s'affichent à l'écran.
• Comment réinstaller mon système d'exploitation
CD Operating system
REMARQUE : Il se peut que le CD Operating System (Système
d'exploitation) soit en option et qu'il ne soit pas fourni avec votre
ordinateur.
Le système d'exploitation est déjà installé sur votre ordinateur. Pour
réinstaller le système d'exploitation, utilisez le CD
. Reportez-vous à la section «Réinstallation de Windows XP»
System
Guide d'utilisation
du
REMARQUE : La couleur du CD varie selon le système
d'exploitation que vous avez commandé.
Guide
.
Démarrer
, puis sur
Aide et support
.
Operating
.
Une fois le système d'exploitation
réinstallé, utilisez le CD Drivers
and Utilities (CD ResourceCD)
pour réinstaller les pilotes des
périphériques accompagnant
votre ordinateur.
L'étiquette de la
Product Key
(Clé de produit) du système
d'exploitation est apposée à
l'ordinateur.
Guide de référence rapide 55
Page 56
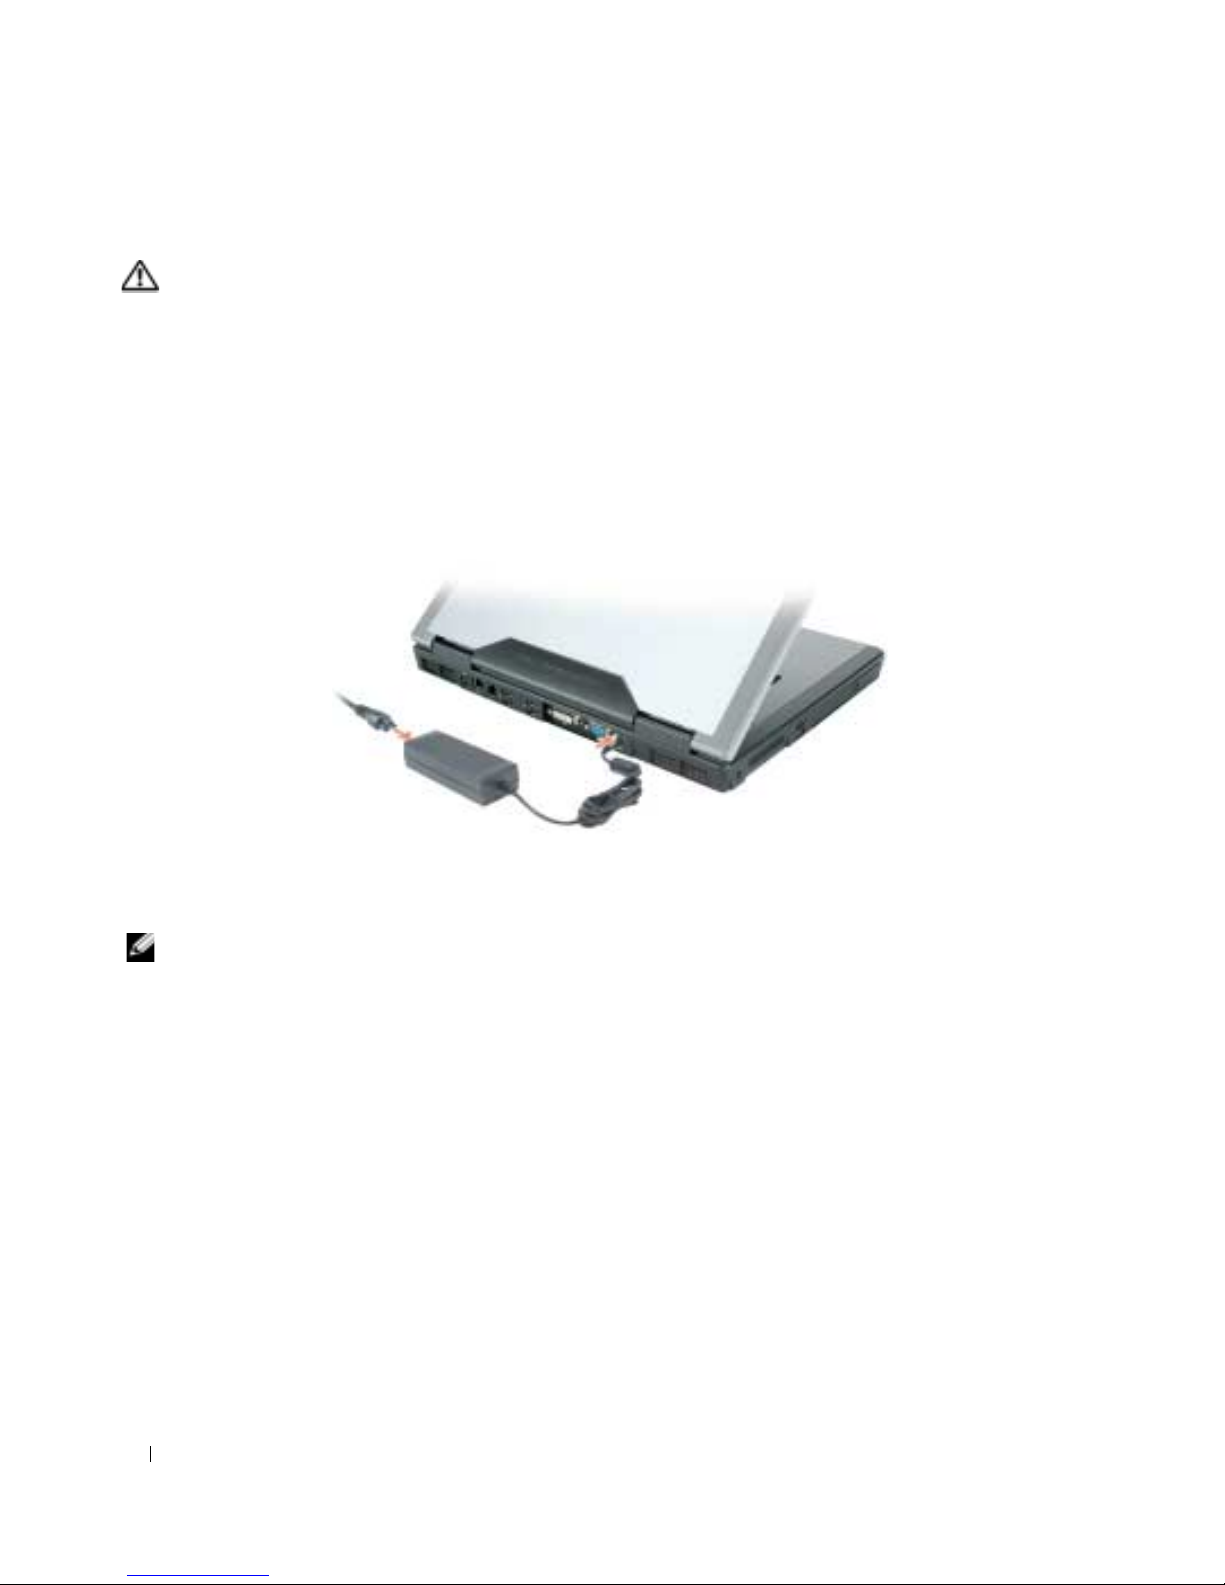
Configuration de votre ordinateur
PRÉCAUTION : Avant de commencer toute procédure de cette section, suivez les consignes de sécurité du
Guide d'information sur le produit.
1
Déballez la boîte d'accessoires.
2
Mettez de côté le contenu de la boîte d'accessoires ; vous en aurez besoin ultérieurement pour
configurer votre ordinateur.
Cette boîte contient également la documentation utilisateur et tout autre logiciel ou matériel
supplémentaire (cartes PC, lecteurs, batteries, etc.) que vous avez commandé.
3
Reliez l'adaptateur secteur au connecteur de l'adaptateur secteur de l'ordinateur et à la prise secteur.
4
Pour mettre l'ordinateur sous tension, ouvrez le moniteur et appuyez sur le bouton d'alimentation
(reportez-vous à la section «Vue frontale» à la page 57).
REMARQUE : Il est recommandé de mettre l'ordinateur sous tension et de l'éteindre au moins une fois avant
d'installer des cartes ou de connecter l'ordinateur à une station d'accueil ou un autre périphérique externe, tel
qu'une imprimante.
56 Guide de référence rapide
Page 57
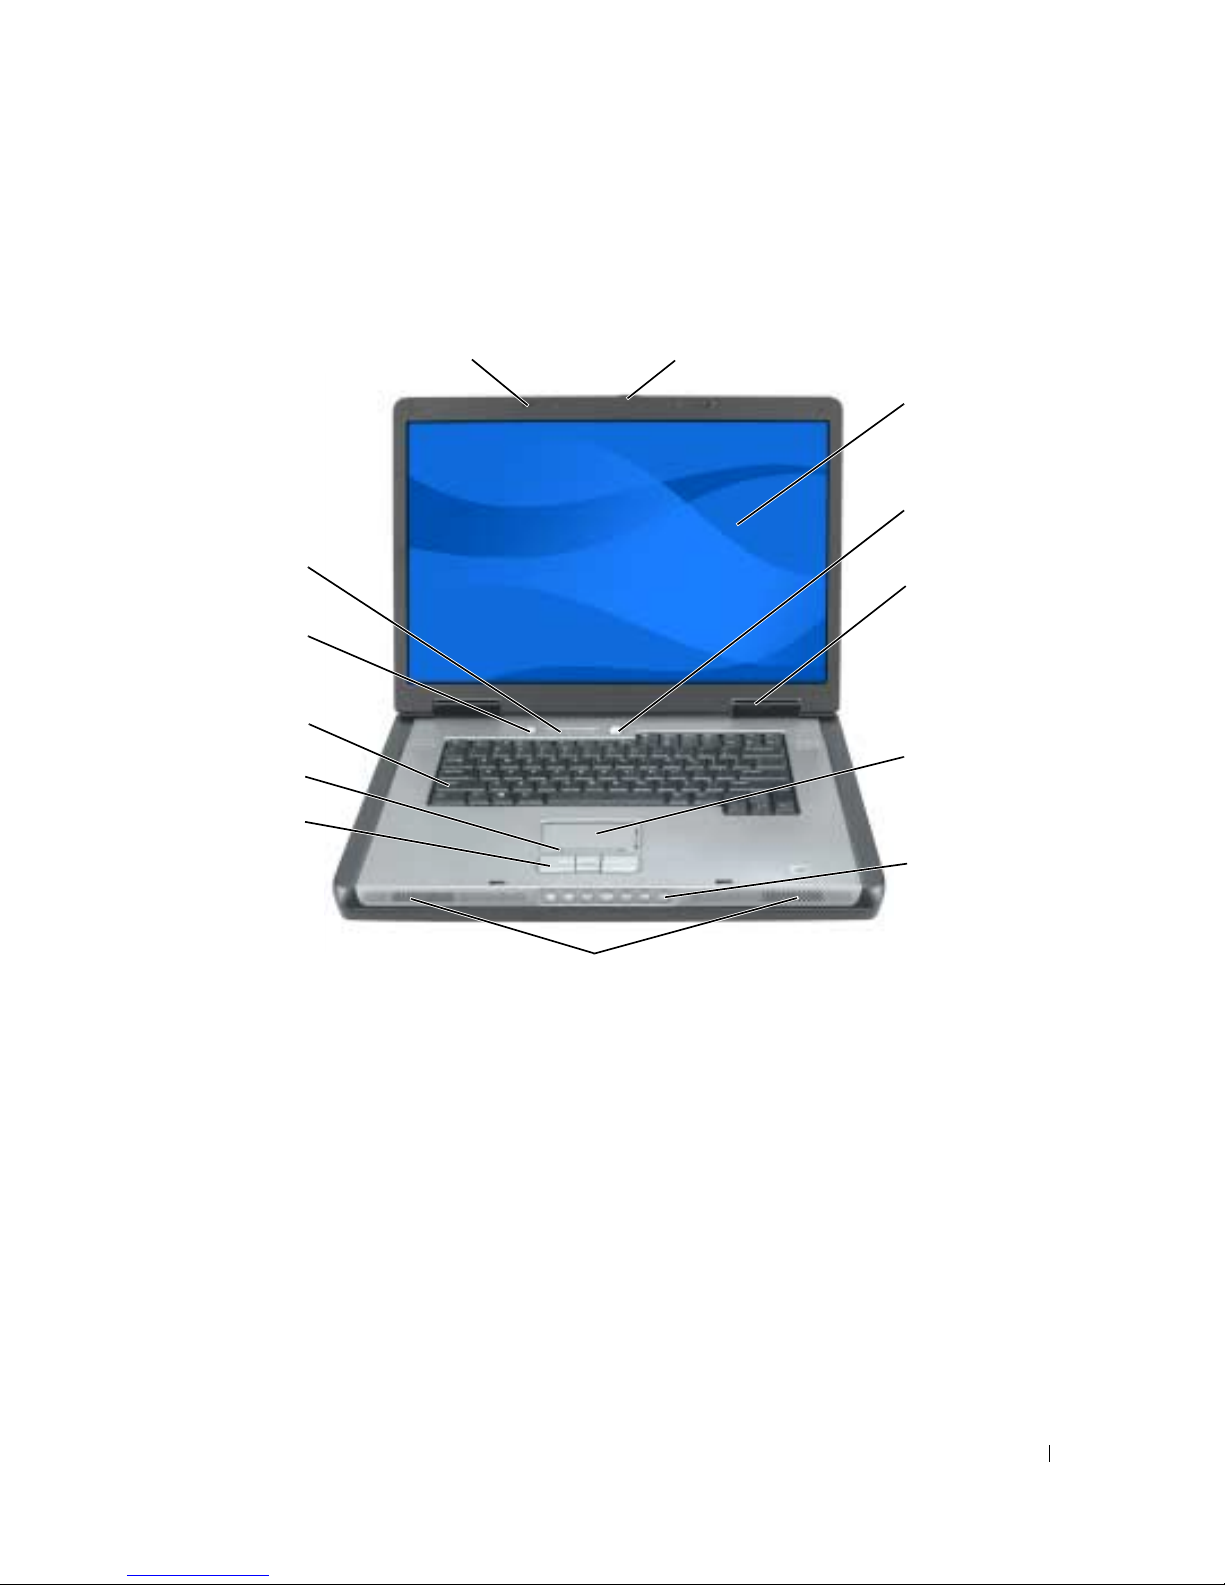
À propos de votre ordinateur
Vue frontale
13
12
11
10
1
9
2
3
4
5
6
7
8
1 loquets de l'écran (2) 6 tablette tactile 11 clavier
2 loquet de fermeture de l'écran 7 boutons de commande multimédia 12 bouton multimédia
3 écran 8 haut-parleurs ( 2) 13 voyants d'état du
clavier et du sans fil
4 bouton d'alimentation 9 boutons de la tablette tactile
5 voyants d'état de l'appareil 10 zone de défilement de la tablette
tactile
Guide de référence rapide 57
Page 58
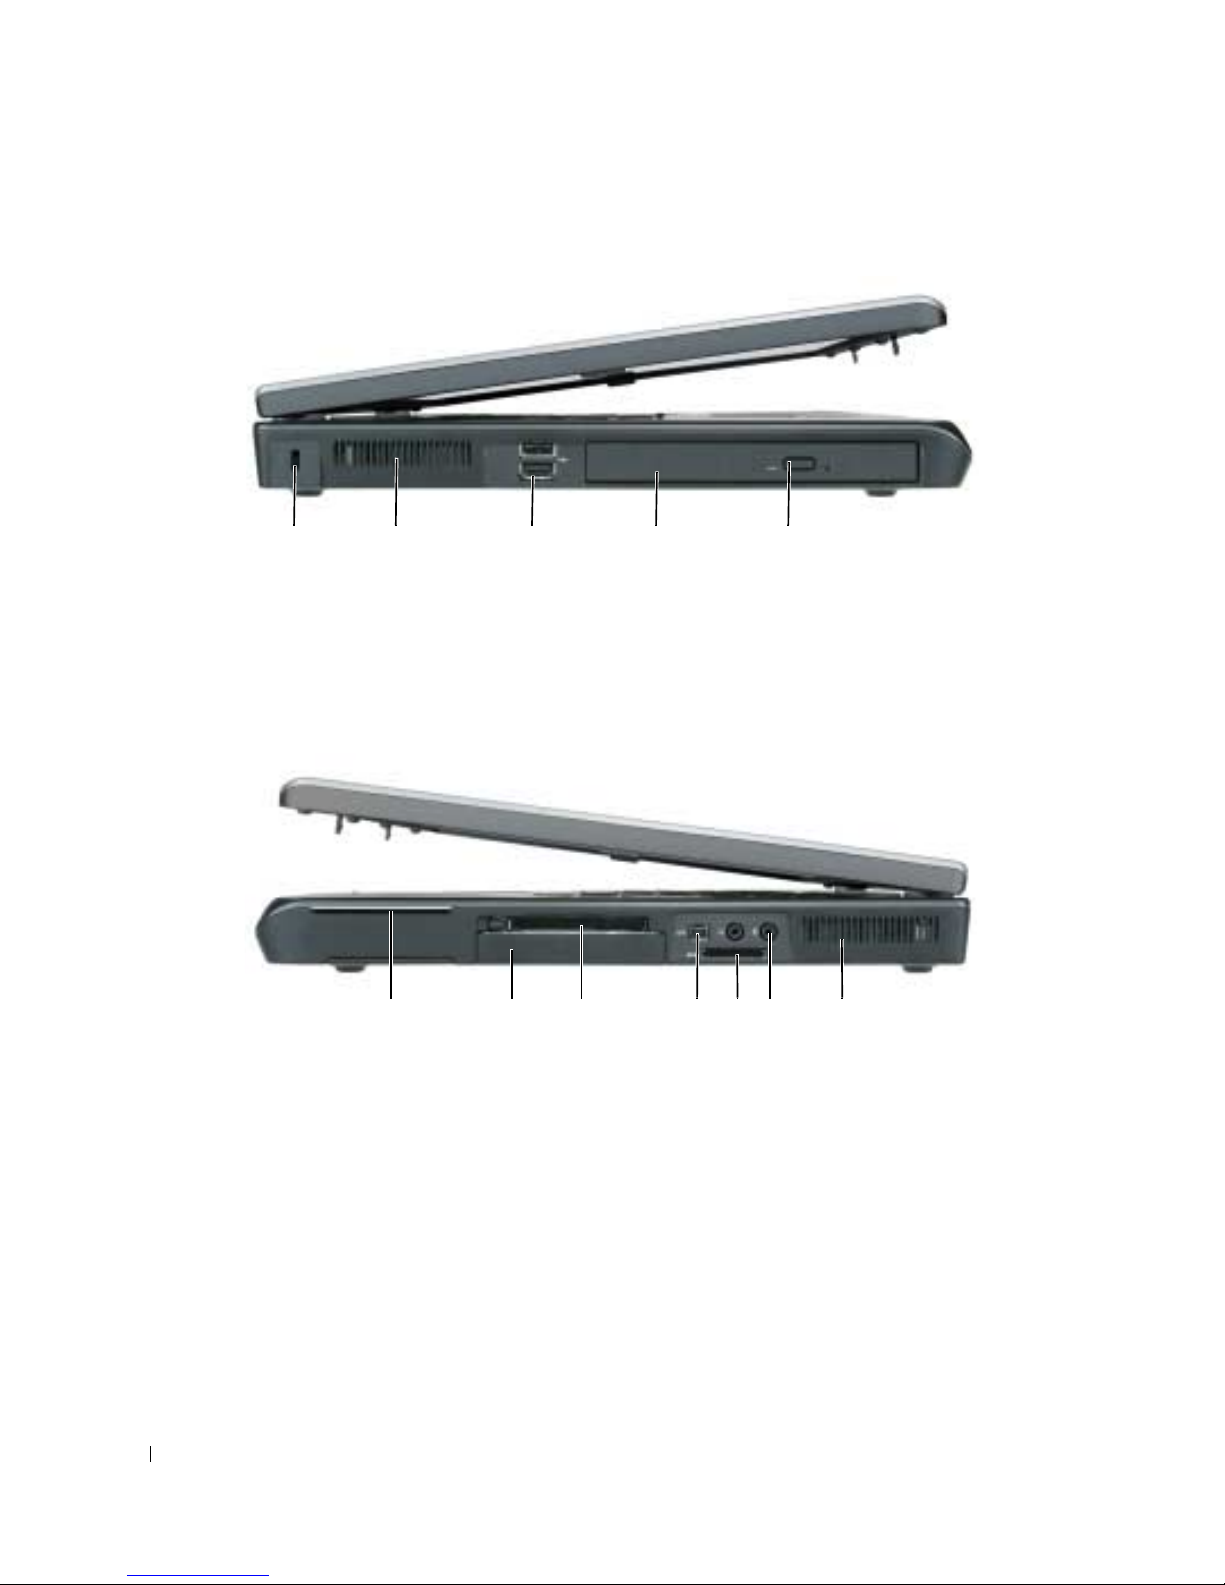
Vue du côté gauche
1 2345
1 emplacement pour câble de sécurité 3 connecteurs USB (2) 5 bouton d'éjection du
plateau du lecteur optique
2 entrée d'air 4 lecteur optique
Vue du côté droit
1 logement de carte à puce 4 connecteur IEEE 1394 7 entrée d'air
2 disque dur 5 lecteur de carte mémoire multimédia 5 en 1
3 logement de carte ExpressCard 6 connecteurs audio (2)
58 Guide de référence rapide
2 345671
Page 59
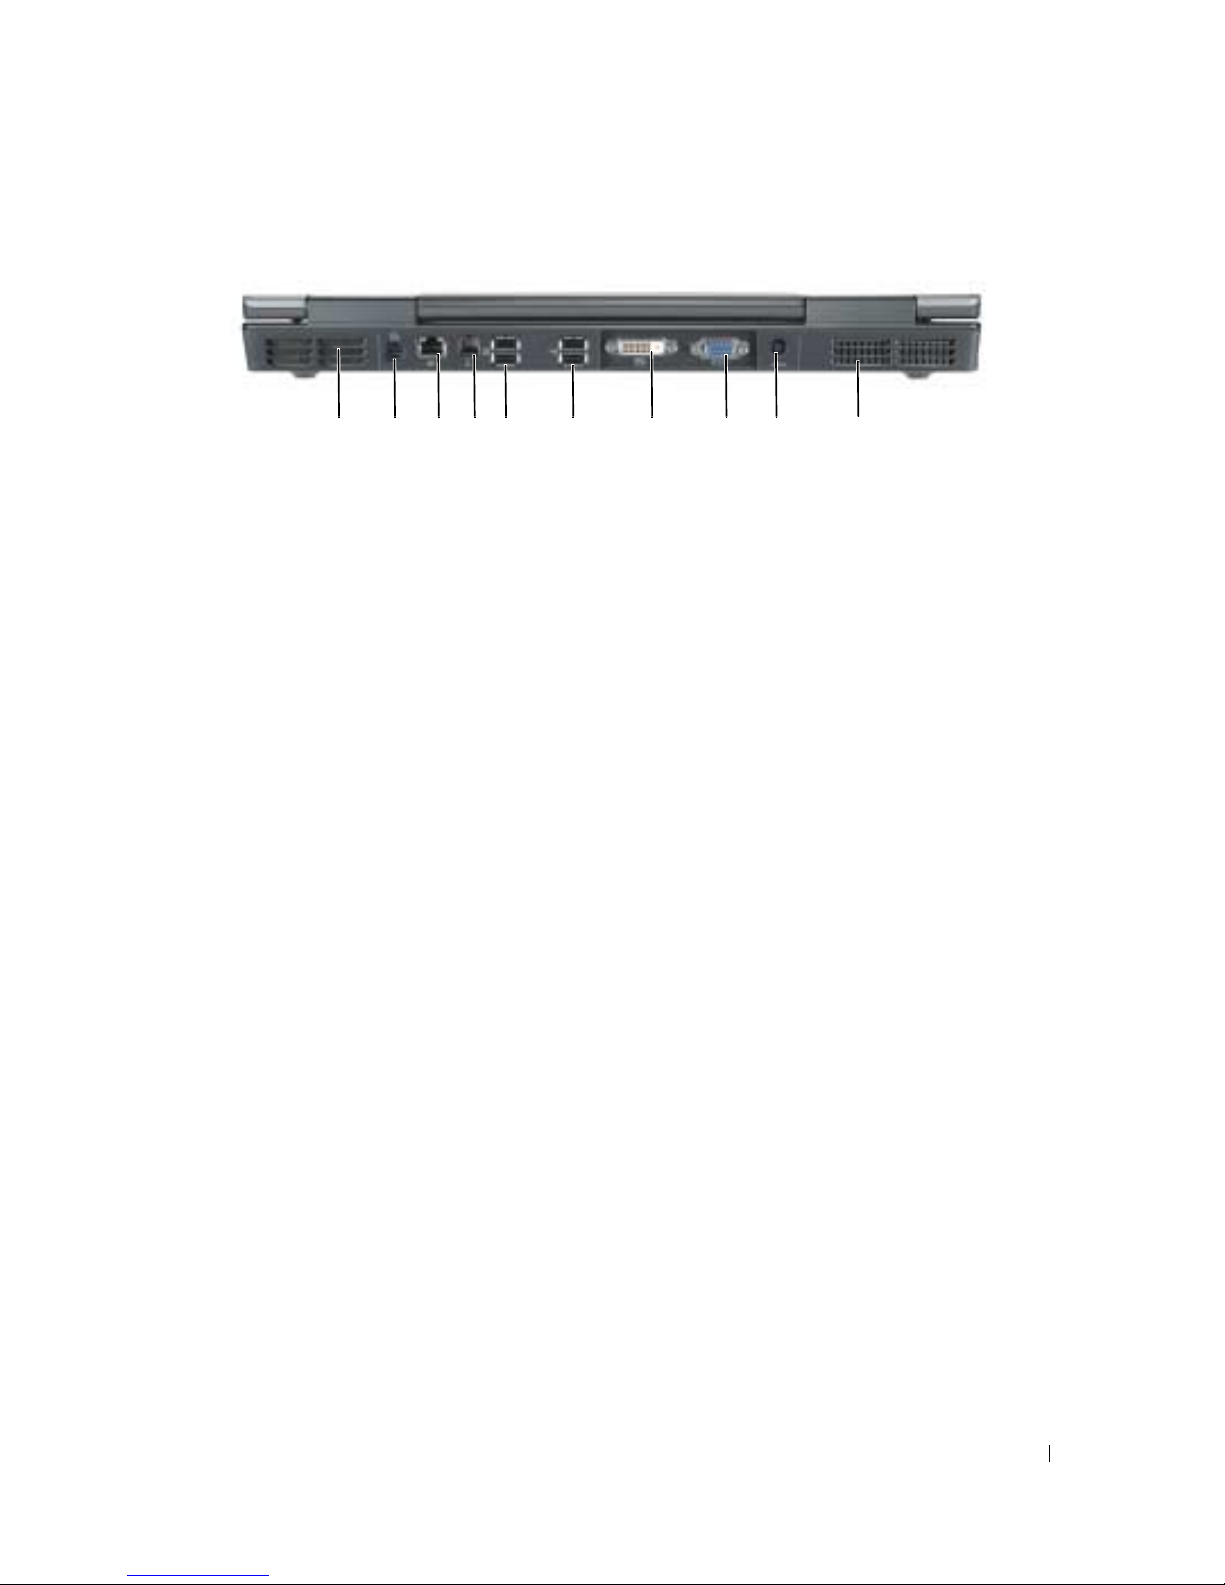
Vue arrière
1 2345 6 7 8 9 10
1 entrée d'air 5 connecteurs USB (2) 9 connecteur d'adaptateur secteur
2 connecteur de sortie TV S-vidéo 6 connecteurs USB (2) 10 entrée d'air
3 connecteur réseau (RJ-45) 7 connecteurs d'interface
vidéo numérique (DVI)
4 connecteur modem (RJ-11) 8 connecteur vidéo (VGA)
Guide de référence rapide 59
Page 60
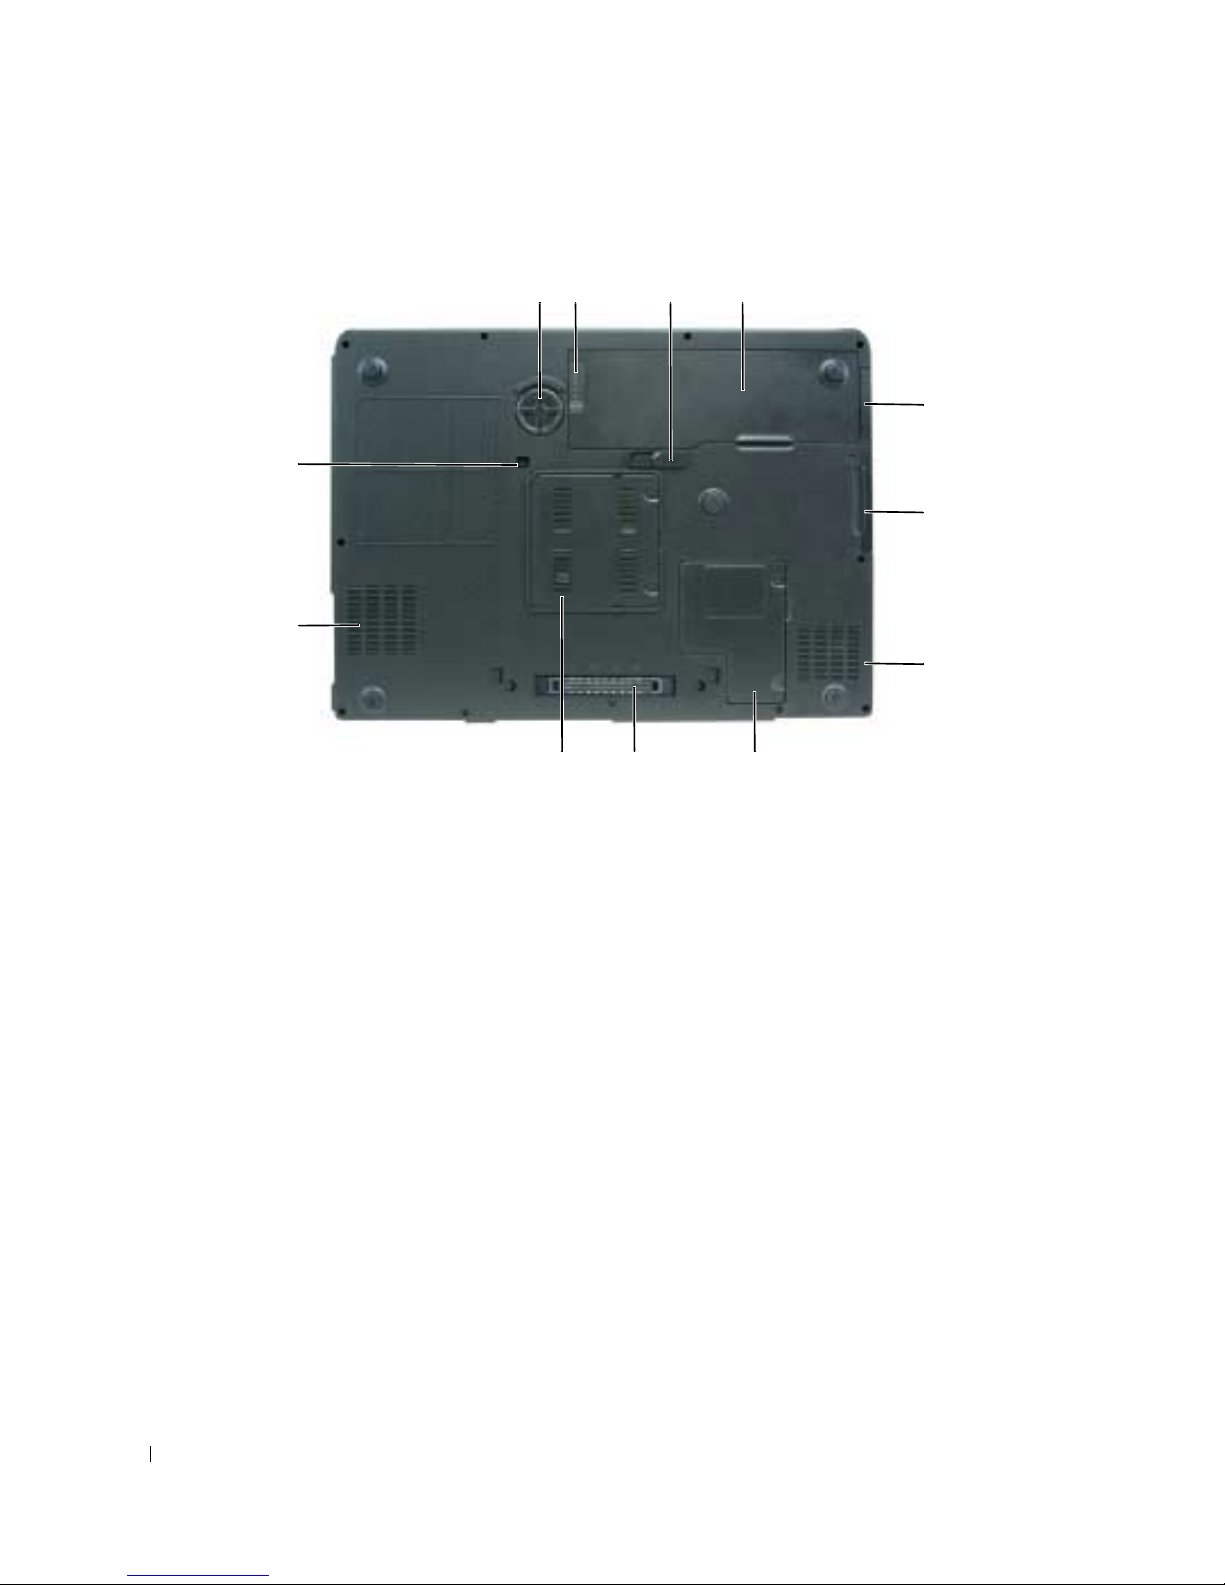
Vue de dessous
12 3 4
5
12
6
11
7
10
89
1 caisson de basse 5 cache de la carte interne optionnelle dotée
®
2 jauge de niveau de
de la technologie sans fil Bluetooth
6 unité de disque dur 10 cache du module de
charge/d'état de la batterie
3 loquet de fermeture de la
7 entrée d'air 11 entrée d'air
baie de batterie
4 batterie 8 cache du compartiment pour carte
Mini/modem
9 connecteur de la station
d'accueil
mémoire
12 vis de fixation du
lecteur optique
60 Guide de référence rapide
Page 61

Utilisation d'une batterie
Performances de la batterie
REMARQUE : Pour obtenir des informations sur la garantie Dell pour votre ordinateur, reportez-vous au Guide
d'information sur le produit ou au document de garantie livré avec votre ordinateur.
Pour un fonctionnement optimal et afin de préserver les paramètres du BIOS, laissez la batterie
principale installée en permanence dans votre ordinateur portable Dell™. Votre ordinateur est livré avec
une batterie, installée dans la baie.
REMARQUE : Lors de la première utilisation de votre ordinateur, la batterie n'étant pas obligatoirement
complètement chargée, utilisez l'adaptateur secteur pour raccorder votre nouvel ordinateur à une prise secteur.
Pour de meilleurs résultats, utilisez l'adaptateur secteur tant que la batterie n'est pas complètement chargée. Pour
afficher le niveau de charge de la batterie, cliquez sur Démarrer→ Panneau de configuration→ Options
d'alimentation, puis cliquez sur l'onglet Jauge d'alimentation.
REMARQUE : L'autonomie de la batterie (la période durant laquelle la batterie peut faire fonctionner l'ordinateur)
diminue avec le temps. Selon la fréquence d'utilisation et les conditions de fonctionnement de la batterie, il est
possible que vous deviez en acheter une autre au cours de la durée de vie de votre ordinateur.
L'autonomie de la batterie varie en fonction des conditions de fonctionnement. Cette durée est
considérablement réduite par l'exécution de certaines opérations, notamment, sans que cela soit limitatif :
• Utilisation de lecteurs optiques.
• Utilisation de périphériques de communication sans fil, cartes ExpressCard ou périphériques USB.
• Utilisation de paramètres d'affichage de luminosité élevée, d'écrans de veille en 3D ou d'autres
programmes gourmands en ressources tels que des applications graphiques en 3D complexes.
• Exécution de l'ordinateur en mode Performances maximales. Pour des informations sur l'accès à la
fenêtre Propriétés des options d'alimentation de Windows et à Dell Quickset, que vous pouvez utiliser
pour configurer les paramètres de gestion de l'alimentation, reportez-vous à la section «Configuration
des paramètres de gestion de l'alimentation» du
REMARQUE :
Il est recommandé de connecter l'ordinateur à une prise électrique lorsque vous gravez un CD ou DVD.
Guide d'utilisation
.
Vous pouvez vérifier le niveau de charge de la batterie avant de l'insérer dans l'ordinateur. Vous pouvez
également définir des options de gestion de l'alimentation afin que l'ordinateur vous alerte lorsque le
niveau de charge de la batterie est bas. Pour plus d'informations, reportez-vous à la section «Vérification
de la charge de la batterie» à la page 62.
PRÉCAUTION : L'utilisation d'une batterie non compatible peut accroître le risque d'incendie ou d'explosion.
Ne remplacez la batterie que par une batterie compatible achetée auprès de Dell. La batterie est conçue pour
fonctionner avec votre ordinateur Dell. N'utilisez pas la batterie d'un autre ordinateur.
PRÉCAUTION : Ne jetez pas les batteries avec les ordures ménagères. Lorsque votre batterie ne tient plus sa
charge, contactez votre service municipal de traitement des déchets pour savoir comment vous en débarrasser.
Consultez la section «Mise au rebut de la batterie» du Guide d'information sur le produit.
Guide de référence rapide 61
Page 62
PRÉCAUTION : Une utilisation inadéquate de la batterie peut augmenter le risque d'incendie ou de brûlure
chimique. Prenez soin de ne pas la percer, l'incinérer, la démonter ou l'exposer à une température supérieure à
65° C (149° F). Conservez la batterie hors de portée des enfants. Manipulez les batteries endommagées ou
percées avec d'extrêmes précautions. Les batteries endommagées peuvent fuir et causer des dommages
personnels ou matériels.
Vérification de la charge de la batterie
La jauge de batterie Dell QuickSet, la fenêtre Jauge de Microsoft Windows et l'icône , l'indicateur de
charge et la jauge d'état de la batterie ainsi que l'alerte de batterie faible donnent des informations sur le
niveau de charge de la batterie.
REMARQUE : Votre ordinateur n'est pas nécessairement équipé de Dell QuickSet.
Jauge de batterie Dell QuickSet
Si
Dell QuickSet est installé, appuyez sur <Fn><F3> pour afficher la jauge de batterie QuickSet. La
fenêtre Jauge de batterie affiche l'état, l'état de fonctionnement de la batterie, le niveau de charge et la
durée nécessaire au chargement complet de la batterie de votre ordinateur.
Pour plus d'informations sur QuickSet, cliquez avec le bouton droit de la souris sur l'icône dans la
barre des tâches, puis cliquez sur Aide.
Jauge d'alimentation de Microsoft® Windows
®
La jauge de Windows indique la charge de batterie restante. Pour consulter la jauge, double-cliquez sur
l'icône de la barre des tâches.
Si l'ordinateur est branché sur le secteur, l'icône apparaît.
Indicateur de charge
En appuyant (ou en appuyant et maintenant enfoncé) le bouton d'état sur l'indicateur de charge de la
batterie, vous pouvez vérifier les éléments suivants :
• Le niveau de charge de la batterie (appuyez et
• L'état de fonctionnement de la batterie (appuyez et
relâchez
maintenez
le bouton d'état)
le bouton d'état enfoncé)
L'autonomie de la batterie est déterminée en grande partie par le nombre de charges qu'elle reçoit. Après
des centaines de cycles de charge et de décharge, la capacité de charge des batteries diminue et l'état des
batteries se dégrade. C'est pourquoi, une batterie peut afficher l'état «chargé» tout en maintenant un
niveau de charge réduit (état).
Vérification du niveau de charge de la batterie
Pour vérifier le niveau de charge de la batterie, appuyez sur le bouton d'état de l'indicateur de charge de la
batterie afin d'allumer les voyants de niveau de charge. Chaque voyant représente environ 20 pour cent
de la charge totale de la batterie. S'il reste, par exemple, 80 pour cent de la charge de la batterie, quatre
des voyants sont allumés. Si aucun voyant n'est allumé, la batterie est complètement déchargée.
62 Guide de référence rapide
Page 63

Vérification de l'état de fonctionnement de la batterie
REMARQUE : Vous pouvez vérifier l'état de fonctionnement de la batterie à l'aide de l'indicateur de charge situé
sur la batterie (comme décrit ci-dessous) ou de la jauge de batterie dans Dell QuickSet. Pour des informations sur
QuickSet, cliquez avec le bouton droit de la souris sur l'icône de la barre des tâches, puis cliquez sur Aide.
Pour vérifier l'état de fonctionnement de la batterie à l'aide de l'indicateur de charge, appuyez sur le
bouton d'état de l'indicateur de charge de la batterie et maintenez-le enfoncé pendant au moins
3 secondes. Si aucun voyant ne s'allume, la batterie est en bon état et elle dispose encore de plus de
80 pour cent de sa capacité de charge d'origine. Chaque voyant représente une dégradation
incrémentielle. Si cinq voyants s'allument, la batterie dispose de moins de 60 pour cent de sa capacité de
charge et vous devez envisager son remplacement. Pour obtenir davantage d'informations sur
l'autonomie de la batterie, reportez-vous à la section «Caractéristiques» du Guide d'utilisation.
Alerte de batterie faible
AVIS : Pour éviter la perte ou la corruption de vos données, enregistrez votre travail immédiatement après avoir
reçu une alerte de batterie faible. Connectez ensuite l'ordinateur à une prise secteur. Si la batterie est
complètement déchargée, l'ordinateur passe automatiquement en mode Mise en veille prolongée.
Une fenêtre contextuelle affiche un message d'avertissement lorsque la batterie est déchargée à environ
90 pour cent. L'ordinateur passe en mode Mise en veille prolongée lorsque la charge de la batterie est
extrêmement faible.
Vous pouvez modifier les paramètres d'alerte de la batterie dans QuickSet ou dans la fenêtre Propriétés
des options d'alimentation. Pour obtenir des informations sur l'accès à QuickSet ou la fenêtre Propriétés
des options d'alimentation, reportez-vous à la section «Configuration des paramètres de gestion de
l'alimentation» du Guide d'utilisation.
Conservation de l'énergie de la batterie
Procédez comme suit pour économiser l'alimentation de la batterie :
• Connectez l'ordinateur à une prise secteur aussi souvent que possible car la durée de vie de la batterie
est largement déterminée par le nombre d'utilisations et de recharges.
• Mettez l'ordinateur en mode Veille ou en mode Mise en veille prolongée lorsque vous le laissez allumé
sans l'utiliser pendant de longs laps de temps. Pour obtenir plus d'informations sur les modes Veille et
Mise en veille prolongée, reportez-vous à la section «Modes d'économie d'énergie» du
• L'Assistant Gestion de l'alimentation
vous permet de sélectionner des options qui optimisent la
Guide d'utilisation
consommation électrique de votre ordinateur. Ces options peuvent également être paramétrées pour
changer lorsque vous appuyez sur le bouton d'alimentation, lorsque vous fermez l'écran ou lorsque
vous appuyez sur <Fn><Échap>. Pour obtenir plus d'informations sur l'Assistant Gestion de
l'alimentation, reportez-vous à la section «Configuration des paramètres de gestion de l'alimentation»
du
Guide d'utilisation
REMARQUE : Reportez-vous à la section «Configuration des paramètres de gestion de l'alimentation» du Guide
d'utilisation.
.
Guide de référence rapide 63
.
Page 64

Chargement de la batterie
REMARQUE : À l'aide de Dell™ ExpressCharge™, l'adaptateur secteur charge une batterie complètement
déchargée à 80 pour cent en environ 1 heure et à 100 pour cent en environ 2 heures, lorsque l'ordinateur est hors
tension. La durée de chargement est plus longue lorsque l'ordinateur est sous tension. Vous pouvez laisser la
batterie dans l'ordinateur aussi longtemps que vous le souhaitez. Les circuits internes de la batterie préviennent
toute surcharge.
Lorsque vous branchez l'ordinateur sur une prise secteur ou que vous installez une batterie pendant que
l'ordinateur est branché sur une prise secteur, l'ordinateur vérifie le niveau de charge et la température de
la batterie. Au besoin, l'adaptateur secteur charge alors la batterie et maintient le niveau de charge.
Si la batterie est chaude parce qu'elle se trouvait dans l'ordinateur ou en raison de la température
extérieure, il est probable qu'elle ne se charge pas lorsque vous branchez l'ordinateur sur une prise
secteur. Si le voyant clignote alternativement vert et orange, la batterie est trop chaude pour être
chargée. Débranchez l'ordinateur de la prise secteur et laissez refroidir l'ordinateur et la batterie jusqu'à
ce qu'ils atteignent la température ambiante. Branchez alors l'ordinateur sur une prise secteur et
continuez à charger la batterie.
Pour des informations supplémentaires sur la résolution des problèmes de batterie, reportez-vous à la
section «Problèmes d'alimentation» du
Guide d'utilisation
.
Remplacement de la batterie
PRÉCAUTION : Avant d'exécuter ces procédures, éteignez votre ordinateur, débranchez l'adaptateur secteur de
la prise secteur et de l'ordinateur, débranchez le modem de la prise murale et de l'ordinateur et retirez les autres
câbles externes de l'ordinateur.
AVIS : Vous devez retirer tous les câbles externes de l'ordinateur pour éviter d'endommager les connecteurs.
PRÉCAUTION : L'utilisation d'une batterie non compatible peut accroître le risque d'incendie ou d'explosion.
Ne remplacez la batterie que par une batterie compatible achetée auprès de Dell. La batterie est conçue pour
fonctionner avec votre ordinateur Dell™. N'utilisez pas la batterie d'un autre ordinateur.
Pour retirer la batterie :
1
Si l'ordinateur est connecté à une station d'accueil (amarré), déconnectez-le. Pour obtenir des
instructions, consultez la documentation qui accompagne la station d'accueil.
2
Assurez-vous que l'ordinateur est éteint.
3
Faites glisser et maintenez le loquet de fermeture de la baie de batterie, situé sur le dessous de
l'ordinateur, puis retirez la batterie de la baie.
64 Guide de référence rapide
Page 65
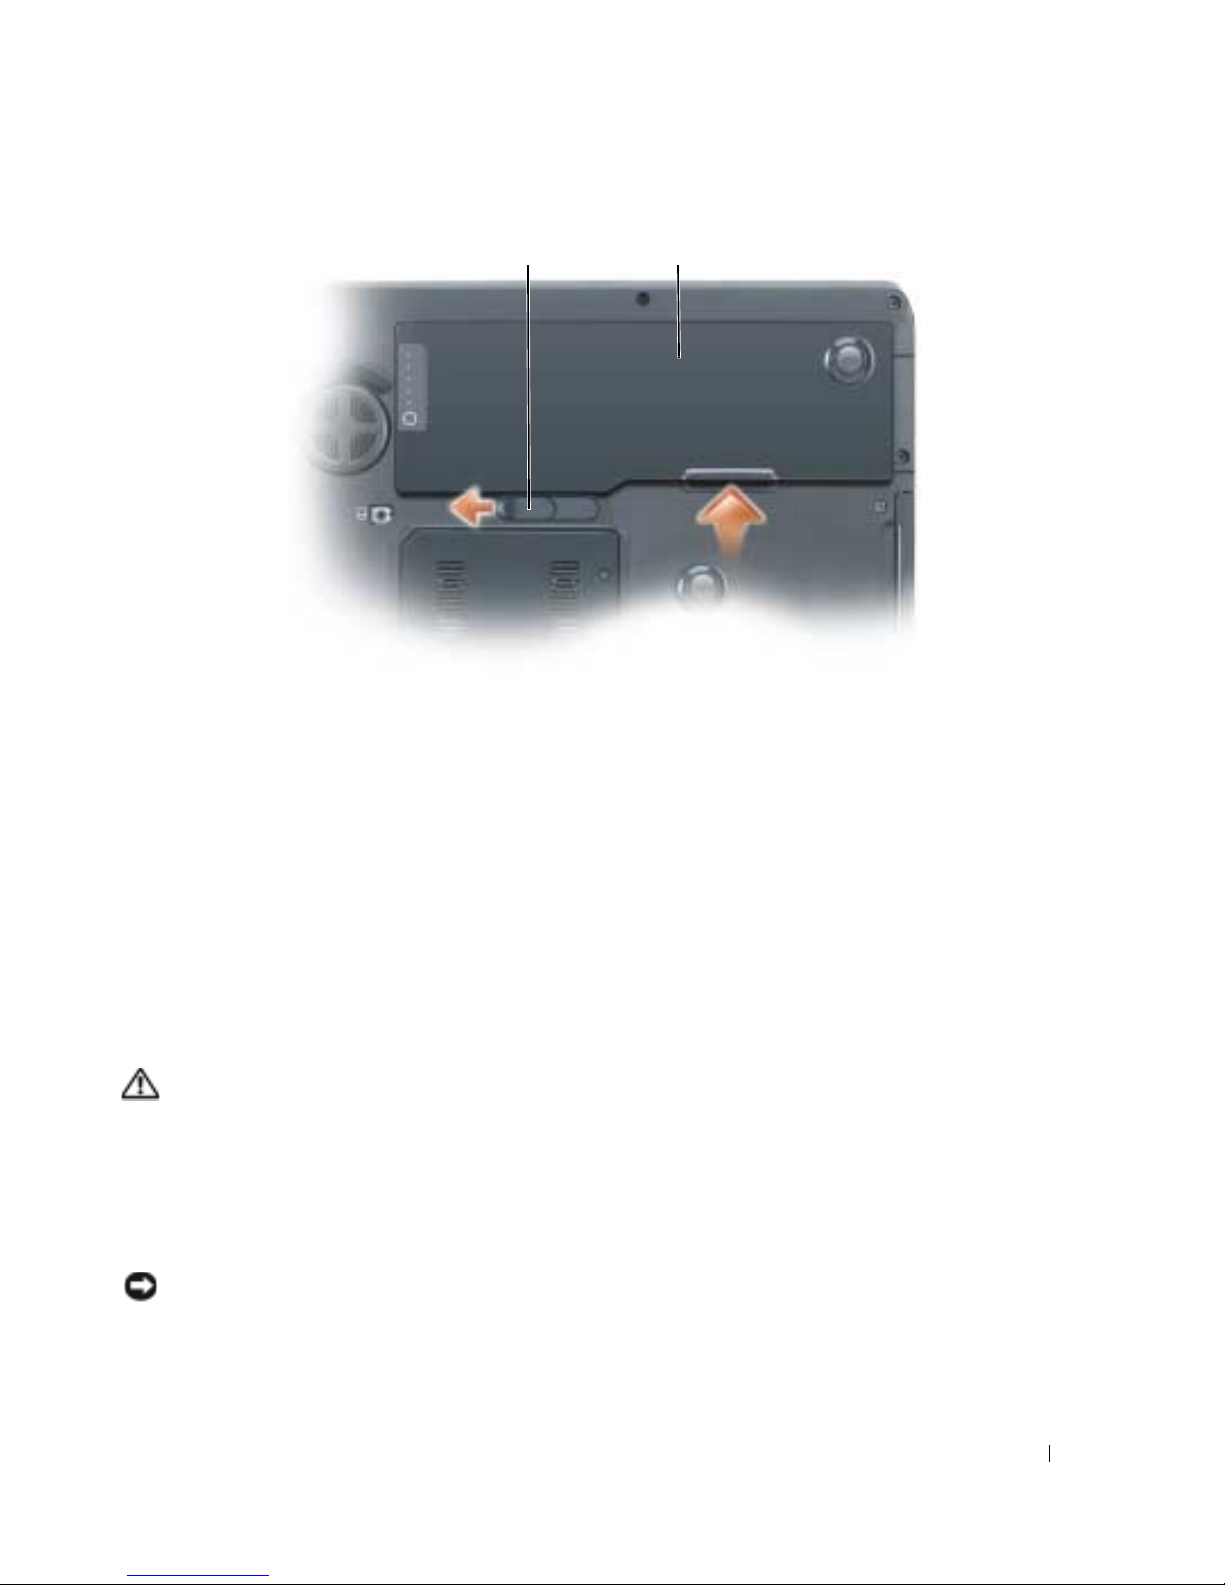
1 2
1 loquet de fermeture de la baie de batterie 2 batterie
Pour remettre en place la batterie, suivez la procédure de retrait dans l'ordre inverse.
Stockage de la batterie
Retirez la batterie de l'ordinateur lorsque vous rangez ce dernier pendant une période prolongée. Sinon,
la batterie finira par se décharger. Après une longue période de stockage, rechargez complètement la
batterie avant de l'utiliser. Reportez-vous à la section «Chargement de la batterie» à la page 64.
Dépannage
Problèmes de blocage et problèmes logiciels
PRÉCAUTION : Avant de commencer toute procédure de cette section, suivez les consignes de sécurité du
Guide d'information sur le produit.
L'ordinateur ne démarre pas
ASSUREZ-VOUS QUE L'ADAPTATEUR SECTEUR EST SOLIDEMENT BRANCHÉ SUR L 'ORDINATEUR ET SUR LA PRISE SECTEUR
L'ordinateur ne répond plus
AVIS : Vous pouvez perdre des données si vous n'arrivez pas à arrêter correctement le système d'exploitation.
É
TEIGNEZ L ' ORDINATEUR — Si vous n'obtenez aucune réponse lorsque vous appuyez sur une touche du
clavier ou lorsque vous déplacez la souris, appuyez sur le bouton d'alimentation et maintenez-le enfoncé
pendant au moins 8 à 10 secondes jusqu'à ce que l'ordinateur s'éteigne. Redémarrez l'ordinateur.
Guide de référence rapide 65
Page 66

Un programme ne répond plus ou se bloque régulièrement
REMARQUE : La documentation de tout logiciel, la disquette ou le CD qui l'accompagne incluent généralement
des instructions d'installation.
Q
UITTEZ LE PROGRAMME —
1
Appuyez simultanément sur <Ctrl><Maj><Échap>.
2
Cliquez sur
3
Cliquez sur le programme qui ne répond plus.
4
Cliquez sur
VÉRIFIEZ LA DOCUMENTATION DU LOGICIEL — Si nécessaire, supprimez, puis réinstallez le programme.
Gestionnaire des tâches
Fin de tâche
.
.
Un programme est conçu pour une version antérieure du système d'exploitation Microsoft® Windows
EXÉCUTEZ L 'ASSISTANT COMPATIBILITÉ DES PROGRAMMES — L'Assistant Compatibilité des programmes
®
configure un programme pour qu'il fonctionne dans un environnement proche des environnements des
systèmes d'exploitation non Windows XP.
1
Cliquez sur le bouton
Assistant Compatibilité des programmes
2
Dans l'écran d'accueil, cliquez sur
3
Suivez les instructions qui s'affichent à l'écran.
Un écran bleu uni apparaît
ÉTEIGNEZ L ' ORDINATEUR — Si vous n'obtenez aucune réponse lorsque vous appuyez sur une touche du
Démarrer
, pointez sur
.
Suivant
.
Tous les programmes→ Accessoires
, puis cliquez sur
clavier ou lorsque vous déplacez la souris, appuyez sur le bouton d'alimentation et maintenez-le enfoncé
pendant au moins 8 à 10 secondes jusqu'à ce que l'ordinateur s'éteigne. Redémarrez l'ordinateur.
Autres problèmes logiciels
VÉRIFIEZ LA DOCUMENTATION DU LOGICIEL OU CONTACTEZ LE FABRICANT POUR OBTENIR DES INFORMATIONS DE
DÉPANNAGE —
• Assurez-vous que le programme est compatible avec le système d'exploitation installé sur votre
ordinateur.
• Assurez-vous que l'ordinateur est conforme aux exigences matérielles requises pour que le logiciel
fonctionne. Consultez la documentation du logiciel pour de plus amples informations.
• Assurez-vous que le programme est correctement installé et configuré.
• Assurez-vous que les pilotes de périphérique n'entrent pas en conflit avec le programme.
• Le cas échéant, supprimez, puis réinstallez le programme.
66 Guide de référence rapide
Page 67

SAUVEGARDEZ IMMÉDIATEMENT VOS FICHIERS
UTILISEZ UN PROGRAMME DE RECHERCHE DES VIRUS POUR VÉRIFIER LE DISQUE DUR, LES DISQUETTES OU LES CD.
NREGISTREZ LES FICHIERS OUVERTS ET QUITTEZ TOUS LES PROGRAMMES, PUIS ÉTEIGNEZ L 'ORDINATEUR VIA LE
E
MENU Démarrer
A
NALYSEZ VOTRE ORDINATEUR POUR VOIR S 'IL CONTIENT DES LOGICIELS ESPIONS — Si vous observez un
ralentissement des performances de votre ordinateur, si des fenêtres publicitaires s'affichent
fréquemment sur votre écran ou si vous avez des problèmes pour vous connecter sur Internet, votre
ordinateur est peut-être infecté par un logiciel espion. Utilisez un programme antivirus qui inclut une
protection contre les logiciels espions (une mise à niveau de votre programme sera peut-être nécessaire)
afin d'analyser votre ordinateur et de supprimer les logiciels espions. Pour plus d'informations, allez sur le
site support.dell.com et lancez une recherche avec le mot-clé espion.
EXÉCUTEZ DELL DIAGNOSTICS — Reportez-vous à la section «Dell Diagnostics» à la page 67. Si tous les
tests s'exécutent correctement, la condition d'erreur est liée à un problème logiciel.
Dell Diagnostics
PRÉCAUTION : Avant de commencer toute procédure de cette section, suivez les consignes de sécurité du
Guide d'information sur le produit.
Quand utiliser Dell Diagnostics
Si vous rencontrez un problème avec votre ordinateur, procédez aux vérifications décrites dans la section
«Problèmes de blocage et problèmes logiciels» à la page 65 et exécutez Dell Diagnostics avant de
contacter Dell pour obtenir une assistance technique.
Nous vous recommandons d'imprimer ces procédures avant de commencer.
AVIS : Dell Diagnostics ne fonctionne qu'avec les ordinateurs Dell.
REMARQUE :
Le CD Drivers and Utilities est en option et n'est pas obligatoirement expédié avec tous les ordinateurs.
Ouvrez le programme de configuration du système, étudiez les informations de configuration de votre
ordinateur et assurez-vous que le périphérique que vous souhaitez tester s'affiche dans le programme de
configuration du système et qu'il est actif.
Démarrez Dell Diagnostics à partir du disque dur ou du CD Drivers and Utilities (également appelé CD
ResourceCD).
Démarrage de Dell Diagnostics à partir du disque dur
1
Mettez votre ordinateur sous tension (ou redémarrez-le).
a
Lorsque le logo DELL™ s'affiche, appuyez immédiatement sur <F12>. Dans le menu
d'amorçage, sélectionnez
REMARQUE : Si vous attendez trop longtemps et que le logo du système d'exploitation apparaît, patientez
jusqu'à ce que vous voyiez le bureau de Microsoft
nouvelle tentative.
Diagnostics
et appuyez sur <Entrée>.
®
Windows®. Éteignez alors votre ordinateur et faites une
Guide de référence rapide 67
Page 68

b
Appuyez sur la touche <Fn> et maintenez-la enfoncée lors de la mise sous tension du système.
REMARQUE : Si un message indique qu'aucune partition de l'utilitaire Diagnostics n'a été trouvée, exécutez
Dell Diagnostics à partir du CD Drivers and Utilities.
2
Reportez-vous à la section «Contacter Dell» du
Démarrage de Dell Diagnostics à partir du CD Drivers and Utilities
1
Insérez le CD
2
Arrêtez, puis redémarrez l'ordinateur.
Drivers and Utilities
.
Guide d'utilisation
.
Lorsque le logo DELL s'affiche, appuyez immédiatement sur <F12>.
Si vous attendez trop longtemps et que le logo Windows apparaît, attendez encore jusqu'à ce que le
bureau Windows s'affiche. Éteignez alors votre ordinateur et faites une nouvelle tentative.
REMARQUE : Les étapes suivantes modifient la séquence d'amorçage pour une seule exécution. Au
démarrage suivant, l'ordinateur démarre en fonction des périphériques définis dans le programme de
configuration du système.
3
Lorsque la liste des périphériques d'amorçage apparaît, sélectionnez
Lecteur de CD/DVD/CD-RW
appuyez sur <Entrée>.
4
Sélectionnez l'option
Boot from CD-ROM
(Amorcer à partir du CD-ROM) dans le menu qui
s'affiche, puis appuyez sur <Entrée>.
5
Ta p e z 1 pour démarrer le menu du CD
ResourceCD
, puis appuyez sur <Entrée> pour continuer.
et
6
Sélectionnez
Exécuter Dell Diagnostics 32 bits
dans la liste numérotée. Si plusieurs versions sont
répertoriées, sélectionnez la version appropriée à votre ordinateur.
7
Lorsque le
Menu principal de Dell Diagnostics
1
Une fois Dell Diagnostics chargé et l'écran du
menu principal
de Dell Diagnostics s'affiche, sélectionnez le test à effectuer.
menu principal
correspondant à l'option souhaitée.
Option Fonction
Express Test
(Test rapide)
Extended Test
(Test approfondi)
Custom Test
(Test personnalisé)
Symptom Tree
(Arborescence des symptômes)
Exécute un test rapide des périphériques. Ce test dure généralement entre 10 et
20 minutes et n'exige pas d'action de votre part. Effectuez tout d'abord un Test
rapide pour trouver le problème plus rapidement.
Exécute un test approfondi des périphériques. En règle générale, ce test prend
une heure ou plus et nécessite que vous répondiez régulièrement à des questions.
Teste un périphérique spécifique. Vous pouvez personnaliser les tests à exécuter.
Répertorie les symptômes couramment rencontrés et permet de sélectionner un
test en fonction du symptôme du problème.
affiché, cliquez sur le bouton
68 Guide de référence rapide
Page 69

2
Si un problème survient pendant un test, un message indiquant le code d'erreur et une description du
problème s'affiche. Notez le code d'erreur et la description du problème et suivez les instructions à l'écran.
Si vous ne pouvez pas résoudre le problème, contactez Dell. Reportez-vous à la section «Contacter
Dell» du
3
Si vous exécutez un test à partir de l'option
Guide d'utilisation
REMARQUE : Le numéro de service de votre ordinateur s'affiche dans la partie supérieure de chaque écran
de test. Lorsque vous contacterez le support technique de Dell, ce numéro de service vous sera demandé.
.
Test personnalisé
ou
Arborescence des symptômes
, cliquez
sur l'onglet approprié décrit dans le tableau suivant pour en savoir plus.
Onglet Fonction
Résultats Affiche les résultats du test et les conditions d'erreur rencontrées.
Erreurs Affiche les conditions d'erreur rencontrées, les codes d'erreur et la description du
problème.
Aide Décrit le test et peut indiquer les conditions requises pour exécuter le test.
Configuration Affiche la configuration matérielle du périphérique sélectionné.
Dell Diagnostics obtient les informations de configuration de tous les périphériques à
partir du programme de configuration du système, de la mémoire et de divers tests
internes, et les affiche dans la liste des périphériques située dans le volet gauche de
l'écran. La liste des périphériques risque de ne pas afficher les noms de tous les
composants installés sur votre ordinateur ou de tous les périphériques reliés à celui-ci.
Paramètres Vous permet de personnaliser le test en modifiant ses paramètres.
4
Une fois les tests terminés, si vous exécutez Dell Diagnostics à partir du CD
retirez le CD.
5
Fermez l'écran de test pour revenir à l'écran du
redémarrer l'ordinateur, fermez l'écran du
menu principal
menu principal
. Pour quitter Dell Diagnostics et
.
Drivers and Utilities,
Guide de référence rapide 69
Page 70

70 Guide de référence rapide
Page 71

Index
A
assistants
Assistant Compatibilité des
programmes, 66
B
batterie
chargement, 64
jauge d'alimentation, 62
performances, 61
retrait, 64
stockage, 65
vérification de la charge, 62
C
CD
système d'exploitation, 55
CD Operating system, 55
CD ResourceCD
Dell Diagnostics, 67
Centre d'aide et de
support, 55
consignes de sécurité, 53
contrat de licence pour
utilisateur final, 53
D
Dell Diagnostics
À propos de, 67
démarrage à partir du CD
Drivers and Utilities, 68
démarrage à partir du disque
dur, 67
dépannage
Centre d'aide et de support, 55
Dell Diagnostics, 67
diagnostics
Dell, 67
documentation
contrat de licence pour
utilisateur final, 53
en ligne, 54
ergonomie, 53
garantie, 53
Guide d'information sur le
produit, 53
Guide d'utilisation, 53
réglementaire, 53
sécurité, 53
E
étiquette Microsoft
Windows, 54
étiquettes
Microsoft Windows, 54
numéro de service, 54
F
fichier d'aide
Centre d'aide et de support de
Windows, 55
G
Guide d'information sur le
produit, 53
Guide d'utilisation, 53
I
informations relatives à
l'ergonomie, 53
informations sur la
garantie, 53
informations sur les
réglementations, 53
L
lecteur optique
description, 58
logiciel
problèmes, 66
logiciel espion, 67
logiciels
problèmes, 66
Dell
site de support, 54
Index 71
Page 72

M
S
matériel
Dell Diagnostics, 67
N
numéro de service, 54
O
ordinateur
blocages, 65-66
ne répond plus, 65
performances lentes, 67
P
problèmes
blocage d'ordinateur, 65-66
blocages, 65
compatibilité des programmes
et Windows, 66
Dell Diagnostics, 67
écran bleu, 66
l'ordinateur ne démarre pas, 65
l'ordinateur ne répond plus, 65
logiciel, 65
logiciel espion, 67
logiciels, 66
performances lentes de
l'ordinateur, 67
un programme ne répond
plus, 66
un programme se bloque, 66
site Web de support, 54
système d'exploitation
CD, 55
réinstallation, 55
W
Windows XP
Assistant Compatibilité des
programmes, 66
Centre d'aide et de support, 55
réinstallation, 55
72 Index
Page 73

Dell Precision™ M90 Mobile
Workstation
Schnellreferenzhandbuch
Modell PP05XA
www.dell.com | support.dell.com
Page 74

Anmerkungen, Hinweise und Vorsichtshinweise
ANMERKUNG: Eine ANMERKUNG macht auf wichtige Informationen aufmerksam, die Ihnen die Arbeit mit dem
Computer erleichtern.
HINWEIS: Ein HINWEIS warnt vor möglichen Beschädigungen der Hardware oder vor Datenverlust und erläutert, wie
das vermieden werden kann.
VORSICHT: Durch VORSICHT werden Sie auf Gefahrenquellen hingewiesen, die materielle Schäden, Verletzungen
oder sogar den Tod von Personen zur Folge haben können.
Abkürzungen und Akronyme
Eine vollständige Liste mit Abkürzungen und Akronymen finden Sie in Ihrem Online-
Benutzerhandbuch
.
Wenn Sie einen Dell™-Computer der Serie N besitzen, treffen alle Referenzen in diesem Dokument auf die
Microsoft
®
Windows®-Betriebssysteme nicht zu.
____________________
Die in diesem Dokument enthaltenen Informationen können sich ohne vorherige Ankündigung ändern.
© 2006 Dell Inc. Alle Rechte vorbehalten.
Die Vervielfältigung oder Wiedergabe in jeglicher Weise ist ohne schriftliche Genehmigung von Dell Inc. strengstens untersagt.
In diesem Text verwendete Marken: Dell, das DELL-Logo, Dell Precision, und ExpressCharge sind Marken von Dell Inc.; Intel ist eine
eingetragene Marke der Intel Corporation; Microsoft und Windows sind eingetragene Marken der Microsoft Corporation; Bluetooth ist eine
Marke von Bluetooth SIG, Inc. und wird von Dell Inc. unter Lizenz verwendet.
Andere in diesem Dokument möglicherweise verwendete Marken und Handelsbezeichnungen dienen ausschließlich der Identifikation der
Firmen, denen diese Marken und Namen gehören, oder ihrer Produkte. Dell Inc. verzichtet auf alle Besitzrechte an Marken und
Handelsbezeichnungen, die nicht ihr Eigentum sind.
Modell PP05XA
Februar 2006 TEILENR. ND243 Rev. A00
Page 75

Inhalt
Informationsquellen . . . . . . . . . . . . . . . . . . . . . . . . . . . . . . . 77
Einrichten des Computers
Wissenswertes über Ihren Computer
Vorderansicht
Linke Seite
. . . . . . . . . . . . . . . . . . . . . . . . . . . . . . . . . 83
Rechte Seite
Rückansicht
Unterseite
. . . . . . . . . . . . . . . . . . . . . . . . . . . . . . . . . 84
. . . . . . . . . . . . . . . . . . . . . . . . . . . . . . . . . . 85
Verwenden eines Akkus
Akkuleistung
Prüfen des Akkuladezustands
Aufladen des Akkus
Austauschen des Akkus
Lagern eines Akkus
Beheben von Störungen
Probleme mit Absturz und Software
Dell Diagnostics
. . . . . . . . . . . . . . . . . . . . . . . . . . . . 81
. . . . . . . . . . . . . . . . . . . . . . 82
. . . . . . . . . . . . . . . . . . . . . . . . . . . . . . . . 82
. . . . . . . . . . . . . . . . . . . . . . . . . . . . . . . . 83
. . . . . . . . . . . . . . . . . . . . . . . . . . . . . 86
. . . . . . . . . . . . . . . . . . . . . . . . . . . . . . . . 86
. . . . . . . . . . . . . . . . . . . . . . . 87
. . . . . . . . . . . . . . . . . . . . . . . . . . . . . 89
. . . . . . . . . . . . . . . . . . . . . . . . . . 89
. . . . . . . . . . . . . . . . . . . . . . . . . . . . . 90
. . . . . . . . . . . . . . . . . . . . . . . . . . . . . 90
. . . . . . . . . . . . . . . . . . . . 90
. . . . . . . . . . . . . . . . . . . . . . . . . . . . . . . 92
Stichwortverzeichnis . . . . . . . . . . . . . . . . . . . . . . . . . . . . . 95
Inhalt 75
Page 76

76 Inhalt
Page 77
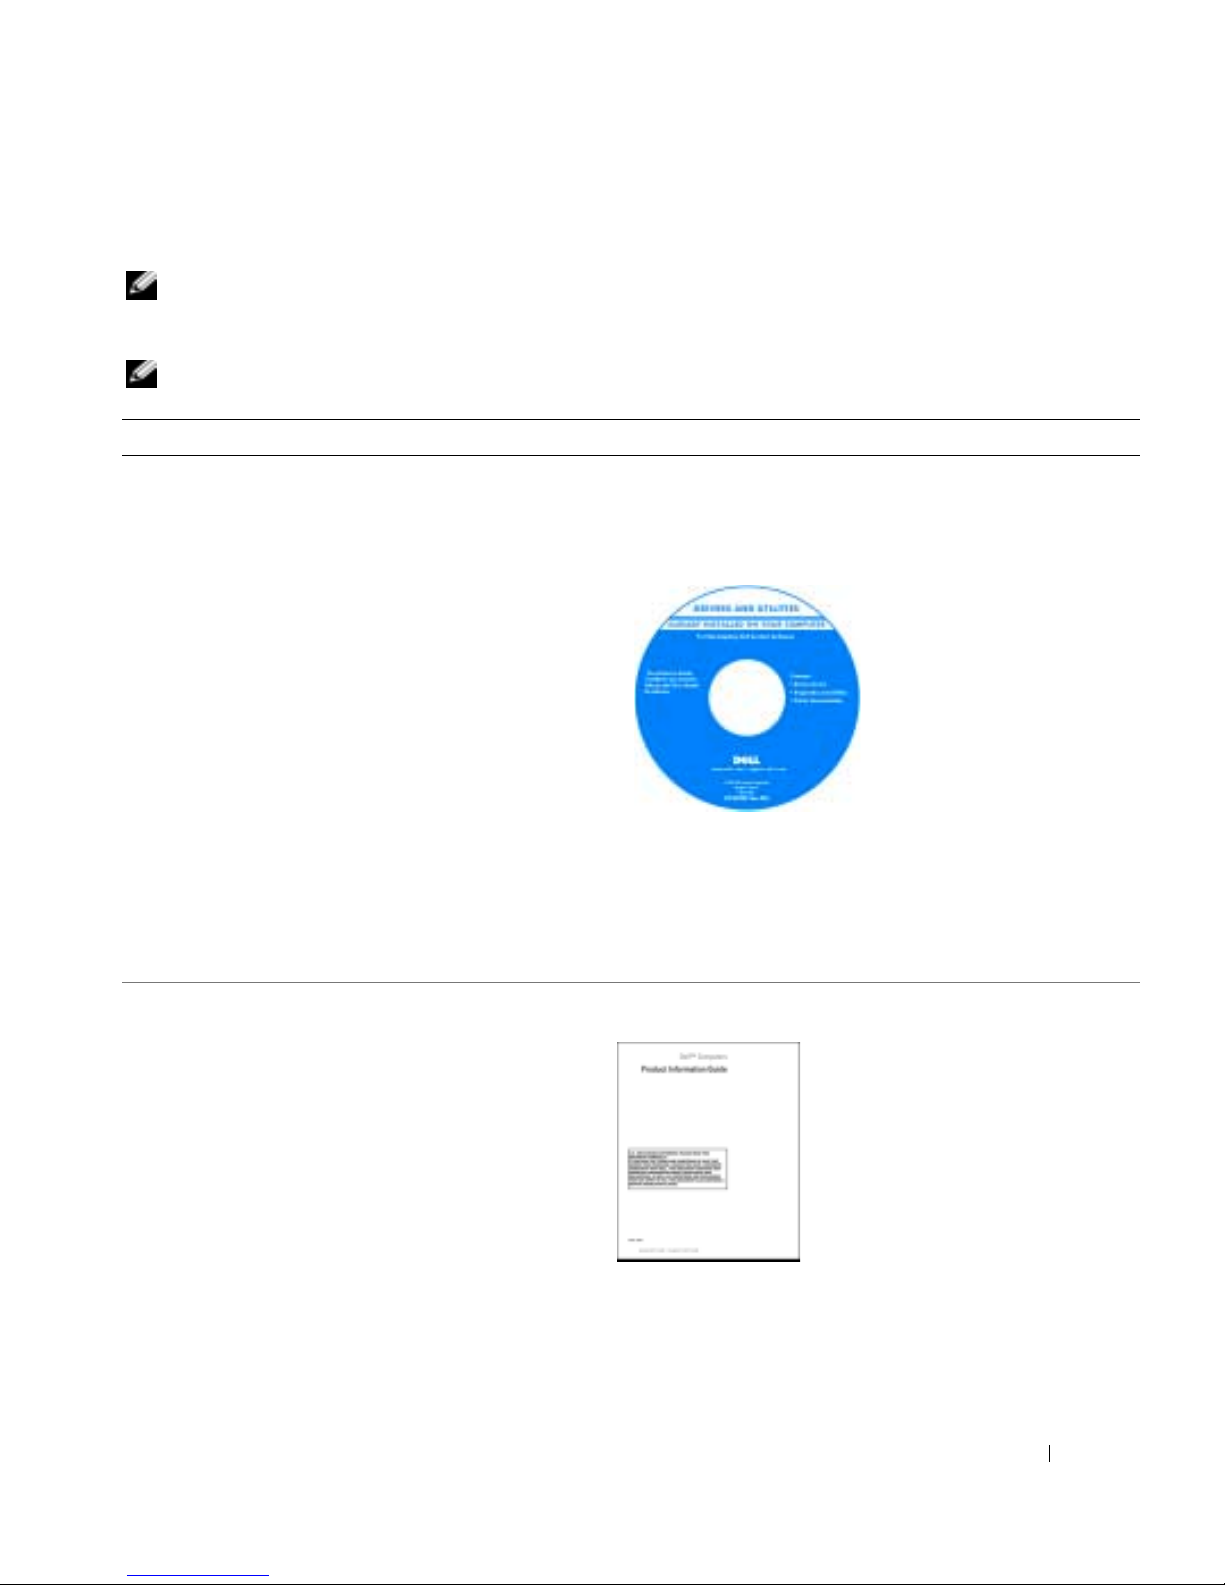
Informationsquellen
ANMERKUNG: Einige Funktionen oder Datenträger sind möglicherweise optional und werden nicht mit Ihrem
Computer geliefert. Einige Funktionen oder Datenträger sind möglicherweise in bestimmten Ländern nicht
verfügbar.
ANMERKUNG: Zusätzliche Informationen werden eventuell mit dem Computer geliefert.
Wonach suchen Sie? Hier finden Sie das Gesuchte:
• Ein Diagnoseprogramm für den Computer
• Treiber für den Computer
• Dokumentation zu Ihrem Computer
• Dokumentation zum Gerät
• Notebook-System-Software (NSS)
• Garantieinformationen
• Verkaufs- und Lieferbedingungen (nur für die USA)
• Sicherheitshinweise
• Zulassungsinformationen
• Informationen zur Ergonomie
• Enduser-Lizenzvereinbarung
Die Drivers and Utilities CD (auch als ResourceCD bezeichnet).
ANMERKUNG: Die Drivers and Utilities CD ist optional und ist
möglicherweise nicht im Lieferumfang Ihres Computers
enthalten.
Dokumentation und Treiber
sind bereits auf dem Computer installiert. Sie können
die CD zum neu Installieren
von Treibern verwenden oder
zum Ausführen von
Diagnostics
(siehe „Dell Diagnostics“ auf
Seite 92).
Möglicherweise finden Sie
auf der CD Readme-Dateien. Diese Dateien enthalten Angaben zu den neuesten
technischen Änderungen bzw. Detailinformationen zu
technischen Fragen für erfahrene Benutzer oder Techniker.
verwenden
Dell
ANMERKUNG: Treiber und Dokumentationsaktualisierungen
finden Sie unter support.dell.com.
Dell™ Produktinformationshandbuch
Schnellreferenzhandbuch 77
Page 78
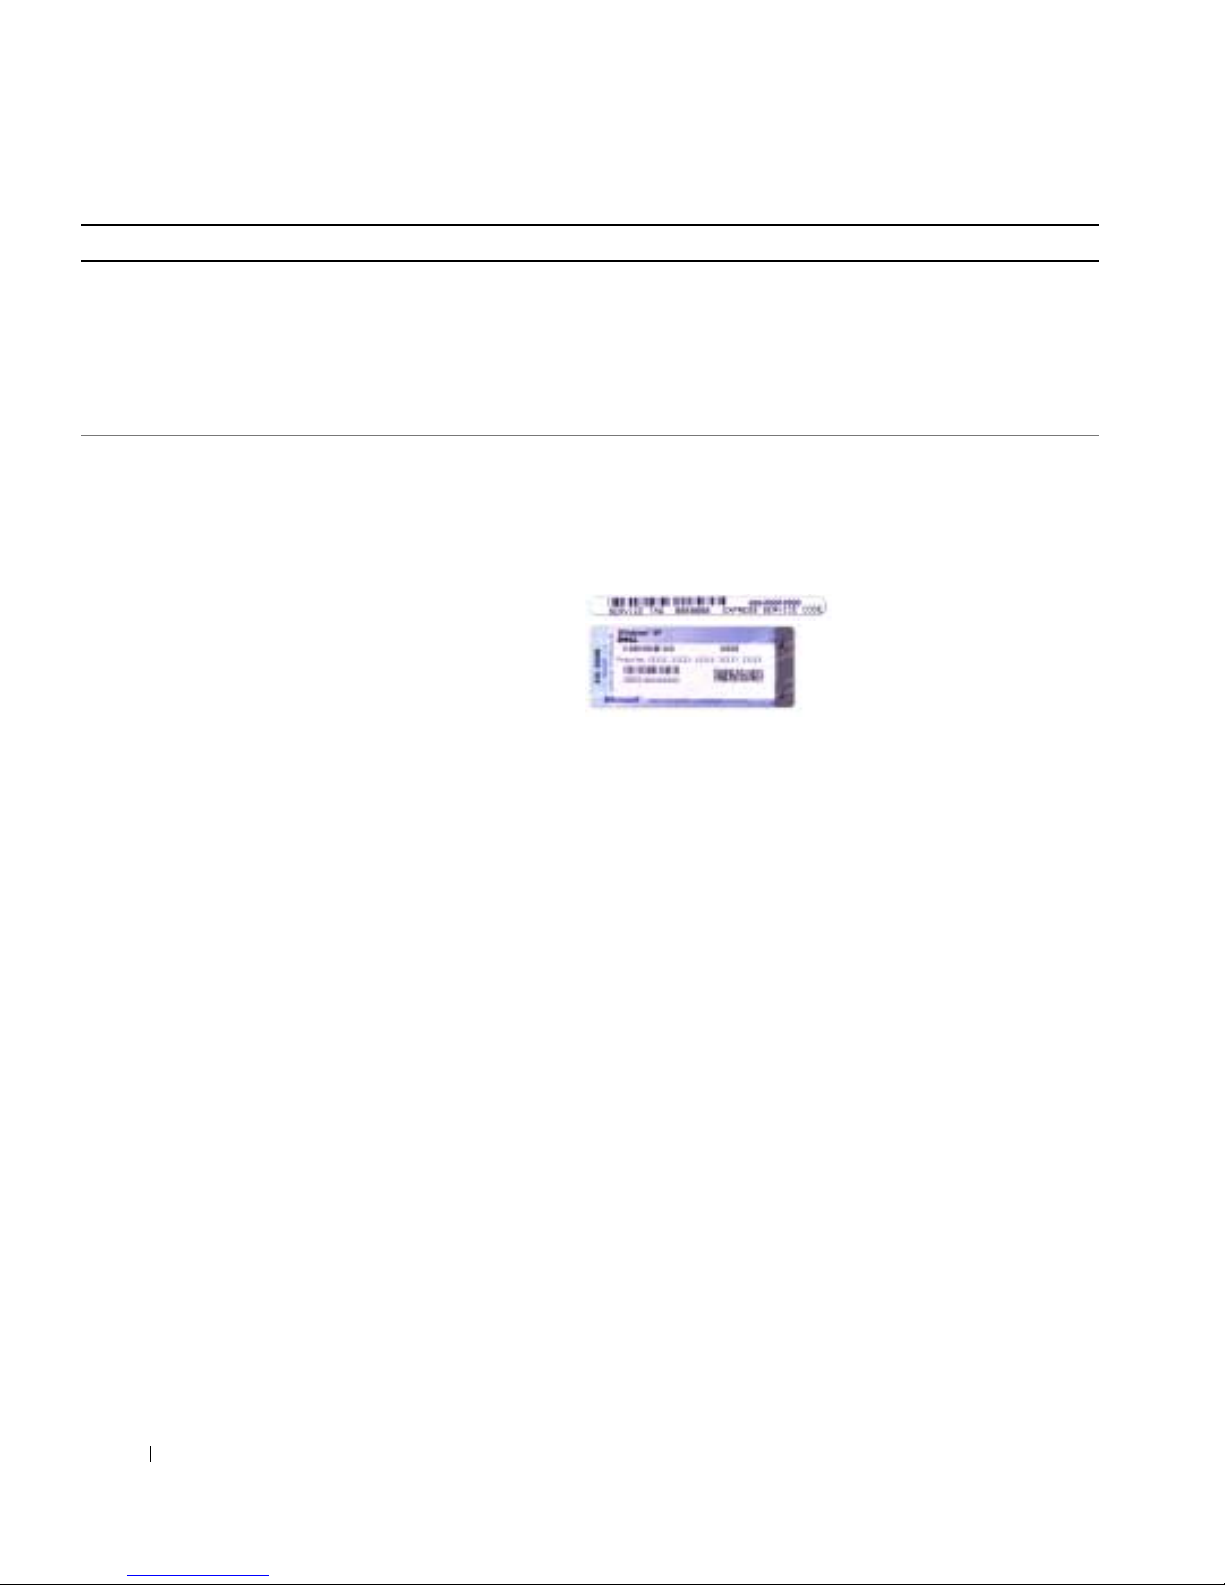
Wonach suchen Sie? Hier finden Sie das Gesuchte:
• Anleitungen zum Entfernen und wieder Einsetzen von
Te il e n
• Technische Daten
• Anleitungen zum Konfigurieren der Systemeinstellungen
• Fehlerbehebung und Beheben von Störungen
• Service-Tag-Nummer und Express-Servicecode
• Microsoft Windows-Lizenzetikett
Dell Precision™ Benutzerhandbuch
Microsoft Windows XP Hilfe- und Supportcenter
1
Klicken Sie auf
Benutzer- und Systemhandbücher
2
Klicken Sie auf das
Service-Tag-Nummer und Microsoft® Windows®-Lizenz
Diese Etiketten sind am Computer angebracht.
• Geben Sie die Service-Tag-Nummer auf der Website
support.dell.com
Support an, um den Computer zu identifizieren.
Start
→
Hilfe und Support
→
Benutzerhandbuch
oder beim Anruf beim Technischen
• Geben Sie beim Anruf
beim Technischen
Support den ExpressServicecode an, um zum
geeigneten Ansprechpartner weitergeleitet zu
werden.
→
Dell
Systemhandbücher
für Ihren Computer
.
78 Schnellreferenzhandbuch
Page 79

Wonach suchen Sie? Hier finden Sie das Gesuchte:
• Lösungen – Hinweise zum Beheben von Störungen,
Veröffentlichungen von Technikern, Online-Schulungen, häufig gestellte Fragen (FAQs)
• Community – Online-Diskussionen mit anderen DellKunden
• Aufrüstungen – Informationen zu Aufrüstungen von
Komponenten, wie z. B. Speicher, Festplatten und
Betriebssysteme
• Kundenbetreuung – Kontaktinformationen, ServiceAnfrage und Bestellstatus, Garantie und Reparaturinformationen
• Service und Support – Status von Service-Anfragen und
Support-Historie, Service-Kontakt, Online-Diskussionen mit dem technischen Support
• Referenz – Computer-Dokumentation, Einzelheiten
über die Computerkonfiguration, Produktangaben und
Whitepapers
• Downloads – Zugelassene Treiber, Patches und
Software-Aktualisierungen
• Notebook System-Software (NSS) – Wenn Sie das
Betriebssystem auf Ihrem Computer neu installieren,
sollten Sie auch das NSS-Dienstprogramm neu installieren. NSS sorgt dafür, dass wichtige Aktualisierungen
für Ihr Betriebssystem durchgeführt werden und bietet
Support für Dell™ 3,5 Zoll-USB-Diskettenlaufwerke,
®
-Prozessoren, optische Laufwerke und USB-
Intel
Geräte.- NSS ist für den ordnungsgemäßen Betrieb Ihres
Dell-Computers erforderlich. Die Software erkennt
automatisch Ihren Computertyp und das Betriebssystem und installiert die für Ihre Konfiguration geeigneten
Aktualisierungen.
Dell Support-Website – support.dell.com
ANMERKUNG: Wählen Sie Ihre Region aus, um zur
entsprechenden Support-Website zu gelangen.
Zum Herunterladen von Notebook-System-Software gehen
Sie folgendermaßen vor:
1
Wählen Sie auf der Website
support.dell.com
Ihre Region
oder Ihren Geschäftsbereich aus und geben Sie Ihre ServiceTag-Nummer ein.
2
Wählen Sie
3
Klicken Sie auf den Namen Ihres Betriebssystems und
suchen Sie nach dem Stichwort
Treiber & Downloads
Notebook-System-Software.
und klicken Sie auf
Los
.
ANMERKUNG: Die support.dell.com Benutzeroberfläche ist je
nach Ihrer Auswahl verschieden.
• Software-Erweiterungen und Hinweise zum Beheben
von Störungen – Häufig gestellte Fragen (FAQs),
aktuelle Themen und Hinweise zum allgemeinen
Zustand Ihres Computersystems
Dell Support-Dienstprogramm
Das Dell Support-Dienstprogramm ist ein automatisches
Aktualisierungs- und Benachrichtigungssystem, das auf
Ihrem Computer installiert ist. Dieses Support-Dienstprogramm bietet Zustandserfassungen Ihrer Rechnerumgebung,
Sofware-Aktualisierungen und relevante Informationen zur
Selbsthilfe in Echtzeit. Öffnen Sie das Dell Support-Dienstprogramm mithilfe des
Symbols in
der Taskleiste.
Weitere Informationen finden Sie unter „Dell SupportDienstprogramm“ in Ihrem
Benutzerhandbuch
.
Schnellreferenzhandbuch 79
Page 80
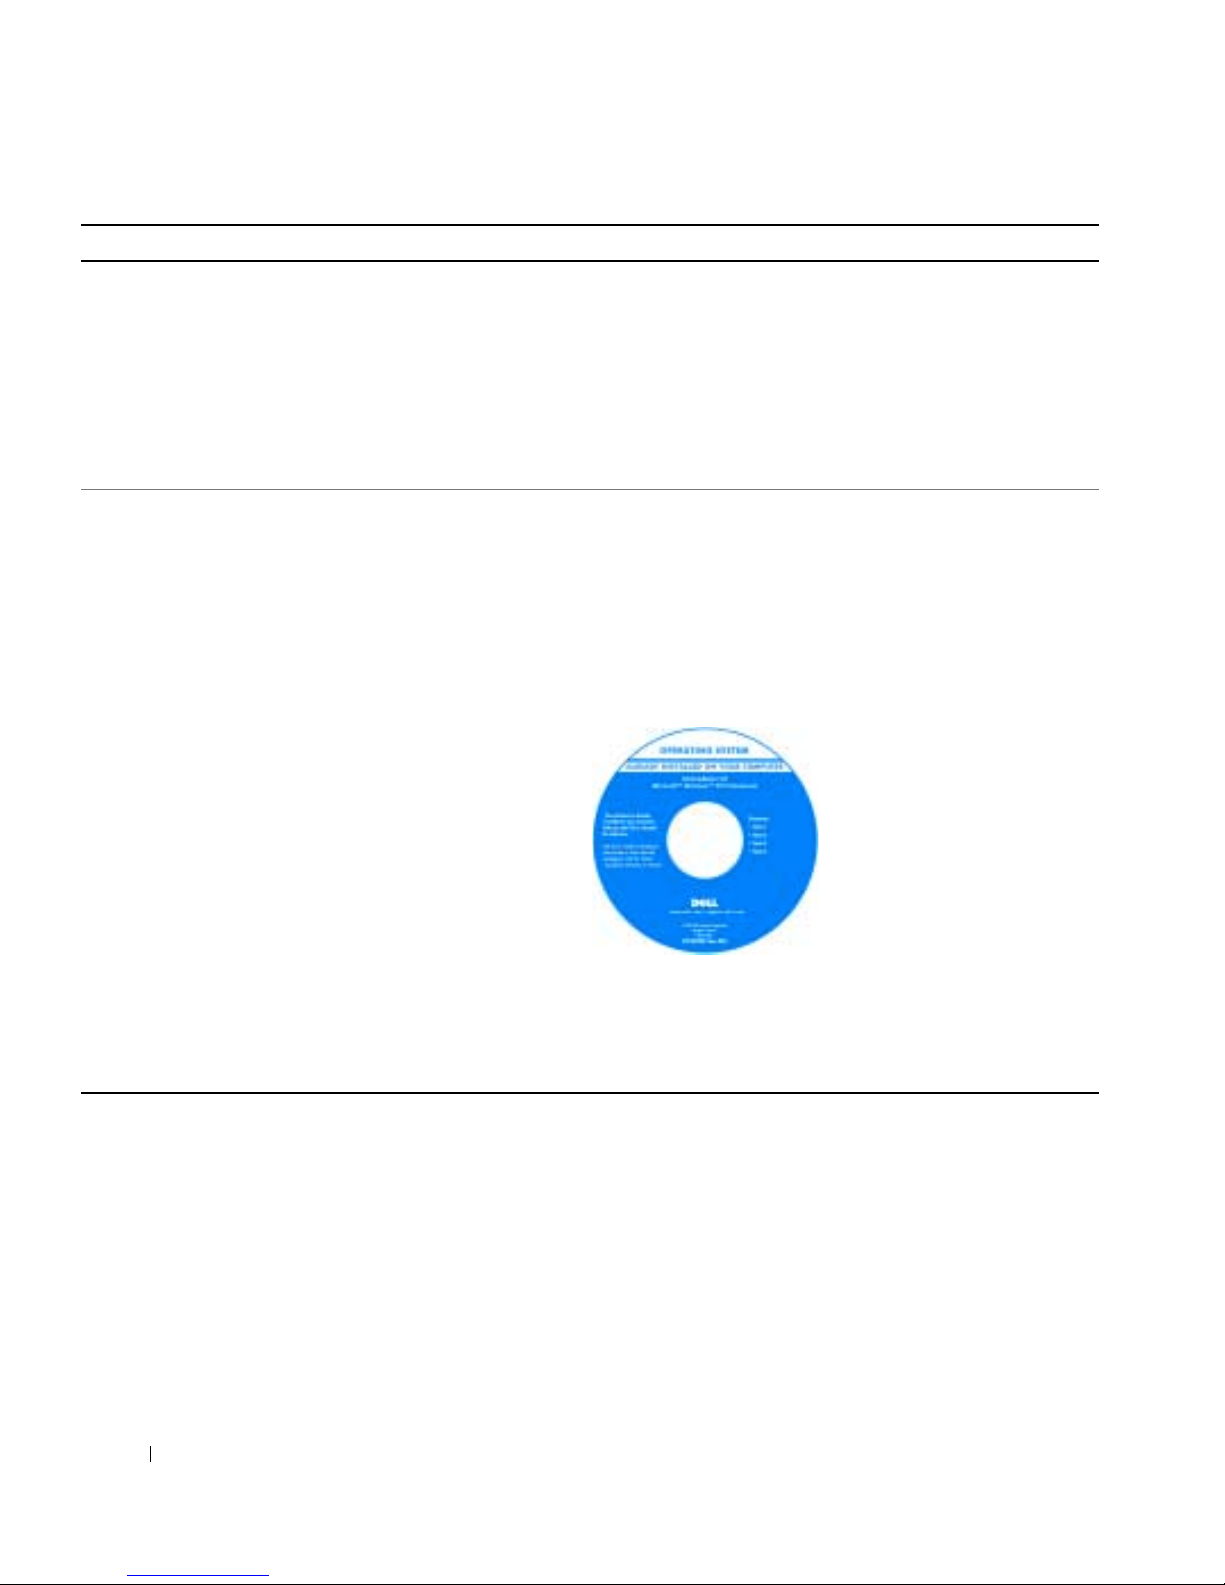
Wonach suchen Sie? Hier finden Sie das Gesuchte:
• Anleitungen zum Arbeiten unter Windows XP
• So arbeiten Sie mit Programmen und Dateien
• So können Sie Ihren Desktop individuell gestalten
• Anleitungen zur Neuinstallation des Betriebssystems
Windows Hilfe- und Supportcenter
1
Klicken Sie auf die Schaltfläche
Support
2
Geben Sie ein Wort oder einen Ausdruck ein, das bzw. der
.
Start
und auf
Hilfe und
Ihr Problem beschreibt, und klicken Sie anschließend auf
das Pfeilsymbol.
3
Klicken Sie auf das Thema, das Ihr Problem beschreibt.
4
Befolgen Sie die Anleitungen auf dem Bildschirm.
Betriebssystem-CD
ANMERKUNG: Die Betriebssystem-CD ist optional und ist
möglicherweise nicht im Lieferumfang Ihres Computers
enthalten.
Das Betriebssystem ist bereits auf dem Computer installiert.
Sie können die Betriebssystem-CD verwenden, um das Betriebssystem neu zu installieren. Siehe „Neu Installieren von
Windows XP“ in Ihrem Benutzerhandbuch.
Nachdem Sie Ihr Betriebssystem neu installiert haben,
verwenden Sie die Drivers
and Utilities CD
(ResourceCD), um Treiber
für die Geräte zu installieren,
die im Lieferumfang Ihres
Computers enthalten sind.
Das Etikett mit dem
des Betriebssystems
Key
finden Sie am Computer.
Product
80 Schnellreferenzhandbuch
ANMERKUNG: Die Farbe der CD hängt davon ab, welches
Betriebssystem Sie bestellt haben.
Page 81
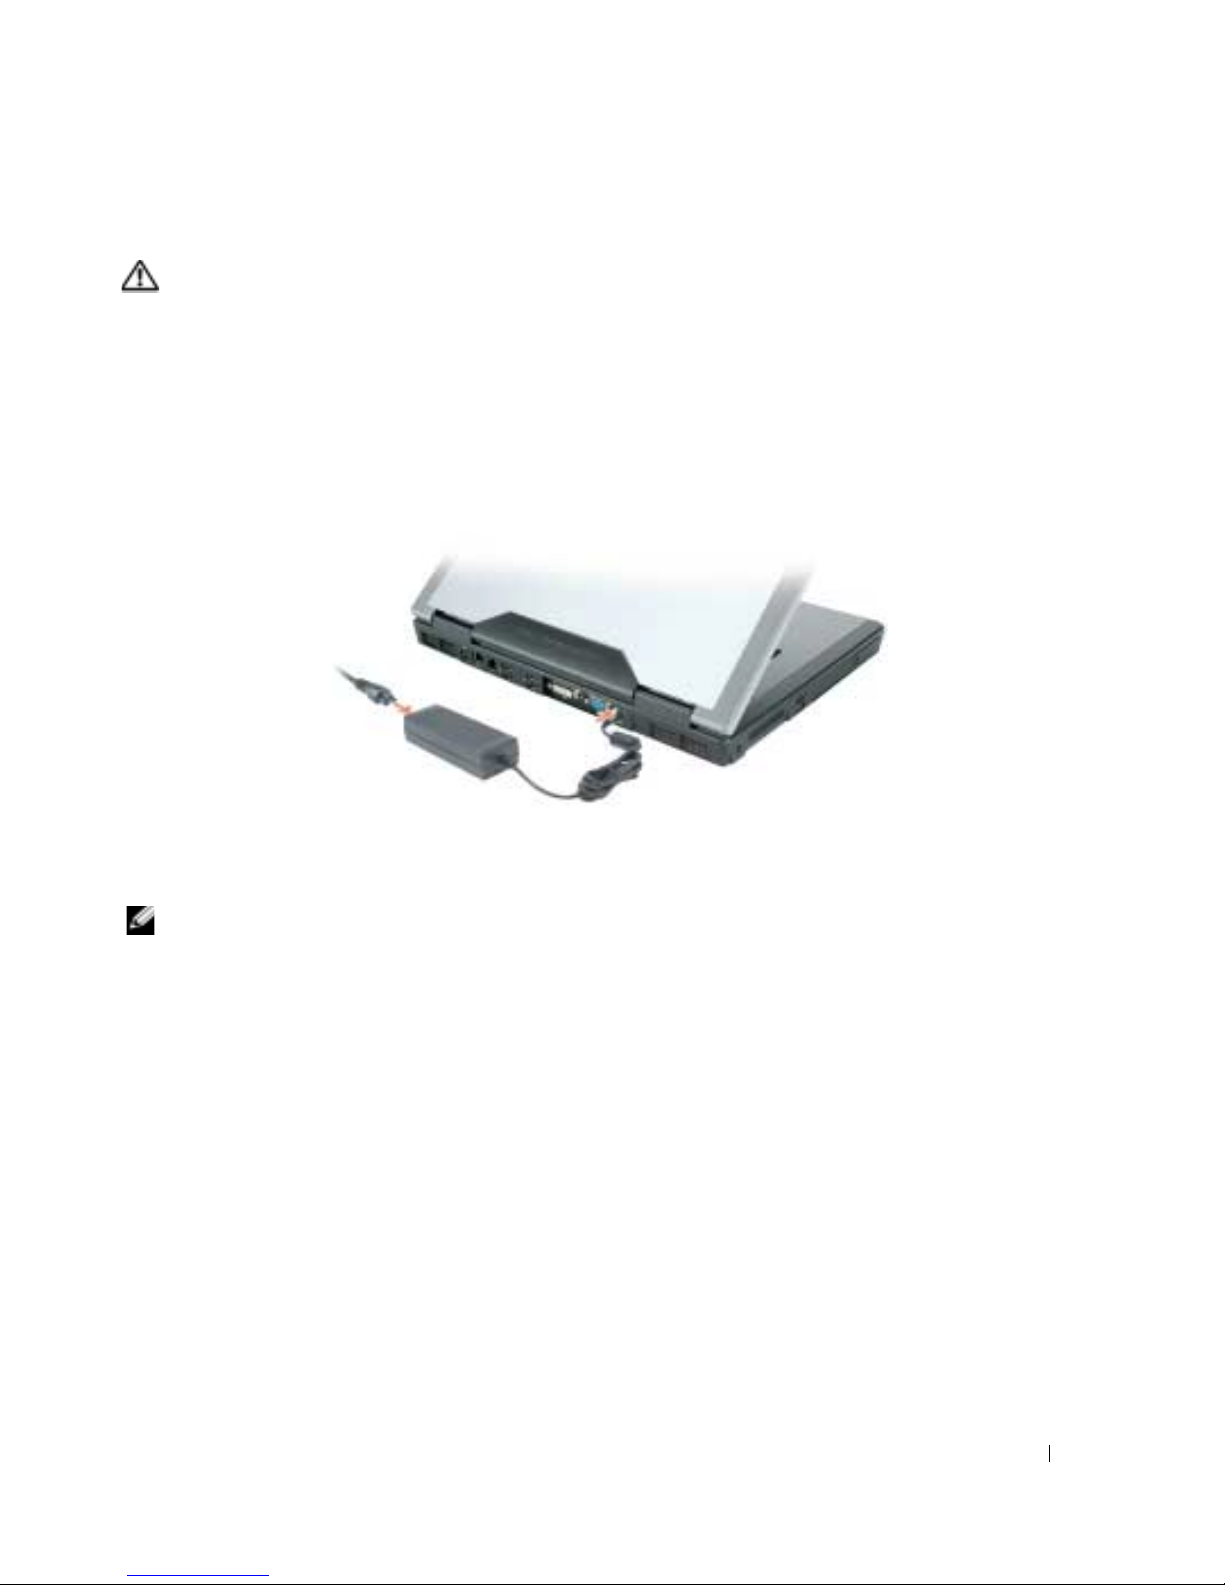
Einrichten des Computers
VORSICHT: Bevor Sie Arbeiten an den in diesem Abschnitt beschriebenen Komponenten ausführen, lesen Sie
erst die Sicherheitshinweise im Produktinformationshandbuch.
1
Packen Sie das Zubehör aus.
2
Legen Sie die für das Einrichten des Computers erforderlichen Zubehörteile bereit.
Der Lieferumfang des Zubehörs umfasst ferner die Benutzerdokumentation sowie die Software oder
zusätzliche Hardware (z. B. PC Cards, Laufwerke oder Akkus), die Sie bestellt haben.
3
Schließen Sie das Netzteil an den Netzteilanschluss des Computers und an die Steckdose an.
4
Öffnen Sie den Computerbildschirm und drücken Sie den Netzschalter, um den Computer
einzuschalten (siehe „Vorderansicht“ auf Seite 82).
ANMERKUNG: Es wird empfohlen, dass Sie den Computer mindestens einmal ein- und wieder ausgeschaltet
haben, bevor Sie eine Karte installieren oder den Computer an eine Docking-Station oder anderes externes Gerät,
wie z. B. einen Drucker, anschließen.
Schnellreferenzhandbuch 81
Page 82
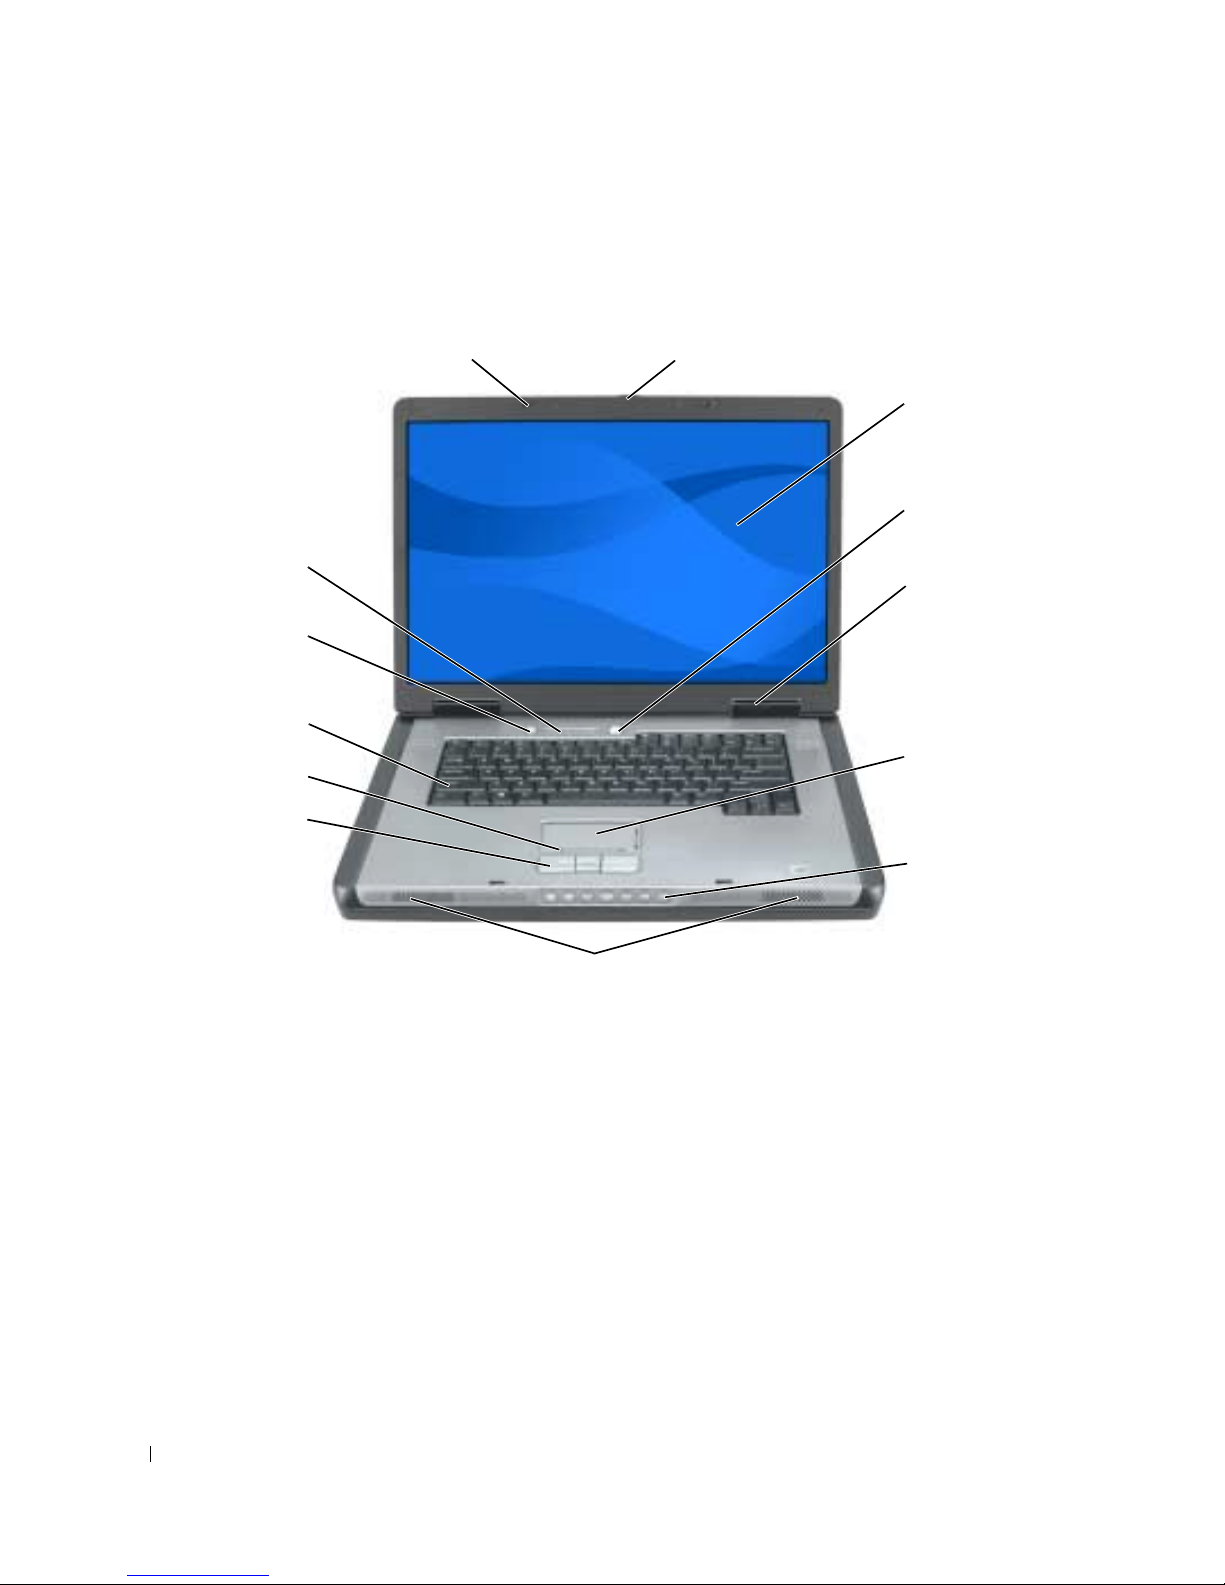
Wissenswertes über Ihren Computer
Vorderansicht
13
12
11
10
1
9
2
3
4
5
6
7
8
1 Bildschirmverriegelungen (2) 6 To u ch p ad 11 Ta s t a t u r
2 Bildschirmfreigabevorrichtung 7 Tasten zur Mediensteuerung 12 Medientaste
3 Bildschirm 8 Lautsprecher (2) 13 Tastatur und Wireless-
Statusanzeigen
4 Netzschalter 9 Touchpad-Tasten
5 Gerätestatusanzeigen 10 Touchpad-Bildlaufbereich
82 Schnellreferenzhandbuch
Page 83
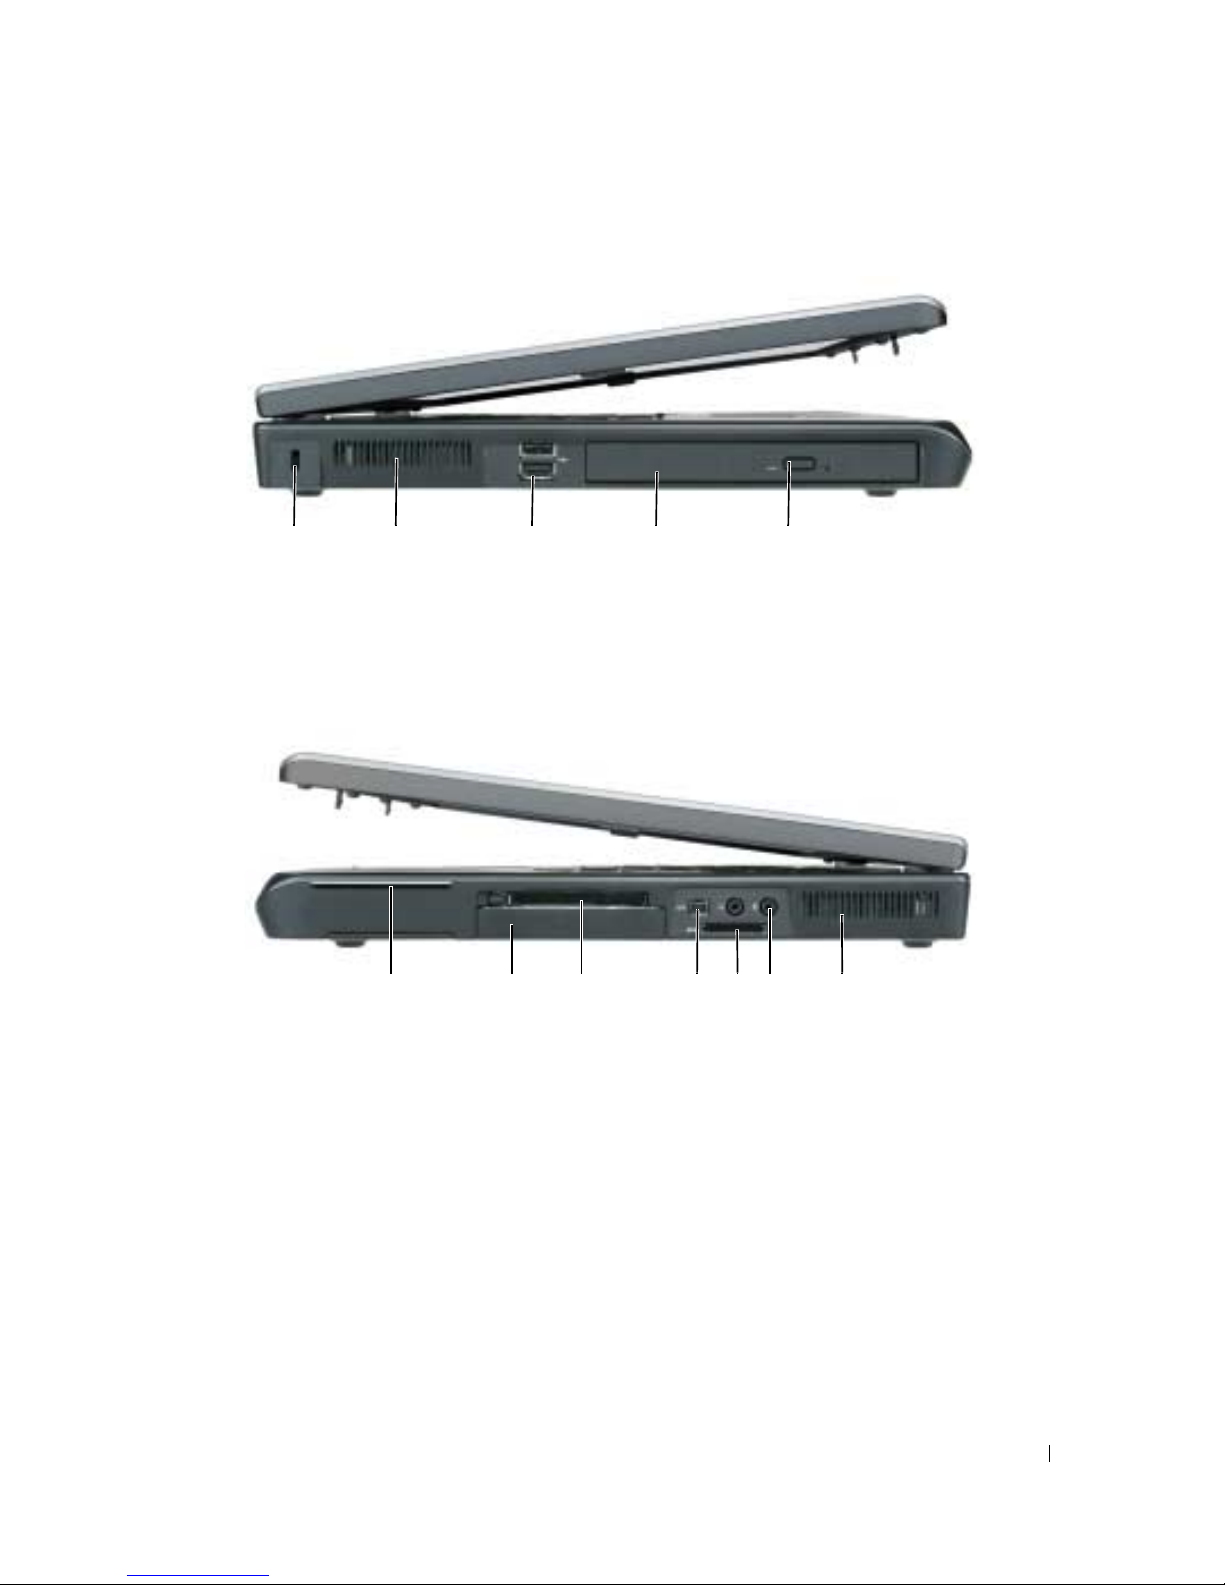
Linke Seite
1 2345
1 Sicherheitskabeleinschub 3 USB-Anschlüsse (2) 5 Auswurftaste für optisches Laufwerk
2 Lüftungsschlitze 4 Optisches Laufwerk
Rechte Seite
1 Steckplatz für Smart Card 4 IEEE 1394-Anschluss 7 Lüftungsschlitze
2 Festplatte 5 5-in-1-Media-Speicherkartenleser
3 ExpressCard-Steckplatz 6 Audioanschlüsse (2)
2 345671
Schnellreferenzhandbuch 83
Page 84
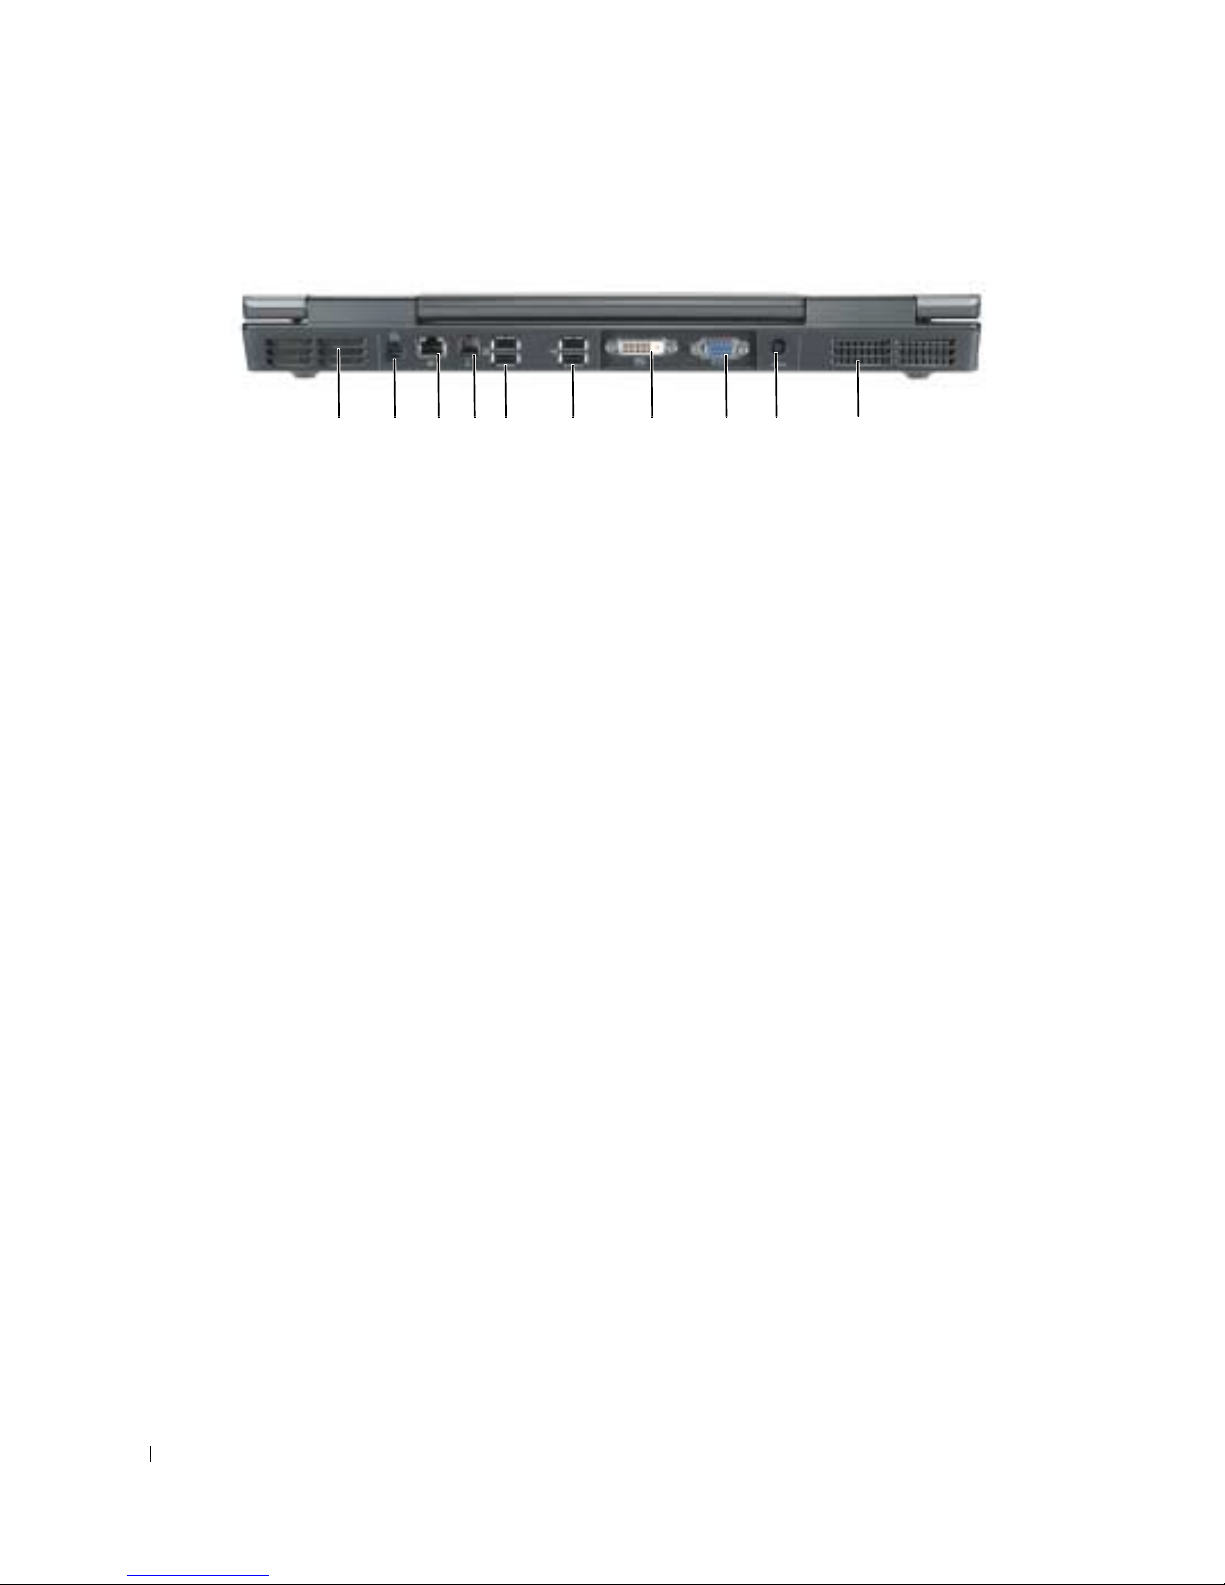
Rückansicht
1 2345 6 7 8 9 10
1 Lüftungsschlitze 5 USB-Anschlüsse (2) 9 Netzteilanschluss
2 Fernseh- und S-Video-Anschluss 6 USB-Anschlüsse (2) 10 Lüftungsschlitze
3 Netzwerkanschluss (RJ-45) 7 Anschluss für digitale
Videoschnittstelle (DVI)
4 Modemanschluss (RJ-11) 8 VGA-Monitoranschluss
84 Schnellreferenzhandbuch
Page 85
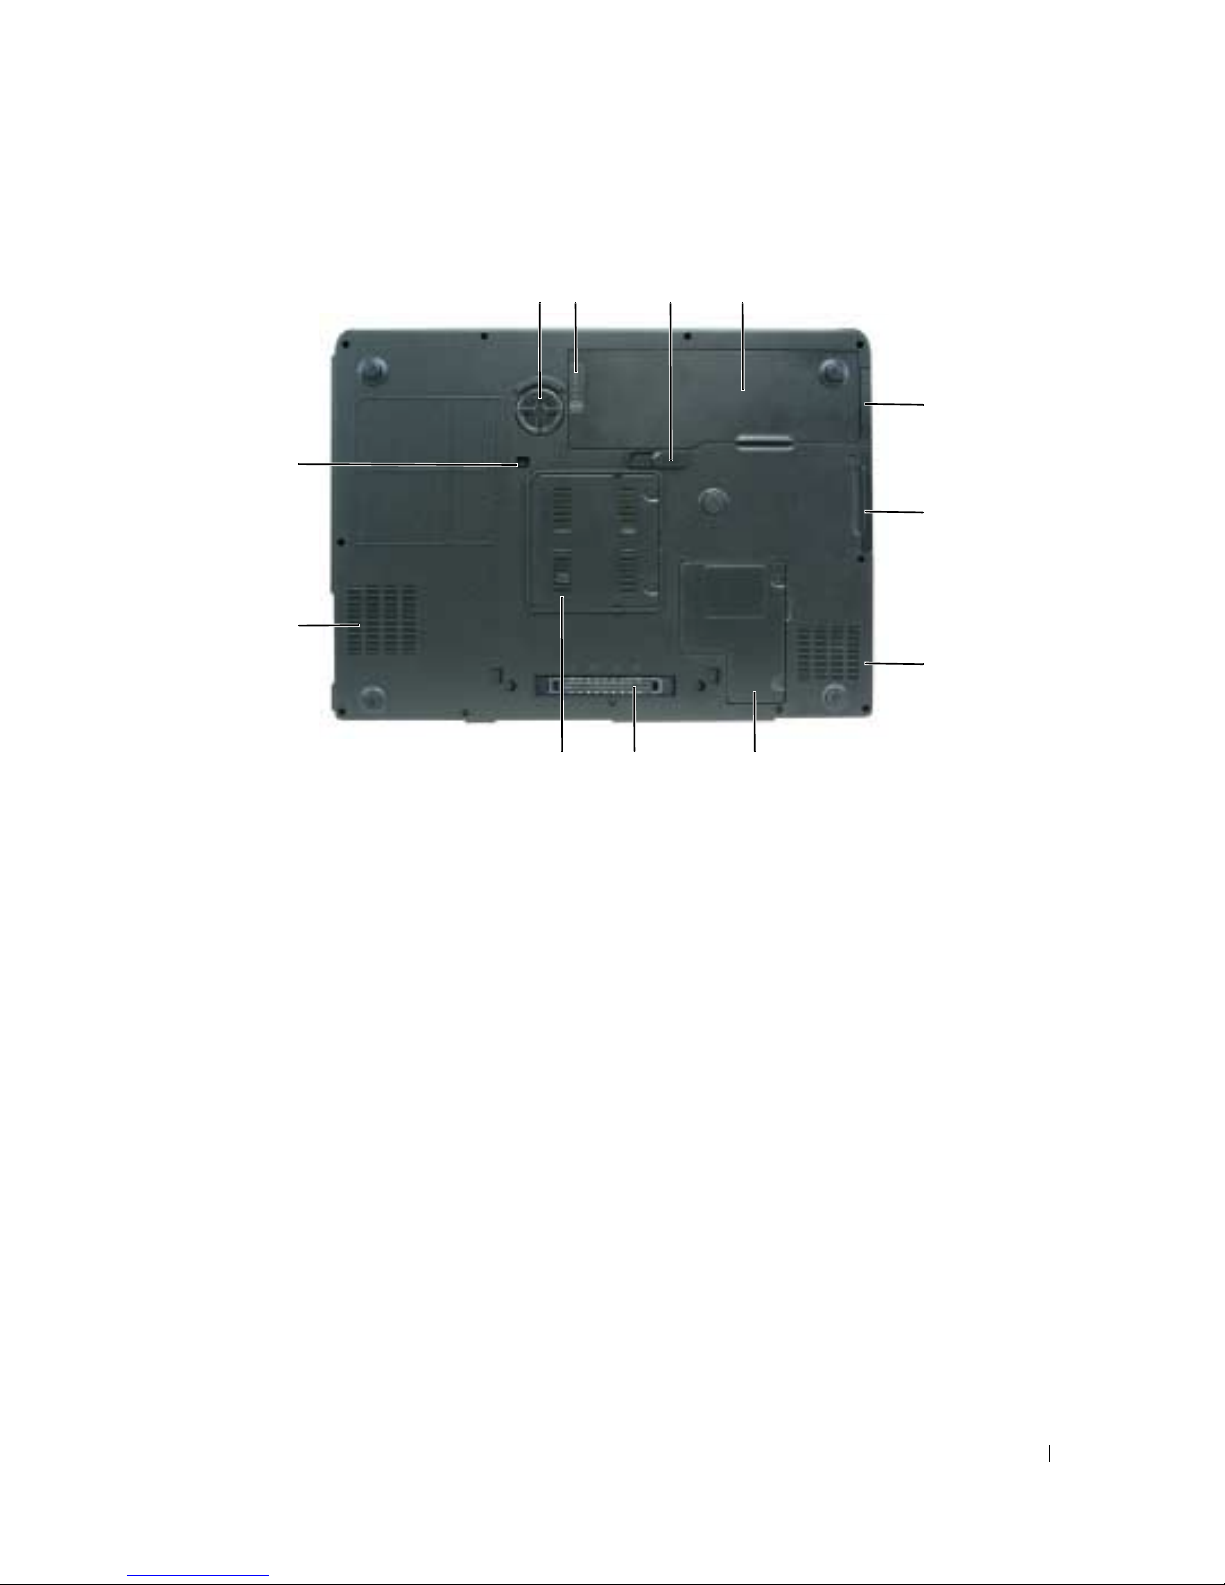
Unterseite
12 3 4
5
12
6
11
7
10
1 Subwoofer 5 Abdeckung für die optionale
interne Karte mit Bluetooth
89
9 Docking-Geräteanschluss
®
Wireless-Technologie
2 Akkuladung/Zustandsanzeige 6 Festplatte 10 Speichermodulabdeckung
3 Akkufachfreigabevorrichtung 7 Lüftungsschlitze 11 Lüftungsschlitze
4 Akku 8 Mini-Card-/Modemabdeckung 12 Sicherheitsschraube für
optisches Laufwerk
Schnellreferenzhandbuch 85
Page 86

Verwenden eines Akkus
Akkuleistung
ANMERKUNG: Informationen über die Dell-Garantie für Ihren Computer finden Sie in Ihrem Produktinformations-
handbuch oder in der gedruckten Garantiebescheinigung, die im Lieferumfang Ihres Computers enthalten ist.
Für eine optimale Leistung des Computers und zur Beibehaltung der BIOS-Einstellungen müssen Sie
für ihr Notebook von Dell™ immer den Akku verwenden. Bei Auslieferung ist standardmäßig bereits ein
Akku im Akkufach installiert.
ANMERKUNG: Da der Akku beim Kauf des Computers möglicherweise nicht vollständig geladen ist, verwenden
Sie ein Netzteil, um Ihren neuen Computer vor der ersten Verwendung an eine Steckdose anzuschließen und den
Akku zu laden. Sie erzielen die besten Ergebnisse, wenn Sie den Computer so lange über ein Netzteil betreiben, bis
der Akku vollständig geladen ist. Um den Ladestatus des Akkus anzuzeigen, klicken Sie auf Start→ System-
steuerung→ Energieoptionen und klicken Sie dann auf die Registerkarte Energieanzeige.
ANMERKUNG: Die Betriebszeit eines Akkus (die Zeit, in der der Akku den Computer betreiben kann) nimmt mit
der Zeit ab. Je nachdem, wie oft und unter welchen Bedingungen der Akku verwendet wird, müssen Sie möglicherweise noch vor Ende der Laufzeit Ihres Computers den Akku ersetzen.
Die Akkubetriebszeit hängt von den Betriebsbedingungen ab. Die Betriebszeit wird stark beeinträchtigt,
wenn Sie bestimmte Vorgänge durchführen. Dazu gehören u. A.:
• Verwenden von optischen Laufwerken
• Verwenden von Wireless-Kommunikationsgeräten, ExpressCards oder USB-Geräten
• Verwenden von sehr hellen Bildschirmeinstellungen, von 3D-Bildschirmschonern oder anderen Programmen, die viel Strom benötigen wie z. B. 3D-Grafik-Anwendungen
• Betrieb des Computers mit maximaler Leistung. Siehe „Konfigurieren von
Energieverwaltungseinstellungen“ in Ihrem
Benutzerhandbuch
, um Informationen über Zugang zu den
Eigenschaften von Energieoptionen in Windows oder zu Dell QuickSet zu erhalten, die Sie dazu
benutzen können, Energieverwaltungseinstellungen einzurichten.
ANMERKUNG: Es wird empfohlen, den Computer beim Beschreiben von CDs oder DVDs an das Stromnetz
anzuschließen.
Sie können den Akkuladezustand überprüfen, bevor Sie den Akku in den Computer einsetzen. Außerdem können Sie die Energieverwaltungsoptionen so konfigurieren, dass eine Warnmeldung ausgegeben
wird, wenn der Ladezustand des Akkus niedrig ist. Weitere Informationen erhalten Sie unter „Prüfen des
Akkuladezustands“ auf Seite 87.
VORSICHT: Bei Verwendung eines ungeeigneten Akkus besteht Brand- oder Explosionsgefahr. Ersetzen Sie die
Akkus nur mit einem kompatiblen Akku von Dell. Der Akku ist für den Einsatz in Ihrem Dell-Computer vorgesehen.
Verwenden Sie keinesfalls den Akku eines anderen Computers für Ihren Computer.
VORSICHT: Entsorgen Sie die Akkus nicht im Hausmüll. Falls ein Akku nicht mehr aufgeladen werden kann,
wenden Sie sich bitte an einen Recyclinghof vor Ort oder an eine Umweltorganisation, um Informationen zur
Entsorgung von Lithium-Ionen-Akkus zu erhalten. Informationen zur Batterieentsorgung finden Sie im entsprechenden Abschnitt im Produktinformationshandbuch.
86 Schnellreferenzhandbuch
Page 87
VORSICHT: Bei unsachgemäßer Verwendung des Akkus besteht Brand- oder Verätzungsgefahr. Sie dürfen den
Akku nicht aufstechen, verbrennen, auseinander nehmen oder Temperaturen über 65 °C aussetzen. Bewahren Sie
den Akku außerhalb der Reichweite von Kindern auf. Handhaben Sie beschädigte oder auslaufende Akkus mit
äußerster Vorsicht. Beschädigte Akkus können auslaufen und Personen- oder Sachschäden verursachen.
Prüfen des Akkuladezustands
Die Akkuanzeige von Dell QuickSet, die Energieanzeige von Microsoft Windows, sowie das -
Symbol, die Akku-Ladestandanzeige und Zustandsanzeige sowie die Warnung „Akku niedrig“ informieren
über den Ladezustand des Akkus.
ANMERKUNG: Dell QuickSet ist möglicherweise auf Ihrem Computer nicht verfügbar.
Akkuanzeige von Dell™ QuickSet
Ist
Dell QuickSet installiert, drücken Sie <Fn><F3>, um die Akkuanzeige von QuickSet anzuzeigen. In
der Akkuanzeige werden Status, Akkuzustand, Ladestand und Ladedauer des Akkus im Computer
angezeigt.
Um weitere Informationen über die QuickSet-Anzeige zu erhalten, klicken Sie in der Symbolleiste mit
der rechten Maustaste auf das Symbol und anschließend auf Hilfe.
Microsoft® Windows®-Energieanzeige
Die Energie- bzw. Akkuanzeige von Windows zeigt die verbleibende Akkuladung an. Um die Ladung zu
überprüfen, doppelklicken Sie auf das entsprechende Symbol in der Taskleiste.
Wenn der Computer an eine Steckdose angeschlossen ist, wird das Symbol angezeigt.
Ladestandanzeige
Durch Drücken (oder Gedrückthalten) der Statustaste an der Ladestandanzeige des Akkus können Sie
Folgendes prüfen:
• Akkuladung (Prüfung durch Drücken und
• Akkuzustand (Prüfung durch Drücken und
Die Betriebszeit des Akkus hängt weitgehend von der Anzahl der Aufladungen ab. Durch Hunderte Aufund Entladungen verlieren Akkus an Ladekapazität, d. h. der Akkuzustand verschlechtert sich. Dies bedeutet, dass ein Akku den Status „aufgeladen“ anzeigt, aber nur über eine verminderte Ladekapazität
(Zustand) verfügt.
Prüfen der Akkuladung
Wenn Sie den Ladezustand des Akkus überprüfen möchten, drücken Sie die Statustaste auf der AkkuLadestandanzeige, damit die Akkustandanzeigen aufleuchten. Jede Anzeige repräsentiert etwa 20 Prozent der Gesamtladekapazität des Akkus. Wenn der Akku also beispielsweise noch zu 80 Prozent geladen
ist, leuchten vier der fünf Anzeigen auf. Wenn keine der Anzeigen aufleuchtet, ist der Akku vollständig
entladen.
Loslassen
Halten
der Statustaste)
der Statustaste)
Schnellreferenzhandbuch 87
Page 88

Prüfen des Akkuzustands
ANMERKUNG: Sie können den Akkuzustand entweder durch Verwendung der Ladestandanzeige am Akku (wie
unten beschrieben), oder durch Verwendung der Akkuanzeige unter Dell QuickSet überprüfen. Weitere Informationen über QuickSet erhalten Sie, wenn Sie mit der rechten Maustaste in der Taskleiste auf das Symbol
klicken und dann auf Hilfe klicken.
Um den Akkuzustand mit der Ladeanzeige zu überprüfen, halten Sie die Statustaste der Akku-Ladestandanzeige mindestens 3 Sekunden lang gedrückt. Wenn keine der Anzeigen aufleuchtet, ist der Akku
in gutem Zustand, und mehr als 80 Prozent der ursprünglichen Ladekapazität verbleiben. Jede Anzeige
stellt eine prozentuelle Verschlechterung dar. Wenn fünf Anzeigen leuchten, verbleiben weniger als
60 Prozent der Ladekapazität. In diesem Fall sollten Sie den Akku ersetzen. Weitere Informationen zu
Akku-Betriebszeiten finden Sie im Abschnitt „Technische Daten“ in Ihrem Benutzerhandbuch.
Warnung „Akku niedrig“
HINWEIS: Um Datenverlust zu vermeiden, sollten Sie Ihre Arbeit sofort nach einer solchen Warnung speichern.
Schließen Sie den Computer anschließend an eine Steckdose an. Ist der Akku vollständig entladen, wird automatisch der Ruhemodus aktiviert.
Wenn der Akku zu ungefähr 90 Prozent erschöpft ist, wird ein Popup-Fenster mit einem entsprechenden
Warnhinweis angezeigt. Der Computer geht in den Ruhemodus über, wenn die Akkuladung ein kritisch
niedriges Niveau erreicht hat.
Sie können die Einstellungen der Akkuwarnanzeigen in QuickSet oder dem Fenster Eigenschaften von
Energieoptionen einstellen. Lesen Sie den Abschnitt unter „Konfigurieren der Energieverwaltungseinstellungen“ in Ihrem Benutzerhandbuch, um Informationen zum Zugriff auf QuickSet oder das Fenster
Eigenschaften von Energieoptionen zu erhalten.
Sparen von Akkuenergie
Die folgenden Maßnahmen helfen Ihnen, Akkuenergie zu sparen:
• Die Betriebsdauer eines Akkus hängt weitgehend davon ab, wie oft er verwendet und wieder aufgeladen wird. Daher sollten Sie Ihren Computer, soweit dies möglich ist, immer mit Netzstrom
betreiben.
• Aktivieren Sie den Standby-Modus oder den Ruhemodus, wenn Sie den Computer längere Zeit nicht
verwenden. Lesen Sie den Abschnitt unter „Energieverwaltungsmodi“ in Ihrem
Benutzerhandbuch
weitere Informationen zu Standby und Ruhemodi zu erhalten.
zum
• Verwenden Sie den Assistenten für die Energieverwaltung
Auswählen der Optionen zur Optimierung des Stromverbrauchs Ihres Computers Diese Optionen können auch so definiert werden, dass sie
sich ändern, wenn Sie den Netzschalter drücken, den Bildschirm schließen oder die Tastenkombination <Fn><Esc> drücken. Lesen Sie den Abschnitt unter „Konfigurieren der Energieverwaltungseinstellungen“ in Ihrem
Benutzerhandbuch
, um weitere Informationen zum Verwenden des Energiever-
waltungsassistenten zu erhalten.
ANMERKUNG: Lesen Sie den Abschnitt unter „Konfigurieren der Energieverwaltungseinstellungen“ in Ihrem
Benutzerhandbuch.
88 Schnellreferenzhandbuch
, um
Page 89

Aufladen des Akkus
ANMERKUNG: Mit Dell™ ExpressCharge™ lädt das Netzteil einen vollständig entladenen Akku bei ausgeschal-
tetem Computer zu 80 Prozent in etwa 1 Stunde und zu 100 Prozent in etwa 2 Stunden. Bei eingeschaltetem Computer verlängert sich die Ladezeit entsprechend. Der Akku kann beliebig lange im Computer verbleiben. Ein im Akku
integrierter Schaltkreis verhindert das Überladen des Akkus.
Wenn der Computer an das Stromnetz angeschlossen oder ein Akku in einen daran angeschlossenen
Computer eingesetzt wird, prüft der Computer den Ladezustand und die Temperatur des Akkus. Das
Netzteil lädt gegebenenfalls den Akku auf und erhält die Akkuladung.
Falls der Akku durch Betrieb in Ihrem Computer oder aufgrund hoher Umgebungstemperaturen heiß ist,
wird der Akku bei Anschluss des Computers an eine Steckdose unter Umständen nicht geladen.Der
Akku ist zu heiß, um aufgeladen zu werden, wenn die Statusanzeige orange und grün blinkt. Ziehen
Sie den Netzstecker aus der Steckdose, und lassen Sie Computer und Akku auf Zimmertemperatur abkühlen. Schließen Sie den Computer anschließend wieder an eine Steckdose an, und setzen Sie den
Ladevorgang fort.
Weitere Informationen zum Beheben von Problemen mit dem Akku finden Sie unter „Probleme mit der
Stromversorgung“ in Ihrem
Benutzerhandbuch
.
Austauschen des Akkus
VORSICHT: Führen Sie die folgenden Schritte aus, bevor Sie fortfahren: Computer ausschalten, Netzkabel aus
der Steckdose und dem Computer ziehen, Modem vom Wandanschluss und vom Computer trennen sowie alle
externen Kabel vom Computer trennen.
HINWEIS: Trennen Sie alle externen Kabel vom Computer, um Beschädigungen an den Anschlüssen zu vermei-
den.
VORSICHT: Bei Verwendung eines ungeeigneten Akkus besteht Brand- oder Explosionsgefahr. Ersetzen Sie die
Akkus nur mit einem kompatiblen Akku von Dell. Der Akku ist für den Einsatz in Ihrem Dell™-Computer vorgesehen. Verwenden Sie keinesfalls den Akku eines anderen Computers für Ihren Computer.
So entfernen Sie den Akku:
1
Falls der Computer mit einem Docking-Gerät verbunden ist, trennen Sie die Verbindung. Weitere
Anweisungen hierzu finden Sie in der Dokumentation zum Docking-Gerät.
2
Stellen Sie sicher, dass der Computer ausgeschaltet ist.
3
Betätigen Sie die Akkufreigabevorrichtung für das Akkufach an der Unterseite des Computers und
nehmen Sie den Akku heraus.
Schnellreferenzhandbuch 89
Page 90
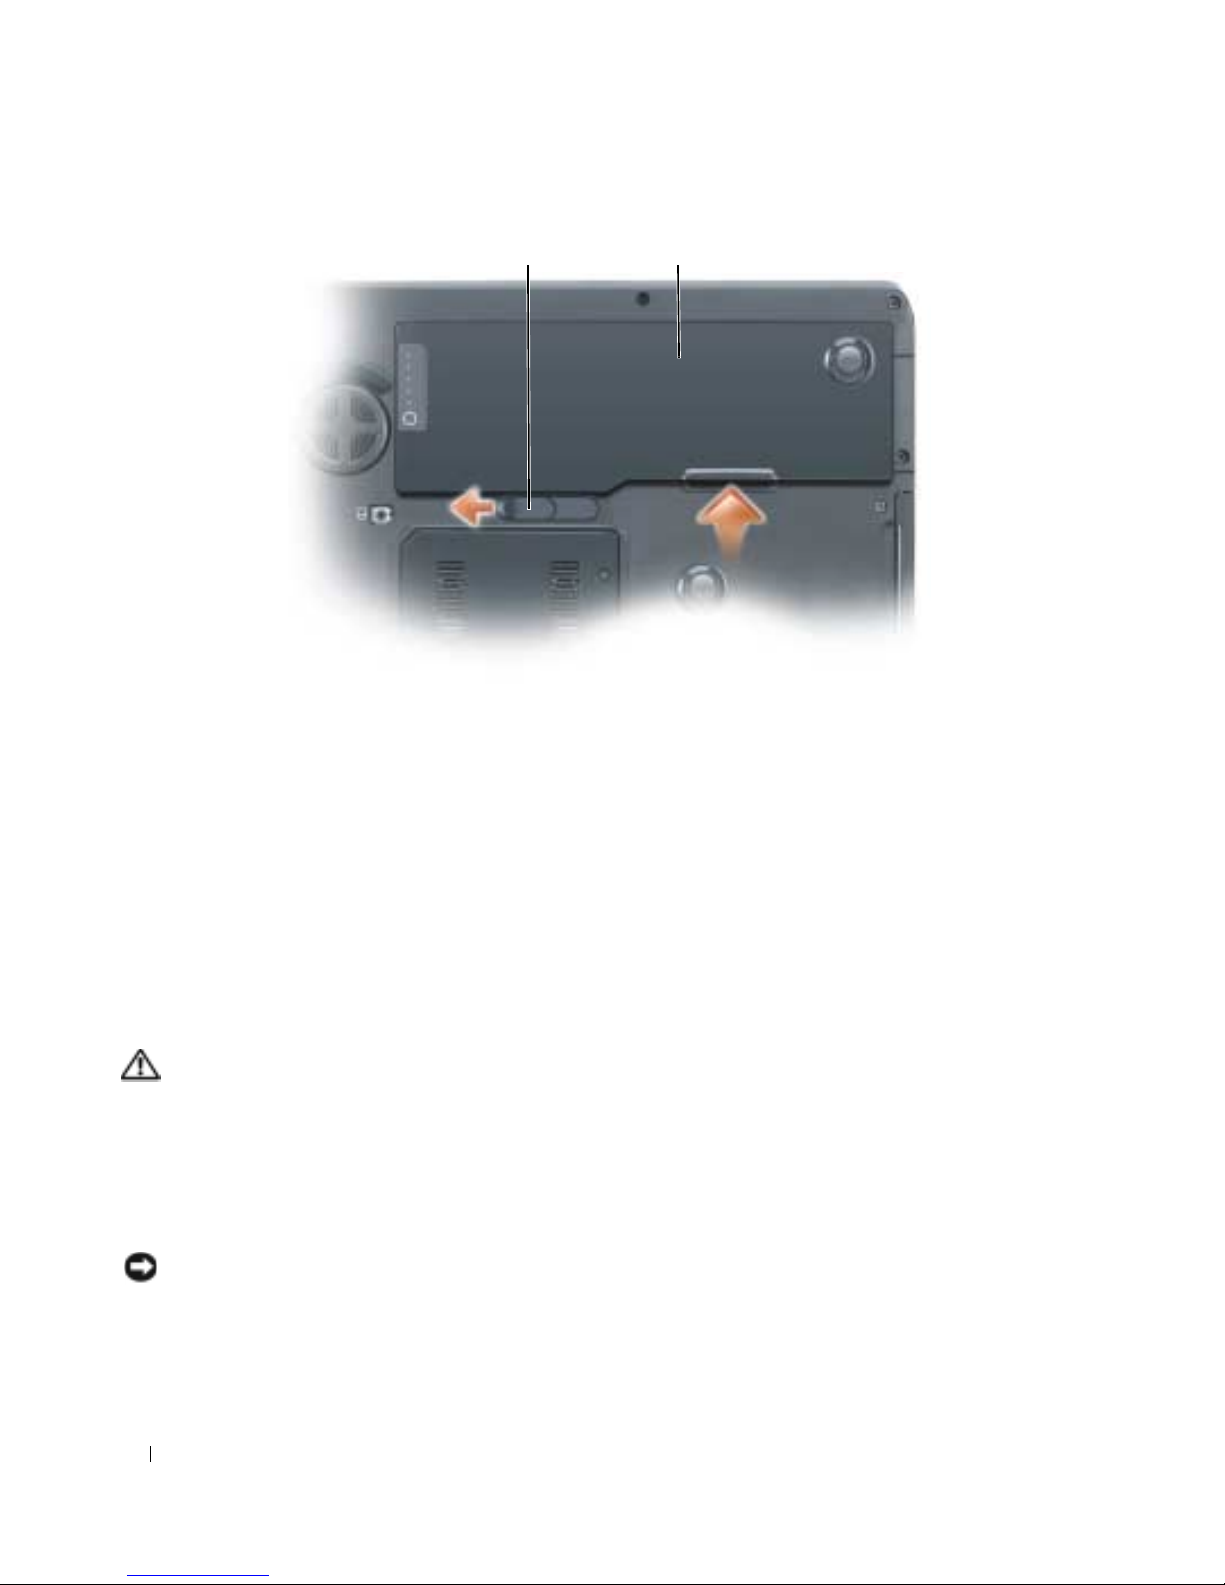
1 2
1 Akkufachfreigabevorrichtung 2 Akku
Um den Akku wieder einzusetzen, gehen Sie in umgekehrter Reihenfolge wie beim Herausnehmen vor.
Lagern eines Akkus
Entfernen Sie den Akku, wenn Sie den Computer für längere Zeit lagern möchten. Akkus entladen sich
während einer längeren Lagerzeit. Nach längerer Lagerung sollten Sie den Akku wieder vollständig aufladen, bevor Sie ihn verwenden. Siehe „Aufladen des Akkus“ auf Seite 89.
Beheben von Störungen
Probleme mit Absturz und Software
VORSICHT: Bevor Sie Arbeiten an den in diesem Abschnitt beschriebenen Komponenten ausführen, lesen Sie
erst die Sicherheitshinweise im Produktinformationshandbuch.
Der Computer startet nicht
STELLEN SIE SICHER, DASS DAS NETZKABEL RICHTIG AM COMPUTER UND AN DER STECKDOSE ANGESCHLOSSEN IS T.
Der Computer reagiert nicht mehr
HINWEIS: Wenn Sie das Betriebssystem nicht ordnungsgemäß herunterfahren, können Daten verloren gehen.
D
EN COMPUTER AUSSCHALTEN – Wenn der Computer nicht mehr reagiert und auch nicht durch Drücken
einer Taste auf der Tastatur bzw. Bewegen der Maus aktiviert werden kann, halten Sie den Netzschalter
mindestens acht bis zehn Sekunden lang gedrückt, bis der Computer ausgeschaltet wird. Starten Sie
anschließend den Computer neu.
90 Schnellreferenzhandbuch
Page 91

Ein Programm reagiert nicht mehr; oder stürzt wiederholt ab
ANMERKUNG: Anweisungen für die Installation von Software finden Sie im Allgemeinen in der jeweiligen Doku-
mentation oder auf einer mitgelieferten Diskette oder CD.
P
ROGRAMM BEENDEN –
1
Drücken Sie die Tastenkombination <Strg><Umsch><Esc>.
2
Klicken Sie auf
3
Klicken Sie auf das Programm, das nicht mehr reagiert.
4
Klicken Sie auf
SOFTWARE-DOKUMENTATION LESEN – Deinstallieren Sie gegebenenfalls das Programm und installieren Sie
Task-Manager
End Task
(Task beenden).
.
es anschließend erneut.
Ein Programm wurde für ein früheres Microsoft® Windows®-Betriebssystem entwickelt
PROGRAMMKOMPATIBILITÄTS-ASSISTENTEN AUSFÜHREN – Der „Programmkompatibilitäts-Assistent“ kon-
figuriert ein Programm für Windows XP entsprechend, sodass es auch in ähnlichen
Betriebssystemumgebungen eingesetzt werden kann.
1
Klicken Sie auf
Programmkompatibilitäts-Assistent
2
Klicken Sie auf der Begrüßungsseite auf
3
Befolgen Sie die Anleitungen auf dem Bildschirm.
Start
, zeigen Sie auf
Alle Programme
.
Weite r
.
→
Zubehör
, und klicken Sie anschließend auf
Ein blauer Bildschirm wird angezeigt
DEN COMPUTER AUSSCHALTEN – Wenn der Computer nicht mehr reagiert und auch nicht durch Drücken
einer Taste auf der Tastatur bzw. Bewegen der Maus aktiviert werden kann, halten Sie den Netzschalter
mindestens acht bis zehn Sekunden lang gedrückt, bis der Computer ausgeschaltet wird. Starten Sie
anschließend den Computer neu.
Andere Probleme mit der Software
DIE DOKUMENTATION ZU DEM JEWEILIGEN PROGRAMM LESEN ODER SICH MIT DEM HERSTELLER DER SOFTWARE
IN VERBINDUNG SETZEN –
• Stellen Sie sicher, dass das Programm mit dem auf Ihrem Computer installierten Betriebssystem
kompatibel ist.
• Stellen Sie sicher, dass Ihr Computer die Mindest-Hardware-Anforderungen erfüllt, die für die Software erforderlich sind. Informationen dazu finden Sie in der Software-Dokumentation.
• Stellen Sie sicher, dass das Programm ordnungsgemäß installiert und konfiguriert wurde.
• Stellen Sie sicher, dass die Gerätetreiber nicht mit dem Programm in Konflikt stehen.
• Deinstallieren Sie gegebenenfalls das Programm und installieren Sie es anschließend erneut.
SICHERN SIE SOFORT DIE DATEIEN.
ERWENDEN SIE EIN VIRUSABTASTPROGRAMM, UM DIE FESTPLATTE, DISKETTEN- UND CD-LAUFWERKE AUF
V
IREN ZU ÜBERPRÜFEN.
V
Schnellreferenzhandbuch 91
Page 92

SPEICHERN UND SCHLIEßEN SIE ALLE GEÖFFNETEN DATEIEN ODER PROGRAMME UND FAHREN SIE IHREN
C
OMPUTER ÜBER DAS MENÜ Start HERUNTER.
EN COMPUTER AUF SPYWARE DURCHSUCHEN – Wenn die Leistung Ihres Computers gering ist, Ihr
D
Computer regelmäßig Popup-Meldungen anzeigt oder Sie Probleme haben, sich mit dem Internet zu
verbinden, könnte Ihr Computer von Spyware befallen sein. Benutzen Sie ein Anti-Virus Program, das
einen Anti-Spyware Schutz hat (Ihr Programm braucht möglicherweise eine Aktualisierung), um den
Computer zu scannen und die Spyware zu entfernen. Weitere Informationen erhalten Sie auf der Website support.dell.com. Suchen Sie dort nach dem Stichwort Spyware.
DELL DIAGNOSTICS AUSFÜHREN – Siehe „Dell Diagnostics“ auf Seite 92. Wenn alle Tests erfolgreich
ausgeführt wurden, liegt der Fehler in der Software begründet.
Dell Diagnostics
VORSICHT: Bevor Sie Arbeiten an den in diesem Abschnitt beschriebenen Komponenten ausführen, lesen Sie
erst die Sicherheitshinweise im Produktinformationshandbuch.
Wann wird das Programm Dell Diagnostics eingesetzt?
Wenn Probleme mit dem Computer auftreten, führen Sie die unter „Probleme mit Absturz und
Software“ auf Seite 90 aufgeführten Maßnahmen durch und führen Sie Dell Diagnostics aus, bevor Sie
von Dell technische Unterstützung anfordern.
Wir empfehlen Ihnen, diese Anweisungen vor Beginn der Arbeiten auszudrucken.
HINWEIS: Das Programm Dell Diagnostics kann nur auf Dell™-Computern ausgeführt werden.
ANMERKUNG: Die Drivers and Utilities CD ist optional und ist möglicherweise nicht im Lieferumfang Ihres
Computers enthalten.
Rufen Sie das System-Setup-Programm auf, prüfen Sie die Konfiguration des Computers und stellen Sie
sicher, dass das zu prüfende Gerät im System-Setup-Programm aufgeführt wird und aktiv ist.
Starten Sie das Programm Dell Diagnostics entweder über Ihr Festplattenlaufwerk oder über die Drivers
and Utilities CD (auch bekannt unter der Bezeichnung ResourceCD bezeichnet).
Dell Diagnostics von Ihrer Festplatte starten
1
Schalten Sie den Computer ein bzw. führen Sie einen Neustart durch.
a
Wenn das DELL™-Logo angezeigt wird, drücken Sie sofort <F12>. Wählen Sie
Diagnostics
vom
Startmenü und drücken Sie die <Eingabetaste>.
ANMERKUNG: Falls Sie zu lange gewartet haben, und das Betriebssystem-Logo angezeigt wird, warten Sie
noch, bis der Microsoft
starten Sie ihn erneut.
Halten Sie die <Fn>-Taste gedrückt, während Sie das System starten.
b
ANMERKUNG: Wenn eine Meldung erscheint, dass keine Diagnoseprogrammpartition gefunden wurde,
führen Sie das Programm Dell Diagnostics über die Drivers and Utilities CD aus.
2
Siehe „Kontaktaufnahme mit Dell“ in Ihrem
®
Windows®-Desktop angezeigt wird. Fahren Sie danach den Computer herunter und
Benutzerhandbuch
.
92 Schnellreferenzhandbuch
Page 93

Starten von Dell Diagnostics von der Drivers and Utilities CD
1
Legen Sie die
2
Computer herunterfahren und erneut starten.
Drivers and Utilities
CD.
Wenn das Dell-Logo angezeigt wird, drücken Sie sofort <F12>.
Wenn Sie zu lange warten und das Windows-Logo eingeblendet wird, warten Sie, bis der Windows-
Desktop angezeigt wird. Fahren Sie danach den Computer herunter und starten Sie ihn erneut.
ANMERKUNG: Durch die nächsten Schritte wird die Startreihenfolge einmalig geändert. Beim nächsten
Systemstart startet der Computer entsprechend den im System-Setup-Programm angegebenen Geräten.
3
Wenn die Liste der Startgeräte erscheint, markieren Sie
CD/DVD/CD-RW Drive
(CD/DVD/CD-RW-
Laufwerk) und drücken Sie auf die <Eingabetaste>.
4
Wählen Sie aus dem Menü die Option
5
Geben Sie 1 ein, um das Menü der
von CD-ROM starten
ResourceCD
zu starten, und drücken Sie die <Eingabetaste> um
und drücken Sie die <Eingabetaste>.
fortzufahren.
6
Wählen Sie
Run Dell 32-bit Diagnostics
(Dell 32-Bit-Diagnose ausführen) aus der nummerierten
Liste aus. Wählen Sie die für Ihren Computer zutreffende Version aus, wenn mehrere Versionen
aufgelistet werden.
7
Wenn das
Hauptmenü
des Programms „Dell Diagnostics“ erscheint, wählen Sie den gewünschten
Test aus.
Hauptmenü des Programms Dell Diagnostics
1
Klicken Sie nach dem Laden der Dell Diagnostics und nachdem das
die Schaltfläche für die von Ihnen gewünschte Option.
Option Funktion
Express Test (Schnelltest) Es wird ein Schnelltest der Geräte durchgeführt. Dieser
Test dauert normalerweise etwa 10 bis 20 Minuten. Es ist
keine Benutzeraktion erforderlich. Führen Sie den Express
Te st (Schnelltest) zuerst aus, um die Möglichkeit zum
schnellen Auffinden des Problems zu erhöhen.
Extended Test (Erweiterter Test) Es wird ein ausführlicher Test der Geräte durchgeführt.
Dieser Test nimmt normalerweise mindestens eine
Stunde in Anspruch. Dabei muss der Benutzer in
regelmäßigen Abständen Informationen eingeben.
Custom Test (Benutzerdefinierter Test) Es wird ein bestimmtes Gerät geprüft. Die auszufüh-
renden Tests können vom Benutzer angepasst werden.
Symptom Tree (Problemübersicht) Listet die am häufigsten vorkommenden Symptome auf
und lässt zu, dass Sie einen Test wählen, der auf dem
Symptom der vorliegenden Störung basiert.
Hauptmenü
angezeigt wird auf
Schnellreferenzhandbuch 93
Page 94

2
Wenn beim Test eine Störung gefunden wird, wird eine Meldung mit dem Fehlercode und eine Beschreibung der Störung angezeigt. Notieren Sie den Fehlercode und die Problembeschreibung und
folgen Sie den Anweisungen auf dem Bildschirm.
Kann das Problem nicht gelöst werden, wenden Sie sich an Dell. Siehe „Kontaktaufnahme mit Dell“ in
Ihrem
3
Klicken Sie beim Ausführen eines Tests im
Tre e
Benutzerhandbuch
ANMERKUNG: Die Service-Tag-Nummer des Computers finden Sie im oberen Bereich der einzelnen
Testanzeigen. Wenn Sie bei Dell anrufen, fragt Sie der Technische Support nach der Service-Tag-Nummer.
.
benutzerdefinierten Test
oder mit der Option
Symptom
(Problemübersicht) auf das in der folgenden Tabelle beschriebene zutreffende Register, um
weitere Informationen zu erhalten.
Registerkarte Funktion
Ergebnisse Es werden die Testergebnisse und möglicherweise gefundene Probleme
angezeigt.
Fehler Es werden die gefundenen Fehler, die Fehlercodes und eine Beschrei-
bung des Problems angezeigt.
Hilfe Beschreibt den Test und verweist auf mögliche Voraussetzungen für
die Durchführung des Tests.
Konfiguration Die Hardware-Konfiguration der ausgewählten Geräte wird angezeigt.
Dell Diagnostics sammelt über das System-Setup-Programm, den
Speicher und verschiedene interne Tests Konfigurationsinformationen
für alle Geräte. Diese Informationen werden in der Geräteliste auf der
linken Seite angezeigt. In der Geräteliste werden möglicherweise nicht
die Namen aller Geräte angezeigt, die im Computer installiert oder
daran angeschlossen sind.
Parameter Der Test kann durch Änderungen an den Einstellungen an Ihre Be-
4
Nachdem die Tests abgeschlossen sind, wenn Sie Dell Diagnostics von der
entfernen Sie die CD.
5
Schließen Sie den Testbildschirm und kehren Sie zum
den von Dell Diagnostics und zum Neustart des Computers das
94 Schnellreferenzhandbuch
dürfnisse angepasst werden.
Hauptmenü
Hauptmenü
Drivers and Utilities
CD
,
zurück. Schließen Sie zum Been-
.
Page 95

Stichwortverzeichnis
A
Akku
Aufladen, 89
Energieanzeige, 87
Entfernen, 89
lagern, 90
Leistung, 86
Prüfen des Ladezustands, 87
Assistenten
Programmkompatibilitäts-
Assistent, 91
B
Beheben von Störungen
Dell Diagnostics, 92
Hilfe- und Supportcenter, 80
Benutzerhandbuch, 78
Betriebssystem
CD, 80
neu installieren, 80
Betriebssystem CD, 80
C
CDs
Betriebssystem, 80
Computer
stark verlangsamte
Computerverarbeitungsleistung, 92
stürzt ab, 90-91
Computer reagiert nicht
mehr, 90
D
Dell
Support-Website, 79
Dell Diagnostics
Info, 92
starten von Ihrer Festplatte, 92
von der Drivers and Utilities
CD starten, 93
Diagnose
Dell, 92
Dokumentation
Benutzerhandbuch, 78
Enduser-
Lizenzvereinbarung, 77
Ergonomie, 77
Garantie, 77
Online, 79
Produktinformations-
handbuch, 77
Sicherheit, 77
Zulassung, 77
E
Enduser-
Lizenzvereinbarung, 77
Etikett
Microsoft Windows, 78
Etiketten
Service-Tag-Nummer, 78
G
Garantieinformationen, 77
H
Hardware
Dell Diagnostics, 92
Hilfe- und Supportcenter, 80
Hilfedatei
Windows Hilfe- und
Supportcenter, 80
I
Informationen zur
Ergonomie, 77
M
Microsoft Windows-
Etikett, 78
O
optical drive
description, 83
Stichwortverzeichnis 95
Page 96

P
W
Probleme
Absturz, 90
blauer Bildschirm, 91
Computer reagiert nicht
mehr, 90
Computer startet nicht, 90
Computer stürzt ab, 90-91
Dell Diagnostics, 92
Programm reagiert nicht
mehr, 91
Programm stürzt ab, 91
Programme und Windows-
kompatibilität, 91
Software, 90-91
Spyware, 92
stark verlangsamte
Computerverarbeitungs-
leistung, 92
Produktinformationshand-
buch, 77
Windows XP
Hilfe- und Supportcenter, 80
neu installieren, 80
Programmkompatibilitäts-
Assistent, 91
Z
Zulassungsinformationen, 77
R
ResourceCD
Dell Diagnostics, 92
S
Service-Tag-Nummer, 78
Sicherheitshinweise, 77
Software
Probleme, 91
Spyware, 92
Support-Website, 79
96 Stichwortverzeichnis
Page 97

Stazione di lavoro mobile
Dell Precision™ M90
Guida di consultazione rapida
Modello PP05XA
www.dell.com | support.dell.com
Page 98

N.B., Avvisi e Attenzione
N.B. Un N.B. indica informazioni importanti che contribuiscono a migliorare l'utilizzo del computer.
AVVISO: Un AVVISO indica un danno potenziale all'hardware o perdita di dati e spiega come evitare il problema.
ATTENZIONE: Un messaggio di ATTENZIONE indica un rischio di danni materiali, lesioni personali o morte.
Abbreviazioni ed acronimi
Per un elenco completo delle abbreviazioni e degli acronimi, consultare il Glossario nella
Guida dell'utente
Se si è acquistato un computer Dell™ Serie n, qualsiasi riferimento in questo documento ai sistemi operativi
Microsoft
®
Windows® non è applicabile.
____________________
Le informazioni contenute nel presente documento sono soggette a modifiche senza preavviso.
© 2006 Dell Inc. Tutti i diritti riservati.
È severamente vietata la riproduzione, con qualsiasi strumento, senza l'autorizzazione scritta di Dell Inc.
Marchi commerciali utilizzati in questo testo: Dell, il logo DELL, Dell Precision e ExpressChar ge sono marchi commerciali di Dell Inc.; Intel
è un marchio depositato di Intel Corporation; Microsoft e Windows sono marchi depositati di Microsoft Corporation; Bluetooth è un marchio
commerciale di proprietà di Bluetooth SIG, Inc. ed è utilizzato per concessione da Dell Inc.
Nel presente documento possono essere utilizzati altri marchi e nomi commerciali che si riferiscono sia ad entità che rivendicano i marchi che
ai nomi o ai loro prodotti. Dell Inc. nega qualsiasi partecipazione di proprietà relativa a marchi e nomi commerciali diversi da quelli di sua
proprietà.
Modello PP05XA
Febbraio 2006 N/P ND243 Rev. A00
Page 99

Sommario
Ricerca di informazioni . . . . . . . . . . . . . . . . . . . . . . . . . . . . 101
Configurazione del computer
Informazioni sul computer
Vista anteriore
. . . . . . . . . . . . . . . . . . . . . . . . . . . . . . 105
Vista laterale sinistra
Vista laterale destra
Vista posteriore
Vista inferiore
Uso della batteria
. . . . . . . . . . . . . . . . . . . . . . . . . . . . . . 107
. . . . . . . . . . . . . . . . . . . . . . . . . . . . . . . 108
. . . . . . . . . . . . . . . . . . . . . . . . . . . . . . . 109
Rendimento della batteria
Controllo del livello di carica della batteria
Ricarica della batteria
Sostituzione della batteria
Conservazione della batteria
Risoluzione dei problemi
Blocchi e problemi relativi al software
Dell Diagnostics
. . . . . . . . . . . . . . . . . . . . . . . . . . . . . . 115
. . . . . . . . . . . . . . . . . . . . . . . . . 104
. . . . . . . . . . . . . . . . . . . . . . . . . . . 105
. . . . . . . . . . . . . . . . . . . . . . . . . . . 106
. . . . . . . . . . . . . . . . . . . . . . . . . . . 106
. . . . . . . . . . . . . . . . . . . . . . . . 109
. . . . . . . . . . . . . . . . 110
. . . . . . . . . . . . . . . . . . . . . . . . . . 112
. . . . . . . . . . . . . . . . . . . . . . . . 112
. . . . . . . . . . . . . . . . . . . . . . . 113
. . . . . . . . . . . . . . . . . . . . . . . . . . . 113
. . . . . . . . . . . . . . . . . . 113
Indice analitico . . . . . . . . . . . . . . . . . . . . . . . . . . . . . . . . 119
Sommario 99
Page 100

100 Sommario
 Loading...