

Page 1

Dell Precision™ Workstation 380
Quick Reference Guide
Model DCTA
www.dell.com | support.dell.com
Page 2

Notes, Notices, and Cautions
NOTE: A NOTE indicates important information that helps you make better use of your computer.
NOTICE: A NOTICE indicates either potential damage to hardware or loss of data and tells you how to avoid the
problem.
CAUTION: A CAUTION indicates a potential for property damage, personal injury, or death.
Abbreviations and Acronyms
For a complete list of abbreviations and acronyms, see the Glossary in your
User’s Guide
.
If you purchased a Dell™ n Series computer, any references in this document to Microsoft
operating systems are not applicable.
____________________
®
Windows®
Information in this document is subject to change without notice.
© 2005 Dell Inc. All rights reserved.
Reproduction in any manner whatsoever without the written permission of Dell Inc. is strictly forbidden.
Trademarks used in this text: Dell, the DELL logo, and Dell Precision are trademarks of Dell Inc.; Intel and Pen ti um are registered trademarks
of Intel Corporation; Microsoft and Windows are registered trademarks of Microsoft Corporation.
Other trademarks and trade names may be used in this document to refer to either the entities claiming the marks and names or their products.
Dell Inc. disclaims any proprietary interest in trademarks and trade names other than its own.
Model DCTA
May 2005 P/N M8559 Rev. A01
Page 3

Contents
Finding Information . . . . . . . . . . . . . . . . . . . . . . . . . . . . . . . . 5
Setting Up Your Computer (Tower Orientation)
Setting Up Your Computer (Desktop Orientation)
About Your Computer
Front View (Tower Orientation)
Back View (Tower Orientation)
Front View (Desktop Orientation)
Back View (Desktop Orientation)
Back-Panel Connectors
Inside View
System Board Components
Locating Your User’s Guide
Removing the Computer Cover
Caring for Your Computer
Solving Problems
Troubleshooting Tips
. . . . . . . . . . . . . . . . . . . . . . . . . . . . . . . 19
. . . . . . . . . . . . . . . . . . . . . . . 19
. . . . . . . . . . . . . . . . . . . . . . . 21
. . . . . . . . . . . . . . . . . . . . . . 22
. . . . . . . . . . . . . . . . . . . . . . 24
. . . . . . . . . . . . . . . . . . . . . . . . . . 24
. . . . . . . . . . . . . . . . . . . . . . . . . . . . . . . . . 27
. . . . . . . . . . . . . . . . . . . . . . . . . . . . 28
. . . . . . . . . . . . . . . . . . . . . . . . . . . 29
. . . . . . . . . . . . . . . . . . . . . . . . . . 30
. . . . . . . . . . . . . . . . . . . . . . . . . . . . 31
. . . . . . . . . . . . . . . . . . . . . . . . . . . . . . . . 32
. . . . . . . . . . . . . . . . . . . . . . . . . . . . 32
Resolving Software and Hardware Incompatibilities
®
Using Microsoft
Windows® XP System Restore . . . . . . . . . . . . . 32
Using the Last Known Good Configuration
Dell Diagnostics
Before You Start Testing
. . . . . . . . . . . . . . . . . . . . . . . . . . . . . . . 34
. . . . . . . . . . . . . . . . . . . . . . . . . . 36
. . . . . . . . . . . . . . . . . . 9
. . . . . . . . . . . . . . . . 14
. . . . . . . . . . . 32
. . . . . . . . . . . . . . . . . 34
Beep Codes
. . . . . . . . . . . . . . . . . . . . . . . . . . . . . . . . . . . . 36
Error Messages
Diagnostic Lights
. . . . . . . . . . . . . . . . . . . . . . . . . . . . . . . . . 37
Frequently Asked Questions
Index . . . . . . . . . . . . . . . . . . . . . . . . . . . . . . . . . . . . . . . . . 45
. . . . . . . . . . . . . . . . . . . . . . . . . . . . . . . 37
. . . . . . . . . . . . . . . . . . . . . . . . . . . 42
Contents 3
Page 4

4 Contents
Page 5
Finding Information
NOTE: Some features may not be available for your computer or in certain countries.
NOTE: Additional information may ship with your computer.
What Are You Looking For? Find It Here
• A diagnostic program for my computer
• Drivers for my computer
• My computer documentation
• My device documentation
• Desktop System Software (DSS)
• How to set up my computer
• How to care for my computer
• Basic troubleshooting information
• How to run the Dell Diagnostics
• Error codes and diagnostic lights
• How to remove and install parts
• How to open my computer cover
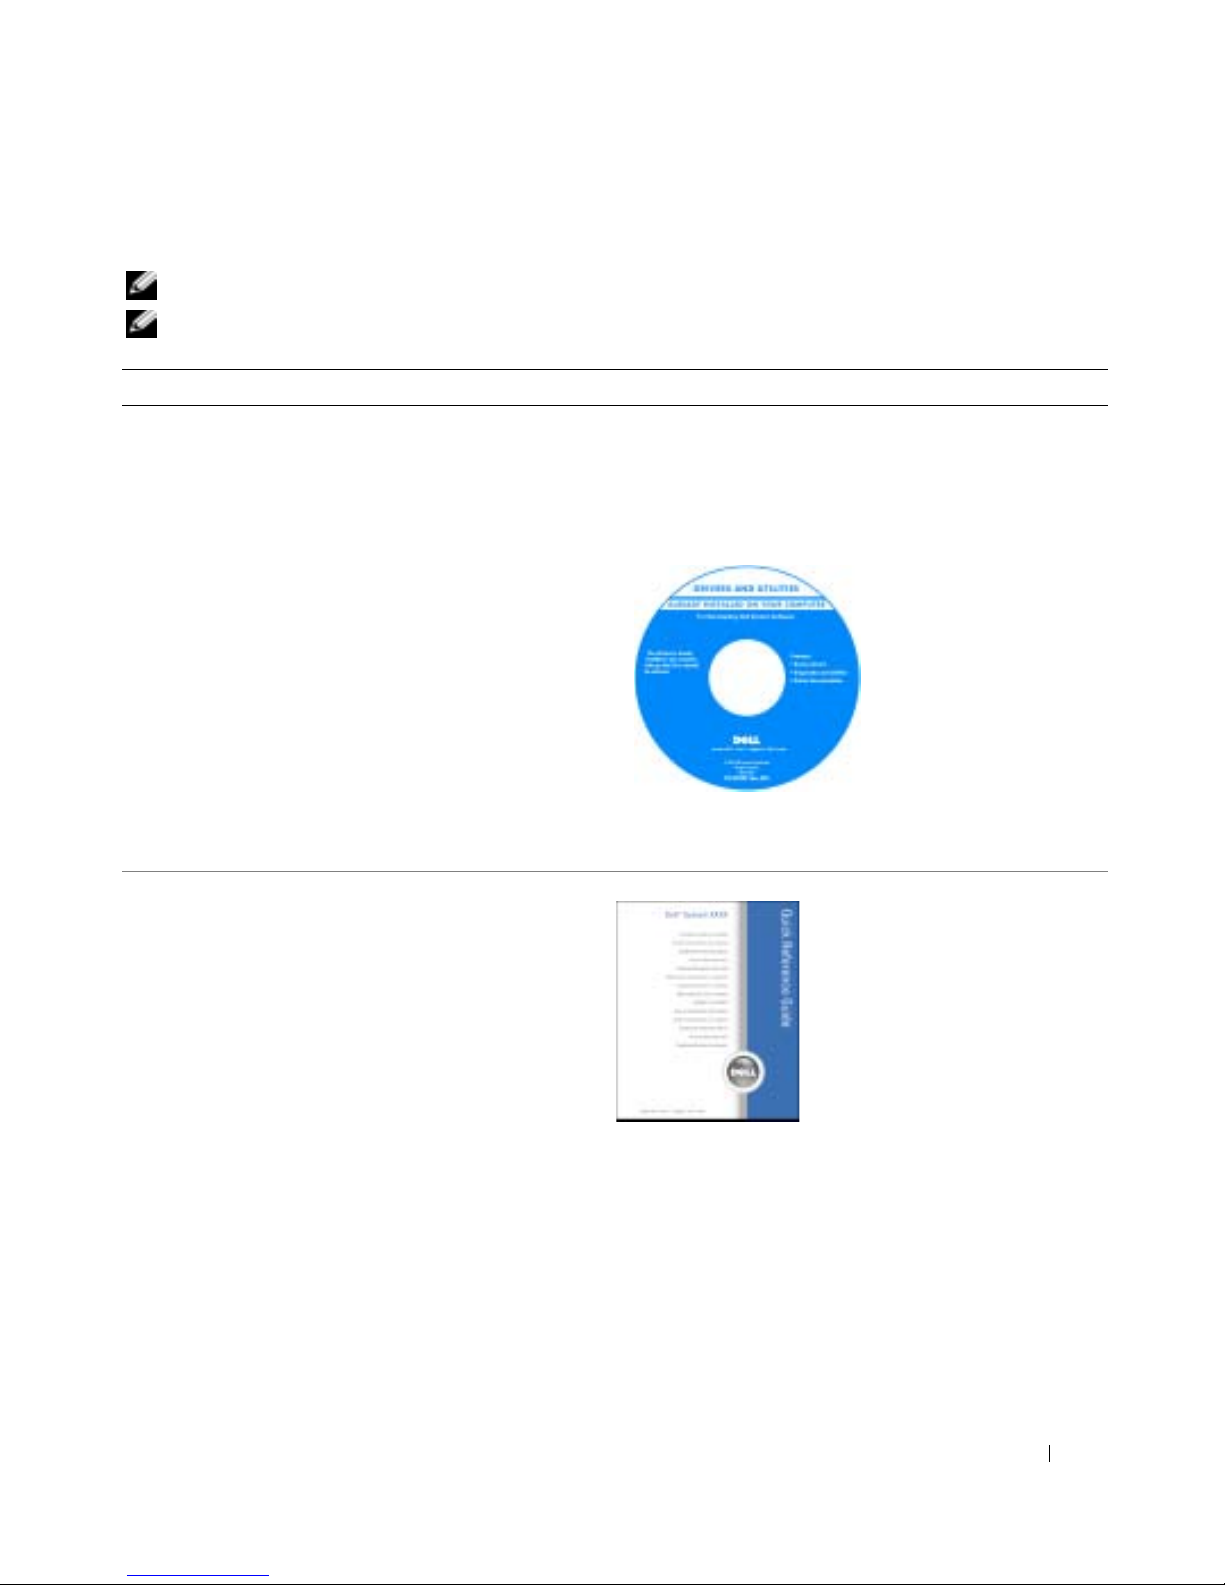
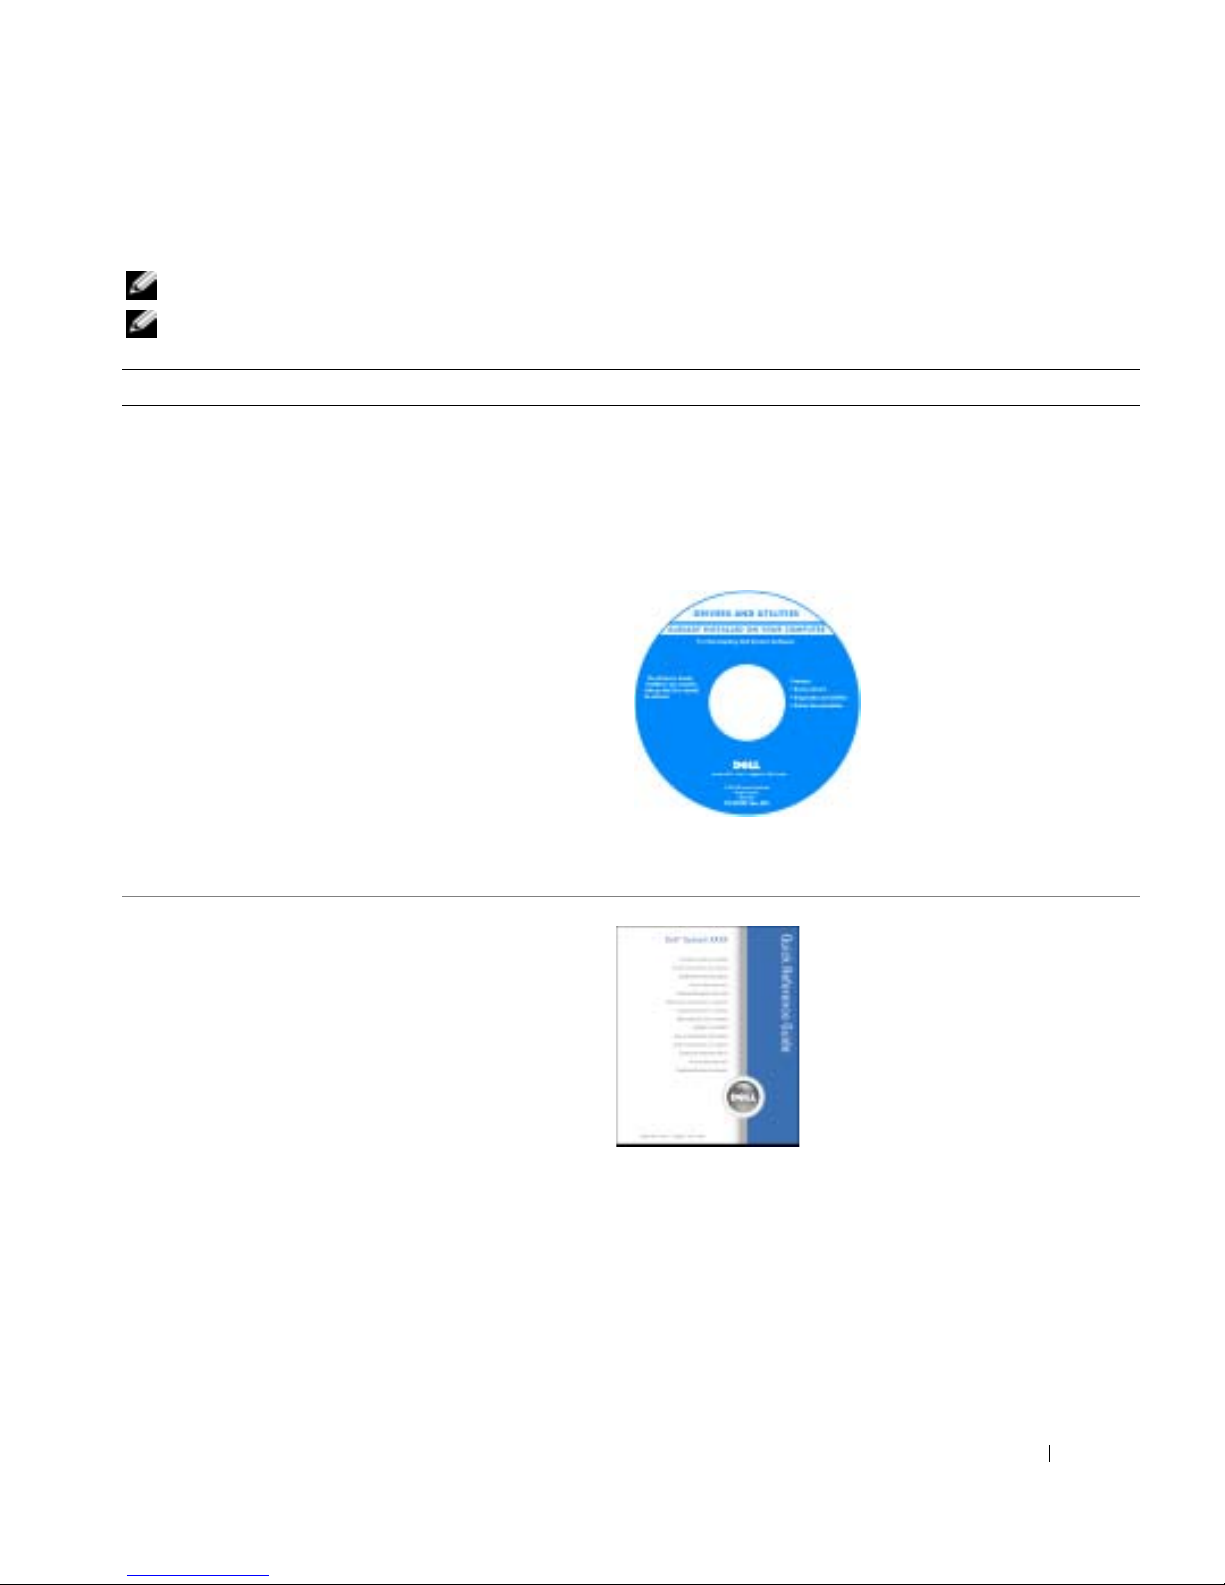
Drivers and Utilities CD (also known as ResourceCD)
Documentation and drivers are already installed on your
computer. You can use the CD to reinstall drivers, run the
"Dell Diagnostics" on page 34, or access your
documentation.
Readme files may be
included on your CD to
provide last-minute
updates about technical
changes to your
computer or advanced
technical-reference
material for technicians
or experienced users.
NOTE: Drivers and documentation updates can be found at
support.dell.com.
Quick Reference Guide
NOTE: This document is available as a PDF at
support.dell.com.
Quick Reference Guide 5
Page 6

What Are You Looking For? Find It Here
• Warranty information
• Terms and Conditions (U.S. only)
• Safety instructions
• Regulatory information
• Ergonomics information
• End User License Agreement
www.dell.com | support.dell.com
• How to remove and replace parts
• Specifications
• How to configure system settings
• How to troubleshoot and solve problems
• Service Tag and Express Service Code
• Microsoft Windows License Label
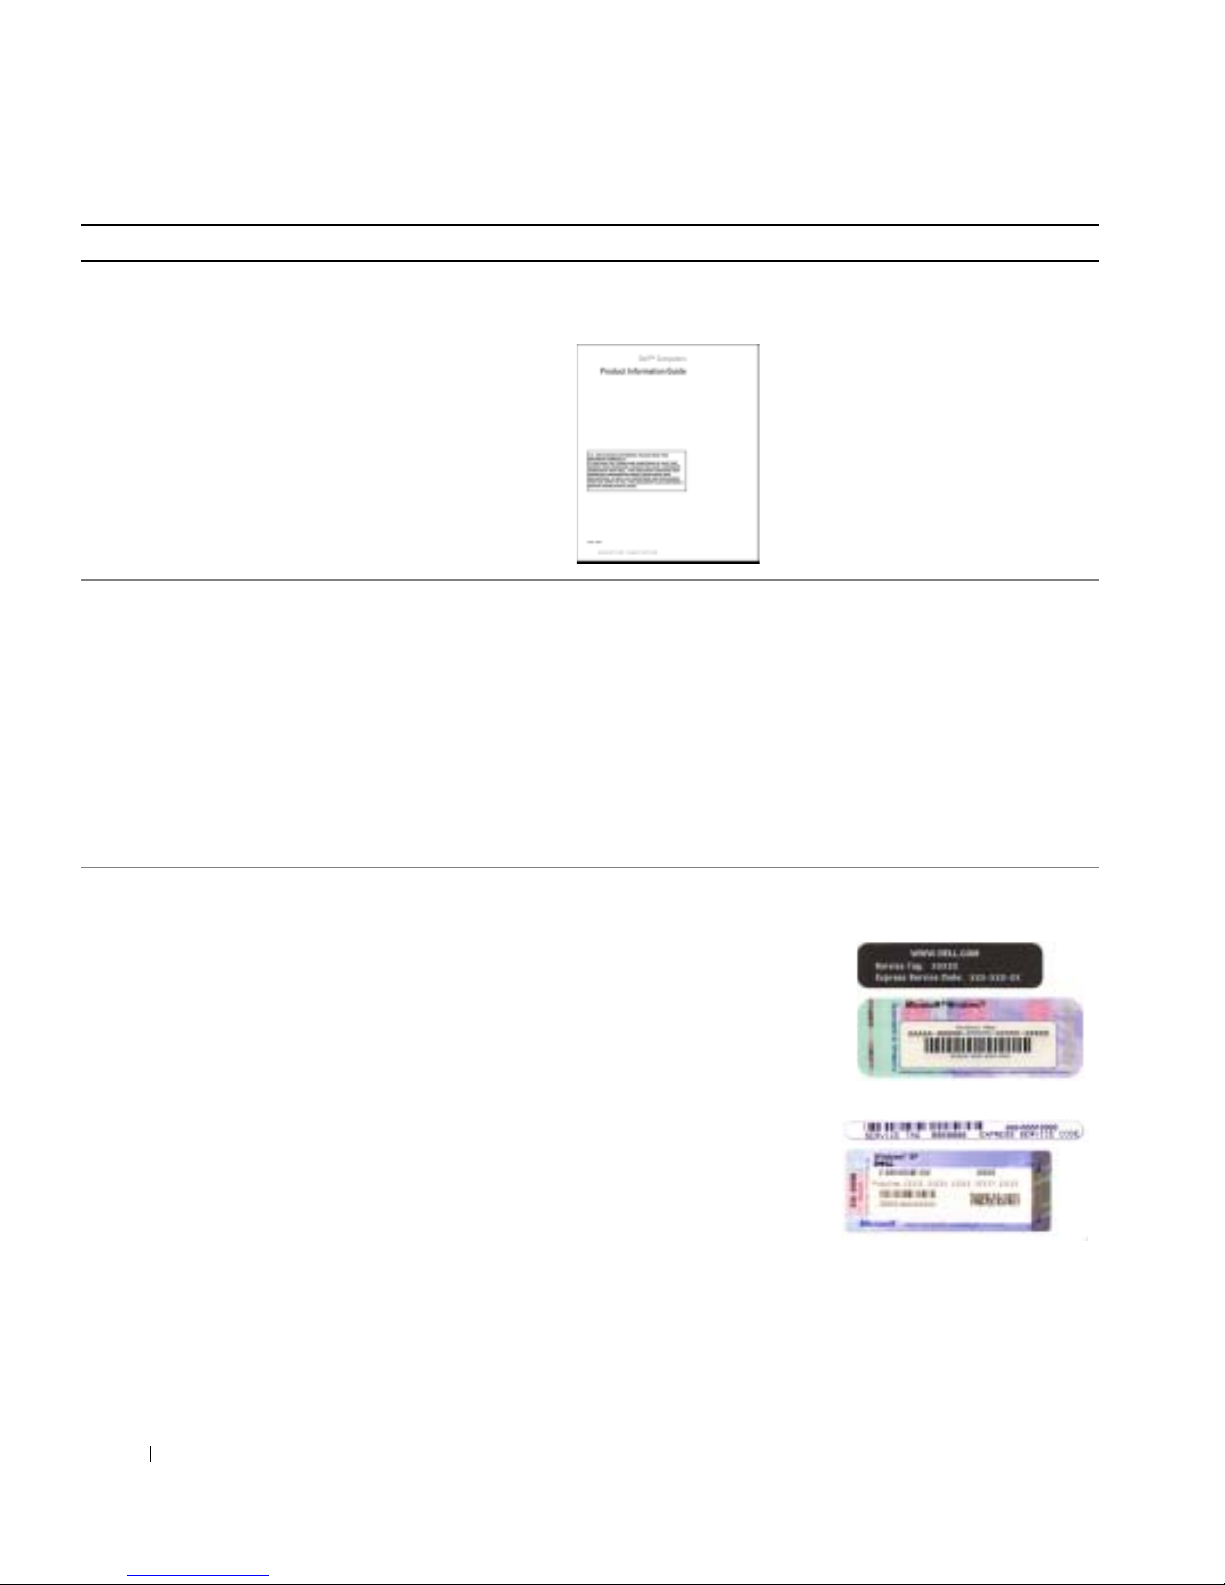
Dell™ Product Information Guide
User’s Guide
Microsoft
1
2
The User’s Guide is also available on the
Utilities
®
Windows® XP Help and Support Center
Click the
Click
Start
button and click
User’s and system guides
CD
.
Help and Support
and click
User’s guides
Drivers and
Service Tag and Microsoft® Windows® License
These labels are located on your computer.
• Use the Service Tag to
identify your
computer when you
support.dell.com
use
or contact technical
support.
.
.
6 Quick Reference Guide
• Enter the Express
Service Code to direct
your call when
contacting technical
support.
Page 7

What Are You Looking For? Find It Here
• Solutions — Troubleshooting hints and tips, articles
from technicians, online courses, frequently asked
questions
• Community — Online discussion with other Dell
customers
• Upgrades — Upgrade information for components, such
as memory, the hard drive, and the operating system
• Customer Care — Contact information, service call and
order status, warranty, and repair information
• Service and support — Service call status and support
history, service contract, online discussions with
technical support
• Reference — Computer documentation, details on my
computer configuration, product specifications, and
white papers
• Downloads — Certified drivers, patches, and software
updates
• Desktop System Software (DSS) — If you reinstall the
operating system for your computer, you should also
reinstall the DSS utility. DSS provides critical updates
for your operating system and support for Dell™
3.5-inch USB floppy drives, Intel
®
Pentium®M
processors, optical drives, and USB devices. DSS is
necessary for correct operation of your Dell computer.
The software automatically detects your computer and
operating system and installs the updates appropriate
for your configuration.
To download Desktop System Software:
1
Go to
support.dell.com
2
Enter your Service Tag or product model.
3
In the
Download Category
4
Select the operating system and operating system
language for your computer, and click
Under
Select a Device
Configuration Utilities
Software
.
and click
Downloads
drop-down menu, click
Submit.
, scroll to
, and click
System and
Dell Desktop System
.
All
.
Dell Support Website — support.dell.com
NOTE: Select your region to view the appropriate support
site.
NOTE: Corporate, government, and education customers
can also use the customized Dell Premier Support website
at premier.support.dell.com. The website may not be
available in all regions.
• How to use Windows XP
• Documentation for my computer
• Documentation for devices (such as a modem)
Windows Help and Support Center
1
Click the
2
Type a word or phrase that describes your problem and
Start
button and click
Help and Support
click the arrow icon.
3
Click the topic that describes your problem.
4
Follow the instructions on the screen.
Quick Reference Guide 7
.
Page 8

What Are You Looking For? Find It Here
• How to reinstall my operating system
www.dell.com | support.dell.com
• How to use Linux
• E-mail discussions with users of Dell Precision™
products and the Linux operating system
• Additional information regarding Linux and my Dell
Precision computer
Operating System CD
The operating system is already installed on your
computer. To reinstall your operating system, use the
Operating System CD. See your User’s Guide for
instructions.
After you reinstall your
operating system, use the
optional Drivers and
Utilities CD to reinstall
drivers for the devices
that came with your
computer.
Your operating system
product key label is
located on your
computer.
NOTE: The color of your CD varies based on the operating
system you ordered.
NOTE: The Operating System CD is optional and may not
ship with your computer.
Dell Supported Linux Sites
• Linux.dell.com
• Lists.us.dell.com/mailman/listinfo/linux-precision
8 Quick Reference Guide
Page 9
Setting Up Your Computer (Tower Orientation)
CAUTION: Before you begin any of the procedures in this section, follow the safety instructions in the
Product Information Guide.
You must complete all steps to properly set up your computer.
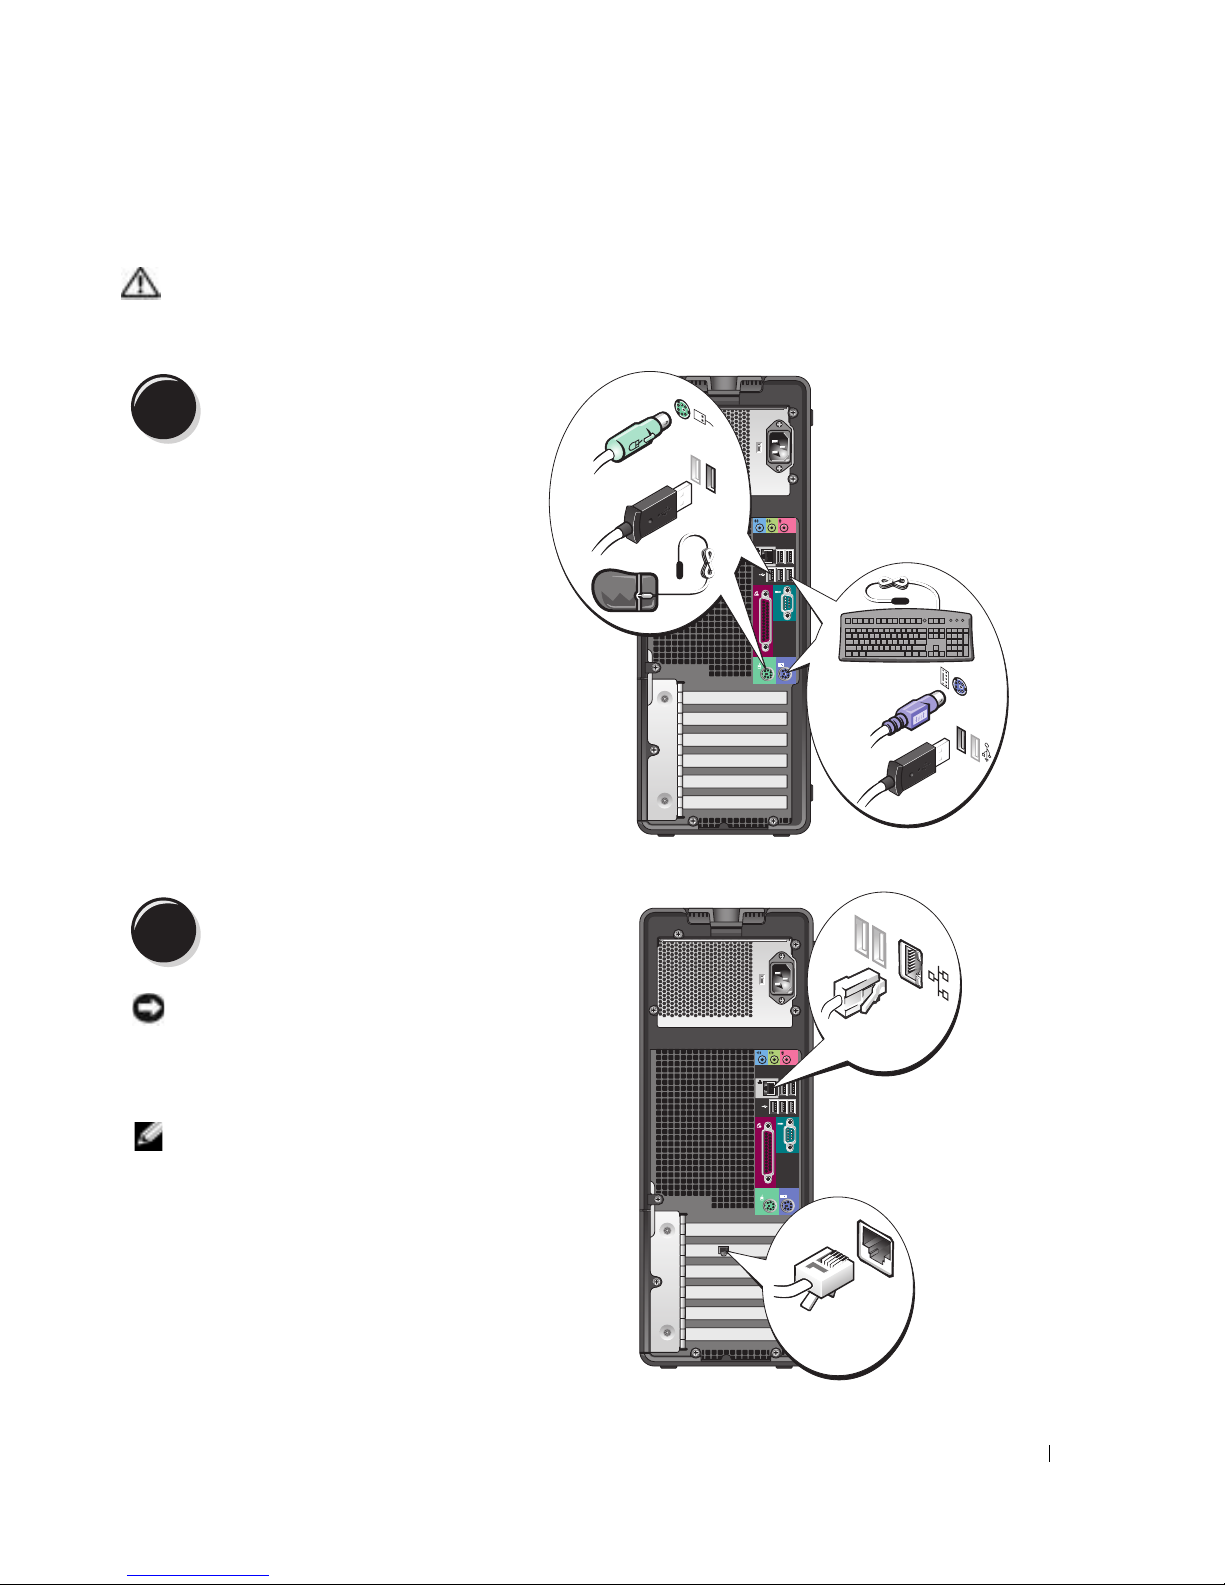
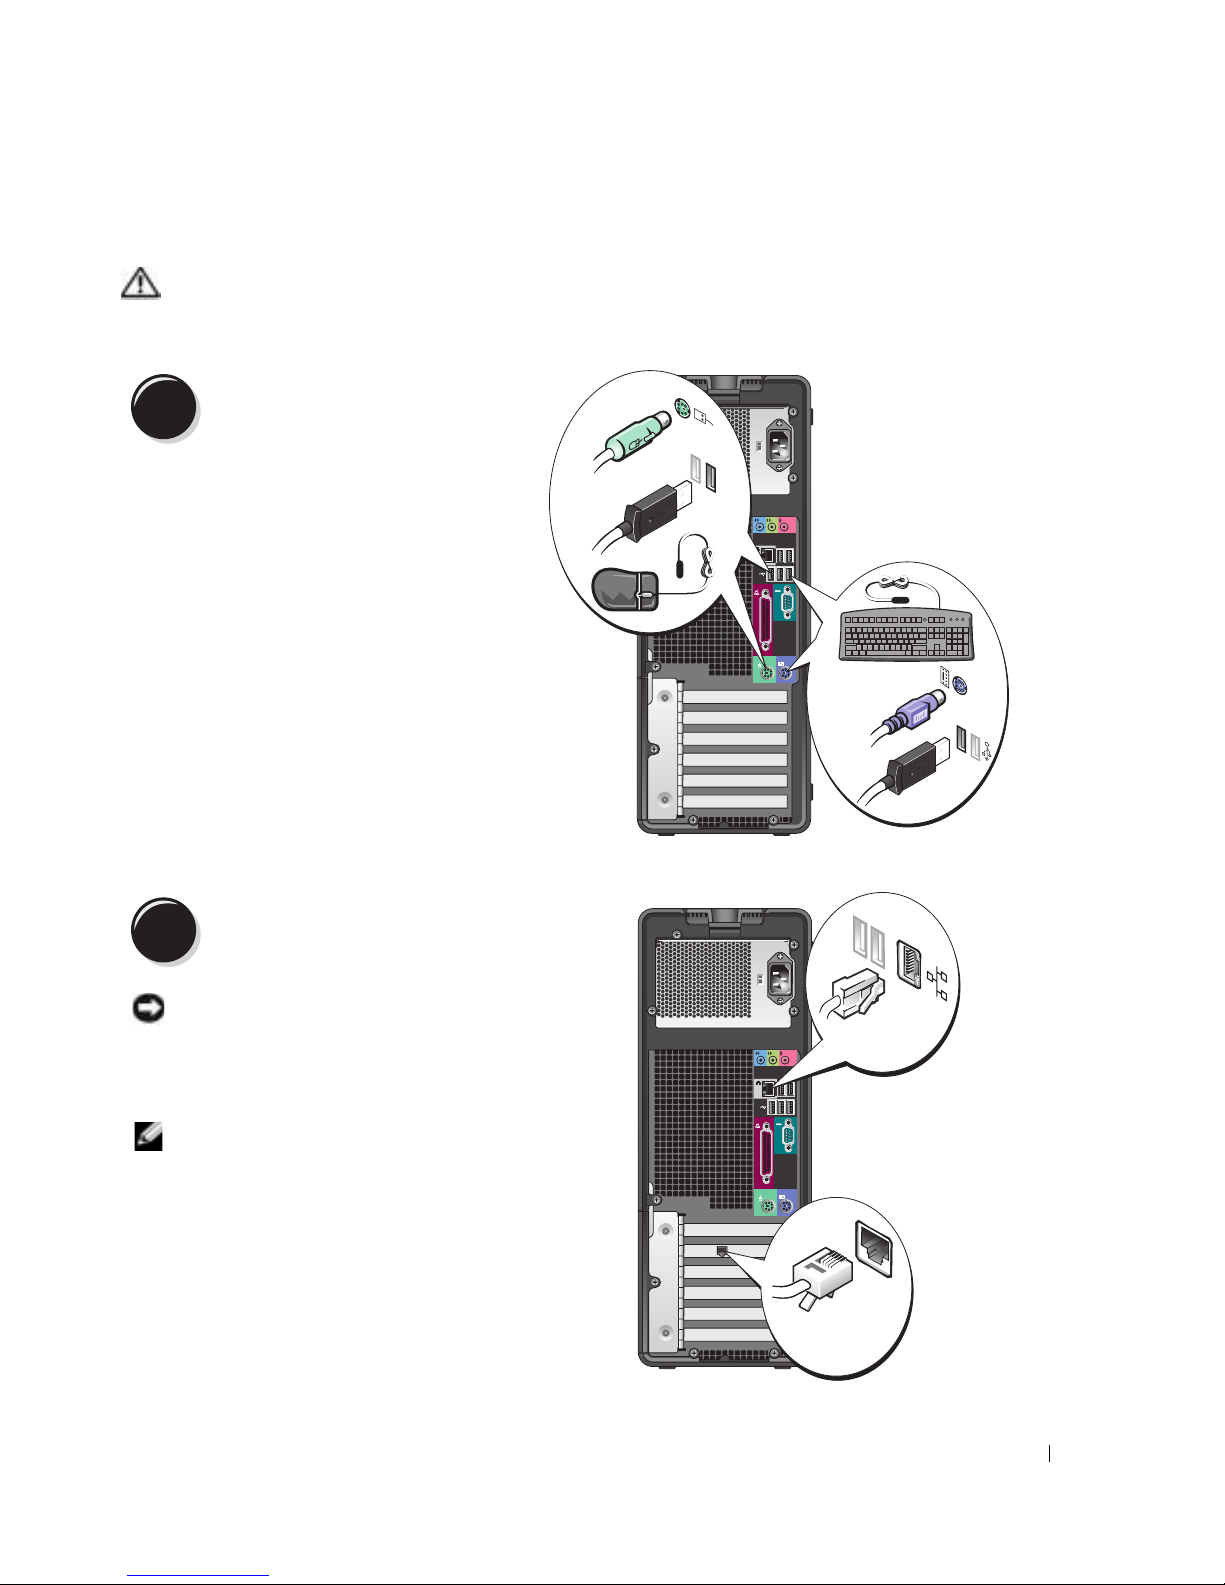
1
Connect the keyboard and the mouse.
PS/2
or
USB
PS/2
USB
2
Connect the modem or the network cable.
or
NOTICE: Do not connect a modem cable to the
network adapter. Voltage from telephone
communications can damage the network adapter.
NOTE: If your computer has a network card installed,
connect the network cable to the card.
Network
Modem
Quick Reference Guide 9
Page 10

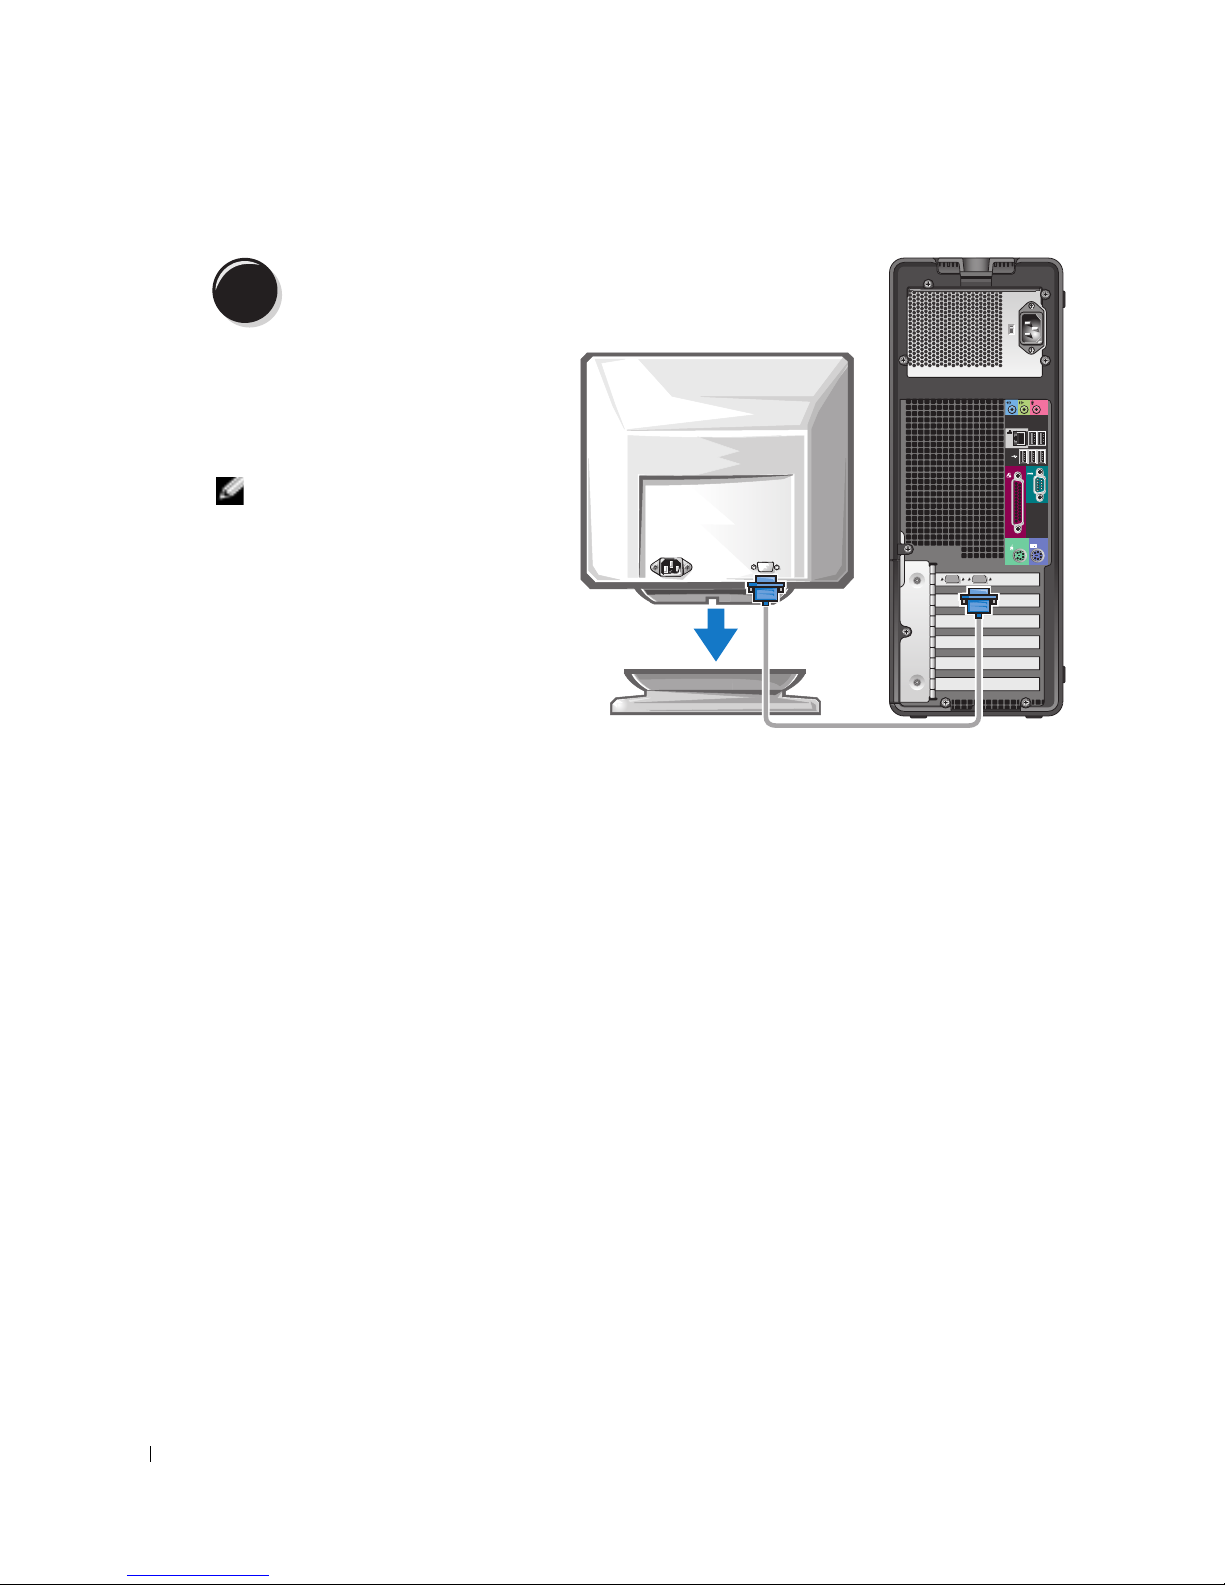
3
Connect the monitor.
Depending on your graphics
card, you can connect your
monitor in various ways.
NOTE: You may need to use
the provided adapter or
www.dell.com | support.dell.com
cable to connect your
monitor to the computer.
10 Quick Reference Guide
Page 11
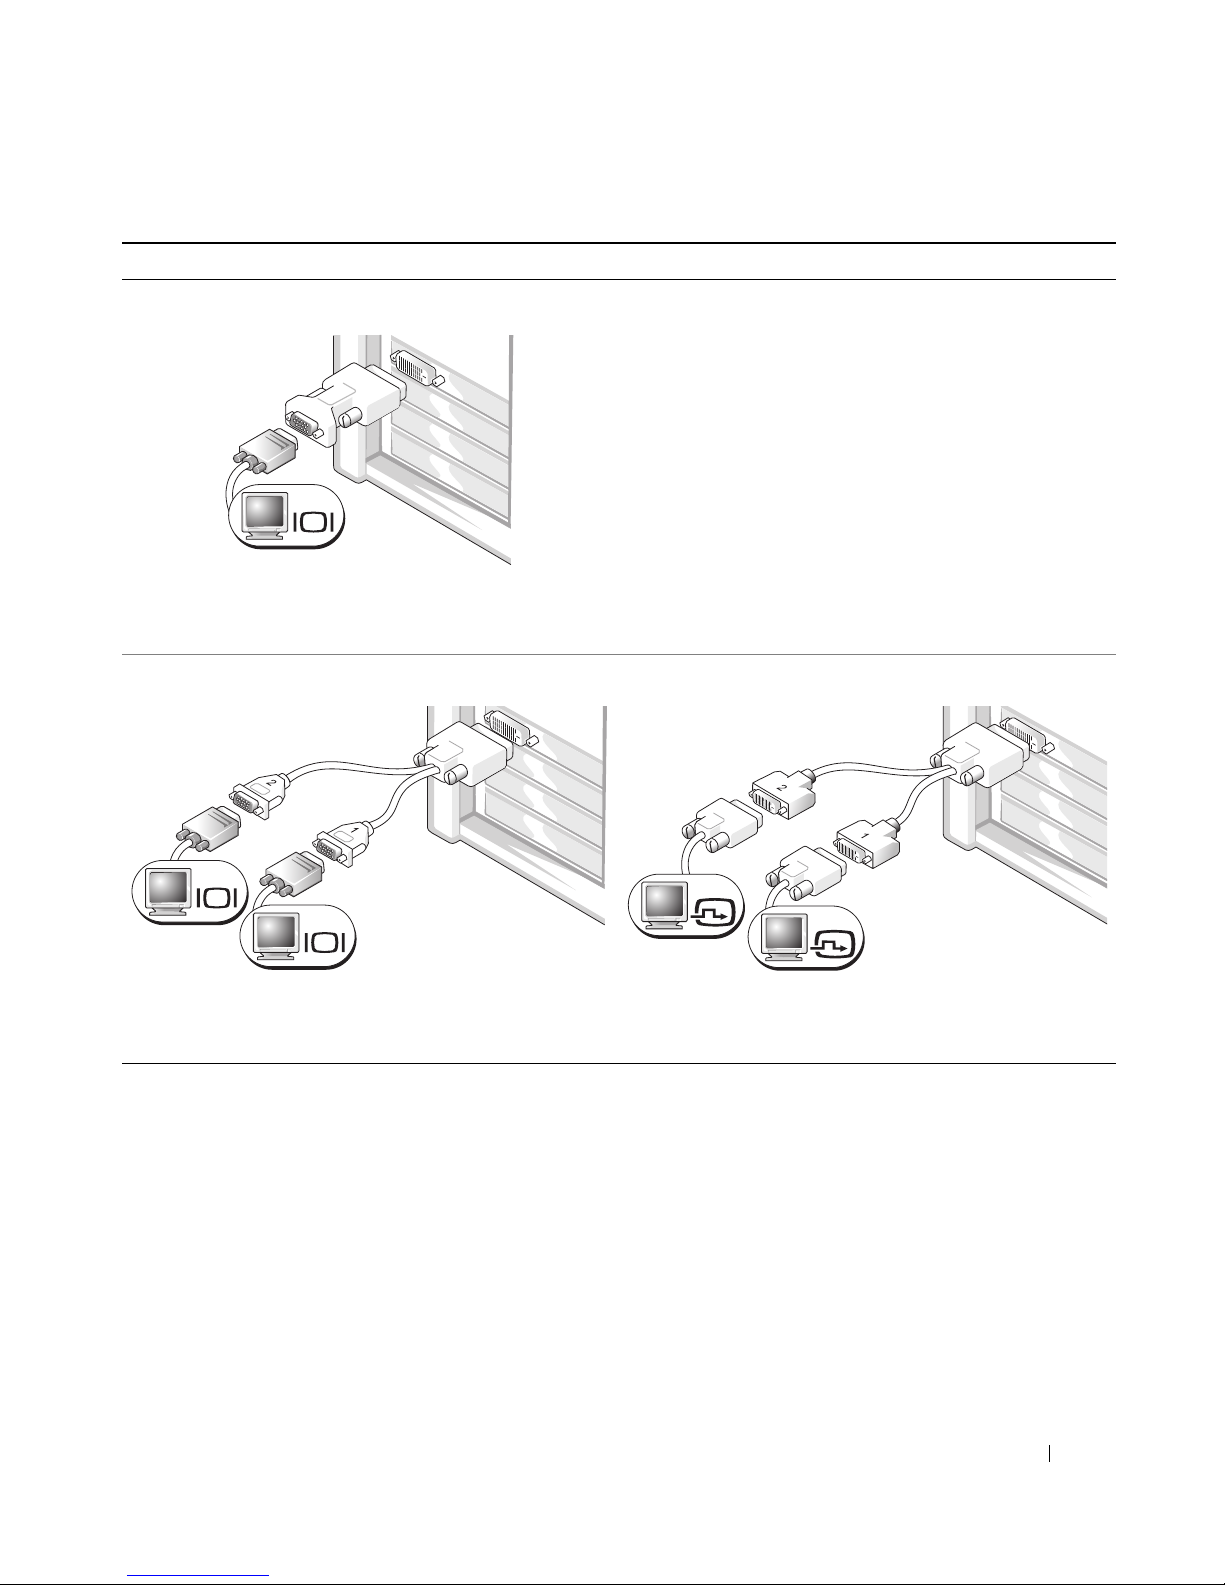
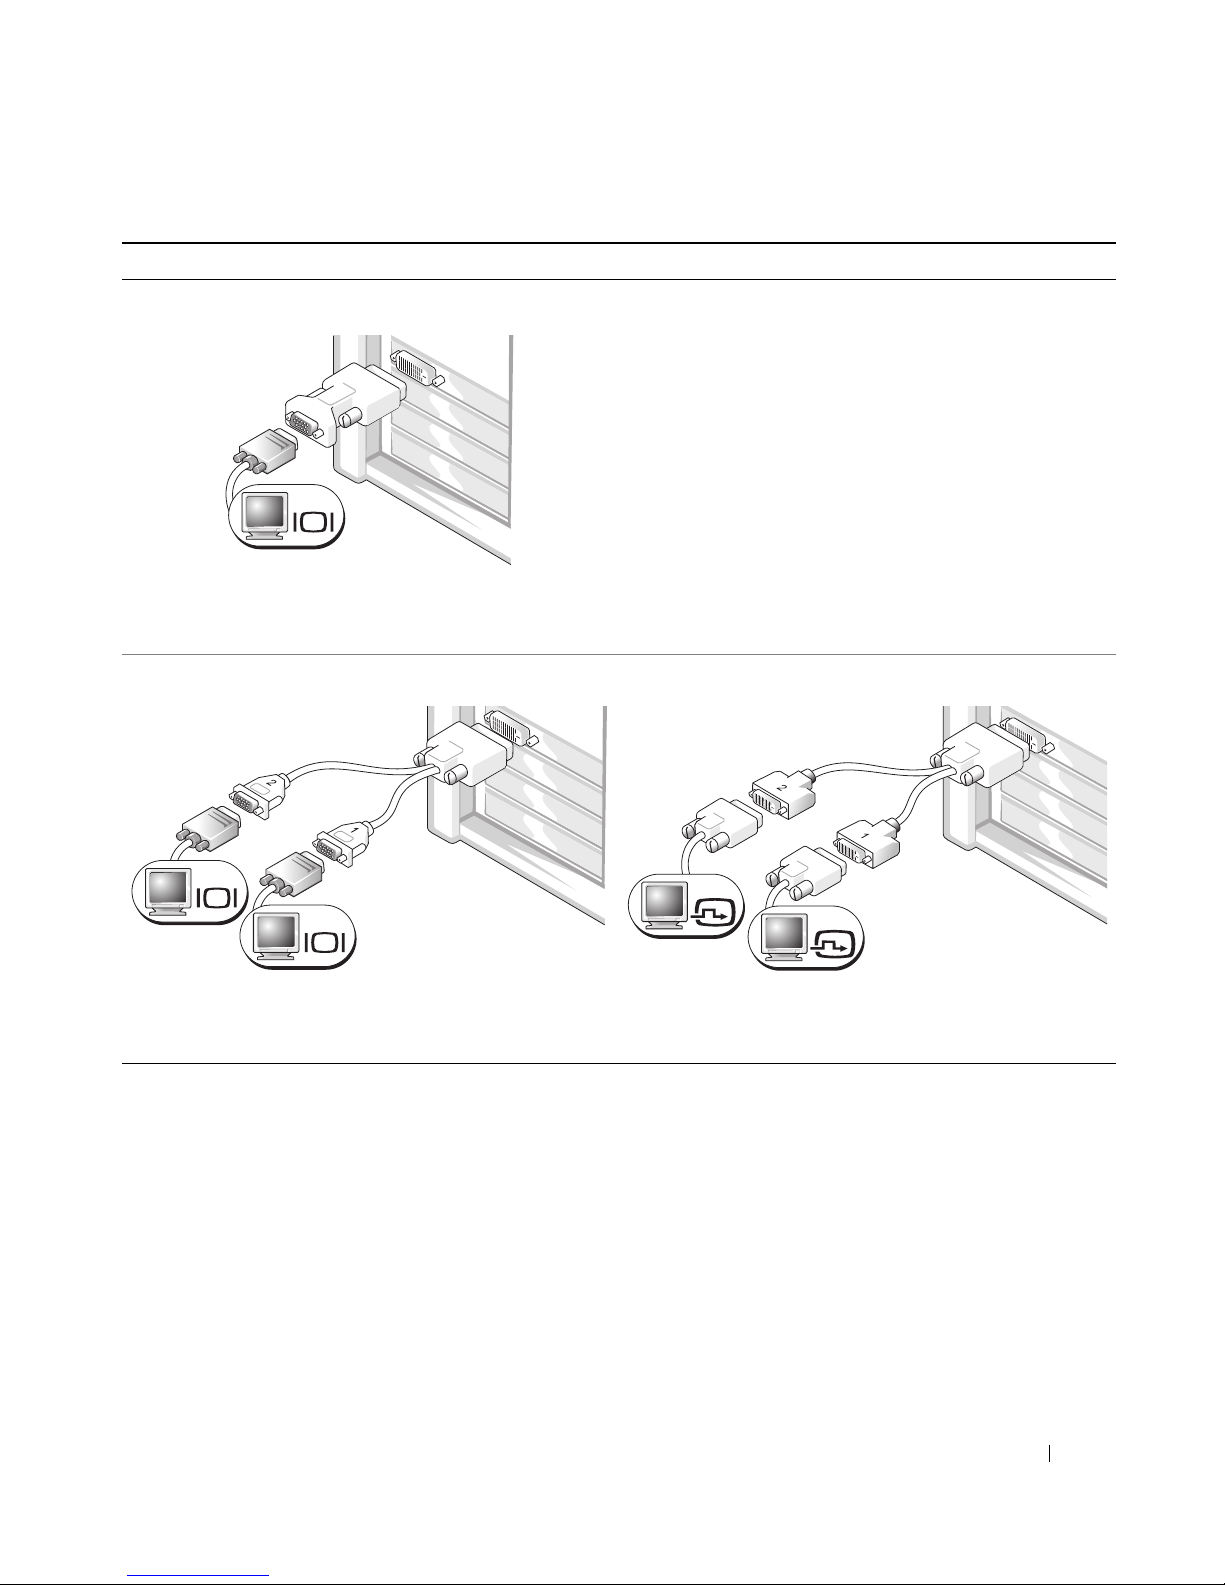
For single- and dual-monitor capable cards with a single connector
One VGA adapter:
VGA
Use the VGA adapter when you have a single-monitor
graphics card and you want to connect your computer to a
VGA monitor.
Dual VGA Y cable adapter:
VGA
VGA
Use the appropriate Y cable when your graphics card has a
single connector and you want to connect your computer
to one or two VGA monitors.
Dual DVI Y cable adapter:
DVI
DVI
Use the appropriate Y cable when your graphics card has a
single connector and you want to connect your computer
to one or two DVI monitors.
The dual-monitor cable is color-coded; the blue connector is for the primary monitor, and the black
connector is for the second monitor. To enable dual-monitor support, both monitors must be
attached to the computer when you start the computer.
Quick Reference Guide 11
Page 12
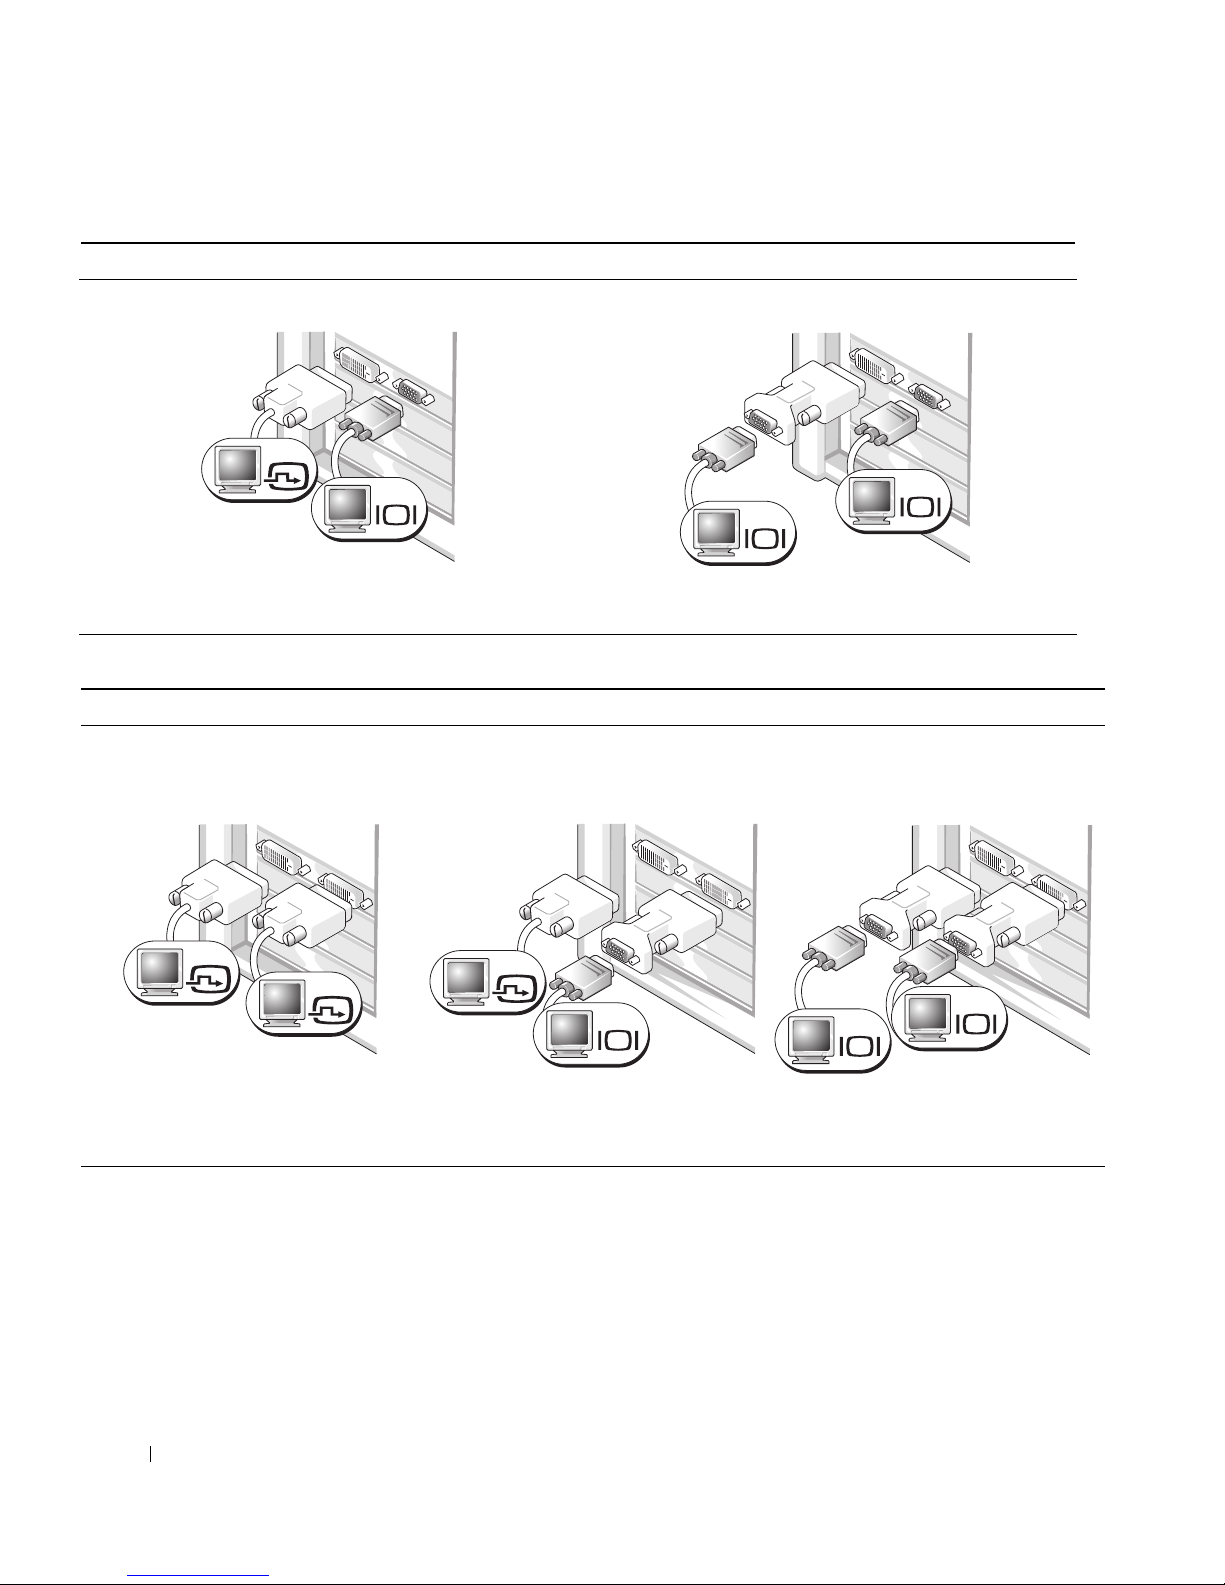
For dual-monitor capable cards with one DVI connector and one VGA connector
One DVI connector and one VGA connector:
DVI
VGA
www.dell.com | support.dell.com
Use the appropriate connector(s) when you want to
connect your computer to one or two monitors.
For dual-monitor capable cards with two DVI connectors
Two DVI connectors:
Two DVI connectors with one VGA
adapter:
Two VGA connectors with one VGA adapter:
VGA
VGA
Use the VGA adapter when you want to connect your
computer to two VGA monitors.
Two DVI connectors with two VGA
adapters:
DVI
DVI
Use the DVI connectors to connect
your computer to one or two DVI
monitors.
12 Quick Reference Guide
DVI
VGA
Use the VGA adapter to connect a
VGA monitor to one of the DVI
connectors on your computer
VGA
VGA
Use two VGA adapters to connect two
VGA monitors to the DVI connectors
on your computer.
Page 13
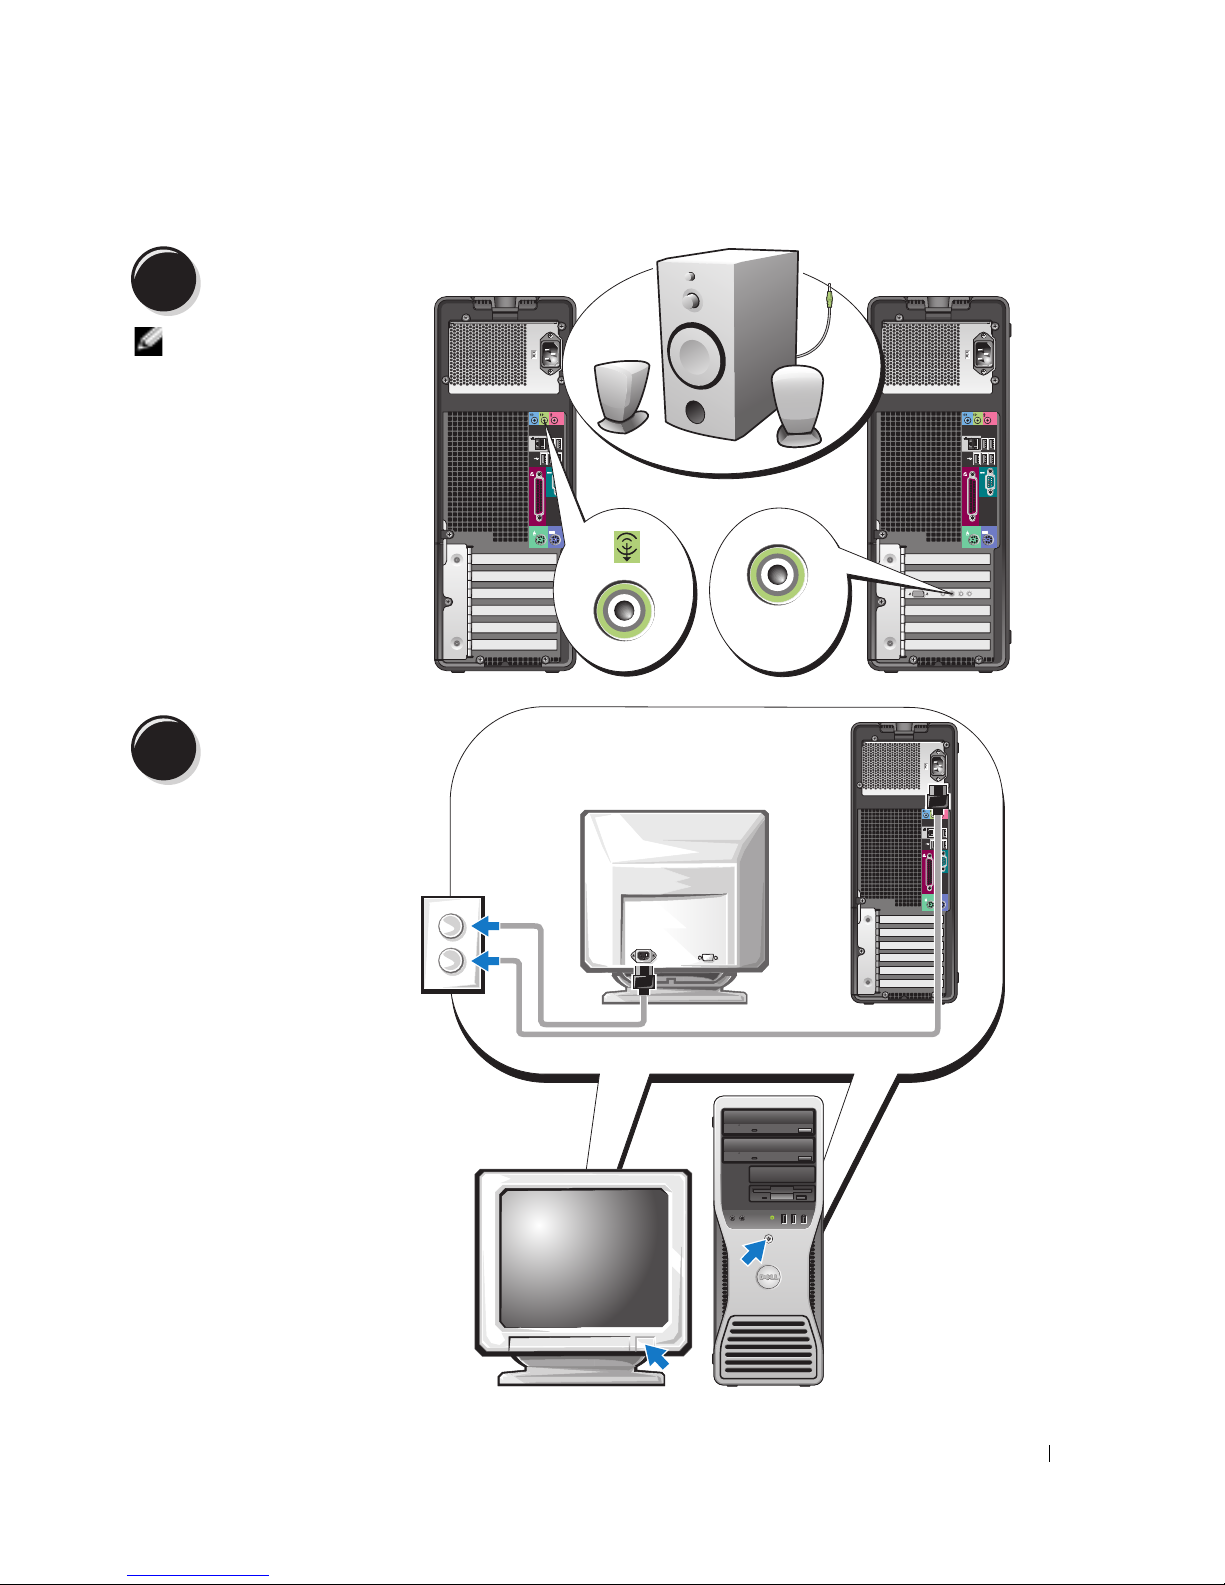
4
5
Connect the speakers.
NOTE: If your
computer has a sound
card installed, connect
the speakers to the
card.
Connect the power
cables and turn on the
computer and monitor.
LINE OUT
1234
Quick Reference Guide 13
Page 14
6
Install additional software or devices.
Before you install any devices or software that did not come with your computer, read the
documentation that came with the software or device or contact the vendor to verify that the
software or device is compatible with your computer and operating system.
You have now completed the setup for your tower computer.
Setting Up Your Computer (Desktop Orientation)
www.dell.com | support.dell.com
CAUTION: Before you begin any of the procedures in this section, follow the safety instructions in the
Product Information Guide.
You must complete all steps to properly set up your computer.
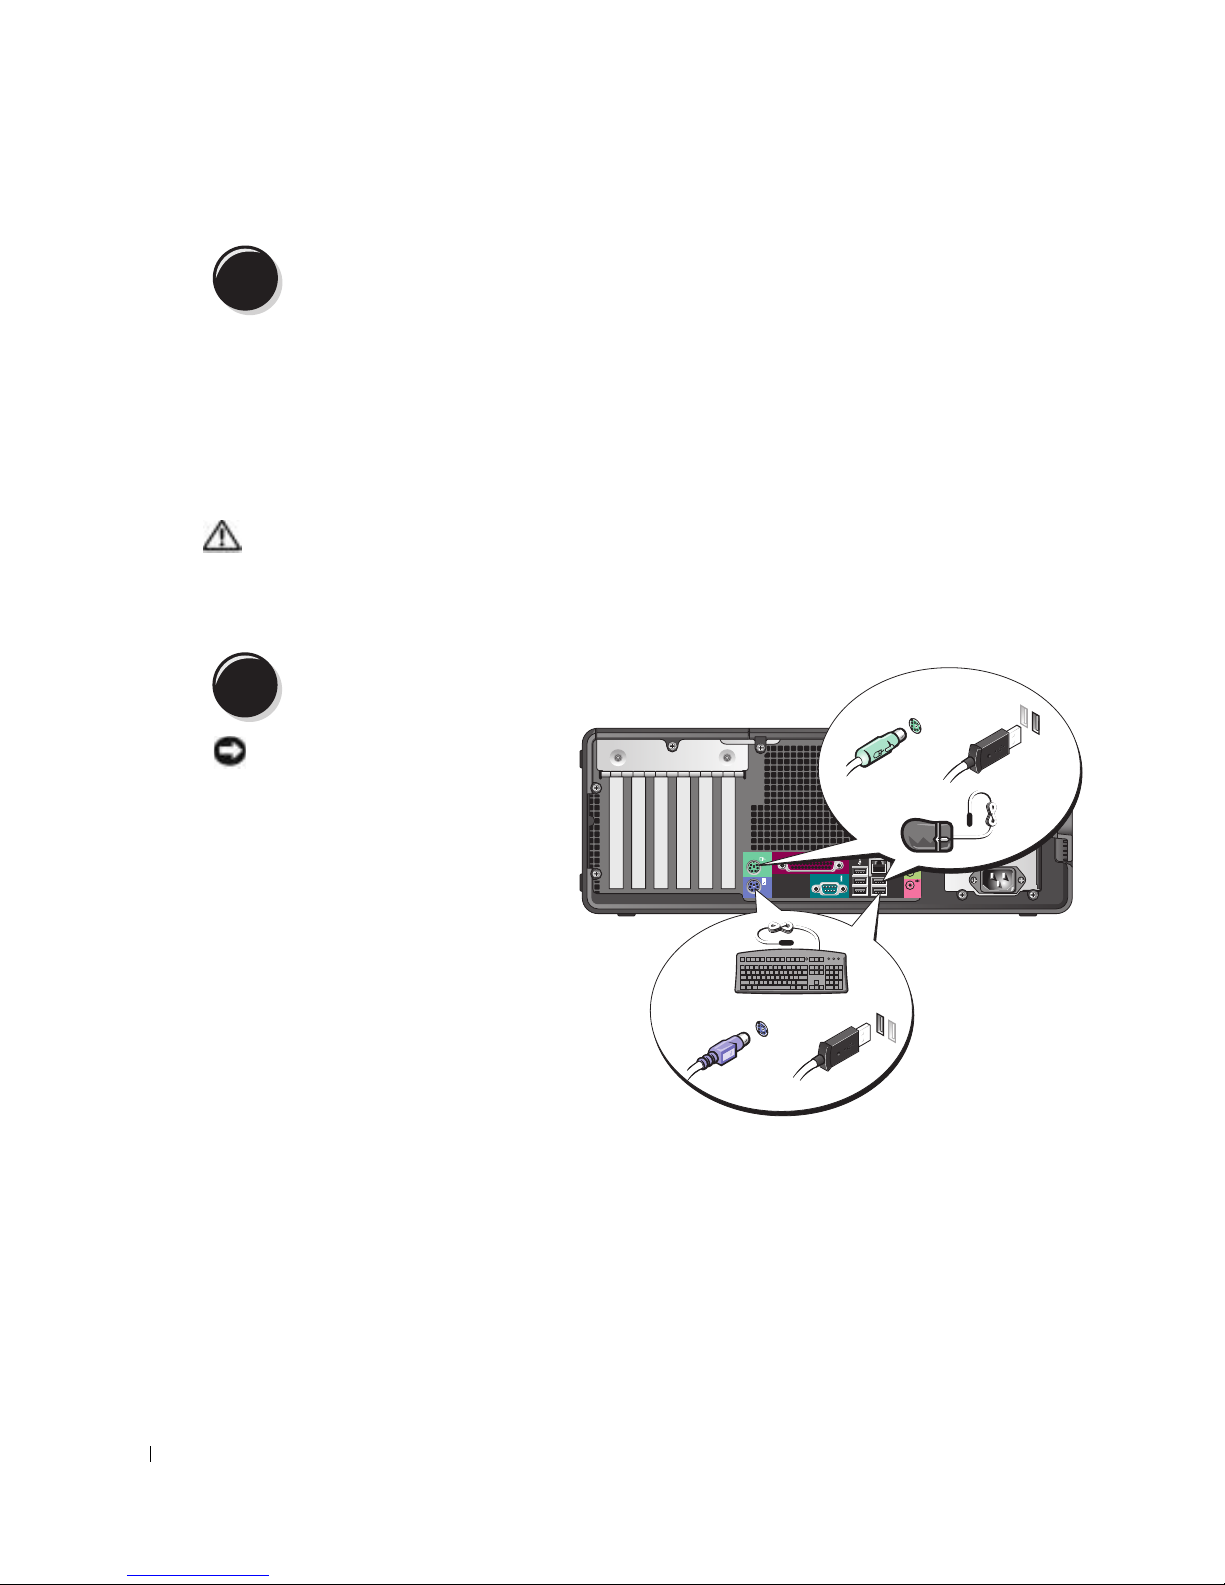
1
Connect the keyboard and the
mouse.
NOTICE: Do not connect a
modem cable to the network
adapter. Voltage from
telephone communications
can damage the network
adapter.
PS/2
or
USB
PS/2
or
USB
14 Quick Reference Guide
Page 15
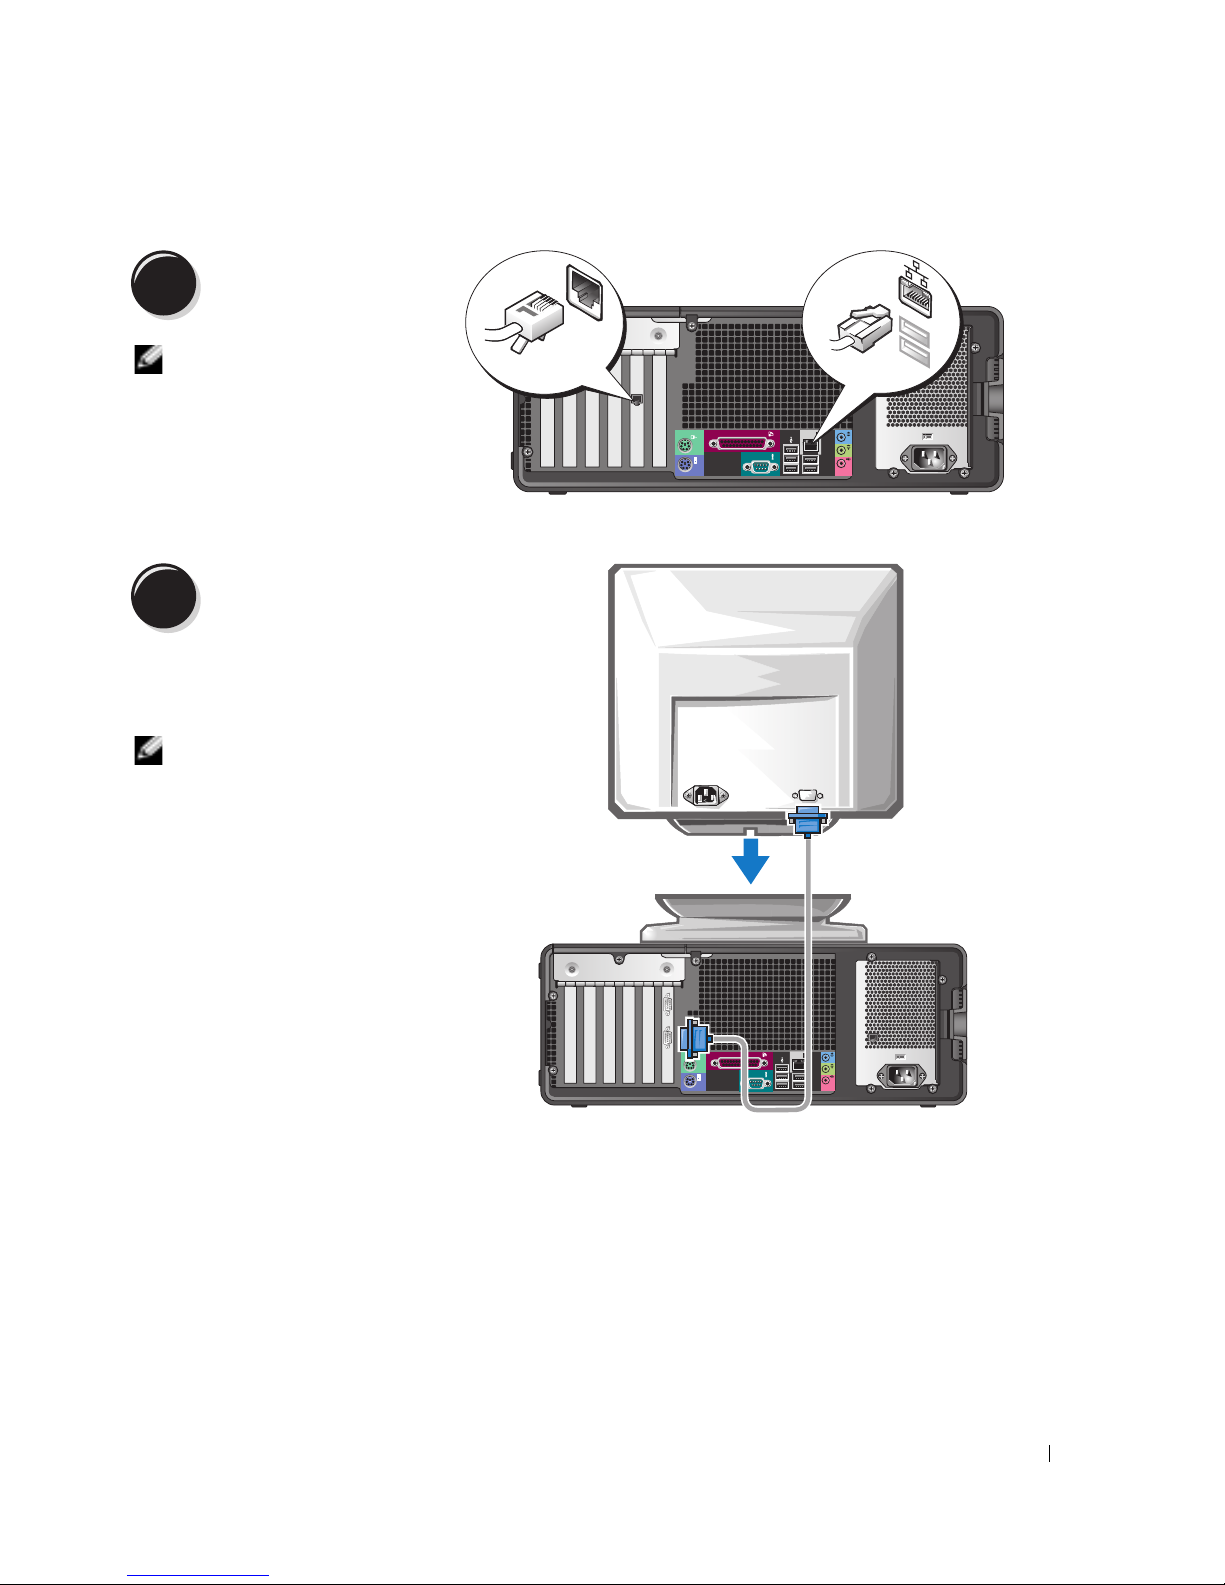
2
Connect the modem or the
network cable.
NOTE: If your computer
has a network card
installed, connect the
network cable to the card.
3
Connect the monitor.
Depending on your graphics card, you
can connect your monitor in various
ways.
NOTE: You may need to use the
provided adapter or cable to connect
your monitor to the computer.
Modem
Network
Quick Reference Guide 15
Page 16
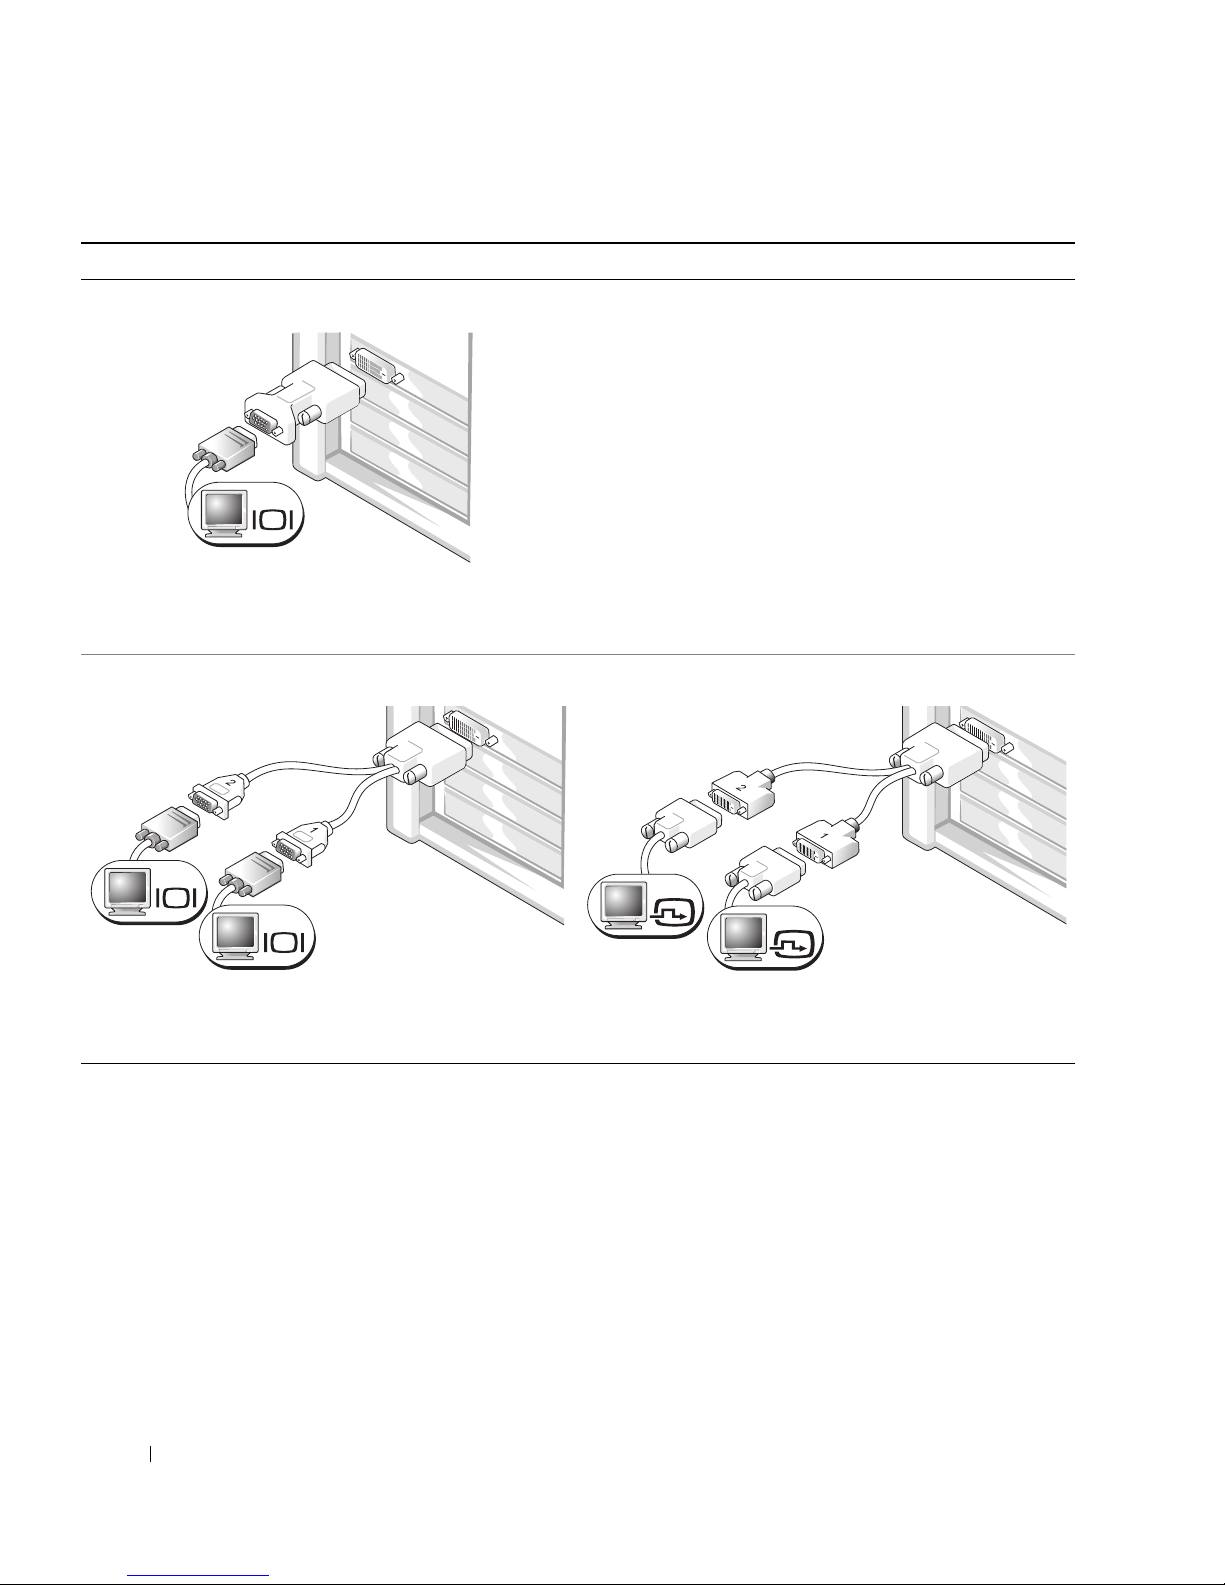
For single- and dual-monitor capable cards with a single connector
VGA adapter:
VGA
www.dell.com | support.dell.com
Use the VGA adapter when you have a single monitor
graphics card and you want to connect your computer to a
VGA monitor.
Dual VGA Y cable adapter:
VGA
VGA
Use the appropriate Y cable when your graphics card has a
single connector and you want to connect your computer
to one or two VGA monitors.
The dual-monitor cable is color-coded; the blue connector is for the primary monitor, and the black
connector is for the second monitor. To enable dual-monitor support, both monitors must be
attached to the computer when you start your computer.
Dual DVI Y cable adapter:
DVI
DVI
Use the appropriate Y cable when your graphics card has a
single connector and you want to connect your computer
to one or two DVI monitors.
16 Quick Reference Guide
Page 17
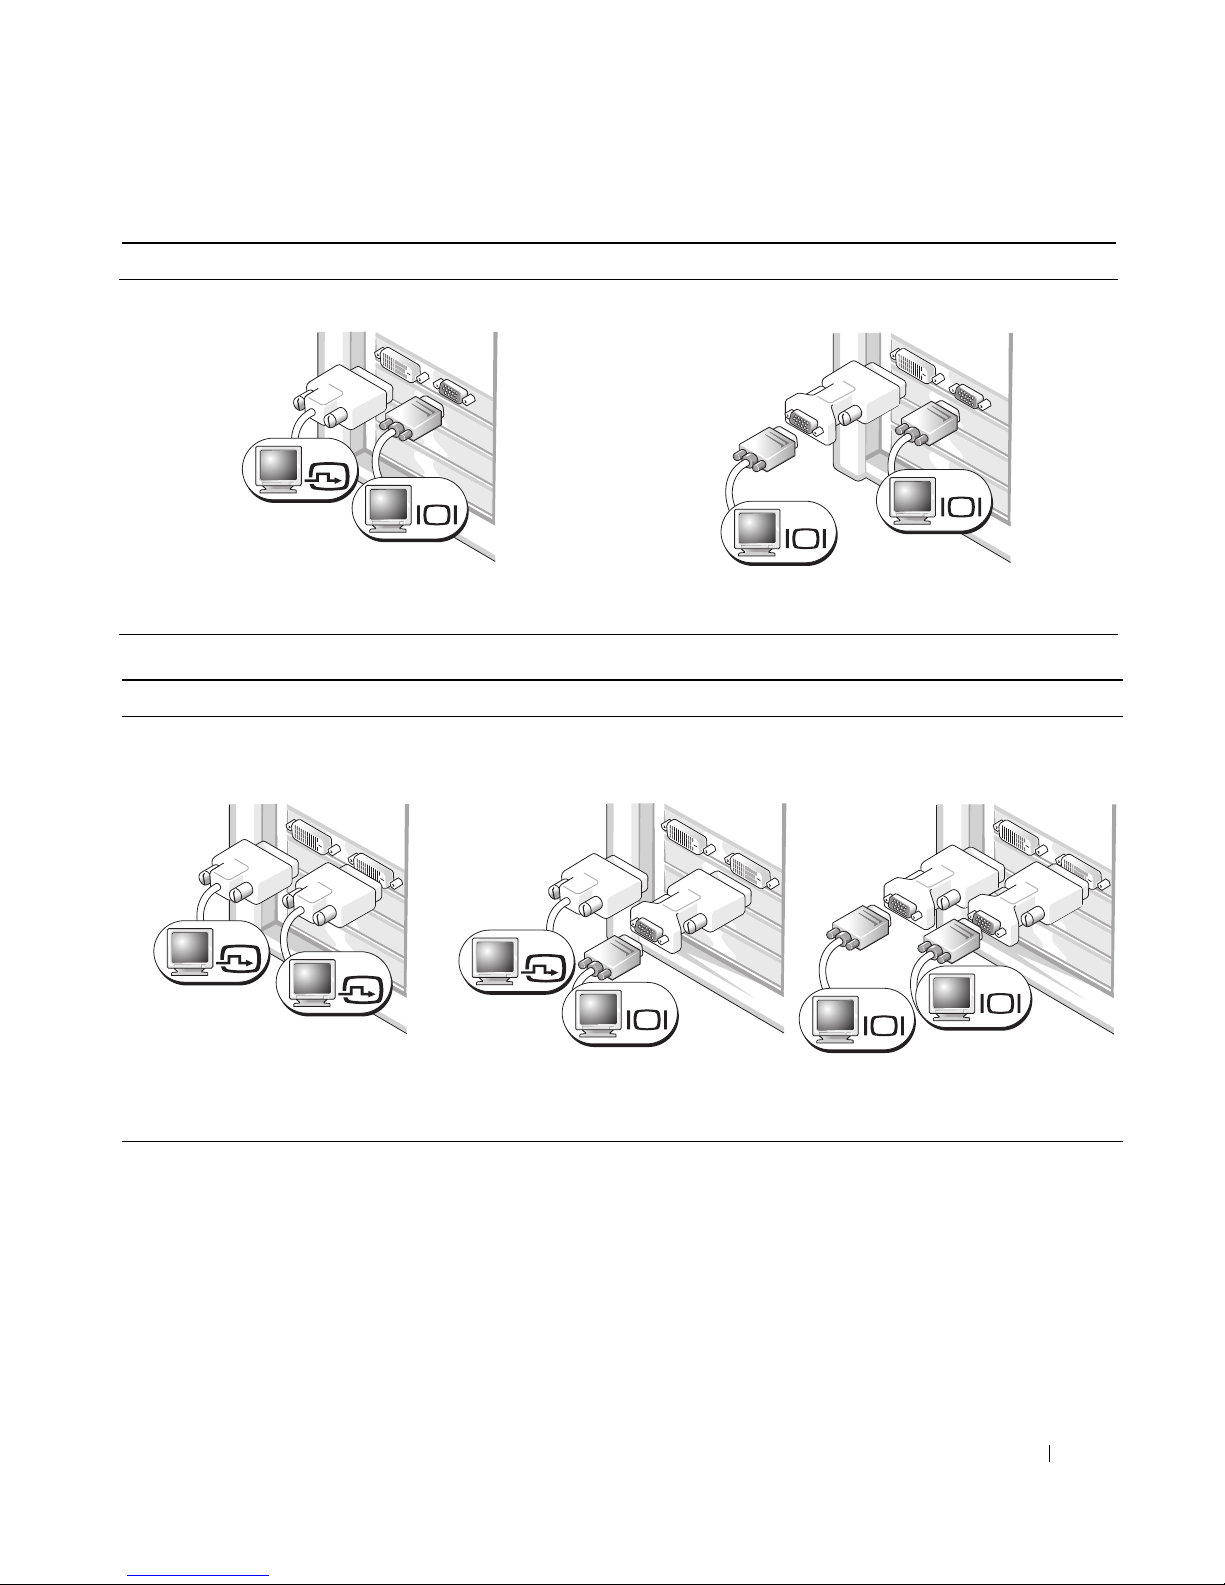
For dual-monitor capable cards with one DVI connector and one VGA connector
One DVI connector and one VGA connector:
DVI
VGA
Use the appropriate connector(s) when you want to
connect your computer to one or two monitors.
For dual-monitor capable cards with two DVI connectors
Two DVI connectors:
Two DVI connectors with one VGA
adapter:
Two VGA connectors with one VGA adapter:
VGA
VGA
Use the VGA adapter when you want to connect your
computer to two VGA monitors.
Two DVI connectors with two VGA
adapters:
DVI
DVI
Use the DVI connector(s) to connect
your computer to one or two DVI
monitors.
DVI
VGA
Use the VGA adapter to connect a
VGA monitor to one of the DVI
connectors on your computer.
VGA
VGA
Use two VGA adapters to connect two
VGA monitors to the DVI connectors
on your computer.
Quick Reference Guide 17
Page 18
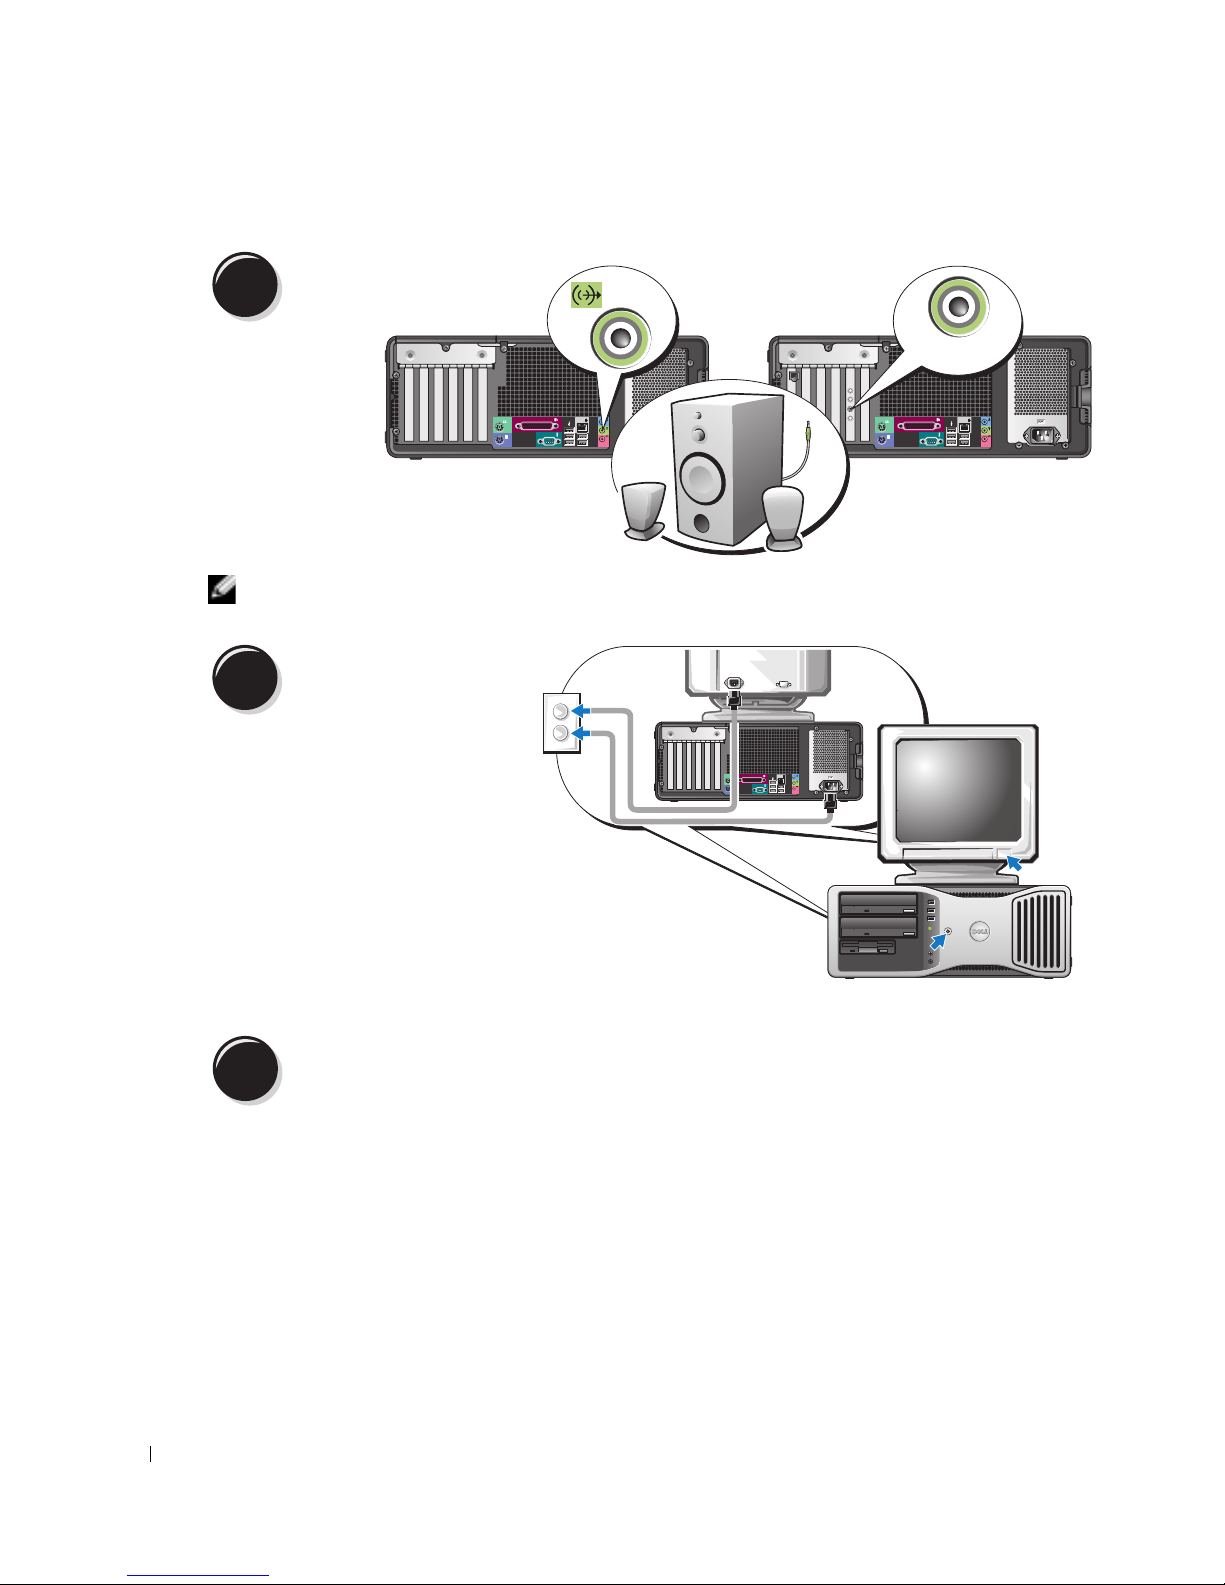
4
www.dell.com | support.dell.com
NOTE: If your computer has a sound card installed, connect the speakers to the card.
5
Connect the speakers.
Connect the power cables
and turn on the computer
and monitor.
Your desktop computer has an
optional front IEEE 1394
connector. This connector is only
available if you purchased an
IEEE 1394 card. To purchase a
card, contact Dell. For
instructions on contacting Dell
and for more information on the
IEEE 1394 card, see your
Guide
.
User’s
LINE OUT
4
3
2
1
6
Install additional software or devices.
Before you install any devices or software that did not come with your computer, read the
documentation that came with the software or device or contact the vendor to verify that the
software or device is compatible with your computer and operating system.
You have now completed the setup for your desktop computer.
18 Quick Reference Guide
Page 19

About Your Computer
Front View (Tower Orientation)
14
13
1
2
3
4
12
11
1234
10
9
1 upper 5.25-inch drive bay Holds a CD/DVD drive.
2 lower 5.25-inch drive bay Holds a CD/DVD drive or an optional third hard drive.
3 upper 3.5-inch drive bay Holds an optional fourth hard drive (serial ATA).
4 lower 3.5-inch drive bay You can use the bay for an optional floppy drive or an optional
Media Card Reader.
5 hard-drive activity light The hard drive light is on when the computer reads data from or
writes data to the hard drive. The light might also be on when a
device such as your CD player is operating.
5
6
7
8
Quick Reference Guide 19
Page 20
6 IEEE 1394 connector
(optional)
7 USB 2.0 connectors (2) Use the front USB connectors for devices that you connect occasionally, such as
8 Dell™ badge rotation
notch
9 power button Press to turn on the computer.
www.dell.com | support.dell.com
Use the optional IEEE 1394 connectors for high-speed data devices such as digital
video cameras and external storage devices.
flash memory keys or cameras, or for bootable USB devices (see
more information on booting to a USB device).
It is recommended that you use the back USB connectors for devices that typically
remain connected, such as printers and keyboards.
To rotate, place fingers around the outside of the badge, press in, and turn the
badge. You can also rotate the badge using the slot provided near the bottom of
the badge.
NOTICE: To avoid losing data, do not use the power button to turn off the
computer. Instead, perform an operating system shutdown.
system setup
NOTE: The power button can also be used to wake the computer or to place it into a
power-saving state. See "Power Management" in your User’s Guide for more
information.
10 power light The power light illuminates and blinks or remains solid to indicate different states:
• No light — The computer is turned off.
• Steady green — The computer is in a normal operating state.
• Blinking green — The computer is in a power-saving state.
• Blinking or solid amber — See "Power Problems" in your
To exit from a power-saving state, press the power button or use the keyboard or
the mouse if it is configured as a wake device in the Windows Device Manager. For
more information about sleep states and exiting from a power-saving state, see
"Power Management" in your User’s Guide.
See "Diagnostic Lights" on page 37 for a description of light codes that can help
you troubleshoot problems with your computer.
11 microphone connector Use the microphone connector to attach a personal computer microphone for
voice or musical input into a sound or telephony program.
12 headphone connector Use the headphone connector to attach headphones.
13 diagnostic lights (4) Use the lights to help you troubleshoot a computer problem based on the
diagnostic code. For more information, see "Diagnostic Lights" on page 37.
14 network link light The network link light is on when a good connection exists between a 10-Mbps,
100-Mbps, or 1000-Mbps (or 1-Gbps) network and the computer.
User’s Guide
for
.
20 Quick Reference Guide
Page 21
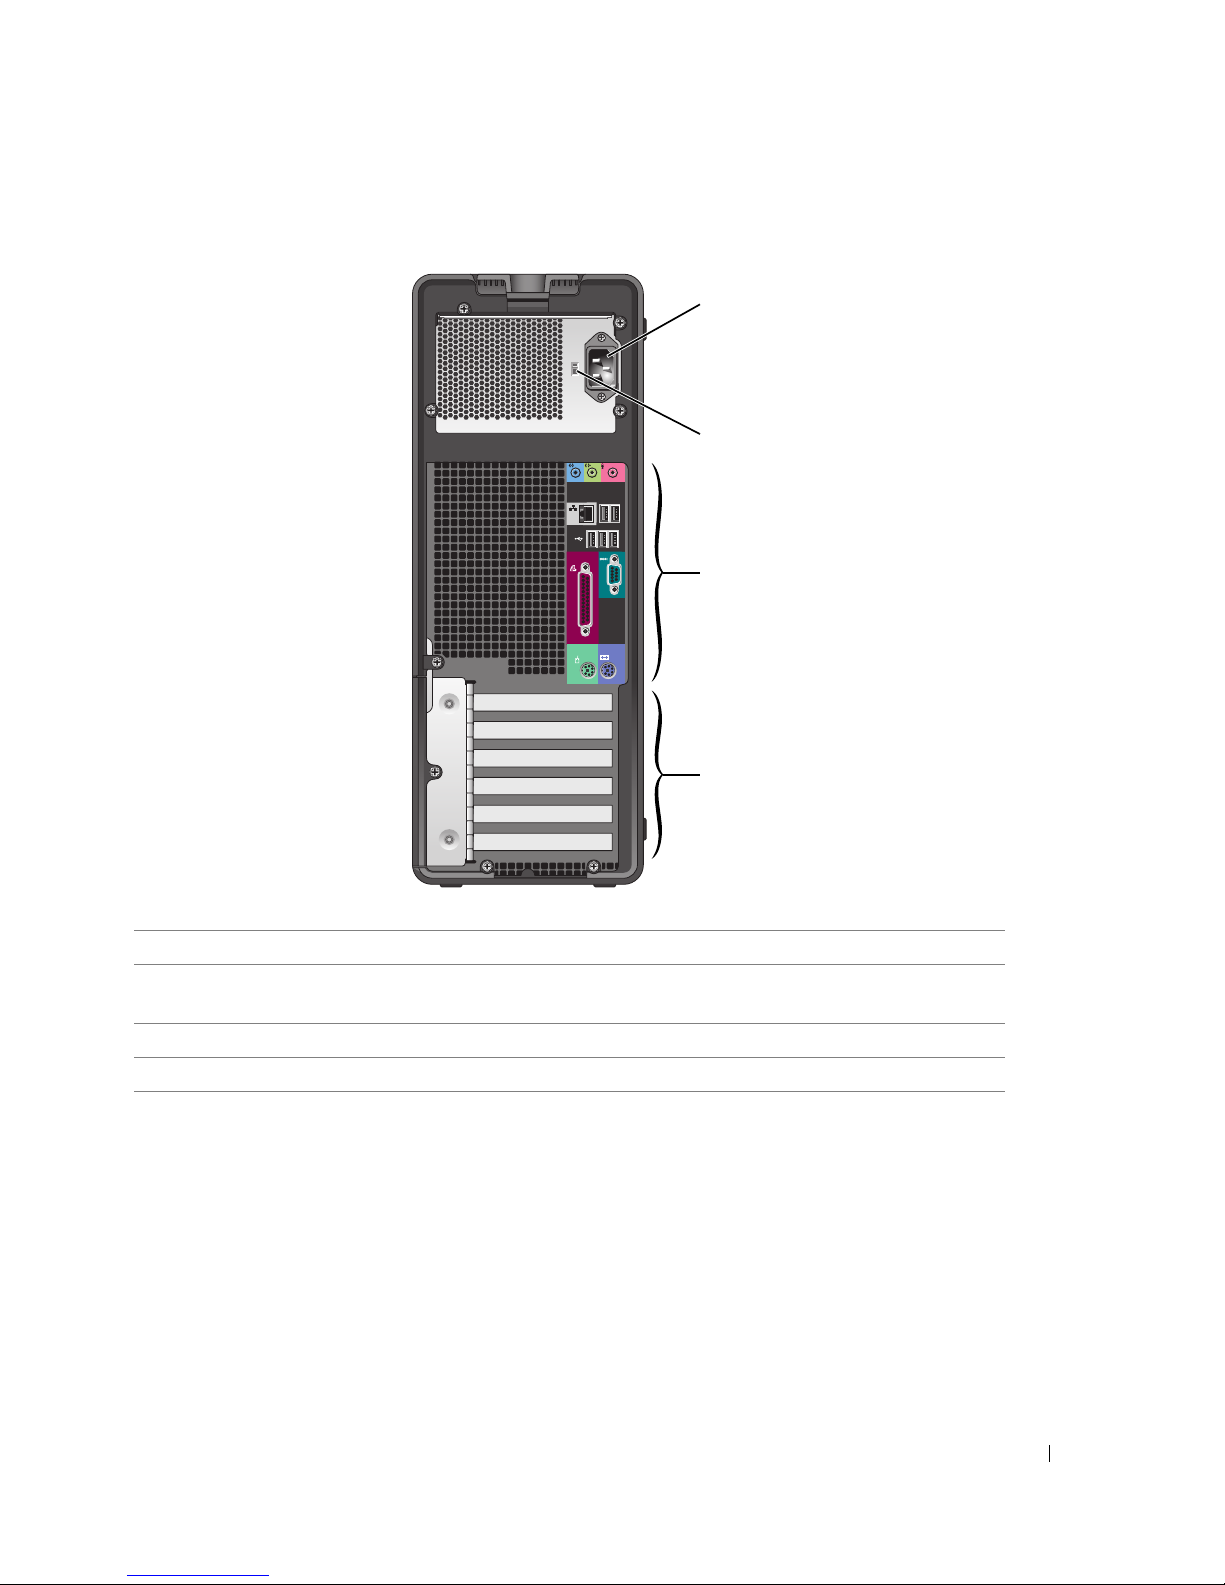
Back View (Tower Orientation)
1
2
3
4
1 power connector Insert the power cable into this connector.
2 voltage selection switch See the safety instructions in the Product Information Guide for more
information.
3 back-panel connectors Plug serial, USB, and other devices into the appropriate connector.
4 card slots Access connectors for any installed PCI or PCI Express cards.
Quick Reference Guide 21
Page 22
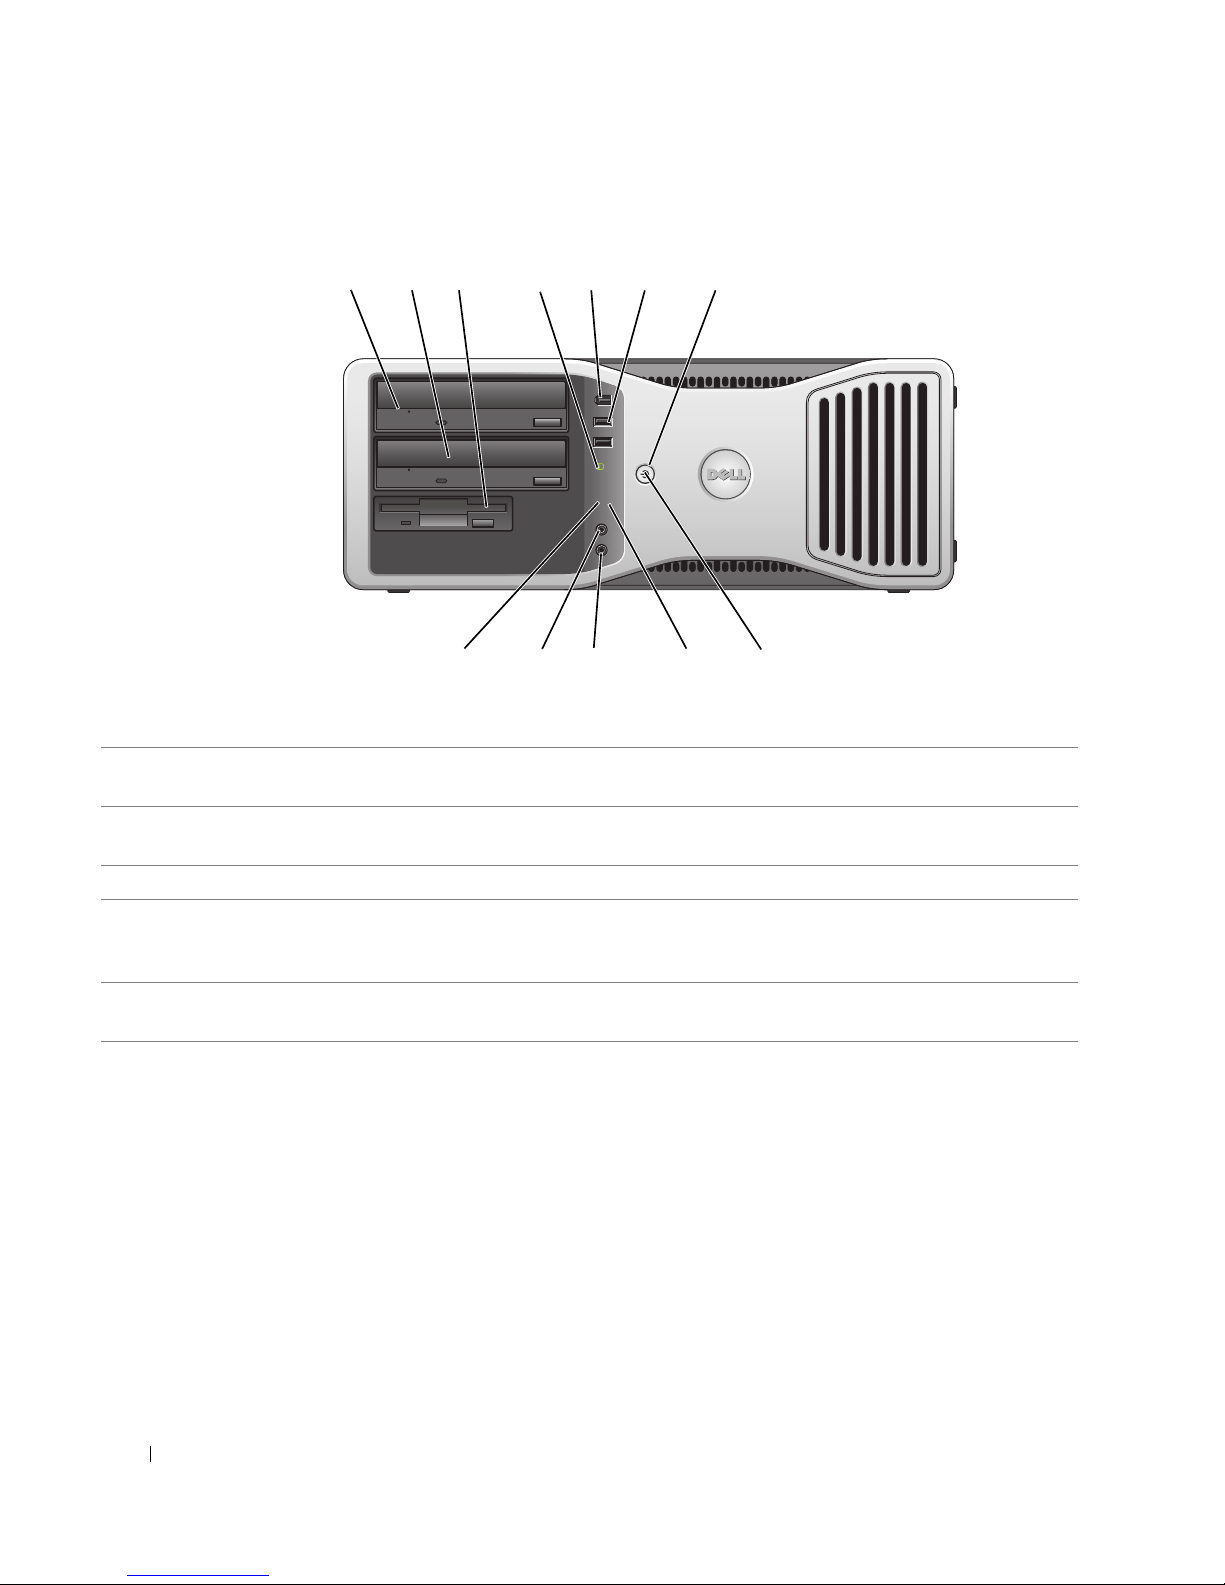
Front View (Desktop Orientation)
1 2 7
3
5 6
www.dell.com | support.dell.com
4
4
3
2
1
89101112
1 upper 5.25-inch drive
This bay holds a CD/DVD drive.
bay
2 lower 5.25-inch drive bay This bay holds an optional CD/DVD drive or an optional third hard drive (serial
ATA or SCSI).
3 3.5-inch drive bay You can use the bay for a floppy drive or an optional Media Card Reader.
4 hard-drive activity light The hard-drive activity light is on when the computer reads data from or writes
data to the hard drive. The light might also be on when a device such as your CD
player is operating.
5 IEEE 1394 connector
(optional)
Use the optional IEEE 1394 connectors for high-speed data devices such as digital
video cameras and external storage devices.
22 Quick Reference Guide
Page 23
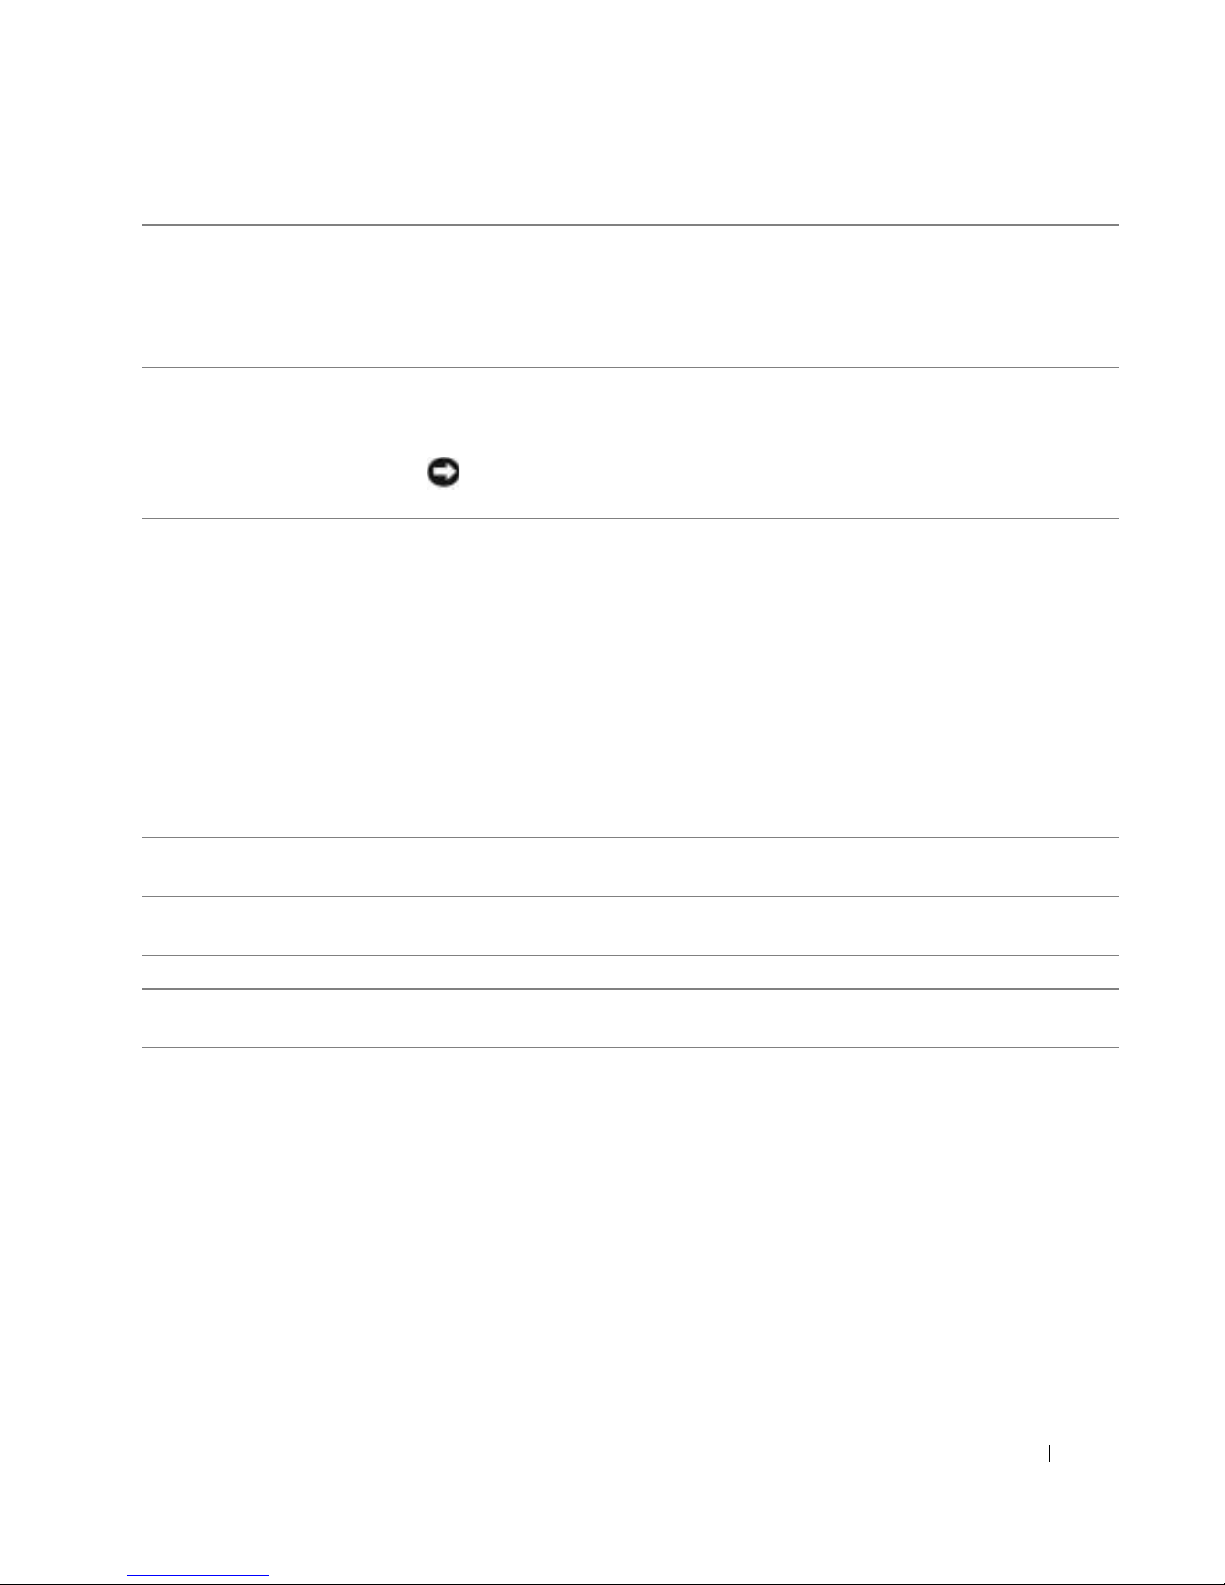
6 USB 2.0 connectors (2) Use the front USB connectors for devices that you connect occasionally, such as
flash memory keys or cameras, or for bootable USB devices (see
more information on booting to a USB device).
It is recommended that you use the back USB connectors for devices that typically
remain connected, such as printers and keyboards.
7 power button Press to turn on the computer.
system setup
for
NOTE: The power button can also be used to wake the computer or to place it into a
power-saving state. See "Power Management" for more information.
NOTICE: To avoid losing data, do not use the power button to turn off the
computer. Instead, perform an operating system shutdown.
8 power light The power light illuminates and blinks or remains solid to indicate different states:
• No light — The computer is turned off.
• Steady green — The computer is in a normal operating state.
• Blinking green — The computer is in a power-saving state.
• Blinking or solid amber — See "Power Problems."
To exit from a power-saving state, press the power button or use the keyboard or
the mouse if it is configured as a wake device in the Windows Device Manager. For
more information about sleep states and exiting from a power-saving state, see
"Power Management."
See "Diagnostic Lights" on page 37 for a description of light codes that can help
you troubleshoot problems with your computer.
9 diagnostic lights (4) Use the lights to help you troubleshoot a computer problem based on the
diagnostic code. For more information, see "Diagnostic Lights" on page 37.
10 microphone connector Use the microphone connector to attach a personal computer microphone for
voice or musical input into a sound or telephony program.
11 headphone connector Use the headphone connector to attach headphones.
12 network link light The network link light is on when a good connection exists between a 10-Mbps,
100-Mbps, or 1000-Mbps (or 1-Gbps) network and the computer.
Quick Reference Guide 23
Page 24
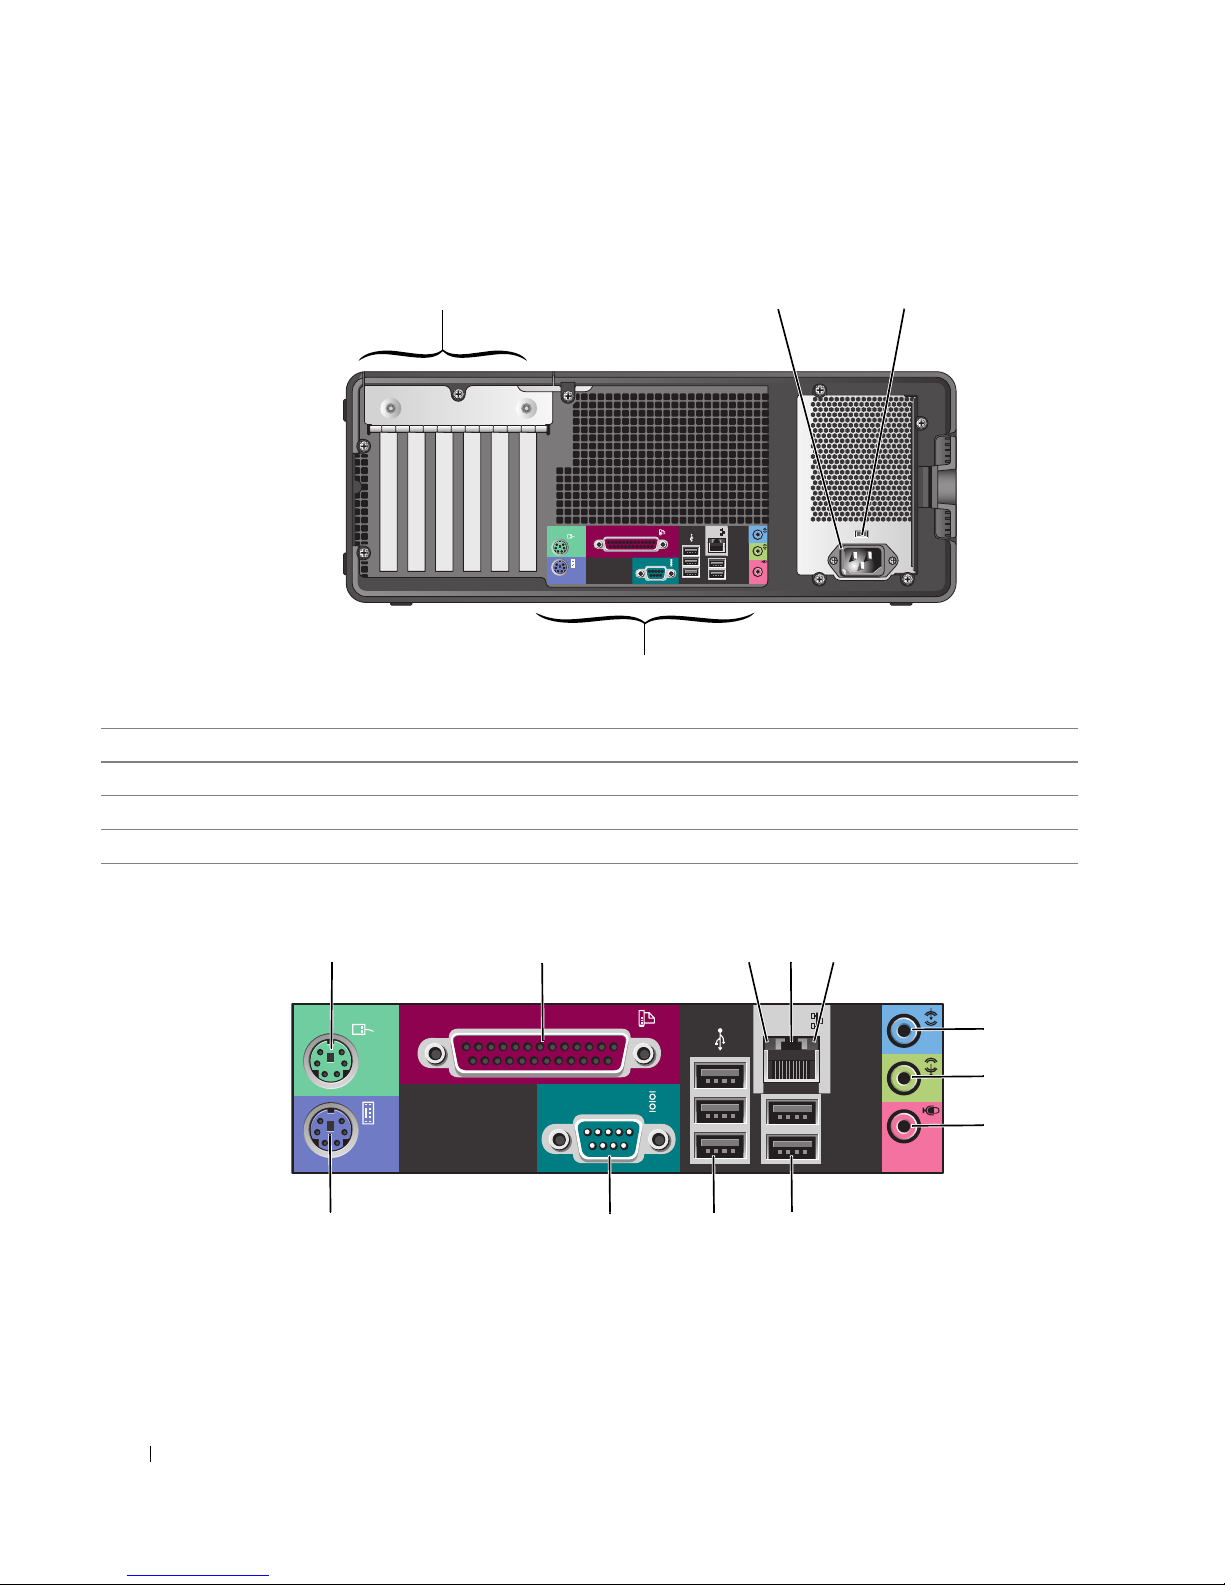
Back View (Desktop Orientation)
32
1
1
www.dell.com | support.dell.com
4
1 card slots Access connectors for any installed PCI or PCI Express cards.
2 power connector Insert the power cable into this connector.
3 voltage selection switch See the safety instructions in the Product Information Guide for more information.
4 back-panel connectors Plug serial, USB, and other devices into the appropriate connector.
Back-Panel Connectors
24 Quick Reference Guide
2 345
6
7
8
9101112
Page 25

1 mouse connector Plug a standard mouse into the green mouse connector. Turn off the computer
and any attached devices before you connect a mouse to the computer. If you have
a USB mouse, plug it into a USB connector.
®
If your computer is running the Microsoft
Windows XP operating system, the
necessary mouse drivers have been installed on your hard drive.
2 parallel connector Connect a parallel device, such as a printer, to the parallel connector. If you have a
USB printer, plug it into a USB connector.
NOTE: The integrated parallel connector is automatically disabled if the computer
detects an installed card containing a parallel connector configured to the same
address. For more information, see "System Setup Options" in the User’s Guide.
3 link integrity light
• Green — A good connection exists between a 10-Mbps network and the
computer.
• Orange — A good connection exists between a 100-Mbps network and the
computer.
• Yellow — A good connection exists between a 1000-Mbps (or 1-Gbps) network
and the computer.
• Off — The computer is not detecting a physical connection to the network.
4 network adapter
connector
To attach your computer to a network or broadband device, connect one end of a
network cable to either a network jack or your network or broadband device.
Connect the other end of the network cable to the network adapter connector on
your computer. A click indicates that the network cable has been securely
attached.
NOTE: Do not plug a telephone cable into the network connector.
On computers with an additional network connector card, use the connectors on
the card and on the back of the computer when setting up multiple network
connections (such as a separate intra- and extranet).
It is recommended that you use Category 5 wiring and connectors for your
network. If you must use Category 3 wiring, force the network speed to 10 Mbps to
ensure reliable operation.
5 network activity light Flashes a yellow light when the computer is transmitting or receiving network
data. A high volume of network traffic may make this light appear to be in a steady
"on" state.
Quick Reference Guide 25
Page 26

6 line-in connector Use the blue line-in connector to attach a record/playback device such as a cassette
player, CD player, or VCR.
On computers with a sound card, use the connector on the card.
7 line-out connector Use the green line-out connector to attach headphones and most speakers with
integrated amplifiers.
On computers with a sound card, use the connector on the card.
8 microphone connector Use the pink microphone connector to attach a personal computer microphone
for voice or musical input into a sound or telephony program.
On computers with a sound card, the microphone connector is on the card.
9 USB 2.0 connectors (2) Use the back USB connectors for devices that typically remain connected, such as
www.dell.com | support.dell.com
printers and keyboards.
It is recommended that you use the front USB connectors for devices that you
connect occasionally, such as flash memory keys or cameras, or for bootable USB
devices.
10 USB 2.0 connectors (3) Use the back USB connectors for devices that typically remain connected, such as
printers and keyboards.
It is recommended that you use the front USB connectors for devices that you
connect occasionally, such as flash memory keys or cameras, or for bootable USB
devices.
11 serial connector Connect a serial device, such as a handheld device, to the serial port. The default
designations are COM1 for serial connector 1 and COM2 for the optional serial
connector 2.
For more information, see "System Setup Options" in the User’s Guide
12 keyboard connector If you have a standard keyboard, plug it into the purple keyboard connector. If you
have a USB keyboard, plug it into a USB connector.
.
26 Quick Reference Guide
Page 27
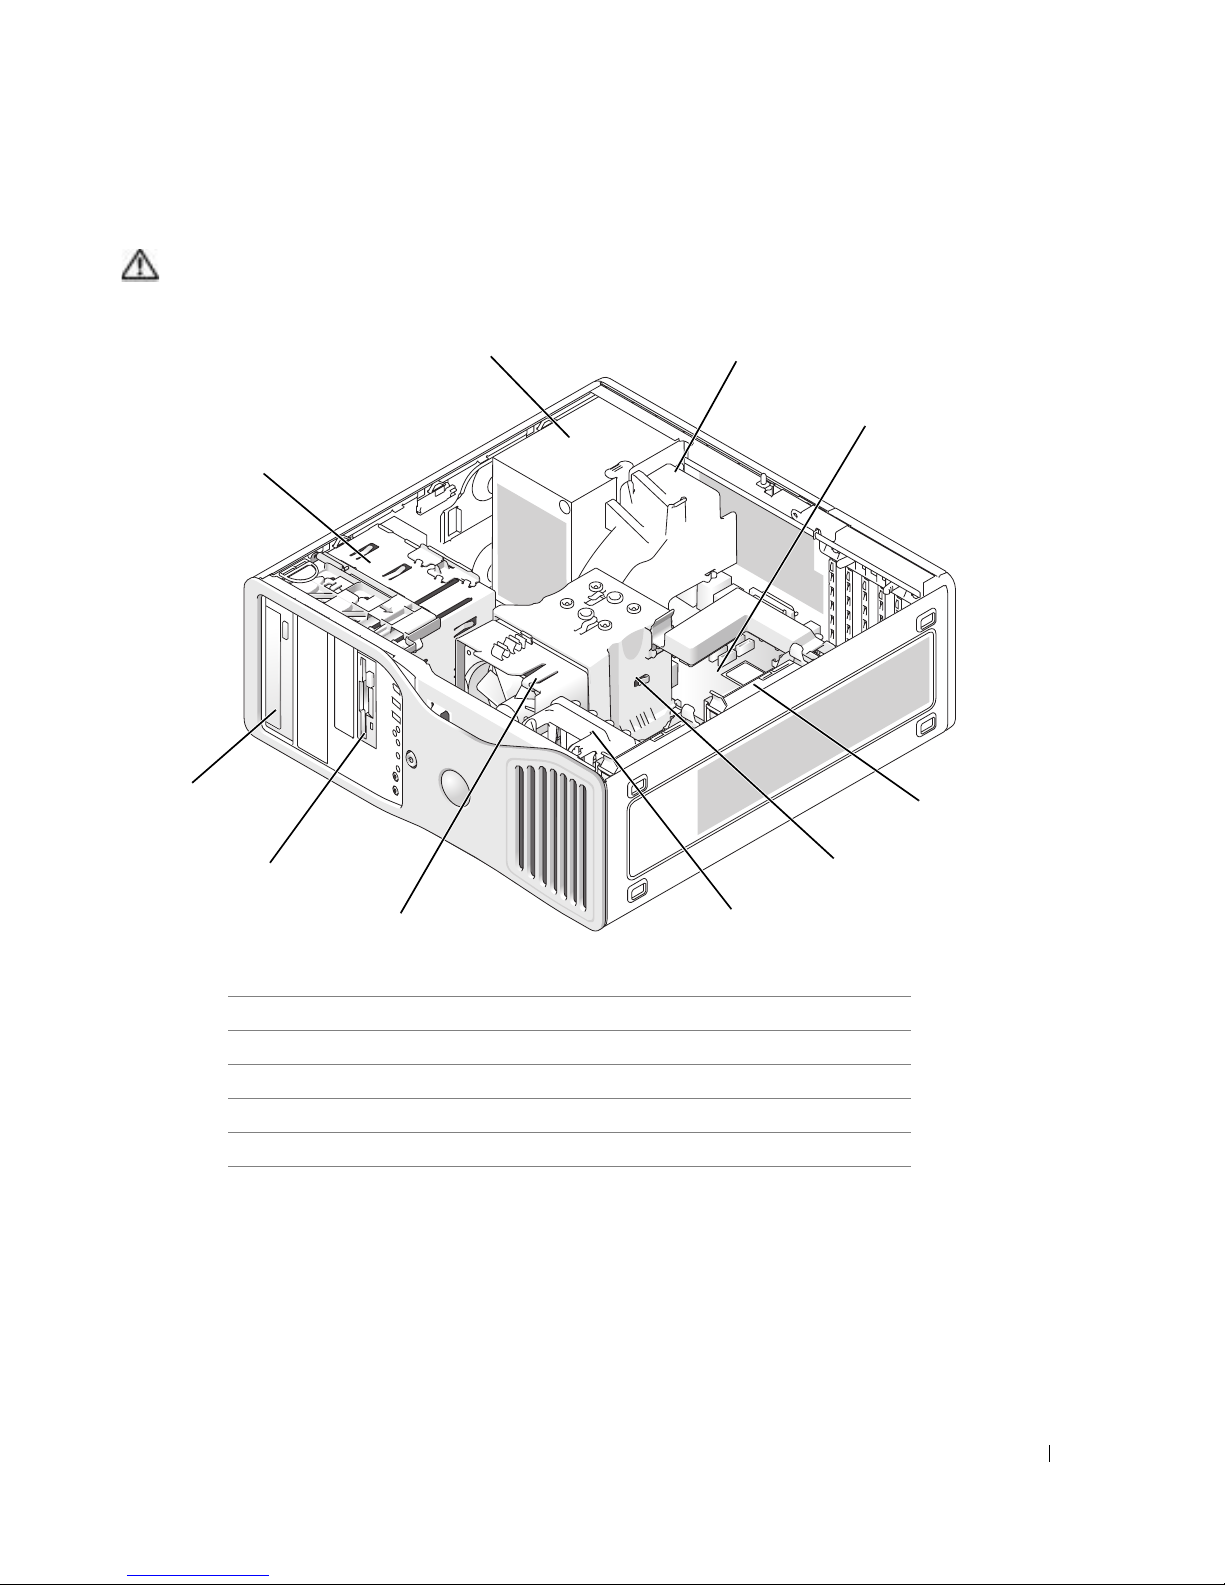
Inside View
1
2
CAUTION: Before you begin any of the procedures in this section, follow the safety instructions in the
Product Information Guide.
3
10
9
8
7
1 power supply 6 card fan
2 optional additional fan 7 processor fan
3 system board 8 lower 3.5-inch drive bay
4 hard drive 9 upper 5.25-inch drive bay
5 processor airflow shroud 10 drive cage
4
5
6
Quick Reference Guide 27
Page 28
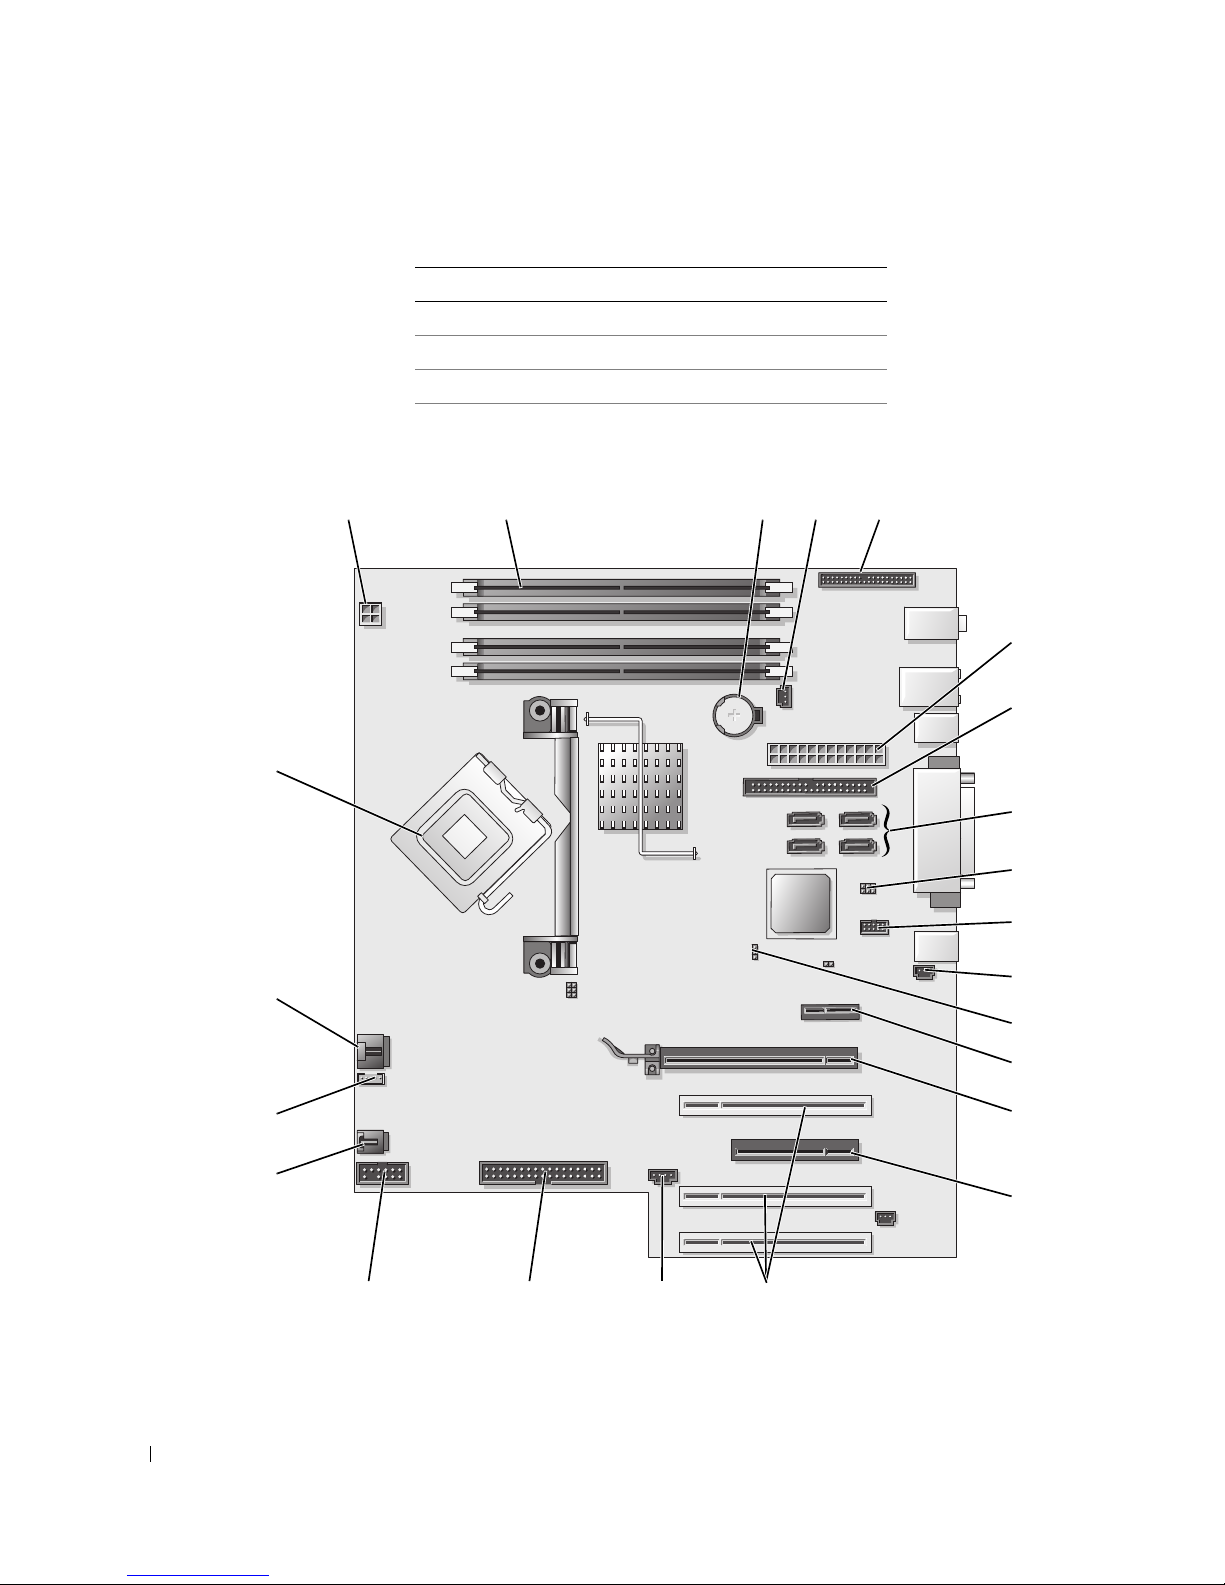
Cable Colors
1
2
3 4 5
System Board Components
www.dell.com | support.dell.com
Device Color
Hard drive blue cable
Floppy drive black pull tab
CD/DVD drive orange pull tab
6
7
23
22
21
20
19
18
8
9
10
11
12
13
14
15
1617
28 Quick Reference Guide
Page 29

1 power connector (12VPOWER) 13 PCI-Express x1 card slot
2 memory module connectors 14 PCI-Express x16 up to 150w card slot
3 battery socket (BATTERY) 15 PCI-Express x8 card slot (wired as x4)
4 memory fan connector (FAN_MEM) 16 PCI card slots (1-3)
5 front panel connector 17 external light connector (AUX LED)
6 main power connector (POWER) 18 floppy drive (FLOPPY)
7 IDE drive connector (IDE) 19 serial connector (SERIAL2)
8 SATA connectors (SATA-1, SATA-3, SATA-0,
SATA-2)
9 RTC reset jumper (RTCRST) 21 internal speaker connector (INT_SPKR)
10 Flexbay connector (FLEXBAY) 22 processor fan connector (FAN_CPU)
11 chassis intrusion header 23 processor connector (CPU)
12 password jumper (PASS)
20 card cage fan (FAN CARD CAGE)
Locating Your User’s Guide
Your
User’s Guide
• Technical specifications
contains additional information about your computer such as:
• Information for changing the orientation of your computer from a desktop to a tower
• Front and back views of your computer, including all of the available connectors
• Inside views of your computer, including a detailed graphic of the system board and the
connectors
• Instructions for cleaning your computer
• Information on software features, such as LegacySelect Technology control, using a password,
and system setup options
• Tips and information for using the Microsoft Windows XP operating system
• Instructions for removing and installing parts, including memory, cards, drives, the
microprocessor, and the battery
• Information for troubleshooting various computer problems
• Instructions for using the Dell Diagnostics and reinstalling drivers
• Information on how to contact Dell
You can access the
support.dell.com
.
User’s Guide
from your hard drive or the Dell Support website at
Quick Reference Guide 29
Page 30

To access the User’s Guide from your hard drive:
Click the
To access your User’s Guide from the Dell Support website:
1
2
3
Start
Go to
support.dell.com
Follow the prompts on the website that ask you for information specific to your computer.
At the Dell Support website home page, click
and then select your computer.
Removing the Computer Cover
www.dell.com | support.dell.com
CAUTION: Before you begin any of the procedures in this section, follow the safety instructions in the
Product Information Guide.
CAUTION: To guard against electrical shock, always unplug your computer from the electrical outlet
before removing the cover.
NOTICE: Before touching anything inside your computer, ground yourself by touching an unpainted
metal surface, such as the metal at the back of the computer. While you work, periodically touch an
unpainted metal surface to dissipate any static electricity that could harm internal components.
NOTICE: To avoid losing data, save and close any open files and exit any open programs before you turn
off your computer.
button and click
.
Help and Support
.
Reference
, click
User’s Guides
, click
Systems
,
1
Shut down the operating system:
a
Save and close any open files, exit any open programs, click the
b
Turn Off Computer
click
In the
Turn off computer
.
window, click
Tur n o ff
.
Start
button, and then
The computer turns off after the operating system shutdown process finishes.
2
Ensure that the computer and any attached devices are turned off. If your computer and
attached devices did not automatically turn off when you shut down your operating system,
turn them off now.
3
If you have installed a security cable, remove it from the security cable slot.
NOTICE: Ensure that you are working on a level, protected surface to avoid scratching either the
computer or the surface on which it is resting.
4
Lay your computer on a flat surface with the computer cover facing up.
5
Pull back the cover latch release.
30 Quick Reference Guide
Page 31
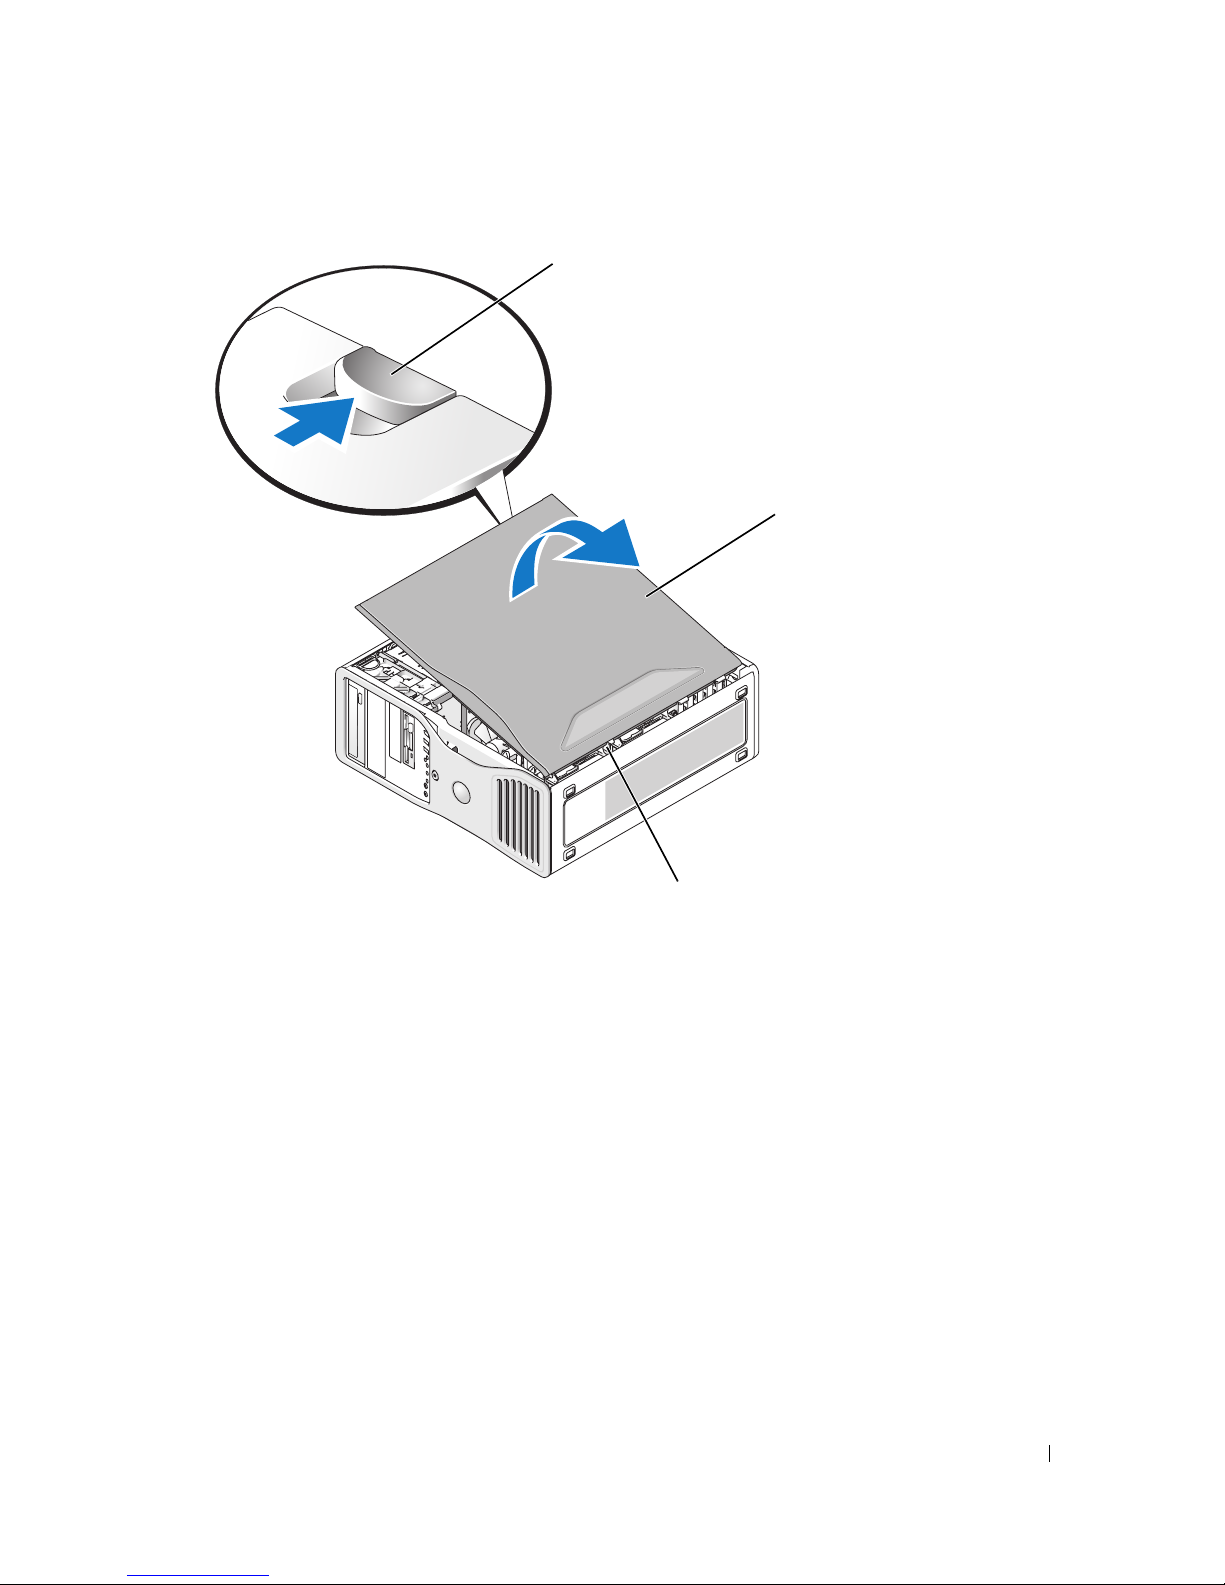
cover latc
h
cover latch release
computer cover
hinge tabs (3)
6
Locate the three hinge tabs on the edge of the computer.
7
Grip the sides of the computer cover and pivot the cover up, using the hinges as leverage
points.
8
Release the cover from the hinge tabs and set it aside in a secure location.
Caring for Your Computer
To help maintain your computer, follow these suggestions:
• To avoid losing or corrupting data, never turn off your computer when the hard drive light is on.
• Schedule regular virus scans using virus software.
• Manage hard drive space by periodically deleting unnecessary files and defragmenting the
drive.
• Back up files on a regular basis.
• Periodically clean your monitor screen, mouse, and keyboard (see your
information).
User’s Guide
Quick Reference Guide 31
for more
Page 32

Solving Problems
Troubleshooting Tips
Perform the following checks when you troubleshoot your computer:
• If you added or removed a part before the problem started, review the installation procedures
and ensure that the part is correctly installed.
• If a peripheral device does not work, ensure that the device is properly connected.
• If an error message appears on the screen, write down the exact message. The message may
help technical support personnel diagnose and fix the problem(s).
www.dell.com | support.dell.com
• If an error message occurs in a program, see the program’s documentation.
• If the recommended action in the troubleshooting section is to see a section in your
, go to
Guide
Guide.
Resolving Software and Hardware Incompatibilities
If a device is either not detected during the operating system setup or is detected but incorrectly
configured, you can use the Hardware Troubleshooter to resolve the incompatibility.
To resolve incompatibilities using the Hardware Troubleshooter:
1
Click the
2
Ty p e
hardware troubleshooter
3
Click
Hardware Troubleshooter
4
In the
computer
Hardware Troubleshooter
Using Microsoft® Windows® XP System Restore
The Microsoft Windows XP operating system provides System Restore to allow you to return your
computer to an earlier operating state (without affecting data files) if changes to the hardware,
software, or other system settings have left the computer in an undesirable operating state. See the
Windows Help and Support Center (see "Finding Information" on page 5) for information about
using System Restore.
support.dell.com (on another computer if necessary) to access your
Start
button and click
, and click
Next
.
Help and Support
in the
in the
list, click
Search
Search Results
I need to resolve a hardware conflict on my
.
field and click the arrow to start the search.
list.
User’s
User’s
NOTICE: Make regular backups of your data files. System Restore does not monitor your data files or
recover them.
Creating a Restore Point
1
Click the
2
Click
3
Follow the instructions on the screen.
32 Quick Reference Guide
Start
button and click
System Restore
Help and Support
.
.
Page 33

Restoring the Computer to an Earlier Operating State
NOTICE: Before you restore the computer to an earlier operating state, save and close any open files
and exit any open programs. Do not alter, open, or delete any files or programs until the system
restoration is complete.
1
Click the
System Restore
2
Ensure that
3
Click a calendar date to which you want to restore your computer.
The
Start
button, point to
.
Restore my computer to an earlier time
Select a Restore Point
All Programs→
Accessories→
System Tools
is selected and click
, and then click
Next
.
screen provides a calendar that allows you to see and select restore
points. All calendar dates with available restore points appear in boldface type.
4
Select a restore point and click
Next
.
If a calendar date has only one restore point, then that restore point is automatically selected.
If two or more restore points are available, click the restore point that you prefer.
5
Click
Next
.
The
Restoration Complete
screen appears after System Restore finishes collecting data and
then the computer restarts.
6
After the computer restarts, click OK.
To change the restore point, you can either repeat the steps using a different restore point, or you
can undo the restoration.
Undoing the Last System Restore
NOTICE: Before you undo the last system restore, save and close all open files and exit any open
programs. Do not alter, open, or delete any files or programs until the system restoration is complete.
1
Click the
System Restore
2
Click
3
Click
The
4
After the computer restarts, click OK.
Enabling System Restore
Start
button, point to
.
Undo my last restoration
Next
.
System Restore
screen appears and the computer restarts.
All Programs→ Accessories→ System Tools
and click
Next
.
, and then click
If you reinstall Windows XP with less than 200 MB of free hard-disk space available, System
Restore is automatically disabled. To see if System Restore is enabled:
1
Click the
2
Click
3
Click
Start
button and click
Control Panel
Performance and Maintenance
System
.
.
.
Quick Reference Guide 33
Page 34

4
Click the
5
Ensure that
System Restore
tab.
Turn off System Restore
is unchecked.
Using the Last Known Good Configuration
1
Restart your computer and press <F8> when the message
operating system to start
2
Highlight
Last Known Good Configuration
appears.
, press <Enter>, press <l>, and then select your
operating system when prompted.
Other Options to Help Resolve Additional Device or Software Conflicts
Please select the
www.dell.com | support.dell.com
NOTICE: The following processes erase all of the information on your hard drive.
• Reinstall your operating system using the operating system installation guide and
System
CD.
During the operating system reinstallation, you can select to delete the existing partitions and
reformat your hard drive.
• Reinstall all drivers, beginning with the chipset, using the
Dell Diagnostics
CAUTION: Before you begin any of the procedures in this section, follow the safety instructions in the
Product Information Guide.
When to Use the Dell Diagnostics
If you experience a problem with your computer, perform the checks in "Solving Problems" on
page 32 and run the Dell Diagnostics before you contact Dell for technical assistance.
It is recommended that you print these procedures before you begin.
NOTICE: The Dell Diagnostics works only on Dell™ computers. Using this program with other computers
can cause incorrect computer responses or result in error messages.
The Dell Diagnostics allow you to:
• Perform quick checks or extensive tests on one or all devices
Drivers and Utilities
Operating
CD
.
• Choose how many times a test is run
• Display or print test results or save them in a file
• Suspend testing if an error is detected or terminate testing if a certain number of errors occur
• Access online
Help
• Read status messages that tell you whether tests completed successfully
• Receive error messages if problems are detected
34 Quick Reference Guide
screens that describe the tests and how to run them
Page 35

Starting the Dell Diagnostics From Your Hard Drive
1
Turn on (or restart) your computer.
2
When the DELL™ logo appears, press <F12> immediately.
NOTE: If you see a message stating that no diagnostics utility partition has been found, see "Starting the
Dell Diagnostics From the Drivers and Utilities CD" on page 35.
If you wait too long and the operating system logo appears, continue to wait until you see the
Microsoft Windows desktop. Then shut down your computer and try again. For more
information on shutting down your computer, see your
3
When the boot device list appears, highlight
4
When the Dell Diagnostics
information on the tests, see your
Starting the Dell Diagnostics From the Drivers and Utilities CD
1
Insert the
2
Shut down and restart the computer. For more information on shutting down your computer,
see your
3
When the DELL logo appears, press <F12> immediately.
Drivers and Utilities
User’s Guide.
Main Menu
User’s Guide.
CD.
Boot to Utility Partition
appears, select the test you want to run. For more
User’s Guide.
and press <Enter>.
If you wait too long and the Windows logo appears, continue to wait until you see the
Windows desktop. Then shut down your computer and try again. For more information on
shutting down your computer, see your
User’s Guide.
NOTE: The next steps change the boot sequence for one time only. On the next start-up, the computer
boots according to the devices specified in system setup.
4
When the boot device list appears, highlight
5
Select the
6
Select the
7
Ty p e 1 to start the ResourceCD menu.
8
Ty p e 2 to start the Dell Diagnostics.
9
Select
IDE CD-ROM Device
Boot from CD-ROM
option from the CD boot menu.
option from the menu that appears.
Run the 32 Bit Dell Diagnostics
IDE CD-ROM Device
and press <Enter>.
from the numbered list. If multiple versions are listed,
select the version appropriate for your computer.
10
When the Dell Diagnostics
information on the tests, see your
Main Menu
User’s Guide.
appears, select the test you want to run. For more
Quick Reference Guide 35
Page 36

Before You Start Testing
CAUTION: Before you begin any of the procedures in this section, follow the safety instructions in the
Product Information Guide.
• Turn on your printer if one is attached.
• Enter system setup, review your computer’s configuration information, and enable all of your
computer’s components and devices, such as connectors.
Beep Codes
Your computer might emit a series of beeps during start-up if the monitor cannot display errors or
problems. This series of beeps, called a beep code, identifies a problem. One possible beep code
www.dell.com | support.dell.com
(code 1-3-1) consists of one beep, a burst of three beeps, and then one beep. This beep code tells
you that the computer encountered a memory problem.
If a beep code is emitted, write it down and look it up in the following table.
Code Cause
1-1-2 Microprocessor register failure
1-1-3 NVRAM read/write failure
1-1-4 ROM BIOS checksum failure
1-2-1 Programmable interval timer failure
1-2-2 DMA initialization failure
1-2-3 DMA page register read/write failure
1-3 Video Memory Test failure
1-3-1 through 2-4-4 Memory not being properly identified or used
1-3-2 Memory problem
3-1-1 Slave DMA register failure
3-1-2 Master DMA register failure
3-1-3 Master interrupt mask register failure
3-1-4 Slave interrupt mask register failure
3-2-2 Interrupt vector loading failure
3-2-4 Keyboard Controller Test failure
3-3-1 NVRAM power loss
3-3-2 Invalid NVRAM configuration
3-3-4 Video Memory Test failure
3-4-1 Screen initialization failure
36 Quick Reference Guide
Page 37
Code Cause
3-4-2 Screen retrace failure
3-4-3 Search for video ROM failure
4-2-1 No timer tick
4-2-2 Shutdown failure
4-2-3 Gate A20 failure
4-2-4 Unexpected interrupt in protected mode
4-3-1 Memory failure above address 0FFFFh
4-3-3 Timer-chip counter 2 failure
4-3-4 Time-of-day clock stopped
4-4-1 Serial or parallel port test failure
4-4-2 Failure to decompress code to shadowed memory
4-4-3 Math-coprocessor test failure
4-4-4 Cache test failure
Error Messages
NOTE: If the message is not listed, see the documentation for either the operating system or the program
that was running when the message appeared.
If an error occurs during start-up, a message may be displayed on the monitor identifying the
problem. See "Error Messages" in the
User’s Guide
for suggestions on resolving any problems.
Diagnostic Lights
CAUTION: Before you begin any of the procedures in this section, follow the safety instructions in the
Product Information Guide.
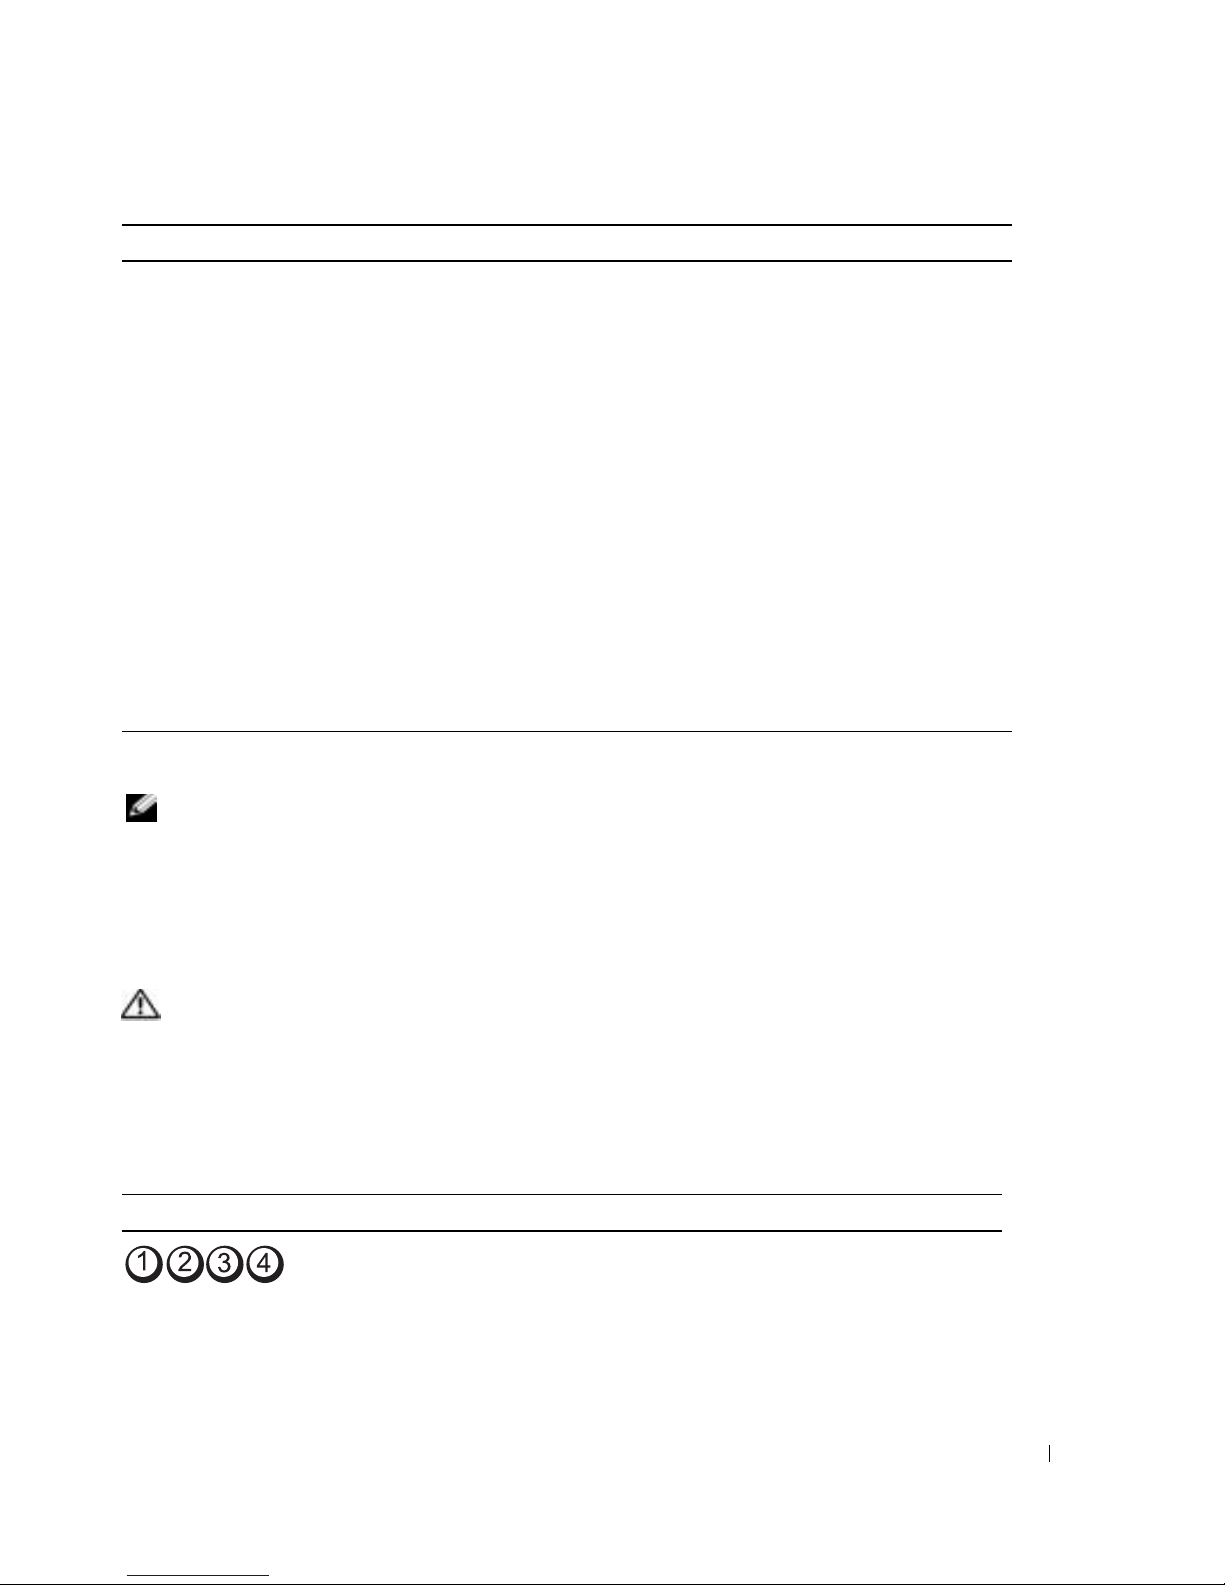
To help you troubleshoot a problem, your computer has four lights labeled "1," "2," "3," and "4" on
the front. The lights can be off or green. When the computer starts normally, the lights flash. After
the computer starts, all four lights display solid green briefly and then turn off to indicate normal
operation. If the computer malfunctions, the pattern of the lights identify the problem.
Light Pattern Problem Description Suggested Resolution
The computer is in a normal off
condition or a possible pre-BIOS failure
has occurred.
NOTE: The diagnostic lights turn off after
a short time if the computer is in a normal
operating condition after POST.
Plug the computer into a working
electrical outlet and press the power
button.
Quick Reference Guide 37
Page 38
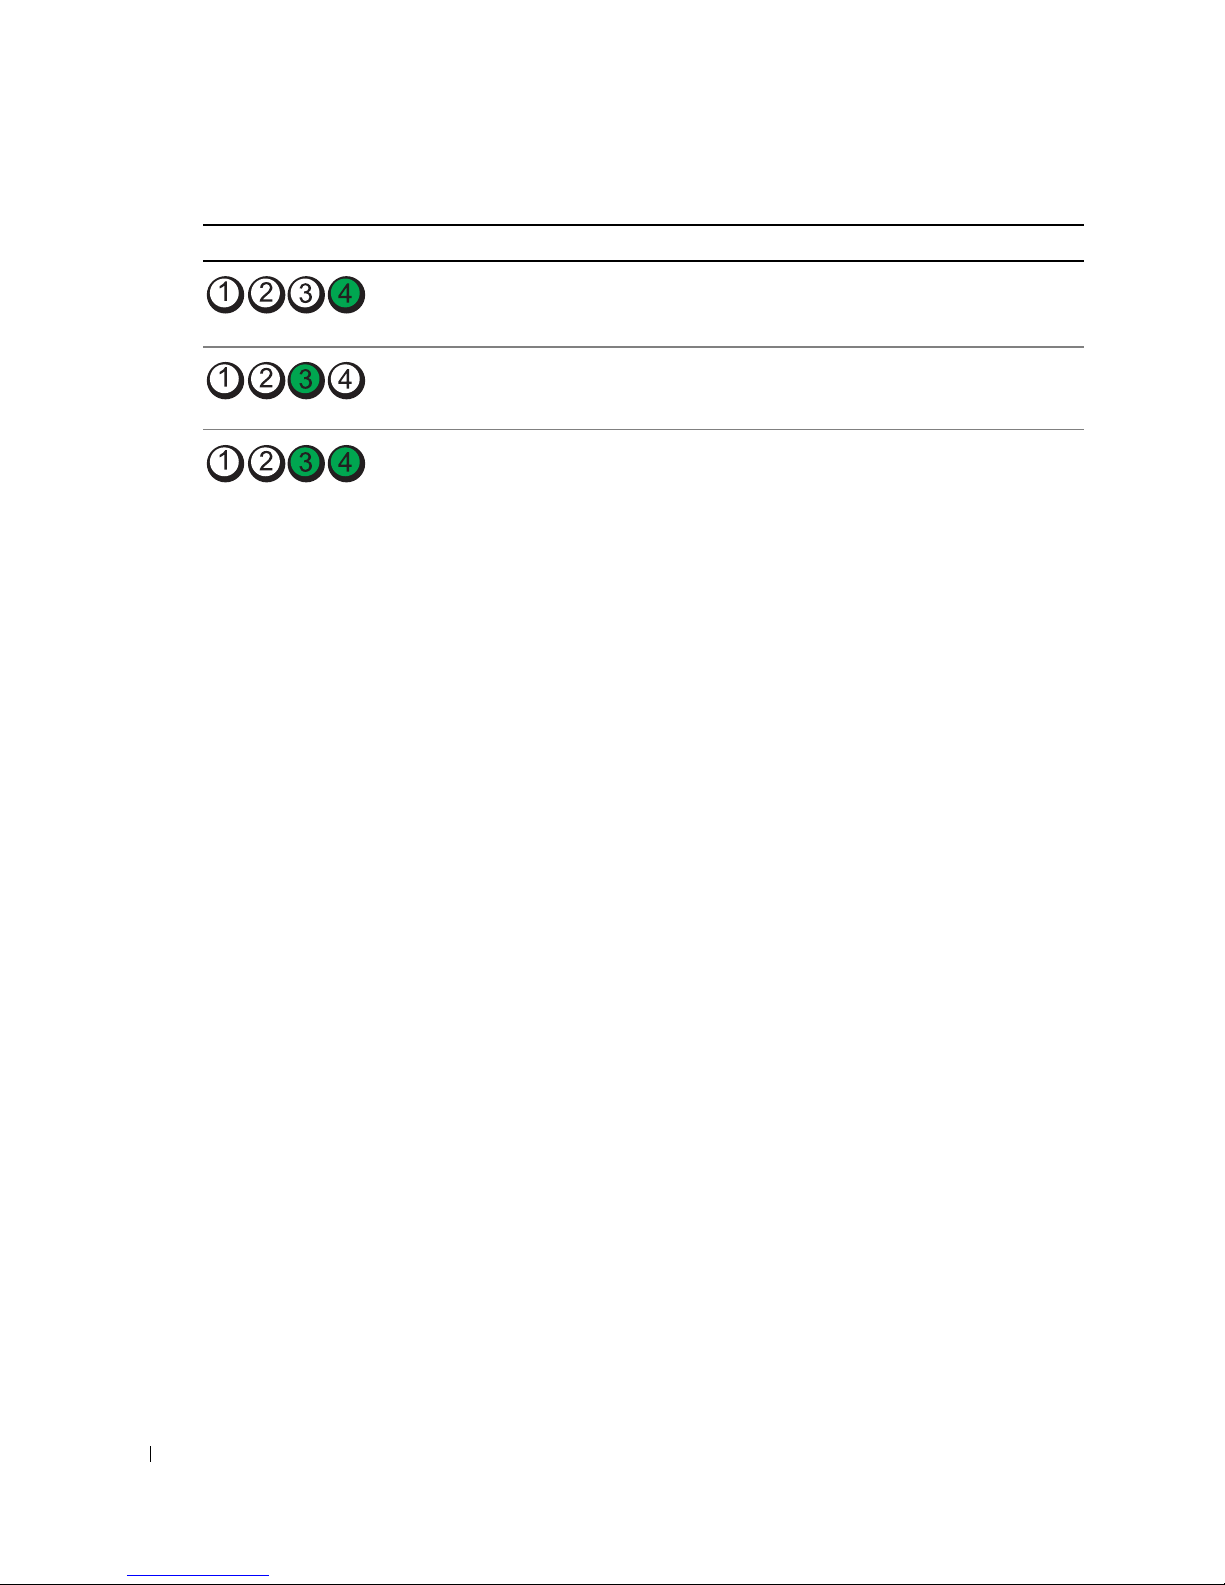
Light Pattern Problem Description Suggested Resolution
www.dell.com | support.dell.com
A possible BIOS failure has occurred; the
computer is in the recovery mode.
Run the BIOS Recovery utility, wait for
recovery completion, and then restart
the computer.
A possible processor failure has occurred. Reinstall the processor and restart the
computer.
Memory modules are detected, but a
memory failure has occurred.
1
Reseat the memory modules to ensure
that your computer is successfully
communicating with the memory.
2
Restart the computer.
3
If the problem still exists, remove all
the memory modules and install one
memory module in memory module
connector 4.
4
Restart the computer.
The following message appears:
Alert! Operating in Debug
Mode. Please Populate
Memory in Pairs for Normal
Operation
5
Press <F1> to boot to the operating
.
system.
6
Run the Dell Diagnostics. See page 34
for instructions.
7
If the memory module passes, shut
down the computer, remove the
memory module, and then repeat the
process with the remaining memory
modules until a memory error occurs
during start-up or diagnostic testing.
If the first memory module tested is
defective, repeat the process with the
remaining modules to ensure that the
remaining modules are not defective.
8
When the defective memory module
is identified, contact Dell for a
replacement. For instructions on
contacting Dell, see your
User’s Guide
NOTE: If necessary, the computer can
operate in debug mode until new memory
modules are installed.
.
38 Quick Reference Guide
Page 39
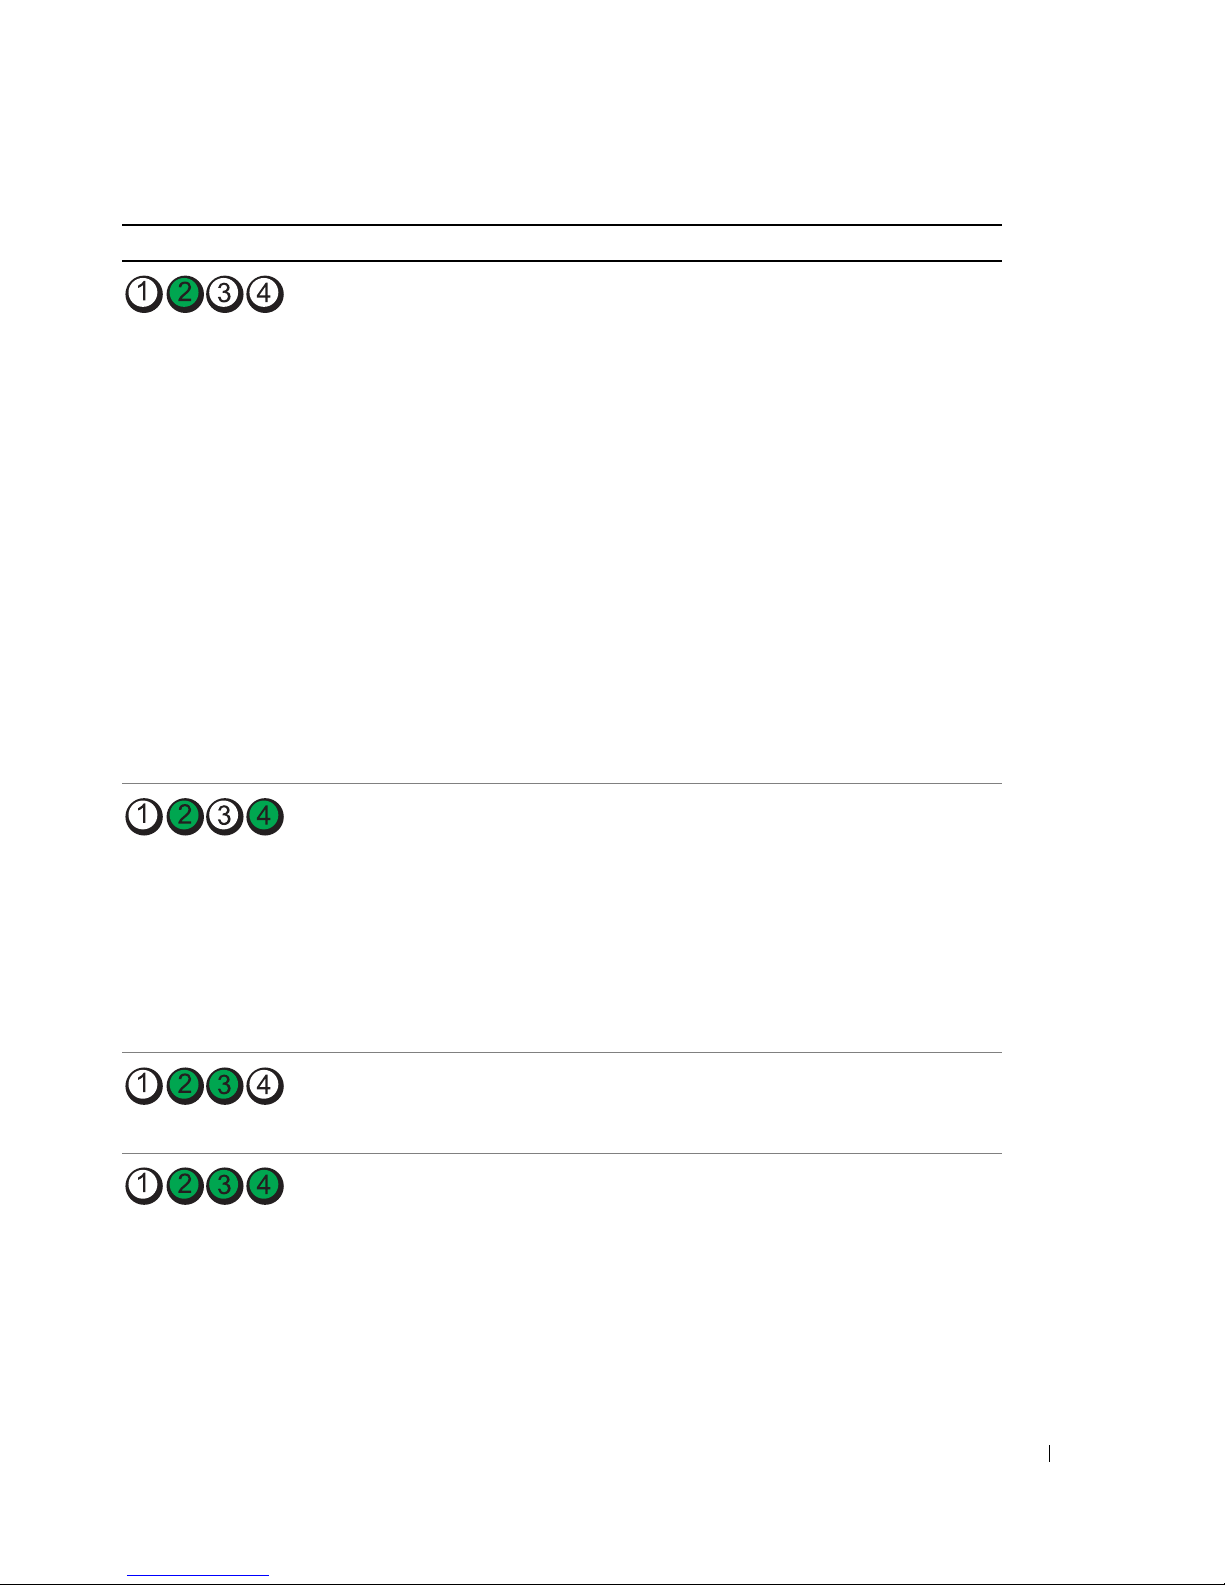
Light Pattern Problem Description Suggested Resolution
A possible expansion card failure has
occurred.
A possible graphics card failure has
occurred.
1
Determine if a conflict exists by
removing a card (not the graphics
card) and then restarting the
computer. For more information on
removing a card, see your
.
Guide
2
If the problem persists, reinstall the
User’s
card that you removed, remove a
different card, and then restart the
computer.
3
Repeat this process for each card. If
the computer starts normally,
troubleshoot the last card removed
from the computer for resource
conflicts (see"Resolving Software and
Hardware Incompatibilities" on
page 32).
4
If the problem persists, contact Dell.
For instructions on contacting Dell,
see your
User’s Guide
.
• If the computer has a graphics card,
remove the card, reinstall it, and then
restart the computer.
• If the problem still exists, install a
graphics card that you know works and
restart the computer.
• If the problem persists or the
computer has integrated graphics,
contact Dell. For instructions on
contacting Dell, see your
User’s Guide.
A possible floppy or hard drive failure
has occurred.
A possible USB failure has occurred. Reinstall all USB devices, check cable
Reseat all power and data cables and
restart the computer.
connections, and then restart the
computer.
Quick Reference Guide 39
Page 40
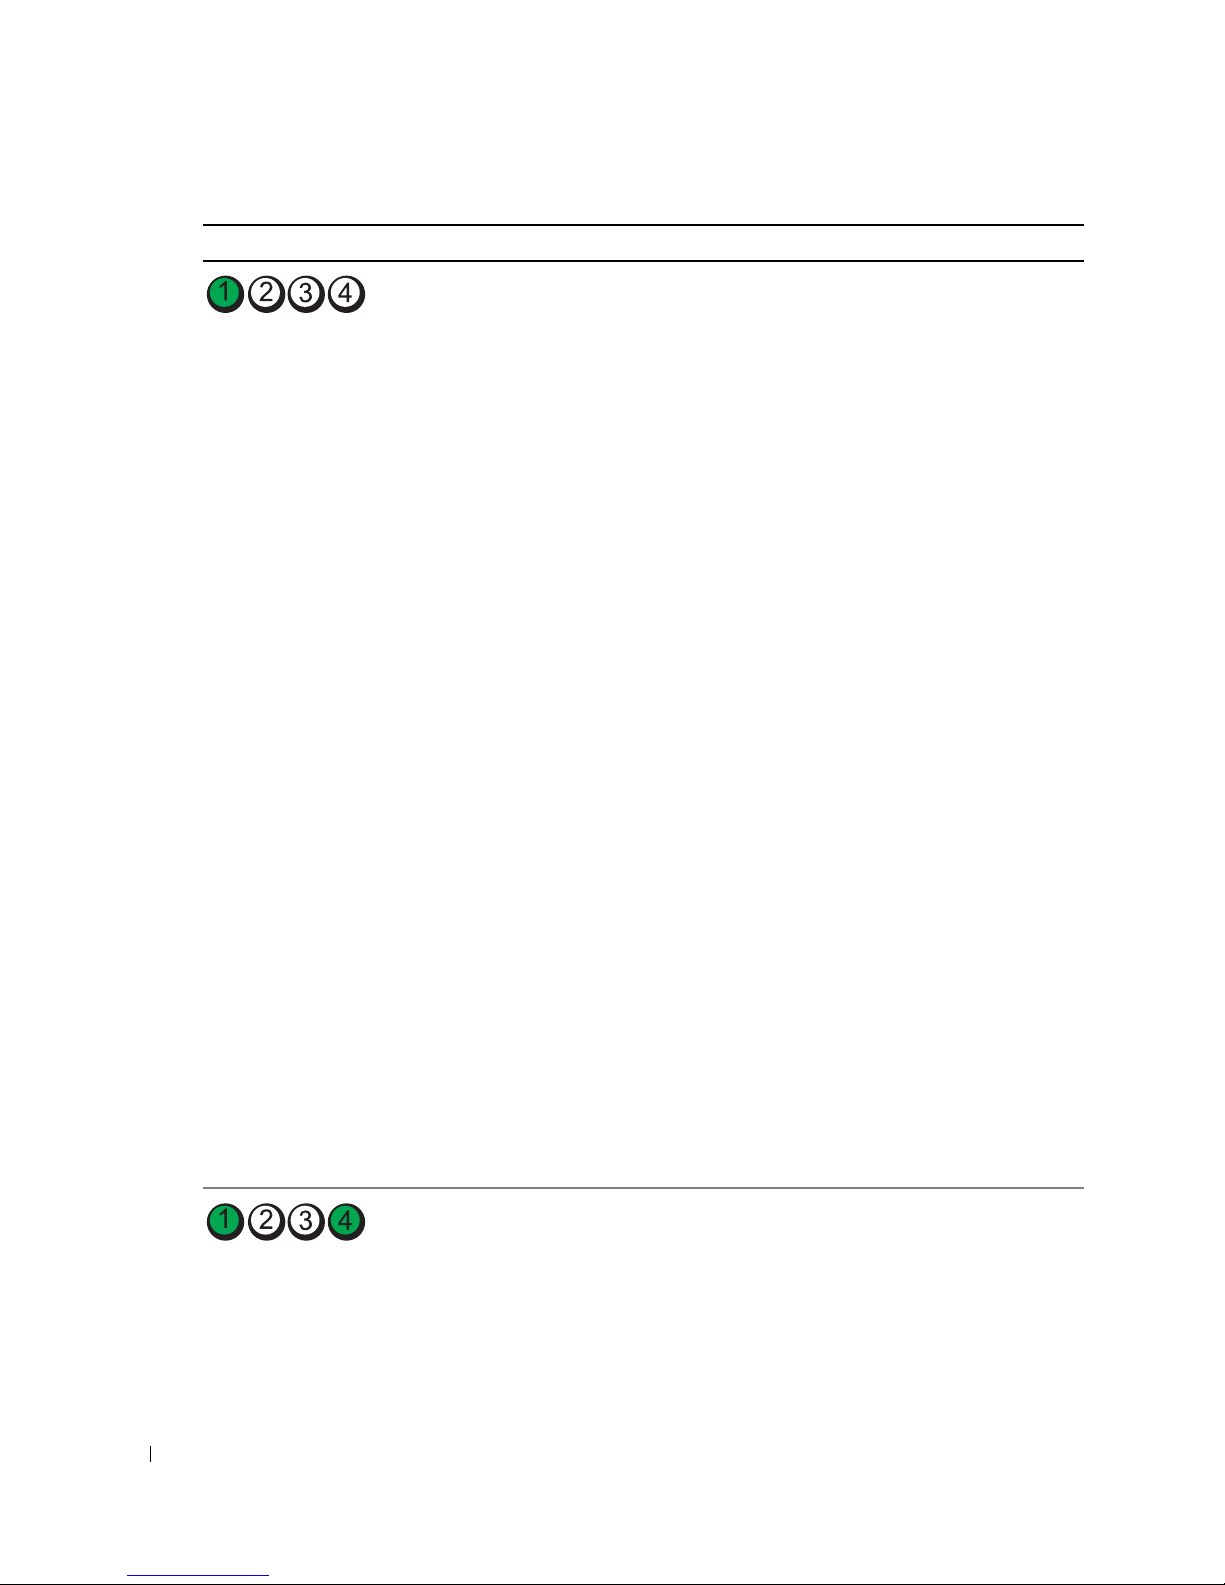
Light Pattern Problem Description Suggested Resolution
www.dell.com | support.dell.com
No memory modules are detected. 1
NOTE: If necessary, the computer can
operate in debug mode until new memory
modules are installed.
Reseat the memory modules to ensure
that your computer is successfully
communicating with the memory.
2
Restart the computer.
3
If the problem still exists, remove all
the memory modules and install one
memory module in memory module
connector 4.
4
Restart the computer.
The following message appears:
Alert! Operating in Debug
Mode. Please Populate
Memory in Pairs for Normal
Operation
5
Press <F1> to boot to the operating
.
system.
6
Run the Dell Diagnostics. See page 34
for instructions.
7
If the memory module passes, shut
down the computer, remove the
memory module, and then repeat the
process with the remaining memory
modules until a memory error occurs
during start-up or diagnostic testing.
If the first memory module tested is
defective, repeat the process with the
remaining modules to ensure that the
remaining modules are not defective.
8
When the defective memory module
is identified, contact Dell for a
replacement.For instructions on
contacting Dell, see your
User’s Guide.
System board failure has occurred. Contact Dell for technical assistance.
40 Quick Reference Guide
For instructions on contacting Dell, see
your User’s Guide.
Page 41
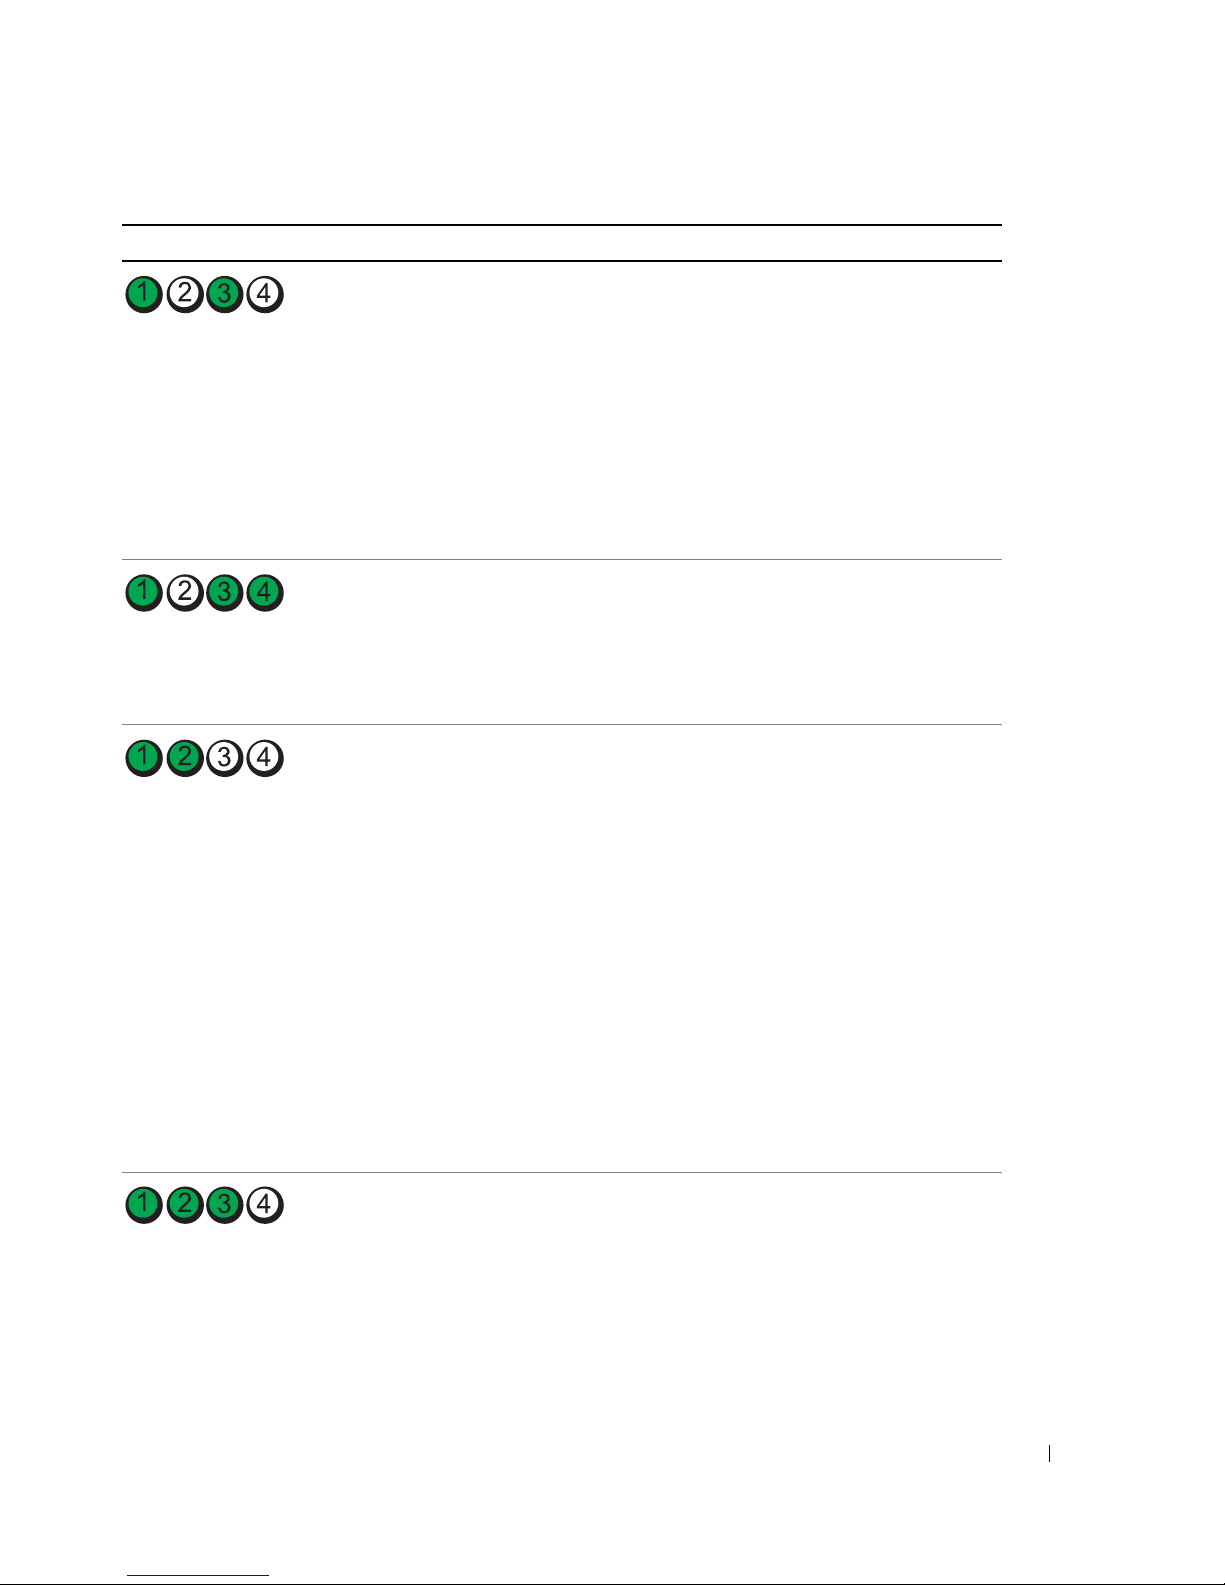
Light Pattern Problem Description Suggested Resolution
Memory modules are detected, but a
memory configuration or compatibility
error exists.
A possible system board resource and/or
hardware failure has occurred.
A possible expansion card failure has
occurred.
• Ensure that no special memory
module/memory connector placement
requirements exist.
• Verify that the memory modules that
you are installing are compatible with
your computer.
• Reinstall the memory modules and
restart the computer.
• If the problem persists, contact Dell.
For instructions on contacting Dell,
see your
User’s Guide.
• Perform the procedures in "Resolving
Software and Hardware
Incompatibilities" on page 32.
• If the problem persists, contact Dell.
For instructions on contacting Dell,
see your
1
Determine if a conflict exists by
User’s Guide.
removing a card (not a graphics card)
and restarting the computer.
2
If the problem persists, reinstall the
card that you removed, remove a
different card, and then restart the
computer.
3
Repeat this process for each card. If
the computer starts normally,
troubleshoot the last card removed
from the computer for resource
conflicts (see "Resolving Software and
Hardware Incompatibilities" on
page 32).
4
If the problem persists, contact Dell.
For instructions on contacting Dell,
see your
User’s Guide.
Another failure has occurred.
This pattern also displays when you enter
system setup and may not indicate a
problem.
• Ensure that the cables are properly
connected to the system board from
the hard drive, CD drive, and DVD
drive.
• If the problem persists, contact Dell.
For instructions on contacting Dell,
see your
User’s Guide.
Quick Reference Guide 41
Page 42

Light Pattern Problem Description Suggested Resolution
The computer is in a normal operating
condition after POST.
None.
NOTE: The diagnostic lights turn off after
a short time if the computer is in a normal
operating condition after POST.
Frequently Asked Questions
How Do I... Solution Where to Find Additional Information
Set up my computer to use two
www.dell.com | support.dell.com
monitors?
Connect my monitor when the
monitor cable connector doesn’t
seem to fit the connector on the
back of my computer?
If your computer has the required
graphics card to support dualmonitor setup, then look in your
shipping box for a Y-cable. The
Y-cable has a single connector on one
end (plug this connector into the
back panel) and branches into two
connectors (plug these connectors
into the monitor cables). For the
tower computer, see page 10 and for
the desktop computer, see page 15.
If your graphics card has a DVI
connector but your monitor has a
VGA connector, then you need to use
an adapter. An adapter should be
included in the shipping box.
See "Setting Up Your Computer
(Tower Orientation)" on page 9 or
"Setting Up Your Computer
(Desktop Orientation)" on page 14
for information on connecting dual
monitors to your computer.
See "Setting Up Your Computer
(Tower Orientation)" on page 9 or
"Setting Up Your Computer
(Desktop Orientation)" on page 14
for information on connecting
monitors to your computer. For more
information, contact Dell. For
information on contacting Dell, see
your User’s Guide.
Connect my speakers? If you have a sound card installed,
connect the speakers to the
connectors on the card. For the tower
computer, see page 13 and for the
desktop computer, see page 18.
42 Quick Reference Guide
See the documentation that came
with your speakers for more
information.
Page 43

How Do I... Solution Where to Find Additional Information
Find the right connectors for my
USB or IEEE 1394 devices?
Locate information about the
hardware and other technical
specifications for my computer?
Find documentation for my
computer?
Your tower computer has eight USB
connectors (two on the front, one
internal, and five on the back).
Your desktop computer has eight
USB connectors (two on the front,
one internal, and five on the back)
and an optional front IEEE 1394
connector. This connector is only
available if you purchased an IEEE
1394 card. To purchase a card,
contact Dell. For more information
on the IEEE 1394 card, see your
User’s Guide.
Yo u r User’s Guide has a
specifications table that provides
more detailed information about
your computer and the hardware. To
locate your User’s Guide, see
"Finding Information" on page 5.
The following documentation is
available for your computer:
• User’s Guide
• Product Information Guide
• System Information Label
To locate these documents, see
"Finding Information" on page 5.
See "About Your Computer" on
page 19 for illustrations of the front
and back views of your computer.
For help locating your User’s Guide,
see "Finding Information" on page 5.
Go to the Dell Support website at
support.dell.com and use one of the
following support tools: read white
papers on the latest technology or
communicate with other Dell users
at the Dell forum chat room.
If you lose your documentation, it is
available on the Dell Support website
at support.dell.com.
Quick Reference Guide 43
Page 44

www.dell.com | support.dell.com
44 Quick Reference Guide
Page 45

Index
B
beep codes, 36
C
cards
slots, 21, 24
computer
beep codes, 36
restore to previous state, 32
conflicts
software and hardware
incompatibilities, 32
connectors
headphone, 20, 23
IEEE, 20, 22
keyboard, 26
line-in, 26
line-out, 26
microphone, 26
mouse, 25
network adapter, 25
parallel, 25
power, 21, 24
serial, 26
sound, 26
USB, 20, 23, 26
D
Dell
support site, 7
Dell Diagnostics, 34
Dell Premier Support
website, 6-7
diagnostic lights, 37
diagnostics
beep codes, 36
Dell, 34
Drivers and Utilities CD, 5
lights, 20, 23, 37
documentation
device, 5
online, 7
Product Information Guide, 6
Quick Reference, 5
ResourceCD, 5
User’s Guide, 6
drivers
ResourceCD, 5
Drivers and Utilities CD, 5
E
error messages
beep codes, 36
diagnostic lights, 37
H
hard drive
activity light, 19-20, 22-23
hardware
beep codes, 36
conflicts, 32
Dell Diagnostics, 34
Hardware Troubleshooter, 32
headphone
connector, 20, 23
Help and Support Center, 7
I
IEEE
connectors, 20, 22
installing parts
turning off your computer, 30
IRQ conflicts, 32
K
keyboard
connector, 26
L
labels
Microsoft Windows, 6
Service Tag, 6
Index 45
Page 46

46 Index
lights
back of computer, 37
diagnostic, 20, 23, 37
hard-drive activity, 19-20,
22-23
link integrity, 25
network, 25
network activity, 25
power, 20, 23
M
microphone
connector, 26
Microsoft Windows label, 6
motherboard. See system
board
mouse
connector, 25
P
power
button, 20, 23
connector, 21, 24
light, 20, 23
problems
beep codes, 36
conflicts, 32
Dell Diagnostics, 34
diagnostic lights, 37
restore to previous state, 32
R
reinstalling
Drivers and Utilities CD, 5
ResourceCD, 5
ResourceCD
Dell Diagnostics, 34
T
troubleshooting
conflicts, 32
Dell Diagnostics, 34
diagnostic lights, 37
Hardware Troubleshooter, 32
Help and Support Center, 7
restore to previous state, 32
U
USB
connector, 26
connectors, 20, 23
User’s Guide, 6
V
voltage selection switch, 21,
24
N
network
connector, 25
O
Operating System
CD, 8
Installation Guide, 8
46 Index
S
safety instructions, 6
Service Tag, 6
software
conflicts, 32
sound connectors
line-in, 26
line-out, 26
system board, 28
System Restore, 32
W
warranty, 6
Windows XP
Hardware Troubleshooter, 32
Help and Support Center, 7
System Restore, 32
Page 47

Dell Precision™ Workstation 380
Hurtig referenceguide
Model DCTA
www.dell.com | support.dell.com
Page 48

Bemærkninger, meddelelser og advarsler
OBS! En OBS angiver vigtige oplysninger, som du kan bruge for at udnytte computeren optimalt.
BEMÆRK: En BEMÆRK angiver enten en mulig beskadigelse af hardware eller tab af data og oplyser dig om, hvordan
du kan undgå dette problem.
FORSIGTIG: En FORSIGTIG angiver mulig tingskade, legemsbeskadigelse eller død.
Forkortelser og akronymer
For en fuldstændig liste over forkortelser og akronymer, se Ordliste i
Brugervejledning
.
Hvis du købte en Dell™ n Series computer, er eventuelle referencer i dette dokument til Microsoft
operativsystemerne ikke gældende.
____________________
®
Windows®
Oplysningerne i dette dokument kan ændres uden varsel.
© 2005 Dell Inc. Alle rettigheder forbeholdes.
Enhver form for gengivelse uden skriftlig tilladelse fra Dell Inc. er strengt forbudt.
Anvendte varemærker i denne tekst: Dell, DELL- logoet og Dell Precision er varemærker, som tilhører Dell Inc.; Intel og Penti um er registrerede
varemærker, som tilhører Intel Corporation; Microsoft og Windows er registrerede varemærker, som tilhører Microsoft Corporation.
Andre varemærker og firmanavne kan være brugt i dette dokument til at henvise til enten de fysiske eller juridiske personer, som gør krav på
mærkerne og navnene, eller til deres produkter. Dell Inc. fraskriver sig enhver tingslig rettighed, for så vidt angår varemærker og firmanavne,
som ikke er deres egne.
Model DCTA
Maj 2005 P/N M8559 Rev. A01
Page 49

Indholdsfortegnelse
Sådan finder du information . . . . . . . . . . . . . . . . . . . . . . . . . . . 51
Opsætning af computeren (Tower-retning)
Opsætning af computeren (Desktop-retning)
Om computeren
Visning forfra (Tower-retning)
. . . . . . . . . . . . . . . . . . . . . . . . . . . . . . . . . 65
. . . . . . . . . . . . . . . . . . . . . . . 65
Visning bagfra (Tower-retning)
Visning forfra (Desktop-retning)
Visning bagfra (Desktop-retning)
Stik på bagpanelet
Indvendig visning
Systemkortkomponenter
. . . . . . . . . . . . . . . . . . . . . . . . . . . . . 70
. . . . . . . . . . . . . . . . . . . . . . . . . . . . . . 73
. . . . . . . . . . . . . . . . . . . . . . . . . . . . . 74
. . . . . . . . . . . . . . . . . . . 55
. . . . . . . . . . . . . . . . . . 60
. . . . . . . . . . . . . . . . . . . . . . . 67
. . . . . . . . . . . . . . . . . . . . . . 68
. . . . . . . . . . . . . . . . . . . . . . 70
Sådan finder du User’s Guide (Brugervejledning)
Fjernelse af computerdækslet
Pleje af computeren
Problemløsning
. . . . . . . . . . . . . . . . . . . . . . . . . . . . . . . 77
. . . . . . . . . . . . . . . . . . . . . . . . . . . . . . . . . 78
Tips til problemløsning
. . . . . . . . . . . . . . . . . . . . . . . . . . 76
. . . . . . . . . . . . . . . . . . . . . . . . . . . 78
Løsning af software- og hardwareinkompabilitet
®
Brug Microsoft
Windows® XP Systemgendannelse . . . . . . . . . . . 78
Brug af den sidst kendte gode installation
Dell Diagnostics (Dell diagnosticering)
Før du starter en test
. . . . . . . . . . . . . . . . . . . . . . . . . . . . 82
. . . . . . . . . . . . . . . . . . . 80
. . . . . . . . . . . . . . . . 75
. . . . . . . . . . . . . 78
. . . . . . . . . . . . . . . . . 80
Bip-koder
. . . . . . . . . . . . . . . . . . . . . . . . . . . . . . . . . . . . . 82
Fejlmeddelelser
Diagnoselys
. . . . . . . . . . . . . . . . . . . . . . . . . . . . . . . . . . . 84
Ofte stillede spørgsmål
Index . . . . . . . . . . . . . . . . . . . . . . . . . . . . . . . . . . . . . . . . . 91
. . . . . . . . . . . . . . . . . . . . . . . . . . . . . . . 83
. . . . . . . . . . . . . . . . . . . . . . . . . . . . . 89
Indholdsfortegnelse 49
Page 50

50 Indholdsfortegnelse
Page 51
Sådan finder du information
OBS! Nogle egenskaber vil måske ikke være tilgængelige i visse lande.
OBS! Yderligere information kan blive sendt med computeren.
Hvad søger du efter? Find det her
• Et diagnosticeringsprogram til computeren
• Drivere til computeren
• Dokumentation til computeren
• Dokumentationen til enheden
• Desktop System Software (DSS)
• Sådan konfigureres computeren
• Sådan plejes computeren
• Grundlæggende fejlfindingsinformation
• Sådan køres Dell Diagnostics (Dell Diagnosticering)
• Fejlkoder og diagnostiske lamper
• Sådan afmonteres og monteres dele
• Sådan åbnes computerdækslet
Cd'en Drivers and Utilities (Drivere og hjælpeværktøjer) (også
kendt som ResourceCD (Resurse-cd'en))
Dokumentationen og driverne er allerede installeret på
computeren. Du kan bruge cd'en til at genininstallere drivere,
køre "Dell Diagnostics (Dell diagnosticering)" på side 80 eller
få adgang til dokumentationen.
På cd'en kan der være
readme-filer (Vigtigt-filer),
som indeholder sidste
øjebliks-opdateringer om
tekniske ændringer eller
avanceret teknisk
referencemateriale til
teknikere eller erfarne
brugere.
BEMÆRK: Opdatering af drivere og dokumentation kan findes
på support.dell.com.
Quick Reference Guide (Hurtig referenceguide)
BEMÆRK: Dette dokument er tilgængeligt i PDF-format på
support.dell.com.
Hurtig referenceguide 51
Page 52
Hvad søger du efter? Find det her
• Garantioplysninger
• Handelsbetingelser (Kun USA)
• Sikkerhedsinstruktioner
• Kontrolinformation
• Ergonomi-information
• Licensaftale for slutbrugere
www.dell.com | support.dell.com
• Afmontering og udskiftning af dele
• Specifikationer
• Konfiguration af systemindstillinger
• Fejlfinding og løsning af problemer
Dell™ Product Information Guide
(Produktinformationsvejledning)
User’s Guide (Brugervejledning)
®
Microsoft
Windows® XP Help and Support Center (Hjælpe-
og supportcenter)
1
Klik på knappen
Start
og klik på
Help and Support
(Hjælp
og support).
2
Klik på
systeminformation) og klik på
User and system guides
(Brugervejledning og
User’s guides
(Brugerhåndbøger).
User’s Guide (Brugervejledning) kan også findes på cd'en
Drivers and Utilities
(Drivere og hjælpeværktøjer).
• Servicemærke og ekspresservicekode
• Microsoft Windows licensetiket
52 Hurtig referenceguide
Servicemærke og Microsoft® Windows® Licens
Disse mærkater findes på computeren.
• Anvend servicemærket til
at identificere
computeren, når du
bruger
support.dell.com
eller kontakter teknisk
support.
•Indtast
ekspreservicekoden for at
anvise opkaldet, når du
kontakter teknisk support.
Page 53

Hvad søger du efter? Find det her
• Løsninger — fejlfindingsoplysninger og tip, tekniske
artikler og onlinekurser, ofte stillede spørgsmål
• Kundeforum — online diskussion med andre Dellkunder
• Opgraderinger — Opgraderingoplysninger om
komponenter, f.eks. hukommelse, harddisken og
operativsystemet
• Kundepleje — Kontaktoplysninger, serviceopkald og
ordrestatus, garanti- og reparationsoplysninger
• Service og support — Status på serviceopkald og
supporthistorie, servicekontrakt, online diskussioner
med teknisk support
• Reference — Computer-dokumentation, detaljer om
min computerkonfiguration, produktspecifikationer og
hvidbøger
• Downloads — Godkendte drivere, programrettelser og
softwareopdateringer
• Desktop System Software (DSS) — Hvis du installerer
operativsystemet på computeren igen, bør du også
geninstallere DSS hjælpeprogram. DSS giver kritiske
opdateringer til operativsystemet og support til Dell™
3,5-tomme USB-diskettedrev, Intel
®
Pentium
®
M-processorer, optiske drev og USB-enheder. DSS er
nødvendigt for korrekt drift af Dell- computeren.
Softwaren opdager automatisk din computer og dit
styresystem og installerer de opdateringer, der passer til
din konfiguration.
Til download Desktop System-software
1
Gå til
support.dell.com
2
Indtast servicemærket eller produktmodellen.
3
I rullemenuen
klikkes på
4
Vælg operativsystem og operativsystemets sprog til
Download Category
All
(Alle).
computeren, og klik på
Valg af en enhed
Under
Configuration Utilities
konfigurationsværktøjer) og klikke på
System-software
, og klik på
Submit
, skal du rulle til
(System og
.
Downloads
.
(Downloadkategori)
(Send).
System and
Dell Desktop
Dell support-webside — support.dell.com
BEMÆRK: Vælg dit område for at se den relevante
supportside.
BEMÆRK: Kunder fra virksomheder, det offentlige og
uddannelsessystemet kan også bruge det tilpassede Dell
Premier Support websted på premier.support.dell.com. Det kan
forekomme, at hjemmesiden ikke er tilgængelig i alle områder.
Hurtig referenceguide 53
Page 54

Hvad søger du efter? Find det her
• Brug af Windows XP
• Dokumentation for min computer
• Dokumentation for enheder (f.eks. et modem)
• Geninstallation af operativsystemet
www.dell.com | support.dell.com
Windows Help and Support Center (Hjælp og supportcenter)
1
Klik på knappen
Start
, og klik på
Help and Support
(Hjælp
og support).
2
Skriv et ord eller en sætning, der beskriver problemet, og klik
på pileikonet.
3
Klik på det emne, der beskriver problemet.
4
Følg vejledningen på skærmen.
Cd'en Operating System ('Operativsystem)
Operativsystemet er allerede installeret på computeren. For
at geninstallere dit operativsystem, skal du bruge cd'en
Operating System (Operativsystem). Se User’s Guide
(Brugervejledning) for instruktioner.
Efter du har installeret
operativsystemet igen, skal
du bruge ekstraudstyret cd'en
Drivers and Utilities (Drivere
og hjælpeværktøjer) for at
geninstallere driverne til de
enheder, der blev leveret
sammen med computeren.
Operativsystemets
produktnøgle- etiket findes
på computeren.
BEMÆRK: Farven på din cd kan variere, afhængig af det
operativsystem, som du bestilte.
BEMÆRK: Cd'en Operating System (Operativsystem) er ekstra
og følger muligvis ikke med computeren.
• Sådan bruges Linux
• Udvekslinger via e-mail blandt brugere af Dell
Precision™-produkter og Linux-operativsystemet
• Yderligere oplysninger med hensyn til Linux og Dell
Precision-computeren
54 Hurtig referenceguide
Linux-sider, som understøttes af Dell
• Linux.dell.com
• Lists.us.dell.com/mailman/listinfo/linux-precision
Page 55
Opsætning af computeren (Tower-retning)
FORSIGTIG: Før udførelse af nogle af procedurerne i dette afsnit, skal sikkerhedsinstruktionerne i
Product Information Guide (Produktinformationsvejledning) følges.
Du skal fuldføre alle trin for at opsætte computeren korrekt.
1
Tilslut tastaturet og musen.
PS/2
eller
or
USB
PS/2
USB
2
Tilslut modem eller netværkskabel.
eller
or
BEMÆRK: Tilslut ikke et modemkabel til
netværksadapteren. Spænding fra
telefonkommunikation kan beskadige
netværksadapteren.
OBS! Hvis computeren har et netværkskort
installeret, tilsluttes netværkskablet til kortet.
Netværk
Network
Modem
Modem
Hurtig referenceguide 55
Page 56
3
Tilslut skærmen.
Afhængig af grafikkortet, kan
skærmen tilsluttes på
forskellige måder.
OBS! Det er muligvis
nødvendigt at bruge den
www.dell.com | support.dell.com
vedlagte adapter eller kabel
til at tilslutte skærmen til
computeren.
56 Hurtig referenceguide
Page 57
Til kort med mulighed for enkelt og dobbelt skærm med en enkelt konnektor
En VGA-adapter:
VGA
Brug VGA-adapteren, når du har et grafikkort til en enkelt
skærm, og du ønsker at tilslutte computeren til en
VGA-skærm.
Dobbelt VGA Y-kabeladapter:
VGA
VGA
Brug det rigtige Y- kabel, når grafikkortet har en enkelt
konnektor, og du ønsker at tilslutte computeren til en eller
to VGA-skærme.
Dobbelt DVI Y-kabeladapter:
DVI
DVI
Brug det rigtige Y-kabel, når grafikkortet har en enkelt
konnektor, og du ønsker at tilslutte computeren til en eller
to DVI-skærme.
Kablet til dobbelt-skærm er farvekodet; den blå konnektor er til hovedskærmen, og den sorte
konnektor er til den sekundære skærm. For at aktivere support af dobbelt-skærm, skal begge
skærme være tilsluttede til computeren, når du starter computeren.
Hurtig referenceguide 57
Page 58
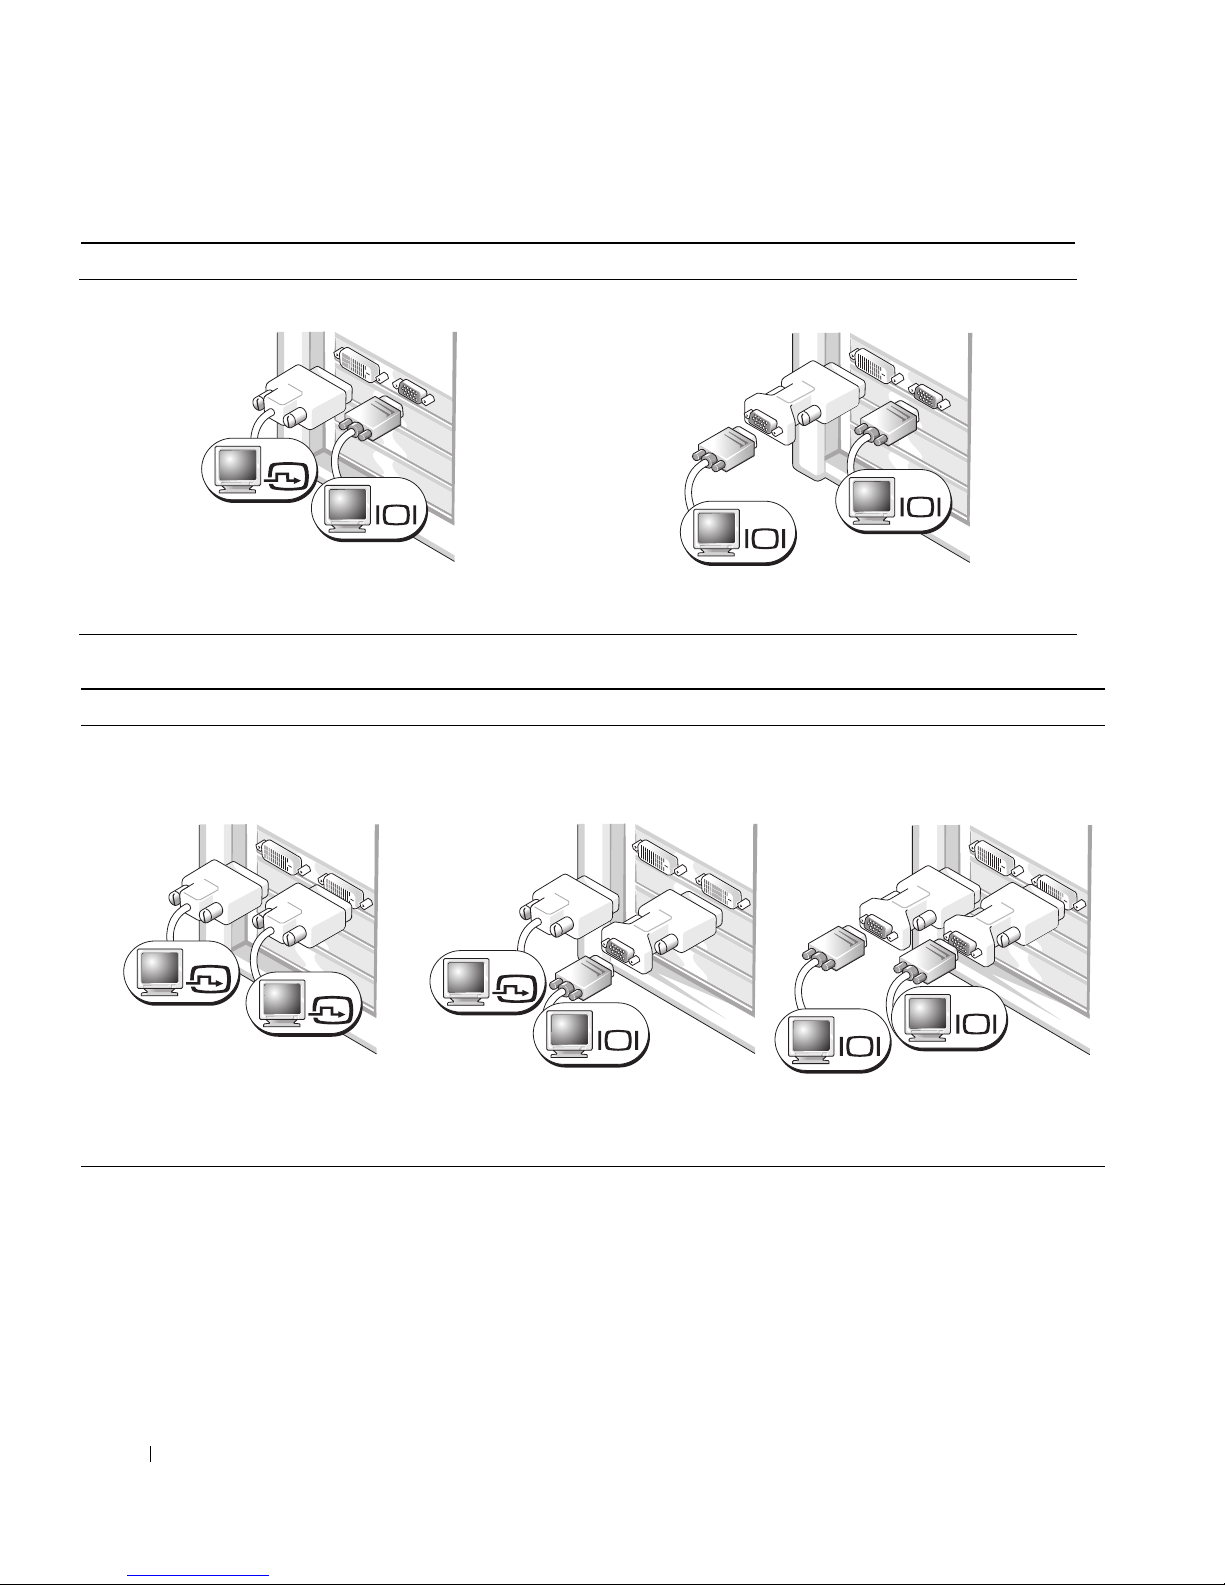
For kort med mulighed for dobbeltskærme med en DVI-konnektor og en VGA-konnektor
En DVI-konnektor og en VGA-konnektor:
DVI
VGA
www.dell.com | support.dell.com
Brug den/de rigtige konnektor(er), når du vil tilslutte
computeren til en eller to skærme.
For kort med mulighed for dobbeltskærm med to DVI-konnektorer
To DVI-konnektorer:
To DVI-konnektorer med en
VGA-adapter:
To VGA-konnektorer med en VGA-adapter:
VGA
VGA
Brug VGA-adapteren, når du vil tilslutte computeren til to
VGA-skærme.
To DVI-konnektorer med to
VGA-adaptere:
DVI
DVI
Brug DVI-konnektorerne til at tilslutte
computeren til en eller to DVI-skærme.
58 Hurtig referenceguide
DVI
VGA
Brug VGA-adapteren til at tilslutte en
VGA-skærm til en af
DVI-konnektorerne på computeren.
VGA
VGA
Brug to VGA-adaptere til at tilslutte to
VGA-skærme til DVI-konnektorerne på
computeren.
Page 59
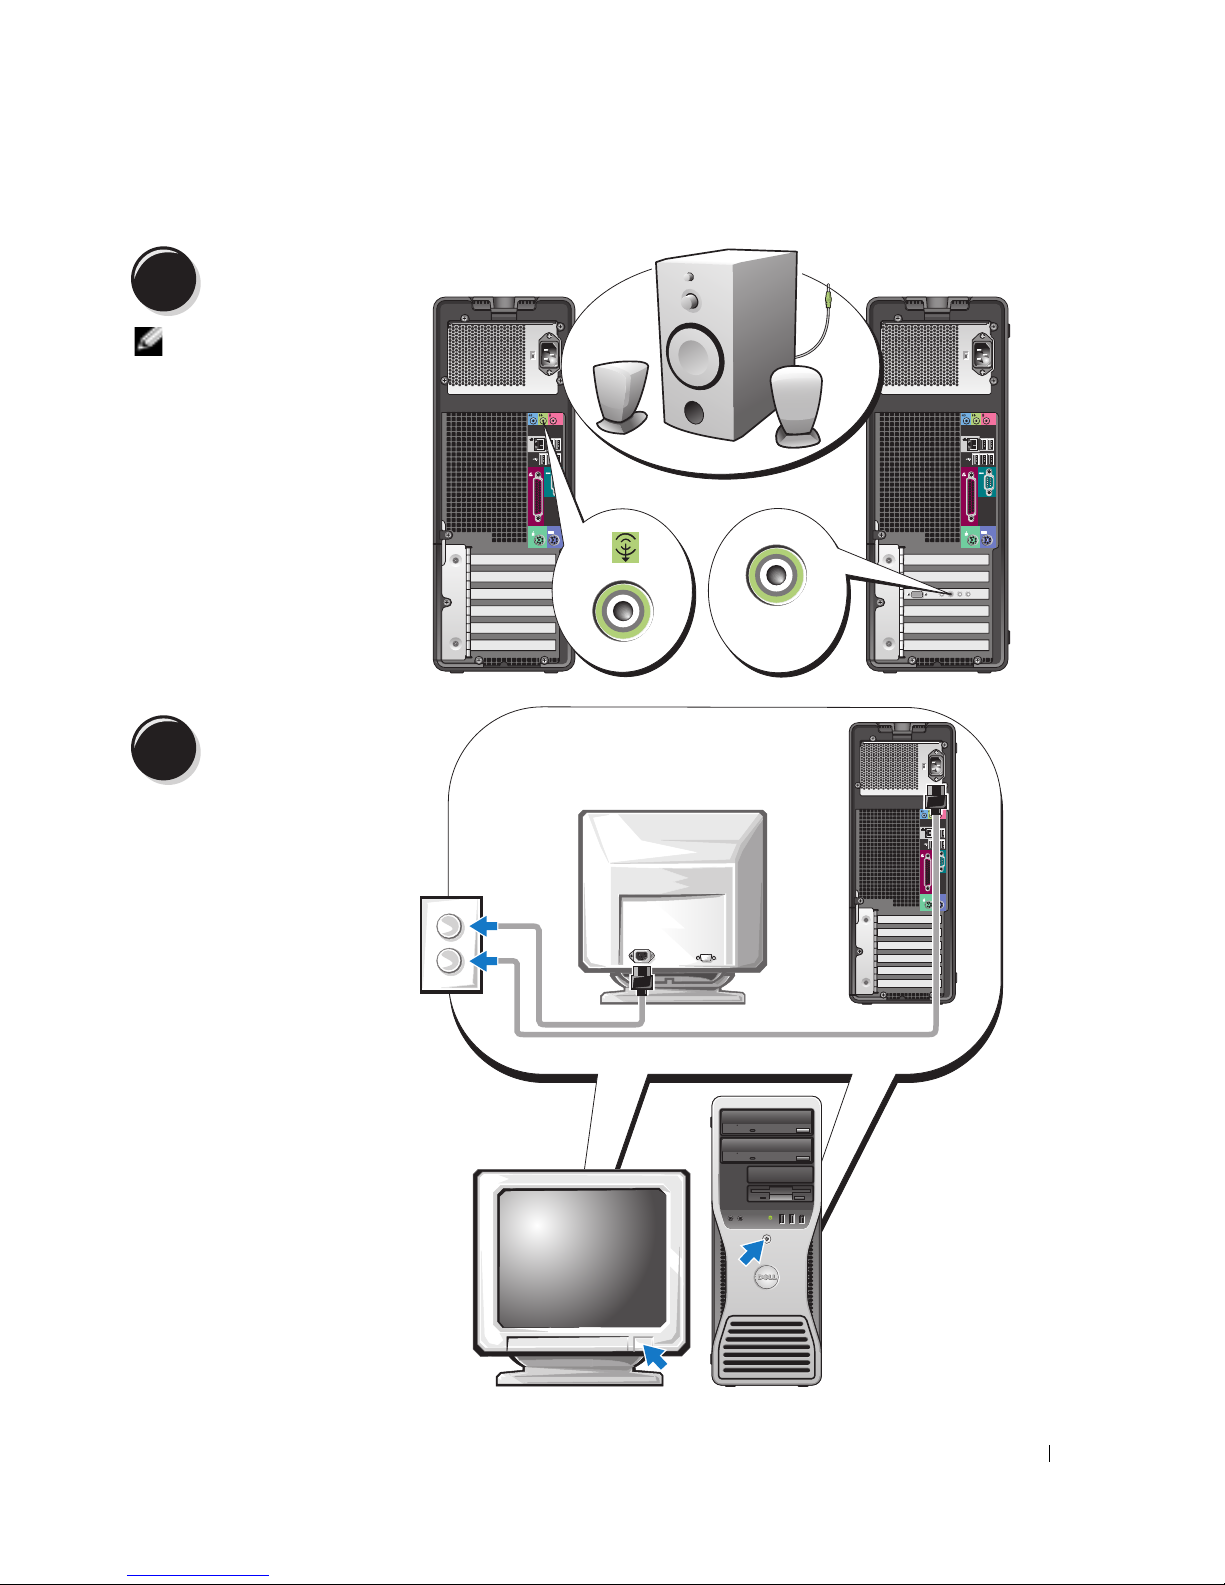
4
5
Tilslut højttalerne.
OBS! Hvis
computeren har et
lydkort installeret,
tilsluttes højttalerne til
kortet.
Tilslut strømkablerne,
og tænd for
computeren og
skærmen.
LINE OUT
1234
Hurtig referenceguide 59
Page 60
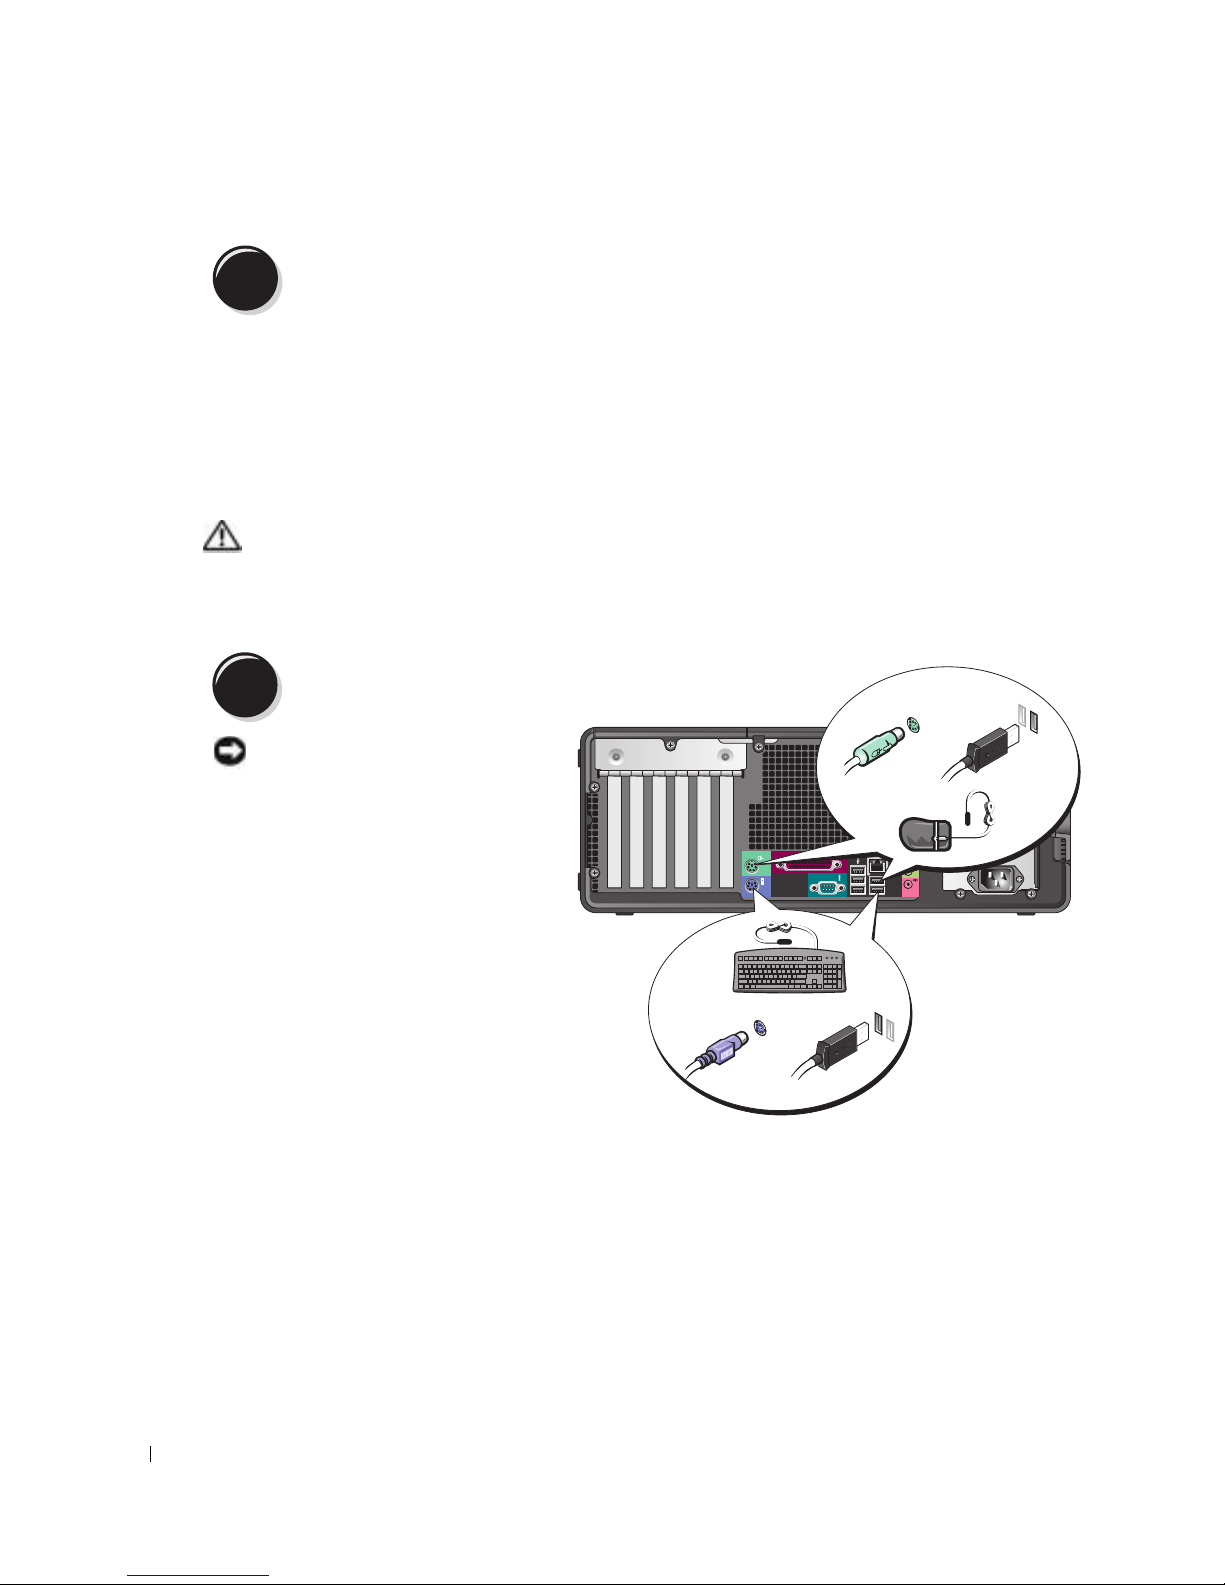
6
Installér yderligere software eller enheder.
Før du installerer nogle enheder eller software, som ikke fulgte med computeren, skal du læse den
dokumentation, der fulgte med enheden eller softwaren eller kontakte sælgeren for at kontrollere,
at enheden eller softwaren er kompatibel med computeren og operativsystemet.
Du har nu fuldført installationen af din tower-computer.
Opsætning af computeren (Desktop-retning)
www.dell.com | support.dell.com
FORSIGTIG: Før udførelse af nogle af procedurerne i dette afsnit, skal sikkerhedsinstruktionerne i
Product Information Guide (Produktinformationsvejledning) følges.
Du skal fuldføre alle trin for at opsætte computeren korrekt.
1
Tilslut tastaturet og musen.
BEMÆRK: Tilslut ikke et
modemkabel til
netværksadapteren.
Spænding fra
telefonkommunikation kan
beskadige
netværksadapteren.
PS/2
eller
or
USB
PS/2
eller
or
USB
60 Hurtig referenceguide
Page 61
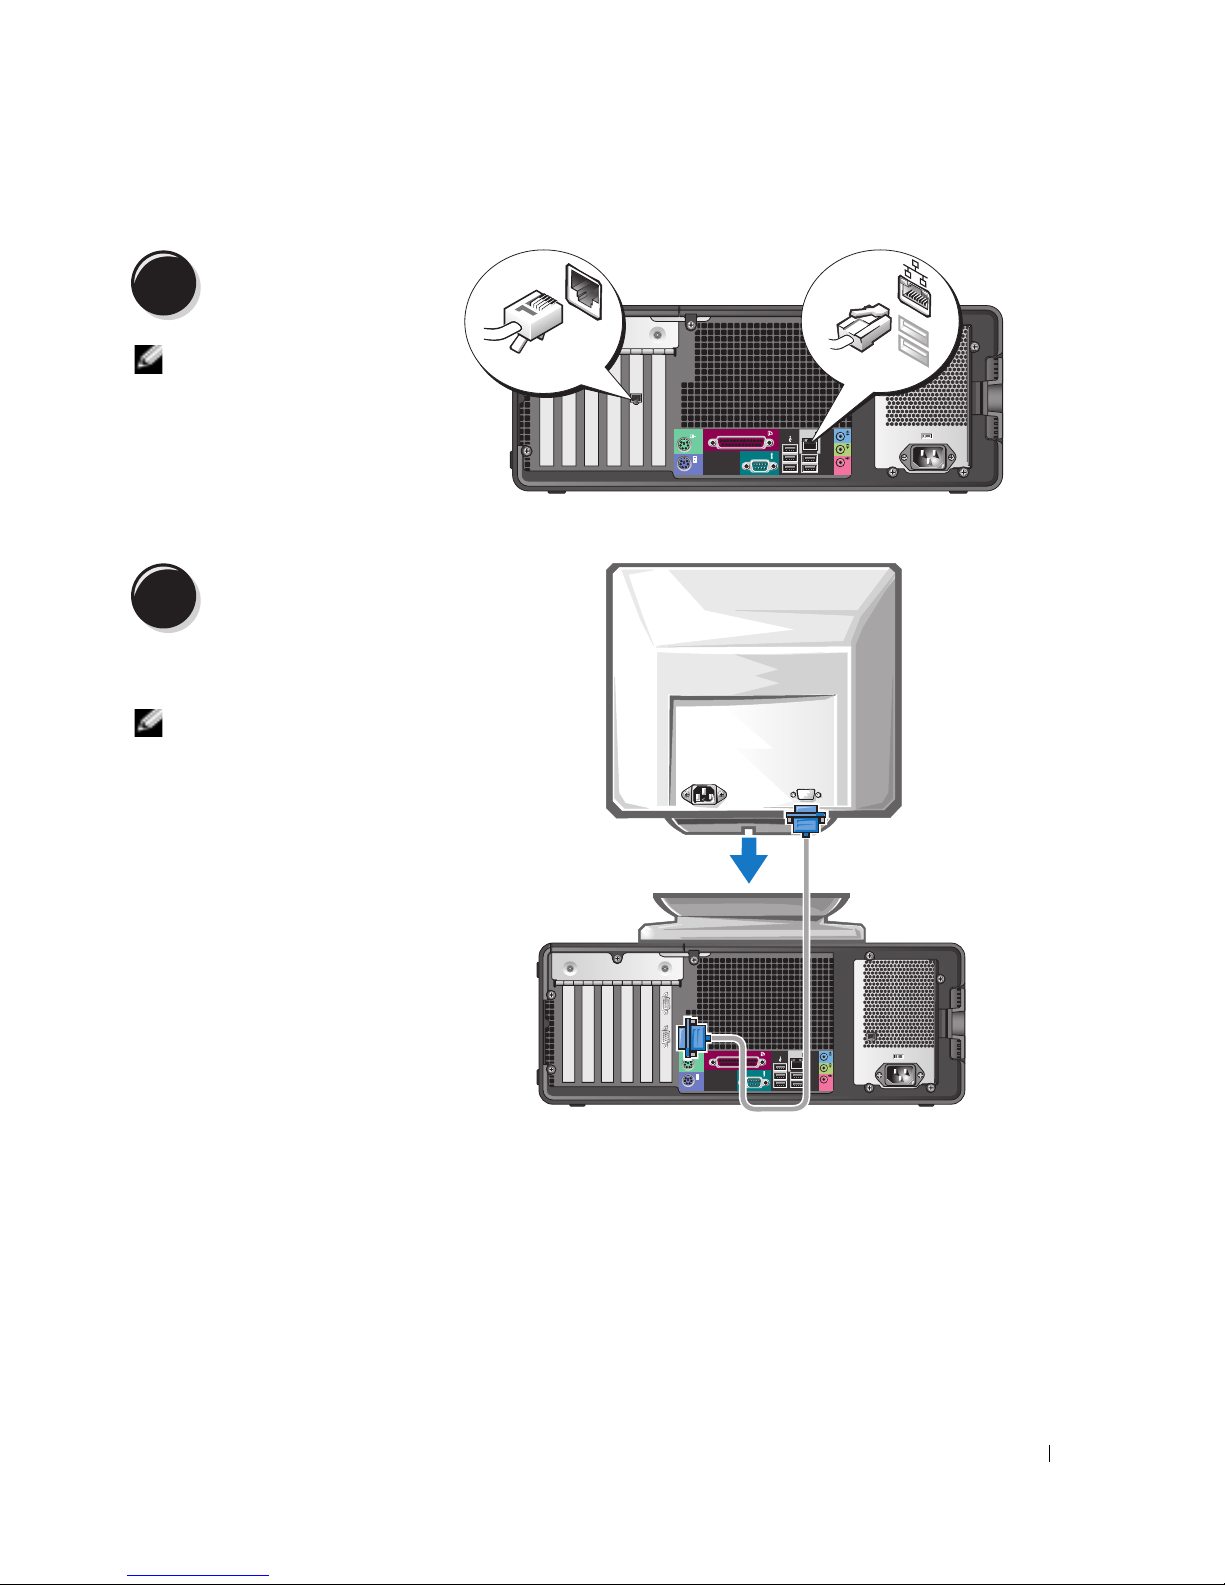
2
Tilslut modem eller
netværkskabel.
OBS! Hvis computeren har
et netværkskort installeret,
tilsluttes netværkskablet til
kortet.
3
Tilslut skærmen.
Afhængig af grafikkortet, kan skærmen
tilsluttes på forskellige måder.
OBS! Det er muligvis nødvendigt at
bruge den vedlagte adapter eller kabel
til at tilslutte skærmen til computeren.
Modem
Modem
Netværk
Network
Hurtig referenceguide 61
Page 62
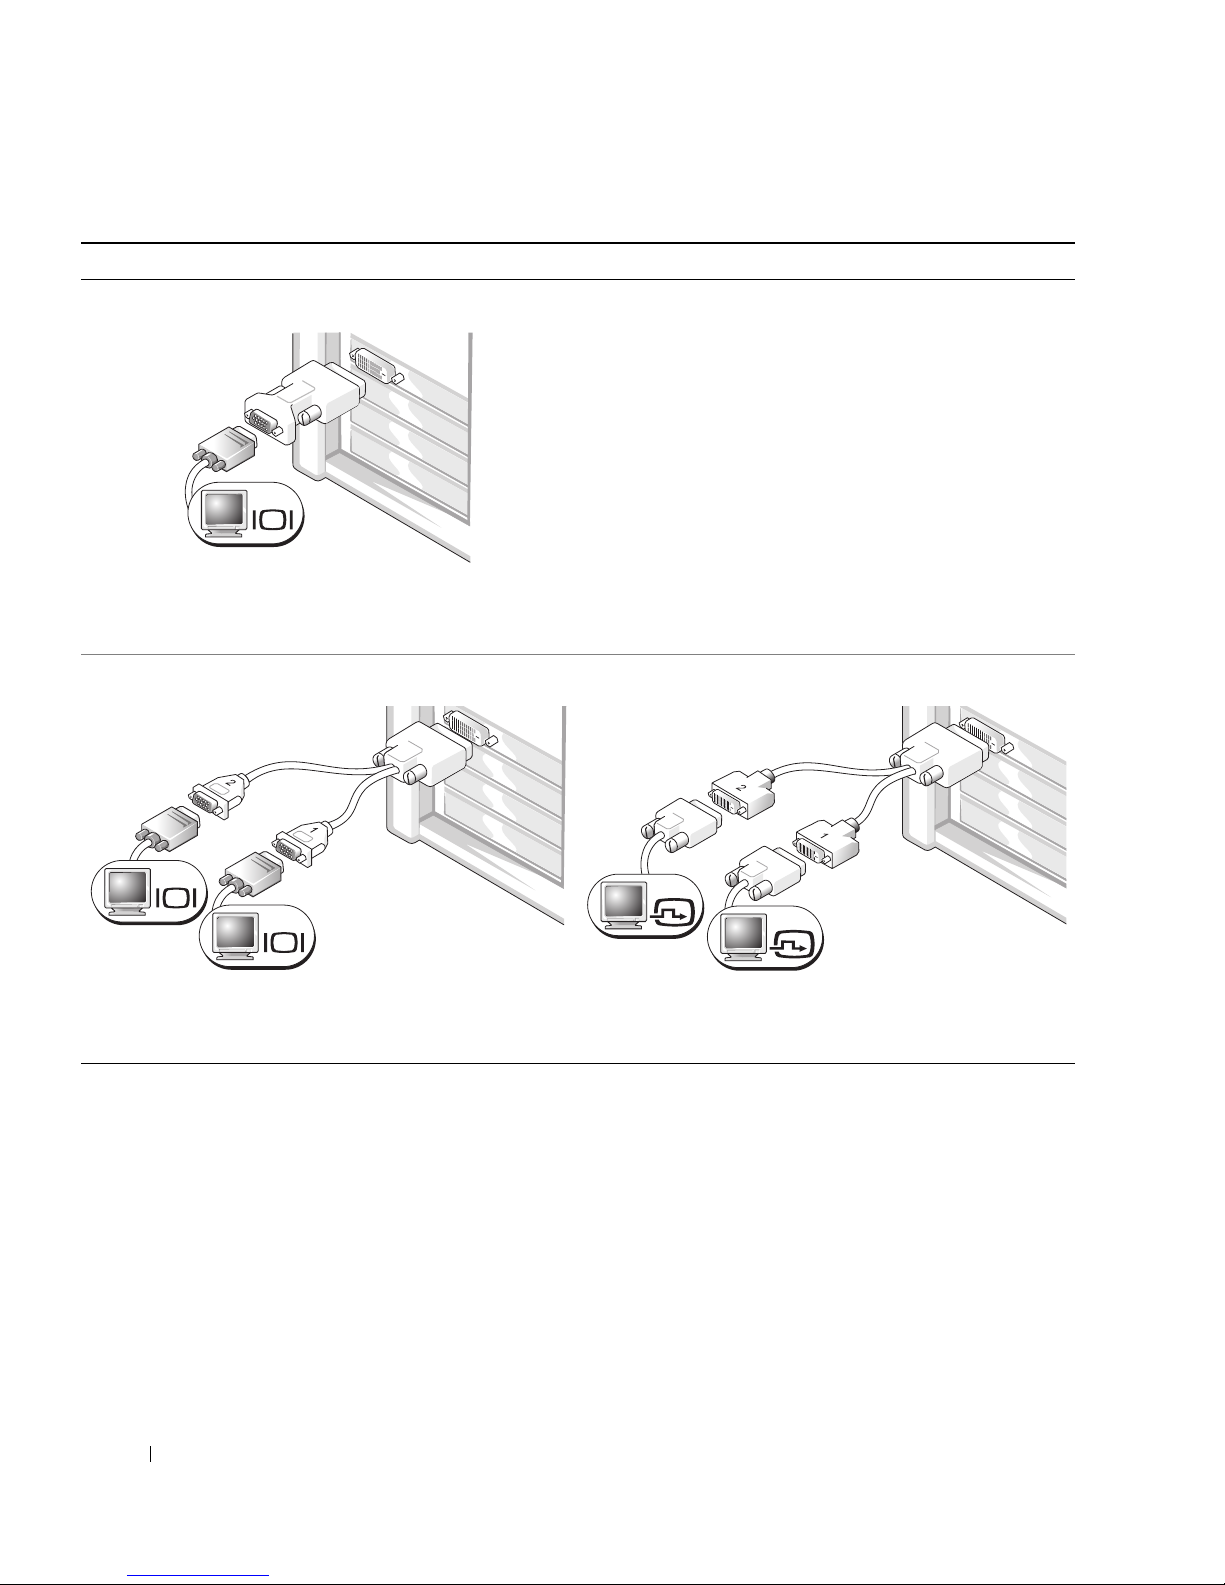
Til kort med mulighed for enkelt- og dobbeltskærm med en enkelt konnektor
VGA-adapter:
VGA
www.dell.com | support.dell.com
Brug VGA-adapteren, når du har et grafikkort til en enkelt
skærm, og du ønsker at tilslutte computeren til en
VGA-skærm.
Dobbelt VGA Y-kabeladapter:
VGA
VGA
Brug det rigtige Y-kabel, når grafikkortet har en enkelt
konnektor, og du ønsker at tilslutte computeren til en eller
to VGA-skærme.
Kablet til dobbeltskærmen er farvekodet; den blå konnektor er til hovedskærmen, og den sorte
konnektor er til den sekundære skærm. For at aktivere support til dobbelt-skærme, skal begge
skærme være tilsluttede til computeren, når du starter computeren.
Dobbelt DVI Y-kabeladapter:
DVI
DVI
Brug det rigtige Y-kabel, når grafikkortet har en enkelt
konnektor, og du ønsker at tilslutte computeren til en eller
to DVI-skærme.
62 Hurtig referenceguide
Page 63
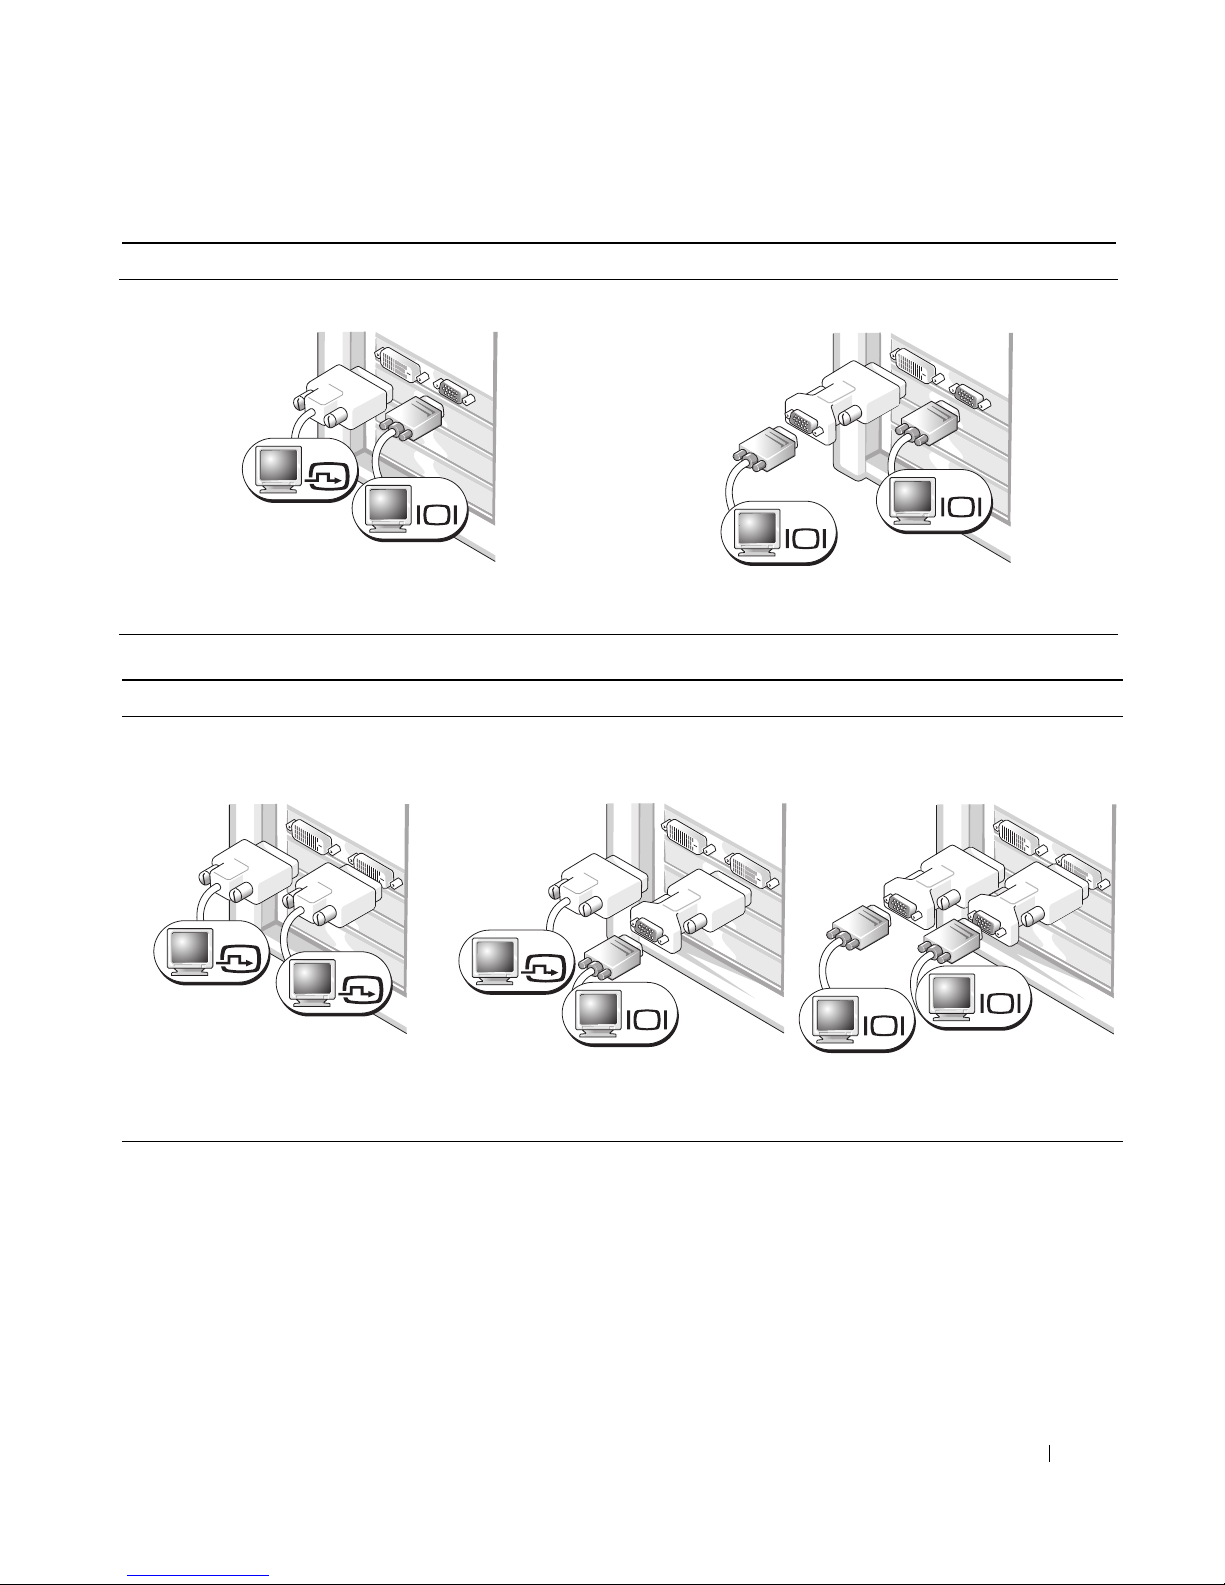
For kort med mulighed for dobbeltskærme med en DVI-konnektor og en VGA-konnektor
En DVI-konnektor og en VGA-konnektor:
DVI
VGA
Brug den/de rigtige konnektor(er), når du vil tilslutte
computeren til en eller to skærme.
To VGA-konnektorer med en VGA-adapter:
Brug VGA-adapteren, når du vil tilslutte computeren til to
VGA-skærme.
For kort med mulighed for dobbeltskærm med to DVI-konnektorer
To DVI-konnektorer:
To DVI-konnektor med en
VGA-adapter:
VGA
VGA
To DVI-konnektorer med to
VGA-adaptere:
DVI
DVI
Brug DVI-konnektor(erne) til at
tilslutte computeren til en eller to
DVI-skærme.
DVI
VGA
Brug VGA-adapteren til at tilslutte en
VGA-skærm til en af
DVI-konnektorerne på computeren.
VGA
VGA
Brug to VGA-adaptere til at tilslutte to
VGA-skærme til DVI-konnektorerne
på computeren.
Hurtig referenceguide 63
Page 64
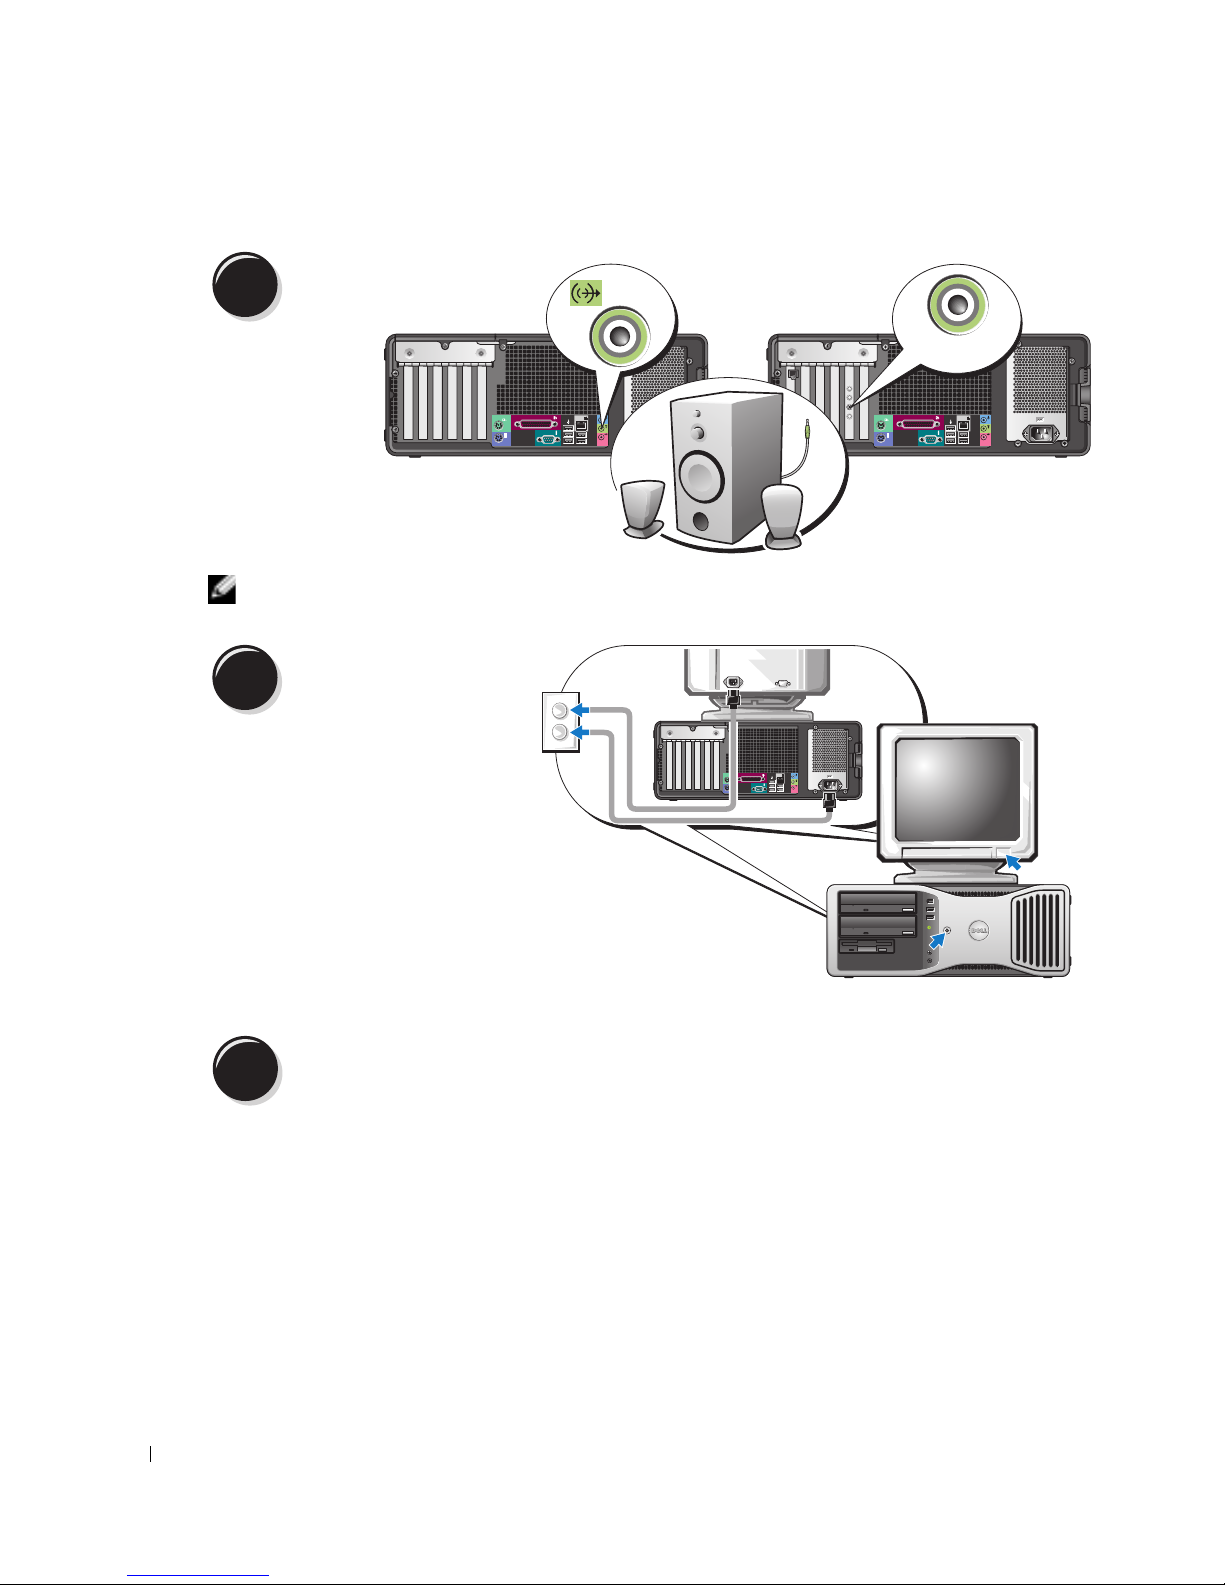
4
www.dell.com | support.dell.com
OBS! Hvis computeren har et lydkort installeret, tilsluttes højttalerne til kortet.
5
Tilslut højttalerne.
Tilslut strømkablerne, og
tænd for computeren og
skærmen.
Desktopcomputeren har en valgfri
IEEE 1394-konnektor på fronten.
Denne konnektor er kun
tilgængelig, hvis du købte et IEEE
1394-kort. Kontakt Dell for at
købe et kort. For instruktioner om
at tage kontakt med Dell og for
mere information om IEEE
1394-kortet, henvises til
Guide
(Brugervejledning).
User’s
LINE OUT
4
3
2
1
6
Installér yderligere software eller enheder.
Før du installerer nogle enheder eller software, som ikke fulgte med computeren, skal du læse den
dokumentation, der fulgte med enheden eller softwaren eller kontakte sælgeren for at kontrollere,
at enheden eller softwaren er kompatibel med computeren og operativsystemet.
Du har nu afsluttet opsætningen af din stationære computer.
64 Hurtig referenceguide
Page 65
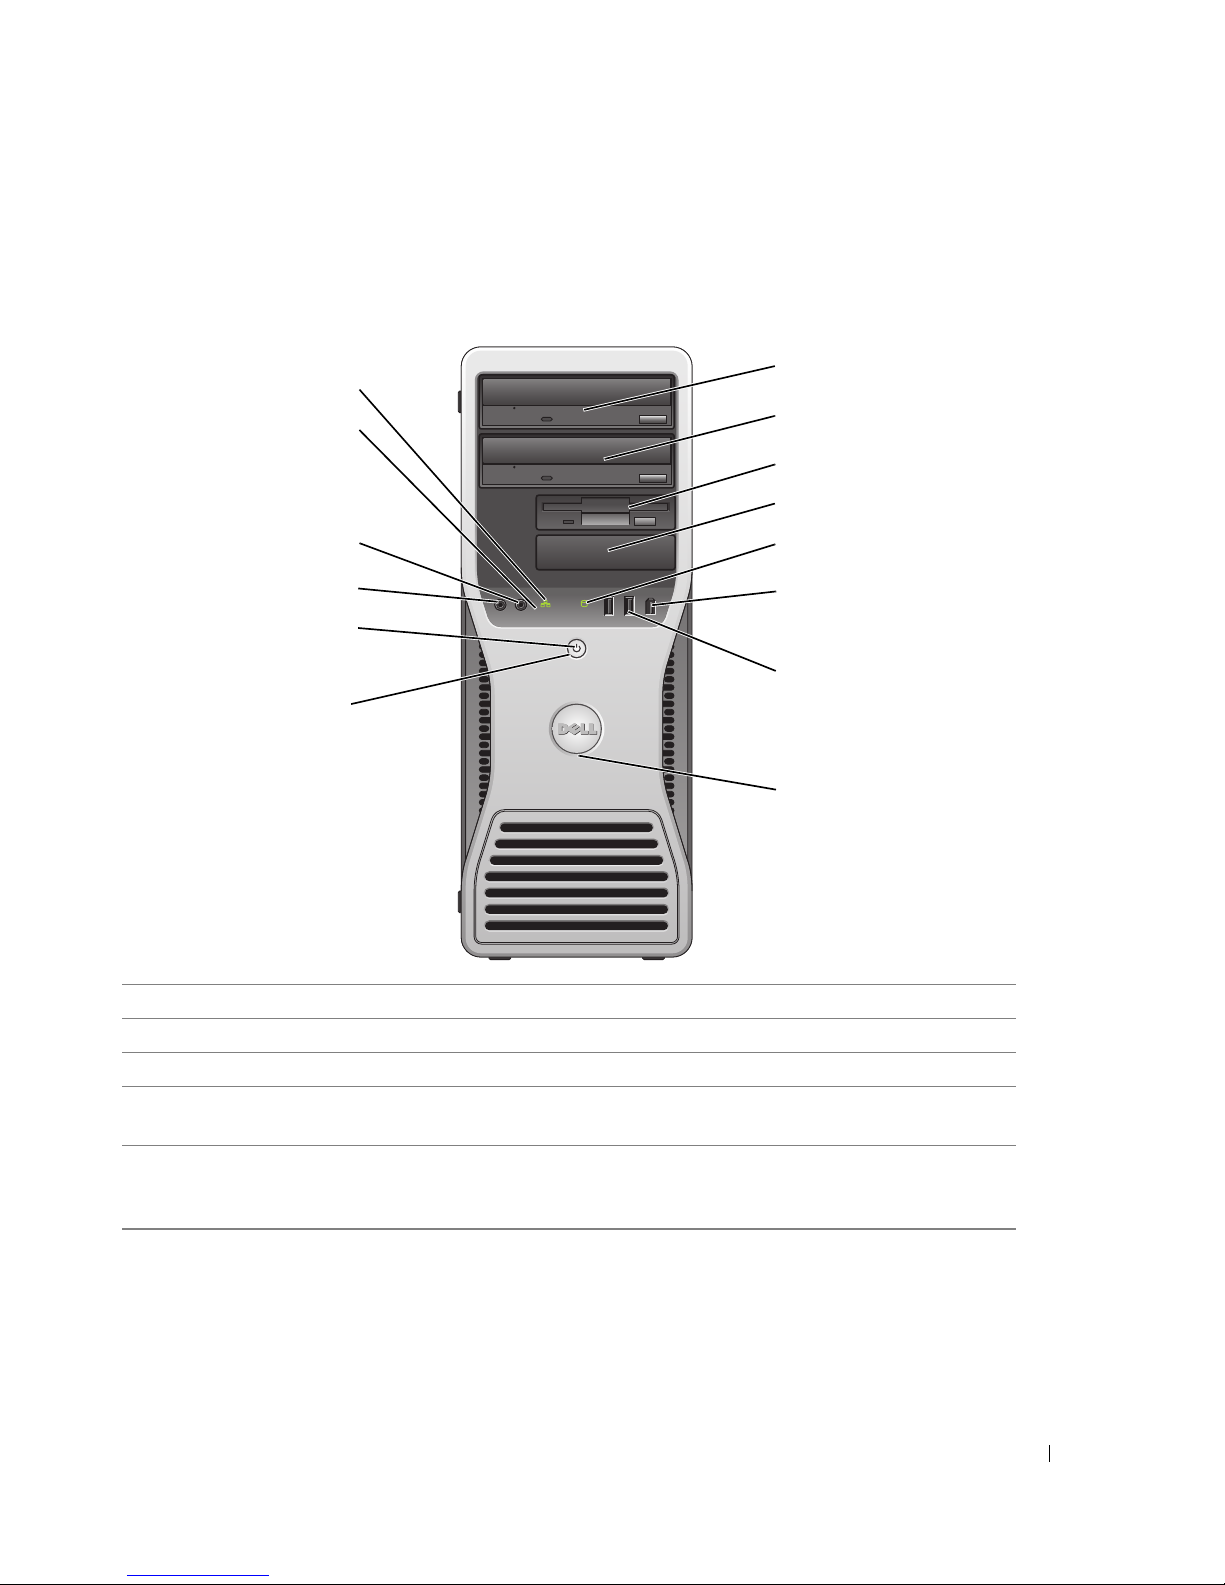
Om computeren
Visning forfra (Tower-retning)
14
13
1
2
3
4
12
11
1234
10
9
1 øverste 5,25-tomme drevbås Holder et CD/DVD-drev.
2 nederste 5,25-tomme drevbås Holder et CD/DVD-drev eller en ekstra tredje harddisk.
3 øverste 3,5-tomme drevbås Holder en ekstra fjerde harddisk (ATA-serie).
4 nederste 3,5-tomme drevbås Du kan bruge denne bås til et ekstra diskettedrev eller en ekstra
kortlæser.
5 harddiskaktivitetslys Harddisklyset tændes, når computeren læser data fra eller skriver
data til harddisken. Lyset er muligvis også tændt, når en enhed,
som f.eks. cd-afspilleren, er i brug.
5
6
7
8
Hurtig referenceguide 65
Page 66

6 IEEE 1394-konnektor
(ekstra)
7 USB 2.0-stik (2) Brug de forreste USB-stik til enheder, som du bruger af og til, som f.eks. flash
8 Dell™-drejeknaphak For at dreje skal du placere fingrene rundt om badgen, trykke den ind, og dreje den. Du
9 strømknap Tryk for at tænde computeren.
Brug de ekstra IEEE 1394-konnektorer til dataenheder med høj hastighed, som f.eks.
digitale videokameraer og eksterne lagerenheder.
memorynøgler eller kameraer eller for bootbare USB-enheder (se
mere information om booting til en USB-enhed).
Det anbefales, at du bruger USB-stikkene på bagsiden til enheder, som normalt
forbliver tilsluttede, som f.eks. printere og tastaturer.
kan også dreje badgen ved at bruge hakket, som kan findes tæt ved badgens bund.
systemopsætning
for
www.dell.com | support.dell.com
BEMÆRK: Brug ikke strømknappen til at slukke for computeren for at undgå tab af
data. Foretag i stedet en nedlukning af operativsystemet.
BEMÆRK: Strømknappen kan også bruges til at "vække" computeren eller til at sætte den
i strømsparefunktion. Se "Power Management (Strømstyring)" i User’s Guide
(Brugervejledning) for mere information.
10 strømlys Strømlyset tændes og blinker eller lyser konstant for at angive forskellige tilstande:
• Intet lys — Computeren er slukket.
• Konstant grønt — Computeren er i normal driftstilstand.
• Blinker grønt — Computeren står i strømsparefunktion.
• Blinker fast gult — Se "Power Problems" (Strømproblemer) i
(Brugervejledning).
For at forlade strømsparefunktionen skal du trykke på strømknappen eller bruge
tastaturet eller musen, hvis den er konfigureret til at vække enheden i Windows
enhedsstyring. For mere information om strømsparefunktion og om at forlade
strømsparefunktionen, se "Power Management" (Strømstyring) i User’s Guide
(Brugervejledning)
Se "Diagnoselys" på side 84 for en beskrivelse af lyskoderne, som kan hjælpe dig med at
fejlfinde problemer med computeren.
11 mikrofonstik Brug mikrofonstikket til at tilslutte en mikrofon til pc til stemme- eller musikoptagelse
i et lyd- eller telefoniprogram.
12 hovedtelefonstik Brug hovedtelefonstikket til at tilslutte hovedtelefonerne.
13 diagnostiske lys (4) Brug lysene til at hjælpe dig med at fejlfinde computerproblemer, baseret på den
diagnostiske kode. For mere information, se "Diagnoselys" på side 84.
14 netværkslinklys Netværksblinklyset tændes, når der er en god forbindelse mellem et 10-Mbps,
100-Mbps, eller 1000-Mbps (eller 1-Gbps)-netværk og computeren.
.
User’s Guide
66 Hurtig referenceguide
Page 67
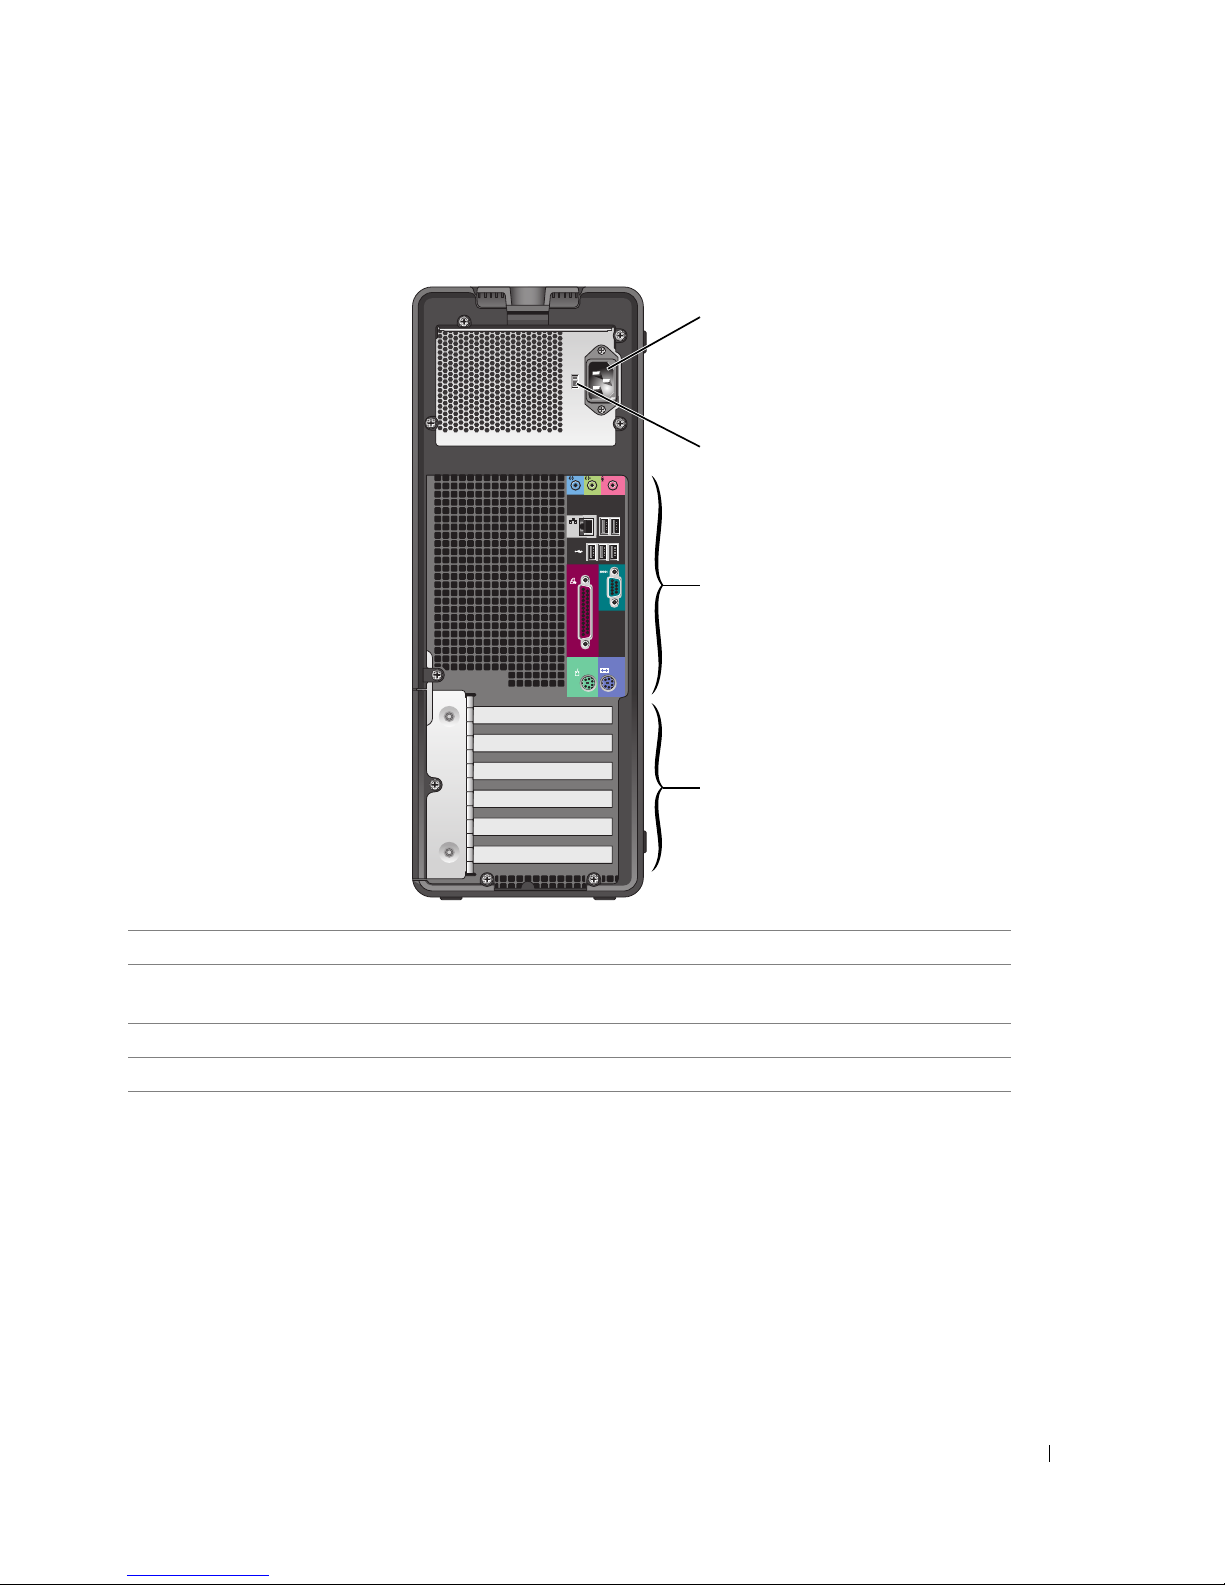
Visning bagfra (Tower-retning)
1
2
3
4
1 strømstik Sæt strømkablet i dette stik.
2 spændingsomskifter Se sikkerhedsinstruktioner i Product Information Guide
(Produktinformationsvejledning) for mere information.
3 stik på bagpanelet Tilslut serielle, USB-stik og andre enheder i det tilsvarende stik.
4 kortslot Få adgang til konnektorer til alle installerede PCI- eller PCI Expres-kort.
Hurtig referenceguide 67
Page 68
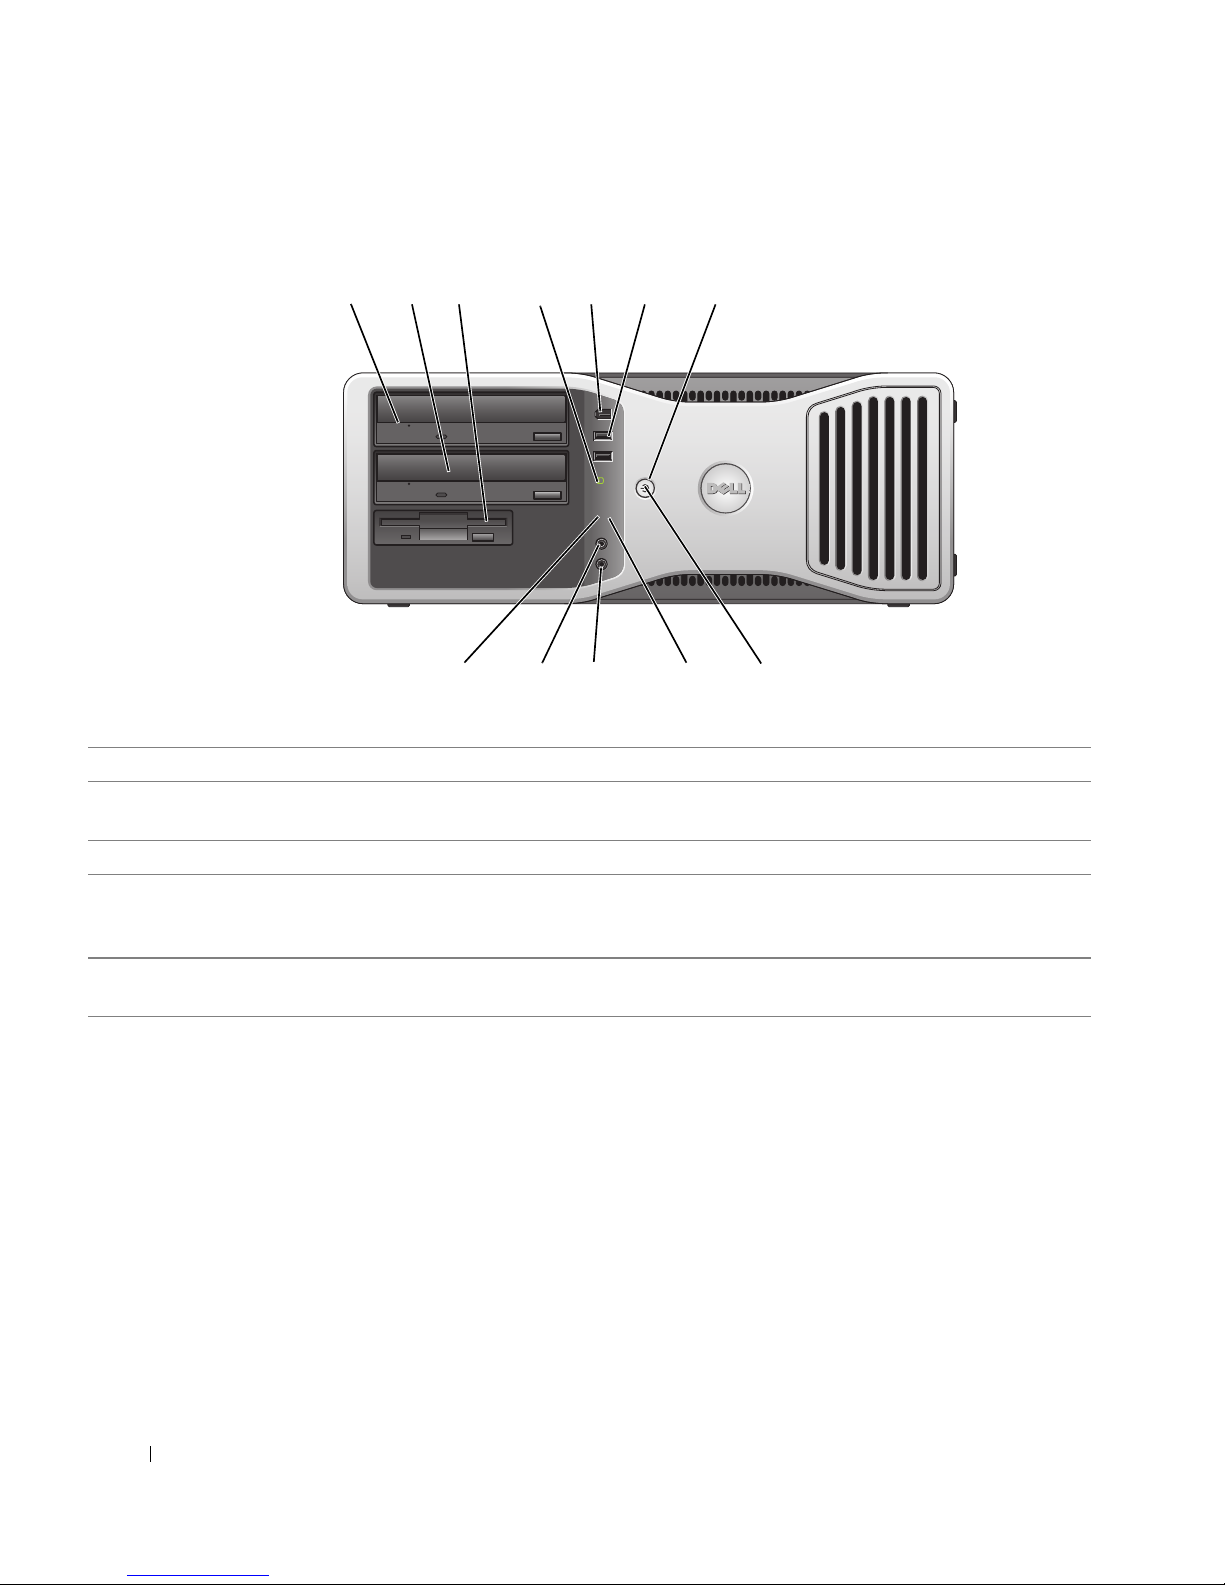
Visning forfra (Desktop-retning)
1 2 7
www.dell.com | support.dell.com
3
5 6
4
4
3
2
1
9101112
8
1 øverste 5,25-tomme drevbås Denne bås holder et CD/DVD-drev.
2 nederste 5,25-tomme drevbås Denne bås holder et ekstra CD/DVD-drev eller en ekstra tredje harddisk
(ATA-serie eller SCSI).
3 3,5-tomme drevbås Du kan bruge denne bås til et diskettedrev eller en ekstra kortlæser.
4 harddiskaktivitetslys Hard diskaktivitets lyset er tændt, når computeren læser data fra eller skriver
data til harddisken. Lyset er muligvis også tændt, når en enhed, som f.eks.
cd-afspilleren, er i brug.
5 IEEE 1394-stik (ekstra) Brug de ekstra IEEE 1394-stik til dataenheder med høj hastighed, som f.eks.
digitale videokameraer og eksterne lagerenheder.
68 Hurtig referenceguide
Page 69
6 USB 2.0-stik (2) Brug de forreste USB-stik for enheder, som du bruger af og til, som f.eks. flash
memorynøgler eller kameraer eller til bootbare USB-enheder (se
systemopsætning
Det anbefales, at du bruger USB-stikkene på bagsiden til enheder, som normalt
forbliver tilsluttede, som f.eks. printere og tastaturer.
7 strømknap Tryk for at tænde computeren.
for mere information om at boote til en USB-enhed).
BEMÆRK: Strømknappen kan også bruges til at "vække" computeren eller til at
sætte den i strømsparefunktion. Se "Power Management" (Strømstyring) for mere
information.
BEMÆRK: Brug ikke strømknappen til at slukke for computeren for at undgå
tab af data. Foretag i stedet en nedlukning af operativsystemet.
8 strømlys Strømlyset tænder og blinker eller lyser konstant for at angive forskellige
tilstande:
• Intet lys — Computeren er slukket.
• Konstant grønt — Computeren er i normal driftstilstand.
• Blinkende grønt lys — Computeren er i strømsparefunktion.
• Blinkende eller fast gult lys — Se "Power Problems" (Strømproblemer).
For at forlade strømsparefunktionen skal du trykke på knappen eller bruge
tastaturet eller musen, hvis den er konfigureret til at "vække" enheden i
Windows enhedsstyring. For mere information om "sove"-funktioner, og om
hvordan du forlader strømsparefunktionen, se "Power Management"
(Strømstyring).
Se "Diagnoselys" på side 84 for en beskrivelse af lyskoderne, som kan hjælpe dig
med at fejlfinde problemer med computeren.
9 diagnostiske lys (4) Brug lysene til at hjælpe dig med at fejlfinde computerproblemer, baseret på den
diagnostiske kode. For mere information, se "Diagnoselys" på side 84.
10 mikrofonstik Brug mikrofonstikket til at tilslutte en mikrofon til pc til stemme- eller
musikoptagelse i et lyd- eller telefoniprogram.
11 hovedtelefonstik Brug hovedtelefonkonstikket til at tilslutte hovedtelefonerne.
12 netværkslinklys Netværkslyset er tændt, når der er en god forbindelse mellem et 10-Mbps,
100-Mbps eller 1000-Mbps (eller 1-Gbps)-netværk og computeren.
Hurtig referenceguide 69
Page 70
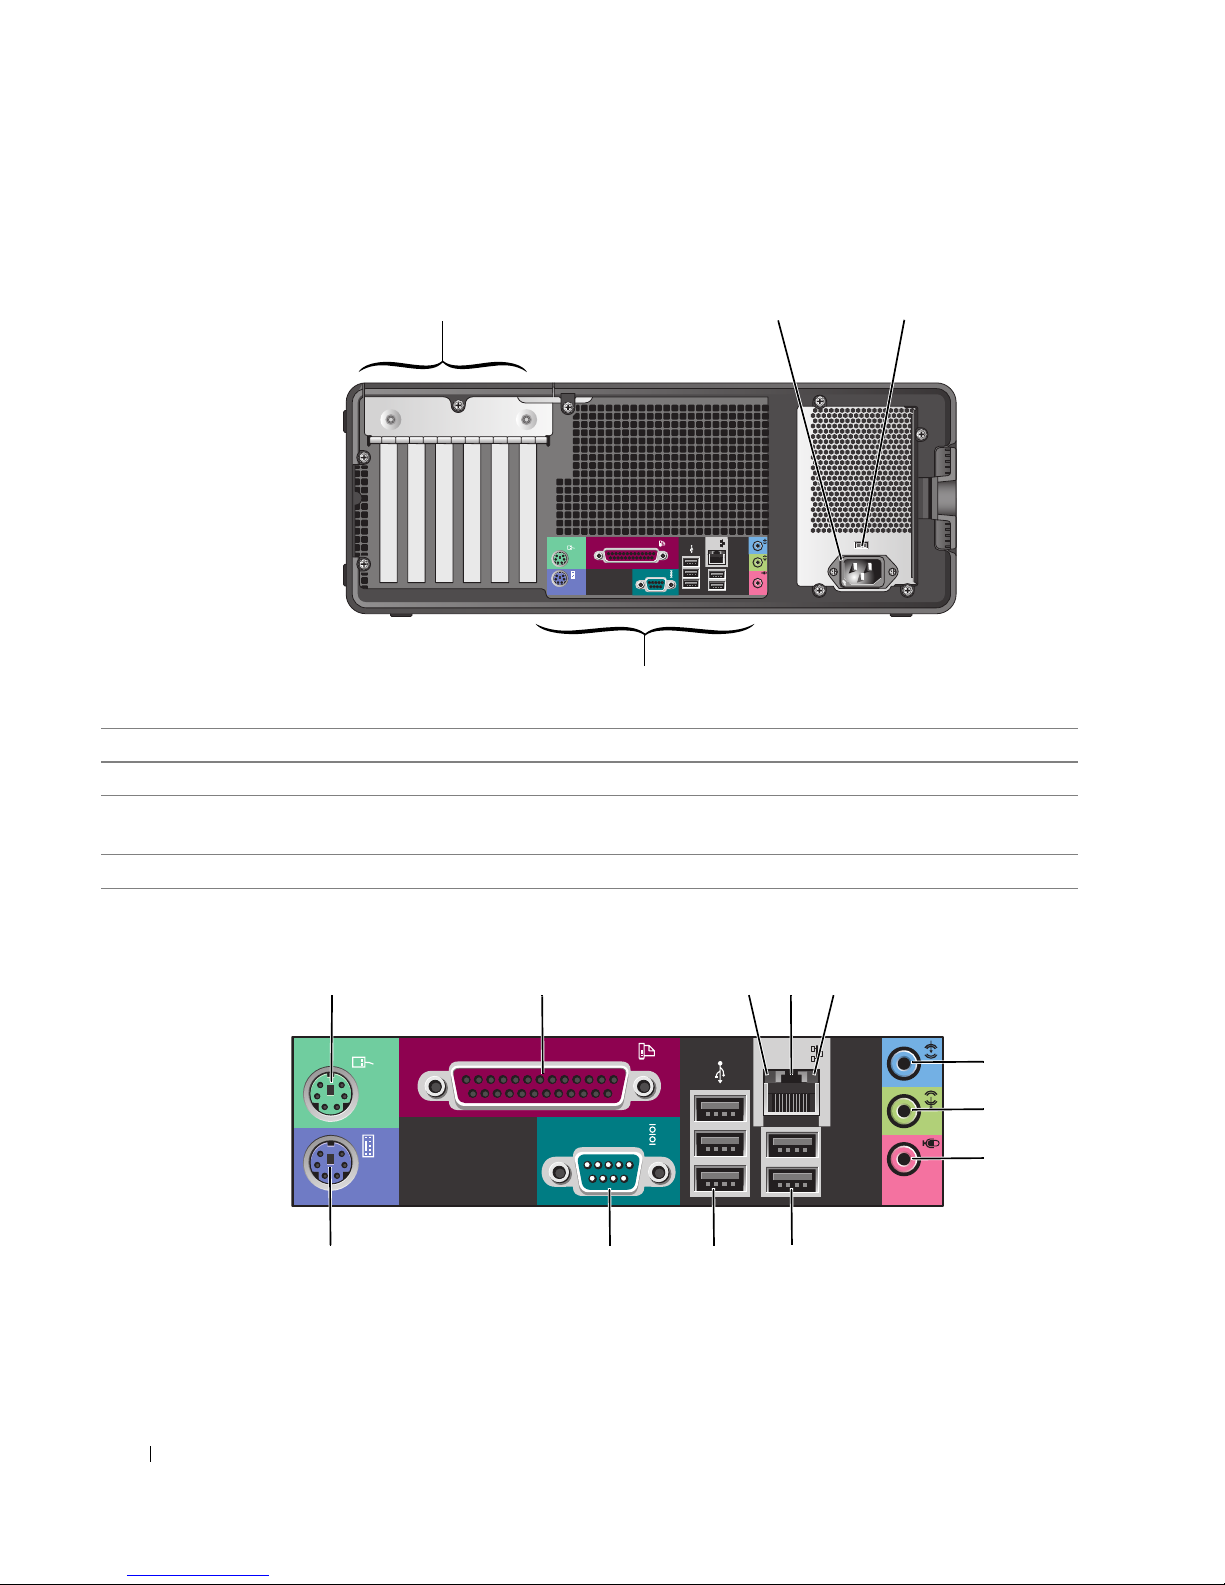
Visning bagfra (Desktop-retning)
1
www.dell.com | support.dell.com
4
1 kortslot Få adgang til stik til alle installerede PCI- eller PCI Expres-kort.
2 strømstik Sæt strømkablet i dette stik.
3 spændingsomskifter Se sikkerhedsinstruktioner i Product Information Guide
(Produktinformationsvejledning) for mere information.
4 stik på bagpanelet Tilslut serielle, USB- og andre enheder i det tilsvarende stik.
32
Stik på bagpanelet
1
70 Hurtig referenceguide
2 345
6
7
8
9101112
Page 71

1 stik til mus Sæt en standardmus i det grønne stik til mus. Sluk for computeren og alle
tilsluttede enheder, før du tilslutter en mus til computeren. Hvis du har en USBmus, sættes den i en USB-stik.
®
Hvis computeren kører Microsoft
Windows XP-operativsystemet, er de
nødvendige drivere til musen installeret på harddisken.
2 parallelstik Tilslut en parallel enhed, som f.eks. en printer, til parallelstikket. Hvis du har en
USB-printer, skal den sættes i et USB-stik.
BEMÆRK: Det integrerede parallelstik deaktiveres automatisk, hvis computeren
detekterer et installeret kort, som indeholder et parallelstik, der er indstillet til den
samme adresse. For mere information, se "Systemopsætningsoptioner" i User’s Guide
(Brugervejledning).
3 lys til linkintegritet
• Grøn — Der er en god forbindelse mellem et 10-mbps netværk og computeren.
• Orange — Der er en god forbindelse mellem et 100-mbps netværk og
computeren.
• Gul — Der er en god forbindelse mellem et 1000-mbps (eller 1-gbps) netværk og
computeren.
• Slukket — Computeren detekterer ikke en fysisk forbindelse til netværket.
4 stik til netværksadapter For at forbinde computeren til et netværk eller bredbåndsenhed, skal du tilslutte
den ene ende af et netværkskabel til enten et netværksstik eller netværks- eller
bredbåndsenheden. Tilslut den anden ende af netværkskablet til
netværksadapterens stik på computeren. Et klik angiver, at netværkskablet er
blevet forsvarligt sat i.
BEMÆRK: Sæt ikke en telefonledning i netværksstikket.
På computere med et ekstra netværksstikkort skal stikkene på kortet og på
computerens bagside bruges, når der installeres flere netværksforbindelser (som
f.eks. et separat intra- og ekstranet).
Det anbefales, at du bruger Cat. 5- kabler og stik til netværket. Hvis du er nødt til
at bruge Cat. 3- kabler, skal netværkshastigheden tvinges op til 10 Mbps for at
sikre en pålidelig drift.
5 lys til netværksaktivitet Et gult lys blinker, når computeren sender eller modtager netværksdata. En stor
mængde netværkstrafik kan få dette lys til at se ud som om, det "lyser" konstant.
Hurtig referenceguide 71
Page 72

6 stik til linie ind Brug det blå indgangsstik for at tilslutte en optage-/afspilningsenhed som f.eks. en
kassetteafspiller, cd-afspiller eller videobåndoptager.
På computere med et lydkort, skal stikket på kortet anvendes.
7 stik til linie ud Brug det grønne stik til linje ud for at tilslutte hovedtelefoner og de fleste
højttalere med integrerede forstærkere.
På computere med et lydkort, skal stikket på kortet anvendes.
8 mikrofonstik Brug det pink mikrofonstik til at tilslutte en pc-mikrofon til stemme- eller
musikinput til et lyd- eller telefoniprogram.
På computere med et lydkort kan mikrofonstikket findes på kortet.
9 USB 2.0-stik (2) Brug de bageste USB-stik til enheder, som normalt forbliver tilsluttede, som f.eks.
www.dell.com | support.dell.com
printere og tastaturer.
Det anbefales, at du bruger de forreste USB-stik til enheder, som du tilslutter
engang imellem, som f.eks. flash memorynøgler eller kameraer eller til bootbare
USB-enheder.
10 USB 2.0-stik (3) Brug de bageste USB-stik til enheder, som normalt forbliver tilsluttede, som f.eks.
printere og tastaturer.
Det anbefales, at du bruger de forreste USB-stik til enheder, som du tilslutter
engang imellem, som f.eks. flash memorynøgler eller kameraer eller til bootbare
USB-enheder.
11 serielstik Tilslut en seriel enhed, som f.eks. en håndholdt enhed, til serielporten.
Standardangivelser er COM1 for serielstik 1 og COM2 for det valgfrie serielstik 2.
For mere information, se "System Setup Options" (Systemopsætningsoptioner) i
User’s Guide (Brugervejledning).
12 stik til tastatur Hvis du har et standardtastatur, skal det sættes i det lilla tastaturstik. Hvis du har
et USB-tastatur, skal det sættes i et USB-stik.
72 Hurtig referenceguide
Page 73
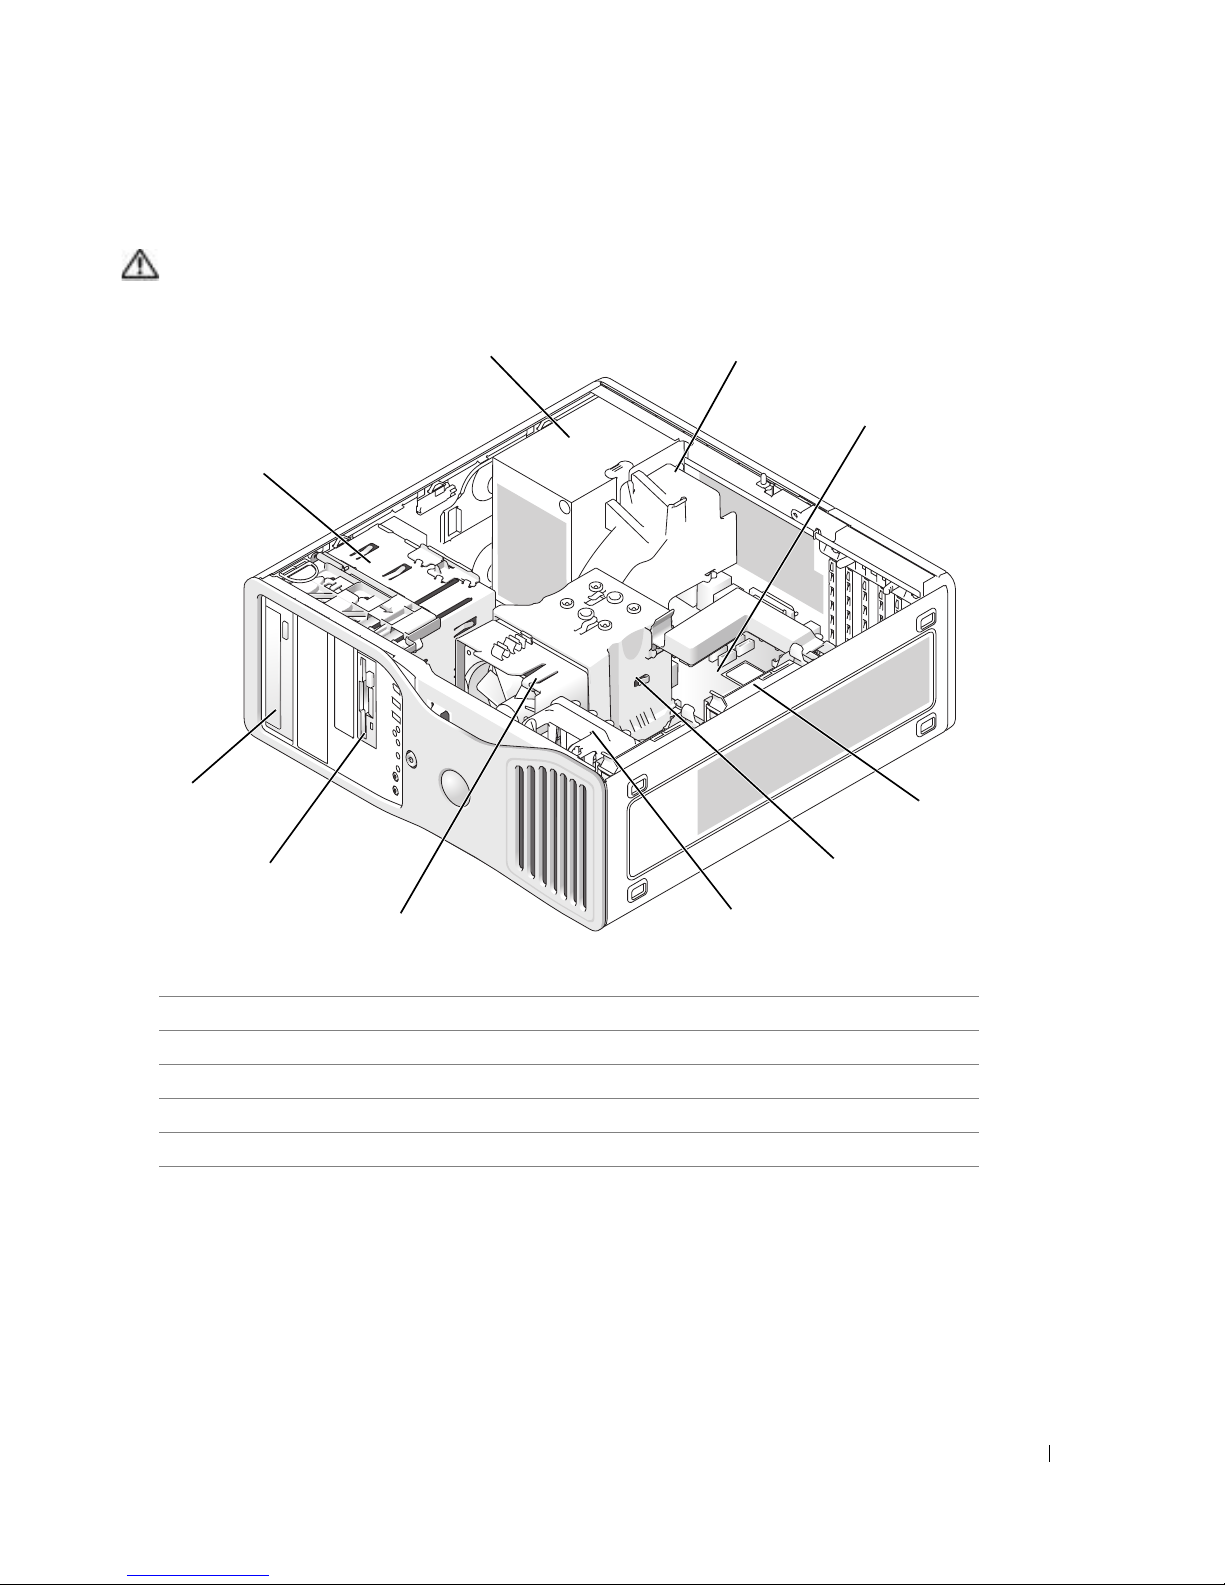
Indvendig visning
1
2
FORSIGTIG: Før udførelse af nogle af procedurerne i dette afsnit, skal sikkerhedsinstruktionerne
iProduct Information Guide (Produktinformationsguiden) følges.
3
10
9
8
7
1 strømtilførsel 6 kortventilator
2 ekstra blæser 7 processorventilator
3 systemkort 8 nederste 3,5-tomme drevbås
4 harddisk 9 øverste 5,25-tommedrevbås
5 processor luftstrømningsbeklædning 10 diskramme
6
4
5
Hurtig referenceguide 73
Page 74
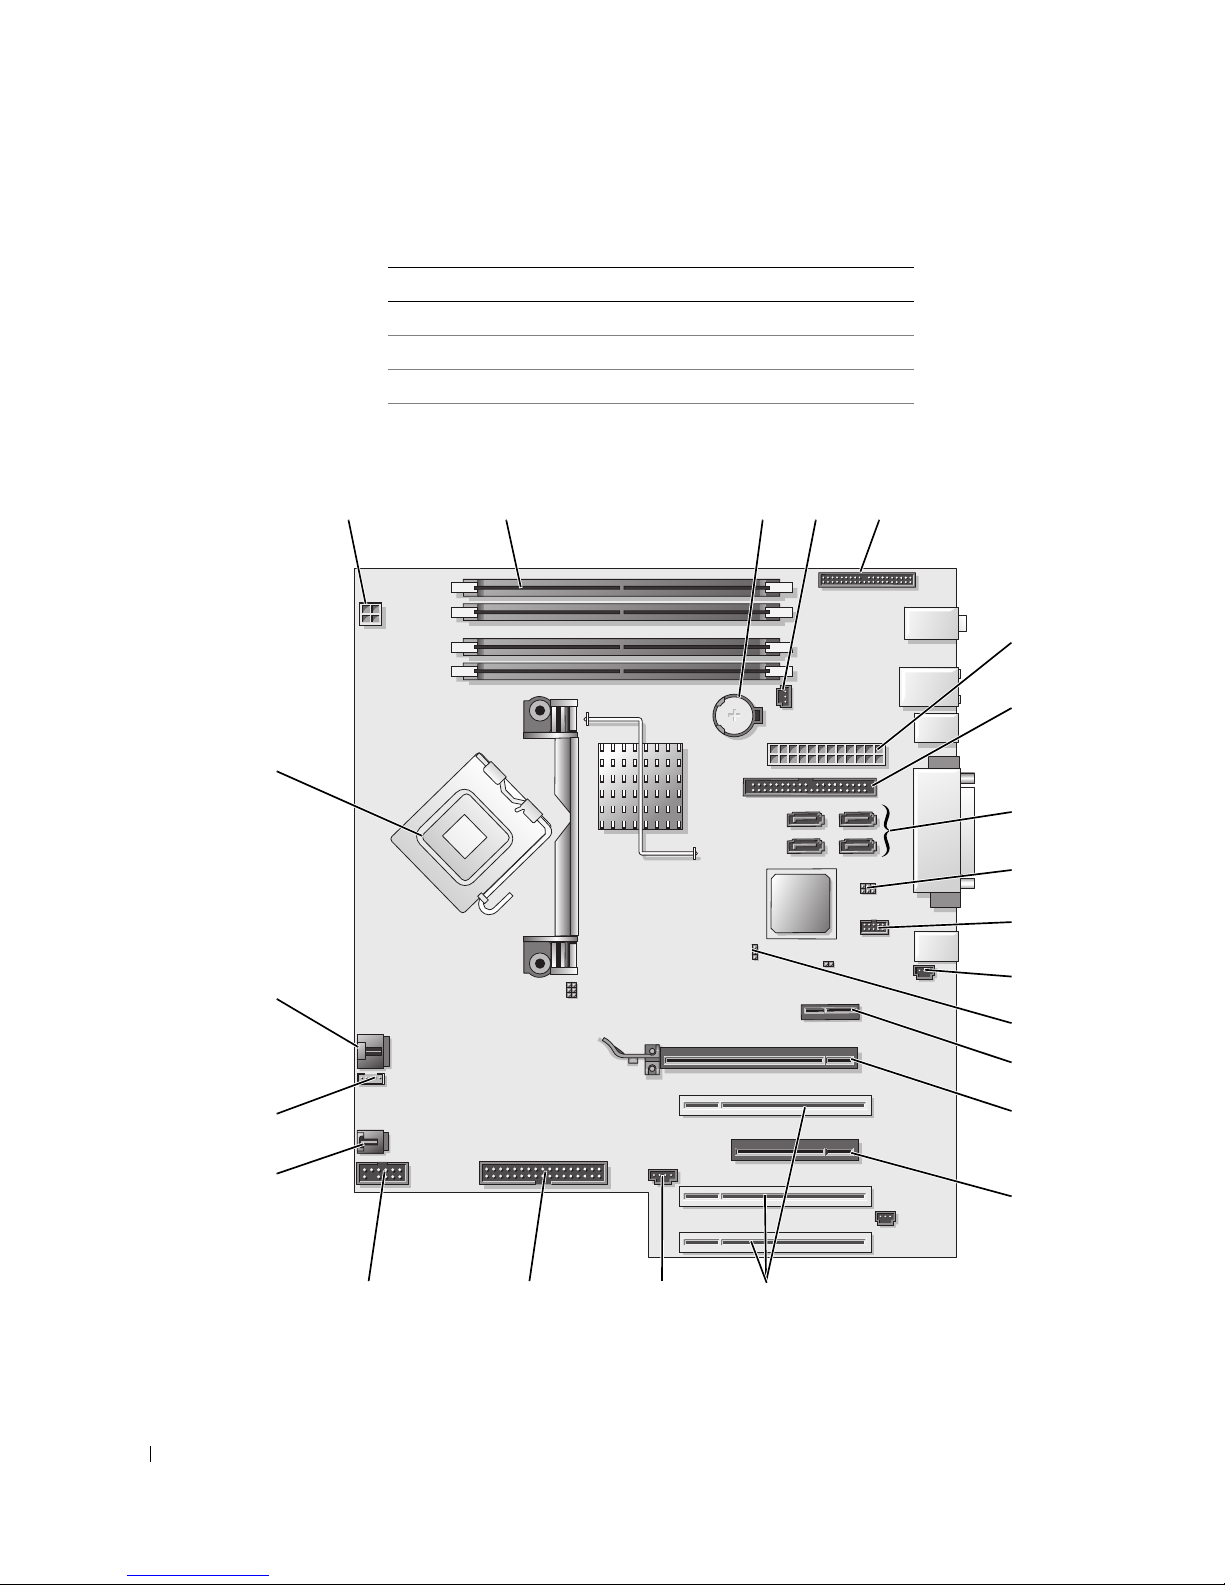
Kabelfarver
1
2
3 4 5
Systemkortkomponenter
www.dell.com | support.dell.com
Enhed Farve
Harddisk blå kabel
Diskettedrev sort afrivningsstrimmel
cd/dvd-drev orange afrivningsstrimmel
6
7
23
22
21
20
19
18
8
9
10
11
12
13
14
15
1617
74 Hurtig referenceguide
Page 75

1 strømstik (12VPOWER) 13 PCI-Express x1 kortslot
2 stik til hukommelsesmodul 14 PCI-Express x16 op til 150w kortslot
3 batterisocket (BATTERI) 15 PCI-Express x8 kortslot (ledningsført som x4)
4 stik til hukommelsesventilator (FAN_MEM) 16 PCI kortslot (1-3)
5 frontpanelstik 17 eksternt lys-stik (AUX LED)
6 primære strømstik (POWER) 18 diskettedrev (FLOPPY)
7 IDE-drevstik (IDE) 19 serielstik (SERIAL2)
8 SATA-stik (SATA-1, SATA-3, SATA-0, SATA-2) 20 kortrammeventilator (FAN CARD CAGE)
9 RTC nulstillingsjumper (RTCRST) 21 internt højttalerstik (INT_SPKR)
10 Flexbay-stik (FLEXBAY) 22 processorventilatorstik (FAN_CPU)
11 chassis intrusionsheader 23 processorstik (CPU)
12 adgangskodejumper (PASS)
Sådan finder du User’s Guide (Brugervejledning)
User’s Guide
(Brugervejledning) indeholder yderligere information om computeren, som f.eks.:
• Tekniske specifikationer
• Information om ændring af computeren fra desktop til tower
• Visninger af computeren forfra og bagfra, inklusiv alle de tilgængelige stik
• Indvendige visninger af computeren, inklusiv en detaljeret grafik af systemkortet og stikkene
• Instruktioner om rengøring af computeren
• Information om softwareegenskaber, som f.eks. kontrol af LegacySelect Technology, ved brug
af en adgangskode samt systemopsætningsoptioner
• Tips og information om anvendelse af Microsoft Windows XP-operativsystemet
• Instruktioner om fjernelse og montering af dele, inklusiv hukommelse, kort, drev,
mikroprocessoren og batteriet
• Information om problemløsning af forskellige computerproblemer
• Instruktioner om anvendelse af Dell Diagnostics og geninstallation af drivere
• Information om hvordan Dell kontaktes
Du kan få adgang til
webstedet på
support.dell.com
User’s Guide
(Brugervejledning) fra harddisken eller på Dell Support-
.
Hurtig referenceguide 75
Page 76
For adgang til User’s Guide (Brugervejledning) fra harddisken:
Klik på knappen
For adgang til User’s Guide (Brugervejledning) fra Dell Support websted:
1
Gå til
support.dell.com
2
Følg meddelelserne på webstedet, som beder dig om oplysninger, der er specifikke for
computeren.
3
På Dell Supports hjemmeside, skal du klikke på
(Brugerhåndbøger), så på
www.dell.com | support.dell.com
Fjernelse af computerdækslet
FORSIGTIG: Før udførelse af nogle af procedurerne i dette afsnit, skal sikkerhedsinstruktionerne i
Product Information Guide (Produktinformationsvejledning) følges.
FORSIGTIG: For at beskytte mod elektrisk stød, skal du altid afbryde computeren fra stikkontakten på
væggen, før du fjerner dækslet.
BEMÆRK: Før du rører ved noget inde i computeren, skal du have jordforbindelse ved at røre ved en
umalet metaloverflade, som for eksempel metallet på computerens bagside. Mens du arbejder, bør du
jævnligt røre ved en umalet metalflade for at fjerne eventuel statisk elektricitet, der kan beskadige de
interne komponenter.
BEMÆRK: Før du slukker for computeren, skal du gemme og lukke alle åbne filer og forlade alle åbne
programmer.
Start
og klik på
.
Help and Support
Systems
(Systemer), hvor du vælger computeren.
(Hjælp og support).
Reference
, derefter på
User’s Guides
1
For at lukke for operativsystemet:
a
Gem og luk alle åbne filer, afslut alle åbne programmer, klik på knappen
derefter på
b
I vinduet
Computeren slukker, når operativsystemets nedlukningsproces er færdig.
2
Sørg for, at computeren og alle tilkoblede enheder er slukkede. Hvis computeren og tilkoblede
enheder ikke slukkede automatisk, da du lukkede operativsystemet ned, skal du slukke for
dem nu.
3
Hvis du har installeret et sikkerhedskabel, skal du fjerne det fra slottet.
BEMÆRK: Sørg for, at du arbejder på en flad, beskyttet overflade for at undgå ridser enten på
computeren eller på overfladen, som den er placeret på.
4
Anbring computeren på en flad overflade med computerdækslet opad.
5
Træk dækslets smæklås tilbage.
76 Hurtig referenceguide
Sluk computer
Sluk computer
.
, klik på
Sluk
Start,
og klik
.
Page 77
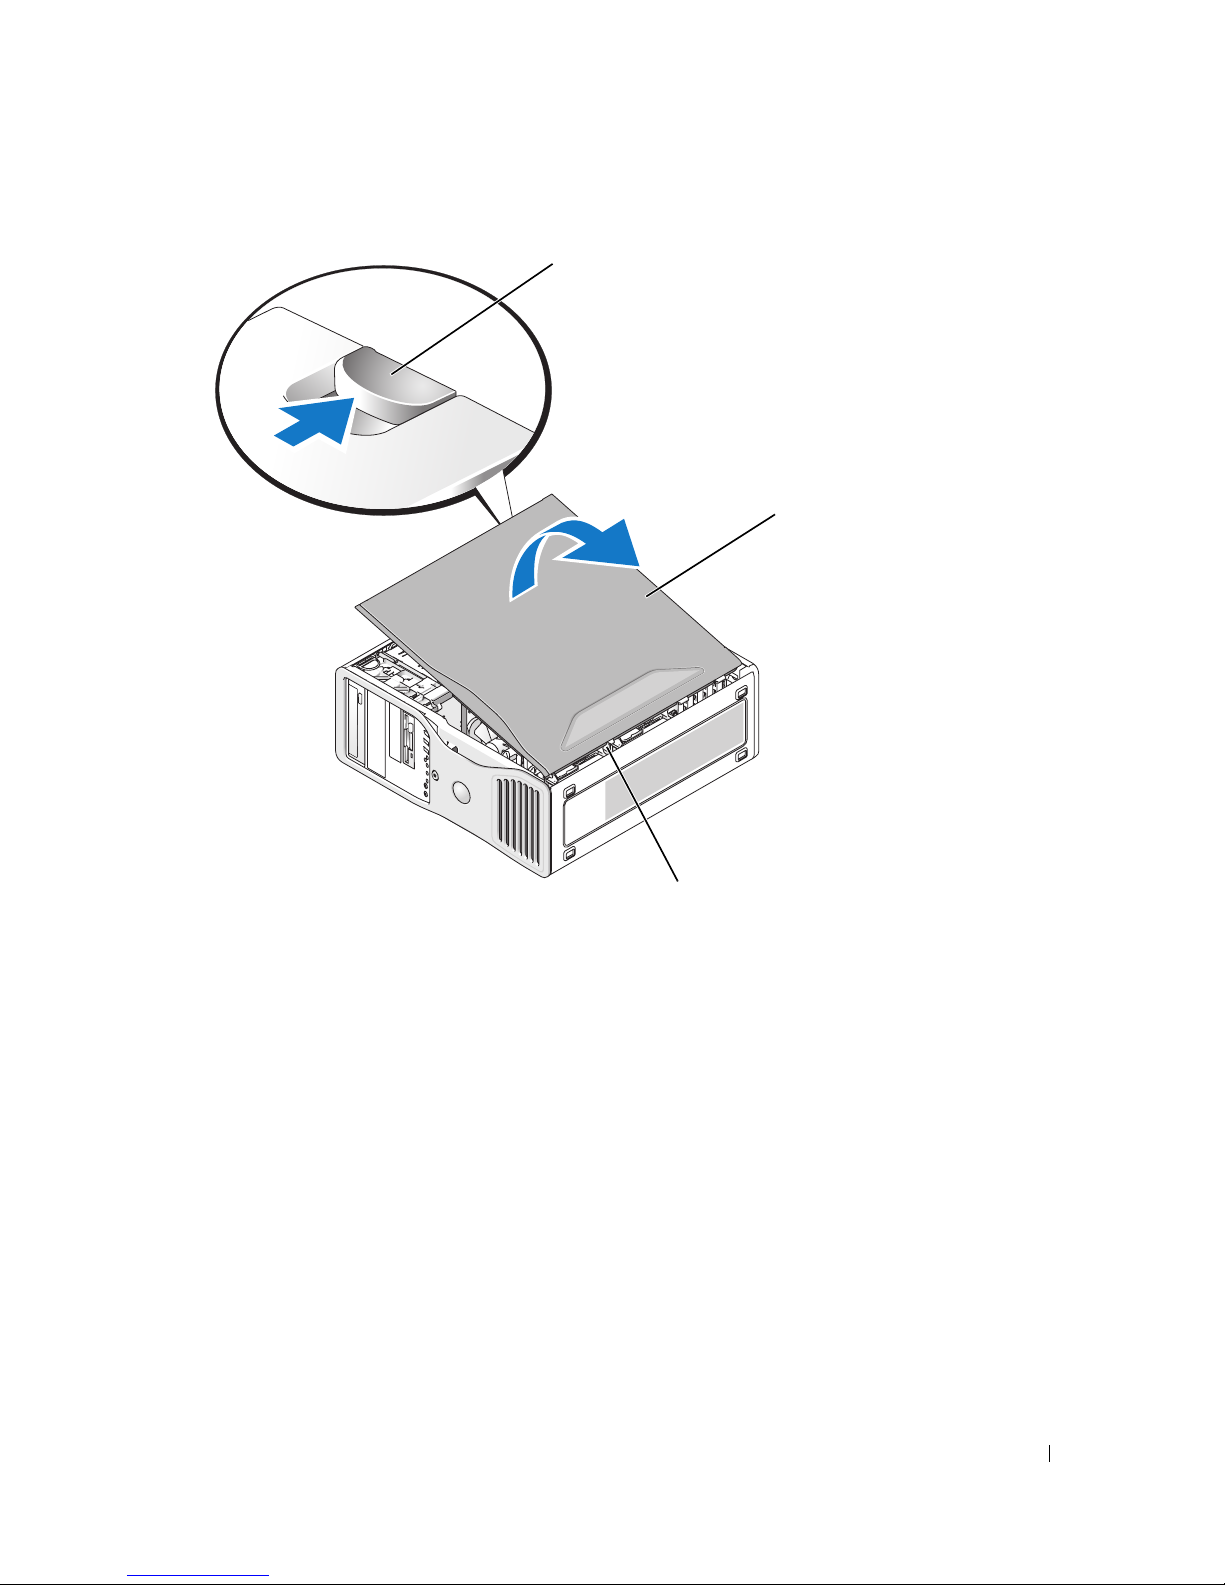
dækslets smæklås
computerdæksel
hængselflige (3)
6
Find de tre hængselflige på computerens kant.
7
Tag fat i siderne på computerdækslet, og drej dækslet op ved at bruge hængslerne som
løftestangspunkter.
8
Løsn dækslet fra hængselfligene, og sæt det til siden på et sikkert sted.
Pleje af computeren
For at hjælpe med at vedligeholde computeren, bør disse forslag følges:
• For at undgå at tabe eller få korrupt data, må computeren aldrig slukkes, når lampen til
harddisken lyser.
• Planlæg regelmæssige virusscanninger med virussoftware.
• Kontrollér plads på harddisken ved at slette unødvendige filer og defragmentere drevet
regelmæssigt.
• Sikkerhedskopiér filer med regelmæssige mellemrum.
• Rengør med mellemrum computerskærmen, musen og tastaturet (se
(Brugervejledning) for mere information).
User’s Guide
Hurtig referenceguide 77
Page 78

Problemløsning
Tips til problemløsning
Foretag følgende eftersyn, når du fejlsøger computeren:
• Hvis du tilføjede eller fjernede en del, før problemet startede, skal du gennemgå
installationsprocedurerne og sikre, at delen er korrekt installeret.
• Hvis en perifer enhed ikke fungerer, skal det sikres, at enheden er tilsluttet korrekt.
• Hvis en fejlmeddelelse vises på skærmen, skal den nøjagtige meddelelse skrives ned.
Meddelelsen kan hjælpe det tekniske supportpersonale med at finde en diagnose og håndtere
problemet(erne).
www.dell.com | support.dell.com
• Hvis en fejlmeddelelse forekommer i et program, henvises til programmets dokumentation.
• Hvis den anbefalede handling i fejlfindingsafsnittet er at læse et afsnit i
(Brugervejledning), gå til
adgang til
User’s Guide
support.dell.com
(Brugervejledning).
(fra en anden computer om nødvendigt) for at få
User’s Guide
Løsning af software- og hardwareinkompabilitet
Hvis en enhed enten ikke findes under opsætning af operativsystemet eller findes, men er
forkert konfigureret, kan du bruge Hardware Troubleshooter (Hardware-fejlfinder):
til at løse inkompabiliteten.
For at løse inkompabilitet ved hjælp af Hardware Troubleshooter (Hardware-fejlfinder):
1
Klik på knappen
2
Skriv
hardware troubleshooter
3
Tryk p å
4I Hardware Troubleshooter
conflict on my computer"
Next
Hardware-Troubleshooter
(Næste).
Start
og klik på
Help and Support
i
Søge-
feltet, og tryk på pilen for at starte søgning.
(Hardware-fejlfinder) i
(Hardware-fejlfinder) -listen klik på
(Jeg skal løse en hardwarekonflikt på min computer), og klik på
(Hjælp og support).
søgeresultat-
"I need to resolve a hardware
listen.
Brug Microsoft® Windows® XP Systemgendannelse
Microsoft Windows XP operativsystem giver via System Restore (Systemgendannelse) mulighed
for at få computeren tilbage til en tidligere operativ indstilling (uden påvirkning af datafilerne),
hvis der foretages ændringer på hardware, software eller andre systemindstillinger, der har efterladt
computeren i en uønsket operativ indstilling. Se Windows Hjælp- og Supportcenter (se "Sådan
finder du information" på side 51) for information om brug af Systemgendannelse.
BEMÆRK: Foretag reglmæssig back-up af dine datafiler. System Restore (Systemgendannelse) viser
ikke dine datafiler eller reparerer dem.
78 Hurtig referenceguide
Page 79

Dannelse af Restore Point (Gendannelsessted)
1
Klik på knappen
2
Klik på
3
Følg vejledningen på skærmen.
Gendan computeren til en tidligere operativ indstilling
BEMÆRK: Før du gendanner computeren til en tidligere operativ indstilling, skal du gemme og lukke alle
åbne filer og forlade alle åbne programmer. Ændr, åbn eller slet ikke nogen filer eller programmer, førend
systemgendannelsen er fuldført.
1
Klik på
System Restore
Start
System Tools
2
Kontrollér at
tidspunkt) er valgt og klik på
3
Klik på den kalenderdag, du ønsker at gendanne din computer fra.
Start
og klik på
Help and Support
(Hjælp og support).
(Systemgendannelse).
-knappen, peg på
All Programs
(Alle programmer)→
(Systemværktøjer), og klik derefter på
Restore my computer to an earlier time
Next
(Næste).
System Restore
Accessories
(Systemgendannelse).
(Tilbehør)→
(Gendan min computer til et tidligere
For at vælge
Select a Restore Point
(Vælg et gendannelsessted) viser skærmen en kalender,
der sætter dig i stand til at se og vælge gendannelsessteder. Alle kalenderdage med
tilgængelige gendannelsessteder kommer frem med fede typer.
4
Vælg et gendannelsessted og klik på
Next
(Næste).
Hvis en kalenderdag kun har et gendannelsessted, vil gendannelsesstedet automatisk blive
valgt. Hvis to eller flere steder er tilgængelige, klikkes på det gendannelsessted, du ønsker.
5
Klik på
Restoration Complete
Next
(Næste).
(Gendannelse fuldført)-skærmen kommer frem efter System Restore
(Systemgendannelse) er færdig med at indsamle data, og derefter genstarter computeren.
6
Når computeren er genstartet, klikkes på OK.
For at ændre gendannelsessted, kan du gentage enten trinnene ved at vælge et andet
gendannelsessted, eller du kan vælge Undo (Fortryd) gendannelsen.
Undoing the Last System Restore (Fortryd den sidste foretagne systemgendannelse)
BEMÆRK: Før du fortryder den sidste foretagne systemgendannelse, gemmes og lukkes alle åbne filer,
og alle åbne programmer forlades. Ændr, åbn eller slet ikke nogen filer eller programmer, førend
systemgendannelsen er fuldført.
1
Klik på
System Tools
Start
-knappen, peg på
All Programs
(Systemværktøjer), og klik derefter på
(Alle programmer)→ Accessories
System Restore
(Systemgendannelse).
(Tilbehør)
→
2
Klik på
3
Klik på
System Restore
4
Når computeren er genstartet, klikkes på OK.
Undo my last restoration
Next
(Næste).
(Systemgendannelse)-skærmen kommer frem, og computeren genstarter.
(Fortryd min seneste gendannelse) og klik på
Hurtig referenceguide 79
Next
(Næste).
Page 80

Aktivering af System Restore (Systemgendannelse)
Hvis du geninstallerer Windows XP med mindre end 200 MB tilgængelig fri harddiskplads, vil
System Restore (Systemgendannelse) automatisk blive deaktiveret. For at se om System Restore
(Systemgendannelse) er aktiveret:
1
Klik på tasten
2
Klik på
3
Klik på
4
Klik på fanebladet
5
Kontrollér, at
Performance and Maintenance
System
Start,
og klik på
Control Panel
.
System Restore
(Systemgendannelse).
Turn off System Restore
(Kontrolpanel).
(Ydelse og vedligeholdelse).
(Annullér systemgendannelse) ikke er markeret.
www.dell.com | support.dell.com
Brug af den sidst kendte gode installation
1
Genstart computeren, og tryk på <F8> når meddelelsen
system to start
2
Fremhæv
<Enter>, tryk på <l>, og vælg derefter operativsystemet, når du bedes om det.
Andre optioner til at hjælpe med at løse yderligere enheds- eller softwarekonflikter
BEMÆRK: Følgende processer sletter al informationen på harddisken.
• Geninstallér operativsystemet med operativsystemets installationsguide og cd'en
System
(Operativsystem).
Under geninstallation af operativsystemet kan du vælge at slette de eksisterende partitioner
og genformatere harddisken.
• Geninstallér alle drivere, hvor du starter med chipsættet, ved hjælp af cd'en
Utilities
.
Dell Diagnostics (Dell diagnosticering)
FORSIGTIG: Før udførelse af nogle af procedurerne i dette afsnit, skal sikkerhedsinstruktionerne i
Produktinformationsguiden følges.
Hvornår Dell Diagnostics (Dell-diagnosticering) skal anvendes
(Vælg operativsystemet, som skal starte) vises.
Last Known Good Configuration
Please select the operating
(Sidst kendte gode installation), tryk på
Operating
Drivers and
Hvis du kommer ud for et problem med computeren, skal du foretage eftersynene i
"Problemløsning" på side 78 og køre Dell Diagnostics, før du kontakter Dell for teknisk hjælp.
Det anbefales at udskrive disse procedurer, før du begynder.
BEMÆRK: Dell Diagnostics (Dell-diagnosticering) fungerer kun på Dell™-computere. Anvendelse af
dette program med andre computere kan medføre computerreaktioner eller resultere i fejlmeddelelser.
80 Hurtig referenceguide
Page 81

Dell Diagnostics (Dell diagnosticering) lader dig:
• Foretage hurtige eftersyn eller uddybende tester på en eller alle enheder
• Vælge, hvor mange gange en test skal køres
• Vise eller udskrive testresultater eller gemme dem til en fil
• Suspendere test, hvis en fejl detekteres eller afslutte test, hvis et bestemt antal fejl
forekommer
• Få adgang til online Help (Hjælp)-skærme, som beskriver testerne og hvordan de skal køres
• Læse statusmeddelelser, som fortæller dig, om testerne er færdige
• Modtage fejlmeddelelser, hvis der detekteres problemer
Start af Dell Diagnostics (Dell-diagnosticering) fra harddisken
1
Tænd (eller genstart) din computer.
2
Når DELL™-logoet vises, skal du trykke <F12>med det samme.
OBS! Hvis du ser en meddelelse, som angiver, at ingen diagnostisk hjælpepartition er blevet fundet,
henvises til "Start af Dell Diagnostics (Dell-diagnoser) fra cd'en Drivers and Utilities (Drivere og
hjælpeværktøjer)" på side 81.
Hvis du venter for længe, og operativsystemets logo vises, skal du fortsætte med at vente, til
du ser Microsoft Windows skrivebordet. Luk derefter computeren og prøv igen. For mere
information om nedlukning af computeren, henvises til
User’s Guide
(Brugervejledning).
3
Når listen med startenheder vises, fremhæv
4
Når Dell Diagnostics
Main Menu
(Hovedmenu for Dell-diagnoser) vises, vælges den test,
som du vil køre. For mere information om testene, henvises til
Boot til hjælpepartition
User’s Guide
og tryk på <Enter>.
(Brugervejledning).
Start af Dell Diagnostics (Dell-diagnoser) fra cd'en Drivers and Utilities (Drivere og hjælpeværktøjer)
1
Isæt
cd'en Drivers and Utilities
2
Luk computeren, og genstart den. For mere information om nedlukning af computeren,
henvises til
3
Når DELL-logoet vises, skal du trykke på <F12> med det samme.
User’s Guide
(drivere og hjælpeværktøjer).
(Brugervejledning).
Hvis du venter for længe, og Windows-logoet vises, skal du fortsætte med at vente, indtil du
ser skrivebordet i Windows. Luk derefter computeren og prøv igen. For mere information om
nedlukning af computeren, henvises til
OBS! De næste trin ændrer kun boot-sekvensen denne ene gang. Ved den næste opstart, starter
computeren op i overensstemmelse med enhederne, som er specificeret i systemets opsætning.
4
Når listen med startenheder vises, fremhæves
5
Væ lg
IDE cd-rom-enhed
valgt fra CD-boot-menuen.
User’s Guide
IDE cd-rom-enhed
(Brugervejledning).
og tryk på <Enter>.
Hurtig referenceguide 81
Page 82

6
Vælg
Boot from CD-ROM
7
Skriv 1 for at starte menuen for ResourceCD (Resurse-cd).
8
Skriv 2 for at starte Dell Diagnostics (Dell-diagnoser).
9
Vælg
Run the 32 Bit Dell Diagnostics
(Boot fra cd-rom) fra menuen, som vises.
(Kør 32 bit Dell-diagnoser) fra den nummererede liste.
Hvis der er anført flere versioner, vælges versionen, som passer til computeren.
10
Når Dell Diagnostics
som du vil køre. For mere information om testerne, henvises til
Main Menu
(Hovedmenu for Dell-diagnoser) vises, vælges den test,
User’s Guide
(Brugervejledning).
Før du starter en test
www.dell.com | support.dell.com
FORSIGTIG: Før udførelse af nogle af procedurerne i dette afsnit, skal sikkerhedsinstruktionerne i
Produktinformationsguiden følges.
• Tænd for printeren, hvis en printer er tilkoblet.
• Gå i systemopsætning, gennemse computerens installationsinformation og aktivér alle
computerens komponenter og enheder, som f.eks. stik.
Bip-koder
Computeren kan sende en serie bip under opstart, hvis skærmen ikke kan vise fejl eller problemer.
Disse serier af bip, kaldet bip-koder, identificerer et problem. En mulig bip-kode (kode 1-3-1) består
af et bip, en stribe med tre bip og derefter et bip. Denne bip-kode fortæller, at din computer har
fundet et hukommelsesproblem.
Hvis der lyder en bip-kode, skriv den ned og find den i den følgende tabel.
Kode Årsag
1-1-2 Fejl på mikroprocessor-register
1-1-3 Fejl på læse/skrive-NVRAM
1-1-4 Fejl på ROM BIOS-checksum
1-2-1 Fejl på programmérbar interval-timer
1-2-2 Fejl på DMA-initialisation
1-2-3 Fejl på læse/skrive DMA side-register
1-3 Fejl på videohukommelsestest
1-3-1 via 2-4-4 Hukommelse ikke korrekt identificeret eller anvendt
1-3-2 Hukommelsesproblem
3-1-1 Fejl på slave DMA-register
3-1-2 Fejl på master DMA-register
82 Hurtig referenceguide
Page 83

Kode Årsag
3-1-3 Fejl på master interrupt mask-register
3-1-4 Fejl på slave interrupt mask-register
3-2-2 Fejl på interrupt vector loading
3-2-4 Fejl på kontroltest af tastatur
3-3-1 Tab af NVRAM-strøm
3-3-2 Forkert NVRAM-konfiguration
3-3-4 Fejl på videohukommelsestest
3-4-1 Fejl på skærm-initialisation
3-4-2 Fejl på returskærm
3-4-3 Fejl på søgning efter video-ROM
4-2-1 Ingen timer-tick
4-2-2 Fejl ved nedlukning
4-2-3 Fejl på gate-A20
4-2-4 Ikke forventet afbrydelse i beskyttet tilstand
4-3-1 Hukommelsesfejl ovenfor adressen 0FFFFh
4-3-3 Fejl i timer-chip-tæller 2
4-3-4 Tid-på-dagen-ur standset
4-4-1 Fejltest på seriel- eller parallelport
4-4-2 Fejl i dekomprimeringskode for shadowed hukommelse
4-4-3 Fejltest i math-coprocessor
4-4-4 Fejl i cache-test
Fejlmeddelelser
OBS! Hvis meddelelsen ikke er anført, henvises til dokumentationen for enten operativsystemet eller
programmet, som kørte, da meddelelsen kom frem.
Hvis en fejl opstod under opstart, vises en meddelelse muligvis på skærmen, som identificerer
problemet. Se "Fejlmeddelelser" i
eventuelle problemer.
User’s Guide
(Brugervejledning) for forslag vedrørende løsning af
Hurtig referenceguide 83
Page 84
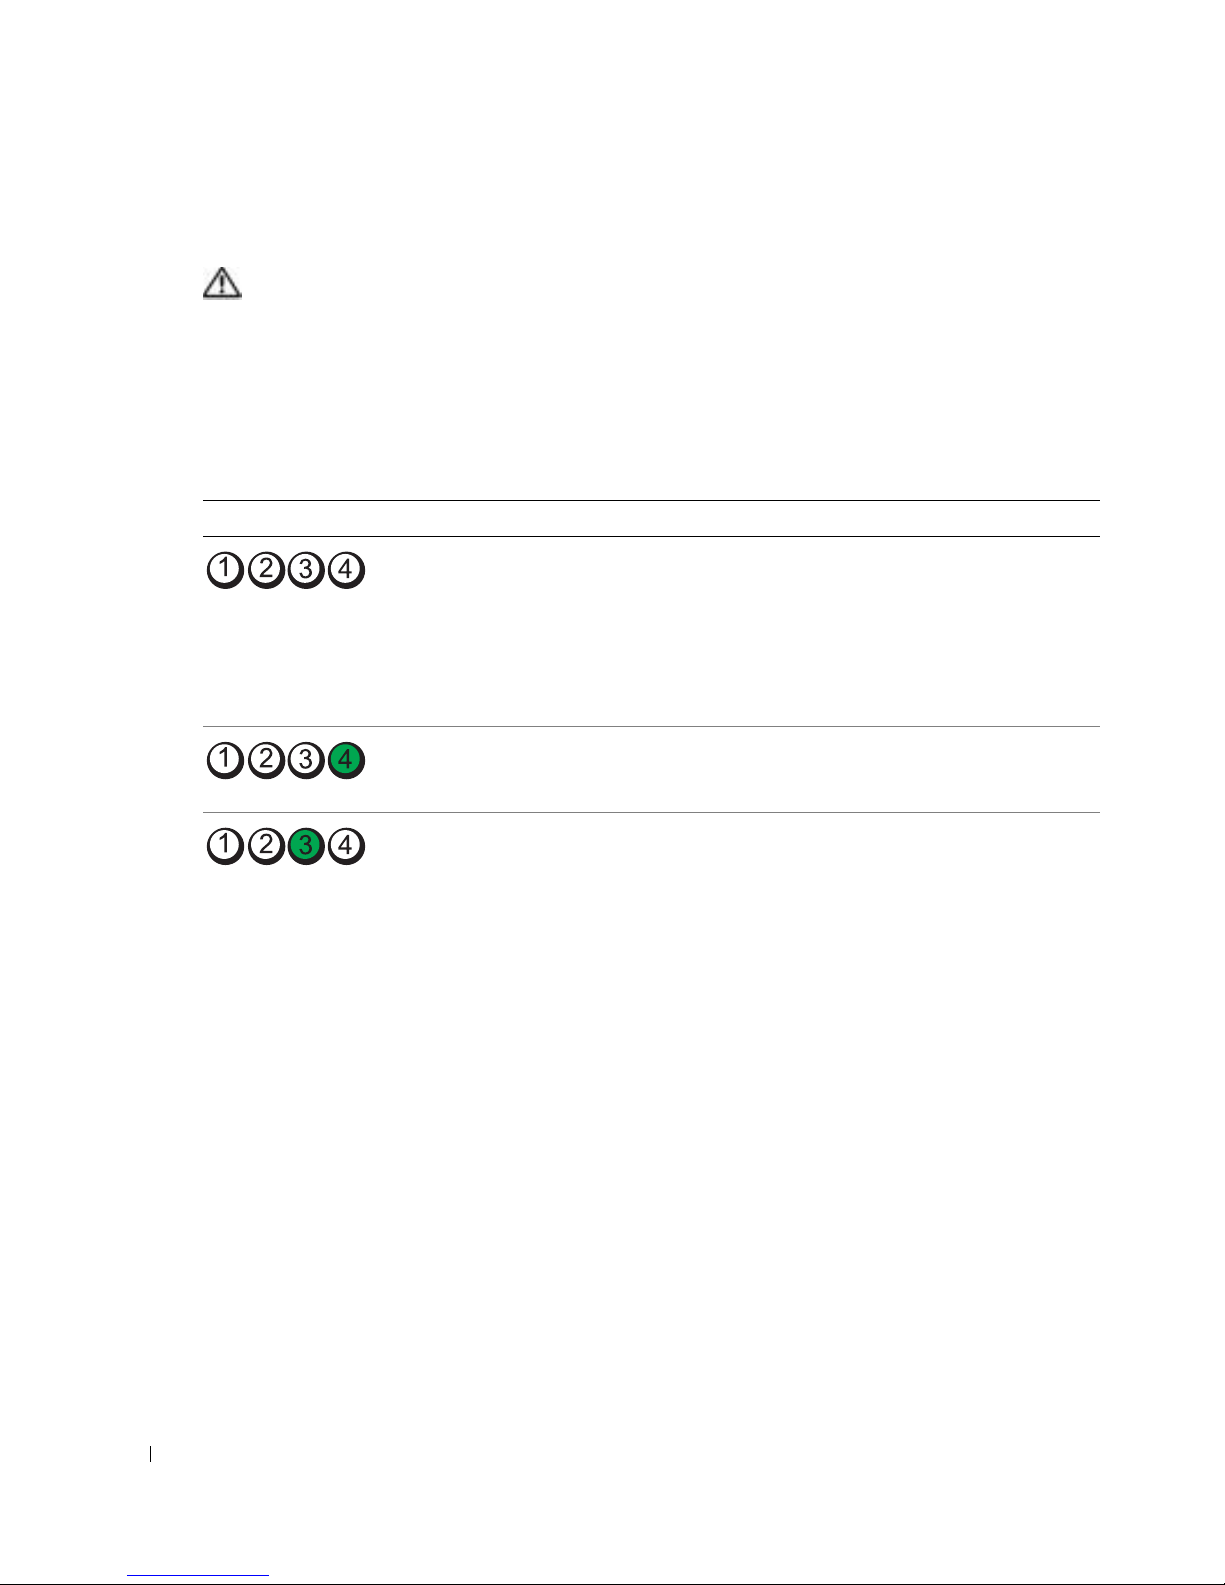
Diagnoselys
FORSIGTIG: Før udførelse af nogle af procedurerne i dette afsnit, skal sikkerhedsinstruktionerne i
Produktinformationsguiden følges.
For at hjælpe dig med at fejlfinde et problem, har computeren fire lamper, som er markeret "1", "2",
"3" og "4" på fronten. Lamperne kan være slukkede eller grønne. Når computeren starter normalt,
blinker lysene. Når computeren starter, lyser alle fire lamper konstant grønt et kort øjeblik, og
derefter går de ud for at angive normal drift. Hvis computeren fejlfungerer, vil lampernes mønster
identificere problemet.
Lysmønster Problembeskrivelse Foreslået løsning
www.dell.com | support.dell.com
Computeren er i normal
sluk-tilstand eller en mulig før-Biosfejl er opstået.
BEMÆRK: De diagnostiske lamper
går ud efter en kort tid, hvis
computeren er i en normal
driftstilstand efter POST.
Der er opstået en mulig BIOS-fejl,
og computeren kører i fejlsikret
tilstand.
Der er opstået en mulig processorfejl.
Sæt computeren i et fungerende elektrisk
vægudtag, og tryk på strømtilførselsknappen.
Kør BIOS Recovery utility (BIOSreparationsværktøj), afvent færdiggørelse af
reparation og genstart derefter computeren.
Geninstallér processoren, og genstart
computeren.
84 Hurtig referenceguide
Page 85

Lysmønster Problembeskrivelse Foreslået løsning
Der er genkendt
hukommelsesmoduler, men der er
opstået en hukommelsesfejl.
1
Genindstil hukommelsesmodulerne for at
sikre, at computeren kommunikerer korrekt
med hukommelsen.
2
Genstart computeren.
3
Hvis problemet stadig er der, fjernes alle
hukommelsesmoduler, og installér et
hukommelsesmodul i
hukommelsesmodulport 4.
4
Genstart computeren.
Følgende meddelelse vises:
Alert!
(Alarm) Operating in Debug Mode.
Please Populate Memory in Pairs
for Normal Operation
(Kører i
fejlsikret tilstand. Installér hukommelse
parvist til normal funktion).
5
Tryk <F1>for at boote operativsystemet.
6
Kør Dell Diagnostics. Se side 80 for
instruktioner.
7
Hvis hukommelsesmodulet klarer det, lukkes
for computeren, hukommelsesmodulet
fjernes, og gentag derefter processen med de
tilbageværende hukommelsesmoduler, indtil
der opstår en hukommelsesfejl under opstart
eller ved kørsel af diagnosetesten.
Hvis der er fejl på den først testede
hukommelse, gentages processen med de
tilbageværende hukommelsesmoduler for at
sikre, at der ikke er fejl på de tilbageværende
moduler.
8
Når du har fundet frem til det
hukommelsesmodul, der har fejl, kontaktes
Dell for et nyt. For instruktioner i, hvordan
Dell kontaktes, henvises til
User’s Guide
(Brugervejledning).
BEMÆRK: Hvis det er nødvendigt, kan
computeren køre i fejlsikret tilstand, indtil nye
hukommelsesmoduler installeres.
Hurtig referenceguide 85
Page 86
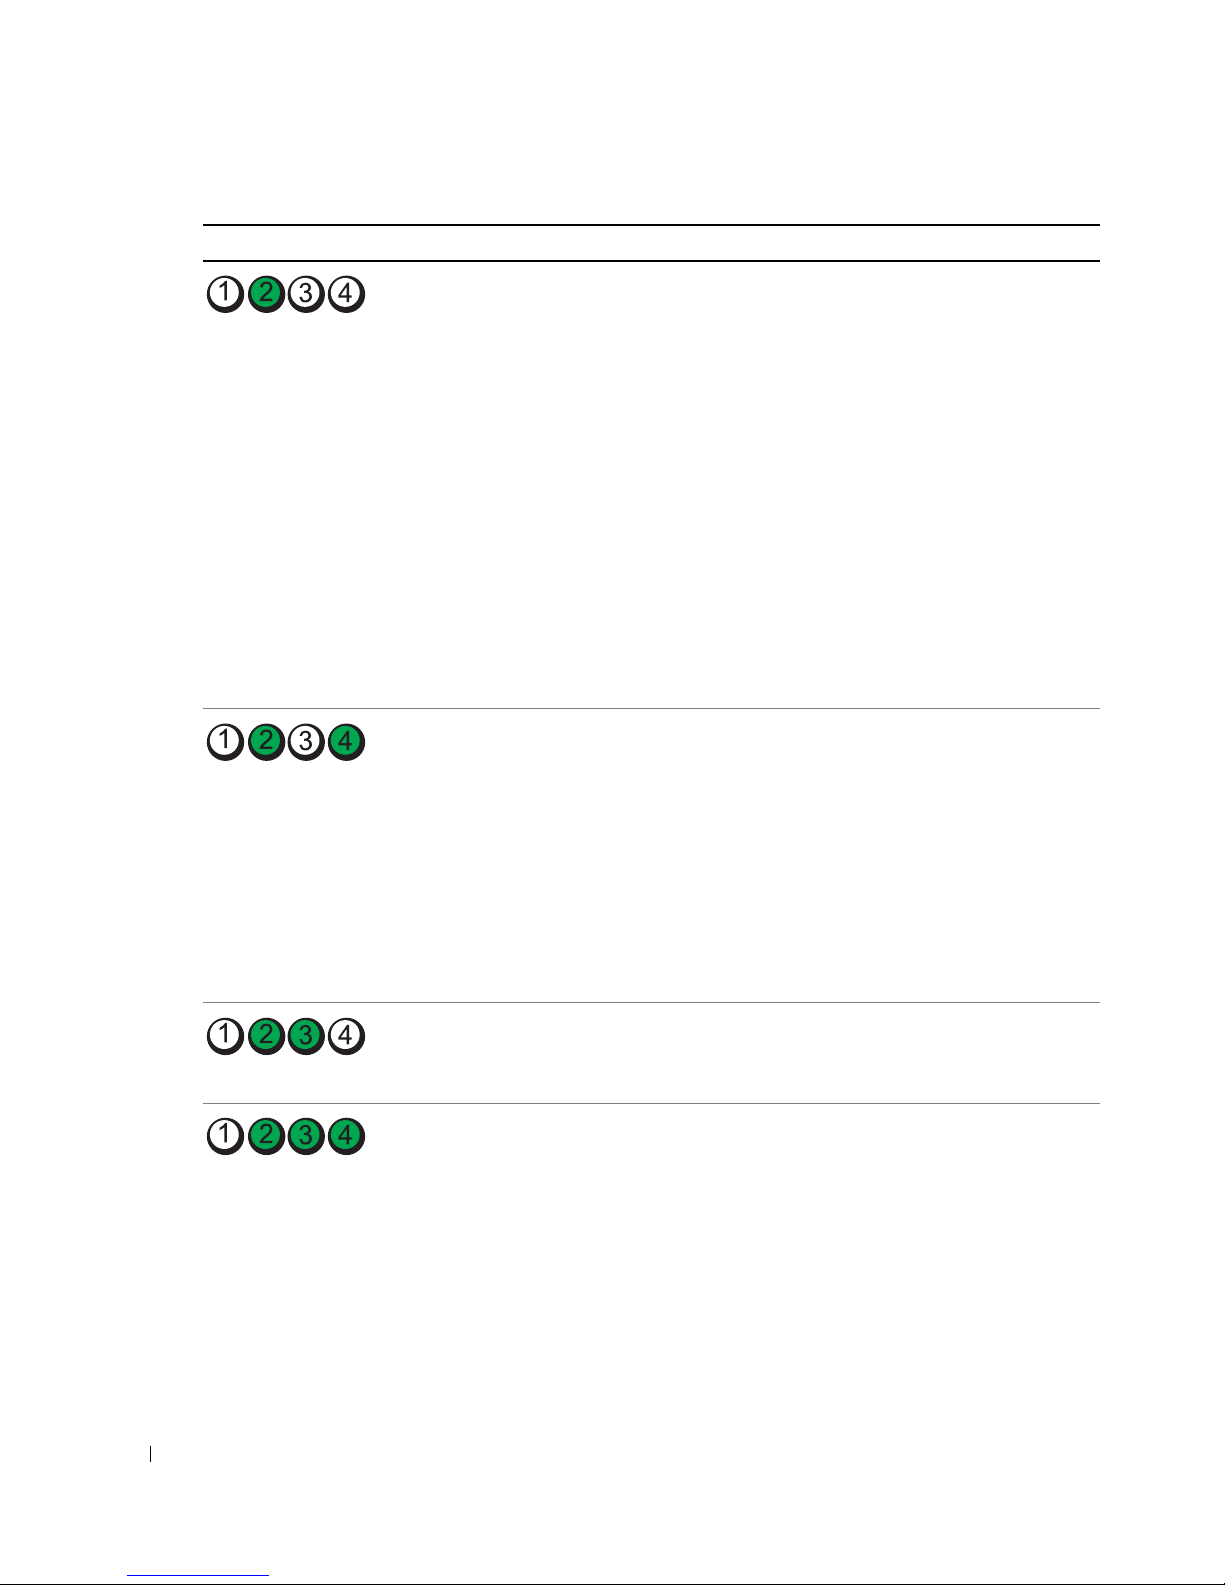
Lysmønster Problembeskrivelse Foreslået løsning
www.dell.com | support.dell.com
Der er opstået en mulig fejl på
udvidelseskortet.
Der er opstået en mulig fejl på
grafikkortet.
1
Fastslå, om der er opstået en konflik ved at
fjerne et kort(ikke grafikkortet), og genstart
derefter computeren. For mere information
om fjernelse af et kort henvises til
(Brugervejledning).
Guide
2
Hvis problemet stadig fortsætter,
User’s
geninstalleres det kort, som du fjernede, fjern
et andet kort, og genstart derefter
computeren.
3
Gentag denne proces for hvert kort, Hvis
computeren starter normalt, så kontroller det
sidst fjernede kort fra computeren for
resurcekonflikter (se "Løsning af software- og
hardwareinkompabilitet" på side 78).
4
Hvis problemet fortsætter, kontakt da Dell.
For instruktioner i hvordan Dell kontaktes,
henvises til
User’s Guide
(Brugervejledning).
• Hvis computeren har et grafikkort fjernes
grafikkortet, og derefter geninstalleres det, og
til sidst genstartes computeren.
• Hvis problemet stadig findes, installeres et
grafikkort, som du ved fungerer, og genstart
derefter computeren.
• Hvis problemet stadig fortsætter, eller hvis
computeren har integreret grafik, kontakt da
Dell. For instruktioner i hvordan Dell
kontaktes, henvises til
User’s Guide
(Brugervejledning).
Der er opstået en mulig fejl på
diskettedrevet eller harddisken.
Der er opstået en mulig USB-fejl. Geninstaller alle USB-enheder, kontrollér
86 Hurtig referenceguide
Geninstallér alle strøm- og datakabler, og
genstart derefter computeren.
kabelstik, og genstart derefter computeren.
Page 87
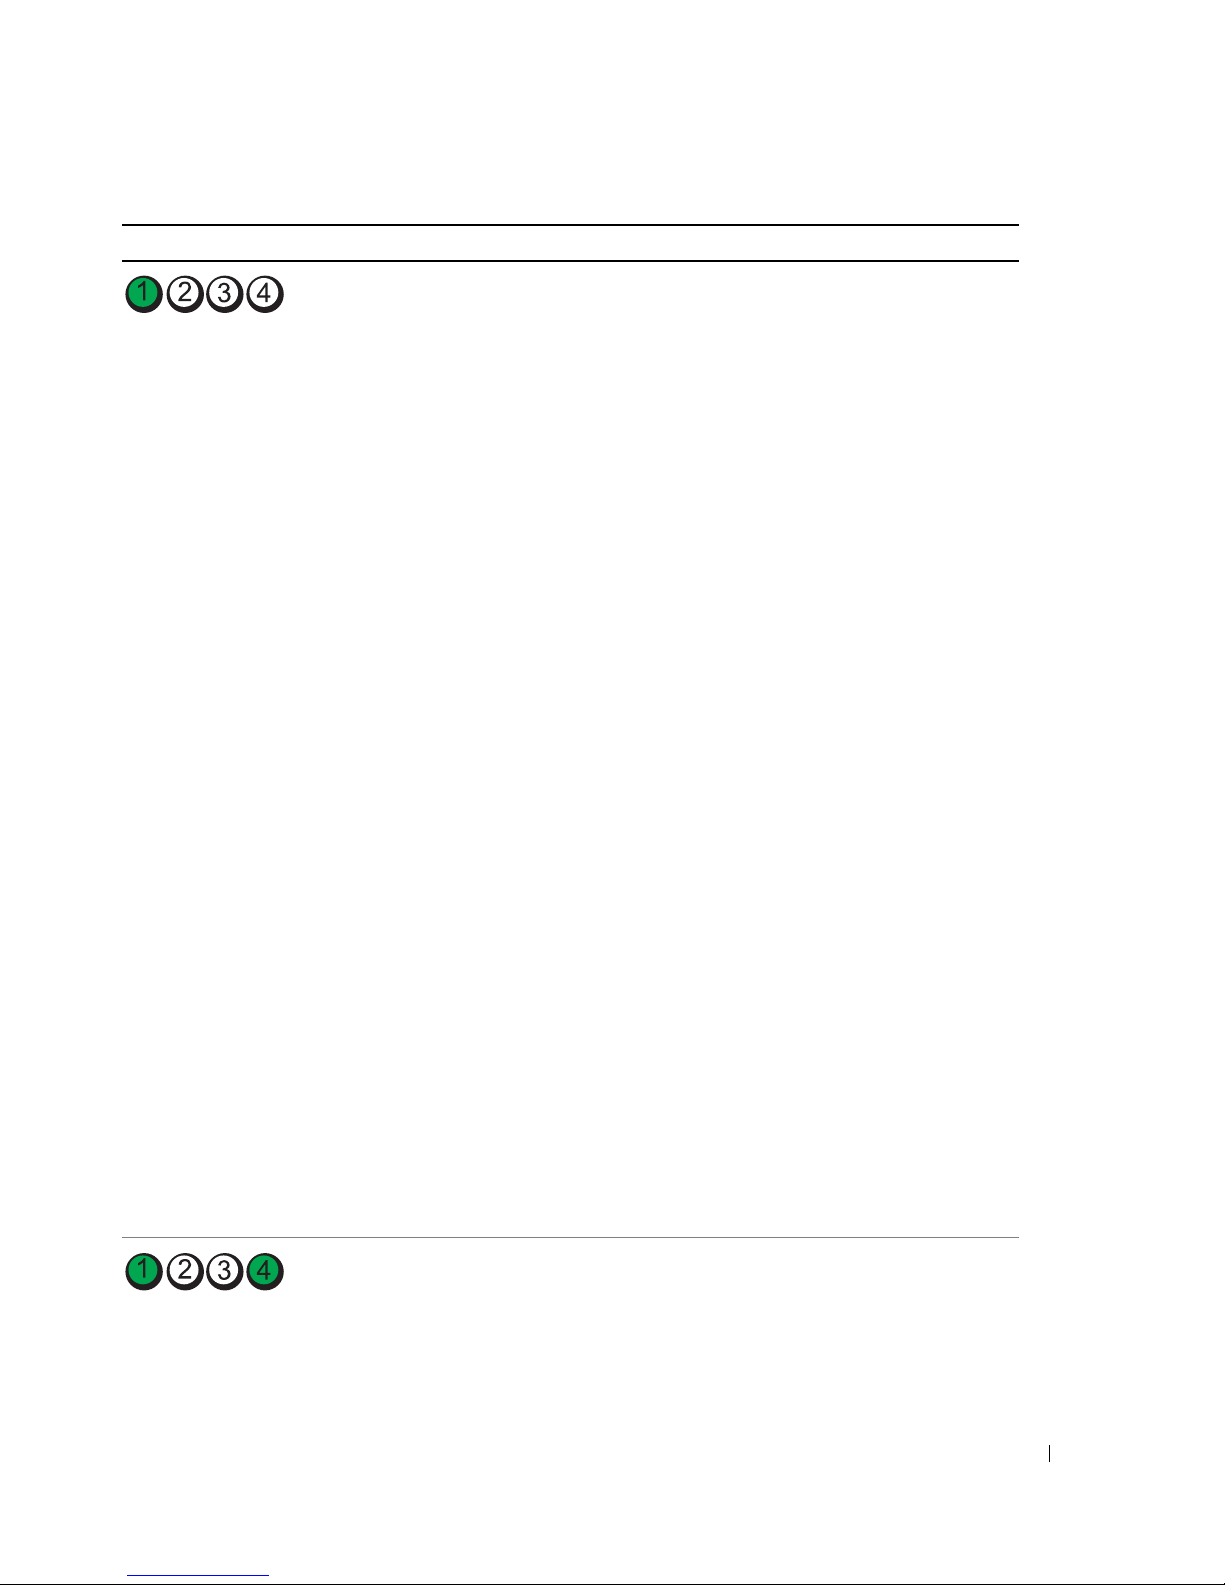
Lysmønster Problembeskrivelse Foreslået løsning
Der er ikke fundet nogen
hukommelsesmoduler.
1
Genindstil hukommelsesmodulerne for at
sikre, at computeren kommunikerer korrekt
medhukommelsen.
2
Genstart computeren.
3
Hvis problemet stadig er der, fjernes alle
hukommelsesmoduler, og installér et
hukommelsesmodul i
hukommelsesmodulport 4.
4
Genstart computeren.
Følgende meddelelse vises:
Alert!
(Alarm) Operating in Debug Mode.
Please Populate Memory in Pairs
for Normal Operation
(Kører i
fejlsikret tilstand. Installér hukommelse
parvist til normal funktion).
5
Tryk <F1>for at boote operativsystemet.
6
Kør Dell Diagnostics. Se side 80 for
instruktioner.
7
Hvis hukommelsesmodulet klarer det, lukkes
for computeren, hukommelsesmodulet
fjernes, og gentag derefter processen med de
tilbageværende hukommelsesmoduler, indtil
der opstår en hukommelsesfejl under opstart
eller ved kørsel af diagnosetesten.
Hvis den der er fejl på den først testede
hukommelse, gentages processen med de
tilbageværende hukommelsesmoduler for at
sikre, at der ikke er fejl på de tilbageværende
moduler.
8
Når du har fundet frem til det
hukommelsesmodul, der har fejl, kontaktes
Dell for et nyt. For instruktioner i hvordan
Dell kontaktes, henvises til
User’s Guide
(Brugervejledning).
BEMÆRK: Hvis det er nødvendigt, kan
computeren køre i fejlsikret tilstand, indtil nye
hukommelsesmoduler installeres.
Der er opstået fejl på systemkortet. Kontakt Dell for teknisk assistance. For
instruktioner i hvordan Dell kontaktes, henvises
til User’s Guide
(Brugervejledning).
Hurtig referenceguide 87
Page 88
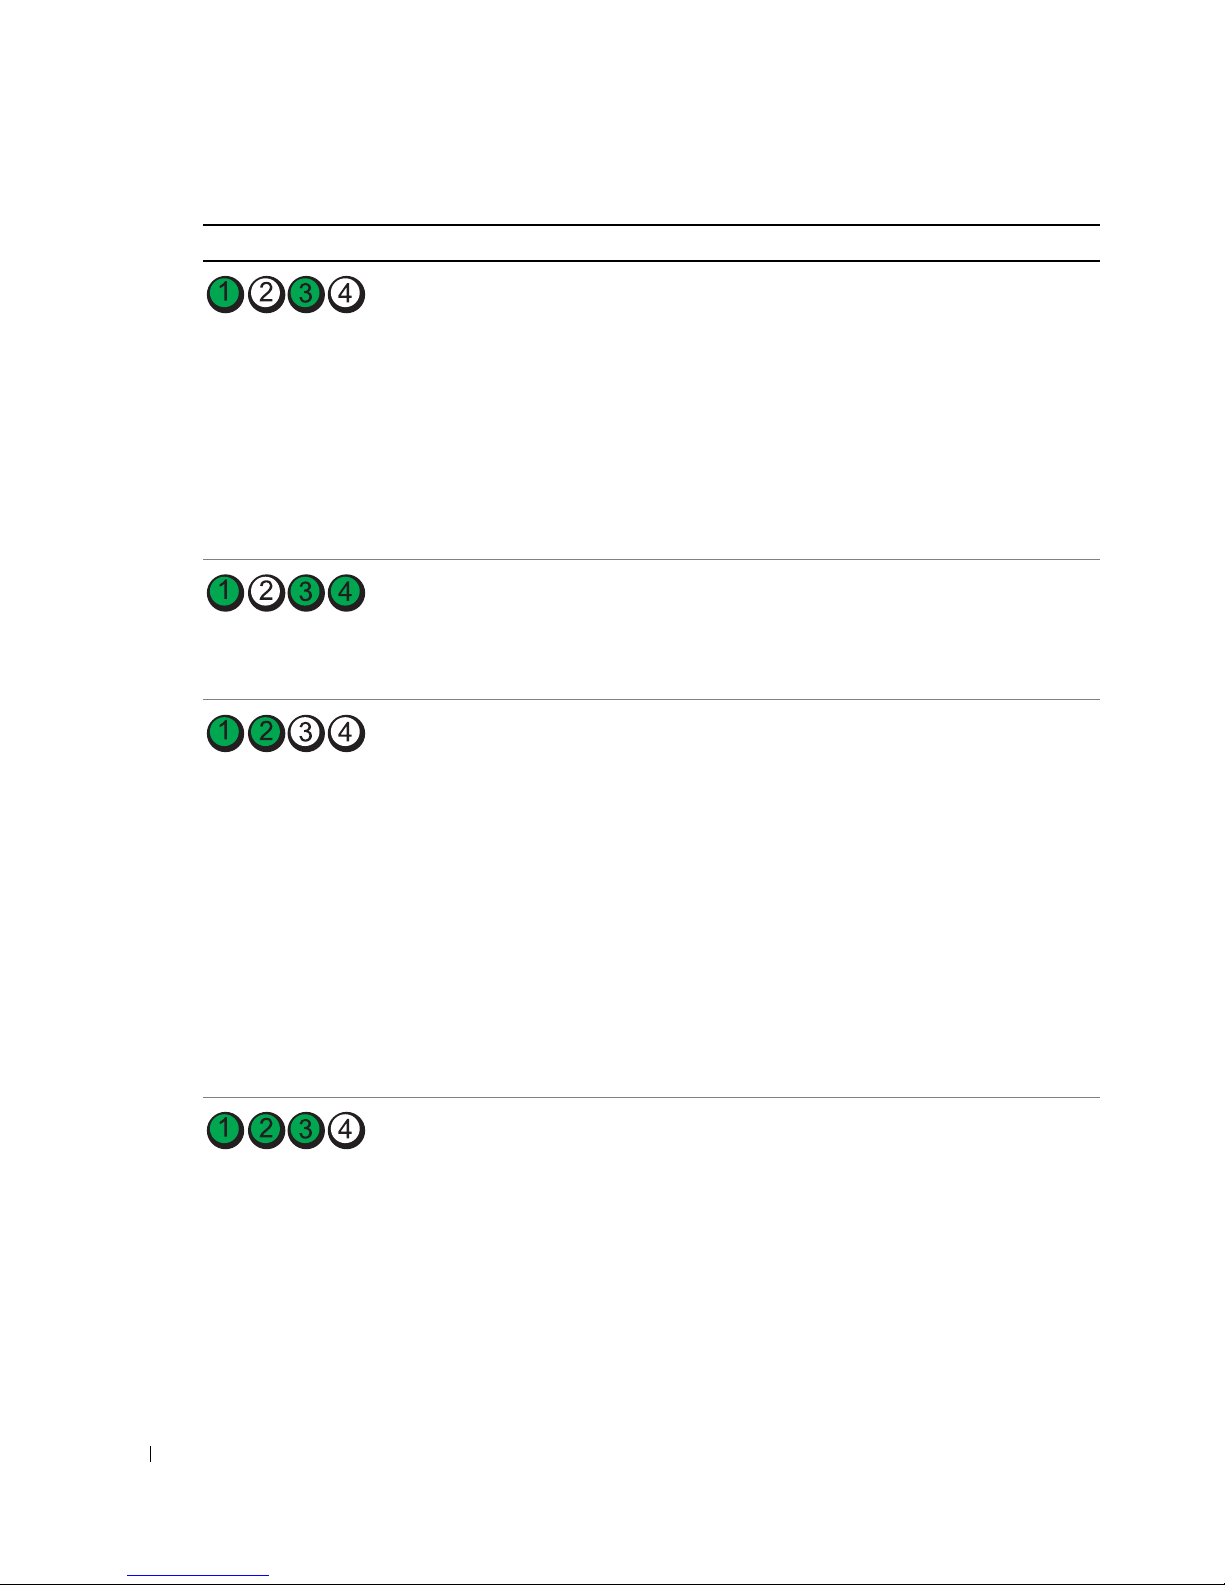
Lysmønster Problembeskrivelse Foreslået løsning
www.dell.com | support.dell.com
Der er fundet
hukommelsesmoduler, men der er
opstået en
hukommelseskonfigurations- eller
kompatibilitetsfejl.
Der er opstået en mulig fejl på
systemkortresurse og/eller hardware.
Der er opstået en mulig fejl på
udvidelseskortet.
• Sørg for, at ingen specielle placeringskrav for
hukommelsesmodul/hukommelsesstik er
tilstede.
• Kontrollér, at de hukommelsesmoduler, som
du installerer på computeren, er kompatible
med computeren.
• Geninstallér hukommelsesmodulerne, og
genstart computeren.
• Hvis problemet fortsætter, kontakt da Dell.
For instruktioner i, hvordan Dell kontaktes,
henvises til
User’s Guide
(Brugervejledning).
• Udfør procedurerne i "Løsning af software- og
hardwareinkompabilitet" på side 78.
• Hvis problemet fortsætter, kontakt da Dell.
For instruktioner i hvordan Dell kontaktes,
henvises til
1
Fastslå, om der er opstået en konflik ved at
User’s Guide
(Brugervejledning).
fjerne et kort (ikke grafikkortet), og genstart
derefter computeren.
2
Hvis problemet stadig fortsætter,
geninstalleres det kort, som du fjernede, fjern
et andet kort, og genstart derefter
computeren.
3
Gentag denne proces for hvert kort. Hvis
computeren starter normalt, så kontroller det
sidst fjernede kort fra computeren for
resurcekonflikter (se "Løsning af software- og
hardwareinkompabilitet" på side 78).
4
Hvis problemet fortsætter, kontakt da Dell.
For instruktioner i hvordan Dell kontaktes,
henvises til
User’s Guide
(Brugervejledning).
Der er opstået en anden fejl.
Dette mønster vises også, når du går i
systemopsætning og indikerer
muligvis ikke et problem.
88 Hurtig referenceguide
• Kontrollér at kablerne er korrekt tilsluttet til
systemkortet fra harddisken, cd-drevet, og
dvd-drevet.
• Hvis problemet fortsætter, kontakt da Dell.
For instruktioner i hvordan Dell kontaktes,
henvises til
User’s Guide
(Brugervejledning).
Page 89

Lysmønster Problembeskrivelse Foreslået løsning
Computeren er i normal
betjeningsfunktion efter POST.
Ingen.
BEMÆRK: De diagnostiske lamper
går ud efter en kort tid, hvis
computeren er i en normal
driftstilstand efter POST.
Ofte stillede spørgsmål
Hvordan... Løsning Her findes yderligere information
opsætter jeg computeren til at
bruge to skærme?
tilslutter jeg min skærm, når
skærmkablet ikke synes at passe
med stikket bag på computeren?
Hvis computeren har det nødvendige
grafikkort til at understøtte opstilling
med to skærme, skal du finde et
Y-kabel i transportkassen. Y--kablet
har et enkelt stik i den ene ende (sæt
dette stik ind i bagpanelet) og
forgrenes ind i de to stik (sæt disse
stik ind i skærmkablerne). For
tower-computeren, se side 56 og for
desktop-computeren, se side 61.
Hvis grafikkortet har en
DVI-konnektor, men skærmen har en
VGA-konnektor, skal du bruge en
adapter. En adapter bør være vedlagt
i forsendelseskassen.
Se "Opsætning af computeren
(Tower-retning)" på side 55 eller
"Opsætning af computeren
(Desktop-retning)" på side 60 for
information om tilslutning af
dobbelte skærme til computeren.
Se "Opsætning af computeren
(Tower-retning)" på side 55 eller
"Opsætning af computeren
(Desktop-retning)" på side 60 for
information om tilslutning af
skærme til computeren. For mere
information, kontakt Dell. For
instruktioner i, hvordan Dell
kontaktes, henvises til User’s Guide
(Brugervejledning).
tilslutter jeg mine højttalere? Hvis du har et lydkort installeret,
tilsluttes højttalerene til stikkene på
kortet. For tower-computeren, se
side 59 og for desktop-computeren,
se side 64.
Se den dokumentation, der fulgte
med højttalerne for yderligere
information.
Hurtig referenceguide 89
Page 90

Hvordan... Løsning Her findes yderligere information
finder jeg de rigtige stik til mine
USB- eller IEEE 1394-enheder?
www.dell.com | support.dell.com
finder jeg information om
hardwaren og andre tekniske
specifikationer for computeren?
finder jeg dokumentation til
computeren?
Tower-computeren har otte USB-stik
(to foran, et indvendigt og fem på
bagsiden).
Desktop-computeren har otte
USB-stik (to foran, et indvendigt og
fem på bagsiden) samt et valgtfrit
IEEE 1394-stik foran. Dette stik er
kun tilgængeligt, hvis du købte et
IEEE 1394-kort. Kontakt Dell for at
købe et kort. For mere information
om IEEE 1394-kortet, henvises til
User’s Guide (Brugervejledning).
User’s Guide (Brugervejledning) har
en specifikationstabel, som giver
mere detaljeret information om
computeren og hardwaren. For hjælp
med at finde User’s Guide
(Brugervejledning), se. "Sådan finder
du information" på side 51
Følgende dokumentation kan findes
på computeren:
• Brugervejledning
• Produktinformationsvejledning
• Systeminformationsetiket
For at finde disse dokumenter, se.
"Sådan finder du information" på
side 51
Se "Om computeren" på side 65 for
illustrationer af computerens for- og
bagvisninger.
For hjælp til at finde User ’s Guide
(Brugervejledning), se "Sådan finder
du information" på side 51.
Gå til Dell Support websted på
support.dell.com, og brug en af
følgende supportredskaber: læs
hvidbøger om den seneste teknologi
eller kommunikér med andre
Dell-brugere i Dell-forummets
chatroom.
Hvis du mister dokumentationen,
kan du finde den på Dell Support
websted på support.dell.com.
90 Hurtig referenceguide
Page 91

Index
B
bip-koder, 82
C
computer
bip-koder, 82
gendan til forrige status, 78
D
Dell
supportside, 53
Dell Diagnostics (Dell
diagnosticering), 80
Dell Premier Support
Website, 52
Dell Premier Support
websted, 53
diagnose
lys, 84
diagnoselys, 84
diagnoser
bip-koder, 82
Drivers and Utilities CD
(CD'en drivere og
hjælpeværktøjer), 51
diagnosticering
Dell, 80
diagnostisk
lys, 66, 69
dokumentation
online, 53
Produktinformationsvejledning,
52
Quick Reference (Hurtig
reference), 51
ResourceCD, 51
User’s Guide
(Brugerhåndbog), 52
doumentation
enhed, 51
drivere
ResourceCD, 51
Drivers and Utilities CD
(CD'en drivere og
hjælpeværktøjer), 51
F
Fejlfinding
Help og Support Center, 54
fejlfinding
Dell Diagnostics (Dell
diagnosticering), 80
diagnoselys, 84
gendan til forrige status, 78
Hardware-fejlfinder, 78
konflikter, 78
fejlmeddelelser
bip-koder, 82
diagnoselys, 84
G
garanti, 52
geninstallation
Drivers, 51
ResourceCD, 51
H
harddisk
aktivitetslys, 65-66, 68-69
hardware
bip-koder, 82
Dell Diagnostics (Dell
diagnosticering), 80
konflikter, 78
Hardware-fejlfinder, 78
Help and Support Center
(Hjælp og
supportcenter), 54
hovedtelefon
stik, 66, 69
I
IEEE
konnektorer, 66
stik, 68
installation af dele
slukning af computeren, 76
IRQ-konflikter, 78
K
konnektorer
IEEE, 66
kort
slot, 67, 70
Index 91
Page 92

92 Index
L
lydstik
linie ind, 72
linie ud, 72
lys
bagsiden af computeren, 84
diagnose, 84
diagnostisk, 66, 69
harddiskaktivitet, 65, 68-69
harddiskdrev aktivitets, 66
linkintegritet, 71
netværk, 71
netværksaktivitet, 71
strøm, 66, 69
M
mærker
Microsoft Windows, 52
Servicemærke, 52
Microsoft Windows-
mærke, 52
mikrofon
stik, 72
motherboard. Se systemkort
mus
stik, 71
N
netværk
stik, 71
O
Operating System
(Operativsystem)
cd, 54
Installationsvejledning, 54
P
problemer
bip-koder, 82
Dell Diagnostics (Dell
diagnosticering), 80
diagnoselys, 84
gendan til forrige status, 78
konflikter, 78
R
ResourceCD (Resurse-cd)
Dell Diagn, 80
S
Servicemærke, 52
sikkerhedsinstruktioner, 52
skonflikter
software- og
hardwareinkompabilitet, 7
8
software
konflikter, 78
spændingsomskifter, 67, 70
stik
hovedtelefon, 66, 69
IEEE, 68
linie ind, 72
linie ud, 72
lyd, 72
mikrofon, 72
mus, 71
netværksadapter, 71
parallel, 71
seriel, 72
strøm, 67, 70
tastatur, 72
USB, 66, 69, 72
strøm
knap, 66, 69
lys, 66, 69
stik, 67, 70
Systemgendannelse, 78
systemkort, 74
T
tastatur
stik, 72
U
USB
stik, 66, 69, 72
User’s Guide
(Brugerhåndbog), 52
W
Windows XP
Hardware-fejlfinder, 78
Systemgendannelse, 78
Windows XP (Hjælp og
supportcenter til
Windows XP) Help og
Support Center (Hjælp og
supportcenter), 54
92 Index
Page 93

Dell Precision™ -työasema 380
Pikaopas
DCTA-malli
www.dell.com | support.dell.com
Page 94

Huomautukset, varoitukset ja vaara
HUOMAUTUS: HUOMAUTUKSET ovat tärkeitä tietoja, joiden avulla voit käyttää tietokonetta entistä paremmin.
VAROITUS: VAROITUKSET ovat varoituksia tilanteista, joissa laitteisto voi vahingoittua tai joissa tietoja voidaan
menettää. Niissä kerrotaan myös, miten nämä tilanteet voidaan välttää.
VAARA: VAARA-merkinnät kertovat tilanteesta, joihin saattaa liittyä omaisuusvahinkojen, loukkaantumisen tai
kuoleman vaara.
Lyhenteet
Täydellinen luettelo lyhenteistä on
Käyttöoppaan
sanastossa.
Jos ostit Dellin™ n-sarjan tietokoneen, mitkään tässä asiakirjassa esitettävät viittaukset Microsoft
käyttöjärjestelmiin eivät koske sinua.
____________________
®
Windows® -
Tämän asiakirjan tiedot voivat muuttua ilman erillistä ilmoitusta.
© 2005 Dell Inc. Kaikki oikeudet pidätetään.
Tämän tekstin kaikenlainen kopioiminen ilman Dell Inc:n kirjallista lupaa on jyrkästi kielletty.
Tekstissä käytetyt tavaramerkit: Dell, DELL-logo ja Dell Precision ovat Dell Inc.:n tavaramerkkejä; Intel ja Pe nt iu m ovat ovat Intel Corporationin
rekisteröityjä tavaramerkkejä; Microsoft ja Windows ovat Microsoft Corporationin rekisteröityjä tavaramerkkejä.
Muut tekstissä mahdollisesti käytetyt tavaramerkit ja tuotenimet viittaavat joko merkkien ja nimien haltijoihin tai näiden tuotteisiin. Dell Inc.
kieltää omistusoikeuden muihin kuin omiin tavaramerkkeihinsä ja tuotenimiinsä.
DCTA-malli
Toukokuu 2005 Osanro M8559 Versio A01
Page 95

Sisältö
Tietojen etsiminen . . . . . . . . . . . . . . . . . . . . . . . . . . . . . . . . 97
Tietokoneen asennus (tornimalli)
Tietokoneen asennus (pöytämalli)
Tietoja tietokoneesta
. . . . . . . . . . . . . . . . . . . . . . . . . . . . . 111
Tietokone edestä katsottuna (tornimalli)
Tietokone takaa katsottuna (tornimalli)
Tietokone edestä katsottuna (pöytämalli)
Tietokone takaa katsottuna (pöytämalli)
takapaneelin liittimet
. . . . . . . . . . . . . . . . . . . . . . . . . . . 116
Tietokone sisältä katsottuna
Emolevykomponentit
. . . . . . . . . . . . . . . . . . . . . . . . . . . . . . 120
Käyttöoppaan paikantaminen
Tietokoneen kannen irrottaminen
Tietokoneen ylläpito
Ongelmien ratkominen
Vianmääritysvihjeitä
. . . . . . . . . . . . . . . . . . . . . . . . . . . . . . 123
. . . . . . . . . . . . . . . . . . . . . . . . . . . . . 124
. . . . . . . . . . . . . . . . . . . . . . . . . . . . 124
. . . . . . . . . . . . . . . . . . . . . . . 101
. . . . . . . . . . . . . . . . . . . . . . . 106
. . . . . . . . . . . . . . . . . 111
. . . . . . . . . . . . . . . . . . 113
. . . . . . . . . . . . . . . . 114
. . . . . . . . . . . . . . . . . 116
. . . . . . . . . . . . . . . . . . . . . . . 119
. . . . . . . . . . . . . . . . . . . . . . . . . 121
. . . . . . . . . . . . . . . . . . . . . . . 122
Ohjelmisto- ja laitteistoyhteensopivuusongelmien ratkaiseminen
®
Microsoft
Windows® XP:n järjestelmänpalauttamistoiminto . . . . . 124
Viimeisimmän toimivan kokoonpanomäärityksen käyttö
Dell-diagnostiikka
Ennen testauksen aloittamista
. . . . . . . . . . . . . . . . . . . . . . . . . . . . . 126
. . . . . . . . . . . . . . . . . . . . . . 128
. . . . 124
. . . . . . . . . 126
Äänimerkkikoodit
Virhesanomat
Diagnostiikkavalot
. . . . . . . . . . . . . . . . . . . . . . . . . . . . . . . 128
. . . . . . . . . . . . . . . . . . . . . . . . . . . . . . . 129
. . . . . . . . . . . . . . . . . . . . . . . . . . . . . . . 130
Usein kysyttyjä kysymyksiä
Hakemisto . . . . . . . . . . . . . . . . . . . . . . . . . . . . . . . . . . . . 137
. . . . . . . . . . . . . . . . . . . . . . . . . . 135
Sisältö 95
Page 96

96 Sisältö
Page 97
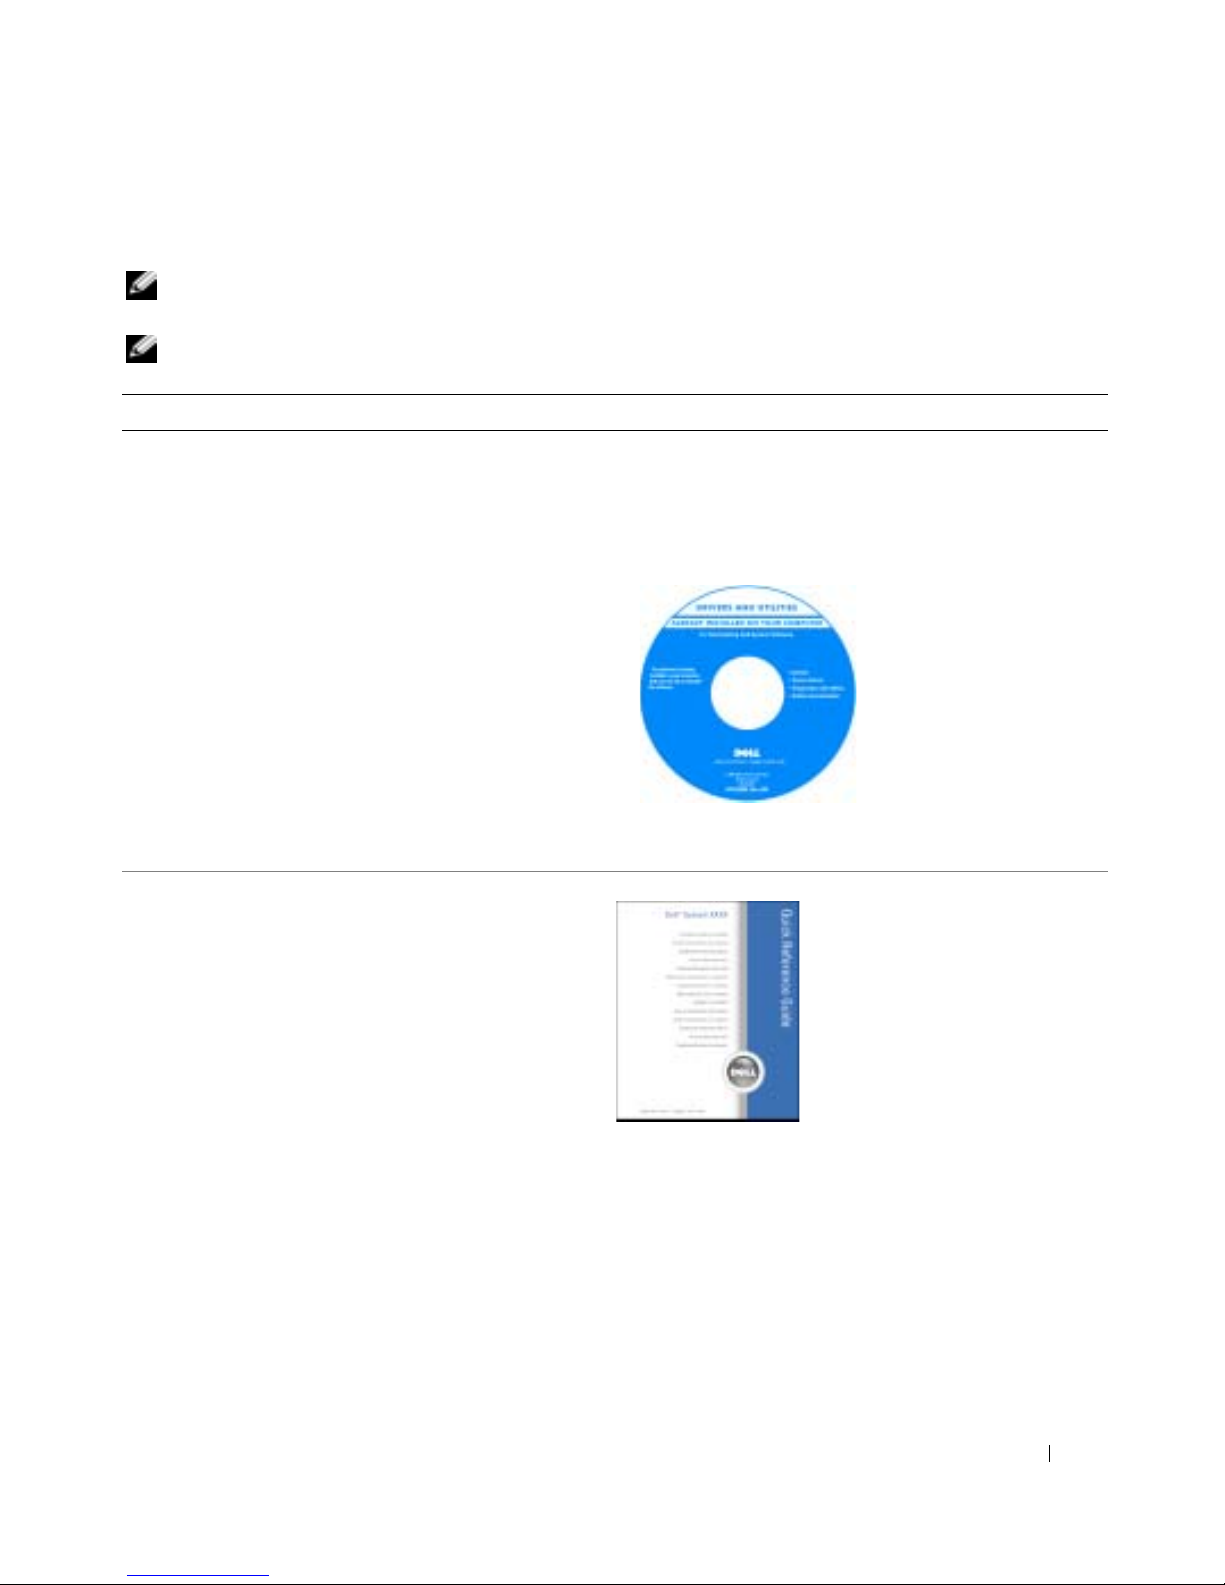
Tietojen etsiminen
HUOMAUTUS: Jotkin ominaisuudet eivät ehkä ole käytettävissä kaikissa tietokoneissa tai kaikissa
maissa.
HUOMAUTUS: Tietokoneen kanssa voidaan toimittaa lisätietoja.
Mitä etsit? Tietolähde:
• Tietokoneen diagnostiikkaohjelma
• Tietokoneen ohjaimet
• Tietokoneen ohjekirjat
• Laitteen ohjekirjat
• Desktop System Software (DSS) -ohjelmisto
• Tietokoneen käyttöönottaminen
• Tietokoneen huolto
• Vianmäärityksen perustiedot
• Dell-diagnostiikan käyttäminen
• Virhekoodit ja diagnostiikkavalot
• Osien irrottaminen ja asentaminen
• Tietokoneen kannen avaaminen
Drivers and Utilities -CD-levy ( Resurssilevy)
Ohjeet ja ohjaimet on asennettu tietokoneeseen
valmiiksi. CD-levyn avulla voit asentaa ohjaimia
uudelleen, suorittaa Dell-diagnostiikka sivulla 126 ohjelman tai lukea ohjeita.
CD-levyllä saattaa olla
Lueminut-tiedostoja,
joissa on viimeisimpiä
päivityksiä tietokoneen
teknisistä muutoksista
tai teknisiä lisätietoja
kokeneille käyttäjille tai
teknikoille.
HUOMAUTUS: Ohjain- ja opaspäivityksiä on osoitteessa
support.dell.com.
Pikaopas
HUOMAUTUS: Tämä tiedosto on saatavissa PDF-
muotoisena osoitteesta support.dell.com.
Pikaopas 97
Page 98
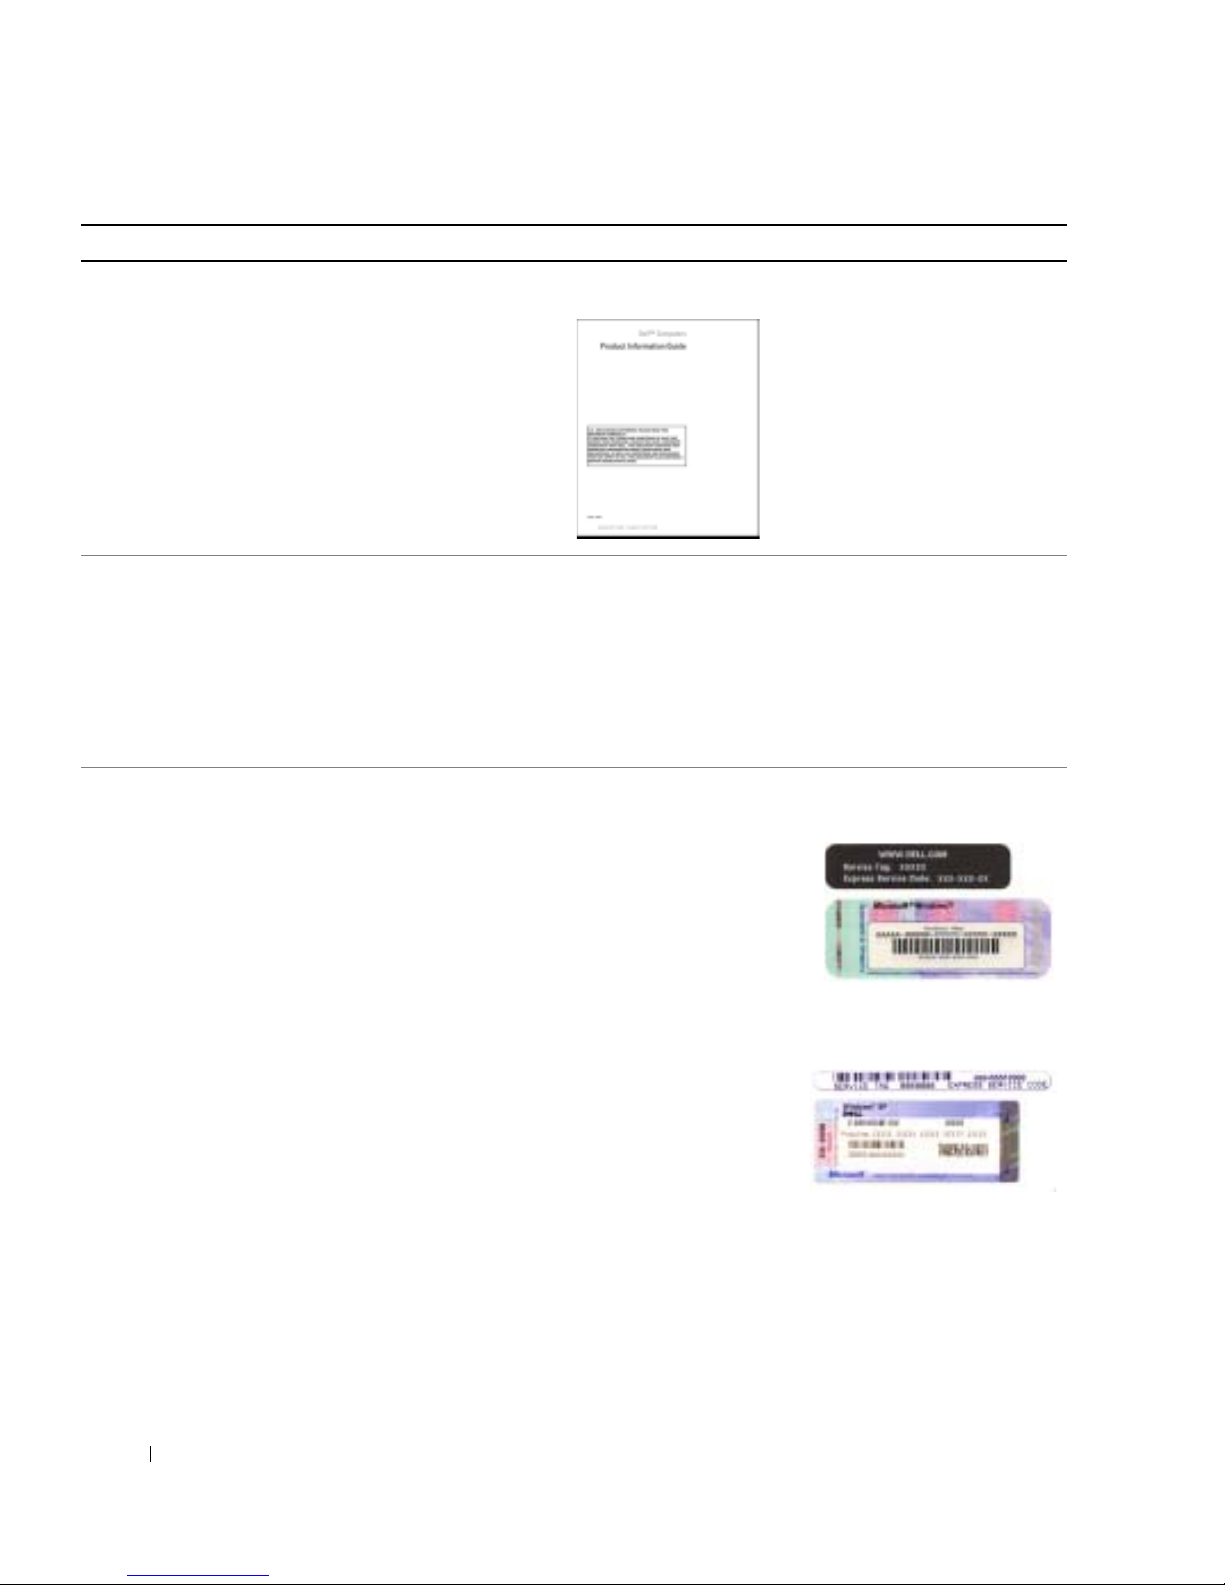
Mitä etsit? Tietolähde:
• Takuutiedot
• Ehdot (vain USA)
• Turvallisuustiedot
• Säädöksiin liittyvät tiedot
• Ergonomiatiedot
• Loppukäyttäjän lisenssisopimus
www.dell.com | support.dell.com
• Osien poistaminen ja vaihtaminen
• Tekniset tiedot
• Järjestelmäasetusten määrittäminen
• Ongelmien vianmääritys ja ratkaiseminen
• Huoltomerkki ja pikapalvelukoodi
• Microsoft Windowsin käyttöoikeustarra
Dell™ -tuotetieto-opas
Käyttöopas
Microsoft
1
2
Käyttöopason käytettävissä myös
CD-levyltä
®
Windows® XP:n ohje- ja tukikeskus
Napsauta
Va li t se
Käyttöoppaat
Käynnistä
-painiketta ja valitse
Käyttö- ja järjestelmäoppaat
.
.
Ohje ja tuki
, ja valitse
Drivers and Utilities
Huoltomerkki ja Microsoft® Windowsin® käyttöoikeus
Tarrat ovat tietokoneessa.
.
-
• Huoltomerkin avulla
voit tunnistaa
tietokoneesi, kun
käytät
support.dell.com
sivustoa tai otat
yhteyden tekniseen
tukeen.
• Anna
pikapalvelukoodi, joka
ohjaa puheluasi
ottaessasi yhteyden
tekniseen tukeen.
98 Pikaopas
Page 99

Mitä etsit? Tietolähde:
• Solutions (ratkaisuja) — vianmääritysvihjeitä, teknisten
asiantuntijoiden kirjoittamia artikkeleja, online-kursseja,
usein kysyttyjä kysymyksiä
• Community (yhteisö) — online-keskustelua muiden
Dellin asiakkaiden kanssa
• Upgrades (päivitykset) — komponenttien
päivitysohjeita, esimerkiksi muistin, kiintolevyaseman ja
käyttöjärjestelmän päivitysohjeet
• Customer Care (asiakaspalvelu) — yhteystiedot,
palvelupuhelu- ja tilaustiedot sekä takuu- ja
korjaustiedot
• Service and support (palvelut ja tuki) —
palvelupuhelujen tila ja tukitapahtumat,
palvelusopimukset, online-keskustelut teknisen tuen
kanssa
• Reference (viittaukset) — tietokoneen ohjeet,
laitekokoonpanon tiedot, tuotetekniset tiedot ja white
paper -raportit
• Downloads (ladattavat tiedostot) — sertifioidut ajurit,
korjaustiedostot ja ohjelmapäivitykset
• Desktop System Software (DSS) -ohjelmisto — Jos
asennat tietokoneesi käyttöjärjestelmän uudelleen,
sinun on asennettava uudelleen myös DSS -apuohjelma.
DSS sisältää tärkeitä käyttöjärjestelmäpäivityksiä ja
tukea Dellin™ 3,5 tuuman USB-levyasemille, Intel
®
Pentium
M -suorittimille, optisille asemille ja USB-
®
laitteille. DSS tarvitaan, jotta Dell-tietokone toimisi
oikein. Ohjelma tunnistaa automaattisesti tietokoneen
ja käyttöjärjestelmän ja asentaa niiden kokoonpanojen
mukaiset päivitykset.
Näin ladataan Desktop System Software:
1
Siirry osoitteeseen
Downloads (Ladattavat ohjelmat)
2
Anna huoltomerkki tai tuotteen malli.
3
Valitse avattavasta
-valikosta
4
Valitse tietokoneesi käyttöjärjestelmä ja sen kieli ja
valitse
Selaa
All (Kaikki)
Submit (Lähetä).
Select a Device
and Configuration Utilities
support.dell.com
ja valitse
.
Download Category (Latausluokka)
.
(Valitse laite) -kohdassa
System
(Järjestelmän ja
kokoonpanon apuohjelmat) -vaihtoehtoon ja valitse
Dell Desktop System Software
.
Dellin tukisivusto — support.dell.com
HUOMAUTUS: Valitsemalla oman alueesi saat esiin sitä
koskevan tukisivuston.
HUOMAUTUS: Yritys-, viranomais- ja opetusasiakkaat
voivat käyttää myös mukautettua Dell Premier -tukisivustoa
osoitteessa premier.support.dell.com. Tämä sivusto ei ehkä
ole käytettävissä kaikilla alueilla.
Pikaopas 99
Page 100
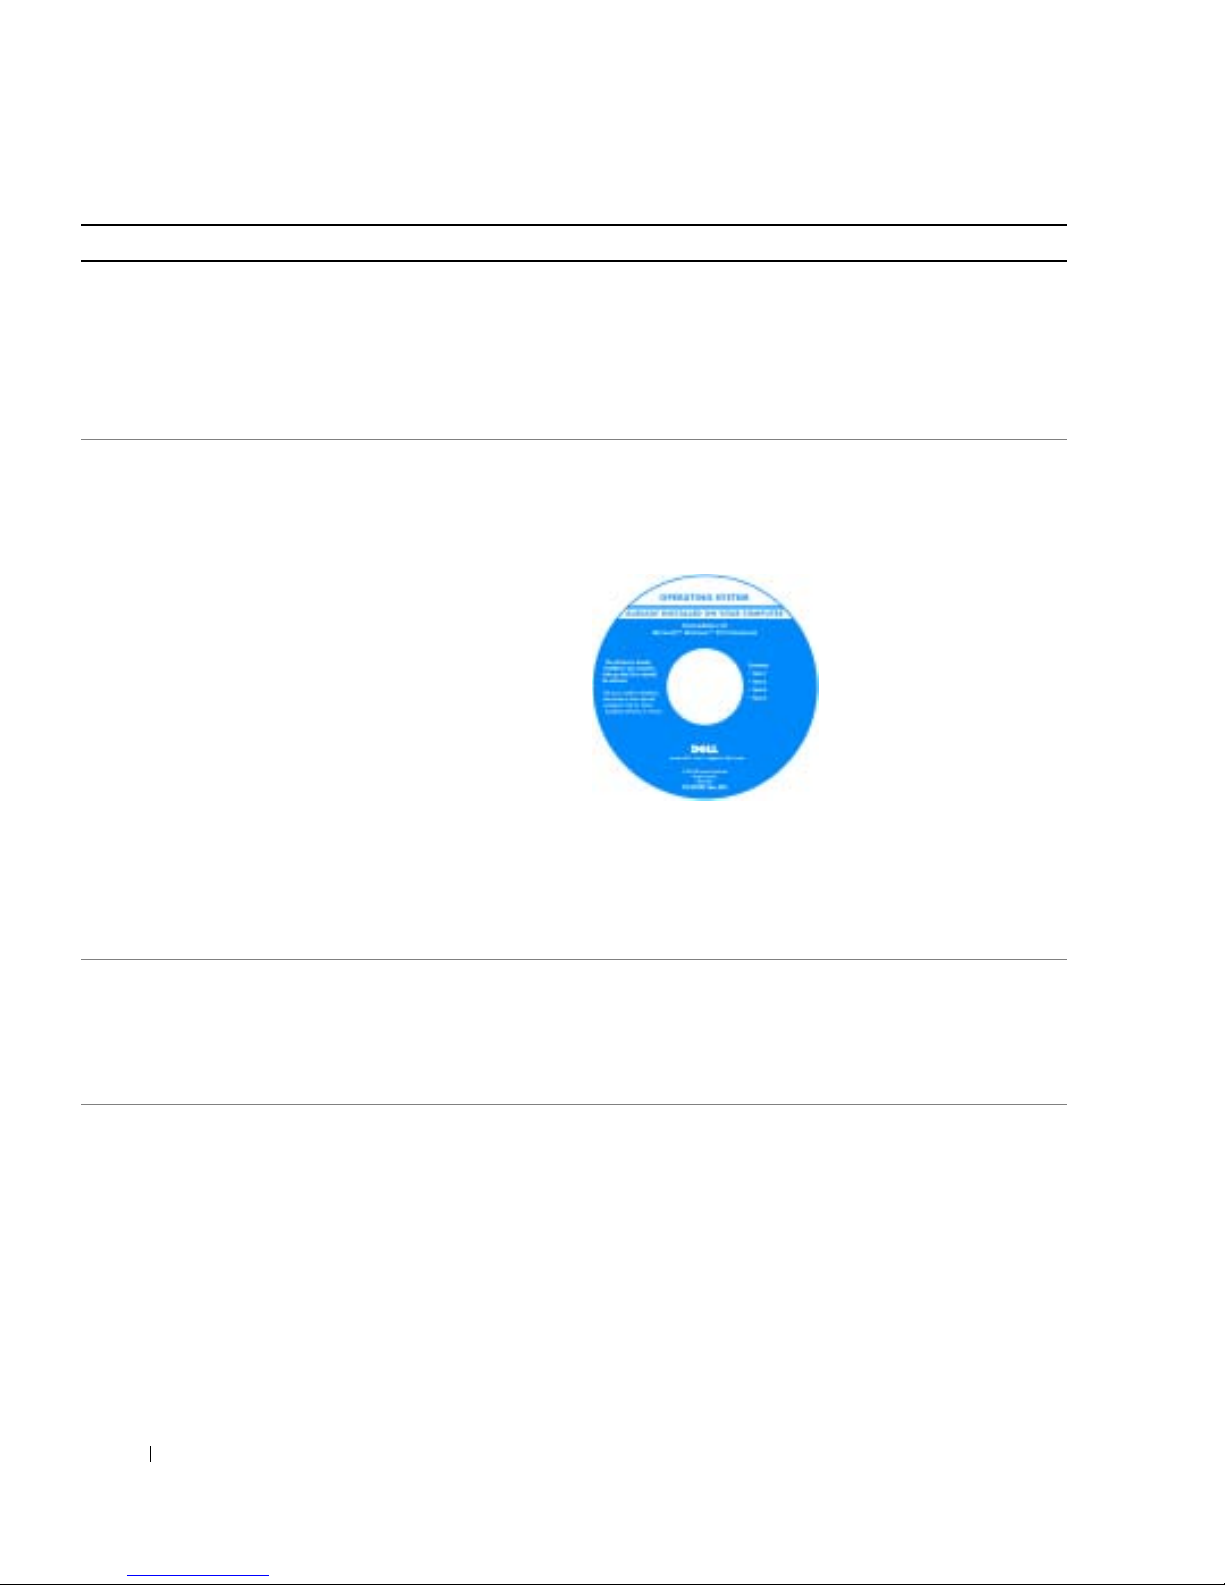
Mitä etsit? Tietolähde:
• Windows XP:n käyttö
• Tietokoneen oppaat
• Laitteiden (kuten modeemin) ohjekirjat
• Käyttöjärjestelmän uudelleenasentaminen
www.dell.com | support.dell.com
Windowsin Ohje- ja tukikeskus
1
Napsauta
2
Kirjoita ongelmaa kuvaava sana tai lause ja napsauta
Käynnistä
-painiketta ja valitse
Ohje ja tuki
.
nuolikuvaketta.
3
Napsauta ohjeaihetta, joka kuvaa ongelmaa.
4
Noudata näytön ohjeita.
Käyttöjärjestelmä-CD-levy
Käyttöjärjestelmä on jo asennettu tietokoneeseen. Jos
haluat asentaa käyttöjärjestelmän uudelleen, käytä
Käyttöjärjestelmä-CD-levyä. Ohjeita on Käyttöoppaassa.
Kun olet asentanut
käyttöjärjestelmän
uudelleen, asenna
uudelleen tietokoneen
mukana toimitettujen
laitteiden ohjaimet
valinnaiselta Drivers and
Utilities -CD-levyltä.
Käyttöjärjestelmän
tuoteavain on
tietokoneessa.
HUOMAUTUS: CD-levyn väri vaihtelee tilaamasi
käyttöjärjestelmän mukaan.
HUOMAUTUS: Käyttöjärjestelmä-CD-levy on valinnainen
eikä sitä välttämättä toimiteta tietokoneen mukana.
• Linuxin käyttäminen
• Sähköpostikeskustelut toisten Dell Precision™ tuotteiden ja Linux-käyttöjärjestelmän käyttäjien kanssa
• Lisätietoja Linuxista ja omasta Dell Precision tietokoneestani
100 Pikaopas
Dellin tukemat Linux-sivustot
• Linux.dell.com
• Lists.us.dell.com/mailman/listinfo/linux-precision
 Loading...