

Dell Precision KP542, Precision T3400, Precision Workstation T3400 DCTA Quick Reference Manual
Page 1

www.dell.com | support.dell.com
Dell Precision™ Workstation T3400
Quick Reference Guide
Model DCTA
Page 2

Notes, Notices, and Cautions
NOTE: A NOTE indicates important information that helps you make better use of
your computer.
NOTICE: A NOTICE indicates either potential damage to hardware or loss of data
and tells you how to avoid the problem.
CAUTION: A CAUTION indicates a potential for property damage, personal injury,
or death.
____________________
Information in this document is subject to change without notice.
© 2007 Dell Inc. All rights reserved.
Reproduction in any manner whatsoever without the written permission of Dell Inc. is strictly
forbidden.
Trademarks used in this text: Dell, the DELL logo, and Dell Precision are trademarks of Dell Inc.;
Microsoft, Windows, and Windows Vista are either trademarks or registered trademarks of Microsoft
Corporation in the United States and/or other countries.
Other trademarks and trade names may be used in this document to refer to either the entities claiming
the marks and names or their products. Dell Inc. disclaims any proprietary interest in trademarks and
trade names other than its own.
Model DCTA
August 2007 P/N KP542 Rev. A00
Page 3

Contents 3
Contents
Finding Information . . . . . . . . . . . . . . . . . . . . 5
About Your Computer
. . . . . . . . . . . . . . . . . . 11
Front View (Tower Orientation)
. . . . . . . . . . 11
Back View (Tower Orientation)
. . . . . . . . . . 14
Front View (Desktop Orientation)
. . . . . . . . . 15
Back View (Desktop Orientation)
. . . . . . . . . 18
Back Panel Connectors
. . . . . . . . . . . . . . 19
Setting Up Your Computer
. . . . . . . . . . . . . . . . 21
Changing Between Tower and
Desktop Orientations
. . . . . . . . . . . . . . . . 21
Installing Your Computer in an Enclosure
. . . . . 22
Transferring Information to a New Computer
. . . 25
Power Protection Devices
. . . . . . . . . . . . . 28
Cleaning Your Computer
. . . . . . . . . . . . . . . . 30
Computer, Keyboard, and Monitor
. . . . . . . . . 30
Mouse (Non-Optical)
. . . . . . . . . . . . . . . . 30
Floppy Drive
. . . . . . . . . . . . . . . . . . . . 31
CDs and DVDs
. . . . . . . . . . . . . . . . . . . 31
Troubleshooting Tools
. . . . . . . . . . . . . . . . . . 31
Power Lights
. . . . . . . . . . . . . . . . . . . . 31
Diagnostic Lights
. . . . . . . . . . . . . . . . . . 33
Beep Codes
. . . . . . . . . . . . . . . . . . . . 37
System Messages
. . . . . . . . . . . . . . . . . 39
Hardware Troubleshooter
. . . . . . . . . . . . . 41
Dell Diagnostics
. . . . . . . . . . . . . . . . . . 41
Page 4

4 Contents
Troubleshooting . . . . . . . . . . . . . . . . . . . . . 45
Battery Problems
. . . . . . . . . . . . . . . . . . 46
Drive Problems
. . . . . . . . . . . . . . . . . . . 46
E-Mail, Modem, and Internet Problems
. . . . . . 48
Error Messages
. . . . . . . . . . . . . . . . . . 49
IEEE 1394 Device Problems
. . . . . . . . . . . . . 50
Keyboard Problems
. . . . . . . . . . . . . . . . . 51
Lockups and Software Problems
. . . . . . . . . . 51
Memory Problems
. . . . . . . . . . . . . . . . . 53
Mouse Problems
. . . . . . . . . . . . . . . . . . 54
Network Problems
. . . . . . . . . . . . . . . . . 55
Power Problems
. . . . . . . . . . . . . . . . . . 55
Printer Problems
. . . . . . . . . . . . . . . . . . 56
Scanner Problems
. . . . . . . . . . . . . . . . . 57
Sound and Speaker Problems
. . . . . . . . . . . 58
Video and Monitor Problems
. . . . . . . . . . . . 59
Index . . . . . . . . . . . . . . . . . . . . . . . . . . . . . . . 61
Page 5
Quick Reference Guide 5
Finding Information
NOTE: Some features or media may be optional and may not ship with your
computer. Some features or media may not be available in certain countries.
NOTE: Additional information may ship with your computer.
What Are You Looking For? Find It Here
• A diagnostic program for my computer
• Drivers for my computer
• Desktop System Software (DSS)
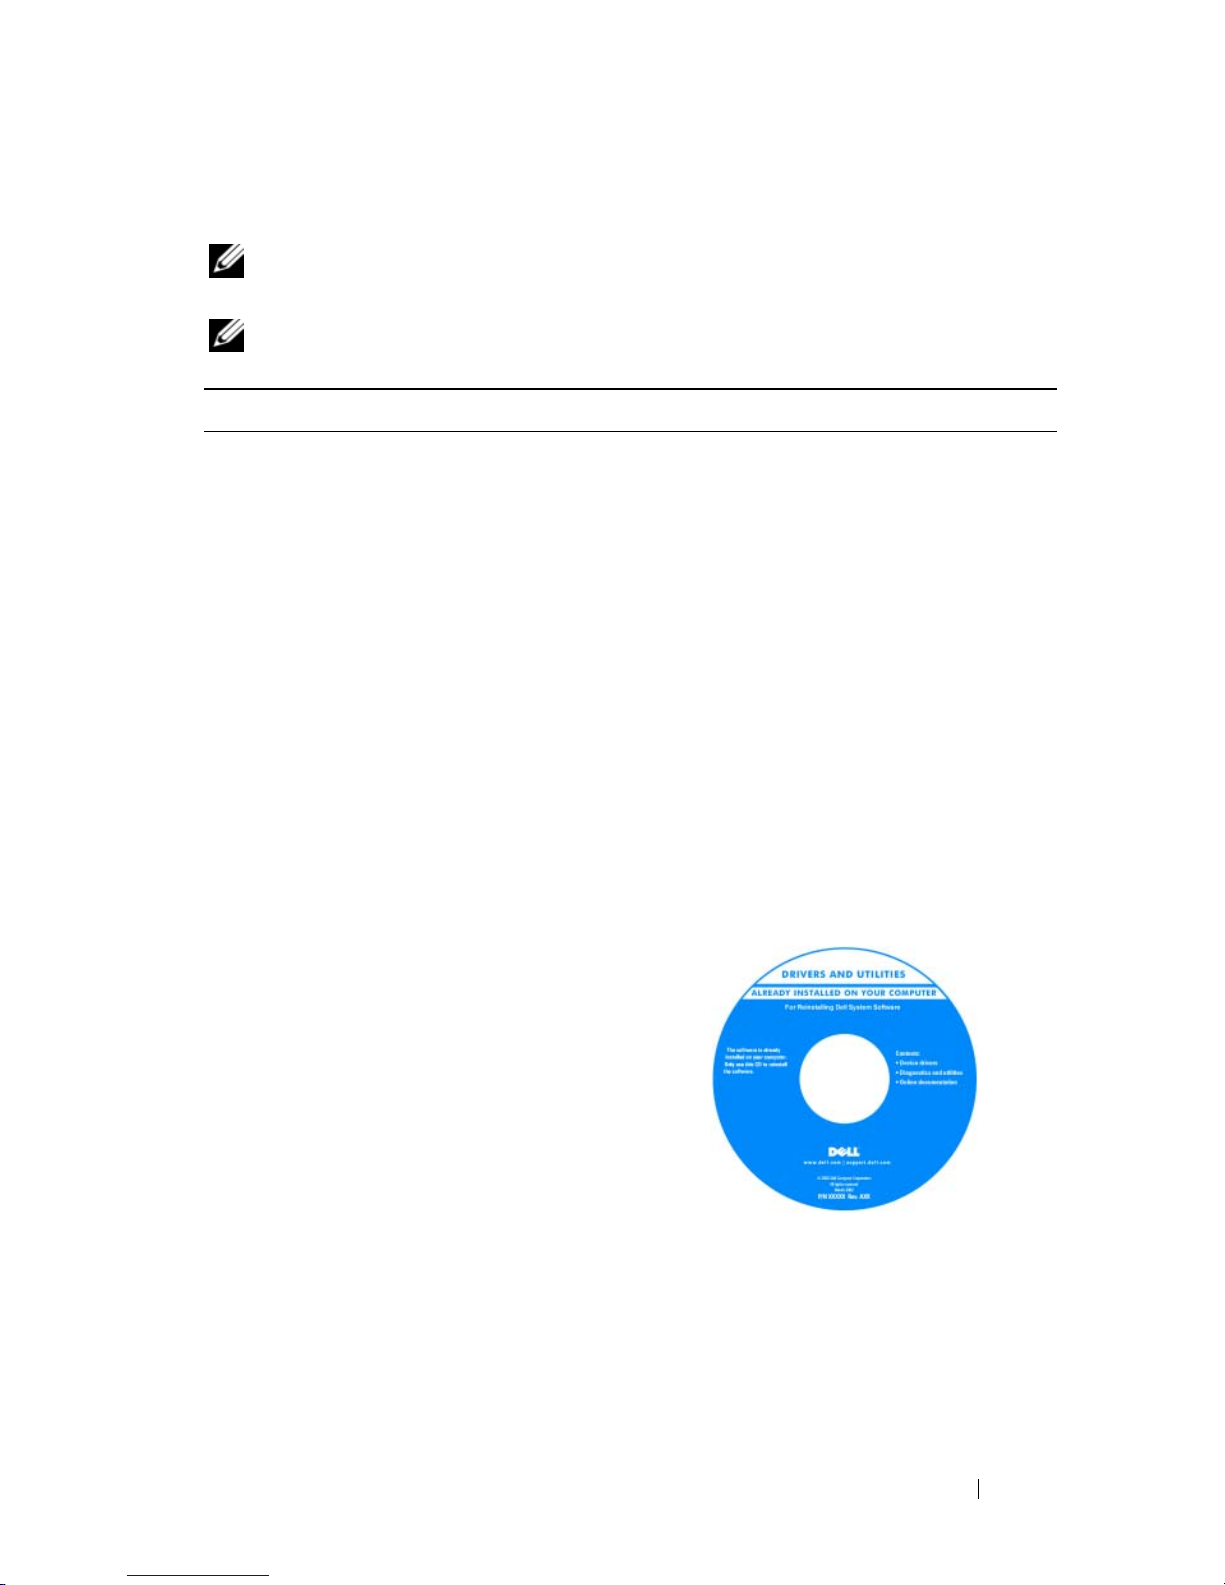
Drivers and Utilities Disc
NOTE: The Drivers and Utilities disc may
be optional and may not ship with your
computer.
Documentation and drivers are already
installed on your computer. You can use
the Drivers and Utilities disc to reinstall
drivers (see "Reinstalling Drivers and
Utilities" in your User’s Guide), or to run
the Dell Diagnostics (see "Dell Diagnostics"
on page 41).
Readme files may be included on your
disc to provide last-minute updates about
technical changes to your computer or
advanced technical-reference material for
technicians or experienced users.
Drivers and documentation updates can be
found at support.dell.com.
Page 6
6 Quick Reference Guide
• Warranty information
• Terms and Conditions (U.S. only)
• Safety instructions
• Regulatory information
• Ergonomics information
• End User License Agreement
Dell™ Product Information Guide
• How to remove and replace parts
• Specifications
• How to configure system settings
• How to troubleshoot and solve problems
Dell Precision™ User’s Guide
Microsoft
®
Windows® XP and Windows
Vista
™
Help and Support Center
1
Click
Start→
Help and Support→
Dell User and System Guides
→
System Guides
.
2
Click the
User’s Guide
for your
computer.
What Are You Looking For? Find It Here
Page 7
Quick Reference Guide 7
• Service Tag and Express Service Code
• Microsoft Windows Product Key
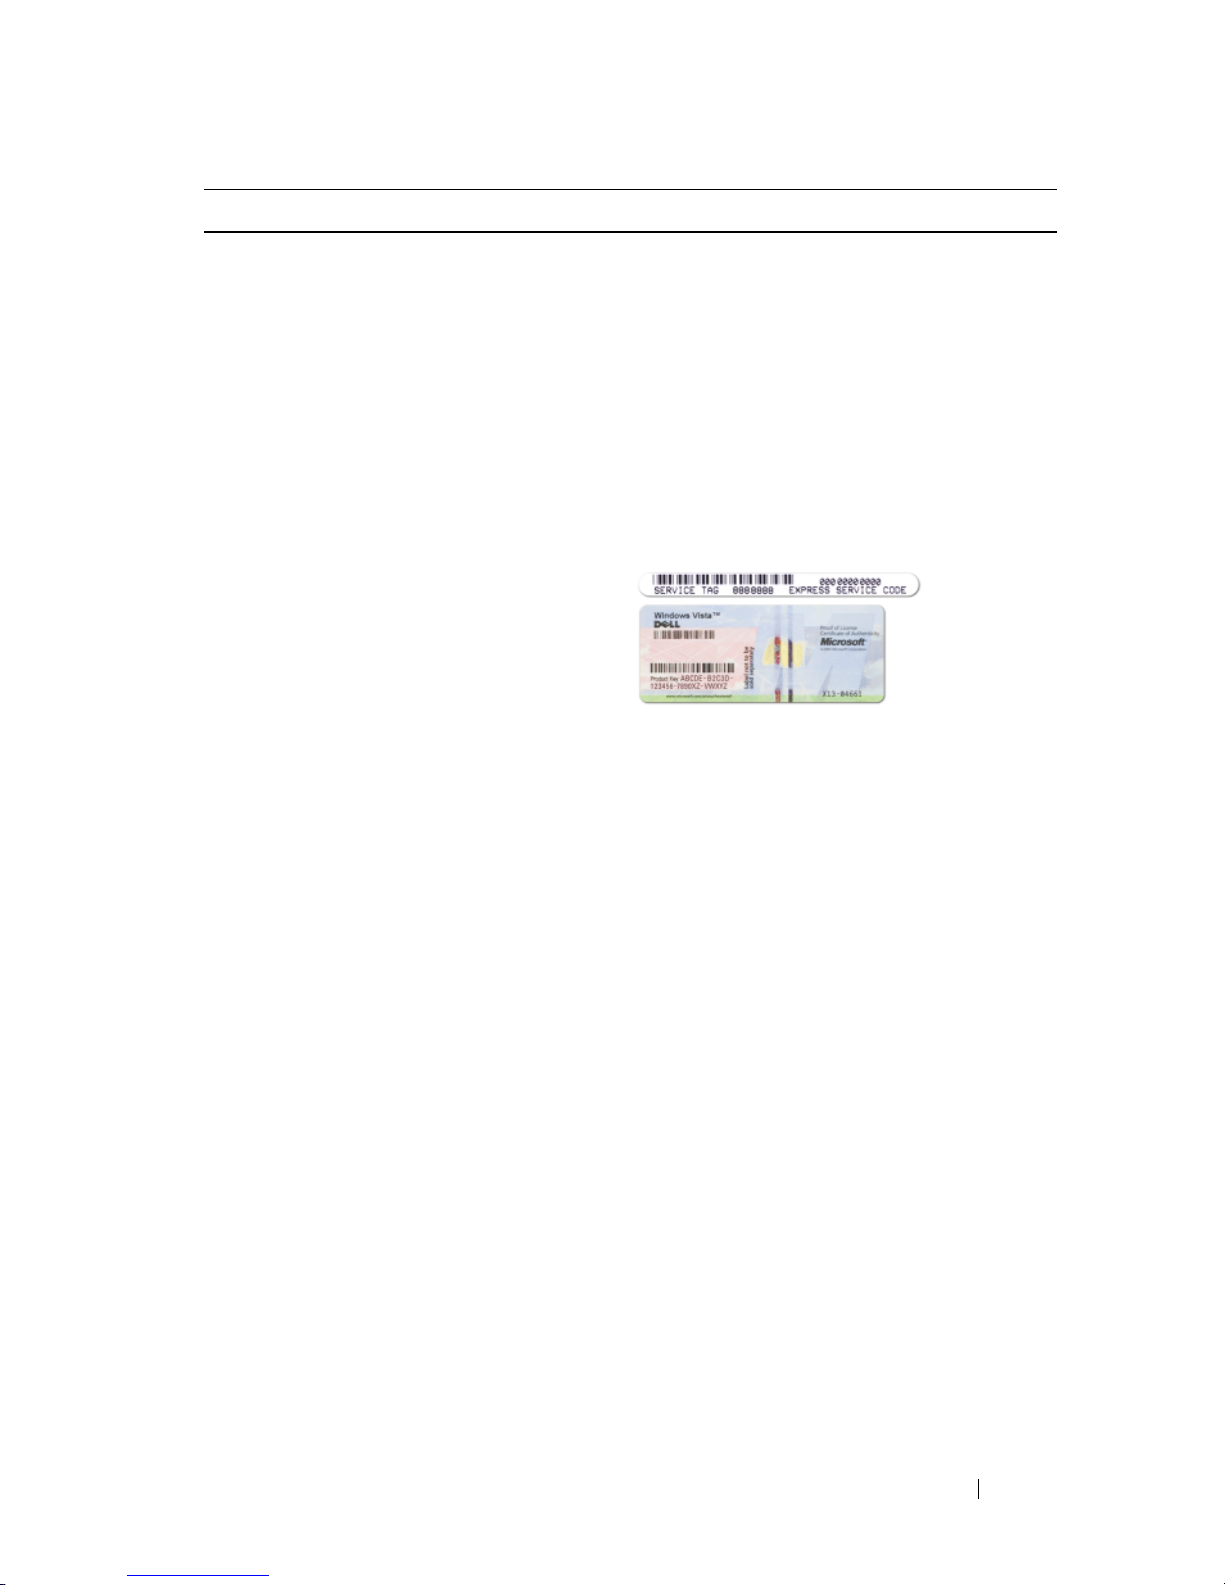
Service Tag and Microsoft Windows
Product Key
These labels are located on your
computer.
• Use the Service Tag to identify your
computer when you use
support.dell.com
or contact support.
• Enter the Express Service Code to
direct your call when contacting
support.
NOTE: As an increased security measure,
the newly designed Microsoft Windows
license label incorporates a missing
portion, or hole, to discourage removal of
the label.
What Are You Looking For? Find It Here
Page 8

8 Quick Reference Guide
• Solutions — Troubleshooting hints and
tips, articles from technicians, online
courses, and frequently asked questions
• Community — Online discussion with
other Dell customers
• Upgrades — Upgrade information for
components, such as the memory, hard
drive, and operating system
• Customer Care — Contact information,
service call and order status, and
warranty and repair information
• Service and support — Service call
status, support history, service contract,
and online discussions with support
• Dell Technical Update Service —
Proactive e-mail notification of software
and hardware updates for your computer
• Reference — Computer documentation,
details on my computer configuration,
product specifications, and white papers
• Downloads — Certified drivers, patches,
and software updates
Dell Support Website — support.dell.com
NOTE: Select your region or business
segment to view the appropriate support
site.
What Are You Looking For? Find It Here
Page 9

Quick Reference Guide 9
• Desktop System Software (DSS)— If
you reinstall the operating system for
your computer, you should also reinstall
the DSS utility. DSS automatically
detects your computer and operating
system and installs the updates
appropriate for your configuration,
providing critical updates for your
operating system and support for
processors, optical drives, USB devices,
etc. DSS is necessary for correct
operation of your Dell computer.
To download Desktop System Software:
1
Go to
support.dell.com
, select your
country/region, and then click
Drivers
& Downloads
.
2
Click
Select Model
or
Enter a Tag
,
make the appropriate selections or enter
the appropriate information for your
computer, and then click
Confirm
.
3
Scroll down to
System and
Configuration Utilities
→
Desktop
System Software
, and then click
Download Now.
NOTE: The support.dell.com user
interface may vary depending on your
selections.
• How to use Windows XP
• How to use Windows Vista
• How to work with programs and files
• How to personalize my desktop
Windows Help and Support Center
1
Click
Start→
Help and Support
.
2
Type a word or phrase that describes
your problem and click the arrow icon.
3
Click the topic that describes your
problem.
4
Follow the instructions on the screen.
What Are You Looking For? Find It Here
Page 10
10 Quick Reference Guide
• How to reinstall my operating system
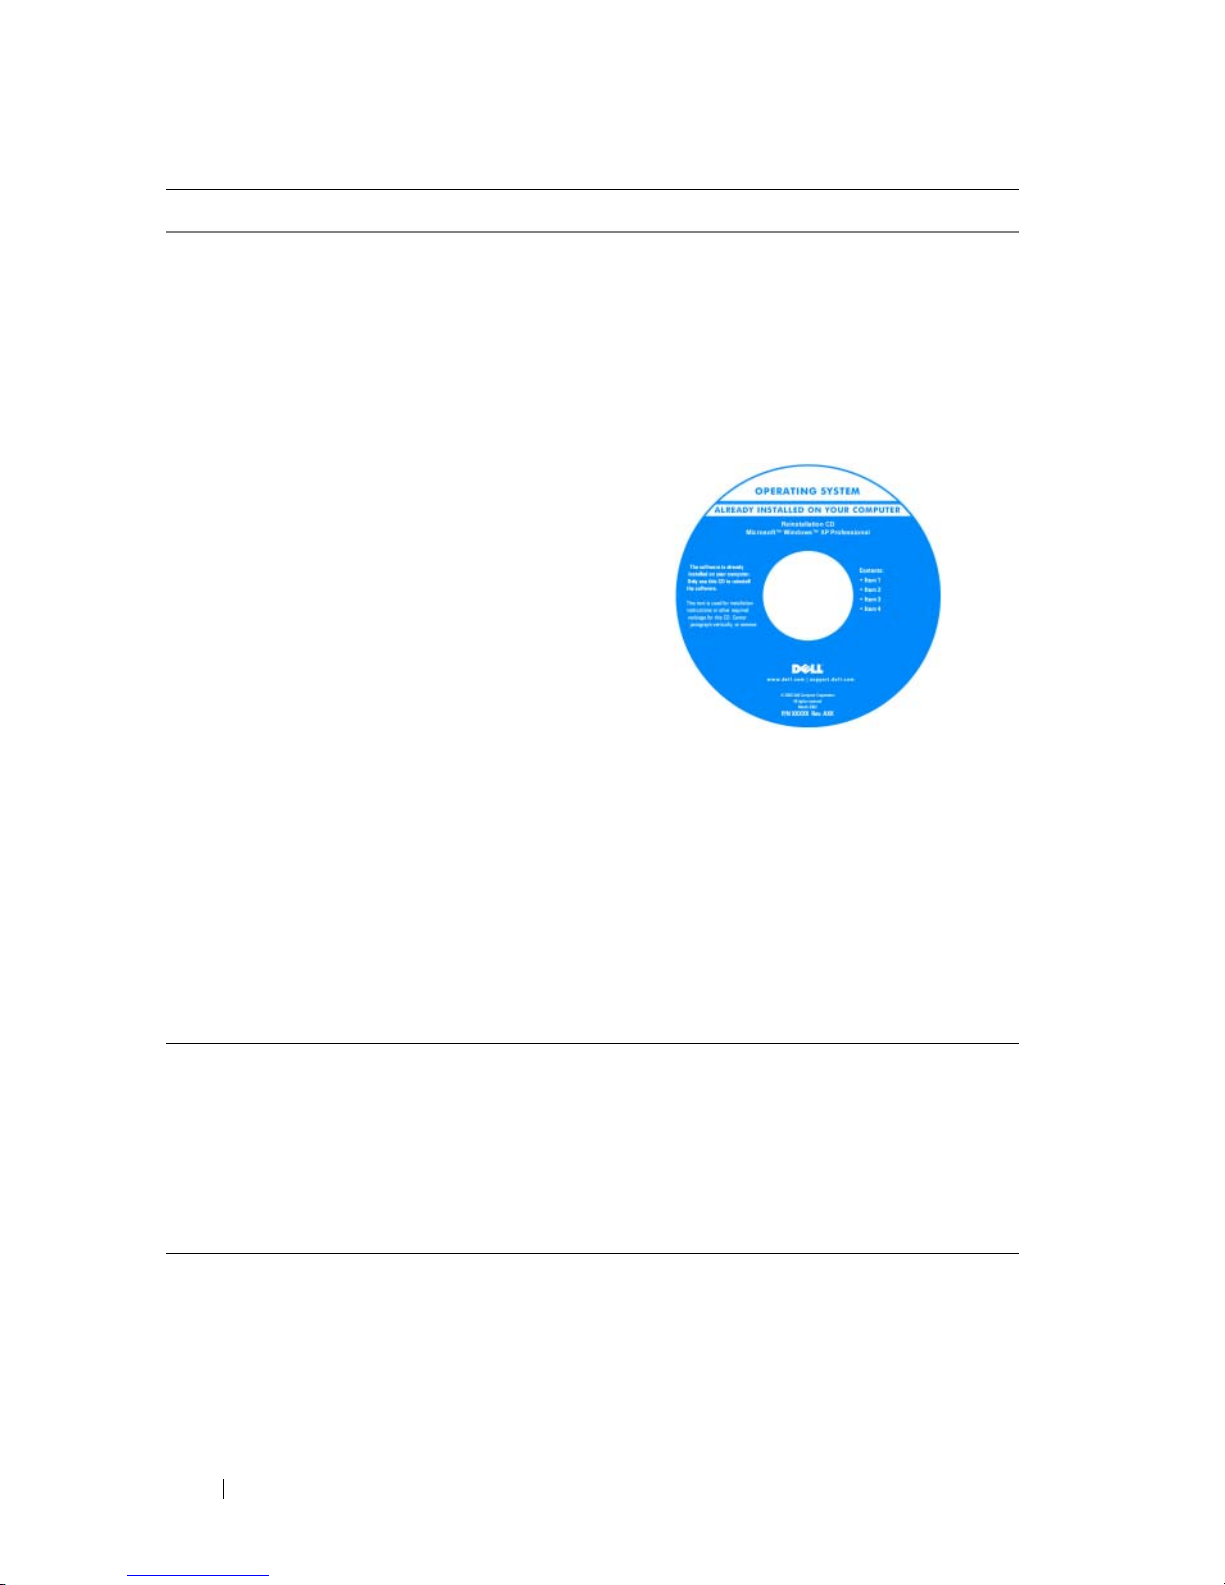
Operating System Media
The operating system is already installed
on your computer. To reinstall your
operating system, use the Operating
System reinstallation media that came
with your computer (see "Restoring Your
Operating System" in your User’s Guide).
After you reinstall your operating system,
use the optional Drivers and Utilities disc
to reinstall drivers for the devices that
came with your computer
Your operating system product key label is
located on your computer.
NOTE: The color of your operating system
installation media varies according to the
operating system you ordered.
• How to use Linux
• E-mail discussions with users of Dell
Precision products and the Linux
operating system
• Additional information regarding Linux
and my Dell Precision computer
Dell Supported Linux Sites
• linux.dell.com
• lists.us.dell.com/mailman/listinfo/linuxprecision
What Are You Looking For? Find It Here
Page 11
Quick Reference Guide 11
About Your Computer
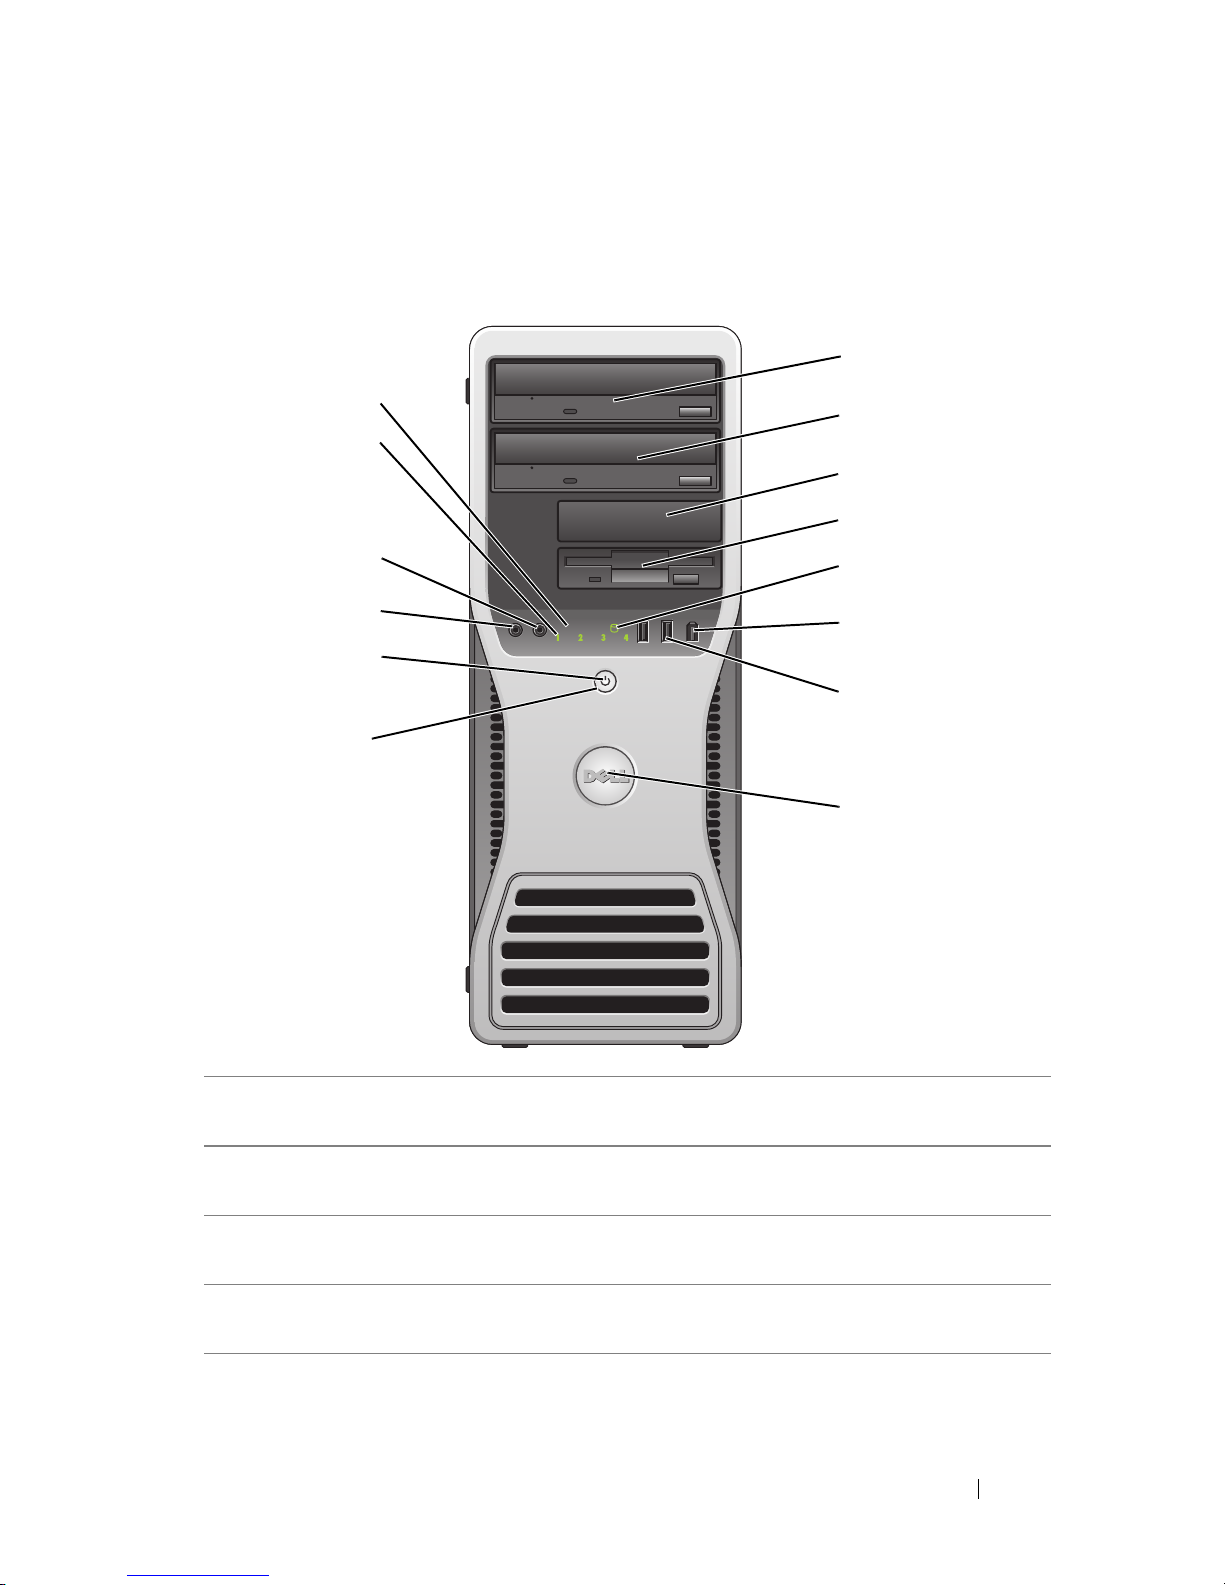
Front View (Tower Orientation)
1 upper 5.25-inch drive
bay
Supports an optical drive.
2 lower 5.25-inch drive
bay
Supports an optical drive or an additional hard drive
(SATA only).
3 upper 3.5-inch drive
bay
Supports a floppy drive, a Media Card Reader, or an
additional hard drive (SATA or SAS).
4 lower 3.5-inch drive
bay
Supports a floppy drive or a Media Card Reader.
1
9
10
11
12
13
14
4
5
6
7
8
3
2
Page 12

12 Quick Reference Guide
5 hard drive activity
light
The hard drive activity light is on when the computer
reads data from or writes data to the hard drive. The
light may also be on when a device such as an optical
drive is in operation.
6 IEEE 1394 connector
(optional)
Use the optional IEEE 1394 connector for high-speed
data devices such as digital video cameras and external
storage devices.
7 USB 2.0 connectors
(2)
Use the front USB connectors for devices that you
connect occasionally, such as flash memory keys or
cameras, or for bootable USB devices (see "System
Setup" in your User’s Guide for more information on
booting to a USB device).
NOTE: It is recommended that you use the back USB
connectors for devices that typically remain connected,
such as printers and keyboards.
8 Dell badge (rotatable) Use the plastic handle on the back of the Dell badge to
rotate the badge for tower-to-desktop or desktop-totower conversion.
9 power button Press to turn on the computer.
NOTICE: To avoid losing data, do not use the
power button to turn off the computer. Instead,
perform an operating system shutdown.
NOTICE: If your operating system has ACPI
enabled, when you press the power button the
computer will perform an operating system
shutdown.
NOTE: The power button can also be used to wake the
system or to place it into a power-saving state (see
"Power Management" in your User’s Guide).
Page 13

Quick Reference Guide 13
10 power light The power light illuminates and blinks or remains solid
to indicate different states:
• No light — The computer is turned off (S4, S5, or
mechanical OFF).
• Steady green — The computer is in a normal
operating state.
• Blinking green — The computer is in a powersaving state (S1 or S3).
• Blinking or solid amber — See "Power Problems" in
your
User’s Guide
.
To exit from a power-saving state, press the power
button or use the keyboard or mouse if it is configured
as a wake device in the Windows Device Manager. For
more information about sleep states and exiting from
a power-saving state, see "Power Management" in your
User’s Guide
.
For a description of diagnostic light codes for
troubleshooting problems with your computer, see
"Diagnostic Lights" on page 33.
11 microphone
connector
Use the microphone connector to attach a personal
computer microphone for voice or musical input into
a sound or telephony program.
12 headphone connector Use the headphone connector to attach headphones.
13 diagnostic lights (4) Use the diagnostic lights to help you troubleshoot
a problem with your computer (see "Diagnostic Lights"
on page 33).
14 network link light The network link light is on when a good connection
exists between a 10-Mbps, 100-Mbps, or 1000-Mbps
(1-Gbps) network and the computer.
Page 14
14 Quick Reference Guide
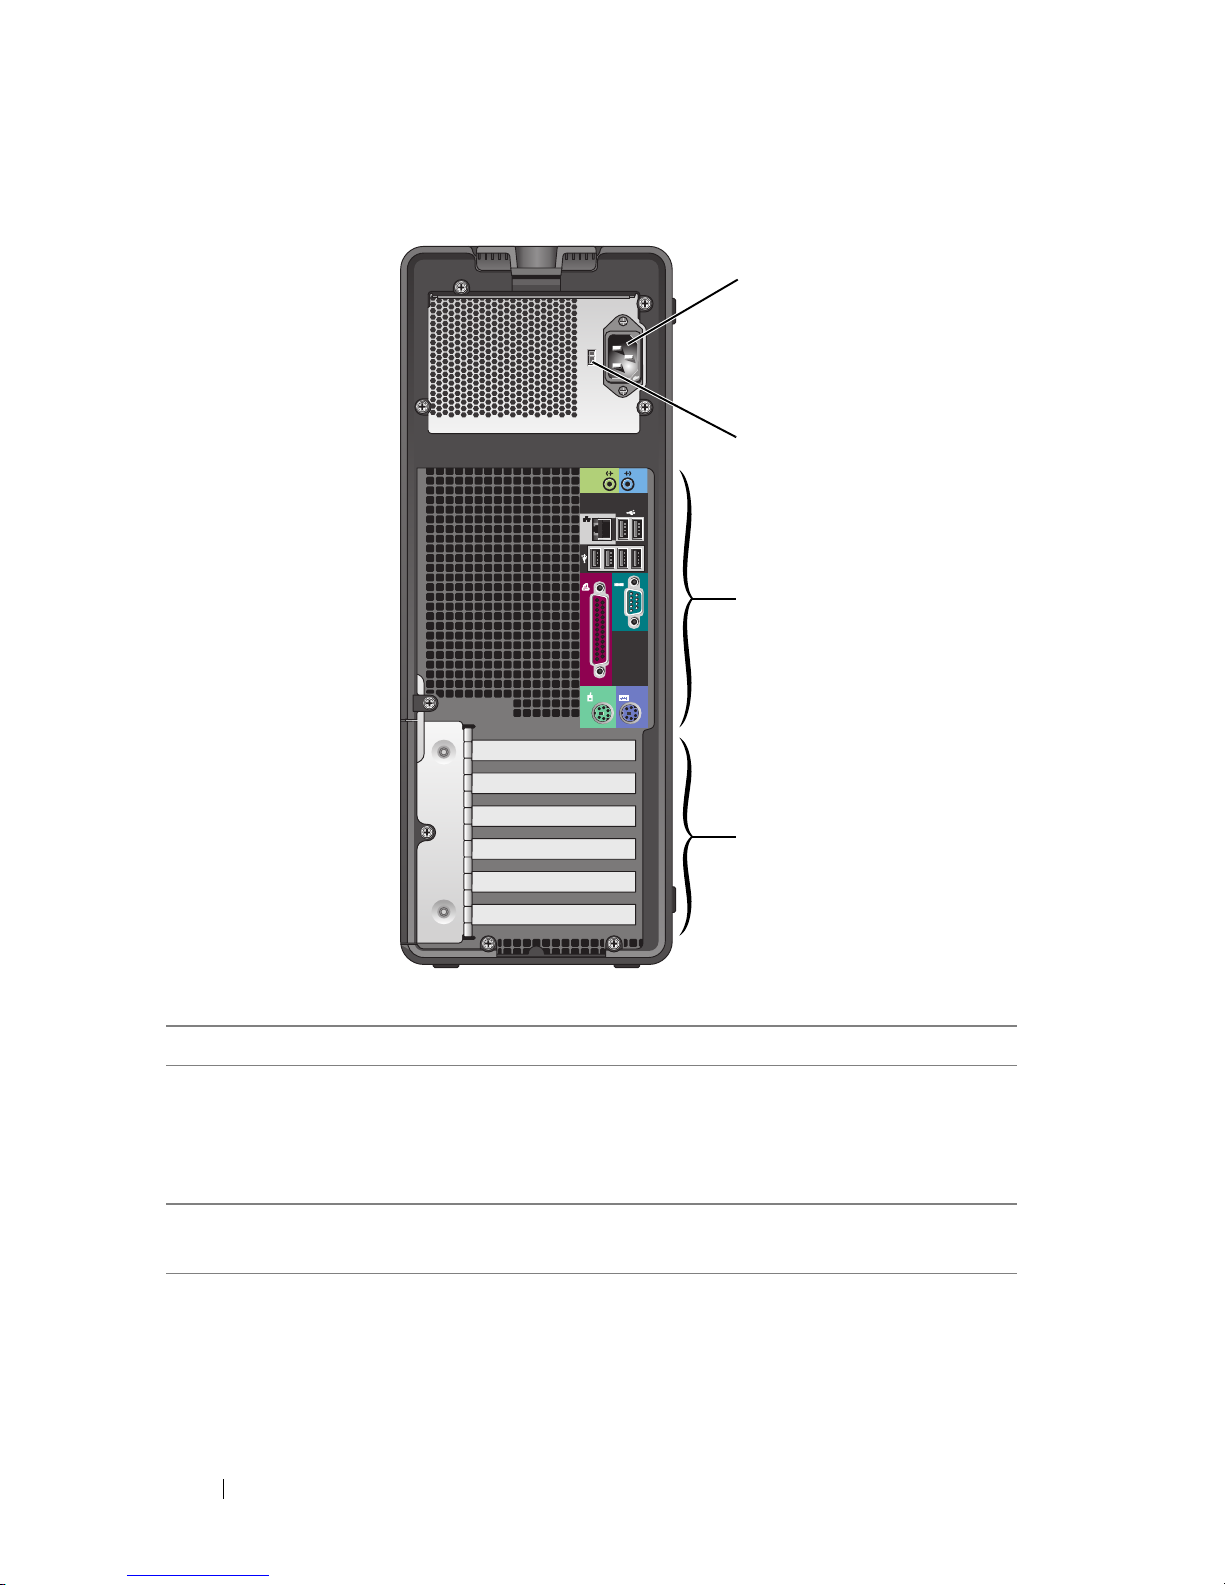
Back View (Tower Orientation)
1 power connector Insert the power cable.
2 voltage selection
switch
See the safety instructions in the Product Information
Guide for more information.
NOTE: The voltage selection switch is available on the 375-W
PSU only.
3 back panel
connectors
Plug serial, USB, and other devices into the appropriate
connector.
1
2
3
4
Page 15
Quick Reference Guide 15
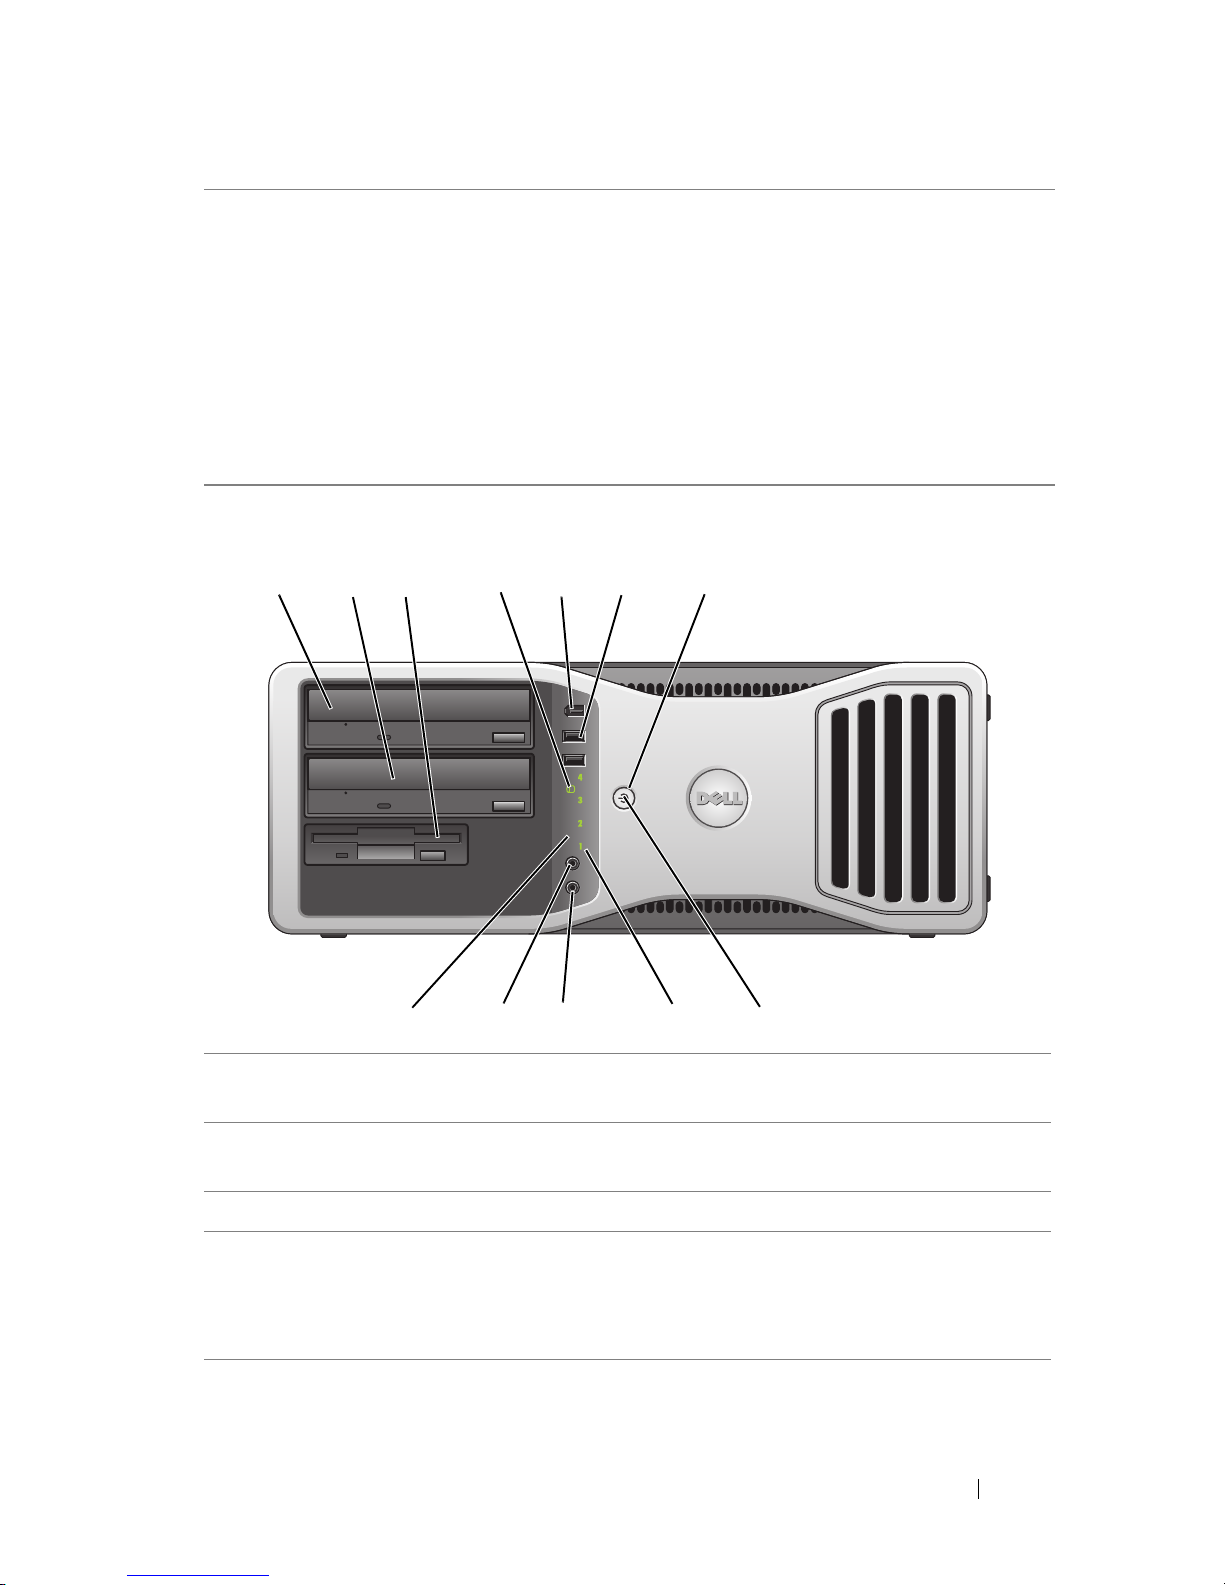
Front View (Desktop Orientation)
4 card slots Access connectors for any installed PCI or PCI Express
cards.
NOTE: The upper five connector slots support full-length
cards; the connector slot at the bottom supports a half-length
card.
NOTE: Check the documentation for cards to ensure that you
can accommodate them in your configuration. Some cards
that require more physical space and power (such as PCI
Express graphics cards) may restrict the use of other cards.
1 upper 5.25-inch drive
bay
Supports an optical drive.
2 lower 5.25-inch drive
bay
Supports an optical drive or an additional hard drive
(SATA only).
3 3.5-inch drive bay Supports a floppy drive or a Media Card Reader.
4 hard drive activity
light
The hard drive activity light is on when the computer
reads data from or writes data to the hard drive. The
light may also be on when a device such as an optical
drive is in operation.
1 2 7
8
9101112
3
4
5 6
Page 16

16 Quick Reference Guide
5 IEEE 1394 connector
(optional)
Use the optional IEEE 1394 connector for high-speed
data devices such as digital video cameras and external
storage devices.
6 USB 2.0 connectors
(2)
Use the front USB connectors for devices that you
connect occasionally, such as flash memory keys or
cameras, or for bootable USB devices (see "System
Setup" in your User’s Guide for more information on
booting to a USB device).
NOTE: It is recommended that you use the back USB
connectors for devices that typically remain connected,
such as printers and keyboards.
7 power button Press to turn on the computer.
NOTICE: To avoid losing data, do not use the
power button to turn off the computer. Instead,
perform an operating system shutdown.
NOTICE: If your operating system has ACPI
enabled, when you press the power button the
computer will perform an operating system
shutdown.
NOTE: The power button can also be used to wake the
system or to place it into a power-saving state (see
"Power Management" in your User’s Guide).
Page 17

Quick Reference Guide 17
8 power light The power light illuminates and blinks or remains solid
to indicate different states:
• No light — The computer is turned off (S4, S5, or
mechanical OFF).
• Steady green — The computer is in a normal
operating state.
• Blinking green — The computer is in a powersaving state (S1 or S3).
• Blinking or solid amber — See "Power Problems"
in
your User’s Guide
.
To exit from a power-saving state, press the power
button or use the keyboard or mouse if it is configured
as a wake device in the Windows Device Manager. For
more information about sleep states and exiting from
a power-saving state, see "Power Management" in your
User’s Guide.
For a description of diagnostic light codes for
troubleshooting problems with your computer, see
"Diagnostic Lights" on page 33.
9 diagnostic lights (4) Use the diagnostic lights to help you troubleshoot
a problem with your computer (see "Diagnostic Lights"
on page 33).
10 microphone
connector
Use the microphone connector to attach a personal
computer microphone for voice or musical input into
a sound or telephony program.
11 headphone connector Use the headphone connector to attach headphones.
12 network link light The network link light is on when a good connection
exists between a 10-Mbps, 100-Mbps, or 1000-Mbps
(or 1-Gbps) network and the computer.
Page 18
18 Quick Reference Guide
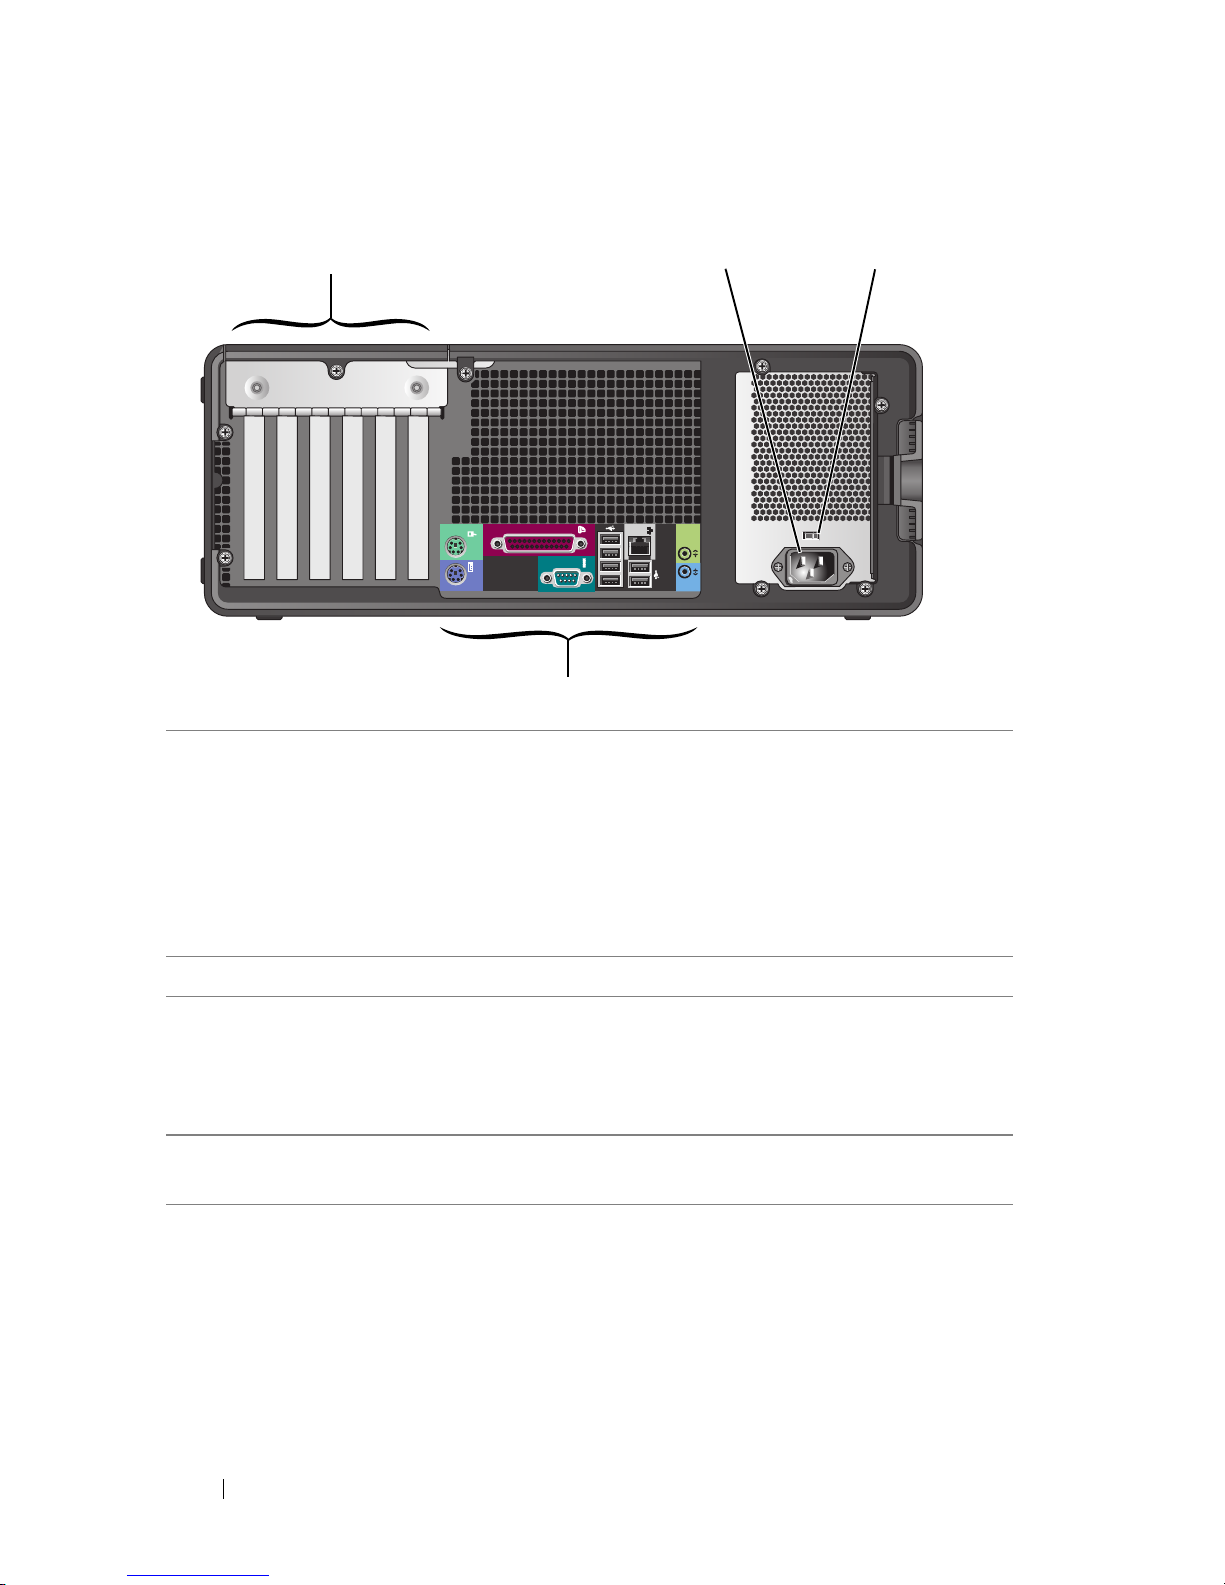
Back View (Desktop Orientation)
1 card slots Access connectors for any installed PCI or PCI Express
cards.
NOTE: Check the documentation for cards to ensure that
you can accommodate them in your configuration. Some
cards that require more physical space and power (such
as PCI Express graphics cards) may restrict the use of
other cards.
2 power connector Insert the power cable.
3 voltage selection
switch
See the safety instructions in the Product Information
Guide for more information.
NOTE: The voltage selection switch is available on the
375-W PSU only.
4 back panel connectors Plug serial, USB, and other devices into the
appropriate connector.
32
4
1
Page 19
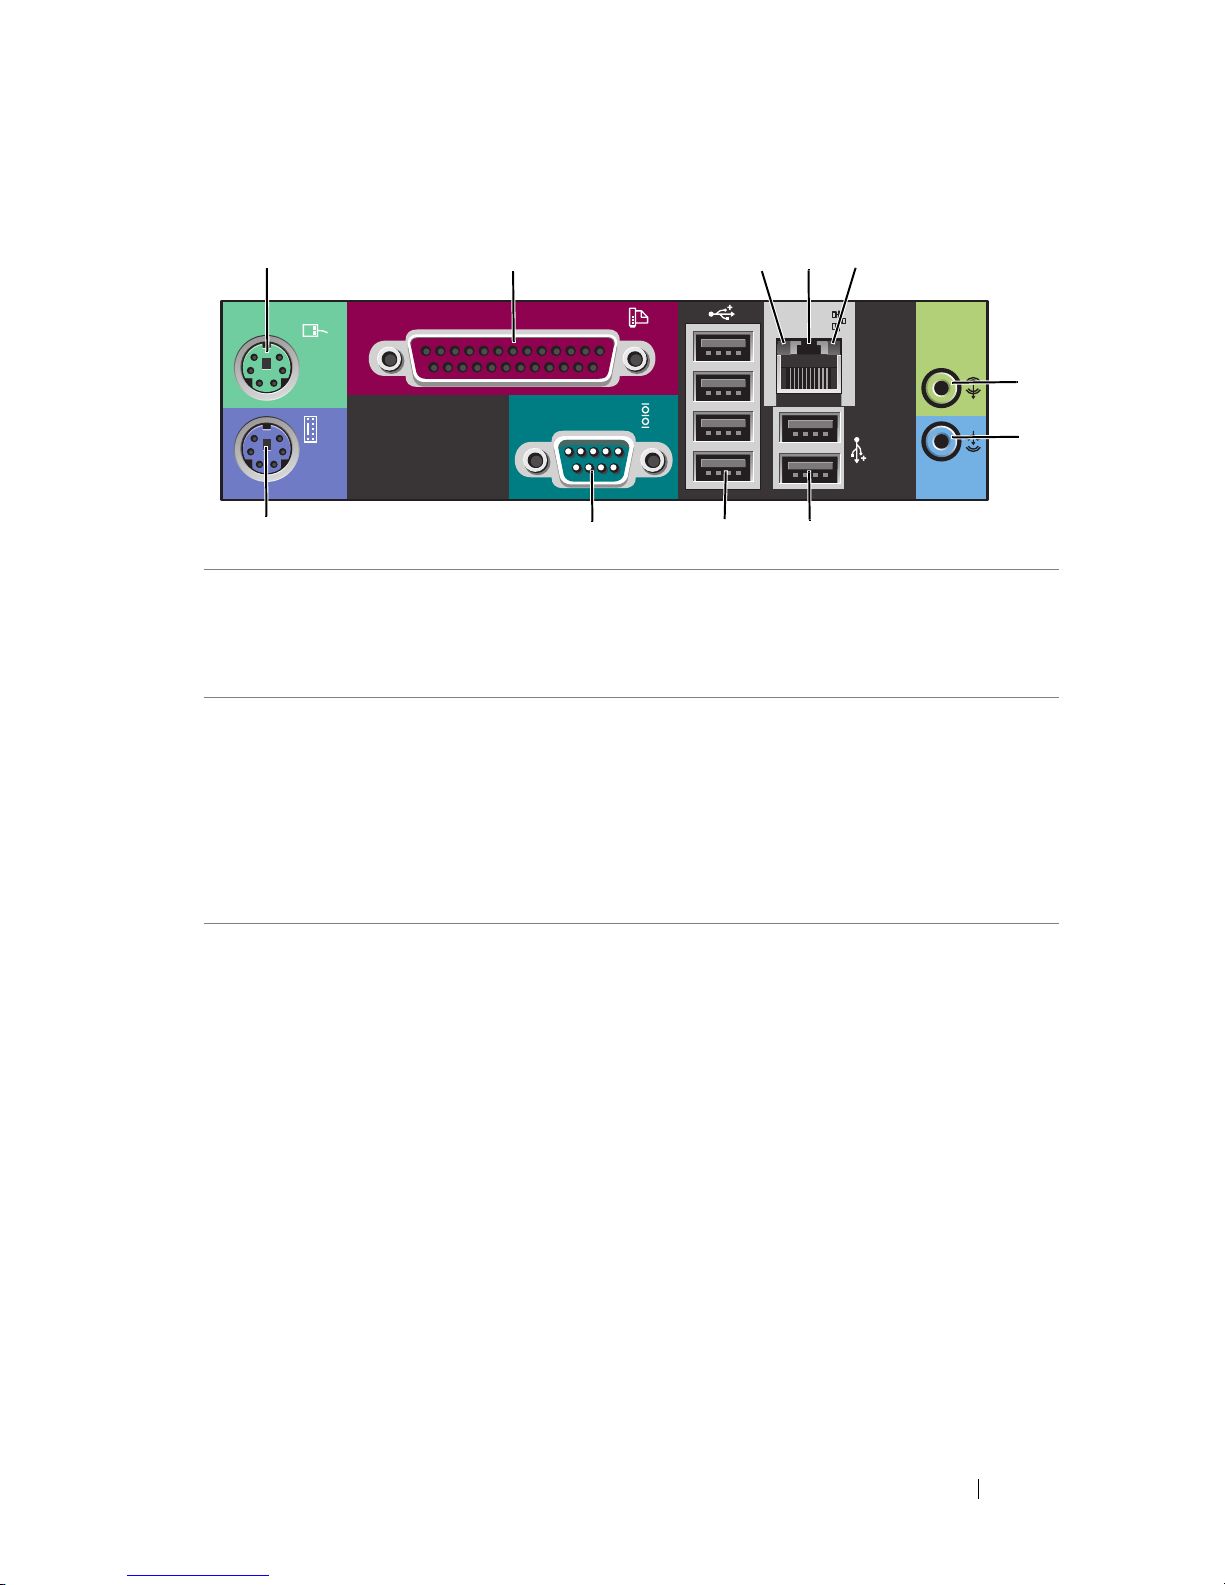
Quick Reference Guide 19
Back Panel Connectors
1 mouse connector Plug a PS/2 mouse into the green mouse connector. Turn off
the computer and any attached devices before you connect
a mouse to the computer. If you have a USB mouse, plug it
into a USB connector.
2 parallel
connector
Connect a parallel device, such as a printer, to the parallel
connector. If you have a USB printer, plug it into a USB
connector.
NOTE: The integrated parallel connector is automatically
disabled if the computer detects an installed card containing
a parallel connector configured to the same address. For more
information, see "System Setup Options" in your User’s Guide.
3 link integrity
light
• Green — A good connection exists between a 10-Mbps
network and the computer.
• Orange — A good connection exists between a 100-Mbps
network and the computer.
• Yellow — A good connection exists between a 1000-Mbps
(1-Gbps) network and the computer.
• Off — The computer is not detecting a physical
connection to the network.
1
2 345
891011
6
7
Page 20

20 Quick Reference Guide
4 network adapter
connector
To attach your computer to a network or broadband device,
connect one end of a network cable to either a network jack
or your network or broadband device. Connect the other
end of the network cable to the network adapter connector
on your computer. A click indicates that the network cable
has been securely attached.
NOTICE: Do not plug a telephone cable into the network
connector.
On computers with an additional network connector card,
use the connectors on the card and on the back of the
computer when setting up multiple network connections
(such as a separate intra- and extranet).
It is recommended that you use Category 5 wiring and
connectors for your network. If you must use Category
3 wiring, force the network speed to 10 Mbps to ensure
reliable operation.
5 network activity
light
The network activity light is on (flashing) when the
computer is transmitting or receiving network data. A high
volume of network traffic may make this light appear to be
in a steady on state.
6 line-out
connector
Use the green line-out connector to attach headphones and
most speakers with integrated amplifiers.
On computers with a sound card, use the connector on the
card.
7 line-in connector Use the blue line-in connector to attach a record/playback
device such as a microphone, cassette player, CD player,
or VCR.
On computers with a sound card, use the connector on the
card.
8 Rear Dual USB
2.0 connectors
(2)
Use the back USB connectors for devices that typically
remain connected, such as printers and keyboards.
NOTE: It is recommended that you use the front USB
connectors for devices that you connect occasionally, such as
flash memory keys or cameras, or for bootable USB devices.
Page 21
Quick Reference Guide 21
Setting Up Your Computer
Changing Between Tower and Desktop Orientations
CAUTION: Before you begin any of the procedures in this section, follow the
safety instructions in the
Product Information Guide
.
NOTE: To change your computer to either the tower or the desktop orientation, you
must use an optional kit available from Dell. See "Product Information" in your User’s
Guide for more details on ordering from Dell.
NOTE: The tower computer supports one more 3.5-inch drive in the front than does
the desktop computer.
1
Follow the procedures in "Before You Begin" in your
User’s Guide
.
2
Remove the computer cover (see "Removing the Computer Cover" in your
User’s Guide
).
3
Remove the front panel (see "Removing the Front Panel" in your
User’s
Guide
).
4
Remove the drive panel and prepare the drive panel by adding or removing
inserts, as needed (see "Drive Panel" in your
User’s Guide
).
9 Rear Quad USB
2.0 connectors
(4)
Use the back USB connectors for devices that typically
remain connected, such as printers and keyboards.
NOTE: It is recommended that you use the front USB
connectors for devices that you connect occasionally, such as
flash memory keys or cameras, or for bootable USB devices.
10 serial connector Connect a serial device, such as a handheld device, to the
serial port. The default designations are COM1 for serial
connector 1 and COM2 for the optional serial connector 2.
For more information, see "System Setup Options" in your
User’s Guide.
11 keyboard
connector
If you have a PS/2 keyboard, plug it into the purple keyboard
connector. If you have a USB keyboard, plug it into a USB
connector.
Page 22

22 Quick Reference Guide
Switching From Tower to Desktop Orientation
1
Remove all installed floppy drives or media card readers by following the
steps in "Removing a Floppy Drive or Media Card Reader (Tower
Computer)" in your
User’s Guide
, and then reinstall a single floppy drive or
media card reader by following the steps in "Installing a Floppy Drive or
Media Card Reader (Desktop Computer)" in your
User’s Guide
.
2
Remove all installed optical drives by following the steps in "Removing an
Optical Drive (Tower Computer)" in your
User’s Guide
, and then reinstall
the drives by following the steps in "Installing an Optical Drive (Desktop
Computer)" in your
User’s Guide
.
Switching From Desktop to Tower Orientation
1
Remove the floppy drive or media card reader (if installed) by following
the steps in "Removing a Floppy Drive or a Media Card Reader (Desktop
Computer)" in your
User’s Guide
, and then reinstall the floppy drive or
media card reader by following the steps in "Installing a Floppy Drive or
Media Card Reader (Tower Computer)" in your
User’s Guide
.
2
Remove all installed optical drives by following the steps in "Removing an
Optical Drive (Desktop Computer)" in your
User’s Guide
, and reinstall the
drives by following the steps in "Installing an Optical Drive (Tower
Computer)" in your
User’s Guide
.
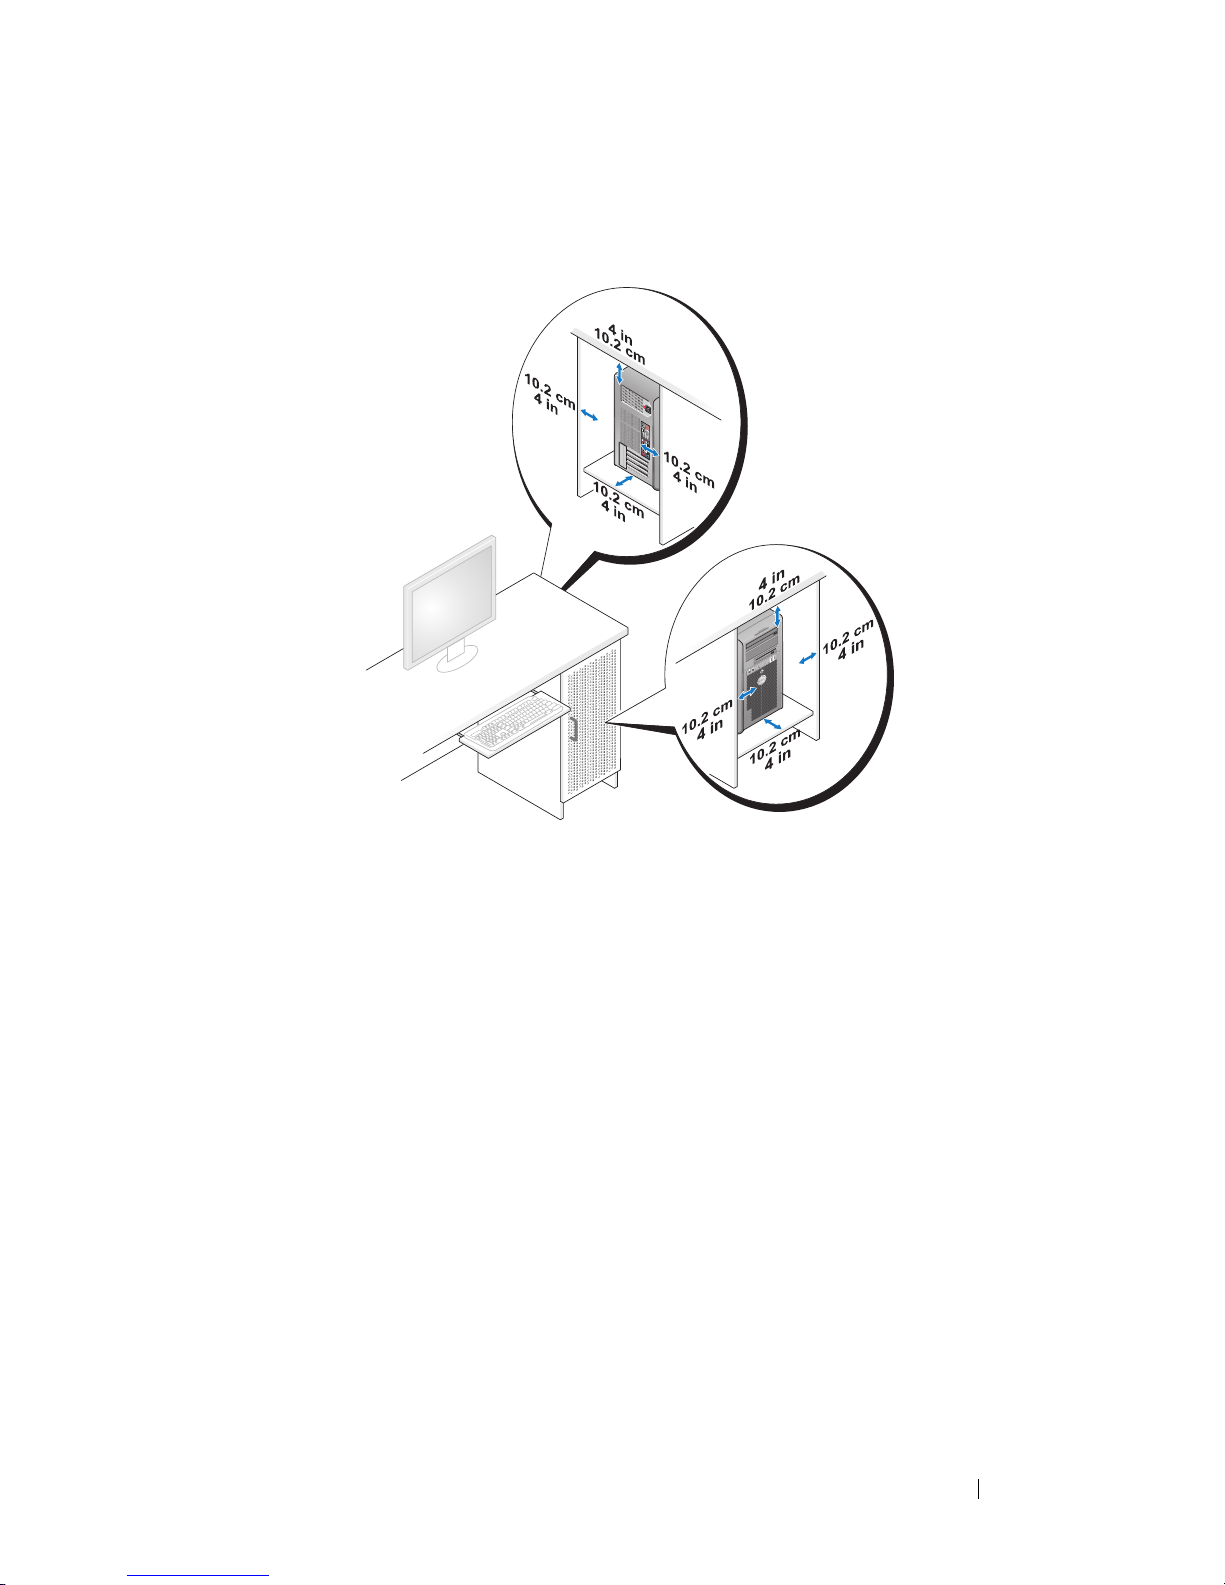
Installing Your Computer in an Enclosure
Installing your computer in an enclosure can restrict airflow, can cause your
computer to overheat, and may impact your computer’s performance. Follow
the guidelines below when installing your computer in an enclosure:
NOTICE: The operating temperature specified in this manual reflects the maximum
ambient operating temperature. The ambient room temperature must be a
consideration when installing your computer in an enclosure. For details about your
computer’s specifications, see "
Specifications" in your User’s Guide.
Page 23
Quick Reference Guide 23
• Leave 10.2 cm (4 in) minimum clearance on all vented sides of the
computer to permit the airflow required for proper ventilation.
• If your computer is installed in a corner on or under a desk, leave 5.1 cm
(2 in) minimum clearance from the back of the computer to the wall to
permit the airflow required for proper ventilation.
• If your enclosure has doors, ensure that they allow at least thirty percent
airflow through the enclosure (front and back).
Page 24
24 Quick Reference Guide
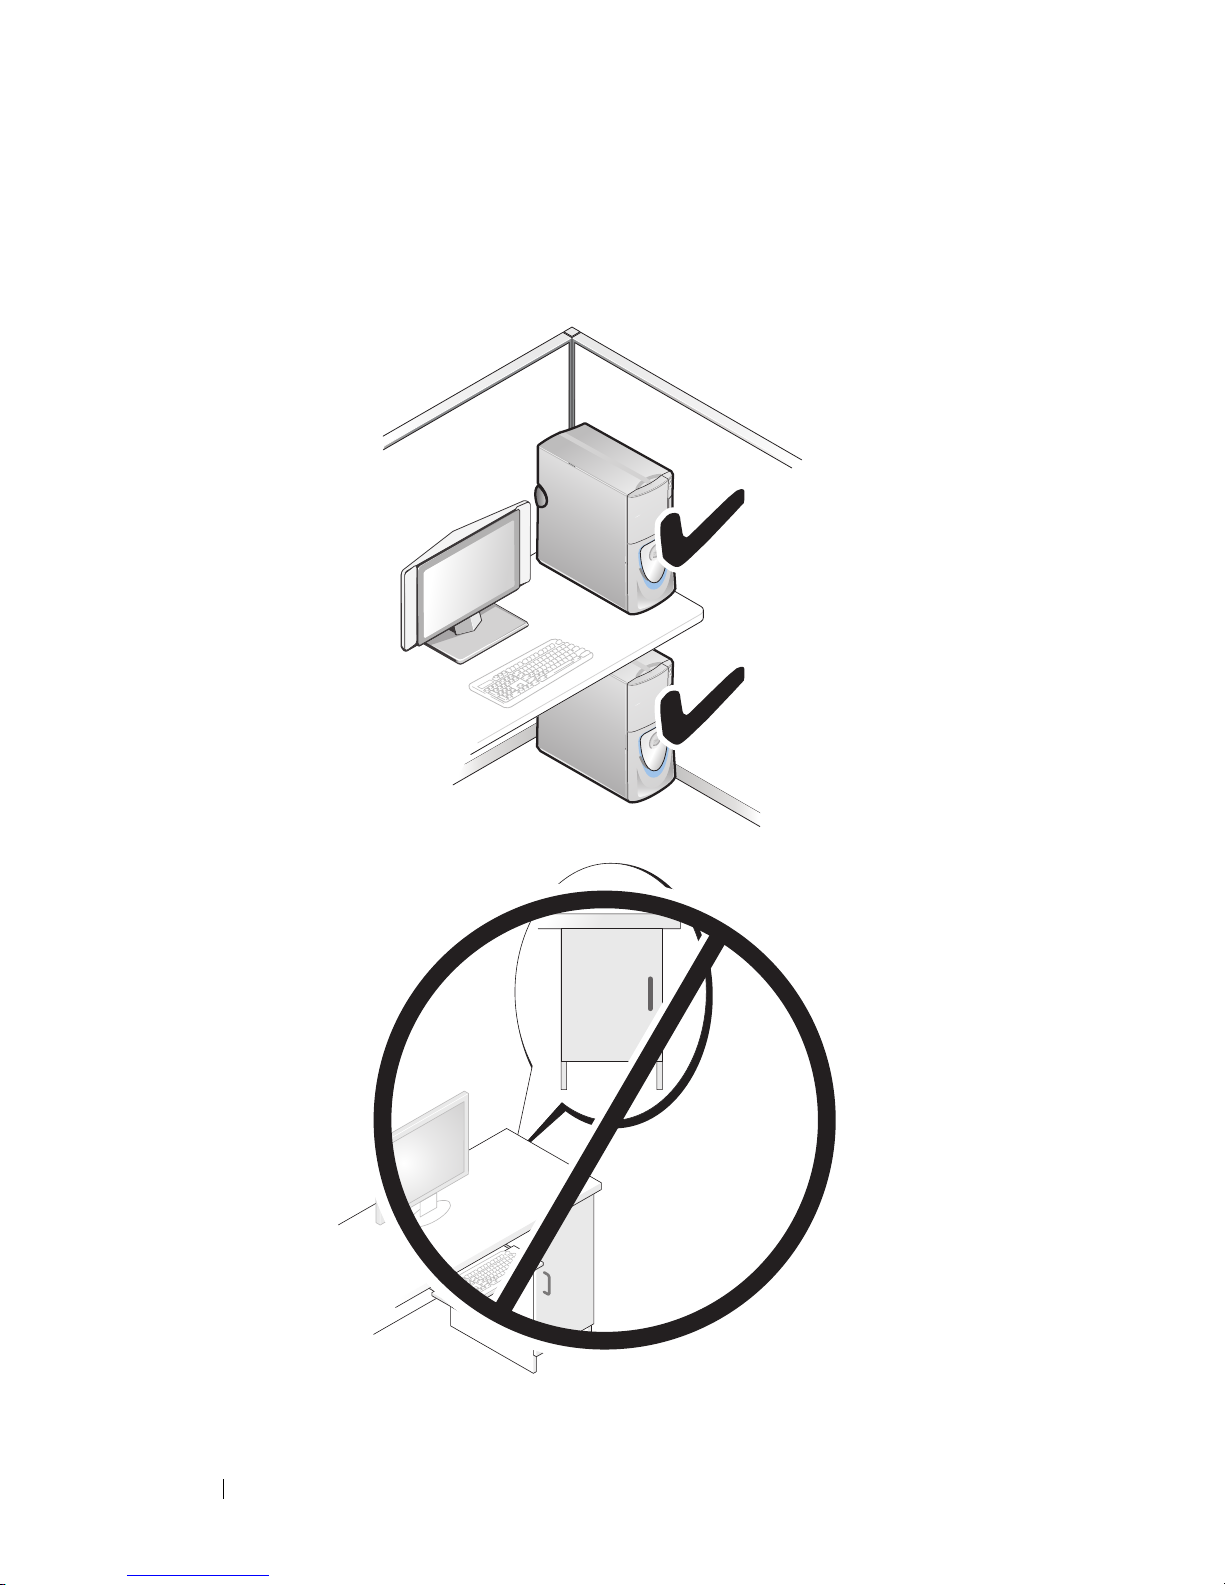
• Do not install your computer in an enclosure that does not allow airflow.
Restricting the airflow
can cause your computer to overheat, and may
impact your computer’s performance
.
Page 25

Quick Reference Guide 25
Transferring Information to a New Computer
You can use your operating system wizards to help you transfer files and other
data from one computer to another computer.
Microsoft Windows XP
The Microsoft Windows XP operating system provides the Files and Settings
Transfer Wizard to transfer data, such as:
• E-mail messages
• Toolbar settings
•Window sizes
• Internet bookmarks
You can transfer data from one computer to another computer over a network
or serial connection, or by storing the data on removable media, such as
a writable CD or DVD.
NOTE: You can transfer information from one computer to another computer by
directly connecting a serial cable to the input/output (I/O) ports of the two
computers. To transfer data over a serial connection, you must use the Network
Connections utility in the Control Panel to perform additional configuration steps,
such as setting up an advanced connection and designating the host computer and
the guest computer.
For instructions on setting up a direct cable connection between two computers,
see Microsoft Knowledge Base Article #305621, (How to Set Up a Direct Cable
Connection Between Two Computers in Windows XP). This information may not be
available in certain countries.
Using the Files and Settings Transfer Wizard requires the Operating System
installation media that came with your computer or a wizard disk, which the
wizard can create for you.
NOTE: For more information about transferring data, search support.dell.com for
document #154781 (What Are The Different Methods To Transfer Files From My Old
Computer To My New Dell™ Computer Using the Microsoft
®
Windows® XP
Operating System?).
NOTE: Access to the Dell Knowledge Base document may not be available in
certain countries.
Page 26

26 Quick Reference Guide
Files and Settings Transfer Wizard (With the Operating System Media)
NOTE: The Files and Settings Transfer Wizard designates the source computer
from which data is to be transferred as the old computer, and designates the
destination computer to which the data is going to be transferred as the new
computer.
PREPARE THE DESTINATION COMPUTER FOR THE FILE TRANSFER:
1
Click
Start→ All Programs→ Accessories→ System Tools→ Files and
Settings Transfer Wizard
.
2
Under
Which computer is this?
, click
New computer
, then click
Next
.
3
Under
Do you have a Windows XP CD?
, click
I will use the wizard from
the Windows XP CD
, then click
Next
.
4
Review the information under
Now go to your old computer
, and then go
to the source computer. Do
not
click
Next
.
COPY DATA FROM THE SOURCE COMPUTER:
1
Insert the Windows XP
Operating System
installation media into the
source computer.
The
Welcome to Microsoft Windows XP
screen appears.
2
Click
Perform additional tasks
.
3
Under
What do you want to do?
, click
Transfer files and settings
.
The
Files and Settings Transfer Wizard
window appears.
4
Click
Next
.
5
Under
Which computer is this?
, click
Old Computer
, then click
Next
.
6
Under
Select a transfer method
, click the transfer method of your choice,
then click
Next
.
7
Under
What do you want to transfer?
, click to select the data you want to
transfer, then click
Next
.
The selected data is copied and the
Completing the Collection Phase
screen appears.
8
Click
Finish
.
TRANSFER DATA TO THE DESTINATION COMPUTER:
1
Go to the destination computer.
2
Under
Now go to your old computer
, click
Next
.
Page 27

Quick Reference Guide 27
3
Under
Where are the files and settings?
, click to select the method you
chose for transferring your settings and files, then click
Next
.
The wizard reads the collected files and settings and applies them to the
destination computer. When the transfer is complete, the
Finished
screen
appears.
4
Click
Finished
, and then restart the computer.
Files and Settings Transfer Wizard (Without the Operating System Media)
To run the Files and Settings Transfer Wizard without the Operating System
installation media, you must create a wizard disk. The wizard disk allows you
to create a backup image file on removable media.
NOTE: The Files and Settings Transfer Wizard designates the source computer
from which data is to be transferred as the old computer, and designates the
destination computer to which the data is going to be transferred as the new
computer.
CREATE A WIZARD DISK:
1
On the destination computer, click
Start→
All Programs→
Accessories→
System Tools
→
Files and Settings Transfer Wizard
.
2
Under
Which computer is this?
, click
New computer
, then click
Next
.
3
Under
Do you have a Windows XP CD?
, click
I want to create a Wizard
Disk in the following drive
, then click
Next.
4
Insert removable media, such as a writable CD or DVD, then click OK.
5
Review the information under
Now go to your old computer
, and then go
to the source computer. Do
not
click
Next
.
COPY DATA FROM THE SOURCE COMPUTER:
1
Insert the wizard disk into the source computer.
2
Click
Start→
Run
.
3
Click
Browse...
and navigate to
fastwiz
on the wizard disk, then click OK.
4
Under
Which computer is this?
, click
Old Computer
, then click
Next
.
5
Under
Select a transfer method
, click the transfer method of your choice,
then click
Next
.
Page 28

28 Quick Reference Guide
6
Under
What do you want to transfer?
, click to select the data you want to
transfer, then click
Next
.
The selected data is copied and the
Completing the Collection Phase
screen appears.
7
Click
Finish
.
TRANSFER DATA TO THE DESTINATION COMPUTER:
1
Go to the destination computer.
2
Under
Now go to your old computer
, click
Next
.
3
Under
Where are the files and settings?
, click to select the method you
chose for transferring your settings and files, then click
Next
.
The wizard reads the collected files and settings and applies them to the
destination computer. When the transfer is complete, the
Finished
screen
appears.
4
Click
Finished
, and then restart the computer.
Microsoft Windows Vista
1
Click the Windows Vista Start button , and then click
Transfer files
and settings
→
Start Windows Easy Transfer.
2
In the
User Account Control
dialog box, click
Continue
.
3
Click
Start a new transfer
or
Continue a transfer in progress
.
Follow the instructions provided on the screen by the Windows Easy Transfer
wizard.
Power Protection Devices
Several devices are available to protect against power fluctuations and
failures:
• Surge protectors
• Line conditioners
• Uninterruptible power supplies (UPS)
Page 29

Quick Reference Guide 29
Surge Protectors
Surge protectors and power strips equipped with surge protection help
prevent damage to your computer from voltage spikes that can occur during
electrical storms or after power interruptions. Some surge protector
manufacturers include warranty coverage for certain types of damage.
Carefully read the device warranty when choosing a surge protector and
compare joule ratings to determine the relative effectiveness of different
devices. A device with a higher joule rating offers more protection.
NOTICE: Most surge protectors do not protect against power fluctuations or
power interruptions caused by nearby lightning strikes. When lightning occurs in
your area, disconnect the telephone line from the telephone wall jack and
disconnect your computer from the electrical outlet.
Many surge protectors have a telephone jack for modem protection. See the
surge protector documentation for modem connection instructions.
NOTICE: Not all surge protectors offer network adapter protection. Disconnect the
network cable from the network wall jack during electrical storms.
Line Conditioners
NOTICE: Line conditioners do not protect against power interruptions.
Line conditioners are designed to maintain AC voltage at a fairly constant
level.
Uninterruptible Power Supplies (UPS)
NOTICE: Loss of power while data is being saved to the hard drive may result in
data loss or file damage.
NOTE: To ensure maximum battery operating time, connect only your computer to
a UPS. Connect other devices, such as a printer, to a separate power strip that
provides surge protection.
A UPS protects against power fluctuations and interruptions. UPS devices
contain a battery that provides temporary power to connected devices when AC
power is interrupted. The battery charges while AC power is available. See the
UPS manufacturer documentation for information on battery operating time
and to ensure that the device is approved by Underwriters Laboratories (UL).
Page 30

30 Quick Reference Guide
Cleaning Your Computer
CAUTION: Before you begin any of the procedures in this section, follow the
safety instructions in the
Product Information Guide
.
Computer, Keyboard, and Monitor
CAUTION: Before you clean your computer, disconnect the computer from the
electrical outlet. Clean your computer with a soft cloth dampened with water. Do
not use liquid or aerosol cleaners, which may contain flammable substances.
• Use a vacuum cleaner with a brush attachment to gently remove dust from
the slots and holes on your computer and from between the keys on the
keyboard.
NOTICE: Do not wipe the display screen with a soap or alcohol solution. Doing so
may damage the antiglare coating.
• To clean your monitor screen, lightly dampen a soft, clean cloth with water.
If possible, use a special screen-cleaning tissue or solution suitable for the
monitor’s antistatic coating.
• Wipe the keyboard, computer, and plastic part of the monitor with a soft
cleaning cloth moistened with water.
Do not soak the cloth or let water drip inside your computer or keyboard.
Mouse (Non-Optical)
1
Turn the retainer ring on the underside of your mouse counterclockwise,
and then remove the ball.
2
Wipe the ball with a clean, lint-free cloth.
3
Blow carefully into the ball cage to dislodge dust and lint.
4
Clean the rollers inside the ball cage with a cotton swab moistened lightly
with isopropyl alcohol.
5
Recenter the rollers in their channels, as needed. Ensure that fluff from
the swab is not left on the rollers.
6
Replace the ball and retainer ring, and then turn the retainer ring clockwise
until it clicks into place.
Page 31

Quick Reference Guide 31
Floppy Drive
NOTICE: Do not attempt to clean drive heads with a swab. The heads may become
misaligned and prevent the drive from operating.
Clean your floppy drive using a commercially available cleaning kit. These
kits contain pretreated floppy disks to remove contaminants that accumulate
during normal operation.
CDs and DVDs
NOTICE: Always use compressed air to clean the lens in the CD/DVD drive, and
follow the instructions that come with the compressed air. Never touch the lens in
the drive.
1
Hold the disc by its outer edge. You can also touch the inside edge of the
center hole.
NOTICE: To prevent damaging the surface, do not wipe in a circular motion around
the disc.
2
With a soft, lint-free cloth, gently wipe the bottom of the disc (the
unlabeled side) in a straight line from the center to the outer edge of the
disc.
For stubborn dirt, try using water or a diluted solution of water and mild
soap. You can also purchase commercial products that clean discs and
provide some protection from dust, fingerprints, and scratches. Cleaning
products for CDs are safe to use on DVDs.
Troubleshooting Tools
Power Lights
CAUTION: Before you begin any of the procedures in this section, follow the
safety instructions in the
Product Information Guide
.
The power button light located on the front of the computer illuminates and
blinks or remains solid to indicate different states:
• If the power light is green and the computer is not responding, see
"Diagnostic Lights" on page 33
Page 32

32 Quick Reference Guide
• If the power light is blinking green, the computer is in standby mode. Press
a key on the keyboard, move the mouse, or press the power button to
resume normal operation.
• If the power light is off, the computer is either turned off or is not
receiving power.
– Reseat the power cable into both the power connector on the back of
the computer and the electrical outlet.
– If the computer is plugged into a power strip, ensure that the power
strip is plugged into an electrical outlet and that the power strip is
turned on.
– Bypass power protection devices, power strips, and power extension
cables to verify that the computer turns on properly.
– Ensure that the electrical outlet is working by testing it with another
device, such as a lamp.
– Ensure that the main power cable and front panel cable are securely
connected to the system board (see "System Board Components" in
your
User’s Guide
).
• If the power light is blinking amber, the computer is receiving electrical
power, but an internal power problem might exist.
– Ensure that the voltage selection switch is set to match the AC power
at your location, if applicable.
– Ensure that the processor power cable is securely connected to the
system board (see "System Board Components" in your
User’s Guide
).
• If the power light is steady amber, a device may be malfunctioning or
incorrectly installed.
– Remove and then reinstall the memory modules (see "Memory" in
your
User’s Guide
).
– Remove and then reinstall any cards (see "Cards" in your
User’s
Guide
).
• Eliminate interference. Some possible causes of interference are:
– Power, keyboard, and mouse extension cables
– Too many devices on a power strip
– Multiple power strips connected to the same electrical outlet
Page 33
Quick Reference Guide 33
Diagnostic Lights
CAUTION: Before you begin any of the procedures in this section, follow the
safety instructions in the
Product Information Guide
.
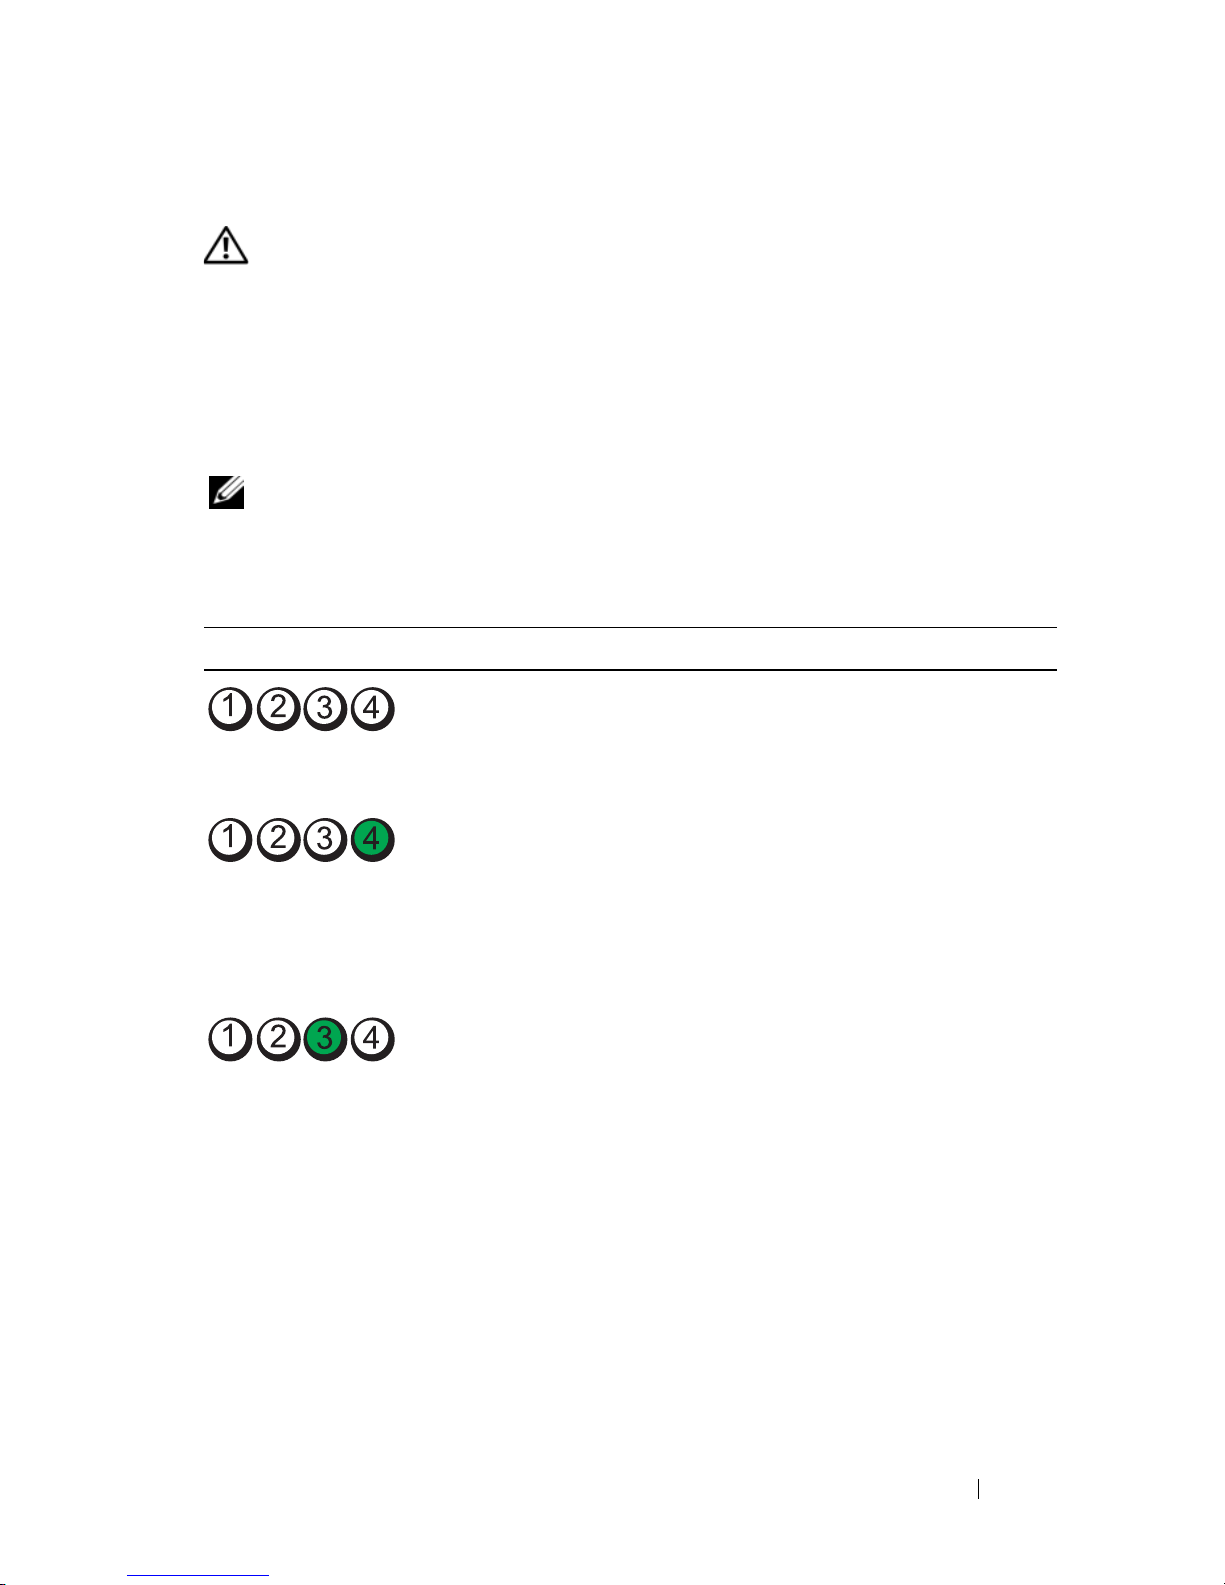
To help troubleshoot a problem, your computer has four lights labeled 1, 2, 3,
and 4 on the front panel (see "Front View (Tower Orientation)" on page 11 or
"Front View (Desktop Orientation)" on page 15). When the computer starts
normally, the lights flash, and then turn off. If the computer malfunctions,
use the sequence of the lights to help identify the problem.
NOTE: After the computer completes POST, all four lights turn off before booting to
the operating system.
Diagnostic Light Codes During POST
Light Pattern Problem Description Suggested Resolution
The computer is in a
normal off condition
or a possible pre-BIOS
failure has occurred.
Plug the computer into a working
electrical outlet and press the power
button.
A possible BIOS
failure has occurred;
the computer is in the
recovery mode.
• Run the BIOS Recovery utility, wait
for recovery completion, and then
restart the computer.
• If the problem persists, contact Dell
(see
"Contacting Dell" in your User’s
Guide
).
A possible processor
failure has occurred.
• Reseat the processor (see "Processor"
in your User’s Guide
).
• If the problem persists, contact Dell
(see
"Contacting Dell" in your User’s
Guide
).
Page 34
34 Quick Reference Guide
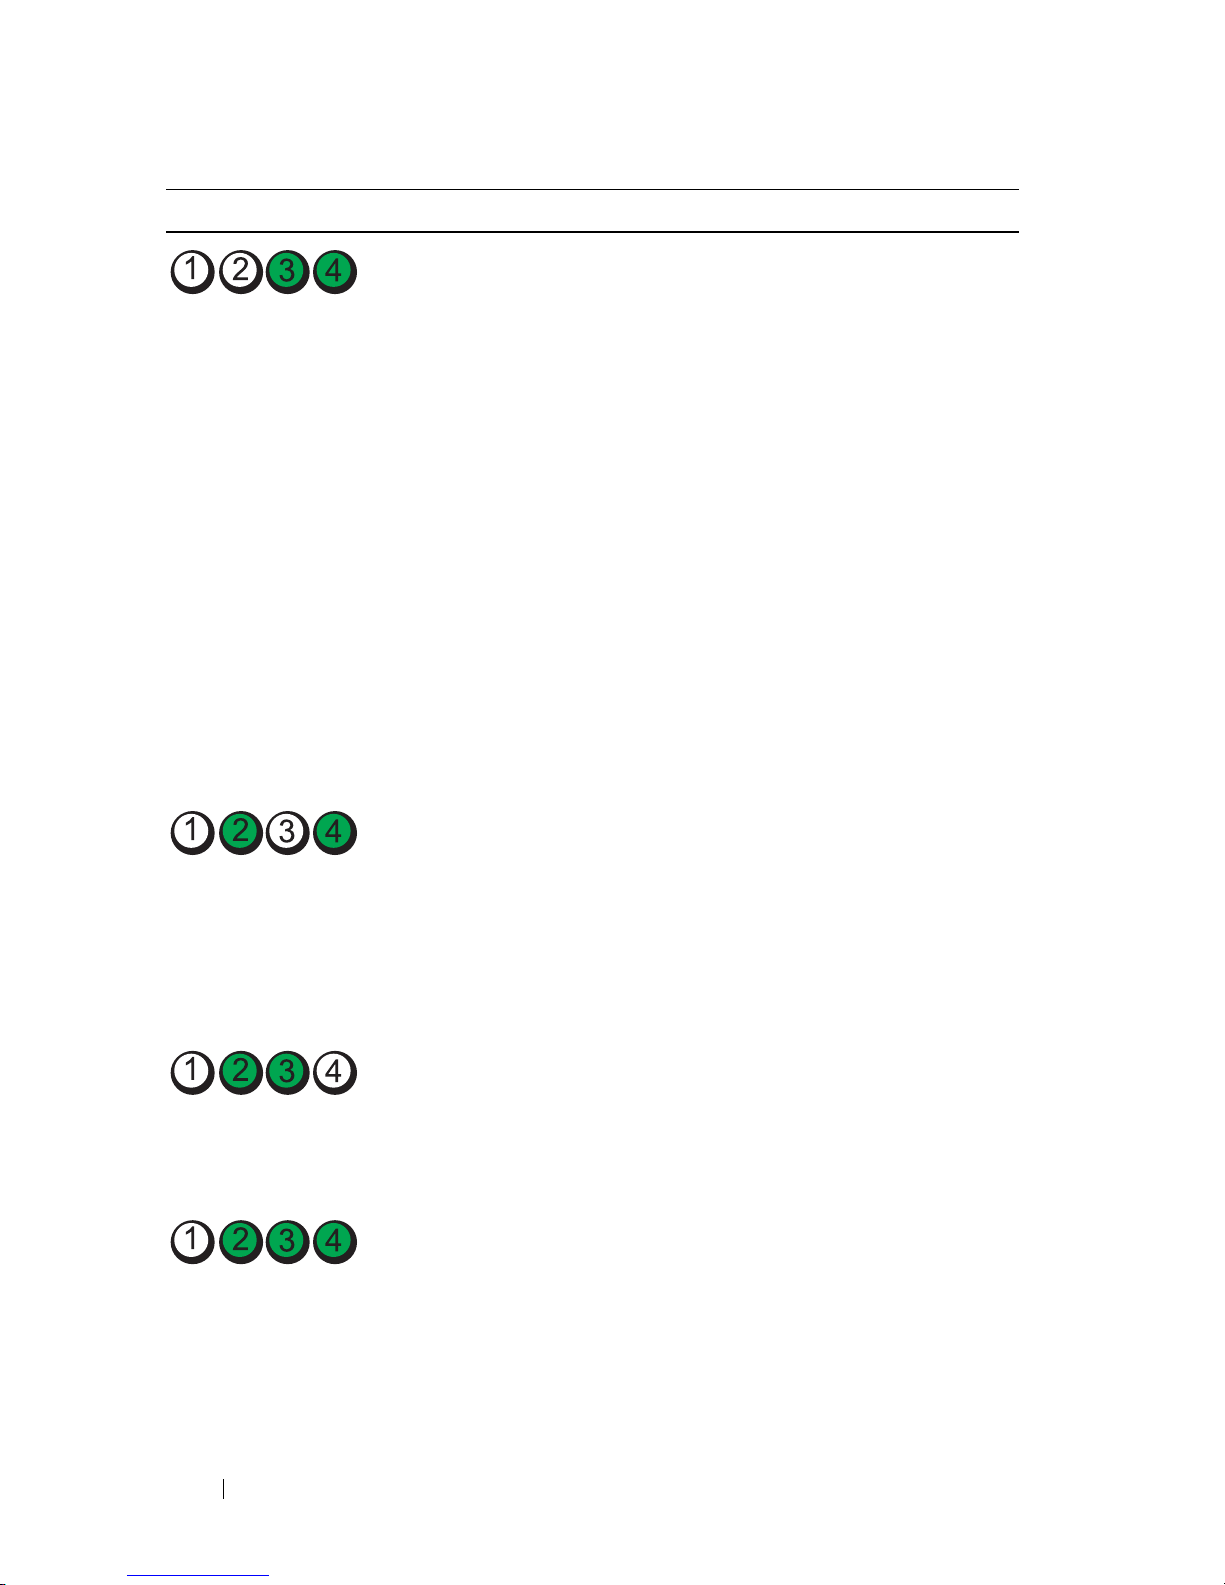
Memory modules are
detected, but a
memory failure has
occurred.
• If two or more memory modules are
installed, remove the modules (see
"Removing a Memory Module" in your
User’s Guide
), then reinstall one
module (see "Installing a Memory
Module" in your
User’s Guide
) and
restart the computer. If the computer
starts normally, continue to install
additional memory modules (one at a
time) until you have identified a
faulty module or reinstalled all
modules without error.
• If available, install working memory of
the same type into your computer (see
"Memory" in your
User’s Guide
).
• If the problem persists, contact Dell
(see "Contacting Dell" in your
User’s
Guide
).
A possible graphics
card failure has
occurred.
• Reseat any installed graphics cards
(see "Cards" in your
User’s Guide
).
• If available, install a working graphics
card into your computer.
• If the problem persists, contact Dell
(see "Contacting Dell" in your
User’s
Guide
).
A possible floppy or
hard drive failure has
occurred.
• Reseat all power and data cables and
restart the computer.
• If the problem persists, contact Dell
(see "Contacting Dell" in your
User’s
Guide
).
A possible USB failure
has occurred.
• Reinstall all USB devices, check cable
connections, and then restart the
computer.
• If the problem persists, contact Dell
(see
"Contacting Dell" in your User’s
Guide
).
Light Pattern Problem Description Suggested Resolution
Page 35
Quick Reference Guide 35
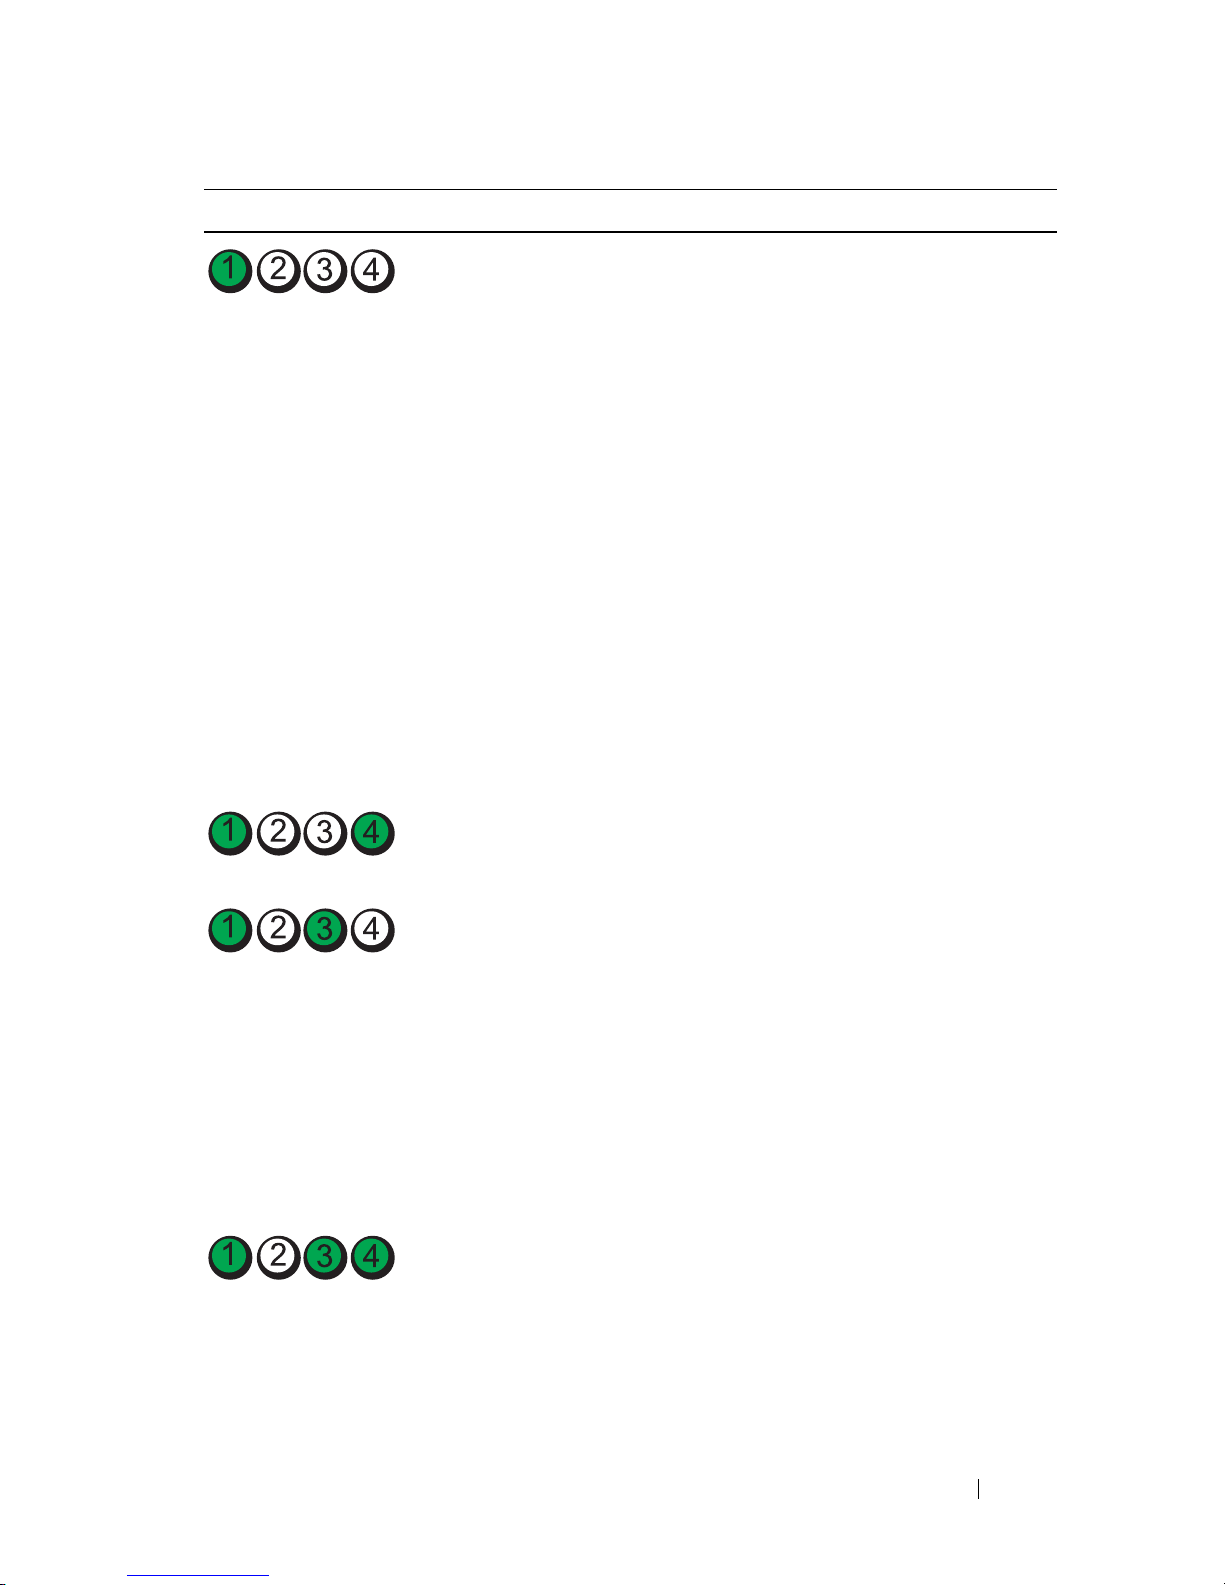
No memory modules
are detected.
• If two or more memory modules are
installed, remove the modules (see
"Removing a Memory Module" in your
User’s Guide
), then reinstall one
module (see "Installing a Memory
Module" in your
User’s Guide
) and
restart the computer. If the computer
starts normally, continue to install
additional memory modules (one at a
time) until you have identified a
faulty module or reinstalled all
modules without error.
• If available, install working memory of
the same type into your computer (see
"Memory" in your
User’s Guide
).
• If the problem persists, contact Dell
(see "Contacting Dell" in your
User’s
Guide
).
System board failure
has occurred.
Contact Dell (see "Contacting Dell" in
your User’s Guide).
Memory modules are
detected, but a
memory
configuration or
compatibility error
exists.
• Ensure that no special requirements
for memory module/connector
placement exist (see "Memory" in your
User’s Guide
).
• Ensure that the memory you are using
is supported by your computer (see
"Memory" in your
User’s Guide
).
• If the problem persists, contact Dell
(see "Contacting Dell" in your
User’s
Guide
).
A possible system
board resource and/or
hardware failure has
occurred.
• Perform the procedures in "Restoring
Your Operating System" in your
User’s
Guide
.
• If the problem persists, contact Dell
(see "Contacting Dell" in your
User’s
Guide
).
Light Pattern Problem Description Suggested Resolution
Page 36

36 Quick Reference Guide
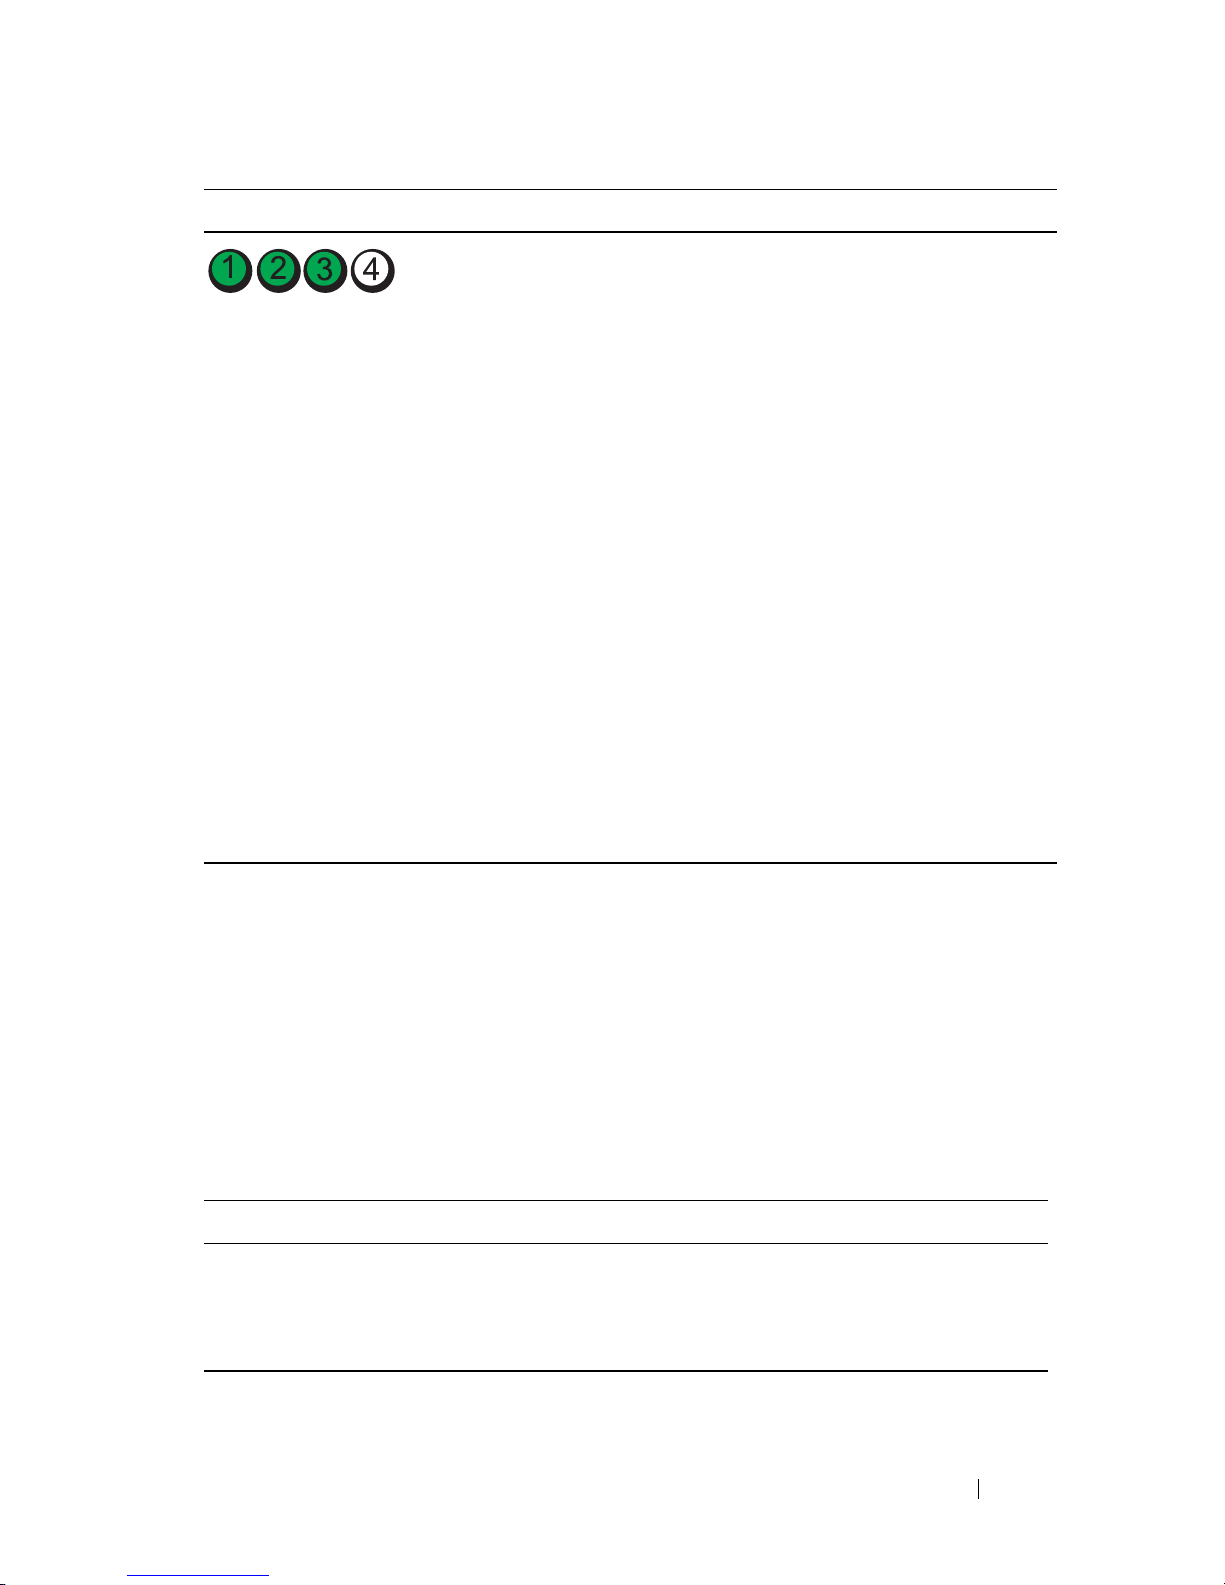
A possible expansion
card failure has
occurred.
1
Determine if a conflict exists by
removing an expansion card (not a
graphics card) and restarting the
computer (see "Cards" in your
User’s
Guide
).
2
If the problem persists, reinstall the
card you removed, then remove a
different card and restart the
computer.
3
Repeat this process for each expansion
card installed. If the computer starts
normally, troubleshoot the last card
removed from the computer for
resource conflicts (see "Restoring Your
Operating System" in your
User’s
Guide
).
4
If the problem persists, contact Dell
(see "Contacting Dell" in your
User’s
Guide
).
Light Pattern Problem Description Suggested Resolution
Page 37
Quick Reference Guide 37
Beep Codes
Your computer may emit a series of beeps during start up. The series of beeps
is called a beep code and can be used to help identify a problem with your
computer.
If your computer emits a series of beeps during start-up:
1
Write down the beep code.
2
Run the Dell Diagnostics to identify the cause (see "Dell Diagnostics" on
page 41).
Another failure has
occurred.
• Ensure that all hard drive and
CD/DVD drive cables are properly
connected to the system board (see
"System Board Components" in your
User’s Guide
).
• If there is an error message on the
screen identifying a problem with a
device (such as the floppy drive or
hard drive), check the device to make
sure it is functioning properly.
• If the operating system is attempting
to boot from a device (such as the
floppy drive or CD/DVD drive), check
system setup (see "System Setup" in
your
User’s Guide
) to ensure the boot
sequence is correct for the devices
installed on your computer.
• If the problem persists, contact Dell
(see "Contacting Dell" in your
User’s
Guide
).
Code Cause
2 short, 1 long BIOS checksum error
1 long, 3 short, 2 short Memory error
1 short F12 key pressed
Light Pattern Problem Description Suggested Resolution
Page 38

38 Quick Reference Guide
Code
(repetitive
short beeps)
Description Suggested Remedy
1BIOS checksum
failure. Possible
motherboard failure.
Contact Dell (see "Contacting Dell" in
your User’s Guide).
2 No memory modules
are detected.
• If two or more memory modules are
installed, remove the modules (see
"Removing a Memory Module" in your
User’s Guide
), then reinstall one module
(see "Installing a Memory Module" in
your
User’s Guide
) and restart the
computer. If the computer starts
normally, continue to install additional
memory modules (one at a time) until
you have identified a faulty module or
reinstalled all modules without error.
• If available, install working memory of
the same type into your computer (see
"Memory" in your
User’s Guide
).
• If the problem persists, contact Dell (see
"Contacting Dell" in your
User’s Guide
).
3
Possible motherboard
failure.
Contact Dell (see "Contacting Dell" in
your User’s Guide).
4 RAM Read/Write
failure.
• Ensure that no special requirements for
memory module/connector placement
exist (see "Memory" in your
User’s
Guide
).
• Ensure that the memory you are using is
supported by your computer (see
"Memory"
in your User’s Guide
).
• If the problem persists, contact Dell (see
"Contacting Dell" in your User’s
Guide).
Page 39

Quick Reference Guide 39
System Messages
NOTE: If the message you received is not listed in the table, see the documentation
for either the operating system or the program that was running when the message
appeared.
5 Real time clock failure.
Possible battery failure
or motherboard failure.
• Replace the battery (see "Replacing the
Battery" in your
User’s Guide
).
• If the problem persists, contact Dell (see
"Contacting Dell" in your
User’s Guide
).
6 Video BIOS Test
Failure.
Contact Dell (see "Contacting Dell" in
your User’s Guide).
ALERT! PREVIOUS ATTEMPTS AT BOOTING THIS SYSTEM HAVE FAILED AT
CHECKPOINT [NNNN]. FOR HELP IN RESOLVING THIS PROBLEM, PLEASE NOTE
THIS CHECKPOINT AND CONTACT DELL TECHNICAL SUPPORT — The computer
failed to complete the boot routine three consecutive times for the same error (see
"Contacting Dell" in your User’s Guide for assistance).
CMOS CHECKSUM ERROR — Possible motherboard failure or RTC battery low.
Replace the battery (see "Replacing the Battery" or see "Contacting Dell" in your
User’s Guide for assistance).
CPU FAN FAILURE — CPU fan failure. Replace the CPU fan (see "Removing the
Processor" in your User’s Guide).
FLOPPY DISKETTE SEEK FAILURE — A cable may be loose, or the computer
configuration information may not match the hardware configuration. Check cable
connections (see "Contacting Dell" in your User’s Guide for assistance).
DISKETTE READ FAILURE — The floppy disk may be defective or a cable may be
loose. Replace the floppy disk/check for a loose cable connection.
Code
(repetitive
short beeps)
Description Suggested Remedy
Page 40

40 Quick Reference Guide
HARD-DISK READ FAILURE — Possible HDD failure during HDD boot test (see
"Contacting Dell" in your User’s Guide for assistance).
KEYBOARD FAILURE — Keyboard failure or keyboard cable loose (see "Keyboard
Problems" in your User’s Guide).
NO BOOT DEVICE AVAILABLE — The system cannot detect a bootable device or
partition.
• If the floppy drive is your boot device, ensure that the cables are connected and
that a bootable floppy disk is in the drive.
• If the hard drive is your boot device, ensure that the cables are connected and
that the drive is installed properly and partitioned as a boot device.
• Enter System Setup and ensure that the boot sequence information is correct
(see "Entering System Setup"
in your User’s Guide
).
NO TIMER TICK INTERRUPT — A chip on the system board might be
malfunctioning or motherboard failure (see "Contacting Dell" in your User’s Guide
for assistance).
NON-SYSTEM DISK OR DISK ERROR —Replace the floppy disk with one that
has a bootable operating system or remove the floppy disk from drive A and restart
the computer.
NOT A BOOT DISKETTE —Insert a bootable floppy disk and restart your
computer.
NOTICE - HARD DRIVE SELF MONITORING SYSTEM HAS REPORTED THAT A
PARAMETER HAS EXCEEDED ITS NORMAL OPERATING RANGE. DELL
RECOMMENDS THAT YOU BACK UP YOUR DATA REGULARLY. A PARAMETER OUT
OF RANGE MAY OR MAY NOT INDICATE A POTENTIAL HARD DRIVE PROBLEM.—
S.M.A.R.T error, possible HDD failure. This feature can be enabled or disabled in
BIOS setup.
Page 41

Quick Reference Guide 41
Hardware Troubleshooter
If a device is either not detected during the operating system setup or is
detected, but incorrectly configured, you can use the Hardware Troubleshooter
to resolve the incompatibility.
Windows XP:
1
Click
Start→
Help and Support
.
2
Ty p e
hardware troubleshooter
in the search field and press
<Enter> to start the search.
3
In the
Fix a Problem
section, click
Hardware Troubleshooter
.
4
In the
Hardware Troubleshooter
list, select the option that best describes
the problem and click
Next
to follow the remaining troubleshooting steps.
Windows Vista:
1
Click the Windows Vista Start button
,
and click
Help and Support.
2
Ty p e
hardware troubleshooter
in the search field and press
<Enter> to start the search.
3
In the search results, select the option that best describes the problem and
follow the remaining troubleshooting steps.
Dell Diagnostics
CAUTION: Before you begin any of the procedures in this section, follow the
safety instructions in the
Product Information Guide
.
When to Use the Dell Diagnostics
If you experience a problem with your computer, perform the checks in
Lockups and Software Problems (see "Troubleshooting" in your User’s Guide)
and run the Dell Diagnostics before you contact Dell for assistance.
You can run the Dell Diagnostics from your hard drive or from the Drivers and
Utilities disc.
Page 42

42 Quick Reference Guide
See "System Setup" in your User’s Guide to review your computer’s
configuration information, and ensure that the device that you want to test
displays in System Setup and is active.
NOTE: The Dell Diagnostics works only on Dell computers.
NOTE: Print the following procedures before you run the Dell diagnostics.
Starting the Dell Diagnostics From Your Hard Drive
The Dell Diagnostics is located on a separate diagnostic utility partition on
your hard drive.
NOTE: If your computer cannot display a screen image, see "Contacting Dell" in
your User’s Guide.
1
Turn on (or restart) your computer.
2
When the DELL logo appears, press <F12> immediately.
NOTE: Keyboard failure may result when a key is held down for extended
periods of time. To avoid possible keyboard failure, press and release <F12> in
even intervals to open the Boot Device Menu.
NOTE: If at any time a message appears stating that no diagnostics utility
partition has been found, run the Dell Diagnostics from your Drivers and
Utilities disc
(see "Starting the Dell Diagnostics From the Drivers and
Utilities Disc" on page 43).
If you wait too long and the operating system logo appears, continue to
wait until you see the Microsoft Windows desktop, then shut down your
computer and try again.
3
At the
Boot Device Menu
, use the up- and down-arrow keys or press the
appropriate number on the keyboard to highlight
Boot to Utility Partition
,
and then press <Enter>.
NOTE: The Quickboot feature changes the boot sequence for the current
boot only. Upon restart, the computer boots according to the boot sequence
specified in System Setup.
4
At the Dell Diagnostics
Main Menu
, left-click with the mouse, or press
<Tab> and then <Enter>, to select the test you want to run (see "Dell
Diagnostics Main Menu" on page 44).
NOTE: Write down any error codes and problem descriptions exactly as they
appear and follow the instructions on the screen.
Page 43

Quick Reference Guide 43
5
After all tests have completed, close the test window to return to the Dell
Diagnostics
Main Menu
.
6
Close the
Main Menu
window to exit the Dell Diagnostics and restart the
computer.
Starting the Dell Diagnostics From the Drivers and Utilities Disc
1
Turn on your computer.
2
Press the eject button on the front of the optical drive to open the drive
tray.
3
Place the
Drivers and Utilities
disc in the center of the drive tray, then
press the eject button or gently push on the tray to close it.
4
Restart the computer.
5
When the DELL logo appears, press <F12> immediately.
NOTE: Keyboard failure may result when a key on the keyboard is held down
for extended periods of time. To avoid possible keyboard failure, press and
release <F12> in even intervals until the Boot Device Menu appears.
If you wait too long and the operating system logo appears, continue to
wait until you see the Microsoft Windows desktop, then shut down your
computer and try again.
6
At the
Boot Device Menu
, use the up- and down-arrow keys or press the
appropriate number on the keyboard to highlight
Onboard or USB
CD-ROM
, and then press <Enter>.
NOTE: The Quickboot feature changes the boot sequence for the current
boot only. Upon restart, the computer boots according to the boot sequence
specified in System Setup.
7
Press <1> to select the Dell Diagnostics.
8
At the
Dell Diagnostics Menu
press <1> to select the Dell Diagnostics
for ResourceCD (graphical user interface).
9
At the Dell Diagnostics
Main Menu
, left-click with the mouse, or press
<Tab> and then <Enter>, to select the test you want to run (see "Dell
Diagnostics Main Menu" on page 44).
NOTE: Write down any error codes and problem descriptions exactly as they
appear and follow the instructions on the screen.
Page 44
44 Quick Reference Guide
10
After all tests have completed, close the test window to return to the Dell
Diagnostics
Main Menu
.
11
Remove the
Drivers and Utilities
disc, then close the
Main Menu
window
to exit the Dell Diagnostics and restart the computer.
Dell Diagnostics Main Menu
The following tests can be run from the Dell Diagnostics Main Menu:
For any problem encountered during a test, a message appears with an error
code and a description of the problem. Write down the error code and
problem description exactly as it appears and follow the instructions on the
screen. If you cannot resolve the problem, contact Dell (see "Contacting Dell"
in your User’s Guide).
NOTE: The Service Tag for your computer is located at the top of each test screen.
When contacting Dell support, have your Service Tag ready.
Option Function
Express Test Performs a quick test of system devices. The test typically
takes 10 to 20 minutes and requires no interaction on your
part. Run Express Test first to increase the possibility of
tracing the problem quickly.
Extended Test Performs a thorough check of system devices. The test
typically takes an hour or more and periodically requires
your input to answer specific questions.
Custom Test Tests a specific device in the system and can be used to
customize the tests you want to run.
Symptom Tree Lists a number of common symptoms and allows you to
select a test based on the symptom of the problem you are
having.
Page 45

Quick Reference Guide 45
The following tabs provide additional information for tests run from the
Custom Test or Symptom Tree option:
Troubleshooting
Follow these tips when you troubleshoot your computer:
• If you added or removed a part before the problem started, review the
installation procedures and ensure that the part is correctly installed.
• If a peripheral device does not work, ensure that the device is properly
connected.
• If an error message appears on the screen, write down the exact message.
This message may help support personnel diagnose and fix the problem(s).
• If an error message occurs in a program, see the program’s documentation.
NOTE: The procedures in this document were written for the Windows default
view, and may not apply if you set your Dell computer to the Windows Classic view.
Tab Function
Results Displays the results of the test and any error conditions
encountered.
Errors Displays error conditions encountered, error codes, and the
problem description.
Help Describes the test and any requirements for running the
test.
Configuration
(Custom Test only)
Displays the hardware configuration for the selected device.
The Dell Diagnostics obtains configuration information for
all devices from System Setup, memory, and various
internal tests, and it displays the information in the device
list in the left pane of the screen.
NOTE: The device list may not display the names of all the
components installed on your computer or all devices
attached to your computer.
Parameters
(Custom Test only)
Allows you to customize the test, if applicable, by changing
the test settings.
Page 46

46 Quick Reference Guide
Battery Problems
CAUTION: There is a danger of a new battery exploding if it is incorrectly
installed. Replace the battery only with the same or equivalent type recommended
by the manufacturer. Discard used batteries according to the manufacturer's
instructions.
CAUTION: Before you begin any of the procedures in this section, follow the
safety instructions in the
Product Information Guide
.
R
EPLACE THE BATTERY — If you have to repeatedly reset time and date information
after turning on the computer, or if an incorrect time or date displays during start-up,
replace the battery (see "Replacing the Battery" in your User’s Guide). If the battery still
does not work properly, contact Dell (see "Contacting Dell" in your User’s Guide).
Drive Problems
CAUTION: Before you begin any of the procedures in this section, follow the
safety instructions in the
Product Information Guide
.
E
NSURE THAT MICROSOFT WINDOWS RECOGNIZES THE DRIVE —
Windows XP:
•Click
Start
and click
My Computer
.
Windows Vista:
• Click the Windows Vista Start button and click
Computer
.
If the drive is not listed, perform a full scan with your antivirus software to check for
and remove viruses. Viruses can sometimes prevent Windows from recognizing the
drive.
T
EST THE DRIVE —
• Insert another disc to eliminate the possibility that the original drive is defective.
• Insert a bootable floppy disk and restart the computer.
CLEAN THE DRIVE OR DISK — See
"Cleaning Your Computer" on page 30
.
C
HECK THE CABLE CONNECTIONS
RUN THE HARDWARE TROUBLESHOOTER — See "Hardware Troubleshooter" on
page 41.
R
UN THE DELL DIAGNOSTICS —
See "Dell Diagnostics" on page 41
.
Page 47

Quick Reference Guide 47
Optical drive problems
NOTE: High-speed optical drive vibration is normal and may cause noise, which
does not indicate a defect in the drive or the media.
NOTE: Because of different regions worldwide and different disc formats, not all
DVD titles work in all DVD drives.
A
DJUST THE WINDOWS VOLUME CONTROL —
• Click the speaker icon in the lower-right corner of your screen.
• Ensure that the volume is turned up by clicking the slidebar and dragging it up.
• Ensure that the sound is not muted by clicking any boxes that are checked.
CHECK THE SPEAKERS AND SUBWOOFER — See "Sound and Speaker Problems" on
page 58.
Problems writing to an optical drive
CLOSE OTHER PROGRAMS — The optical drive must receive a steady stream of data
during the writing process. If the stream is interrupted, an error occurs. Try closing all
programs before you write to the optical drive.
T
URN OFF STANDBY MODE IN WINDOWS BEFORE WRITING TO A DISC — Search for
the keyword standby in Windows Help and Support for information on power
management modes.
Hard drive problems
RUN CHECK DISK —
Windows XP:
1
Click
Start and click My Computer
.
2
Right-click
Local Disk C:
.
3
Click
Properties→ Tools→
Check Now
.
4
Click
Scan for and attempt recovery of bad sectors and click Start
.
Windows Vista:
1
Click
Start
and click
Computer
.
2
Right-click
Local Disk C:
.
3
Click
Properties→ Tools→
Check Now
.
The
User Account Control
window may appear. If you are an administrator on the
computer, click
Continue
; otherwise, contact your administrator to continue the
desired action.
4
Follow the instructions on the screen.
Page 48

48 Quick Reference Guide
E-Mail, Modem, and Internet Problems
CAUTION: Before you begin any of the procedures in this section, follow the
safety instructions in the
Product Information Guide
.
NOTE: Connect the modem to an analog telephone jack only. The modem does not
operate while it is connected to a digital telephone network.
NOTE: Do not plug a telephone cable into the network adapter connector (see
"Back Panel Connectors" in your User’s Guide).
C
HECK THE MICROSOFT OUTLOOK
®
EXPRESS SECURITY SETTINGS — If you cannot
open your e-mail attachments:
1
In Outlook Express, click
Tools→
Options→
Security
.
2
Click
Do not allow attachments
to remove the checkmark, as needed.
CHECK THE TELEPHONE LINE CONNECTION
CHECK THE TELEPHONE JACK
CONNECT THE MODEM DIRECTLY TO THE TELEPHONE WALL JACK
USE A DIFFERENT TELEPHONE LINE —
• Verify that the telephone line is connected to the jack on the modem (the jack has
either a green label or a connector-shaped icon next to it).
• Ensure that you hear a click when you insert the telephone line connector into the
modem.
• Disconnect the telephone line from the modem and connect it to a telephone, then
listen for a dial tone.
• If you have other telephone devices sharing the line, such as an answering machine,
fax machine, surge protector, or line splitter, bypass them and use the telephone to
connect the modem directly to the telephone wall jack. If you are using a line that is
3 meters (10 feet) or more in length, try a shorter one.
RUN THE MODEM DIAGNOSTIC TOOL —
Windows XP:
1
Click
Start→
All Programs→
Modem Helper
.
2
Follow the instructions on the screen to identify and resolve modem problems.
Modem Helper is not available on certain computers.
Windows Vista:
1
Click
Start
→
All Programs→ Modem Diagnostic Tool
.
2
Follow the instructions on the screen to identify and resolve modem problems.
Modem diagnostics are not available on all computers.
VERIFY THAT THE MODEM IS COMMUNICATING WITH WINDOWS —
Page 49

Quick Reference Guide 49
Windows XP:
1
Click
Start→
Control Panel→
Printers and Other Hardware→ Phone and Modem
Options
→
Modems
.
2
Click the COM port for your modem→ Properties→ Diagnostics→
Query Modem
to
verify that the modem is communicating with Windows.
If all commands receive responses, the modem is operating properly.
Windows Vista:
1
Click
Start
→
Control Panel→
Hardware and Sound→
Phone and Modem
Options
→
Modems
.
2
Click the COM port for your modem→
Properties
→
Diagnostics→
Query Modem
to verify that the modem is communicating with Windows.
If all commands receive responses, the modem is operating properly.
ENSURE THAT YOU ARE CONNECTED TO THE INTERNET — Ensure that you have
subscribed to an Internet provider. With the Outlook Express e-mail program open,
click File. If Work Offline has a checkmark next to it, click the checkmark to remove it
and connect to the Internet. For help, contact your Internet service provider.
Error Messages
CAUTION: Before you begin any of the procedures in this section, follow the
safety instructions in the
Product Information Guide
.
If the error message is not listed, see the documentation for the operating
system or the program that was running when the message appeared.
A FILENAME CANNOT CONTAIN ANY OF THE FOLLOWING CHARACTERS: \ / : * ? “ <
> | — Do not use these characters in filenames.
A
REQUIRED .DLL FILE WAS NOT FOUND — The program that you are trying to open
is missing an essential file. To remove and then reinstall the program:
Windows XP:
1
Click
Start→
Control Panel→ Add or Remove Programs→ Programs and Features
.
2
Select the program you want to remove.
3
Click
Uninstall
.
4
See the program documentation for installation instructions.
Windows Vista:
1
Click
Start
→
Control Panel→ Programs→ Programs and Features
.
2
Select the program you want to remove.
3
Click
Uninstall
.
4
See the program documentation for installation instructions.
Page 50

50 Quick Reference Guide
drive letter
:\ IS NOT ACCESSIBLE. THE DEVICE IS NOT READY — The drive
cannot read the disk. Insert a disk into the drive and try again.
I
NSERT BOOTABLE MEDIA — Insert a bootable floppy disk, CD, or DVD.
N
ON-SYSTEM DISK ERROR — Remove the floppy disk from the floppy drive and
restart your computer.
N
OT ENOUGH MEMORY OR RESOURCES. CLOSE SOME PROGRAMS AND TRY
AGAIN — Close all windows and open the program that you want to use. In some
cases, you may have to restart your computer to restore computer resources. If so, run
the program that you want to use first.
O
PERATING SYSTEM NOT FOUND — Contact Dell (see "Contacting Dell" in your
User’s Guide).
IEEE 1394 Device Problems
CAUTION: Before you begin any of the procedures in this section, follow the
safety instructions in the
Product Information Guide
.
E
NSURE THAT THE CABLE FOR THE IEEE 1394 DEVICE IS PROPERLY INSERTED INTO
THE DEVICE AND INTO THE CONNECTOR ON THE COMPUTER
ENSURE THAT THE IEEE 1394 DEVICE IS ENABLED IN SYSTEM SETUP — See
"System Setup Options" in your User’s Guide.
E
NSURE THAT THE IEEE 1394 DEVICE IS RECOGNIZED BY WINDOWS —
Windows XP:
1
Click
Start and click Control Panel
.
2
Under
Pick a Category
, click
Performance and Maintenance→
System→
System
Properties
→
Hardware→
Device Manager
.
Windows Vista:
1
Click
Start
→
Control Panel→ Hardware and Sound
.
2
Click
Device Manager.
If your IEEE 1394 device is listed, Windows recognizes the device.
E
NSURE THAT THE IEEE 1394 CARD IS PROPERLY SEATED
ENSURE THAT THE IEEE 1394 CABLE IS CONNECTED SECURELY TO THE SYSTEM
BOARD CONNECTOR AND THE CONNECTOR ON THE FRONT I /O PANEL
IF YOU HAVE PROBLEMS WITH A DELL IEEE 1394 DEVICE — Contact Dell (see
"Contacting Dell" in your User’s Guide).
I
F YOU HAVE PROBLEMS WITH AN IEEE 1394 DEVICE NOT PROVIDED BY DELL —
Contact the IEEE 1394 device manufacturer.
Page 51

Quick Reference Guide 51
Keyboard Problems
CAUTION: Before you begin any of the procedures in this section, follow the
safety instructions in the
Product Information Guide
.
C
HECK THE KEYBOARD CABLE —
• Ensure that the keyboard cable is firmly connected to the computer.
• Shut down the computer (see "Turning Off Your Computer"
in your User’s Guide
),
reconnect the keyboard cable as shown on the setup diagram for your computer, and
then restart the computer.
• Ensure that the cable is not damaged or frayed and check cable connectors for bent or
broken pins. Straighten any bent pins.
• Remove any keyboard extension cables and connect the keyboard directly to the
computer.
TEST THE KEYBOARD — Connect a properly working keyboard to the computer, then
try using the keyboard.
R
UN THE HARDWARE TROUBLESHOOTER — See "Hardware Troubleshooter" on page 41.
Lockups and Software Problems
CAUTION: Before you begin any of the procedures in this section, follow the
safety instructions in the
Product Information Guide
.
The computer does not start up
CHECK THE DIAGNOSTIC LIGHTS — See "Diagnostic Lights" on page 33.
E
NSURE THAT THE POWER CABLE IS FIRMLY CONNECTED TO THE COMPUTER AND TO
THE ELECTRICAL OUTLET
The computer stops responding
NOTICE: You may lose data if you are unable to perform an operating system
shutdown.
T
URN THE COMPUTER OFF — If you are unable to get a response by pressing a key on
your keyboard or moving your mouse, press and hold the power button for at least 8 to
10 seconds (until the computer turns off), and then restart your computer.
Page 52

52 Quick Reference Guide
A program stops responding
END THE PROGRAM —
1
Press <Ctrl><Shift><Esc> simultaneously to access the Task Manager.
2
Click the
Applications
tab.
3
Click to select the program that is no longer responding.
4
Click
End Task
.
A program crashes repeatedly
NOTE: Most software includes installation instructions in its documentation or on
a floppy disk, CD, or DVD.
C
HECK THE SOFTWARE DOCUMENTATION — If necessary, uninstall and then reinstall
the program.
A program is designed for an earlier Windows operating system
RUN THE PROGRAM COMPATIBILITY WIZARD —
Windows XP:
The Program Compatibility Wizard configures a program so that it runs in an
environment similar to non-XP operating system environments.
1
Click
Start→
All Programs→ Accessories→ Program Compatibility Wizard→ Next
.
2
Follow the instructions on the screen.
Windows Vista:
The Program Compatibility Wizard configures a program so that it runs in an
environment similar to non-Windows Vista operating system environments.
1
Click
Start
→
Control Panel→ Programs→ Use an older program with this
version of Windows.
2
In the welcome screen, click
Next
.
3
Follow the instructions on the screen.
A solid blue screen appears
TURN THE COMPUTER OFF — If you are unable to get a response by pressing
a key on your keyboard or moving your mouse, press and hold the power
button for at least 8 to 10 seconds (until the computer turns off), and then
restart your computer.
Page 53

Quick Reference Guide 53
Other software problems
CHECK THE SOFTWARE DOCUMENTATION OR CONTACT THE SOFTWARE
MANUFACTURER FOR TROUBLESHOOTING INFORMATION —
• Ensure that the program is compatible with the operating system installed on your
computer.
• Ensure that your computer meets the minimum hardware requirements needed to run
the software. See the software documentation for information.
• Ensure that the program is installed and configured properly.
• Verify that the device drivers do not conflict with the program.
• If necessary, uninstall and then reinstall the program.
BACK UP YOUR FILES IMMEDIATELY
USE A VIRUS-SCANNING PROGRAM TO CHECK THE HARD DRIVE, FLOPPY DISKS,
CD
S, OR DVDS
SAVE AND CLOSE ANY OPEN FILES OR PROGRAMS AND SHUT DOWN YOUR
COMPUTER THROUGH THE START MENU
Memory Problems
CAUTION: Before you begin any of the procedures in this section, follow the
safety instructions in the
Product Information Guide
.
I
F YOU RECEIVE AN INSUFFICIENT MEMORY MESSAGE —
• Save and close any open files and exit any open programs you are not using to see if
that resolves the problem.
• See the software documentation for minimum memory requirements. If necessary,
install additional memory (see "Installing a Memory Module"
in your User’s Guide
).
• Reseat the memory modules (see "Memory"
in your User’s Guide
) to ensure that your
computer is successfully communicating with the memory.
• Run the Dell Diagnostics (See "Dell Diagnostics" on page 41).
IF YOU EXPERIENCE OTHER MEMORY PROBLEMS —
• Reseat the memory modules (see "Memory"
in your User’s Guide
) to ensure that your
computer is successfully communicating with the memory.
• Ensure that you are following the memory installation guidelines (see "Installing a
Memory Module"
in your User’s Guide
).
Page 54

54 Quick Reference Guide
• Ensure that the memory you are using is supported by your computer. For more
information about the type of memory supported by your computer, see "Memory"
in
your User’s Guide
.
• Run the Dell Diagnostics (See "Dell Diagnostics" on page 41).
Mouse Problems
CAUTION: Before you begin any of the procedures in this section, follow the
safety instructions in the
Product Information Guide
.
C
HECK THE MOUSE CABLE —
• Ensure that the cable is not damaged or frayed and check cable connectors for bent or
broken pins. Straighten any bent pins.
• Remove any mouse extension cables, and connect the mouse directly to the computer.
• Verify that the mouse cable is connected as shown on the setup diagram for your
computer.
RESTART THE COMPUTER —
1
Simultaneously press <Ctrl><Esc> to display the
Start
menu.
2
Press <u>,
press the up- and down-arrow keys
to highlight
Shut down
or
Tu r n
Off
, and then press <Enter>.
3
After the computer turns off, reconnect the mouse cable as shown on the setup
diagram.
4
Turn on the computer.
TEST THE MOUSE — Connect a properly working mouse to the computer, then try
using the mouse.
C
HECK THE MOUSE SETTINGS —
Windows XP:
1
Click
Start→ Control Panel→
Mouse
.
2
Adjust the settings as needed.
Windows Vista:
1
Click
Start
→ Control Panel→ Hardware and Sound→ Mouse
.
2
Adjust the settings as needed.
REINSTALL THE MOUSE DRIVER — See "Drivers" in your User’s Guide.
R
UN THE HARDWARE TROUBLESHOOTER — See "Hardware Troubleshooter" on
page 41.
Page 55

Quick Reference Guide 55
Network Problems
CAUTION: Before you begin any of the procedures in this section, follow the
safety instructions in the
Product Information Guide
.
C
HECK THE NETWORK LIGHT ON THE FRONT OF THE COMPUTER — If the link
integrity light is off (see "Controls and Lights" in your User’s Guide), no network
communication is occurring. Replace the network cable.
C
HECK THE NETWORK CABLE CONNECTOR — Ensure that the network cable is firmly
inserted into the network connector on the back of the computer and the network jack.
R
ESTART THE COMPUTER AND ATTEMPT TO LOG ON TO THE NETWORK AGAIN
CHECK YOUR NETWORK SETTINGS — Contact your network administrator or the
person who set up your network to verify that your network settings are correct and
that the network is functioning.
R
UN THE HARDWARE TROUBLESHOOTER — See "Hardware Troubleshooter" on page 41.
Power Problems
CAUTION: Before you begin any of the procedures in this section, follow the
safety instructions in the
Product Information Guide
.
I
F THE POWER LIGHT IS GREEN AND THE COMPUTER IS NOT RESPONDING — See
"Diagnostic Lights" on page 33.
I
F THE POWER LIGHT IS BLINKING GREEN — The computer is in standby mode.
Press a key on the keyboard, move the mouse, or press the power button to resume
normal operation.
I
F THE POWER LIGHT IS OFF — The computer is either turned off or is not receiving
power.
• Reseat the power cable in the power connector on the back of the computer and the
electrical outlet.
• Bypass power strips, power extension cables, and other power protection devices to
verify that the computer turns on properly.
• Ensure that any power strips being used are plugged into an electrical outlet and are
turned on.
• Ensure that the electrical outlet is working by testing it with another device, such as a
lamp.
• Ensure that the main power cable and front panel cable are securely connected to the
system board (see "System Board Components"
in your User’s Guide
).
Page 56

56 Quick Reference Guide
IF THE POWER LIGHT IS BLINKING AMBER — The computer is receiving electrical
power, but an internal power problem may exist.
• Ensure that the voltage selection switch is set to match the AC power at your location
(if applicable).
• Ensure that all components and cables are properly installed and securely connected
to the system board (see "System Board Components"
in your User’s Guide
).
IF THE POWER LIGHT IS STEADY AMBER — A device may be malfunctioning or
incorrectly installed.
• Remove and then reinstall all memory modules (see "Memory"
in your User’s Guide
).
• Remove and then reinstall any expansion cards, including graphics cards (see "Cards"
in your
User’s Guide
).
ELIMINATE INTERFERENCE — Some possible causes of interference are:
• Power, keyboard, and mouse extension cables.
• Too many devices connected to the same power strip.
• Multiple power strips connected to the same electrical outlet.
Printer Problems
CAUTION: Before you begin any of the procedures in this section, follow the
safety instructions in the
Product Information Guide
.
NOTE: If you need technical assistance for your printer, contact the printer’s
manufacturer.
C
HECK THE PRINTER DOCUMENTATION — See the printer documentation for setup
and troubleshooting information.
E
NSURE THAT THE PRINTER IS TURNED ON
CHECK THE PRINTER CABLE CONNECTIONS —
• See the printer documentation for cable connection information.
• Ensure that the printer cables are securely connected to the printer and the computer.
TEST THE ELECTRICAL OUTLET — Ensure that the electrical outlet is working by
testing it with another device, such as a lamp.
V
ERIFY THAT THE PRINTER IS RECOGNIZED BY WINDOWS —
Windows XP:
1
Click
Start→
Control Panel→
Printers and Other Hardware→
View installed
printers or fax printers
.
2
If the printer is listed, right-click the printer icon.
Page 57

Quick Reference Guide 57
3
Click
Properties→
Ports
. For a parallel printer, ensure that the
Print to the following
port(s):
setting is
LPT1 (Printer Port)
. For a USB printer, ensure that the
Print to the
following port(s):
setting is
USB
.
Windows Vista:
1
Click
Start
→ Control Panel→ Hardware and Sound→ Printer
.
2
If the printer is listed, right-click the printer icon.
3
Click
Properties,
and then click
Ports
.
4
Adjust the settings, as needed.
REINSTALL THE PRINTER DRIVER — See the printer documentation for information
on reinstalling the printer driver.
Scanner Problems
CAUTION: Before you begin any of the procedures in this section, follow the
safety instructions in the
Product Information Guide
.
NOTE: If you need technical assistance for your scanner, contact the scanner’s
manufacturer.
C
HECK THE SCANNER DOCUMENTATION — See the scanner documentation for setup
and troubleshooting information.
U
NLOCK THE SCANNER — Ensure that your scanner is unlocked (if the scanner has a
locking tab or button).
R
ESTART THE COMPUTER AND TRY THE SCANNER AGAIN
CHECK THE CABLE CONNECTIONS —
• See the scanner documentation for information on cable connections.
• Ensure that the scanner cables are securely connected to the scanner and the
computer.
VERIFY THAT THE SCANNER IS RECOGNIZED BY MICROSOFT WINDOWS —
Windows XP:
1
Click
Start→
Control Panel→
Printers and Other Hardware→
Scanners and
Cameras
.
2
If your scanner is listed, Windows recognizes the scanner.
Windows Vista:
1
Click
Start
→ Control Panel→ Hardware and Sound→ Scanners and Cameras
.
2
If the scanner is listed, Windows recognizes the scanner.
REINSTALL THE SCANNER DRIVER — See the scanner documentation for
instructions.
Page 58

58 Quick Reference Guide
Sound and Speaker Problems
CAUTION: Before you begin any of the procedures in this section, follow the
safety instructions in the
Product Information Guide
.
No sound from speakers
NOTE: The volume control in MP3 and other media players may override the
Windows volume setting. Always check to ensure that the volume on the media
player(s) has not been turned down or off.
C
HECK THE SPEAKER CABLE CONNECTIONS — Ensure that the speakers are
connected as shown on the setup diagram supplied with the speakers. If you purchased
a sound card, ensure that the speakers are connected to the card.
E
NSURE THAT THE SUBWOOFER AND THE SPEAKERS ARE TURNED ON — See the
setup diagram supplied with the speakers. If your speakers have volume controls,
adjust the volume, bass, or treble to eliminate distortion.
A
DJUST THE WINDOWS VOLUME CONTROL — Click or double-click the speaker icon
in the lower-right corner of your screen. Ensure that the volume is turned up and that
the sound is not muted.
D
ISCONNECT HEADPHONES FROM THE HEADPHONE CONNECTOR — Sound from the
speakers is automatically disabled when headphones are connected to the computer’s
front-panel headphone connector.
T
EST THE ELECTRICAL OUTLET — Ensure that the electrical outlet is working by
testing it with another device, such as a lamp.
E
LIMINATE POSSIBLE INTERFERENCE — Turn off nearby fans, fluorescent lights, or
halogen lamps to check for interference.
R
UN THE SPEAKER DIAGNOSTICS
REINSTALL THE SOUND DRIVER — See "Drivers" in your User’s Guide.
R
UN THE HARDWARE TROUBLESHOOTER — See "Hardware Troubleshooter" on
page 41.
No sound from headphones
CHECK THE HEADPHONE CABLE CONNECTION — Ensure that the headphone cable is
securely inserted into the headphone connector (see "About Your Computer" on
page 11).
A
DJUST THE WINDOWS VOLUME CONTROL — Click or double-click the speaker icon
in the lower-right corner of your screen. Ensure that the volume is turned up and that
the sound is not muted.
Page 59

Quick Reference Guide 59
Video and Monitor Problems
CAUTION: Before you begin any of the procedures in this section, follow the
safety instructions in the
Product Information Guide
.
NOTICE: If your computer came with a PCI Express graphics card installed,
removal of the card is not necessary when installing additional graphics cards;
however, the card is required for troubleshooting purposes. If you remove the card,
store it in a safe and secure location. For information about your graphics card, go
to support.dell.com.
The screen is blank
NOTE: For troubleshooting procedures, see the monitor’s documentation.
C
HECK THE MONITOR CABLE CONNECTION —
• Ensure that the monitor cable is connected to the correct graphics card (for dual
graphics card configurations).
• If you are using a DVI-to-VGA adapter, ensure that the adapter is correctly attached to
the graphics card and monitor.
• Ensure that the monitor cable is connected as shown on the setup diagram for your
computer.
• Remove any video extension cables and connect the monitor directly to the computer.
• Swap the computer and monitor power cables to determine if the monitor’s power
cable is defective.
• Check the connectors for bent or broken pins (it is normal for monitor cable
connectors to have missing pins).
CHECK THE MONITOR POWER LIGHT —
• If the power light is lit or blinking, the monitor has power.
• If the power light is off, firmly press the button to ensure that the monitor is
turned on.
• If the power light is blinking, press a key on the keyboard or move the mouse to
resume normal operation.
TEST THE ELECTRICAL OUTLET — Ensure that the electrical outlet is working by
testing it with another device, such as a lamp.
C
HECK THE DIAGNOSTIC LIGHTS — See "Diagnostic Lights" on page 33.
Page 60

60 Quick Reference Guide
The screen is difficult to read
CHECK THE MONITOR SETTINGS — See the monitor documentation for instructions
on adjusting the contrast and brightness, demagnetizing (degaussing) the monitor,
and running the monitor self-test.
M
OVE THE SUBWOOFER AWAY FROM THE MONITOR — If your speaker system
includes a subwoofer, ensure that the subwoofer is positioned at least 60 centimeters
(2 feet) away from the monitor.
M
OVE THE MONITOR AWAY FROM EXTERNAL POWER SOURCES — Fans, fluorescent
lights, halogen lamps, and other electrical devices can cause the screen image to
appear shaky. Turn off nearby devices to check for interference.
R
OTATE THE MONITOR TO ELIMINATE SUNLIGHT GLARE AND POSSIBLE
INTERFERENCE
ADJUST THE WINDOWS DISPLAY SETTINGS —
Windows XP:
1
Click
Start→
Control Panel→
Appearance and Themes
.
2
Click the area you want to change or click the
Display
icon.
3
Try different settings for
Color quality
and
Screen resolution
.
Windows Vista:
1
Click
Start
→ Control Panel→ Hardware and Sound→ Personalization
→
Display Settings
.
2
Adjust
Resolution
and
Colors settings,
as needed.
3D image quality is poor
CHECK THE GRAPHICS CARD POWER CABLE CONNECTION — Ensure that the power
cable for the graphics card(s) is correctly attached to the card.
C
HECK THE MONITOR SETTINGS — See the monitor documentation for instructions
on adjusting the contrast and brightness, demagnetizing (degaussing) the monitor,
and running the monitor self-test.
Only part of the screen is readable
TURN ON THE COMPUTER AND THE MONITOR AND ADJUST THE MONITOR
BRIGHTNESS AND CONTRAST CONTROLS — If the monitor works, the graphics
card(s) may be defective.
Contact Dell (see "Contacting Dell"
in your User’s Guide
).
Page 61

Index 61
Index
B
battery
problems, 46
beep codes, 37
C
cards
slots, 15, 18
CD-RW drive
problems, 47
CDs
operating system, 10
Check Disk, 47
computer
beep codes, 37
crashes, 51-52
stops responding, 51
conflicts
software and hardware
incompatibilities, 41
connectors
headphone, 13, 17
IEEE, 12, 16
keyboard, 21
line-in, 20
line-out, 20
mouse, 19
connectors (continued)
network adapter, 20
parallel, 19
power, 14, 18
serial, 21
sound, 20
USB, 12, 16, 20-21
D
Dell Diagnostics, 41
Dell support site, 8
diagnostic lights, 33
diagnostics
beep codes, 37
Dell, 41
lights, 13, 17, 33
display. See monitor
documentation
End User License Agreement, 6
ergonomics, 6
online, 8
Product Information Guide, 6
regulatory, 6
safety, 6
User’s Guide, 6
warranty, 6
drives
problems, 46
Page 62

62 Index
E
e-mail
problems, 48
End User License Agreement, 6
ergonomics information, 6
error messages
beep codes, 37
diagnostic lights, 33
problems, 49
F
Files and Settings Transfer
Wizard, 25
H
hard drive
activity light, 12-13, 15, 17
problems, 47
hardware
beep codes, 37
conflicts, 41
Dell Diagnostics, 41
Hardware Troubleshooter, 41
headphone
connector, 13, 17
Help and Support Center, 9
help file
Windows Help and Support
Center, 9
I
IEEE
connectors, 12, 16
IEEE 1394
problems, 50
Internet
problems, 48
IRQ conflicts, 41
K
keyboard
connector, 21
problems, 51
L
labels
Microsoft Windows, 7
Service Tag, 7
lights
back of computer, 33
diagnostic, 13, 17, 33
hard drive activity, 12-13, 15, 17
link integrity, 19
network, 19-20
network activity, 20
power, 13, 17
Page 63

Index 63
M
memory
problems, 53
messages
error, 49
modem
problems, 48
monitor
blank, 59
hard to read, 60
problems, 59
mouse
connector, 19
problems, 54
N
network
connector, 20
problems, 55
O
operating system
reinstalling, 10
Operating System CD, 10
optical drive
problems, 46-47
P
power
button, 12, 16
connector, 14, 18
light, 13, 17
line conditioners, 28
problems, 55
protection devices, 28
surge protectors, 28
UPS, 28
power light
conditions, 55
printer
connecting, 25
problems, 56
setting up, 25
problems
battery, 46
beep codes, 37
blue screen, 52
CD-RW drive, 47
computer crashes, 51-52
computer stops responding, 51
conflicts, 41
Dell Diagnostics, 41
diagnostic lights, 33
drives, 46
e-mail, 48
error messages, 49
general, 51
hard drive, 47
IEEE 1394, 50
Internet, 48
keyboard, 51
Page 64

64 Index
problems (continued)
memory, 53
modem, 48
monitor hard to read, 60
monitor is blank, 59
mouse, 54
network, 55
optical drive, 46-47
power, 55
power light conditions, 55
printer, 56
program crashes, 52
program stops responding, 52
scanner, 57
screen hard to read, 60
screen is blank, 59
software, 52-53
video and monitor, 59
volume adjusting, 58
Product Information Guide, 6
R
regulatory information, 6
ResourceCD
Dell Diagnostics, 41
S
S.M.A.R.T, 40
safety instructions, 6
scanner
problems, 57
screen. See monitor
Service Tag, 7
software
conflicts, 41
problems, 52-53
sound connectors
line-in, 20
line-out, 20
Starting the Dell Diagnostics
From the Drivers and
Utilities CD, 43
Starting the Dell Diagnostics
From Your Hard Drive, 42
support website, 8
T
transferring information to a new
computer, 25
troubleshooting
conflicts, 41
Dell Diagnostics, 41
diagnostic lights, 33
Hardware Troubleshooter, 41
Help and Support Center, 9
U
uninterruptible power supply.
See UPS,28
UPS, 28
Page 65

Index 65
USB
connector, 20-21
connectors, 12, 16
User’s Guide, 6
V
video
problems, 59
voltage selection switch, 14, 18
volume
adjusting, 58
W
warranty information, 6
Windows XP
Files and Settings Transfer
Wizard, 25
Hardware Troubleshooter, 41
Help and Support Center, 9
reinstalling, 10
wizards
Files and Settings Transfer
Wizard, 25
Page 66

66 Index
Page 67

Dell Precision™ Workstation T3400
Guide de référence rapide
Modèle DCTA
www.dell.com | support.dell.com
Page 68
Remarques, avis et précautions
REMARQUE : Une REMARQUE fournit des informations importantes qui vous aident
à mieux utiliser votre ordinateur.
AVIS : Un AVIS vous avertit d'un risque de dommage matériel ou de perte de données
et vous indique comment éviter le problème.
PRÉCAUTION : Une PRÉCAUTION indique un risque potentiel d'endommagement
du matériel, de blessure corporelle ou de mort.
____________________
Les informations contenues dans ce document sont sujettes à modification sans préavis.
© 2007 Dell Inc. Tous droits réservés.
Toute reproduction sous quelque forme que ce soit est interdite sans l'autorisation préalable et écrite de
Dell, Inc.
Marques utilisées dans ce document : Dell, le logo DELL et Dell Precision sont des marques de Dell Inc. ;
Microsoft, Windows et Windows Vista sont des marques ou des marques deposes de Microsoft
Corporation aux Etats-Unis et dans d'autres pays.
Les autres marques et noms de produits pouvant être utilisés dans ce document sont reconnus comme
appartenant à leurs propriétaires respectifs. Dell Inc. rejette tout intérêt propriétaire dans les marques
et les noms commerciaux autres que les siens.
Modèle DCTA
Août 2007 N/P KP542 Rév. A00
Page 69

Table des matières
Recherche d'informations . . . . . . . . . . . . . . . 71
A propos de votre ordinateur
Vue frontale (mode tour)
Vue arrière (mode tour)
Vue avant (mode bureau)
Vue arrière (mode bureau)
. . . . . . . . . . . . . . 77
. . . . . . . . . . . . . . 77
. . . . . . . . . . . . . . 80
. . . . . . . . . . . . . 81
. . . . . . . . . . . . . 84
Connecteurs du panneau arrière
Configuration de votre ordinateur
Passage du mode tour en mode bureau
Installation de votre ordinateur dans
un espace fermé
. . . . . . . . . . . . . . . . . . 89
Transfert d'informations vers un
nouvel ordinateur
. . . . . . . . . . . . . . . . . 91
Périphériques de protection contre
les surtensions électriques
Nettoyage de votre ordinateur
. . . . . . . . . . . . . 96
. . . . . . . . . 85
. . . . . . . . . . . 87
. . . . . . 87
. . . . . . . . . . . . 95
Outils de dépannage
Ordinateur, clavier et moniteur
Souris (non optique)
Lecteur de disquette
CD et DVD
. . . . . . . . . . . . . . . . . . . . . 97
Voyants d'alimentation
Voyants de diagnostic
Codes sonores
Messages système
. . . . . . . . . . . . . . . . 97
. . . . . . . . . . . . . . . . 97
. . . . . . . . . . . . . . . . . . 98
. . . . . . . . . . . . . . . 98
. . . . . . . . . . . . . . . 99
. . . . . . . . . . . . . . . . . . . 104
. . . . . . . . . . . . . . . . . 107
Dépanneur des conflits matériels
Dell Diagnostics
. . . . . . . . . . . . . . . . . . 109
. . . . . . . . . . 96
. . . . . . . . . 109
Table des matières 69
Page 70

Dépannage . . . . . . . . . . . . . . . . . . . . . . . . 114
Problèmes liés aux batteries
Problèmes de lecteur
. . . . . . . . . . . . . . . . 114
. . . . . . . . . . . . 114
Problèmes liés à la messagerie électronique,
au modem ou à Internet
Messages d'erreur
Problèmes de périphérique IEEE 1394
Problèmes de clavier
. . . . . . . . . . . . . . 116
. . . . . . . . . . . . . . . . . 118
. . . . . . . 119
. . . . . . . . . . . . . . . . 119
Problèmes de blocage et problèmes logiciels
Problèmes de mémoire
Problèmes de souriss
Problèmes de réseau
Problèmes d'alimentation
Problèmes d'imprimante
Problèmes de scanner
Problèmes de son et de haut-parleurs
Incidents liés à l'affichage et au moniteur
. . . . . . . . . . . . . . . 122
. . . . . . . . . . . . . . . 123
. . . . . . . . . . . . . . . . 123
. . . . . . . . . . . . . 124
. . . . . . . . . . . . . . 125
. . . . . . . . . . . . . . . 126
. . . . . . . 127
. . . . . 128
. . . 120
Index . . . . . . . . . . . . . . . . . . . . . . . . . . . . . . 131
70 Table des matières
Page 71
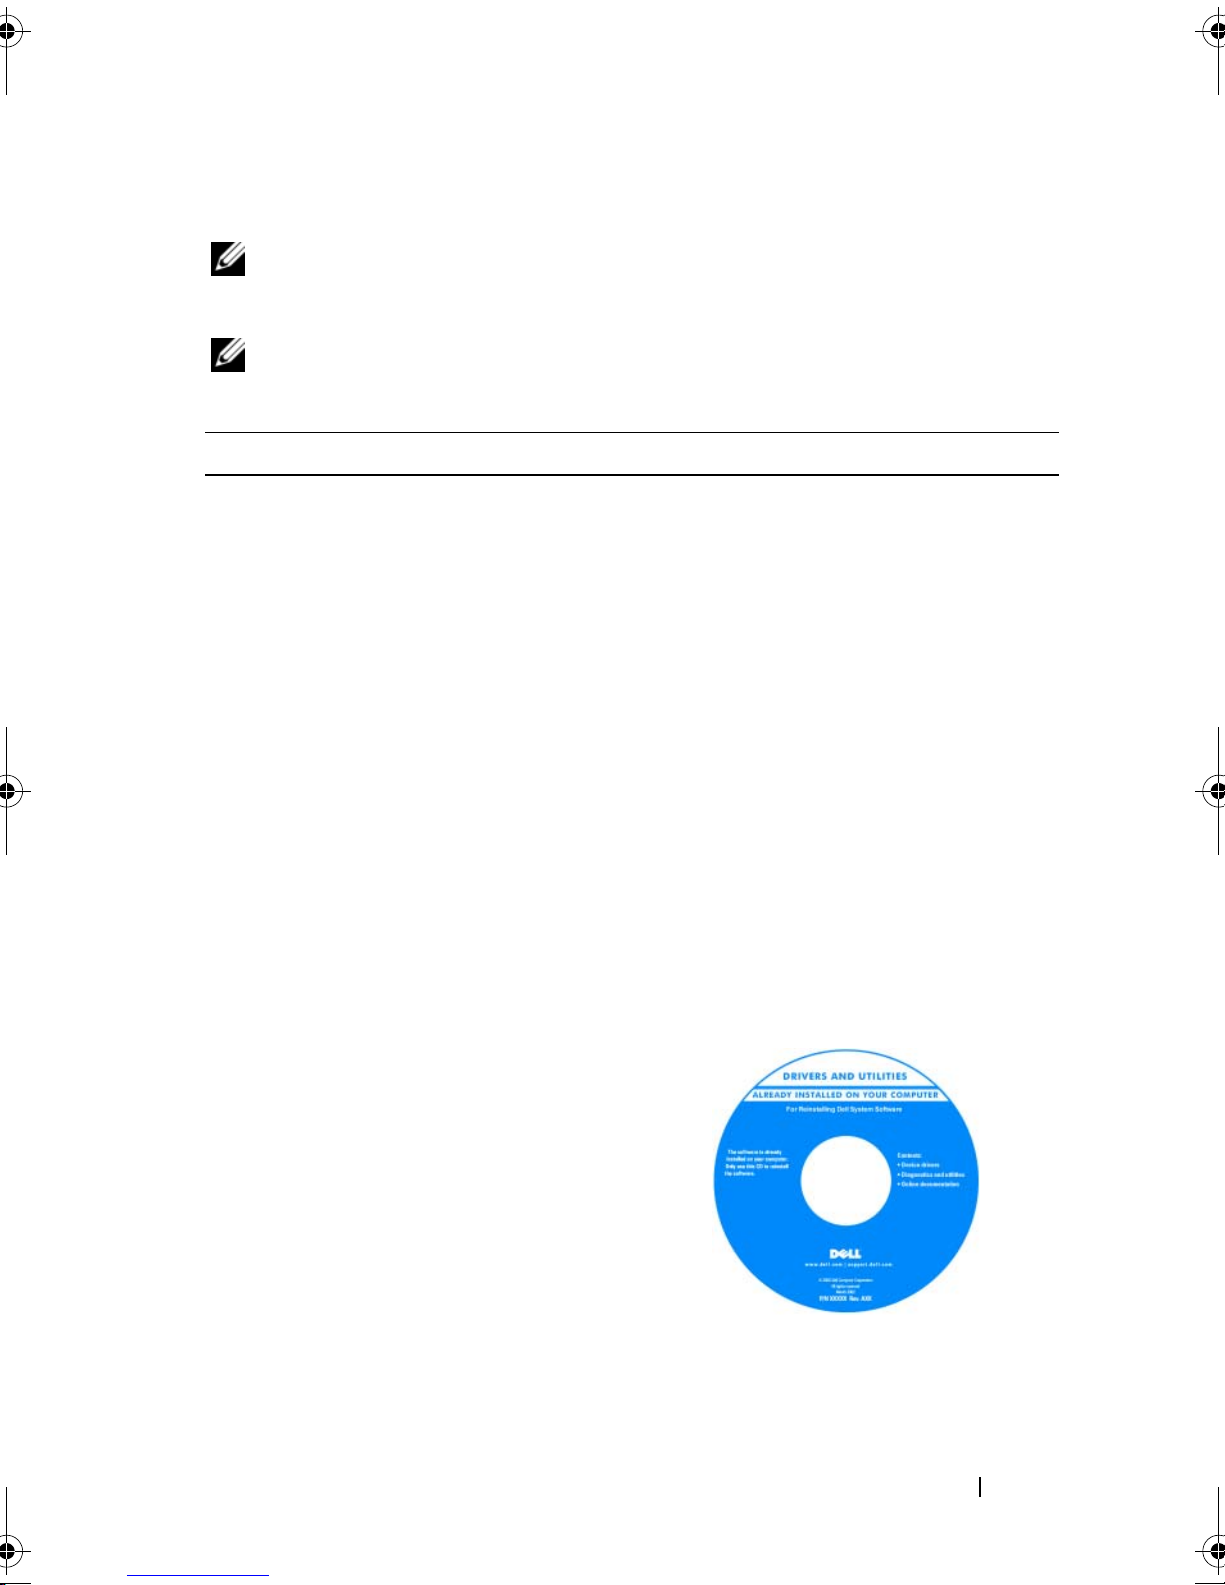
Recherche d'informations
REMARQUE : Certaines fonctionnalités ou supports de données peuvent être en
option et ne pas être livrés avec votre ordinateur. Certaines fonctionnalités ou supports
de données peuvent ne pas être disponibles dans certains pays.
REMARQUE : Il est possible que des informations supplémentaires soient livrées
avec votre ordinateur.
Que recherchez-vous ? Trouvez-le ici
• Un programme de diagnostics pour mon
ordinateur
• Pilotes pour mon ordinateur
• Le logiciel DSS (Desktop System Software)
Disque Drivers and Utilities
REMARQUE : Le disque Drivers and Utilities
peut être en option et n'est pas forcément
livré avec votre ordinateur.
La documentation et les pilotes sont déjà
installés sur l'ordinateur. Vous pouvez
utiliser le disque Drivers and Utilities pour
réinstaller les pilotes (voir «Réinistallation
des pilotes et des utilitaires» de votre Guide
d'utilisation), ou exécuter Dell Diagnostics
(voir «Dell Diagnostics» à la page 109).
Des fichiers Lisez-moi peuvent être inclus
sur votre disque afin de fournir des
informations sur les modifications
techniques apportées en dernière minute
à votre système ou des informations de
référence destinées aux techniciens ou aux
utilisateurs expérimentés.
Les dernières mises à jour des pilotes et de
la documentation se trouvent à l'adresse
support.dell.com.
Guide de référence rapide 71
Page 72
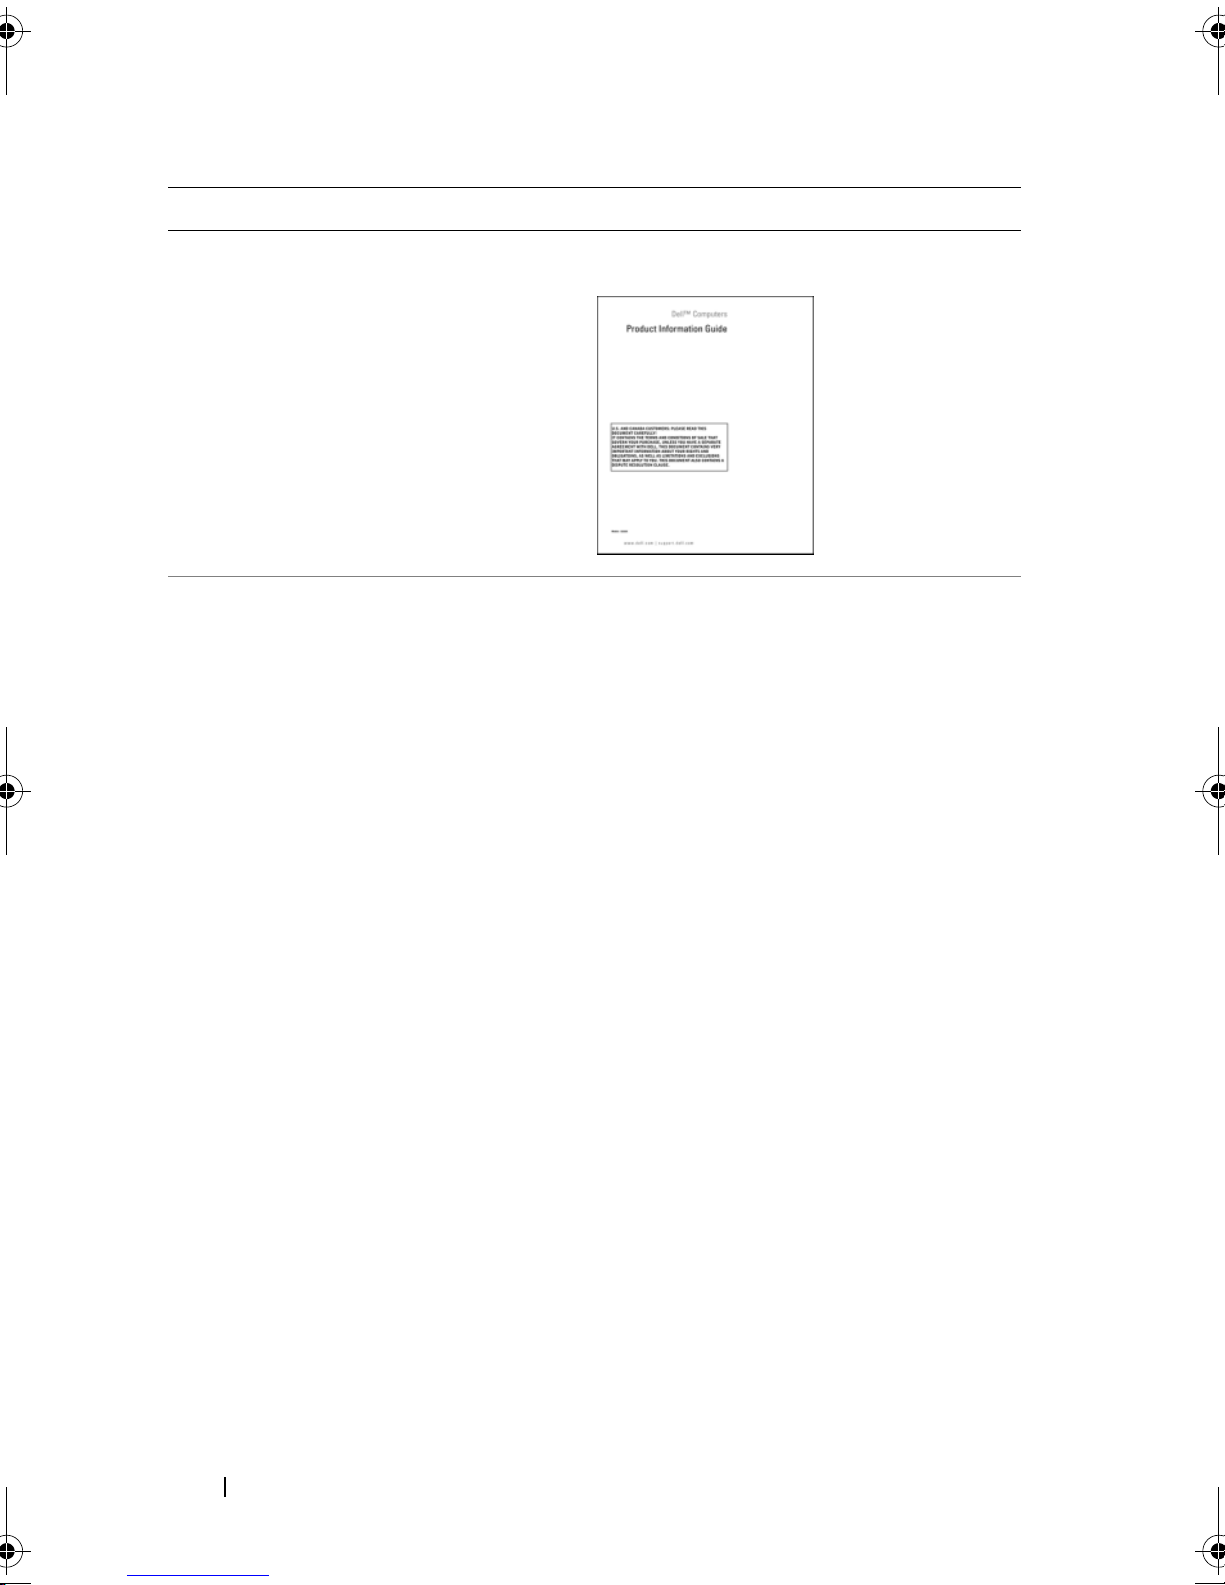
Que recherchez-vous ? Trouvez-le ici
• Informations sur la garantie
• Termes et Conditions (Etats-Unis
uniquement)
• Consignes de sécurité
• Informations sur les réglementations
• Informations sur l'ergonomie
• Contrat de licence pour utilisateur final
• Comment retirer et remplacer des pièces
• Caractéristiques
• Comment configurer les paramètres
système
• Comment dépanner et résoudre les
problèmes
Guide d'information sur le produit Dell™
Guide d'utilisation Dell Precision™
®
Microsoft
Vista
1
Cliquez sur
support
Dell
2
Cliquez sur le
Windows® XP et Windows
™
Centre d'aide et de support
Démarrer→
→
Guides utilisateur et système
→
Guides système
Aide et
.
Guide d'utilisation
de votre
ordinateur.
72 Guide de référence rapide
Page 73
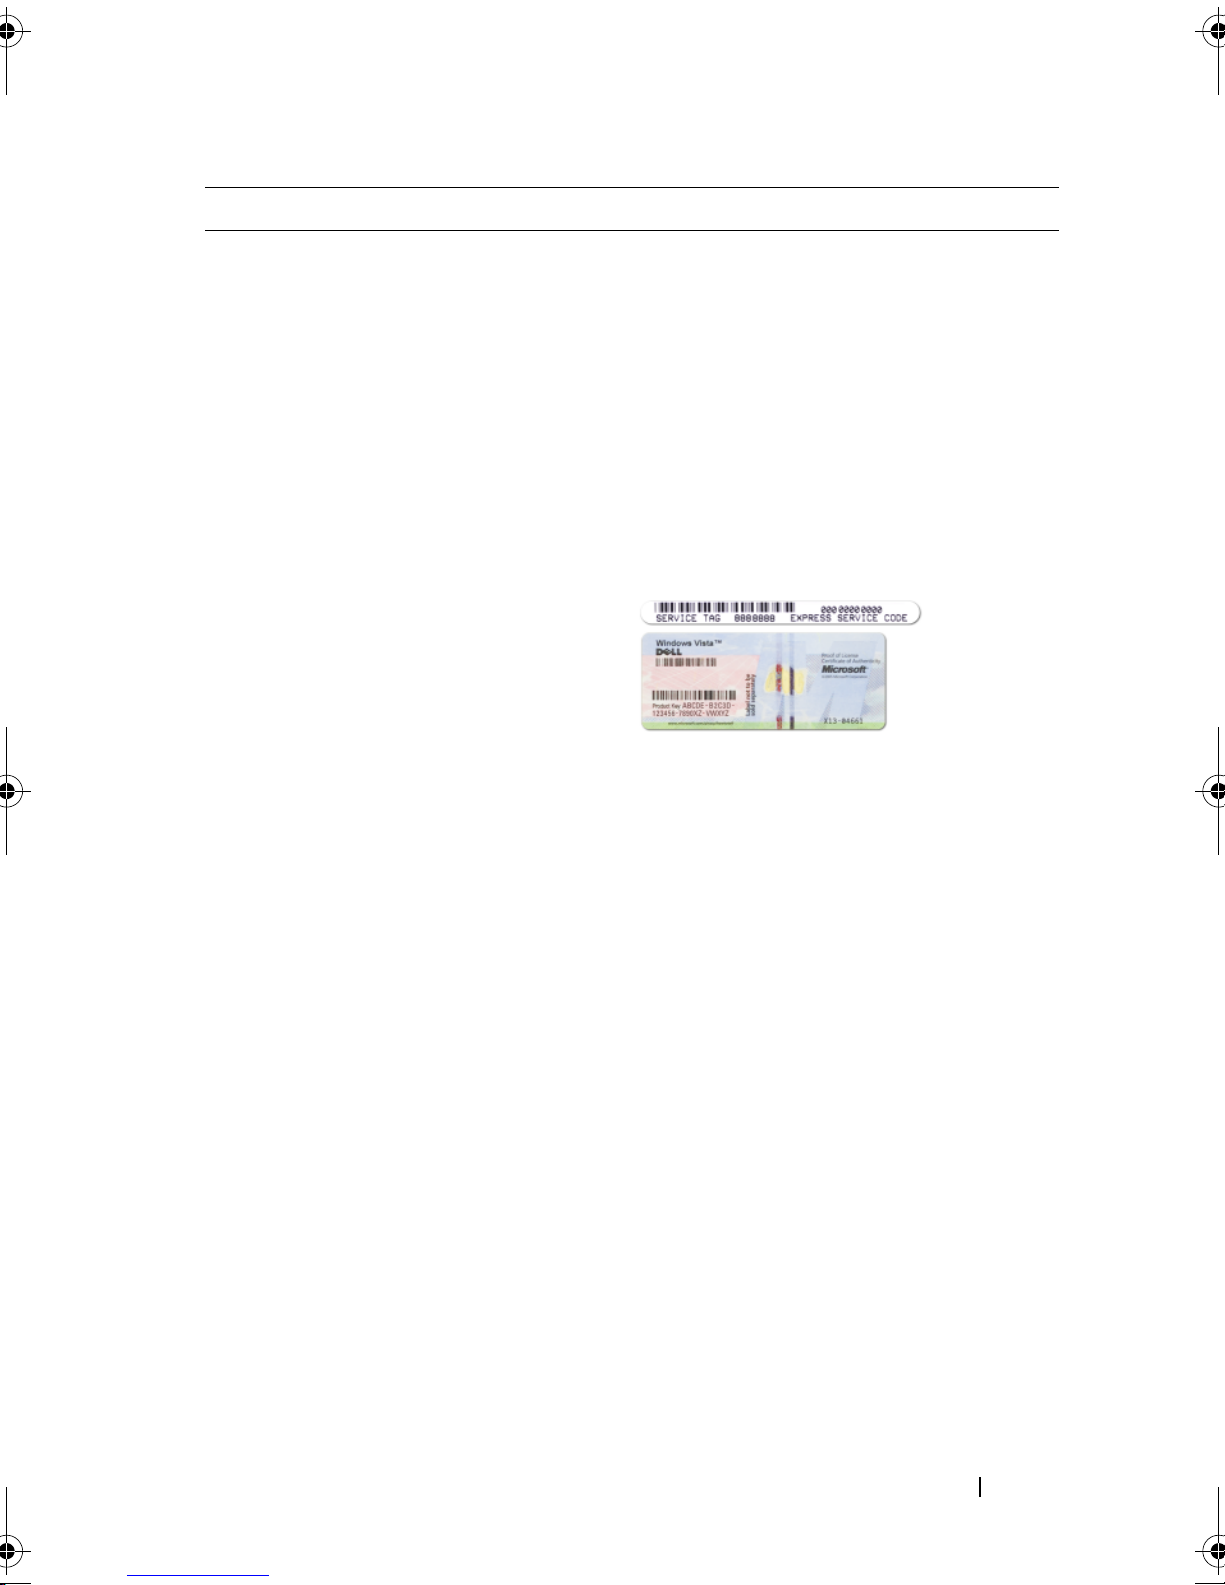
Que recherchez-vous ? Trouvez-le ici
• Numéro de service et code de service
express
• Clé du produit Microsoft Windows
Numéro de service et clé produit
Microsoft Windows
Ces étiquettes sont apposées sur votre
ordinateur.
• Utilisez le numéro de service pour
identifier votre ordinateur lorsque vous
accédez au site Web
support.dell.com
ou lorsque vous appelez le support.
• Entrez le code de service express pour
orienter votre appel lorsque vous contactez
le service de support.
REMARQUE : Par mesure de sécurité
supplémentaire, la nouvelle étiquette de
licence Microsoft Windows a une partie
manquante ou trou pour dissuader le
décollement de l'étiquette.
Guide de référence rapide 73
Page 74

Que recherchez-vous ? Trouvez-le ici
• Solutions — Astuces de dépannage,
articles de techniciens, cours en ligne
et questions fréquemment posées
• Des forums clients — Discussion en
ligne avec d'autres clients Dell
• Mises à niveau — Informations de mise
à niveau pour les composants, tels que la
mémoire, le disque dur et le système
d'exploitation
• Service clientèle — Coordonnées, appels
de service et état des commandes, garantie
et informations sur les réparations
• Service et support — Etat des appels de
service, historique du support, contrat
de service, discussions en ligne avec le
support technique
• Service de mise à jour technique Dell —
Avertissement par e-mail des mises à jour
logicielles et matérielles correspondant
à votre ordinateur
Site web de Support Dell — support.dell.com
REMARQUE : Sélectionnez votre région ou
votre secteur d'activité pour voir le site de
support qui vous concerne.
• Référence — Documentation de
l'ordinateur, détails sur la configuration
de l'ordinateur, caractéristiques de produit
et livres blancs
• Téléchargements — Pilotes, correctifs et
mises à jour logicielles agréés
74 Guide de référence rapide
Page 75

Que recherchez-vous ? Trouvez-le ici
• DSS (Desktop System Software) — Si
vous réinstallez le système d'exploitation
de votre ordinateur, vous devez également
réinstaller l'utilitaire DSS. DSS détecte
automatiquement votre ordinateur et
votre système d'exploitation et y installe
les mises à jour correspondant à votre
configuration, notamment les mises
à niveau critiques pour votre système
d'exploitation et la prise en charge des
processeurs, lecteurs optiques et
périphériques USB, etc. DSS est requis
pour le bon fonctionnement de votre
ordinateur Dell.
Pour télécharger Desktop System Software :
1
Allez à l'adresse
support.dell.com
,
sélectionnez votre pays/région, puis cliquez
sur
Drivers & Downloads
(Pilotes et
téléchargement).
2
Cliquez sur
modèle) ou
Select Model
Enter a Tag
(Numéro de série),
(Sélectionner un
Faites les choix ou entrez les informations
correspondant à votre ordinateur, puis
cliquez sur le bouton
Confirm
(Confirmer).
3
Faites défiler jusqu'à
Configuration Utilities
systèmes et utilitaires de configuration)
Desktop System Software
Download Now
sur
System and
(Utilitaires
→
, puis cliquez
(Télécharger
maintenant).
REMARQUE : L'interface utilisateur
support.dell.com peut varier selon vos
sélections.
• Comment utiliser Windows XP
• Comment utiliser Windows Vista
• Comment utiliser des programmes et
des fichiers
• Comment personnaliser mon bureau
Centre d'aide et de support de Windows
1
Cliquez sur
2
Tapez un mot ou une expression qui
Démarrer→
Aide et support
décrit votre problème, puis cliquez sur
l'icône représentant une flèche.
3
Cliquez sur la rubrique qui décrit votre
problème.
4
Suivez les instructions qui s'affichent.
.
Guide de référence rapide 75
Page 76
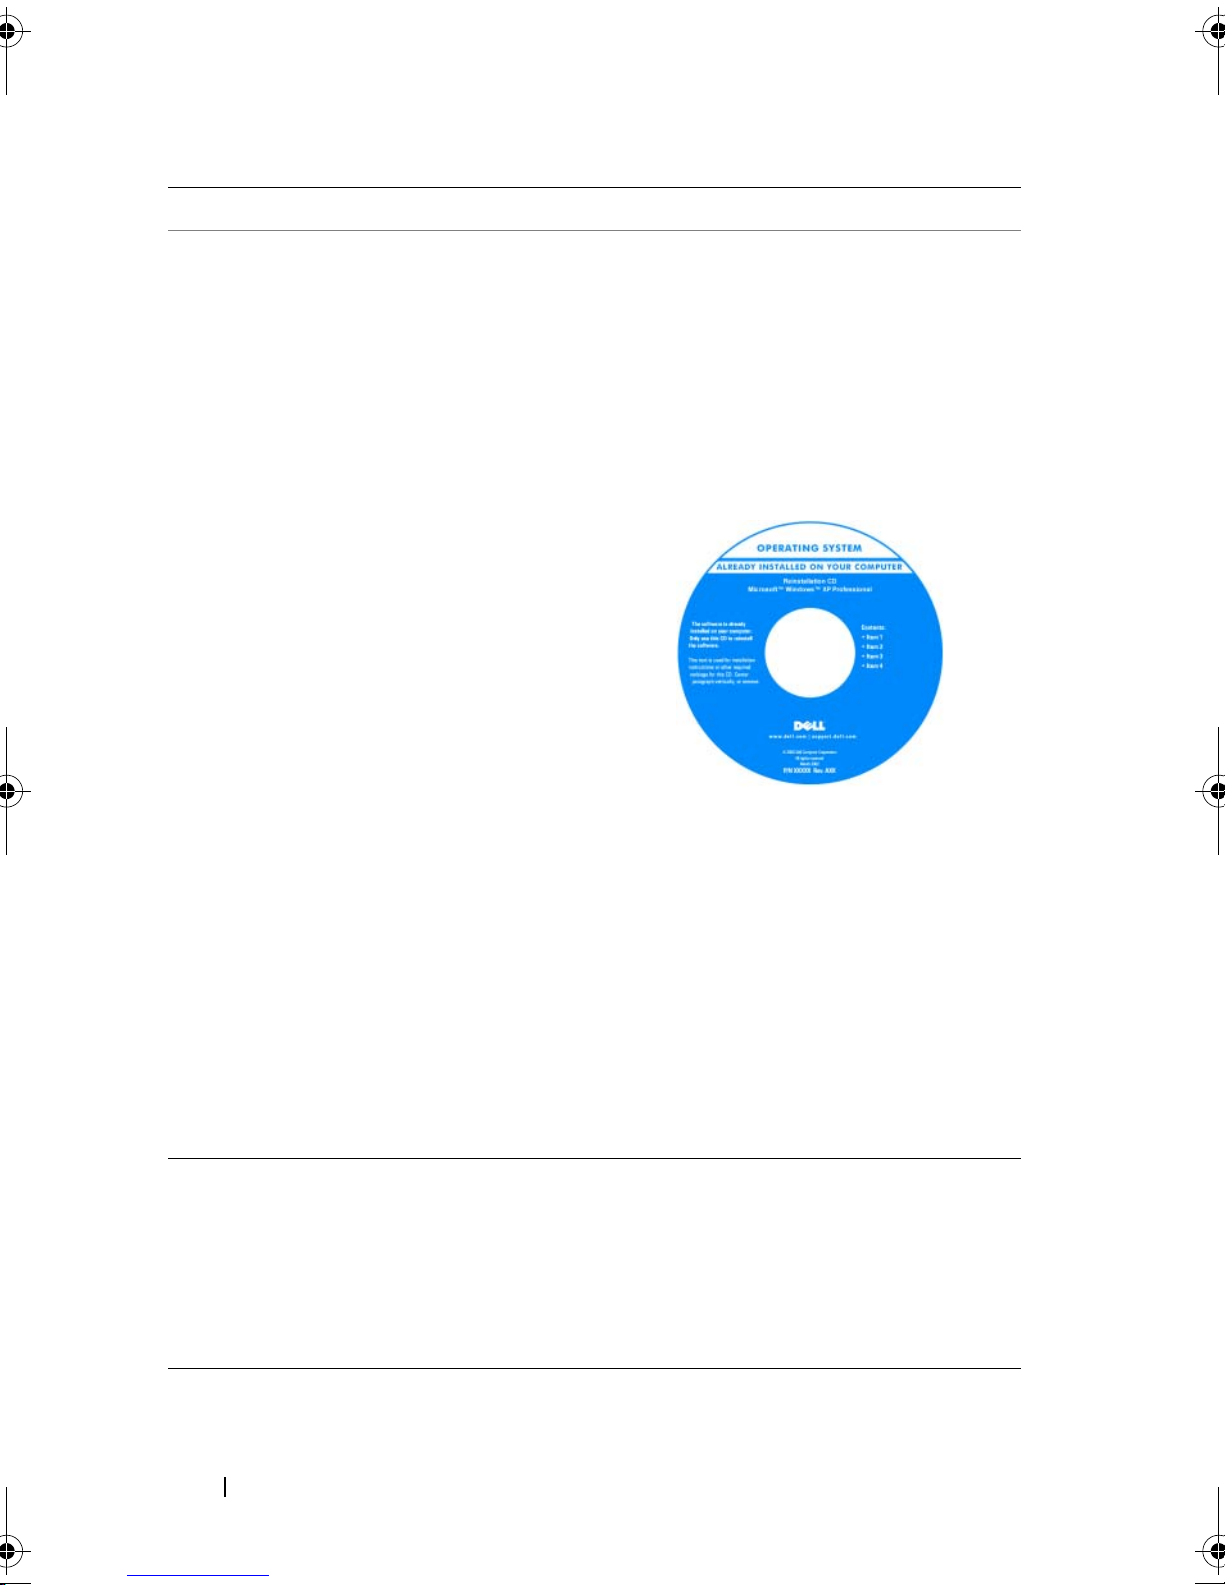
Que recherchez-vous ? Trouvez-le ici
• Comment réinstaller mon système
d'exploitation
Média Operating System (système
d'exploitation)
Le système d'exploitation est déjà installé
sur votre ordinateur. Pour réinsaller le
système d'exploitation, utiliez le support
de réinstallation Operating System livré
avec votre ordinateur (voir «Restauration
de votre système d'exploitation» dans le
Guide d'utilisation).
Après avoir réinstallé votre système
d'exploitation, utilisez le disque Drivers
and Utilities en option pour réinstaller les
pilotes des périphériques livrés avec votre
ordinateur.
• Comment utiliser Linux
• Discussions par e-mail avec d'autres
utilisateurs des ordinateurs Dell Precision
et du système d'exploitation Linux
• Des informations supplémentaires sur
Linux et mon Dell Precision
76 Guide de référence rapide
L'étiquette de la Product key (clé de produit)
de votre système d'exploitation se trouve sur
l'ordinateur.
REMARQUE : La couleur du support
d'installation du système d'exploitation dépend
du système d'exploitation commandé.
Sites Linux pris en charge par Dell
• linux.dell.com
• lists.us.dell.com/mailman/listinfo/linuxprecision
Page 77
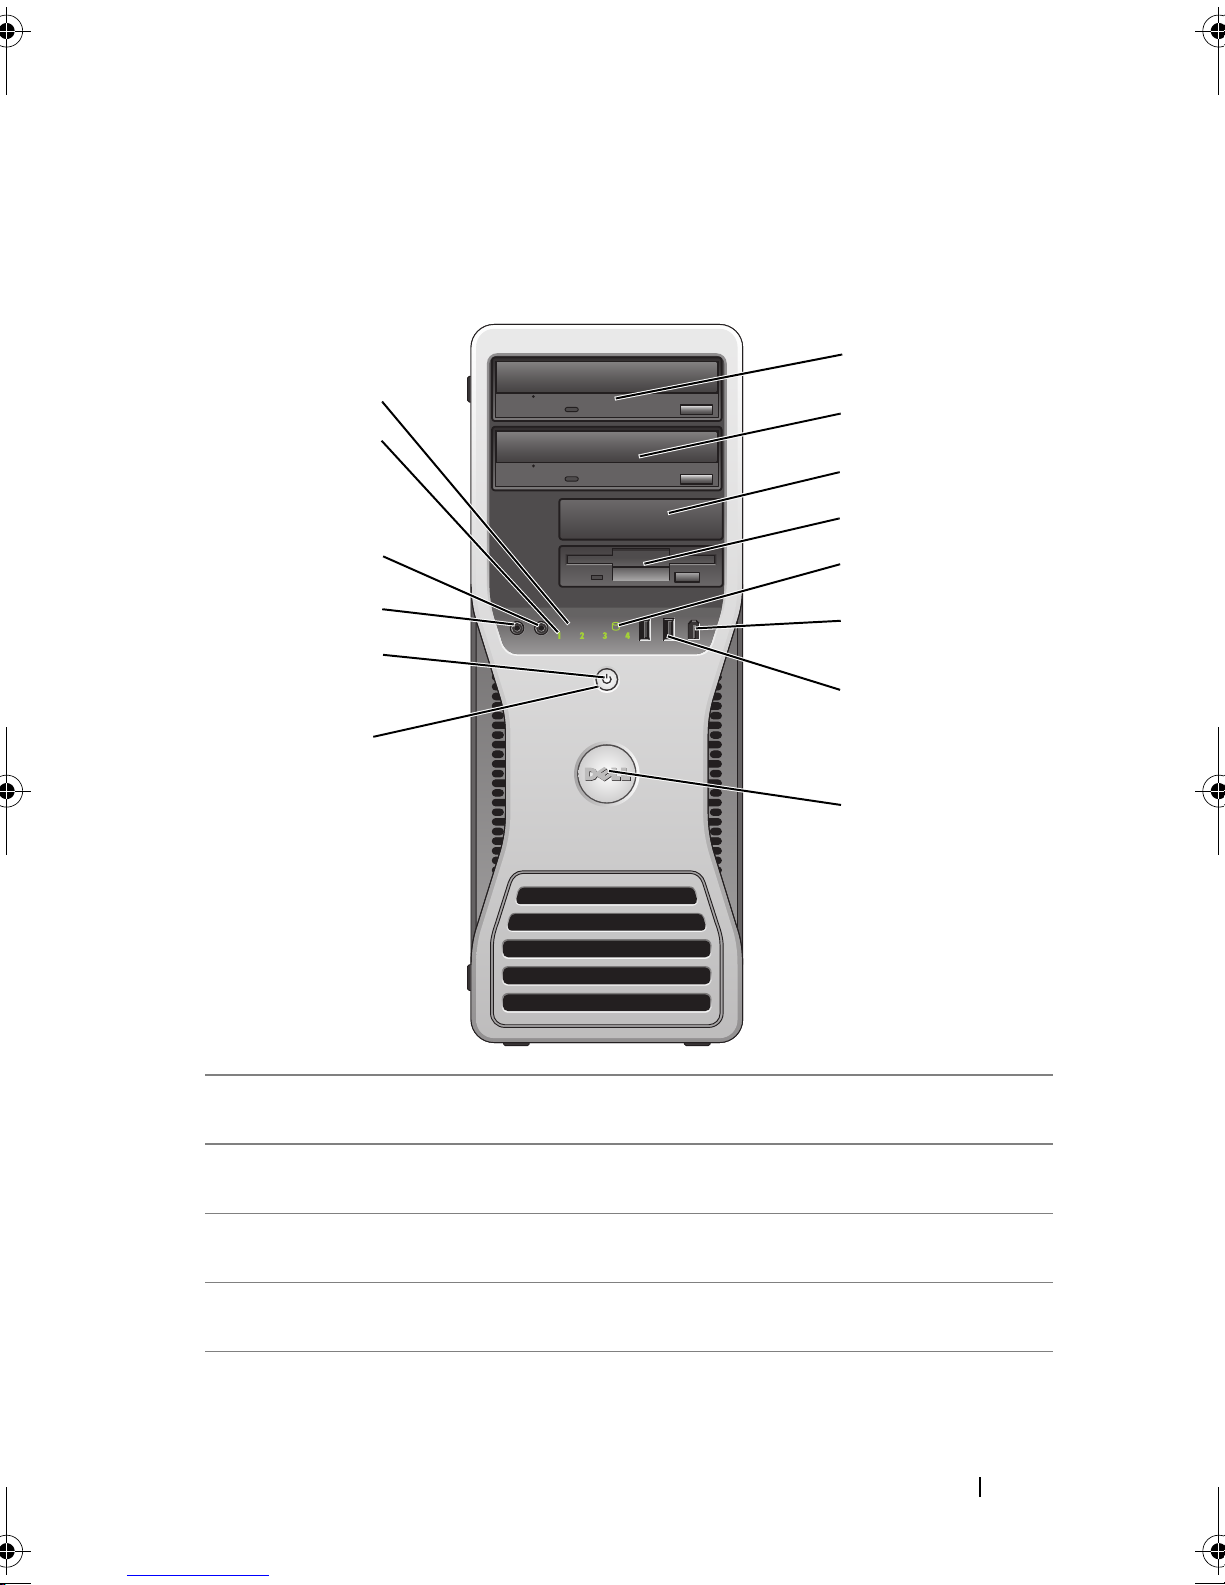
A propos de votre ordinateur
Vue frontale (mode tour)
1
14
13
12
11
10
9
2
3
4
5
6
7
8
1 Baie de lecteurs 5,25
pouces supérieure
2 Baie de lecteurs 5,25
pouces inférieure
3 Baie de lecteurs 3,5
pouces supérieure
4 Baie de lecteurs 3,5
pouces inférieure
Peut recevoir un disque optique.
Peut recevoir un disque optique ou un disque dur
supplémentaire (SATA seulement).
Peut recevoir un lecteur de disquette, un lecteur de
carte ou un disque dur supplémentaire (SATA ou SAS).
Peut recevoir un lecteur de disquette ou un lecteur de
carte.
Guide de référence rapide 77
Page 78
5 Voyant d'activité du
disque dur
Ce voyant est allumé lorsque l'ordinateur lit ou écrit
des données sur le disque dur. Il peut également être
allumé pendant le fonctionnement d'un périphérique
tel qu'un lecteur optique.
6 Connecteur IEEE
1394 (en option)
7 Connecteurs
USB 2.0 (2)
Le connecteur IEEE1394 (en option) permet de brancher
des périphériques de données à haut débit tels que des
appareils photo numériques et des périphériques de
stockage externes.
Utilisez les connecteurs USB frontaux pour les
périphériques que vous connectez occasionnellement
(clés de mémoire flash, appareils photo ou périphériques
USB amorçables). Voir la section «Configuration du
système» du Guide d'utilisation pour plus de détails
concernant le démarrage à partir d'un périphérique USB.
REMARQUE : Il est recommandé d'utiliser les connecteurs
USB à l'arrière pour les périphériques qui restent connectés,
comme une imprimante ou un clavier.
8 Badge Dell (pivotant) Utilisez la poignée en plastique à l'arrière du badge
Dell pour le faire pivoter lors du passage de bureau en
tour ou de tour en bureau.
9 Bouton d'alimentation Appuyez sur ce bouton pour allumer l'ordinateur.
AVIS : Pour éviter de perdre des données, n'utilisez
pas le bouton d'alimentation pour éteindre l'ordinateur.
Procédez plutôt à un arrêt du système d'exploitation.
78 Guide de référence rapide
AVIS : Si la fonctionnalité ACPI est activée,
l'ordinateur arrête le système d'exploitation avant
de s'éteindre lorsque vous appuyez sur le bouton
d'alimentation.
REMARQUE : Le bouton d'alimentation peut également
être utilisé pour réactiver le système lorsqu'il est en veille,
ou pour le faire passer dans un mode d'économie d'énergie
(voir «Gestion de l'alimentation» dans le Guide d'utilisation).
Page 79
10 Voyant d'alimentation Le voyant d'alimentation s'allume et clignote ou reste
allumé, selon l'état :
• Eteint — L'ordinateur est arrêté (S4, S5 ou arrêt
mécanique).
• Vert fixe — L'ordinateur est en mode de
fonctionnement normal.
• Vert clignotant — L'ordinateur est en mode économie
d'énergie (S1 ou S3).
• Orange clignotant ou fixe — Voir «Problèmes liés
à l'alimentation» dans le
Guide d'utilisation
.
Pour quitter le mode d'économie d'énergie, appuyez
sur le bouton d'alimentation. Vous pouvez également
utiliser le clavier ou la souris s'ils sont définis en tant
que périphériques de réactivation dans le Gestionnaire
de périphériques de Windows. Pour plus d'informations
sur les états de veille et comment quitter le mode
d'économie d'énergie, voir «Gestion d'alimentation»
dans le
Guide d'utilisation
.
Pour une description des codes des voyants de diagnostic
lors du dépistage de problèmes sur votre ordinateur, voir
«Voyants de diagnostic» à la page 99.
11 Connecteur de
microphone
Utilisez cette prise pour brancher un microphone afin
d'entrer des données vocales ou musicales dans un
programme audio ou de téléphonie.
12 Prise casque Utilisez cette prise pour brancher un casque.
13 Voyants de
diagnostic (4)
Utilisez les voyants de diagnostic pour vous aider à dépister
un problème sur votre ordinateur (voir «Voyants de
diagnostic» à la page 99).
14 Voyant de lien réseau Ce voyant s'allume lorsqu'une connexion de bonne
qualité est établie entre l'ordinateur et un réseau à 10,
100 ou 1000 Mbps (1 Gbps).
Guide de référence rapide 79
Page 80
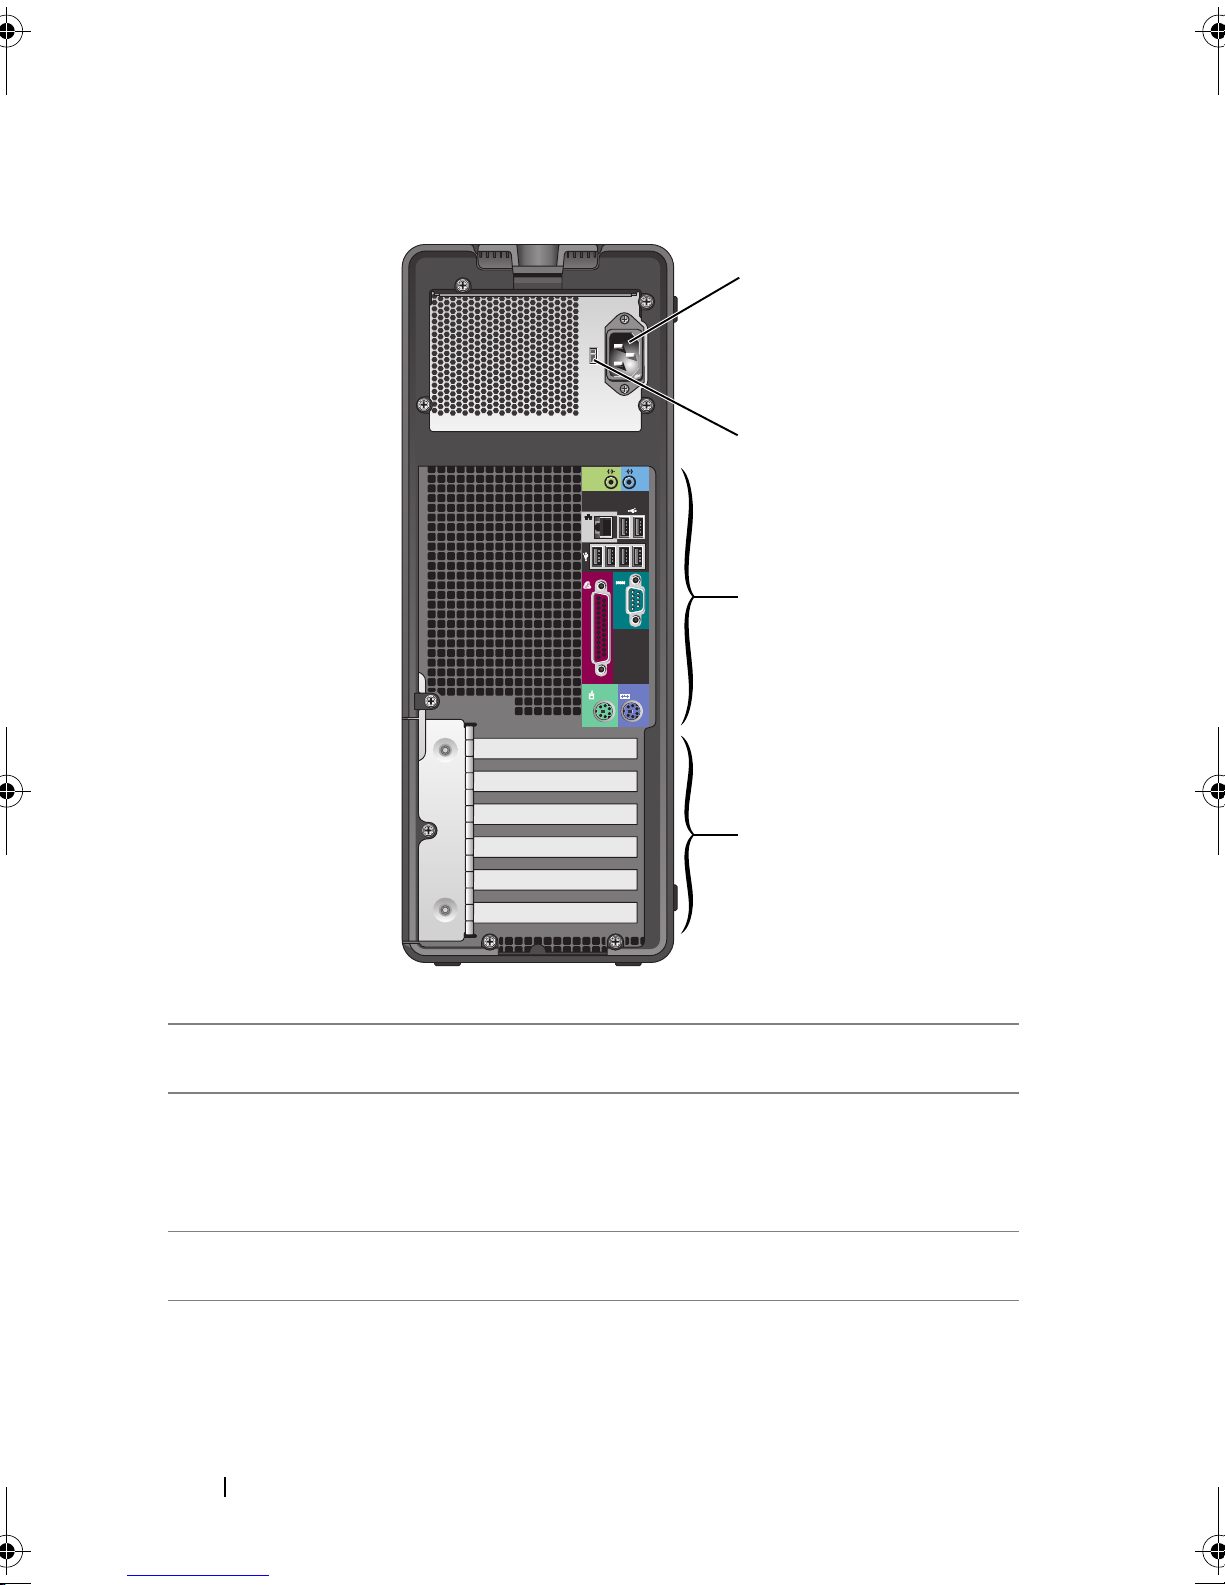
Vue arrière (mode tour)
1
2
3
1 Connecteur
d'alimentation
2 Sélecteur de
tension
3 Connecteurs du
panneau arrière
4
Insérez le câble d'alimentation.
Lisez les consignes de sécurité du document Guide
d'information sur le produit pour plus de détails.
REMARQUE : Le sélecteur de tension n'est disponible que
sur l'alimentation 375 W.
Branchez les périphériques série, USB et les autres
périphériques sur les connecteurs appropriés.
80 Guide de référence rapide
Page 81
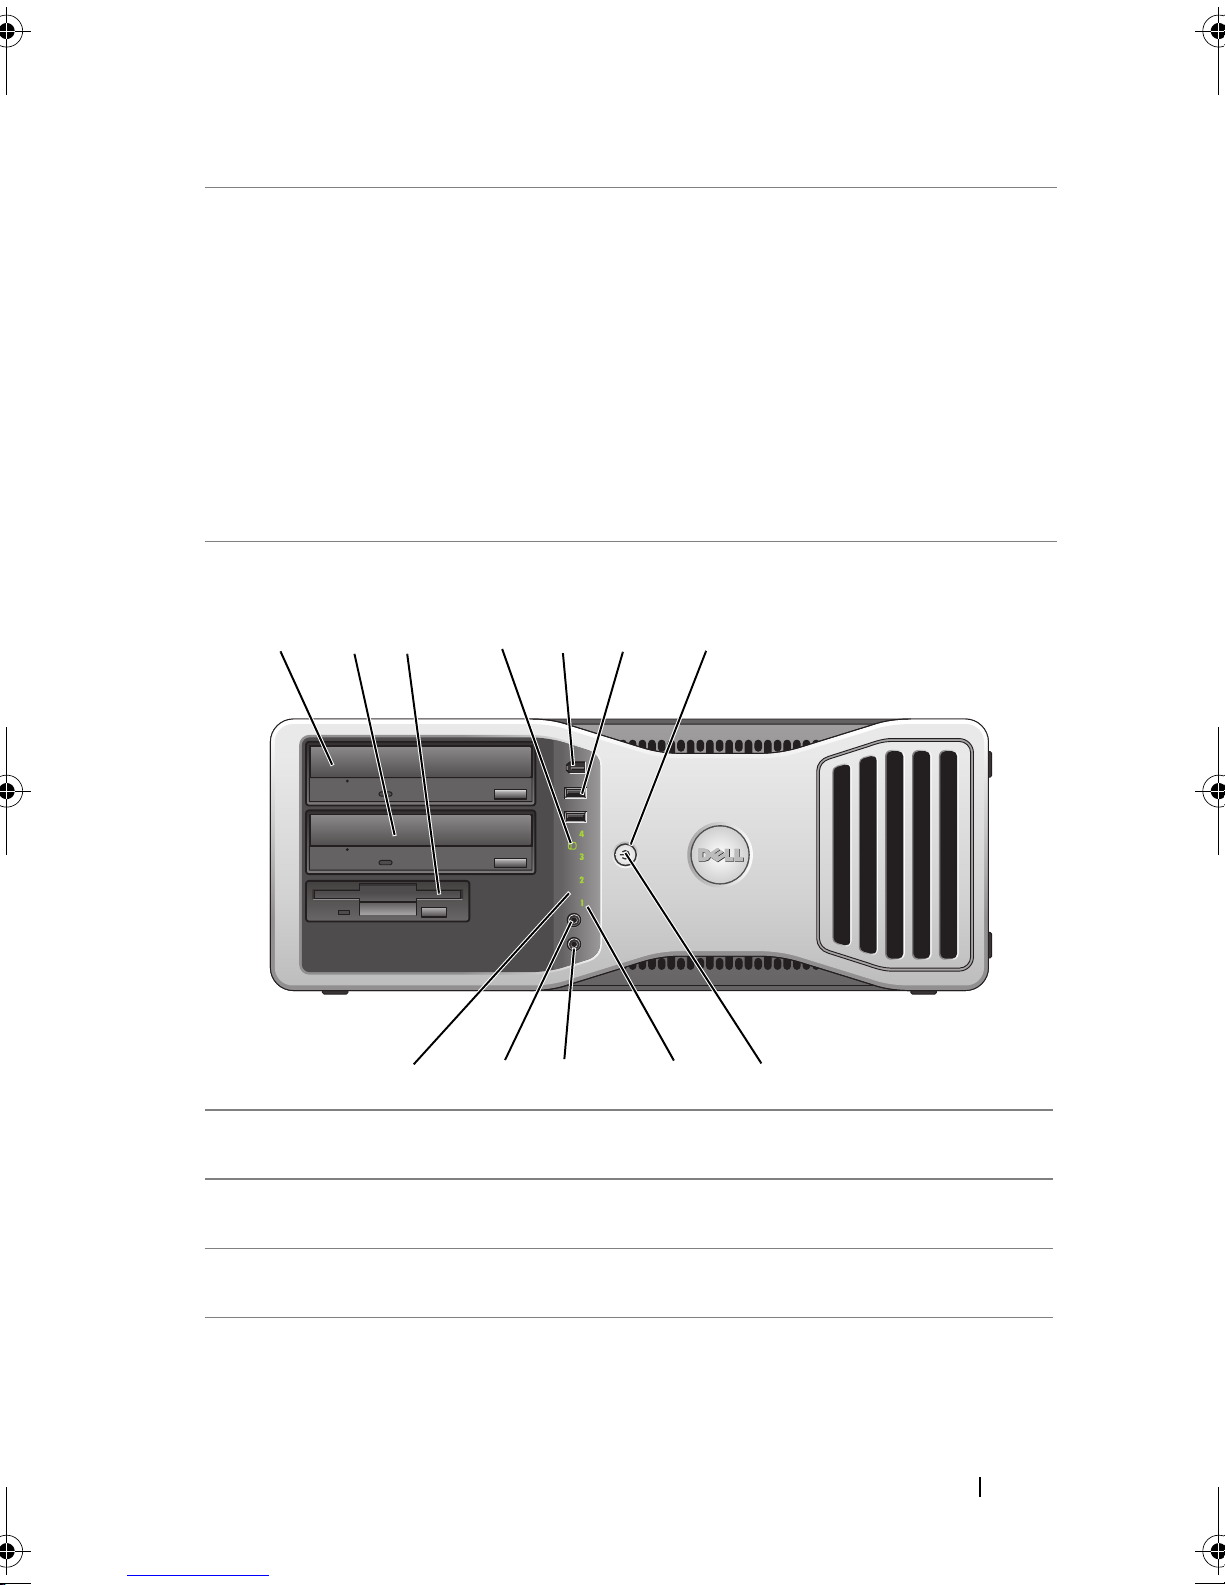
4 Logements de
cartes
Permettent d'accéder aux connecteurs de toutes les cartes
PCI ou PCI Express installées.
REMARQUE : les 5 connecteurs du haut acceptent les cartes
pleine longueur ; le connecteur du bas permet d'installer une
carte mi-longueur.
REMARQUE : Reportez-vous à la documentation fournie avec
les cartes pour vous assurer que celles-ci sont compatibles avec
votre configuration. Certaines cartes plus encombrantes et
consommant plus d'électricité (cartes graphiques PCI Express,
par exemple) peuvent restreindre la possibilité d'utiliser d'autres
cartes.
Vue avant (mode bureau)
1 2 7
1 Baie de lecteurs 5,25
pouces supérieure
2 Baie de lecteurs 5,25
pouces inférieure
3
4
5 6
Peut recevoir un disque optique.
Peut recevoir un disque optique ou un disque dur
supplémentaire (SATA seulement).
9101112
8
3 Baie de lecteur de 3,5
pouces
Peut recevoir un lecteur de disquette ou un lecteur de
carte.
Guide de référence rapide 81
Page 82
4 Voyant d'activité du
disque dur
Ce voyant est allumé lorsque l'ordinateur lit ou écrit
des données sur le disque dur. Il peut également être
allumé pendant le fonctionnement d'un périphérique
tel qu'un lecteur optique.
5 Connecteur IEEE
1394 (en option)
6 Connecteurs
USB 2.0 (2)
Le connecteur IEEE1394 (en option) permet de brancher
des périphériques de données à haut débit tels que des
appareils photo numériques et des périphériques de
stockage externes.
Utilisez les connecteurs USB frontaux pour les
périphériques que vous connectez occasionnellement
(clés de mémoire flash, appareils photo ou périphériques
USB amorçables). Voir la section «Configuration du
système» du Guide d'utilisation pour plus de détails
concernant le démarrage à partir d'un périphérique USB.
REMARQUE : Il est recommandé d'utiliser les connecteurs
USB à l'arrière pour les périphériques qui restent connectés,
comme une imprimante ou un clavier.
7 Bouton d'alimentation Appuyez sur ce bouton pour allumer l'ordinateur.
AVIS : Pour éviter de perdre des données, n'utilisez
pas le bouton d'alimentation pour éteindre l'ordinateur.
Procédez plutôt à un arrêt du système d'exploitation.
AVIS : Si la fonctionnalité ACPI est activée,
l'ordinateur arrête le système d'exploitation avant
de s'éteindre lorsque vous appuyez sur le bouton
d'alimentation.
82 Guide de référence rapide
REMARQUE : Le bouton d'alimentation peut également
être utilisé pour réactiver le système lorsqu'il est en veille,
ou pour le faire passer dans un mode d'économie d'énergie
(voir «Gestion de l'alimentation» dans le Guide d'utilisation).
Page 83
8 Voyant d'alimentation Le voyant d'alimentation s'allume et clignote ou reste
allumé, selon l'état :
• Eteint — L'ordinateur est arrêté (S4, S5 ou arrêt
mécanique).
• Vert fixe — L'ordinateur est en mode de
fonctionnement normal.
• Vert clignotant — L'ordinateur est en mode économie
d'énergie (S1 ou S3).
• Orange clignotant ou fixe — Voir «Problèmes liés
à l'alimentation»
dans le Guide d'utilisation
.
Pour quitter le mode d'économie d'énergie, appuyez
sur le bouton d'alimentation. Vous pouvez également
utiliser le clavier ou la souris s'ils sont définis en tant
que périphériques de réactivation dans le Gestionnaire
de périphériques de Windows. Pour plus d'informations sur
les états de veille et comment quitter le mode d'économie
d'énergie, voir «Gestion d'alimentation» dans le Guide
d'utilisation.
Pour une description des codes des voyants de diagnostic
lors du dépistage de problèmes sur votre ordinateur, voir
«Voyants de diagnostic» à la page 99.
9 Voyants de
diagnostic (4)
Utilisez les voyants de diagnostic pour vous aider à dépister
un problème sur votre ordinateur (voir «Voyants de
diagnostic» à la page 99).
10 Connecteur de
microphone
Utilisez cette prise pour brancher un microphone afin
d'entrer des données vocales ou musicales dans un
programme audio ou de téléphonie.
11 Prise casque Utilisez cette prise pour brancher un casque.
12 Voyant de lien réseau Ce voyant s'allume lorsqu'une connexion de bonne
qualité est établie entre l'ordinateur et un réseau à 10,
100 ou 1000 Mbps (1 Gbps).
Guide de référence rapide 83
Page 84
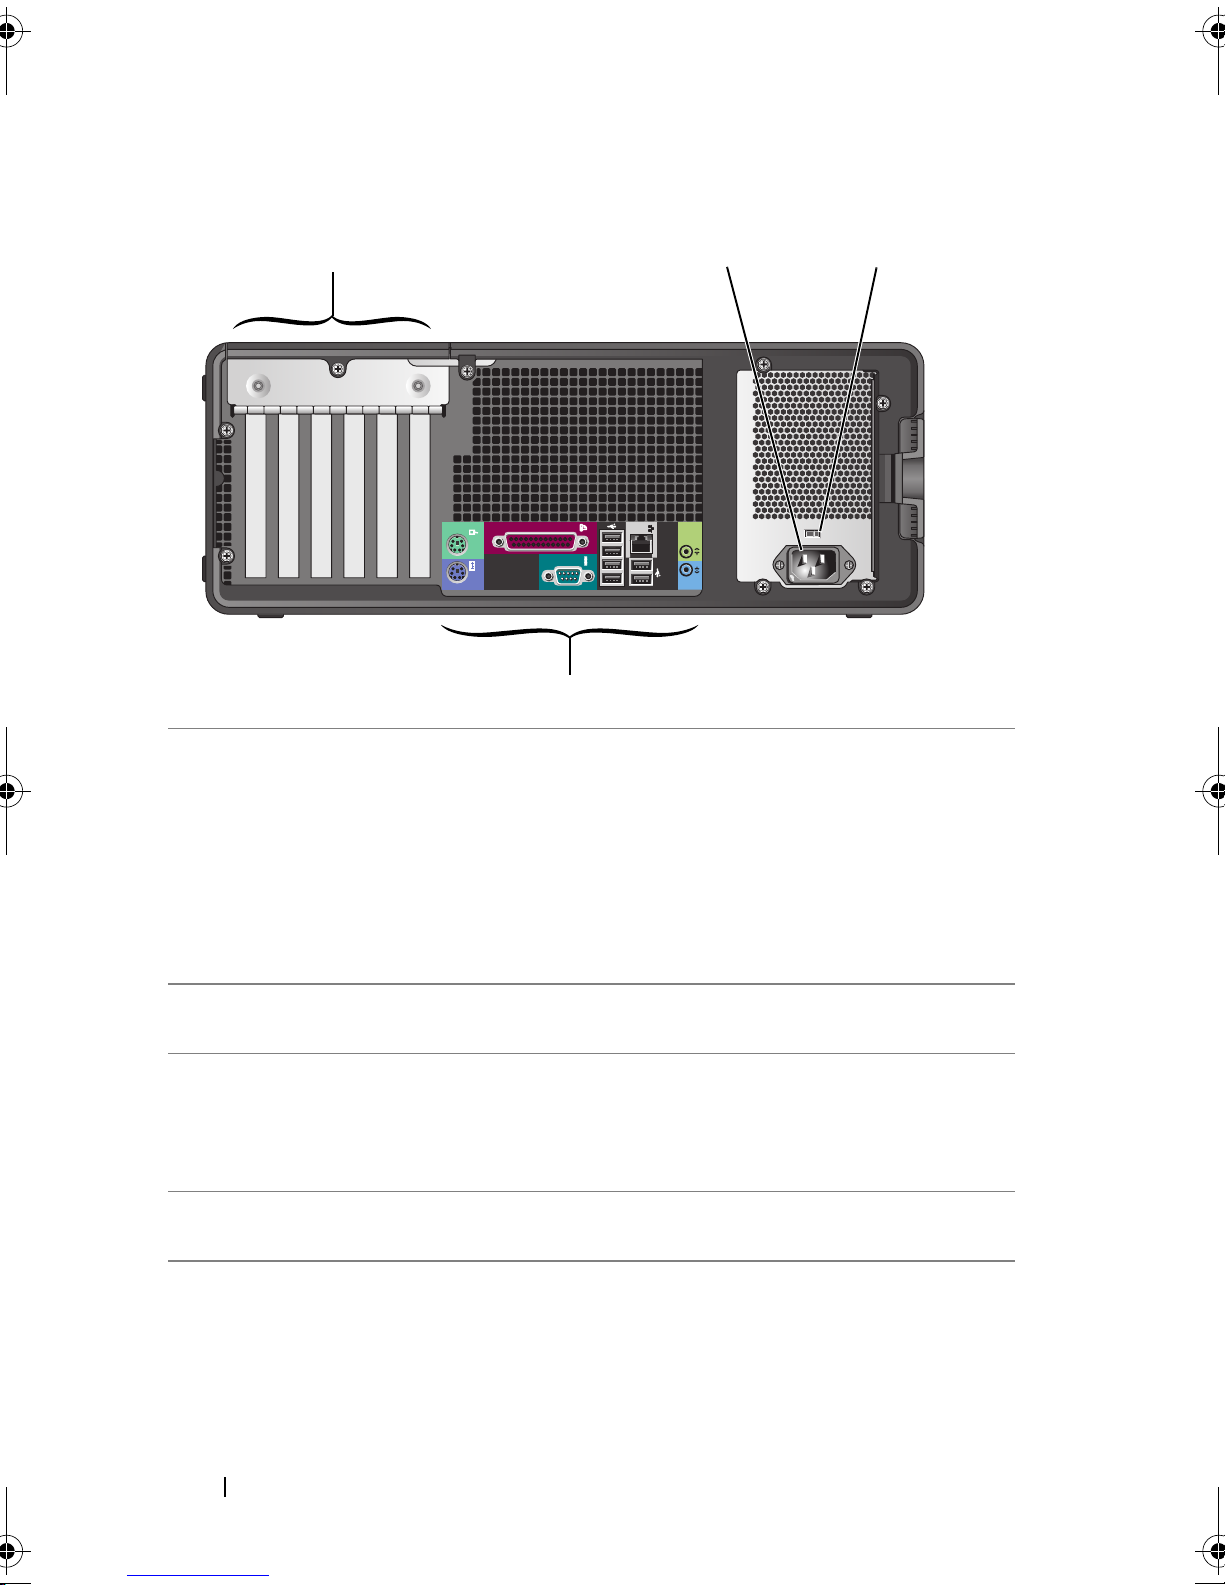
Vue arrière (mode bureau)
1
4
1 Logements de cartes Permettent d'accéder aux connecteurs de toutes les
cartes PCI ou PCI Express installées.
32
REMARQUE : Reportez-vous à la documentation fournie
avec les cartes pour vous assurer que celles-ci sont
compatibles avec votre configuration. Certaines cartes
plus encombrantes et consommant plus d'électricité
(cartes graphiques PCI Express, par exemple) peuvent
restreindre la possibilité d'utiliser d'autres cartes.
2 Connecteur
d'alimentation
3 Sélecteur de tension Lisez les consignes de sécurité du document Guide
4 Connecteurs du
panneau arrière
84 Guide de référence rapide
Insérez le câble d'alimentation.
d'information sur le produit pour plus de détails.
REMARQUE : Le sélecteur de tension n'est disponible
que sur l'alimentation 375 W.
Branchez les périphériques série, USB et les autres
périphériques sur les connecteurs appropriés.
Page 85
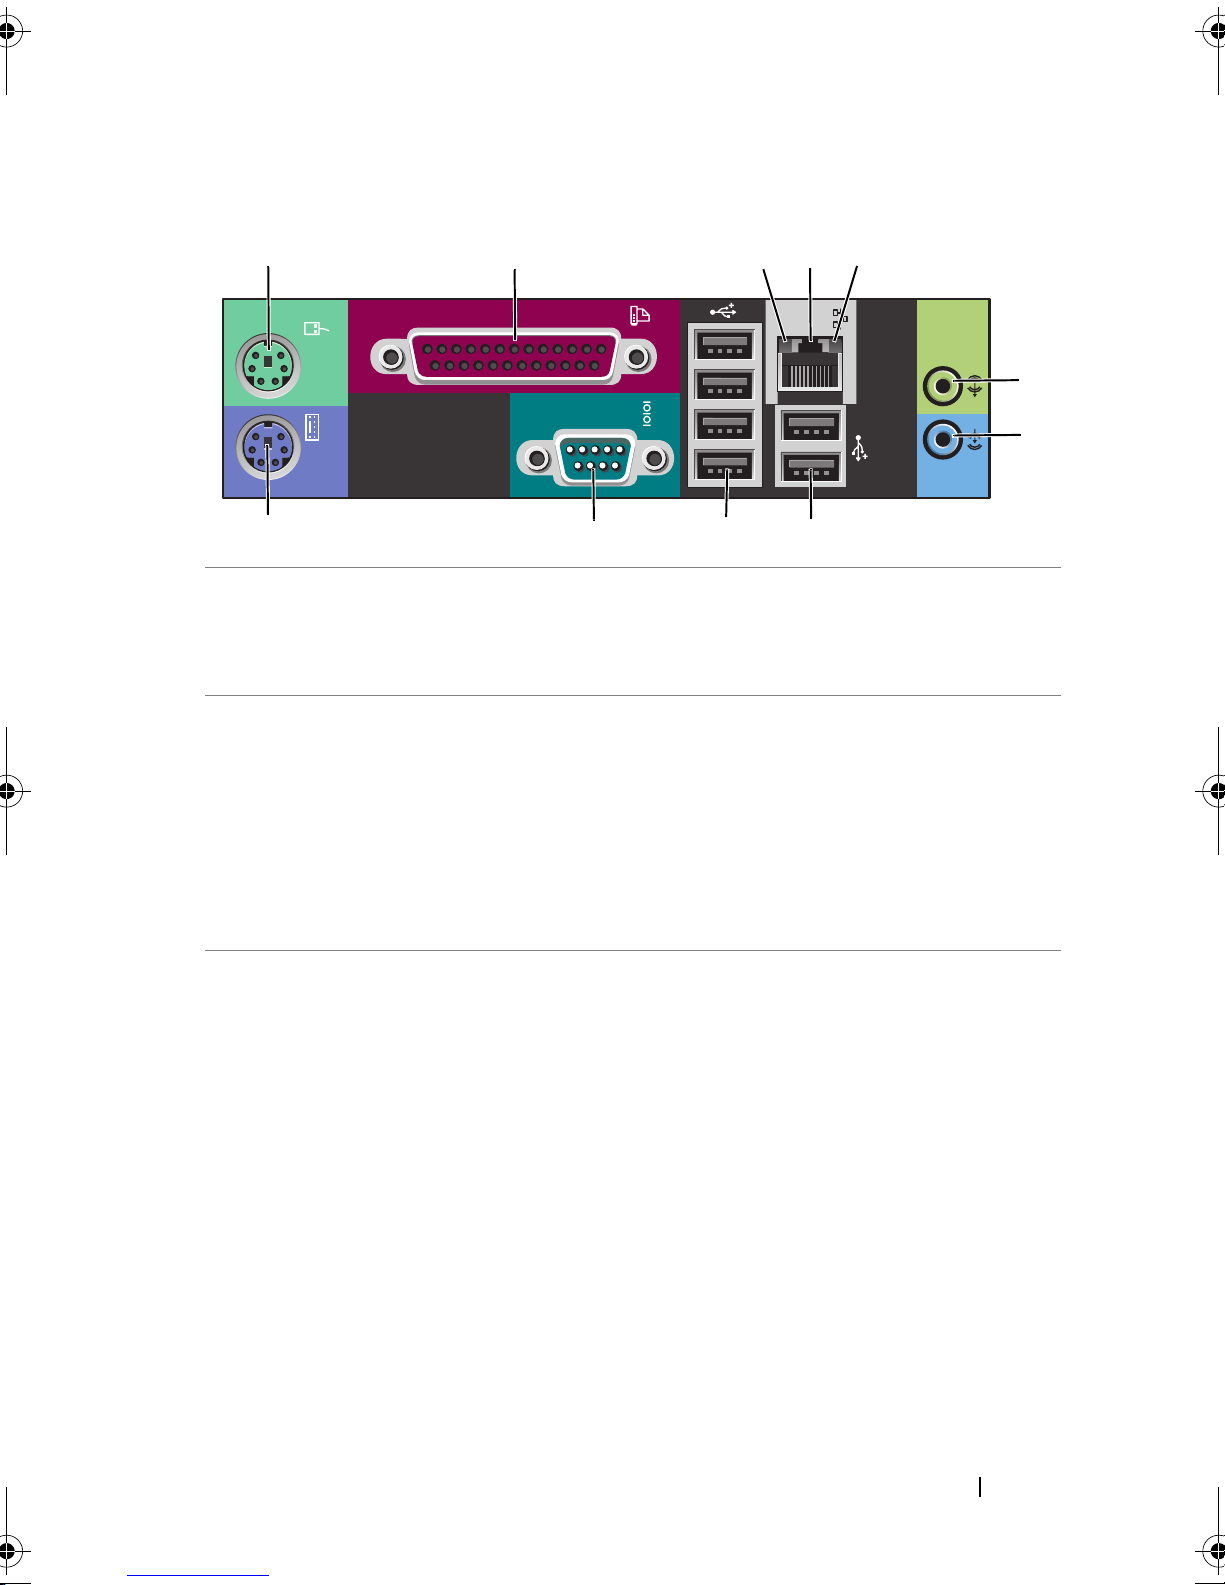
Connecteurs du panneau arrière
1
1 Connecteur de
souris
2 Connecteur
parallèle
2 345
6
7
891011
Connecteur vert permettant d'installer une souris PS/2.
Éteignez l'ordinateur et tous les périphériques connectés avant
de connecter une souris à l'ordinateur. Si vous disposez d'une
souris USB, reliez-la à un connecteur USB.
Permet de raccorder un périphérique parallèle (imprimante,
etc.). Si vous avez une imprimante USB, raccordez-la à un
connecteur USB.
REMARQUE : Le connecteur parallèle intégré est désactivé
automatiquement si l'ordinateur détecte qu'une carte installée
contient un connecteur parallèle configuré avec la même adresse.
Pour plus d'informations, voir «Options du programme de
configuration» dans Guide d'utilisation.
3 Voyant d'intégrité
du lien
• Vert — Une connexion de bonne qualité est établie entre
un réseau à 10 Mbps et l'ordinateur.
• Orange — Une connexion de bonne qualité est établie entre
un réseau à 100 Mbps et l'ordinateur.
• Jaune — Une bonne connexion est établie entre un réseau
à 1 Gb/s (ou 1000 Mb/s) et l'ordinateur.
• Eteint — L'ordinateur ne détecte pas de connexion physique
au réseau.
Guide de référence rapide 85
Page 86
4 Connecteur de
carte réseau
Pour brancher l'ordinateur à un périphérique réseau ou haut
débit, branchez l'une des extrémités d'un câble réseau à une
prise réseau, un périphérique réseau ou un périphérique haut
débit. Enfichez ensuite l'autre extrémité du câble réseau dans le
connecteur de carte réseau de l'ordinateur. Un déclic indique
que le câble de réseau est correctement inséré.
AVIS : Ne branchez pas un câble téléphonique au
connecteur réseau.
Si votre ordinateur est équipé d'une carte réseau supplémentaire,
utilisez les connecteurs de cette dernière et ceux situés à l'arrière
du système pour configurer plusieurs connexions réseau
(intranet ou extranet distinct).
Il est recommandé d'utiliser un câblage et des connecteurs
de catégorie 5 pour le réseau. Si vous devez utiliser un câblage de
catégorie 3, forcez le débit du réseau à 10 Mbps pour garantir
un fonctionnement fiable.
5 Voyant d'activité
réseau
6 Connecteur de
sortie de ligne
7 Connecteur
d'entrée ligne
8 Doubles
connecteurs USB
2.0 à l'arrière (2)
Le voyant d'activité réseau est allumé (clignotant) quand
l'ordinateur envoie ou reçoit des données sur le réseau. Un
trafic réseau important peut donner l'impression que ce voyant
est fixe.
Utilisez le connecteur sortie ligne vert pour raccorder le casque
et la plupart des haut-parleurs dotés d'amplificateurs intégrés.
Sur les ordinateurs disposant d'une carte son, utilisez le
connecteur qui se trouve sur cette carte.
Utilisez le connecteur d'entrée ligne bleu pour connecter des
périphériques d'enregistrement ou de lecture (microphone,
magnétophones, lecteurs de CD ou magnétoscopes).
Sur les ordinateurs disposant d'une carte son, utilisez le
connecteur qui se trouve sur cette carte.
Utilisez les connecteurs USB arrière pour les périphériques
connectés en permanence, comme l'imprimante et le clavier.
REMARQUE : Il est recommandé d'utiliser les connecteurs USB
situés à l'avant pour les périphériques que vous connectez
occasionnellement (clés de mémoire flash, appareils photo ou pour
les périphériques USB amorçables).
86 Guide de référence rapide
Page 87
9 Quadruples
connecteurs USB
2.0 à l'arrière (4)
10 Connecteur série Utilisez ce port pour brancher un périphérique série (assistant
Utilisez les connecteurs USB arrière pour les périphériques
connectés en permanence, comme l'imprimante et le clavier.
REMARQUE : Il est recommandé d'utiliser les connecteurs USB
situés à l'avant pour les périphériques que vous connectez
occasionnellement (clés de mémoire flash, appareils photo ou pour
les périphériques USB amorçables).
de poche, etc). Les désignations par défaut sont COM1 pour le
connecteur série 1 et COM2 pour le connecteur série 2 en
option.
Pour plus d'informations, voir «Options du programme de
configuration» dans Guide d'utilisation.
11 Connecteur de
clavier
Si vous disposez d'un clavier PS/2, reliez-le au connecteur violet.
Si vous disposez d'un clavier USB, reliez-le à un connecteur USB.
Configuration de votre ordinateur
Passage du mode tour en mode bureau
PRÉCAUTION : Avant de commencer toute procédure de cette section, consultez
et respectez les consignes de sécurité du
REMARQUE : Pour passer du mode tour en mode bureau ou inversement, vous
devez utiliser un kit en option disponible auprès de Dell. Voir «Informations produit»
dans le Guide d'utilisation pour plus de détails sur la commande de produits auprès
de Dell.
REMARQUE : En mode tour, cet ordinateur accepte un lecteur 3,5 pouces à l'avant
de plus qu'en mode Bureau.
1
Suivez les procédures de la section «Avant de commencer» du
d'utilisation
2
Déposez le capot de l'ordinateur (voir «Retrait du capot de l'ordinateur»
dans le
.
Guide d'utilisation
).
Guide d'information sur le produit
Guide
.
3
Déposez le panneau avant (voir «Retrait du panneau avant» dans le
d'utilisation
4
Retirez le panneau des lecteurs et préparez-le en ajoutant ou retirant des
).
caches, selon les besoins (voir «Panneau des lecteurs» dans le
Guide
Guide d'utilisation
Guide de référence rapide 87
).
Page 88

Passage du mode tour au mode bureau
1
Déposez tous les lecteurs de disquette ou lecteurs de carte media installés
en suivant la procédure de «Dépose d'un lecteur de disquette ou d'un
lecteur de carte (mode tour)» dans le
Guide d'utilisation
, puis reposez un
seul lecteur de disquette ou de carte média en suivant la procédure de
«Installation d'un lecteur de disquette ou d'un lecteur de carte (mode bureau)»
dans le
2
Déposez tous les lecteurs optiques en suivant la procédure de «Dépose d'un
lecteur optique (mode tour)» dans le
Guide d'utilisation
.
Guide d'utilisation
, puis reposez les
lecteurs en suivant la procédure de «Installation d'un lecteur optique (mode
bureau)» dans le
Passage du mode bureau au mode tour
1
Déposez le lecteur de disquette ou lecteur de carte mémoire (le cas échéant)
Guide d'utilisation
.
en suivant la procédure de «Dépose d'un lecteur de disquette ou d'un lecteur
de carte (mode bureau)» dans le
Guide d'utilisation
, puis reposez le lecteur
de disquette ou de carte mémoire en suivant la procédure de «Installation
d'un lecteur de disquette ou d'un lecteur de carte (mode tour)» dans le
Guide d'utilisation
.
2
Déposez tous les lecteurs optiques en suivant la procédure de «Dépose d'un
lecteur optique (mode bureau)» dans le
Guide d'utilisation
, puis reposez les
lecteurs en suivant la procédure de «Installation d'un lecteur optique (mode
tour)» dans le
Guide d'utilisation
.
88 Guide de référence rapide
Page 89
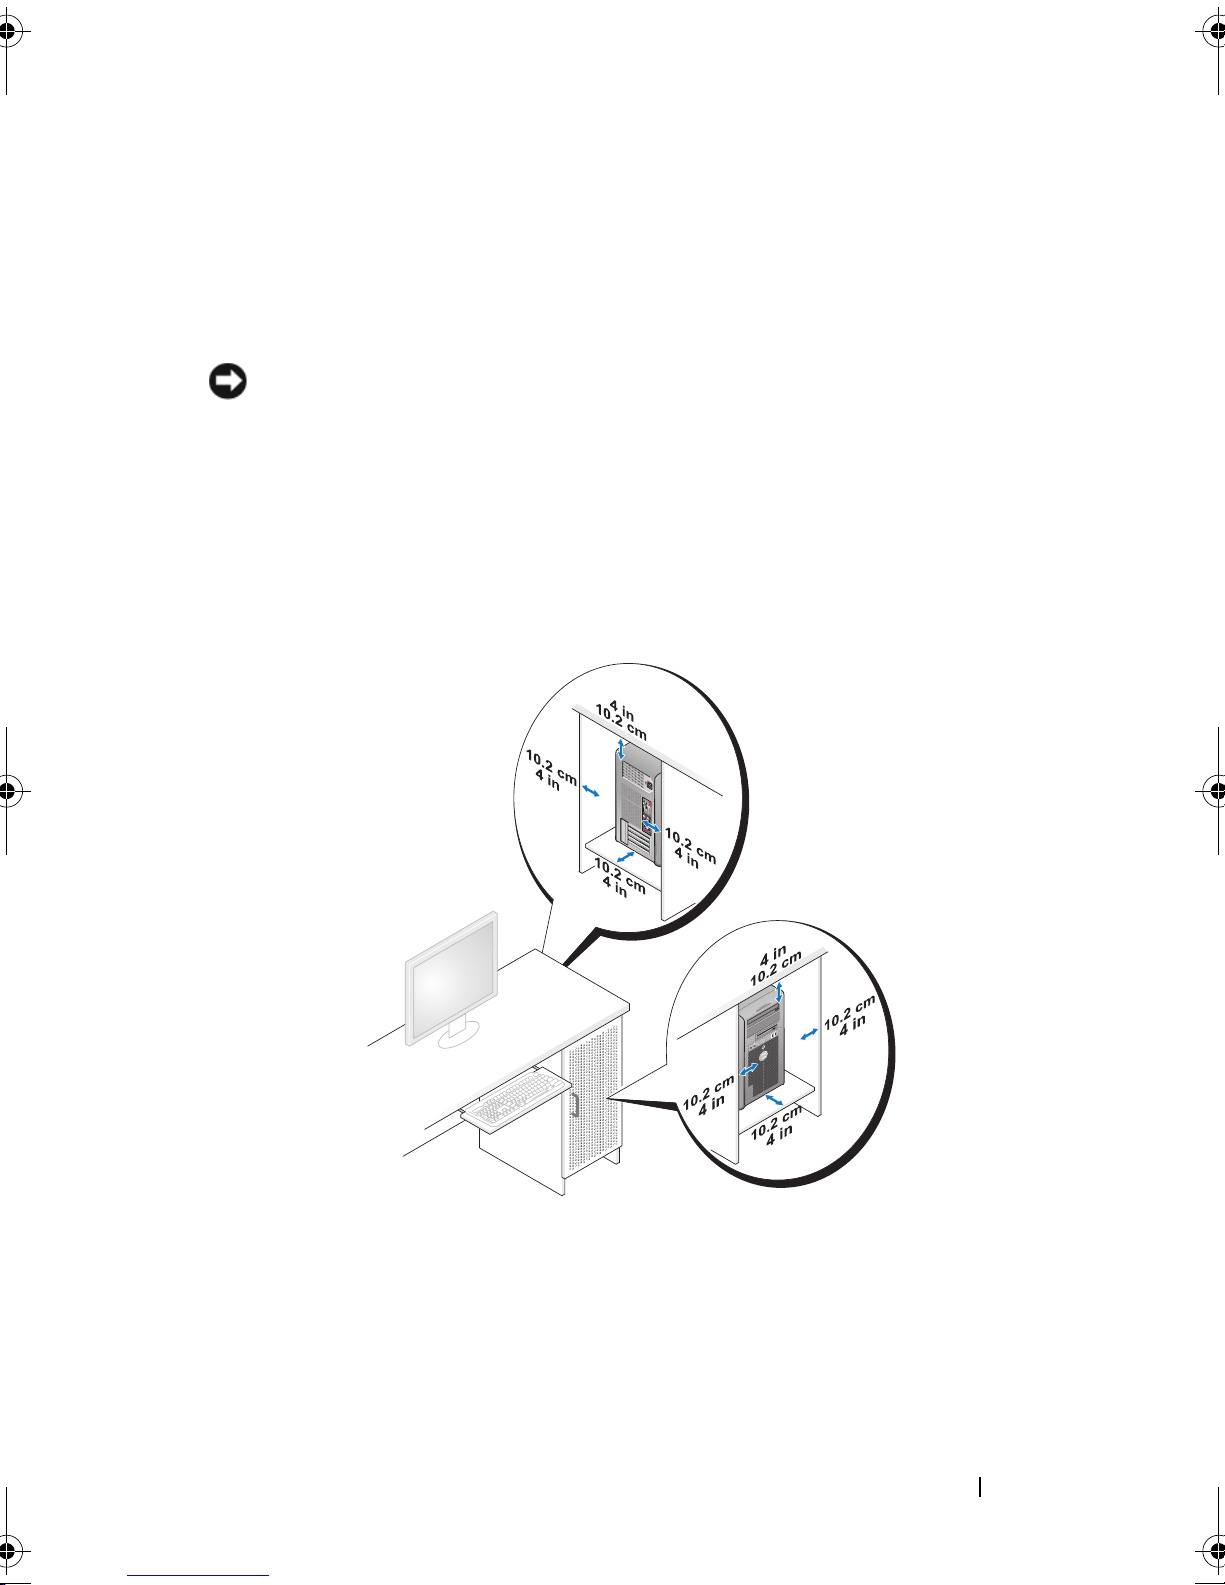
Installation de votre ordinateur dans un espace fermé
L'installation de votre ordinateur dans un espace fermé peut limiter le débit
d'air et causer une surchauffe de votre ordinateur, qui aurait une influence sur
ses performances. Respectez les règles ci-dessous pour installer votre ordinateur
dans un espace fermé :
AVIS : La température de fonctionnement mentionnée dans ce manuel désigne la
température ambiante maximale en utilisation. La température ambiante de la pièce
doit être prise en compte pour l'installation de votre ordinateur dans un espace fermé.
Pour plus de détails sur les caractéristiques de votre ordinateur, voir «
dans le Guide d'utilisation.
• Laissez un dégagement d'au moins 10,2 cm (4 po) de tous les côtés de
l'ordinateur comportant des prises d'air pour assurer le débit d'air nécessaire
pour une ventilation correcte.
Caractéristiques»
• Si votre ordinateur est installé dans un coin ou sous un bureau, laissez un
dégagement minimum de 5,1 cm (2 po) de l'arrière de l'ordinateur au mur
pour permettre un débit d'air suffisant pour une ventilation correcte.
• Si l'espace fermé qui reçoit l'ordinateur dispose de portes, vérifiez qu'elles
laissent au moins un passage d'air de trente pour cent à travers le caisson
(à l'avant et à l'arrière).
Guide de référence rapide 89
Page 90
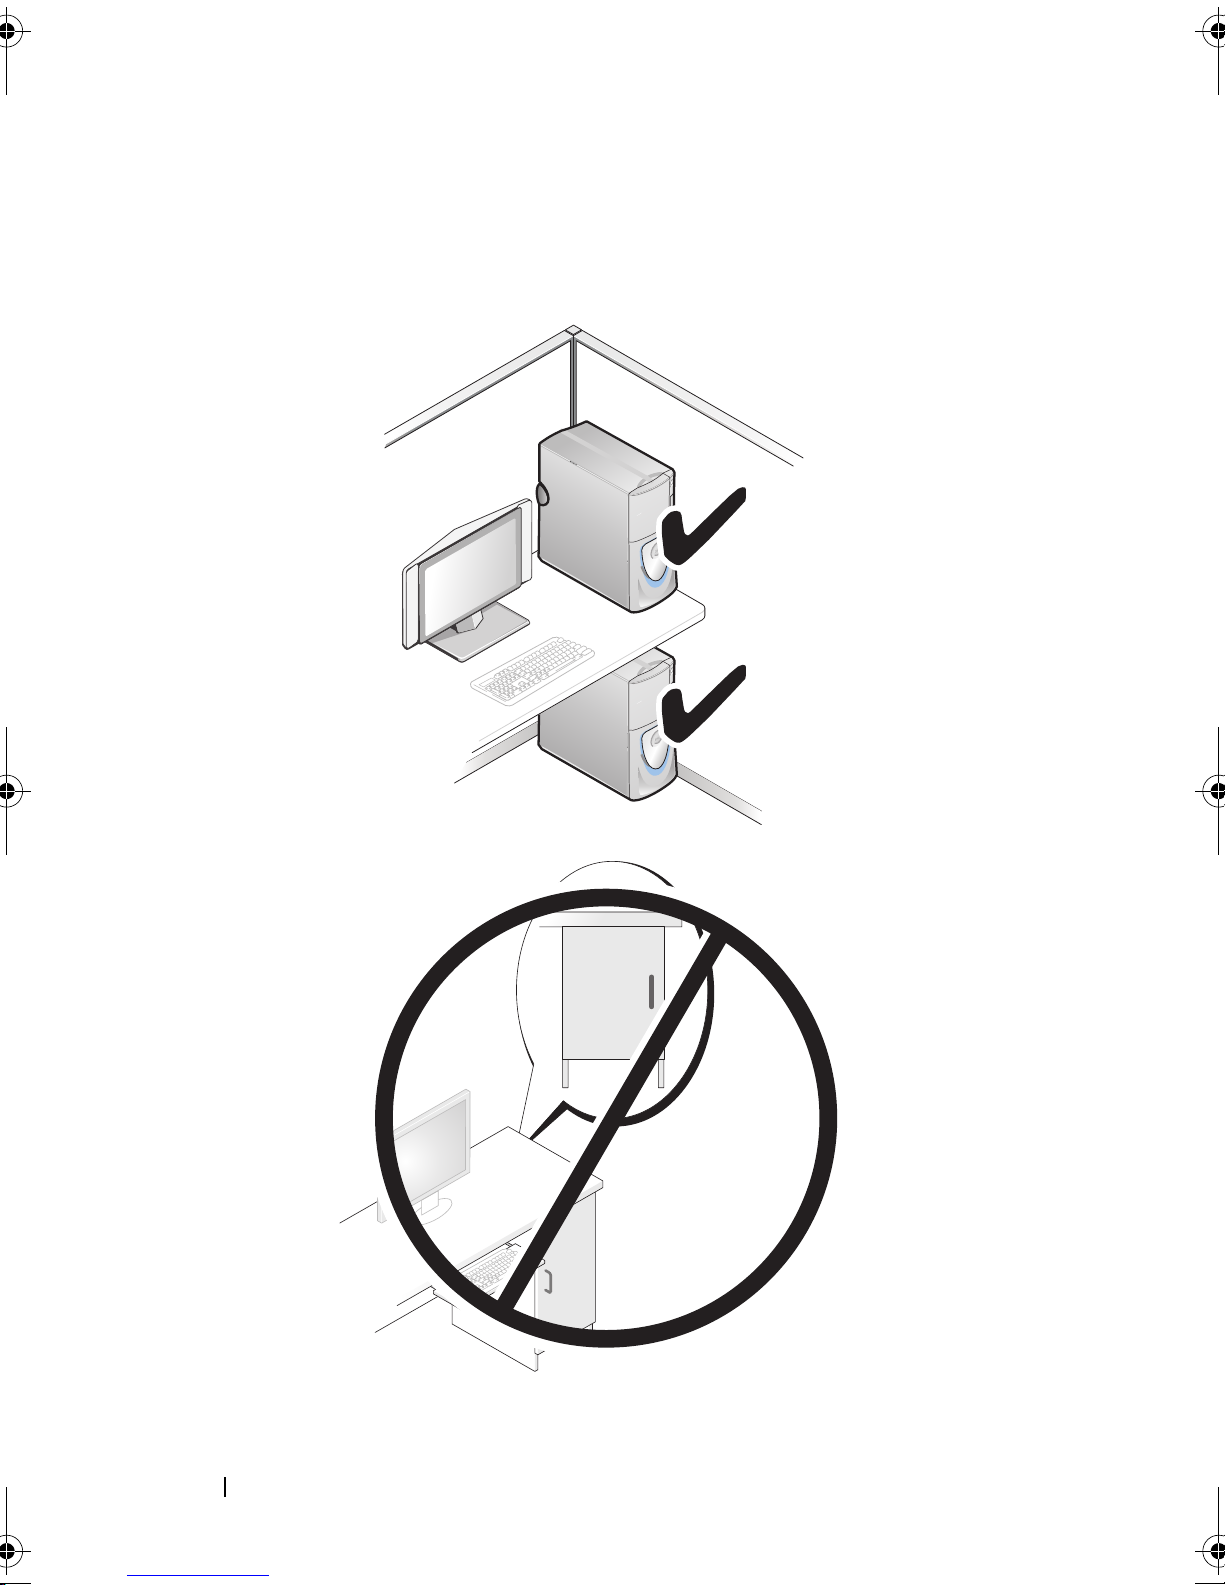
• N'installez pas votre ordinateur dans un caisson sans circulation d'air. La
limitation de la circulation d'air
ordinateur qui aurait une influence sur ses performances
peut entraîner une surchauffe de votre
.
90 Guide de référence rapide
Page 91
Transfert d'informations vers un nouvel ordinateur
Vous pouvez utiliser les assistants du système d'exploitation pour vous aider
à transférer les fichiers et autres données d'un ordinateur à l'autre.
Microsoft Windows XP
Le système d'exploitation Microsoft Windows XP propose un assistant Transfert
de fichiers et de paramètres pour transférer les données telles que :
•E-mails
• Paramètres de barre d'outils
• Dimensions des fenêtres
•Favoris Internet
Vous pouvez transférer les données d'un ordinateur à l'autre par un réseau ou
une connexion série, ou par enregistrement des données sur des supports
amovibles, par exemple CD ou DVD enregistrables.
REMARQUE : Vous pouvez transférer des informations d'un ordinateur à l'autre
par connexion directe d'un câble série sur les ports d'entrée-sortie (E/S) des deux
ordinateurs. Pour transférer des données sur une connexion série, vous devez utiliser
le programme Connexions réseau du Panneau de configuration pour effectuer une
configuration supplémentaire, par exemple définition d'une connexion évoluée et
désignation de l'ordinateur source et de l'ordinateur cible.
Pour obtenir des instructions sur la configuration d'une connexion câblée directe
entre deux ordinateurs, reportez-vous à l'article n° 305621 de la Base de connaissances
Microsoft, (Comment configurer une connexion câblée directe entre deux ordinateurs
sous Windows XP). Ces informations peuvent ne pas être disponibles dans certains
pays.
L'utilisation de l'assistant de Transfert de fichiers et de paramètres nécessite
le support d'installation Operating System livré avec votre ordinateur ou un
disque d'assistant, que l'assistant peut créer pour vous.
REMARQUE : Pour plus d'informations sur le transfert de données, recherchez
dans support.dell.com le document n° 154781 (What Are The Different Methods To
Transfer Files From My Old Computer To My New Dell™ Computer Using the
Microsoft
REMARQUE : L'accès à ce document de la base de connaissances Dell peut ne
pas être possible dans certains pays.
®
Windows® XP Operating System ?).
Guide de référence rapide 91
Page 92

Assistant de Transfert de fichiers et de paramètres (avec le support Operating
System)
REMARQUE : L'assistant de Transfert de fichiers et de paramètres désigne l'ordinateur
source depuis lequel les données doivent être transférées comme ancien ordinateur, et
l'ordinateur destination vers lequel les données seront transférées comme nouvel
ordinateur.
RÉPAREZ L 'ORDINATEUR DESTINATION DU TRANSFERT DE FICHIERS :
P
1
Cliquez sur
système
2
Sous
De quel ordinateur s'agit-il ?
cliquez sur
3
Sous
Avez-vous un CD-ROM de Windows XP ?
l'Assistant du CD-ROM Windows XP
4
Consultez les informations sous
puis passez à l'ordinateur source. Ne cliquez
COPIE DES DONNÉES DEPUIS L 'ORDINATEUR SOURCE :
Démarrer→ Tous les programmes→ Accessoires→ Outils
→
Assistant Transfert de fichiers et de paramètres
Suivant
, cliquez sur
.
Nouvel ordinateur
.
, cliquez sur
, puis cliquez sur
Suivant
Allez maintenant à votre ancien ordinateur
pas
sur
Suivant
.
, puis
J'utiliserai
.
,
1
Insérez le support d'installation
Operating System
l'ordinateur source.
L'écran
2
Cliquez sur
3
Dans la catégorie
fichiers et des paramètres
La fenêtre
4
Cliquez sur
5
Sous
cliquez sur
6
Sous
transfert de votre choix, puis cliquez sur
7
Sous
à transférer, puis cliquez sur
Bienvenue à Microsoft Windows XP
Effectuer des tâches supplémentaires
Que voulez-vous faire ?
, sélectionnez
.
Assistant Transfert de fichiers et de paramètres
Suivant
De quel ordinateur s'agit-il ?
Suivant
.
, cliquez sur
.
Sélectionner une méthode de transfert
Suivant
Que voulez-vous transférer ?
Suivant
, cliquez pour sélectionner les données
.
Les données sélectionnées sont copiées et l'écran
de collecte
apparaît.
Windows XP dans
apparaît.
.
Transférer des
apparaît.
Ancien ordinateur
, puis
, cliquez sur la méthode de
.
Achèvement de la phase
8
Cliquez sur
Ter mi ne r
92 Guide de référence rapide
.
Page 93
TRANSFERT DES DONNÉES VERS L'ORDINATEUR DE DESTINATION :
1
Passez à l'ordinateur destination.
2
Sous
Allez maintenant à votre ancien ordinateur
3
Sous
Où sont les fichiers et les paramètres ?
transfert des fichiers et paramètres, puis cliquez sur
, cliquez sur
Suivant
.
, sélectionnez la méthode de
Suivant
.
L'assistant lit les fichiers et paramètres collectés et les applique sur l'ordinateur
destination. Quand le transfert est terminé, l'écran
4
Cliquez sur
Assistant de Transfert de fichiers et de paramètres (sans le support Operating System)
Terminer
puis redémarrez l'ordinateur.
Terminé
apparaît.
Pour exécuter l'Assistant Transfert de fichiers et de paramètres sans le support
d'installation Operating System, vous devez créer un disque d'assistant. Le disque
d'assistant permet de créer un fichier d'image de sauvegarde sur un support
amovible.
REMARQUE : L'assistant de Transfert de fichiers et de paramètres désigne l'ordinateur
source depuis lequel les données doivent être transférées comme ancien ordinateur, et
l'ordinateur destination vers lequel les données seront transférées comme nouvel
ordinateur.
RÉATION D 'UN DISQUE D 'ASSISTANT :
C
1
Sur l'ordinateur destination, cliquez sur
Accessoires→ Outils système→
2
Sous
De quel ordinateur s'agit-il ?
sur
3
Suivant
Sous
.
Avez-vous un CD-ROM de Windows XP ?
Assistant Transfert de fichiers et de paramètres
, cliquez sur
une disquette de l'assistant dans le lecteur suivant
4
Insérez un support amovible, par exemple un CD ou DVD enregistrable,
puis cliquez sur
5
Consultez les informations sous
OK
.
Allez maintenant à votre ancien ordinateur
puis passez à l'ordinateur source. Ne cliquez
COPIE DES DONNÉES DEPUIS L 'ORDINATEUR SOURCE :
1
Insérez le disque de l'assistant dans l'ordinateur source.
2
Cliquez sur
Démarrer→
Exécuter
Démarrer→
.
Tous les programmes→
Nouvel ordinateur
, cliquez sur
, puis cliquez sur
pas
sur
Suivant
.
.
, puis cliquez
Je veux créer
Suivant.
,
Guide de référence rapide 93
Page 94

3
Cliquez sur
cliquez sur
4
Sous
cliquez sur
5
Sous
De quel ordinateur s'agit-il ?
Sélectionner une méthode de transfert
Parcourir...
OK
.
Suivant
.
et trouvez
transfert de votre choix, puis cliquez sur
6
Sous
Que voulez-vous transférer ?
à transférer, puis cliquez sur
Suivant
fastwiz
, cliquez sur
sur le disque de l'assistant, puis
Ancien ordinateur
, puis
, cliquez sur la méthode de
Suivant
.
, cliquez pour sélectionner les données
.
Les données sélectionnées sont copiées et l'écran
de collecte
7
Cliquez sur
TRANSFERT DES DONNÉES VERS L'ORDINATEUR DE DESTINATION :
1
Passez à l'ordinateur destination.
2
Sous
Allez maintenant à votre ancien ordinateur
3
Sous
Où sont les fichiers et les paramètres ?
apparaît.
Ter mi ne r
.
transfert des fichiers et paramètres, puis cliquez sur
Achèvement de la phase
, cliquez sur
Suivant
, sélectionnez la méthode de
Suivant
.
L'assistant lit les fichiers et paramètres collectés et les applique sur l'ordinateur
destination. Quand le transfert est terminé, l'écran
4
Cliquez sur
Microsoft Windows Vista
1
Cliquez sur le bouton Démarrer de Windows Vista , puis cliquez sur
Ter mi ne r
puis redémarrez l'ordinateur.
Transfert de fichiers et de paramètres Windows→
Ter mi né
apparaît.
Démarrer Transfert
Windows.
.
2
Dans la boîte de dialogue
Continuer
3
Cliquez sur
.
Démarrer un nouveau transfert
Suivez les instructions fournies à l'écran par l'assistant Transfert Windows.
94 Guide de référence rapide
Contrôle du compte utilisateur
ou
Continuer un transfert en cours
, cliquez sur
.
Page 95
Périphériques de protection contre les surtensions électriques
Plusieurs périphériques peuvent vous protéger contre les fluctuations de la
tension et les pannes d'alimentation :
• Protecteurs de surtension
• Filtres de ligne
• Onduleurs
Protecteurs de surtension
Les protecteurs de surtension et les rampes d'alimentation équipées d'une
protection contre la surtension réduisent les risques d'endommagement de votre
ordinateur provoqués par les pointes de tension pouvant survenir au cours d'un
orage électrique ou après une coupure de courant. Certains fabricants offrent
également une garantie contre certains types de dégâts. Lisez attentivement la
garantie de l'appareil lors du choix d'un protecteur de surtension et comparez
les valeurs nominales en Joules pour déterminer les efficacités relatives de différents
appareils. Un protecteur doté d'une valeur nominale en joules plus élevée offre
une meilleure protection.
AVIS : La plupart des protecteurs de surtension ne protègent pas contre les fluctuations
de tension ou les coupures de courant. Lorsqu'un orage est proche, débranchez la
ligne téléphonique de la prise murale et déconnectez votre ordinateur de la prise de
courant.
De nombreux protecteurs de surtension sont équipés d'une prise téléphonique
pour assurer la protection du modem. Consultez la documentation du protecteur
de surtension pour obtenir des instructions sur la connexion du modem.
AVIS : Certains protecteurs de surtension n'offrent pas de protection pour les cartes
réseau. Déconnectez le câble de réseau de la prise réseau murale pendant les orages.
Filtres de ligne
AVIS : Les filtres de ligne n'offrent pas de protection contre les coupures de courant.
Ils sont conçus pour maintenir la tension CA à un niveau relativement constant.
Guide de référence rapide 95
Page 96
Onduleurs
AVIS : Une baisse de tension pendant l'enregistrement des données sur le disque
dur peut provoquer une perte de données ou la corruption du fichier.
REMARQUE : Pour optimiser le temps de fonctionnement de la batterie, connectez
uniquement votre ordinateur à un onduleur. Connectez les autres périphériques, tels
que l'imprimante, à une rampe d'alimentation différente équipée d'un protecteur de
surtension.
Les onduleurs protègent contre les fluctuations de tension et les coupures de
courant. Ils incluent une batterie qui alimente temporairement les périphériques
connectés lorsque l'alimentation secteur est coupée. La batterie se charge lorsque
l'alimentation secteur est disponible. Consultez la documentation fournie par
le fabricant de l'onduleur afin d'obtenir des informations sur la durée de
fonctionnement de la batterie et vous assurer que le dispositif est approuvé
par Underwriters Laboratories (UL).
Nettoyage de votre ordinateur
PRÉCAUTION : Avant de commencer toute procédure de cette section, consultez
et respectez les consignes de sécurité du
Guide d'information sur le produit
.
Ordinateur, clavier et moniteur
PRÉCAUTION : Débranchez l'ordinateur de la prise électrique avant de le nettoyer.
Nettoyez votre ordinateur avec un tissu doux et humecté avec de l'eau. N'utilisez
pas de liquide ni d'aérosol nettoyants, ceux-ci peuvent contenir des substances
inflammables.
• Utilisez un aspirateur muni d'une brosse pour ôter délicatement la poussière
des baies et ouvertures de l'ordinateur ainsi qu'entre les touches du clavier.
AVIS : N'essuyez pas le moniteur avec une solution à base d'alcool ou de savon.
Vous risqueriez d'endommager le revêtement antireflet.
• Pour nettoyer votre écran, humidifiez légèrement un chiffon doux et propre
avec de l'eau. Si possible, utilisez un chiffon conçu spécialement pour le
nettoyage des écrans et adapté au revêtement antistatique du moniteur.
• Nettoyez le clavier, l'ordinateur et les parties en plastique de l'écran avec
un chiffon doux imbibé d'eau.
Imbibez légèrement le chiffon et veillez à ne pas faire dégouliner de l'eau
à l'intérieur de l'ordinateur ou du clavier.
96 Guide de référence rapide
Page 97
Souris (non optique)
1
Tournez l'anneau de retenue situé sous votre souris dans le sens inverse des
aiguilles d'une montre pour retirer la bille.
2
Essuyez la bille avec un chiffon propre et non pelucheux.
3
Soufflez doucement dans la cavité de la bille pour en déloger la poussière
et les peluches.
4
Nettoyez les rouleaux dans la cavité de la bille avec un coton-tige légèrement
imbibé d'alcool isopropylique.
5
Vérifiez le centrage des rouleaux dans leurs logements, si nécessaire.
Assurez-vous que le coton-tige n'a pas laissé de peluches sur les rouleaux.
6
Remettez en place la bille et l'anneau de retenue, puis tournez ce dernier
dans le sens des aiguilles d'une montre pour le remettre en place.
Lecteur de disquette
AVIS : Ne tentez pas de nettoyer les têtes du lecteur à l'aide d'un coton-tige. Les
têtes peuvent être désalignées et empêcher le fonctionnement du lecteur.
Nettoyez votre lecteur de disquette à l'aide d'un kit de nettoyage du commerce.
Ces kits comportent des disquettes prétraitées permettant d'enlever les dépôts
accumulés au cours d'une utilisation normale.
CD et DVD
AVIS : Utilisez toujours de l'air comprimé pour nettoyer la lentille du lecteur et suivez
les instructions fournies avec l'air comprimé. Ne touchez jamais la lentille du lecteur.
1
Maintenez le disque par le bord extérieur. Vous pouvez aussi le tenir par le
bord intérieur du trou central.
AVIS : Pour éviter d'endommager la surface, n'essuyez pas le disque de façon circulaire.
2
À l'aide d'un chiffon doux et non pelucheux, essuyez doucement la face
inférieure du disque (à l'opposé de l'étiquette) de façon rectiligne, du centre
au bord du disque.
Pour les poussières tenaces, essayez de l'eau ou de l'eau savonneuse. Vous
pouvez aussi acheter des produits du commerce permettant de nettoyer les
disquettes et assurant une protection contre la poussière, les empreintes de
doigts et les rayures. Les produits de nettoyage pour CD peuvent être utilisés
sur les DVD sans aucun risque.
Guide de référence rapide 97
Page 98

Outils de dépannage
Voyants d'alimentation
PRÉCAUTION : Avant de commencer toute procédure de cette section, consultez
et respectez les consignes de sécurité du
Guide d'information sur le produit
Le voyant d'alimentation à l'avant de l'ordinateur s'allume et clignote ou reste
allumé, selon l'état :
• Si le voyant d'alimentation est vert et si l'ordinateur ne répond pas, voir
«Voyants de diagnostic» à la page 99.
• Si le voyant clignote en vert, l'ordinateur est en mode Veille. Appuyez sur
une touche du clavier, déplacez la souris ou appuyez sur le bouton d'alimentation
pour revenir au fonctionnement normal.
• Si le voyant d'alimentation est éteint, l'ordinateur est éteint ou n'est pas
alimenté.
– Réinsérez correctement le câble d'alimentation dans le connecteur
situé à l'arrière de l'ordinateur et dans la prise électrique.
.
– Si l'ordinateur est branché sur une barrette d'alimentation, vérifiez que
celle-ci est branchée sur une prise électrique et qu'elle est allumée.
– Retirez temporairement les périphériques de protection contre les
surtensions, les barrettes d'alimentation et les rallonges pour vérifier
que la mise sous tension de l'ordinateur s'effectue correctement.
– Assurez-vous que la prise électrique fonctionne en la testant à l'aide
d'un autre appareil, une lampe par exemple.
– Vérifiez que le câble d'alimentation principal et le câble du panneau
avant sont correctement branchés à la carte système (voir «Composants de
la carte système» dans le
Guide d'utilisation
).
• Si le voyant d'alimentation clignote en orange, l'ordinateur est alimenté,
mais un incident lié à l'alimentation interne s'est peut-être produit.
– Vérifiez que le sélecteur de tension est correctement réglé pour
l'alimentation en CA du pays où vous vous trouvez, le cas échéant.
– Vérifiez que le câble d'alimentation du processeur est correctement
branché à la carte système (voir «Composants de la carte système»
dans le
Guide d'utilisation
).
98 Guide de référence rapide
Page 99
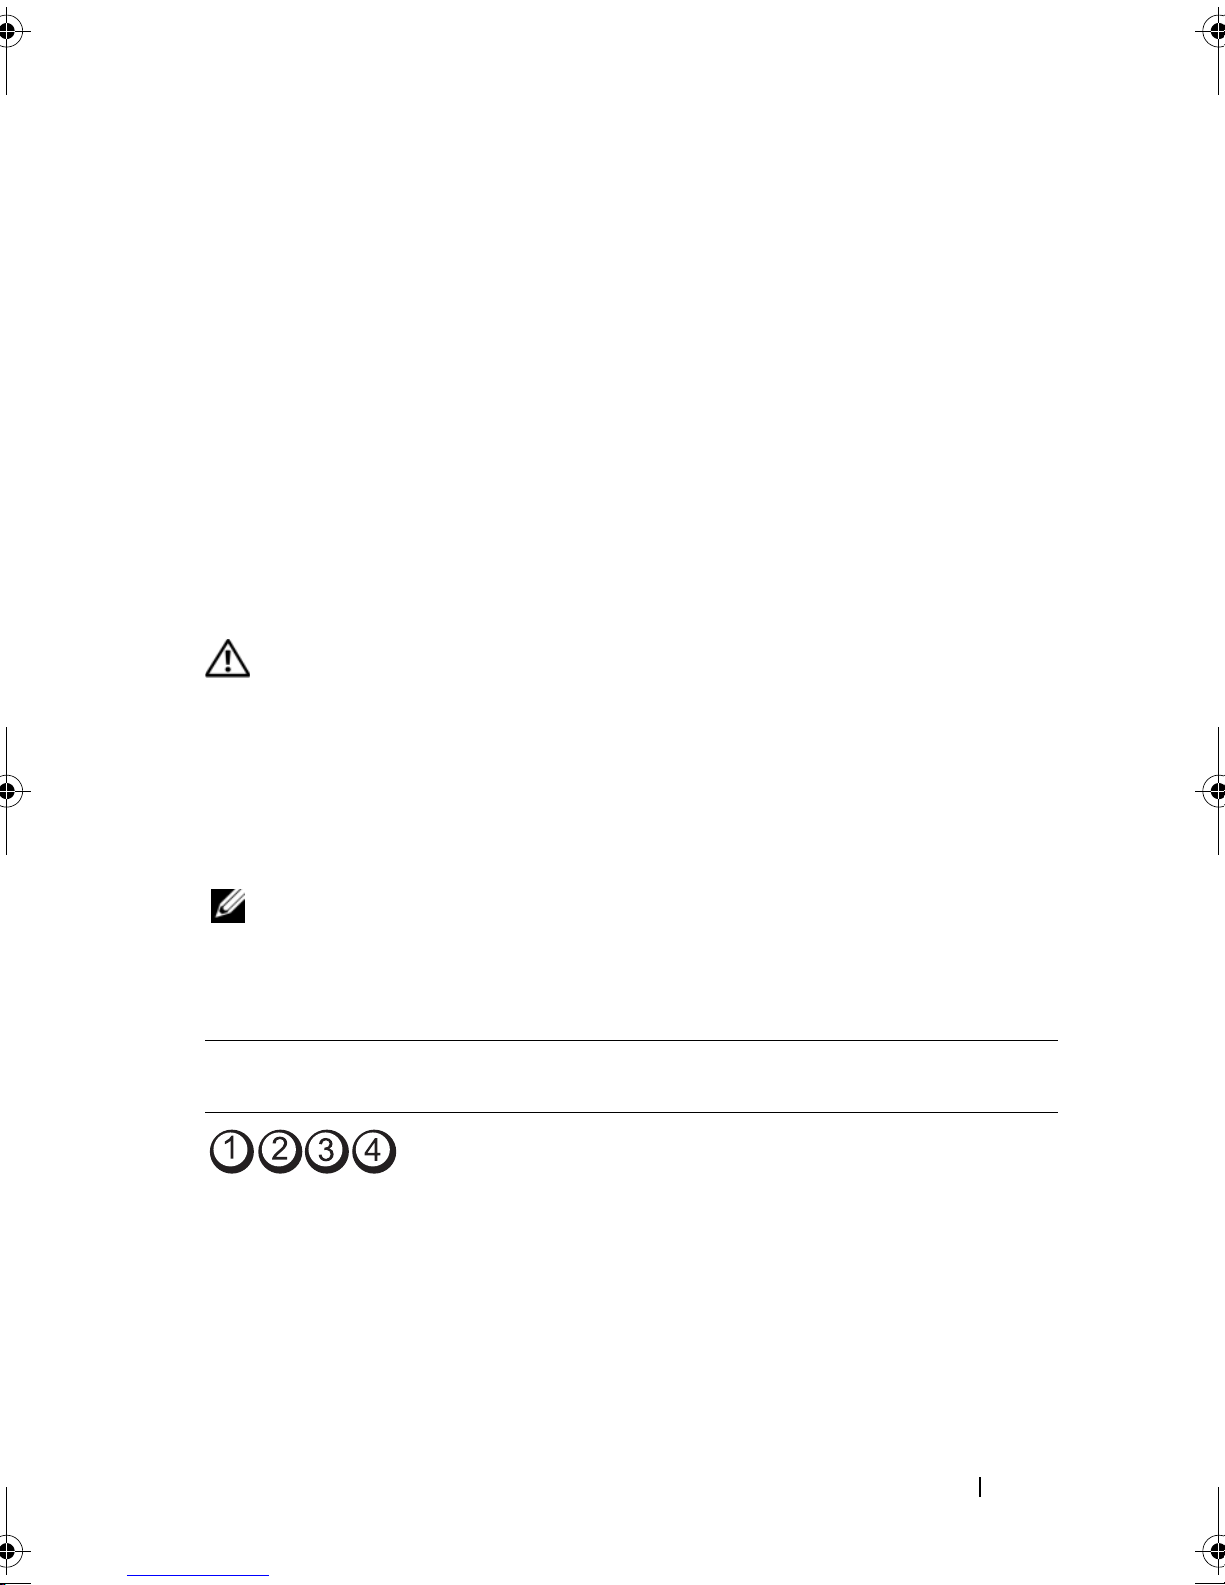
• Si le voyant d'alimentation est orange fixe, un périphérique est défectueux
ou mal installé.
– Déposez puis reposez les modules de mémoire (voir «Mémoire» dans
le
Guide d'utilisation
).
– Déposez puis reposez toutes les cartes (voir «Cartes» dans le
d'utilisation
).
Guide
• Eliminez les interférences. Les interférences peuvent être dues à divers facteurs :
– Rallonges pour le clavier, la souris et l'alimentation
– Trop de périphériques raccordés à une même barrette d'alimentation
– Plusieurs barrettes d'alimentation raccordées à la même prise électrique
Voyants de diagnostic
PRÉCAUTION : Avant de commencer toute procédure de cette section, consultez
et respectez les consignes de sécurité du
Guide d'information sur le produit
Les quatre voyants numérotés 1, 2, 3 et 4 sur le panneau avant peuvent vous
aider à résoudre certains incidents (voir «Vue frontale (mode tour)» à la page 77
ou «Vue avant (mode bureau)» à la page 81). Lorsque l'ordinateur démarre
normalement, les voyants clignotent puis s'éteignent. En cas d'incident, utilisez
la séquence des voyants pour identifier son origine.
REMARQUE : Quand l'ordinateur a terminé l'autotest de démarrage (POST), les
quatre voyants s'éteignent avant l'amorçage du système d'exploitation.
.
Codes des voyants de diagnostic pendant l'autotest de démarrage
Couleurs des
voyants
Description du
problème
L'ordinateur est en
condition d'arrêt
normale ou une
panne est survenue
avant le BIOS.
Solution proposée
Raccordez l'ordinateur à une prise
électrique qui fonctionne et appuyez
sur le bouton d'alimentation.
Guide de référence rapide 99
Page 100
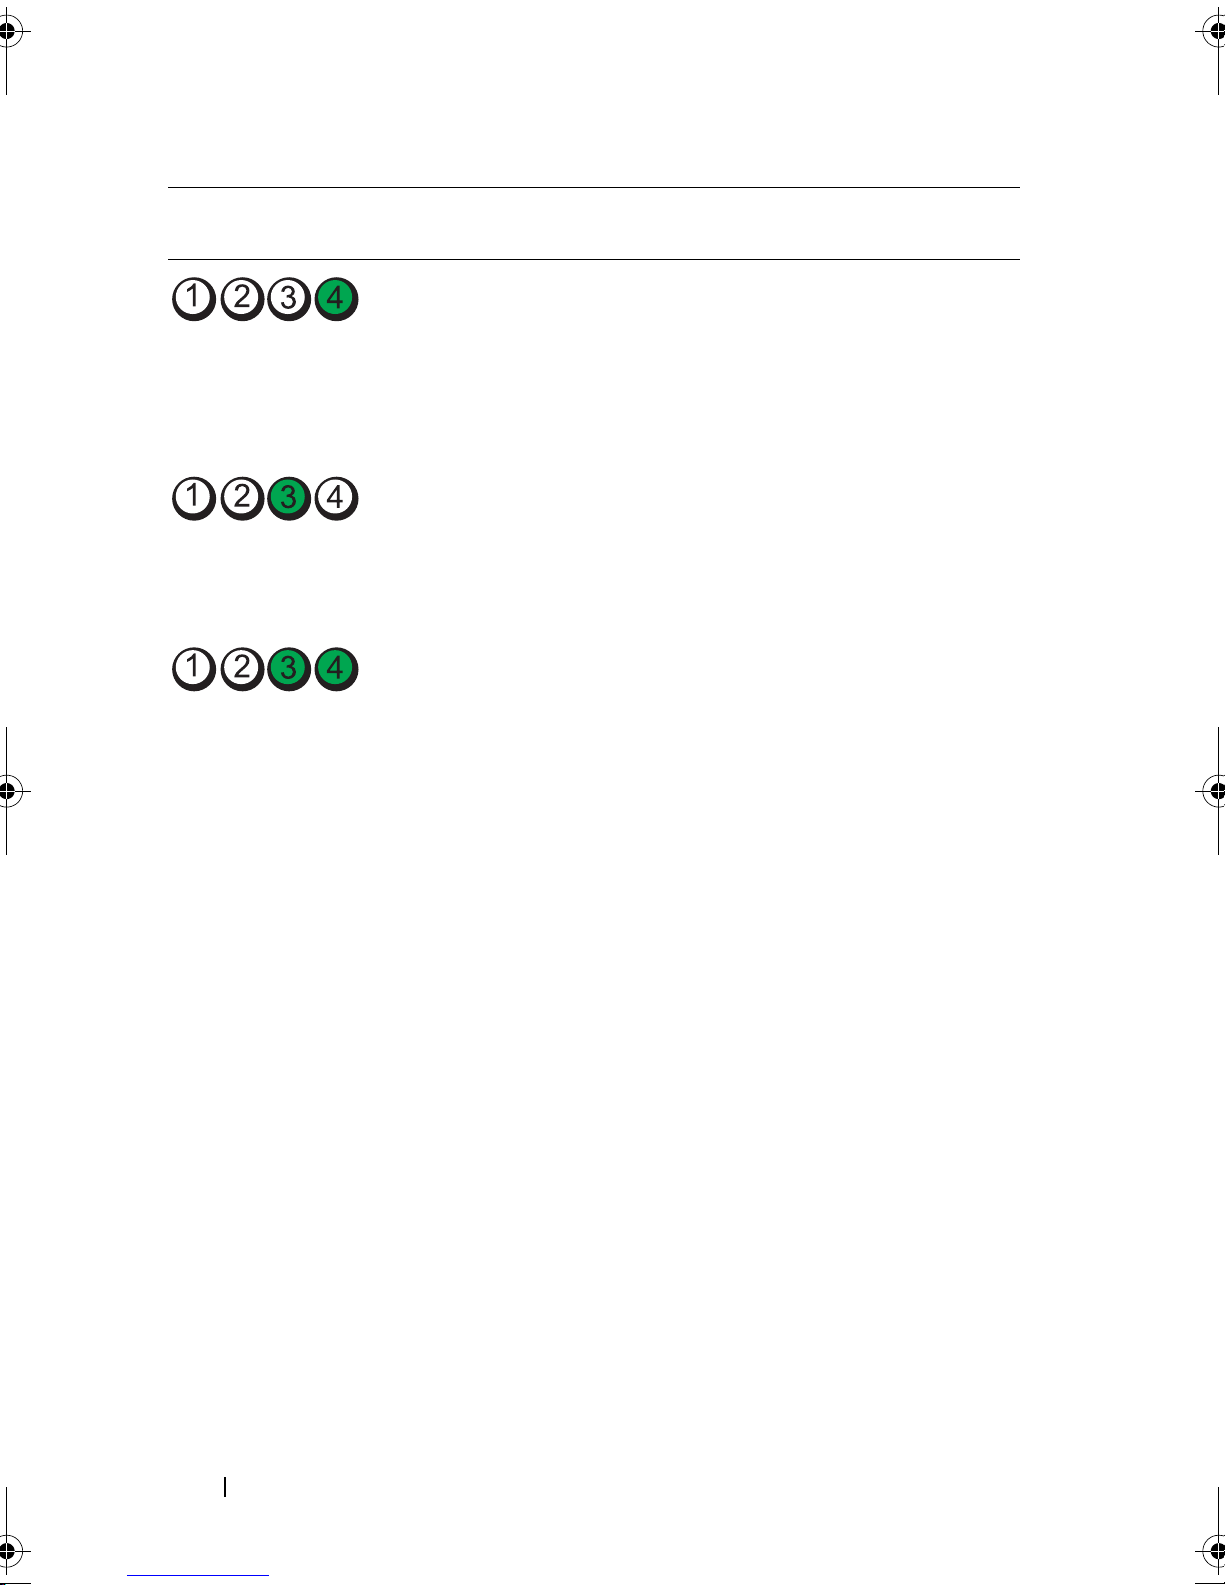
Couleurs des
voyants
Description du
problème
Solution proposée
Echec éventuel du
BIOS ; l'ordinateur est
en mode Récupération.
Panne possible du
processeur.
Les modules de
mémoire sont détectés,
mais une panne de
mémoire est survenue.
• Exécutez l'utilitaire de sauvegarde du
BIOS, attendez que la récupération soit
terminée et redémarrez l'ordinateur.
• Si le problème persiste, contactez Dell
«Pour prendre contact avec Dell»
(voir
dans le Guide d'utilisation
).
• Réinstallez le processeur (voir
«Processeur»
dans le Guide d'utilisation
).
• Si le problème persiste, contactez Dell
«Pour prendre contact avec Dell»
(voir
dans le Guide d'utilisation
).
• Si deux modules de mémoire ou plus
sont installés, déposez les modules
(voir «Dépose d'un module de mémoire»
dans le
Guide d'utilisation
), puis
reposez-en un (voir «Installation d'un
module de mémoire» dans le
d'utilisation
) et redémarrez l'ordinateur.
Guide
Si l'ordinateur démarre normalement,
continuez à installer les modules de
mémoire supplémentaires (un à la fois)
jusqu'à l'identification d'un module
défectueux ou à la réinstallation de
tous les modules sans erreur.
100 Guide de référence rapide
• Dans la mesure du possible, installez
des modules de même type (voir
«Mémoire» dans le
Guide d'utilisation
).
• Si le problème persiste, contactez Dell
(voir «Pour prendre contact avec Dell»
dans le
Guide d'utilisation
).
 Loading...