

Dell Precision Workstation 370, Precision 370 DHM, Precision 370 WHM Quick Reference Manual
Page 1

Dell Precision™ Workstation
370 Systems
Quick Reference Guide
Models DHM and WHM
www.dell.com | support.dell.com
Page 2

Notes, Notices, and Cautions
NOTE: A NOTE indicates important information that helps you make better use of your computer.
NOTICE: A NOTICE indicates either potential damage to hardware or loss of data and tells you how to avoid
the problem.
CAUTION: A CAUTION indicates a potential for property damage, personal injury, or death.
Abbreviations and Acronyms
For a complete list of abbreviations and acronyms, see the Glossary in your
User’s Guide
.
If you purchased a Dell™ n Series computer, any references in this document to Microsoft
operating systems are not applicable.
____________________
®
Windows®
Information in this document is subject to change without notice.
© 2004 Dell Inc. All rights reserved.
Reproduction in any manner whatsoever without the written permission of Dell Inc. is strictly forbidden.
Trademarks used in this text: Dell, the DELL logo, and Dell Precision are trademarks of Dell Inc.;
Microsoft and Windows are registered trademarks of Microsoft Corporation.
Other trademarks and trade names may be used in this document to refer to either the entities claiming the marks and names
or their products. Dell Inc. disclaims any proprietary interest in trademarks and trade names other than its own.
Models DHM and WHM
April 2004 P/N T3914 Rev. A00
Page 3

Contents
Finding Information and Assistance . . . . . . . . . . . . . . . . . . . . 5
Setting Up Your Mini-Tower Computer
Setting Up Your Desktop Computer
Locating Your User’s Guide
. . . . . . . . . . . . . . . . . . . . . . . . . 19
Opening Your Mini-Tower Computer
The Card Cooling Fan
. . . . . . . . . . . . . . . . . . . . . . . . . . . 22
Opening Your Desktop Computer
Caring for Your Computer
Solving Problems
Troubleshooting Tips
. . . . . . . . . . . . . . . . . . . . . . . . . . 24
. . . . . . . . . . . . . . . . . . . . . . . . . . . . . 25
. . . . . . . . . . . . . . . . . . . . . . . . . 25
. . . . . . . . . . . . . . . . . . . 9
. . . . . . . . . . . . . . . . . . . . . 14
. . . . . . . . . . . . . . . . . . . . 20
. . . . . . . . . . . . . . . . . . . . . . 23
Resolving Software and Hardware Incompatibilities
Using Microsoft Windows XP System Restore
Using Last Known Good Configuration
Dell Diagnostics
Before You Start Testing
Beep Codes
. . . . . . . . . . . . . . . . . . . . . . . . . . . . . . . . 30
Error Messages
. . . . . . . . . . . . . . . . . . . . . . . . . . . . 28
. . . . . . . . . . . . . . . . . . . . . . . . 30
. . . . . . . . . . . . . . . . . . . . . . . . . . . . 31
. . . . . . . . . . . . . . . . . 28
. . . . . . . . . . 25
. . . . . . . . . . . . . 26
Diagnostic Lights
. . . . . . . . . . . . . . . . . . . . . . . . . . . . . 31
Frequently Asked Questions
Index . . . . . . . . . . . . . . . . . . . . . . . . . . . . . . . . . . . . 39
. . . . . . . . . . . . . . . . . . . . . . . . 36
Contents 3
Page 4

4 Contents
Page 5
Finding Information and Assistance
What Are You Looking For? Find it Here
• A diagnostic program for my computer
• Drivers for my computer
• My device documentation
• System board connectors
• Location of system board components
Drivers and Utilities CD (also known as the ResourceCD)
Documentation and drivers are already installed on your
computer. You can use the CD to reinstall drivers, run the
Dell Diagnostics (see page 28), or access your device
documentation.
Readme files may be
included on your CD
to provide last-minute
updates about technical
changes to your
computer or advanced
technical-reference
material for technicians
or experienced users.
NOTE: The latest drivers and documentation updates
can be found at support.dell.com.
System Information Label
Located on the inside cover of your computer.
Quick Reference Guide 5
Page 6
What Are You Looking For? Find it Here
• Warranty information
• Safety instructions
• Regulatory information
• Ergonomics information
• End User License Agreement
www.dell.com | support.dell.com
• How to remove and replace parts
• Technical specifications
• How to configure system settings
• How to troubleshoot and solve problems
• Service Tag and Express Service Code
• Microsoft Windows License Label
Dell™ Product Information Guide
Dell Precision User’s Guide
Microsoft
1
2
®
Windows® XP Help and Support Center
Click the
Click
Start
button and click
User’s and system guides
Help and Support.
and click
User’s guides
Service Tag and Microsoft Windows License
These labels are located on your computer.
• Use the Service Tag
to identify your
computer when you
support.dell.com
use
or contact technical
support.
• Enter the Express
Service Code to direct your call when contacting
technical support. The Express Service Code is not
available in all countries.
.
6 Quick Reference Guide
Page 7

What Are You Looking For? Find it Here
• Latest drivers for my computer
• Answers to technical service and support questions
• Online discussions with other users and technical
support
• Documentation for my computer
• Service call status and support history
• Top technical issues for my computer
• Frequently asked questions
• File downloads
• Details on my computer configuration
• Service contract for my computer
Dell Support Website — support.dell.com
NOTE: Select your region to view the appropriate support
site.
The Dell Support website provides several online tools,
including:
• Solutions — Troubleshooting hints and tips, articles
from technicians, and online courses
• Community — Online discussion with other Dell
customers
• Upgrades — Upgrade information for components, such
as memory, the hard drive, and the operating system
• Customer Care — Contact information, order status,
warranty, and repair information
• Downloads — Drivers, patches, and software updates
• Reference — Computer documentation, product
specifications, and white papers
Dell Premier Support Website — premiersupport.dell.com
The Dell Premier Support website is customized for
corporate, government, and education customers. This
website may not be available in all regions.
• How to use Windows XP
• Documentation for my computer
• Documentation for devices (such as a modem)
• How to use Linux
• E-mail discussions with Dell Precision and Linux users
• Additional information regarding Linux and my Dell
Precision computer
Windows Help and Support Center
1
Click the
2
Type a word or phrase that describes your problem
Start
button and click
Help and Support
and click the arrow icon.
3
Click the topic that describes your problem.
4
Follow the instructions on the screen.
Dell Supported Linux Sites
• http://linux.dell.com
• http://lists.us.dell.com/mailman/listinfo/linuxprecision
• http://docs.us.dell.com/docs/software/oslinux/
• http://docs.us.dell.com/docs/software/OSRHEL3/
Quick Reference Guide 7
.
Page 8

What Are You Looking For? Find it Here
• How to reinstall my operating system
www.dell.com | support.dell.com
Operating System CD
The operating system is already installed on your
computer. To reinstall your operating system, use the
Operating System CD. See your Precision User’s Guide
for instructions.
After you reinstall your
operating system, use the
Drivers and Utilities CD
to reinstall drivers for the
devices that came with
your computer.
Your operating system
product key label is
located on your
computer.
NOTE: The color of your CD varies based on the operating
system you ordered.
8 Quick Reference Guide
Page 9
Setting Up Your Mini-Tower Computer
CAUTION: Before you begin any of the procedures in this section, follow the safety instructions
located in the Product Information Guide.
You must complete all steps to properly set up your computer.
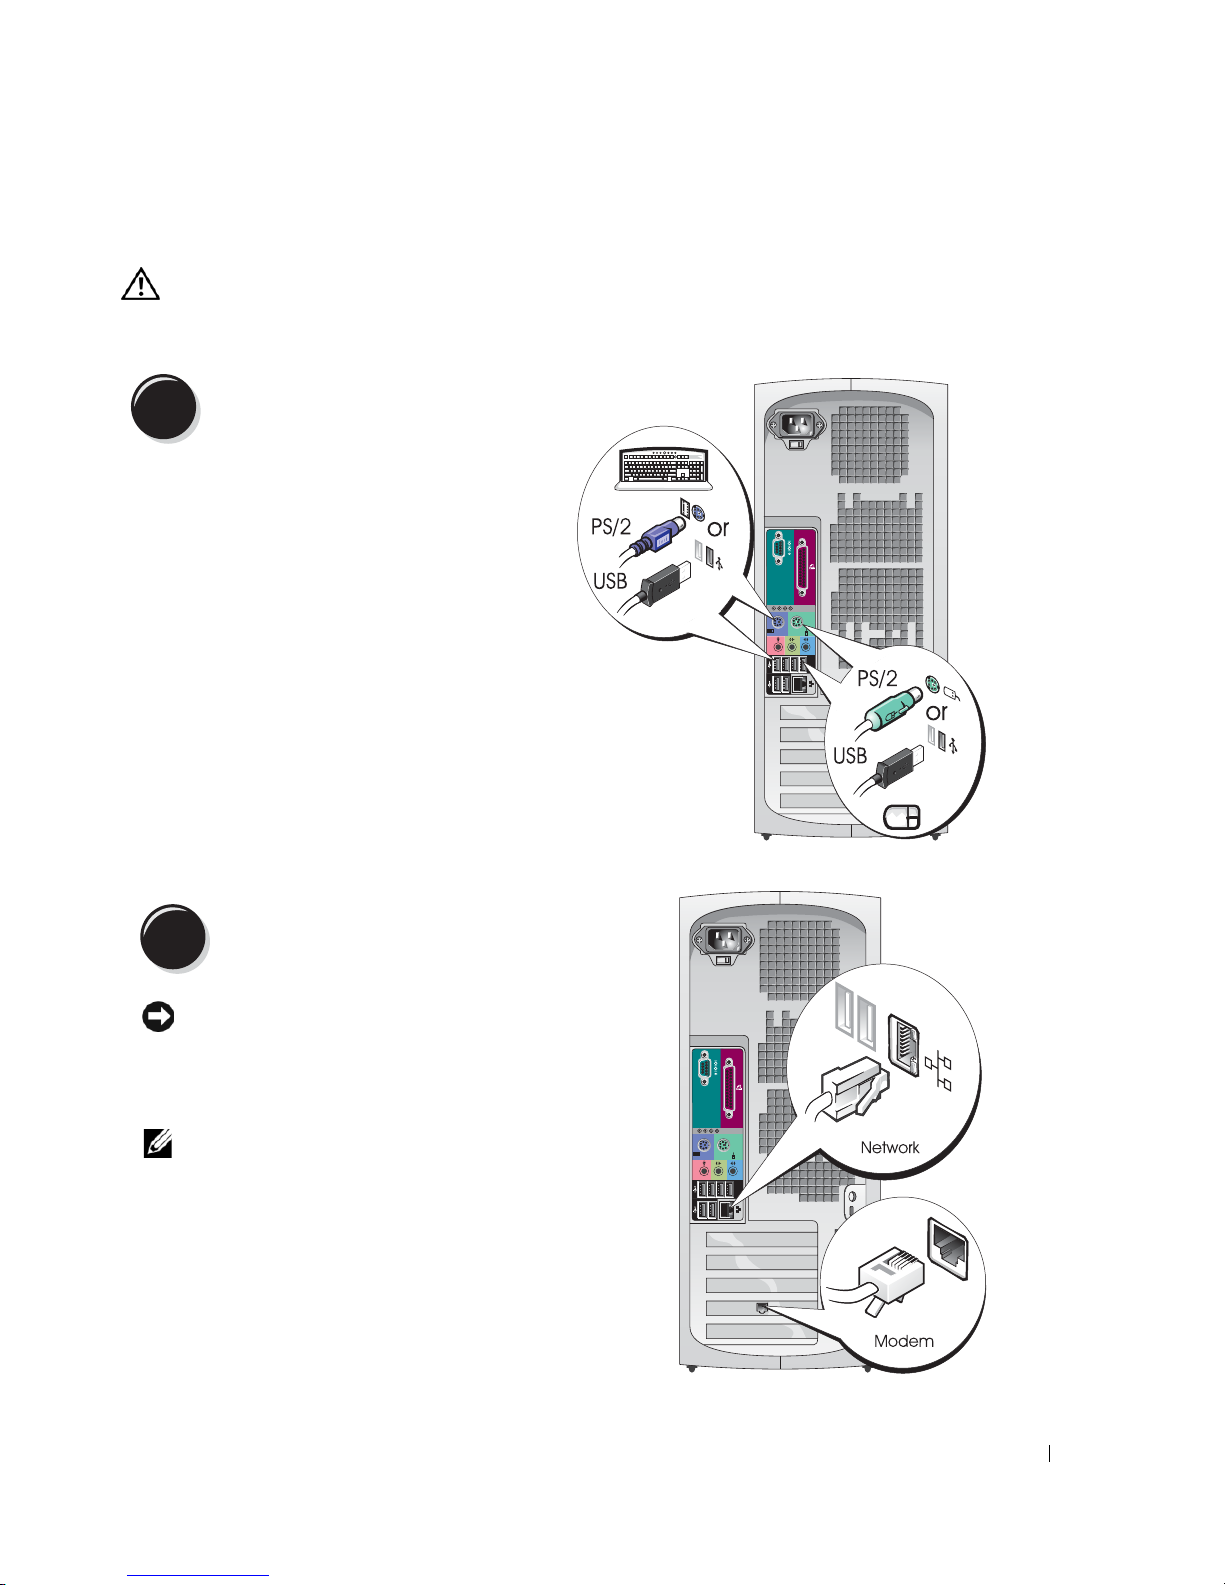
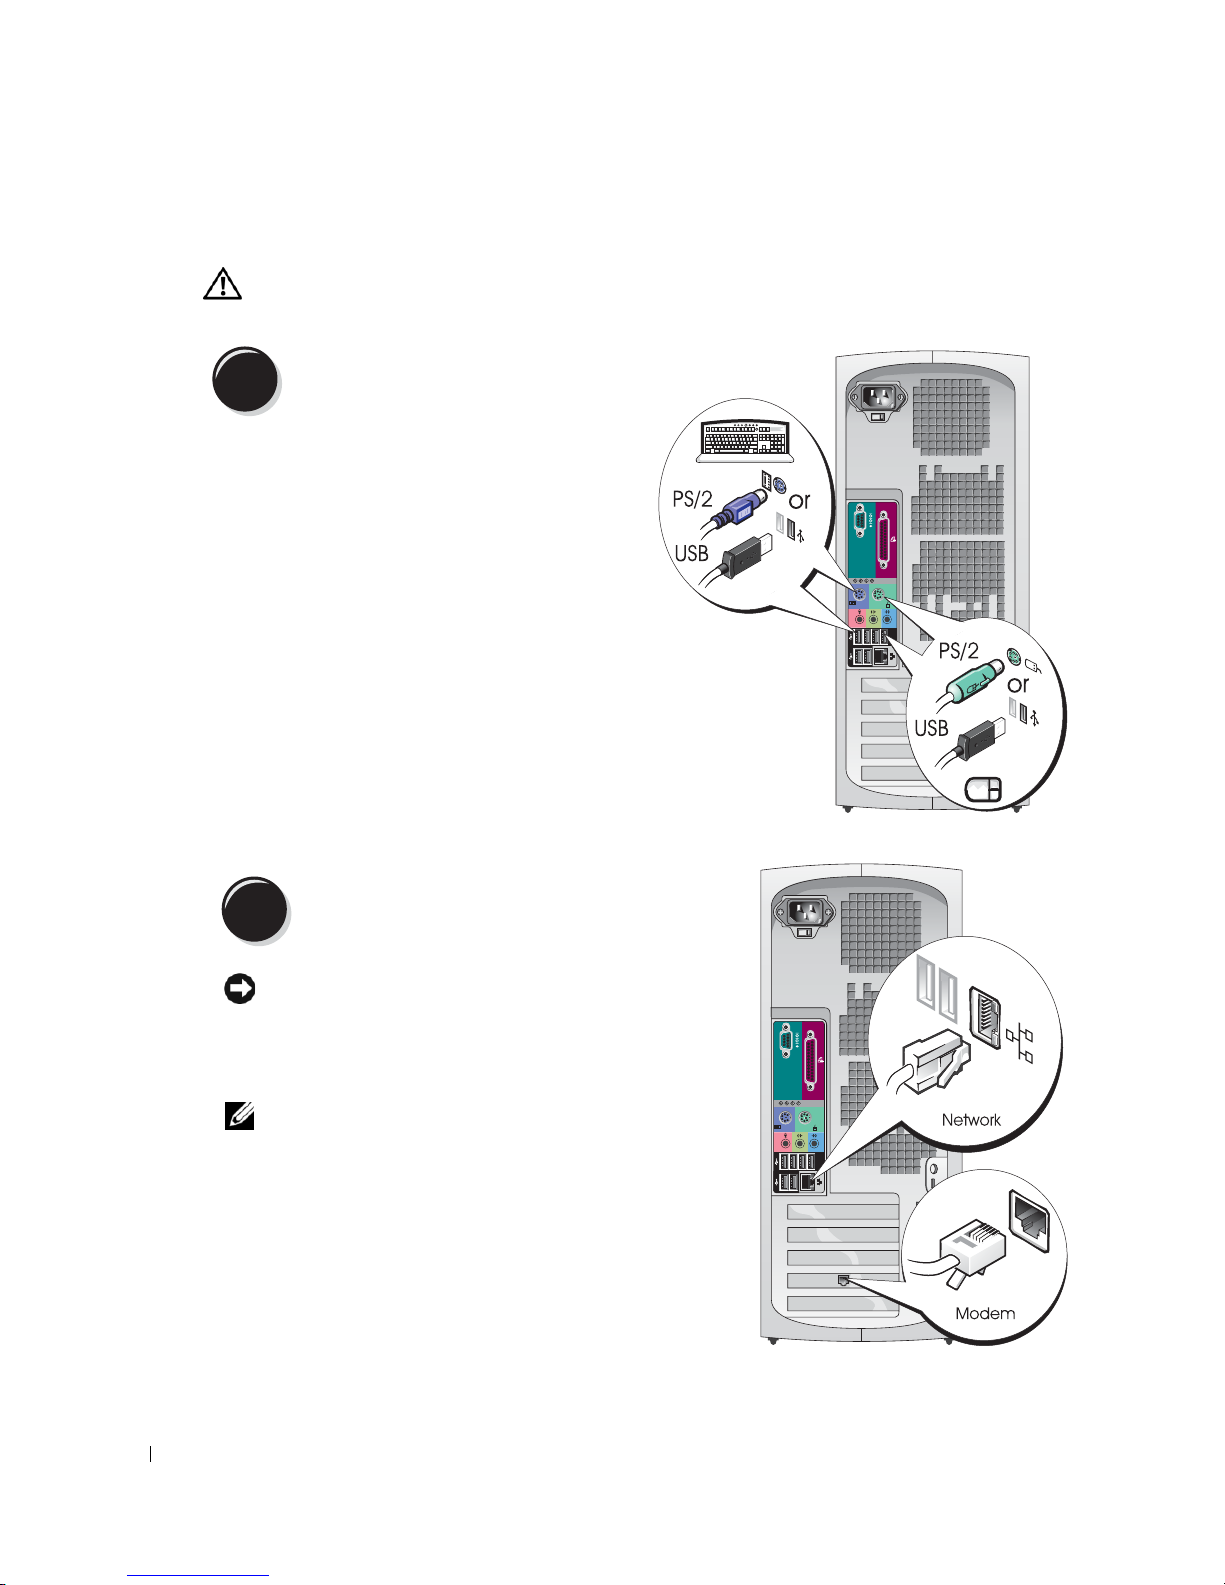
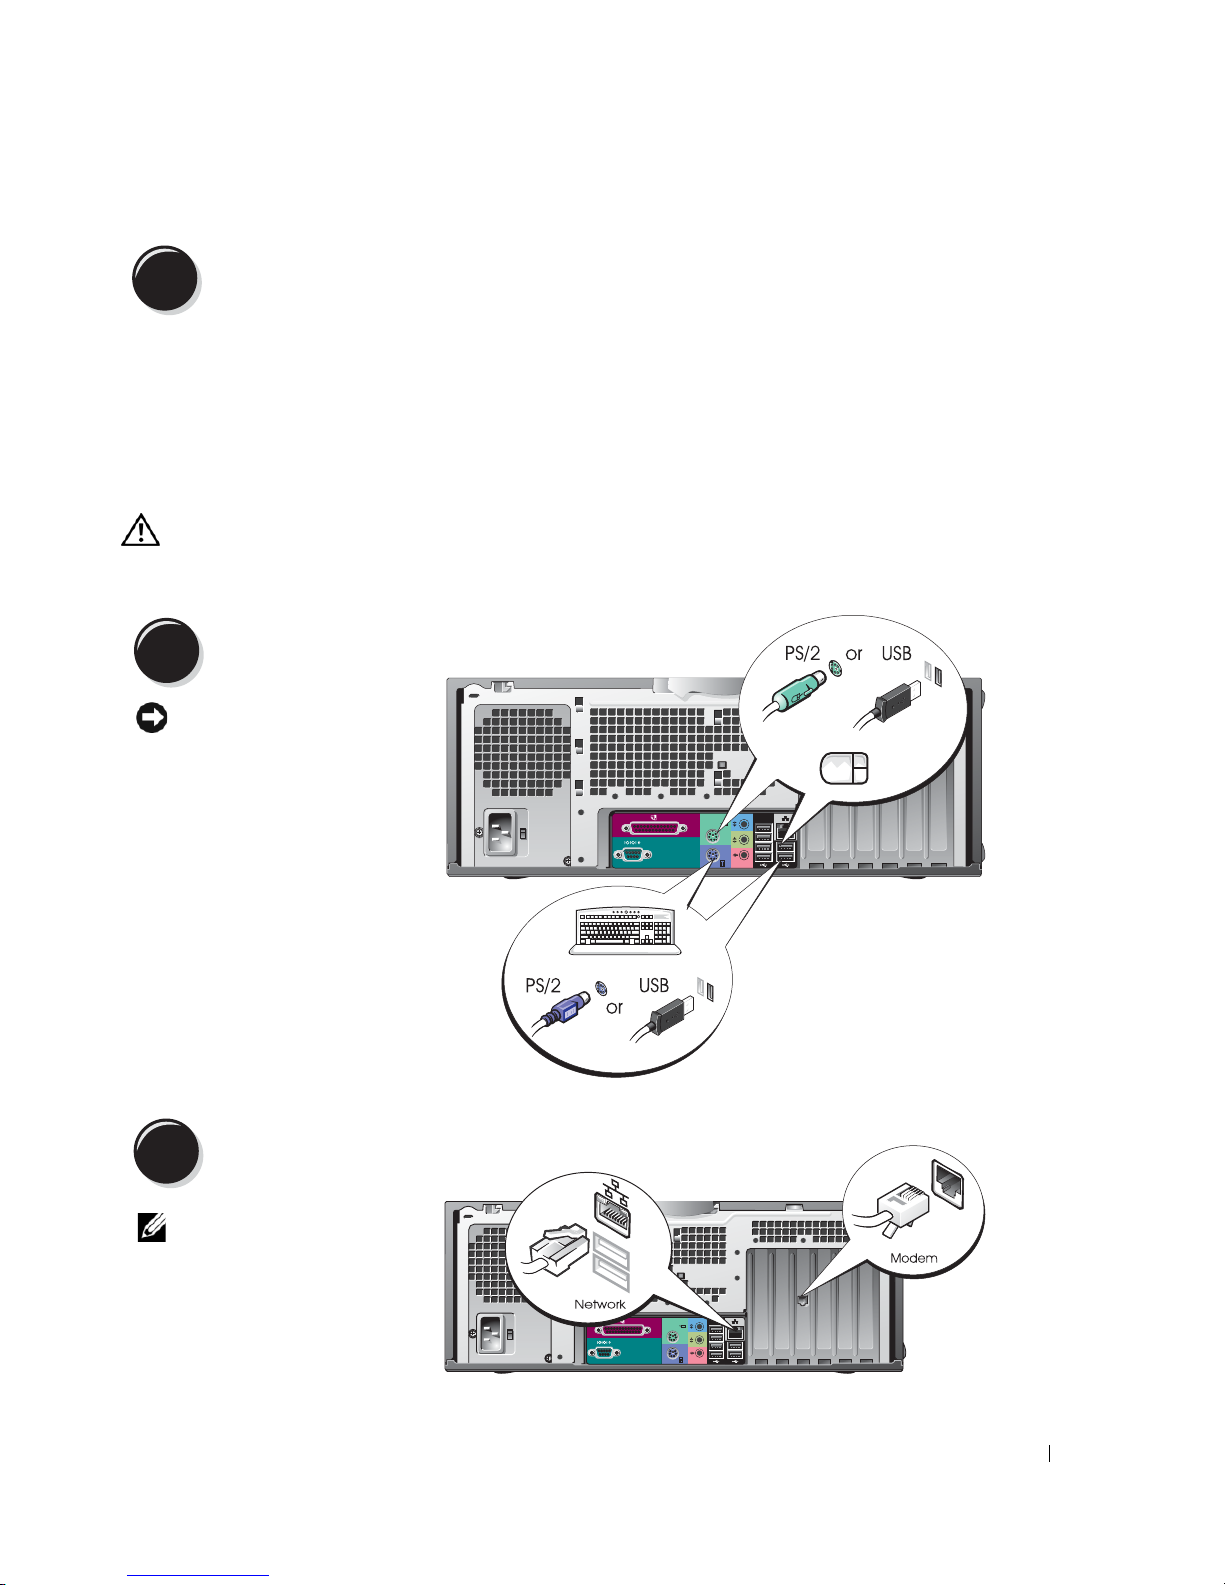
Connect the keyboard and the mouse.
1
2
Connect the modem or the network cable.
NOTICE: Do not connect a modem cable to the
network adapter. Voltage from telephone
communications can damage the network adapter.
NOTE: If your computer has a network card installed,
connect the network cable to the card.
Quick Reference Guide 9
Page 10
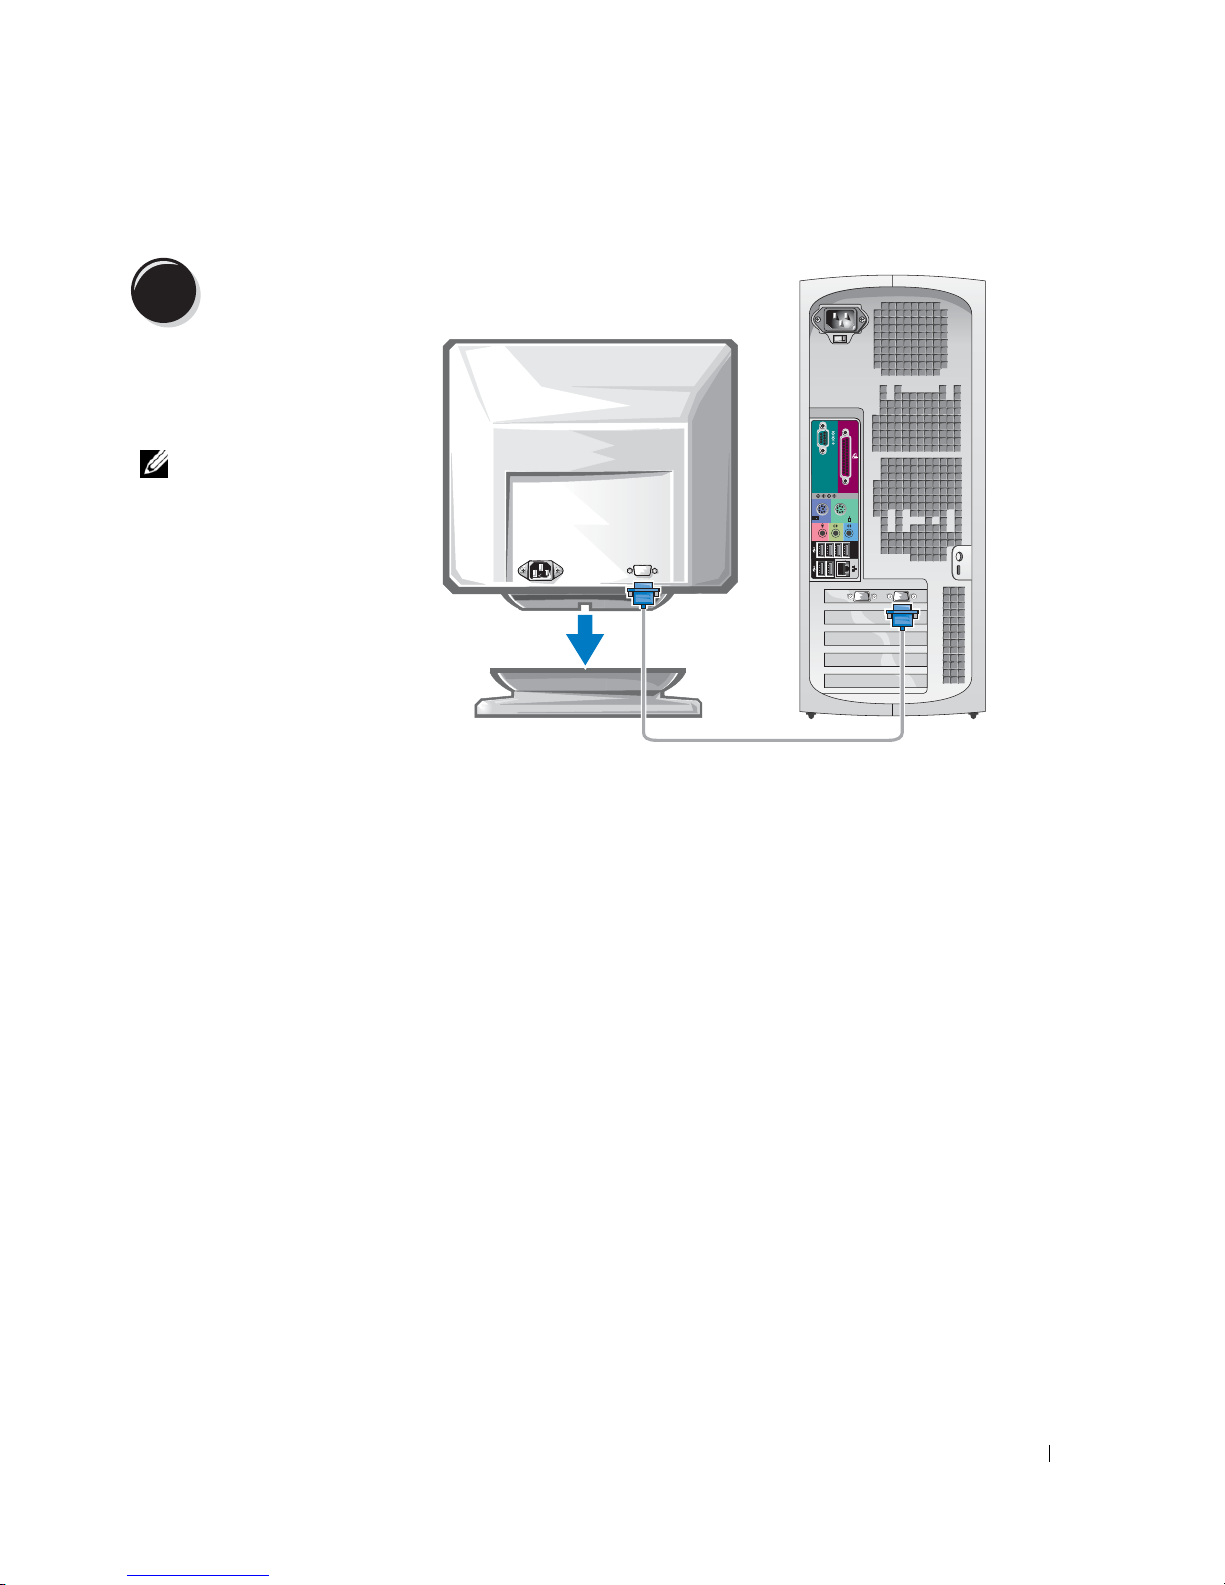
3
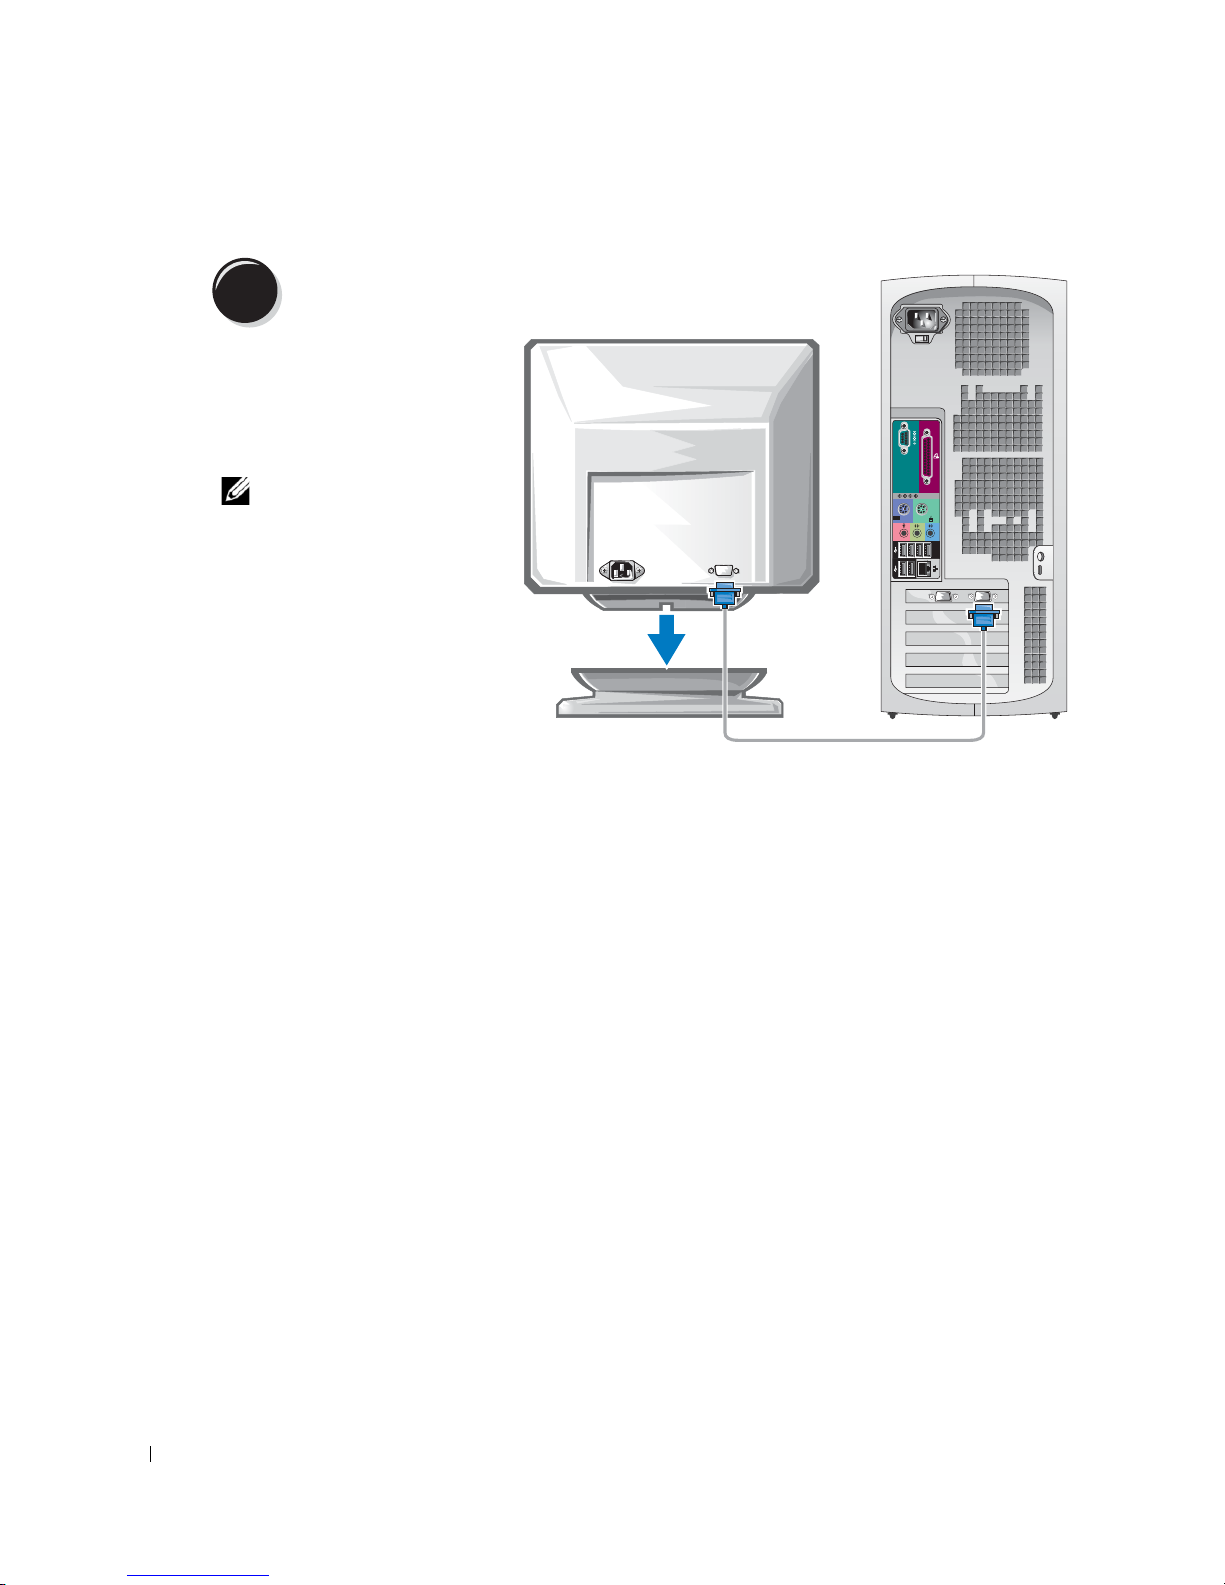
Connect the monitor.
Depending on your graphics
card, you can connect your
monitor in various ways.
NOTE: You may need to use
the provided adapter or
www.dell.com | support.dell.com
cable to connect your
monitor to the computer.
10 Quick Reference Guide
Page 11
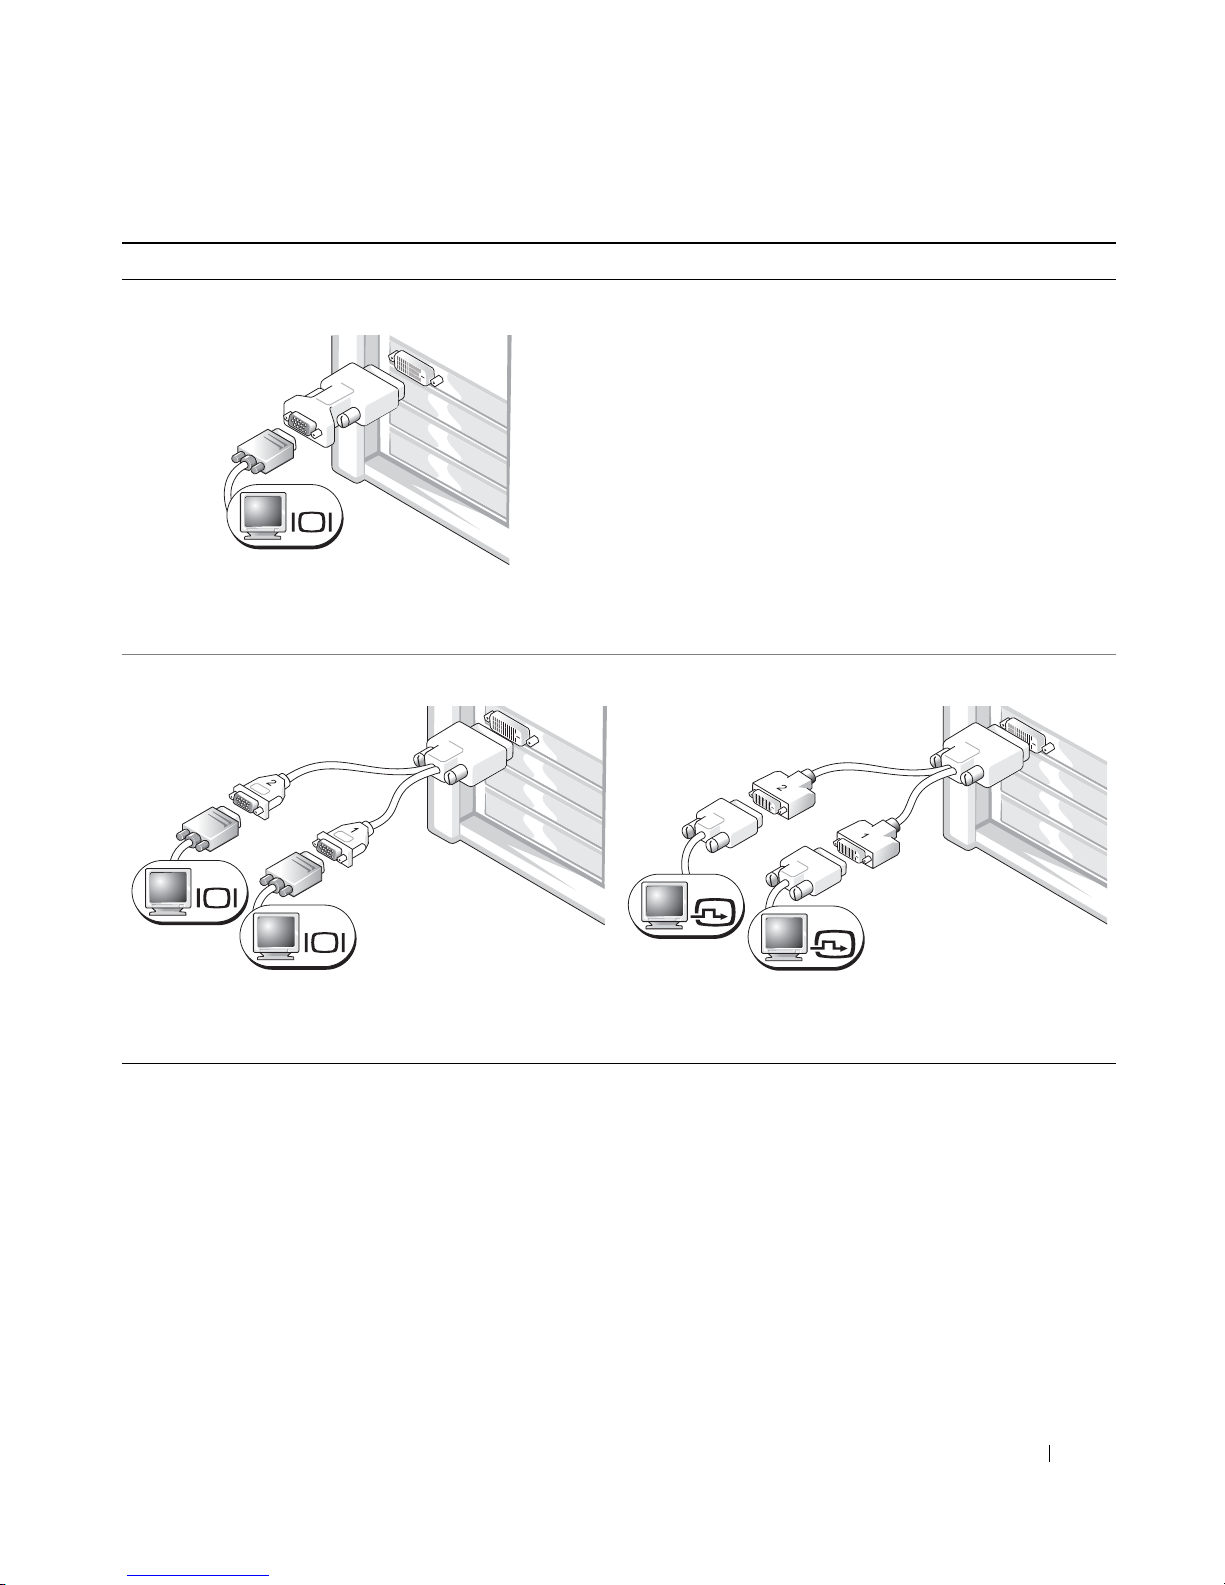
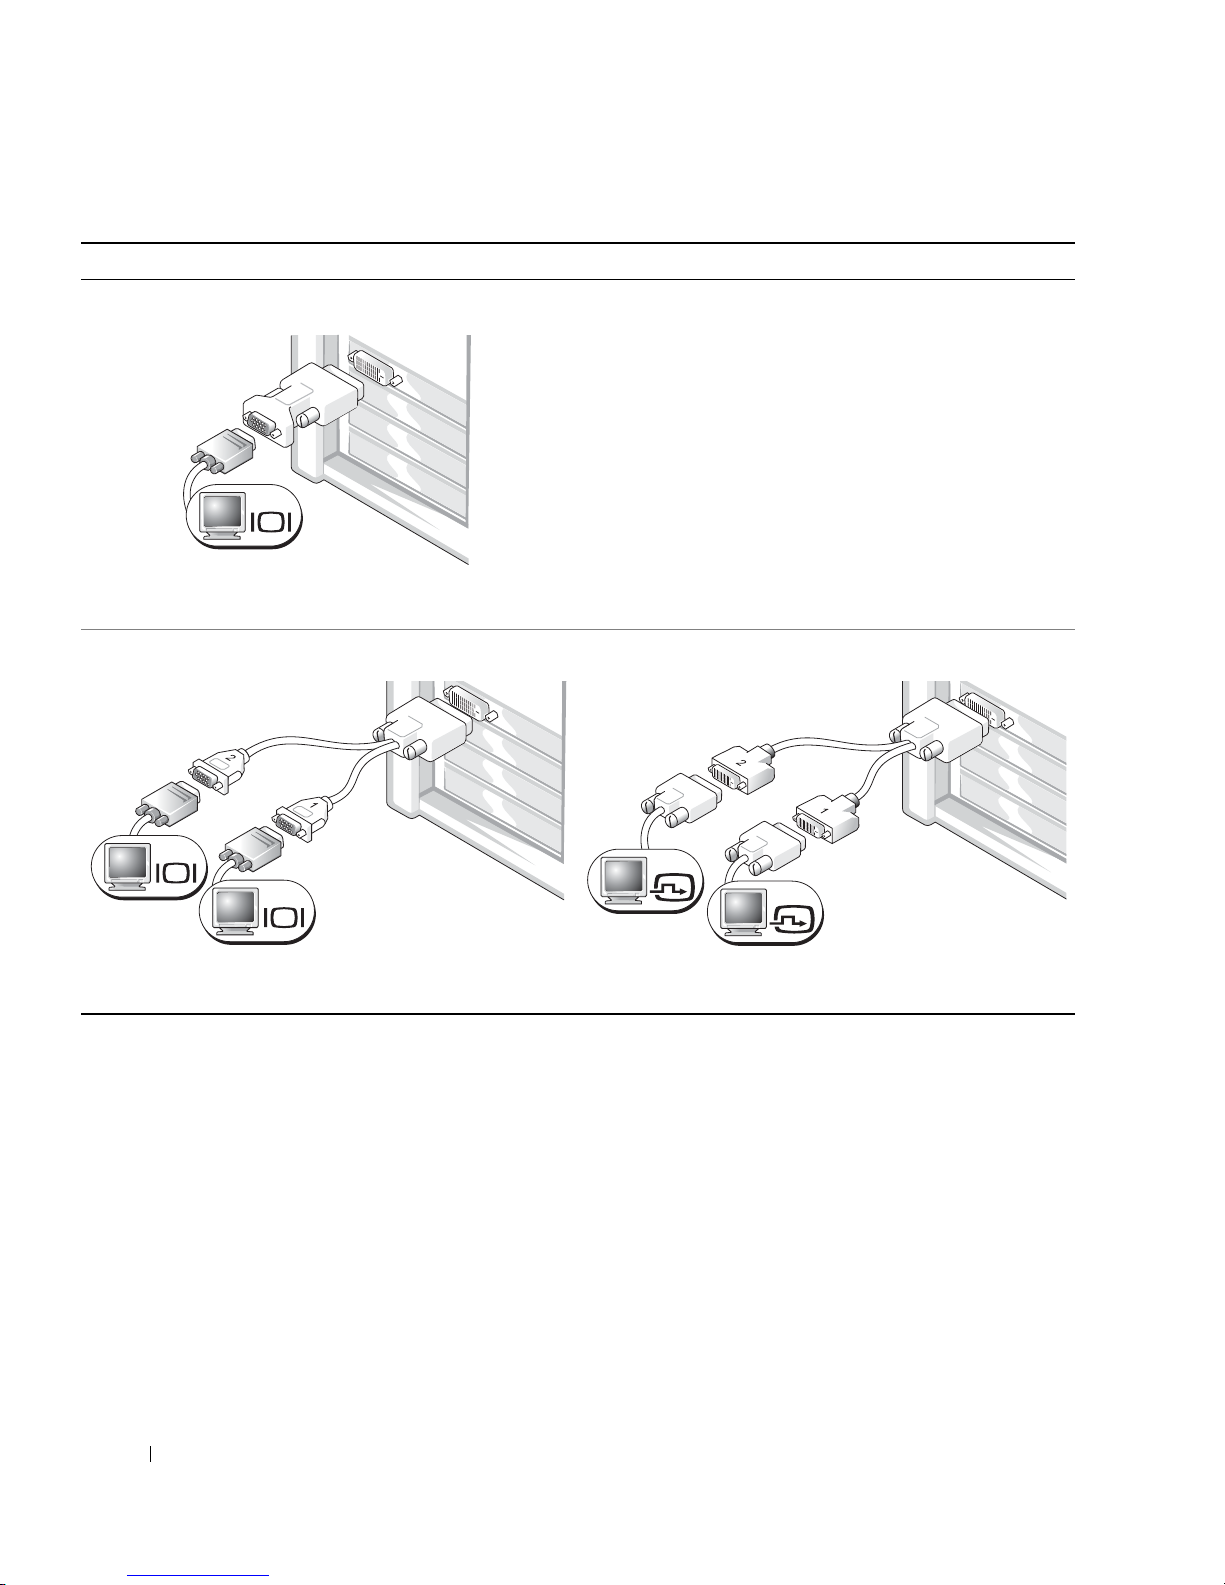
For single- and dual-monitor capable cards with a single connector
VGA Adapter
VGA
Use the VGA adapter when you have a single monitor
graphics card and you want to connect your computer
to a VGA monitor.
Dual VGA Y Cable Adapter
VGA
VGA
Use the appropriate Y cable when your graphics card has a
single connector and you want to connect your computer
to one or two VGA monitors.
Dual DVI Y Cable Adapter
DVI
DVI
Use the appropriate Y cable when your graphics card has a
single connector and you want to connect your computer
to one or two DVI monitors.
The dual-monitor cable is color coded; the blue connector is for the primary monitor, and the black
connector is for the secondary monitor. To enable dual-monitor support, both monitors must be
attached to the computer when it starts.
Quick Reference Guide 11
Page 12
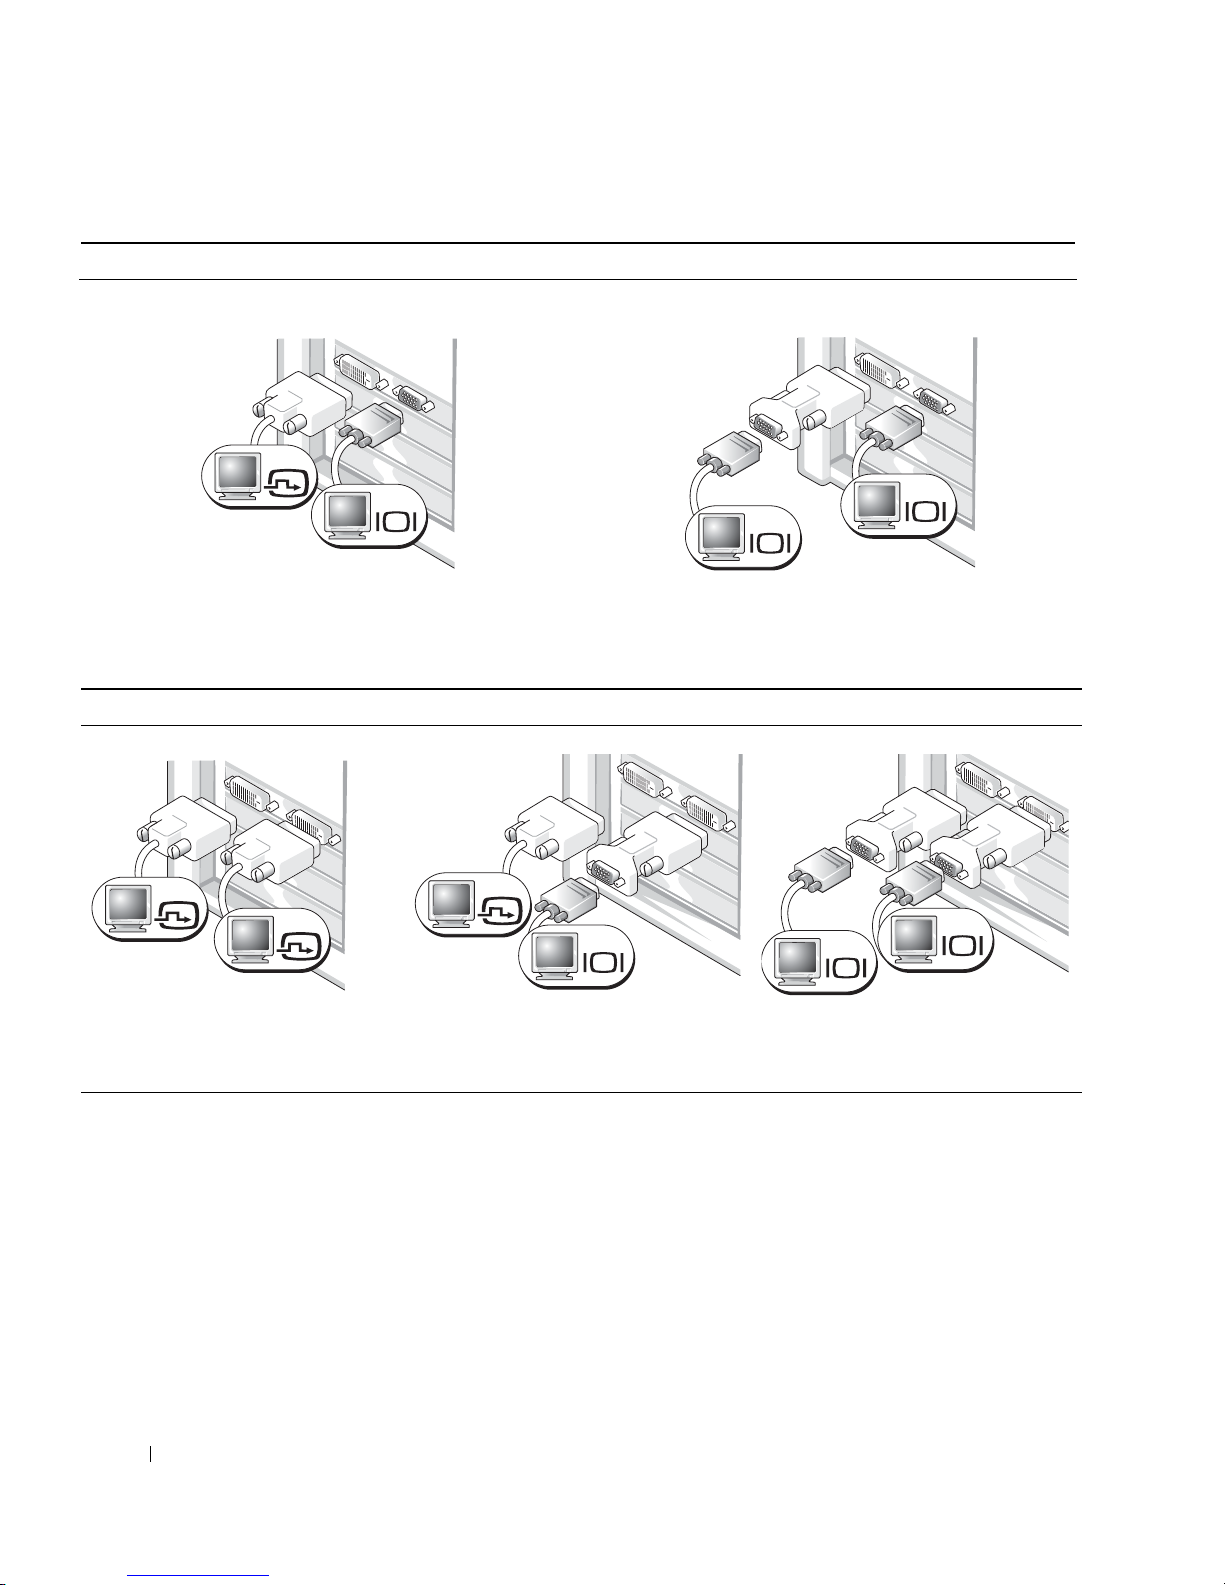
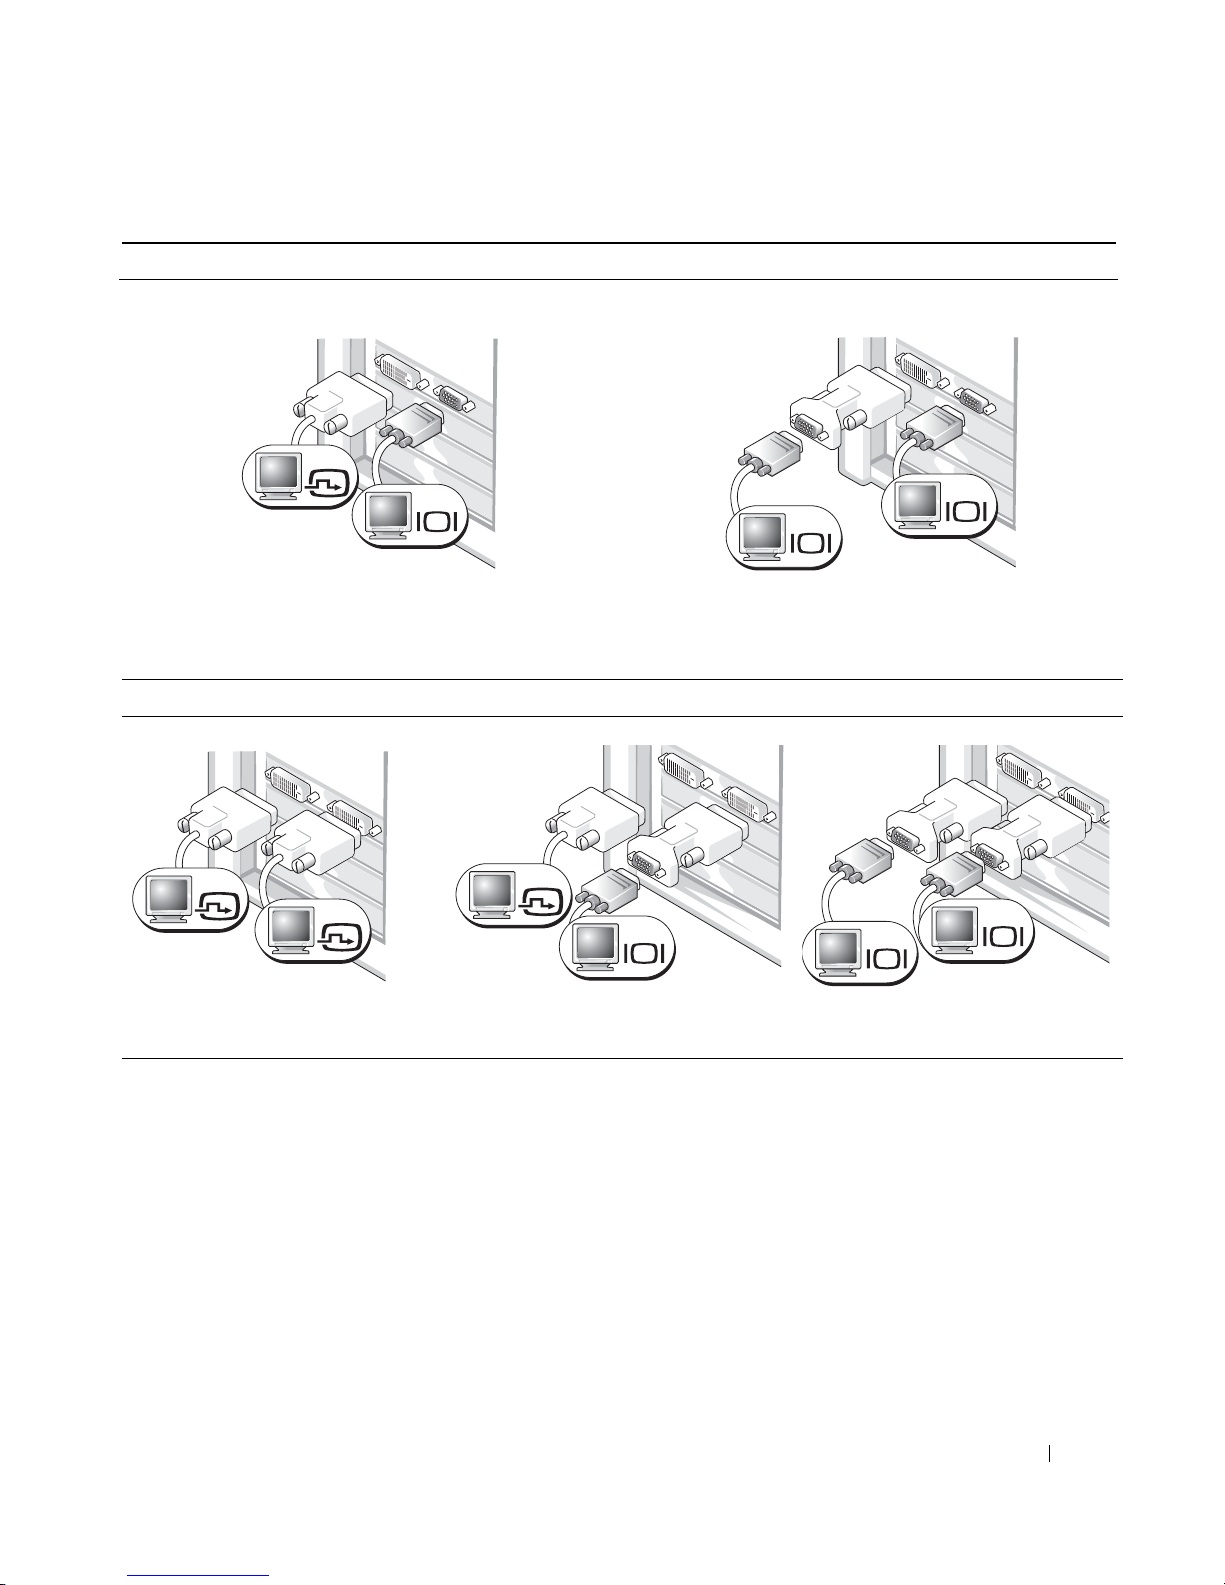
For dual-monitor capable cards with 1 DVI and 1 VGA connector
Single DVI/Single VGA
DVI
VGA
www.dell.com | support.dell.com
Use the appropriate connector(s) when you want
to connect your computer to one or two monitors.
For dual-monitor capable cards with 2 DVI connectors
Dual DVI
Dual DVI With One VGA Adapter
Dual VGA With VGA Adapter
VGA
VGA
Use the VGA adapter when you want to connect
your computer to two VGA monitors.
Dual DVI With Two VGA Adapters
DVI
DVI
Use the DVI connectors to connect
your computer to one or two DVI
monitors.
12 Quick Reference Guide
DVI
VGA
Use the VGA adapter to connect a
VGA monitor to one of the DVI
connector.s on your computer
VGA
VGA
Use two VGA adapters to connect two
VGA monitors to the DVI connectors
on your computer.
Page 13
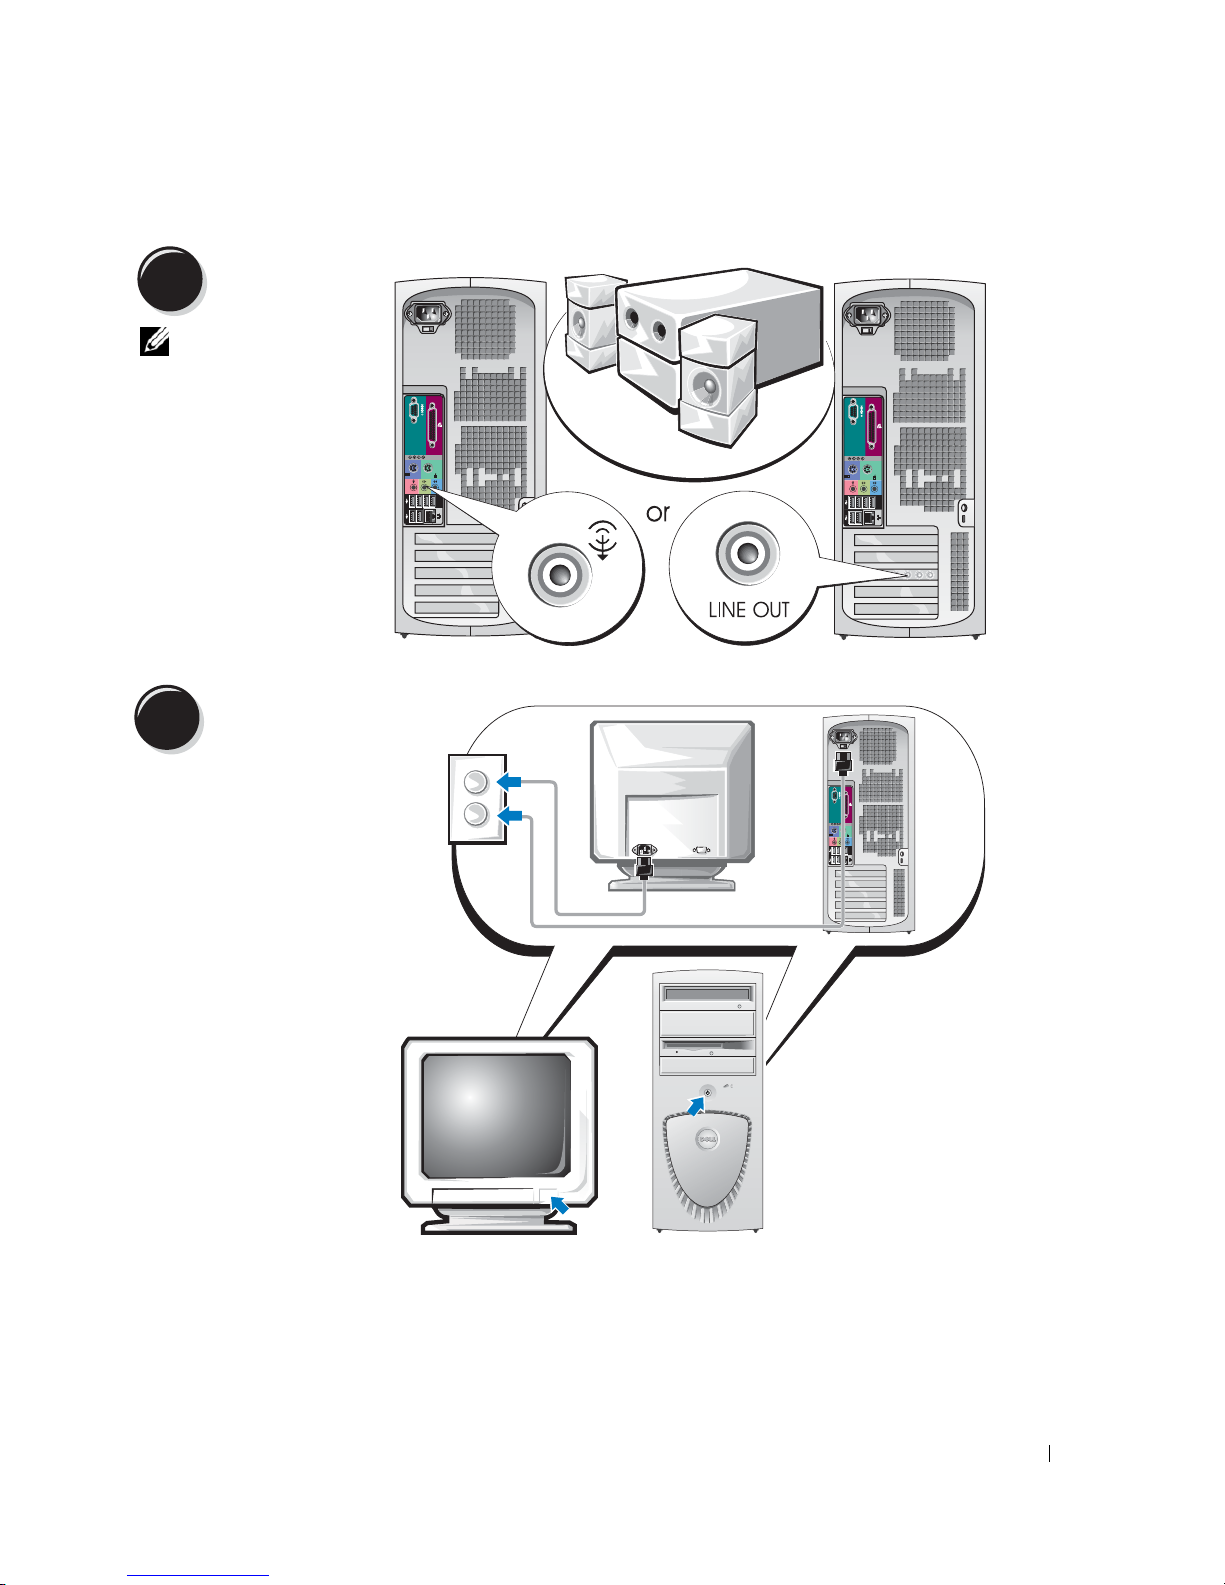
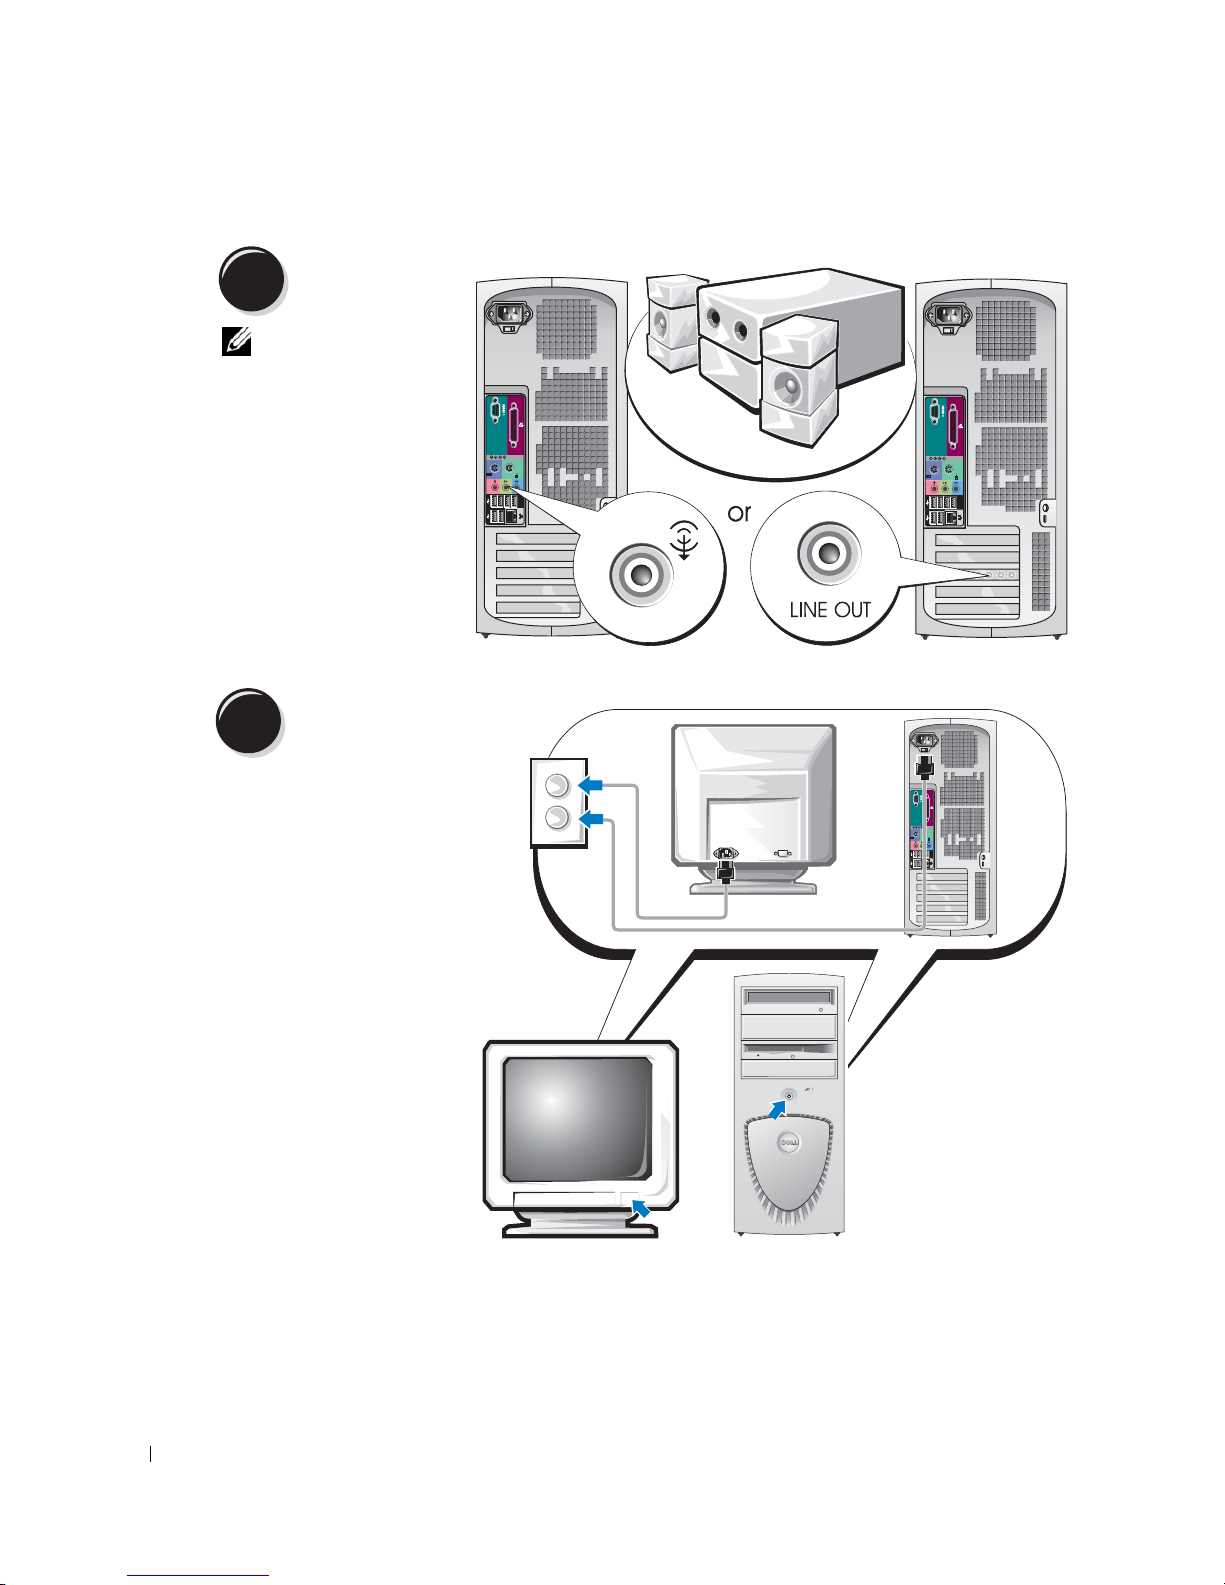
4
Connect the
speakers.
NOTE: If your
computer has an audio
card installed, connect
the speakers to the
card.
5
Connect the power
cables and turn on
the computer and
monitor.
Quick Reference Guide 13
Page 14
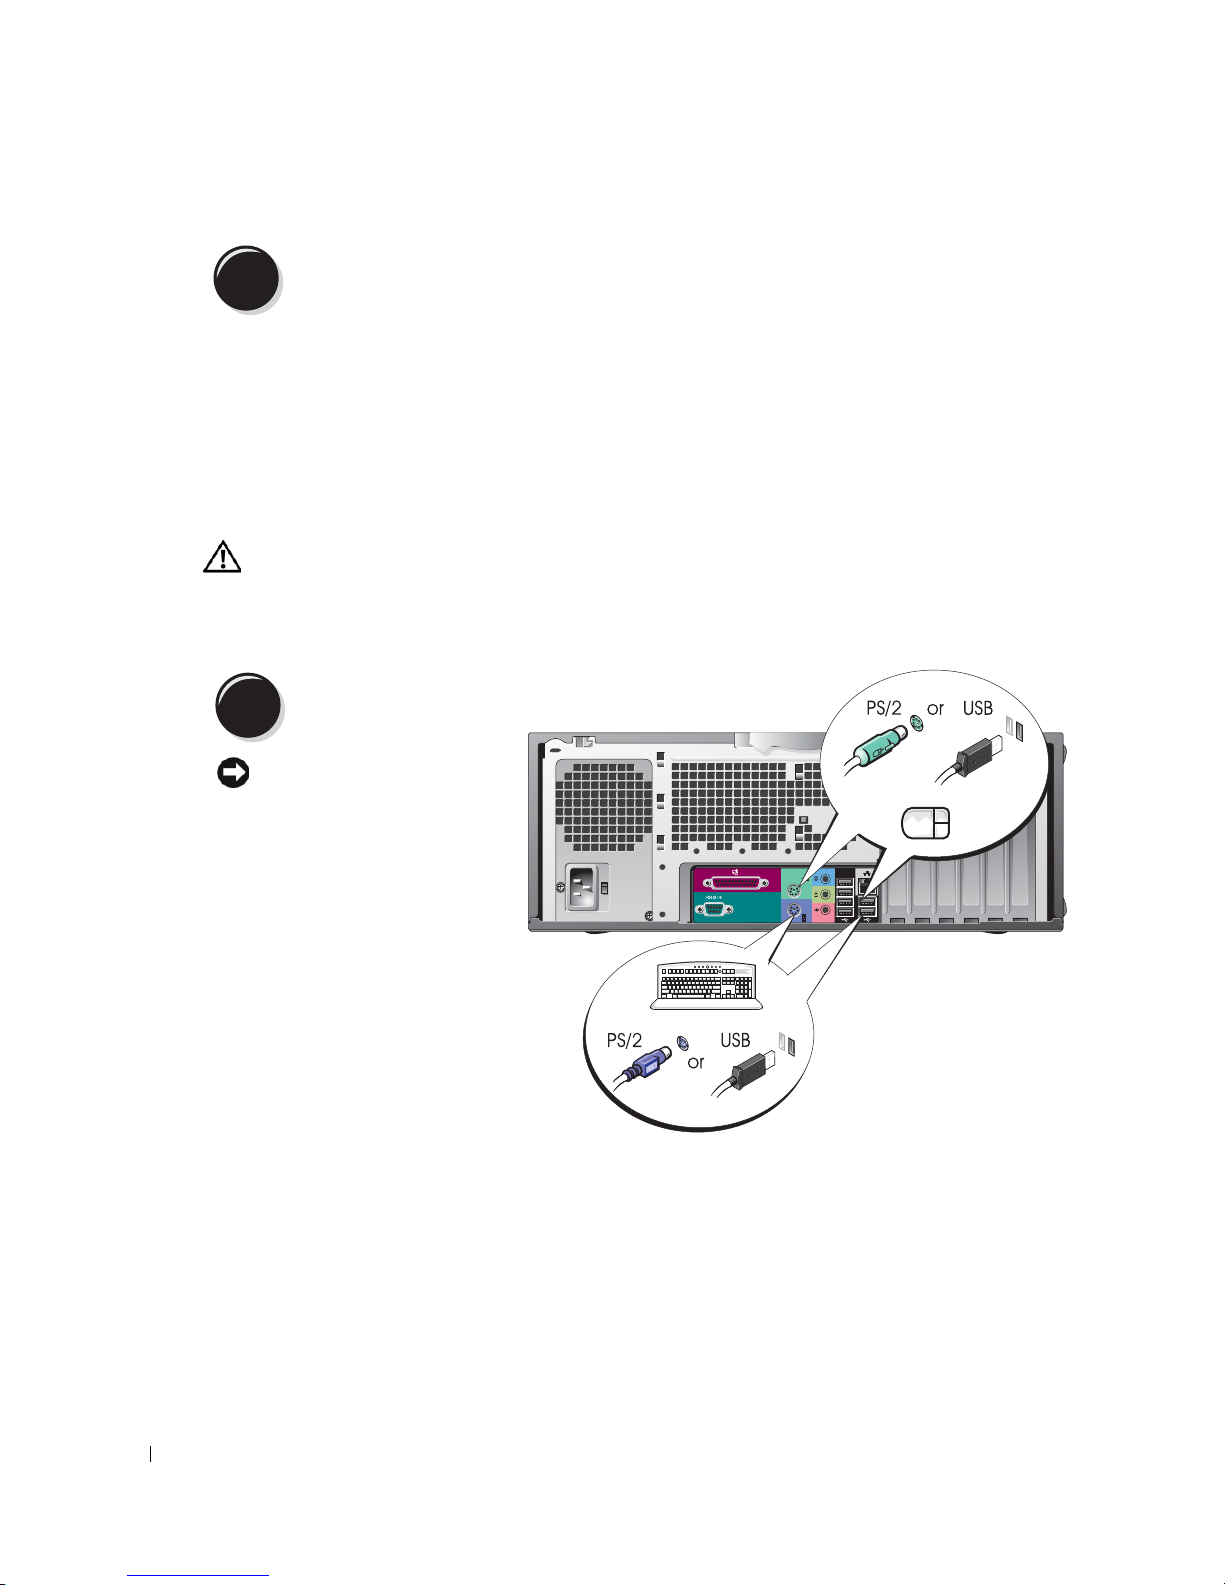
6
Before you install any devices or software that did not come with your computer, read the
documentation that came with the software or device or contact the vendor to verify that
the software or device is compatible with your computer and operating system.
Install additional software or devices.
Congratulations! You have completed the setup for your mini-tower computer.
Setting Up Your Desktop Computer
www.dell.com | support.dell.com
CAUTION: Before you begin any of the procedures in this section, follow the safety instructions
located in the Product Information Guide.
You must complete all steps to properly set up your computer.
Connect the keyboard and the mouse.
1
NOTICE: Do not connect a
modem cable to the network
adapter. Voltage from
telephone communications
can damage the network
adapter.
14 Quick Reference Guide
Page 15
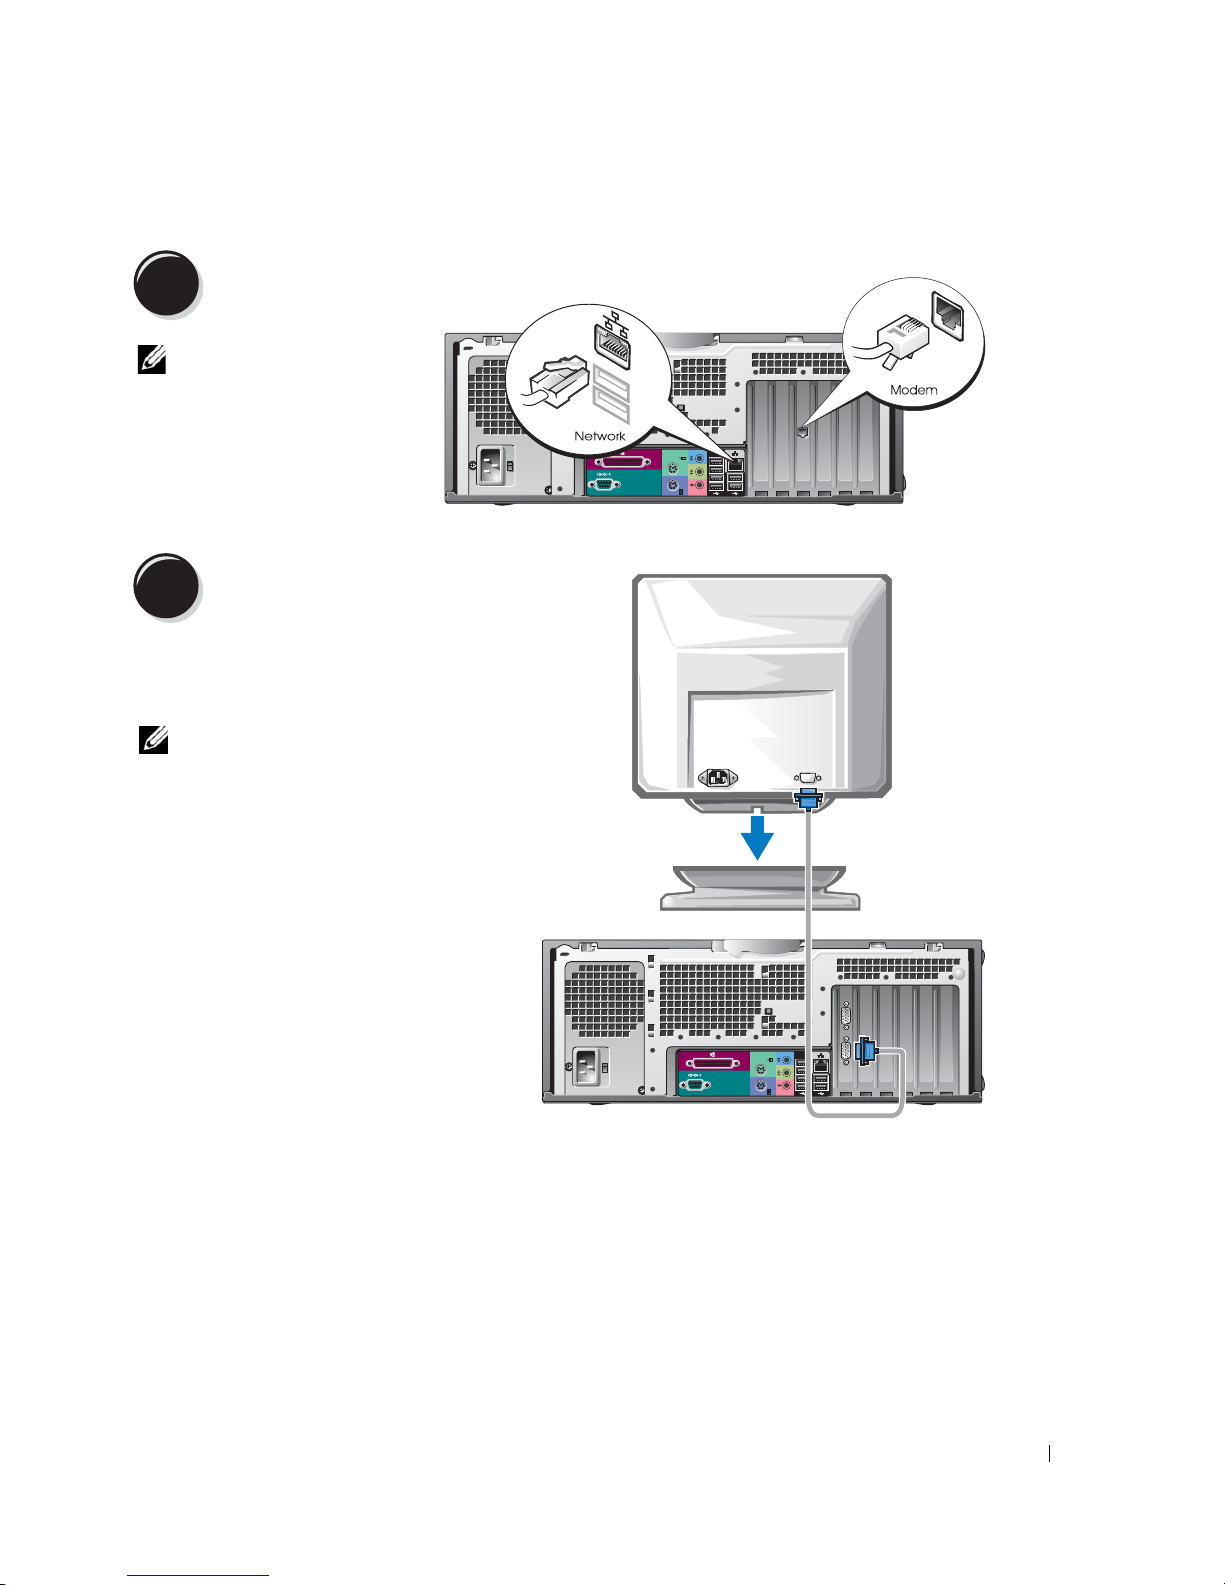
2
Connect the modem
or the network cable.
NOTE: If your computer
has a network card
installed, connect the
network cable to the card.
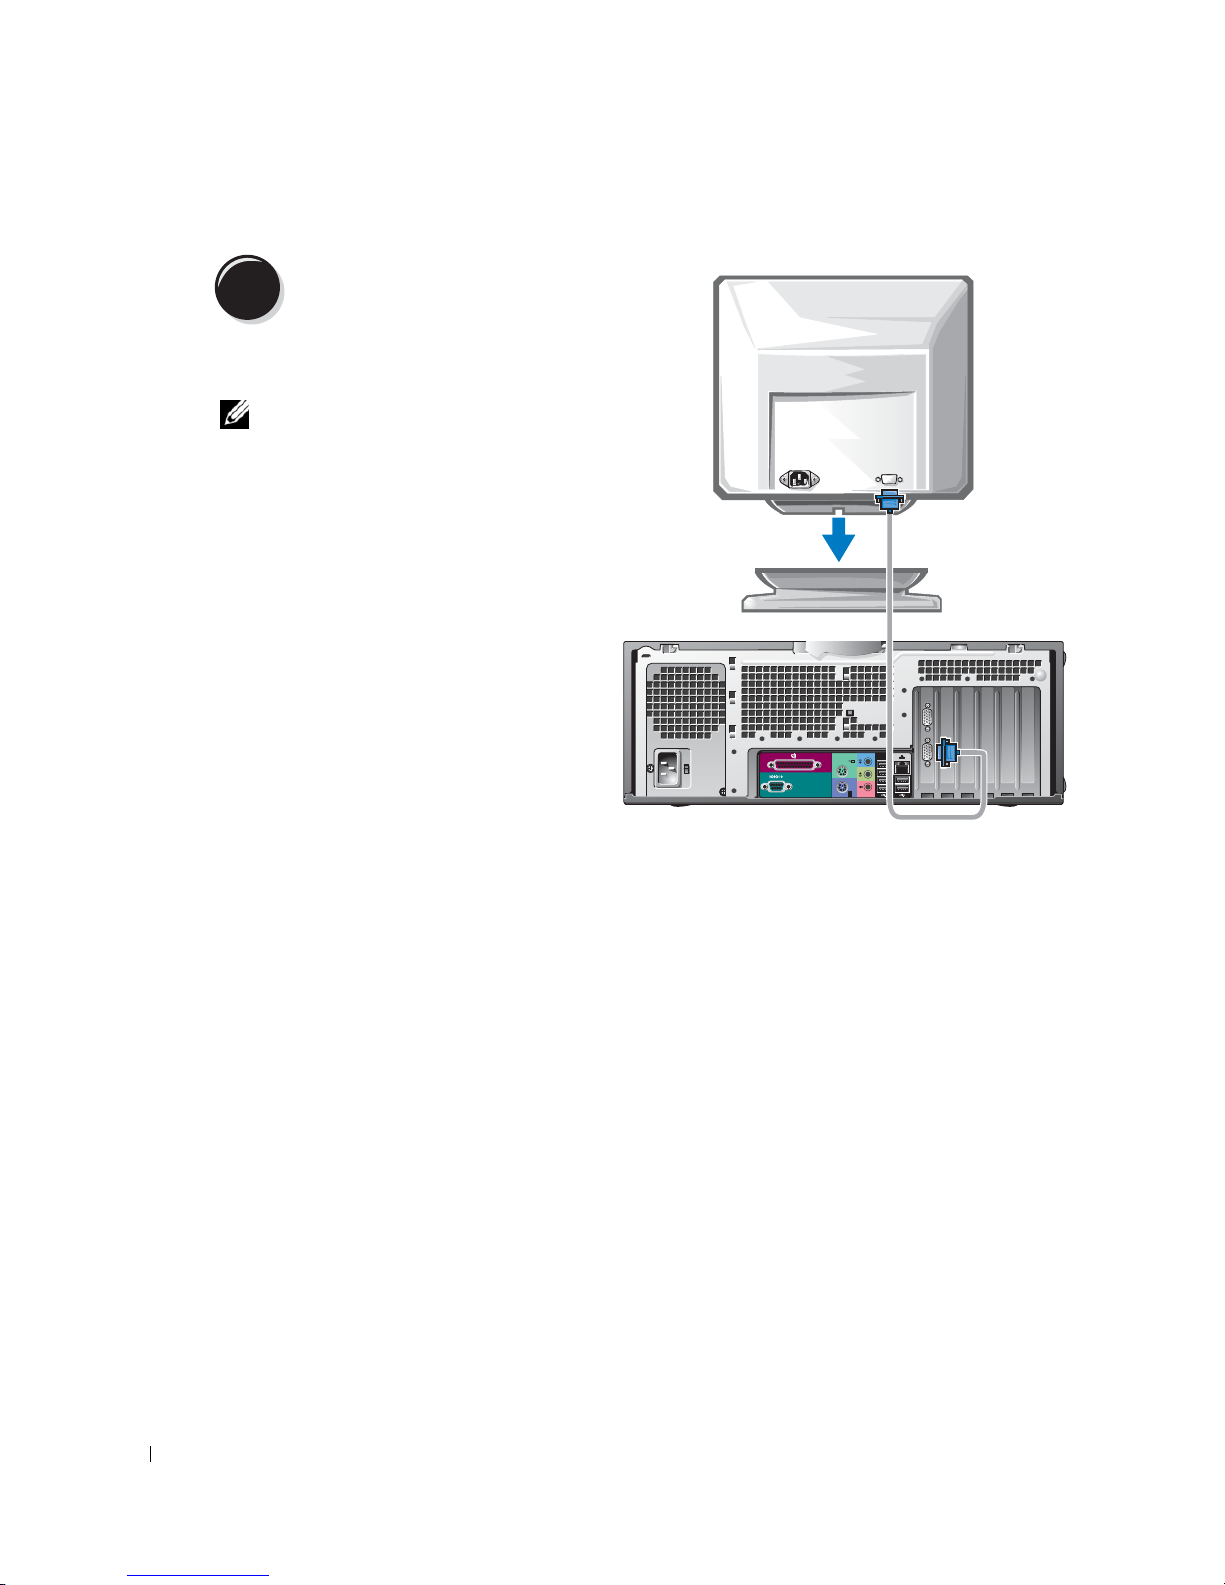
3
Depending on your graphics card, you
can connect your monitor in various
ways.
Connect the monitor.
NOTE: You may need to use the
provided adapter or cable to connect
your monitor to the computer.
Quick Reference Guide 15
Page 16
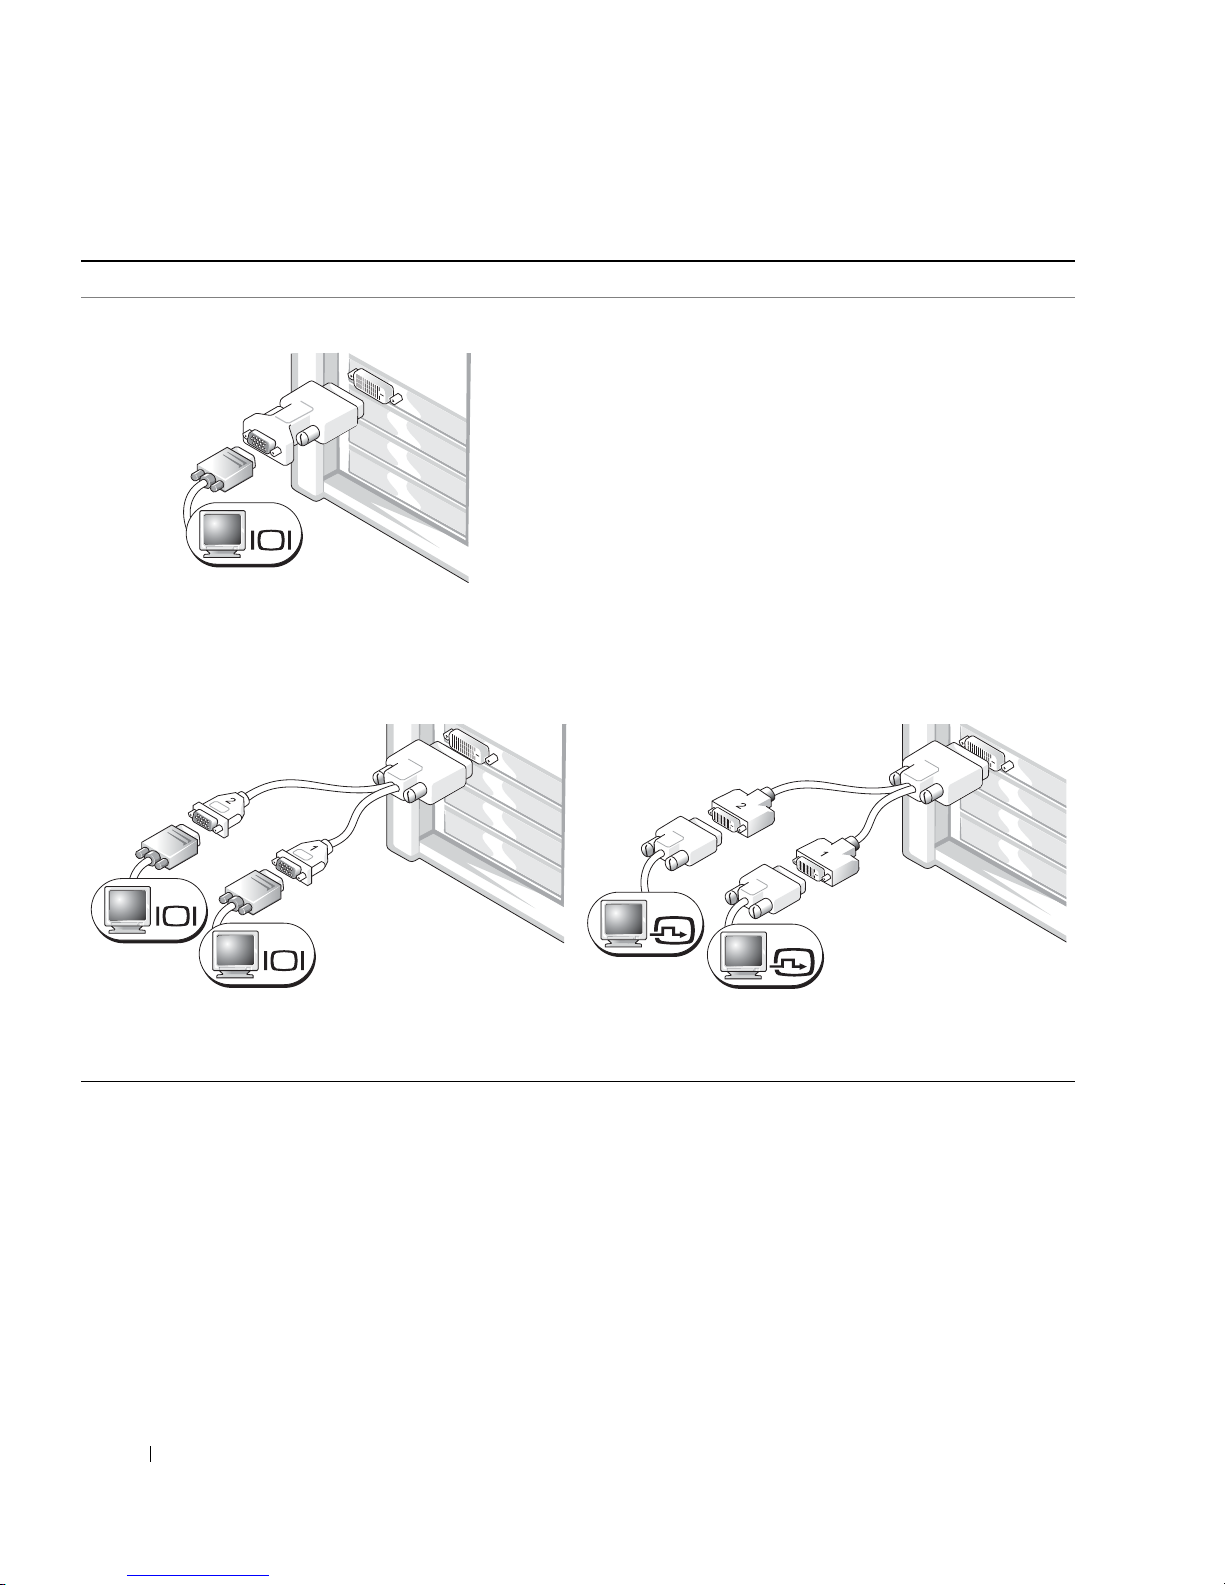
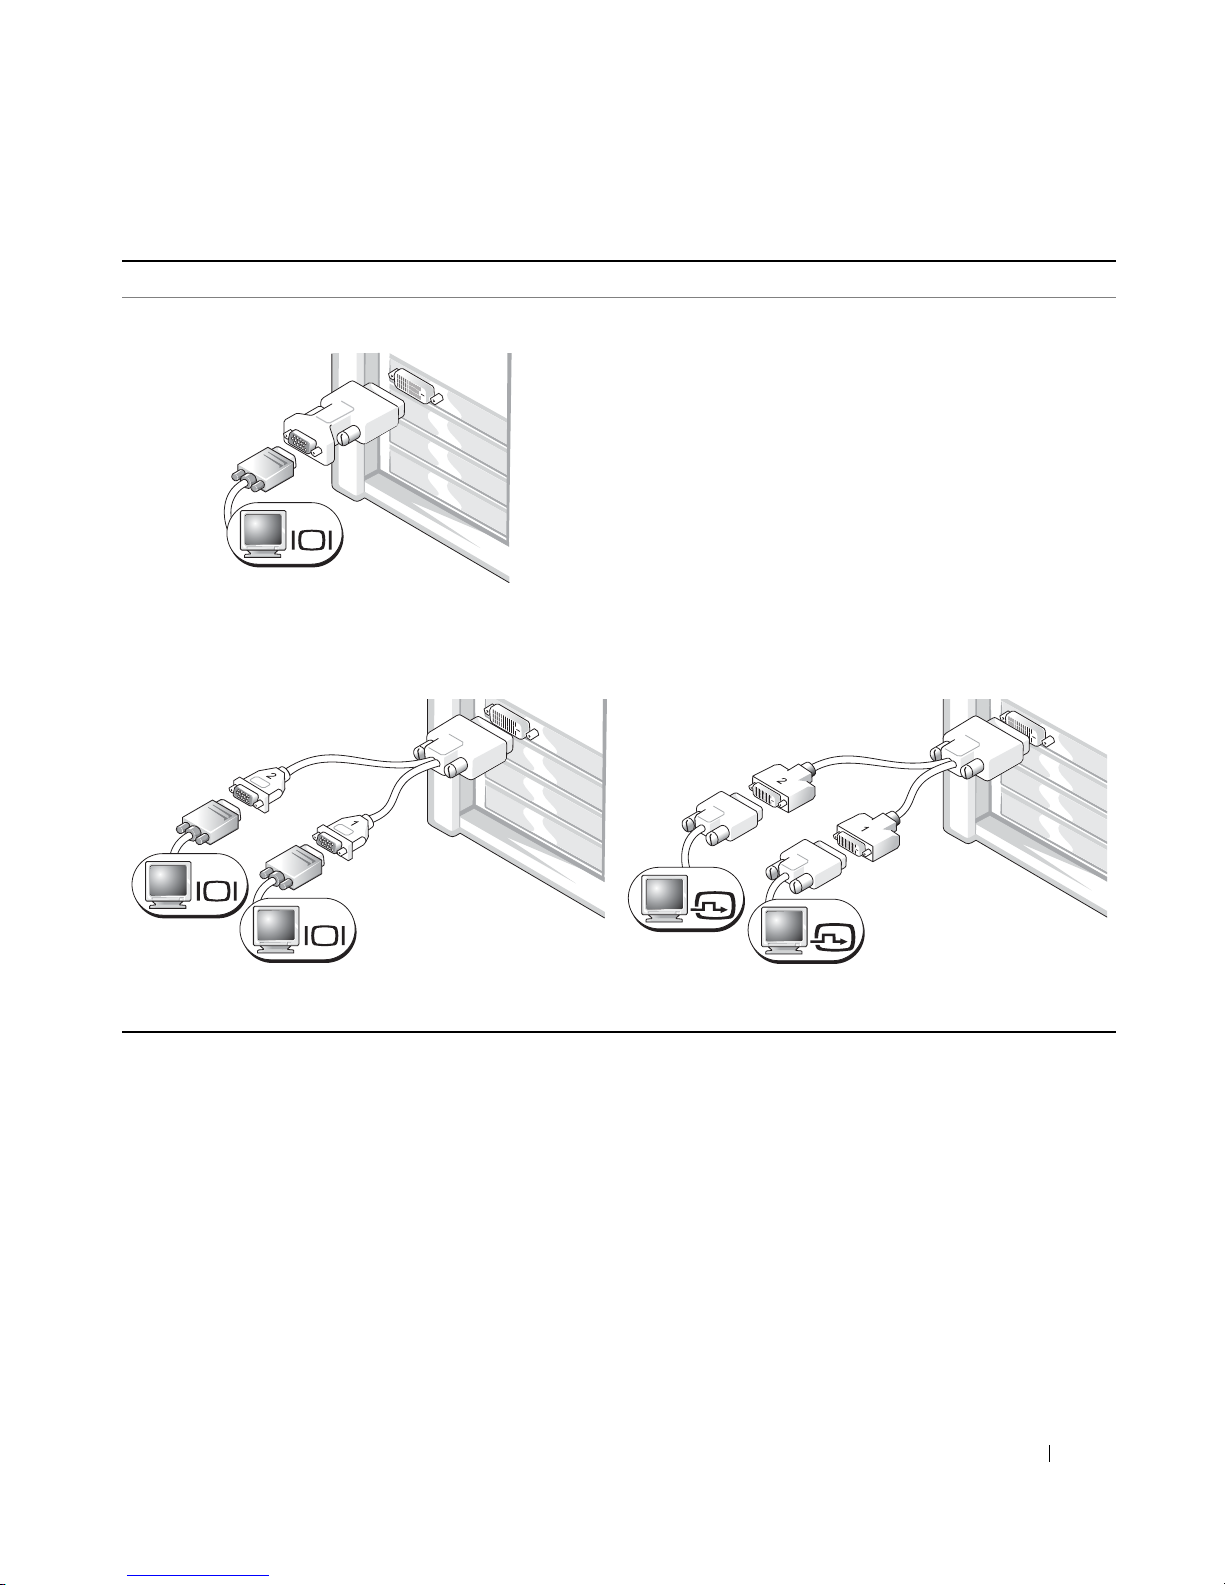
For single- and dual-monitor capable cards with a single connector
VGA Adapter
VGA
www.dell.com | support.dell.com
Use the VGA adapter when you have a single monitor
graphics card and you want to connect your computer
to a VGA monitor.
Dual VGA Y Cable Adapter
VGA
VGA
Use the appropriate Y cable when your graphics card has a
single connector and you want to connect your computer
to one or two VGA monitors.
The dual-monitor cable is color coded; the blue connector is for the primary monitor, and the black
connector is for the secondary monitor. To enable dual-monitor support, both monitors must be
attached to the computer when it starts.
Dual DVI Y Cable Adapter
DVI
DVI
Use the appropriate Y cable when your graphics card has a
single connector and you want to connect your computer
to one or two DVI monitors.
16 Quick Reference Guide
Page 17
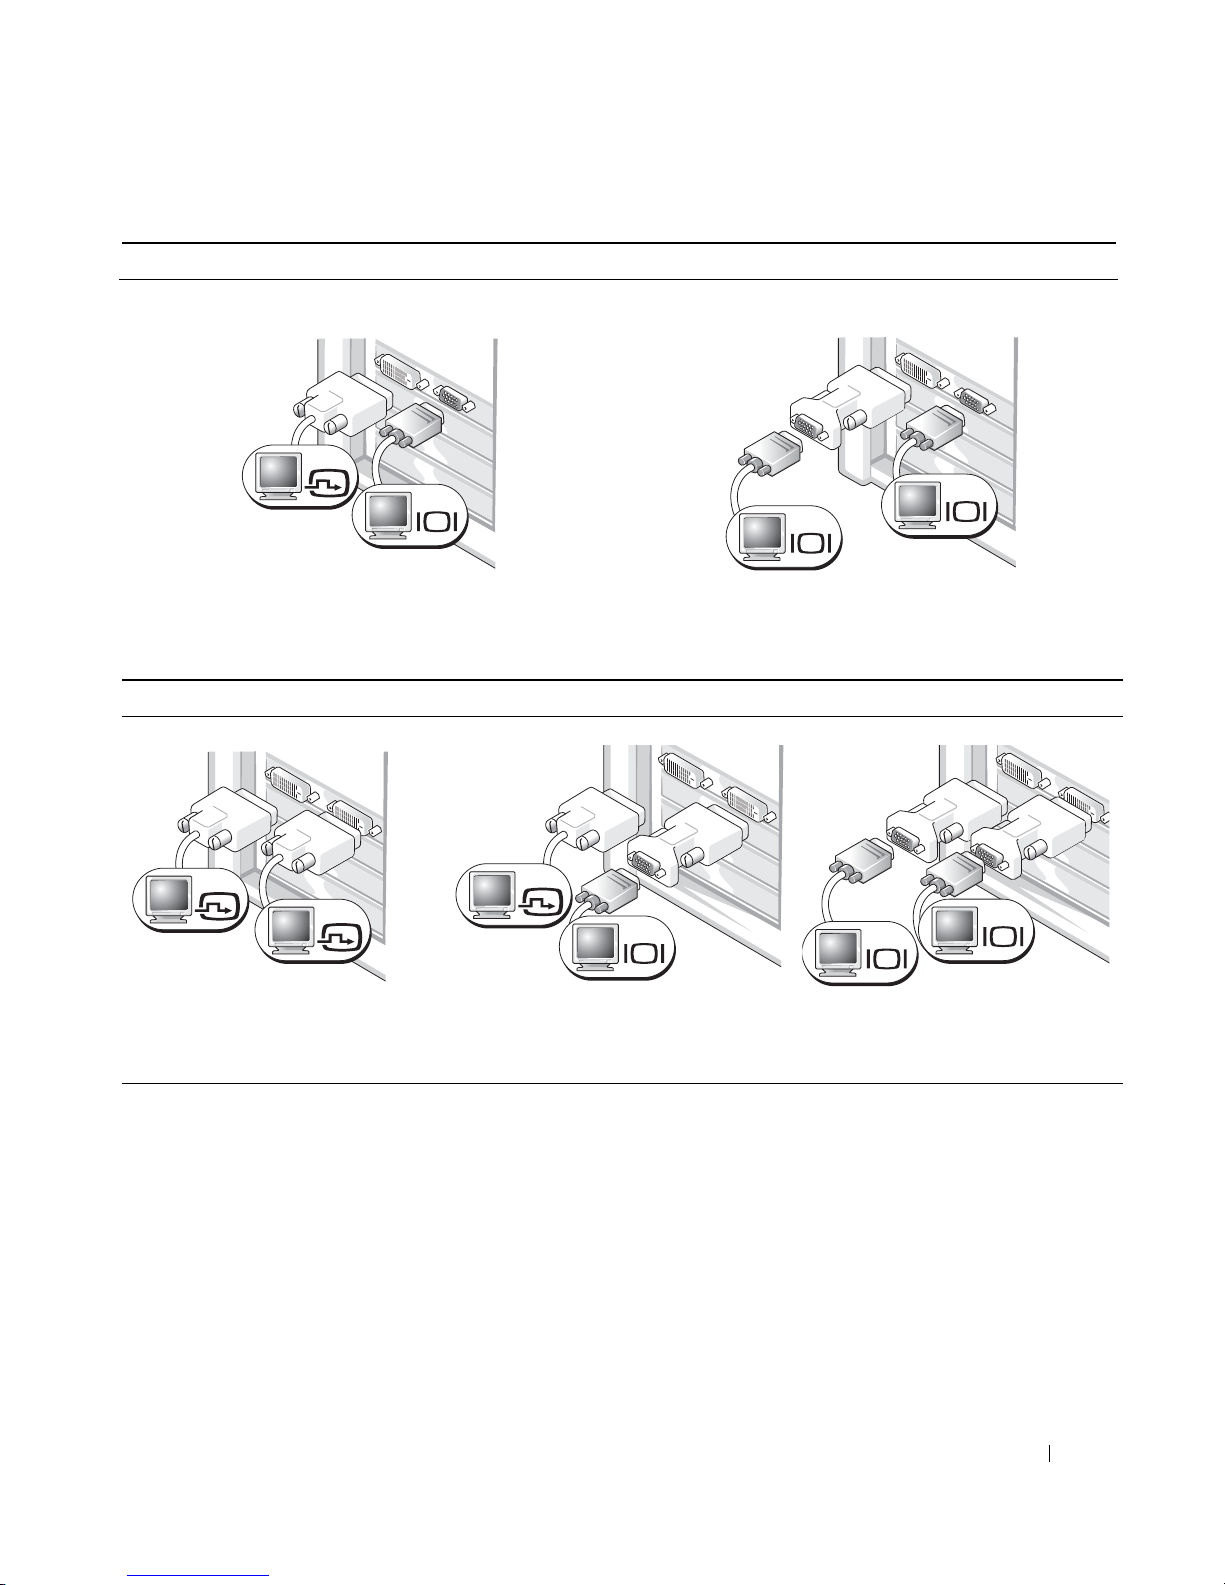
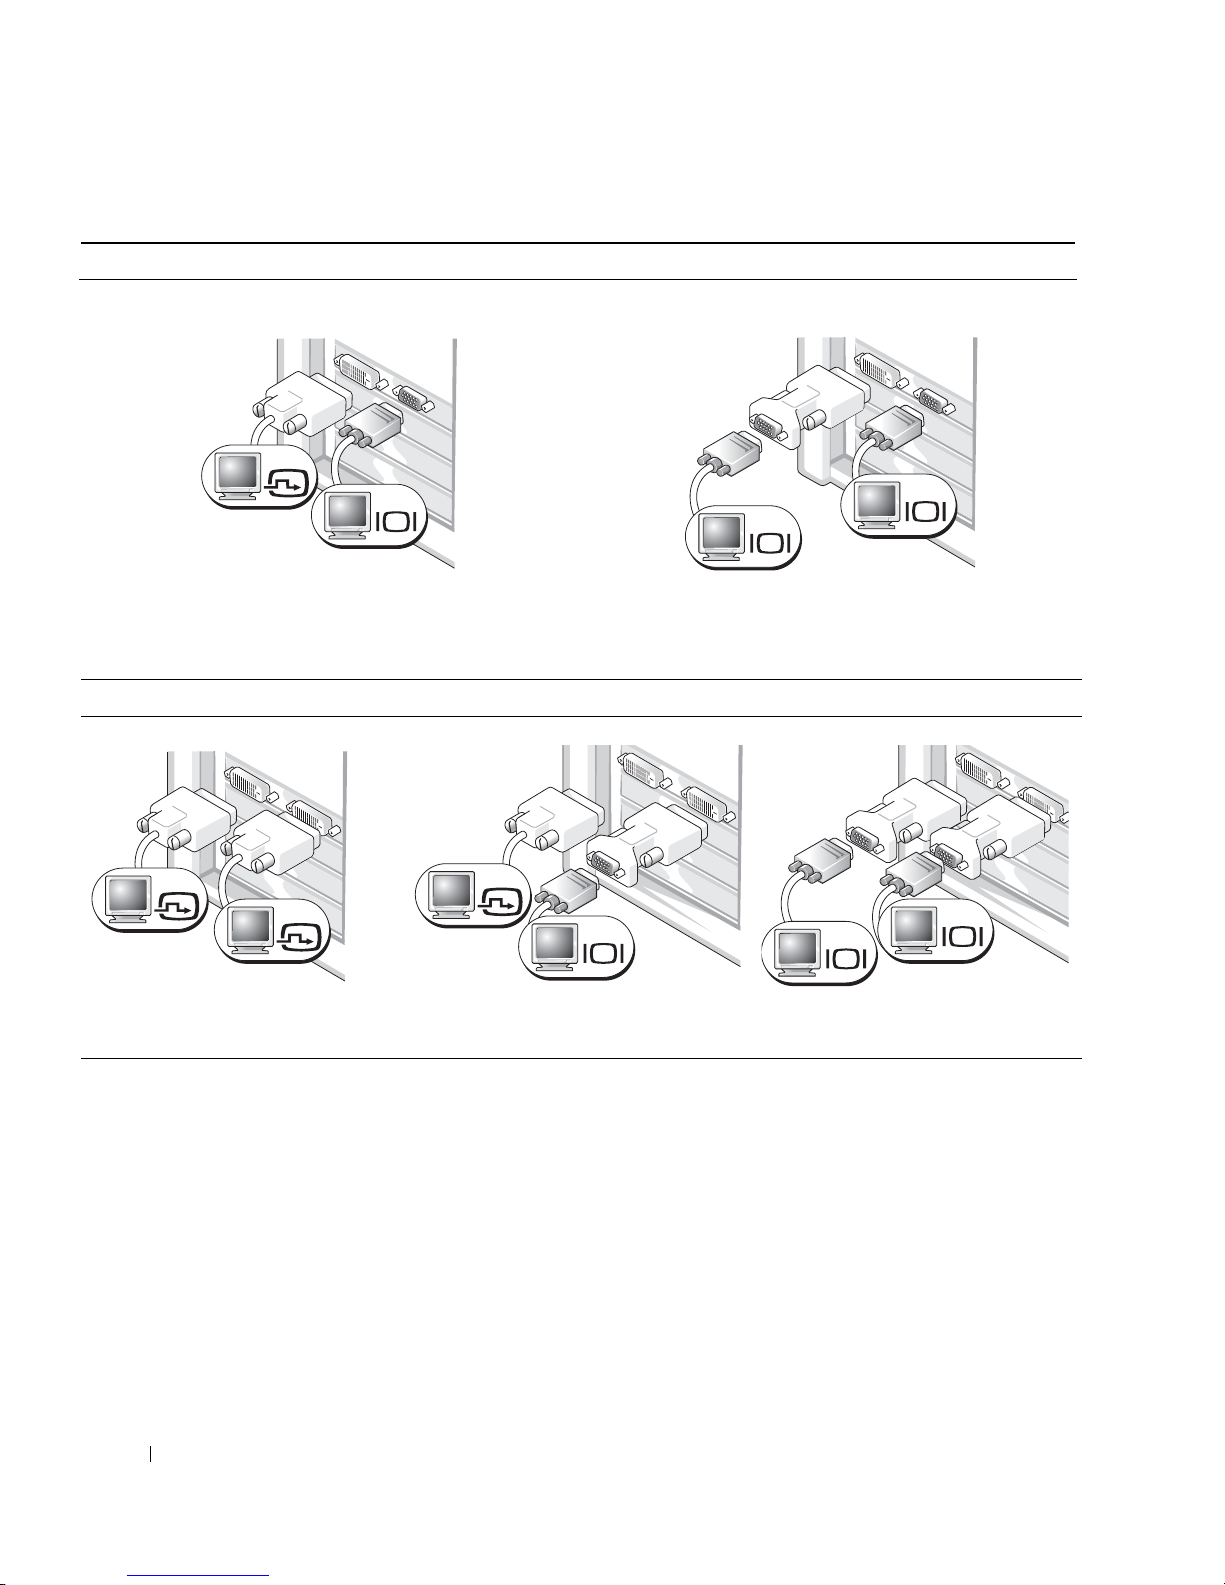
For dual-monitor capable cards with 1 DVI and 1 VGA connector
Single DVI/Single VGA
DVI
VGA
Use the appropriate connector(s) when you want
to connect your computer to one or two monitors.
For dual-monitor capable cards with 2 DVI connectors
Dual DVI
Dual DVI With One VGA Adapter
Dual VGA With VGA Adapter
VGA
VGA
Use the VGA adapter when you want to connect
your computer to two VGA monitors.
Dual DVI With Two VGA Adapters
DVI
DVI
Use the DVI connector(s) to connect
your computer to one or two DVI
monitors.
DVI
VGA
Use the VGA adapter to connect
a VGA monitor to one of the DVI
connectors on your computer.
VGA
VGA
Use two VGA adapters to connect
two VGA monitors to the DVI
connectors on your computer.
Quick Reference Guide 17
Page 18

Connect the speakers.
4
www.dell.com | support.dell.com
NOTE: If your computer has an audio card installed, connect the speakers to the card.
Connect the power cables
5
Your desktop computer has an
optional front IEEE 1394
connector. This connector is only
available if you purchased an addin IEEE 1394 card. To purchase a
card, contact Dell. For more
information on the add-in card,
see your
and turn on the computer
and monitor.
User’s Guide
.
6
Before you install any devices or software that did not come with your computer, read the
documentation that came with the software or device or contact the vendor to verify that
the software or device is compatible with your computer and operating system.
Install additional software or devices.
Congratulations! You have completed the setup for your desktop computer.
18 Quick Reference Guide
Page 19

Locating Your User’s Guide
Your
Dell Precision™ Workstation 370 User’s Guide
your computer such as:
• Technical specifications
• Front and back views of your computer, including all of the available connectors
• Inside views of your computer, including a detailed graphic of the system board
and the connectors
• Instructions for cleaning your computer
• Information on software features, such as LegacySelect Technology control, using a password,
and system setup options
• Tips and information for using the Microsoft Windows XP operating system
• Instructions for removing and installing parts, including memory, cards, drives,
the microprocessor, and the battery
• Information for troubleshooting various computer problems
• Instructions for using the Dell Diagnostics and reinstalling drivers
• Information on how to contact Dell
contains additional information about
You can access the
support.dell.com
at
To access the User’s Guide from your hard drive:
Click the
To access your User’s Guide from the Dell Support Site:
1
2
3
Start
Go to
support.dell.com
Follow the prompts on the website that ask you for information specific to your computer.
At the Dell Support website home page, click
User’s Guide
.
button and click
.
from your hard drive or the Dell Support website
Help and Support
.
Reference
, click
User’s Guides
, click
and then select your Dell Precision computer.
Systems
,
Quick Reference Guide 19
Page 20

Opening Your Mini-Tower Computer
CAUTION: Before you begin any of the procedures in this section, follow the safety instructions
located in the Product Information Guide.
CAUTION: To guard against electrical shock, always unplug your computer from the electrical outlet
before opening the cover.
NOTICE: To avoid losing data, save and close any open files and exit any open programs before you turn
off your computer.
Shut down the operating system:
1
a
Save and close any open files, exit any open programs, click the
www.dell.com | support.dell.com
2
3
then click
b
In the
The computer turns off after the operating system shutdown process finishes.
Ensure that the computer and any attached devices are turned off. If your computer and
attached devices did not automatically turn off when you shut down your operating system,
turn them off now.
If you have installed a padlock through the padlock ring on the back panel, remove the
padlock.
NOTICE: Ensure that sufficient space exists to support the open cover—at least 30 cm (1 ft) of desk top
space.
Turn Off Computer
Turn off computer
.
window, click
Turn o f f
Start
button, and
.
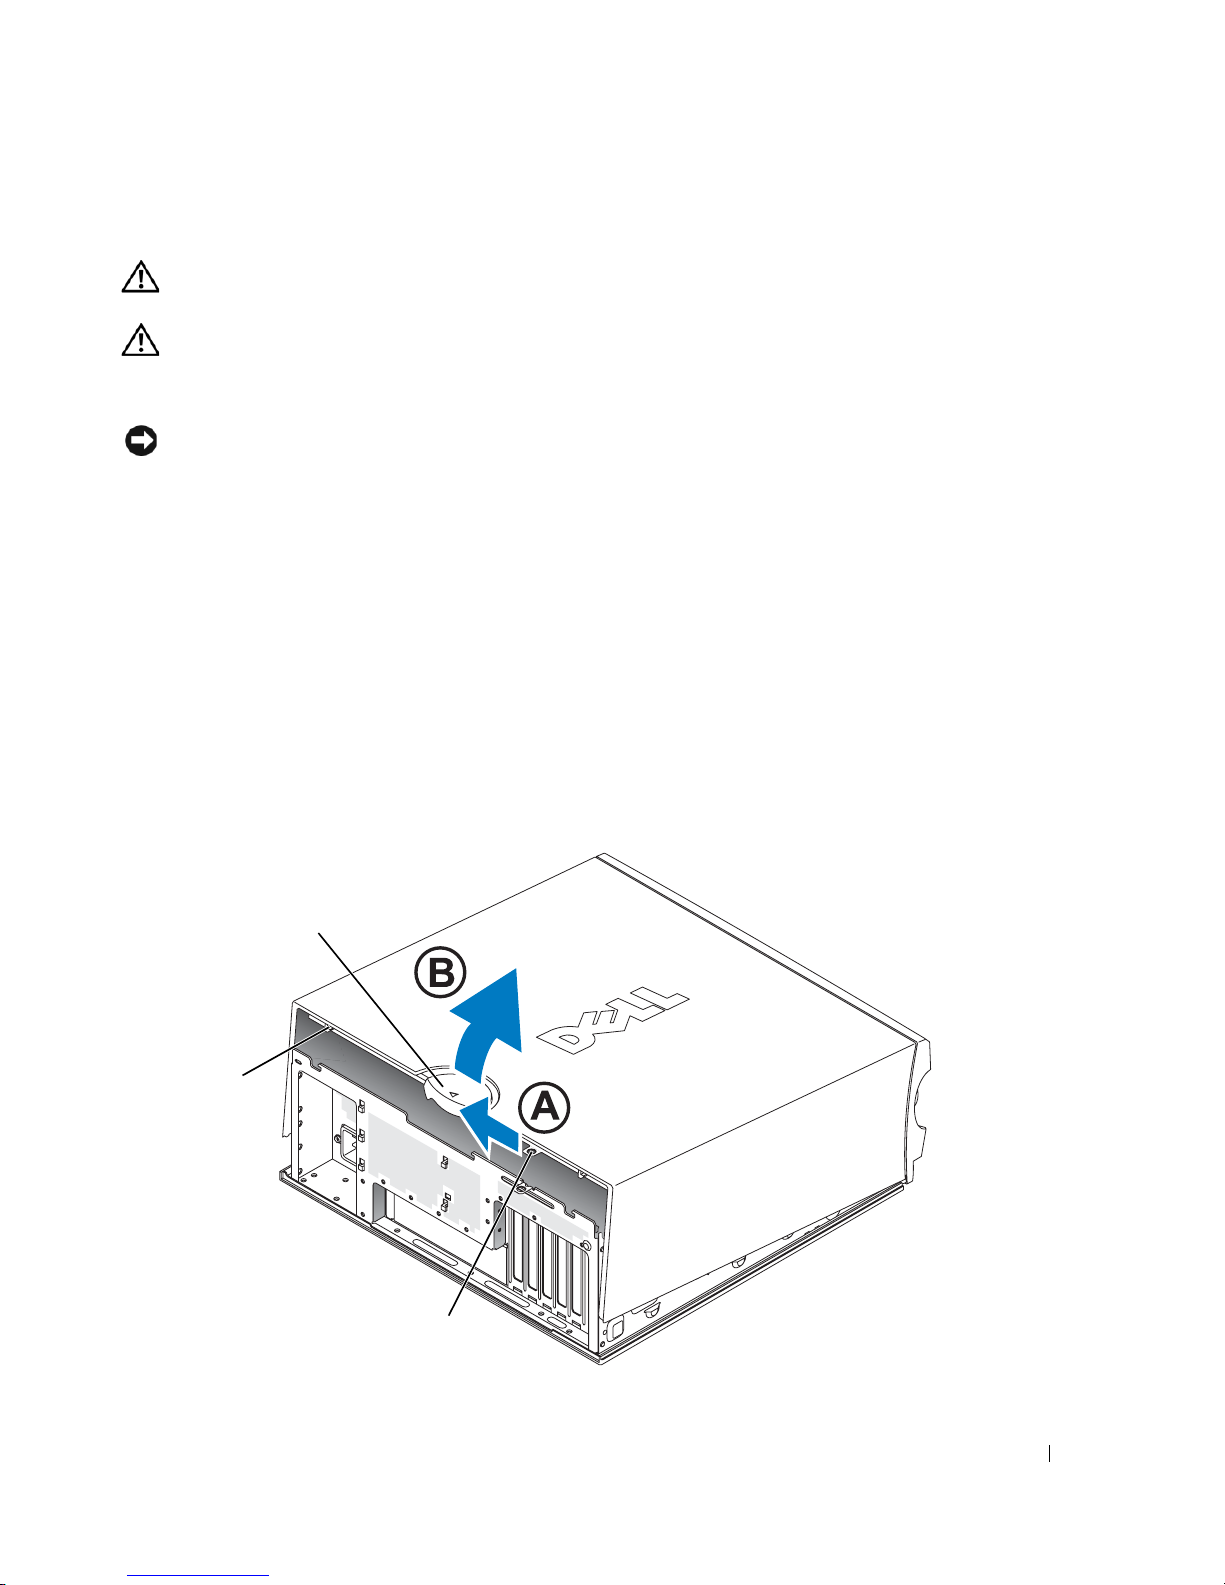
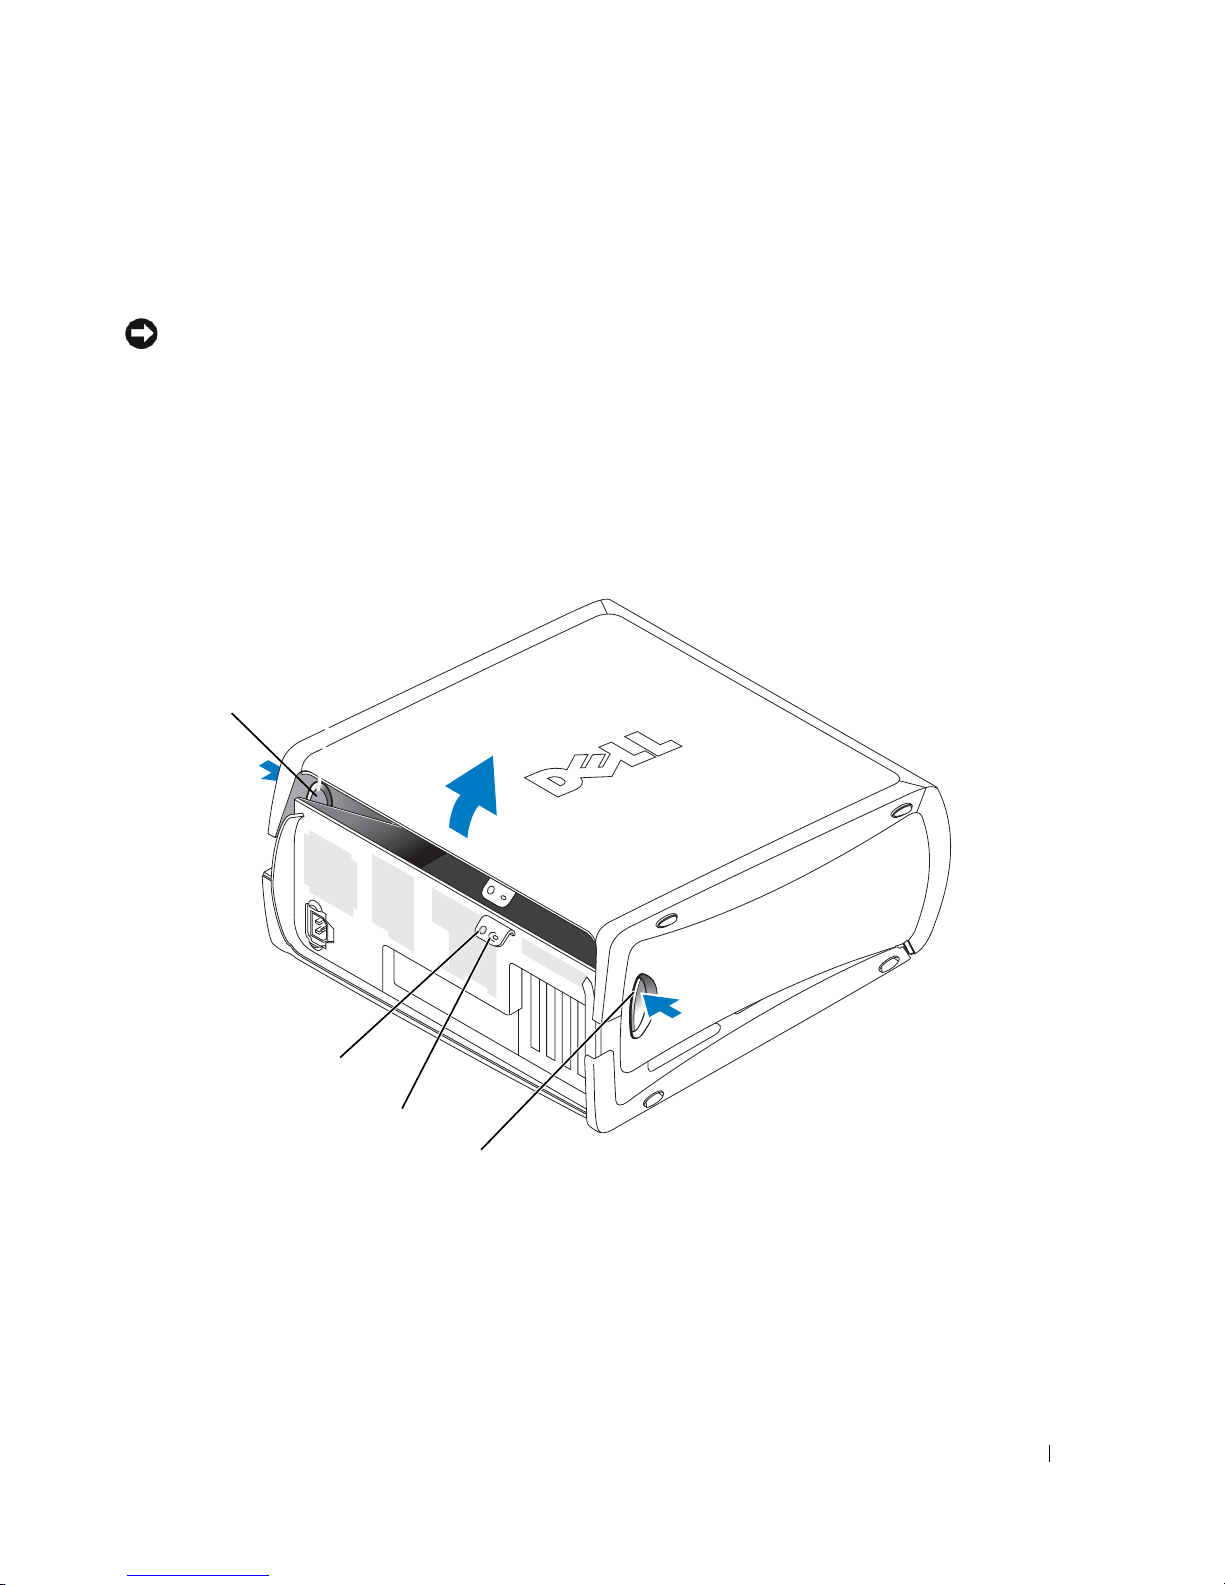
Lay the computer on its side as shown in the following illustration.
4
5
Open the cover:
a
Facing the back of the computer, press the release button on the right side of the
computer with one hand while pulling up on the top of the cover with the other hand.
b
Press the release button on the left side of the computer with one hand while pulling up
on the top of the cover with the other hand.
6
Hold the bottom of the computer with one hand, and then pull open the cover with the other
hand.
20 Quick Reference Guide
Page 21
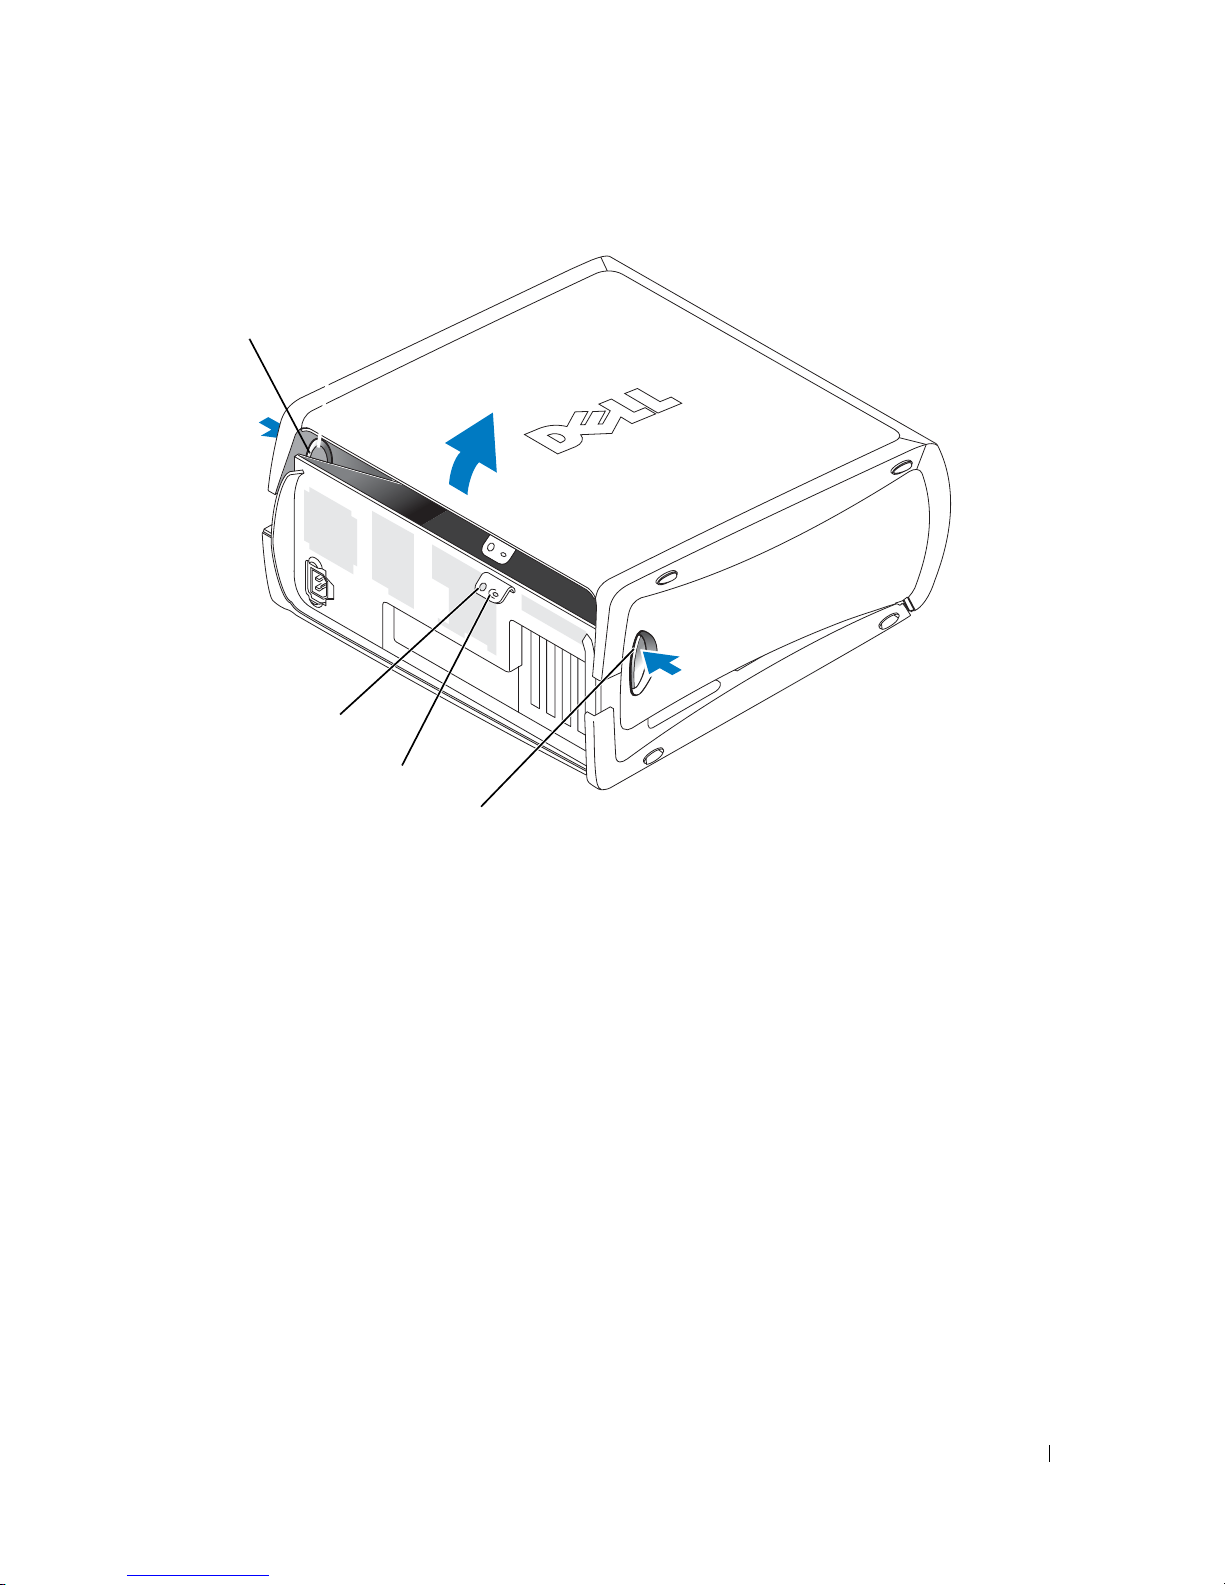
release button
security cable slot
padlock ring
release button
Quick Reference Guide 21
Page 22
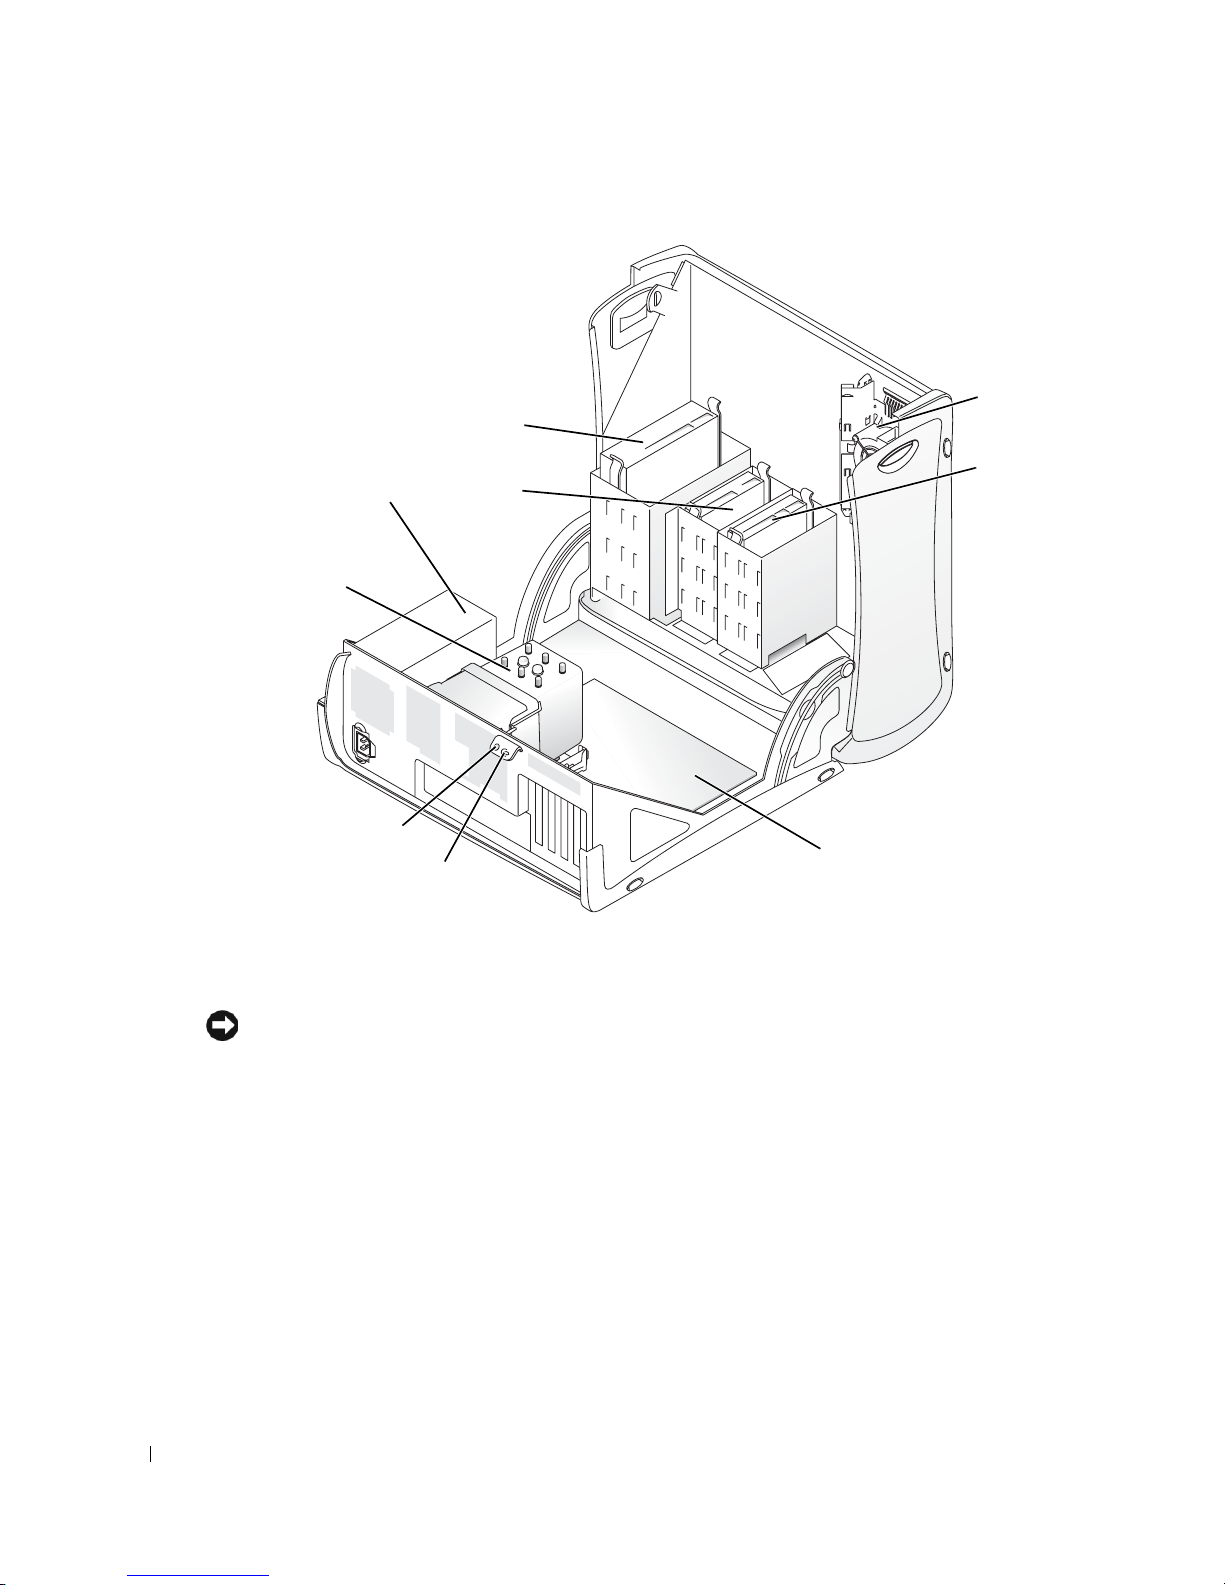
CD/DVD drive
card fan
power supply
www.dell.com | support.dell.com
processor
airflow shroud
and fan
security cable slot
The Card Cooling Fan
NOTICE: PCI Express graphics cards that run higher than 75 watts (W) require an additional cooling fan
installed. Otherwise, your card could overheat and damage your computer.
padlock ring
floppy drive
(optional)
hard drive
system board
If you ordered your computer with a graphics card that requires the fan, the fan is included. If a
card fan is not present in your computer and you are installing a graphics card that runs higher than
75 W, contact Dell to purchase a card fan.
If the computer detects that you have installed a card that requires a fan, an error message appears.
For Dell contact information, see your
Contact Us
.
22 Quick Reference Guide
User's Guide
or go to
support.dell.com
and click
Page 23
Opening Your Desktop Computer
CAUTION: Before you begin any of the procedures in this section, follow the safety instructions
located in the Product Information Guide.
CAUTION: To prevent static damage to components inside your computer, discharge static electricity
from your body before you touch any of your computer’s electronic components. You can do so by
touching an unpainted metal surface on the computer.
NOTICE: To avoid losing data, save and close any open files and exit any open programs before you turn
off your computer.
Shut down the operating system:
1
a
Save and close any open files, exit any open programs, click the
click
b
Turn Off Computer
In the
Turn off computer
.
window, click
Tur n o f f
.
The computer turns off after the operating system shutdown process finishes.
2
Ensure that the computer and any attached devices are turned off. If your computer and
attached devices did not automatically turn off when you shut down your operating system,
turn them off now.
3
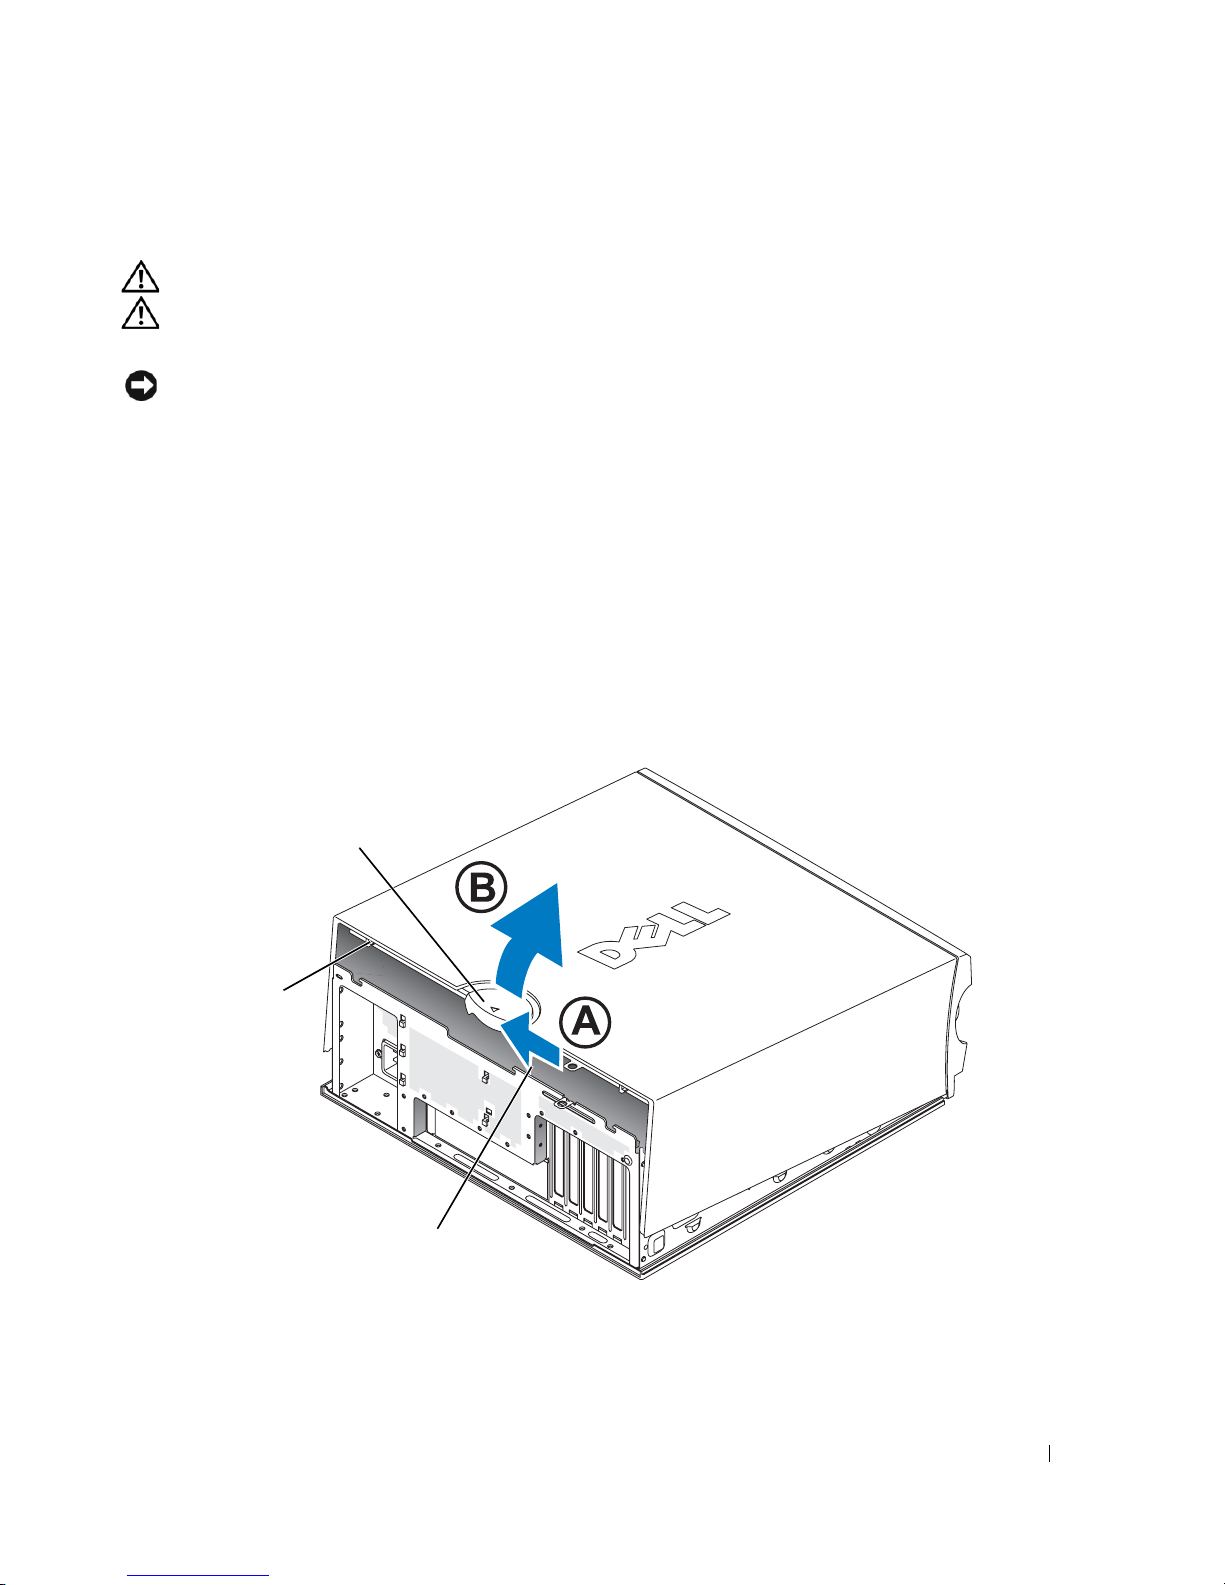
Slide the cover release latch to the left.
4
Raise the cover, and pivot it toward the front of the computer.
Start
button, and then
cover latch release
security
cable slot
padlock ring
Quick Reference Guide 23
Page 24
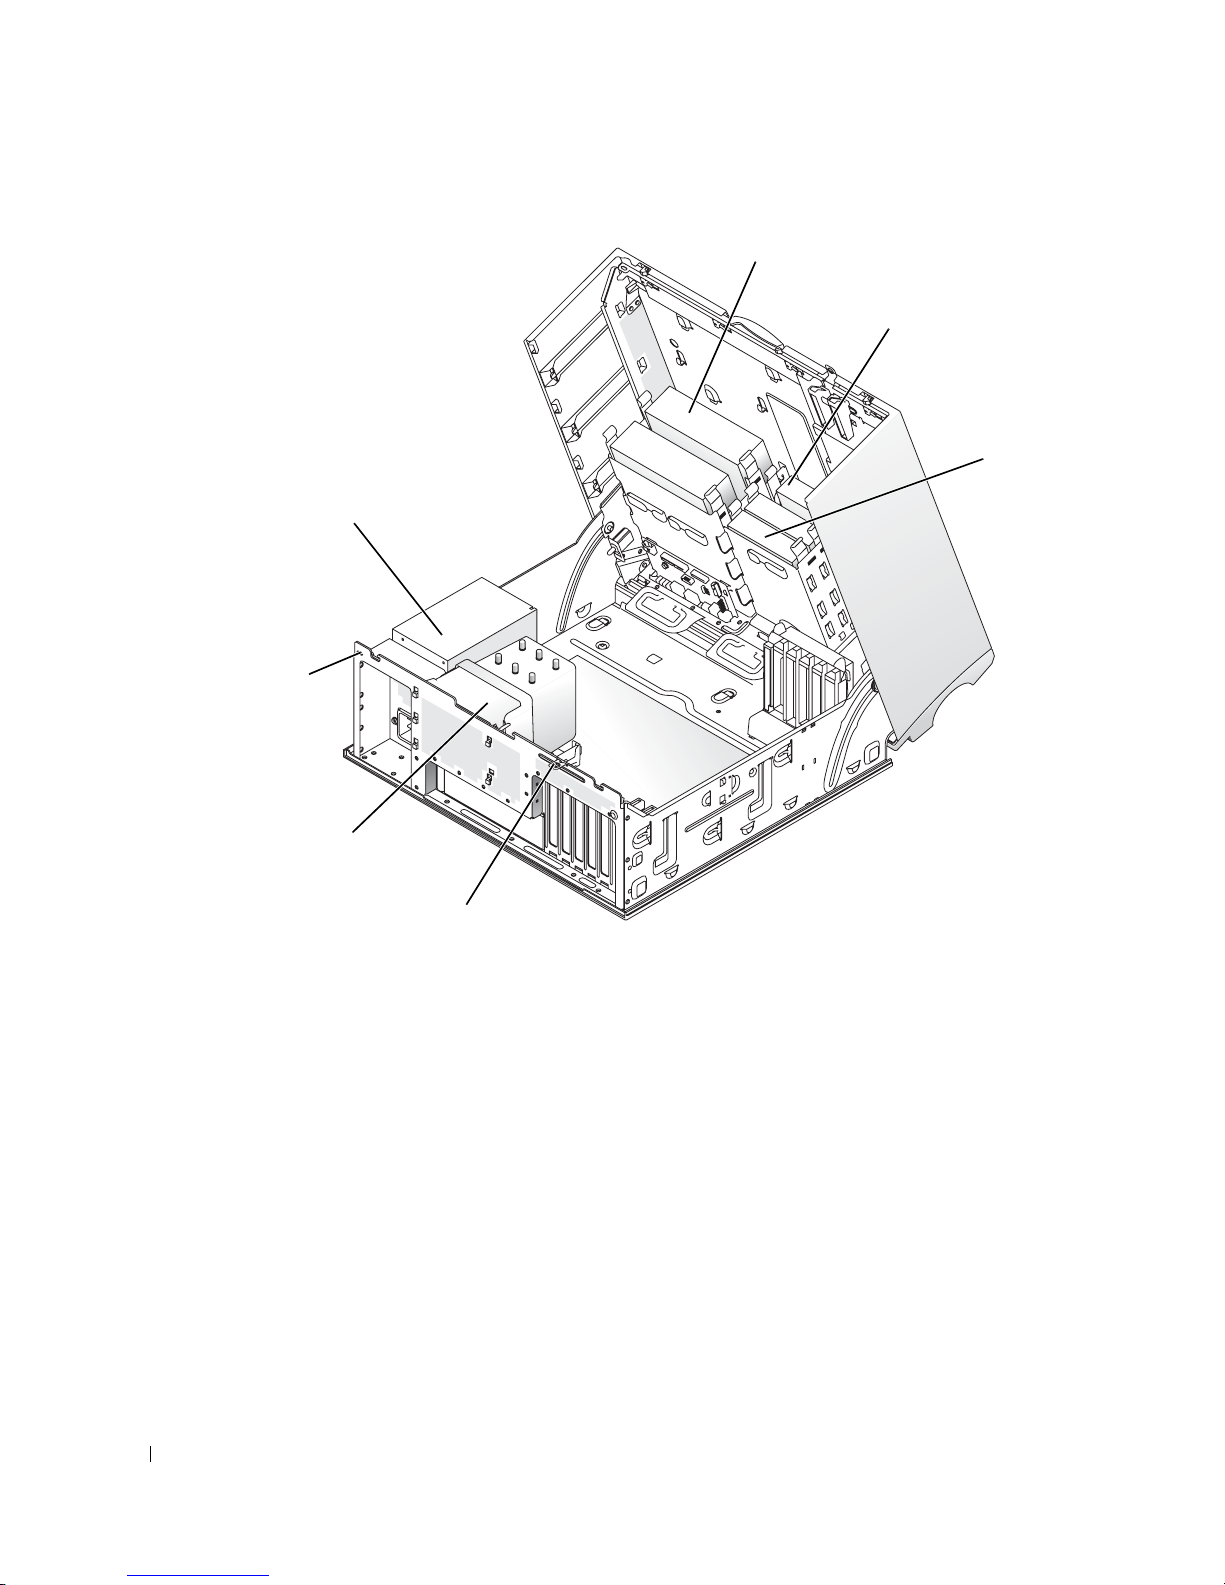
power supply
s
www.dell.com | support.dell.com
ecurity
cable slot
processor airflow
shroud and fan
CD/DVD drive
floppy drive (optional)
hard drive
padlock ring
Caring for Your Computer
To help maintain your computer, follow these suggestions:
• To avoid losing or corrupting data, never turn off your computer when the hard drive light is
on.
• Schedule regular virus scans using virus software.
• Manage hard drive space by periodically deleting unnecessary files and defragmenting
the drive.
24 Quick Reference Guide
• Back up files on a regular basis.
• Periodically clean your monitor screen, mouse, and keyboard (see your
information).
User’s Guide
for more
Page 25

Solving Problems
Troubleshooting Tips
Follow the following tips when you troubleshoot your computer:
• If you added or removed a part before the problem started, review the installation procedures
and ensure that the part is correctly installed.
• If a peripheral device does not work, ensure that the device is properly connected.
• If an error message appears on the screen, write down the exact message. The message may
help technical support personnel diagnose and fix the problem(s).
• If an error message occurs in a program, see the program’s documentation.
• If the recommended action in the troubleshooting section is to see a section in your
Guide
, go to
support.dell.com (on another computer if necessary) to access your
User’s
User’s
Guide.
Resolving Software and Hardware Incompatibilities
If a device is either not detected during the operating system setup or is detected but incorrectly
configured, you can use the Hardware Troubleshooter to resolve the incompatibility. In the
Microsoft
incompatibilities.
Windows XP
To resolve incompatibilities using the Hardware Troubleshooter:
1
2
3
4
Windows 2000
®
Windows® 2000 operating system, you can also use Device Manager to resolve
Click the
Ty p e
Start
button and click
Help and Support
hardware troubleshooter
in the
.
Search
field and click the arrow to start
the search.
Click
Hardware Troubleshooter
In the
on my computer
Hardware Troubleshooter
, and click
Next
in the
Search Results
list, click
.
list.
I need to resolve a hardware conflict
To resolve incompatibilities using Device Manager:
1
Click the
2
In the
3
Click the
4
Click
5
Click
Start
button, point to
Control Panel
Hardware
tab.
Device Manager
View
and click
Resources by connection
window, double-click
.
Settings
, and then click
System
.
.
Control Panel
.
Quick Reference Guide 25
Page 26

6
Double-click
Interrupt request (IRQ)
.
Incorrectly configured devices are indicated by a yellow exclamation point (
the device has been disabled.
7
Double-click any device marked with an exclamation point to display the
The
Device status
reconfigured.
8
Reconfigure the devices or remove the devices from the Device Manager. See the
documentation that came with the device for information on configuring the device.
To resolve incompatibilities using the Hardware Troubleshooter:
1
www.dell.com | support.dell.com
Click the
2
Click
Troubleshooting and Maintenance
troubleshooters
3
In the
Hardware Troubleshooter
computer
Using Microsoft Windows XP System Restore
The Microsoft Windows XP operating system provides System Restore to allow you to return
your computer to an earlier operating state (without affecting data files) if changes to the
hardware, software, or other system settings have left the computer in an undesirable operating
state. See the Windows Help and Support Center (see "Finding Information and Assistance"
on page 5) for information about using System Restore.
area in the
Start
button and click
, and then click
and click
Next
.
Properties
Help
.
Hardware
list, click
!
) or a red X if
Properties
window.
window reports the cards or devices that need to be
on the
Contents
tab, click
Windows 2000
.
I need to resolve a hardware conflict on my
NOTICE: Make regular backups of your data files. System Restore does not monitor your data files
or recover them.
Creating a Restore Point
1
Click the
2
Click
3
Follow the instructions on the screen.
Restoring the Computer to an Earlier Operating State
NOTICE: Before you restore the computer to an earlier operating state, save and close any open files
and exit any open programs. Do not alter, open, or delete any files or programs until the system
restoration is complete.
Click the
1
Start
System Restore
Start
System Restore
2
Ensure that
26 Quick Reference Guide
button and click
Help and Support
.
.
button, point to
All Programs→
Accessories→
.
Restore my computer to an earlier time
System Tools
is selected and click
, and then click
Next
.
Page 27

3
Click a calendar date to which you want to restore your computer.
The
Select a Restore Point
screen provides a calendar that allows you to see and select restore
points. All calendar dates with available restore points appear in boldface type.
4
Select a restore point and click
Next
.
If a calendar date has only one restore point, then that restore point is automatically selected.
If two or more restore points are available, click the restore point that you prefer.
5
Click
Next
.
Restoration Complete
The
screen appears after System Restore finishes collecting data and
then the computer restarts.
6
After the computer restarts, click OK.
To change the restore point, you can either repeat the steps using a different restore point, or you
can undo the restoration.
Undoing the Last System Restore
NOTICE: Before you undo the last system restore, save and close all open files and exit any open
programs. Do not alter, open, or delete any files or programs until the system restoration is complete.
Click the
1
System Restore
2
Click
3
Click
The
4
After the computer restarts, click OK.
Enabling System Restore
Start
button, point to
.
Undo my last restoration
Next
.
System Restore
screen appears and the computer restarts.
All Programs→ Accessories→ System Tools
and click
Next
.
, and then click
If you reinstall Windows XP with less than 200 MB of free hard-disk space available,
System Restore is automatically disabled. To see if System Restore is enabled:
1
Click the
2
Click
3
Click
4
Click the
5
Ensure that
Start
button and click
Performance and Maintenance
System
.
System Restore
tab.
Turn off System Restore
Control Panel
.
is unchecked.
.
Quick Reference Guide 27
Page 28

Using Last Known Good Configuration
1
Restart your computer and press <F8> when the message Please select the
operating system to start
2
Highlight Last Known Good Setting, press <Enter>, press <l>, and then select
your operating system when prompted.
Other Options to Help Resolve Additional Device or Software Conflicts
NOTICE: The following processes erase all of the information on your hard drive.
• Reinstall your operating system using the operating system installation guide and operating
system CD.
www.dell.com | support.dell.com
During the operating system reinstallation, you can select to delete the existing partitions
and reformat your hard drive.
appears.
• Reinstall all drivers, beginning with the chipset, using the
Drivers and Utilities
CD
.
Dell Diagnostics
CAUTION: Before you begin any of the procedures in this section, follow the safety instructions
located in the Product Information Guide.
When to Use the Dell Diagnostics
If you experience a problem with your computer, perform the checks in "Solving Problems"
on page 25 and run the Dell Diagnostics before you contact Dell for technical assistance.
It is recommended that you print these procedures before you begin.
NOTICE: The Dell Diagnostics works only on Dell™ computers. Using this program with other computers
can cause incorrect computer responses or result in error messages.
The Dell Diagnostics allow you to:
• Perform quick checks or extensive tests on one or all devices
• Choose how many times a test is run
• Display or print test results or save them in a file
• Suspend testing if an error is detected or terminate testing if a certain number of errors occur
Help
• Access online
screens that describe the tests and how to run them
• Read status messages that tell you whether tests completed successfully
• Receive error messages if problems are detected
28 Quick Reference Guide
Page 29

Starting the Dell Diagnostics From Your Hard Drive
1
Turn on (or restart) your computer.
2
When the DELL™ logo appears, press <F12> immediately.
NOTE: If you see a message stating that no diagnostics utility partition has been found,
see "Starting the Dell Diagnostics From the Drivers and Utilities CD" on page 29.
If you wait too long and the operating system logo appears, continue to wait until you see
the Microsoft Windows desktop. Then shut down your computer and try again. For more
information on shutting down your computer, see your
3
When the boot device list appears, highlight
4
When the Dell Diagnostics
information on the tests, see your
Starting the Dell Diagnostics From the Drivers and Utilities CD
1
Insert the
2
Shut down and restart the computer. For more information on shutting down your computer,
see your
3
When the DELL logo appears, press <F12> immediately.
Drivers and Utilities
User’s Guide.
Main Menu
User’s Guide.
CD.
Boot to Utility Partition
appears, select the test you want to run. For more
User’s Guide.
and press <Enter>.
If you wait too long and the Windows logo appears, continue to wait until you see the
Windows desktop. Then shut down your computer and try again. For more information
on shutting down your computer, see your
User’s Guide.
NOTE: The next steps change the boot sequence for one time only. On the next start-up, the computer
boots according to the devices specified in system setup.
When the boot device list appears, highlight
4
5
Select the
6
Select the
7
Ty p e 1 to start the ResourceCD menu.
8
Ty p e 2 to start the Dell Diagnostics.
9
Select
IDE CD-ROM Device
Boot from CD-ROM
option from the CD boot menu.
option from the menu that appears.
Run the 32 Bit Dell Diagnostics
IDE CD-ROM Device
and press <Enter>.
from the numbered list. If multiple versions are listed,
select the version appropriate for your computer.
10
When the Dell Diagnostics
information on the tests, see your
Main Menu
User’s Guide.
appears, select the test you want to run. For more
Quick Reference Guide 29
Page 30

Before You Start Testing
CAUTION: Before you begin any of the procedures in this section, follow the safety instructions
in the Product Information Guide.
• Turn on your printer if one is attached.
• Enter system setup, review your computer’s configuration information, and enable all of your
computer’s components and devices, such as connectors.
Beep Codes
Your computer might emit a series of beeps that can identify a problem. One possible series
(code 1-3-1) consists of one beep, a burst of three beeps, and then one beep. This series tell you
www.dell.com | support.dell.com
that the computer encountered a memory problem.
If a beep code is emitted, write it down and look it up in the following table.
Code Cause
1-1-2 Microprocessor register failure
1-1-3 NVRAM read/write failure
1-1-4 ROM BIOS checksum failure
1-2-1 Programmable interval timer failure
1-2-2 DMA initialization failure
1-2-3 DMA page register read/write failure
1-3 Video Memory Test failure
1-3-1 through 2-4-4 Memory not being properly identified or used
3-1-1 Slave DMA register failure
3-1-2 Master DMA register failure
3-1-3 Master interrupt mask register failure
3-1-4 Slave interrupt mask register failure
3-2-2 Interrupt vector loading failure
3-2-4 Keyboard Controller Test failure
3-3-1 NVRAM power loss
3-3-2 Invalid NVRAM configuration
3-3-4 Video Memory Test failure
3-4-1 Screen initialization failure
3-4-2 Screen retrace failure
3-4-3 Search for video ROM failure
30 Quick Reference Guide
Page 31
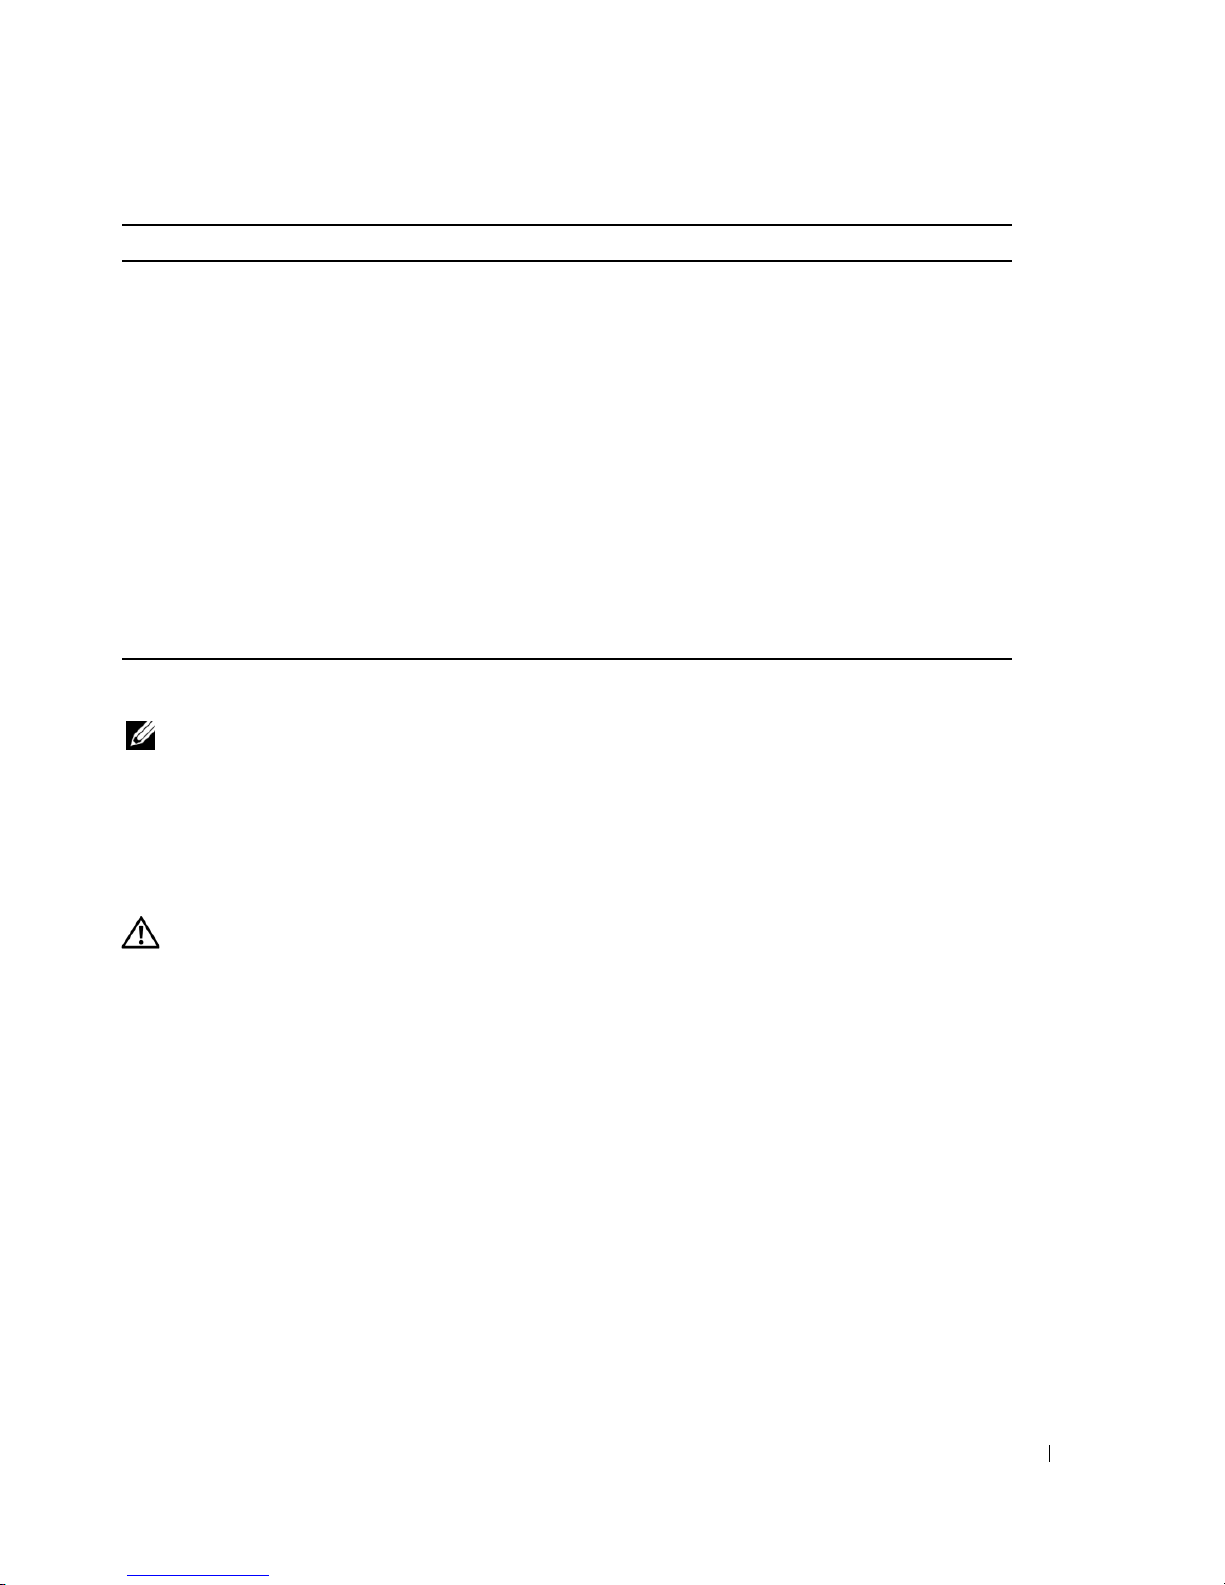
Code Cause
4-2-1 No timer tick
4-2-2 Shutdown failure
4-2-3 Gate A20 failure
4-2-4 Unexpected interrupt in protected mode
4-3-1 Memory failure above address 0FFFFh
4-3-3 Timer-chip counter 2 failure
4-3-4 Time-of-day clock stopped
4-4-1 Serial or parallel port test failure
4-4-2 Failure to decompress code to shadowed memory
4-4-3 Math-coprocessor test failure
4-4-4 Cache test failure
Error Messages
NOTE: If the message is not listed, see the documentation for either the operating system or the program
that was running when the message appeared.
If an error occurs during start-up, a message may be displayed on the monitor identifying the
problem. See "Error Messages" in the
User’s Guide
for suggestions on resolving any problems.
Diagnostic Lights
CAUTION: Before you begin any of the procedures in this section, follow the safety instructions
located in the Product Information Guide.
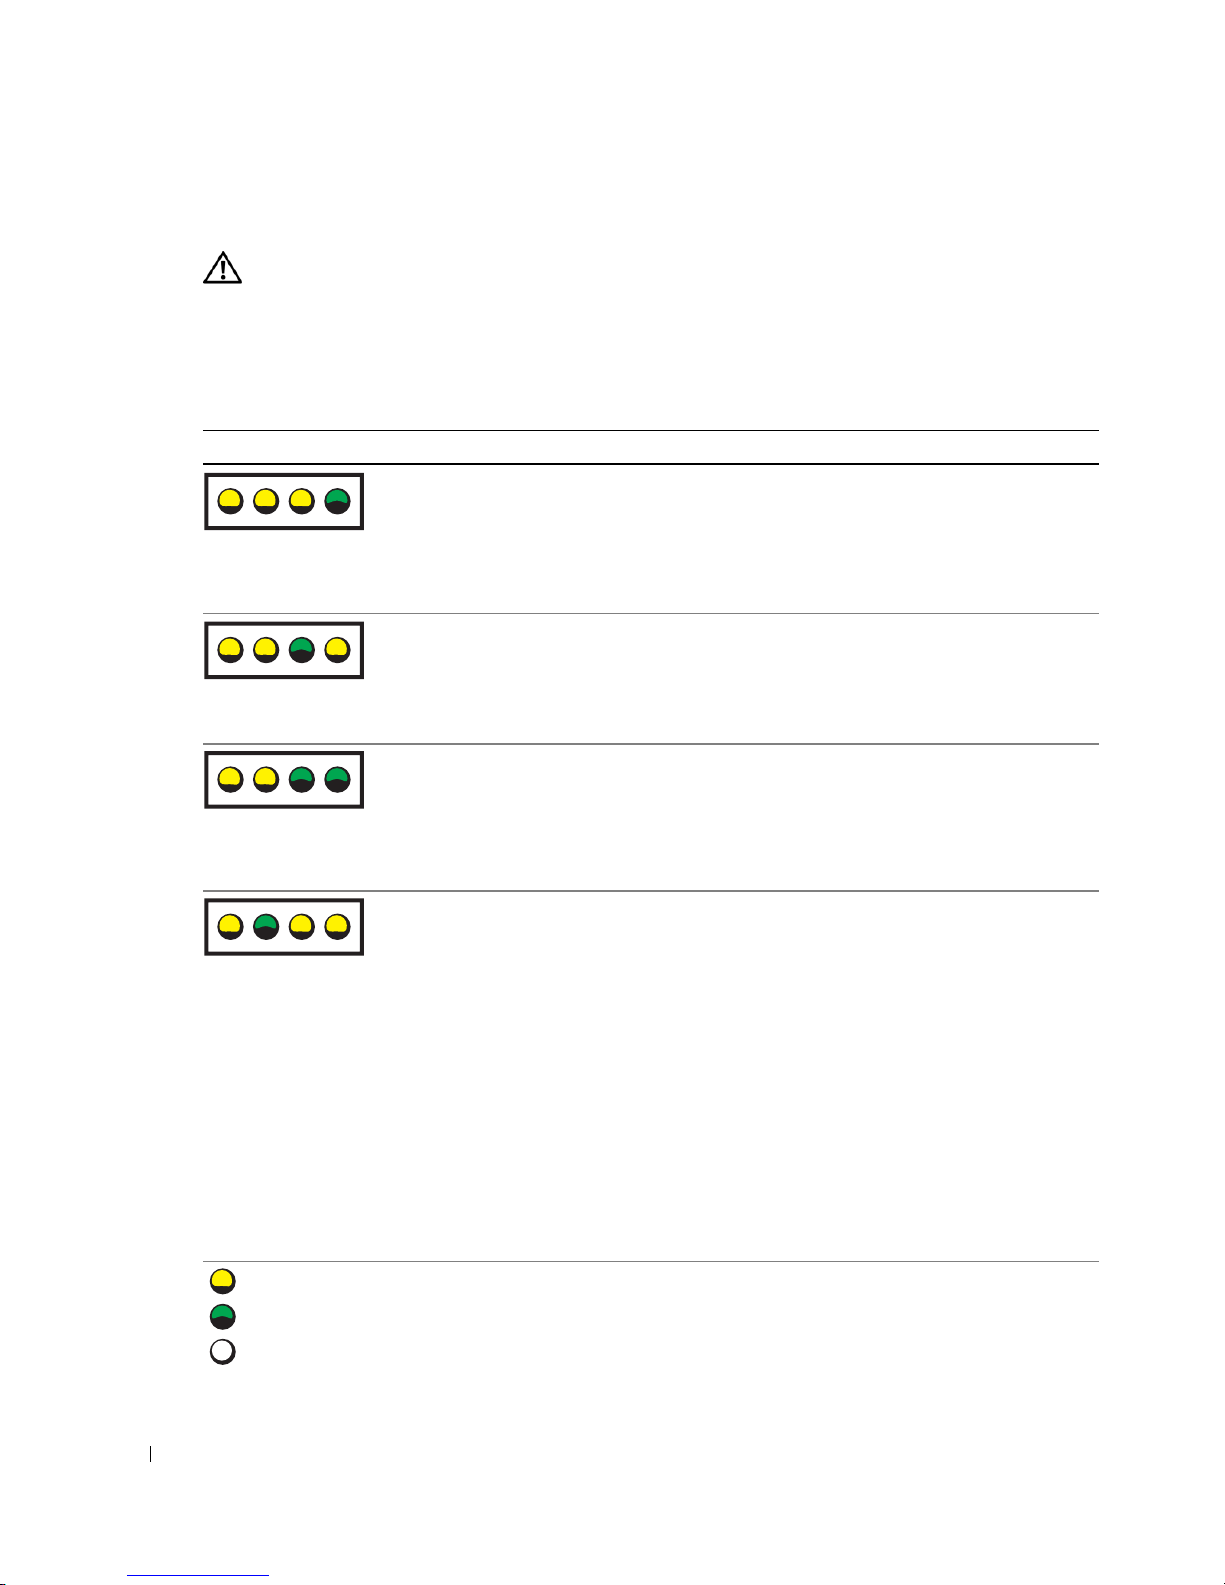
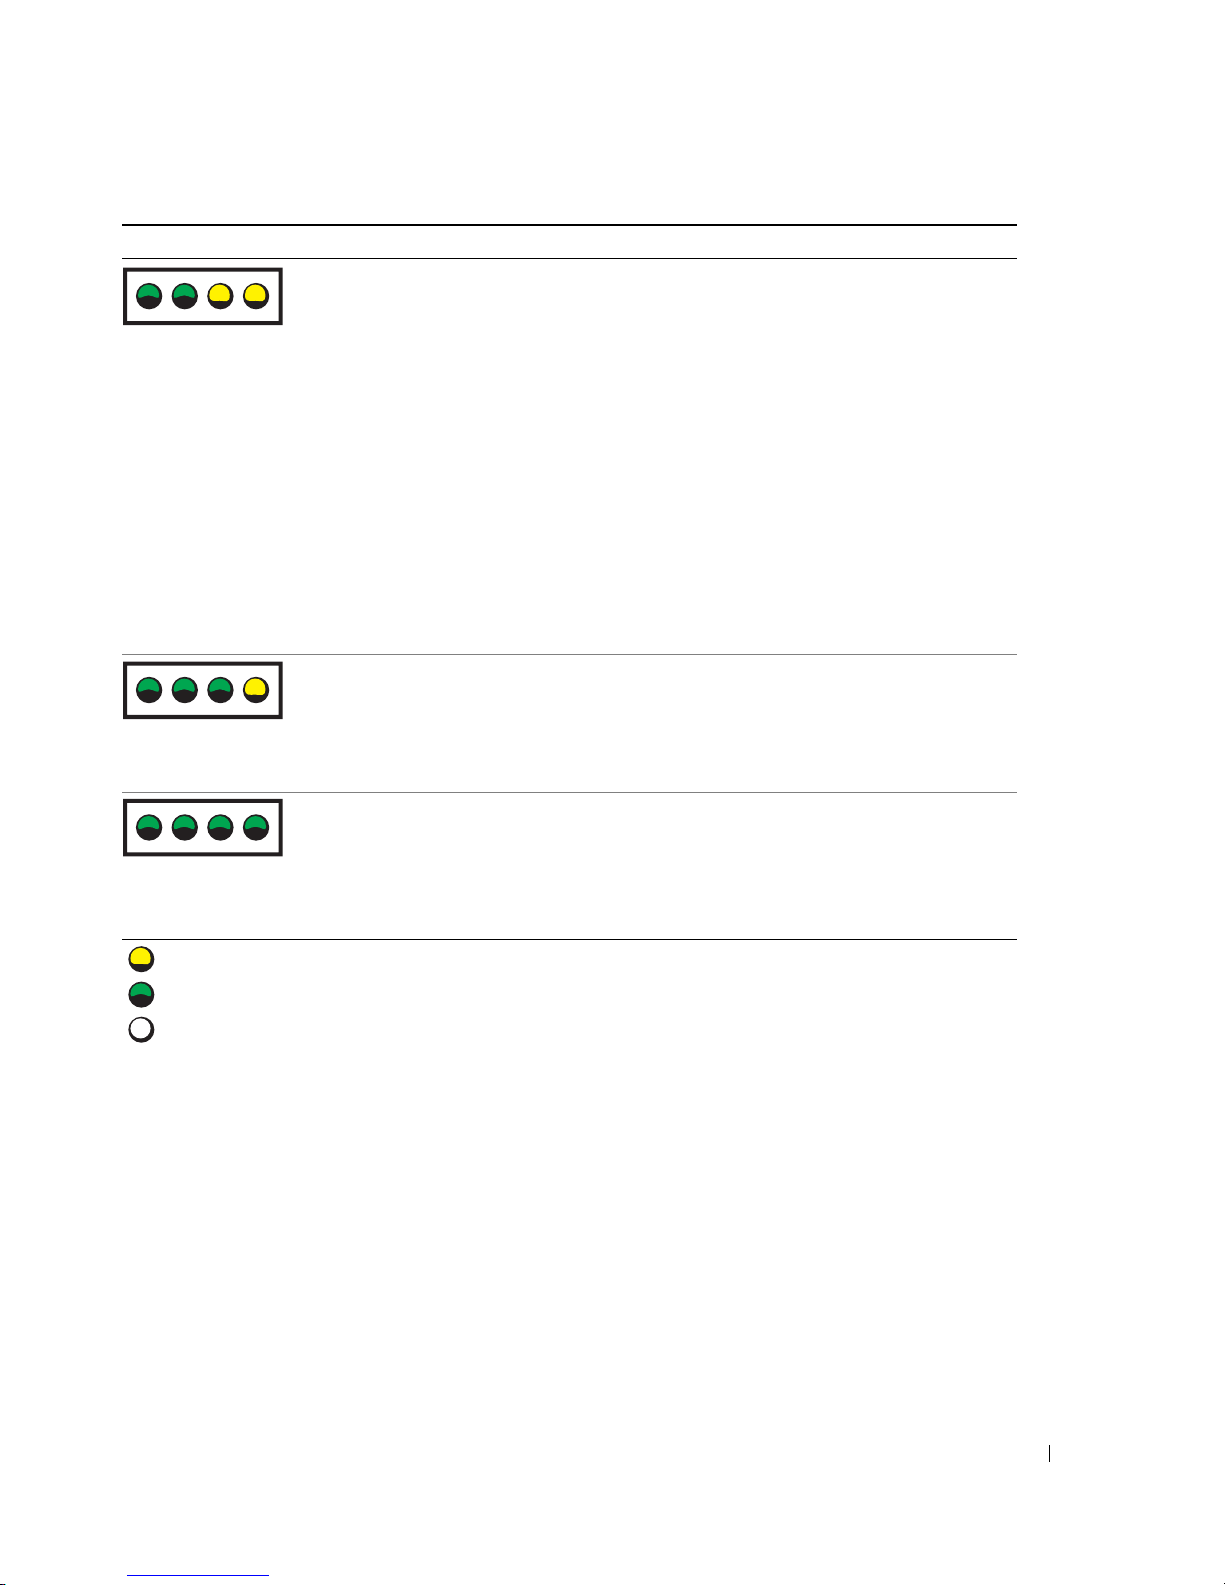
To help you troubleshoot a problem, your computer has four lights labeled "A," "B," "C," and "D" on
the front or back panel. The lights can be yellow or green. When the computer starts normally, the
lights flash. After the computer starts, all four lights display solid green. If the computer
malfunctions, the color and sequence of the lights identify the problem.
Quick Reference Guide 31
Page 32
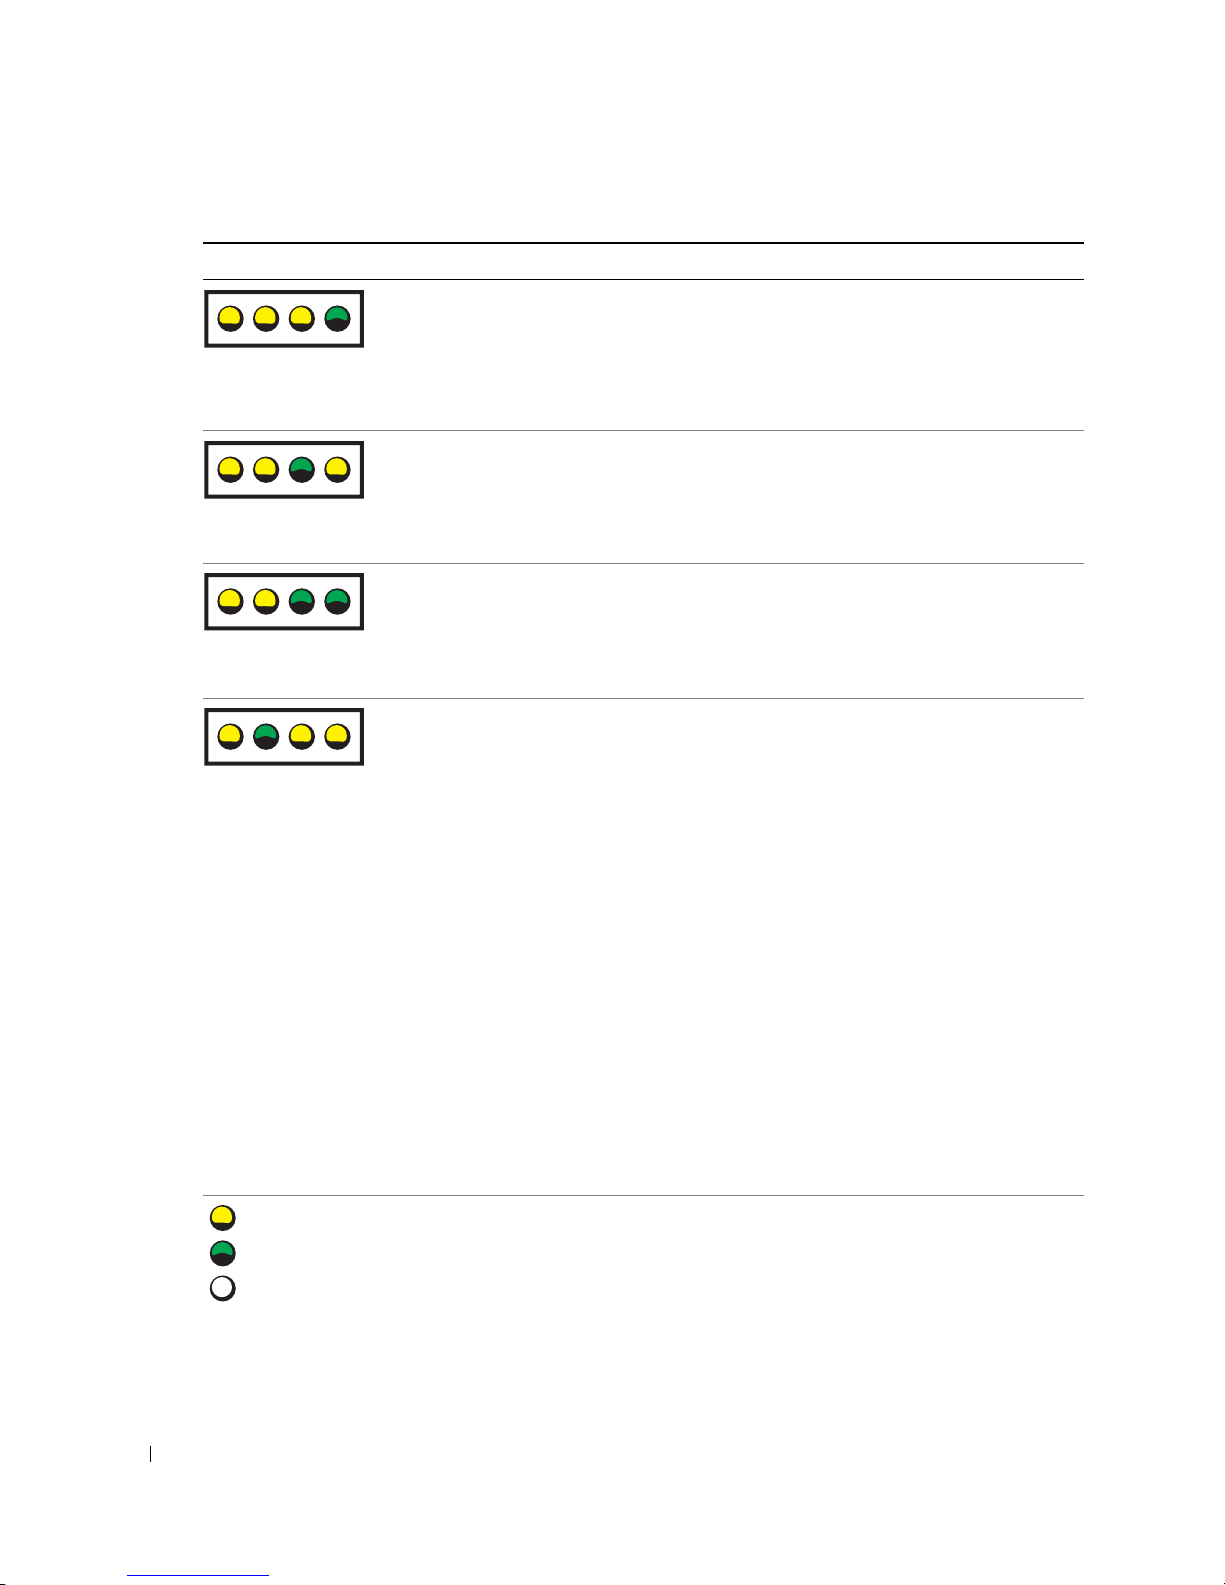
Light Pattern Problem Description Suggested Resolution
ABCD
ABCD
www.dell.com | support.dell.com
ABCD
ABCD
A possible BIOS failure has occurred; the
computer is in the recovery mode.
Run the BIOS Recovery utility, wait for
recovery completion, and then restart
the computer.
A possible processor failure has occurred. Reinstall the processor and restart the
computer. For more information on
reinstalling the processor, see your
User’s Guide.
Memory modules are detected, but
a memory failure has occurred.
A possible expansion card failure has
occurred.
1
Reseat the memory modules.
2
Restart the computer.
3
Run the Dell Diagnostics.
4
If the problem persists, contact Dell.
1
Determine if a conflict exists by
removing a card (not the graphics
card) and then restarting the
computer. For more information
on removing a card, see your
.
Guide
2
If the problem persists, reinstall the
User’s
card that you removed, remove a
different card, and then restart the
computer.
3
Repeat this process for each card.
If the computer starts normally,
troubleshoot the last card you
removed for resource conflicts (see
"Resolving Software and Hardware
Incompatibilities").
4
If the problem persists, contact Dell.
For more information on contacting
Dell, see your
User’s Guide
.
= yellow
= green
= off
32 Quick Reference Guide
Page 33
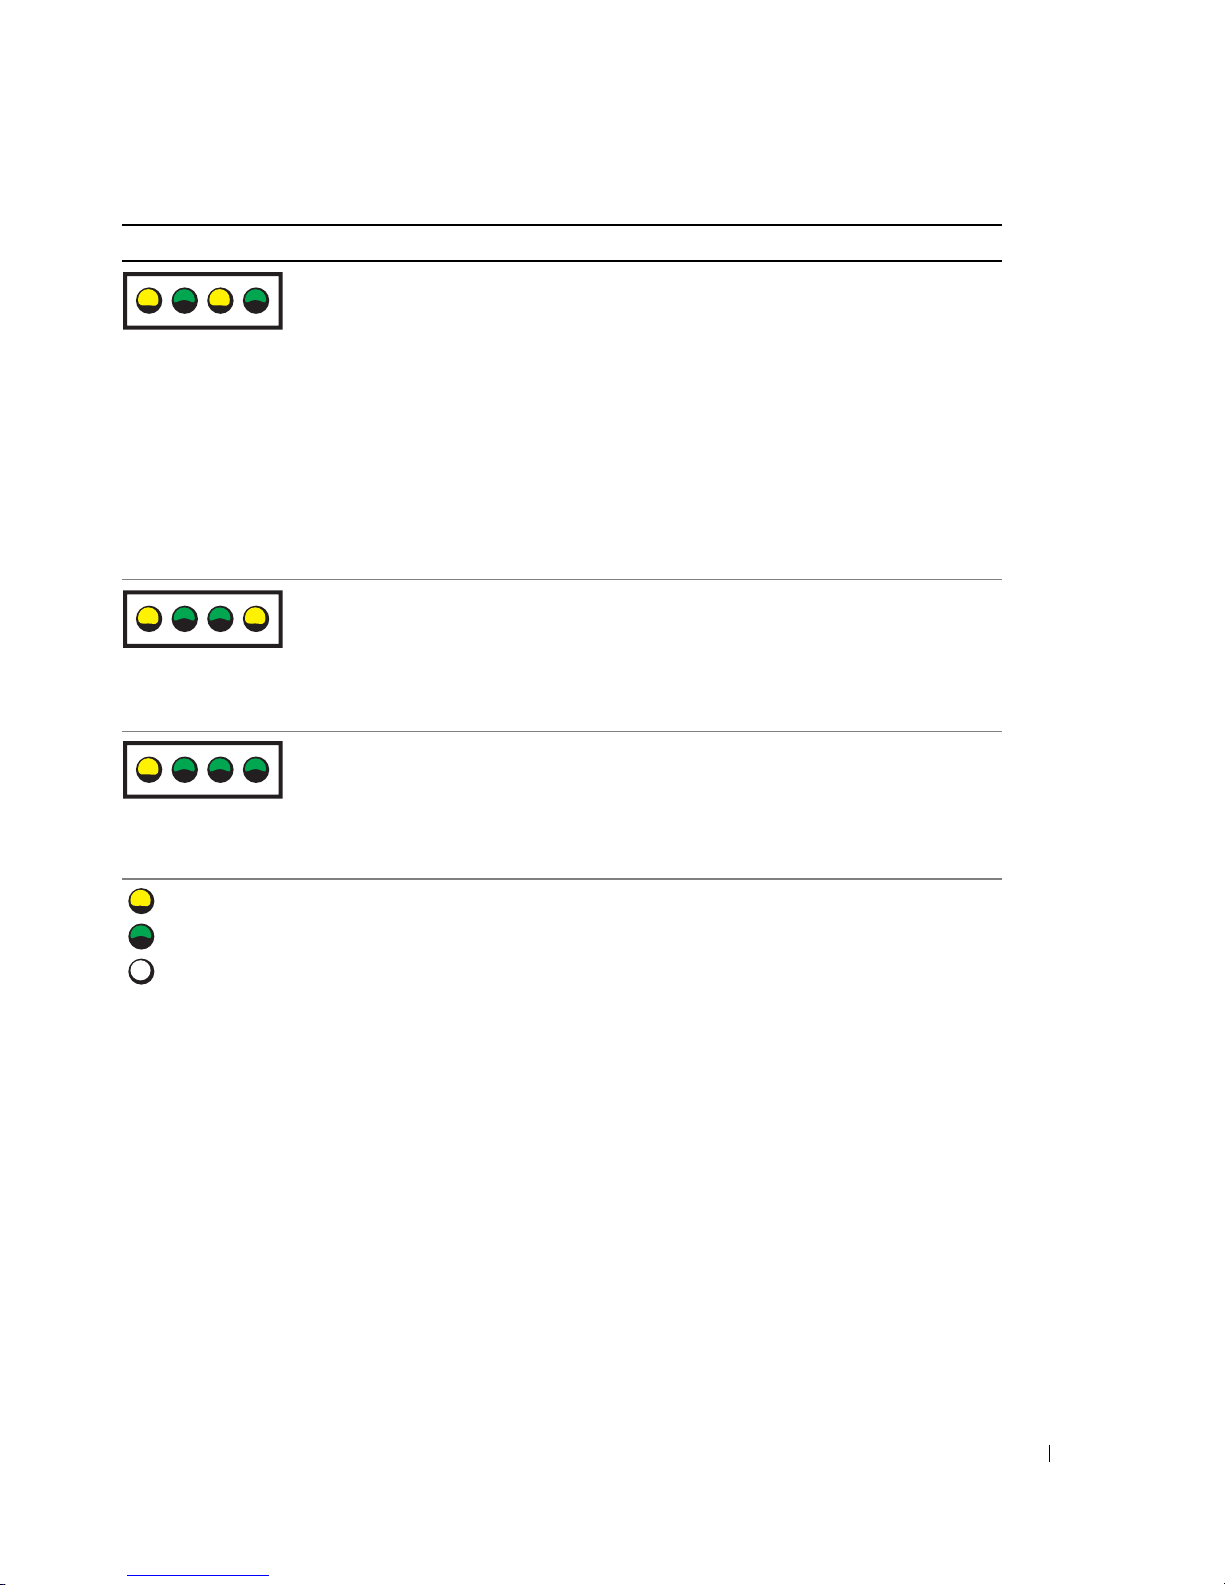
Light Pattern Problem Description Suggested Resolution
ABCD
ABCD
ABCD
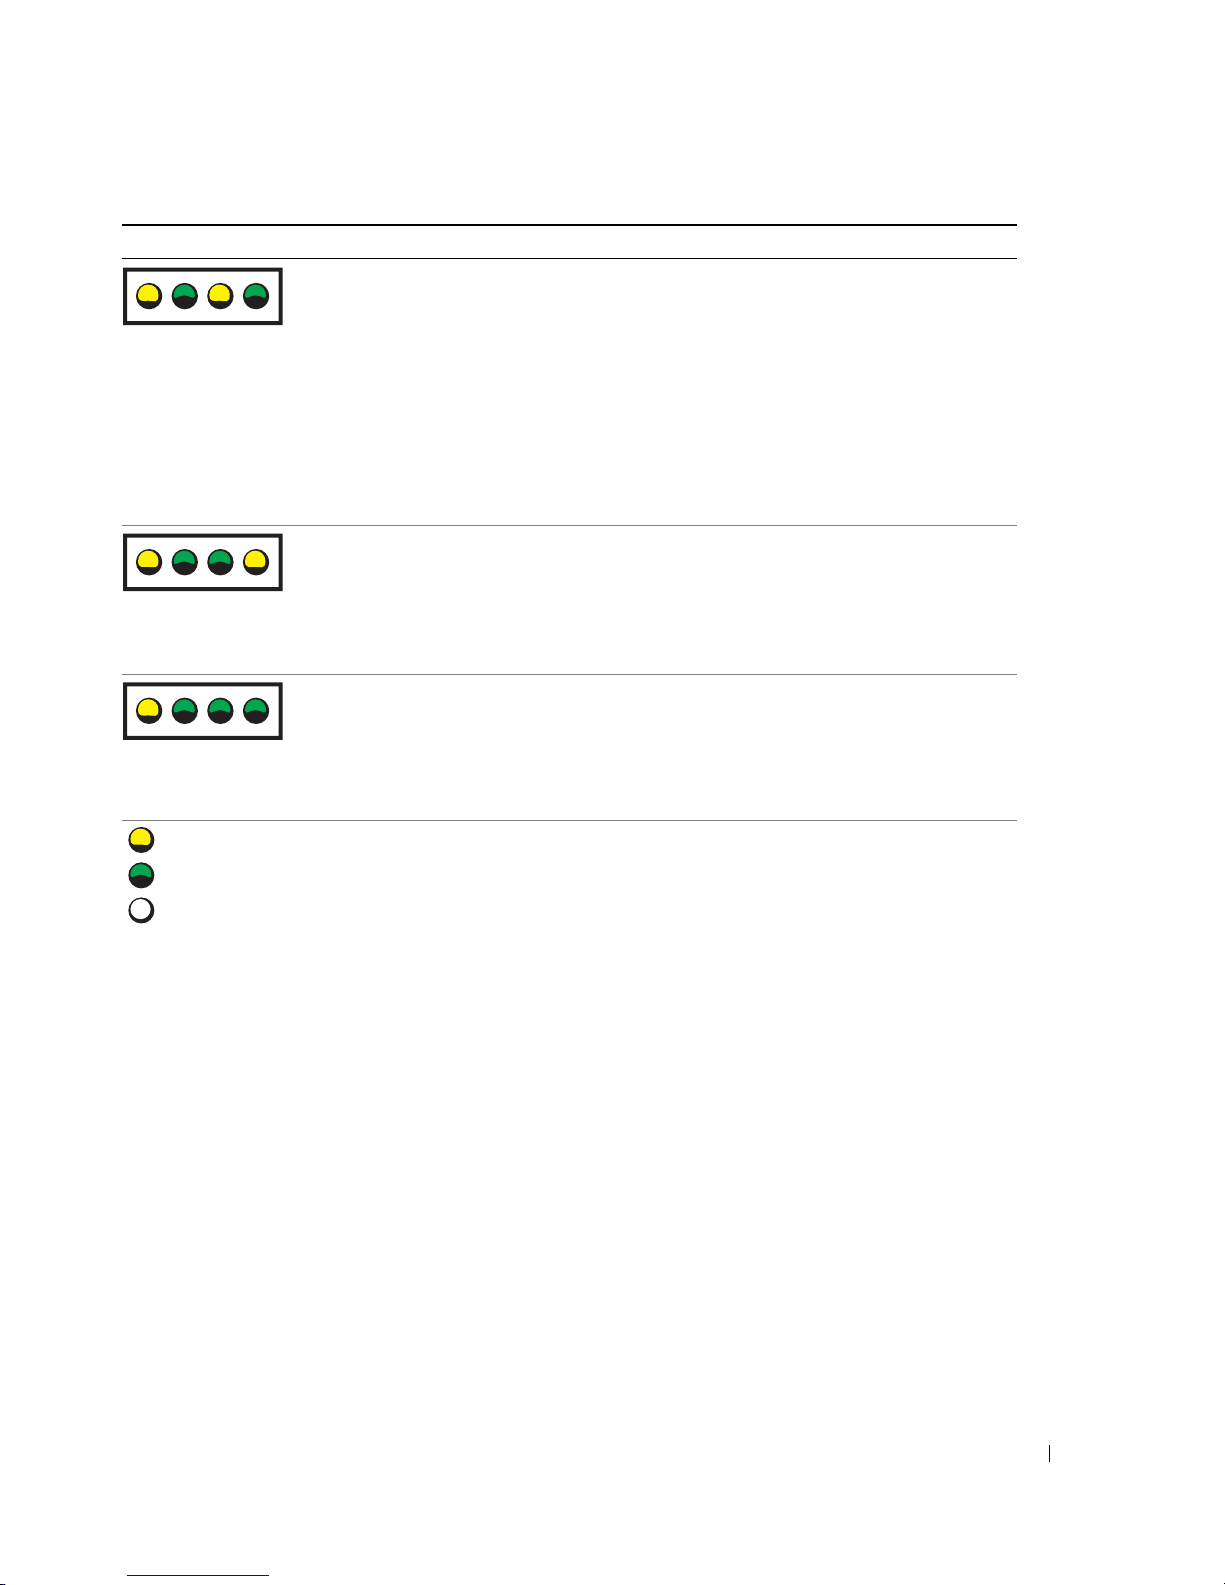
A possible graphics card failure has
occurred.
A possible floppy or hard drive failure
has occurred.
A possible USB failure has occurred. Reinstall all USB devices, check cable
• If the computer has a graphics card,
remove the card, reinstall it, and then
restart the computer. For more
information on reinstalling the
graphics card, see your
• If the problem still exists, install a
graphics card that you know works and
restart the computer.
• If the problem persists or the
computer has integrated graphics,
contact Dell. For more information on
contacting Dell, see your
Reseat all power and data cables and
restart the computer.
connections, and then restart the
computer.
User’s Guide
User’s Guide
.
.
= yellow
= green
= off
Quick Reference Guide 33
Page 34
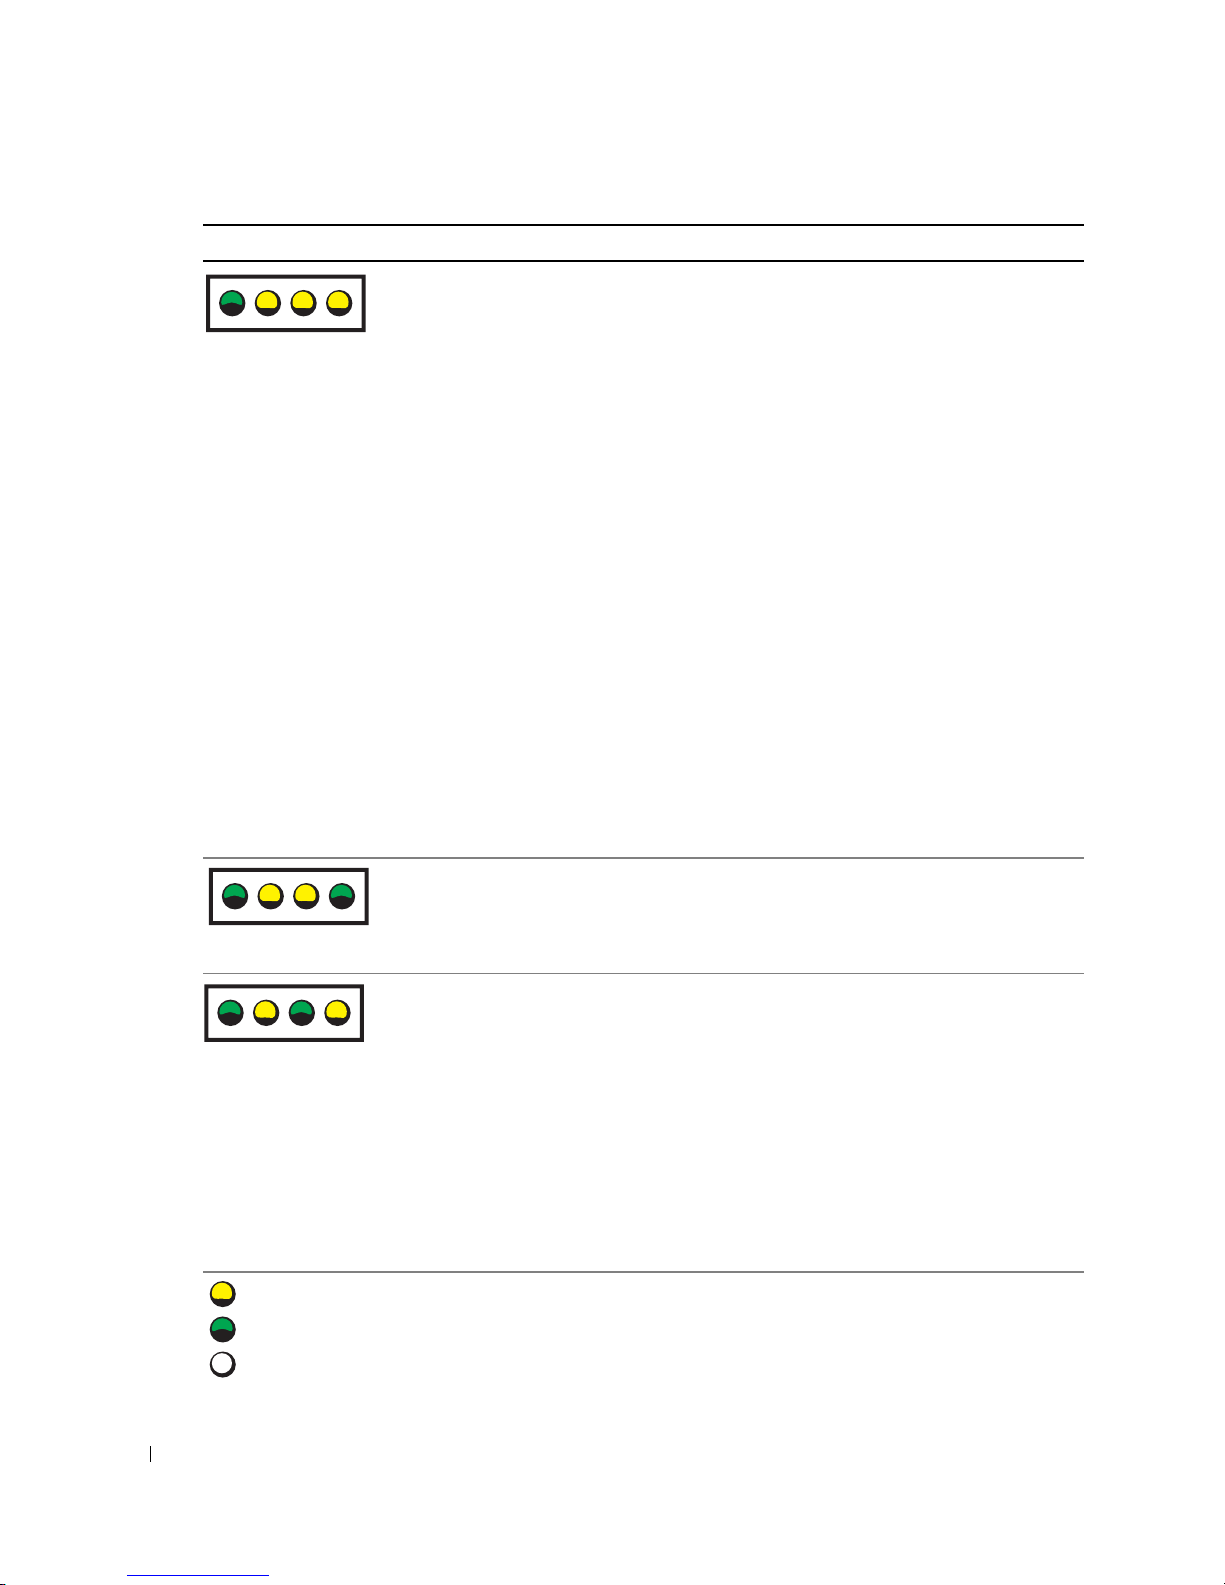
Light Pattern Problem Description Suggested Resolution
ABCD
www.dell.com | support.dell.com
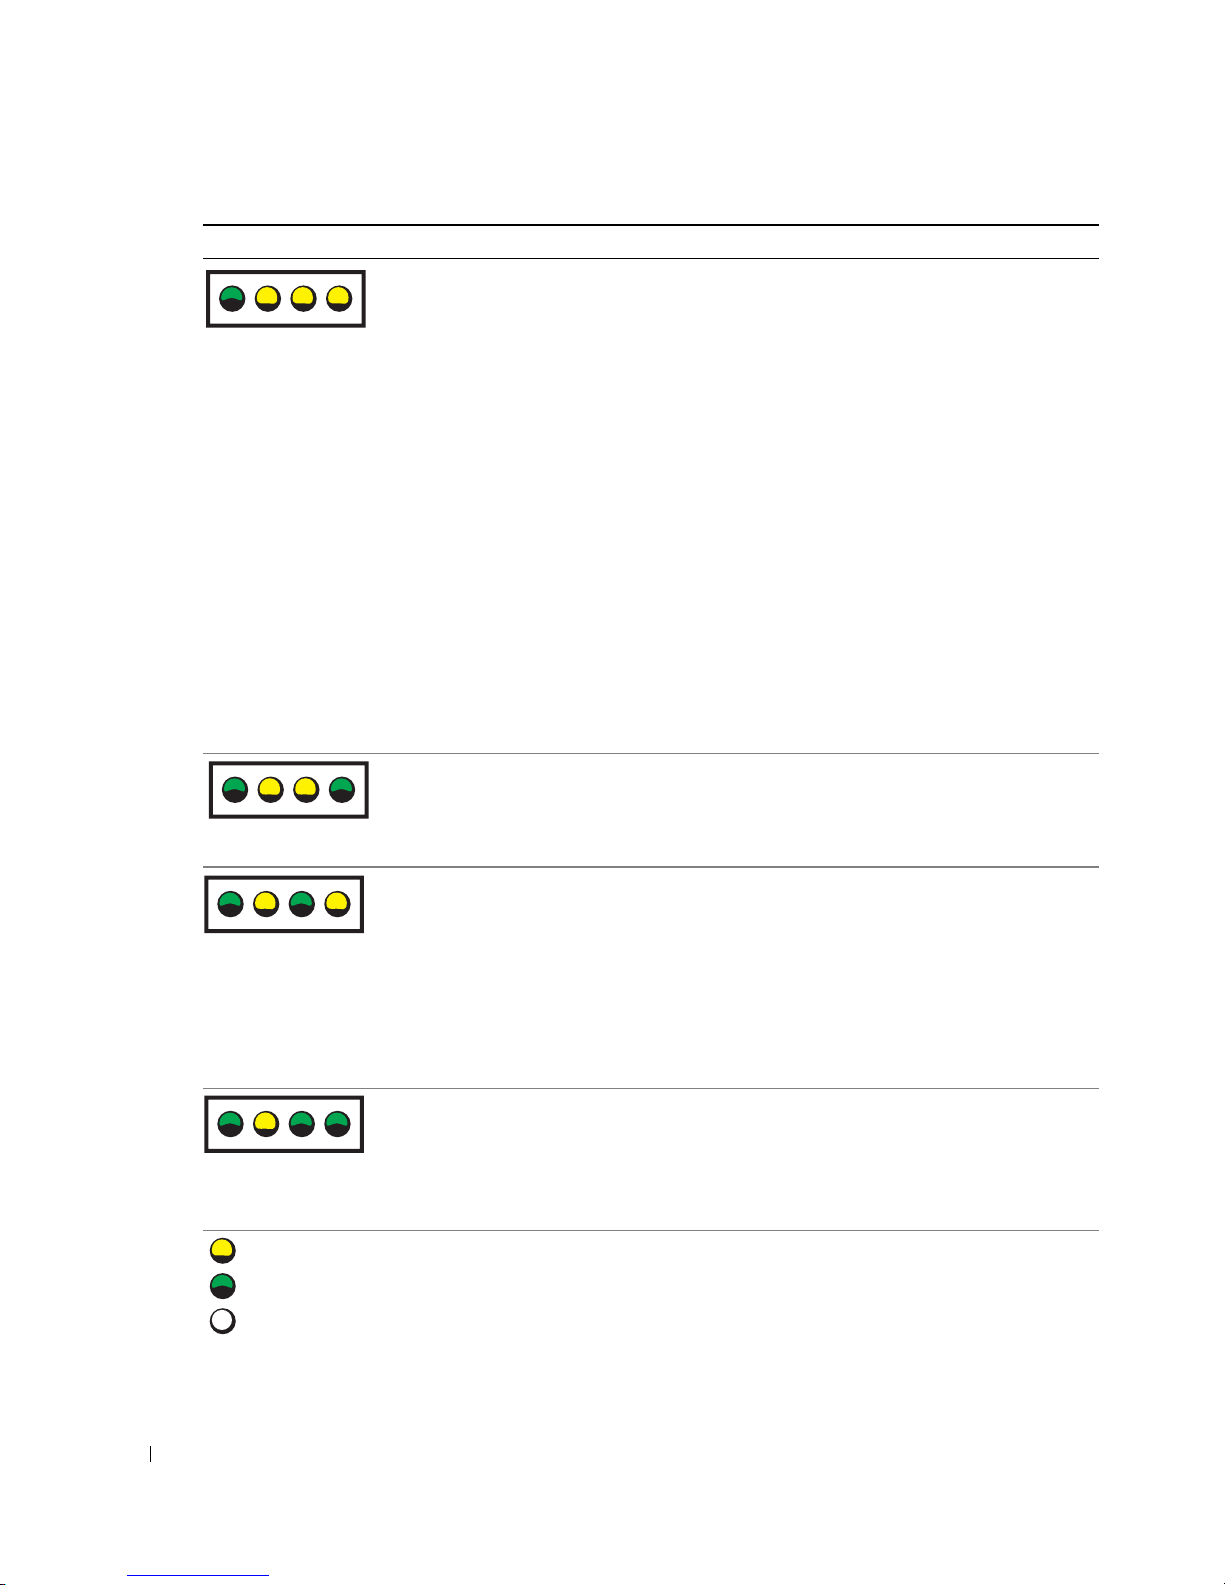
No memory modules are detected.
• If you have one memory module
installed, reinstall it and restart the
computer. For more information on
memory modules, see your
.
Guide
• If you have two or more memory
modules installed, remove the
modules, reinstall one module, and
then restart the computer. If the
computer starts normally, reinstall an
additional module. Continue until
you have identified a faulty module or
reinstalled all modules without error.
For more information on memory
modules, see your
• If available, install properly working
memory of the same type into your
computer. For more information on
memory modules, see your
.
Guide
• If the problem persists, contact Dell.
For more information on contacting
Dell, see your
User’s Guide
User’s Guide
User’s
.
User’s
.
ABCD
ABCD
= yellow
= green
= off
34 Quick Reference Guide
System board failure has occurred.
Memory modules are detected, but a
memory configuration or compatibility
error exists.
Contact Dell
For more information on contacting
Dell, see your User’s Guide.
• Ensure that no special memory
module/memory connector placement
requirements exist.
• Verify that the memory modules that
you are installing are compatible with
your computer.
• Reinstall the memory modules and
restart the computer.
• If the problem persists, contact Dell.
For more information on contacting
Dell, see your
for technical assistance.
User’s Guide
.
Page 35
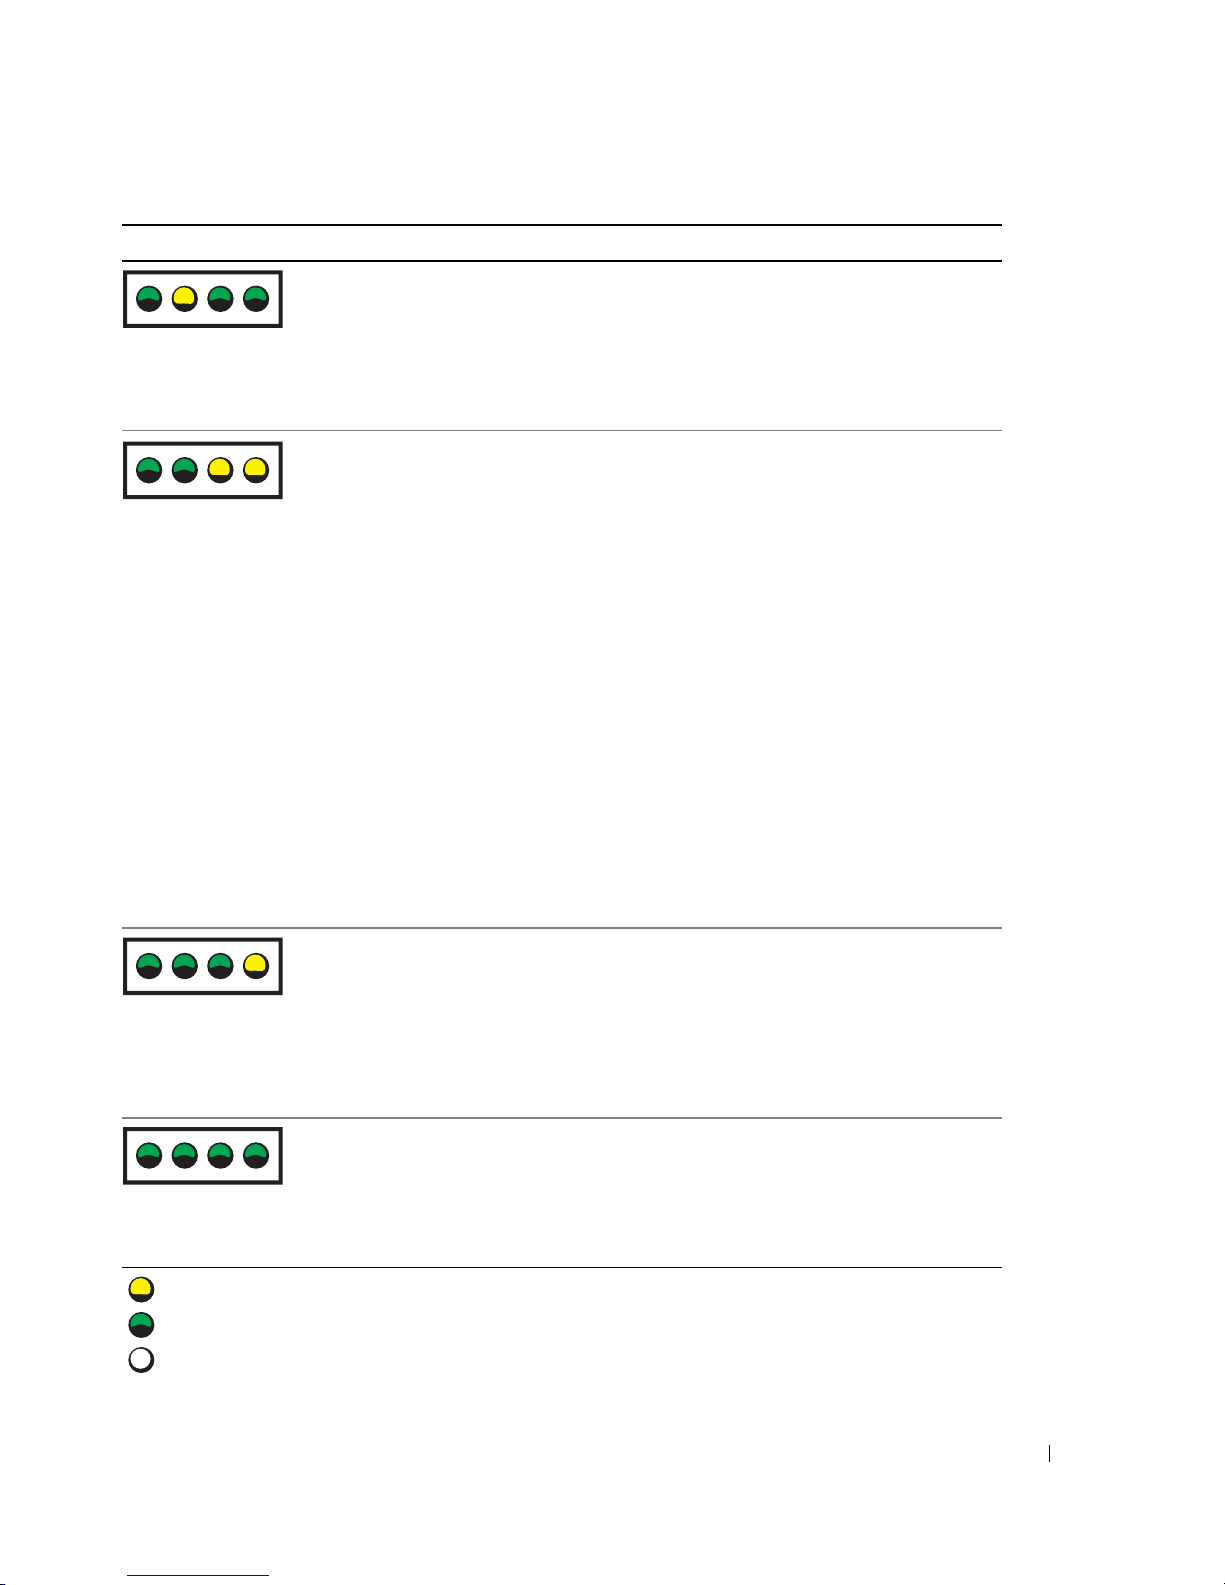
Light Pattern Problem Description Suggested Resolution
ABCD
ABCD
A possible system board resource and/or
hardware failure has occurred.
A possible expansion card failure has
occurred.
Perform the procedures in
Software and Hardware
Incompatibilities"
If the problem persists,
more information on contacting Dell,
see your User’s Guide.
1
Determine if a conflict exists by
removing a card (not a graphics card)
and restarting the computer. For more
information on removing a card, see
ser’s Guide
your U
2
If the problem persists, reinstall
the card that you removed, remove
a different card, and then restart
the computer.
3
Repeat this process for each card.
If the computer starts normally,
troubleshoot the last card removed
from the computer for resource
conflicts (see "Resolving Software
and Hardware Incompatibilities" on
page 25).
4
If the problem persists, contact Dell.
For more information on contacting
Dell, see your
(see
User’s Guide
"Resolving
page 25).
contact Dell
.
. For
.
ABCD
ABCD
= yellow
= green
= off
Another failure has occurred.
The computer is in a normal operating
condition after POST.
• Ensure that the cables are properly
connected to the system board from
the hard drive, CD drive, and DVD
drive.
• If the problem persists, contact Dell.
For more information on contacting
Dell, see your
None.
User’s Guide
Quick Reference Guide 35
.
Page 36

Frequently Asked Questions
How Do I... Solution Where to Find Additional Information
Set up my computer to use
two monitors?
www.dell.com | support.dell.com
Connect my monitor when the
monitor cable connector doesn’t
seem to fit the connector on the
back of my computer?
Install a card fan? If you have installed a new graphics
If your computer has the required
graphics card to support dualmonitor setup, then look in your box
for a Y-cable. The Y-cable has a single
connector on one end (plug this
connector into the back panel) and
branches into two connectors (plug
these connectors into the monitor
cables). For the mini-tower
computer, see "Connect the monitor"
on page 10 and for the desktop
computer, see "Connect the monitor"
on page 15.
If your graphics card has a DVI
connector but your monitor has a
VGA connector, then you need to use
an adapter. An adapter should be
included in the box.
card that runs higher than 75 W, you
need to install a card cooling fan. To
order a card cooling fan, contact
Dell. Contact information is located
in your User's Guide and at
support.dell.com.
To locate additional information
about using dual monitors, see the
graphics card documentation on the
Drivers and Utilities CD.
Contact Dell for more information.
For information on installing a card
fan or a card, see your User's Guide.
Connect my speakers? If you have a sound card installed,
connect the speakers to the
connectors on the card. For the minitower computer, see "Connect the
speakers" on page 13 and for the
desktop computer, see "Connect the
speakers" on page 18.
36 Quick Reference Guide
See the documentation that came
with your speakers for more
information.
Page 37

How Do I... Solution Where to Find Additional Information
Find the right connectors for my
USB or IEEE 1394 devices?
Locate information about the
hardware and other technical
specifications for my computer?
Find documentation
for my computer?
Your mini-tower computer has
eight USB connectors (two on
the front and six on the back).
Your Desktop computer has eight
USB connectors (two on the front
and six on the back) and an optional
front IEEE 1394 connector. This
connector is only available if you
purchased an add-in IEEE 1394 card.
To purchase a card, contact Dell. For
more information on the add-in card,
see your User’s Guide.
Yo u r User’s Guide has a
specifications table that provides
more detailed information about
your computer and the hardware.
To locate your User’s Guide,
see "Finding Information and
Assistance" on page 5.
The following documentation is
available for your computer:
• User’s Guide
• Product Information Guide
• System Information Label
To locate these documents,
see "Finding Information and
Assistance" on page 5.
See the front and back view graphics
of your computer in your User’s
Guide. For help locating your User’s
Guide, see "Finding Information and
Assistance" on page 5.
Go to the Dell Support website at
support.dell.com and use one of the
following support tools: read white
papers on the latest technology or
communicate with other Dell users
at the Dell forum chat room.
If you lose your documentation, it is
available on the Dell Support website
at support.dell.com.
Quick Reference Guide 37
Page 38

www.dell.com | support.dell.com
38 Quick Reference Guide
Page 39

Index
C
computer
restore to previous state, 26
conflicts
software and hardware
incompatibilities, 25
D
Dell
premier support website, 7
support site, 7
Dell Diagnostics, 28
Dell Premier Support
website, 6-7
Device Manager, 25
diagnostic lights, 31
diagnostics
Dell, 28
Drivers and Utilities CD, 5
lights, 31
documentation, 14
device, 5
online, 7
Product Information Guide, 6
ResourceCD, 5
User’s Guide, 6
drivers
ResourceCD, 5
Drivers and Utilities CD, 5
E
error messages
diagnostic lights, 31
F
finding information, 5
H
hardware
conflicts, 25
Dell Diagnostics, 28
Hardware Troubleshooter, 25
Help and Support Center, 7
I
installing parts
turning off your
computer, 20, 23
IRQ conflicts, 25
L
labels
Microsoft Windows, 6
Service Tag, 6
lights
back of computer, 31
diagnostic, 31
M
Microsoft Windows label, 6
O
Operating System CD, 8
P
problems
conflicts, 25
Dell Diagnostics, 28
diagnostic lights, 31
restore to previous state, 26
R
reinstalling
Drivers and Utilities CD, 5
ResourceCD, 5
ResourceCD
Dell Diagnostics, 28
Index 39
Page 40

S
U
safety instructions, 6
Service Tag, 6
software
conflicts, 25
system board, 5
system information label, 5
System Restore, 26
T
troubleshooting
conflicts, 25
Dell Diagnostics, 28
diagnostic lights, 31
Hardware Troubleshooter, 25
Help and Support Center, 7
restore to previous state, 26
User’s Guide, 6
W
warranty, 6
Windows 2000
Device Manager, 25
Hardware Troubleshooter, 25
Windows XP
Hardware Troubleshooter, 25
Help and Support Center, 7
System Restore, 26
40 Index
Page 41

Dell Precision™ Workstation
370 系统
快速参考指南
型号:DHM 和 WHM
www.dell.com | support.dell.com
Page 42

注、注意和警告
注: 注表示可以帮助您更好地使用计算机系统的重要信息。
注意:
警告:
注意表示可能会损坏硬件或导致数据丢失,并告诉您如何避免此类问题。
警告表示有可能造成财产损失、人身伤害或死亡。
缩写词和缩略语
有关缩写词与缩略语的完整列表,请参阅 《用户指南》中的 “词汇表”。
®
如果您购买的是
适用。
Dell™ n
系列计算机,则本文中关于
Microsoft
Windows®
操作系统的任何参考内容均不
____________________
本文中的信息如有更改,恕不另行通知。
© 2004 Dell Inc.
未经
Dell Inc.
本文中使用的商标:
Microsoft 和 Windows 是 Microsoft Corporation
本文中述及的其它商标和产品名称是指拥有相应商标和名称的公司或其制造的产品。
Dell Inc.
型号:DHM 和 WHM
2004 年 4
对本公司的商标和产品名称之外的其他商标和产品名称不拥有任何专利权。
月
保留所有权利。
书面许可,不准以任何形式进行复制。
Dell、DELL
P/N T3914 Rev. A00
徽标和
Dell Precision 是 Dell Inc.
的注册商标。
的商标;
Page 43

目录
查找信息和帮助 . . . . . . . . . . . . . . . . . . . . . . . . . . .
安装小型塔式计算机
安装台式计算机
查找用户指南
. . . . . . . . . . . . . . . . . . . . . . . . . . . .
打开小型塔式计算机
插卡冷却风扇
. . . . . . . . . . . . . . . . . . . . . . . . . . . .
打开台式计算机
维护计算机
解决问题
. . . . . . . . . . . . . . . . . . . . . . . . . . . . .
. . . . . . . . . . . . . . . . . . . . . . . . . . . . . . .
故障排除提示
解决软件与硬件不兼容的问题
使用 Microsoft Windows XP 系统还原
使用最后一次正确的配置
Dell 诊断程序
开始检测之前
. . . . . . . . . . . . . . . . . . . . . . . .
. . . . . . . . . . . . . . . . . . . . . . . . . . .
. . . . . . . . . . . . . . . . . . . . . . . .
. . . . . . . . . . . . . . . . . . . . . . . . . . .
. . . . . . . . . . . . . . . . . . . . . . . . . . 23
. . . . . . . . . . . . . . . . . 23
. . . . . . . . . . . . . . 24
. . . . . . . . . . . . . . . . . . . . 26
. . . . . . . . . . . . . . . . . . . . . . . . . . 26
. . . . . . . . . . . . . . . . . . . . . . . . . . 28
5
8
13
18
18
20
21
22
23
哔声代码
诊断指示灯
常见问题
. . . . . . . . . . . . . . . . . . . . . . . . . . . . . . .
错误信息
. . . . . . . . . . . . . . . . . . . . . . . . . . . . 29
. . . . . . . . . . . . . . . . . . . . . . . . . . . . .
. . . . . . . . . . . . . . . . . . . . . . . . . . . . . . .
索引 . . . . . . . . . . . . . . . . . . . . . . . . . . . . . . . . . . . . 37
28
30
34
目录 3
Page 44

4 目录
Page 45
查找信息和帮助
您查找的内容 可以找到的位置
•
适用于计算机的诊断程序
•
适用于计算机的驱动程序
•
设备说明文件
•
主机板连接器
•
主机板组件的位置
Drivers and Utilities CD
说明文件和驱动程序已安装在您的计算机上。 您可以
使用
(请参阅
注:
的驱动程序和说明文件更新。
系统信息标签
位于主机盖内侧。
重新安装驱动程序、运行
CD
第
您可以在
页)或查看设备说明文件。
26
support.ap.dell.com/china
(也称为
ResourceCD
Dell
中可能包含自述文
CD
件,它介绍了计算机的
最新技术更改信息,或
者为技术人员或有经验
的用户提供了高级技术
参考资料。
)
诊断程序
上找到最新
快速参考指南 5
Page 46
您查找的内容 可以找到的位置
•
保修信息
•
安全说明
•
管制信息
•
人机工程学信息
•
最终用户许可协议
www.dell.com | support.dell.com
•
如何卸下和更换部件
•
技术规格
•
如何配置系统设置
•
如何排除故障并解决问题
•
服务标签和快速服务代码
•
Microsoft Windows
许可标签
产品信息指南
Dell™
Dell Precision
Microsoft
1
单击
开始
2
单击
用户和系统指南
服务标签和
这些标签位于您的计算机上。
•
使用
support.ap.dell.com/
china
系时,请使用服务标签
来识别您的计算机。
•
与技术支持联系时,请
输入快速服务代码以转
接您的呼叫。
代码。
用户指南
®
Windows® XP
按钮,并单击
Microsoft Windows
或与技术支持联
并非所有国家/地区均提供了快速服务
帮助和支持中心
帮助和支持
,并单击
许可
。
用户指南
。
•
适用于计算机的最新驱动程序
•
对技术服务与支持问题的解答
•
与其他用户和技术支持人员进行联机讨论
•
适用于计算机的说明文件
6 快速参考指南
支持
Dell
注:
请选择您所在的地区来查看相应的支持站点。
支持
Dell
•
解决方案 - 故障排除提示、技术性文章和联机课程
•
社区论坛 - 与其他
•
升级 - 内存、硬盘驱动器和操作系统等组件的升级
信息
•
客户服务 - 联系信息、订购状态、保修和维修信息
•
下载 - 驱动程序、补丁程序和软件更新
•
参考 - 计算机说明文件、产品规格和白皮书
站点 -
Web
站点提供了几种联机工具,包括:
Web
support.ap.dell.com/china
客户进行联机讨论
Dell
Page 47
您查找的内容 可以找到的位置
•
服务呼叫状态与支持历史记录
•
关于计算机的重要技术问题
•
常见问题
•
文件下载
•
关于计算机配置的详情
•
计算机的服务合同
•
如何使用
•
适用于计算机的说明文件
•
设备说明文件 (例如调制解调器)
Windows XP
客户特选支持
Dell
premiersupport.dell.com
客户特选支持
Dell
机构客户设计。
Windows
1
2
3
4
帮助和支持中心
单击
开始
按钮,并单击
键入说明问题的字词,然后单击箭头图标。
单击说明问题的主题。
按照屏幕上的说明进行操作。
站点 -
Web
站点专为公司、政府部门和教育
Web
并非所有地区均可访问此
帮助和支持
。
Web
站点。
•
如何使用
•
与
•
有关
•
如何重新安装操作系统
Linux
Dell Precision 和 Linux
Linux 和 Dell Precision
用户进行电子邮件讨论
计算机的其他信息
Dell 的 Linux
•
http://linux.dell.com
•
http://lists.us.dell.com/mailman/listinfo/linux-
支持站点
precision
•
http://docs.us.dell.com/docs/software/oslinux/
•
http://docs.us.dell.com/docs/software/OSRHEL3/
Operating System CD
操作系统已安装在您的计算机上。 要重新安装操作系
统,请使用
Precision
《用户指南》。
Operating System CD。
有关说明,请参阅
重新安装操作系统后,
请使用
Utilities CD
带的设备重新安装驱动
程序。
您的操作系统产品密钥
标签位于计算机上。
注:
的操作系统而异。
Drivers and
为计算机附
CD 的颜色因您订购
快速参考指南 7
Page 48
安装小型塔式计算机
警告: 开始本部分中的任何过程之前,请先参阅 《产品信息指南》中的安全说明。
为了正确安装计算机,请务必完成所有步骤。
连接键盘和鼠标。
1
www.dell.com | support.dell.com
2
连接调制解调器或网络电缆。
注意: 请勿将调制解调器电缆连接至网络适配器。
电话通信产生的电压会损坏网络适配器。
注: 如果您的计算机已安装网卡,请将网络电缆
连接至该卡。
8 快速参考指南
Page 49
3
连接显示器。
您可以采用不同方式连接显
示器,视您的图形卡而定。
注: 您可能需要使用附带
的适配器或电缆,才能将
显示器连接到计算机上。
快速参考指南 9
Page 50
配备单个连接器并支持单显示器和双显示器的插卡
适配器
VGA
VGA
www.dell.com | support.dell.com
如果您有单显示器图形卡,并且想将计算机连接至
显示器,请使用
VGA
VGA
适配器。
双
VGA Y
型电缆适配器
VGA
VGA
如果您的图形卡只有一个连接器,而您想将计算机连接
至一台或两台
显示器,请使用适当的
VGA
型电缆。
Y
双显示器电缆具有彩色编码,蓝色的连接器用于主显示器,黑色的连接器用于次显示器。
要启用双显示器支持功能,计算机在启动时必须连接两台显示器。
双
DVI Y
型电缆适配器
DVI
DVI
如果您的图形卡只有一个连接器,而您想将计算机连接
至一台或两台
显示器,请使用适当的
DVI
型电缆。
Y
10 快速参考指南
Page 51
配备
1 个 DVI 和 1 个 VGA
连接器并支持双显示器的插卡
单
DVI/单 VGA
DVI
VGA
如果要将计算机连接至一台或两台显示器,
请使用相应的连接器。
配备
双
DVI
2 个 DVI
连接器并支持双显示器的插卡
附带一个
DVI
DVI
VGA
DVI
附带
VGA
适配器的双
如果要将计算机连接至两台
请使用
适配器的双
VGA
VGA
DVI
适配器。
VGA
VGA
附带两个
VGA
VGA
VGA
VGA
显示器,
适配器的双
VGA
DVI
请使用
一台或两台
连接器将计算机连接至
DVI
显示器。
DVI
请使用
适配器将一台
VGA
器连接至计算机的一个
DVI
显示
VGA
连接器。
请使用两个
适配器将两台
VGA
显示器连接至计算机的
快速参考指南 11
DVI
VGA
连接器。
Page 52
4
www.dell.com | support.dell.com
连接扬声器。
注: 如果您的计算机
已安装声卡,请将扬
声器连接至该卡。
5
连接电源电缆并打开
计算机和显示器。
12 快速参考指南
Page 53
6
安装并非计算机附带的任何设备或软件之前,请先阅读随该软件或设备附带的说明文件或与
制造商联系,确认软件或设备是否与您的计算机和操作系统兼容。
安装附加软件或设备。
祝贺您! 您的小型塔式计算机已经安装完成。
安装台式计算机
警告: 开始本部分中的任何过程之前,请先参阅 《产品信息指南》中的安全说明。
为了正确安装计算机,请务必完成所有步骤。
连接键盘和鼠标。
1
注意: 请勿将调制解调器
电缆连接至网络适配器。 电
话通信产生的电压会损坏网
络适配器。
2
连接调制解调器或网络电缆。
注: 如果您的计算机已
安装网卡,请将网络电缆
连接至该卡。
快速参考指南 13
Page 54
3
连接显示器。
您可以采用不同方式连接显示器,
视您的图形卡而定。
注: 您可能需要使用附带的适配器
或电缆,才能将显示器连接到计算
机上。
www.dell.com | support.dell.com
14 快速参考指南
Page 55
配备单个连接器并支持单显示器和双显示器的插卡
适配器
VGA
VGA
如果您有单显示器图形卡,并且想将计算机连接至
显示器,请使用
VGA
双
VGA Y
VGA
型电缆适配器
VGA
VGA
适配器。
如果您的图形卡只有一个连接器,而您想将计算机连接
至一台或两台
显示器,请使用适当的
VGA
型电缆。
Y
双显示器电缆具有彩色编码,蓝色的连接器用于主显示器,黑色的连接器用于次显示器。
双
DVI Y
型电缆适配器
DVI
DVI
如果您的图形卡只有一个连接器,而您想将计算机连接
至一台或两台
显示器,请使用适当的
DVI
要启用双显示器支持功能,计算机在启动时必须连接两台显示器。
型电缆。
Y
快速参考指南 15
Page 56
配备
1 个 DVI 和 1 个 VGA
连接器并支持双显示器的插卡
单
DVI/单 VGA
DVI
VGA
www.dell.com | support.dell.com
如果要将计算机连接至一台或两台显示器,
请使用相应的连接器。
配备
双
DVI
2 个 DVI
连接器并支持双显示器的插卡
DVI
DVI
附带一个
VGA
DVI
附带
VGA
适配器的双
VGA
如果要将计算机连接至两台
请使用
适配器的双
VGA
VGA
DVI
适配器。
VGA
附带两个
VGA
VGA
VGA
VGA
显示器,
适配器的双
VGA
DVI
请使用
一台或两台
连接器将计算机连接至
DVI
显示器。
DVI
16 快速参考指南
请使用
适配器将一台
VGA
器连接至计算机的一个
DVI
VGA
连接器。
显示
请使用两个
显示器连接至计算机的
适配器将两台
VGA
DVI
VGA
连接器。
Page 57
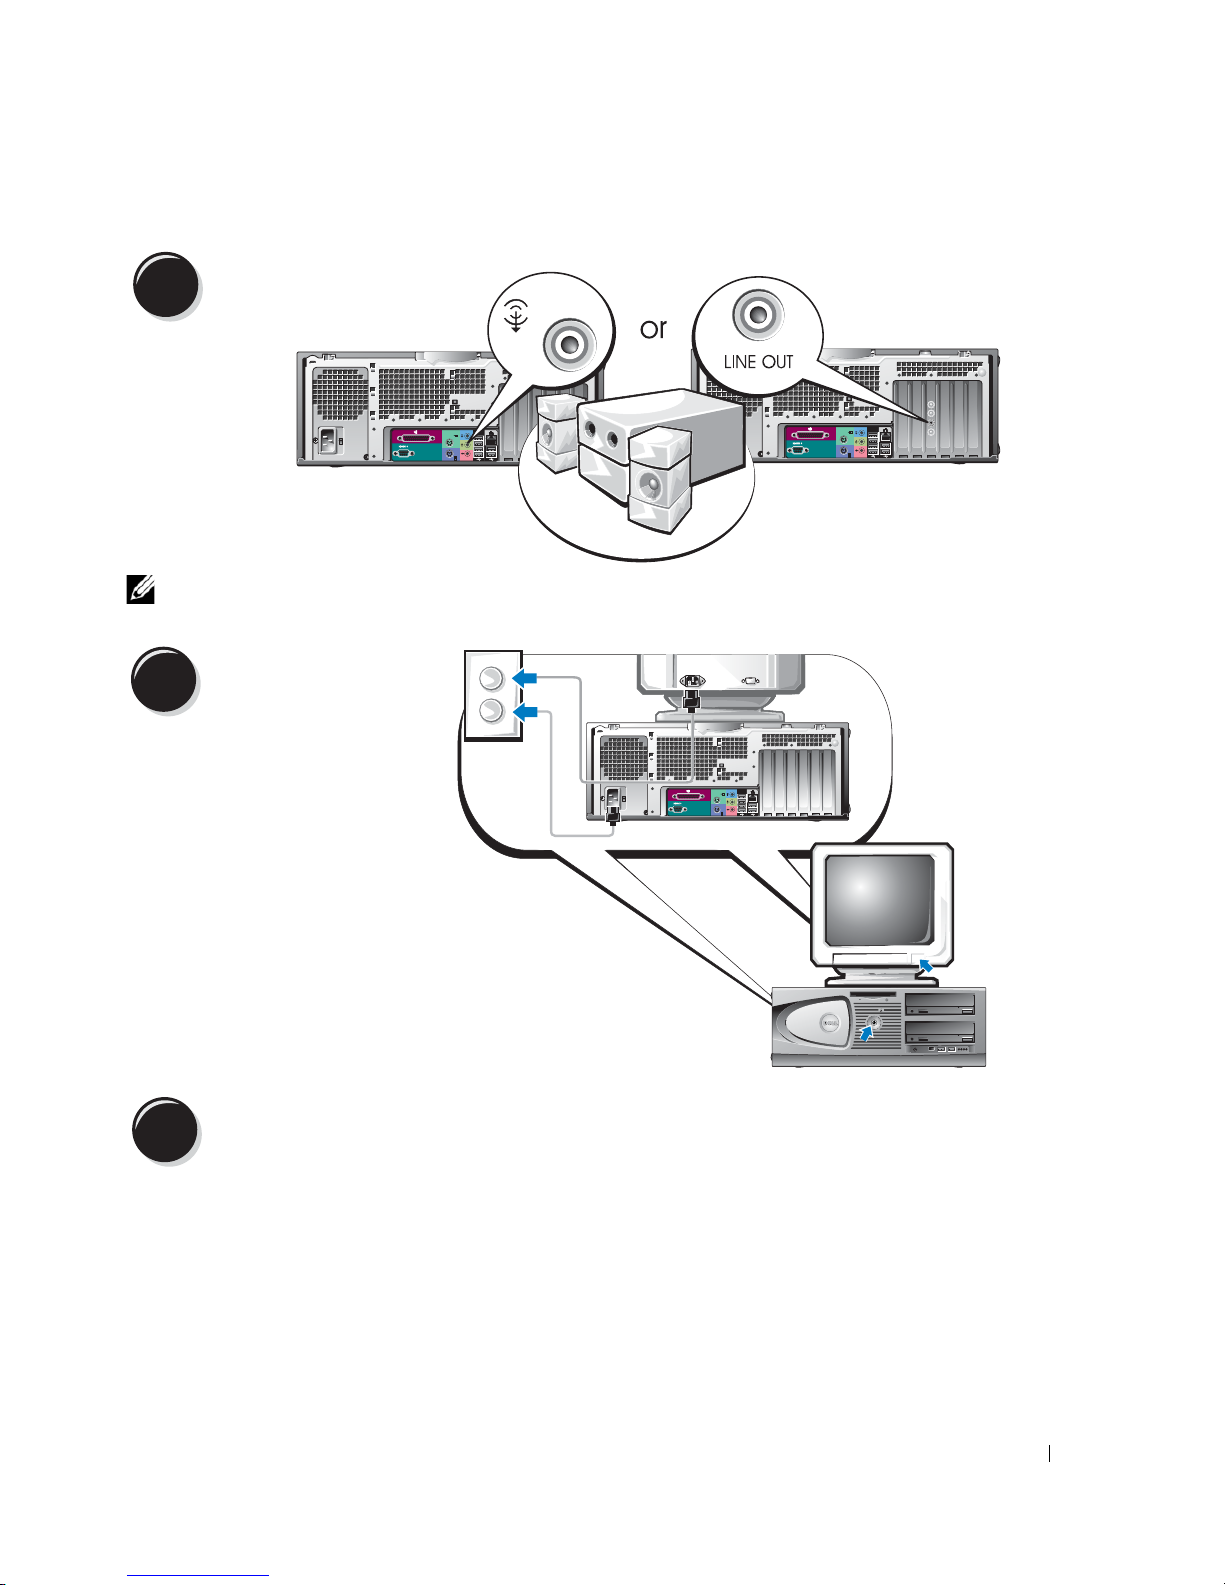
连接扬声器。
4
注: 如果您的计算机已安装声卡,请将扬声器连接至该卡。
连接电源电缆并打开计算机
5
和显示器。
您的台式计算机有一个可选的
IEEE 1394
买了
IEEE 1394
接器才可用。要购买该插卡,请
与
Dell
详情,请参阅 《用户指南》。
6
安装并非计算机附带的任何设备或软件之前,请先阅读随该软件或设备附带的说明文件或与
供应商联系,确认软件或设备是否与您的计算机和操作系统兼容。
前连接器。 您只有购
附加插卡,该连
联系。 有关附加插卡的
安装附加软件或设备。
祝贺您! 您的台式计算机已经安装完成。
快速参考指南 17
Page 58

查找用户指南
您的
Dell Precision™ Workstation 370
•
技术规格
•
计算机正面和背面视图,包括所有可用连接器
•
计算机内部视图,包括主机板和连接器的详细图形
•
计算机清洁说明
•
关于软件功能的信息,例如
•
使用
Microsoft Windows XP
•
www.dell.com | support.dell.com
卸下和安装部件的说明,包括内存、插卡、驱动器、微处理器和电池
•
排除各种计算机故障的信息
•
使用
Dell
•
有关如何与
您可以从硬盘驱动器或通过
《用户指南》。
从硬盘驱动器访问用户指南:
单击开始按钮,并单击帮助和支持。
通过
1
支持站点访问用户指南:
Dell
进入
support.ap.dell.com/china
《用户指南》包含有关计算机的以下附加信息:
LegacySelect Technology
操作系统的提示和信息
诊断程序和重新安装驱动程序的说明
联系的信息
Dell
Dell
支持
Web
站点
support.ap.dell.com/china
。
控制、密码使用以及系统设置选项
来访问
2
按照
3
在
Dell
Systems
打开小型塔式计算机
警告: 开始本部分中的任何过程之前,请先参阅 《产品信息指南》中的安全说明。
警告:
注意:
的程序。
关闭操作系统:
1
a
b
18 快速参考指南
站点的提示提供计算机的特定信息。
Web
支持
(系统),然后选择您的
为避免遭受电击,应始终确保在打开主机盖之前先从电源插座上拔下计算机插头。
为避免丢失数据,在关闭计算机之前,请保存和关闭所有打开的文件,并退出所有打开
站点主页上依次单击
Web
Reference
Dell Precision
(参考)、
计算机。
User's Guides
(用户指南)、
保存并关闭所有打开的文件,退出所有打开的程序,单击开始按钮,然后单击关闭
计算机。
在关闭计算机窗口中,单击关闭。
操作系统关闭进程结束后,计算机将会关闭。
Page 59
2
确保关闭计算机和已连接的任何设备。 如果计算机和已连接的设备在您关闭操作系统时
未自动关闭,请立即将其关闭。
3
如果已在背面板上的挂锁扣环中安装了挂锁,请卸下挂锁。
注意: 确保有足够的空间来放置打开的主机盖,至少要有 30 厘米 (1 英尺)的桌面空间。
将计算机侧面朝下放置,如下图所示。
4
5
打开主机盖:
a
面对计算机背面,用一只手按下计算机右侧的释放按钮,同时用另一只手提起主机
盖顶部。
b
用一只手按下计算机左侧的释放按钮,同时用另一只手提起主机盖顶部。
6
用一只手抓住计算机底部,然后用另一只手提起并打开主机盖。
释放按钮
安全缆线孔
挂锁扣环
释放按钮
快速参考指南 19
Page 60
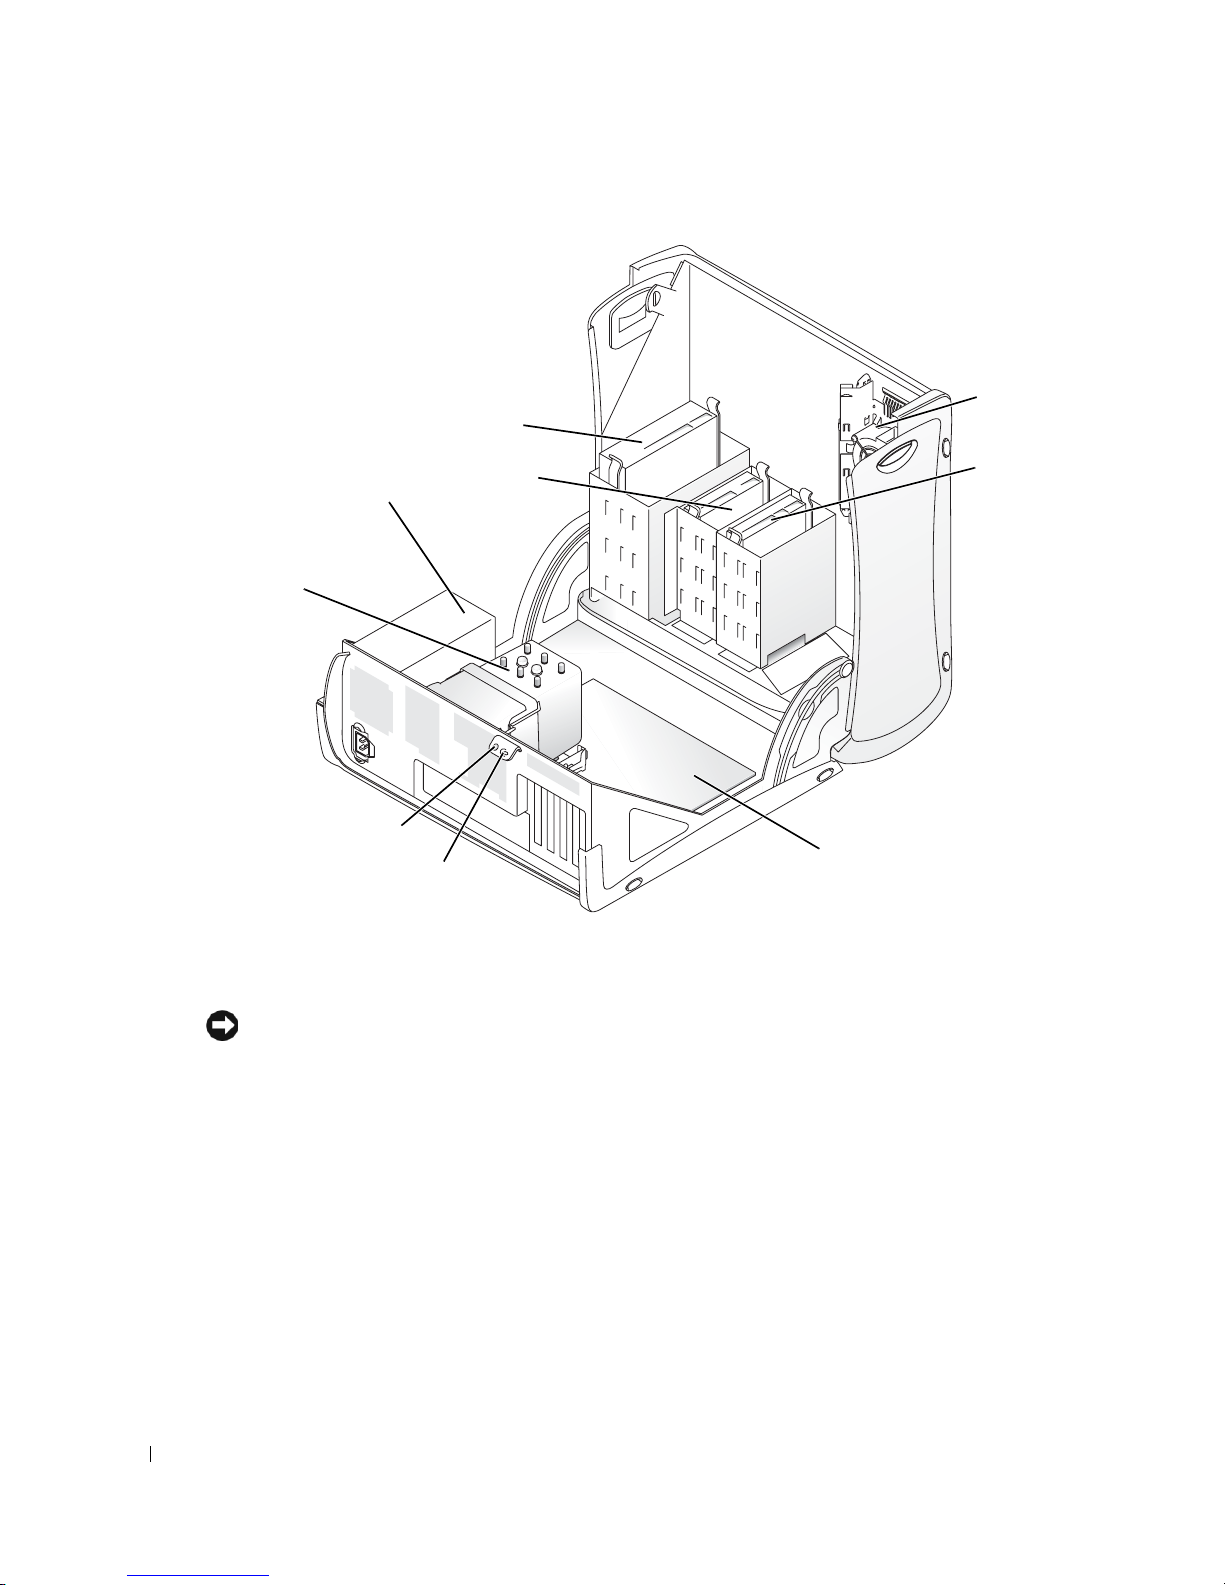
CD/DVD
插卡风扇
驱动器
电源设备
www.dell.com | support.dell.com
处理器通风罩和风扇
安全缆线孔
插卡冷却风扇
注意: 功率超过 75 瓦 (W) 的 PCI Express 图形卡要求安装额外的冷却风扇。 否则,您的插卡可能
过热并损害计算机。
挂锁扣环
软盘驱动器
(可选)
硬盘驱动器
主机板
如果您订购的计算机所使用的图形卡需要风扇,风扇会包括在内。 如果计算机内没有插卡风
扇,而您安装的图形卡的功率超过
如果计算机检测到您安装的插卡需要风扇,将会显示错误信息。
有关
并单击
联系信息,请参阅 《用户指南》,或访问
Dell
Contact Us
(联系我们)。
20 快速参考指南
75 W
,请联系
购买插卡风扇。
Dell
support.ap.dell.com/china
Page 61
打开台式计算机
警告: 开始本部分中的任何过程之前,请先参阅 《产品信息指南》中的安全说明。
警告:
静电。 您可以通过触摸计算机上未上漆的金属表面来导去静电。
注意:
并退出所有打开的程序。
关闭操作系统:
1
a
为防止静电损害计算机内部组件,请在接触计算机的任何电子组件之前先导去您身上的
为避免丢失数据,在关闭计算机之前,请保存和关闭所有打开的文件,
保存并关闭所有打开的文件,退出所有打开的程序,单击开始按钮,
然后单击关闭计算机。
b
在关闭计算机窗口中,单击关闭。
操作系统关闭进程结束后,计算机将会关闭。
2
确保关闭计算机和已连接的任何设备。 如果计算机和已连接的设备在您关闭操作系统时
未自动关闭,请立即将其关闭。
3
将主机盖释放闩锁向左滑动。
4
抬起主机盖并朝计算机正面转动。
主机盖释放闩锁
安全缆线孔
挂锁扣环
快速参考指南 21
Page 62
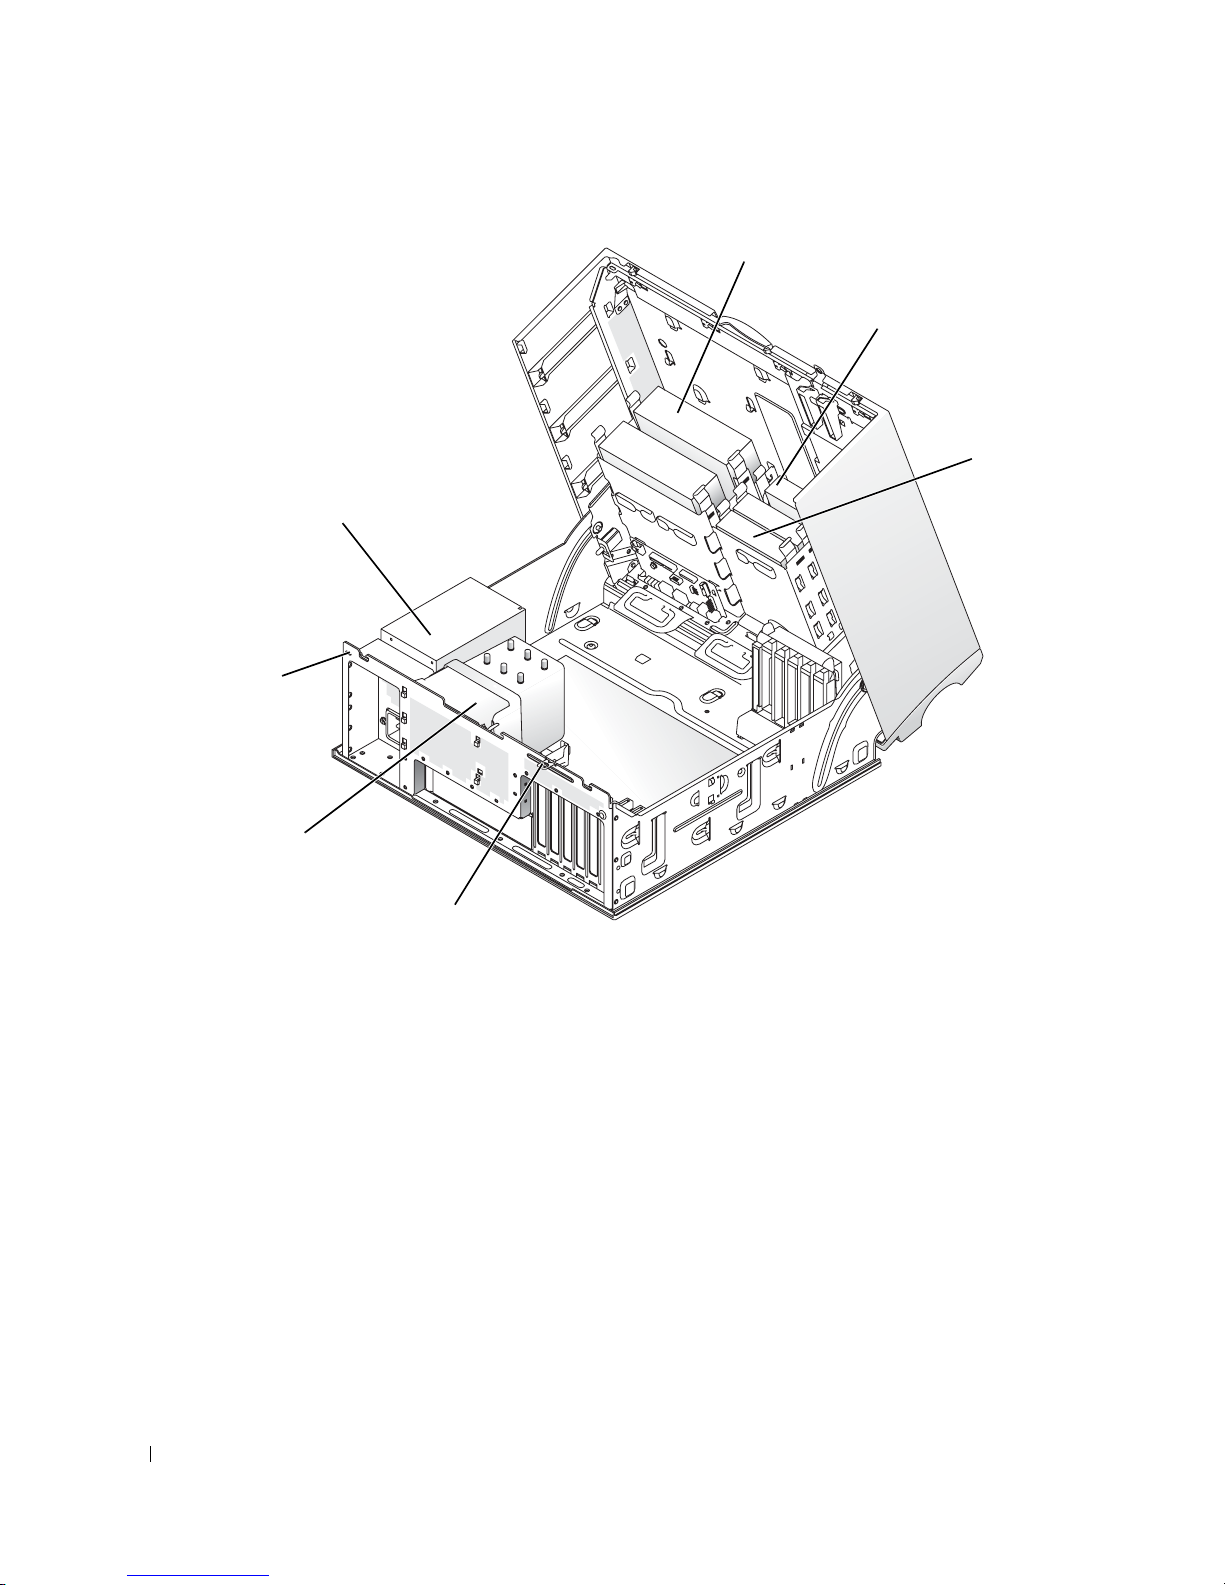
电源设备
www.dell.com | support.dell.com
安全缆线孔
CD/DVD
驱动器
软盘驱动器 (可选)
硬盘驱动器
处理器通风罩和风扇
挂锁扣环
维护计算机
为帮助维护计算机,请遵循以下建议:
•
为避免丢失或损坏数据,切勿在硬盘驱动器指示灯仍然亮起时关闭计算机。
•
定期使用防病毒软件扫描病毒。
•
定期删除不需要的文件并清理驱动器碎片,管理好硬盘驱动器空间。
•
定期备份文件。
•
定期清洁显示器屏幕、鼠标和键盘 (有关详情,请参阅 《用户指南》)。
22 快速参考指南
Page 63

解决问题
故障排除提示
排除计算机故障时,请遵循以下提示:
•
如果您在问题出现之前添加或删除了部件,请复查安装过程并确保该部件已正确地安装。
•
如果外围设备无法工作,请确保该设备已正确地连接。
•
如果屏幕上显示错误信息,请准确无误地将其记下。 此信息可以帮助技术支持人员诊断
并解决问题。
•
如果程序中显示错误信息,请参阅程序说明文件。
•
如果故障排除部分建议的措施是参阅 《用户指南》的某个章节,请进入
support.ap.dell.com/china
(如果需要,可使用另一台计算机),以便访问 《用户指南》。
解决软件与硬件不兼容的问题
如果在操作系统安装过程中未检测到某个设备,或者虽已检测到该设备但配置不正确,则可
以使用 “硬件疑难解答”来解决不兼容的问题。
您还可以使用 “设备管理器”来解决不兼容的问题。
Windows XP
要使用 “硬件疑难解答”来解决不兼容问题,请:
在 Microsoft® Windows® 2000
操作系统中,
1
单击开始按钮,并单击帮助和支持。
2
在搜索字段中键入
3
在搜索结果列表中,单击硬件疑难解答。
4
在硬件疑难解答列表中,单击我需要解决计算机上的硬件冲突,然后单击下一步。
Windows 2000
硬件疑难解答
,然后单击箭头开始搜索。
要使用 “设备管理器”来解决不兼容问题,请:
1
单击开始按钮,指向设置,然后单击控制面板。
2
在控制面板窗口中,双击系统。
3
单击硬件选项卡。
4
单击设备管理器。
5
单击查看,然后单击依连接排序资源。
快速参考指南 23
Page 64

6
双击中断请求
(IRQ)
。
如果设备配置不正确,则将显示黄色感叹号
7
双击任一标有感叹号的设备以显示属性窗口。
属性窗口中的设备状态区域将报告需要重新配置的插卡或设备。
8
重新配置设备或从 “设备管理器”中删除设备。 有关配置设备的信息,请参阅设备附带
的说明文件。
要使用 “硬件疑难解答”来解决不兼容问题,请:
1
单击开始按钮,然后单击帮助。
2
在目录选项卡中,单击疑难解答和维护,并单击
www.dell.com | support.dell.com
然后单击硬件。
3
在硬件疑难解答列表中,单击我需要解决计算机上的硬件冲突,然后单击下一步。
使用
Microsoft Windows XP
Microsoft Windows XP
置后计算机呈现不希望的运行状态,则该功能使您可以将计算机还原为先前的运行状态,
而不会影响数据文件。
(参阅第
注意: 请定期备份您的数据文件。 系统还原功能不会监控或恢复数据文件。
创建还原点
页的 “查找信息和帮助”)。
5
;如果设备已被禁用,则将显示红色
(!)
Windows 2000
疑难解答,
系统还原
操作系统提供了系统还原功能。如果在更改硬件、软件或其他系统设
有关使用系统还原功能的信息,请参阅
Windows
帮助和支持中心
X
。
1
单击开始按钮,并单击帮助和支持。
2
单击系统还原。
3
按照屏幕上的说明进行操作。
24 快速参考指南
Page 65

将计算机还原为较早的操作状态
注意: 将计算机还原为较早的操作状态之前,请保存并关闭所有打开的文件,退出所有打开的
程序。 完成系统还原之前,请勿更改、打开或删除任何文件或程序。
单击开始按钮,指向所有程序
1
2
确保选中恢复我的计算机到一个较早的时间,然后单击下一步。
3
要将计算机还原到某个日期,请在日历中单击该日期。
选择一个还原点屏幕提供了日历,以便您查看和选择还原点。
历日期均以粗体显示。
4
选择一个还原点并单击下一步。
→ 附件
→ 系统工具,然后单击系统还原。
所有包含可用还原点的日
如果日历日期只有一个还原点,则会自动选择该还原点。 如果有两个或更多还原点,
请单击所需的还原点。
5
单击下一步。
“系统还原”完成数据收集后,将显示恢复完成屏幕,然后计算机将重新启动。
6
计算机重新启动后,单击确定。
要更改还原点,您可以使用不同的还原点重复以上步骤,也可撤销还原。
撤销上次系统还原
注意: 撤销上次系统还原之前,请保存并关闭所有打开的文件,退出所有打开的程序。
完成系统还原之前,请勿更改、打开或删除任何文件或程序。
单击开始按钮,指向所有程序
1
2
单击撤销我上次的恢复并单击下一步。
→ 附件
→ 系统工具,然后单击系统还原。
3
单击下一步。
系统将显示系统还原屏幕,然后计算机将重新启动。
4
计算机重新启动后,单击确定。
启用系统还原
如果您重新安装
Windows XP
时的可用硬盘空间小于
要查看是否已启用系统还原,请:
1
单击开始按钮,并单击控制面板。
2
单击性能和维护。
3
单击系统。
4
单击系统还原选项卡。
5
确保未选取关闭系统还原。
200 MB
,系统还原将自动被禁用。
快速参考指南 25
Page 66

使用最后一次正确的配置
1
重新启动计算机,并在显示
2
突出显示 “最后一次正确的配置”,按
系统。
有助于解决附加设备或软件冲突的其他选项
注意: 以下过程将清除硬盘驱动器上的所有信息。
•
使用操作系统安装指南和操作系统
间,您可以选择删除现有的分区并重新格式化硬盘驱动器。
•
从芯片集的驱动程序开始,使用
www.dell.com | support.dell.com
诊断程序
Dell
警告: 开始本部分中的任何过程之前,请先参阅 《产品信息指南》中的安全说明。
“请选择要启动的操作系统”
<Enter>
,重新安装您的操作系统。 重新安装操作系统期
CD
Drivers and Utilities
,再按
CD
信息时按
,然后在提示时选择操作
<L>
<F8>
。
重新安装所有驱动程序。
何时使用
如果您遇到计算机问题,请执行第
然后再与
诊断程序
Dell
联系以获得技术帮助。
Dell
页的 “解决问题”中的检查步骤并运行
23
Dell
建议您在开始之前先打印这些步骤。
注意: Dell 诊断程序只能在 Dell™ 计算机上运行。 如果在其他类型的计算机上使用此程序,
会导致计算机响应不正确或产生错误信息。
诊断程序允许您执行以下操作:
Dell
•
快速或全面检测一个或全部设备
•
选择运行多少次检测程序
•
显示或打印检测结果,或者将检测结果存入文件
•
在检测到错误时暂停检测,或者在出现一定数量的错误时终止检测
•
访问联机帮助屏幕,其中介绍了检测程序及其运行方法
•
读取状态信息,了解检测程序是否已成功完成
•
在检测到问题时接收错误信息
诊断程序,
26 快速参考指南
Page 67

从硬盘驱动器启动
1
打开 (或重新启动)计算机。
2
显示
DELL™
注: 如果显示的信息表示未找到诊断公用程序分区,请参阅第 27 页的 “从 Drivers and Utilities CD
启动 Dell 诊断程序”。
诊断程序
Dell
徽标时,立即按
<F12>
。
如果您等待太久,并且屏幕上已显示操作系统徽标,请继续等待,直至看到
Windows
桌面。 然后关闭计算机并再试一次。 有关关闭计算机的详情,
Microsoft
请参阅 《用户指南》。
3
系统显示引导设备列表时,突出显示
并按
4
系统显示
<Enter>
Dell
。
诊断程序
Main Menu
Boot to Utility Partition
(主菜单)时,选择要运行的检测程序。
(引导至公用程序分区)
有关检测程序的详情,请参阅 《用户指南》。
从
Drivers and Utilities CD
1
插入
Drivers and Utilities
2
关闭并重新启动计算机。 有关关闭计算机的详情,请参阅 《用户指南》。
3
系统显示
DELL
如果您等待太久,并且屏幕上已显示
启动
Dell
CD
诊断程序
。
徽标时,立即按
<F12>
Windows
。
徽标,请继续等待,直至看到
Windows
桌面。 然后关闭计算机并再试一次。 有关关闭计算机的详情,请参阅
《用户指南》。
注: 以下步骤只能使更改的引导顺序在本次启动时有效。 下次启动时,计算机将根据在系统设
置程序中指定的设备进行引导。
系统显示引导设备列表时,突出显示
4
并按
<Enter>
。
IDE CD-ROM Device(IDE CD-ROM
设备)
5
从
6
从系统显示的菜单中选择
7
键入
8
键入
9
从编号列表中选择
引导菜单中选择
CD
以启动
1
以启动
2
IDE CD-ROM Device(IDE CD-ROM
ResourceCD
诊断程序。
Dell
Run the 32 Bit Dell Diagnostics
如果列出了多个版本,请选择适用于您的计算机的版本。
10
系统显示
Dell
诊断程序
Main Menu
有关检测程序的详情,请参阅 《用户指南》。
Boot from CD-ROM
菜单。
(主菜单)时,选择要运行的检测程序。
(从
CD-ROM
(运行
设备)选项。
引导)选项。
32 位 Dell
诊断程序)。
快速参考指南 27
Page 68

开始检测之前
警告: 开始本部分中的任何过程之前,请先参阅 《产品信息指南》中的安全说明。
•
如果连接了打印机,请将其打开。
•
进入系统设置程序,查阅计算机的配置信息,然后启用所有计算机组件和设备
(例如连接器)。
哔声代码
计算机可能会发出一连串标识问题的哔声。 一连串哔声可能包含一声哔声、短促的三声哔声,
然后是一声哔声 (代码为
1-3-1)。
此串哔声表示计算机遇到内存问题。
www.dell.com | support.dell.com
如果计算机发出哔声代码,请将其记录下来,然后在下表中查找该代码。
代码原因
1-1-2
1-1-3
1-1-4
1-2-1
1-2-2
1-2-3
1-3
1-3-1 至 2-4-4
3-1-1
3-1-2
3-1-3
3-1-4
3-2-2
3-2-4
微处理器寄存器出现故障
NVRAM
ROM BIOS
可编程间隔计时器出现故障
DMA
DMA
视频内存检测失败
未正确识别或使用内存
从
主
主中断屏蔽寄存器出现故障
从中断屏蔽寄存器出现故障
中断向量载入失败
键盘控制器检测失败
读/写失败
校验和失败
初始化失败
页面寄存器读/写失败
寄存器出现故障
DMA
寄存器出现故障
DMA
3-3-1
3-3-2
3-3-4
3-4-1
3-4-2
3-4-3
4-2-1
NVRAM
NVRAM
视频内存检测失败
屏幕初始化失败
屏幕回扫失败
搜索视频
无计时器嘀嗒信号
28 快速参考指南
断电
配置无效
失败
ROM
Page 69

代码原因
4-2-2
4-2-3
4-2-4
4-3-1
4-3-3
4-3-4
4-4-1
4-4-2
4-4-3
4-4-4
关闭系统失败
门电路出现故障
A20
保护模式中出现意外中断
0FFFFh
计时器芯片计数器
计时时钟停止
串行或并行端口检测失败
无法将代码解压缩至阴影内存
数学协处理器检测失败
高速缓存检测失败
以上地址出现内存故障
出现故障
2
错误信息
注: 如果信息未在其中列出,请参阅显示该信息时所运行操作系统或程序的说明文件。
如果计算机在启动期间出现错误,显示器屏幕将会显示一则说明问题的信息。 有关解决任何
问题的建议,请参阅 《用户指南》中的 “错误信息”。
快速参考指南 29
Page 70
诊断指示灯
警告: 开始本部分中的任何过程之前,请先参阅 《产品信息指南》中的安全说明。
为帮助您排除故障,计算机前面板或背面板上配备了四个指示灯,分别标有
。 这些指示灯可以呈黄色或绿色。 计算机正常启动时,这些指示灯将闪烁。 计算机启动
"D"
后,四个指示灯将全部呈绿色稳定亮起。
识问题。
指示灯模式 问题说明 建议的解决方案
www.dell.com | support.dell.com
ABCD
ABCD
ABCD
ABCD
"A"、"B"、"C" 和
如果计算机出现故障,指示灯的颜色和顺序可以标
可能出现故障,计算机进入恢复
BIOS
模式。
处理器可能出现故障。 重新安装处理器并重新启动计算机。
检测到内存模块,但是内存出现故障。
扩充卡可能出现故障。 1
运行
BIOS Recovery
复完成,然后重新启动计算机。
有关重新安装处理器的详情,请参阅
《用户指南》。
1
重置内存模块。
2
重新启动计算机。
3
运行
4
如果问题仍然存在,
请与
卸下某个插卡 (不是图形卡)并重新
启动计算机,确定是否出现冲突。
有关卸下插卡的详情,请参阅
《用户指南》。
2
如果问题仍然存在,请重新安装您卸
下的插卡并卸下另一个插卡,然后重
新启动计算机。
3
对每一个插卡重复此过程。如果计算
机启动正常,则排除您卸下的最后一
个插卡的资源冲突故障 (请参阅 “
Dell
Dell
诊断程序。
联系。
决软件与硬件不兼容的问题
4
如果问题仍然存在,请与
有关与
《用户指南》。
Dell
公用程序,等待恢
”)。
联系。
Dell
联系的详情,请参阅
解
黄色
=
绿色
=
熄灭
=
30 快速参考指南
Page 71
指示灯模式 问题说明 建议的解决方案
图形卡可能出现故障。
ABCD
软盘驱动器或硬盘驱动器可能出现故障。
•
如果计算机配备了图形卡,请卸下并
重新安装该卡,然后重新启动计算机。
有关重新安装图形卡的详情,请参阅
《用户指南》。
•
如果问题仍然存在,请安装已知能够
正常工作的图形卡并重新启动计算机。
•
如果问题仍然存在,或者计算机使用
集成图形卡,请与
联系的详情,请参阅
Dell
《用户指南》。
重置所有电源电缆和数据电缆并重新启
动计算机。
ABCD
联系。 有关与
Dell
ABCD
黄色
=
绿色
=
熄灭
=
可能出现故障。 重新安装所有
USB
接,然后重新启动计算机。
设备,检查电缆连
USB
快速参考指南 31
Page 72
指示灯模式 问题说明 建议的解决方案
ABCD
www.dell.com | support.dell.com
ABCD
未检测到内存模块。
主机板出现故障。
•
如果系统中安装了一个内存模块,请
重新安装该模块并重新启动计算机。
关内存模块的详情,请参阅 《用户指
南》。
•
如果系统中安装了两个或多个内存模
块,请卸下这些模块,并重新安装一
个模块,然后重新启动计算机。
算机启动正常,请重新安装其他模块。
继续该步骤直至您找到出现故障的模
块,或者重新安装所有模块都未发现
故障。
《用户指南》。
•
如果有类型相同、能够正常工作的内
存,请将其安装到计算机中。
有关内存模块的详情,请参阅
《用户指南》。
•
如果问题仍然存在,请与
有关与
《用户指南》。
与
Dell
有关与
《用户指南》。
有关内存模块的详情,请参阅
联系。
Dell
联系的详情,请参阅
Dell
联系
,寻求技术帮助。
联系的详情,请参阅
Dell
如果计
有
ABCD
ABCD
黄色
=
绿色
=
熄灭
=
32 快速参考指南
•
检测到内存模块,但是存在内存配置
或兼容性错误。
主机板资源和/或硬件可能出现故障。 执行
确保内存模块/内存连接器无特殊安装
要求。
•
验证您安装的内存模块是否与计算机
兼容。
重新安装内存模块并重新启动计算机。
•
•
如果问题仍然存在,请与
有关与
请参阅 《用户指南》。
中的步骤 (请参阅
如果问题仍然存在,请
有关与
《用户指南》。
联系。
Dell
联系的详情,
Dell
“解决软件与硬件不兼容的问题”
第
联系的详情,请参阅
Dell
23
与
页
)。
Dell
联系
。
Page 73
指示灯模式 问题说明 建议的解决方案
ABCD
ABCD
扩充卡可能出现故障。 1
出现其他故障。
计算机在
POST
后进入正常操作状态。 无。
卸下某个插卡 (不是图形卡)并重新
启动计算机,确定是否出现冲突。
卸下插卡的详情,请参阅
《用户指南》。
2
如果问题仍然存在,请重新安装您卸
下的插卡并卸下另一个插卡,然后重
新启动计算机。
3
对每一个插卡重复此过程。如果计算
机启动正常,则排除您从计算机上卸
下的最后一个插卡的资源冲突故障
(请参阅
不兼容的问题”)。
4
如果问题仍然存在,请与
有关与
《用户指南》。
•
确保硬盘驱动器、
驱动器的电缆已正确连接至主机板。
•
如果问题仍然存在,请与
有关与
《用户指南》。
第
Dell
Dell
页
的“解决软件与硬件
23
联系。
Dell
联系的详情,请参阅
驱动器和
CD
联系。
Dell
联系的详情,请参阅
有关
DVD
ABCD
黄色
=
绿色
=
熄灭
=
快速参考指南 33
Page 74

常见问题
如何才能
将计算机安装为使用两台显示器?
www.dell.com | support.dell.com
在显示器电缆连接器似乎无法插
入计算机背面的连接器时连接显
示器?
安装插卡风扇? 如果您安装了功率超过
...
解决方案 在何处查找其他信息
如果计算机配备了支持双显示器安
装所需的图形卡,请在包装箱中找
到
型电缆。
Y
个连接器 (将此连接器插入背面
板),另一端分支为两个连接器
(将这两个连接器插入显示器电
缆)。 对于小型塔式计算机,请参
第9 页的 “连接显示器”;对
阅
于台式计算机,请参阅
“连接显示器”。
如果图形卡使用
示器使用的是
须使用适配器。 包装箱中应该附带
了适配器。
图形卡,则需要安装插卡冷却风
扇。 如果要订购一个插卡冷却风
扇,请与
在 《用户指南》和
Y
VGA
联系。 联系信息可以
Dell
support.ap.dell.com/china
上找到。
型电缆的一端为单
第
连接器,而显
DVI
连接器,则必
75 W
14
页的
的新
要查找有关使用双显示器的其他信息,请
参阅
Drivers and Utilities CD
明文件。
有关详情,请与
有关安装插卡风扇或插卡的信息,
请参阅 《用户指南》。
Dell
联系。
上的图形卡说
连接扬声器? 如果您已安装声卡,请将扬声器连
接至该卡的连接器。对于小型塔式
计算机,请参阅
扬声器”;对于台式计算机,请参
第
阅
17
第
页的 “连接扬声器”。
页的“连接
12
34 快速参考指南
有关详情,请参阅随扬声器附带的说明文
件。
Page 75

如何才能
...
解决方案 在何处查找其他信息
找到适用于
备的正确连接器?
找到有关计算机硬件和其它技术
规格的信息?
查找适用于计算机的说明文件? 以下说明文件可用于您的计算机:
USB 或 IEEE 1394
设
小型塔式计算机配备了八个
接器 (正面两个,背面六个)。
台式计算机配备了八个
(正面两个,背面六个),以及一
个可选的
只有购买了
该连接器才可用。要购买该插卡,
请与
情,请参阅 《用户指南》。
《用户指南》中包含规格表,其中
提供了有关计算机和硬件的更多详
情。 要找到 《用户指南》,请参阅
第5 页的 “查找信息和帮助”。
•
•
•
要找到这些说明文件,请参阅第
页的 “查找信息和帮助”。
IEEE 1394
IEEE 1394
联系。 有关附加插卡的详
Dell
用户指南
产品信息指南
系统信息标签
USB
前连接器。 您
附加插卡,
USB
连接器
连
请在 《用户指南》中查看计算机的正面和背
面视图。
参阅第
进入
support.ap.dell.com/china
下一种支持工具:
书,或者在
户进行交流。
如果您丢失了自己的说明文件,
可以在
support.ap.dell.com/china
5
有关查找 《用户指南》的帮助,请
页的 “查找信息和帮助”。
5
Dell
Dell
支持
Dell
支持
站点
We b
论坛聊天室内与其他
,然后使用以
阅读有关最新技术的白皮
站点
Web
上找到。
Dell
用
快速参考指南 35
Page 76

www.dell.com | support.dell.com
36 快速参考指南
Page 77

索引
A
安全说明 ,
安装部件
关闭计算机 ,
6
18, 21
B
帮助和支持中心 ,
保修 ,
标签
6
服务标签 ,
Microsoft Windows, 6
7
6
C
查找信息说明文件 ,
冲突
软件与硬件不兼容问题 ,
5
23
F
服务标签 ,
6
G
故障排除
帮助和支持中心 ,
冲突 ,
Dell
还原为先前的状态 ,
硬件疑难解答 ,
诊断指示灯 ,
23
诊断程序 ,
I
冲突 ,
IRQ
计算机
还原为先前的状态 ,
23
30
26
23
7
24
24
R
ResourceCD
诊断程序 ,
Dell
S
设备管理器 ,
说明文件 ,
产品信息指南 ,
联机 , 6-
ResourceCD, 5
设备 ,
用户指南 ,
23
13
7
5
6
W
Windows 2000
设备管理器 ,
硬件疑难解答 ,
26
6
23
23
错误信息
诊断指示灯 ,
30
D
Dell
客户特选支持
支持站点 ,
诊断程序 ,
Dell
Drivers and Utilities CD, 5
6
Web
26
站点 ,
7
M
Microsoft Windows
标签 ,
O
Operating System CD, 7
Q
驱动程序
ResourceCD, 5
6
Windows XP
帮助和支持中心 ,
系统还原 ,
硬件疑难解答 ,
问题
诊断程序 ,
Dell
还原为先前的状态 ,
诊断指示灯 ,
24
30
索引 37
7
23
26
24
Page 78

38 索引
X
系统还原 ,
系统信息标签 ,
24
Y
硬件
诊断程序 ,
Dell
硬件疑难解答 ,
用户指南 ,
6
5
26
23
Z
诊断程序
Dell, 26
Drivers and Utilities CD, 5
指示灯 ,
诊断指示灯 ,
指示灯
计算机背面 ,
诊断 ,
重新安装
Drivers and Utilities CD, 5
ResourceCD, 5
主机板 ,
30
30
30
30
5
38 索引
Page 79

Dell Precision™ Workstation
370 システム
クイックリファレンスガイド
DHM および WHM モデル
www.dell.com | support.dell.com
Page 80

メモ、注意、および警告
メモ: メモは、コンピュータを使いやすくするための重要な情報を説明しています。
注意: 注意は、ハードウェアの損傷やデータの損失の可能性があることを示し、その危険を回避するため
の方法を説明しています。
注意: 警告は、物的損害、けが、または死亡の原因となる可能性があることを示しています。
略語について
略語の説明は、『ユーザーズガイド』の「用語集」を参照してください。
Dell™ n
Microsoft
シリーズコンピュータをお買い上げいただいた場合は、このマニュアルで参照する
®
Windows®
オペレーティングシステムについての記述は適用されません。
____________________
本書の内容は予告なく変更されることがあります。
© 2004 すべての著作権は Dell Inc. にあります。
Dell Inc. の書面による許可のない複写は、いかなる形態においても厳重に禁じられています。
本書で使用されている商標について:Del、DELL ロゴ、および Dell Precision は Dell Inc. の商標です。
Microsoft および Windows は Microsoft Corporation の登録商標です。
本書では、必要に応じて上記以外の商標や会社名が使用されている場合がありますが、これらの商標や会社名は、
一切 Dell Inc. に所属するものではありません。
DHM および WHM モデル
2004 年 4 月 P/N T3914 Rev. A00
Page 81

目次
情報とアシスタンスの入手 . . . . . . . . . . . . . . . . . . . . . . . 5
ミニタワーコンピュータのセットアップ
デスクトップコンピュータのセットアップ
ユーザーズガイドを見つけるには
. . . . . . . . . . . . . . . . . . . . 19
ミニタワーコンピュータのカバーの開き方
カード冷却ファン
. . . . . . . . . . . . . . . . . . . . . . . . . . . . 22
デスクトップコンピュータのカバーの開き方
コンピュータのメンテナンス
問題の解決
. . . . . . . . . . . . . . . . . . . . . . . . . . . . . . . . 26
. . . . . . . . . . . . . . . . . . . . . . 25
トラブルシューティングのヒント
. . . . . . . . . . . . . . . . 9
. . . . . . . . . . . . . . . 14
. . . . . . . . . . . . . . . 20
. . . . . . . . . . . . . . 23
. . . . . . . . . . . . . . . . . 26
ハードウェアとソフトウェアの非互換性問題の解決
Microsoft Windows XP システムの復元の使い方
前回正常起動時の構成機能の使い方
Dell 診断プログラム
テストを実行する前に
ビープコード
. . . . . . . . . . . . . . . . . . . . . . . . . . . . . . . 31
エラーメッセージ
. . . . . . . . . . . . . . . . . . . . . . . . . 29
. . . . . . . . . . . . . . . . . . . . . . . 31
. . . . . . . . . . . . . . . . . . . . . . . . . . 32
. . . . . . . . . . . . . . . . 29
. . . . . . . 26
. . . . . . . . . . . 27
診断用ライト
よくある質問
. . . . . . . . . . . . . . . . . . . . . . . . . . . . . . . 33
. . . . . . . . . . . . . . . . . . . . . . . . . . . . . . . 39
索引 . . . . . . . . . . . . . . . . . . . . . . . . . . . . . . . . . . . . . 41
目次 3
Page 82

4 目次
Page 83
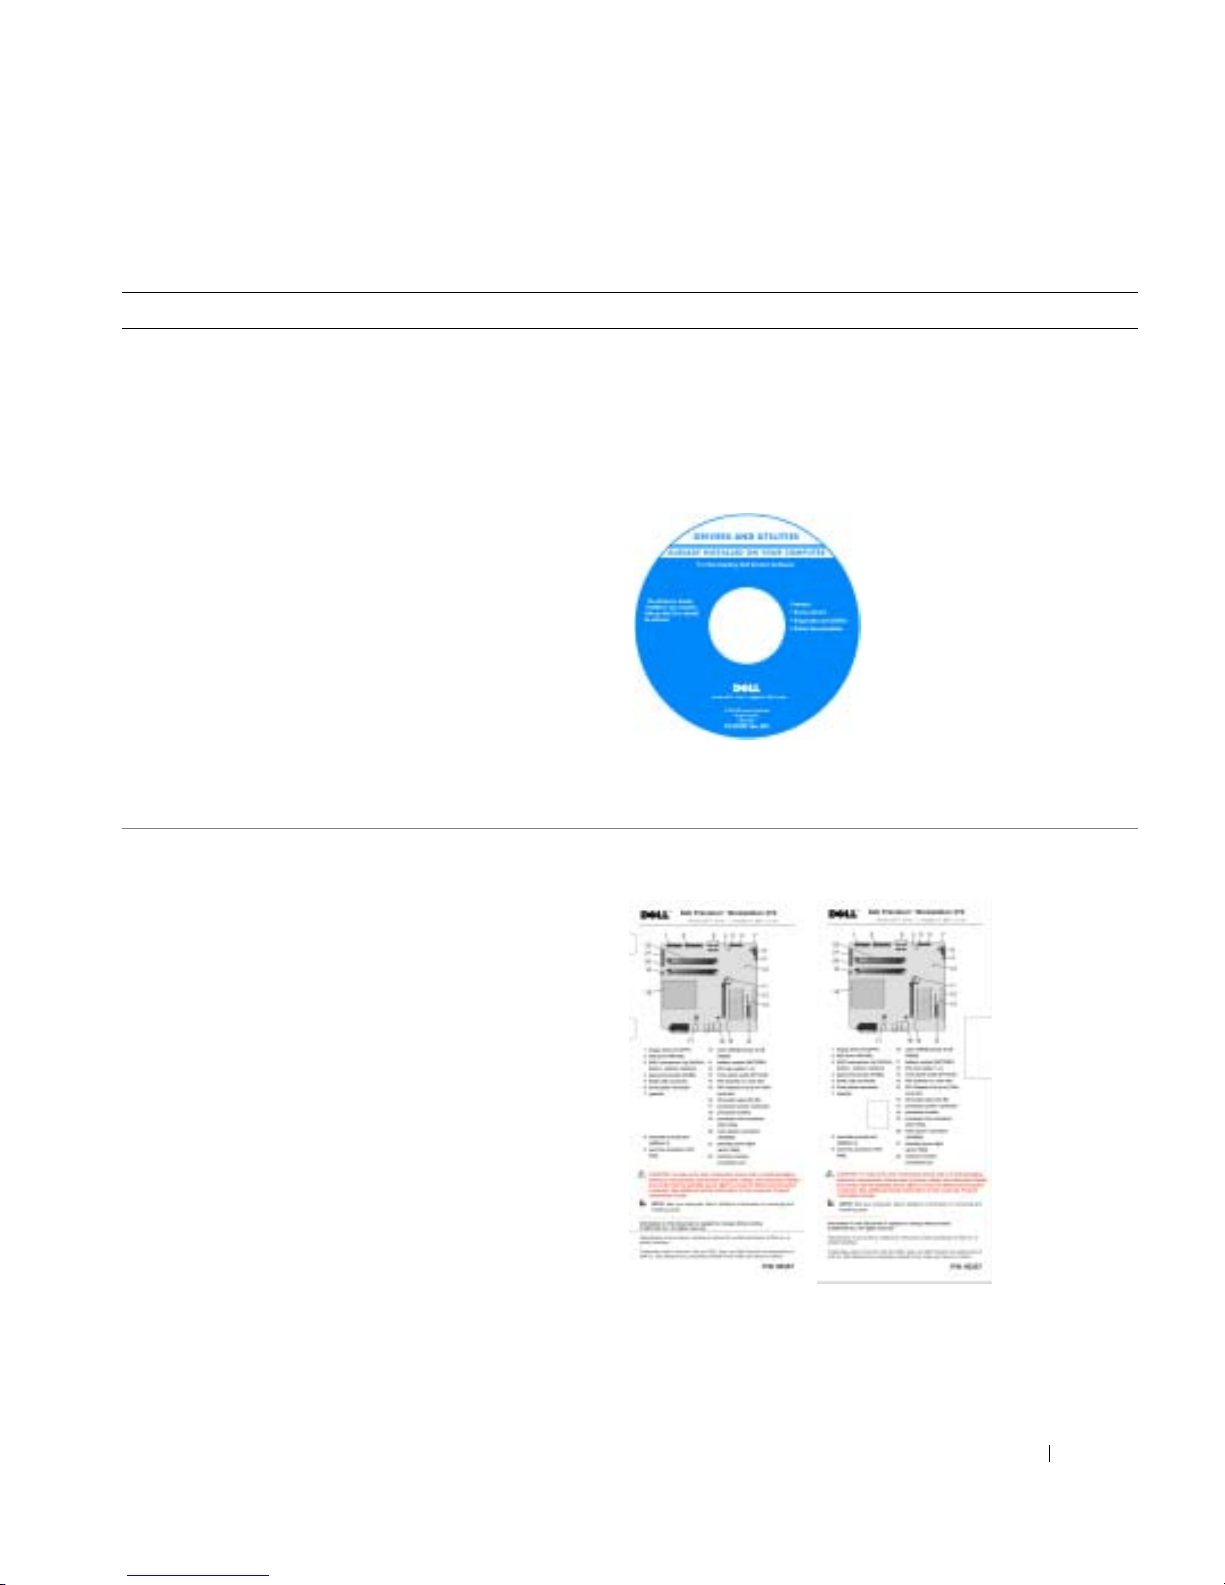
情報とアシスタンスの入手
参照したい情報 参照先
•
コンピュータの診断プログラム
•
コンピュータに対応したドライバ
•
デバイスのマニュアル
Drivers and Utilities CD(別名: ResourceCD)
マニュアルおよびドライバは、本コンピュータにすでに
インストールされています。 この CD は、ドライバを再
インストールしたり、Dell 診断プログラムを実行したり
(29 ページ を参照)、マニュアルにアクセスしたりする
ときに使います。
メモ: 最新のドライバおよびマニュアルのアップデー
トは、support.dell.com で入手できます。
CD 内の Readme ファイル
では、コンピュータの技
術的変更に関する最新の
アップデートや、技術者
または専門知識をお持ち
のユーザーを対象とした
高度な技術資料を参照で
きます。
•
システム基板のコネクタ
•
システム基板のコンポーネントの位置
システム情報ラベル
コンピュータカバーの内側に貼付されています。
クイックリファレンスガイド 5
Page 84
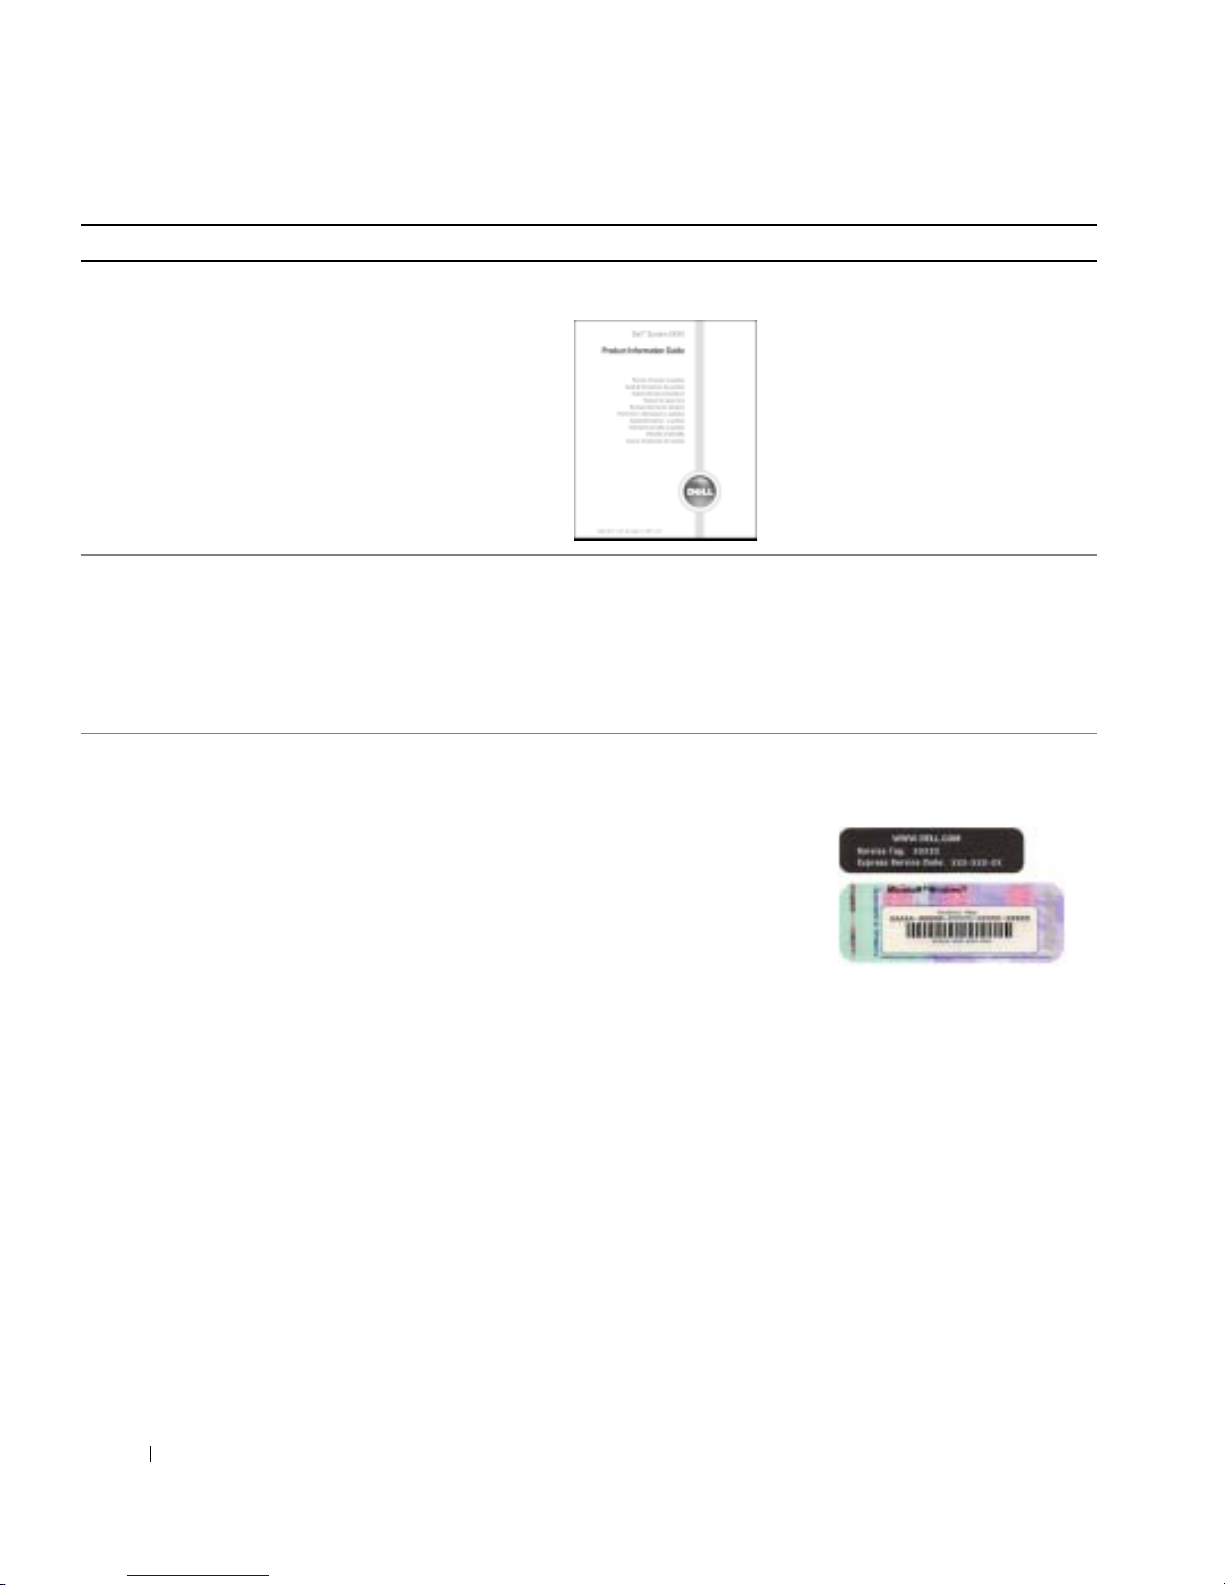
参照したい情報 参照先
•
保証に関する情報
•
安全にお使いいただくための注意
•
認可機関の情報
•
人間工学に合ったコンピュータの使い方
•
エンドユーザー使用許諾契約
www.dell.com | support.dell.com
•
部品の取り外しおよび交換方法
•
仕様
•
システムの設定方法
•
トラブルシューティングおよび問題の解決方法
•
サービスタグとエクスプレスサービスコード
•
Microsoft Windows
ライセンスラベル
Dell™ 製品情報ガイド
Dell Precision ユーザーズガイド
®
Microsoft
1
スタート
Windows® XP のヘルプとサポートセンター
ボタンをクリックし、
ヘルプとサポート をク
リックします。
2
ユーザーズガイドおよびシステムガイド をクリックし、
ユーザーズガイド をクリックします。
サービスタグおよび Microsoft Windows ライセンス
これらのラベルはコンピュータに貼付されています。
•
サービスタグは、
support.jp.dell.com
のデルのサポートサイト
を利用する際やテクニカ
ルサポートへのお問い合
わせの際に、ご使用のコ
ンピュータを識別するた
めに使います。
•
エクスプレスサービスコードを利用すると、適切なテ
クニカルサポートに直接電話で問い合わせることがで
きます。
エクスプレスサービスコードは、国によって利
用できないことがあります。
6 クイックリファレンスガイド
Page 85

参照したい情報 参照先
•
コンピュータに対応したドライバ
•
テクニカルサービスやサポートに関する質問の答え
•
コンピュータのマニュアル
デルのサポートウェブサイト ― support.jp.dell.com
メモ: 最初に表示される世界地図のページで希望の国
や地域を選択できます。
デルのサポートサイトには、次のようなメニューがあり
ます。
•
技術情報 ―
(診断プログラム)、インストールガイドなど。
•
各種サービスのご案内 ― サービスプラン、登録内容変
更申し込み、リサイクル
状況確認など。
•
ダウンロード ― ファイルライブラリでは、ドライバ、
ユーティリティなどのファイルのダウンロードサービ
ス。
•
参考資料 ― 周辺機器やソフトウェアのマニュアルを集
めたデルドキュメント、ベンダーサポートリンク、パ
ソコン活用術、デル
•
Windows XP
•
コンピュータのマニュアル
•
デバイス(モデムなど)のマニュアル
の使用方法
Windows ヘルプとサポートセンター
1
スタート ボタンをクリックし、
リックします。
2
問題を説明する単語や語句を入力して、
矢印のアイコンをクリックします。
3
問題を説明しているトピックをクリックします。
4
画面の指示に従います。
Q & A
集、トラブル解決ナビ、
•
買取サービス、引き取り修理
PC
用語集など。
ヘルプとサポート をク
Diagnostics
•
Linux
の使用方法
•
Dell Precision
で相談
•
Dell Precision
および
および
Linux
のユーザーと
Linux
に関するその他の情報
E
メール
Dell がサポートする Linux サイト
•
http://linux.dell.com
•
http://lists.us.dell.com/mailman/listinfo/linuxprecision
•
http://docs.us.dell.com/docs/software/oslinux/
•
http://docs.us.dell.com/docs/software/OSRHEL3/
クイックリファレンスガイド 7
Page 86

参照したい情報 参照先
•
オペレーティングシステムの再インストール方法
www.dell.com | support.dell.com
オペレーティングシステム CD
オペレーティングシステムは、本コンピュータにすでに
インストールされています。 オペレーティングシステム
を再インストールするには、『オペレーティングシステ
ム CD』を使います。 操作手順は、 Precision 『ユーザー
ズガイド』を参照してください。
オペレーティングシステム
の再インストールを完了し
たら、『Drivers and
Utilities CD』 を使って、コ
ンピュータに付属している
デバイス用のドライバを再
インストールします。
オペレーティングシステム
のプロダクトキーラベル
は、コンピュータに貼付さ
れています。
メモ: CD の色はご注文のオペレーティングシステムに
よって異なります。
8 クイックリファレンスガイド
Page 87
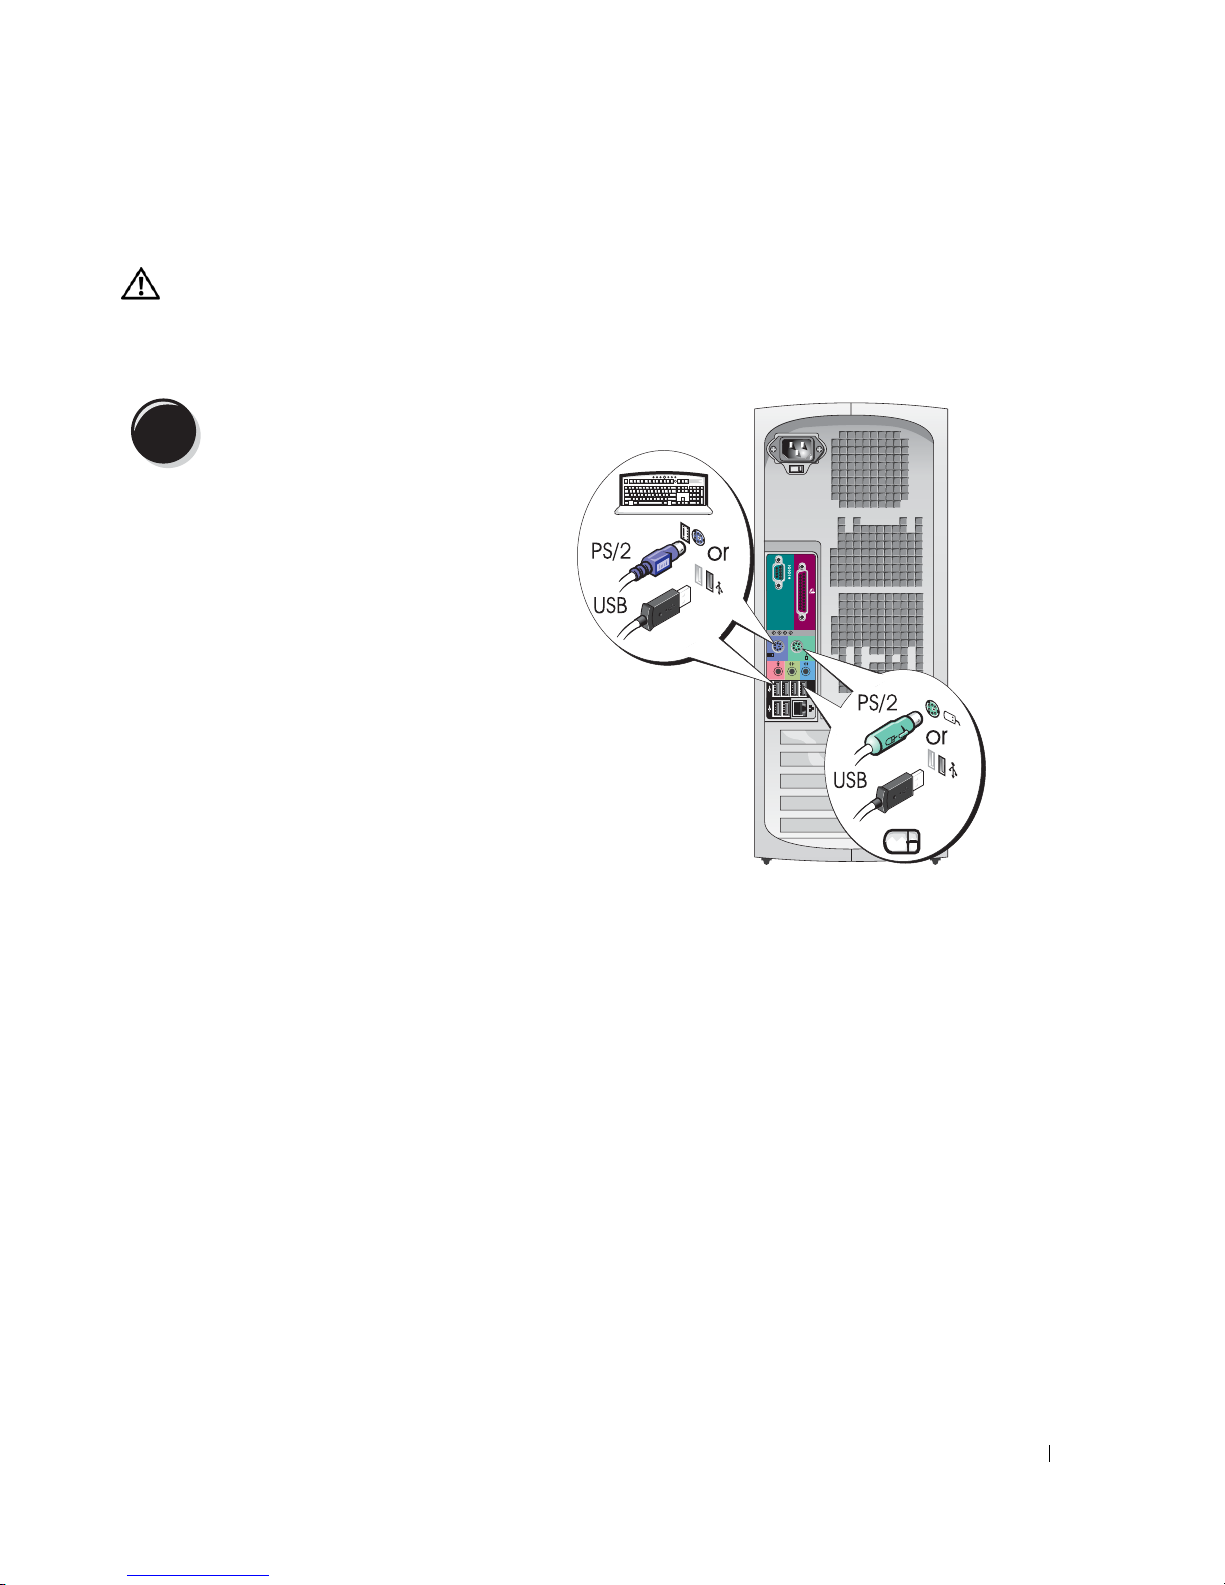
ミニタワーコンピュータのセットアップ
警告: 以下のセットアップの手順は、『製品情報ガイド』の安全にお使いいただくための注
意を守って実行してください。
コンピュータを正しくセットアップするには、ここで説明する手順をすべて完了する必要
があります。
キーボードとマウスを接続します。
1
クイックリファレンスガイド 9
Page 88
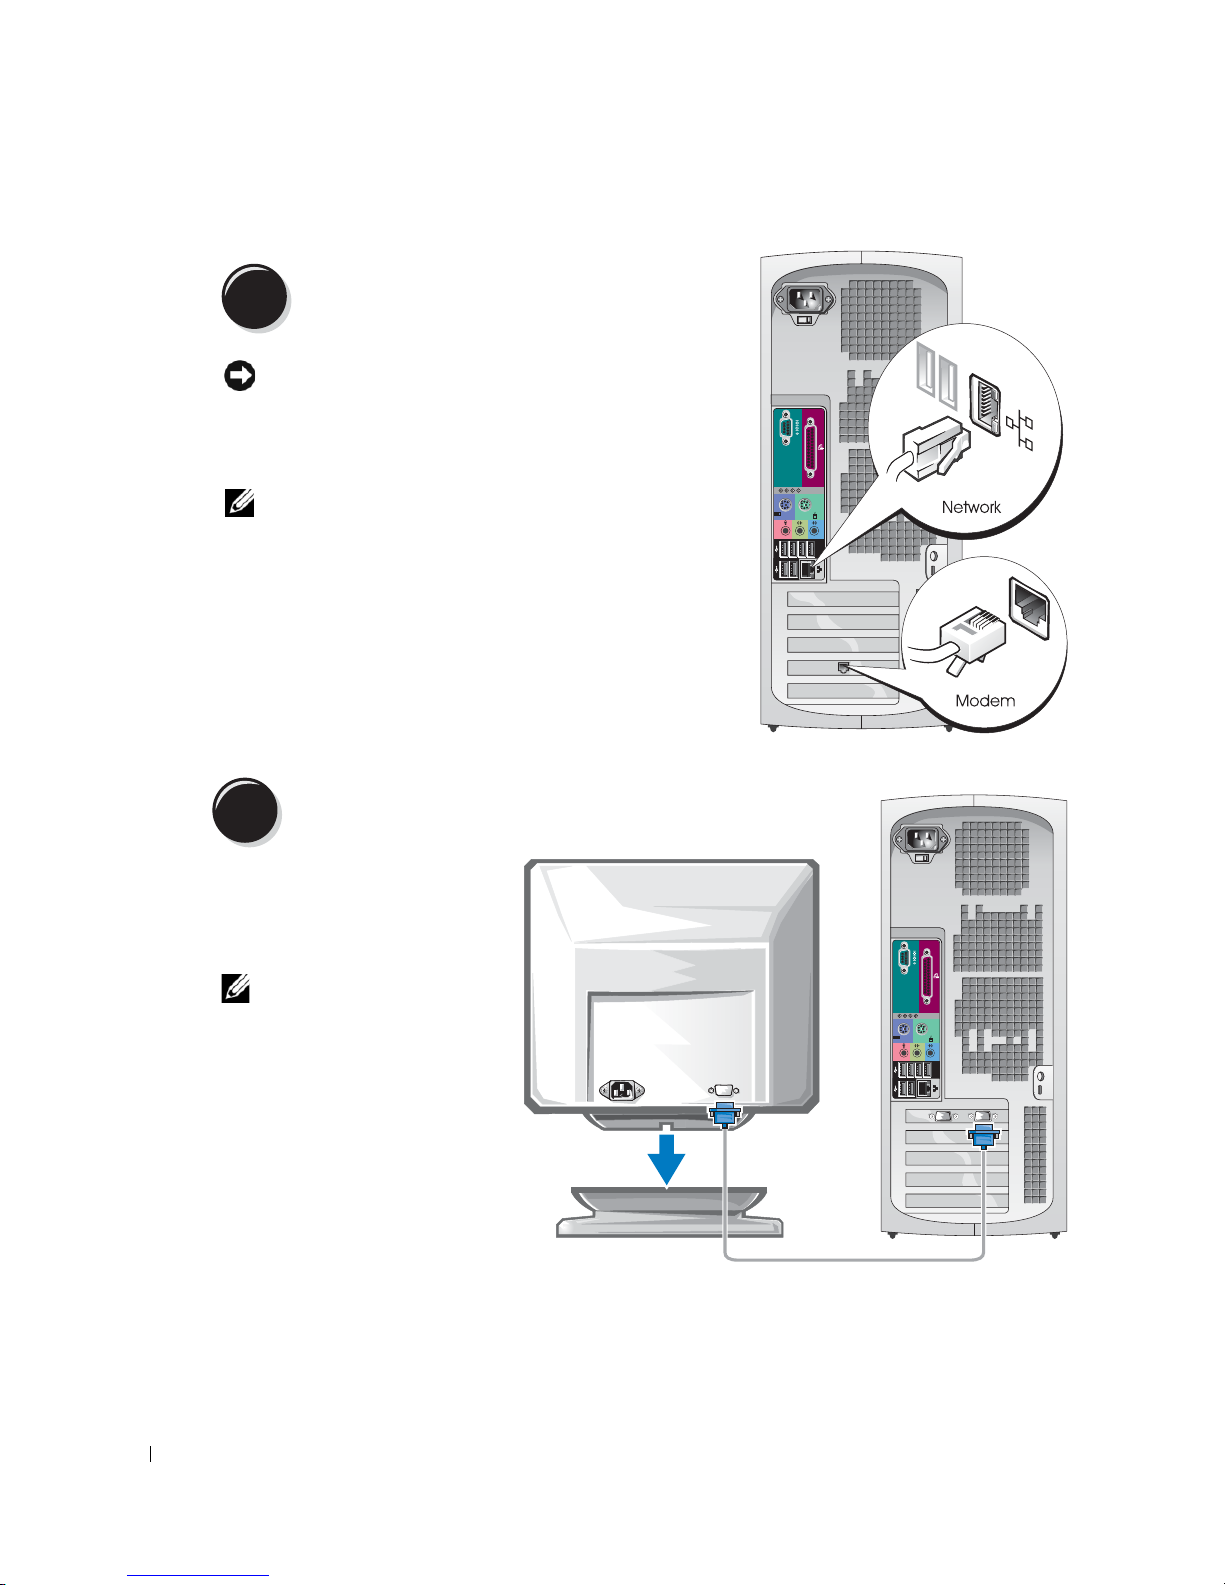
2
www.dell.com | support.dell.com
3
モデムとネットワークケーブルを接続します。
注意: モデムケーブルを誤ってネットワークア
ダプタに接続しないでください。 モデムの通信回
路で発生する電圧はネットワークアダプタを損
傷する原因となります。
メモ: コンピュータにネットワークカードが装
着されている場合は、ネットワークケーブルは
カードに接続してください。
モニタを接続します。
モニタの接続方法はお使い
のグラフィックカードに
よって異なります。
メモ: お使いのモニタ
によっては、コンピュー
タへの接続に付属のモニ
タケーブルまたはアダプ
タが必要になることがあ
ります。
10 クイックリファレンスガイド
Page 89
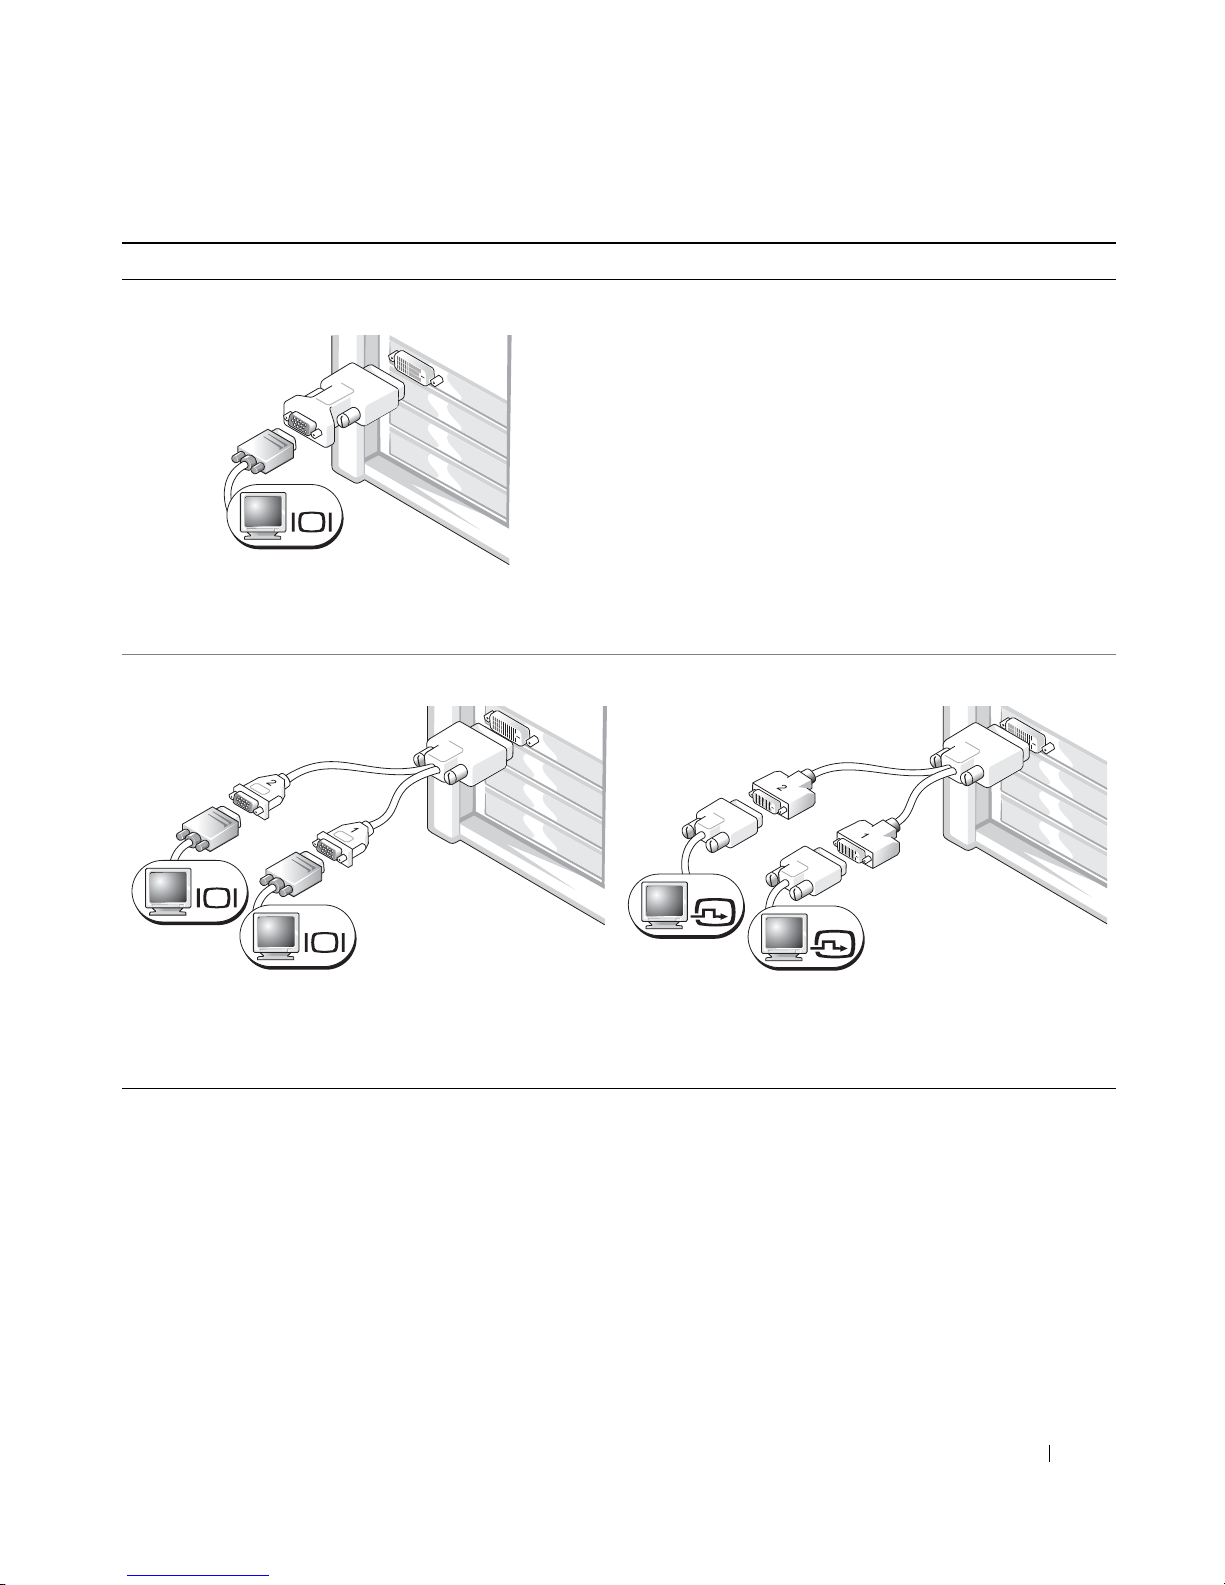
シングルコネクタ付きシングルモニタおよびデュアルモニタ対応カード
VGA アダプタ
VGA
シングルモニタグラフィックカードを装着したコン
ピュータに 1 台の VGA モニタを接続するには、VGA
アダプタを使います。
デュアル VGA Y ケーブルアダプタ
VGA
VGA
シングルコネクタ付きのグラフィックカー
ドを装着したコンピュータに、1 台または 2 台の
VGA モニタを接続するには、適切な Y ケー
ブルアダプタを使います。
デュアル DVI Y ケーブルアダプタ
DVI
DVI
シングルコネクタ付きのグラフィックカードを装着
したコンピュータに、1 台または 2 台の DVI モニタ
を接続するには、適切な Y ケーブルアダプタを使い
ます。
デュアルモニタケーブルは色分けされています。青いコネクタはプライマリモニタ用で、
黒いコネクタはセカンドモニタ用です。
デュアルモニタサポートを有効にするには、コン
ピュータの起動前にモニタを両方とも接続しておく必要があります。
クイックリファレンスガイド 11
Page 90
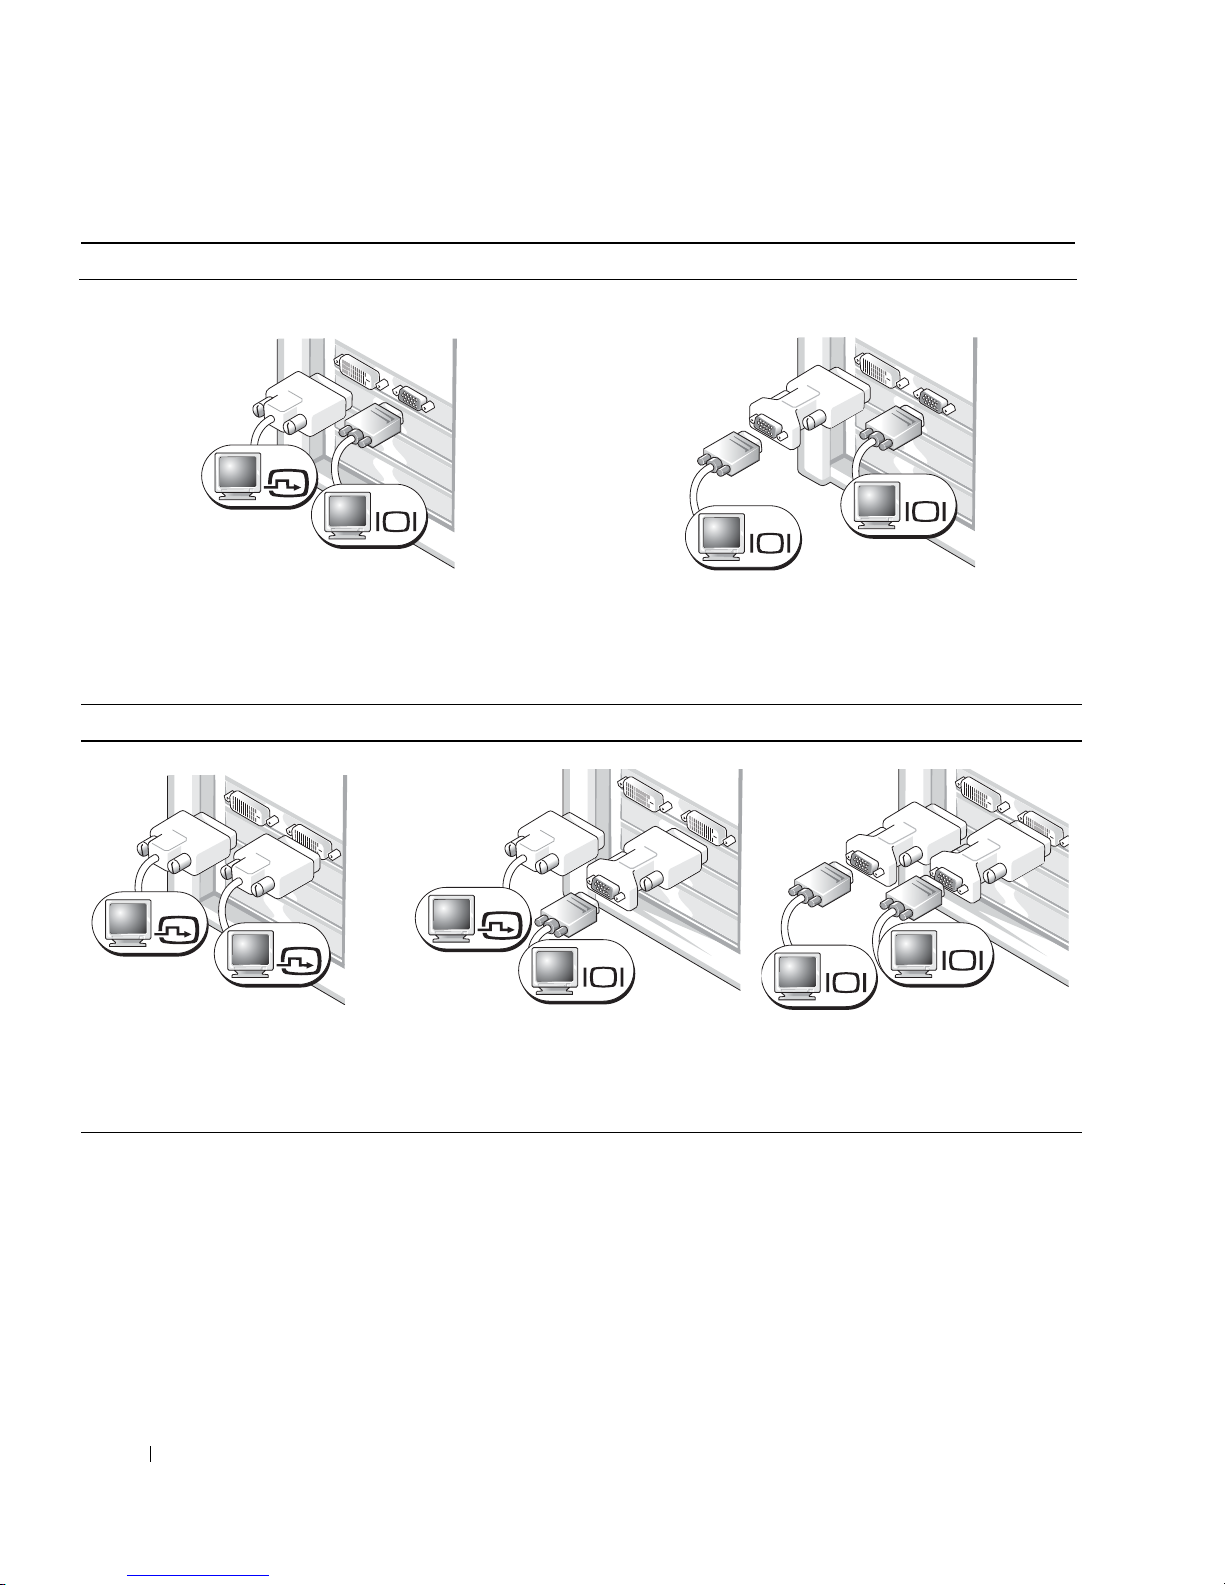
シングル DVI と シングル VGA コネクタ付きデュアルモニタ対応カード
シングル DVI / シングル VGA
DVI
VGA
www.dell.com | support.dell.com
コンピュータに 1 台または 2 台のモニタを
接続するには、それぞれ対応する適切なコ
ネクタを使います。
デュアル DVI コネクタ付きデュアルモニタ対応カード
デュアル
DVI
VGA
アダプタ
VGA アダプタ使用のデュアル VGA
VGA
VGA
コンピュータに 2 台の VGA モニタを接続するには、
VGA アダプタを 1 つ使います。
1
つ使用のデュアル
DVI
VGA
アダプタ
2
つ使用のデュアル
DVI
DVI
DVI
コンピュータに 1 台または
2 台の DVI モニタを接続する
には、それぞれ DVI コネクタ
を使います。
12 クイックリファレンスガイド
DVI
VGA
コンピュータの DVI コネクタの 1
つに VGA アダプタを取り付けて
VGA モニタを接続します。
VGA
VGA
コンピュータの 2 つの DVI コネク
タに 2 つの VGA アダプタを取り付
けて、2 台の VGA モニタを接続し
ます。
Page 91
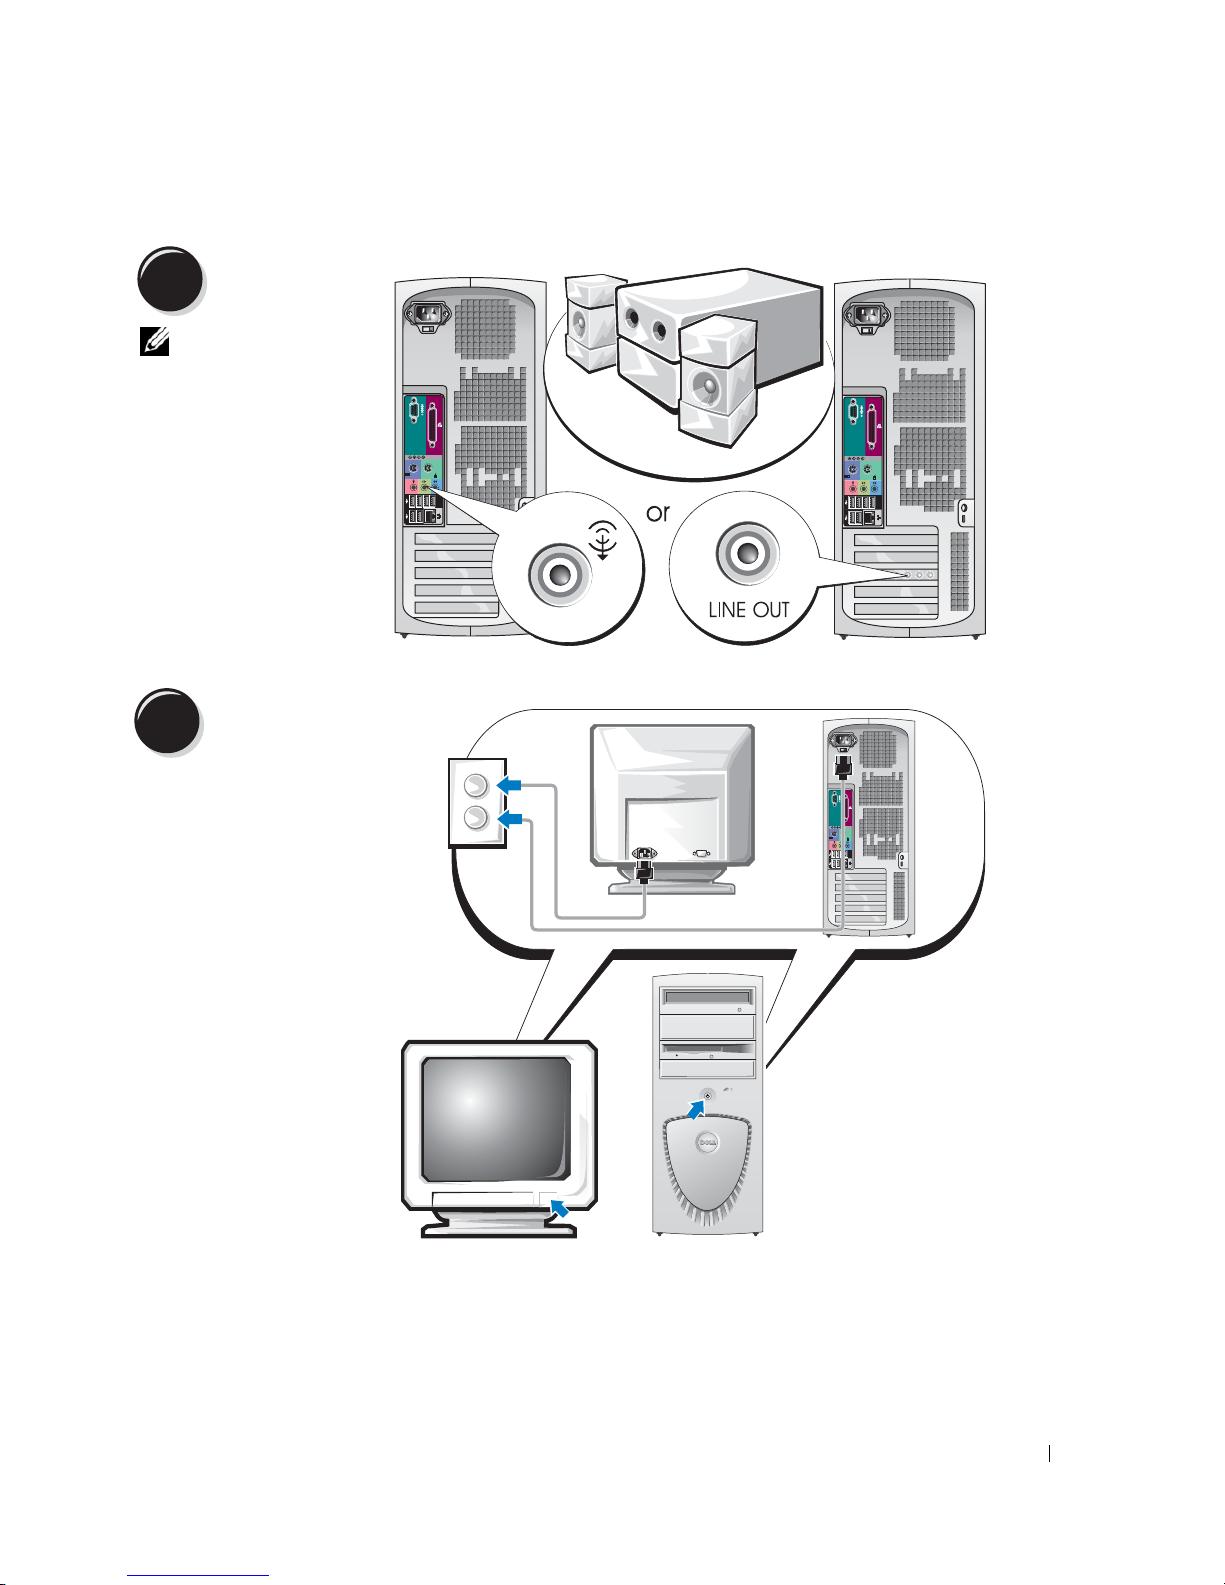
4
スピーカーを接
続します。
メモ: コンピュー
タにサウンドカード
が装着されている場
合は、サウンドカー
ドにスピーカーを接
続してください。
5
電源コードを接続し
て、コンピュータと
モニタの電源を入れ
ます。
クイックリファレンスガイド 13
Page 92
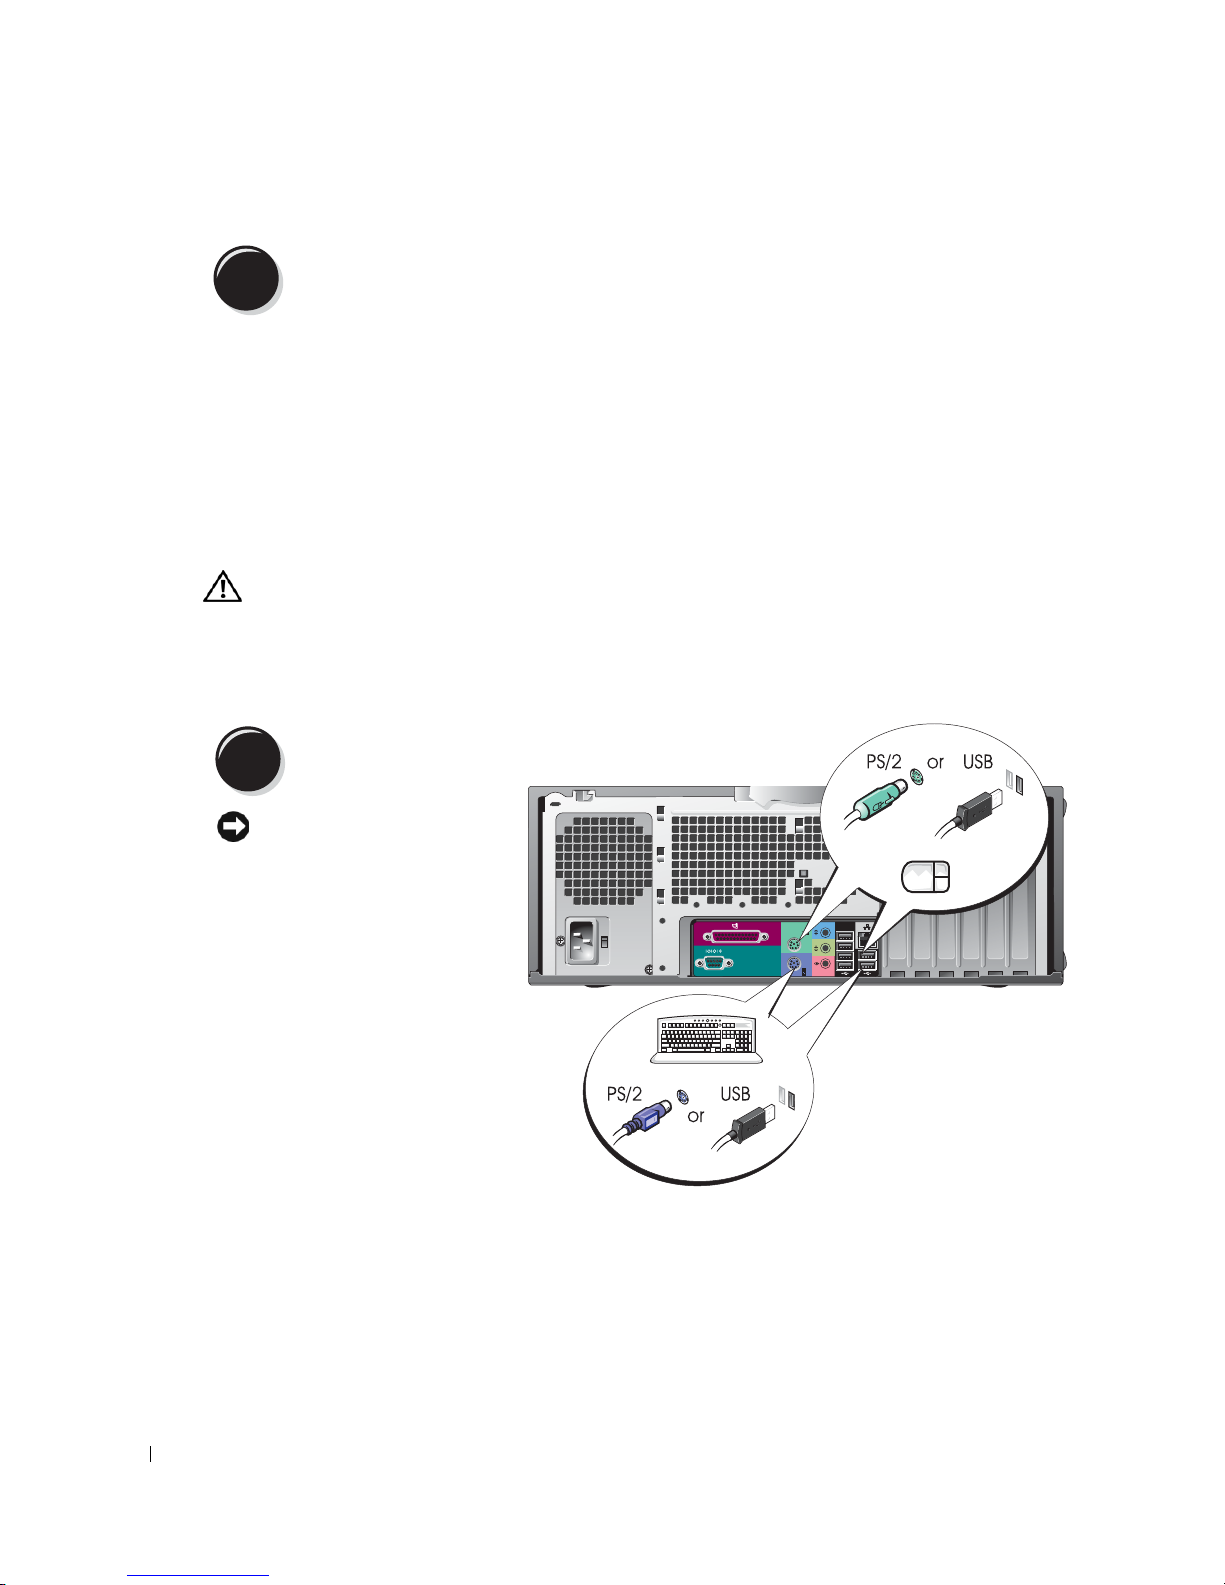
6
コンピュータに同梱されていないデバイスやソフトウェアについては、取り付け/インス
トールを行う前に、それぞれのマニュアルを読むか製品の販売元に問い合わせて、コン
ピュータとの互換性を確認してください。
周辺機器を取り付け、追加ソフトウェアがあればインストールします。
セットアップ完了です! これでミニタワーコンピュータを起動する準備が整い
ました。
www.dell.com | support.dell.com
デスクトップコンピュータのセットアップ
警告: 以下のセットアップの手順は、『製品情報ガイド』の安全にお使いいただくための注
意を守って実行してください。
コンピュータを正しくセットアップするには、ここで説明する手順をすべて完了する必要
があります。
キーボードとマウスを接続します。
1
注意: モデムケーブルを
誤ってネットワークアダプ
タに接続しないでくださ
い。 モデムの通信回路で発
生する電圧はネットワーク
アダプタを損傷する原因と
なります。
14 クイックリファレンスガイド
Page 93
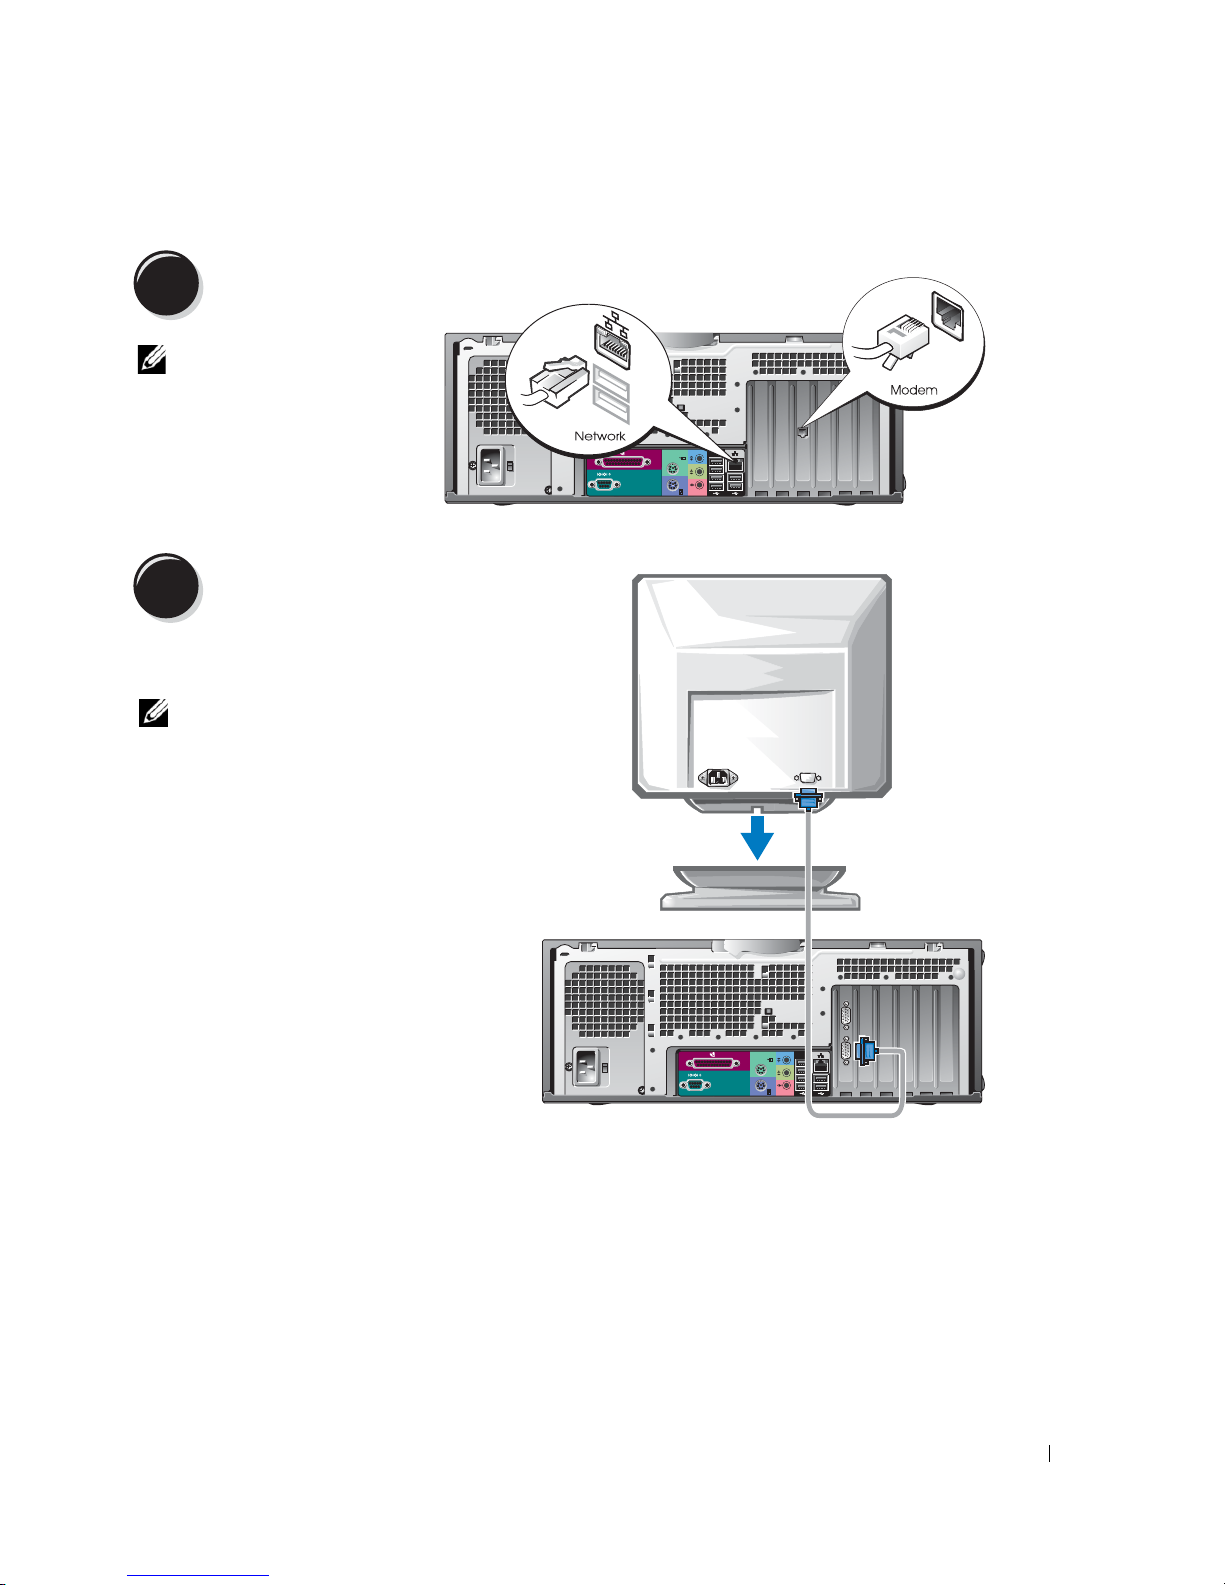
2
モデムとネットワークケーブ
ルを接続します。
メモ: コンピュータに
ネットワークカードが装着
されている場合は、ネット
ワークケーブルはカードに
接続してください。
3
モニタを接続します。
モニタの接続方法はお使いのグラ
フィックカードによって異なります。
メモ: お使いのモニタによって
は、コンピュータへの接続に付属
のモニタケーブルまたはアダプタ
が必要になることがあります。
クイックリファレンスガイド 15
Page 94
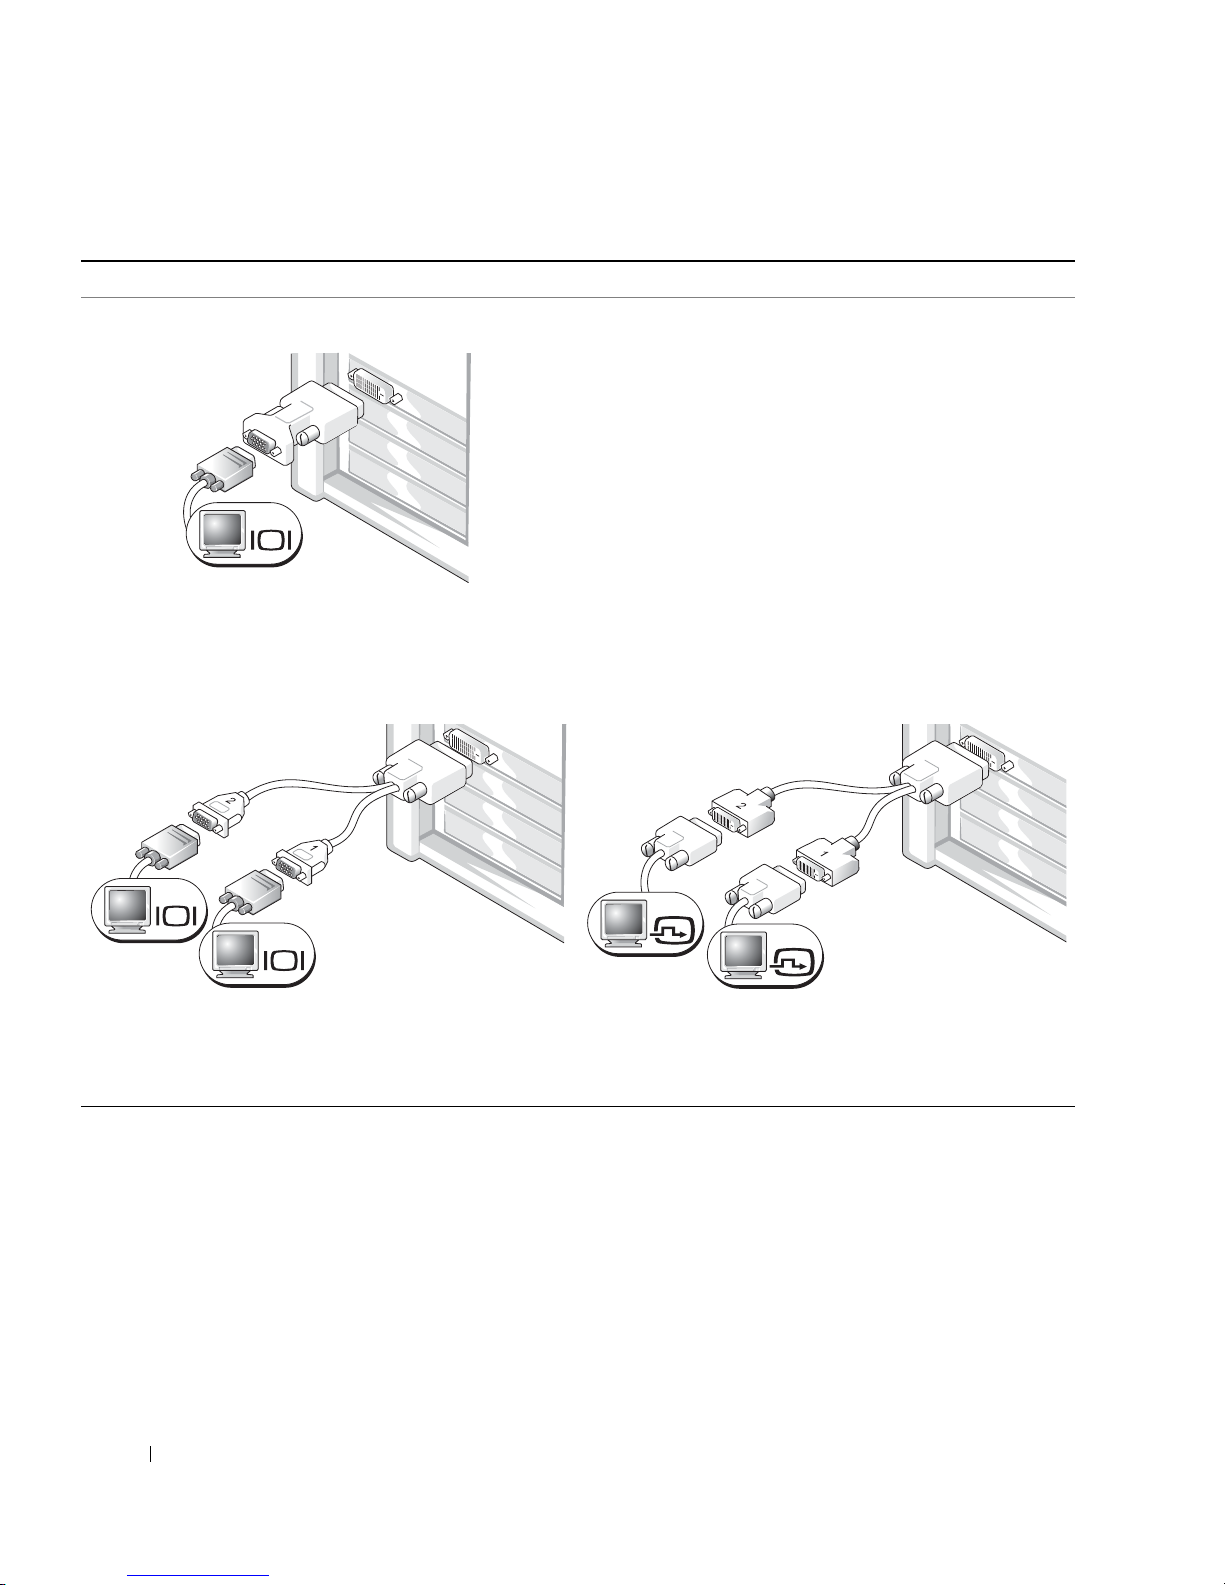
シングルコネクタ付きシングルモニタおよびデュアルモニタ対応カード
VGA アダプタ
VGA
www.dell.com | support.dell.com
シングルモニタグラフィックカードを装着したコン
ピュータに 1 台の VGA モニタを接続するには、
VGA アダプタを使います。
デュアル VGA Y ケーブルアダプタ
VGA
VGA
シングルコネクタ付きのグラフィックカー
ドを装着したコンピュータに、1 台または
2 台の VGA モニタを接続するには、適切な Y
ケーブルアダプタを使います。
デュアルモニタケーブルは色分けされています。青いコネクタはプライマリモニタ用で、
黒いコネクタはセカンドモニタ用です。
ピュータの起動前にモニタを両方とも接続しておく必要があります。
デュアル DVI Y ケーブルアダプタ
DVI
DVI
シングルコネクタ付きのグラフィックカードを装着
したコンピュータに、1 台または 2 台の DVI モニタ
を接続するには、適切な Y ケーブルアダプタを使い
ます。
デュアルモニタサポートを有効にするには、コン
16 クイックリファレンスガイド
Page 95
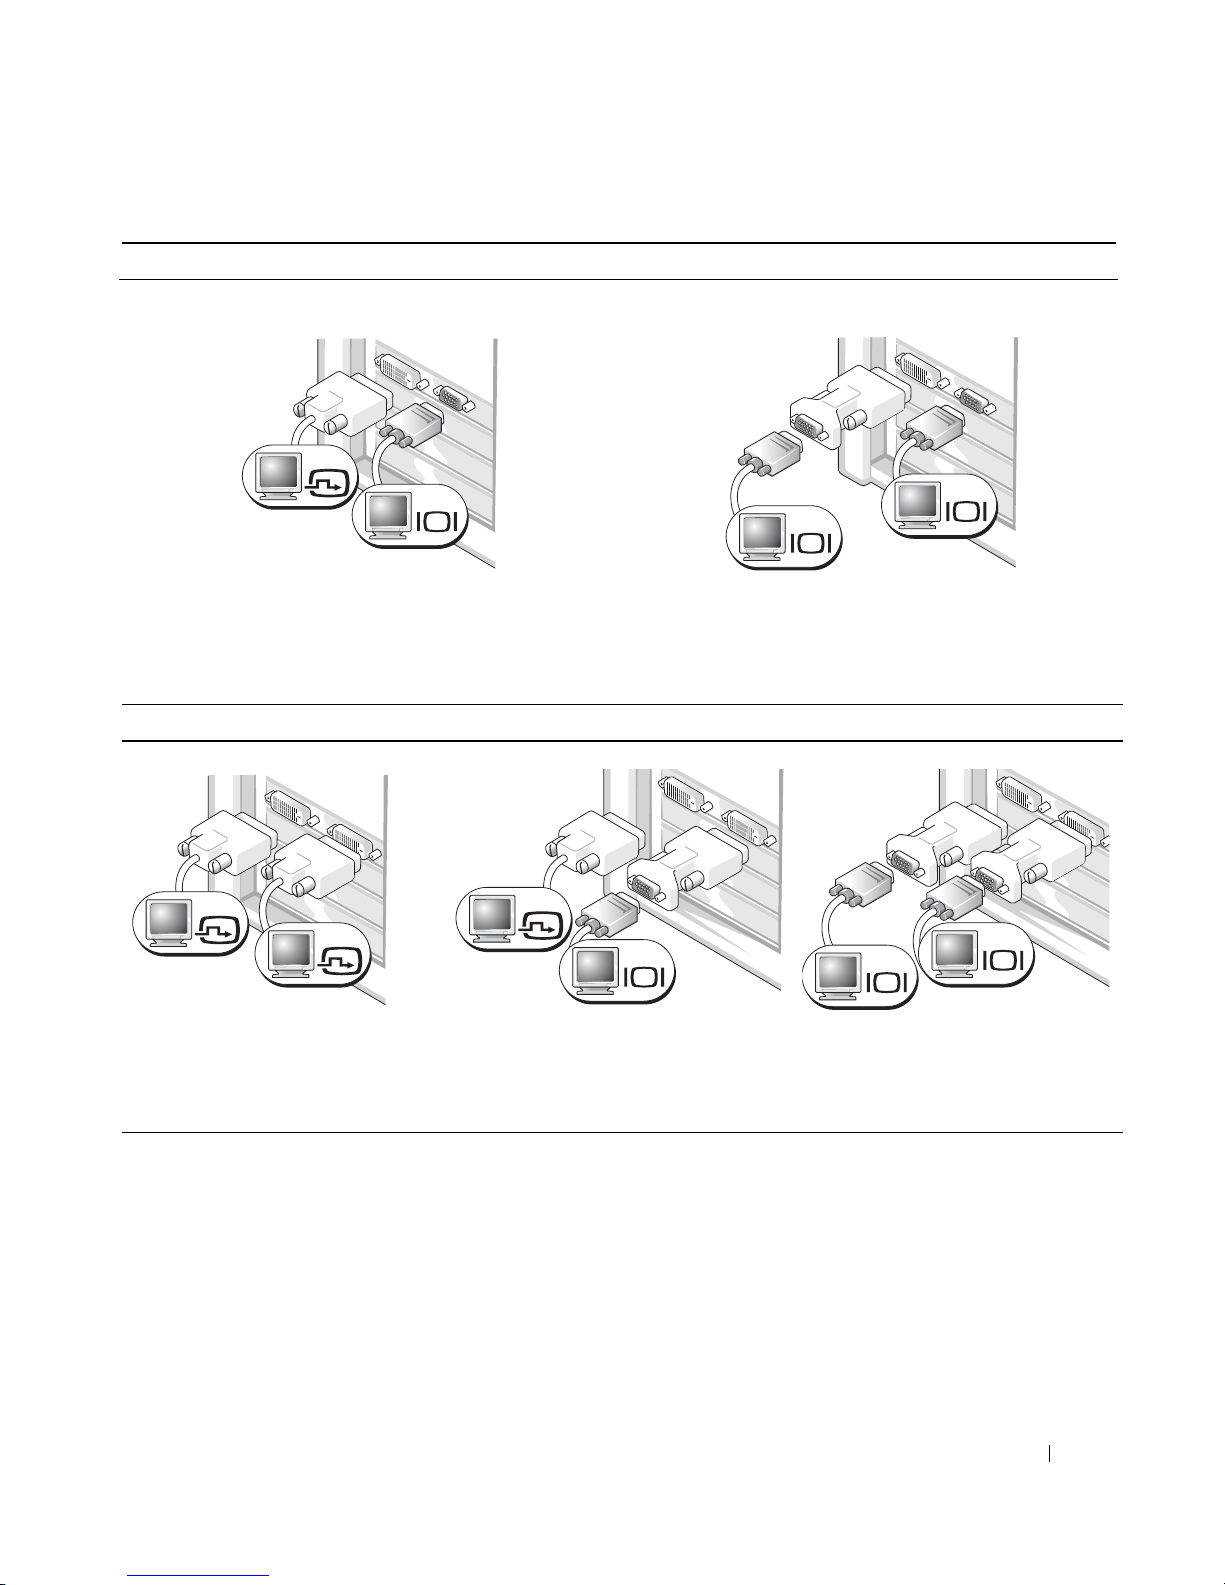
シングル DVI と シングル VGA コネクタ付きデュアルモニタ対応カード
シングル DVI / シングル VGA
DVI
VGA
コンピュータに 1 台または 2 台のモニタを
接続するには、それぞれ対応する適切なコ
ネクタを使います。
デュアル DVI コネクタ付きデュアルモニタ対応カード
デュアル
DVI
VGA
アダプタ
1
VGA アダプタ使用のデュアル VGA
VGA
VGA
コンピュータに 2 台の VGA モニタを接続するには、
VGA アダプタを 1 つ使います。
つ使用のデュアル
DVI
VGA
アダプタ
2
つ使用のデュアル
DVI
DVI
DVI
コンピュータに 1 台または
2 台の DVI モニタを接続する
には、それぞれ DVI コネクタ
を使います。
DVI
VGA
コンピュータの DVI コネクタの 1
つに VGA アダプタを取り付けて
VGA モニタを接続します。
VGA
VGA
コンピュータの 2 つの DVI コネク
タに 2 つの VGA アダプタを取り付
けて、2 台の VGA モニタを接続し
ます。
クイックリファレンスガイド 17
Page 96
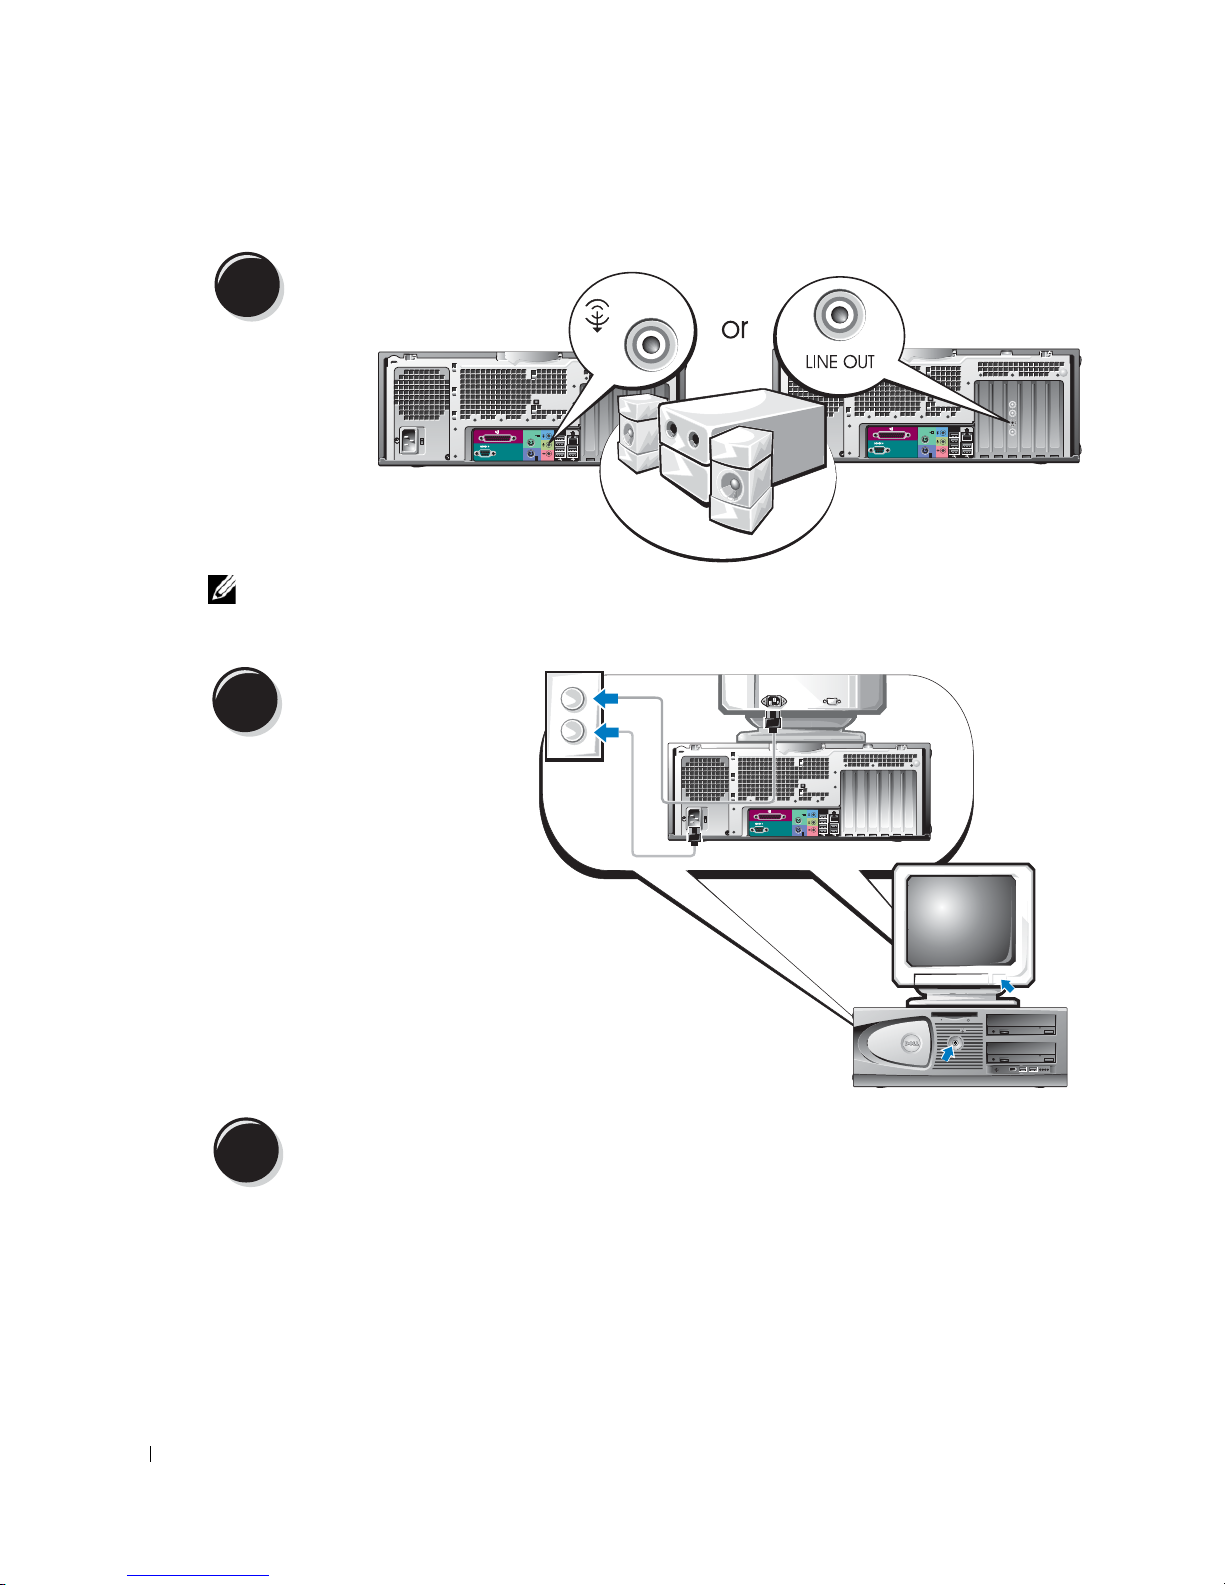
スピーカーを接続します。
4
www.dell.com | support.dell.com
メモ: コンピュータにサウンドカードが装着されている場合は、サウンドカードにスピー
カーを接続してください。
電源コードを接続して、コ
5
このデスクトップコンピュータ
は、オプションとして
1394
能です。
1394
された場合にのみ装備されま
す。このカードの購入について
は、デルにお問い合わせくださ
い。
いては、『ユーザーズガイド』
を参照してください。
ンピュータとモニタの電源
を入れます。
コネクタを正面に装備可
このコネクタは
のアドインカードを購入
アドインカードの詳細につ
IEEE
IEEE
6
コンピュータに同梱されていないデバイスやソフトウェアについては、取り付け/インス
トールを行う前に、それぞれのマニュアルを読むか製品の販売元に問い合わせて、コン
ピュータとの互換性を確認してください。
周辺機器を取り付け、追加ソフトウェアがあればインストールします。
セットアップ完了です! これでデスクトップコンピュータを起動する準備が整
いました。
18 クイックリファレンスガイド
Page 97

ユーザーズガイドを見つけるには
『
Dell Precision™ Workstation 370
います。
•
コンピュータの仕様
•
装備されているすべてのコネクタの位置を示すコンピュータの正面と背面の図
•
システム基板とコネクタを含む詳細なコンピュータの内部を示す図
•
コンピュータのクリーニング手順
•
パスワードやセットアップユーティリティオプションを使用した
ロジコントロールなどのソフトウェア機能についての情報
•
Microsoft Windows XP
•
メモリ、カード、ドライブ、プロセッサ、バッテリを含む、部品の取り付けと取り外
オペレーティングシステムの使用に関する情報
しの手順
•
さまざまなコンピュータ問題のトラブルシューティング情報
•
Dell
診断プログラムの使用およびドライバの再インストール手順
•
デルへのお問い合わせ方法
ユーザーズガイド』には、次のような情報が含まれて
LegacySelect
テクノ
『ユーザーズガイド』へは、ご使用のコンピュータのハードドライブまたは
support.jp.dell.com
ハードドライブにある『ユーザーズガイド』を読むには、
スタート ボタンをクリックし、
デルのサポートサイトで『ユーザーズガイド』を読むには、
1
support.jp.dell.com
2
お使いのコンピュータを特定する情報の入力を求める画面が表示されたら、その指示
にあるデルのサポートウェブサイトからアクセスできます。
ヘルプとサポート をクリックします。
にアクセスします。
に従って入力します。
3
デルサポートサイトホームページのファイルライブラリでお使いの
Dell Precision
コンピュータのモデルを選択します。
クイックリファレンスガイド 19
Page 98

ミニタワーコンピュータのカバーの開き方
警告: 以下の手順は、『製品情報ガイド』の安全にお使いいただくための注意を守って実行
してください。
警告: 感電防止のため、カバーを開く前に、必ずコンピュータの電源プラグをコンセントか
ら抜いてください。
注意: データの損失を避けるため、コンピュータの電源を切る前に、開いているファイルが
あればすべて閉じ、実行中のプログラムをすべて終了します。
オペレーティングシステムをシャットダウンします。
1
a
開いているファイルがあればすべて閉じ、実行中のプログラムをすべて終了して
www.dell.com | support.dell.com
2
3
から、
b
コンピュータの
オペレーティングシステムのシャットダウン処理が完了すると、コンピュータの
電源が切れます。
コンピュータとすべての周辺機器の電源が切れていることを確認します。 オペレー
ティングシステムのシャットダウンで自動的に電源が切れないコンピュータや周辺機
器があれば、手操作で電源を切ってください。
背面パネルのパドロックリングにパドロックを取り付けている場合は、パドロックを
外してください。
スタート ボタン、
電源を切る ウィンドウで、
コンピュータの終了 を順にクリックします。
電源を切る をクリックします。
注意: カバーを開いて作業できるように、高さ 30 cm 以上の十分なスペースが作業台上にあ
るか確認してください。
次の図に示すように、側面を下にしてコンピュータを置きます。
4
5
カバーを開きます。
a
コンピュータの背面を手前に向け、片方の手でコンピュータの右側にあるリリー
スボタンを押しながら、もう一方の手でカバー上端を引き上げます。
b
片方の手でカバー上端を引き上げながら、もう一方の手でコンピュータの左側に
あるリリースボタンを押します。
6
片方の手でコンピュータの底部を押さえ、もう一方の手でカバーを手前に引いて開き
ます。
20 クイックリファレンスガイド
Page 99
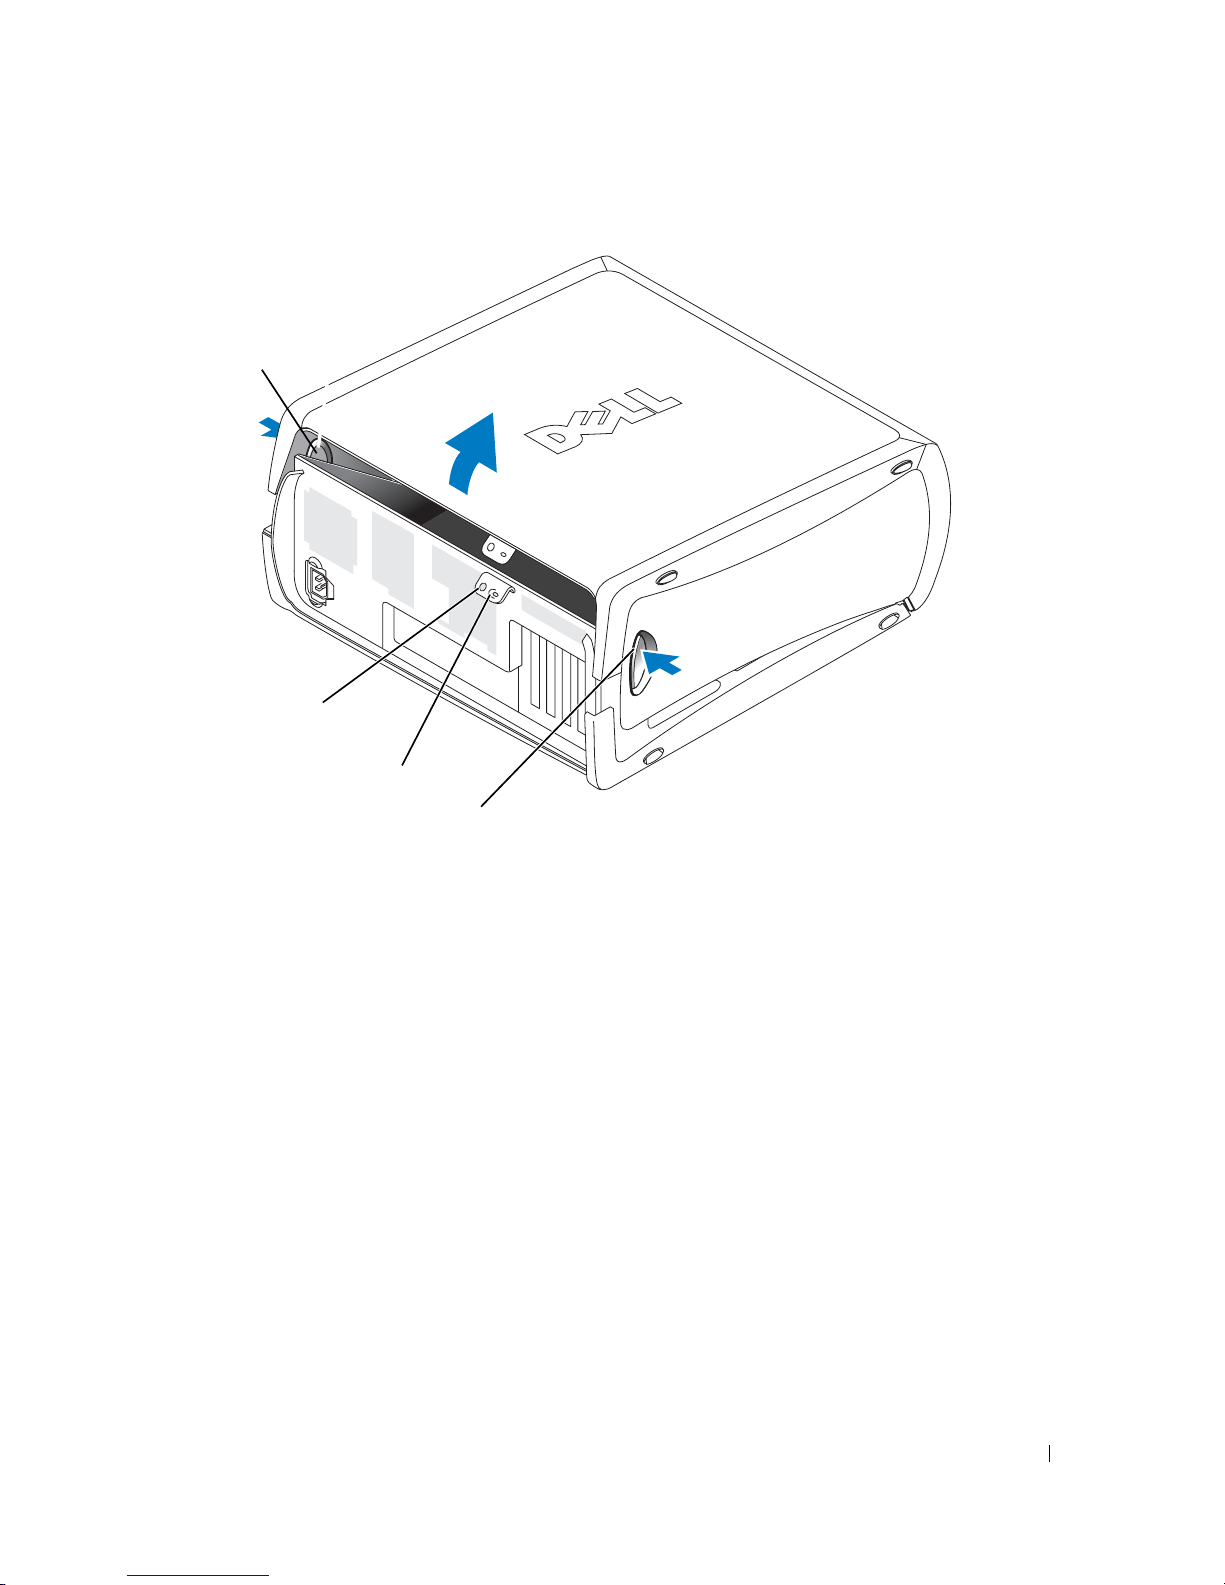
リリースボタン
セキュリティケーブ
ルスロット
パドロックリング
リリースボタン
クイックリファレンスガイド 21
Page 100
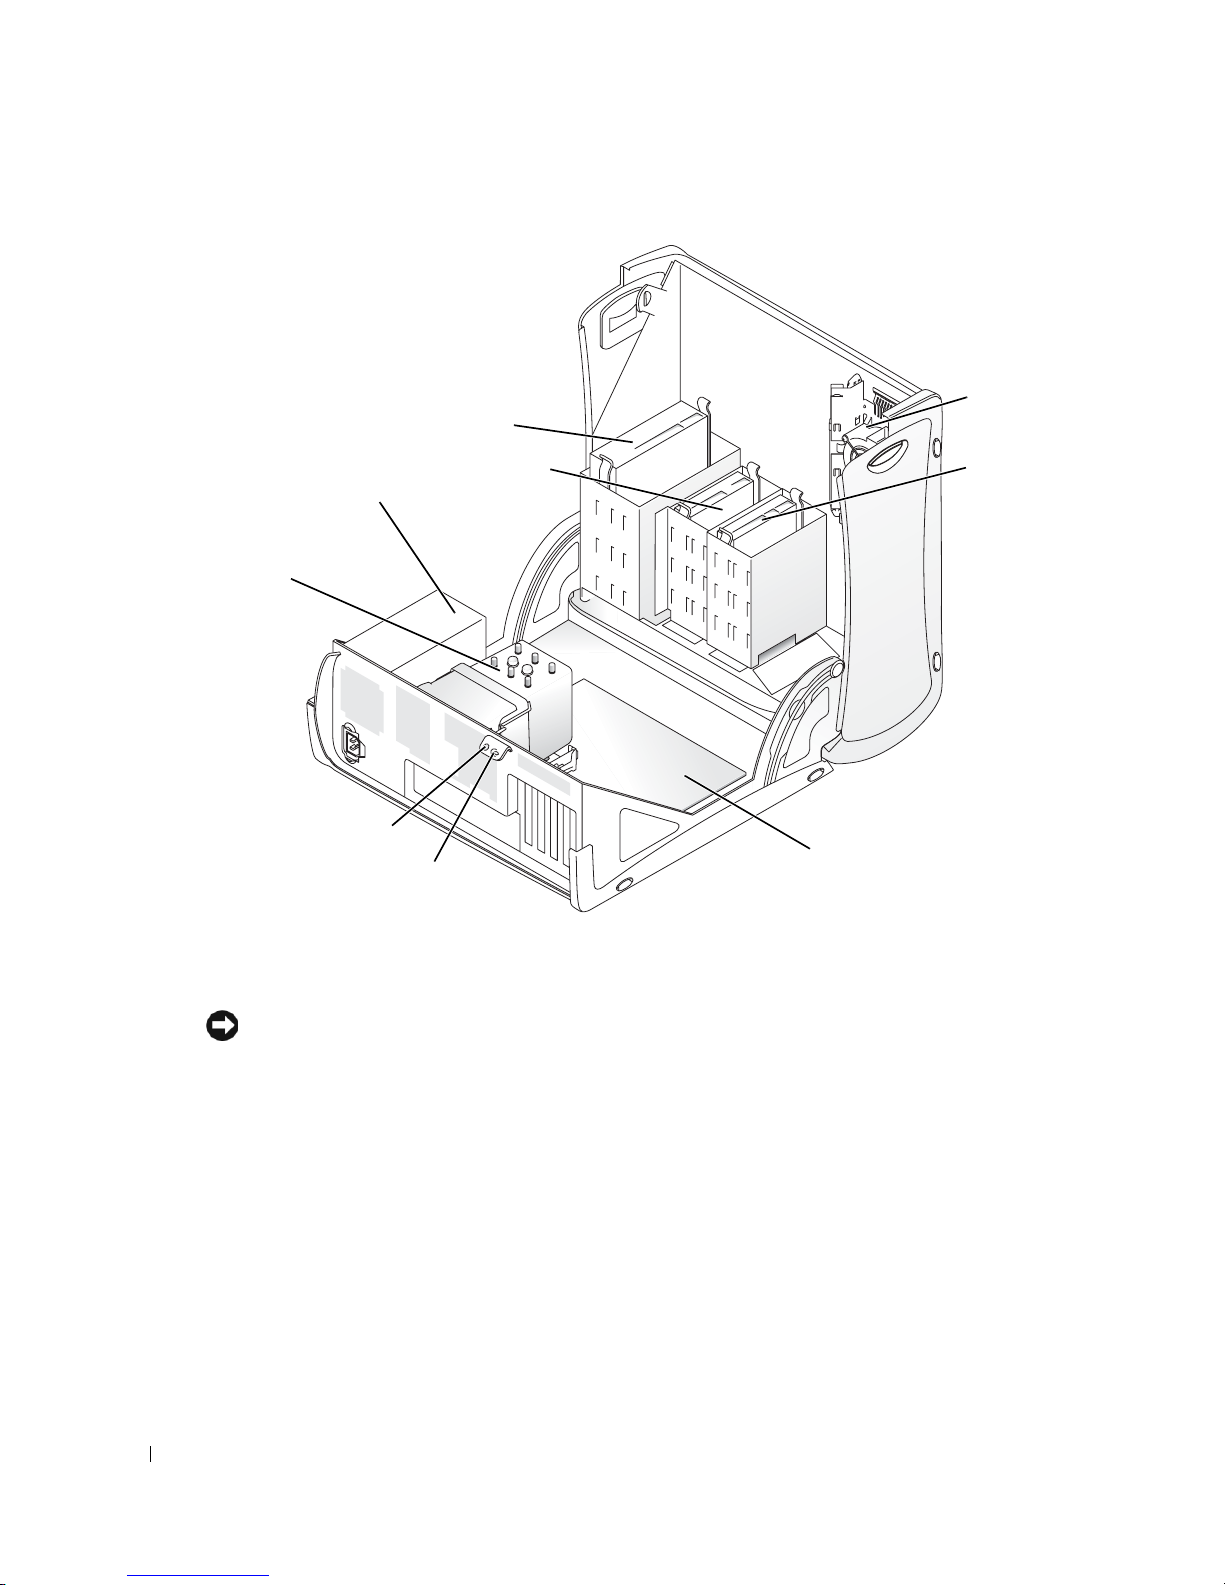
電源装置
CD/DVD ドライブ
フロッピードライ
ブ(オプション)
カードファン
ハードドライブ
www.dell.com | support.dell.com
プロセッサエアフロー
カバーおよびファン
セキュリティケーブル
スロット
パドロックリング
カード冷却ファン
注意: 電力消費が 75 ワットを超える PCI Express グラフィックカード搭載モデルには追加の
冷却ファンを取り付ける必要があります。 追加冷却ファンが装備されていないと、オーバー
ヒートによるコンピュータ破損の原因となります。
追加冷却ファンが必要なグラフィックカードを注文された場合は、このカード用のファン
が同梱されています。
フィックカードを取り付けるときは、デルにカードファンをご注文ください。
システム基板
カード用のファンが同梱されていない場合で、
75 W
以上のグラ
カードファンの必要なカードが取り付けられていることをコンピュータが検知すると、
エラーメッセージが表示されます。
デルにお問い合わせになる場合の連絡先は、『ユーザーズガイド』または
support.jp.dell.com
22 クイックリファレンスガイド
の
お問い合わせ を参照してください。
 Loading...