

Page 1

Dell Precision™ 350 Workstation
Setup and Quick
Reference Guide
www.dell.com | support.dell.com
Page 2

Notes, Notices, and Cautions
NOTE: A NOTE indicates important information that helps you make better
use of your computer.
NOTICE: A NOTICE indicates either potential damage to hardware or loss of
data and tells you how to avoid the problem.
CAUTION: A CAUTION indicates a potential for property damage,
personal injury, or death.
Abbreviations and Acronyms
For a complete list of abbreviations and acronyms, see the “Glossary” in the
User’s Guide.
If you purchased a Dell™ n Series computer, any references in this
®
document to Microsoft
Windows® operating systems are not applicable.
____________________
Information in this document is subject to change without notice.
© 2002 Dell Computer Corporation. All rights reserved.
Reproduction in any manner whatsoever without the written permission of Dell Computer
Corporation is strictly forbidden.
Trademarks used in this text: Dell, the DELL logo, and Dell Precision are trademarks of Dell
Computer Corporation; Microsoft and Windows are registered trademarks of Microsoft Corporation.
Other trademarks and trade names may be used in this document to refer to either the entities claiming
the marks and names or their products. Dell Computer Corporation disclaims any proprietary interest
in trademarks and trade names other than its own.
December 2002 P /N 9T217 Rev. A01
Page 3

Contents
Finding Information for Your Computer . . . . . . . . . . . . . . 5
Connect the keyboard and the mouse
Connect the modem or the network cable
Connect the monitor
Connect the speakers
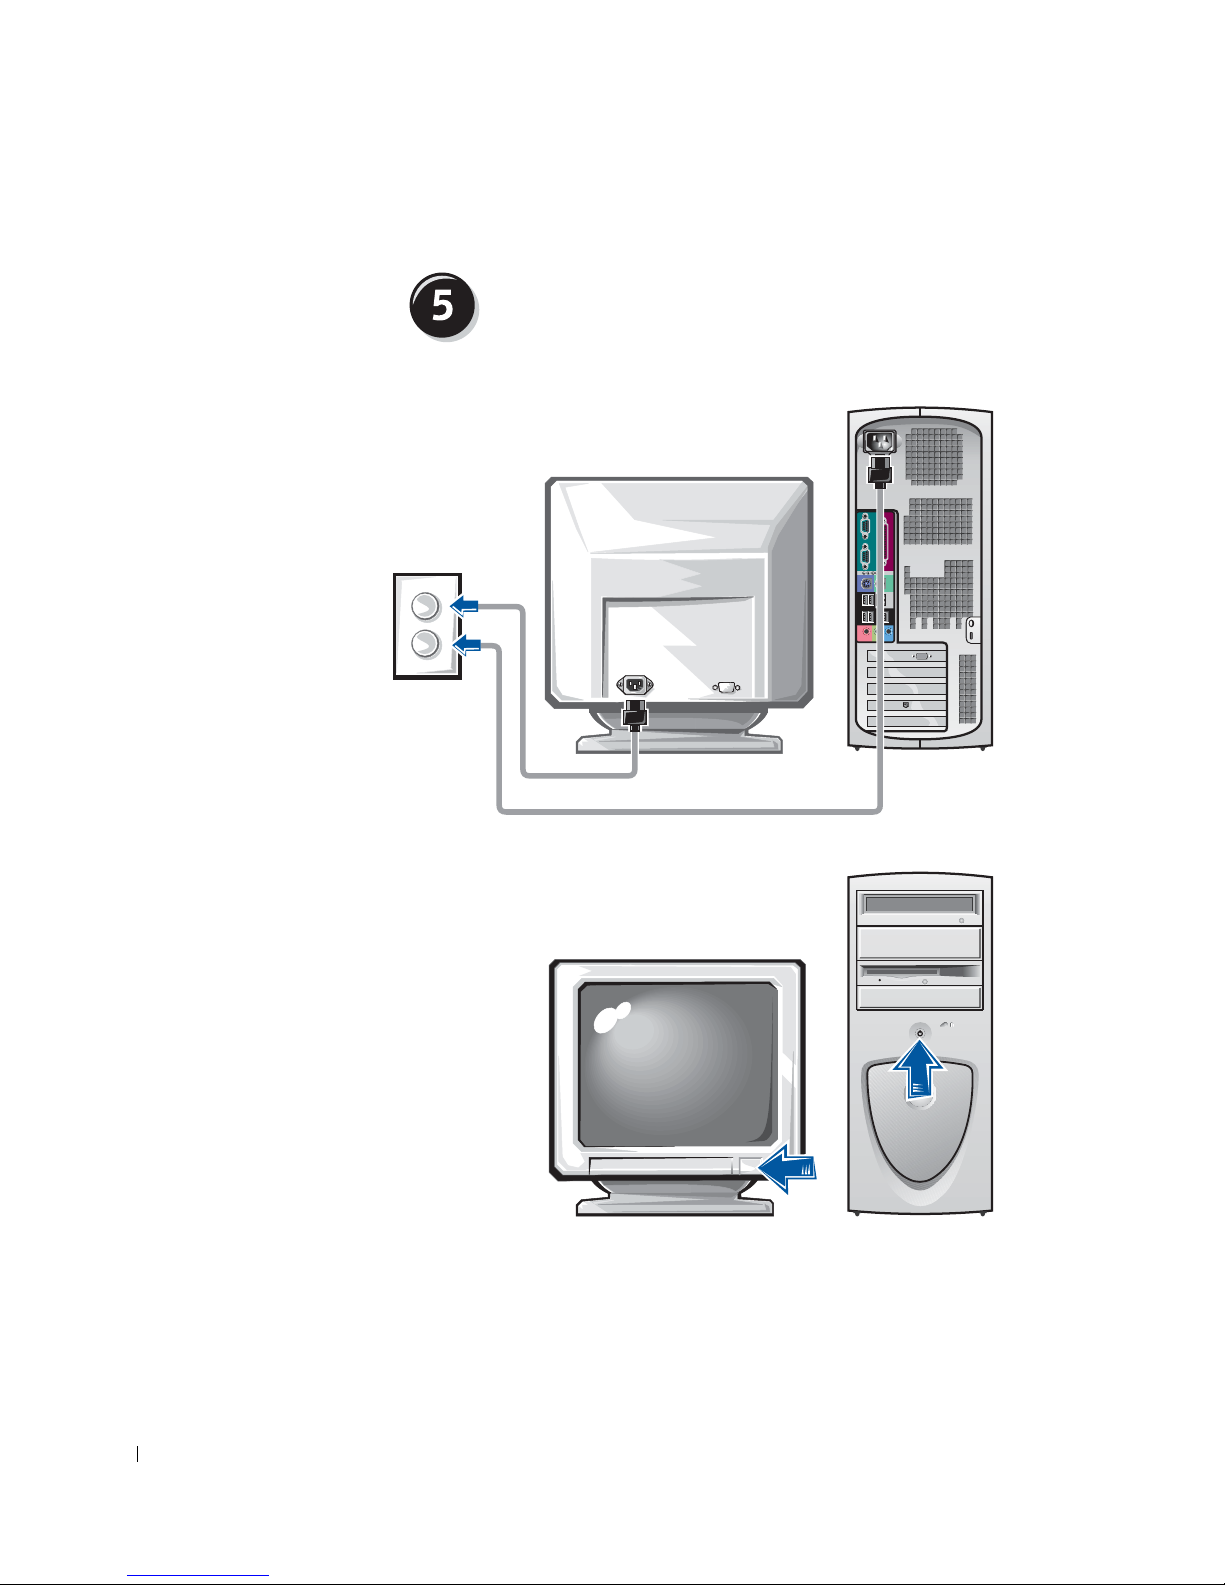
Connect the power cables and turn on the computer
and monitor
Install additional software or devices
. . . . . . . . . . . . . . 9
. . . . . . . . . . . . 10
. . . . . . . . . . . . . . . . . . . . . . . 11
. . . . . . . . . . . . . . . . . . . . . . 14
. . . . . . . . . . . . . . . . . . . . . . . . . . . 15
. . . . . . . . . . . . . . 16
Opening the Computer Cover
Inside Your Computer
Solving Problems
. . . . . . . . . . . . . . . . . . . . . . . 19
. . . . . . . . . . . . . . . . . . . . . . . . . . 20
. . . . . . . . . . . . . . . . . . . 17
Resolving Software and Hardware Incompatibilities
Using System Restore in Windows XP
. . . . . . . . . . . . . . 21
Using the Last Known Good Configuration in
Windows 2000
When to Use the Dell Diagnostics
Starting the Dell Diagnostics
Beep Codes
Error Messages
Diagnostic Lights
Frequently Asked Questions
. . . . . . . . . . . . . . . . . . . . . . . . . 22
. . . . . . . . . . . . . . . . 23
. . . . . . . . . . . . . . . . . . 23
. . . . . . . . . . . . . . . . . . . . . . . . . . . 26
. . . . . . . . . . . . . . . . . . . . . . . . . 26
. . . . . . . . . . . . . . . . . . . . . . . . 26
. . . . . . . . . . . . . . . . . . . . 30
. . . . . . . 20
Contents 3
Page 4

4 Contents
Page 5

Finding Information for Your Computer
The following table lists the resources that Dell provides as support tools.
Additional resources may be shipped with your computer.
What Are You Looking For? Find it Here
• A diagnostic program for my computer
• Drivers for my computer
• My computer documentation
• My device documentation
• How to set up my computer
• Troubleshooting information
• Tools and utilities
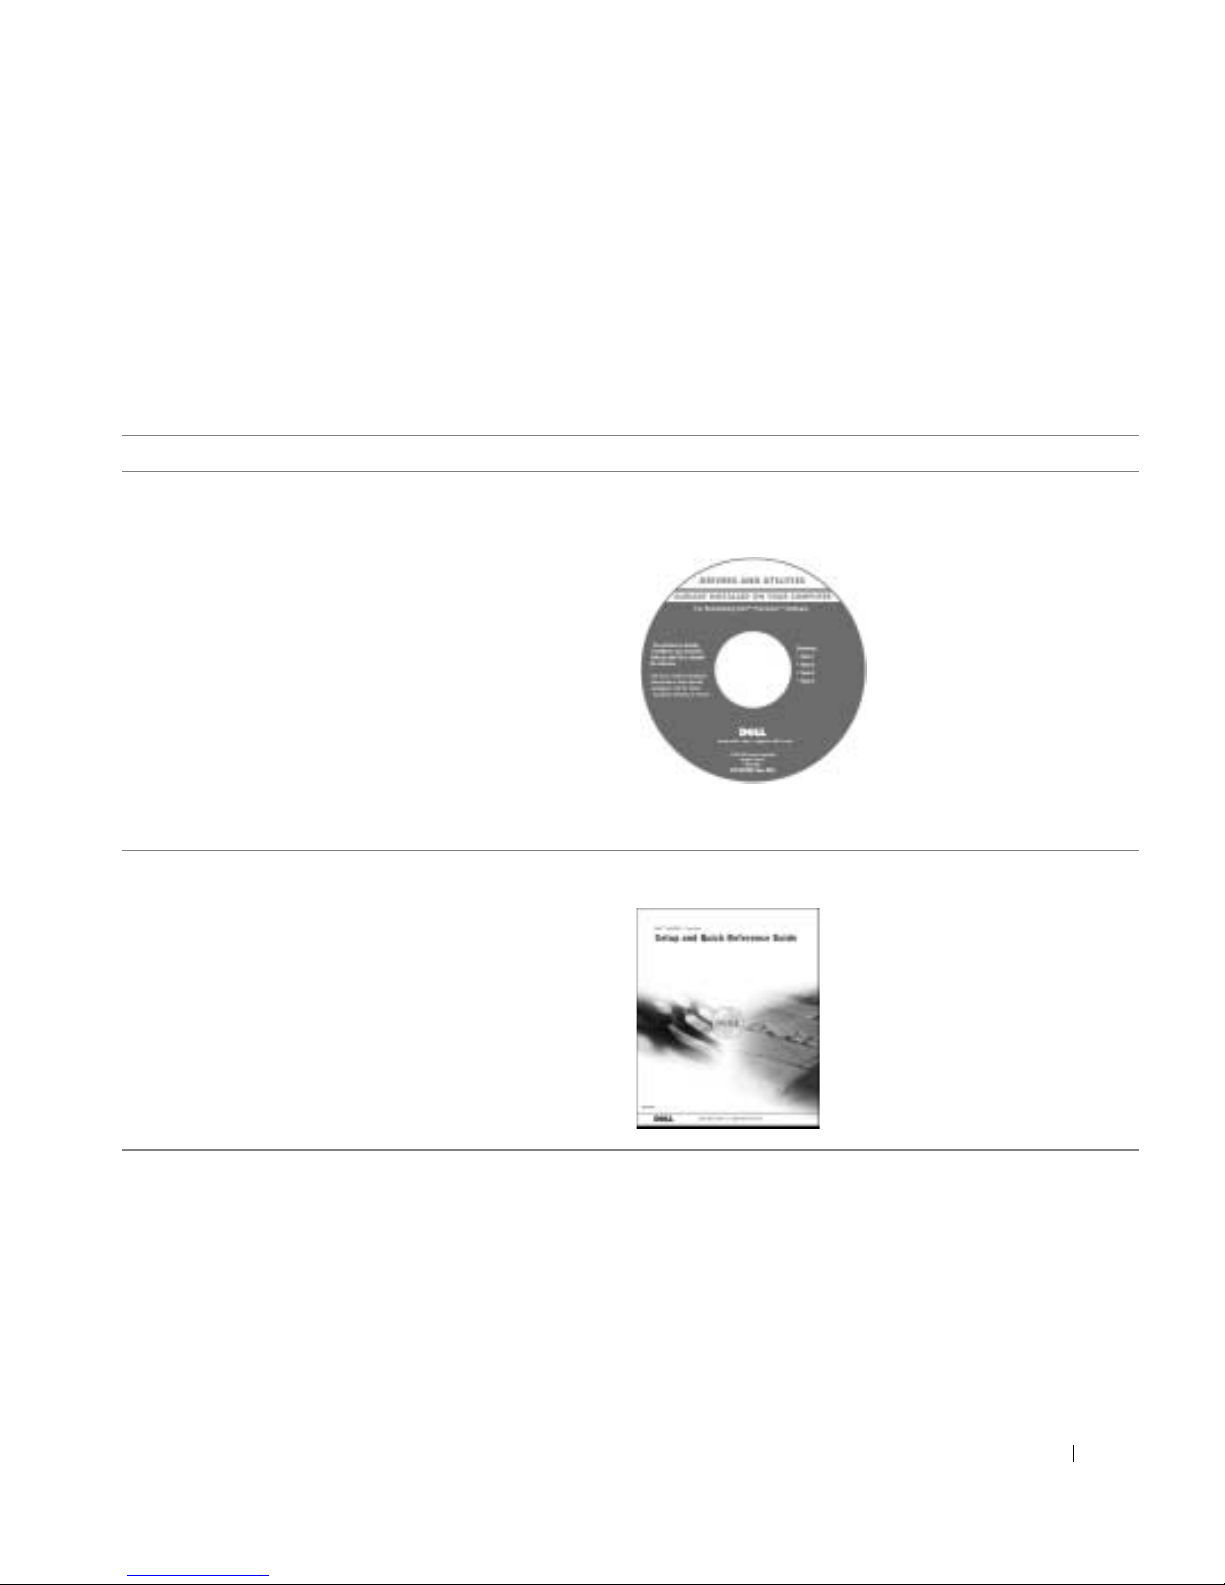
Drivers and Utilities CD (also known as the
ResourceCD)
You can use this CD to access documentation, reinstall drivers, or run
diagnostics tools.
Setup and Quick Reference Guide
Setup and Quick Reference Guide 5
Page 6
What Are You Looking For? Find it Here
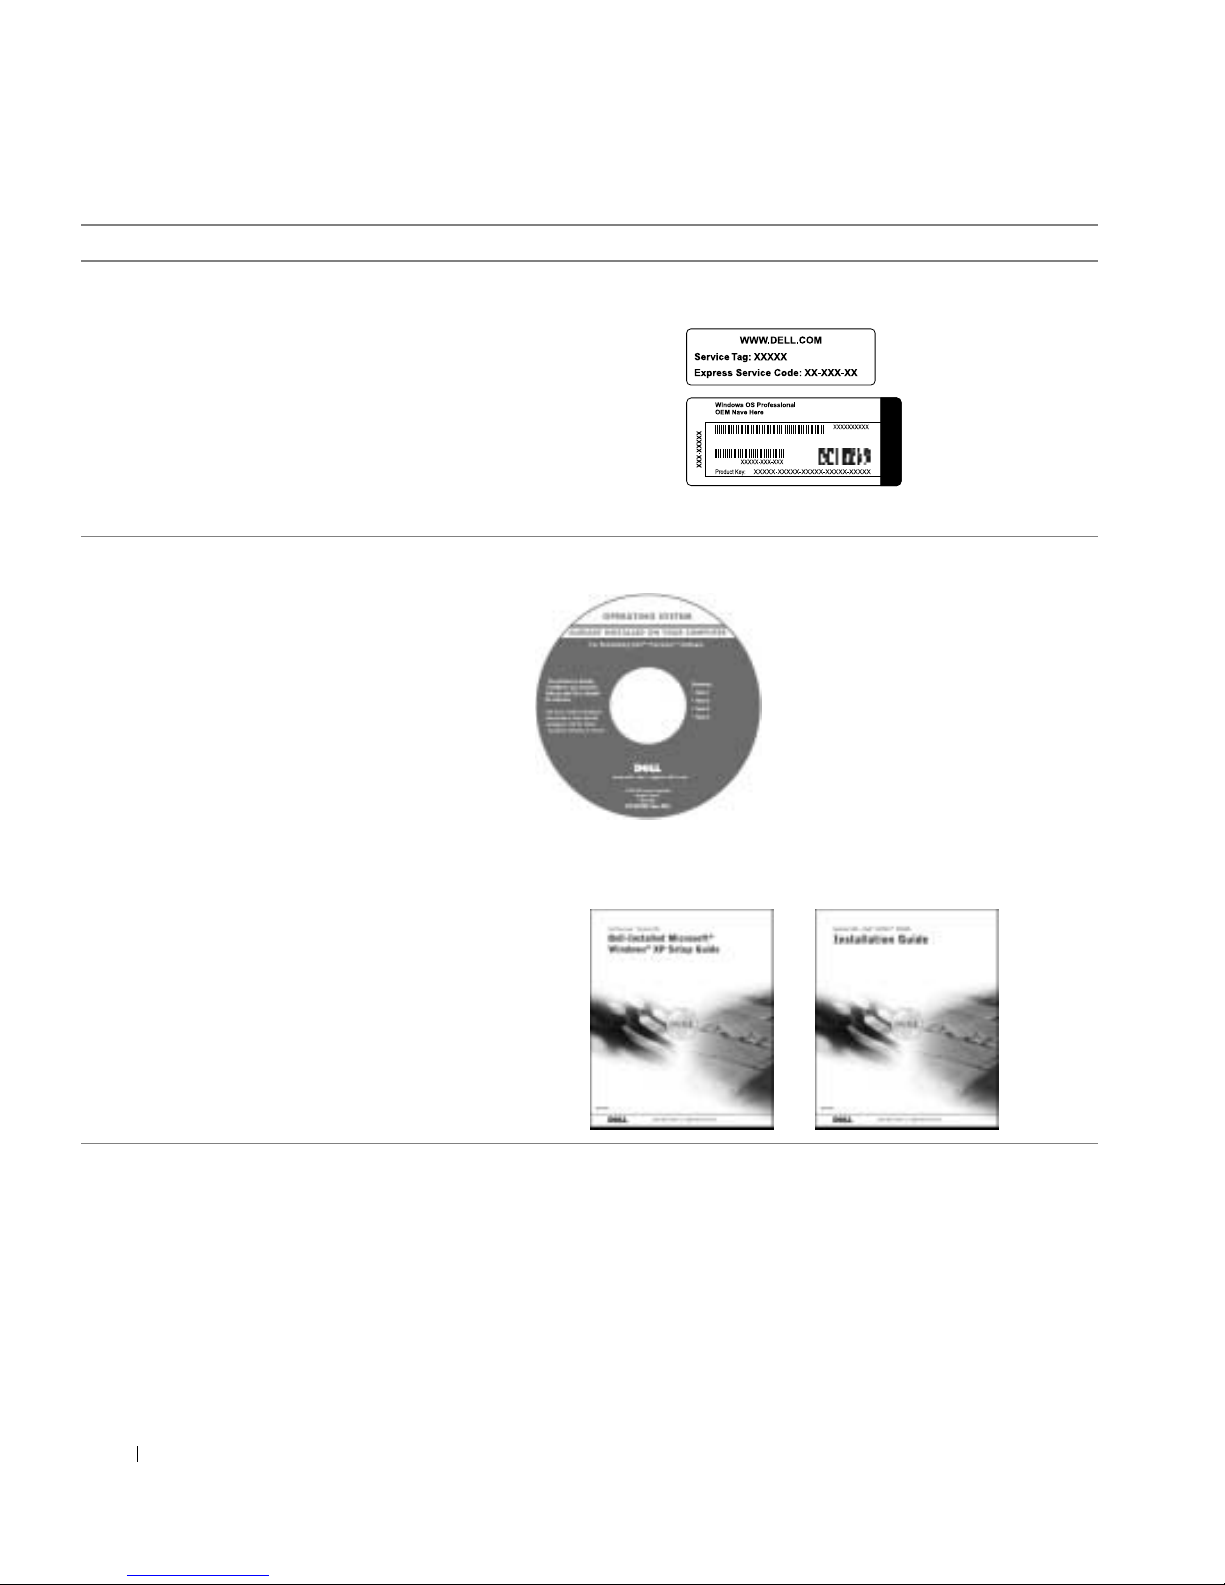
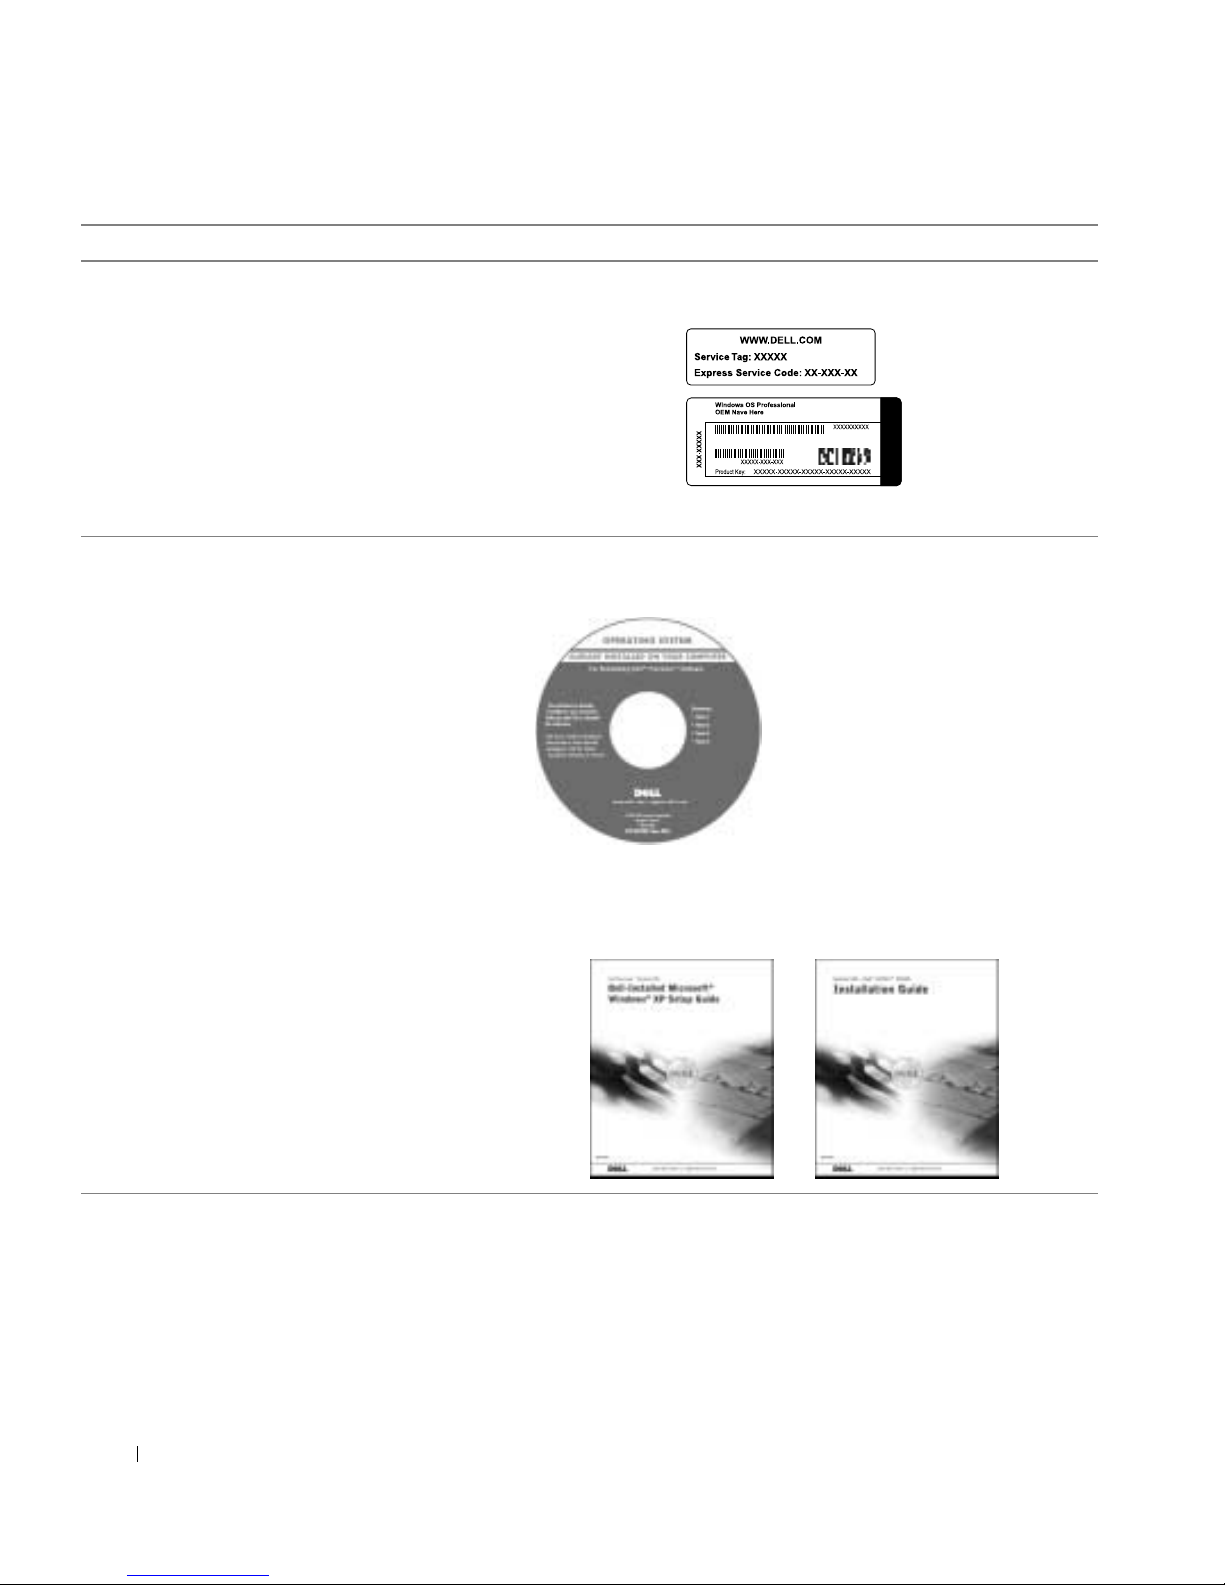
• Express Service Code and Service Tag
• Microsoft
®
Windows® License Label
Express Service Code and Product Key
The labels are located on your computer under the front-panel door.
• How to reinstall my operating system Operating System CD and Installation Guide
www.dell.com | support.dell.com
If you reinstall your operating system, use the Drivers and Utilities CD
to reinstall drivers for the devices that came with your computer.
6 Setup and Quick Reference Guide
Page 7
What Are You Looking For? Find it Here
• How to remove and replace parts
User’s Guide Icon
• Technical specifications
• How to configure system settings
• How to troubleshoot and solve problems
To access the electronic documentation stored on your hard drive:
If you are using Microsoft Windows 2000, double-click the User’s
Guides icon on your desktop. If you are using Windows XP, click the
Start button and click Help and Support.
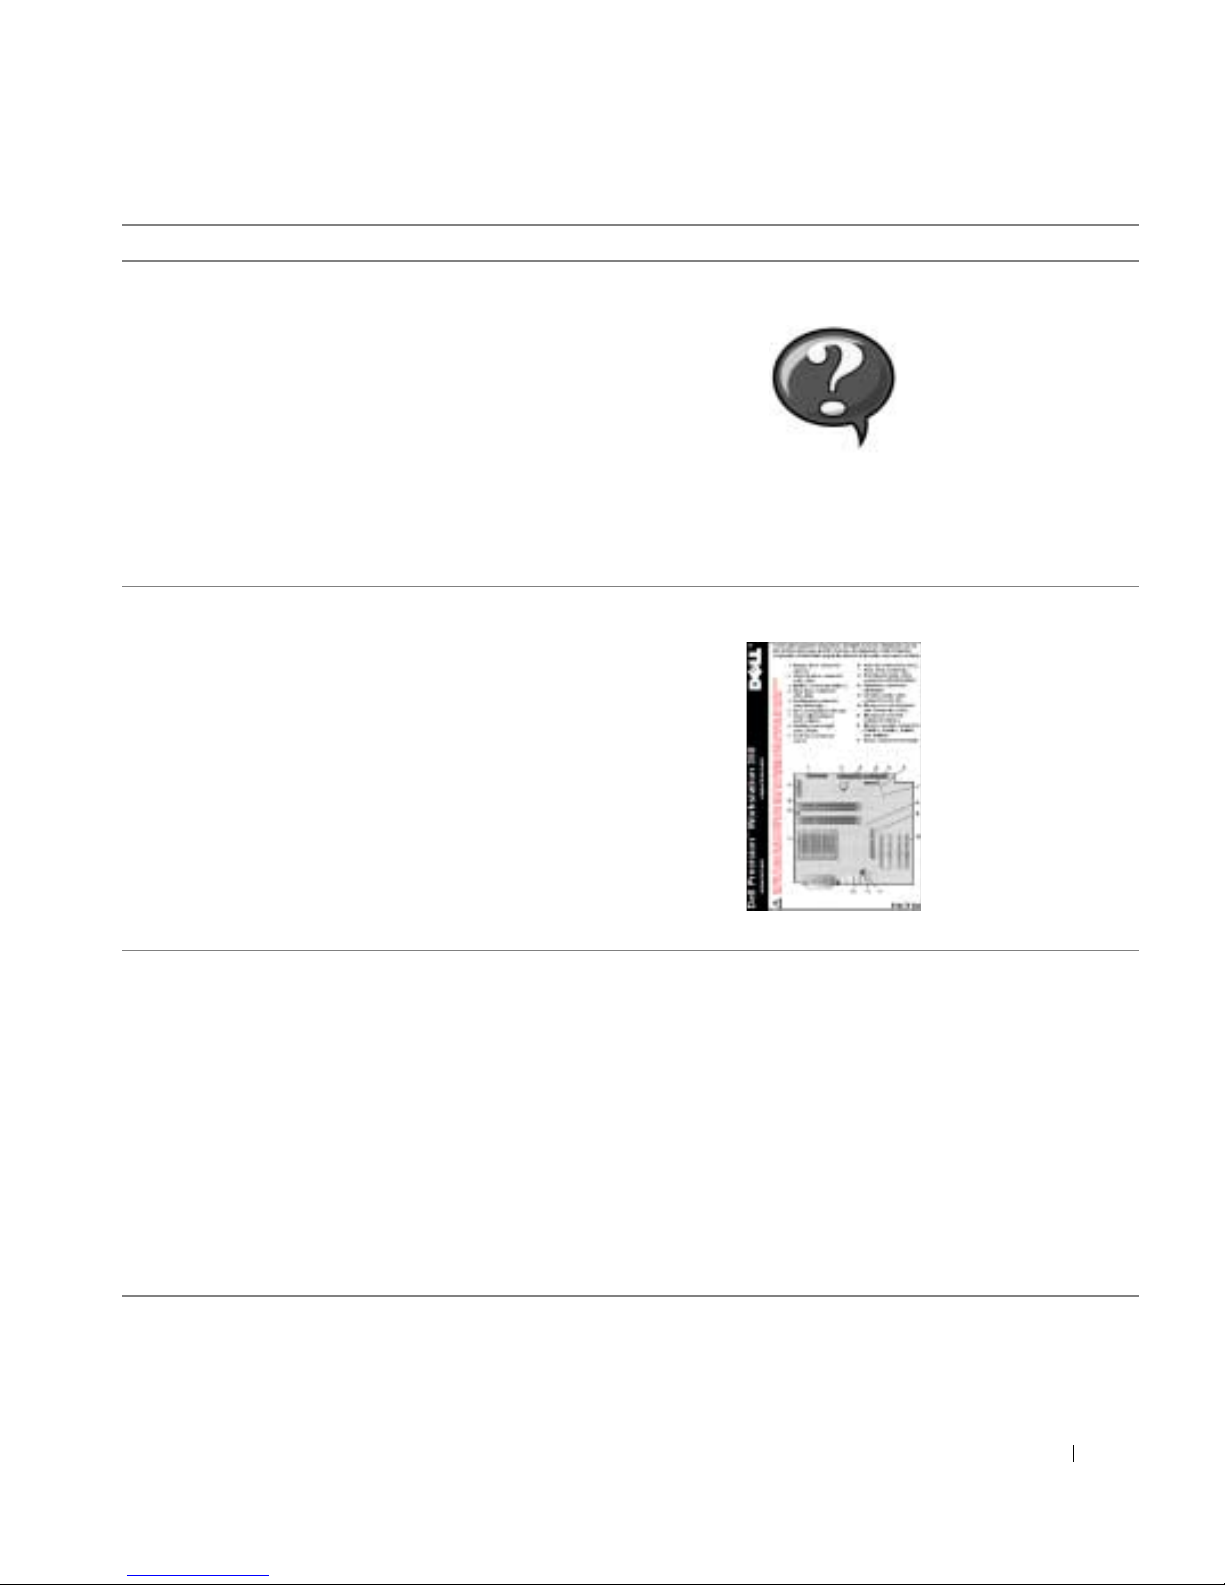
• Location of connectors on the system board System Information Label
• Latest drivers for my computer
• Answers to technical service and support
questions
• Online discussions with other users and
technical support
• Documentation for my computer including
the Service Manual
This label is located on the inside of your computer cover.
Dell Support Website — support.dell.com
The Dell Support website at support.dell.com provides several online
tools, including:
• Knowledge Base — Hints, tips, and online courses
• Customer Forum — Online discussion with other Dell customers
• Upgrades — Upgrade information for components, such as memory,
the hard drive, and the operating system
• Customer Care — Contact information, order status, warranty, and
repair information
• Downloads — Drivers, patches, and software updates
• Reference — Computer documentation, product specifications, and
white papers
Setup and Quick Reference Guide 7
Page 8
What Are You Looking For? Find it Here
• Service call status
• Top technical issues for my computer
• Frequently asked questions
• File downloads
• Details on my computer’s configuration
Dell Premier Support Website —
premiersupport.dell.com
The Dell Premier Support website is customized for corporate,
government, and education customers. This website may not be
available in all regions.
• Service contract for my computer
• Warranty Information System Information Guide
www.dell.com | support.dell.com
• How to use Windows XP
• Documentation for my computer and
devices
Windows XP Help and Support Center
1 Click the Start button and click Help and Support.
2 Type a word or phrase that describes your problem and click the
arrow icon.
3 Click the topic that describes your problem.
4 Follow the instructions shown on the screen.
8 Setup and Quick Reference Guide
Page 9
Setting Up Your Dell Precision™ 350
Computer
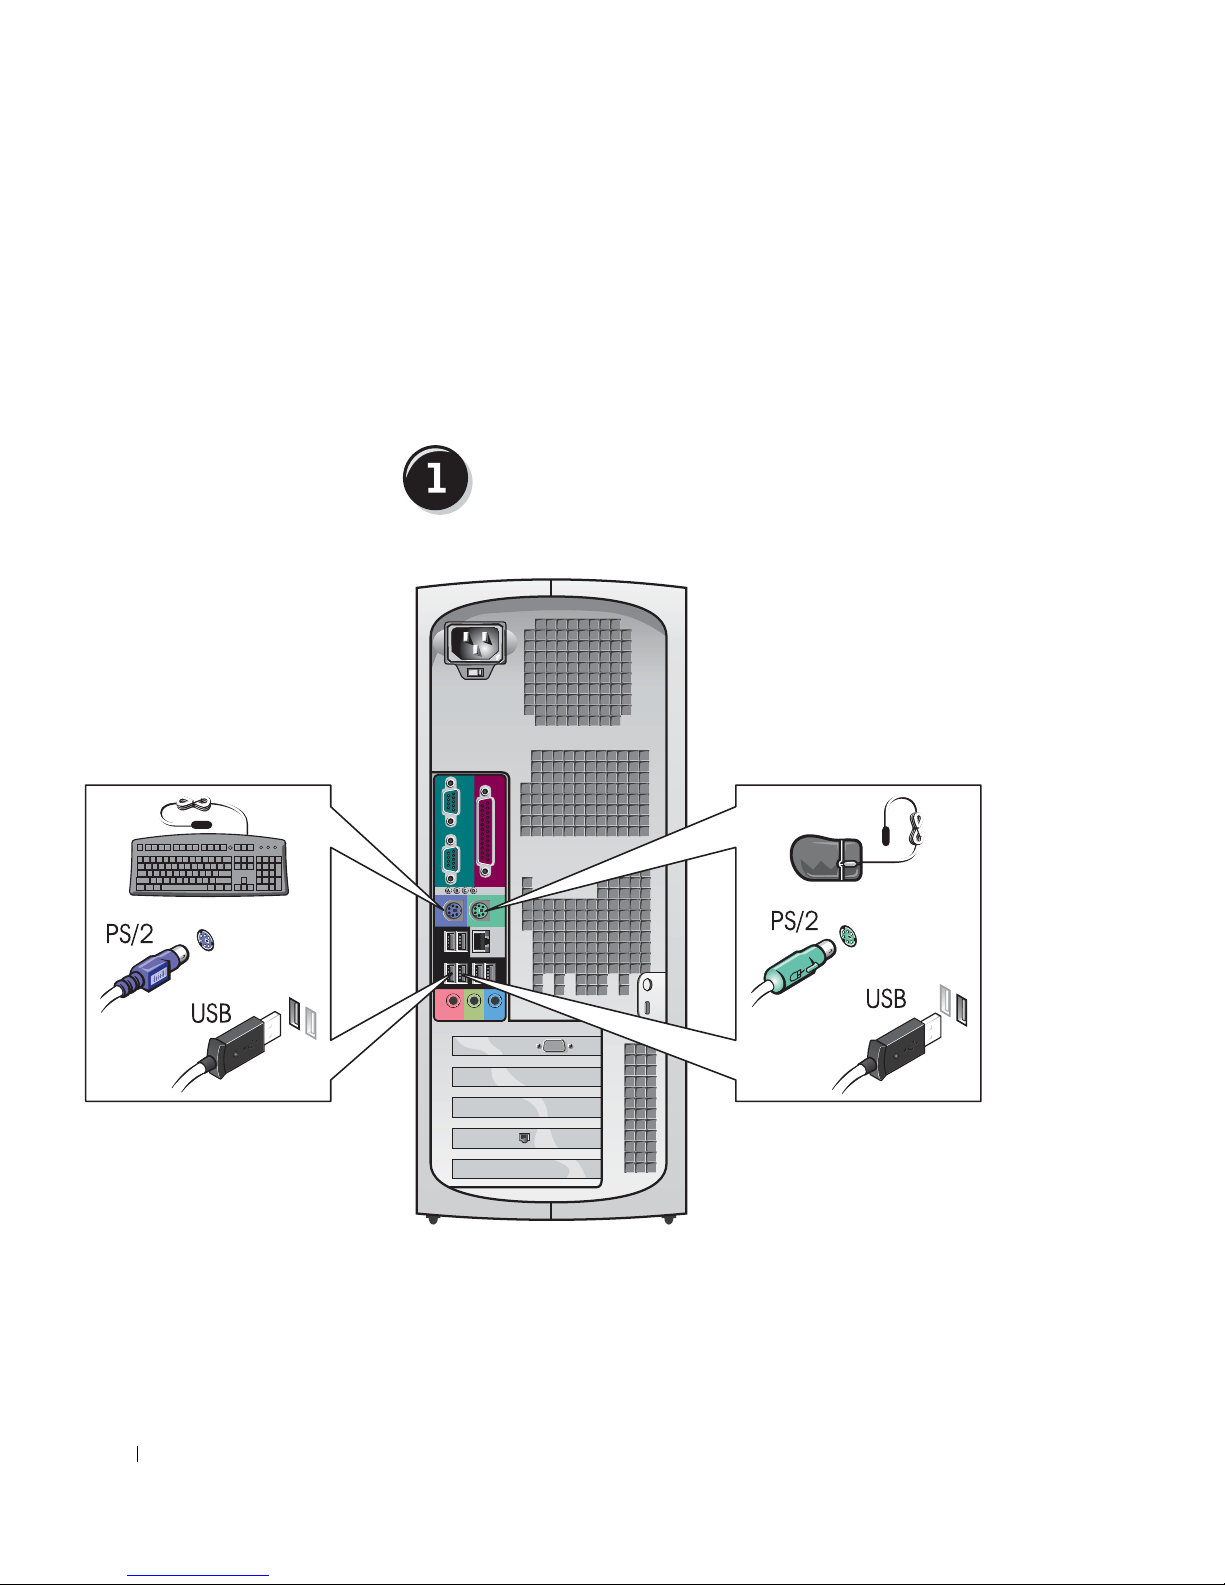
You must complete all steps to properly set up your computer.
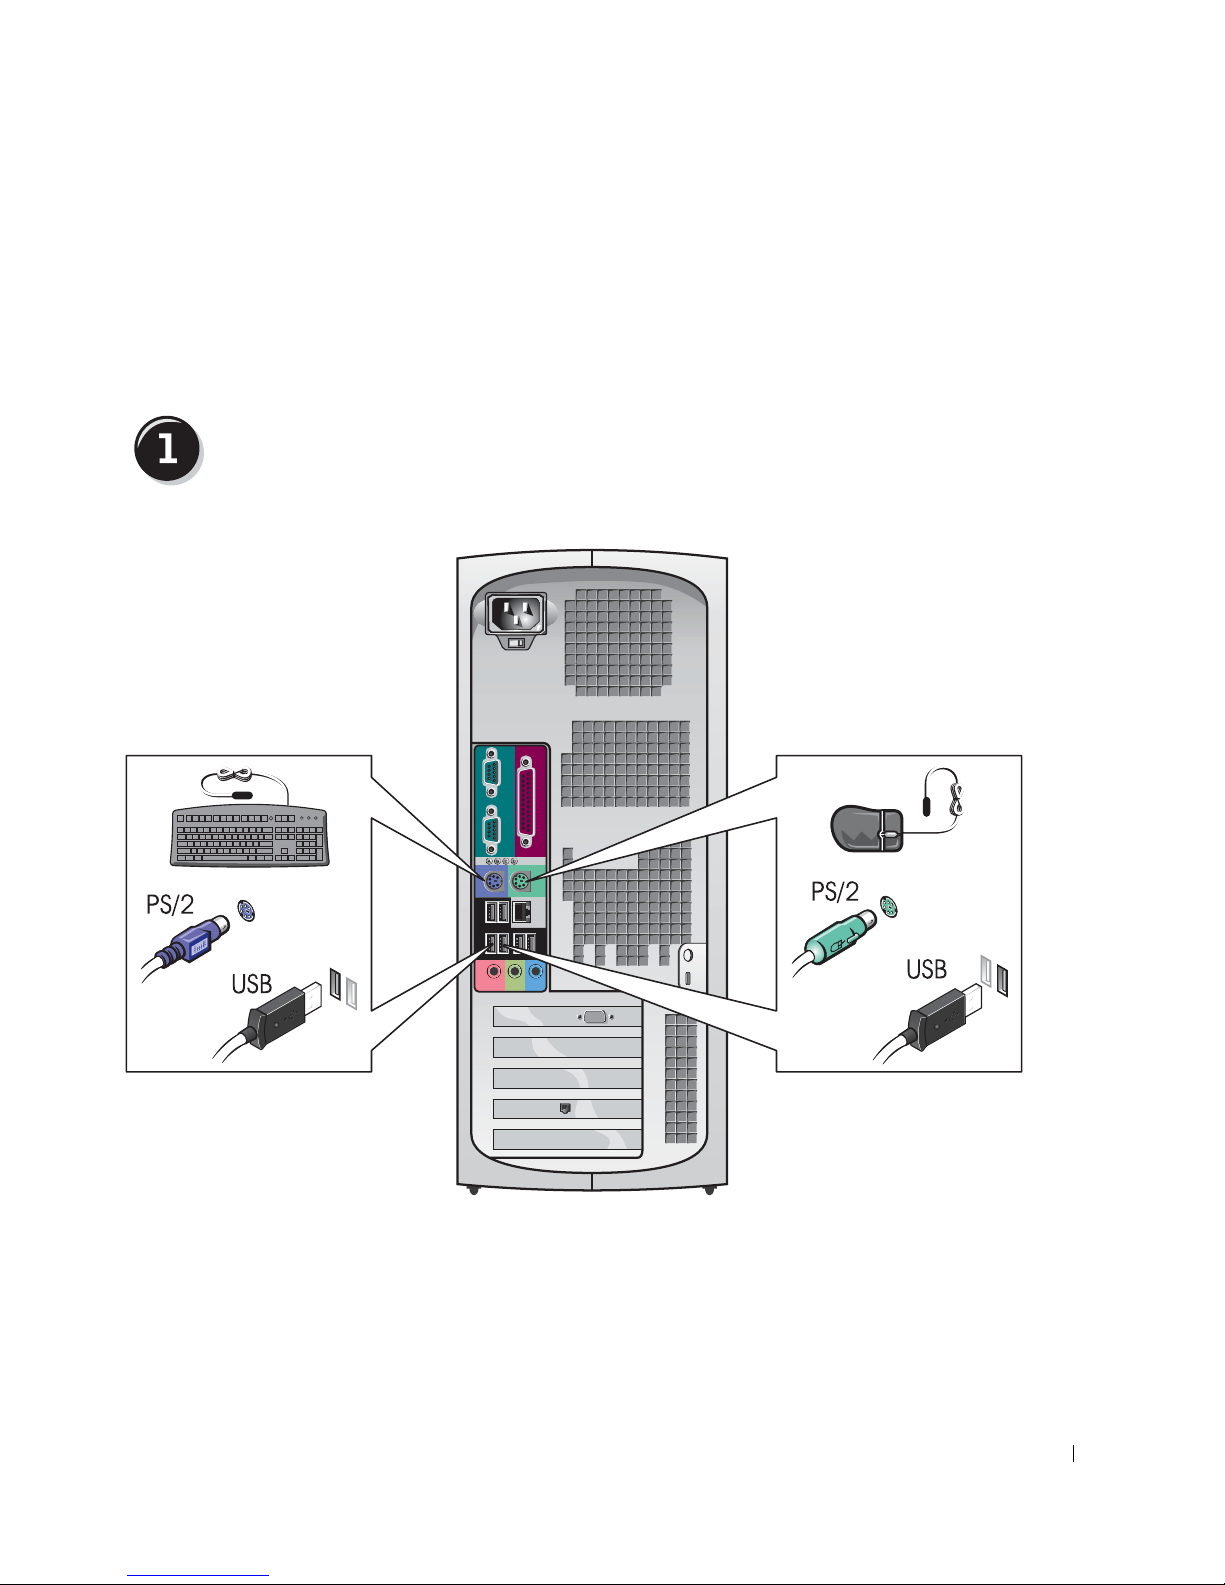
Connect the keyboard and the mouse
Setup and Quick Reference Guide 9
Page 10
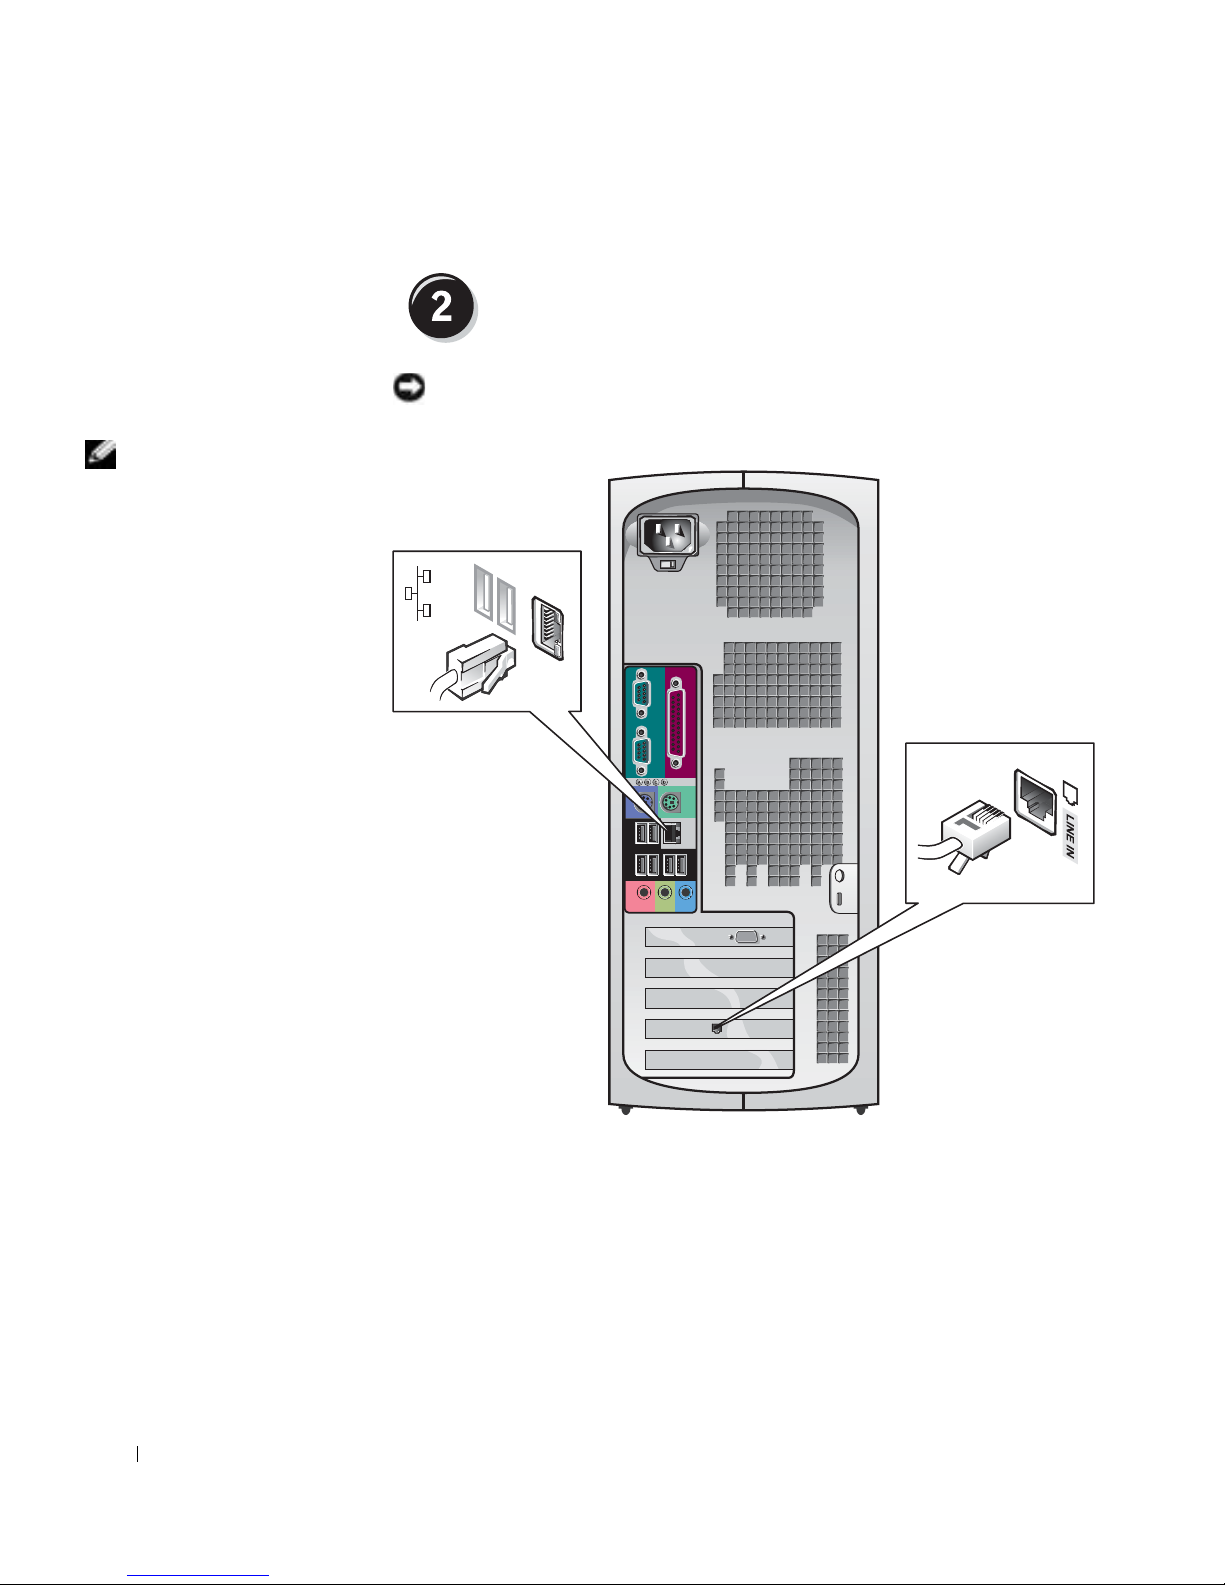
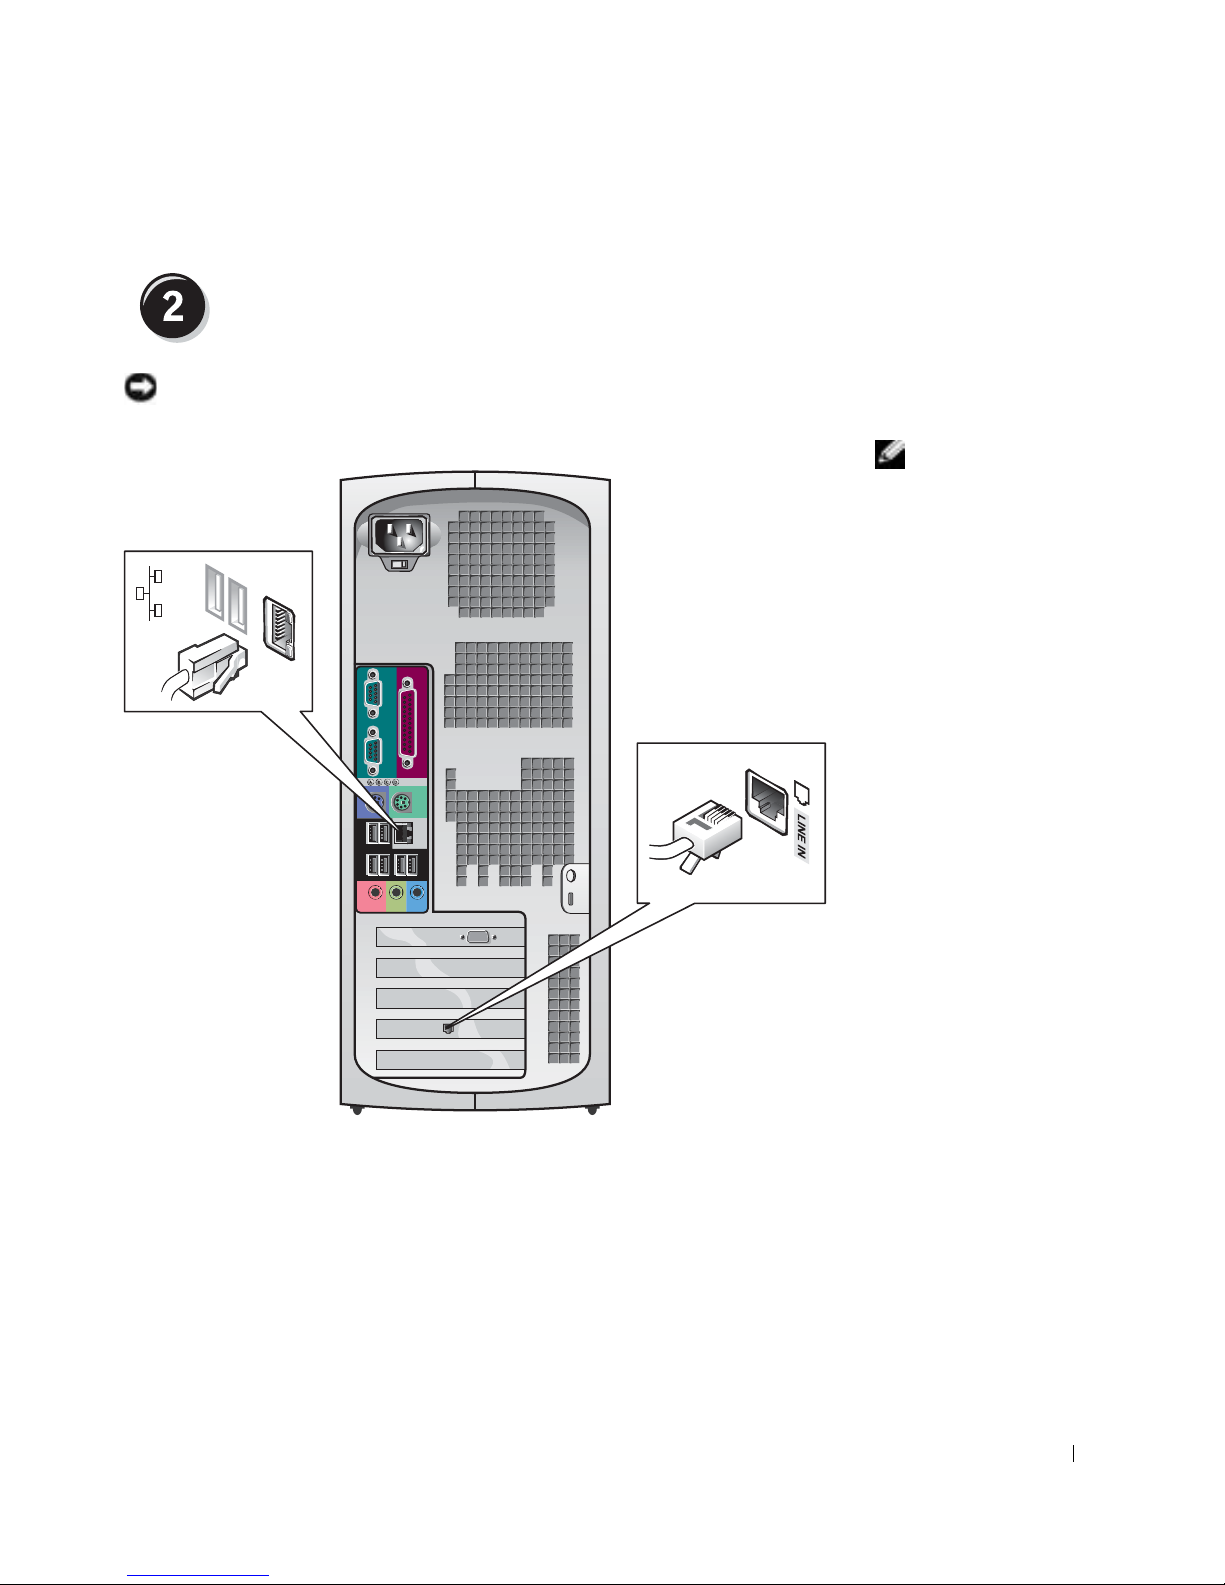
NOTE: If your computer
has a network card
installed, connect the
network cable to the card.
www.dell.com | support.dell.com
Connect the modem or the network cable
NOTICE: Do not connect a modem cable to the network adapter. Voltage
from telephone communications can damage the network adapter.
10 Setup and Quick Reference Guide
Page 11
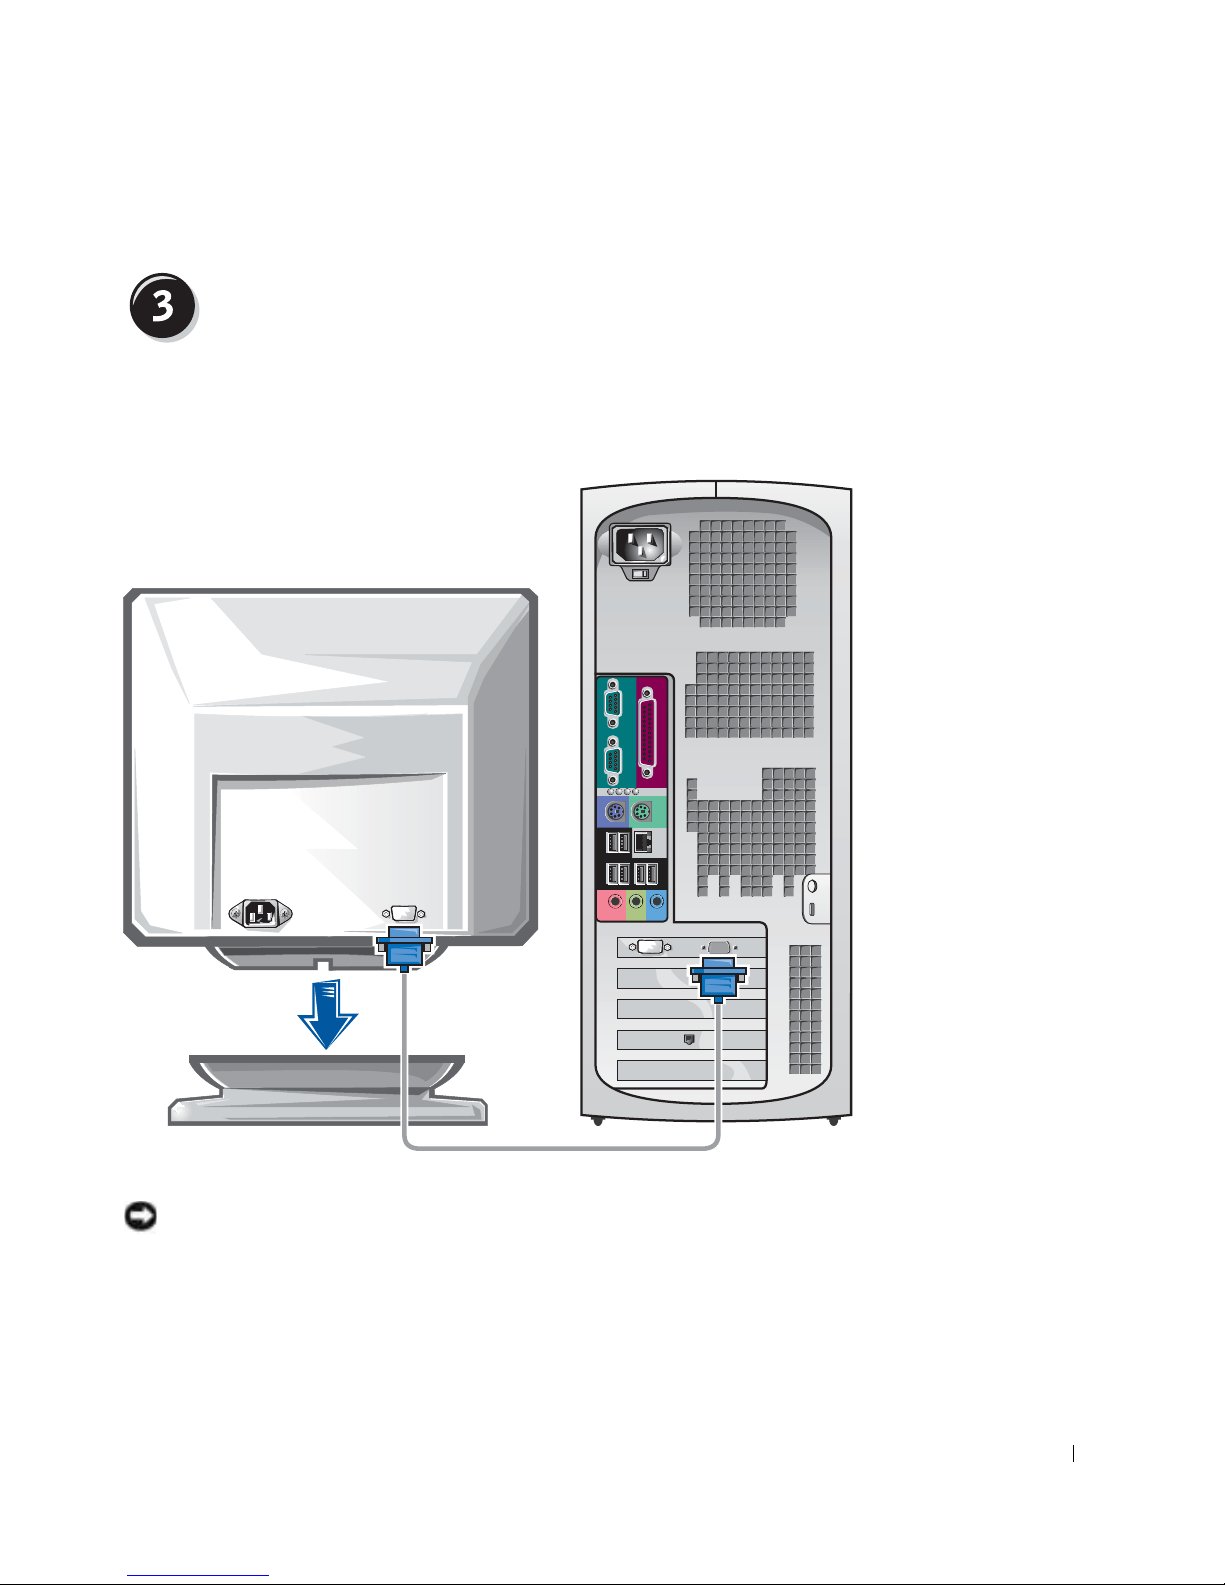
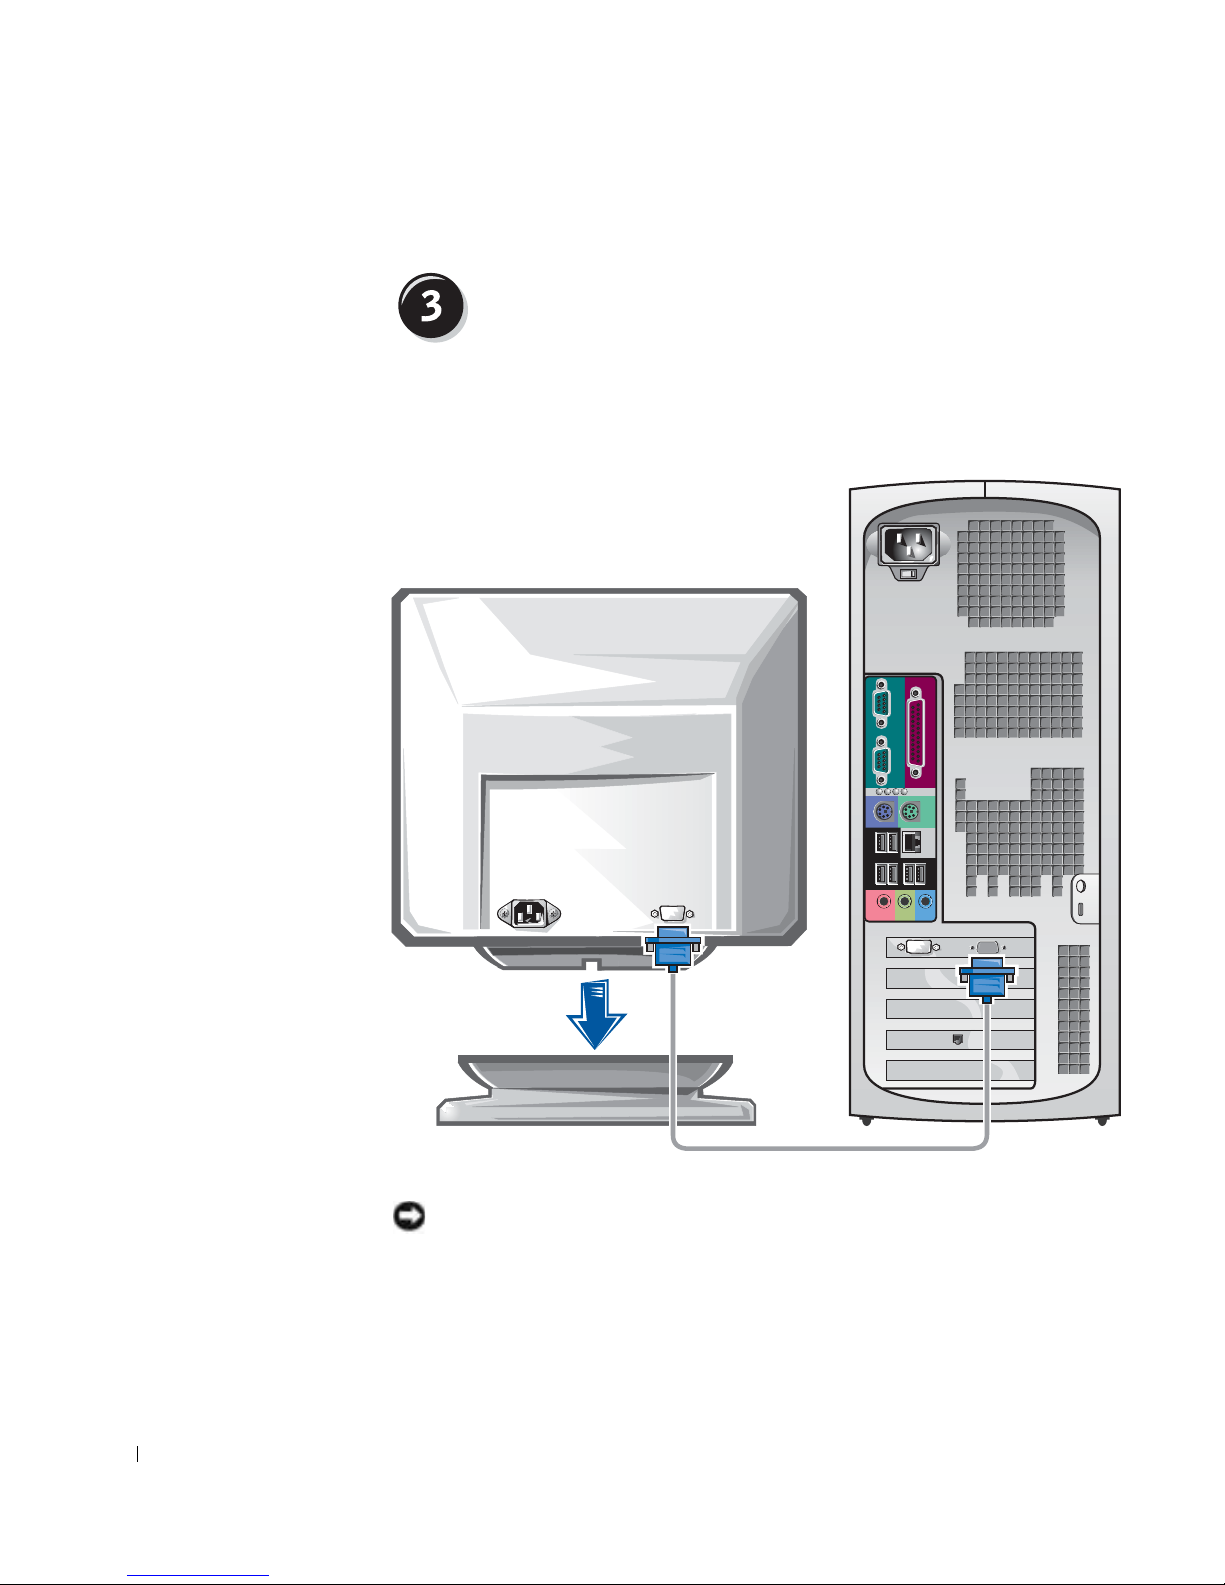
Connect the monitor
Depending on your graphics card, you can connect your monitor in various
ways.
A B C D
NOTICE: Your computer may require the use of the provided adapter or cable
to connect to your monitor.
Setup and Quick Reference Guide 11
Page 12
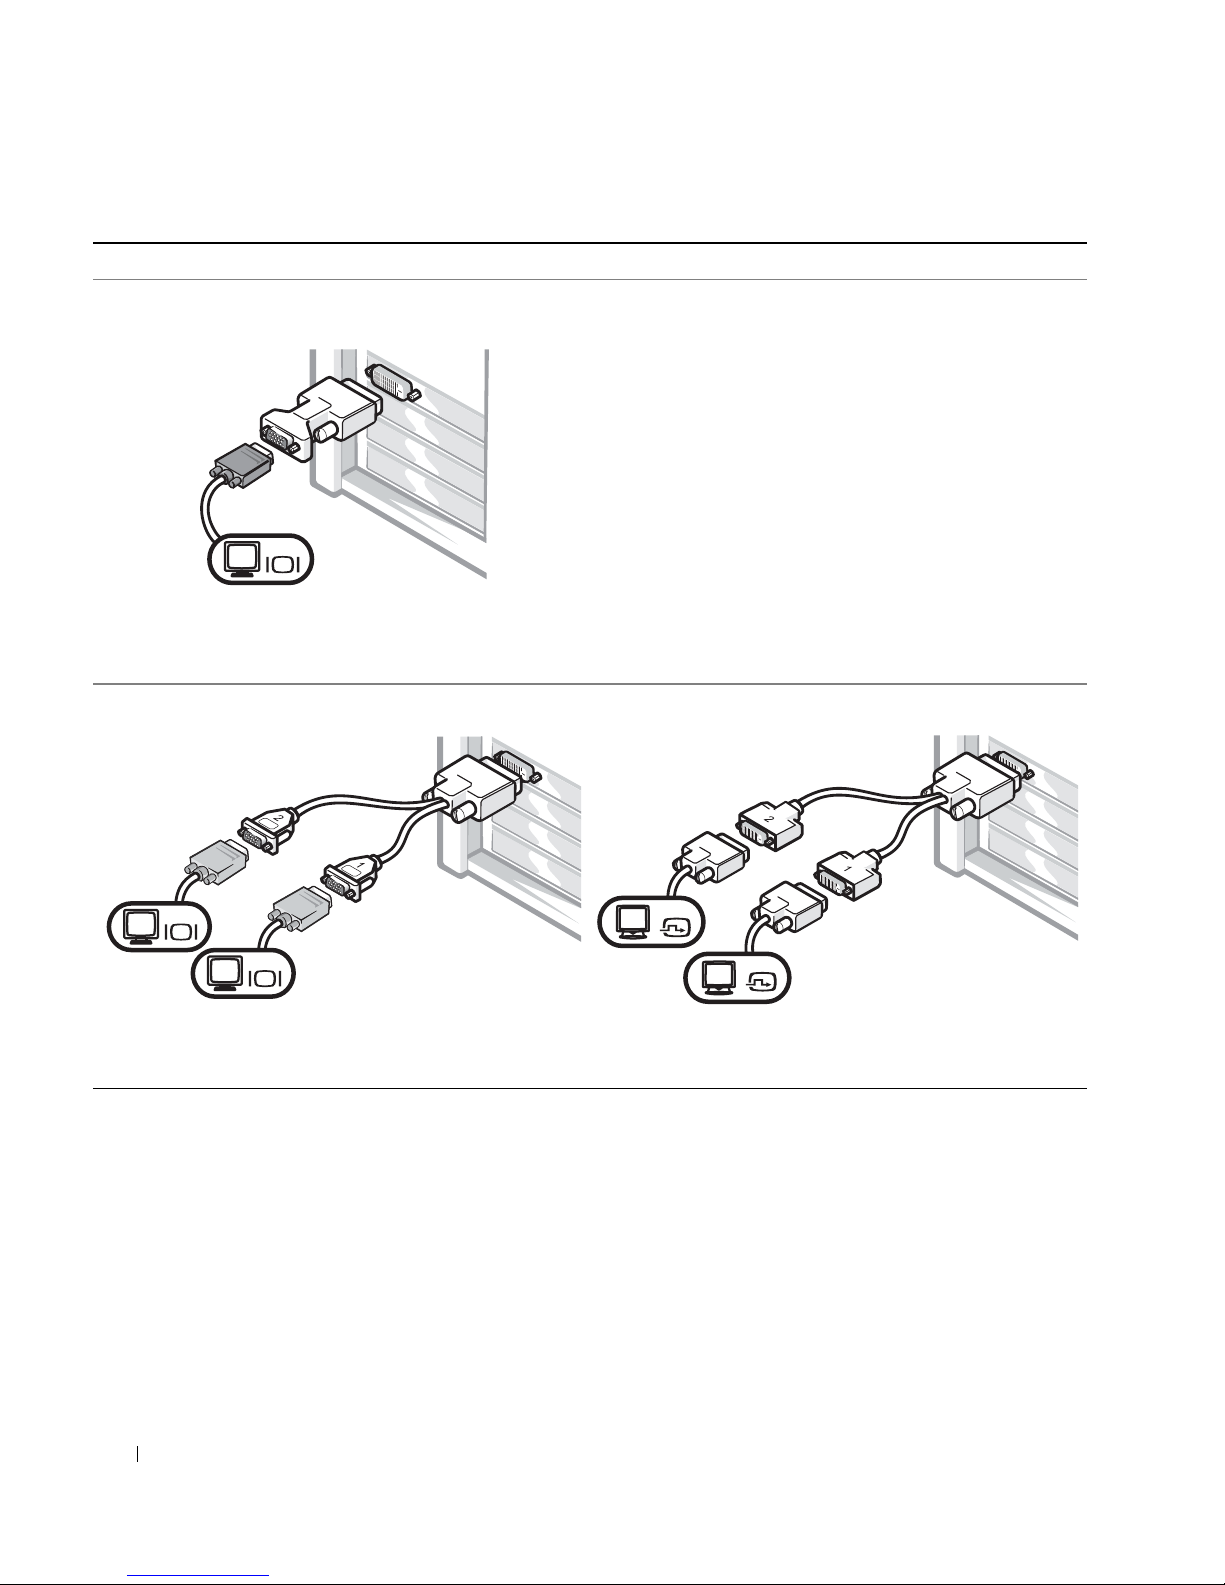
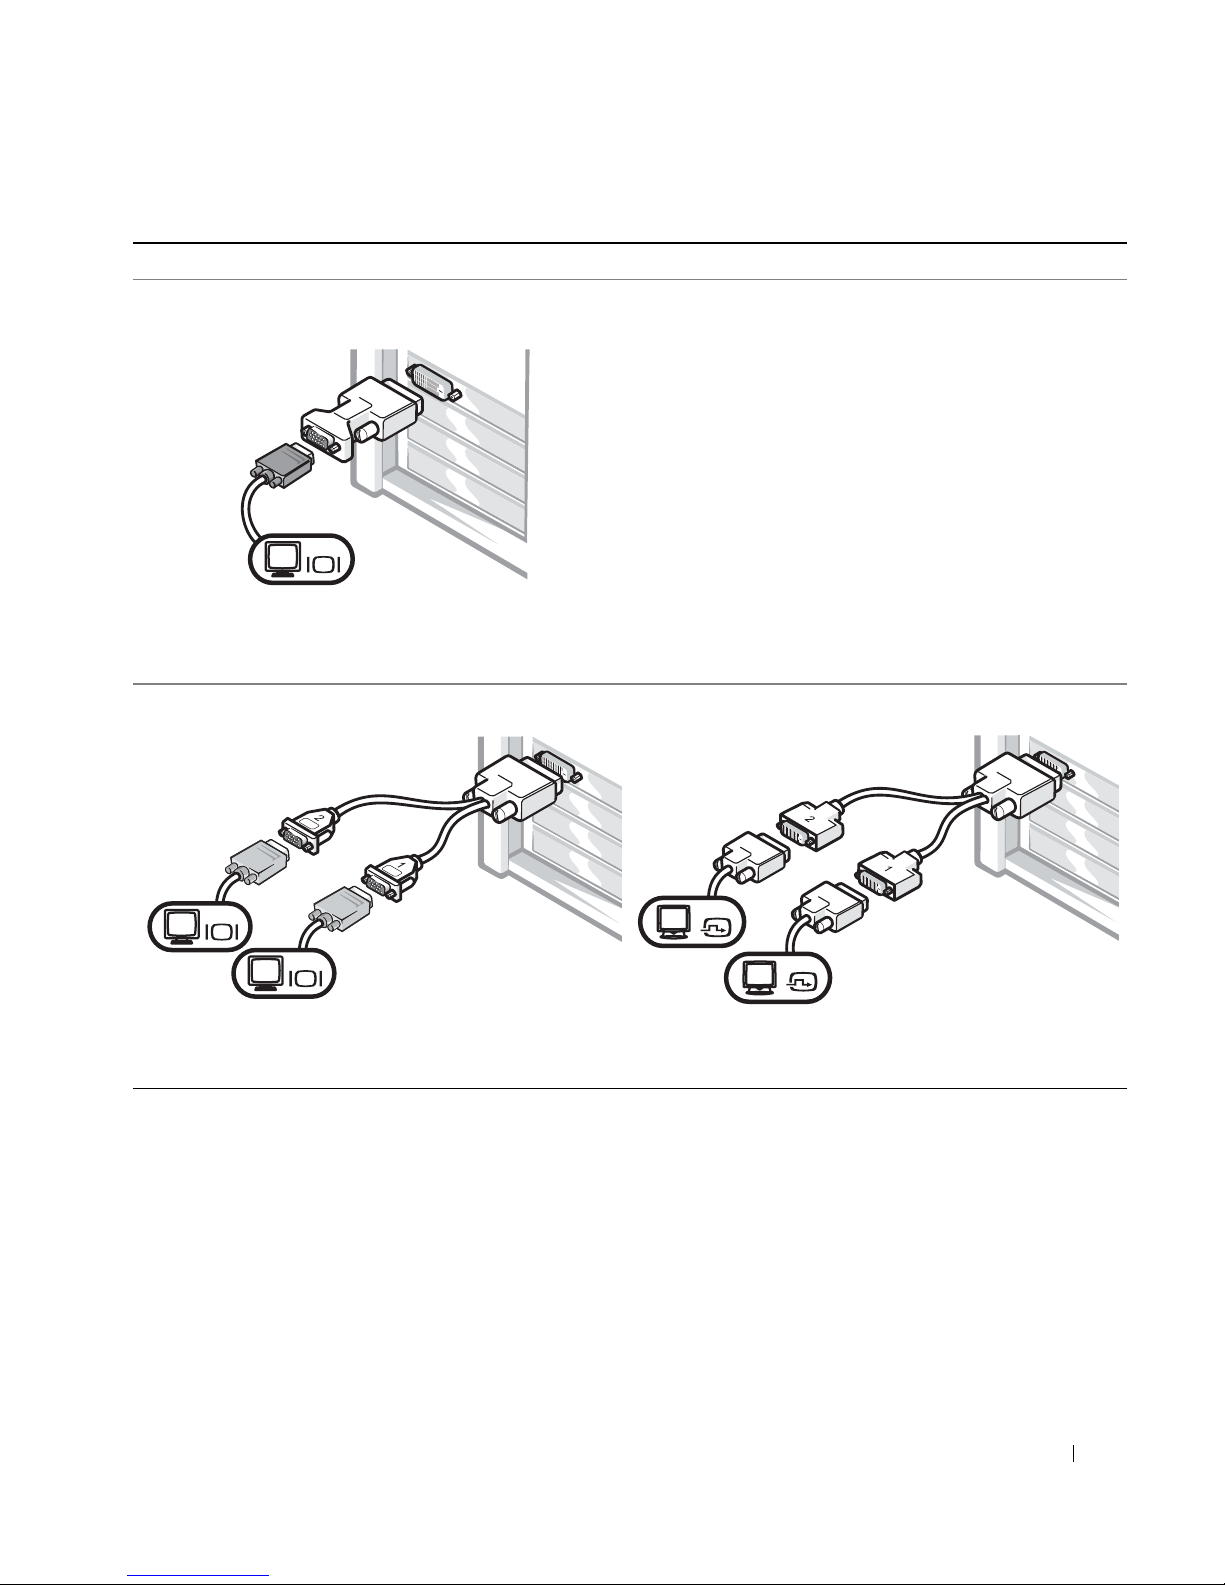
For single- and dual-monitor capable cards with a single connector
VGA Adapter
www.dell.com | support.dell.com
VGA
• Use the VGA adapter when you have a single
monitor graphics card and you want to connect to a
VGA monitor.
Dual VGA Y Cable Adapter
VGA
VGA
• Use the appropriate Y cable when your graphics card
has a single connector and you want to connect to
one or two VGA monitors.
Dual DVI Y Cable Adapter
DVI
DVI
• Use the appropriate Y cable when your graphics card
has a single connector and you want to connect to
one or two DVI monitors.
The dual-monitor cable is color coded; the blue connector is for the primary
monitor, and the black connector is for the secondary monitor. To enable
dual-monitor support, both monitors must be attached when the computer
starts.
12 Setup and Quick Reference Guide
Page 13
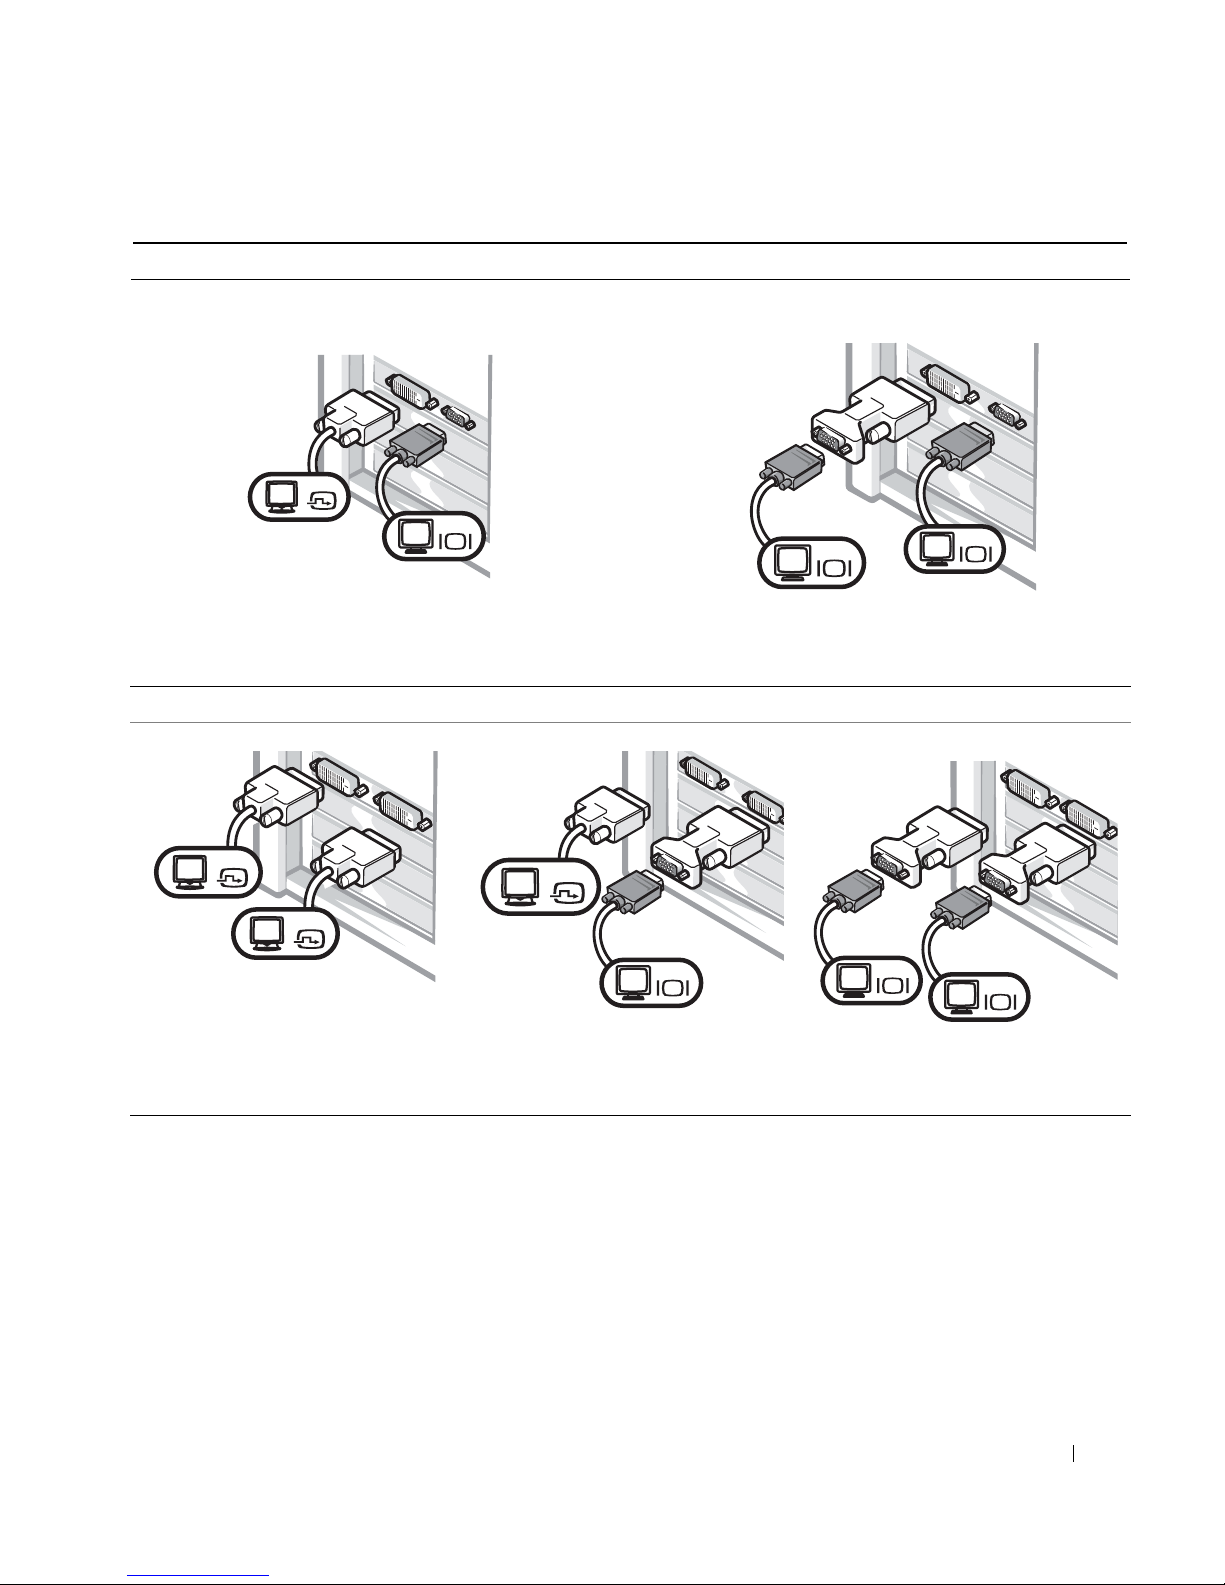
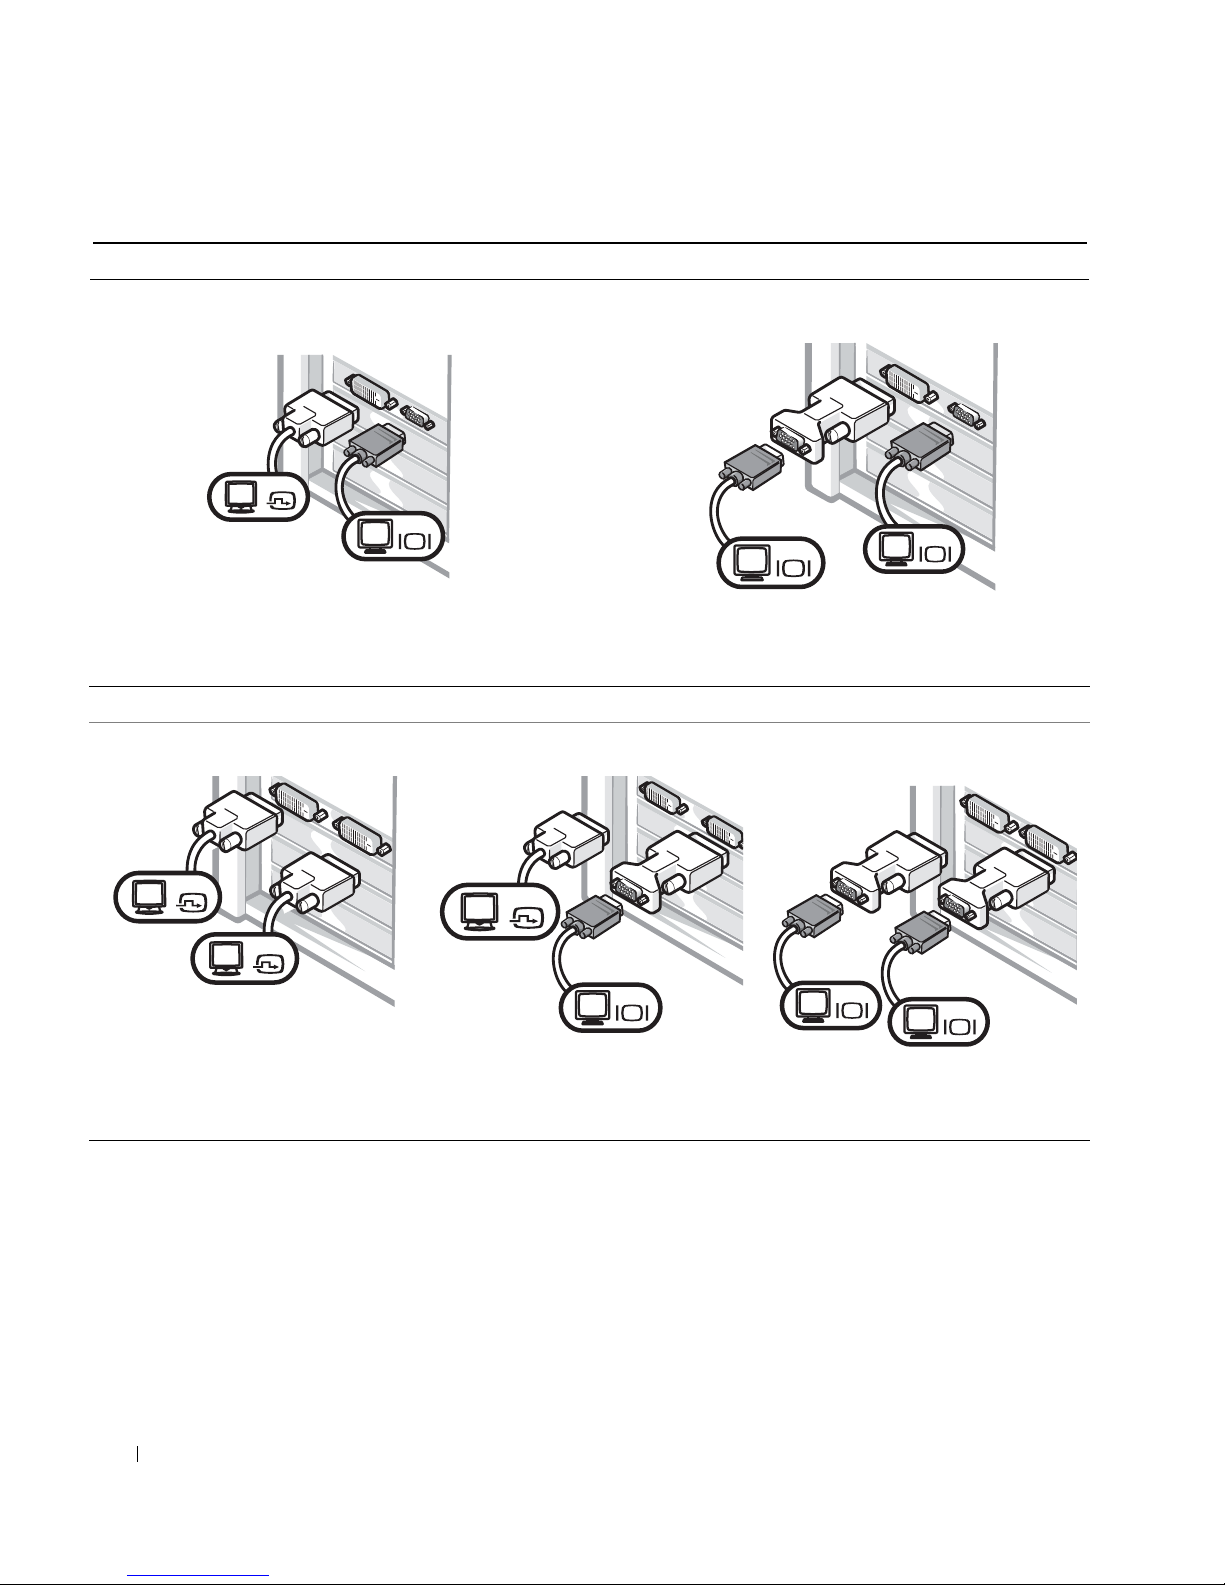
For dual-monitor capable cards with 1 DVI and 1 VGA connector
Single DVI/Single VGA
DVI
VGA
• Use the appropriate connector when you connect to
Dual VGA With VGA Adapter
• Use the VGA adapter when you want to connect to
one or two monitors.
For dual-monitor capable cards with 2 DVI connectors
Dual DVI
DVI
Dual DVI With One VGA Adapter
DVI
VGA
two VGA monitors.
Dual DVI With Two VGA Adapters
VGA
DVI
• Use the DVI connectors to
connect to one or two DVI
monitors.
VGA
• Use the VGA adapter to connect
a VGA monitor to one DVI
connector.
Setup and Quick Reference Guide 13
VGA
VGA
• Use two VGA adapters to
connect two VGA monitors to
the DVI connectors.
Page 14

NOTE: If your computer
has an audio card
installed, connect the
speakers to the card.
www.dell.com | support.dell.com
Connect the speakers
14 Setup and Quick Reference Guide
Page 15
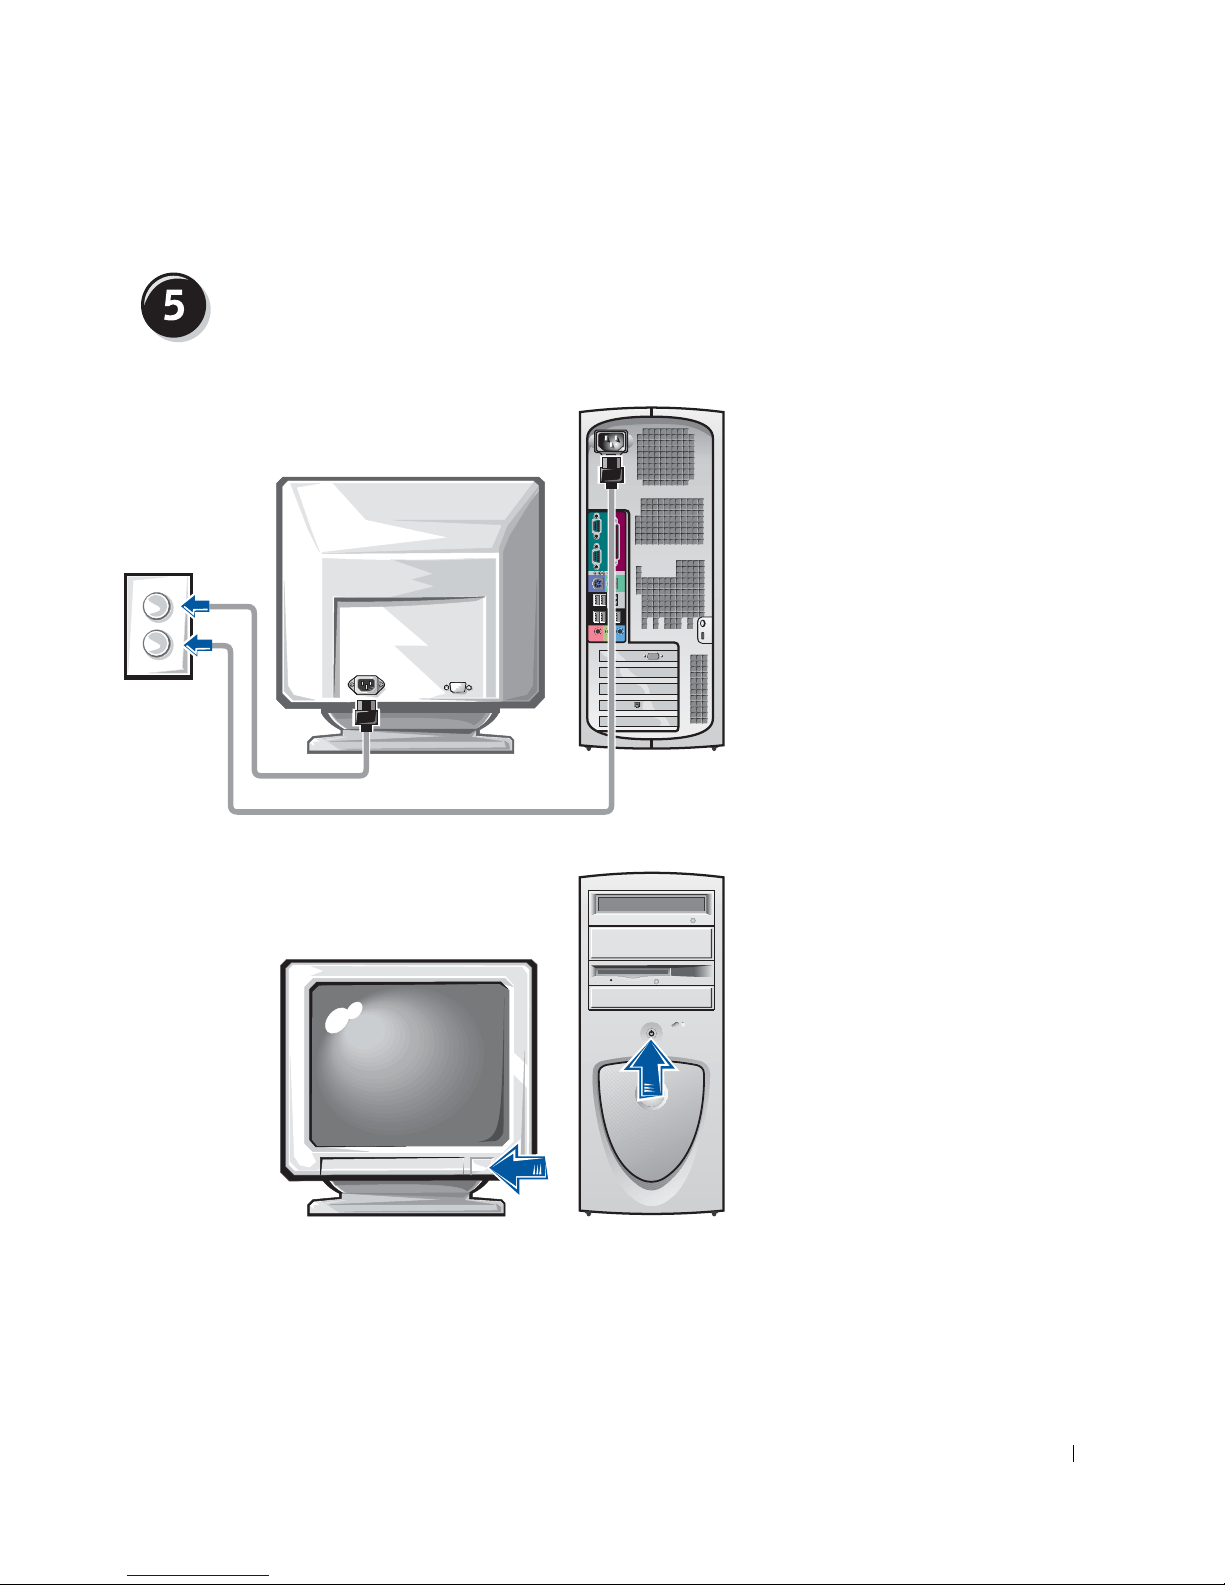
Connect the power cables and turn on the
computer and monitor
Setup and Quick Reference Guide 15
Page 16

Install additional software or devices
Before you install any devices or software that did not ship with your
computer, read the documentation that came with the software or device or
contact the vendor to verify that the software or device is compatible with
your computer and operating system.
www.dell.com | support.dell.com
Congratulations! You have completed the setup for your
computer.
For more information about your computer, including removing and
replacing parts, diagnostics and troubleshooting tools, access the User’s
Guide from your hard drive, the Drivers and Utilities CD, or the Dell
Support website.
To access the User’s Guide from your hard drive:
If you have Windows 2000, double-click the User’s Guides icon.
If you have Windows XP, click the Start button and click Help and
Support.
To access the User’s Guide from the CD:
1 Insert the Drivers and Utilities CD into the drive.
If you are using the Drivers and Utilities CD for the first time, the
ResourceCD Installation window opens to inform you that the CD is
about to begin installation.
2 Click OK to continue, and then respond to the prompts offered by the
installation program.
3 Click Next at the Welcome Dell System Owner screen.
To access the User’s Guide from the Dell Support Site:
1 Go to www.support.dell.com.
2 Follow the prompts on the website that ask for information about your
16 Setup and Quick Reference Guide
computer.
Page 17

3 At the Dell Support website home page, click Reference, click User’s
Guides, click Systems, and then select your Dell Precision computer.
Opening the Computer Cover
CAUTION: Before you begin any of the procedures in this section,
follow the safety instructions in the System Information Guide.
Shut down the computer through the Start menu.
1
2 Ensure that your computer and attached devices are turned off. If your
computer and attached devices did not automatically turn off when
you shut down your computer, turn them off now.
NOTICE: To disconnect a network cable, first unplug the cable from your
computer and then unplug it from the network wall jack.
Disconnect any telephone or telecommunication lines from the
3
computer.
4 Disconnect your computer and all attached devices from electrical
outlets, and then press the power button to ground the system board.
5 If you have installed a padlock through the padlock ring on the back
panel, remove the padlock.
CAUTION: To guard against electrical shock, always unplug your
computer from the electrical outlet before opening the cover.
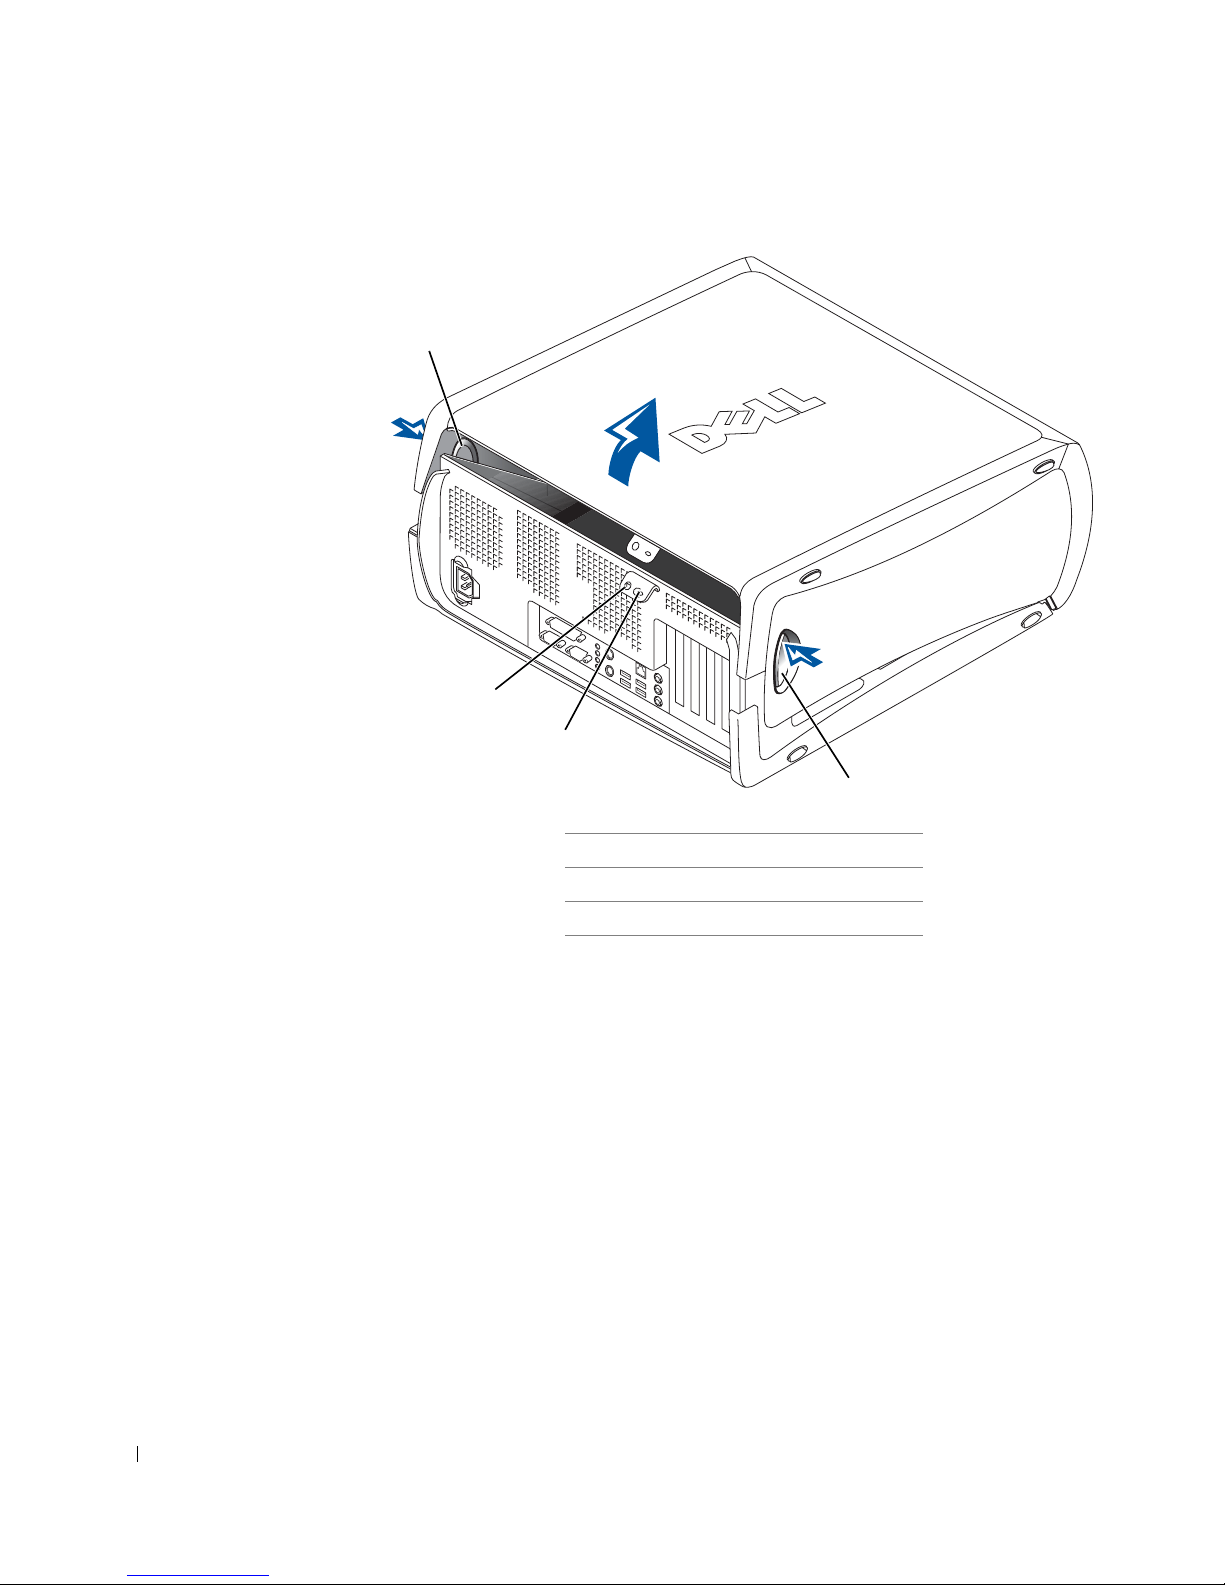
Lay the computer on its side as shown in the illustration.
6
NOTICE: Ensure that sufficient space exists to support the open cover—at
least 30 cm (1 ft) of desktop space.
Open the computer cover:
7
a Facing the back of the computer, press the release button on the
right side of the computer with one hand while pulling up on the
top of the cover with the other hand.
b Press the release button on the left side of the computer with one
hand while pulling up on the top of the cover with the other hand.
c Hold the bottom of the computer with one hand, and then pull
open the cover with the other hand.
Setup and Quick Reference Guide 17
Page 18
www.dell.com | support.dell.com
1
2
3
1
1 release buttons (2)
2 padlock ring
3 security cable slot
18 Setup and Quick Reference Guide
Page 19
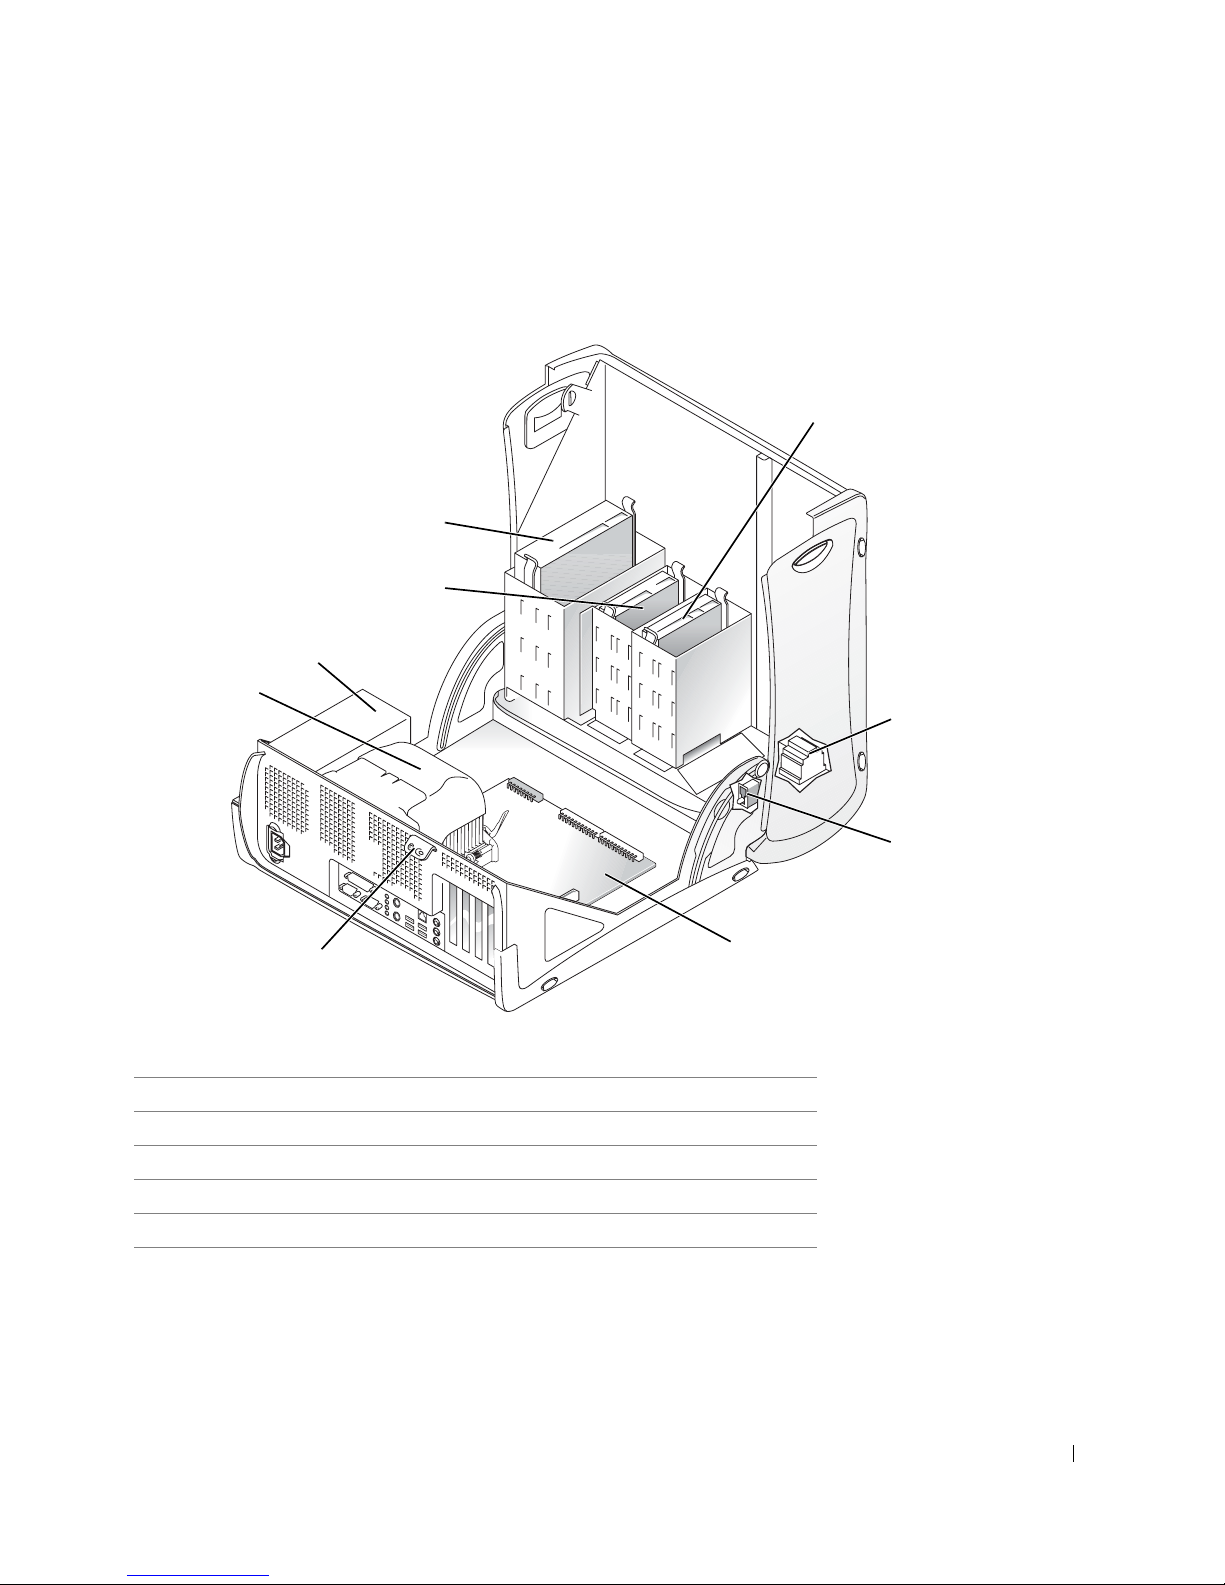
Inside Your Computer
9
8
7
6
1
2
5
1 hard drive 6 heat sink and blower assembly
2 internal speaker 7 power supply
3 chassis intrusion switch 8 floppy drive
4 system board 9 CD/DVD drive
5 padlock ring
4
3
Setup and Quick Reference Guide 19
Page 20

Solving Problems
Resolving Software and Hardware Incompatibilities
Microsoft® Windows® XP
Windows XP IRQ conflicts occur if a device either is not detected during
the operating system setup or is detected but incorrectly configured.
To check for conflicts on a computer running Windows XP:
1 Click the Start button and click Control Panel.
www.dell.com | support.dell.com
2 Click Performance and Maintenance and click System.
3 Click the Hardware tab and click Device Manager.
4 In the Device Manager list, check for conflicts with the other devices.
Conflicts are indicated by a yellow exclamation point (
conflicting device or a red
5 Double-click any conflict to display the Properties window.
X if the device has been disabled.
!) beside the
If an IRQ conflict exists, the Device status area in the Properties
window reports the cards or devices that share the device's IRQ.
6 Resolve conflicts by reconfiguring the devices or removing the devices
from the Device Manager.
To use the Windows XP Hardware Troubleshooter:
1 Click the Start button and click Help and Support.
2 Type hardware troubleshooter in the Search field, and click the
arrow to start the search.
3 Click Hardware Troubleshooter in the Search Results list.
4 In the Hardware Troubleshooter list, click I need to resolve a hardware
conflict on my computer, and then click Next.
Windows 2000
To check for conflicts on a computer running Windows 2000:
1 Click the Start button, point to Settings, and then click Control
2 In the Control Panel window, double-click System.
20 Setup and Quick Reference Guide
Panel.
Page 21

3 Click the Hardware tab.
4 Click Device Manager.
5 Click View and click Resources by connection.
6 Double-click Interrupt request (IRQ) to view the IRQ assignments.
Conflicts are indicated by a yellow exclamation point (
conflicting device or a red
7 Double-click any conflict to display the Properties window.
X if the device has been disabled.
!) beside the
If an IRQ conflict exists, the Device status area in the Properties
window reports the cards or devices that share the device's IRQ.
8 Resolve conflicts by reconfiguring the devices or removing the devices
from the Device Manager.
To use the Windows 2000 Hardware Troubleshooter:
1 Click the Start button and click Help.
2 Click Troubleshooting and Maintenance on the Contents tab, click
Windows 2000 troubleshooters, and then click Hardware.
3 In the Hardware Troubleshooter list, click I need to resolve a hardware
conflict on my computer, and then click Next.
Using System Restore in Windows XP
The Windows XP operating system provides System Restore to allow you to
return your computer to an earlier operating state (without affecting data
files) if changes to the hardware, software, or other system settings have left
the computer in an undesirable operating state. See "Windows XP Help and
Support Center" on page 8 for additional information on using System
Restore.
NOTICE: Back up your data files regularly. System Restore does not monitor
your data files or recover them.
Creating a Restore Point
1 Click the Start button and click Help and Support.
2 Click System Restore.
3 Follow the instructions on the screen.
Setup and Quick Reference Guide 21
Page 22

www.dell.com | support.dell.com
Restoring the Computer to an Earlier Operating State
NOTICE: Before you restore the computer to an earlier operating state, save
and close all open files and close all open programs. Do not alter, open, or
delete any files or programs until the system restoration is complete.
Click the Start button, point to All Programs→ Accessories→ System
1
Tools, and then click System Restore.
2 Ensure that Restore my computer to an earlier time is selected, and
then click Next.
3 Click a calendar date to which you want to restore your computer.
The Select a Restore Point screen provides a calendar that allows you
to see and select restore points. All calendar dates with available
restore points appear in bold.
4 Select a restore point and click Next.
If a calendar date has only one restore point, then that restore point is
automatically selected. If two or more restore points are available, click
the restore point that you prefer.
5 Click Next.
The Restoration Complete screen appears after System Restore
finishes collecting data, and then the computer automatically restarts.
6 After the computer restarts, click OK.
To change the restore point, you can either repeat the steps using a
different restore point, or you can undo the restoration.
Using the Last Known Good Configuration in Windows 2000
1 Restart your computer and press <F8> when the message Please
select the operating system to start
2 Highlight Last Known Good Setting, press <Enter>, press <L>, and
then select your operating system when prompted.
22 Setup and Quick Reference Guide
appears.
Page 23

Other Options to Help Resolve Additional Device or Software Conflicts
NOTICE: The following processes erase all of the information on your hard
drive.
• If the previous procedures did not work, run a low-level format of your
hard drive.
See your operating system installation guide for more information.
• Reinstall your operating system using the operating system installation
guide and operating system CD.
When to Use the Dell Diagnostics
If you experience a problem with your computer, perform the checks in
"Solving Problems" in your User’s Guide and run the Dell Diagnostics before
you contact Dell for technical assistance. Running the Dell Diagnostics may
help you resolve the problem without contacting Dell. If you do contact
Dell, the test results can provide important information for Dell's service
and support personnel.
The Dell Diagnostics allows you to:
• Perform express, extended, or custom tests on one or all devices
• Select tests based on a symptom of the problem you are having
• Choose how many times a test is run
• Display test results
• Suspend testing if an error is detected
• Access online help information that describes the tests and devices
• Receive status messages that tell you whether tests completed
successfully
• Receive error messages if problems are detected
Starting the Dell Diagnostics
It is recommended that you print these procedures before you begin.
NOTICE: Only use the Dell Diagnostics to test your Dell™ computer. Using
this program with other computers can result in error messages.
Enter system setup, review your computer’s configuration information, and
ensure that the device you want to test displays in system setup and is
active.
Setup and Quick Reference Guide 23
Page 24

Start the Dell Diagnostics from either your hard drive or from the Drivers
and Utilities CD (also known as the ResourceCD).
Starting the Dell Diagnostics From Your Hard Drive
1 Shut down and restart the computer.
2 When the DELL logo appears, press <F12> immediately.
NOTE: If you receive a
message stating that no
Diagnostics utility
partition has been found,
follow the instructions to
www.dell.com | support.dell.com
run the Dell Diagnostics
from your Drivers and
Utilities CD.
NOTE: This feature
changes the boot sequence
for one time only. On the
next start-up, the
computer boots according
to the devices specified in
system setup.
If you wait too long and the Windows logo appears, continue to wait
until you see the Windows desktop. Then shut down your computer
through the Start menu and try again.
3 When the boot device list appears, highlight Boot to Utility Partition
and press <Enter>.
4 When the Dell Diagnostics Main Menu appears, select the test you
want to run.
Starting the Dell Diagnostics From the Drivers and Utilities CD
1 Insert the Drivers and Utilities CD into the CD drive.
2 Shut down and restart the computer.
When the DELL logo appears, press <F12> immediately.
If you wait too long and the Windows logo appears, continue to wait
until you see the Windows desktop. Then shut down your computer
through the Start menu and try again
3 When the boot device list appears, highlight IDE CD-ROM Device
and press <Enter>.
4 Select the IDE CD-ROM Device option from the CD boot menu.
5 Select the Boot from CD-ROM option from the menu that appears.
6 Type 1 to start the ResourceCD menu.
7 Type 2 to start the Dell Diagnostics.
8 Select Run the 32 Bit Dell Diagnostics from the numbered list. If
9 When the Dell Diagnostics Main Menu appears, select the test you
24 Setup and Quick Reference Guide
multiple versions are listed, select the version appropriate for your
platform.
want to run.
Page 25

Dell Diagnostics Main Menu
1 After the Dell Diagnostics loads and the Main Menu screen appears,
click the button for the option you want.
Option Function
Express
Test
Performs a quick test of devices. This test typically takes 10
to 20 minutes and requires no interaction on your part.
Run Express Test first to increase the possibility of tracing
the problem quickly.
NOTE: The Service Tag
for your computer is
located at the top of each
test screen.
Extended
Test
Custom
Test
Symptom
Tr ee
If a problem is encountered during a test, a message displaying the
2
Performs a thorough check of devices. This test typically
takes an hour or more and requires you to answer questions
periodically.
Tests a specific device. You can customize the tests you
want to run.
Lists the most common symptoms encountered and allows
you to select a test based on the symptom of the problem
you are having.
error code and a description of the problem appear. Write down the
error code and problem description and follow the instructions on the
screen.
If you cannot resolve the error condition, contact Dell.
3 If you run a test from the Custom Test or Symptom Tree option, click
the applicable tab described in the following table for more
information.
Tab Function
Results Displays the results of the test and any error conditions
encountered.
Errors Displays error conditions encountered, error codes, and
problem description.
Help Describes the test and may indicate requirements for
running the test.
Setup and Quick Reference Guide 25
Page 26

www.dell.com | support.dell.com
Configuration Displays your hardware configuration for the selected
device.
The Dell Diagnostics obtains your configuration
information for all devices from system setup, memory,
and various internal tests and displays it in the device
list in the left pane of the screen. The device list may
not display the names of all the components installed on
your computer or all devices attached to your computer.
Parameters Allows you to customize the test by changing the test
settings.
4 When the tests are completed, if you are running the Dell Diagnostics
from the Drivers and Utilities CD, remove the CD.
5 Close the test screen to return to the Main Menu screen. To exit the
Dell Diagnostics and restart the computer, close the Main Menu
screen.
Beep Codes
Your computer might emit a series of beeps that identify a problem. One
possible series (code 1-3-1) consists of one beep, a burst of three beeps, and
then one beep. This series tell you that the computer encountered a
memory problem.
If a beep code is emitted, write it down and look it up under "Beep Codes"
in the User’s Guide.
Error Messages
NOTE: If the message is
not listed, see the
documentation for either
the operating system or
the program that was
running when the message
appeared.
26 Setup and Quick Reference Guide
If an error occurs during start-up, a message may be displayed on the
monitor identifying the problem. See "Error Messages" in the User’s Guide
for suggestions on resolving any problems.
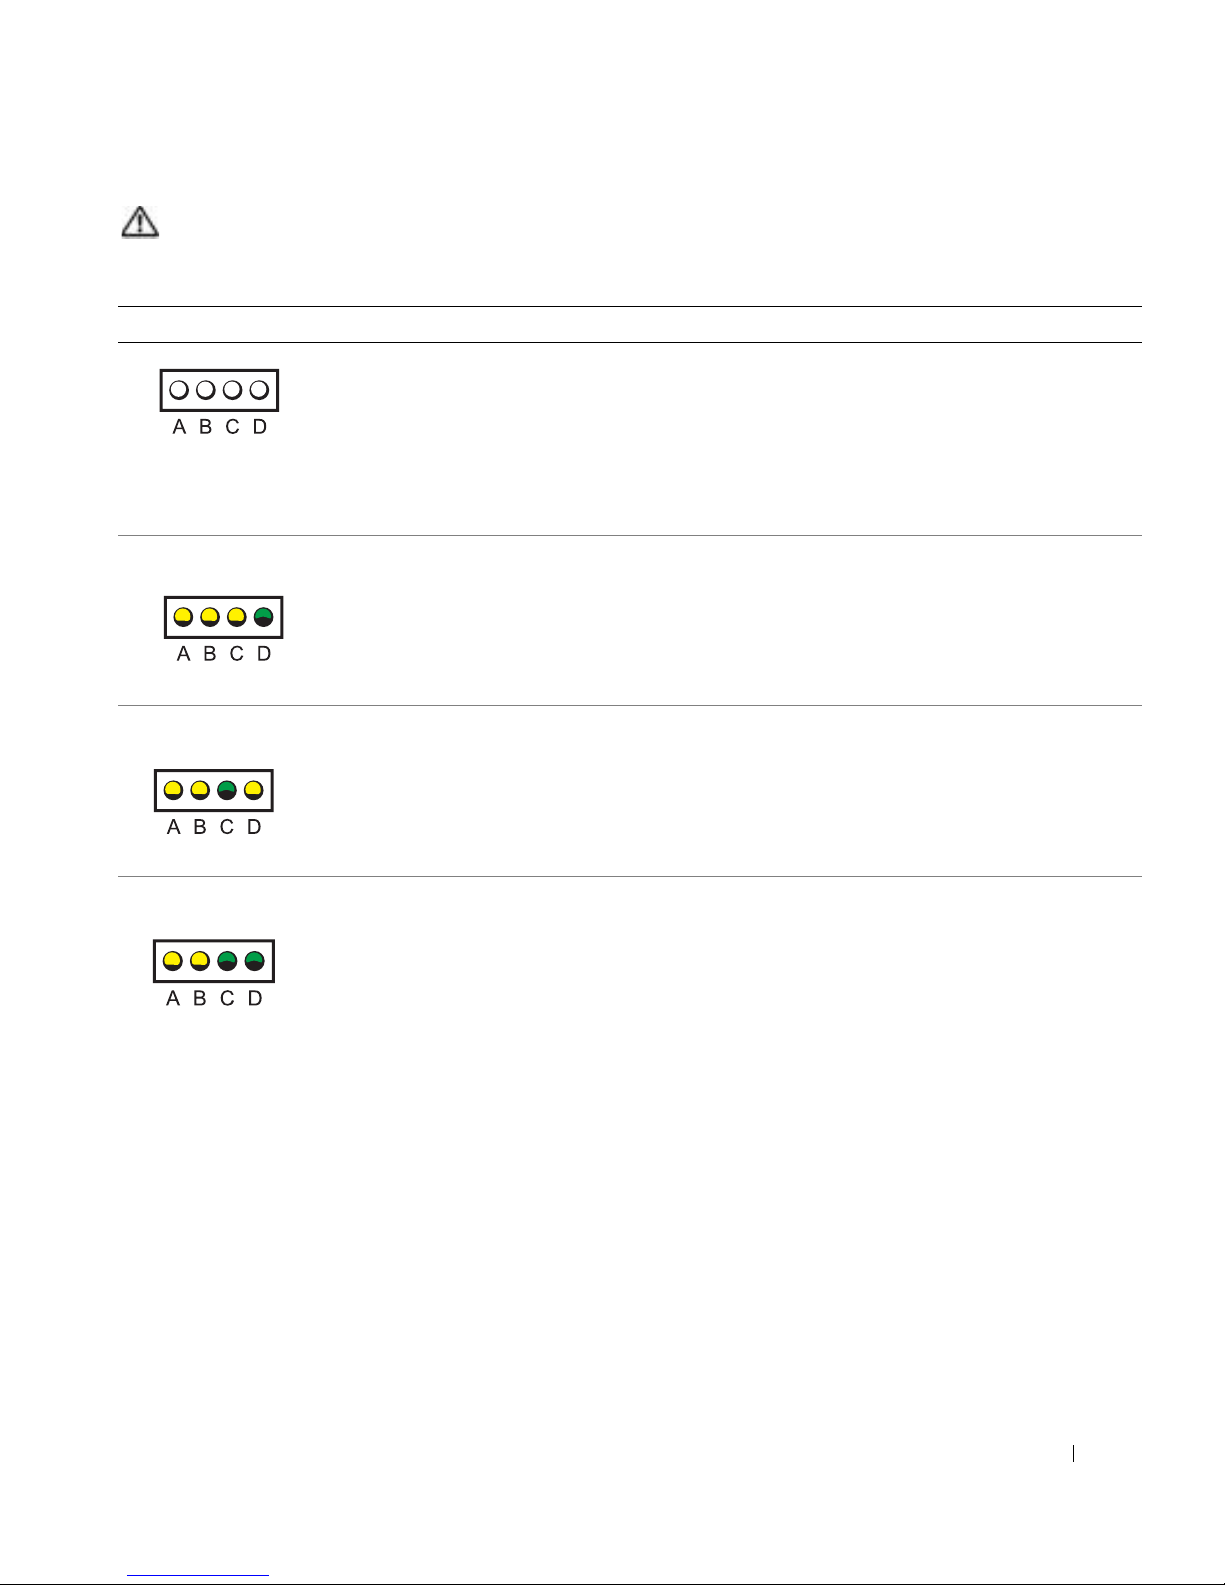
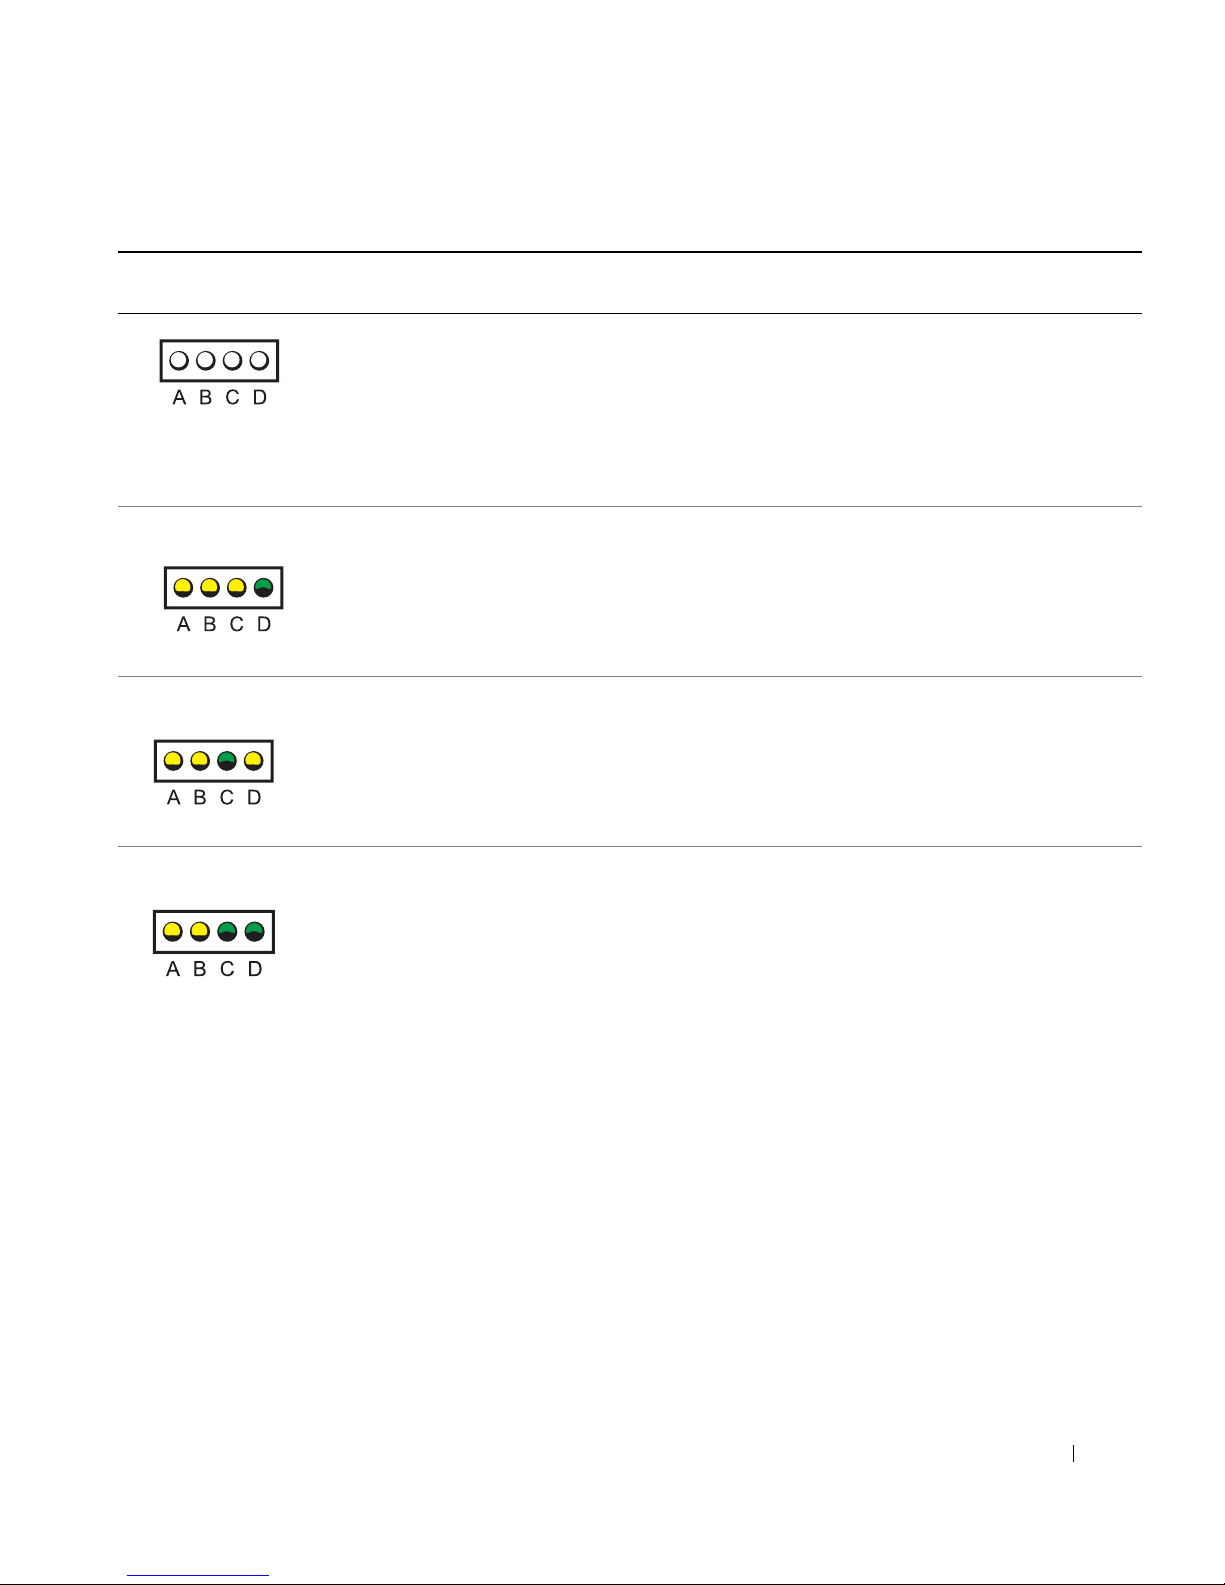
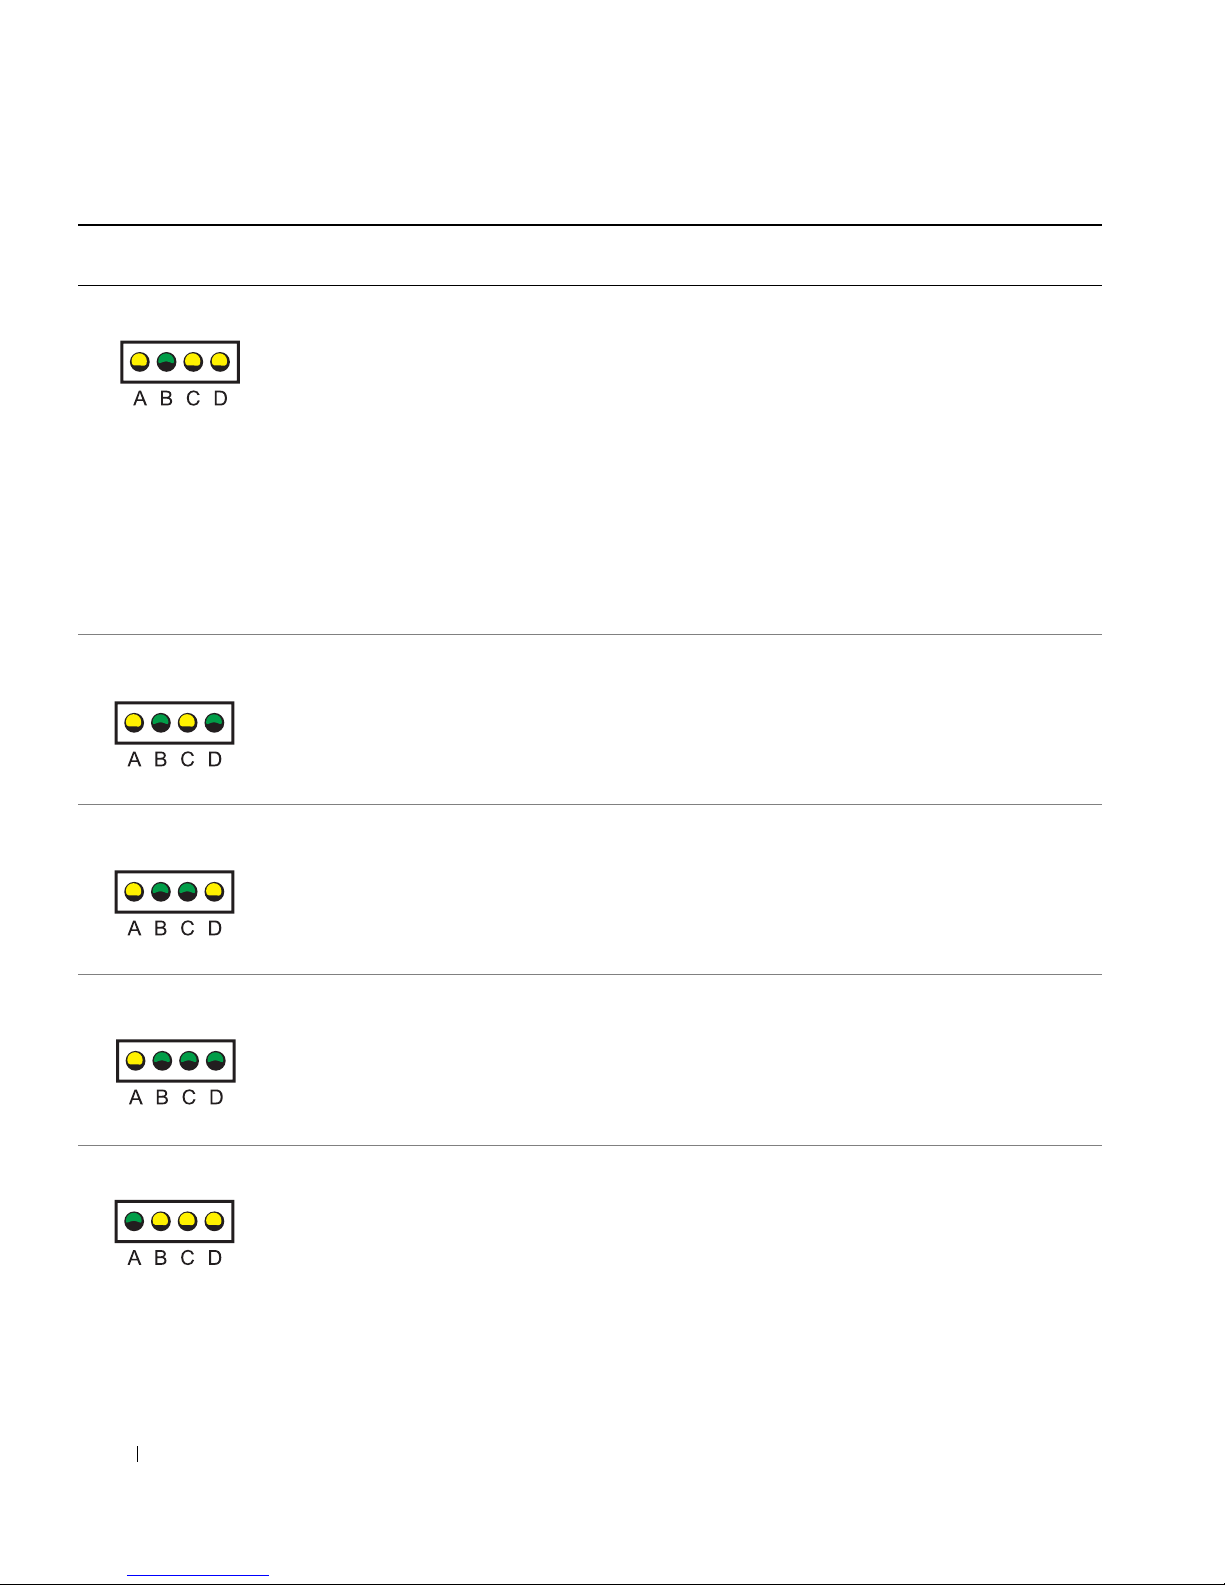
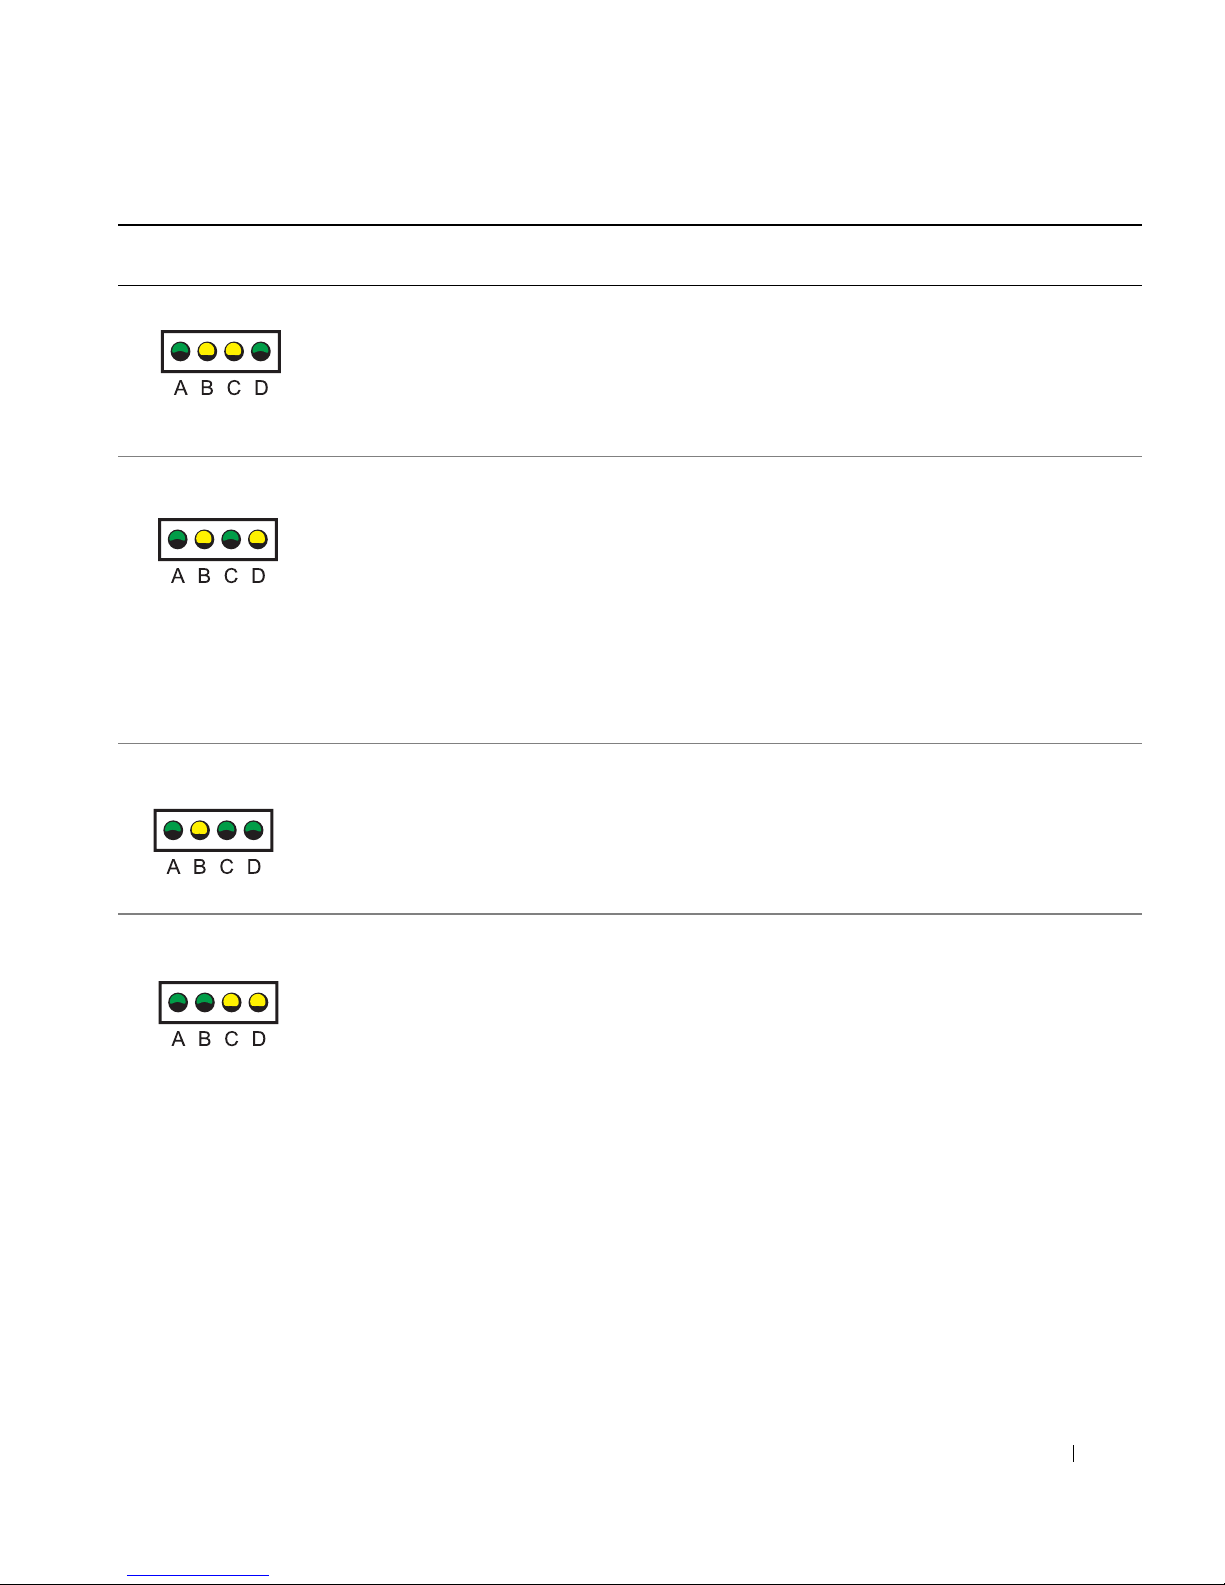
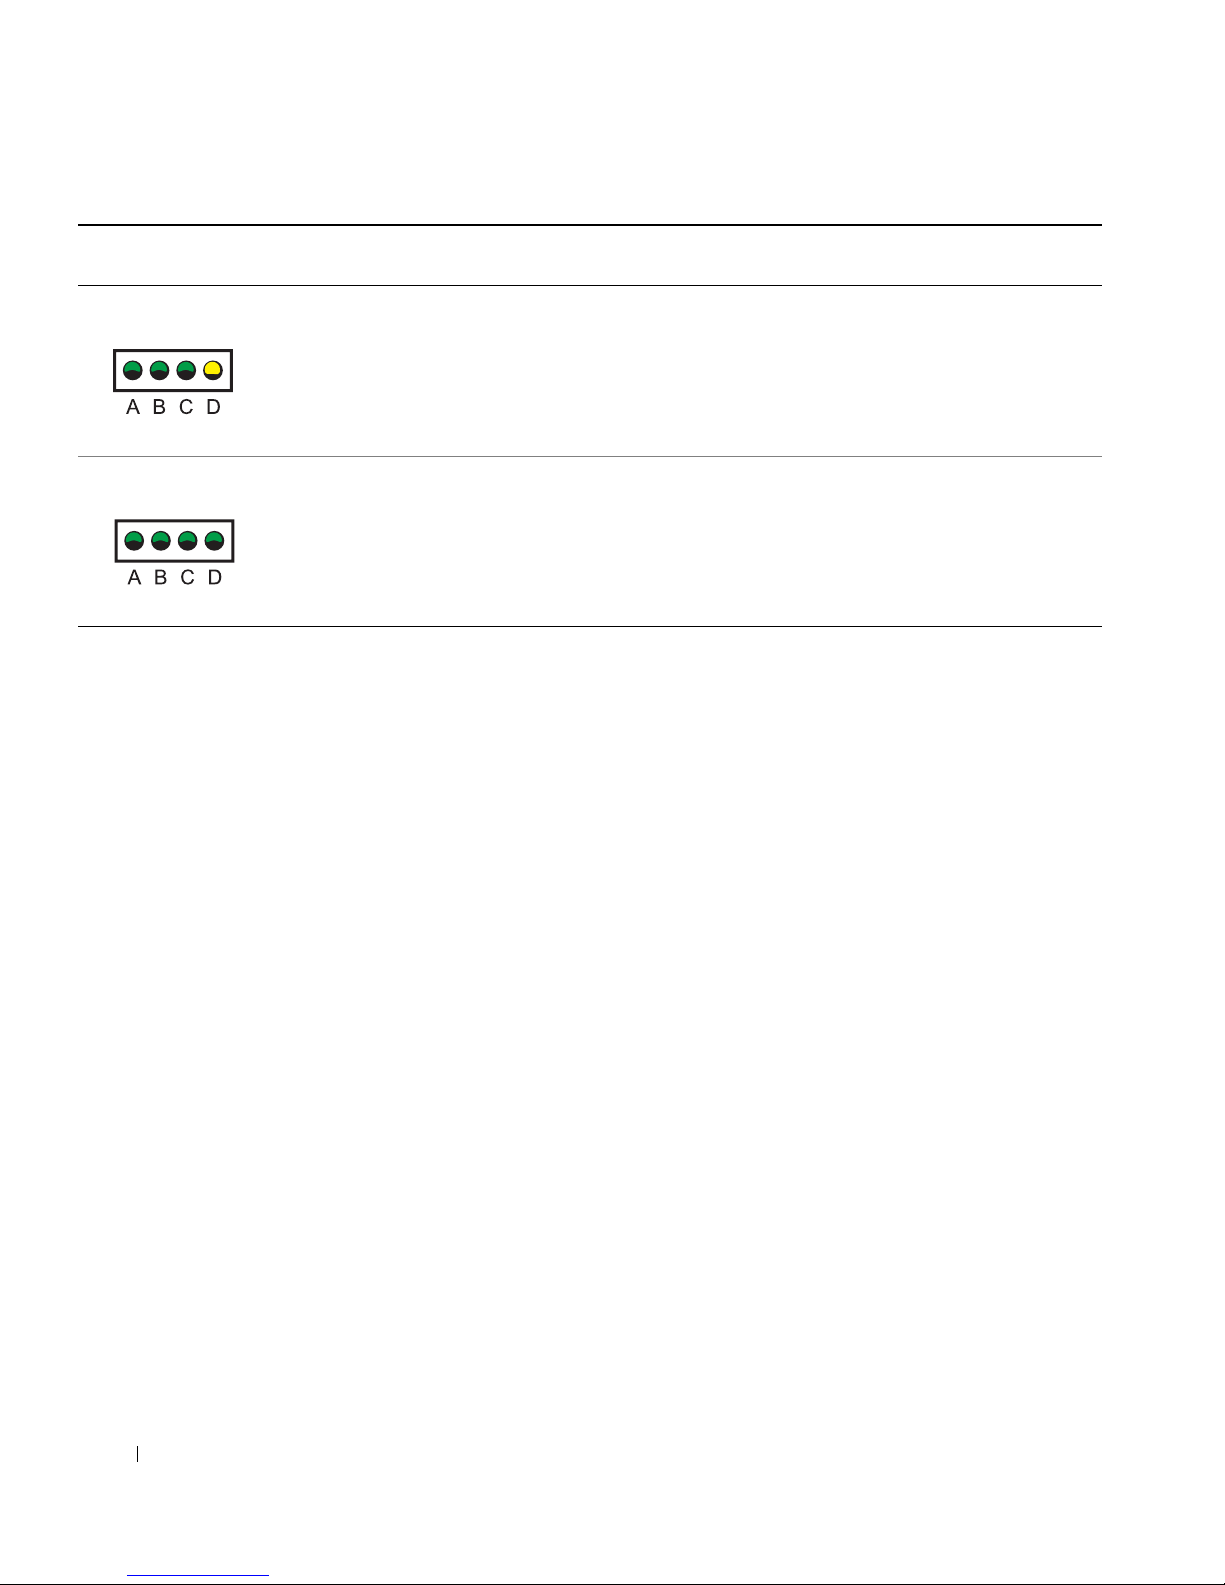
Diagnostic Lights
To help you troubleshoot a problem, your computer is equipped with four
lights on the back panel labeled "A," "B," "C," and "D". These lights can be
yellow or green. When the computer starts normally, the lights flash. After
the computer starts, the lights remain green. If the computer malfunctions,
the color and sequence of the lights identify the problem.
Page 27
CAUTION: Before you begin any of the procedures in this section,
follow the safety instructions in the System Information Guide.
Light Pattern Problem Description Suggested Resolution
YYYG
YYGY
YYGG
Normal off condition or
possible power failure.
Possible BIOS failure; the
computer is in the
recovery mode.
Possible microprocessor
failure.
Memory modules are
detected, but a memory
failure has occurred.
Verify that the computer power cable is plugged into the
computer and a working electrical outlet. Press the power
button.
Run the BIOS Recovery utility, wait for recovery
completion, and then restart the computer.
Reinstall the microprocessor, and restart the computer.
Remove and reinstall all memory modules and CRIMMs.
Ensure that all the connector tabs are locked. Restart the
computer.
Install the memory modules in memory connectors
RIMM 1 (located closest to the microprocessor) and
RIMM 2 and ensure that, if no additional memory is
used, CRIMMs are installed in memory connectors
RIMM 3 and RIMM 4.
If you installed memory modules in memory connectors
RIMM3 and RIMM4 that were not purchased from Dell,
remove the modules and replace them with the
CRIMMs that were originally installed in your computer.
If available, install Dell memory of the same type into
your computer.
If the problem persists, contact Dell.
Setup and Quick Reference Guide 27
Page 28
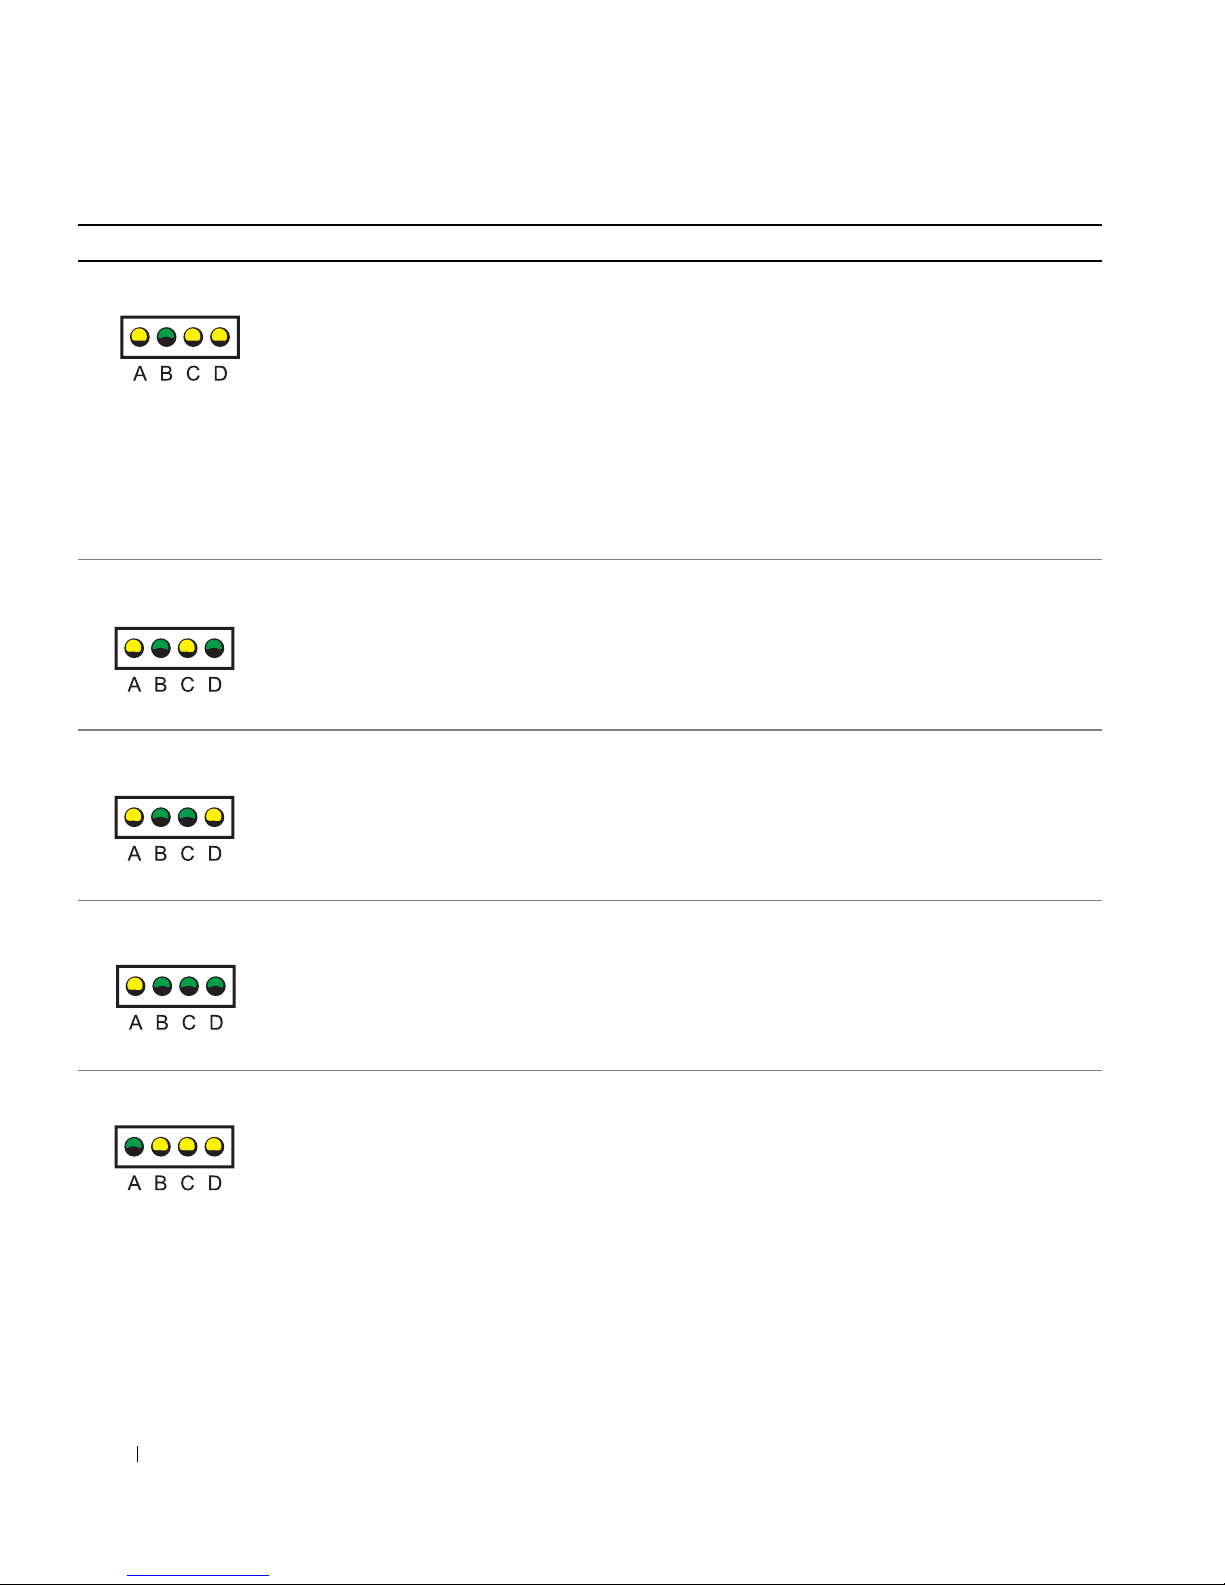
Light Pattern Problem Description Suggested Resolution
YGYY
www.dell.com | support.dell.com
YGYG
YGGY
Possible expansion card
failure.
Possible video card failure
or bad on-board video.
Possible floppy or hard
drive failure.
1 Determine if a conflict exists by removing a card (not
the video card) and then restarting the computer.
2 If the problem persists, reinstall the card that you
removed, remove a different card, and then restart the
computer.
3 Repeat this process for each card. If the computer
starts normally, troubleshoot the last card removed
from the computer for resource conflicts (see
"Resolving Software and Hardware Incompatibilities"
in your User’s Guide).
4 If the problem persists, contact Dell.
If the computer has a video card, remove the card and
reinstall it.
If the problem persists or the computer has integrated
video, contact Dell.
Check all power and data cable connections, and then
restart the computer.
YGGG
GYYY
Possible USB failure. Reinstall all USB devices, check cable connections, and
No memory modules are
installed.
28 Setup and Quick Reference Guide
then restart the computer.
Reinstall all memory modules and then restart the
computer.
If the problem persists, contact Dell.
Page 29
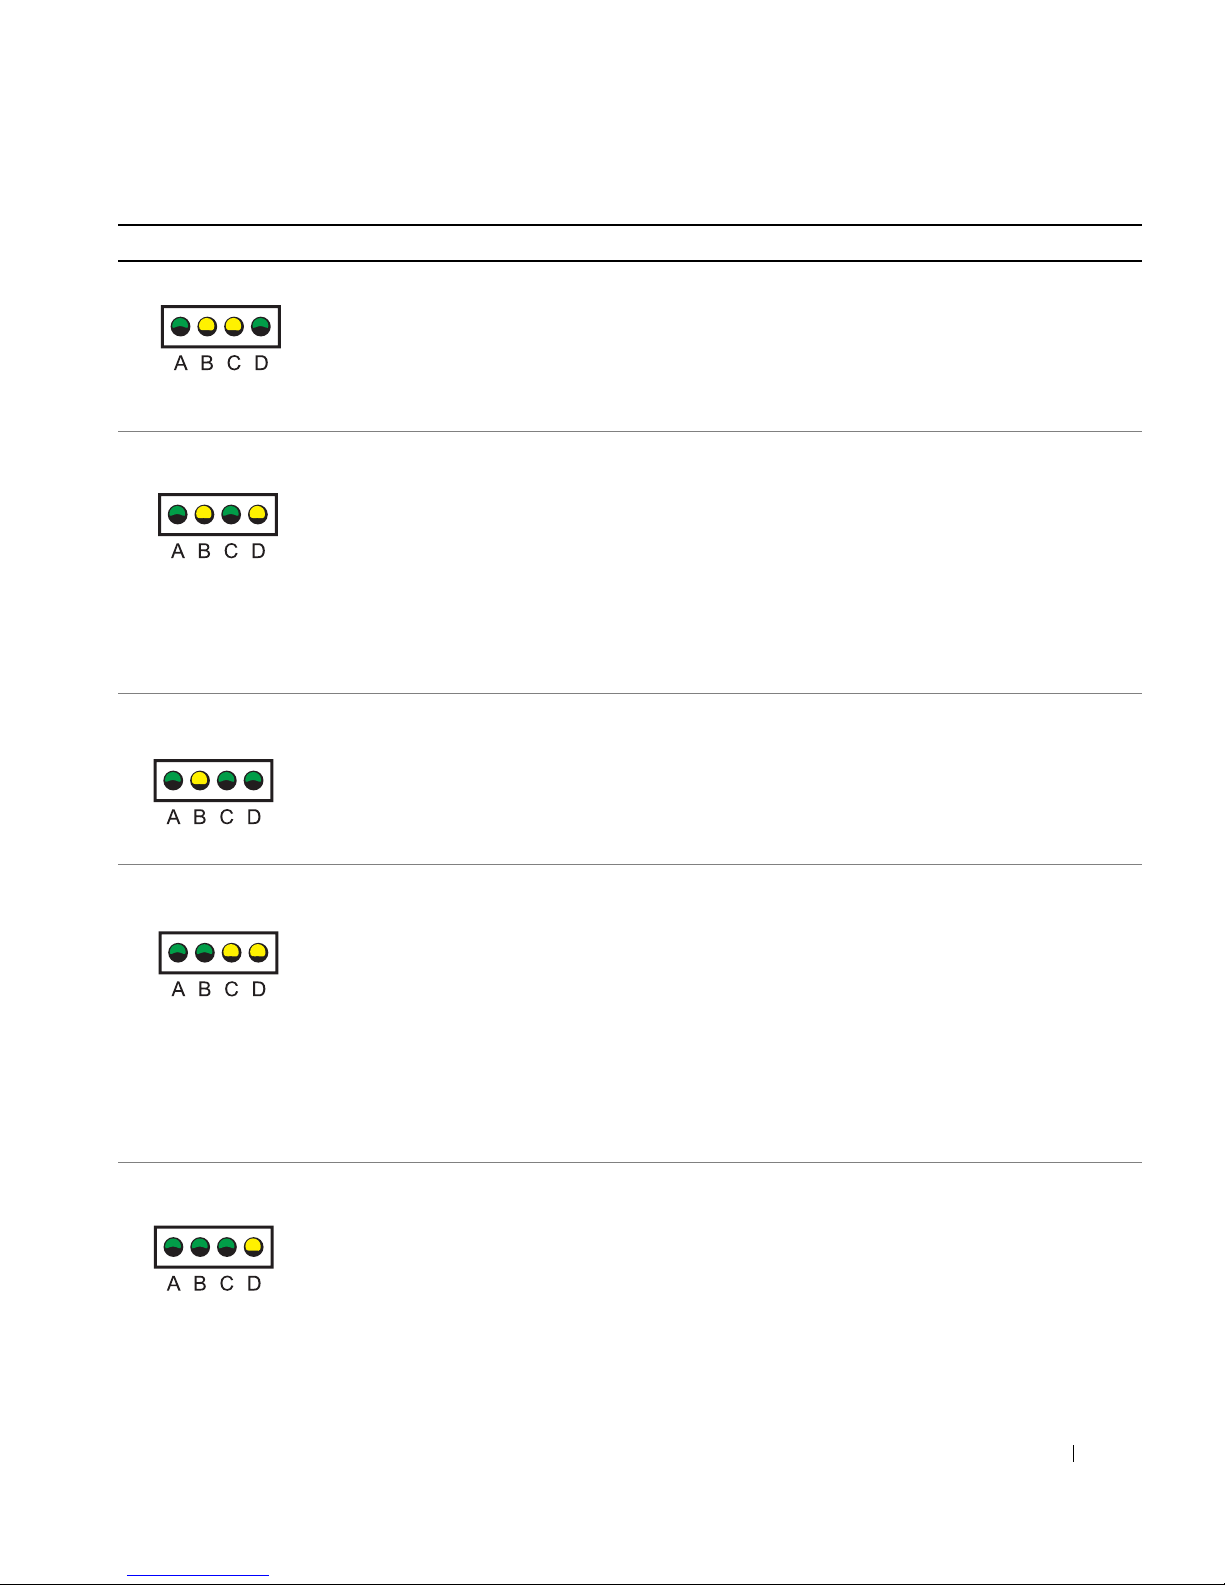
Light Pattern Problem Description Suggested Resolution
GYYG
GYGY
GYGG
Possible system board
failure.
Memory modules are
detected, but a memory
configuration or
compatibility error exists.
Possible system board
resource and/or hardware
failure.
Perform the procedures in "System Board Problems" in
your User’s Guide.
If the problem persists, contact Dell.
Ensure that there are no special memory
module/memory connector placement requirements (see
"Memory" in your User’s Guide).
Verify that the memory modules that you are installing
are compatible with your computer (see "Memory" in
your User’s Guide).
Reinstall the memory modules and then restart the
computer.
If the problem persists, contact Dell.
Perform the procedure in "System Board Problems" and
see "Resolving Software and Hardware Incompatibilities"
in your User’s Guide.
If the problem persists, contact Dell.
GGYY
GGGY
Possible expansion card
failure.
Other failures has
occurred.
1 Determine if a conflict exists by removing a card (not
the video card) and then restarting the computer.
2 If the problem persists, reinstall the card that you
removed, remove a different card, and then restart the
computer.
3 Repeat this process for each card. If the computer
starts normally, troubleshoot the last card removed
from the computer for resource conflicts (see
"Resolving Software and Hardware Incompatibilities"
in your User’s Guide).
4 If the problem persists, contact Dell.
Ensure that the cables are properly connected from the
hard drive, CD drive, and DVD drive to the system
board.
If the problem persists, contact Dell.
Setup and Quick Reference Guide 29
Page 30
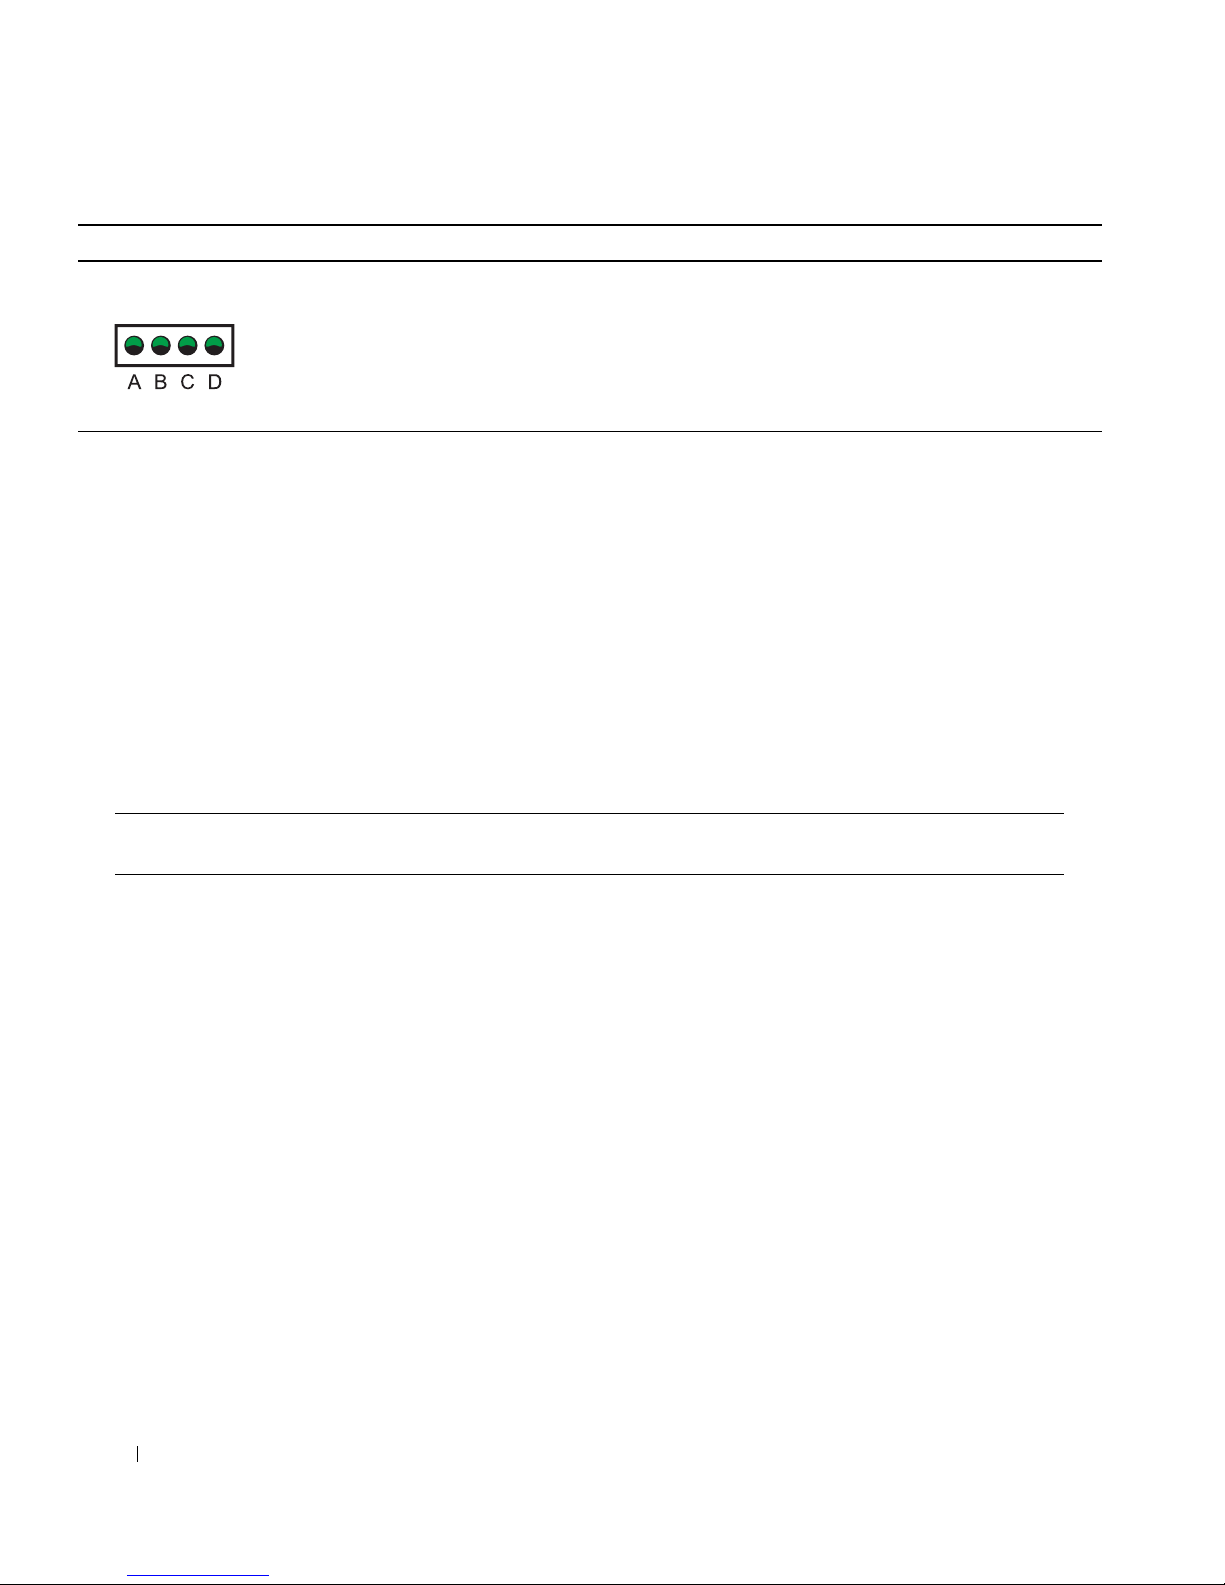
Light Pattern Problem Description Suggested Resolution
GGGG
www.dell.com | support.dell.com
How Do I... Solution Where to Find Additional
Normal operating
condition after POST.
None.
If a computer problem occurs that you are unable to resolve through the
steps in this section or the procedures in "Finding Solutions" in your User’s
Guide, complete the following steps before you contact Dell:
1 Write a detailed description of the error, beep code, or diagnostic light
problem.
2 Record your Express Service Code and Service Tag.
3 Contact Dell from the same location as your computer.
Frequently Asked Questions
Information
Set up my computer to use two
monitors?
Connect my monitor when the
monitor cable connector doesn’t
seem to fit the connector on the
back of my computer?
30 Setup and Quick Reference Guide
If your computer has the required
graphics card to support dualmonitor setup, then look in your
box for a Y-cable. The cable has a
single connector on one end (plug
this connector into the back panel)
and branches into two connectors
(plug these connectors into the
monitor cables). See "Connect the
monitor" on page 11.
If your graphics card has a DVI
connector but your monitor has a
VGA connector, then you need to
use an adapter. An adapter should
be included in the box.
Contact Dell Technical Support
for more information.
Page 31

How Do I... Solution Where to Find Additional
Information
Connect my speakers? If you have a sound card installed,
connect the speakers to the
connectors on the card. See
"Connect the speakers" on page 14.
Find the right connectors for my
USB devices?
Your Dell Precision 350 computer
has eight USB connectors (two on
the front and six on the back).
Locate information about the
hardware and other technical
specifications for my computer?
Yo u r User’s Guide has a
specifications table that provides
more detailed information about
your computer and the hardware.
To locate your User’s Guide, see
"Finding Information for Your
Computer" on page 5.
Find documentation for my
computer?
The following documentation is
available for your computer:
• User’s Guide
• Setup and Quick Reference
Guide
• System Information Guide
• System Information Label
• Service Manual
To locate these documents,
see "Finding Information for Your
Computer" on page 5.
See the documentation that came
with your speakers for more
information.
See the front and back view
graphics of your computer in your
User’s Guide. For help with
locating your User’s Guide see
"Finding Information for Your
Computer" on page 5.
Go to the Dell Support website
and use one of the following
support tools: read white papers on
the latest technology or
communicate with other Dell users
at the Dell forum chat room.
If you lose your documentation, it
is available on the Dell Support
website at support.dell.com.
Setup and Quick Reference Guide 31
Page 32

www.dell.com | support.dell.com
32 Setup and Quick Reference Guide
Page 33

Dell Precision™ 350 Workstation
Guide de configuration et de
référence rapide
www.dell.com | support.euro.dell.com
Page 34

Remarques, avis et précautions
REMARQUE : Une REMARQUE fournit des informations importantes qui
vous aident à mieux utiliser votre ordinateur.
AVIS : Un AVIS vous avertit d'un risque de dommage matériel ou de perte de
données et vous indique comment éviter le problème.
PRÉCAUTION : Une PRÉCAUTION indique un risque potentiel
d'endommagement du matériel, de blessure corporelle ou de mort.
Abréviations et acronymes
Pour obtenir une liste complète des abréviations et des acronymes, reportezvous à la section « Glossaire » du Guide d'utilisation.
Il est à noter que toutes les références dans ce document faites aux
®
systèmes d'exploitation Microsoft
Windows® seront inapplicables pour
les ordinateurs Dell™ n Series.
____________________
Les informations contenues dans ce document sont sujettes à modification sans préavis.
© 2002 Dell Computer Corporation. Tous droits réservés.
Toute reproduction sous quelque forme que ce soit sans l'autorisation écrite de Dell Computer
Corporation est strictement interdite.
Marques utilisées dans ce document : Dell, le logo DELL et Dell Precision sont des marques
de Dell Computer Corporation ; Microsoft et Windows sont des marques déposées de
Microsoft Corporation.
D'autres marques et noms commerciaux peuvent être utilisés dans ce document pour faire référence
aux entités se réclamant de ces marques et de ces noms ou à leurs produits. Dell Computer
Corporation dénie tout intérêt propriétaire aux marques et aux noms commerciaux autres que
les siens.
Décembre 2002 P /N 9T217 Rev. A01
Page 35

Sommaire
Trouver des informations sur votre ordinateur . . . . . . . . . . . 37
Branchez le clavier et la souris
Branchez le modem ou le câble réseau
Branchez l'écran
Branchez les haut-parleurs
Branchez les câbles d'alimentation et allumez l'ordinateur
et l'écran
Installez les logiciels ou périphériques supplémentaires
. . . . . . . . . . . . . . . . . 42
. . . . . . . . . . . . . . 43
. . . . . . . . . . . . . . . . . . . . . . . . 44
. . . . . . . . . . . . . . . . . . . 47
. . . . . . . . . . . . . . . . . . . . . . . . . . . . 48
. . . . . 49
Ouverture du capot de l'ordinateur
L'intérieur de votre ordinateur
Résolution des problèmes
. . . . . . . . . . . . . . . . . . . . . 53
. . . . . . . . . . . . . . . . . 50
. . . . . . . . . . . . . . . . . . . 52
Résolution des problèmes d'incompatibilité logicielle
ou matérielle
. . . . . . . . . . . . . . . . . . . . . . . . . . 53
Utilisation de la fonction de restauration du système
de Windows XP
. . . . . . . . . . . . . . . . . . . . . . . . . 55
Utilisation de la dernière configuration adaptée sous
Windows 2000
Quand utiliser les Diagnostics Dell
Démarrage des Diagnostics Dell
Signaux sonores
Messages d'erreur
Voyants de diagnostic
Foire aux questions
. . . . . . . . . . . . . . . . . . . . . . . . . 57
. . . . . . . . . . . . . . . . 57
. . . . . . . . . . . . . . . . . 58
. . . . . . . . . . . . . . . . . . . . . . . . . 62
. . . . . . . . . . . . . . . . . . . . . . . . 62
. . . . . . . . . . . . . . . . . . . . . . 62
. . . . . . . . . . . . . . . . . . . . . . . . . 67
Sommaire 35
Page 36

36 Sommaire
Page 37
Trouver des informations sur votre
ordinateur
Le tableau suivant recense les outils d'aide que vous propose Dell. À noter
que d'autres informations ont pu vous être fournies avec votre ordinateur.
Que recherchez-vous ? Retrouvez les éléments ici
• Un programme de diagnostic pour
mon ordinateur
• Des pilotes pour mon ordinateur
• De la documentation sur mon ordinateur
• De la documentation sur mon périphérique
• Configuration de mon ordinateur
• Informations de dépannage
• Outils et utilitaires
CD Drivers and Utilities (aussi appelé
ResourceCD)
Ce CD vous permet d'accéder à de la documentation, de réinstaller des
pilotes ou de lancer des outils de diagnostic.
Guide de configuration et de référence rapide
Guide de configuration et de référence rapide 37
Page 38
Que recherchez-vous ? Retrouvez les éléments ici
• Code de service express et Numéro
de service
• Étiquette de licence pour
Microsoft
®
Windows®
• Comment réinstaller mon système
d'exploitation
www.dell.com | support.euro.dell.com
Code de service express et Clé produit
Ces étiquettes sont situées sur votre ordinateur, sous le panneau avant.
CD du système d'exploitation et Guide
d'installation
En cas de réinstallation du système d'exploitation, utilisez le CD
Drivers and Utilities (Pilotes et utilitaires) pour réinstaller les pilotes
des périphériques livrés avec votre machine.
38 Guide de configuration et de référence rapide
Page 39
Que recherchez-vous ? Retrouvez les éléments ici
• Comment retirer et remplacer des pièces
• Caractéristiques techniques
• Comment configurer des paramètres
système
• Comment résoudre les problèmes
• Emplacement des connecteurs sur la
carte système
Icône du Guide d'utilisation
Pour accéder à la documentation électronique présente sur votre
disque dur :
Si vous utilisez Microsoft Windows 2000, double-cliquez sur l'icône
User's Guides (Guides d'utilisation) sur votre bureau. Si vous utilisez
Windows XP, cliquez sur le bouton Start (Démarrer), puis cliquez sur
Help and Support (Aide et support technique).
Étiquette d'informations du système
Elle est située sur l'intérieur du capot de votre machine.
Guide de configuration et de référence rapide 39
Page 40

Que recherchez-vous ? Retrouvez les éléments ici
• Les pilotes les plus récents pour mon
ordinateur
• Des réponses aux questions de support
et de service technique
• Des discussions en ligne avec d'autres
utilisateurs et avec le support technique
• De la documentation pour mon ordinateur,
comprenant le Guide technique
www.dell.com | support.euro.dell.com
• Suivi de l'appel au service technique
• Principaux problèmes techniques de
mon ordinateur
• Foire aux questions
• Téléchargements de fichiers
• Informations sur la configuration de mon
ordinateur
• Contrat de service pour mon ordinateur
Site Web de support technique — support.dell.com
Le site Web du support technique de Dell, à l'adresse support.dell.com
propose plusieurs outils en ligne, et notamment :
• Une base de connaissances : conseils, astuces et cours en ligne
• Un forum pour les clients : des discussions en ligne avec d'autres
clients Dell
• Des mises à niveau : des informations de mise à niveau sur les
composants, tels que la mémoire, le disque dur et le système
d'exploitation
• Un service clientèle : des coordonnées, le suivi de l'état des
commandes, les garanties et diverses informations sur les réparations
• Des téléchargements : pilotes, correctifs et mises à jour logicielles
• Des outils de référence : la documentation de votre ordinateur,
des caractéristiques de produits et des livres blancs
Site Web du support technique Premier de Dell —
premiersupport.dell.com
Le site Web du support technique Premier de Dell est personnalisé,
à destination des clients en entreprises, dans les gouvernements et
l'enseignement. Ce site Web risque de ne pas être disponible dans
tous les pays.
40 Guide de configuration et de référence rapide
Page 41
Que recherchez-vous ? Retrouvez les éléments ici
• Informations de garantie Guide d'informations du système
• Comment utiliser Windows XP
• Documentation de mon ordinateur et
de ses périphériques
Centre d'aide et de support technique pour
Windows XP
1 Cliquez sur le bouton Start (Démarrer), puis cliquez sur Help and
Support (Aide et support technique).
2 Tapez un mot ou une phrase décrivant votre problème et cliquez sur
l'icône de la flèche.
3 Cliquez sur le sujet qui décrit votre problème.
4 Suivez les instructions qui s'affichent à l'écran.
Guide de configuration et de référence rapide 41
Page 42
Configuration de votre ordinateur
Dell Precision™ 350
Votre ordinateur ne sera correctement configuré qu'une fois toutes ces
étapes réalisées.
www.dell.com | support.euro.dell.com
Branchez le clavier et la souris
42 Guide de configuration et de référence rapide
Page 43
Branchez le modem ou le câble réseau
AVIS : Ne branchez pas de câble modem sur la carte réseau. En effet, la
tension des communications téléphoniques risquerait de l'endommager.
REMARQUE : Si votre
ordinateur est équipé
d'une carte réseau, reliez
le câble réseau à la carte.
Guide de configuration et de référence rapide 43
Page 44
En fonction de votre carte graphique, vous pouvez brancher votre écran
de différentes façons.
www.dell.com | support.euro.dell.com
Branchez l'écran
A B C D
44 Guide de configuration et de référence rapide
AVIS : Votre ordinateur peut exiger l'utilisation de l'adaptateur ou du câble
fourni pour brancher votre écran.
Page 45
Pour les cartes compatibles écran unique ou double-écran avec un seul connecteur
Adaptateur VGA
VGA
• Utilisez l'adaptateur VGA lorsque vous disposez
d'une carte graphique écran unique et que vous
souhaitez brancher un écran VGA.
Adaptateur de câble Y VGA double
VGA
VGA
• Utilisez le câble Y approprié lorsque votre carte
graphique dispose d'un seul connecteur et que
vous souhaitez brancher un ou deux écrans VGA.
Adaptateur de câble Y DVI double
DVI
• Utilisez le câble Y approprié lorsque votre carte
graphique dispose d'un seul connecteur et que
vous souhaitez brancher un ou deux écrans DVI.
Ce câble présente un code de couleurs : le connecteur bleu est destiné
à l'écran principal, tandis que le connecteur noir est destiné à l'écran
secondaire. Pour permettre le fonctionnement de deux écrans, branchez
les deux moniteurs avant de démarrer l'ordinateur.
DVI
Guide de configuration et de référence rapide 45
Page 46
Pour les cartes graphiques compatibles double-écran avec 1 connecteur DVI et 1 connecteur VGA
DVI unique/VGA unique
DVI
www.dell.com | support.euro.dell.com
• Utilisez le connecteur approprié lorsque vous
branchez un ou deux écrans.
VGA
Double VGA avec adaptateur VGA
• Utilisez l'adaptateur VGA lorsque vous branchez
deux écrans VGA.
Pour les cartes graphiques compatibles double-écran avec 2 connecteur DVI
Double DVI
Double DVI avec un
adaptateur VGA
VGA
VGA
Double DVI avec deux
adaptateurs VGA
DVI
DVI
• Utilisez les connecteurs DVI
lorsque vous branchez un
ou deux écrans DVI.
• Utilisez l'adaptateur VGA lorsque
DVI
vous branchez un écran VGA à
un connecteur DVI.
46 Guide de configuration et de référence rapide
VGA
VGA
VGA
• Utilisez deux adaptateurs VGA
lorsque vous branchez deux
écrans aux connecteurs DVI.
Page 47
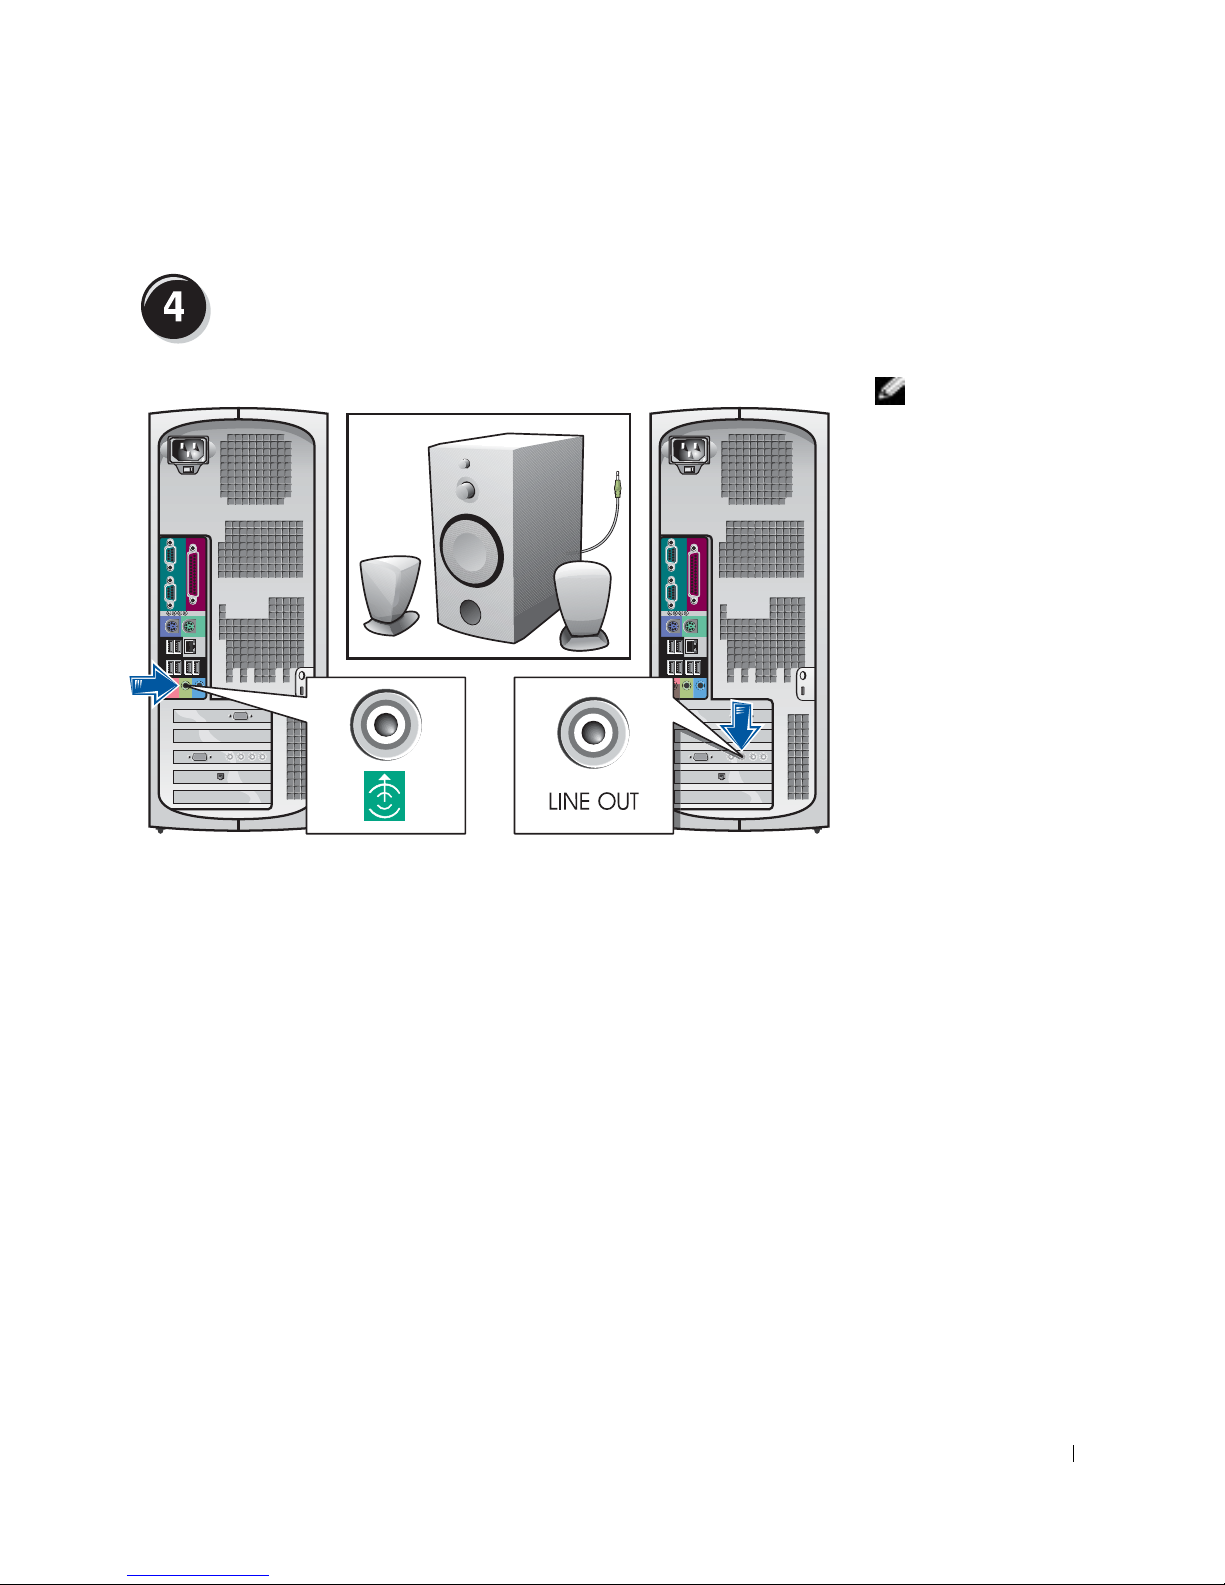
Branchez les haut-parleurs
REMARQUE : Si
votre ordinateur est
équipé d'une carte audio,
branchez les hautparleurs à la carte.
Guide de configuration et de référence rapide 47
Page 48
www.dell.com | support.euro.dell.com
Branchez les câbles d'alimentation et allumez
l'ordinateur et l'écran
48 Guide de configuration et de référence rapide
Page 49

Installez les logiciels ou périphériques
supplémentaires
Avant d'installer tout périphérique ou logiciel qui n'a pas été livré avec votre
ordinateur, lisez attentivement la documentation fournie avec le logiciel ou
le périphérique ou contactez votre fournisseur, afin de vous assurer que le
logiciel ou l'appareil est compatible avec votre ordinateur et votre système
d'exploitation.
Félicitations ! Vous avez maintenant terminé la configuration
de votre ordinateur.
Pour obtenir de plus amples informations sur votre ordinateur, notamment
pour le retrait et le remplacement de pièces, les outils de diagnostic et de
dépannage, accédez au Guide d'utilisation depuis votre disque dur, le CD
Drivers and Utilities (Pilotes et utilitaires) ou le site Web du support
technique de Dell.
Pour accéder au Guide d'utilisation présent sur votre disque dur :
Sous Windows 2000, double-cliquez sur l'icône User's Guides
(Guides d'utilisation).
Sous Windows XP, cliquez sur le bouton Start (Démarrer), puis cliquez
sur Help and Support (Aide et support technique).
Pour accéder au Guide d'utilisation présent sur le CD :
1 Insérez le CD Drivers and Utilities (Pilotes et utilitaires) dans
le lecteur.
Lors de la première utilisation de ce CD, la fenêtre ResourceCD
Installation (Installation du ResourceCD) s'affiche pour vous
informer que l'installation démarre.
2 Cliquez sur OK pour poursuivre et répondez aux invites du
programme d'installation.
3 Cliquez sur Next (Suivant) sur l'écran Welcome Dell System Owner
(Bienvenue au propriétaire de ce système Dell).
Guide de configuration et de référence rapide 49
Page 50

Pour accéder au Guide d'utilisation à partir du site de support
technique de Dell :
1 Rendez-vous à l'adresse www.support.dell.com.
2 Suivez les invites du site Web et fournissez les informations
nécessaires au sujet de votre ordinateur.
3 Sur la page d'accueil du site Web de support technique de Dell,
cliquez sur Reference (Outils de référence), cliquez sur User's Guides
(Guides d'utilisation), puis sur Systems (Systèmes), enfin
sélectionnez votre ordinateur Dell Precision.
Ouverture du capot de l'ordinateur
www.dell.com | support.euro.dell.com
PRÉCAUTION : Avant de lancer n'importe laquelle des procédures
de cette section, suivez les instructions de sécurité fournies dans
le Guide d'informations du système.
Éteignez l'ordinateur par le biais du menu Start (Démarrer).
1
2 Vérifiez que votre ordinateur et que les périphériques connectés
sont bien éteints. Si votre ordinateur et les périphériques qui y sont
connectés ne se sont pas éteints automatiquement lorsque vous
avez éteint votre ordinateur, éteignez-les maintenant.
AVIS : Pour débrancher un câble réseau, débranchez tout d'abord le câble de
votre ordinateur, puis de la prise réseau murale.
3
Débranchez les lignes téléphoniques ou de télécommunications
de l'ordinateur.
4 Débranchez votre ordinateur et tous les périphériques connectés des
prises électriques, puis appuyez sur le bouton d'alimentation pour
mettre la carte système à la terre.
5 Si vous avez installé un cadenas dans l'anneau de sécurité situé sur
le panneau arrière, ôtez-le.
PRÉCAUTION : Pour prévenir tout risque de choc électrique,
débranchez toujours votre ordinateur de la prise électrique avant
d'ouvrir le capot.
6
50 Guide de configuration et de référence rapide
Déposez l'ordinateur sur le côté, comme indiqué sur l'illustration.
AVIS : Assurez-vous qu'il existe un espace suffisant pour permettre l'ouverture
du capot, à savoir au moins 30 cm alentour.
Page 51
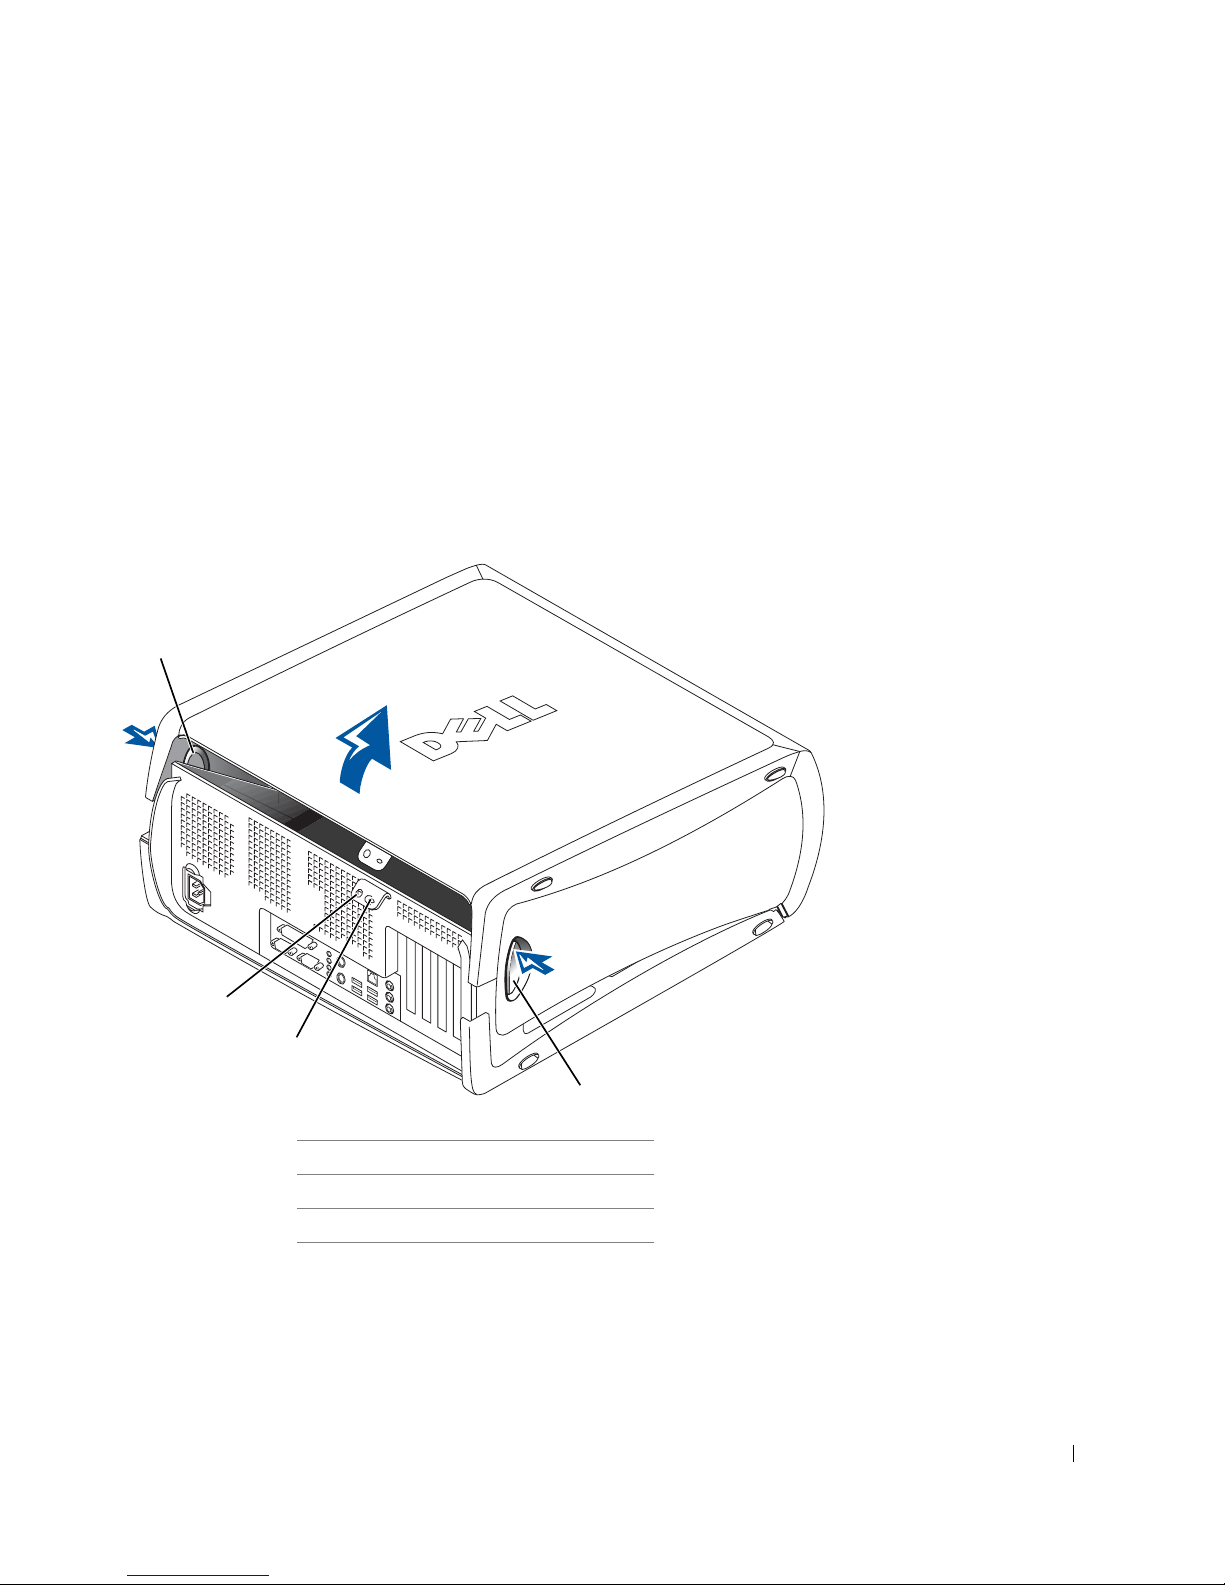
7 Ouvrez le capot de l'ordinateur :
a À l'arrière de l'ordinateur, appuyez sur le bouton d'éjection situé du
côté droit de l'ordinateur d'une main, tout en tirant le capot vers le
haut avec l'autre main.
b Appuyez sur le bouton d'éjection situé du côté gauche de
l'ordinateur d'une main, tout en tirant le capot vers le haut
avec l'autre main.
c Maintenez le bas de l'ordinateur d'une main, tout en tirant sur
le capot de l'autre main pour l'ouvrir.
1
2
3
1 boutons d'éjection (2)
2 anneau pour cadenas
3 fente pour câble de sécurité
1
Guide de configuration et de référence rapide 51
Page 52
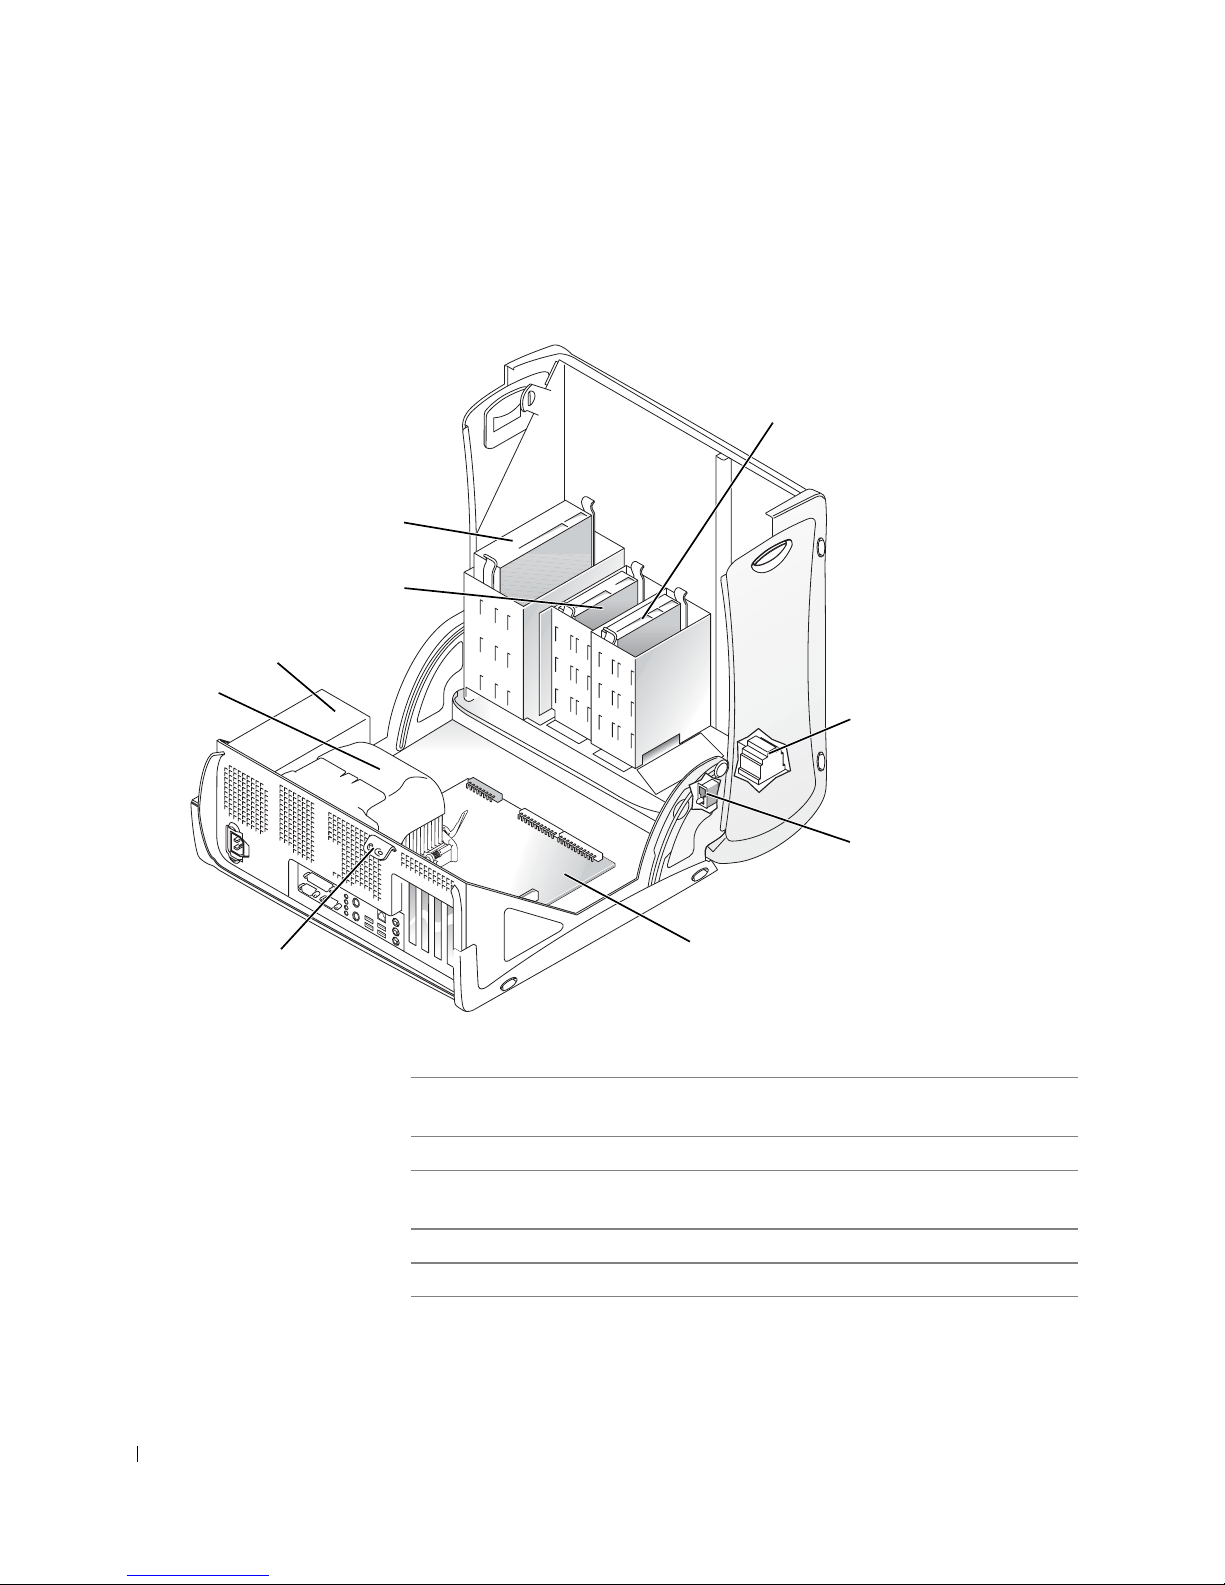
L'intérieur de votre ordinateur
9
8
www.dell.com | support.euro.dell.com
7
6
1
2
3
5
1 unité de disque dur 6 dissipateur de chaleur et
2 haut-parleur interne 7 alimentation électrique
3 commutateur d'intrusion du
châssis
4 carte système 9 Lecteur de CD/DVD-ROM
5 anneau pour cadenas
4
ventilateur
8 lecteur de disquette
52 Guide de configuration et de référence rapide
Page 53

Résolution des problèmes
Résolution des problèmes d'incompatibilité logicielle
ou matérielle
Microsoft® Windows® XP
Avec les systèmes d'exploitation Windows XP, les conflits d'interruption
(IRQ) se produisent lorsqu'un périphérique n'est pas détecté lors de
l'installation du système d'exploitation ou lorsqu'il est détecté mais
qu'il n'est pas correctement configuré.
Pour retrouver des conflits sur un ordinateur fonctionnant sous Windows XP :
1 Cliquez sur le bouton Start (Démarrer), puis sur Control Panel
(Panneau de configuration).
2 Cliquez sur Performance and Maintenance (Performances et
maintenance) puis sur System (Système).
3 Cliquez sur l'onglet Hardware (Matériel), puis sur Device Manager
(Gestionnaire de périphériques).
4 Dans la liste Device Manager (Gestionnaire de périphériques),
vérifiez s'il existe des conflits avec les autres périphériques.
Les conflits sont indiqués par un point d'exclamation jaune (
!) situé
en regard du périphérique qui est à l'origine du conflit ou par un x
rouge (
5 Double-cliquez sur l'un des conflits pour afficher la fenêtre
X) lorsque le périphérique a été désactivé.
Properties (Propriétés).
En cas de conflit d'IRQ, la zone Device (Périphérique) de la fenêtre
Properties (Propriétés) signale les autres cartes ou périphériques qui
partagent cette IRQ.
6 Corrigez les conflits, en reconfigurant les périphériques ou en les
supprimant du Gestionnaire de périphériques.
Guide de configuration et de référence rapide 53
Page 54

Vous pouvez également utiliser le Hardware Troubleshooter (utilitaire de
résolution de problèmes matériels) de Windows XP :
www.dell.com | support.euro.dell.com
Windows 2000
Pour retrouver des conflits sur un ordinateur fonctionnant sous
Windows 2000 :
1 Cliquez sur le bouton Start (Démarrer), puis cliquez sur Help and
Support (Aide et support technique).
2 Ta p e z hardware troubleshooter (utilitaire de résolution
de problèmes matériels)
dans le champ Search (Rechercher),
puis cliquez sur la flèche pour lancer la recherche.
3 Cliquez sur Hardware Troubleshooter (utilitaire de résolution
de problèmes matériels) dans la liste Search Results (Résultats de
la recherche).
4 Dans la liste Hardware Troubleshooter (utilitaire de résolution de
problèmes matériels), cliquez sur I need to resolve a hardware conflict
on my computer (je dois résoudre un problème matériel sur mon
ordinateur), puis sur Next (Suivant).
1 Cliquez sur le bouton Start (Démarrer), pointez sur Settings
(Paramètres), puis cliquez sur Control Panel (Panneau de
configuration).
2 Dans le Control Panel (Panneau de configuration), double-cliquez
sur System (Système).
3 Cliquez sur l'onglet Hardware (Matériel).
4 Cliquez sur Device Manager (Gestionnaire de périphériques).
5 Cliquez sur View (Afficher), puis sur Resources by connection
(Ressources par connexion).
6 Double-cliquez sur Interrupt request (IRQ) [Interrompre requête
(IRQ)] pour afficher les affectations d'IRQ.
Les conflits sont indiqués par un point d'exclamation jaune (
!) situé
en regard du périphérique qui est à l'origine du conflit ou par un x
rouge (
X) lorsque le périphérique a été désactivé.
54 Guide de configuration et de référence rapide
Page 55

7 Double-cliquez sur l'un des conflits pour afficher la fenêtre
Properties (Propriétés).
En cas de conflit d'IRQ, la zone Device (Périphérique) de la fenêtre
Properties (Propriétés) signale les autres cartes ou périphériques qui
partagent cette IRQ.
8 Corrigez les conflits, en reconfigurant les périphériques ou en les
supprimant du Gestionnaire de périphériques.
Vous pouvez également utiliser le Hardware Troubleshooter (utilitaire de
résolution de problèmes matériels) de Windows 2000 :
1 Cliquez sur le bouton Start (Démarrer), puis cliquez sur Help (Aide).
2 Cliquez sur Troubleshooting and Maintenance (Dépannage et
maintenance) sous l'onglet Contents (Sommaire), cliquez sur
Windows 2000 troubleshooters (utilitaires de résolution de
problèmes de Windows 2000), puis sur Hardware (Matériel).
3 Dans la liste Hardware Troubleshooter (utilitaire de résolution de
problèmes matériels), cliquez sur I need to resolve a hardware conflict
on my computer (je dois résoudre un problème matériel sur mon
ordinateur), puis sur Next (Suivant).
Utilisation de la fonction de restauration du système
de Windows XP
Le système d'exploitation Windows XP offre une fonction de restauration
du système, vous permettant de ramener votre ordinateur à une étape
précédente (sans pour autant affecter les fichiers de données) lorsque des
changements du matériel, des logiciels ou d'autres réglages du système ont
créé une situation indésirable pour l'ordinateur. Reportez-vous au « Centre
d'aide et de support technique pour Windows XP » page 41 pour obtenir de
plus amples informations sur l'utilisation de la fonction System Restore
(Restauration du système).
AVIS :
système ne gère pas vos fichiers de données et ne peut pas non plus les récupérer.
Création d'un point de restauration
1 Cliquez sur le bouton Start (Démarrer), puis cliquez sur Help and
Support (Aide et support technique).
2 Cliquez sur System Restore (Restauration du système).
3 Suivez les instructions qui s'affichent à l'écran.
Sauvegardez vos fichiers de données régulièrement. La restauration du
Guide de configuration et de référence rapide 55
Page 56

Restauration de l'ordinateur à un état antérieur
AVIS : Avant de restaurer l'ordinateur à un état antérieur, enregistrez et
fermez tous les fichiers et les programmes ouverts. Ne modifiez, ouvrez
ou supprimez en aucun cas des fichiers ou des programmes tant que la
restauration du système n'est pas terminée.
1 Cliquez sur le bouton Start (Démarrer), pointez sur All Programs
(Tous les programmes) → Accessories (Accessoires) → System Tools
(Outils système), puis cliquez sur System Restore (Restauration
du système).
2 Vérifiez que l'option Restore my computer to an earlier time
(restaurer mon ordinateur à une heure antérieure) est sélectionnée
et cliquez sur Next (Suivant).
www.dell.com | support.euro.dell.com
3 Cliquez sur la date à laquelle vous souhaitez restaurer l'ordinateur.
L'écran
Select a Restore Point (Sélectionnez un point de restauration)
inclut un calendrier vous permettant de visualiser et de sélectionner les
points de restauration. Toutes les dates du calendrier comportant des
points de restauration apparaissent en gras.
4 Sélectionnez un point de restauration et cliquez sur Next (Suivant).
Si une date du calendrier contient un seul point de restauration,
ce dernier est sélectionné automatiquement. Si plusieurs points
de restauration sont disponibles, cliquez sur celui que vous
souhaitez utiliser.
5 Cliquez sur Next (Suivant).
Une fois que la fonction System Restore (Restauration du système)
termine la collecte des données, l'écran Restoration Complete
(Restauration terminée) apparaît et l'ordinateur redémarre
automatiquement.
6 Une fois l'ordinateur redémarré, cliquez sur OK.
Pour changer de point de restauration, répétez les étapes précédentes
un utilisant un autre point de restauration ou annulez la restauration.
56 Guide de configuration et de référence rapide
Page 57

Utilisation de la dernière configuration adaptée sous
Windows 2000
1 Redémarrez votre ordinateur et appuyez sur <F8> lorsque le
message
(Sélectionnez le système d'exploitation pour
commencer)
2 Sélectionnez Last Known Good Setting (Dernière configuration
adaptée), appuyez sur <Entrée>, puis sur la touche <L> et
sélectionnez votre système d'exploitation lorsque vous y êtes invité.
Autres options permettant de résoudre des conflits logiciels ou matériels
AVIS : Les procédures suivantes effacent toutes les informations sur
votre disque dur.
• Si les procédures qui précèdent n'ont pas fonctionné, exécutez un
formatage de bas niveau sur votre disque dur.
Reportez-vous au guide d'installation de votre système d'exploitation
pour obtenir de plus amples informations.
• Réinstallez le système à l'aide du CD du guide d'installation et du
système d'exploitation.
Please select the operating system to start
apparaît.
Quand utiliser les Diagnostics Dell
Si vous rencontrez un problème avec votre ordinateur, procédez aux
vérifications décrites dans la rubrique « Résolution des problèmes » de votre
Guide d'utilisation et exécutez les Diagnostics Dell avant de contacter le
service technique. Exécuter les Diagnostics Dell peut vous aider à résoudre
le problème sans contacter le service technique. Si vous contactez le service
technique, les résultats du test fournissent en effet des informations
importantes pour le personnel d'assistance de Dell.
Les Diagnostics Dell vous permettent de :
• Effectuer des vérifications rapides ou des tests approfondis ou
personnalisés sur un périphérique ou sur tous les périphériques
• Sélectionner les tests selon un symptôme du problème que vous
rencontrez
• Choisir le nombre d'exécutions d'un test
• Afficher les résultats du test
Guide de configuration et de référence rapide 57
Page 58

Démarrage des Diagnostics Dell
Dell vous recommande d'imprimer ces procédures avant de commencer.
www.dell.com | support.euro.dell.com
Ouvrez le programme de configuration du système, étudiez les informations
de configuration de votre ordinateur et assurez-vous que le périphérique
que vous souhaitez tester s'affiche dans le programme de configuration
du système et qu'il est actif.
Démarrez les Diagnostics Dell à partir de votre disque dur ou du
CD Drivers and Utilities (également appelé ResourceCD).
• Suspendre le test si une erreur est détectée
• Accéder à des informations de l'aide en ligne décrivant les tests
et périphériques
• Recevoir des messages qui vous indiquent si les tests se sont terminés
avec succès
• Recevoir des messages d'erreur en cas de détection de problèmes
AVIS : Utilisez les Diagnostics Dell pour tester uniquement votre ordinateur
Dell™. L'emploi de ce programme avec d'autres ordinateurs peut générer des
messages d'erreur.
REMARQUE : Si
un message indique
qu'aucune partition des
Diagnostics Dell n'a été
trouvée, suivez les
instructions pour les
exécuter à partir du CD
Drivers and Utilities
(Pilotes et utilitaires).
Démarrage des Diagnostics Dell à partir de votre disque dur
1 Arrêtez puis redémarrez l'ordinateur.
2 Lorsque le logo Dell apparaît, appuyez immédiatement sur <F12>.
Si vous attendez trop longtemps et que le logo Windows apparaît,
attendez encore jusqu'à ce que le bureau Windows s'affiche. Éteignez
alors votre ordinateur par le biais du menu Start (Démarrer) et faites
une nouvelle tentative.
3 Lorsque la liste des périphériques d'amorçage s'affiche, sélectionnez
Boot to Utility Partition (initialiser à partir de l'utilitaire de
diagnostics)
4 Lorsque le menu principal Dell Diagnostics (Diagnostics Dell)
et appuyez sur <Entrée>.
apparaît, sélectionnez le test à réaliser.
58 Guide de configuration et de référence rapide
Page 59

Démarrage des Diagnostics Dell à partir du CD Drivers and Utilities
1
Insérez le CD
2 Arrêtez puis redémarrez l'ordinateur.
Drivers and Utilities (Pilotes et utilitaires)
dans le lecteur.
Lorsque le logo Dell apparaît, appuyez immédiatement sur <F12>.
Si vous attendez trop longtemps et que le logo Windows apparaît,
attendez encore jusqu'à ce que le bureau Windows s'affiche. Éteignez
alors votre ordinateur par le biais du menu Start (Démarrer) et faites
une nouvelle tentative.
Lorsque la liste des périphériques d'amorçage s'affiche, sélectionnez
3
IDE CD-ROM Device (périphérique CD-ROM IDE) et appuyez
sur <Entrée>.
4 Sélectionnez l'option IDE CD-ROM Device (périphérique
CD-ROM IDE) à partir du menu d'initialisation du CD.
5 Sélectionnez l'option Boot from CD-ROM (Initialiser à partir du
CD-ROM) à partir du menu s'affichant.
6 Ta p e z 1 pour démarrer le menu ResourceCD.
7 Ta p e z 2 pour démarrer les Diagnostics Dell.
8 Sélectionnez Run Dell 32-bit Diagnostics (Exécuter les diagnostics
Dell 32 bits) dans la liste numérotée. Si plusieurs versions sont
recensées, sélectionnez celle correspondant à votre plate-forme.
9 Lorsque le menu principal Dell Diagnostics (Diagnostics Dell)
apparaît, sélectionnez le test à réaliser.
REMARQUE : Cette
fonction modifie la
séquence de démarrage
une seule fois. Au
prochain démarrage,
l'ordinateur démarrera à
l'aide des périphériques
spécifiés dans la
configuration système.
Guide de configuration et de référence rapide 59
Page 60

REMARQUE : Le
numéro de service de
votre ordinateur est
situé en haut de chaque
écran de test.
Menu principal Dell Diagnostics (Diagnostics Dell)
1 Une fois les diagnostics Dell chargés et lorsque l'écran Menu principal
s'affiche, cliquez sur le bouton de l'option que vous souhaitez.
Option Fonction
Express Test
(test rapide)
Exécute un test rapide des périphériques. En règle
générale, ce test prend 10 à 20 minutes et n'exige
aucune intervention de votre part. Exécutez
Express Test (test rapide) en premier pour
augmenter la possibilité de déterminer le
problème rapidement.
www.dell.com | support.euro.dell.com
Extended Test
(test complet)
Custom Test
(test personnalisé)
Symptom Tree
(arborescence des
symptômes)
Si un problème est rencontré lors d'un test, un message affichant le
2
Exécute un test approfondi des périphériques.
En règle générale, ce test prend une heure ou plus
et nécessite que vous répondiez régulièrement à
des questions.
Teste un périphérique spécifique. Vous pouvez
personnaliser les tests que vous souhaitez exécuter.
Répertorie les symptômes rencontrés les plus
communs et vous permet de sélectionner un
test selon le symptôme du problème auquel
vous êtes confronté.
code d'erreur et une description du problème apparaissent. Notez le
code d'erreur et la description du problème et suivez les instructions
à l'écran.
Si vous ne pouvez pas résoudre le problème, contactez Dell.
60 Guide de configuration et de référence rapide
Page 61

3 Si vous exécutez un test à partir de l'option Custom Test (test
personnalisé) ou Symptom Tree (arborescence des symptômes),
cliquez sur l'onglet approprié décrit dans le tableau suivant pour
obtenir plus d'informations.
Onglet Fonction
Résultats Affiche les résultats du test et les conditions d'erreur
rencontrées.
Erreurs Affiche les conditions d'erreur rencontrées, les codes
d'erreur et la description du problème.
Aide Décrit le test et peut indiquer les conditions requises
pour exécuter le test.
Configuration Affiche la configuration matérielle du périphérique
sélectionné.
Les diagnostics Dell obtiennent vos informations
de configuration de tous les périphériques à partir du
programme de configuration du système, de la mémoire
et de divers tests internes et les affichent dans la liste
des périphériques, dans le volet gauche de l'écran. La
liste des périphériques peut ne pas afficher les noms de
tous les composants installés sur votre ordinateurs ou
de tous les périphériques reliés à votre ordinateur.
Parameters
(paramètres)
4 Lorsque les tests sont terminés, si vous exécutez les diagnostics Dell
Vous permet de personnaliser le test en modifiant les
paramètres du test.
à partir du CD Drivers and Utilities, retirez le CD.
5 Fermez l'écran de test pour revenir à l'écran Menu principal. Pour
quitter les Diagnostics Dell et redémarrer l'ordinateur, fermez l'écran
Menu principal.
Guide de configuration et de référence rapide 61
Page 62

Signaux sonores
Il est possible que votre ordinateur émette une série de signaux sonores
identifiant un problème. Vous pouvez par exemple entendre (code 1-3-1) un
signal long, un ensemble de trois sons courts, puis un nouveau signal long.
Cette série vous indique que l'ordinateur rencontre un problème de mémoire.
En cas d'émission d'un signal sonore, écrivez-le et consultez le
« Codes sonores » dans le Guide d'utilisation.
Messages d'erreur
REMARQUE : Si
le message n'est pas
répertorié, consultez la
www.dell.com | support.euro.dell.com
documentation du système
d'exploitation ou du
programme en cours
d'utilisation au moment
où le message est apparu.
En cas de survenue d'une erreur au démarrage, un message peut s'afficher
sur l'écran pour identifier le problème. Reportez-vous à la section
« Messages d'erreur » dans le Guide d'utilisation pour obtenir des
suggestions sur la résolution des problèmes.
Voyants de diagnostic
Pour vous aider à résoudre un problème, votre ordinateur est équipé de
quatre voyants, situés sur le panneau arrière, et intitulés « A », « B », « C »
et « D ». Ces voyants peuvent s'allumer en jaune ou en vert. Au cours d'un
démarrage normal, les voyants clignotent. Une fois l'ordinateur allumé, ils
restent verts. Toutefois, si l'ordinateur subit un mauvais fonctionnement,
la couleur et la séquence d'apparition des voyants vous permettent
d'identifier le problème.
PRÉCAUTION : Avant de lancer n'importe laquelle des procédures
de cette section, suivez les instructions de sécurité fournies dans
le Guide d'informations du système.
62 Guide de configuration et de référence rapide
Page 63
Motif des voyants Description du
problème
Solution proposée
JJJV
JJVJ
JJVV
L'ordinateur a été éteint
normalement ou le
courant électrique a
été coupé.
Il est possible que le BIOS
soit en panne ; l'ordinateur
est en mode de
récupération.
Il est possible que le
micro-processeur soit
en panne.
Les modules de mémoire
sont détectés, mais la
mémoire est tombée
en panne.
Vérifiez que le câble d'alimentation est branché à
l'ordinateur et à une prise électrique en état de marche.
Appuyez sur le bouton d'alimentation.
Lancez l'utilitaire de récupération du BIOS, patientez
jusqu'à la fin de l'opération, puis redémarrez l'ordinateur.
Réinstallez le micro-processeur puis redémarrez
l'ordinateur.
Retirez et réinstallez tous les modules de mémoire et
les modules CRIMM. Vérifiez que toutes les pattes
des connecteurs sont bien verrouillées. Redémarrez
l'ordinateur.
Installez les modules de mémoire dans les connecteurs
de mémoire RIMM 1 (situés le plus près du microprocesseur) et RIMM 2 et vérifiez, si aucune mémoire
supplémentaire n'est utilisée, que les CRIMM sont
installés dans les connecteurs de mémoire RIMM 3
et RIMM 4.
Si vous avez installé des modules de mémoire aux
emplacements RIMM3 et RIMM4, modules acquis
auprès d'autres fabricants que Dell, retirez-les et
remplacez-les par les modules CRIMM qui étaient
installés à l'origine sur votre ordinateur.
Si possible, installez de la mémoire Dell de même type
que celle fournie à l'origine.
Si le problème persiste, contactez Dell.
Guide de configuration et de référence rapide 63
Page 64
Motif des voyants Description du
problème
Solution proposée
JVJJ
www.dell.com | support.euro.dell.com
JVJV
Il est possible que la carte
d'extension soit en panne.
Il est possible que la carte
vidéo soit en panne ou
qu'une mauvaise carte
vidéo soit installée.
JVVJ
Il est possible que le
lecteur de disquette ou
que le disque dur soient
en panne.
1 Vérifiez s'il existe un conflit en retirant une carte
(mais pas la carte vidéo), puis en redémarrant
l'ordinateur.
2 Si le problème persiste, réinstallez la carte que vous
avez retirée, ôtez une autre carte, puis redémarrez
l'ordinateur.
3 Répétez cette procédure pour chaque carte. Si
l'ordinateur démarre normalement, vérifiez la dernière
carte supprimée de l'ordinateur à la recherche de
conflits de ressources (reportez-vous à la section
« Résolution des incompatibilités matérielles et
logicielles » dans votre Guide d'utilisation).
4 Si le problème persiste, contactez Dell.
Si l'ordinateur est équipé d'une carte vidéo, enlevez-la,
puis installez-la de nouveau.
Si le problème persiste ou si l'ordinateur possède la vidéo
intégrée, contactez Dell.
Vérifiez toutes les connexions électriques et celles des
câbles de données, puis redémarrez l'ordinateur.
JVVV
Il est possible que le
système USB soit
en panne.
VJJJ
Aucun module de
mémoire n'est installé.
64 Guide de configuration et de référence rapide
Réinstallez tous les périphériques USB, vérifiez toutes les
connexions des câbles, puis redémarrez l'ordinateur.
Réinstallez les modules de mémoire et redémarrez
l'ordinateur.
Si le problème persiste, contactez Dell.
Page 65
Motif des voyants Description du
problème
Solution proposée
VJJV
VJVJ
VJVV
Il est possible que la carte
système soit en panne.
Les modules de mémoire
sont détectés, mais il
existe une erreur de
configuration ou de
compatibilité de la
mémoire.
Il est possible que votre
carte système et/ou votre
matériel soient en panne.
Exécutez les procédures de la section « Problèmes de
carte système » de votre Guide d'utilisation.
Si le problème persiste, contactez Dell.
Vérifiez qu'il n'existe pas d'exigences de placement
spéciale pour les connecteurs de mémoire ou les modules
de mémoire (reportez-vous à la section « Mémoire » dans
votre Guide d'utilisation).
Vérifiez que les modules de mémoire que vous installez
sont compatibles avec votre ordinateur (reportez-vous à
la section « Mémoire » de votre Guide d'utilisation).
Réinstallez les modules de mémoire et redémarrez
l'ordinateur..
Si le problème persiste, contactez Dell.
Exécutez les procédures de la section « Problèmes de
carte système » et consultez « Résolution des problèmes
d'incompatibilité logicielle ou matérielle » de votre
Guide d'utilisation.
Si le problème persiste, contactez Dell.
VVJJ
Il est possible que la carte
d'extension soit en panne.
Guide de configuration et de référence rapide 65
1 Vérifiez s'il existe un conflit en retirant une carte
(mais pas la carte vidéo), puis en redémarrant
l'ordinateur.
2 Si le problème persiste, réinstallez la carte que vous
avez retirée, ôtez une autre carte, puis redémarrez
l'ordinateur.
3 Répétez cette procédure pour chaque carte. Si
l'ordinateur démarre normalement, vérifiez la dernière
carte supprimée de l'ordinateur à la recherche de
conflits de ressources (reportez-vous à la section
« Résolution des incompatibilités matérielles et
logicielles » dans votre Guide d'utilisation).
4 Si le problème persiste, contactez Dell.
Page 66
Motif des voyants Description du
problème
Solution proposée
VVVJ
VVVV
www.dell.com | support.euro.dell.com
D'autres pannes sont
survenues.
L'ordinateur se trouve en
état de fonctionnement
normal après un auto-test
de démarrage.
Au cas où il ne serait pas possible de résoudre un problème de l'ordinateur
par le biais des étapes de cette section ou des procédures de la section
« Solutions » de votre Guide d'utilisation, réalisez les étapes suivantes
avant de contacter Dell :
Vérifiez que les câbles sont correctement branchés
du disque dur, du lecteur CD et du lecteur DVD à
la carte système.
Si le problème persiste, contactez Dell.
Aucun.
1 Rédigez une description détaillée de l'erreur, des signaux ou du voyant
de diagnostic.
2 Notez votre Code de service express et votre Numéro de service.
3 Contactez Dell depuis l'endroit où se trouve votre ordinateur.
66 Guide de configuration et de référence rapide
Page 67

Foire aux questions
Comment faire pour... Solution Où trouver des informations
supplémentaires ?
Configurer mon ordinateur
pour utiliser deux écrans ?
Connecter mon écran lorsque le
connecteur du câble de l'écran
ne semble pas correspondre à
celui situé à l'arrière de mon
ordinateur ?
Brancher mes haut-parleurs ? Si une carte son est installée,
Si votre ordinateur est équipé de
la carte graphique nécessaire à
la configuration de deux écrans,
retrouvez un câble Y dans votre
emballage. Ce câble possède un
connecteur unique à une extrémité
(branchez-le sur le panneau arrière
de l'ordinateur) et des prises pour
deux connecteurs (branchez ces
connecteurs aux câbles de l'écran).
Reportez-vous à la section
« Branchez l'écran » page 44.
Si votre carte graphique possède
un connecteur DVI mais que celui
de votre écran est de type VGA,
vous devez utiliser un adaptateur,
que vous devriez retrouver dans
l'emballage.
branchez les haut-parleurs aux
connecteurs de la carte. Reportezvous à la section « Branchez les
haut-parleurs » page 47.
Contactez le Support technique
de Dell pour de plus amples
informations.
Consultez la documentation
fournie avec les haut-parleurs
pour plus d'informations.
Trouver les bons connecteurs
pour mes périphériques USB ?
Votre ordinateur Dell Precision 350
possède huit connecteurs USB
(deux à l'avant et six à l'arrière).
Guide de configuration et de référence rapide 67
Reportez-vous aux graphiques
des vues avant et arrière de
votre ordinateur dans le Guide
d'utilisation. Pour obtenir de
l'aide afin de retrouver votre Guide
d'utilisation, reportez-vous à la
section « Trouver des informations
sur votre ordinateur » page 37.
Page 68

Comment faire pour... Solution Où trouver des informations
supplémentaires ?
Trouver des informations
sur le matériel et autres
caractéristiques techniques
de mon ordinateur ?
Trouver de la documentation
pour mon ordinateur ?
www.dell.com | support.euro.dell.com
Votre Guide d'utilisation présente
un tableau des caractéristiques,
dont le but est de fournir des
informations plus détaillées sur
votre ordinateur et sur le matériel.
Pour retrouver votre Guide
d'utilisation, reportez-vous à la
section « Trouver des informations
sur votre ordinateur » page 37.
La documentation suivante est
disponible pour votre ordinateur :
• Guide d'utilisation
• Guide de configuration et de
référence rapide
• Guide d'informations du système
• Étiquette d'informations
du système
• Guide technique
Pour retrouver ces documents,
reportez-vous à la section
« Trouver des informations sur
votre ordinateur » page 37.
Reportez-vous au site Web du
support technique de Dell et
utilisez l'un des outils d'assistance
suivants : lisez les livres blancs
relatifs aux dernières technologies
en date ou communiquez avec
d'autres utilisateurs Dell sur
le salon de discussion.
En cas de perte de votre
documentation, vous pourrez
la retrouver sur le site Web du
support technique de Dell à
l'adresse support.dell.com.
68 Guide de configuration et de référence rapide
Page 69

Dell Precision™ 350 Workstation
Setup- und
Schnellreferenzhandbuch
www.dell.com |
Page 70

Hinweise, Vorsichtshinweise und
Warnungen
HINWEIS: Ein HINWEIS macht auf wichtige Informationen aufmerksam,
mit denen Sie das System besser einsetzen können.
VORSICHT: VORSICHT warnt vor möglichen Beschädigungen der Hardware
oder vor Datenverlust und zeigt, wie diese vermieden werden können.
WARNUNG: Eine WARNUNG weist auf Gefahrenquellen hin,
die materielle Schäden, Verletzungen oder sogar den Tod von
Personen zur Folge haben können.
Abkürzungen und Akronyme
Eine vollständige Liste von Abkürzungen und Akronymen finden Sie im
Benutzerhandbuch.
Wenn Sie einen Dell™-Computer der N-Serie besitzen, treffen
®
alle Referenzen dieses Dokuments auf die Microsoft
Windows®-
Betriebssysteme nicht zu.
____________________
Irrtümer und technische Änderungen vorbehalten.
© 2002 Dell Computer Corporation. Alle Rechte vorbehalten.
Nachdrucke jeglicher Art ohne die vorherige schriftliche Genehmigung der Dell Computer
Corporation sind strengstens untersagt.
Marken in diesem T e xt: Dell, das DELL-Logo und Dell Precision sind Marken der Dell Computer
Corporation; Microsoft und Windows sind eingetragene Marken der Microsoft Corporation.
Alle anderen in dieser Dokumentation genannten Marken und Handelsbezeichnungen sind
Eigentum der entsprechenden Hersteller und Firmen. Die Dell Computer Corporation verzichtet
auf alle Besitzrechte an Marken und Handelsbezeichnungen, die nicht ihr Eigentum sind.
Dezember 2002 P /N 9T217 Rev. A01
Page 71

Inhalt
Informationsquellen für Ihren Computer . . . . . . . . . . . . . 73
Anschließen der Tastatur und der Maus
Anschließen des Modems und des Netzwerkabels
Anschließen des Bildschirms
Anschließen der Lautsprecher
. . . . . . . . . . . . . . . . . . 79
. . . . . . . . . . . . . . . . . . 82
. . . . . . . . . . . . . 77
. . . . . . . . 78
Anschließen der Stromkabel sowie Einschalten des Computers
und des Bildschirms
Installation zusätzlicher Software und Geräte
. . . . . . . . . . . . . . . . . . . . . . . 83
. . . . . . . . . . 84
Öffnen der Computerabdeckung
Interne Komponenten
Problemlösung
. . . . . . . . . . . . . . . . . . . . . . . . . . . 88
. . . . . . . . . . . . . . . . . . . . . . . 87
. . . . . . . . . . . . . . . . . . 85
Beheben von Software- und Hardware-Inkompatibilitäten
Verwenden der Systemwiederherstellung unter Windows XP
Verwendung der letzten, als funktionierend bekannten
Konfiguration unter Windows 2000
. . . . . . . . . . . . . . . 91
Wann wird das Dell-Diagnoseprogramm eingesetzt?
Starten des Dell-Diagnoseprogramms
Signaltoncodes
Fehlermeldungen
Diagnoseanzeigen
Häufig gestellte Fragen
. . . . . . . . . . . . . . . . . . . . . . . . . 96
. . . . . . . . . . . . . . . . . . . . . . . . 96
. . . . . . . . . . . . . . . . . . . . . . . . 96
. . . . . . . . . . . . . . . . . . . . . . 101
. . . . . . . . . . . . . . 92
. . . . 88
. . . 90
. . . . . . . 92
Inhalt 71
Page 72

72 Inhalt
Page 73
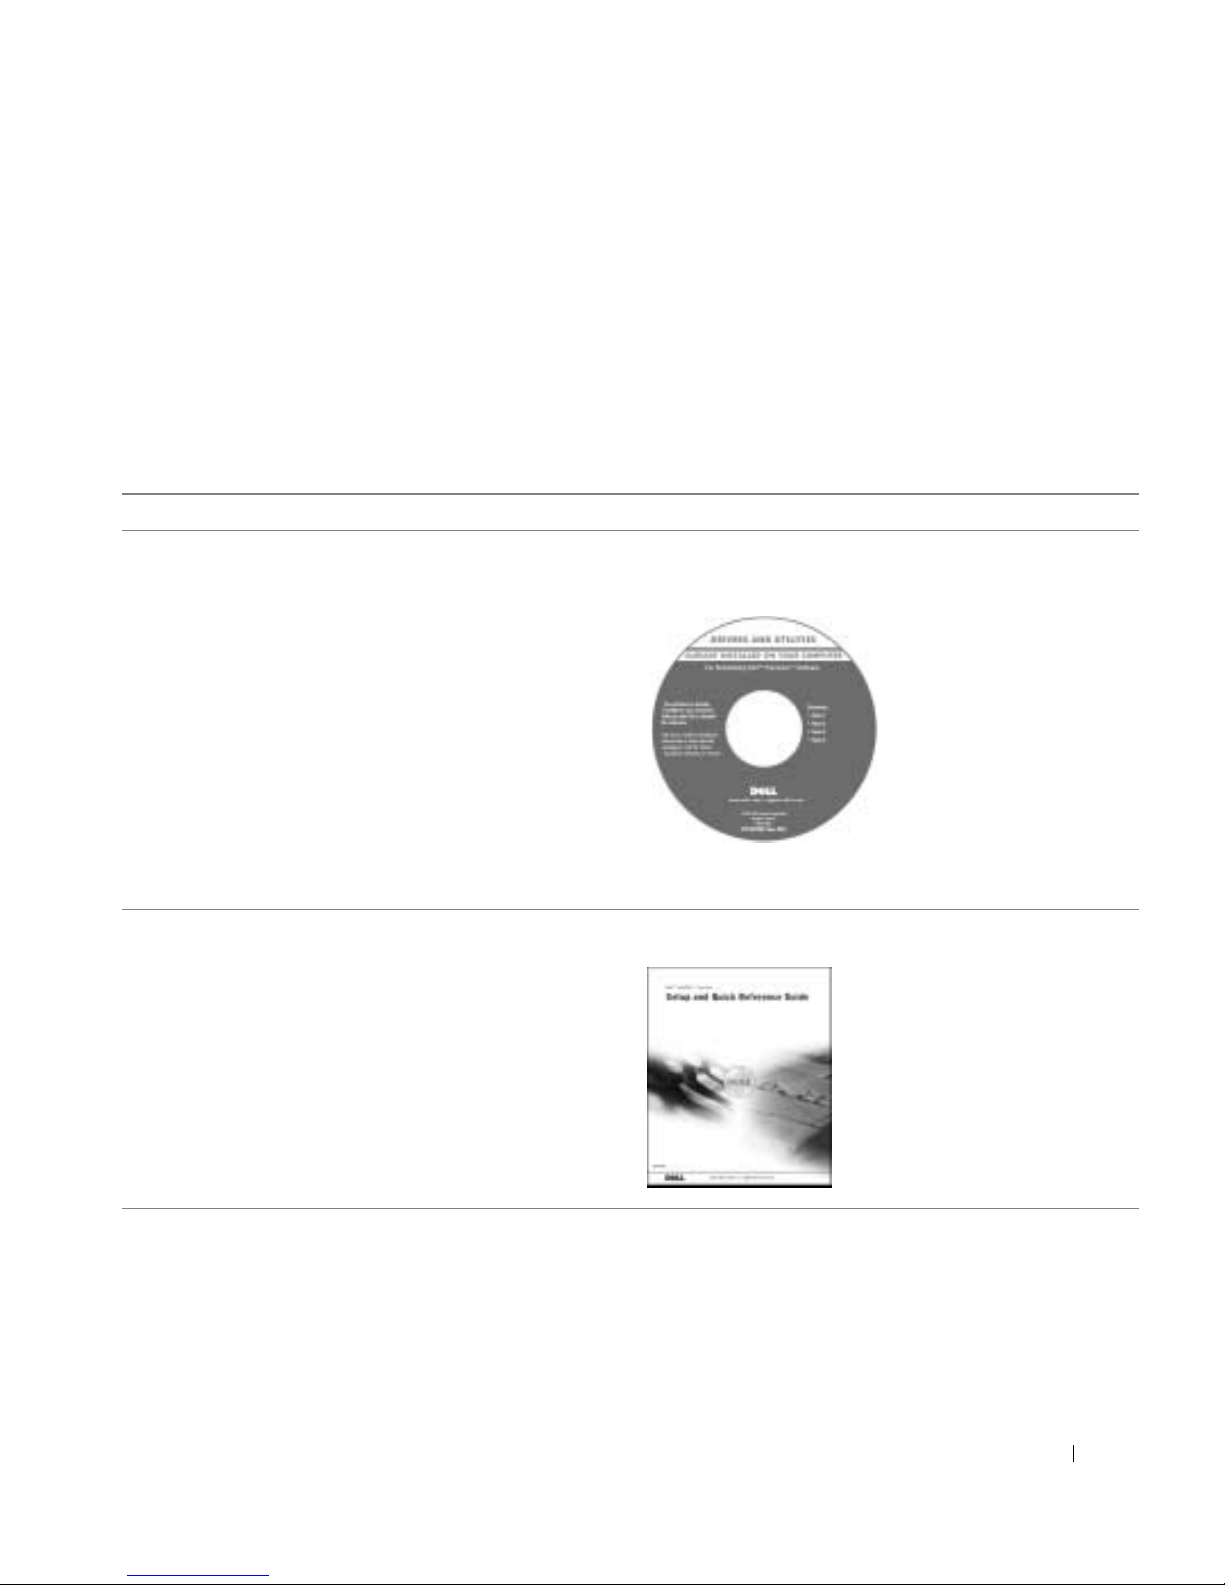
Informationsquellen für Ihren
Computer
Die folgende Tabelle enthält Informationsquellen und Hilfsprogramme,
die von Dell zu Ihrer Unterstützung bereit gestellt werden. Weiteres
Informations- und Dokumentationsmaterial ist möglicherweise im
Lieferumfang des Computers enthalten.
Wonach suchen Sie? Wo Sie es finden
• Ein Diagnoseprogramm für den Computer
• Treiber für den Computer
• Die Dokumentation für den Computer
• Die Dokumentation für das Gerät
• Informationen zum Einrichten des
Computers
• Informationen zur Fehlerbeseitigung
• Werkzeuge und Dienstprogramme
Die CD „Drivers and Utilities“
(diese wird auch als ResourceCD bezeichnet)
Mit Hilfe dieser CD können Sie auf die Dokumentation zugreifen,
Treiber neu installieren, oder das Diagnoseprogramm ausführen..
Setup- und Schnellreferenzhandbuch
Setup- und Schnellreferenzhandbuch 73
Page 74
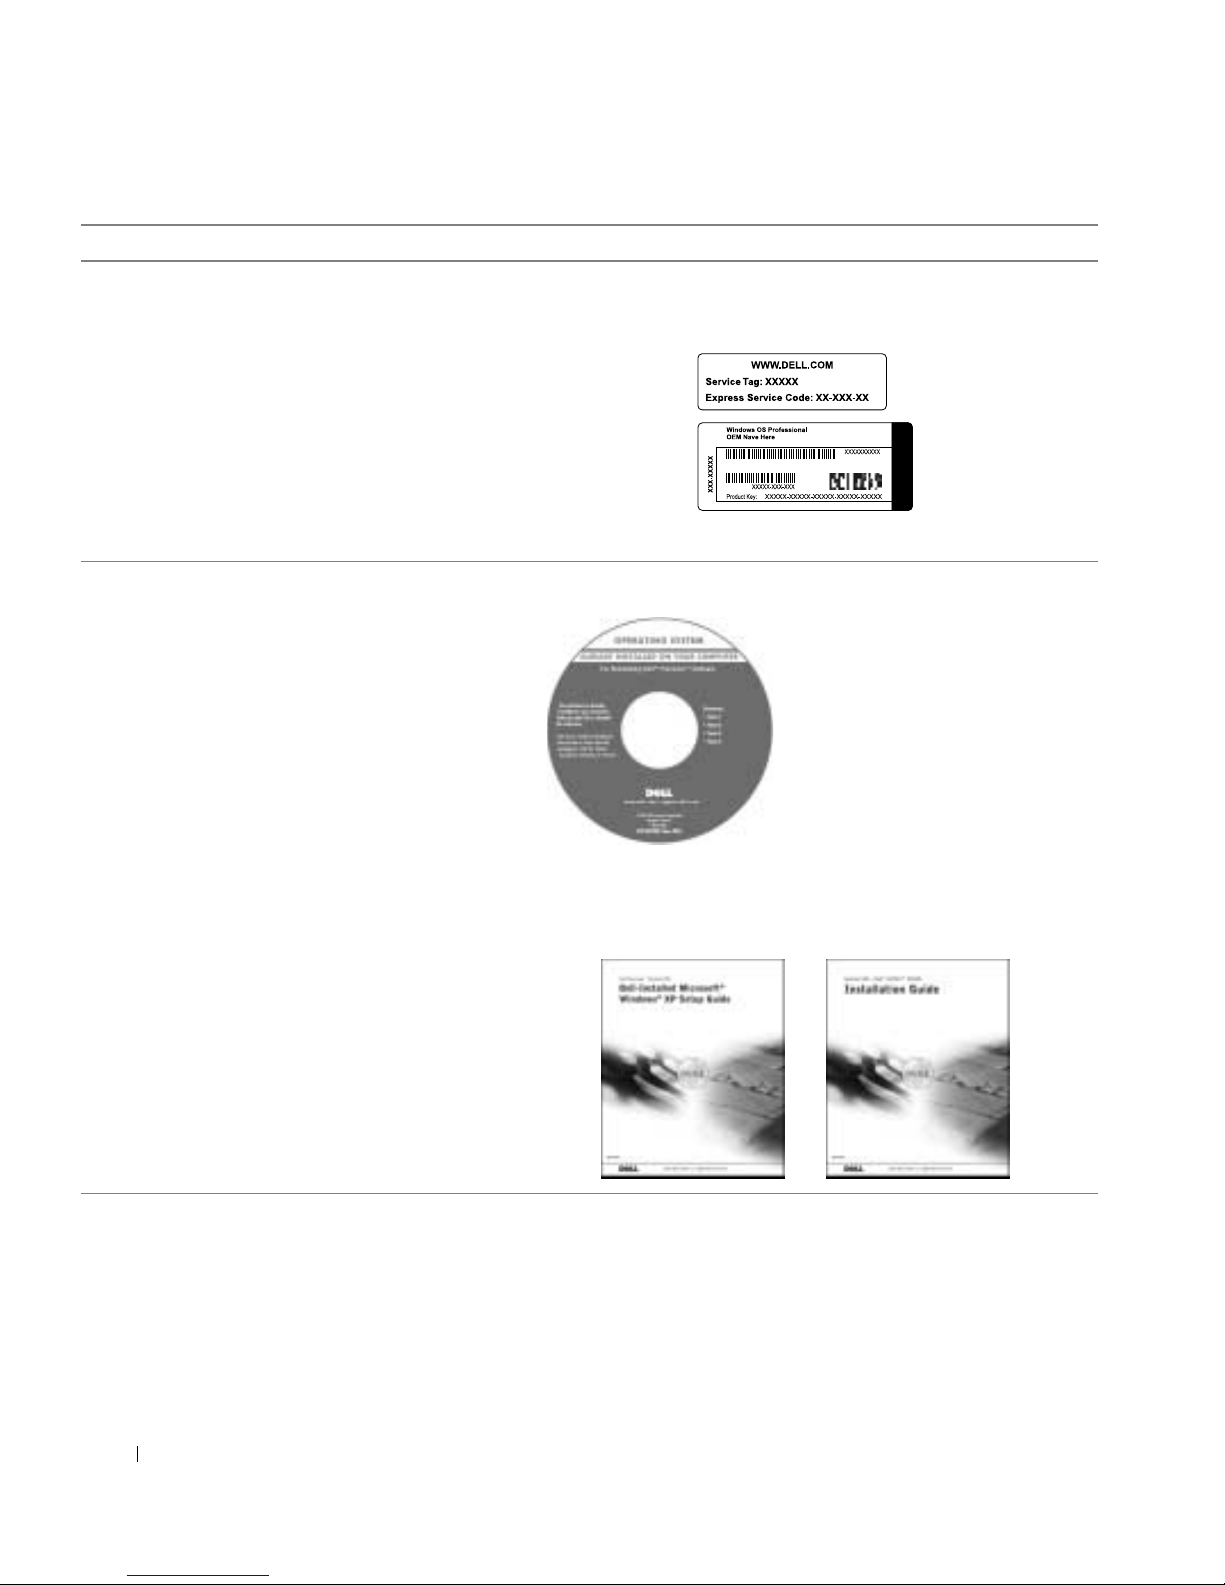
Wonach suchen Sie? Wo Sie es finden
• Expressdienst-Codenummer und
Service-Kennnummer
• Microsoft
®
Windows®-Lizenzetikett
• Informationen zum Neuinstallieren
des Betriebssystems
www.dell.com | support.euro.dell.com
Expressdienst-Codenummer und
Produktschlüssel
Die Etiketten befinden sich auf der Vorderseite des Computers.
Betriebssystem-CD und Installationshandbuch
Verwenden Sie die Drivers and Utilities-CD, um neuere Treiber
für die mit Ihrem Computer ausgelieferten Geräte zu installieren,
wenn Sie das Betriebssystem Ihres Computers neu installieren.
74 Setup- und Schnellreferenzhandbuch
Page 75
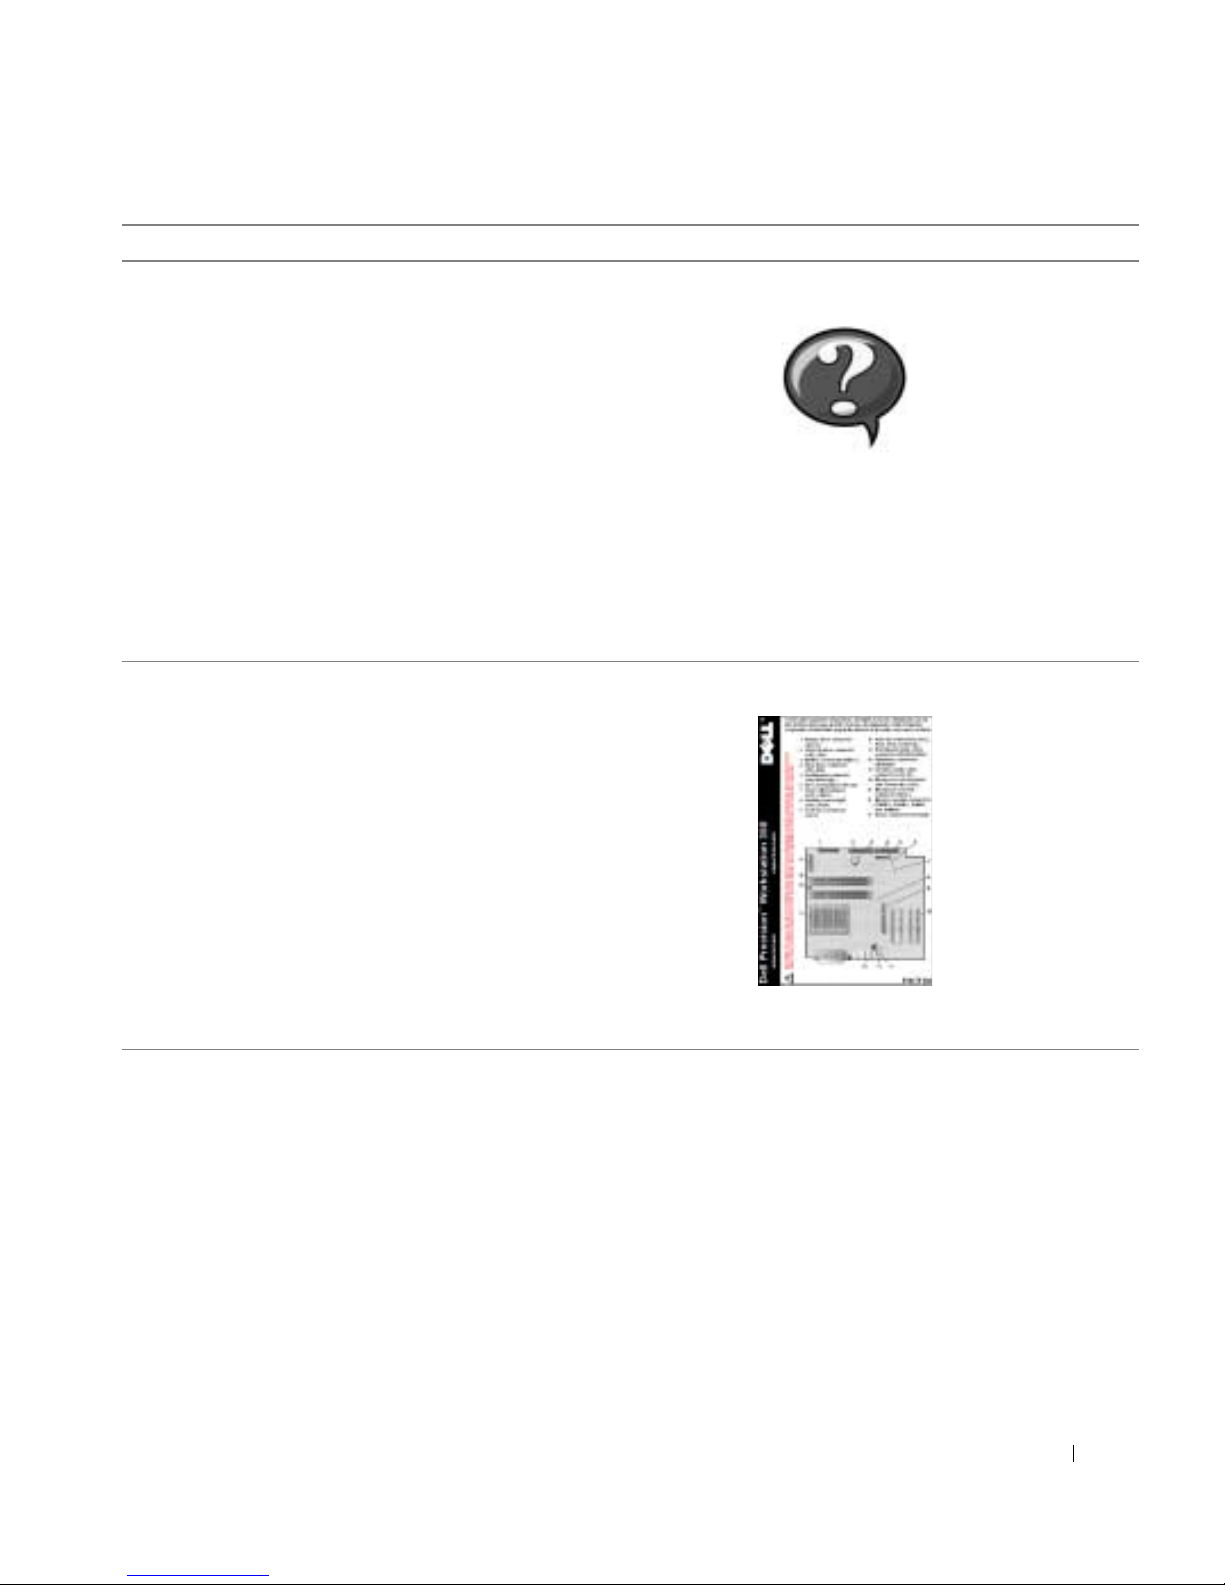
Wonach suchen Sie? Wo Sie es finden
• Informationen zum Entfernen und
Das Symbol Benutzerhandbuch
Austauschen von Teilen
• Technische Daten
• Informationen zum Konfigurieren von
Systemeinstellungen
• Informationen zur Fehlerbeseitigung
und Problemlösung
So greifen Sie auf die auf Ihrem Festplattenlaufwerk gespeicherte
Dokumentation zu:
Wenn Sie mit Microsoft Windows 2000 arbeiten, doppelklicken Sie
auf das Symbol User’s Guides (Benutzerhandbücher) auf Ihrem
Desktop. Wenn Sie mit Windows XP arbeiten, klicken Sie auf
die Schaltfläche Start und anschließend auf Help and Support
(Hilfe und Support).
• Anschlüsse auf der Systemplatine Etikett mit den Systeminformationen
Dieses Etikett befindet sich an der Innenseite des
Computergehäuses.
Setup- und Schnellreferenzhandbuch 75
Page 76
Wonach suchen Sie? Wo Sie es finden
• Aktuelle Treiber für den Computer
• Informationen zum technischen Support
und Kundendienst
• Onlinediskussionen mit anderen Benutzern
und dem technischen Support
• Dokumentation für den Computer,
einschließlich des Servicehandbuchs
Dell-Support-Website – support.euro.dell.com
Die Support-Website von Dell unter support.euro.dell.com bietet
verschiedene Onlinetools, z. B:
• Wissensdatenbank – Hinweise, Tipps und Onlinekurse
• Kundenforum – Onlinediskussionen mit anderen Dell-Kunden
• Aktualisierungen – Aktualisierungsinformationen für Komponenten, z. B. für den Speicher, das Festplattenlaufwerk und das
Betriebssystem
• Kundenbetreuung – Kontaktinformationen, Bestellstatus,
Garantie und Informationen in Notfällen
• Downloads – Treiber, Patches und Software-Updates
• Referenz – Computerdokumentation, Produktspezifikationen
www.dell.com | support.euro.dell.com
• Serviceanruf-Status
• Technische Top-Themen für den Computer
• Häufig gestellte Fragen
• Herunterladen von Dateien
• Details über die Konfiguration des
Computers
und Whitepapers
Dell Premier Support-Website –
premiersupport.dell.com
Die Dell Premier Support-Website ist speziell auf Großkunden
und Kunden aus den Bereichen öffentlicher Dienst, Regierung/
Verwaltung und Bildungswesen zugeschnitten. Diese Website
ist möglicherweise nicht in allen Ländern verfügbar.
• Servicevertrag für den Computer
• Garantieinformationen Systeminformationshandbuch
• Anleitung zum Arbeiten mit Windows XP
• Dokumentation für den Computer und die
zugehörigen Geräte
76 Setup- und Schnellreferenzhandbuch
Hilfe- und Supportcenter unter Windows XP
1 Auf die Schaltfläche Start und anschließend auf Help and
Support (Hilfe und Support) klicken.
2 Ein Wort oder einen Ausdruck eingeben, das bzw. der Ihr Problem
beschreibt, und anschließend auf das Pfeilsymbol klicken.
3 Auf das Thema klicken, das Ihr Problem beschreibt.
4 Den Anweisungen auf dem Bildschirm folgen.
Page 77
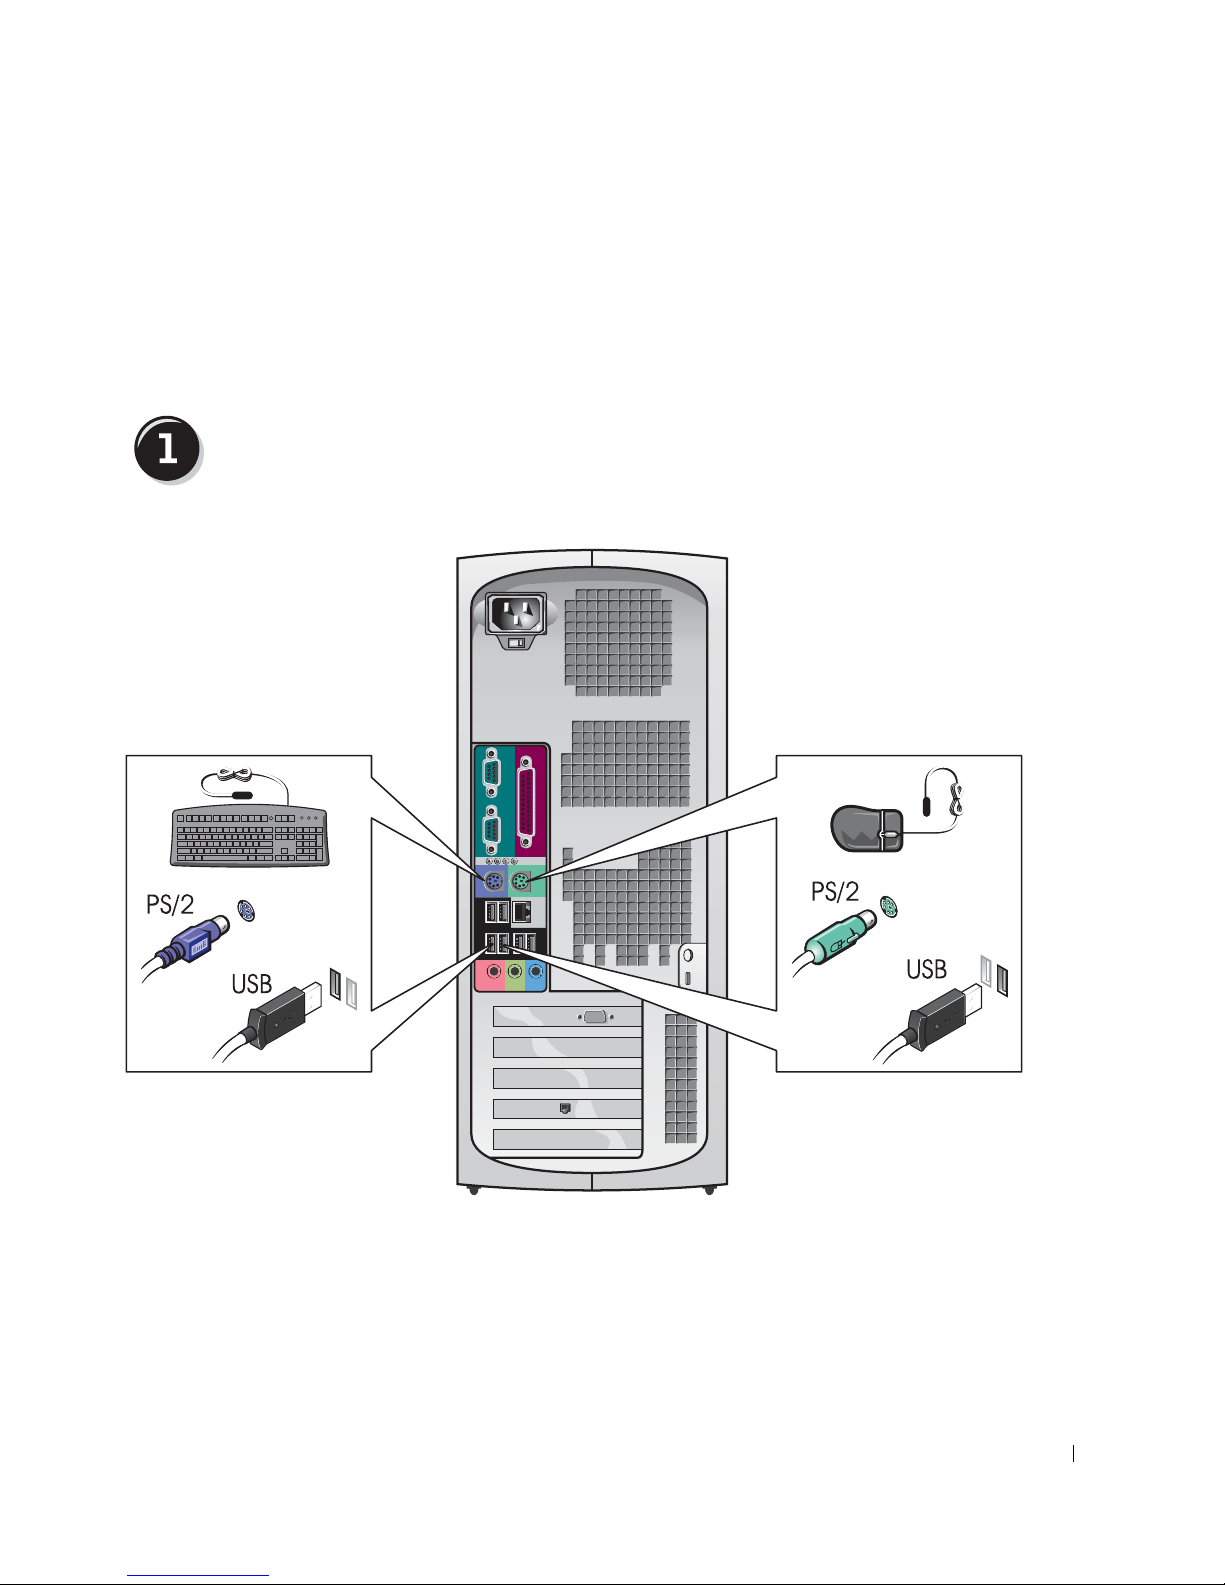
Einrichten des Dell Precision™
350-Computers
Sie müssen alle Schritte ausführen, um den Computer korrekt einzurichten.
Anschließen der Tastatur und der Maus
Setup- und Schnellreferenzhandbuch 77
Page 78
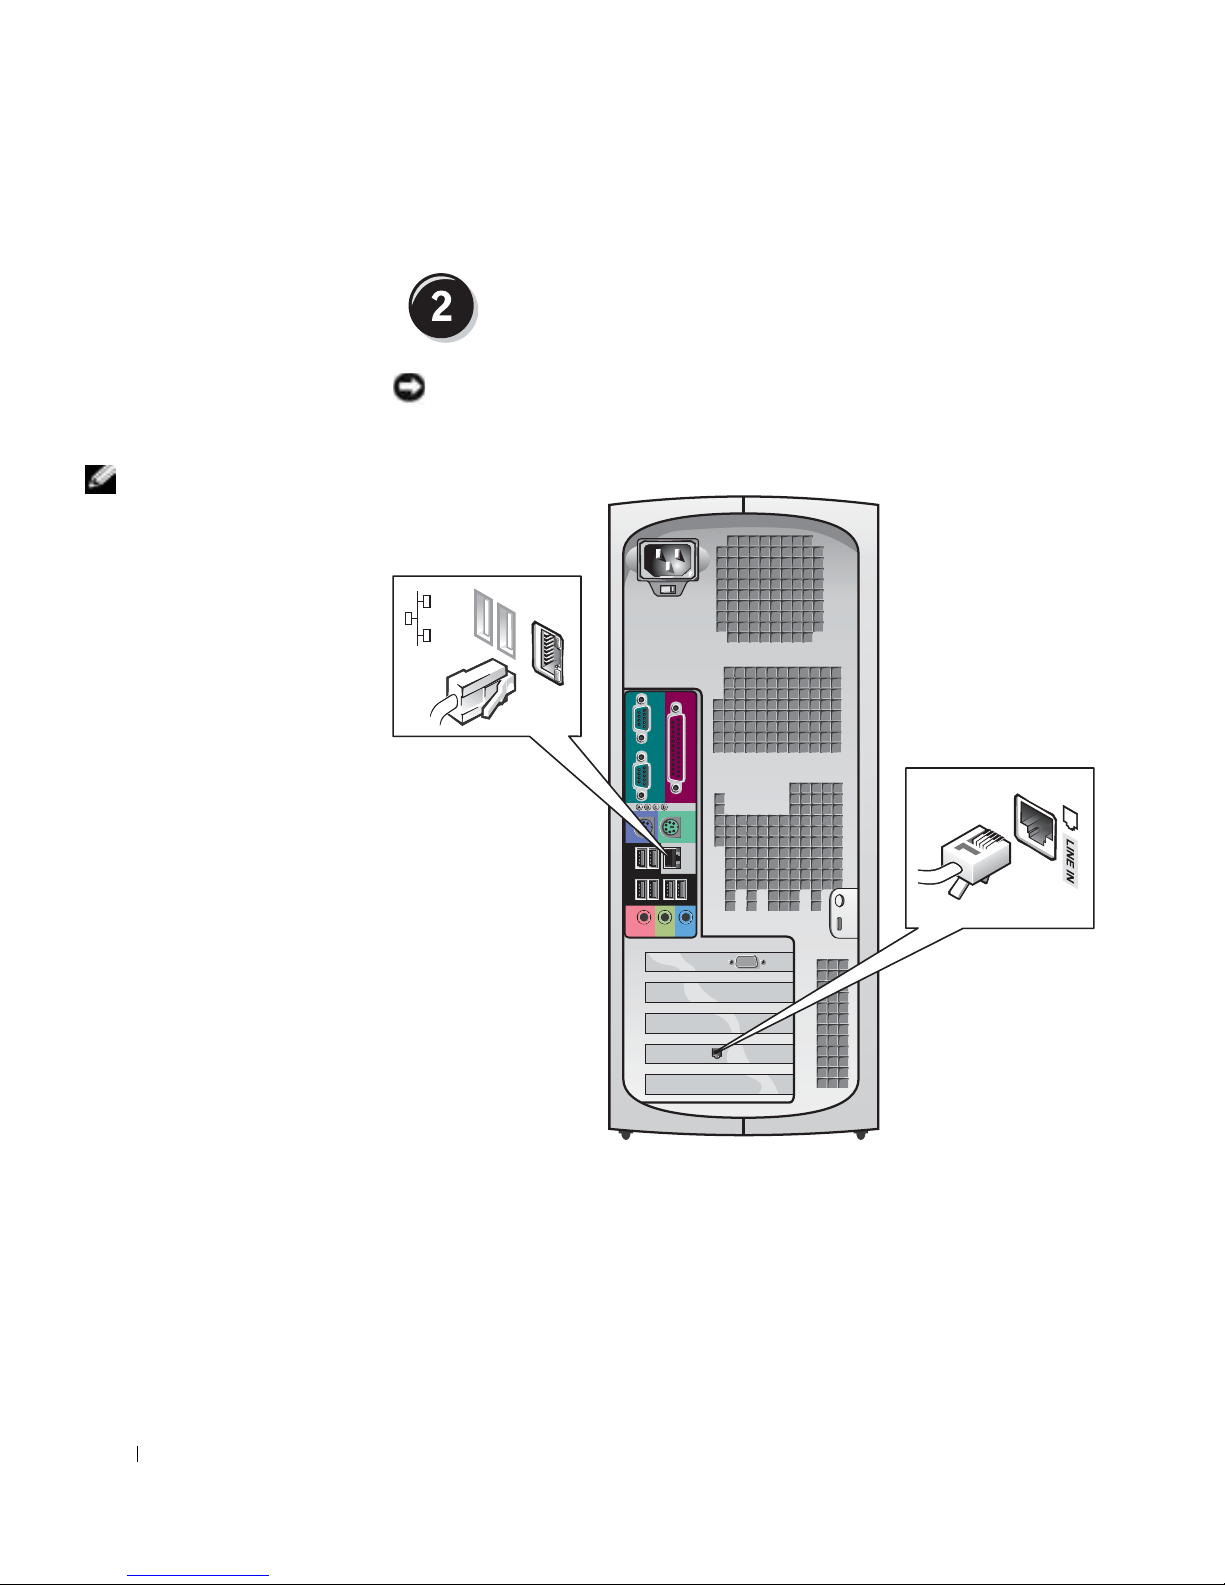
HINWEIS: Wenn auf
Ihrem Computer eine
Netzwerkkarte installiert
ist, schließen Sie das
Netzwerkkabel an die
www.dell.com | support.euro.dell.com
Netzwerkkarte an.
Anschließen des Modems und des Netzwerkabels
VORSICHT: Schließen Sie kein Modemkabel an den Netzwerkadapter an.
Die bei der Telefonkommunikation entstehende Spannung kann den Netzwerkadapter beschädigen.
78 Setup- und Schnellreferenzhandbuch
Page 79
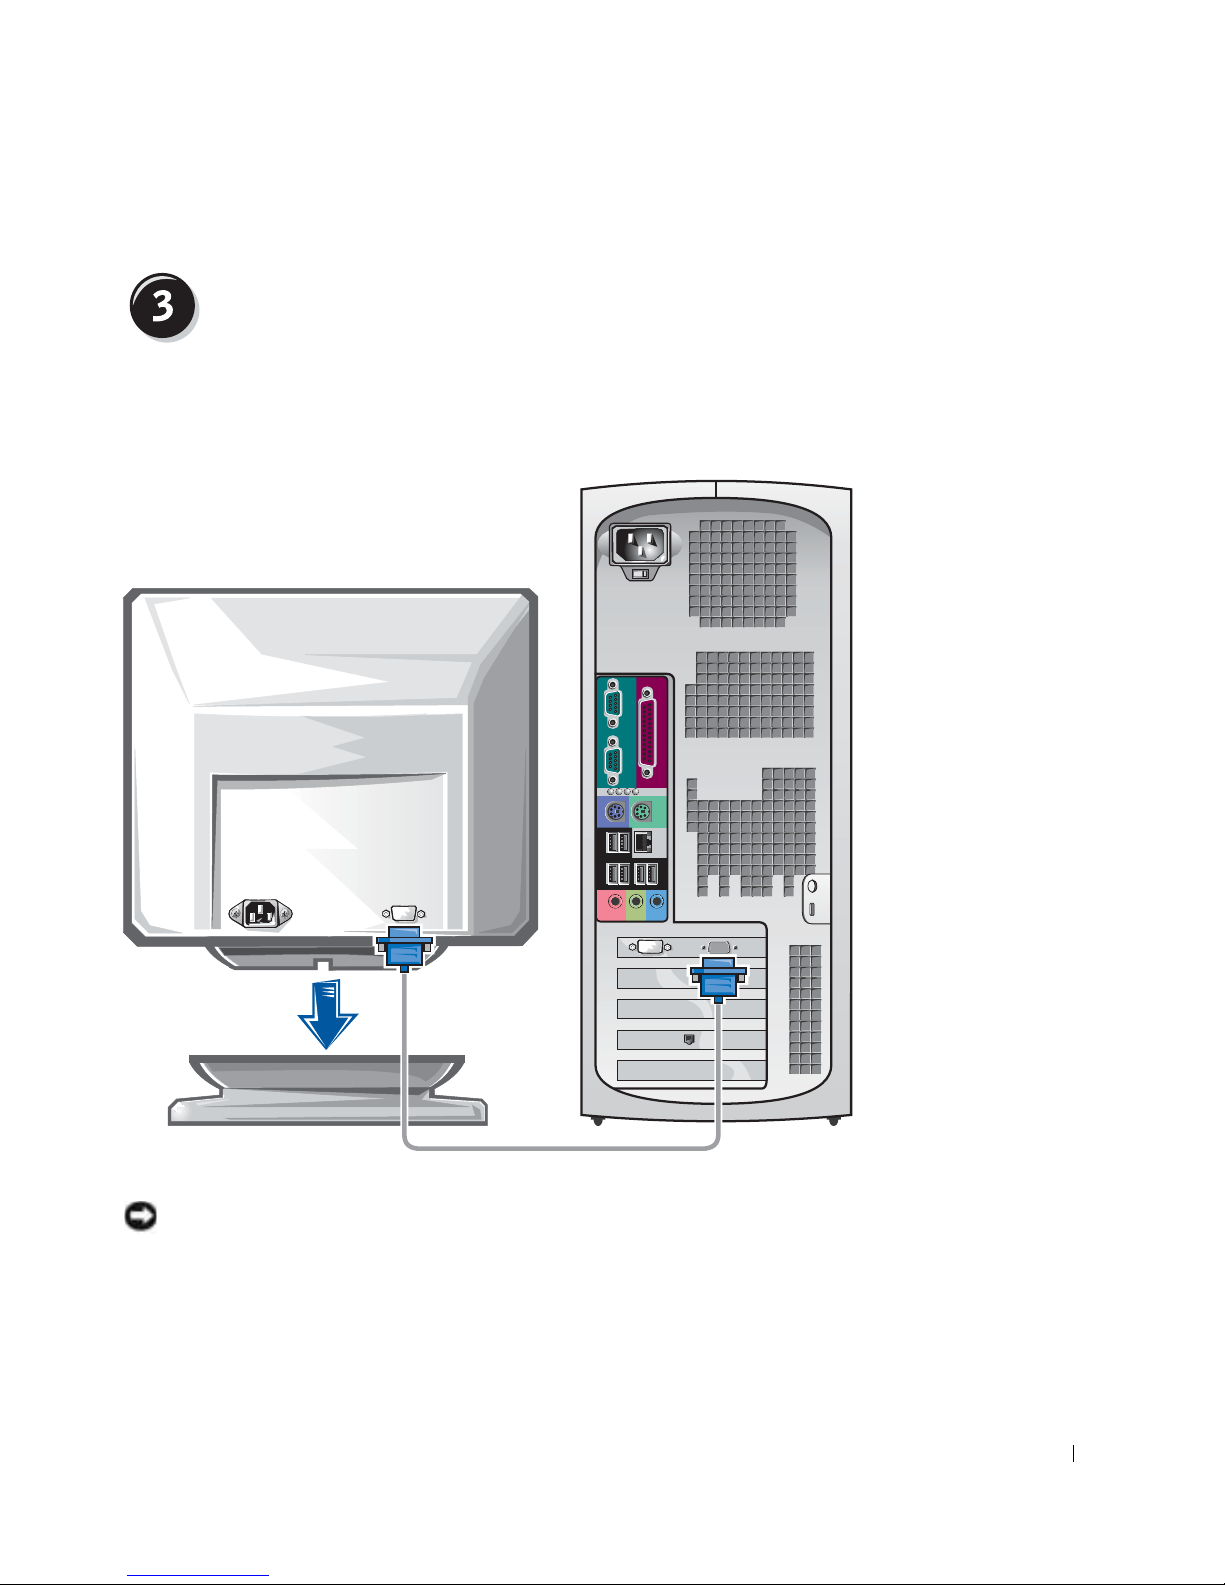
Anschließen des Bildschirms
Je nach Grafikkarte, kann der Bildschirm auf verschiedene Weise
angeschlossen werden.
A B C D
VORSICHT: Möglicherweise muss der mitgelieferte Adapter oder das Kabel
zum Anschließen des Bildschirms verwendet werden.
Setup- und Schnellreferenzhandbuch 79
Page 80
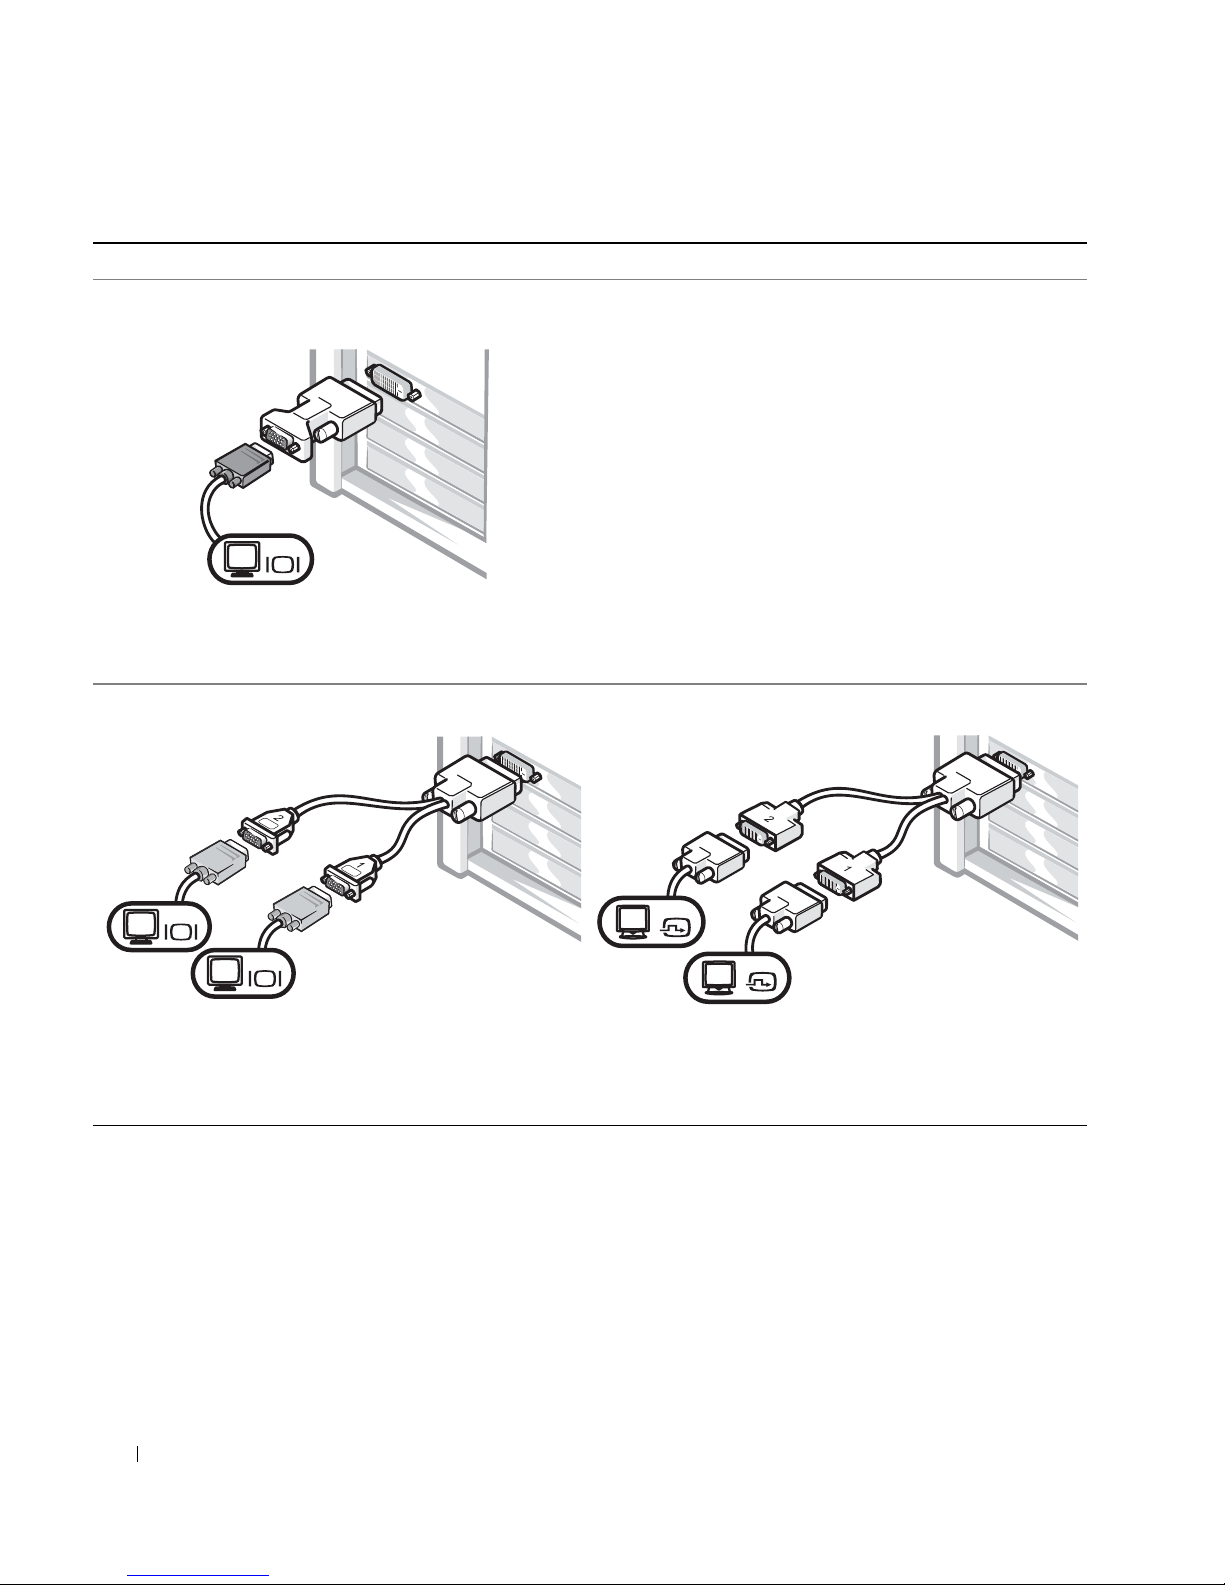
Für Einzel- und Dual-Monitor-fähige Karten mit einem einzelnen Anschluss
VGA-Adapter
VGA
www.dell.com | support.euro.dell.com
• Verwenden Sie den VGA-Adapter, wenn eine
einzelne Grafikkarte verwendet wird und ein
VGA-Bildschirm angeschlossen werden soll.
Dual-VGA-Y-Kabeladapter
VGA
VGA
• Verwenden Sie das entsprechende Y-Kabel, wenn
die Grafikkarte über einen einzelnen Anschluss
verfügt und eine Verbindung zu einem oder zwei
VGA-Bildschirmen hergestellt werden soll.
Das Dual-Monitor-Kabel verfügt über eine Farbkodierung; der blaue
Anschluss ist für den primären Bildschirm und der schwarze für den
sekundären Monitor bestimmt. Um eine Dual-Monitor-Unterstützung zu
ermöglichen, müssen beide Bildschirme beim Starten des Computers
angeschlossen sein.
Dual-DVI-Y-Kabeladapter
DVI
DVI
• Verwenden Sie das entsprechende Y-Kabel, wenn
die Grafikkarte über einen einzelnen Anschluss
verfügt und eine Verbindung zu einem oder zwei
DVI-Bildschirmen hergestellt werden soll.
80 Setup- und Schnellreferenzhandbuch
Page 81
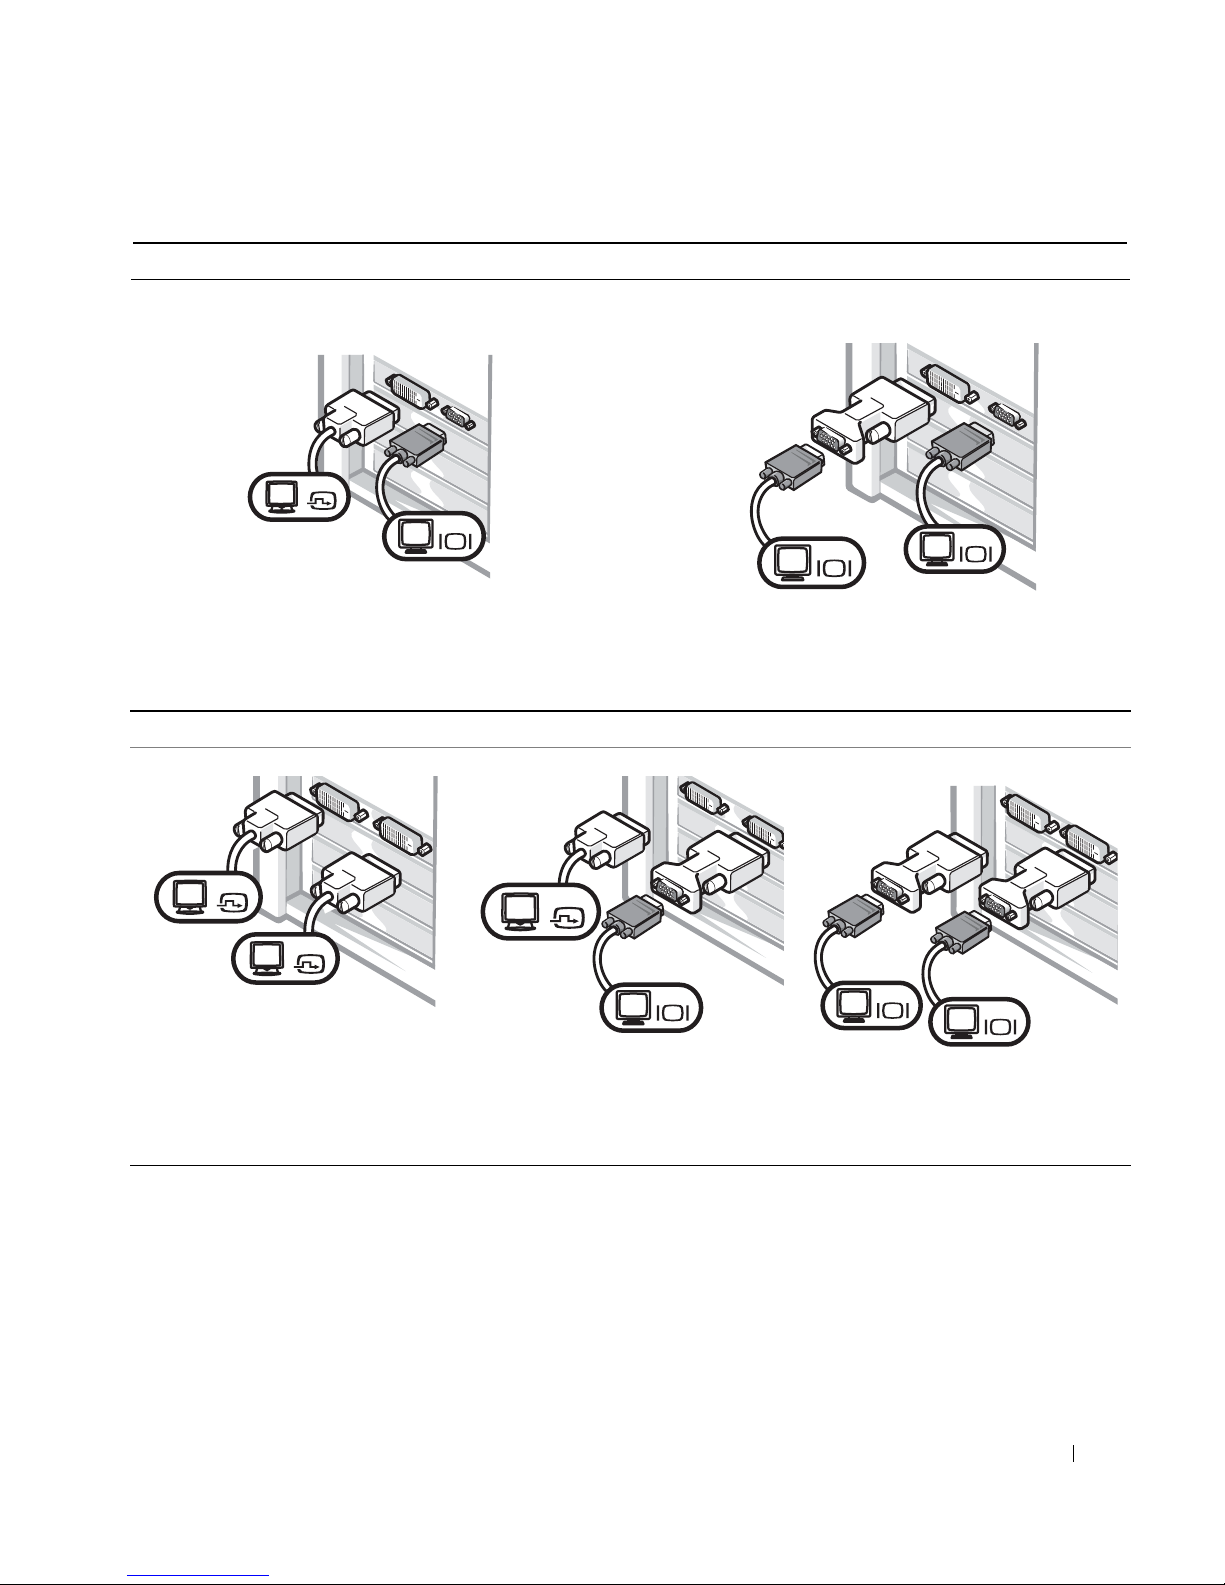
Für Dual-Monitor-fähige Karten mit einem DVI- und einem VGA-Anschluss
Einzel-DVI/Einzel-VGA
DVI
VGA
• Verwenden Sie den entsprechenden Anschluss,
um eine Verbindung zu einem oder zwei
Dual-VGA mit VGA-Adapter
• Verwenden Sie den VGA-Adapter, um zwei
VGA-Bildschirme anzuschließen.
Bildschirmen herzustellen.
Für Dual-Monitor-fähige Karten mit zwei DVI-Anschlüssen
Dual-DVI
Dual-DVI mit einem VGA-Adapter
VGA
VGA
Dual-DVI mit zwei VGA-Adaptern
DVI
DVI
• Verwenden Sie die
DVI-Anschlüsse, um einen
oder zwei DVI-Bildschirme
anzuschließen.
DVI
VGA
• Verwenden Sie den
VGA-Adapter, um einen
VGA-Bildschirm mit einem
DVI-Anschluss zu verbinden.
Setup- und Schnellreferenzhandbuch 81
VGA
VGA
• Verwenden Sie die beiden
VGA-Adapter, um zwei
VGA-Bildschirme mit den
DVI-Anschlüssen zu verbinden.
Page 82
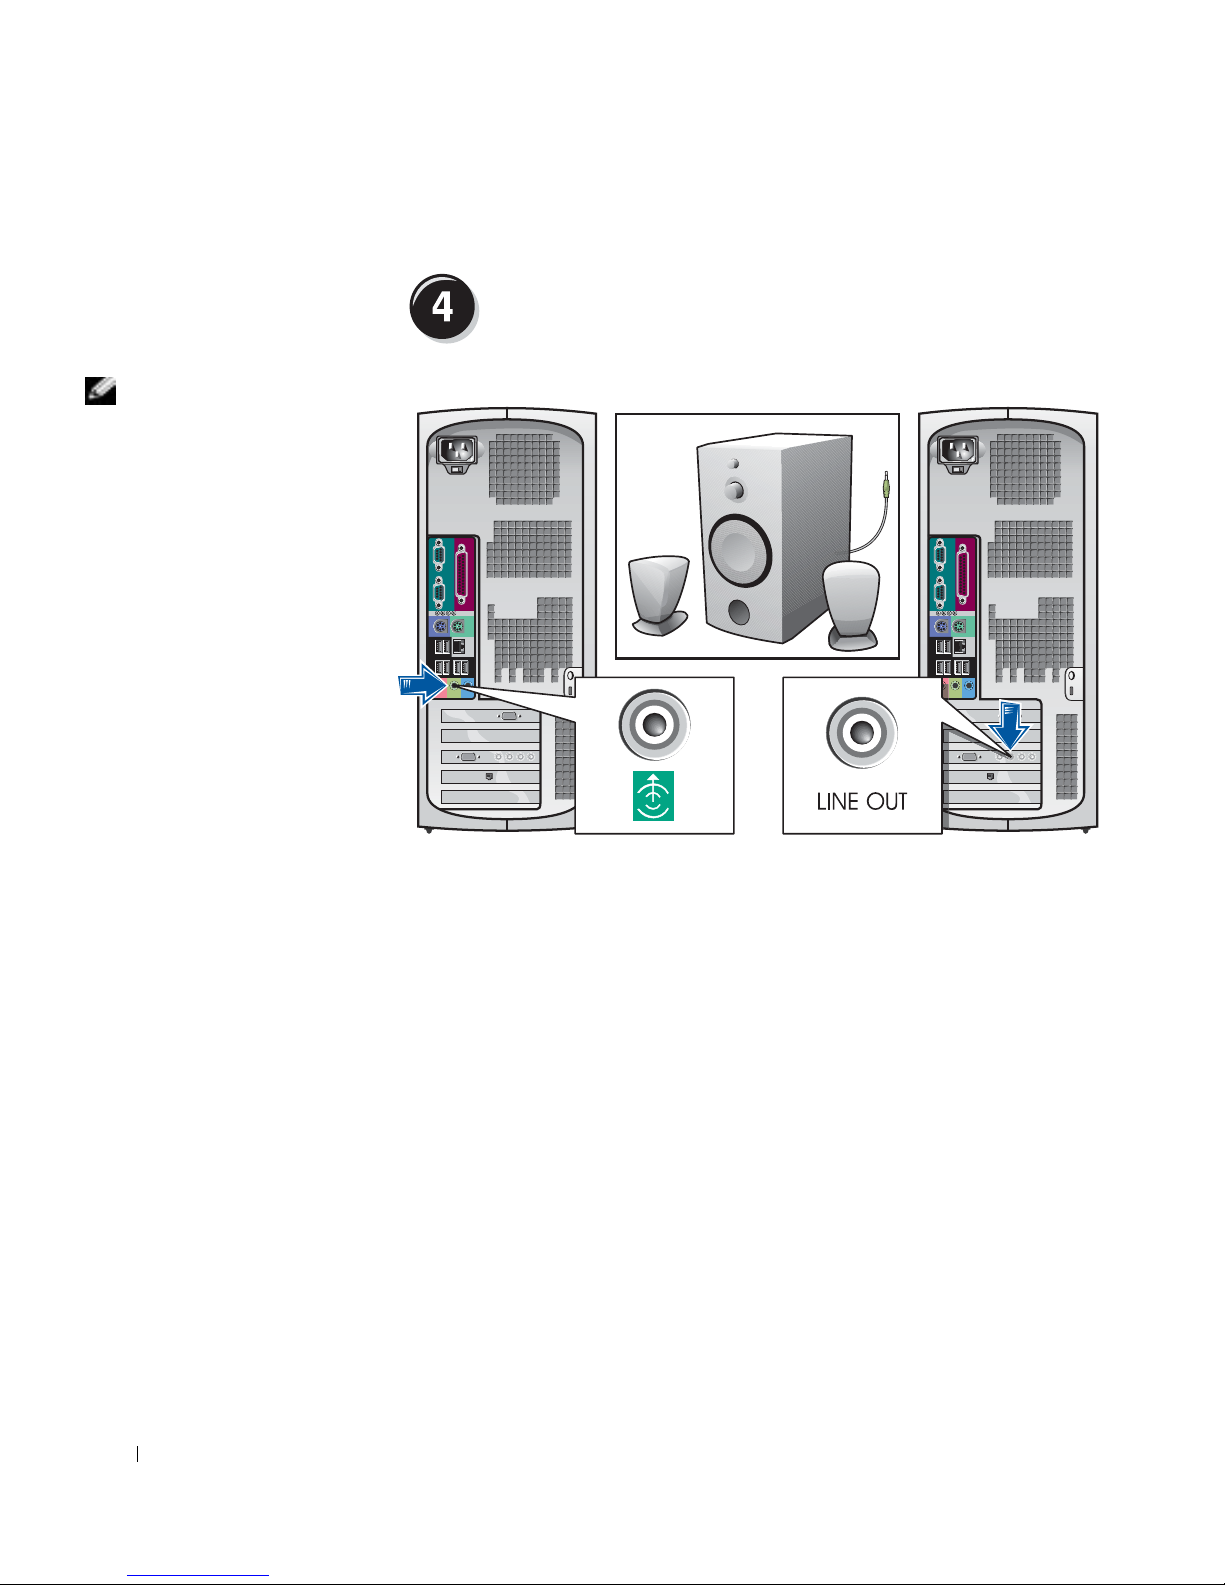
HINWEIS: Wenn in
Ihrem Computer eine
Audiokarte installiert ist,
schließen Sie die Lautsprecher an diese Karte
an.
www.dell.com | support.euro.dell.com
Anschließen der Lautsprecher
82 Setup- und Schnellreferenzhandbuch
Page 83
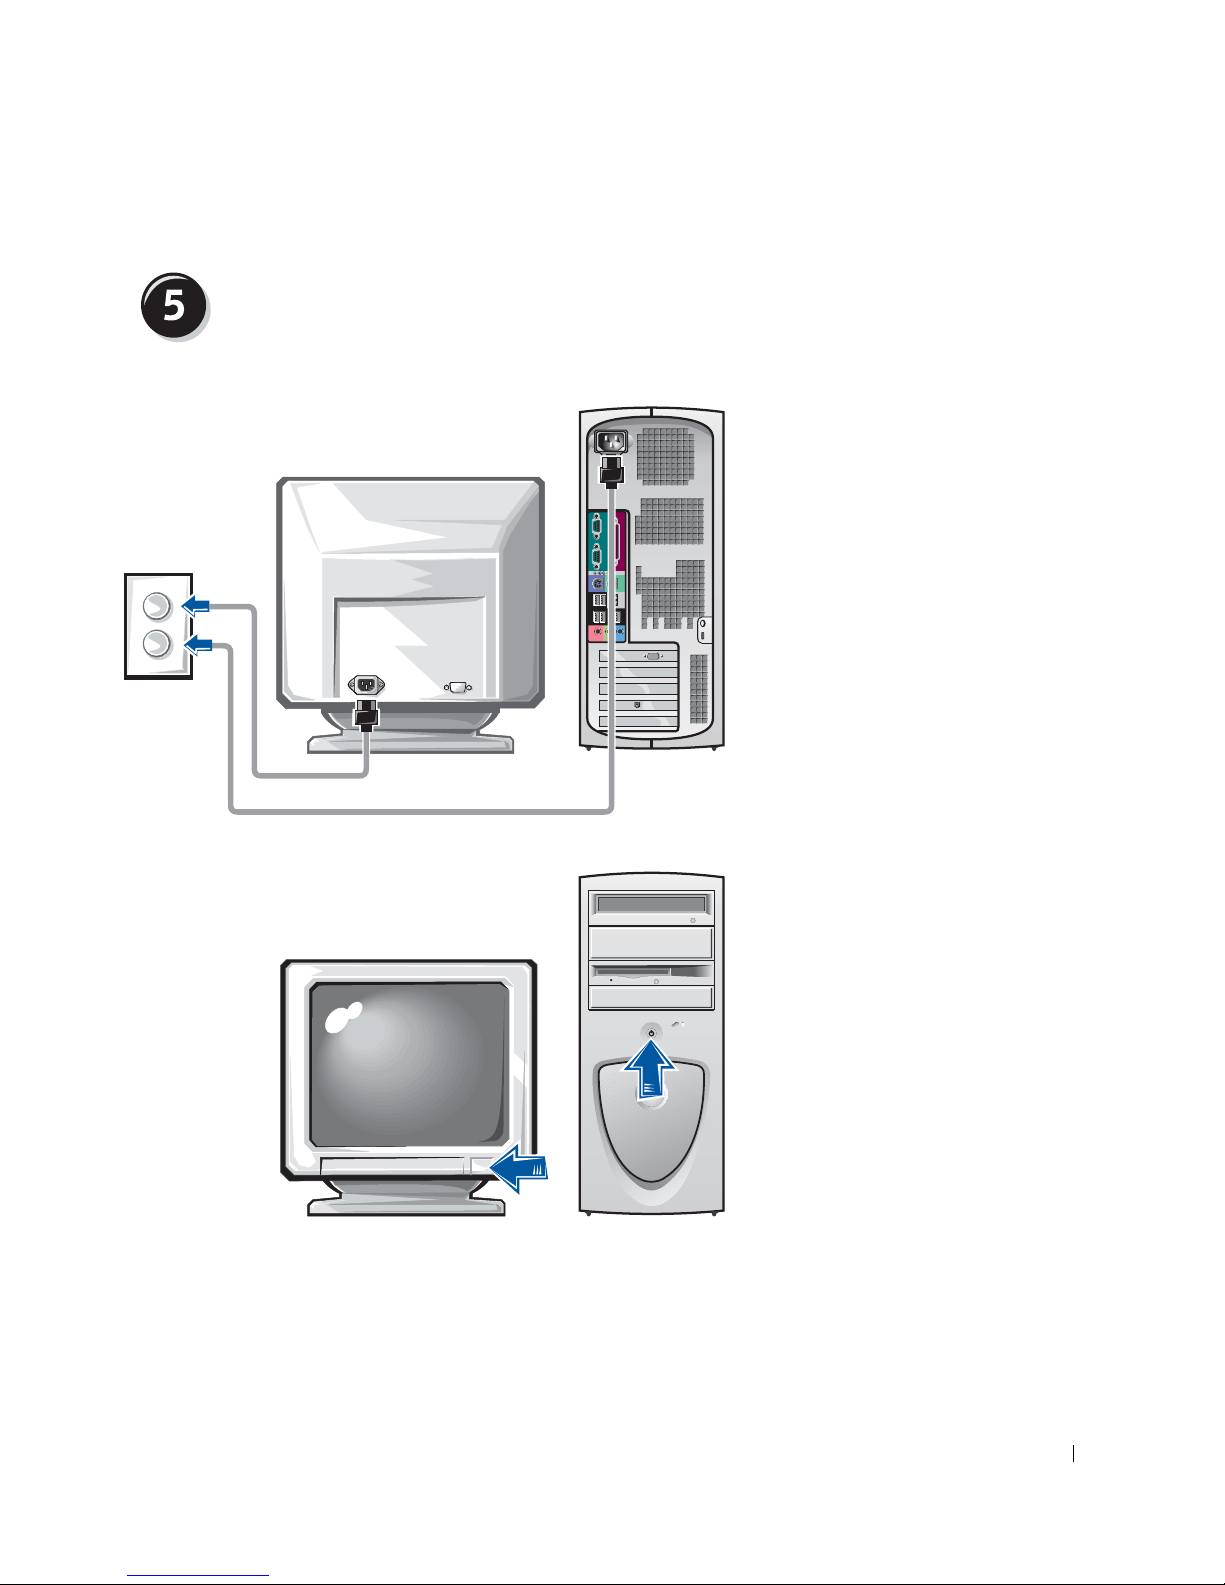
Anschließen der Stromkabel sowie Einschalten
des Computers und des Bildschirms
Setup- und Schnellreferenzhandbuch 83
Page 84

Bevor Sie Geräte oder Software installieren, die nicht mit Ihrem Computer
ausgeliefert wurden, sollten Sie die mit der Software oder dem Gerät gelieferte Dokumentation lesen oder sich an den Händler wenden, um sicherzustellen, dass die Software bzw. das Gerät mit Ihrem Computer und
Betriebssystem kompatibel sind.
Herzlichen Glückwunsch! Das Einrichten des Computers ist
www.dell.com | support.euro.dell.com
abgeschlossen.
Weitere Informationen über Ihren Computer, einschließlich des Entfernens
oder Ersetzens bestimmter Teile, Diagnosen und Tools zur Fehlerbeseitigung finden Sie im Benutzerhandbuch auf der Festplatte, auf der CD
Drivers and Utilities oder auf der Support-Website von Dell.
So greifen Sie auf das Benutzerhandbuch auf der Festplatte zu:
Installation zusätzlicher Software und Geräte
Wenn Sie mit Windows 2000 arbeiten, doppelklicken Sie auf das
Symbol User's Guides (Benutzerhandbücher).
Wenn Sie mit Windows XP arbeiten, klicken Sie auf die Schaltfläche
Start und anschließend auf Help and Support (Hilfe und Support).
So greifen Sie auf das Benutzerhandbuch auf der CD zu:
1 Die Drivers and Utilities-CD in das Laufwerk einlegen.
Wenn Sie die Drivers and Utilities -CD zum ersten Mal verwenden,
wird das Fenster ResourceCD-Installation geöffnet, das Sie über den
Beginn der Installation von der CD informiert.
2 Auf OK klicken, um fortzufahren, und auf die Aufforderungen
antworten, die vom Installationsprogramm angezeigt werden.
3 Im Fenster Welcome Dell System Owner (Willkommen) auf Weiter
klicken.
84 Setup- und Schnellreferenzhandbuch
Page 85

So greifen Sie auf das Benutzerhandbuch auf der Support-Website von
Dell zu:
1 Die Website www.support.euro.dell.com aufrufen.
2 Die Aufforderungen auf der Website befolgen, die Informationen über
Ihren Computer abfragen.
3 Auf der Support-Website von Dell auf Reference (Referenz) klicken,
anschließend auf User’s Guides (Benutzerhandbücher) und Systems
(Systeme) klicken und Ihren Dell Precision-Computer auswählen.
Öffnen der Computerabdeckung
WARNUNG: Bevor Sie die in diesem Abschnitt beschriebenen
Arbeiten ausführen, befolgen Sie zunächst die Sicherheitshinweise im Systeminformationshandbuch.
1
Den Computer mit Hilfe des Menüs Start herunterfahren.
2 Sicherstellen, dass der Computer und alle zugehörigen Geräte ausge-
schaltet sind. Wenn Ihr Computer und die zugehörigen Geräte nicht
automatisch beim Herunterfahren des Computers ausgeschaltet
wurden, schalten Sie sie jetzt aus.
VORSICHT: Wenn Sie ein Netzwerkkabel lösen, ziehen Sie es erst vom
Computer und dann von der Wandbuchse ab.
Alle Telefon- und Datenübertragungskabel vom System trennen.
3
4 Den Computer und die daran angeschlossenen Geräte von der Steck-
dose trennen und den Netzschalter drücken, um die Systemplatine zu
erden.
5 Wenn an der Rückseite ein Vorhängeschloss durch den Ring
geschoben wurde, das Vorhängeschloss entfernen.
WARNUNG: Um elektrische Schläge zu vermeiden, trennen Sie
vor dem Entfernen der Abdeckung den Computer immer von
der Stromversorgung.
6
Den Computer auf die Seite legen, wie in der folgenden Abbildung
dargestellt.
VORSICHT: Stellen Sie sicher, dass auf der Arbeitsfläche genügend Platz
für die geöffnete Systemabdeckung verfügbar ist (mindestens 30 cm).
Setup- und Schnellreferenzhandbuch 85
Page 86
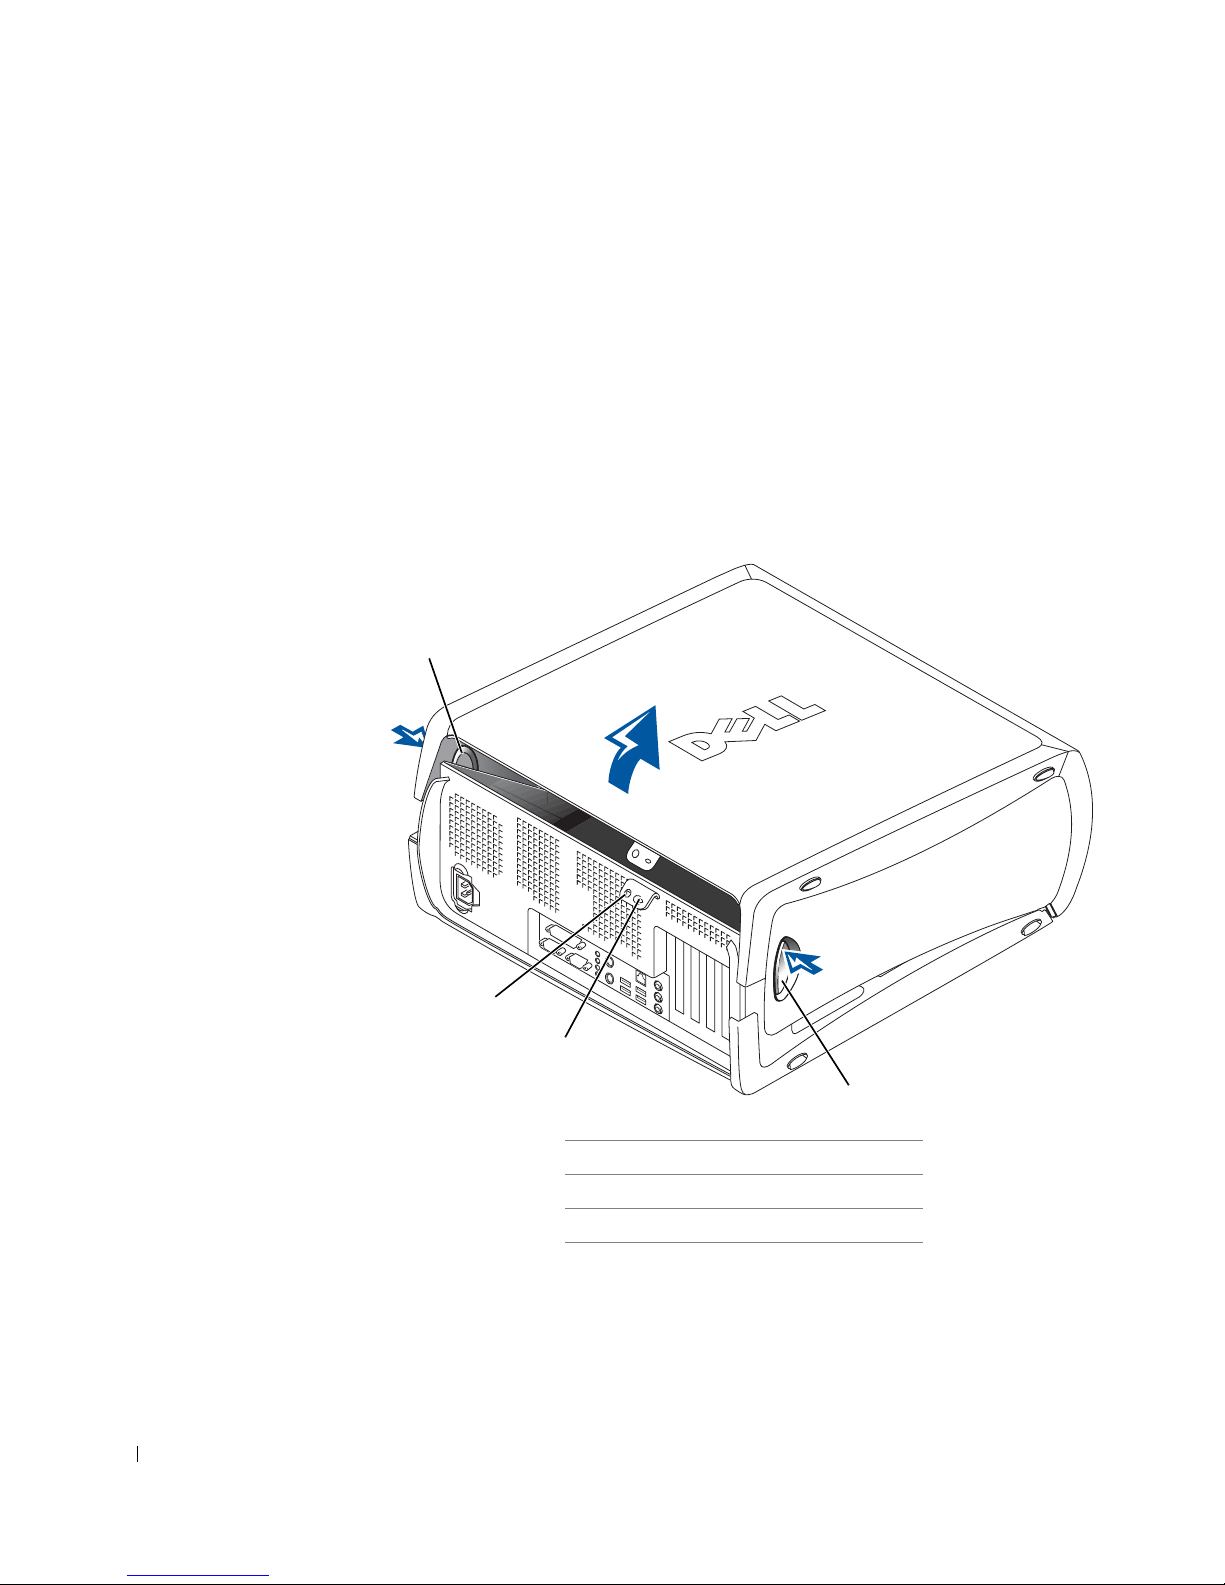
www.dell.com | support.euro.dell.com
7 Die Systemabdeckung öffnen:
a Auf der Rückseite des Computers die Entriegelungstaste auf
der rechten Seite mit einer Hand drücken, während Sie mit der
anderen Hand an der Abdeckung ziehen.
b Mit einer Hand die Entriegelungstaste auf der linken Seite des
Computers drücken, während Sie mit der anderen Hand an der
Abdeckung ziehen.
c Den unteren Teil des Computers mit einer Hand festhalten und
das Gehäuse mit der anderen Hand öffnen.
1
86 Setup- und Schnellreferenzhandbuch
2
3
1
1 Freigabetasten (2)
2 Ring für das Vorhängeschloss
3 Sicherungskabeleinschub
Page 87
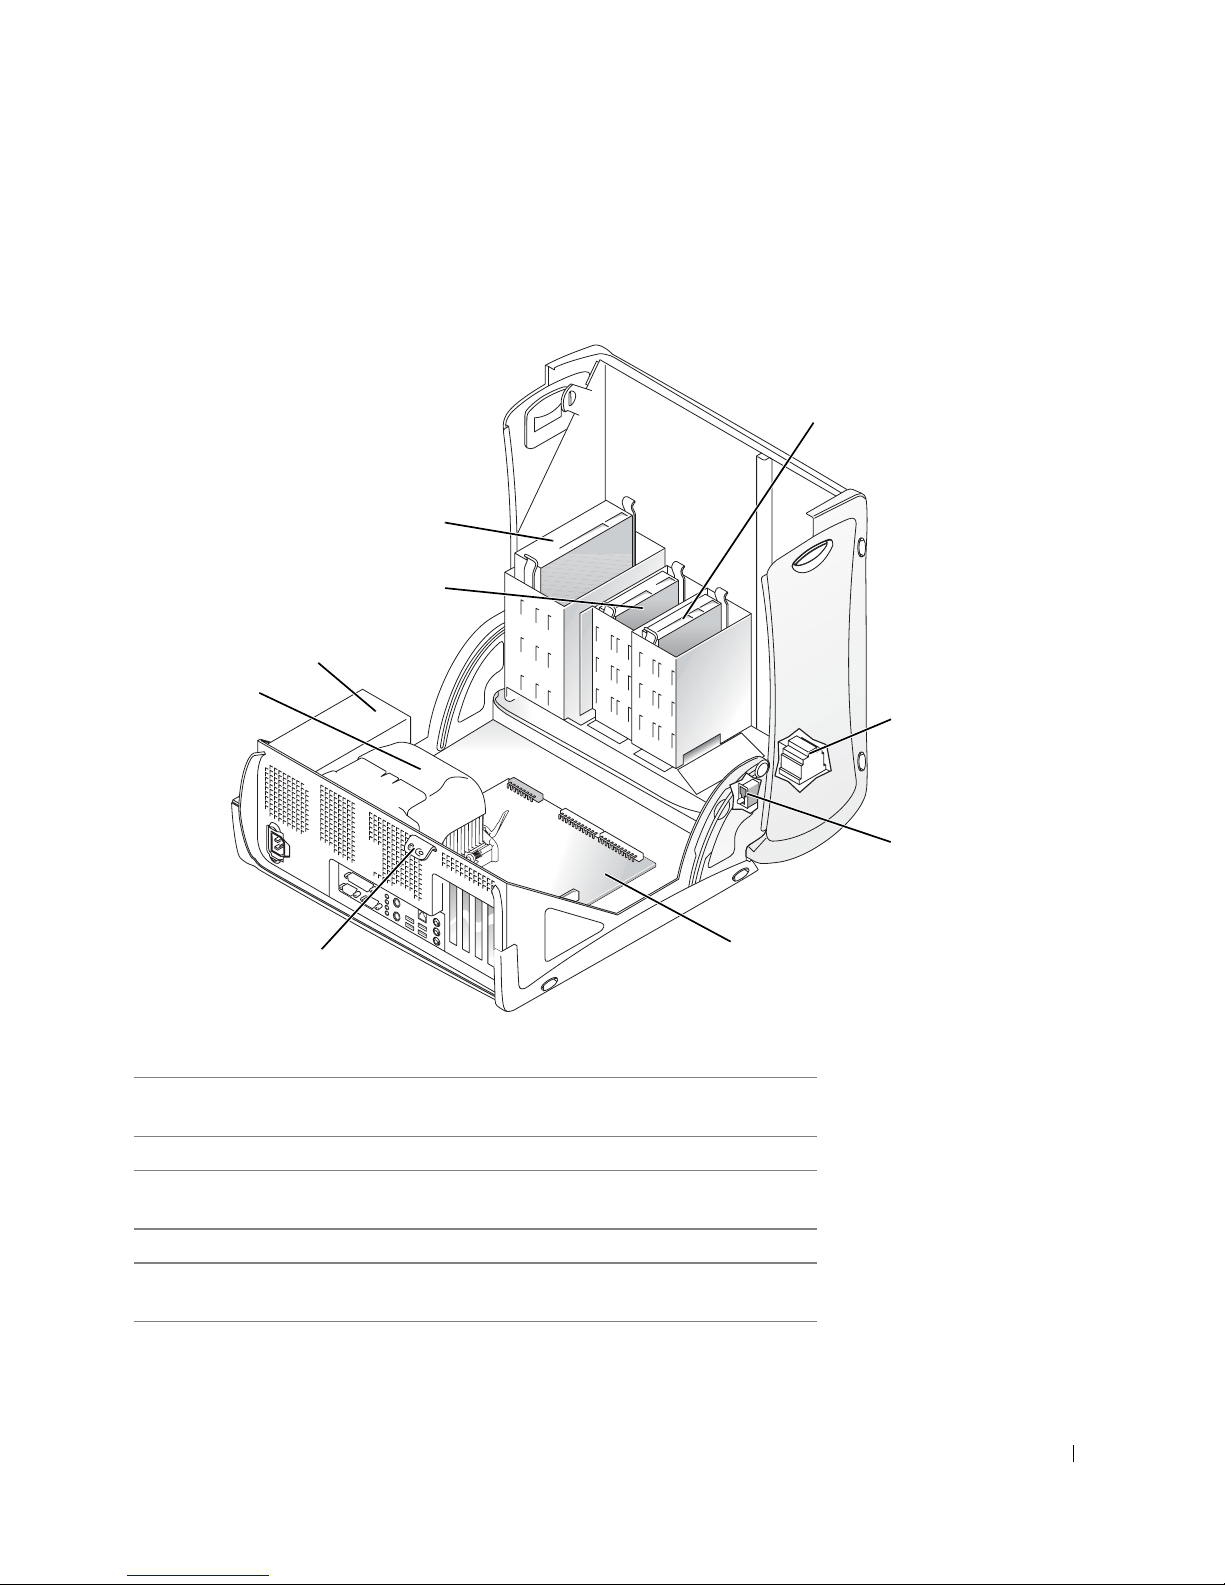
Interne Komponenten
9
8
7
6
1
2
5
1 Festplattenlaufwerk 6 Wärmableitblech und
Lüftungsvorrichtung
2 Interne Lautsprecher 7 Netzteil
3 Schalter für die
Gehäuseeingriffswarnung
4 Systemplatine 9 CD-/DVD-Laufwerk
5 Ring für das
Vorh äng esc hlo ss
8 Diskettenlaufwerk
3
4
Setup- und Schnellreferenzhandbuch 87
Page 88

Problemlösung
Beheben von Software- und Hardware-Inkompatibilitäten
Microsoft® Windows® XP
IRQ-Konflikte bei Windows XP treten auf, wenn ein Gerät entweder
während der Einrichtung des Betriebssystems nicht erkannt oder zwar
erkannt, jedoch inkorrekt konfiguriert wird.
So ermitteln Sie eventuell bestehende Konflikte unter Windows XP:
1 Auf die Schaltfläche Start und anschließend auf Control Panel
(Systemsteuerung) klicken.
www.dell.com | support.euro.dell.com
So verwenden Sie den Hardware-Ratgeber unter Windows XP:
2 Auf Performance and Maintenance (Leistung und Wartung) und
dann auf System klicken.
3 Auf der Registerkarte Hardware auf Device Manager
(Geräte-Manager) klicken.
4 In der Liste Geräte-Manager prüfen, ob Konflikte mit anderen
Geräten vorliegen.
Konflikte werden durch ein gelbes Ausrufezeichen (
!) neben dem
Gerät angezeigt, bei dem der Konflikt vorliegt. Wenn das Gerät
deaktiviert wurde, wird ein rotes
5 Auf einen Konflikt doppelklicken, um das Fenster Properties
X angezeigt.
(Eigenschaften) anzuzeigen.
Wenn ein IRQ-Konflikt vorliegt, wird im Bereich Device status
(Gerätestatus) im Fenster Eigenschaften angegeben, welche Karten
oder anderen Geräte denselben IRQ verwenden.
6 Konflikte durch erneutes Konfigurieren bzw. durch Entfernen aus dem
Geräte-Manager lösen.
1 Auf die Schaltfläche Start und anschließend auf Help and Support
(Hilfe und Support) klicken.
2 Im Feld Search (Suchen) Hardware troubleshooter (Hardware-
3 In der Liste Search Results (Suchergebnisse) auf Hardware
88 Setup- und Schnellreferenzhandbuch
Ratgeber)
eingeben und anschließend auf den Pfeil klicken, um mit
der Suche zu beginnen.
Troubleshooter (Hardware-Ratgeber) klicken.
Page 89

4 In der Liste Hardware-Ratgeber auf I need to resolve a hardware
conflict on my computer (Ein Hardwarekonflikt auf dem Computer
muss gelöst werden) und anschließend auf Next (Weiter) klicken.
Windows 2000
So ermitteln Sie eventuell bestehende Konflikte unter Windows 2000:
1 Auf die Schaltfläche Start klicken, auf Settings (Einstellungen) zeigen
und anschließend auf Control Panel (Systemsteuerung) klicken.
2 In der Systemsteuerung auf das Symbol System doppelklicken.
3 Auf die Registerkarte Hardware klicken.
4 Auf Device Manager (Geräte-Manager) klicken.
5 Auf View (Ansicht) und anschließend auf Resources by connection
(Ressourcen nach Verbindung) klicken.
6 Auf Interrupt request (IRQ) (Interruptanforderung [IRQ])
doppelklicken, um die IRQ-Zuweisungen anzuzeigen.
Konflikte werden durch ein gelbes Ausrufezeichen (
!) neben dem
Gerät angezeigt, bei dem der Konflikt vorliegt. Wenn das Gerät
deaktiviert wurde, wird ein rotes
7 Auf einen Konflikt doppelklicken, um das Fenster Properties
X angezeigt.
(Eigenschaften) anzuzeigen.
Wenn ein IRQ-Konflikt vorliegt, wird im Bereich Device status
(Gerätestatus) im Fenster Eigenschaften angegeben, welche Karten
oder anderen Geräte denselben IRQ verwenden.
8 Konflikte durch erneutes Konfigurieren bzw. durch Entfernen aus dem
Geräte-Manager lösen.
So verwenden Sie den Hardware-Ratgeber unter Windows 2000:
1 Auf die Schaltfläche Start und anschließend auf Help (Hilfe) klicken.
2 Auf der Registerkarte Contents (Inhalt) auf Troubleshooting and
Maintenance (Problembehandlung und Verwaltung), auf Windows
2000 troubleshooters (Windows 2000-Ratgeber) und anschließend
auf Hardware klicken.
3 Klicken Sie in der Liste Hardware Troubleshooter (Hardware-Rat-
geber) auf I need to resolve a hardware conflict on my computer
(Ein Hardwarekonflikt auf dem Computer muss gelöst werden) und
anschließend auf Next (Weiter).
Setup- und Schnellreferenzhandbuch 89
Page 90

Verwenden der Systemwiederherstellung unter Windows XP
Das Betriebssystem Windows XP bietet die Möglichkeit der Systemwiederherstellung, damit Sie Ihren Computer nach Änderungen an der Hardware
und Software oder sonstiger Systemeinstellungen wieder in einen früheren
Betriebszustand zurückversetzen können (ohne dabei die Arbeitsdateien
zu beeinträchtigen), wenn die vorgenommenen Änderungen nicht den
gewünschten Erfolg zeigten oder zu Fehlfunktionen führten. Unter „Hilfeund Supportcenter unter Windows XP“ auf Seite 76 erhalten Sie weitere
Informationen über die Verwendung der Systemwiederherstellung.
VORSICHT: Erstellen Sie in regelmäßigen Abständen Sicherungskopien
Ihrer Daten. Die Systemwiederherstellung überwacht keine Arbeitsdateien
und kann diese Dateien nicht wiederherstellen.
www.dell.com | support.euro.dell.com
Erstellen eines Wiederherstellungspunktes
Zurückversetzen des Computers in einen früheren Betriebszustand
1 Auf die Schaltfläche Start und anschließend auf Help and Support
(Hilfe und Support) klicken.
2 Auf System Restore (Systemwiederherstellung) klicken.
3 Den Anweisungen auf dem Bildschirm folgen.
VORSICHT: Speichern und schließen Sie alle geöffneten Dateien, und
beenden Sie alle aktiven Programme, bevor Sie den Computer in den früheren
Betriebszustand zurückversetzen. Ändern, öffnen oder löschen Sie keine
Dateien oder Programme, bis die Systemwiederherstellung vollständig
abgeschlossen ist.
Auf die Schaltfläche Start klicken, auf All Programs (Alle Pro-
1
gramme)→ Accessories (Zubehör)→ System Tools (Systemprogramme) zeigen und dann auf System Restore (Systemwiederherstellung) klicken.
2 Sicherstellen, dass die Option Restore my computer to an earlier
time (Computer zu einem früheren Zeitpunkt wiederherstellen)
ausgewählt ist, und auf Next (Weiter) klicken.
3 Auf das Kalenderdatum klicken, für das der Computer wiederher-
gestellt werden soll.
90 Setup- und Schnellreferenzhandbuch
Im Bildschirm Select a Restore Point (Einen Wiederherstellungspunkt wählen) können Sie den Kalender verwenden, um Wiederher-
stellungspunkte anzuzeigen und auszuwählen. Alle Kalenderdaten, für
die Wiederherstellungspunkte vorhanden sind, werden fett formatiert
dargestellt.
Page 91

4 Einen Wiederherstellungspunkt wählen und auf Weite r klicken.
Wenn für das Kalenderdatum nur ein einziger Wiederherstellungspunkt existiert, wird dieser automatisch ausgewählt. Bei zwei oder
mehr Wiederherstellungspunkten auf den gewünschten Wiederherstellungspunkt klicken.
5 Auf We iter klicken.
Nachdem die Systemwiederherstellung alle Daten zusammengestellt
hat, wird das Fenster Restoration Complete (Wiederherstellung
abgeschlossen) angezeigt und der Computer startet automatisch neu.
6 Nach dem Neustart auf OK klicken.
Um den Wiederherstellungspunkt zu ändern, können Sie entweder
die Schritte mit einem anderen Wiederherstellungspunkt wiederholen
oder die Wiederherstellung rückgängig machen.
Verwendung der letzten, als funktionierend bekannten
Konfiguration unter Windows 2000
1 Den Computer neu starten und <F8> drücken, wenn die Meldung
Please select the operating system to start
(Betriebssystem zum Starten auswählen)
angezeigt wird.
2 Die Option Last Known Good Setting (Letzte, als funktionierend
bekannte Einstellung) markieren, die <Eingabetaste> und
anschließend <L> drücken sowie das Betriebssystem auswählen,
wenn Sie dazu aufgefordert werden.
Weitere Optionen, die bei der Lösung von Konflikten bei zusätzlichen
Geräten oder Software helfen
VORSICHT: Durch die folgenden Prozesse werden alle Informationen auf der
Festplatte gelöscht.
• Wenn die vorherigen Prozeduren nicht funktioniert haben, führen Sie
eine Low-Level-Formatierung Ihrer Festplatte durch.
Im Installationshandbuch Ihres Betriebssystems finden Sie weitere
Informationen.
• Installieren Sie Ihr Betriebssystem unter Verwendung des Handbuchs
und der Betriebssystem-CD erneut.
Setup- und Schnellreferenzhandbuch 91
Page 92

Wann wird das Dell-Diagnoseprogramm eingesetzt?
Wenn Probleme mit dem Computer auftreten, führen Sie die unter „Problemlösung“ im Benutzerhandbuch aufgeführten Maßnahmen durch, und
führen Sie das Dell-Diagnoseprogramm aus, bevor Sie von Dell technische
Unterstützung anfordern. Durch die Verwendung des Dell-Diagnoseprogramms kann das Problem möglicherweise auch ohne die Hilfe von Dell
gelöst werden. Wenn Sie sich an Dell wenden, können die Testergebnisse
den Service-Technikern von Dell wichtige Informationen liefern.
Mit dem Dell-Diagnoseprogramm können Sie:
• schnelle, ausführliche oder benutzerdefinierte Tests für ein Gerät oder
alle Geräte durchführen
www.dell.com | support.euro.dell.com
Starten des Dell-Diagnoseprogramms
Es wird empfohlen, diese Anweisungen vor der Installation auszudrucken.
Rufen Sie das System-Setup-Programm auf, prüfen Sie die Konfiguration
des Computers, und stellen Sie sicher, dass das zu prüfende Gerät im
System-Setup aufgeführt wird und aktiviert ist.
• die entsprechenden Tests für das jeweilige Problem auswählen
• auswählen, wie oft ein Test ausgeführt werden soll
• die Testergebnisse anzeigen
• den Test unterbrechen, wenn ein Fehler festgestellt wird
• über die Online-Hilfe auf Informationen zu den Tests und Geräten
zugreifen
• Statusmeldungen anzeigen, die angeben, ob die Tests erfolgreich
ausgeführt wurden
• Fehlermeldungen erhalten, die angezeigt werden, wenn Probleme
festgestellt werden
VORSICHT: Verwenden Sie das Dell-Diagnoseprogramm nur zum Testen
Ihres Dell™-Computers. Wenn Sie das Programm auf anderen Computern
ausführen, erhalten Sie möglicherweise Fehlermeldungen.
Starten Sie das Dell-Diagnoseprogramm auf der Festplatte oder der Drivers
and Utilities-CD. (Diese CD wird auch als ResourceCD bezeichnet.)
92 Setup- und Schnellreferenzhandbuch
Page 93

Starten des Dell-Diagnoseprogramms auf der Festplatte
1 Computer herunterfahren und erneut starten.
2 Wenn das DELL-Logo angezeigt wird, sofort <F12> drücken.
Falls so lange gewartet wurde, bis das Windows-Logo erscheint, noch
warten, bis der Windows-Desktop angezeigt wird. Den Computer über
das Menü Start herunterfahren und erneut starten.
3 Wenn die Liste der Startgeräte erscheint, die Option Boot to Utility
Partition (In Dienstprogrammpartition starten)
markieren und
<Eingabe> drücken.
4 Wenn das Hauptmenü des Dell-Diagnoseprogramms erscheint, den
gewünschten Test auswählen.
Starten des Dell-Diagnoseprogramms von der Drivers and Utilities-CD
1 Die Drivers and Utilities-CD in das Laufwerk einlegen.
2 Computer herunterfahren und erneut starten.
Wenn das DELL-Logo angezeigt wird, sofort <F12> drücken.
Falls so lange gewartet wurde, bis das Windows-Logo erscheint, noch
warten, bis der Windows-Desktop angezeigt wird. Den Computer über
das Menü Start herunterfahren und erneut starten.
Wenn die Liste der Startgeräte erscheint, die Option IDE CD-ROM
3
Device (IDE CD-ROM-Gerät)
4 Die Option IDE CD-ROM-Gerät im CD-Startmenü auswählen.
5 Im anschließend erscheinenden Menü die Option Boot from
markieren und <Eingabe> drücken.
CD-ROM (Von CD-ROM starten) auswählen.
6 1 eingeben, um das ResourceCD-Menü aufzurufen.
HINWEIS: Wenn eine
Meldung erscheint, dass
keine Partition mit dem
Diagnosedienstprogramm
gefunden wurde, folgen
Sie den Anweisungen,
um das Dell-Diagnoseprogramm von der
Drivers and Utilities-CD
auszuführen.
HINWEIS: Durch diese
Funktion wird die Startreihenfolge nur einmal
geändert. Beim nächsten
Start wird der Computer
gemäß den im SystemSetup festgelegten
Geräten gestartet.
7 2 eingeben, um das Dell-Diagnoseprogramm aufzurufen.
8 Run Dell 32-bit Diagnostics (Dell 32-Bit-Diagnose ausführen) aus
der nummerierten Liste auswählen. Wenn mehrere Versionen
aufgeführt sind, die Ihrer Plattform entsprechende Version wählen.
9 Wenn das Hauptmenü des Dell-Diagnoseprogramms erscheint, den
gewünschten Test auswählen.
Setup- und Schnellreferenzhandbuch 93
Page 94

HINWEIS: Die Service-
Kennnummer des Computers finden Sie im oberen
Bereich der einzelnen
Testanzeigen.
Hauptmenü des Dell-Diagnoseprogramms
1 Wenn das Dell-Diagnoseprogramm geladen wurde und das Haupt-
menü erscheint, auf die Schaltfläche für die gewünschte Option
klicken.
Option Funktion
Express Test
(Schnelltest)
Es wird ein Schnelltest der Geräte durchgeführt. Dieser
Test dauert normalerweise etwa 10 bis 20 Minuten. Es
ist keine Benutzeraktion erforderlich. Führen Sie zuerst
den Schnelltest durch, um die Ursache des Problems
möglicherweise schnell zu erkennen.
www.dell.com | support.euro.dell.com
Extended Test
(Erweiterter
Test)
Custom Test
(Benutzerdefinierter Test)
Symptom Tree
(Problemübersicht)
2
Tritt während eines Tests ein Problem auf, werden in einer Meldung
Es wird ein ausführlicher Test der Geräte durchgeführt.
Dieser Test nimmt normalerweise mindestens eine Stunde
in Anspruch. Dabei muss der Benutzer in regelmäßigen
Abständen Informationen eingeben.
Es wird ein bestimmtes Gerät geprüft. Die auszuführenden
Tests können vom Benutzer angepasst werden.
Es werden die am häufigsten auftretenden Probleme
aufgeführt. Vom Benutzer kann der entsprechende Test
für das jeweils aufgetretene Problem ausgewählt werden.
der Fehlercode und eine Beschreibung des Problems angezeigt.
Den Fehlercode und die Problembeschreibung notieren und den
Anweisungen auf dem Bildschirm folgen.
Kann das Problem nicht gelöst werden, an Dell wenden.
94 Setup- und Schnellreferenzhandbuch
Page 95

3 Wird ein Test der Kategorie Custom Test (Benutzerdefinierter Test)
oder Symptom Tree (Problemübersicht) ausgeführt, auf die
entsprechende, im Folgenden beschriebene Registerkarte klicken,
um weitere Informationen zu erhalten.
Registerkarte Funktion
Results
(Ergebnisse)
Errors (Fehler) Es werden die gefundenen Fehler, die Fehlercodes und
Help (Hilfe) Beschreibt den Test und verweist auf mögliche
Configuration
(Konfiguration)
Parameters
(Parameter)
4 Werden die Tests von der Drivers and Utilities-CD ausgeführt, nach
Es werden die Testergebnisse und möglicherweise
gefundene Probleme angezeigt.
eine Beschreibung des Problems angezeigt.
Voraussetzungen für die Durchführung des Tests.
Die Hardware-Konfiguration der ausgewählten Geräte
wird angezeigt.
Das Dell-Diagnoseprogramm sammelt über das System-
Setup-Programm, den Speicher und verschiedene
interne Tests Konfigurationsinformationen für alle
Geräte. Diese werden in der Geräteliste auf der linken
Seite angezeigt. In der Geräteliste werden möglicherweise nicht alle Namen von Geräten angezeigt, die im
Computer installiert oder daran angeschlossen sind.
Der Test kann durch Änderungen an den Einstellungen
an Ihre Bedürfnisse angepasst werden.
Abschluss der Tests die CD aus dem Laufwerk entfernen.
5 Das Testfenster schließen, um zum Hauptmenü zurückzukehren. Um
das Dell-Diagnoseprogramm zu verlassen und den Computer neu zu
starten, das Fenster des Hauptmenüs schließen.
Setup- und Schnellreferenzhandbuch 95
Page 96

Signaltoncodes
Der Computer gibt möglicherweise eine Reihe von Signaltönen aus, anhand
derer das Problem ausfindig gemacht werden kann. Eine mögliche Reihe
(Code 1-3-1) besteht aus einem einzelnen Signalton, einer schnellen Folge
von drei Signaltönen und einem weiteren einzelnen Signalton. Diese Reihe
deutet darauf hin, dass der Computer ein Speicherproblem festgestellt hat.
Wenn ein Signaltoncode ausgegeben wird, notieren Sie diesen und schlagen
ihn im Benutzerhandbuch unter „Signaltoncodes“ nach.
Fehlermeldungen
HINWEIS: Wenn eine
Meldung hier nicht
www.dell.com | support.euro.dell.com
aufgeführt ist, lesen Sie
in der Dokumentation zu
dem Betriebssystem oder
Programm nach, das beim
Auftreten der Störung
ausgeführt wurde.
Wenn während des Starts ein Fehler auftritt, wird möglicherweise eine Meldung angezeigt, die auf ein Problem hinweist. Unter „Fehlermeldungen“ im
Benutzerhandbuch finden Sie Vorschläge zur Lösung von Problemen.
Diagnoseanzeigen
Um Ihnen die Fehlerbeseitigung zu erleichtern, befinden sich an der Rückseite des Computers vier Anzeigelämpchen, die mit „A“, „B“, „C“ und „D“
gekennzeichnet sind. Es kann sich dabei um gelbe oder grüne Anzeigen
handeln. Wenn der Computer ohne Probleme gestartet wird, blinken die
Anzeigelämpchen. Nachdem der Computer gestartet wurde, leuchten die
Anzeigelämpchen grün. Wenn eine Fehlfunktion auftritt, kann das Problem
anhand der Farbe und der Abfolge der Anzeigen ermittelt werden.
WARNUNG: Bevor Sie die in diesem Abschnitt beschriebenen
Arbeiten ausführen, befolgen Sie zunächst die
Sicherheitshinweise im Systeminformationshandbuch.
96 Setup- und Schnellreferenzhandbuch
Page 97
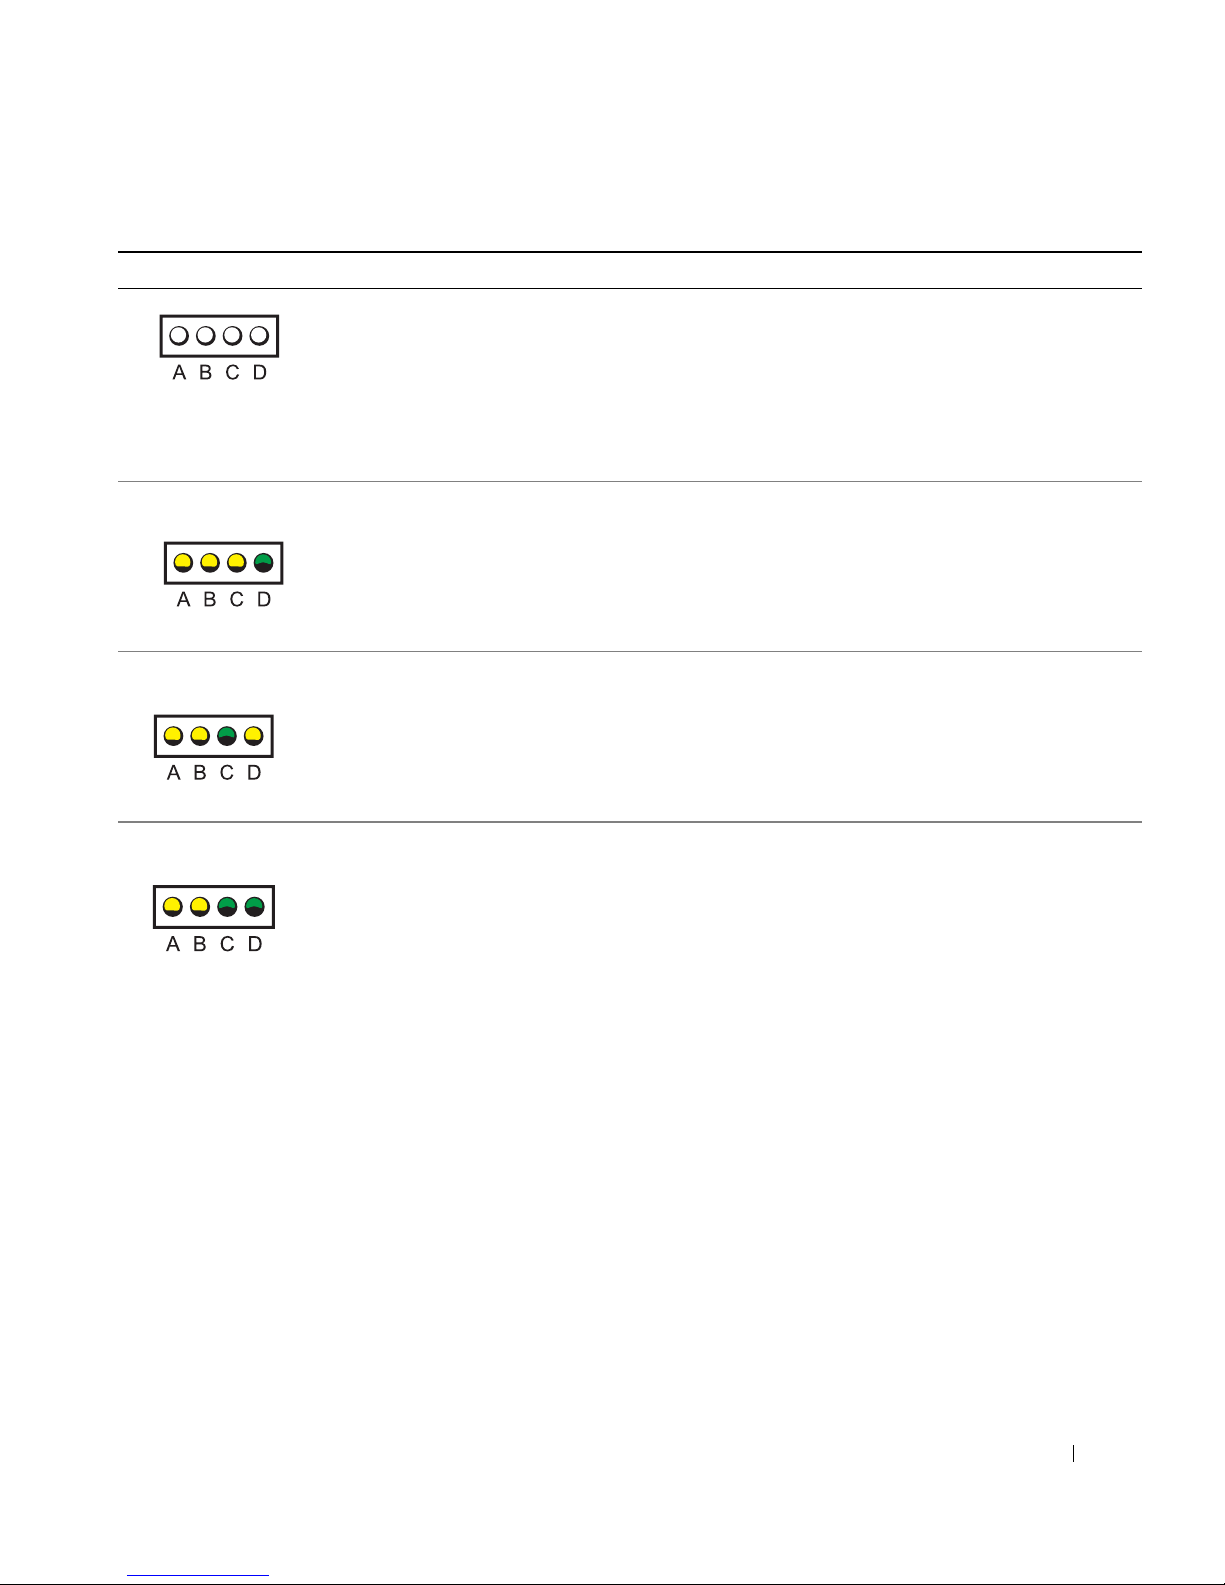
Anzeigemuster Problembeschreibung Lösungsvorschlag
Gelb/Gelb/Gelb/Grün
Gelb/Gelb/Grün/Gelb
Gelb/Gelb/Grün/Grün
Der Computer läuft nicht,
oder es ist möglicherweise
eine Unterbrechung der
Stromversorgung
aufgetreten.
Es ist möglicherweise ein
BIOS-Fehler aufgetreten;
der Computer befindet
sich im Wiederherstellungsmodus.
Der Mikroprozessor ist
möglicherweise fehlerhaft.
Speichermodule werden
erfasst; es ist jedoch
ein Speicherfehler
aufgetreten.
Stellen Sie sicher, dass das Stromkabel mit dem
Computer und einer funktionierenden Steckdose
verbunden ist. Drücken Sie den Netzschalter.
Führen Sie das BIOS-Wiederherstellungsprogramm aus,
warten Sie, bis die Wiederherstellung abgeschlossen ist,
und starten Sie den Computer neu.
Installieren Sie den Mikroprozessor neu, und starten
Sie den Computer neu.
Entfernen Sie alle Speichermodule und CRIMMs, und
installieren Sie sie erneut. Stellen Sie sicher, dass alle
Anschlussklammern verriegelt sind. Starten Sie den
Computer neu.
Installieren Sie die Speichermodule in den Speichermodulanschlüssen RIMM 1 (direkt neben dem Mikroprozessor) sowie RIMM 2, und vergewissern Sie sich,
dass, falls kein zusätzlicher Speicher verwendet wird,
CRIMMs in den Speichermodulanschlüssen RIMM 3
und RIMM4 installiert werden.
Wenn Sie Speichermodule in den Speichermodulanschlüssen RIMM 3 und RIMM 4 installiert haben,
die nicht von Dell stammen, entfernen Sie die Module
und ersetzen sie durch die CRIMMs, die ursprünglich
in Ihrem Computer installiert waren.
Installieren Sie, falls verfügbar, einen Dell-Speicher des
gleichen Typs in Ihrem Computer.
Besteht das Problem weiterhin, wenden Sie sich an Dell.
Setup- und Schnellreferenzhandbuch 97
Page 98
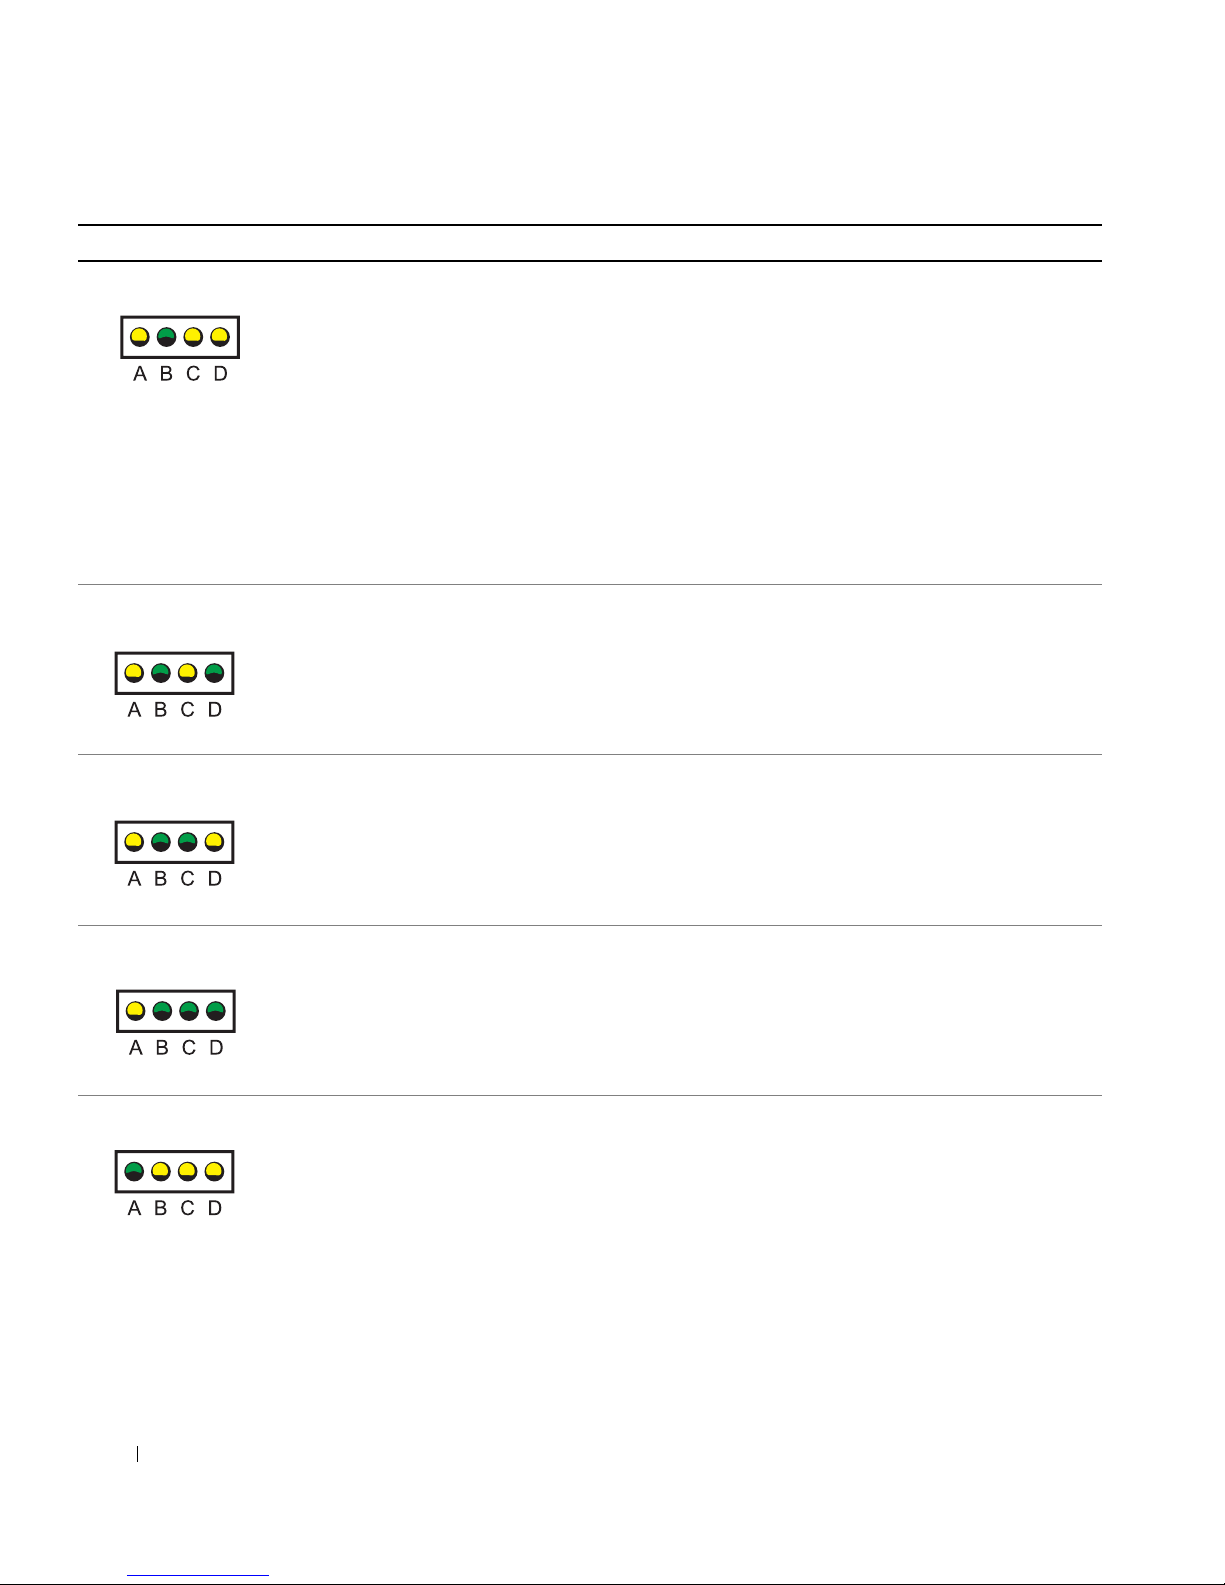
Anzeigemuster Problembeschreibung Lösungsvorschlag
Gelb/Grün/Gelb/Gelb
Die Erweiterungskarte ist
möglicherweise fehlerhaft.
Gelb/Grün/Gelb/Grün
www.dell.com | support.euro.dell.com
Die Grafikkarte oder der
integrierte Grafik-Kontroller ist möglicherweise
fehlerhaft.
Gelb/Grün/Grün/Gelb
Das Disketten- oder Festplattenlaufwerk ist möglicherweise fehlerhaft.
1 Feststellen, ob ein Konflikt vorliegt. Dazu eine Karte
(außer der Grafikkarte) entfernen und den Computer
neu starten.
2 Besteht das Problem weiterhin, die entfernten Karten
erneut installieren, eine andere Karte entfernen und
den Computer erneut starten.
3 Diesen Vorgang für jede Karte wiederholen. Wenn der
Computer normal startet, die zuletzt entfernte Karte
auf Ressourcenkonflikte überprüfen (siehe „Beheben
von Software- und Hardware-Inkompatibilitäten“ im
Benutzerhandbuch).
4 Besteht das Problem weiterhin, an Dell wenden.
Wenn der Computer mit einer Grafikkarte ausgestattet
ist, entfernen Sie die Karte, und installieren Sie sie neu.
Besteht das Problem weiterhin oder verfügt der Computer über eine integrierte Videofunktion, wenden Sie sich
an Dell.
Überprüfen Sie alle Strom- und Datenkabelverbindungen, und starten Sie den Computer dann neu.
Gelb/Grün/Grün/Grün
Grün/Gelb/Gelb/Gelb
Es ist möglicherweise ein
USB-Fehler aufgetreten.
Es sind keine Speichermodule installiert.
98 Setup- und Schnellreferenzhandbuch
Installieren Sie alle USB-Geräte neu, prüfen Sie die
Kabelverbindungen, und starten Sie dann den Computer
neu.
Installieren Sie die Speichermodule neu, und starten Sie
den Computer dann erneut.
Besteht das Problem weiterhin, wenden Sie sich an Dell.
Page 99
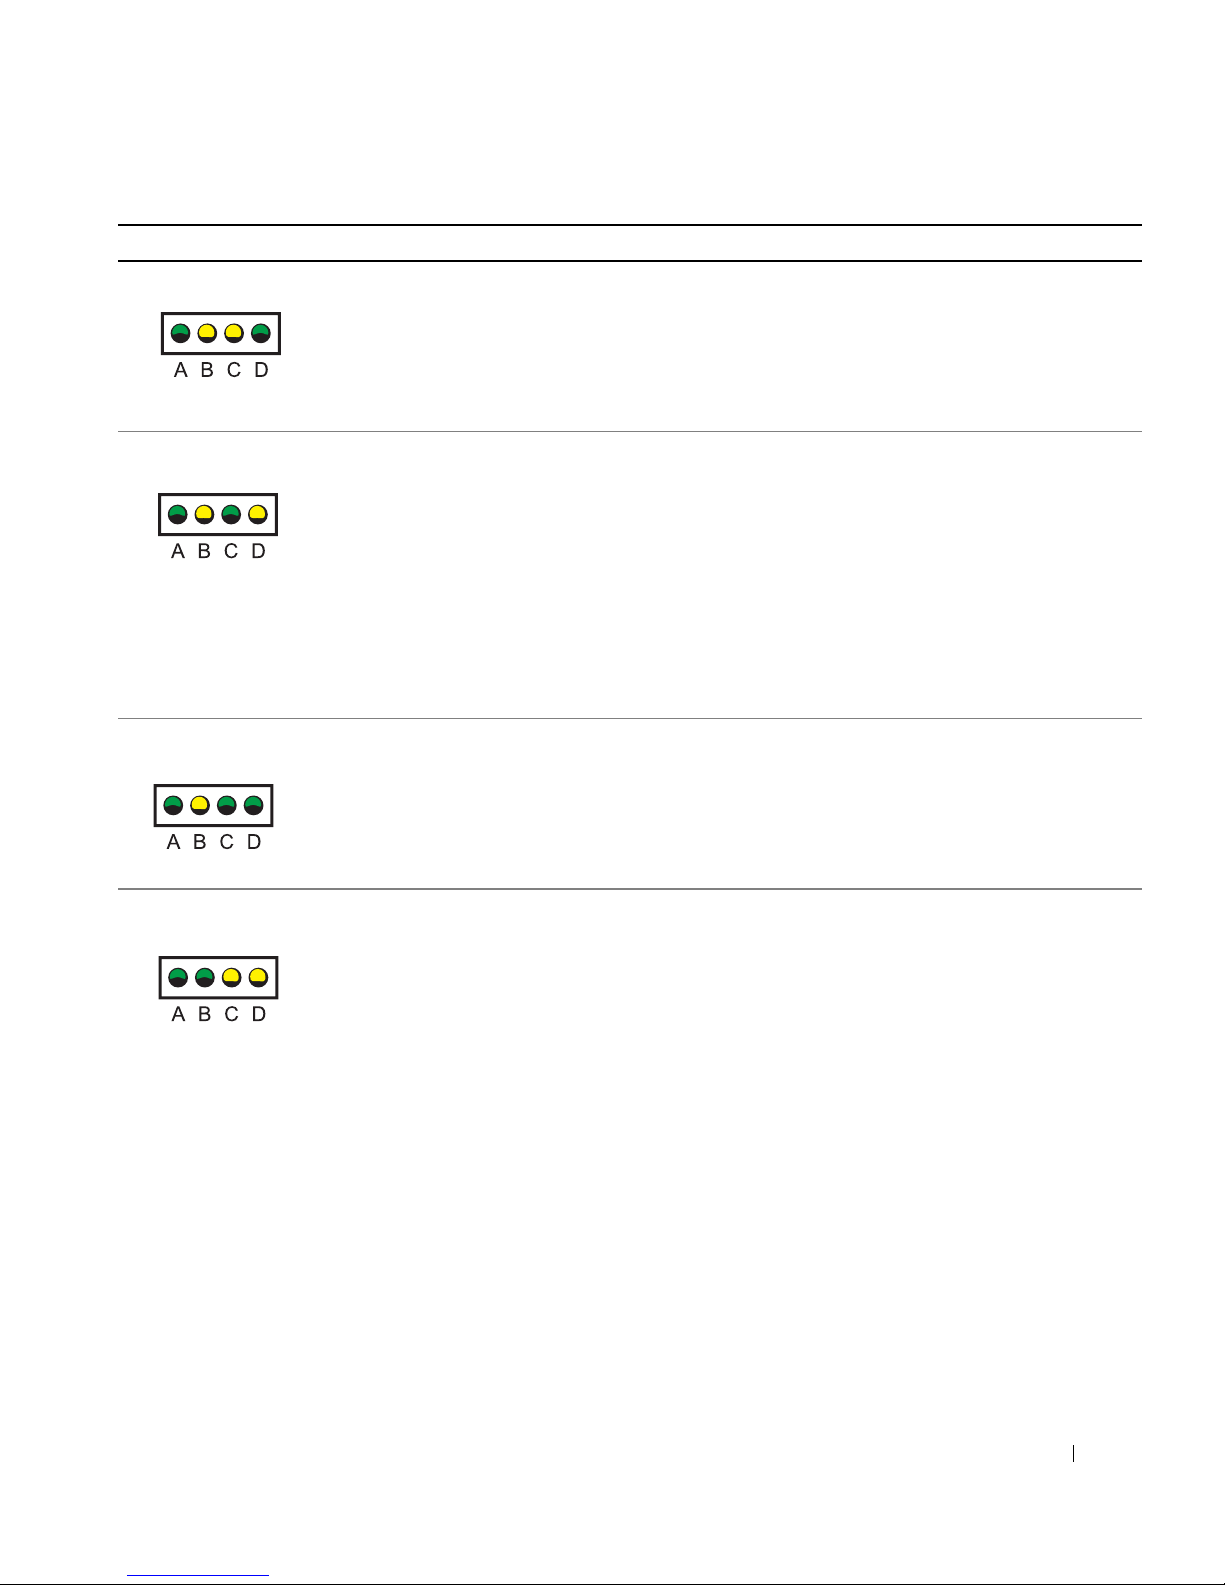
Anzeigemuster Problembeschreibung Lösungsvorschlag
Grün/Gelb/Gelb/Grün
Grün/Gelb/Grün/Gelb
Grün/Gelb/Grün/Grün
Die Systemplatine ist
möglicherweise fehlerhaft.
Speichermodule werden
erfasst; es ist jedoch ein
Fehler bei der Speicherkonfiguration bzw. ein
Kompatibilitätsfehler
aufgetreten.
Systemplatinenressourcen
und/oder die Hardware
sind möglicherweise
fehlerhaft.
Führen Sie die unter „Probleme mit der Systemplatine“
im Benutzerhandbuch aufgeführten Schritte durch.
Besteht das Problem weiterhin, wenden Sie sich an Dell.
Stellen Sie sicher, dass keine besonderen Anforderungen
bezüglich der Installation von Speichermodulen/
Speichermodulanschlüssen vorhanden sind (siehe
unter „Speicher“ im Benutzerhandbuch).
Stellen Sie sicher, dass die von Ihnen installierten
Speichermodule mit Ihrem Computer kompatibel sind
(siehe unter „Speicher“ im Benutzerhandbuch).
Installieren Sie die Speichermodule neu, und starten
Sie den Computer dann erneut.
Besteht das Problem weiterhin, wenden Sie sich an Dell.
Führen Sie die unter „Probleme mit der Systemplatine“
aufgeführten Verfahren durch, und lesen Sie den
Abschnitt „Beheben von Software- und HardwareInkompatibilitäten“ im Benutzerhandbuch.
Besteht das Problem weiterhin, wenden Sie sich an Dell.
Grün/Grün/Gelb/Gelb
Die Erweiterungskarte
ist möglicherweise
fehlerhaft.
1 Feststellen, ob ein Konflikt vorliegt. Dazu eine Karte
(außer der Grafikkarte) entfernen und den Computer
neu starten.
2 Besteht das Problem weiterhin, die entfernten Karten
erneut installieren, eine andere Karte entfernen und
den Computer erneut starten.
3 Diesen Vorgang für jede Karte wiederholen. Wenn der
Computer normal startet, die zuletzt entfernte Karte
auf Ressourcenkonflikte überprüfen (siehe „Beheben
von Software- und Hardware-Inkompatibilitäten“ im
Benutzerhandbuch).
4 Besteht das Problem weiterhin, an Dell wenden.
Setup- und Schnellreferenzhandbuch 99
Page 100
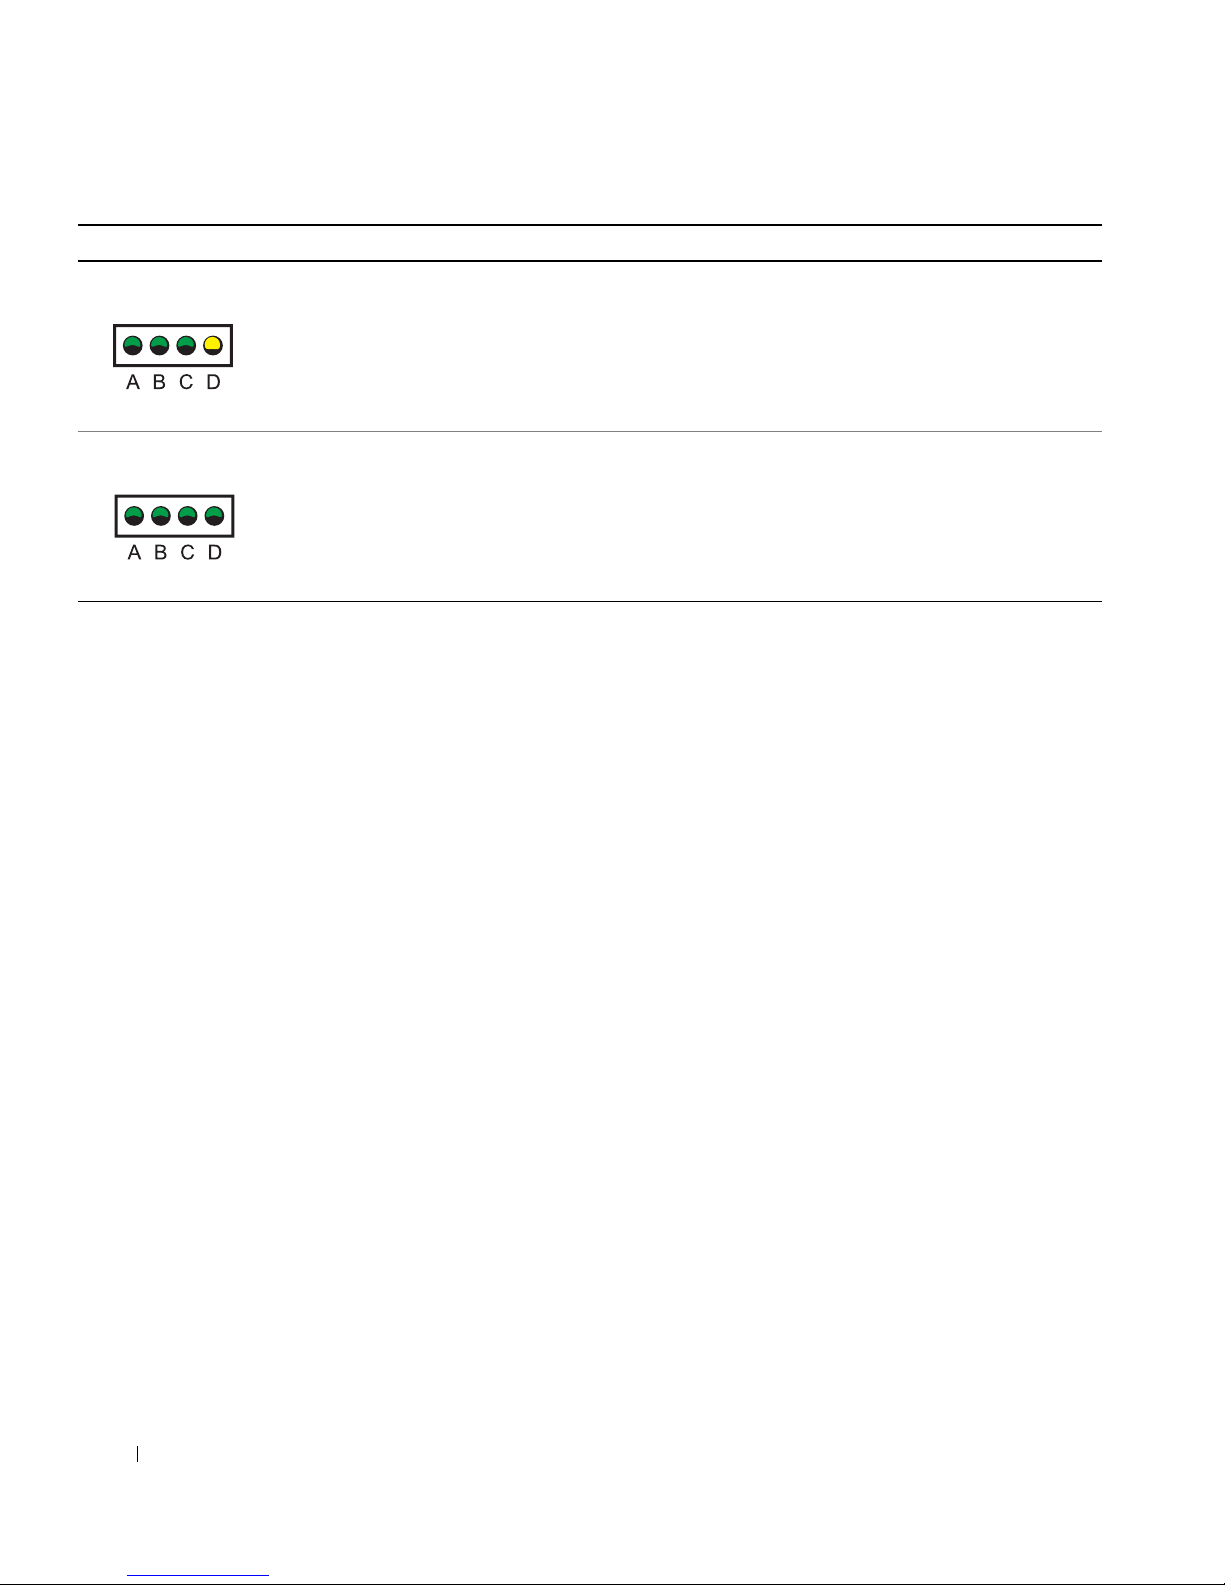
Anzeigemuster Problembeschreibung Lösungsvorschlag
Grün/Grün/Grün/Gelb
Grün/Grün/Grün/Grün
www.dell.com | support.euro.dell.com
Andere Fehler sind
aufgetreten.
Normale Betriebsbedingung nach POST.
Wenn ein Problem auftritt, das Sie durch die in diesem Abschnitt beschriebenen Schritte oder durch die Vorgehensweisen unter „Problemlösungen“
im Benutzerhandbuch nicht lösen können, führen Sie die folgenden Schritte
aus, bevor Sie sich an Dell wenden:
Vergewissern Sie sich, dass die Kabel des Festplattenlaufwerks, CD-Laufwerks bzw. DVD-Laufwerks korrekt mit
der Systemplatine verbunden sind.
Besteht das Problem weiterhin, wenden Sie sich an Dell.
Keine Aktion erforderlich.
1 Eine detaillierte Beschreibung des Fehlers, des Signaltoncodes oder
der Diagnoseanzeige erstellen.
2 Die Expressdienst-Codenummer und Service-Kennnummer notieren.
3 Wenn Sie sich an Dell wenden, sollten Sie sich in der Nähe des
Computers aufhalten.
100 Setup- und Schnellreferenzhandbuch
 Loading...