

Dell PowerVault MD1400 Setup Manual

PowerVault (Dell MD1400) Setup Guide

Copyright © 1994-2019 Dell Inc. or its subsidiaries. All Rights Reserved.
Contact Information
RSA Link at https://community.rsa.com contains a knowledgebase that answers common
questions and provides solutions to known problems, product documentation, community
discussions, and case management.
Trademarks
For a list of RSA trademarks, go to www.emc.com/legal/emc-corporation-trademarks.htm#rsa.
License Agreement
This software and the associated documentation are proprietary and confidential to Dell, are
furnished under license, and may be used and copied only in accordance with the terms of such
license and with the inclusion of the copyright notice below. This software and the
documentation, and any copies thereof, may not be provided or otherwise made available to any
other person.
No title to or ownership of the software or documentation or any intellectual property rights
thereto is hereby transferred. Any unauthorized use or reproduction of this software and the
documentation may be subject to civil and/or criminal liability.
This software is subject to change without notice and should not be construed as a commitment
by Dell.
Third-Party Licenses
This product may include software developed by parties other than RSA. The text of the license
agreements applicable to third-party software in this product may be viewed on the product
documentation page on RSA Link. By using this product, a user of this product agrees to be fully
bound by terms of the license agreements.
Note on Encryption Technologies
This product may contain encryption technology. Many countries prohibit or restrict the use,
import, or export of encryption technologies, and current use, import, and export regulations
should be followed when using, importing or exporting this product.
Distribution
Dell believes the information in this publication is accurate as of its publication date. The
information is subject to change without notice.
May 2019

Contents
About this Document 5
Hardware Description 6
High-Level Capacity Information 6
Enclosure Options 6
Capability with RSA NetWitness Platform Series 5 or 6 Hosts 7
Package Contents 7
Customer Supplied Materials 7
Rear View of the PowerVault 8
Mini-to-Mini SAS Cable Connector 8
Monitoring PowerVault Through IDRAC 9
Install PowerVault without Encryption 10
Prerequisites 10
Introduction 11
Attach and Configure a PowerVault without Encryption 11
NetWitness Platform 11.3 and Later 11
NetWitness Platform 11.2 and Earlier 12
Connect PowerVaults to a Concentrator, Archiver, Decoder, or Log Decoder Physical Host 12
Connect a PowerVault to a Hybrid 20
Run the PowerVault Installation Scripts on the Decoder, Log Decoder, Concentrator, or
Archiver 22
Run the PowerVault Installation Scripts on a Hybrid 25
Restart the Service 28
Task 4 - (Conditional) License Host Services 29
Install PowerVault with Encryption on a Series 6 R640 Host 30
Enclosure Options for Encryption 30
Minimum NetWitness Platform Software Versions 30
Attach and Configure New PowerVault with Encryption 31
NetWitness Platform 11.3 and Later 31
NetWitness Platform 11.2 and Earlier 31
Task 1 - Connect PowerVaults to an Archiver, Concentrator, or (Network) Decoder Host 31
Task 2 - Run the PowerVault Installation Scripts on the Archiver, Concentrator, or
(Network) Decoder 34
Task 3 - Restart the Service 40
Task 4 - (Conditional) License Host Services 41

PowerVault (Dell MD1400) Setup Guide
Install PowerVaults and 15-Drive DACs on a Series 5 or Series 6 Host
(Mixed Mode) 42
Minimum NetWitness Platform Software Versions 42
Introduction 42
High-Level Procedure 43
NetWitness Platform 11.3 and Later 43
NetWitness Platform 11.2 and Earlier 43
Connect External Storage Devices to RSA Series 5 or Series 6 Archiver, Decoder, or Log
Decoder Hosts 44
Connect External Storage Devices to Series 5 (R630) 44
Connect External Storage Devices to Series 6 (R640) 46
Run the External Storage Script on the Decoder, Log Decoder, or Archiver 48
Restart the Service 55
Install PowerVault on Core Appliance Used as a Hybrid 56
Prerequisites 56
Introduction 57
High-Level Procedure 57
NetWitness Platform 11.3 and Later 57
NetWitness Platform 11.2 and Earlier 58
Connect PowerVaults to a Core Physical Host Used as a Hybrid 59
Run the PowerVault Installation Scripts on an R603 or R640 Used as a Hybrid 63
Restart the Services 67
4
PowerVault (Dell MD1400) Setup Guide
About this Document
This document provides instructions for installing a PowerVault external storage device on
RSASeries 5 and Series 6 (Network) Decoder, Log Decoder, Concentrator, Archiver, and
Hybrid hosts.
The hardware setup instructions in this document are for hardware only; they do not apply to a
specific release of RSA NetWitness Platform software. This document is for new hardware
only. It is not intended for PowerVaults with preexisting data.
The PowerVault installation script instructions in this guide apply only to NetWitness Platform
11.2 and earlier. For NetWitness Platform 11.3 and later, use the hardware connection
information in this guide, but refer to Storage Guide for RSA NetWitness Platform Version 11.3
and later for instructions on how to allocate storage for your hardware.
Caution: If you are adding a previously used PowerVault and would like to preserve the data,
DO NOT follow the instructions in this guide. Contact RSA Customer Support. Running the
script on a previously used PowerVault could erase any existing data.
Note: When viewing a printed guide, be aware that a newer version of the guide may be
available online at RSA Link in RSA NetWitness® Platform under Hardware Setup Guides:
https://community.rsa.com/community/products/netwitness/hardware-setup-guides
5 About this Document
PowerVault (Dell MD1400) Setup Guide
Host SKU Description Specification
Decoder /
Archiver
NWPVHD72
NetWitness PowerVault
High Density 72TB
DellStorage MD1400, 12HDs 3.5",
Rackmount, 2Us ,12x6TB NLSAS
Decoder /
Archiver
NWPVHD144
NetWitness PowerVault
High Density 144TB
DellStorage MD1400, 12HDs 3.5",
Rackmount, 2Us, 12x12TB NLSAS
Decoder /
Archiver
NWPVHDE96
NetWitness PowerVault
High Density 96TB SED
(Self Encrypted Drives)
DellStorage MD1400, 12HDs 3.5",
Rackmount, 2Us, 12x8TB NL-SAS
SED
Concentrator NW-
PVHP56
NetWitness PowerVault
High Performance 56TB
DellStorage MD1400, 12HDs 3.5",
Rackmount, 2Us, 9x6TB NLSAS,
3x800GB SSD
Concentrator
NWPVHP113
NetWitness PowerVault
High Performance 113TB
DellStorage MD1400, 12HDs 3.5",
Rackmount, 2Us, 9x12TB NLSAS,
3x1.6TB SSD
Concentrator NW-
PVHPE78
NetWitness PowerVault
High Performance 78TB
SED (Self Encrypted
Drives)
DellStorage MD1400, 12HDs 3.5",
Rackmount, 2Us, 9x8TB NLSAS
SED, 3x1.92TB SSD SED
Hardware Description
The RSA PowerVault (Dell MD 1400) high capacity storage device is a drive array enclosure
powered by EMC/Dell. PowerVault is used to extend the usable storage on the RSA Series 5
and Series 6 (Network) Decoder, Log Decoder, Concentrator, Archiver, and Hybrid hosts.
High-Level Capacity Information
PowerVault:
l Stores up to 120 TB for a single enclosure.
l Accommodates up to 12 hot-pluggable 3.5" and 2.5" drives (2.5" available with adapter).
l Allows you to daisy-chain eight PowerVaults (four enclosures per channel).
l Provides improved device monitoring and management.
l Is compatible with Dell OpenManage/iDRAC system management technology.
Enclosure Options
Hardware Description 6

PowerVault (Dell MD1400) Setup Guide
Capability with RSA NetWitness Platform Series 5 or 6 Hosts
RSA NetWitness Platform Series 5 or 6 hosts are shipped with the software to support a
PowerVault installation. The initial setup of a PowerVault in your network involves these steps:
1. Review site requirements and safety information.
2. Install PowerVault.
Package Contents
Refer to the documentation that is included with the PowerVault. The Dell Storage MD1400
Enclosures Hardware Owner's Manual (http://topics-cdn.dell.com/pdf/storage-md1400-dsms_
owners-manual_en-us.pdf) contains detailed instruction on all the optional setups you can
implement with PowerVault to address the needs of your environment.
Note: The PowerVault comes with four SAS cables. You only need one cable to connect the
PowerVault to a Series 5 or 6 host. Use a cable with the mini-to-mini-SAS connectors to
connect the PowerVault to a Series 5 or 6 host.
Customer Supplied Materials
You do not need to supply any materials.
7 Hardware Description
PowerVault (Dell MD1400) Setup Guide
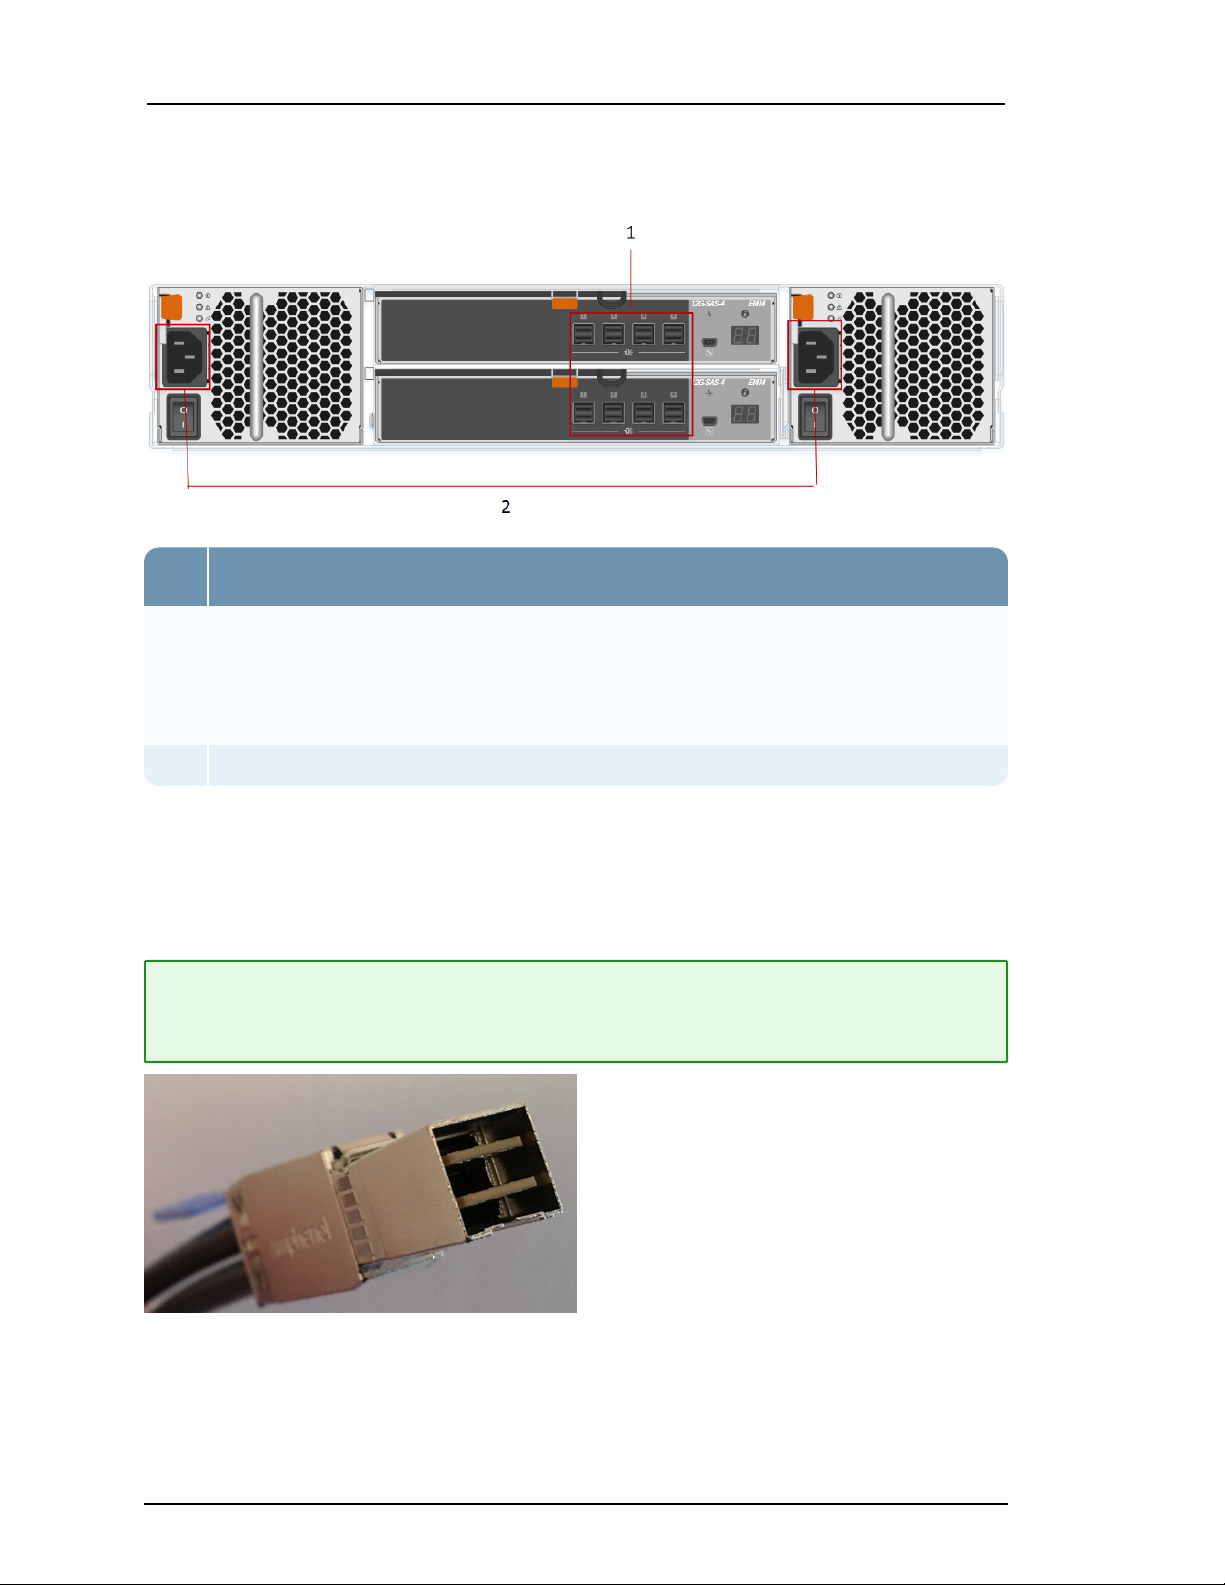
Key Description
1 SAS ports. Each set of ports has a Primary port and an Expansion port. In each set, the
Primary port is closer to the center of the chassis. There are two rows of ports. In each
row, the ports are labeled 1 to 4 from left to right. Start with the upper row port 1. You
can daisy chain using the rest of the ports if you have multiple PowerVaults connected
to a Series 5 or 6 host.
2 Power Input Connections
Rear View of the PowerVault
Mini-to-Mini SAS Cable Connector
Both connectors are the same on the Mini-to-Mini SAS cable. The following figures shows one
mini connector.
Note: You must insert the cable correctly at both ends with the correct side up. If you have
done this correctly, you hear a click and a green light displays on the rear of the PowerVault
and the rear of the Series 5 or Series 6 host indicating a live connection.
Hardware Description 8

PowerVault (Dell MD1400) Setup Guide
Monitoring PowerVault Through IDRAC
You can monitor PowerVault MD array communication through the Integrated Dell Remote
Access Controller (IDRAC). Refer to the "Monitoring network devices using web interface" and
"Monitoring network devices using RACADM" sections of the Integrated Dell Remote Access
Controller 8/7 Version 2.60.60.60 User’s Guide (https://topics-cdn.dell.com/pdf/idrac7-8-
lifecycle-controller-v2606060_users-guide_en-us.pdf) for information on how to monitor network
devices through IDRAC.
9 Hardware Description

PowerVault (Dell MD1400) Setup Guide
Install PowerVault without Encryption
This topic describes how to install a PowerVault without encryption on RSA Series 5 and Series
6 Decoder, Log Decoder, Concentrator, Archiver, and Hybrid physical hosts.
Prerequisites
Make sure that you have the following required software:
l For RSA NetWitness Platform 11.1.0.2 and later versions:
rsa-sa-tools-11.2.1.0-1901070555.5.d1d4cb3.el7.noarch.rpm or newer
version of this file, which contains the script you need to configure the storage.
For RSA Security Analytics 10.6.6.1 and later versions:
l
rsa-sa-tools-10.6.6.1-199.5.47209f4.el6.noarch.rpm or newer or newer
version of this file, which contains the script you need to configure the storage. This file is
available on RSA Link at https://community.rsa.com/docs/DOC-100361.
To verify the rsa-sa-tools version, log in as root on the physical hosts and run the following
command:
rpm -qa | grep sa-tools
Results example:
l For 11.x: rsa-sa-tools-11.2.1.0-1901070555.5.d1d4cb3.el7.noarch.rpm
l For 10.6.6.x: rsa-sa-tools-10.6.6.1-199.5.47209f4.el6.noarch.rpm
This RPM is updated quarterly. Contact RSA Customer Support to obtain the most recent
version.
l RSA NetWitness Platform - The minimum version is 10.6.6.0 (licensed only). The
recommended versions are 10.6.6.x and 11.1.0.2 and later.
To verify the version, in the Administration Services view (Administration > Services), the
release version is displayed to the right of each service listed. To check the version at the
command line, run the following command:
rpm -qa | grep nw
Results example:
nwconcentrator-10.6.6.2-182.3.0f6d16e.el6.x86_64
Caution: If you are adding a previously used PowerVault and would like to preserve the data,
DO NOT follow the instructions in this guide. Contact RSA Customer Support. Running the
script on a previously used PowerVault could erase any existing data.
Install PowerVault without Encryption 10

PowerVault (Dell MD1400) Setup Guide
Deployment Scen-
ario
Tasks
Concentrator, Archiver,
Decoder, and Log
Decoder (Multiple PowerVaults)
1. Connect the PowerVaults to the physical host before powering
on the physical host as described in Connect PowerVaults to a
Concentrator, Archiver, Decoder, or Log Decoder Physical Host .
2. Follow the instructions in the Storage Guide for RSA
NetWitness Platform Version 11.3 and Later to allocate
storage for your hardware.
Hybrid
1. Connect the PowerVault to the physical host before powering
on the physical host as described in Connect a PowerVault to a
Hybrid .
2. Follow the instructions in the Storage Guide for RSA
NetWitness Platform Version 11.3 and Later to allocate
storage for your hardware.
Introduction
The following table contains the summarized installation instructions for different deployments,
and detailed procedures are in individual subsections. The deployment scenarios are:
l Multiple PowerVaults in a Concentrator, (Network) Decoder, Log Decoder, and Archiver
deployment.
l A single PowerVault in a Hybrid deployment.
Attach and Configure a PowerVault without Encryption
This table summarizes the steps you must complete to attach and configure a PowerVault
without encryption. The scenarios are shown in detail in the topics following immediately the
table.
NetWitness Platform 11.3 and Later
11 Install PowerVault without Encryption

PowerVault (Dell MD1400) Setup Guide
Deployment
Scenario
Tasks
Concentrator,
Archiver, Decoder,
and Log Decoder
(Multiple PowerVaults)
1. Connect the PowerVaults to the physical host before powering on
the physical host as described in Connect PowerVaults to a
Concentrator, Archiver, Decoder, or Log Decoder Physical Host .
2. Run the NwArrayConfig.py script as described in Run the
PowerVault Installation Scripts on the Decoder, Log Decoder,
Concentrator, or Archiver .
3. Restart the services for this host as described in Restart the Service.
4. License the services for this host (if they are not already licensed).
Refer to the Licensing Guide available through the application Help
option and RSA Link at https://community.rsa.com/docs/DOC-40370
for instructions on licensing RSA physical hosts.
Hybrid
1. Connect the PowerVault to the physical host before powering on the
physical host as described in Connect a PowerVault to a Hybrid .
2. Run the NwArrayConfig.py script as described in Run the
PowerVault Installation Scripts on a Hybrid .
3. Restart the services for this host as described in Restart the Service.
4. License the services for this host (if they are not already licensed).
Refer to the Licensing Guide available through the application Help
option and RSA Link at https://community.rsa.com/docs/DOC-40370
for instructions on licensing RSA physical hosts.
NetWitness Platform 11.2 and Earlier
Connect PowerVaults to a Concentrator, Archiver, Decoder, or Log
Decoder Physical Host
You can connect one or more PowerVaults to a RSA Series 5 or Series 6 Concentrator,
Archiver, Decoder, or Log Decoder physical hosts. You can only add four PowerVaults per port
for a total of eight PowerVaults per PERC H830 (Series 5) RAID controller or five per PERC
H840 (Series 6) RAID controller.
Install PowerVault without Encryption 12

PowerVault (Dell MD1400) Setup Guide
Note: 1.) If you are attaching more then 3 PowerVaults to a single port you may received the
following Error message:
The total number of enclosures connected to connector 00, has
exceeded the maximum allowable limit of 3 enclosures. Please remove
the extra enclosure and then restart your system. This error was caused by
PERC profile settings. From factory, PERC profile is set to PD64. Setting the profile to PD240
corrects the issue. Profile PD240 is labeled as “default”, however, this is not set from factory.
To set the PD Profile:
1. Enter the DELL PERC 10 Configuration Utility. See Navigating to Dell PERC 10
configuration utility.
2. Click Main Menu > Controller Management > Advanced Controller Properties > Profile
Management. Current profile and profile properties are displayed.
3. Change profile using the Choose Profile option.
4. Select Set Profile. Click Reboot.
2.) The PowerVault comes with four SAS cables. You only need one cable to connect the
PowerVault to the physical host. For RSA Series 5 physical hosts, use a cable with the miniSAS connector.
1. Ensure that the physical host is powered off.
2. Connect one end of the SAS cable to the left port of the RAID controller on the back of the
Concentrator, Archiver, Decoder, or Log Decoder physical host.
3. Connect the other end of the SAS cable to the PowerVault unit.
When you connect the first PowerVault to the RAID controller, make sure that you insert the
cable into the Primary SAS port on the PowerVault as shown in the following figures.
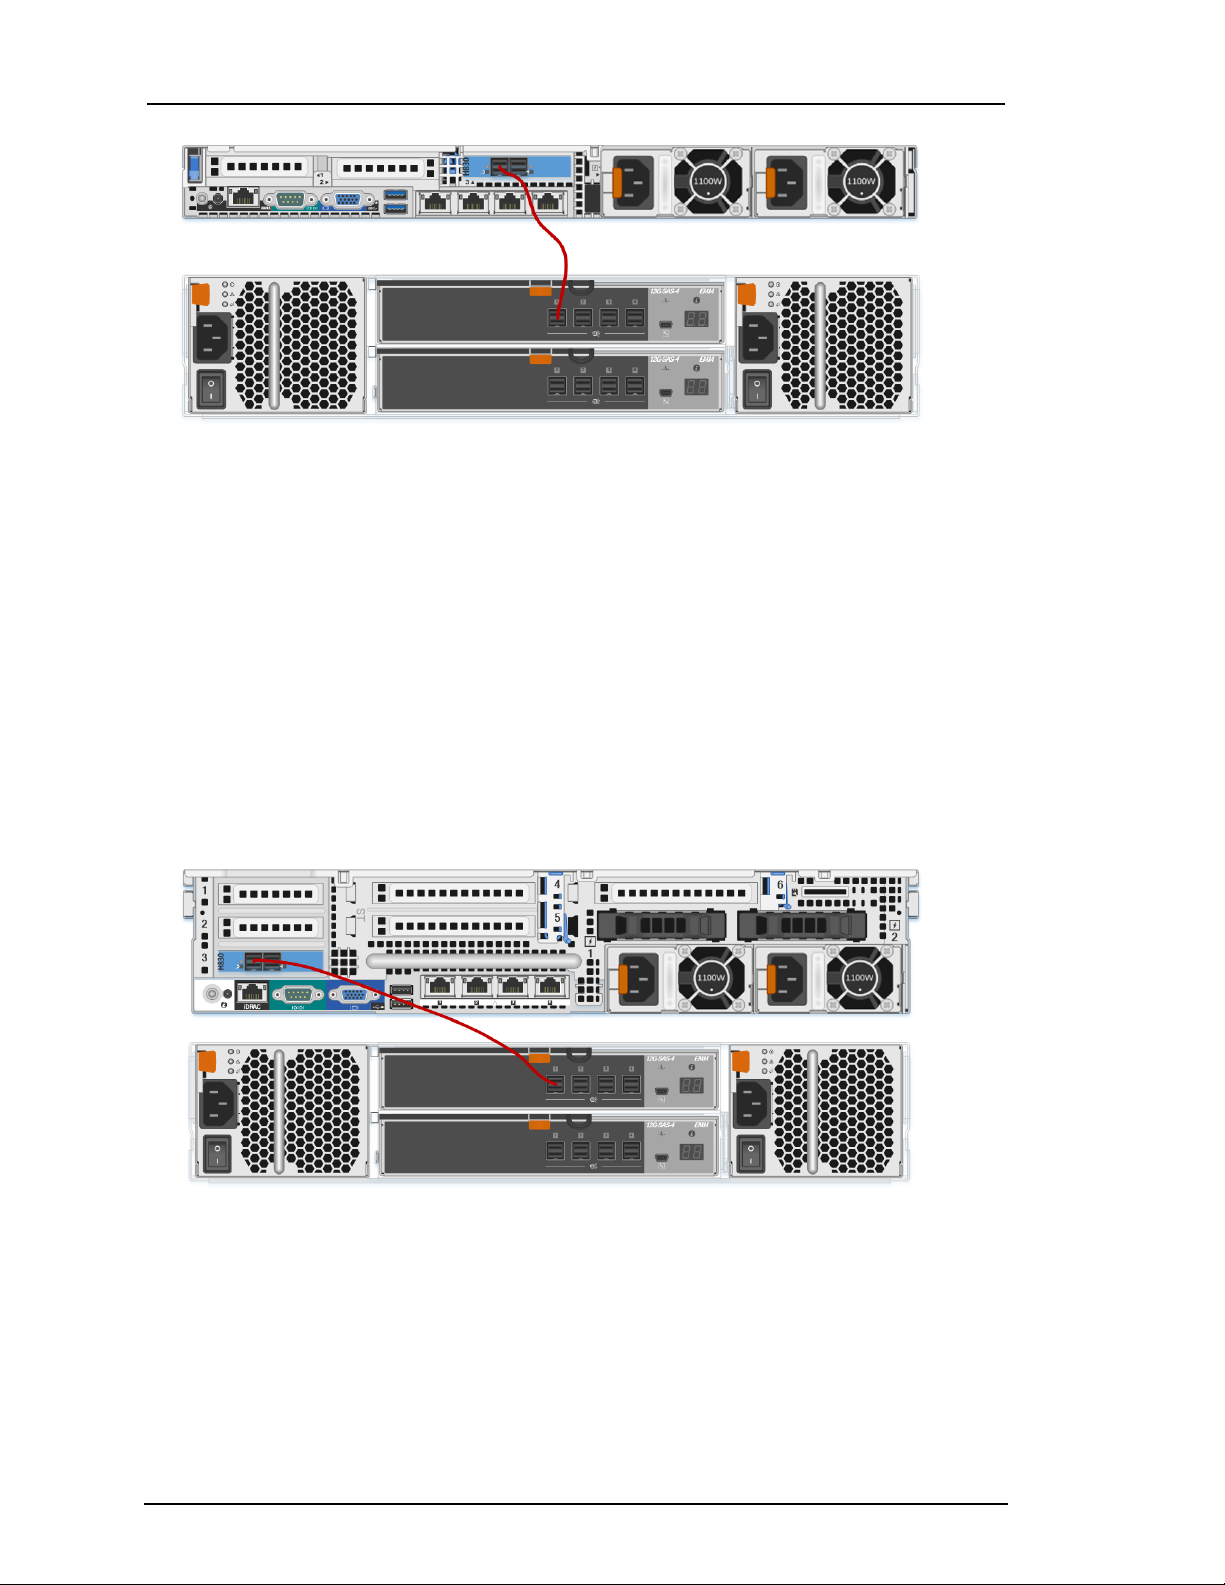
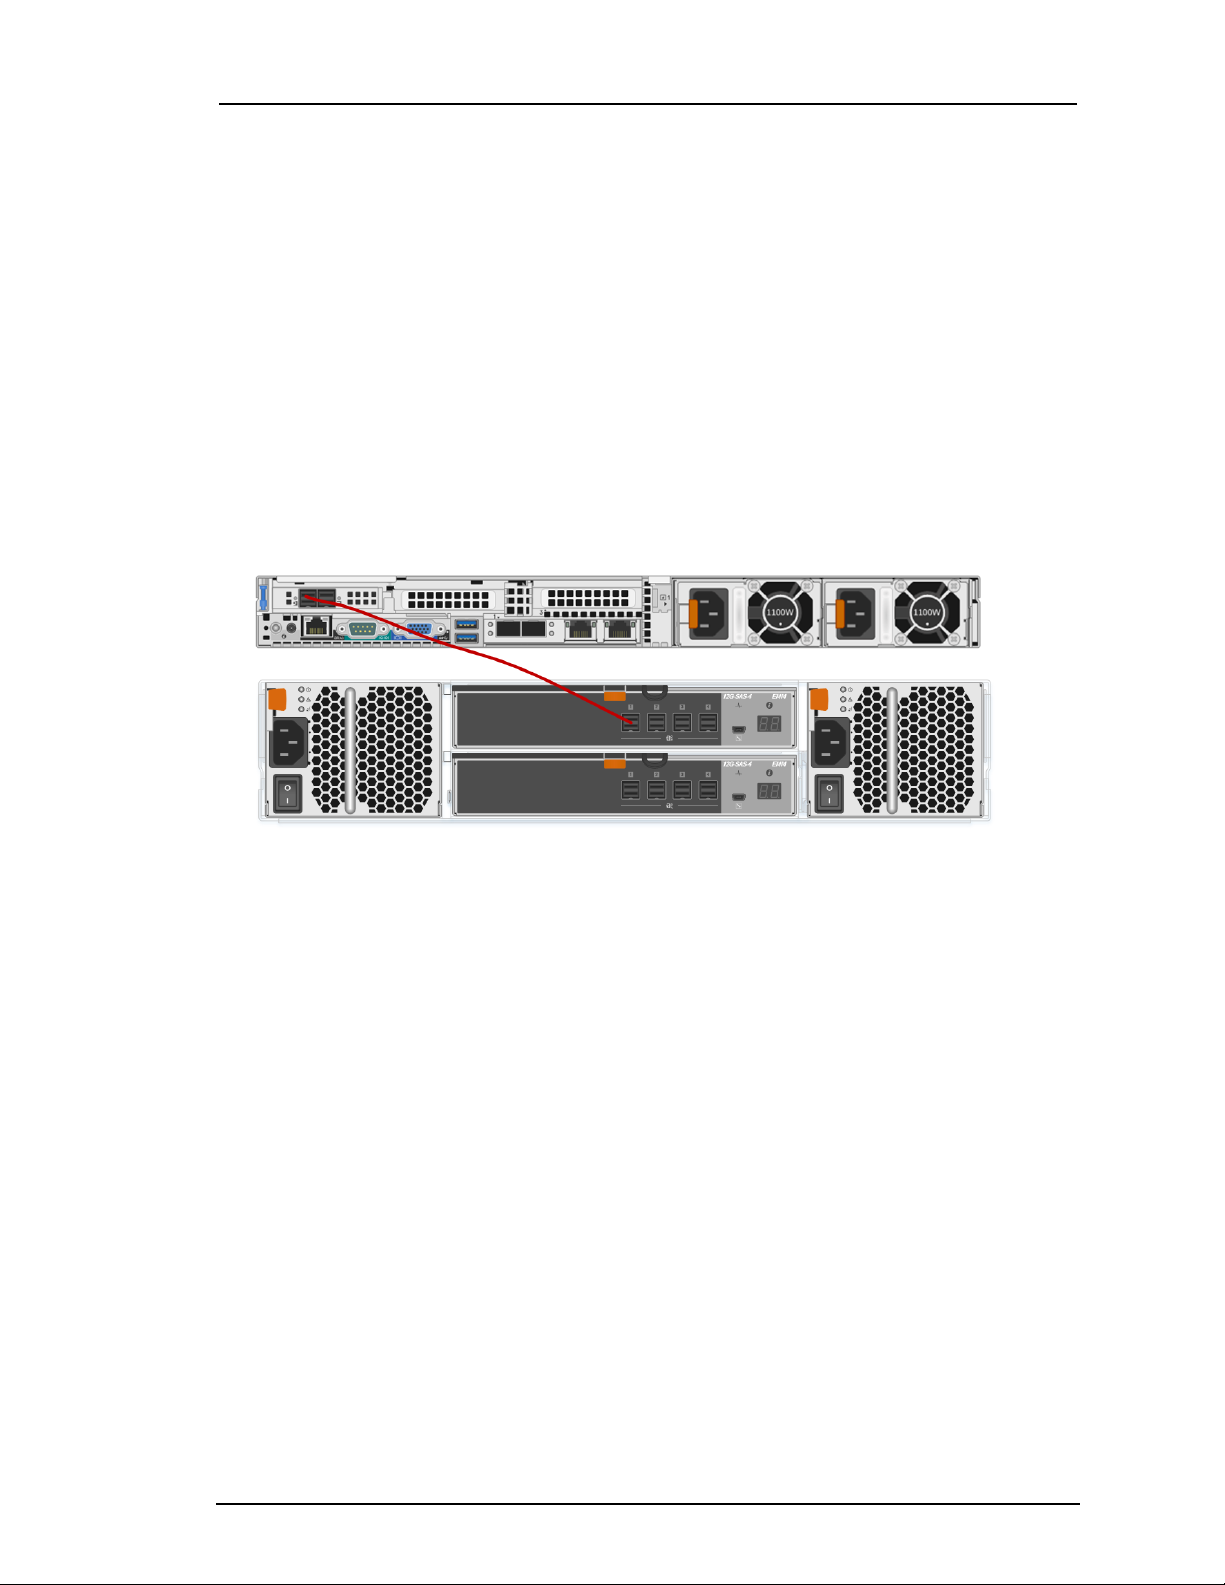
Series 5 Physical Hosts
Series 5 - R630
The following figure shows an R630 host (port 0 ) connected to a PowerVault (port 1 in top
row of ports) using a mini-to-mini SAS cable.
The PERC830 card for the R630 is installed in slot #3. This means that:
l Port 0 is on the left and port 1 is on the right on the R630.
l You must attach the cable to the R630 with the connector's blue tab on the top.
l You must attach the other end the cable to the PowerVault with the connector's blue tab
on the top.
l You know if the cable is properly connected when you hear a click as the cable locks into
place and see the green port light illuminate on the R630.
13 Install PowerVault without Encryption
PowerVault (Dell MD1400) Setup Guide
Series 5 - R730 (Hybrid)
The following figure shows an R730 host (port 0 ) connected to a PowerVault (port 1 in top
row of ports) using a mini-to-mini SAS cable.
The PERC830 card for the R730 is installed in slot #3. This means that:
l Port 0 is on the left and port 1 is on the right on the R730.
l You must attach the cable to the R730 with the connector's blue tab on the top.
l You must attach the other end the cable to the PowerVault with the connector's blue tab
on the top.
l You know if the cable is properly connected when you hear a click as the cable locks into
place and see the green port light illuminate on the R730.
Install PowerVault without Encryption 14
PowerVault (Dell MD1400) Setup Guide
Series 6 Physical Hosts
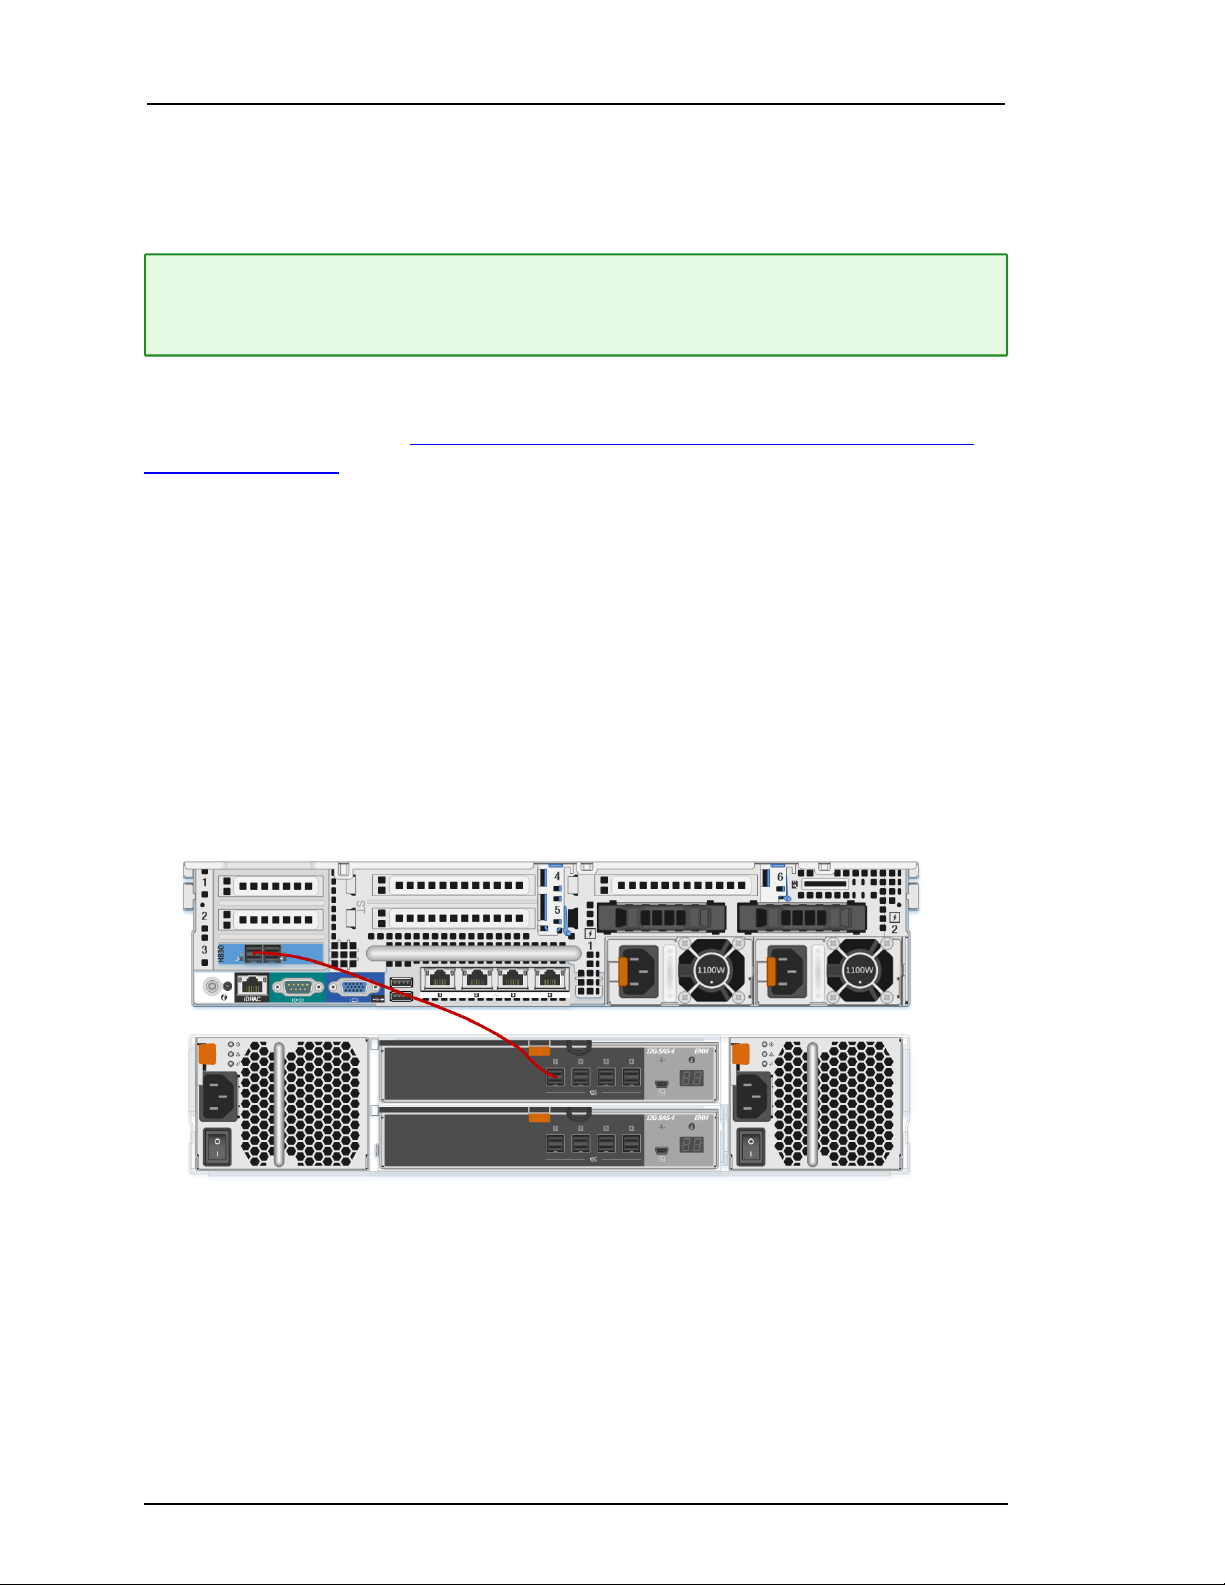
Series 6 - R640
The following figure shows Series 6 - R640 host (port 0) connected to PowerVault (port 1 in
top row of ports) using a mini-to-mini SAS cable.
The PERC H840 card for the R640 is installed in slot #1. This means that:
l Port 0 is on the left and port 1 is on the right on the R640.
l You must attach the cable to the R640 with the connector's blue tab on the top.
l You must attach the other end the cable to the PowerVault with the connector's blue tab
on the top.
l You know if the cable is properly connected when you hear a click as the cable locks into
place and see the green port light illuminate on the R640.
15 Install PowerVault without Encryption

PowerVault (Dell MD1400) Setup Guide
Series 6 - R740xd (Hybrid)
The following figure shows Series 6 - R740 hybrid host (port 0) connected to PowerVault
(port 1 in top row of ports) using a mini-to-mini SAS cable.
The PERC H840 card for the R740 is installed in slot #4 inverted (upside down) in this slot.
This means that:
l Port 0 is on the right and port 1 is on the left on the R740.
l You must attach the cable to the R740 with the connector's blue tab on the bottom as
shown in the following picture.
l You must attach the other end the cable to the PowerVault with the connector's blue tab
on the top.
l You know if the cable is properly connected when you hear a click as the cable locks into
place and see the green port light illuminate on the R740.
Install PowerVault without Encryption 16

PowerVault (Dell MD1400) Setup Guide
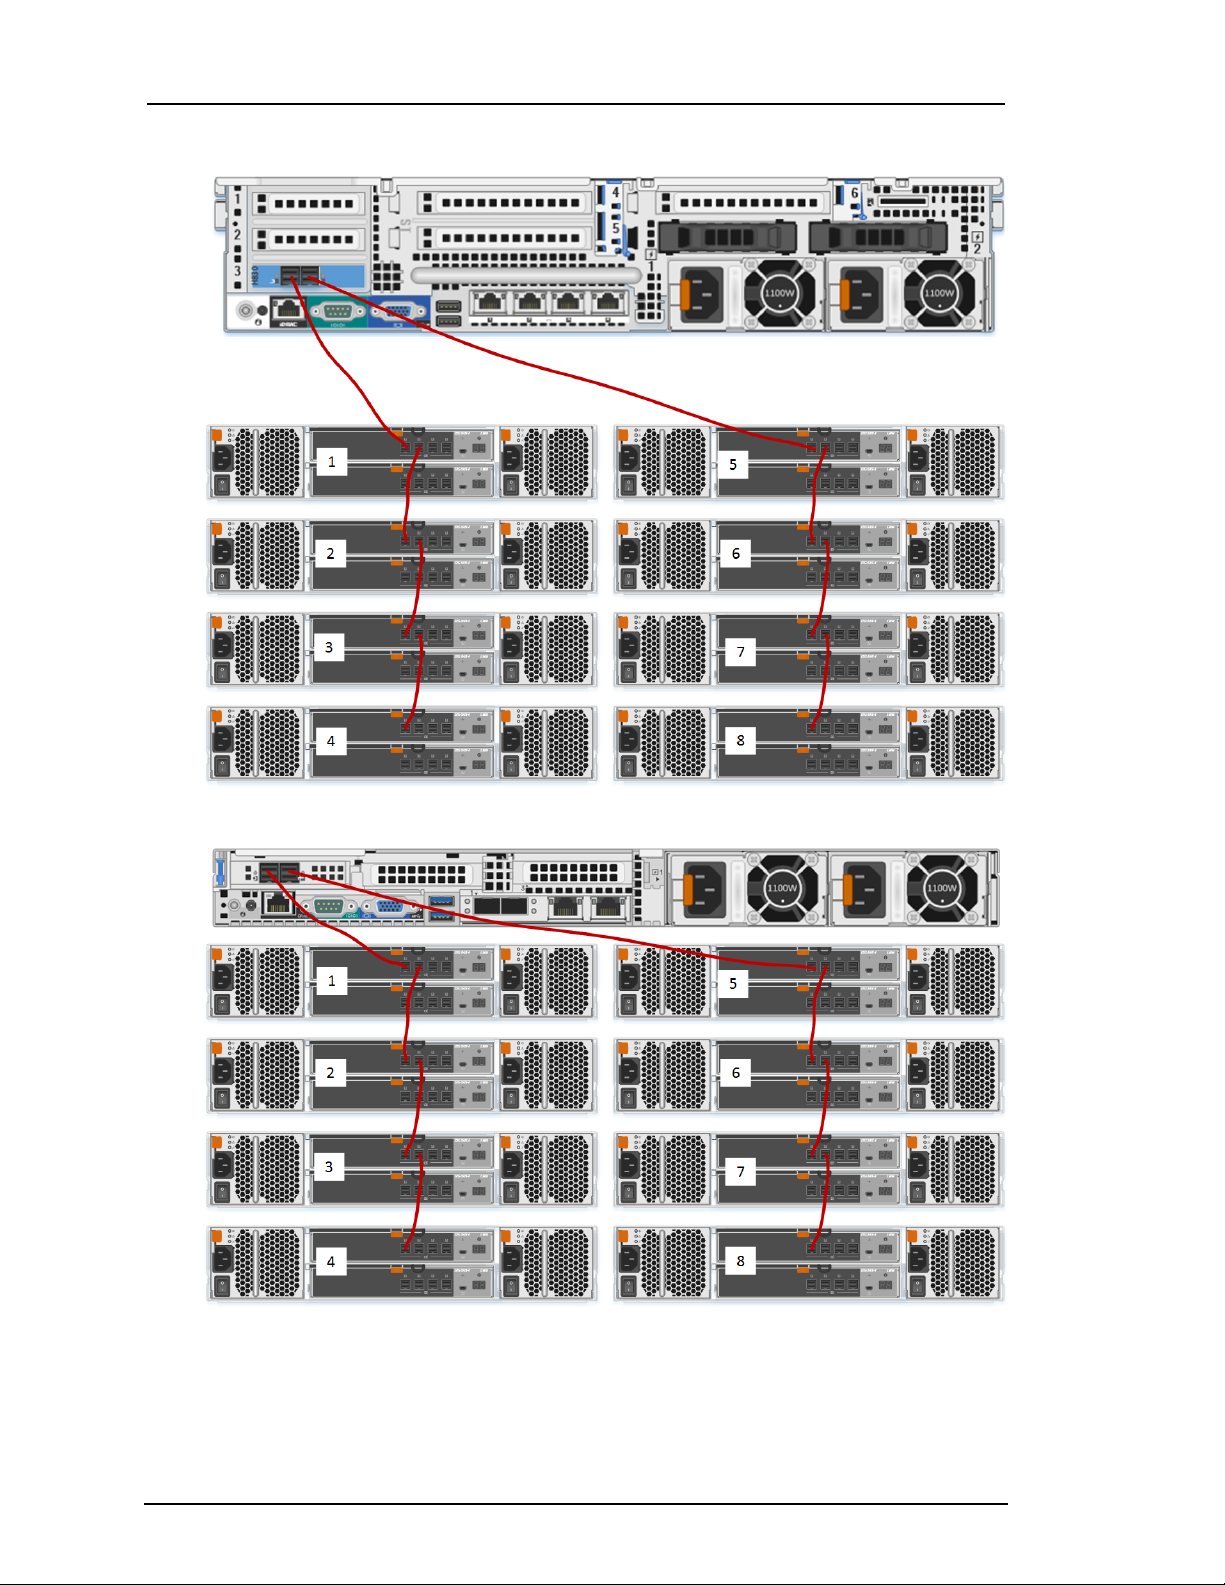
4. When you connect two or more PowerVaults to the RAID controller, make sure that you:
l Connect the Primary Port 1 of the first PowerVault to Port 0 of the Decoder RAID
controller.
l Daisy chain up to three additional PowerVaults to the first PowerVault.
The following figure shows you how to connect eight PowerVaults to an RSASeries 5
and Series 6 physical hosts.
Series 5 - R630 Attached to Eight PowerVaults
17 Install PowerVault without Encryption
PowerVault (Dell MD1400) Setup Guide
Series 5 R730 (Hybrid) Attached to Eight PowerVaults
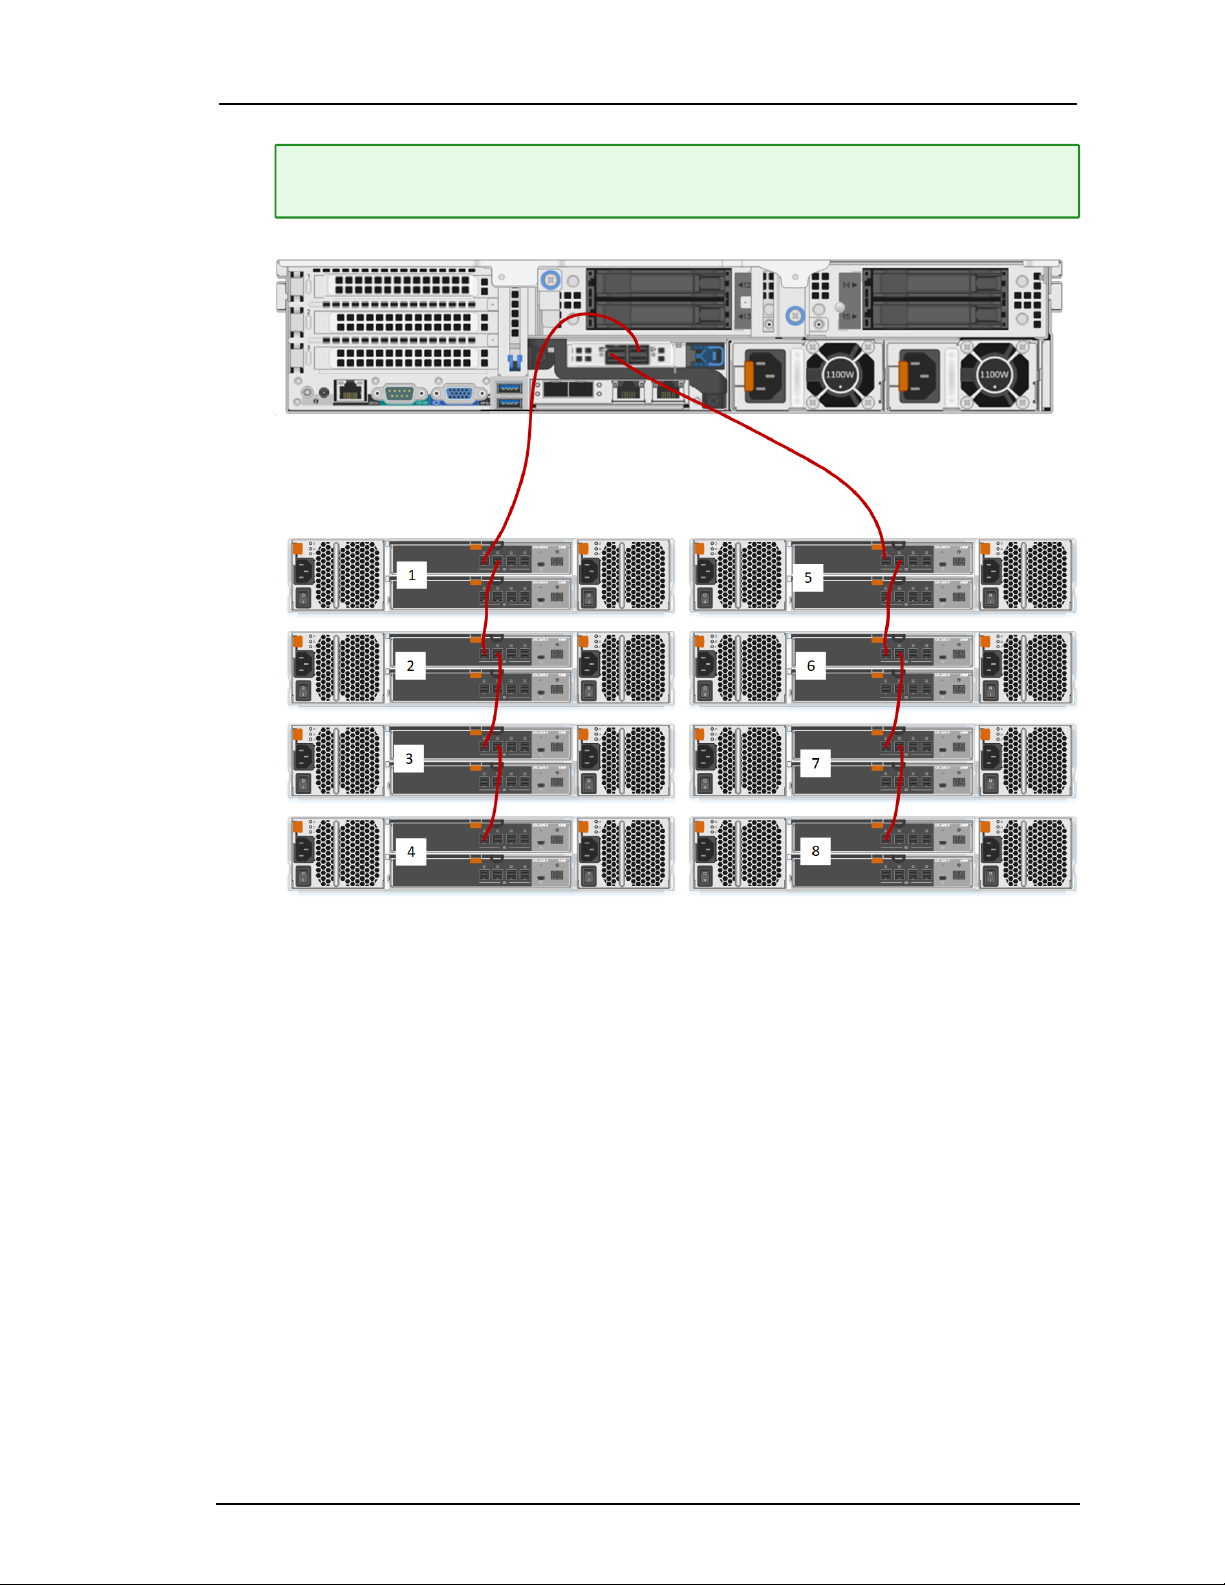
Series 6 - R640 Attached to Eight PowerVaults
Series 6 R740xd (Hybrid) Attached to Eight PowerVaults
Install PowerVault without Encryption 18
PowerVault (Dell MD1400) Setup Guide
Note: The PERC840 card for the R740 is installed in slot #4 inverted (upside down) in
this slot. This means that Port 0 is on the right and port 1 is on the left on the R740.
5. When you finish the cabling, ensure that the PowerVault is powered on and then power on
the physical host.
19 Install PowerVault without Encryption
PowerVault (Dell MD1400) Setup Guide
Connect a PowerVault to a Hybrid
You can connect only one PowerVault to a Hybrid physical host.
Note: The PowerVault comes with four SAS cables. You only need one cable to connect the
PowerVault to the physical host. RSASeries 5 physical hosts require different cables. For
RSA Series 6 physical hosts, use a cable with the mini-SAS connector.
To connect a PowerVault to a Series 6 Hybrid:
Follow the instructions In the Connect PowerVaults to a Concentrator, Archiver, Decoder, or Log
Decoder Physical Host procedure above and connect the RSA Series Series 6 Hybrid physical
host to only one PowerVault.
To connect a PowerVault to a Hybrid physical host:
1. Ensure that the physical host is powered off.
2. Connect one end of the mini-to-mini SAS cable to the Port 0 of the RAID controller on the
back of the Series 5 Hybrid physical host.
3. Connect the other end of the mini-to-mini SAS cable to the PowerVault unit (Port 1 in the
following example).
When you connect the first PowerVault to the RAID controller, make sure that you insert the
cable into the Primary SAS port on the PowerVault as shown in the following figure.
Series 5 R730 Hybrid
Install PowerVault without Encryption 20

PowerVault (Dell MD1400) Setup Guide
Series 6 R740xd Hybrid
4. When you finish the cabling, ensure that the PowerVault is powered on and then power on
the physical host.
21 Install PowerVault without Encryption
 Loading...