

Dell PowerVault ML6000, PowerVault TL2000, PowerVault TL4000, PowerVault Encryption Key Manager User Manual
Page 1

Dell™PowerVault™Encryption Key Manager
User's Guide
Page 2

© 2007, 2010 Dell Inc. All rights reserved.
Information in this document is subject to change without notice.
Reproduction in any manner whatsoever without the written permission of Dell Inc. is strictly forbidden.
Trademarks used in this text: Dell, the DELL logo and PowerVault are trademarks of Dell Inc.
Other trademarks and trade names may be used in this document to refer to either the entities claiming the marks
and names or their products. Dell Inc. disclaims any proprietary interest in trademarks and trade names other than
its own.
Page 3

Contents
Figures ...............v
Tables ...............vii
Preface ...............ix
About this Book .............ix
Who Should Read this Book ........ix
Conventions and Terminology Used in this Book ix
Attention Notice .............ix
Related Publications ............x
Linux Information ...........x
Microsoft Windows Information .......x
Online Support ............x
Read this First............xi
Contacting Dell .............xi
Chapter 1. Tape Encryption Overview 1-1
Components ..............1-1
Managing Encryption ...........1-2
Application-Managed Tape Encryption ....1-4
Library-Managed Tape Encryption .....1-5
About Encryption Keys ..........1-5
Chapter 2. Planning Your Encryption
Key Manager Environment ......2-1
Encryption Setup Tasks at a Glance ......2-1
Encryption Key Manager Setup Tasks ....2-1
Planning for Library-Managed Tape Encryption 2-1
Hardware and Software Requirements .....2-2
Linux Solution Components .......2-2
Windows Solution Components ......2-3
Keystore Considerations ..........2-3
The JCEKS Keystore ..........2-3
Encryption Keys and the LTO 4 and LTO 5 Tape
|
Drives ...............2-4
Backing up Keystore Data ........2-5
Multiple Key Managers for Redundancy . . . 2-7
Encryption Key Manager Server Configurations 2-7
Disaster Recovery Site Considerations .....2-9
Considerations for Sharing Encrypted Tapes Offsite 2-9
Federal Information Processing Standard 140-2
Considerations.............2-10
Chapter 3. Installing the Encryption
Key Manager and Keystores .....3-1
Downloading the Latest Version Key Manager ISO
|
Image................3-1
|
Installing the Encryption Key Manager on Linux 3-1
Installing the Encryption Key Manager on
Windows ...............3-2
Using the GUI to Create a Configuration File,
Keystore, and Certificates .........3-5
Generating Keys and Aliases for Encryption on
LTO4andLTO5............3-9
|
Creating and Managing Key Groups .....3-14
Chapter 4. Configuring the Encryption
Key Manager ............4-1
Using the GUI to Configure the Encryption Key
Manager ...............4-1
Configuration Strategies ..........4-1
Automatically Update Tape Drive Table....4-1
Synchronizing Data Between Two Key Manager
Servers ..............4-2
Configuration Basics ...........4-3
Chapter 5. Administering the
Encryption Key Manager.......5-1
Starting, Refreshing, and Stopping the Key
Manager Server .............5-1
The Command Line Interface Client ......5-5
CLI Commands .............5-7
Chapter 6. Problem Determination . . 6-1
Check These Important Files for Encryption Key
Manager Server Problems .........6-1
Debugging Communication Problems Between the
CLI Client and the EKM Server .......6-2
Debugging Key Manager Server Problems ....6-2
Encryption Key Manager-Reported Errors ....6-5
Messages ...............6-9
Config File not Specified .........6-9
Failed to Add Drive ..........6-10
Failed to Archive the Log File ......6-10
Failed to Delete the Configuration .....6-10
Failed to Delete the Drive Entry ......6-11
Failed to Import ...........6-11
Failed to Modify the Configuration .....6-11
File Name Cannot be Null ........6-11
File Size Limit Cannot be a Negative Number 6-12
No Data to be Synchronized .......6-12
Invalid Input ............6-12
Invalid SSL Port Number in Configuration File 6-13
Invalid TCP Port Number in Configuration File 6-13
Must Specify SSL Port Number in
Configuration File ..........6-13
Must Specify TCP Port Number in
Configuration File ..........6-14
Server Failed to Start .........6-14
Sync Failed .............6-14
The Specified Audit Log File is Read Only . . 6-15
Unable to Load the Admin Keystore ....6-15
Unable to load the keystore .......6-16
Unable to Load the Transport Keystore . . . 6-16
Unsupported Action ..........6-16
iii
Page 4

Chapter 7. Audit Records ......7-1
Audit Overview ............7-1
Audit Configuration Parameters .......7-1
Audit.event.types ...........7-1
Audit.event.outcome ..........7-2
Audit.eventQueue.max .........7-2
Audit.handler.file.directory ........7-2
Audit.handler.file.size..........7-3
Audit.handler.file.name .........7-3
Audit.handler.file.multithreads .......7-4
Audit.handler.file.threadlifespan ......7-4
Audit Record Format ...........7-4
Audit Points in the Encryption Key Manager . . 7-5
Audit Record Attributes .........7-5
Audited Events .............7-7
Linux Platforms ...........A-1
Sample Configuration Files.........A-1
Appendix B. Encryption Key Manager
Configuration Properties Files ....B-1
Encryption Key Manager Server Configuration
Properties File .............B-1
CLI Client Configuration Properties File ....B-9
Appendix C. Frequently Asked
Questions .............C-1
Notices ..............D-1
Trademarks ..............D-1
Chapter 8. Using Metadata ......8-1
Appendix A. Sample Files ......A-1
Sample startup daemon script ........A-1
Glossary .............E-1
Index ...............X-1
iv
Dell Encryption Key Mgr User's Guide
Page 5

Figures
1-1. The Encryption Key Manager’s four main
components ...........1-2
1-2. Two possible locations for encryption policy
engine and key management. .....1-4
1-3. Encryption Using Symmetric Encryption
|
|
|
|
||
||
|
||
Keys..............1-6
2-1. LTO 4 or LTO 5 Tape Drive Request for
Encryption Write Operation ......2-4
2-2. LTO 4 or LTO 5 Tape Drive Request for
Encryption Read Operation ......2-5
2-3. Backup Critical Files Window .....2-6
2-4. Single Server Configuration ......2-7
2-5. Two Servers with Shared Configurations 2-8
2-6. Two Servers with Different Configurations
Accessing the Same Devices ......2-9
3-1. Choose Destination Location window 3-3
3-2. Set this version of JVM to default 3-3
3-3. Start Copying Files window ......3-4
3-4. EKM Server Configuration Page.....3-6
3-5. EKM Server Certificate Configuration Page 3-7
3-6. Backup Critical Files Window .....3-8
3-7. Create a Group of Keys .......3-15
3-8. Change Default Write Key Group 3-16
3-9. Assign Group to Drive .......3-17
3-10. Delete Drive ...........3-18
5-1. Server Status ...........5-1
5-2. Login Window ..........5-2
v
Page 6

vi Dell Encryption Key Mgr User's Guide
Page 7

Tables
1. Typographic Conventions used in this Book ix
1-1. Encryption Key Summary .......1-7
2-1. Minimum Software Requirements for Linux 2-2
2-2. Minimum Software Requirements for
Windows ............2-3
6-1. Errors that are reported by the encryption
key manager ...........6-5
7-1. Audit record types that the Encryption Key
Manager writes to audit files ......7-5
7-2. Audit record types by audited event 7-7
8-1. Metadata Query Output Format .....8-2
vii
Page 8

viii Dell Encryption Key Mgr User's Guide
Page 9

Preface
About this Book
This manual contains information and instructions necessary for the installation
and operation of the Dell
procedures pertaining to:
|
v Encryption-capable LTO 4 and LTO 5 Tape Drives
v Cryptographic keys
v Digital certificates
™
Encryption Key Manager. It includes concepts and
Who Should Read this Book
This book is intended for storage and security administrators responsible for
security and backup of vital data, and anyone assisting in the setup and
maintenance of Encryption Key Manager servers in the operating environment. It
assumes the reader has a working knowledge of storage devices and networks.
Conventions and Terminology Used in this Book
This book uses the following typographic conventions:
Table 1. Typographic Conventions used in this Book
Convention Usage
bold Bold words or characters represent system
elements that you must use literally, such as
command names, file names, flag names,
path names, and selected menu options.
constant width Examples, text specified by the user, and
information that the system displays appear
in constant width typeface.
italic Italicized words or characters represent
variable values that you must supply.
[item] Indicates optional items.
{item} Encloses a list from which you must choose
an item in format and syntax descriptions.
| A vertical bar separates items in a list of
choices.
<Key> Indicates keys you press.
Attention Notice
An attention notice indicates the possibility of damage to a program, device,
system, or to data. An exclamation point symbol may accompany an attention
notice, but is not required. Sample attention notices follow:
Attention: If you use a power screwdriver to perform this
procedure it could destroy the tape.
ix
Page 10

Related Publications
Refer to the following publications for more information:
v Getting Started with the Dell™PowerVault™TL2000 and TL4000 Tape Libraries
provides installation information.
™
v Dell
provides supported SCSI commands and protocol governing the behavior of
SCSI interface.
Linux Information
Red Hat Information
The following URL relates to Red Hat Linux®systems:
v http://www.redhat.com
SuSE Information
The following URL relates to SuSE Linux systems:
v http://www.suse.com
Microsoft Windows Information
The following URL provides access to information about Microsoft®Windows
systems:
v http://www.microsoft.com
PowerVault™TL2000 Tape Library and TL4000 Tape Library SCSI Reference
®
Online Support
Visit http://support.dell.com for the following related publication:
Dell Encryption Key Manager Quick Start Guide provides information for setting
up a basic configuration.
Visit http://www.dell.com for the following related publication:
The Library Managed Encryption for Tape white paper suggests best practices for
LTO tape encryption.
x Dell Encryption Key Mgr User's Guide
Page 11

Read this First
Contacting Dell
For customers in the United States, call 800-WWW-DELL (800-999-3355).
Note: If you do not have an active Internet connection, you can find contact
Dell provides several online and telephone-based support and service options.
Availability varies by country and product, and some services may not be available
in your area. To contact Dell for sales, technical support, or customer service
issues:
1. Visit http://support.dell.com.
2. Verify your country or region in the Choose A Country/Region drop-down
3. Click Contact Us on the left side of the page.
4. Select the appropriate service or support link based on your need.
5. Choose the method of contacting Dell that is convenient for you.
information on your purchase invoice, packing slip, bill, or Dell product
catalog.
menu at the bottom of the page.
xi
Page 12

xii Dell Encryption Key Mgr User's Guide
Page 13

Chapter 1. Tape Encryption Overview
Data is one of the most highly valued resources in a competitive business
environment. Protecting that data, controlling access to it, and verifying its
authenticity while maintaining its availability are priorities in our
security-conscious world. Data encryption is a tool that answers many of these
needs. The Dell Encryption Key Manager (referred to as the Encryption Key
Manager from this point forward) simplifies encryption tasks.
|
|
|
|
The LTO 4 and LTO 5 drives are capable of encrypting data as it is written to any
LTO 4 and LTO 5 Data Cartridges. This new capability adds a strong measure of
security to stored data without the processing overhead and performance
degradation associated with encryption performed on the server or the expense of
a dedicated appliance.
The tape drive encryption solution comprises three major elements:
The Encryption-Enabled Tape Drive
All LTO 4 and LTO 5 Tape Drives must be enabled through the library
interface.
See “Hardware and Software Requirements” on page 2-2 for more information
on tape drives.
Encryption Key Management
Encryption involves the use of several kinds of keys, in successive layers. The
generation, maintenance, control, and transmission of these keys depends upon
the operating environment where the encrypting tape drive is installed. Some
applications are capable of performing key management. For environments
without such applications or those where application-agnostic encryption is
desired, Dell Encryption Key Manager performs all necessary key management
tasks. “Managing Encryption” on page 1-2 describes these tasks in more detail.
Encryption Policy
This is the method used to implement encryption. It includes the rules that
govern which volumes are encrypted and the mechanism for key selection.
How and where these rules are set up depends on the operating environment.
See “Managing Encryption” on page 1-2 for more information.
Components
The Encryption Key Manager is part of the Java environment and uses the Java
Security components for its cryptographic capabilities. (For more information on
the Java Security components please see the related publications section.) The
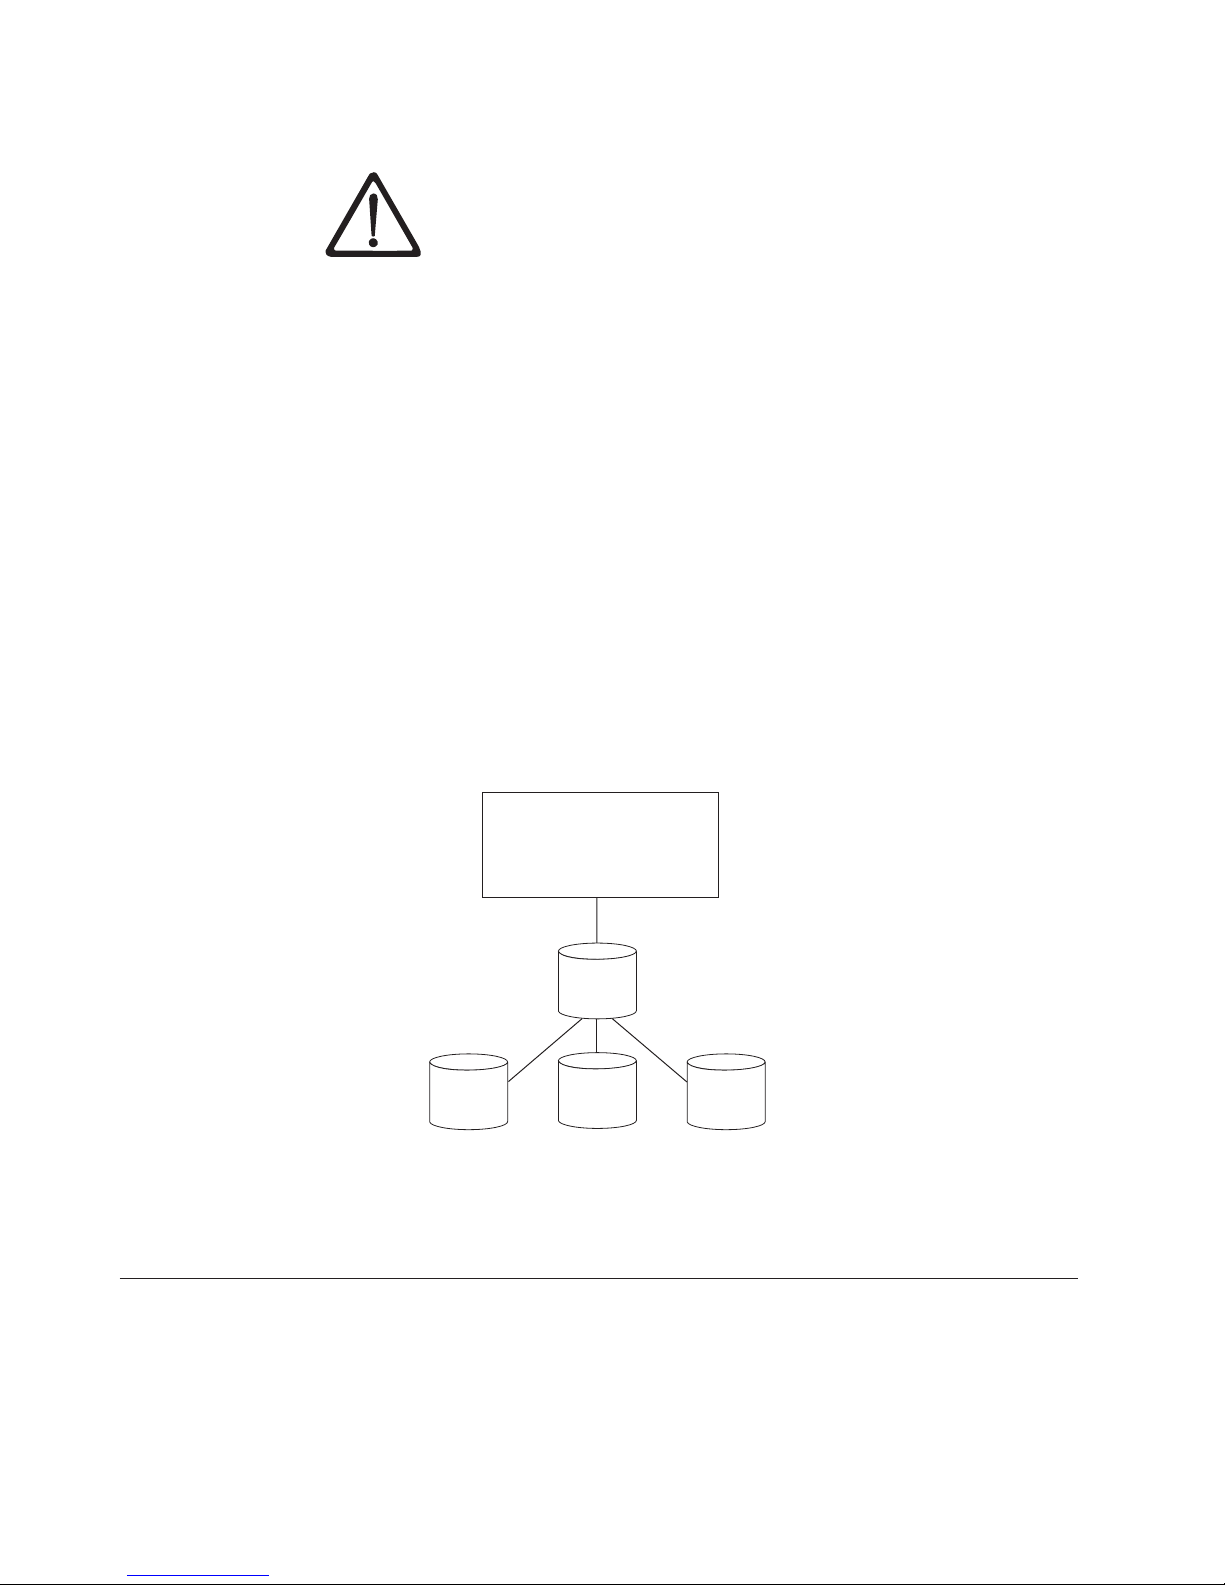
Encryption Key Manager has three main components that are used to control its
behavior. These components are:
Java security keystore
The keystore is defined as part of the Java Cryptography Extension (JCE)
and an element of the Java Security components, which are, in turn, part of
the Java runtime environment. A keystore holds the certificates and keys
(or pointers to the certificates and keys) used by the Encryption Key
Manager to perform cryptographic operations. Several types of Java
keystores are supported offering different operational characteristics to
meet your needs. These characteristics are discussed in detail in “Keystore
1-1
Page 14
Considerations” on page 2-3.
It is impossible to overstate the importance of preserving your keystore data.
Without access to your keystore you will be unable to decrypt your
encrypted tapes. Please carefully read the topics below to understand the
methods available for protecting your keystore data.
Configuration files
The configuration files allow you to customize the behavior of the
Encryption Key Manager to meet the needs of your organization. These
behavioral choices are described extensively in this document, first in
Chapter 2, “Planning Your Encryption Key Manager Environment,” on
page 2-1, then in the Chapter 4, “Configuring the Encryption Key
Manager,” on page 4-1, and later in Appendix B where the full set of
configuration options is described.
Tape drive table
The tape drive table is used by the Encryption Key Manager to keep track
of the tape devices it supports. The tape drive table is a non-editable,
binary file whose location is specified in the configuration file. You can
change its location to meet your needs.
KeyGroups.xml file
This password-protected file contains the names of all encryption key
groups and the aliases of the encryption keys associated with each key
group.
Encryption Key Manager
Generates encryption keys
and manages their transfer
to and from tape devices
Config
File
Holds public/private key
pairs and certificates
Figure 1-1. The Encryption Key Manager’s four main components
Key
store
Key
Groups
Organizes
encryption
keys into
groups
Managing Encryption
The Dell Encryption Key Manager is a Java™software program that assists
encryption-enabled tape drives in generating, protecting, storing, and maintaining
encryption keys that are used to encrypt information being written to, and decrypt
information being read from, tape media (tape and cartridge formats). The
Encryption Key Manager operates on Linux (SLES and RHEL) and Windows, and
is designed to run in the background as a shared resource deployed in several
Records Keystore location and
defines
Encryption Key
Manager
behavior
Drive
Table
Tracks which tape
devices
Manager
Encryption Key
supports
a14m0234
1-2 Dell Encryption Key Mgr User's Guide
Page 15

locations within an enterprise. A command line interface client provides a robust
set of commands to customize the Encryption Key Manager for your environment
and monitor its operation. Many customization and monitoring functions are also
available on the Dell Encryption Key Manager graphical user interface (GUI). The
Encryption Key Manager uses one or more keystores to hold the certificates and
keys (or pointers to the certificates and keys) required for all encryption tasks. See
“Keystore Considerations” on page 2-3 for detailed information.
IMPORTANT Encryption Key Manager HOST SERVER CONFIGURATION
INFORMATION: It is recommended that machines hosting the Dell
Encryption Key Manager program use ECC memory in order to minimize
the risk of data loss. The Encryption Key Manager performs the function of
requesting the generation of encryption keys and passing those keys to the
|
LTO 4 and LTO 5 tape drives. The key material, in wrapped (encrypted
form) resides in system memory during processing by the Encryption Key
Manager. Note that the key material must be transferred without error to the
appropriate tape drive so that data written on a cartridge may be recovered
(decrypted). If for some reason key material is corrupted due to a bit error in
system memory, and that key material is used to write data to a cartridge,
then the data written to that cartridge will not be recoverable (i.e. decrypted
at a later date). There are safeguards in place to make sure that such data
errors do not occur. However, if the machine hosting the Encryption Key
Manager is not using Error Correction Code (ECC) memory there remains a
possibility that the key material may become corrupted while in system
memory and the corruption could then cause data loss. The chance of this
occurrence is small, but it is always recommended that machines hosting
critical applications (like the Encryption Key Manager) use ECC memory.
The Encryption Key Manager acts as a background process awaiting key
generation or key retrieval requests sent to it through a TCP/IP communication
path between itself and the tape library. When a tape drive writes encrypted data,
it first requests an encryption key from the Encryption Key Manager. Upon receipt
of the request, the Encryption Key Manager performs the following tasks.
The Encryption Key Manager fetches an existing AES key from a keystore and
wraps it for secure transfer to the tape drive where it is unwrapped upon arrival
and used to encrypt the data being written to tape.
|
When an encrypted tape is read by an LTO 4 or LTO 5 drive, the Encryption Key
Manager fetches the required key from the keystore, based on the information in
the Key ID on the tape, and serves it to the tape drive wrapped for secure transfer.
There are two methods of encryption management to choose from. These methods
differ in where the encryption policy engine resides, where key management is
performed for your solution, as well as how the Encryption Key Manager is
connected to the drive. Your operating environment determines which is the best
for you. Key management and the encryption policy engine may be located in any
one of the following two environmental layers.
Chapter 1. Tape Encryption Overview 1-3
Page 16
Policy
Application
Data Path
or
Library
Policy
Library Drive Interface
Figure 1-2. Two possible locations for encryption policy engine and key management.
Application Layer
An application program, separate from the key manager, initiates data transfer
for tape storage. See “Application-Managed Tape Encryption” for supported
applications.
Library Layer
The enclosure for tape storage, such as the Dell PowerVault TL2000/TL4000
and ML6000 family. A modern tape library contains an internal interface to
each tape drive within it.
Data Path
a14m0252
Application-Managed Tape Encryption
This method is best where operating environments run an application already
capable of generating and managing encryption policies and keys. Policies
specifying when encryption is to be used are defined through the application
interface. The policies and keys pass through the data path between the application
layer and the encrypting tape drives. Encryption is the result of interaction
between the application and the encryption-enabled tape drive, and does not
require any changes to the system and library layers. Since the application
manages the encryption keys, volumes written and encrypted using the application
method can only be read using the application-managed encryption method, by
the same application that wrote them.
Encryption Key Manager is not required by, or used by, application-managed
tape encryption.
The following minimum version applications can be used to manage encryption:
v CommVault Galaxy 7.0 SP1
v Symantec Backup Exec 12
1-4 Dell Encryption Key Mgr User's Guide
Page 17

|
Application-managed tape encryption is supported in LTO 4 and LTO 5 Tape
Drives in:
v Dell
v Dell
v Dell™PowerVault™ML6000 Tape Library
See your tape backup software application documentation to learn how to manage
encryption policies and keys.
Library-Managed Tape Encryption
|
Use this method for LTO 4 and LTO 5 tape drives in the Dell™PowerVault
TL2000 Tape Library, Dell™PowerVault™TL4000 Tape Library, or Dell
PowerVault™ML6000 Tape Library. Key generation and management is performed
by the Encryption Key Manager, a Java application running on a library-attached
host. Policy control and keys pass through the library-to-drive interface, therefore
encryption is transparent to the applications.
About Encryption Keys
An encryption key is a random string of bits generated specifically to scramble and
unscramble data. Encryption keys are created using algorithms designed to ensure
that each key is unique and unpredictable. The longer the key constructed this
way, the harder it is to break the encryption code. Both the IBM and T10 methods
of encryption use 256-bit AES algorithm keys to encrypt data. 256-bit AES is the
encryption standard currently recognized and recommended by the U.S.
government, which allows three different key lengths. 256-bit keys are the longest
allowed by AES.
™
PowerVault™TL2000 Tape Library
™
PowerVault™TL4000 Tape Library
™
™
Two types of encryption algorithms are used by the Encryption Key Manager:
symmetric algorithms and asymmetric algorithms. Symmetric, or secret key
encryption, uses a single key for both encryption and decryption. Symmetric key
encryption is generally used for encrypting large amounts of data in an efficient
manner. 256-bit AES keys are symmetric keys. Asymmetric, or public/private
encryption, uses a pair of keys. Data encrypted using one key can only be
decrypted using the other key in the public/private key pair. When an asymmetric
key pair is generated, the public key is used to encrypt, and the private key is
used to decrypt.
The Encryption Key Manager uses both symmetric and asymmetric keys;
symmetric encryption for high-speed encryption of user or host data, and
asymmetric encryption (which is necessarily slower) for protecting the symmetric
key.
Encryption keys may be generated for the Encryption Key Manager by a utility
such as keytool. The responsibility for generating AES keys and the manner in
which they are transferred to the tape drive depends on the method of encryption
management. However, it may be helpful to understand the difference between
how the Encryption Key Manager uses encryption keys and how other applications
use them.
Encryption Key Processing by the Dell Encryption Key Manager
|
|
In library-managed tape encryption, unencrypted data is sent to the LTO 4 or LTO
5 Tape Drive and converted to ciphertext using a pre-generated symmetric Data
Key (DK) from a keystore available to the Encryption Key Manager, and is then
Chapter 1. Tape Encryption Overview 1-5
Page 18

written to tape. The Encryption Key Manager selects a pre-generated DK in round
robin fashion. DKs are reused on multiple tape cartridges when an insufficient
|
number of DKs have been pre-generated. The DK is sent to the LTO 4 or the LTO 5
tape drive in encrypted or wrapped form by the Encryption Key Manager. The
|
|
|
LTO 4 and LTO 5 tape drives unwrap this DK and use it to perform encryption or
decryption. However, no wrapped key is stored anywhere on the LTO 4 or the
LTO 5 tape cartridges. After the encrypted volume is written, the DK must be
accessible based on the alias or key label, and available to the Encryption Key
Manager in order for the volume to be read. Figure 1-3 illustrates this process.
The Dell Encryption Key Manager also gives you the ability to organize your
symmetric keys for LTO encryption into key groups. In this way, you can group
keys according to the type of data they encrypt, the users who have access to
them, or by any other meaningful characteristic. See “Creating and Managing Key
Groups” on page 3-14 for more information.
Encryption Key Processing by Other Applications
|
|
In application-managed tape encryption, unencrypted data is sent to the LTO 4 and
LTO 5 Tape Drives and converted to ciphertext using a symmetric DK provided by
the application, and is then written to tape. The DK is not stored anywhere on the
tape cartridge. Once the encrypted volume is written, the DK must be in a location
available to the application, a server database, for example, in order for the volume
to be read.
|
LTO 4 and LTO 5 Tape Drives can use applications such as Yosemite (for Dell
PowerVault TL2000 and TL4000 Tape Libraries), CommVault, and Symantec
Backup Exec for application-managed encryption.
|
Alternatively, LTO 4 and LTO 5 Tape Drives can be used by applications that use
the T10 command set to perform encryption. The T10 command set uses symmetric
256-bit AES keys provided by the application. T10 can use multiple, unique DKs
per tape cartridge, and even write encrypted data and clear data to the same tape
cartridge. When the application encrypts a tape cartridge, it selects or generates a
DK using a method determined by the application and sends it to the tape drive.
The key is not wrapped with an asymmetric public key and it is not stored on the
tape cartridge. Once the encrypted data is written to tape, the DK must be in a
location available to the application in order for the data to be read.
The process for application-managed and library-managed encryption tape
encryption is shown in Figure 1-3.
Clear
Data
DK
Figure 1-3. Encryption Using Symmetric Encryption Keys. Library-Managed and Application-Managed Encryption on
LTO 4 and LTO 5 Tape Drives.
|
1-6 Dell Encryption Key Mgr User's Guide
E {data,DK}
sym
Cipher
Tex t
Encrypted
Tape
a14m0236
Page 19

In Summary
The number of encryption keys that may be used for each volume depends on the
tape drive, the encryption standard, and method used to manage the encryption.
|
||
For transparent encryption of LTO 4 and LTO 5, (that is, using library-managed
encryption with the Encryption Key Manager,) the uniqueness of DKs depends on
the availability of a sufficient number of pre-generated keys to the Encryption Key
Manager.
Table 1-1. Encryption Key Summary
Encryption Management
Method
Library-Managed Encryption 1 DK / cartridge N/A
Application-Managed
Encryption
DK = Symmetric AES 256-bit DK
IBM Encryption T10 Encryption
Multiple DKs / cartridge Multiple DKs / cartridge
Keys used by
Chapter 1. Tape Encryption Overview 1-7
Page 20

1-8 Dell Encryption Key Mgr User's Guide
Page 21

Chapter 2. Planning Your Encryption Key Manager
Environment
This section is intended to provide information to allow you to determine the best
Encryption Key Manager configuration for your needs. Many factors must be
considered when you are planning how to set up your encryption strategy.
Encryption Setup Tasks at a Glance
Before you can use the encryption capability of the tape drive, certain software and
hardware requirements must be met. The following checklists are intended to help
you meet these requirements.
Encryption Key Manager Setup Tasks
Before you can encrypt tapes, the Encryption Key Manager must first be
configured and running so that it can communicate with the encrypting tape
drives. The Encryption Key Manager need not be running while tape drives are
being installed, but it must be running in order to perform encryption.
v Decide what system platform(s) to use as Encryption Key Manager server(s).
v Upgrade server operating system if necessary. (See “Hardware and Software
Requirements” on page 2-2.)
v Install Java Unrestricted Policy Files. (See “Hardware and Software
Requirements” on page 2-2.)
v Upgrade the Encryption Key Manager JAR. (See “Downloading the Latest
|
Version Key Manager ISO Image” on page 3-1.)
v Create keys, certificates, and key groups.
“Using the GUI to Create a Configuration File, Keystore, and Certificates” on
page 3-5
“Creating and Managing Key Groups” on page 3-14
v These steps are not required if you follow the procedure in “Using the GUI to
Create a Configuration File, Keystore, and Certificates” on page 3-5, unless you
wish to take advantage of additional configuration options:
– If necessary, import keys and certificates. (See “Importing Data Keys Using
Keytool -importseckey ” on page 3-12.)
– Define the configuration properties file. (See Chapter 4, “Configuring the
Encryption Key Manager,” on page 4-1.)
– Define tape drives to the Encryption Key Manager or set
drive.acceptUnknownDrives configuration property value on. (See
“adddrive” on page 5-8 to define drives explicitly, or see “Automatically
Update Tape Drive Table” on page 4-1.)
– Start the Encryption Key Manager server. (See “Starting, Refreshing, and
Stopping the Key Manager Server” on page 5-1.)
– Start the command line interface client. (See “The Command Line Interface
Client” on page 5-5.)
Planning for Library-Managed Tape Encryption
In order to perform encryption, you require:
|
v Encryption-capable LTO 4 and LTO 5 Tape Drive(s)
2-1
Page 22

v Keystore
v Dell Encryption Key Manager
Library-Managed Tape Encryption Tasks
|
|
1. Install and cable the LTO 4 and LTO 5 Tape Drive(s).
v Update library firmware (TL2000, TL4000, ML6000 where necessary). Visit
http://support.dell.com.
™
– Dell
PowerVault™TL2000 Tape Library minimum required firmware
version = 5.xx.
™
– Dell
PowerVault™TL4000 Tape Library minimum required firmware
version = 5.xx.
™
– Dell
PowerVault™ML6000 Tape Library Family minimum required
firmware version = 415G.xxx.
v Update tape drive firmware if necessary The minimum required firmware
version is 77B5.
2. Enable LTO 4 and LTO 5 Tape Drives and Tape Library for library-managed
tape encryption (see your Dell tape library information for details).
v Add Encryption Key Manager Server IP addresses
3. Use library diagnostic functions to verify Encryption Key Manager paths and
encryption configuration (see your Dell tape library information for details).
Hardware and Software Requirements
Note: Only the IBM version of the Java Runtime Environment (JRE) for each of the
following platforms supports the Encryption Key Manager.
Linux Solution Components
Operating Systems
v RHEL 4
v RHEL 5
v SLES 9
v SLES 10
|
|
v SLES 11
Encryption Key Manager (Running on Linux)
Table 2-1. Minimum Software Requirements for Linux
IBM Software
Platform
64-bit AMD/Opteron/
EM64T
®
32-bit Intel
compatible
Developer Kit Available at:
Java 6.0 SR5 http://support.dell.com
Tape Libraries
|
|
|
For the Dell PowerVault TL2000 Tape Library, TL4000 Tape Library, and ML6000
Tape Library, assure that the firmware level is the latest available. For firmware
updates, visit http://support.dell.com.
2-2 Dell Encryption Key Mgr User's Guide
Page 23

Tape Drive
|
|
For the LTO 4 and LTO 5 Tape Drives, assure that the firmware level is the latest
available. For firmware updates, visit http://support.dell.com.
Windows Solution Components
Operating Systems
|
|
|
Windows Server 2003, 2008, and 2008 R2
Dell Encryption Key Manager
The minimum required version of the Encryption Key Manager is 2.1 with a build
date of 20070914 or later, and one of the following IBM Runtime Environments:
Table 2-2. Minimum Software Requirements for Windows
Operating
System IBM Runtime Environment
Windows 2003
Windows 2008
and 2008 R2
®
v IBM
v IBM 32-bit Runtime Environment for Windows, Java 2 Technology
IBM 64-bit Runtime Environment for Windows on AMD64/EM64T
architecture, Java 2 Technology Edition, Version 6.0 SR5
64-bit Runtime Environment for Windows on AMD64/EM64T
architecture, Java 2 Technology Edition, Version 5.0 SR5
Edition, Version 5.0 SR5
Tape Libraries
|
|
|
For the Dell™PowerVault™TL2000 Tape Library, Dell™PowerVault™TL4000 Tape
Library, and Dell™PowerVault™ML6000 Tape Library, assure that the firmware
level is the latest available. For firmware update, visit http://support.dell.com.
Tape Drive
|
|
For the LTO 4 and LTO 5 Tape Drives, assure that the firmware level is the latest
available. For firmware update, visit http://support.dell.com.
Keystore Considerations
The JCEKS Keystore
EKM supports the JCEKS keystore type.
JCEKS (Unix System Services file based) is a file-based keystore supported on all
platforms where EKM runs. Thus it is relatively easy to copy the contents of this
keystore for back up and recovery, and to keep two EKM instances synchronized
for failover. JCEKS provides password-based protection of the contents of the
keystore for security, and provides relatively good performance. File copy methods
such as FTP may be used.
It is impossible to overstate the importance of preserving your keystore data.
Without access to your keystore you will be unable to decrypt your
encrypted tapes. Carefully read the topics below to understand the methods
available for protecting your keystore data.
Chapter 2. Planning Your Encryption Key Manager Environment 2-3
Page 24
|
Encryption Keys and the LTO 4 and LTO 5 Tape Drives
The Dell Encryption Key Manager and its supported tape drives use symmetric,
256-bit AES keys to encrypt data. This topic explains what you should know about
these keys and certificates.
|
|
|
|
|
When performing encryption tasks on the LTO 4 or LTO 5 Tape Drives for LTO
tape cartridges, Encryption Key Manager uses 256-bit AES symmetric data keys
only.
When an LTO 4 or LTO 5 requests a key, Encryption Key Manager uses the alias
specified for the tape drive. If no alias was specified for the tape drive, an alias
from a key group, key alias list, or range of key aliases specified in the
symmetricKeySet configuration property is used. Lacking a specific alias for the
tape drive, aliases are selected from the other entities in round robin fashion to
balance the use of keys evenly.
The selected alias is associated with a symmetric Data Key (DK) that was
preloaded in the keystore. Encryption Key Manager sends this DK, wrapped with
a different key that the tape drive can decrypt, to the LTO 4 or LTO 5 tape drive to
encrypt the data. The DK is not transmitted through TCP/IP in the clear. The
selected alias is also converted to an entity called Data Key identifier (DKi), which
is written to tape with the encrypted data. In this way, Encryption Key Manager
can use the DKi to identify the correct DK needed to decrypt the data when the
LTO 4 or LTO 5 tape is read.
The adddrive and moddrive topics in “CLI Commands” on page 5-7 show how to
specify an alias for a tape drive. See “Generating Keys and Aliases for Encryption
on LTO 4 and LTO 5” on page 3-9, which includes information on importing keys,
exporting keys, and specifying default aliases in the symmetricKeySet
configuration property. “Creating and Managing Key Groups” on page 3-14 shows
how to define a key group and populate it with aliases from your keystore.
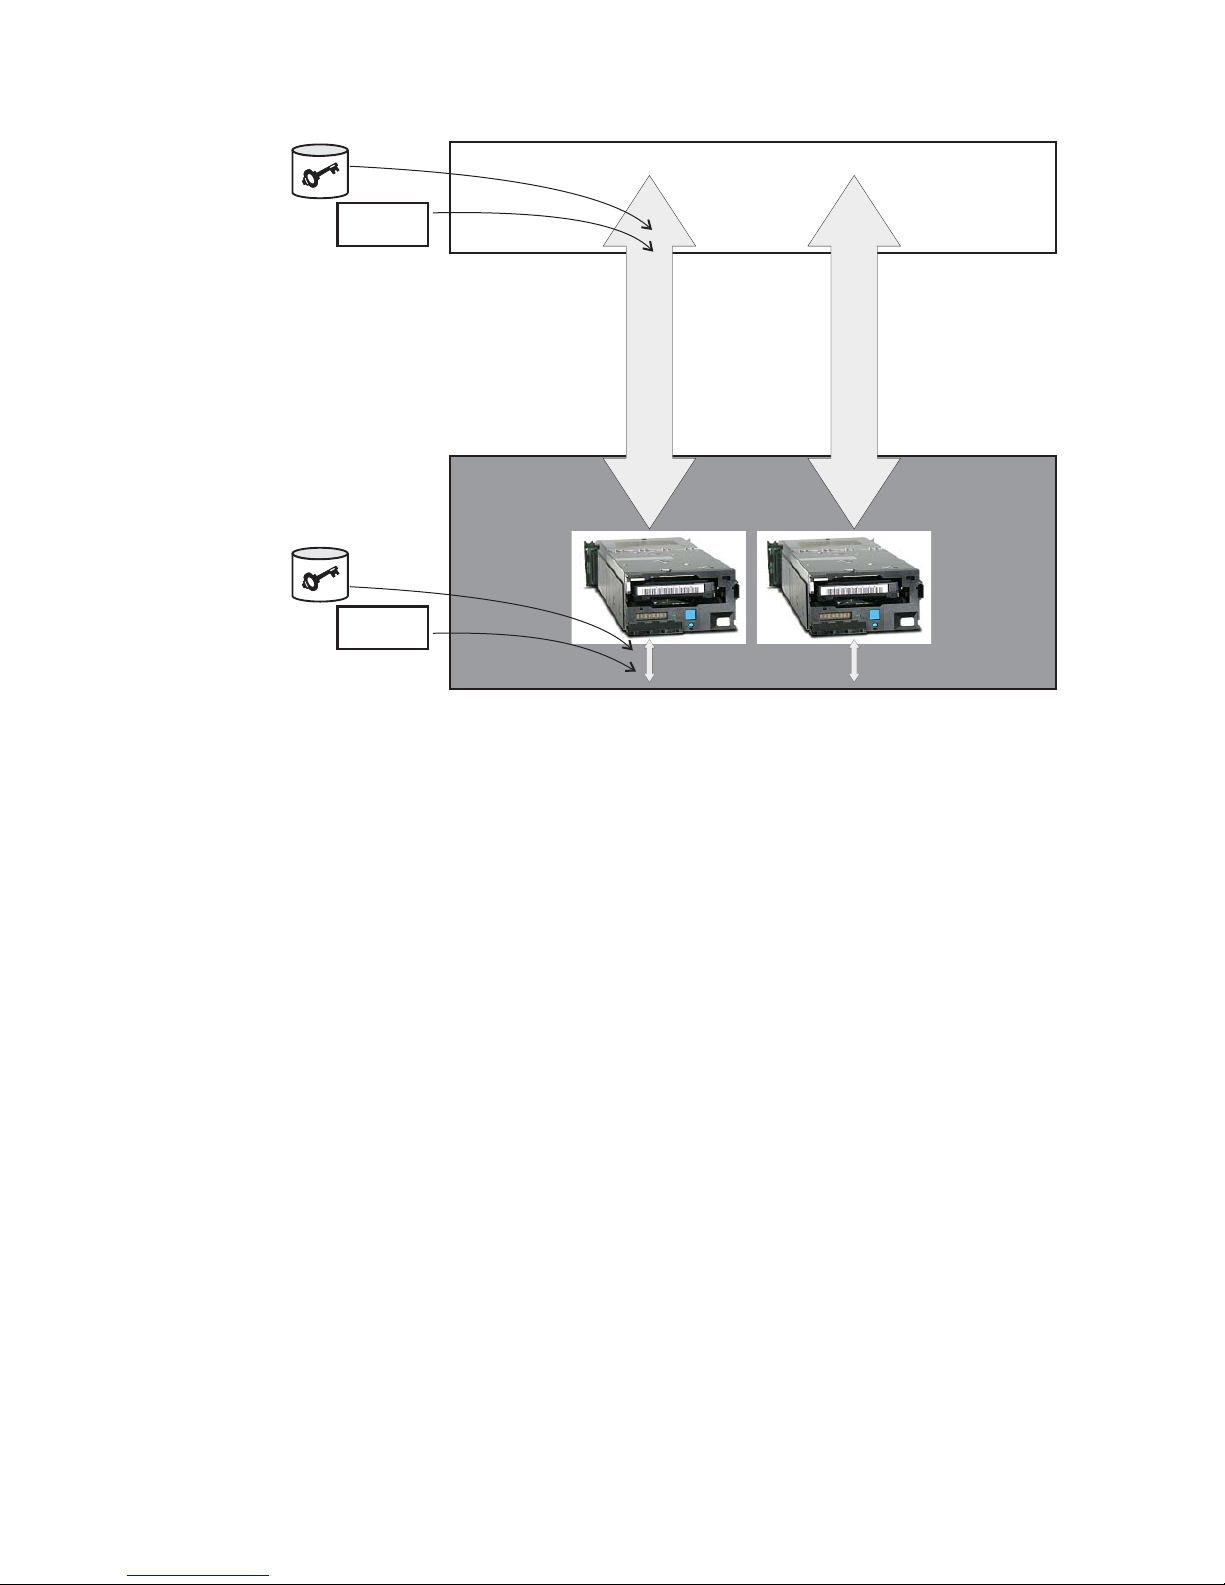
Figure 2-1 shows how keys are processed for encrypted write operation.
5
DK, DKi
6
Key Manager
alias
3
DK
1
Config
File
4
Key
store
Figure 2-1. LTO 4 or LTO 5 Tape Drive Request for Encryption Write Operation
|
1. Tape drive requests key to encrypt tape
2. Encryption Key Manager verifies tape device in Drive Table
2
Drive
Table
7
2-4 Dell Encryption Key Mgr User's Guide
Page 25
3. If no alias is specified in the request and no alias is specified in the drive table,
Encryption Key Manager selects an alias from the set of aliases or the key
group in the keyAliasList.
4. Encryption Key Manager fetches a corresponding DK from the keystore.
5. Encryption Key Manager converts the alias to a DKi and wraps the DK with a
key the drive can decrypt
6. Encryption Key Manager sends the DK and DKi to the tape drive
7. Tape drive unwraps the DK and writes encrypted data and DKi to tape
Figure 2-2 shows how keys are processed for encrypted read operation.
4
DK
5
Key Manager
3
DKi Alias
1
Config
File
2
Key
store
Figure 2-2. LTO 4 or LTO 5 Tape Drive Request for Encryption Read Operation
|
1. Tape drive receives read request and sends DKi to Encryption Key Manager
2. Encryption Key Manager verifies tape device in Drive Table
3. Encryption Key Manager translates DKi to alias and fetches corresponding DK
from keystore
4. Encryption Key Manager wraps the DK with a key the drive can decrypt
5. Encryption Key Manager sends the wrapped DK to tape drive
6. Tape drive unwraps the DK and uses it to decrypt the data
Drive
Table
6
Backing up Keystore Data
Note: Due to the critical nature of the keys in your keystore, it is vital that you
back up this data on a non-encrypted device so that you can recover it as
needed and be able to read the tapes that were encrypted using those
certificates associated with that tape drive or library. Failure to backup
your keystore properly will result in irrevocably losing all access to your
encrypted data.
There are many ways to backup this keystore information. Each keystore type has
it own unique characteristics. These general guidelines apply to all:
v Keep a copy of all certificates loaded into the keystore (usually a PKCS12 format
file).
v Use system backup capabilities (such as RACF) to create a backup copy of the
keystore information (be careful not to encrypt this copy using the encrypting
tape drives as it would impossible to decrypt it for recovery).
Chapter 2. Planning Your Encryption Key Manager Environment 2-5
Page 26
v Maintain a primary and secondary Encryption Key Manager and keystore copy
(for backup as well as failover redundancy). Back up the keystores for both
primary and secondary for added redundancy.
v For a JCEKS keystore, simply copy the keystore file and store the clear
(unencrypted) copy in a secure location such as a vault (be careful not to encrypt
this copy using the encrypting tape drives as it would be impossible to decrypt
it for recovery).
At a minimum, you should back up your keystore data whenever you change it.
The Encryption Key Manager does not modify keystore data. The only changes to
the keystore are those that you apply, so be sure to copy the keystore as soon as
you change it.
Backing up Your Files Using the GUI
1. Open the GUI if it is not yet started:
On Windows
Navigate to c:\ekm\gui and click LaunchEKMGui.bat
On Linux platforms
Navigate to /var/ekm/gui and enter . ./LaunchEKMGui.sh
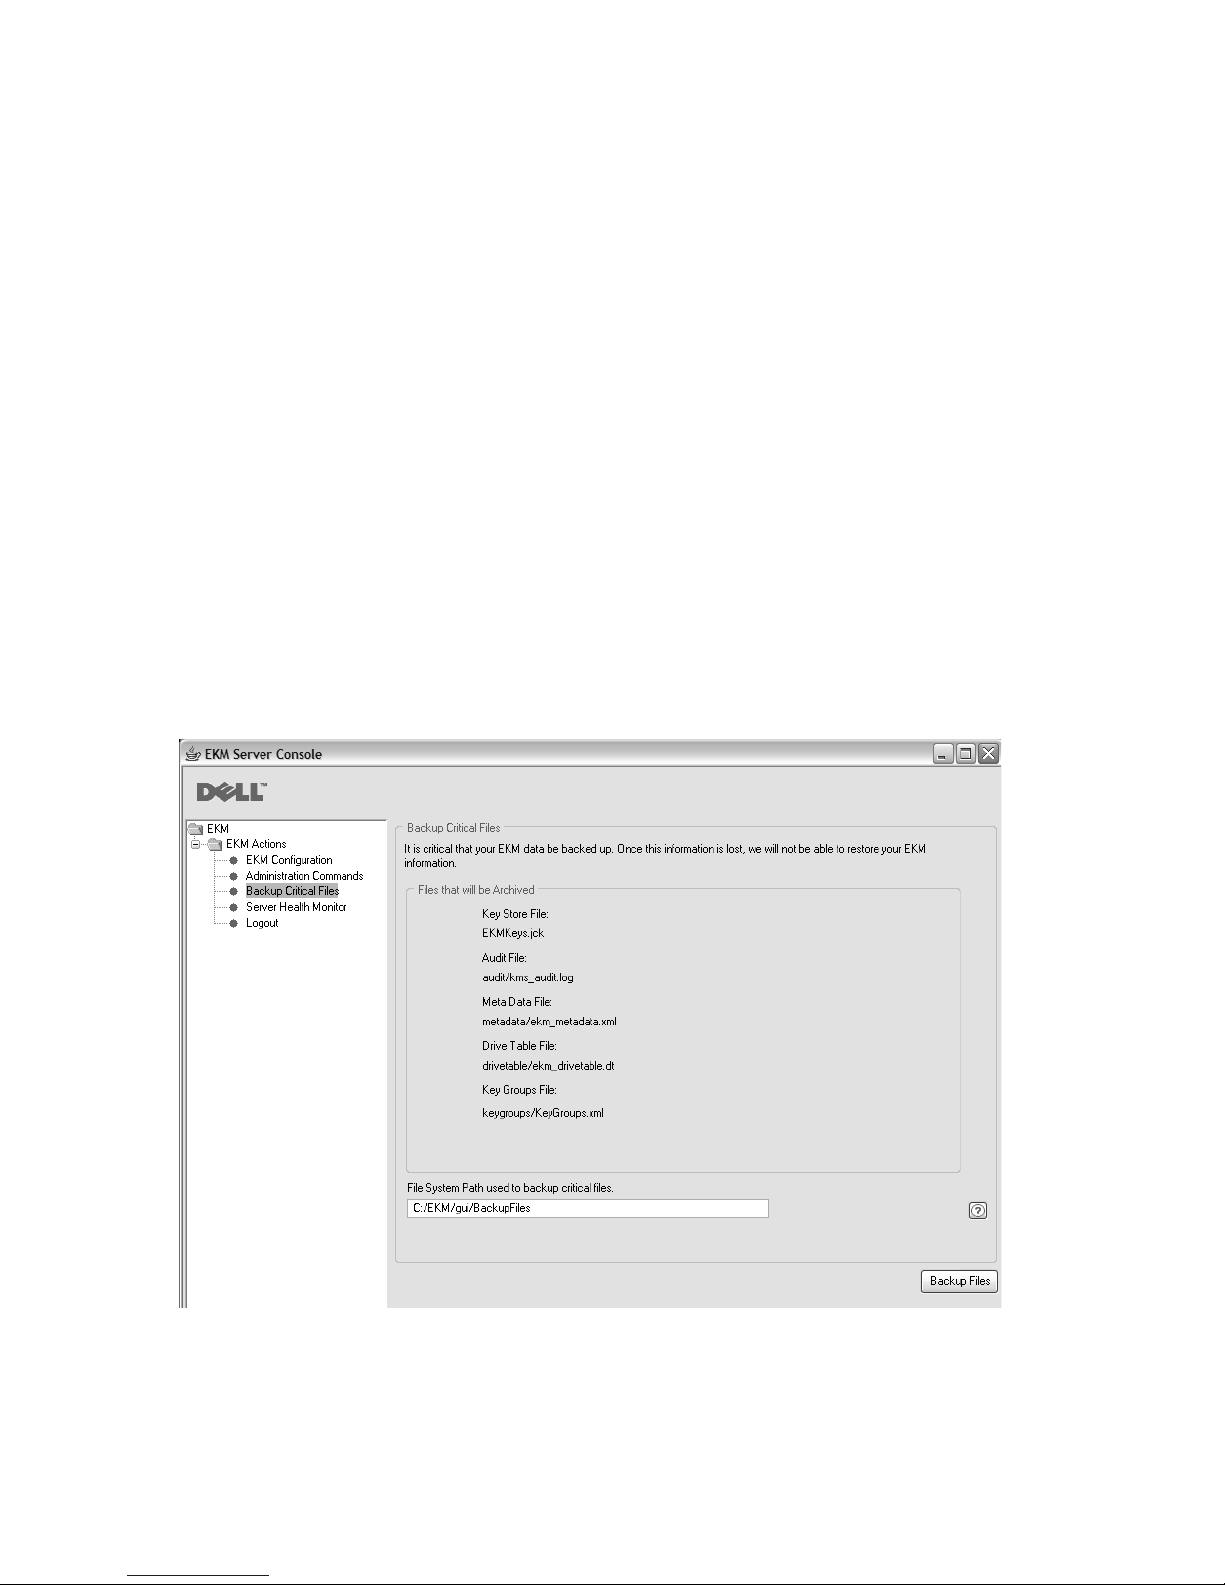
2. Select Backup Critical Files in the navigator on the left of the Encryption Key
Manager GUI.
3. Enter the path for your backup data in the displayed dialog (Figure 2-3).
Figure 2-3. Backup Critical Files Window
4. Click Backup Files.
5. An information message displays the results.
2-6 Dell Encryption Key Mgr User's Guide
a14m0241
Page 27

Multiple Key Managers for Redundancy
The Encryption Key Manager is designed to work with tape drives and libraries to
allow redundancy, and thus high availability, so you can have multiple key
managers servicing the same tape drives and libraries. Moreover, these key
managers need not be on the same systems as the tape drives and libraries. The
maximum number of key managers depends on your library or proxy. The only
requirement is that they be available to the tape drives through TCP/IP
connectivity.
This allows you to have two Encryption Key Managers that are mirror images of
each other with built-in backup of the critical information about your keystores, as
well as a failover in the event one key manager becomes unavailable. When you
configure your device (or proxy) you can point it to two key managers. If one key
manager becomes unavailable for any reason, your device (or library) will simply
use the alternate key manager.
You also have the capability to keep the two Encryption Key Managers
synchronized. It is critical that you take advantage of this important function when
needed, both for its inherent backup of critical data and also for its failover
capability to avoid any outages in your tape operations. Refer to “Synchronizing
Data Between Two Key Manager Servers” on page 4-2.
Note: Synchronization does not include keystores. They must be copied manually.
Encryption Key Manager Server Configurations
The Encryption Key Manager may be installed on a single-server or on multiple
servers. The following examples show one- and two-key manager configurations
but your library may allow more.
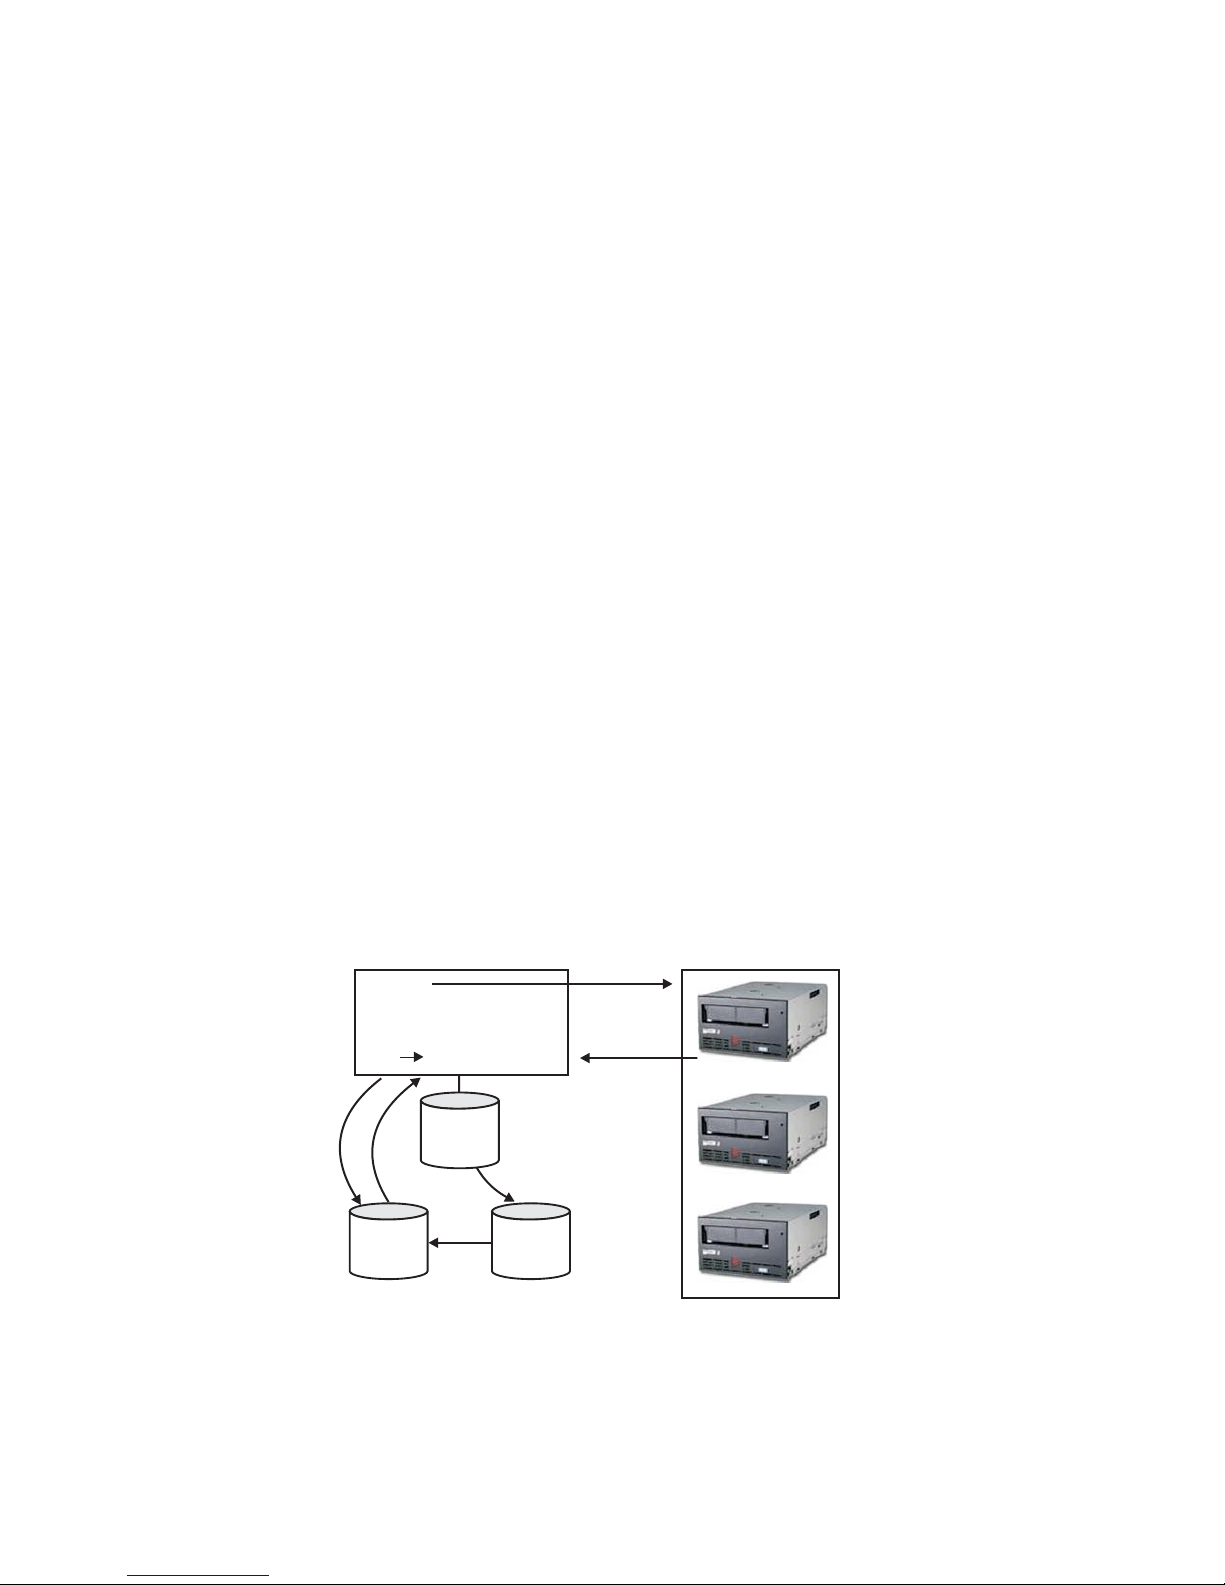
Single-Server Configuration
A single-server configuration, shown in Figure 2-4, is the simplest Encryption Key
Manager configuration. However, because of the lack of redundancy it is not
recommended. In this configuration, all tape drives rely on a single key manager
server with no backup. Should the server go down, the keystore, configuration file,
KeyGroups.xml file, and drive table would be unavailable, making any encrypted
tape unreadable. In a single-server configuration you must ensure that backup
copies of the keystore, configuration file, KeyGroups.xml file, and drive table are
maintained in a safe place, separate from the Encryption Key Manager, so its
function can be rebuilt on a replacement server if the server copies are lost.
|
|
Figure 2-4. Single Server Configuration
|
|
Tape Library
A
Encryption
Key
Manager
Tape Library
B
Key Store
Drive Table
Config File
Key Groups
Tape Library
C
a14m0256
Chapter 2. Planning Your Encryption Key Manager Environment 2-7
Page 28

Two-Server Configurations
A two-server configuration is recommended. This Encryption Key Manager
configuration will automatically failover to the secondary key manager should the
primary be inaccessible for any reason.
Note: When different Encryption Key Manager servers are used to handle requests
from the same set of tape drives, the information in the associated keystores
MUST be identical. This is required so that regardless which key manager
server is contacted, the necessary information is available to support
requests from the tape drives.
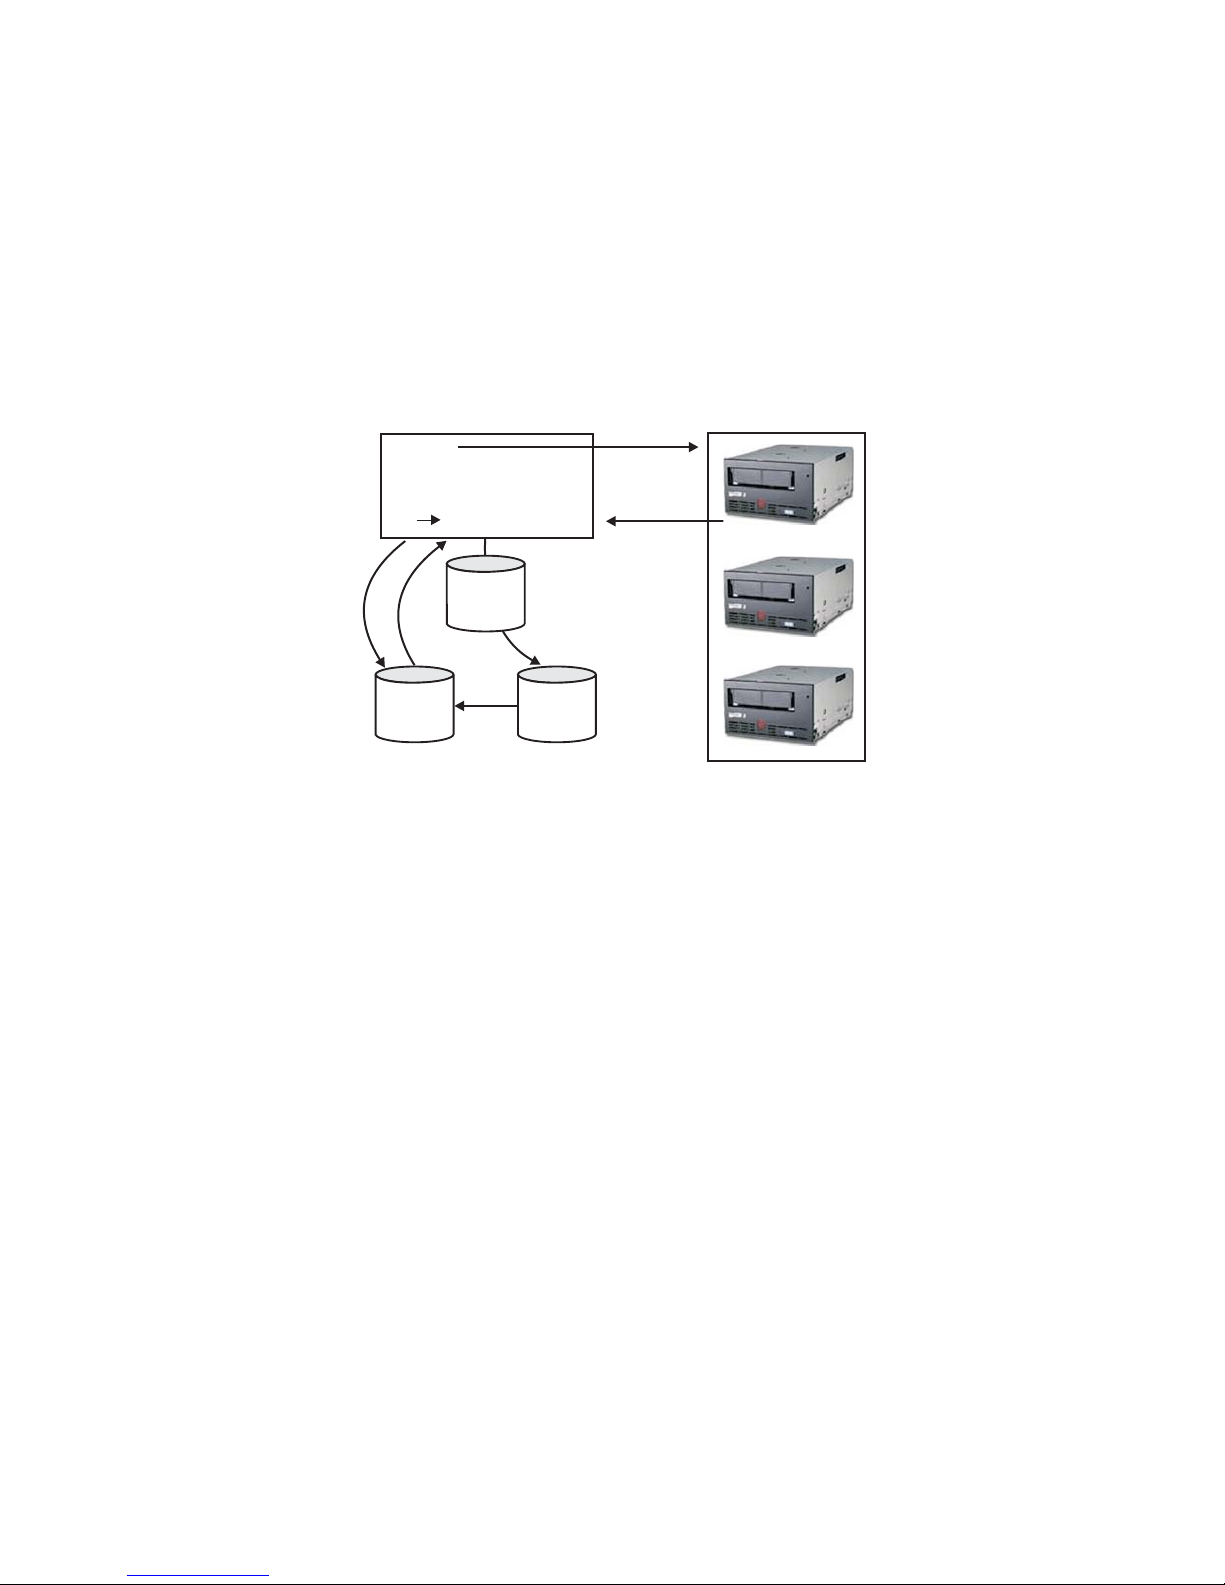
Identical configurations: In an environment with two Encryption Key Manager
servers having identical configurations, such as those shown in Figure 2-5,
processing will automatically failover to the secondary key manager should the
primary go down. In such a configuration it is essential that the two key manager
servers be synchronized. Updates to the configuration file and drive table of one
key manager server can be duplicated on the other automatically using the sync
command, but updates to one keystore must be copied to the other using methods
specific to the keystore(s) being used. The keystores and key groups XML file must
be copied manually. Refer to “Synchronizing Data Between Two Key Manager
Servers” on page 4-2 for more information.
|
Primary
Encryption
Key Manager
Tape Library
A
|
Figure 2-5. Two Servers with Shared Configurations
|
Key Store
Drive Table
Config File
Key Groups
|
Separate configurations: Two Encryption Key Manager servers may share a
common keystore and drive table yet have two different configuration files and
two different sets of key groups defined in their XML files. The only requirement is
that the keys used to serve the common tape drives must be the same for each
server. This allows each key manager server to have its own set of properties. In
this type of configuration, shown in Figure 2-6 on page 2-9, only the drive table
should be synchronized between key manager servers. (Refer to “Synchronizing
Data Between Two Key Manager Servers” on page 4-2 for more information.) Be
sure to specify sync.type = drivetab (do not specify config or all) to prevent the
configuration files from being overwritten.
Note: There is no way to partially share the configuration between servers.
=
=
Drive Table
=
Config File
=
Key Groups
Tape Library
B
Key Store
Secondary
Encryption
Key Manager
Tape Library
C
a14m0254
2-8 Dell Encryption Key Mgr User's Guide
Page 29

|
Primary
Encryption
Key Manager
Key Store
Drive Table
Config File
Key Groups
=
=
=
Key Store
Drive Table
Config File
Key Groups
Secondary
Encryption
Key Manager
Tape Library
A
|
Figure 2-6. Two Servers with Different Configurations Accessing the Same Devices
|
Tape Library
B
|
Disaster Recovery Site Considerations
If you plan to use a disaster recovery (DR) site, the Encryption Key Manager
provides a number of options to enable that site to read and write encrypted tapes.
These are:
v Create a duplicate Encryption Key Manager at the DR site.
Set up a duplicate Encryption Key Manager at the DR site with the same
information as your local Encryption Key Manager (configuration file, tape drive
table, key groups XML file, and keystore). This key manager would then be in
place and capable of taking over for one of your existing production key
managers to read and write encrypted tapes.
v Create a backup copy of the three Encryption Key Manager data files to be able
to recover as needed.
If you create a current copy of the four data elements needed by the Encryption
Key Manager (configuration file, tape drive table, key groups XML file, and
keystore) then you would be able to start a key manager at any time to act as a
duplicate at the DR site. (Remember that you should not use the Encryption Key
Manager to encrypt the copies of these files as you would not be able to decrypt
it without a functioning key manager). If your DR site uses different tape drives
from your primary site, the configuration file and tape drive table must contain
the correct information for the DR site.
Tape Library
C
a14m0255
Considerations for Sharing Encrypted Tapes Offsite
Note: It is important to verify the validity of any certificate received from a
business partner by checking the chain of trust of such a certificate back to
the Certificate Authority (CA) that ultimately signed it. If you trust the CA,
then you can trust that certificate. Alternately, the validity of a certificate can
be verified if it was securely guarded in transit. Failure to verify a
certificate’s validity in one of these ways may open the door to a
“Man-in-the-Middle” attack.
|
|
Sharing LTO 4 and LTO 5 Tape
In order to share encrypted data on an LTO 4 or LTO 5 tape, a copy of the
symmetric key used to encrypt the data on the tape must be made available to the
other organization to enable them to read the tape. In order for the symmetric key
to be shared, the other organization must share their public key with you. This
public key will be used to wrap the symmetric key when it is exported from the
Encryption Key Manager keystore using keytool (see “Exporting Data Keys Using
Chapter 2. Planning Your Encryption Key Manager Environment 2-9
Page 30

Keytool -exportseckey ” on page 3-12). When the other organization imports the
symmetric key into their Encryption Key Manager keystore, it will be unwrapped
using their corresponding private key (see “Importing Data Keys Using Keytool
-importseckey ” on page 3-12). This ensures that the symmetric key is safe in
transit since only the holder of the private key is able to unwrap the symmetric
key. With the symmetric key that was used to encrypt the data in their Encryption
Key Manager keystore, the other organization will then be able to read the data on
the tape.
Federal Information Processing Standard 140-2 Considerations
Federal Information Processing Standard 140-2 has become important now that the
Federal government requires all its cryptographic providers to be FIPS 140
certified. This standard has also been adopted in a growing private sector
community. The certification of cryptographic capabilities by a third party in
accordance with government standards is felt to have increased value in this
security-conscious world.
The Encryption Key Manager does not provide cryptographic capabilities itself and
therefore does not require, nor is it allowed to obtain, FIPS 140-2 certification.
However, the Encryption Key Manager takes advantage of the cryptographic
capabilities of the IBM JVM in the IBM Java Cryptographic Extension component
and allows the selection and use of the IBMJCEFIPS cryptographic provider, which
has a FIPS 140-2 level 1 certification. By setting the fips configuration parameter to
on in the Configuration Properties file, you make the Encryption Key Manager use
the IBMJCEFIPS provider for all cryptographic functions.
See the documentation from specific hardware and software cryptographic
providers for information on whether their products are FIPS 140-2 certified.
2-10 Dell Encryption Key Mgr User's Guide
Page 31

Chapter 3. Installing the Encryption Key Manager and
Keystores
The Encryption Key Manager is shipped with the IBM Java Virtual Machine
installation, and requires the IBM Software Developer Kit for Linux, and the IBM
Runtime Environment for Windows (see “Hardware and Software Requirements”
on page 2-2). Follow the procedure appropriate for your operating system:
v “Installing the Encryption Key Manager on Linux”
v “Installing the Encryption Key Manager on Windows” on page 3-2
If you are uncertain whether you have the latest version of Encryption Key
|
|
Manager, “Downloading the Latest Version Key Manager ISO Image” explains how
to learn if a newer version is available. It is a good idea to get the latest version of
Encryption Key Manager, which may not be in your Java installation. Visit
http://support.dell.com for more information.
IMPORTANT Encryption Key Manager HOST SERVER CONFIGURATION
INFORMATION: It is recommended that machines hosting the Dell
Encryption Key Manager program use ECC memory in order to minimize
the risk of data loss. The Encryption Key Manager performs the function of
requesting the generation of encryption keys and passing those keys to the
LTO 4 and LTO 5 tape drives. The key material, in wrapped (encrypted
form) resides in system memory during processing by the Encryption Key
Manager. Note that the key material must be transferred without error to the
appropriate tape drive so that data written on a cartridge may be recovered
(decrypted). If for some reason key material is corrupted due to a bit error in
system memory, and that key material is used to write data to a cartridge,
then the data written to that cartridge will not be recoverable (i.e. decrypted
at a later date). There are safeguards in place to make sure that such data
errors do not occur. However, if the machine hosting the Encryption Key
Manager is not using Error Correction Code (ECC) memory there remains a
possibility that the key material may become corrupted while in system
memory and the corruption could then cause data loss. The chance of this
occurrence is small, but it is always recommended that machines hosting
critical applications (like the Encryption Key Manager) use ECC memory.
Downloading the Latest Version Key Manager ISO Image
|
|
To download the latest version of the Dell ISO image, go to http://
support.dell.com.
Installing the Encryption Key Manager on Linux
Installing the Encryption Key Manager on Linux From the CD
1. Insert the Dell Encryption Key Manager CD and enter Install_Linux from the
CD root directory.
The installation copies all contents (documentation, GUI files, and configuration
property files) appropriate to your operating system from the CD to your hard
drive. During installation, your system is checked for the correct IBM Java
Runtime Environment. If not found, it is automatically installed.
When installation is complete, the Graphical User Interface (GUI) is started.
3-1
Page 32

Install the Software Developer Kit Manually on Linux
Follow these steps if you are not installing from the CD.
1. From http://support.dell.com, download the correct runtime environment for
Java based on your operating system:
|
|
|
|
|
|
|
|
|
|
|
|
|
|
|
|
|
|
|
|
|
|
v Java 6 SR 5 (32-bit) or later
v Java 6 SR 5 (64-bit) or later
2. Place the Java linux rpm file in a working directory:
mordor:~ #/tape/Encryption/java/1.6.0# pwd
/tape/Encryption/java/1.6.0
mordor:~ #/tape/Encryption/java/1.6.0# ls
ibm-java-i386-jre-6.0-5.0.i386.rpm
3. Install the rpm package:
mordor:~ #rpm -ivh -nodeps ibm-java-i386-jre-6.0-5.0.i386.rpm
This will place the files in the /opt/ibm/java-i386-60/ dir:
mordor:~ #/opt/ibm/java-i386-60/jre # ls
.systemPrefs bin javaws lib
4. Edit (or create if necessary) the file /etc/profile.local with the JAVA_HOME,
CLASSPATH, and the bin dir for the Java you installed. Add these three lines:
JAVA_HOME=/opt/ibm/java-i386-60/jre
CLASSPATH=/opt/ibm/java-i386-60/jre/lib
PATH=$JAVA_HOME:opt/ibm/java-i386-60/jre/bin/:$PATH
5. Log out and log back into your host for the /etc/profile.local entries to take
effect or issue the export command line commands:
mordor:~ # export JAVA_HOME=/opt/ibm/java-i386-60/jre
mordor:~ # export CLASSPATH=/opt/ibm/java-i386-60/jre/lib
mordor:~ # export PATH=/opt/ibm/java-i386-60/jre/bin/:$PATH
6. After you log back in, issue the java -version command. You should see these
results:
mordor:~ # java -version
java version "1.6.0"
Java(TM) SE Runtime Environment (build pmz60sr5-20090529(SR5))
IBM J9 VM (build 2.4, J2RE 1.6.0 IBM J9 2.4 Linux x86-32 jvmxi3260-20090519_35743 (JIT enabled)
...
mordor:~ # which java
/opt/ibm/java-i386-60/jre/bin/java
Installing the Encryption Key Manager on Windows
1. Insert the Dell Encryption Key Manager CD.
The installation copies all contents (documentation, GUI files, and
configuration property files) appropriate to your operating system from the
CD to your hard drive. During installation, your system is checked for the
correct IBM Java Runtime Environment. If not found, it is automatically
installed.
When installation is complete, the Graphical User Interface (GUI) is started.
2. When the InstallShield Wizard opens, click Next.
3. Read the License Agreement and click Yes.
4. When the Choose Destination Location window opens (Figure 3-1 on page
3-3), choose a folder and make note of it. You will need this Java path to
launch the Encryption Key Manager.
3-2 Dell Encryption Key Mgr User's Guide
Page 33

Figure 3-1. Choose Destination Location window
Click Next.
5. A window opens asking if you want this Java Runtime Environment as the
default system JVM (Figure 3-2).
Figure 3-2. Set this version of JVM to default
Click No.
6. The Start Copying Files window opens (Figure 3-3 on page 3-4). Make sure
you have taken note of the target directory.
a14m0257
a14m0232
Chapter 3. Installing the Encryption Key Manager and Keystores 3-3
Page 34

Figure 3-3. Start Copying Files window
Click Next.
7. The status window indicates installation progress.
8. The Browser Registration window opens. Choose a browser to use with
Encryption Key Manager. Click Next.
9. When the InstallShield Wizard Complete window opens, click Finish.
After installation, you can open a command prompt to query the Java version
installed:
|
|
|
|
|
|
C:\WinEKM>C:\"Program Files"\IBM\Java60\jre\bin\java -version
java version "1.6.0"
Java(TM) SE Runtime Environment (build pwi3260sr5-20090529_04(SR5))
IBM J9 VM (build 2.4, J2RE 1.6.0 IBM J9 2.4 Windows Server 2003 x86-32 j9vmwi3223-20090
519_35743 (JIT enabled, AOT enabled)
...
10. Update the PATH variable as follows:(required for Encryption Key Manager
2.1 but optional for build date of 05032007 and earlier).
If you will be invoking the Java SDK from a command window, you might
wish to set the PATH variable if you want to be able to run the Java JRE
executables (java.exe) from any directory without having to enter the full path
of the command. If you don’t set the PATH variable, you must specify the full
path to the executable every time you run it, such as:
|
C:>\Program Files\IBM\Java60\jre\bin\java ...
a14m0258
3-4 Dell Encryption Key Mgr User's Guide
Page 35

To set the PATH permanently (required for Encryption Key Manager 2.1), add
the full path of the java bin directory to the PATH variable. Typically this full
path looks similar to
|
C:\Program Files\IBM\Java60\jre\bin
|
|
|
|
|
|
|
|
|
|
|
|
To set the PATH permanently in Microsoft Windows 2003, 2008, and 2008 R2:
Note: Setting the PATH variable from the command line will not work.
a. From the Start menu, select Settings and then Control Panel.
b. Double-click on System.
c. Click the Advanced tab.
d. Click Environment Variables.
e. Scroll down the list of System Variables to the Path variable and click Edit.
f. Add the IBM JVM path to the beginning of the Path variable.
The default install is C:\PROGRA~1\IBM\Java60\jre\bin.
IMPORTANT: Insert a semicolon at the end of the path to differentiate it
from other directories in the path list.
g. Click OK.
Using the GUI to Create a Configuration File, Keystore, and
Certificates
Before launching the Encryption Key Manager, you must create at least one new
keystore and at least one self-signed certificate. You can use the Dell Encryption
Key Manager Server Graphical User Interface (GUI) to create your Encryption Key
Manager configuration properties file, a keystore, certificate(s), and key(s). A
simple CLI configuration properties file is also created as a result of this process.
1. Open the GUI if it is not yet started:
On Windows
Navigate to c:\ekm\gui and click LaunchEKMGui.bat
On Linux platforms
Navigate to /var/ekm/gui and enter . ./LaunchEKMGui.sh
2. Select EKM Configuration in the navigator on the left of the GUI.
Chapter 3. Installing the Encryption Key Manager and Keystores 3-5
Page 36

3. On the “EKM Server Configuration” page (Figure 3-4) enter the data in all
required fields (indicated by an asterisk *). Some fields are filled in for your
convenience. Click on the question mark to the right of any data field for a
description. Click Next.
Note: Once you have set the keystore password, do not change it unless its
security has been breached. The passwords are obfuscated to eliminate
any security exposure. Changing the keystore password requires that
every password in that keystore be changed individually using the
keytool command. See “Changing Keystore Passwords” on page 3-12.
Figure 3-4. EKM Server Configuration Page
Although the number of keys that can be generated for the Dell Encryption
Key Manager keystore has no limit, the time required to generate keys will
increase depending the number of keys requested. The Encryption Key
Manager takes 15 seconds to generate 10 keys, and takes over 30 minutes to
generate 10000 keys. Please note the number of keys is limited by the host
server resources (memory in the server). The Encryption Key Manager
application maintains the keystore list in system memory while running in
order to have quick access to the keys when the library sends a key request
from the drive.
Note: Interrupting the Encryption Key Manager GUI during key generation
3-6 Dell Encryption Key Mgr User's Guide
a14m0247
requires an Encryption Key Manager re-install.
Page 37

Keystore file corruption will occur if you stop the Encryption Key
Manager key generation process before it is complete. To recover from
this event, follow these steps:
v If the Encryption Key Manager was interrupted during the initial
Encryption Key Manager install, navigate to the directory where the
Encryption Key Manager directory is located (example x:\ekm). Delete
the directory and restart the install.
v If the Encryption Key Manager was interrupted while adding a new
keygroup, stop your Encryption Key Manager server, restore your
keystore file with the latest backup keystore (this file is located in your
x:\ekm\gui\backupfiles folder). Note that the backup file contains the
date and time stamp as part of the file name (for example,
2007_11_19_16_38_31_EKMKeys.jck). The date and time stamp must be
removed once the file is copied into the x:\ekm\gui directory. Restart
the Encryption Key Manager server and add the key group that was
previously interrupted.
4. On the “EKM Server Certificate Configuration” page (Figure 3-5) enter the key
store alias and any additional data you wish. Click Submit and Restart Server.
Figure 3-5. EKM Server Certificate Configuration Page
5. A “Backup Critical Files” window (Figure 3-6 on page 3-8) opens reminding
you to back up your Encryption Key Manager data files.
a14m0243
Chapter 3. Installing the Encryption Key Manager and Keystores 3-7
Page 38

Figure 3-6. Backup Critical Files Window
Verify the path and click Backup. The Dell Encryption Key Manager server is
launched in the background.
The Encryption Key Manager generates a set of backup files every time you
click OK when changing the Encryption Key Manager server configuration or
Backup in the “Backup Critical Files” window. The files listed as Files to be
Archived are saved to c:/ekm/gui/BackupFlies directory. Each filename is
prepended with the date and the time. For example, a set of files backed up on
Nov 26 2007 at 2:58 and 46 seconds pm will all have the following date and
time stamp at the beginning of their name “2007_11_26_14_58_46_FileName.
Backup files are not overwritten.
6. Select Server Health Monitor in the GUI navigator to verify that the
Encryption Key Manager server is up.
To add keys to an existing keystore, see “Using the GUI to Define Key Groups and
Create Keys” on page 3-14.
How to Locate the Correct Host IP Address:
Limitations in the current Encryption Key Manager GUI may prevent it from
displaying the Encryption Key Manager host IP address in the Server Health
Monitor:
v If the host is configured with an IPv6 address, the Encryption Key Manager
application will not be able to display the IP address.
v If the Encryption Key Manager application is installed in a Linux system, the
Encryption Key Manager application displays the localhost address and not the
actual active IP port.
1. To retrieve the actual IP address of the host system, locate the IP port address
by accessing the network configuration.
v In a Windows system, open a command window and enter ipconfig.
v For Linux enter isconfig.
a14m0251
3-8 Dell Encryption Key Mgr User's Guide
Page 39

How to Identify the EKM SSL Port
1. Start the Encryption Key Manager server using the command line.
v On Windows, navigate to cd c:\ekm and click startServer.bat
v On Linux platforms, navigate to /var/ekm and enter startServer.sh
v See “Starting, Refreshing, and Stopping the Key Manager Server” on page
5-1 for more information.
2. Start the CLI client using the command line.
v On Windows, navigate to cd c:\ekm and click startClient.bat
v On Linux platforms, navigate to /var/ekm and enter startClient.sh
v See “The Command Line Interface Client” on page 5-5 for more information.
3. Login to a CLI client on the Encryption Key Manager server using the
following command:
login –ekmuser userID –ekmpassword password
where userID = EKMAdmin and password = changeME (This is the default
Password. If you previously changed the default password use your new
password.)
Once login is successful User successfully logged in is displayed.
4. Identify the SSL port by entering the following command:
status
The displayed response should be similar to this: server is running. TCP
port: 3801, SSL port: 443.
Make a note of the SSL configured port and ensure it is the port used to
configure your library-managed encryption settings.
5. Logout from the command line. Enter the following command:
exit
Close the command window.
Generating Keys and Aliases for Encryption on LTO 4 and LTO 5
|
The Dell Encryption Key Manager Server GUI is the easiest way to generate
symmetric encryption keys (see “Using the GUI to Create a Configuration File,
Keystore, and Certificates” on page 3-5). You can also use the Keytool utility to
generate symmetric encryption keys. Keytool is especially useful for importing and
exporting keys between different keystores. See “Importing Data Keys Using
Keytool -importseckey ” on page 3-12 and “Exporting Data Keys Using Keytool
-exportseckey ” on page 3-12 for details.
Keytool is a utility for managing keys, certificates, and aliases. It enables you to
generate, import, and export your encryption data keys and store them in a
keystore.
Each data key in the keystore is accessed through a unique alias. An alias is a
string of characters, such as 123456tape. In JCEKS keystores, 123456Tape would be
equivalent to 123456tape and allow access to the same entry in the keystore. When
you use the keytool -genseckey command to generate a data key, you specify a
corresponding alias in the same command. The alias enables you to identify the
correct key, in the correct key group and keystore, for use in writing and reading
|
encrypted data on LTO 4 and LTO 5 tape.
Chapter 3. Installing the Encryption Key Manager and Keystores 3-9
Page 40

Note: Individual aliases and alias ranges must be unique. This is enforced when
keys are generated on a given keystore/Encryption Key Manager instance.
However, in a multiple Encryption Key Manager/Keystore environment,
you should use a naming convention that maintains uniqueness across
multiple instances in the event it becomes desirable to transport keys
between instances while maintaining uniqueness of reference.
After generating keys and aliases, update the symmetricKeySet property in the
KeyManagerConfig.properties file to specify the new alias, range of aliases, or key
group GroupID, the filename under which the symmetric keys are stored, and the
filename where key groups are defined. (See “Creating and Managing Key
Groups” on page 3-14 for details.) Only those keys named in the symmetricKeySet
will be validated (checked for an existing alias and a symmetric key of the proper
size and algorithm). If an invalid key is specified in this property, the key manager
does not start and an audit record is created.
The keytool utility also provides for the import and export of data keys to and
from other keystores. An overview of each task follows. You can issue the keytool
-ekmhelp to display all the key manager-related parameters covered in the
following discussions.
Editing the Configuration Properties Files
To make changes to the KeyManagerConfig.properties or the
ClientKeyManagerConfig.properties file:
1. Stop the Encryption Key Manager server.
2. Using the text editor of your choice, open the KeyManagerConfig.properties file
to make changes to the server configuration, or the
ClientKeyManagerConfig.properties file for the client configuration. Do not use
Windows to edit the file for a Linux machine because of ^M. If you use
Windows, edit the file with gvim/vim.
3. Change the property value(s) according to the directions provided in this
document.
4. Save the file.
5. Restart the Encryption Key Manager server.
If You are Not Using Keytool
If you do not use keytool or the GUI to generate keys and aliases, you cannot
generate ranges of keys compatible with the Encryption Key Manager. To generate
individual keys compatible with the Encryption Key Manager, be sure to specify
aliases using one of the following formats:
v 12 printable characters or less (for example, abcdefghijk)
v 3 printable characters, followed by two zeros, followed by 16 hexadecimal digits
(for example, ABC000000000000000001) for a total of exactly 21 characters
Generating Data Keys and Aliases Using Keytool -genseckey
Note: Before using the keytool command for the first time in any session, run the
updatePath script to set the correct environment.
On Windows
3-10 Dell Encryption Key Mgr User's Guide
Navigate to cd c:\ekm and click updatePath.bat
Page 41

On Linux platforms
Navigate to /var/ekm and enter . ./updatePath.sh
|
|
The Keytool utility generates aliases and symmetric keys for encryption on LTO 4
and LTO 5 Tape Drives using LTO 4 and LTO 5 tape. Use the keytool -genseckey
command to generate one or more secret keys and store them in a specified
keystore. keytool -genseckey takes the following parameters:
-genseckey [-v] [-protected]
[-alias <alias> | aliasrange <aliasRange>] [-keypass <keypass>]
[-keyalg <keyalg>] [-keysize <keysize>]
[-keystore <keystore>] [-storepass <storepass>]
[-storetype <storetype>] [-providerName <name>]
[-providerClass <provider_class_name> [-providerArg <arg>] ...
[-providerPath <pathlist>]
These parameters are of particular importance when generating data keys for
|
Encryption Key Manager to serve to the LTO 4 and LTO 5 drives for tape
encryption:
-alias
Specify an alias value for a single data key with up to 12 printable characters
(for example, abcfrg or key123tape).
-aliasrange
When generating multiple data keys, aliasrange is specified as a 3-character
alphabetic prefix followed by lower and upper limits for a series of
16-character (hexadecimal) strings with leading zeroes filled in automatically to
construct aliases 21-characters in length. For example, specifying key1-a would
yield a series of aliases from KEY000000000000000001 through
KEY00000000000000000A. Specifying an aliasrange value of xyz01-FF would yield
XYZ000000000000000001 through XYZ0000000000000000FF , which would
generate 255 symmetric keys.
-keypass
Specifies a password used to protect the data key. This password must be
identical to the keystore password. If no password is specified, you are
prompted for it. If you press Enter at the prompt, the key password is set to
the same password as that used for the keystore. keypass must be at least six
characters long.
Note: Once you have set the keystore password, do not change it unless its
security has been breached. See “Changing Keystore Passwords” on
page 3-12.
-keyalg
Specifies the alogrithm to be used to generate the data key. This value must be
specified as AES.
-keysize
Specifies the size of the data key to be generated. The key size must be
specified as 256.
Examples of acceptable aliases that could be associated with symmetric keys are:
abc000000000000000001
abc00a0120fa000000001
Examples of aliases that would not be accepted by the key manager are:
Chapter 3. Installing the Encryption Key Manager and Keystores 3-11
Page 42

abcefghij1234567 ? wrong length
abcg0000000000000001 ? prefix is longer than 3 characters
If an alias already exists in the keystore, keytool throws an exception and stops.
Changing Keystore Passwords
Note: Once you have set the keystore password, do not change it unless its
security has been breached. The passwords are obfuscated to eliminate any
security exposure. Changing the keystore password requires that the
password on every key in that keystore be changed individually using the
following keytool command.
To change the keystore password enter:
keytool -keypasswd -keypass old_passwd -new new_passwd -alias alias
You must also edit KeyManagerConfig.properties to change the keystore password
in every server configuration file property where it is specified using one of these
methods:
v Delete the entire obfuscated password and allow the Encryption Key Manager to
v Delete the entire obfuscated password and type the new password in the clear. It
-keystore keystorename -storetype keystoretype
prompt on the next startup.
will be obfuscated on the next startup.
Importing Data Keys Using Keytool -importseckey
Use the keytool -importseckey command to import a secret key or a batch of secret
keys from an import file. keytool -importseckey takes the following parameters:
-importseckey [-v]
[-keyalias <keyalias>] [-keypass <keypass>]
[-keystore <keystore>] [-storepass <storepass>]
[-storetype <storetype>] [-providerName <name>]
[-importfile <importfile>] [-providerClass <provider_class_name>]
[providerArg <arg>]
These parameters are of particular importance when importing data keys for the
|
Encryption Key Manager to serve to the LTO 4 and LTO 5 drives for tape
encryption:
-keyalias
Specifies the alias of a private key in keystore to decrypt all the data keys in
importfile.
-importfile
Specifies the file that contains the data keys to be imported.
Exporting Data Keys Using Keytool -exportseckey
Use the keytool -exportseckey command to export a secret key or a batch of secret
keys to an export file. keytool -exportseckey takes the following parameters:
-exportseckey [-v]
3-12 Dell Encryption Key Mgr User's Guide
[-alias <alias> | aliasrange <aliasRange>] [-keyalias <keyalias>]
[-keystore <keystore>] [-storepass <storepass>]
Page 43

[-storetype <storetype>] [-providerName <name>]
[-exportfile <exportfile>] [-providerClass <provider_class_name>]
[providerArg <arg>]
These parameters are of particular importance when exporting data keys for
|
Encryption Key Manager to serve to the LTO 4 and LTO 5 drives for tape
encryption:
-alias
Specify an alias value for a single data key with up to 12 printable characters
(for example, abcfrg or key123tape).
-aliasrange
When exporting multiple data keys, aliasrange is specified as a 3-character
alphabetic prefix followed by lower and upper limits for a series of
16-character (hexadecimal) strings with leading zeroes filled in automatically to
construct aliases 21-characters in length. For example, specifying key1-a would
yield a series of aliases from KEY000000000000000001 through
KEY00000000000000000A. Specifying an aliasrange value of xyz01-FF would yield
XYZ000000000000000001 through XYZ0000000000000000FF
-exportfile
Specifies the file to store the data keys when they are exported.
-keyalias
Specifies the alias of a public key in keystore to encrypt all the data keys.
Ensure that the keystore where the symmetric (data) keys will be imported
contains the corresponding private key.
|
Sample Alias and Symmetric Key Setup for LTO 4 and LTO 5
Encryption Using a JCEKS Keystore
Invoke the KeyTool with the -aliasrange option.
Note that key algorithm (-keyalg) must be specified as AES and key size (–keysize)
must be specified as 256, as follows:
/bin/keytool –genseckey –v –aliasrange AES01-FF –keyalg AES –keysize 256
–keypass password -storetype jceks –keystore path/filename.jceks
These KeyTool invocations generate 255 sequential aliases in the range
AES000000000000000001 through AES0000000000000000FF and associated AES
256-bit symmetric keys. Either can be repeated cumulatively as many times as
necessary to setup the full number of ranged and standalone key aliases that are
desired for robust key manager operation. For example, to generate an additional
|
alias and symmetric key for LTO 4 and LTO 5:
/bin/keytool –genseckey –v –alias abcfrg –keyalg AES –keysize 256
–keypass password -storetype jceks –keystore path/filename.jceks
This invocation adds standalone alias abcfrg cumulatively to the named keystore,
which already contains 255 aliases from the invocation above yielding 256
symmetric keys in the jceks file named in –keystore option.
Update the symmetricKeySet property in the KeyManagerConfig.properties file to
add the following line to match any or all of the alias ranges used above, and the
filename under which the symmetric keys were stored. Note that the Encryption
Key Manager may not start if an invalid alias is specified. Other causes for
validation check failure may include incorrect bit size (for AES keysize MUST be
256) or an invalid algorithm for the platform. -keyalg must be AES and -keysize
Chapter 3. Installing the Encryption Key Manager and Keystores 3-13
Page 44

must be 256. The filename specified in the config.keystore.file should match the
name specified in the –keystore <filename> in the KeyTool invocation:
symmetricKeySet = AES01-FF,abcfrg
config.keystore.file = <filename>.jceks
Only those keys named in the symmetricKeySet will be validated (checked for an
existing alias and a symmetric key of the proper size and algorithm). If an invalid
key is specified in this property, the Encryption Key Manager will not start and an
audit record will be created.
Creating and Managing Key Groups
The Encryption Key Manager gives you the ability to organize your symmetric
|
keys for LTO 4 and LTO 5 encryption into key groups. In this way, you can group
keys according to the type of data they encrypt, the users who have access to
them, or by any other meaningful characteristic. Once a key group is created, you
can associate it with a specific tape drive using the -symrec keyword in the
adddrive command. See “adddrive” on page 5-8 for syntax.
In order to build a key group, you must define it in the KeyGroups.xml file. If you
followed the procedure in “Using the GUI to Create a Configuration File, Keystore,
and Certificates” on page 3-5, the location of this file was specified on the EKM
Configuration page. If you are creating the configuration file manually, the location
of the KeyGroups.xml file is specified in the configuration properties file as
follows:
config.keygroup.xml.file = FILE:KeyGroups.xml
If this parameter is not specified, then the default behavior is to use the
KeyGroups.xml file from the the Encryption Key Manager launching location’s
working directory. If this file does not exist, an empty KeyGroups.xml file is
created. On subsequent starts of the Encryption Key Manager Server, the following
message may appear in the native_stderr.log: [Fatal Error] :-1:-1: Premature
end of file. This is an error in parsing the empty KeyGroups.xml file and it does
not prevent the Encryption Key Manager Server from starting unless the
Encryption Key Manager Server has been configured to use keygroups.
Key groups are built using the Dell Encryption Key Manager Server GUI or using
the following CLI client commands (see “CLI Commands” on page 5-7 for syntax):
Using the GUI to Define Key Groups and Create Keys
You can use the GUI to perform all tasks necessary for managing key groups. You
can also use it to create additional keys.
Note: When you click Submit Changes while performing any of the following
tasks, a backup dialog window (Figure 3-6 on page 3-8) opens reminding
you to back up your Encryption Key Manager data files. Enter a path where
backup data is to be saved. Click Submit. Then verify the backup path and
click OK.
To create a key group and populate it with keys, or to add keys to an existing
keygroup:
1. Open the GUI if it is not yet started:
3-14 Dell Encryption Key Mgr User's Guide
Page 45

On Windows
Navigate to c:\ekm\gui and click LaunchEKMGui.bat
On Linux platforms
Navigate to /var/ekm/gui and enter . ./LaunchEKMGui.sh
2. Select Administration Commands in the navigator on the left of the GUI.
3. Click Create a Group of Keys at the bottom of the window (Figure 3-7).
Figure 3-7. Create a Group of Keys
4. Enter the name of the new key group, the prefix to be used for the key alias(es)
and the number of keys the group is to contain. Click Submit Changes.
To change the default key group:
1. Select Administration Commands in the navigator on the left of the GUI.
2. Click Change Default Write Key Group at the bottom of the window
(Figure 3-8 on page 3-16).
a14m0248
Chapter 3. Installing the Encryption Key Manager and Keystores 3-15
Page 46

Figure 3-8. Change Default Write Key Group
3. Select the new default key group from the Group List at the right.
4. Verify the current and new default key groups at the bottom of the window
and click Submit Changes.
To assign a specific key group to a specific tape drive:
1. Select Administration Commands in the navigator on the left of the GUI.
2. Click Assign Group to Drive at the bottom of the window (Figure 3-9 on page
3-17).
a14m0244
3-16 Dell Encryption Key Mgr User's Guide
Page 47

Figure 3-9. Assign Group to Drive
3. Select the tape drive from the Drive List.
4. Select the key group from the Group List.
5. Verify the drive and key group at the bottom of the window and click Submit
Changes.
To delete a tape drive from the drive table:
1. Select Administration Commands in the navigator on the left of the GUI.
2. Click Delete Drive at the bottom of the window (Figure 3-10 on page 3-18).
a14m0246
Chapter 3. Installing the Encryption Key Manager and Keystores 3-17
Page 48

Figure 3-10. Delete Drive
a14m0245
3. Select the tape drive from the Drive List.
4. Verify the drive name at the bottom of the window and click Submit Changes.
Using CLI Commands to Define Key Groups
The Encryption Key Manager has a key group feature that allows you to group
sets of keys.
Once the Encryption Key Manager application is installed and configured (keystore
and keys generated) and the Encryption Key Manager server is started, log in to
into the server using the client and follow these steps:
1. Run the createkeygroup command.
This command creates the initial key group object in the KeyGroups.xml file.
Run this only once.
Syntax: createkeygroup -password password
-password
The password that is used to encrypt the keystore’s password in the
KeyGroups.xml file for later retrieval. The keystore encrypts the key
group’s key, which in turn encrypts each individual key group alias
password. Therefore no key in the KeyGroups.xml file is in the clear.
Example: createkeygroup -password a75xynrd
2. Run the addkeygroup command.
This command creates an instance of a key group with a unique Group ID in
the KeyGroups.xml.
3-18 Dell Encryption Key Mgr User's Guide
Page 49

Syntax: addkeygroup -groupID groupname
-groupID
The unique groupname used to identify the group in the KeyGroups.xml
file.
Example: addkeygroup -groupID keygroup1
3. Run the addkeygroupalias command.
This command creates a new alias for an existing key alias in your keystore for
addition to a specific key group ID.
Syntax: addkeygroupalias -alias aliasname -groupID groupname
-alias
The new aliasname for the key. This must be the full key name, that is,
Key00 must be entered as key000000000000000000.
-groupID
The unique groupname used to identify the group in the KeyGroups.xml
file.
Example: addkeygroupalias -alias key000000000000000000 -groupID keygroup1
Note: When using this CLI command, you can only add one key at time. This
command must be run for every individual key that needs to be added
to the key group.
4. Associate a key group with a new or existing tape drive.
a. Run the moddrive command to associate a key group with an existing tape
drive.
This command modifies tape drive information in the drive table.
Syntax: moddrive -drivename drivename -symrec alias
-drivename
drivename specifies the serial number of the tape drive.
-symrec
Specifies an alias (of the symmetric key) or a key group name for the
tape drive.
Example: moddrive -drivename 000123456789 -symrec keygroup1
b. Run the adddrive command to add a tape drive to the drive table and
associate it with a key group.
This command allows you to add a drive and associate it with a specific
key group.
Syntax: adddrive -drivename drivename -symrec alias
-drivename
|
|
|
drivename specifies the 12-digit serial number of the drive to be added.
Note: You must add two leading zeros (0) in front of the 10–digit serial
number to reach a total of 12 digits.
-symrec
Specifies an alias (of the symmetric key) or a groupID for the tape drive.
Example: adddrive -drivename 000123456789 -symrec keygroup1
To specify a key group as default for use when no alias is defined for a tape drive,
set the symmetrickeySet property of the configuration properties file to the
GroupID of the key group you wish to use. For example,
symmetricKeySet = keygroup1
Chapter 3. Installing the Encryption Key Manager and Keystores 3-19
Page 50

The GroupID must match an existing key group ID in the KeyGroups.xml file. If
not, the Encryption Key Manager Server will not start. The Encryption Key
Manager tracks key usage within a key group. When you specify a valid GroupID,
the Encryption Key Manager records which key was last used and then selects a
random key from within the specified key group.
Copying Keys From One Key Group to Another
Run addaliastogroup command.
This command copies a specific alias from an existing (source) key group to a new
(target) key group.
Syntax: addaliastogroup -aliasID aliasname -sourceGroupID groupname
-targetGroupID groupname
-aliasID
The aliasname for the key to be added.
-sourceGroupID
The unique groupname used to identify the group from which the alias is to be
copied.
-targetGroupID
The unique groupname used to identify the group to which the alias is to be
added.
Example: addaliastogroup -aliasID aliasname -sourceGroupID keygroup1
-targetGroupID keygroup2
Note: Key is available in both key groups.
3-20 Dell Encryption Key Mgr User's Guide
Page 51

Chapter 4. Configuring the Encryption Key Manager
Using the GUI to Configure the Encryption Key Manager
The easiest way to create your configuration properties file is to use the Dell
Encryption Key Manager GUI following the procedure in “Using the GUI to Create
a Configuration File, Keystore, and Certificates” on page 3-5. If you have done so,
then you have already created your configuration file and no additional
configuration is required. The following information may be helpful if you wish to
take advantage of additional Encryption Key Manager configuration options.
Configuration Strategies
Some configuration settings in the KeyManagerConfig.properties file provide
shortcuts that may have effects you should know about.
Automatically Update Tape Drive Table
The Encryption Key Manager provides a variable in the configuration file
(drive.acceptUnknownDrives) that, when set to a value of true, automatically
populates the tape drive table when a new tape drive contacts the the Dell
Encryption Key Manager. This eliminates the need to use the adddrive command
|
for each tape drive or library. In this mode, the 10-digit serial number for each of
these devices need not be entered using the CLI client commands. The new drives
undergo the normal public/private key cryptography exchange to verify the
identity of the tape device. Once this verification is complete, the new device is
able to read existing tapes based on the key IDs stored on them (assuming the
corresponding key information is found in the configured keystore).
Note: The Encryption Key Manager server should be refreshed using the GUI or
the command “refresh” on page 5-13 after drives are added automatically to
ensure that they are stored in the drive table.
|
|
For LTO 4 and LTO 5 drives, you can set the default symmetric key pool
(symmetricKeySet) for encryption on newly added devices. In other words, you
can have the Encryption Key Manager fully configure the device with associated
key material when the device makes contact. If you choose not to do this when the
device is added to the drive table, you can do so after the tape drive has been
added to the tape drive table, using the moddrive command.
In addition to relieving the administrator of the need to enter the 10-digit serial
number for each of the tape drives the Encryption Key Manager will service, it
also allows a default environment for large systems configurations.
It should be noted that such convenience comes at the price of reduced security.
Since the devices are added automatically and could be associated with a
certificate alias (able to write a tape with that certificate alias), the added security
check that the administrator would perform when adding the devices manually is
skipped. It is important that you evaluate the advantages and disadvantages of
this option to determine if automatically adding the tape drive information to the
drive table, and implicitly granting that new device access to the certificate
information, is an acceptable security risk.
4-1
Page 52

Note: The drive.acceptUnknownDrives property is set to false by default. Thus,
the Encryption Key Manager will not add new drives to the drive table
automatically. Choose the mode you wish to operate in and change the
configuration accordingly. See Appendix B for details.
Synchronizing Data Between Two Key Manager Servers
The drive table and configuration properties file can be synchronized between two
Encryption Key Manager servers. This can be done manually by using the CLI
client sync command or automatically by setting four properties in the
KeyManagerConfig.properties file.
Notes
Neither synchronization method acts on the keystore or key groups XML file.
They must be copied manually.
The automatic synchronization function is enabled only when a valid IP
address is specified in the sync.ipaddress property of the
KeyManagerConfig.properties file. See “Automatic Synchronization” on page
4-3.
Manual Synchronization
The manual method involves executing the CLI client sync command. The syntax
is as follows:
sync {-all | -config | -drivetab} -ipaddr ip_addr :sslport [-merge | -rewrite]
This command sends the configuration file properties or the drive table
information or both from the source (or sending) server to the destination (or
receiving) server specified by the –ipaddr parameter. The receiving Encryption Key
Manager server must be up and running.
Required fields
-all
Send both the configuration properties file and the drive table information to
the server specified by -ipaddr.
-config
Send only the configuration properties file to the server specified by -ipaddr.
-drivetab
Send only the drive table information to the server specified by -ipaddr.
-ipaddr
ip_addr:sslport specifies the address and ssl port of the receiving server. The
sslport should match the value specified for “TransportListener.ssl.port” in the
KeyManagerConfig.properties file of the receiving server.
Optional fields
-merge
Merge (add) new drive table data with current data on receiving server. (The
configuration file is always a rewrite.) This is the default.
-rewrite
Replace the current data on the receiving server with new data.
4-2 Dell Encryption Key Mgr User's Guide
Page 53

Automatic Synchronization
The drive table and properties file can be sent from a primary key manager server
to a secondary server automatically. The secondary server must be running for
synchronization of the data to occur. To automatically synchronize the data from
the primary to the secondary, the following four properties in the primary server
KeyManagerConfig.properties file must be specified. There are no changes required
to the secondary or receiving server properties file.
sync.ipaddress
Specifies the address and ssl port of the receiving server, for example,
sync.ipaddress = backupekm.server.ibm.com:1443
If this property is unspecified or specified incorrectly, automatic
synchronization is disabled.
sync.action
Merge or rewrite the existing data in the receiving server Valid values are
merge (default) and rewrite. Synchronizing the configuration properties always
results in a rewrite.
sync.timeinhours
How often the data should be sent. The value is specified in whole numbers
(hours). The time interval begins when the server is started, that is, the
synchronization will occur after the server has been running for the specified
number of hours. The default is 24.
sync.type
Which data should be sent. Valid values are drivetab (default), config, and all.
Configuration Basics
Note: If you followed the procedure in “Using the GUI to Create a Configuration
File, Keystore, and Certificates” on page 3-5, then a basic configuration is
already created and you do not have to perform any of the steps below. This
information shows how to perform these tasks without using the GUI, and
may be useful if you wish to take advantage of additional configuration
options.
Note to Windows Users: Windows does not accept commands with directory
This procedure contains the minimum steps necessary to configure the Encryption
Key Manager. Appendix A includes examples of server configuration property files.
See Appendix B for a complete list of all properties for both server and client
configuration.
1. Use keytool to manage JCEKS keystores. When creating the keystore, take
note of the path and filename as well as the names given to the certificates
and keys. This information will be used in later steps.
2. Create a keystore if none exists. Add or import the certificates and keys that
will be used with your tape drives to this new keystore. (See “Generating
paths that contain blanks. When entering commands it
may be necessary to specify the short name generated for
such directories, for example progra~1 instead of Program
Files. To list directory short names, issue the dir /x
command.
Chapter 4. Configuring the Encryption Key Manager 4-3
Page 54

|
Keys and Aliases for Encryption on LTO 4 and LTO 5” on page 3-9.) Take note
of the names given to the certificates and keys. This information will be used
in later steps.
3. Create key groups and populate with key aliases. See “Creating and Managing
Key Groups” on page 3-14.
4. Using the text editor of your choice, open the KeyManagerConfig.properties
to specify the following properties. Please note that the current design of the
server is very strict. Do not use Windows to edit the file for a Linux machine
because of ^M. If you use Windows, edit the file with gvim/vim.
Note to Windows Users: The Java SDK uses forward slashes, even when
running on Windows. When specifying paths in the
KeyManagerConfig.properties file, be sure to use
forward slashes. When specifying a fully-qualified
path name in the command window, use back
slashes in the normal manner for Windows.
a. Audit.Handler.File.Directory – specify a location where audit logs are to
be stored.
b. Audit.metadata.file.name – specify a fully qualified path and filename for
the metadata XML file.
c. Config.drivetable.file.url – specify a location for information about drives
that are known to the Encryption Key Manager. This file is not required
before starting the server or CLI client. If it does not exist, it will be
created during shutdown of the Encryption Key Manager server.
d. TransportListener.ssl.keystore.name – specify the path and filename of the
keystore created in step 1.
e. TransportListener.ssl.truststore.name - specify the path and filename of
the keystore created in step 1.
f. Admin.ssl.keystore.name - specify the path and filename of the keystore
created in step 1.
g. Admin.ssl.truststore.name - specify the path and filename of the keystore
created in step 1.
h. config.keystore.file - specify the path and filename of the keystore created
in step 1.
i. drive.acceptUnknownDrives - specify true or false. A value of true allows
new tape drives that contact the Encryption Key Manager to be
automatically added to the drive table. The default is false.
5. The following optional password entries may be added or omitted. If these
entries are not specified in KeyManagerConfig.properties, the Encryption Key
Manager will prompt for the keystore password during the startup of the
server.
a. Admin.ssl.keystore.password - specify the password of the keystore
created in step 1.
b. config.keystore.password - specify the password of the keystore created in
step 1.
c. TransportListener.ssl.keystore.password - specify the password of the
keystore created in step 1.
When added to the KeyManagerConfig.properties file, the Encryption Key
Manager obfuscates these passwords for additional security.
6. Optionally set the Server.authMechanism property to a value of LocalOS if
CLI client authentication is to be done against the local operating system
4-4 Dell Encryption Key Mgr User's Guide
Page 55

registry. If unspecified (or set to EKM) the default is to have the CLI client user
login to the key manager server using usr/passwd as EKMAdmin/changeME.
(This password can be changed with the chgpasswd command.)
When the Server.authMechanism property is set to LocalOS, additional setup
is required for Linux platforms. For more information, see the readme file at
http://support.dell.com or on the Dell Encryption Key Manager media
provided with your product. “Authenticating CLI Client Users” on page 5-5
contains more information.
7. Save the changes to KeyManagerConfig.properties.
8. Start the Encryption Key Manager server. To start the server without the GUI,
On Windows
Navigate to cd c:\ekm\ekmserver and click startServer.bat
On Linux platforms
Navigate to /var/ekm/ekmserver and enter . ./startServer.sh
See “Starting, Refreshing, and Stopping the Key Manager Server” on page 5-1
for details.
9. Start the CLI client:
On Windows
Navigate to cd c:\ekm\ekmclient and click startClient.bat
On Linux platforms
Navigate to /var/ekm/ekmclient and enter . ./startClient.sh
See “The Command Line Interface Client” on page 5-5 for details.
10. If you specified drive.acceptUnknownDrives = false in step 4(i), configure a
drive by entering the following at the # prompt:
adddrive -drivename drive_name -recl cert_name -rec2 cert_name
For example:
# adddrive -drivename 000001365054 -rec1 key1c1 -rec2 key1c2
followed by
# listdrives -drivename 000001365054
returns
Entry Key: SerialNumber = 000001365054
Entry Key: AliasTwo = key1c2
Entry Key: AliasOne = key1c1
Deleted : false
Updated : true
TimeStamp : Sun Jul 03 17:34:44 MST 2007
11. Enter the listdrives command at the # prompt to ensure the drive was
successfully added.
Chapter 4. Configuring the Encryption Key Manager 4-5
Page 56

4-6 Dell Encryption Key Mgr User's Guide
Page 57

Chapter 5. Administering the Encryption Key Manager
Starting, Refreshing, and Stopping the Key Manager Server
The Encryption Key Manager server is very easy to start and stop.
Refreshing the server makes the Encryption Key Manager dump the current
contents of the keystore, drive table and configuration information it has in
memory out to the respective files and then reload them into memory. Issuing a
refresh is useful after making any changes to these components using the CLI
client. Although such changes are automatically saved at Encryption Key Manager
server shutdown, issuing a server refresh guards against these changes being lost
in the event of a system crash or power outage.
Start the Encryption Key Manager server from the Dell Encryption Key Manager
GUI:
1. Open the GUI if it is not yet started:
On Windows
Navigate to c:\ekm\gui and click LaunchEKMGui.bat
On Linux platforms
Navigate to /var/ekm/gui and enter . ./LaunchEKMGui.sh
2. Click Server Health Monitor in the navigator on the left of the GUI.
3. On the “Server Status” page (Figure 5-1), click Start Server or Refresh Server.
Figure 5-1. Server Status
4. The change in server status is reflected on the Server Status window. See
Figure 5-1.
5. The Login window displays (Figure 5-2 on page 5-2).
a14m0249
5-1
Page 58

Figure 5-2. Login Window
a14m0250
Enter EKMAdmin for the User Name. The initial password is changeME. After you
are logged in, you can use the chgpasswd command to change the password.
See “chgpasswd” on page 5-9.
Note: v The Dell Encryption Key Manager GUI may not be capable of
displaying the host IP address
Two limitations in the current GUI prevent it from displaying the
Encryption Key Manager host IP address in the Server Health Monitor :
v The current application does not recognize IPV6. If the host is
configured with an IPV6 address, the Encryption Key Manager
application will not be able to display the IP address.
v If the Encryption Key Manager application is installed in a Linux
system, the application displays the localhost address and not the
actual active IP port.
To retrieve the actual IP address of the host system, locate the IP port
address by accessing the network configuration. In a Windows system
open a command window and enter ipconfig. For Linux enter isconfig.
6. Click Login.
Use the same Server Status page to stop the server.
Starting the Key Manager Server Using a Script
On Windows
Navigate to cd c:\ekm\ekmserver and click startServer.bat
On Linux platforms
Navigate to /var/ekm/ekmserver and enter . ./startServer.sh
To stop the server, issue the stopekm command using any of the methods
described below in “The Command Line Interface Client” on page 5-5. Another
method is to send a sigterm to the key manager process. This allows the server to
5-2 Dell Encryption Key Mgr User's Guide
Page 59

shutdown and end cleanly. Do not send a sigkill to the key manager process.
sigkill will not shut the process down cleanly. For example, on Linux systems,
enter kill -SIGTERM pid or kill -15 pid.
Starting and Stopping the Key Manager Server from the
Command Prompt
To start the Encryption Key Manager server from any command window or shell ,
enter:
java com.ibm.keymanager.EKMLaunch KeymanagerConfig.properties
This launches the Encryption Key Manager server in the background. When started
correctly, the Encryption Key Manager Java process can be displayed with the ps
-ef | grep java command (Linux platforms) or using the Windows Task Manager.
When running as a Windows Service, it displays as LaunchEKMService.
To stop the server, issue the stopekm command using any of the methods
described below in “The Command Line Interface Client” on page 5-5. Another
method is to send a sigterm to the key manager process. This allows the server to
shutdown and end cleanly. Do not send a sigkill to the key manager process.
sigkill will not shut the process down cleanly. For example, on Linux systems,
enter kill -SIGTERM pid or kill -15 pid.
On Windows platforms, when the Dell Encryption Key Manager is started as a
Windows Service, it can be stopped from the Control Panel.
Installing the Key Manager Server as a Window Service
Installing the Encryption Key Manager server as a service in the host server
ensures that when the host server is rebooted the Encryption Key Manager server
application will be started.
1. Extract the executable LaunchEKMService.exe file from the release downloaded
from Dell Support Website (http://support.dell.com) into a temporary directory.
2. For the service to run properly some environment variables must be set:
a. From the Start menu, click Control Panel.
b. Double click System.
c. Click the Advanced tab.
d. Click Environment Variables.
e. Under the list of System Variables, click New.
f. Specify JAVA_HOME as the variable name and enter the IBM JVM directory.
|
|
The default install is C:\PROGRA~1\IBM\Java60
g. Click OK.
3. Edit the system PATH variable using this procedure.
Note: Setting the PATH variable from the command line will not work.
a. From the Start menu, click Control Panel.
b. Double click System.
c. Click the Advanced tab.
d. Click Environment Variables.
e. Scroll the list of System Variables for the Path variable and click Edit.
f. Add the IBM JVM path to the beginning of the Path variable. The default
install is C:\PROGRA~1\IBM\Java60\jre\bin
Chapter 5. Administering the Encryption Key Manager 5-3
Page 60

Note: Insert a semicolon at the end of the path to differentiate it from other
directories in the path list.
g. Click OK.
4. Ensure the paths in your Encryption Key Manager Server Configuration
properties file are fully qualified. This file is named
KeyManagerConfig.properties and is located in the C:\ekm\gui directory. All
the following paths in the file should be checked and updated to ensure they
have a fully qualified path (for example, use c:\ekm\gui\EKMKeys.jck and not
gui\EKMKeys.jck). See the following examples for how to change the paths
when using a default installation.
These are the properties and fully qualified paths they should point to when
using the default installation and keystore names. You will find each of these
entries in the KeyManagerConfig.properties file.
config.keygroup.xml.file
Path should be changed to: FILE:C:/ekm/gui/keygroups/
KeyGroups.xml
Admin.ssl.keystore.name
Path should be changed to: C:/ekm/gui/EKMKeys.jck
TransportListener.ssl.truststore.name
Path should be changed to: C:/ekm/gui/EKMKeys.jck
Audit.metadata.file.name
Path should be changed to: C:/ekm/gui/metadata/ekm_metadata.xml
Audit.handler.file.directory
Path should be changed to: C:/ekm/gui/audit
config.keystore.file
Path should be changed to: C:/ekm/gui/EKMKeys.jck
TransportListener.ssl.keystore.name
Path should be changed to: C:/ekm/gui/EKMKeys.jck
config.drivetable.file.url
Path should be changed to: FILE:C:/ekm/gui/drivetable/
ekm_drivetable.dt
Admin.ssl.truststore.name
Path should be changed to: C:/ekm/gui/EKMKeys.jck
5. The LaunchEKMServices.exe file must be run from a command prompt. This
can be accessed in Windows by navigating to Start > Programs > Accessories >
Command Prompt.
6. From the command prompt, navigate to the temporary directory where
LaunchEKMService.exe was extracted. Run the LaunchEKMService.exe file
using the following options as a reference.
LaunchEKMService {-help | -i config_file | -u}
-help
Displays the usage information.
-i Installs the Encryption Key Manager as a Windows service. This option
requires full path name of the configuration properties file to be passed in
as an argument. The default path and filename are C:\ekm\gui\
KeyManagerConfig.properties.
-u Uninstalls the key manager Windows Service if you no longer need to run
it as a service. Note that the EKMServer service must be stopped before it
5-4 Dell Encryption Key Mgr User's Guide
Page 61

is uninstalled. When running this command, you may also see the
following error message: Could not remove EKMServer. Error 0. However,
the service may still be uninstalled.
To install Encryption Key Manager as a Windows service, issue:
LaunchEKMService.exe -i config file
7. Once the service is installed using the command above, EKMServer will appear
in the service control panel and you can start and stop the Encryption Key
Manager using the Service Control Panel.
Note: You must start the Windows service manually the first time it is used by
using the control panel.
The Command Line Interface Client
Once the Encryption Key Manager server is started, you can issue CLI commands
through the client interface locally or remotely. To issue CLI commands you must
first start the CLI client.
Authenticating CLI Client Users
The Server.authMechanism property in the configuration file specifies the
authentication mechanism to be used with local/remote clients. When the value is
set to EKM, the CLI client user must login to the server using user/password as
EKMAdmin/changeME. (This password can be changed with chgpasswd
command. See “chgpasswd” on page 5-9.) The default setting for the
Server.authMechanism property is EKM.
When the Server.authMechanism property value is specified as LocalOS in the
KeyManagerConfig.properties file, client authentication is done against the local
operating system registry. The CLI client user must login to the server with OS
user/password. Note that only user/password allowed to login and submit
commands to the server is the user ID under which the server is running and
which also has superuser/root authority.
Important: The Encryption Key Manager server must be off and the GUI must be
closed when making these changes to the Encryption Key Manager configuration
file
For local OS-based authentication in Windows, set the
Server.authMechanism=LocalOS in KeyManagerConfig.properties as follows:
1. Locate The KeyManagerConfig.properties file (c:\ekm\gui directory).
2. Open the file with the text editor of your choice (WordPad recommended).
3. Locate the Server.authMechanism string. If this string is not present, add it to
the file in the in this exact format Server.authMechanism=LocalOS.
4. Save the file.
Now your user ID and password for the Encryption Key Manager server match
the OS user account. Note that only users allowed to login and submit commands
to the server and have administrator privileges can manage the Encryption Key
Manager server
For local OS-based authentication on Linux platforms, additional steps are
required:
Chapter 5. Administering the Encryption Key Manager 5-5
Page 62

1. Download Dell Release R175158 (EKMServicesAndSamples) from
http://support.dell.com and extract the files to a directory of your choice.
2. Locate the LocalOS directory in the download.
3. Copy the libjaasauth.so file from the JVM-JaasSetup directory appropriate to
your platform to java_home/jre/bin.
v On 32-bit Intel Linux environments, copy the LocalOS-setup/linux_ia32/
libjaasauth.so file to the java_home/jre/bin/ directory, where java_home is
|
|
|
|
typically java_install_path/IBMJava-i386-60 for a 32-bit Intel Linux kernel
running the 1.6 JVM.
v On 64-bit AMD64 Linux environments, copy the LocalOS-setup/linux-
x86_64/libjaasauth.so file to the java_home/jre/bin/ directory, where
java_home is typically java_install_path/IBMJava-x86_64-60 for a 64-bit Linux
kernel running the 1.6 JVM.
For Windows platforms this file is not necessary.
After the installation is done, you can start the Encryption Key Manager server.
The Encryption Key Manager client can now login with OS-based user/password.
Note that only user ID allowed to login and submit commands to the server is the
user ID under which the server is running, and which also has superuser/root
authority.
A readme file included on your Dell product media and available at
http://support.dell.com provides more installation details.
Starting the Command Line Interface Client
Note: The TransportListener.ssl.port properties in both the Encryption Key
Manager Server and the Encryption Key Manager CLI client properties files
must be set to the same value or they will not communicate. See
“Debugging Communication Problems Between the CLI Client and the EKM
Server” on page 6-2 if problems occur.
The Encryption Key Manager CLI Client and Encryption Key Manager Server use
SSL to secure their communications. When using the default JSSE configuration of
no client authentication, the certificates in the TransportListener.ssl.keystore on the
Encryption Key Manager Server must be present in the
TransportListener.ssl.truststore. In this way the client knows it can trust the server.
If the Encryption Key Manager CLI client is running on the same system as the
Encryption Key Manager Server, then the same configuration properties file can be
used. This allows the Encryption Key Manager CLI Client to use the same
keystore/truststore configuration as the Encryption Key Manager Server. If they
are not on the same system or if you would like to have the client use different
keystores, you must export the certificates from the TransportListener.ssl.keystore
specified in the Encryption Key Manager Server configuration properties file. These
certificates must be imported into the truststore specified by the
TransportListener.ssl.truststore in the Encryption Key Manager CLI properties file.
You can start the CLI client and issue CLI commands in four ways. Regardless
which you choose, you must specify the name of a CLI configuration file. See
Appendix B for details.
Using the script
On Windows
Navigate to cd c:\ekm\ekmclient and click startClient.bat
5-6 Dell Encryption Key Mgr User's Guide
Page 63

On Linux platforms
Navigate to /var/ekm/ekmclient and enter . ./startClient.sh
Interactively
To run the commands interactively from any command window or shell, enter:
java com.ibm.keymanager.KMSAdminCmd CLIconfiglfile_name -i
The # prompt appears. Before submitting any commands, you must log in the
CLI client into the key manager server with the following command:
#login –ekmuser EKMAdmin –ekmpassword changeME
Once the CLI client is successfully logged into the key manager server, you can
execute any CLI commands. Use the quit or logout command to shut down
the CLI client when you are finished. By default, the Encryption Key Manager
server closes the communication socket with an unused client after ten
minutes. Any attempt to enter a command after that will result in the client
exiting. To specify a longer timeout period for the Encryption Key Manager
server-client socket, modify theTransportListener.ssl.timeout property in the
KeyManagerConfig.properties file.
Using a command file
To submit a batch of commands in a file to the key manager server, create a
file containing the commands you wish to issue, for example, clifile. The first
command in this file must be the login command because the client is required
to login before executing any commands. For example, clifile might contain the
following:
login -ekmuser EKMAdmin -ekmpassword changeME
listdrives
CLI Commands
Then to execute this command file, start the CLI client:
java com.ibm.keymanager.admin.KMSAdminCmd CLIconfiglfile_name –filename clifile
One command at a time
You can run a single command at a time by specifying the CLI userid_ID and
password for each command. From any command window or shell, enter:
java com.ibm.keymanager.KMSAdminCmd ClientConfig.properties_name -listdrives
-ekmuser EKMAdmin -ekmpassword changeME
(This password can be changed with chgpasswd command.) The command
will execute and the client session will end.
The Encryption Key Manager provides a command set that can be used to interact
with the Encryption Key Manager server from a command-line interface client,
which includes the following commands.
addaliastogroup
Copy a specific alias from an existing (source) key group to a new (target) key
group. This is useful when you wish to add an alias that already exists in one key
group to a different key group.
addaliastogroup -aliasID aliasname -sourceGroupID groupname -targetGroupID
groupname
Chapter 5. Administering the Encryption Key Manager 5-7
Page 64

-aliasID
The aliasname for the key to be added.
-sourceGroupID
The unique groupname used to identify the group from which the alias is to be
copied.
-targetGroupID
The unique groupname used to identify the group to which the alias is to be
added.
Example: addaliastogroup -aliasID aliasname -sourceGroupID keygroup1
-targetGroupID keygroup2
adddrive
Add a new drive to key manager drive table. Refer to “Automatically Update Tape
Drive Table” on page 4-1 to learn how to add tape drives to the drive table
|
automatically. See “Encryption Keys and the LTO 4 and LTO 5 Tape Drives” on
page 2-4 for information about alias requirements.
adddrive -drivename drivename [ -rec1 alias][-rec2 alias][-symrec alias]
-drivename
drivename specifies the 12-digit serial number of the drive to be added.
|
|
Note: You must add two leading zeros (0) in front of the 10–digit serial
number to reach a total of 12 digits.
-rec1
Specifies the alias (or key label) of the drive’s certificate.
-rec2
Specifies a second alias (or key label) of the drive’s certificate.
-symrec
Specifies an alias (of the symmetric key) or a key group name for the tape
drive.
Example: adddrive -drivename 000123456789 -rec1 alias1 -rec2 alias2
addkeygroup
Create an instance of a key group with a unique Group ID in the Key Group XML.
addkeygroup -groupID groupname
-groupID
The unique groupname used to identify the group in the KeyGroup XML file.
Example: addkeygroup -groupID keygroup1
addkeygroupalias
Create a new alias for an existing key alias in your keystore for addition to a
specific key group ID.
addkeygroupalias -alias aliasname -groupID groupname
5-8 Dell Encryption Key Mgr User's Guide
Page 65

-alias
The new aliasname for the key.
-groupID
The unique groupname used to identify the group in the KeyGroup XML file.
Example: addkeygroupalias -alias aliasname -groupID keygroup1
chgpasswd
Change the CLI client’s user (EKMAdmin) default password.
chgpasswd -new password
-new
The new password that replaces the previous password.
Example: chgpasswd -new ebw74jxr
createkeygroup
Create the initial key group object in the KeyGroups.xml file. Run only once.
createkeygroup -password password
-password
The password that is used to encrypt the keystore’s password in the
KeyGroups.xml file for later retrieval. The keystore encrypts the key group’s
key, which in turn encrypts each individual key group alias password.
Therefore no key in the KeyGroups.xml file is in the clear.
Example: createkeygroup -password password
deletedrive
Delete a drive from key manager drive table. Equivalent commands are deldrive
and removedrive.
deletedrive -drivename drivename
-drivename
drivename specifies the serial number of the drive to be deleted.
Example: deletedrive -drivename 000123456789
delgroupalias
Delete a key alias from a key group.
delgroupalias -groupID groupname -alias aliasname
-groupID
The unique groupname used to identify the group in the KeyGroups.xml file.
-alias
The aliasname for the key alias to be removed.
Example: delgroupalias -groupID keygroup1 -alias aliasname
Chapter 5. Administering the Encryption Key Manager 5-9
Page 66

delkeygroup
Delete an entire key group.
delkeygroup -groupID groupname
-groupID
The unique groupname used to identify the group in the KeyGroups.xml file.
Example: delkeygroup -groupID keygroup1
exit
Exit CLI client and stop Encryption Key Manager server. Equivalent command is
quit.
Example: exit
export
Export a drive table or Encryption Key Manager server configuration file to the
specified URL.
export {-drivetab|-config} -url urlname
-drivetab
Export the drive table.
-config
Export the Encryption Key Manager server configuration file.
-url
urlname specifies the location where the file is to be written.
Example: export -drivetab -url FILE:///keymanager/data/export.table
help
Display command line interface command names and syntax. Equivalent command
is ?.
help
import
Import a drive table or configuration file from a specified URL.
import {-merge|-rewrite}{-drivetab|-config} -url urlname
-merge
Merge the new data with current data.
-rewrite
Replace the current data with new data.
-drivetab
Import the drive table.
-config
Import the configuration file.
5-10 Dell Encryption Key Mgr User's Guide
Page 67

-url
urlname specifies the location from which the new data is to be taken.
Example: import -merge -drivetab -url FILE:///keymanager/data/export.table
list
List certificates contained in keystore named by config.keystore.file property.
list [-cert |-key|-keysym][-alias alias -verbose |-v]
-cert
List certificates in the specified keystore.
-key
List all keys in the specified keystore.
-keysym
List symmetric keys in the specified keystore.
-alias
alias specifies a specific certificate to list.
-verbose|-v
Display more information about the certificate(s).
Examples:
list -v lists everything in the keystore.
list -alias mycert -v lists all available data for the mycert alias if it exists in
the config.keystore.file keystore.
listcerts
List certificates contained in keystore named by config.keystore.file property.
listcerts [-alias alias -verbose |-v]
-alias
alias specifies a specific certificate to list.
-verbose|-v
Display more information about the certificate(s).
Example: listcerts -alias alias1 -v
listconfig
Lists the Encryption Key Manager server configuration properties in memory,
reflecting the current contents of the KeyManagerConfig.properties file plus any
updates made with the modconfig command.
listconfig
listdrives
List drives in drive table.
listdrives [-drivename drivename ]
Chapter 5. Administering the Encryption Key Manager 5-11
Page 68

-drivename
drivename specifies the serial number of the tape drive to list.
-verbose|-v
Display more information about the tape drive(s).
Example: listdrives -drivename 000123456789
login
Sign on to a CLI client on the Encryption Key Manager server.
login -ekmuser userID -ekmpassword password
-ekmuser
Specify EKMadmin or a localOS user ID value for userID, depending on the type
of authentication used (see “Authenticating CLI Client Users” on page 5-5).
-ekmpassword
Valid password for user ID.
Example: login -ekmuser EKMAdmin -ekmpassword changeME
logout
Logs off the current user. Equivalent command is logoff. These commands are only
useful when the client session is enabled.
Example: logout
modconfig
Modify a property in the Encryption Key Manager server configuration properties
file, KeyManagerConfig.properties. Equivalent command is modifyconfig.
modconfig {-set | -unset} -property name -value value
-set
Set the specified property to the specified value.
-unset
Remove the specified property.
-property
name specifies the name of the target property.
-value
value specifies the new value for the target property when -set is specified.
Example: modconfig -set -property sync.timeinhours -value 24
moddrive
Modify drive information in the drive table. Equivalent command is modifydrive.
moddrive -drivename drivename {-rec1 [alias]|-rec2 [alias]| -symrec [alias]}
-drivename
drivename specifies the serial number of the tape drive.
5-12 Dell Encryption Key Mgr User's Guide
Page 69

-rec1
Specifies the alias (or key label) of the drive’s certificate.
-rec2
Specifies a second alias (or key label) of the drive’s certificate.
-symrec
Specifies an alias (of the symmetric key) or a key group name for the tape
drive.
Example: moddrive -drivename 000123456789 -rec1 newalias1
refresh
Tells the Encryption Key Manager to refresh the debug, audit, and drive table
values with the latest configuration parameters.
Example: refresh
refreshks
Refreshes the keystore. Use this to reload the keystore specified in
config.keystore.file if it was modified while the Encryption Key Manager server
was running. Use this command only when needed as it may degrade
performance.
Example: refreshks
status
Displays whether key manager server is started or stopped.
Example: status
stopekm
Stops the Encryption Key Manager server.
Example: stopekm
sync
Synchronizes the configuration file properties, or drive table information, or both
on another Encryption Key Manager server with those on the key manager server
issuing the command.
Note: Neither synchronization method acts on the keystore or KeyGroups.xml file.
These must be copied manually.
sync {-all | -config | -drivetab} -ipaddr ip_addr :ssl:port [-merge | -rewrite]
-all
Send both the configuration properties file and the drive table information to
the Encryption Key Manager server specified by -ipaddr.
-config
Send only the configuration properties file to the Encryption Key Manager
server specified by -ipaddr.
Chapter 5. Administering the Encryption Key Manager 5-13
Page 70

-drivetab
Send only the drive table information to the Encryption Key Manager server
specified by -ipaddr.
-ipaddr
ip_addr:ssl:port specifies the address and ssl port of the receiving Encryption
Key Manager server. The ssl:port should match the value specified for
“TransportListener.ssl.port” in the KeyManagerConfig.properties file of the
receiving server.
-merge
Merge new drive table data with current data. (The configuration file is always
a rewrite.) This is the default.
-rewrite
Replace the current data with new data.
Example: sync -drivetab -ipaddr remoteekm.ibm.com:443 -merge
version
Displays the version of the Encryption Key Manager server.
Example: version
5-14 Dell Encryption Key Mgr User's Guide
Page 71

Chapter 6. Problem Determination
You can enable debugging for an individual component, multiple components, or
all components of the Encryption Key Manager.
Check These Important Files for Encryption Key Manager Server
Problems
When the Encryption Key Manager fails to start there are three files to check to
determine the cause of the problem.
v native_stdout.log and native_stderr.log
– Since the Encryption Key Manager Server runs in a background process, it
has no console to display its normal informational and error messages. Those
messages are logged to these two files.
– If the Encryption Key Manager Server properties file contains the property
debug.output.file, then these two files are created in the same directory as
the debug log.
– If the Encryption Key Manager Server properties file does not contain the
property debug.output.file, then these two files are created in the working
directory.
– These two files are deleted and recreated on every start of the Encryption Key
Manager Server.
v Audit log
– Audit log contains records that were logged as the Encryption Key Manager
is processing.
– The location of this file is specified by two properties in
KeyManagerConfig.properties, the Encryption Key Manager Server
configuration properties file:
- Audit.handler.file.directory – specifies which directory the audit log should
be located
- Audit.handler.file.name – specifies the filename of the audit log.
– For more information on Audit, see Chapter 7, “Audit Records,” on page 7-1.
Log Entries for Keystore Passwords Greater than 127 Characters
When the Encryption Key Manager is installed as a Windows Service and the
keystore passwords in the KeyManagerConfig.properties file are 128 characters in
length or greater, the Encryption Key Manager will fail to start because it has no
way to prompt for a password of acceptable length. The native Encryption Key
Manager logs will contain entries similar to the following:
native_stdout.log
Server initialized
Default keystore failed to load
native_stderr.log
at com.ibm.keymanager.KeyManagerException: Default keystore failed to load
at com.ibm.keymanager.keygroups.KeyGroupManager.loadDefaultKeyStore(KeyGroupManager.java:145)
at com.ibm.keymanager.keygroups.KeyGroupManager.init(KeyGroupManager.java:605)
at com.ibm.keymanager.EKMServer.c(EKMServer.java:243)
6-1
Page 72

at com.ibm.keymanager.EKMServer.<init>(EKMServer.java:753)
at com.ibm.keymanager.EKMServer.a(EKMServer.java:716)
at com.ibm.keymanager.EKMServer.main(EKMServer.java:129)
Debugging Communication Problems Between the CLI Client and the
EKM Server
Communication between the EKM CLI client and the EKM Server is done over the
ports specified in the TransportListener.ssl.port property in both the server and
client configuration properties files and is protected by SSL.
The following is a list of possible reasons why the client may not connect to the
EKM Server. It includes steps showing how to determine the problem and correct
it.
v The EKM Server is not running, therefore the client has nothing to communicate
with.
1. Issue netstat –an from a command window and confirm that the ports
specified by the TransportListener.ssl.port and TransportListener.tcp.port
properties in the EKM Server properties file are displayed. If the ports are
not displayed, then the server is not running
v The TransportListener.ssl.host property in the EKM CLI client properties file
does not point to the correct host where the EKM Server is running.
1. The value of the TransportListener.ssl.host property in the EKM CLI client
properties file defaults to localhost. Modify the value of this property to
point to the correct host.
v The EKM Server and the EKM CLI client are not talking on the same port.
1. Check the TransportListener.ssl.port properties in both the EKM Server and
the EKM CLI client properties files to confirm they are set to the same value.
v The EKM Server and the EKM CLI client cannot find a common certificate to
use to secure communications.
1. Ensure the keystores specified in the TransportListener.ssl.keystore and
TransportListener.ssl.truststore CLI client properties contain the same
certificates as the Admin.ssl.keystore and Admin.ssl.truststore keystores in
the server properties.
2. Ensure the TransportListener.ssl.keystore.password in the client properties
has the correct password.
3. Ensure none of the certificates in these keystores have expired. JSSE will not
use expired certificates to secure communications.
v The EKM CLI client properties file is read-only.
1. Check the attributes or the permissions on the file to ensure the user running
the EKM CLI client has permission to access and modify the file.
v The EKM Server properties file has Server.authMechanism = LocalOS but the
required file from the EKMServicesAndSamples package has not been installed
or was installed in the wrong location.
1. See the readme included with the EKMServiceAndSamples package for more
information about authentication.
Debugging Key Manager Server Problems
Most problems concerning the key manager involve configuration or starting the
key manager server. Refer to Appendix B, Default Configuration File, for
information on specifying the debug property.
6-2 Dell Encryption Key Mgr User's Guide
Page 73

If the Encryption Key Manager fails to start, check for a firewall.
Either a software firewall or a hardware firewall may be blocking the Encryption
Key Manager from accessing the port.
EKM server not started. EKM.properties config could not be
loaded or found.
1. This error occurs when starting the KMSAdminCmd or EKMLaunch without
specifying the complete path of KeyManagerConfig.properties when the
properties file is not located in the default path.
Default path on Windows is C:/Program Files/IBM/KeyManagerServer/
Default path on Linux platforms is /opt/ibm/KeyManagerServer/
2. Re-enter the command to start the KMSAdminCmd and include the complete
path of the KeyManagerConfig.properties file. See Appendix B, “Encryption
Key Manager Configuration Properties Files” for more information.
EKM server is not started. File name for XML metadata file needs
to be specified in the configuration file.
The Audit.metadata.file.name entry is missing from the configuration file.
To correct this problem, add the Audit.metadata.file.name property to the
KeyManagerConfig.properties configuration file.
Failed to start EKM.Mykeys. The system cannot find the
specified file.
1. This error message occurs when the keystore entries in
KeyManagerConfig.properties do not point to an existing file.
2. To correct this problem, ensure the following entries in the
KeyManagerConfig.properties file point to existing, valid keystore files:
Admin.ssl.keystore.name
TransportListener.ssl.truststore.name
TransportListener.ssl.keystore.name
Admin.ssl.truststore.name
See Appendix B, “Encryption Key Manager Configuration Properties Files” for
more information.
Failed to start EKM. File does not exist = safkeyring://xxx/yyy
The error can be caused by specifying the wrong provider in the IJO variable in
the Encryption Key Manager environment shell script.
For JCECCARACFKS keystores use:
-Djava.protocol.handler.pkgs=com.ibm.crypto.hdwrCCA.provider
and for JCERACFKS keystores use:
-Djava.protocol.handler.pkgs=com.ibm.crypto.provider
Chapter 6. Problem Determination 6-3
Page 74

Failed to start EKM. keystore was tampered with, or password
was incorrect.
1. This error occurs if one or more of these entries in the properties file (see
Appendix B, “Encryption Key Manager Configuration Properties Files”) has the
wrong value:
config.keystore.password (corresponds to config.keystore.file)
admin.keystore.password (corresponds to admin.keystore.name)
transportListener.keystore.password (corresponds to
transportListener.keystore.name)
2. This error could also occur if the wrong password is entered at the password
prompt on start up of the server.
3. If none of the passwords are in the configuration, you are prompted up to three
times if all 3 keystores entries in the properties file are unique. If all of the
entries in the properties are the same, then you are prompted once.
Failed to start EKM. Invalid keystore format.
1. This error may occur when the wrong keystore type is specified for one of the
keystore entries in the properties file.
2. If all of the keystore entries in the properties file point to the same file, the
Encryption Key Manager will use the config.keystore.type value as the keystore
type for all keystores.
3. When there is no type entry in the properties file for a particular keystore, the
Encryption Key Manager assumes the type is jceks.
Failed to start the server. Listener thread is not up and running.
This error may occur for a number of reasons:
1. The following two entries in the KeyManagerConfig.properties file point to the
same port:
TransportListener.ssl.port
TransportListener.tcp.port
Each of the transport listeners must be configured to listen on its own port.
2. One or both of those entries is configured to a port that is already in use by
another service running on the same machine as the Key Manager server. Find
ports that are not in use by another service and use those to configure the Key
Manager server.
3. On systems running Linux operating systems, this error may occur if one or
both of the ports are lower than 1024 and the user starting the Key Manager
server is not root. Modify the transport listener entries in the
KeyManagerConfig.properties to use ports above 1024.
“[Fatal Error] :-1:-1: Premature end of file.” message in
native_stderr.log.
This message occurs when the Encryption Key Manager loads an empty keygroups
file. This message is from the XML parser and does not keep the Encryption Key
Manager from starting unless it is configured to use keygroups and the file
specified by the config.keygroup.xml.file property in
KeyManagerConfig.properties, the Encryption Key Manager Server properties file,
is corrupted.
6-4 Dell Encryption Key Mgr User's Guide
Page 75

Error: Unable to find Secretkey in the config keystore with
alias:MyKey.
The symmetricKeySet entry in properties file is contains a key alias that does not
exist in the config.keystore.file
To correct this problem, modify the symmetricKeySet entry in the configuration file
to only contain aliases that exist in the keystore file designated by the
config.keystore.file entry in KeyManagerConfig.properties OR add the missing
symmetric key to the keystore. See Appendix B, “Encryption Key Manager
Configuration Properties Files” for more information.
No symmetric keys in symmetricKeySet, LTO drives cannot be
supported.
This is an information message. The Encryption Key Manager server will still start,
but LTO drives cannot be supported on this instance of Encryption Key Manager.
This is not a problem if there are no LTO drives configured to communicate with
this Encryption Key Manager.
Encryption Key Manager-Reported Errors
This section defines error messages that are reported by the Encryption Key
Manager and returned in the drive sense data. They are typically called fault
symptom codes or FSCs. The table includes the error number, a short description
of the failure, and corrective actions. Refer to Appendix B, Default Configuration
File, for information on specifying the debug property.
Table 6-1. Errors that are reported by the encryption key manager
Error Number Description Action
EE02 Encryption Read Message Failure:
DriverErrorNotifyParameterError: ″Bad ASC
& ASCQ received. ASC & ASCQ does not
match with either of Key Creation/Key
|
Translation/Key Aquisition operation.″
|
The tape drive asked for an unsupported
action. Ensure that you are running the latest
version of the Encryption Key Manager
(refer to “Downloading the Latest Version
Key Manager ISO Image” on page 3-1 to
determine the latest version). Check the
versions of drive or proxy server firmware
and update them to the latest release, if
needed. Enable debug tracing on the key
manager server. Try to recreate the problem
and gather debug logs. If the problem
persists, refer to “Contacting Dell” in the
“Read this First” section at the front of this
publication for information on getting
technical assistance.
Chapter 6. Problem Determination 6-5
Page 76

Table 6-1. Errors that are reported by the encryption key manager (continued)
Error Number Description Action
EE0F Encryption logic error: Internal error:
″Unexpected error. Internal programming
error in EKM.″
|
|
Error: Hardware error from call CSNDDSV
returnCode 12 reasonCode 0.
EE23 Encryption Read Message Failure: Internal
error: ″Unexpected error........″
|
|
EE25 Encryption Configuration Problem: Errors
that are related to the drive table occurred.
|
|
Ensure that you are running the latest
version of the Encryption Key Manager
(refer to “Downloading the Latest Version
Key Manager ISO Image” on page 3-1 to
determine the latest version). Check the
versions of drive or proxy server firmware
and update them to the latest release, if
needed. Enable debug tracing on the key
manager server. Try to recreate the problem
and gather debug logs. If the problem
persists, refer to “Contacting Dell” in the
“Read this First” section at the front of this
publication for information on getting
technical assistance.
If using hardware cryptography, ensure that
ICSF is started.
The message received from the drive or
proxy server could not be parsed because of
general error. Ensure that you are running
the latest version of the Encryption Key
Manager (refer to “Downloading the Latest
Version Key Manager ISO Image” on page
3-1 to determine the latest version). Enable
debug on the key manager server. Try to
recreate the problem and gather debug logs.
If the problem persists, refer to “Contacting
Dell” in the “Read this First” section at the
front of this publication for information on
getting technical assistance.
Ensure that the config.drivetable.file.url is
correct in the KeyManagerConfig.properties
file, if that parameter is supplied. Run the
listdrives -drivename <drivename>
command on the Encryption Key Manager
server to verify whether the drive is correctly
configured (for example, the drive serial
number, alias, and certificates are correct).
Ensure that you are running the latest
version of the Encryption Key Manager
(refer to “Downloading the Latest Version
Key Manager ISO Image” on page 3-1 to
determine the latest version). Check the
versions of drive or proxy server firmware
and update them to the latest release, if
needed. Enable debug tracing and retry the
operation. If the problem persists, refer to
“Contacting Dell” in the “Read this First”
section at the front of this publication for
information on getting technical assistance.
6-6 Dell Encryption Key Mgr User's Guide
Page 77

Table 6-1. Errors that are reported by the encryption key manager (continued)
Error Number Description Action
EE29 Encryption Read Message Failure: Invalid
signature
|
|
EE2B Encryption Read Message Failure: Internal
error: ″Either no signature in DSK or
signature in DSK can not be verified.″
|
|
EE2C Encryption Read Message Failure:
QueryDSKParameterError: ″Error parsing a
QueryDSKMessage from a device.
Unexpected dsk count or unexpected
payload.″
|
|
The message received from the drive or
proxy server does not match the signature on
it. Ensure that you are running the latest
version of the Encryption Key Manager
(refer to “Downloading the Latest Version
Key Manager ISO Image” on page 3-1 to
determine the latest version). Enable debug
on the key manager server. Try to recreate
the problem and gather debug logs. If the
problem persists, refer to “Contacting Dell”
in the “Read this First” section at the front of
this publication for information on getting
technical assistance.
Ensure that you are running the latest
version of the Encryption Key Manager
(refer to “Downloading the Latest Version
Key Manager ISO Image” on page 3-1 to
determine the latest version). Check the
versions of drive or proxy server firmware
and update them to the latest release, if
needed. Enable debug tracing on the key
manager server. Try to recreate the problem
and gather debug logs. If the problem
persists, refer to “Contacting Dell” in the
“Read this First” section at the front of this
publication for information on getting
technical assistance.
The tape drive asked the Encryption Key
Manager to do an unsupported function.
Ensure that you are running the latest
version of the Encryption Key Manager
(refer to “Downloading the Latest Version
Key Manager ISO Image” on page 3-1 to
determine the latest version). Check the
versions of drive or proxy server firmware
and update them to the latest release, if
needed. Enable debug tracing on the key
manager server. Try to recreate the problem
and gather debug logs. If the problem
persists, refer to “Contacting Dell” in the
“Read this First” section at the front of this
publication for information on getting
technical assistance.
Chapter 6. Problem Determination 6-7
Page 78

Table 6-1. Errors that are reported by the encryption key manager (continued)
Error Number Description Action
EE2D Encryption Read Message Failure: Invalid
Message Type
|
|
EE2E Encryption Read Message Failure: Internal
error: Invalid signature type
|
|
EE30 Prohibited request. An unsupported operation has been
EE31 Encryption Configuration Problem: Errors
that are related to the keystore occurred.
The Encryption Key Manager received a
message out of sequence or received a
message that it does not know how to
handle. Ensure that you are running the
latest version of the Encryption Key Manager
(refer to “Downloading the Latest Version
Key Manager ISO Image” on page 3-1 to
determine the latest version). Enable debug
on the key manager server. Try to recreate
the problem and gather debug logs. If the
problem persists, refer to “Contacting Dell”
in the “Read this First” section at the front of
this publication for information on getting
technical assistance.
The message received from the drive or
proxy server does not have a valid signature
type. Ensure that you are running the latest
version of the Encryption Key Manager
(refer to “Downloading the Latest Version
Key Manager ISO Image” on page 3-1 to
determine the latest version). Enable debug
on the key manager server. Try to recreate
the problem and gather debug logs. If the
problem persists, refer to “Contacting Dell”
in the “Read this First” section at the front of
this publication for information on getting
technical assistance.
requested for a tape drive. Enter the correct,
supported command for the target tape
drive.
Check the key labels that you are trying to
use or configured for the defaults. You can
list the certificates that are available to the
Encryption Key Manager by using the
listcerts command. If you know that you are
trying to use the defaults, then run the
listdrives -drivename drivename command on
the Encryption Key Manager server to verify
whether the drive is correctly configured (for
example, the drive serial number, and
associated aliases/key labels are correct). If
the drive in question has no aliases/key
labels associated with it, then check the
values of default.drive.alias1 and
default.drive.alias2. If this does not help or
the alias/key label exists, then collect debug
logs and refer to “Contacting Dell” in the
“Read this First” section at the front of this
publication in the “Read this First” section at
the front of this publication for information
on getting technical assistance.
6-8 Dell Encryption Key Mgr User's Guide
Page 79

Table 6-1. Errors that are reported by the encryption key manager (continued)
Error Number Description Action
EE32 Keystore-related problem. Most likely cause is either that tape was
EEE1 Encryption logic error: Internal error:
″Unexpected error: EK/EEDK flags conflict
with subpage.″
|
|
EF01 Encryption Configuration Problem: ″Drive
not configured.″
encrypted using a different Encryption Key
Manager with different keys or the key that
was used to encrypt this tape has been
renamed or deleted from the keystore. Issue
list -keysym and ensure the request alias is
in the keystore.
Ensure that you are running the latest
version of the Encryption Key Manager
(refer to “Downloading the Latest Version
Key Manager ISO Image” on page 3-1 to
determine the latest version). Check the
versions of drive or proxy server firmware
and update them to the latest release, if
needed. Enable debug on the key manager
server. Try to recreate the problem and
gather debug logs. If the problem persists,
refer to “Contacting Dell” in the “Read this
First” section at the front of this publication
for information on getting technical
assistance.
The drive that is trying to communicate with
the Encryption Key Manager is not present
in the drive table. Ensure that the
config.drivetable.file.url is correct in the
KeyManagerConfig.properties file, if that
parameter is supplied. Run the listdrives
command to check whether the drive is in
the list. If not, configure the drive manually
by using the adddrive command with the
correct drive information or set the
″drive.acceptUnknownDrives″ property to
true using the modconfig command. Enable
debug tracing and retry the operation. If the
problem persists, refer to “Contacting Dell”
in the “Read this First” section at the front of
this publication for information on getting
technical assistance.
Messages
The following messages can be generated by the Encryption Key Manager and
displayed on the admin console.
Config File not Specified
Text
Configuration file not specified: KeyManager Configuration file not
specified when starting EKM.
Explanation
The KMSAdmin command requires that the configuration file be passed in as a
command-line parameter.
Chapter 6. Problem Determination 6-9
Page 80

System Response
The program stops.
Operator Response
Supply the configuration file and retry the command.
Failed to Add Drive
Text
Failed to add drive. Drive already exists.
Explanation
The adddrive command failed because the drive is already configured with the
Encryption Key Manager and exists in the drive table.
Operator Response
Run the listdrives command to see if the drive is already configured with
Encryption Key Manager. If the drive already exists, the drive configuration can be
changed using moddrive command. Run help for more information.
Failed to Archive the Log File
Text
Failed to archive the log file.
Explanation
The log file cannot be renamed.
Operator Response
Check file permissions and space on that drive.
Failed to Delete the Configuration
Text
“modconfig” command failed.
Explanation
Failed to delete the Encryption Key Manager configuration through modconfig
command.
Operator Response
Check the command syntax using help make sure parameters supplied are correct.
Please check the audit logs for more information.
6-10 Dell Encryption Key Mgr User's Guide
Page 81

Failed to Delete the Drive Entry
Text
“deldrive” command failed.
Explanation
deldrive command failed to delete the drive entry from the drive table.
Operator Response
Check the command syntax using help and make sure parameters supplied are
correct. Make sure the drive is configured with the Encryption Key Manager using
listdrives command. Please check the audit logs for more information.
Failed to Import
Text
“import” command failed.
Explanation
Drive table or configuration files cannot be imported.
System Response
The Encryption Key Manager server does not start.
Operator Response
Make sure the specified URL exists and has read permissions. Check the command
syntax using help. Make sure the parameters are correct and retry.
Failed to Modify the Configuration
Text
“modconfig” command failed.
Explanation
Failed to modify the Encryption Key Manager configuration through modconfig
command.
Operator Response
Check the command syntax using help make sure parameters supplied are correct.
Please check the audit logs for more information.
File Name Cannot be Null
Text
File name was not supplied for audit log file.
Chapter 6. Problem Determination 6-11
Page 82

Explanation
Audit file name is not supplied through configuration properties for the
Encryption Key Manager. This parameter is a required configuration parameter.
System Response
The program stops.
Operator Response
Check that the property Audit.handler.file.name is defined in the configuration
properties file supplied to Encryption Key Manager and try restarting it.
File Size Limit Cannot be a Negative Number
Text
Maximum file size for audit log can not be a negative number.
Explanation
Audit.handler.file.size property value in the Encryption Key Manager
configuration file must be a positive number.
System Response
The Encryption Key Manager does not start.
Operator Response
Please specify a valid number for Audit.handler.file.size and try restarting the
Encryption Key Manager.
No Data to be Synchronized
Text
No data can be found to be synchronized with “sync”.
Explanation
The sync command cannot identify any data to be synchronized.
Operator Response
Check the configuration file supplied exists and if drive table is correctly
configured in the configuration file using config.drivetable.file.url. Check the syntax
using help and retry the sync command.
Invalid Input
Text
Invalid input parameters for the CLI.
6-12 Dell Encryption Key Mgr User's Guide
Page 83

Explanation
The particular command syntax may not be correct.
Operator Response
Make sure the command entered is correct. Check the command syntax using help.
Make sure parameters supplied are correct and retry.
Invalid SSL Port Number in Configuration File
Text
Invalid SSL port number specified in the EKM configuration file.
Explanation
SSL port number supplied in the configuration file is not a valid number.
System Response
The Encryption Key Manager does not start.
Operator Response
Specify valid port number for the TransportListener.ssl.port property in the
configuration file when starting the Encryption Key Manager and try to restart.
Invalid TCP Port Number in Configuration File
Text
Invalid TCP port number specified in the EKM configuration file.
Explanation
TCP port number supplied in the configuration file is not a valid number.
System Response
The Encryption Key Manager does not start.
Operator Response
Specify valid port number for the TransportListener.tcp.port property in the
configuration file when starting the Encryption Key Manager and try to restart.
The default TCP port number is 3801.
Must Specify SSL Port Number in Configuration File
Text
SSL port number is not configured in the properties file.
Chapter 6. Problem Determination 6-13
Page 84

Explanation
SSL port number is a required property to be configured in configuration
properties file. It is used for communication between Encryption Key Manager
servers in a multi-server environment.
System Response
The Encryption Key Manager does not start.
Operator Response
Specify valid port number for the TransportListener.ssl.port property and try to
restart the Encryption Key Manager.
Must Specify TCP Port Number in Configuration File
Text
TCP port number is not configured in the properties file.
Explanation
TCP port number is a required property to be configured in configuration
properties file. It is used for communication between the drive and the Encryption
Key Manager.
System Response
The Encryption Key Manager does not start.
Operator Response
Specify valid port number for the TransportListener.tcp.port property and try to
restart the Encryption Key Manager. The default TCP port number is 3801.
Server Failed to Start
Text
EKM server failed to start.
Explanation
The Encryption Key Manager server cannot start because of configuration
problems.
Operator Response
Check the parameters in the configuration file supplied. Please check the logs for
more information.
Sync Failed
Text
“sync” command failed.
6-14 Dell Encryption Key Mgr User's Guide
Page 85

Explanation
Sync operation to synchronize the data between two Encryption Key Manager
servers failed.
Operator Response
Make sure IP address specified for remote Encryption Key Manager server is
correct and that computer is accessible. Make sure configuration file exists and
contains correct drive table information. Check the sync command syntax using
help. Check the logs for more information.
The Specified Audit Log File is Read Only
Text
The audit log file can not be opened for writing.
Explanation
Audit log file in the Encryption Key Manager configuration specified by the
property Audit.handler.file.name cannot be opened for writing.
System Response
The Encryption Key Manager does not start.
Operator Response
Please check the permissions on the given audit file and directory and try
restarting the Encryption Key Manager.
Unable to Load the Admin Keystore
Text
Keystore for Admin cannot be loaded.
Explanation
Admin keystore supplied to the Encryption Key Manager cannot be loaded. Admin
keystore is used between Encryption Key Manager servers for server side
communication in multi-server environment.
System Response
The Encryption Key Manager does not start.
Operator Response
Check the configuration file setup. Make sure the properties admin.keystore.file,
admin.keystore.provider and admin.keystore.type in the Encryption Key
Manager configuration file are correct (refer to Appendix B) and the keystore file
exists and has read permission. Make sure the password supplied for admin
keystore either through admin.keystore.password property or entered on the
command line is correct. Try restarting the Encryption Key Manager.
Chapter 6. Problem Determination 6-15
Page 86

Unable to load the keystore
Text
Keystore for EKM can not be loaded.
Explanation
Keystore specified to the Encryption Key Manager cannot be loaded.
System Response
The Encryption Key Manager does not start.
Operator Response
Check the configuration file setup. Make sure the properties config.keystore.file,
config.keystore.provider and config.keystore.type in the Encryption Key
Manager configuration file are correct and the keystore file exists and has read
permission. Make sure the password supplied for the Encryption Key Manager
keystore either through config.keystore.password property or entered on the
command line is correct. Try restarting.
Unable to Load the Transport Keystore
Text
Transport keystore cannot be loaded.
Explanation
Transport keystore supplied to the Encryption Key Manager cannot be loaded.
Transport keystore is used between Encryption Key Manager servers for client side
communication in multi-server environment.
System Response
The Encryption Key Manager does not start.
Operator Response
Check the configuration file setup. Make sure the properties
transport.keystore.file, transport.keystore.provider and
transport.keystore.type in the Encryption Key Manager configuration file are
correct and the keystore file exists and has read permission. Make sure the
password supplied for admin keystore either through
transport.keystore.password property or entered on the command line is correct.
Try restarting Encryption Key Manager.
Unsupported Action
Text
User entered action for the CLI which is not supported for EKM.
6-16 Dell Encryption Key Mgr User's Guide
Page 87

Explanation
Action supplied for sync command is not supported or understood by the
Encryption Key Manager. The valid actions are merge or rewrite.
Operator Response
Check the command syntax using help and try again.
Chapter 6. Problem Determination 6-17
Page 88

6-18 Dell Encryption Key Mgr User's Guide
Page 89

Chapter 7. Audit Records
Note: The audit record formats described in this chapter are not considered to be
programming interfaces. The format of these records may change from
release to release. The format is documented in this chapter in case some
parsing of the audit records is desired.
Audit Overview
The audit subsystem writes textual audit records to a set of sequential files as
various auditable events occur during the Encryption Key Manager’s processing of
requests. The audit subsystem writes to a file (directory and file name are
configurable). The file size of these files is also configurable. As records are written
to the file, and the size of the file reaches the configurable size, then the file is
closed, renamed based on the current timestamp, and another file is opened and
records are written to the newly created file. The overall log of audit records is
thus separated into configurable sized files, their names sequenced by the
timestamp of when the size of the file exceeds the configurable size.
To keep the amount of information in the overall audit log (spanning all of the
sequential files created) from growing too large and exceeding the space available
in the filesystem, you might consider creating a script or program to monitor the
set of files in the configured audit directory/folder/container. As files are closed
and named based on the timestamp, the file’s contents should be copied and
appended to the desired long-term, continuous log location and then cleared. Be
careful not to remove or alter the file which is having records written to it by the
Encryption Key Manager while running (this file does not have a timestamp in the
file name).
Audit Configuration Parameters
The following parameters are used in the Encryption Key Manager’s configuration
file to control which events are logged in the audit log, where the audit log files
are written to, and the maximum size of the audit log files.
Audit.event.types
Syntax
Audit.event.types={type[;type]}
Usage
Used to specify which audit types should be sent to the audit log. Possible values
for configuration parameter are:
all All event types
authentication Authentication events
data_synchronization Events that occur during synchronization of information
runtime Events that occur as a part of processing operations and
between Encryption Key Manager servers
requests sent to the Encryption Key Manager
7-1
Page 90

configuration_management Events that occur as configuration changes are made
resource_management Events that occur as resource (tape drive) settings in the
Examples
An example specification for this configuration value is:
Audit.event.types=all
Another example is:
Audit.event.types=authentication;runtime;resource_management
Audit.event.outcome
Syntax
Audit.event.outcome={outcome[;outcome]}
Usage
Used to indicate whether events occurring as a result of successful operations,
unsuccessful operations, or both should be audited. Specify success for events to
be logged which occur as a result of successful operations. Specify failure for
events to be logged which occur as a result of unsuccessful operations.
Encryption Key Manager are changed
Examples
An example specification for this configuration value is:
Audit.event.outcome=failure
To enable both successful and unsuccessful cases:
Audit.event.outcome=success;failure
Audit.eventQueue.max
Syntax
Audit.eventQueue.max=number_events
Usage
Used to set the maximum number of event objects to be held in the memory
queue. This parameter is optional but recommended. the default is zero.
Example
Audit.eventQueue.max=8
Audit.handler.file.directory
Syntax
Audit.handler.file.directory=directoryName
7-2 Dell Encryption Key Mgr User's Guide
Page 91

Usage
This parameter is used to indicate into which directory the audit record files
should be written. Note that if the directory does not exist, the Encryption Key
Manager will attempt to create the directory. If not successful, however, the
Encryption Key Manager will not start. It is recommended that the directory exist
prior to running the Encryption Key Manager. Note also that the User ID under
which the Encryption Key Manager runs must have write access to the directory
specified.
Examples
To set the directory to /var/ekm/ekm1/audit:
Audit.handler.file.directory=/var/ekm/ekm1/audit
Audit.handler.file.size
Syntax
Audit.handler.file.size=sizeInKiloBytes
Usage
This parameter is used to indicate the size limit upon which an audit file is closed
and a new audit file is then written to. Note that the actual size of the resulting
audit file may exceed this value by several bytes as the file is closed after the size
limit has been exceeded.
Examples
To set the maximum file size to roughly 2 megabytes, enter:
Audit.handler.file.size=2000
Audit.handler.file.name
Syntax
Audit.handler.file.name=fileName
Usage
Use this parameter to specify the base file name, within the specified audit
directory to use as the base name in creating audit log files. Note that this
parameter must contain only the base file name and not the fully qualified path
name. The full name of the audit log file will have the value corresponding to the
time upon which the file was written appended to this name.
To show this, consider an example where the Audit.handler.file.name value is set
to ekm.log. The full name of the file(s) will be something like: ekm.log.2315003554.
The appended string can be used to help determine the order in which the audit
log files were created – higher number values indicate newer audit log files.
Examples
An example setting the base name to ekm.log is:
Audit.handler.file.name=ekm.log
Chapter 7. Audit Records 7-3
Page 92

Audit.handler.file.multithreads
Syntax
Audit.handler.file.multithreads={yes|true|no|false}
Usage
If specified as true, then a separate thread is used to write the event data to the
audit log, allowing the current thread of execution (operation) to continue without
waiting for the write to the audit log to complete. Use of multiple threads is the
default behavior.
Examples
An example setting the base name to true is:
Audit.handler.file.multithreads=true
Audit.handler.file.threadlifespan
Syntax
Audit.handler.file.threadlifespan=timeInSeconds
Usage
This parameter is used to specify the maximum time a thread should be expected
to require in order to write an audit log entry. This value is used during clean up
processing to allow threads to complete their work before interrupting them. If a
background thread has not completed its work within the time allotted by the
threadlifespan parameter, then upon clean up processing, the thread will be
interrupted.
Examples
To set the expected time a thread to write to the audit log should require to 10
seconds, specify:
Audit.handler.file.threadlifespan=10
Audit Record Format
All audit records use a similar output format which is described here. All audit
records contain some common information including timestamp and record type,
along with information specific to the audit event which occurred. The general
format for audit records is shown here:
AuditRecordType:[
timestamp=timestamp
Attribute Name=Attribute Value
...
]
Each record spans multiple lines in the file, with the first line of the record
beginning with the audit record type beginning at the first character on the line,
followed by a colon (;) and an opening left bracket ([). Subsequent lines associated
with the same audit record are indented two (2) spaces to assist in readability of
the log records. The last line for a single audit record contains a closing right
7-4 Dell Encryption Key Mgr User's Guide
Page 93

bracket (]) indented two (2) spaces. The number of lines for each audit record
varies based on the audit record type and the additional attribute information that
is provided with the audit record.
The timestamp for the audit records is based on the system clock of the system on
which the Encryption Key Manager is running. If these records are to be correlated
based on timestamp with events occurring on other systems, some type of time
synchronization should be used to ensure that the clocks of the various systems in
the environment are synchronized to an acceptable level of accuracy.
Audit Points in the Encryption Key Manager
The Encryption Key Manager can write audit records, based on configuration, for
many events that occur during the processing of requests. In this section, the set of
events that can be audited is described along with the audit record configuration
category, which must be enabled in order for these audit records to be written to
the audit files (see Table 7-1).
Table 7-1. Audit record types that the Encryption Key Manager writes to audit files
Audit Record
Type Audit Type Description
Authentication authentication Used to log authentication events
Data
Synchronization
Runtime runtime Used to log various important
Resource
Management
Configuration
Management
data_synchronization Used to log data synchronization
processing
processing events which occur within
the Encryption Key Manager server
while handling requests
resource_management Used to log changes to how resources
are configured to the Encryption Key
Manager
configuration_management Used to log changes to the
configuration of the Encryption Key
Manager server
Audit Record Attributes
The following lists show the attributes available to each of the audit record types.
Authentication event
The format for these records is:
Authentication event:[
timestamp=timestamp
event source=source
outcome=outcome
event type=SECURITY_AUTHN
message=message
authentication type=type
users=users
]
Note that the message value only appears if information for it is available.
Chapter 7. Audit Records 7-5
Page 94

Data Synchronization event
The format for these records is:
Data synchronization event:
timestamp=timestamp
event source=source
outcome=outcome
event type=SECURITY_DATA_SYNC
message=message
action=action
resource=resource
user=user
]
Note that the message and user values only appear if information for them is
available.
Runtime event
The format for these records is:
Runtime event:
timestamp=timestamp
event source=source
outcome=outcome
event type=SECURITY_RUNTIME
message=message
resource=resource
action=action
user=user
]
Note that the message and user values only appear if information for them is
available.
Resource Management event
The format for these records is:
Resource management event:
timestamp=timestamp
event source=source
outcome=outcome
event type=SECURITY_MGMT_RESOURCE
message=message
action=action
user=user
resource=resource
]
Note that the message value only appears if information for it is available.
Configuration Management event
The format for these records is:
Configuration management event:
timestamp=timestamp
event source=source
outcome=outcome
event type=SECURITY_MGMT_CONFIG
message=message
7-6 Dell Encryption Key Mgr User's Guide
Page 95

Audited Events
action=action
command type=type
user=user
]
Note that the message value only appears if information for it is available.
Table 7-2 describes the events that cause audit records to be created. The table lists
the audit record type that is logged when this event occurs.
Table 7-2. Audit record types by audited event
Audited Event Audit Record Type
User successfully authenticated authentication
User authentication failed authentication
Data successfully sent to other EKM data_synchronization
Error sending data to other EKM data_synchronization
sync command processed data_synchronization
Error processing sync command data_synchronization
Command line processing started runtime
exit command received runtime
Unknown command entered runtime
Message received from drive runtime
Error processing message from drive runtime
Error from message received from drive runtime
Error updating drive table with information
received from drive
Error retrieving information from drive table runtime
Error retrieving information from keystore runtime
Error processing certificate from keystore runtime
Error finding private key from keystore runtime
Error computing cryptographic values runtime
Message exchange processed successfully runtime
Message processing started runtime
Command line processing started runtime
Problem found using cryptographic services runtime
New drive discovered runtime
Error configuring drive to drive table runtime
Successfully started processing messages
from drive
Received and processed stopekm command runtime
Drive removed from drive table resource_management
Error removing drive from drive table resource_management
Drive table import successful resource_management
Error importing drive table resource_management
runtime
runtime
Chapter 7. Audit Records 7-7
Page 96

Table 7-2. Audit record types by audited event (continued)
Audited Event Audit Record Type
Drive table export successful resource_management
Error exporting drive table resource_management
listcerts command successful resource_management
Drive add to drive table successful resource_management
Error adding drive to drive table resource_management
listdrives command successful resource_management
Error processing listdrives command resource_management
Drive table modify successful resource_management
Error modifying drive table resource_management
Successful KeyStore open resource_management
Error opening KeyStore resource_management
Configuration property changed configuration_management
Error changing configuration property configuration_management
Configuration property deleted configuration_management
Error deleting configuration property configuration_management
Configuration import successful configuration_management
Error importing configuration configuration_management
Configuration export successful configuration_management
Error exporting configuration configuration_management
listconfig command successful configuration_management
7-8 Dell Encryption Key Mgr User's Guide
Page 97

Chapter 8. Using Metadata
The Encryption Key Manager must be configured to create an XML file that
captures vital information as data is being encrypted and written to tape. This file
can be queried by volume serial number to display the alias or key label that was
used on the volume. Conversely, the file can be queried by alias to display all
volumes associated with that key label/alias.
Note: If you do not configure a metadata file, the Encryption Key Manager will
not start.
As encryption processing is performed, the Encryption Key Manager collects the
following data:
v Drive Serial Number
v Drive WorldWideName
v Creation Date
v Key Alias 1
v Key Alias 2
v DKi
v VolSer
When the collected data reaches a certain limit, it is written to an XML file. The
default limit, which can be set in the Encryption Key Manager properties file
(KeyManagerConfig.properties), is 100 records. Once the file is written, it can be
queried as long as the Encryption Key Manager is running. To prevent the file
from growing too large, it is automatically rolled over to a new file after a
maximum file size is reached. The default maximum file size for rollover, which
can also be set in the Encryption Key Manager properties file, is 1 MB. Only a
current and a previous file version is saved. The values to set in the Encryption
Key Manager configuration properties file are:
Audit.metadata.file.name
Name of XML file where metadata is saved. This is required.
Audit.metadata.file.size
The maximum filesize, specified in kilobytes, before rolling the file over from
current to previous version. This is optional. The default is 1024 (1MB).
Audit.metadata.file.cachecount
The number of records to be cached before writing the metadata file. This is
optional. The default is 100.
XML File Format
The file contains records in the following format.
<KeyUsageEvent>
<DriveSSN>FVTDRIVE0000</driveSSN> -Drive Serial Number
<VolSer>TESTER</volSer> -Volume Serial
<DriveWWN>57574E414D453030</driveWWN> -drive WWN
<keyAlias2>cert2</keyAlias2> -Key Alias1
8-1
Page 98

<keyAlias1>cert1</keyAlias1> - keyAlias2
<dateTime>Tue Feb 20 09:18:07 CST 2007</dateTime> - creation date
</KeyUsageEvent>
|
Note: For LTO 4 and LTO 5 drives there will only be <keyAlias1></keyAlias1>
record and DKi will be recorded.
Querying the Metadata XML File
Use the EKMDataParser tool to query the metadata file. This tool parses the XML
file using Document Object Model (DOM) techniques and cannot be run from the
Encryption Key Manager command line interface. It is invoked as follows:
java com.ibm.keymanager.tools.EKMDataParser -filename
full_path_to_metadata_file {-volser volser | -keyalias alias}
metadata_path
This is the same directory path specified for the metadata file in
Audit.metadata.file.name in the KeyManagerConfig.properties file.
-filename
filename is required and must be the name of the XML metadata file. This will
usually match the name specified in the Audit.metadata.file.name property in
the KeyManagerConfig.properties file.
-volser
The volume serial number of the tape cartridge you are searching for in the
XML file. Either -volser or -keyalias must be specified.
-keyalias
The key label or alias you are searching for in the XML file. Either -volser or
-keyalias must be specified.
Example
Assuming that the metadata filename property (Audit.metadata.file.name) in
KeyManagerConfig.properties is set to a value of metadata and the file is located
in your local directory where the Encryption Key Manager runs, the following
command would filter (display) only the XML records related to volser 72448:
<jvm_path>/bin/java com.ibm.keymanager.tools.EKMDataParser -filename metadata -volser 72448
The output would be formatted as follows:
Table 8-1. Metadata Query Output Format
keyalias1 keyalias2 volSer dateTime driveSSN dki
cert1 cert2 72448 Wed Mar 14 10:31:32 CDT 2007 FVTDRIVE0004
Recovering from a Corrupted Metadata File
The Encryption Key Manager metadata file can become corrupted if the Encryption
Key Manager is improperly shutdown or the system where the Encryption Key
Manager is running crashes. Improper editing or modification of the metadata file
can also corrupt it. The corruption will go unnoticed until the EKMDataParser
parses the metadata file. The EKMDataParser may fail with an error similar to the
following:
8-2 Dell Encryption Key Mgr User's Guide
Page 99

[Fatal Error] EKMData.xml:290:16: The end-tag for element type "KeyUsageEvent" must
end with a '>' delimiter.
org.xml.sax.SAXParseException: The end-tag for element type "KeyUsageEvent" must
end with a '>' delimiter.
at org.apache.xerces.parsers.DOMParser.parse(Unknown Source)
at org.apache.xerces.jaxp.DocumentBuilderImpl.parse(Unknown Source)
at javax.xml.parsers.DocumentBuilder.parse(Unknown Source)
at com.ibm.keymanager.tools.EKMDataParser.a(EKMDataParser.java:136)
at com.ibm.keymanager.tools.EKMDataParser.a(EKMDataParser.java:26)
at com.ibm.keymanager.tools.EKMDataParser.main(EKMDataParser.java:93)
If this error occurs, it is due to a missing XML ending tag for an element. The
Encryption Key Manager metadata file can be recovered to allow the
EKMDataParser to parse the file again.
1. Make a backup copy of the Encryption Key Manager metadata file.
2. Edit the Encryption Key Manager metadata file.
3. In XML, there is should be an initial tag and a corresponding ending tag for
each piece of data or event.
v Some examples of an initial tag:
– <KeyUsageEvent>
– <driveSSN>
– <keyAlias1>
v Some examples of an ending tag:
– </KeyUsageEvent>
– </driveSSN>
– </keyAlias1>
4. Scan the file and look for unmatched tags. The error message from the
EKMDataParser lists which tag is missing its ending tag. This should make the
search somewhat easier.
5. When an unmatched tag is found, temporarily delete the event or add the
necessary tags to complete the event.
v For example, the following excerpt from a Encryption Key Manager metadata
file shows a first KeyUsageEvent that has no ending tag:
<KeyUsageEvent>
<driveSSN>001310000109</driveSSN>
<volSer> </volSer>
<driveWWN>5005076312418B07</driveWWN>
<keyAlias1>key00000000000000000F</keyAlias1>
<dki>6B657900000000000000000F</dki>
<dateTime>Thu Aug 30 09:50:53 MDT 2007</dateTime>
<KeyUsageEvent>
<driveSSN>001310000100</driveSSN>
<volSer> </volSer>
<driveWWN>5005076312418ABB</driveWWN>
<keyAlias1>key000000000000000000</keyAlias1>
<dki>6B6579000000000000000000</dki>
<dateTime>Thu Sep 06 16:49:39 MDT 2007</dateTime>
</KeyUsageEvent>
Adding a </KeyUsageEvent> between the lines <dateTime>Thu Aug 30
09:50:53 MDT 2007</dateTime> and <KeyUsageEvent> would complete the
first <KeyUsageEvent>.
Repairing the file corruption will allow the EKMDataParser to successfully parse
the data.
Chapter 8. Using Metadata 8-3
Page 100

8-4 Dell Encryption Key Mgr User's Guide
 Loading...