

Page 1

Seeding from a Dell™ DR Series System to an
External Device
Using the Dell DR Series System CLI
Dell Engineering
August 2014
A Dell Technical White Paper
Page 2

Revisions
Date
Description
August 2014
Initial release
THIS WHITE PAPER IS FOR INFORMATIONAL PURPOSES ONLY, AND MAY CONTAIN TYPOGRAPHICAL ERRORS AND
TECHNICAL INACCURACIES. THE CONTENT IS PROVIDED AS IS, WITHOUT EXPRESS OR IMPLIED WARRANTIES OF
ANY KIND.
© 2014 Dell Inc. All rights reserved. Reproduction of this material in any manner whatsoever without the express
written permission of Dell Inc. is strictly forbidden. For more information, contact Dell.
PRODUCT WARRANTIES APPLICABLE TO THE DELL PRODUCTS DESCRIBED IN THIS DOCUMENT MAY BE FOUND
AT: http://www.dell.com/learn/us/en/19/terms-of-sale-commercial-and-public-sector
reference architectures discussed in this document may vary with differing deployment conditions, network loads, and
the like. Third party products may be included in reference architectures for the convenience of the reader. Inclusion
of such third party products does not necessarily constitute Dell’s recommendation of those products. Please consult
your Dell representative for additional information.
Trademarks used in this text:
Dell™, the Dell logo, Dell Boomi™, Dell Precision™ ,OptiPlex™, Latitude™, PowerEdge™, PowerVault™,
PowerConnect™, OpenManage™, EqualLogic™, Compellent™, KACE™, FlexAddress™, Force10™ and Vostro™ are
trademarks of Dell Inc. Other Dell trademarks may be used in this document. Cisco Nexus®, Cisco MDS
®
, and other Cisco Catalyst® are registered trademarks of Cisco System Inc. EMC VNX®, and EMC Unisphere® are
0S
registered trademarks of EMC Corporation. Intel
Intel Corporation in the U.S. and other countries. AMD
®
, Pentium®, Xeon®, Core® and Celeron® are registered trademarks of
®
is a registered trademark and AMD Opteron™, AMD
Phenom™ and AMD Sempron™ are trademarks of Advanced Micro Devices, Inc. Microsoft
®
Server
, Internet Explorer®, MS-DOS®, Windows Vista® and Active Directory® are either trademarks or registered
trademarks of Microsoft Corporation in the United States and/or other countries. Red Hat
®
are registered trademarks of Red Hat, Inc. in the United States and/or other countries. Novell® and SUSE® are
Linux
registered trademarks of Novell Inc. in the United States and other countries. Oracle
®
Oracle Corporation and/or its affiliates. Citrix
, Xen®, XenServer® and XenMotion® are either registered trademarks or
trademarks of Citrix Systems, Inc. in the United States and/or other countries. VMware
®
vCenter
countries. IBM
NetXtreme
and vSphere® are registered trademarks or trademarks of VMware, Inc. in the United States or other
®
is a registered trademark of International Business Machines Corporation. Broadcom® and
®
are registered trademarks of Broadcom Corporation. Qlogic is a registered trademark of QLogic
Corporation. Other trademarks and trade names may be used in this document to refer to either the entities claiming
the marks and/or names or their products and are the property of their respective owners. Dell disclaims proprietary
interest in the marks and names of others.
Performance of network
®
, Cisco NX-
®
, Windows®, Windows
®
and Red Hat® Enterprise
®
is a registered trademark of
®
, Virtual SMP®, vMotion®,
2 Seeding from a Dell™ DR Series System to an External Device | August 2014
Page 3

Table of contents
Understanding the seeding process ............................................................................................................................................. 5
1
2 Seeding data from a DR Series system and copying it to a replication target ................................................................... 6
2.1 Preparing for seeding ............................................................................................................................................................ 6
2.2 Setting up a seeding export job on the source DR Series system ............................................................................. 6
2.3 Important notes about the seeding export process ...................................................................................................... 9
2.4 Export CLI flow ...................................................................................................................................................................... 10
3 Setting up a seeding import job on the target DR Series system......................................................................................... 11
3.2 Important notes about the import seeding process ................................................................................................... 13
3.4 Import CLI flow ..................................................................................................................................................................... 14
4 Synchronizing the source and target containers .................................................................................................................... 15
4.1 If a target container exists .................................................................................................................................................. 15
4.2 If the target container does not exist .............................................................................................................................. 15
3 Seeding from a Dell™ DR Series System to an External Device | August 2014
Page 4

Executive summary
This paper provides information about how to set up seeding from a Dell DR Series system to an external
device through the Dell DR Series command line interface (CLI). This paper is a quick reference guide and
does not include all DR Series system deployment best practices.
For additional information, see the DR Series system documentation and other data management
application best practices whitepapers for your specific DR Series system at:
http://www.dell.com/powervaultmanuals
4 Seeding from a Dell™ DR Series System to an External Device | August 2014
Page 5
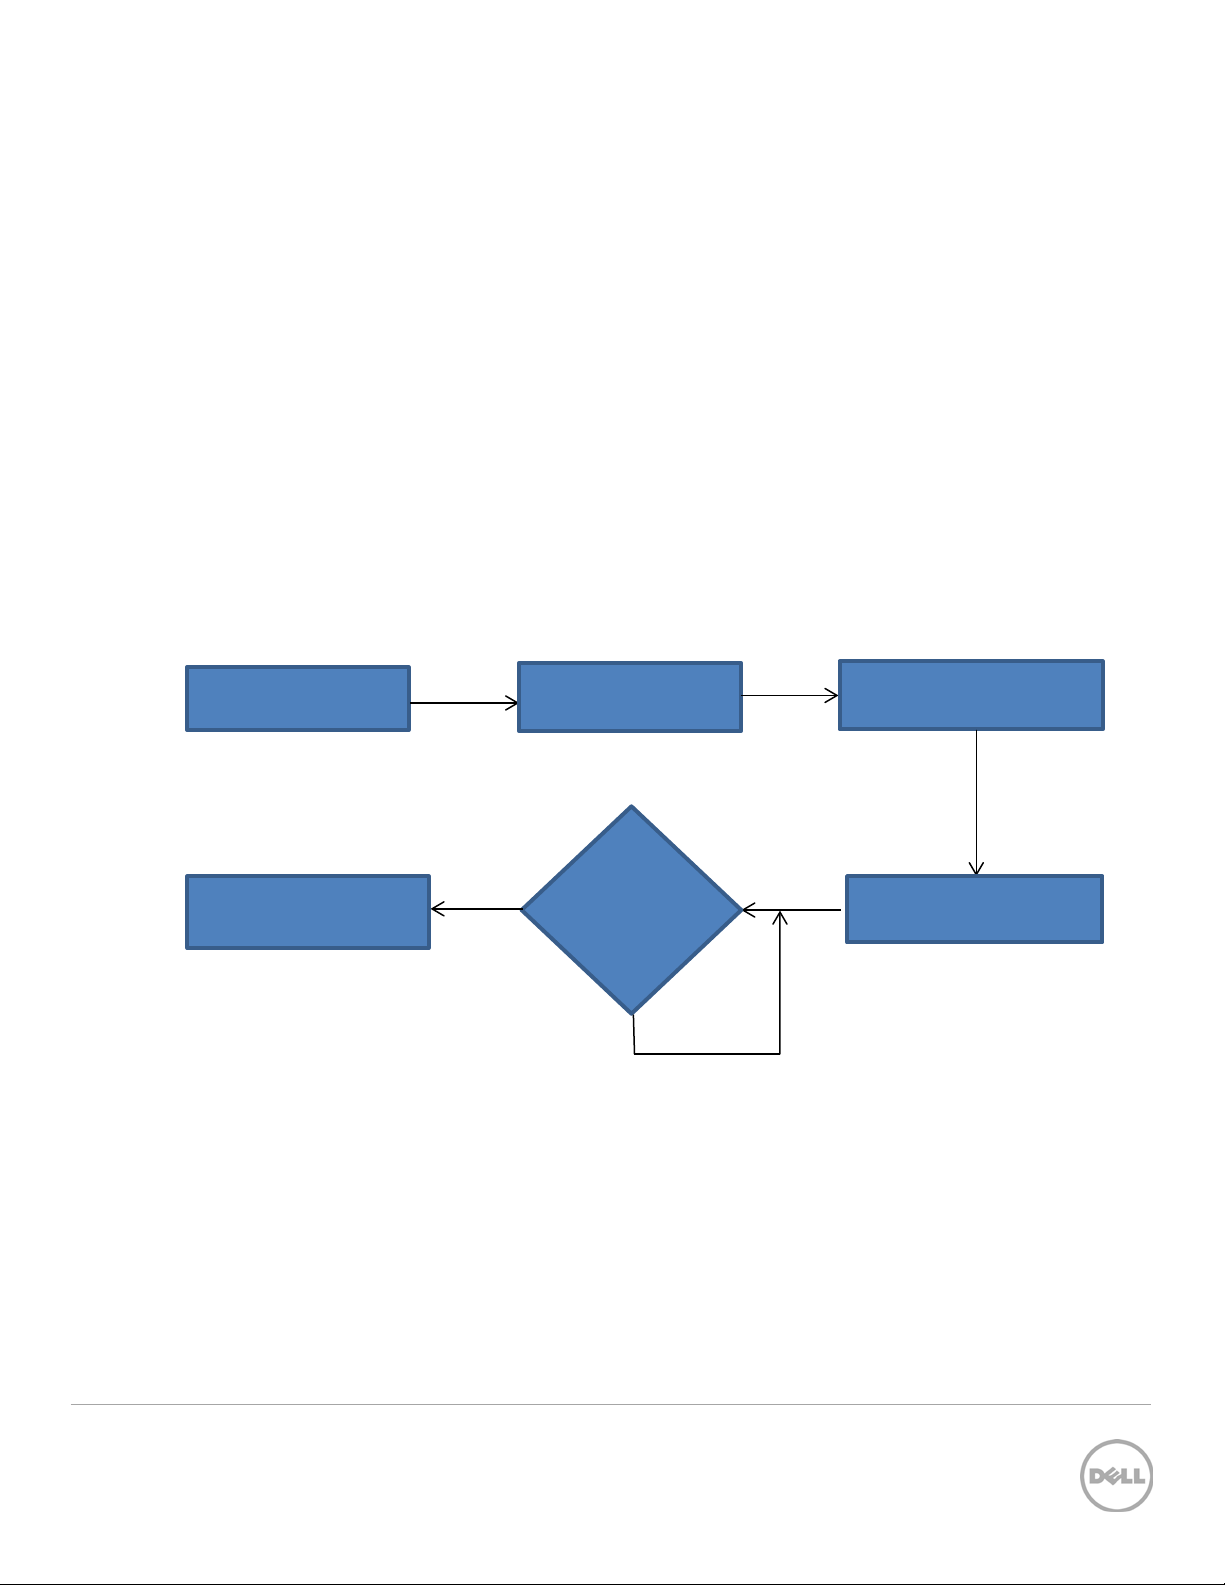
Perform seed export
Enable the replication
No
Yes
1 Understanding the seeding process
Seeding is a process that copies de-duplicated data from a DR Series system to an external device
(typically USB), which is exported as a CIFS share. The seeding process comprises the following steps:
1. The device attached to a client machine is mounted using the CIFS protocol on the DR Series system;
and, seeding is initiated, which copies the data (export) to the device.
2. Once the data is copied entirely, the devices are later shipped to the location of the target DR Series
system.
3. The device is attached to another client at the remote site and mounted using the CIFS protocol on
the target DR Series system.
4. The data is imported to the target DR Series system.
5. Once all of the data is imported, replication re-sync is initiated between the source and target DR
containers. Since the data is already present on the target, the re-sync completes quickly after
transferring the namespace with any other changes in data. Replication setup is ready between the
source and target.
The following diagram shows this process.
Transfer the devices to
target location
Perform seed import
Perform seed cleanup
Is
INSYNC?
relationship
5 Seeding from a Dell™ DR Series System to an External Device | August 2014
Page 6

2 Seeding data from a DR Series system and copying it to a
replication target
2.1 Preparing for seeding
Before the seeding process is started, you need to gather the following information.
• The names of the containers on the appliance that contain the data to be replicated (typically the
containers for which the disaster recovery setup must be done). These container names are given as
input to the seeding process.
• Name or IP address of the client machine on which the USB device is mounted.
• Name of the CIFS share (USB device) exported to the “outside world.”
• Credentials (including domain, if any) to access the client.
• A password (minimum eight characters) to use for encrypting the data on the device. This password
must be input at import time to decrypt the data.
2.2 Setting up a seeding export job on the source DR Series system
The following steps describe the commands for setting up a seeding export job on the source DR Series
system.
1. Create a seed export job by entering the following command.
seed --create --op export [--enc_type <aes128 | aes256>]
By default the data is encrypted; however, the encryption type is optional. This command would
request a password that is needed for encryption as shown in the following example. (Note that
this same password is to be given as input to the import operation, which verifies and decrypts the
data.)
2. Once a seed job is created, the container whose data is to be seeded must be added to the job. If
there are multiple containers, you can execute the following command multiple times to seed the
data from all containers.
seed --add_container --name <container name>
6 Seeding from a Dell™ DR Series System to an External Device | August 2014
Page 7

3. To reference the device to which the seed data must be copied, enter the following command.
(Note that only the shares exported by CIFS protocol are recognized.)
seed --add_device --server <server name> --volume <volume> --username
<user name> [--domain <domain name>]
In this command, the parameters are as follows:
• server name - the name of the client which exports the device as a CIFS share.
• volume name - the name of the export share on the target server. The name is case-sensitive.
• user name - credentials to access the share. Password is requested separately.
4. Once the add device is successful, you can cross check the configuration details by using the
following command. This step is recommended before you proceed further.
seed –show
5. Enter the following command to start the seeding process.
seed –start
The data copy begins and will continue until either the space on the device is full or all of the data
of the containers added is seeded.
6. Enter the following command to monitor the seeding progress. If the “Seed status” has reached
‘FINISHED’, then the seeding of the containers given as input is complete.
seed –stats
7 Seeding from a Dell™ DR Series System to an External Device | August 2014
Page 8

If the status is shown as ‘Paused (Device full),’ then the share has no more space to copy the data.
The device must be removed (using the commands, “seed –stop” and “seed –
remove_device”) and a new device with free space can be added (using the command, seed –
add_device). This scenario occurs when more devices are available, and seeding has to be
continued. Adding a new device without deleting the job would continue to copy the data from
where it was left. You can execute the command, “seed –start” to continue.
The type of information in the output of the command, “seed –stats,” looks similar to the
following example.
7. If seeding must be stopped for some time, or the device must be removed, you can execute the
following command to stop all I/O to the seeding device.
seed –stop
8. You can enter the following command to remove the device from the DR Series system to which
the seed data has been written. It is recommended that you execute the command, seed –stop
before removing the device.
seed –remove_device
8 Seeding from a Dell™ DR Series System to an External Device | August 2014
Page 9

9. If the data to be seeded is completely gathered and the seed job is complete, you can delete the
job by entering the following command.
seed –delete
2.3 Important notes about the seeding export process
• If ‘seed –delete’ is executed, all of the information about the seeding job is removed from the DR
Series system. If a new job is created for the same container, then it will copy all the data once again.
• The seeding process does not require that data ingest be stopped; even to the container to which the
data is seeded. This means the DR Series system can continue to function normally while seeding is in
process.
• If the external device runs out of space, you should enter the commands ‘seed –stop,’ ‘seed –
remove_device,’ and then ‘seed –add_device’ to add the new device. Enter ‘seed –start’ to
continue seeding to the new device or the same device after the data on the device is imported on the
target.
• If the seeding process encounters any errors writing to the device, then you should remove the device
by executing the command, ‘seed –stop,’ followed by ‘seed –remove_device’. The device can be
re-attached, or a new device can be attached. To start seeding after adding a device, enter the
command, ‘seed –start’. Seeding at this point will continue from the point where it stopped earlier.
If seeding is stopped for any reason, enter the ‘seed –stop’ command, which will stop all of the
seeding I/O activity. To continue again, enter the command, ‘seed –start’.
• You need to export the attached device through the CIFS protocol. It can be a Windows share or a
share exported from a Linux machine using the Samba protocol.
• During seeding, replication can be enabled as needed on the same containers to the same DR Series
system or to different DR Series systems.
• Seeding does not delete the data on the device. Data on the device can also co-exist with the seed
data. It is optional to delete the data on the device to free up the space for accommodating seed data.
9 Seeding from a Dell™ DR Series System to an External Device | August 2014
Page 10

seed --create --op export
seed --add_container < …
seed --add_device < … >
seed --show
seed --stats
seed?
seed --remove_device
seed --delete
Pending
No
• You are not required to seed the entire data. You can choose the amount of data that can be seeded,
depending on factors like time, amount of external space available, and so on; and you can stop
seeding accordingly. The residual data will reach the target during replication re-sync.
2.4 Export CLI flow
The following diagram demonstrates the flow of the data export using the DR Series system CLI
commands.
Ready
to
seed --start
Status
True
Finished
seed --stop
FINISHED/No Space/Error
Check
seed
status
10 Seeding from a Dell™ DR Series System to an External Device | August 2014
Page 11

3 Setting up a seeding import job on the target DR Series
system
The seed import process copies the de-duplicated data from the external device provided to the target DR
Series system. The following steps describe the CLI commands you need to enter for the import job on
the target DR Series system.
1. Create a seed import job using the following command.
seed --create --op import
This command requests a password, which is the same password defined at the time of data
export. The password is used to verify and decrypt the data.
2. You can reference the device from which the seed data is to be read by using the following
command. (Note that only the shares exported by the CIFS protocol are recognized.)
seed --add_device --server <server name> --volume <volume> --username
<user name> [--domain <domain name>]
In this command, the parameters are as follows:
• server name - the name of the client that exports the device as a CIFS share.
• volume name - the name of the export share on the target server. The name is case sensitive.
• user name - the credentials needed to access the share. The password is requested separately.
3. Once the device is added successfully, you can cross check the configuration details by using the
following command. This step is recommended before you proceed further.
seed –show
11 Seeding from a Dell™ DR Series System to an External Device | August 2014
Page 12

4. To start the seeding process, enter the following command.
seed –start
The data copy begins and continues until all of the data from the device is completely read.
5. To monitor the seeding process, enter the following command.
seed --stats
The type of information in the output of the command, “seed –stats,” looks similar to the
following example.
If the seed status is ‘FINISHED,’ then the data has been completely read from the attached device
attached. The device can be removed after issuing the command, ‘seed –stop,’ and a new
device if present can be attached.
6. If you need to stop seeding, or the device needs to be removed, you can enter the following
command to stop all I/O from the seeding device.
seed –stop
12 Seeding from a Dell™ DR Series System to an External Device | August 2014
Page 13

7. To remove the device from the DR Series system to which the seed data has been written, enter
the following command. (It is recommended that you enter the command, seed –stop, before
removing the device.)
seed –remove_device
8. If the data gathering from all the devices is complete, you can enter the following command to
remove the seed job completely.
seed --delete
9. Once the import is complete, replication re-sync must be performed between the source and
target DR Series system containers. Once replication reaches the ‘INSYNC’ state, execute the
following command to remove any data that is left unaccounted from seeding.
Seed –cleanup
3.1 Important notes about the import seeding process
• The order in which the seed devices are attached makes no difference for the seeding process.
• The data at source could have changed after the export process is initiated. This data is replicated
during replication re-sync.
• The command ‘seed –cleanup’ must be executed only after the replication is established between
source and target. If it is executed before, the entire imported data set could be deleted.
• If seeding has to be stopped for any reason, you should enter the ‘seed –stop,’ which will stop all
seeding I/O activity. To continue, enter the command, ‘seed –start’. If an error occurs while reading
the seeding device, you should remove the device using the command, ‘seed –remove_device,’
after stopping the I/O, and then re-attach the device.
• If any device is lost, corrupted, or left unattached during the import process, the data in that particular
device will be received at the time of replication resync and will not have any effect on the import
process.
13 Seeding from a Dell™ DR Series System to an External Device | August 2014
Page 14

seed --create --op import
seed --start
Check
status
Ready
seed?
seed --stop
seed --delete
Add
Pending
Yes
• Once the data on the device is imported, the seed import process will not delete the data on the seed
location. You could use the same data, or the device, to import the data on a different DR Series
system if needed (for example, to setup cascaded replication). However, it is recommended that you
remove the data after replication setup is complete.
3.2 Import CLI flow
The following diagram demonstrates the flow of the data import using the DR Series system CLI
commands.
seed --add_device < … >
seed --show
another
device?
seed --remove_device
No
to
FINISHED
seed
seed --stats
14 Seeding from a Dell™ DR Series System to an External Device | August 2014
Page 15

4 Synchronizing the source and target containers
Once seeding import is complete, two possible scenarios exist:
• The target container already exists, or,
• The target container does not exist, and, therefore, a fresh replication pair must be created.
4.1 If a target container exists
If a target container exists, you should initiate replication re-sync between the source and target DR Series
system containers. Since the data is already present on the target, the re-sync will complete quickly after
transferring the namespace with any other new or changed data. Complete the following steps.
1. Enter the command:
replication --resync --name <name> --role <source | target>
2. Wait for replication state to come to “INSYNC”.
4.2 If the target container does not exist
If a target container does not exist, complete the following steps.
1. Create a container on the target DR Series system.
2. Enable replication between the source and target DR containers by using the following command:
replication --add < … >
3. Once the replication status changes to ‘INSYNC,’ then both source and target have the same data.
4. Enter the following command on the target to remove unwanted data created by seeding:
seed –cleanup
15 Seeding from a Dell™ DR Series System to an External Device | August 2014
 Loading...