

Page 1

Dell PowerVault DL Backup To Disk Appliance
Powered By CommVault Simpana
User’s Guide
Page 2

Notes, Cautions, and Warnings
NOTE: A NOTE indicates important information that helps you make better use of your computer.
CAUTION: A CAUTION indicates either potential damage to hardware or loss of data and tells you how to avoid the
problem.
WARNING: A WARNING indicates a potential for property damage, personal injury, or death.
© 2012 Dell Inc.
Trademarks used in this text: Dell™, the Dell logo, Dell Boomi™, Dell Precision™ , OptiPlex™, Latitude™, PowerEdge™, PowerVault™,
PowerConnect™, OpenManage™, EqualLogic™, Compellent™, KACE™, FlexAddress™, Force10™ and Vostro™ are trademarks of Dell
Inc. Intel®, Pentium®, Xeon®, Core® and Celeron® are registered trademarks of Intel Corporation in the U.S. and other countries. AMD
is a registered trademark and AMD Opteron™, AMD Phenom™ and AMD Sempron™ are trademarks of Advanced Micro Devices, Inc.
Microsoft®, Windows®, Windows Server®, Internet Explorer®, MS-DOS®, Windows Vista® and Active Directory® are either trademarks
or registered trademarks of Microsoft Corporation in the United States and/or other countries. Red Hat® and Red Hat
Enterprise Linux® are registered trademarks of Red Hat, Inc. in the United States and/or other countries. Novell® and SUSE® are
registered trademarks of Novell Inc. in the United States and other countries. Oracle® is a registered trademark of Oracle Corporation
and/or its affiliates. Citrix®, Xen®, XenServer® and XenMotion® are either registered trademarks or trademarks of Citrix Systems, Inc. in
the United States and/or other countries. VMware
trademarks of VMware, Inc. in the United States or other countries.
Corporation.
2012 - 10
®
,
Virtual SMP
®
®
,
vMotion
®
is a registered trademark of International Business Machines
IBM
,
vCenter
®
and
vSphere
®
are registered trademarks or
®
®
Rev. A04
Page 3

Contents
Notes, Cautions, and Warnings...................................................................................................2
1 Introduction..................................................................................................................................7
Compatibility Matrix..................................................................................................................................................8
2 Setting Up DL Backup To Disk Appliance...............................................................................9
Installation Prerequisites..........................................................................................................................................9
Network Requirements......................................................................................................................................9
Licenses.............................................................................................................................................................9
Setting Up The Hardware.........................................................................................................................................9
Installing The Appliance In A Rack..................................................................................................................10
Cabling The Appliance.....................................................................................................................................10
Setting The Storage Enclosure Configuration Switch......................................................................................10
Connecting The Storage Enclosure To The PowerVault DL2x00 System........................................................11
Connecting The Cable Management Arm (Optional).......................................................................................14
Turning On The DL Backup To Disk Appliance................................................................................................14
Configuring The Software.......................................................................................................................................14
Cable Connection Verification..........................................................................................................................14
Configuring SNMP Settings.............................................................................................................................15
Disk Configuration Settings....................................................................................................................................15
Disk Subsystem States.....................................................................................................................................15
PowerVault DL2000 Disk Configurations..........................................................................................................15
PowerVault DL2100 Disk Configurations..........................................................................................................16
PowerVault MD1000 Storage Enclosure Disk Configurations..........................................................................16
PowerVault DL2200 Disk Configurations Running Windows Server 2008 Standard x64 Edition......................16
PowerVault DL2200 Disk Configurations Running Windows Server 2008 R2...................................................17
PowerVault DL2300 Disk Configurations..........................................................................................................17
Advanced Disk Subsystem State.....................................................................................................................17
Disk Configuration Policies..............................................................................................................................18
Installing CommVault Simpana........................................................................................................................18
Configuring The PowerVault DL2x00 System With NIC Teaming...........................................................................19
3 Using The DL Backup To Disk Appliance Console..............................................................21
Automatic Disk Configuration.................................................................................................................................21
Adding An Optional Tape Library ...........................................................................................................................22
Adding The Tape Device To The Disk Appliance Console......................................................................................23
Configuring The Storage Manually.........................................................................................................................23
Page 4

Creating Virtual Disks.......................................................................................................................................23
Preparing Manually Created Virtual Disks For Use With CommVault Simpana...............................................24
Launching Simpana Software..........................................................................................................................24
Logging On To The CommCell..........................................................................................................................25
Capturing Support Log Files....................................................................................................................................25
Changing Automatic Disk Configuration.................................................................................................................25
Compatibility Manager............................................................................................................................................25
About Enclosure Numbers......................................................................................................................................26
4 Updating DL Backup To Disk Appliance Software..............................................................27
Updating System Software.....................................................................................................................................27
Receiving System Software Update Notifications.................................................................................................27
Updating The Operating System.............................................................................................................................28
Updating DL Backup To Disk Appliance Applications............................................................................................28
Updating Server Administrator...............................................................................................................................28
Updating CommVault Simpana Backup And Recovery..........................................................................................28
5 Disaster Recovery.....................................................................................................................29
Using The iDRAC Virtual Media..............................................................................................................................29
Configuring The iDRAC Enterprise For Remote Access...................................................................................29
Accessing The Web Interface And Configuring Virtual Media........................................................................29
Recovery Solution Map..........................................................................................................................................29
Completing A Full Recovery Of The DL Backup To Disk Appliance.................................................................30
Recovering From Disk Failures...............................................................................................................................31
About RAID Types............................................................................................................................................31
Detecting And Monitoring Disk Failures..........................................................................................................31
Recovering From Single Disk Failures..............................................................................................................32
Recovering From Multiple Disk Failures...........................................................................................................32
Replacing Disks................................................................................................................................................32
Reinstalling The Operating System.........................................................................................................................32
Using The Dell Systems Build And Update Utility To Manually Recover The Operating System....................32
Using The Dell Unified Server Configurator - Lifecycle Controller Enabled To Recover The Operating
System..............................................................................................................................................................33
Completing Operating System Reinstallation...................................................................................................34
Updating BIOS, Firmware, And Driver..............................................................................................................34
Reinstalling Dell PowerVault DL Backup To Disk Appliance Applications.............................................................34
Using The Dell PowerVault DL Backup To Disk Appliance Recovery And Update Utility During
Disaster Recovery............................................................................................................................................35
Installing Windows Server Roles And Features Manually...............................................................................41
Using The Dell PowerVault DL Backup To Disk Appliance Recovery And Update Utility For System
Repair...............................................................................................................................................................43
Repairing OpenManage Server Administrator.......................................................................................................43
Page 5

Reinstalling CommVault Simpana Backup And Recovery During Disaster Recovery............................................43
Repairing CommVault Simpana Backup And Recovery...................................................................................44
6 Solution Map..............................................................................................................................45
Deployment Planning..............................................................................................................................................45
Setup.......................................................................................................................................................................45
Deployment And Maintenance...............................................................................................................................46
Storage Expansion And Migration..........................................................................................................................47
Troubleshooting And Getting Help..........................................................................................................................48
7 Additional References..............................................................................................................49
Software Documents..............................................................................................................................................49
Hardware Documents.............................................................................................................................................49
Systems Management Documents.........................................................................................................................50
DL Backup To Disk Appliance Media.....................................................................................................................51
Page 6

6
Page 7

Introduction
The Dell PowerVault DL Backup to Disk Appliance is the latest generation of backup to disk protection powered by
CommVault Simpana software. The DL Backup to Disk Appliance allows:
• Scalable storage capabilities to support organizations of any size.
• Faster backups, as well as quicker recovery scenarios over conventional tape devices and backup
methodologies.
• Optional deduplication capability.
• Simplified and unified management for disk and tape.
• Continuous data protection for data center and remote office servers.
• Quick and easy deployment experience that reduces the time required to begin protecting critical data.
The DL Backup to Disk Appliance includes the following hardware and software:
• Dell PowerVault DL2x00 system
• Optional Dell PowerEdge RAID Controllers (PERC)
• Optional Dell PowerVault MD1x00 storage enclosures
NOTE: If the appliance configuration does not include PowerVault MD1x00 storage enclosures, ignore any
references to PowerVault MD1x00 and storage enclosures in this document.
NOTE: The MD1x00 systems refer to the MD1000, MD1100, and MD1200 storage enclosures and DL2x00 systems
refer to the DL2000, DL2100, DL2200, and DL2300 systems.
1
• Support for optional tape libraries and devices
• Preinstalled operating system and Dell OpenManage system and storage management software
• CommVault Simpana Backup and Recovery software
The initial requirements unique to the IT environment must be entered the first time you use the system.
NOTE: For documents and recovery media referenced in this document, see Additional References.
For a list of supported external drives, see the
manuals.
For a list of supported tape devices, firmware, and driver versions, see the
dell.com/pvmatrix.
NOTE: CommVault Simpana software uses the OEM-supported drivers listed in the
Matrix
.
The following table lists the terms used in this document to refer to various components of the DL Backup to Disk
Appliance hardware and software.
Dell PowerVault MD1x00 Systems Support Matrix
Dell PowerVault Compatibility Matrix
at support.dell.com/
Dell PowerVault Compatibility
at
7
Page 8

Table 1. DL Backup to Disk Appliance Hardware and Software Components
Component Type
DL Backup to Disk Appliance Appliance
PowerVault DL2x00 system DL2x00 system
PowerVault MD1x00 storage enclosure Storage enclosure
CommVault Simpana Backup and Recovery Simpana Backup and Recovery
Compatibility Matrix
DL2000 DL2100 DL2200 DL2300
OS Versions
Windows 2008
x64
Windows 2008
R2
Windows 2008
x64
Windows 2008
R2
Windows 2008
x64
Windows 2008
R2
Windows 2008
x64
Windows 2008 R2
Windows
2008 R2 (DL
Value
Edition)
Windows
2008 R2 (DL
Enterprise
Edition)
Internal RAID
Controller
Internal RAID
Configurations
External RAID
Controller
External RAID
Configurations
External
Storage
Compatibility
Manager
SAS6i/R SAS6i/R PERC6/i PERC H700 PERC H710 PERC H710
RAID 1 (0, 1) RAID 1 (0, 1) RAID 1 (0, 1)
and RAID 5
(2-5)
PERC6/e PERC6/e PERC6/e PERC H800 PERC H810 PERC H810
Hot Spare (0),
RAID 5 (1-7),
(8-15)
MD1000 MD1000 MD1000 MD1200 MD1200 MD1200
No Yes Yes Yes Yes Yes
Hot Spare (0),
RAID 5 (1-7),
(8-15)
Hot Spare (0),
RAID 5 (1-7),
(8-15)
RAID 1 (12, 13) for
all configurations.
Optional
configurations to
choose from:
Hot Spare (0),
RAID 5 (1-5),
(6-11)
RAID 6 (0-5) and
(6-11)
RAID 6 (0-11)
Same as internal
selection
RAID 1 (12,
13)
RAID 10 for
DDB (0-5)
and RAID 6
for Backup
Data (6-11)
Single RAID
6 (0-11)
RAID 1 (12,
13)
RAID 10 for
DDB (0-5)
and RAID 10
for DDB
(6-11)
Single RAID 6
(0-11)
8
Page 9

2
Setting Up DL Backup To Disk Appliance
Installation Prerequisites
Network Requirements
The Dell PowerVault DL Backup to Disk Appliance requires the following network environment:
• Active network with available Ethernet cables and connections
• A static IP address and DNS server IP address, if not provided by the Dynamic Host Configuration Protocol
(DHCP)
• At least one IPv4 address (for licensing purposes)
• A Microsoft Windows Domain Controller to set up a CommVault CommServe system
• User name and password with administrator privileges
Licenses
See the
Register Your Software
obtaining additional licenses. You can also visit commvault.com/dell/support to register your software. Registered users
have access to the latest software patches, downloadable service packs, and CommVault's knowledge base.
Before adding a DL Backup to Disk Appliance to an existing CommVault CommCell purchased from Dell:
document in the enclosed media kit for instructions on registering your software and
• E-mail dellreg@commvault.com and include the ID number of the CommCell to acquire additional required
licenses. You must receive a response within 24 hours.
• Follow the instructions provided in the e-mail response to install the supplied licenses to CommCell. If you need
assistance, contact your Dell sales representative.
NOTE: If the appliance is deployed as a media agent, verify that the CommServe Simpana version is the same
version supplied with the appliance. If the CommServe version is older, you must upgrade the CommServe version
before deploying the appliance as a media agent.
Setting Up The Hardware
The appliance ships with a single PowerVault DL2x00 system and, optionally, one or more PowerVault MD1x00 storage
enclosures.
NOTE: The software is pre-installed on the appliance. Any media included with the system must be used only in the
event of a system recovery.
Before setting up the appliance hardware, locate the
optional PowerVault MD1x00 storage enclosure(s) that came with the appliance. Unpack and set up the DL Backup to
Disk Appliance hardware.
To set up the DL Backup to Disk Appliance hardware:
Getting Started Guide
for your PowerVault DL2x00 system and the
9
Page 10
1. Rack and cable the PowerVault DL2x00 system and storage enclosure(s).
2. Configure the PowerVault MD1x00 storage enclosure(s) to unified mode.
3. Connect the storage enclosure(s) to the PowerVault DL2x00 system.
4. Turn on the PowerVault DL2x00 system and the storage enclosure(s).
Installing The Appliance In A Rack
If the PowerVault DL2x00 system and the optional storage enclosure include a rail kit, locate the
Instructions
PowerVault DL2x00 system and the storage enclosure in the rack.
supplied within the rack kit. Follow the instructions to install the rails in the rack unit and to install the
NOTE: Repeat the rail installation procedure in the rack unit for each storage enclosure.
Rack Installation
Cabling The Appliance
Locate the PowerVault DL2x00 and PowerVault MD1x00
follow the instructions to:
• Attach the keyboard, mouse, monitor, power, and network cables to the PowerVault DL2x00 system
• Attach the power cables to each storage enclosure
NOTE: Do not turn on the PowerVault DL2x00 system or the storage enclosure(s).
NOTE: If the appliance configuration does not include one or more storage enclosures, proceed to Connecting The
Cable Management Arm (Optional).
Getting Started Guides
that shipped with the appliance and
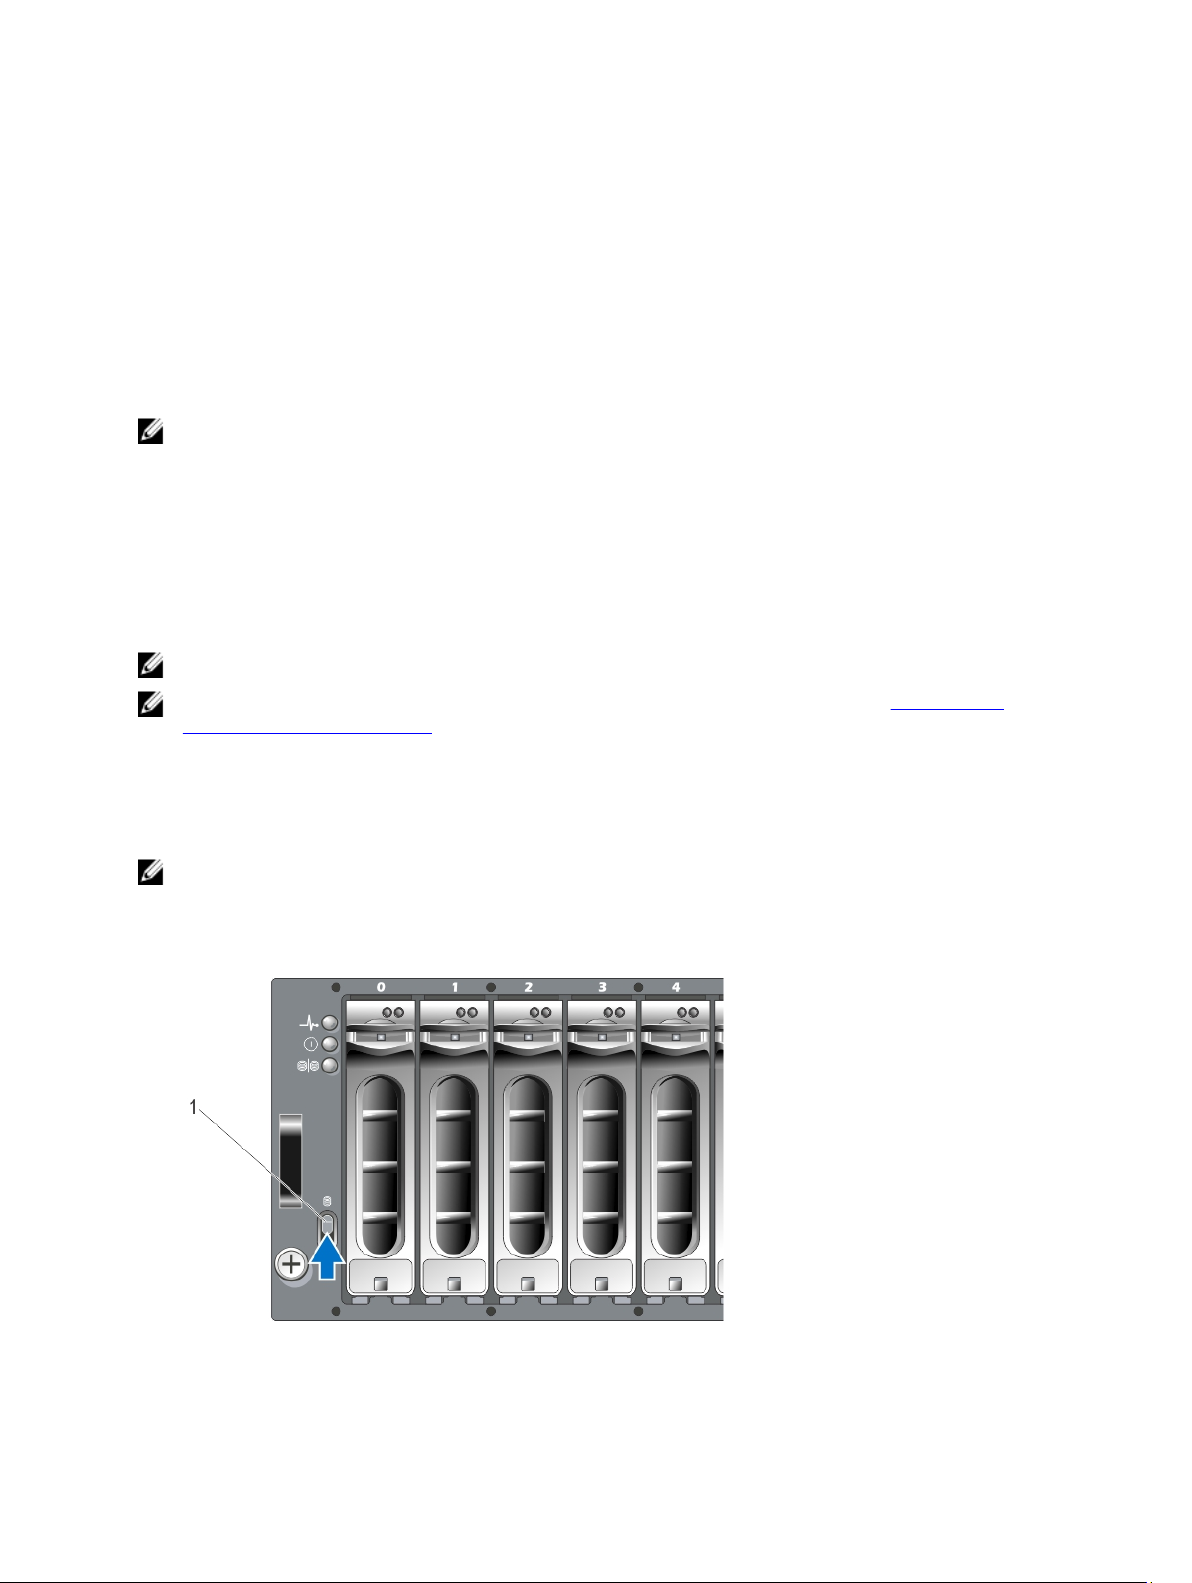
Setting The Storage Enclosure Configuration Switch
Set the storage mode for each storage enclosure to unified mode as indicated in the following figures.
NOTE: The configuration switch must be set before turning on the storage enclosure. Changing the configuration
mode after turning on the storage enclosure has no effect on enclosure configuration until the system is power
cycled. For more information, see the Dell PowerVault MD1x00
manuals.
Hardware Owner's Manual
at support.dell.com/
Figure 1. Setting the PowerVault MD1000 Storage Enclosure Configuration Switch
10
Page 11
1. configuration switch
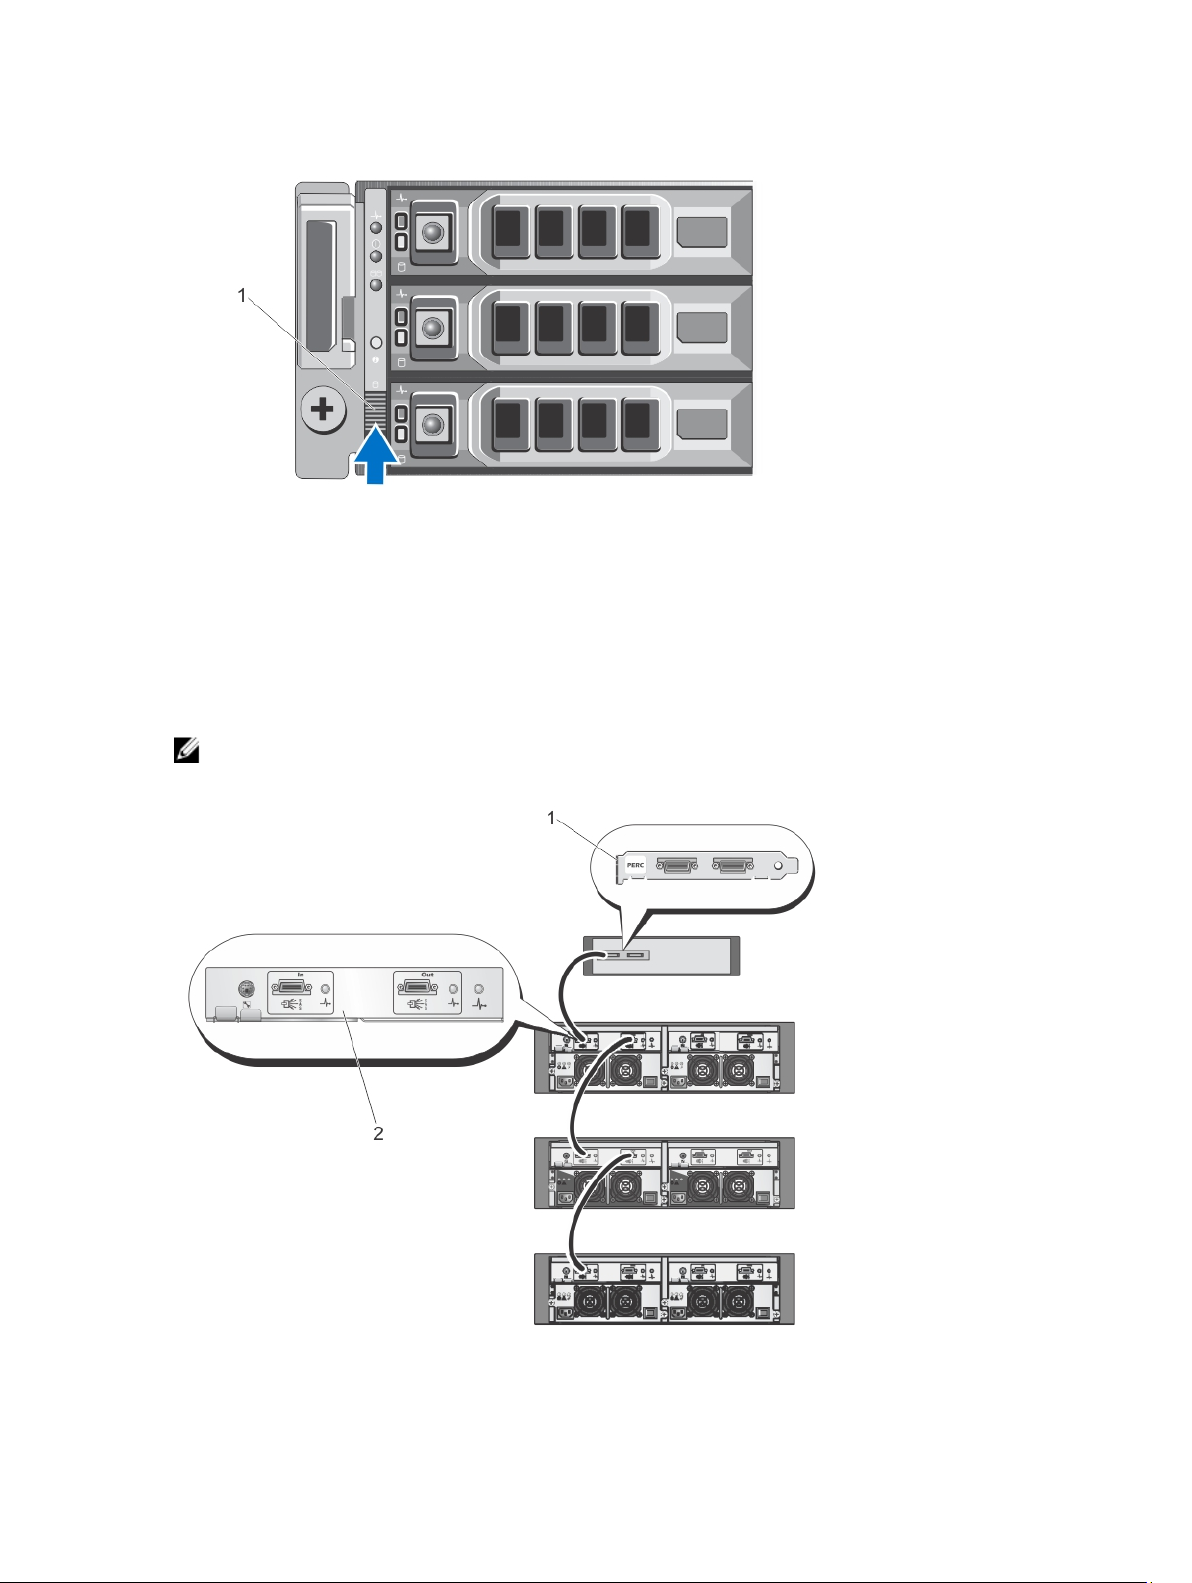
Figure 2. Setting the PowerVault MD1200 Storage Enclosure Configuration Switch
1. configuration switch
Connecting The Storage Enclosure To The PowerVault DL2x00 System
Connect the SAS data cable from the PowerEdge RAID Controller (PERC) installed in the PowerVault DL2x00 system to
the primary Enclosure Management Module (EMM) SAS In port of the storage enclosure. For more information, see the
figures below.
NOTE: Do not connect tape devices to the PERC adapter. For more information about the proper configuration, see
figure Connecting the PowerVault DL2x00 System to the Storage Enclosure and Optional Tape Library.
Figure 3. Connecting the SAS Cable From the PowerVault DL2x00 System to the PowerVault MD1000 Storage Enclosure
11
Page 12
1. PERC
2. EMM
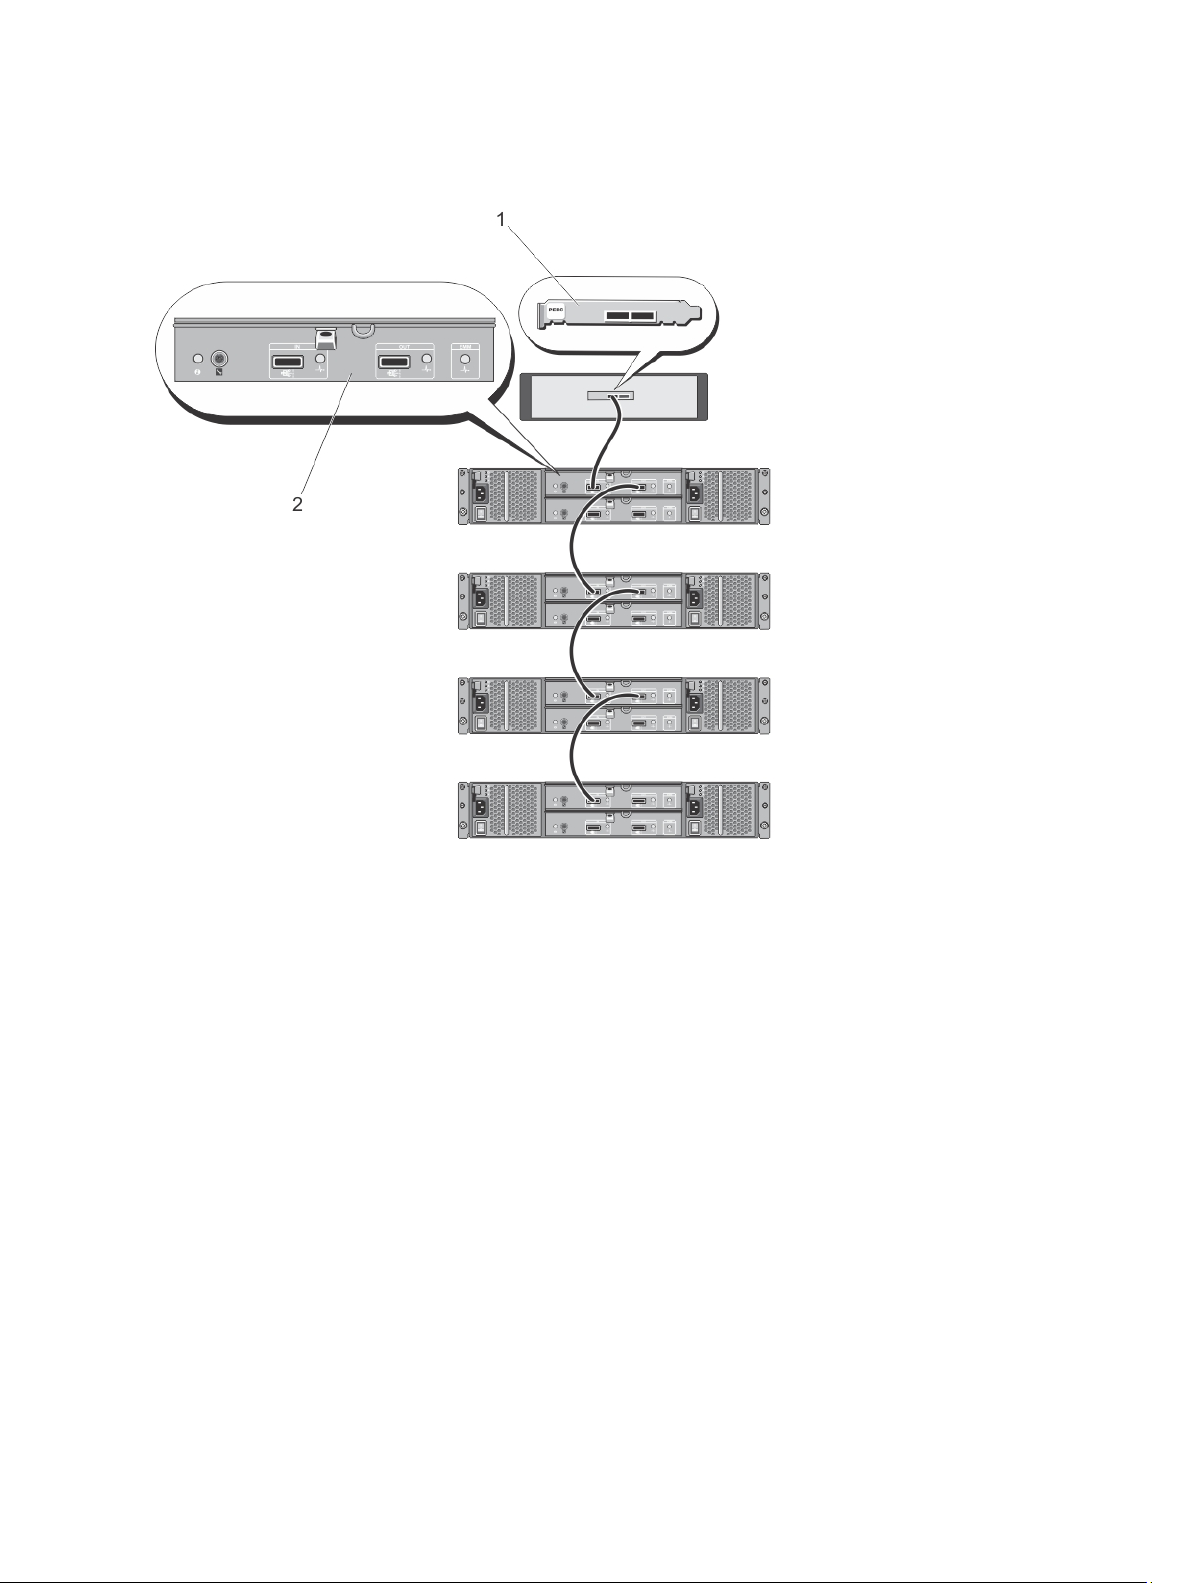
Figure 4. Connecting the SAS Cable From the PowerVault DL2x00 System to the PowerVault MD1200 Storage Enclosure
1. PERC
2. EMM
12
Page 13
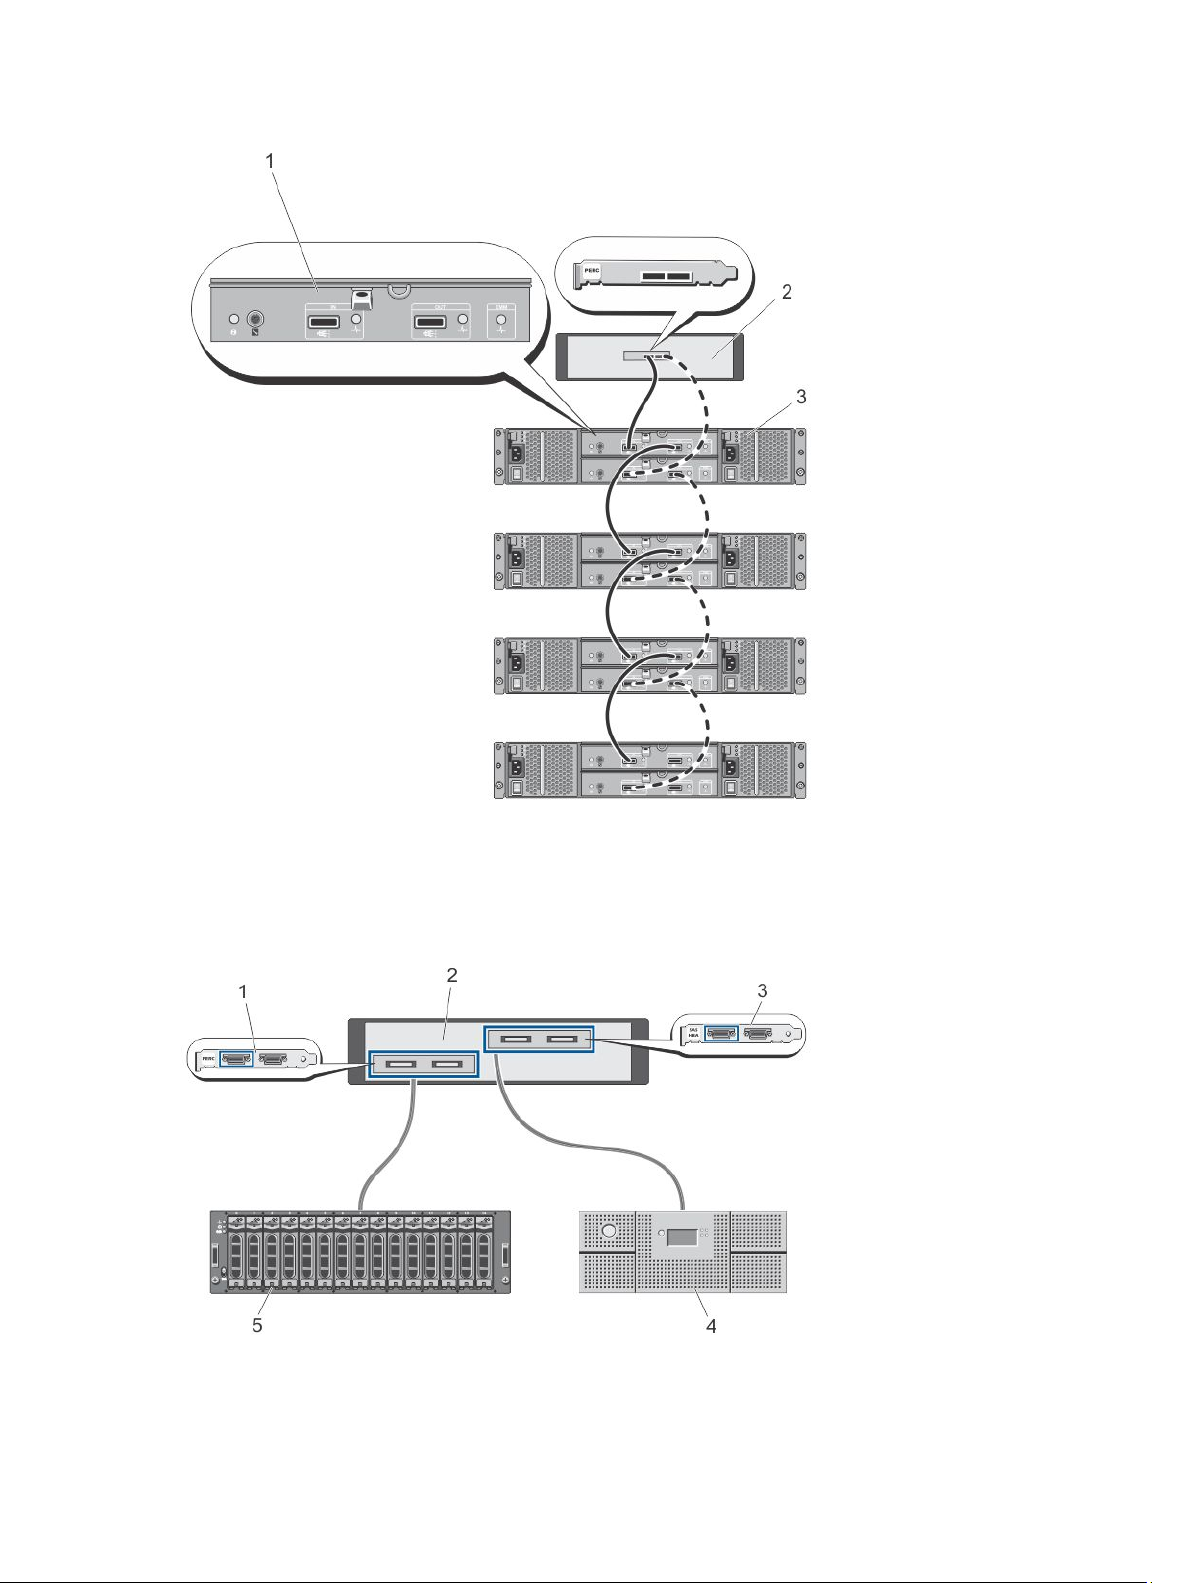
Figure 5. Connecting the SAS Cable From the PowerVault DL2x00 System to the PowerVault MD1200 Storage Enclosure
(Redundant Configuration)
1. Primary EMM
2. DL2x00 system
3. Optional MD1200 storage enclosures (4)
Figure 6. Connecting the PowerVault DL2x00 System to the Storage Enclosure and Optional Tape Library
13
Page 14

1. PERC (optional)
2. PowerVault DL2x00 system
3. SAS HBA (optional)
4. tape backup (optional)
5. storage enclosure (optional)
NOTE: If a SCSI, SAS, or Fibre Channel host adapter is installed for use with an optional tape device, see Adding An
Optional Tape Library.
Connecting The Cable Management Arm (Optional)
If the appliance includes a cable management arm (CMA), locate the CMA
CMA kit and follow the instructions to install the CMA.
Installation Instructions
that shipped with the
Turning On The DL Backup To Disk Appliance
After cabling the appliance, turn on each storage enclosure and then the PowerVault DL2x00 system.
NOTE: It is recommended that you connect the appliance to an uninterrupted power supply (UPS) for maximum
reliability and availability. For more information, see your system's Hardware Owner's Manual at support.dell.com/
manuals
.
Configuring The Software
All software necessary to deploy the appliance is pre-installed on the PowerVault DL2x00 system. When you turn on the
system for the first time, the PowerVault DL Backup to Disk Appliance Configuration Wizard runs automatically. The
wizard guides you through a series of questions to configure the software on the appliance.
NOTE: The PowerVault DL Backup to Disk Appliance Configuration Wizard may take up to 30 seconds to appear on
the system console.
NOTE: Complete all steps of the PowerVault DL Backup to Disk Appliance Configuration Wizard before using
Microsoft Windows Update.
After logging on to Microsoft Windows Server 2008, the system automatically launches the PowerVault DL Backup to
Disk Appliance Configuration Wizard, which configures the appliance based on the information provided. To continue
with the PowerVault DL Backup to Disk Appliance Configuration Wizard, ensure that:
• At least one network interface is connected.
• All storage enclosures are turned on and connected to the PowerVault DL2x00 system.
• The optional tape device is turned on and connected to the PowerVault DL2x00 system.
Cable Connection Verification
The PowerVault DL Backup to Disk Appliance Configuration Wizard verifies if the PowerVault DL2x00 system is
connected correctly to the external disk storage and tape devices. If the SAS cables are not connected correctly, you
must turn off the PowerVault DL2x00 system. With the PowerVault DL2x00 turned off, correct the indicated cable(s) by
connecting the following:
• PowerVault MD1x00 storage controllers to a PERC adapter
• Tape device to a SAS, SCSI, or Fibre Channel HBA
14
Page 15

Reboot the PowerVault DL2x00 and log on to resume the PowerVault DL Backup to Disk Appliance Configuration Wizard.
Configuring SNMP Settings
Simple Network Management Protocol (SNMP) is a network protocol used to manage TCP/IP networks. In Windows, the
SNMP service, known as the SNMP agent, provides status information about an SNMP host. You can add the appliance
to an SNMP community. In addition, you can add the name of other SNMP host(s) or an SNMP management system.
A community name acts as a password shared by one or more SNMP hosts. When adding additional host(s), the system
can accept either host names or an IP address.
An SNMP alert or SNMP trap is an event notification message sent by the SNMP trap service running on an SNMP host.
The SNMP trap is sent to other SNMP hosts or to an SNMP management system, which are known as trap destinations.
If SNMP alerts are required, one or more community names must be specified.
• Community name — The name of the community used by the trap destination. The SNMP agent can only send
SNMP trap messages to SNMP hosts that use a known community name.
• Trap Destination — Lists trap destinations, which are SNMP management systems that receive SNMP trap
messages from any SNMP host in the selected community.
Disk Configuration Settings
Disk Subsystem States
The appliance operates in one of the following configurations:
• Standard — In this state, the backup application automatically configures available disk drives in the
PowerVault DL2x00 system and optional storage enclosures and uses them for backup storage. You can set the
disk configuration policy to automatically configure the available disks by selecting either of the automatic
settings. See Disk Configuration Policies.
• Advanced — In this state, automatic disk configuration is disabled and the disk configuration policy
automatically switches to Manual. In this state, you must manually configure disk storage to be used by the
backup application.
The appliance determines the disk subsystem state by inspecting the storage subsystem. You cannot set the disk
subsystem state. The appliance disk subsystem state is standard if you use the predefined configurations for the DL2x00
system and any attached storage enclosures as shown in the following sections. If the predefined configurations are not
used, the disk subsystem state is advanced. Disk groups must include a drive in each of the indicated system and
storage enclosure slots except in the case when a failed drive has been temporarily removed for replacement.
Automatic disk configuration does not begin on a given disk group until every slot in the disk group is occupied by a disk.
The optional hot spares, if present, must reside in the indicated slot.
PowerVault DL2000 Disk Configurations
The PowerVault DL2000 supports SATA drives only. The operating system resides on a RAID 1 (mirrored) virtual disk
using slots 0 and 1. Slots 2 through 5 are not available for automatic configuration but can be manually configured (if
required).
15
Page 16
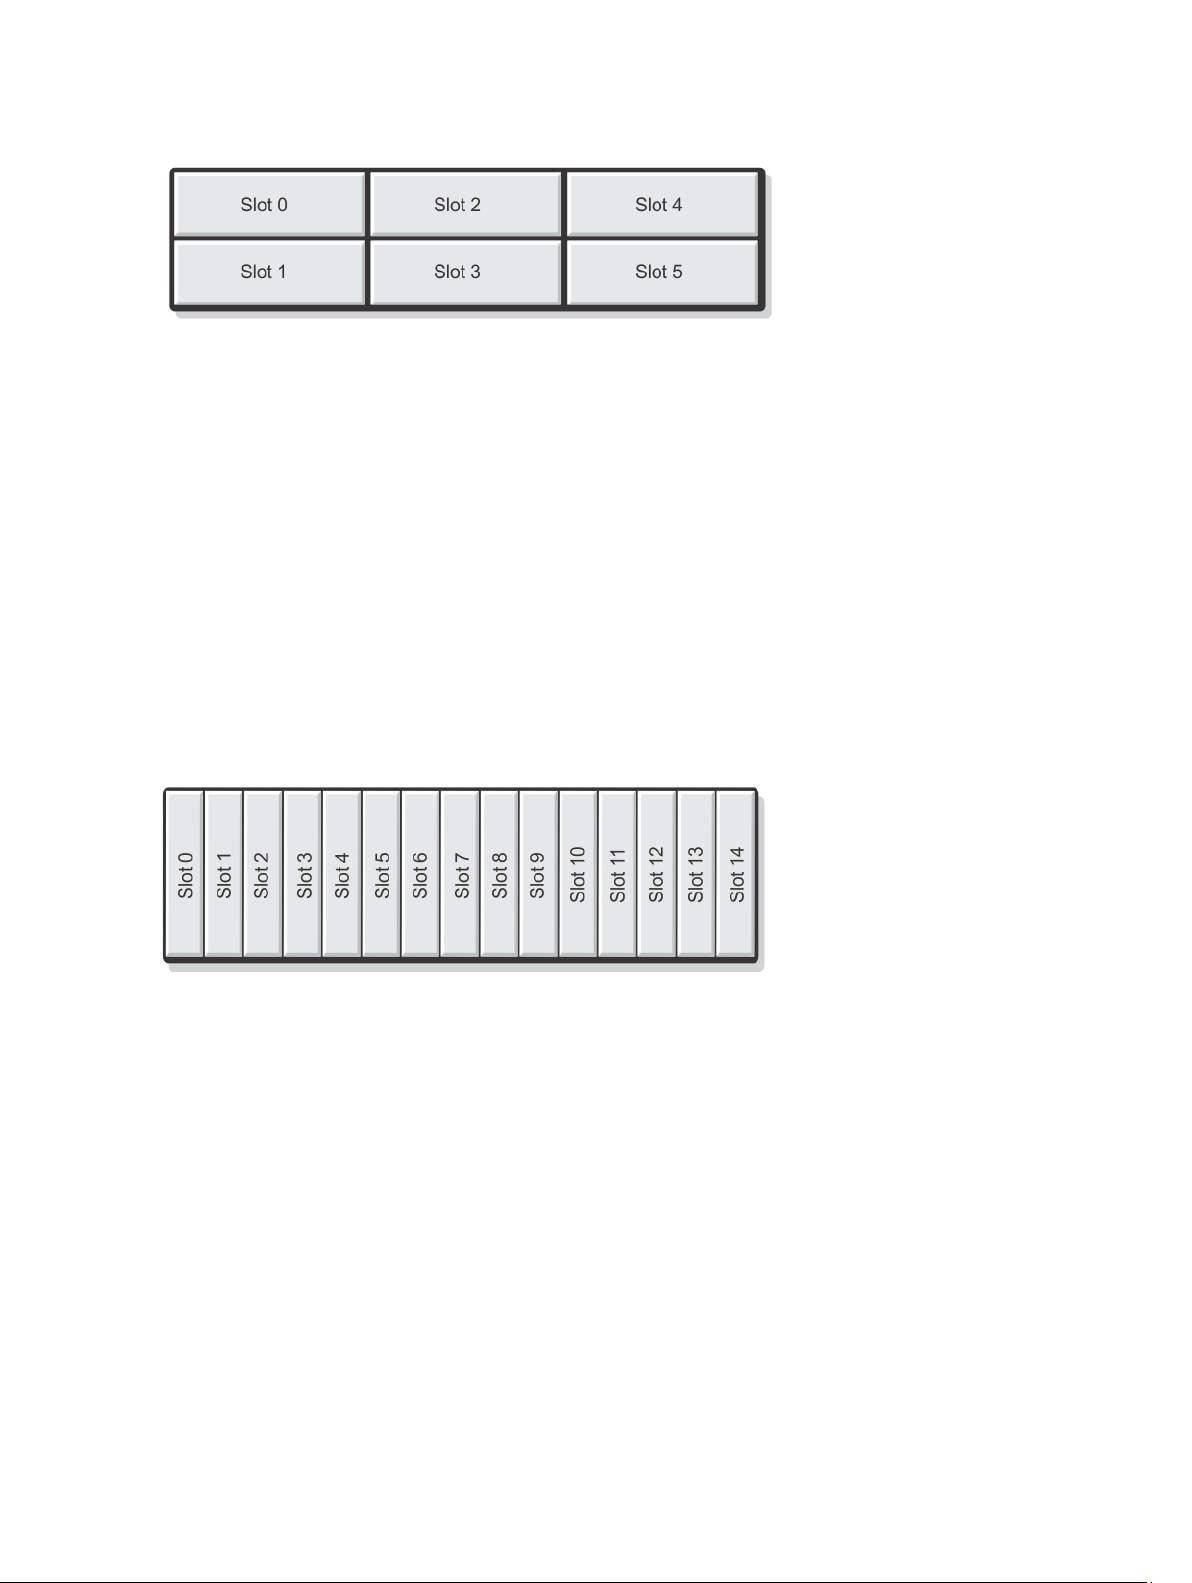
Figure 7. Dell PowerVault DL2000 and DL2100 Disk Slots
PowerVault DL2100 Disk Configurations
The PowerVault DL2100 supports SATA drives only. The operating system resides on a RAID 1 (mirrored) virtual disk
using slots 0 and 1. See the figure above. If the DL2100 system shipped with a SAS 6i/R internal storage controller, slots 2
through 5 are not available for automatic disk configuration but can be manually configured.
If the DL2100 system shipped with a PERC 6/i internal storage controller, the standard configuration is comprised of a
single disk group occupying slots 2 through 5. Automatic disk configuration creates one or more RAID 5 virtual disks on
this disk group.
PowerVault MD1000 Storage Enclosure Disk Configurations
The PowerVault MD1000 supports SATA drives only. The standard configuration is comprised of a hot spare in slot 0, a
disk group occupying slots 1 through 7, and a disk group occupying slots 8 through 14. Automatic disk configuration
creates one or more RAID 5 virtual disks on each disk group.
Figure 8. Dell PowerVault MD1000 Storage Enclosure Disk Slots
PowerVault DL2200 Disk Configurations Running Windows Server 2008 Standard x64 Edition
The PowerVault DL2200 supports SAS and nearline SAS drives only. The operating system resides on a RAID 1
(mirrored) virtual disk located within the system. These disks appear as slots 12 and 13 in Dell OpenManage Server
Administrator. For information on these disks, see the
support.dell.com/manuals.
The standard configuration is comprised of hot spare in slot 0, a disk group occupying slots 1 through 5, and a disk group
occupying slots 6 through 11. Automatic disk configuration creates one or more RAID 5 virtual disks on each disk group.
The standard configuration of the optional PowerVault MD1200 storage enclosure is identical to the DL2200’s slots 0
through 11.
16
Dell PowerVault DL2200 Hardware Owner’s Manual
at
Page 17

Figure 9. Dell PowerVault DL2200, DL2300, and MD1200 Disk Slots
PowerVault DL2200 Disk Configurations Running Windows Server 2008 R2
In addition to the RAID 5 standard configuration supported under Windows Server 2008 Standard x64 Edition, the DL2200
and MD1200 storage enclosures support alternative RAID 6 standard configurations, if the following conditions are met:
• The appliance software stack version must be version 3.3 or higher
• CommVault Simpana must be version 9.0 SP2 or higher
The two RAID 6 standard configuration is comprised of a disk group occupying slots 0 through 5 and a disk group
occupying slots 6 through 11. Automatic disk configuration creates one or more RAID 6 virtual disks on each disk group.
The single RAID 6 standard configuration is comprised of a single disk group occupying slots 0 through 11. Automatic
disk configuration creates one or more RAID 6 virtual disks on the disk group.
PowerVault DL2300 Disk Configurations
The PowerVault DL2300 supports SAS and nearline SAS drives only. The operating system resides on a RAID 1
(mirrored) virtual disk located located in the rear facing hotplug slots. These disks appear as slots 12 and 13 in Dell
OpenManage Server Administrator. (See the figure Dell PowerVault DL2200, 2300 and MD1200 Disk Slots). For
information on these disks, see the
The following are the DL2300 system configurations: Value and Enterprise configuration.
• Value configuration — The DL2300 Value configuration is comprised of SAS drives in slots 0 through 5 and
nearline SAS drives in slots 6 through 11. Automatic disk configuration creates a single RAID 10 disk group on
the SAS drives in slots 0 through 5. This virtual disk is used for the Deduplication Database for the CommVault
backup application. Automatic disk configuration also creates a single RAID 6 disk group on the nearline SAS
drives in slots 6 through 11 with one or more virtual disks in that disk group. These virtual disks will be used to
store the backup data. Capacity expansion using an MD1200 is optional.
• Enterprise configuration — The DL2300 Enterprise configuration is comprised of all SAS drives in slots 0 through
11 for enhanced performance. Automatic disk configuration creates a RAID 10 disk group with a single virtual
disk in slots 0 through 5 as well as another RAID 10 disk group with a single virtual disk in slots 6 through 11.
These two internal virtual disks are used for the Deduplication Database for the CommVault backup application.
Since all the drives within the DL2300 Enterprise configuration are used for the Deduplication Database,
additional MD1200(s) are required to store the backup data if automatic disk configuration is used.
Dell PowerVault DL2300 Hardware Owner’s Manual
at support.dell.com/manuals.
Both Enterprise and Value configurations can expand storage capacity by adding MD1200 enclosures. When additional
MD1200s are attached, Automatic disk configuration creates a single RAID 6 disk group with one or more virtual disks in
slots 0 through 11. These virtual disks are used to store the backup data.
Advanced Disk Subsystem State
If any of the conditions above are not met, the disk subsystem state is advanced. After the condition(s) that caused the
disk subsystem state to advance is corrected, the disk subsystem state automatically reverts to the standard state.
17
Page 18

NOTE: Under certain circumstances, a physical disk failure can cause the configuration state to transition from
advanced to standard. In this case, the disk subsystem reverts to advanced after the failed physical disk is
replaced and the copy back operation is complete.
Disk Configuration Policies
You can select one of the following disk configuration policies on the Settings tab in the DL Backup To Disk Appliance
Console if the disk subsystem state is standard.
NOTE: If the disk subsystem state is advanced, the disk configuration policy is automatically set to Manual.
Automatic With Confirmation Policy
The backup application automatically configures available physical disks. You must accept or reject the proposed disk
configuration.
NOTE: It is recommended that you use the Automatic with confirmation policy.
Automatic Without Confirmation Policy
The backup application automatically configures available physical disks.
NOTE: Automatic configuration occurs only when the system is in a standard configuration state.
Manual Disk Policy
This policy disables automatic disk configuration. You must manually configure the physical disks using OpenManage
Server Administrator. This disk policy is recommended only for advanced users.
If you select manual disk policy, see Configuring The Storage Manually after configuring the appliance.
Installing CommVault Simpana
The PowerVault DL Backup to Disk Appliance Configuration Wizard collects information to install and configure the
Simpana Backup and Recovery software.
To designate the role of Simpana Backup and Recovery:
1. In CommVault software setup screen, select either CommServe system and Media Agent or Media agent only.
2. If you select:
– CommServe system and Media Agent — enter the details in E-mail server and E-mail address for alerts.
– Media agent only — enter the details in Name of the CommServe system to connect to.
3. Click CommVault End User License Agreement to read the terms and conditions of the agreement.
4. Select the Accept check-box to continue the installation.
5. Click Finish.
NOTE: Setup takes 10 to 15 minutes to complete.
6. Click Exit.
NOTE: Do not turn off the appliance until automatic disk configuration is complete. Automatic disk
configuration runs in the background and configures the storage attached to the PowerVault DL2x00 system.
The time required for disk configuration depends on the amount of storage attached to the PowerVault DL2x00
system. Check the Automatic Disk Configuration status in the DL Backup to Disk Appliance Console and the
Event Viewer window in the CommCell console.
18
Page 19

Configuring The PowerVault DL2x00 System With NIC Teaming
The Broadcom Advanced Control Suite (BACS) is preinstalled on the appliance. You use BACS to configure, manage,
and team Network Interface Controllers (NICs) on the PowerVault DL2x00 system. The benefits of teaming include traffic
load balancing and fault tolerance.
If the Team Management button is not present in the lower left corner of the BACS management tool, you must install
the Broadcom teaming software. Run setup.exe at C:\Install\BroadcomAdvanced\Driver_Management_Apps_Installer.
Follow the installation instructions and when prompted, select the Broadcom Advanced Server Program (BASP) driver
to be installed on the local hard drive.
For more information about configuring NIC teaming, see Configuring Teaming in the
Adapter User Guide
For optimal backup performance, use the CommVault Data Interface Pairs tool. For more information, go to
documentation.commvault.com/dell and click Simpana → Index → Network → Data Interface Pairs.
at support.dell.com/manuals.
Broadcom NetXtreme II Network
19
Page 20

20
Page 21

3
Using The DL Backup To Disk Appliance Console
You can use the Dell PowerVault DL Backup to Disk Appliance Console to:
• Manage the DL Backup to Disk appliance
• Launch the CommVault Simpana Backup and Recovery software
• Display appliance information
• Report appliance status
• Display the available disk space
• Add or remove tape devices
• Configure network and SNMP settings
NOTE: After the system boots, the PowerVault DL Backup to Disk Appliance Console may take up to three minutes
to report appliance status.
NOTE: If Dell OpenManage Server Administrator is not installed, the DL Backup to Disk Appliance Console prompts
you to install it. System and disk subsystem status is unknown if Server Administrator is not installed.
Automatic Disk Configuration
The Automatic Disk Configuration tool manages disk group configuration operations. Automatic disk configuration runs
automatically when:
• A new storage enclosure containing a sufficient number of physical disks is added to the appliance.
• A sufficient number of physical disks are added to the existing storage enclosure.
NOTE: Automatic disk configuration does not launch, if disk configuration policy is set to Manual.
When the backup application is configuring disk storage, the Automatic Disk Configuration status indicator on the DL
Backup to Disk Appliance Console blinks yellow and the system displays the message In Progress. Do not shut
x
down the DL2
During automatic disk configuration, if the disk configuration policy is set to Automatic with Confirmation, the Automatic
Disk Group Configuration window is displayed. If the Disk Configuration Policy is set to Automatic without Confirmation,
the Automatic Disk Group Configuration is displayed only if there is an error condition detected with the new physical
disks. In the Automatic Disk Group Configuration window, you can select:
• Continue with disk group configuration — to configure the disks.
• Cancel disk group configuration — to cancel disk configuration. You can use the Automatic Disk Configuration
• Change physical disks and retry — to correct the error and instruct the Automatic Disk Configuration tool to re-
00 system until automatic disk configuration is complete.
tool at a later time to complete the configuration.
examine the physical disks or storage enclosure. This option is available only if an error occurs during automatic
disk configuration. To determine the error conditions detected by the Automatic Disk Configuration tool, review
the event viewer in the CommVault CommCell console.
21
Page 22

Depending on the error condition, automatic disk configuration may or may not be able to proceed. The
following table lists the error conditions that can occur during automatic disk configuration and recommends
you can proceed with automatic disk configuration.
Table 2. Automatic Disk Configuration Error Conditions
Error Condition Description Solution/Workaround
Unconfigured physical disks are
not all the same size
Slot 0 is empty (applies to DL2200,
DL2100, DL2000)
Slot 0 disk size is smaller than
other disks (applies to DL2200,
DL2100, DL2000)
The new disk is a SAS disk
The new disk is a SATA disk
One or more physical disks vary in
capacity.
You can proceed with automatic disk
configuration, but, the RAID group is
formed as if all physical disks are the size
of the smallest physical disk. Additional
space on the larger disk(s) is not usable.
If the selected standard configuration is
RAID 5 and a disk is available in slot 0,
automatic disk configuration assigns it as
a global hot spare.
You can proceed with automatic disk
configuration, but, a global hot spare is
not created.
A physical disk in slot 0 to be configured
as a global hot spare is smaller than one
or more physical disks in the remaining
slots in the storage enclosure.
You can proceed with automatic disk
configuration, but, this global hot spare
does not provide failover support for
larger physical disks.
Automatic disk configuration is disabled
when any SAS disk drive is detected.
You cannot proceed with automatic disk
configuration.
Automatic disk configuration is disabled
when any SATA disk drive is detected.
You cannot proceed with automatic disk
configuration.
To avoid losing storage capacity, all
physical disks must be of the same
size.
You can add a physical disk in slot 0 at
a later time and automatic disk
configuration assigns that disk as a
global hot spare.
Replace this physical disk with a disk
whose capacity is at least as large as
the remaining physical disks in the
storage enclosure.
Either remove the SAS drive or
replace the SAS drive with a SATA
drive.
Either remove the SATA drive or
replace the SATA drive with a SAS or
nearline SAS drive.
Adding An Optional Tape Library
For a list of supported tape devices, see the
about initial setup and configuration of the tape device, see the tape documentation.
NOTE: The tape device is not configured automatically by the CommVault Simpana Backup and Recovery software.
To add a supported tape device to the appliance:
1. Launch the CommCell Console from the Appliance Console link.
2. From the Tools menu, select Control Panel.
3. In the Control Panel, double-click Library and Drive Configuration.
4. Click Start.
5. Select:
– SCSI Devices
22
Dell PowerVault Compatibility Matrix
at dell.com/pvmatrix. For information
Page 23

– Detect on Selected MediaAgents in Parallel
– Automatically Create DOS Drivepools
– Exhaustive Detection (Only for Libraries without Drive IDs Support)
6. Click OK.
Adding The Tape Device To The Disk Appliance Console
To add a tape device to the disk appliance console:
1. On the PowerVault DL Backup to Disk Appliance Console, click the Settings tab.
2. Under Tape Devices, click Add.
3. Enter the model, description, and the IP address of the tape device.
For tape description, enter a name to identify the tape device.
4. After the tape device is added, click Launch.
5. Log on using the user name and password for the tape device. For more information, see the tape documentation.
Configuring The Storage Manually
NOTE: If you select automatic disk configuration policy (with or without confirmation), the following steps are not
required. See Launching Simpana Software.
NOTE: Manual disk configuration is recommended only for advanced users.
To create virtual disks manually using OpenManage Server Administrator, select Manual disk configuration policy within
the DL Backup to Disk Appliance Console. Server Administrator provides:
• Systems and storage management for the appliance.
• System hardware and peripherals monitoring for fault conditions, providing advance warning of potential system
failures.
• An easy-to-use graphical user interface allowing the administrator to configure the storage subsystem, such as,
virtual disks and RAIDs.
To manually create a virtual disk using Server Administrator:
1. In PowerVault DL Backup to Disk Appliance Console, click Settings → Launch Dell OpenManage Server
Administrator.
2. If you see a certificate error, click Continue to this website.
The log on window is displayed.
3. Log on to OpenManage Server Administrator with the user name and password created using the PowerVault DL
Backup to Disk Appliance Configuration Wizard
.
Creating Virtual Disks
In Server Administrator, you can create a virtual disk using either the Express Wizard or the Advanced Wizard.
• Express Wizard — The Express Wizard requires minimal user input and is recommended for novice users. It
calculates an appropriate virtual disk configuration based on the available space and controller considerations.
When using the Express Wizard, select the RAID level and size for the virtual disk. The Express Wizard selects a
recommended disk configuration that matches your RAID level and size selection.
• Advanced Wizard — The Advanced Wizard is recommended for advanced users having good knowledge of
RAID levels and hardware. It allows you to specify the read, write, and cache policy for the virtual disk. You can
also select physical disks and the controller connector to be used.
23
Page 24

To launch the Express and Advanced Create Virtual Disk wizards:
1. In Dell OpenManage Server Administrator Storage Management, expand the storage tree object to display the
controller objects.
2. Select the PERC adapter object for which the physical disks must be configured.
3. In the Properties tab of the PERC adapter, select Information/Configuration.
4. Locate Controller Tasks, select Create Virtual Disk, and then select Execute.
5. Create the number of virtual disks that you require for your configuration.
Preparing Manually Created Virtual Disks For Use With CommVault Simpana
To prepare manually created virtual disks for use with CommVault Simpana:
1. After you create the virtual disks using Server Administrator, click Start → Administrative Tools → Server
Manager and select Disk Management in Storage.
2. Initialize the new virtual disks as GUID Partition Table (GPT) format.
3. Create a simple volume on each new virtual disk using Disk Management.
The New Simple Volume Wizard displays the Assign Drive Letter or Path screen.
4. Select Mount in the following empty NTFS folder, and click Browse.
5. Browse to C:\DiskStorage and click New Folder.
6. Enter a unique folder name for the new virtual disk.
7. Perform a quick NTFS format of the volume.
8. Enter a unique volume name for this virtual disk.
NOTE: Do not select Enable file and folder compression.
9. In the CommCell Console, click Tools and select Control Panel.
10. Launch Library and Drive Configuration.
11. Select and add the MediaAgent that represents this appliance.
12. Select the Libraries tab in the Library and Drive Configuration wizard. The new virtual disk can be added to an
existing Magnetic Library or to a new Magnetic Library.
NOTE: To simplify disaster recovery, all virtual disks that reside on a given PERC adapter must reside within
the same Magnetic Library.
– To add the new virtual disk to a new Magnetic Library, right-click Libraries and select Add a Magnetic
Library. Add the local mount path by browsing to C:\DiskStorage and select the folder name entered in step
6.
– To add the new virtual disk to an existing Magnetic Library, right-click Libraries and select Add a Magnetic
Library. Add the local mount path by browsing to C:\DiskStorage and select the folder name entered in step
6.
After the mount path is configured, the disk library can be viewed under Storage Resources.
Launching Simpana Software
To launch the Simpana Backup and Recovery application using the PowerVault DL Backup to Disk Appliance Console,
click Home → Launch CommVault Software.
24
Page 25

Logging On To The CommCell
For versions of Simpana prior to 9.0, the default user name and password to log on to the CommCell is cvadmin. For
Simpana versions 9.0 and later, the default user name and password is admin. It is recommended that you change the
password after you first log on.
You receive a reminder if you do not activate the license. For more information about using the CommCell console
including licensing, see documentation.commvault.com/dell. Click Simpana → Dell PowerVault DL Backup To Disk
Appliance → Getting Started.
Capturing Support Log Files
If log files are required by the Dell support representative, they can be automatically collected by clicking the Support
tab in the PowerVault DL Backup to Disk Appliance Console.
To generate log files, click the link Click here to collect appliance information and logs for Dell Support.
Changing Automatic Disk Configuration
If the appliance supports RAID 5 and RAID 6 standard disk configurations (see Disk Configuration Settings), the standard
disk configuration setting is displayed on the Settings tab of the DL Backup to Disk Appliance Console.
1. Choose standard disk configuration when the appliance is first configured using the DL Backup to Disk Appliance
Configuration Wizard
After selecting the standard disk configuration and configuring the automatic disk configuration for one or more
virtual disks, this setting should not be changed. Otherwise, the disk subsystem state changes from standard to
advanced.
2. If during a disaster recovery an incorrect standard configuration was selected, click Change Automatic RAID
configuration to reset the standard disk configuration back to the value prior to the system failure.
If in doubt, use Server Administrator to determine the RAID type and slots using the existing virtual disks. Under
Server Administrator, expand the Storage section of the System device tree.
3. Verify the virtual disks for each PERC adapter in the appliance noting the layout type (RAID 5 or RAID 6). Click each
virtual disk to determine the physicals disks and slots used by that virtual disk.
.
NOTE: Changing the standard disk configuration setting sets the storage configuration policy to Manual and
reboots the system. Do not perform this operation when backup jobs are running. After the system reboots, enable
automatic disk provisioning by setting the configuration policy to Automatic.
Compatibility Manager
The Compatibility Manager provides a notification if a software component is below the minimum supported version.
Click the Compatibility tab in the Appliance Console to view the Compatibility Manager. This screen displays the
currently installed version(s) of BIOS, firmware, drivers, operating system, and appliance applications.
• A warning level indicates that the appliance continues to operate but the software component needs to be
updated to the minimum required level as soon as possible.
• A critical level indicates an incompatibility with the installed software component version. When a critical level
is reported, the appliance stops backup application jobs to prevent unexpected errors.
25
Page 26

When all the critical software components have been updated to a supported version, backup application jobs resume.
See Updating DL Backup To Disk Appliance Applications for instructions on how to update the software components on
the DL appliance.
NOTE: The Compatibility Manager feature is available on versions 3.2 and later of the appliance software stack.
See the Dell PowerVault DL Backup to Disk Appliance Interoperability Guide for supported DL2x00 platforms.
About Enclosure Numbers
The backup application and Server Administrator refer to the MD1x00 storage enclosures by enclosure numbers.
Windows storage management applications refer to the enclosure by the bus number. The enclosure number and bus
number refer to the same enclosure.
The first enclosure attached to port 0 of the PERC 6/E adapter is 0. Additional enclosures daisy-chained off the first
enclosure are numbered 1 and 2 respectively. The first enclosure attached to port 1 of the PERC 6/E adapter is 3.
Additional enclosures attached to this enclosure are numbered 4 and 5 respectively.
The first enclosure attached to port 0 of the PERC H800 and PERC H810 adapter is 0. Additional enclosures daisy-chained
off the first enclosure are numbered 1, 2, and 3 respectively. The first enclosure attached to port 1 of the PERC H800 and
H810 adapter is 4. Additional enclosures attached to this enclosure are numbered 5, 6, and 7 respectively.
Internal PERC adapters such as the PERC 6/i, PERC H700, and PERC H710 are assigned the enclosure number 255.
26
Page 27

4
Updating DL Backup To Disk Appliance Software
Dell PowerVault DL Backup to Disk Appliance software is updated periodically to correct problems, improve
performance, introduce new capabilities, and support additional hardware. It is recommended that you apply these
updates to keep the appliance running optimally. See the
Guide
at support.dell.com/manuals to determine the minimum software versions supported on the appliance. Software
updates may be available in one or more of the following categories:
• System software — This includes the DL2x00 system BIOS, firmware, and device drivers for the PowerVault
DL2x00 system and PowerVault MD1x00 storage enclosures.
• Operating System — Microsoft Windows Server 2008 Standard x64 Edition or Microsoft Windows Server 2008
R2 including service packs.
• DL Backup to Disk Appliance applications — This includes the Dell PowerVault DL Backup to Disk Appliance
Configuration Wizard and the Dell PowerVault DL Backup to Disk Appliance Console.
• Systems and Storage Management — Dell OpenManage Server Administrator.
• Backup and Recovery Application — CommVault Simpana Backup and Recovery.
NOTE: You must ensure that you provide the system Service Tag or system model while searching for system
software updates on support.dell.com. After entering the Service Tag or the system model, select the correct
operating system from the drop-down menu on the Drivers and Downloads page.
Updating System Software
Dell PowerVault DL Backup to Disk Appliance Interoperability
Updates for the system BIOS, firmware, and device drivers are available at support.dell.com/support/downloads.
You can update system software using:
• Server Update Utility — Dell OpenManage Server Update Utility (SUU) is a DVD-based application that identifies
and applies updates to the DL2x00 system. SUU compares the versions of components currently installed on the
system with update components packaged on the server update medium. SUU then displays a comparison
report of the versions and provides the option of updating the components, such as the BIOS, firmware, and
drivers. The Dell server updates medium is published periodically. For more information, see the
OpenManage Server Update Utility User’s Guide
• Dell Update Packages — Dell Update Package (DUP) is a self-contained executable in a standard package
format. Each update package is designed to update a single software component such as a specific device
driver on your system. DUPs are published when updates are available. For more information, see the
Update Packages for Microsoft Windows User’s Guide
at support.dell.com/manuals.
at support.dell.com/manuals.
Dell
Dell
Receiving System Software Update Notifications
Dell technical update subscriptions e-mails critical product alerts, updates to files, drivers, and utilities for your system.
To register for these notifications, go to support.dell.com and click the Technical Subscriptions link under the Drivers
and Downloads section.
27
Page 28

Updating The Operating System
To acquire and run the latest security patches, fixes, and updates for the operating system, click the Windows Update
link in the PowerVault DL Backup to Disk Appliance Console.
Updating DL Backup To Disk Appliance Applications
Use the Dell PowerVault DL Backup to Disk Appliance Recovery and Update Utility to update DL Backup to Disk
Appliance Applications. Download the latest version of the DL Backup to Disk Appliance Recovery and Update Utility
from support.dell.com/support/downloads. The utility is located under the IDM category on the Drivers and Downloads
page.
NOTE: Running the DL Backup to Disk Appliance Recovery and Update Utility may require an appliance reboot. Run
this utility during a time that does not impact production backup jobs.
NOTE: The DL Backup to Disk Appliance Recovery and Update Utility is specific to the system model. Ensure that
you download the appropriate utility for your system.
NOTE: For the PowerVault DL2100 and DL2200, the DL Backup to Disk Appliance Recovery and Update Utility is also
specific to the operating system. Ensure that the correct version of the application is downloaded for the operating
system.
Updating Server Administrator
You can download updates to Server Administrator from support.dell.com/support/downloads. Select OpenManage
Server Administrator Managed Node under the systems management category. Follow the installation instructions
provided on the download page.
Updating CommVault Simpana Backup And Recovery
Use the Automatic Updates feature of the CommVault Simpana Backup and Recovery software to obtain and apply
updates. See the Automatic Updates section in the
documentation.commvault.com/dell.
28
CommVault Books Online
documentation at
Page 29

Disaster Recovery
You can recover the Dell PowerVault DL Backup to Disk Appliance from a number of hardware or software failures.
Depending on the type of failure, you may need to:
• Recover from internal server disk failures
• Recover from external storage enclosure disk failures
• Reinstall the operating system
• Reinstall Dell OpenManage system management applications
• Reinstall Dell PowerVault DL Backup to Disk Appliance applications
• Reinstall CommVault Simpana Backup and Recovery software and database
5
NOTE: Before you perform the recovery steps, see the
Simpana Release Notes
at support.dell.com/manuals for the latest information.
Dell PowerVault DL2x00 Systems Powered by CommVault
Using The iDRAC Virtual Media
PowerVault DL2x00 systems that include the Integrated Dell Remote Access Controller 7 (iDRAC7) Enterprise support
iDRAC7 virtual media. The iDRAC virtual media feature allows a management station’s DVD drive to be accessed by the
managed server. The appliance operating system and applications can be installed using the iDRAC7 virtual media and
is an alternative to using an internal or USB DVD drive.
NOTE: If your appliance does not have an internal DVD drive, connect either a USB DVD drive or use the iDRAC
virtual media to reinstall the operating system and the applications from the media.
Configuring The iDRAC Enterprise For Remote Access
Before virtual media can be enabled, the iDRAC Enterprise card must be configured for remote access. For more
information, see Configuring Your System to Use an iDRAC7 in the
User's Guide
at support.dell.com/manuals.
Accessing The Web Interface And Configuring Virtual Media
Virtual media is configured using the iDRAC Enterprise web interface. For more information on accessing the web
interface, see Accessing the Web Interface in the
support.dell.com/manuals.
After the web interface has been accessed the virtual media can be configured. For specific instructions, see
Configuring and Using Virtual Media in the
support.dell.com/manuals.
Integrated Dell Remote Access Controller 7 (iDRAC7) User's Guide
Integrated Dell Remote Access Controller 7 (iDRAC7) User's Guide
Integrated Dell Remote Access Controller 7 (iDRAC7)
at
at
Recovery Solution Map
Keep the following guidelines in mind:
29
Page 30

• Reinstallation of the operating system requires you to reinstall all the applications on the appliance.
• A non-recoverable failure of the disk group containing the operating system requires reinstallation of the
operating system and all applications.
• A non-recoverable failure of the disk group containing one or more CommVault Simpana Backup and Recovery
backup sets requires restoration of the backup sets on that disk group from tape or secondary disk.
• For all non-disk related hardware failures, see the
and PowerVault MD1x00 storage enclosure at support.dell.com/manuals.
Table 3. System Recovery Map
Potentially Affected System Components
Hardware Software
Failure Type Server
Disk
Group
Storage
Enclosure
Disk
Group
Hardware Owner’s Manual
Operating
System
Dell
PowerVault
DL
Appliance
Application
for PowerVault DL2x00 system
Server
Administrat
or
CommVaul
t Simpana
Backup
and
Recovery
Recovery
Methods
Use the
following
steps to
resolve
these issues.
Server RAID Group Failure
(Internal Disk Failure)
Storage Enclosure RAID
Groups (External Disk
Failure)
Operating System X X X X 2, 3
Dell PowerVault DL
Appliance Applications
Server Administrator X 4
CommVault Simpana
Backup and Recovery
Application
1—Recovering From Disk Failures
2—Reinstalling The Operating System
3—Reinstalling Dell PowerVault DL Backup To Disk Appliance Applications
4—Repairing Server Administrator
5—Reinstalling CommVault Simpana Backup And Recovery During Disaster Recovery
X X X X X 1, 2, 3
X 1
X 3
X 5
Completing A Full Recovery Of The DL Backup To Disk Appliance
To complete a full recovery of the appliance, you must:
• Recover the operating system. See Using The Dell Unified Server Configurator - Lifecycle Controller Enabled To
Recover The Operating System.
• Update the BIOS, firmware, and drivers. See Updating BIOS Firmware And Driver.
• Recover the DL Backup to Disk Appliance applications. See Using The Dell PowerVault DL Backup To Disk
Appliance Recovery And Update Utility During Disaster Recovery.
30
Page 31

Recovering From Disk Failures
About RAID Types
The internal disk storage containing the operating system and applications in the DL2x00 system is preconfigured as
RAID 1. RAID 1 is a mirrored disk group that provides uninterrupted operation of the appliance if a single disk fails within
that disk group.
CAUTION: A failed system disk must be replaced immediately to avoid data loss or complete failure of the
appliance.
The optional data disks in the PowerVault DL2100 and DL2200 systems and storage enclosures are automatically
configured by the backup application in RAID 5 or RAID 6 disk groups. See Disk Configuration Settings.
NOTE: Automatic configuration only occurs if the disk configuration state is Standard and if you select one of the
automatic disk configuration policies. See Disk Subsystem States and Disk Configuration Policies.
RAID 5 provides uninterrupted operation of the appliance if a single disk fails within that disk group. The RAID 5 standard
configuration includes a global hot spare in each storage enclosure and PowerVault DL2200 systems. If a single disk
failure occurs, the hot spare is automatically assigned and rebuilt into that disk group. After the disk group is rebuilt, the
RAID 5 disk group continues to operate normally.
CAUTION: If another disk fails while the internal or external disk group is rebuilding, all data in that disk group is
lost. Always monitor the status of the appliance's disk rebuild to ensure that the rebuild operation completes.
When the failed disk is replaced, the data residing on the global hot spare is automatically copied back to the
replacement disk. After the copy-back operation is complete, the global hot spare is once again available if another disk
fails. For more information about using global hot spares, see the
at support.dell.com/manuals.
Dell OpenManage Server Administrator User's Guide
NOTE: Only one disk group per storage enclosure can utilize a hot spare at a time.
NOTE: There are no dedicated hot spares for internal disks in the DL2000, Dl2100 and DL2300 systems.
NOTE: The DL2200 systems have dedicated hot spares for internal disks.
RAID 6 provides uninterrupted operation of the appliance if up to two disks fail within that disk group. Replacement of
the failed disk(s) causes the disk group to rebuild. If a third disk fails before the disk group rebuild is complete, data loss
occurs. The standard RAID 6 configurations do not include a hot spare.
RAID 10 provides high redundancy and throughput by combining RAID 1 and RAID 0 to stripe across four or more even
numbered mirrored disks. The entire capacity of the internal auto-provisioned RAID10 disk group(s) is assigned for use
as the CommVault Deduplication Database.
Detecting And Monitoring Disk Failures
To optimize the protection of RAID configured storage on the appliance, it is essential that you detect hard drive failures
immediately. Replacing failed disks immediately reduces the risk of unplanned downtime and loss of critical data.
You can use the following methods to monitor the health of the disks:
• Hard drive LED indicators — Each drive in the server and storage enclosure contains status LEDs to indicate
drive activity and certain failure status. See the
enclosures at support.dell.com/manuals.
• Dell OpenManage Server Administrator — Server Administrator can monitor the health of both internal and
external direct-attached disks. See Replacing Disks.
Hardware Owner’s Manual
for the servers and storage
31
Page 32

• Dell Management Console — The Dell Management Console (DMC) centrally monitors the status of Dell
systems. For more information about installing and using DMC, see the
at support.dell.com/manuals.
Dell Management Console User’s Guide
Recovering From Single Disk Failures
After you replace the failed disk drive within a RAID group, the appliance automatically rebuilds the disk group. The data
on the virtual disks that reside on the disk group is still available to the appliance and the appliance runs without any
interruption. The appliance operates in degraded mode until the rebuild operation is complete.
CAUTION: If a disk fails in the same RAID 1 or RAID 5 disk group during the rebuild operation, data loss occurs.
Use Server Administrator to monitor the progress and status of the RAID rebuild. If the rebuild does not begin
automatically, see the
rebuild manually. Server Administrator reports the status and progress of a rebuilding RAID group.
Dell OpenManage Server Administrator User’s Guide
at support.dell.com/manuals to initiate the
Recovering From Multiple Disk Failures
Data loss occurs if both disks in the RAID 1 group fail, two or more disks in a RAID 5 group fail, or three or more disks in
a RAID 6 group fail. After replacing the failed disks, depending on which RAID group failed, choose from the following
methods, to complete the recovery:
• Server disk group failure — The server RAID 1 group contains the operating system, CommVault Simpana, and
the DL Backup to Disk Appliance applications. See the System Recovery Map and follow the steps for the
operating system failure type. If the optional internal backup data RAID disk group fails, follow the procedure
below for storage array disk group failure.
• Storage array disk group failure — You can restore the backup sets archived to tape. Backup sets can also be
restored from a secondary appliance protecting the primary appliance. For more information about disaster
planning recovery procedures, see the CommVault Simpana Backup and Recovery documents.
Replacing Disks
When replacing disks, use only supported disks identified in the
Interoperability Guide
of greater capacity are used, some usable disk space is lost in the RAID configuration. You can replace:
• Internal disks — To replace the appliance's internal disks, see the
Manual
• Disks in a storage enclosure — To replace disk drives in a storage enclosure, see the storage enclosure’s
Hardware Owner’s Manual at support.dell.com/manuals.
. Ensure that you replace the failed disk with a new disk of the same or greater capacity. If drives
at support.dell.com/manuals.
Dell PowerVault DL Backup to Disk Appliance
Dell PowerVault DL2x00 Hardware Owner's
Reinstalling The Operating System
The operating system is preinstalled on the appliance. Perform the following procedure to reinstall the operating system.
Using The Dell Systems Build And Update Utility To Manually Recover The Operating System
To reinstall the operating system, use the Dell Systems Build and Update Utility (SBUU) on the Dell Systems
Management Tools and Documentation media. The SBUU installs the operating system software and device drivers.
32
Page 33

NOTE: SBUU is only supported on the DL2000 appliance. For all other appliance models, see Using The Dell Unified
Server Configurator - Lifecycle Controller Enabled To Recover The Operating System.
The SBUU requires the original Microsoft installation media to install the operating system.
NOTE: The SBUU is shipped with the appliance and is also available at support.dell.com. When using the SBUU
from support.dell.com, you must download the Dell Windows Operating Systems install support pack to a CD/DVD.
Use the CD/DVD when prompted by the SBUU.
CAUTION: Using the SBUU erases all data from the virtual disk where you install the operating system.
To reinstall the operating system, perform the following steps:
1. Insert the SBUU media into the appliance.
2. Configure BIOS to boot from CD/DVD drive and boot the appliance using SBUU. The utility walks you through the
preliminary steps before proceeding with the installation of the operating system.
3. Accept the End User Licensing Agreement.
4. Select Install Operating System.
5. Set the date and time.
6. Select Windows Server 2008 X64.
7. Select Skip RAID Configuration.
8. Review the summary of steps and click Continue.
9. If SBUU prompts you for the Windows Server Pack installation media, insert the media with the Dell Windows OS
install support pack downloaded from support.dell.com.
10. Click Finish.
11. Remove the SBUU media and, when prompted, insert the Microsoft Windows Server 2008 Standard x64 Edition
media that shipped with the system. Follow the instructions on the screen to complete the installation.
The system reboots and asks for the Windows installation media to be inserted. The setup confirms that a valid
Windows media is inserted.
12. Click OK.
13. When the system asks whether a core or full installation is desired, select a full installation.
14. Set localization options, then click Next.
15. Select Custom Installation.
(The upgrade option is grayed out and not selectable.)
16. When the partitions or raw disk space is listed, select the former C: drive [not the MD1000 logical unit numbers
(LUNs)] and click New.
17. Highlight the partition and select Format.
18. Click Next.
The Windows installation begins.
19. Proceed to Completing Operating System Reinstallation.
Using The Dell Unified Server Configurator - Lifecycle Controller Enabled To Recover The Operating System
Use the Unified Server Configurator - Lifecycle Controller Enabled (USC-LCE) utility on the DL2x00 system to recover the
operating system. For specific instructions, see Deploying the Operating System using the OS Deployment Wizard in the
Dell Unified Server Configurator - Life Cycle Enabler User Guide
at support.dell.com/manuals.
33
Page 34

NOTE: USC LCE is not supported on the DL2000 appliance. See Using The Dell Systems Build And Update Utility To
Manually Recover The Operating System.
Locate the Microsoft operating system media that came with the system to proceed with the installation.
After a multiple disk failure of the DL2x00 system boot disk, you must replace the failed disks, create a RAID 1 disk group,
and then reinstall the operating system. See Recovering From Disk Failures.
The USC-LCE utility includes a RAID Configuration wizard to complete this task. When prompted select Configure RAID
Now and configure the DL2x00 system drives in slot 0 and slot 1 as RAID 1.
CAUTION: Reinstalling the operating system on existing disk drives removes all installed applications and erases
all data.
If the boot disk has not failed and you are reinstalling the operating system, you can skip the Configure RAID Now step
and proceed directly to the OS Deployment step.
NOTE: In the RAID Configuration Wizard, ensure that you uncheck Assign a HS if available if it is checked by
default.
Proceed to Completing Operating System Reinstallation.
Completing Operating System Reinstallation
1. On completing the Windows installation, change the password when prompted.
The Set Network Location window is displayed.
2. Select the Work location and click Cancel.
NOTE: Windows firewall may prevent a connection to the network. If connecting to network services, you may
need to disable the firewall.
The Initial Configuration Tasks window is displayed. Close this window. Proceed to Updating BIOS, Firmware, and
Driver.
Updating BIOS, Firmware, And Driver
Before you install additional software on the appliance, such as the Dell PowerVault DL Backup to Disk Appliance
applications, see the
to determine the required BIOS, firmware, and driver versions for the appliance. For more information, see Updating
System Software.
NOTE: Complete the installation of remaining software on the appliance before enabling Windows update on the
DL2x00 system.
Dell PowerVault DL Backup to Disk Appliance Interoperability Guide
at support.dell.com/manuals
Reinstalling Dell PowerVault DL Backup To Disk Appliance Applications
The appliance is pre-installed with:
• PowerVault DL Backup to Disk Appliance Configuration Wizard — This wizard is used to configure the appliance
at first-time boot.
• PowerVault DL Backup to Disk Appliance Console — This console is a single launch point for CommVault
Simpana Backup and Recovery, as well as for standard and advanced hardware configuration utilities.
• Other applications used by the appliance.
34
Page 35

NOTE: Perform the following steps to either repair a corrupted application or during the system recovery process
of a disaster recovery scenario.
Using The Dell PowerVault DL Backup To Disk Appliance Recovery And Update Utility During Disaster Recovery
In a disaster recovery scenario, download the Dell PowerVault DL Backup to Disk Appliance Recovery and Update Utility
from support.dell.com/support/downloads. Use this utility to install the Dell PowerVault DL Backup to Disk Appliance
Applications after installing the Windows operating system.
To install the Dell PowerVault DL Backup to Disk Appliance Applications using the Dell PowerVault DL Backup to Disk
Appliance Recovery and Update Utility:
1. Run the executable file.
2. Select Install Windows Server Roles and Features, Dell PowerVault DL Appliance Applications, then select Dell
Open Manage Server Administrator
NOTE: Installing the Windows Server Roles and Features and the PowerVault DL Backup to Disk Appliance
applications may require an appliance reboot. In such a scenario, re-launch the DL Backup to Disk Appliance
Recovery and Update Utility once the appliance has completed the reboot.
3. Click Go to proceed with the installation.
applications and Reinstall backup application.
4. The Dell PowerVault DL Backup to Disk Appliance Recovery and Update Utility prompts you to insert the
Systems Management Tools and Documentation
5. If the
Dell Systems Management Tools and Documentation
Administrator Managed Node application from support.dell.com/support/downloads.
a) Run the application to extract the Server Administrator installation files.
b) When prompted by the Dell PowerVault DL Backup to Disk Appliance Recovery and Update Utility for the
Systems Management Tools and Documentation
Server Administrator installation files.
The Server Administrator installer runs a compatibility check to confirm that there are no conditions preventing a
successful installation.
6. Click Finish.
The system launches the DL Backup to Disk Appliance Configuration Wizard in Recovery Mode, which guides you
through the setup of the network and domain settings, and reinstallation of CommVault Backup and Recovery
software.
7. When prompted, insert disk 1 of the CommVault Backup and Recovery installation media. Follow the instructions on
the screen to complete the installation.
NOTE: During the installation, a reboot may be required.
8. After the system reboots, log on to Windows.
9. Click Finish.
The CommVault Simpana service starts, recovers, and remounts all volumes in the disk array under C:
\DiskStorage_Recovered directory. The DL Backup to Disk Appliance Console launches automatically.
media.
media is not available, download the Server
media, browse to the location where you have extracted the
Dell
Dell
10. From the DL Backup to Disk Appliance Console Home tab, click Launch CommServe Disaster Recovery.
The CommServe Disaster Recovery GUI window is displayed.
35
Page 36

Figure 10. Commvault Simpana 8.0 SQL Restore
36
Page 37

Figure 11. CommVault Simpana 9.0 Database Restore
37
Page 38

Figure 12. Database Restore for CommVault Simpana 9.0 SP4 and Later
11. For Simpana versions prior to 9.0, on the SQL Restore tab in the CommServeDisasterRecoveryGUI, select Restore
DB and provide the DR dump location for the database restore in the Restore file field.
12. For Simpana version 9.0 and later, on the Database Restore tab in the CommServeDisasterRecoveryGUI, select
Restore DB and Restore Single Dump or Restore Single Database radio button. Browse the Restore File field to
locate the database DR dump file.
NOTE: By default, the CommServe DR dump location is the first mountpath on the disk array. For example, if C:
\DiskStorage\1\1\SET_XY is the DR dump location, this location is available under C:\DiskStorage_Recovered
\1\1\SET_XY upon recovery. Thus, the DR dump is available to use in the CommServe Database Disaster
recovery operation.
NOTE: The CommVault disaster recovery backup is automatically created. By default, the disaster recovery
backup runs daily at 10:00 a.m. local time.
13. For Simpana versions prior to 9.0, select the Post Recovery tab and select:
– Perform Post Recovery operations
– Delete all Active jobs
– Reset index cache timestamps
– Disable scheduler
38
Page 39

Figure 13. Simpana 8.0 Post Recovery
For Simpana versions 9.0 and later, select the Post Recovery tab and select:
– Perform Post Recovery operations
– Reset index cache timestamps
– Disable scheduler
– Suspend Running Jobs
39
Page 40

Figure 14. Simpana 9.0 Post Recovery
14. Click OK to continue with the restore.
15. If prompted to stop the Simpana services to proceed with the restore, click Yes.
16. When the restore is complete, close the CommServeDisasterRecoveryGUI.
17. Click Launch the Service Control Manager from the Home tab of the appliance management console to start the
services.
18. Close the Service Control Manager.
NOTE: When the restore operation is complete, CommVault Simpana services are started. As a result,
volumes on the storage enclosure(s), which were configured using automatic disk configuration are available
under the original location of C:\DiskStorage. All volumes from the C:\DiskStorage_Recovered directory are
unmounted and no longer visible at that location.
NOTE: Wait until all volumes from the C:\ DiskStorage_Recovered directory are unmounted and no longer
visible at that location before proceeding to the next step. This process can take upto five minutes.
NOTE: The CommVault license key is stored in the CommServe database. After importing the database, all
features and licenses are restored.
19. From the CommCell console, navigate to the CommCell browser tree view.
40
Page 41

20. Right-click the CommServe system name at the top of the tree view and select Properties.
21. Select all the options in the Activity Control tab.
22. Click OK.
23. For Simpana version prior to 9.0, right-click the CommServe system name and select All Tasks and Schedules.
24. For Simpana version 9.0 and later, right-click the CommServer system name and select View then Schedules.
25. Enable all the available Schedule Policies and click Close.
NOTE: Install the latest CommVault service packs, updates, and patches on the PowerVault DL2x00 appliance
after recovering the CommServe database.
Disaster recovery is complete and the backup data can be restored from the disk subsystem.
NOTE: It may take up to 15 minutes for the magnetic library drives to display as ready in the CommCell
console.
Installing Windows Server Roles And Features Manually
The PowerVault DL Backup to Disk Appliance Recovery and Update Utility can be used to automatically install all the
required Windows Server Roles and Features. To install the required roles and features manually:
1. Launch Server Manager.
2. Click Add features to display the Select Features window in the Add Features Wizard.
3. Select the following features depending on which operating system is being restored on the PowerVault DL2x00.
41
Page 42

Table 4. List of Windows Server 2008 Roles and Features in the Add Features Wizard
Features Notes
.NET Framework 3.0 Features A dialog box may display the required roles and features for .NET
3.0. Click Add Required Role Services to continue.
Remote Server Administration Tools A dialog box may display the required roles and features for Remote
Server Administration Tools. Click Add Required Role Services to
continue.
SNMP Services
Windows Process Activation Service
.NET Framework 3.5 Features A dialog box may display the required roles and features for .NET
3.5. Click Add Required Role Services to continue.
Remote Server Administration Tools Expand the Remote Server Administration Tools node and then
expand the Role Administration Tools. Select Remote Desktop
Services Tools. A dialog box may display the required roles and
features for Remote Server Administration Tools. Click Add Required
Role Services to continue.
SNMP Services
Windows Process Activation Service
4. Click Next.
The Web Server (IIS) window is displayed.
5. Click Next to display the Select Role Services window and select the following Role Services and sub-options for
Web Server (IIS):
Table 5. List of Role Services
Role Services Sub Options
Common HTTP Features
Application Development
Health and Diagnostic
Security
Performance
42
– Static Content
– Default Document
– Directory Browsing
– HTTP Errors
– NET Extensibility
– ASP (A dialog box may display the required roles and
features for Application Development. Click Add Required
Role Services to continue.)
– CGI
– ISAPI Extensions
– HTTP Logging
– Request Monitor
– Request Filtering
– Static Content Compression
Page 43

Role Services Sub Options
Management Tools
6. Click Next.
The Confirm Installation Selections window is displayed.
7. Click Install to proceed with the installation of the selected roles and features.
If required, the system reboots after the installation is complete.
– IIS Management Console
– IIS 6 Management Compatibility (select all sub-options)
Using The Dell PowerVault DL Backup To Disk Appliance Recovery And Update Utility For System Repair
The Dell PowerVault DL Backup to Disk Appliance Recovery and Update Utility can be used to repair or update the Dell
PowerVault DL Backup to Disk Appliance applications in a non-disaster recovery scenario. For more information, see
Updating DL Backup To Disk Appliance Applications.
Repairing OpenManage Server Administrator
Dell OpenManage Server Administrator is a system management application that is helpful in viewing overall system
hardware health. It monitors the health of the appliance’s internal and external disk groups.
NOTE: In a disaster recovery scenario, Server Administrator is installed in the steps defined in Using the Dell
PowerVault DL Backup to Disk Appliance Recovery and Update Utility During Disaster Recovery; therefore, the
following steps would not be necessary.
To repair server administrator:
1. Verify that the version is supported in the
before installing Server Administrator.
2. Install Server Administrator using the
the system.
3. If the Server Administrator installation process does not begin automatically, run autorun.exe located in the root
folder of the media and proceed to step 5.
4. If you have misplaced the media, download the Server Administrator Managed Node application from
support.dell.com/support/downloads and follow the installation instructions on the download page.
5. Select Dell OpenManage Server Administrator for standalone server management and click Install.
The Server Administrator installer runs a compatibility check to confirm that no conditions prevent installation.
6. Select Repair or Modify Installation.
The installer completes the repair.
Dell PowerVault DL Backup to Disk Appliance Interoperability Guide
Dell Systems Management Tools and Documentation
media that shipped with
,
Reinstalling CommVault Simpana Backup And Recovery During Disaster Recovery
The Dell PowerVault DL Backup to Disk Appliance Recovery and Update Utility guides you through the installation of
CommVault Simpana Backup and Recovery software, in a disaster recovery scenario.
The following prerequisites must be met before reinstallation:
• Locate the CommVault Simpana Backup and Recovery installation media that came with the appliance.
43
Page 44

• Verify the functionality to be installed on the appliance. CommVault Simpana Backup and Recovery can be
installed as a CommServe system including the Media Agent, or as a Media Agent only.
• Windows network domain information is required for installation. Check with the network administrator for these
settings.
• Confirm that Windows Disk Manager can access the external disk.
• Ensure that the CommVault Backup and Recovery software is not already installed on the DL2x00 system.
NOTE: If the CommVault Backup and Recovery software is already installed, the Recovery and Update
Utility does not allow the reinstallation of the backup application. The option to reinstall the backup
application is inactive.
To reinstall the CommVault Simpana Backup and Recovery software:
1. Launch the Dell PowerVault DL Backup to Disk Appliance Recovery and Update Utility.
2. Select Re-install Backup Application and follow the instructions on the screen to complete the reinstallation.
Repairing CommVault Simpana Backup And Recovery
If the CommVault Simpana Backup and Recovery software gets corrupted or unusable and must be reinstalled, you
must:
1. Uninstall the CommVault Simpana Backup and Recovery software using Programs and Features located in the
Windows Server 2008 control panel.
NOTE: When uninstalling the CommVault software use the SQL administrator SA password:
2StrongPassword!
2. Follow the steps in Reinstalling CommVault Simpana Backup And Recovery During Disaster Recovery.
3. Restore the Disaster Recovery Backup data using the CommServe Disaster Recovery Tool.
NOTE: For additional information, see disaster planning in the CommVault Simpana book online documentation at
documentation.commvault.com/dell. Click Simpana → Dell PowerVault DL Backup To Disk Appliance → Disaster
Recovery.
44
Page 45

Solution Map
Depending on the version of CommVault Simpana software installed on the DL2x00 system, select the appropriate
documentation link at documentation.commvault.com/dell.
Deployment Planning
What do You Want to do? Documents and Resources Available
Learn about system requirements for the DL Backup to
Disk Appliance
Learn about known issues For information about potential issues and workarounds
Learn about supported backup agent requirements Visit documentation.commvault.com/dell. Click Simpana
Learn about pre-installation setup and requirements See Installation Prerequisites.
Determine what type of data can be backed up Visit documentation.commvault.com/dell.
For a list of Dell-supported hardware and software, see
the
Dell PowerVault DL Backup to Disk Appliance
Interoperability Guide
for your Dell PowerVault DL Backup to Disk Appliance,
see the
Dell PowerVault DL2x00 Systems Powered by
CommVault Simpana Release Notes
manuals
→ System Requirements → Backup & Recovery Agents.
For Simpana 8.0, click Simpana → Getting Started →
Install Components.
For Simpana 9.0, click Simpana → Getting Started →
Setup Clients to Manage Data.
.
at support.dell.com/manuals.
at support.dell.com/
6
Setup
What do You Want to do? Documents and Resources Available
Set up the DL Backup to Disk Appliance See Setting Up DL Backup To Disk Appliance or
Dell PowerVault DL Backup to Disk Appliance
DL2x00 system.
Add tape devices to the DL Backup to Disk
Appliance
Manage and monitor the system and storage
hardware
Configure NIC teaming For more information on configuring NIC teaming, see Configuring
For information on adding tapes to your system, see Adding The
Tape Device To The Disk Appliance Console.
For information on monitoring the system for hardware and
software faults and managing storage, see the
Server Administrator User's Guide
Teaming in the
Guide
or Configuring the PowerVault DL2x00 System With NIC
Teaming.
Broadcom NetXtreme II Network Adapter User
at support.dell.com/manuals.
Setting Up Your
supplied with the
Dell OpenManage
45
Page 46

Deployment And Maintenance
What do You Want to do? Documents and Resources Available
Learn more about system requirements for the DL Backup
to Disk Appliance
Learn about supported backup agent requirements Visit documentation.commvault.com/dell.
Learn about known issues For late-breaking information about the DL Backup to Disk
For a list of Dell-supported hardware and software, see
the
Dell PowerVault DL Backup to Disk Appliance
Interoperability Guide
For CommVault Simpana 8.0 software requirements, click
Simpana → System Requirements → Backup & Recovery
Agents.
For CommVault Simpana 9.0 software requirements, click
Simpana → Backup & Recovery Agents.
Appliance and potential issues and workarounds, see the
at support.dell.com/manuals.
Dell PowerVault DL2x00 Systems Powered by CommVault
Simpana Release Notes
Understand the CommVault CommCell architecture
(CommServe system and Media Agent)
Understand the CommVault Simpana software storage
provisioning features for the DL Backup to Disk Appliance
Set up and schedule a disaster recovery solution in
CommVault Simpana
Set up and schedule backup jobs Visit documentation.commvault.com/dell.
Visit documentation.commvault.com/dell. Click Simpana
→ CommCell Overview.
Visit documentation.commvault.com/dell. Click Simpana
→ Dell PowerVault DL Backup To Disk Appliance →
Getting Started.
Visit documentation.commvault.com/dell. Click Simpana
→ Common Technology Engine → Disaster Recovery.
For Simpana 8.0, click Simpana → Getting Started →
Protect Your Data.
For Simpana 9.0, click Simpana → Popular Features → All
Features... → Scheduling.
at support.dell.com/manuals.
View your backup job status Visit documentation.commvault.com/dell. Click Simpana
→ Getting Started → Where to Go from Here → Where to
Go from Here → Schedule Data protection, reports, and
other jobs.
Configure automatic alerting in CommVault Simpana Visit documentation.commvault.com/dell. Click Simpana
→ Getting Started → Where to Go from Here →
Configure Alerts.
Recover the system using disaster recovery See Disaster Recovery.
Add an optional tape library in CommVault Simpana Visit documentation.commvault.com/dell.
For Simpana 8.0, click Simpana → Getting Started →
Configure Libraries and Drives.
For Simpana 9.0, click Simpana → Getting Started →
Configure Storage Devices.
46
Page 47

What do You Want to do? Documents and Resources Available
Understand and set up a media management strategy for
the optional tape library in CommVault Simpana
Recover backup data Visit documentation.commvault.com/dell.
Upgrade the DL Backup to Disk Appliance Software See Updating DL Backup To Disk Appliance Software.
Upgrade the CommVault Simpana backup application Visit documentation.commvault.com/dell. Click Simpana
Deduplication configuration and features Visit documentation.commvault.com/dell.
Configure Data Interface Pairs Visit documentation.commvault.com/dell. Click Simpana
Visit documentation.commvault.com/dell. Click Simpana
→ Common Technology Engine → Media Management.
For Simpana 8.0, click Simpana → Getting Started →
Recover Your Data.
For Simpana 9.0, click Simpana → Popular Features → All
Features... → D → Restore Backup Data.
→ Upgrades.
For Simpana 8.0, click Simpana → Features → Support
Information → Deduplication.
For Simpana 9.0, click Simpana → Popular Features →
Deduplication.
→ Index → N → Network → Data Interface Pairs.
Storage Expansion And Migration
What do You Want to do? Documents and Resources Available
Add a PERC adapter to the PowerVault DL2x00 system See Expansion Cards in the
your Dell PowerVault DL2x00 system at support.dell.com/
manuals.
Also, see the
Dell PERC 6/i, PERC 6/E, PERC H700, PERC
H710, PERC H800, and PERC H810
support.dell.com/manuals.
Add a PowerVault MD1x00 storage enclosure to a newly
installed PERC adapter in the PowerVault DL2x00 system
Add a PowerVault MD1x00 storage enclosure to an
existing PowerVault MD1x00
Add additional disk storage capacity to the
PowerVaultMD1x00 storage enclosure
Incorporate recently added storage into the PowerVault
DL2x00 system
Migrate or copy backup data from one PowerVault DL2x00
system to another
See Setting Up The Hardware.
See Setting Up The Hardware. Also see the
PowerVault MD1x00 Storage Enclosure Hardware
Owner's Manual
See Installing Enclosure Components in the
at support.dell.com/manuals.
PowerVault MD1x00 Storage Enclosure Hardware
Owner's Manual
Visit documentation.commvault.com/dell.
Click Simpana → Dell PowerVault DL Backup to Disk
Appliance → Getting Started → Automatic Disk Group
Configuration.
Visit documentation.commvault.com/dell.
For Simpana 8.0, click Simpana → Dell PowerVault DL
Backup to Disk Appliance → Other Features → Disk
at support.dell.com/manuals.
Hardware Owner's Manual
User's Guides at
Dell
Dell
of
47
Page 48

What do You Want to do? Documents and Resources Available
Management , and type migrate a magnetic library in the
search tool.
For Simpana 9.0, click Simpana → Dell PowerVault DL
Backup to Disk Appliance → Other Features → Disk
Management → Migrate Libraries.
Create an advanced RAID group on the PowerVault
DL2x00 system
See Configuring The Storage Manually.
Troubleshooting And Getting Help
What do You Want to do? Documents and Resources Available
Contact Dell for support Visit support.dell.com or contact your Dell Support
representative.
Recover from a system hardware failure See Disaster Recovery.
Get troubleshooting information for CommVault Simpana
software
Learn about CommVault Simpana software licensing Visit documentation.commvault.com/dell.
Visit documentation.commvault.com/dell, click Simpana
→ Search, and type CommCell Troubleshooting.
Click Simpana → Index → License Administration.
48
Page 49

Additional References
NOTE: Depending on the version of CommVault Simpana software installed on the PowerVault DL2x00, select the
appropriate documentation link at documentation.commvault.com/dell.
Software Documents
Table 6. DL Backup to Disk Appliance Documents
Document Description Location
7
Setting Up Your Dell PowerVault DL Backup to
Disk Appliance
Dell PowerVault DL Backup to Disk Appliance
Interoperability Guide
Dell PowerVault DL2x00 Systems Powered by
CommVault Simpana Release Notes
Table 7. CommVault Simpana Software Documents
Document Description Location
CommVault Simpana Books Online
Helps you set up the appliance
hardware and configure the
software before using the system
for the first time.
Lists the Dell supported hardware
and software compatible with the
appliance.
Contains late-breaking
information about the appliance.
Contains information about setup,
system administration, and
troubleshooting for CommVault
Simpana Backup and Recovery
software.
support.dell.com/manuals (also
supplied with your system)
support.dell.com/manuals
support.dell.com/manuals
documentation.commvault.com/
dell
NOTE: Select the
appropriate documentation
link depending on the
version of CommVault
Simpana software installed
on the PowerVault DL2x00.
Hardware Documents
Document Description Location
Dell PowerVault DL2xxx Getting
Started With Your System
Dell PowerVault DL2000 Hardware
Owner's Manual
Helps you get started with the Dell
PowerVault DL2x00 systems.
Contains information specific to your
Dell hardware.
support.dell.com/manuals
support.dell.com/manuals
49
Page 50

Document Description Location
Dell Serial-Attached SCSI 6/iR
Integrated and Adapter User’s Guide
Dell PERC 6/i, PERC 6/E, and CERC 6/i
User's Guide
Dell PERC H700 and H800 User's Guide Contains information on the PERC
Dell PERC H710 and H810 User's Guide Contains information on the PERC
Dell PowerVault MD1x00 Getting
Started With Your System
Dell PowerVault MD1x00 Storage
Enclosure Hardware Owner's Manual
Dell PowerVault Systems
Compatibility Matrix
Dell PowerVault TL2000/4000 Tape
Library Getting Started Guide
Dell PowerVault TL2000/4000 Tape
Library User’s Guide
Contains information on the Serial
Attached SCSI (SAS) 6/iR adapter.
Contains information on the PERC 6series adapters.
H700 and H800 adapters.
H710 and H810 adapters.
Helps you get started with the Dell
PowerVault MD1x00 storage
enclosure.
Contains information specific to your
Dell PowerVault MD1x00 storage
enclosure.
Contains information on supported
software and hardware for the Dell
PowerVault storage enclosures and
tape library systems.
Contains information on setting up an
optional TL2000/4000 tape library.
Contains information on the optional
TL2000/4000 tape library.
support.dell.com/manuals
support.dell.com/manuals
support.dell.com/manuals
support.dell.com/manuals
support.dell.com/manuals
support.dell.com/manuals
support.dell.com/manuals
support.dell.com/manuals
support.dell.com/manuals
Rack Installation Guide
Dell PowerVault ML6000 Tape Library
User's Guide
Dell PowerVault 122T Autoloader
User's guide
Broadcom NetXtreme II Network
Adapter User Guide
Contains information on installing the
system in a rack.
Contains information on the optional
ML6000 tape library.
Contains information on the optional
122T autoloader.
Contains information on configuring
and diagnosing Broadcom NICs.
support.dell.com/manuals
support.dell.com/manuals
support.dell.com/manuals
support.dell.com/manuals
Systems Management Documents
Document Description Location
Dell OpenManage Software
Installation and Security User's Guide
Dell OpenManage Server
Administrator User's Guide
Describes how to install the Dell
OpenManage Server Administrator
software.
Describes how to use the
OpenManage Server Administrator to
manage your system.
support.dell.com/manuals
support.dell.com/manuals
50
Page 51

Document Description Location
Dell Unified Server Configurator and
Unified Server Configurator - Lifecycle
Controller Enabled User Guide
Dell OpenManage Server Update
Utility User's Guide
Dell Update Packages for Microsoft
Windows Operating Systems User's
Guide
Dell Management Console User's
Guide
Dell OpenManage IT Assistant
Integrated Dell Remote Access
Controller 7 (iDRAC7) User's Guide
Dell Management Pack for Microsoft
System Center Operations Manager
2007 User's Guide
Describes how to deploy an Operating
System, run diagnostics, and apply
updates to the system.
Describes how to use the Server
Update Utility to update system
software.
Describes how to use Dell Update
Packages to update individual devices
on your system.
Describes how to install and use the
Dell Management Console to remotely
manage the DL Backup to Disk
Appliance.
Contains information on how to install
and use IT Assistant for centralized
management of the system.
Describes iDRAC7, which monitors
your system and can be used for
remote access.
Describes how to manage your
PowerVault system using Microsoft
System Center Operations Manager
2007.
support.dell.com/manuals
support.dell.com/manuals
support.dell.com/manuals
support.dell.com/manuals
support.dell.com/manuals
support.dell.com/manuals
support.dell.com/manuals
Dell Management Pack for Microsoft
Operations Manager User's Guide
Describes how to manage your
PowerVault system using Microsoft
Operations Manager 2005.
support.dell.com/manuals
DL Backup To Disk Appliance Media
CD/DVD Media Description Location
Dell Systems Build and Update Utility
DVD (DL2000 only)
Dell OpenManage Management
Station
Dell Systems Management Tools and
Documentation DVD
Dell Systems Build and Update Utility
is a bootable utility for server
Operating System install, pre-OS
firmware updates and pre-OS system
configuration.
Contains IT Assistant, BMC
management utility, Dell remote
Access controller console, and the
Microsoft Active Directory Snap-in
utility.
A DVD that includes OpenManage
Server Administrator, Dell Online
Diagnostics, and documentation.
Supplied with the DL2000 (disk image
can also be downloaded from
support.dell.com/support/downloads)
support.dell.com/support/downloads
Supplied with your system (disk image
can also be downloaded from
support.dell.com/support/downloads)
51
Page 52

CD/DVD Media Description Location
Dell Management Console
CommVault Simpana software
installation media
Microsoft Windows Server 2008
Standard x64 Edition
or
Microsoft
Windows Server 2008 R2
DVD containing the installation
software and documentation for the
Dell Management Console.
Contains setup files for the
CommVault Simpana software.
Contains setup files for your operating
system.
Supplied with your system (disk image
can also be downloaded from
support.dell.com/support downloads)
Supplied with your system
Supplied with your system
52
 Loading...