

Page 1

Dell PowerEdge R515 Systems
Getting Started
With Your System
Začínáme se systémem
Guide de mise en route
Erste Schritte mit dem System
Τα πρώτα βήµατα µε το σύστηµά σας
Rozpoczęcie pracy z systemem
Начало работы с системой
Procedimientos iniciales con el sistema
Sisteminizi Kullanmaya Başlarken
תכרעמה םע הדובעה תליחת
Page 2

Page 3

Dell PowerEdge R515 Systems
Getting Started
With Your System
Regulatory Model E12S Series and E13S Series
Page 4

Notes, Cautions, and Warnings
NOTE: A NOTE indicates important information that helps you make better use of
your computer.
CAUTION: A CAUTION indicates potential damage to hardware or loss of data if
instructions are not followed.
WARNING: A WARNING indicates a potential for property damage, personal
injury, or death.
____________________
Information in this publication is subject to change without notice.
© 2010 Dell Inc. All rights reserved.
Reproduction of these materials in any manner whatsoever without the written permission of Dell Inc.
is strictly forbidden.
Trademarks used in this text: Dell™, the DELL logo, and PowerEdge™ are trademarks of Dell Inc.
®
is a registered trademark of Advanced Micro Devices, Inc. Microsoft®, Windows®, and
AMD
Windows Server
United States and/or other countries. Red Hat Enterprise Linux
trademarks of Red Hat, Inc. in the United States and/or other countries. Novell
registered trademarks of Novell Inc. in the United States and other countries. Citrix
XenServer
and/or other countries.
Other trademarks and trade names may be used in this publication to refer to either the entities claiming
the marks and names or their products. Dell Inc. disclaims any proprietary interest in trademarks and
trade names other than its own.
®
are either trademarks or registered trademarks of Microsoft Corporation in the
®
are either registered trademarks or trademarks of Citrix System, Inc. in the United States
®
and Enterprise Linux® are registered
®
and SUSE® are
®
, Xen®, and
Regulatory Model E12S Series and E13S Series
June 2010 P/N 9V9CK Rev. A00
Page 5
Installation and Configuration
WARNING: Before performing the following procedure, review the safety
instructions that came with the system.
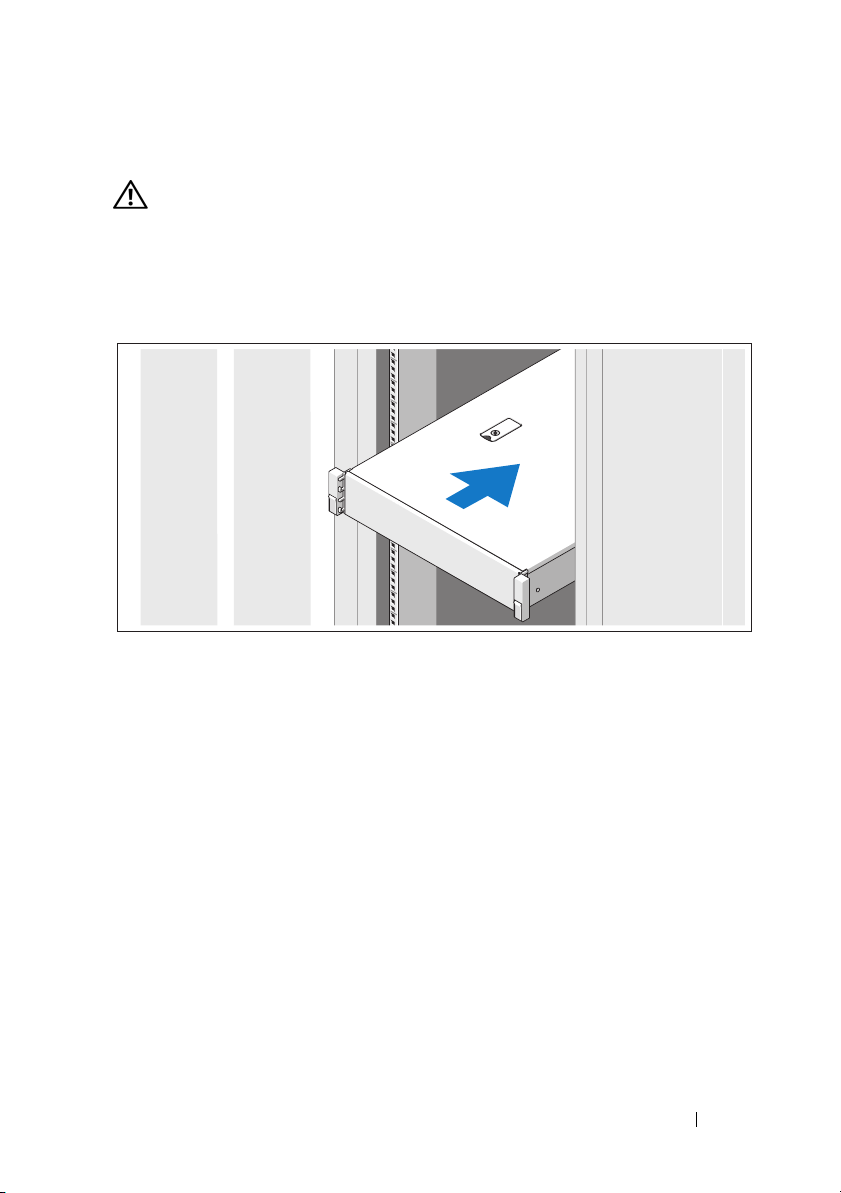
Unpacking the System
Unpack your system and identify each item.
Assemble the rails and install the system in the rack following the safety
instructions and the rack installation instructions provided with your system.
Getting Started With Your System 3
Page 6

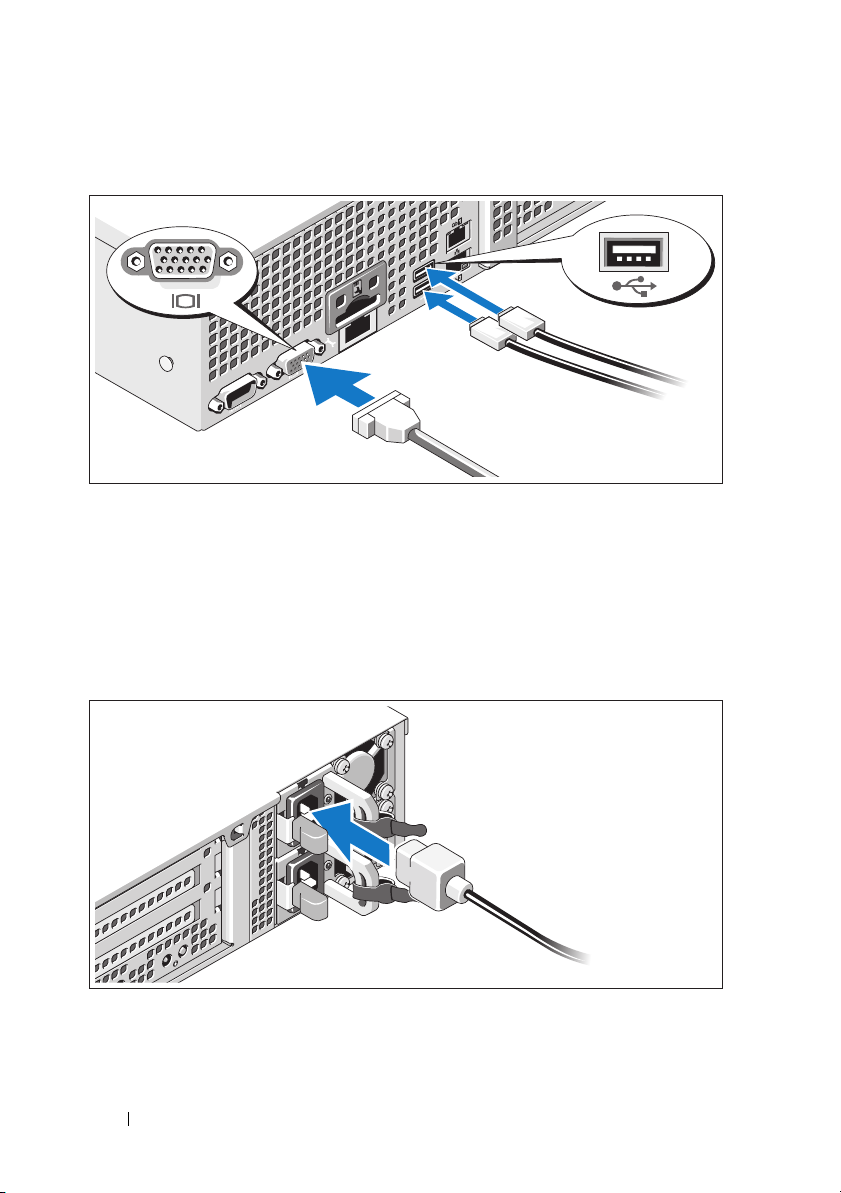
Optional – Connecting the Keyboard, Mouse, and Monitor
Connect the keyboard, mouse, and monitor (optional).
The connectors on the back of your system have icons indicating which cable
to plug into each connector. Be sure to tighten the screws (if any) on the
monitor's cable connector.
Connecting the Power Cable(s)
Connect the system’s power cable(s) to the system and, if a monitor is used,
connect the monitor’s power cable to the monitor.
4 Getting Started With Your System
Page 7
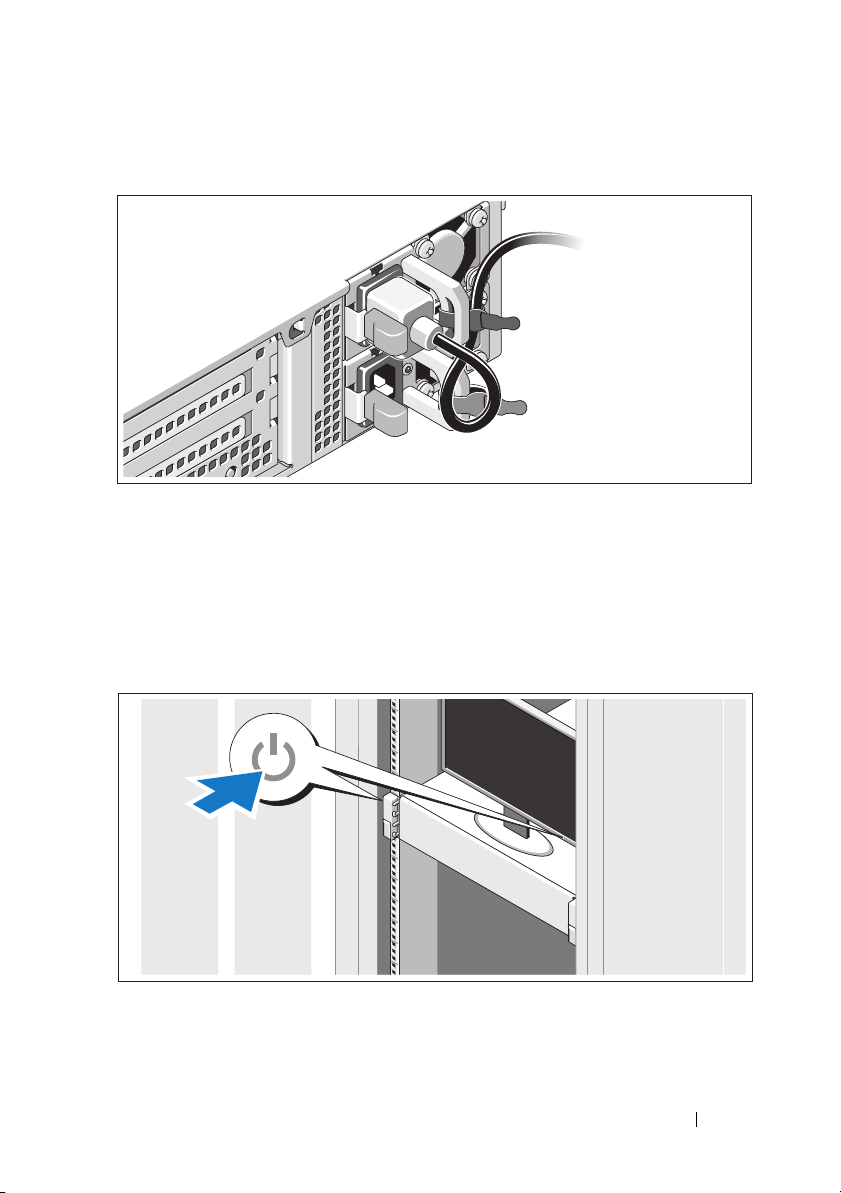
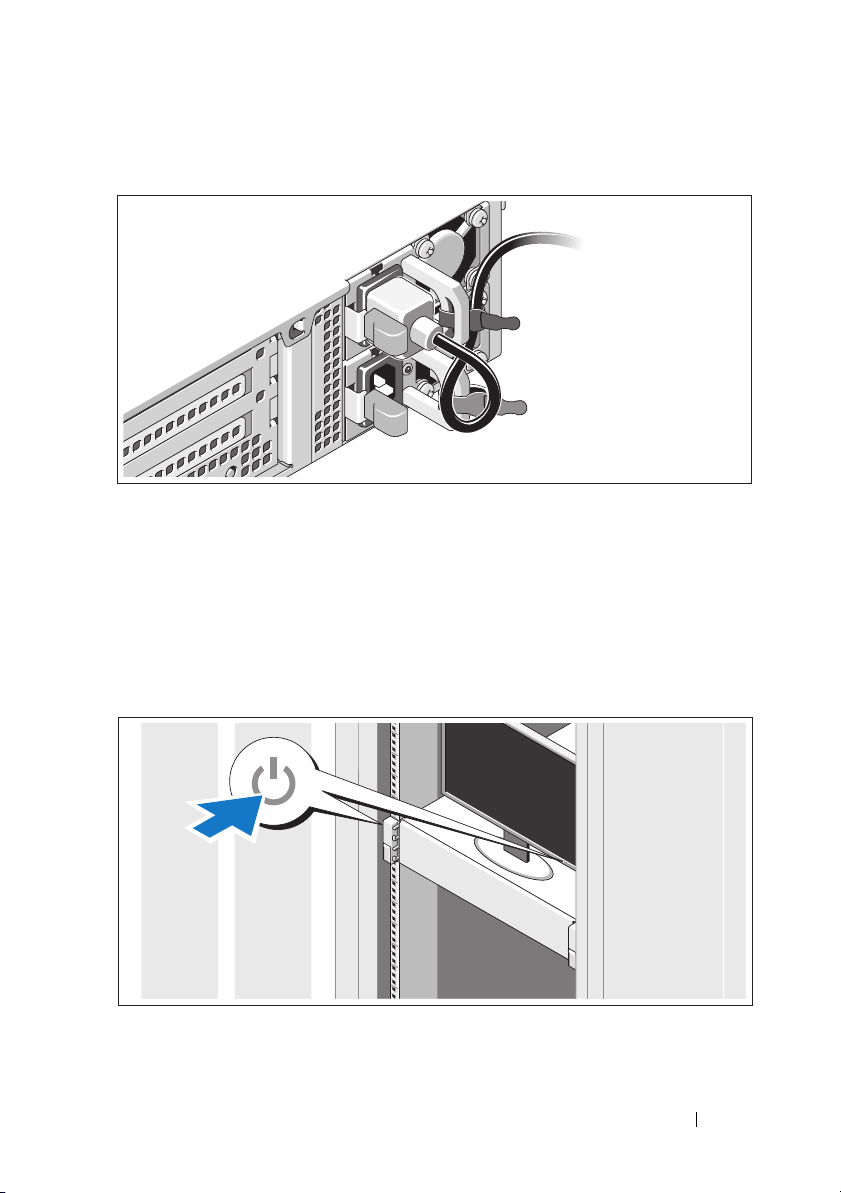
Securing the Power Cable(s)
Bend the system power cable into a loop as shown in the illustration and secure
the cable to the bracket using the provided strap. Plug the other end of the
power cable into a grounded electrical outlet or a separate power source such as
an uninterrupted power supply (UPS) or a power distribution unit (PDU).
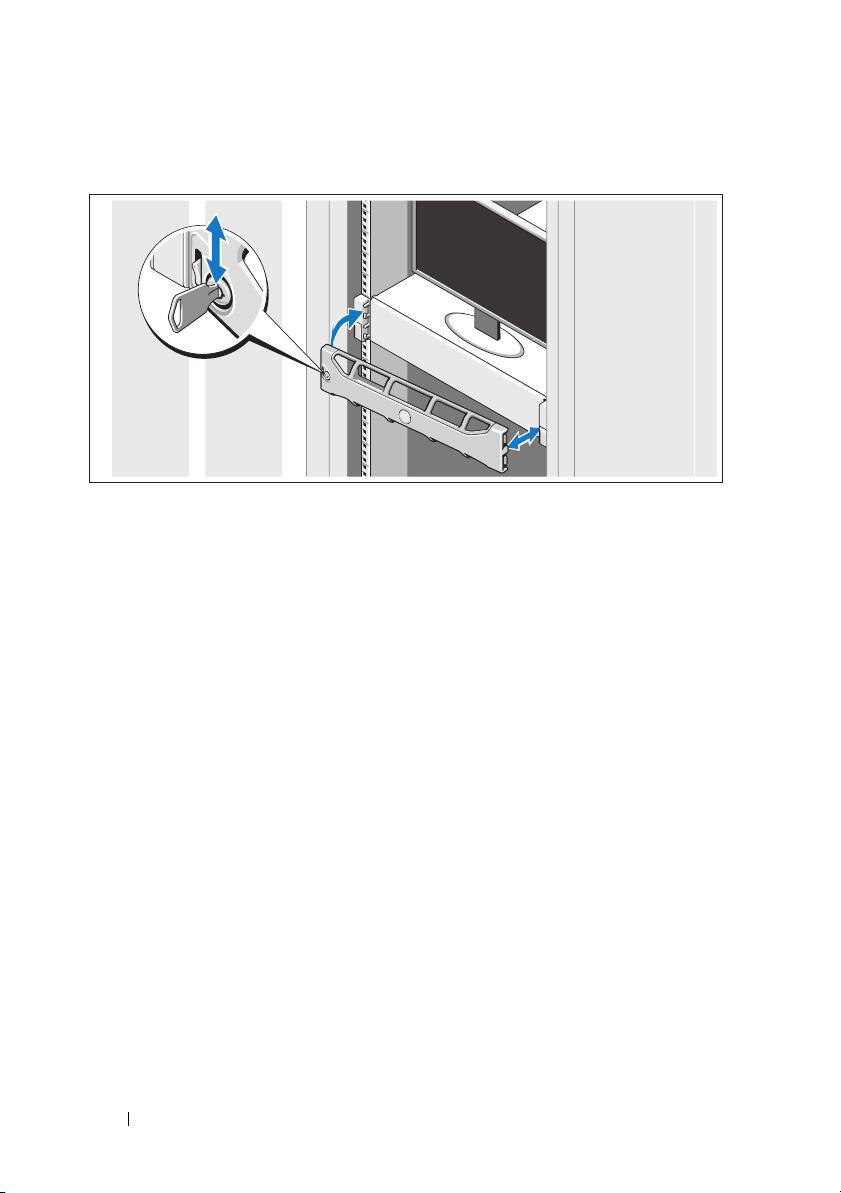
Turning On the System
Press the power button on the system and the monitor. The power indicators
should light.
Getting Started With Your System 5
Page 8
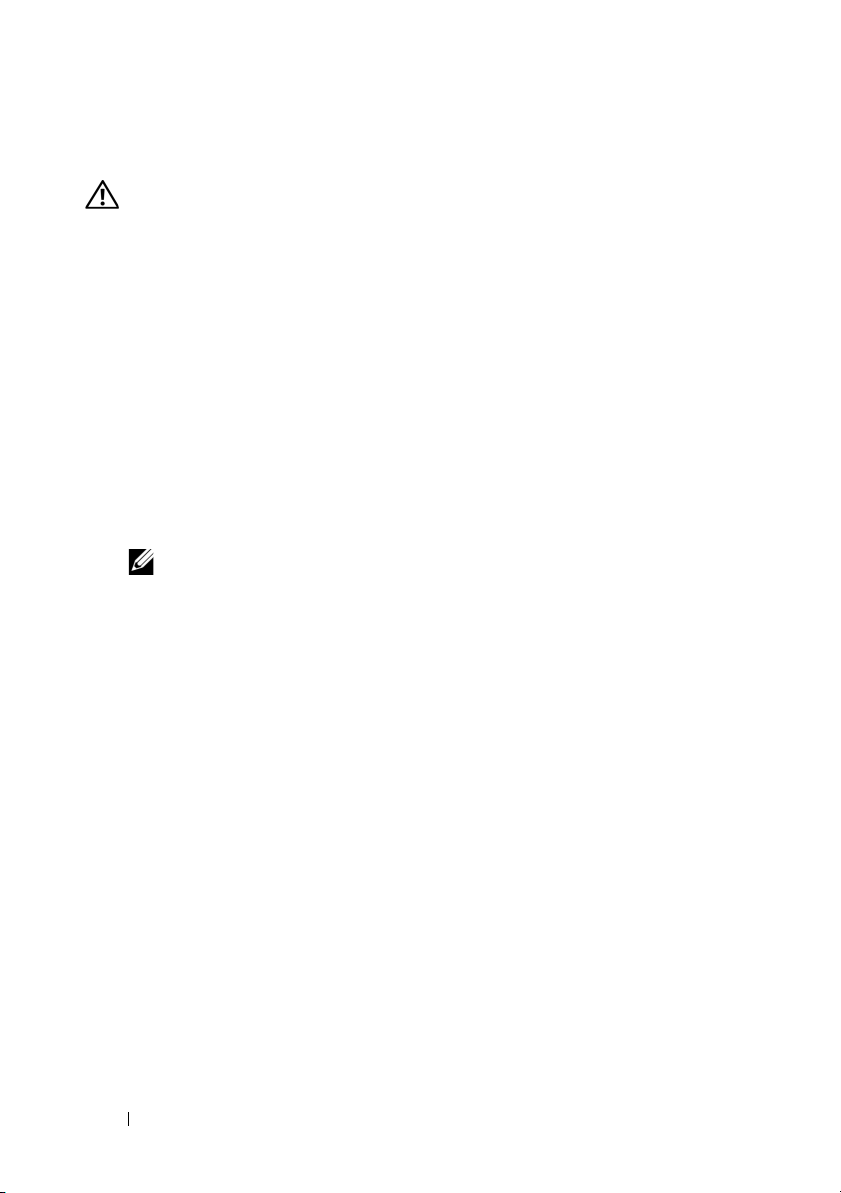
Installing the Optional Bezel
Install the bezel (optional).
Complete the Operating System Setup
If you purchased a preinstalled operating system, see the operating system
documentation that ships with your system. To install an operating system for
the first time, see the installation and configuration documentation for your
operating system. Be sure the operating system is installed before installing
hardware or software not purchased with the system.
6 Getting Started With Your System
Page 9

Supported Operating Systems
NOTE: For twelve–hard-drive systems with additional internal hard drives, it is
recommended that you install the operating system on the internal hard drives
in a RAID 1 configuration.
• Microsoft Windows Server 2008 SP2 Web, Standard, and Enterprise (x86)
Editions
• Microsoft Windows Server 2008 SP2 Web, Standard, Enterprise,
and Datacenter (x64) Editions
• Microsoft Windows Server 2008 R2 Web, Standard, Enterprise,
and Datacenter (x64) Editions
• Windows Small Business Server 2008 R2 (x64) Standard and
Premium Editions
• Microsoft Windows Server 2008 R2 HPC (x64) Edition
• Microsoft Windows Server 2008 SP2 HPC (x64) Edition
• Red Hat Enterprise Linux 5.5 Standard (x86_64),
Advanced Platform (x86_64), and HPC Editions
• SUSE Linux Enterprise Server 11 SP1 (x86_64)
• SUSE Linux Enterprise Server 10 SP3 (x86_64)
• VMware ESX 4.0 Update 2 Classic Edition
• VMware ESXi 4.0 Update 2 Installable Edition
• VMware ESX 4.1 Classic Edition
• VMware ESXi 4.1 Installable Edition
• Citrix XenServer 5.6 Enterprise Edition
• Microsoft Hyper-V Windows Server 2008 R2 (stand-alone)
• Microsoft Windows Server 2008 R2 Hyper-V role
NOTE: For the latest information on supported operating systems,
see support.dell.com.
Getting Started With Your System 7
Page 10
Other Information You May Need
WARNING: See the safety and regulatory information that shipped with
your system. Warranty information may be included within this document or
as a separate document.
• The rack documentation included with your rack solution describes
how to install your system into a rack.
•The
• Any media that ships with your system that provides documentation
Hardware Owner’s Manual
features and describes how to troubleshoot the system and install or
replace system components. This document is available online at
support.dell.com/manuals
and tools for configuring and managing your system, including those
pertaining to the operating system, system management software,
system updates, and system components that you purchased
with your system.
NOTE: Always check for updates on support.dell.com/manuals and read the
updates first because they often supersede information in other documents.
provides information about system
.
Obtaining Technical Assistance
If you do not understand a procedure in this guide or if the system does
not perform as expected, see your Hardware Owner’s Manual. Dell offers
comprehensive hardware training and certification. See dell.com/training for
more information. This service may not be offered in all locations.
8 Getting Started With Your System
Page 11

Technical Specifications
Processor
Processor type Up to two AMD Opteron 4100 processors
Expansion Bus
Bus type PCI Express Generation 2
Expansion slots using riser cards
NOTE: Depending on the configuration, your system may have either riser 1 or riser 2.
Riser 1
OR
Riser 2
Memory
Architecture 1333 MHz DDR3 registered or
Memory module sockets Eight 240-pin
Memory module capacities 1 GB, 2 GB, 4 GB, or 8 GB
Minimum RAM 1 GB with a single processor (1 DIMM
Maximum RAM 64 GB (8 GB dual-rank DIMMs)
Slot 1: PCIe x4, half-length, full-height
Slot 2: PCIe x4, full-length, full-height
Slot 3: PCIe x8, half-length, full-height
Slot 4: PCIe x4, internal slot for integrated card
NOTE: All four slots are x8 connectors.
Slot 1: PCIe x16, full-length, full-height
Slot 2: PCIe x4, internal for integrated card
NOTE: A General Purpose Computation on
Graphics Processing Units (GPGPU) optimized
configuration is available on riser 2.
unbuffered Error Correcting Code (ECC)
DIMMs
per processor)
128 GB (16 GB quad-rank DIMMs)
(when available)
Getting Started With Your System 9
Page 12

Drives
Hard drives
Eight–hard-drive systems
Up to eight 3.5" or 2.5", hot-swappable SAS,
SATA, or SSD drives
Twelve–hard-drive systems
Up to twelve 3.5" or 2.5", hot-swappable SAS,
SATA, or SSD drives and up to two cabled
2.5" SAS or SSD drives
NOTE: For twelve–hard-drive systems with
additional internal hard drives, it is
recommended that you install the operating
system on the internal hard drives in a RAID 1
configuration.
Optical drive Optional internal slim-line SATA DVD-ROM
or DVD+/-RW
Optional external USB DVD-ROM
NOTE: Twelve–hard-drive systems support
only an external USB DVD-ROM.
Connectors
Back
NIC
Serial
USB
Video
Front
Video
USB
Internal
USB
Two RJ-45 (for integrated 1-GB NICs)
9-pin, DTE, 16550-compatible
Two 4-pin, USB 2.0-compliant
15-pin VGA
15-pin VGA
Two 4-pin, USB 2.0-compliant
Two 4-pin, USB 2.0-compliant
Video
Video type Matrox G200, integrated in the BMC
Video memory 8 MB
10 Getting Started With Your System
Page 13

Power
AC power supply (per power supply)
Wattage
Vo lt ag e
Heat dissipation
Eight–hard-drive systems
Twelve–hard-drive systems
Maximum inrush current
Batteries
System battery
Physical
Height
Eight– hard-drive systems
Twelve–hard-drive systems
Width
Eight–hard-drive systems
Twelve–hard-drive systems
Depth
Eight–hard-drive systems
Twelve–hard-drive systems
Weight (maximum configuration)
Eight–hard-drive systems
Twelve–hard-drive systems
Weight (empty)
Eight–hard-drive systems
Twelve–hard-drive systems
750 W (optional redundant power supply)
100–240 VAC, autoranging, 50–60 Hz
2200 BTU/hr maximum
2450 BTU/hr maximum
Under typical line conditions and over the
entire system ambient operating range,
the inrush current may reach 55 A per
power supply for 10 ms or less.
CR 2032 3.0-V lithium ion coin cell
8.64 cm (3.4 in)
8.67 cm (3.42 in)
43.66 cm (17.19 in)
44.52 cm (17.53 in)
61.02 cm (24.09 in)
66.46 cm (26.17 in)
22.5 kg (49.5 lbs)
29.0 kg (63.8 lbs)
13.5 kg (29.7 lbs)
15.85 kg (34.87 lbs)
Getting Started With Your System 11
Page 14

Environmental
NOTE: For additional information about environmental measurements for specific
system configurations, see www.dell.com/environmental_datasheets.
Temperature
Operating
10° to 35°C (50° to 95°F) with a maximum
temperature gradation of 10°C per hour
NOTE: For altitudes above 2950 feet,
the maximum operating temperature is
derated 1ºF/550 ft.
Storage
Relative humidity
Operating
Storage
Maximum vibration
Operating
Storage
Maximum shock
Operating
Storage
–40° to 65°C (–40° to 149°F) with a
maximum temperature gradation
of 20°C per hour
20% to 80% (noncondensing) with
a maximum humidity gradation
of 10% per hour
5% to 95%, maximum humidity gradation
of 10% per hour.
0.26 G at 5–350 Hz for 15 min
1.87 G at 10–500 Hz for 15 min
One shock pulse in the positive z axis
(one pulse on each side of the system) of
31 G for 2.6 ms in the operational orientation
Six consecutively executed shock pulses in
the positive and negative x, y, and z axes
(one pulse on each side of the system)
of 71 G for up to 2 ms, and Square Wave
32G, 270in/sec
12 Getting Started With Your System
Page 15

Environmental (continued)
Altitude
Operating
Storage
Airborne Contaminant Level
Class
–16 to 10,668 m (-50 to 35,000 ft)
NOTE: For altitudes above 2950 feet,
the maximum operating temperature
is derated 1ºF/550 ft.
–16 to 10,600 m (–50 to 35,000 ft)
G1 or lower as defined by ISA-S71.04-1985
Getting Started With Your System 13
Page 16

14 Getting Started With Your System
Page 17

Systémy Dell PowerEdge R515
Začínáme se
systémem
Regulatorní model řady E12S a řady E13S
Page 18

Poznámky a upozornění
POZNÁMKA: POZNÁMKA označuje důležité informace, které pomáhají
lepšímu využití počítače.
UPOZORNĚNÍ: UPOZORNĚNÍ poukazuje na možnost poškození
hardwaru nebo ztráty dat v případě nedodržení pokynů.
VAROVÁNÍ: VAROVÁNÍ upozorňuje na potenciální nebezpečí
poškození majetku, úrazu nebo smrti.
____________________
Informace v této publikaci se mohou bez předchozího upozornění změnit.
© 2010 Dell Inc. Všechna práva vyhrazena.
Jakákoli reprodukce těchto materiálů bez písemného povolení společnosti Dell Inc. je přísně zakázána.
Ochranné známky použité v tomto textu: Dell™, logo DELL a PowerEdge™ jsou ochranné známky
společnosti Dell Inc. AMD
Devices, Inc. Microsoft
ochranné známky společnosti Microsoft Corporation v USA a dalších zemích. Red Hat Enterprise
®
a Enterprise Linux® jsou registrované ochranné známky společnosti Red Hat, Inc. v USA a
Linux
dalších zemích. Novell
a dalších zemích. Citrix
známky společnosti Citrix System, Inc. v USA a dalších zemích.
V této publikaci mohou být použity další ochranné známky a obchodní názvy s odkazem na společnosti
vlastnící tyto známky a názvy nebo na jejich produkty. Společnost Dell Inc. nemá vlastnické zájmy
vůči ochranným známkám a obchodním názvům jiným než svým vlastním.
®
je registrovaná ochranná známka společnosti Advanced Micro
®
, Windows® a Windows Server® jsou ochranné známky nebo registrované
®
a SUSE® jsou registrované ochranné známky společnosti Novell Inc. v USA
®
, Xen® a XenServer® jsou registrované ochranné známky nebo ochranné
Regulatorní model řady E12S a řady E13S
Červen 2010 Č. dílu 9V9CK Rev. A00
Page 19

Instalace a konfigurace
VAROVÁNÍ: Před provedením následujícího postupu si prostudujte
bezpečnostní pokyny dodané se systémem.
Rozbalení systému
Rozbalte systém a identifikujte jeho jednotlivé součásti.
Sestavte kolejničky a nainstalujte systém do stojanu podle bezpečnostních pokynů
a pokynů k instalaci do stojanu dodaných se systémem.
Začínáme se systémem 17
Page 20
Volitelné – Připojení klávesnice, myši a monitoru
Připojte klávesnici, myš a monitor (volitelné).
Konektory na zadní straně systému mají ikony znázorňující, který kabel se má
připojit ke kterému konektoru. Zajistěte, aby šroubky na konektoru kabelu
monitoru byly dobře dotaženy (je-li jimi konektor vybaven).
Připojení napájecích kabelů
Připojte napájecí kabely k systému, a pokud používáte monitor, připojte napájecí
kabel také k monitoru.
18 Začínáme se systémem
Page 21
Zajištění napájecích kabelů
Ohněte napájecí kabel systému do smyčky, jak je znázorněno na obrázku, a
připevněte jej dodanou páskou k držáku. Poté zasuňte druhý konec napájecího
kabelu do uzemněné elektrické zásuvky nebo jej připojte k samostatnému zdroji
napájení, například ke zdroji nepřerušitelného napájení (UPS) nebo jednotce
rozvaděče (PDU).
Zapnutí systému
Stiskněte vypínač na systému a na monitoru. Indikátory napájení by se měly
rozsvítit.
Začínáme se systémem 19
Page 22

Instalace volitelného čelního krytu
Nainstalujte čelní kryt (volitelný).
Dokončení nastavení operačního systému
Pokud jste zakoupili předinstalovaný operační systém, prostudujte dokumentaci k
operačnímu systému dodanou se systémem. Chcete-li provést první instalaci
operačního systému, postupujte podle dokumentace k instalaci a konfiguraci
operačního systému. Než začnete s instalací hardwaru či softwaru, který nebyl
zakoupen společně se systémem, ujistěte se, že je nainstalován operační systém.
20 Začínáme se systémem
Page 23

Podporované operační systémy
POZNÁMKA: U systémů s dvanácti pevnými disky s přídavnými interními
pevnými disky se doporučuje nainstalovat operační systém na interní
pevné disky v konfiguraci RAID 1.
•
Microsoft Windows Server 2008 SP2, edice Web, Standard a Enterprise
(x86)
•
Microsoft Windows Server 2008 SP2, edice Web, Standard, Enterprise
a Datacenter (x64)
•
Microsoft Windows Server 2008 R2, edice Web, Standard, Enterprise
a Datacenter (x64)
•
Windows Small Business Server 2008 R2 (x64), edice Standard a Premium
•
Microsoft Windows Server 2008 R2 HPC (x64)
•
Microsoft Windows Server 2008 SP2 HPC (x64)
•
Red Hat Enterprise Linux 5.5, edice Standard (x86_64),
Advanced Platform (x86_64) a HPC
•
SUSE Linux Enterprise Server 11 SP1 (x86_64)
•
SUSE Linux Enterprise Server 10 SP3 (x86_64)
•
VMware ESX 4.0, aktualizace 2, klasická edice
•
VMware ESXi 4.0, aktualizace 2, instalovatelná edice
•
VMware ESX 4.1, klasická edice
•
VMware ESXi 4.1, instalovatelná edice
•
Citrix XenServer 5.6, edice Enterprise
•
Microsoft Hyper-V Windows Server 2008 R2 (samostatný)
•
Microsoft Windows Server 2008 R2 s rolí Hyper-V
POZNÁMKA: Nejnovější informace o podporovaných operačních
systémech naleznete na webu support.dell.com.
Začínáme se systémem 21
Page 24

Další užitečné informace
VAROVÁNÍ: Prostudujte si informace o bezpečnosti a předpisech,
které byly dodány se systémem. Informace o záruce jsou součástí
tohoto dokumentu nebo jsou přiloženy samostatně.
•
Pokyny k instalaci do stojanu dodané se stojanovým řešením popisují
instalaci systému do stojanu.
•
Příručka majitele hardwaru
popisuje řešení problémů se systémem a instalaci nebo výměnu komponent.
Tento dokument je k dispozici online na adrese
•
Média dodaná se systémem obsahují dokumentaci a nástroje pro konfiguraci
a správu systému. Mohou být dodána například média týkající se operačního
systému, softwaru pro správu systému, aktualizací systému a komponent
zakoupených se systémem.
POZNÁMKA: Vždy nejprve zkontrolujte a pročtěte aktualizace
uvedené na adrese support.dell.com/manuals, protože tyto
aktualizace často nahrazují informace v ostatních dokumentech.
obsahuje informace o funkcích systému a
support.dell.com/manuals
Odborná pomoc
Nerozumíte-li některému z postupů popsaných v této příručce nebo nepracuje-li
systém podle očekávání, nahlédněte do
Dell nabízí v souvislosti s hardwarem kompletní školení a certifikaci. Další
informace naleznete na webových stránkách
nemusí být nabízena ve všech regionech.
Příručky majitele hardwaru
dell.com/training
. Tato služba
. Společnost
.
22 Začínáme se systémem
Page 25

Technické specifikace
Procesor
Typ procesoru Až dva procesory AMD Opteron 4100
Rozšiřovací sběrnice
Typ sběrnice PCI Express 2. generace
Rozšiřovací sloty na zvedacích kartách
POZNÁMKA: V závislosti na konfiguraci bude systém vybaven zvedací
kartou 1 nebo zvedací kartou 2.
Zvedací karta 1
NEBO
Zvedací karta 2
Pamět’
Architektura Pamět’ové moduly DIMM s taktovací frekvencí
Sloty pro pamět’ové moduly Osm 240kolíkových
Kapacity pamět’ových modulů 1 GB, 2 GB, 4 GB nebo 8 GB
Minimum paměti RAM 1 GB s jedním procesorem (1 modul DIMM
Maximum paměti RAM 64 GB (duální moduly DIMM po 8 GB)
Slot 1: PCIe x4, poloviční délka, plná výška
Slot 2: PCIe x4, plná délka, plná výška
Slot 3: PCIe x8, poloviční délka, plná výška
Slot 4: PCIe x4, interní slot pro integrovanou kartu
POZNÁMKA: Všechny čtyři sloty mají
konektory x8.
Slot 1: PCIe x16, plná délka, plná výška
Slot 2: PCIe x4, interní pro integrovanou kartu
POZNÁMKA: Na zvedací kartě 2 je k
dispozici konfigurace optimalizovaná pro
provádění obecných výpočtů grafickým
procesorem (GPGPU).
1333 MHz, typ DDR3, registrované nebo bez
vyrovnávací paměti, s ochranou ECC
na každý procesor)
128 GB (kvadrální moduly DIMM po 16 GB)
(jakmile budou k dispozici)
Začínáme se systémem 23
Page 26

Jednotky
Pevné disky
Systémy s osmi pevnými disky
Až osm 3,5palcových nebo 2,5palcových disků
SAS, SATA nebo SSD vyměnitelných za
provozu
Systémy s dvanácti pevnými disky
Až dvanáct 3,5palcových nebo 2,5palcových
disků SAS, SATA nebo SSD vyměnitelných za
provozu a až dva 2,5palcové disky SAS nebo
SSD připojené kabelem
POZNÁMKA: U systémů s dvanácti
pevnými disky s přídavnými interními
pevnými disky se doporučuje nainstalovat
operační systém na interní pevné disky v
konfiguraci RAID 1.
Optická jednotka Volitelná interní jednotka SATA DVD-ROM
nebo DVD+/-RW (slim-line)
Volitelná externí jednotka USB DVD-ROM
POZNÁMKA: Systémy s dvanácti
pevnými disky podporují pouze externí
jednotku USB DVD-ROM.
24 Začínáme se systémem
Page 27

Konektory
Vzadu
Sít’ové Dva konektory RJ-45 (pro integrované sít’ové
karty 1 Gb/s)
Sériový 9kolíkový, DTE, kompatibilní s normou 16550
USB Dva 4kolíkové, USB 2.0
Video 15kolíkový VGA
Vpředu
Video 15kolíkový VGA
USB Dva 4kolíkové, USB 2.0
Interní
USB Dva 4kolíkové, USB 2.0
Video
Typ grafiky Karta Matrox G200, integrovaná v řadiči BMC
Grafická pamět’ 8 MB
Napájení
Střídavý proud (na jeden napájecí zdroj)
Výkon 750 W (volitelný záložní napájecí zdroj)
Napětí 100–240 V stř., automatické stanovení rozsahu,
50–60 Hz
Odvod tepla
Systémy s osmi pevnými disky
Systémy s dvanácti pevnými disky
Maximální nárazový proud V typických podmínkách napájení a v celém
Baterie
Systémová baterie Lithium-iontová knoflíková baterie
Maximálně 2200 BTU/hod.
Maximálně 2450 BTU/hod.
provozním rozsahu systému může nárazový
proud dosáhnout 55 A na jeden napájecí zdroj po
dobu 10 ms nebo méně.
CR 2032 3,0 V
Začínáme se systémem 25
Page 28

Rozměry
Výška
Systémy s osmi pevnými disky
Systémy s dvanácti pevnými disky
Šířka
Systémy s osmi pevnými disky
Systémy s dvanácti pevnými disky
Hloubka
Systémy s osmi pevnými disky
Systémy s dvanácti pevnými disky
Hmotnost (maximální konfigurace)
Systémy s osmi pevnými disky
Systémy s dvanácti pevnými disky
Hmotnost (prázdné)
Systémy s osmi pevnými disky
Systémy s dvanácti pevnými disky
Prostředí
8,64 cm
8,67 cm
43,66 cm
44,52 cm
61,02 cm
66,46 cm
22,5 kg
29,0 kg
13,5 kg
15,85 kg
POZNÁMKA: Další informace o měřených údajích prostředí najdete pro
jednotlivé systémové konfigurace na adrese
www.dell.com/environmental_datasheets.
Teplota
Provozní 10 až 35 °C s maximálním nárůstem teploty o
10 °C za hodinu
POZNÁMKA: V nadmořských výškách
nad 900 metrů je maximální provozní
teplota snížena o 1 °C na každých
300 metrů.
Skladovací -40 až 65 °C s maximálním nárůstem teploty o
20 °C za hodinu
26 Začínáme se systémem
Page 29

Prostředí (Pokračování)
Relativní vlhkost
Provozní 20 až 80 % (bez kondenzace) s maximálním
nárůstem vlhkosti o 10 % za hodinu
Skladovací 5 až 95 % s maximálním nárůstem vlhkosti o
10 % za hodinu
Maximální vibrace
Provozní 0,26 g při 5–350 Hz po dobu 15 minut
Skladovací 1,87 g při 10–500 Hz po dobu 15 minut
Maximální ráz
Provozní Jeden rázový impuls v kladné ose z (jeden
impuls na každé straně systému) o síle 31 G
v délce do 2,6 ms v provozní orientaci
Skladovací Šest po sobě jdoucích rázových impulsů v
kladné i záporné ose x, y a z (jeden impuls na
každé straně systému) o síle 71 G v délce do 2
ms, impuls s průběhem sladěné obdélníkové
vlny o síle 32 G se změnou rychlosti 6,86 m/s
Nadmořská výška
Provozní -16 až 10 668 m
POZNÁMKA: V nadmořských výškách
nad 900 metrů je maximální provozní
teplota snížena o 1 °C na každých
300 metrů.
Skladovací -16 až 10 600 m
Úroveň uvolňování znečišt’ujících látek do vzduchu
Třída G1 nebo nižší dle normy ISA-S71.04-1985
Začínáme se systémem 27
Page 30

28 Začínáme se systémem
Page 31

Systèmes Dell
PowerEdge R515
Guide de mise en route
Modèle réglementaire séries E12S et E13S
Page 32

Remarques, précautions et avertissements
REMARQUE : Une REMARQUE indique des informations importantes qui peuvent
vous aider à mieux utiliser votre ordinateur.
PRÉCAUTION : Une PRÉCAUTION vous avertit d'un risque de dommage matériel
ou de perte de données en cas de non-respect des instructions données.
AVERTISSEMENT: Un AVERTISSEMENT indique un risque d'endommagement
du matériel, de blessures corporelles ou même de mort.
____________________
Les informations contenues dans ce document sont sujettes à modification sans préavis.
© 2010 Dell Inc. tous droits réservés.
La reproduction de ce document de quelque manière que ce soit sans l'autorisation écrite de Dell Inc.
est strictement interdite.
Marques utilisées dans ce document : Dell™, le logo DELL et PowerEdge™ sont des marques de
Dell Inc. AMD
Windows Server
Unis et/ou dans d'autres pays. Red Hat Enterprise Linux
déposées de Red Hat, Inc. aux États-Unis et/ou dans d'autres pays. Novell
déposées de Novell, Inc. aux États-Unis et dans d'autres pays. Citrix
marques déposées ou des marques de Citrix Systems, Inc. aux États-Unis et/ou dans d'autres pays.
D'autres marques commerciales et noms de marque peuvent être utilisés dans ce document pour faire
référence aux entités se réclamant de ces marques et de ces noms ou de leurs produits. Dell Inc. rejette
tout intérêt propriétaire dans les marques et les noms commerciaux autres que les siens.
®
est une marque déposée d'Advanced Micro Devices, Inc. Microsoft®, Windows® et
®
sont des marques ou des marques déposées de Microsoft Corporation aux États-
®
et Enterprise Linux® sont des marques
®
et SUSE® sont des marques
®
, Xen® et XenServer® sont des
Modèle réglementaire séries E12S et E13S
Juin 2010 N/P 9V9CK Rév. A00
Page 33

Installation et configuration
AVERTISSEMENT: avant d'exécuter la procédure ci-dessous,
lisez les consignes de sécurité fournies avec le système.
Déballage du système
Sortez le système de son emballage et identifiez chaque élément.
Assemblez les rails et installez le système dans le rack en suivant les consignes
de sécurité et les instructions d'installation du rack fournies avec votre
système.
Guide de mise en route 31
Page 34

Facultatif – Connexion du clavier, de la souris et du moniteur
Connectez le clavier, la souris et le moniteur (en option).
Aidez-vous des icônes des connecteurs situés à l'arrière du système pour
savoir où insérer chaque câble. N'oubliez pas de serrer les vis situées sur
le connecteur du câble du moniteur, s'il en est équipé.
Branchement du ou des câbles d'alimentation
Connectez le ou les câbles d'alimentation au système et, si vous utilisez
un moniteur, connectez le câble d'alimentation du moniteur à ce dernier.
32 Guide de mise en route
Page 35

Fixation du ou des câbles d'alimentation
Faites une boucle comme indiqué dans l'illustration, puis fixez-le à l'aide de
la sangle fournie. Branchez ensuite l'autre extrémité du câble d'alimentation
sur une prise secteur mise à la terre ou sur une source d'alimentation autonome
(telle qu'un onduleur (UPS) ou une unité de distribution de
l'alimentation(PDU)).
Mise sous tension du système
Appuyez sur le bouton d'alimentation du système et sur celui du moniteur.
Les voyants d'alimentation s'allument.
Guide de mise en route 33
Page 36

Installation du cadre en option
Installez le cadre (en option).
Finalisation de l'installation du système d'exploitation
Si vous avez acheté un système d'exploitation préinstallé, consultez la
documentation connexe fournie avec le système. Voir la documentation
relative à l'installation et à la configuration du système d'exploitation si
vous installez celui-ci pour la première fois. Veillez à installer le système
d'exploitation avant tout élément matériel ou logiciel acheté séparément.
34 Guide de mise en route
Page 37

Systèmes d'exploitation pris en charge
REMARQUE : il est recommandé d'installer le système d'exploitation
des disques durs internes dans une configuration RAID 1 pour des systèmes
à douze disques durs.
• Microsoft Windows Server 2008 SP2, éditions Web, Standard
et Enterprise (x86)
• Microsoft Windows Server 2008 SP2, éditions Web, Standard, Enterprise
et DataCenter (x64)
• Microsoft Windows Server 2008 R2, éditions Web, Standard, Enterprise
et DataCenter (x64)
• Microsoft Windows Small Business Server 2008 R2, éditions Standard
et Premium (x64)
• Microsoft Windows Server 2008 R2 (x64), édition HPC
• Microsoft Windows Server 2008 SP2 (x64), édition HPC
• Red Hat Enterprise Linux 5.5, éditions Standard (x86_64),
Advanced Platform (x86_64) et HPC
• SUSE Linux Enterprise Server 11 SP1 (x86_64)
• SUSE Linux Enterprise Server 10 SP3 (x86_64)
• VMware ESX 4.0 mise à jour 2, édition Classic
• VMware ESXi 4.0 mise à jour 2, édition Installable
• VMware ESX 4.1, édition Classic
• VMware ESXi 4.1, édition Installable
• Citrix XenServer 5.6, édition Enterprise
• Microsoft Hyper-V Windows Server 2008 R2 (autonome)
• Microsoft Windows Server 2008 R2 rôle Hyper-V
REMARQUE : pour obtenir les dernières informations sur les systèmes
d'exploitation pris en charge, rendez-vous sur le site support dell.com.
Guide de mise en route 35
Page 38

Autres informations utiles
AVERTISSEMENT: voir les informations sur la sécurité et les réglementations
qui accompagnent votre système. Les informations sur la garantie se trouvent dans
ce document ou dans un document distinct.
• La documentation fournie avec le rack indique comment installer
le système dans un rack.
• Le manuel
du matériel présente les fonctionnalités du système et contient des
informations de dépannage du système et des instructions d'installation ou
de remplacement des composants du système. Il est disponible en ligne sur
le site
• Tous les supports fournis avec le système contiennent de la documentation
et des outils de configuration et de gestion du système, notamment
du système d'exploitation même et du logiciel de gestion du système,
des mises à jour et des composants système que vous avez achetés avec
le système.
REMARQUE : vérifiez toujours si des mises à jour sont disponibles sur le site
Hardware Owners' Manual
support.dell.com/manuals
support.dell.com/manuals et lisez-les en premier, car elles remplacent
souvent les informations que contiennent les autres documents.
(Manuel du propriétaire)
.
Obtention d'une assistance technique
Si vous ne comprenez pas une procédure décrite dans ce guide ou si le
système ne réagit pas comme prévu, reportez-vous au document Hardware
Owner's Manual (Manuel du propriétaire). Dell™ offre une formation
exhaustive et une certification sur le matériel. Consultez dell.com/training
pour de plus amples informations. Ce service n'est disponible que dans
certains pays.
36 Guide de mise en route
Page 39

Caractéristiques techniques
Processeur
Type de processeur Jusqu'à deux processeurs AMD Opteron 4100
Bus d'extension
Type de bus PCI Express 2e génération
Logements d'extension dotés
de cartes de montage
REMARQUE : En fonction de sa configuration, le système peut être doté de la carte
de montage 1 ou 2.
carte de montage 1
OU
carte de montage 2
Logement 1 : PCIe x4, demi-longueur,
pleine hauteur
Logement 2 : PCIe x4, pleine longueur,
pleine hauteur
Logement 1 : PCIe x8, demi-longueur,
pleine hauteur
Logement 4 : PCIe x4, logement interne
pour carte intégrée
REMARQUE : les quatre logements sont dotés
de connecteurs de type x8.
Logement 1 : PCIe x16, pleine longueur,
pleine hauteur
Logement 2 : PCIe x4, interne pour carte
intégrée
REMARQUE : une configuration optimisée
pour le calcul générique sur un processeur
graphique (GPGPU, General Purpose
Computation on Graphics Processing Units)
est disponible sur la carte de montage 2.
Guide de mise en route 37
Page 40

Mémoire
Architecture Barrettes de mémoire ECC (code de
correction d'erreur) DDR3 cadencées
à 1 333 MHz inscrites ou sans tampon
Connecteurs de barrettes de mémoire Huit de 240 broches
Capacité des barrettes de mémoire 1 Go, 2 Go, 4 Go ou 8 Go
RAM minimale 1 Go avec un seul processeur
(1 DIMM par processeur)
RAM maximale 64 Go (DIMM de 8 Go à double rangées)
128 Go (DIMM de 16 Go à quatre rangées)
(selon disponibilité)
Lecteurs
Disques durs
Systèmes à huit disques durs
Jusqu'à huit lecteurs SAS, SATA ou SSD
de 3,5 ou 2,5 pouces, remplaçables à chaud
Systèmes à douze disques durs
Jusqu'à douze lecteurs SAS, SATA, ou SSD
de 3,5 ou 2,5 pouces remplaçables à chaud
et jusqu'à deux lecteurs SAS ou SSD de
2,5 pouces avec câble
REMARQUE : il est recommandé d'installer
le système d'exploitation des disques durs
internes dans une configuration RAID 1
pour des systèmes à douze disques durs.
Lecteur optique Un lecteur DVD-ROM ou DVD+/-RW SATA
slim (en option)
Un lecteur de DVD-ROM USB externe
(en option)
REMARQUE : les systèmes à douze disques
durs prennent uniquement en charge les
lecteurs de DVD-ROM USB externes.
38 Guide de mise en route
Page 41

Connecteurs
Arrière
NIC
Série
USB
Vidéo
Avant
Vidéo
USB
Interne
USB
Vidéo
Type de vidéo Matrox G200, intégré au contrôleur BMC
Mémoire vidéo 8 Mo
Deux connecteurs RJ-45 (pour cartes réseau
intégrées de 1 Go)
Un connecteur DTE à 9 broches,
compatible 16550
Deux connecteurs à 4 broches,
compatibles USB 2.0
Un connecteur VGA à 15 broches
Un connecteur VGA à 15 broches
Deux connecteurs à 4 broches,
compatibles USB 2.0
Deux connecteurs à 4 broches,
compatibles USB 2.0
Guide de mise en route 39
Page 42

Alimentation
Alimentation secteur CA (par bloc d'alimentation)
Puissance
Te ns i on
Dissipation thermique
Systèmes à huit disques durs
Systèmes à douze disques durs
Appel de courant maximal
Piles
Pile du système
Caractéristiques physiques
Hauteur
Systèmes à huit disques durs
Systèmes à douze disques durs
Largeur
Systèmes à huit disques durs
Systèmes à douze disques durs
Profondeur
Systèmes à huit disques durs
Systèmes à douze disques durs
Poids (configuration maximale)
Systèmes à huit disques durs
Systèmes à douze disques durs
Poids (vide)
Systèmes à huit disques durs
Systèmes à douze disques durs
750 W (bloc d'alimentation redondant
en option)
100–240 VAC, 50–60 Hz, avec sélection
automatique de la tension
2 200 BTU/h maximum
2 450 BTU/h maximum
Dans des conditions de lignes typiques et
dans toute la gamme ambiante de
fonctionnement du système, l'appel
de courant peut atteindre 55 A par bloc
d'alimentation pendant un maximum
de 10 ms.
Pile bouton au lithium-ion CR 2032 (3 V)
8,64 cm (3,4 pouces)
8,67 cm (3,42 pouces)
43,66 cm (17,19 pouces)
44,52 cm (17,53 pouces)
61,02 cm (24,09 pouces)
66,46 cm (26,17 pouces)
22,5 kg (49,5 livres)
29 kg (63,8 livres)
13,5 kg (29,7 livres)
15,85 kg (34,87 livres)
40 Guide de mise en route
Page 43

Caractéristiques environnementales
REMARQUE : pour des informations supplémentaires sur les mesures
environnementales liées aux différentes configurations du système, voir
www.dell.com/environmental_datasheets.
Température
En fonctionnement
De 10 à 35 °C (de 50 à 95 °F) avec un
gradient thermique maximal de 10 °C
par heure
REMARQUE : pour les altitudes supérieures
à 900 mètres (2 950 pieds), la température
maximale de fonctionnement est réduite de
0,55 °C (1 °F) tous les 168 mètres (550 pieds).
Stockage
Humidité relative
En fonctionnement
Stockage
Tolérance maximale aux vibrations
En fonctionnement
Stockage
Choc maximal
En fonctionnement
Stockage
De -40 à 65 °C (de -40 à 149 °F) avec
un gradient thermique maximal de 20 °C
par heure
De 20 à 80 % (sans condensation) avec
un gradient d'humidité maximal de 10 %
par heure
De 5 à 95 % avec un gradient d'humidité
maximal de 10 % par heure.
0,26 G avec un balayage de 5 à 350 Hz
pendant 15 minutes
1,87 G avec un balayage de 10 à 500 Hz
pendant 15 minutes
Une impulsion de choc de 31 G pendant
un maximum de 2,6 ms sur l'axe z positif
(une impulsion de chaque côté du système)
Six impulsions de chocs consécutives de 71 G
pendant un maximum de 2 ms en positif et
négatif sur les axes x, y et z (une impulsion de
chaque côté du système) et une impulsion
d'onde carrée de 32 G à 270 pouces/sec
Guide de mise en route 41
Page 44

Caractéristiques environnementales (suite)
Altitude
En fonctionnement
De -16 à 10 668 m (–50 à 35 000 pieds)
REMARQUE : pour les altitudes supérieures
à 900 mètres (2 950 pieds), la température
maximale de fonctionnement est réduite de
0,55 °C (1 °F) tous les 168 mètres (550 pieds).
Stockage
Contaminants en suspension dans l'air
Classe
De -16 à 10 600 m (-50 à 35 000 pieds)
G1 ou inférieure selon la norme
ISA-S71.04-1985
42 Guide de mise en route
Page 45

Dell PowerEdge R515-Systeme
Erste Schritte
mit dem System
Genormtes Modell Reihe E12S und Reihe E13S
Page 46

Anmerkungen, Vorsichtshinweise
und Warnungen
ANMERKUNG: Eine ANMERKUNG macht auf wichtige Informationen
aufmerksam, mit denen Sie den Computer besser einsetzen können.
VORSICHTSHINWEIS: Ein VORSICHTSHINWEIS macht aufmerksam auf
mögliche Beschädigung der Hardware oder Datenverlust, wenn die Anweisungen
nicht befolgt werden.
WARNUNG: Durch eine WARNUNG werden Sie auf Gefahrenquellen
hingewiesen, die materielle Schäden, Verletzungen oder sogar den Tod von
Personen zur Folge haben können.
____________________
Irrtümer und technische Änderungen vorbehalten.
© 2010 Dell Inc. Alle Rechte vorbehalten.
Die Vervielfältigung oder Wiedergabe dieser Materialien in jeglicher Weise ohne vorherige schriftliche
Genehmigung von Dell Inc. ist strengstens untersagt.
Marken in diesem Text: Dell™, das DELL Logo und PowerEdge™ sind Marken von Dell Inc. AMD
ist eine eingetragene Marke von Advanced Micro Devices, Inc. Microsoft
®
sind Marken oder eingetragene Marken von Microsoft Corporation in den USA und/oder
Server
anderen Ländern. Red Hat Enterprise Linux
Red Hat, Inc. in den USA und/oder anderen Ländern. Novell
von Novell Inc. in den USA und anderen Ländern. Citrix
Marken oder Marken von Citrix Systems, Inc. in den USA und/oder anderen Ländern.
Andere in diesem Dokument möglicherweise verwendete Marken und Handelsnamen beziehen sich
auf die entsprechenden Eigentümer oder deren Produkte. Dell Inc. erhebt keinen Anspruch auf Marken
und Handelsbezeichnungen mit Ausnahme der eigenen.
®
und Enterprise Linux® sind eingetragene Marken von
®
and SUSE® sind eingetragene Marken
®
, Xen® und XenServer® sind eingetragene
®
, Windows® und Windows
®
Genormtes Modell Reihe E12S und Reihe E13S
Juni 2010 Teilenr. 9V9CK Rev. A00
Page 47

Installation und Konfiguration
WARNUNG: Lesen Sie vor dem Ausführen der folgenden Schritte
die Sicherheitshinweise für das System.
Auspacken des Systems
Entnehmen Sie das System der Verpackung und identifizieren Sie
die einzelnen Komponenten.
Lesen Sie vor der Montage der Schienen und dem Einbau des Systems im
Rack zunächst die mit dem System gelieferten Sicherheitshinweise und
die Rack-Installationsanleitung.
Erste Schritte mit dem System 45
Page 48

Optional – Anschließen von Tastatur, Maus und Bildschirm
Schließen Sie die Tastatur, die Maus und den Bildschirm an (optional).
Die Anschlüsse auf der Rückseite des Systems sind mit Symbolen
gekennzeichnet, mit denen sich die entsprechenden Kabel zuordnen lassen.
Denken Sie daran, gegebenenfalls die Schrauben am Stecker des Bildschirmkabels festzuziehen.
Anschließen der Netzstromkabel
Verbinden Sie die Netzstromkabel mit dem System sowie gegebenenfalls mit
dem Bildschirm.
46 Erste Schritte mit dem System
Page 49

Befestigen der Netzstromkabel
Bilden Sie mit dem Systemnetzstromkabel wie abgebildet eine Schlaufe, und
sichern Sie das Kabel mit dem beigefügten Band an der Klammer. Verbinden
Sie das andere Ende des Netzstromkabels mit einer geerdeten Steckdose oder
einer separaten Spannungsquelle, etwa einer unterbrechungsfreien
Stromversorgung (USV) oder einem Stromverteiler (PDU).
Einschalten des Systems
Drücken Sie den Netzschalter am System und am Bildschirm.
Die Betriebsanzeigen sollten aufleuchten.
Erste Schritte mit dem System 47
Page 50

Anbringen der optionalen Frontverkleidung
Befestigen Sie die Frontverkleidung (optional).
Abschließen des Betriebssystem-Setups
Wenn das Betriebssystem vorinstalliert ist, lesen Sie die zusammen mit
dem System gelieferte Dokumentation zum Betriebssystem. Wenn Sie
das Betriebssystem erstmals installieren, finden Sie weitere Hinweise in
der Dokumentation zur Installation und Konfiguration des Betriebssystems.
Das Betriebssystem muss installiert sein, bevor Sie andere, nicht zusammen
mit dem System erworbene Hardware oder Software installieren.
48 Erste Schritte mit dem System
Page 51

Unterstützte Betriebssysteme
ANMERKUNG: Bei 12-Festplatten-Systemen mit zusätzlichen internen Festplatten
wird empfohlen, das Betriebssystem auf den internen Festplatten in einer RAID-1Konfiguration zu installieren.
• Microsoft Windows Server 2008 SP2 Web, Standard und Enterprise (x86)
Edition
• Microsoft Windows Server 2008 SP2 Web, Standard, Enterprise
und Datacenter (x64) Edition
• Microsoft Windows Server 2008 R2 Web, Standard, Enterprise
und Datacenter (x64) Edition
• Windows Small Business Server 2008 R2 (x64) Standard und
Premium Edition
• Microsoft Windows Server 2008 R2 HPC (x64) Edition
• Microsoft Windows Server 2008 SP2 HPC (x64) Edition
• Red Hat Enterprise Linux 5.5 Standard (x86_64),
Advanced Platform (x86_64) und HPC Edition
• SUSE Linux Enterprise Server 11 SP1 (x86_64)
• SUSE Linux Enterprise Server 10 SP3 (x86_64)
• VMware ESX 4.0 Update 2 Classic Edition
• VMware ESXi 4.0 Update 2 Installable Edition
• VMware ESX 4.1 Classic Edition
• VMware ESXi 4.1 Installable Edition
• Citrix XenServer 5.6 Enterprise Edition
• Microsoft Hyper-V Windows Server 2008 R2 (Standalone)
• Microsoft Windows Server 2008 R2 Hyper-V-Rolle
ANMERKUNG: Die neuesten Informationen zu den unterstützten
Betriebssystemen erhalten Sie unter support.dell.com.
Erste Schritte mit dem System 49
Page 52

Weitere nützliche Informationen
WARNUNG: Beachten Sie die Sicherheits- und Betriebsbestimmungen, die mit
dem Computer geliefert wurden. Garantiebestimmungen können möglicherweise
als separates Dokument beigelegt sein.
• In der mit der Rack-Lösung gelieferten Rack-Dokumentation ist
beschrieben, wie das System in einem Rack installiert wird.
•Im
• Alle im Lieferumfang des Systems enthaltenen Medien mit
Hardware-Benutzerhandbuch
Systemfunktionen, Fehlerbehebung im System und zum Installieren
oder Austauschen von Systemkomponenten. Sie finden dieses Dokument
online unter
Dokumentationen und Hilfsmitteln zur Konfiguration und Verwaltung
des Systems, insbesondere in Bezug auf Betriebssystem, Systemverwaltungssoftware, System-Updates und mit dem System erworbene
Komponenten.
ANMERKUNG: Wenn auf der Website support.dell.com/manuals
aktualisierte Dokumente vorliegen, lesen Sie diese immer zuerst,
denn frühere Informationen werden damit gegebenenfalls ungültig.
support.dell.com/manuals
finden Sie Informationen über
.
Anfordern von technischer Unterstützung
Falls Sie einen Vorgang in diesem Handbuch nicht nachvollziehen können
oder das System sich nicht wie erwartet verhält, nehmen Sie das Hardware-
Benutzerhandbuch zur Hand. Dell™ bietet Ihnen umfangreiche HardwareSchulungen und Zertifizierungen. Nähere Informationen erhalten Sie unter
www.dell.com/training. Diese Dienstleistungen stehen unter Umständen
nicht an allen Standorten zur Verfügung.
50 Erste Schritte mit dem System
Page 53

Technische Daten
Prozessor
Prozessortyp Bis zu zwei AMD Opteron 4100-Prozessoren
Erweiterungsbus
Bustyp PCI-Express der 2. Generation
Erweiterungssteckplätze
über Riserkarten
ANMERKUNG: Je nach Konfiguration ist das System mit Riser 1 oder Riser 2
ausgestattet.
Riser 1
ODER
Riser 2
Steckplatz 1: PCIe x4, halbe Baulänge,
volle Bauhöhe
Steckplatz 2: PCIe x4, volle Baulänge,
volle Bauhöhe
Steckplatz 3: PCIe x8, halbe Baulänge,
volle Bauhöhe
Steckplatz 4: PCIe x4, interner Steckplatz
für integrierte Karte
ANMERKUNG: Alle vier Steckplätze sind
mit x8-Anschlüssen ausgestattet.
Steckplatz 1: PCIe x16, volle Baulänge,
volle Bauhöhe
Steckplatz 2: PCIe x4, intern für integrierte
Karte
ANMERKUNG: Eine GPGPU-optimierte
Konfiguration (General Purpose Computation
on Graphics Processing Units) ist an Riser 2
verfügbar.
Erste Schritte mit dem System 51
Page 54

Speicher
Architektur Registrierte oder ungepuffferte Error
Correcting Code (ECC)-DIMM-Module
(DDR3, 1333 MHz)
Speichermodulsockel Achtmal 240-polig
Speichermodulkapazitäten 1 GB, 2 GB, 4 GB oder 8 GB
RAM (Minimum) 1 GB mit einem Einzelprozessor
(1 DIMM je Prozessor)
RAM (Maximum) 64 GB (Zweifach-DIMMs mit jeweils 8 GB)
128 GB (Vierfach-DIMMs mit jeweils 16 GB)
(sofern verfügbar)
Laufwerke
Festplattenlaufwerke
8-Festplatten-Systeme
Bis zu acht hot-swap-fähige SAS-, SATAoder SSD-Laufwerke (3,5 Zoll oder 2,5 Zoll)
12-Festplatten-Systeme
Bis zu zwölf hot-swap-fähige SAS-, SATAoder SSD-Laufwerke (3,5 Zoll oder 2,5 Zoll)
und bis zu zwei verkabelte SAS- oder
SSD-Laufwerke (2,5 Zoll).
ANMERKUNG: Bei 12-Festplatten-Systemen
mit zusätzlichen internen Festplatten wird
empfohlen, das Betriebssystem auf den
internen Festplatten in einer RAID-1Konfiguration zu installieren.
Optisches Laufwerk Optionales internes SATA-DVD-ROM- oder
DVD+/-RW-Laufwerk in Schmalbauweise
Optionales externes USB-DVD-ROMLaufwerk
ANMERKUNG: 12-Festplatten-Systeme
unterstützen nur ein externes USB-DVD-ROMLaufwerk.
52 Erste Schritte mit dem System
Page 55

Anschlüsse
Rückseite
NIC
Seriell
USB
Grafik
Vorderseite
Grafik
USB
Intern
USB
Grafik
Grafiktyp Matrox G200, integriert im BMC
Grafikspeicher 8 MB
Stromversorgung
Netzstromversorgung (je Netzteil)
Leistung
Spannung
Wärmeabgabe
8-Festplatten-Systeme
12-Festplatten-Systeme
Maximaler Einschaltstrom
Batterien
Systembatterie
Zwei RJ-45 (für integrierte 1-GB-NICs)
9-polig, DTE, 16550-kompatibel
Zwei 4-polige Anschlüsse, USB-2.0-konform
VGA, 15-polig
VGA, 15-polig
Zwei 4-polige Anschlüsse, USB-2.0-konform
Zwei 4-polige Anschlüsse, USB-2.0-konform
750 W (optionales redundantes Netzteil)
100-240 V Wechselstrom, autom.
Bereichseinstellung, 50-60 Hz
Maximal 2200 BTU/h
Maximal 2450 BTU/h
Unter typischen Leitungsbedingungen
und über den gesamten Umgebungsbetriebsbereich des Systems kann der Einschaltstrom
55 A pro Netzteil erreichen (über einen Zeitraum von 10 ms oder weniger).
CR 2032, Lithium-Knopfzelle (3,0 V)
Erste Schritte mit dem System 53
Page 56

Abmessungen und Gewicht
Höhe
8-Festplatten-Systeme
12-Festplatten-Systeme
Breite
8-Festplatten-Systeme
12-Festplatten-Systeme
Tiefe
8-Festplatten-Systeme
12-Festplatten-Systeme
Gewicht (maximale Konfiguration)
8-Festplatten-Systeme
12-Festplatten-Systeme
Gewicht (leer)
8-Festplatten-Systeme
12-Festplatten-Systeme
Umgebungsbedingungen
8,64 cm
8,67 cm
43,66 cm
44,52 cm
61,02 cm
66,46 cm
22,5 kg
29,0 kg
13,5 kg
15,85 kg
ANMERKUNG: Weitere Informationen zu Umgebungsbedingungen bei verschiedenen
Systemkonfigurationen finden Sie unter www.dell.com/environmental_datasheets.
Temperatur
Betrieb
10° bis 35 °C mit einem maximalen
Temperaturgradienten von 10 °C pro Stunde
ANMERKUNG: Bei Höhen über 900 Meter
verringert sich die maximale
Betriebstemperatur um 1 °C/300 m.
Lagerung
-40° bis 65 °C mit einem maximalen
Temperaturgradienten von 20 °C pro Stunde
54 Erste Schritte mit dem System
Page 57

Umgebungsbedingungen (fortgesetzt)
Relative Luftfeuchtigkeit
Betrieb
Lagerung
Zulässige Erschütterung
Betrieb
Lagerung
Zulässige Stoßeinwirkung
Betrieb
Lagerung
Höhe über NN
Betrieb
Lagerung
Luftverschmutzungsklasse
Klasse
20% bis 80% (nicht-kondensierend) mit
einem maximalen Luftfeuchtegradienten
von 10% pro Stunde
5% bis 95%, mit einem Luftfeuchtegradienten von 10% pro Stunde.
0,26 G bei 5-350 Hz, 15 min. lang
1,87 G bei 10-500 Hz, 15 min lang
Ein Stoß von 31 G in der positiven z-Achse
(ein Stoß auf jeder Seite des Systems) über
einen Zeitraum von 2,6 ms in der
Betriebsrichtung.
Sechs nacheinander ausgeführte Stöße mit
71 G von bis zu 2 ms Dauer in positiver
und negativer X-, Y- und Z-Richtung
(ein Stoß auf jeder Seite des Systems) sowie
Rechteckimpuls von 32 G und 686 cm/s
-16 bis 10 668 m
ANMERKUNG: Bei Höhen über 900 Meter
verringert sich die maximale Betriebstemperatur um 1 °C/300 m.
-16 bis 10 600 m
G1 oder niedriger gemäß ISA-S71.04-1985
Erste Schritte mit dem System 55
Page 58

56 Erste Schritte mit dem System
Page 59

Συστήµατα Dell
PowerEdge R515
Τα πρώτα βήµατα
µε το σύστηµά σας
Ρυθµιστικό πρότυπο Σειρά E12S και
Σειρά E13S
Page 60

Σηµειώσεις, ειδοποιήσεις και προσοχές
ΣΗΜΕΙΩΣΗ: Η ΣΗΜΕΙΩΣΗ αφορά σηµαντικές πληροφορίες που σας
βοηθούν να χρησιµοποιείτε καλύτερα τον υπολογιστή σας.
ΠΡΟΣΟΧΗ: Η ΠΡΟΣΟΧΗ υποδηλώνει πιθανή υλική ζηµιά ή απώλεια
δεδοµένων, αν δεν τηρηθούν οι οδηγίες.
ΕΙ∆ΟΠΟΙΗΣΗ: Η ΕΙ∆ΟΠΟΙΗΣΗ αφορά πιθανή υλική ζηµιά, σωµατική
βλάβη ή θάνατο.
____________________
Οι πληροφορίες αυτού του εγγράφου υπόκεινται σε αλλαγές χωρίς ειδοποίηση.
© 2010 Dell Inc. Με επιφύλαξη όλων των δικαιωµάτων.
Απαγορεύεται αυστηρώς η αναπαραγωγή αυτών των υλικών µε οποιονδήποτε τρόπο χωρίς την
έγγραφη άδεια της Dell Inc.
Τα εµπορικά σήµατα που χρησιµοποιούνται σε αυτό το κείµενο: η ονοµασία Dell™, το λογότυπο
DELL και η ονοµασία PowerEdge™ είναι εµπορικά σήµατα της Dell Inc. Η ονοµασία AMD
ένα σήµα κατατεθέν της Advanced Micro Devices, Inc. Οι ονοµασίες Microsoft
Windows Server
Ηνωµένες Πολιτείες ή/και άλλες χώρες. Οι ονοµασίες Red Hat Enterprise Linux
®
Linux
Οι ονοµασίες Novell
και άλλες χώρες. Οι ονοµασίες Citrix
εµπορικά σήµατα της Citrix System, Inc. στις Ηνωµένες πολιτείες ή/και άλλες χώρες.
Άλλα εµπορικά σήµατα και εµπορικές ονοµασίες µπορεί να χρησιµοποιούνται στο παρόν έγγραφο
αναφερόµενα είτε στους κατόχους των σηµάτων και των ονοµάτων είτε στα προϊόντα τους. Η Dell Inc.
παραιτείται από κάθε δικαίωµα σε εµπορικά σήµατα και εµπορικές ονοµασίες τρίτων.
®
είναι είτε εµπορικά σήµατα ή σήµατα κατατεθέντα της Microsoft Corporation στις
είναι σήµατα κατατεθέντα της Red Hat, Inc. στις Ηνωµένες Πολιτείες ή/και άλλες χώρες.
®
και SUSE® είναι σήµατα κατατεθέντα της Novell Inc. στις Ηνωµένες Πολιτείες
®
, Xen® και XenServer® είναι είτε σήµατα κατατεθέντα ή
®
, Windows® και
®
και Enterprise
®
είναι
Ρυθµιστικό πρότυπο Σειρά E12S και Σειρά E13S
Ιούνιος 2010 P/N 9V9CK Αναθ. A00
Page 61

Εγκατάσταση και ρύθµιση παραµέτρων
ΕΙ∆ΟΠΟΙΗΣΗ: Προτού εκτελέσετε την παρακάτω διαδικασία,
συµβουλευθείτε τις οδηγίες ασφάλειας που συνοδεύουν το σύστηµά
σας.
Άνοιγµα της συσκευασίας του συστήµατος
Ανοίξτε τη συσκευασία του συστήµατός σας και αναγνωρίστε κάθε αντικείµενο.
Συναρµολογήστε τις ράγες και εγκαταστήστε το σύστηµα σε βάση (rack) σύµφωνα µε
τις οδηγίες ασφάλειας και τις οδηγίες εγκατάστασης σε βάση, που παρέχονται µε το
σύστηµά σας.
Τα πρώτα βήµατα µε το σύστηµά σας 59
Page 62

Προαιρετικά - Σύνδεση πληκτρολογίου, ποντικιού και οθόνης
Συνδέστε το πληκτρολόγιο, το ποντίκι και την οθόνη (προαιρετικά).
Οι θύρες στο πίσω µέρος του συστήµατος έχουν εικονίδια, τα οποία υποδεικνύουν το
καλώδιο που συνδέεται σε κάθε θύρα. Πρέπει να σφίξετε τις βίδες (εάν υπάρχουν) στη
θύρα καλωδίου της οθόνης.
Σύνδεση των καλωδίων τροφοδοσίας
Συνδέστε το(τα) καλώδιο(α) τροφοδοσίας του συστήµατος στο σύστηµα και, εάν
χρησιµοποιείτε οθόνη, συνδέστε το καλώδιο τροφοδοσίας της οθόνης στην οθόνη.
60 Τα πρώτα βήµατα µε το σύστηµά σας
Page 63

Ασφάλιση των καλωδίων τροφοδοσίας
Τυλίξτε το καλώδιο τροφοδοσίας του συστήµατος όπως φαίνεται στην εικόνα και
στερεώστε το στο στήριγµα χρησιµοποιώντας την παρεχόµενη ταινία. Τοποθετήστε
την άλλη άκρη του καλωδίου τροφοδοσίας σε γειωµένη πρίζα ή σε ξεχωριστή πηγή
ηλεκτρικού ρεύµατος, π.χ. σε ένα σύστηµα αδιάλειπτης τροφοδοσίας (UPS) ή µια
µονάδα διανοµής ρεύµατος (PDU).
Ενεργοποίηση του συστήµατος
Πατήστε το κουµπί λειτουργίας στο σύστηµα και την οθόνη. Ανάβουν οι λυχνίες
λειτουργίας.
Τα πρώτα βήµατα µε το σύστηµά σας 61
Page 64

Τοποθέτηση της προαιρετικής στεφάνης συγκράτησης
Τοποθετήστε το πλαίσιο (προαιρετικά).
Ολοκλήρωση της εγκατάστασης του λειτουργικού συστήµατος
Εάν έχετε αγοράσει προεγκατεστηµένο λειτουργικό σύστηµα, ανατρέξτε στην
τεκµηρίωση του λειτουργικού συστήµατος που συνοδεύει το σύστηµά σας. Όταν
εγκαθιστάτε ένα λειτουργικό σύστηµα για πρώτη φορά, ανατρέξτε στην τεκµηρίωση
εγκατάστασης και διαµόρφωσης που αφορά το λειτουργικό σας σύστηµα. Βεβαιωθείτε
ότι το λειτουργικό σύστηµα είναι εγκατεστηµένο προτού εγκαταστήσετε υλικό ή
λογισµικό που δεν έχετε αγοράσει µαζί µε το σύστηµα.
62 Τα πρώτα βήµατα µε το σύστηµά σας
Page 65

Λειτουργικά συστήµατα που υποστηρίζονται
ΣΗΜΕΙΩΣΗ: Για συστήµατα δώδεκα µονάδων σκληρού δίσκου που
διαθέτουν πρόσθετες εσωτερικές µονάδες σκληρού δίσκου συνιστάται να
εγκαταστήσετε το λειτουργικό σύστηµα στις εσωτερικές µονάδες σκληρού
δίσκου βάσει µιας διαµόρφωσης RAID 1.
•
Microsoft Windows Server 2008 SP2, εκδόσεις Web, Standard και Enterprise
(x86)
•
Microsoft Windows Server 2008 SP2, εκδόσεις Web, Standard, Enterprise και
Datacenter (x64)
•
Microsoft Windows Server 2008 R2, εκδόσεις Web, Standard, Enterprise και
Datacenter (x64)
•
Microsoft Small Business Server 2008 R2 (x64), εκδόσεις Standard και Premium
•
Microsoft Windows Server 2008 R2 HPC, έκδοση (x64)
•
Microsoft Windows Server 2008 SP2 HPC, έκδοση (x64)
•
Red Hat Enterprise Linux 5.5, εκδόσεις Standard (x86_64),
Advanced Platform (x86_64) και HPC
•
SUSE Linux Enterprise Server 11 SP1 (x86_64)
•
SUSE Linux Enterprise Server 10 SP3 (x86_64)
•
VMware ESX 4.0 Update 2 έκδοση Classic
•
VMware ESXi 4.0 Update 2 έκδοση Installable
•
VMware ESX 4.1 έκδοση Classic
•
VMware ESXi 4.1 έκδοση Installable
•
Citrix XenServer 5.6 έκδοση Enterprise
•
Microsoft Hyper-V Windows Server 2008 R2 (αυτόνοµα)
•
Microsoft Windows Server 2008 R2, ρόλος Hyper-V
ΣΗΜΕΙΩΣΗ: Για τις πιο πρόσφατες πληροφορίες σχετικά µε τα
λειτουργικά συστήµατα που υποστηρίζονται, επισκεφτείτε τη διεύθυνση
www.dell.com.
Τα πρώτα βήµατα µε το σύστηµά σας 63
Page 66

Άλλες πληροφορίες που ενδέχεται να χρειαστείτε
ΕΙ∆ΟΠΟΙΗΣΗ: Ανατρέξτε στις πληροφορίες σχετικά µε την ασφάλεια
και τους κανονισµούς που έχουν αποσταλεί µε το σύστηµά σας.
Οι πληροφορίες για την εγγύηση ενδέχεται να συµπεριλαµβάνονται
σε αυτό το έγγραφο ή να αποτελούν ξεχωριστό έγγραφο.
•
Η τεκµηρίωση για τις βάσεις (rack), που συνοδεύει τη δική σας αντίστοιχη λύση,
περιγράφει πως να τοποθετήσετε το σύστηµά σας σε µια βάση.
•
Το
Εγχειρίδιο κατόχου υλικού
χαρακτηριστικά του συστήµατος και περιγράφει την αντιµετώπιση προβληµάτων
του συστήµατός σας και την εγκατάσταση ή την αντικατάσταση συστατικών
στοιχείων του συστήµατος. Το παρόν έγγραφο είναι διαθέσιµο ηλεκτρονικά στην
τοποθεσία
•
Τυχόν δίσκοι CD/DVD που συνοδεύουν το σύστηµά σας και παρέχουν
τεκµηρίωση και εργαλεία για τη διαµόρφωση και τη διαχείριση του συστήµατός
σας, όπου συµπεριλαµβάνονται η τεκµηρίωση και τα εργαλεία για το
λειτουργικό σύστηµα, το λογισµικό διαχείρισης συστήµατος, οι
ενηµερώσεις συστήµατος και τα εξαρτήµατα συστήµατος που αγοράσατε µαζί
µε το σύστηµά σας.
support.dell.com/manuals.
ΣΗΜΕΙΩΣΗ: Ελέγχετε πάντοτε για ενηµερωµένες εκδόσεις στην
τοποθεσία support.dell.com/manuals και να διαβάζετε πρώτα τις
ενηµερωµένες εκδόσεις επειδή πολύ συχνά αντικαθιστούν τις
πληροφορίες άλλων εγγράφων.
παρέχει πληροφορίες σχετικά µε τα
Λήψη τεχνικής βοήθειας
Εάν δεν κατανοείτε µια διαδικασία του οδηγού αυτού ή αν το σύστηµα δεν λειτουργεί µε
τον αναµενόµενο τρόπο, ανατρέξτε στο
ολοκληρωµένη εκπαίδευση και πιστοποίηση υλικού. Για περισσότερες πληροφορίες,
ανατρέξτε στη διεύθυνση
προσφέρεται σε όλες τις τοποθεσίες.
www.dell.com/training
64 Τα πρώτα βήµατα µε το σύστηµά σας
Εγχειρίδιο κατόχου υλικού
. Η υπηρεσία αυτή ενδέχεται να µην
. Η Dell παρέχει
Page 67

Τεχνικές προδιαγραφές
Επεξεργαστής
Τύπος επεξεργαστή Έως και δύο επεξεργαστές AMD Opteron 4100
∆ίαυλος επέκτασης
Τύπος διαύλου PCI Express Generation 2
Υποδοχές επέκτασης µε κάθετη
κάρτα (riser)
ΣΗΜΕΙΩΣΗ: Ανάλογα µε τη διαµόρφωση, το σύστηµά σας µπορεί να διαθέτει την
κάθετη κάρτα 1 ή την κάθετη κάρτα 2.
Κάθετη κάρτα (riser) 1
Ή
Κάθετη κάρτα (riser) 2
Υποδοχή 1: PCIe x4, µισού µήκους, πλήρους
ύψους
Υποδοχή 2: PCIe x4, πλήρους µήκους,
πλήρους ύψους
Υποδοχή 3: PCIe x8, µισού µήκους, πλήρους
ύψους
Υποδοχή 4: PCIe x4, εσωτερική υποδοχή για
ενσωµατωµένη κάρτα
ΣΗΜΕΙΩΣΗ: Και οι τέσσερις υποδοχές
είναι θύρες x8.
Υποδοχή 1: PCIe x16, πλήρους µήκους,
πλήρους ύψους
Υποδοχή 2: PCIe x4, εσωτερική υποδοχή για
ενσωµατωµένη κάρτα
ΣΗΜΕΙΩΣΗ: Στην κάθετη κάρτα 2 υπάρχει
διαθέσιµος ένας υπολογισµός γενικής
χρήσης για τη βελτιστοποιηµένη διαµόρφωση
των µονάδων επεξεργασίας γραφικών
(GPGPU).
Τα πρώτα βήµατα µε το σύστηµά σας 65
Page 68

Μνήµη
Αρχιτεκτονική καταχωρηµένη 1333 MHz DDR3 ή χωρίς
περιοχή προσωρινής µνήµης µε Kώδικα
∆ιόρθωσης Σφάλµατος (ΕCC) Μονάδες DIMM
Υποδοχές λειτουργικών µονάδων
Οκτώ των 240 ακίδων
µνήµης
Χωρητικότητες µονάδων µνήµης 1 GB, 2 GB, 4 GB ή 8 GB
Ελάχιστη µνήµη RAM 1 GB µε µονό επεξεργαστή (1 DIMM)
ανά επεξεργαστή)
Μέγιστη µνήµη RAM 64 GB (µονάδες DIMM διπλής σειράς των
8GB)
128 GB (µονάδες DIMM τετραπλής σειράς
των 16 GB) (αν είναι διαθέσιµες)
Μονάδες
Μονάδες σκληρού δίσκου
Συστήµατα µε οκτώ µονάδες
σκληρού δίσκου
Έως και οκτώ µονάδες σκληρού δίσκου SAS,
SATA ή SSD 3,5 ιντσών ή 2,5 ιντσών µε
δυνατότητα σύνδεσης εν ώρα λειτουργίας
Συστήµατα µε δώδεκα µονάδες
σκληρού δίσκου
Έως δώδεκα µονάδες σκληρού δίσκου SAS,
SATA ή SSD 3,5 ιντσών ή 2,5 ιντσών µε
δυνατότητα σύνδεσης εν ώρα λειτουργίας και
έως δύο µονάδες σκληρού δίσκου SAS ή SSD
2,5 ιντσών που συνδέονται µέσω καλωδίου
ΣΗΜΕΙΩΣΗ: Για συστήµατα δώδεκα
µονάδων σκληρού δίσκου που διαθέτουν
πρόσθετες εσωτερικές µονάδες σκληρού
δίσκου συνιστάται να εγκαταστήσετε το
λειτουργικό σύστηµα στις εσωτερικές µονάδες
σκληρού δίσκου βάσει µιας διαµόρφωσης
RAID 1.
Μονάδα οπτικών δίσκων Προαιρετική εσωτερική λεπτή µονάδα SATA
DVD-ROM ή DVD+/-RW
Προαιρετική εξωτερική µονάδα USB
DVD-ROM
ΣΗΜΕΙΩΣΗ: Τα συστήµατα δώδεκα
µονάδων σκληρού δίσκου υποστηρίζουν
µόνο µια εξωτερική µονάδα USB DVD-ROM.
66 Τα πρώτα βήµατα µε το σύστηµά σας
Page 69

Θύρες
Πίσω
Κάρτα δικτύου
Σειριακές
USB
Κάρτα γραφικών
Μπροστά
Κάρτα γραφικών
USB
Εσωτερικά
USB
Κάρτα γραφικών
Τύπος κάρτας γραφικών Matrox G200, ενσωµατωµένη στο BMC
Μνήµη κάρτας γραφικών 8 MB
Τροφοδοσία
Τροφοδοσία AC (ανά παροχή τροφοδοσίας)
Ισχύς σε watt
Τάση
Έκλυση θερµότητας
Συστήµατα µε οκτώ µονάδες
σκληρού δίσκου
Συστήµατα µε δώδεκα µονάδες
σκληρού δίσκου
Μέγιστο ρεύµα εισροής
∆ύο RJ-45 (για ενσωµατωµένες κάρτες
διασύνδεσης δικτύου 1-GB)
9 ακίδων, DTE, συµβατές µε 16550
∆ύο των 4 ακίδων, συµβατές µε USB 2.0
VGA 15 ακίδων
VGA 15 ακίδων
∆ύο των 4 ακίδων, συµβατές µε USB 2.0
∆ύο των 4 ακίδων, συµβατές µε USB 2.0
750 W (προαιρετική εφεδρική τροφοδοσία)
Αυτορυθµιζόµενη 100–240 VAC, 50–60 Hz
2.200 BTU/hr µέγιστο
2450 BTU/hr µέγιστο
Κάτω από τυπικές συνθήκες γραµµής και
επάνω από το εύρος τιµών λειτουργίας
περιβάλλοντος ολόκληρου του συστήµατος,
το ρεύµα εισροής µπορεί να προσεγγίσει τα
55 A ανά ανά παροχή τροφοδοσίας για 10 ms ή
λιγότερο.
Τα πρώτα βήµατα µε το σύστηµά σας 67
Page 70

Τροφοδοσία (συνέχεια)
Μπαταρίες
Μπαταρία συστήµατος
Φυσικά χαρακτηριστικά
Ύψος
Συστήµατα µε 8 µονάδες σκληρού
δίσκου
Συστήµατα µε δώδεκα µονάδες
σκληρού δίσκου
Πλάτος
Συστήµατα µε οκτώ µονάδες
σκληρού δίσκου
Συστήµατα µε δώδεκα µονάδες
σκληρού δίσκου
Βάθος
Συστήµατα µε οκτώ µονάδες
σκληρού δίσκου
Συστήµατα µε δώδεκα µονάδες
σκληρού δίσκου
Βάρος (µέγιστη διαµόρφωση)
Συστήµατα µε οκτώ µονάδες
σκληρού δίσκου
Συστήµατα µε δώδεκα µονάδες
σκληρού δίσκου
Βάρος (κενό)
Συστήµατα µε οκτώ µονάδες
σκληρού δίσκου
Συστήµατα µε δώδεκα µονάδες
σκληρού δίσκου
CR 2032 3,0 V ιόντων λιθίου σε σχήµα
νοµίσµατος
8,64 εκ. (3,4 ίντσες)
8,67 εκ. (3,42 ίντσες)
43,66 εκ. (17,19 ίντσες)
44,52 εκ. (17,53 ίντσες)
61,02 εκ. (24,09 ίντσες)
66,46 εκ. (26,17 ίντσες)
22,5 κιλά (49,5 λίβρες)
29,0 kg
13,5 κιλά (29,7 λίβρες)
15,85 kg
68 Τα πρώτα βήµατα µε το σύστηµά σας
Page 71

Χαρακτηριστικά περιβάλλοντος
ΣΗΜΕΙΩΣΗ: Για επιπλέον πληροφορίες σχετικά µε τις περιβαλλοντικές µετρήσεις
για συγκεκριµένες διαµορφώσεις συστήµατος, επισκεφτείτε τη διεύθυνση
www.dell.com/environmental_datasheets.
Θερµοκρασία
Κατά τη λειτουργία
από 10° έως 35°C, µε µέγιστο ρυθµό
µεταβολής της θερµοκρασίας τους 10°C/ώρα
ΣΗΜΕΙΩΣΗ: Για υψόµετρο άνω των
900 µέτρων, η µέγιστη θερµοκρασία
λειτουργίας ελαττώνεται ονοµαστικά κατά
0,55°C ανά 168 µέτρα.
Κατά την αποθήκευση
Σχετική υγρασία
Κατά τη λειτουργία
Κατά την αποθήκευση
Μέγιστη ταλάντευση
Κατά τη λειτουργία
Κατά την αποθήκευση
Μέγιστη δόνηση
Κατά τη λειτουργία
Κατά την αποθήκευση
από -40° έως 65°C, µε µέγιστο ρυθµό
µεταβολής της θερµοκρασίας τούς 20°C
ανά ώρα
20% έως 80% (χωρίς συµπύκνωση) µε µέγιστο
ρυθµό µεταβολής της υγρασίας 10% ανά ώρα
5% έως 95%, µέγιστο βαθµό µεταβολής
υγρασίας 10% ανά ώρα.
0,26 G στα 5–350 Hz για 15 λεπτά
1,87 G σε 10–500 Hz για 15 λεπτά
Ένας παλµός δόνησης στο θετικό τµήµα του
άξονα z (ένας παλµός σε κάθε πλευρά του
συστήµατος) των 31 G για έως και 2,6 ms προς
την κατευθύνση λειτουργίας
Έξι διαδοχικά εκτελεσµένοι παλµοί δόνησης
στο θετικό και αρνητικό τµήµα των αξόνων x,
y και z (ένας παλµός σε κάθε πλευρά του
συστήµατος) των 71 G για έως και 2 ms και
δόνηση τετράγωνου κύµατος 32G, 270
ίντσες/δευτερόλεπτο.
Τα πρώτα βήµατα µε το σύστηµά σας 69
Page 72

Χαρακτηριστικά περιβάλλοντος (συνέχεια)
Υψόµετρο
Κατά τη λειτουργία
-16 έως 10.668 µέτρα (-50 έως 35.000 πόδια)
ΣΗΜΕΙΩΣΗ: Για υψόµετρο άνω των
900 µέτρων, η µέγιστη θερµοκρασία
λειτουργίας ελαττώνεται ονοµαστικά κατά
0,55°C ανά 168 µέτρα.
Κατά την αποθήκευση
Επίπεδα ρύπων στην ατµόσφαιρα
Κατηγορία
από -16 έως 10.600 µέτρα
G1 ή χαµηλότερο, όπως ορίζεται από το
ISA-S71.04-1985
70 Τα πρώτα βήµατα µε το σύστηµά σας
Page 73

Systemy Dell
PowerEdge R515
Rozpoczęcie
pracy z systemem
Model zgodny z normą E12S Series i
E13S Series
Page 74

Uwagi, przestrogi i ostrzeżenia
UWAGA: UWAGA oznacza ważną wiadomość, która pomoże lepiej
wykorzystać komputer.
PRZESTROGA: PRZESTROGA wskazuje na ryzyko uszkodzenia
sprzętu lub utraty danych w razie nieprzestrzegania instrukcji.
OSTRZEŻENIE: OSTRZEŻENIE informuje o sytuacjach, w których
występuje ryzyko uszkodzenia mienia, odniesienia obrażeń ciała lub
śmierci.
____________________
Informacje zawarte w tym dokumencie mogą zostać zmienione bez uprzedzenia.
© 2010 Dell Inc. Wszelkie prawa zastrzeżone.
Powielanie tych materiałów w jakiejkolwiek formie bez pisemnej zgody firmy Dell Inc. jest surowo
zabronione.
Znaki towarowe użyte w tym dokumencie: Dell™, logo DELL i PowerEdge™ są znakami
towarowymi firmy Dell Inc. AMD
Devices, Inc. Microsoft
zarejestrowanymi znakami towarowymi firmy Microsoft Corporation w Stanach Zjednoczonych
i/lub innych krajach. Red Hat Enterprise Linux
towarowymi firmy Red Hat, Inc. w Stanach Zjednoczonych i/lub innych krajach. Novell
są zarejestrowanymi znakami towarowymi firmy Novell Inc. w Stanach Zjednoczonych i innych
krajach. Citrix
towarowymi firmy Citrix System, Inc. w Stanach Zjednoczonych i/lub innych krajach.
Tekst może zawierać także inne znaki i nazwy handlowe, odnoszące się do podmiotów posiadających
prawa do tych znaków i nazw lub do ich produktów. Firma Dell Inc. nie rości sobie żadnych praw do
znaków i nazw towarowych innych niż jej własne.
®
, Windows® i Windows Server® są znakami towarowymi lub
®
, Xen® i XenServer® są znakami towarowymi lub zarejestrowanymi znakami
®
jest zarejestrowanym znakiem towarowym Advanced Micro
®
i Enterprise Linux® są zarejestrowanymi znakami
®
i SUSE®
Model zgodny z normą E12S Series i E13S Series
Czerwiec 2010 Nr ref. 9V9CK Wersja A00
Page 75

Instalacja i konfiguracja
OSTRZEŻENIE: Przed rozpoczęciem wykonywania poniższej
procedury zapoznaj się z instrukcjami dotyczącymi bezpieczeństwa
dołączonymi do systemu.
Rozpakowanie systemu
Rozpakuj system i zidentyfikuj jego poszczególne elementy.
Zamontuj prowadnice i zainstaluj system w szafie typu rack zgodnie z instrukcjami
dotyczącymi bezpieczeństwa oraz instrukcjami dotyczącymi montowania systemów w
szafie typu rack dostarczonymi wraz z systemem.
Rozpoczęcie pracy z systemem 73
Page 76

Czynności opcjonalne — podłączanie klawiatury, myszy i
monitora
Podłącz klawiaturę, mysz i monitor (opcjonalnie).
Złącza w tylnej części systemu oznaczone są ikonami, wskazującymi kabel,
który należy podłączyć do każdego złącza. Upewnij się, że śruby na złączu kabla
monitora zostały dokręcone (o ile występują).
Podłączanie kabla (kabli) zasilania
Podłącz odpowiedni kabel (lub kable) zasilania do systemu oraz do monitora,
o ile używasz monitora.
74 Rozpoczęcie pracy z systemem
Page 77

Mocowanie kabla (kabli) zasilania
Zegnij kabel zasilania systemu w pętlę, jak przedstawiono na rysunku, i zamocuj kabel
na wsporniku, używając załączonej opaski. Podłącz drugą końcówkę kabla zasilania do
uziemionego gniazdka elektrycznego lub oddzielnego źródła zasilania, np. do zasilania
bezprzerwowego (UPS) lub do jednostki rozdziału zasilania (PDU).
Włączanie systemu
Naciśnij przyciski zasilania systemu i monitora. Powinny zaświecić się wskaźniki
zasilania.
Rozpoczęcie pracy z systemem 75
Page 78

Montaż opcjonalnej osłony
Zamontuj osłonę (opcjonalną).
Konfiguracja systemu operacyjnego
W przypadku zakupienia systemu operacyjnego zainstalowanego fabrycznie zapoznaj
się z dokumentacją systemu operacyjnego dostarczoną wraz z systemem. Przed
rozpoczęciem instalowania systemu operacyjnego po raz pierwszy zapoznaj się z
dokumentacją dotyczącą instalacji i konfiguracji systemu operacyjnego. Upewnij się,
że system operacyjny został zainstalowany przed instalacją sprzętu i oprogramowania
niezakupionego wraz z komputerem.
76 Rozpoczęcie pracy z systemem
Page 79

Obsługiwane systemy operacyjne
UWAGA: W systemach z dwunastoma dyskami twardymi z dodatkowymi
wewnętrznymi dyskami twardymi zaleca się zainstalowanie systemu
operacyjnego na wewnętrznych twardych dyskach w konfiguracji RAID 1.
• Microsoft Windows Server 2008 SP2 – wersje Web, Standard oraz Enterprise
(x86)
• Microsoft Windows Server 2008 SP2 – wersje Web, Standard, Enterprise oraz
Datacenter (x64)
• Microsoft Windows Server 2008 R2 – wersje Web, Standard, Enterprise oraz
Datacenter (x64)
• Microsoft Windows Small Business Server 2008 R2 (x64) – wersje Standard i
Premium (x64)
• Microsoft Windows Server 2008 R2 HPC 2008 R2 – wersja (x64)
• Microsoft Windows Server 2008 SP2 HPC – wersja (x64)
• Red Hat Enterprise Linux 5.5 – wersje Standard (x86_64),
Advanced Platform (x86_64) i HPC
• SUSE Linux Enterprise Server 11 SP1 (x86_64)
• SUSE Linux Enterprise Server 10 SP3 (x86_64)
• VMware ESX 4.0, uaktualnienie 2 - wersja Classic
• VMware ESXi 4.0, uaktualnienie 2 - wersja możliwa do instalacji
• VMware ESX 4.1 - wersja Classic
• VMware ESXi 4.1 - wersja możliwa do instalacji
• Citrix XenServer 5.6 – wersja Enterprise
• Microsoft Hyper-V Windows Server 2008 R2 (niezależny)
• Microsoft Windows Server 2008 R2 Hyper-V
UWAGA: Najbardziej aktualne informacje o obsługiwanych systemach
operacyjnych można znaleźć na stronie support.dell.com.
Rozpoczęcie pracy z systemem 77
Page 80

Inne przydatne informacje
OSTRZEŻENIE: Zobacz: uwagi dotyczące bezpieczeństwa i
przepisów prawnych w dokumencie dostarczonym wraz z systemem.
Informacje dotyczące gwarancji mogą zostać zamieszczone w tym
dokumencie lub dostarczone jako oddzielny dokument.
• Dokumentacja dołączona do szafy typu rack przedstawia sposób
montowania w niej komputera.
Podręcznik użytkownika sprzętu
•
sposobów rozwiązywania problemów zaistniałych podczas jego użytkowania, a
także instrukcje dotyczące instalacji lub wymiany jego elementów. Dokument ten
jest dostępny w trybie online na stronie
• Wszystkie nośniki dostarczone z systemem zawierające dokumentację
i narzędzia do konfiguracji systemu oraz zarządzania nim, w tym te, które
dotyczą systemu operacyjnego, oprogramowania do zarządzania systemem,
uaktualnienia systemu oraz elementów nabytych wraz z systemem.
UWAGA: Należy zawsze sprawdzać, czy na stronie
support.dell.com/manuals pojawiły się aktualizacje, i czytać je w
pierwszej kolejności, ponieważ często pojawiają się one z
wyprzedzeniem w stosunku do innych dokumentów.
zawiera informacje o funkcjach systemu i opis
support.dell.com/manuals
.
Uzyskiwanie pomocy technicznej
Jeśli procedury opisane w tym podręczniku są niezrozumiałe lub jeśli system nie działa
zgodnie z oczekiwaniami, należy zapoznać się z
Dell™ oferuje kompleksowe szkolenie w dziedzinie sprzętu i certyfikację. Więcej
informacji na ten temat można znaleźć na stronie
może nie być oferowana we wszystkich lokalizacjach.
Podręcznikiem użytkownika sprzętu
www.dell.com/training
. Ta usługa
.
78 Rozpoczęcie pracy z systemem
Page 81

Dane techniczne
Procesor
Typ procesora Do dwóch procesorów AMD Opteron 4100
Szyna rozszerzeń
Typ magistrali PCI Express Generation 2
Gniazda rozszerzeń z zastosowaniem
kart nośnych
UWAGA: W zależności od konfiguracji system może być wyposażony w kartę
nośną 1 lub kartę nośną 2.
Karta nośna 1
LUB
Karta nośna 2
Gniazdo 1: PCIe x4 o połówkowej długości i
pełnej wysokości
Gniazdo 2: PCIe x4 o pełnej długości i pełnej
wysokości
Gniazdo 3: PCIe x8 o połówkowej długości i
pełnej wysokości
Gniazdo 4: PCIe x4, wewnętrzne gniazdo dla karty
zintegrowanej
UWAGA: Wszystkie cztery gniazda są
złączami x8.
Gniazdo 1: PCIe x16 o pełnej długości i pełnej
wysokości
Gniazdo 2: PCIe x4 wewnętrzne gniazdo dla
karty zintegrowanej
UWAGA: Na karcie nośnej 2 jest
dostępna zoptymalizowana konfiguracja
General Purpose Computation on
Graphics Processing Units (GPGPU).
Pamięć
Architektura Moduły pamięci 1333 MHz DDR3 rejestrowane
lub niebuforowane moduły DIMM z kodem
korekcji błędu (ECC)
Gniazda modułów pamięci Osiem 240-stykowych
Pojemność modułów pamięci 1 GB, 2 GB, 4 GB lub 8 GB
Rozpoczęcie pracy z systemem 79
Page 82

Pamięć (ciąg dalszy)
Minimalna pojemność pamięci RAM 1 GB z jednym procesorem (1 moduł DIMM
na każdy procesor)
Maksymalna pojemność pamięci RAM 64 GB (dwuszeregowe moduły DIMM 8 GB)
128 GB (czteroszeregowe moduły DIMM
16 GB) (o ile dostępne)
Napędy
Dyski twarde
Systemy z ośmioma dyskami
twardymi
Do ośmiu wymienianych podczas pracy
3,5-calowych lub 2,5-calowych napędów SAS,
SATA lub SSD
Systemy z dwunastoma dyskami
twardymi
Do dwunastu 3,5-calowych lub 2,5-calowych,
wymienianych podczas pracy napędów SAS,
SATA lub SSD i do dwóch 2,5-calowych
napędów SAS lub SSD połączonych kablem
UWAGA: W systemach z dwunastoma
dyskami twardymi z dodatkowymi
wewnętrznymi dyskami twardymi zaleca
się zainstalowanie systemu operacyjnego
na wewnętrznych twardych dyskach w
konfiguracji RAID 1.
Napęd optyczny Opcjonalny wewnętrzny wąski napęd SATA
DVD-ROM lub DVD+/-RW
Opcjonalny, zewnętrzny napęd DVD-ROM typu
USB
UWAGA: Systemy z dwunastoma
dyskami twardymi obsługują tylko
zewnętrzny napęd DVD-ROM typu USB.
80 Rozpoczęcie pracy z systemem
Page 83

Złącza
Z tyłu
Kontroler NIC Dwa złącza RJ-45 (dla zintegrowanych kart
sieciowych o pojemności 1 GB)
Szeregowe 9-stykowe, DTE, kompatybilne z 16550
USB Dwa 4-stykowe, kompatybilne z USB 2.0
Wideo 15-stykowa karta VGA
Z przodu
Wideo 15-stykowa karta VGA
USB Dwa 4-stykowe, kompatybilne z USB 2.0
Wewn ęt rz ne
USB Dwa 4-stykowe, kompatybilne z USB 2.0
Wideo
Typ wideo Matrox G200, zintegrowana z kontrolerem płyty
Pamięć wideo 8 MB
Zasilanie
Zasilacz prądu zmiennego (na zasilacz)
Moc 750 W (opcjonalny zasilacz nadmiarowy)
Napięcie 100–240 V prądu zmiennego, automatyczne
dopasowywanie zakresu, 50–60 Hz
Emisja ciepła
Systemy z ośmioma dyskami
twardymi
Systemy z dwunastoma dyskami
twardymi
Maks. natężenie prądu przy
włączeniu
maks. 2200 BTU/godz.
maks. 2450 BTU/godz.
Przy typowym zasilaniu i w całym dozwolonym
zakresie warunków pracy systemu natężenie
prądu przy włączeniu może osiągnąć 55 A na
zasilacz przez 10 ms lub krócej.
Rozpoczęcie pracy z systemem 81
Page 84

Zasilanie (ciąg dalszy)
Baterie
Bateria systemu Litowo-jonowa bateria pastylkowa CR 2032 o
napięciu 3,0 V
Cechy fizyczne
Wysokość
Systemy z ośmioma dyskami
twardymi
Systemy z dwunastoma dyskami
twardymi
Szerokość
Systemy z ośmioma dyskami
twardymi
Systemy z dwunastoma dyskami
twardymi
Głębokość
Systemy z ośmioma dyskami
twardymi
Systemy z dwunastoma dyskami
twardymi
Waga (przy maksymalnej konfiguracji)
Systemy z ośmioma dyskami
twardymi
Systemy z dwunastoma dyskami
twardymi
Waga (bez wyposażenia)
Systemy z ośmioma dyskami
twardymi
Systemy z dwunastoma dyskami
twardymi
8,64 cm
8,67 cm
43,66 cm
44,52 cm
61,02 cm
66,46 cm
22,5 kg
29,0 kg
13,5 kg
15,85 kg
82 Rozpoczęcie pracy z systemem
Page 85

Warunki otoczenia
UWAGA: Dodatkowe informacje o warunkach otoczenia przewidzianych dla
poszczególnych konfiguracji systemu można znaleźć na stronie
www.dell.com/environmental_datasheets
Temperatura:
W trakcie pracy Od 10 do 35°C przy maksymalnym gradiencie
temperaturowym 10°C na godzinę
UWAGA: W przypadku wysokości
powyżej 899,16 m maksymalna
temperatura, w jakiej urządzenie może
pracować, obniża się o 0,55°C na każde
167,64 m.
Przechowywanie Od -40° do 65°C przy maksymalnym gradiencie
temperaturowym 20°C na godzinę
Wilgotność względna
W trakcie pracy Od 20 do 80% (bez kondensacji)
przy maksymalnym gradiencie
wilgotności 10% na godzinę
Przechowywanie Od 5% do 95%, maksymalny gradient
wilgotności 10% na godzinę.
Maksymalne drgania
W trakcie pracy 0,26 G przy częstotliwości 5 – 350 Hz przez
15 min.
Przechowywanie 1,87 G przy częstotliwości 10 – 500 Hz przez
15 min.
Maksymalny wstrząs
W trakcie pracy Jeden impuls wstrząsowy na dodatniej osi Z
(jeden wstrząs po każdej stronie systemu) o
sile 31 G, trwający przez 2,6 ms w kierunkach
działania
Przechowywanie Sześć kolejnych impulsów wstrząsowych na
dodatniej i ujemnej stronie osi X, Y i Z (jeden
wstrząs po każdej stronie systemu) o sile 71 G
trwających maksymalnie 2 ms z falą
kwadratową 32 G, 270 cali/sek.
Rozpoczęcie pracy z systemem 83
Page 86

Warunki otoczenia (ciąg dalszy)
Wysokość n.p.m.
W trakcie pracy Od -16 do 10 668 m
UWAGA: W przypadku wysokości n.p.m.
powyżej 899,16 m maksymalna
temperatura, w jakiej urządzenie może
pracować, obniża się o 0,55°C na każde
167,64 m.
Przechowywanie Od -16 do 10 600 m
Poziom zanieczyszczeń w powietrzu
Klasa G1 lub niższa, wg definicji w ISA-S71.04-1985
84 Rozpoczęcie pracy z systemem
Page 87

Системы Dell
PowerEdge R515
Начало работы
с системой
Нормативная модель серии E12S и E13S
Page 88

Примечания, предупреждения
и предостережения
ПРИМЕЧАНИЕ: ПРИМЕЧАНИЕ указывает на важную информацию,
которая поможет использовать компьютер более эффективно.
ВНИМАНИЕ: ВНИМАНИЕ – указывает на риск повреждения
оборудования или потери данных в случае несоблюдения
инструкций.
ОСТОРОЖНО: ОСТОРОЖНО указывает на потенциальную
опасность повреждения оборудования, получения травм или
угрозу для жизни.
____________________
Информация, содержащаяся в данном документе, может быть изменена без
предварительного уведомления.
© 2010 Dell Inc. Все права защищены.
Воспроизведение материалов данного руководства в любой форме без письменного разрешения
корпорации Dell Inc. строго запрещается.
В данном тексте используются следующие товарные знаки: Dell™, эмблема DELL,
PowerEdge™ являются товарными знаками корпорации Dell Inc. AMD
зарегистрированным товарным знаком корпорации Advanced Micro Devices, Inc. Microsoft
Windows
товарными знаками корпорации Microsoft в Соединенных Штатах и/или других странах.
Red Hat Enterprise Linux
Red Hat, Inc., в США и других странах. Novell
торговыми марками корпорации Novell в США и других странах. Citrix
являются товарными знаками или зарегистрированными товарными знаками компании Citrix
System в США и/или других странах.
Прочие товарные знаки и названия продуктов могут использоваться в данном документе для
обозначения компаний, заявляющих права на эти товарные знаки и названия, или продуктов
этих компаний. Dell Inc. не претендует на права собственности в отношении каких-либо
товарных знаков и торговых наименований, кроме своих собственных.
®
и Windows Server® являются товарными знаками или зарегистрированными
®
и Enterprise Linux® являются охраняемыми товарными знаками
®
и SUSE® являются зарегистрированными
®
является
®
, Xen® и XenServer®
®
,
Нормативная модель серии E12S и E13S
Июнь 2010 P/N 9V9CK Ред. A00
Page 89

Установка и конфигурирование
ОСТОРОЖНО: Перед тем как приступить к выполнению
следующей процедуры, прочитайте инструкции по технике
безопасности, прилагаемые к системе.
Распаковка системы
Распакуйте систему и идентифицируйте каждый элемент.
Смонтируйте направляющие кронштейны и установите систему в стойку согласно
инструкциям по технике безопасности и инструкциям по установке стойки. Эти
инструкции прилагаются к системе.
Начало работы с системой 87
Page 90

Дополнительно: подключение клавиатуры, мыши и монитора
Подключите клавиатуру, мышь и монитор (дополнительно).
Разъемы на задней панели системы снабжены значками, позволяющими определить
соответствие кабелей разьемам. На кабельном разъеме монитора необходимо затянуть
винты (если они есть).
Подключение кабелей питания
Подключите кабель (кабели) питания к системе. Если используется монитор, также
подключите к нему кабель питания.
88 Начало работы с системой
Page 91

Фиксация кабелей питания
Изогните кабель питания системы в форме петли, как показано на рисунке, и прикрепите
его шиной к прилагаемой скобе. Подключите другой конец кабеля питания к заземленной
электрической розетке или отдельному источнику питания, например к источнику
бесперебойного питания (ИБП) или блоку распределения питания (PDU).
Включение системы
Нажмите кнопки питания на системном блоке и мониторе. Должны загореться
индикаторы потребления энергии.
Начало работы с системой 89
Page 92

Установка дополнительной лицевой панели
Установите лицевую панель (дополнительно).
Завершение установки операционной системы
Если компьютер приобретен с предустановленной операционной системой,
см. соответствующую документацию, поставляемую вместе с компьютером.
Чтобы установить операционную систему, см. документацию по установке и
конфигурированию операционной системы. Операционная система должна быть
установлена до установки аппаратного или программного обеспечения, которое не
было приобретено вместе с системой.
90 Начало работы с системой
Page 93

Поддерживаемые операционные системы
ПРИМЕЧАНИЕ: Для систем, в которых установлено двенадцать
жестких дисков с дополнительными внутренними жесткими дисками
рекомендуется устанавливать операционную систему на внутренние
жесткие диски в конфигурации RAID 1.
•
Microsoft Windows Server 2008 SP2 (x86) Web Edition, Standard Edition и Enterprise
Edition
•
Microsoft Windows Server 2008 SP2 Web Edition, Standard, Enterprise Edition
и DataCenter Edition (x64)
•
Microsoft Windows Server 2008 R2 Web Edition, Standard, Enterprise Edition
и DataCenter Edition (x64)
•
Microsoft Small Business Server 2008 R2 (x64) Standard Edition и Premium Edition
•
Microsoft Windows Server 2008 R2 HPC (x64) Edition
•
Microsoft Windows Server 2008 SP2 HPC (x64) Edition
•
Red Hat Enterprise Linux 5.5 Standard (x86_64) Edition, Advanced Platform (x86_64)
Edition и HPC Edition
•
SUSE Linux Enterprise Server 11 SP1 (x86_64)
•
SUSE Linux Enterprise Server 10 с пакетом обновления SP3 (x86_64)
•
VMware ESX 4.0 обновление 2 Classic Edition
•
VMware ESXi 4.0 обновление 2 Installable Edition
•
VMware ESX 4.1 Classic Edition
•
VMware ESXi 4.1 Classic Edition
•
Citrix XenServer 5.6 Enterprise Edition
•
Microsoft Hyper-V Windows Server 2008 R2 (автономный)
•
Microsoft Windows Server 2008 R2 с ролью Hyper-V
ПРИМЕЧАНИЕ: Свежую информацию о поддерживаемых
операционных системах см. на веб-странице support.dell.com.
Начало работы с системой 91
Page 94

Прочая полезная информация
ОСТОРОЖНО: См. документацию по безопасности и
соответствию нормативам, которая предоставляется вместе
с компьютером. Гарантийная информация может входить в
состав данного документа или предоставляться
в виде отдельного документа.
•
В документации, которая поставляется в комплекте со стойкой, содержатся
инструкции по установке системы в эту стойку.
•В Руководстве по эксплуатации оборудования
характеристиках системы, порядке устранения неисправностей, установке и
замене ее компонентов. Данный документ доступен на веб-странице
support.dell.com/manuals
•
Любой носитель в комплекте с системой, содержащий документацию
и программные средства для настройки системы и управления ею, включая
компоненты, относящиеся к операционной системе, ПО для управления системой
и обновления системы, а также компоненты, приобретенные вместе с системой.
ПРИМЕЧАНИЕ: Обязательно проверяйте наличие обновлений на
веб-странице support.dell.com/manuals и предварительно читайте
обновленные документы, поскольку они нередко заменяют
информацию, содержащуюся в других документах.
.
содержится информация о
Получение технической поддержки
Если непонятна приведенная в настоящем руководстве процедура или если система
не работает должным образом, см.
Корпорация Dell предлагает пройти полный курс обучения работе с оборудованием и
получить сертификат. Дополнительная информация представлена на веб-сайте
dell.com/training
. Службы обучения и сертификации доступны не во всех регионах.
руководство по эксплуатации оборудования
.
92 Начало работы с системой
Page 95

Технические характеристики
Процессор
Тип процессора До двух процессоров AMD Opteron 4100
Шина расширения
Тип шины PCI Express 2-го поколения
Разъемы расширениядля надстроечных
плат
ПРИМЕЧАНИЕ: В зависимости от конфигурации в данной системе может
быть надстроечная плата 1 или надстроечная плата 2.
Надстроечная плата 1
ЛИБО
Надстроечная плата 2
Слот 1: PCIe x4, половинной длины, полной
высоты
Слот 2: PCIe x4, полной длины, полной высоты
Слот 3: PCIe x8, половинной длины, полной
высоты
Слот 4: PCIe x4, внутренний слот для встроенной
платы
ПРИМЕЧАНИЕ: Все четыре слота
являются восьмиканальными разъемами.
Слот 1: PCIe x16, полной длины, полной высоты
Слот 2: PCIe x4, внутренний слот для встроенной
платы
ПРИМЕЧАНИЕ: В надстроечной плате
2 доступна оптимизированная
конфигурация General Purpose
Computation on Graphics Processing Units
(GPGPU).
Память
Архитектура 1333 МГц DDR3 регистровой или
или небуферизованного (unbuffered) обнаружения и
корректировки ошибок
(Error Correcting Code — ECC)
Разъемы для модулей памяти Восемь 240-контактных
Емкость модулей памяти 1 ГБ, 2 ГБ, 4 ГБ или 8 ГБ
Минимальный объем ОЗУ 1 ГБ с одним процессором (1 модуль памяти DIMM
на каждый процессор)
Начало работы с системой 93
Page 96

Память (Продолжение)
Максимальный объем ОЗУ 64 ГБ (8 ГБ модули памяти с двусторонним
расположением чипов)
128 ГБ (16 ГБ модули памяти с четырехсторонним
расположением чипов) (если доступно)
Накопители
Жесткие диски
Системы с восемью жесткими дисками
Системы с 12 жесткими дисками
До восьми 3,5- или 2,5-дюймовых дисков SAS,
SATA или SSD с возможностью “горячего”
переключения
До двенадцати 3,5-дюймовых дисков SAS, SATA
или SSD с возможностью “горячего” переключения
и до двух 2,5-дюймовых дисков SAS или SSD с
кабельным подключением
ПРИМЕЧАНИЕ: Для систем, в которых
установлено двенадцать жестких дисков с
дополнительными внутренними жесткими
дисками рекомендуется устанавливать
операционную систему на внутренние
жесткие диски в конфигурации RAID 1.
Оптический дисковод Дополнительные внутренние малогабаритные
дисководы SATA DVD-ROM или DVD+/-RW
Дополнительный внешний USB-дисковод
DVD-ROM
ПРИМЕЧАНИЕ: Системы с 12 жесткими
дисками поддерживают только внешний
привод USB DVD-ROM.
94 Начало работы с системой
Page 97

Разъемы
Задняя панель
Сетевая интерфейсная плата (NIC) Два разъема RJ-45 (для встроенных сетевых
Последовательный порт 9-контактный разъем DTE, совместимый с 16550
Шина USB Два 4-контактных разъема, совместимых с шиной
Видео 15-контактный разъем VGA
Передняя панель
Видео 15-контактный разъем VGA
Шина USB Два 4-контактных разъема, совместимых с шиной
Внутренние
Шина USB Два 4-контактных разъема, совместимых с шиной
адаптеров Gigabit Ethernet)
USB 2.0
USB 2.0
USB 2.0
Видео
Тип видео Matrox G200, встроен в BMC
Видеопамять 8 Мб
Power (Питание)
Источник питания переменного тока (для каждого источника питания)
Мощность 750 Вт (дополнительный резервный блок питания)
Напряжение 100–240 В переменного тока, функция
автоматического переключения диапазонов
измерений, 50–60 Гц
Теплоотдача
Системы с восемью жесткими
дисками
Системы с 12 жесткими дисками
Максимальный бросок тока При стандартных условиях питания сети и во
Максимум 2200 БТЕ/час
Максимум 2450 БТЕ/час
всем рабочем диапазоне внешних параметров
системы
бросок тока может достигать 55 А для каждого
источника питания в течение не более 10 мс.
Начало работы с системой 95
Page 98

Power (Питание) (Продолжение)
Аккумуляторные батареи
Системная аккумуляторная батарея Литиевая батарейка типа “таблетка” CR 2032, 3,0 В
Физические характеристики
Высота
Системы с 8 жесткими дисками
Системы с 12 жесткими дисками
Ширина
Системы с восемью жесткими
дисками
Системы с 12 жесткими дисками
Длина
Системы с восемью жесткими
дисками
Системы с 12 жесткими дисками
Масса (макс. конфигурация)
Системы с восемью жесткими
дисками
Системы с 12 жесткими дисками
Масса (пустой)
Системы с восемью жесткими
дисками
Системы с 12 жесткими дисками
8,64 см (3,4 дюйма)
8,67 см (3,42 дюйма)
43,66 см (17,19 дюйма)
44,52 см (17,53 дюйма)
61,02 см (24,09 дюйма)
66,46 см (26,17 дюйма)
22,5 кг
29,0 кг
13,5 кг
15,85 кг
Условия эксплуатации
ПРИМЕЧАНИЕ: Дополнительную информацию о параметрах окружающей
среды для установки определенной конфигурации системы см. на вебстранице www.dell.com/environmental_datasheets.
Температура
В процессе работы От 10 до 35 °C с максимальной скоростью
изменения температуры 10 °C в час
ПРИМЕЧАНИЕ: Если высота над
уровнем моря превышает 900 м,
максимальная рабочая температура
снижается на 1 градус по Фаренгейту за
168 м.
Во время хранения От –40° до 65°C с максимальной скоростью
изменения температуры 20°C в час
96 Начало работы с системой
Page 99

Условия эксплуатации (Продолжение)
Относительная влажность
В процессе работы От 20% до 80% (без конденсации)
с максимальными колебаниями
влажности 10% в час
Во время хранения от 5% до 95%, максимальное изменение влажности
Максимальная вибрация
В процессе работы 0,26 G при частоте 5–350 Гц в течение 15 минут
Во время хранения 1,87 G при частоте 10–500 Гц в течение 15 минут
Максимальная ударная нагрузка
В процессе работы Один ударный импульс 31 G длительностью не
Во время хранения Шесть последовательных ударных импульсов 71 G
Высота над уровнем моря
В процессе работы От -16 до 10 668 м (от -50 до 35 000 футов)
10% в час.
более 2,6 мс в положительном направлении по оси
z (по одному импульсу с каждой стороны системы)
при рабочей ориентации
длительностью не более 2 мс в положительном
и отрицательном направлениях по осям X, Y и Z
(по одному импульсу с каждой стороны системы)
и прямоугольный импульс 32 G, 686 см/с
ПРИМЕЧАНИЕ: Если высота над
уровнем моря превышает
900 м, максимальная рабочая
температура снижается на 1 °F/168 м.
Во время хранения От –16 до 10 600 м (от –50 до 35 000 футов)
Уровень загрязняющих веществ в атмосфере
Класс G1 или ниже, согласно классификации
ISA-S71.04-1985
Начало работы с системой 97
Page 100

98 Начало работы с системой
 Loading...