

Page 1

Dell PowerConnect W-
AirWave 7.4
Configuration Guide
Page 2

Copyright
© 2011 Dell PowerConnect W Networks, Inc. Dell PowerConnect W Networks trademarks include , Dell PowerConnect W
Networks®, Dell PowerConnect W Wireless Networks®, the registered Dell PowerConnect W the Mobile Edge Company logo, and Dell
PowerConnect W Mobility Management System
®
. Dell™, the DELL™ logo, and PowerConnect™ are trademarks of Dell Inc.
All rights reserved. Specifications in this manual are subject to change without notice.
Originated in the USA. All other trademarks are the property of their respective owners.
Open Source Code
Certain Dell PowerConnect W products include Open Source software code developed by third parties, including software code subject to the
GNU General Public License (GPL), GNU Lesser General Public License (LGPL), or other Open Source Licenses. The Open Source code used
can be found at this site:
http://www.arubanetworks.com/open_source
Legal Notice
The use of Dell PowerConnect W Networks, Inc. switching platforms and software, by all individuals or corporations, to terminate other vendors’
VPN client devices constitutes complete acceptance of liability by that individual or corporation for this action and indemnifies, in full, Dell
PowerConnect W Networks, Inc. from any and all legal actions that might be taken against it with respect to infringement of copyright on behalf
of those vendors.
Dell PowerConnect W-AirWave 7.4 | Configuration Guide 0510904-05 | December 2011
Page 3

Contents
Preface....................................................................................................................................................................... 7
Document Audience and Organization...........................................................................................7
Note, Caution, and Warning Icons ..................................................................................................7
Contacting Support ............................................................................................................................8
Chapter 1 Dell PowerConnect W Configuration in AirWave.......................................................... 9
Introduction ......................................................................................................................................... 9
Requirements, Restrictions, and ArubaOS Support in AirWave ................................................9
Requirements .............................................................................................................................. 9
Restrictions.................................................................................................................................. 9
ArubaOS Support in AirWave...................................................................................................9
Overview of Dell PowerConnect W Configuration in AirWave................................................. 10
Device Setup > Dell PowerConnect W Configuration Page .............................................11
Groups > Dell PowerConnect W Config Page With Global Configuration Enabled ......12
Groups > Dell PowerConnect W Config When Global Configuration is Disabled .........12
Dell PowerConnect W Configuration Sections in the Tree View..................................... 13
Dell PowerConnect W AP Groups Section .................................................................. 13
AP Overrides Section ......................................................................................................14
WLANs Section ................................................................................................................14
Profiles Section ................................................................................................................15
Security Section ...............................................................................................................15
Local Config Section........................................................................................................16
Advanced Services Section ...........................................................................................16
APs/Devices > List Page ......................................................................................................... 17
APs/Devices > Manage Page.................................................................................................17
APs/Devices > Monitor Page ................................................................................................. 18
Groups > Basic Page ............................................................................................................... 18
Additional Concepts and Components of Dell PowerConnect W Configuration ................... 19
Global Configuration and Scope ............................................................................................ 19
Referenced Profile Setup in Dell PowerConnect W Configuration ................................. 19
Save, Save and Apply, and Revert Buttons..........................................................................20
Additional Concepts and Benefits ......................................................................................... 20
Scheduling Configuration Changes............................................................................... 20
Auditing and Reviewing Configurations ....................................................................... 20
Licensing and Dependencies in Dell PowerConnect W Configuration................... 20
Setting Up Initial Dell PowerConnect W Configuration ............................................................. 21
Prerequisites ............................................................................................................................. 21
Procedure .................................................................................................................................. 21
Additional Capabilities of Dell PowerConnect W-Series Configuration .........................26
Chapter 2 Using Dell PowerConnect W Configuration in Daily Operations............................... 27
Introduction ....................................................................................................................................... 27
Procedures and Guidelines for Dell PowerConnect W AP Groups ......................................... 27
Guidelines and Pages for Dell PowerConnect W AP Groups........................................... 27
Selecting Dell PowerConnect W AP Groups....................................................................... 28
Configuring Dell PowerConnect W AP Groups ...................................................................28
General WLAN Guidelines .............................................................................................................. 28
Dell PowerConnect W-AirWave 7.4 | Configuration Guide | 3
Page 4

General Profiles Guidelines ............................................................................................................ 28
General Controller Procedures and Guidelines .......................................................................... 29
Using Controllers in Dell PowerConnect W Configuration................................................ 29
Pushing Device Configurations to Controllers.....................................................................29
Supporting APs with Dell PowerConnect W Configuration ...................................................... 30
AP Overrides Guidelines ......................................................................................................... 30
Changing Adaptive Radio Management (ARM) Settings ..................................................30
Changing SSID and Encryption Settings .............................................................................. 30
Changing the Dell PowerConnect W AP Group for an AP Device................................... 30
Using AirWave to Deploy Dell PowerConnect W APs for the First Time........................ 31
Using General AirWave Device Groups and Folders ......................................................... 32
Visibility in Dell PowerConnect W Configuration........................................................................32
Visibility Overview .................................................................................................................... 32
Defining Visibility for Dell PowerConnect W Configuration.............................................. 33
Appendix A Configuration Reference.................................................................................................. 35
Introduction ....................................................................................................................................... 35
Dell PowerConnect W AP Groups ................................................................................................. 35
Dell PowerConnect W AP Groups ......................................................................................... 35
AP Overrides ..................................................................................................................................... 39
AP Overrides ............................................................................................................................. 39
WLANs ............................................................................................................................................... 43
Overview of WLANs Configuration........................................................................................43
WLANs ....................................................................................................................................... 43
WLANs > Basic.........................................................................................................................44
WLANs > Advanced.................................................................................................................45
Profiles ............................................................................................................................................... 48
Understanding Dell PowerConnect W Configuration Profiles.......................................... 48
Profiles > AAA Overview.........................................................................................................48
Profiles > AAA...........................................................................................................................49
Profiles > AAA > 802.1x Auth .................................................................................................. 51
Profiles > AAA > Advanced Authentication......................................................................... 56
Profiles > AAA > Captive Portal Auth.................................................................................... 57
Profiles > AAA > IPv6 Extension Header .............................................................................. 59
Profiles > AAA > MAC Auth .................................................................................................... 60
Profiles > AAA > VPN Connection......................................................................................... 61
Profiles > AAA > VPN Connection > VIA Auth..................................................................... 63
Profiles > AAA > VPN Connection > VIA Client WLAN ......................................................63
Profiles > AAA > VIA Global....................................................................................................65
Profiles > AAA > Stateful 802.1X Auth...................................................................................65
Profiles > AAA > Wired Auth .................................................................................................. 66
Profiles > AAA > Combined VPN Auth.................................................................................. 66
Profiles > AAA > Management Auth ..................................................................................... 67
Profiles > AAA > Stateful NTLM Auth................................................................................... 68
Profiles > AAA > WISPr Auth ................................................................................................. 69
Profiles > AP..............................................................................................................................70
Profiles > AP > Authorization..................................................................................................71
Profiles > AP > Ethernet Link .................................................................................................. 72
Profiles > AP > Provisioning ................................................................................................... 72
Profiles > AP > Regulatory Domain ....................................................................................... 74
Profiles > AP > SNMP..............................................................................................................75
Profiles > AP > SNMP > SNMP User .................................................................................... 75
Profiles > AP > System ............................................................................................................ 76
Profiles > AP > Wired Port ...................................................................................................... 80
Profiles > AP > Wired...............................................................................................................80
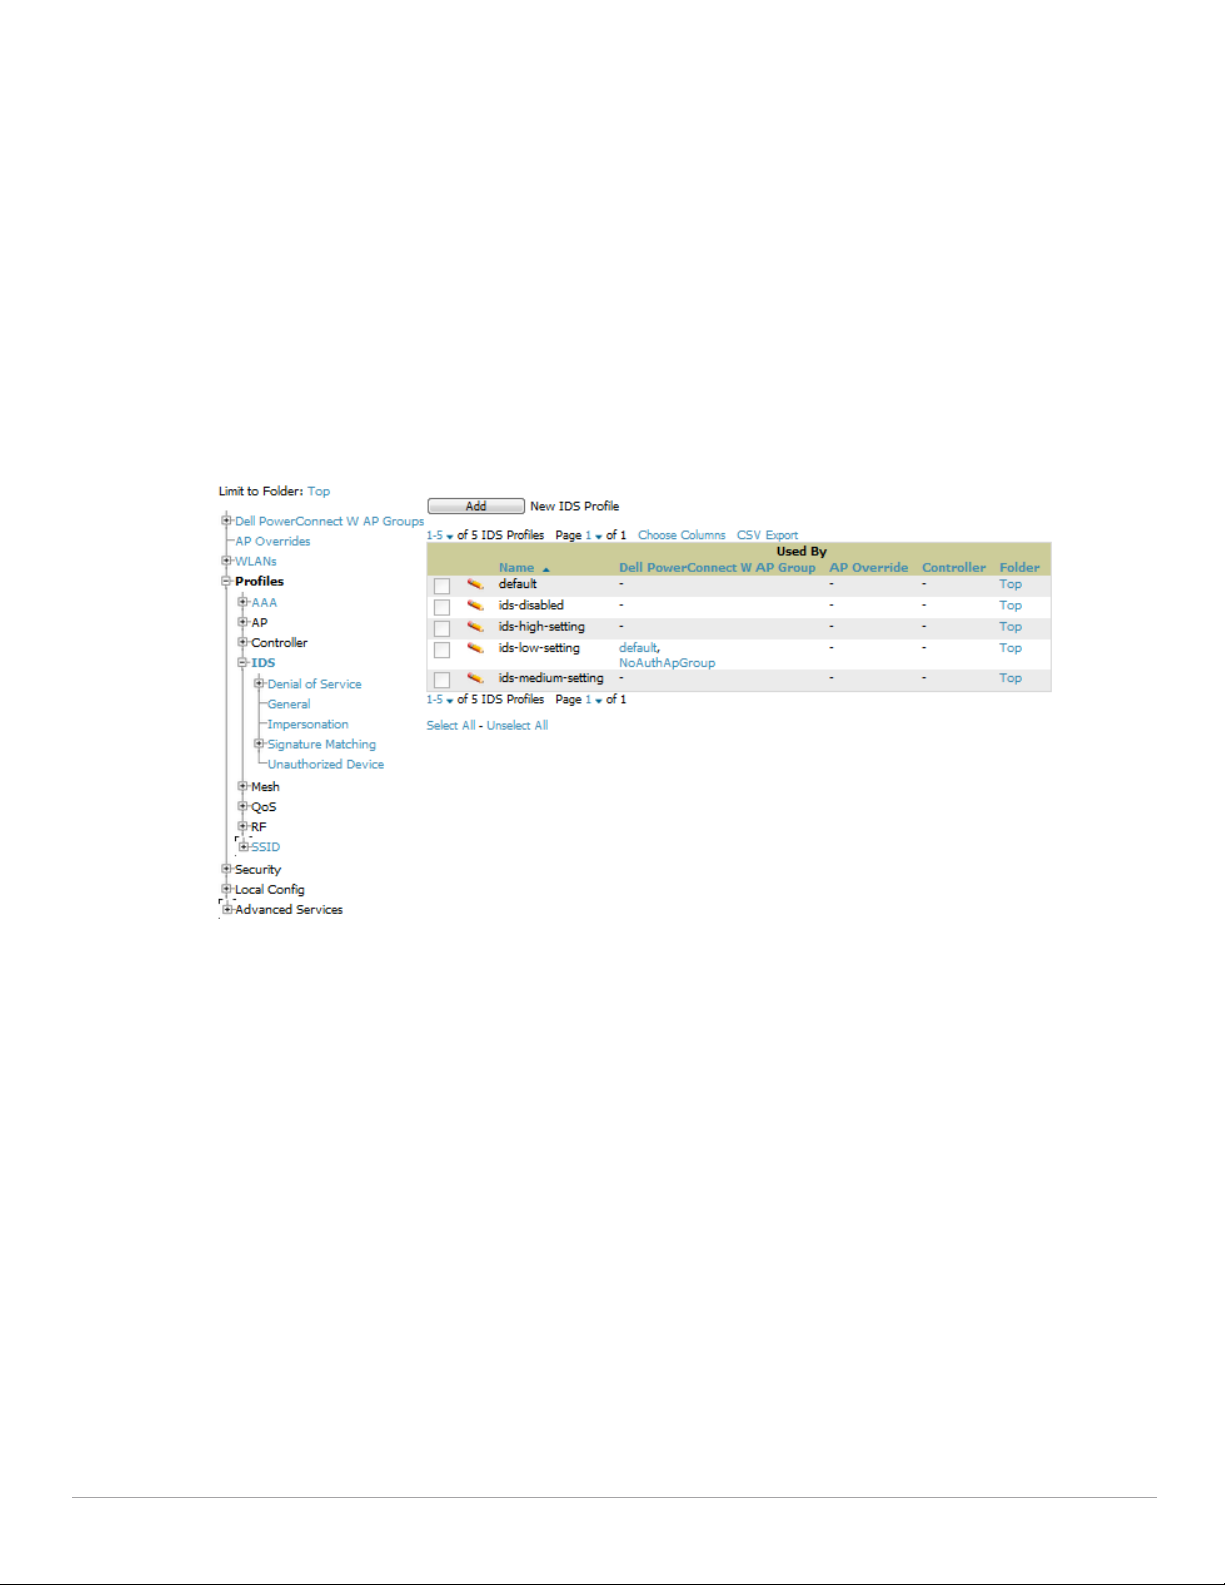
Profiles > IDS.............................................................................................................................82
4 | Dell PowerConnect W-AirWave 7.4 | Configuration Guide
Page 5

Profiles > IDS > General .......................................................................................................... 84
Profiles > IDS > Signature Matching.....................................................................................85
Profiles > IDS > Signature Matching > Signature............................................................... 86
Profiles > IDS > Denial of Service..........................................................................................86
Profiles > IDS > Denial of Service > Rate Threshold.......................................................... 89
Profiles > IDS > Impersonation .............................................................................................. 90
Profiles > IDS > Unauthorized Device................................................................................... 92
Profiles > Mesh.........................................................................................................................95
Profiles > Mesh > Cluster........................................................................................................95
Profiles > Mesh > Radio .......................................................................................................... 96
Profiles > Mesh > Radio > Mesh HT SSID............................................................................ 98
Profiles > Mobility Switch ..................................................................................................... 100
Profiles > Mobility Switch > IGMP Snooping.....................................................................100
Profiles > Mobility Switch > Ethernet Link ......................................................................... 101
Profiles > Mobility Switch > Port Switching ...................................................................... 102
Profiles > Mobility Switch > VLAN.......................................................................................103
Profiles > QoS..........................................................................................................................104
Profiles > QoS > Traffic Management.................................................................................104
Profiles > QoS > VoIP Call Admission Control ................................................................... 105
Profiles > QoS > WMM Traffic Management.................................................................... 107
Profiles > RF............................................................................................................................. 108
Profiles > RF > 802.11a/g Radio ............................................................................................ 109
Profiles > RF > 802.11a/g Radio > AM Scanning................................................................113
Profiles > RF > 802.11a/g Radio > ARM ............................................................................... 113
Profiles > RF > 802.11a/g Radio > HT Radio........................................................................ 116
Profiles > RF > 802.11a/g Radio > Spectrum.......................................................................117
Profiles > RF > Event Thresholds ......................................................................................... 118
Profiles > RF > Optimization .................................................................................................. 120
Profiles > SSID ........................................................................................................................ 121
Profiles > SSID ........................................................................................................................ 122
Profiles > SSID > EDCA AP ................................................................................................... 126
Profiles > SSID > EDCA Station............................................................................................ 129
Profiles > SSID > HT SSID..................................................................................................... 131
Profiles > SSID > 802.11K ...................................................................................................... 133
Security ....................................................................................................................... ..................... 134
Security > User Roles ............................................................................................................ 135
Security > User Roles > BW Contracts............................................................................... 138
Security > User Roles > VPN Dialers .................................................................................. 139
Security > Policies..................................................................................................................141
Security > Policies > Destinations....................................................................................... 143
Security > Policies > Services..............................................................................................143
Security > Server Groups......................................................................................................144
Server Groups Page Overview..................................................................................... 144
Supported Servers .........................................................................................................145
Adding a New Server Group ........................................................................................ 146
Security > Server Groups > LDAP........................................................................................147
Security > Server Groups > RADIUS ................................................................................... 148
Security > Server Groups > TACACS .................................................................................. 149
Security > Server Groups > Internal....................................................................................150
Security > Server Groups > XML API.................................................................................. 151
Security > Server Groups > RFC 3576..................................................................................151
Security > Server Groups > Windows.................................................................................152
Security > TACACS Accounting........................................................................................... 152
Security > Time Ranges.........................................................................................................153
Security > User Rules ............................................................................................................ 154
Local Config of SNMP Management........................................................................................... 155
Advanced Services ........................................................................................................................ 156
Dell PowerConnect W-AirWave 7.4 | Configuration Guide | 5
Page 6

Overview of IP Mobility Domains.........................................................................................157
Advanced Services > IP Mobility.........................................................................................158
Advanced Services > IP Mobility > Mobility Domain....................................................... 160
Advanced Services > VPN Services ................................................................................... 161
Advanced Services > VPN Services > IKE......................................................................... 163
Advanced Services > VPN Services > IKE > IKE Policy...................................................163
Advanced Services > VPN Services > L2TP...................................................................... 164
Advanced Services > VPN Services > PPTP..................................................................... 165
Advanced Services > VPN Services > IPSEC.................................................................... 166
Advanced Services > VPN Services > IPSEC > Dynamic Map ......................................167
Advanced Services > VPN Services > IPSEC > Dynamic Map > Transform Set......... 168
Groups > Dell PowerConnect W Config Page and Section Information ............................... 169
Index....................................................................................................................................................................... 171
6 | Dell PowerConnect W-AirWave 7.4 | Configuration Guide
Page 7
Preface
Document Audience and Organization
This configuration guide is intended for wireless network administrators and helpdesk personnel who deploy
ArubaOS on the network and wish to manage it with Dell PowerConnect W-AirWave 7.4. Dell PowerConnect
W-AirWave 7.4 versions 6.3 and later support Dell PowerConnect Configuration.
NOTE: Dell PowerConnect W-Series AirWave Wireless Management Suite (AWMS), AirWave, and AirWave Management
Platform (AMP) refer to the same product set and are used interchangeably.
This document provides instructions for using Dell PowerConnect W Configuration and contains the following
chapters:
Table 1 Document Organization and Purposes
Chapter Description
Chapter 1, “Dell PowerConnect W
Configuration in AirWave” on page 9
Chapter 2, “Using Dell PowerConnect W
Configuration in Daily Operations” on
page 27
Appendix A, “Configuration Reference” on
page 37
Introduces the concepts, components, navigation, and initial setup of Dell
Configuration.
Provides a series of procedures for configuring, modifying, and using Dell
Configuration once initial setup is complete. This chapter is oriented around the
most common tasks in Dell Configuration.
Provides an encyclopedic reference to the fields, settings, and default values of
all Dell Configuration components, to include a few additional procedures
supporting more advanced configurations.
Note, Caution, and Warning Icons
This document uses the following note, caution, and warning icons to emphasize advisories for certain actions,
configurations, or concepts:
NOTE: Indicates helpful suggestions, pertinent information, and important things to remember.
CAUTION: Indicates a risk of damage to your hardware or loss of data.
WARNING: Indicates a risk of personal injury or death.
Dell PowerConnect W-AirWave 7.4 | Configuration Guide Preface | 7
Page 8

Contacting Support
Table 2 Web Support
Web Support
Main Website dell.com
Support Website support.dell.com
Documentation Website support.dell.com/manuals
8 | Preface Dell PowerConnect W-AirWave 7.4 | Configuration Guide
Page 9

Chapter 1
Dell PowerConnect W Configuration in AirWave
Introduction
ArubaOS (AOS) is the operating system, software suite, and application engine that operates Dell PowerConnect
W-Series mobility controllers and centralizes control over the entire mobile environment. The AOS wizards,
command-line interface (CLI), and the AOS WebUI are the primary means used to configure and deploy AOS.
For a complete description of AOS, refer to the Dell PowerConnect W-Series ArubaOS User Guide at
support.dell.com/manuals for your release.
The Dell PowerConnect W Configuration feature in AMP consolidates AOS configuration and pushes global
Dell PowerConnect W configurations from one utility. This chapter introduces the components and initial setup
of Dell PowerConnect W Configuration with the following topics:
Requirements, Restrictions, and ArubaOS Support in AirWave
Additional Concepts and Components of Dell PowerConnect W Configuration
Setting Up Initial Dell PowerConnect W Configuration
NOTE: AirWave supports Dell PowerConnect W AP Groups which should not be confused with standard AirWave Device Groups.
This document provides information about the configuration and use of Dell PowerConnect W AP Groups, and describes how Dell
PowerConnect W AP Groups interoperate with standard AirWave Device Groups.
Requirements, Restrictions, and ArubaOS Support in AirWave
Requirements
Dell PowerConnect W Configuration has the following requirements in AirWave:
AirWave 6.3 or a later AirWave version must be installed and operational on the network.
Dell PowerConnect W-Series controllers on the network must have AOS installed and operational.
For access to all monitoring features, you must provide Telnet/SSH credentials for a user with minimum
access level of read only. In order to perform configuration, the credentials must be for a root level user. In
either case, the “enable” password must be provided.
Restrictions
Dell PowerConnect W Configuration has the following restrictions in AirWave:
At present, Dell PowerConnect W Configuration in AirWave does not support every AOS network
component. For example, AirWave supports only IP Mobility and VLANs in the Advanced Services section.
AOS Configuration is not supported in either Global Groups or the Master Console. Appropriate options will
be available in the Subscriber Groups containing the controller(s).
ArubaOS Support in AirWave
AMP provides three options for configuring Dell PowerConnect W-Series devices:
Global GUI config for organizations who have near-identical deployments on all of their controllers
Group-level GUI config for organizations who have two or more configuration strategies
Dell PowerConnect W-AirWave 7.4 | Configuration Guide Dell PowerConnect W Configuration in AirWave | 9
Page 10
Configuration changes are pushed to the controller via SSH with no reboot required.
AMP only supports configuration of the settings which a master controller would push to the standby / local
controllers (global features). AMP supports all master, master-standby, and master-local deployments.
All settings for Profiles, Dell PowerConnect W AP Groups, Servers and Roles are supported, as is the AOS WLAN
Wizard. Controller IP addresses, VLANs, and interfaces are not supported, nor are Advanced Services with the
exception of VPN and IP Mobility.
Other features of Dell PowerConnect W Configuration in AMP include the following:
Dell PowerConnect W-AirWave 7.4 understands AOS license dependencies.
AMP supports a variety of Dell PowerConnect W firmware versions, so profiles / fields which are not
supported by an older version will not be configured on controllers running that version.
You can provision thin APs from the AP/Devices > Manage page. You can move APs into Dell PowerConnect
W AP Groups from the Modify Devices option on the APs/Devices > List page.
You can configure AP names as AP Overrides.
Values for specific fields may be overwritten for individual controllers on the controller's APs/Devices > Manage
page.
Changes to dependency between the AMP group and folders help customers who want to use the folder structure to
manage configuration; however, users are now able to see (but not access) group and folder paths for which they do
not have permissions.
For more detailed information about this feature, as well as steps to transition from template-based configuration to
web-based configuration, refer to additional chapters in this user guide. For known issues and details on the AOS
version supported by each release, refer to the Dell PowerConnect W-AirWave 7.4 Release Notes at
download.dell-pcw.com.
Overview of Dell PowerConnect W Configuration in AirWave
This section describes the pages in Dell PowerConnect W-AirWave 7.4 that support Dell PowerConnect W
Configuration.
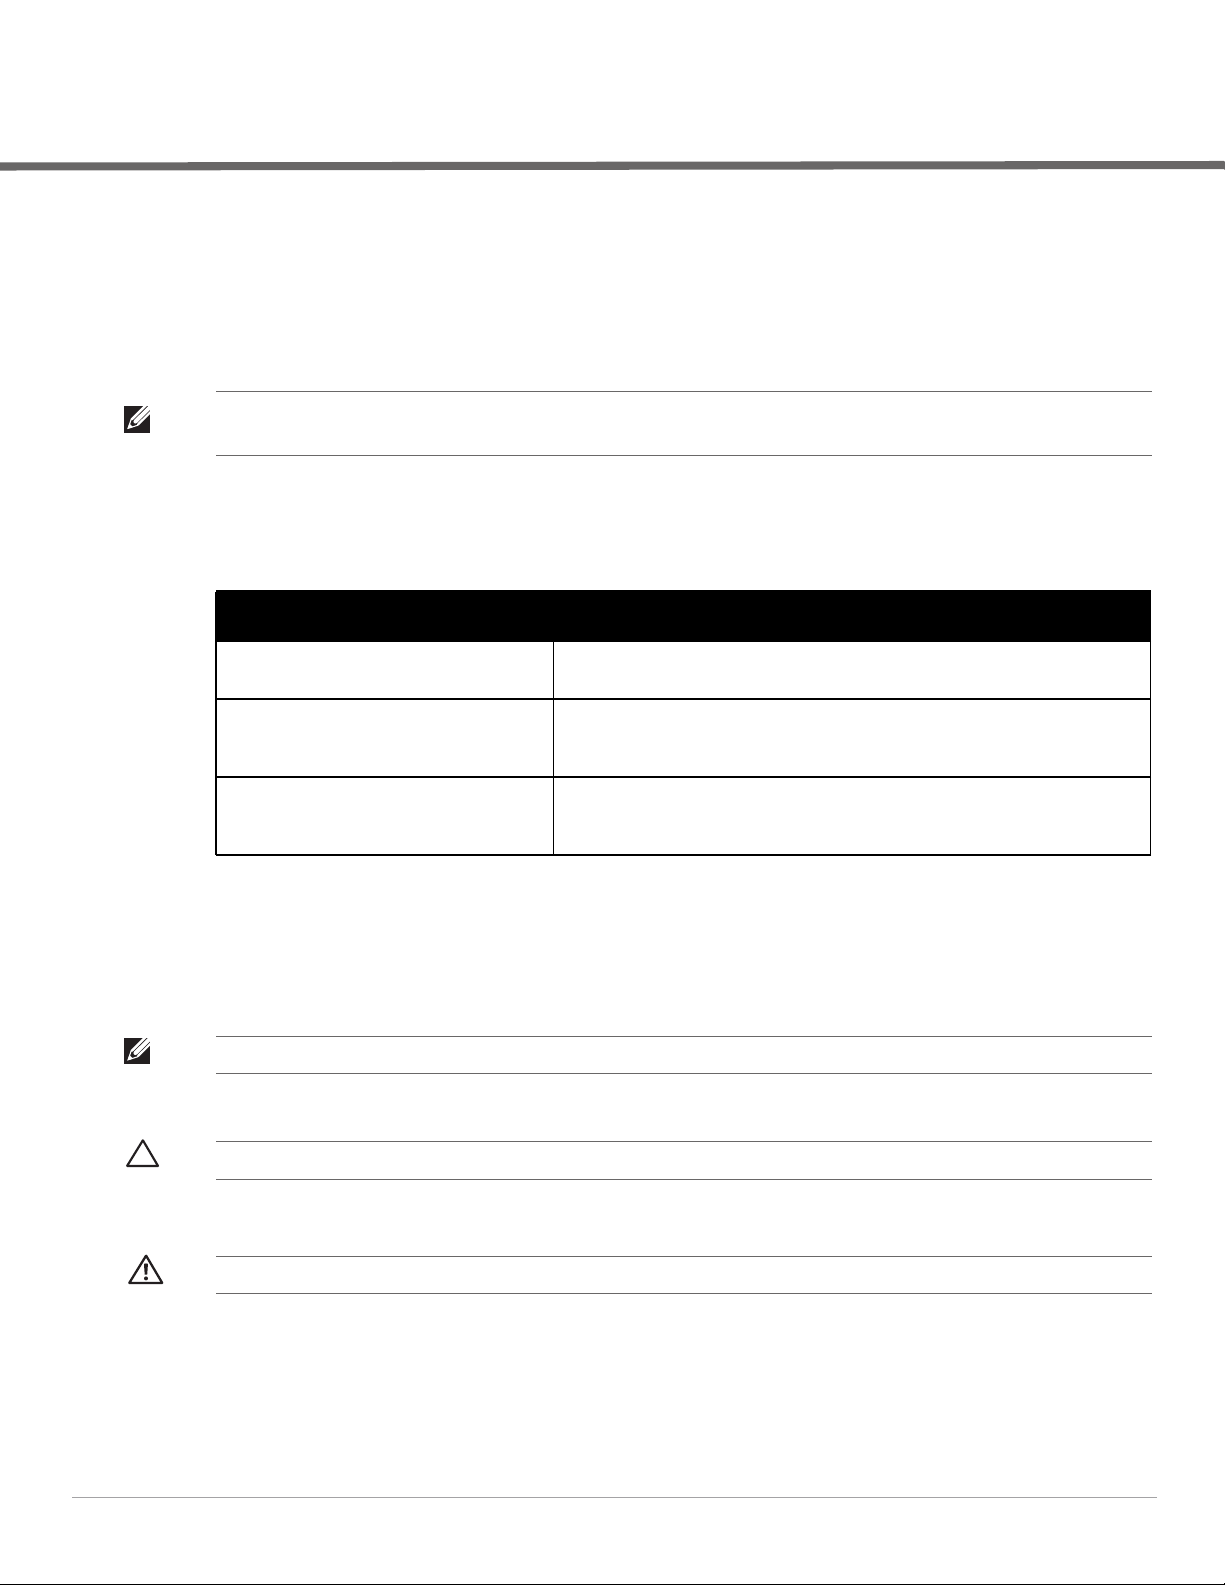
AMP can be configured on AMP Setup > General > Device Configuration to configure Dell PowerConnect W
devices globally (in the Device Setup > Dell PowerConnect W Configuration page) or by Device Group (in the
Groups > Dell PowerConnect W Config page). By default, global Dell PowerConnect W Configuration is
enabled.
Figure 1 AMP Setup > General Setting for Global or Group Dell PowerConnect W Configuration
AirWave supports Dell PowerConnect W Configuration with the following pages:
Device Setup > Dell PowerConnect W Configuration Page—deploys and maintains global Dell
PowerConnect W Configuration in AirWave. You can limit the view to a folder.
10 | Dell PowerConnect W Configuration in AirWave Dell PowerConnect W-AirWave 7.4 | Configuration Guide
Page 11
Groups > Dell PowerConnect W Config Page With Global Configuration Enabled—the way this page
displays depends on whether global or group configuration is enabled in AMP Setup > General > Device
Configuration:
If global configuration is enabled, the Groups > Dell PowerConnect W Config page manages Dell
PowerConnect W AP group and other controller-wide settings defined on the Device Setup > Dell
PowerConnect W Configuration page.
If global configuration is disabled, the Groups > Dell PowerConnect W Config page resembles the
Device Setup > Dell PowerConnect W Configuration tree navigation (the same sections listed in the
previous bullet are available), but the Groups > Dell PowerConnect W Config pages do not display the
Folder as a column in the list tables or as a field in the individual profiles.
Groups > Dell PowerConnect W Config When Global Configuration is Disabled— this page modifies or
reboots all devices when Global Dell PowerConnect W Configuration is enabled.
APs/Devices > Manage Page—supports device-level settings and changes in AirWave.
APs/Devices > Monitor Page—supports device-level monitoring in AirWave.
APs/Devices > Audit Page—supports device level configuration importing in AMP.
Groups > Basic Page—For device groups containing Dell PowerConnect W devices, basic information such
as the group’s name, regulatory domain, the use of Global Groups, SNMP Polling periods, and turning on the
Dell PowerConnect W GUI Config are managed here.
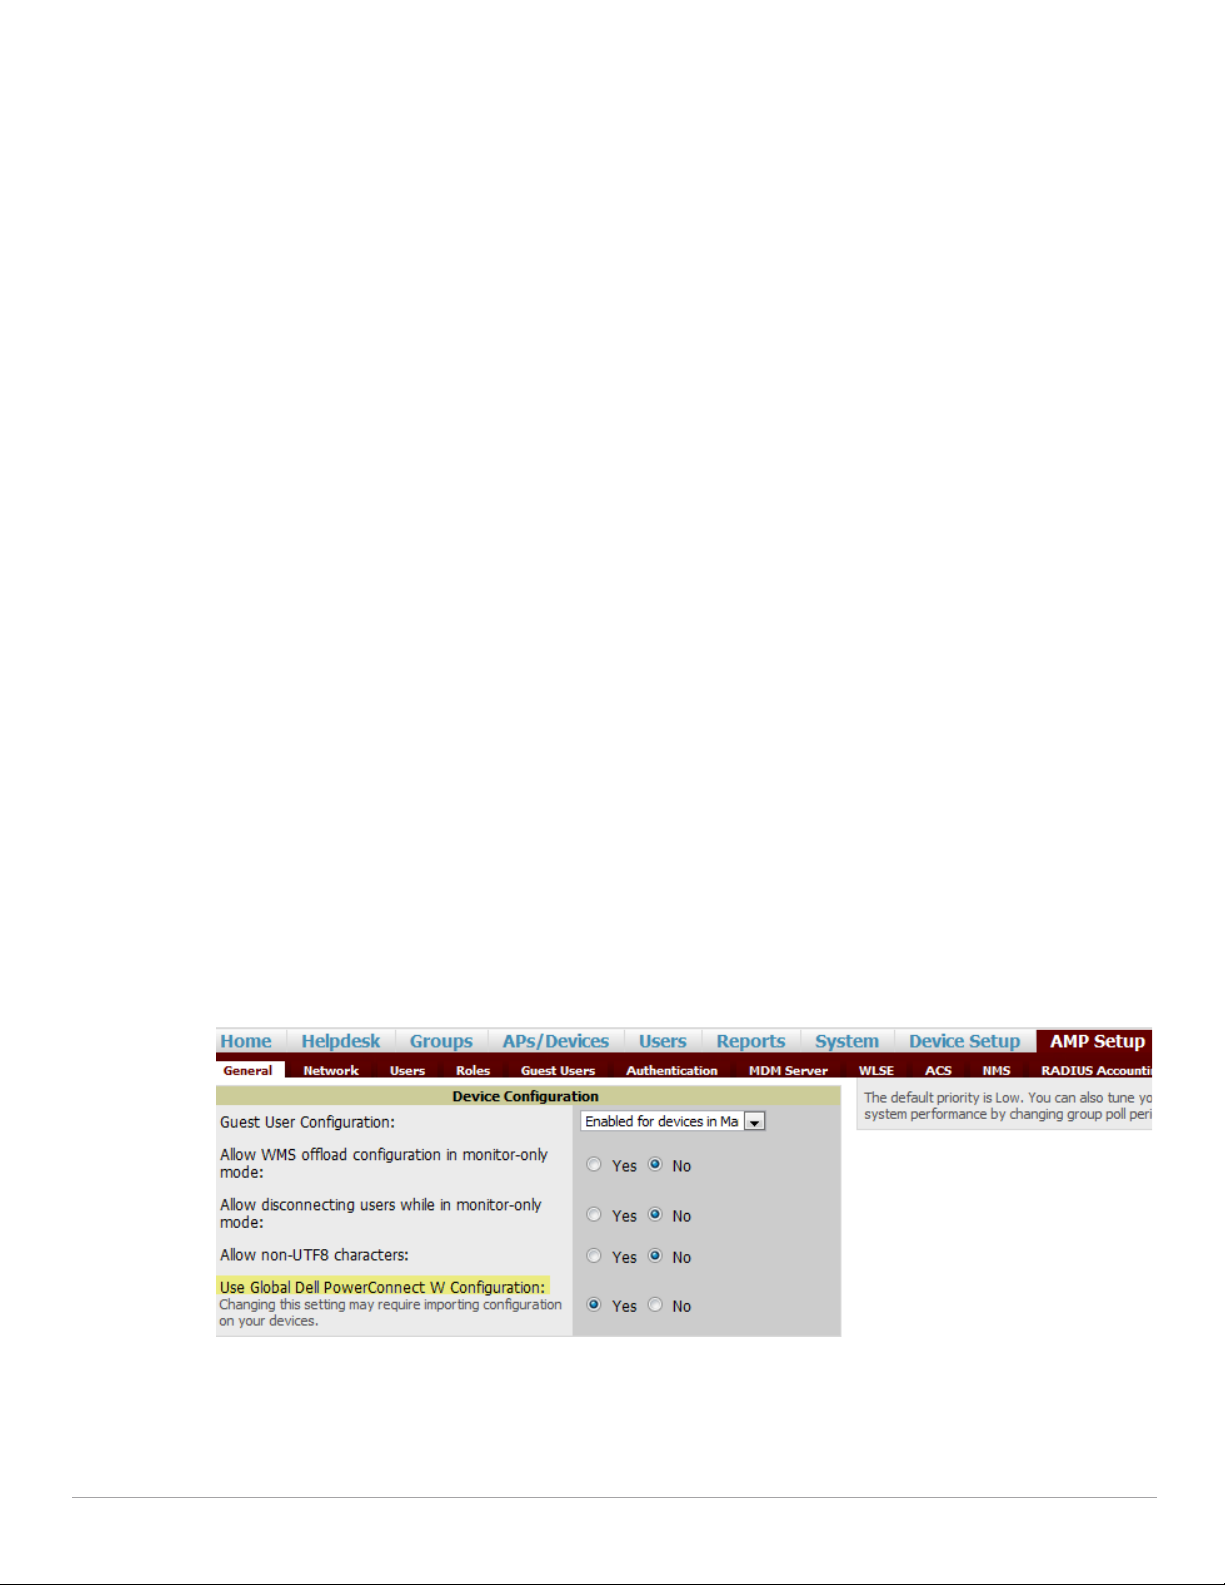
Device Setup > Dell PowerConnect W Configuration Page
NOTE: This page is not available if Use Global Dell PowerConnect W Configuration is disabled in AMP Setup > General.
The Device Setup > Dell PowerConnect W Configuration page uses an expandable navigation pane to support
Dell PowerConnect W AP Groups, AP Overrides, WLANs, Profiles, Security, Local Config, and Advanced
Services. Each of these sections is summarized in “Dell PowerConnect W Configuration Sections in the Tree
View” on page13.
Figure 2 Device Setup > Dell PowerConnect W Configuration Page Illustration
Dell PowerConnect W-AirWave 7.4 | Configuration Guide Dell PowerConnect W Configuration in AirWave | 11
Page 12
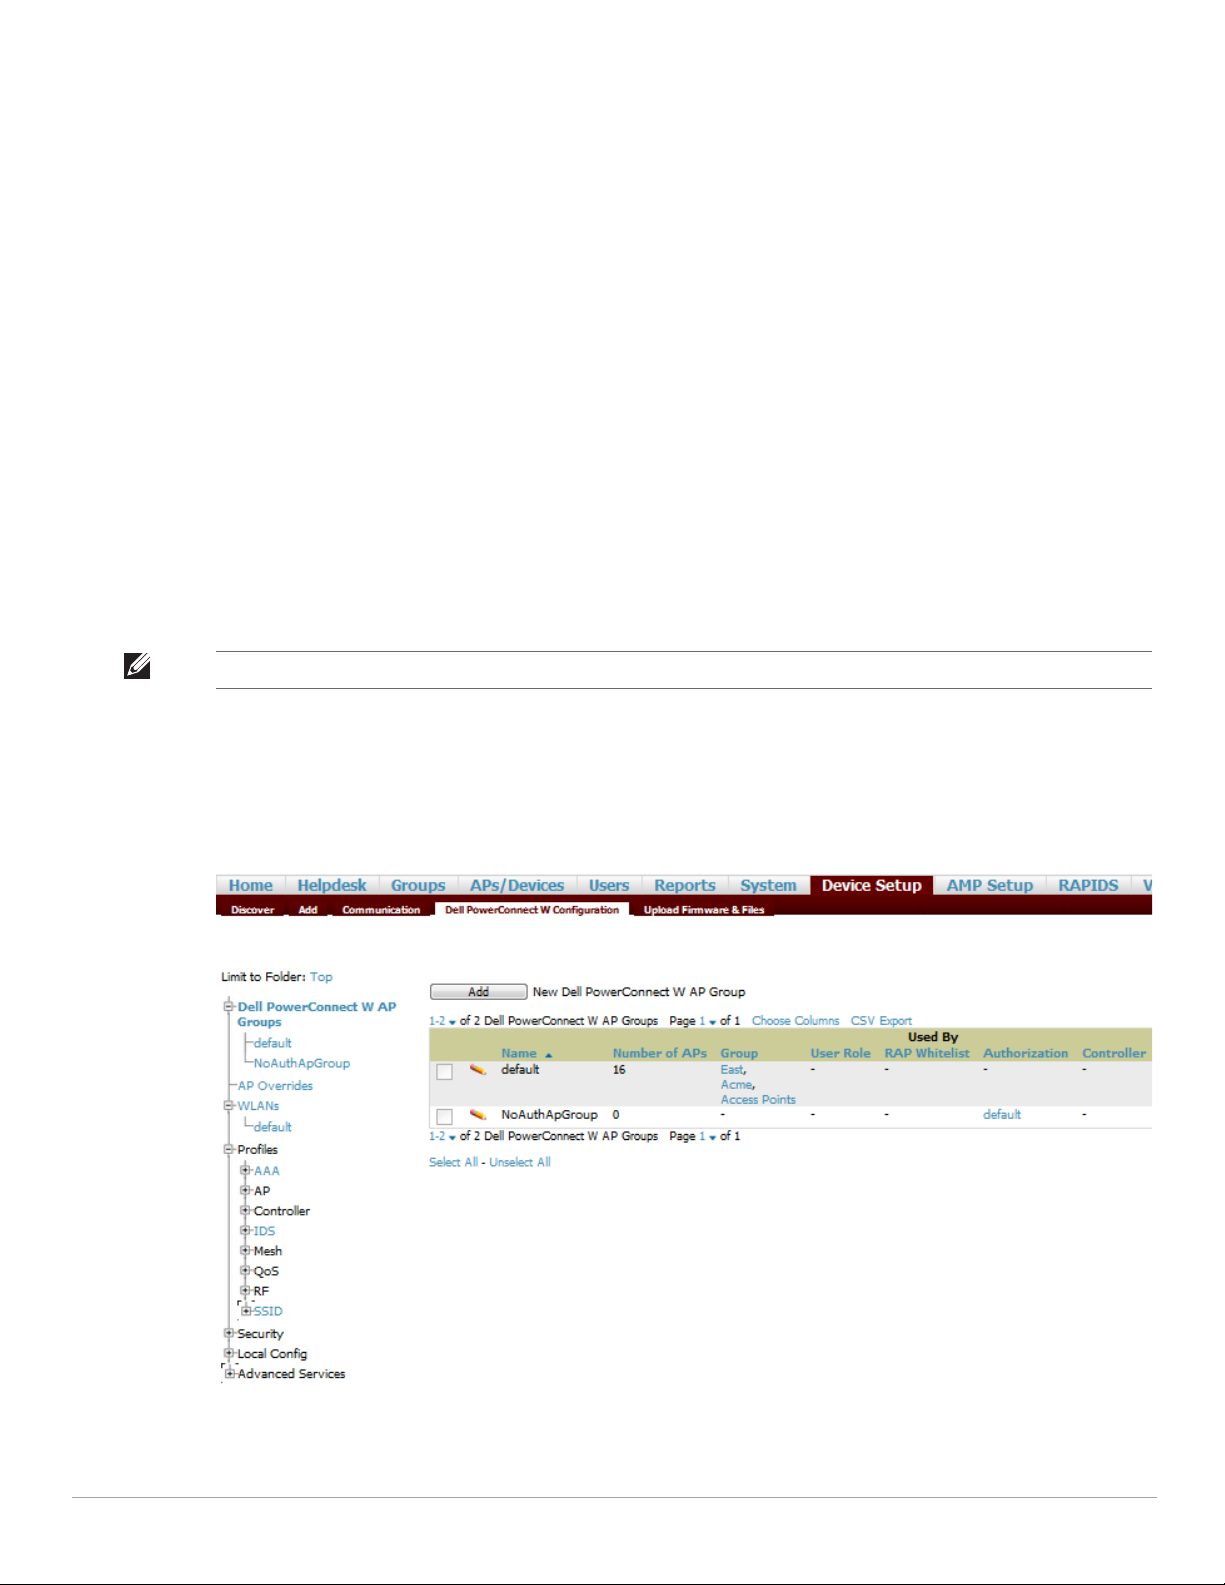
Groups > Dell PowerConnect W Config Page With Global Configuration Enabled
When Use Global Dell PowerConnect W Configuration is enabled in AMP Setup > General, focused submenu
page displays and edits all configured Dell PowerConnect W AP groups, with the following factors:
Dell PowerConnect W AP Groups must be defined from the Device Setup > Dell PowerConnect W
Configuration page before they are visible on the Groups > Dell PowerConnect W Config page.
Use this page to select the Dell PowerConnect W AP Groups that you push to controllers.
Use this page to associate a device group to one or more Dell PowerConnect W AP Groups.
From this page, you can select other profiles that are defined on the controller, like an internal server.
Figure 3 Groups > Dell PowerConnect W Config Page Illustration (Partial Display)
Groups > Dell PowerConnect W Config When Global Configuration is Disabled
If Use Global Dell PowerConnect W Configuration in AMP Setup > General is set to No, the Groups > Dell
PowerConnect W Config page can be used to manage two or more distinctive configuration strategies using the
same tree navigation as the Device Setup > Dell PowerConnect W Configuration page, as shown in Figure 4.
Each of the sections is explained in “Dell PowerConnect W Configuration Sections in the Tree View” on
page13.
12 | Dell PowerConnect W Configuration in AirWave Dell PowerConnect W-AirWave 7.4 | Configuration Guide
Page 13
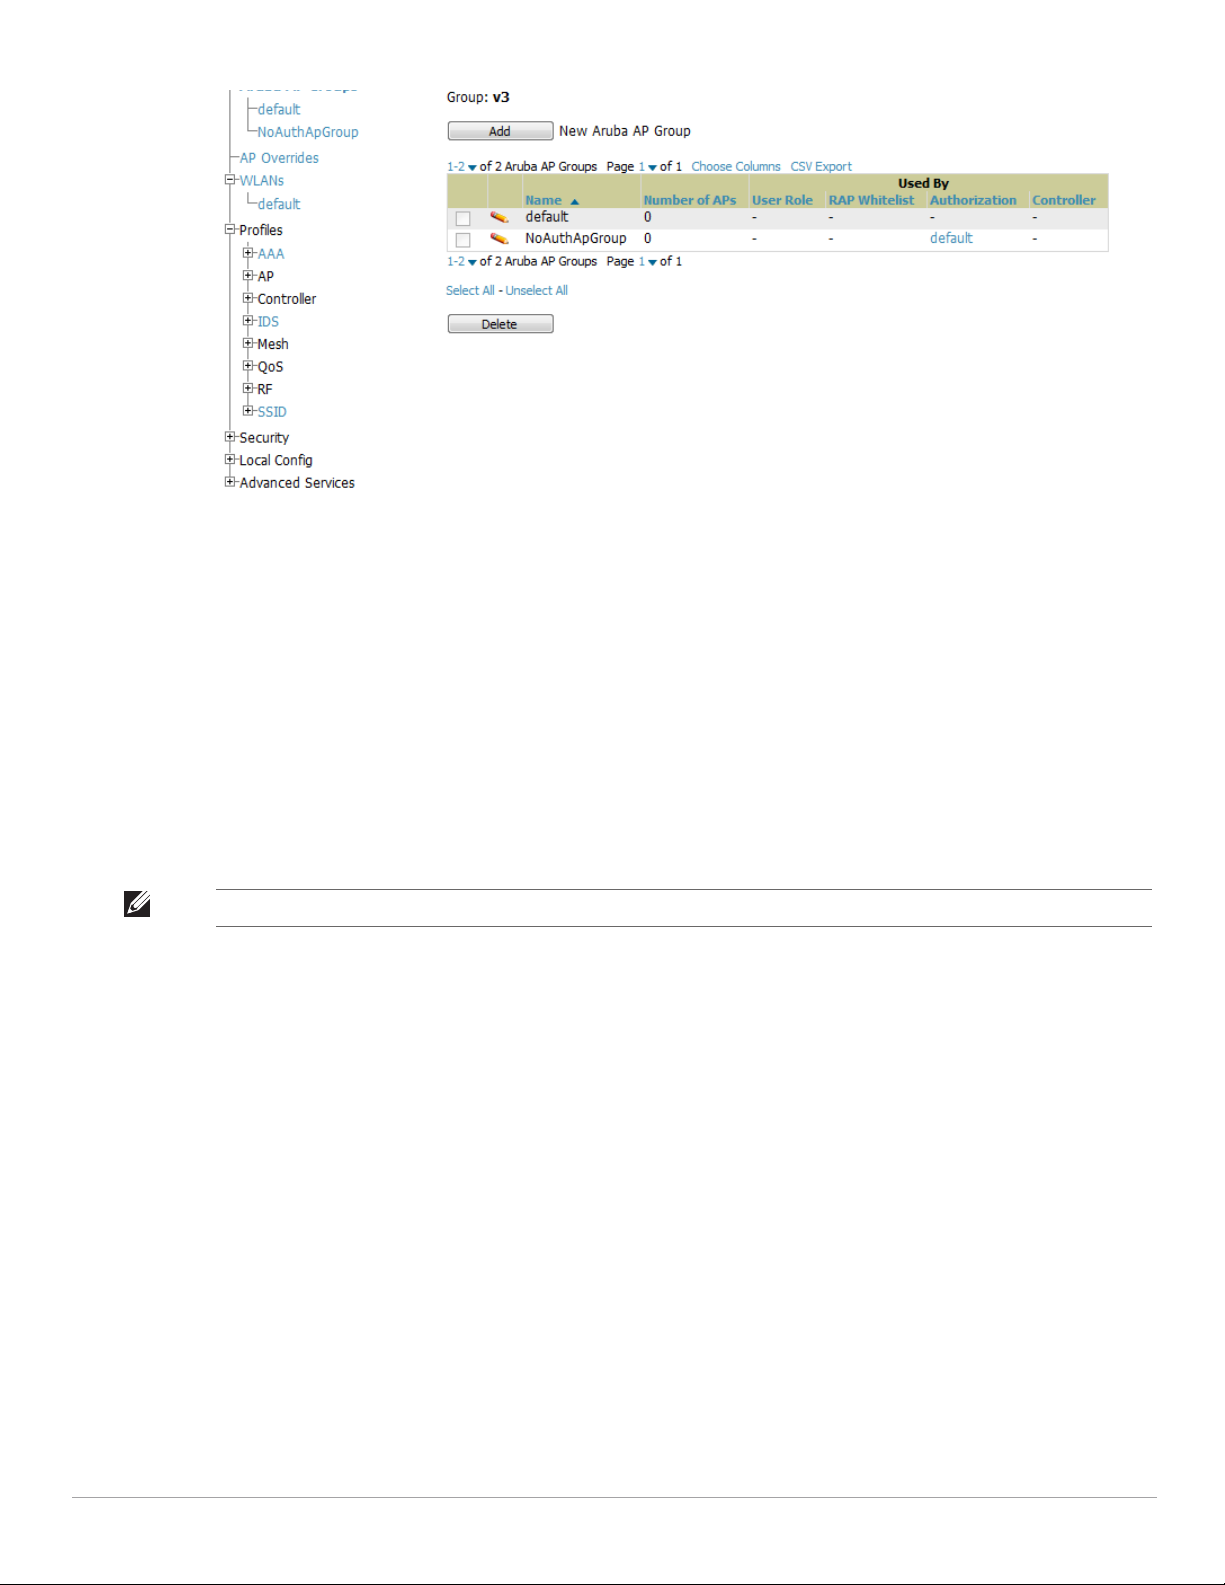
Figure 4 Groups > Dell PowerConnect W Config with Group-Level Configuration
Dell PowerConnect W Configuration Sections in the Tree View
Whether you are using global or group configuration, the Dell PowerConnect W Configuration tree view page
supports several sections, as follows:
Dell PowerConnect W AP Groups Section
AP Overrides Section
WLANs Section
Profiles Section
Security Section
Local Config Section
Advanced Services Section
NOTE: Only Dell PowerConnect W AP Groups, AP Overrides, and WLANs contain custom-created items in the navigation pane.
For the remainder of this document, the navigation Dell PowerConnect W Configuration > refers to the tree
view in Device Setup or Groups tabs, depending on whether global or group configuration is enabled.
Dell PowerConnect W AP Groups Section
A Dell PowerConnect W AP Group is a collection of configuration profiles that define specific settings on Dell
PowerConnect W controllers and the devices that they govern. A Dell PowerConnect W AP Group references
multiple configuration profiles, and in turn links to multiple WLANs.
To access them, navigate to the Dell PowerConnect W Configuration > Dell PowerConnect W AP Groups page.
Dell PowerConnect W AP Groups are not to be confused with conventional AirWave device groups. Dell PowerConnect
W-AirWave 7.4 supports both group types and both are viewable on the Groups > List page when so configured.
Dell PowerConnect W AP Groups have the following characteristics:
Any Dell PowerConnect W controller can support multiple Dell PowerConnect W AP Groups.
Dell PowerConnect W AP Groups are assigned to folders, and folders define visibility. Using conventional
AirWave folders to define visibility, Dell PowerConnect W AP Groups can provide visibility to some or many
components while blocking visibility to other users for more sensitive components, such as SSIDs. Navigate to
the Clients pages to define folder visibility, and refer to “Visibility in Dell PowerConnect W Configuration”
on page33.
Dell PowerConnect W-AirWave 7.4 | Configuration Guide Dell PowerConnect W Configuration in AirWave | 13
Page 14
You can import a controller configuration file from AOS for Dell PowerConnect W AP Group deployment in
AirWave.
For additional information, refer to the following sections in this document:
“Setting Up Initial Dell PowerConnect W Configuration” on page21
“General Dell PowerConnect W AP Groups Procedures and Guidelines” on page27
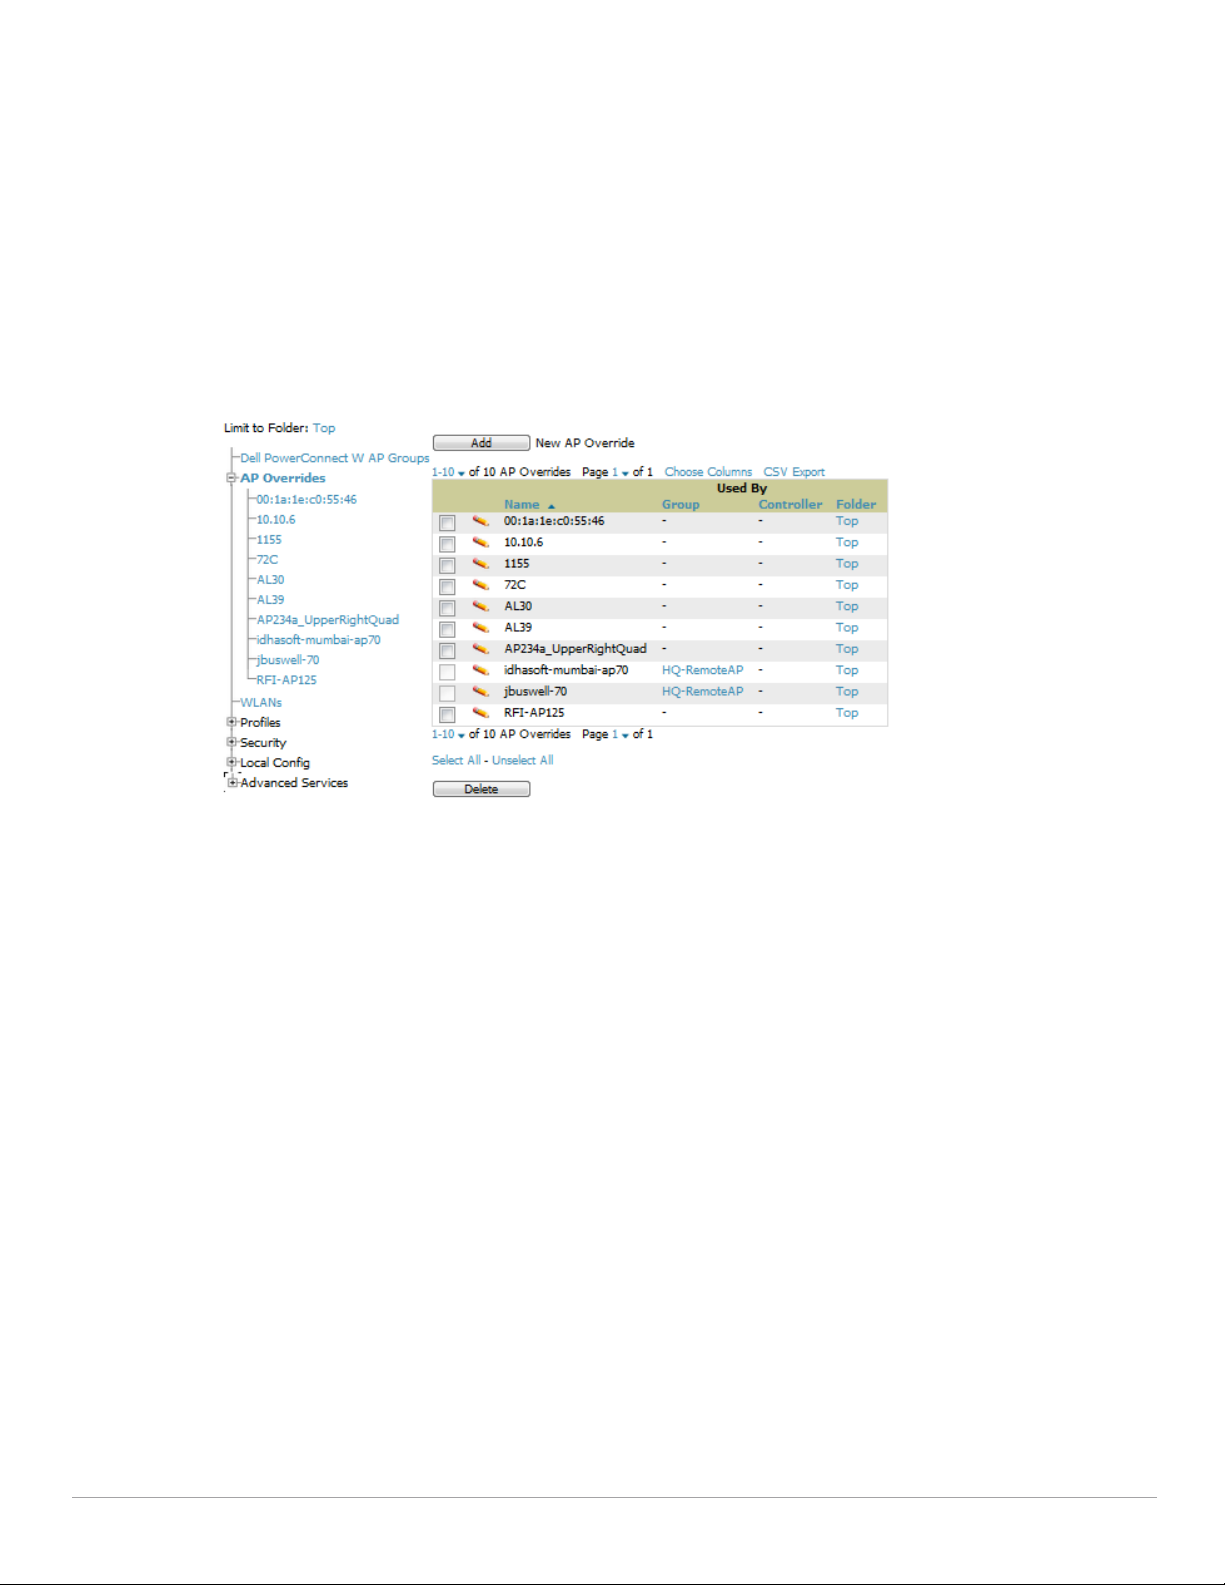
AP Overrides Section
The second major component of Dell PowerConnect W Configuration is the AP Overrides page, appearing
immediately below Dell PowerConnect W AP Groups in the Navigation Pane. Figure 5 illustrates this location
and access:
Figure 5 Dell PowerConnect W Configuration > AP Overrides Navigation
AP Overrides operate as follows in Dell PowerConnect W Configuration:
Custom-created AP Overrides appear in the Dell PowerConnect W Configuration navigation pane, as
illustrated in Figure 5.
Dell PowerConnect W controllers and AP devices operate in Dell PowerConnect W AP Groups that define
shared parameters for all devices in those groups. The Dell PowerConnect W Configuration > Dell
PowerConnect W AP Groups page displays all current Dell PowerConnect W AP groups.
AP Override allows you to change some parameters for any specific device without having to create a Dell
PowerConnect W AP group per AP.
The name of any AP Override should be the same as the name of the device to which it applies.
This establishes the basis of all linking to that device.
Once you have created an AP Override for a device in a group, you specify the WLANs to be included and
excluded.
For additional information about how to configure and use AP Overrides, refer to these topics:
“AP Overrides Guidelines” on page30
“AP Overrides” on page41 in the Appendix
WLANs Section
Access WLANs with Dell PowerConnect W Configuration > WLANs.
The following concepts govern the use of WLANs in Dell PowerConnect W Configuration:
WLANs are the same as virtual AP configuration profiles.
14 | Dell PowerConnect W Configuration in AirWave Dell PowerConnect W-AirWave 7.4 | Configuration Guide
Page 15
WLAN profiles contain several diverse settings including SSIDs, referenced Dell PowerConnect W AP
Groups, Traffic Management profiles, and device Folders.
This document describes WLAN configuration in the following section and chapter:
“Setting Up Initial Dell PowerConnect W Configuration” on page21
“General WLAN Guidelines” on page28
“WLANs” on page45
Profiles Section
Profiles provide a way to organize and deploy groups of configurations for Dell PowerConnect W AP Groups,
WLANs, and other profiles. Profiles are assigned to folders; this establishes visibility to Dell PowerConnect W AP
Groups and WLAN settings. Access Profiles with Dell PowerConnect W Configuration > Profiles, illustrated in
Figure 6.
Figure 6 Dell PowerConnect W Configuration > Profiles Navigation
Profiles are organized by type. Custom-named profiles do not appear in the navigation pane as do custom-named
Dell PowerConnect W AP Groups, WLANs, and AP Overrides.
For additional information about profile procedures and guidelines, refer to the following sections in this
document:
“Setting Up Initial Dell PowerConnect W Configuration” on page21
“General Profiles Guidelines” on page28
“Profiles” on page50 in the Appendix
Security Section
The Security section displays, adds, edits, or deletes security profiles in multiple categories, including user roles,
policies, rules, and servers such as RADIUS, TACACS+, and LDAP servers. Navigate to Security with the Dell
PowerConnect W Configuration > Security path, illustrated in Figure 7.
Dell PowerConnect W-AirWave 7.4 | Configuration Guide Dell PowerConnect W Configuration in AirWave | 15
Page 16
Figure 7 Dell PowerConnect W Configuration > Security Navigation
The following general guidelines apply to Security profiles in Dell PowerConnect W configuration:
Roles can have multiple policies; each policy can have numerous roles.
Server groups are comprised of servers and rules. Security rules apply in Dell PowerConnect W Configuration
in the same way as deployed in AOS.
For additional information about Security, refer to “Security” on page126.
Local Config Section
The Local Config section, introduced in AMP 7.2, is used for local configuration of Dell PowerConnect W
controllers. Locally configured settings are not pushed to local controllers by master controllers.
SNMP trap settings for controllers are managed locally.
Figure 8 Dell PowerConnect W Configuration > Local Config Navigation
For complete details on the Local Config section, refer to “Local Config of SNMP Management” on page147.
Advanced Services Section
Navigate to Advanced Services with the Dell PowerConnect W Configuration > Advanced Services path. The
Advanced Services section includes IP Mobility and VPN Services. Figure 9 illustrates this navigation and the
components.
Figure 9 Dell PowerConnect W Configuration > Advanced Services Navigation
16 | Dell PowerConnect W Configuration in AirWave Dell PowerConnect W-AirWave 7.4 | Configuration Guide
Page 17
For additional information about IP Mobility and VPN Services, refer to “Advanced Services” on page149.
APs/Devices > List Page
This page supports devices in all of AirWave. This page supports controller reboot, controller re-provisioning, and
changing Dell PowerConnect W AP groups. Select Modify Devices to configure thin AP settings.
Figure 10 APs/Devices List Page Illustration (Partial Display)
APs/Devices > Manage Page
This page configures device-level settings, including Manage mode that enables pushing configurations to
controllers. For additional information, refer to “Pushing Device Configurations to Controllers” on page29.
You can create controller overrides for entire profiles or a specific profile setting per profile. This allows you to
avoid creating new profiles or Dell PowerConnect W AP Groups that differ by one more settings. Controller
overrides can be added from the controller's APs/Devices > Manage page. Figure 11 illustrates an APs/Devices >
Manage page with controller overrides:
Dell PowerConnect W-AirWave 7.4 | Configuration Guide Dell PowerConnect W Configuration in AirWave | 17
Page 18
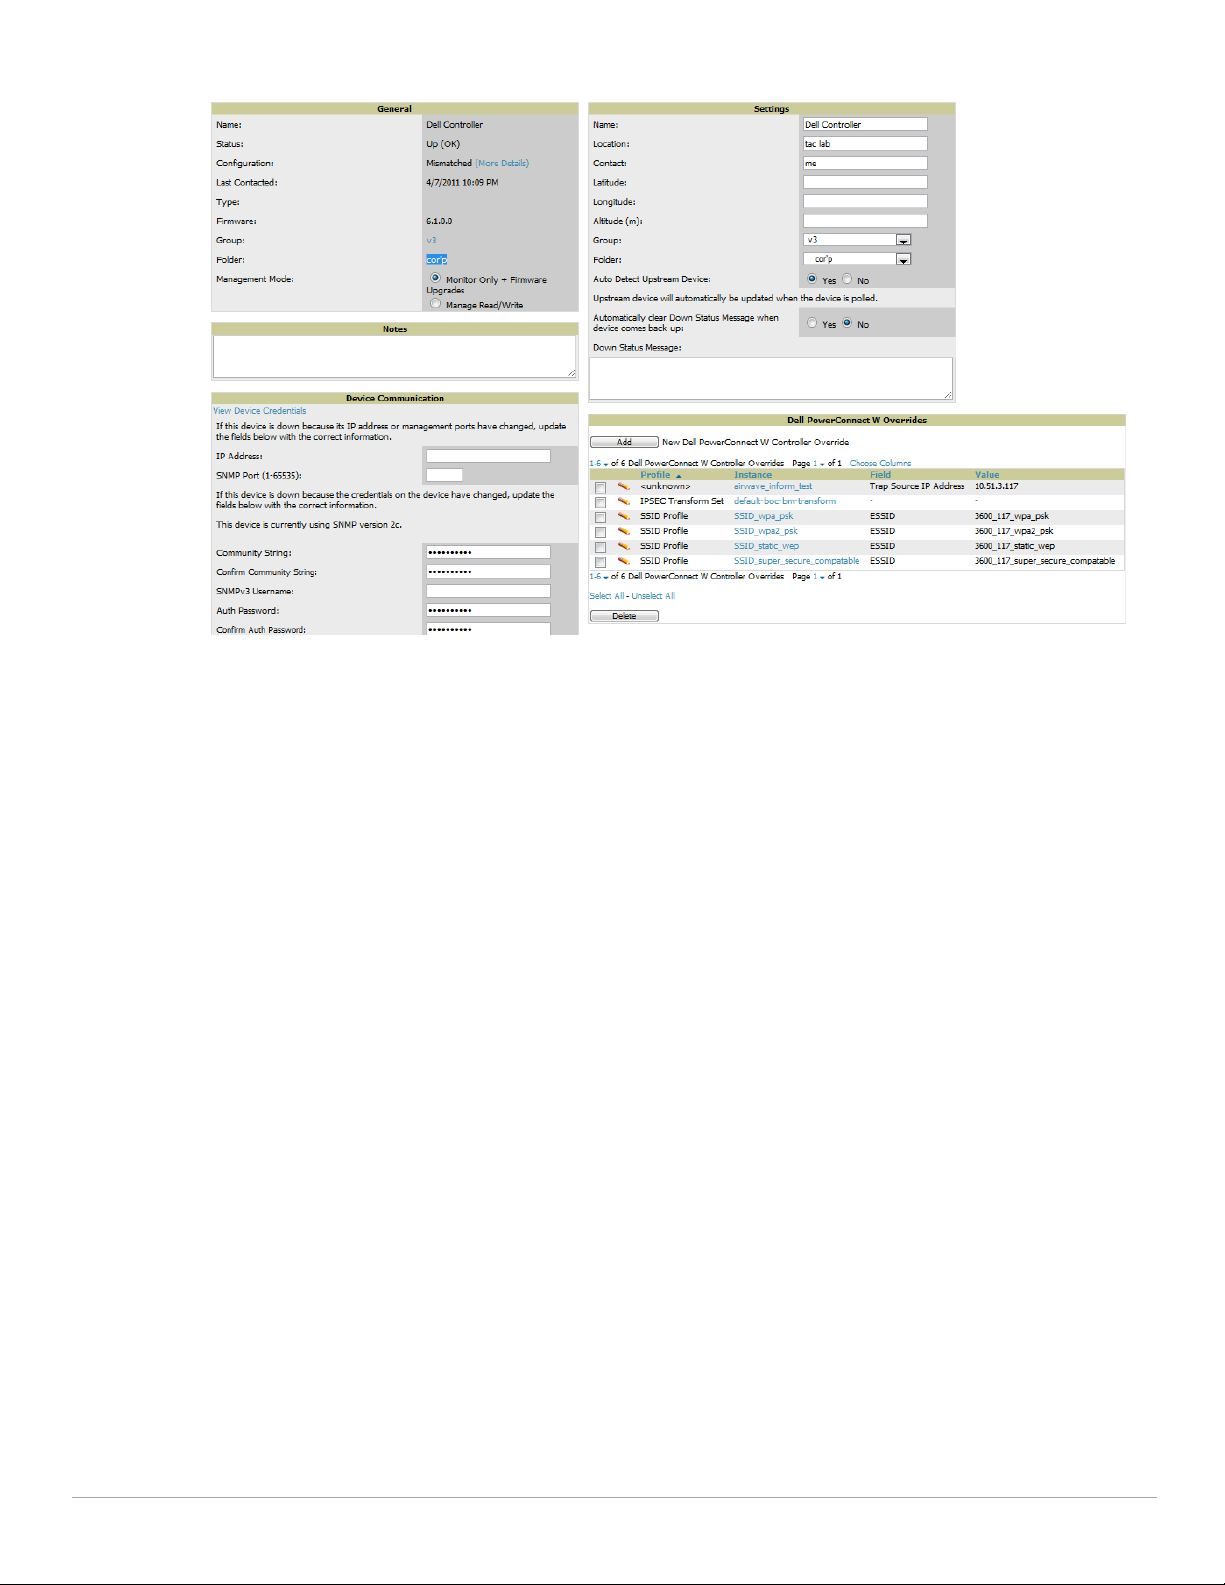
Figure 11 APs/Devices > Manage Page Illustration (Partial Display)
APs/Devices > Monitor Page
Used in conjunction with the Manage page, the Monitor page enables review of device-level settings. This page is
large and often contains a great amount of information, including the following sections:
Status information
Controller’s License link (see “Licensing and Dependencies in Dell PowerConnect W Configuration” on
page20)
Radio Statistics of some Dell PowerConnect W thin APs
User and Bandwidth interactive graphs
CPU Utilization and Memory Utilization interactive graphs
APs Managed by this Controller list (when viewing a controller)
Alert Summary
Recent Events
Audit Log
For additional information, refer to “Pushing Device Configurations to Controllers” on page29.
Groups > Basic Page
The Groups > Basic page deploys the following aspects of Dell PowerConnect W Configuration:
Use this page to control which device settings appear on the Groups pages.
If you want to configure your controllers using templates instead, you should disable Dell PowerConnect W
GUI configuration from the Groups > Basic page and use template-based configuration. For more
information on templates, see the Templates chapter of the Dell PowerConnect W-AirWave 7.4 User Guide.
18 | Dell PowerConnect W Configuration in AirWave Dell PowerConnect W-AirWave 7.4 | Configuration Guide
Page 19
Additional Concepts and Components of Dell PowerConnect W Configuration
Dell PowerConnect W Configuration emphasizes the following components and network management concepts.
Global Configuration and Scope
Dell PowerConnect W Configuration supports ArubaOS as follows:
AirWave supports global configuration from both a master-local controller deployment and an all-master
controller deployment:
In a master-local controller deployment, ArubaOS is the agent that pushes global configurations from
master controllers to local controllers. AirWave supports this AOS functionality.
In an all-master-controller scenario, every master controller operates independent of other master
controllers. AirWave provides the ability to push configuration to all master controllers in this scenario.
AirWave Dell PowerConnect W Configuration supports ArubaOS profiles, Dell PowerConnect W AP
Profiles, Servers, and User Roles.
For additional information about these and additional functions, refer to “General Controller Procedures and
Guidelines” on page29.
Referenced Profile Setup in Dell PowerConnect W Configuration
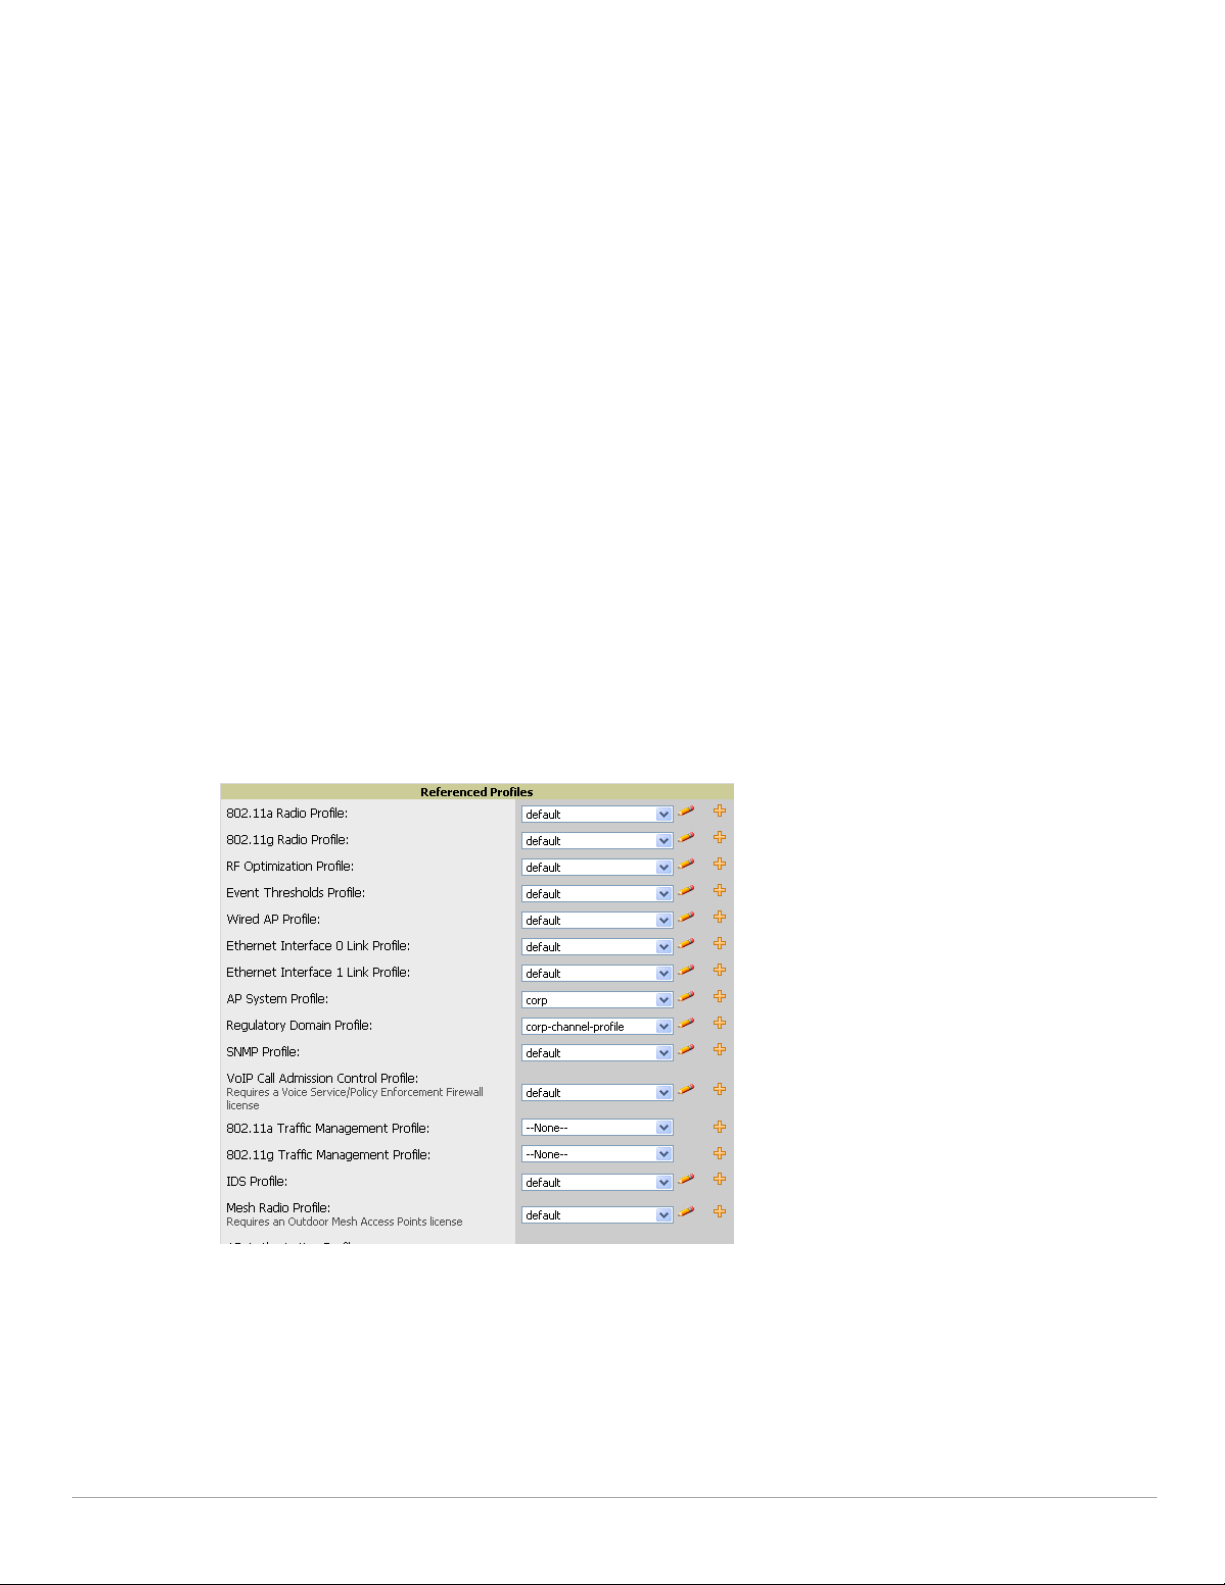
AirWave allows you to add or reconfigure many configuration profiles while guiding you through a larger
configuration sequence for a Dell PowerConnect W AP Group or WLAN. Consider the following example:
When you create a new Dell PowerConnect W AP Group from the Device Setup > Dell PowerConnect W
Configuration page, the Referenced Profile section appears as shown in Figure 12:
Figure 12 Referenced Profile Configuration for a Dell PowerConnect W AP Group
Click the Add icon (the plus symbol) on the right to add a referenced profile. Once you Save or Save and
Apply that profile, AirWave automatically returns you to the original Dell PowerConnect W AP Group
configuration page.
This embedded configuration is also supported on the Additional Dell PowerConnect W Profiles section of
the Groups > Dell PowerConnect W Config page.
Dell PowerConnect W-AirWave 7.4 | Configuration Guide Dell PowerConnect W Configuration in AirWave | 19
Page 20
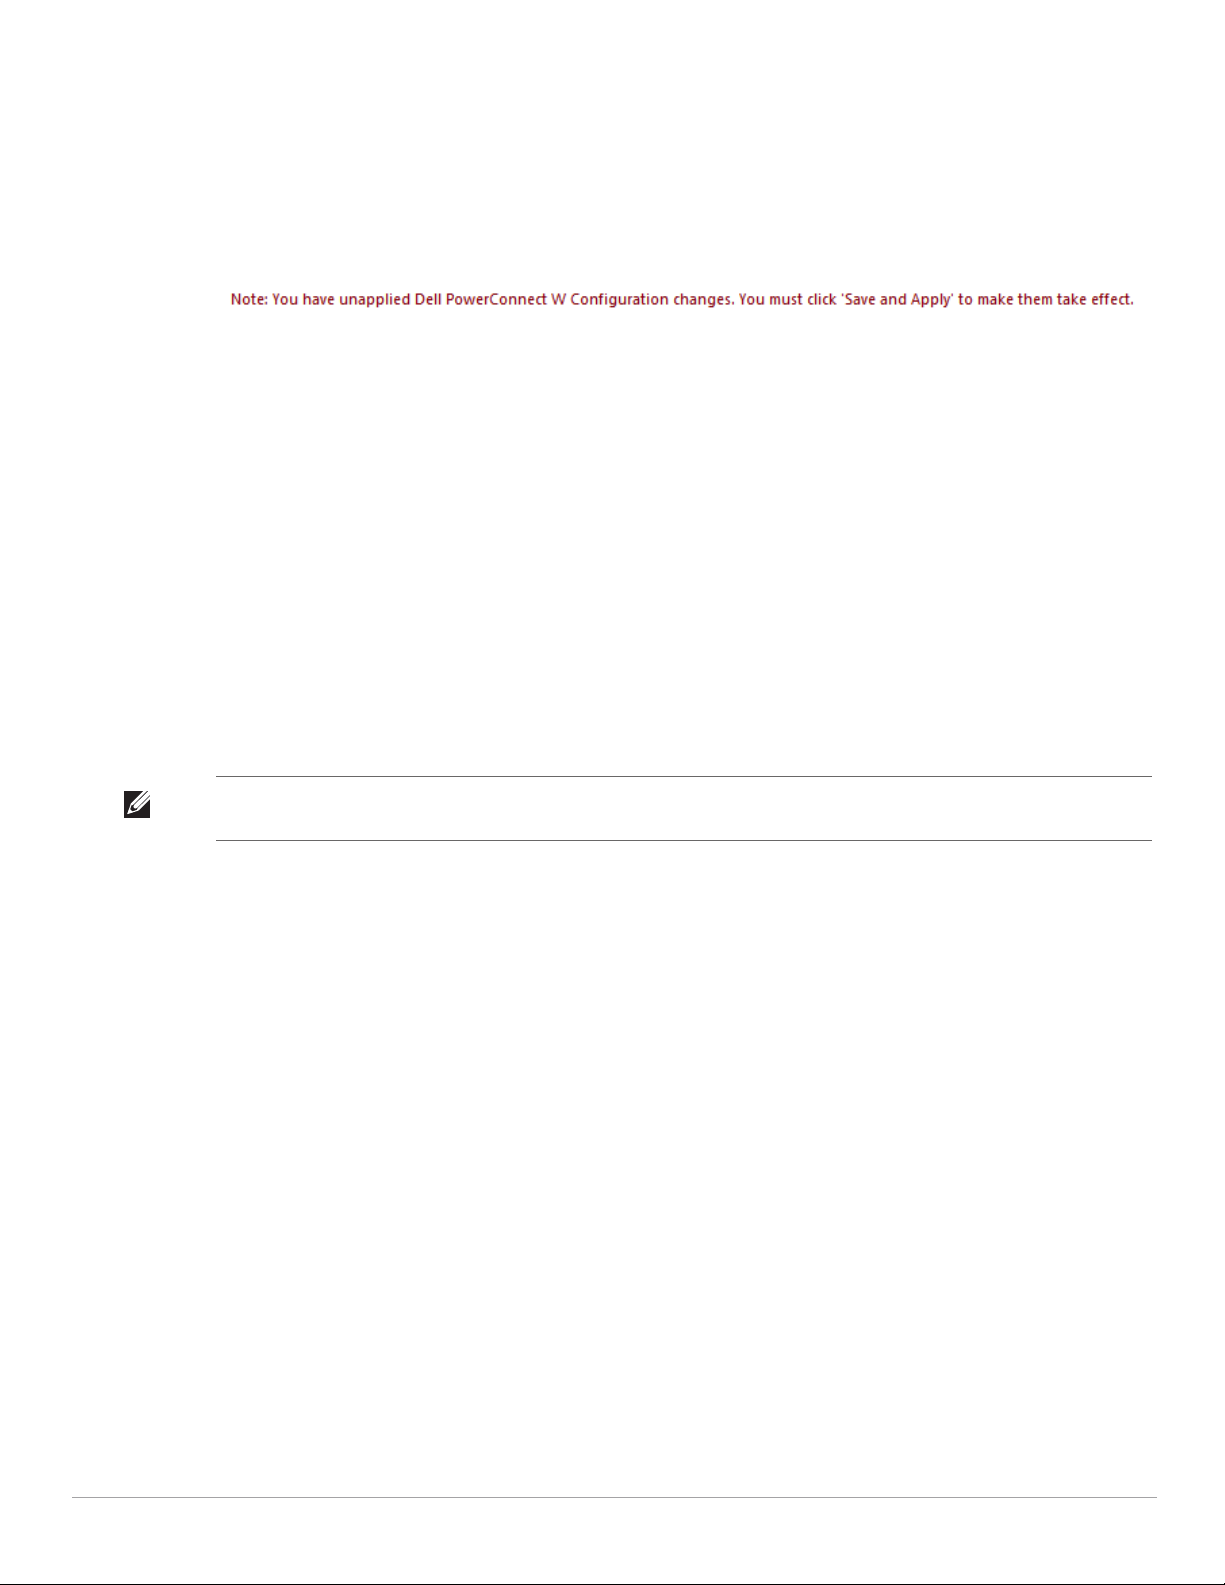
Save, Save and Apply, and Revert Buttons
Several Add or Detail pages in Dell PowerConnect W Configuration include the Save, Save and Apply, and
Revert buttons. These buttons function as follows:
Save—This button saves a configuration but does not apply it, allowing you to return to complete or apply the
configuration at a later time. If you use this button, you may see the following alert on other Dell PowerConnect
W Configuration pages. You can apply the configuration when all changes are complete at a later time.
Figure 13 Unapplied Dell PowerConnect W Configuration Changes Message
Save and Apply —This button saves and applies the configuration with reference to Manage and Monitor
modes. For example, you must click Save and Apply for a configuration profile to propagate to all controllers
in Manage mode. If you have controllers in Monitor Only mode, AMP audits them, comparing their current
configuration with the new desired configuration. For additional information and instructions about using
Manage and Monitor Only modes, refer to “Pushing Device Configurations to Controllers” on page29.
Revert—This button cancels out of a new configuration or reverts back to the last saved configuration.
Additional Concepts and Benefits
Scheduling Configuration Changes
You can schedule deployment of Dell PowerConnect W Configuration to minimize impact on network
performance.
For example, configuration changes can be accumulated over time by using Save and Apply for devices in
Monitor Only mode, then pushing all configuration changes at one time by putting devices in Manage mode.
Refer to “Pushing Device Configurations to Controllers” on page29.
NOTE: If your controllers are already in Manage mode, you can also schedule the application of a single set of changes when
clicking Save and Apply; just enter the date/time under Scheduling Options and click Schedule.
Dell PowerConnect W-AirWave 7.4 pushes configuration settings that are defined in the GUI to the Dell
PowerConnect W-Series controllers as a set of CLI commands using Secure Shell (SSH). No controller reboot is
required.
Auditing and Reviewing Configurations
AirWave supports auditing or reviewing in these ways:
1. You can review the AOS running configuration file. This is configuration information that AirWave reads
from the device. In template-based configuration, you can review the running configuration file when working
on a related template.
2. You can use the APs/Devices > Audit page for device-specific auditing.
3. Once you audit your controller, you can click Import from the APs/Devices > Audit page to import the
controller's current settings into its AMP Group's desired settings.
Licensing and Dependencies in Dell PowerConnect W Configuration
You can review your current licensing status with the Licenses link on the APs/Devices > Monitor page.
Dell PowerConnect W-AirWave 7.4 requires that you have a policy enforcement firewall license always installed
on all Dell PowerConnect W controllers. If you push a policy to a controller without this license, a Good
configuration will not result, and the controller will show as Mismatched on AirWave pages that reflect device
configuration status.
20 | Dell PowerConnect W Configuration in AirWave Dell PowerConnect W-AirWave 7.4 | Configuration Guide
Page 21
Dell PowerConnect W Configuration includes several settings or functions that are dependent on special
licenses. The user interface conveys that a special license is required for any such setting, function, or profile.
AirWave does not push such configurations when a license related to those configurations is unavailable. For
details on the licenses required by a specific version of AOS, refer to the Dell PowerConnectW-AirWave User
Guide on support.dell.com/manuals for that release.
Setting Up Initial Dell PowerConnect W Configuration
This section describes how to deploy an initial setup of Dell PowerConnect W Configuration in AirWave.
Prerequisites
Complete the Dell PowerConnect W-AirWave 7.4 upgrade to AirWave 6.4 or later. Upon upgrade to
AirWave version 6.4 or later, global Dell PowerConnect W Configuration is enabled by default in groups with
devices in monitor-only mode.
Back up your AOS controller configuration file. Information about backing AirWave is available in the Dell
PowerConnect W-AirWave 7.4 User Guide on support.dell.com/manuals in the “Performing Daily Operations
in AirWave” chapter.
Procedure
Perform the following steps to deploy Dell PowerConnect W Configuration when at least one Dell
PowerConnect W AP Group currently exists on at least one Dell PowerConnect W-Series controller on the
network:
1. Determine whether you are using global or group configuration, and set AMP Setup > General > Device
Configuration > Use Global Dell PowerConnect W Configuration accordingly.
2. On the Groups > Basic page, enable device preferences for Dell PowerConnect W-Series devices. This
configuration defines optional group display options. This step is not critical to setup, and default settings will
support groups appropriate for Dell PowerConnect W Configuration. One important setting on this page is
the Dell PowerConnect W GUI Config option. Ensure that setting is Yes, which is the default setting.
3. Authorize Dell PowerConnect W controllers into the device group in Monitor Only mode.
CAUTION: When authorizing the first controller onto a device group, you must add the device in monitor-only mode. Otherwise,
AirWave removes the configuration of the controller before you have a chance to import the configuration, and this would
remove critical network configuration and status.
NOTE: Dell PowerConnect W Configuration is enabled by default in AirWave.
4. Navigate to the AP/s/Devices > Audit page for the first controller to prepare for importing an existing Dell
PowerConnect W-Series controller configuration file. Figure 14 illustrates the information available on this
page if the device is mismatched.
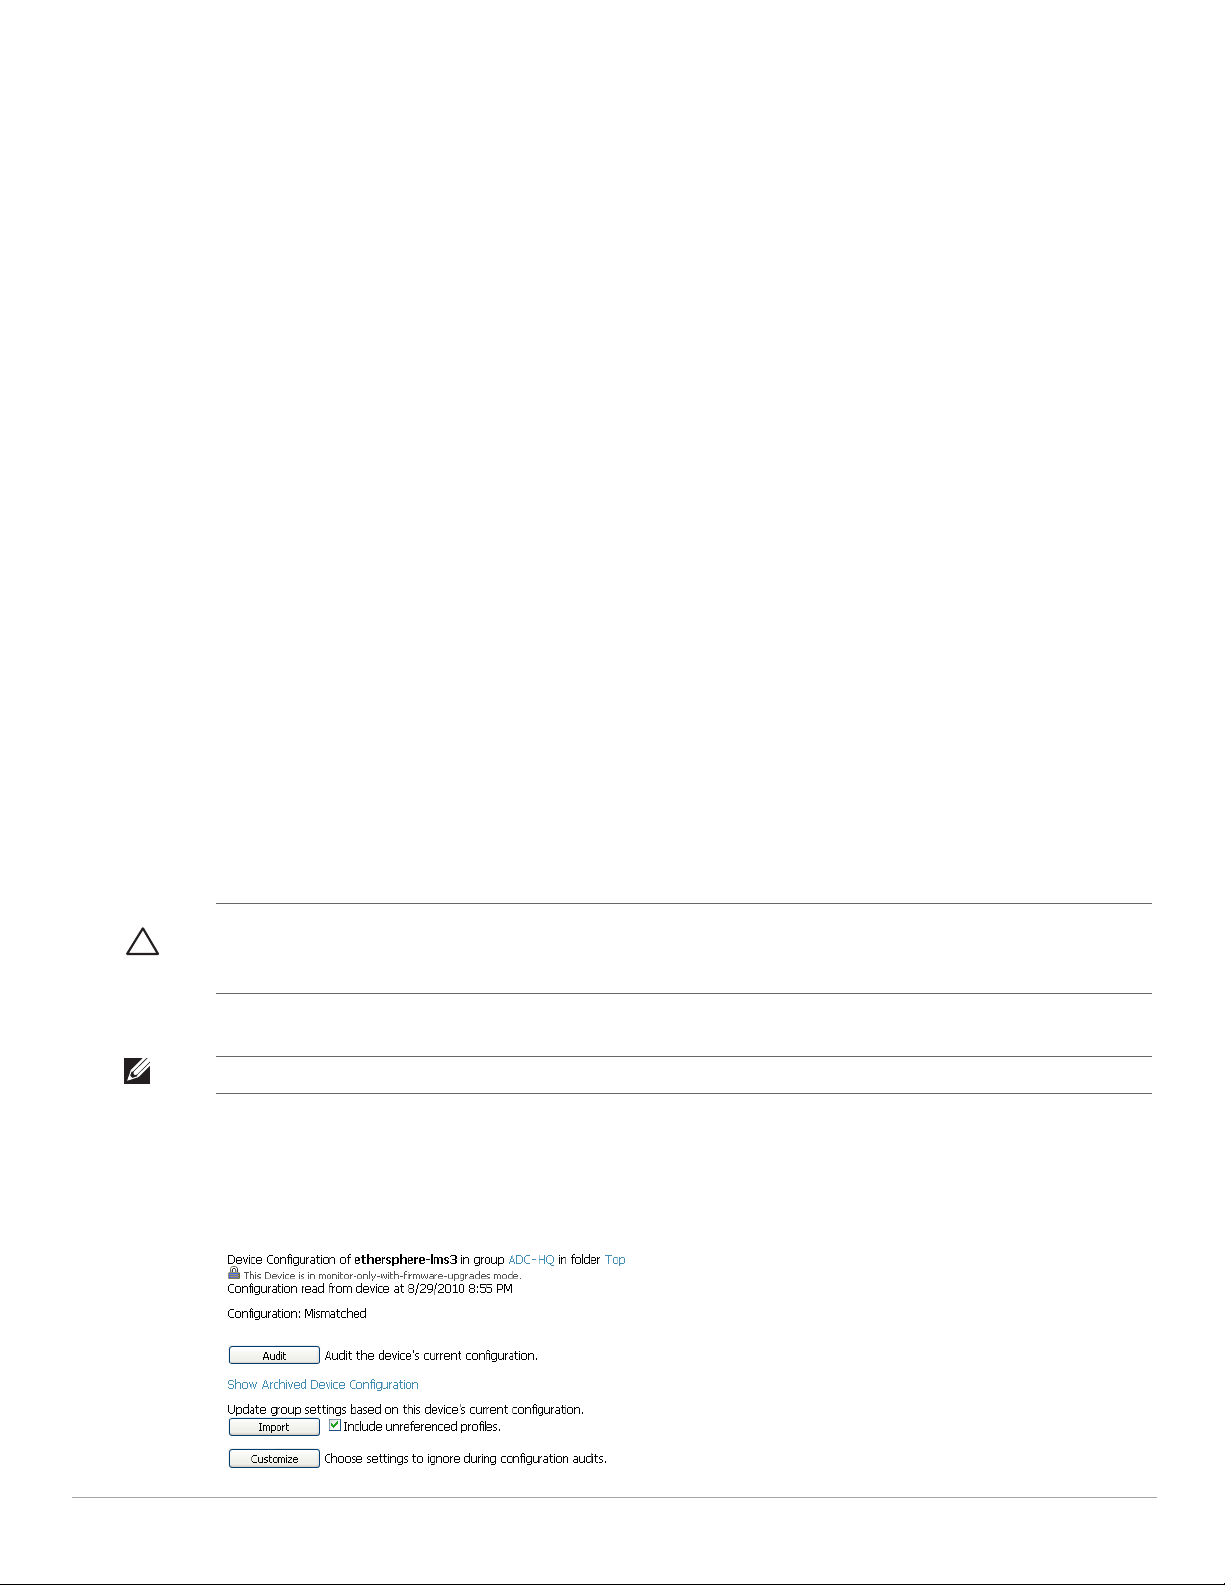
Figure 14 APs/Devices > Audit Page Illustration
Dell PowerConnect W-AirWave 7.4 | Configuration Guide Dell PowerConnect W Configuration in AirWave | 21
Page 22

If the page reports a device mismatch, the page will display an Import button that allows you to import the
Dell PowerConnect W-Series controller settings from a Dell PowerConnect W-Series controller that has
already been configured. To import the complete configuration from the controller (including any
unreferenced profiles) select the Include unreferenced profiles checkbox. If you deselect the checkbox, AMP
will delete the unreferenced profiles/AP Groups on the controller when that configuration is pushed later, and
they will not be imported.
In Global Configuration:
Importing this configuration creates all the Profiles and Dell PowerConnect W AP Groups on the Device
Setup > Dell PowerConnect W Configuration page. This action also adds and selects the Dell
PowerConnect W AP Groups that appear on the Groups > Dell PowerConnect W Config page.
The folder for all the Profiles and Dell PowerConnect W AP Groups is set to the top folder of the AirWave
user who imports the configuration. This folder is Top in the case of managing administrators with read/write
privileges.
In Group Configuration:
Importing this configuration creates Profiles and Dell PowerConnect W AP Groups in the controller’s Groups
> Dell PowerConnect W Config page.
5. After configuration file import is complete, refresh the page to verify the results of the import and add or edit
as required.
6. Navigate to the Dell PowerConnect W Configuration page.
This page displays a list of APs authorized on the AMP that are using the Dell PowerConnect W AP
Group.
The User Role is the Dell PowerConnect W User Role used in firewall settings. For additional
information, refer to “Security > User Roles” on page127.
Global Configuration only: The Folder column cites the visibility level to devices in each Dell
PowerConnect W AP Group. For additional information, refer to “Visibility in Dell PowerConnect W
Configuration” on page33.
7. Add or modify Dell PowerConnect W AP Groups as required:
a. Navigate to the Dell PowerConnect W Configuration > Dell PowerConnect W AP Groups page.
b. Click Add from the Dell PowerConnect W AP Groups page to create a new Dell PowerConnect W AP
Group. To edit a Dell PowerConnect W AP Group, click the pencil icon next to the group. The Details
page for the Dell PowerConnect W AP Group appears. This page allows you to select the profiles to apply
to the Dell PowerConnect W AP Group, and to select one or more WLANs that support that Dell
PowerConnect W AP Group. Figure 15 illustrates this page.
22 | Dell PowerConnect W Configuration in AirWave Dell PowerConnect W-AirWave 7.4 | Configuration Guide
Page 23
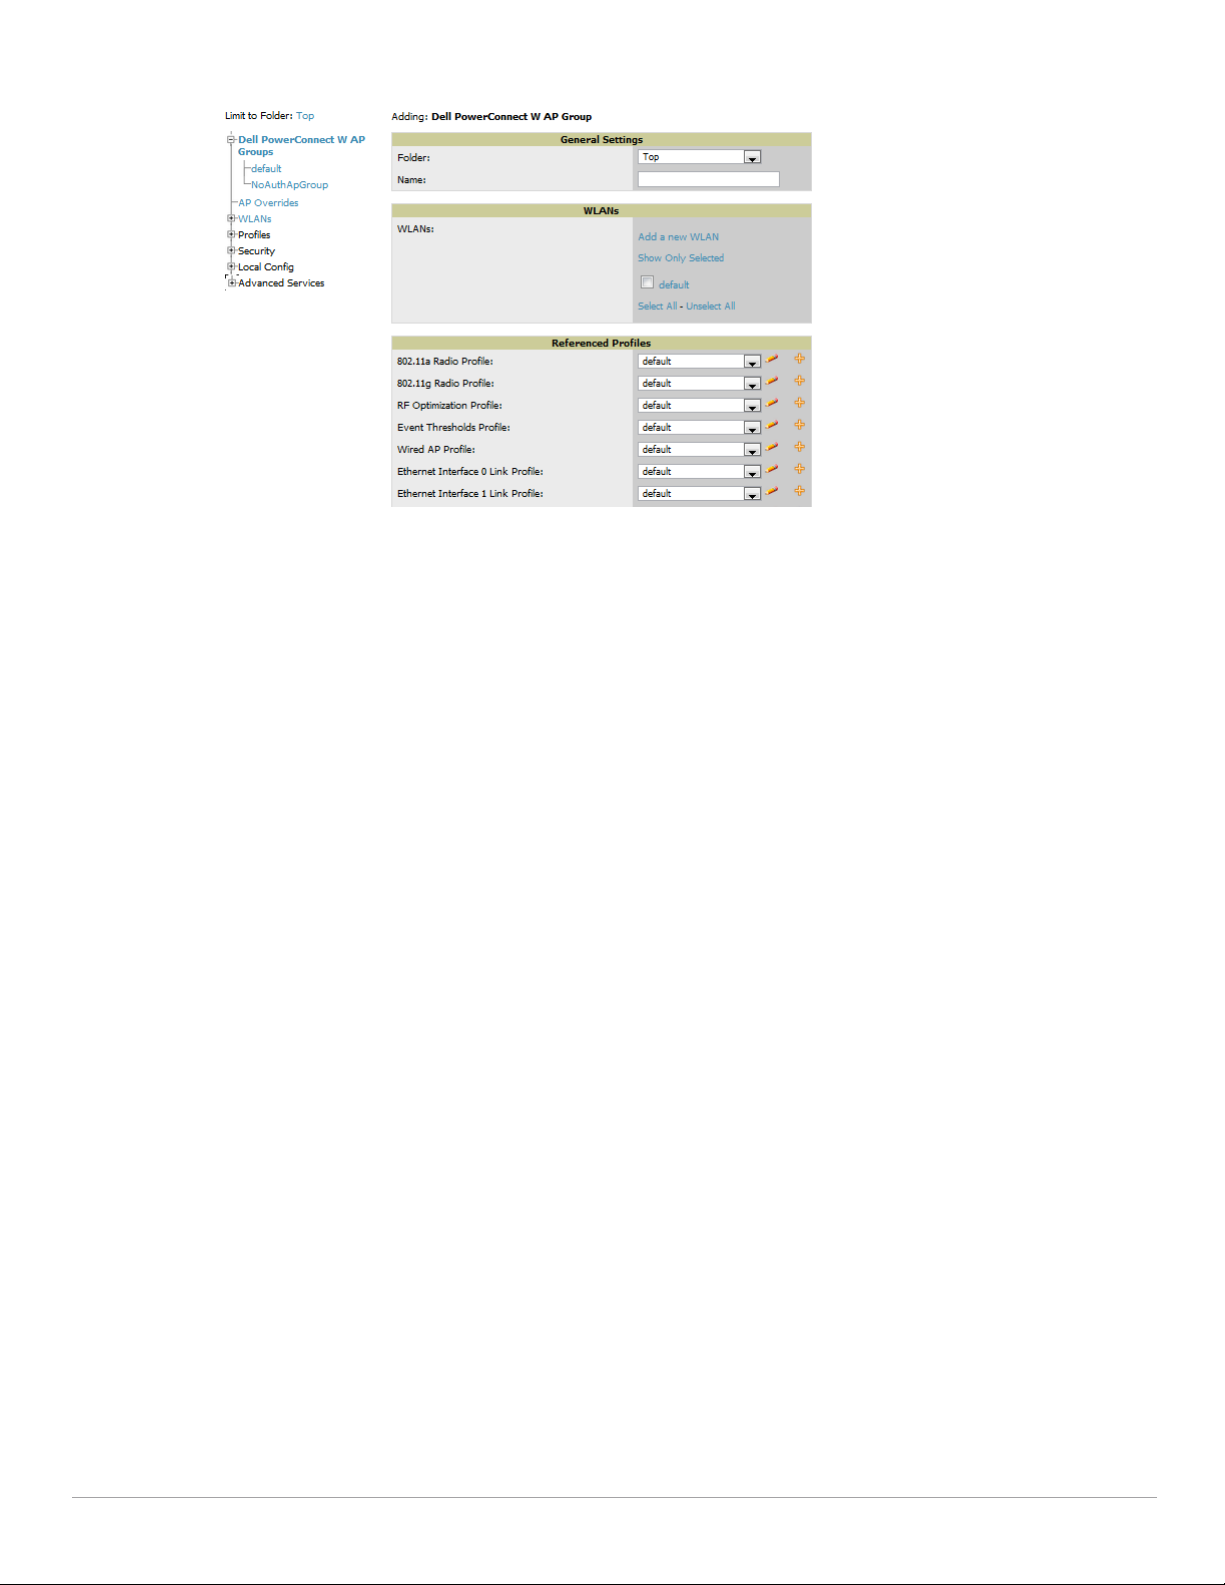
Figure 15 Dell PowerConnect W Configuration > Dell PowerConnect W AP Groups > Add/Edit Details Page (Partial View)
The following section of this configuration guide provides additional information about configuring Dell
PowerConnect W AP Groups:
“General Dell PowerConnect W AP Groups Procedures and Guidelines” on page27
8. Add or edit WLANs in Dell PowerConnect W Configuration as required.
a. Navigate to the Dell PowerConnect W Configuration > WLANs page. This page can display all WLANs
currently configured, or can display only selected WLANs.
b. Click Add to create a new WLAN, or click the pencil icon to edit an existing WLAN.
You can add or edit WLANs in one of two ways, as follows:
Basic—This display is essentially the same as the AOS Wizard View on the Dell PowerConnect W
controller. This page does not require in-depth knowledge of the profiles that define the Dell
PowerConnect W AP Group.
Advanced—This display allows you to select individual profiles that define the WLAN and associated
Dell PowerConnect W AP Group. This page requires in-depth knowledge of all profiles and their
respective settings.
The following sections of this configuration guide provide additional information and illustrations for
configuring WLANs:
“General WLAN Guidelines” on page28
“WLANs” on page45 in the Appendix for details on all WLAN settings
9. Add or edit Dell PowerConnect W Configuration Profiles as required.
a. Navigate to Dell PowerConnect W Configuration > Profiles section of the navigation pane.
b. Select the type of profile in the navigation pane to configure: AAA, AP, Controller, IDS, Mesh, QoS, RF,
or SSID.
c. Click Add from any of these specific profile pages to create a new profile, or click the pencil icon to edit an
existing profile.
Most profiles in AirWave are similar to the All Profiles display in the Dell PowerConnect W controller
WebUI. The primary difference in AirWave is that AAA and SSID profiles are not listed under the WLAN
column, but under Profiles.
d. Save changes to each element as you proceed through profile and WLAN configuration.
All other settings supported on Dell PowerConnect W-Series controllers can be defined on the Dell
PowerConnect W Configuration page. The following section in this document provides additional
information about configuring profiles:
Dell PowerConnect W-AirWave 7.4 | Configuration Guide Dell PowerConnect W Configuration in AirWave | 23
Page 24
“General Profiles Guidelines” on page28
10. Provision multiple Dell PowerConnect W AP Groups on one or more controllers by putting the controllers
into an AMP group and configuring that group to use the selected Dell PowerConnect W AP Groups. With
global configuration enabled, configure such Dell PowerConnect W AP Groups settings on the Group > Dell
PowerConnect W Config page. With group configuration, use the Dell PowerConnect W AP Groups. The
following section of this document provides additional information:
“General Dell PowerConnect W AP Groups Procedures and Guidelines” on page27
11. As required, add or edit AP devices. The following section of this document has additional information:
“Supporting APs with Dell PowerConnect W Configuration” on page30
12. Each AP can be assigned to a single Dell PowerConnect W AP Group. Make sure to choose an AP Group that
has been configured on that controller using that controller's AMP Group. Use the APs/Devices > List,
Modify Devices field and the APs/Devices > Manage page. You can create or edit settings such as the AP
name, syslocation, and syscontact on the APs/Devices > Manage page. For additional information, refer to
“Supporting APs with Dell PowerConnect W Configuration” on page30.
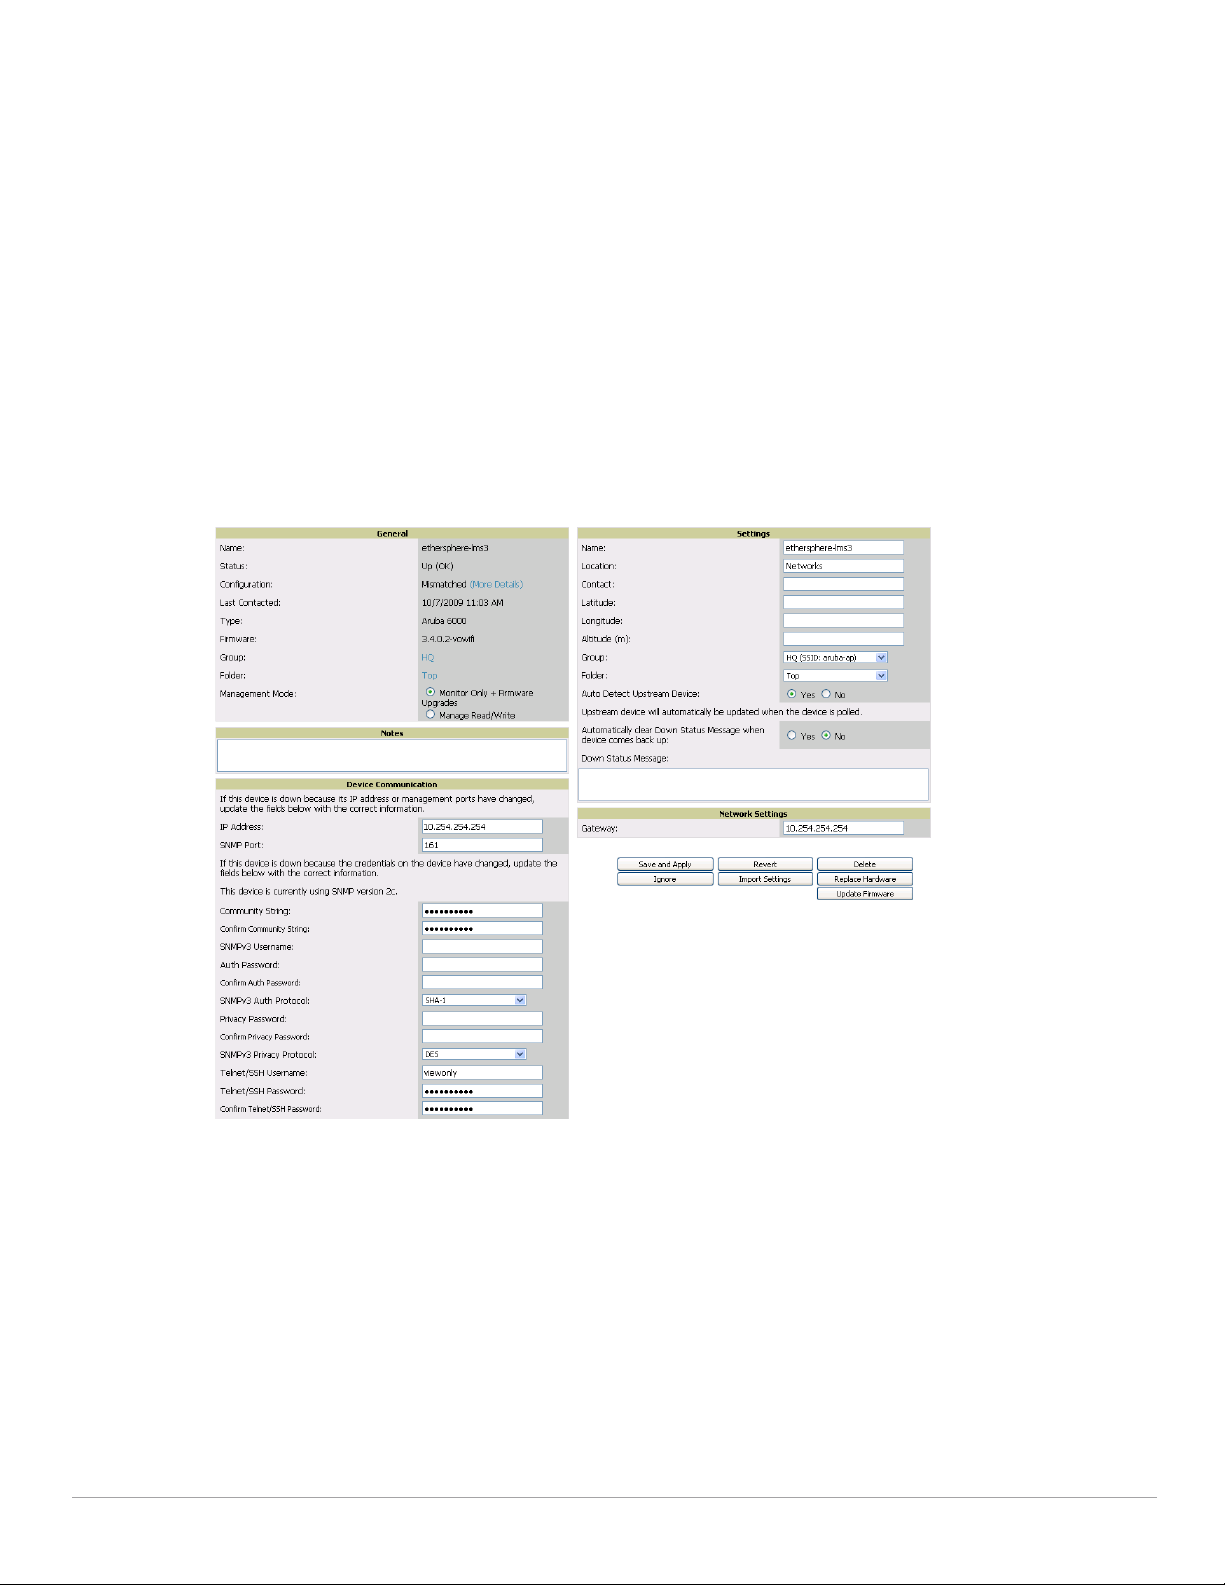
Figure 16 APs/Devices > Manage Page Illustration (Partial Display)
13. Navigate to the APs/Devices > Audit page for the controller to view mismatched settings. This page provides
links to display additional and current configurations. You can display all mismatched devices by navigating to
the APs/Devices > Mismatched page.
24 | Dell PowerConnect W Configuration in AirWave Dell PowerConnect W-AirWave 7.4 | Configuration Guide
Page 25
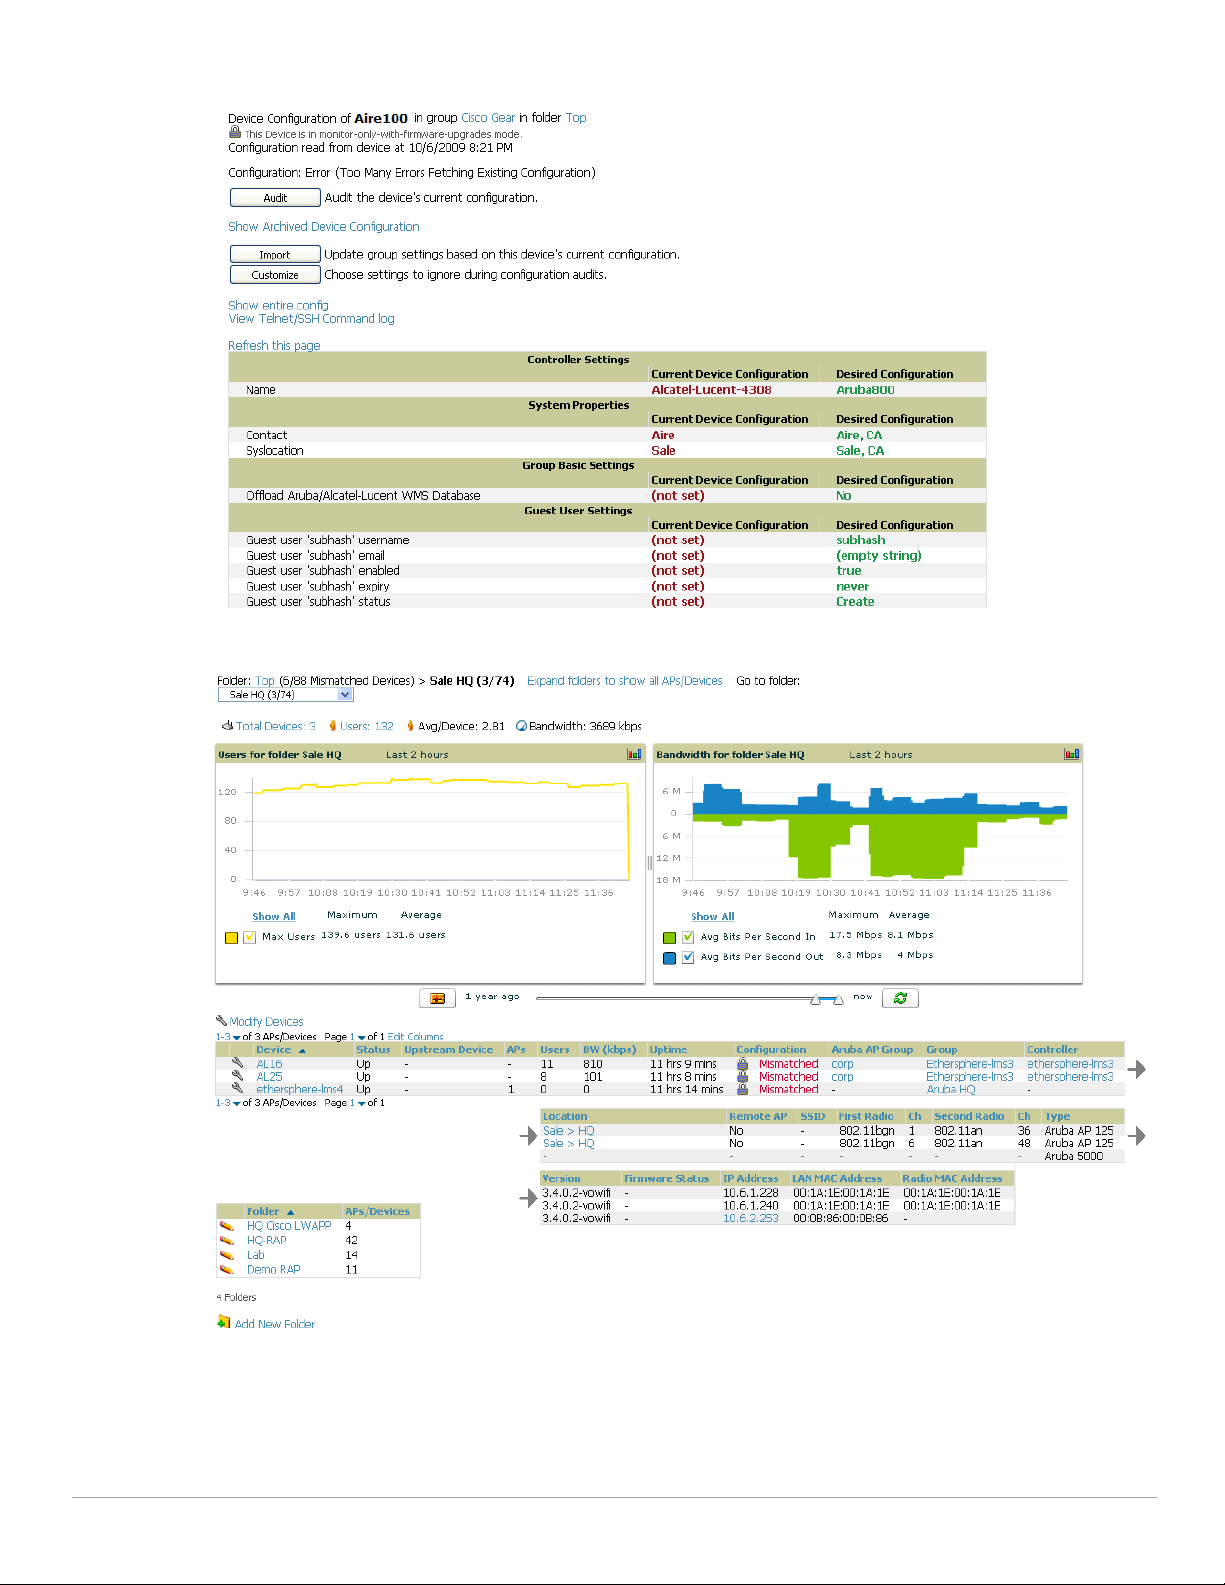
Figure 17 APs/Devices > Audit Page Illustration (Partial Display)
Figure 18 APs/Devices > Mismatched Page Illustration
After initial AOS deployment with the Dell PowerConnect W-Series Configuration feature, you can make
additional configurations or continue with maintenance tasks, such as the following examples:
Once Dell PowerConnect W-Series Configuration is deployed in AirWave, you can perform debugging with
Telnet/SSH. Review the telnet_cmds file in the /var/log folder from the command line interface, or
Dell PowerConnect W-AirWave 7.4 | Configuration Guide Dell PowerConnect W Configuration in AirWave | 25
Page 26

access this file from the System > Status page. For additional information, refer to the Dell PowerConnect WAirWave 7.4 User Guide on support.dell.com/manuals.
To resolve communication issues, review the credentials on the APs/Devices > Manage page.
Mismatches can occur when importing profiles because AirWave deletes orphaned profiles, even if following a
new import.
Additional Capabilities of Dell PowerConnect W-Series Configuration
AirWave supports many additional ArubaOS configurations and settings. Refer to these additional resources for
more information on support.dell.com/manuals:
Dell PowerConnect W-AirWave 7.4 User Guide
Dell PowerConnect W-AirWave 7.4 Best Practices Guide
26 | Dell PowerConnect W Configuration in AirWave Dell PowerConnect W-AirWave 7.4 | Configuration Guide
Page 27

Chapter 2
Using Dell PowerConnect W Configuration in Daily Operations
Introduction
This chapter presents common tasks or concepts after initial setup of Dell PowerConnect W Configuration is
complete, as described in the section “Setting Up Initial Dell PowerConnect W Configuration” on page21. This
chapter emphasizes frequent procedures as follows:
Procedures and Guidelines for Dell PowerConnect W AP Groups
General WLAN Guidelines
General Controller Procedures and Guidelines
Supporting APs with Dell PowerConnect W Configuration
Visibility in Dell PowerConnect W Configuration
Using AirWave to Deploy Dell PowerConnect W APs for the First Time
NOTE: For a complete reference on all Dell PowerConnect W Configuration pages, field descriptions, and certain additional
procedures that are more specialized, refer to Appendix A, “Configuration Reference” on page 37.
Procedures and Guidelines for Dell PowerConnect W AP Groups
Guidelines and Pages for Dell PowerConnect W AP Groups
The fields and default settings for Dell PowerConnect W AP Groups are described in “Dell PowerConnect W AP
Groups” on page 37 in the Appendix. The following guidelines govern the configuration and use of Dell
PowerConnect W AP Groups across Dell PowerConnect W-AirWave 7.4:
Dell PowerConnect W AP Groups function with standard AirWave groups that contain them. Add Dell
PowerConnect W AP Groups to standard AirWave groups. Additional procedures in this document explain
their interoperability.
APs can belong to a controller's AirWave group or to an AirWave group by themselves.
All configurations of Dell PowerConnect W AP Groups must be pushed to Dell PowerConnect W controllers
to become active on the network.
Additional dynamics between master, standby master, and local controllers still apply. In this case, refer to
“Using Controllers in Dell PowerConnect W Configuration” on page 29.
The following pages in AirWave govern the configuration and use of Dell PowerConnect W AP Groups or
standard device groups across AirWave:
The Dell PowerConnect W Configuration navigation pane displays standard AOS components and your
custom-configured Dell PowerConnect W AP Groups, WLANs, and AP Overrides.
You define or modify Dell PowerConnect W AP Groups on the Dell PowerConnect W Configuration page.
Click Dell PowerConnect W AP Groups from the navigation pane.
With Global configuration enabled, you select Dell PowerConnect W AP Groups to associate with AMP
(AirWave) Groups with the Groups > Dell PowerConnect W Config page.
You modify devices in Dell PowerConnect W AP Groups with the APs/Devices > List page, clicking Modify
Devices. This is the page where you assign devices to a given group and Dell PowerConnect W AP Group.
Dell PowerConnect W-AirWave 7.4 | Configuration Guide Using Dell PowerConnect W Configuration in Daily Operations | 27
Page 28

Selecting Dell PowerConnect W AP Groups
To select Dell PowerConnect W AP Groups, navigate to the Dell PowerConnect W Configuration > Dell
PowerConnect W AP Groups page. This page is central to defining Dell PowerConnect W AP Groups, to viewing
the AMP groups with which an Dell PowerConnect W AP Group is associated, changing or deleting Dell
PowerConnect W AP Groups, and assigning AP devices to an Dell PowerConnect W AP Group.
Configuring Dell PowerConnect W AP Groups
Perform the following steps to display, add, edit, or delete Dell PowerConnect W AP Groups in Dell
PowerConnect W Configuration.
1. Browse to the Dell PowerConnect W Configuration page, and click the AP Groups heading in the navigation
pane on the left. The Groups Summary page appears and displays all current Dell PowerConnect W AP
Groups.
2. To add a new group, click the Add AP Group button. To edit an existing group, click the pencil icon next to
the group name. The Details page appears with current or default configurations. The settings on this page are
described in “Dell PowerConnect W AP Groups” on page37.
3. Click Add or Save to finish creating or editing the Dell PowerConnect W AP Group. Click Cancel to exit this
screen and to cancel the AP Group configurations.
4. New AP groups appear in the AP Groups section of the Dell PowerConnect W Configuration navigation
pane, and clicking the group name takes you to the Details page for that group.
5. When this and other procedures are completed, push the configuration to the Dell PowerConnect W
controllers by clicking Save and Apply. The principles of Monitor and Manage mode still apply. For additional
information, refer to “Pushing Device Configurations to Controllers” on page29.
Once Dell PowerConnect W AP groups are defined, ensure that all desired WLANs are referenced in Dell
PowerConnect W AP Groups, as required. Repeat the above procedure to revise WLANs as required. You can
add or edit AP devices in Dell PowerConnect W AP Groups, and you can configure AP Override settings that
allow for custom AP configuration within the larger group in which it operates.
General WLAN Guidelines
The Dell PowerConnect W Configuration navigation pane displays custom-configured WLANs and Dell
PowerConnect W AP Groups. You define or modify WLANs on the Dell PowerConnect W Configuration
page. Click WLANs from the navigation pane.
You can create or edit any profile in an WLAN as you define or modify that WLAN. If you digress to profile
setup from a different page, AirWave returns you to the WLAN setup page once you are done with profile
setup.
All configurations must be pushed to Dell PowerConnect W controllers to become active on the network.
General Profiles Guidelines
AOS elements can be added or edited after an AOS configuration file is imported to AirWave and pushed to
controllers with the steps described in “Setting Up Initial Dell PowerConnect W Configuration” on page21.
Profiles in Dell PowerConnect W configuration entail the following concepts or dynamics:
Profiles define nearly all parameters for Dell PowerConnect W AP Groups and WLANs, and Dell
PowerConnect W Configuration supports many diverse profile types.
Some profiles provide the configurations for additional profiles that reference them. When this is the case,
this document describes the interrelationship of such profiles to each other.
Profiles can be configured in standalone fashion using the procedures in this chapter, then applied elsewhere
as desired. Otherwise, you can define referenced profiles as you progress through Dell PowerConnect W AP
28 | Using Dell PowerConnect W Configuration in Daily Operations Dell PowerConnect W-AirWave 7.4 | Configuration Guide
Page 29

Group or WLAN setup. In the latter case, AirWave takes you to profile setup on separate pages, then returns
to the Dell PowerConnect W AP Group or WLAN setup.
For complete Profiles inventory and field descriptions, refer to “Profiles” on page50 in the Appendix.
General Controller Procedures and Guidelines
Using Controllers in Dell PowerConnect W Configuration
AirWave implements the following general approaches to controllers:
Master Controller—This controller maintains and pushes all global configurations. AirWave pushes
configurations only to a master controller.
Standby Controller—The master controller synchronizes with the standby master controller, which remains
ready to govern global configurations for all controllers should the active master controller fail.
Local Controller—Master controllers push local configurations to local controllers. Local controllers retain
settings such as the interfaces and global VLANs.
AirWave is aware of differences in what is pushed to master controllers and local controllers, and automatically
pushes all configurations to the appropriate controllers. Thin AP provisioning is pushed to the controller to which
a thin AP is connected.
You can determine additional details about what is specific to each controller by reviewing information on the
Groups > Dell PowerConnect W Config page, and the Groups > Monitor page for any specific AP that lists its
master and standby master controller.
Pushing Device Configurations to Controllers
When you add or edit device configurations, you can push device configurations to controllers as follows:
Make device changes on the Dell PowerConnect W Configuration page and click Save and Apply.
If global configuration is enabled, also make devices changes on the Groups > Dell PowerConnect W Config
page and click Save and Apply.
A device must be in Manage mode to push configurations in this way.
NOTE: If you click Save and Apply when a device is in Monitor mode, this initiates a verification process in which AirWave
advises you of the latest mismatches. Mismatches are viewable from the APs/Devices > Mismatched page. Additional Audit and
Group pages list mismatched statuses for devices.
Normally, devices are in Monitor mode. It may be advisable in some circumstances to accumulate several
configuration changes in Monitor mode prior to pushing an entire set of changes to controllers. Follow these
general steps when implementing configuration changes for devices in Monitor mode:
1. Make all device changes using the Dell PowerConnect W Configuration pages. Click Save and Apply as you
complete device-level changes. This builds an inventory of pending configuration changes that have not been
pushed to the controller and APs.
2. Review the entire set of newly mismatched devices on the APs/Devices > Mismatched page.
3. For each mismatched device, navigate to the APs/Devices > Audit page to audit recent configuration changes
as desired.
4. Once all mismatched device configurations are verified to be correct from the APs/Devices > Audit page, use
the Modify Devices link on the Groups > Monitor page to place these devices into Manage mode. This
instructs AirWave to push the device configurations to the controller.
5. As desired, return devices to Monitor mode until the next set of configuration changes is ready to push to
controllers.
Dell PowerConnect W-AirWave 7.4 | Configuration Guide Using Dell PowerConnect W Configuration in Daily Operations | 29
Page 30

Supporting APs with Dell PowerConnect W Configuration
AP Overrides Guidelines
The AP Override component of Dell PowerConnect W Configuration operates with the following principles:
AP devices function within groups that define operational parameters for groups of APs. This is standard
across all of Dell PowerConnect W-AirWave 7.4.
AP Overrides allows you to change some parameters of any given AP without having to remove that AP from
the configuration group in which it operates.
The name of any AP Override that you create should be the same as the name of the AP device to which it
applies. This establishes the basis of all linking to that AP device.
Once you have created an AP Override, you select the WLANs in which it applies.
Once you have created the AP Override, you can go one step further with the Exclude WLANs option of AP
Override, which allows you to exclude certain SSIDs from the AP override. For example, if you have a set of
WLANs with several SSIDs available, the Exclude WLANs option allows you to specify which SSIDs to
exclude from the AP Override.
You can also exclude mesh clusters from the AP Override.
In summary, the AP Override feature prevents you from having to create a new AP group for customized APs that
otherwise share parameters with other APs in a group. AP Override allows you to have less total AP groups than
you might otherwise require.
Changing Adaptive Radio Management (ARM) Settings
You can adjust ARM settings for the radios of a particular Dell PowerConnect W AP Group. To do so, refer to the
following topics that describe ARM in relation to Dell PowerConnect W AP groups and device-level radio
settings:
“Configuring Dell PowerConnect W AP Groups” on page28
“Dell PowerConnect W AP Groups” on page37
“Profiles > RF > 802.11a/g Radio > ARM” on page 105 in the Appendix.
Changing SSID and Encryption Settings
You can adjust SSID and Encryption parameters for devices by adjusting the profiles that define these settings,
then applying those profiles to Dell PowerConnect W AP Groups and WLANs that support them. To do so, refer
to the following topics that describe relevant steps and configuration pages:
“Configuring Dell PowerConnect W AP Groups” on page28
“Guidelines and Pages for Dell PowerConnect W AP Groups” on page 27
“Profiles > SSID” on page 113 and related profiles in the Appendix.
Changing the Dell PowerConnect W AP Group for an AP Device
You can change the Dell PowerConnect W AP Group to which an AP device is associated. Perform the
following steps to change the Dell PowerConnect W AP Group for an AP device:
1. As required, review the Dell PowerConnect W AP Groups currently configured in AirWave. Navigate to the
Dell PowerConnect W Configuration page, and click Dell PowerConnect W AP Groups from the navigation
pane. This page displays and allows editing for all Dell PowerConnect W AP Groups that are currently
configured in AirWave.
2. Navigate to the APs/Devices > List page to view all devices currently seen by AirWave.
3. If necessary, add the device to AirWave using the APs/Devices > New page.
To discover additional devices, ensure that the controller is set to perform a thin AP poll period.
30 | Using Dell PowerConnect W Configuration in Daily Operations Dell PowerConnect W-AirWave 7.4 | Configuration Guide
Page 31

4. On the APs/Devices > List page, you can specify the Group and Folder to which a device belongs. Click
Modify Devices to change more than one device, or click the Wrench icon associated with any specific device
to make changes. The APs/Devices > Manage page appears.
5. In the Settings section of the APs/Devices > Manage page, select the new Dell PowerConnect W AP Group
to assign to the device. Change or adjust any additional settings as desired.
6. Click Save and Apply to retain these settings and to propagate them throughout AirWave, or click one of the
alternate buttons as follows for an alternative change:
Click Revert to cancel out of all changes on this page.
Click Delete to remove this device from AirWave.
Click Ignore to keep the device in AirWave but to ignore it.
Click Import Settings to define device settings from previously created configurations.
Click Replace Hardware to replace the AP device with a new AP device.
Click Update Firmware to update the Firmware that operates this device.
7. Push this configuration change to the AP controller that is to support this AP device. For additional
information, refer to “Pushing Device Configurations to Controllers” on page29.
Using AirWave to Deploy Dell PowerConnect W APs for the First Time
In addition to migrating Dell PowerConnect W access points (APs) from ArubaOS-oriented administration to
AirWave administration, you can use AirWave to deploy Dell PowerConnect W-Series APs for the first time
without separate AOS configuration. Be aware of the following dynamics in this scenario:
AirWave can manage all wireless network management functions, including:
the first-time provisioning of Dell PowerConnect W-Series APs
managing Dell PowerConnect W-Series controllers with AirWave
In this scenario, when a new Dell PowerConnect W-Series AP boots up, AirWave may discover the AP before
you have a chance to configure and launch it through AOS configuration on the Dell PowerConnect W-Series
controller. In this case, the AP appears in AirWave with a device name based on the MAC address.
When you provision the AP through the Dell PowerConnect W-Series controller and then rename the AP, the
new AP name is not updated in AirWave.
An efficient and robust approach to update a Dell PowerConnect W-Series AP device name is to deploy Dell
PowerConnect W-Series APs in AirWave with the following steps:
1. Define communication settings for Dell PowerConnect W-Series APs pending discovery in the Device Setup >
Communication page. This assigns communication settings to multiple devices at the time of discovery, and
prevents having to define such settings manually for each device after discovery.
2. Discover new Dell PowerConnect W-Series APs with AirWave. You can do so with the Device Setup >
Discover page.
3. Click New Devices In the Status section at the top of any AirWave page, or navigate to the APs/Devices >
New page.
4. Select (check) the box next to any AP you want to provision.
5. Rename all new APs. Type in the new device name in the Device column.
6. Scroll to the bottom of the page and put APs in the appropriate AirWave group and folder. Set the devices to
Manage Read/Write mode.
7. Click Add. Wait approximately five to ten minutes. You can observe that the APs have been renamed not only
in AMP but also on the Dell PowerConnect W AP Group and Dell PowerConnect W-Series controller with
the show ap database command.
8. To set the appropriate Dell PowerConnect W AP Group, select the AP/Devices or Groups page and locate
your APs.
Dell PowerConnect W-AirWave 7.4 | Configuration Guide Using Dell PowerConnect W Configuration in Daily Operations | 31
Page 32

9. Click Modify Devices.
10. Select the APs you want to re-group.
11. In the field that states Move to Dell PowerConnect W AP Group below the list of the devices, select the
appropriate group and click Move.
NOTE: If the list of Dell PowerConnect W AP Groups are not there, ensure you either create these Dell PowerConnect W AP
groups manually on the Device Setup > Dell PowerConnect W Configuration page, wherein you merely need the device names and
not the settings, or import the configuration from one of your controllers to learn the groups.
12. Wait another five to 10 minutes to observe the changes on AMP. The changes should be observable within
one or two minutes on the controller.
Using General AirWave Device Groups and Folders
AirWave only allows any given AP to belong to one AirWave device group at a time. Supporting one AP in two or
more AirWave device groups would create at least two possible issues including the following:
Data collection for such an AP device would have two or more sources and two or more related processes.
A multi-group AP would be counted several times and that would change the value calculations for AirWave
graphs.
As a result, some users may wish to evaluate how they deploy the group or folder for any given AP.
NOTE: Dell PowerConnect W-Series APs can also belong to Dell PowerConnect W AP Groups, but each AP is still limited to one
general AirWave device group.
You can organize and manage any group of APs by type and by location. Use groups and folders with either of the
following two approaches:
Organize AP device groups by device type, and device folders by device location.
In this setup, similar devices are in the same device group, and operate from a similar configuration or
template. Once this is established, create and maintain device folders by location.
Organize AP device groups by location, and device folders by type.
In this setup, you can organize all devices according to location in the device groups, but for viewing, you
organize the device hierarchy by folders and type.
Be aware of the following additional factors:
Configuration audits are done at the AirWave group level.
AirWave folders support multiple sublevels.
Therefore, unless there is a compelling reason to use the folders-by-device-type approach, use groups for AP type
and folders strictly for AP location.
Visibility in Dell PowerConnect W Configuration
Visibility Overview
Dell PowerConnect W Configuration supports device configuration and user information in the following ways:
User roles
AP/Device access level
Folders (in global configuration)
32 | Using Dell PowerConnect W Configuration in Daily Operations Dell PowerConnect W-AirWave 7.4 | Configuration Guide
Page 33

Additional factors for visibility are as follows:
Administrative and Management users in AirWave can view the Dell PowerConnect W Configuration page
and the APs/Devices > Manage pages.
Administrative users are enabled to view all configurations.
Management users have access to all profiles and Dell PowerConnect W AP groups for their respective
folders.
The Device Setup > Dell PowerConnect W Configuration page has a limit to folder drop-down options for
customers that manage different accounts and different types of users.
Dell PowerConnect W Configuration entails specific user role and security profiles that define some
components of visibility, as follows:
Security > User Roles
Security > Policies
AirWave continues to support the standard operation of folders, users, and user roles as described in the Dell
PowerConnect W-AirWave 7.4 User Guide in Home>Documentation.
Defining Visibility for Dell PowerConnect W Configuration
Perform these steps to define or adjust visibility for users to manage and support Dell PowerConnect W
Configuration:
1. As required, create a new AirWave device folder with management access.
a. Navigate to the APs/Device > List page, scroll to the bottom of the page. (An alternate page supporting
new folders is Users > Connected page).
b. Click the Add New Folder link. The Folder detail page appears, as illustrated in Figure 19:
Figure 19 APs/Devices > Add New Folder > Folders Page Illustration
c. Click Add. The APs/Devices > List page reappears. You can view your new folder by selecting it from the
Go to folder drop-down list at the top right of this page. Figure 20 illustrates an unpopulated device page
for an example folder.
Figure 20 APs/Devices > List Page With No Devices
2. Add Dell PowerConnect W-Series controller devices to that folder as required. Use the Device Setup > Add
page following instructions available in the Dell PowerConnect W-AirWave 7.4 User Guide in
Home>Documentation.
3. As required, create or edit a user role that is to have rights and manage privileges required to support their
function in Dell PowerConnect W Configuration.
Dell PowerConnect W-AirWave 7.4 | Configuration Guide Using Dell PowerConnect W Configuration in Daily Operations | 33
Page 34

a. At least one user must have administrative privileges, but several additional users may be required with less
rights and visibility to support Dell PowerConnect W Configuration without access to the most sensitive
information, such as SSIDs or other security related data.
b. Navigate to the AMP Setup > Roles page, and click Add New Role to create a new role with appropriate
rights, or click the pencil (manage) icon next to an existing role to adjust rights as required. The Role page
appears, illustrated in Figure 21.
Figure 21 AMP Setup > Roles > Add/Edit Role Page Illustration
c. As per standard AirWave configuration, complete the settings on this page. The most important fields
with regard to Dell PowerConnect W Configuration, device visibility and user rights are as follows:
Type—Specify the type of user. Important consideration should be given to whether the user is an
administrative user with universal access, or an AP/Device manager to specialize in device
administration, or additional users with differing rights and access.
AP/Device Access Level—Define the access level that this user is to have in support of Dell
PowerConnect W controllers, devices, and general Dell PowerConnect W Configuration operations.
Top Folder—Specify the folder created earlier in this procedure, or specify the Top folder for an
administrative user.
d. Click Add to complete the role creation, or click Save to retain changes to an existing role. The AMP
Setup page now displays the new or revised role.
4. As required, add or edit one or more users to manage and support Dell PowerConnect W Configuration. This
step creates or edits users to have rights appropriate to Dell PowerConnect W Configuration. This user
inherits visibility to Dell PowerConnect W-Series controllers and Dell PowerConnect W Configuration data
based on the role and device folder created earlier in this procedure.
a. Navigate to the AMP Setup > Users page.
b. Click Add New User, or click the pencil (manage) icon next to an existing user to edit that user.
c. Select the user role created with the prior step, and complete the remainder of this page as per standard
AirWave configuration. Refer to the Dell PowerConnect W-AirWave 7.4 User Guide at support.dell.com/
manuals, as required.
5. Observe visibility created or edited with this procedure.
The user, role, and device folder created with this procedure are now available to configure, manage, and
support Dell PowerConnect W Configuration and associated devices according to the visibility defined in this
procedure. Any component of this setup can be adjusted or revised by referring to the steps and AirWave
pages in this procedure.
6. Add or discover devices for the device folder defined during step 1 of this procedure. Information about
devices is available in the Dell PowerConnect W-AirWave 7.4 User Guide.
7. Continue to other elements of Dell PowerConnect W Configuration described in this document.
34 | Using Dell PowerConnect W Configuration in Daily Operations Dell PowerConnect W-AirWave 7.4 | Configuration Guide
Page 35

Appendix A
Configuration Reference
Introduction
This appendix describes the pages, field-level settings, and interdependencies of Dell PowerConnect W
Configuration profiles. Additional information is available as follows:
Dell PowerConnect W Configuration components are summarized in “Additional Concepts and
Components of Dell PowerConnect W Configuration” on page 19.
For procedures that use several of these components, refer to earlier chapters in this document.
For architectural information about AOS, refer to the Dell PowerConnect W-Series ArubaOS User Guide at
support.dell.com/manuals.
NOTE: The default values of profile parameters or functions may differ slightly between AOS releases.
Access all pages and field descriptions in this appendix from the Device Setup > Dell PowerConnect W
Configuration page using the navigation pane on the left-hand side. The one exception is the additional Groups
> Dell PowerConnect W Config page that you access from the standard AirWave navigation menu.
This appendix describes Dell PowerConnect W Configuration components with the following organization and
topics:
Dell PowerConnect W AP Groups
AP Overrides
WLANs
Profiles
Security
Local Config of SNMP Management
Advanced Services
Groups > Dell PowerConnect W Config Page and Section Information
Dell PowerConnect W AP Groups
Dell PowerConnect W AP Groups appear at the top of the navigation pane. This section describes the
configuration pages and fields of Dell PowerConnect W AP Groups.
Dell PowerConnect W AP Groups
The Dell PowerConnect W AP Groups page displays all configured Dell PowerConnect W AP Groups and
enables you to add or edit Dell PowerConnect W AP Groups. For additional information about using this page,
refer to “General Dell PowerConnect W AP Groups Procedures and Guidelines” on page 27.
Dell PowerConnect W-AirWave 7.4 | Configuration Guide Configuration Reference | 35
Page 36

The Dell PowerConnect W AP Groups page displays the following information for every group currently
configured:
Table 1 Dell PowerConnect W Configuration > Dell PowerConnect W AP Groups Page
Column Description
Name Displays the name of the Dell PowerConnect W AP Group. Select the pencil icon next to any group to edit.
(Used by)
Group
(Used by)
Number of AP
(Used By)
User Role
Folder Displays the folder that is associated with this Dell PowerConnect W AP Group, when defined.
Displays the AirWave device groups that define this Dell PowerConnect W AP Group. Select the name of
any group in this column to display the detailed Groups > Dell PowerConnect W Config page.
The device groups in this column receive the profile configurations from the associated Dell PowerConnect
W AP Group. Any Dell PowerConnect W AP Group profiles can define device groups.
Displays the number of APs in this Dell PowerConnect W AP Group. A detailed list of each AP by name can
be displayed by navigating to the Groups > List page and selecting that group.
Displays the user role or roles that support the respective Dell PowerConnect W AP Group, when defined.
A Top viewable folder for the role is able to view all devices and groups contained by the top folder. The top
folder and its subfolders must contain all the devices in any groups it can view.
Clicking any folder name takes you to the APs/Devices > List page for folder inventory and configuration.
Select Add to create a new Dell PowerConnect W AP Group, or click the pencil icon next to an existing Dell
PowerConnect W AP Group to edit that group. The Add/Edit Dell PowerConnect W AP Group page contains
the following fields, describes in Table 2.
Table 2 Dell PowerConnect W Configuration > Dell PowerConnect W AP Groups Details, Settings and Default Values
Field Default Description
General Settings
Folder Top Displays the folder with which the AP Group is associated. The drop-down menu displays all
Name Default Enter the name of the AP Group.
WLANs
Add a new WLAN Select this link to create a new WLAN to support Dell PowerConnect W Configuration. Once
Show only selected/
Show All
WLANs None
selected
folders available for association with the AP Group.
Folders provide a way to organize the visibility of device parameters that is separate from
the configuration groups of devices. Using folders, you can view basic statistics about
device, and define which users have visibility to which device parameters.
created, that new WLAN will appear with others on this page.
To set the WLANs that appear on this page, select (check) the desired WLANs, then click
Show Only Selected.
Displays the WLANs currently present in Dell PowerConnect W Configuration with
checkboxes. You may select as few or as many WLANS as desired for which this AP Group
is active.
To configure additional WLANs that appear in this section, click Add a new WLAN or
navigate to the WLANs section in the navigation pane on the left.
36 | Configuration Reference Dell PowerConnect W-AirWave 7.4 | Configuration Guide
Page 37

Table 2 Dell PowerConnect W Configuration > Dell PowerConnect W AP Groups Details, Settings and Default Values (Continued)
Field Default Description
Referenced Profiles
802.11a Radio Profile 5_am Defines AP radio settings for the 5 GHz frequency band, including the Adaptive Radio
Management (ARM) profile and the high-throughput (802.11n) radio profile.
Select the pencil icon next to this field to edit or create additional profile settings in the RF >
802.11a/g Radio page of Dell PowerConnect W Configuration.
802.11g Radio Profile 2.4_am Defines AP radio settings for the 2.4 GHz frequency band, including the Adaptive Radio
Management (ARM) profile and the high-throughput (802.11n) radio profile. Each 802.11a
and 802.11b radio profile includes a reference to an Adaptive Radio Management (ARM)
profile.
If you would like the ARM feature to select dynamically the best channel and transmission
power for the radio, verify that the 802.11a/802.11g radio profile references an active and
enabled ARM profile. If you want to manually select a channel for each AP group, create
separate 802.11a and 802.11g profiles for each AP group and assign a different transmission
channel for each profile.
The drop-down menu displays these options:
default
nchannel too high
nchannel too low
Select the pencil icon next to this field to edit profile settings in the RF > 802.11a/g Radio
page.
RF Optimization
Profile
default Enables or disables load balancing based on a user-defined number of clients or degree of
AP utilization on an AP. Use this profile to detect coverage holes, radio interference and STA
association failures and configure Received signal strength indication (RSSI) metrics.
Select the pencil icon next to this field to display the Profiles > RF section and edit these
settings as desired.
Event Thresholds
Profile
default Defines error event conditions, based on a customizable percentage of low-speed frames,
non-unicast frames, or fragmented, retry or error frames. The drop-down menu displays
these options:
default
all additional RF profiles currently configured in Dell PowerConnect W Configuration
Select the pencil icon next to this field to display the Profiles > RF > Events Threshold
section and edit these settings as desired.
Wired AP Profile default Controls whether 802.11 frames are tunneled to the controller using Generic Routing
Encapsulation (GRE) tunnels, bridged into the local Ethernet LAN (for remote APs), or are
configured for combination of the two (split-mode). This profile also configures the
switching mode characteristics for the port, and sets the port as either trusted or untrusted.
Select the pencil icon next to this field to display the Profiles > AP > Wired page and adjust
these settings as desired.
Ethernet Interface 0
Link Profile
default Sets the duplex mode and speed of AP’s Ethernet link for ethernet interface 0. The
configurable speed is dependent on the port type, and you can define a separate Ethernet
Interface profile for each Ethernet link.
Select the pencil icon next to this field to display the Profiles > AP > Ethernet Link details
page and adjust these settings as desired.
Ethernet Interface 1
Link Profile
default Sets the duplex mode and speed of AP’s Ethernet link for ethernet interface 1. The
configurable speed is dependent on the port type, and you can define a separate Ethernet
Interface profile for each Ethernet link.
Select the pencil icon next to this field to display the Profiles > AP > Ethernet Link details
page and adjust these settings as desired.
Dell PowerConnect W-AirWave 7.4 | Configuration Guide Configuration Reference | 37
Page 38

Table 2 Dell PowerConnect W Configuration > Dell PowerConnect W AP Groups Details, Settings and Default Values (Continued)
Field Default Description
AP System Profile default Defines administrative options for the controller, including the IP addresses of the local,
backup, and master controllers, Real-time Locating Systems (RTLS) server values and the
number of consecutive missed heartbeats on a GRE tunnel before an AP reboots traps.
This field is a drop-down menu with the following options:
Non-integer RTLS Server Station Message Frequency
Too-high RTLS Server Port
Too-low AeroScout RTLS Server Port
Too-low RTLS Server Port
Select the pencil icon next to this field to display the Profiles > AP > System details page
and adjust these settings as desired.
Regulatory Domain
Profile
default Defines an AP’s country code and valid channels for both legacy and high-throughput
802.11a and 802.11b/g radios.
Select the pencil icon next to this field to display the Profiles > AP > Regulatory Domain
page and adjust these settings as desired.
SNMP Profile default Selects the SNMP profile to associate with this AP group. The drop-down menu lists all
SNMP profiles currently enabled in AirWave.
Select the pencil icon next to this field to display the Profiles > AP > SNMP page and adjust
these settings as desired.
VoIP Call Admission
Control Profile
default Dell PowerConnect W’s Voice Call Admission Control limits the number of active voice calls
per AP by load-balancing or ignoring excess call requests. This profile enables active load
balancing and call admission controls, and sets limits for the numbers of simultaneous
Session Initiated Protocol (SIP), SpectraLink Voice Priority (SVP), Cisco Skinny Client
Control Protocol (SCCP), Vocera or New Office Environment (NOE) calls that can be handled
by a single radio.
Select the pencil icon next to this field to display the Profiles > AP > Regulatory Domain
page and adjust these settings as desired.
802.11g Traffic
Management Profile
default Specify the minimum percentage of available bandwidth to be allocated to a specific SSID
when there is congestion on the wireless network, and sets the interval between bandwidth
usage reports. This setting pertains specifically to 802.11g.
802.11a Traffic
Management Profile
default Specify the minimum percentage of available bandwidth to be allocated to a specific SSID
when there is congestion on the wireless network, and sets the interval between bandwidth
usage reports. This setting pertains specifically to 802.11a.
IDS Profile default Selects the IDS profile to be associated with the new AP Group. The drop-down menu
contains these options:
ids-disabled
ids-high-setting
ids -low-setting
ids-medium-setting
The IDS profiles configure the AP’s Intrusion Detection System features, which detect and
disable rogue APs and other devices that can potentially disrupt network operations. An AP
is considered to be a rogue AP if it is both unauthorized and plugged into the wired side of
the network. An AP is considered to be an interfering AP if it is seen in the RF environment
but is not connected to the wired network.
Select the pencil icon next to this field to display the Profiles > IDS page and adjust these
settings as desired.
Mesh Radio Profile default Determines many of the settings used by mesh nodes to establish mesh links and the path to
the mesh portal, including the maximum number of children a mesh node can accept, and
transmit rates for the 802.11a and 802.11g radios.
38 | Configuration Reference Dell PowerConnect W-AirWave 7.4 | Configuration Guide
Page 39

Table 2 Dell PowerConnect W Configuration > Dell PowerConnect W AP Groups Details, Settings and Default Values (Continued)
Field Default Description
Mesh Cluster Profiles
Add New Mesh
Cluster Profile
Select to display a new Mesh Cluster Profile section to this page. This section has two
fields, as follows:
Mesh Cluster Profile—Drop-down menu displays all supported profiles. Select one from
the menu.
Priority (1-16)—Type in the priority number for this profile. The priority may be any
integer from 1 to 16, incusive.
Complete these fields, click the Add button, and the profile displays as an option in the
Mesh Cluster Profile section, which may be selected for the AP Group to be added or
edited.
Select Add to complete the creation or click Save to complete the editing of the Dell PowerConnect W AP
Group. This group now appears in the navigation pane of the Dell PowerConnect W Configuration page.
AP Overrides
The AP Overrides component of Dell PowerConnect W-Series Configuration allow you to define device-specific
settings for an AP device without having to remove that device from an existing Dell PowerConnect W AP Group
or create a new Dell PowerConnect W AP Group specifically for that device. The AP Overrides page is for custom
AP devices that otherwise comply with most settings in the Dell PowerConnect W AP Group in which it is
managed.
AP Overrides
The AP Overrides page displays all AP overrides that are currently configured. These overrides also appear in the
navigation pane at left. The name of any override matches the AP device name.
Table 3 describes the fields on this page.
Table 3 AP Overrides Fields and Descriptions
Field Description
Name Displays the name of the AP Overrides profile. This name matches the name of the specific AP device that
Used By (Group) Displays the name of and link to the Dell PowerConnect W AP Group in which this AP Override applies.
Folder Displays the folder associated with the AP Overrides profile. The folder establishes the visibility of this
Select Add on the AP Overrides page to create a new AP Override, or click the pencil icon next to an existing
override to edit that override. Table 4 describes the fields on the AP Overrides > Add/Edit Details page.
Table 4 AP Overrides Add or Edit Page Fields
it defines.
Additional details about the Dell PowerConnect W AP Group appear on the Groups > Dell PowerConnect W
Config page when you click the name of the group.
profile to users.
Field Default Description
Name Blank Name of the AP Override. Use the name of the AP device to which it applies.
Folder Top Displays the folder with which the WLAN is associated. The drop-down menu
displays all folders available for association with the WLAN.
Dell PowerConnect W-AirWave 7.4 | Configuration Guide Configuration Reference | 39
Page 40

Table 4 AP Overrides Add or Edit Page Fields (Continued)
Field Default Description
WLANs
WLANs This section lists the WLANs currently defined in Dell PowerConnect W
Configuration by default. You can display selected WLANs or all WLANs.
Select one or more WLANs for which AP Override is to apply.
Excluded WLANs
Excluded WLANs This section displays WLANs currently defined by default. This section can display
selected WLANs or all WLANs. Use this section to specify which WLANs are not to
support AP Override.
Referenced Profiles
802.11a Radio Profile 5_am Defines AP radio settings for the 5 GHz frequency band, including the Adaptive Radio
Management (ARM) profile and the high-throughput (802.11n) radio profile.
Select the pencil icon next to this field to edit or create additional profile settings in
the RF > 802.11a/g Radio page.
Refer to “Profiles > RF > 802.11a/g Radio” on page 109.
802.11g Radio Profile 2.4_am Defines AP radio settings for the 2.4 GHz frequency band, including the Adaptive
Radio Management (ARM) profile and the high-throughput (802.11n) radio profile.
Each 802.11a and 802.11b radio profile includes a reference to an Adaptive Radio
Management (ARM) profile.
If you would like the ARM feature to select dynamically the best channel and
transmission power for the radio, verify that the 802.11a/802.11g radio profile
references an active and enabled ARM profile. If you want to manually select a
channel for each AP group, create separate 802.11a and 802.11g profiles for each AP
group and assign a different transmission channel for each profile.
The drop-down menu displays these options:
default
nchannel too high
nchannel too low
Select the pencil icon next to this field to edit or create additional profile settings in
the RF > 802.11a/g Radio page of Dell PowerConnect W Configuration.
Refer to “Profiles > RF > 802.11a/g Radio” on page 109.
RF Optimization Profile default Enables or disables load balancing based on a user-defined number of clients or
degree of AP utilization on an AP. Use this profile to detect coverage holes, radio
interference and STA association failures and configure Received signal strength
indication (RSSI) metrics.
Select the pencil icon next to this field to display the Profiles > RF section and edit
these settings as desired.
Refer to “Profiles > RF > 802.11a/g Radio” on page 109.
Event Thresholds
Profile
default Defines error event conditions, based on a customizable percentage of low-speed
frames, non-unicast frames, or fragmented, retry or error frames. The drop-down
menu displays these options:
default
all additional RF profiles currently configured in Dell PowerConnect W
Configuration
Select the pencil icon next to this field to display the Profiles > RF > Events Threshold
section and edit these settings as desired.
Refer to “Profiles > RF > Event Thresholds” on page 118.
40 | Configuration Reference Dell PowerConnect W-AirWave 7.4 | Configuration Guide
Page 41

Table 4 AP Overrides Add or Edit Page Fields (Continued)
Field Default Description
Wired AP Profile default Controls whether 802.11 frames are tunneled to the controller using Generic Routing
Encapsulation (GRE) tunnels, bridged into the local Ethernet LAN (for remote APs), or
a configured for combination of the two (split-mode). This profile also configures the
switching mode characteristics for the port, and sets the port as either trusted or
untrusted.
Select the pencil icon next to this field to display the Profiles > AP > Wired page and
adjust these settings as desired.
Refer to “Profiles > AP > System” on page 76.
Ethernet Interface 0
Link Profile
default Sets the duplex mode and speed of AP’s Ethernet link for ethernet interface 0. The
configurable speed is dependent on the port type, and you can define a separate
Ethernet Interface profile for each Ethernet link.
Select the pencil icon next to this field to display the Profiles > AP > Ethernet Link
details page and adjust these settings as desired.
Refer to “Profiles > AP > SNMP” on page 75.
Ethernet Interface 1
Link Profile
default Sets the duplex mode and speed of AP’s Ethernet link for ethernet interface 1. The
configurable speed is dependent on the port type, and you can define a separate
Ethernet Interface profile for each Ethernet link.
Select the pencil icon next to this field to display the Profiles > AP > Ethernet Link
details page and adjust these settings as desired.
Refer to “Profiles > AP > SNMP” on page 75.
AP System Profile default Defines administrative options for the controller, including the IP addresses of the
local, backup, and master controllers, Real-time Locating Systems (RTLS) server
values and the number of consecutive missed heartbeats on a GRE tunnel before an
AP reboots traps.
This field is a drop-down menu with the following options:
Non-integer RTLS Server Station Message Frequency
Too-high RTLS Server Port
Too-low AeroScout RTLS Server Port
Too-low RTLS Server Port
Select the pencil icon next to this field to display the Profiles > AP > System details
page and adjust these settings as desired.
Refer to “Profiles > AP > System” on page 76.
Regulatory Domain
Profile
default Defines an AP’s country code and valid channels for both legacy and high-
throughput 802.11a and 802.11b/g radios.
Select the pencil icon next to this field to display the Profiles > AP > Regulatory
Domain page and adjust these settings as desired.
Refer to “Profiles > AP > Regulatory Domain” on page 74.
SNMP Profile default Selects the SNMP profile to associate with this AP group. The drop-down menu lists
all SNMP profiles currently enabled in AirWave.
Select the pencil icon next to this field to display the Profiles > AP > SNMP page and
adjust these settings as desired.
Refer to “Profiles > AP > SNMP” on page 75.
VoIP Call Admission
Control Profile
default Dell PowerConnect W’s Voice Call Admission Control limits the number of active
voice calls per AP by load-balancing or ignoring excess call requests. This profile
enables active load balancing and call admission controls, and sets limits for the
numbers of simultaneous Session Initiated Protocol (SIP), SpectraLink Voice Priority
(SVP), Cisco Skinny Client Control Protocol (SCCP), Vocera or New Office
Environment (NOE) calls that can be handled by a single radio.
Select the pencil icon next to this field to display the Profiles > AP > Regulatory
Domain page and adjust these settings as desired.
Refer to “Profiles > AP > SNMP” on page 75.
Dell PowerConnect W-AirWave 7.4 | Configuration Guide Configuration Reference | 41
Page 42

Table 4 AP Overrides Add or Edit Page Fields (Continued)
Field Default Description
802.11g Traffic
Management Profile
default Specify the minimum percentage of available bandwidth to be allocated to a specific
SSID when there is congestion on the wireless network, and sets the interval
between bandwidth usage reports. This setting pertains specifically to 802.11g.
Refer to “Profiles > QoS > Traffic Management” on page 104
802.11a Traffic
Management Profile
default Specify the minimum percentage of available bandwidth to be allocated to a specific
SSID when there is congestion on the wireless network, and sets the interval
between bandwidth usage reports. This setting pertains specifically to 802.11a.
Refer to “Profiles > QoS > Traffic Management” on page 104
IDS Profile default Selects the IDS profile to be associated with the new AP Group. The drop-down
menu contains these options:
ids-disabled
ids-high-setting
ids -low-setting (the default)
ids-medium-setting
The IDS profiles configure the AP’s Intrusion Detection System features, which
detect and disable rogue APs and other devices that can potentially disrupt network
operations. An AP is considered to be a rogue AP if it is both unauthorized and
plugged into the wired side of the network. An AP is considered to be an interfering
AP if it is seen in the RF environment but is not connected to the wired network.
Select the pencil icon next to this field to display the Profiles > IDS page and adjust
these settings as desired.
Refer to “Profiles > IDS” on page 82
Mesh Radio Profile default Determines many of the settings used by mesh nodes to establish mesh links and the
path to the mesh portal, including the maximum number of children a mesh node can
accept, and transmit rates for the 802.11a and 802.11g radios.
Refer to “Profiles > Mesh” on page 95.
AP Authorization Profile Selects the AP Authorization profile to be associated with the new AP Group. This
profile requires a Remote Access Points license. Refer to “Profiles > AP >
Authorization” on page 71.
AP Provisioning Profile Selects the AP Provisioning profile to be associated with the new AP Group. Refer to
“Profiles > AP > Provisioning” on page 72.
Ethernet Interface 0-4
Port Configuration
Selects the Ethernet port configuration to be associated with the new AP Group. This
profile allows you to configure all AP wired port profiles and their status. The dropdown menu contains these options:
default
NoWiredAuthPort
shutdown
Refer to “Select Add or Save. The added or edited Wired Port profile appears on the
Profiles page, and on the Wired Port details page.” on page 80.
Mesh Cluster Profiles
Add New Mesh Cluster
Profile
Hidden by
default until
the Add
button is
clicked
Clicking this Add button displays a new Mesh Cluster Profile field. The drop-down
menu displays all supported profiles. Select one from the menu.
Complete this field, click the Add button, and the profile displays as an option in the
Mesh Cluster Profile section, which may be selected for the AP Group to be added or
edited.
For additional information about Mesh Cluster profiles, refer to these sections:
“Profiles > Mesh” on page 95
“Profiles > QoS” on page 104.
42 | Configuration Reference Dell PowerConnect W-AirWave 7.4 | Configuration Guide
Page 43

Table 4 AP Overrides Add or Edit Page Fields (Continued)
Field Default Description
Excluded Mesh Cluster Profiles
Excluded Mesh Cluster
Profiles
If required, select one or more Mesh Cluster profiles from this field. This field can
display all Mesh Cluster profiles or can display only selected Mesh Cluster profiles.
For additional information about Mesh Cluster profiles, refer to “Profiles > QoS” on
page 104.
Select Add to complete the creation of the new AP Overrides profile, or click Save to preserve changes to an
existing AP Overrides profile. The AP Overrides page and the navigation pane display the name of the AP
Overrides profile.
WLANs
Overview of WLANs Configuration
You have a wide variety of options for authentication, encryption, access management, and user rights when you
configure a WLAN. However, you must configure the following basic elements:
An SSID that uniquely identifies the WLAN
Layer-2 authentication to protect against unauthorized access to the WLAN
Layer-2 encryption to ensure the privacy and confidentiality of the data transmitted to and from the network
A user role and virtual local area network (VLAN) for the authenticated client
For more information, refer to the Dell PowerConnect W-Series ArubaOS User Guide at support.dell.com/
manuals.
Use the following guidelines when configuring and using WLANs in Dell PowerConnect W Configuration:
The Device Setup > Dell PowerConnect W Configuration navigation pane displays custom-configured
WLANs and Dell PowerConnect W AP Groups. All other components of the navigation pane are standard
across all deployments of Dell PowerConnect Configuration.
You define or modify WLANs on the Device Setup > Dell PowerConnect W Configuration page. Select
WLANs from the navigation pane.
You can create or edit any profile in an WLAN as you define or modify that WLAN. If you digress to profile
setup from a different page, AirWave returns you to your place on the WLAN setup page once you are done
with profile setup.
WLANs
The WLANs page displays all configured WLANs and enables you to add or edit WLANs. For additional
information about using this page, refer to “General WLAN Guidelines” on page 28.
The Dell PowerConnect W Configuration > WLANs page contains additional information as described in
Table 5:
Table 5 Dell PowerConnect W Configuration > WLANs Page Fields and Descriptions
Field Description
Name Lists the name of the WLAN.
SSID Lists the SSID currently defined for the WLAN.
Dell PowerConnect W-AirWave 7.4 | Configuration Guide Configuration Reference | 43
Page 44

Table 5 Dell PowerConnect W Configuration > WLANs Page Fields and Descriptions (Continued)
Field Description
Dell PowerConnect W
AP Group
AP Override Lists any AP Override configurations for specific APs on the WLAN and in the respective Dell
Traffic Management Lists Traffic Management profiles that are currently configured and deployed on the WLAN.
Folder Lists the folder for the WLAN.
Lists the Dell PowerConnect W AP Group or Groups that use the associated WLAN.
PowerConnect W AP Groups.
You can create new WLANs from this page by clicking the Add button. You can edit an existing WLAN by
clicking the pencil icon for that WLAN.
You have two pages by which to create or edit WLANs: the Basic page and the Advanced page. The remainder of
this section describes these two pages.
WLANs > Basic
From the Dell PowerConnect W Configuration > WLANs page, click Add to create a new WLAN, or click the
pencil icon to edit an existing WLAN, then click Basic. This page provides a streamlined way to create or edit a
WLAN. Table 6 describes the fields for this page.
Table 6 WLANs > Basic Page Fields and Descriptions
Field Default Description
Name Blank Enter the name of the WLAN.
Folder Top Displays the folder with which the WLAN is associated. The drop-down menu displays
SSID Select the SSID profile that defines encryption, EDCA or high-throughput SSID
Radio Type Define whether the supported radio type on the WLAN is 802.11a, 802.11g, or all.
Enable 802.11n Yes Define whether the WLAN is to support 802.11n.
VLAN 1 Select the VLAN ID number to be supported on this WLAN.
Intended Use Internal Define whether this WLAN is Internal to the enterprise or to support Guest users.
Encryption opensystem Select one or more encryption types, as desired, to be supported by this WLAN.
Use Captive Portal No Select whether this WLAN will use captive portal authentication. Captive portal
Authenticated User
Role
logon For the captive portal authentication profile, you specify the previously-created
all folders available for association with the WLAN.
parameters. Access these SSID profiles by clicking Profiles > SSID in the navigation
pane. Refer to “Profiles > SSID” on page 122.
authentication directs clients to a special web page that typically requires them to
enter a username and password before accessing the network. For additional
information about this profile type, refer to “Profiles > AAA > Captive Portal Auth” on
page 57.
authguest user role as the default user role for authenticated captive portal clients
and the authentication server group (“Internal”). Refer to “Security > User Roles” on
page 135.
Select Add to create the WLAN, or click Save to finish reconfiguring an existing WLAN. The WLAN appears on
the WLANs page in the navigation pane.
44 | Configuration Reference Dell PowerConnect W-AirWave 7.4 | Configuration Guide
Page 45

The alternate way to create or edit WLANs is from the Advanced page. Refer to “WLANs > Advanced” on
page 45.
WLANs > Advanced
From the Dell PowerConnect W Configuration > WLANs page, click Add to create a new WLAN, or click the
pencil icon to edit an existing WLAN, then click Advanced. The Advanced page allows you to configure many
more sophisticated settings when creating or editing WLANs. Table 7 describes the fields for this page.
Table 7 WLANs > Advanced Page Fields
Field Default Description
General Settings
Folder Top Displays the folder with which the WLAN is associated. The drop-down menu
Name Blank Name of the WLAN.
Referenced Profiles
SSID Profile Select the SSID profile that defines encryption, EDCA or high-throughput SSID
AAA Profile Select the AAA profile that defines RADIUS, TACACS+, or other AAA server
802.11k Profile Manages settings for the 802.11k protocol. The 802.11k protocol allows APs and
WMM Traffic
Management Profile
displays all folders available for association with the WLAN.
parameters. Access these SSID profiles by clicking Profiles > SSID in the navigation
pane. Refer to “Profiles > SSID” on page 122.
configurations for this WLAN. Access these SSID profiles by clicking Profiles > AAA
in the navigation pane. Refer to “Profiles > AAA Overview” on page 48.
clients to dynamically query their radio environment and take appropriate connection
actions. For example, in a 802.11k network if the AP with the strongest signal reaches
its CAC (Call Admission Control) limits for voice calls, then on-hook voice clients may
connect to an under utilized AP with a weaker signal. You can configure the following
options in 802.11k profile:
Enable or disable 802.11K support on the AP
Forceful disassociation of on-hook voice clients
Measurement mode for beacon reports.
For more details, see the “Configuring 802.11k Protocol” topic in the ArubaOS User
Guide.
Manages settings for the bandwidth management profile for Wi-Fi Multimedia
(WMM). Refer to “Profiles > QoS > Traffic Management” on page 104.
Other Settings
Virtual AP Enable Yes Enable this setting to allow virtual AP configurations to be deployed on this WLAN.
This profile defines your WLAN by enabling or disabling the bandsteering, fast
roaming, and DoS prevention features. It defines radio band, forwarding mode and
blacklisting parameters, and includes references an AAA Profile, an EDCA
Parameters AP Profile and a High-throughput SSID profile
Allowed Band All Select whether this WLAN is to support 802.11a, 802.11g, or both.
VLAN Enter the VLAN or range of VLANs to be supported with this WLAN.
Forward Mode Tunnel Define whether this WLAN is to support tunnel, bridge, or split-mode IP forwarding.
Deny Time Range None Define the time range restrictions for the roles in this WLAN, if any.
Dell PowerConnect W-AirWave 7.4 | Configuration Guide Configuration Reference | 45
Page 46

Table 7 WLANs > Advanced Page Fields (Continued)
Field Default Description
Mobile IP Yes Enable or disable mobile IP functions. This setting specifies whether the controller is
the home agent for a client. When enabled, this setting detects when a mobile client
has moved to a foreign network and determines the home agent for a roaming client.
HA Discovery on
Association
No Enable or disable HA discovery on Association. In normal circumstances a controller
performs an HA discovery only when it is aware of the client’s IP address which it
learns through the ARP or any L3 packet from the client. This limitation of learning the
client’s IP and then performing the HA discovery is not effective when the client
performs an inter switch move silently (does not send any data packet when in power
save mode). This behavior is commonly seen with various handheld devices, Wi-Fi
phones, etc. This delays HA discovery and eventually resulting in loss of downstream
traffic if any meant for the mobile client.
With HA discovery on association, a controller can perform a HA discovery as soon
as the client is associated. By default, this feature is disabled. You can enable this on
virtual APs with devices in power-save mode and requiring mobility. This option will
also poll for all potential HAs.
DoS Prevention No Enable or disable DoS prevention functions, as defined in virtual AP profiles.
Station Blacklisting Yes Enable or disable DoS prevention functions, as defined in virtual AP profiles. The
blacklisting option can be used to prevent access to clients that are attempting to
breach the security.
When a client is blacklisted in the Dell PowerConnect W system, the client is not
allowed to associate with any AP in the network for a specified amount of time. If a
client is connected to the network when it is blacklisted, a de-authentication
message is sent to force the client to disconnect. While blacklisted, the client cannot
associate with another SSID in the network.
Blacklist Time 3600 If station blacklisting is enabled, specify the time in seconds for which blacklisting is
enabled. When a client is blacklisted in the Dell PowerConnect W system, the client is
not allowed to associate with any AP in the network for a specified amount of time.
Authentication Failure
Blacklist Time
3600 You can configure a maximum authentication failure threshold in seconds for each of
the following authentication methods:
802.1x
MAC
Captive portal
VPN
When a client exceeds the configured threshold for one of the above methods, the
client is automatically
blacklisted by the controller, an event is logged, and an SNMP trap is sent. By default,
the maximum authentication failure threshold is set to 0 for the above authentication
methods, which means that there is no limit to the number of times a client can
attempt to authenticate.
With 802.1x authentication, you can also configure blacklisting of clients who fail
machine authentication.
NOTE: This requires that the External Services Interface (ESI) license be installed in
the controller.
NOTE: When clients are blacklisted because they exceed the authentication failure
threshold, they are blacklisted indefinitely by default. You can configure the duration
of the blacklisting.
Fast Roaming No Fast roaming is a component of virtual AP profiles in which client devices are allowed
to roam from one access point to another without requiring reauthentication by the
main RADIUS server.
Strict Compliance No Define whether clients should have strict adherence to settings on this page for
network access.
VLAN Mobility No Define whether clients in the WLAN and VLAN should have mobility or roaming
privileges.
46 | Configuration Reference Dell PowerConnect W-AirWave 7.4 | Configuration Guide
Page 47

Table 7 WLANs > Advanced Page Fields (Continued)
Field Default Description
Remote AP Operation Standard Define the rights for remote APs in this WLAN. Options are as follows:
standard
persistent
backup
always
Remote APs connect to a controller using Layer-2 Tunneling Protocol and Internet
Protocol Security (L2TP/IPSec). AP control and 802.11 data traffic are carried through
this tunnel. Secure Remote Access Point Service extends the corporate office to the
remote site. Remote users can use the same features as corporate office users.
Secure Remote Access Point Service can also be used to secure control traffic
between an AP and the controller in a corporate environment. In this case, both the
AP and controller are in the company’s private address space.
Drop Broadcast and
Multicast
Convert Broadcast ARP
Requests to Unicast
No Specify whether the WLAN should drop broadcast and multicast mesh network
advertising on the WLAN.
No Specify whether ARP table information should be distributed in broadcast (default) or
unicast fashion.
Deny Inter User Traffic No If enabled, this setting disables traffic between all untrusted users. You can configure
user role policies that prevent Layer-3 traffic between users or networks but this does
not block Layer-2 traffic. Requires a minimum version of 6.1.0.0.
Band Steering No Enable or disable band steering on the WLAN. Band steering reduces co-channel
interference and increases available bandwidth for dual-band clients, because there
are more channels on the 5GHz band than on the 2.4GHz band. Dual-band 802.11ncapable clients may see even greater bandwidth improvements, because the band
steering feature will automatically select between 40 MHz or 20 MHz channels in
802.11n networks. This feature is disabled by default, and must be enabled in a Virtual
AP profile.
Steering Mode Prefer-5GHz Band steering supports three different band steering modes.
Force-5GHz: When the AP is configured in force-5GHz band steering mode, the
AP will try to force 5GHz-capable APs to use that radio band.
Prefer-5GHz (Default): If you configure the AP to use prefer-5GHz band steering
mode, the AP will try to steer the client to 5GHz band (if the client is 5GHz
capable) but will let the client connect on the 2.4G band if the client persists in
2.4G association attempts.
Balance-bands: In this band steering mode, the AP tries to balance the clients
across the two radios in order to best utilize the available 2.4G bandwidth. This
feature takes into account the fact that the 5GHz band has more channels than
the 2.4 GHz band, and that the 5GHz channels operate in 40 MHz while the 2.4GHz
band operates in 20MHz.
NOTE: Steering modes do not take effect until the band steering feature has been
enabled.
Dynamic Multicast
No If enabled, DMO techniques will be used to reliably transmit video data.
Optimization (DMO)
Dynamic Multicast
Optimization (DMO)
6 Maximum number of high-throughput stations in a multicast group beyond which
dynamic multicast optimization stops.
Threshold (2-255)
Select Add to create the WLAN, or click Save to finish reconfiguring an existing WLAN. The WLAN appears on
the WLANs page in the navigation pane.
Dell PowerConnect W-AirWave 7.4 | Configuration Guide Configuration Reference | 47
Page 48

Profiles
Understanding Dell PowerConnect W Configuration Profiles
In AOS, related configuration parameters are grouped into a profile that you can apply as needed to an AP group
or to individual APs. This section lists each category of AP profiles that you can configure and then apply to an AP
group or to an individual AP. Note that some profiles reference other profiles. For example, a virtual AP profile
references SSID and AAA profiles, while an AAA profile can reference an 802.1x authentication profile and server
group.
You can apply the following types of profiles to an AP or AP group. For additional details and configuration
instructions, continue to the related procedures in this section.
Browse to the Device Setup > Dell PowerConnect W Configuration page, and click the Profiles heading in the
navigation pane on the left. Expand the Profiles menu by clicking the plus sign (+) next to it. Several profile
options appear.
This document section describes the profiles and settings supported in Dell PowerConnect W Configuration in
the following sections:
Profiles > AAA Overview
Profiles > AP
Profiles > IDS
Profiles > Mesh
Profiles > Mobility Switch
Profiles > QoS
Profiles > RF
Profiles > SSID
Profiles > AAA Overview
This profile type defines authentication settings for the WLAN users, including the role for unauthenticated
users, and the different roles that should be assigned to users authenticated via 802.1x, MAC or SIP
authentication. Perform these steps to determine the need for and to configure AAA profiles.
1. To view and configure AAA profiles, click the Profiles > AAA profile heading in the navigation pane. The
AAA Profiles page appears and lists the current profiles. Figure 22 illustrates this page.
Figure 22 AAA Profiles Navigation of Dell PowerConnect W Configuration
48 | Configuration Reference Dell PowerConnect W-AirWave 7.4 | Configuration Guide
Page 49

2. From the navigation pane, you can configure the following profile types:
AAA Profile—The AAA profile defines the authentication method and the default user role for
unauthenticated users. This profile type references additional profiles. Refer to “Profiles > AAA” on
page 49.
802.1x Auth—Manages settings for the 802.11k protocol. In a 802.1k network, if the AP with the strongest
signal is reaches its maximum capacity, clients may connect to an under utilized AP with a weaker signal
under utilized APs. Refer to “Profiles > AAA > Advanced Authentication” on page 56.
Advanced Authentication—Manages timers to apply to all clients and servers. Refer to “Profiles > AAA >
Advanced Authentication” on page56.
Captive Portal Auth—Captive portal authentication directs clients to a special web page that typically
requires them to enter a username and password before accessing the network. This profile defines login
wait times and the URLs for login and welcome pages, and manages the default user role for authenticated
captive portal clients. You can also use this profile to set the maximum number of authentication failures
allowed per user before that user is blacklisted. This profile includes a reference to a Server group profile.
Refer to “Profiles > AAA > Captive Portal Auth” on page 57.
Combined VPN Auth—Identifies the default role for authenticated VPN clients. This profile also
references a server group. Refer to “Profiles > AAA > Combined VPN Auth” on page 66.
IPv6 Extension Header—This profile allows you to edit the packet filter options in the IPv6 Extension
Header (EH). Refer to “Profiles > AAA > IPv6 Extension Header” on page59.
MAC Auth—Defines parameters for MAC address authentication, including the case of MAC string
(upper- or lower-case), the format of the diameters in the string, and the maximum number of
authentication failures before a user is blacklisted. Refer to “Profiles > AAA > MAC Auth” on page 60.
Management Auth—Enables or disables management authentication, and identifies the default role for
authenticated management clients. This profile also references a server group. Refer to “Profiles > AAA >
Management Auth” on page 67.
Stateful 802.1x Auth—Enables or disables 802.1x authentication for clients on non-Dell PowerConnect W
APs, and defines the default role for those users once they are authenticated. This profile also references a
server group to be used for authentication. Refer to “Profiles > AAA > Stateful 802.1X Auth” on page 65.
Stateful NTLM Auth—Requires that you specify a server group which includes the servers performing
NTLM authentication, and a default role to be assigned to authenticated users. Refer to “Profiles > AAA
> Stateful NTLM Auth” on page 68.
VPN Connection— Allows you to create a VPN Connection profile. Refer to “Profiles > AAA > VPN
Connection” on page 61.
VIA Auth— Creates a VPN Authentication profile. “Profiles > AAA > VPN Connection > VIA Auth” on
page 63.
VIA Client WLAN— Sets up a VIA Client WLAN profile. Refer to “Profiles > AAA > VPN Connection >
VIA Client WLAN” on page 63.
VIA Global— “Profiles > AAA > VIA Global” on page 65.
Wired Auth—This profile merely references an AAA profile to be used for wired authentication. Refer to
“Profiles > AAA > Wired Auth” on page 66.
WISPr Auth—The Wireless Internet Service Provider roaming (WISPr) protocol allows users to roam
between service providers. A RADIUS server is used to authenticate subscriber credentials. Refer to
“Profiles > AAA > WISPr Auth” on page 69.
Profiles > AAA
Perform these steps to configure a AAA profile.
1. Select Profiles > AAA in the navigation pane.
Dell PowerConnect W-AirWave 7.4 | Configuration Guide Configuration Reference | 49
Page 50

2. Select the Add button to create a new AAA profile, or click the pencil icon next to an existing profile to edit.
Complete the settings as described in Table 8.
Table 8 Profiles > AAA > New AAA Profile Settings
Field Default Description
General Settings
Folder Top Set the folder with which the profile is associated. The drop-down menu displays all
Name Blank Enter the name of the AAA profile.
Referenced Profiles
MAC Authentication
Profile
MAC Authentication
Server Group
802.1X Authentication
Profile
802.1X Authentication
Server Group
RADIUS Accounting
Server Group
Other Settings
None Select a MAC Authentication profile to be referenced by the AAA profile being
default Select a MAC Authentication server group. You can add a new server group by
None Select the 802.1X Authentication Profile to be referenced by the AAA profile being
None Select the 802.1X Authentication server group. You can add a new server group by
None Select the RADIUS accounting server group to be referenced by the AAA profile being
folders available for association with the profile.
configured. If necessary, click the pencil or add icon to add or edit a MAC
Authentication profile. Refer to “Profiles > AAA > MAC Auth” on page 60 if required.
NOTE: Not supported with WLAN RAP Operation “always” after version 6.0.0.0.
clicking the add icon or edit an existing server group by clicking the pencil icon.
configured. You can add a new profile by clicking the add icon or edit an existing
profile by clicking the pencil icon. Refer to “Profiles > AAA > Advanced
Authentication” on page 56.
clicking the add icon or edit an existing server group by clicking the pencil icon.
configured. Select the add icon to create a new RADIUS server group.
Initial Role logon Select the initial role to be referenced by the AAA profile being configured. Add a new
MAC Authentication
Default Role
802.1X Authentication
Default Role
User Derivation Rules None Select the user derivation rules to be referenced by the AAA profile being configured.
Wired to Wireless
Roaming
guest Select the MAC authentication default role to be referenced by the AAA profile being
guest Select the 802.1X authentication default role to be referenced by the AAA profile
Yes Enable or disable support for roaming from wired to wireless networks.
role by clicking the add icon, or edit an existing role by clicking the pencil icon.
configured. Add a new role by clicking the add icon, or edit an existing role by clicking
the pencil icon. This setting requires a policy enforcement firewall license.
being configured. Add a new role by clicking the add icon, or edit an existing role by
clicking the pencil icon. This setting requires a policy enforcement firewall license.
User derivation rules are executed before client authentication.
The user role can be derived from attributes from the client’s association with an AP.
You configure the user role to be derived by specifying condition rules; when a
condition is met, the specified user role is assigned to the client. You can specify more
than one condition rule; the order of rules is important as the first matching condition
is applied.
Add a new rule by clicking the add icon, or edit an existing rule by clicking the pencil
icon.
50 | Configuration Reference Dell PowerConnect W-AirWave 7.4 | Configuration Guide
Page 51

Table 8 Profiles > AAA > New AAA Profile Settings (Continued)
Field Default Description
SIP Authentication Role None Select the role to function for SIP authentication. The controller supports the stateful
Enforce DHCP When you select this option, clients must obtain an IP using DHCP before they are
Radius Interim
Accounting
Device Type
Classification
L2 Authentication Fail
through
XML API Servers
tracking of session initiation protocol (SIP) authentication between a SIP client and a
SIP registry server. Upon successful registration, a user role is assigned to the SIP
client. Select the add icon to create a new role, or click the pencil icon to edit an
existing role.
This setting requires a voice service license.
allowed to associate to an AP. Enable this option when you create a user rule that
assigns a specific role or VLAN based upon the client device’s type.
NOTE: If a client is removed from the user table by the “Logon user lifetime” AAA
timer, then that client will not be able to send traffic until it renews its DHCP.
By default, the RADIUS accounting feature sends only start and stop messages to the
RADIUS accounting server. Issue the interim-radius-accounting command to allow
the controller to send Interim-Update messages with current user statistics to the
server at regular intervals. Requires a minimum version of 6.1.0.0.
When you select this option, the controller will parse user-agent strings and attempt
to identify the type of device connecting to the AP. When the device type
classification is enabled, the Global client table shown in the Monitoring >Network >
All WLAN Clients window shows each client’s device type, if that client device can be
identified. Requires a minimum version of 6.0.1.0.
When MAC authentication fails, enable this option to perform 802.1x authentication.
Requires a minimum version of 6.1.0.0.
XML API Servers Select the XML API server to support the AAA profile being configured, if required.
RFC 3576 Servers
RFC 3576 Servers Select the RFC 3576 RADIUS server to support the AAA profile being configured, if
This section is blank if there are no XML API servers.
required. This section is blank if there are no such servers.
3. Select Add or Save. The added or edited AAA profile appears on the AAA Profiles page.
Profiles > AAA > 802.1x Auth
802.1x authentication consists of three components:
The supplicant, or client, is the device attempting to gain access to the network. You can configure the Dell
PowerConnect W user-centric network to support 802.1x authentication for wired users as well as wireless
users.
The authenticator is the gatekeeper to the network and permits or denies access to the supplicants. The Dell
PowerConnect W controller acts as the authenticator, relaying information between the authentication server
and supplicant. The EAP type must be consistent between the authentication server and supplicant and is
transparent to the controller.
The authentication server provides a database of information required for authentication and informs the
authenticator to deny or permit access to the supplicant.
The 802.1x authentication server is typically an EAP-compliant Remote Access Dial-In User Service (RADIUS)
server which can authenticate either users (through passwords or certificates) or the client computer.
An example of an 802.1x authentication server is the Internet Authentication Service (IAS) in Windows (see
http://technet2.microsoft.com/windowsserver/en/technologies/ias.mspx).
Dell PowerConnect W-AirWave 7.4 | Configuration Guide Configuration Reference | 51
Page 52

In Dell PowerConnect W user-centric networks, you can terminate the 802.1x authentication on the controller.
The controller passes user authentication to its internal database or to a “backend” non-802.1x server. This
feature, also called “AAA FastConnect,” is useful for deployments where an 802.1x EAP-compliant RADIUS
server is not available or required for authentication.
Perform these steps to configure an 802.1X Auth profile.
1. Select Profiles > AAA > 802.1x Auth in the navigation pane. The details page summarizes the current
profiles of this type.
2. Select the Add button to create a new 802.1x Auth profile, or click the pencil icon next to an existing profile
to edit. Complete the settings as described in Table 9:
Table 9 Profiles > AAA > 802.1x Auth Profile Settings
Field Default Description
General Settings
Folder Top Set the folder with which the profile is associated. The drop-down menu displays all
Name Blank Enter the name of the profile.
Other Settings
Max Authentication
Failures
Enforce Machine
Authentication
Machine
Authentication: Default
Machine Role
Machine
Authentication Cache
Timeout
(1-1000 hrs)
0 Number of times a user can try to login with wrong credentials after which the user will
No (For Windows environments only) Select this option to enforce machine authentication
ap-role Select the default role to be assigned to the user after completing machine
24 When a Windows device boots, it logs onto the network domain using a machine
folders available for association with the profile.
be blacklisted as a security threat.
Set to 0 to disable blacklisting, otherwise enter a non-zero integer to blacklist the user
after the specified number of failures.
This setting requires a wireless intrusion protection license.
before user authentication. If selected, either the Machine Authentication Default Role
or the User Authentication Default Role is assigned to the user, depending on which
authentication is successful.
This setting requires a policy enforcement firewall license.
authentication.
account. Within the domain, the device is authenticated before computer group policies
and software settings can be executed; this process is known as machine
authentication. Machine authentication ensures that only authorized devices are
allowed on the network.
You can configure 802.1x for both user and machine authentication (select the Enforce
Machine Authentication option described in Table 51 on page 272). This tightens the
authentication process further since both the device and user need to be authenticated.
When you enable machine authentication, there are two additional roles you can define
in the 802.1x authentication profile:
Machine authentication default machine role
Machine authentication default user role
While you can select the same role for both options, you should define the roles as per
the polices that need to be enforced. Also, these roles can be different from the 802.1x
authentication default role configured in the AAA profile.
With machine authentication enabled, the assigned role depends upon the success or
failure of the machine and user authentications. In certain cases, the role that is
ultimately assigned to a client can also depend upon attributes returned by the
authentication server or server derivation rules configured on the controller.
This setting requires a policy enforcement firewall license.
52 | Configuration Reference Dell PowerConnect W-AirWave 7.4 | Configuration Guide
Page 53

Table 9 Profiles > AAA > 802.1x Auth Profile Settings (Continued)
Field Default Description
Blacklist on Machine
Authentication Failure
Machine
Authentication: Default
User Role
Interval Between
Identity Requests (165535 sec)
Quiet Period after Failed
Authentication
(1-65535 sec)
Reauthentication
Interval
(60-864000 sec
Use Server Provided
Reauthentication
Interval
Multicast Key Rotation
(60-864000 sec)
No Define whether the user is blacklisted upon authentication failure.
This setting requires a policy enforcement firewall license.
ap-role Select the default role to be assigned to the user after completing 802.1x authentication.
This setting requires a policy enforcement firewall license.
30 Specify the interval in which identity requests are to be spaced between each other.
30 Specify the amount of time in seconds in which failed authentication denies access to a
86,400
seconds
No 802.1x re-authentication can be attempted after the expiration of the default timer for re-
No Define whether Multicast Key Rotation is enabled or disabled.
user, after failed authentication.
Select this option to force the client to do a 802.1x re-authentication after the expiration
of the default timer for re-authentication. The default value of the timer
(Reauthentication Interval) is 24 hours. If the user fails to re-authenticate with valid
credentials, the state of the user is cleared.
If derivation rules are used to classify 802.1x-authenticated users, then the
Reauthentication timer per role overrides this setting.
authentication. Specify whether this is to be supported from the authentication server.
When enabled, unicast and multicast keys are updated after each reauthorization. It is a
best practice to configure the time intervals for reauthentication, multicast key rotation,
and unicast key rotation to be at least 15 minutes.
Multicast Key Rotation
Time Interval
(60-86400 sec)
Unicast Key Rotation
Time Interval
(60-864000 sec)
Authentication Server
Retry Interval
(5-65535 sec)
Authentication Server
Retry Count (0-3)
Framed MTU
(500-1500)
Number of Times IDRequests are Retried (1-
10)
Maximum Number of
Reauthentication
Attempts (1-10)
Maximum Number of
Times Held State Can
Be Bypassed (0-3)
1800 When enabled, unicast and multicast keys are updated after each reauthorization. It is a
900
30 Specify the interface at which reauthentication is supported. The supported range is
2 Define the number of times that failed authentication should be allowed to retry
1100 Define the size, in bytes, for framed maximum transmission units.
3 Define the number of allowable times that failed ID requests are allowed to retry the
3 Set the number of times that reauthentication is to be attempted if the first
0 Define whether a held state can be bypassed, and the number of times this is to be
best practice to configure the time intervals for reauthentication, multicast key rotation,
and unicast key rotation to be at least 15 minutes. Make sure these intervals are
mutually prime, and the factor of the unicast key rotation interval and the multicast key
rotation interval is less than the reauthentication interval.
from 1 to 6,535 seconds.
authentication.
request.
authentication attempt fails.
allowed.
Dell PowerConnect W-AirWave 7.4 | Configuration Guide Configuration Reference | 53
Page 54

Table 9 Profiles > AAA > 802.1x Auth Profile Settings (Continued)
Field Default Description
Dynamic WEP Key
Message Retry Count
(1-3)
Dynamic WEP Key Size
(bits)
Interval Between WPA/
WPA2 Key Messages
(10-5000 msec)
Display Between EAPSuccess and WPA2
Unicast Key Exchange
(0-2000 msec)
Delay between WPA/
WPA2 Unicast Key
Exchange
(0-2000 msec)
WPA/WPA2 Key
Message Retry Count
(1-10)
1 Define the number of times that failed authentication with a WEP key should be allowed
to retry authentication. The range is from 0 to 3 attempts.
A primary means of cracking WEP keys is to capture 802.11 frames over an extended
period of time and searching for such weak implementations that are still used by many
legacy devices.
128 Specify the maximum size of the WEP key in bits. The options are 40 or 128.
1000 Specify the key message interval in milliseconds.
0 Define EAP for RADIUS server authentication.
802.1x uses the Extensible Authentication Protocol (EAP) to exchange messages during
the authentication process. The authentication protocols that operate inside the 802.1x
framework that are suitable for wireless networks include EAP-Transport Layer Security
(EAP-TLS), Protected EAP (PEAP), and EAP-Tunneled TLS (EAP-TTLS). These protocols
allow the network to authenticate the client while also allowing the client to
authenticate the network.
0 Specify the delay between processing these two key times during authentication.
3 Specify the number of times that WPA or WPA2 keys are allowed to retry. The supported
range is from 1 to 10.
Multicast Key Rotation No Enable or disable multicast key rotation, and define the related settings on this page for
Unicast Key Rotation No Enable or disable unicast key rotation, and define the related settings on this page for
Reauthentication No Enable or disable reauthentication. Although reauthentication and rekey timers are
Opportunistic Key
Caching
Validate PMKID No Define whether PMKID authentication should be validated.
Use Session Key No Specify whether a client session should use a security key.
Use Static Key No The IEEE 802.1x authentication standard allows for the use of keys that are dynamically
xSec MTU
(1024 - 1500 Bytes)
Termination No Select this option to terminate 802.1x authentication on the controller.
Termination EAP-Type
TLS
Yes Enable or disable opportunistic key caching (also configured in the 802.1x
1300 bytes Define the maximum transmission unit size in bytes.
No Specify if the EAP termination type is TLS.
multicast key rotation time and interval if this field is enabled.
unicast key rotation time and interval if t his field is enabled.
configurable on a per-SSID basis, an 802.1x transaction during a call can affect voice
quality. If a client is on a call, 802.1x reauthentication and rekey are disabled by default
until the call is completed. You disable or re-enable the “voice aware” feature in the
802.1x authentication profile.
Authentication profile). This supports WPA2 clients.
generated on a per-client basis, or as a static key that is the same on all devices in the
network). Define whether to use a static key with this setting.
54 | Configuration Reference Dell PowerConnect W-AirWave 7.4 | Configuration Guide
Page 55

Table 9 Profiles > AAA > 802.1x Auth Profile Settings (Continued)
Field Default Description
Termination EAP-Type
PEAP
Termination Inner EAPType MSCHAPv2
Termination Inner EAPType GTC
Token Caching Disabled Specify whether EAP token caching is enabled or disabled.
Token Caching Period
(1-240 hrs)
CA-Certificate Type the CA certificate imported into the controller.
0 Specify EAP-PEAP termination.
802.1x authentication based on PEAP with MS-CHAPv2 provides both computer and
user authentication. If a user attempts to log in without the computer being
authenticated first, the user is placed into a more limited “guest” user role.
Windows domain credentials are used for computer authentication, and the user’s
Windows login and password are used for user authentication. A single user sign-on
facilitates both authentication to the wireless network and access to the Windows
server resources.
No Enable or disable this setting. You can enable caching of user credentials on the
controller as a backup to an external authentication server. The EAP-Microsoft
Challenge Authentication Protocol version 2 (MS-CHAPv2), described in RFC 2759, is
widely supported by Microsoft clients.
No Enable or disable GTC. EAP-Generic Token Card (GTC): Described in RFC 2284, this EAP
method permits the transfer of unencrypted usernames and passwords from client to
server. The main uses for EAP-GTC are one-time token cards such as SecureID and the
use of LDAP or RADIUS as the user authentication server.
You can also enable caching of user credentials on the controller as a backup to an
external authentication server.
24 Specify token caching, in hours. The supported range is from 1 to 240 hours.
Server-Certificate Specify a server certificate. The list of available certificates is taken from the computer
TLS Guest Access No Specify if TLS authentication supports guest users.
TLS Guest Role ap-role Specify the TLS authentication role that will support guests. This setting requires a
Ignore EAPOL-START
After Authentication
Handle EAPOL-Logoff No Specify whether authentication should manage logoff activity.
Ignore EAP ID During
Negotiation
No Enable or disable this setting.
No Specify whether EAP should be ignored during authentication.
certificate store on which IAS is running. In this case, a self-signed certificate was
generated by the local certificate authority and installed on the IAS system. On each
wireless client device, the local certificate authority is added as a trusted certificate
authority, thus allowing this certificate to be trusted.
User-level authentication is performed by an external RADIUS server using PPP EAPTLS. In this scenario, client and server certificates are mutually authenticated during
the EAP-TLS exchange. During the authentication, the controller encapsulates EAP-TLS
messages from the client into RADIUS messages and forwards them to the server.
policy enforcement firewall license.
EAP authentication starts with a EAPOL-start frame that is sent by the wireless client to
the AP. Upon reception of such a frame, the AP responds back to the wireless client
with an EAP-Identify-Request and also does internal resource allocation. Attackers can
use this vulnerability by sending a lot of EAPOL-start frames to the Access point, either
by spoofing the MAC address or by emulating wireless clients. This forces the AP to
allocate increasing resource and eventually bringing it down. Enable this setting to
reduce the risk.
WPA-Fast-Handover No In the 802.1x Authentication profile, the WPA fast handover feature allows certain WPA
Dell PowerConnect W-AirWave 7.4 | Configuration Guide Configuration Reference | 55
clients to use a pre-authorized PMK, significantly reducing handover interruption.
Check with the manufacturer of your handset to see if this feature is supported. This
feature is disabled by default.
Page 56

Table 9 Profiles > AAA > 802.1x Auth Profile Settings (Continued)
Field Default Description
Disable Rekey and
Reauthentication for
Clients on Call
No Although reauthentication and rekey timers are configurable on a per-SSID basis, an
802.1x transaction during a call can affect voice quality. If a client is on a call, 802.1x
reauthentication and rekey are disabled by default until the call is completed. You
disable or re-enable the “voice aware” feature in the 802.1x authentication profile. This
setting requires a voice service license.
Select Add or Save. The added or edited 802.1x Auth profile appears on the AAA Profiles page, and on the 802.1x
Auth details page.
Profiles > AAA > Advanced Authentication
In Advanced Authentication, you can apply timers and DNS query intervals. Follow these steps to configure an
Advanced Authentication profile.
1. Select Profiles > AAA > Advanced Authentication in the navigation pane. The details page summarizes the
current profiles of this type.
2. Select the Add button to create a new Advanced Authentication profile, or click the pencil icon next to an
existing profile to edit. Complete the settings as described in Table 10:
Table 10 Profiles > AAA > Advanced Authentication Profile Settings
Field Default Description
General Settings
Folder Top Set the folder with which the profile is associated. The drop-down menu displays all
Name Blank Enter the name of the Advanced Authentication profile.
Authentication Timers
User Idle Timeout 300 seconds Maximum period, in seconds, after which a client is considered idle if there is no
User Stats Timeout 600 Set the timeout value for user stats reporting in seconds. The supported range is 300-
Fast Aging of Multiple
Instances of User
folders available for association with the profile.
user traffic from the client.
The timeout period is reset if there is a user traffic. After this timeout period has
elapsed, the controller sends probe packets to the client; if the client responds to the
probe, it is considered active and the User Idle Timeout is reset (an active client that
is not initiating new sessions is not removed). If the client does not respond to the
probe, it is removed from the system.
Range: 30 to 15300 seconds
600 seconds, or 5-10 minutes, and the default value is 600 seconds. Requires a
minimum version of 6.1.0.0.
When this feature is enabled, the controller actively sends probe packets to all users
with the same MAC address but different IP addresses. The users that fail to respond
are purged from the system. This command enables quick detection of multiple
instances of the same MAC address in the user table and removal of an “old” IP
address. This can occur when a client (or an AP connected to an untrusted port on
the controller) changes its IP address.
56 | Configuration Reference Dell PowerConnect W-AirWave 7.4 | Configuration Guide
Page 57

Table 10 Profiles > AAA > Advanced Authentication Profile Settings (Continued)
Field Default Description
Dead Time for down
Authentication Server
(0-60 min)
Unauthenticated User
Lifetime
(0-255 min)
RADIUS Client
RFC 3576 Server UDP
Port
(1-65535)
DNS Query Interval
DNS Query Interval (11440 min)
10 minutes Maximum period, in minutes, that the controller considers an unresponsive
authentication server to be “out of service”.
This timer is only applicable if there are two or more authentication servers
configured on the controller. If there is only one authentication server configured,
the server is never considered out of service and all requests are sent to the server.
If one or more backup servers are configured and a server is unresponsive, it is
marked as out of service for the dead time; subsequent requests are sent to the next
server on the priority list for the duration of the dead time. If the server is responsive
after the dead time has elapsed, it can take over servicing requests from a lowerpriority server; if the server continues to be unresponsive, it is marked as down for
the dead time.
Range: 0–50
5 minutes Maximum time, in minutes, unauthenticated clients are allowed to remain
logged on.
Range: 0–255
3799 Configures the UDP port to receive requests from a RADIUS server that can send
user disconnect and change-of-authorization messages, as described in RFC 3576,
“Dynamic Authorization Extensions to Remote Dial In User Service (RADIUS)”.
NOTE: This parameter can only be used on the master controller.
15 If you define a RADIUS server using the FQDN of the server rather than its IP
address, the controller will periodically generate a DNS request and cache the IP
address returned in the DNS response. By default, DNS requests are sent every 15
minutes
3. Select Add or Save. The added or edited Advanced Authentication profile appears on the Profiles > AAA
page.
Profiles > AAA > Captive Portal Auth
In this section, you create an instance of the captive portal authentication profile and the AAA profile. For the
captive portal authentication profile, you specify the previously-created auth-guest user role as the default user
role for authenticated captive portal clients and the authentication server group (“Internal”).
Perform these steps to configure a Captive Portal Authentication profile.
1. Select Profiles > AAA > Captive Portal Auth in the navigation pane.
2. Select the Add button to create a new Captive Portal Auth profile, or click the pencil icon next to an existing
profile to edit. Complete the settings as described in Table 11.
Table 11 Profiles > AAA > Captive Portal Auth Profile Settings
Field Default Description
General Settings
Name Blank Enter the name of the Captive Portal Authentication profile.
Referenced Profiles
Dell PowerConnect W-AirWave 7.4 | Configuration Guide Configuration Reference | 57
Page 58

Table 11 Profiles > AAA > Captive Portal Auth Profile Settings (Continued)
Field Default Description
Server Group default Enter the name of the internal VPN authentication server group, or the server
Other Settings
Default Role default Role assigned to the Captive Portal user upon login. When both user and guest
Default Guest Role default Role assigned to a guest user upon login.
Redirect Pause
(0-60 sec)
User Login Yes Enables Captive Portal with authentication of user credentials.
Guest Login No Enables Captive Portal logon without authentication.
Logout Popup Window Yes Enables a pop-up window with the Logout link for the user to logout after logon.
Use HTTP Authentication No Use HTTP protocol on redirection to the Captive Portal page. If you use this
Logon Wait Minimum
Wait (1-10 sec)
10 Time, in seconds, that the system remains in the initial welcome page before
5 Minimum time, in seconds, the user will have to wait for the logon page to pop
group that performs 802.1x authentication.
logon are enabled, the default role applies to the user logon; users logging in
using the guest interface are assigned the guest role. The Policy Enforcement
Firewall license must be installed.
redirecting the user to the final web URL. If set to 0, the welcome page displays
until the user clicks on the indicated link.
If this is disabled, The user remains logged in until the user timeout period has
elapsed or the station reloads.
option, modify the captive portal policy to allow HTTP traffic.
up if the CPU load is high. This works in conjunction with the Logon wait CPU
utilization threshold parameter.
Logon Wait Maximum
Wait
(0-10 sec)
Logon Wait CPU
Utilization Threshold (0100%)
Max Authentication
Failures
Show FQDN No Allows the user to see and select the fully-qualified domain name (FQDN) on
Use CHAP
(Non-standard)
Sygate-on-demandagent
Login Page /auth/index.html URL of the page that appears for the user logon. This can be set to any URL.
Welcome Page /auth/
Show Welcome Page Yes Enables the display of the welcome page. If this option is disabled, redirection
10 Maximum time, in seconds, the user will have to wait for the logon page to pop
60 CPU utilization percentage above which the Logon wait interval is applied
0 Maximum number of authentication failures before the user is blacklisted.The
No Use CHAP protocol. You should not use this option unless instructed to do so by
No Enables client remediation with Sygate-on-demand-agent (SODA). Requires a
welcome.html
up if the CPU load is high. This works in conjunction with the Logon wait CPU
utilization threshold parameter.
when presenting the user with the logon page.
range is 1-10. Requires a Wireless Intrusion Protection license or an RFprotect
license.
the login page.
a representative from Dell PowerConnect W.
Client Integrity license and a version earlier than 6.0.0.0.
URL of the page that appears after logon and before redirection to the web
URL. This can be set to any URL.
to the web URL happens immediately after logon.
58 | Configuration Reference Dell PowerConnect W-AirWave 7.4 | Configuration Guide
Page 59

Table 11 Profiles > AAA > Captive Portal Auth Profile Settings (Continued)
Field Default Description
Add switch IP
address in
redirection URL
Allow Only One Active
User Session
Add a Controller
Interface in Redirection
URL
Show the Acceptable
Use Policy Page
Add User VLAN in
Redirection URL
White List Net
Destinations
Black List Net
Destinations
No Sends the switch IP address in the redirection URL when external captive
portal servers are used. An external captive portal server can determine the
controller from which a request originated by parsing the ‘switchip’ variable in
the URL.
No Allows only one active user session at a time.
0.0.0.0 Select this option to send the controller’s IP address in the redirection URL
when external captive portal servers are used. An external captive portal
server can determine the controller from which a request originated by parsing
the ‘controllerip’ variable in the URL. Requires a Public Wi-Fi Access license.
Show the acceptable use policy page before the logon page.
No Enable this option to send the user VLAN in the redirection URL when external
captive portal servers are used. Requires a Public Wi-Fi Access license.
This setting allows you to select net destinations for your whitelist. Requires a
Public Wi-Fi Access license.
This setting allows you to select net destinations for your blacklist. Requires a
Public Wi-Fi Access license.
3. Select Add or Save. The added or edited Captive Portal Auth profile appears on the AAA Profiles page.
The captive portal authentication profile specifies the captive portal login page and other configurable
parameters. The initial user role configuration must include the applicable captive portal authentication profile
instance. Therefore, you need to modify the guest-logon user role configuration to include the guestnet captive
portal authentication profile.
Profiles > AAA > IPv6 Extension Header
This profile allows you to edit the packet filter options in the IPv6 Extension Header (EH). ArubaOS firewall is
enhanced to process the EH to enable IPv6 packet filtering. You can now filter the incoming IPv6 packets based
on the EH type. You can edit the packet filter options in the default EH.
NOTE: This profile depends on the controller having a Policy Enforcement Firewall license and a minimum version of 6.1.0.0.
Perform these steps to configure an IPv6 Extension Header profile.
1. Select Profiles > AAA > IPv6 Extension Header in the navigation pane.
2. Select the Add button to create a new IPv6 Extension Header profile, or click the pencil icon next to an existing
profile to edit. Complete the settings as described in Table 12:
Table 12 Profiles > AAA > IPv6 Extension Header Profile Settings
Field Default Description
General Settings
Folder Top Set the folder with which the profile is associated. The drop-down menu displays all
Name Blank Enter the name of the IPv6 Extension Header profile.
folders available for association with the profile.
Dell PowerConnect W-AirWave 7.4 | Configuration Guide Configuration Reference | 59
Page 60

Table 12 Profiles > AAA > IPv6 Extension Header Profile Settings
Field Default Description
Denied Extension Header Filter Items
Match IPv6 Header Type
(0-255)
hop-by-hop Specify one of the following EH types:
authentication: Matches the IPv6 authentication header
dest-option: Matches the IPv6 destination-option header
esp: Matches the IPv6 encapsulation security payload header
fragment: Matches the IPv6 fragment header
hop-by-hop: Matches the IPv6 hop-by-hop header
mobility: Matches the IPv6 mobility header
routing: Matches the IPv6 routing header
3. Select Add or Save. The added or edited IPv6 Extension Header profile appears on the IPv6 Extension
Header details page.
Profiles > AAA > MAC Auth
Before configuring MAC-based authentication, you must configure the following:
The user role that will be assigned as the default role for the MAC-based authenticated clients. You configure
the default user role for MAC-based authentication in the AAA profile. If derivation rules exist or if the client
configuration in the internal database has a role assignment, these values take precedence over the default
user role.
Authentication server group that the controller uses to validate the clients. The internal database can be used
to configure the clients for MAC-based authentication.
Perform these steps to configure a MAC Auth profile.
1. Select Profiles > AAA > MAC Auth in the navigation pane.
2. Select the Add button to create a new MAC Auth profile, or click the pencil icon next to an existing profile to
edit. Complete the settings as described in Table 13:
Table 13 Profiles > AAA > MAC Auth Profile Settings
Field Default Description
General Settings
Folder Top Set the folder with which the profile is associated. The drop-down menu displays all
Name Blank Enter the name of the MAC Auth profile.
Other Settings
Delimiter none Delimiter used in the MAC string:
Case lower The case (upper or lower) used in the MAC string.
folders available for association with the profile.
colon specifies the format xx:xx:xx:xx:xx:xx
dash specifies the format xx-xx-xx-xx-xx-xx
none specifies the format xxxxxxxxxxxx
oui-nic specifies the format xxxxxx-xxxxxx (use the client device’s OUI as a
delimiter) - for 6.1.0.0 versions or later
Max Authentication
Failures (0-10)
60 | Configuration Reference Dell PowerConnect W-AirWave 7.4 | Configuration Guide
0 Number of times a station can fail to authenticate before it is blacklisted. A value of 0
disables blacklisting.
Page 61

3. Select Add or Save. The added or edited MAC Auth profile appears on the Profiles > AAA page, and on the
MAC Auth details page.
Profiles > AAA > VPN Connection
A VIA connection profile contains settings required by VIA to establish a secure connection to the controller. You
can configure multiple VIA connection profiles. A VIA connection profile is always associated to a user role and
all users belonging to that role will use the configured settings. If you do not assign a VIA connection profile to a
user role, the default connection profile is used.
NOTE: This profile depends on the controller having a VPN Server license and a minimum version of 5.0.0.0.
Perform these steps to configure a VPN Connection profile.
1. Select Profiles > AAA > VPN Connection in the Navigation pane.
2. Select the Add button to create a new VPN Connection profile, or click the pencil icon next to an existing
profile to edit. Complete the settings as described in Table 14:
Table 14 Profiles > AAA > VPN Connection Profile Settings
Field Default Description
General Settings
Folder Top Set the folder with which the profile is associated. The drop-down menu displays all
Name Blank Enter the name of the VPN Connection profile.
Other Settings
Allow user to
disconnect VIA
Client auto-login Yes Enable or disable VIA client to auto login and establish a secure connection to the
Allow client to autoupgrade
Allow client side
logging
VIA client network
mask
VIA client DNS suffix
list
Yes Enable or disable users to disconnect their VIA sessions.
Yes Enable or disable VIA client to automatically upgrade when an updated version of the
Yes Enable or disable client side logging. If enabled, VIA client will collect logs that can be
255.255.255.255The network mask that has to be set on the client after the VPN connection is
folders available for association with the profile.
controller.
client is available on the controller.
sent to the support email-address for troubleshooting.
established.
The DNS suffix list (comma separated) that has be set on the client once the VPN
connection is established.
VIA external download
URL
Maximum reconnection
attempts (0-10)
VIA max session
timeout (5-65535 min)
Dell PowerConnect W-AirWave 7.4 | Configuration Guide Configuration Reference | 61
3 The maximum number of re-connection attempts by the VIA client due to authentication
1440 The maximum time (minutes) allowed before the VIA session is disconnected.
End users will use this URL to download VIA on their computers.
failures.
Page 62

Table 14 Profiles > AAA > VPN Connection Profile Settings (Continued)
Field Default Description
Allow user to save
Yes Enable or disable users to save passwords entered in VIA.
passwords
Enable split tunneling No Enable or disable split tunneling.
If enabled, all traffic to the VIA tunneled networks will go through the controller and
the rest is just bridged directly on the client.
If disabled, all traffic will flow through the controller.
VIA Support E-Mail
The support e-mail address to which VIA users will send client logs.
Address
Validate server
Yes Enable or disable VIA from validating the server certificate presented by the controller.
certificate
Use Windows
credentials
Yes Enable or disable the use of the Windows credentials to login to VIA. If enabled, the
SSO (Single Sign-on) feature can be utilized by remote users to connect to internal
resources.
VIA IPSEC CryptoMap Default-
IPsec Crypto Map that the VIA client uses to connect to the controller.
dynamicmap
VIA IKE Policy
20 (AE256/
SHA)
Select from a list of IKE policies that the VIA Client has to use to connect to the
controller.
Enable IKEv2 Whether to enable IKE V2. Requires a minimum version of 6.1.0.0.
IKEv2 Authentication
Method
User
Certificate
Set the IKEv2 authentication method. By default user certificate is used for
authentication. The other supported methods are EAP-MSCHAPv2, EAP-TLS. The EAP
authentication is done on an external RADIUS server.
VIA IPSECv2 CryptoMap IPSec V2 crypto maps that the VIA client uses to connect to the controller.
VIA IKEv2 Policy 20 (AE256/
IKE V2 policies that the VIA Client has to use to connect to the controller
SHA)
Use Suite B
No Use this option to enable Suite-B cryptography.
Cryptography
VIA Tunneled Networks A list of network destination (IP address and netmask) that the VIA client will tunnel
through the controller. All other network destinations will be reachable directly by the
VIA client.
Enable Content Security
No Use this option to enable the content security service.
Services
Content Security
Gateway URL
Comma Seperated List
of HTTP Ports to Be
Inspected (Apart from
Specify the content security service providers URL here. You must provide a fully
qualified domain name.
Specify the ports (separated by comma) that will be monitored by the content security
service provider.
Do not add space before or after the comma.
Default Port 80)
Keep VIA Window
Minimized
No Use this option to keep the VIA client on a Microsoft WIndows operating system
minimized to system tray.
Via Logoff Script Specify the name of the log-off script that must be executed the VIA is disconnected.
The log-off script must reside in the client computer.
Via Logon Script Specify the name of the logon script that must be executed after VIA establishes a
secure connection. The logon script must reside in the client computer.
62 | Configuration Reference Dell PowerConnect W-AirWave 7.4 | Configuration Guide
Page 63

Table 14 Profiles > AAA > VPN Connection Profile Settings (Continued)
Field Default Description
VIA Authentication
Profile
VIA Client WLAN Profile Select a VIA Client WLAN Profile to reference. Refer to “Profiles > AAA > VPN
VIA Controller Enter the Hostname/IP address, internal IP address, and description of the VIA
Select a VIA Authentication Profile to reference. Refer to “Profiles > AAA > VPN
Connection > VIA Auth” on page 63.
Connection > VIA Client WLAN” on page 63.
Controller.
3. Select Add or Save. The added or edited VPN Connection profile appears on the Profiles > AAA page, and
on the details page.
Profiles > AAA > VPN Connection > VIA Auth
Perform these steps to configure a VPN Authentication profile.
1. Select Profiles > AAA > VPN Auth in the Navigation pane.
2. Select the Add button to create a new VPN Auth profile, or click the pencil icon next to an existing profile to
edit. Complete the settings as described in Table 14:
Table 15 Profiles > AAA > VPN Auth Profile Settings
Field Default Description
General Settings
Folder Top Set the folder with which the profile is associated. The drop-down menu displays all
Name Blank Enter the name of the VPN Auth profile.
Other Settings
Default Role The role that will be assigned to the authenticated users. Requires a Policy Enforcement
Max Authentication
Failures (0-10)
Server Group A user friendly name or description for the authentication profile.
folders available for association with the profile.
Firewall for VPN users license.
Specifies the maximum authentication failures allowed. Requires a Wireless Intrusion
Protection license or an RFProtect license.
3. Select Add or Save. The added or edited VPN Auth profile appears on the Profiles > AAA page, and on the
details page.
Profiles > AAA > VPN Connection > VIA Client WLAN
Create the VIA client WLAN profiles that needs to be pushed to the client machines that use Windows Zero
Config (WZC) to configure or manage their wireless networks. Perform these steps to configure a VIA Client
WLAN profile.
1. Select Profiles > AAA > VIA Client WLAN in the Navigation pane.
2. Select the Add button to create a new VIA Client WLAN profile, or click the pencil icon next to an existing
profile to edit. Complete the settings as described in Table 14:
Dell PowerConnect W-AirWave 7.4 | Configuration Guide Configuration Reference | 63
Page 64

Table 16 Profiles > AAA > VIA Client WLAN Profile Settings
Field Default Description
General Settings
Folder Top Set the folder with which the profile is associated. The drop-down menu displays all
folders available for association with the profile.
Name Blank Enter the name of the VIA Client WLAN profile.
EAP-PEAP
EAP-PEAP options Select the following options, if the EAP type is PEAP (Protected EAP):
validate-server-certificate: Select this option to validate server certificates.
enable-fast-reconnect: Select this option to allow fast reconnect.
enable-quarantine-checks: Select this option to perform quarantine checks.
disconnect-if-no-cryptobinding-tlv: Select this option to disconnect if server does not
present cryptobinding TLV.
dont-allow-user-authorization: Select this to disable prompts to user for authorizing
new servers or trusted certification authorities.
EAP Type Select an EAP type used by client to connect to wireless network.
Connect only to these
Comma separated list of servers.
servers
EAP Certificate
EAP-Certificate options If you select EAP type as certificate, you can select one of the following options:
mschapv2-use-windows-credentials
use-smartcard
simple-certificate-selection
use-different-name
validate-server-certificate
Connect only to these
Comma separated list of servers.
servers
Inner EAP
Inner EAP
authentication options
mschapv2-use-windows-credentials: Automatically use the Windows logon name
and password (and domain if any)
use-smartcard: Use a smart card
simple-certificate-selection: Use a certificate on the user’s computer or use a simple
certificate selection method (recommended)
validate-server-certificate: Validate the server certificate
use-different-name: Use a different user name for the connection (and not the CN on
the certificate)
Inner EAP Type Select the inner EAP type.
Connect only to these
Comma separated list of servers.
servers
Other Settings
Automatically connect
when this WLAN is in
Yes Select this option if you want WZC (Microsoft Windows Wireless Zero Config tool) to
connect when this network (SSID) is available.
range
64 | Configuration Reference Dell PowerConnect W-AirWave 7.4 | Configuration Guide
Page 65

Table 16 Profiles > AAA > VIA Client WLAN Profile Settings (Continued)
Field Default Description
Enable IEEE 802.1x
authentication for this
network
Authenticate as
computer when
computer info is
available
Connect even if this
WLAN is not
broadcasting
SSID Profile default Select an SSID configuration profile to reference. Refer to “Profiles > SSID” on page 121.
Yes Select this option to enable 802.1x authentication for this network.
Yes Select this option to authenticate as a computer when computer information is available.
No Whether to connect even if this WLAN is not broadcasting.
3. Select Add or Save. The added or edited VPN Client WLAN profile appears on the Profiles > AAA page, and
on the details page.
Profiles > AAA > VIA Global
The global config option allows to you to enable SSL fallback mode. If the SSL fallback mode is enabled the VIA
client will use SSL to create a secure connection.
To configure a VIA Global profile, select Profiles > AAA > VIA Global in the Navigation pane.
In the Allow via SSL Fallback field, select whether to enable the SSL fallback mode.
Then select Add or Save. The added or edited VIA Global profile appears on the Profiles > AAA page and on the
details page.
Profiles > AAA > Stateful 802.1X Auth
This profile type enables or disables 802.1x authentication for clients on non-Dell PowerConnect W APs, and
defines the default role for those users once they are authenticated. This profile also references a server group to
be used for authentication.
Perform these steps to configure a Stateful 802.1X Auth profile.
1. Select Profiles > AAA > Stateful 802.11 Auth in the navigation pane.
2. Select the Add button to create a new Stateful 802.11 Auth profile, or click the pencil icon next to an existing
profile to edit. Complete the settings described in Table 17:
Table 17 Profiles > AAA > Stateful 802.1X Profile Settings
Field Default Description
General Settings
Folder Top Set the folder with which the profile is associated. The drop-down menu displays all
Name Blank Enter the name of the profile.
folders available for association with the profile.
Dell PowerConnect W-AirWave 7.4 | Configuration Guide Configuration Reference | 65
Page 66

Table 17 Profiles > AAA > Stateful 802.1X Profile Settings (Continued)
Field Default Description
Referenced Profiles
Server Group Select the AAA authentication server group. Select the pencil icon to edit an existing
Other Settings
Default Role ap-role The user role to be associated with this authentication profile.
Timeout (1-20 sec) 10 Maximum time, in seconds, that the server waits before timing out the request.
Enabled No When enabled with Yes, activates the authentication server.
server group or click the add icon to create a new server group.
3. Select Add or Save. The added or edited Stateful 802.11 Auth profile appears on the AAA Profiles page, and
on the Stateful 802.11 Auth details page.
Profiles > AAA > Wired Auth
This profile type references an AAA profile to be used for wired authentication.
Perform these steps to configure a Wired Auth profile.
1. Select Profiles > AAA > Wired Auth in the navigation pane.
2. Select the Add button to create a new Wired Auth profile, or click the pencil icon next to an existing profile to
edit. Complete the settings as described in Table 18:
Table 18 Profiles > AAA > Wired Auth Profile Settings
Field Default Description
General Settings
Folder Top Set the folder with which the profile is associated. The drop-down menu displays all
Name Blank Enter the name of the Wired Authentication profile.
Referenced Profiles
AAA None From the drop-down menu, select the AAA profile for wired authentication. Select the
folders available for association with the profile.
pencil icon to edit an existing profile or click the add icon to create a new profile.
3. Select Add or Save. The added or edited Wired Auth profile appears on the AAA Profiles page, and on the
Wired Auth details page.
Profiles > AAA > Combined VPN Auth
A VPN Authentication profile identifies the default role for authenticated VPN clients. This profile also
references a server group.
Before you enable VPN authentication, you must configure the authentication server(s) and server group that the
controller will use to validate the remote AP. When you provision the remote AP, you configure IPSec settings for
the AP, including the username and password. This username and password must be validated by an
authentication server before the remote AP is allowed to establish a VPN tunnel to the controller. The
authentication server can be any type of server supported by the controller, including the controller’s internal
database.
66 | Configuration Reference Dell PowerConnect W-AirWave 7.4 | Configuration Guide
Page 67

Perform these steps to configure a Combined VPN Auth profile.
1. Select Profiles > AAA > Combined VPN Auth in the navigation pane.
2. Select the Add button to create a new VPN Auth profile, or click the pencil icon next to an existing profile to
edit. Complete the settings as described in Table 19:
Table 19 Dell PowerConnect W Configuration > Profiles > AAA > VPN Auth Profile Settings
Field Default Description
General Settings
Folder Top Setthe folder with which the profile is associated. The drop-down menu displays all
Name Blank Enter the name of the profile.
Referenced Profiles
Server Group Select the AAA authentication server group. Select the pencil icon to edit an
Other Settings
Default Role default-vpn-role Select the role to be associated with this authentication profile.
Max Authentication
failures (0-10)
Check Certificate
Common Name against
AAA Server
0 Enter the number of times a station can fail to authenticate before it is blacklisted. A
Yes This field appears if you are adding or modifying a RAP VPN Authentication Profile.
folders available for association with the profile.
existing server group or click the add icon to create a new server group.
value of 0 disables blacklisting.
If you use client certificates for user authentication, enable this option to verify that
the certificate's common name exists in the server. This parameter is enabled by
default in the default-cap and default-rap VPN profiles, and disabled by default on
all other VPN profiles. Requires a minimum version of 6.1.0.0.
3. Select Add or Save. The added or edited Combined VPN Auth profile appears on the AAA Profiles page, and
on the VPN Auth details page.
Profiles > AAA > Management Auth
Users who need to access the controller to monitor, manage, or configure the Dell PowerConnect W user-centric
network can be authenticated with RADIUS, TACACS+, or LDAP servers or the internal database.
Perform these steps to configure a Management Auth profile.
1. Select Profiles > AAA > Management Auth in the navigation pane.
2. Select the Add button to create a new Management Auth profile, or click the pencil icon next to an existing
profile to edit. Complete the settings as described in Table 20:
Table 20 Profiles > AAA > Management Auth Profile Settings
Field Default Description
General Settings
Folder Top Set the folder with which the profile is associated. The drop-down menu displays all
Name Blank Enter the name of the profile.
Dell PowerConnect W-AirWave 7.4 | Configuration Guide Configuration Reference | 67
folders available for association with the profile.
Page 68

Table 20 Profiles > AAA > Management Auth Profile Settings (Continued)
Field Default Description
Referenced Profiles
Server Group Select the AAA authentication server group. Select the pencil icon to edit an existing
Other Settings
Default Role root The role to be associated with this authentication profile:
Enable No When enabled, this setting activates the authentication server.
server group or click the add icon to create a new server group.
guest-provisioning: Allows the user to create guest accounts.
location-api-mgmt: Permits access to location API information. You can log in,
however, you cannot use any commands.
network-operations: Permits access to Monitoring, Reports, and Events pages in the
WebUI. You can log in; however, you can only use a subset of commands to monitor
the controller.
read-only: Permits access to monitoring pages only.
root: Permits access to all management functions on the controller.
3. Select Add or Save. The added or edited Management Auth profile appears on the AAA Profiles page, and on
the Management Auth details page.
Profiles > AAA > Stateful NTLM Auth
When the user logs off or shuts down the client machine, this profile allows the user to remain in the
authenticated role until the user ages out. Aging out means the user has sent no traffic for the amount of time
specified for the Timeout parameter of this profile.
The Stateful NT LAN Manager (NTLM) Authentication profile requires that you specify the following
components:
a server group that includes the servers performing NTLM authentication
a default role to be assigned to authenticated users.
The Wireless Internet Service Provider roaming (WISPr) protocol allows users to roam between service providers.
A RADIUS server is used to authenticate subscriber credentials.
For details on defining a Windows server used for NTLM authentication, refer to “Security > Server Groups >
Windows” on page 152.
Perform these steps to configure a Stateful NTLM Auth profile.
1. Select Profiles > AAA > Stateful NTLM Auth in the navigation pane. The details page summarizes the
current profiles of this type.
2. Select the Add button to create a new Stateful NTLM Auth profile, or click the pencil icon next to an existing
profile to edit. Complete the settings as described in Table 21:
Table 21 Profiles > AAA > Stateful NTLM Auth Profile Settings
Field Default Description
General Settings
Folder Top Setthe folder with which the profile is associated. The drop-down menu displays all
folders available for association with the profile.
68 | Configuration Reference Dell PowerConnect W-AirWave 7.4 | Configuration Guide
Page 69

Table 21 Profiles > AAA > Stateful NTLM Auth Profile Settings (Continued)
Field Default Description
Name Blank Enter the name of the profile.
Other Settings
Timeout 10 Set the aging out or timeout period, which is the amount of time for which the user
Server Group default Select a server from the drop-down menu. You can edit servers with the Pencil icon
Default Role guest Select a user role to associate with the user from the drop-down menu. You can
Mode No Indicates whether this profile is enabled or disabled.
sends no traffic. The user’s role remains authenticated unless this period of time is
exceeded.
or add additional servers with the Add icon.
edit roles with the Pencil icon or add additional roles with the Add icon.
A minimum of AOS 6.0.0.0 is required.
3. Select Add or Save. The added or edited profile appears on the Stateful NTLM Auth page, and on the details
page.
Profiles > AAA > WISPr Auth
The Wireless Internet Service Provider roaming (WISPr) protocol allows users to roam between service providers.
A RADIUS server is used to authenticate subscriber credentials.
AOS supports stateful 802.1x authentication, stateful NTLM authentication and authentication for Wireless
Internet Service Provider roaming (WISPr). Stateful authentication differs from 802.1x authentication in that
the controller does not manage the authentication process directly, but monitors the authentication messages
between a user and an external authentication server, and then assigns a role to that user based upon the
information in those authentication messages. WISPr authentication allows clients to roam between hotspots
using different ISPs.
Refer to the Dell PowerConnect W-Series ArubaOS User Guide at support.dell.com/manuals for additional
information about stateful NTLM and WISPr authentication.
Perform these steps to configure a WISPr Auth profile.
1. Select Profiles > AAA > WISPr Auth in the navigation pane. The details page summarizes the current
profiles of this type.
2. Select the Add button to create a new Stateful NTLM Auth profile, or click the pencil icon next to an existing
profile to edit. Complete the settings as described in Table 22:
Table 22 Profiles > AAA > WISPr Auth Profile Settings
Field Default Description
General Settings
Folder Top Set the folder with which the profile is associated. The drop-down menu displays all
Name Blank Enter the name of the profile.
Other Settings
Server Group default Select the AAA authentication server group. Select the pencil icon to edit an existing
folders available for association with the profile.
server group or click the add icon to create a new server group.
Dell PowerConnect W-AirWave 7.4 | Configuration Guide Configuration Reference | 69
Page 70

Table 22 Profiles > AAA > WISPr Auth Profile Settings (Continued)
Field Default Description
Default Role guest Select the default role assigned to users that complete WISPr authentication.
Max Authentication
Failures
Logon Wait Minimum
Wait
Logon Wait Maximum
Wait
Logon Wait CPU
Utilization Threshold
WISPr Location-ID ISO
Country Code
WISPr Location-ID
E.164 Area Code
WISPr Location-ID
SSID/zone
0 Number of times a user can try to login with wrong credentials after which the user will be
blacklisted as a security threat.
Set to 0 to disable blacklisting, otherwise enter a non-zero integer to blacklist the user
after the specified number of failures.
This setting requires a wireless intrusion protection license.
5 Define the minimum wait time for additional logon attempts. If the controller’s CPU
utilization has surpassed the Logon Wait CPU utilization threshold value, this wait
parameter defines the minimum number of seconds a user will have to wait prior to
retrying a login attempt. The supported range is 1 to 10 seconds.
10 Define the maximum wait time for additional logon attempts. If the controller’s CPU
utilization has surpassed the Login wait CPU utilization threshold value, this wait
parameter defines the maximum number of seconds a user will have to wait prior to
retrying a login attempt. The supported range is form 1 to 10 seconds.
60 Set the percentage of CPU utilization at which the maximum and minimum logon wait
times are enforced. The supported range is from 1% to 100%.
Enter the ISO Country Code section of the WISPr Location ID.
Enter the E.164 Area Code section of the WISPr Location ID.
Enter the SSID/Zone section of the WISPr Location ID.
WISPr Operator Name Enter a name identifying the hotspot operator.
WISPr Location Name Enter a name identifying the hotspot location. If no name is defined, the
parameter will use the name of the AP to which the user has associated.
3. Select Add or Save. The added or edited profile appears on the Stateful NTLM Auth page, and on the details
page.
Profiles > AP
Display the currently configured AP profiles by navigating to Device Setup > Profiles > AP.
In AOS, related configuration parameters are grouped into a profile that you can apply as needed to an AP group
or to individual APs. This section lists each category of AP profiles that you can configure and apply to an AP
group or to an individual AP. Note that some profiles reference other profiles. For example, a virtual AP profile
references SSID and AAA profiles, while an AAA profile can reference an 802.1x authentication profile and server
group. You can apply the following types of profiles to an AP or AP group:
Perform these steps to configure AP profiles.
1. Select the Profiles > AP profile heading in the navigation pane.
70 | Configuration Reference Dell PowerConnect W-AirWave 7.4 | Configuration Guide
Page 71

Figure 23 Profiles > AP in Dell PowerConnect W Configuration
2. From the navigation pane, you can configure the following profile types. The following AP profiles configure
AP operation parameters, regulatory domain, SNMP information, and more:
Authorization—Allows you to assign authorization settings to a provisioned but unauthorized AP to an AP
group with a restricted configuration profile. Refer to “Profiles > AP > Authorization” on page71.
Ethernet Link—Sets the duplex mode and speed of AP’s Ethernet link. The configurable speed is
dependent on the port type, and you can define a separate Ethernet Interface profile for each Ethernet
link. Refer to “Profiles > AP > SNMP” on page 75.
Provisioning —Defines a group of provisioning parameters for an AP or AP group. Refer to “Profiles > AP
> Provisioning” on page72.
Regulatory Domain—Defines an AP’s country code and valid channels for both legacy and high-
throughput 802.11a and 802.11b/g radios. Refer to “Profiles > AP > Regulatory Domain” on page 74.
Wired Port—Allows you to enable or disable the wired port, define an AAA profile for wired port devices,
and associate the port with an ethernet link profile that defines its speed and duplex values. Refer to
“Profiles > AP > Wired Port” on page80.
Wired—Controls whether 802.11 frames are tunneled to the controller using Generic Routing
Encapsulation (GRE) tunnels, bridged into the local Ethernet LAN (for remote APs), or a configured for
combination of the two (split-mode). This profile also configures the switching mode characteristics for
the port, and sets the port as either trusted or untrusted. Refer to “Profiles > AP > System” on page 76.
SNMP—Defines and enables SNMP settings, to include community string and SNMP user profiles.
“Profiles > AP > SNMP” on page 75.
SNMP User—Sets the SNMP user name and authentication profile to support more general SNMP
profiles. Refer to “Profiles > AP > SNMP > SNMP User” on page 75.
System—Defines administrative options for the controller, including the IP addresses of the local, backup,
and master controllers, Real-time Locating Systems (RTLS) server values and the number of consecutive
missed heartbeats on a GRE tunnel before an AP reboots traps. Refer to “Profiles > AP > System” on
page 76.
Profiles > AP > Authorization
Remote AP configurations include an authorization profile that specifies which profile settings should be
assigned to a remote AP that has been provisioned but not yet authenticated at the remote site. By default, these
yet-unauthorized APs are assigned the pre-defined profile NoAuthApGroup. This configuration allows the user to
connect to an unauthorized remote AP via a wired port then enter a corporate username and password.
Once a valid user has authorized the AP and the remote AP will be marked as authorized on the network. The
remote AP will then download the configuration assigned to that AP by its permanent AP group.
Perform these steps to configure an Authorization profile.
1. Select Profiles > AP > Authorization in the navigation pane.
Dell PowerConnect W-AirWave 7.4 | Configuration Guide Configuration Reference | 71
Page 72

2. Select the Add button to create a new profile, or click the pencil icon next to an existing profile to edit.
Complete the settings as described in Table 23:
Table 23 Profiles > AP > Authorization Profile Settings
Field Default Description
General Settings
Folder Top Set the folder with which the profile is associated. The drop-down menu displays all
Name Blank Enter the name of the profile.
Referenced Profiles
AP Authorization Group None Designates the profile to reference. Refer to “Dell PowerConnect W AP Groups” on
folders available for association with the profile.
page 35.
3. Select Add or Save. The added or edited profile appears on the AP Authorization page, and on the details
page.
Profiles > AP > Ethernet Link
The configurable speed defined in this profile is dependent on the port type, and you can define a separate
Ethernet Interface profile for each Ethernet link.
Perform these steps to configure a Ethernet Link profile.
1. Select Profiles > AP > Ethernet Link in the navigation pane.
2. Select the Add button to create a new profile, or click the pencil icon next to an existing profile to edit.
Complete the settings as described in Table 24:
Table 24 Profiles > AP > Ethernet Link Profile Settings
Field Default Description
General Settings
Folder Top Set the folder with which the profile is associated. The drop-down menu displays all
Name Blank Enter the name of the profile.
Other Settings
Speed (Mbps) auto Designates the speed of the Ethernet link for this profile. Options are 10, 100,or1000
Duplex auto Defines this profile to support duplex Ethernet. Options are full, half,orauto.
folders available for association with the profile.
Mbits.
3. Select Add or Save. The added or edited Ethernet Link profile appears on the AAA Profiles page, and on the
802.1x Auth details page.
Profiles > AP > Provisioning
Perform these steps to define a provisioning profile for an AP or group of APs:
1. Select Profiles > AP > System in the navigation pane. This page summarizes the current profiles of this type.
72 | Configuration Reference Dell PowerConnect W-AirWave 7.4 | Configuration Guide
Page 73

2. Select the Add button to create a new System profile, or click the pencil icon next to an existing profile to
edit. Complete the settings as described in Table 25:
Table 25 Profiles > AP > Provisioning Profile Settings
Field Default Description
General Settings
Folder Top Set the folder with which the profile is associated. The drop-down menu displays all
Name Blank Enter the name of the profile.
Other Settings
Remote-AP No Whether the AP you are provisioning is a remote AP.
Set or Clear Master IP/
FQDN
Domain Name Fully-qualified domain name (FQDN) for the AP. Requires a version earlier than
PPPoE User Name Point-to-Point Protocol over Ethernet (PPPoE) username for the AP.
PPPoE Password PPPoE password for the AP.
PPPoE Service Name PPPoE service name for the AP.
USB User Name The PPP username provided.
USB Password A PPP password, if provided.
USB Device Type The USB device type.
USB Device Identifier The USB device identifier.
folders available for association with the profile.
Whether to specify or clear the definition for the Master IP or fully qualified domain
name of the AP.
6.1.0.0.
USB Dial String The dial string for the USB modem.
USB Initialization String The initialization string for the USB modem.
USB TTY Device Path The TTY device path for the USB modem.
USB TTY Device Control
Path
Link Priority Ethernet (0-255) 0 Set the priority of the cellular uplink. By default, the cellular uplink is a lower priority
Link Priority Cellular (0-255) 0 Set the priority of the wired uplink. Each uplink type has an associated priority;
Uplink VLAN (0-4095) 0 If you configure an uplink VLAN on an AP connected to a port in trunk mode, the AP
Requires a minimum version of 6.1.0.0.
than the wired uplink; making the wired link the primary link and the cellular link the
secondary or backup link.
Configuring the cellular link with a higher priority than your wired link priority will
set your cellular link as the primary controller link.
wired ports having the highest priority by default.
sends and receives frames tagged with this VLAN on its Ethernet uplink.
By default, an AP has an uplink VLAN of 0, which disables this feature.
NOTE: If an AP is provisioned with an uplink VLAN, it must be connected to a trunk
mode port or the AP’s frames will be dropped.
Dell PowerConnect W-AirWave 7.4 | Configuration Guide Configuration Reference | 73
Page 74

Profiles > AP > Regulatory Domain
This profile type defines an AP’s country code and valid channels for both legacy and high-throughput 802.11a
and 802.11b/g radios.
With the implementation of the high-throughput IEEE 802.11n draft standard, 40 MHz channels were added in
addition to the existing 20 MHz channel options. Available 20 MHz and 40 MHz channels are dependent on the
country code entered in the regulatory domain profile.
The following channel configurations are now available in AOS:
A 20 MHz channel assignment consists of a single 20 MHz channel assignment. This channel assignment is
valid for 802.11a/b/g and for 802.11n 20 MHz mode of operation.
A 40 MHz channel assignment consists of two 20 MHz channels bonded together (a bonded pair). This
channel assignment is valid for 802.11n 40 MHz mode of operation and is most often utilized on the 5 GHz
frequency band. If high-throughput is disabled, a 40 MHz channel assignment can be configured, but only the
primary channel assignment will be utilized. 20 MHz clients can also associate using this configuration, but
only the primary channel will be utilized.
A high-throughput (HT) AP can use a 40 MHz channel pair comprised of two adjacent 20 MHz channels
available in the regulatory domain profile for your country. When ARM is configured for a dual-band AP, it will
dynamically select the primary and secondary channels for these devices. It can, however, continue to scan all
changes in the a+b/g bands to calculate interference and detect rogue APs.
Perform these steps to configure a Regulatory Domain profile.
1. Select Profiles > AP > Regulatory Domain in the navigation pane. This page summarizes the current profiles
of this type.
2. Select the Add button to create a new Regulatory Domain profile, or click the pencil icon next to an existing
profile to edit. Complete the settings as described in Table 26:
Table 26 Profiles > AP > Regulatory Domain Profile Settings
Field Default Description
General Settings
Folder Top Set the folder with which the profile is associated. The drop-down menu displays all
Name Blank Enter the name of the profile.
Other Settings
Country Code Designate the country with the 802.1X regulatory standard relevant to this WLAN.
Valid 802.11a 40MHz
Channel pairs
folders available for association with the profile.
Select a 40 MHz channel pair for 802.11a.
A high-throughput (HT) AP can use a 40 MHz channel pair comprised of two adjacent 20
MHz channels available in the regulatory domain profile for your country. When ARM is
configured for a dual-band AP, it will dynamically select the primary and secondary
channels for these devices. It can, however, continue to scan all changes in the a+b/g
bands to calculate interference and detect rogue APs.
Valid 802.11g 40 MHz
Channel Pairs
Valid 802.11a 40MHz
Channels
Valid 802.11g 40 MHz
Channels
74 | Configuration Reference Dell PowerConnect W-AirWave 7.4 | Configuration Guide
Select a 40 MHz channel pair for 802.11g
Specify the valid channels for 40 MHz channel pairing in 802.11a.
Specify the valid channels for 40 MHz channel pairing in 802.11g.
Page 75

3. Select Add or Save. The added or edited Regulatory Domain profile appears on the Regulatory Domain
Profiles page.
Profiles > AP > SNMP
Dell PowerConnect W-Series controllers and APs support versions 1, 2c, and 3 of Simple Network Management
Protocol (SNMP) for reporting purposes only. In other words, SNMP cannot be used for setting values in a system
in the current AOS version. Perform these steps to configure a SNMP profile.
1. Select Profiles > AP > SNMP in the navigation pane.
2. Select the Add button to create a new SNMP profile, or click the pencil icon next to an existing profile to
edit. Complete the settings as described in Table 27:
Table 27 Profiles > AP > SNMP Profile Settings
Field Default Description
General Settings
Folder Top Set the folder with which the profile is associated. The drop-down menu displays all
Name Blank Enter the name of the profile.
Other Settings
SNMP Enable Yes Enable or disable SNMP in this profile.
Enter Community String Text field allows you to type one or multiple SNMP community strings applied to this
Select SNMP User Profile
Select SNMP User
Profile
folders available for association with the profile.
profile.
If SNMP is enabled in this profile, and one or more profiles have been configured, select
the corresponding SNMP profile from this list.
3. Select Add or Save. The added or edited SNMP profile appears on the SNMP profiles page.
Profiles > AP > SNMP > SNMP User
Perform these steps to configure a SNMP profile.
1. Select Profiles > AP > SNMP > SNMP User in the navigation pane.
2. Select the Add button to create a new user, or click the pencil icon next to an existing user to edit that user.
Complete the settings as described in Table 28:
Table 28 Profiles > AP > SNMP > SNMP User Settings
Field Default Description
General Settings
Folder Top Set the folder with which the profile is associated. The drop-down menu displays all
Name Blank Name of the SNMP user profile. This is the name by which the SNMP user is managed
Other Settings
Dell PowerConnect W-AirWave 7.4 | Configuration Guide Configuration Reference | 75
folders available for association with the profile.
and accessed when cited by SNMP profiles
Page 76

Table 28 Profiles > AP > SNMP > SNMP User Settings (Continued)
Field Default Description
User Name Blank Actual name of the network user to be supported by this SNMP profile in Dell
Authentication Profile none Select a protocol from the drop-down menu. Options are as follows:
PowerConnect W Configuration
none—Uses no authentication type for the user being defined.
md5—Sets the MD5 hashing algorithm for the user that hashes a cleartext
password.
sha—Sets the SHA hashing algorithm for the user that hashes a cleartext
password.
3. Select Add or Save. The added or edited SNMP user appears on the SNMP User page. This user can now be
referenced in SNMP profiles.
For additional information about SNMP traps, refer to the Dell PowerConnect W-Series ArubaOS MIB Guide at
support.dell.com/manuals.
Profiles > AP > System
Using DNS, the remote AP receives multiple IP addresses in response to a host name lookup. Known as the
backup controller list, remote APs go through this list to associate with a controller. If the primary controller is
unavailable or does not respond, the remote AP continues through the list until it finds an available controller.
This provides redundancy and failover protection.
If the remote AP loses connectivity on the IPSec tunnel to the controller, the remote AP establishes connectivity
with a backup controller from the list and automatically reboots. Network connectivity is lost during this time.
You can also configure a remote AP to revert back to the primary controller when it becomes available.To
complete this scenario, you must also configure the LMS IP address and the backup LMS IP address.
Perform these steps to configure a System profile.
1. Select Profiles > AP > System in the navigation pane. This page summarizes the current profiles of this type.
2. Select the Add button to create a new System profile, or click the pencil icon next to an existing profile to
edit. Complete the settings as described in Table 29:
Table 29 Profiles > AP > System Profile Settings
Field Default Description
General Settings
Folder Top Set the folder with which the profile is associated. The drop-down menu displays
Name Blank Enter the name of the profile.
Other Settings
all folders available for association with the profile.
76 | Configuration Reference Dell PowerConnect W-AirWave 7.4 | Configuration Guide
Page 77

Table 29 Profiles > AP > System Profile Settings (Continued)
Field Default Description
LMS IP In multi-controller networks, this parameter specifies the IP address of the
local management switch (LMS)—the Dell PowerConnect W-Series controller—
which is responsible for terminating user traffic from the APs, and processing and
forwarding the traffic to the wired network. This can be the IP address of the local
or master controller.
When using redundant controllers as the LMS, set this parameter to be the
VRRP IP address to ensure that APs always have an active IP address with
which to terminate sessions.For those APs that need to boot off the local controller,
configure the LMS IP address to point to the new local controller.
LMS IPv6 The IPv6 address of the local management switch (LMS)—the Dell controller
Backup LMS IP In multi-controller networks, specify the IPv4 address of a backup to the IP address
Backup LMS IPv6 For multi-controller networks, specify the IPv6 address of a backup to the IP
LMS Preemption No The AP fallback feature allows an AP associated with the backup controller
LMS Hold-down Period
(1-3600 sec)
Number of IPSEC
Retries
Master controller IP
Address
LED Operating Mode normal The operating mode for the AP LEDs. Options are normal and off.
RF Band g Indicates the band for mesh operation for multiband radios. Select a or g.
600 Enter the amount of time the remote AP must wait before moving back to the
360 Number of times the AP will try to create an IPsec tunnel with the master controller
which is responsible for terminating user traffic from the APs, and processing and
forwarding the traffic to the wired network. Requires a minimum version of 6.1.0.0
specified with the LMS IP field.
address specified with the LMS IPv6 field.
(backup LMS) to fail back to the primary controller (primary LMS) if it becomes
available. Enable LMS preemption with this field.
primary controller.
before the AP will reboot. If you specify a value of 0, and AP will not reboot if it
cannot create the IPsec tunnel. The supported range of values is 0-1000 retries,
and the default value is 360 retries.
Enter the IP address of the master controller.
Important: If you create more than one mesh cluster profile for an AP or AP group,
each mesh cluster profile must use the same band.
RF Band for AM mode
scanning
Double Encrypt No The double encryption feature applies only for traffic to and from a wireless client
Native VLAN ID
(0-4094)
SAP MTU Specify the Service Access Point (SAP) maximum transmission unit (MTU) in bytes.
Dell PowerConnect W-AirWave 7.4 | Configuration Guide Configuration Reference | 77
all Scanning band for multiple RF radios. Options are all, a, or g. Requires a minimum of
6.0.0.0.
that is connected to a tunneled SSID. When this feature is enabled, all traffic
(which is already encrypted using Layer-2 encryption) is re-encrypted in the IPSec
tunnel. When this feature is disabled, the wireless frame is only encapsulated
inside the IPSec tunnel. All other types of data traffic between the controller and
the AP (wired traffic and traffic from a split-tunneled SSID) are always encrypted in
the IPSec tunnel.
1 Enter the ID of the native VLAN. The supported range is from 0 to 4094.
The range is 1024 to 1578 bytes.
Page 78

Table 29 Profiles > AP > System Profile Settings (Continued)
Field Default Description
Bootstrap Threshold (1-
65535)
Request Retry Interval 10 Enter in seconds the amount of time for retries. The supported range is from 1 to
Maximum Request
Retries
Keepalive Interval (30-
65535)
Dump Server Enter the IP address for the dump server.
Telnet No Enables Telnet in this system profile.
SNMP Sys-contact Enter an IP address to the value for SNMP sys_ contact, the SNMP system Sys
RFprotect Server IP Enter the IP address of the RFprotect server.
8 Enter a threshold value from 0 to 65,535.
Adjust the bootstrap threshold to 30 if the network experiences packet loss. This
makes the AP recover more slowly in the event of a failure, but it will be more
tolerant to heartbeat packet loss.
The default maximum request retries and bootstrap threshold settings are
recommended for most mesh networks; however, if you must keep your mesh
network alive, you can modify the settings as described in this section. The
modified settings are not applicable if mesh portals are directly connected to the
controller.
65,535 seconds.
10 Maximum number of times to retry AP-generated requests. The default is 10 times.
If you must modify this setting, the recommended value is 10,000. The supported
range is from 1 to 65,535.
60 Define the keepalive interval in a range of 30 to 65,535 seconds.
location.
RFprotect Backup
Server IP
Configure Aeroscout
RTLS Server
Ortonics Walljack Yes Specify whether the Dell PowerConnect W controller uses an Ortonics walljack.
Ortonics LED Off TimeOut
Ortonics Low Temp 100 Enter the low and high temperatures in Celsius for Ortonics wall jacks. The range is
Ortonics High Temp 110
Configure RTLS Server No Enable this setting for Real-time Locating Systems (RTLS) server values and the
No Enable this option if you wish to support an Aeroscout RTLS server.
Yes Enable the LED time-out function for Ortonics wall jacks when used. When enabled,
Enter an IP address.
When a Dell PowerConnect W controller is present in a Dell PowerConnect W
RFprotect system, a Dell PowerConnect W AP that is acting as an RFprotect sensor
can be configured and managed from the controller. As a Managed Sensor, the
Dell PowerConnect W AP is managed by the controller but sends collected security
data about the wireless environment to an RFprotect Server.
Ortronics® Wi-Jack™ and Wi-Jack Duo™ thin client access points are centrally
configured and managed by the Dell PowerConnect W Networks wireless
controllers to provide a high performance wireless network that integrates
seamlessly into the structured cabling infrastructure. When enabled, this setting
requires an Ortonics Access Point License.
this setting requires an Ortonics Access Point License.
from 0C to 255C degrees. When Ortonics is enabled, these settings require an
Ortonics Access Point License.
number of consecutive missed heartbeats on a GRE tunnel before an AP reboots
traps.
Remote-AP DHCP
Server VLAN
(1-4094)
78 | Configuration Reference Dell PowerConnect W-AirWave 7.4 | Configuration Guide
Specify the VLAN to be associated with the remote-AP DHCP server. This field
requires a remote access points license, when used.
Page 79

Table 29 Profiles > AP > System Profile Settings (Continued)
Field Default Description
Remote-AP DHCP
Server ID
Remote-AP DHCP
Default Router
Remote-AP DHCP DNS
Server
Remote-AP DHCP Pool
Start
Remote-AP DHCP Pool
End
Remote-AP DHCP Pool
Netmask
Remote-AP DHCP
Lease Time
(0-30 days)
Heartbeat DSCP
(0-63)
Session ACL none Select an access control list for user sessions. To add a new policy for access
Corporate DNS Domain Enter the domain name service (DNS) domain or domains, one per line.
255.255.255.0 Enter the subnet mask. This field requires a remote access points license, when
0 Specify the amount of time that the IP address of the DHCP server is valid. The
0 This setting defines DSCP for low-speed networks. The supported range is from 0
Specify the IP address of the remote-AP DHCP server.
Specify the IP address of the remote-AP DHCP default router. This field requires a
remote AP license. This field requires a remote access points license, when used.
Enter the IP address or addresses of one or more remote-AP DHCP DNS servers.
Specify the DHCP IP address pool. This configures the pool of IP addresses from
which the remote AP uses to assign IP addresses.
At the Remote-AP-DHCP Pool Start and End fields, enter the first and last IP
addresses of the pool. These fields require a remote access point license, when
used.
used.
supported range is from 0 to 30 days. A value of 0 disables this function. This field
requires a remote access points license, when used.
to 63. To enable this function, enter a value greater than 0.
control, click the plus sign and refer to“Security > Policies” on page 141.
Image URL If an AP developers license is active, enter the image URL in a range from 1 to 1024.
Maintenance Mode No You can configure APs to suppress traps and syslog messages related to those
WISPr Location-ID ISO
Country Code
WISPr Location-ID
E.164 Country Code
WISPr Location-ID
E.164 Area Code
WISPr Location-ID
SSID/Zone
WISPr Operator Name A name identifying the hotspot operator. Requires a minimum version of 5.0.0.0 and
WISPr Location Name A name identifying the hotspot location. If no name is defined, the parameter will
This setting requires an AP Developer license.
APs. Known as AP maintenance mode, this setting in the AP system profile is
particularly useful when deploying, maintaining, or upgrading the network. If
enabled, APs stop flooding unnecessary traps and syslog messages to network
management systems or network operations centers during a deployment or
scheduled maintenance. The controller still generates debug syslog messages if
debug logging is enabled. After completing the network maintenance, disable AP
maintenance mode to ensure all traps and syslog messages are sent. AP
maintenance mode is disabled by default.
The ISO Country Code section of the WISPr Location ID. Requires a minimum
version of 5.0.0.0 and a version earlier than 6.0.0.0
The E.164 Country Code section of the WISPr Location ID. Requires a minimum
version of 5.0.0.0 and a version earlier than 6.0.0.0
The E.164 Area Code section of the WISPr Location ID. Requires a minimum version
of 5.0.0.0 and a version earlier than 6.0.0.0
The SSID/Zone section of the WISPr Location ID.Requires a minimum version of
5.0.0.0 and a version earlier than 6.0.0.0
a version earlier than 6.0.0.0
use the name of the AP to which the user has associated. Requires a minimum
version of 5.0.0.0 and a version earlier than 6.0.0.0
Dell PowerConnect W-AirWave 7.4 | Configuration Guide Configuration Reference | 79
Page 80

3. Select Add or Save. The added or edited System profile appears on the System profiles list page.
Profiles > AP > Wired Port
APs with multiple wired Ethernet ports include a wired port profile that can enable or disable the wired port,
define an AAA profile for wired port devices, and associate the port with an ethernet link profile that defines its
speed and duplex values.
Perform these steps to configure a Wired Port profile.
1. Select Profiles > AP > Wired Port in the navigation pane. This page summarizes the current profiles of this
type.
2. Select the Add button to create a new Wired Port profile, or click the pencil icon next to an existing profile to
edit. Complete the settings as described in Table 30:
Table 30 Profiles > AP > Wired Port Profile Settings
Field Default Description
General Settings
Folder Top Set the folder with which the profile is associated. The drop-down menu displays all
Name Blank Enter the name of the profile.
Referenced Profiles
Wired AP Profile default Profile that defines wired port settings for APs assigned to the AP group. Refer to
Ethernet Interface Link
Profile
AAA Profile None Name of an AAA profile to be used by devices connecting to the AP’s wired port. Refer
Other Settings
Shut down No Whether to disable the wired AP port.
Remote-AP Backup Yes Select the Remote AP Backup checkbox to use the wired port on a Remote
Bridge Role none Role that is assigned to a user if split-tunnel authentication fails.
default Specify an ethernet link profile to be used by devices connecting to the AP’s wired port
folders available for association with the profile.
“Profiles > AP > Wired” on page 80.
profile. This profile defines the duplex value and speed to be used by the port.
to “Profiles > AAA Overview” on page 48.
AP for local connectivity and troubleshooting when the AP cannot reach the
controller. If the AP is not connected to the controller, no firewall policies will
be applied when this option is enabled. (The AAA profile will only be applied
when the AP is connected to controller).
Time To Wait for
Authentication To
Succeed
20 Authentication timeout value, in seconds, for devices connecting the AP’s
wired port. The supported range is 1-65535 seconds.
3. Select Add or Save. The added or edited Wired Port profile appears on the Profiles page, and on the Wired
Port details page.
Profiles > AP > Wired
The wired AP profile controls the configuration of the Ethernet port(s) on your AP. You can use the wired AP
profile to configure Ethernet ports for bridging or secure jack operation using the wired AP profile.
80 | Configuration Reference Dell PowerConnect W-AirWave 7.4 | Configuration Guide
Page 81

Perform these steps to configure a Wired profile.
1. Select Profiles > AP > Wired in the navigation pane. This page summarizes the current profiles of this type.
2. Select the Add button to create a new Wired profile, or click the pencil icon next to an existing profile to edit.
Complete the settings as described in Table 31:
Table 31 Profiles > AP > Wired Profile Settings
Field Default Description
General Settings
Folder Top Set the folder with which the profile is associated. The drop-down menu displays all
Name Blank Enter the name of the profile.
Other Settings
Wired AP Enable No Designate whether Wired APs are to be enabled or disabled.
Forward Mode tunnel If Wired AP is enabled, designate whether forwarding is to be bridge-based or tunnel-
Switchport Mode Access Select access or trunk. These options only apply to bridge mode configurations.
Access Mode VLAN (1-
4096)
1 Access mode forwards untagged packets received on the port to the controller and
folders available for association with the profile.
based (or split-tunnel).
Access mode forwards untagged packets received on the port to the controller and
they appear on the configured access mode VLAN. Tagged packets are dropped.
All packets received from the controller and sent via this port are untagged. Define
the access mode VLAN in the Access mode VLAN field.
Trunk mode contains a list of allowed VLANs. Any packet received on the port that
is tagged with an allowed VLAN is forwarded to the controller. Untagged packets
are forwarded to the controller on the configured Native VLAN. Packets received
from the controller and sent out the port remain tagged unless the tag value in the
packet is the Native VLAN, in which case the tag is removed. Define the Native
VLAN in the Trunk mode native VLAN field and the other allowed VLANs in the
Trunk mode allowed VLANs field.
they appear on the configured access mode VLAN. Tagged packets are dropped. All
packets received from the controller and sent via this port are untagged. Define the
access mode VLAN in the Access mode VLAN field. The VLAN range is from 1 to 4096.
Trunk Mode Native
VLAN (1-4096)
Trunk Mode Allowed
VLANs
Trusted No Use this option if the wired port is a trusted port.
Broadcast Yes Use this option if the wired port is a broadcast port.
1 Trunk mode contains a list of allowed VLANs. Any packet received on the port that is
tagged with an allowed VLAN is forwarded to the controller. Untagged packets are
forwarded to the controller on the configured Native VLAN. Packets received from the
controller and sent out the port remain tagged unless the tag value in the packet is the
Native VLAN, in which case the tag is removed. Define the Native VLAN in the Trunk
mode native VLAN field and the other allowed VLANs in the Trunk mode allowed VLANs
field.
Define whether the trunk mode settings defined in additional fields of this profile are to
allow VLANs. The VLAN range is from 1 to 4094.
Enter a list or a range of numbers. The VLAN range is from 1 to 4096. You can enter a
range of numbers, specific numbers or a combination of range and specific VLAN
numbers, as desired.
3. Select Add or Save. The added or edited Wired profile appears on the Profiles page, and on the Wired details
page.
Dell PowerConnect W-AirWave 7.4 | Configuration Guide Configuration Reference | 81
Page 82

Profiles > IDS
The IDS profiles configure the AP’s Intrusion Detection System features, which detect and disable rogue APs and
other devices that can potentially disrupt network operations. An AP is considered to be a rogue AP if it is both
unauthorized and plugged into the wired side of the network. An AP is considered to be an interfering AP if it is
seen in the RF environment but is not connected to the wired network.
The top-level IDS profile assigned to a Dell PowerConnect W AP group or AP name references additional IDS
profiles that are also described in this section. ArubaOS includes predefined top-level IDS profiles that provide
different levels of sensitivity. The following are predefined IDS profiles:
ids-disabled
ids-high-setting
ids-low-setting (the default setting)
ids-medium-setting
You apply the top-level IDS profile to an AP group or specific AP.
To view IDS profiles, click Profiles > IDS in the navigation pane.
Figure 24 IDS Profiles
NOTE: A predefined IDS profile refers to specific instances of the other IDS profiles. You cannot create new instances of a profile
within a predefined IDS profile. You can modify parameters within the other IDS profiles.
IDS profiles reference other profiles. These additional profiles can be created before, during, or after the
configuration of the IDS profile.
Select the Add button to create a new IDS profile, or click the pencil icon next to an existing profile to edit.
Complete the settings as described in Table 32:
Table 32 Profiles > IDS > General Profile Settings
Field Default Description
General Settings
Folder Top Set the folder with which the profile is associated. The drop-down menu displays all folders
Name Blank Enter the name of the profile.
available for association with the profile.
82 | Configuration Reference Dell PowerConnect W-AirWave 7.4 | Configuration Guide
Page 83

Table 32 Profiles > IDS > General Profile Settings (Continued)
Field Default Description
Other Settings and AP SNMP User Profiles
IDS Unauthorized
Device Profile
default Select the IDS Unauthorized Device Profile from the drop-down menu. This profile is
referenced by the overriding IDS profile currently being configured. The drop-down menu
contains any profiles that you have configured.
To create a new profile of this type, click the add icon. To edit an existing profile, select that
profile then click the pencil icon.
For additional information about configuring IDS Unauthorized Device Profiles, refer to
“Profiles > IDS > Unauthorized Device” on page 92.
IDS Signature
Matching Profile
default Select the IDS Signature Matching Profile from the drop-down menu. The drop-down menu
lists all signature matching profiles that are currently configured and available. To create a
new profile of this type, click the add icon. To edit an existing profile, select that profile then
click the pencil icon.
For additional information about configuring IDS Unauthorized Device Profiles, refer to
“Profiles > IDS > Signature Matching” on page 85.
IDS General Profile default Select the IDS General Profile from the drop-down menu. The drop-down menu lists all
General IDS profiles that are currently configured and available.
To create a new profile of this type, click the add icon. To edit an existing profile, select that
profile then click the pencil icon.
For additional information about configuring IDS Unauthorized Device Profiles, refer to
“Profiles > IDS > General” on page 84.
IDS Impersonation
Profile
default Select the IDS Impersonation Profile from the drop-down menu. The drop-down menu lists
all such profiles that are currently configured and available.
To create a new profile of this type, click the add icon. To edit an existing profile, select that
profile then click the pencil icon.
For additional information about configuring IDS Impersonation Profiles, refer to “Profiles >
IDS > Impersonation” on page 90.
IDS DoS Profile default Select the IDS Impersonation Profile from the drop-down menu. The drop-down menu lists
all such profiles that are currently configured and available.
To create a new profile of this type, click the add icon. To edit an existing profile, select that
profile then click the pencil icon.
For additional information about configuring IDS Impersonation Profiles, refer to “Profiles >
IDS > Denial of Service” on page 86.
4. Select the profile type to view or configure:
Denial of Service—Configures traffic anomaly settings for Denial of Service (DoS) attacks. Refer to “Profiles
> IDS > Denial of Service” on page86.
Rate Thresholds—Defines thresholds assigned to the different frame types for rate anomaly checking.
Refer to “Profiles > IDS > Denial of Service > Rate Threshold” on page 89.
General—Configures general AP attributes. Refer to “Profiles > IDS > General” on page 84.
Impersonation—Configures anomaly settings for impersonation attacks. Refer to “Profiles > IDS >
Impersonation” on page 90.
Signature Matching—Configures signatures and signature matching for intrusion detection. Refer to “Profiles
> IDS > Signature Matching” on page 85.
Signature—Defines a predefined signature. Refer to “Profiles > IDS > Signature Matching > Signature”
on page 86.
Unauthorized Device—Configures detection for unauthorized devices. Also configures rogue AP detection and
containment. Refer to “Profiles > IDS > Unauthorized Device” on page 92.
5. Select Add or Save. The added or edited IDS profile appears on the IDS profiles page.
Dell PowerConnect W-AirWave 7.4 | Configuration Guide Configuration Reference | 83
Page 84

Profiles > IDS > General
Perform these steps to configure a General IDS profile.
1. Select Profiles > IDS > General in the navigation pane. The list of current IDS profiles appears on this page.
2. Select the Add button to create a new General profile, or click the pencil icon next to an existing profile to
edit. Complete the settings as described in Table 33:
Table 33 Profiles > IDS > General Profile Settings
Field Default Description
General Settings
Folder Top Set the folder with which the profile is associated. The drop-down menu displays all
Name Blank Enter the name of the profile.
Other Settings and AP SNMP User Profiles
Stats Update Interval
(60-36000 sec)
AP Max Unseen Timeout
(5-36000 sec)
AP Inactivity Timeout
(5-36000 sec)
STA Max Unseen
Timeout (5-36000 sec)
STA Inactivity Timeout
(30-36000 sec)
Min Potential AP Beacon
Rate
(0-100%)
60 Set the time interval, in seconds, for the AP to update the controller with
600 Sets the time, in seconds, after which an AP is aged out.
5 Set the time, in seconds, after which an AP is aged out.
600 Sets the time, in seconds, after which a station is aged out.
60 Set the time, in seconds, after which a station is aged out.
25 Set the minimum beacon rate acceptable from a potential AP, in percentage of the
folders available for association with the profile.
statistics.
NOTE: This setting takes effect only if the Dell PowerConnect W Mobility Manager
is configured. Otherwise, statistics update to the controller is
disabled.
NOTE: This setting requires a minimum of AOS 6.0.0.0.
NOTE: This setting requires a minimum of AOS 6.0.0.0.
advertised beacon interval.
Min Potential AP Monitor
Time
(0-36000 sec)
Signature Quiet Time (60360000 sec)
Wireless Containment Deauth only Enable wireless containment including Tarpit Shielding. Tarpit shielding works by
Debug Wireless
Containment
Wired Containment No Enable containment from the wired side.
84 | Configuration Reference Dell PowerConnect W-AirWave 7.4 | Configuration Guide
2 Set the minimum time, in seconds, a potential AP has to be up before it is classified
as a real AP.
900 Set the time to wait, in seconds, after which the check can be resumed when
detecting a signature match.
steering a client to a tarpit so that the client associates with it instead of the AP that
is being contained.
deauth-only—Containment using deauthentication only
none—Disable wireless containment
tarpit-all-sta—Wireless containment by tarpit of all stations
tarpit-non-valid-sta—Wireless containment by tarpit of non-valid clients
NOTE: Tarpit requires a minimum version of 6.0.0.0.
No Enable/disable debug of containment from the wireless side.
Note: Enabling this debug option will cause containment to not function properly.
Page 85

Table 33 Profiles > IDS > General Profile Settings (Continued)
Field Default Description
Wired Containment of
AP's Adj MACs
Monitored Device Stats
Update Interval (0-36000
sec)
Mobility Manager RTLS No Enable/disable RTLS communication with the configured mobility-manager
Send Ad-hoc Info to
Controller
Ad-hoc AP Max Unseen
Timeout (5-36000 sec)
Ad-hoc (IBSS) AP
Inactivity Timeout (536000 sec)
IDS Event Generation onAPNone Enable or disable IDS event generation from the AP. Event generation from the AP
No Enable/disable wired containment of MACs offset by one from APs BSSID.
NOTE: This setting requires a minimum of AOS 6.0.0.0.
0 Time interval, in seconds, for AP to update the switch with stats for monitored
devices. Minimum is 60.
Yes Enable or disable sending Ad hoc information to the controller from the AP.
NOTE: This setting requires a WIPS or RFprotect license and a minimum of AOS
6.0.0.0.
180 Ageout time in seconds since ad hoc (IBSS) AP was last seen.
NOTE: This setting requires a minimum of AOS 6.0.0.0.
5 Ad hoc (IBSS) AP inactivity timeout in number of scans.
NOTE: This setting requires a minimum of AOS 6.0.0.0.
can be enabled for syslogs, traps, or both. This does not affect generation of IDS
correlated events on the switch.
3. Select Add or Save. The added or edited General profile appears on the IDS > General profiles page.
Profiles > IDS > Signature Matching
The IDS signature matching profile contains signatures for intrusion detection. This profile can include
predefined or custom signatures. Table 34 describes the predefined signatures that you can add to the profile.
Perform these steps to configure a Signature Matching profile.
1. Select Profiles > IDS > Signature Matching in the navigation pane.
2. Select the Add button to create a new Signature Matching profile, or click the pencil icon next to an existing
profile to edit. Complete the settings as described in Table 34:
Table 34 Profiles > IDS > Signature Matching Profile Settings
Field Default Description
General Settings
Folder Top Set the folder with which the profile is associated. The drop-down menu displays
Name Blank Enter the name of the profile.
all folders available for association with the profile.
Dell PowerConnect W-AirWave 7.4 | Configuration Guide Configuration Reference | 85
Page 86

Table 34 Profiles > IDS > Signature Matching Profile Settings (Continued)
Field Default Description
Signature Profiles
Select Signature
Profiles
Select from signature options as follows:
AirJack
ASLEAP
Deauth-Broadcast
default
Disassoc-Broadcast
Netstumbler Generic
Netstrumbler Version 3.3.0x
Null-Probe-Response
Wellenreiter
3. Select Add or Save. The added or edited Signature Matching profile appears on the IDS > Signature
Matching profiles page.
Profiles > IDS > Signature Matching > Signature
Perform these steps to create signatures for use with Signature Matching profiles.
1. Select Profiles > IDS > Signature Matching > Signature in the navigation pane.
2. Select the Add button to create a new Signature, or click the pencil icon next to an existing profile to edit.
Complete the settings as described in Table 35:
Table 35 Profiles > IDS > Signature Creation Settings
Field Default Description
General Settings
Folder Top Set the folder with which the profile is associated. The drop-down menu displays all
folders available for association with the profile.
Name Blank Enter the name of the signature.
IDS Signatures
Add Select this button to add a new IDS signature. Complete the settings as follows:
Parameter, which can be one of the following:
bssid
dst-mac
frame-type
payload
seq-num
src-mac
BSSID
Select Add when these signature settings are defined.
3. Select Add or Save on the Signature page. The added or edited Signature appears on the IDS > Signature
Matching > Signatures page.
Profiles > IDS > Denial of Service
This profile type defines traffic anomaly settings that detect and process denial-of-service attacks. This profile
type defines the parameters that are monitored and acted upon when detecting and blacklisting an offending
86 | Configuration Reference Dell PowerConnect W-AirWave 7.4 | Configuration Guide
Page 87

client from the Dell PowerConnect W system. When a client is blacklisted in the Dell PowerConnect W system,
the client is not allowed to associate with any AP in the network for a specified amount of time. If a client is
connected to the network when it is blacklisted, a de-authentication message is sent to force the client to
disconnect. While blacklisted, the client cannot associate with another SSID in the network.
Table 36 summarizes the predefined IDS Denial of Service profiles. These profiles are viewable with the Profiles
> IDS > Denial of Service path in the navigation pane.
Table 36 Predefined IDS DoS Profiles
Parameter ids-dosdisabled ids-dos-lowsetting ids-dosmedium-setting ids-dos-highsetting
Detect Disconnect Station
Attack
Disconnect STA Detection
Quiet Time
Spoofed Deauth Blacklist disabled disabled disabled disabled
Detect AP Flood Attack disabled disabled disabled disabled
AP Flood Threshold 50 50 50 50
AP Flood Increase Time 3 seconds 3 seconds 3 seconds 3 seconds
AP Flood Detection Quiet Time 900 seconds 900 seconds 900 seconds 900 seconds
Detect EAP Rate Anomaly disabled disabled enabled enabled
EAP Rate Threshold 60 60 30 60
EAP Rate Time Interval 3 seconds 3 seconds 3 seconds 3 seconds
EAP Rate Quiet Time 900 seconds 900 seconds 900 seconds 900 seconds
Detect Rate Anomalies disabled disabled disabled enabled
Detect 802.11n 40 MHz
Intolerance Setting
disabled enabled enabled enabled
900 seconds 900 seconds 900 seconds 900 seconds
disabled enabled enabled enabled
Client 40 MHz Intolerance
Detection Quiet Time
Rate Thresholds for Assoc
Frames
Rate Thresholds for Disassoc
Frames
Rate Thresholds for Deauth
Frames
Rate Thresholds for Probe
Request Frames
Rate Thresholds for Probe
Response Frames
default default default default
900 seconds 900 seconds 900 seconds 900 seconds
default default default default
default default default default
default default default default
default probe-request-response-
default probe-requestresponse-thresholds
thresholds
probe-request-responsethresholds
probe-request-responsethresholds
probe-request-responsethresholds
probe-request-responsethresholds
Rate Thresholds for Auth
Frames
Perform these steps to configure or edit an IDS Denial of Service profile, and to create or edit profiles that are
referenced by a DOC profile.
1. Select Profiles > IDS > Denial of Service in the navigation pane.
Dell PowerConnect W-AirWave 7.4 | Configuration Guide Configuration Reference | 87
Page 88

2. Select the Add button to create a new Signature Matching profile, or click the pencil icon next to an existing
profile to edit. Complete the settings as described in Table 37:
Table 37 Profiles > IDS > Denial of Service Profile Settings
Field Default Description
General Settings
Folder Top Set the folder with which the profile is associated. The drop-down menu displays all
Name Blank Enter the name of the profile.
Referenced Profiles
Rate Thresholds for
Assoc Frames
Rate Thresholds for
Disassoc Frames
Rate Thresholds for
Deauth Frames
Rate Thresholds for
Probe Request Frames
Rate Thresholds for
Probe Response
Frames
default Select a profile from the drop-down menu, or click the edit (icon) or add (icon) to edit or
default Select a profile from the drop-down menu, or click the edit (icon) or add (icon) to edit or
default Select a profile from the drop-down menu, or click the edit (icon) or add (icon) to edit or
default Select a profile from the drop-down menu, or click the edit (icon) or add (icon) to edit or
default Select a profile from the drop-down menu, or click the edit (icon) or add (icon) to edit or
folders available for association with the profile.
create a profile that sets the rate threshold for association frames. The IDS rate
threshold profile defines thresholds assigned to the different frame types for rate
anomaly checking.
create a profile that sets the rate threshold for disassociation frames. The IDS rate
threshold profile defines thresholds assigned to the different frame types for rate
anomaly checking.
create a profile that sets the rate threshold for de-authentication frames. The IDS rate
threshold profile defines thresholds assigned to the different frame types for rate
anomaly checking.
create a profile that sets the rate threshold for probe request frames. The IDS rate
threshold profile defines thresholds assigned to the different frame types for rate
anomaly checking.
create a profile that sets the rate threshold for probe response frames. The IDS rate
threshold profile defines thresholds assigned to the different frame types for rate
anomaly checking.
Rate Thresholds for
Auth Frames
Other Settings
Detect Disconnect
Station Attack
Disconnect STA Assoc
Response Threshold
Disconnect STA Deauth
and Disassoc Threshold
Disconnect STA
Detection Quiet Time
Spoofed Deauth
Blacklist
88 | Configuration Reference Dell PowerConnect W-AirWave 7.4 | Configuration Guide
default Select a profile from the drop-down menu, or click the edit (icon) or add (icon) to edit or
create a profile that sets the rate threshold for authentication frames. The IDS rate
threshold profile defines thresholds assigned to the different frame types for rate
anomaly checking.
Yes Enables or disables detection of station disconnection attacks.
5 The number of successful Association Response or Reassociation response frames
seen in an interval of 10 seconds that should trigger this event. Requires a minimum
version of 6.0.0.0.
8 Rate thresholds for Disassociate frames. Requires a minimum version of 6.0.0.0
900 After a station disconnection attack is detected, sets the time (in seconds) that must
elapse before another identical alarm can be generated.
No Enables or disables automatic client blacklisting of spoofed de-authentication.
Page 89

Table 37 Profiles > IDS > Denial of Service Profile Settings (Continued)
Field Default Description
Detect AP Flood Attack No Enables or disables the detection of flooding with fake AP beacons to confuse
AP Flood Threshold 50 Sets the number of Fake AP beacons that must be received within the Flood Increase
AP Flood Increase Time 3 Sets the time, in seconds, during which a configured number of Fake AP beacons must
AP Flood Detection
Quiet Time
Detect Client Flood
Attack
Client Flood Threshold 150 Threshold for the number of spurious clients in the system. Requires a Wireless
Client Flood Increase
Time
Client Flood Detection
Quiet Time
900 After an alarm has been triggered by a Fake AP flood, the time (in seconds) that must
No Enable/disable detection of client flood attack. There are fake AP tools that can be used
3 Number of consecutive seconds over which the client count is more than the threshold.
900 Time to wait, in seconds, after detecting a client flood before continuing the check.
legitimate users and to increase the amount of processing need on client operating
systems.
Time to trigger an alarm.
be received to trigger an alarm.
elapse before an identical alarm may be triggered.
to attack wireless intrusion detection itself by generating a large
number of fake clients that fill internal tables with fake information. If successful, it
overwhelms the wireless intrusion system, resulting in a DoS. Requires a Wireless
Intrusion Protection license or an RFprotect license and a minimum version of 6.0.0.0.
Intrusion Protection license or an RFprotect license and a minimum version of 6.0.0.0
Requires a Wireless Intrusion Protection license or an RFprotect license and a minimum
version of 6.0.0.0
Requires a Wireless Intrusion Protection license or an RFprotect license and a minimum
version of 6.0.0.0
Detect EAP Rate
Anomaly
EAP Rate Thresholds 60 Sets the number of EAP handshakes that must be received within the EAP Rate Time
EAP Rate Time Interval 3 Sets the time, in seconds, during which the configured number of EAP handshakes must
EAP Rate Quiet Time 900 After an alarm has been triggered, sets the time (in seconds) that must elapse before
Detect Rate Anomalies No Enables or disables detection of rate anomalies.
Detect 802.11n 40MHz
Intolerance Setting
Client 40 MHz
Intolerance Detection
Quiet Time
No Enables or disables Extensible Authentication Protocol (EAP) handshake analysis to
detect an abnormal number of authentication procedures on a channel and generates
an alarm when this condition is detected.
Interval to trigger an alarm.
be received to trigger an alarm.
another identical alarm may be triggered.
Yes Enables or disables detection of 802.11n 40 MHz intolerance setting, which controls
whether stations and APs advertising 40 MHz intolerance will be reported.
900 Controls the quiet time (when to stop reporting intolerant STAs if they have not been
detected), in seconds, for detection of 802.11n 40 MHz intolerance setting.
3. Select Add or Save. The added or edited Denial of Service profile appears on the IDS > Denial of Service
profiles page.
Profiles > IDS > Denial of Service > Rate Threshold
The IDS rate threshold profile defines thresholds assigned to the different frame types for rate anomaly checking.
A profile of this type is attached to each of the following 802.11 frame types in the IDS Denial of Service profile:
Dell PowerConnect W-AirWave 7.4 | Configuration Guide Configuration Reference | 89
Page 90

Association frames
Disassociation frames
Deauthentication frames
Probe Request frames
Probe Response frames
Authentication frames
A channel threshold applies to an entire channel, while a node threshold applies to a particular client MAC
address. Dell PowerConnect W provides predefined default IDS rate thresholds profiles for each of these types of
frames. Default values depend upon the frame type.
Perform these steps to create Rate Threshold Profiles for use with Denial of Service profiles.
1. Select Profiles > IDS > Denial of Service > Rate Thresholds in the navigation pane. This page summarizes
the current thresholds available.
2. Select the Add button to create a new Rate Threshold, or click the pencil icon next to an existing threshold to
edit. Complete the settings as described in Table 38:
Table 38 Profiles > IDS > Denial of Service, Rate Threshold Settings
Field Default Description
General Settings
Folder Top Set the folder with which the profile is associated. The drop-down menu displays all
Name Blank Enter the name of the rate threshold profile.
Other Settings
Channel Increase Time
(0--360000 sec)
Channel Quiet Time (60360000 sec)
Channel Threshold (0-
100000)
Node Time Interval (1-120
sec)
Node Quiet Time
(60-360000 sec)
Node Threshold
(0-100000)
15 Set the time, in seconds, in which the threshold must be exceeded in order to trigger
900 Set the time that must elapse before another identical alarm may be triggered, after
300 Specify the number of a specific type of frame. This number must be exceeded within
15 Set the time, in seconds, in which the threshold must be exceeded in order to trigger
900 Set the time that must elapse before another identical alarm may be triggered, after
200 Specify the number of a specific type of frame that must be exceeded within a
folders available for association with the profile.
an alarm.
an alarm has been triggered, Use this option to prevent excessive messages in the log
file.
a specific interval in an entire channel to trigger an alarm.
an alarm.
an alarm has been triggered. This option prevents excessive messages in the log file.
specific interval for a particular client MAC address to trigger an alarm.
3. Select Add or Save. The added or edited Rate Threshold appears on the Profiles > IDS > Denial of Service
> Rate Thresholds page.
Profiles > IDS > Impersonation
Perform these steps to create IDS Impersonation profiles.
1. Select Profiles > IDS > Impersonation in the navigation pane.
90 | Configuration Reference Dell PowerConnect W-AirWave 7.4 | Configuration Guide
Page 91

2. Select the Add button to create a new Impersonation profile, or click the pencil icon next to an existing
profile to edit. Complete the settings as described in Table 39:
Table 39 Profiles > IDS > Impersonation Settings
Field Default Description
General Settings
Folder Top Set the folder with which the profile is associated. The drop-down menu displays all
Name Blank Enter the name of the impersonation profile.
Other Settings
Detect AP
Impersonation
Protect from AP
Impersonation
Beacon Diff Threshold
(0-100%)
Beacon Increase Wait
Time
(0-360000 sec)
Detect Sequence
Anomaly
Yes Enable or disable detection of AP impersonation. In AP impersonation attacks, the
No When AP impersonation is detected, use this control to set both the legitimate and
50 Set the percentage increase in beacon rate that triggers an AP impersonation alert.
3 Set the time, in seconds, after the Beacon Diff Threshold is crossed before an AP
No Enable or disable detection of anomalies between sequence numbers seen in 802.11
folders available for association with the profile.
attacker sets up an AP that assumes the BSSID and ESSID of a valid AP. AP
impersonation attacks can be done for man-in-the-middle attacks, a rogue AP
attempting to bypass detection, or a honeypot attack.
impersonating AP to be disabled using a denial of service attack.
impersonation event is generated.
frames. During an impersonation attack, the attacker may spoof the MAC address of a
client or AP — if two devices are active on the network with the same MAC address, the
sequence numbers in the frames will not match since the sequence number is
generated by NIC firmware.
Sequence Number of
Difference
(0-100000)
Sequence Number Time
Tolerance
(0-360000 sec)
Sequence Number
Quiet Time
(60-360000 sec)
Detect AP Spoofing Yes Whether to detect AP Spoofing.
AP Spoofing Quiet Time 900 Time to wait, in seconds, after a spoofing attempt to resume the check.
Detect Beacon Wrong
Channel
Beacon Wrong Channel
Detection Quiet Time
Detect Hotspotter
Attack
Hotspotter Quiet Time 900 Time to wait in seconds after detecting an attempt to use the Hotspotter tool against
300 Set the maximum allowable tolerance between sequence numbers within the Sequence
Number Time Tolerance period.
300 Time, in seconds, during which sequence numbers must exceed the Sequence Number
Difference value for an alarm to be triggered.
900 After an alarm has been triggered, the time (in seconds) that must elapse before another
identical alarm may be triggered.
NOTE: Requires a WIDS license.
No Enable/disable detection of beacons advertising the incorrect channel.
900 Time to wait in seconds after detecting an attempt of beacons advertising the incorrect
channel, after which the check can be resumed.
No Enable/disable detection of the Hotspotter attack to lure away valid clients.
clients.
Dell PowerConnect W-AirWave 7.4 | Configuration Guide Configuration Reference | 91
Page 92

3. Select Add or Save. The added or edited Impersonation profile appears on the Profiles > IDS >
Impersonation page.
Profiles > IDS > Unauthorized Device
Unauthorized device detection includes the ability to detect and disable rogue APs and other devices that can
potentially disrupt network operations.
The most important IDS functionality offered in the Dell PowerConnect W system is the ability to classify an AP
as either a rogue AP or an interfering AP. An AP is considered to be a rogue AP if it is both unauthorized and
plugged into the wired side of the network. An AP is considered to be an interfering AP if it is seen in the RF
environment but is not connected to the wired network. While the interfering AP can potentially cause RF
interference, it is not considered a direct security threat since it is not connected to the wired network. However,
an interfering AP may be reclassified as a rogue AP.
NOTE: Rogue device classification for WMS Offload infrastructure is also described in the Dell PowerConnect W-AirWave 7.4
User Guide found in Home > Documentation.
You can enable a policy to automatically disable APs that are classified as a rogue APs by the Dell PowerConnect
W system. When a rogue AP is disabled, no wireless stations are allowed to associate to that AP.
Perform these steps to create IDS Unauthorized Device profiles.
1. Select Profiles > IDS > Unauthorized Devices in the navigation pane.
2. Select the Add button to create a new Unauthorized Devices profile, or click the pencil icon next to an
existing profile to edit. Complete the settings as described in Table 40:
Table 40 Profiles > IDS > Unauthorized Devices Profile Settings
Field Default Description
General Settings
Folder Top Set the folder with which the profile is associated. The drop-down menu displays all
Name Blank Enter the name of the profile.
Other Settings
Detect Adhoc Networks Yes Enable or disable detection of adhoc networks.
Protect from Adhoc
Networks
Detect Windows Bridge Yes Enable or disable detection of Windows station bridging.
Detect Wireless Bridge Yes Enable or disable detection of wireless bridging.
Detect Devices with An
Invalid MAC OUI
No Enable or disable protection from adhoc networks. When adhoc networks are detected,
No Enable or disable the checking of the first three bytes of a MAC address, known as the
folders available for association with the profile.
they are disabled using a denial of service attack.
MAC organizationally unique identifier (OUI), assigned by the IEEE to known
manufacturers. Often clients using a spoofed MAC address do not use a valid OUI and
instead use a randomly generated MAC address. Enabling MAC OUI checking causes
an alarm to be triggered if an unrecognized MAC address is in use.
MAC OUI Detection Quiet
Time
(60-360000 sec)
92 | Configuration Reference Dell PowerConnect W-AirWave 7.4 | Configuration Guide
900 Set the time, in seconds, that must elapse after an invalid MAC OUI alarm has been
triggered before another identical alarm may be triggered.
Page 93

Table 40 Profiles > IDS > Unauthorized Devices Profile Settings (Continued)
Field Default Description
Adhoc Network
Detection Quiet Time
900 Set the time, in seconds, that must elapse after an adhoc network detection alarm has
been triggered before another identical alarm may be triggered.
(60-360000 sec)
Wireless Bridge
Detection Quiet Time
900 Set the time, in seconds, that must elapse after a wired bridging alarm has been
triggered before another identical alarm may be triggered.
(60-360000 sec)
Rogue AP Classification Yes Enable or disable rogue AP classification. A rogue AP is one that is unauthorized and
plugged into the wired side of the network. Any other AP seen in the RF environment
that is not part of the valid enterprise network is considered to be “interfering” — it has
the potential to cause RF interference but it is not connected to the wired network and
thus does not represent a direct threat.
Overlay Rogue AP
Classification
Yes Set Overlay Rogue Classification, which is classification through valid/rogue APs. A
controller uses the wired-mac table of other valid and rogue APs as equivalents of the
wired MACs that it sees on our network. When this match is triggered, it makes a note
of the AP that helped in this process, and this info will be displayed as the Helper-AP.
Valid Wired MACs Set a list of MAC addresses of wired devices in the network, typically gateways or
servers.
Rogue Containment No By default, rogue APs are only detected but are not automatically disabled. This option
automatically shuts down rogue APs. When this option is enabled, clients attempting to
associate to a rogue AP will be disconnected from the rogue AP through a denial of
service attack.
Allow Well Known MAC Allow devices with known MAC addresses to classify rogues APs.
Depending on your network, configure one or more of the following options for
classifying rogue APs:
hsrp—Routers configured for HSRP, a Cisco-proprietary redundancy protocol, with
the HSRP MAC OUI 00:00:0c.
iana—Routers using the IANA MAC OUI 00:00:5e.
local-mac—Devices with locally administered MAC addresses starting with 02.
vmware—Devices with any of the following VMWare OUIs: 00:0c:29, 00:05:69, or
00:50:56
vmware1—Devices with VMWare OUI 00:0c:29.
vmware2—Devices with VMWare OUI 00:05:69.
vmware3—Devices with VMWare OUI 00:50:56.
If you modify an existing configuration, the new configuration overrides the original
configuration.
Suspected Rogue
Containment
No Use this setting to treat suspected rogue APs as interfering APs; thereby the controller
attempts to reclassify them as rogue APs. By default, suspected rogue APs are not
automatically contained.
In combination with the suspected rogue containment confidence level, this option
automatically shuts down suspected rogue APs. When this option is enabled, clients
attempting to associate to a suspected rogue AP will be disconnected from the
suspected rogue AP through a denial of service attack.
Suspected Rogue
Containment Confidence
Level (50-100)
60 Set the confidence level. When an AP is classified as a suspected rogue AP, it is
assigned a 50% confidence level. If multiple APs trigger the same events that classify
the AP as a suspected rogue, the confidence level increases by 5% up to 95%.
In combination with suspected rogue containment, this option configures the threshold
by which containment should occur. Suspected rogue containment occurs only when
the configured confidence level is met.
Protect Valid Stations No Use this setting to disallow valid stations from connecting to a non-valid AP.
Dell PowerConnect W-AirWave 7.4 | Configuration Guide Configuration Reference | 93
Page 94

Table 40 Profiles > IDS > Unauthorized Devices Profile Settings (Continued)
Field Default Description
Detect Bad WEP No Enable or disable detection of WEP initialization vectors that are known to be weak. A
primary means of cracking WEP keys is to capture 802.11 frames over an extended
period of time and searching for such weak implementations that are still used by many
legacy devices.
Detect Misconfigured AP No Enable or disable detection of misconfigured APs. An AP is classified as misconfigured
if it does not meet any of the following configurable parameters:
Valid channels
Encryption type
Short preamble
List of valid AP MAC OUIs
Valid SSID list
Protect MisconfiguredAPNo Enable or disable protection of misconfigured APs.
Detect Valid SSID
Misuse
No If an unauthorized AP (neighbor or interfering) is using the same SSID as an authorized
network, a valid client may be tricked into connecting to the wrong network. If a client
connects to a malicious network, security breaches or attacks can occur. Enable/
disable detection of Interfering or Neighbor APs using valid/protected SSIDs. Requires
a Wireless Intrusion Protection license or an RFprotect license and a minimum version
of 6.1.0.0
Protect SSID No Enable or disable use of SSID by only valid APs.
Privacy No Enable or disable encryption as valid AP configuration.
Require WPA No Enable or disable “misconfigured” flagging of any valid AP that is not using WPA
encryption.
Detect Unencrypted
Valid Clients
Unencrypted Valid Client
Detection Quiet Time
900 Time to wait, in seconds, after detecting an unencrypted valid client after which the
Enable/disable detection of unencrypted valid clients. Requires a Wireless Intrusion
Protection license or an RFprotect license and a minimum version of 6.0.0.0
check can be resumed.Requires a Wireless Intrusion Protection license or an RFprotect
license and a minimum version of 6.0.0.0
Valid 802.11g Channel for
Enter the list of valid 802.11g channels that third-party APs are allowed to use.
Policy Enforcement
Valid 802.11a Channel for
Enter the list of valid 802.11a channels that third-party APs are allowed to use.
Policy Enforcement
Valid MAC OUIs Enter the list of MAC OUIs of wired devices in the network, typically gateways or
servers.
Valid and Protected
Enter the list of valid and protected SSIDs.
SSIDs
Protect 802.11n High
Throughput Devices
Protect 40MHz 802.11n
High Throughput Devices
Detect Active 802.11
Greenfield Mode
No Enable or disable protection of high-throughput 802.11n devices not operating in 40 MHz
mode.
No Enable or disable protection of high-throughput (802.11n) devices operating in 40 MHz
mode.
Yes Enable or disable detection of high-throughput devices advertising greenfield preamble
capability.
3. Select Add or Save. The added or edited profile appears on the Profiles > IDS > Unauthorized Devices page.
94 | Configuration Reference Dell PowerConnect W-AirWave 7.4 | Configuration Guide
Page 95

Profiles > Mesh
Mesh profiles help define and bring-up the mesh network. This section describes the mesh radio and mesh cluster
profiles in more detail.
Cluster—Mesh clusters are grouped and defined by a mesh cluster profile, which provides the framework of
the mesh network. Similar to virtual AP profiles, the mesh cluster profile contains the MSSID (mesh cluster
name), authentication methods, security credentials, and cluster priority required for mesh nodes to associate
with their neighbors and join the cluster. Associated mesh nodes store this information in flash memory.
Although most mesh deployments will require only a single mesh cluster profile, you can configure and apply
multiple mesh cluster profiles to an AP group or an individual AP. If you have multiple cluster profiles, the
mesh portal uses the profile with the highest priority to bring up the mesh network. Mesh points, in contrast,
go through the list of mesh cluster profiles in order of priority to decide which profile to use to associate
themselves with the network. The mesh cluster priority determines the order by which the mesh cluster
profiles are used. This allows you, rather than the link metric algorithm, to explicitly segment the network by
defining multiple cluster profiles. AirWave provides a “default” version of the mesh cluster profile. You can
use the “default” version or create a new instance of a profile which you can then edit as you need. You can
configure a maximum of 16 mesh cluster profiles on a mesh node. Refer to “Profiles > QoS” on page104.
Radio—Dell PowerConnect W provides a “default” version of the mesh radio profile. You can use the
“default” version or create a new instance of a profile which you can then edit as you need. The mesh radio
profile allows you to specify the set of rates used to transmit data on the mesh link. Refer to “Profiles > Mesh
> Radio” on page96.
Radio > Mesh HT SSID—The mesh high-throughput SSID profile enables or disables high-throughput
(802.11n) features for the SSID specified in the profile. Refer to “Profiles > Mesh > Radio > Mesh HT
SSID” on page 98.
Profiles > Mesh > Cluster
AirWave provides a “default” version of the mesh cluster profile. You can use the “default” version or create a
new instance of a profile which you can then edit as you need. You can configure a maximum of 16 mesh cluster
profiles on a mesh node.
Perform these steps to create or edit Mesh Cluster profiles.
1. Select Profiles > Mesh > Cluster in the navigation pane.
2. Select the Add button to create a new Cluster profile, or click the pencil icon to edit an existing profile.
Complete the settings as described in Table 41:
Table 41 Profiles > Mesh > Cluster Profile Settings
Field Default Description
General Settings
Folder Top Set the folder with which the profile is associated. The drop-down menu displays all folders
Name Blank Enter the name of the profile.
available for association with the profile.
Dell PowerConnect W-AirWave 7.4 | Configuration Guide Configuration Reference | 95
Page 96

Table 41 Profiles > Mesh > Cluster Profile Settings (Continued)
Field Default Description
Other Settings
Cluster Name aruba-mesh Enter the mesh cluster name. The name can have a maximum of 32 characters, which is
RF Band a Use this setting to indicate the band for mesh operation for multiband radios. Select a or g.
Encryption Open System Use this setting to configure the data encryption, which can be either open system (no
used as the MSSID. When you create a new cluster profile, it is a member of the “arubamesh” cluster.
NOTE: Each mesh cluster profile should have a unique MSSID. Configure a new MSSID
before you apply the mesh cluster profile.
To view existing mesh cluster profiles, use the drop-down menu. A mesh portal chooses
the best cluster profile and provisions it for use. A mesh point can have a maximum of 16
cluster profiles
Important: If you create more than one mesh cluster profile for an AP or AP group, each
mesh cluster profile must use the same band
authentication or h) or WPA2-PSK-AES (WPA2 with AES encryption using a preshared key).
Selecting WPA2-PSK-AES and entering a passphrase is recommended. Keep the
passphrase in a safe place.
3. Select Add or Save. The added or edited Cluster profile appears on Profiles > Mesh > Cluster.
Profiles > Mesh > Radio
The mesh radio profile allows you to specify the transmit power and set of rates used to transmit data on the
mesh link.
Perform these steps to create or edit Mesh Radio profiles.
1. Select Profiles > Mesh > Radio in the navigation pane.
2. Select the Add button to create a new Radio profile, or click the pencil icon to edit an existing profile.
Complete the settings as described in Table 42:
Table 42 Profiles > Mesh > Radio Profile Settings
Field Default Description
General Settings
Folder Top Set the folder with which the profile is associated. The drop-down menu displays all
Name Blank Enter the name of the profile.
Other Settings
Maximum Children (1-
64)
Maximum Hop Count (1-
32)
Heartbeat Threshold (1-
255)
64 Use this field to indicate the maximum number of children a mesh node can accept.
8 Use this field to indicate the maximum hop count from the mesh portal. The
10 Use this field to indicate the maximum number of heartbeat messages that can be
folders available for association with the profile.
The supported range is from 1 to 64.
supported range is from 1 to 32.
lost between neighboring mesh nodes. The supported range is from 1 to 255.
96 | Configuration Reference Dell PowerConnect W-AirWave 7.4 | Configuration Guide
Page 97

Table 42 Profiles > Mesh > Radio Profile Settings (Continued)
Field Default Description
Link Threshold
12 Use this setting to optimize operation of the link metric algorithm.
(1-255)
Reselection Mode startup-
subthreshold
Indicates the minimal RSSI value. If the RSSI value is below this threshold, the link
may be considered a subthreshold link. A sub-threshold link is one whose average
RSSI value falls below the configured link threshold.
If this occurs, the mesh node may try to find a better link on the same channel and
cluster (only neighbors on the same channel are considered).
The supported threshold is hardware dependent, with a practical range of 1 to 255.
Use this setting to optimize operation of the link metric algorithm.
Specify the method a mesh node uses to find a better uplink to create a path to the
mesh portal. Only neighbors
on the same channel in the same mesh cluster are considered.
Available options are:
reselect-anytime—Connected mesh nodes evaluate mesh links every 30
seconds. If a mesh node finds a better uplink, the mesh node connects to the
new parent to create an improved path to the mesh portal.
reselect-never—Connected mesh nodes do not evaluate other mesh links to
create an improved path to the mesh portal.
startup-subthreshold—When bringing up the mesh network, mesh nodes have 3
minutes to find a better uplink. After that time, each mesh node evaluates
alternative links only if the existing uplink falls below the configured threshold
level (the link becomes a sub-threshold link). The reselection process is
cancelled if the average RSSI on the existing uplink rises above the configured
link-threshold.
subthreshold-only—Connected mesh nodes evaluate alternative links only if the
existing uplink becomes a sub-threshold link.
NOTE: The default value is recommended.
Metric Algorithm distributed-
tree-rssi
802.11g Portal Channel
Blank Each 802.11a and 802.11g radio profile references an Adaptive Radio Management
(1-14)
802.11a Portal Channel
Blank
(34-165)
Beacon Period
100 Define the beacon period supporting mesh profiles, as described for the fields
(60-999999 msec)
Transmit Power
30 Define the transmission power supporting mesh profiles, as described for the portal
(0-30 dBm)
Use this setting to optimize operation of the link metric algorithm.
Specify the algorithm used by a mesh node to select its parent.
Available options are:
best-link-rssi—Selects the parent with the strongest RSSI, regardless of the
number of children a potential parent has.
distributed-tree-rssi—Selects the parent based on link-RSSI and node cost
based on the number of children. This option evenly distributes the mesh points
over high quality uplinks. Low quality uplinks are selected as a last resort.
NOTE: The default value is recommended.
(ARM) profile. When you assign an active ARM profile to a mesh radio, ARM's
automatic power-assignment and channel-assignment features automatically
select the radio channel with the least amount of interference for each mesh portal,
maximizing end user performance. In earlier versions of this software, an AP with a
mesh radio received its beacon period, transmission power and 11a/11g portal
channel settings from its mesh radio profile. Mesh-access AP portals now inherit
these radio settings from their dot11a or dot11g radio profiles.
NOTE: Do not delete or modify mesh cluster profiles once you use them to provision
mesh nodes. You can recover the mesh point if the original cluster profile is still
available. Creating a new mesh cluster profile is recommended, if needed.
immediately above.
channel settings immediately above. This setting supports a range from 0 to 30 dBm.
Retry Limit (0-15) 4 Indicate the number of times a mesh node can re-send a packet. This setting
supports a range from 0 to 15.
Dell PowerConnect W-AirWave 7.4 | Configuration Guide Configuration Reference | 97
Page 98

Table 42 Profiles > Mesh > Radio Profile Settings (Continued)
Field Default Description
RTS Threshold
(256-2346 bytes)
802.11a Transmit Rates All selected Indicate the transmit rates for the 802.11a radio. The AP attempts to use the highest
802.11g Transmit Rates All selected Indicate the transmit rates for the 802.11g radio. The AP attempts to use the highest
Mesh Private VLAN (0-
4094)
BC/MC Rate
Optimization
2333 Define the packet size sent by mesh nodes. Mesh nodes transmitting frames larger
than this threshold must issue request to send (RTS) and wait for other mesh nodes
to respond with clear to send (CTS) to begin transmission. This helps prevent mid-air
collisions. The supported range is from 256 to 2346 bytes.
transmission rate to establish a mesh link. If a rate is unavailable, the AP goes
through the list and uses the next highest rate.
transmission rate to establish a mesh link. If a rate is unavailable, the AP goes
through the list and uses the next highest rate.
0 Enter a VLAN ID for control traffic between an remote mesh portal and mesh nodes.
This VLAN ID must not be used for user traffic.
Range: 0-4094. Default: 0 (disabled).
Yes Enable or disable scanning of all active stations currently associated to a mesh
point to select the lowest transmission rate based on the slowest connected mesh
child.
When enabled, this setting dynamically adjusts the multicast rate to that of the
slowest connected mesh child. Multicast frames are not sent if there are no mesh
children.
NOTE: The default value is recommended.
3. Select Add or Save. The added or edited Radio profile appears on the Profiles > Mesh > Radio page.
Profiles > Mesh > Radio > Mesh HT SSID
The mesh high-throughput SSID profile enables or disables high-throughput (802.11n) features for the SSID
specified in the profile. This parameter is enabled by default. The mesh high-throughput profile can have a
maximum of 32 characters.
Perform these steps to configure a Mesh HT SSID profile.
1. Select Profiles > Mesh > Radio > Mesh HT SSID in the navigation pane. The details page summarizes the
current profiles of this type.
2. Select the Add button to create a new Mesh HT SSID profile, or click the pencil icon next to an existing
profile to edit. Complete the settings as described in Table 43:
Table 43 Mesh > Radio > Mesh HT SSID Profile Settings
Field
General Settings
Folder Top Set the folder with which the profile is associated. The drop-down menu displays all
Name Blank Enter the name of the profile. This profile name can have a maximum of 32 characters.
Other Settings
Defaul
t
Description
folders available for association with the profile.
40 MHz Channel Usage Yes Enable or disable the use of 40 MHz channels. This parameter is enabled by default.
98 | Configuration Reference Dell PowerConnect W-AirWave 7.4 | Configuration Guide
Page 99

Table 43 Mesh > Radio > Mesh HT SSID Profile Settings (Continued)
Field
Low-density Parity
Check
MPDU Aggregation Enable or disable MAC protocol data unit (MPDU) aggregation.
Max Received A-MPDU
Size (bytes)
Min MPCU Start
Spacing (µsec)
High Throughput Enable
(SSID)
Supported MCS Set 0-15 Set a list of Modulation Coding Scheme (MCS) values or ranges of values to be supported
Defaul
t
65535 Set the maximum size of a received aggregate MAC Protocol Data Unit (A-MPDU), in
8 Set the minimum time between the start of adjacent MPDUs within an aggregate MPDU, in
Yes Enable or disable high-throughput (802.11n) features on this SSID. This parameter is
Description
If enabled, the AP will advertise Low-density Parity Check (LDPC) support. LDPC improves
data transmission over radio channels with high levels of background noise. Requires a
minimum version of 6.1.0.0.
High-throughput mesh APs are able to send aggregated MAC protocol data units
(MDPUs), which allow an AP to receive a single block acknowledgment instead of multiple
ACK signals. This option, which is enabled by default, reduces network traffic overhead by
effectively eliminating the need to initiate a new transfer for every MPDU.
bytes.
microseconds.
The allowed values are 0 (No restriction on MDPU start spacing), . 25 µsec, .5 µsec, 1 µsec,
2 µsec, 4 µsec, 8 µsec, and 16 µsec.
enabled by default.
on this SSID. The MCS you choose determines the channel width (20MHz vs. 40MHz) and
the number of spatial streams used by the mesh node.
The default value is 1-15; the complete set of supported values. To specify a smaller range
of values, enter a hyphen between the lower and upper values. To specify a series of
different values, separate each value with a comma.
Enter a list or range of numbers. The overall supported range is from 0-15. The following
are two potential examples of supported ranges:
2-10
1,3,6,9,12
Short Guard Interval in
40 MHz Mode
Short Guard Interval in
20 MHz Mode
Yes Enable or disable use of short (400ns) guard interval in 40 MHz mode. A guard interval is a
period of time between transmissions that allows reflections from the previous data
transmission to settle before an AP transmits data again. An AP identifies any signal
content received inside this interval as unwanted inter-symbol interference, and rejects
that data.
The 802.11n standard specifies two guard intervals: 400ns (short) and 800ns (long).
Enabling a short guard interval can decrease network overhead by reducing unnecessary
idle time on each AP. Some outdoor deployments, may, however require a longer guard
interval. If the short guard interval does not allow enough time for reflections to settle in
your mesh deployment, inter-symbol interference values may increase and degrade
throughput.
This parameter is enabled by default.
Yes Enable or disable use of short (400ns) guard interval in 20 MHz mode. This parameter is
enabled by default.
A guard interval is a period of time between transmissions that allows reflections from the
previous data transmission to settle before an AP transmits data again. An AP identifies
any signal content received inside this interval as unwanted inter-symbol interference,
and rejects that data. The 802.11n standard specifies two guard intervals: 400ns (short)
and 800ns (long). Enabling a short guard interval can decrease network overhead by
reducing unnecessary idle time on each AP. Some outdoor deployments, may, however
require a longer guard interval. If the short guard interval does not allow enough time for
reflections to settle in your mesh deployment, inter-symbol interference values may
increase and degrade throughput.
Requires a minimum version of 6.1.0.0.
Dell PowerConnect W-AirWave 7.4 | Configuration Guide Configuration Reference | 99
Page 100

Table 43 Mesh > Radio > Mesh HT SSID Profile Settings (Continued)
Field
Maximum Number of
Spatial Streams Usable
for STBC Transmission
Maximum Number of
Spatial Streams Usable
for STBC Reception
Legacy Stations Yes Allow or disallow associations from legacy (non-HT) stations.
Max Transmitted AMPDU Size
Defaul
t
65535 Sets maximum size of a transmitted aggregate MPDU, in bytes.
Description
Controls the maximum number of spatial streams usable for STBC transmission. 0 disables
STBC transmission, 1 uses STBC for MCS 0-7. Higher MCS values are not supported.
Controls the maximum number of spatial streams usable for STBC reception. 0 disables
STBC reception, 1 uses STBC for MCS 0-7. Higher MCS values are not supported.
This parameter is enabled by default (legacy stations are allowed).
Specify size in the supported range of 1576 to 65535 bytes.
3. Select Add or Save. The added or edited profile appears on the Mesh HT SSID page.
Profiles > Mobility Switch
Use the following profiles to configure an Dell switch:
IGMP Snooping — Create and configure the IGMP snooping profiles for VLANs. Refer to “Profiles >
Mobility Switch > IGMP Snooping” on page100 for more information.
Ethernet Link — Configure autonegotiation, duplex, speed, and flow control for the port.Refer to “Profiles >
Mobility Switch > Ethernet Link” on page101 for more information.
Port Switching — Create a switching profile that can be applied to any interface, interface group, or a port-
channel. Refer to “Profiles > Mobility Switch > Port Switching” on page102 for more information.
VLAN — Create a VLAN with the specified configuration parameters. Refer to “Profiles > Mobility Switch >
VLAN” on page103 for more information.
Profiles > Mobility Switch > IGMP Snooping
IGMP snooping allows a network switch to listen in on the Internet Group Management Protocol (IGMP)
interaction between hosts and routers in order to map links to IP multicast streams.
Perform these steps to configure a Mobility Switch > IGMP Snooping profile:
1. Select Profiles > Mobility Switch > IGMP Snooping in the Navigation pane. The details page summarizes
the current profiles of this type.
2. Select the Add button to create a new IGMP Snooping profile, or select the pencil icon next to an existing
profile to edit. Complete the settings as described in Table 44:
Table 44 Profiles > Mobility Switch > IGMP Snooping Profile Settings
Field Default Description
General Settings
Folder Top Specify the folder with which the profile is associated. The drop-down menu
Name Blank Enter the name of the profile.
displays all folders available for association with the profile.
100 | Configuration Reference Dell PowerConnect W-AirWave 7.4 | Configuration Guide
 Loading...