

Page 1

Dell Premier Rechargeable Active Pen
PN7522W
User’s Guide
Reg ula tor y M ode l: AS2 201 w
Feb rua ry 202 2
Rev . A 01
Page 2

Notes, cautions, and warnings
NOTE: A NOTE indicates important information that helps you make better use of your product.
CAUTION: A CAUTION indicates either potential damage to hardware or loss of data and tells you how to avoid
the problem.
WARNING: A WARNING indicates a potential for property damage, personal injury, or death.
© 2021-2022 Dell Inc. or its subsidiaries. All rights reserved. Del l, EMC , and other trademarks are trademarks of Dell Inc. or its subsidiar ies .
Other trademarks may be trademarks of their respective owners.
Page 3

Contents
Chapter 1: What’s in the box......................................................................................................... 4
Chapter 2: Features...................................................................................................................... 6
Chapter 3: Setting up your PN7522W............................................................................................ 8
Connecting and charging your pen................................................................................................................................. 8
Manual Bluetooth pairing................................................................................................................................................... 8
Chapter 4: Dell Peripheral Manager..............................................................................................10
Chapter 5: Holding your PN7522W............................................................................................... 11
Chapter 6: Specifications............................................................................................................ 12
Chapter 7: Replacing the pen nib................................................................................................. 13
Chapter 8: Tile............................................................................................................................. 14
Chapter 9: Troubleshooting......................................................................................................... 15
Chapter 10: Statutory information............................................................................................... 16
Chapter 11: Regulatory statement ............................................................................................... 17
Chapter 12: Getting help and contacting Dell............................................................................... 18
Contents 3
Page 4
1
What’s in the box
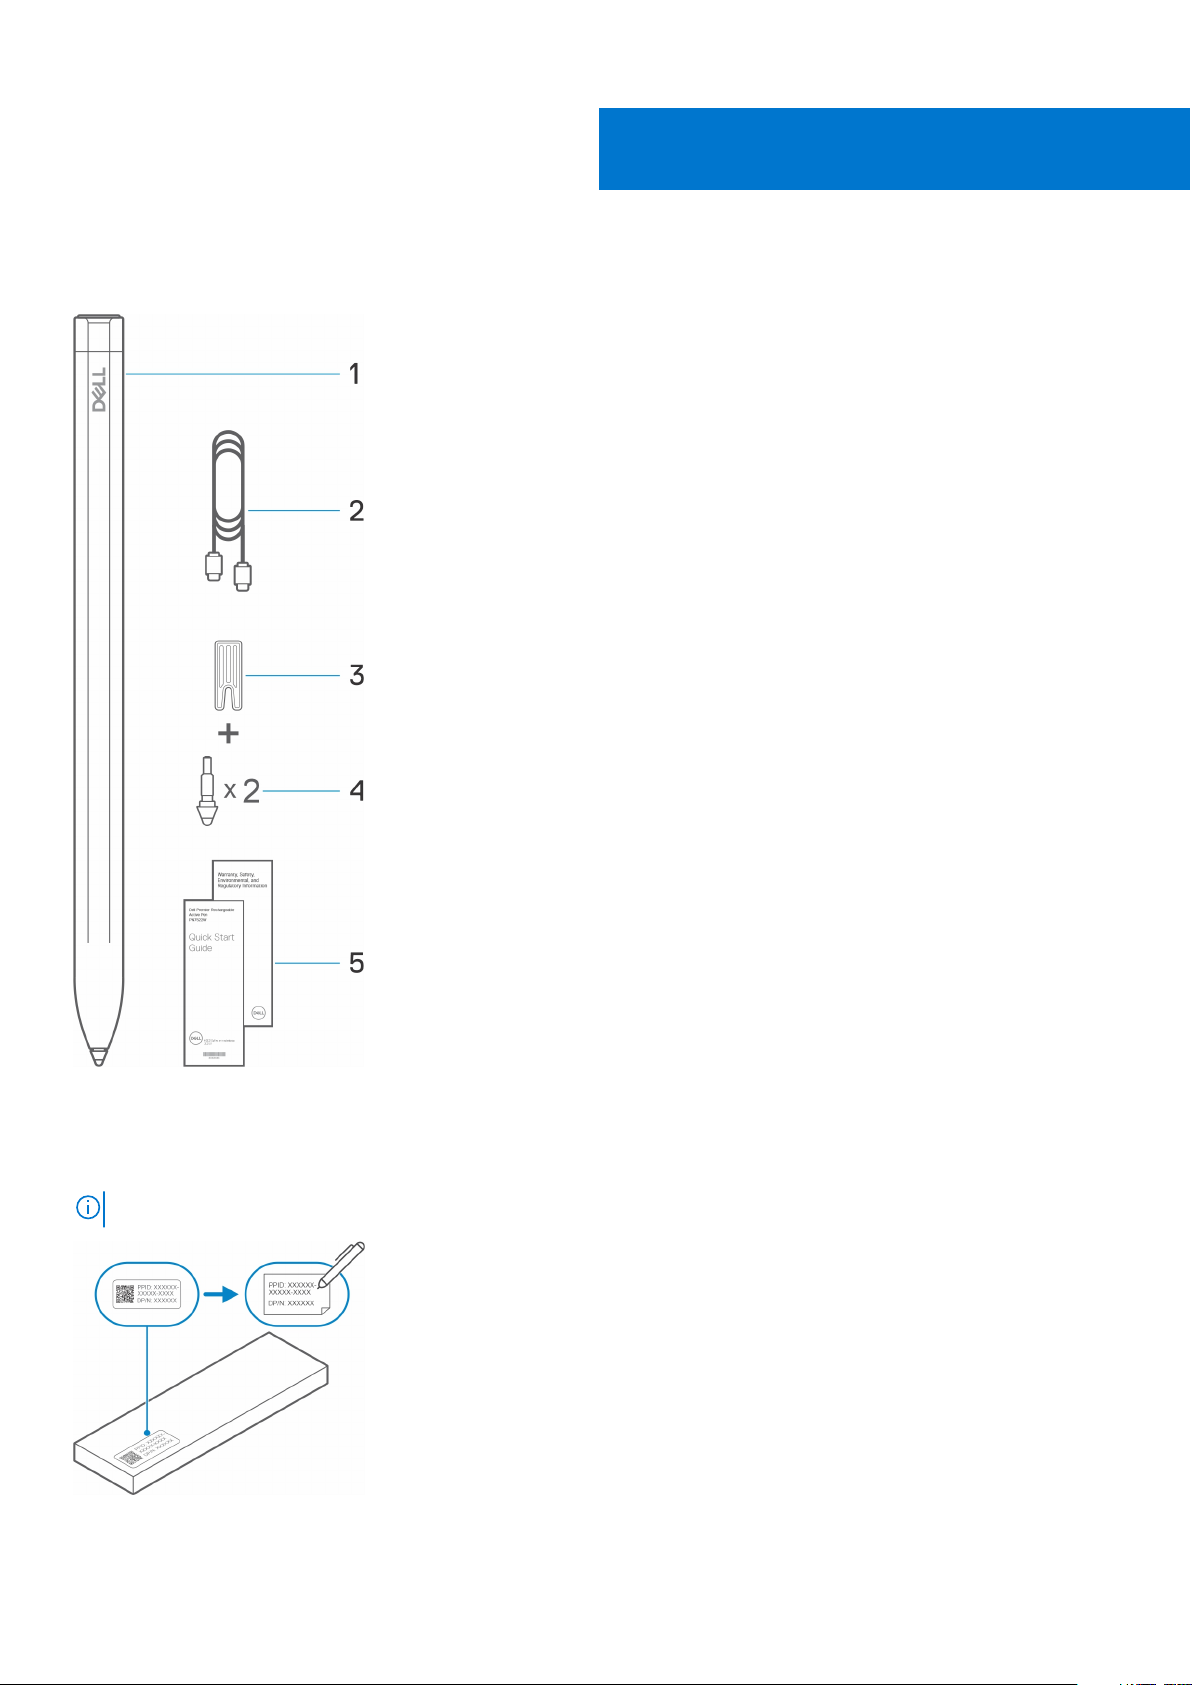
1. Dell Premier Rechargeable Active Pen 2. USB-C to USB-C cable
3. Nib remover 4. Pen nib (2)
5. Documents
NOTE: For warranty purpose, note down the PPID number located behind the box or retain the box.
4 What’s in the box
Page 5

NOTE: The PPID number can also be noted down from a secondary location on the pen barrel.
What’s in the box 5
Page 6
Features
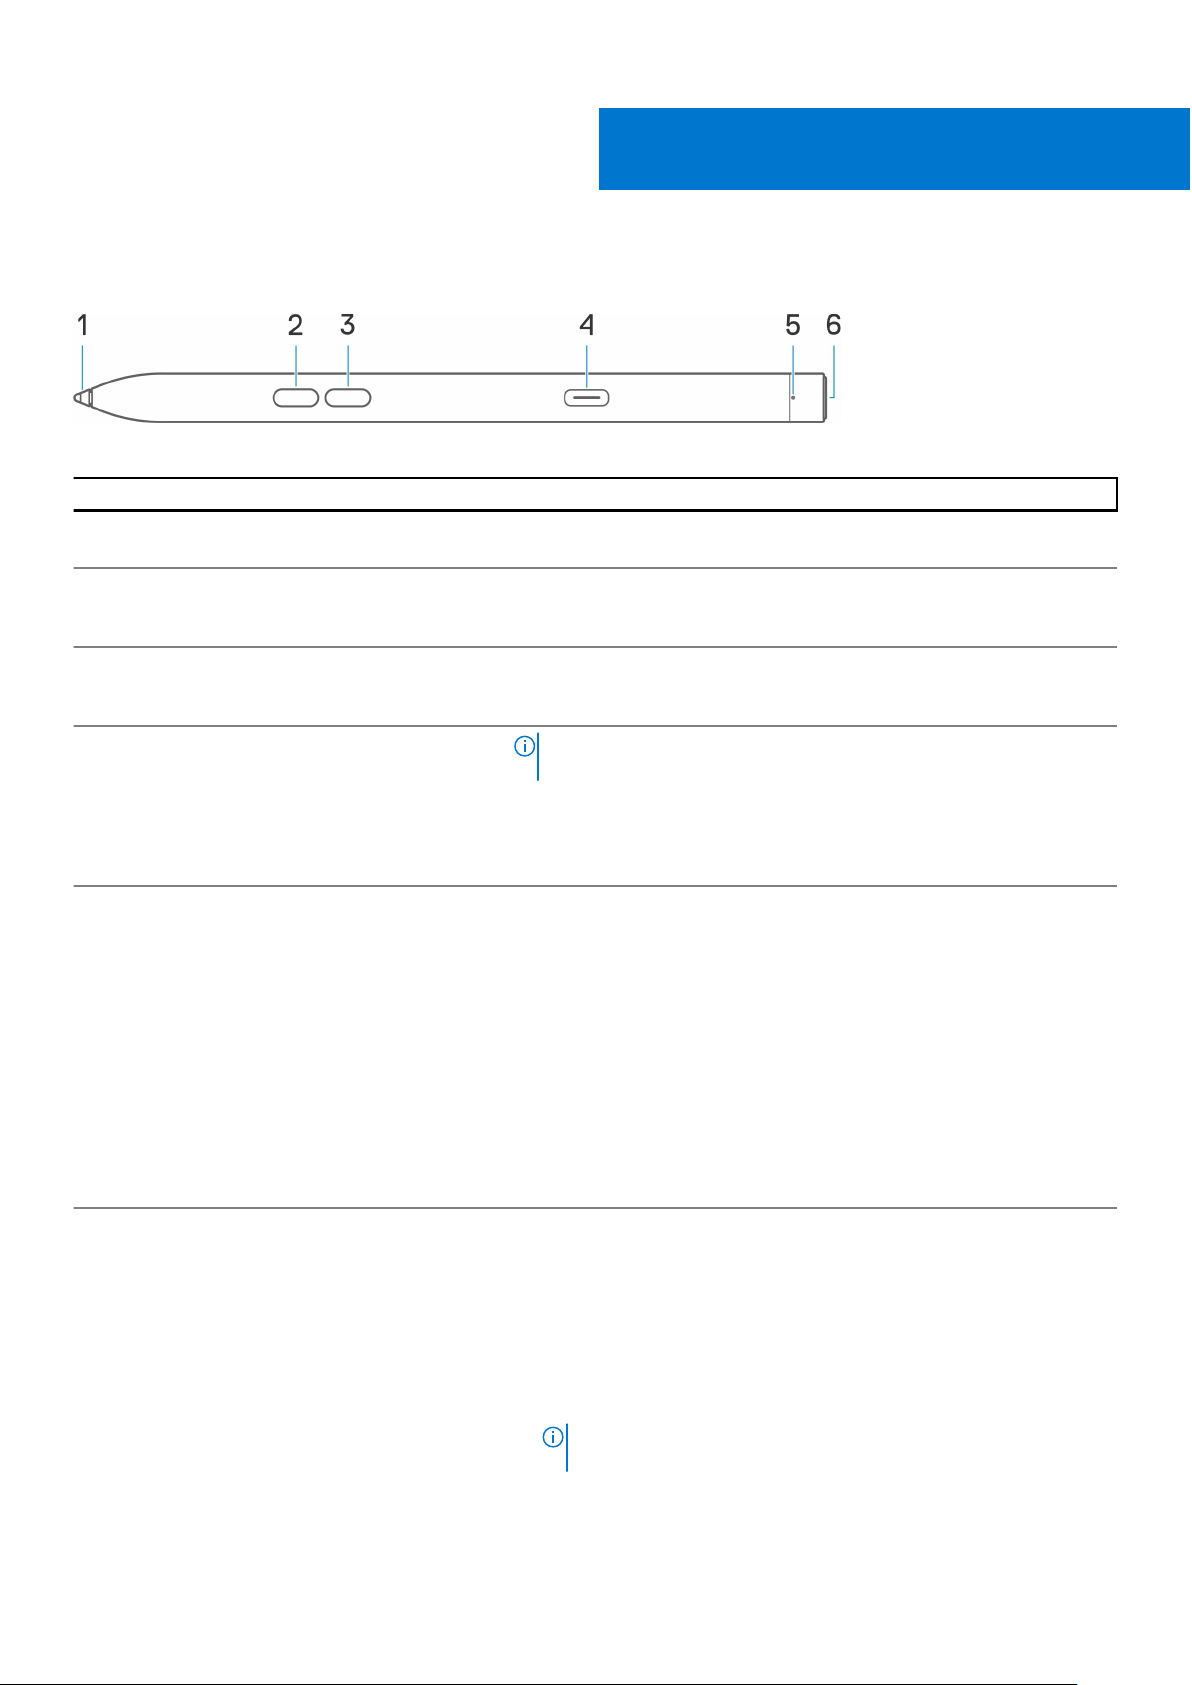
Table 1. Features and functionality of your PN7522W
Feature Functionality
1 Tip Move the tip over a touchscreen to move the pointer. Enables you to
write, draw, and select objects.
2 Bottom barrel button Press and hold the bottom barrel button and move the tip over the area
you want to erase. To change the functionality of this button, see Dell
Peripheral Manager.
3 Top barrel button Press the top barrel button to open the context menu or perform a
right-click. To change the functionality of this button, see Dell Peripheral
Manager.
2
4 USB Type-C charging port
5 LED indicator
6 Top button
NOTE: Ensure that your laptop is connected to Internet before
connecting the USB-C cable to your laptop and pen.
Connect the USB-C cable to the USB-C port on your pen and your laptop
to charge your PN7522W and to establish Bluetooth pairing with your
laptop, if not yet paired. After your pen is paired with your laptop through
Bluetooth, Dell Peripheral Manager is downloaded automatically.
Blue
● Blinking - Bluetooth pairing enabled
● Solid (for three seconds) - Bluetooth succesfully paired
White
● Blinking - Updating pen firmware
● Solid - Pen is charging
Amber
Blinking - Pen battery is low
Green
Blinking - Tile is locating the pen
Before pairing your PN7522W with your laptop, press and hold for three
seconds to enable pairing mode.
After pairing your PN7522W with your laptop:
● Single press — Launch pen menu
● Double press — Take a screenshot
● Long press (1.5s) — Launch Sticky Notes
● Press and hold or press twice in succession to wake your Bluetooth
paired laptop from sleep.
NOTE: This feature is available only on computers that support
Modern Standby mode.
6 Features
Page 7

Table 1. Features and functionality of your PN7522W (continued)
Feature Functionality
NOTE: These functions are available only in Windows 10 and
Windows 11.
NOTE: These functions can be changed by re-programming
button functionality in Dell Peripheral Manager (DPeM). For more
information about installing DPeM, see Dell Peripheral Manager.
When using Microsoft Powerpoint in Presentation mode:
● Press and hold to go to the next slide
● Press twice in quickly to return to the previous slide
NOTE: These functions in Microsoft Powerpoint are available only
if Dell Peripheral Manager (DPeM) is installed. For more information
about installing DPeM, see Dell Peripheral Manager.
Features 7
Page 8
Setting up your PN7522W
Connecting and charging your pen
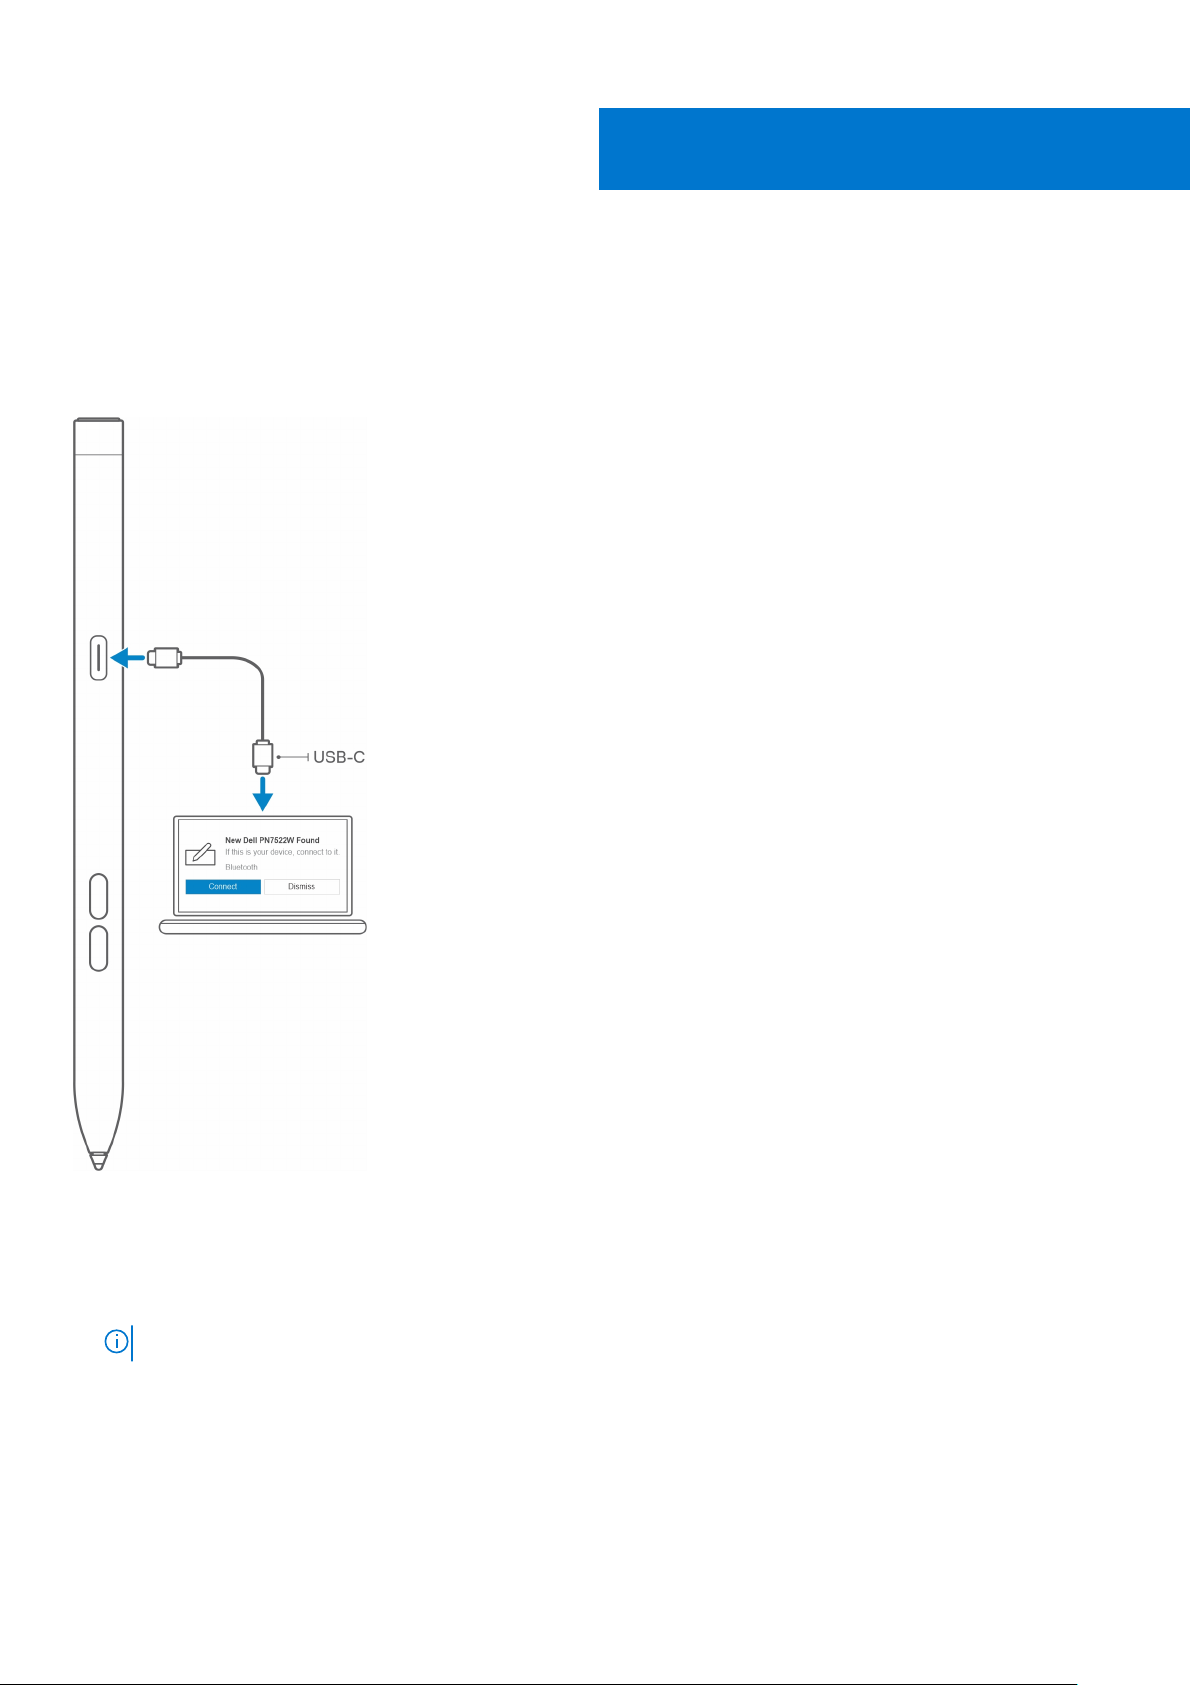
Connect the pen to your laptop to activate it automatically. The pen will only start working after this activation.
3
Follow these steps to connect and charge your pen:
1. To charge your PN7522W, connect one end of the Type-C cable to the charging port and the other end to your laptop or
tablet.
2. When you connect your PN7522W to your laptop or tablet a pop-up window appears asking you to pair your pen with the
laptop through Bluetooth.
3. Click Connect to confirm the Bluetooth pairing.
NOTE: Do not remove the USB-C cable until the pen is fully charged.
Manual Bluetooth pairing
About this task
Perform the following steps if you are unable to pair your pen automatically through the USB-C cable connection.
8 Setting up your PN7522W
Page 9

NOTE: You can use your PN7522W only with selected Dell laptops. For the list of supported devices, see www.dell.com.
NOTE: If your PN7522W is already listed under Bluetooth devices, remove it from the list before performing the following
steps.
Steps
1. Press and hold the top button for three seconds to enable pairing mode.
The Bluetooth-pairing light starts blinking blue to confirm the pairing mode is enabled.
2. In Windows Search, type Blu eto oth .
3. From the list that appears, tap or click Bluetooth & other devices.
4. Ensure that the Bluetooth is enabled.
5. From the list of devices under Bluetooth & other devices, tap or click Dell PN7522W→ Pair.
NOTE: If your PN7522W is not listed, ensure that the pairing mode is enabled on the pen.
6. Confirm the pairing process on both pen and your device.
The Bluetooth-pairing light turns solid blue for few seconds to indicate the pairing is complete and then turns off. After
successful pairing, your device and pen connect automatically when Bluetooth is enabled and are within the Bluetooth range.
Setting up your PN7522W 9
Page 10

4
Dell Peripheral Manager
Use Dell Peripheral Manager (DPeM) to customize the pen buttons, change pressure sensitivity, and so on. The latest version of
DPeM is automatically installed on your laptop or tablet when you set up your pen. The installation may take approximately 20
minutes to complete. If DPeM is not installed automatically, perform the following steps:
1. Ensure that you have the latest Windows and Driver updates installed on your laptop or tablet.
NOTE: See the Knowledge Base article Windows Update: FAQ for information about installing the latest version of
Windows and updates.
NOTE: Use the SupportAssist application to update the drivers on your laptop, browse to SupportAssist for PCs and
tablets.
NOTE: For more information about manually updating drivers, see How do I download and install a driver? section of
Dell Knowledge base article Drivers and Downloads FAQs.
2. Install DPeM.
a. Browse to the Dell Peripheral Manager download page.
b. Tap or click Download.
c. Once the DPeM installer is downloaded, tap or click the installer to start the installation, and then follow the on-screen
instructions.
10 Dell Peripheral Manager
Page 11
Holding your PN7522W
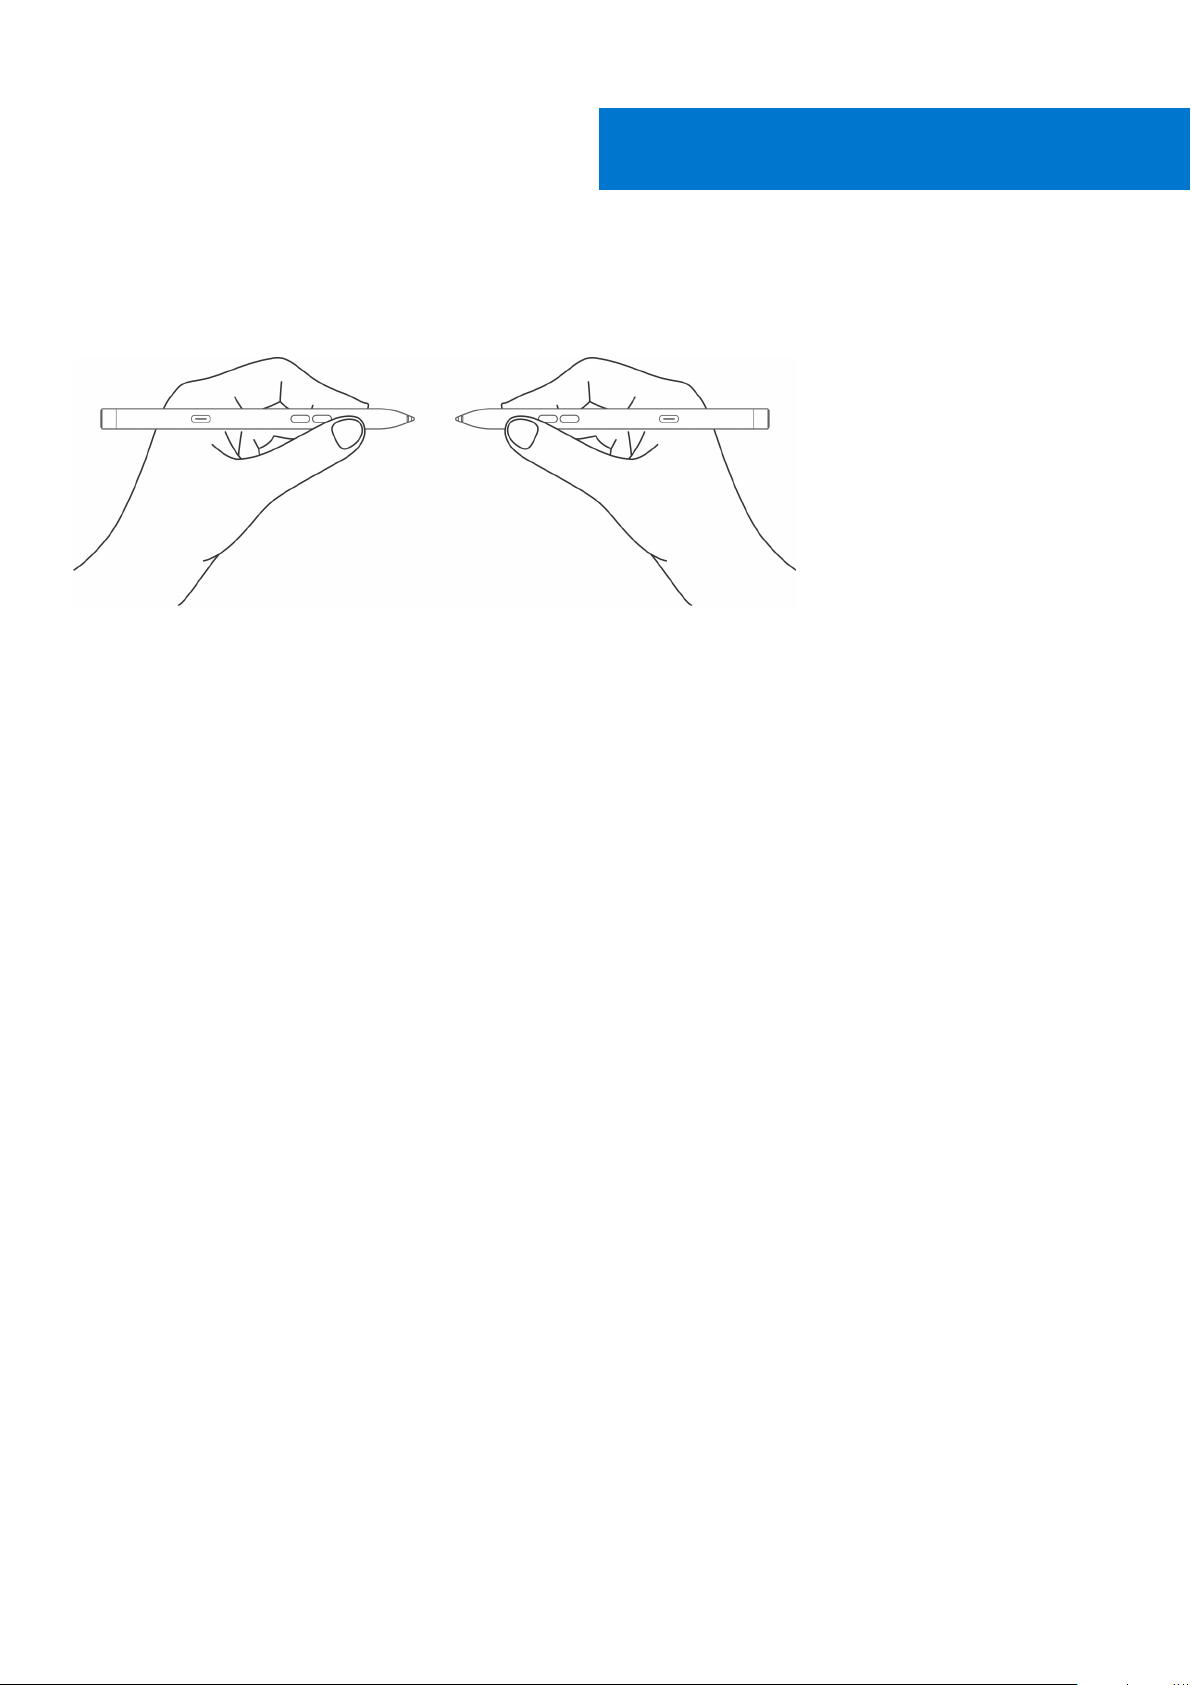
Hold your PN7522W as you hold a pencil or pen. Adjust the grip so that you can use the barrel button
easily. Ensure that you do not accidentally press the barrel buttons while drawing or positioning the pen.
5
Holding your PN7522W 11
Page 12
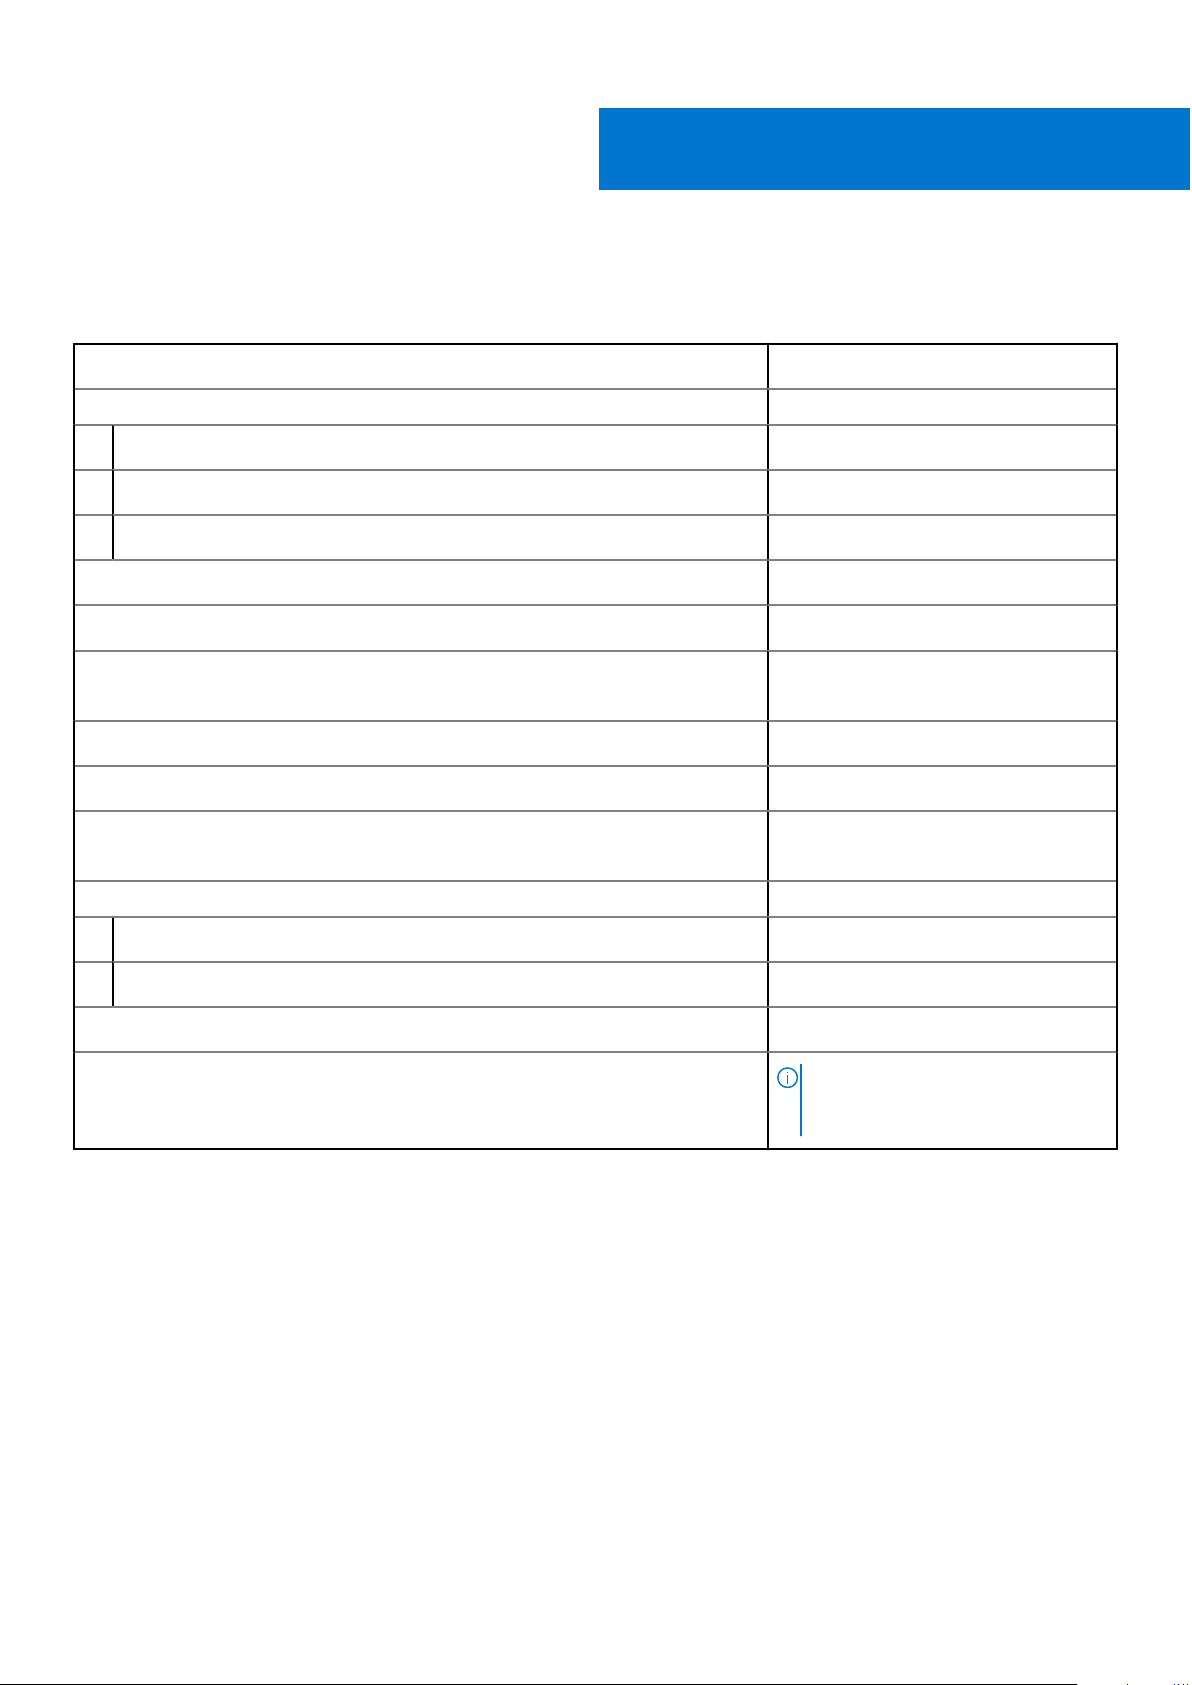
Table 2. Specifications of your PN7522W
6
Specifications
Model
Dimensions and weight:
Length
Diameter
Weight
Wireless
Wireless operating range
Inking technology
Pen tip detectable height
Batteries
Supported operating system
Temperature:
Stock
PN7522W
155 mm (6.10 in.)
9.80 mm (0.38 in.)
14.20 g (0.031 lb)
Bluetooth Smart Low Energy 5.0
10 m (32.80 ft)
● AES 1.0/2.0
● WGP
5 mm to 10 mm (0.20 in. to 0.39 in.)
Li-ion rechargeable battery
● Windows 10
● Windows 11
-10°C to 55°C (14°F to 131°F)
Operating
Humidity
Others
5°C to 40°C (41°F to 104°F)
30% to 80%
NOTE: It is recommended that you
do not expose the pen to alcohol or
solvent solution (including sanitizer).
12 Specifications
Page 13
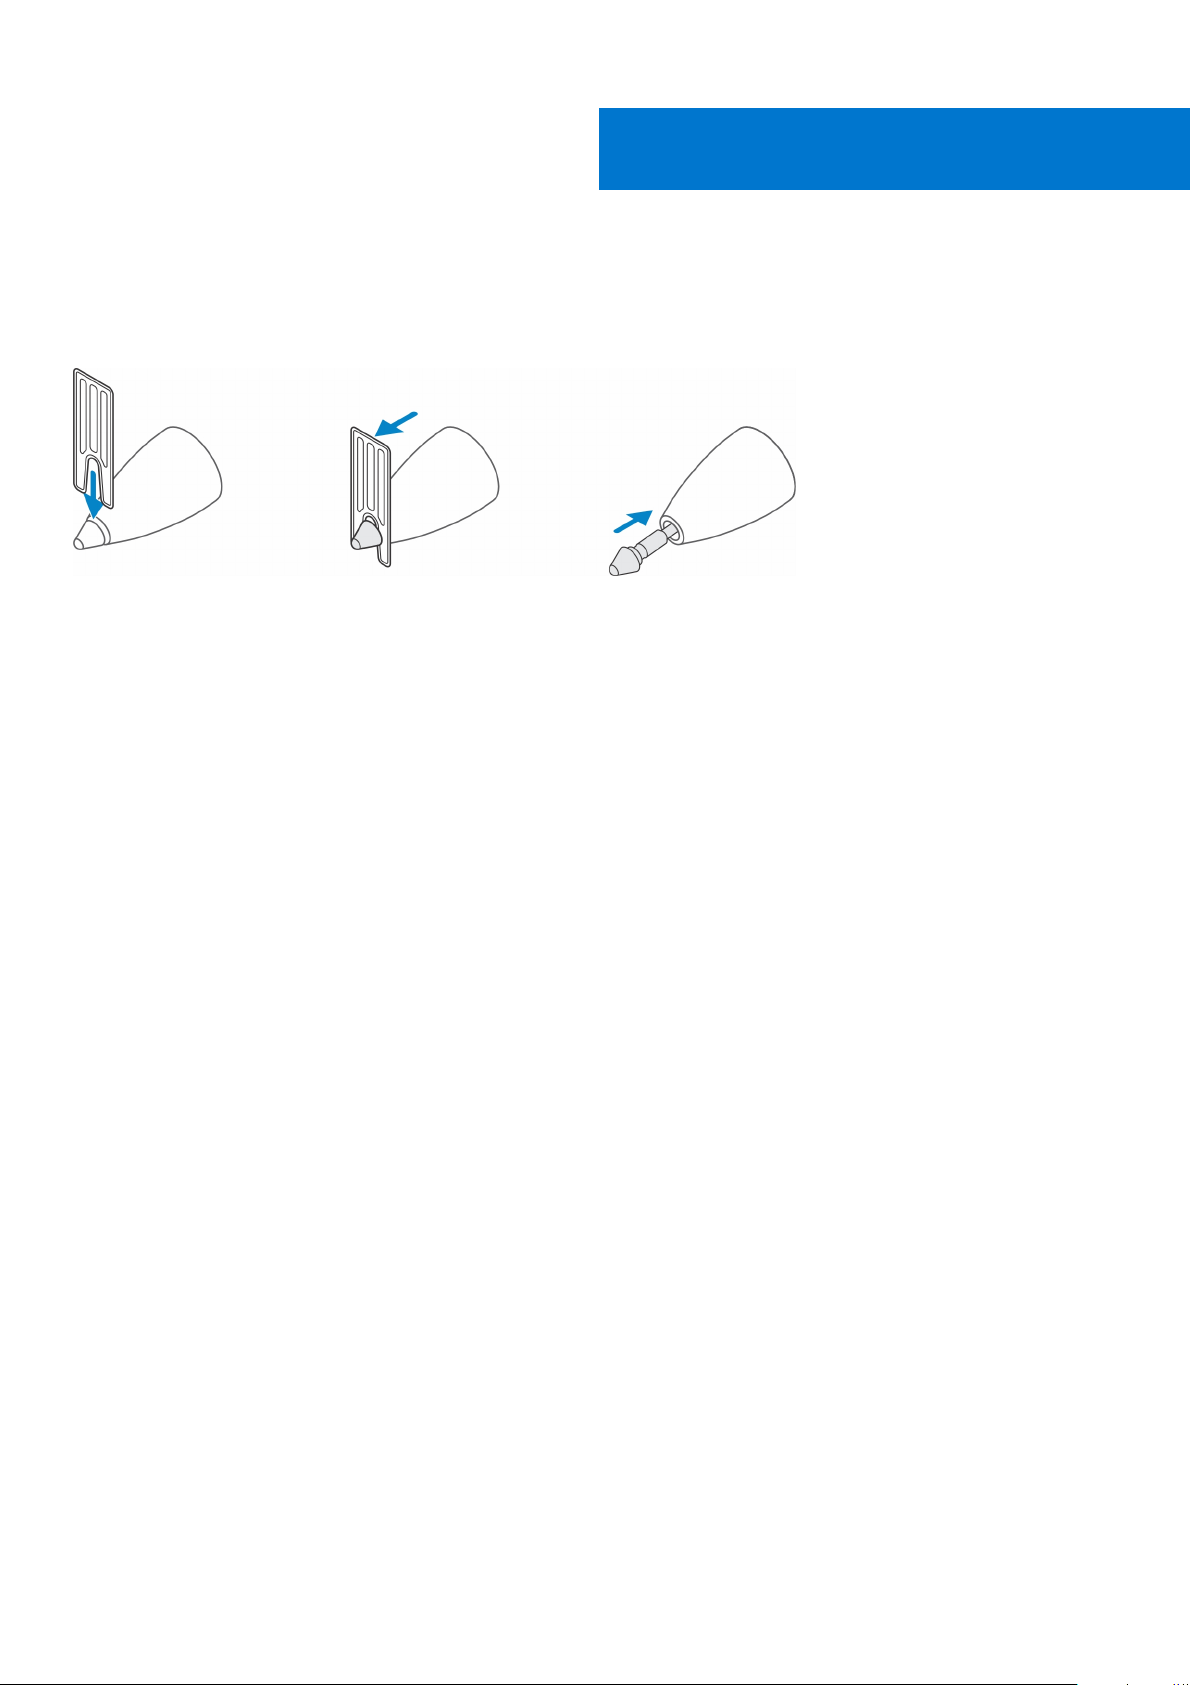
Replacing the pen nib
When the pen nib on your PN7522W is worn out or damaged, replace the pen nib using the nib kit as shown in the following
image.
7
Replacing the pen nib 13
Page 14
8
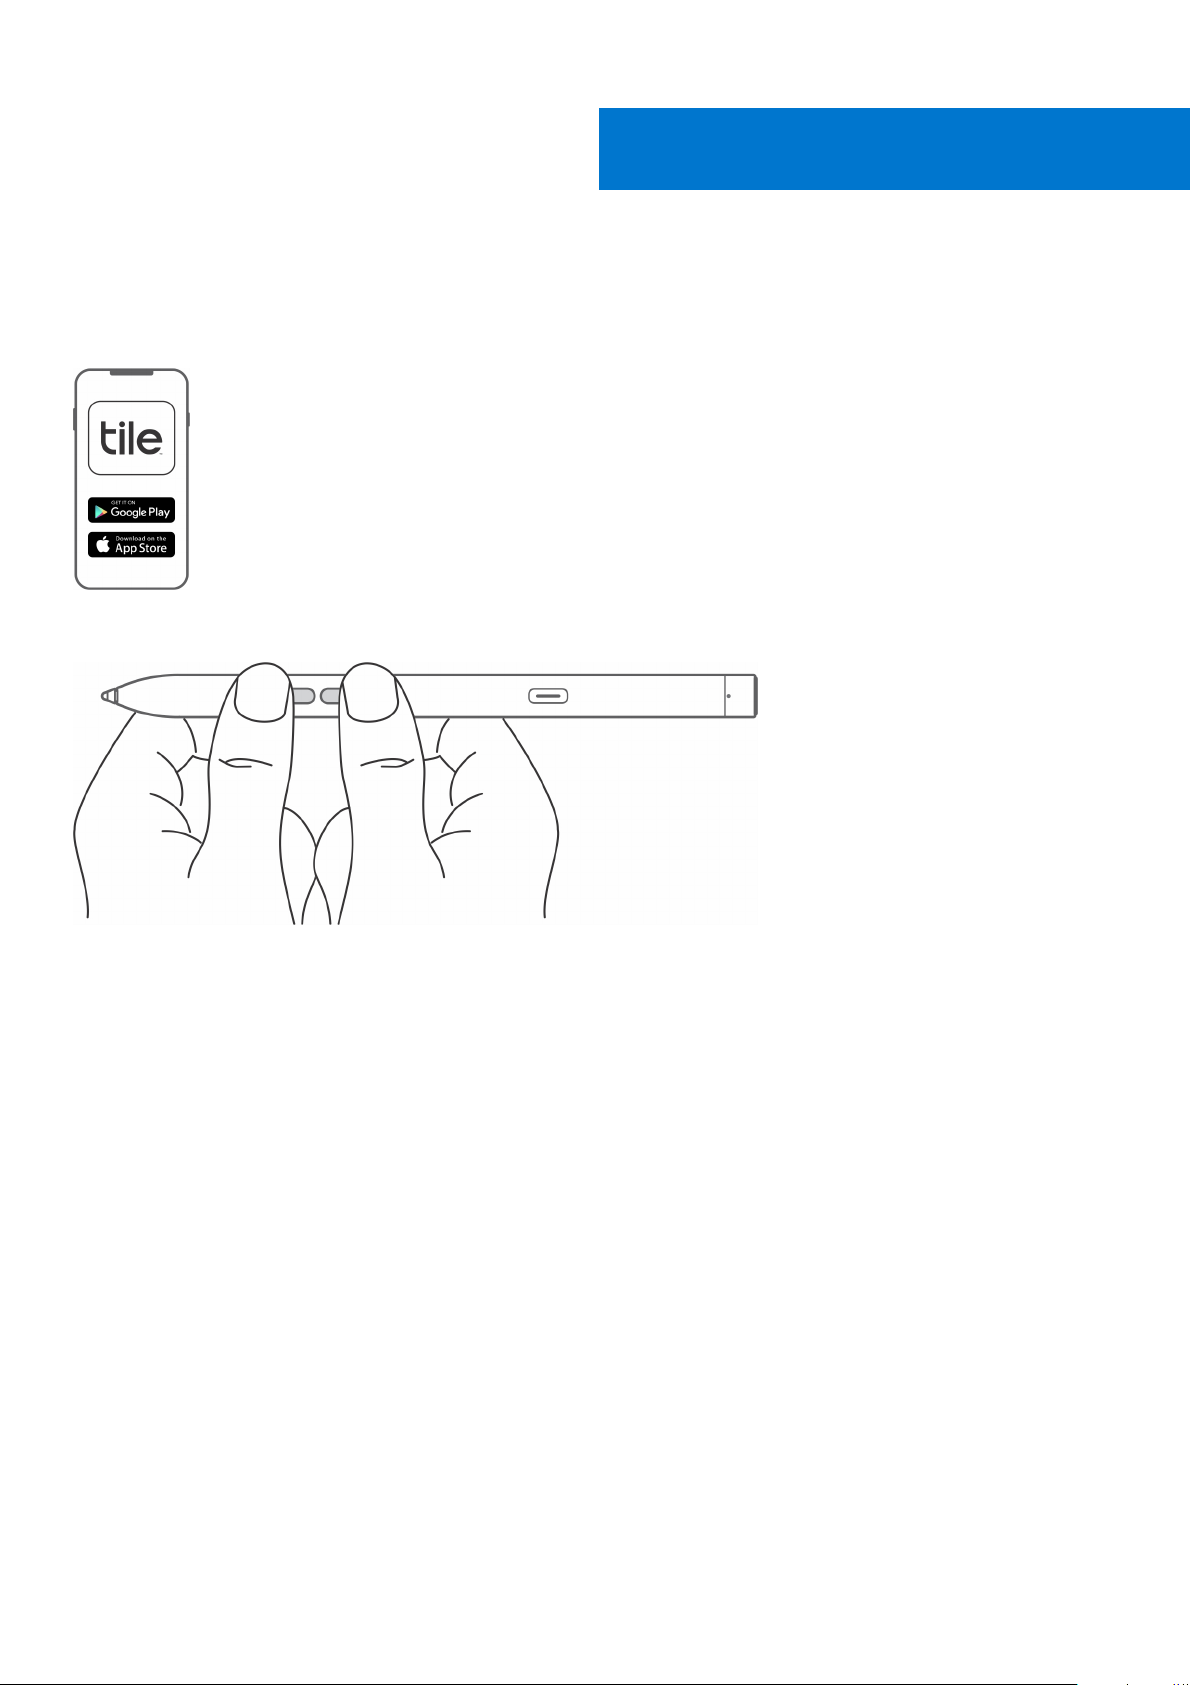
Tile
You can install Tile on Android or Apple iOS devices. It enables you to locate your PN7522W on the Tile application. For more
information, see the Tile application help information on your device.
To enable Tile pairing mode on your pen to sync the Tile app to your pen through Bluetooth, press and hold the top and bottom
barrel buttons of your pen.
14 Tile
Page 15
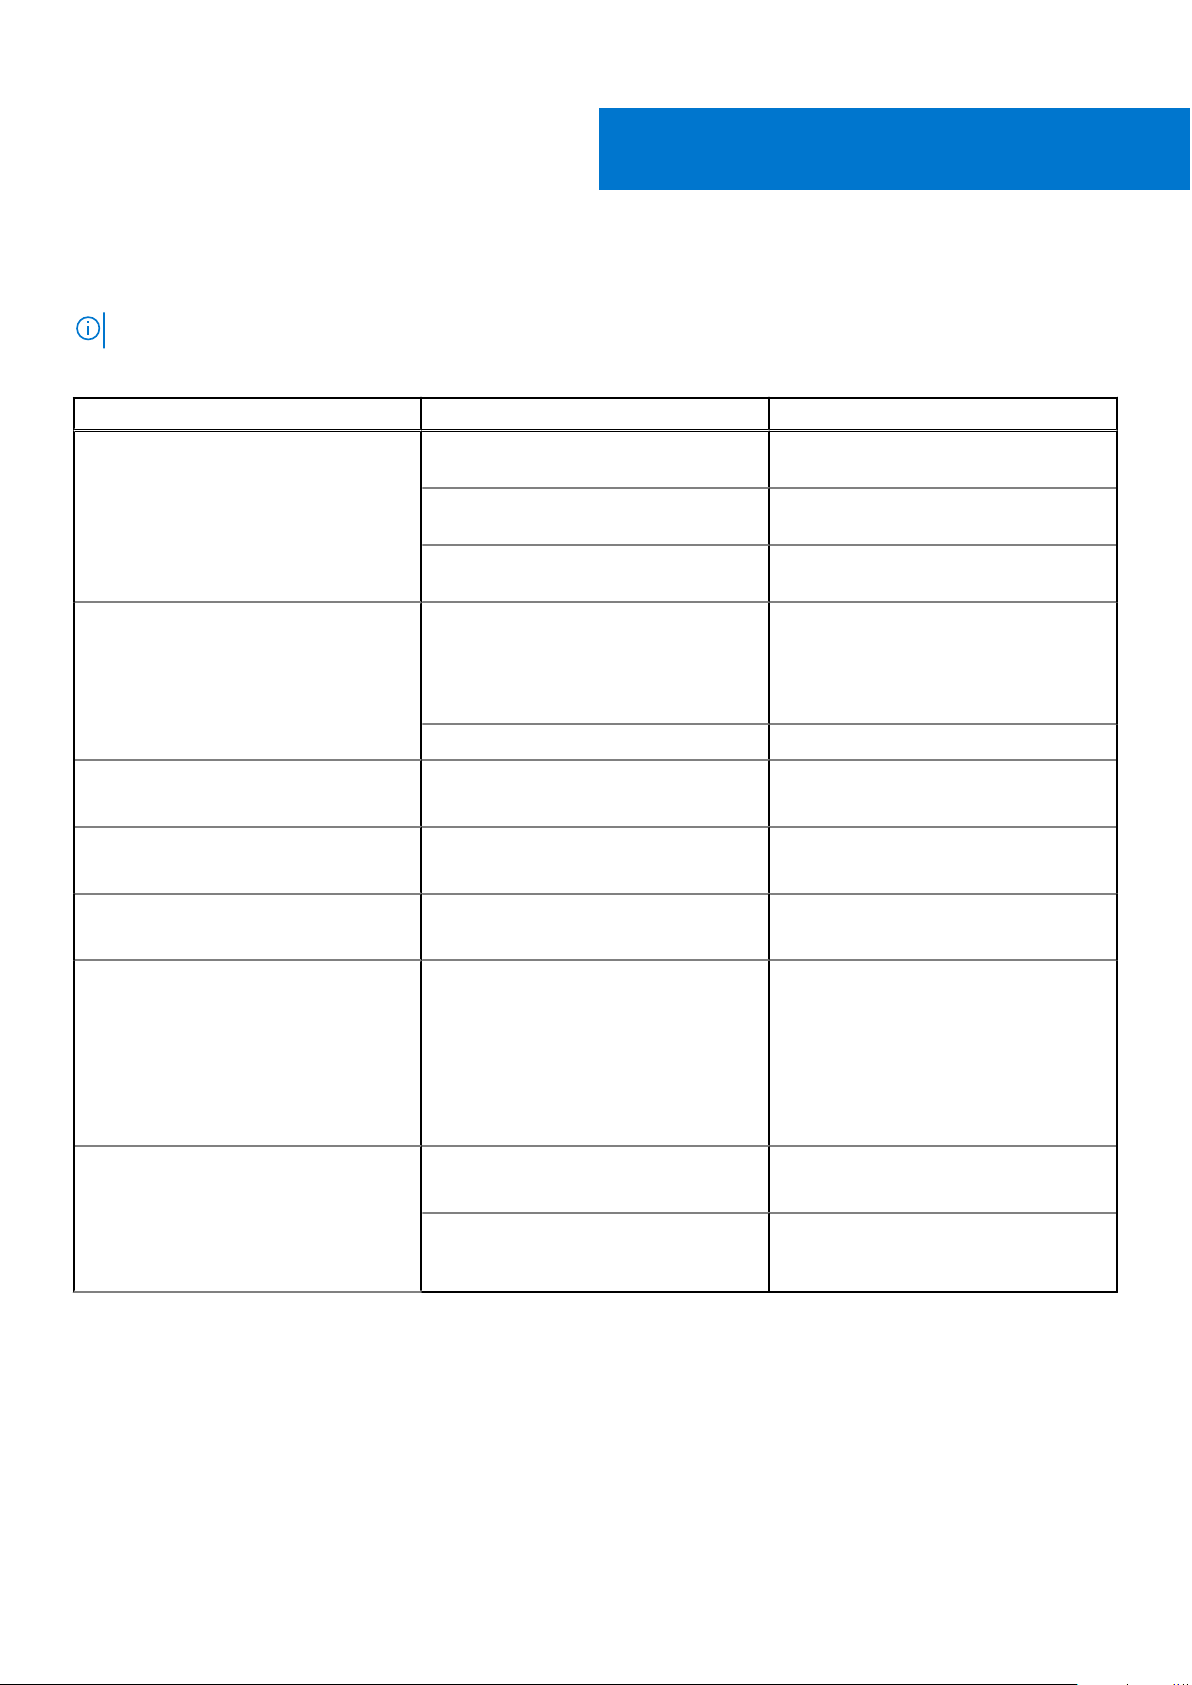
Troubleshooting
NOTE: You can only use your PN7522W with selected Dell laptops. For a list of supported laptops, see www.dell.com.
Table 3. Dell Active Pen troubleshooting
Problems Possible causes Possible solutions
9
Pen buttons do not work, pen does not
write or draw on your laptop.
Pen does not auto-pair with laptop
when connected with USB Type-C cable
during the first time setup.
Unable to pair the pen with your laptop. Bluetooth driver outdated. Install the latest Bluetooth driver for
Bluetooth pairing light does not turn on. Battery is fully drained. Charge the pen with the USB-C cable
Default functions for pen buttons do not
work as expected.
Tile app cannot find my pen.
Laptop does not support the pen. Pen works only with supported Dell
laptops.
Battery is fully drained. Charge the pen using the USB-C cable
included in the box.
Charge the pen using the USB-C cable
included in the box.
Swift Pair function is not enabled in
Windows.
USB-C cable is not working. Replace the USB-C cable.
The default function is changed or
overwritten.
The pen may be outside of Tile's
Bluetooth range.
Connect the pen to your laptop using the
USB-C cable included in the box.
On your laptop, go to Windows
Settings click or tap on Devices, then
Bluetooth & other devices, and then
select notifications to connect using
Swift Pair.
your laptop.
included in the box.
Launch DPeM to check the function
assignment of the buttons.
Ensure to use this feature within Tile's
Bluetooth range of 10 meters in an
unblocked area.
If you have lost your pen in a location
farther than 10 meters, follow the Tile
app's instructions to view its most
recent location.
Pen skin peels off.
Alcohol based liquid may damage the pen
skin.
Unsuitable stock and operating
temperature and humidity may damage
the pen body.
Avoid using alcohol based cleaner or
sanitiser on the pen directly.
See Specifications to find more
information on the stocking and
operating specifications of the pen.
Troubleshooting 15
Page 16

10
Statutory information
Warranty
Limited warranty and return policies
Dell-branded products carry a three year limited hardware warranty. If purchased together with a Dell system, it will follow the
system warranty.
For U.S. customers:
This purchase and your use of this product are subject to Dell’s end user agreement, which you can find at www.dell.com/
terms. This document contains a binding arbitration clause.
For European, Middle Eastern and African customers:
Dell-branded products that are sold and used are subject to applicable national consumer legal rights, the terms of any retailer
sale agreement that you have entered into (which will apply between you and the retailer) and Dell’s end user contract terms.
Dell may also provide an additional hardware warranty—full details of the Dell end user contract and warranty terms can be
found by going to www.dell.com, selecting your country from the list at the bottom of the “home” page and then clicking the
“terms and conditions” link for the end user terms or the “support” link for the warranty terms.
For non-U.S. customers:
Dell-branded products that are sold and used are subject to applicable national consumer legal rights, the terms of any retailer
sale agreement that you have entered into (which will apply between you and the retailer) and Dell’s warranty terms. Dell may
also provide an additional hardware warranty—full details of Dell’s warranty terms can be found by going to www.dell.com,
selecting your country from the list at the bottom of the “home” page and then clicking the “terms and conditions” link or the
“support” link for the warranty terms.
16 Statutory information
Page 17

11
Regulatory statement
FCC notices (U.S. only) and other regulatory information
For FCC notices and other regulatory information, see the regulatory compliance website located at www.dell.com/
regulatory_compliance.
This device complies with Part 15 of the FCC Rules. Operation is subject to the following two conditions:
1. This device may not cause harmful interference.
2. This device must accept any interference received including interference that may cause undesired operation.
CAUTION: Changes or modifications on this unit that are not expressly approved by the party responsible for
compliance which could void the user’s authority to operate the equipment.
This equipment has been tested and found to comply with the limits for a class B digital device, pursuant to part 15 of the
FCC Rules. These limits are designed to provide reasonable protection against harmful interference in a residential installation.
This equipment generates, uses and can radiate radio frequency energy and if not installed and used in accordance with the
instructions, may cause harmful interference to radio communications. However, there is no guarantee that interference will not
occur in a particular installation. If this equipment does cause harmful interference to radio or television reception, which can be
determined by turning the equipment off and on, the user is encouraged to try to correct the interference by one or more of the
following measures:
● Reorient or relocate the receiving antenna.
● Increase the separation between the equipment and receiver.
● Connect the equipment into an outlet on a circuit different from that to which the receiver is connected.
● Consult the dealer or an experienced radio/TV technician for help.
Shielded cables must be used with this unit to ensure compliance with the Class B FCC Limits.
Regulatory statement 17
Page 18
Getting help and contacting Dell
Contacting Dell
To contact Dell for sales, technical support, or customer service issues, see www.dell.com/contactdell.
NOTE: Availability varies by country and product, and some services may not be available in your country.
NOTE: If you do not have an active internet connection, you can find contact information on your purchase invoice, packing
slip, bill, or Dell product catalog.
Self-help resources
You can get information and help on Dell products and services using these online self-help resources:
Table 4. Getting help and contacting Dell
Information about Dell products and services www.dell.com/support
Online help for operating system www.dell.com/support/windows
12
Troubleshooting information, user manuals, setup instructions,
product specifications, technical help blogs, drivers, software
updates, and so on.
www.dell.com/support
18 Getting help and contacting Dell
 Loading...