

Page 1

Inspiron 3181 2-in-1
Setup and Specications
Regulatory Model: P26T
Regulatory Type: P26T001
Page 2

Notes, cautions, and warnings
NOTE: A NOTE indicates important information that helps you make better use of your product.
CAUTION: A CAUTION indicates either potential damage to hardware or loss of data and tells you how to avoid the problem.
WARNING: A WARNING indicates a potential for property damage, personal injury, or death.
© 2018 Dell Inc. or its subsidiaries. All rights reserved. Dell, EMC, and other trademarks are trademarks of Dell Inc. or its subsidiaries. Other trademarks
may be trademarks of their respective owners.
2018 - 07
Rev. A00
Page 3

Contents
1 Set up your Chromebook................................................................................................................................5
2 Chromebook recovery....................................................................................................................................6
Recovering the Chromebook............................................................................................................................................6
Step 1: Check for the "Chrome OS is missing or damaged" message...................................................................6
Step 2: Create the recovery USB ash drive or SD card........................................................................................6
Reinstall the Chrome Operating System................................................................................................................... 7
"Chrome OS verication is turned o" Message..................................................................................................... 7
Troubleshooting Tips....................................................................................................................................................8
3 Views of Inspiron 3181 2-in-1.......................................................................................................................... 9
Front.................................................................................................................................................................................... 9
Right.................................................................................................................................................................................... 9
Left.....................................................................................................................................................................................10
Base....................................................................................................................................................................................10
Display.................................................................................................................................................................................11
Bottom................................................................................................................................................................................11
Modes................................................................................................................................................................................ 12
Notebook..................................................................................................................................................................... 12
Tablet............................................................................................................................................................................12
Stand............................................................................................................................................................................12
Tent...............................................................................................................................................................................13
4 Specications of Inspiron 3181 2-in-1............................................................................................................ 14
Computer model............................................................................................................................................................... 14
Dimensions and weight.................................................................................................................................................... 14
Processors.........................................................................................................................................................................14
Chipset...............................................................................................................................................................................15
Operating system..............................................................................................................................................................15
Memory..............................................................................................................................................................................15
Ports and connectors.......................................................................................................................................................15
Communications............................................................................................................................................................... 16
EthernetWireless module...........................................................................................................................................16
Audio.................................................................................................................................................................................. 16
Storage...............................................................................................................................................................................17
Media-card reader............................................................................................................................................................ 17
Keyboard............................................................................................................................................................................ 17
Keyboard...................................................................................................................................................................... 17
Camera...............................................................................................................................................................................19
Touchpad...........................................................................................................................................................................20
Touchpad.....................................................................................................................................................................20
Power adapter...................................................................................................................................................................21
Battery............................................................................................................................................................................... 21
Contents
3
Page 4

Display............................................................................................................................................................................... 22
Video..................................................................................................................................................................................23
Computer environment................................................................................................................................................... 23
5 Contacting Dell............................................................................................................................................ 24
4 Contents
Page 5

Set up your Chromebook
1 Connect the power adapter and press the power button.
NOTE: To conserve battery power, the battery might enter power saving mode. Connect the power adapter and press the
power button to turn on the computer.
2 On the Welcome screen, select your language, keyboard layout, and choose which network to which the device will be connected. If
the network is secure, you will need to enter the proper password. After making these choices, click Let's go.
3 The next screen will display the Chrome OS terms of agreement. There will be a check box to allow automatic usage statistics and
crash reports to be sent to Google. You may choose to opt out of this if you wish. You must click
Accept and continue to complete
the setup.
4 The next screen allows you to sign in using your Google account. If you do not have a Google account, you can create one at this point
or you can choose to continue and browse as a guest.
NOTE
: When the device is set for enterprise enrollment, you will not be able to register the device until you coordinate with
your network administrator or cancel enterprise enrollment by pressing CTRL + Alt + E.
5 After entering your Google account information, you should be at the Chrome desktop. There will be icons for Google Apps, the
Chrome Browser, Gmail, Google Search (which also launches the Chrome Browser), Google Docs, You Tube, and the Get Started app.
1
Set up your Chromebook 5
Page 6

Chromebook recovery
This page contains information about recovering Dell Chromebook.
Recovering the Chromebook
Install a new version of the Chrome operating system on your Chromebook by going through the recovery process. You may want to go
through this process if you are having problems updating your Chromebook or if it stops working.
NOTE: All account information and data stored on your Chromebook, such as photos, downloaded les, and saved networks, will
be deleted. Owner privileges for your primary account will also be reset. However, the actual Google Accounts and any data
synced to these accounts are not aected by the recovery process. After the recovery process is complete, you will be guided
through the initial setup again.
Prerequisites:
Before starting this process, you need the following:
• A Chrome device, Windows, Mac, or the Linux computer with administrative rights.
• A 4 GB or larger USB ash drive or SD card.
Step 1: Check for the "Chrome OS is missing or damaged"
message
If you see this message, you can rst try to perform a hard reset on your Chromebook by pressing Refresh + Power. If you still see this
message after performing a hard reset, please proceed to Step 2.
If you see the Chrome OS verication is turned o message, refer to Chrome OS verication is turned o message section below.
Step 2: Create the recovery USB ash drive or SD card
Insert a USB ash drive or SD card into your computer and follow the instructions below:
Table 1. Chromebook recovery
Operating System Instructions
Chrome Device Instructions
Create a recovery ash drive by using the Image Burner. The tool
may not be available in all languages.
1 Type chrome://imageburner into the omnibox (browser's
address bar) .
2 Run the tool and follow the instructions that appear on your
screen.
NOTE: When recovering your Chromebook, make sure to
create the recovery ash drive on the same model.
Windows Instructions 1 Click this link to download the Recovery Tool.
2
6 Chromebook recovery
Page 7

Operating System Instructions
2 Run the tool and follow the instructions that appear on your
screen.
3 After you recover your Chromebook, you must format your
USB ash drive or SD card using the Recovery Tool. If you do
not format your USB ash drive or SD card, you will not be
able to use all the storage space on your external device.
Additionally, your USB ash drive or SD card may not be
recognizable by Windows.
Mac Instructions
Create a recovery ash drive by using the Recovery Tool. The tool
may not be available in all languages.
1 Click this link to download the Recovery Tool.
2 Run the tool and follow the instructions that appear on your
screen.
After the process is complete, you might see an alert saying your
USB drive or SD card is unreadable. If this fails, try removing and
reinserting your USB drive or SD card. Your USB drive or SD card
should now be ready to use for recovery.
Linux Instructions
Create a recovery ash drive by using the Recovery Tool. The tool
may not be available in all languages.
1 1.Click this link to download the Recovery Tool.
2 Modify the script permissions to allow execution with the
following command: $ & sudo chmod 755 linux_recovery.sh.
3 Run the script with root privileges with the following
command:$ sudo bash linux_recovery.sh.
4 Follow the prompts from the tool to complete building the
operating system image.
Reinstall the Chrome Operating System
1 Start your Chromebook.
2 When the Chrome OS is missing or damaged screen appears, insert the USB ash drive or SD card you created into the USB port or
SD card slot on your Chrome device.
3 Wait for the Chromebook to boot up from the ash drive.
4 Follow the instructions that appear on the screen.
5 On successful installation of the Chrome operating system, you will be prompted to remove the USB ash drive or SD card.
6 Remove the USB ash drive or SD card when prompted, and your Chromebook will automatically restart.
You should now be able to start your Chromebook as normal. Because the data stored on your Chromebook has been cleared, you will need
to go through the initial setup again. Make sure you sign in with your primary Google Account, because this account will be set as the
owner account.
"Chrome OS verication is turned o" Message
By default, Chromebooks are set to the normal user mode. If you've set the user mode to developer mode instead, you'll see a screen with
the message "Chrome OS verication is turned o" when you start up. Use the developer mode if you want to test your own version of the
Chrome operating system.
Press Ctrl+D to enter developer mode. If you press the space bar instead, you'll see a screen asking to recover your device.
Chromebook recovery
7
Page 8

Troubleshooting Tips
Table 2. Troubleshooting tips
Question Solution
I am unable to recover my Chromebook To help ensure that you are running the latest version of Chrome
OS once you recover your Chromebook, we recommend creating
the recovery media with the latest version of Chrome OS and avoid
using recovery media that may contain an older version of the
operating system.
An error message An unexpected error has occurred. Try the following steps:
1 Conrm that you successfully completed all instructions
exactly as specied in Step 2: Create the recovery USB ash
drive or SD card above.
2 Try using a dierent USB stick or SD card.
3 If the problem persists, contact Google Chrome support team.
An error message You are using an out-of-date Chrome OS
recovery image.
You should download an up-to date recovery image. Simply follow all
the instructions exactly as specied in Step 2 above.
You successfully recovered your Chromebook but now you can not
use your USB or SD card with Windows
After you have completed recovery, you need to format your USB
or SD card using the recovery tool.
You successfully recovered your Chromebook but now Windows
does not recognize the whole size of the USB or SD card used for
recover.
After you have completed recovery, you need to format your USB
or SD card using the recovery tool.
8 Chromebook recovery
Page 9
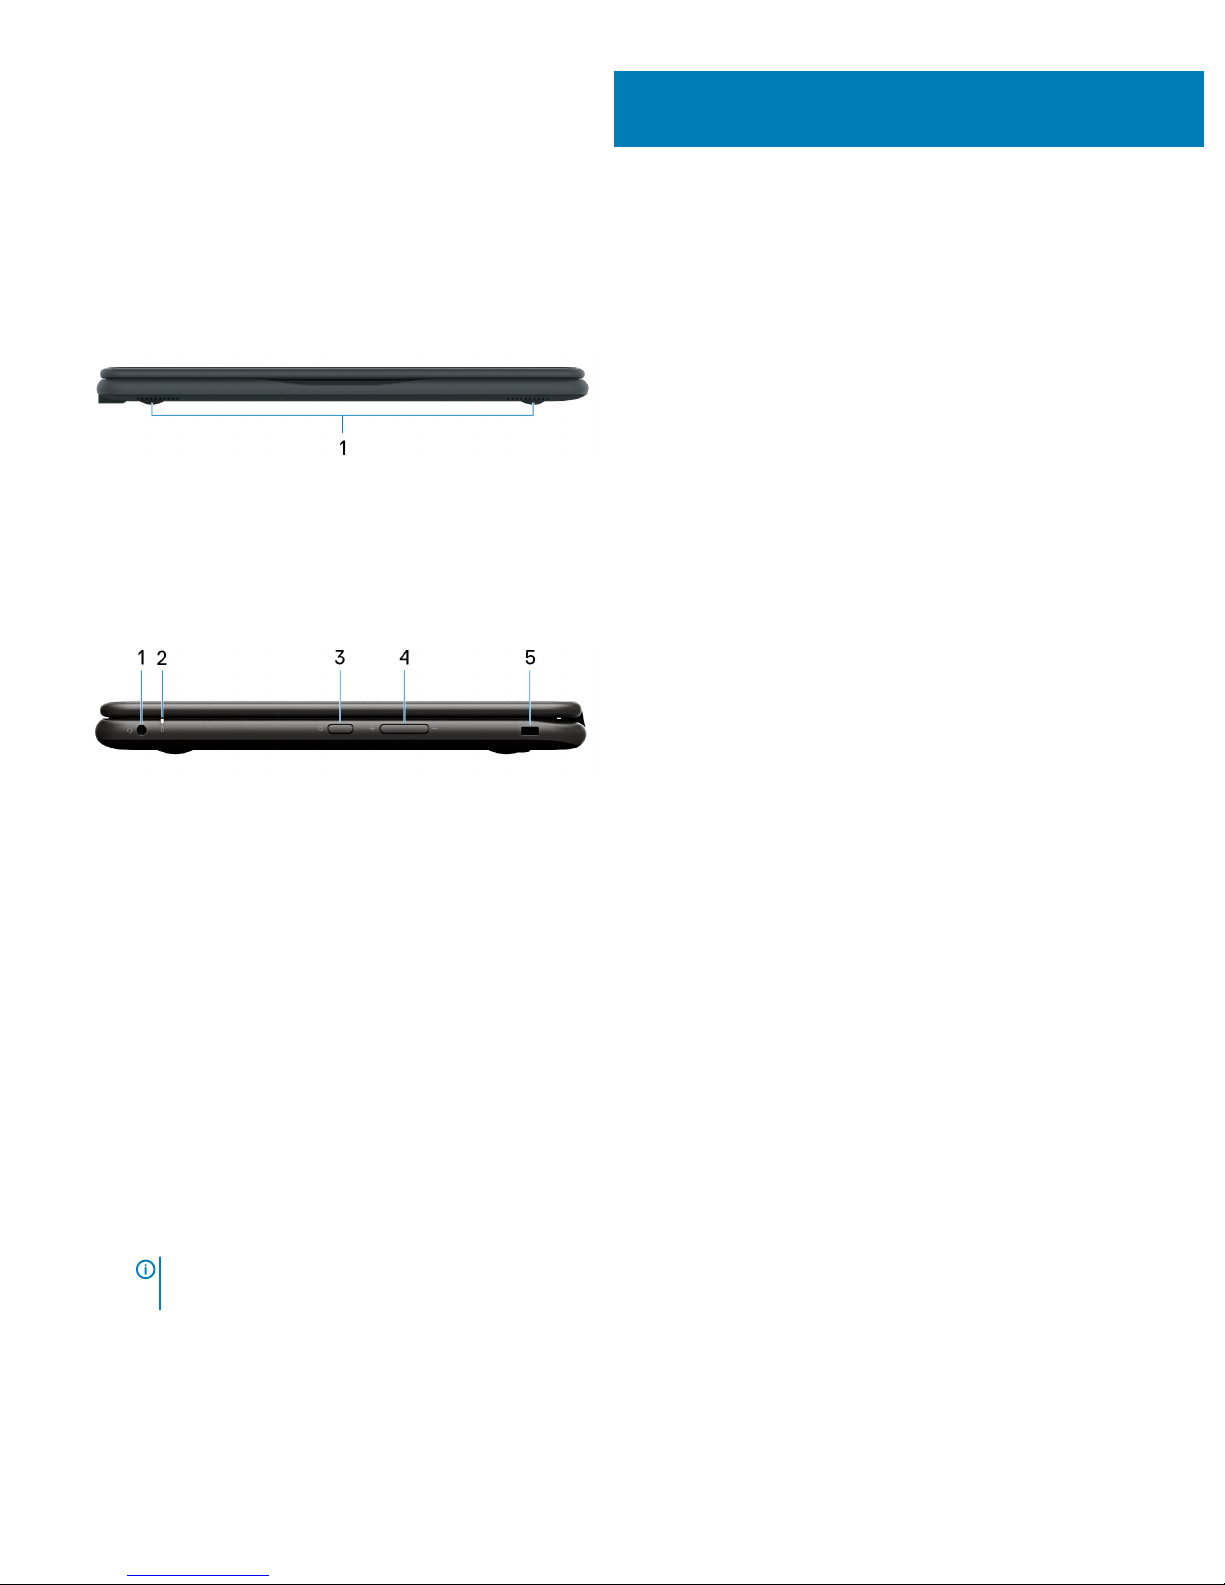
Views of Inspiron 3181 2-in-1
Front
1 Speakers
Provide audio output.
Right
1 Headset port
Connect headphones or a headset (headphone and microphone combo).
2 Power and battery-status light
Indicates the power state and battery state of the computer.
Solid white—Power adapter is connected and the battery is charging.
Solid amber—Battery charge is low or critical.
O—Battery is fully charged.
3 Power button
Press to turn on the computer if it is turned o, in sleep state, or in hibernate state.
Press to put the computer in sleep state if it is turned on.
Press and hold to force shut-down the computer.
NOTE
: You can customize the power-button behavior in Power Options. For more information, see
Me and My Dell
at
www.dell.com/support/manuals.
4 Volume-control button
Press to increase or decrease the volume.
3
Views of Inspiron 3181 2-in-1 9
Page 10
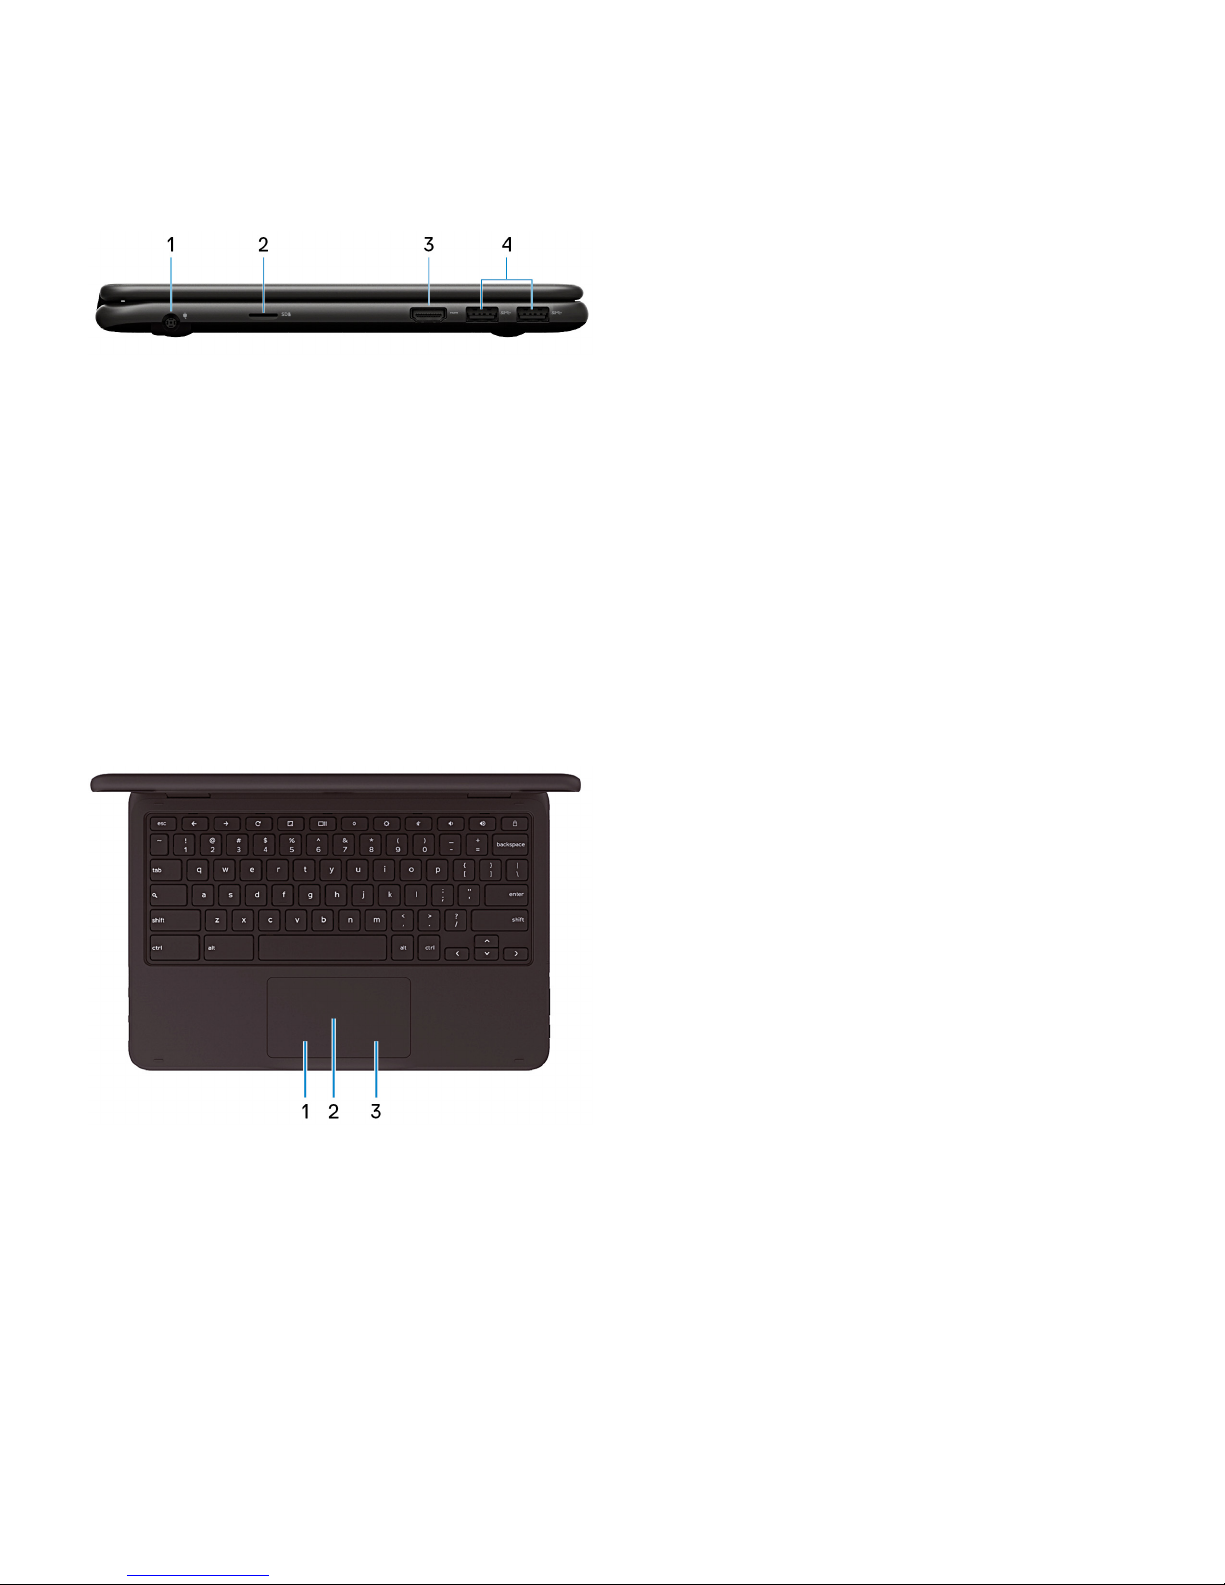
5 Security-cable slot (for Noble locks)
Connect a security cable to prevent unauthorized movement of your computer.
Left
1 Power-adapter port
Connect a power adapter to provide power to your computer.
2 microSD-card slot
Insert a microSD card to expand the computer’s storage capacity.
3 HDMI port
Connect to a TV or another HDMI-in enabled device. Provides video and audio output.
4 USB 3.1 Gen 1 ports (2)
Connect peripherals such as external storage devices and printers. Provides data transfer speeds up to 5 Gbps.
Base
1 Left-click area
Press to left-click.
2 Touchpad
Move your nger on the touchpad to move the mouse pointer. Tap to left-click and two nger tap to right-click.
3 Right-click area
Press to right-click.
10
Views of Inspiron 3181 2-in-1
Page 11
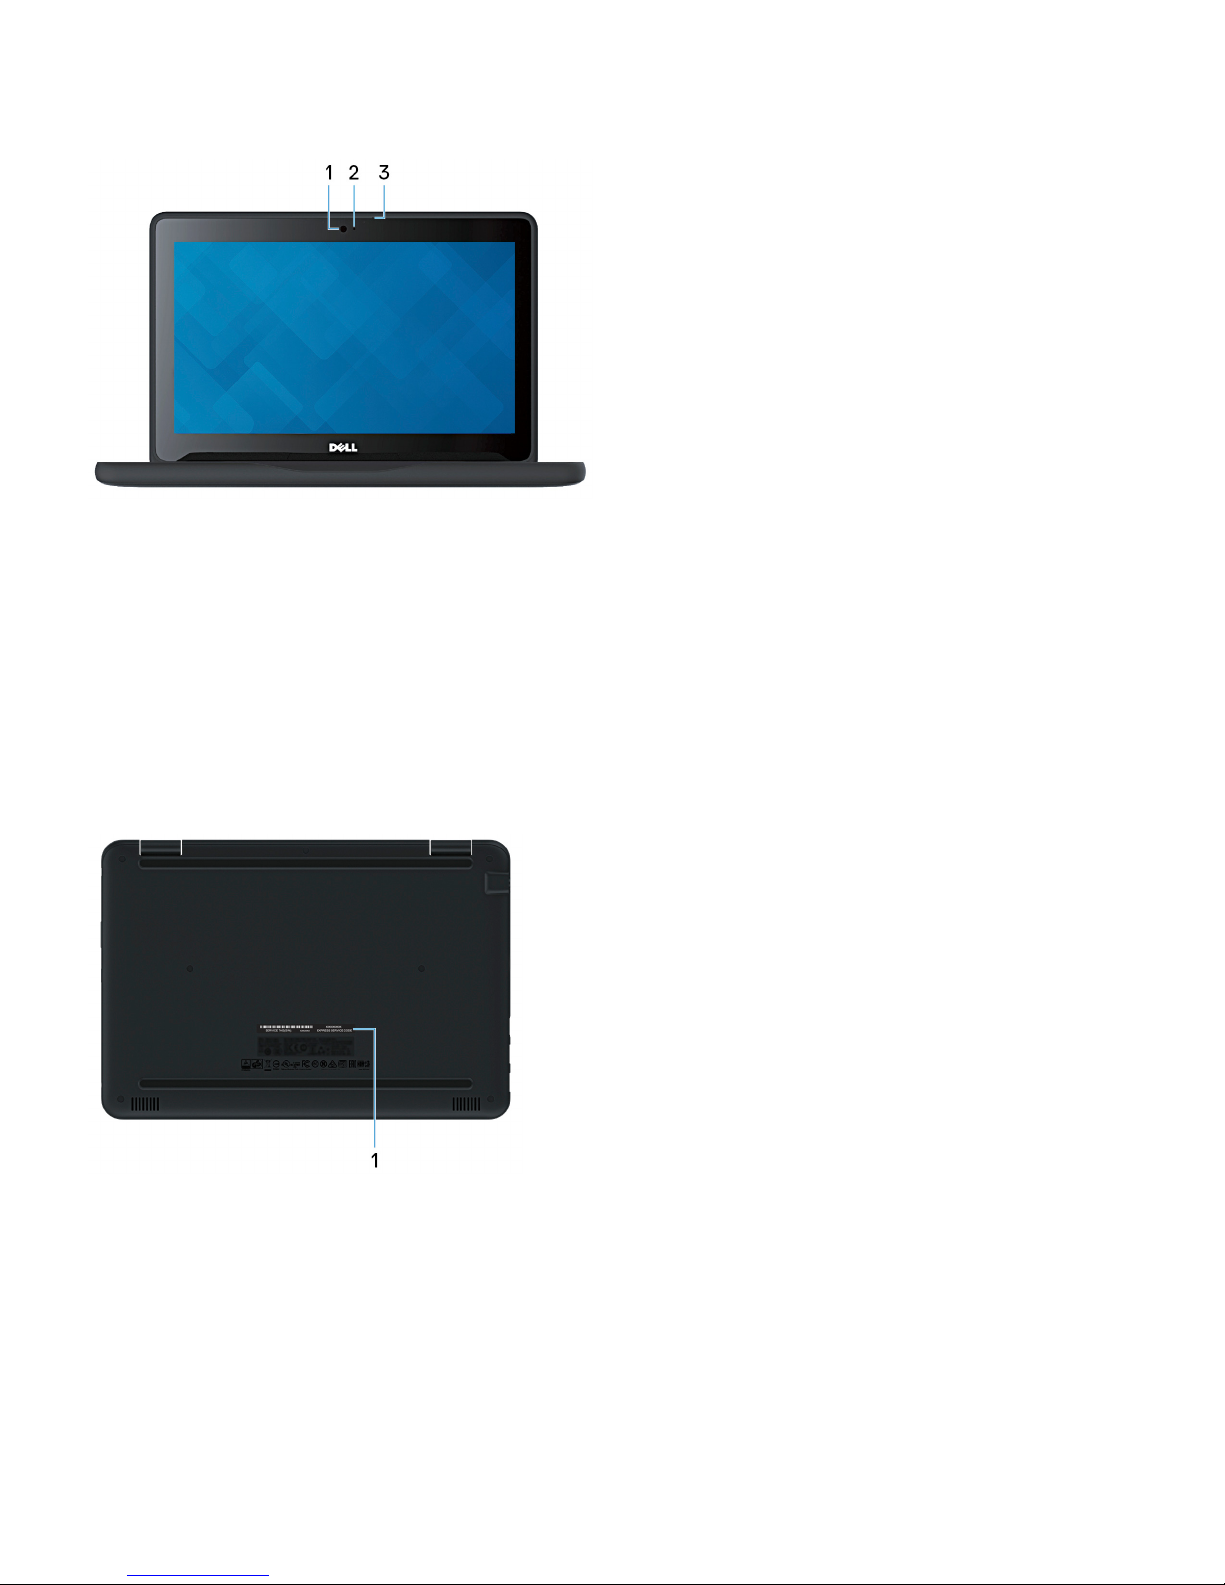
Display
1 Camera
Enables you to video chat, capture photos, and record videos.
2 Camera-status light
Turns on when the camera is in use.
3 Microphone
Provides digital sound input for audio recording, voice calls, and so on.
Bottom
1 Service Tag label
The Service Tag is a unique alphanumeric identier that enables Dell service technicians to identify the hardware components in your
computer and access warranty information.
Views of Inspiron 3181 2-in-1
11
Page 12
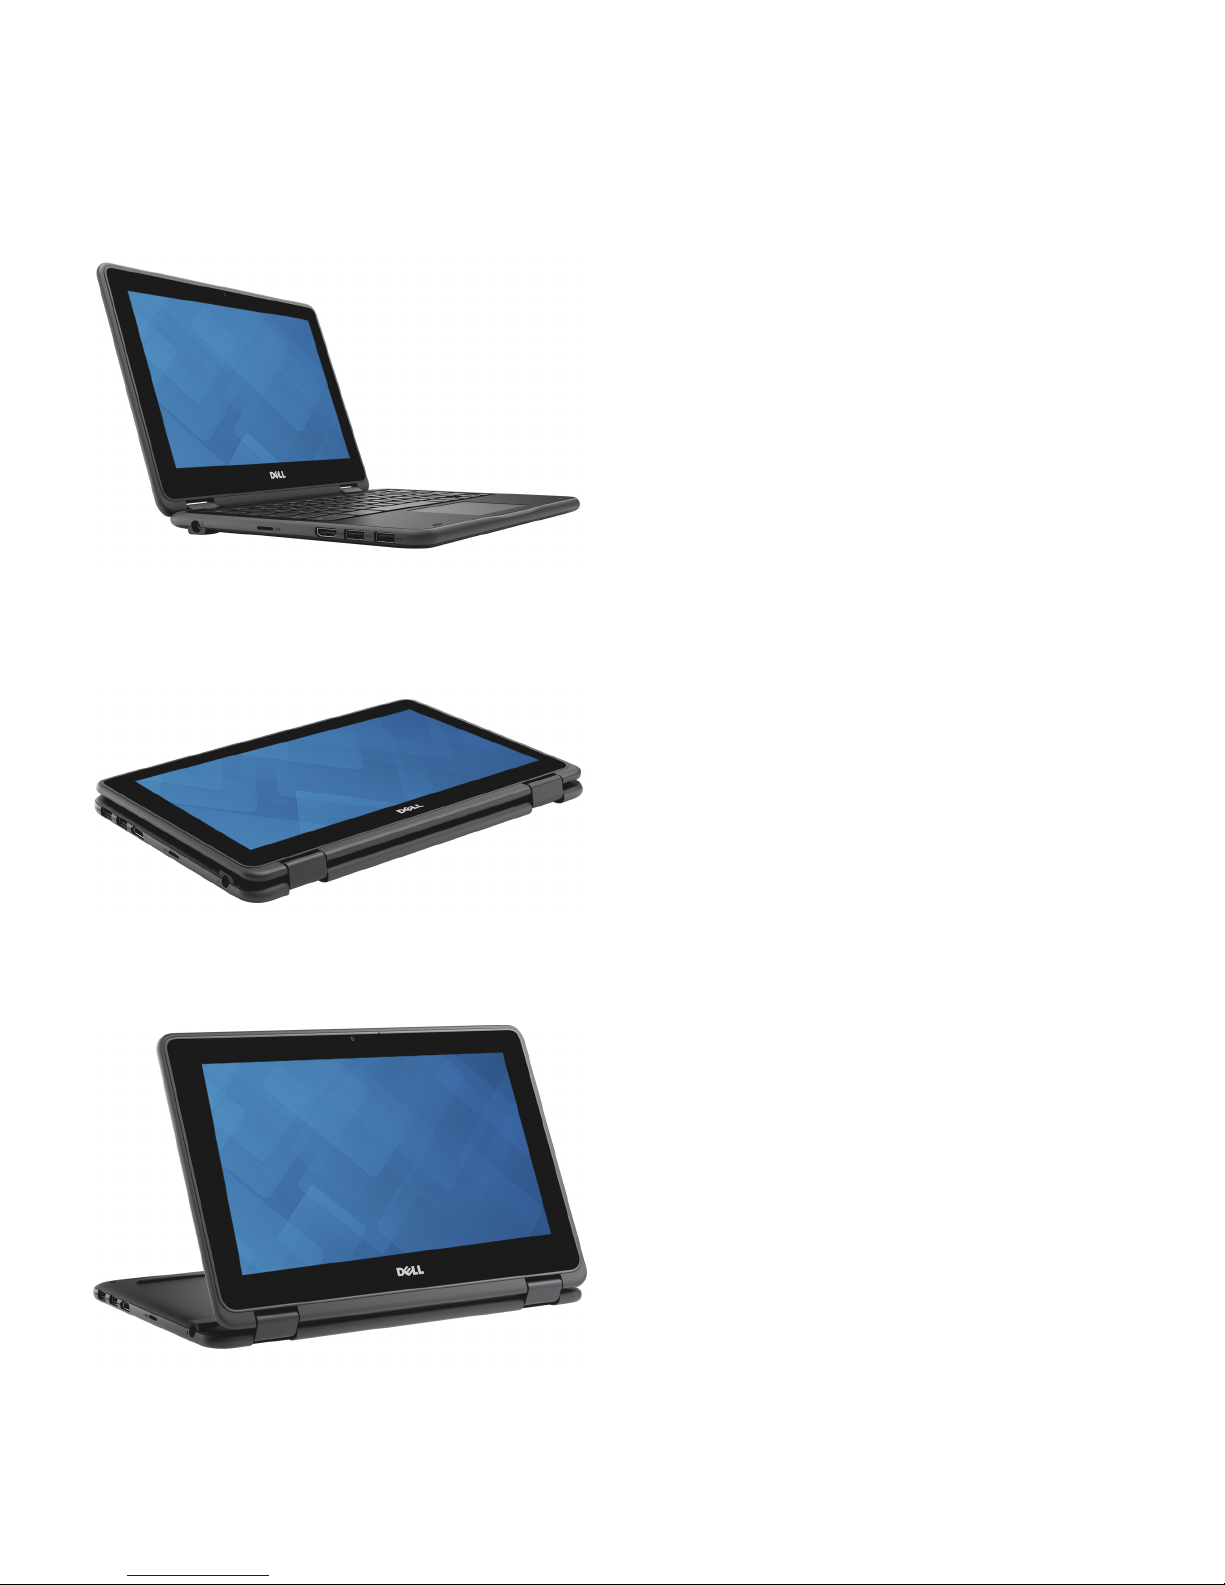
Modes
Notebook
Tablet
Stand
12
Views of Inspiron 3181 2-in-1
Page 13
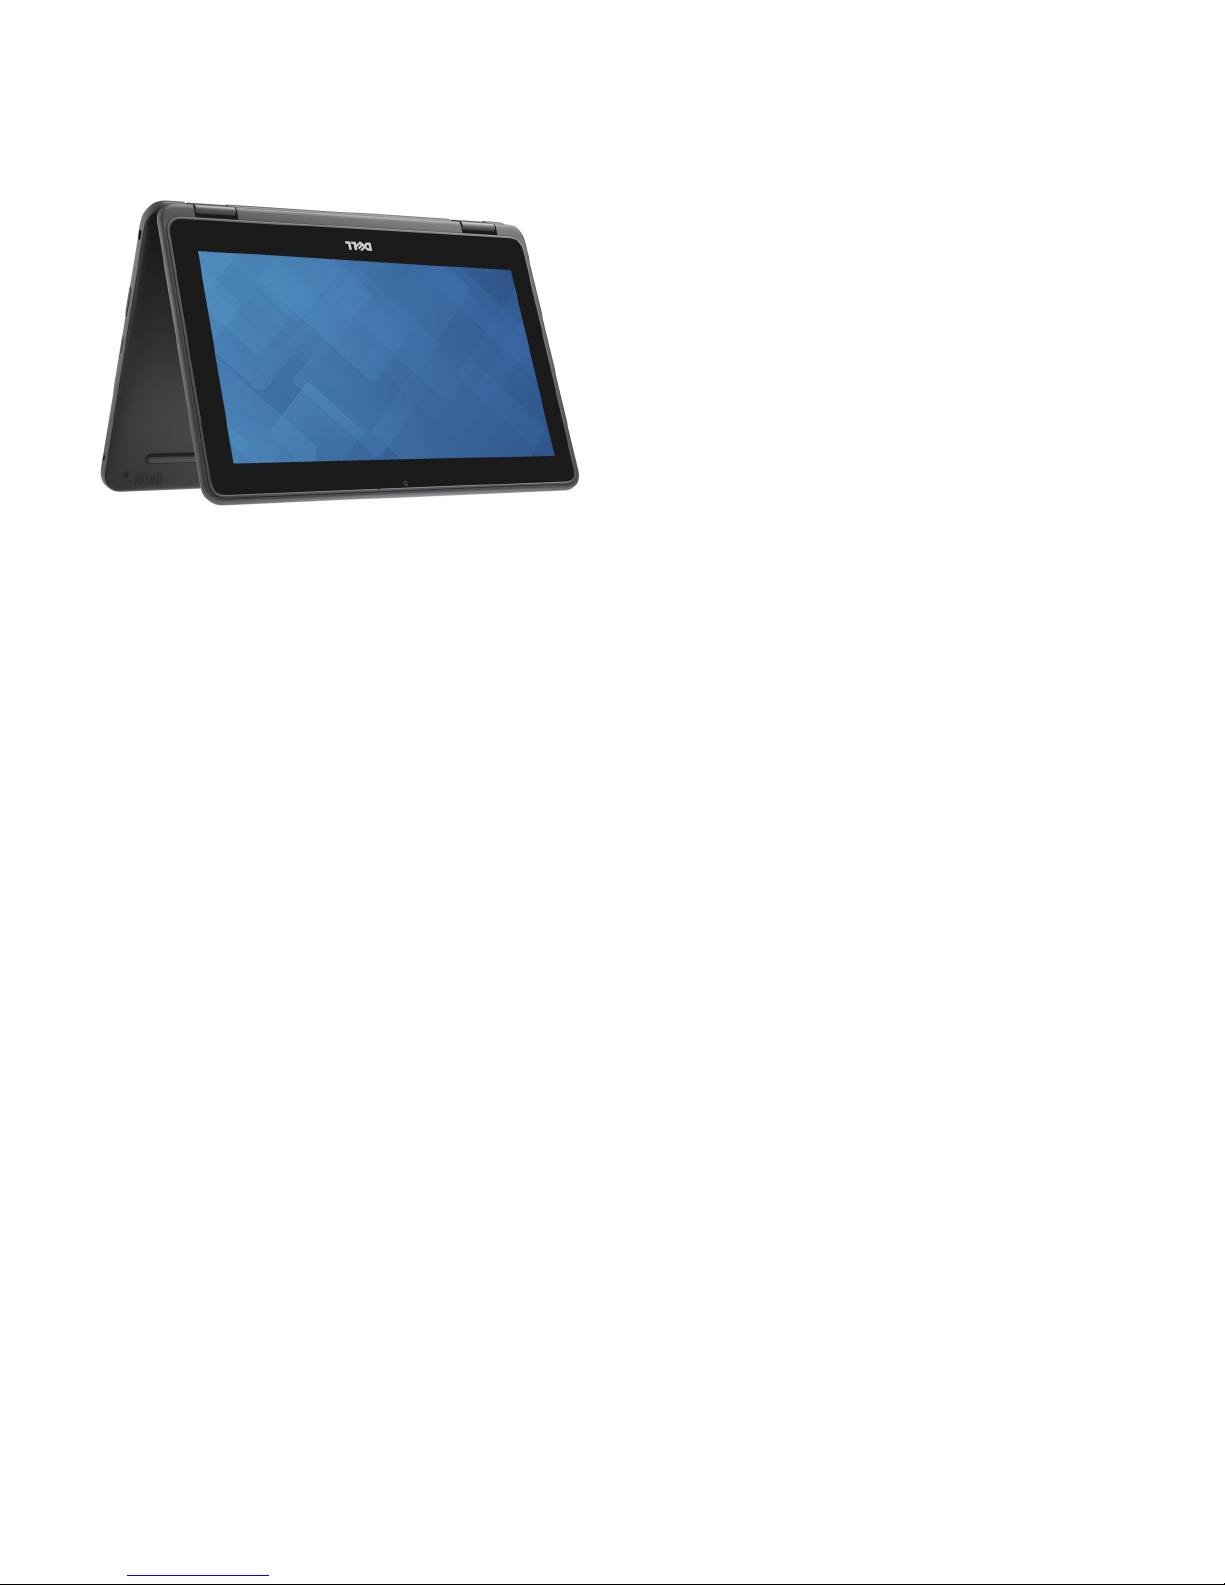
Tent
Views of Inspiron 3181 2-in-1 13
Page 14

Specications of Inspiron 3181 2-in-1
Computer model
Inspiron 3181 2-in-1
Dimensions and weight
Table 3. Dimensions and weight
Height:
Front
20.75 mm (0.81 in)
Rear
20.75 mm (0.81 in)
Width
303.80 mm (11.96 in)
Depth
207.90 mm (8.18 in)
Weight (maximum)
1.44 kg (3.17 lb)
NOTE: The weight of your computer depends on the
conguration ordered and the manufacturing variability.
Processors
Table 4.
Processor specications
Processor Intel Celeron Processor N3060
Wattage
6 W
Core count/Thread count
2/2
Speed
Up to 1.6 GHz, 2.48 GHz Boost
L2 cache
2 MB
L3 cache
Not supported
Integrated graphics
Intel HD Graphics 400 GPU
4
14 Specications of Inspiron 3181 2-in-1
Page 15

Chipset
Table 5. Chipset specications
Chipset
Integrated on the processor
DRAM bus width
64 bits
Flash EPROM
8 MB
PCIe bus
Up to Gen2
External bus frequency
Up to 5 GT per second
Operating system
Chrome OS
Memory
Table 6. Memory specications
Slots
On board RAM
Type
LPDDR3
Speed
1600 MHz
Maximum memory
4 GB
Ports and connectors
Table 7.
Ports and connectors specications
External:
USB Two USB 3.1 Gen 1 ports
Audio One Microphone/headphone/headset Combo port
Video
One HDMI-out 1.4 port
Memory card reader
One MicroSD-card slot
Power adapter port
One power-adapter port
Security
Noble lock
Specications of Inspiron 3181 2-in-1 15
Page 16

Communications
Ethernet
Table 8. Ethernet specications
Model number
Not supported
Transfer rate
Not supported
Wireless module
Table 9. Wireless module specications
Model number
Intel Dual Band Wireless-AC 7265
Transfer rate
867 Mbps
Frequency bands supported
2.4 GHz/5 GHz
Wireless standards
Wi-Fi 802.11ac
Encryption
• 64-bit/128-bit WEP
• AES-CCMP
• TKIP
Bluetooth
Bluetooth 4.2
Audio
Table 10.
Audio specications
Type
High-Denition-Audio
Controller
Realtek ALC3256
Stereo conversion
Supported
Internal interface
12S
External interface Headset combo jack (stereo headphones/microphone-in)
Speakers
Supported
Internal speaker amplier
Supported
External volume controls
Supported
16 Specications of Inspiron 3181 2-in-1
Page 17

Speaker output:
Average
2 W
Peak
2.5 W
Subwoofer output
Not supported
Microphone
Supported
Storage
Table 11. Storage specications
Storage type Interface type Capacity
One embedded multimedia card (eMMC) eMMC
• 32 GB
• 64 GB
Media-card reader
Table 12. Media-card reader specications
Type
One MicroSD-card slot
Cards supported
MicroSD
Keyboard
Table 13.
Keyboard specications
Type
Standard non-backlit keyboard
Layout
QWERTY
Number of keys
• United States and Canada: 74 keys
• United Kingdom: 75 keys
Size
• X = 19.05 mm key pitch
• Y = 18.05 mm key pitch
Keyboard
Dell Chromebook keyboards have a few extra features to help you browse the web eortlessly and eciently. The keyboard contains a
dedicated search key and a new row of web shortcut keys. A standard USB Windows keyboard can also be used with the Chromebook,
Specications
of Inspiron 3181 2-in-1 17
Page 18
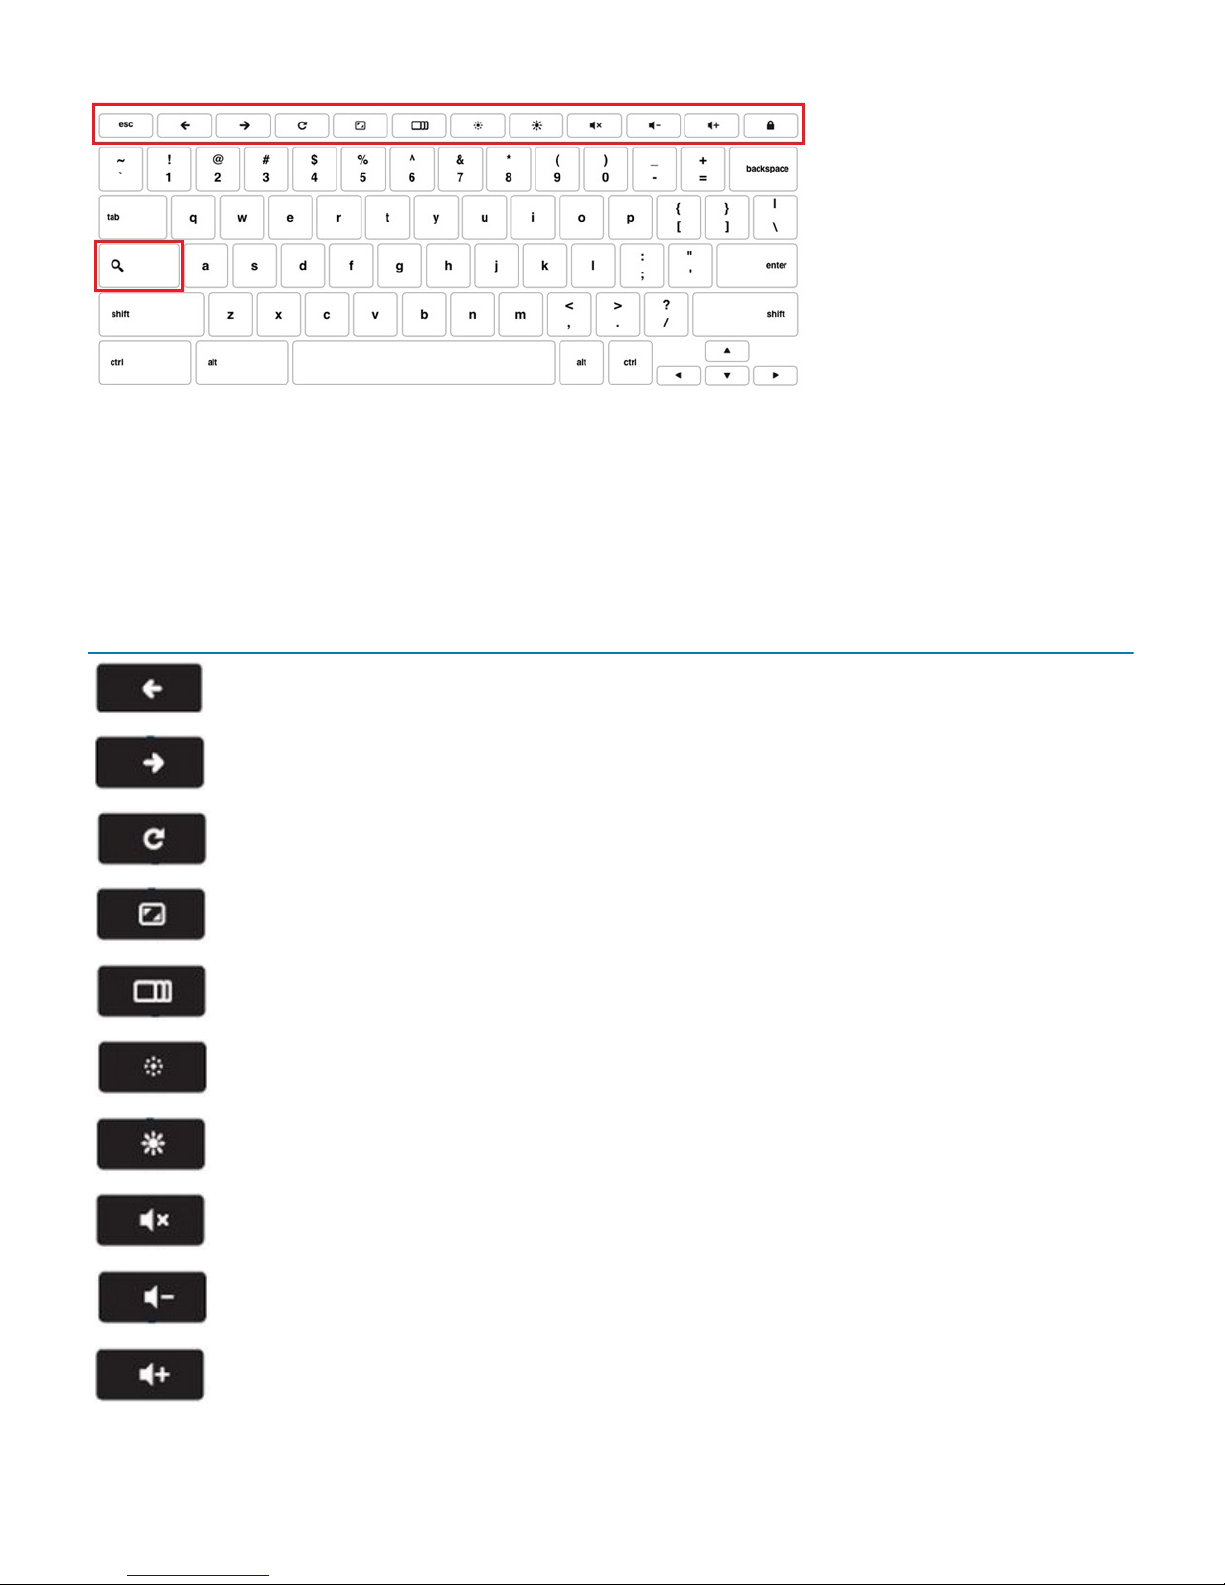
using the same keyboard shortcuts. The image below shows the keyboard layout.
Keyboard keys function
The Chrome device keyboard is designed to help you get to the things you need the most. The table below is an overview of the special
keys on the top row of the keyboard:
Table 14. Special keys
Special keys
Go to the previous page in browser history
Go to the next page in browser history
Reload current page
Enter Immersive mode, which hides the tabs and launcher
Enter Overview mode, which shows all windows
Decrease screen brightness
Increase screen brightness
Mute
Decrease the volume
Increase the volume
18 Specications of Inspiron 3181 2-in-1
Page 19

Special keys
Search applications and the web at the same time. On a Chromebook, this key is on the side, where the Caps Lock key
is normally located.
Keyboard shortcut keys
Table 15. Shortcut keys
Shortcut keys
Function Combination keys
Page up Press Alt and the up arrow
Page down Press Alt and the down arrow
Home Press Ctrl+Alt, and the up arrow
End Press, Ctrl+Alt and the down arrow
Delete Press Alt+Backspace
Toggle the bookmark bar Ctrl+Shift+B
Search current webpage Ctrl+F
Open a new tab Ctrl+T
Open a new window Ctrl+N
Open the link you clicked in a new background tab Press Alt and click a link
Switch to next tab Ctrl+Tab
Switch to next window Switch to next window
Sign out of Google Account Ctrl+Shift+Q
Close current tab Ctrl+W
To see more shortcuts, simply press Ctrl+Alt+? To open the keyboard viewer on your screen.
Camera
Table 16.
Camera specications
Number of cameras
One
Type
One HD xed focus
Location
Front
Sensor type
CMOS sensor technology
Resolution:
Still image
1280 x 720 (HD)
Video
1280 x 720 (HD) at 30 fps
Specications of Inspiron 3181 2-in-1 19
Page 20
Diagonal viewing angle:
75.2 degrees
Touchpad
Table 17. Touchpad specications
Resolution
Horizontal
3061
Vertical
1637
Dimensions:
Horizontal
100 mm (3.93 in)
Vertical
55 mm (2.16 in)
Touchpad
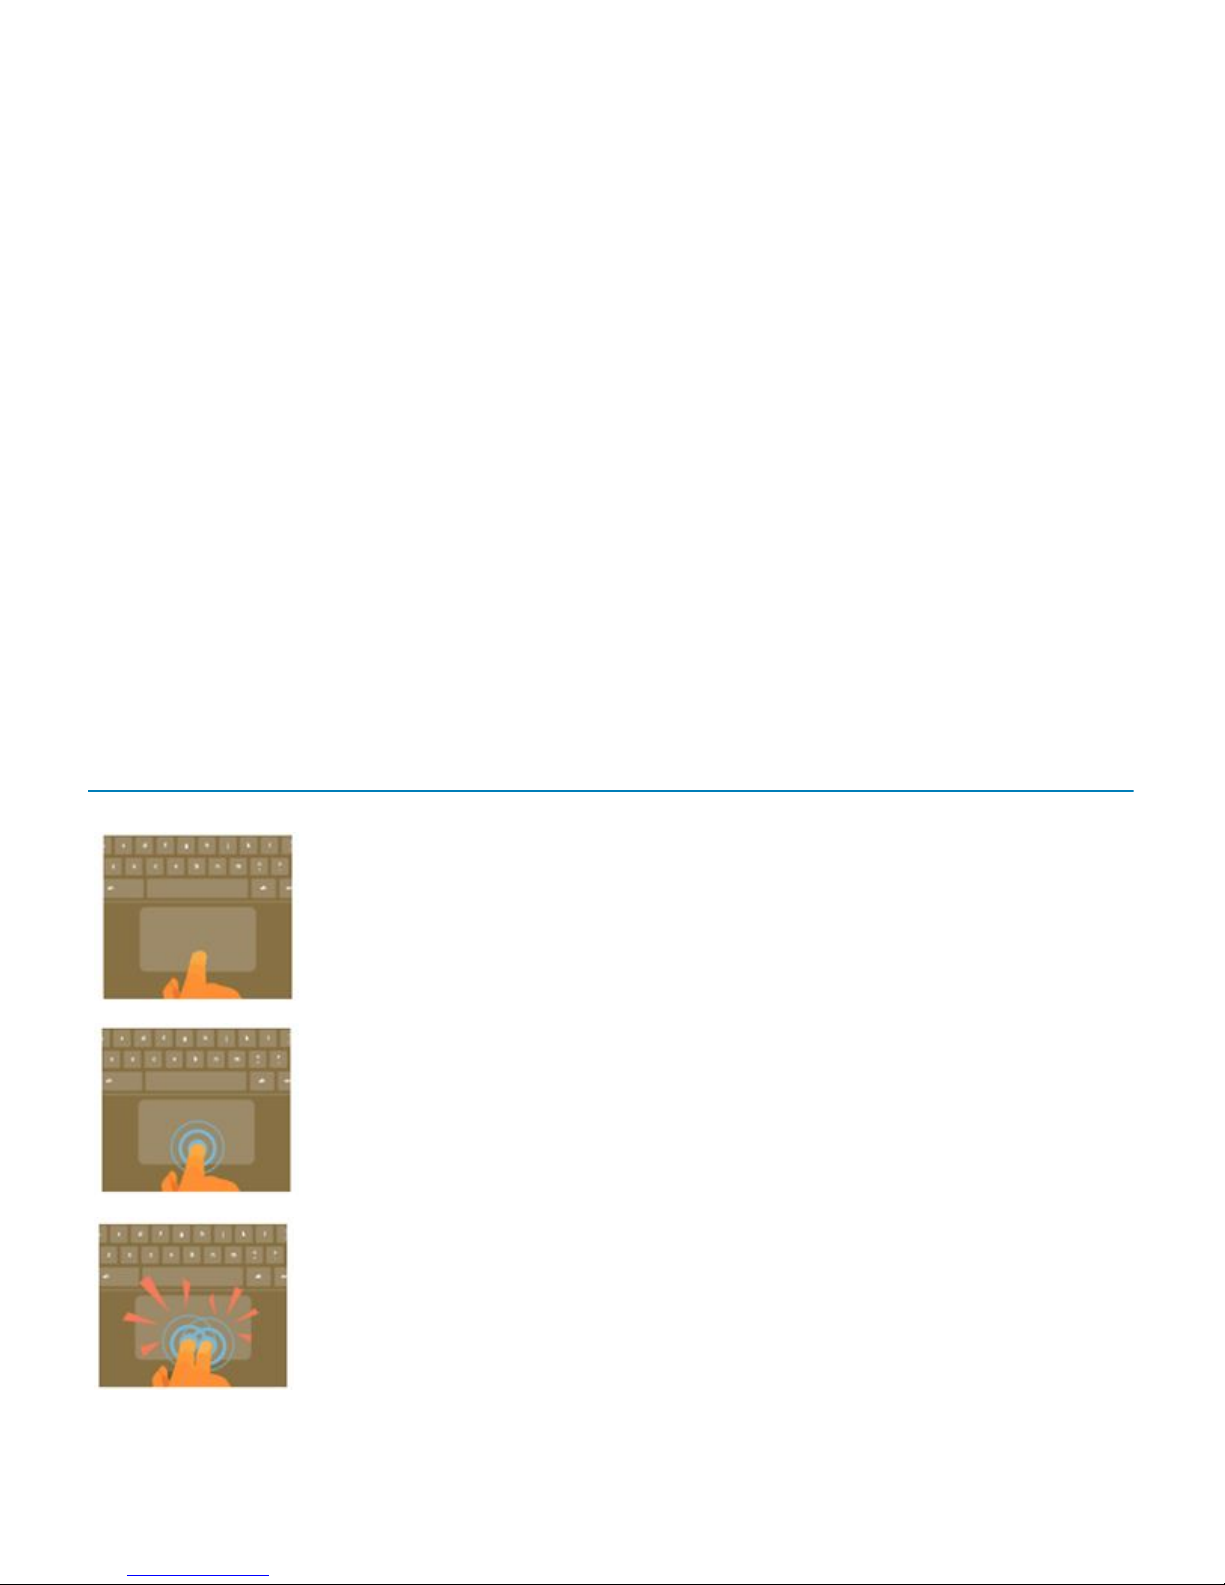
This page contains information for Dell Chromebook touchpad gestures.
The following table lists some gestures and actions supported by the Chromebook touchpad:
Table 18. Touch pad gestures
Touchpad gestures
Gestures Explanation
Simply move your nger across the touchpad.
Press down on the lower half of the touchpad. Since tap-to-click is enabled by default, you can quickly tap the
touchpad to click.
Click the touchpad with two ngers.
20 Specications of Inspiron 3181 2-in-1
Page 21
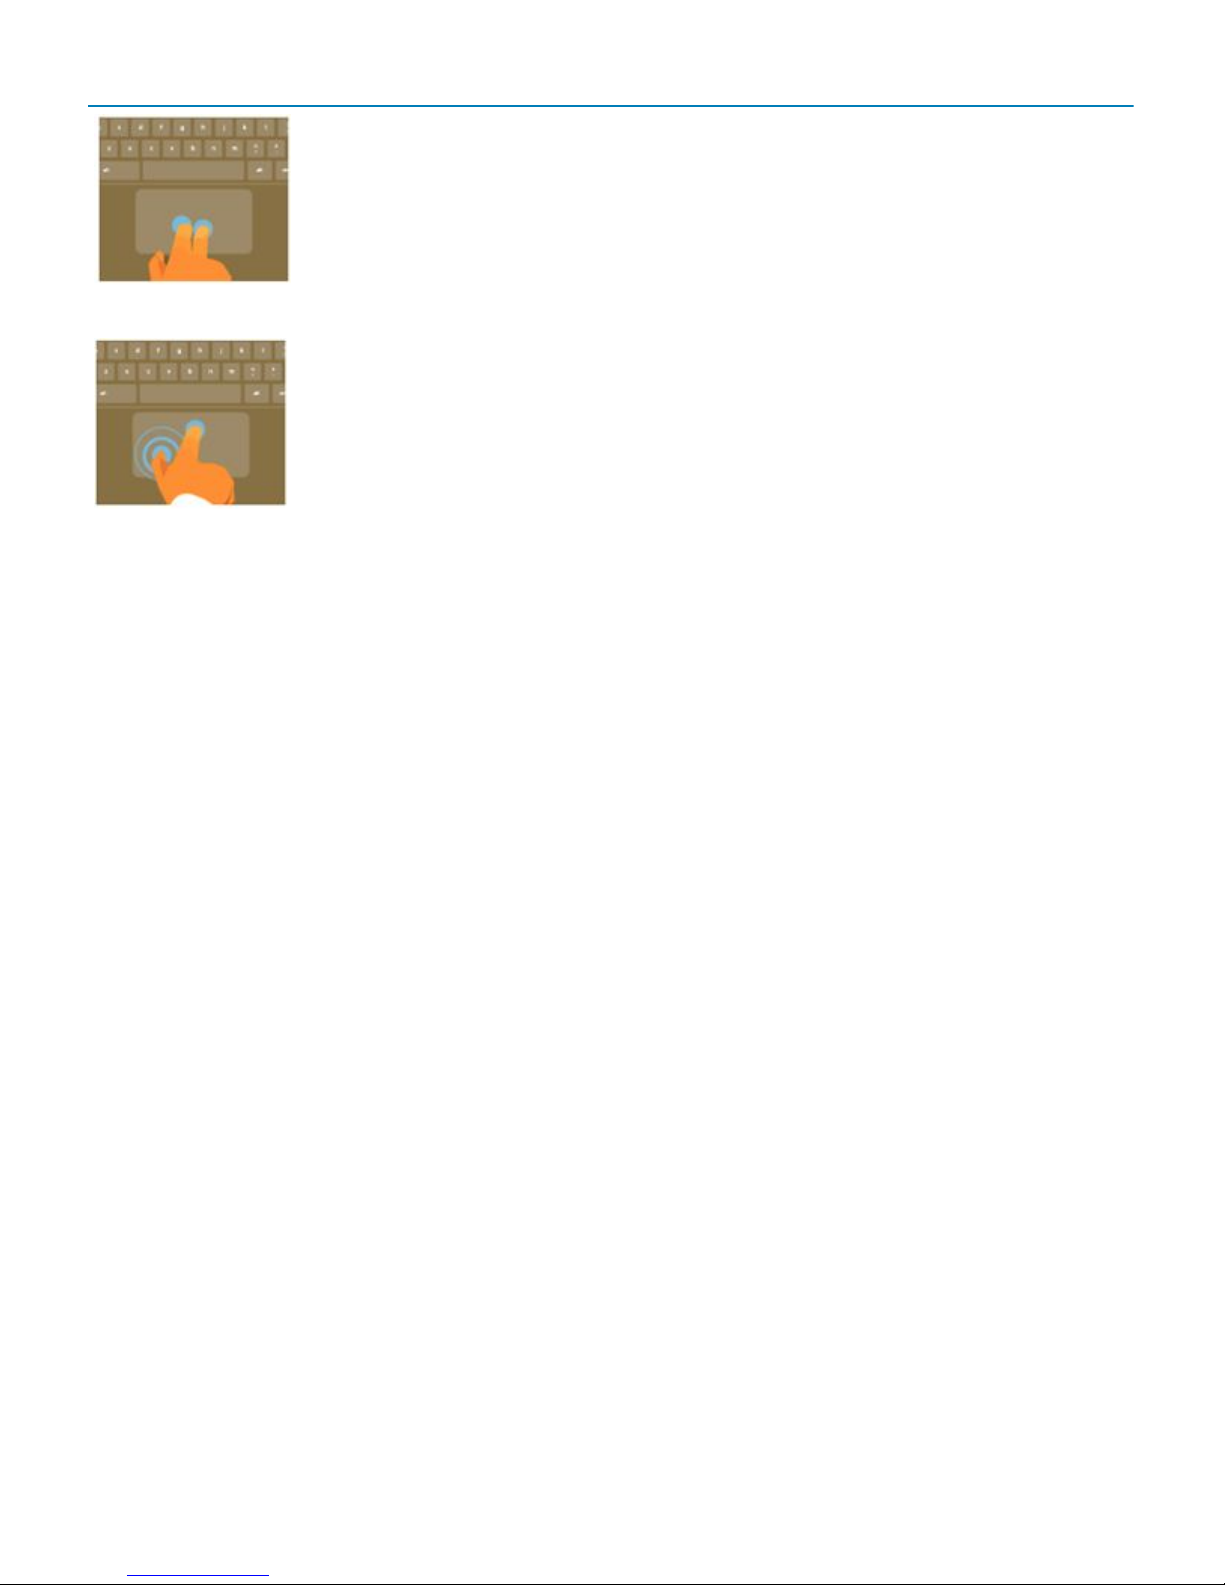
Touchpad gestures
Place two ngers on the touchpad and move them up and down to scroll vertically, left and right to scroll
horizontally. If you have Australian scrolling enabled, move two ngers up to scroll down. (It works in the same
way as say, your smartphone or tablet.) If you have multiple browser tabs open, you can also swipe left and
right with three ngers to quickly move between tabs.
Swipe Quickly move two ngers left or right to go backward or forward on web pages or while using apps.
Click the item you want to move with one nger. With a second nger, move the item. Release both ngers to
drop the item at its new location.
Power adapter
Table 19. Power adapter specications
Type
65 W
Diameter (connector)
7.4 mm
Input voltage
100 VAC-240 VAC
Input frequency
50 Hz-60 Hz
Input current (maximum)
1.5 A
Output current (continuous)
3.34 A
Rated output voltage
19.50 VDC
Temperature range:
Operating
0°C to 40°C (32°F to 104°F)
Storage
–40°C to 70°C (–40°F to 158°F)
Battery
Table 20.
Battery specications
Type
3-cell “smart” lithium-ion (42 WHr)
Voltage
11.40 VDC
Weight (maximum)
0.2 kg (0.44 lb)
Specications of Inspiron 3181 2-in-1 21
Page 22

Dimensions:
Height
5.90 mm (0.23 in)
Width
97.15 mm (3.82 in)
Depth
184.15 mm (7.25 in)
Temperature range:
Operating
0°C to 35°C (32°F to 95°F)
Storage
–20°C to 65°C (–40°F to 149°F)
Operating time
Varies depending on operating conditions and can signicantly
reduce under certain power-intensive conditions.
Charging time (approximate)
• 0~15°C : 4 hours
• 16~60°C : 3 hours
• 46~60°C : 3 hours
NOTE: Control the charging time, duration, start and
end time, and so on using the Dell Power Manger
application. For more information on the Dell Power
Manger see,
Me and My Dell
on https://www.dell.com/
Life span (approximate)
1 year warranty for 300 cycles discharge/charge cycles
Coin-cell battery
CR-2032
Display
Table 21.
Display specications
Type 11.6-inch HD touch
Panel technology HD Anti-nger
Luminance (typical) 200 nits
Dimensions (active area):
Height
144 mm (5.70 in)
Width
256.12 mm (10.08 in)
Diagonal
293.83 mm (11.60 in)
Native resolution
1366 x 768
Pixels Per Inch (PPI)
135
Contrast ratio (minimum)
16:9
Response time (maximum)
20 msec rise/fall
22 Specications of Inspiron 3181 2-in-1
Page 23

Refresh rate
60 Hz
Horizontal view angle +/-80 degrees
Vertical view angle +/-80 degrees
Pixel pitch
0.1875 mm
Power consumption (maximum) 3.0 W
Anti-glare vs glossy nish Anti-nger
Touch options Yes
Video
Table 22. Integrated graphics specications
The following table provides the detailed integrated graphics specications of Inspiron 3181 2-in-1.
Controller External display support Memory size Memory type
Intel HD Graphics One HDMI port Shared system
memory
System memory
Computer environment
Airborne contaminant level: G1 as dened by ISA-S71.04-1985
Table 23.
Computer environment
Operating Storage
Temperature range
0°C to 35°C (32°F to 95°F) –40°C to 65°C (–40°F to 149°F)
Relative humidity (maximum)
10% to 90% (non-condensing) 0% to 95% (non-condensing)
Vibration (maximum)
0.66 GRMS 1.30 GRMS
Shock (maximum)
110 G† 160 G‡
Altitude (maximum)
–15.2 m to 3,048 m (–50 ft to 10,000 ft) –15.2 m to 10,668 m (–50 ft to 35,000 ft)
* Measured using a random vibration spectrum that simulates user environment.
† Measured using a 2 ms half-sine pulse when the hard drive is in use.
‡ Measured using a 2 ms half-sine pulse when the hard-drive head is in parked position.
Specications
of Inspiron 3181 2-in-1 23
Page 24

Contacting Dell
NOTE: If you do not have an active Internet connection, you can nd contact information on your purchase invoice, packing slip,
bill, or Dell product catalog.
Dell provides several online and telephone-based support and service options. Availability varies by country and product, and some services
may not be available in your area. To contact Dell for sales, technical support, or customer service issues:
1 Go to Dell.com/support.
2 Select your support category.
3 Verify your country or region in the Choose a Country/Region drop-down list at the bottom of the page.
4 Select the appropriate service or support link based on your need.
5
24 Contacting Dell
 Loading...