

Page 1

INSPIRON
SETUP GUIDE
™
Page 2

Page 3

INSPIRON
SETUP GUIDE
Models P04F and P04G series Types P04F001 and P04G001
™
Page 4

Notes, Cautions, and Warnings
NOTE: A NOTE indicates important information that helps you make better use of your
computer.
CAUTION: A CAUTION indicates either potential damage to hardware or loss of data and tells
you how to avoid the problem.
WARNING: A WARNING indicates a potential for property damage, personal injury, or death.
__________________
Information in this document is subject to change without notice.
© 2009 Dell Inc. All rights reserved.
Reproduction of these materials in any manner whatsoever without the written permission of Dell Inc. is strictly forbidden.
Trademarks used in this text:
Intel, Pentium
countries;
trademarks of Microsoft Corporation in the United States and/or other countries;
Blu-ray Disc Association;
under license.
Other trademarks and trade names may be used in this document to refer to either the entities claiming the marks and
names or their products. Dell Inc. disclaims any proprietary interest in trademarks and trade names other than its own.
, and
Microsoft, Windows, Windows Vista
July 2009 P/N 81TR2 Rev. A00
Dell
, the
Celeron
are registered trademarks and
Bluetooth
DELL
is a registered trademark owned by Bluetooth SIG, Inc. and is used by Dell
logo,
Inspiron, YOURS IS HERE
, and
Core
Windows Vista
, and
is a trademark of Intel Corporation in the U.S. and other
DellConnect
start button logo are either trademarks or registered
Blu-ray Disc
are trademarks of Dell Inc.;
is a trademark of the
Page 5

Contents
Setting Up Your Inspiron Laptop. . . . . . . . . .5
Before Setting Up Your Computer . . . . . . . . . 5
Connect the AC Adapter . . . . . . . . . . . . . . . . .6
Connect the Network Cable (Optional) . . . . . 7
Press the Power Button . . . . . . . . . . . . . . . . . 8
Set Up Microsoft Windows. . . . . . . . . . . . . . . 9
Enable or Disable Wireless (Optional). . . . . 10
Connect to the Internet (Optional) . . . . . . . . 12
Using Your Inspiron Laptop. . . . . . . . . . . . .16
Right View Features. . . . . . . . . . . . . . . . . . . . 16
Left View Features. . . . . . . . . . . . . . . . . . . . . 18
Front View Features. . . . . . . . . . . . . . . . . . . . 20
Computer Base and Keyboard
Features . . . . . . . . . . . . . . . . . . . . . . . . . . . . . 22
Touch Pad Gestures. . . . . . . . . . . . . . . . . . . . 24
Multimedia Control Keys. . . . . . . . . . . . . . . . 26
Display Features . . . . . . . . . . . . . . . . . . . . . .28
Dell Extended Battery Life . . . . . . . . . . . . . .30
Removing and Replacing the Battery . . . . . 30
Software Features . . . . . . . . . . . . . . . . . . . . . 32
Dell Dock . . . . . . . . . . . . . . . . . . . . . . . . . . . . 35
Solving Problems . . . . . . . . . . . . . . . . . . . . .36
Beep or LED Codes . . . . . . . . . . . . . . . . . . . . 36
Network Problems . . . . . . . . . . . . . . . . . . . . . 37
Power Problems. . . . . . . . . . . . . . . . . . . . . . . 38
Memory Problems . . . . . . . . . . . . . . . . . . . . . 39
Lockups and Software Problems . . . . . . . . . 40
Using Support Tools. . . . . . . . . . . . . . . . . . .42
Dell Support Center . . . . . . . . . . . . . . . . . . . . 42
System Messages . . . . . . . . . . . . . . . . . . . . . 43
Hardware Troubleshooter . . . . . . . . . . . . . . . 45
Dell Diagnostics . . . . . . . . . . . . . . . . . . . . . . 45
3
Page 6

Contents
Restoring Your Operating System . . . . . . .50
System Restore . . . . . . . . . . . . . . . . . . . . . . . 50
Dell Factory Image Restore . . . . . . . . . . . . .52
Operating System Reinstallation . . . . . . . . . 54
Getting Help . . . . . . . . . . . . . . . . . . . . . . . . .56
Technical Support and Customer
Service . . . . . . . . . . . . . . . . . . . . . . . . . . . . . . 57
DellConnect . . . . . . . . . . . . . . . . . . . . . . . . . . 57
Online Services . . . . . . . . . . . . . . . . . . . . . . . 58
Automated Order-Status Service. . . . . . . . . 59
Product Information. . . . . . . . . . . . . . . . . . . . 59
Returning Items for Repair Under
Warranty or for Credit . . . . . . . . . . . . . . . . . . 60
Before You Call. . . . . . . . . . . . . . . . . . . . . . . .61
Contacting Dell. . . . . . . . . . . . . . . . . . . . . . . . 63
4
Finding More Information and
Resources . . . . . . . . . . . . . . . . . . . . . . . . . . .64
Basic Specifications . . . . . . . . . . . . . . . . . .66
Appendix. . . . . . . . . . . . . . . . . . . . . . . . . . . .72
Macrovision Product Notice. . . . . . . . . . . . . 72
Information for NOM, or Official
Mexican Standard (only for Mexico) . . . . . . 73
Index . . . . . . . . . . . . . . . . . . . . . . . . . . . . . . .74
Page 7

Setting Up Your Inspiron Laptop
INSPIRON
This section provides information about setting
up your Dell™ Inspiron™ 1470/1570 laptop.
Before Setting Up Your Computer
When positioning your computer, ensure that
you allow easy access to a power source,
adequate ventilation, and a level surface to
place your computer.
Restricting airflow around your Inspiron
laptop may cause it to overheat. To prevent
overheating ensure that you leave at least
10.2 cm (4 inches) at the back of the computer
and a minimum of 5.1 cm (2 inches) on all other
sides. You should never place your computer in
an enclosed space, such as a cabinet or drawer
when it is powered on.
WARNING: Do not block, push objects
into, or allow dust to accumulate in the
air vents. Do not place your Dell computer
in a low-airflow environment, such as a
closed briefcase, while it is powered on.
Restricting the airflow can damage the
computer or cause a fire. The computer
turns on the fan when the computer gets
hot. Fan noise is normal and does not
indicate a problem with the fan or the
computer.
CAUTION: Placing or stacking heavy or
sharp objects on the computer may result
in permanent damage to the computer.
5
Page 8
Setting Up Your Inspiron Laptop
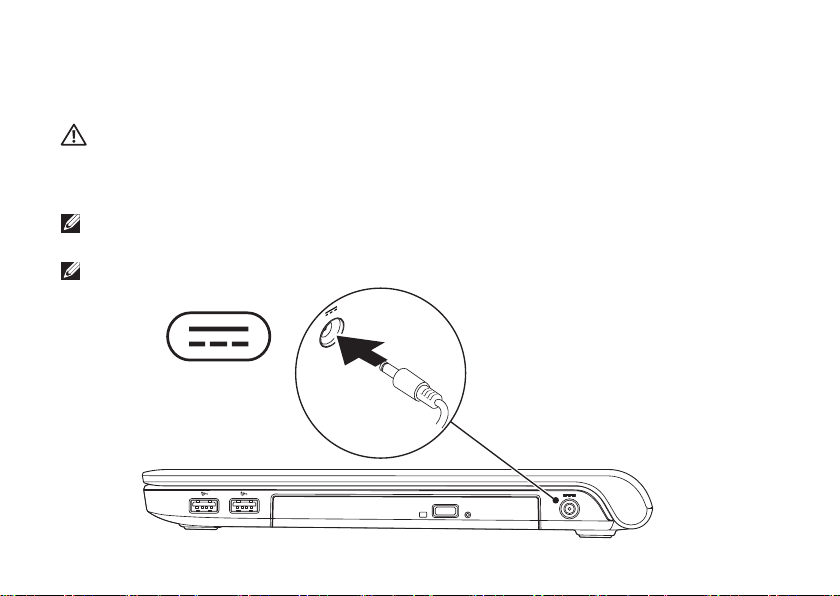
Connect the AC Adapter
Connect the AC adapter to the computer and then plug it into a wall outlet or surge protector.
WARNING: The AC adapter works with electrical outlets worldwide. However, power
connectors and power strips vary among countries. Using an incompatible cable or
improperly connecting the cable to a power strip or electrical outlet may cause fire or
permanent damage to your computer.
NOTE: Connect the power cord to the adapter firmly and ensure that the light on the adapter is
on when you turn on power.
NOTE: Use only Dell AC adapter family PA-3E, PA-10, and PA-12 with your computer.
6
Page 9
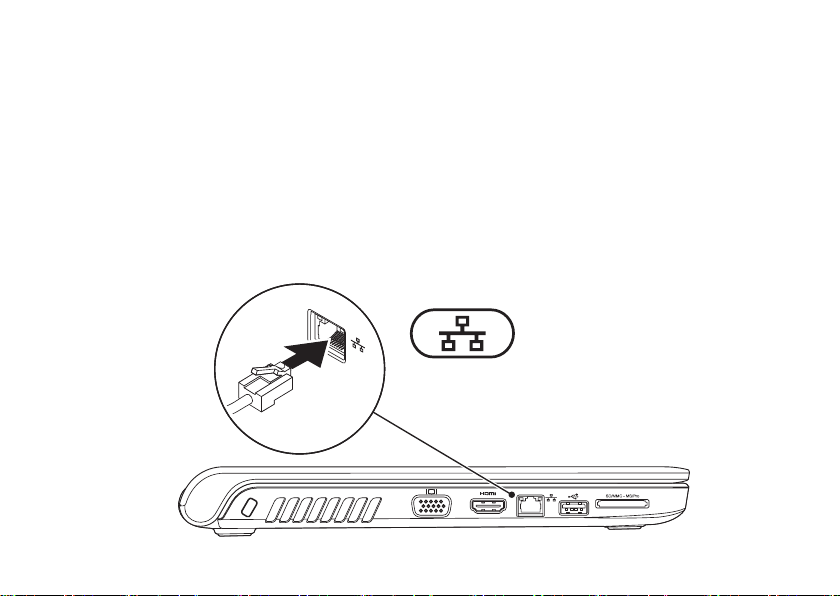
Connect the Network Cable (Optional)
To use a wired network connection, connect the network cable.
Setting Up Your Inspiron Laptop
7
Page 10
Setting Up Your Inspiron Laptop
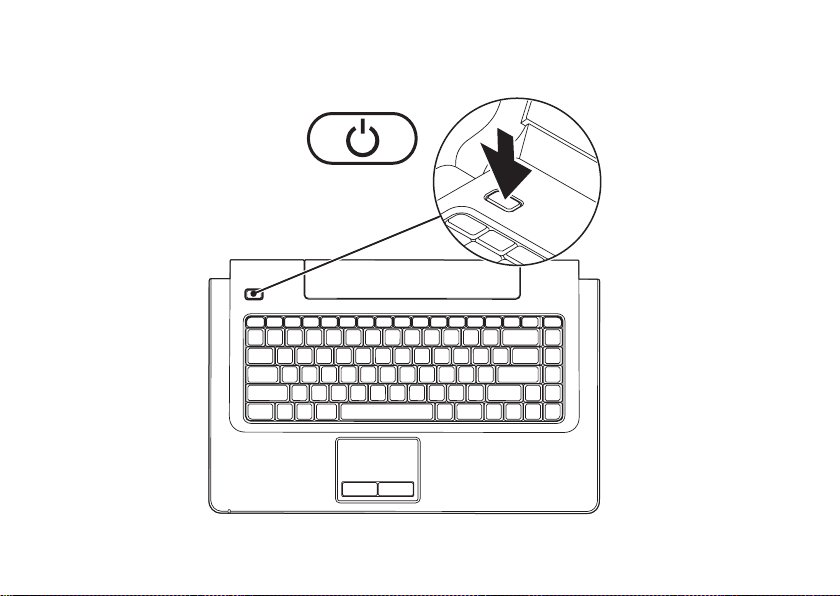
Press the Power Button
8
Page 11

Setting Up Your Inspiron Laptop
Set Up Microsoft Windows
Your Dell computer is preconfigured with Microsoft® Windows® operating system. To set up
Windows for the first time, follow the instructions on the screen. These steps are mandatory
and may take some time to complete. The Windows setup screens will take you through several
procedures including accepting license agreements, setting preferences, and setting up an Internet
connection.
CAUTION: Do not interrupt the operating system’s setup process. Doing so may render your
computer unusable and you will need to reinstall the operating system.
NOTE: For optimal performance of your computer, it is recommended that you download and
install the latest BIOS and drivers for your computer available on the Dell Support website at
support.dell.com.
9
Page 12
Setting Up Your Inspiron Laptop
Enable or Disable Wireless (Optional)
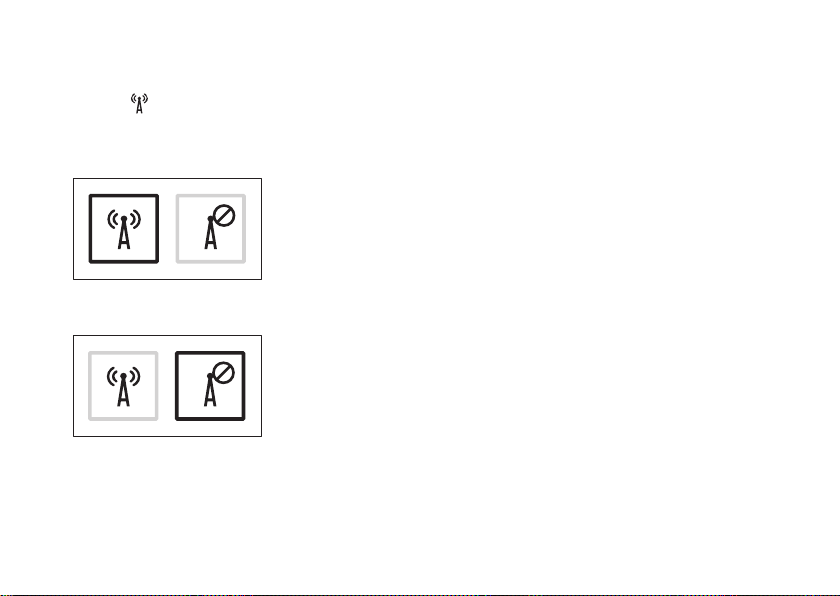
Press the key or press the <Fn><F2> keys on the keyboard to enable or disable wireless.
The wireless on or off icons appear on the screen to indicate the status.
Wireless on:
Wireless off:
For information on changing the behavior of the Fn key, see “Multimedia Control Keys” on page 26.
10
Page 13

Setting Up Your Inspiron Laptop
11
Page 14

Setting Up Your Inspiron Laptop
Connect to the Internet (Optional)
To connect to the Internet, you need an external
modem or network connection and an Internet
Service Provider (ISP).
If an external USB modem or WLAN adapter
is not a part of your original order, you can
purchase one from the Dell website at
www.dell.com.
12
Setting Up a Wired Connection
If you are using a DSL or cable/satellite •
modem connection, contact your ISP
or cellular telephone service for setup
instructions.
If you are using a dial-up connection, •
connect the telephone line to the optional
external USB modem and to the telephone
wall connector before you set up your
Internet connection.
To complete setting up your wired Internet
connection, follow the instructions in “Setting
Up Your Internet Connection” on page 14.
Page 15

Setting Up Your Inspiron Laptop
Setting Up a Wireless Connection
NOTE: To set up your wireless router,
see the documentation that shipped with
your router.
Before you can use your wireless Internet
connection, you need to connect to your
wireless router.
To setup your connection to a wireless router:
Windows Vista
Ensure that wireless is enabled on your 1.
computer (see “Enable or Disable Wireless”
on page 10).
Save and close any open files, and exit any 2.
open programs.
Click 3. Start → Connect To.
Follow the instructions on the screen to 4.
complete the setup.
®
Windows® 7
Ensure that wireless is enabled on your 1.
computer (see “Enable or Disable Wireless”
on page 10).
Save and close any open files, and exit any 2.
open programs.
Click 3. Start → Control Panel→ Network
and Sharing Center→ Connect to a network.
Follow the instructions on the screen to 4.
complete the setup.
13
Page 16

Setting Up Your Inspiron Laptop
Setting Up Your Internet Connection
ISPs and ISP offerings vary by country. Contact
your ISP for offerings available in your country.
If you cannot connect to the Internet but have
successfully connected in the past, the Internet
Service Provider (ISP) might have a service
outage. Contact your ISP to check the service
status, or try connecting again later.
Have your ISP information ready. If you do not
have an ISP, the Connect to the Internet wizard
can help you get one.
14
To set up your Internet connection:
Windows Vista
NOTE: The following instructions are
applicable to the Windows default view,
so they may not apply if you set your Dell™
computer to the Windows Classic view.
Save and close any open files, and exit any 1.
open programs.
Click 2. Start → Control Panel.
Click 3. Network and Internet→ Network and
Sharing Center→ Set up a connection or
Network→ Connect to the Internet.
The Connect to the Internet window appears.
NOTE: If you do not know which type of
connection to select, click Help me choose
or contact your ISP.
Follow the instructions on the screen and 4.
use the setup information provided by your
ISP to complete the setup.
®
Page 17

Windows® 7
Save and close any open files, and exit any 1.
open programs.
Click 2. Start → Control Panel→ Network
and Sharing Center→ Set up a new
connection or network→ Connect to the
Internet.
The Connect to the Internet window appears.
NOTE: If you do not know which type of
connection to select, click Help me choose
or contact your ISP.
Follow the instructions on the screen and 3.
use the setup information provided by your
ISP to complete the setup.
Setting Up Your Inspiron Laptop
15
Page 18
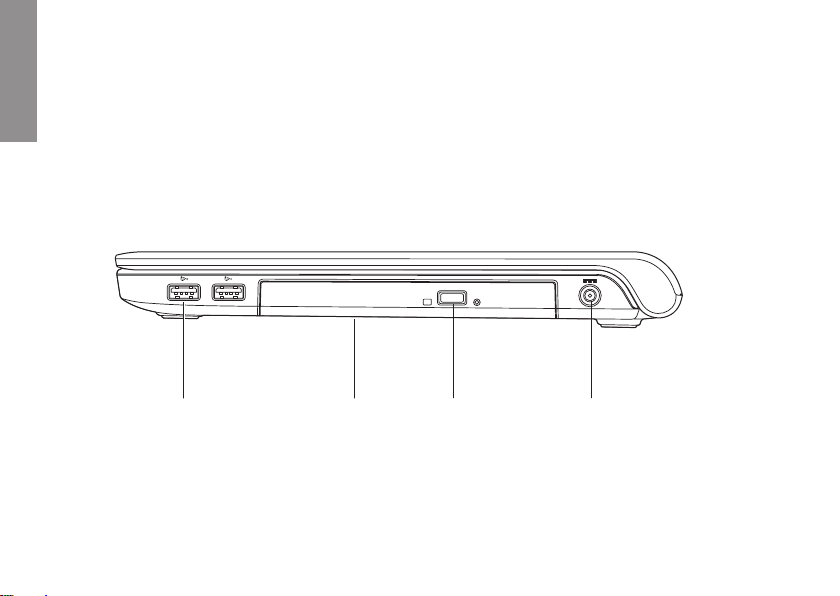
Using Your Inspiron Laptop
1 2
4
3
This section provides information about the features available on your Inspiron 1470/1570 laptop.
INSPIRON
Right View Features
16
Page 19
Using Your Inspiron Laptop
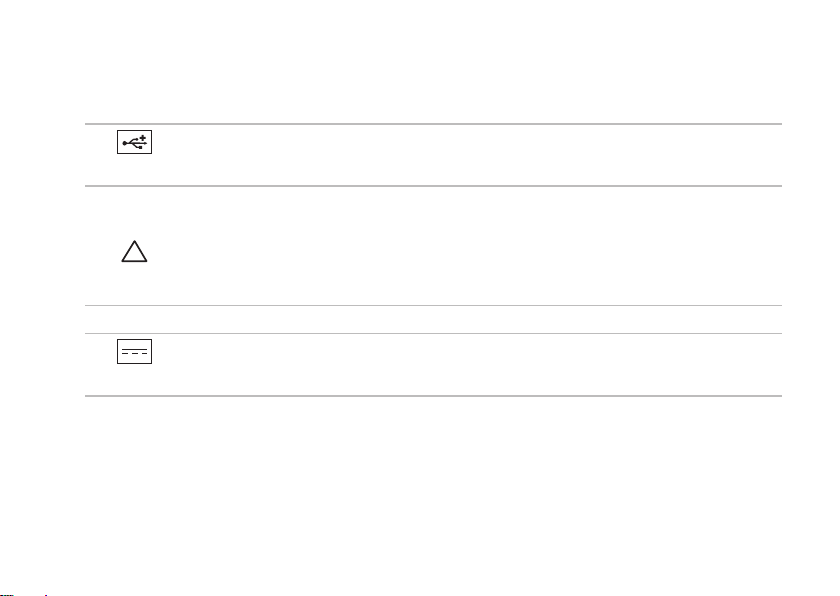
1
USB 2.0 connectors (2) – Connects to USB devices, such as a mouse, keyboard, printer,
external drive, or MP3 player.
2
Optical drive – Plays or records CDs, DVDs, or Blu-ray Discs (optional). Ensure that the side
with print or writing is facing upward when inserting discs.
CAUTION: This drive supports nonstandard-sized and -shaped discs; however,
degradation in drive performance may be experienced, and in extreme cases, the drive
may be damaged.
3
Eject button – Opens the optical drive tray when pressed.
4
AC adapter connector – Connects to the AC adapter to power the computer and charge
the battery.
17
Page 20
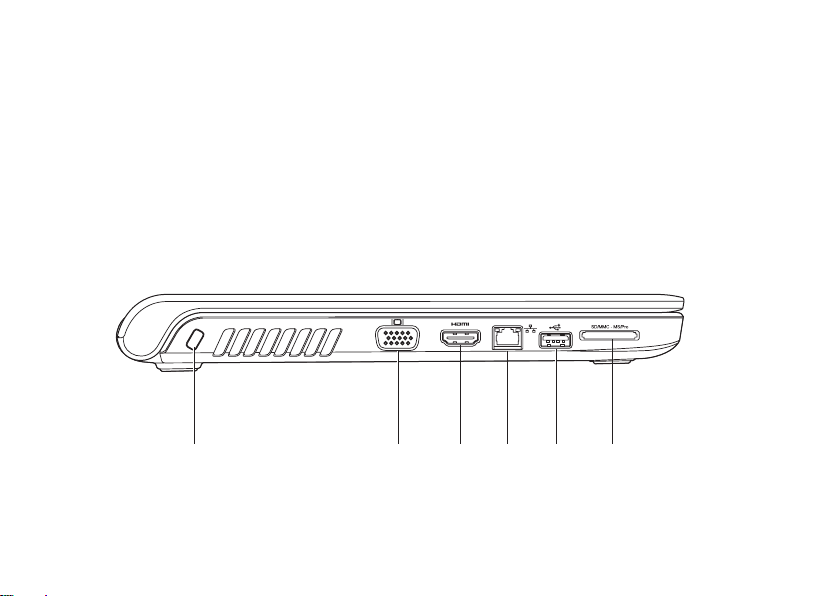
Using Your Inspiron Laptop
1 2 63
4 5
Left View Features
18
Page 21
Using Your Inspiron Laptop
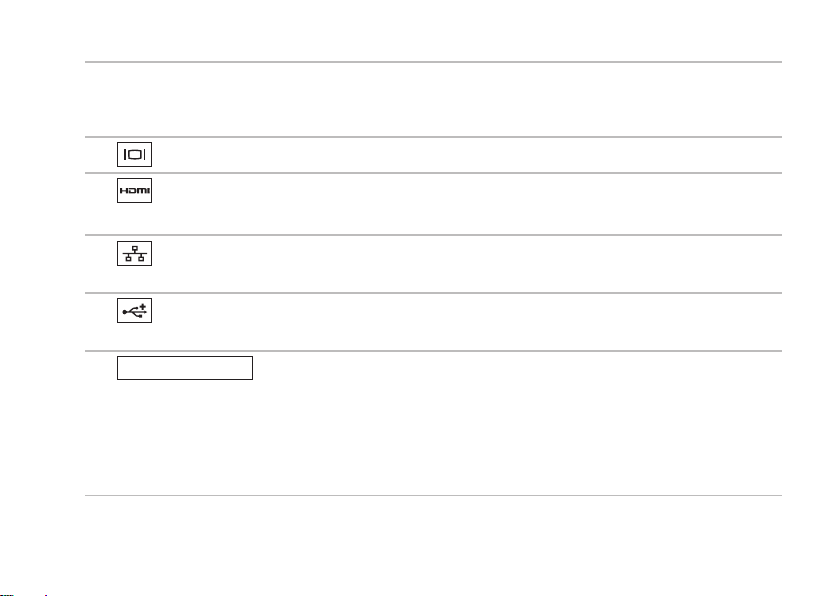
1
Security cable slot – Attaches a commercially available antitheft device to the computer.
NOTE: Before you buy an antitheft device, ensure that it works with the security cable slot on
your computer.
2
VGA connector – Connects to video devices, such as a monitor or a projector.
3
HDMI connector – Connects to a TV for both 5.1 audio and video signals.
NOTE: When used with a monitor, only the video signal is read.
4
Network connector – Connects your computer to a network or a broadband device if you
are using a wired network.
5
USB 2.0 connector – Connects to USB devices, such as a mouse, keyboard, printer,
external drive, or MP3 player.
SD/MMC - MS/Pro
6
7-in-1 Memory Card Reader – Provides a fast and convenient way to view
and share digital photos, music, videos, and documents stored on the memory cards (see
“Basic Specifications” on page 66 for supported memory cards).
NOTE: Your computer ships with a plastic blank installed in the memory card slot. Blanks
protect unused slots from dust and other particles. Save the blank for use when no memory
card is installed in the slot; blanks from other computers may not fit your computer.
19
Page 22
Using Your Inspiron Laptop
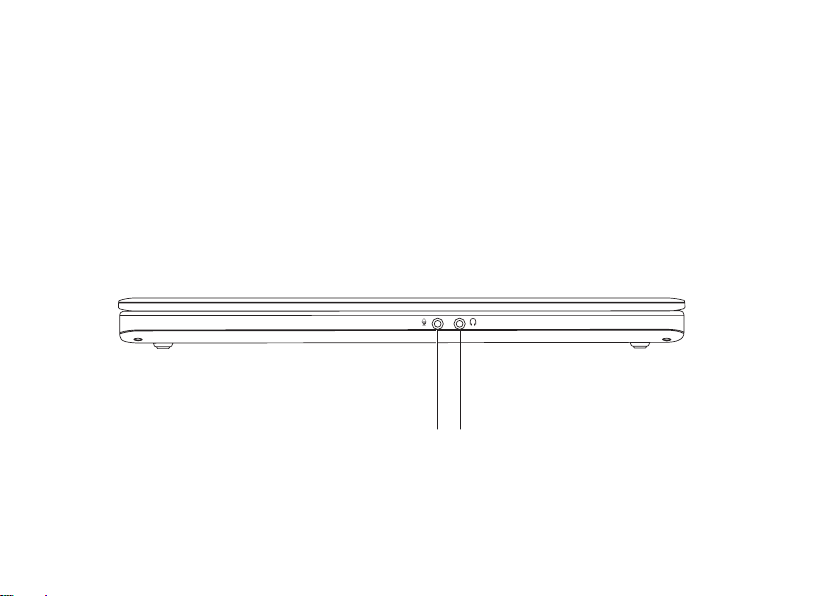
1 2
Front View Features
20
Page 23
Using Your Inspiron Laptop
1
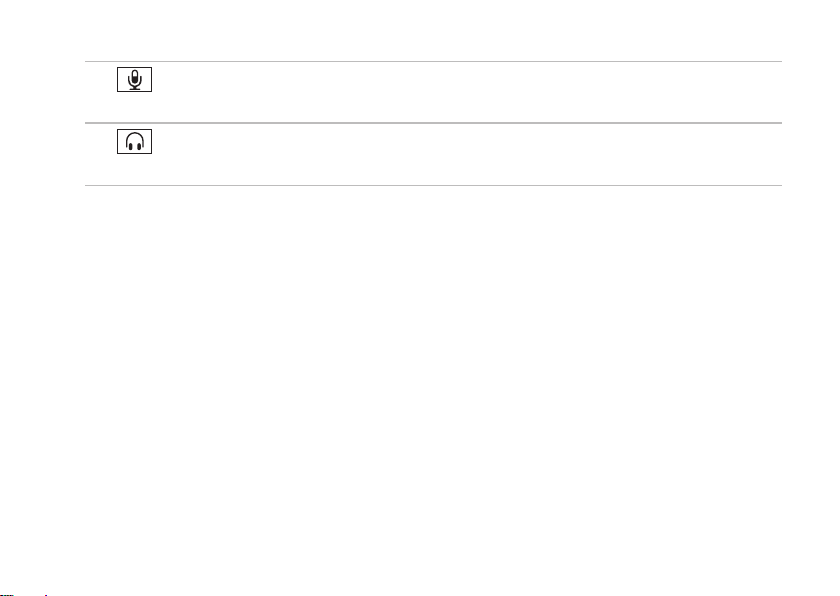
Audio in/Microphone connector – Connects to a microphone or inputs signal for use
with audio programs.
2
Audio out/Headphone connector – Connects to headphones or sends audio to a powered
speaker or sound system.
21
Page 24
Using Your Inspiron Laptop
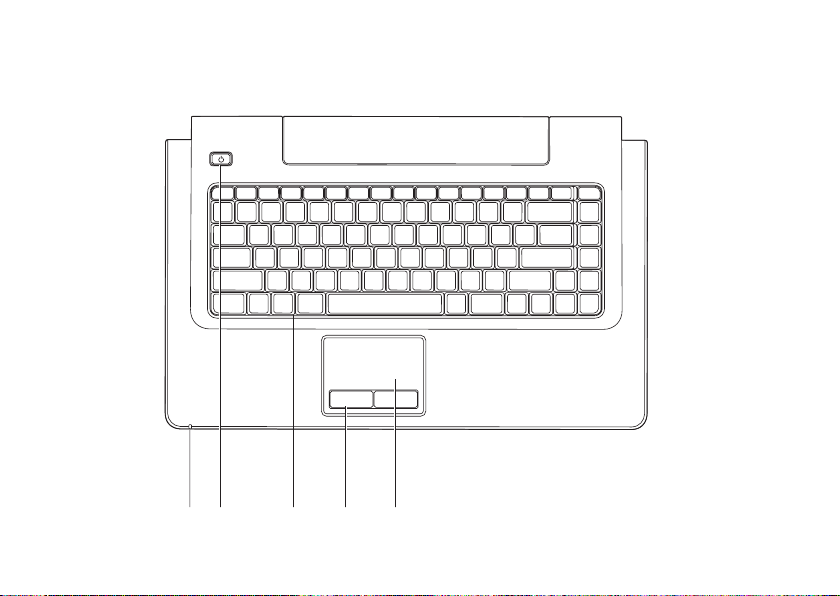
4 52 3
1
Computer Base and Keyboard Features
22
Page 25
Using Your Inspiron Laptop
1
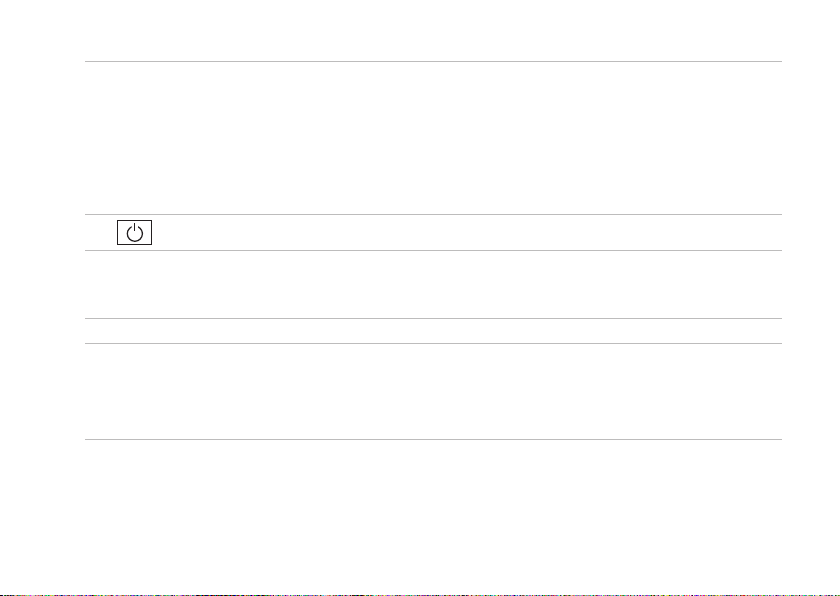
Power/Battery activity indicator – Indicates the following power/battery charge states:
Solid white • – Computer is on, and the AC adapter is charging the battery.
Solid amber • – Computer is in stand-by mode, and the battery charge is low.
Blinking white • – Computer in stand-by mode, and the AC adapter is charging the battery or
the battery charge is good.
Off • – Computer is off or in hibernate state.
2
Power button – Turns the computer on or off when pressed.
3
Keyboard/Multimedia control keys – For more information about the keyboard, see the
Technology Guide
Control Keys” and page 26.
4
Touch pad buttons – Provide left-click and right-click functions like those on a mouse.
5
Touch pad – Provides the functionality of a mouse to move the cursor, drag or move selected
items, and right-click or left-click by tapping the surface.
The touch pad supports the Scroll, Flick, Zoom, Rotate, and Desktop features. To change the
touch pad settings, double-click the Dell Touch pad icon in the notification area of the desktop.
. For more information about the multimedia control keys, see “Multimedia
Dell
23
Page 26
Using Your Inspiron Laptop
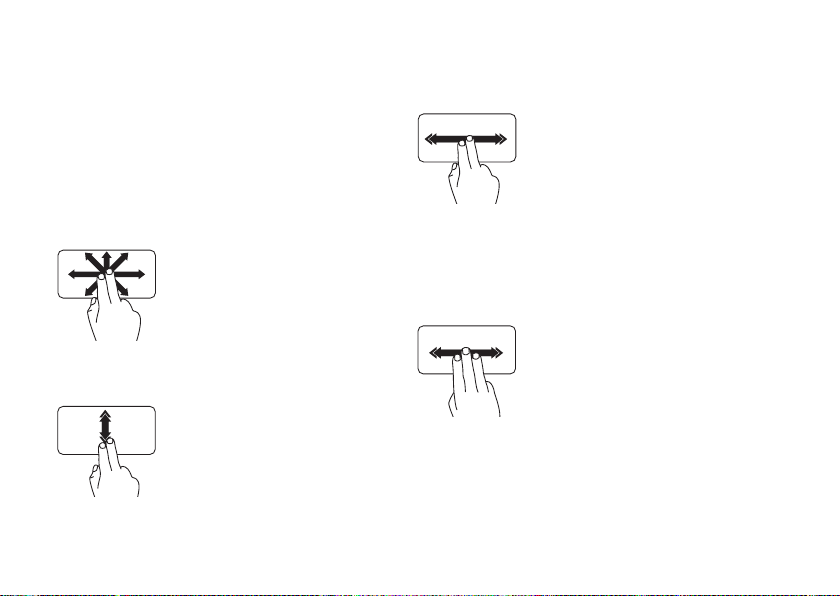
Touch Pad Gestures
Scroll
Allows you to scroll through content. The scroll
feature includes:
Pan – Allows you to move the focus on the
selected object when the entire object is not
visible.
Move two fingers in the
desired direction to pan scroll
the selected object.
Auto Scroll Vertical – Allows you to scroll up or
down on the active window.
Move two fingers up or down
at a fast pace to activate
vertical auto scrolling.
Tap on the touch pad to stop
auto scrolling.
24
Auto Scroll Horizontal – Allows you to scroll
left or right on the active window.
Move two fingers to your left or
right at a fast pace to activate
horizontal auto scrolling.
Tap on the touch pad to stop
auto scrolling.
Flick
Allows you to flip content forward or backward
based on the direction of the flick.
Move three fingers quickly in
the desired direction to flip
content in the active window.
Page 27
Using Your Inspiron Laptop
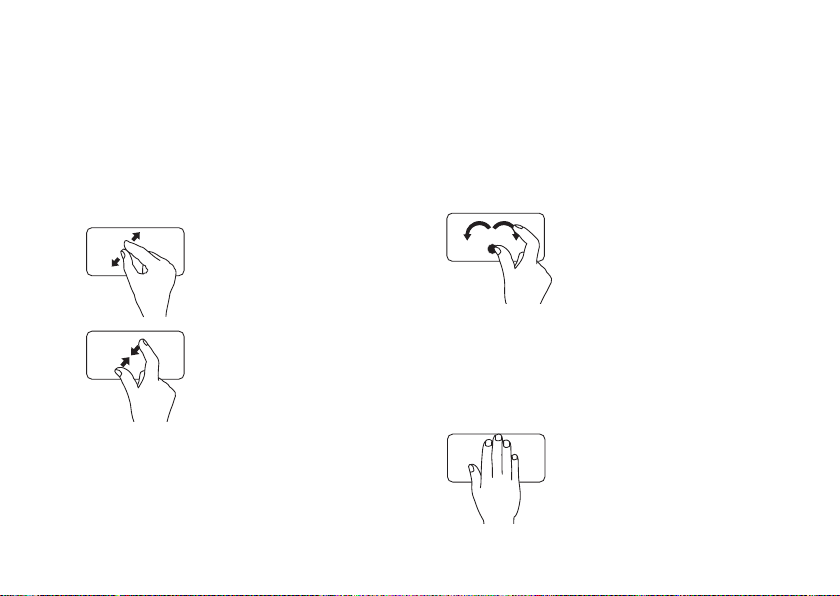
Zoom
Allows you to increase or decrease the
magnification of the screen content. The zoom
feature includes:
Pinch – Allows you to zoom in or zoom out
by moving two fingers apart or bringing them
closer together on the touch pad.
To zoom in
apart to enlarge the view of the
active window.
To zoom out
close together to reduce the
view of the active window.
: Move two fingers
: Move two fingers
Rotate
Allows you to rotate the active content on the
screen. The rotate feature includes:
Twist – Allows you to rotate active content in
90° increments using two fingers where one
finger is anchored and the other rotates.
Keeping the thumb in place,
move the index finger in
an arced direction right or
left to rotate the selected
item 90° clockwise or
counterclockwise.
Desktop
Allows you to minimize all open windows so that
the desktop is visible.
Place your hand on the touch
pad in any orientation, briefly
hold in place and then remove
your hand.
25
Page 28

Using Your Inspiron Laptop
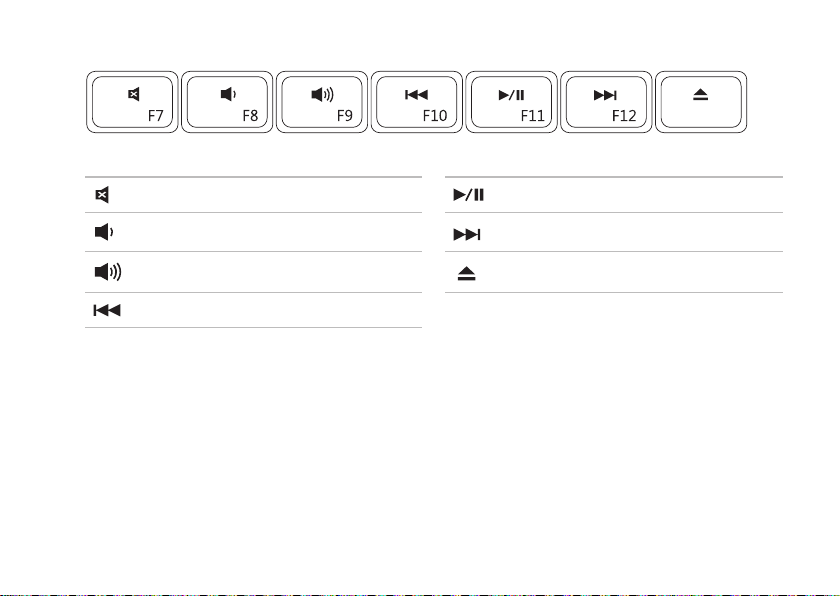
Multimedia Control Keys
You can configure the multimedia control keys on the keyboard using the Function Key Behavior in
the System Setup (BIOS) utility. The options in the Function Key Behavior setting are:
Multimedia Key First – This is the default setting. Pressing any multimedia control key performs the
associated multimedia action. For function key, press <Fn> + the required function key.
Function Key First – Pressing any function key performs the associated function. For multimedia
action, press <Fn> + the required multimedia control key.
NOTE: The Multimedia Key First option is active only in the operating system.
26
Page 29
Using Your Inspiron Laptop
Mute the sound Play or pause
Decrease the volume level Play the next track or chapter
Increase the volume level Eject the disc
Play the previous track or chapter
27
Page 30
Using Your Inspiron Laptop
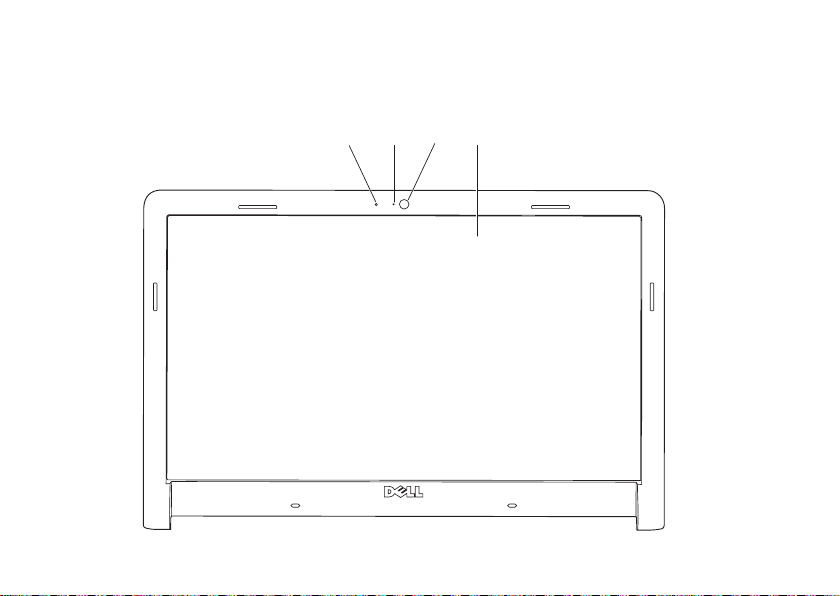
1 2 3 4
Display Features
The display panel holds a camera and accompanying digital microphone.
28
Page 31

Using Your Inspiron Laptop
1
Digital microphone – Provides quality sound for audio chatting and voice recording.
2
Camera activity indicator – Indicates if the camera is on or off.
3
Camera – Built-in camera for video capture, conferencing, and chat.
4
Display – Your display can vary based on selections you made when purchasing your
computer. For more information about displays, see the Dell Technology Guide.
29
Page 32

Using Your Inspiron Laptop
Dell Extended Battery Life
The Dell Extended Battery Life feature provides
options to derive the maximum backup time from
your battery. This feature is enabled by default
and is activated when you disconnect the AC
power.
Press <F3> to enable or disable the feature.
The Extended Battery Life pop-up appears to
indicate the current status.
To learn more about the customization options
for Dell Extended Battery Life:
Press <F3>. 1.
The Extended Battery Life pop-up appears.
Click 2. Show Settings.
The Battery Meter window appears.
Click 3. What is Dell Extended Battery Life?
30
Removing and Replacing the Battery
WARNING: Using an incompatible battery
may increase the risk of fire or explosion.
This computer should only use a battery
purchased from Dell. Do not use batteries
from other computers.
WARNING: Before removing the battery,
shut down the computer, and remove
external cables (including the AC adapter).
To remove the battery:
Shut down the computer and turn it over. 1.
Slide the battery release latch to the side.2.
Slide the battery away from the battery bay.3.
To replace the battery:
Slide the battery into the battery bay.1.
Click the battery into place.2.
Page 33
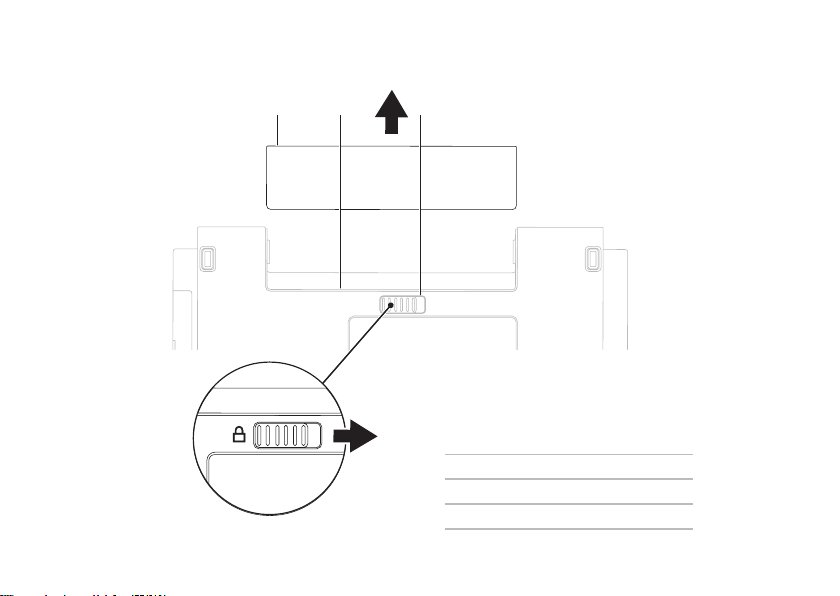
1 2 3
1
battery
2
battery bay
3
battery release latch
Using Your Inspiron Laptop
31
Page 34

Using Your Inspiron Laptop
Software Features
NOTE: For more information about the
features described in this section, see
the Dell Technology Guide on your hard
drive or on the Dell Support website at
support.dell.com.
Productivity and Communication
You can use your computer to create
presentations, brochures, greeting cards, fliers,
and spreadsheets. You can also edit and view
digital photographs and images. Check your
purchase order for software installed on
your computer.
After connecting to the Internet, you can access
websites, setup an e-mail account, and upload
or download files.
Entertainment and Multimedia
You can use your computer to watch videos,
play games, create your own CDs/DVDs, listen to
music or internet radio stations. Your optical disc
32
drive may support multiple disc media formats
including CDs, DVDs, and Blu-ray Discs (optional).
You can download or copy pictures and video files
from portable devices, such as digital cameras
and cell phones. Optional software applications
enable you to organize and create music and
video files that can be recorded to disc, saved
on portable products such as MP3 players and
handheld entertainment devices, or played and
viewed directly on connected TVs, projectors,
and home theater equipment.
Customizing the Desktop
You can use the customizing options available
in your operating system to change the
appearance, resolution, wallpaper, screensaver,
or other features on your desktop.
Windows Vista
Right-click an open area of the desktop.1.
Click 2. Personalize, to open the Personalize
appearance and sounds window and learn
more about your customization options.
®
Page 35

Using Your Inspiron Laptop
Windows® 7
Right-click an open area of the desktop.1.
Click 2. Personalize, to open the Change
the visuals and sounds on your computer
window and learn more about your
customization options.
Customizing Your Energy Settings
You can use the power options in your operating
system to configure the power settings on your
computer. The Microsoft® Windows® operating
system installed on your Dell computer provides
three default options:
Windows Vista
®
Dell Recommended• — Offers full
performance when you need it and saves
power during periods of inactivity.
Power saver• — Saves power on your
computer by reducing system performance
to maximize the life of the computer and by
reducing the amount of energy consumed by
your computer over its lifetime.
High performance• — Provides the highest
level of system performance on your
computer by adapting processor speed
to your activity and by maximizing system
performance.
Windows® 7
Power saver• — Saves power on your
computer by reducing system performance
to maximize the life of the computer and by
reducing the amount of energy consumed by
your computer over its lifetime.
Balanced (recommended)• — Automatically
balances the performance of your computer
by consuming energy on capable hardware.
33
Page 36

Using Your Inspiron Laptop
Transferring Information to a New
Computer
Windows Vista
NOTE: The following steps are applicable
for the Windows default view, so they may
not apply if you set your Dell™ computer to
the Windows Classic view.
Click 1. Start → Control Panel→ System and
Maintenance→ Welcome Center→ Transfer
files and settings.
If the User Account Control window appears,
click Continue.
Follow the instructions on the 2. Windows Easy
Transfer wizard.
Windows® 7
Click 1. Start → Control Panel→ Getting
Started→ Transfer files from another
computer.
Follow the instructions on the 2. Windows Easy
Transfer wizard.
34
®
Backing Up Your Data
It is recommended that you periodically back
up files and folders on your computer. To back
up files:
Windows Vista
Click 1. Start → Control Panel→ System
and Maintenance→ Back Up and Restore
Center→ Back up files.
If the User Account Control window appears,
click Continue.
NOTE: Certain editions of Windows Vista
provide an option to back up your computer.
Follow the instructions on the 2. Back Up Files
wizard.
Windows® 7
Click 1. Start → Control Panel→ Back Up
and Restore.
Click 2. Set up backup....
Follow the instructions on the 3. Configure
Backup wizard.
®
Page 37
Using Your Inspiron Laptop
Dell Dock
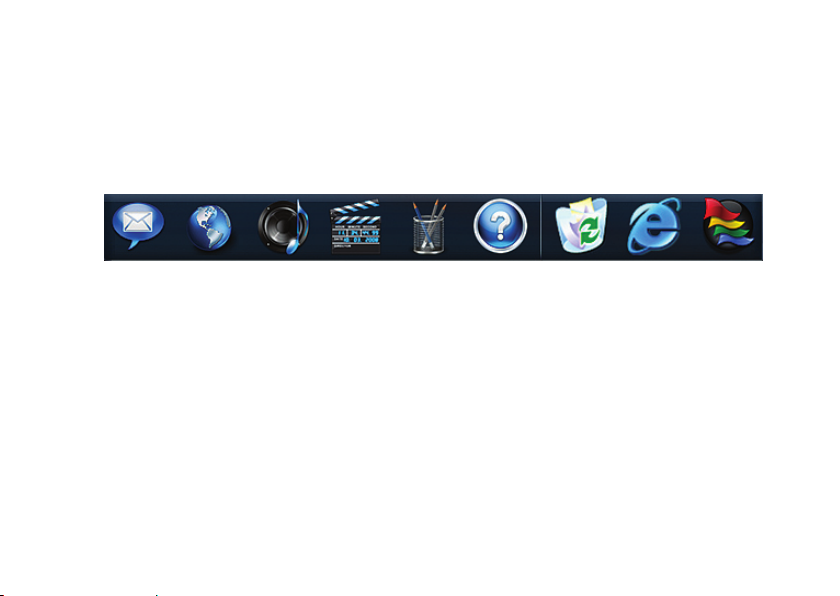
The Dell Dock is a group of icons that provide easy access to frequently-used applications, files,
and folders. You can personalize the Dock by:
Adding or removing icons•
Grouping related icons into categories•
Changing the color and location of the Dock•
Changing the behavior of the icons•
Add a Category
Right-click the Dock, click 1. Add→ Category.
The Add/Edit Category window appears.
Enter a title for the category in the 2. Title field.
Select an icon for the category from the 3.
Select an image: box.
Click 4. Save.
Add an Icon
Drag and drop the icon to the Dock or a
category.
Remove a Category or Icon
Right-click the category or icon on the Dock 1.
and click Delete shortcut or Delete category.
Follow the instructions on the screen.2.
Personalize the Dock
Right-click the Dock and click 1. Advanced
Setting....
Choose the desired option to personalize the 2.
Dock.
35
Page 38

Solving Problems
This section provides troubleshooting
INSPIRON
information for your computer. If you cannot
solve your problem using the following
guidelines, see “Using Support Tools” on
page 42 or “Contacting Dell” on page 63.
WARNING: Only trained service personnel
should remove the computer cover. See the
Service Manual
website at support.dell.com for advanced
service and troubleshooting instructions.
36
on the Dell Support
Beep or LED Codes
If your monitor cannot display errors or
problems, your computer may emit a series of
beeps or the power/battery activity indicator
may flash in various sequences during start-up.
If this occurs, Contact Dell (see “Contacting
Dell” on page 65) for further assistance.
Page 39

Solving Problems
Network Problems
Wireless Connections
If the wireless network connection is lost —
The wireless router is offline or wireless has
been disabled on the computer.
Check your wireless router to ensure it is •
powered on and connected to your data
source (cable modem or network hub).
Interference may be blocking or interrupting •
your wireless connection. Try moving the
computer closer to your wireless router.
Re-establish your connection to the •
wireless router (see “Setting Up a Wireless
Connection” on page 13).
Wired Connections
If the wired network connection is lost — The
cable is loose or damaged.
Check the cable to ensure it is plugged in •
and not damaged.
If the problem persists, contact your network •
administrator or ISP.
37
Page 40

Solving Problems
Power Problems
If the power light is off — The computer is
either turned off, in hibernate state, or not
receiving power.
Press the power button. The computer •
resumes normal operation if it is off or in
hibernate mode.
Reseat the power cable into both the •
power connector on the computer and the
electrical outlet.
If the computer is plugged into a power strip, •
ensure that the power strip is plugged into
an electrical outlet and that the power strip
is turned on. Also bypass power protection
devices, power strips, and power extension
cables to verify that the computer turns on
properly.
Ensure that the electrical outlet is working •
by testing it with another device, such as
a lamp.
38
Check the AC adapter cable connections. •
If the AC adapter has a light, ensure that the
light on the AC adapter is on.
If the power light is solid white and the
computer is not responding — The display may
not be responding. Press the power button until
the computer turns off and then turn it back on.
If the power light is blinking white — The
computer is in standby mode. Move the mouse,
touch the touch pad, or press the power button
to resume normal operation.
If the power light is solid amber — The
computer is in standby mode and the battery
charge is low.
Connect the AC adapter to charge the •
battery.
Move the mouse, touch the touch pad, or •
press the power button to resume normal
operation.
Page 41

Solving Problems
If you encounter interference that hinders
reception on your computer — An unwanted
signal is creating interference by interrupting or
blocking other signals. Some possible causes of
interference are:
Power, keyboard, and mouse extension cables.•
Too many devices connected to a power strip.•
Multiple power strips connected to the same •
electrical outlet.
Memory Problems
If you receive an insufficient memory
message —
Save and close any open files and exit any •
open programs you are not using to see if
that resolves the problem.
See the software documentation for •
minimum memory requirements. If
necessary, install additional memory (see
the Service Manual on the Dell Support
website at support.dell.com).
Reseat the memory modules (see the •
Service Manual on the Dell Support website
at support.dell.com) to ensure that your
computer is successfully communicating
with the memory.
If you experience other memory problems —
Ensure that you are following the memory •
installation guidelines (see the Service
Manual on the Dell Support website at
support.dell.com).
Check if the memory module is compatible •
with your computer. Your computer supports
DDR3 memory. For more information about the
type of memory supported by your computer,
see “Basic Specifications” on page 66.
Run the Dell Diagnostics (see “Dell •
Diagnostics” on page 45).
Reseat the memory modules (see the •
Service Manual on the Dell Support website at
support.dell.com) to ensure that your computer
is successfully communicating with the memory.
39
Page 42

Solving Problems
Lockups and Software Problems
If the computer does not start up — Ensure
that the power cable is firmly connected to the
computer and to the electrical outlet.
If a program stops responding —
End the program:
Press <Ctrl><Shift><Esc> simultaneously.1.
Click 2. Applications.
Click the program that is no longer 3.
responding
Click 4. End Task.
If a program crashes repeatedly — Check the
software documentation. If necessary, uninstall
and then reinstall the program.
NOTE: Software usually includes
installation instructions in its
documentation or on the CD.
40
If the computer stops responding or a solid blue
screen appears —
WARNING: You might lose data if you are
unable to perform an operating system
shutdown.
If you are unable to get a response by pressing
a key on your keyboard or moving your mouse,
press the power button for at least 8 to 10 seconds
until the computer turns off and then restart your
computer.
If a program is designed for an earlier
Microsoft® Windows® operating system —
Run the Program Compatibility Wizard. The
Program Compatibility Wizard configures a
program so that it runs in an environment similar
to an earlier version of Microsoft Windows
operating system environments.
Page 43

Solving Problems
To run the Program Compatability Wizard:
Windows Vista
®
Click 1. Start → Control Panel→
Programs→ Use an older program with this
version of Windows.
In the welcome screen, click 2. Next.
Follow the instructions on the screen.3.
Windows® 7
Click 1. Start .
In the search box, type 2. Use an older
program with this version of
Windows and press <Enter>.
Follow the instructions on the 3. Program
Compatibility wizard.
If you have other software problems —
Back up your files immediately.•
Use a virus-scanning program to check the •
hard drive or CDs.
Save and close any open files or programs •
and shut down your computer through the
Start menu.
Check the software documentation or •
contact the software manufacturer for
troubleshooting information:
Ensure that the program is compatible –
with the operating system installed on
your computer.
Ensure that your computer meets the –
minimum hardware requirements needed
to run the software. See the software
documentation for information.
Ensure that the program is installed and –
configured properly.
Verify that the device drivers do not –
conflict with the program.
If necessary, uninstall and then reinstall –
the program.
41
Page 44
Using Support Tools
Dell Support Center
INSPIRON
The Dell Support Center helps you find
the service, support, and system-specific
information you need.
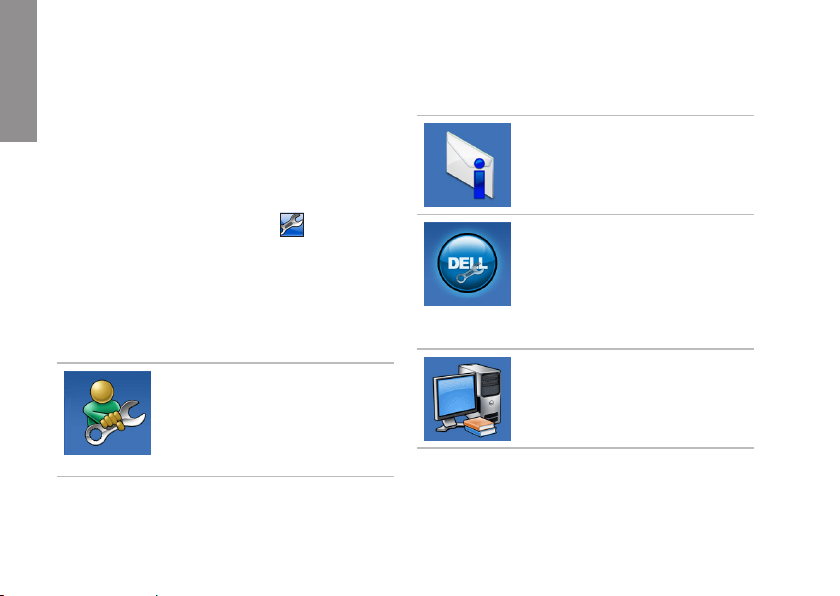
To launch the application, click the icon in the
taskbar.
The Dell Support Center home page displays your
computer’s model number, service tag, express
service code, and service contact information.
The home page also provides links to access:
Self Help (Troubleshooting,
Security, System Performance,
Network/Internet, Backup/
Recovery, and Windows
operating system)
42
Alerts (technical support alerts
relevant to your computer)
Assistance from Dell (Technical
Support with DellConnect™,
Customer Service, Training and
Tutorials, How-To Help with Dell
on Call, and Online Scan with
PC CheckUp)
About Your System (System
Documentation, Warranty
Information, System Information,
Upgrades & Accessories)
For more information about Dell Support Center
and available support tools, click the Services
tab at support.dell.com.
Page 45

Using Support Tools
System Messages
If your computer has an issue or error, it may
display a System Message that will help you identify
the cause and action needed to resolve the issue.
NOTE: If the message you received is not
listed in the following examples, see the
documentation for either the operating
system or the program that was running
when the message appeared. Alternatively
you could see the Dell Technology Guide
on your hard drive or on the Dell Support
website at support.dell.com or see
“Contacting Dell” on page 63 for assistance.
Alert! Previous attempts at booting this system
have failed at checkpoint [nnnn]. For help
in resolving this problem, please note this
checkpoint and contact Dell Technical
Support — The computer failed to complete
the boot routine three consecutive times for
the same error. Contact Dell for assistance
(see “Contacting Dell” on page 63).
CMOS checksum error — Possible motherboard
failure or Real Time Clock (RTC) battery low.
Replace the RTC coin-cell battery (see the
Service Manual on the Dell Support website
at support.dell.com) or contact Dell (see
“Contacting Dell” on page 63).
CPU fan failure — CPU fan has failed. Replace
the CPU fan (see the Service Manual on the Dell
Support website at support.dell.com).
Hard-disk drive failure — Possible hard disk
drive failure during POST. Contact Dell for
assistance (see “Contacting Dell” on page 63).
Hard-disk drive read failure — Possible hard
disk drive failure during HDD boot test. Contact
Dell for assistance (see “Contacting Dell” on
page 63).
Keyboard failure — Keyboard failure or
loose cable.
To replace the keyboard, see the Service
Manual on the Dell Support website at
support.dell.com.
43
Page 46

Using Support Tools
No boot device available — No bootable
partition on hard disk drive, the hard disk drive
cable is loose, or no bootable device exists.
If the hard drive is your boot device, ensure •
that the cables are connected and that the
drive is installed properly and partitioned as
a boot device.
Enter system setup and ensure that the boot •
sequence information is correct (see the
Dell Technology Guide on the Dell Support
website at support.dell.com).
No timer tick interrupt — A chip on the system
board might be malfunctioning or motherboard
failure. Contact Dell for assistance (see
“Contacting Dell” on page 63).
44
USB over current error — Disconnect the USB
device. Your USB device needs more power for
it to function properly. Use an external power
source to connect the USB device, or if your
device has two USB cables, connect both
of them.
CAUTION - Hard Drive SELF MONITORING
SYSTEM has reported that a parameter has
exceeded its normal operating range. It is
recommended that you back up your data
regularly. A parameter out of range may or may
not indicate a potential hard drive problem —
S.M.A.R.T error, possible hard disk drive failure.
Contact Dell for assistance (see “Contacting
Dell” on page 63).
Page 47

Using Support Tools
Hardware Troubleshooter
If a device is either not detected during
the operating system setup or is detected
but incorrectly configured, you can use the
Hardware Troubleshooter to resolve the
incompatibility.
To start the Hardware Troubleshooter:
Click 1. Start → Help and Support.
Type 2. hardware troubleshooter in
the search field and press <Enter> to start
the search.
In the search results, select the option that 3.
best describes the problem and follow the
remaining troubleshooting steps.
Dell Diagnostics
If you experience a problem with your
computer, perform the checks in “Lockups and
Software Problems” on page 40 and run the
Dell Diagnostics before you contact Dell for
technical assistance.
NOTE: Dell Diagnostics works only on Dell
computers.
NOTE: The
is optional and may not ship with your
computer.
See the Dell Technology Guide to review your
computer’s configuration information, and
ensure that the device that you want to test
appears in the system setup program and is
active.
Start the Dell Diagnostics from your hard drive
or from the
Drivers and Utilities
Drivers and Utilities
disc
disc.
45
Page 48

Using Support Tools
Starting Dell Diagnostics From Your
Hard Drive
The Dell Diagnostics is located on a hidden
diagnostic utility partition on your hard drive.
NOTE: If your computer cannot display
a screen image, contact Dell (see
“Contacting Dell” on page 63).
Ensure that the computer is connected to an 1.
electrical outlet that is known to be working
properly.
Turn on (or restart) your computer.2.
When the DELL3.
immediately. Select Diagnostics from the
boot menu and press <Enter>.
NOTE: If you wait too long and the operating
system logo appears, continue to wait until
you see the Microsoft® Windows® desktop;
then, shut down your computer and try again.
46
™
logo appears, press <F12>
NOTE: If you see a message stating that no
diagnostics utility partition has been found,
run the Dell Diagnostics from the
and Utilities
disc.
If PSA is invoked:
The PSA starts running tests.a.
If the PSA completes successfully, b.
the following message appears: “No
problems have been found
with this system so far.
Do you want to run the
remaining memory tests? This
will take about 30 minutes
or more. Do you want to
continue? (Recommended).”
Drivers
Page 49

Using Support Tools
If you are experiencing memory issues, c.
press <y>, otherwise press <n>. The
following message appears: “Booting
Dell Diagnostic Utility
Partition. Press any key to
continue.”
Press any key to go to the d. Choose An
Option window.
If PSA is not invoked:
Press any key to start the Dell Diagnostics from
the diagnostics utility partition on your hard
drive.
Select the test you want to run.4.
If a problem is encountered during a test, 5.
a message appears with an error code and
a description of the problem. Write down
the error code and problem description
and contact Dell (see “Contacting Dell” on
page 63).
NOTE: The Service Tag for your computer
is located at the top of each test screen.
The Service Tag helps you identify your
computer when you contact Dell.
When the tests are complete, close the test 6.
screen to return to the Choose An Option
window.
To exit the Dell Diagnostics and to restart the 7.
computer, click Exit.
47
Page 50

Using Support Tools
Starting Dell Diagnostics From the
Drivers and Utilities Disc
Insert the1.
Shut down and restart the computer. 2.
When the DELL logo appears, press <F12>
immediately.
48
Drivers and Utilities
NOTE: If you wait too long and the
operating system logo appears, continue to
wait until you see the Microsoft® Windows®
desktop; then, shut down your computer
and try again.
NOTE: The next steps change the boot
sequence for one time only. On the next
start-up, the computer boots according to
the devices specified in the system setup
program.
disc.
When the boot device list appears, highlight 3.
CD/DVD/CD-RW and press <Enter>.
Select the 4. Boot from CD-ROM option from
the menu that appears and press <Enter>.
Type 5. 1 to start the CD menu and press
<Enter> to proceed.
Select 6. Run the 32 Bit Dell Diagnostics from
the numbered list. If multiple versions are
listed, select the version appropriate for
your computer.
Select the test you want to run.7.
Page 51

If a problem is encountered during a test, 8.
a message appears with an error code and
a description of the problem. Write down
the error code and problem description
and contact Dell (see “Contacting Dell” on
page 63).
NOTE: The Service Tag for your computer
is located at the top of each test screen.
The Service Tag helps you identify your
computer when you contact Dell.
When the tests are complete, close the test 9.
screen to return to the Choose An Option
window.
To exit the Dell Diagnostics and restart the 10.
computer, click Exit.
Remove the11.
Drivers and Utilities
disc.
Using Support Tools
49
Page 52

Restoring Your Operating System
You can restore your operating system in the
INSPIRON
following ways:
System • Restore returns your computer to an
earlier operating state without affecting data
files. Use System Restore as the first solution
for restoring your operating system and
preserving data files.
Dell Factory Image Restore returns your hard •
drive to the operating state it was in when
you purchased the computer. This procedure
permanently deletes all data on the hard
drive and removes any programs installed
after you received the computer. Use Dell
Factory Image Restore only if System
Restore did not resolve your operating
system problem.
50
If you received an Operating System disc •
with your computer, you can use it to restore
your operating system. However, using the
Operating System disc also deletes all data
on the hard drive. Use the disc only if System
Restore did not resolve your operating
system problem.
System Restore
The Windows operating systems provide
a System Restore option which allows
you to return your computer to an earlier
operating state (without affecting data files) if
changes to the hardware, software, or other
system settings have left the computer in an
undesirable operating state. Any changes that
System Restore makes to your computer are
completely reversible.
Page 53

Restoring Your Operating System
CAUTION: Make regular backups of your
data files. System Restore does not monitor
your data files or recover them.
NOTE: The procedures in this document are
applicable for the Windows default view,
so they may not apply if you set your Dell™
computer to the Windows Classic view.
Starting System Restore
Click 1. Start .
In the search box, type 2. System Restore
and press <Enter>.
NOTE: The User Account Control window
may appear. If you are an administrator on
the computer, click Continue; otherwise,
contact your administrator to continue the
desired action.
Click 3. Next and remaining prompts on the
screen.
In the event that System Restore did not resolve
the issue, you may undo the last system restore.
Undoing the Last System Restore
NOTE: Before you undo the last system
restore, save and close all open files and
exit any open programs. Do not alter, open,
or delete any files or programs until the
system restoration is complete.
Click 1. Start .
In the search box, type 2. System Restore
and press <Enter>.
Click 3. Undo my last restoration and click
Next.
51
Page 54

Restoring Your Operating System
Dell Factory Image Restore
WARNING: Using Dell Factory Image
Restore permanently deletes all data on
the hard drive and removes any programs
or drivers installed after you received your
computer. If possible, back up the data
before using this option. Use Dell Factory
Image Restore only if System Restore did
not resolve your operating system problem.
NOTE: Dell Factory Image Restore may
not be available in certain countries or on
certain computers.
Use Dell Factory Image Restore only as
the last method to restore your operating
system. This option restores your hard drive
to the operating state it was in when you
purchased the computer. Any programs or files
added since you received your computer—
including data files—are permanently
52
deleted from the hard drive. Data files include
documents, spreadsheets, e-mail messages,
digital photos, music files, and so on. If possible,
back up all data before using Dell Factory Image
Restore.
Starting Dell Factory Image Restore
Turn on the computer. When the Dell logo 1.
appears, press <F8> several times to access
the Advanced Boot Options window.
NOTE: If you wait too long and the
operating system logo appears, continue to
wait until you see the Microsoft® Windows®
desktop; then, shut down your computer
and try again.
Select 2. Repair Your Computer.
The 3. System Recovery Options window
appears.
Page 55

Restoring Your Operating System
Select a keyboard layout and click 4. Next.
To access the recovery options, log on as 5.
a local user. To access the command prompt,
type administrator in the User name
field, then click OK.
Click 6. Dell Factory Image Restore. The Dell
Factory Image Restore welcome screen
appears.
NOTE: Depending upon your configuration,
you may need to select Dell Factory Tools,
then Dell Factory Image Restore.
Click 7. Next. The Confirm Data Deletion
screen appears.
NOTE: If you do not want to proceed with
Factory Image Restore, click Cancel.
Select the checkbox to confirm that you 8.
want to continue reformatting the hard drive
and restoring the system software to the
factory condition, then click Next.
The restore process begins and may take
five or more minutes to complete. A message
appears when the operating system and
factory-installed applications have been
restored to factory condition.
Click 9. Finish to reboot the system.
53
Page 56

Restoring Your Operating System
Operating System Reinstallation
Before You Begin
If you are considering reinstalling the Windows
operating system to correct a problem with a
newly installed driver, first try using Windows
Device Driver Rollback. If Device Driver Rollback
does not resolve the problem, then use System
Restore to return your operating system to the
operating state it was in before you installed
the new device driver. See “System Restore” on
page 50.
54
CAUTION: Before performing the
installation, back up all data files on your
primary hard drive. For conventional hard
drive configurations, the primary hard
drive is the first drive detected by the
computer.
To reinstall Windows, you need the following:
Dell•
Operating System
Dell•
Drivers and Utilities
NOTE: The
contains drivers that were installed during
the assembly of the computer. Use the
Dell
required drivers. Depending on the region
from which you ordered your computer,
or whether you requested the disc, the
Dell
System
computer.
Drivers and Utilities
Drivers and Utilities
Drivers and Utilities
disc may not ship with your
disc
disc
disc
disc to load any
disc and
Operating
Page 57

Restoring Your Operating System
Reinstalling Microsoft Windows
The reinstallation process can take 1 to 2 hours
to complete. After you reinstall the operating
system, you must also reinstall the device
drivers, virus protection program, and other
software.
Save and close any open files and exit any 1.
open programs.
Insert the 2.
Click 3. Exit if the Install Windows message
appears.
Restart the computer.4.
When the DELL logo appears, press <F12> 5.
immediately.
Operating System
disc.
NOTE: If you wait too long and the
operating system logo appears, continue
to wait until you see the Microsoft®
Windows® desktop; then, shut down your
computer and try again.
NOTE: The next steps change the boot
sequence for one time only. On the next
start-up, the computer boots according to
the devices specified in the system setup
program.
When the boot device list appears, highlight 6.
CD/DVD/CD-RW Drive and press <Enter>.
Press any key to 7. Boot from CD-ROM.
Follow the instructions on the screen to
complete the installation.
55
Page 58

Getting Help
If you experience a problem with your computer,
INSPIRON
you can complete the following steps to
diagnose and troubleshoot the problem:
See “Solving Problems” on page 1. 36 for
information and procedures that pertain to
the problem your computer is experiencing.
See the 2.
Dell Technology Guide
troubleshooting information.
See “Dell Diagnostics” on page 3. 45 for
procedures on how to run Dell Diagnostics.
Fill out the “Diagnostic Checklist” on 4.
page 62.
Use Dell’s extensive suite of online services 5.
available at Dell Support (support.dell.com)
for help with installation and troubleshooting
procedures. See “Online Services” on
page 58 for a more extensive list of Dell
Support online.
for more
56
If the preceding steps have not resolved the 6.
problem, see “Before You Call” on page 61.
NOTE: Call Dell Support from a telephone
near or at the computer so that the support
staff can assist you with any necessary
procedures.
NOTE: Dell’s Express Service Code system
may not be available in all countries.
When prompted by Dell’s automated telephone
system, enter your Express Service Code to
route the call directly to the proper support
personnel. If you do not have an Express
Service Code, open the Dell Accessories folder,
double-click the Express Service Code icon, and
follow the directions.
NOTE: Some of the services are not
always available in all locations outside
the continental U.S. Call your local Dell
representative for information on availability.
Page 59

Getting Help
Technical Support and Customer Service
Dell’s support service is available to answer
your questions about Dell hardware. Our support
staff use computer-based diagnostics to provide
fast, accurate answers.
To contact Dell’s support service, see “Before
You Call” on page 61 and then see the contact
information for your region or go to
support.dell.com.
DellConnect
DellConnect™ is a simple online access tool that
allows a Dell service and support associate to
access your computer through a broadband
connection, diagnose your problem and repair it
all under your supervision. For more information,
go to www.dell.com/dellconnect.
57
Page 60

Getting Help
Online Services
You can learn about Dell products and services
on the following websites:
www.dell.com•
www.dell.com/ap• (Asian/Pacific countries
only)
www.dell.com/jp• (Japan only)
www.euro.dell.com• (Europe only)
www.dell.com/la• (Latin American and
Caribbean countries)
www.dell.ca• (Canada only)
You can access Dell Support through the
following websites and e-mail addresses:
Dell Support websites
support.dell.com•
support.jp.dell.com• (Japan only)
support.euro.dell.com• (Europe only)
supportapj.dell.com• (Asia Pacific only)
58
Dell Support e-mail addresses
[email protected]• (Latin America and
Caribbean countries only)
[email protected]• (Asian/Pacific
countries only)
Dell Marketing and Sales e-mail
addresses
[email protected]• (Asian/Pacific
countries only)
[email protected]• (Canada only)
Anonymous file transfer protocol (FTP)
ftp.dell.com•
Log in as user: anonymous, and use your
e-mail address as your password.
Page 61

Getting Help
Automated Order-Status Service
To check on the status of any Dell products
that you have ordered, you can go to
support.dell.com, or you can call the automated
order-status service. A recording prompts you
for the information needed to locate and report
on your order. For the telephone number to call
your region, see “Contacting Dell” on page 63.
If you have a problem with your order, such as
missing parts, wrong parts, or incorrect billing,
contact Dell for customer assistance. Have your
invoice or packing slip handy when you call.
For the telephone number to call for your region,
see “Contacting Dell” on page 63.
Product Information
If you need information about additional
products available from Dell, or if you would like
to place an order, visit the Dell website at
www.dell.com. For the telephone number to call
for your region or to speak to a sales specialist,
see “Contacting Dell” on page 63.
59
Page 62

Getting Help
Returning Items for Repair Under Warranty or for Credit
Prepare all items being returned, whether for
repair or credit, as follows:
NOTE: Before you return the product to Dell,
make sure to back up any data on the hard
drive and on any other storage device in the
product. Remove any and all confidential,
proprietary and personal information, as
well as removable media, such as CDs and
PC Cards. Dell is not responsible for any of
your confidential, proprietary or personal
information; lost or corrupted data; or
damaged or lost removable media that may
be included with your return.
60
Call Dell to obtain a Return Material 1.
Authorization Number, and write it clearly
and prominently on the outside of the box.
For the telephone number to call for your
region, see “Contacting Dell” on page 63.
Include a copy of the invoice and a letter 2.
describing the reason for the return.
Include a copy of the Diagnostics Checklist (see 3.
“Diagnostic Checklist” on page 62), indicating
the tests that you have run and any error
messages reported by the Dell Diagnostics (see
“Dell Diagnostics” on page 45).
Include any accessories that belong with the 4.
item(s) being returned (power cables, software,
guides, and so on) if the return is for credit.
Page 63

Getting Help
Pack the equipment to be returned in the 5.
original (or equivalent) packing materials.
NOTE: You are responsible for paying
shipping expenses. You are also
responsible for insuring any product
returned, and you assume the risk of loss
during shipment to Dell. Collect On Delivery
(C.O.D.) packages are not accepted.
NOTE: Returns that are missing any of the
preceding requirements will be refused at
Dell’s receiving dock and returned to you.
Before You Call
NOTE: Have your Express Service Code
ready when you call. The code helps Dell’s
automated-support telephone system direct
your call more efficiently. You may also be
asked for your Service Tag (located on the
back or bottom of your computer).
Remember to fill out the following Diagnostics
Checklist. If possible, turn on your computer
before you call Dell for assistance and call from
a telephone at or near the computer. You may be
asked to type some commands at the keyboard,
relay detailed information during operations, or
try other troubleshooting steps possible only at
the computer itself. Ensure that the computer
documentation is available.
61
Page 64

Getting Help
Diagnostic Checklist
Name:•
Date:•
Address:•
Phone number:•
Service Tag (bar code on the back or bottom •
of the computer):
Express Service Code:•
Return Material Authorization Number (if •
provided by Dell support technician):
Operating system and version:•
Devices:•
Expansion cards:•
Are you connected to a network? Yes /No•
Network, version, and network adapter:•
Programs and versions:•
62
See your operating system documentation
to determine the contents of the computer’s
start-up files. If the computer is connected to
a printer, print each file. Otherwise, record the
contents of each file before calling Dell.
Error message, beep code, or diagnostic •
code:
Description of problem and troubleshooting •
procedures you performed:
Page 65

Getting Help
Contacting Dell
For customers in the United States, call
800-WWW-DELL (800-999-3355).
NOTE: If you do not have an active
Internet connection, you can find contact
information on your purchase invoice,
packing slip, bill, or Dell product catalog.
Dell provides several online and telephonebased support and service options. Availability
varies by country and product, and some
services may not be available in your area.
To contact Dell for sales, technical support, or
customer service issues:
Visit 1. support.dell.com.
Verify your country or region in the 2. Choose
A Country/Region drop-down menu at the
bottom of the page.
Click 3. Contact Us on the left side of the page.
Select the appropriate service or support 4.
link based on your need.
Choose the method of contacting Dell that is 5.
convenient for you.
63
Page 66
Finding More Information and Resources
If you need to: See:
INSPIRON
reinstall your operating system the Operating System disc
run a diagnostic program for your computer,
reinstall computer system software, or update
drivers for your computer, and readme files
the
Drivers and Utilities
NOTE: Drivers and documentation updates
can be found on the Dell™ Support website
at support.dell.com.
disc
learn more about your operating system,
maintaining peripherals, RAID, Internet,
Bluetooth®, networking, and e-mail
upgrade your computer with new or additional
memory, or a new hard drive
reinstall or replace a worn or defective part
64
the Dell Technology Guide installed on your
hard drive
the Service Manual on the Dell Support website
at support.dell.com/manuals
NOTE: In some countries, opening and
replacing parts of your computer may void
your warranty. Check your warranty and
return policies before working inside your
computer.
Page 67

If you need to: See:
find safety best practices information for your
computer
review Warranty information, Terms and
Conditions (U.S. only), Safety instructions,
Regulatory information, Ergonomics
information, and End User License Agreement
find your Service tag/Express Service Code —
You must use the service tag to identify your
computer on support.dell.com or to contact
technical support
find drivers and downloads
access technical support and product help
check on your order status for new purchases
find solutions and answers to common
questions
locate information for last-minute updates
about technical changes to your computer or
advanced technical-reference material for
technicians or experienced users
the safety and regulatory documents that
shipped with your computer and also see the
Regulatory Compliance Homepage at
www.dell.com/regulatory_compliance
the back or bottom of your computer
the Dell™ Support website at
support.dell.com
Finding More Information and Resources
65
Page 68

Basic Specifications
System Model
INSPIRON
Dell Inspiron 1470/1570
This section provides information that you
may need when setting up, updating drivers
for, and upgrading your computer. For more
detailed specifications, see the
Specifications
support.dell.com/manuals.
NOTE: Offerings may vary by region.
For more information regarding the
configuration of your computer, click
Start → Help and Support and select
the option to view information about your
computer.
66
on the Dell Support website at
Comprehensive
Processor
Type Intel® Pentium®
Single-Core
Intel Core™2 Solo
Intel Core2 Duo
Computer Information
System chipset Intel GS45 + ICH9M SFF
Camera
Pixel 1.3 megapixel
Video Resolution 160 x 120 ~1280 x 1024
(160 x 120 ~ 640 x 480
at 30 fps)
Page 69

Basic Specications
7-in-1 Memory Card Reader
Memory card
controller
Memory card
connector
Flash cards
supported
Ricoh R5C833
7-in-1 combo card
connector
Secure Digital (SD)
SD High-Density
(SDHD)
SD High-Capacity
(SDHC)
MultiMediaCard
(MMC)
MMCplus
xD-Picure Card
Memory Stick
Memory Stick Pro
Memory
Memory module
connector
Memory module
capacities
Memory type DDR3 1067 MHz
NOTE: For instructions on upgrading
memory, see the Service Manual on the
Dell Support website at support.dell.com.
two user-accessible
SODIMM connectors
1 GB, 2 GB, and 4 GB
Connectors
Audio one microphone-in
connector, one stereo
headphone/speaker
connector
67
Page 70

Basic Specications
Connectors
Mini-Card one Type IIIA full
Mini-Card slot, one
half-size Mini-Card slot
HDMI connector 19-pin
Network adapter RJ45 connector
USB three 4-pin USB
2.0-compliant connectors
Video 15-hole connector
Communications
Modem
(optional)
Network adapter 10/100/1000 Ethernet LAN
Wireless WLAN and Bluetooth®
68
External V.92 56K USB
Modem
on system board
wireless technology
Display
Inspiron 1470:
Type 14.0” HD WLED backlight,
TrueLife
Height 173.95 mm (6.85 inches)
Width 309.4 mm (12.2 inches)
Diagonal 355.6 mm (14.0 inches)
Inspiron 1570:
Type 15.6” HD WLED backlight,
TrueLife
Height 193.54 mm (7.62 inches)
Width 344.23 mm (13.55 inches)
Diagonal 396.42 mm (15.6 inches)
Page 71

Basic Specications
Battery
4-cell/6-cell “smart” lithium ion:
Depth 53.2 mm
(2.09 inches)
Height 21.4 mm
(0.84 inches)
Width 209.4 mm
(8.24 inches)
Weight 0.26 kg (0.57 lb) (4-cell)
0.35 kg (0.77 lb) (6-cell)
9-cell “smart” lithium ion:
Depth 53.2 mm
(2.09 inches)
Height 41.7 mm
(1.64 inches)
Width 264.6 mm
(10.41 inches)
Battery
Weight 0.52 kg (1.15 lb)
Voltage 11.1 VDC (6/9 cell)
Charge time
(approximate)
Operating time
(approximate)
Coin-cell battery CR-2032
4 hours (when the
computer is turned off)
Battery operating time
varies depending on
operating conditions.
AC Adapter
Input voltage 100–240 VAC
Input current 1.5 A
Input frequency 50–60 Hz
Output power 65 W
69
Page 72

Basic Specications
AC Adapter
Output current 3.34 A (continuous)
Rated output
voltage
Operating
temperature
Storage
temperature
19.5 ± 1 VDC
0° to 40°C
(32° to 104°F)
–40° to 70°C
(–40° to 158°F)
Physical
Inspiron 1470:
Height 26.3 mm to 29.2 mm
(1.03 inches to 1.5 inches)
Width 340.0 mm
(13.39 inches)
70
Physical
Depth 242.5 mm
(9.54 inches)
Weight (with
ODD Airbay and
4-cell battery)
Inspiron 1570:
Height 26.3 mm to 29.2 mm
Width 376.0 mm (14.8 inches)
Depth 247.9 mm (9.76 inches)
Weight (with
ODD Airbay and
4-cell battery)
configurable to less than
1.89 kg (4.17 lbs)
(1.03 inches to
1.5 inches)
configurable to less than
2.18 kg (4.81 lbs)
Page 73

Basic Specications
Computer Environment
Temperature range:
Operating 0° to 35°C
(32° to 95°F)
Storage –40° to 65°C
(–40° to 149°F)
Relative humidity (maximum):
Operating 10% to 90%
Storage 5% to 95%
Maximum vibration (using a random vibration
spectrum that simulates user environment):
Operating 0.66 GRMS
Non-Operating 1.30 GRMS
(noncondensing)
(noncondensing)
Computer Environment
Maximum shock (for operating — measured
with Dell Diagnostics running on the hard
drive and a 2-ms half-sine pulse;
for non-operating — measured with hard
drive in head-parked position and a 2-ms
half-sine pulse):
Operating 110 G
Non-Operating 160 G
Altitude (maximum):
Operating –15.2 to 3048 m
( –50 to 10,000 ft)
Storage –15.2 to 10,668 m
(–50 to 35,000 ft)
Airborne contaminant
level
G2 or lower as
defined by
ISA-S71.04-1985
71
Page 74

Appendix
Macrovision Product Notice
INSPIRON
This product incorporates copyright protection
technology that is protected by method claims
of certain U.S. patents and other intellectual
property rights owned by Macrovision
Corporation and other rights owners. Use of
this copyright protection technology must be
authorized by Macrovision Corporation, and is
intended for home and other limited viewing
uses only unless otherwise authorized by
Macrovision Corporation. Reverse engineering
or disassembly is prohibited.
72
Page 75

Appendix
Information for NOM, or Official Mexican Standard (only for Mexico)
The following information is provided in the device(s) described in this document in accordance
with the requirements of the Official Mexican Standard (NOM):
Importer:
Dell México S.A. de C.V.
Paseo de la Reforma 2620 – Flat 11°
Col. Lomas Altas
11950 México, D.F.
Laptops
Regulatory
model number Voltage Frequency
P04F 100-240 V CA 50-60 Hz 3,5 A 19,5 V de CC 12,3 A
P04G 100-240 V CA 50-60 Hz 3,5 A 19,5 V de CC 12,3 A
For details, read the safety information that shipped with your computer.
For additional safety best practices information, see the Regulatory Compliance Homepage at
www.dell.com/regulatory_compliance.
Electricity
consumption Output voltage
Output
intensity
73
Page 76

Index
A
INSPIRON
airflow, allowing 5
Appendix
Macrovision 72
B
backups
creating 34
C
CDs, playing and creating 32
computer capabilities 32
computer, setting up 5
connect(ing)
to the Internet 12
conserving energy 33
74
Contacting Dell online 63
customizing
your desktop 32
your energy settings 33
D
damage, avoiding 5
data, backing up 34
Dell Diagnostics 45
Dell Factory Image Restore 52
Dell support website 65
drivers and downloads 65
DVDs, playing and creating 32
E
email addresses
for technical support 58
Page 77

Index
energy
conserving 33
F
FTP login, anonymous 58
H
help
getting assistance and support 56
I
Internet connection 12
ISP
Internet Service Provider 12
R
reinstalling Windows 55
restoring factory image 52
S
setup, before you begin 5
support email addresses 58
system reinstall options 50
System Restore 50
T
Touch Pad
Gestures 24
V
ventilation, ensuring 5
W
Windows, reinstalling 55
wired network
network cable, connecting 7
75
Page 78

Page 79

Page 80

081TR2A00
Printed in the U.S.A.
www.dell.com | support.dell.com
 Loading...