

Page 1

Dell™ OptiPlex™ 330
Quick Reference Guide
Model DCSM and DCNE
www.dell.com | support.dell.com
Page 2

Notes, Notices, and Cautions
NOTE: A NOTE indicates important information that helps you make better use of
your computer.
NOTICE: A NOTICE indicates either potential damage to hardware or loss of data
and tells you how to avoid the problem.
CAUTION: A CAUTION indicates a potential for property damage, personal injury,
or death.
____________________
Information in this document is subject to change without notice.
© 2007 Dell Inc. All rights reserved.
Reproduction in any manner whatsoever without the written permission of Dell Inc. is strictly
forbidden.
Trademarks used in this text: Dell, the DELL logo, Inspiron, Dell Precision, Dimension, OptiPlex,
Latitude, PowerEdge, PowerVault, Powe rA pp , and Dell OpenManage are trademarks of Dell Inc.;
Intel, Pentium, and Celeron are registered trademarks of Intel Corporation; Microsoft and Windows
are registered trademarks of Microsoft Corporation.
Other trademarks and trade names may be used in this document to refer to either the entities claiming
the marks and names or their products. Dell Inc. disclaims any proprietary interest in trademarks and
trade names other than its own.
Model DCSM and DCNE
September 2007 P/N YN992 Rev. A00
Page 3

Contents
Finding Information . . . . . . . . . . . . . . . . . . . . 5
Before You Begin
. . . . . . . . . . . . . . . . . . . . 10
Before Working Inside Your Computer
Adding and Replacing Parts
Setting Up Your Computer
. . . . . . . . . . . . . . 11
. . . . . . . . . . . . . . . . 13
Installing Your Computer in an Enclosure
Setting Up a Home and Office Network
Connecting to a Network Adapter
Network Setup
Connecting to the Internet
. . . . . . . . . . . . . . . . . . . 16
. . . . . . . . . . . . . . . 17
Moving Information to a New Computer
Setting Up a Printer
Connecting Two Monitors
Power Protection Devices
Desktop Computer
Front View
Back View
Back Panel Connectors
. . . . . . . . . . . . . . . . . . . 23
. . . . . . . . . . . . . . . . 24
. . . . . . . . . . . . . . . 26
. . . . . . . . . . . . . . . . . . . . 28
. . . . . . . . . . . . . . . . . . . . . 28
. . . . . . . . . . . . . . . . . . . . . 30
. . . . . . . . . . . . . . 31
. . . . . . . 10
. . . . . 13
. . . . . . . . 15
. . . . . . . . . 15
. . . . . . . . 19
Removing the Computer Cover
Inside View of Your Computer
. . . . . . . . . . . . . 33
. . . . . . . . . . . . . 35
Contents 3
Page 4

System Board Components . . . . . . . . . . . . . . . 36
Replacing the Computer Cover
Mini Tower Computer
Front View
Back View
Back Panel Connectors
. . . . . . . . . . . . . . . . . . 38
. . . . . . . . . . . . . . . . . . . . . 38
. . . . . . . . . . . . . . . . . . . . . 40
. . . . . . . . . . . . . . . . . 41
Removing the Computer Cover
Inside View of Your Computer
System Board Components
. . . . . . . . . . . . . . . 46
Replacing the Computer Cover
Solving Problems
Dell Diagnostics
Power Lights
Beep Codes
System Messages
. . . . . . . . . . . . . . . . . . . . 47
. . . . . . . . . . . . . . . . . . . . . 48
. . . . . . . . . . . . . . . . . . . . . . . 51
. . . . . . . . . . . . . . . . . . . . . . . 53
. . . . . . . . . . . . . . . . . . . . 54
. . . . . . . . . . . . . 37
. . . . . . . . . . . . . 43
. . . . . . . . . . . . . . 45
. . . . . . . . . . . . . 47
Index . . . . . . . . . . . . . . . . . . . . . . . . . . . . . . . 65
4 Contents
Diagnostic Lights
. . . . . . . . . . . . . . . . . . . . 56
Clearing Forgotten Passwords
Clearing CMOS Settings
Flashing the BIOS
. . . . . . . . . . . . . . . . . 62
. . . . . . . . . . . . . . . . . . . . 63
. . . . . . . . . . . . . 60
Page 5
Finding Information
NOTE: Some features or media may be optional and may not ship with your
computer. Some features or media may not be available in certain countries.
NOTE: Additional information may ship with your computer.
What Are You Looking For? Find It Here
• A diagnostic program for my
computer
• Drivers for my computer
• Desktop System Software (DSS)
Drivers and Utilities Media
NOTE: The Drivers and Utilities media may be
optional and may not ship with your computer.
Drivers are already installed on your
computer. You can use the media to reinstall
drivers (see the online User’s Guide), to run
the Dell Diagnostics (see "Dell Diagnostics"
on page 48).
Readme files may be included on your media
to provide last-minute updates about
technical changes to your computer or
advanced technical-reference material for
technicians or experienced users.
NOTE: Drivers and documentation updates can
be found at support.dell.com.
Quick Reference Guide 5
Page 6
What Are You Looking For? Find It Here
• Basic troubleshooting information
• How to run the Dell Diagnostics
• Tools and utilities
• How to set up a printer
Quick Reference Guide
NOTE: This document may be optional and may
not ship with your computer.
NOTE: This document is available as a PDF at
support.dell.com.
• Warranty information
• Terms and Conditions (U.S. only)
• Safety instructions
• Regulatory information
• Ergonomics information
• End User License Agreement
Dell™ Product Information Guide
• How to remove and replace parts
• Specifications
• How to configure system settings
• How to troubleshoot and solve
problems
6 Quick Reference Guide
Dell OptiPlex™ 330 User’s Guide
Microsoft Windows Help and Support Center
1
Click the Windows Vista
Help and Support→ Dell User and System
→ System Guides
Guides
2
Click the
User’s Guide
Start button→
.
for your computer.
Page 7

What Are You Looking For? Find It Here
• Service Tag and Express Service
Code
• Microsoft Windows License Label
Service Tag and Microsoft® Windows®
License
These labels are located on your computer.
• Use the Service Tag to identify your
computer when you use
contact support.
• Enter the Express Service Code to direct
your call when contacting support.
NOTE: As an increased security measure, the
newly designed Microsoft Windows license
label incorporates a missing portion or "hole" to
discourage removal of the label.
support.dell.com
or
Quick Reference Guide 7
Page 8

What Are You Looking For? Find It Here
• Solutions — Troubleshooting hints
and tips, articles from technicians,
and online courses, frequently
asked questions
• Community — Online discussion
with other Dell customers
• Upgrades — Upgrade information
for components, such as memory,
the hard drive, and the operating
system
• Customer Care — Contact
information, service call and order
status, warranty, and repair
information
• Service and support — Service call
status and support history, service
contract, online discussions with
technical support
• Dell Technical Update Service —
Proactive e-mail notification of
software and hardware updates for
your computer
• Reference — Computer
documentation, details on my
computer configuration, product
specifications, and white papers
• Downloads — Certified drivers,
patches, and software updates
Dell Support Website — support.dell.com
NOTE: Select your region or business segment
to view the appropriate support site.
8 Quick Reference Guide
Page 9

What Are You Looking For? Find It Here
• Desktop System Software
(DSS) — If you reinstall the
operating system for your
computer, you should also reinstall
the DSS utility. DSS provides
critical updates for your operating
system and support for processors,
optical drives, USB devices, and so
on. DSS is necessary for correct
operation of your Dell computer.
To download Desktop System Software:
1
Go to
support.dell.com
or business segment, and enter your Service
Tag.
2
Select
3
Click your operating system and search for
the keyword
NOTE: The support.dell.com user interface may
vary depending on your selections.
The software automatically detects
your computer and operating
system and installs the updates
appropriate for your configuration.
• How to use Windows
• How to work with programs and
files
• How to personalize my desktop
Windows Help and Support Center
1
To access Windows Help and Support:
• In Windows XP, click
and Support
• In Windows Vista™, click the Windows
Vista
Support
2
Type a word or phrase that describes your
problem and click the arrow icon.
3
Click the topic that describes your problem.
4
Follow the instructions on the screen.
• How to reinstall my operating
system
Operating System Media
NOTE: The Operating System media may be
optional and may not ship with your computer.
, select your region
Drivers & Downloads
Desktop System Software
Start
.
s
tart button
→
.
and click Go.
.
and click
Help and
Help
Quick Reference Guide 9
Page 10
What Are You Looking For? Find It Here
The operating system is already installed on
your computer. To reinstall your operating
system, use the Operating System disc, and see
the online User’s Guide.
After you reinstall your operating system, use
the Drivers and Utilities disc to reinstall
drivers for the devices that came with your
computer.
Your operating system product key label is
located on your computer.
NOTE: The color of your disc varies based on
the operating system you ordered.
Before You Begin
Before Working Inside Your Computer
Use the following safety guidelines to help protect your computer from
potential damage and to help to ensure your own personal safety.
CAUTION: Before you begin any of the procedures in this section, follow the
safety instructions in the Product Information Guide.
NOTICE: Handle components and cards with care. Do not touch the components
or contacts on a card. Hold a card by its edges or by its metal mounting bracket.
Hold a component such as a processor by its edges, not by its pins.
10 Quick Reference Guide
Page 11

NOTICE: Only a certified service technician should perform repairs on your
computer. Damage due to servicing that is not authorized by Dell is not covered by
your warranty.
NOTICE: When you disconnect a cable, pull on its connector or on its pull-tab, not
on the cable itself. Some cables have connectors with locking tabs; if you are
disconnecting this type of cable, press in on the locking tabs before you disconnect
the cable. As you pull connectors apart, keep them evenly aligned to avoid bending
any connector pins. Also, before you connect a cable, ensure that both connectors
are correctly oriented and aligned.
NOTICE: To avoid damaging the computer, perform the following steps before you
begin working inside the computer.
1
Turn off your computer (see "Turning Off Your Computer" on page 12).
CAUTION: Never apply power to the computer when the cover has been removed.
NOTICE: To disconnect a network cable, first unplug the cable from your computer
and then unplug the cable from the network device.
2
Disconnect all telephone or network cables from the computer.
3
Disconnect your computer and all attached devices from their electrical
outlets.
4
Press the power button to ground the system board.
NOTICE: Before touching anything inside your computer, ground yourself by
touching an unpainted metal surface, such as the metal at the back of the computer.
While you work, periodically touch an unpainted metal surface to dissipate static
electricity, which could harm internal components.
Adding and Replacing Parts
This section provides procedures for removing and installing the components
in your computer. Unless otherwise noted, each procedure assumes that the
following conditions exist:
• You have performed the steps in "Turning Off Your Computer" on page 12
and "Before Working Inside Your Computer" on page 10.
• You have read the safety information in the Dell™
Guide
.
• A component can be replaced or—if purchased separately—installed by
performing the removal procedure in reverse order.
Quick Reference Guide 11
Product Information
Page 12

Recommended Tools
The procedures in this document may require the following tools:
• Small flat-blade screwdriver
• Small Phillips screwdriver
• Small plastic scribe
Turning Off Your Computer
NOTICE: To avoid losing data, save and close all open files and exit all open
programs before you turn off your computer.
1
Shut down the operating system:
a
Save and close all open files and exit all open programs.
b
In the Microsoft® Windows® XP operating system
→ Shut down
Down
.
, click
Start→
Shut
In Microsoft® Windows Vista™
, click the Windows Vista Start button
, in the lower-left corner of the desktop, click the arrow in the
lower-right corner of the Start menu as shown below, and then click
Shut Down
.
The computer turns off after the operating system shutdown process is
complete.
2
Ensure that the computer and all attached devices are turned off. If your
computer and attached devices did not automatically turn off when you
shut down your operating system, press and hold the power button for
about 4 seconds to turn them off.
12 Quick Reference Guide
Page 13
Setting Up Your Computer
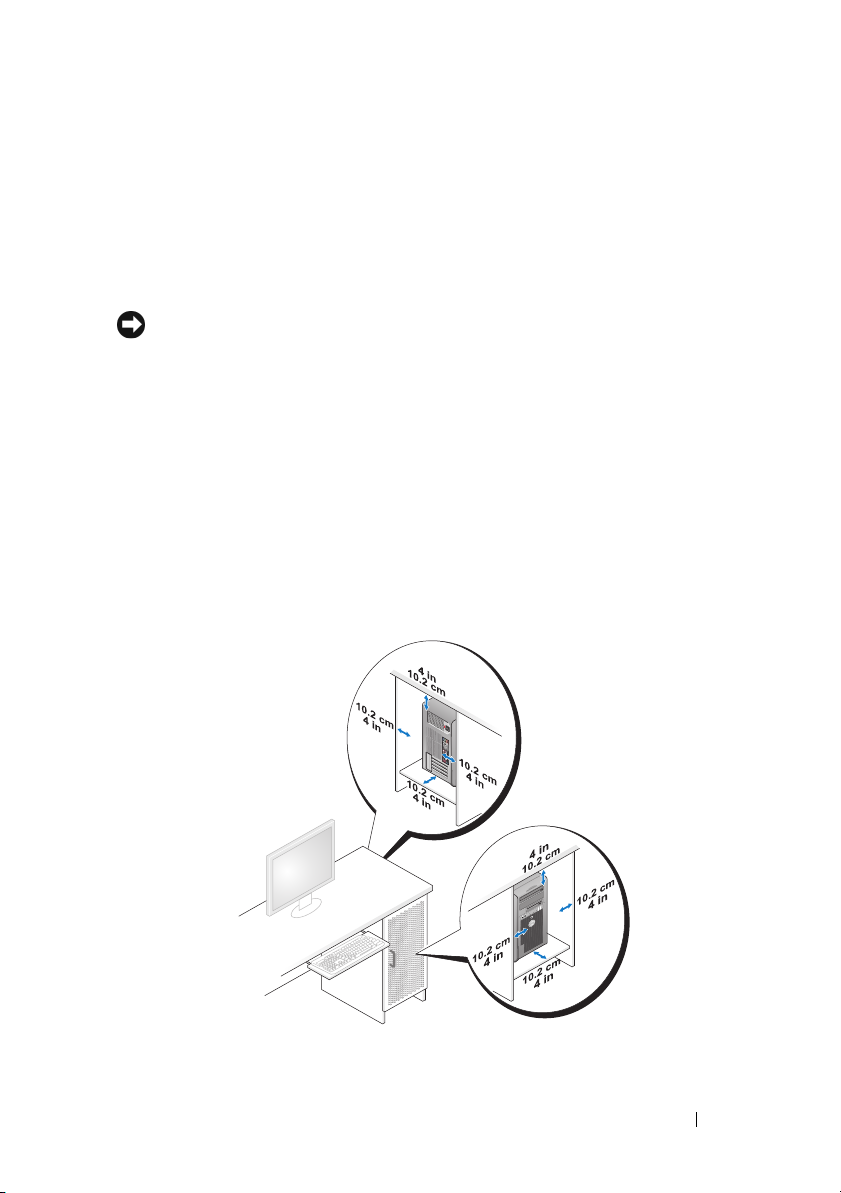
Installing Your Computer in an Enclosure
Installing your computer in an enclosure can restrict the airflow and impact
your computer’s performance, possibly causing it to overheat. Follow the
guidelines below when installing your computer in an enclosure:
NOTICE: The operating temperature specifications indicated in this manual
reflects the maximum ambient operating temperature. The room ambient
temperature needs to be a consideration when installing your computer in an
enclosure. For example, if the ambient room temperature is at 25°C (77°F),
depending on your computer’s specifications, you only have 5° to 10°C (9° to 18°F)
temperature margin before you reach your computer’s maximum operating
temperature. For details about your computer’s specifications, see the online User’s
Guide.
• Leave a 10.2 cm (4 in) minimum clearance on all vented sides of the
computer to permit the airflow required for proper ventilation.
• If your enclosure has doors, they need to be of a type that allows at least
30 percent airflow through the enclosure (front and back).
Quick Reference Guide 13
Page 14
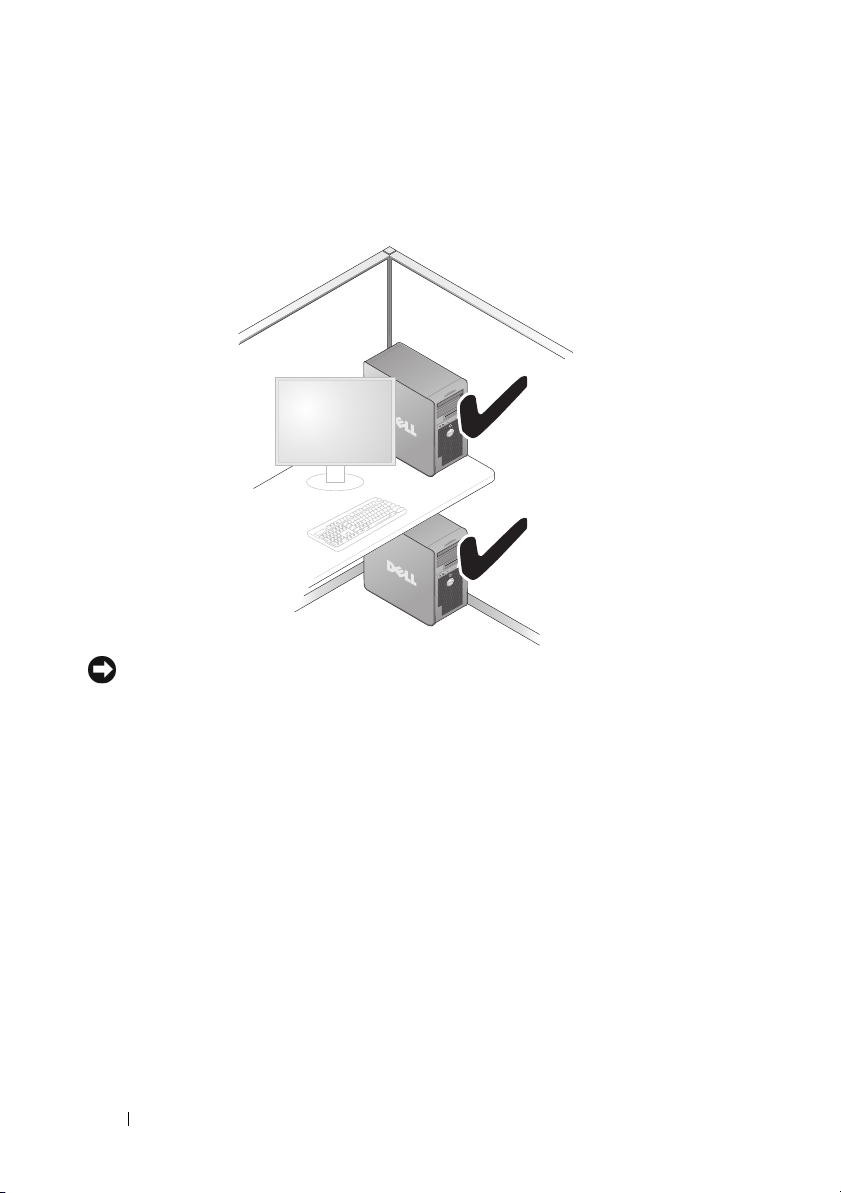
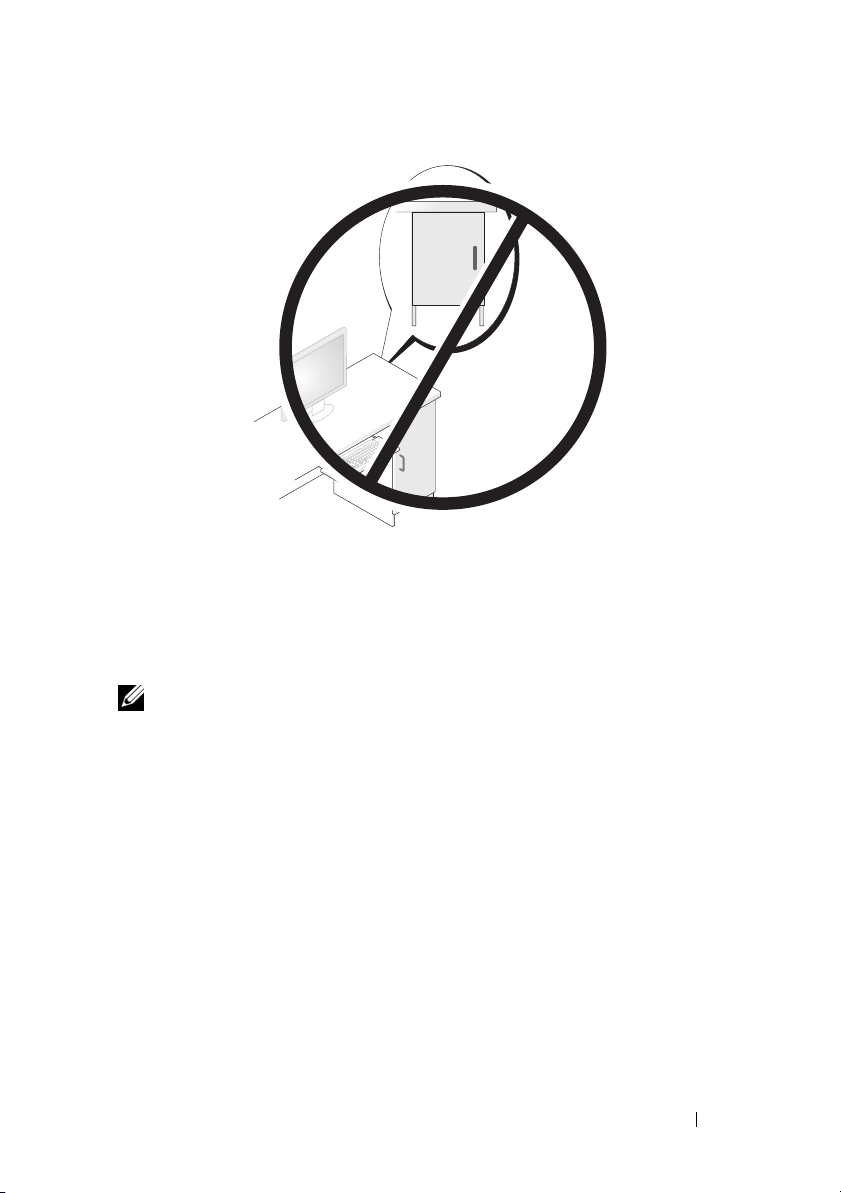
• If your computer is installed in a corner on a desk or under a desk, leave at
least 5.1 cm (2 in) clearance from the back of the computer to the wall to
permit the airflow required for proper ventilation.
NOTICE: Do not install your computer in an enclosure that does not allow airflow.
Restricting the airflow impacts your computer’s performance, possibly causing it to
overheat.
14 Quick Reference Guide
Page 15
Setting Up a Home and Office Network
Connecting to a Network Adapter
To connect a network cable:
NOTE: Plug the network cable into the network adapter connector on the
computer. Do not plug the network cable into the modem connector on the
computer. Do not plug a network cable into a telephone wall jack.
1
Connect the network cable to the network adapter connector on the back
of your computer.
Insert the cable until it clicks into place, and then gently pull it to ensure
that it is secure.
2
Connect the other end of the network cable to a network device.
Quick Reference Guide 15
Page 16
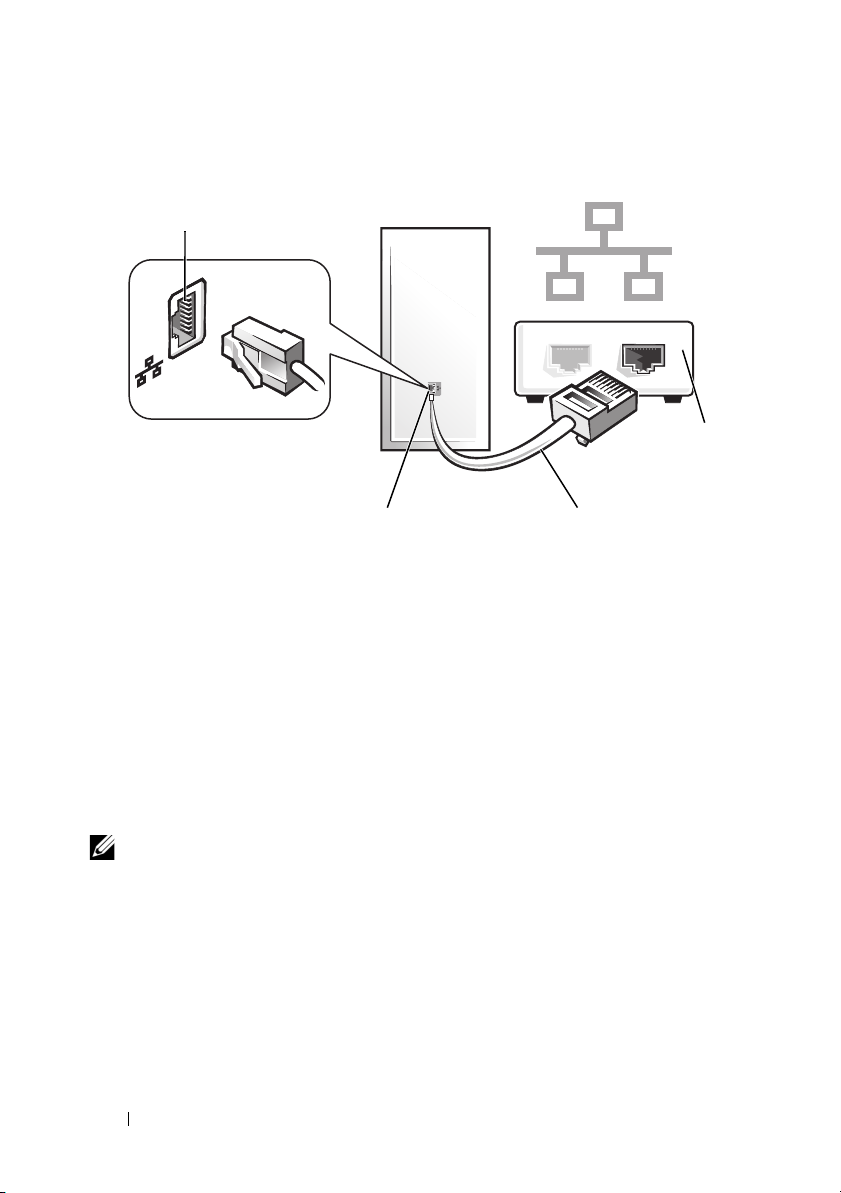
network
adapter
connector
network
device
network adapter connector on computer
network cable
Network Setup
Windows XP
The Microsoft® Windows® XP operating system provides a Network Setup
Wizard to guide you through the process of sharing files, printers, or an
Internet connection between computers in a home or small office.
1
Click the
Communications
2
On the
3
Click
NOTE: Selecting the connection method This computer connects directly to the
Internet enables the integrated firewall provided with Windows XP Service Pack 1
(SP1) or later.
4
Complete the checklist and required preparations.
5
Return to the Network Setup Wizard and follow the instructions on the
screen.
Start
button, point to
, and then click
Network Setup Wizard
All Programs→ Accessories→
Network Setup Wizard
welcome screen, click
Checklist for creating a network
.
Next
.
.
16 Quick Reference Guide
Page 17

Windows Vista
To make changes to your network setup in Microsoft® Windows Vista™:
1
Click the Windows Vista Start button, , and then click
Network and Sharing Center
2
Click
Set up a connection or network
3
Select the type of network connection you want to make and follow the
instructions on the screen.
4
When finished, close the Network and Sharing Center.
.
.
Network→
Connecting to the Internet
NOTE: ISPs and ISP offerings vary by country.
To connect to the Internet, you need a modem or network connection and an
Internet service provider (ISP). Your ISP will offer one or more of the
following Internet connection options:
• DSL connections that provide high-speed Internet access through your
existing telephone line or cellular telephone service. With a DSL
connection, you can access the Internet and use your telephone on the
same line simultaneously.
• Cable modem connections that provide high-speed Internet access
through your local cable TV line.
• Satellite modem connections that provide high-speed Internet access
through a satellite television system.
• Dial-up connections that provide Internet access through a telephone line.
Dial-up connections are considerably slower than DSL and cable (or
satellite) modem connections.
• Wireless LAN connections that provide Internet access using Bluetooth
wireless technology.
If you are using a dial-up connection, connect a telephone line to the modem
connector on your computer and to the telephone wall jack before you set up
your Internet connection. If you are using a DSL or cable/satellite modem
connection, contact your ISP or cellular telephone service for setup
instructions.
®
Quick Reference Guide 17
Page 18

Setting Up Your Internet Connection
To set up an Internet connection with a provided ISP desktop shortcut:
1
Save and close any open files, and exit any open programs.
2
Double-click the ISP icon on the Microsoft® Windows® desktop.
3
Follow the instructions on the screen to complete the setup.
If you do not have an ISP icon on your desktop or if you want to set up an
Internet connection with a different ISP, perform the steps in the following
section that corresponds to the operating system your computer is using.
NOTE: If you are having problems connecting to the Internet, see "Setting Up a
Home and Office Network" on page 15. If you cannot connect to the Internet but
have successfully connected in the past, the ISP might have a service outage.
Contact your ISP to check the service status, or try connecting again later.
Windows XP
1
Save and close any open files, and exit any open programs.
2
Click
Start→
The
New Connection Wizard
3
Click
Connect to the Internet
4
In the next window, click the appropriate option:
• If you do not have an ISP and want to select one, click
list of Internet service providers (ISPs)
Internet Explorer
.
appears.
.
Choose from a
.
• If you have already obtained setup information from your ISP but you
did not receive a setup CD, click
• If you have a CD, click
5
Click
Next
.
If you selected
Set up my connection manually
Use the CD I got from an ISP
Set up my connection manually
.
, continue to step 6.
.
Otherwise, follow the instructions on the screen to complete the setup.
NOTE: If you do not know which type of connection to select, contact your ISP.
6
Click the appropriate option under
Internet?
7
Use the setup information provided by your ISP to complete the setup.
, and then click
Next
How do you want to connect to the
.
18 Quick Reference Guide
Page 19

Windows Vista™
NOTE: Have your ISP information ready. If you do not have an ISP, the Connect to
the Internet wizard can help you get one.
1
Save and close any open files, and exit any open programs.
2
Click the Windows Vista Start button , and click
3
Under
The
4
Click either
Network and Internet
Connect to the Internet
Broadband (PPPoE)
, click
Connect to the Internet
window appears.
or
Dial-up
, depending on how you want
Control Panel
.
.
to connect:
•Choose
Broadband
if you will use a DSL, satellite modem, cable TV
modem, or Bluetooth wireless technology connection.
• Chose
NOTE: If you do not know which type of connection to select, click Help me choose
or contact your ISP.
5
Follow the instructions on the screen and use the setup information
Dial-up
if you will use a dial-up modem or ISDN.
provided by your ISP to complete the setup.
Moving Information to a New Computer
You can use your operating system "wizards" to help you transfer files and
other data from one computer to another—for example, from an old
computer to a new computer. For instructions, see the following section that
corresponds to the operating system that your computer is running.
Microsoft® Windows® XP (Optional)
The Microsoft Windows XP operating system provides the Files and Settings
Transfer Wizard to move data from a source computer to a new computer.
You can transfer data, such as:
• E-mail messages
• Toolbar settings
• Window sizes
• Internet bookmarks
Quick Reference Guide 19
Page 20

You can transfer the data to the new computer over a network or serial
connection, or you can store it on removable media, such as a writable CD,
for transfer to the new computer.
NOTE: You can transfer information from an old computer to a new computer by
directly connecting a serial cable to the input/output (I/O) ports of the two
computers. To transfer data over a serial connection, you must access the Network
Connections utility from the Control Panel and perform additional configuration
steps, such as setting up an advanced connection and designating the host
computer and the guest computer.
For instructions on setting up a direct cable connection between two computers,
see Microsoft Knowledge Base Article #305621, titled How to Set Up a Direct Cable
Connection Between Two Computers in Windows XP. This information may not be
available in certain countries.
For transferring information to a new computer, you must run the Files and
Settings Transfer Wizard. You can use the optional Operating System media
for this process or you can create a wizard disk with the Files and Settings
Transfer Wizard.
Running the Files and Settings Transfer Wizard With the Operating System Media
NOTE: This procedure requires the Operating System media. This media is optional
and may not be included with certain computers.
To prepare a new computer for the file transfer:
1
Open the Files and Settings Transfer Wizard: click
Accessories→ System Tools→
2
When the
click
3
On the
4
On the
Files and Settings Transfer Wizard
Next
.
Which computer is this?
Do you have a Windows XP CD?
from the Windows XP CD
5
When the
source computer. Do
Now go to your old computer
not
Files and Settings Transfer Wizard
screen, click
screen, click
→ Next
.
screen appears, go to your old or
click
Next
at this time.
Start→
All Programs→
.
welcome screen appears,
New Computer→
Next
.
I will use the wizard
20 Quick Reference Guide
Page 21

To copy data from the old computer:
1
On the old computer, insert the Windows XP
2
On the
additional tasks
3
Under
4
On the
5
On the
Welcome to Microsoft Windows XP
.
What do you want to do?
Which computer is this?
Select a transfer method
, click
screen, click
screen, click the transfer method you
Operating System
screen, click
Perform
Transfer files and settings→ Next
Old Computer→
prefer.
6
On the
transfer and click
After the information has been copied, the
Phase
7
Click
What do you want to transfer?
Next
.
screen appears.
Finish
.
screen, select the items you want to
Completing the Collection
To transfer data to the new computer:
On the
1
Next
2
On the
chose for transferring your settings and files and click
Now go to your old computer
.
Where are the files and settings?
screen on the new computer, click
screen, select the method you
Next
.
The wizard reads the collected files and settings and applies them to your
new computer.
media.
Next
.
.
When all of the settings and files have been applied, the
Finished
screen
appears.
3
Click
Finished
Running the Files and Settings Transfer Wizard Without the Operating System
Media
and restart the new computer.
To run the Files and Settings Transfer Wizard without the Operating System
media, you must create a wizard disk that will allow you to create a backup
image file to removable media.
To create a wizard disk, use your new computer with Windows XP and
perform the following steps:
1
Open the Files and Settings Transfer Wizard: click
Accessories→ System Tools→
Files and Settings Transfer Wizard
Quick Reference Guide 21
Start→
All Programs→
.
Page 22

2
When the
click
3
On the
4
On the
Wizard Disk in the following drive
5
Insert the removable media, such as a writable CD, and click OK.
6
When the disk creation completes and the
computer
7
Go to the old computer.
To copy data from the old computer:
On the old computer, insert the wizard disk.
1
2
Click
3
In the
the appropriate removable media) and click
4
On the
5
On the
6
On the
prefer.
7
On the
transfer and click
After the information has been copied, the
Phase
Files and Settings Transfer Wizard
Next
.
Which computer is this?
Do you have a Windows XP CD?
message appears,
Start→
screen appears.
Run
.
Open
field on the
Files and Settings Transfer Wizard
Which computer is this?
Select a transfer method
What do you want to transfer?
Next
.
screen, click
→
do not
Run
window, browse to the path for
screen, click
screen, click the transfer method you
welcome screen appears,
New Computer→
screen, click
Next
.
Now go to your old
click
Next
.
OK
.
welcome screen, click
Old Computer→
screen, select the items you want to
Completing the Collection
Next
.
I want to create a
fastwiz
(on
Next
.
Next
.
8
Click
Finish
.
To transfer data to the new computer:
On the
1
Next
2
On the
chose for transferring your settings and files and click
instructions on the screen.
The wizard reads the collected files and settings and applies them to your
new computer.
22 Quick Reference Guide
Now go to your old computer
.
Where are the files and settings?
screen on the new computer, click
screen, select the method you
Next
. Follow the
Page 23

When all of the settings and files have been applied, the
Finished
screen
appears.
3
Click
Finished
NOTE: For more information about this procedure, search support.dell.com for
document #154781 (What Are The Different Methods To Transfer Files From My Old
Computer To My New Dell™ Computer Using the Microsoft
Operating System?).
NOTE: Access to the Dell™ Knowledge Base document may not be available in
certain countries.
Microsoft Windows Vista™ (Optional)
1
Click the Windows Vista Start button , and then click
and settings
2
In the
User Account Control
3
Click
Start a new transfer
and restart the new computer.
→ Start Windows Easy Transfer
dialog box, click
or
Continue a transfer in progress
.
Continue
®
Windows® XP
Transfer files
.
.
Follow the instructions provided on the screen by the Windows Easy Transfer
wizard.
Setting Up a Printer
NOTICE: Complete the operating system setup before you connect a printer to the
computer.
See the documentation that came with the printer for setup information,
including how to:
• Obtain and install updated drivers.
• Connect the printer to the computer.
• Load paper and install the toner or ink cartridge.
For technical assistance, refer to the printer owner's manual or contact the
printer manufacturer.
Quick Reference Guide 23
Page 24

Printer Cable
Your printer connects to your computer with either a USB cable or a parallel
cable. Your printer may not come with a printer cable, so if you purchase a
cable separately, ensure that it is compatible with your printer and computer.
If you purchased a printer cable at the same time you purchased your
computer, the cable may arrive in the computer’s shipping box.
Connecting Two Monitors
CAUTION: Before you begin any of the procedures in this section, follow the
safety instructions in the Product Information Guide.
If you purchased a graphics card that supports dual monitors, follow these
instructions to connect and enable your monitors. The instructions tell you
how to connect either two monitors (each with a VGA connector), one monitor
with a VGA connector and one monitor with a DVI connector, or a TV.
NOTICE: If you are connecting two monitors that have VGA connectors, you must
have the optional DVI adapter to connect the cable. If you are connecting two
flat-panel monitors, at least one of them must have a VGA connector. If you are
connecting a TV, you may connect only one monitor (VGA or DVI) in addition to the TV.
Connecting Two Monitors With VGA Connectors
1
Shutdown your system.
NOTE: If your computer has integrated video, do not connect either monitor to the
integrated video connector. If the integrated video connector is covered by a cap,
do not remove the cap to connect the monitor or the monitor will not function.
2
Connect one of the monitors to the VGA (blue) connector on the back of
the computer.
3
Connect the other monitor to the optional DVI adapter and connect the
DVI adapter to the DVI (white) connector on the back of the computer.
4
Restart your system.
24 Quick Reference Guide
Page 25

1
4
1 optional DVI adapter 2 DVI (white) connector
3 TV-OUT connector 4 VGA (blue) connector
Connecting One Monitor With a VGA Connector and One Monitor With a DVI
Connector
1
Shutdown your system.
2
Connect the VGA connector on the monitor to the VGA (blue) connector
23
on the back of the computer.
3
Connect the DVI connector on the other monitor to the DVI (white)
connector on the back of the computer.
4
Restart your system.
Quick Reference Guide 25
Page 26

Connecting a TV
NOTE: You must purchase an S-video cable, available at most consumer electronics
stores, to connect a TV to your computer. It is not included with your computer.
1
Shutdown your system.
2
Connect one end of the S-video cable to the optional TV-OUT connector
on the back of the computer.
3
Connect the other end of the S-video cable to the S-video input connector
on your TV.
4
Connect the VGA or DVI monitor.
5
Restart your system.
Changing the Display Settings
1
After you connect the monitor(s) or TV, turn on the computer.
The Microsoft
2
Enable extended desktop mode in the display settings. In extended
desktop mode, you can drag objects from one screen to the other,
effectively doubling the amount of viewable work space.
®
Windows® desktop displays on the primary monitor.
Power Protection Devices
Several devices are available to protect against power fluctuations and
failures:
• Surge protectors
• Line conditioners
• Uninterruptible power supplies (UPS)
Surge Protectors
Surge protectors and power strips equipped with surge protection help
prevent damage to your computer from voltage spikes that can occur during
electrical storms or after power interruptions. Some surge protector
manufacturers include warranty coverage for certain types of damage.
Carefully read the device warranty when choosing a surge protector. A device
with a higher joule rating offers more protection. Compare joule ratings to
determine the relative effectiveness of different devices.
26 Quick Reference Guide
Page 27

NOTICE: Most surge protectors do not protect against power fluctuations or
power interruptions caused by nearby lightning strikes. When lightning occurs in
your area, disconnect the telephone line from the telephone wall jack and
disconnect your computer from the electrical outlet.
Many surge protectors have a telephone jack for modem protection. See the
surge protector documentation for modem connection instructions.
NOTICE: Not all surge protectors offer network adapter protection. Disconnect the
network cable from the network wall jack during electrical storms.
Line Conditioners
NOTICE: Line conditioners do not protect against power interruptions.
Line conditioners are designed to maintain AC voltage at a fairly constant
level.
Uninterruptible Power Supplies
NOTICE: Loss of power while data is being saved to the hard drive may result in
data loss or file damage.
NOTE: To ensure maximum battery operating time, connect only your computer to
a UPS. Connect other devices, such as a printer, to a separate power strip that
provides surge protection.
A UPS protects against power fluctuations and interruptions. UPS devices
contain a battery that provides temporary power to connected devices when
AC power is interrupted. The battery charges while AC power is available. See
the UPS manufacturer documentation for information on battery operating
time and to ensure that the device is approved by Underwriters Laboratories
(UL).
Quick Reference Guide 27
Page 28
Desktop Computer
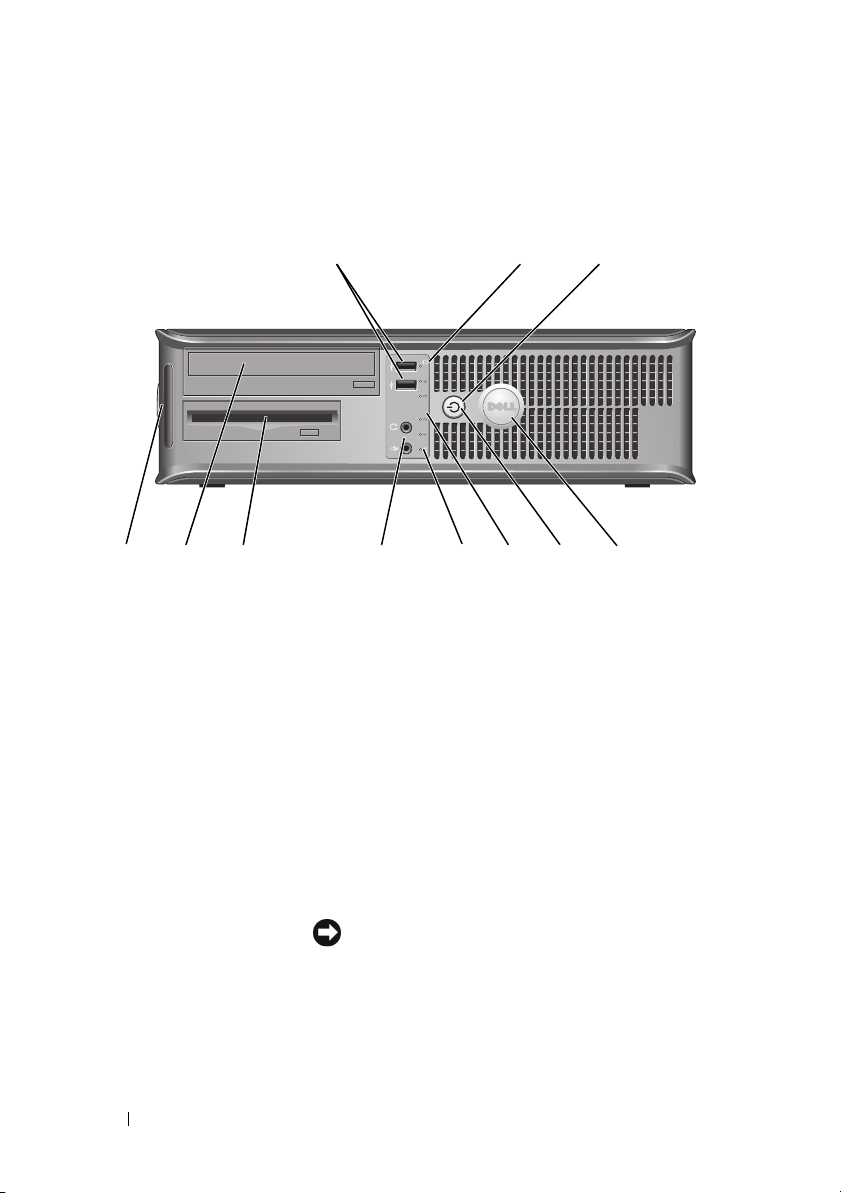
Front View
1
11 7
1 USB 2.0 connectors
(2)
2 drive activity light The drive activity light is on when the computer reads
3 power button,
power light
Use the front USB connectors for devices that you connect
occasionally, such as joysticks or cameras, or for bootable
USB devices (see "System Setup Options in the online
User’s Guide for more information on booting to a
USB device). It is recommended that you use the back
USB connectors for devices that typically remain
connected, such as printers and keyboards.
data from or writes data to the hard drive. The light
might also be on when a device such as an optical drive
is operating.
Press the power button to turn on the computer.
The light in the center of this button indicates
power state.
89
2
3
5
4610
28 Quick Reference Guide
NOTICE: To avoid losing data, do not use the
power button to turn off the computer. Instead,
perform an operating system shutdown.
Page 29

4 Dell badge This badge can be rotated to match the orientation of
your computer. To rotate the badge, place your fingers
around the outside of the badge, press firmly, and turn
the badge. You can also rotate the badge using the slot
provided near the bottom of the badge.
5 power light The power light illuminates and blinks or remains solid
to indicate different operating states:
• No light — The computer is turned off.
• Steady green — The computer is in a normal
operating state.
• Blinking green — The computer is in a power-saving
mode.
• Blinking or solid amber — See "Power Problems" in
the online
To exit from a power-saving mode, press the power
button or use the keyboard or the mouse if it is
configured as a wake device in the Windows Device
Manager. For more information about sleep modes and
exiting from a power-saving mode, see the online
User’s Guide.
See"Diagnostic Lights" on page 56" for a description of
light codes that can help you troubleshoot problems
with your computer.
6 diagnostic lights Use the lights to help you troubleshoot a computer
problem based on the diagnostic code. For more
information, see "Diagnostic Lights" on page 56.
7 LAN indicator light This light indicates that a LAN (local area network)
connection is established.
8 headphone and
microphone
connectors
9 floppy drive Can contain an optional floppy drive.
10 optical drive Use the optical drive to play a CD/DVD.
11 Service Tag Use the Service Tag to identify your computer when you
Use the microphone connector to attach a personal
computer microphone. On computers with a sound
card, the microphone connector is on the card.
Use the headphone connector to attach headphones
and most kinds of speakers.
access the Dell Support website or call Support.
User’s Guide
.
Quick Reference Guide 29
Page 30

Back View
1
1 card slots Access connectors for any installed PCI and PCI Express cards.
2 back panel
connectors
3 power connector Insert the power cable.
4 voltage selector
switch
5 padlock rings Padlock rings are for attaching a commercially available
6 cover release latch Use this latch to open the computer cover.
2 3 4 6
Plug USB, audio, and other devices into the appropriate
connector (see "Back Panel Connectors" on page 31 for
more information).
For selecting voltage rating.
antitheft device. The padlock rings allows you to secure the
computer cover to the chassis with a padlock to prevent
unauthorized access to the inside of the computer. To use
the padlock rings, insert a commercially available padlock
through the rings, and then lock the padlock.
5
CAUTION: Ensure that none of the system air vents are blocked. Blocking them
would cause serious thermal problems.
30 Quick Reference Guide
Page 31

Back Panel Connectors
13
98 7
1 parallel
connector
Connect a parallel device, such as a printer, to the parallel
connector. If you have a USB printer, plug it into a USB
connector.
24
NOTE: The integrated parallel connector is automatically
disabled if the computer detects an installed card containing a
parallel connector configured to the same address. For more
information, see "System Setup Options" in the online User’s
Guide.
2 link integrity
light
• Green — A good connection exists between a 10-Mbps
network and the computer.
• Orange — A good connection exists between a 100-Mbps
network and the computer.
• Yellow — A good connection exists between a 1-Gbps
(1000-Mbps) network and the computer.
• Off — The computer is not detecting a physical
connection to the network.
5
6
Quick Reference Guide 31
Page 32

3 network adapter
connector
4 network activity
light
5 line-out
connector
6 microphone/line-
in connector
7 USB 2.0
connectors (6)
To attach your computer to a network or broadband device,
connect one end of a network cable to either a network jack
or your network or broadband device. Connect the other
end of the network cable to the network adapter connector
on the back panel of your computer. A click indicates that
the network cable has been securely attached.
NOTE: Do not plug a telephone cable into the network
connector.
On computers with a network adapter card, use the
connector on the card.
It is recommended that you use at least Category 5 wiring
and connectors for your network. If you must use Category 3
wiring, force the network speed to 10 Mbps to ensure
reliable operation.
This light flashes yellow when the computer is transmitting
or receiving network data. A high volume of network traffic
may make this light appear to be in a steady "on" state.
Use the green line-out connector to attach headphones and
most speakers with integrated amplifiers.
On computers with a sound card, use the connector on the
card.
Use the blue line-in connector to attach a record/playback
device such as a cassette player, CD player, or VCR.
Use the pink microphone connector to attach a personal
computer microphone for voice or musical input into a
sound or telephony program.
On computers with a sound card, use the connector on the
card.
Use the back USB connectors for devices that typically
remain connected, such as printers and keyboards.
It is recommended that you use the front USB connectors
for devices that you connect occasionally, such as joysticks or
cameras.
32 Quick Reference Guide
Page 33

8 VGA video
connector
9 serial connector Connect a serial device, such as a handheld device, to the
Connect the monitor’s VGA cable to the VGA connector on
the computer.
On computers with a video card, use the connector on the
card.
serial port. The default designation is COM1 for serial
connector 1.
For more information, see "System Setup Options" in the
online User’s Guide.
Removing the Computer Cover
CAUTION: Before you begin any of the procedures in this section, follow the
safety instructions in the Product Information Guide.
CAUTION: To guard against electrical shock, always unplug your computer from
the electrical outlet before removing the cover.
1
Follow the procedures in "Before You Begin" on page 10.
NOTE: Ensure that sufficient space exists to support the removed cover.
NOTICE: Ensure that you are working on a level, protected surface to avoid
scratching either the computer or the surface on which it is resting.
2
If you have installed a padlock through the padlock ring on the back panel,
remove the padlock.
3
Slide the cover release latch back as you lift the cover.
Quick Reference Guide 33
Page 34

1 security cable slot 2 cover release latch
3 padlock ring
1
2
3
4
Pivot the cover up using the hinge tabs as leverage points.
5
Remove the cover from the hinge tabs and set it aside on a soft
nonabrasive surface.
34 Quick Reference Guide
Page 35

Inside View of Your Computer
CAUTION: Before you begin any of the procedures in this section, follow the
safety instructions in the Product Information Guide.
CAUTION: To avoid electrical shock, always unplug your computer from the
electrical outlet before removing the computer cover.
NOTICE: Be careful when opening the computer cover to ensure that you do not
accidentally disconnect cables from the system board.
2
1
3
4
6
1 drives bay
(CD/DVD, floppy, and hard drive)
3 system board 4 card slots
5 heat sink assembly 6 front I/O panel
2 power supply
Quick Reference Guide 35
5
Page 36

System Board Components
12
17
16
15
14
13
12
3
4
5
6
11 89
1 internal speaker connector
(INT_SPKR)
3 processor power connector
(12VPOWER)
10
36 Quick Reference Guide
7
2 processor connector (CPU)
4 memory module connectors
(DIMM_1, DIMM_2)
Page 37

5 SATA drive connectors
(SATA0, SATA1)
7 power connector
(POWER)
9 RTC reset jumper (RTCRST) 10 password jumper (PSWD)
11 battery socket (BATTERY) 12 PCI Express x16 card connector
13 PCI card connectors
(SLOT2 and SLOT3)
15 serial/ PS/2 connector (PS2/SER2) 16 fan connector (FAN_CPU)
17 floppy drive connector (FLOPPY)
6 front-panel connector
(FRONTPANEL)
8 SATA drive connectors
(SATA2, SATA3)
(SLOT1)
14 internal buzzer (SPKR)
Replacing the Computer Cover
CAUTION: Before you begin any of the procedures in this section, follow the
safety instructions located in the Product Information Guide.
1
Ensure that all cables are connected, and fold cables out of the way.
2
Ensure that no tools or extra parts are left inside the computer.
3
To replace the cover:
a
Align the bottom of the cover with the hinge tabs located along the
bottom edge of the computer.
b
Using the hinge tabs as leverage, rotate the cover downward to close it.
c
Snap the cover into place by pulling back on the cover release latch
and then releasing the latch when the cover is properly seated.
d
Ensure that the cover is seated correctly before moving the computer.
Quick Reference Guide 37
Page 38

Mini Tower Computer
Front View
10
1
2
3
9
8
1 Service Tag Use the Service Tag to identify your computer when you
access the Dell Support website or call Support.
2 optical drive Use the optical drive to play a CD/DVD.
4
5
6
7
38 Quick Reference Guide
Page 39

3 floppy drive A floppy drive is optional.
4 drive activity light The drive activity light is on when the computer reads
data from or writes data to the hard drive. The light
might also be on when a device such as an optical drive
is operating.
5 USB 2.0 connectors
(2)
6 diagnostic lights Use these lights to help you troubleshoot a computer
7 power button,
power light
8 headphone connector Use the headphone connector to attach headphones
9 microphone
connector
10 LAN indicator light This light indicates that a LAN (local area network)
Use the front USB connectors for devices that you connect
occasionally, such as joysticks or cameras, or for bootable
USB devices (see "System Setup Options" in the online
User’s Guide for more information on booting to a
USB device). It is recommended that you use the back
USB connectors for devices that typically remain
connected, such as printers and keyboards.
problem based on the diagnostic code. For more
information, see "Diagnostic Lights" on page 56.
Press the power button to turn on the computer.
The light in the center of this button indicates
power state.
NOTICE: To avoid losing data, do not use the
power button to turn off the computer. Instead,
perform an operating system shutdown.
and most kinds of speakers.
Use the microphone connector to attach a personal
computer microphone for voice or musical input into a
sound or telephony program.
On computers with a sound card, the microphone
connector is on the card.
connection is established.
Quick Reference Guide 39
Page 40

Back View
1
2
3
4
5
6
1 cover release latch This latch allows you to open the computer cover.
2 padlock rings Padlock rings are for attaching a commercially available
antitheft device. The padlock rings allows you to secure the
computer cover to the chassis with a padlock to prevent
unauthorized access to the inside of the computer. To use
the padlock rings, insert a commercially available padlock
through the rings, and then lock the padlock.
40 Quick Reference Guide
Page 41

3 power connector Insert the power cable.
4 voltage selector
switch
5 back panel
connectors
6 card slots Access connectors for any installed PCI and PCI Express cards.
CAUTION: Ensure that none of the system air vents are blocked. Blocking them
would cause serious thermal problems.
For selecting voltage rating.
Plug USB, audio, and other devices into the appropriate
connector (see "Back Panel Connectors" on page 31 for
more information.
Back Panel Connectors
24
1
98 7
3
5
6
1 parallel
connector
Connect a parallel device, such as a printer, to the parallel
connector. If you have a USB printer, plug it into a USB
connector.
NOTE: The integrated parallel connector is automatically
disabled if the computer detects an installed card containing a
parallel connector configured to the same address. For more
information, see "System Setup Options" in the online User’s
Guide.
Quick Reference Guide 41
Page 42

2 link integrity
light
3 network adapter
connector
4 network activity
light
5 line-out
connector
6 microphone/line-
in connector
7 USB 2.0
connectors (6)
• Green — A good connection exists between a 10-Mbps
network and the computer.
• Orange — A good connection exists between a 100-Mbps
network and the computer.
• Yellow — A good connection exists between a 1-Gbps
(1000-Mbps) network and the computer.
• Off — The computer is not detecting a physical
connection to the network.
To attach your computer to a network or broadband device,
connect one end of a network cable to either a network jack
or your network or broadband device. Connect the other
end of the network cable to the network adapter connector
on the back panel of your computer. A click indicates that
the network cable has been securely attached.
NOTE: Do not plug a telephone cable into the network
connector.
On computers with a network adapter card, use the
connector on the card.
It is recommended that you use at least Category 5 wiring
and connectors for your network. If you must use Category 3
wiring, force the network speed to 10 Mbps to ensure
reliable operation.
This light flashes yellow when the computer is transmitting
or receiving network data. A high volume of network traffic
may make this light appear to be in a steady "on" state.
Use the green line-out connector to attach headphones and
most speakers with integrated amplifiers.
On computers with a sound card, use the connector on the
card.
Use the blue and pink line-in connector to attach a
record/playback device such as a cassette player, CD player,
or VCR; or personal computer microphone.
Use the back USB connectors for devices that typically
remain connected, such as printers and keyboards.
It is recommended that you use the front USB connectors
for devices that you connect occasionally, such as joysticks or
cameras.
42 Quick Reference Guide
Page 43

8 VGA video
connector
9 serial connector Connect a serial device, such as a handheld device, to the
Connect the monitor’s VGA cable to the VGA connector on
the computer.
On computers with a video card, use the connector on the
card.
serial port. The default designation is COM1 for serial
connector 1.
For more information, see "System Setup Options" in the
online User’s Guide.
Removing the Computer Cover
CAUTION: Before you begin any of the procedures in this section, follow the
safety instructions in the Product Information Guide.
CAUTION: To guard against electrical shock, always unplug your computer from
the electrical outlet before removing the cover.
1
Follow the procedures in "Before You Begin" on page 10.
NOTE: Ensure that sufficient space exists to support the removed cover.
NOTICE: Ensure that you are working on a level, protected surface to avoid
scratching either the computer or the surface on which it is resting.
2
Lay your computer on its side with the computer cover facing up.
Quick Reference Guide 43
Page 44

1
2
3
1 security cable slot 2 cover release latch
3 padlock ring
3
Release the computer cover by pulling it away from the front of the
computer and lifting it up.
4
Set the cover aside in a secure location.
44 Quick Reference Guide
Page 45

Inside View of Your Computer
3
2
1
4
5
6
1 floppy drive 2 optical drive
3 power supply 4 system board
5 heat sink assembly 6 hard drive
Quick Reference Guide 45
Page 46

System Board Components
12
17
16
15
14
13
12
3
4
5
6
1011 89
1 internal speaker connector
(INT_SPKR)
3 processor power connector
(12VPOWER)
46 Quick Reference Guide
7
2 processor connector (CPU)
4 memory module connectors
(DIMM_1, DIMM_2)
Page 47

5 SATA drive connectors
(SATA0, SATA1)
7 power connector
(POWER)
9 RTC reset jumper (RTCRST) 10 password jumper (PSWD)
11 battery socket (BATTERY) 12 PCI Express x16 card connector
13 PCI card connectors
(SLOT2 and SLOT3)
15 serial/ PS/2 connector (PS2/SER2) 16 fan connector (FAN_CPU)
17 floppy drive connector (FLOPPY)
6 front-panel connector
(FRONTPANEL)
8 SATA drive connectors
(SATA2, SATA3)
(SLOT1)
14 internal buzzer (SPKR)
Replacing the Computer Cover
CAUTION: Before you begin any of the procedures in this section, follow the
safety instructions located in the Product Information Guide.
1
Ensure that all cables are connected, and fold cables out of the way.
2
Ensure that no tools or extra parts are left inside the computer.
3
To replace the cover:
a
Align the bottom of the cover with the hinge tabs located along the
bottom edge of the computer.
b
Using the hinge tabs as leverage, rotate the cover downward to close it.
c
Snap the cover into place by pulling back on the cover release latch
and then releasing the latch when the cover is properly seated.
d
Ensure that the cover is seated correctly before moving the computer.
4
Move the computer to the upright position.
Solving Problems
Dell provides a number of tools to help you if your computer does not
perform as expected. For the latest troubleshooting information available for
your computer, see the Dell support website at support.dell.com.
Quick Reference Guide 47
Page 48

If computer problems occur that require help from Dell, write a detailed
description of the error, beep codes, or diagnostic light patterns, record your
Express Service Code and Service Tag below, and then contact Dell from the
same location as your computer.
For an example of the Express Service Code and Service Tag, see "Finding
Information" in your computer User’s Guide.
Express Service Code:
Service Tag:
Dell Diagnostics
CAUTION: Before you begin any of the procedures in this section, follow the
safety instructions in the Product Information Guide.
When to Use the Dell Diagnostics
If you experience a problem with your computer, perform the checks in
Lockups and Software Problems (see the online User’s Guide for details) and
run the Dell Diagnostics before you contact Dell for technical assistance.
It is recommended that you print these procedures before you begin.
NOTICE: The Dell Diagnostics works only on Dell™ computers.
NOTE: The Drivers and Utilities media is optional and may not ship with your
computer.
See "System Setup" in the online User’s Guide to review your computer’s
configuration information, and ensure that the device that you want to test
displays in the system setup program and is active.
Start the Dell Diagnostics from your hard drive or from the Drivers and
Utilities media.
Starting the Dell Diagnostics From Your Hard Drive
The Dell Diagnostics is located on a hidden diagnostic utility partition on
your hard drive.
NOTE: If your computer cannot display a screen image, contact Dell.
1
Ensure that the computer is connected to an electrical outlet that is
known to be working properly.
48 Quick Reference Guide
Page 49

2
Turn on (or restart) your computer.
3
When the DELL™ logo appears, press <F12> immediately. Select
Diagnostics
from the boot menu and press <Enter>.
NOTE: If you wait too long and the operating system logo appears, continue to
wait until you see the Microsoft
computer and try again.
NOTE: If you see a message stating that no diagnostics utility partition has
been found, run the Dell Diagnostics from the Drivers and Utilities media.
4
Press any key to start the Dell Diagnostics from the diagnostics utility
®
Windows® desktop; then, shut down your
partition on your hard drive.
Starting the Dell Diagnostics From the Drivers and Utilities Media
1
Insert the
2
Shut down and restart the computer.
Drivers and Utilities media
.
When the DELL logo appears, press <F12> immediately.
NOTE: If you wait too long and the operating system logo appears, continue
to wait until you see the Microsoft
computer and try again.
NOTE: The next steps change the boot sequence for one time only. On the
next start-up, the computer boots according to the devices specified in the
system setup program.
3
When the boot device list appears, highlight
®
Windows® desktop; then, shut down your
CD/DVD/CD-RW
<Enter>.
4
Select the
Boot from CD-ROM
option from the menu that appears and
press <Enter>.
5
Ty p e 1 to start the CD menu and press <Enter> to proceed.
6
Select
Run the 32 Bit Dell Diagnostics
from the numbered list. If
multiple versions are listed, select the version appropriate for your
computer.
7
When the Dell Diagnostics
Main Menu
appears, select the test you want
to run.
and press
Quick Reference Guide 49
Page 50

Dell Diagnostics Main Menu
1
After the Dell Diagnostics loads and the
Main Menu
screen appears, click
the button for the option you want.
NOTE: It is recommended that you select Test System to run a complete test on
your computer.
Option Function
Test Memory Run the stand-alone memory test
Test System Run System Diagnostics
Exit Exit the Diagnostics
2
After you have selected the
Tes t S ys te m
option from the main menu, the
following menu appears:
NOTE: It is recommended that you select Extended Test from the menu below to
run a more thorough check of devices in the computer.
Option Function
Express Test Performs a quick test of devices in the system. This
typically can take 10 to 20 minutes.
Extended Test Performs a thorough check of devices in the system. This
typically can take an hour or more.
Custom Test Use to test a specific device or customize the tests to be
run.
Symptom Tree This option allows you to select tests based on a
symptom of the problem you are having. This option lists
the most common symptoms.
3
If a problem is encountered during a test, a message appears with an error
code and a description of the problem. Write down the error code and
problem description and contact Dell.
NOTE: The Service Tag for your computer is located at the top of each test
screen. If you contact Dell, technical support will ask for your Service Tag.
4
If you run a test from the
Custom Test or Symptom Tree
option, click the
applicable tab described in the following table for more information.
50 Quick Reference Guide
Page 51

Tab Function
Results Displays the results of the test and any error conditions
encountered.
Errors Displays error conditions encountered, error codes, and
the problem description.
Help Describes the test and may indicate requirements for
running the test.
Configuration Displays your hardware configuration for the selected
device.
The Dell Diagnostics obtains configuration information
for all devices from system setup, memory, and various
internal tests, and it displays the information in the
device list in the left pane of the screen. The device list
may not display the names of all the components
installed on your computer or all devices attached to your
computer.
Parameters Allows you to customize the test by changing the test
settings.
5
When the tests are complete, close the test screen to return to the
Menu
screen. To exit the Dell Diagnostics and restart the computer, close
the
Main Menu
6
Remove the Dell
screen.
Drivers and Utilities media
(if applicable).
Main
Power Lights
CAUTION: Before you begin any of the procedures in this section, follow the
safety instructions in the Product Information Guide.
The power button light (bi-color LED) located on the front of the computer
illuminates and blinks or remains solid to indicate different states:
• If the power light is off, the computer is either turned off or is not
receiving power.
– Reseat the power cable in the power connector on the back of the
computer and the electrical outlet.
Quick Reference Guide 51
Page 52

– If the computer is plugged into a power strip, ensure that the power
strip is plugged into an electrical outlet and that the power strip is
turned on. Also, bypass power protection devices, power strips, and
power extension cables to verify that the computer turns on properly.
– Ensure that the electrical outlet is working by testing it with another
device, such as a lamp.
• If the power light is steady green and the computer is not responding:
– Ensure that the display is connected and powered on.
– If the display is connected and powered on, see "Beep Codes" on
page 53.
• If the power light is blinking green, the computer is in standby mode. Press
a key on the keyboard, move the mouse, or press the power button to
resume normal operation.If the power light is green and the computer is
not responding:
– Ensure the display is connected and powered on.
– If the display is connected and powered on, see "Beep Codes" on
page 53.
• If the power light is steady amber, the computer is receiving electrical
power, but a device might be malfunctioning or incorrectly installed.
– Remove and then reinstall the memory modules.
– Remove and then reinstall any cards.
– Remove and then reinstall the graphics card, if applicable.
• If the power light is blinking amber, there may be a power problem or an
internal device malfunction.
– Ensure that all power cables are securely connected to the system
board (see "System Board Components" on page 36).
– Ensure that the main power cable and front panel cable are securely
connected to the system board (see "System Board Components" on
page 36).
52 Quick Reference Guide
Page 53

Beep Codes
Your computer might emit a series of beeps during start-up if the monitor
cannot display errors or problems. This series of beeps, called a beep code,
identifies a problem. For example, beep code 1-3-1 (one possible beep code)
consists of one beep, a burst of three beeps, and then one beep. This beep
code tells you that the computer encountered a memory problem.
Reseating the memory modules may correct the following beep code errors. If
the problem persists, contact Dell (see "Contacting Dell"
for instructions on obtaining technical assistance.
Code Cause
1-3-1 through
2-4-4
4-3-1 Memory failure above address 0FFFFh
Memory not being properly identified or used
If you experience any of the following beep code errors, see "Contacting Dell"
in the
User’s Guide
Code Cause
1-1-2 Microprocessor register failure
1-1-3 NVRAM read/write failure
1-1-4 ROM BIOS checksum failure
1-2-1 Programmable interval timer failure
1-2-2 DMA initialization failure
1-2-3 DMA page register read/write failure
1-3 Video Memory Test failure
1-3-1 through
2-4-4
3-1-1 Slave DMA register failure
3-1-2 Master DMA register failure
3-1-3 Master interrupt mask register failure
3-1-4 Slave interrupt mask register failure
for instructions on obtaining technical assistance.
Memory not being properly identified or used
in the
User’s Guide
)
Quick Reference Guide 53
Page 54

Code Cause
3-2-2 Interrupt vector loading failure
3-2-4 Keyboard Controller Test failure
3-3-1 NVRAM power loss
3-3-2 Invalid NVRAM configuration
3-3-4 Video Memory Test failure
3-4-1 Screen initialization failure
3-4-2 Screen retrace failure
3-4-3 Search for video ROM failure
4-2-1 No timer tick
4-2-2 Shutdown failure
4-2-3 Gate A20 failure
4-2-4 Unexpected interrupt in protected mode
4-3-1 Memory failure above address 0FFFFh
4-3-3 Timer-chip counter 2 failure
4-3-4 Time-of-day clock stopped
4-4-1 Serial or parallel port test failure
4-4-2 Failure to decompress code to shadowed memory
4-4-3 Math-coprocessor test failure
4-4-4 Cache test failure
System Messages
NOTE: If the message you received is not listed in the table, see the documentation
for either the operating system or the program that was running when the message
appeared.
ALERT! PREVIOUS ATTEMPTS AT BOOTING THIS SYSTEM HAVE FAILED AT
CHECKPOINT [NNNN]. FOR HELP IN RESOLVING THIS PROBLEM, PLEASE NOTE
THIS CHECKPOINT AND CONTACT DELL TECHNICAL SUPPORT — The computer
failed to complete the boot routine three consecutive times for the same error.
54 Quick Reference Guide
Page 55

CMOS CHECKSUM ERROR — Possible motherboard failure or RTC battery low.
Replace battery.
CPU FAN FAILURE — CPU fan failure. Replace the CPU fan.
DISKETTE DRIVE 0 SEEK FAILURE — A cable may be loose, or the computer
configuration information may not match the hardware configuration. Check cable
connections.
DISKETTE READ FAILURE — The floppy disk may be defective or a cable may be
loose. Replace the floppy disk/check for a loose cable connection.
HARD- DISK DRIVE FAILURE — Possible hard disk drive failure during HDD
POST. Check cables /swap hard disks.
HARD- DISK DRIVE READ FAILURE — Possible HDD failure during HDD boot test.
KEYBOARD FAILURE — Keyboard failure or keyboard cable loose.
NO BOOT DEVICE AVAILABLE — The system cannot detect a bootable device or
partition.
• If the floppy drive is your boot device, ensure that the cables are connected and
that a bootable floppy disk is in the drive.
• If the hard drive is your boot device, ensure that the cables are connected and
that the drive is installed properly and partitioned as a boot device.
• Enter system setup and ensure that the boot sequence information is correct.
NO TIMER TICK INTERRUPT — A chip on the system board might be
malfunctioning or motherboard failure.
NON- SYSTEM DISK OR DISK ERROR — Replace the floppy disk with one that has
a bootable operating system or remove the floppy disk from drive A and restart the
computer.
Quick Reference Guide 55
Page 56

NOT A BOOT DISKETTE — Insert a bootable floppy disk and restart your
computer.
USB OVER CURRENT ERROR — Disconnect the USB device. Use an external
power source for the USB device.
NOTICE - HARD DRIVE SELF MONITORING SYSTEM HAS REPORTED THAT A
PARAMETER HAS EXCEEDED ITS NORMAL OPERATING RANGE. DELL
RECOMMENDS THAT YOU BACK UP YOUR DATA REGULARLY. A PARAMETER OUT
OF RANGE MAY OR MAY NOT INDICATE A POTENTIAL HARD DRIVE PROBLEM —
S.M.A.R.T error, possible HDD failure. This feature can be enabled or disabled in
BIOS setup.
Diagnostic Lights
CAUTION: Before you begin any of the procedures in this section, follow the
safety instructions located in the Product Information Guide.
To help you troubleshoot a problem, your computer has four lights labeled 1,
2, 3, and 4 on the front or back panel. The lights can be off or green. When
the computer starts normally, the patterns or codes on the lights change as
the boot process completes. When the computer starts normally, the patterns
or codes on the lights change as the boot process completes. If the POST
portion of system boot completes successfully, all four lights display solid
green. If the computer malfunctions during the POST process, the pattern
displayed on the LEDs may help identify where in the process the computer
halted.
NOTE: The orientation of the diagnostic lights may vary depending on the system
type. The diagnostic lights can appear either vertical or horizontal.
56 Quick Reference Guide
Page 57

Light Pattern Problem Description Suggested Resolution
The computer is in a normal
"off" condition, or a possible
pre-BIOS failure has occurred.
The diagnostic lights are not lit
after the computer successfully
boots to the operating system.
A possible BIOS failure has
occurred; the computer is in
the recovery mode.
A possible processor failure has
occurred.
Plug the computer into a
working electrical outlet and
press the power button.
Run the BIOS Recovery utility,
wait for recovery completion,
and then restart the computer.
Reinstall the processor and
restart the computer.
Memory modules are detected,
but a memory failure has
occurred.
• If you have one memory
module installed, reinstall it
and restart the computer.
(see the online
for instructions on how to
remove and install memory
modules.)
• If you have two or more
memory modules installed,
remove the modules,
reinstall one module, and
then restart the computer. If
the computer starts
normally, reinstall an
additional module.
Continue until you have
identified a faulty module or
reinstalled all modules
without error.
• If available, install properly
working memory of the same
type into your computer.
• If the problem persists,
contact Dell
User’s Guide
.
Quick Reference Guide 57
Page 58

Light Pattern Problem Description Suggested Resolution
A possible graphics card failure
has occurred.
A possible floppy or hard drive
failure has occurred.
A possible USB failure has
occurred.
• If the computer has a
graphics card, remove the
card, reinstall it, and then
restart the computer.
• If the problem still exists,
install a graphics card that
you know works and restart
the computer.
• If the problem persists or the
computer has integrated
graphics,
Reseat all power and data
cables and restart the
computer.
Reinstall all USB devices,
check cable connections, and
then restart the computer.
contact Dell
.
58 Quick Reference Guide
Page 59

Light Pattern Problem Description Suggested Resolution
No memory modules are
detected.
Memory modules are detected,
but a memory configuration or
compatibility error exists.
• If you have one memory
module installed, reinstall it
and restart the computer.
See the online
for instructions on how to
remove and install memory
modules.
• If you have two or more
memory modules installed,
remove the modules,
reinstall one module, and
then restart the computer. If
the computer starts
normally, reinstall an
additional module.
Continue until you have
identified a faulty module or
reinstalled all modules
without error.
• If available, install properly
working memory of the same
type into your computer.
• If the problem persists,
contact Dell
• Ensure that no
memory module/memory
connector placement
requirements
• Verify that the
modules
installing are compatible
with your computer.
• If the problem persists,
Contact Dell.
User’s Guide
.
special
exist.
memory
that you are
Quick Reference Guide 59
Page 60

Light Pattern Problem Description Suggested Resolution
A failure has occurred.
This pattern also displays when
you enter system setup and
may not indicate a problem.
After POST is complete, all
four diagnostic lights turn
green briefly before turning off
to indicate normal operating
condition.
• Ensure that the cables are
properly connected to the
system board from the hard
drive and the optical drive.
• Check the computer
message that appears on
your monitor screen.
• If the problem persists,
Contact Dell.
None.
Clearing Forgotten Passwords
CAUTION: Before you begin any of the procedures in this section, follow the
safety instructions located in the Product Information Guide.
1
Follow the procedures in "Before You Begin" on page 10.
2
Remove the computer cover (see "Removing the Computer Cover" on
page 43).
3
Locate the 2-pin password jumper (PSWD) on the system board. By
default, Pin1 and Pin2 should be connected. You will need to remove the
jumper and boot the system, as follows.
4
Remove the jumper.
60 Quick Reference Guide
Page 61

5
Replace the computer cover (see "Replacing the Computer Cover" on
page 37).
NOTICE: To connect a network cable, first plug the cable into the network device
and then plug it into the computer.
6
Connect your computer and devices to electrical outlets, and turn
them on.
7
After the Microsoft® Windows® desktop appears on your computer, shut
down your computer (see "Turning Off Your Computer" on page 12).
8
Turn off the monitor and disconnect it from the electrical outlet.
9
Disconnect the computer power cable from the electrical outlet, and press
the power button to ground the system board.
10
Open the computer cover.
11
Locate the 2-pin password jumper (PSWD) on the system board and
attach the jumper to reenable the password feature.
12
Replace the computer cover (see "Replacing the Computer Cover" on
page 37).
Quick Reference Guide 61
Page 62

NOTICE: To connect a network cable, first plug the cable into the network wall jack
and then plug it into the computer.
13
Connect your computer and devices to electrical outlets, and turn
them on.
NOTE: This procedure enables the password feature. When you enter system
setup (see "Entering System Setup" in your User’s Guide), both system and
administrator password options appear as Not Set—meaning that the password
feature is enabled but no password is assigned.
14
Assign a new system and/or administrator password.
Clearing CMOS Settings
CAUTION: Before you begin any of the procedures in this section, follow the
safety instructions located in the Product Information Guide.
1
Follow the procedures in "Before You Begin" on page 10.
NOTE: The computer must be disconnected from the electrical outlet to clear
the CMOS setting.
2
Remove the computer cover (see "Removing the Computer Cover" on
page 43).
3
Remove the computer cover.
4
Reset the current CMOS settings:
a
Locate the password (PSWD) and CMOS (RTCRST) jumpers on the
system board (see "Clearing Forgotten Passwords" on page 60).
b
Remove the password jumper plug from its pins.
c
Place the password jumper plug on the RTCRST pins and wait
approximately 5 seconds.
d
Remove the jumper plug from the RTCRST pins and place it back on
the password pins.
5
Replace the computer cover (see "Replacing the Computer Cover" on
page 37).
NOTICE: To connect a network cable, first plug the cable into the network port or
device and then plug it into the computer.
6
Connect your computer and devices to electrical outlets, and turn
them on.
62 Quick Reference Guide
Page 63

Flashing the BIOS
The BIOS may require flashing when an update is available or when replacing
the system board.
1
Turn on the computer.
2
Locate the BIOS update file for your computer at the Dell Support
website at
3
Click
4
If the
this Agreement
The
5
Click
The
6
Click the down arrow to view the
click
The file downloads to your desktop.
7
Click Close when the
The file icon appears on your desktop and is titled the same as the
downloaded BIOS update file.
8
Double-click the file icon on the desktop and follow the on-screen
instructions.
support.dell.com
Download Now
Export Compliance Disclaimer
.
File Download
Save this program to disk
Save In
Save
window appears.
.
window appears.
.
to download the file.
, and then click OK.
Save In
Download Complete
window appears, click
menu, select
window appears.
Desktop
Yes, I Accept
, and then
Quick Reference Guide 63
Page 64

64 Quick Reference Guide
Page 65

Index
B
beep codes, 53
C
CDs
operating system, 9
CMOS settings
clearing, 62
computer
beep codes, 53
components inside, 35, 45
inside view, 35, 45
cover
removing, 33, 43
replacing, 37, 47
D
Dell Diagnostics, 48
Dell support site, 8
diagnostics
beep codes, 53
Dell, 48
Product Information Guide, 6
Quick Reference, 6
regulatory, 6
safety, 6
User’s Guide, 6
warranty, 6
E
End User License Agreement, 6
ergonomics information, 6
error messages
beep codes, 53
H
hardware
beep codes, 53
Dell Diagnostics, 48
Help and Support Center, 9
help file
Windows Help and Support
Center, 9
documentation
End User License Agreement, 6
ergonomics, 6
online, 8
I
installing parts
before you begin, 11
recommended tools, 12
Index 65
Page 66

turning off your computer, 12
Internet connection
about, 17
options, 17
setting up, 18
O
operating system
reinstalling, 9
Operating System CD, 9
L
labels
Microsoft Windows, 7
Service Tag, 7, 29, 38
lights
power, 29
M
monitor
clone mode, 26
connect DVI, 24-25
connect TV, 24, 26
connect two, 24-25
connect VGA, 24-25
display settings, 26
extended desktop mode, 26
motherboard. See system board
N
network
Network Setup Wizard, 16
Network Setup Wizard, 16
P
password
clearing, 60
jumper, 60
power
button, 28, 39
light, 29
line conditioners
protection devices
surge protectors
UPS
printer
cable, 24
connecting, 15, 23
setting up, 15, 23
problems
beep codes, 53
Dell Diagnostics, 48
Product Information Guide, 6
R
regulatory information, 6
ResourceCD
Dell Diagnostics, 48
66 Index
Page 67

S
S.M.A.R.T, 56
safety instructions, 6
Service Tag, 7, 29, 38
Starting the Dell Diagnostics
From the Drivers and
Utilities CD, 49
Starting the Dell Diagnostics
From Your Hard Drive, 48
support website, 8
system board, 36, 46
T
troubleshooting
Dell Diagnostics, 48
Help and Support Center, 9
TV
connect to computer, 24, 26
Help and Support Center, 9
Network Setup Wizard, 16
reinstalling, 9
wizards
Network Setup Wizard, 16
U
uninterruptible power supply.
See UPS
UPS
User’s Guide, 6
W
warranty information, 6
Windows XP
Index 67
Page 68

68 Index
Page 69

Dell™ OptiPlex™ 330
Stručná úvodní příručka
Models DCSM a DCNE
www.dell.com | support.dell.com
Page 70

Poznámky, upozornění a varování
POZNÁMKA:
POZNÁMKA označuje důležité informace, které napomáhají lepšímu
využití počítače.
UPOZORNĚNÍ:
UPOZORNĚNÍ označuje nebezpečí poškození hardwaru nebo ztráty dat
a popisuje, jak se lze problému vyhnout.
VÝSTRAHA: VAROVÁNÍ upozorňuje na potenciální nebezpečí poškození majetku,
úrazu nebo smrti.
____________________
Změna informací v tomto dokumentu vyhrazena.
© 2007 Dell Inc. Všechna práva vyhrazena.
Jakákoli reprodukce bez písemného povolení společnosti Dell Inc. je přísně zakázána.
Obchodní značky použité v tomto textu: Dell, logo DELL, Inspiron, Dell Precision, Dimension,
OptiPlex, Latitude, PowerEdge, PowerVault, PowerApp a Dell OpenManage jsou ochranné známky
Dell Inc.; Intel, Pentium a Celeron jsou registrované ochranné známky společnosti Intel Corporation;
Microsoft a Windows jsou registrované ochranné známky společnosti Microsoft Corporation.
Ostatní obchodní značky a názvy mohou být v tomto dokumentu použity buď v souvislosti s
organizacemi, které si na tyto značky a názvy činí nárok, nebo s jejich produkty. Společnost Dell Inc.
si nečiní nárok na jiné obchodní značky a názvy než své vlastní.
Models DCSM a DCNE
Září 2007 Č. dílu YN992 Rev. A00
Page 71

Obsah
Kde hledat informace
Než začnete
. . . . . . . . . . . . . . . . . . . . . . . . .
Před manipulací uvnitř počítače
Přidávání a výměna součástek
Instalace počítače
. . . . . . . . . . . . . . . . . . . .
. . . . . . . . . . . . .
. . . . . . . . . . . . . . .
. . . . . . . . . . . . . . . . . . . . .
Instalace vašeho počítače do skříně
Nastavení sítě pro domácnost a kancelář
Připojení k sít’ovému adaptéru
Instalace sítě
. . . . . . . . . . . . . . . . . . . . . .
Připojení k internetu
. . . . . . . . . . . . . . . . . . . .
. . . . . . . . . . . . . .
Přenesení informací do nového počítače
Nastavení tiskárny
Připojení dvou monitorů
Přepět’ové ochrany
Stolní počítač
Pohled zepředu
Pohled zezadu
Konektory na zadním panelu
. . . . . . . . . . . . . . . . . . . . .
. . . . . . . . . . . . . . . . . . .
. . . . . . . . . . . . . . . . . . . . .
. . . . . . . . . . . . . . . . . . . . . . . .
. . . . . . . . . . . . . . . . . . . . .
. . . . . . . . . . . . . . . . . . . . . .
. . . . . . . . . . . . . . .
. . . . . . . . . . .
. . . . . . . . .
. . . . . . . . . .
73
78
78
79
81
81
83
83
84
85
87
91
92
94
96
96
98
99
Demontáž krytu počítače
Pohled do vašeho počítače
Součásti základní desky
. . . . . . . . . . . . . . . . . .
. . . . . . . . . . . . . . . . .
. . . . . . . . . . . . . . . . . .
Nasazení krytu skříně počítače
Počítač typu minivěž
Pohled zepředu
Pohled zezadu
. . . . . . . . . . . . . . . . . . . .
. . . . . . . . . . . . . . . . . . . . .
. . . . . . . . . . . . . . . . . . . . . .
. . . . . . . . . . . . . . .
Obsah
101
103
104
105
106
106
108
71
Page 72

Konektory na zadním panelu
. . . . . . . . . . . . . . . .
110
Demontáž krytu skříně počítače
Pohled do vašeho počítače
Součásti základní desky
. . . . . . . . . . . . . . . . . .
Nasazení krytu skříně počítače
Řešení problémů
. . . . . . . . . . . . . . . . . . . . . .
Diagnostický program Dell Diagnostics
Kontrolky napájení
Zvukové signály
Systémová hlášení
Diagnostické kontrolky
. . . . . . . . . . . . . . . . . . . . .
. . . . . . . . . . . . . . . . . . . . . . .
. . . . . . . . . . . . . . . . . . . . .
. . . . . . . . . . . . . . . . . . .
Vymazání zapomenutých hesel
Vymazání nastavení CMOS
Aktualizace BIOSu
Rejstrík
. . . . . . . . . . . . . . . . . . . . . . . . . . . .
. . . . . . . . . . . . . . . . . . . . .
. . . . . . . . . . . . . .
. . . . . . . . . . . . . . . . .
. . . . . . . . . . . . . . .
. . . . . . . . . . .
. . . . . . . . . . . . . . .
. . . . . . . . . . . . . . . . .
112
114
115
116
117
117
121
122
124
126
129
131
132
133
72
Obsah
Page 73

Kde hledat informace
POZNÁMKA:
počítačem dodána. Některé funkce nebo média nemusejí být v některých zemích k
dispozici.
POZNÁMKA:
Jaké informace hledáte? Zde je naleznete
• Diagnostický program pro počítač
• Ovladače pro počítač
• Software DSS (Desktop System
Software)
Některé funkce nebo média jsou volitelná a nemusela být s tímto
Doplňkové informace byly pravděpodobně dodány s počítačem.
Média Ovladače a nástroje
POZNÁMKA:
být volitelná a nemusejí být s počítačem dodána.
Ovladače jsou v počítači již nainstalovány. Toto
médium můžete použít k nové instalaci
ovladačů (viz online Příručka uživatele) a ke
spuštění diagnostického nástroje Dell
Diagnostics (viz „Diagnostický program Dell
Diagnostics“ na straně 117).
Na médiu se mohou nacházet soubory Readme
obsahující nejaktuálnější informace o
technických změnách počítače nebo technický
referenční materiál pro techniky a zkušené
uživatele.
Média
Ovladače a nástroje
mohou
POZNÁMKA:
dokumentace jsou k dispozici na internetové stránce
support.dell.com
Ovladače a aktualizace
.
Stručná úvodní příručka
73
Page 74

Jaké informace hledáte? Zde je naleznete
• Základní informace o odstraňování
problémů
• Spuštění nástroje Dell Diagnostics
•Nástroje
• Nastavení tiskárny
Stručná úvodní příručka
POZNÁMKA:
nemusí být s počítačem dodán.
Tento dokument může být volitelný a
• Informace o záruce
• Podmínky (jen USA)
• Bezpečnostní pokyny
• Informace o předpisech
• Informace o ergonomii
• Licenční smlouva s koncovým
uživatelem
• Odstraňování a výměna součástí
• Technické údaje
• Konfigurace systému
• Odstraňování a řešení problémů
POZNÁMKA:
formátu PDF na internetové stránce
support.dell.com
Informační příručka produktu Dell™
Příručka uživatele Dell OptiPlex™ 330
Centrum pro nápovědu a odbornou pomoc
Microsoft Windows
1
Klepněte na
systému Windows Vista
Nápověda a a odborná pomoc→ Příručka
uživatele a systémová příručka Dell
Systémová příručka
2
Klepněte na položku
počítač.
Tento dokument je k dispozici ve
.
tlačítko Start
v operačním
→
a na možnost
.
Příručka uživatele
→
pro váš
74
Stručná úvodní příručka
Page 75

Jaké informace hledáte? Zde je naleznete
• Servisní štítek a kód expresní
služby
• Licenční štítek operačního systému
Microsoft Windows
Servisní štítek a licence Microsoft® Windows®
License
Tyto štítky jsou umístěny na vašem počítači.
• Při používání internetové stránky
support.dell.com
použijte servisní štítek k identifikaci počítače.
• Zadejte kód expresní služby, aby vaše volání
mohlo být při kontaktování podpory
přesměrováno.
nebo kontaktování podpory
POZNÁMKA:
opatření obsahuje nový licenční štítek operačního
systému Microsoft Windows vybrání („díru“), které
znesnadňuje odstranění štítku.
Jako dodatečné bezpečnostní
Stručná úvodní příručka
75
Page 76

Jaké informace hledáte? Zde je naleznete
• Řešení – Rady a tipy k odstraňování
problémů, články techniků a online
kurzy, časté otázky
• Community (Veřejnost) – Online
diskuse s ostatními zákazníky
společnosti Dell
• Upgrades (Nejnovější verze) –
Informace o nejnovějších verzích
pro součásti, jako je pamět’, pevný
disk a operační systém
• Péče o zákazníky – Kontaktní
informace, servisní požadavek a
stav objednávky, záruka a
informace o opravách
• Servis a podpora – Stav servisního
požadavku a historie odborné
podpory, servisní smlouva, online
diskuse s technickou podporou
• Služba aktuálních technických
informací Dell – Proaktivní
e-mailové upozornění na
aktualizace softwaru a hardwaru
pro váš počítač
• Reference – Dokumentace k
počítači, podrobnosti o
individuální konfiguraci počítače,
technické údaje produktů a
oficiální dokumenty
• Soubory ke stažení – Certifikované
ovladače, opravy a aktualizace
softwaru
Internetová stránka podpory Dell –
support.dell.com
POZNÁMKA:
segmentu se zobrazí příslušná stránka odborné
pomoci.
Po vybrání oblasti nebo obchodního
76
Stručná úvodní příručka
Page 77

Jaké informace hledáte? Zde je naleznete
• Desktop System Software (DSS) –
Při nové instalaci operačního
systému v počítači byste měli nově
instalovat také nástroj DSS.
Nástroj DSS poskytuje kritické
aktualizace pro operační systém a
podporu pro procesory, optické
jednotky, USB zařízení atd. Nástroj
DSS je nezbytný pro správné
fungování vašeho počítače Dell.
Tento softwa re au tom ati cky
rozpozná počítač a operační systém
a nainstaluje aktualizace, které
odpovídají individuální
konfiguraci.
• Používání Windows
• Práce s programy a soubory
• Individuální přizpůsobení pracovní
plochy
Stažení nástroje Desktop System Software:
1
Přejděte na internetovou stránku
support.dell.com
obchodní segment a zadejte údaj ze servisního
štítku.
2
Vyberte položku
(Ovladače a soubory ke stažení) a klepněte na
Go
tlačítko
3
Klepněte na příslušný operační systém a
vyhledejte klíčové slovo
Software
.
POZNÁMKA:
support.dell.com
stránky
na vybraných údajích.
Centrum pro nápovědu a odbornou pomoc
Windows
1
Část Nápověda a odborná pomoc operačního
systému Windows otevřete takto:
• V operačním systému Windows XP
klepněte na tlačítko
možnost
• V operačním systému Windows Vista™
klepněte na tlačítko
možnost
2
Napište slovo nebo frázi popisující vzniklé
potíže a klepněte na ikonu se šipkou.
3
Klepněte na téma popisující vaše potíže.
4
Postupujte podle pokynů na obrazovce.
, vyberte region nebo
Drivers & Downloads
(Přejít).
Desktop System
Uživatelské rozhraní internetové
se může lišit v závislosti
Start
a pak klepněte na
Nápověda a odborná pomoc
Start
→
na
Nápověda a odborná pomoc
.
.
Stručná úvodní příručka
77
Page 78

Jaké informace hledáte? Zde je naleznete
• Nová instalace operačního systému
Médium Operační systém
POZNÁMKA:
volitelné a nemusí být s počítačem dodáno.
Operační systém je v počítači již nainstalován.
Pro novou instalaci operačního systému
použijte disk s operačním systémem a online
Příručku uživatele.
Po nové instalaci operačního systému nově
nainstalujte ovladače pro zařízení dodaná s
počítačem pomocí disku Ovladače a nástroj.
Štítek s kódem operačního systému se nachází
na počítači.
POZNÁMKA:
systému, který jste si objednali.
Médium
Barva disku závisí na operačním
Operační systém
může být
Než začnete
Před manipulací uvnitř počítače
Dodržujte následující bezpečnostní zásady, abyste zabránili možnému
poškození počítače nebo úrazu.
VÝSTRAHA: Před prováděním některého z postupů uvedených v této kapitole si
přečtěte bezpečnostní pokyny v Informační příručce produktu.
UPOZORNENÍ:
komponent nebo kontaktů na desce. Držte desku za její hrany nebo kovový montážní
držák. Součásti jako například procesor držte za hrany, nikoli za kolíky.
78
Stručná úvodní příručka
Zacházejte s komponentami a deskami opatrně. Nedotýkejte se
Page 79

UPOZORNENÍ:
škody způsobené servisním zásahem, který nebyl schválen společností Dell, se nevztahuje
záruka.
Opravy počítače smí provádět pouze kvalifikovaný servisní technik. Na
UPOZORNENÍ:
za samotný kabel. Některé kabely jsou vybaveny konektory s pojistkami; pokud
rozpojujete tento typ kabelu, před rozpojením kabelu stiskněte pojistky. Při odtahování
konektorů od sebe je udržujte rovnoměrně zarovnány, abyste neohnuli kolíky konektorů.
Také se před zapojením kabelu ujistěte, zda jsou oba konektory správně nasměrovány a
zarovnány.
UPOZORNENÍ:
následující kroky.
1
Vypněte počítač (viz „Vypnutí počítače“ na straně 80).
VÝSTRAHA: Nikdy nezapínejte napájení, pokud je počítač bez krytu.
UPOZORNENÍ:
potom se sít’ového zařízení.
2
Odpojte od počítače veškeré telefonní a sít’ové kabely.
3
Odpojte počítač a všechna připojená zařízení z elektrických zásuvek.
4
Stisknutím vypínače uzemníte systémovou desku.
UPOZORNENÍ:
elektrostatický náboj ze svého těla tím, že se dotknete nenatřeného kovového povrchu,
například některé kovové části na zadní straně počítače. Během manipulace se
opakovaně dotýkejte nenatřeného kovového povrchu, abyste odvedli potencionální
elektrostatický náboj, který by mohl poškodit vnitřní součásti.
Při rozpojování kabelu táhněte za konektor nebo vytahovací pojistku, ne
Aby se zabránilo poškození, proved ’ te před manipulací uvnitř počítače
Při odpojování sít’ového kabelu nejprve odpojte kabel od počítače a
Dříve než se dotknete některé části uvnitř počítače, odved ’ te
Přidávání a výměna součástek
Tato kapitola uvádí postupy pro demontáž a instalaci součástek pro váš počítač.
Není-li uvedeno jinak, u každého postupu se předpokládá, že jsou splněny
následující podmínky:
• Provedli jste kroky popsané v částech „Vypnutí počítače“ na straně 80 a
„Před manipulací uvnitř počítače“ na straně 78.
• Přečetli jste si bezpečnostní pokyny v
Informační příručce produktu
Dell™.
• Součástku můžete vyměnit nebo – pokud jste ji zakoupili zvlášt’ –
instalovat postupem pro demontáž, ale v opačném pořadí.
Stručná úvodní příručka
79
Page 80

Doporučené nástroje
Pro postupy popsané v tomto dokumentu mohou být zapotřebí následující
nástroje:
• malý plochý šroubovák,
• malý šroubovák Philips,
• malá plastová rycí jehla.
Vypnutí počítače
UPOZORNENÍ:
všechny otevřené soubory a ukončete všechny spuštěné programy.
1
Ukončete operační systém:
a
Uložte a zavřete všechny otevřené soubory a ukončete všechny
Abyste zabránili ztrátě dat, uložte a zavřete před vypnutím počítače
spuštěné programy.
b
V operačním systému Microsoft® Windows® XP
Start→
Vypnout počítač→
Vypn ou t
.
V operačním systému Microsoft® Windows Vista™
klepněte na tlačítko
klepněte na tlačítko
Start v levém dolním rohu plochy, klepněte na šipku v pravém
dolním rohu nabídky Start podle ilustrace uvedené níže a klepněte na
možnost
Vypn ou t
.
Po ukončení operačního systému se počítač vypne.
2
Zkontroluje, zda je počítač stejně jako všechna připojená zařízení vypnutý.
Pokud se počítač a připojená zařízení nevypnuly automaticky při vypnutí
operačního systému, vypněte je stisknutím a podržením vypínače přibližně
na 4 sekundy.
80
Stručná úvodní příručka
Page 81

Instalace počítače
Instalace vašeho počítače do skříně
Instalace vašeho počítače do skříně může omezit proudění vzduchu a ovlivnit
chod počítače, eventuálně může způsobit i jeho přehřátí. Při instalaci počítače
do skříně postupujte podle níže uvedených pokynů:
UPOZORNENÍ:
provozní teplotu. Při instalaci počítače do skříně proto zvažte i okolní teplotu. Např. pokud
je okolní teplota 25 °C, v závislosti na technických údajích vašeho počítače je teplotní
rezerva už jen 5 až 10 °C, než se dosáhne maximální provozní teploty. Podrobné technické
údaje svého počítače naleznete v online
Provozní teplota uvedená v tomto návodu vyjadřuje maximální okolní
Příručce uživatele
.
• Na všech stranách počítače s větracími otvory ponechte alespoň 10,2 cm
volného místa, aby bylo umožněno dostatečné větrání.
• Pokud je vaše skříň vybavena dvířky, musí umožňovat min. 30% proudění
vzduchu (zepředu a zezadu).
Stručná úvodní příručka
81
Page 82

• Pokud počítač umístíte do rohu desky pracovního stolu nebo pod ní,
nechte mezi stěnou a zadní stranou počítače min. 5,1 cm volného místa,
aby bylo umožněno proudění vzduchu potřebné pro větrání.
UPOZORNENÍ:
Zamezením proudění vzduchu ovlivníte chod počítače a můžete způsobit i jeho přehřátí.
82
Stručná úvodní příručka
Neinstalujte počítač do skříně, která neumožňuje proudění vzduchu.
Page 83

Nastavení sítě pro domácnost a kancelář
Připojení k sít’ovému adaptéru
Připojení sít’ového kabelu:
POZNÁMKA:
Nezastrkujte sít’ový kabel do konektoru modemu na počítači. Nezastrkujte sít’ový kabel do
telefonní zdířky na stěně.
1
Připojte sít’ový kabel ke konektoru sít’ového adaptéru na zadním panelu
počítače.
Kabel připojte, až zacvakne, a jemně za něj zatáhněte, abyste zkontrolovali,
zda je dobře připojený.
2
Druhý konec sít’ového kabelu připojte do sít’ového zařízení.
Zastrčte sít’ový kabel do konektoru sít’ového adaptéru na počítači.
Stručná úvodní příručka
83
Page 84

konektor
sít’ového
adaptéru
sít’ové
zařízení
konektor sít’ového adaptéru na počítači
sít’ový kabel
Instalace sítě
Windows XP
Operační systém Microsoft® Windows® XP nabízí Průvodce instalací sítě, který
vás provede procesem sdílení souborů, tiskáren nebo internetového připojení
mezi počítači doma nebo v malé kanceláři.
1
Klepněte na tlačítko
Příslušenství
2
Na úvodní obrazovce
3
Klepněte na
POZNÁMKA:
povolí integrovaný firewall, který je součástí Windows XP Service Pack 1 (SP1) a vyšších.
4
Dokončete kontrolní seznam a požadované přípravy.
5
Vrat’te se zpět do Průvodce instalací sítě a postupujte podle pokynů na
→
Kontrolní seznam pro vytvoření sítě
Výběr způsobu připojení Tento počítač se připojuje přímo k internetu
obrazovce.
Start
, přejděte na položku
Komunikace
a potom klepněte na
Průvodce instalací sítě
Všechny programy→
Průvodce instalací sítě
klepněte na
Další
.
.
.
84
Stručná úvodní příručka
Page 85

Windows Vista
Změny instalace sítě v systému Microsoft® Windows Vista™ provedete takto:
1
V systému Windows Vista klepněte na tlačítko Start, , a potom
klepněte na možnost
2
Klepněte na
3
Zvolte typ požadovaného sít’ového připojení a postupujte podle pokynů na
Vytvoření připojení nebo sítě
Sít’→ Sít’ a sdílení
.
.
obrazovce.
4
Po dokončení zavřete možnost Sít’ a sdílení.
Připojení k internetu
POZNÁMKA:
zemích liší.
Poskytovatelé služeb Internetu (ISP) a jejich nabídky se v jednotlivých
Pro připojení k internetu potřebujete modem nebo sít’ové připojení a
poskytovatele služeb Internetu (ISP). Váš ISP vám nabídne jednu nebo více z
následujících možností internetového připojení:
• DSL připojení, které umožňuje vysokorychlostní přístup k internetu
prostřednictvím vaší stávající pevné telefonní linky nebo prostřednictvím
mobilního telefonu. Pomocí DSL připojení se můžete být připojeni k
internetu a zároveň telefonovat.
• Připojení prostřednictvím kabelového modemu, které umožňuje
vysokorychlostní připojení k internetu prostřednictvím vaší místní
kabelové televize.
• Připojení prostřednictvím satelitního modemu, které umožňuje
vysokorychlostní připojení k internetu prostřednictvím satelitní televize.
• Vytáčené připojení, které umožňuje připojení k internetu prostřednictvím
telefonní linky. Vytáčené připojení je podstatně pomalejší než DSL a
kabelové (nebo satelitní) připojení přes modem.
• Bezdrátové LAN připojení, které umožňuje připojení k internetu
prostřednictvím bezdrátové technologie Bluetooth
®
.
Pokud používáte vytáčené připojení, ještě před nastavením internetového
připojení připojte telefonní linku ke konektoru modemu na počítači a do
telefonní zdířky na stěně. Pokud používáte DSL nebo kabelové/satelitní
připojení přes modem, pokyny pro nastavení získáte u svého ISP nebo v
zákaznickém centru pro mobilní telefony.
Stručná úvodní příručka
85
Page 86

Nastavení vašeho internetového připojení
Nastavení internetového připojení pomocí zástupce ISP na ploše:
1
Uložte a zavřete všechny otevřené soubory a ukončete spuštěné programy.
2
Poklepejte na ikonu ISP na ploše operačního systému Microsoft®
Windows
3
Dokončete nastavení podle pokynů na obrazovce.
®
.
Pokud na ploše nemáte ikonu ISP nebo pokud chcete internetové připojení
nastavit s jiným ISP, proved ’ te kroky uvedené v následující kapitole, které
odpovídají operačnímu systému používanému na vašem počítači.
POZNÁMKA:
pro domácnost a kancelář“ na straně 83. Pokud se nemůžete připojit k internetu, ale dříve
vám to šlo bez problémů, může mít váš ISP výpadek. Kontaktujte svého ISP a ověřte si
stav poskytované služby nebo se zkuste připojit znovu později.
Windows XP
1
Uložte a zavřete všechny otevřené soubory a ukončete spuštěné programy.
2
Klepněte na tlačítko
Zobrazí se
3
Klepněte na možnost
4
V následujícím okně klepněte na odpovídající možnost:
Pokud máte s připojením k internetu problémy, vyhledejte „Nastavení sítě
Start→
Průvodce novým připojením
Internet Explorer
.
Připojit k Internetu
.
.
• Pokud nemáte ISP a chcete si nějakého vybrat, klepněte na možnost
Vybrat ze seznamu poskytovatelů služeb Internetu
.
• Pokud jste od svého ISP již získali informace potřebné pro nastavení,
ale nedostali jste nastavovací CD, klepněte na možnost
připojení ručně
.
• Pokud máte disk CD, klepněte na možnost
poskytovatele služeb Internetu
5
Klepněte na tlačítko
Pokud jste zvolili možnost
Další
.
Nastavit připojení ručně
.
Použít disk CD-ROM od
, pokračujte k Krok 6.
Nastavit
Dokončete nastavení podle pokynů na obrazovce.
POZNÁMKA:
6
Klepněte na odpovídající možnost v
potom klepněte na tlačítko
7
K dokončení nastavení použijte informace dodané vaším ISP.
Pokud si nejste jisti, který typ připojení zvolit, kontaktujte svého ISP.
Jak se chcete připojit k Internetu?
Další
.
a
86
Stručná úvodní příručka
Page 87

Windows Vista™
POZNÁMKA:
Připojení k Internetu
1
Uložte a zavřete všechny otevřené soubory a ukončete spuštěné programy.
2
Klepněte na tlačítko Start systému Windows Vista, , a potom klepněte
Ovládací panel
na
3
V možnosti
Zobrazí se okno
4
Klepněte bud ’ na
Telefonické připojení
•Zvolte
Připravte si informace od svého ISP. Pokud nemáte žádného ISP, průvodce
vám pomůže nějakého vybrat.
.
Sít’ a internet
Připojit k Internetu
klepněte na
Připojit k Internetu
.
Širokopásmové připojení (PPPoE)
.
, nebo na
podle toho, jak se chcete připojit:
Širokopásmové připojení
, pokud budete používat připojení
prostřednictvím DSL, satelitního modemu, modemu kabelové TV
nebo bezdrátové technologie Bluetooth.
•Zvolte
Telefonické připojení
, pokud budete používat analogový
modem nebo ISDN.
POZNÁMKA:
nebo kontaktujte svého ISP
5
Postupujte podle pokynů na obrazovce ak dokončení nastavení použijte
Pokud si nejste jistí, který typ připojení zvolit, klepněte na Pomoz mi zvolit
.
informace dodané vaším ISP.
Přenesení informací do nového počítače
K přenesení souborů a dalších dat z jednoho počítače do druhého – např. ze
starého
počítače do
Pokyny naleznete v následující kapitole, která odpovídá operačnímu systému
používanému na vašem počítači.
nového
– můžete použít „průvodce“ operačního systému.
Microsoft® Windows® XP (volitelně)
Operační systém Microsoft Windows XP nabízí Průvodce přenesením souborů a
nastavení určeného k přenesení dat ze zdrojového počítače do nového počítače.
Můžete přenést data, jako jsou:
•e-maily,
• nastavení nástrojové lišty,
• velikost oken,
• záložky na Internetu.
Stručná úvodní příručka
87
Page 88

Data můžete do nového počítače přenést prostřednictvím sítě nebo sériového
připojení nebo je můžete uložit na vyměnitelné médium, např. zapisovatelný
disk CD, abyste je následně mohli přenést do nového počítače.
POZNÁMKA:
propojením vstupních/výstupních (I/O) portů obou počítačů prostřednictvím sériového
kabelu. K přenesení dat prostřednictvím sériového kabelu musíte otevřít nástroj Sít’ová
připojení na Ovládacím panelu a provést několik dodatečných konfiguračních úkonů, např.
pokročilé nastavení připojení a určení hostitelského a připojovaného počítače.
Pokyny pro nastavení přímého propojení dvou počítačů kabelem naleznete ve znalostní
bázi Microsoft Knowledge Base, článek #305621, nazvaný
dvou počítačů v operačním systému Windows XP pomocí kabelu
nemusí být tato informace k dispozici.
Informace ze starého počítače do nového můžete přenést také přímo
Vytvoření přímého propojení
. V některých zemích
Pro přenesení informací do nového počítače musíte spustit Průvodce
přenesením souborů a nastavení. Pro tento proces můžete použít volitelné
médium
Operační systém
nebo si můžete vytvořit disk s Průvodcem přenesením
souborů a nastavení.
Spuštění Průvodce přenesením souborů a nastavení z média Operační systém
POZNÁMKA:
médium je volitelné a nemusí být součástí příslušenství některých počítačů.
K provedení tohoto postupu potřebujete médium
Operační systém
. Toto
Příprava nového počítače na přenesení souborů:
1
Otevřete Průvodce přenesením souborů a nastavení: Klepněte na tlačítko
Start→
Průvodce přenesením souborů a nastavení
2
Jakmile se zobrazí okno
klepněte na
3
Na obrazovce
Další
4
Na obrazovce
možnost
Další
5
Jakmile se zobrazí obrazovka
ke svému starému nebo zdrojovému počítači. Tentokrát
tlačítko
Všechny programy→
Příslušenství→ Systémové nástroje→
.
Průvodce přenesením souborů a nastavení
Další
.
O který počítač jde?
klepněte na možnost
Nový počítač→
.
Máte disk CD-ROM systému Windows XP?
klepněte na
Použiji průvodce z disku CD-ROM systému Windows XP→
.
Nyní přejděte ke starému počítači
ne
klepejte na
Další
.
,
, přejděte
88
Stručná úvodní příručka
Page 89

Kopírování dat ze starého počítače:
6
Do starého počítače vložte médium
7
Na obrazovce
klepněte na možnost
8
V možnosti
nastavení
9
Na obrazovce
Další
.
10
Na obrazovce
Vítejte v operačním systému Microsoft Windows XP
Provést další úkony
Co chcete udělat?
→
Další
.
O který počítač jde?
Vyberte metodu přenosu
Operační systém
.
klepněte na možnost
klepněte na možnost
klepněte na požadovaný způsob
Windows XP.
Přenesení souborů a
Starý počítač→
přenosu.
11
Na obrazovce
klepněte na tlačítko
Po okopírování informací se zobrazí obrazovka
shromažd ’ ování
12
Klepněte na možnost
Co chcete přenést?
Další
.
.
Dokončit
.
zvolte položky, které chcete přesunout a
Dokončení fáze
Přesun dat do nového počítače:
1
Na obrazovce
klepněte na tlačítko
2
Na obrazovce
přenosu souborů a nastavení a klepněte na tlačítko
Nyní přejděte ke starému počítači
Další
Kde jsou soubory a nastavení?
zvolte vámi vybraný způsob
svého nového počítače
Další
.
Průvodce shromážděné soubory a nastavení přečte a přesune do vašeho
nového počítače.
Po přesunutí všech souborů a nastavení se zobrazí obrazovka
3
Klepněte na tlačítko
Spuštění Průvodce přesunem souborů a nastavení bez média Operační systém
Hotovo
a nový počítače restartujte.
Ke spuštění Průvodce přesunem souborů a nastavení bez média
Hotovo
.
Operační systém
si musíte vytvořit disk s průvodcem, který vám umožní na vyměnitelném médiu
vytvořit záložní image soubor.
Disk s průvodcem vytvoříte pomocí svého nového počítače s operačním
systémem Windows XP při dodržení následujících kroků:
1
Otevřete Průvodce přesunem souborů a nastavení: Klepněte na tlačítko
Start→
Průvodce přenesením souborů a nastavení
Všechny programy→
Příslušenství→ Systémové nástroje→
.
Stručná úvodní příručka
89
Page 90

2
Jakmile se zobrazí okno
na
Další
.
3
Na obrazovce
Další
.
4
Na obrazovce
možnost
5
Vložte vyměnitelné médium, např. zapisovatelný disk CD, a klepněte na
tlačítko
6
Po dokončení vytváření disku a zobrazení hlášení
O který počítač jde?
Máte disk CD-ROM systému Windows XP?
Na následujícím disku chci vytvořit disk s průvodcem→ Další
OK
.
old computer
Další
.
7
Přejděte ke svému starému počítači.
Průvodce přesunem souborů a nastavení
klepněte na možnost
Now go to your
(Nyní přejděte ke starému počítači)
Nový počítač→
klepněte na
ne
klepejte na
Kopírování dat ze starého počítače:
1
Do starého počítače vložte disk s průvodcem.
2
Klepněte na tlačítko
3
V poli
Otevřít
vyměnitelném médiu) a klepněte na tlačítko
4
Na úvodní obrazovce
na
Další
.
5
Na obrazovce
Další
.
6
Na obrazovce
okna
Start→
Spustit
Spustit
.
vyhledejte cestu k
fastwiz
OK
Průvodce přenesením souborů a nastavení
O který počítač jde?
Vyberte metodu přenosu
klepněte na možnost
klepněte na požadovaný způsob
(na odpovídajícím
.
Starý počítač→
přesunu.
7
Na obrazovce
přesunout a klepněte na
Po okopírování informací se zobrazí okno
Co chcete přesunout?
Další
.
zvolte položky, které chcete
Dokončení fáze shromažd’ování
, klepněte
.
klepněte
.
8
Klepněte na tlačítko
Dokončit
.
Přesun dat do nového počítače:
1
Na obrazovce
klepněte na
2
Na obrazovce
Nyní přejděte ke starému počítači
Další
.
Kde jsou soubory a nastavení?
přenosu souborů a nastavení a klepněte na tlačítko
pokynů na obrazovce.
90
Stručná úvodní příručka
svého nového počítače
zvolte vámi vybraný způsob
Další
. Postupujte podle
Page 91

Průvodce shromážděné soubory a nastavení přečte a přenese do vašeho
nového počítače.
Po přesunu všech souborů a nastavení se zobrazí obrazovka
3
Klepněte na tlačítko
POZNÁMKA:
support.dell.com
starého počítače do mého nového počítače Dell™ vybaveného operačním systémem
Microsoft
POZNÁMKA:
Dell™.
Microsoft Windows Vista™ (volitelně)
1
V systému Windows Vista klepněte na tlačítko Start, potom klepněte
na možnost
Windows
2
V dialogovém okně
Pokračovat
3
Klepněte na možnost
Více informací o tomto postupu naleznete na internetové stránce
®
Windows® XP
V některých zemích nemusí existovat možnost přístupu ke znalostní bázi
Přenesení souborů a nastavení→
.
.
Hotovo
v dokumentu #154781 (
a nový počítače restartujte.
Různé způsoby přesunu souborů z mého
).
Kontrola uživatelského účtu
Spustit nový přenos
Spustit snadný přenos
klepněte na možnost
nebo
Pokračovat v přenosu
Hotovo
.
.
Postupujte podle pokynů uvedených Průvodcem snadného přenosu Windows na
obrazovce.
Nastavení tiskárny
UPOZORNENÍ:
počítači.
Přečtěte si pokyny pro nastavení uvedené v dokumentech dodaných spolu s
tiskárnou, včetně postupu, jak:
• Získat a nainstalovat aktualizované ovladače.
• Připojit tiskárnu k počítači.
• Vložit papír a instalovat toner nebo inkoustovou patronu.
Technickou asistenci naleznete v návodu k obsluze tiskárny nebo kontaktujte
přímo výrobce tiskárny.
Nastavení operačního systému dokončete před připojením tiskárny k
Stručná úvodní příručka
91
Page 92

Kabel tiskárny
Tiskárnu připojíte k počítači pomocí USB kabelu nebo paralelního kabelu. Kabel
k tiskárně nemusí být součástí příslušenství vaší tiskárny. Proto pokud ho budete
kupovat samostatně, ujistěte se, zda je kompatibilní s vaší tiskárnou a
počítačem. Pokud jste kabel k tiskárně zakoupili zároveň s počítačem, je možné,
že kabel obdržíte v krabici spolu s počítačem.
Připojení dvou monitorů
VÝSTRAHA: Před prováděním některého z postupů uvedených v této kapitole si
přečtěte bezpečnostní pokyny v Informační příručce produktu.
Pokud jste si zakoupili grafickou kartu podporující připojení dvou monitorů,
připojte a zapněte je podle těchto pokynů. Pokyny uvádějí, jak připojit bud ’ dva
monitory (každý s VGA konektorem), nebo jeden monitor s VGA konektorem,
nebo jeden monitor s DVI konektorem, nebo TV.
UPOZORNENÍ:
připojení kabelu volitelný DVI adaptér. V případě připojování dvou monitorů s plochou
obrazovkou musí mít alespoň jeden z nich VGA konektor. V případě připojování TV můžete
navíc k TV připojit pouze jeden monitor (VGA nebo DVI).
Připojování dvou monitorů s VGA konektory
1
Vypněte systém.
POZNÁMKA:
zabudovanému video konektoru. Pokud má zabudovaný video konektor nasazený kryt,
nesundavejte ho, abyste do něj mohli připojit monitor, protože monitor by pak nefungoval.
2
Jeden z monitorů připojte k VGA (modrému) konektoru na zadní straně
V případě připojování dvou monitorů s VGA konektory potřebujete pro
Pokud má váš počítač vestavěné video, nepřipojujte monitory k
počítače.
3
Druhý monitor připojte k volitelnému DVI adaptéru, a ten připojte k DVI
(bílému) konektoru na zadní straně počítače.
4
Restartujte systém.
92
Stručná úvodní příručka
Page 93

1
4
1
volitelný DVI adaptér
3
TV-OUT konektor
Připojení jednoho monitoru s VGA konektorem a jednoho monitoru s DVI
konektorem
Vypněte systém.
1
2
Propojte VGA konektor na monitoru s VGA (modrým) konektorem na
23
2
DVI (bílý) konektor
4
VGA (modrý) konektor
zadní straně počítače.
3
Propojte DVI konektor na dalším monitoru s DVI (bílým) konektorem na
zadní straně počítače.
4
Restartujte systém.
Stručná úvodní příručka
93
Page 94

Připojení TV
POZNÁMKA:
dostání v obchodech s elektronikou. Není součástí příslušenství vašeho počítače.
1
Vypněte systém.
2
Jeden konec S-video kabelu zapojte do volitelného TV-OUT konektoru na
Pro připojení TV k počítači si musíte zakoupit S-video kabel, který je běžně k
zadní straně počítače.
3
Druhý konec S-video kabelu zapojte do vstupního S-Video konektoru na
televizoru.
4
Připojte VGA nebo DVI monitor.
5
Restartujte systém.
Změna nastavení zobrazení
1
Po připojení monitoru/monitorů nebo TV zapněte počítač.
Na primárním monitoru se zobrazí plocha systému Microsoft
2
V nastavení zobrazení aktivujte režim rozšířené plochy. V režimu rozšířené
®
Windows®.
plochy můžete přetahovat objekty z jedné obrazovky na druhou, a
efektivně tak zdvojnásobit zobrazený pracovní prostor.
Přepět’ové ochrany
K dispozici je několik zařízení chránících před kolísáním napájení a poruchami:
• svodiče přepětí,
• stabilizátory napětí,
• záložní zdroje (UPS),
Svodiče přepětí
Svodiče přepětí a power stripy vybavené ochranou proti přepětí pomáhají
předcházet případnému poškození vašeho počítače způsobeného výkyvy napětí,
ke kterým dochází při bouřkách nebo po výpadcích elektrického proudu. Někteří
výrobci svodičů přepětí přidávají záruku na určité typy škod. Při výběru svodiče
přepětí si proto pečlivě přečtěte záruční podmínky daného zařízení. Zařízení s
vyšší joulovou hodnotou poskytuje vyšší ochranu. Proto porovnávejte efektivitu
jednotlivých zařízení podle uvedeného počtu joulů.
94
Stručná úvodní příručka
Page 95

UPOZORNENÍ:
příkonu způsobeného blesky. Pokud se tedy ve vaší oblasti vyskytne bouřka, odpojte
telefonní kabel ze zdířky a odpojte počítač z elektrické zásuvky.
Většina svodičů přepětí nechrání před kolísáním nebo přerušením
Řada svodičů přepětí má také telefonní zdířku pro ochranu modemu. Viz
pokyny pro připojení modemu v dokumentaci ke svodiči přepětí.
UPOZORNENÍ:
bouřce proto odpojte ze sít’ového zdířky na stěně sít’ový kabel.
Ne všechny svodiče přepětí ale nabízejí ochranu sít’ového adaptéru. Při
Stabilizátory napětí
UPOZORNENÍ:
Stabilizátory napětí nechrání před výpadkem proudu.
Stabilizátory napětí jsou určeny k udržení střídavého napětí na zcela konstantní
úrovni.
Záložní zdroje
UPOZORNENÍ:
ztrátu dat nebo poškození souborů.
POZNÁMKA:
Ostatní zařízení, např. tiskárnu, připojte k samostatnému power stripu, který zajistí
ochranu proti přepětí.
Přerušení napájení během ukládání dat na pevný disk může způsobit
Maximální provozní dobu baterie zajistíte připojením počítače k UPS.
UPS chrání proti kolísání napětí a výpadkům proudu. UPS zařízení obsahuje
baterii, která zajistí dočasné napájení připojeným zařízení v případě přerušení
dodávky střídavého proudu. Baterie se dobíjí během dodávky střídavého proudu.
Informace o provozní době baterie naleznete v dokumentaci výrobce UPS a
zároveň se ujistěte, zda je zařízení schváleno státními zkušebnami Underwriters
Laboratories (UL).
Stručná úvodní příručka
95
Page 96

Stolní počítač
Pohled zepředu
1
11 7
1
USB konektory 2.0 (2) K USB konektorům na přední straně připojujte zařízení,
která používáte občas, například joysticky nebo
fotoaparáty, nebo spustitelná USB zařízení (další
informace o spuštění USB zařízení najdete v online
Příručce uživatele v kapitole „Možnosti systémového
nastavení“). Zařízení, která běžně zůstávají připojená
(například tiskárny nebo klávesnice), doporučujeme
připojit k zadním USB konektorům.
2
kontrolka činnosti
disku
3
vypínač,
kontrolka napájení
Kontrolka činnosti disku svítí, když počítač čte data z
pevného disku nebo když na pevný disk data zapisuje.
Kontrolka může svítit také tehdy, když je v chodu
nějaké zařízení, např. optická jednotka.
Zapněte počítač stisknutím vypínače. Kontrolka
uprostřed tohoto tlačítka indikuje stav napájení.
89
UPOZORNENÍ:
nepoužívejte tento vypínač k vypnutí počítače. Místo
toho řádně ukončete operační systém.
2
Aby se zabránilo ztrátě dat,
3
5
4610
96
Stručná úvodní příručka
Page 97

4
štítek Dell Tento štítek je možné natočit tak, aby odpovídal
poloze počítače. Chcete-li štítek natočit, položte prsty
na vnější okraj štítku, zatlačte a štítek natočte. Štítek
lze rovněž natočit pomocí štěrbiny u dolní části štítku.
5
kontrolka napájení Blikáním a svícením signalizuje kontrolka napájení
různé provozní stavy:
• Nesvítí – Počítač je vypnutý.
• Svítí zeleně – Počítač je zapnutý a pracuje normálně.
• Bliká zeleně – Počítač se nachází v úsporném režimu.
• Bliká nebo svítí oranžově – Viz kapitola „Problémy s
napájením“ v online
Chcete-li ukončit úsporný režim, stiskněte vypínač
nebo použijte klávesnici nebo myš (pokud jsou tato
zařízení ve Správci zařízení systému Windows
nakonfigurována pro buzení). Další informace o
režimech spánku a ukončování úsporného režimu
najdete v online Příručce uživatele.
V kapitole „Diagnostické kontrolky“ na straně 126 jsou
popsány kódy kontrolek, které vám mohou pomoci při
odstraňování problémů s počítačem.
6
diagnostické
kontrolky
7
kontrolka místní sítě
LAN
8
konektory pro
sluchátka a mikrofon
9
disketová jednotka Může zahrnovat volitelnou disketovou jednotku.
10
optická jednotka Optická jednotka slouží k přehrávání disků CD/DVD.
11
servisní štítek Servisní štítek slouží k identifikaci počítače na
Pomocí diagnostických kódů těchto kontrolek můžete
odstraňovat problémy s počítačem. Více informací
najdete v kapitole „Diagnostické kontrolky“ na
straně 126.
Tato kontrolka indikuje, že bylo navázáno připojení k
místní síti LAN.
Konektor pro mikrofon slouží k připojení počítačového
mikrofonu. U počítačů se zvukovou kartou používejte
konektor mikrofonu na kartě.
Ke konektoru sluchátek můžete připojit sluchátka a
většinu typů reproduktorů.
internetové stránce podpory Dell nebo při kontaktování
telefonické technické podpory.
Příručce uživatele
.
Stručná úvodní příručka
97
Page 98

Pohled zezadu
1
1
patice pro karty Přístupové konektory všech nainstalovaných karet PCI a
2
konektory na
zadním panelu
3
konektor napájení Připojte napájecí kabel.
4
přepínač napětí Pro výběr napětí.
5
kroužky zámku Kroužky zámku jsou určené pro připevnění běžně
6
západka pro
uvolnění krytu
počítače
2 3 4 6
PCI Express.
USB, audio a další zařízení zapojte do odpovídajících
konektorů (více informací naleznete v kapitole „Konektory
na zadním panelu“ na straně 99).
dostupného zařízení proti krádežím. Kroužky zámku vám
umožní zabezpečit počítač připevněním krytu ke
konstrukci pomocí zámku před nepovoleným přístupem ke
vnitřku počítače. Pokud chcete kroužky použít, prostrčte
jimi běžný visací zámek, a ten potom zamkněte.
Tato západka slouží k otevírání krytu počítače.
5
VÝSTRAHA: Zkontrolujte, zda nejsou větrací otvory ucpané. Jejich zablokováním
byste mohli způsobit vážné tepelné problémy počítače.
98
Stručná úvodní příručka
Page 99

Konektory na zadním panelu
13
98 7
1
paralelní
konektor
2
kontrolka
integrity linky
K paralelnímu portu počítače připojte paralelní zařízení,
jako například tiskárnu. Máte-li k dispozici USB tiskárnu,
připojte ji k USB konektoru.
POZNÁMKA:
paralelním konektorem, který je nakonfigurován na stejnou adresu,
bude integrovaný paralelní konektor automaticky zakázán. Další
informace najdete v kapitole „Možnosti nastavení systému“ v
Příručce uživatele
online
• Zelená – Existuje dobré spojení mezi sítí 10 Mb/s a
počítačem.
• Oranžová – Existuje dobré spojení mezi sítí 100 Mb/s a
počítačem.
• élutá – Existuje dobré spojení mezi sítí 1000 Mb/s (1 Gb/s)
a počítačem.
• Nesvítí – Počítač nerozpoznal fyzické připojení k síti.
Jestliže počítač rozpozná nainstalovanou kartu s
24
.
5
6
Stručná úvodní příručka
99
Page 100

3
konektor
sít’ového
adaptéru
4
kontrolka aktivity
sítě
5
konektor
linkového
výstupu
6
konektor
mikrofonu /
linkového vstupu
7
konektory
USB 2.0 (6)
Chcete-li připojit počítač k sít’ovému nebo
širokopásmovému zařízení, připojte jeden konec sít’ového
kabelu k sít’ové zásuvce nebo k sít’ovému nebo
širokopásmovému zařízení. Druhý konec sít’ového kabelu
připojte ke konektoru sít’ového adaptéru na zadním panelu
počítače. Pro správné připojení je třeba sít’ový kabel
zacvaknout.
POZNÁMKA:
U počítačů s kartou sít’ového adaptéru použijte konektor na
kartě.
Pro sít’ovou kabeláž doporučujeme použít kabely a konektory
alespoň kategorie 5. Pokud musíte použít kabeláž kategorie
3, musíte pro zajištění spolehlivého provozu nastavit
rychlost sítě na 10 Mb/s.
Tato kontrolka bliká žlutě, když počítač přenáší nebo přijímá
sít’ová data. Při intenzivním sít’ovém provozu se může zdát,
že tato kontrolka takřka svítí.
K zelenému výstupnímu linkovému konektoru můžete
připojit sluchátka a většinu reproduktorových soustav se
zabudovaným zesilovačem.
U počítačů se zvukovou kartou používejte konektor na kartě.
K modrému konektoru linkového vstupu připojte zařízení
pro nahrávání/přehrávání, například magnetofon, přehrávač
CD nebo videorekordér.
K růžovému konektoru mikrofonu připojte počítačový
mikrofon jako zdroj hlasu a hudby pro zvukový nebo
telefonický program.
U počítačů se zvukovou kartou používejte konektor na kartě.
Zařízení, která běžně zůstávají připojená (například tiskárny
nebo klávesnice), doporučujeme připojit k zadním USB
konektorům.
Přední USB konektory doporučujeme používat pro zařízení,
která připojujete příležitostně, například joysticky nebo
fotoaparáty.
K sít’ovému konektoru nepřipojujte telefonní kabel.
100
Stručná úvodní příručka
 Loading...