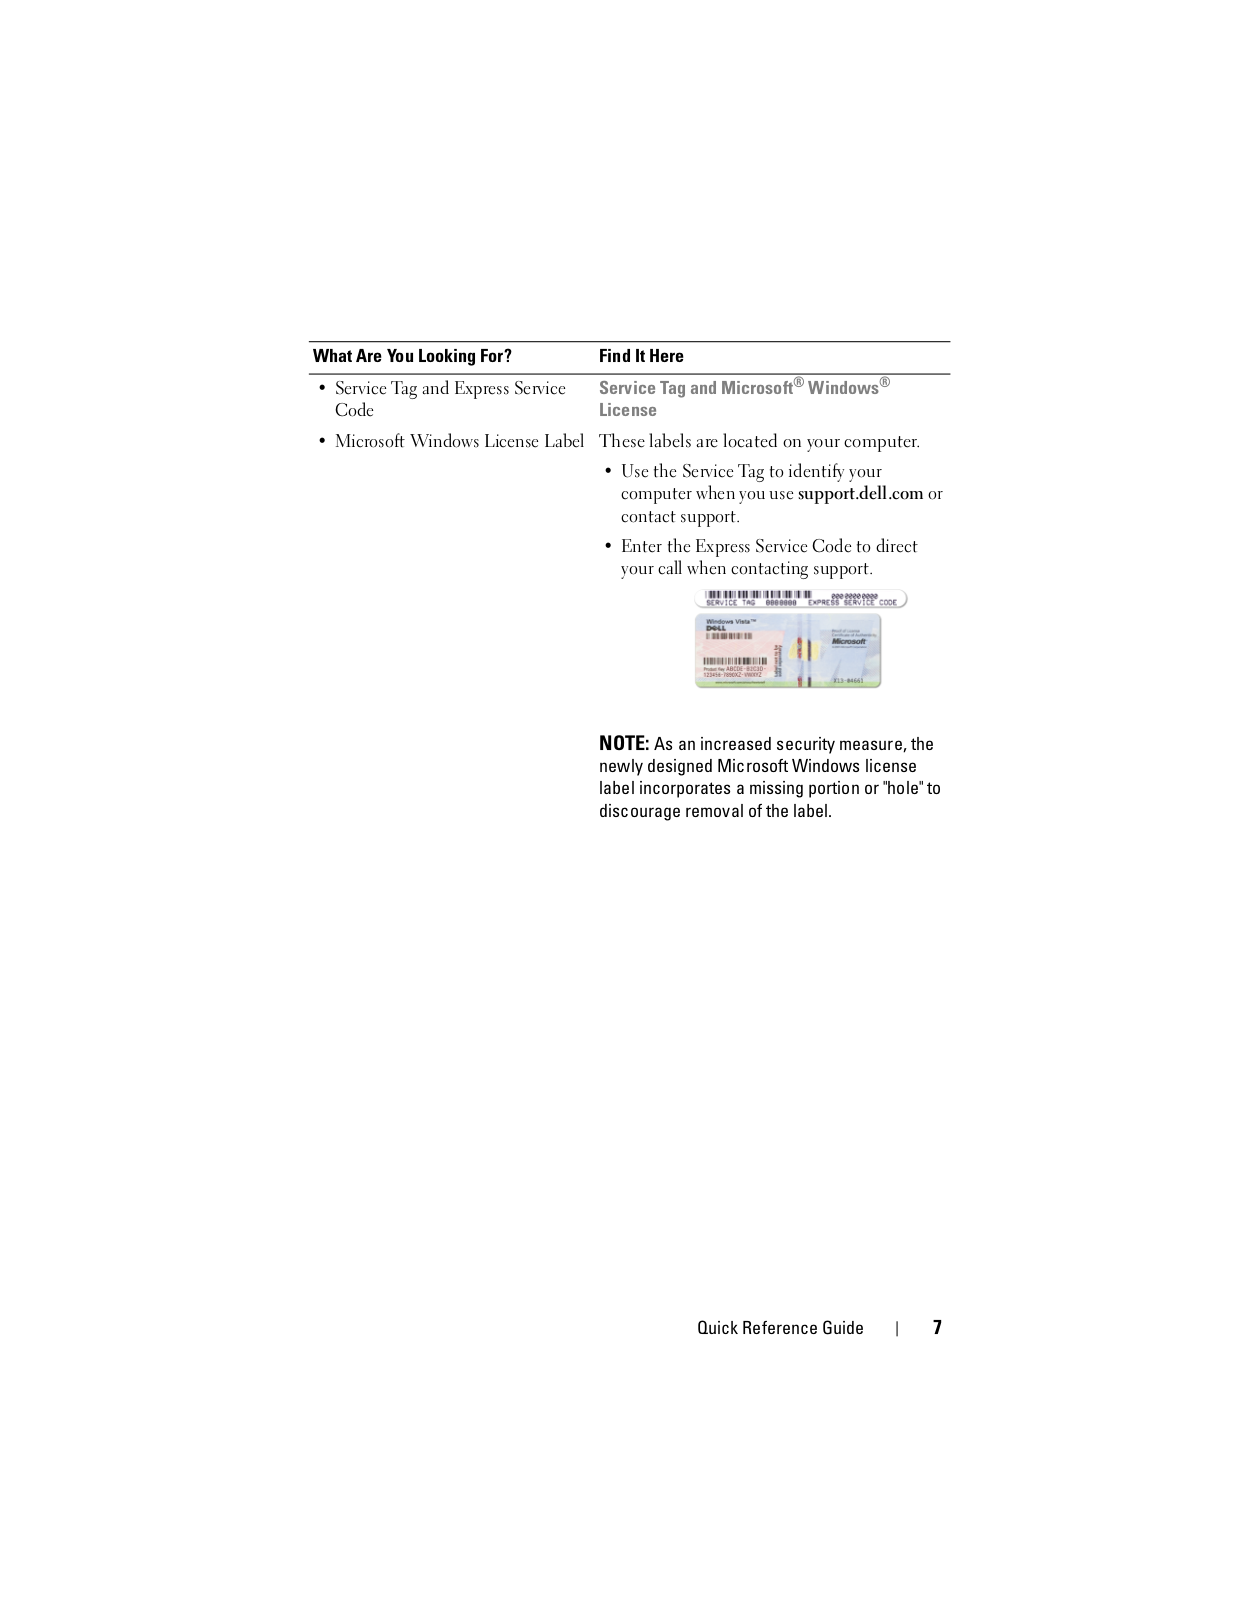
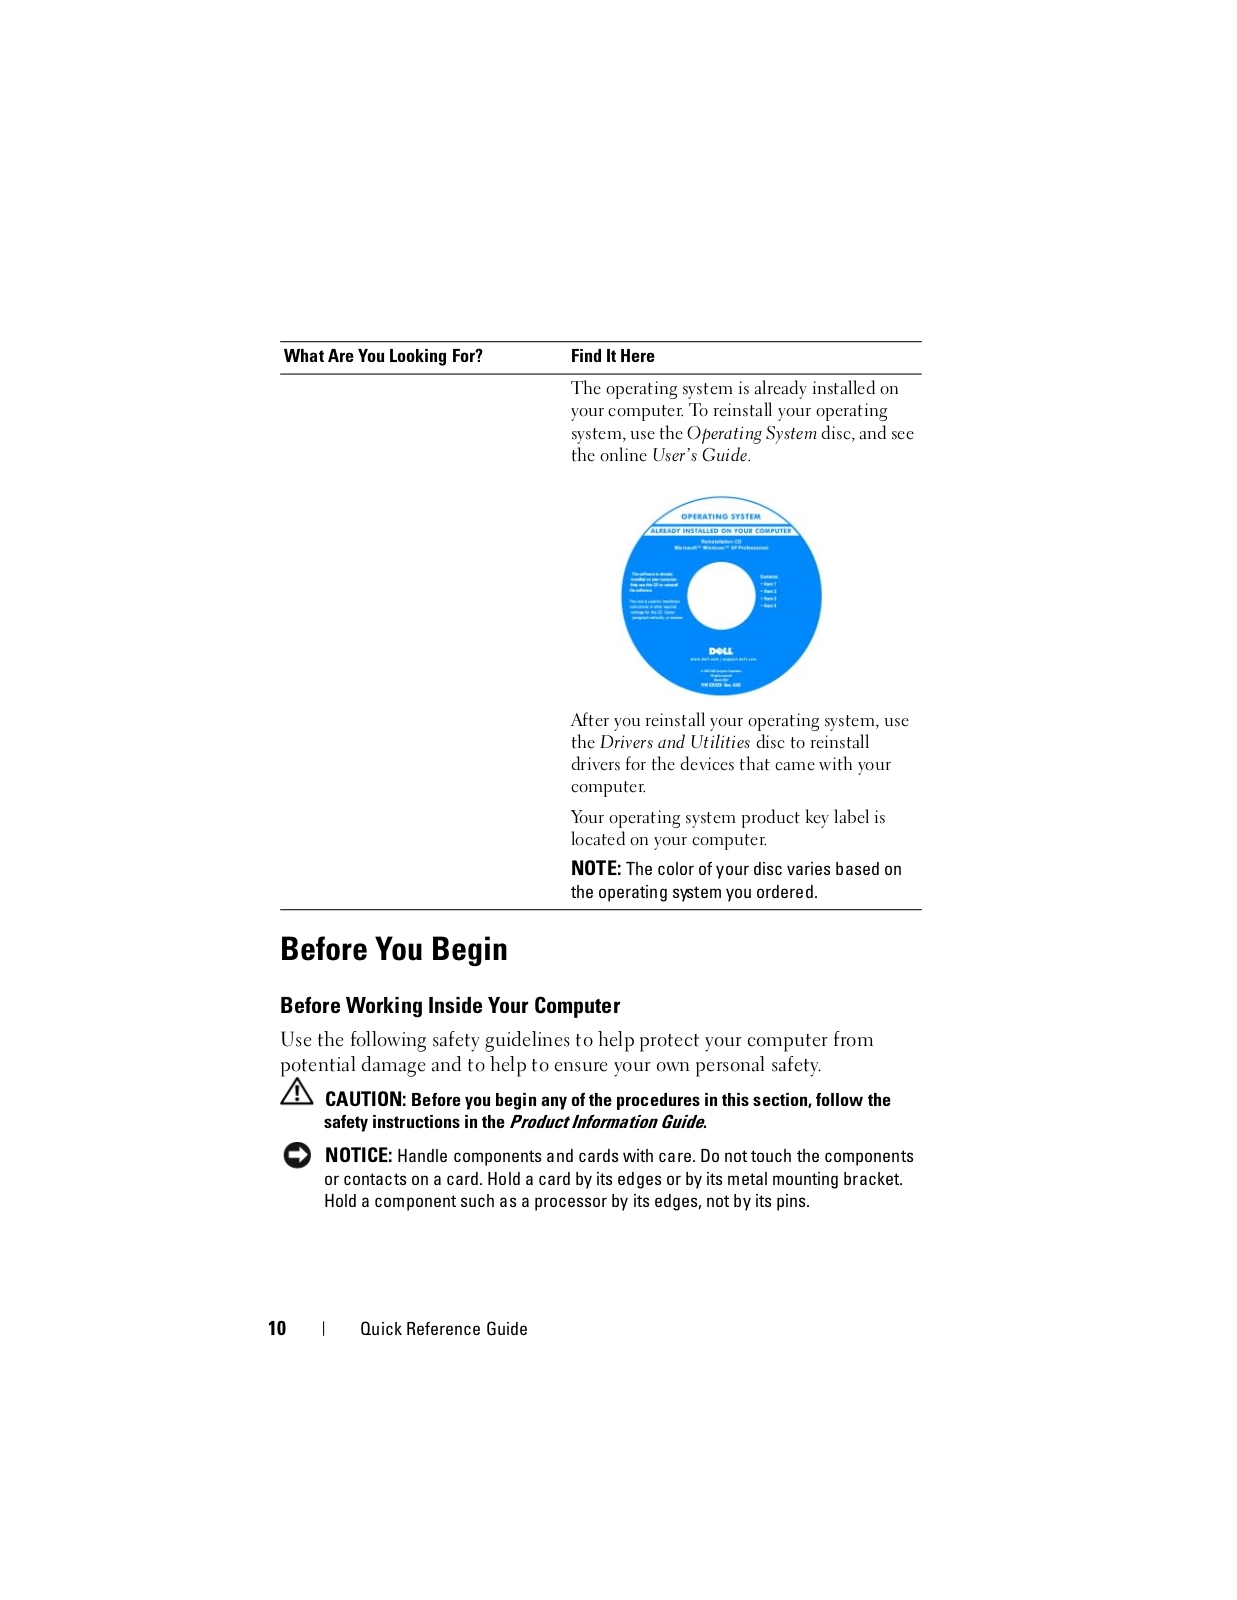
Dell OptiPlex 330 User Manual [th]

Dell™ OptiPlex™ 330

Quick Reference Guide

Model DCSM and DCNE

w w w . d e l l . c o m | s u p p o r t . d e l l . c o m

Notes, Notices, and Cautions

NOTE: A NOTE indicates important information that helps you make better use of your computer.

NOTICE: A NOTICE indicates either potential damage to hardware or loss of data and tells you how to avoid the problem.

CAUTION: A CAUTION indicates a potential for property damage, personal injury, or death.

____________________

Information in this document is subject to change without notice. © 2007 Dell Inc. All rights reserved.

Reproduction in any manner whatsoever without the written permission of Dell Inc. is strictly forbidden.

Trademarks used in this text: Dell, the DELL logo, Inspiron, Dell Precision, Dimension, OptiPlex, Latitude, PowerEdge, PowerVault, PowerApp, and Dell OpenManage are trademarks of Dell Inc.;

Intel, Pentium, and Celeron are registered trademarks of Intel Corporation; Microsoft and Windows are registered trademarks of Microsoft Corporation.

Other trademarks and trade names may be used in this document to refer to either the entities claiming the marks and names or their products. Dell Inc. disclaims any proprietary interest in trademarks and trade names other than its own.

Model DCSM and DCNE

September 2007

P/N KP286

Rev. A00

Contents

Finding Information . . . . . . . . . . . . . . . . . . . .

5

Before You Begin . . . . . . . . . . . . . . . . . . . .

10

Before Working Inside Your Computer . . . . . . .

10

Adding and Replacing Parts . . . . . . . . . . . . . .

11

Setting Up Your Computer . . . . . . . . . . . . . . . .

13

Installing Your Computer in an Enclosure . . . . .

13

Setting Up a Home and Office Network . . . . . . . .

15

Connecting to a Network Adapter . . . . . . . . .

15

Network Setup . . . . . . . . . . . . . . . . . . .

16

Connecting to the Internet . . . . . . . . . . . . . . .

17

Moving Information to a New Computer . . . . . . . .

19

Setting Up a Printer . . . . . . . . . . . . . . . . . . .

23

Connecting Two Monitors . . . . . . . . . . . . . . . .

24

Power Protection Devices . . . . . . . . . . . . . . .

26

Desktop Computer . . . . . . . . . . . . . . . . . . . .

28

Front View . . . . . . . . . . . . . . . . . . . . .

28

Back View . . . . . . . . . . . . . . . . . . . . .

30

Back Panel Connectors . . . . . . . . . . . . . .

31

Removing the Computer Cover . . . . . . . . . . . . .

33

Inside View of Your Computer . . . . . . . . . . . . .

35

Contents 3

System Board Components . . . . . . . . . . . . . . .

36

Replacing the Computer Cover . . . . . . . . . . . . .

37

Mini Tower Computer . . . . . . . . . . . . . . . . . .

38

Front View . . . . . . . . . . . . . . . . . . . . .

38

Back View . . . . . . . . . . . . . . . . . . . . .

40

Back Panel Connectors . . . . . . . . . . . . . . . . .

41

Removing the Computer Cover . . . . . . . . . . . . .

43

Inside View of Your Computer . . . . . . . . . . . . . .

45

System Board Components . . . . . . . . . . . . . . .

46

Replacing the Computer Cover . . . . . . . . . . . . .

47

Solving Problems . . . . . . . . . . . . . . . . . . . .

47

Dell Diagnostics . . . . . . . . . . . . . . . . . . . . .

48

Power Lights . . . . . . . . . . . . . . . . . . . . . . .

51

Beep Codes . . . . . . . . . . . . . . . . . . . . . . .

53

System Messages . . . . . . . . . . . . . . . . . . . .

54

Diagnostic Lights . . . . . . . . . . . . . . . . . . . .

56

Clearing Forgotten Passwords . . . . . . . . . . . . .

60

Clearing CMOS Settings . . . . . . . . . . . . . . . . .

62

Flashing the BIOS . . . . . . . . . . . . . . . . . . . .

63

Index . . . . . . . . . . . . . . . . . . . . . . . . . . . . . . .

65

4 Contents

Finding Information

NOTE: Some features or media may be optional and may not ship with your computer. Some features or media may not be available in certain countries.

NOTE: Additional information may ship with your computer.

What Are You Looking For?

Find It Here


• A diagnostic program for my

Drivers and Utilities Media

computer

NOTE: The Drivers and Utilities media may be


• Drivers for my computer

optional and may not ship with your computer.

• Desktop System Software (DSS)

Drivers are already installed on your


computer. You can use the media to reinstall


drivers (see the online User’s Guide), to run


the Dell Diagnostics (see "Dell Diagnostics"


on page 48).


Readme files may be included on your media


to provide last-minute updates about


technical changes to your computer or


advanced technical-reference material for


technicians or experienced users.

NOTE: Drivers and documentation updates can be found at support.dell.com.

Quick Reference Guide

5

What Are You Looking For?

Find It Here


• Basic troubleshooting information

Quick Reference Guide

• How to run the Dell Diagnostics

NOTE: This document may be optional and may

• Tools and utilities

not ship with your computer.


• How to set up a printer


NOTE: This document is available as a PDF at


support.dell.com.


• Warranty information

Dell™ Product Information Guide

Terms and Conditions (U.S. only)

Safety instructions

Regulatory information

Ergonomics information

End User License Agreement

How to remove and replace parts

Specifications

How to configure system settings

How to troubleshoot and solve problems

Dell OptiPlex™ 330 User’s Guide

Microsoft Windows Help and Support Center

1 Click the Windows Vista Start button→ Help and Support→ Dell User and System Guides→ System Guides.

2 Click the User’s Guide for your computer.

6

Quick Reference Guide

What Are You Looking For?

Find It Here


• Service Tag and Express Service

Service Tag and Microsoft® Windows®

Code

License

Microsoft Windows License Label These labels are located on your computer.

Use the Service Tag to identify your computer when you use support.dell.com or contact support.

Enter the Express Service Code to direct your call when contacting support.

NOTE: As an increased security measure, the newly designed Microsoft Windows license label incorporates a missing portion or "hole" to discourage removal of the label.

Quick Reference Guide

7

What Are You Looking For?

Find It Here


• Solutions — Troubleshooting hints

Dell Support Website — support.dell.com

and tips, articles from technicians,

NOTE: Select your region or business segment

and online courses, frequently

to view the appropriate support site.

asked questions


• Community — Online discussion


with other Dell customers


• Upgrades — Upgrade information


for components, such as memory,


the hard drive, and the operating


system


• Customer Care — Contact


information, service call and order


status, warranty, and repair


information


• Service and support — Service call


status and support history, service


contract, online discussions with


technical support


• Dell Technical Update Service —


Proactive e-mail notification of


software and hardware updates for


your computer


• Reference — Computer


documentation, details on my


computer configuration, product


specifications, and white papers


• Downloads — Certified drivers,


patches, and software updates


8

Quick Reference Guide

What Are You Looking For?

Find It Here


• Desktop System Software

To download Desktop System Software:

(DSS) — If you reinstall the

1 Go to support.dell.com, select your region

operating system for your

or business segment, and enter your Service

computer, you should also reinstall

Tag.


the DSS utility. DSS provides

2 Select Drivers & Downloads and click Go.

critical updates for your operating

3 Click your operating system and search for

system and support for processors,

the keyword Desktop System Software.

optical drives, USB devices, and so


on. DSS is necessary for correct

NOTE: The support.dell.com user interface may

operation of your Dell computer.

vary depending on your selections.

The software automatically detects


your computer and operating


system and installs the updates


appropriate for your configuration.


• How to use Windows

Windows Help and Support Center

• How to work with programs and

1 To access Windows Help and Support:

files

• In Windows XP, click Start and click Help

• How to personalize my desktop

and Support.


• In Windows Vista™, click the Windows


Vista start button

Help and

Support.

2 Type a word or phrase that describes your problem and click the arrow icon.

3 Click the topic that describes your problem.

4 Follow the instructions on the screen.

• How to reinstall my operating

Operating System Media

system

NOTE: The Operating System media may be


optional and may not ship with your computer.

Quick Reference Guide

9

What Are You Looking For?

Find It Here


The operating system is already installed on


your computer. To reinstall your operating


system, use the Operating System disc, and see


the online User’s Guide.

After you reinstall your operating system, use the Drivers and Utilities disc to reinstall drivers for the devices that came with your computer.

Your operating system product key label is located on your computer.

NOTE: The color of your disc varies based on the operating system you ordered.

Before You Begin

Before Working Inside Your Computer

Use the following safety guidelines to help protect your computer from potential damage and to help to ensure your own personal safety.

CAUTION: Before you begin any of the procedures in this section, follow the safety instructions in the Product Information Guide.

NOTICE: Handle components and cards with care. Do not touch the components or contacts on a card. Hold a card by its edges or by its metal mounting bracket. Hold a component such as a processor by its edges, not by its pins.

10

Quick Reference Guide

NOTICE: Only a certified service technician should perform repairs on your computer. Damage due to servicing that is not authorized by Dell is not covered by your warranty.

NOTICE: When you disconnect a cable, pull on its connector or on its pull-tab, not on the cable itself. Some cables have connectors with locking tabs; if you are disconnecting this type of cable, press in on the locking tabs before you disconnect the cable. As you pull connectors apart, keep them evenly aligned to avoid bending any connector pins. Also, before you connect a cable, ensure that both connectors are correctly oriented and aligned.

NOTICE: To avoid damaging the computer, perform the following steps before you begin working inside the computer.

1 Turn off your computer (see "Turning Off Your Computer" on page 12).

CAUTION: Never apply power to the computer when the cover has been removed.

NOTICE: To disconnect a network cable, first unplug the cable from your computer and then unplug the cable from the network device.

2Disconnect all telephone or network cables from the computer.

3Disconnect your computer and all attached devices from their electrical outlets.

4Press the power button to ground the system board.

NOTICE: Before touching anything inside your computer, ground yourself by touching an unpainted metal surface, such as the metal at the back of the computer. While you work, periodically touch an unpainted metal surface to dissipate static electricity, which could harm internal components.

Adding and Replacing Parts

This section provides procedures for removing and installing the components in your computer. Unless otherwise noted, each procedure assumes that the following conditions exist:

You have performed the steps in "Turning Off Your Computer" on page 12 and "Before Working Inside Your Computer" on page 10.

You have read the safety information in the Dell™ Product Information Guide.

A component can be replaced or—if purchased separately—installed by performing the removal procedure in reverse order.

Quick Reference Guide

11

Recommended Tools

The procedures in this document may require the following tools:

Small flat-blade screwdriver

Small Phillips screwdriver

Small plastic scribe

Turning Off Your Computer

NOTICE: To avoid losing data, save and close all open files and exit all open programs before you turn off your computer.

1Shut down the operating system:

a Save and close all open files and exit all open programs.

b In the Microsoft® Windows® XP operating system, click Start→ Shut Down→ Shut down.

In Microsoft® Windows Vista™, click the Windows Vista Start button

, in the lower-left corner of the desktop, click the arrow in the lower-right corner of the Start menu as shown below, and then click

Shut Down.

The computer turns off after the operating system shutdown process is complete.

2Ensure that the computer and all attached devices are turned off. If your computer and attached devices did not automatically turn off when you shut down your operating system, press and hold the power button for about 4 seconds to turn them off.

12

Quick Reference Guide

Setting Up Your Computer

Installing Your Computer in an Enclosure

Installing your computer in an enclosure can restrict the airflow and impact your computer’s performance, possibly causing it to overheat. Follow the guidelines below when installing your computer in an enclosure:

NOTICE: The operating temperature specifications indicated in this manual reflects the maximum ambient operating temperature. The room ambient temperature needs to be a consideration when installing your computer in an enclosure. For example, if the ambient room temperature is at 25°C (77°F), depending on your computer’s specifications, you only have 5° to 10°C (9° to 18°F) temperature margin before you reach your computer’s maximum operating temperature. For details about your computer’s specifications, see the online User’s Guide.

Leave a 10.2 cm (4 in) minimum clearance on all vented sides of the computer to permit the airflow required for proper ventilation.

If your enclosure has doors, they need to be of a type that allows at least 30 percent airflow through the enclosure (front and back).


13


Quick Reference Guide


If your computer is installed in a corner on a desk or under a desk, leave at least 5.1 cm (2 in) clearance from the back of the computer to the wall to permit the airflow required for proper ventilation.

NOTICE: Do not install your computer in an enclosure that does not allow airflow. Restricting the airflow impacts your computer’s performance, possibly causing it to overheat.

14

Quick Reference Guide

Setting Up a Home and Office Network

Connecting to a Network Adapter

To connect a network cable:

NOTE: Plug the network cable into the network adapter connector on the computer. Do not plug the network cable into the modem connector on the computer. Do not plug a network cable into a telephone wall jack.

1Connect the network cable to the network adapter connector on the back of your computer.

Insert the cable until it clicks into place, and then gently pull it to ensure that it is secure.

2Connect the other end of the network cable to a network device.

Quick Reference Guide

15

network adapter connector

network device

network adapter connector on computer

network cable

Network Setup

Windows XP

The Microsoft® Windows® XP operating system provides a Network Setup Wizard to guide you through the process of sharing files, printers, or an Internet connection between computers in a home or small office.

1Click the Start button, point to All Programs→ Accessories→ Communications, and then click Network Setup Wizard.

2On the Network Setup Wizard welcome screen, click Next.

3Click Checklist for creating a network.

NOTE: Selecting the connection method This computer connects directly to the Internet enables the integrated firewall provided with Windows XP Service Pack 1 (SP1) or later.

4Complete the checklist and required preparations.

5Return to the Network Setup Wizard and follow the instructions on the screen.

16

Quick Reference Guide

Windows Vista

To make changes to your network setup in Microsoft® Windows Vista™:

1Click the Windows Vista Start button, , and then click Network→ Network and Sharing Center.

2Click Set up a connection or network.

3Select the type of network connection you want to make and follow the instructions on the screen.

4When finished, close the Network and Sharing Center.

Connecting to the Internet

NOTE: ISPs and ISP offerings vary by country.

To connect to the Internet, you need a modem or network connection and an Internet service provider (ISP). Your ISP will offer one or more of the following Internet connection options:

DSL connections that provide high-speed Internet access through your existing telephone line or cellular telephone service. With a DSL connection, you can access the Internet and use your telephone on the same line simultaneously.

Cable modem connections that provide high-speed Internet access through your local cable TV line.

Satellite modem connections that provide high-speed Internet access through a satellite television system.

Dial-up connections that provide Internet access through a telephone line. Dial-up connections are considerably slower than DSL and cable (or satellite) modem connections.

Wireless LAN connections that provide Internet access using Bluetooth® wireless technology.

If you are using a dial-up connection, connect a telephone line to the modem connector on your computer and to the telephone wall jack before you set up your Internet connection. If you are using a DSL or cable/satellite modem connection, contact your ISP or cellular telephone service for setup instructions.

Quick Reference Guide

17

Setting Up Your Internet Connection

To set up an Internet connection with a provided ISP desktop shortcut:

1Save and close any open files, and exit any open programs.

2Double-click the ISP icon on the Microsoft® Windows® desktop.

3Follow the instructions on the screen to complete the setup.

If you do not have an ISP icon on your desktop or if you want to set up an Internet connection with a different ISP, perform the steps in the following section that corresponds to the operating system your computer is using.

NOTE: If you are having problems connecting to the Internet, see "Setting Up a Home and Office Network" on page 15. If you cannot connect to the Internet but have successfully connected in the past, the ISP might have a service outage.

Contact your ISP to check the service status, or try connecting again later.

Windows XP

1Save and close any open files, and exit any open programs.

2Click Start→ Internet Explorer.

The New Connection Wizard appears.

3Click Connect to the Internet.

4In the next window, click the appropriate option:

If you do not have an ISP and want to select one, click Choose from a list of Internet service providers (ISPs).

If you have already obtained setup information from your ISP but you did not receive a setup CD, click Set up my connection manually.

If you have a CD, click Use the CD I got from an ISP.

5Click Next.

If you selected Set up my connection manually, continue to step 6. Otherwise, follow the instructions on the screen to complete the setup.

NOTE: If you do not know which type of connection to select, contact your ISP.

6Click the appropriate option under How do you want to connect to the Internet?, and then click Next.

7Use the setup information provided by your ISP to complete the setup.

18

Quick Reference Guide

Windows Vista™

NOTE: Have your ISP information ready. If you do not have an ISP, the Connect to the Internet wizard can help you get one.

1Save and close any open files, and exit any open programs.

2Click the Windows Vista Start button , and click Control Panel.

3Under Network and Internet, click Connect to the Internet. The Connect to the Internet window appears.

4Click either Broadband (PPPoE) or Dial-up, depending on how you want to connect:

Choose Broadband if you will use a DSL, satellite modem, cable TV modem, or Bluetooth wireless technology connection.

Chose Dial-up if you will use a dial-up modem or ISDN.

NOTE: If you do not know which type of connection to select, click Help me choose or contact your ISP.

5Follow the instructions on the screen and use the setup information provided by your ISP to complete the setup.

Moving Information to a New Computer

You can use your operating system "wizards" to help you transfer files and other data from one computer to another—for example, from an old computer to a new computer. For instructions, see the following section that corresponds to the operating system that your computer is running.

Microsoft® Windows® XP (Optional)

The Microsoft Windows XP operating system provides the Files and Settings Transfer Wizard to move data from a source computer to a new computer. You can transfer data, such as:

E-mail messages

Toolbar settings

Window sizes

Internet bookmarks

Quick Reference Guide

19

You can transfer the data to the new computer over a network or serial connection, or you can store it on removable media, such as a writable CD, for transfer to the new computer.

NOTE: You can transfer information from an old computer to a new computer by directly connecting a serial cable to the input/output (I/O) ports of the two computers. To transfer data over a serial connection, you must access the Network Connections utility from the Control Panel and perform additional configuration steps, such as setting up an advanced connection and designating the host computer and the guest computer.

For instructions on setting up a direct cable connection between two computers, see Microsoft Knowledge Base Article #305621, titled How to Set Up a Direct Cable Connection Between Two Computers in Windows XP. This information may not be available in certain countries.

For transferring information to a new computer, you must run the Files and Settings Transfer Wizard. You can use the optional Operating System media for this process or you can create a wizard disk with the Files and Settings Transfer Wizard.

Running the Files and Settings Transfer Wizard With the Operating System Media

NOTE: This procedure requires the Operating System media. This media is optional and may not be included with certain computers.

To prepare a new computer for the file transfer:

1Open the Files and Settings Transfer Wizard: click Start→ All Programs→ Accessories→ System Tools→ Files and Settings Transfer Wizard.

2When the Files and Settings Transfer Wizard welcome screen appears, click Next.

3On the Which computer is this? screen, click New Computer→ Next.

4On the Do you have a Windows XP CD? screen, click I will use the wizard from the Windows XP CD→ Next.

5When the Now go to your old computer screen appears, go to your old or source computer. Do not click Next at this time.

20

Quick Reference Guide

To copy data from the old computer:

1On the old computer, insert the Windows XP Operating System media.

2On the Welcome to Microsoft Windows XP screen, click Perform additional tasks.

3Under What do you want to do?, click Transfer files and settings→ Next.

4On the Which computer is this? screen, click Old Computer→ Next.

5On the Select a transfer method screen, click the transfer method you prefer.

6On the What do you want to transfer? screen, select the items you want to transfer and click Next.

After the information has been copied, the Completing the Collection Phase screen appears.

7Click Finish.

To transfer data to the new computer:

1On the Now go to your old computer screen on the new computer, click

Next.

2On the Where are the files and settings? screen, select the method you chose for transferring your settings and files and click Next.

The wizard reads the collected files and settings and applies them to your new computer.

When all of the settings and files have been applied, the Finished screen appears.

3Click Finished and restart the new computer.

Running the Files and Settings Transfer Wizard Without the Operating System Media

To run the Files and Settings Transfer Wizard without the Operating System media, you must create a wizard disk that will allow you to create a backup image file to removable media.

To create a wizard disk, use your new computer with Windows XP and perform the following steps:

1Open the Files and Settings Transfer Wizard: click Start→ All Programs→ Accessories→ System Tools→ Files and Settings Transfer Wizard.

Quick Reference Guide

21

2When the Files and Settings Transfer Wizard welcome screen appears, click Next.

3On the Which computer is this? screen, click New Computer→ Next.

4On the Do you have a Windows XP CD? screen, click I want to create a Wizard Disk in the following drive→ Next.

5Insert the removable media, such as a writable CD, and click OK.

6When the disk creation completes and the Now go to your old computer message appears, do not click Next.

7Go to the old computer.

To copy data from the old computer:

1On the old computer, insert the wizard disk.

2Click Start→ Run.

3In the Open field on the Run window, browse to the path for fastwiz (on the appropriate removable media) and click OK.

4On the Files and Settings Transfer Wizard welcome screen, click Next.

5On the Which computer is this? screen, click Old Computer→ Next.

6On the Select a transfer method screen, click the transfer method you prefer.

7On the What do you want to transfer? screen, select the items you want to transfer and click Next.

After the information has been copied, the Completing the Collection Phase screen appears.

8Click Finish.

To transfer data to the new computer:

1On the Now go to your old computer screen on the new computer, click

Next.

2On the Where are the files and settings? screen, select the method you chose for transferring your settings and files and click Next. Follow the instructions on the screen.

The wizard reads the collected files and settings and applies them to your new computer.

22

Quick Reference Guide

When all of the settings and files have been applied, the Finished screen appears.

3 Click Finished and restart the new computer.

NOTE: For more information about this procedure, search support.dell.com for document #154781 (What Are The Different Methods To Transfer Files From My Old Computer To My New Dell™ Computer Using the Microsoft® Windows® XP Operating System?).

NOTE: Access to the Dell™ Knowledge Base document may not be available in certain countries.

Microsoft Windows Vista™ (Optional)

1Click the Windows Vista Start button , and then click Transfer files and settings→ Start Windows Easy Transfer.

2In the User Account Control dialog box, click Continue.

3Click Start a new transfer or Continue a transfer in progress.

Follow the instructions provided on the screen by the Windows Easy Transfer wizard.

Setting Up a Printer

NOTICE: Complete the operating system setup before you connect a printer to the computer.

See the documentation that came with the printer for setup information, including how to:

Obtain and install updated drivers.

Connect the printer to the computer.

Load paper and install the toner or ink cartridge.

For technical assistance, refer to the printer owner's manual or contact the printer manufacturer.

Quick Reference Guide

23

Printer Cable

Your printer connects to your computer with either a USB cable or a parallel cable. Your printer may not come with a printer cable, so if you purchase a cable separately, ensure that it is compatible with your printer and computer. If you purchased a printer cable at the same time you purchased your computer, the cable may arrive in the computer’s shipping box.

Connecting Two Monitors

CAUTION: Before you begin any of the procedures in this section, follow the safety instructions in the Product Information Guide.

If you purchased a graphics card that supports dual monitors, follow these instructions to connect and enable your monitors. The instructions tell you how to connect either two monitors (each with a VGA connector), one monitor with a VGA connector and one monitor with a DVI connector, or a TV.

NOTICE: If you are connecting two monitors that have VGA connectors, you must have the optional DVI adapter to connect the cable. If you are connecting two flat-panel monitors, at least one of them must have a VGA connector. If you are connecting a TV, you may connect only one monitor (VGA or DVI) in addition to the TV.

Connecting Two Monitors With VGA Connectors

1 Shutdown your system.

NOTE: If your computer has integrated video, do not connect either monitor to the integrated video connector. If the integrated video connector is covered by a cap, do not remove the cap to connect the monitor or the monitor will not function.

2Connect one of the monitors to the VGA (blue) connector on the back of the computer.

3Connect the other monitor to the optional DVI adapter and connect the DVI adapter to the DVI (white) connector on the back of the computer.

4Restart your system.

24

Quick Reference Guide

Dell OptiPlex 330 User Manual

1


4

3

2


1


optional DVI adapter

2

DVI (white) connector

3


TV-OUT connector

4

VGA (blue) connector

Connecting One Monitor With a VGA Connector and One Monitor With a DVI Connector

1Shutdown your system.

2Connect the VGA connector on the monitor to the VGA (blue) connector on the back of the computer.

3Connect the DVI connector on the other monitor to the DVI (white) connector on the back of the computer.

4Restart your system.

Quick Reference Guide

25

Connecting a TV

NOTE: You must purchase an S-video cable, available at most consumer electronics stores, to connect a TV to your computer. It is not included with your computer.

1Shutdown your system.

2Connect one end of the S-video cable to the optional TV-OUT connector on the back of the computer.

3Connect the other end of the S-video cable to the S-video input connector on your TV.

4Connect the VGA or DVI monitor.

5Restart your system.

Changing the Display Settings

1After you connect the monitor(s) or TV, turn on the computer.

The Microsoft® Windows® desktop displays on the primary monitor.

2Enable extended desktop mode in the display settings. In extended desktop mode, you can drag objects from one screen to the other, effectively doubling the amount of viewable work space.

Power Protection Devices

Several devices are available to protect against power fluctuations and failures:

Surge protectors

Line conditioners

Uninterruptible power supplies (UPS)

Surge Protectors

Surge protectors and power strips equipped with surge protection help prevent damage to your computer from voltage spikes that can occur during electrical storms or after power interruptions. Some surge protector manufacturers include warranty coverage for certain types of damage. Carefully read the device warranty when choosing a surge protector. A device with a higher joule rating offers more protection. Compare joule ratings to determine the relative effectiveness of different devices.

26

Quick Reference Guide

NOTICE: Most surge protectors do not protect against power fluctuations or power interruptions caused by nearby lightning strikes. When lightning occurs in your area, disconnect the telephone line from the telephone wall jack and disconnect your computer from the electrical outlet.

Many surge protectors have a telephone jack for modem protection. See the surge protector documentation for modem connection instructions.

NOTICE: Not all surge protectors offer network adapter protection. Disconnect the network cable from the network wall jack during electrical storms.

Line Conditioners

NOTICE: Line conditioners do not protect against power interruptions.

Line conditioners are designed to maintain AC voltage at a fairly constant level.

Uninterruptible Power Supplies

NOTICE: Loss of power while data is being saved to the hard drive may result in data loss or file damage.

NOTE: To ensure maximum battery operating time, connect only your computer to a UPS. Connect other devices, such as a printer, to a separate power strip that provides surge protection.

A UPS protects against power fluctuations and interruptions. UPS devices contain a battery that provides temporary power to connected devices when AC power is interrupted. The battery charges while AC power is available. See the UPS manufacturer documentation for information on battery operating time and to ensure that the device is approved by Underwriters Laboratories (UL).

Quick Reference Guide

27

Desktop Computer

Front View

1

2

3


11

10

9

8

7

6

5

4

1

USB 2.0 connectors

Use the front USB connectors for devices that you connect


(2)


occasionally, such as joysticks or cameras, or for bootable


USB devices (see "System Setup Options in the online


User’s Guide for more information on booting to a


USB device). It is recommended that you use the back


USB connectors for devices that typically remain


connected, such as printers and keyboards.

2

drive activity light

The drive activity light is on when the computer reads


data from or writes data to the hard drive. The light


might also be on when a device such as an optical drive


is operating.


3power button, power light

Press the power button to turn on the computer. The light in the center of this button indicates power state.

NOTICE: To avoid losing data, do not use the power button to turn off the computer. Instead, perform an operating system shutdown.

28

Quick Reference Guide

4

Dell badge

This badge can be rotated to match the orientation of


your computer. To rotate the badge, place your fingers


around the outside of the badge, press firmly, and turn


the badge. You can also rotate the badge using the slot


provided near the bottom of the badge.

5

power light

The power light illuminates and blinks or remains solid


to indicate different operating states:


• No light — The computer is turned off.


• Steady green — The computer is in a normal


operating state.


• Blinking green — The computer is in a power-saving


mode.


• Blinking or solid amber — See "Power Problems" in


the online User’s Guide.


To exit from a power-saving mode, press the power


button or use the keyboard or the mouse if it is


configured as a wake device in the Windows Device


Manager. For more information about sleep modes and


exiting from a power-saving mode, see the online


User’s Guide.


See"Diagnostic Lights" on page 56" for a description of


light codes that can help you troubleshoot problems


with your computer.

6

diagnostic lights

Use the lights to help you troubleshoot a computer


problem based on the diagnostic code. For more


information, see "Diagnostic Lights" on page 56.

7

LAN indicator light

This light indicates that a LAN (local area network)


connection is established.

8

headphone and

Use the microphone connector to attach a personal


microphone

computer microphone. On computers with a sound


connectors

card, the microphone connector is on the card.


Use the headphone connector to attach headphones


and most kinds of speakers.

9

floppy drive

Can contain an optional floppy drive.

10

optical drive

Use the optical drive to play a CD/DVD.

11

Service Tag

Use the Service Tag to identify your computer when you


access the Dell Support website or call Support.

Quick Reference Guide

29

Back View

1

2

3

4

5

6


1

card slots

Access connectors for any installed PCI and PCI Express cards.

2

back panel

Plug USB, audio, and other devices into the appropriate


connectors

connector (see "Back Panel Connectors" on page 31 for


more information).

3

power connector

Insert the power cable.

4

voltage selector

For selecting voltage rating.


switch


5

padlock rings

Padlock rings are for attaching a commercially available


antitheft device. The padlock rings allows you to secure the


computer cover to the chassis with a padlock to prevent


unauthorized access to the inside of the computer. To use


the padlock rings, insert a commercially available padlock


through the rings, and then lock the padlock.

6

cover release latch

Use this latch to open the computer cover.

CAUTION: Ensure that none of the system air vents are blocked. Blocking them would cause serious thermal problems.

30

Quick Reference Guide

Loading...
+ 170 hidden pages