

Page 1

Dell OpenManage Essentials
Version 1.0
User’s Guide
Page 2

Notes and Cautions
NOTE: A NOTE indicates important information that helps you make better use of
your computer.
CAUTION: A CAUTION indicates potential damage to hardware or loss of data if
instructions are not followed.
____________________
Information in this publication is subject to change without notice.
© 2012 Dell Inc. All rights reserved.
Reproduction of these materials in any manner whatsoever without the written permission of Dell Inc.
is strictly forbidden.
Trademarks used in this text: Dell™, the DELL logo, Dell Precision™, OptiPlex™, Latitude™,
PowerEdge™, PowerVault™, PowerConnect™, OpenManage™, EqualLogic™, KACE™,
FlexAddress™ and Vostro™ are trademarks of Dell Inc. Intel
®
Celeron
registered trademark and AMD Opteron™, AMD Phenom™, and AMD Sempron™ are trademarks
of Advanced Micro Devices, Inc. Microsoft
Windows Vista
are registered trademarks of Intel Corporation in the U.S. and other countries. AMD® is a
®
®
are either trademarks or registered trademarks of Microsoft Corporation in the United
, Windows®, Windows Server®, MS-DOS® and
States and/or other countries. Red Hat Enterprise Linux
trademarks of Red Hat, Inc. in the United States and/or other countries. Novell
trademark and SUSE ™ is a trademark of Novell Inc. in the United States and other countries. Oracle
is a registered trademark of Oracle Corporation and/or its affiliates. Citrix
XenMotion
and/or other countries. VMware
®
are either registered trademarks or trademarks of Citrix Systems, Inc. in the United States
®
, Virtual SMP®, vMotion®, vCenter®, and vSphere® are registered
trademarks or trademarks of VMWare, Inc. in the United States or other countries.
Other trademarks and trade names may be used in this publication to refer to either the entities claiming
the marks and names or their products. Dell Inc. disclaims any proprietary interest in trademarks and
trade names other than its own.
®
, Pentium®, Xeon®, Core™ and
®
and Enterprise Linux® are registered
®
is a registered
®
, Xen®, XenServer® and
®
2012 - 1
Page 3

Contents
1 About OpenManage Essentials . . . . . . . . 15
2 Installing OpenManage Essentials . . . . . 17
Installation Prerequisites and Minimum
Requirements . . . . . . . . . . . . . . . . . . . . . . 17
Downloading OpenManage Essentials
Terms and Conditions for Using Relational Database
Management Systems
Installing OpenManage Essentials
Setting Up OpenManage Essentials Database on a
Remote SQL Server
Installing Repository Manager
Uninstalling OpenManage Essentials. . . . . . . . . . 23
Migrating IT Assistant to OpenManage Essentials
Migration Use Cases
List of Migrated and Non-Migrated
Components . . . . . . . . . . . . . . . . . . . . 26
. . . . . . . . . . . . . . . . . . 18
. . . . . . . . . . . . . . . . . . . 22
. . . . . . . . . . . . . . . . 24
. . . . . . . . . 18
. . . . . . . . . . . 19
. . . . . . . . . . . . . 22
3 Getting Started With OpenManage
Essentials
Logging On to OpenManage Essentials . . . . . . . . . 29
. . . . . . . . . . . . . . . . . . . . . . . . 29
. . . 23
Contents 3
Page 4

Configuring OpenManage Essentials . . . . . . . . . . 29
Using the OpenManage Essentials Home Portal
Customizing the Home Portal
. . . . . . . . . . . . . . 31
. . . . 30
Displaying Additional Available Reports and
. . . . . . . . . . . . . . . . . . . . . . . . . . 31
Graphs
Drilling-Down Charts and Reports for More
Information
Saving and Loading the Home Portal Layout
. . . . . . . . . . . . . . . . . . . . . 32
. . . . . . 32
Updating the Portal Data. . . . . . . . . . . . . . . . . 32
Hiding Graphs and Reports (Components)
. . . . . . . . 32
Re-arranging or Re-sizing Graphs and
Reports (Components)
Filtering Data
. . . . . . . . . . . . . . . . . . 33
. . . . . . . . . . . . . . . . . . . . . . . 33
4 OpenManage Essentials Home Portal -
Reference . . . . . . . . . . . . . . . . . . . . . . . . 35
OpenManage Essentials Heading Banner. . . . . . . . 35
4 Contents
Home Portal Reports
. . . . . . . . . . . . . . . . . . . 35
Device by Status . . . . . . . . . . . . . . . . . . . . . 36
Alerts by Severity
Discovered Versus Inventoried Devices
Task Status
. . . . . . . . . . . . . . . . . . . . 36
. . . . . . . . . 37
. . . . . . . . . . . . . . . . . . . . . . . . 37
Page 5

5 Discovering and Inventorying Devices . . 39
Supported Devices and Protocols. . . . . . . . . . . . 39
Supported Operating Systems (Servers), Protocols,
and Features Matrix
Supported Operating Systems (Storage), Protocols,
and Features Matrix
. . . . . . . . . . . . . . . . . . . 43
. . . . . . . . . . . . . . . . . . . 44
Using the Discovery and Inventory Portal
. . . . . . . . 47
Configuring a Discovery and Inventory Task . . . . . . 47
Excluding Ranges
. . . . . . . . . . . . . . . . . . . . 49
Viewing Configured Discovery and Inventory
. . . . . . . . . . . . . . . . . . . . . . . . . . 50
Ranges
Scheduling Discovery
Multithreading
. . . . . . . . . . . . . . . . . . 50
. . . . . . . . . . . . . . . . . . . 50
Scheduling Inventory . . . . . . . . . . . . . . . . . . 51
Configuring Status Polling Frequency
. . . . . . . . . . 52
6 Discovery And Inventory - Reference. . . 53
Discovery and Inventory Portal Page Options . . . . . 53
Discovery and Inventory Portal
Last Discovery and Inventory
Discovered Versus Inventoried Devices
Task Status
. . . . . . . . . . . . . . . . . . . . . 55
. . . . . . . . . . . . . 53
. . . . . . . . . . . 54
. . . . . . 54
Viewing Device Summary
Discovery Ranges
. . . . . . . . . . . . . . . . . . . . 57
. . . . . . . . . . . . . . . . 55
Contents 5
Page 6

Discovery Range Summary . . . . . . . . . . . . . . . 57
Add Discovery Range
IP Address, Range, or Host Name Configuration
. . . . . . . . . . . . . . . . . . 58
. . . . 58
ICMP Configuration . . . . . . . . . . . . . . . . . . . 60
SNMP Configuration
WMI Configuration
. . . . . . . . . . . . . . . . . . . 60
. . . . . . . . . . . . . . . . . . . . 62
Storage Configuration . . . . . . . . . . . . . . . . . . 62
WS-Man Configuration
IPMI Configuration
. . . . . . . . . . . . . . . . . 62
. . . . . . . . . . . . . . . . . . . . 63
Discovery Range Action . . . . . . . . . . . . . . . . . 64
Summary
Add Exclude Range
Configuration
. . . . . . . . . . . . . . . . . . . . . . . . . 65
. . . . . . . . . . . . . . . . . . . 65
. . . . . . . . . . . . . . . . . . . . . . . 66
Discovery Schedule
Inventory Schedule
Status Configuration
. . . . . . . . . . . . . . . . . 66
. . . . . . . . . . . . . . . . . 67
. . . . . . . . . . . . . . . . 68
7 Managing Devices . . . . . . . . . . . . . . . . . 71
6 Contents
Viewing Devices . . . . . . . . . . . . . . . . . . . . . 71
Nodes and Symbols Description
Device Details
. . . . . . . . . . . . . . . . . . . . 73
Viewing Device Inventory
Viewing Alerts Summary
. . . . . . . . . . . . . . . . 74
. . . . . . . . . . . . . . . . 74
. . . . . . . . . . 72
Page 7

Viewing System Event Logs . . . . . . . . . . . . . . . 74
Searching for Devices
. . . . . . . . . . . . . . . . . . 74
8 Devices - Reference . . . . . . . . . . . . . . . . 77
Viewing Inventory . . . . . . . . . . . . . . . . . . . . 78
Viewing Alerts . . . . . . . . . . . . . . . . . . . . . . 78
Viewing Hardware Logs
Alert Filters
. . . . . . . . . . . . . . . . . . . . . . . . 79
. . . . . . . . . . . . . . . . . 78
Device Search . . . . . . . . . . . . . . . . . . . . . . 79
Query Results
Creating Device Group
Device Group Configuration
Device Selection
. . . . . . . . . . . . . . . . . . . . 80
. . . . . . . . . . . . . . . . . . 80
. . . . . . . . . . . . 80
. . . . . . . . . . . . . . . . . . 81
Summary - Group Configuration . . . . . . . . . . 81
9 Viewing Inventory Reports . . . . . . . . . . . 83
Choosing Predefined Reports . . . . . . . . . . . . . . 83
Filtering Report Data
Exporting Reports
. . . . . . . . . . . . . . . . . . . 85
. . . . . . . . . . . . . . . . . . . . 85
10 Reports - Reference . . . . . . . . . . . . . . . . 87
Server Components and Versions . . . . . . . . . . . . 87
Field Replaceable Unit (FRU) Information
. . . . . . . . 88
Contents 7
Page 8

Memory. . . . . . . . . . . . . . . . . . . . . . . . . . 88
NIC Information
Hard Drives Inventory
. . . . . . . . . . . . . . . . . . . . . 89
. . . . . . . . . . . . . . . . . . 89
PCI Device Information . . . . . . . . . . . . . . . . . 90
Storage Controllers
ESX Information
. . . . . . . . . . . . . . . . . . . 90
. . . . . . . . . . . . . . . . . . . . . 90
HyperV Information . . . . . . . . . . . . . . . . . . . 91
Warranty Information
Modular Enclosures
. . . . . . . . . . . . . . . . . . 91
. . . . . . . . . . . . . . . . . . . 92
Server Overview . . . . . . . . . . . . . . . . . . . . . 93
11 Viewing Warranty Reports. . . . . . . . . . . 95
12 Managing Alerts . . . . . . . . . . . . . . . . . . 97
Viewing Alerts and Alert Categories . . . . . . . . . . 97
Viewing Alert Logs
Understanding the Alert Types
Viewing Alert Categories
Viewing Alert Source Details
. . . . . . . . . . . . . . . . . 97
. . . . . . . . . . . 97
. . . . . . . . . . . . . . 98
. . . . . . . . . . . . 98
8 Contents
Viewing Previously Configured Alert Actions
Handling Alerts
Flagging an Alert
Creating and Editing a New View
Configuring Alert Actions
. . . . . . . . . . . . . . . . . . . . . . 99
. . . . . . . . . . . . . . . . . . 99
. . . . . . . . . 100
. . . . . . . . . . . . . . . 100
. . . . . . 98
Page 9

Setting Up E-mail Notification . . . . . . . . . . . 100
Ignoring Alerts . . . . . . . . . . . . . . . . . . . 102
Running a Custom Script
Forwarding Alerts
. . . . . . . . . . . . . . 102
. . . . . . . . . . . . . . . . . . 103
Working With Sample Alert Action Use Cases
Use Cases in Alert Actions
Configuring Alert Log Settings
. . . . . . . . . . . . . 104
. . . . . . . . . . . . . 105
. . . . . 104
Renaming Alert Categories and Alert Sources . . . . . 106
13 Alerts - Reference . . . . . . . . . . . . . . . . . 107
Alert Logs . . . . . . . . . . . . . . . . . . . . . . . . 107
Alert Logs Fields
Alert Details
Alert Log Settings
Alert View Filters
Alert Filter Name
Severity
Acknowledgement . . . . . . . . . . . . . . . . . 111
Summary - Alert View Filter
Alert Actions
Name and Description
Severity Association
Application Launch Configuration
E-Mail Configuration . . . . . . . . . . . . . . . . 115
Trap Forwarding
Category and Sources Association
Device Association
Date and Time Range
. . . . . . . . . . . . . . . . . . 108
. . . . . . . . . . . . . . . . . . . . . 109
. . . . . . . . . . . . . . . . . . . . 110
. . . . . . . . . . . . . . . . . . . . 110
. . . . . . . . . . . . . . . . . . 110
. . . . . . . . . . . . . . . . . . . . . . . 111
. . . . . . . . . . . . 111
. . . . . . . . . . . . . . . . . . . . . . . 112
. . . . . . . . . . . . . . . 113
. . . . . . . . . . . . . . . . 113
. . . . . . . . . 113
. . . . . . . . . . . . . . . . . . 115
. . . . . . . . 116
. . . . . . . . . . . . . . . . . 116
. . . . . . . . . . . . . . . . 118
Contents 9
Page 10

Alert Action - Duplicate Alert Correlation . . . . 118
Summary- Alert Action Details . . . . . . . . . . 118
Alert Categories . . . . . . . . . . . . . . . . . . . . 120
Alert Source
. . . . . . . . . . . . . . . . . . . . 121
14 Updating Server BIOS, Firmware,
Drivers, and Applications . . . . . . . . . . . 123
Understanding Server BIOS Firmware and
Drivers Sources
Choosing the Right Source for Updates . . . . . . . . 124
. . . . . . . . . . . . . . . . . . . . 124
Selecting an Update Catalog Source
Viewing Comparison Results
. . . . . . . . . 125
. . . . . . . . . . . . . 125
Applying System Updates . . . . . . . . . . . . . . . 125
Selecting Non-Compliant Systems
. . . . . . . . 126
Scheduling Updates . . . . . . . . . . . . . . . 126
Viewing Updated Status
Viewing Active Catalog
. . . . . . . . . . . . . 127
. . . . . . . . . . . . . . . . 127
15 System Update - Reference. . . . . . . . . . 129
Filter Options . . . . . . . . . . . . . . . . . . . . . . 129
System Update . . . . . . . . . . . . . . . . . . . . . 130
Compliance Report
Compliant Systems
Non-Compliant Systems
Non-Inventoried Systems
Inventory Systems
All System Update Tasks
. . . . . . . . . . . . . . . . 130
. . . . . . . . . . . . . . . . 131
. . . . . . . . . . . . . 132
. . . . . . . . . . . . . 133
. . . . . . . . . . . . . . . . 133
. . . . . . . . . . . . . 133
10 Contents
Page 11

Task Execution History . . . . . . . . . . . . . . . 133
Select a Catalog Source
View Active Catalog
. . . . . . . . . . . . . . . . . 134
. . . . . . . . . . . . . . . . . . . 135
Create an Update Task. . . . . . . . . . . . . . . . . . 135
16 Managing Remote Tasks . . . . . . . . . . . . 137
About Remote Tasks . . . . . . . . . . . . . . . . . . . 137
Managing Command Line Task
Managing RACADM Command Line Tasks
. . . . . . . . . . . . . 137
. . . . . 138
Managing Server Power Options . . . . . . . . . . . . 139
Deploying Server Administrator
Working With Sample Remote Tasks Use Cases
Use Cases in Remote Tasks
. . . . . . . . . . . . . 140
. . . . 140
. . . . . . . . . . . . 141
17 Remote Tasks - Reference . . . . . . . . . . 143
Remote Tasks Home . . . . . . . . . . . . . . . . . . . 143
Remote Tasks
All Tasks
. . . . . . . . . . . . . . . . . . . . . . 143
. . . . . . . . . . . . . . . . . . . . . . 144
Task Execution History . . . . . . . . . . . . . . . 144
Server Power Options . . . . . . . . . . . . . . . . . . 145
Deploy Server Administrator Task
Command Line Task
. . . . . . . . . . . . . . . . . . . 149
Remote Server Administrator Command
Generic Command
. . . . . . . . . . . . . . . . . 152
. . . . . . . . . . . . 147
. . . . . . 149
Contents 11
Page 12

IPMI Command . . . . . . . . . . . . . . . . . . 154
RACADM Command Line . . . . . . . . . . . . . 156
18 Managing Security Settings . . . . . . . . . 159
Using Security Roles and Permissions . . . . . . . . 159
Microsoft Windows Authentication
Assigning User Privileges
. . . . . . . . . . . . . . . 160
. . . . . . . . . . 159
Using Custom SSL Certificates (Optional) . . . . . . . 160
Supported Protocols and Ports in OpenManage
Essentials
. . . . . . . . . . . . . . . . . . . . . . . 161
19 Troubleshooting . . . . . . . . . . . . . . . . . . . 165
OpenManage Essentials Troubleshooting Tool . . . . 165
Troubleshooting Procedures
Troubleshooting Inventory
Troubleshooting Device Discovery
Troubleshooting Receiving SNMP Traps . . . . . 168
Troubleshooting Discovery of Windows Server
2008-Based Servers
Troubleshooting SNMP Traps for ESX or ESXi
Versions 3.5, 4.x, or 5.0 . . . . . . . . . . . . . . 169
. . . . . . . . . . . . . . 166
. . . . . . . . . . . . 166
. . . . . . . . 167
. . . . . . . . . . . . . . . . 169
20 Frequently Asked Questions . . . . . . . . . 173
12 Contents
Installation . . . . . . . . . . . . . . . . . . . . . . . 173
Ta sk s
. . . . . . . . . . . . . . . . . . . . . . . . . . 173
E-mail Alert Action
. . . . . . . . . . . . . . . . . . . 178
Page 13

Discovery . . . . . . . . . . . . . . . . . . . . . . . . 178
Inventory
System Update
. . . . . . . . . . . . . . . . . . . . . . . . . 180
. . . . . . . . . . . . . . . . . . . . . . 180
21 Preferences - Reference. . . . . . . . . . . . 183
22 Tools- Reference . . . . . . . . . . . . . . . . . . 185
User Interface Logs . . . . . . . . . . . . . . . . . . . 185
Application Logs
. . . . . . . . . . . . . . . . . . . . . 186
23 Tutorials. . . . . . . . . . . . . . . . . . . . . . . . . 187
24 Appendix—Right-Click Actions. . . . . . . 189
Devices. . . . . . . . . . . . . . . . . . . . . . . . . . 189
Device Search
Discovery Range Summary . . . . . . . . . . . . . . . 190
Managing Include Ranges
Managing Exclude Ranges . . . . . . . . . . . . . 190
. . . . . . . . . . . . . . . . . . . . . . 190
. . . . . . . . . . . . . 190
View Filters . . . . . . . . . . . . . . . . . . . . . . . 191
. . . . . . . . . . . . . . . . . . . . . . . . . . . 191
Alerts
Remote Tasks
. . . . . . . . . . . . . . . . . . . . . . 191
Contents 13
Page 14

14 Contents
Page 15

1
About OpenManage Essentials
OpenManage Essentials is a hardware management application that
provides a comprehensive view of Dell systems, devices, and components in
the enterprise’s network. With OpenManage Essentials, a web-based and
one-to-many systems management application for Dell systems and other
devices, you can:
• Discover and inventory the systems.
• Monitor systems’ health.
• View and manage system alerts.
• Perform system updates.
• View hardware inventory and compliance reports.
About OpenManage Essentials 5
Page 16

6 About OpenManage Essentials
Page 17

2
Installing OpenManage Essentials
Installation Prerequisites and Minimum Requirements
For a list of supported platforms, operating systems, and browsers, see the
Dell OpenManage Essentials Support Matrix at
To install OpenManage Essentials, you require local system administrator
privileges and the system you are using must meet the criteria mentioned in
Table 1 and Table 2.
NOTE: It is recommended that you do not install OpenManage Essentials on a
domain controller system. The installer does not allow you to proceed with the
installation and displays an operating system not supported error message.
Table 1. Minimum Recommended Hardware
support.dell.com/manuals
.
Minimum
Recommended
Hardware
Number of
Devices
Typ e o f S y st em Physical
RAM 8 GB 6 GB 6 GB 6 GB 4 GB
Processors 8 cores total 4 cores total 4 cores total 2 cores total 2 cores total
Database SQL
Database
Location
Hard Drive 10 GB 6 GB 6 GB 6 GB 6 GB
Large
Deployments
2000 500 300 100 100
Machines /
Virtual
Machines
Standard
Remote Local Local Local Local
Medium Deployments Small Deployments
Physical
Machines /
Virtual
Machines
SQL Express SQL Express SQL
Physical
Machines /
Virtual
Machines
Installing OpenManage Essentials 7
Physical
Machines /
Virtual
Machines
Express
Physical
Machines /
Virtual
Machines
SQL
Express
Page 18

Table 2. Minimum Requirements
Particulars Minimum Requirement
Operating Systems
Network 100 Mbps or higher
Web Br o ws er
User Interface Microsoft Silverlight version 4.0 or version 5.0
.NET 4.0
• Microsoft Windows Server 2008 Standard Edition
(x86 and x64)
• Windows Server 2008 Enterprise Edition
(x86 and x64)
• Windows Server 2008 R2 Standard Edition
• Windows Server 2008 R2 Enterprise Edition
• Microsoft Internet Explorer 8 or later
•Mozilla Firefox
Downloading OpenManage Essentials
You can download OpenManage Essentials from support.dell.com or the Dell
TechCenter website.
Terms and Conditions for Using Relational Database Management Systems
The relational database management system (RDBMS) used for installing
OpenManage Essentials is an SQL server. The SQL server has configuration
settings separate from the OpenManage Essentials database. The server has
logins (SQL or Windows) that may or may not have access to the OpenManage
Essentials database.
NOTE: You require a sysadmin role to perform the SQL server tasks.
When OpenManage Essentials is installed, Internet security is modified by
adding registry entries to the ZoneMaps for HKLM and HKCU. This ensures
that Internet Explorer identifies the fully qualified domain name as an
intranet site.
8 Installing OpenManage Essentials
Page 19

A self-signed certificate is created and this certificate is installed in the root
Certificate Authorities (CA) and My certificates. However, it is recommended
to use a custom certificate.
To prevent certificate errors, remote clients must install OpenManage Essentials
certificate in both CA and Root Certificate Stores to remove the certificate errors.
For a Typical install of OpenManage Essentials:
• Use the local version of SQL Server that has all supported components.
• The RDBMS is altered to support both SQL and Windows authentication.
• An SQL login is generated for OpenManage Essentials’ services and this
login is added as a RDBMS SQL login with sysadmin privileges.
NOTE: The password for the SQL login is controlled by the application and is
different on every system.
It is recommended that a custom install is selected when you want to use a
domain service account for added security and SQL Server Management
Studio (SSMS) selection.
For a Custom install of OpenManage Essentials, provide the Windows or
SQL login.
At runtime, when the OpenManage Essentials website determines that it has an
invalid certificate or certificate binding; the self-signed certificate is regenerated.
Installing OpenManage Essentials
1
Double-click the OpenManage Essentials executable file.
Dell OpenManage Install
The
are available:
•
Dell OpenManage Essentials
OpenManage Essentials
•
Dell Repository Manager
Manager. Using Repository Manager, you can create customized bundles
and repositories of Dell Update Packages, software utilities such as update
drivers, firmware, BIOS, and other applications.
•
Dell License Manager
manager. Dell License Manager is a one-to-many license deployment
and reporting tool for managing the Dell iDRAC 7 licenses.
screen is displayed. The following options
—Select this option to install
and the
—Select this option to install Dell Repository
—Select this option to install the Dell license
Troubleshooting Tool
Installing OpenManage Essentials 9
Dell
.
Page 20

•
Documentation
•
View Readme
latest readme, go to
2
In
Dell OpenManage Install
click
Install
.
—Click this link to view the online help.
—Click this link to view the readme file. To view the
support.dell.com/manuals
, select
Dell OpenManage Essentials
.
The Dell OpenManage Essentials Prerequisites window, displays the
following requirement types:
•
Critical
•
Wa rn in g
installation but not an
Also, later during installation, use the
—This error condition prevents the installation of a feature.
—This warning condition may disable the
Upgrade
of the feature later during installation.
Custom
Ty p i c a l
installation setup type
to select the feature.
•
Information
Ty p i c a l
—This informational condition does not affect the
selection of a feature.
There are two options for resolving critical dependencies:
and
•Click
Install All Critical Prerequisites
to immediately begin installing
all critical prerequisites without further interaction.
Critical Prerequisites
may require a reboot depending on the
configuration and the Prerequisites installation will resume
automatically after restart.
• Install each prerequisite individually by clicking the associated link
with the required software.
NOTE: To configure remote database, you do not require an SQL Express
installation on the local system. See
Database on a Remote SQL Server
you can install SQL Express by clicking the warning prerequisite link.
Selecting Install All Critical Prerequisites does not install SQL Express.
3
Click
Install Essentials
4
In the install wizard for OpenManage Essentials, click
5
In the
License Agreement
.
page, read the license agreement, select
the terms in the license agreement
6
In
Setup type
If you selected
Ready to Install the Program
select either
Ty p i c a l
, click
Ty p i c a l
Next.
page and the click
Setting Up OpenManage Essentials
. If you are not configuring remote database,
Next
, and then click
or
Custom
Next
installation.
Verify the installation settings in the
Install
.
10 Installing OpenManage Essentials
Install All
.
I accept
.
Page 21

If you selected
a
In
Custom Setup
and then click
b
In custom settings for port numbers, if required, change default values
for
port number
c
In
Database Server
Custom
Next
, in
Custom Setup
, click
Change
.
, click
Next
and do the following:
to change the installation location,
Network Monitoring Service port number, Tas k M an ag er Se rv ic e
, and
Console Launch port
and then click
, do any of the following and then click
• Local database—If you have many SQL server versions available
on the management system and you want to select an SQL server
on which you want to set up the OpenManage Essentials
database, then select the SQL server from the
Database Server
list, the type of authentication, and provide the authentication
details.
• Remote database— Complete the prerequisites. For more
information, see Setting Up OpenManage Essentials Database on
a Remote SQL Server. After the prerequisites are complete, click
Browse
and select the remote system and then provide the
authentication details. You can also set up the OpenManage
Essentials database on a remote system by providing the IP
address or host name and the database instance name of the
remote system in
NOTE: If you have multiple database instances running on a selected database
server, you can specify the required database instance name to configure the
Essentials database with it. For example, using (local)\MyInstance, you are
configuring Essentials database on a local server and MyInstance named
database instance.
Verify the installation settings in the
d
page and the click
7
After the installation is complete, click
Database Server.
Install
.
Ready to Install the Program
Finish
.
Next
.
Next
:
Installing OpenManage Essentials 11
Page 22

Setting Up OpenManage Essentials Database on a Remote SQL Server
You can configure OpenManage Essentials to use an SQL server present on a
remote system. Before setting up the OpenManage Essentials database on the
remote system, check for the following prerequisites:
• Network communication between the OpenManage Essentials system and
the remote system is functioning.
• SQL connection works between the OpenManage Essentials system and
the remote system for the specific database instance. You can use the
Windows ODBC Data Source Administrator
connection. On the remote database server, enable TCP/IP protocol and if
you are using SQL Authentication, enable mixed mode on the remote
SQL server.
You can retarget your database if:
• Your SQL credentials to the SQL server fails.
• Your Windows credentials to the SQL server fails
• Database is moved.
tool to verify the
Installing Repository Manager
1
In
Dell OpenManageInstall
click
Install
.
2
In
Dell Repository Manager - InstallShield Wizard
3
In
License Agreement
and click
4
In
a
b
5
In
another location, and then click
6
In
Next
.
Customer Information
Provide user name and organization information.
Select either
application available to everyone or
retain access.
Destination Folder
Setup Type
Anyone who uses this computer (all users)
, do any of the following and then click
, select
Dell Repository Manager
, click
, select
I accept the terms in the license agreement
, do the following and then click
Only for me (Windows User)
, use the default location or click
Next
.
Next
Change
Next
, and then
.
Next
.
to make this
to specify
.
to
,
12 Installing OpenManage Essentials
Page 23

• Select
• Select
7
In
Ready to Install the Program
8
After the installation is complete, click
Complete
Custom
to choose program features you want to install.
to install all the Repository Manager features.
, click
Install
.
Finish
.
Uninstalling OpenManage Essentials
CAUTION: Uninstalling OpenManage Essentials deletes your database. While
installing upgrades, it is recommended to install the upgrades on top of the
existing version of OpenManage Essentials to preserve the database.
1
Click
StartControl PanelPrograms and Features
2
In
Uninstall or change a program
and click
3
In the message
Essentials?
Uninstall
, click
.
Are you sure you want to uninstall OpenManage
Yes
, select
.
Dell OpenManage Essentials
.
Migrating IT Assistant to OpenManage Essentials
To replace IT Assistant with OpenManage Essentials while preserving the
existing IT Assistant database:
1
Double-click the OpenManage Essentials executable file.
2
In
Dell OpenManage Install
click
Install
.
The check dependencies page is displayed. This page lists the following
requirement types:
, select
Dell OpenManage Essentials
and
•
Critical
•
War ni ng
but not an
during installation, use the
the feature
•
Information
selection of a feature.
—This error condition will prevent the installation of a feature.
—This warning condition disables the
Upgrade
—This informational condition will not affect the
Ty p i c a l
of the feature later during installation. Also, later
Custom
Installing OpenManage Essentials 13
installation setup type to select
installation
Ty p i c a l
Page 24

There are two options for resolving critical dependencies:
•Click
Install All Critical Prerequisites
at the bottom of the page to
immediately begin installing all necessary prerequisites without
further interaction.
• Install each prerequisite individually by clicking the associated link
with the required software.
3
Click
Install Essentials
4
In the install wizard for OpenManage Essentials, click
5
In the License Agreement page, read the license agreement, select
the terms in the license agreement
6
In
Setup type
7
In
Custom Setup
8
In
Custom Settings
click
Next
9
In
Database Server
, select
.
Assistant database and click
NOTE: During the replacement process, a copy of the IT Assistant database
is created and utilized by OpenManage Essentials.
10
In
Ready to Install the Program
11
After the installation is complete, click
.
Next
.
I accept
Custom
, click
Next
and then click
.
.
Next
.
, verify or change the default port numbers and
, enter the required parameters to connect to the IT
Next
.
, review your settings and click
Finish
.
Install
.
Migration Use Cases
If you migrate from IT Assistant to OpenManage Essentials, IT Assistant is
uninstalled and replaced by OpenManage Essentials. However, the IT
Assistant database (ITAssist) remains and you can retrieve it from the SQL
server. Table 3 provides information about different migration use cases.
14 Installing OpenManage Essentials
Page 25

Table 3. Migration Use Cases
Number Use Case Conditions Outcome
1
2
3
4
• IT Assistant is installed on the local system.
• The IT Assistant database is located on the
local system.
• OpenManage Essentials is installed on the
local system.
•The OpenManage Essentials database is
installed on the local system.
• IT Assistant is installed on the local system.
• The IT Assistant database is located on the
local system.
• OpenManage Essentials is installed on the
local system.
•The OpenManage Essentials database is
installed on a remote system.
• IT Assistant is installed on the local system.
• The IT Assistant database is located on a
remote system.
• OpenManage Essentials is installed on the
local system.
•The OpenManage Essentials database is
installed on the local system.
• IT Assistant is installed on the local system.
• The IT Assistant database is located on a
remote system.
• OpenManage Essentials is installed on the
local system.
•The OpenManage Essentials database is
installed on a different remote system.
Data from the IT Assistant
database is copied to the
OpenManage Essentials
database.
Data from the IT Assistant
database is not copied to
the OpenManage
Essentials database.
Data from the IT Assistant
database is not copied to
the OpenManage
Essentials database.
Data from the IT Assistant
database is not copied to
the OpenManage
Essentials database.
Installing OpenManage Essentials 15
Page 26

Table 3. Migration Use Cases
Number Use Case Conditions Outcome
5
• IT Assistant is installed on the local system.
• The IT Assistant database is located on a
remote system.
• OpenManage Essentials is installed on the
local system.
• The OpenManage Essentials database is
installed on a the same remote system as the
IT Assistant database.
Data from the IT Assistant
database is copied to the
OpenManage Essentials
database.
List of Migrated and Non-Migrated Components
Table 4. List of Components
Components That are Migrated Components That are not Migrated
Discovered and inventoried devices OpenManage Server Administrator push
packages
Discovery/inventory include and exclude
ranges
Health status of the devices Software update tasks
Discovery, inventory, and statusing
schedule/settings
Alerts received in IT Assistant Application launch, e-mail, and trap
Custom alert view filters IT Assistant reports
Ignore alert actions Device health search query data
Alert log settings and application logs Server and client software updates
Received alerts IPMI command line tasks
All remote tasks except IPMI and OMSA
deploy tasks.
Server Administrator push tasks
Software updates (imported Dell update
packages)
forward alert actions
Power control device tasks
16 Installing OpenManage Essentials
Page 27

Table 4. List of Components
Components That are Migrated Components That are not Migrated
Polling schedule configuration Import Dell catalog task and data
On-demand statusing Server Administrator deployment for
Windows and Linux
Installing OpenManage Essentials 17
Page 28

18 Installing OpenManage Essentials
Page 29

3
Getting Started With OpenManage Essentials
Logging On to OpenManage Essentials
To log on to OpenManage Essentials:
• From the management station desktop, click the
• From the management station desktop, click
OpenManage Applications
• From a remote system, launch a supported browser. In the address field,
type
https://<IP address, host name, or Fully Qualified Domain Name
(FQDN) >:<Port Number>/web/default.aspx
NOTE: FQDN is required to show a valid certificate. The certificate shows an
error if an IP address or local host is used.
The console launch port number (default port number 2607) is required to
launch OpenManage Essentials from a browser on a remote system. While
installing OpenManage Essentials, if you changed the port using the
Custom Install
preceding URL.
option, use the selected console launch port in the
Essentials Essentials.
Essentials
Start All Programs Dell
.
icon.
The First Time Setup page is displayed.
Configuring OpenManage Essentials
If you are logging on to OpenManage Essentials for the first time, the First
Time Setup tutorial is displayed. The tutorial provides step-by-step instructions
for setting up an environment of servers and devices to communicate with
OpenManage Essentials. The steps include:
• Configuring the SNMP protocol on each target server.
• Installing Dell OpenManage Server Administrator on each target server.
Getting Started With OpenManage Essentials 19
Page 30
• Enabling network discovery (For Windows Server 2008-based servers) on
each target server.
• Discovering devices on your network.
After you have completed the First Time Setup wizard, the Discovery Range
Configuration is displayed, for more information, see
and Inventory Task
.
Configuring a Discovery
Using the OpenManage Essentials Home Portal
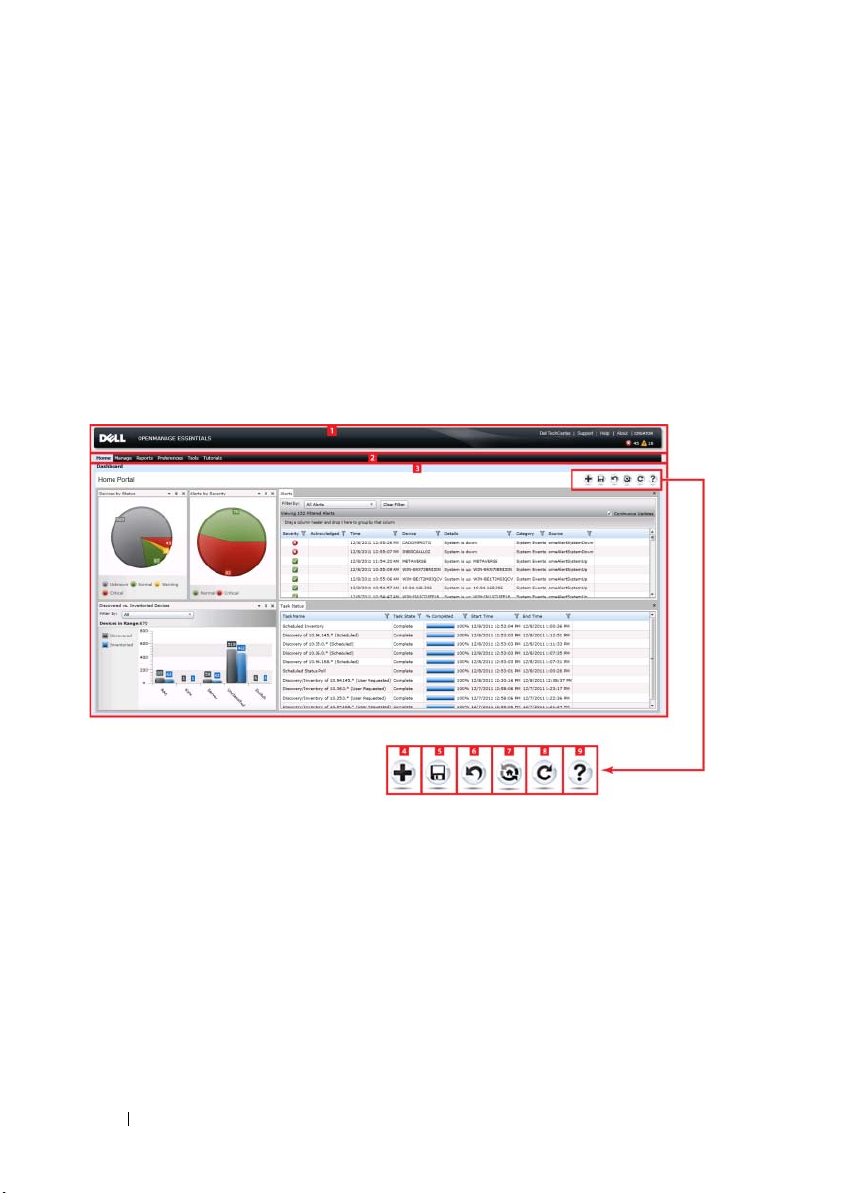
OpenManage Essentials user interface contains these components:
1 Logo and banner 2 Menu items
3 Console area 4 Add a report to the home portal
5 Save the current home portal layout 6 Load the last saved home portal
layout
7 Load the default home portal layout 8 Refresh the home portal page
9 Launch the online help
20 Getting Started With OpenManage Essentials
Page 31

Customizing the Home Portal
You can change the layout of the portal page to accomplish the following:
• Display additional available reports.
• Hide graphs and reports.
• Rearrange or resize graphs and reports by dragging and dropping.
If a pop up window on any screen is bigger than the screen and if scrolling is
not possible, set the browser’s zoom value to 75% or less to make it visible.
From the various reports that are available, you can select specific reports and
set them to display on the Dashboard. You can click on these reports to
further drill-down and get more details; for the list of available reports see
Home Portal Reports
For more information on Home portal, see
Portal - Reference
.
OpenManage Essentials Home
.
Displaying Additional Available Reports and Graphs
Charts have drill-down feature.
To view additional reports and graphs, click the icon on the top right
corner to see and display the list of available reports and graphs.
•Alerts by Severity
• Devices by Status
• Discovered versus Inventoried Devices
•Alerts
• Field Replaceable Unit (FRU) Information
• Hard Drives Inventory
•HyperV Information
•Memory
• Modular Enclosures
•NIC Information
•PCI Device Information
Getting Started With OpenManage Essentials 21
Page 32

• Server Components and Versions
• Server Overview
• Storage Controllers
• Task Status
•ESX Information
After selecting the desired report, dock the control using the control to
the desired location.
Drilling-Down Charts and Reports for More Information
To drill-down for further details, do the following:
• In report charts, click the charts and further details are displayed.
• In report tables, use the drag and drop option or funnel options to filter for
the required data and use right-click options to perform various tasks.
Saving and Loading the Home Portal Layout
To save and load the Home portal layout, click the icon to save changes
to the portal page layout.
All the current layout settings and visible reports on the portal are saved on
the portal page.
To load the previous portal layout, click the icon.
Updating the Portal Data
To refresh the portal page manually, click the icon.
To load the default portal layout, click the icon.
Hiding Graphs and Reports (Components)
To hide graphs and reports (components): Click the icon on the report
or graph and select the Hide option to remove the component from the
portal page or select the Auto Hide option to move the component to the
side bar.
22 Getting Started With OpenManage Essentials
Page 33

To remove a component from the portal page, click the X icon in the report or
graph.
To move the report to the side bar, click the icon.
Re-arranging or Re-sizing Graphs and Reports (Components)
Click the icon and select from the following options:
•
Floating—
•
Dockable
is floating, right-click the title to dock or tab the component.
•
Tabbed Document
Select the control to dock a floating component. You can create a
tabbed view by docking a pane within other panes or dock a pane at the top,
bottom, left, or right side of the main window.
You can resize panes and all panes will fill the selected area when docked.
To move the component to the side bar, click the icon and to restore it,
select the component and click the icon.
To create filters in a report grid, click the icon. This is not specific to the
portal page layout and the settings related to these associations are not saved.
To move the component freely in the portal page.
—To dock the component in the portal page. If the component
—To move the component into a tab in the portal page.
Filtering Data
You can filter the results by dragging and dropping column headers to the top
of reports. You can choose one or more attributes when revising the view to
meet your specific needs.
For exa m ple, in Devices by Status pie chart, click a status such as Critical. In
the Device Summary page, drag the Device Type and Service Tag to the top
of the report. The view immediately changes to a nested information based
on your preference. In this example, the information is grouped first by
Device Type, and second by Service Tag. Drill-down through these filtered
groups to see the remaining information for the devices.
For more information, see
Viewing Device Summary
Getting Started With OpenManage Essentials 23
.
Page 34

24 Getting Started With OpenManage Essentials
Page 35

4
OpenManage Essentials Home Portal - Reference
This dashboard page provides a snapshot of the managed devices that include
servers, storage, switches, and so on.
OpenManage Essentials Heading Banner
The banner displays the Critical and Warning icons including the number of
devices. You can view the devices in either state by clicking the icon or the
number. The banner also contains links to the following:
•
Dell TechCenter—
information on various technologies and a web page where there is sharing
of knowledge, best practices, and information about Dell products and
your installations.
•
Support —
•
Help—
•
About—
information.
• Current User (For example, Administrator)
The tool tip displays the user’s OpenManage Essentials roles.
Click to open
Click to open the online help.
Click to view general OpenManage Essentials product
Click to open Dell’s web page that contains
support.dell.com
.
—
Specifies the current user.
NOTE: The banner is available in all the pages.
Home Portal Reports
From the Home Portal Dashboard page, you can monitor the following:
•Alerts by Severity
• Devices by Status
• Discovered versus Inventoried Devices
•Alerts
• Field Replaceable Unit (FRU) Information
OpenManage Essentials Home Portal - Reference 25
Page 36

•Hard Drives Inventory
• HyperV Information
•Memory
• Modular Enclosures
• NIC Information
•PCI Device Information
• Server Components and Versions
• Server Overview
• Storage Controllers
• Task Status
•ESX Information
Device by Status
Device by status provides device status information in a pie chart format.
Click a segment of the pie chart to view the device summary.
Unknown Health status of these devices are not known.
Normal These devices are working as expected.
Wa rn i ng These devices display behaviors that are not normal and
further investigation is required.
Critical These devices display behaviors that suggest an occurrence
of a failure of a very important aspect.
Alerts by Severity
Alerts by severity provides alert information of devices in a pie chart format.
Click a segment of the pie chart to view the devices.
Normal Alert from these devices confirm to the expected behavior
for the devices.
Critical Alerts from these devices suggest that a failure of a very
important aspect has occurred.
26 OpenManage Essentials Home Portal - Reference
Page 37

Unknown Health status of these devices are not known.
Wa rn in g These devices display behaviors that are not normal and
further investigation is required.
Discovered Versus Inventoried Devices
See
Discovered Versus Inventoried Devices
.
Task Status
See
Tas k S ta t us
.
OpenManage Essentials Home Portal - Reference 27
Page 38

28 OpenManage Essentials Home Portal - Reference
Page 39

5
Discovering and Inventorying Devices
Perform Discovery and Inventory in order to manage your network devices.
Supported Devices and Protocols
Following are the supported devices and associated protocols.
Protocol / Mechanism Simple Network
Management
Protocol (SNMP)
Dell servers
with
OpenManage
Server
Administrator
installed
Windows /
Hyper-V
•Discovery
• Correlation
•Classification
•Hardware
inventory
•Software
inventory
monitoring
•Traps/alerts
application
launch:
• OpenManage
Server
Administrator
console
• Remote
desktop
• Warranty
Windows
Management
Instrumentation
(WMI)
•Discovery
•Correlation
• Classification
• Hardware
inventory
•Software
inventory
monitoring
• Application
launch
• OpenManage
Server
Administrator
console
• Remote
desktop
•Warranty
Web S e r v i c esManagement
(WSMAN)
NS
Discovering and Inventorying Devices 29
Page 40

Protocol / Mechanism Simple Network
Management
Protocol (SNMP)
Windows
Management
Instrumentation
(WMI)
Web S e r v i c e sManagement
(WSMAN)
Linux/
VMware ESX
•Discovery
• Correlation
• Classification
•Hardware
inventory
•Software
inventory
•Monitoring
•Traps/alerts
• Application
launch:
• OpenManage
Server
Administrator
console
•Warranty
NS NS
30 Discovering and Inventorying Devices
Page 41

Protocol / Mechanism Simple Network
Management
Protocol (SNMP)
Windows
Management
Instrumentation
(WMI)
Web S e r v i c esManagement
(WSMAN)
Dell servers
without
OpenManage
Server
Administrator
installed
VMware ESXi Traps/Alerts NS
Windows/Hyper-VDiscovery
Linux/VMware
ESX
(Unknown)
Discovery
(Unknown)
•Discovery
•Correlation
• Classification
• Hardware
• Application
NS NS
•Discovery
• Correlation
• Classification
•Hardware
inventory
•Software
inventory
• Virtual machine
information
• Virtual host
product
information
• Monitoring
(OpenManage
Server
Administrator
health only)
• Application
launch: warranty
NS
inventory
launch
• Remote
desktop
•Warranty
Discovering and Inventorying Devices 31
Page 42

Protocol / Mechanism Simple Network
Management
Protocol (SNMP)
Windows
Management
Instrumentation
(WMI)
Web S e r v i c e sManagement
(WSMAN)
VMware ESXi NS NS
iDRAC / DRAC / BMC
Modular enclosure (M1000e)
•Discovery
•Correlation
• Classification
•Monitoring
•Traps/Platform
Event Traps
(PET)
• Application
launch
•RAC
•Console
•Warranty
•Discovery
•Correlation
• Classification
•Enclosure
health
•Traps
• Application
launch
•CMC
•Console
•Warranty
•Discovery
•Correlation
• Classification
•Hardware
inventory (no
storage
inventory)
NS NS
NS NS
32 Discovering and Inventorying Devices
Page 43

Supported Operating Systems (Servers), Protocols, and Features Matrix
Protocol / Mechanism Intelligent Platform
Management
Interface (IPMI)
Dell servers with
OpenManage Server
Administrator
installed
Dell servers without
OpenManage Server
Administrator
installed
Windows
/Hyper-V
Linux/
VMware ESX
VMware ESXi NS NS
Windows/Hyper-V NS Deploy OpenManage
Linux/VMware ESX NS Deploy OpenManage
VMware ESXi NS NS
NS
NS
Command Line
Interface (CLI)
• OpenManage Server
Administrator CLI
•Deploy
OpenManage Server
Administrator
•Server Updates
•BIOS
•Firmware
•Driver
• OpenManage Server
Administrator CLI
•Deploy
OpenManage Server
Administrator
•Server updates:
•BIOS
•Firmware
•Driver
Server Administrator
Server Administrator
a
Discovering and Inventorying Devices 33
Page 44

Protocol / Mechanism Intelligent Platform
Management
Interface (IPMI)
iDRAC / DRAC / BMC
Modular Enclosure (M1000e) NS
a. You cannot perform this task if the device is not discovered, inventoried, or both.
b. Requires internet connection (support.dell.com) to view warranty information.
•Discovery
• Classification
• Correlation
•iDRAC health
• Application launch
•RAC console
•Warranty
b
Command Line
Interface (CLI)
•RACADM CLI
•IPMI CLI
•RACADM CLI
•IPMI CLI
Supported Operating Systems (Storage), Protocols, and Features Matrix
a
Protocol / Mechanism Simple Network
Storage Devices EqualLogic
Management
Protocol
(SNMP)
•Discovery
•Correlation
• Classification
• Hardware
inventory
• Monitoring
•Traps/alerts
• Application
launch
•EqualLogic
console
34 Discovering and Inventorying Devices
Symbol EMC
NaviSphere CLI
NS NS
Page 45

Protocol / Mechanism Simple Network
Management
Protocol
(SNMP)
Dell|EMC
NOTE: Both
SNMP and
Navisphere are
required for
complete
management of
Dell|EMC devices.
PowerVault Traps/Alerts
•Discovery
•Correlation
• Classification
• Traps/Alerts
Symbol EMC
NaviSphere CLI
NS
•Discovery
•Correlation
• Classification
• Hardware
inventory
•Monitoring
• Application
launch
•Hardware
inventory
•Monitoring
• Application
launch
•EMC
NS
Navisphere
Manager
–Modular
Disk
Storage
Manager
Ta p e
a. Requires Modular Disk Storage Manager Controller software installed on the OpenManage
Essentials system.
b. Requires internet connection (support.dell.com) to view warranty information.
•Discovery
•Correlation
• Classification
•Hardware
inventory
•Monitoring
• Traps/alerts
• Application
launch
•Tape console
• Warranty
NS NS
b
a
Discovering and Inventorying Devices 35
Page 46

Legend and Definitions
•
NS:
Not Supported
•
Discovery:
•
Correlation:
Capability to discover the device on the network.
Capability to correlate:
– Discovered server and DRAC, iDRAC, or BMC devices.
– Discovered modular systems or switches.
– ESX, ESXi, or Hyper-V host and guest virtual machines.
•
Classification:
Capability to classify the devices by type. For example,
servers, network switches, storage, and so on.
•
Hardware Inventory:
Capability to obtain detailed hardware inventory of
the device.
•
Monitoring or Health:
Capability to obtain health status and connection
status of the device.
•
Traps, alerts, or PETs:
•
Application Launch:
Capability to receive SNMP traps from the device.
Provides a right-click action menu item on the
discovered device to launch 1x1 console or application.
•
OpenManage Server Administrator CLI:
Capability to run OpenManage
Server Administrator supported commands on the remote (discovered)
servers.
•
Deploy OpenManage Server Administrator:
Capability to deploy
OpenManage Server Administrator to the remote (discovered) servers.
•
Server Updates:
Capability to deploy BIOS, firmware, and driver updates
to the remote (discovered) servers.
•
RACADM CLI:
Capability to run RACADM tool supported commands
on the remote (discovered) devices.
•
IPMI CLI:
Capability to run IPMITool supported commands on the
remote (discovered) devices.
•
Wa rr an ty:
Requires internet connection (
support.dell.com
) to view
warranty information.
36 Discovering and Inventorying Devices
Page 47

Using the Discovery and Inventory Portal
To access the discovery and inventory portal, click ManageDiscovery and
Inventory.
1 Details from the last discovery and
inventory task run.
3 Details of tasks and their status.
2 Details of previously discovered and
inventoried devices.
Configuring a Discovery and Inventory Task
1
From OpenManage Essentials, click
Inventory
2
In
a
b
Discovery RangesAdd Discovery Range
Discovery Range Configuration
Provide the IP address/range or host name and subnet mask. Click
Add
.
NOTE: You can add multiple IP addresses, ranges, or host names. You can
add multiple host names separated by a comma delimiter. For example,
hostname1, hostname2, hostname3, and so on.
To import host names and IP addresses, click
host names and IP addresses included as line items in a file that is in
Discovering and Inventorying Devices 37
ManageDiscovery and
.
:
Import
. You can import
Page 48

CSV format. Using Microsoft Excel, you can create a .CSV file
containing host names or IP addresses.
c
Click
Next
.
3
After you have provided at least one IP address, IP range, host name, or a
combination thereof, continue to customize the discovery and inventory
options or complete the configuration using the default options.
Clicking
Finish
without setting any further configurations immediately
runs the discovery and inventory tasks using the default SNMP and ICMP
protocols. It is recommended that you review and revise your protocol
configurations prior to clicking Finish.
For more information about each protocol listed below, click
do I need this?) help.
NOTE: When discovering ESXi-based servers, to see the guest virtual
machines grouped with the host, enable and configure the WS-Man protocol.
NOTE: By default, SNMP is enabled and values are assigned ICMP
parameters.
NOTE: After completing any of the following steps, click either Next to
continue or click Finish to complete the Discovery Range Configuration.
•In
ICMP Configuration
, to detect devices on the network, edit the
ICMP parameters.
•In
SNMP Configuration
, to discover servers, provide the SNMP
parameters. Ensure that the SNMP community string specified in
Community
matches the SNMP community string of the device or
devices you wish to discover.
•In
WMI Configuration
, to authenticate and connect to remote
devices, provide the WMI parameters. The format for entering
credentials for WMI must be
networks or
Storage Configuration
•In
localhost\user name
domain\user name
for domain-based
for non-domain based networks.
, to discover PowerVault modular disk array
or EMC devices, edit parameters.
•In
WS-Man Credentials
configuration, to enable discovery of ESXi
installed servers, provide WS-Man parameters.
- (Why
Get
38 Discovering and Inventorying Devices
Page 49

•In
IPMI Configuration
parameters. IPMI is typically used to discover BMC or iDRACs on
Dell servers. You can include the optional KG key when discovering
RAC devices.
•In
Discovery Range Action
tasks. The default option is to perform both discovery and inventory.
Select
Perform only discovery
inventory
to run the task immediately.
, to enable server discovery, provide the IPMI
, choose to discover, inventory, or perform both
or
Perform both discovery and
To schedule the task to run at a later time, select
discovery or inventory
Task or Scheduling a New Inventory Task sections.
• Review your selections in the Summary screen and click
change any of the parameters in previous configuration screens, click
Back
. When complete, click
, and refer to the Scheduling a New Discovery
Finish
.
Do not perform
Finish
. To
Excluding Ranges
Configure exclude ranges to prevent servers from being discovered/rediscovered
or limit the number of devices displayed in the device tree. To exclude a range
from discovery task:
1
From OpenManage Essentials, select
Inventory
2
Right-click
3
In the
4
In
and click
5
After the IP address or host name is listed, click
Discovery Ranges
Exclude Ranges
Create
screen, click Ok.
Exclude Range Configuration
Add
.
and then select
ManageDiscovery and
.
Add Exclude Range
, provide IP address/range or host name
Finish
.
.
Discovering and Inventorying Devices 39
Page 50

Viewing Configured Discovery and Inventory Ranges
From OpenManage Essentials, click ManageDiscovery and Inventory
Discovery RangesDiscovery RangesInclude Ranges.
Scheduling Discovery
1
Click
ManageDiscovery and InventoryConfigurationDiscovery
Schedule
2
In
a
b
c
Discovery Speed slider bar - This control, also known as the discovery
throttle, controls how fast discovery occurs and how much network and
system resources are consumed for discovery by controlling the:
• Number of discovery threads that are allowed to run at any one time.
• Delay in between the communicating devices during a network ping
sweep, in milliseconds.
NOTE: Each tick on the throttle control equals 10% and the range is from 10% to
100%. By default, in OpenManage Essentials, the discovery throttle is set at 60%;
Upon an upgrade from IT Assistant, the throttle control remains at its previously
set value.
.
Discovery Schedule Settings
Select desired schedule parameters.
(Optional)
execution; however, more system resources are consumed.
Discover all instrumented devices.
You may adjust the task speed slider for faster task
:
Multithreading
Dell OpenManage Essentials improves upon the optimized parallel threading
implementation in the Network Monitoring Service introduced in IT Assistant.
As the discovery process is very I/O intensive, you can optimize the process by
making it a parallel operation, where threads running in parallel (known as
multi-threading) are sending requests and handling responses to several
devices at once.
40 Discovering and Inventorying Devices
Page 51

To an extent, the more threads that run in parallel, each communicating to a
different device, the faster is the discovery; barring overall high network
congestion or latency. The discovery process, by default, allows a maximum of
32 threads to run in parallel (or concurrently) at any one time for discovery.
To control the number of parallel threads executing, move the discovery
throttle control either left or right. When set at the maximum, 32 parallel
threads are actually allowed to run. If the throttle is at 50%, only 16 threads
are allowed to run at any one time.
As the discovery service is optimized for parallel threading operations, the
system can utilize more system resources even at the same throttle setting. It is
recommended that you monitor the system resources so that a satisfactory
trade-off is made between discovery speed versus system resources available for
OpenManage Essentials. Lowering or increasing the throttle depends on the
system it is running on and the available resources. Note that the discovery
service may take up to several minutes to adjust to a new throttle setting.
NOTE: For minimal discovery times on medium to large size networks (several
hundred to several thousand devices), it is recommended that you install
OpenManage Essentials services on a multi-processor system.
Scheduling Inventory
1
Click
ManageDiscovery and InventoryConfigurationInventory
Schedule
2
In
a
b
.
Inventory Schedule Settings
, do the following:
Select desired schedule parameters.
(Optional)
You may adjust the task speed slider for faster task
execution; however, more system resources are consumed.
Inventory Speed slider control
—This control acts much like the
discovery throttle, controlling the number of threads that are used
during an inventory cycle. By default, there are a maximum number of
32 threads dedicated to performing the inventory process - the throttle
controls the number of threads are actually used.
NOTE: Each tick on the throttle control equals 10% and the range is from 10%
to 100%. The inventory throttle is set at 60% by default.
Discovering and Inventorying Devices 41
Page 52

Configuring Status Polling Frequency
You can configure OpenManage Essentials to check the health status of all
discovered devices that have a means of health instrumentation such as
OpenManage Server Administrator. The status can be scheduled at a given
interval using Status Polling so that health status is always current. To configure
status polling:
1
Click
ManageDiscovery and InventoryConfigurationStatus
Configuration
2
In
Status Polling
parameters including time and performance and then click
By default, the status polling frequency is enabled and set to one hour.
.
, select
Enable Status Polling
and provide the polling
Finish
.
Polling Speed slider control
throttle, controlling the number of threads that are used during a status
cycle. By default, there are a maximum number of 32 threads dedicated to
performing the status process - the throttle controls the number of threads
that are actually used.
- This control acts much like the discovery
42 Discovering and Inventorying Devices
Page 53

6
Discovery And Inventory Reference
From the Discovery and Inventory Portal page, you can:
• View graphical reports on devices and Dell servers discovered and inventoried.
• Manage discovery ranges for devices and Dell servers.
• Configure discovery, inventory, and status polling for devices and Dell servers.
Discovery and Inventory Portal Page Options
• Discovery Portal
• Discovery Ranges
– Add Discovery Range
• Discovery Ranges
• Include Ranges
• Exclude Ranges
• Configuration
– Discovery Schedule
– Inventory Schedule
– Status Configuration
Discovery and Inventory Portal
The Discovery and Inventory Portal provides information about the:
• Last discovery and inventory details
• Discovered versus inventoried devices
• Task status
Discovery And Inventory - Reference 43
Page 54

Last Discovery and Inventory
Last Discovery Details
Discovery Last Run at Displays the time and date information for the last run
discovery.
Discovery Range Displays the IP Address range or host name.
Devices Discovered Displays information on number of devices discovered.
Last Inventory Details
Inventory Last Run at Displays the time and date information for the last run
inventory.
Inventory Range Displays the IP Address range or host name.
Devices Inventoried Displays information on number of devices inventoried.
Discovered Versus Inventoried Devices
Provides a graphical report of number of devices and Dell servers discovered
or inventoried. You can use this report to ascertain the discovered devices and
Dell servers that are unclassified. See
summary information and filter options for the summary information.
Click any section of the graph to see the device summary for the selected region.
In the device summary, double-click a row to view the details (inventory view for
that device). Alternatively, right-click and select details for the inventory view or
right-click and select alerts for the alerts specific to that device.
Viewing Device Summary
for more on
Filter by Select to refine the search results.
•All
• Ranges-Select to filter based on the selected range.
44 Discovery And Inventory - Reference
Page 55

Task Stat us
Provides a list of currently executing and previously run tasks and their status.
The task status grid on this page shows the status of just discovery, inventory,
and tasks. However, the main portal shows all types of task statuses.
Tas k Na m e Name of the task.
Tas k St a te Status information:
Completed
Running
Stopped
Not Started
%Completed Task completion status in percentage.
Start Time Time and date information at start.
End Time Time and date information at end.
Viewing Device Summary
1
In
OpenManage Essentials
Discovery PortalDiscovery Portal
The
Discovery and Inventory Portal
2
In
Discovered vs Inventoried Devices
discovered or inventoried device band to open the
showing the selected graph details.
The
Device Summary
on device name, Service Tag, device type, and model are displayed.
, click
ManageDiscovery and Inventory
.
page is displayed.
, in the graphical report, click the
Device Summary
page
page, status on health and power, and information
3(Optional
) Click the funnel icon to filter the summary information.
The filter options are displayed.
Discovery And Inventory - Reference 45
Page 56

Select All Select to filter per line item.
Select options, devices, or Dell
servers.
Filter options Create filter with these options:
Select to filter based on options, devices, or Dell
servers.
•
Is equal to
Is not equal to
•
from
Is Less than
•
than the value you provide.
Is less than or equal to
•
that is less than or equal the value you provide.
Is greater than or equal to
•
that is greater than or equal to the value you
provide.
Is greater than
•
greater than the value you provide.
Health Status options:
• Unknown
•Normal
•Warning
•Critical
Connection Status options:
•On
•Off
—Select to create the
—Select to create the
logic.
—Select to find a value that is less
—Select to find a value
—Select to find a value
—Select to find a value that is
same as
different
logic.
4
Click
Filter
to view the filtered summary information.
5
Click
Clear Filter
to remove the filtered summary information.
46 Discovery And Inventory - Reference
Page 57

6
Right-click device status and select from these options:
IP Address or iDRAC name Displays the IP address or the iDRAC name.
Details Select to view device details.
Alerts Select to view the alerts generated for this device.
Application Launch Select to launch an application.
Troubleshoot If the Troubleshooting Tool is installed, then select this
option to launch the Troubleshooting Tool. The
Troubleshooting Tool is disabled by default. To enable the
Troubleshooting Tool, see
Refresh Inventory Select to run inventory on the device.
Refresh Status Select to run a status check on the device.
Add to New Group Select to add the device to a group.
Exclude Range Select to remove the device from the discovery and
inventory range.
Remove Select to remove the device information.
Export Select to export the device information.
Preferences - Reference
.
Discovery Ranges
From Discovery Range page, you can:
• View Discovery Range Summary
•Add Discovery Range
Discovery Range Summary
This page provides the following information:
• Discovery Ranges
– Include Ranges
– Exclude Ranges
• Discovery Range Summary
For list of right-click actions in this page, see
Discovery And Inventory - Reference 47
Appendix—Right-Click Actions
.
Page 58

Add Discovery Range
1
Click
ManageDiscovery and InventoryDiscovery Ranges
Discovery Range Summary
Add Discovery Range
and Inventory Task.
2
Provide information for protocols for discovery, inventory, or both:
• IP Address, Range, or Host name Configuration
• ICMP Configuration
• SNMP Configuration
• WMI Configuration
• Storage Configuration
• WS-Man Configuration
• IPMI Configuration
• Discovery Range Action
• Summary
. Then right-click
. For more information, see Configuring a Discovery
Include Ranges
and select
IP Address, Range, or Host Name Configuration
A discovery range is a network segment registered in OpenManage Essentials
for the purpose of discovering devices. OpenManage Essentials attempts to
discover devices on all registered discovery ranges that are enabled. A
discovery range includes subnet, a range of IP addresses on a subnet, an
individual IP address, or an individual host name.
Specify the IP address, IP address range, or host name for the discovery
process.
48 Discovery And Inventory - Reference
Page 59

IP address / range Specifies the IP address or IP address range.
The following are examples of valid discovery range
type address specifications (* is the wildcard character,
meaning all possible addresses in the specified range):
193.109.112.*
193.104.20-40.*
192.168.*.*
192.168.2-51.3-91
193.109.112.45-99
System IP address—193.109.112.99
NOTE: Click Add to add multiple ranges of IP addresses.
IPV6 addresses are not supported.
Host name Specifies the host name, for example:
mynode.mycompany.com.
Click Add to add multiple host names.
NOTE: You can add multiple host names by separating
them using commas.
NOTE: Invalid characters in the host name are not
checked. If the host name you provide contains invalid
characters, the name is accepted. However, the device is
not found during the discovery cycle.
Subnet mask Specifies the subnet mask for the IP address range. The
subnet mask is used to determine the broadcast
addresses for the subnet(s) part of the range. The
OpenManage Essentials Network Monitoring Service
does not use the broadcast address when discovering
devices in an IP address range. The following are
examples of valid subnet mask specifications:
• 255.255.255.0 (The default subnet mask for a Class C
network.)
• 255.255.0.0 (The default subnet mask for a Class B
network.)
• 255.255.242.0 (A custom subnet mask specification.)
By default, the subnet mask is set to 255.255.255.0.
Discovery And Inventory - Reference 49
Page 60

Import Select this option to import host names and IP
addresses from a file that is in CSV format. However,
you can import only 500 line items per task.
You can use an Active Directory export file in a.CSV
format as input. You can also create a .CSV file in a
spreadsheet editor using the header Name and filling in
system IP addresses or host names in the rows below
the header (one per cell). Save the file in a .CSV
format and use it as the input with the import feature.
If there are any invalid entries in the file, a message is
displayed when the data is imported by OpenManage
Essentials.
ICMP Configuration
Use ICMP during discovery to ping devices on the network. Select these
options to configure the ICMP parameters.
For more information, click - (Why do I need this?) help.
Timeout Set time in milliseconds.
Retries Set number of attempts.
SNMP Configuration
SNMP provides an interface to manage devices on the network such as
servers, storage, switches, and so on. The SNMP agent on the device allows
OpenManage Essentials to query the health and inventory data of the device.
Select these options to discover and inventory servers, storage devices, and
other network devices.
For more information, click - (Why do I need this?) help.
Enable SNMP discovery Enables or disables the SNMP protocol for discovery
range (subnet.)
50 Discovery And Inventory - Reference
Page 61

Get community Specifies or edits the community name for SNMP
get calls from the OpenManage Essentials user
interface. The Get Community is a read-only
password that SNMP agents installed on managed
devices use for authentication. The Get
Community allows OpenManage Essentials to
browse and retrieve SNMP data. This field is casesensitive. OpenManage Essentials uses the first
successful community name to communicate with
the device. You can enter multiple SNMP
community strings separated with commas.
Set community Specifies or edits the community name for SNMP
set calls from the OpenManage Essentials UI. The
Set Community is a read-write password that
SNMP agents installed on managed devices use for
authentication. The Set Community allows
OpenManage Essentials to perform tasks that
require the SNMP protocol, such as shutting down a
system. This field is case-sensitive. OpenManage
Essentials uses the first successful community name
to communicate with the device. You can enter
multiple SNMP community strings separated with
commas.
NOTE: In addition to the Set Community name, an
instrumentation password is required to perform an
SNMP task on a device.
Timeout (seconds) Specifies or edits the amount of time that
OpenManage Essentials waits after issuing a get or
set call before it considers the call failed. A valid
range is from 1 to 15 seconds. The default is 4
seconds.
Retries (attempts) Specifies or edits the number of times that
OpenManage Essentials reissues a get or set call
after the first call times out. A valid range is from 1
to 10 retries. The default is 2.
Discovery And Inventory - Reference 51
Page 62

WMI Configuration
Use the WMI protocol for gathering discovery, inventory, and health information
about Window-based servers. This protocol provides less information about
devices than SNMP but is useful if SNMP is disabled on the network. Select
these options to configure WMI parameters for Windows servers only.
Enable WMI discovery Select to enable WMI discovery.
Domain \ User name Provide the domain and user name.
Password Provide password.
Storage Configuration
Enabling discovery of PowerVault MD or Dell|EMC arrays allows OpenManage
Essentials to gather inventory and health information about the arrays. Set
these options to discover PowerVault MD arrays or Dell|EMC devices.
Enable PowerVault
MD array discovery
Enable Dell/EMC
array discovery
Dell/EMC user name Provide user name.
Dell/EMC password Provide password.
Dell/EMC port Increment or decrement the port number. Enter a TCP/IP
Select to discover PowerVault MD array. This discovery
configuration does not require credentials.
Select to discover Dell/EMC array.
port number ranging 1 to 65535. Default value is 443.
WS-Man Configuration
Use the WS-Man protocol to discover ESXi-based servers and gather
inventory and health status from those servers. Select these options to
configure WS-Man parameters for discovering ESXi installed devices.
Enable WS-Man
Discovery
User ID Provide authenticated user ID.
52 Discovery And Inventory - Reference
Select to discover ESXi installed devices.
Page 63

Password Provide password.
Timeout Provide the time after which the discovery attempts must
stop.
Retries Provide the number of attempts to discover the devices.
Port Provide the port information.
Secure Mode Select to securely discovery devices and components.
Skip Common name
check
Trusted Site Select if the devices you are discovering is a trusted device.
Certificate file Click Browse to traverse to the file location.
Select to skip common name check.
IPMI Configuration
Use the IPMI protocol for out of band discovery of RACs, DRACs, and
iDRACs. This option is for Lifecycle controller enabled discovery and
inventory. Ensure that the IP address of the DRAC and iDRAC is selected. To
configure IPMI, see support.dell.com.
Select these options to configure the IPMI version 2.0 parameters. This
configuration is required for discovery.
Enable IPMI Discovery Enables or disables the IPMI protocol by
discovery range.
User name Enter the Baseboard Management Controller (BMC)
or DRAC user name.
NOTE: The default user name is root. It is
recommended that you change it for security.
Password Enter the BMC or DRAC password.
NOTE: The default password is calvin. It is
recommended that you change it for security.
Discovery And Inventory - Reference 53
Page 64

KG Key Enter the KG key value. DRAC also supports IPMI
KG key value. Each BMC or DRAC is configured to
require an access key in addition to user credentials.
NOTE: The KG key is a public key that is used to
generate an encryption key for use between the
firmware and the application. The KG key value is an
even number of hexadecimal characters.
Timeout Specifies or edits the amount of time that
OpenManage Essentials waits after issuing a get or set
call before it considers the call failed. A valid range is
from 1 to 60 seconds. The default is 5 seconds.
Retries Specifies or edits the number of times that
OpenManage Essentials reissues a get or set call after
the first call times out. A valid range is from 0 to 10
retries. The default is 1.
NOTE: The retries and time-out parameters are used for both the Remote
Management Control Protocol (RMCP) ping and the IPMI connection.
Discovery Range Action
Select these options to discover or inventory devices, components, and servers.
Do not perform discovery or
inventory
Perform only discovery Select this option to perform discovery.
Perform both discovery and
inventory
Select this option set up a schedule to perform
discovery and inventory (at a later time) using the
discovery configuration scheduling options in the
Discovery and Inventory Portal.
Select this option to perform both discovery and
inventory.
54 Discovery And Inventory - Reference
Page 65

Summary
View the configuration selections. To change configurations, click Back.
Add Exclude Range
From Discovery Range Summary, right-click Exclude Ranges and select Add
Exclude Range. Register new ranges to exclude from discovery or to remove a
previously set exclude range.
IP Address/Range Register a device to exclude from the discovery
process by specifying the device's IP address or IP
address range.
The following are examples of valid discovery range
type address specifications (* is the wildcard
character, meaning all possible addresses in the
specified range):
• Exclude range — 193.109.112.*
• 193.104.20-40.*
• 192.168.*.*
• 192.168.2-51.3-91
• Exclude range — 193.109.112.45-99
• System IP address — 193.109.112.99
Host name Register to exclude from the discovery process by
specifying the device's host name, for example:
mynode.mycompany.com.
NOTE: OpenManage Essentials does not check for
invalid characters in the host name. If the host name
you specify contains invalid characters, the name is
accepted. However, the device with that name is not
found during the discovery cycle.
Discovery And Inventory - Reference 55
Page 66

Configuration
The Configuration page contains the following information:
• Discovery Schedule
•Inventory Schedule
• Status Configuration
Discovery Schedule
You can configure OpenManage Essentials to discover devices and display
them in the Device tree.
1
Enable device discovery.
2
Initiate device discovery.
3
Set the discovery speed.
4
Specify how devices are discovered.
5
For failed discovery attempts, use the Troubleshooting Tool.
To vi e w di scov ery c onfiguration, click ManageDiscovery and Inventory
ConfigurationDiscovery Schedule.
Configure OpenManage Essentials to discover new devices on a network. The
settings apply to all discovery ranges. OpenManage Essentials records all
agents, IP addresses, and the health of the devices.
Enable Discovery Select to schedule device discovery.
Configure Global Device
Discovery interval
Discovery Speed Specify the amount of resources (system and network)
Set the frequency of discovery in weekly or daily
intervals.
•
Every Week On
discovery and the time for the discovery to begin.
Every <n> Days <n> Hours interval
•
intervals between discovery cycles. The maximum
discovery interval is 365 days and 23 hours.
available for accelerating the discovery speed. The
faster the speed, more resources are required to perform
discovery, but less time is required.
—Specify the day or days to schedule
—Specify the
56 Discovery And Inventory - Reference
Page 67

Discover Specify how the devices are discovered.
•
All Devices
respond to an Internet Control Message Protocol
(ICMP) ping.
Instrumented Devices
•
devices that have instrumentation (such as Dell
OpenManage Server Administrator, Dell
OpenManage Array Manager, and Dell
PowerConnect) for Simple Network Management
Protocol (SNMP), Windows management
Instrumentation WMI), Intelligent Platform
Management Interface (IPMI) management, or WSManagement (WS-Man). See agents supported for
more information about systems management
instrumentation agents.
Name Resolution Specify how the device names are resolved. If you are
managing a cluster, use the NetBIOS name resolution
to discern each independent system. If you are not
managing a cluster, a DNS name resolution is
recommended.
•
DNS
Naming Service.
NetBIOS
•
names.
—Select to discover all devices that
—Select to discover only
—Select to resolve names using the Domain
—Select to resolve names using system
Inventory Schedule
Use Inventory Polling to specify the default inventory settings for
OpenManage Essentials. OpenManage Essentials collects inventory
information such as software and firmware versions, as well as device-related
information about memory, processor, power supply, Peripheral Component
Interconnect (PCI) cards, and embedded devices, and storage.
Discovery And Inventory - Reference 57
Page 68

Enable Inventory Select to schedule inventory.
Configure Global
Inventory Polling
Interval
Inventory Polling Speed Set the amount of resources available for accelerating
Set the frequency of the inventory in weekly or daily
intervals.
NOTE: OpenManage Essentials performs inventory only
on devices that have already been discovered.
•
Every Week On
that you want to schedule the inventory and the time
that you want it to begin.
Every <n> Days <n> Hours interval
•
intervals between inventory cycles. The maximum
discovery interval is 365 days and 23 hours.
the inventory poll speed. The faster you set the
inventory poll speed, the more resources are required,
but less time is required to perform the inventory.
After changing the speed, OpenManage Essentials may
take several minutes to adjust to the new speed.
—Specify the day or days of the week
—Specify the
Status Configuration
Use this window to specify the default status polling settings for
OpenManage Essentials. Status polling performs a health and power check
for all discovered devices. For example, this poll determines if discovered
devices are healthy or powered down.
58 Discovery And Inventory - Reference
Page 69

Enable Status Polling Select to schedule device status polling.
Device Status Interval Set frequency of the device status poll in intervals of
days, hours, and minutes. The status polling does not
begin until the previous polling has completed.
Days—Specify the number of days between device
status polling.
Hours—Specify the number of hours between device
status polling cycles.
Minutes—Specify the number of minutes between
device status polling cycles.
The maximum discovery interval is 365 days, 23 hours,
and 59 minutes.
Status Polling Speed Set the amount of resources available for accelerating
the device status polling speed. The faster you set the
status speed, the more resources are required, but less
time is required to perform the status polling.
Discovery And Inventory - Reference 59
Page 70

60 Discovery And Inventory - Reference
Page 71

7
Managing Devices
OpenManage Essentials lists devices based on their types. For example, Dell
PowerEdge servers are listed under the device type Servers. OpenManage
Essentials contains a defined list of device types. The devices you discover
and inventory are included under these device types. Unclassified devices are
listed under the device type Unknown. You can create device groups with
combinations of the defined device types. However, you cannot create a new
device types.
In the Devices page, you can:
• View devices types that are discovered on the network.
• View the inventory information for the devices.
• View all the alerts that were generated for a device.
• View the hardware logs for a device.
• Create device groups and include devices to that group based on your
grouping preference. For example, you can create a group and include all
devices present at a geographical location.
Viewing Devices
You can view a device that is discovered. For more information on discovering
and inventorying a device, see
To view devices, click Manage
In the device summary page, expand the device types to view devices. The
following device types are displayed.
• High Availability (HA) clusters
•KVM
• Microsoft Virtualization
• Modular systems
•Network devices
–Switches
Discovering and Inventorying Devices
Devices.
Managing Devices 61
.
Page 72

•OOB unclassified devices
– IPMI unclassified devices
•Printers
•RAC
•Servers
•Storage Devices
– Dell|EMC Arrays
– EqualLogic arrays
– PowerVault MD Arrays
–Tape Devices
•Unknown
• VMware ESX servers
Use the refresh button to update the device tree with the current data. To
update the device tree, right-click Devices and select Refresh.
NOTE: The device tree auto-updates when changes are made. Some changes to the
tree may show after a brief delay depending on the managed servers’ performance
because the information propogates from the SQL database to the user interface.
Nodes and Symbols Description
Node Symbol Description
Denotes that a device is critical and requires attention. This
information is rolled up to the parent device type. For example if a
server is in critical state and requires attention the same symbol is
assigned to the parent device type. Among server states, critical state is
given the highest priority; That is, in a group, if different devices are in
different states, and if one device is in critical state, then the state of
the parent device type is set to critical.
Denotes that a device of this type is not discovered on the network or
classified in the device tree.
Denotes that there is a deviation from the expected behavior, but the
device is still manageable.
62 Managing Devices
Page 73

Node Symbol Description
Denotes that the device is working as expected.
Denotes either the device type is unknown and it is classified as an
unknown device or that the health status cannot be determined,
because the device does not have proper instrumentation or the
proper protocol was not used to discover the device.
Device Details
The device details, depending on the device type, can contain the
following information:
• Device Summary
•OS Information
• Software Agent Information
•NIC Information
• Virtual Machine Host Product Information
•RAC Device Information
• Processor Information
• Memory Device Information
• Firmware Information
•Power Supply Information
•Embedded Device Information
• Device Card Information
• Controller Information
• Controller Battery Information
•Enclosure Information
• Physical Disk Information
• Virtual Disk Information
•Contact Information
• Software Inventory Information
• Trusted Platform Module Information
Managing Devices 63
Page 74

•FRU Information
•Acquisition Information
•Depreciation Information
• Extended Warranty Information
• Ownership Information
• Outsource Information
Viewing Device Inventory
To view inventory, click ManageDevices, expand the device type and click
the device.
Viewing Alerts Summary
You can view all the alerts generated for a device. To view alert summary:
1
Click
ManageDevices
2
Expand the device type and click the device.
3
In the details page, select
.
Alerts
.
Viewing System Event Logs
1
Click
ManageDevices.
2
Expand the device type and select
Hardware Logs
.
Searching for Devices
Right-click All Devices at the top of the device tree and click Search Devices.
You can also search for devices using logical arguments and save the queries
for later.
For example, to create a query to search for a server in critical state with an IP
address containing values 10.35, and the power status as Power Up:
1
Click
ManageDevice Search
adjacent text field enter a query name.
2
From the first line after
64 Managing Devices
Where
, then select
, select
Device Type, Is
Create New Query
, and then
, in the
Server
.
Page 75

3
In the next line select the check box, then select
and then select
4
In the next line select the check box, then select
Contains
5
In the next line select the check box, then select
and then select
6
Click
Save Query
NOTE: You can click Run Query to run the query immediately.
Critical
.
, and then in the adjacent field enter
Power Up
.
.
AND, Device Health, Is
AND, IP Address,
10.35
.
AND, Power Status, Is
To run an existing query, select the query from the drop-down list and click
Run Query. You can filter the results and export it to an HTML, TXT, or
CSV file.
,
,
Managing Devices 65
Page 76

66 Managing Devices
Page 77

8
Devices - Reference
This page provides the following information:
• List of devices based on the device type, for example, HA clusters, servers,
and so on.
• Summary of devices and alerts.
• Alerts generated for a particular device.
• Health of devices based on the Normal, Critical, Unknown, and
Wa r n in g t y p e s .
NOTE: For Dell 12 Generation PowerEdge servers [denoted as yx2x, where y
denotes alphabets, for example M (modular), R (rack), or T (tower) and x
denotes numbers] discovered using WMI and SNMP protocols, the DRAC
health status is displayed (under Servers) even if OpenManage Server
Administrator is not installed on the server.
NOTE: Based on the severity of the agents of a discovered device, the overall
health is the most critical of the severity. For example, in the device tree, for
server types, if there are two servers with status Warning and Critical, then
the parent Server’s status is set to Critical.
• Inventory information for devices.
• View hardware logs for servers.
• Filtering capabilities of the grid:
• The grouping bar
• Filter icon options
• Sorting by clicking on the column
• Re-ordering the columns
NOTE: None of these are saved if the console is closed and restarted.
Devices - Reference 67
Page 78

Viewing Inventory
To view inventory, from All Devices, traverse to the device and click the
device.
The device details and the alerts link are displayed.
Viewing Alerts
To view alerts, from the inventory details page, click Alerts.
Severity Alert severity based on Normal, Critical, Warning, and Unknown.
Acknowledged Flagged status for an alert.
Time Time at which the alert was generated in date and time format.
Device IP address of the device.
Details Lists the alert information. For example, System is down: <IP
Address of the device>.
Category Lists the alert category type, for example System Events.
Source Lists the alert source name.
Viewing Hardware Logs
You can view hardware logs for servers. To view hardware logs, from the
inventory details page, click Hardware Logs.
Severity Alert severity based on Normal, Critical, Warning, and Unknown.
Local Time The system time at which this alert was generated in date and
time format.
UTC Time Coordinated Universal Time (abbreviated UTC) at which the log
was generated.
Details Lists the details of the hardware log.
For example, power supply redundancy is lost.
68 Devices - Reference
Page 79

Alert Filters
You can apply these filters to Alerts. Select Continuous Updates to enable
the user interface to update automatically when new alerts are received.
Severity Select from these alerts: All, Normal, Critical, Warning,
and Unknown.
Acknowledged Flagged status for an alert.
Time Time at which this alert was generated in date and time
format.
Device The IP address or host name of this device.
Details The alert information. For example, System is down: <IP
Address of the device>.
Category The alert category type, for example System Events.
Source The Alert Source.
Device Search
You can do the following devices search options:
• Run an existing query
• Create a new query
• Delete a query
Run Existing Query Select this option and then select a query from the drop-
down list.
Delete Query Select to delete a query after you complete the following
action.
Select the Run Existing Query option, then from the drop
down list select the query that you want to delete.
Create New Query Select this option to create a query and then enter a name
for the query in the adjoining field.
Query logic Select from the query logic options to create multiple query
options. Select the check box to enable and include an
argument.
Devices - Reference 69
Page 80

Run Query Select to run the selected query.
Save Query Select to save a query.
Query Results
The device search lists these options:
Health Status Displays the health status of the device. The status options
are Normal, Warning, Critical, and War ni n g.
Connection Status Displays the connection status of the device. The
connection status are On or Off.
Name Displays the name of the device.
OS Name Displays the operating system installed on the device.
OS Revision Displays the version of the operating system installed on
the device.
Service Tag Displays a unique identifier, that provides the service
lifecycle information.
Asset Tag Displays the defined asset tag for the device.
Device Model Displays the system’s model name. For example,
PowerEdge R710.
Device type Displays the type of device. For example, for the Device
Model PowerEdge R710, the Device Type value is Server.
System Revision
Number
Displays the revision history of the device.
Creating Device Group
Device Group Configuration
Name Provide name of the new group.
Pare nt The device under which this group is created.
Description Provide description for the device group.
70 Devices - Reference
Page 81

Device Selection
You can select predefined groups (device types), custom groups, specific
devices, or a device query.
To use device query, select a query from the list.
Click New to create a new device query to search and assign the devices to the
alert action.
Click Edit to change the query logic.
Select groups or devices from the tree, you can use the query option to create
very specific criteria for the selection.
All Devices Select to include all the Devices that are managed in
OpenManage Essentials.
HA Clusters Select to include High Availability server clusters.
KVM Select to include keyboard video mouse devices.
Microsoft
Virtualization Servers
Modular Systems Select to include modular systems.
Network Devices Select to include network devices.
OOB Unclassified
Devices
Printers Select to include printers.
RAC Select to include devices with remote access controllers.
Servers Select to include Dell servers.
Storage Devices Select to include storage devices.
Unknown Select to include unknown devices.
VMware ESX Servers Select to include VMware ESX servers.
Select to include Microsoft virtualization servers.
Select to include out of band Unclassified Devices like
Lifecycle controller enabled devices.
Summary - Group Configuration
View and edit selections.
Devices - Reference 71
Page 82

72 Devices - Reference
Page 83

9
Viewing Inventory Reports
OpenManage Essentials provides pre-defined reports for all discovered and
inventoried devices. With these reports, you can:
• Consolidate information about devices in your environment.
• Filter report data per your needs.
• Export data for use in another application in the
NOTE: You cannot create new reports.
Choosing Predefined Reports
To view predefined reports, click Reports.
The Managed Systems Reports displays the predefined reports. Select from
the available reports to view particular information about the devices in your
environment. See table for more information.
Report Description
Summary Identifies the OpenManage Server Administrator versions
installed on devices in your environment and allows you to
identify the devices generating the most alerts.
• The upper left web part identifies the OpenManage
Server Administrator versions in your environment.
• Clicking the OpenManage Server Administrator
version in the OpenManage Server Administrator pie
chart in the top right web part shows you the list of
servers with that version installed.
• The lower left web part lists in descending order the
devices generating the most alerts since initial
discovery and inventory.
• The top five event generating devices are identified in
the lower right web part. Click on a specific device to
view the events associated with it.
XML
file format.
Viewing Inventory Reports 73
Page 84

Report Description
Server Components and
Ve rs io n s
FRU Information The Field Replaceable Unit (FRU) provides details on
Memory Provides details on DIMMs and identifies the slot a
NIC Information Identifies the NIC model-IP address, MAC address,
Hard Drives Inventory Identifies serial number, revision, manufacturer, and
PCI Device Information Identifies model, manufacturer, and slot for PCI and
Storage Controllers Identifies the storage controllers on the server and
ESX Information Identifies ESX and ESXi virtual machine hosts and
HyperV Information Identifies the HyperV virtual machine hosts and
Warranty Information See
Modular Enclosures Provides information about the enclosure type,
Server Overview Provides information about the servers such as the
Identifies BIOS, driver, and firmware versions on all
discovered and inventoried servers
replaceable server components.
particular DIMM occupies within a server.
manufacturer and part and serial numbers for NICs.
bus type for hard drives.
PCIe controllers in each server.
provides the controller name, vendor, controller type,
and controller state:
Ready: The storage controller is ready for use.
Degraded: There is a potential problem with the
controller. Investigation is required.
associated virtual machines.
associated virtual machines.
Viewing Warranty Reports
the warranty report and the information it provides.
firmware version, enclosure Service Tag, and so on.
system name, operating system installed on the server,
processors, and memory.
for details on how to run
74 Viewing Inventory Reports
Page 85
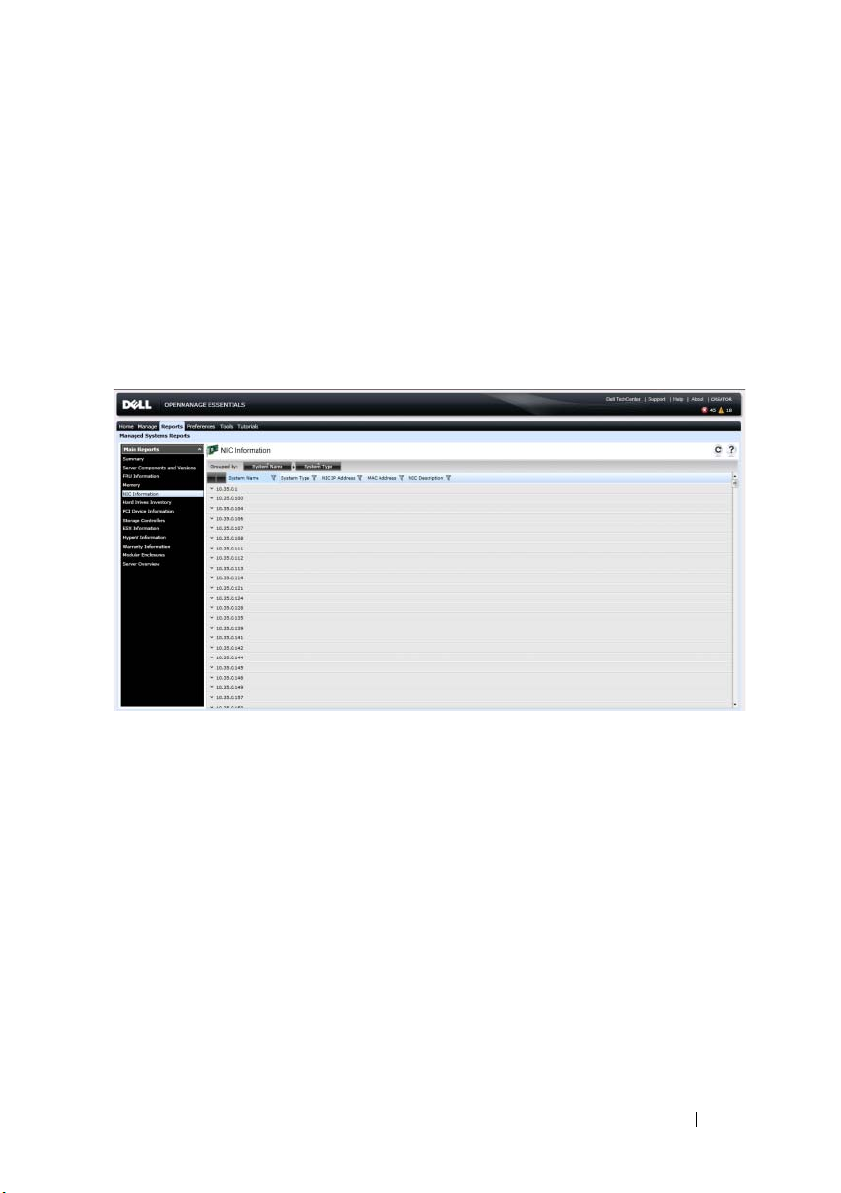
Filtering Report Data
You can filter the results by dragging and dropping column headers to the top
of reports. You can choose one or more attributes when revising the view to
meet your specific needs.
For example, in the NIC Information report, drag the System Type and System
Name to the top of the report. The view immediately changes to a nesting of
information based on your preference. In this example, you can view nested
data for NICs; NIC IP Address, MAC Address, and NIC description.
Exporting Reports
Exporting a report enables you to manipulate and reformat the data.
In the Reports list, right-click on any report to display the Export option.
Scroll over the Export option to display supported formats. Choose your
preferred format (CSV, HTML, or XML) and provide a file name for the
exported report.
Viewing Inventory Reports 75
Page 86

76 Viewing Inventory Reports
Page 87

Reports - Reference
From Reports you can view the following:
• Summary
• Server components and versions
•FRU Information
•Memory
•NIC Information
• Hard Drives Inventory
•PCI Device Information
• Storage Controllers
•ESX Information
•HyperV Information
• Warranty Information
• Modular Enclosures
• Server Overview
The summary page lists the following:
• Systems using specific Server Administrator agent
• Summary of Server Administrator agents and systems
• Active systems based on event occurrence
• Top five systems with most event
10
Server Components and Versions
System Name Host name of the system.
Service Tag Unique identification number assigned to the system.
Model Type The system’s model name. For example PowerEdge R710.
Description The software information.
Reports - Reference 77
Page 88

Software Type The type of software that is available on the system. For
example, firmware.
Software Version The version number of the software that is available on the
system.
Field Replaceable Unit (FRU) Information
System Name The user provided name of the system.
Model Type The system’s model name. For example PowerEdge R710.
Service Tag Unique identification number assigned to the system.
FRU Device Name The standard FRU name assigned to the device.
FRU Manufacturer The name of the FRU manufacturer.
FRU Serial Number The manufacturer specified FRU’s identification number.
FRU Part Number The industry specific number that differentiates the type of
FRU.
Memory
System Name Provide a name for this server power options task.
Service Tag Unique identification number assigned to the system.
System Type The system’s model name. For example PowerEdge R710.
Memory Device Name The device’s named assigned by the manufacturer. For
example, DIMMI_A.
Memory Device Size
(MB)
Memory Device
Manufacturer
Memory Device Part
Number
Memory Device Serial
Number
The size of the memory device in GB.
The name of the device’s manufacturer.
The industry specific number assigned to the device.
The roll number assigned to the device by the
manufacturer.
78 Reports - Reference
Page 89

NIC Information
System Name The name of the system.
System Type The system’s model name. For example, PowerEdge R710.
NIC IP Address The unique IP address assigned to the NIC device.
MAC Address A unique Media Access Control address (MAC address)
identifier assigned to network interfaces for
communications on the physical network segment.
NIC Description Information on the NIC device.
Hard Drives Inventory
System Name The unique system’s name that identifies it on the network.
System Type The system’s model information.
Service Tag A Dell specific unique bar code label identifier on the system.
Channel The number of channels
Enclosure ID The enclosure ID is assigned to the enclosure by Storage
Management. Storage Management numbers the
enclosures attached to the controller starting with zero.
Tar g et I D The SCSI ID of the backplane (internal to the server) or the
enclosure to which the controller connector is attached.
The value is usually 6.
LUN ID In computer storage, a logical unit number or LUN number
used to identify a logical unit, which is a device addressed
by the SCSI protocol or similar protocols such as Fibre
Channel or iSCSI.
Size (GB) The size of the hard drive in gigabytes.
Bus Type The type of bus connection used. Buses are information
pathways between components of a system.
Serial Number The roll number assigned to the device by the
manufacturer.
Revision The hard disk’s revision history.
Ve nd or The organization that supplies the hard drive.
Reports - Reference 79
Page 90

PCI Device Information
System Name The unique system’s name that identifies it on the network.
Service Tag A Dell specific unique bar code label identifier for a system.
System Type The system’s model information.
Device Card
Description
Device Card
Manufacturer
Device Card Slot Type The type of slot on the mother board into which the card
The type of Peripheral Component Interconnect card used.
For example, 82546GB Gigabit Ethernet Controller.
The manufacturer’s information.
is inserted.
Storage Controllers
System Name The unique system’s name that identifies it on the network.
The storage controller is present on this system.
System Type The system’s model information.
Controller Name The name of the storage controller. For example, SAS 6/iR
Integrated.
Ve nd or The supplier’s information. For example, SAS 6/iR
Integrated is supplied by Dell.
Controller Type The type of controller. For example, SAS 6/iR Integrated is
of type SAS.
Controller State The state of the controller. For example, ready to use.
ESX Information
Host Name The unique system’s name that identifies it on the network
and the system in which embedded bare metal product is
installed.
System Type The system’s model information.
80 Reports - Reference
Page 91

VM Type The type of embedded bare-metal product installed on the
system. For example, VMware ESX.
Ve rs io n The version of the embedded bare-metal that is installed on
the system.
Guest Name The name of the guest virtual machine.
Guest OS Type The operating system that is installed on the virtual
machine.
Guest Memory Size
(MB)
Guest State The state of the virtual machine, if the machine is powered
The size of the virtual machine’s RAM.
off or powered on.
HyperV Information
Host Name The unique system’s name that identifies it on the network.
and the system in which the HyperV is installed.
System Type The system’s model information.
Guest Name The name of the guest virtual machine.
Guest Memory Size
(MB)
Guest State The state of the virtual machine, if the machine is powered
The size of the virtual machine’s RAM.
off or powered on.
Warranty Information
System Name The unique system’s name that identifies it on the network.
Enable the proxy setting for the warranty to Warranty data
from support.dell.com.
Device Model Type The system’s model information.
Device Type The type of device, for example, server, Remote Access
Controller.
Shipped Date The date on which the device was sent from the factory.
Service Tag A Dell specific unique bar code label identifier for a system.
Reports - Reference 81
Page 92

Service Level Code Displays the service level code such as parts only warranty
(POW), next business day onsite (NBD), and so on for a
particular system.
Service Provider The name of the organization that will provide the warranty
service support for the device.
Start Date The date from which the warranty is available.
End Date The date on which the warranty will expire.
Days Remaining The number of days the warranty is available for the device.
Warranty Description The warranty details applicable for the device.
Modular Enclosures
Enclosure Model Type The enclosure’s model name. For example, PowerEdge
M1000e.
Slot Number The slot number on the enclosure.
Slot Name The slot name of the enclosure.
Slot Availability Displays if the slot is available or occupied in the modular
enclosure.
Firmware Version The firmware version installed on the enclosure.
Enclosure Service Tag A Dell specific unique bar code label identifier for the
enclosure.
Enclosure Name The unique enclosure name that identifies it on the
network.
Blade Model Type The blade’s model information.
Blade Service Tag A Dell specific unique bar code label identifier for the
blade.
Blade Host Name The blade’s model name. For example, PowerEdge M710.
Blade OS The operating system installed on the blade.
82 Reports - Reference
Page 93

Server Overview
System Name The unique system’s name that identifies it on the network.
System Type The system’s model information.
Operating System The operating system installed on the system.
Processor Count The number of processors installed on the system.
Processor Family The type of processor installed on the system.
Processor Cores The number of processor cores.
Processor Speed The speed of the processor
Tota l Core s The total number of cores present in the system.
Tota l Memo r y The total memory installed on the system
Reports - Reference 83
Page 94

84 Reports - Reference
Page 95

11
Viewing Warranty Reports
Warranty information is available for devices with valid Service Tags,
including servers, switches, storage, and so on. Warranty information is
automatically retrieved at the time devices are discovered.
The Warranty Information report is unique among OpenManage Essentials
reports as it requires internet access to pull warranty information from the
Dell warranty database. If you do not have internet access, no warranty
information is populated. It is downloaded the next time you connect to the
internet and open the Warranty Report.
To extend support for the devices, right-click a device and click View and
Renew Warranty. This option opens support.dell.com with the device
selected. Alternately you can click the View and Renew Warranty button to
open the warranty site. If you log in to the warranty site with the company
account you will see all their devices with warranty information.
Viewing Warranty Reports 85
Page 96

86 Viewing Warranty Reports
Page 97

12
Managing Alerts
With OpenManage Essentials you can:
• View alerts and alert categories
• Manage alert actions
• Configure alert log settings
To view the alerts page, from OpenManage Essentials, click ManageAlerts.
Viewing Alerts and Alert Categories
Viewing Alert Logs
To view alert logs, click ManageAlertsAlert Logs.
Understanding the Alert Types
The following alert log types are displayed.
Icon Alert Description
Normal Alerts An event from a server or a device that describes the
successful operation of a unit, such as a power
supply turning on or a sensor reading returning to
normal.
Warning Alerts An event that is not necessarily significant, but may
indicate a possible future problem, such as crossing a
warning threshold.
Critical Alerts A significant event that indicates actual or
imminent loss of data or loss of function, such as
crossing a failure threshold or a hardware failure.
Unknown Alerts An event has occurred but there is insufficient
information to classify it.
Information Alerts Provides information only.
Managing Alerts 87
Page 98

Viewing Alert Categories
To view alert categories, click ManageAlertsAlert Categories.
The predefined alert categories are listed in alphabetical order.
Viewing Alert Source Details
To view an alert category, in the alert categories list, expand an alert category,
and then select an alert source.
NOTE: You cannot create a new event source.
For example, expand Environmental alert category and then select the
alertCoolingDeviceFailure alert source.
Table 1. Alert Source Values and Descriptions for alertCoolingDeviceFailure
Name Value Description
Name alertCoolingDeviceFailure
Ty p e SNMP An SNMP alert based
source.
Catalog MIB - 10892
Severity Critical If this alert is received then
the system is in critical
state and immediate action
is required.
Format String $3
SNMP Enterprise OID .1.3.6.1.4.1.674.10892.1
SNMP Generic Trap OID 6
SNMP Specific Trap OID 1104
Viewing Previously Configured Alert Actions
To view the application launch alert action:
1
Select
ManageAlertsAlert Actions
2
In Alert Actions, select
88 Managing Alerts
Application Launch
.
.
Page 99

To view the e-mail alert action:
1
Select
ManageAlertsAlert Actions
2
In
Alert Actions
To view the alert ignore action:
1
Select
ManageAlertsAlert Actions
2
In
Alert Actions
To view the alert trap forward action:
1
Select
ManageAlertsAlert Actions
2
In
Alert Actions
, select
Email
, select
Ignore
, select
Trap Forwarding
.
.
.
.
.
.
Handling Alerts
Flagging an Alert
After you have completed action on an alert, flag the alert as acknowledged.
Acknowledging an alert indicates it is resolved or does not require further
action as a reminder to yourself. To acknowledge alerts:
1
Select
ManageAlertsAlert Logs
2
Click the alert you want to acknowledge.
NOTE: You can acknowledge multiple alerts simultaneously. Use <Ctrl> or
<Shift> to select multiple alerts.
3
Right-click and click
If you choose
AcknowledgeSetSelected Alerts or Filtered Alerts
Selected Alerts
, the highlighted alerts are acknowledged.
.
.
If you choose
acknowledged.
To remove an acknowledged flag, right-click and select Acknowledge
ClearSelected Alerts or Filtered Alerts.
Filtered Alerts
, all alerts in the current filter/view are
Managing Alerts 89
Page 100

Creating and Editing a New View
To personalize the way you view alerts, create a new view or modify an
existing view. To create a new view:
1
Select
ManageAlertsAlert LogsAlert View Filters
2
Right click and select
3
In
Name and Severity Association
then check one or more severities. Click
4
In
Categories and Sources Association
to which you want to associate with this view filter and click
5
In
Device Association
device or device groups, which you want to associate to this view filter and
then click
6
(Optional) By default the alert view filter is always active. To limit activity,
in
Date Time Association
then click
7
(Optional) In
action is active, and then click
8
In
Summary
Next
Next
Acknowledged Association
, review inputs and click
New Alert View Filter
, enter a name for the new filter, and
, create query for searching devices or assign the
.
, enter a date range, time range, or days, and
.
Next
. The default is always active.
.
Next
.
, assign the alert category or source
, set duration when this alert
Finish
.
.
Next
Configuring Alert Actions
NOTE: Alert actions occur on all alerts received by the OpenManage Essentials
console. The alert is received and processed by the OpenManage Essentials
console whether or not OpenManage Essentials has discovered the device so long
as OpenManage Essentials is listed in the device's SNMP trap forward destinations
list. To prevent this, remove OpenManage Essentials from the SNMP trap forward
destinations list on the device.
.
Setting Up E-mail Notification
You can create e-mail notifications when an alert is received. For example, an
e-mail is sent if a critical temperature alert is received from a server.
To configure an e-mail notification when an alert(s) is received:
1
Select
ManageAlertsAlert Actions
2
In
Alert Actions
90 Managing Alerts
, right-click
Email
.
and select
New Alert Email Action
.
 Loading...