

Page 1

Dell OpenManage Printer Essentials
User’s Guide
Regulatory mode l: BEL01
Regulatory type: B EL01001
Page 2

NOTE: A NOTE indicates important information that helps you make better
use of your computer.
CAUTION: A CAUTION indicates potential damage to hardware or loss of
data if instructions are not followed.
WARNING: A warning ind icates a potential for property damage,
personal injury, or death.
2016 Dell Technologies. All rights reserved.
Page 3

Contents
1 Introduction . . . . . . . . . . . . . . . . . . . . . . . 9
Key features . . . . . . . . . . . . . . . . . . . . . . . . . . . . . . . . . . 9
OMPE architecture . . . . . . . . . . . . . . . . . . . . . . . . . . . . 10
Product support . . . . . . . . . . . . . . . . . . . . . . . . . . . . . . 11
Online help . . . . . . . . . . . . . . . . . . . . . . . . . . . . . . . . . . . 11
License management . . . . . . . . . . . . . . . . . . . . . . . . . . 12
Activating license online . . . . . . . . . . . . . . . . . . . . . . . . . . . . . . . . . . . . . . 12
Activating license offline . . . . . . . . . . . . . . . . . . . . . . . . . . . . . . . . . . . . . . 12
2 Getting Started . . . . . . . . . . . . . . . . . . . . 14
Installing OMPE . . . . . . . . . . . . . . . . . . . . . . . . . . . . . . . 14
Setting up ADS . . . . . . . . . . . . . . . . . . . . . . . . . . . . . . . . . . . . . . . . . . . . . . . 17
Setting up Single Sign-On . . . . . . . . . . . . . . . . . . . . . . . . . . . . . . . . . . . . . 18
Starting OMPE . . . . . . . . . . . . . . . . . . . . . . . . . . . . . . . . 18
Uninstalling OMPE . . . . . . . . . . . . . . . . . . . . . . . . . . . . 20
Upgrading OMPE. . . . . . . . . . . . . . . . . . . . . . . . . . . . . . 20
OMPE user interface. . . . . . . . . . . . . . . . . . . . . . . . . . . 20
Title bar . . . . . . . . . . . . . . . . . . . . . . . . . . . . . . . . . . . . . . . . . . . . . . . . . . . . . 21
Navigation pane . . . . . . . . . . . . . . . . . . . . . . . . . . . . . . . . . . . . . . . . . . . . . . 22
Elements in the workspace window . . . . . . . . . . . . . . . . . . . . . . . . . . . . 23
Customizing Lists . . . . . . . . . . . . . . . . . . . . . . . . . . . . . 24
Pagination . . . . . . . . . . . . . . . . . . . . . . . . . . . . . . . . . . . . . . . . . . . . . . . . . . . 24
Keyword search . . . . . . . . . . . . . . . . . . . . . . . . . . . . . . . . . . . . . . . . . . . . . . 24
| 1
Page 4

Printer group selection . . . . . . . . . . . . . . . . . . . . . . . . . . . . . . . . . . . . . . . 25
Changing the column position. . . . . . . . . . . . . . . . . . . . . . . . . . . . . . . . . 25
Sorting . . . . . . . . . . . . . . . . . . . . . . . . . . . . . . . . . . . . . . . . . . . . . . . . . . . . . . 25
Filtering a list. . . . . . . . . . . . . . . . . . . . . . . . . . . . . . . . . . . . . . . . . . . . . . . . . 25
Filtering a list column . . . . . . . . . . . . . . . . . . . . . . . . . . . . . . . . . . . . . . . . . 26
3 Discovery. . . . . . . . . . . . . . . . . . . . . . . . . . 27
Discovering printers . . . . . . . . . . . . . . . . . . . . . . . . . . . 28
Selecting discovery criteria . . . . . . . . . . . . . . . . . . . . . . . . . . . . . . . . . . . . 29
Scheduling a discovery. . . . . . . . . . . . . . . . . . . . . . . . . . . . . . . . . . . . . . . . 31
Saving a discovery profile . . . . . . . . . . . . . . . . . . . . . . . . . . . . . . . . . . . . . 31
Editing discovery profile . . . . . . . . . . . . . . . . . . . . . . . 32
Deleting a discovery profile . . . . . . . . . . . . . . . . . . . . . . . . . . . . . . . . . . . 32
Stopping a discovery. . . . . . . . . . . . . . . . . . . . . . . . . . . . . . . . . . . . . . . . . . 32
4 Dashboard. . . . . . . . . . . . . . . . . . . . . . . . . 33
Status bar . . . . . . . . . . . . . . . . . . . . . . . . . . . . . . . . . . . . 34
Dashboard charts . . . . . . . . . . . . . . . . . . . . . . . . . . . . . 34
Selection of charts. . . . . . . . . . . . . . . . . . . . . . . . . . . . . . . . . . . . . . . . . . . . 34
Viewing charts . . . . . . . . . . . . . . . . . . . . . . . . . . . . . . . . . . . . . . . . . . . . . . . 34
Changing dashboard chart settings . . . . . . . . . . . . . . . . . . . . . . . . . . . . 35
Notification widget. . . . . . . . . . . . . . . . . . . . . . . . . . . . 36
Filtering the notification list . . . . . . . . . . . . . . . . . . . . . . . . . . . . . . . . . . . 36
5 Printer List. . . . . . . . . . . . . . . . . . . . . . . . . 37
Status bar . . . . . . . . . . . . . . . . . . . . . . . . . . . . . . . . . . . . 38
Viewing printer details . . . . . . . . . . . . . . . . . . . . . . . . . 38
2 |
Page 5

Printer operations . . . . . . . . . . . . . . . . . . . . . . . . . . . . . 39
Blocking a printer . . . . . . . . . . . . . . . . . . . . . . . . . . . . . . . . . . . . . . . . . . . . 39
Unblocking a blocked printer. . . . . . . . . . . . . . . . . . . . . . . . . . . . . . . . . . 40
Deleting a printer. . . . . . . . . . . . . . . . . . . . . . . . . . . . . . . . . . . . . . . . . . . . . 40
Exporting printer data . . . . . . . . . . . . . . . . . . . . . . . . . . . . . . . . . . . . . . . . 40
Updating firmware . . . . . . . . . . . . . . . . . . . . . . . . . . . . . . . . . . . . . . . . . . . 41
Copying configuration . . . . . . . . . . . . . . . . . . . . . . . . . . . . . . . . . . . . . . . . 42
Generating printer status list report . . . . . . . . . . . . . . . . . . . . . . . . . . .42
6 Groups . . . . . . . . . . . . . . . . . . . . . . . . . . . 44
Adding a group . . . . . . . . . . . . . . . . . . . . . . . . . . . . . . . 45
Adding a manual selection group . . . . . . . . . . . . . . . . . . . . . . . . . . . . . . 45
Adding a rule based group. . . . . . . . . . . . . . . . . . . . . . . . . . . . . . . . . . . . . 45
Editing a group . . . . . . . . . . . . . . . . . . . . . . . . . . . . . . . 46
Editing a manual selection group . . . . . . . . . . . . . . . . . . . . . . . . . . . . . . 46
Editing a rule based group. . . . . . . . . . . . . . . . . . . . . . . . . . . . . . . . . . . . . 46
Deleting a group . . . . . . . . . . . . . . . . . . . . . . . . . . . . . . 47
7 Maps . . . . . . . . . . . . . . . . . . . . . . . . . . . . . . 48
Adding a map . . . . . . . . . . . . . . . . . . . . . . . . . . . . . . . . . 49
Adding printers to a map. . . . . . . . . . . . . . . . . . . . . . . 49
Editing the select printers list . . . . . . . . . . . . . . . . . . . . . . . . . . . . . . . . . . 49
Adding printers on the map . . . . . . . . . . . . . . . . . . . . . . . . . . . . . . . . . . . 50
Viewing printer details . . . . . . . . . . . . . . . . . . . . . . . . . 50
Deleting printers on a map . . . . . . . . . . . . . . . . . . . . . 50
Clearing a map . . . . . . . . . . . . . . . . . . . . . . . . . . . . . . . . 51
| 3
Page 6

Editing a map . . . . . . . . . . . . . . . . . . . . . . . . . . . . . . . . . 51
Deleting a map . . . . . . . . . . . . . . . . . . . . . . . . . . . . . . . . 51
8 Firmware . . . . . . . . . . . . . . . . . . . . . . . . . . 52
Updating firmware from Dell Cloud Connect . . . .53
Updating firmware manually . . . . . . . . . . . . . . . . . . . 54
9 Policy . . . . . . . . . . . . . . . . . . . . . . . . . . . . . 55
Adding a policy . . . . . . . . . . . . . . . . . . . . . . . . . . . . . . . 56
Viewing policy status . . . . . . . . . . . . . . . . . . . . . . . . . . 56
Viewing printer list . . . . . . . . . . . . . . . . . . . . . . . . . . . . . . . . . . . . . . . . . . . 56
Viewing policy widget . . . . . . . . . . . . . . . . . . . . . . . . . . . . . . . . . . . . . . . . 57
Checking for conformance. . . . . . . . . . . . . . . . . . . . . 58
Editing printer list for a policy . . . . . . . . . . . . . . . . . . 58
Enforcing a policy . . . . . . . . . . . . . . . . . . . . . . . . . . . . . 59
Editing a policy . . . . . . . . . . . . . . . . . . . . . . . . . . . . . . . 60
Deleting a policy . . . . . . . . . . . . . . . . . . . . . . . . . . . . . . 60
10 Alerts . . . . . . . . . . . . . . . . . . . . . . . . . . . . 61
Configuring email alerts . . . . . . . . . . . . . . . . . . . . . . . 62
Using trouble ticket option . . . . . . . . . . . . . . . . . . . . 63
Editing an alert. . . . . . . . . . . . . . . . . . . . . . . . . . . . . . . . 63
Deleting an alert . . . . . . . . . . . . . . . . . . . . . . . . . . . . . . 64
4 |
Page 7

11 Templates . . . . . . . . . . . . . . . . . . . . . . . . 65
Updating a template. . . . . . . . . . . . . . . . . . . . . . . . . . . 66
Using custom templates . . . . . . . . . . . . . . . . . . . . . . . 66
Deleting a template . . . . . . . . . . . . . . . . . . . . . . . . . . . 67
Activating a template . . . . . . . . . . . . . . . . . . . . . . . . . . 67
Deactivating a template . . . . . . . . . . . . . . . . . . . . . . . 67
12 Schedules . . . . . . . . . . . . . . . . . . . . . . . . 69
Adding a schedule. . . . . . . . . . . . . . . . . . . . . . . . . . . . . 70
Scheduling a task . . . . . . . . . . . . . . . . . . . . . . . . . . . . . 70
Editing a schedule. . . . . . . . . . . . . . . . . . . . . . . . . . . . . 71
Deleting a schedule . . . . . . . . . . . . . . . . . . . . . . . . . . . 71
13 Connections . . . . . . . . . . . . . . . . . . . . . . 72
Updating connection settings . . . . . . . . . . . . . . . . . . 72
Testing a connection . . . . . . . . . . . . . . . . . . . . . . . . . . 73
14 Reports . . . . . . . . . . . . . . . . . . . . . . . . . . 75
Previewing a report . . . . . . . . . . . . . . . . . . . . . . . . . . . 75
Generating report file . . . . . . . . . . . . . . . . . . . . . . . . . 76
Supplies. . . . . . . . . . . . . . . . . . . . . . . . . . . . . 78
Viewing an order . . . . . . . . . . . . . . . . . . . . . . . . . . . . . . 78
| 5
Page 8

Ordering consumables . . . . . . . . . . . . . . . . . . . . . . . . 78
Configuring an alert . . . . . . . . . . . . . . . . . . . . . . . . . . . 79
15 Settings . . . . . . . . . . . . . . . . . . . . . . . . . . 80
SMTP configuration . . . . . . . . . . . . . . . . . . . . . . . . . . . 80
Changing proxy settings . . . . . . . . . . . . . . . . . . . . . . . 80
Configuring ADS . . . . . . . . . . . . . . . . . . . . . . . . . . . . . . 81
Customizing preferences . . . . . . . . . . . . . . . . . . . . . . 81
Customizing dashboard view . . . . . . . . . . . . . . . . . . . . . . . . . . . . . . . . . . 81
Customizing list view . . . . . . . . . . . . . . . . . . . . . . . . . . . . . . . . . . . . . . . . . 81
Customizing printer data upload. . . . . . . . . . . . . . . . . . . . . . . . . . . . . . . 81
Customizing polling cycles . . . . . . . . . . . . . . . . . . . . . . . . . . . . . . . . . . . . 82
16 User Management. . . . . . . . . . . . . . . . . 83
Adding an user account. . . . . . . . . . . . . . . . . . . . . . . . 84
Adding an OMPE user account. . . . . . . . . . . . . . . . . . . . . . . . . . . . . . . . . 84
Adding an AD user account. . . . . . . . . . . . . . . . . . . . . . . . . . . . . . . . . . . . 85
Editing an user account . . . . . . . . . . . . . . . . . . . . . . . . 85
Deleting an user account . . . . . . . . . . . . . . . . . . . . . .85
17 Database Backup . . . . . . . . . . . . . . . . . . 87
Creating a database backup . . . . . . . . . . . . . . . . . . . . 87
Deleting a database backup schedule . . . . . . . . . . . 87
Restoring database . . . . . . . . . . . . . . . . . . . . . . . . . . . . 88
6 |
Page 9

18 Database Cleanup . . . . . . . . . . . . . . . . . 89
Cleaning the database once . . . . . . . . . . . . . . . . . . . . 89
Scheduling monthly database cleanup . . . . . . . . . . 90
Deleting a database cleanup schedule . . . . . . . . . . 90
19 Logs . . . . . . . . . . . . . . . . . . . . . . . . . . . . . 91
Exporting logs . . . . . . . . . . . . . . . . . . . . . . . . . . . . . . . . 91
20 Troubleshooting . . . . . . . . . . . . . . . . . . 92
21 Frequently Asked Questions. . . . . . . . 94
Installation . . . . . . . . . . . . . . . . . . . . . . . . . . . . . . . . . . . 94
Discovery. . . . . . . . . . . . . . . . . . . . . . . . . . . . . . . . . . . . . 94
Printer Status . . . . . . . . . . . . . . . . . . . . . . . . . . . . . . . . . 95
Printer Details . . . . . . . . . . . . . . . . . . . . . . . . . . . . . . . . 95
Firmware . . . . . . . . . . . . . . . . . . . . . . . . . . . . . . . . . . . . . 96
Policy . . . . . . . . . . . . . . . . . . . . . . . . . . . . . . . . . . . . . . . . 97
Alerts . . . . . . . . . . . . . . . . . . . . . . . . . . . . . . . . . . . . . . . . 97
Reports . . . . . . . . . . . . . . . . . . . . . . . . . . . . . . . . . . . . . . 98
Warranty . . . . . . . . . . . . . . . . . . . . . . . . . . . . . . . . . . . . . 98
Templates . . . . . . . . . . . . . . . . . . . . . . . . . . . . . . . . . . . . 98
License . . . . . . . . . . . . . . . . . . . . . . . . . . . . . . . . . . . . . . . 99
Settings . . . . . . . . . . . . . . . . . . . . . . . . . . . . . . . . . . . . . . 99
| 7
Page 10

Appendix A: Trouble Ticketing system con-
figuration for alerts in OMPE . . . . . . . . 100
Appendix B: Template Components . . 101
Glossary . . . . . . . . . . . . . . . . . . . . . . . . . . . 111
Index . . . . . . . . . . . . . . . . . . . . . . . . . . . . . . 112
8 |
Page 11

1
Introduction
Dell OpenManage™ Printer Essentials (OMPE) is a state-of-the-art printer
management software, with light-weight architecture. Its easy-to-use modern
web interface provides all the features essential for effective printer
management in a corporate network.
With OMPE, administrators can easily manage and monitor both Dell and nonDell printers. OMPE provides complete status information of the printer fleet
with a friendly and organized user interface.
Using OMPE, administrators can:
•
Minimize printer down time with the help of real-time status monitoring
and easy-to-understand status views.
•
Group printers to ease printer management across multiple printers.
•
Copy configuration settings from one printer to other printers.
•
Define and apply policies to configure printers. Enforce policies on non-
conforming printers.
•
Configure email alerts to get real-time printer status.
•
Generate reports for the printer fleet and send it through email.
•
Remotely configure and upgrade printers with the latest firmware.
•
Remotely monitor printer consumables and order for replenishments.
Key features
OMPE provides the following features for simple and effective printer
management:
User friendly interface - OMPE provides an overview of the printer fleet in the
dashboard and printer list to monitor and track printer related events.
Discovery - When new printers are added to the network, OMPE discovers the
printers and retrieves printer parameters for management.
Grouping - OMPE provides logical grouping of printers based on selected
printer characteristics for ease of printer management.
Locating printers using Maps - Printers in the network can be located using
maps to quickly troubleshoot issues.
Introduction | 9
Page 12

Updating printer firmware - Printer firmware for all printers in the fleet can be
updated at the same time.
Scheduling - Printer management tasks can be executed without user
intervention using the schedule feature.
Sending alert emails - OMPE can be configured to notify administrators about
printer centric events by sending alert emails.
Setting policies - The configuration settings for all printers of a particular
model can be simultaneously monitored or configured by enforcing policies.
Ordering for Supplies - OMPE monitors the toner, fuser and drum levels for the
printer fleet, and provides an option to order for printer replenishments when
the consumables are low.
OMPE architecture
OMPE is a web-based application deployed on a tomcat web server engine. It is
installed in a local server on an IPv4 LAN network with printers and other
components.
OMPE uses Simple Network Management Protocol (SNMP) to discover printers.
It uses both SNMP and Hypertext Transfer Protocol (HTTP) to retrieve and set
printer parameters.
OMPE uses a private database to store information retrieved from printers,
settings, configuration and user data.
OMPE communicates with Dell Cloud Connect Server to retrieve printer
firmware files, templates, warranty information, online licensing and send
printer data if Dell Print Metering service is enabled. An internet connection is
required to communicate with Dell Cloud Connect Server.
10 |
Page 13
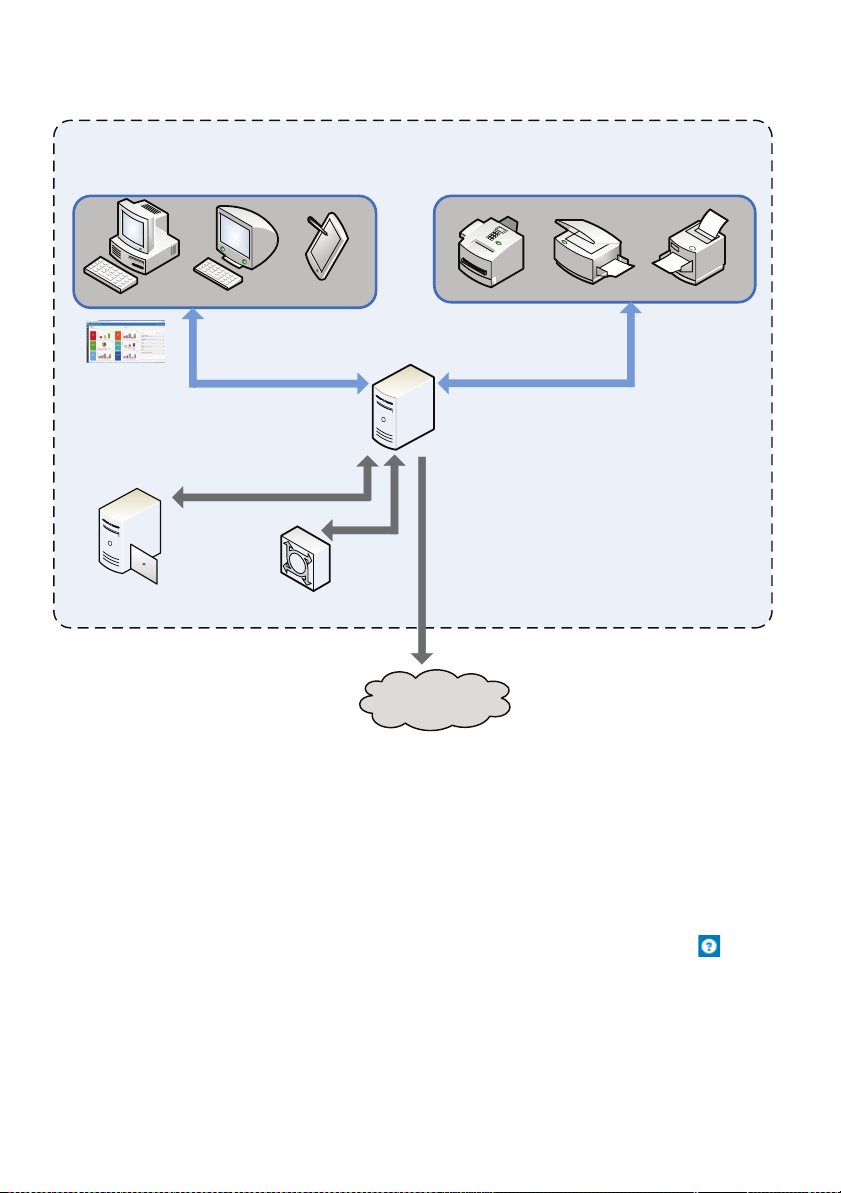
IPv4 LAN Network
Workstation
SNMP / EWS
Printers
Rich browser UI
OMPE Server
Dell Cloud Connect
Server
Personal
Computer
Tablet
SMTP
ADS Server
Product support
For more information, check the Dell support website at
http://www.dell.com/support.
Online help
OMPE online Help provides detailed information about using the software for
managing your printer fleet. To display the online help window, click in Title
bar menu and click Online Help. OMPE displays context sensitive help for the
feature currently being used.
Introduction | 11
Page 14

License management
After the initial installation of the software, you can use a 30 day trial of the full
featured version of OMPE. To use a fully licensed version, a permanent license
for OMPE can be easily obtained by providing the customer information to Dell.
On license requisition, you will receive an activation key to activate the OMPE
license. OMPE license activation is done in the Get License widget.
To open the Get License widget:
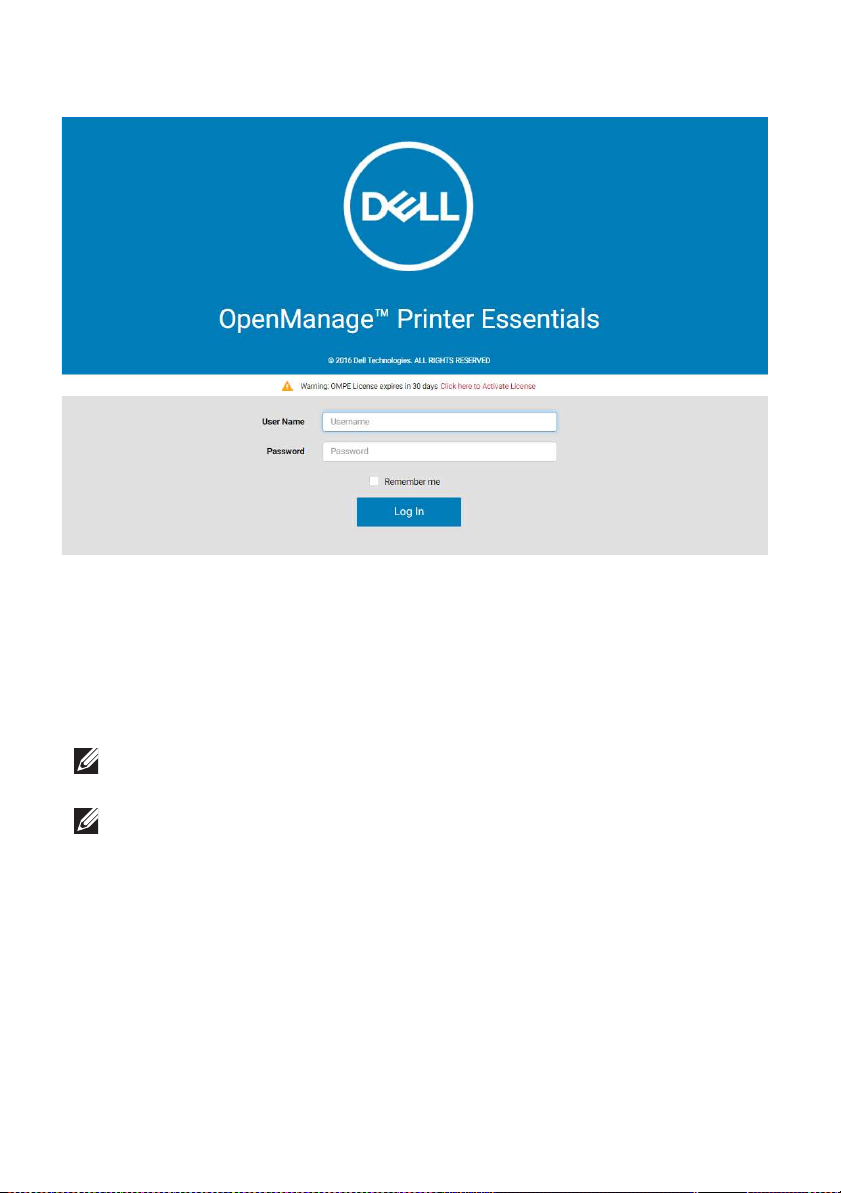
From the Login window, click Click to Activate License.
OR
Click in Title bar menu and click License.
After expiry of the 30 day trial, the OMPE login window is still accessible
through which you can open the Get License widget for license activation.
Activating l icense online
To activate license online, the OMPE server must have internet connectivity. On
receiving the activation key from Dell, OMPE automatically activates the full
version.
1.
From the
2.
Enter customer details in the fields provided.
3.
To add any remarks, enter the remarks in the
4.
If you want a Dell representative to contact you to know more about the
license, select
5.
Click
The customer information is validated by Dell. On successful validation,
OMPE is automatically activated.
License Activation Mode
Yes
. Else select No.
ACTIVATE
.
list, select
Online
Remarks
.
field.
Activating l icense offline
To activate license offline, you can send the customer information by mail from
any system to Dell. On successful validation, the activation key is sent to the
email address provided in customer information details. The activation key
received can be used to activate OMPE offline.
1.
12 |
From the
2.
If you already have an activation key, select
3.
Enter the activation key in
4.
If you need to procure a license, click
5.
Enter customer information details in the fields provided.
License Activation Mode
License Activation Key
list, select
Yes
No.
Offline
.
field.
.
Page 15

6.
Click
ACTIVATE
NOTE: Please ensure that your system’s SMTP settings are correctly setup
for Dell to receive the activation request. For more information, see SMTP
configuration
.
.
Introduction | 13
Page 16

2
Getting Started
OMPE is installed using the OMPE installer package available in the Dell website.
The installer package is equipped with all the prerequisites including templates
for supported printer models. The installer package can also upgrade from
OMPMv2.
The OMPE installer package installs Java as a prerequisite prior to installation.
OMPE uses port 80 or 8080 for web interface.
Installing OMPE
1.
From support.dell.com, navigate to Printers Printing Solutions Dell
OpenManage Printer Essentials.
NOTE: The navigation path may vary in the actual website.
2.
Download and run the OMPE installer package.
NOTE: You must be logged in with administrative privileges.
The InstallShield Wizard begins.
3.
Select the language of your choice before installation.
NOTE: If the operating system fails to recognize any language supported by
OMPE, the English version is installed.
4.
In the InstallShield wizard welcome window, click
5.
Read the OMPE Software License Agreement and OMPE Personal
Information Collection and Use statements. Select
the terms and proceed with the installation.
6.
Click
Next
.
7.
Read the OMPE Printer Data Collection and Use statement to enable
sending printer data to Dell. If you agree to send printer data to Dell, select
Yes
.
8.
Click
Next
.
9.
InstallShield installs OMPE in the default location
Printers\OMPE. To choose a different location
10.
Click
Next
.
11.
If you want to use the system credentials for OMPE login, setup Active
Directory Service (ADS) authentication. For more information, see Setting
up ADS. Otherwise, click
Next
.
Next
.
Yes
for both to accept
C:\<Program Files>\Dell
, click
Browse
.
14 |
Page 17
12.
If you setup ADS, you can use windows credentials to log in to OMPE
using Single Sign-On. To configure Single Sign-On, see Setting up Single
Sign-On.
13.
Select HTTP Port as 80 or 8080.
14.
To create a desktop shortcut, select
15.
Click
Next.
16.
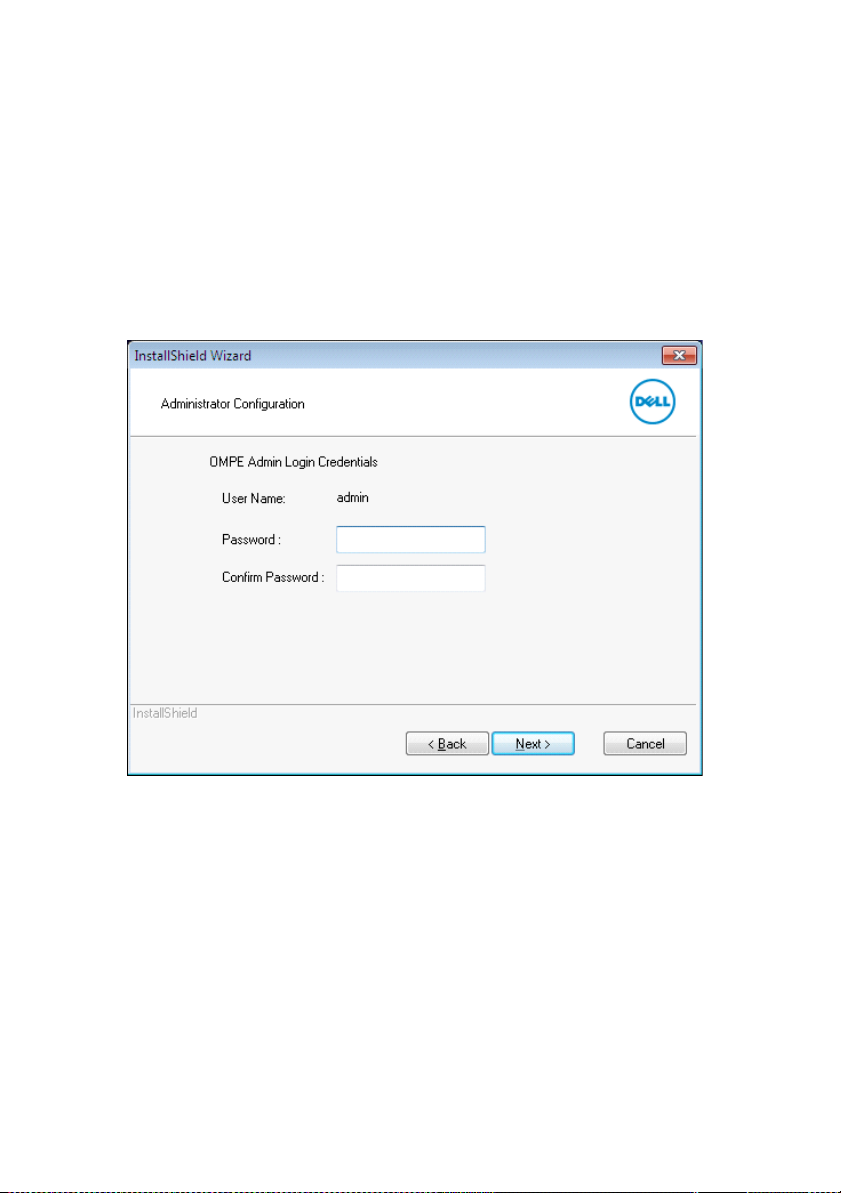
By default, a user with administrator privileges is configured with user
name
admin
. Enter a valid password in the
Create Desktop Shortcut
Password
field.
.
17.
Reenter the password in the
18.
Click
Next.
19.
If OMPMv2 is previously installed in your system, the InstallShield prompts
for data migration from OMPMv2 to OMPE.
Confirm Password
Getting Started | 15
field.
Page 18
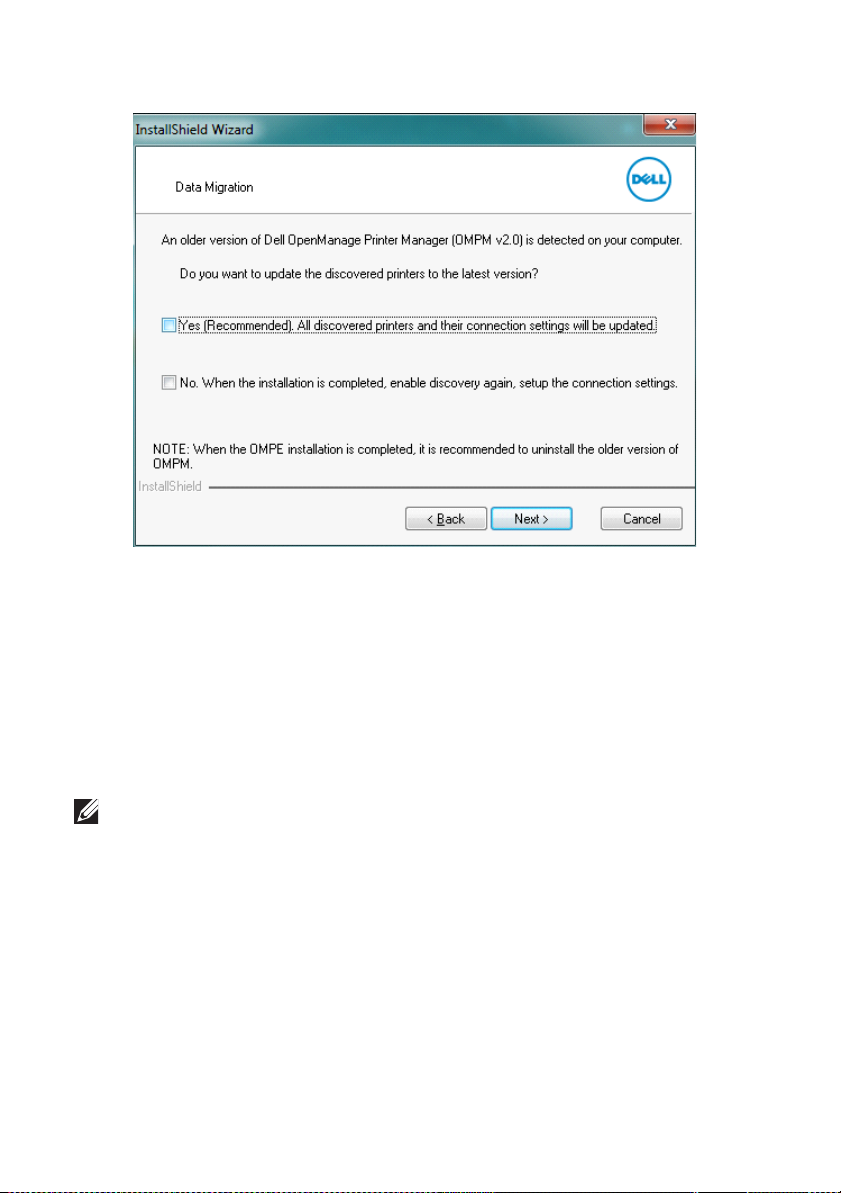
20.
To update all discovered printers from OMPMv2 to OMPE, select
select No.
21.
Click
Next
.
22.
To review or change any installation settings, click
23.
Click
Install
.
The Setup Status window displays the status of OMPE installation in a
progress bar.
NOTE: The normal installation time is approximately five minutes.
24.
On successful installation, InstallShield displays a message indicating
installation is complete.
16 |
Back.
Yes
. Else
Page 19
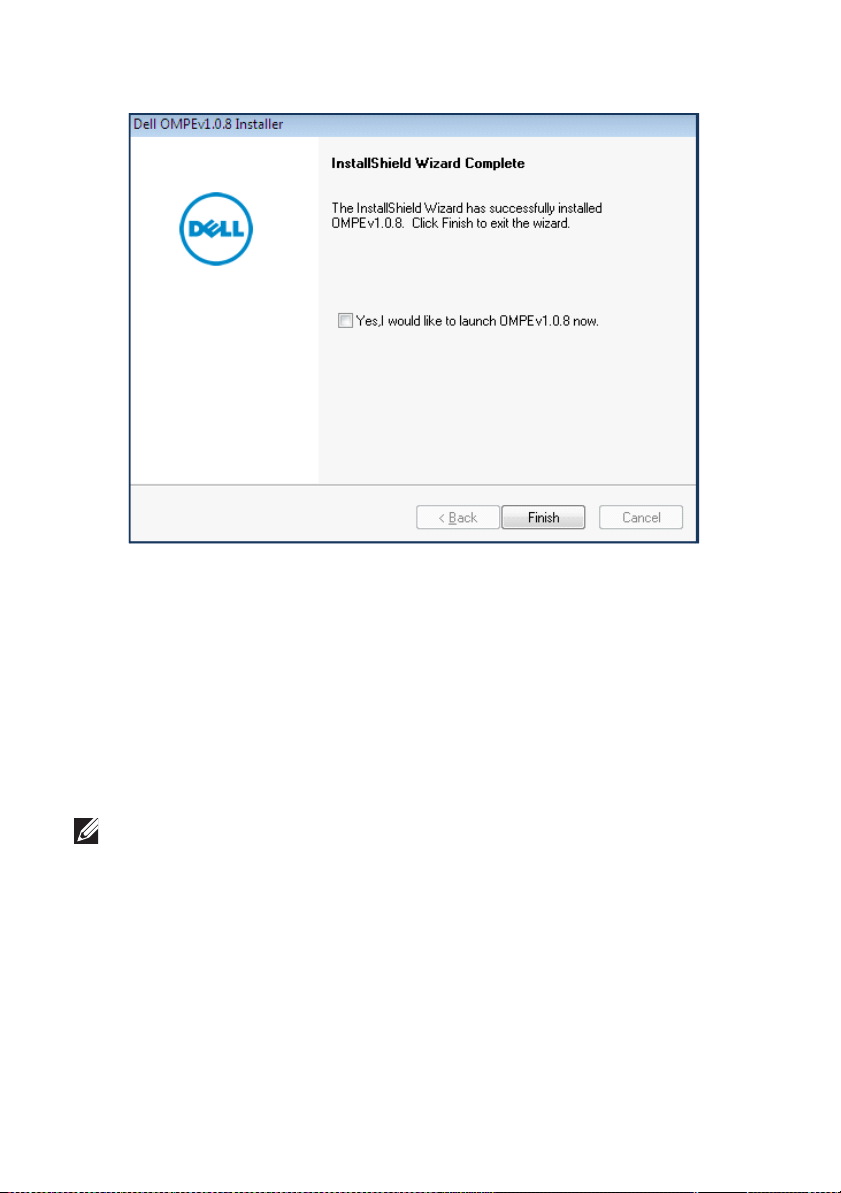
25.
To launch OMPE immediately, select the check box.
26.
Click
Finish
.
Setting up ADS
You can use Active Directory Service (ADS) to authenticate and authorize users
to log in to the OMPE server using their system credentials.
1.
In the ADS configuration window, select
Authentication
NOTE: Active Directory Service uses Lightweight Directory Access Protocol
(LDAP) for authentication.
2.
Enter the following Active Directory properties:
•
ADS Domain Name *
•
ADS Domain Controller *
•
ADS Port Number *
3.
For a secured connection, select
4.
To choose the SSL certificate file, enter the file path in the
Certificate
5.
Click
Next
.
field or click
.
Browse
Use SSL Connection
to navigate to the file.
Use Active Directory LDAP
.
ADS SSL
Getting Started | 17
Page 20

On successful configuration of ADS, the installer continues with configuring
Single Sign-On.
Setting up Single Sign-On
Using the Single Sign-On feature, an Active Directory user can log in to OMPE
using the windows credentials.
NOTE: Single Sign-On can be set up only at the installation stage.
1.
During installation, complete Active Directory Service (ADS) Configuration
and click
NOTE: Active Directory Service (ADS) must be configured before
proceeding with Single Sign-On configuration.
2.
In the
3.
In the configuration window, enter
Kerberos Realm, Principal Name
fields.
NOTE: Please contact your system administrator for exact values.
4.
Click
Next
.
Single Sign-On configuration
Next
to confirm the settings and continue installing OMPE.
window, select
Kerberos Domain Controller Name
, and
Keytab File Name
Use Single Sign-On
in the respective
Starting OMPE
You can log in to OMPE with or without Single Sign-On.
1.
Double click on the desktop shortcut for OMPE or access the URL
http:// ipaddress:<Port>
where ipaddress is the IP address of the OMPE server. Alternatively,
domain name of the OMPE server can be used instead of the IP address.
Port is the HTTP port selected during installation.
.
,
NOTE: If the HTTP port is set as 80 during installation, it is not necessary to
type the port number in the URL.
The Login window is displayed.
18 |
Page 21
2.
Enter a valid username and password.
3.
For OMPE to remember your username and password, select
me
.
4.
If you want to log in using Single Sign-On, select
credentials
NOTE: If you have not configured Single Sign-On during installation, this
check box will not be visible.
NOTE: This feature is supported on IE, Chrome, Mozilla Firefox and Edge
web browsers. The check box to use Windows login credentials will not be
visible in other web browsers.
5.
If you are using the evaluation version of OMPE, a warning message in the
Login window displays the number of days remaining for license expiry.
6.
To activate the license from Login window, in the warning message click
Click here to Activate License
The Get License widget is displayed.
7.
Select the mode of license activation and continue. For more information,
see Product support.
.
.
Use Windows login
Getting Started | 19
Remember
Page 22

8.
Click
Log In.
NOTE: If an activation key is entered, the warning message is not displayed
during subsequent login.
NOTE: The host name-IP address mapping entry must be added to the
hosts file on Windows machine.
Uninstalling OMPE
You can uninstall OMPE from the Start menu or using Add/Remove Programs in
the Control Panel.
To uninstall from the Start menu:
Click Start All Programs Dell Printers OMPE Uninstall
While uninstalling, OMPE prompts for database retention. If you choose to
retain the database, all OMPE components except the database will be deleted.
If you choose to not retain the database, it will be deleted along with all other
OMPE components.
Upgrading OMPE
When a new software upgrade for OMPE is available, OMPE notifies the user in
the Notification widget. To download the new software, click Download Now
in the new software notification event.
To check the availability of new software upgrade, click in the title bar and
select Check for Software Update. OMPE checks for the availability of a new
software version and provides a link to download the software installer. To
install the new version of OMPE, double click on the installer and follow the
installation procedure. For more information on installation procedure, see
Installing OMPE.
OMPE user interface
OMPE’s rich user interface is designed for both desktop and tablet and can be
accessed using a web browser.
20 |
Page 23
The OMPE user interface consists of the following basic elements:
1
3
6
4
5
2
1
Title bar
2
Navigation pane
3
Workspace window
4
Title bar menu
5
Quick-launch toolbar
6
Action menu
Title bar
The title bar displays the OMPE title which consists of a menu with the
following drop-down menu buttons:
•
-
Displays the
Notification
widget that notifies status of important
events and operations. For more information, see Notification widget.
NOTE: The number of unread notifications is displayed above the
notification icon ( )
•
- Displays a drop-down menu with the following system related
.
commands:
-
Help Contents
-
Online Help
-
Feedback
-
Support
-
Logs
-
Export System logs
-
License
-
Check for Software Update
-
About
• - Helps to log out of OMPE.
Getting Started | 21
Page 24

Navigation pane
All printer management operations supported by OMPE are organized in
separate windows. A window is the main work area of OMPE where you can
view and manage printers. To access various windows in OMPE, use the menu
commands in the Navigation pane on the left side of the OMPE screen.
The following table lists the various windows accessible from the Navigation
pane and its functions:
Menu command Description
Home >
Dashboard Provides an overview of printers in a dash-
board.
Printer List Provides an overview of printers in a printer
status list.
Groups To create and manage printer groups.
Discovery To perform printer discovery in various
modes.
Maps Uploads and mark printers on the uploaded
maps.
Device Management >
Firmware Upload or update printer firmware.
Policy Create policies and check for its confor-
mance and enforce policies.
Alerts Send emails to users about printer related
events.
Templates
Schedules Create and manage scheduled tasks.
Connections Configures and update SNMP and EWS set-
Reports Generates reports on printer resource utili-
22 |
Upload or update printer templates*.
tings.
zation.
Page 25

Menu command Description
Supplies Orders for consumables.
Settings >
Preferences Configure the dashboard and printer list
views and enable or disable printer data
upload to Dell Print Metering.
SMTP Configure SMTP settings.
Proxy Configure the proxy settings for OMPE.
Users Enables user account management.
Cleanup Remove unwanted data history from the
database.
Backup Generate database backup.
*
A template file defines how a parameter supported by OMPE is retrieved or set
on the associated printer.
NOTE: In the navigation pane, a blue band on the right of a menu
command indicates that the corresponding window is active.
NOTE: To view the contracted menu in the navigation pane, click at the
bottom of the navigation pane. Conversely, to view the expanded format of
the menu, click .
Elements in the workspace window
Each workspace window consists of the following elements:
Quick-launch toolbar - Toolbar with links to common functions in the
window.
Action menu - Menu with commands to perform printer specific operations on
selected printers.
NOTE: The action menu is enabled only when one or more printers are
selected.
Lists - List of related parameter details of the printer fleet.
Getting Started | 23
Page 26
Keyword search box - To search for a keyword in a list, enter the keyword in
1
2
3
4
2
5
the search box provided on top of the list.
Widget - Separate dialog boxes with editable fields to perform printer specific
operations.
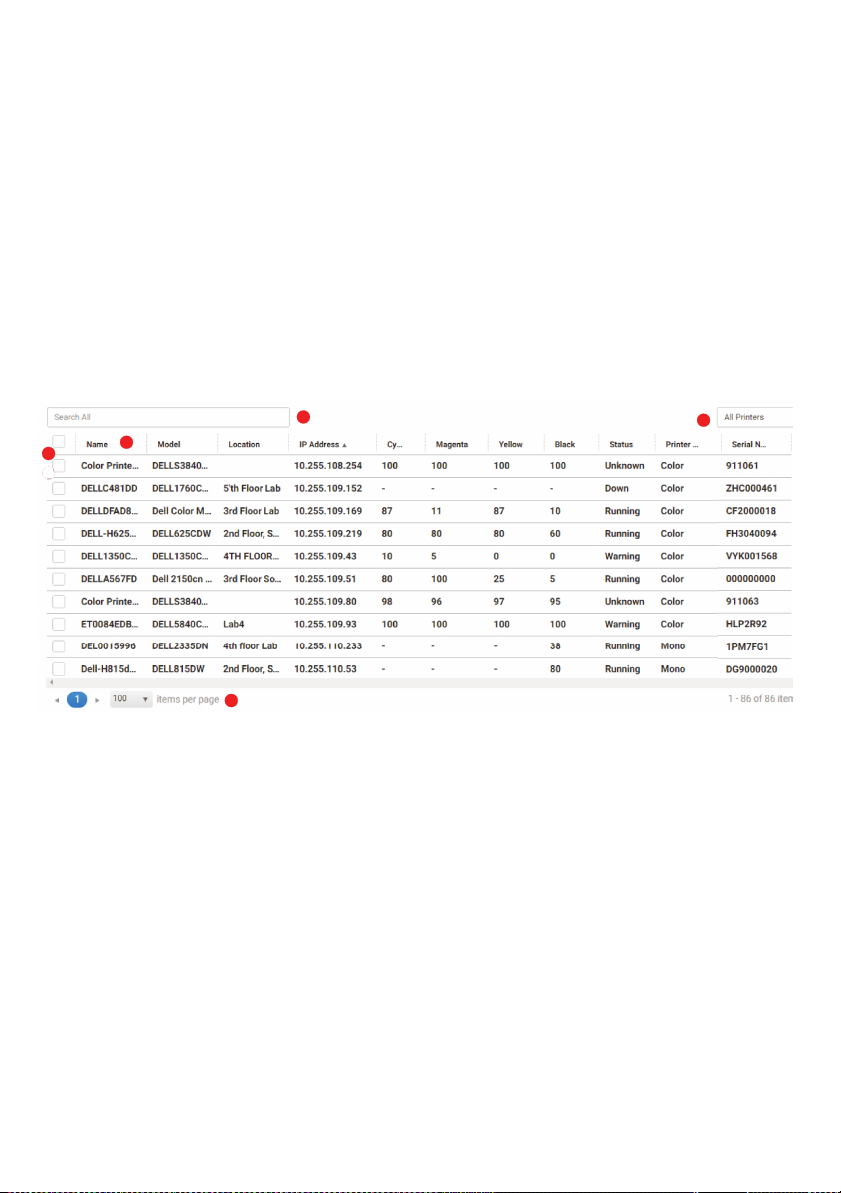
Customizing Lists
OMPE displays printer details in a list form for clarity and easy management.
You can customize lists displayed in OMPE with simple list operations like
search, sort, pagination and filtering.
Each list in the workspace window consists of the following basic elements:
1
Column header
2
Row selection check box
3
Keyword search box
4
Group selection box
5
Pagination
The following operations can be performed on a list:
Pagination
For a multi paged list, you can select the page number and number of items per
page to be displayed in the pagination area provided at the bottom left of each
list.
Keyword search
To search for a keyword in a list, enter the keyword in the search box provided
on top of the list.
24 |
Page 27
Printer group selection
To display the list of printers from a printer group, select the printer group from
the group selection box on the top right corner of the list.
Changing the column position
To change the position of columns in a list, drag the column header to the
required position.
Sorting
It is possible to sort a list based on the order of items in a single column. Click
on the column header to sort rows of the list in ascending (indicated by an
upper arrow ) or descending (indicated by a down arrow ) order of data in
the column.
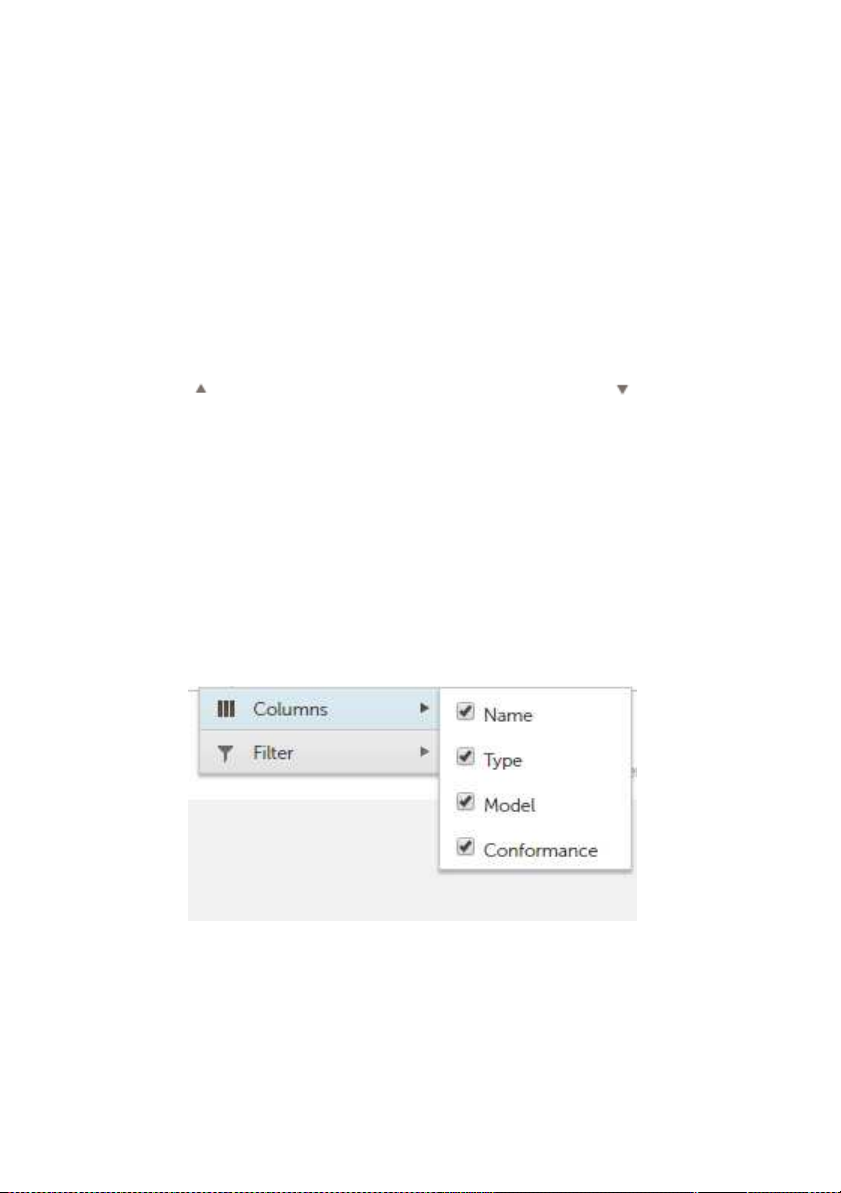
Filtering a list
By filtering a list, the list displays selected columns.
1.
Click the drop-down arrow next to any column header in the list.
2.
Select
3.
To display a column, select the column header in the list.
4.
Columns
A list box with all column headers of the list is displayed.
To hide a column, clear the check box next to the column header in the
list.
.
Getting Started | 25
Page 28
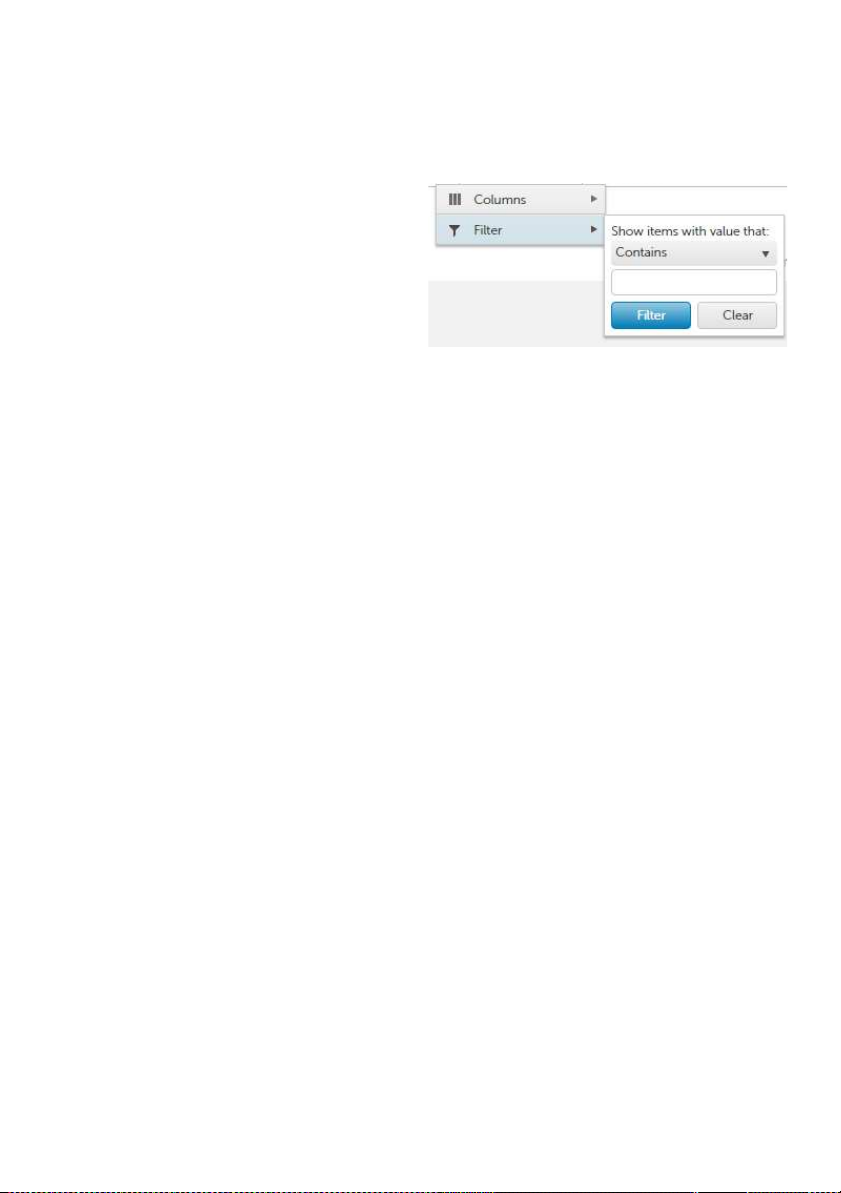
Filtering a list column
By filtering a column, the list displays only the rows with selected values in a
column.
1.
Click on the drop down arrow
next to the column header.
2.
Select
3.
Select the condition for the
4.
5.
Click
Filter
.
filter in
that
Enter or select the filter value.
Show items with value
drop-down box.
Filter
.
26 |
Page 29

3
Discovery
Before Dell OpenManage Printer Essentials (OMPE) can manage network
printers, it needs to discover the printers on the network. OMPE detects and
identifies all printers connected to a network based on their IP address. After
discovery, the printers are automatically placed in predefined groups and
displayed in the printer status list. The details of all discovered printers are
stored in OMPE database.
OMPE discovers printers using Simple Network Management Protocol (SNMP)
on IPv4 Local Area Network (LAN). All printers that comply with RFC3805, 1213
and 2790 standards1 are discovered by OMPE.
OMPE is capable of discovering printers in various modes either immediately or
scheduled for a later time. The various discovery modes available are briefed in
the table below:
Discovery mode Description
Local subnet
mode
Single IP mode Discovers printers in a specified IP address. It
IP range mode Discovers printers in a specified IP range.
1. Request for Comments (RFC) is a type of publication from the Internet Engineering Task
Force (IETF) and the Internet Society that defines methods and behavior of internet connected systems.
Discovers all printers within the local subnet.
is the fastest mode to discover a single
printer and is suitable when a new printer is
commissioned.
This mode is useful for initial discovery of
printers in a large network. It is recommended to run this during off peak hours,
since it is time consuming.
Discovery | 27
Page 30
Discovery mode Description
Subnet mask
mode
CSV import
mode
The user can save the current discovery settings in a discovery profile for future
use. A printer can be blocked to exclude it from discovery. For more
information on blocking printers, see Blocking a printer.
Discovers all printers across a subnet.
example, when IP address is 192.168.0.1 and
subnet mask is 255.255.255.0, OMPE
searches for printers in IP address ranging
from 192.168.0.1 to 192.168.0.255.
Discovers printers with IP addresses
imported from a comma separated value file.
It is the fastest way to discover multiple
printers with a known IP address distributed
across multiple subnets.
For
Discovering printers
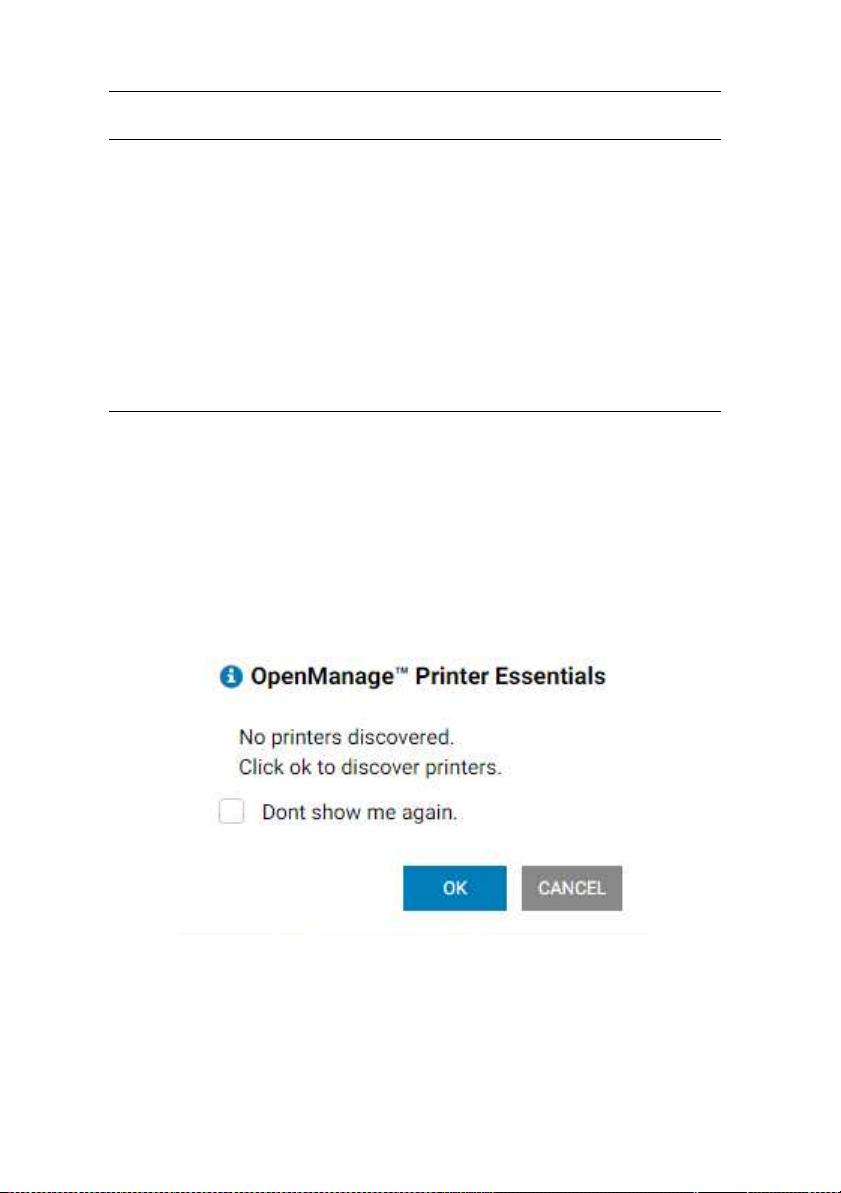
When no printers have been discovered yet, OMPE automatically prompts the
user to discover printers. Click OK in the dialog box to launch the Discovery
widget.
To manually launch the Discovery widget:
1.
Launch the
28 |
Dell OpenManageTM Printer Essentials.
Page 31

2.
In the navigation pane, click
NOTE: If the estimated time taken for discovery exceeds 30 minutes, then a
warning message is displayed indicating a potential delay and prompting
the user to continue.
The Discovery widget is displayed on the right side of the dashboard. The
Discovery widget consists of two tabs:
•
New Discovery - To start a new discovery
•
Edit Discovery - To modify an existing discovery profile
Selecting d iscovery criteria
To discover printers, you have to select various options for printer discovery in
the Discovery widget.
NOTE: While a discovery is in progress, the user can initiate another
discovery which begins after the current discovery is complete.
1.
To use a previously saved discovery profile, from the
select the profile name.
2.
Select the SNMP Options as
NOTE: By default, SNMP v1/v2 option is selected. The selected SNMP
option is saved on starting discovery and reused in subsequent discoveries.
3.
For
SNMP v1/v2
NOTE: The SNMP Community Name field is mandatory and must not be
left blank.
option provide a valid
Home
SNMPv1/v2
Discovery.
Select Discovery
or
SNMP v3
SNMP Community Name
.
list
.
NOTE: Printers whose community name does not match are not
discovered.
4.
For
SNMP v3
User Name - Enter a valid user name. This field is mandatory.
Authentication and Privacy Options - To enable Authentication and Privacy
profiles, select the corresponding check boxes.
NOTE: By default, both Authentication and Privacy options are selected.
You can select both Authentication and Privacy, only Authentication or
none.
Authentication Password - Enter a valid password used by the authentication
protocol for message authentication.
Confirm Password - Reenter the authentication password for confirmation.
option provide the following details:
Discovery | 29
Page 32

Authentication Algorithm - Select the required authentication protocol: (MD5)
or Secure Hash Algorithm (SHA).
Privacy Password - Enter a valid password used by the privacy protocol for
message encryption and decryption.
Confirm Password - Reenter the privacy password for confirmation.
Privacy Algorithm - Select the
required privacy protocol: Data
Encryption Standard (DES) or
Advanced Encryption Standard
(AES).
NOTE: Password should have a
minimum of 8 characters and
not exceed 255 characters. If
the entered and confirmed
passwords do not match then
Confirm Password field is
highlighted in red. Reenter the
password to confirm.
5.
From the
Discovery Mode
list, select the printer
discovery mode as Local
subnet, Single IP, IP range,
Subnet mask or Comma
Separated Value (CSV)
import.
NOTE: By default, Local subnet
mode is selected.
6.
For
Single IP
Discovery Mode Input(s)
mode, in the
field, enter a valid printer IP
address.
NOTE: You can enter wildcard
character ’*’ in the last segment of IP address to discover printers. For
example, when you enter 192.162.49.* OMPE searches for printers in IP
address ranging from 192.162.49.1 to 192.162.49.255.
7.
For
IP Range
and end IP address in the
mode, in the
Discovery Mode Input(s)
From and To fields.
field, enter the start
30 |
Page 33

8.
For
Subnet Mask
address and
9.
For
CSV Import
select the .csv file to import
NOTE: You can create a CSV file for a set of printers by specifying the list of
IP addresses in a comma separated list in ANSI text format and save it as.txt
file.
NOTE: A CSV file with the list of IP addresses cannot have any wildcard
characters.
10.
Select the system resource usage for printer discovery (ranging from one
to four) by adjusting the slider in the
NOTE: Selecting smaller threshold values results in lesser usage of system
resource. Hence, slowing the speed of discovery.
11.
Click
Apply
Scheduling a discovery
In the Discovery widget, Run Now option is selected by default for immediate
discovery. You can schedule a discovery profile to be performed once by
selecting the Later option.
1.
In the
Discovery
2.
From the
3.
From the
and time.
4.
To add any notes, enter the notes in the
5.
Enter a name for the schedule in the
Schedule Task
Schedule to Run
mode, in the
Subnet Mask
mode, in
.
widget, select
Discovery Mode Input(s) field, enter the IP
.
Discovery Mode Input(s)
.
Threshold
Later
.
list, select the schedule frequency.
and
Time
drop-down lists, select schedule date
Schedule Notes
Profile/Schedule Name
, click
option.
Upload
field.
and
field.
NOTE: This field is mandatory.
6.
Click
Apply
.
Saving a d iscovery profile
You can save the current discovery settings in a discovery profile for later use.
1.
In the
Discovery
2.
Enter a name for the discovery profile in the
3.
Click
Apply
widget, select
.
Save in discovery profile
Profile/Schedule Name
Discovery | 31
check box.
field.
Page 34

Editing discovery profile
You can modify the discovery
settings of a saved discovery
profile using this option.
1.
In the
Discovery
click
Edit Discovery
2.
From the
drop-down list, select the
name of discovery profile
to be changed.
3.
Edit the profile settings as
required.
4.
Click
Deleting a d iscovery profile
1.
In the
click
Profile
2.
From the
drop-down list, select the
discovery profile to be
deleted.
3.
Click
Select Discovery
Update
Discovery
Edit Discovery
tab.
Select Profile
Delete
widget,
tab.
.
widget,
.
Stopping a d iscovery
When a discovery is in progress,
you can terminate the operation
in progress.
1.
Place the mouse pointer on in the title bar.
2.
The
32 |
Notification
discovery in the progress bar.
3.
To stop the ongoing discovery operation, click in the Discovery progress
bar.
drop-down window displays the status of ongoing
Page 35

4
1
2
3
4
5
6
7
8
Dashboard
The Dashboard provides an overview of the printer parameters by displaying
real time statistics of the printer fleet with the help of graphical charts.
The Dashboard also provides information on the status of all ongoing and
completed operations in the Notification widget on the right side of the
dashboard.
To view the dashboard:
1.
Launch the
2.
In the navigation pane, click
The Dashboard window consists of the following elements:
Dell OpenManageTM Printer Essentials.
Home
Dashboard
.
1
Status bar
2
Quick-Access toolbar
3
Dashboard charts
4
Chart Action menu
You can switch between dashboard and list view using the quick-access
5
Notification widget
6
Operation type filter
7
Status severity filter
8
Progress bar
toolbar.
To view the dashboard, from the quick-access toolbar, click .
Dashboard | 33
Page 36

You can customize the dashboard to:
•
Change the position of the charts using drag-and-drop operation.
•
Select a chart to be hidden or displayed.
•
Select refresh interval for a chart.
To customize the dashboard view, click . For more information, see
Customizing dashboard view.
Status bar
The status bar shows the total number of printers in the network and the
percentage of printers in each of the following states:
• OK
- Displayed in green indicates that the printers are in good health and in
normal condition.
•
Warning - Displayed in orange indicates that at least one consumable is
below the threshold or the printer operation panel displays a warning.
•
Critical - Displayed in red indicates that the printers are in one of the
following states: Unable to print, Printer offline or Printer is out of service.
Dashboard charts
OMPE provides five predefined charts:
•
Device Status
•
Toner Levels
•
Policy Conformance
•
Drum Levels
•
Fuser/Roller Levels
Selection of charts
1.
From the
A pop-up menu is displayed.
2.
Select the check box corresponding to the chart to be displayed.
3.
To hide a chart, in the pop-up menu clear the check box for the
corresponding chart.
4.
Click
Viewing charts
You can view dashboard charts for a group of printers in pie or column type.
When you hover the mouse pointer on a section of the chart, a pop-up displays
the value of the section.
34 |
Dashboard
Save
.
view, click .
Page 37

In a column chart, to view the list of printers belonging to a column, click on
the column. A pop-up displays a complete list of printers belonging to the
column in the chart. The number of printers in the list is displayed above the
chart name as shown below.
NOTE: You can search for a printer within the list using the search bar in the
pop-up.
Changing dashboard chart settings
You can change the chart settings using the action menu inside the dashboard
chart.
1.
From the chart action menu, click .
2.
To select the type of chart as column or pie chart, from the
select the type of chart to be displayed.
NOTE: The Toner Levels, Drum Levels and Fuser/Roller Levels charts can
be displayed as column charts only.
3.
To view the chart for a printer group,
the printer group.
4.
To change the chart name, enter a name for the chart in the
widget
5.
Click
6.
To refresh the chart, click .
box.
Save
.
from the
Change group
Dashboard | 35
Chart type
list select
Name of the
list
Page 38

Notification widget
OMPE consists of several operations that are either system generated or
initiated by the user. The Notification widget displays the status summary and
progress of all OMPE operations. The status of the following OMPE operations
are displayed as separate progress bars:
•
Discovery
•
Health Poll
•
EWS Poll
•
Status Poll (SNMP)
•
Internet Connection
For an ongoing operation, the progress bar displays the estimated time required
to complete the operation.
NOTE: You can also view the Notification widget from the notification
icon( ) in the title bar.
In the Notification widget you can start or stop an operation from the progress
bar with the help of and buttons respectively.
NOTE: You can not stop an ongoing Internet communication operation.
In the Notification widget, unread status summaries are displayed in bold and
the number of unread status summaries are displayed above the icon in the
title bar.
In the Notification widget, you can filter the list of status summaries displayed
based on the operation type and severity of operation.
•
Filters based on operation type - Discovery, EWS, Firmware, License, Map,
Print metering, Policy, Templates, and Warranty.
•
Filters based on severity of operation status - Critical state ( ),
state( ), Normal state ( ).
NOTE: The number of events with the severity status is displayed next to
the severity icon.
Filtering the notification list
1.
To filter the status summary list based on the type of operation, from the
operation type drop-down list, select the type of operation.
The status summary of events of the selected type of operation is
displayed.
2.
To further filter the list based on the severity, click on the required severity
status icon.
36 |
Warning
Page 39

5
1
6
2
3
45
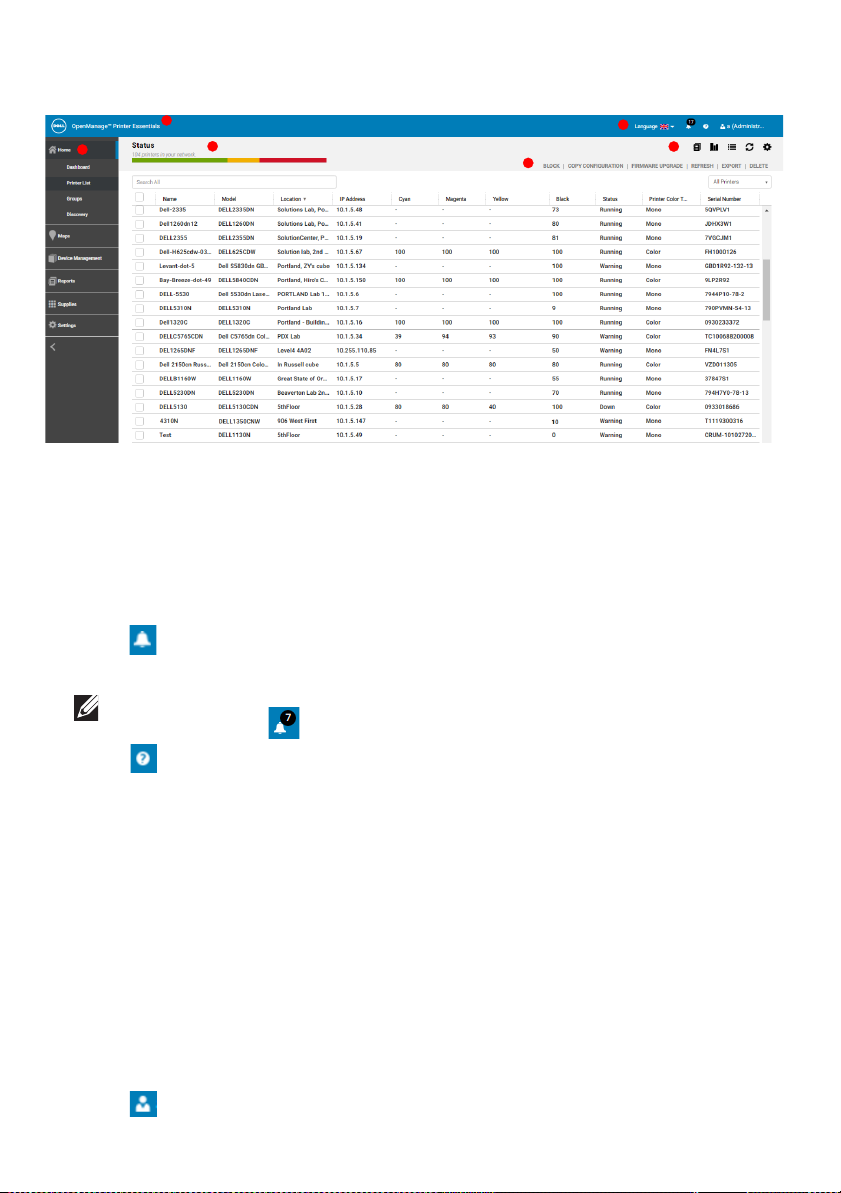
Printer List
The Printer list view displays printer details in a list format with various
parameters listed in separate columns. You can easily analyze and monitor
printer details using list features like sorting, searching or filtering. Basic
operations such as firmware upgrade, deleting a printer, copying printer
configuration, printer blocking and exporting data are also available in the list
view.
To view the printer status list:
1.
Launch the
2.
In the navigation pane, click
The Printer list window consists of the following elements:
Dell OpenManageTM Printer Essentials.
Home
Printer List
.
1
Status bar
2
Quick-Access toolbar
3
Action menu
You can switch between dashboard and list view using the quick-access
4
Printer group selection box
5
Keyword search
6
Printer status list
toolbar.
To go to list view:
From the quick-access toolbar, click .
You can customize list view by selecting the columns to be displayed in the
printer status list. For more information, see Customizing list view.
Printer List | 37
Page 40

Status bar
The status bar indicates the total number of printers in the network and the
percentage of printers in each of the following states:
• OK
- Displayed in green indicates that the printers are in good health and in
normal condition.
•
Warning - Displayed in orange indicates that at least one consumable is
below the threshold or the printer operation panel displays a warning.
•
Critical - Displayed in red indicates that the printers are in one of the
following states: Unable to print, Printer offline or Printer is out of service.
To view the printer list for each status separately, click the corresponding color
on the status bar.
Viewing printer details
To view a printer’s details, click on the printer name in the printer status list. The
printer details widget displays the detailed information of all parameters
associated with the printer. To view the printer details of the previous or next
printer in the printer status list, click Previous or Next.
NOTE: Not all parameters are available for non-Dell printers.
The parameters are grouped into the following tabs in the widget:
•
General
•
Info
•
Printer Settings
•
Email
•
Network Setting
•
Address Book
•
Consumables
•
Warranty
The parameter fields that cannot be retrieved by OMPE are empty. This could
be due to mismatch in SNMP or EWS settings of the printer because of which
OMPE is unable to communicate with the printer.
NOTE: To view more parameters in the tabs, set the printer EWS username
and password in the Connections window. For more information, see
Updating connection settings.
38 |
Page 41

To modify parameters for a printer, in the printer details widget edit the fields
required and click Apply. If the printer is assigned to a location in a map, to
locate the printer on a map click Locate On Map.
NOTE: Fields that cannot be modified in the printer details widget are in
grey.
Printer operations
The printer list view
discussed below.
Blocking a printer
You can stop OMPE from retrieving status parameters from a printer by
blocking the printer.
1.
From the printer status list in the
NOTE: To select printers from a group, from the group selection box, select
the printer group.
2.
From the action menu, click BLOCK
also provides
links to common printer operations
Printer list
view, select the printer(s).
.
Printer List | 39
that are
Page 42

A dialog box is displayed.
3.
Click OK
to confirm.
NOTE: Blocked printers will be moved to All Blocked Printers group. For
more information, see Groups.
Unblocking a blocked printer
OMPE will resume to retrieve status parameters from a blocked printer when
you unblock the printer.
1.
From the group selection box in the
Printers
2.
From the printer status list, select the printer(s).
3.
From the action menu, click
group.
UNBLOCK
Printer list
.
view, select
All Blocked
A dialog box is displayed.
4.
Click OK
to confirm.
Deleting a printer
You can delete a printer and its associated data from OMPE.
1.
From the printer status list in the
Printer list
view, select the printer(s).
NOTE: To select printers from a group, from the group selection box, select
the printer group.
2.
From the action menu, click DELETE
.
A dialog box is displayed.
3.
Click
OK to confirm.
NOTE: Deleted printers can be rediscovered during the next discovery.
Exporting printer data
You can export the complete parameter details of one or more selected
printers in the printer status list to a file in CSV format.
1.
From the printer status list in the Printer list view, select the printer(s).
2.
From the action menu, click
EXPORT
.
A message box is displayed indicating successful file download.
3.
Click OK to save the file.
40 |
Page 43

Updating firmware
You can update
firmware of one or more printers to its latest version from the
Dell Cloud Connect server repository.
NOTE: Firmware upgrade is performed only for Dell printers with available
templates.
1.
From the printer status list in the
Printer list
view, select the printer(s).
NOTE: To select printers from a group, from the group selection box select
the printer group.
2.
From the action menu, click FIRMWARE UPGRADE
The Firmware
Upgrade
widget is displayed.
.
NOTE: If multiple printers are selected, firmware for each printer is updated
to its latest version available in the Dell Cloud Connect server.
3.
The printer model number and current version number are displayed in
Model and
4.
From the Update to list, select the version number for the updated
Current Version
fields.
firmware.
NOTE: If the latest firmware update for a printer is not available in the Dell
Cloud Connect server, manual firmware update option is provided. For
more information, see Updating firmware manually.
5.
The publish date and release notes are displayed in the
Release Notes
field.
6.
To select the firmware tool, click
7.
From the
8.
The command for the selected tool is displayed in the
Tool Name
list, select the firmware tool.
Advanced Options
.
Tool Parameter
field.
9.
To update immediately, click
10.
To schedule the task for a later time, click
11.
Enter a name for the schedule in
Now
.
Schedule Name
Later
.
field.
NOTE: This field is mandatory.
12.
From the
Schedule to run on
and
schedule date and time.
13.
To add any notes, enter the notes in the
14.
Click
OK.
Time
drop-down list, select the
Schedule Notes
Printer List | 41
field.
Page 44

Copying configuration
OMPE enables you to copy the configuration of a printer to one or more
printers of the same printer model.
CAUTION: Previous configuration of the printer will be lost on copying a
new configuration.
1.
From the printer status list in the
Printer list
view, select the printer(s).
NOTE: To select printer(s) from a group, from the group selection box,
select the printer group.
2.
From the action menu, click COPY CONFIG
.
The Copy Configuration widget is displayed.
3.
Select the group of parameters to be copied.
4.
Click
Next
.
The Copy Configuration > Select Printers page displays the printer
model number, parameter options selected for copying and the printer list.
5.
From the printer list, select the printers for which the configuration is to be
applied.
6.
From the action menu, click APPLY
.
A dialog box is displayed.
7.
Click
OK to confirm.
NOTE: The copying of configuration will be skipped if the printer is offline.
Generating printer status l ist report
You can generate a report of printer status list displayed in the Printer list view
in CSV or PDF format. The report can be saved in a file or sent through email.
1.
From the quick-access toolbar, click .
The Report widget is displayed.
2.
Select the report delivery options as
Email
or
Save
.
NOTE: By default, only the Save option is selected.
3.
From the File Type list, select the file format as
4.
From the
reports as Now, Daily, Weekly
Schedule Task
drop-down list, select the frequency
or
Monthly
Comma Delimited
.
or
PDF
to generate
NOTE: By default, Now is selected for immediate report generation.
NOTE: When you schedule report generation, the generated report is sent
through email only.
42 |
.
Page 45

5.
Select the required schedule options for the selected frequency.
•
For
Daily
•
For
schedule, select the time from the
Weekly
schedule, select the day and time from the
Time
drop-down list.
drop-down lists.
•
For
Monthly
schedule, select the date and time from the
drop-down lists.
6.
To add any notes, enter the notes in the
7.
From the
Select Users
list, select registered users who will receive the
Schedule Notes
report through email.
NOTE: This field is mandatory.
8.
Enter email address of the unregistered users in the
Email Address
NOTE: Email addresses must be separated by comma.
9.
Enter the subject of the email in the
10.
Click
Save.
Subject
field.
Day
Date
field.
and
and
Time
Time
field.
Printer List | 43
Page 46

6
Groups
The Groups feature enables logical grouping of printers based on the printer
characteristics. This helps administrators to perform several operations on
multiple printers in a group at once.
OMPE supports three types of printer groups:
•
System
or delete system groups.
•
Manual Selection
printers from the network to manual selection groups.
•
Rule Based
dynamically adds printers with parameters satisfying the rules into the rule
based group.
NOTE: If a printer satisfies the rules of more than one group, it will be added
to multiple groups.
OMPE defines the following system groups:
•
Color
•
Mono
•
Critical
printer can be: Unable to print, Printer is offline or Printer is out of service.
•
Warning
for a printer can be: Input tray out of paper, Output tray full, One or more
consumables low or Warning status sent by the printer.
•
Normal
group have good health and are working normally.
•
All Printers
The
•
All Blocked Printers
maintenance are assigned to this group.
- Default groups pre-defined by OMPE. You cannot create, modify
- Groups with no rules defined. You can add individual
- Groups for which the user defines the rules. OMPE
- Group of all color printers.
- Group of all monochromatic printers.
- Group of printers that are in the critical state
- Group of printers that are in the warning state
- Group of printers that are in the normal state. All printers in this
- All discovered printers in the network belong to this group.
All Printers
group is the superset of all groups.
- Group of printers that are blocked. Usually printers in
. A critical state for a
. A warning state
NOTE: The All Blocked Printers group is exclusive to all other groups.
Blocked printers cannot belong to any other printer group.
To open the Groups window:
1.
44 |
Launch the
2.
In the navigation pane, click
Dell OpenManageTM Printer Essentials.
Home
Groups
.
Page 47

The Groups window displays a list of all available printer groups and its details.
To view the list of printers present in a group, in the Name column click on the
group name.
Adding a group
You can create both manual selection and rule based printer groups using this
option.
Add ing a manual selection group
1.
From the action menu, click
The Create Group widget is displayed.
2.
Select
3.
Click
4.
5.
Click
6.
NOTE: You can search for printers using the search box on top of the list.
7.
Click
Add ing a rule based group
1.
From the action menu, click
2.
Select
3.
Click
4.
5.
Click
6.
Select the rules for printer selection from the drop-down lists in the
7.
From the first drop-down list, select the printer attribute.
8.
9.
In the text box, enter the attribute value to evaluate the condition.
10.
Manual Selection
Next
.
Enter a name for the group in the
Next
.
The Groups > Create Group > Manual Selection window displays the
printer list.
Select printers to be added to the group.
Save
.
The Create Group widget is displayed.
Rule Based Selection
Next
.
Enter a name for the group in the
Next
.
The Rule Based Group widget is displayed.
Option
From the second drop-down list, select the condition.
operators as either
.
To add an additional rule, from the last drop-down list select the rule
AND or OR.
.
CREATE
CREATE
.
.
Enter the group name
.
Enter the group name
field.
field.
Search
Groups | 45
Page 48

An additional rule selection row is displayed.
11.
Select the additional rule by repeating steps 7 to 10.
NOTE: You can click to remove a rule.
12.
Click
Save
.
Printers satisfying the specified rules are displayed in the
Groups > Create Group > Rule Based Selection window.
13.
From the action menu, click
NOTE: To change the rule for a group, click Update Rule from the action
menu.
SAVE
.
Editing a group
You can modify printers in both manual selection and rule based groups by
editing it.
Ed iting a manual selection group
1.
From the groups list in the
group.
2.
From the action menu, click
The View widget is displayed.
3.
Enter the name of the group in
4.
Click
Next
.
The printer list is displayed.
5.
To add printers to the group, select the printers from the printer list.
6.
To delete printers from the group, clear the check box for the printers you
want to remove.
7.
From the action menu, click
Groups
window, select the manual selection
EDIT
.
Enter the group name
SAVE
.
field.
Ed iting a rule based group
1.
From the groups list in the
2.
From the action menu, click
The View widget is displayed.
3.
Enter the name of the group in
4.
Click
Next
.
The Rule Based Group widget is displayed.
5.
Select the new rule from the drop-down lists in the
6.
Click
Search
46 |
.
Groups
window, select the rule based group.
EDIT
.
Enter the group name
field
Search Option.
Page 49

All printers satisfying the defined rule are displayed in the
Groups > Edit Group > Rule Based Selection window.
NOTE: To change the rule, from the action menu click UPDATE RULE.
7.
From the action menu, click
SAVE
.
Deleting a group
You can delete manual selection or rule based groups from the Groups window
or Edit Group window.
NOTE: When you delete a group, printers in the group are not deleted from
the database.
1.
From the group list in the
2.
From the action menu, click
A dialog box is displayed.
3.
Click
Delete to confirm.
To delete a group from the Edit Group window:
1.
From the group list in the
2.
From the action menu, click
The View widget is displayed.
3.
Enter the name of the group in
4.
Click
Next
.
The Groups > Edit Group window is displayed.
5.
From the action menu, click
Groups window
DELETE
Groups window
EDIT
DELETE GROUP
.
.
Enter the group name
, select the group.
, select the group.
field
.
Groups | 47
Page 50

7
1
2
3
4
5
Maps
Using the Map feature, location of network printers can be graphically
represented on a map of the enterprise network. Maps reduce the time taken
for troubleshooting because they help administrators to quickly identify the
location of faulty printers.
Using OMPE the user can upload a map and add printers to it. Printers are
displayed as pins ( ) on a map. The pins ( ) indicate the printer’s location,
updated health status and configuration.
To open the Map window:
1.
Launch the
2.
In the navigation pane, click
The Maps window consists of the following elements:
Dell OpenManageTM Printer Essentials.
Maps.
1
Map selection list
2
Map
3
Select Printers list
4
Printer status legend
5
Zoom tool
48 |
Page 51

Adding a map
You can upload a map in JPEG, PNG or BMP formats to OMPE using this option.
NOTE: If there are no maps uploaded to OMPE, only the add map button
( )
is enabled in the Map window.
1.
In the navigation pane, click
The Map window is displayed.
2.
On the quick-access toolbar, click .
The Add Map widget is displayed.
3.
Enter a name for the map in the
4.
To choose the map file that you want to upload, click
5.
Click
Save
.
Maps
.
Name
field.
Browse
.
Adding printers to a map
Before adding printers to a map, you must add printers to the Select Printers
list. Then you can drag the required printers from the Select Printers list to the
map.
NOTE: A printer can be added to only one map at a time.
Ed iting the select printers l ist
The Select Printers list displays a list of printers selected for the map.
1.
From the
2.
From the action menu, click
A list of discovered printers is displayed in the
Map> Select printers to be added to the map window.
3.
From the group selection menu, select the printer group.
4.
To add printers to the
printers to be added.
5.
To remove printers from the
the check box next to the printers that you want to remove.
map selection drop-down list, enter or
ADD PRINTERS
Select Printers list
Select Printers
.
, from the printer list select the
list, from the printer list clear
select the map name.
NOTE: You can search for printers in the search box on top of the list.
6.
From the action menu, click
SAVE
.
Maps | 49
Page 52

Add ing printers on the map
Printers can be added to the map from the Select Printers list.
1.
Drag the printer pins ( ) from the
on the map.
2.
From the action menu, click
NOTE: The Select Printers list displays only printer pins ( ) that have not
been added to the map.
Select Printers
SAVE.
list to relevant locations
Viewing printer details
The Map window displays the map and the Select Printers list.
To view the details of a printer on the map, place the mouse pointer on a printer
pin ( ). A callout is displayed with printer details such as name, model, IP
address, location, and status.
NOTE: To hide the Select Printers list, click on the upper right corner of
the map. To view the hidden Select Printers list click .
NOTE: The color of a printer pin ( ) indicates the printer’s health status
such as Normal, Warning or Critical.
Deleting printers on a map
When printers are physically moved from one location to another, it must be
updated on the map. You can change the location of printers on a map by
drag-and-drop operation. To delete printer pins ( ) from a map, you must
delete the printer from the map.
1.
From the
2.
On the map, click on the printer pin
A pop-up menu is displayed.
3.
Click
A dialog box is displayed.
4.
Click
map selection
Delete
Delete to confirm.
.
drop-down list, enter or select the map name.
( )
that you want to delete.
NOTE: Printers are deleted from both the map and the Select Printers list.
50 |
Page 53

Clearing a map
All printers marked on a map can be removed by clearing the map.
1.
From the
2.
On the quick- access toolbar, click .
NOTE: All printers are deleted from the map and the Select Printers list.
map selection
drop-down list, enter or select the map name.
Editing a map
You can change the image file of an existing map using the Edit Map
1.
On the quick-access toolbar, click .
The Edit Map
2.
Enter the map name in the
3.
To choose the new map file, click
4.
Click
Save
The Map window displays the newly uploaded map.
NOTE: To change the printers marked on a map, you must edit the Select
Printers list. For more information, see Editing the select printers list.
widget is displayed.
.
Name
field.
Browse
.
Deleting a map
1.
From the
2.
On the quick-access toolbar, click .
A dialog box is displayed.
3.
Click
NOTE: When you delete a map, the Select Printers list associated with the
map is also deleted, but the printers are available in the database.
map selection
Delete
to confirm.
drop-down list, enter or select the map name.
feature.
Maps | 51
Page 54

8
Firmware
The Firmware feature enables you to upgrade firmware for printers
manufactured by Dell. OMPE enables firmware upgrade for printers from its
repository. OMPE uses curl or lpr (Line Printer Remote) tool to upgrade printer
firmware. You can also upgrade the firmware for a printer manually by
uploading the firmware file.
The firmware upgrade feature is also available from the printer list view in the
Home window. Firmware upgrade can be performed immediately or scheduled
for a later time.
To open the Firmware window:
1.
Launch the
2.
In the navigation pane, click
The Firmware window displays a list of printers and the firmware details. The
fields in the list are:
Field Description
Name Name of the printer.
Dell OpenManageTM Printer Essentials.
Device Management
Firmware
.
Model Model number of the printer.
Current Version Current version of firmware in the printer.
Updated On Date on which the current version was
installed.
Other Version Indicates if an updated firmware version is
available.
Status Indicates the current status of the printer.
IP Address IP address of the printer.
Location Location of the printer.
52 |
Page 55

NOTE: You can select firmware details of a printer group or search for
printers using the group selection box and search bar on top of the list
respectively.
Updating firmware from Dell Cloud Connect server
To update firmware for a printer you can choose from multiple firmware
versions available in the Dell Cloud Connect server.
NOTE: To update firmware, you need an internet connection to get
connected to the Dell Cloud Connect server.
1.
From the printer list in the
corresponding to the printer.
The Firmware Upgrade
2.
The current firmware version installed in the printer is displayed in the
Current Version
3.
From the
The selected firmware version’s date of publishing and release notes are
displayed in the Release Notes field.
4.
To select the firmware tool, click
The Tool Name and Tool Parameter fields are displayed.
5.
From the
6.
The command for the selected tool is displayed in the
field.
7.
By default,
schedule the task for a later time, click
8.
Enter a name for the schedule in the
9.
From the
schedule date and time.
10.
To add any notes, enter the notes in the
Update to
Tool Name
Now
Schedule to run on
field.
is enabled to run firmware upgrade immediately. To
Firmware
widget is displayed.
list, select the version for firmware update.
list, select the firmware tool.
window, click
Advanced Options
Later
Name field.
and
Time
drop-down list, select the
Schedule Notes field.
.
Available
.
Tool Parameter
Firmware | 53
Page 56

11.
Click OK.
NOTE: The status of firmware download from Dell Cloud Connect server is
displayed in a pop-up when you click in the quick-access toolbar.
NOTE: Please check your proxy server settings if necessary to receive the
list of firmware versions from the Dell Cloud Connect server. For more
information, see Changing proxy settings.
NOTE: If you select multiple printers for firmware upgrade, the firmware of
each printer is upgraded to its latest version.
Updating firmware manually
You can manually update firmware of one or more printers by uploading the
required firmware file from the local storage.
NOTE: A printer model can be associated with only one firmware tool.
1.
On the quick-access toolbar, click .
The Firmware> Manual Update window displays a list of printers and its
firmware details.
2.
From the
3.
To choose the firmware file you want to upload, click
4.
To select the firmware tool, click
The Tool Name and Tool Parameter fields are displayed.
5.
From the
6.
The command for the selected tool is displayed in the
field.
7.
To select a printer group, from the group selection box select the printer
group.
8.
From the printer list, select the printer(s).
9.
By default,
schedule the task for a later time, click
10.
From the
time.
11.
Enter a name for the schedule in the
Model
Tool Name
list, select the printer model.
Browse.
Advanced Options
list, select the firmware tool.
Now
is enabled to run firmware upgrade immediately. To
Later
.
Run on
and
Time
drop-down lists, select the schedule date and
Schedule Name
.
Tool Parameter
field.
NOTE: This field is mandatory.
12.
To add any notes, enter the notes in the
13.
Click
Update
54 |
.
Schedule Notes field.
Page 57

9
Policy
Administrators can define and audit policies for printers in the network using
the Policy feature. This helps administrators to identify and correct any
deviation in the configuration of the printer fleet.
The Policy feature enables administrators to define, check for conformance
and enforce policies for printers in the network. You can define the following
type of policies in OMPE:
•
Print - To configure printing settings such as orientation, color mode and so
on.
•
Copy - To configure printer copy settings.
•
Email - To configure SMTP settings for sending emails.
•
Fax - To configure the fax settings.
•
FTP - To configure the file transfer protocol settings.
•
General - To configure general settings such as location, language, format
of the date and so on.
•
Network - To configure network settings for printer communication.
•
Paper - To configure the paper settings such as paper size, input tray. and
so on.
•
Scan - To configure scan settings.
•
Security - To configure SNMP and HTTP security settings.
Policies are defined for a specific printer model. If a printer does not conform to
a policy, you can enforce the policy on the printer. You can perform policy
conformance and enforcement operations immediately or schedule for a later
time.
NOTE: After a printer is discovered, the policy defined for its printer model
is automatically applied.
To open the Policy window:
1.
Launch the
2.
In the navigation pane, click
Dell OpenManageTM Printer Essentials.
Device Management
Policy
Policy | 55
.
Page 58

Adding a policy
You can create a new policy for a printer model using this option.
1.
From the action menu, click
The Policy > Create Policy window is displayed.
2.
Enter a name for the policy in the
3.
From the
4.
To copy the current attributes of a printer as the policy settings, from the
Printer
5.
From the
6.
Select the required settings for the policy type in the
7.
Click
NOTE: To enforce the policy immediately after creation, click Save &
Enforce. The Policy > Enforce Conformance window is displayed for policy
enforcement. For more information, see Enforcing a policy.
Model
list select.
Type
Save
.
list, select the printer model.
list, select the type of policy.
CREATE
Policy Name
.
field.
Settings
field.
Viewing policy status
You can view the list of policies in the Policy window. The conformance status
for each policy is displayed in the Conformance column as one of the
following:
•
Running - Indicates policy is being applied.
•
Check - Indicates the policy has been applied. To check for policy
conformance, click
•
Re-check - Indicates the applied policy has been checked for
conformance. To check for conformance again, click
•
Re-Enforce - Indicates the policy has been violated. To enforce the
policy, click
Re-Enforce
Check
.
.
Re-check
.
NOTE: To view details of the policy violation, click
Viewing printer l ist
You can view a consolidated policy conformance status list for all printers in the
Printer List.
1.
From the quick-access toolbar, click .
The Policy > Printer List window is displayed.
2.
The printer list displays all policies defined for a printer in the
corresponding policy type column.
NOTE: To enforce a violated policy, click
56 |
.
in the policy list.
Page 59

Viewing pol icy widget
To view policy details in a separate widget, click on the policy name in the
policy list in Policy window.
tabs:
•
• Details -
• •
•
Violation -
displays the detailed policy settings.
displays a policy violation list with a list of printers that have
violated the policy.
The
Policy
widget is displayed with the following
Place the mouse pointer over to display a callout with details of the policies
violated by the printer.
Policy | 57
Page 60

Checking for conformance
When a policy is defined, you can confirm if the policy is applied on the printers
by checking for conformance immediately or on a scheduled time.
1.
From the policy list in the
2.
From the action menu, click
The Policy > Check Conformance
model is displayed.
Policy
window, select the policy.
CHECK CONFORMANCE
window for the policy and printer
.
NOTE: Policy conformance check
from the policy list for the policy.
3.
From the printer list, select the printer(s).
4.
To check for conformance immediately, from the action menu click
CHECK NOW
A message box confirms that the conformance check is in progress.
5.
To schedule conformance check, from the action menu click
LATER
The Schedule Conformance widget is displayed.
6.
From the
Once, Daily, Weekly
7.
From the
date and time.
8.
To add any notes, enter the notes in the
9.
Click
.
Apply
.
Schedule
Schedule to run on
.
list, select the frequency for conformance checking as
or
Monthly
can also be initiated by clicking
.
and
Time
drop-down list, select schedule
Schedule Notes
CHECK
field.
Check
Editing printer list for a policy
A policy is defined for a specific printer model. You can add or remove printers
belonging to the selected printer model to follow a policy.
1.
58 |
From the policy list in the
2.
From the action menu, click
Policy
window, select the policy.
EDIT PRINTER
.
Page 61

The Policy > Edit Printer
printer model.
3.
From the printer list, select the printers for which the policy has to be
applied.
4.
Click
Update
.
window is displayed with the policy name and
Enforcing a policy
When a policy is violated, you can impose the policy on a printer by enforcing it.
You can enforce a policy immediately or schedule for a later time and date.
1.
From the policy list in
2.
From the action menu, click
The Policy > Enforce
NOTE: Policy enforcement
the policy list.
3.
From the printer list, select the printer.
4.
To enforce the policy immediately after creation, from the action menu
click
ENFORCE NOW
A message box confirms that policy enforcement is in progress.
Policy
window for the policy and printer model is displayed.
.
window, select the policy.
ENFORCE
can also be initiated by clicking
.
Re-Enforce
from
5.
To schedule policy enforcement for a later time, from the action menu
click
ENFORCE LATER
The Schedule Enforcement widget is displayed.
6.
From the
Weekly
7.
From the
schedule date and time.
8.
Click OK.
NOTE: Before enforcing a policy, you must set the printer EWS password
for the printers in Device Management
information, see Updating connection settings
Repeat
or
Monthly
Schedule to run on
.
list, select the frequency for enforcement as
.
and
Time
drop-down lists, select the
Connections. For more
.
Policy | 59
Once, Daily
,
Page 62

Editing a policy
You can modify an existing policy using this option.
1.
From the policy list in the
2.
From the action menu, click
The Policy > Edit Policy window is displayed.
3.
Reconfigure the policy.
4.
Click
Save
.
NOTE: To save and enforce the policy immediately, click Save & Enforce.
The Policy > Enforce Conformance window is displayed. For more
information on enforcing a policy, see Enforcing a policy.
Policy window,
EDIT
.
select the policy.
Deleting a policy
You can remove a defined policy by deleting it. When a policy is deleted, the
default settings are restored for printers conforming to the policy.
1.
From the policy list in the
2.
From the action menu, click
A dialog box is displayed.
3.
Click
OK
to confirm.
Policy window
DELETE
.
, select the policy.
60 |
Page 63

10
Alerts
The Alerts feature enables administrators to configure and manage email alerts
based on printer parameter values. This helps you to be informed about key
printer centric events without connecting to OMPE.
Alerts are configured for a printer group. OMPE can send email alerts to both
registered and unregistered users. You can configure alerts in OMPE for the
following printer events:
•
Low consumable levels for Toner, Fuser, Roller or Drum
•
SNMP traps by the printer
•
Warranty expiry
•
Policy audit violations
•
Printer is offline
The Alerts feature can also be used to create trouble tickets in supported
applications like KACE, BMC REMEDY and SERVICE NOW.
To open the Alerts window:
1.
Launch the
2.
In the navigation pane, click
The Alerts window displays a list of configured alerts and its details. The fields in
the alerts list are:
Dell OpenManageTM Printer Essentials.
Device Management
Alerts
.
Field Description
Alert Type Type of the printer event for which alert is
configured.
Threshold
(% / Hrs/ Days)
Group Name Printer group for which the alert is config-
Registered Users Registered users in OMPE database who will
Value of the parameter at which alert is sent.
(% for printer consumables,
hrs for printer offline event,
days for warranty expiry)
ured.
receive the alert email.
Alerts | 61
Page 64

Field Description
Email address Email address to which the alert is sent.
Unregistered users can be added to receive
alerts using this field.
Email alerts are sent by OMPE using Simple Mail Transfer Protocol (SMTP). For
more information on SMTP configuration, see SMTP configuration.
Configuring email alerts
1.
From the action menu in the
The Alert widget is displayed.
2.
From the
is to be generated.
3.
Enter the threshold value in the
NOTE: This field is mandatory.
4.
From the
configured.
5.
From the
email. For more information on registering users, see Adding an user
account.
6.
Enter the email address of unregistered users in the
Alert Type
Group Name
Select Users
list, select the type of printer event for which the alert
list, select the registered users to receive the alert by
Alerts
window, click
% Remaining
list, select the printer group for which the alert is
CREATE.
field.
Email Addresses
field.
NOTE: Email addresses must be separated by comma.
7.
Enter an appropriate subject in the
NOTE: OMPE provides a default subject for the each alert type. If the
Subject Line
8.
The
email.
NOTE: OMPE has predefined email content for each type of alert.
variables in the email content are converted to actual values when the email is
sent.
9.
To add any notes to the email, enter the notes in the
Email
10.
To use the trouble ticket option, select
For configuring trouble tickets, see Using trouble ticket option
11.
Click
62 |
field is left blank, the default subject is used.
Mail Body
field.
Save
field displays the predefined message with variables for the
.
Subject Line
Enable Trouble Ticket Option
field.
Append Note to
.
The
.
Page 65

Using trouble ticket option
To send trouble ticket alerts, you can choose from the available templates or
create your own custom trouble ticket templates.
1.
From the action menu in the
The Alert widget is displayed.
2.
From the
trouble ticket.
3.
Enter the threshold value in the
4.
From the
ticket is configured.
5.
Select
6.
From the
template to be used.
7.
The
8.
The
with variables. The variables are converted to actual values when the
trouble ticket is sent.
9.
The
with variables. The variables are converted to actual values when the
trouble ticket is sent.
NOTE: The default content of a trouble ticket template is saved as a .txt file
in the Alert template folder of OMPE. To change the template, you can edit
the .txt file and save it.
10.
To add any notes to the email, enter the notes in the
Email
11.
Click
Alert Type
Group Name
Enable Trouble Ticket Option
Trouble Ticket System Option
System Email
Subject Line
Mail Body
field.
Save
.
list, select the type of printer event to generate a
field displays the system email id.
field displays the predefined subject for a printer event
field displays the predefined content of the trouble ticket
Alerts
window, click
% Remaining
list, select the printer group for which the trouble
to use trouble ticket option.
list, select the trouble ticket
field.
CREATE
.
Append Note to
Editing an alert
You can reconfigure an existing alert or trouble ticket by editing it.
1.
From the alerts list in
2.
From the action menu, click
The Alert widget is displayed.
3.
Reconfigure the alert.
4.
Click
Update
.
Alerts window,
EDIT
.
select the alert.
Alerts | 63
Page 66

Deleting an alert
You can stop sending alerts or trouble tickets for a printer event by deleting the
alert.
1.
From the alerts list in
2.
From the action menu, click
A dialog box is displayed.
3.
Click
Delete
to confirm.
Alerts window
DELETE
, select the alert.
.
64 |
Page 67

11
Templates
Templates are Extensible Markup Language (XML) files having a preset format
and define all printer parameters managed by OMPE. Every printer model
supported by OMPE is associated with a template. A template file defines how a
parameter supported by OMPE is retrieved or set on the associated printer.
Templates also store information about printer discovery, and firmware
upgrade.
Templates used by OMPE are open and non-proprietary. OMPE associates
templates for all supported printers during installation. OMPE keeps track of any
new template versions available for its printers in the Dell Cloud Connect
server. When a new template version is available, OMPE marks it as available in
the Templates window. You can update to a new template version or create
your own custom template and manually register it.
This feature enables the user to register, update, and activate templates for
printers in the network.
To open the Templates window:
1.
Launch the
2.
In the navigation pane, click
The Templates window displays a list of printer models in the network and the
templates associated with it. The fields in the template list are:
Dell OpenManageTM Printer Essentials.
Device Management
Templates
.
Field Description
Model Model number of the printer
Template Name Name of the template file
Type Type of template:
•
Base - OMPE provided template that can
be updated from the Dell Cloud
Connect server repository.
•
Custom - User created template.
Vendor Vendor for the template
Upload Date Date on which the template was uploaded
Templates | 65
Page 68

Field Description
Update Indicates if a template update is available
Action Activate - Activates the template
Deactivate - Deactivates the template
Updating a template
When an updated template version is available in the Dell Cloud Connect server
repository, you can update it to any template version from the available list.
NOTE: To update a template, you need an internet connection to get
connected to the Dell Cloud Connect server.
1.
From the template list in the
Update column.
The Template Update widget is displayed.
2.
The printer model number and the current template version is displayed in
the
Model
3.
From the
The published date and release notes of the selected version is displayed
in the Release Notes field.
4.
To activate the new template, select
NOTE: The template that is currently active will be automatically
deactivated.
5.
Click
and
Update to
Update
Current Version
list, select the new version.
.
Templates
fields.
Activate
window, click
.
Available
in the
NOTE: Please check your proxy server settings if necessary to receive
templates from the Dell Cloud Connect server. For more information, see
Changing proxy settings.
Using custom templates
You can create a custom template for any printer to customize templates
provided by OMPE or add new templates to printers for which a template is not
defined. A custom template must be in XML format and can be uploaded
manually. Before using custom templates, you must register them.
To register a new template:
1.
66 |
From the action menu in the
The New Template widget is displayed.
2.
Enter a name for the template in the
Templates
Name
window, click
field.
NEW TEMPLATE
.
Page 69

3.
To choose the template file you want to upload, click
4.
To activate the template, select
5.
Click
Register
.
Activate
.
Browse.
Deleting a template
You can delete a custom template using this option.
NOTE: A base template and an active template cannot be deleted.
NOTE: When a printer has a single template associated with it, you cannot
delete the template.
1.
From the template list in
2.
From the action menu, click
A dialog box is displayed.
3.
Click OK to confirm.
Templates
DELETE
window, select the template
.
.
Activating a template
A printer model can have multiple templates associated with it. But only one
template can be active at a time. All the templates available for a printer model
are displayed in the template list in Templates window. You can activate any
one template from the multiple templates available to be used by the printer
model.
NOTE: A printer model will always have one base template, but can have
zero or more custom templates.
1.
From the template list in the
Action column corresponding to the template.
A dialog box is displayed prompting you to confirm.
2.
Click
OK.
Templates
window, click
Activate in the
NOTE: By default, the base template is active.
Deactivating a template
When a custom template is active, you can deactivate the custom template to
activate another available template.
1.
From the template list in the
Action column corresponding to the currently active template.
2.
From the
Select Template
Templates
list, select the template to be activated.
window, click
Templates | 67
Deactivate in the
Page 70

3.
Click OK.
NOTE: When you deactivate a custom template, the base template is
automatically activated.
68 |
Page 71

12
Schedules
The Schedules feature in OMPE enables you to add, edit or delete schedules for
various printer management operations. The following predefined schedules
are always active and cannot be modified in OMPE:
•
Health Poll
•
Status Poll
•
Alert Monitor
•
EWS Poll
•
Consumables Estimation Poll
•
Firmware Update Poll
•
Warranty Update Poll
•
Template Update Poll
•
Print Metering Poll
In addition to the predefined schedules, the following tasks can be scheduled in
OMPE:
•
Discovery
•
Report Generation
•
Firmware Upgrade
•
Policy
•
Database Backup
•
Database Cleanup
To open the Schedules window:
1.
Launch the
2.
In the navigation pane, click
The Schedules window displays a list of OMPE scheduled tasks and its details.
The fields in the schedules list are:
Field Description
Name Name of the scheduled task
Type Type of operation
Dell OpenManageTM Printer Essentials.
Device Management
Schedules
Schedules | 69
.
Page 72

Field Description
Notes Notes entered by the user while adding a schedule
Status Current status of scheduled task such as
Running, Completed ( ), Recurring ( ), or Next
Schedule Indicates the time and date of the next schedule*
* For a completed schedule, indicates the time and date of completion.
Adding a schedule
You can add a new scheduled task from the Schedules window or from the task
configuration page.
1.
From the action menu, click
The Add Schedule widget is displayed.
2.
From the
The corresponding task widget is displayed.
3.
Select the task configuration and the required schedule time and date.
Schedule Type
CREATE
drop-down list, select the task to be scheduled.
.
Scheduling a task
All tasks that can be scheduled have options to perform the operation
immediately or at a later time.
By default, the Run Now button is enabled to run the task immediately.
1.
Click
Later
.
70 |
Page 73

The schedule options are displayed.
2.
From the
Once, Daily, Weekly
3.
From the
schedule date and time.
NOTE: The task is repeated based on the selected frequency at the
schedule time and date.
Schedule Task
Schedule to run on
list, select the required schedule frequency as
or
Monthly
and
.
Time
drop-down lists, select the
Editing a schedule
To reschedule a task, you can edit an existing schedule from the Schedules
window.
NOTE: Editing a schedule will not modify the task configuration settings.
1.
From the schedules list in the
2.
From the action menu, click
The Edit Schedule widget is displayed.
3.
From the
operation.
4.
Edit the fields in
5.
Click
NOTE: You cannot edit a scheduled task that is running.
Schedule Task
Schedule Options
Update.
Schedules window,
EDIT SCHEDULE
drop-down list, select the required frequency for
as required.
select the schedule.
.
Deleting a schedule
You can delete one or more scheduled tasks from the Schedules window.
1.
From the schedules list in the
2.
From the action menu, click
A dialog box is displayed.
3.
Click
Yes to confirm.
NOTE: You cannot delete a scheduled task that is running.
Schedules window
DELETE
.
, select the schedule(s).
Schedules | 71
Page 74

13
Connections
OMPE communicates with printers using Simple Network Management
Protocol (SNMP) and printer Embedded Web Server (EWS). OMPE uses SNMP
for printer discovery and EWS for retrieving printer status parameters.
During installation, OMPE is configured with default connection settings which
can be changed by the administrator to suit the network environment.The
Connections feature enables you to modify the SNMP and EWS connection
settings for one or more printers in the network.
To open the Connections window:
1.
Launch the
2.
In the navigation pane, click
It is recommended to keep both SNMP and EWS settings in synchronization to
communicate successfully between OMPE and the printer. If SNMP and EWS
settings are modified before OMPE installation, the printer will not be
discovered or some printer parameters will not be retrieved or both.
Updating connection settings
1.
From the printer list in the
2.
From the action menu, click
The Update Connection widget is displayed.
3.
For
SNMP v1/v2
names in the
fields respectively.
4.
For
SNMP v3
field is mandatory.
5.
To enable Authentication and Privacy profiles, select the corresponding
check boxes.
Dell OpenManageTM Printer Essentials.
Device Management
Connections
UPDATE
connection, enter the valid read and write community
SNMP Read Community and
connection,
enter
the user name in the
window, select the printer(s).
.
Connections.
SNMP Write Community
User Name
field. This
NOTE: By default, both Authentication and Privacy options are selected.
You can select both Authentication and Privacy, only Authentication or
none.
72 |
Page 75

6.
Enter the
Field Description
following details:
Authentication and
Privacy Options
Authentication
Password
Confirm Password Reenter the authentication password for confir-
Authentication
Algorithm
Privacy Password Enter a valid password used by the privacy pro-
Confirm Password Reenter the privacy password for confirmation.
Privacy Algorithm Select the required privacy protocol: Data
NOTE: The password should have a minimum of 8 characters and not
exceed 255 characters. If the entered and confirmed passwords do not
match then Confirm Password field is highlighted in red. Reenter the
password to confirm.
7.
For
EWS Settings,
ID and Login Password fields.
8.
Click
Save.
Select the corresponding check boxes to enable
Authentication and Privacy profiles.
Enter a valid password used by the authentication protocol for message authentication.
mation.
Select the required authentication protocol:
Message Digest Algorithm (MD5) or Secure Hash
Algorithm (SHA).
tocol for message encryption and decryption.
Encryption Standard (DES) or Advanced Encryption Standard (AES).
enter the valid EWS login ID and password in the
Login
NOTE: The connection settings will be used by OMPE to communicate
with the printer and not applied to the printer.
Testing a connection
You can test the SNMP v3 connection status for one or more printers using this
option.
1.
From the printer list in
Connections window,
select the printer(s).
Connections | 73
Page 76

2.
From the action menu, click
NOTE: If the SNMP v3 settings are empty, the TEST CONNECTION button is
disabled.
The status of the connection test is displayed in the progress bar.
3.
If the test is successful, OMPE displays a message box prompting you to
save the CSV report. If the test fails, an error message is displayed.
On completion of testing, OMPE stores a consolidated report of success and
failures for each IP address in a CSV file.
TEST CONNECTION
.
74 |
Page 77

14
Reports
Reports enables the administrators to get quick access to real time printer
management information regularly. The Reports feature enables consolidation
of data from one or more printers for generation of the following report types:
•
Device usage - It is a report on the number of
shot period.
•
Printer asset/ Inventory - It is a report on the status of the printers.
•
Consumable usage - It is a report on the levels of pr
as toner, fuser and image drum.
•
Current printer firmware - It is a report on the details of the current printer
firmware.
•
Policy Compliance - It is a report on the policy conformance of printers.
To open the Reports window:
1.
Launch the
2.
In the navigation pane, click
OMPE supports generation of reports in the PDF or comma delimited (csv)
format. You can generate reports immediately or schedule it for a later time to
be saved or sent through email.
Dell OpenManageTM Printer Essentials.
Reports
.
pages printed within a snap
inter consumables such
Previewing a report
You can preview reports by filtering printer information based on one or more
criteria given below:
•
Printer group - You can view the report for a selected printer group.
•
Keyword search - You can view the report of printers whose criteria match
the keyword entered in the search box.
•
Report type - You can view reports of the predefined types.
1.
From the
or a user defined printer group.
2.
Select the criteria for the report type wherever applicable:
•
Percentage Remaining
•
select the snap shot period.
Report Type
For consumable usage type, enter the threshold in the
For Device usage type, from the
list in the
field.
Reports
From
window, select the type of report
and
To
drop-down lists
Less Than
Reports | 75
Page 78

3.
To filter the report for a printer group, from the group selection menu
select the printer group.
4.
To filter the report with a specific keyword, enter the keyword in the search
box.
5.
Click
Preview
NOTE: You can customize the previewed report to display selected
columns, change the position of columns, and sort or filter rows using list
operations. For more information, see Customizing Lists
to view the report.
.
Generating report file
You can save the previewed reports in a file and send through email to
registered and unregistered users.
1.
Preview the report with required criteria. For more information, see
Previewing a report.
2.
From the report preview, select the printer(s).
3.
From the quick-access toolbar, click .
The Report widget is displayed.
4.
Select the report delivery options as
NOTE: By default, only the Save option is selected.
5.
From the
6.
From the
report through email.
File Type
Select Users
list, select the file format as
list, select registered users who will receive the
Email
or
Save
.
Comma Delimited
or
PDF
.
NOTE: This field is mandatory.
7.
Enter email address of the unregistered users in the
NOTE: Email addresses must be separated by comma.
8.
Enter the subject of the email in the
9.
From the
Now, Daily, Weekly
10.
From the
date and time.
NOTE: When you schedule report generation, the generated report is sent
through email only.
11.
Click
76 |
Schedule task list, select the frequency to generate reports as
or
Monthly
Schedule to Run
Save
.
and
Subject
.
Time
field.
drop-down lists, select the schedule
Email Address
field.
Page 79

A dialog box is displayed as shown below.
12.
Click
Yes
to save the report and view the file immediately.
Reports | 77
Page 80

15
Supplies
The Supplies feature helps you to monitor consumables required and order
replenishments for printers in the network. Using this feature you can:
•
View the consumables required.
•
Generate report of consumables to be ordered - for a single printer or
printer group.
•
Order for consumables via Dell website.
•
Generate an alert when a consumable reaches the threshold value.
You can view consumable information of printers based on the percentage of
consumables remaining.
To open the Supplies window:
1.
Launch the
2.
In the navigation pane, click
Viewing an order
You can view the consumables order information for printers in the Supplies
window.
1.
From the group selection box, select the printer group.
2.
Enter the threshold value for percentage of consumables remaining in the
Percentage remaining less than(%)
3.
Click
Dell OpenManageTM Printer Essentials.
Supplies
Preview
.
.
field.
Ordering consumables
You can filter the previewed order report to place an order for consumables for
selected printer models.
1.
From the group selection box in the
group.
2.
Enter the threshold value for percentage of consumables remaining in the
Percentage remaining less than(%)
3.
From the action menu, click
The Supplies > Order page displays printer wise details of the number of
consumables required.
NOTE: You can increase or decrease the number of consumables ordered.
78 |
ORDER
Supplies
field.
.
window, select the printer
Page 81

4.
Click
Order Consumable
The Dell website is open for making the purchase.
.
Configuring an alert
When a consumable is low, you can send an email alert to registered or
unregistered users.
1.
From the group selection box in the
group.
2.
From the quick-access toolbar click .
The Alert widget is displayed.
3.
Select the criteria for printer consumable information in the
remaining less than (%)
4.
Configure the alert. For more information, see Configuring email alerts.
5.
Click
Save
.
NOTE: An alert for low consumable can also be configured from the Alerts
window.
field.
Supplies
window, select the printer
Percentage
Supplies | 79
Page 82

16
Settings
This feature enables you to configure the SMTP connection, change proxy
settings, configure ADS and customize preferences for OMPE.
SMTP configuration
Dell OpenManage Printer Essentials (OMPE) uses Simple Mail Transfer Protocol
(SMTP) to send email alerts. The SMTP window enables you to configure the
SMTP settings in OMPE.
1.
In the navigation pane, click
2.
Enter the SMTP server address for outgoing emails in the
field
.
3.
Enter the TCP/IP port name on the server used for SMTP email services in
the
SMTP Port field
4.
Enter the email address of registered user in the
5.
To enable SMTP server authentication, select
authentication?
6.
If TLS encryption is required, select
encryption?
7.
Enter the username for logging into SMTP server in the
field.
8.
Enter the password for logging into SMTP server in the
Password
9.
You can check the SMTP settings configured by sending a test mail.
To send a test mail, click Send Test Mail.
10.
Click
Save
field.
.
.
Settings
SMTP
.
SMTP Server
Email From Address
SMTP Server requires
SMTP Server requires TLS
SMTP Server Login
SMTP Server
field.
Changing proxy settings
You can modify the proxy settings for OMPE using this option.
1.
80 |
In the navigation pane, click
2.
To enable proxy server, select
3.
Enter IP address in the
4.
Enter port number in the
5.
Click
Save
.
Settings
Enable Proxy Server
IP Address
Port
field.
field.
Proxy
.
.
Page 83

Configuring ADS
If Active Directory Service (ADS) is not setup during installation, you can
configure it using this option.
1.
In the navigation pane, click
2.
To use Active Directory LDAP Authentication, select
LDAP Authentication.
3.
Enter the domain name in the
4.
Enter the domain controller in the
5.
Enter the port number in the
6.
To use SSL connection, select
7.
To choose the ADS SSL Certificate file, click
8.
Click
Save
.
Settings
ADS Port Number
ADS
ADS Domain Name
ADS Domain Controller
Use SSL Connection
Upload
.
Active Directory
field.
field.
field.
.
.
Customizing preferences
The Preferences feature of OMPE enables you to customize the home page
view and set the refresh intervals for polling.
Customizing dashboard view
You can customize the dashboard view to display selected widgets.
1.
In the navigation pane, click
2.
In the
Select Widgets
3.
Click
Save
.
Settings
group, select the widgets to be displayed.
Preferences
.
Customizing l ist view
You can customize the list view to display selected columns.
1.
In the navigation pane, click
2.
In the
Select Columns
3.
Click
Save
.
Customizing printer data upload
You can enable or disable Dell Print Metering service to upload printer data to
the Dell Cloud Connect server.
1.
In the navigation pane, click
2.
From the
disable Dell Print Metering service.
3.
Click
Printer Data Collection
Save
.
Settings
group, select the columns to be displayed.
Settings
Preferences
Preferences
box, select On or
.
.
Off
to enable or
Settings | 81
Page 84

Customizing poll ing cycles
OMPE monitors printers using polling mechanism. Polling in OMPE involves
three cycles: Health, Status SNMP, and Status HTTP.
•
Health poll - Printer parameters such as printer status, page count and
supply level are retrieved during Health poll. These parameters change
frequently and are important to determine printer readiness.
•
Status poll - Parameters such as tray status, network configuration and
printer settings are checked during status poll. These parameters do not
change frequently.
Using the Preferences feature, you can set the refresh interval
during which
OMPE polls the server, retrieves and displays printer information.
NOTE: The duration of polling cycle depends on the number of printers
that are managed by OMPE.
To change the refresh intervals:
1.
In the navigation pane, click
2.
To change the widget refresh interval, enter the required interval time (in
minutes) in the
3.
To change the refresh interval for maps, enter the required interval time (in
minutes) in the
4.
To change the refresh interval for printer health cycle, enter the required
Widget Refresh Interval
Refresh Map Interval
interval time (in minutes) in the
5.
To change the refresh interval for SNMP printer status cycle, enter the
required interval time (in minutes) in the
Status (SNMP)
6.
To change the refresh interval for HTTP printer status cycle, enter the
field.
required interval time (in hours) in the
7.
(HTTP)
Click
field.
Save
.
Settings
Preferences
.
field.
field.
Refresh Interval for Printer Health
Refresh Interval for Printer
Refresh Interval for Printer Status
field.
82 |
Page 85

17
User Management
The Users feature enables administrators to create users, define their roles and
manage their privileges in OMPE. OMPE also supports Active Directory (AD)
based authentication for its users.
OMPE maintains two user roles:
•
Administrator - Can perform all the OMPE tasks.
•
User - Can perform only permitted tasks.
The privileges of administrator and user in OMPE are given in the table below:
Feature Administrator Role User Role
Group management
Discovery View and Schedule No access
Printer inventory
management
Apply printer settings
Reports management
Alerts management View, Add and Remove alerts No access
Manage application settings
Template management
View, Add, Delete, and Modify
Add printer to group,
Delete printer from group,
View and Edit printers in a
group, Block printers
View and Modify View only
View and create reports View and create
View, Add and Modify OMPE
settings
Register new templates,
Update current templates
View only
View only
reports
View only
No access
User Management | 83
Page 86

Feature Administrator Role User Role
Policy management
Supplies management
Software update Configure software updates No access
User management View, Add, Modify, and
Logs View No access
Maps Add, Edit and Delete maps View only
To open the Users window:
1.
Launch the
2.
In the navigation pane, click
Add, Check for conformance, Enforce and delete
policies
Order for consumables Order for consum-
Delete users
Dell OpenManageTM Printer Essentials.
Settings
Users
No access
ables
No access
.
Adding an user account
Administrators can add a new OMPE or ADS user using this option. After a new
user is added, the user can log in to OMPE with the new user ID. OMPE prompts
the user to set the password during first login.
Add ing an OMPE user account
1.
From the action menu in the
The New User widget is displayed.
2.
From the
3.
Enter the login name to be used in the
NOTE: This field is mandatory.
4.
From the
5.
Enter the
respective fields.
NOTE: These fields are mandatory.
6.
Click
84 |
User Type
Role
First Name, Last Name, Email Address
Save
.
list, select
list, select the user role.
Users
window, click
OMPE
.
Login Name
CREATE
field.
and
Address
.
in the
Page 87

Add ing an AD user account
Before adding an AD user account, AD authentication must be successfully
configured. For more information, see Configuring ADS
1.
From the action menu in the
The New User widget is displayed.
2.
From the
NOTE: If ADS is not configured, this option is not enabled.
3.
Enter the following AD user credentials for authentication:
and
4.
To search for a user or a group name, in the
enter the search string.
NOTE: The search string can contain wildcard character ’*’ with at least two
characters in suffix or prefix.
5.
Click
On successful authentication, a list of matched users are displayed.
6.
From the search result list, select the user or group.
7.
From the
8.
Click
User Type
ADS Password
Search
Save
.
Role
list, select the role.
.
list, select
.
Users
window, click
ADS
.
.
CREATE
Look for User or Group
.
ADS Username
field
Editing an user account
You can change user role and other details of the existing OMPE users using
this option.
NOTE: You cannot change the user type and login name of the existing
OMPE users.
1.
From the user list in the
2.
From the action menu, click
The Update User widget is displayed.
3.
Edit the fields as required.
4.
Click
Save
.
Users
window, select the user.
UPDATE
.
Deleting an user account
1.
From the user list in the
2.
From the action menu, click
A dialog box is displayed.
Users
window, select the user.
DELETE
.
User Management | 85
Page 88

3.
Click
Delete
NOTE: You can delete other administrators account but not your own
account.
to confirm.
86 |
Page 89

18
Database Backup
The Database Backup feature enables you to backup database immediately, or
schedule database backup on a daily, weekly or monthly basis.
To open the DB Backup Schedule window:
1.
Launch the
2.
In the navigation pane, click
Creating a database backup
You can start a new database backup schedule using this option.
1.
From the action menu in the
The DB Backup widget is displayed.
2.
Enter a name for the schedule in the
3.
From the
Run Now,Run Once, Run Daily, Run Weekly
4.
Select the required schedule options for the selected frequency.
•
For
drop-down lists.
•
For
•
For
drop-down lists.
•
For
drop-down lists.
5.
To add any notes,
6.
Click
Dell OpenManageTM Printer Essentials.
Settings
DB Backup Schedule window
Schedule Task
Once
schedule, select the date and time from the
Daily
schedule, select the time from the
Weekly
Monthly
Add
schedule, select the day and time from the
schedule, select the date and time from the
.
list, select the required schedule frequency as
enter the notes
Backup.
Name
in the
Schedule Notes field.
field.
or
Time
, click
Run Monthly
Day
and
drop-down list.
Day
Date
.
and
and
NEW
Time
Time
Time
.
NOTE: The backup of the database is available in the OMPE install directory.
Deleting a database backup schedule
1.
From the database backup schedule list
select the schedule.
2.
From the action menu, click
A dialog box is displayed.
3.
Click
Delete
to confirm.
DELETE
DB Backup Schedule window
.
Database Backup | 87
,
Page 90

Restoring database
1.
Close OMPE.
2.
Place the OMPE backup folder on the local machine.
NOTE: By default OMPE places the back up files in <OMPE
Installdirectory>\Dell Printers\OMPE\backup\folder.
3.
Open a command prompt and change the directory to <OMPE Install
directory>\DellPrinters\OMPE\scripts.
4.
Run the batch with the syntax: Restore.bat <backup file path>.
Example: Restore.bat
"C:\ProgramFiles\DellPrinters\OMPE\backup\mybackup_261120161255.bak"
NOTE:
The restore scripts stops and starts the OMPE services and takes few
minutes to execute.
NOTE:
templates and plugins, which can be restored to another OMPE installation.
Any existing alert configuration, schedules, templates and plugins on that
machine will be overwritten with the backed up data.
DB backup also takes a backup of alert configurations, schedules,
88 |
Page 91

19
Database Cleanup
The
Database Cleanup
the OMPE database for improved performance.
OMPE maintains minute wise and hourly data in its database which is
summarized on a daily basis. This process of summarizing detailed data for
storage is called Roll-Up operation. Database roll-up reduces the number of
records in the database, hence, increasing OMPE system response.
By default, OMPE performs roll-up on a daily and monthly basis. It maintains
daily information for one year and monthly information permanently till you
delete it. Using
immediately, or at a later time or on a monthly schedule.
Database Cleanup
feature facilitates removal of unused data history from
feature, you can perform database cleanup
To open the
1.
2.
DB Cleanup Schedule window
Launch the
In the navigation pane, click
Dell OpenManageTM Printer Essentials.
Settings
:
Cleanup
.
Cleaning the database once
You can perform database cleanup immediately, or at a later time using this
option.
CAUTION:
up without maintaining their summaries.
1.
From the action menu in the
The
2.
Enter a name for the task in the
3.
From the
4.
To cleanup database immediately, select
5.
To cleanup database later, select
6.
From the
and time.
7.
From the
months for which data has to be retained. Data older than the selected
number of months will be deleted.
8.
Click
During database cleanup, the audit and system logs are cleaned
DB Cleanup Schedule window
Cleanup
Add
widget is displayed.
Name
Schedule Task
Schedule to Run
Delete items older than (in months)
.
list, select
Later
and
Time
field.
Once
.
Run Now
.
drop-down lists, select schedule date
.
list, select the number of
, click
NEW
.
Database Cleanup | 89
Page 92

Scheduling monthly database cleanup
1.
From the action menu in the
The
Cleanup
2.
Enter a name for the task in the
3.
From the
4.
From the
month the cleanup has to be performed.
5.
From the
NOTE:
The monthly schedule will be performed every month on the
selected time and date.
6.
From the
months for which data has to be retained. Data older than the selected
number of months will be deleted.
7.
Click
Add
widget is displayed.
Schedule Task
Schedule report monthly on day
Time
drop-down list, select the schedule time.
Delete items older than (in months)
.
DB Cleanup Schedule window
Name
field.
list, select
Monthly
.
list, select the day of the
list, select the number of
Deleting a database cleanup schedule
1.
From the database cleanup schedule list in the
window, select schedule.
2.
From the action menu, click
A dialog box is displayed.
3.
Click
Delete
to confirm.
DELETE
.
DB Cleanup Schedule
, click
NEW
.
90 |
Page 93

20
Logs
OMPE logs all activities initiated by the user or the system. These activity logs
can be viewed, archived and exported for troubleshooting.
To open the
1.
2.
The
Logs
user/system that triggered the event, timestamp and the action performed.
Logs
window:
In the title menu bar, click
Click
Logs
.
window display details of all OMPE activities such as the type of event,
.
Exporting logs
Logs are exported in Excel format.
1.
From the action menu in the
A dialog box is displayed.
2.
Click
Export
to continue.
Logs
window, click
EXPORT
.
Logs | 91
Page 94

Troubleshooting
OMPE provides logs to indicate problematic events in the system. Each log
displays an error code that provides information about an error that has
occurred in the application. OMPE logs are available in the <OMPE Install Dir>\
Dell Printers\OMPE\client\logs folder. This section lists the error codes
generated in OMPE with its solutions.
Error code Error message Troubleshooting steps
09980001 Configuration file
09980002 Unable to connect to
10480001 SNMP communication
10380001 No Printers discovered. 1. Check if expected printers are within the given discovery range and
09980003 Login screen not load-
10280001 Unable to receive
10280002 Policy alert not
10380001 Policy conformance
10380002 Could not enforce pol-
missing or corrupted.
DB.
failed.
ing.
emails.
received.
could not be checked.
icy.
1. Check if the OMPE.cfg file is available at <OMPE Install Dir>\OMPE.cfg.
2. Contact OMPE software vendor or re-install the software if the file is
missing and or problem persists.
1. Check if OMPE.fdb file is opened by any other client. Since this is a
embedded version only one connection is allowed.
2. Check if <OMPE Install Dir?\Firebird directory is missing / removed.
3. Contact software vendor or reinstall the software.
4. Check if the environment variable for Firebird is removed. If environ-
ment variable is missing, reinstall the software or set the environment
variable correctly.
1. Check if printer's SNMP configuration has changed since discovery.
2. Check if SNMP version V2C / V1 community name has been modified.
3. Ensure that SNMP configuration for the printer is correctly configured
in OMPE connection settings.
printers that are not discovered are accessible from the OMPE host
machine.
2. Ensure that SNMP configuration for the printer is correctly configured
in OMPE connection settings.
1. Check if OMPE service is started. You can do this via windows services.
2. If the service is not in started state, try starting it. If it does not start after
multiple trials, check if the web server ports configured during installation are used by another web server.
3. Contact software vendor if the above steps does not solve your prob-
lem.
Ensure that SMTP configuration is correct using the Test feature.
Ensure that SMTP configuration is correct using the Test feature.
1. Check if the device for which policy conformance failed is accessible
from the OMPE host machine.
2. Check if the parameter values configured for the policy is acceptable
for the printer.
1. Check if the parameter values configured for the policy is acceptable
for the printer.
2. Check if the printer is accessible from the OMPE host machine.
3. Check if connection settings for that printer in OMPE is correctly con-
figured.
21
92 |
Page 95

Error code Error message Troubleshooting steps
10380003 Policy already exists for
10480001 Add printer to map
10580002 Could not set the val-
10580001 Template registration
10580002 Template upgrade
10580003 Template delete failed.
10780001 No Firmware Updates
10780002 Firmware Update Poll
10780003 Firmware upgrade
10880001 Warranty information is
10880002 Warranty Update Poll
10880003 Warranty information
this printer <Policy
Name>.
failed.
ues for printer <Printer
IP>.
failed. Same version
template already present.
failed. Could not connect to Dell Cloud
Connect server.
Base template cannot
be deleted.
available.
Unable to connect to
Dell Cloud Service.
failed.
not available as service
tag(s) is not present on
Dell Cloud Service OR
Dell Cloud Service is
not responding at this
moment.
unable to connect to
Dell Cloud Service.
can't be fetched for
some of the service
tag(s) as they are not
registered in Dell Product Registration.
Check and remove the policy of the same type before adding a new policy for the same printer.
1. Check if the printer is available and managed by OMPE.
2. If the printer is deleted inadvertently from OMPE, discover the printer
again.
1. Check if the printer is accessible from the OMPE host machine.
2. Check if connection settings for that printer in OMPE is correctly con-
figured.
Check if the version number of the template being registered is same as the active template.
1. Check if the internet connection from the OMPE host machine is func-
tioning.
2. Configure proxy configurations if required.
User cannot delete the base template provided by OMPE. Custom templates added by the user can be deleted.
Start the Internet connection poll in the Notification widget.
1. Goto Settings > Proxy page to configure proxy server settings.
2. Start the internet connection poll in the Notification widget.
1. If lpr tool is used for deployment, check that ‘LPR/LPD’ port(515) and
‘Software Download’ options are enabled on the printer.
2. If curl tool is used for deployment, check that EWS password of the
printer is updated with proper values in the Connections page.
Start the Internet connection poll in the Notification widget.
1. Goto Setting->proxy page to configure proxy server settings.
2. Start the Internet connection poll in the Notification widget.
Check if printer is registered with the Dell.
Troubleshooting | 93
Page 96

22
Frequently Asked Questions
This chapter provides context wise solution for issues and concerns that users
may encounter while using OMPE. For example, to view FAQs for Alerts, scroll
down to the Alerts section in this chapter.
Installation
Q.
"I am running OMPMv2 version on my server and would like to transition to
OMPE"
To upgrade, you can run the OMPE installer on the same machine where
OMPMv2 is running. The OMPE installer will automatically detect OMPMv2 and
migrate printer data and connection settings to OMPE. After successfully
installing OMPE, you can uninstall OMPMv2.
Q.
"While installing OMPE I get an error saying both ports 80 and 8080 are in
use"
For hosting its web application, OMPE uses port 80 or 8080. To install OMPE,
either of the ports must be free. The installer checks the availability of either of
the two ports prior to continuing with setup. If you see this error please
uninstall the conflicting SW, or contact your network admin and look for a
suitable machine in which atleast one of these two ports is available.
Discovery
Q.
"I am unable to discover a printer though the printer is online and I have
entered the printer IP correctly in the discovery widget.”
a. Go to SNMP settings on Printer EWS/ Front panel.
b. Configure SNMP read community.
c. Ensure the printer is accessible from OMPE server. Use the ping
command line tool to confirm this.
d. In discovery settings of OMPE, type the correct IP address and
community name.
e. Reinitiate the discovery.
f. If the problem still persists it could be that the printer does not support
standard SNMP MIBs which OMPE expects. Contact Dell Support.
Q.
"I started the discovery but I do not see my printers in OMPE even after
waiting for a long time"
94 |
Page 97

a. If you are on a large enterprise network, to speed up the discovery it is
suggested to run multiple discoveries with smaller target ranges.
b. If the problem still persists, restart OMPE service by running
RestartOMPEService.bat from the Install folder and then reinitiate the
discovery.
Printer Status
Q.
"My OMPE reports printer as offline even when the printer is up and
connected to the network”
a. Ensure the printer is accessible from OMPE server. Use the ping
command line tool to confirm this.
b. From the navigation pane, click
Connections
c. Ensure the SNMP community name is correctly set for the printer.
d. Open the printer details widget from the list view and click
e. Wait for a few minutes to see the updated printer status.
Q.
"My OMPE reports all discovered printers as offline "
a. Ensure printer network is accessible from the OMPE server.
b. Confirm that the OMPE server is not disconnected from network.
c. From the Notification widget, start the Health Poll.
d. Wait for a few minutes to see the updated printer status.
Device Management
.
Refresh
.
Printer Details
Q.
"Many parameters in printer details widget of Dell Printers are empty."
Q.
"Set operation on all parameters in printer details widget of Dell Printers is
failing."
OMPE uses SNMP and HTTP protocols to query printers and retrieve their
current status and configuration. The SNMP interface retrieves printer status,
while the HTTP interface queries on printer EWS to retrieve configuration and
other general information of the printer. In order to retrieve parameters and set
values, the printer expects correct access details which include SNMP
community name, EWS user name and password. Follow the procedure below
to configure these access credentials.
a. From the navigation pane, click
Connections.
b. Ensure the SNMP community name is correctly set for the printer.
c. Ensure the EWS user name and password is correctly set for the printer.
Device Management
Frequently Asked Questions | 95
Page 98

d. Click
e. Open the printer details widget from the list view and click
f. Wait for a few minutes to see the updated printer status.
g. Now retry your Set operation.
Q.
"Consumable Tab on Printer Details shows Collecting Data"
OMPE uses current usage data to calculate the percentage toner remaining
and pages remaining. It is likely that OMPE has not gathered enough usage data
to calculate the forecast. This may take several days before it can calculate the
forecast. If the problem persists contact Dell Support.
Q.
"My printers in the network do not show the same level of detailed
information like other Dell printers"
It may be likely that your model is not supported in current version of OMPE. In
order to add enhanced support (Only read-only) for your model, you will have
to develop custom template. For more information on how to develop and
register custom templates, see Using custom templates section and Appendix
B: Template Components.
Test Connection
and ensure the test is successful.
Refresh
.
Firmware
Q.
"Firmware window is blank"
OMPE maintains and accesses firmware catalogue of all supported models
from Dell Cloud Connect Server. In order for OMPE to access the firmware
catalogue, administrators should configure OMPE so that it successfully
connects to this external server. Follow the instructions below to configure this
connectivity.
a. Check if you are able to access the following link on your browser:
https://s3-us-west-2.amazonaws.com/url-mapperdevtest/printers/dell/connectivity/InternetConnectivity.txt
b. Check if your enterprise network requires a HTTP proxy configuration.
Configure the HTTP proxy in the Settings window
c. In the Notification widget, click
d. Wait for a few minutes and check if the problem is resolved.
e. Contact your network administrator and ensure network firewalls do
not block traffic to Dell Cloud Connect Server.
Q.
"Firmware window does not show all the printer models in my network”
Firmware update in OMPE is only supported for Dell printer models.
Q.
"Firmware update to the printer fails even after multiple retries"
a. Check if EWS user name and password is correctly set on the printer.
Internet Connection
.
96 |
Page 99

Policy
Q.
Alerts
Q.
Q.
b. Check if firmware download is enabled on the printer.
c. From the navigation pane, click
Connections.
d. Ensure EWS user name and password is correctly set for the printer.
e. Click on Test buttons on Connection settings and ensure the test is
successful.
"Policy enforcement does not work in my OMPE"
a. Check if EWS user name and password is correctly set on the printer.
b. Open Connection Settings from the navigation panel of OMPE.
c. Ensure EWS user name and password is correctly set for the printer.
d. Click
"How do I configure OMPE to send SNMP traps as alerts from OMPE?"
a. Add OMPE host IP address as trap destination for the printers that you
b. Create an alert of type SNMP Traps in OMPE.
"I created an alert and selected enable trouble ticket option, but trouble
tickets are not created for alert conditions."
a. Confirm that you have configured the trouble ticket system to generate
b. Ensure that OMPE alert template is updated to have the same email ID
Test Connection
want to send alerts from OMPE.
tickets using email.
configured in the trouble ticketing system.
and ensure the test is successful.
Device Management
NOTE:
Files\Dell Printers\OMPE\server\webapps\ROOT\conf\alert_templates.
Q.
Q.
Copy of installed alert templates can be located at: C:\Program
"I updated trouble ticket template but the changes are not reflected in
OMPE alert screen or tickets does not contain all the fields that I had
configured in the template."
a. If the OMPE screen does not display values from updated screens,
please refresh your browser by pressing Ctrl+F5.
b. Ensure that the alert type selected matches the trouble-ticket alert
template.
c. Ensure that the variable is used in the intended context.
d. It could be possible that parameter does not have a value.
"How do I configure alerts for SNMP traps in OMPE?"
Frequently Asked Questions | 97
Page 100

a. Enable SNMP Traps on the printer.
b. Register OMPE server IP address or host name as SNMP trap receiver on
the printer.
c. Create an alert by selecting Alert Type as “SNMP Traps”.
Q.
"I am getting too many alerts from OMPE"
OMPE has inbuilt alert suppression mechanism to ensure that repeat alerts are
not sent to users. For all unresolved errors it sends repeat alert every 6 hours
and this interval is configured in the OMPE configuration database. To increase
this suppression interval, kindly contact Dell Support.
Q.
"OMPE is not sending all alerts to me."
It is likely that OMPE alert is not configured to the correct printer group. The
thresholds set may need to be reviewed. Kindly contact Dell support if you are
still unable to get all email alerts.
Reports
Q.
"I am unable to open a generated report."
a. Ensure the latest version of Adobe Acrobat reader is available in the
machine where the OMPE is accessed from.
b. Ensure popup blocker is disabled for the OMPE site.
Q.
"Scheduled reports are not reaching my mail box."
a. Ensure that the SMTP settings are correctly configured in OMPE.
b. Follow the instructions provided under Alerts section of FAQ.
Warranty
Q.
"OMPE does not show warranty information for some of my printers"
OMPE shows warranty information for only registered Dell products. If you are
able to view warranty for some but not all products in your network, contact
Dell Support. If you are unable to view warranty information for any of the
printers, then check your internet connectivity status from OMPE server.
Contact your network administrator and ensure that the traffic to Dell warranty
server is not blocked.
Templates
Q.
"OMPE shows Available under Update column of Template Window."
A template enables OMPE to retrieve and set values for printer parameters. Dell
maintains a repository of the latest templates on Dell Cloud Connect server.
OMPE running in your premise polls this server on a periodic basis and notifies
98 |
 Loading...