

Page 1

Dell Premier Rechargeable
Wireless Mouse
MS7421W
User’s Guide
Regulatory model: MS7421Wc/RG-1216
Page 2

Notes, Caution, and Warnings
NOTE: A NOTE indicates important information that helps you make
better use of your computer.
CAUTION: A CAUTION indicates potential damage to hardware or loss
of data if instructions are not followed.
WARNING: A WARNING indicates a potential for property damage,
personal injury, or death.
Copyright
Dell Inc. or its subsidiaries. Other trademarks may be trademarks of their respective owners.
2020 – 12
Rev. A00
© 2020 Dell Inc. All rights reserved. Dell, EMC, and other trademarks are trademarks of
Page 3

Contents
What’s in the box ........................... 4
Features .................................. 5
Top view . . . . . . . . . . . . . . . . . . . . . . . . . . . 5
Bottom view . . . . . . . . . . . . . . . . . . . . . . . . . 6
Shortcut gestures ...........................7
Dell Peripheral Manager ...................... 8
Setting up your wireless mouse ................ 9
Pairing your wireless mouse...................11
Pairing with a USB device . . . . . . . . . . . . . . . . . 11
Pairing your wireless mouse using Bluetooth . . . . . . . 12
Pairing device three using Bluetooth . . . . . . . . . . . 14
Charging your wireless mouse .................16
Specifications..............................17
Troubleshooting ............................18
Statutory information....................... 22
Page 4
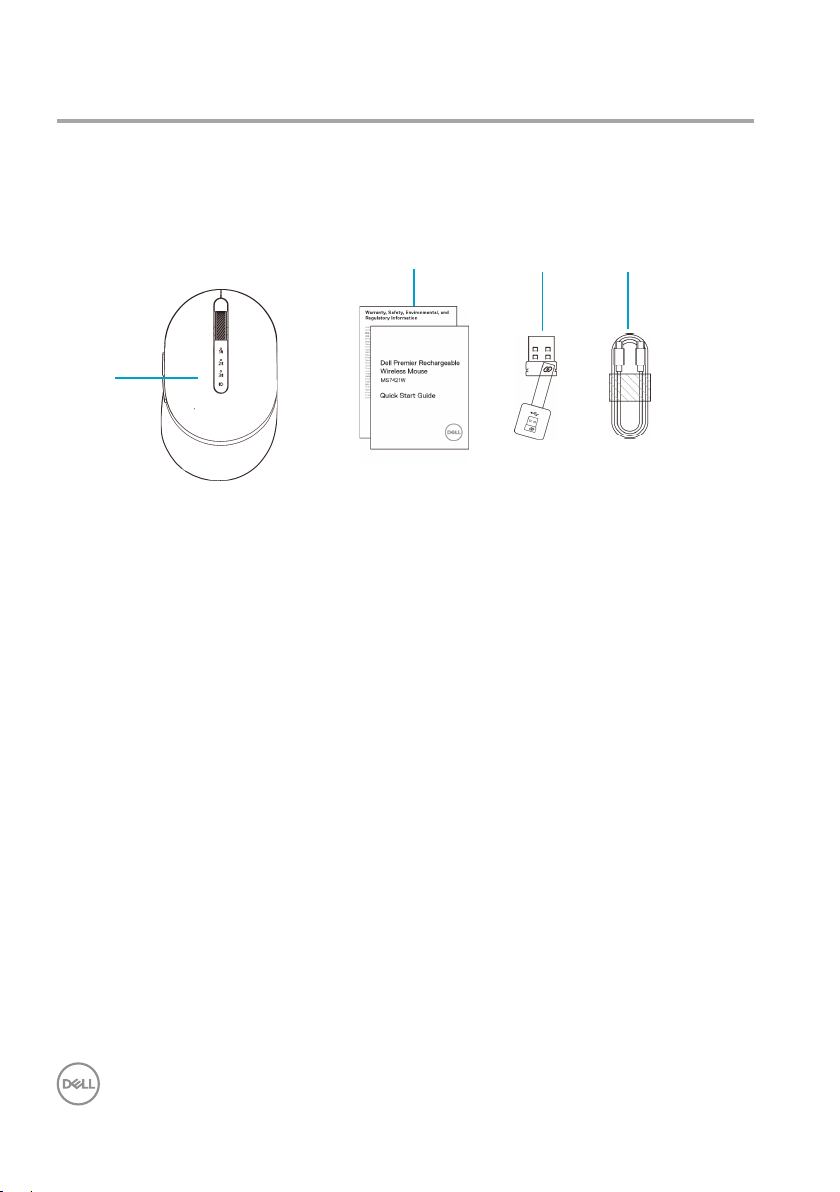
What’s in the box
1
1 Wireless mouse
2 Documents
2
3 Dell Universal Dongle
4 USB-C cable for recharging
3
4
4 │ What’s in the box
Page 5
Features
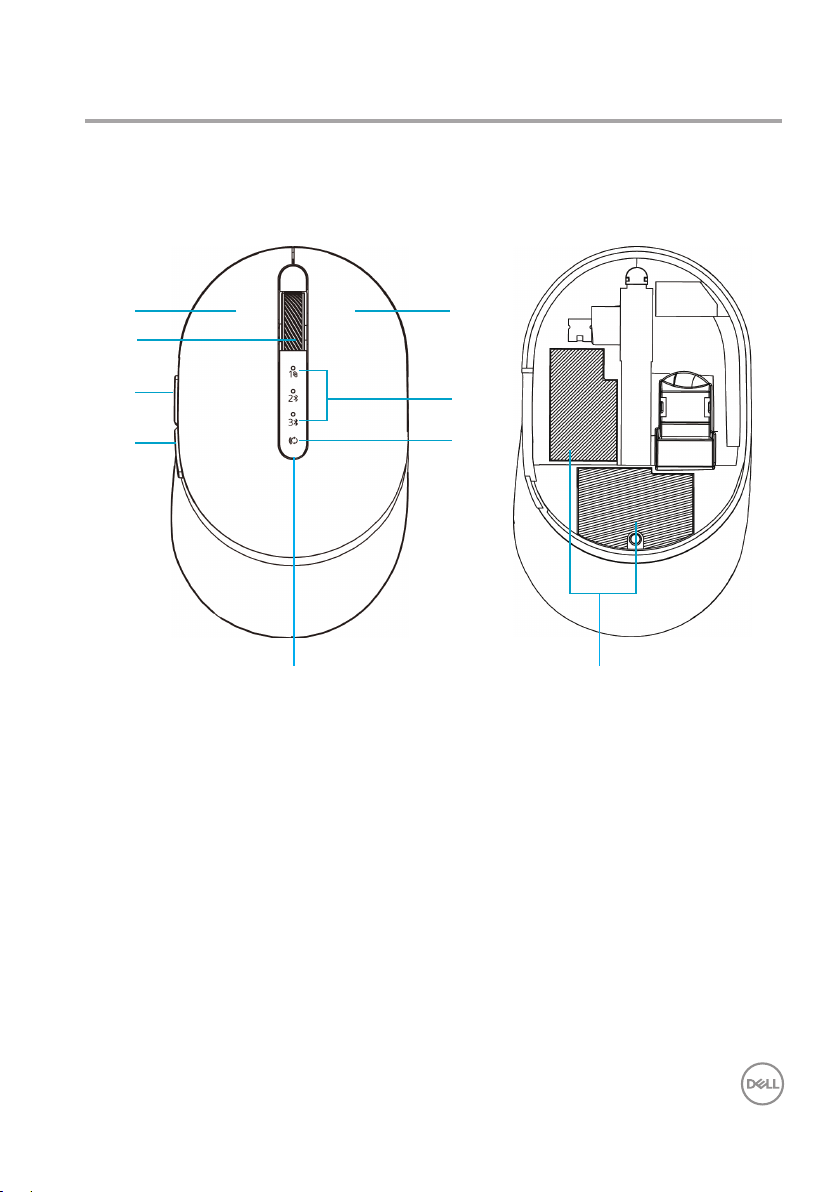
Top view
1
3
4
5
Left button
1
Right button
2
Scroll wheel
3
Forward button
4
Backward button
5
2
6
7
8
6 Connection-mode lights
• White LED blinking: device is not connected to computer
• LED lighting solid white: device is connected to computer
7 Connection-mode button
8 Charging/low battery lights
• White LED breathing: battery in charging
• Amber LED pulsing: device battery is low, need to recharge.
9 PPID/Regulatory labels
9
Features │ 5
Page 6
Features
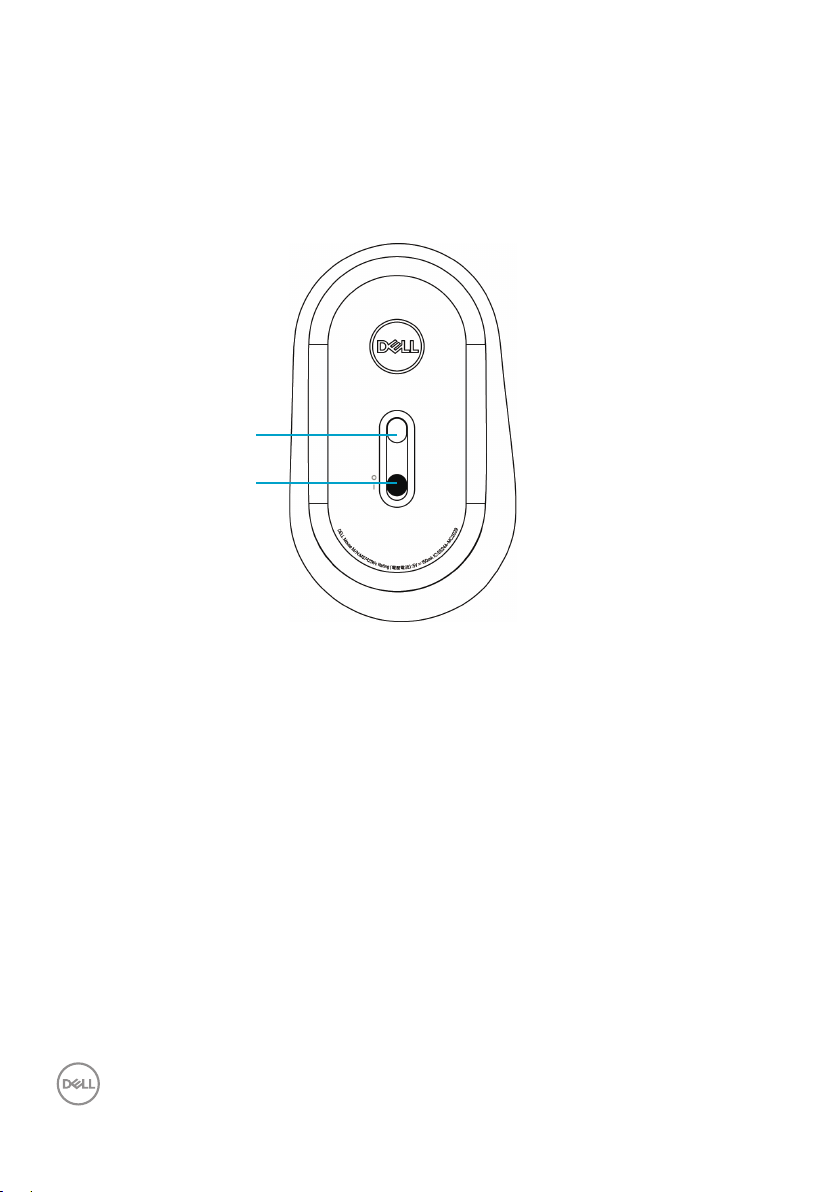
Bottom view
1
2
1 Optical sensor 2 Power switch
6 │ Features
Page 7
Shortcut gestures
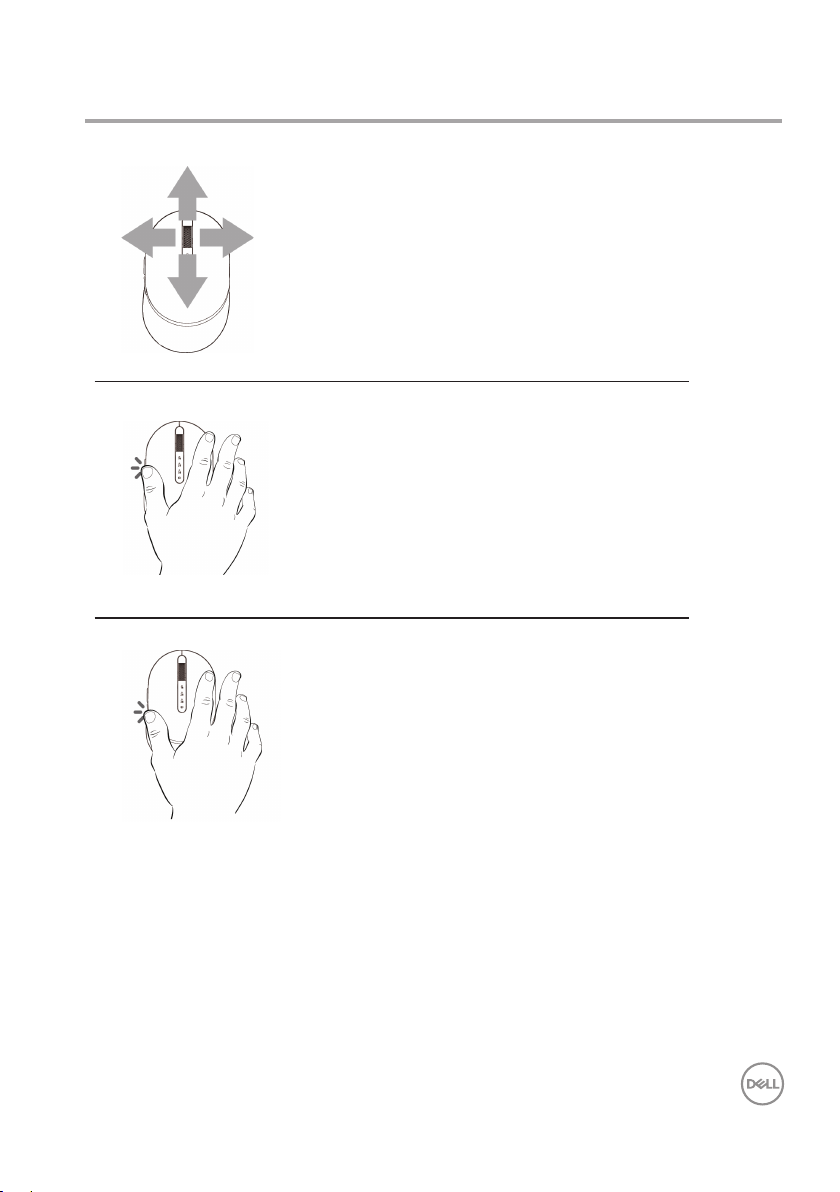
Scroll and Tilt
4-way scroll
Forward function
Press the front button on the side.
Backward function
Press the rear button on the side.
Shortcut gestures │ 7
Page 8

Dell Peripheral Manager
Dell Peripheral Manager software enables you to perform the following:
• Assign program shortcuts to device programmable buttons or keys through
the Action tab.
• View device information such as firmware version and battery status through the
Info tab.
• Upgrade the latest firmware updates on your devices.
• Pair additional devices through the Dell Universal Dongle or directly to your
computer through Bluetooth.
• Change device DPI setting by selecting Device Settings > DPI Setting at the
down-right corner of the window.
• Swap mouse button by selecting Wndows Settings > Primary Mouse Button
at the down-right corner of the window.
For more information, see
at www.dell.com/support
Dell Peripheral Manager User’s Guide
on the product page
8 │ Dell Peripheral Manager
Page 9
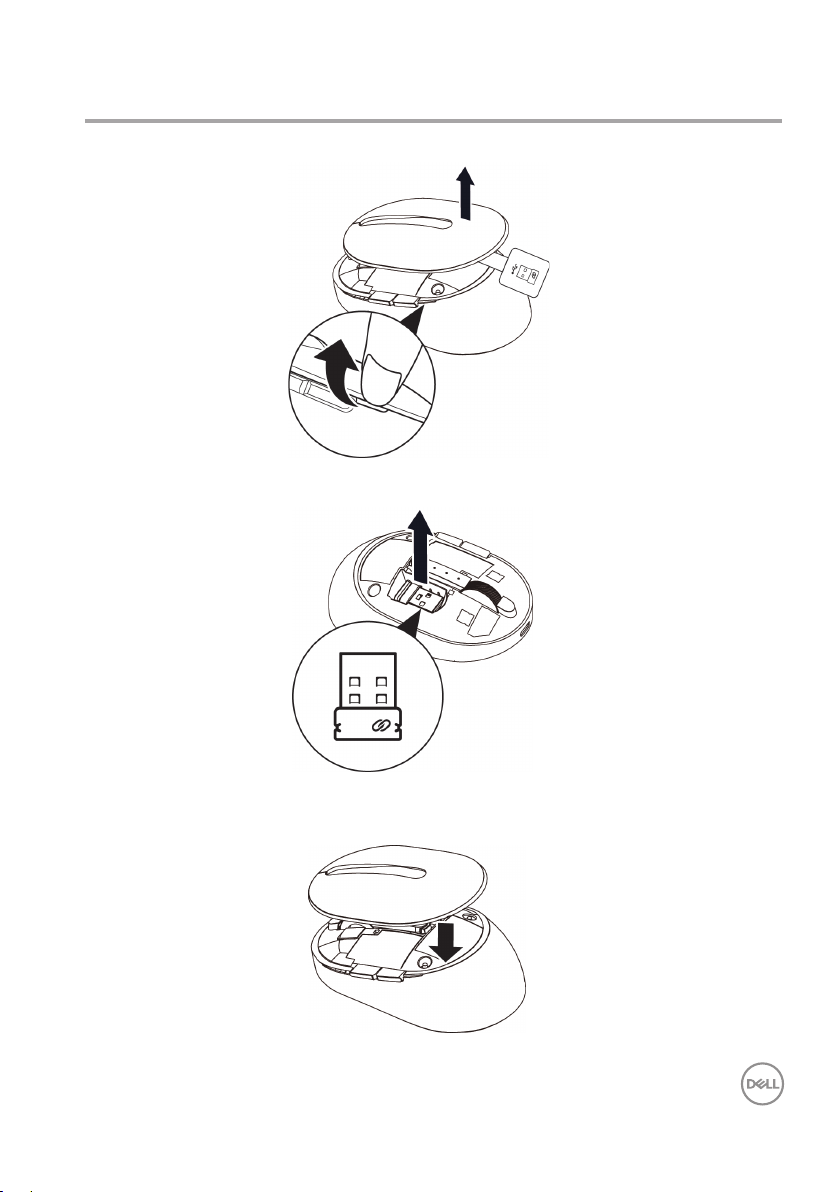
Setting up your wireless mouse
1. Locate the slot on the side of the mouse cover. Using your ngertip, pry open the cover.
2. Remove the Dell Universal Dongle from its compartment.
3. Replace the mouse cover.
Setting up your wireless mouse │ 9
Page 10
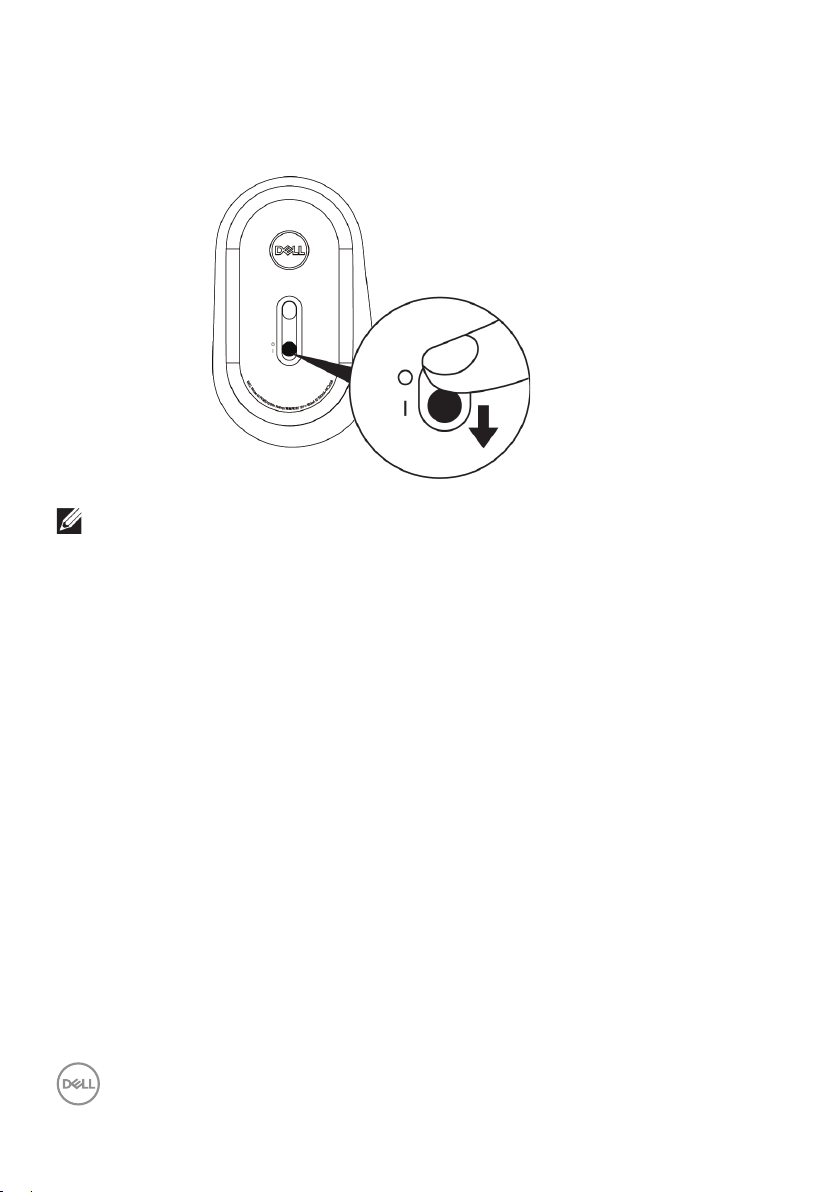
Setting up your wireless mouse
4. Slide the power switch down to turn on the wireless mouse.
NOTE: Ensure that the distance between your computer and mouse is within
ten meters.
10 │ Setting up your wireless mouse
Page 11
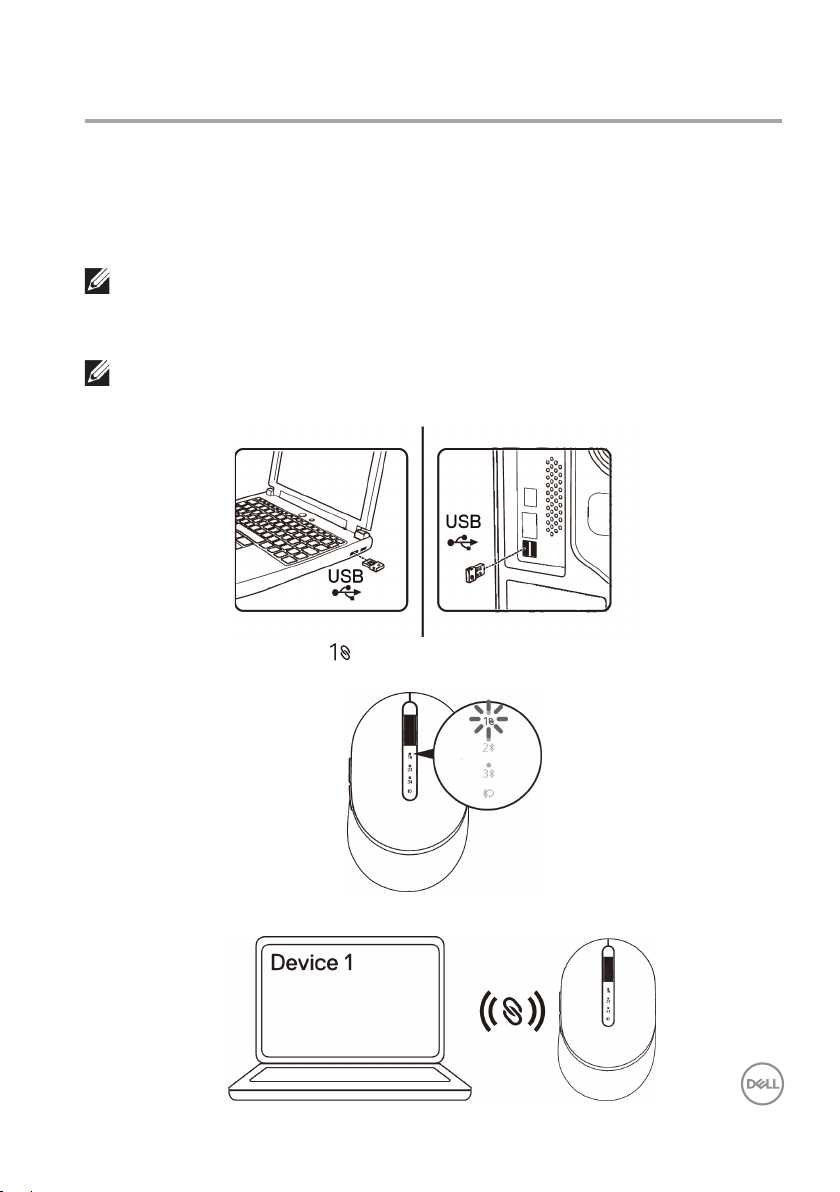
Pairing your wireless mouse
Your Dell wireless mouse can be paired via the Dell Universal Dongle or direct
Bluetooth connection. You can pair and switch between a laptop, desktop, and a
compatible mobile device.
Pairing with the Dell Universal Dongle
NOTE: You can connect a device to your wireless mouse using the Dell Peripheral
Manager.
1. Plug the Dell Universal Dongle into the USB port on your computer.
The Dell Universal Dongle is pre-paired with your wireless mouse
NOTE:
in the factory.
Laptop Desktop
2. The connection-mode light ( ) on the wireless mouse turns on to indicate the Dell
Universal pairing, and then turns o.
3. The wireless mouse is paired with your Dell Universal Dongle.
Pairing your wireless mouse │ 11
Page 12
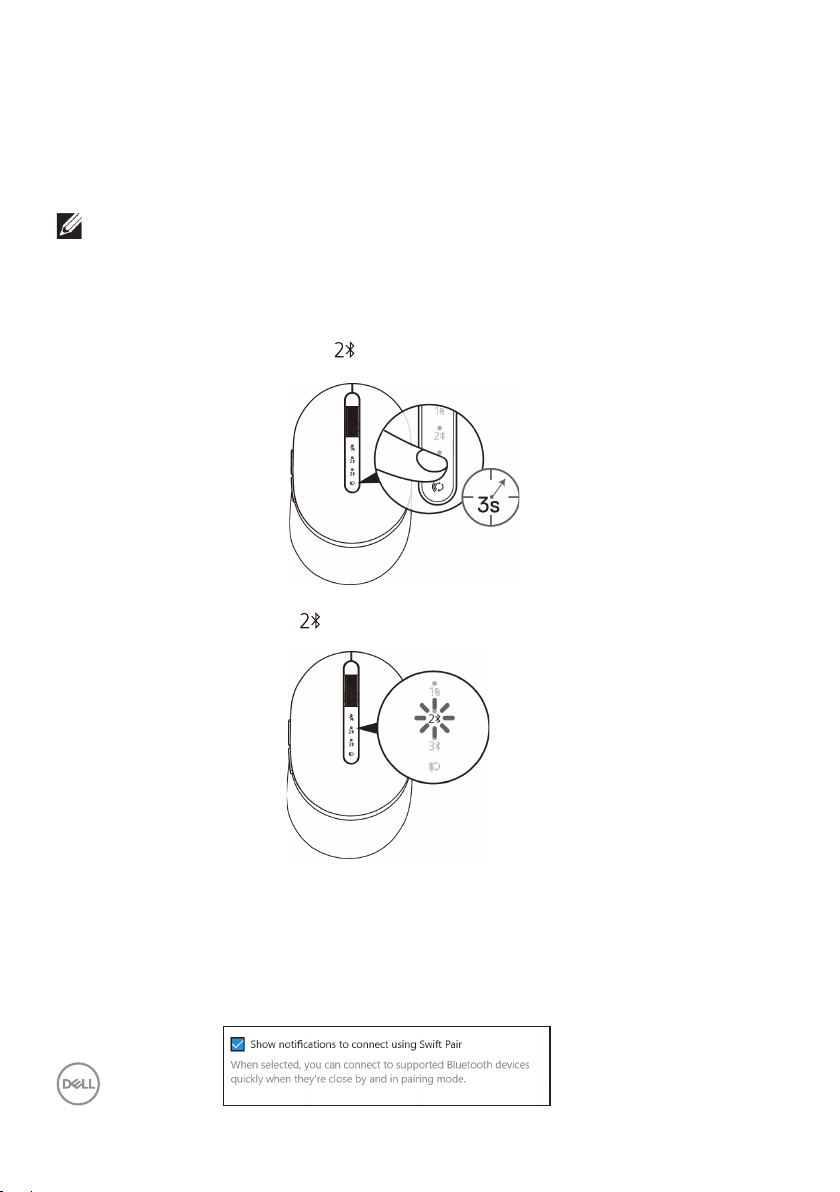
Pairing your wireless mouse using Bluetooth
You can connect up to two devices with your wireless mouse using Bluetooth.
NOTE: Before pairing your wireless mouse using Bluetooth, ensure that you
unpair the inactive devices on your computer, and update the Bluetooth driver
to the latest version on your computer. For more information, see Drivers &
Downloads at https://www.dell.com/support
1. Press the connection-mode button twice on your wireless mouse (within 3 seconds)
until the connection-mode light ( ) turns on indicating that the second Bluetooth
connection is selected.
2. The connection-mode light ( ) blinks for 3 minutes, indicating your wireless mouse is in
the pairing mode.
3. Pair your wireless mouse with your Bluetooth-enabled computer.
Swift Pair:
a. In Windows Search, type Bluetooth.
b. Click Bluetooth and other devices settings. The Settings window appears.
c. Ensure that the “Show notifications to connect using Swift Pair” box is checked.
12 │ Pairing your wireless mouse
Page 13
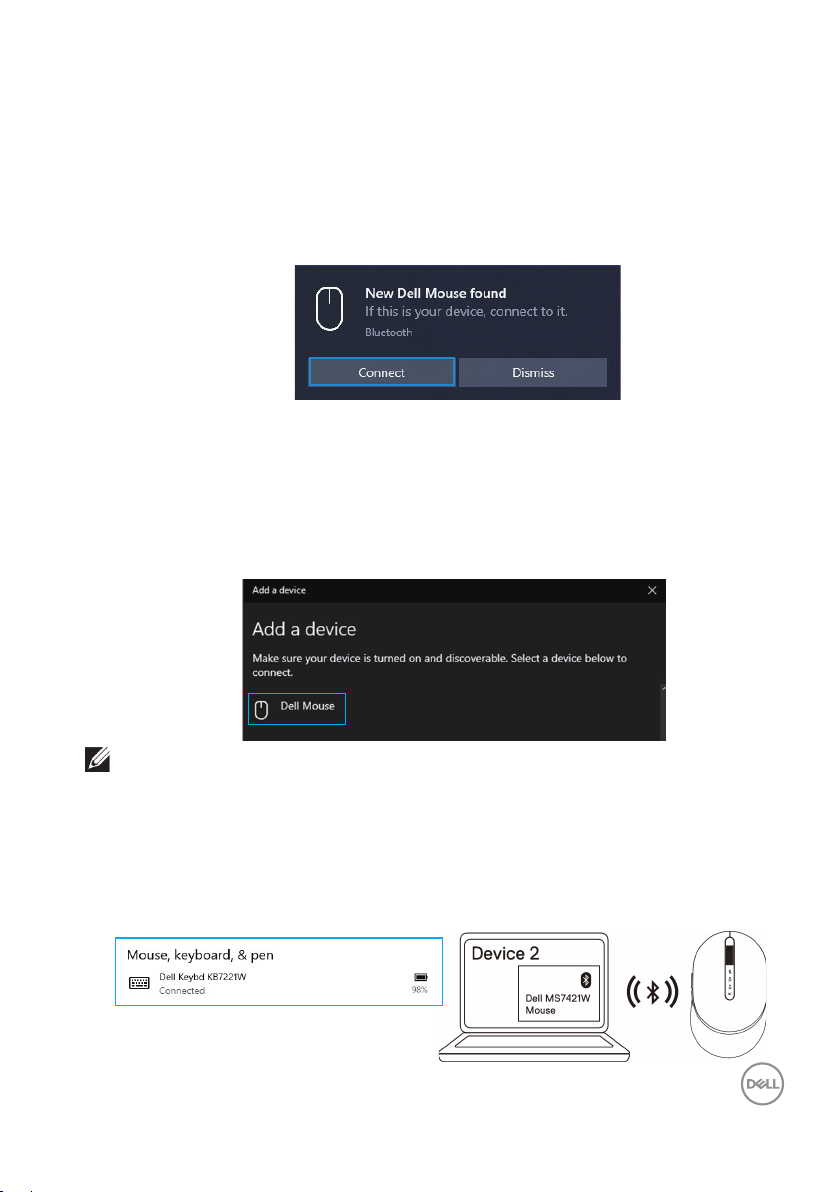
d. Ensure that the Bluetooth is turned on.
e. Place your wireless mouse near your computer. The New Dell Mouse found
window appears.
f. Click Connect and confirm the pairing process on both wireless mouse and
your computer.
1. Pair your wireless mouse with your Bluetooth-enabled computer.
Add Device:
a. In Windows Search, type Bluetooth.
b. Click Bluetooth and other devices settings. The Settings window appears.
c. Ensure that the Bluetooth is turned on.
d. Click Add Bluetooth or other device > Bluetooth.
e. From the list of available devices, click Dell Mouse.
NOTE: If Mouse MS7421W is not listed, ensure that the pairing mode is enabled
on the wireless mouse.
4. Conrm that both the wireless mouse and the device are paired.
The second Bluetooth connection light turns solid white for 3 seconds to confirm
the connection is established, and then turns off. After the wireless mouse and a device
are paired, they connect automatically when Bluetooth is enabled and they are within
Bluetooth range.
Pairing your wireless mouse │ 13
Page 14
Pairing device three using Bluetooth
NOTE: You can connect a third device to your wireless mouse using Bluetooth.
NOTE: Before pairing your wireless mouse using Bluetooth, ensure that you
unpair the inactive devices on your computer, and update the Bluetooth driver
to the latest version on your computer. For more information, see Drivers &
Downloads at https://www.dell.com/support
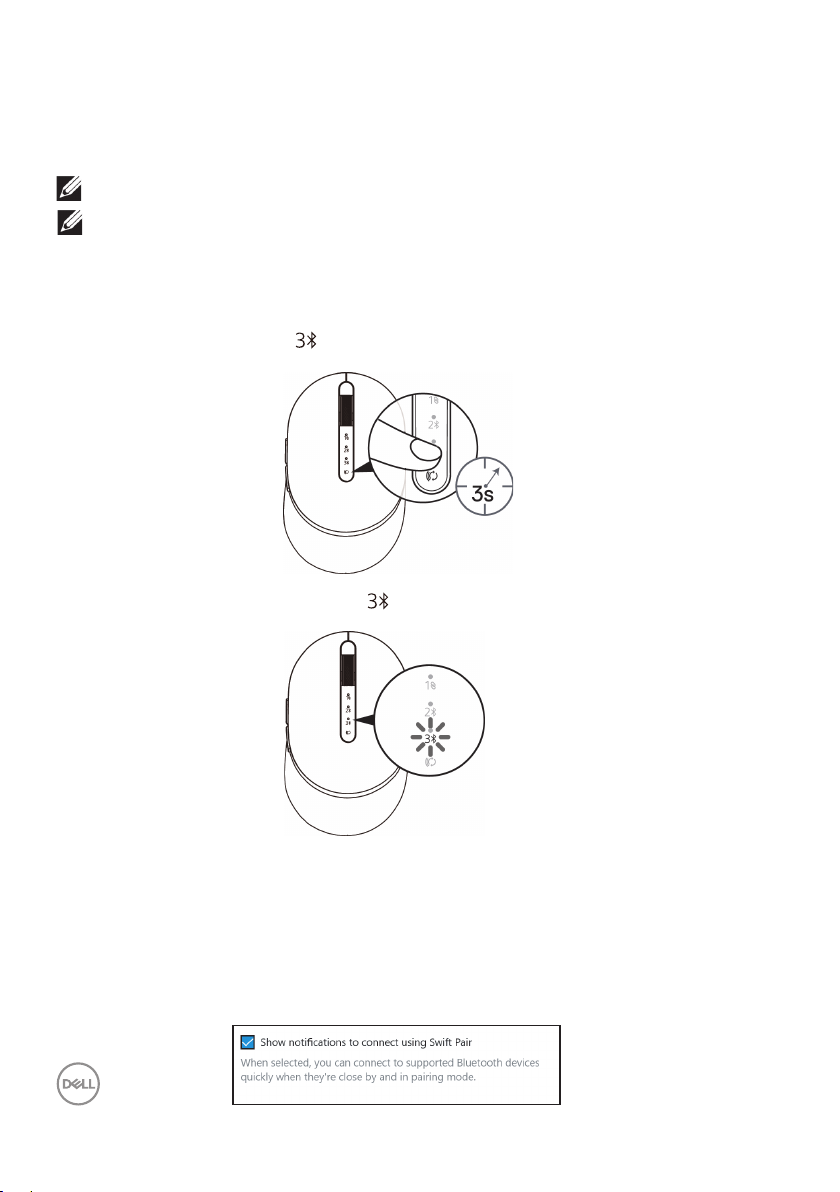
1. Press the connection-mode button twice on your wireless mouse (within 3 seconds) until
the connection-mode light ( ) turns on indicating that the third Bluetooth connection
is selected.
2. The third Bluetooth connection light ( ) starts blinking to conrm the pairing mode
is enabled.
3. Pair your wireless mouse with your Bluetooth-enabled computer.
Swift Pair:
a. In Windows Search, type Bluetooth.
b. Click Bluetooth and other devices settings. The Settings window appears.
c. Ensure that the “Show notifications to connect using Swift Pair” box is checked.
d. Ensure that the Bluetooth is turned on.
14 │ Pairing your wireless mouse
Page 15
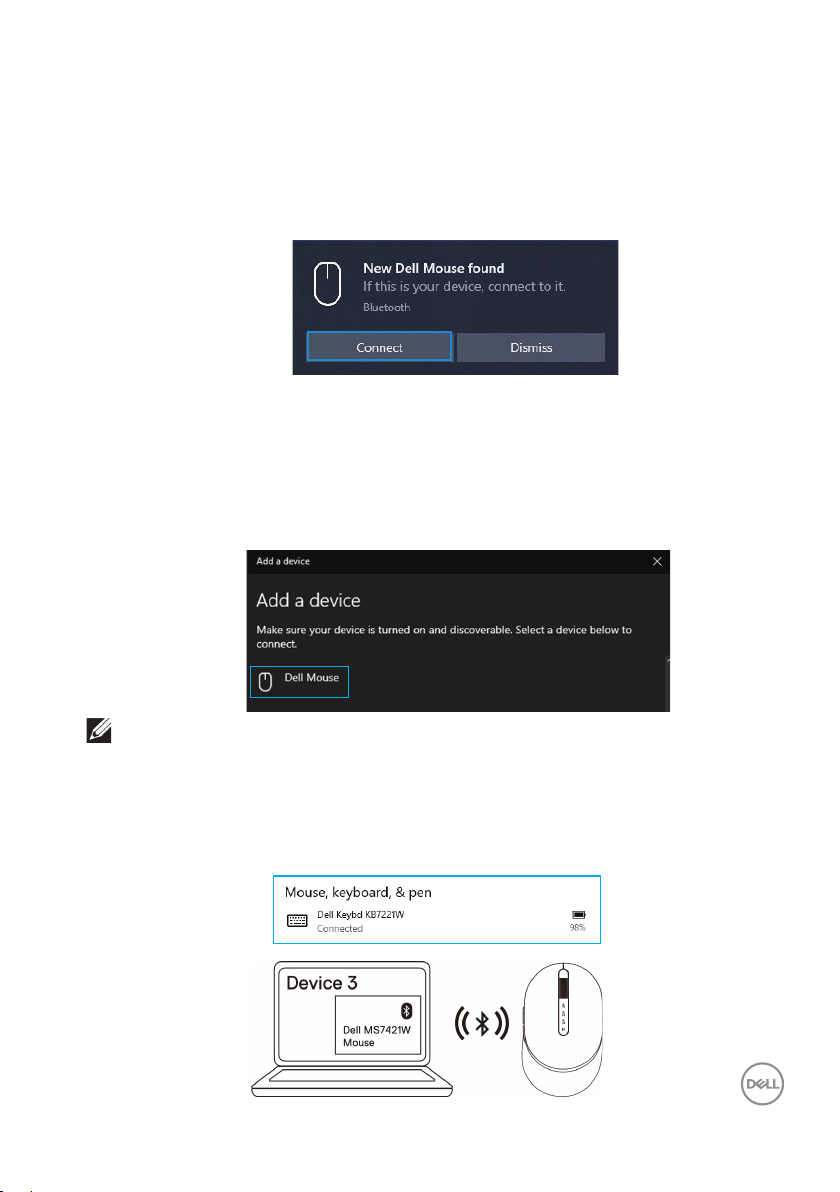
e. Place your wireless mouse near your computer. The New Dell Mouse found
window appears.
f. Click Connect and confirm the pairing process on both wireless mouse and
your computer.
1. Pair your wireless mouse with your Bluetooth-enabled computer.
Add Device:
a. In Windows Search, type Bluetooth.
b. Click Bluetooth and other devices settings. The Settings window appears.
c. Ensure that the Bluetooth is turned on.
d. Click Add Bluetooth or other device > Bluetooth.
e. From the list of available devices, click Dell Mouse.
NOTE: If Mouse MS7421W is not listed, ensure that the pairing mode is enabled
on the wireless mouse.
4. The third Bluetooth connection light turns solid white for 3 seconds to conrm the
connection is established then dims o. After the wireless mouse and a device are paired,
they connect automatically when Bluetooth is enabled and they are within Bluetooth
range.
Pairing your wireless mouse │ 15
Page 16
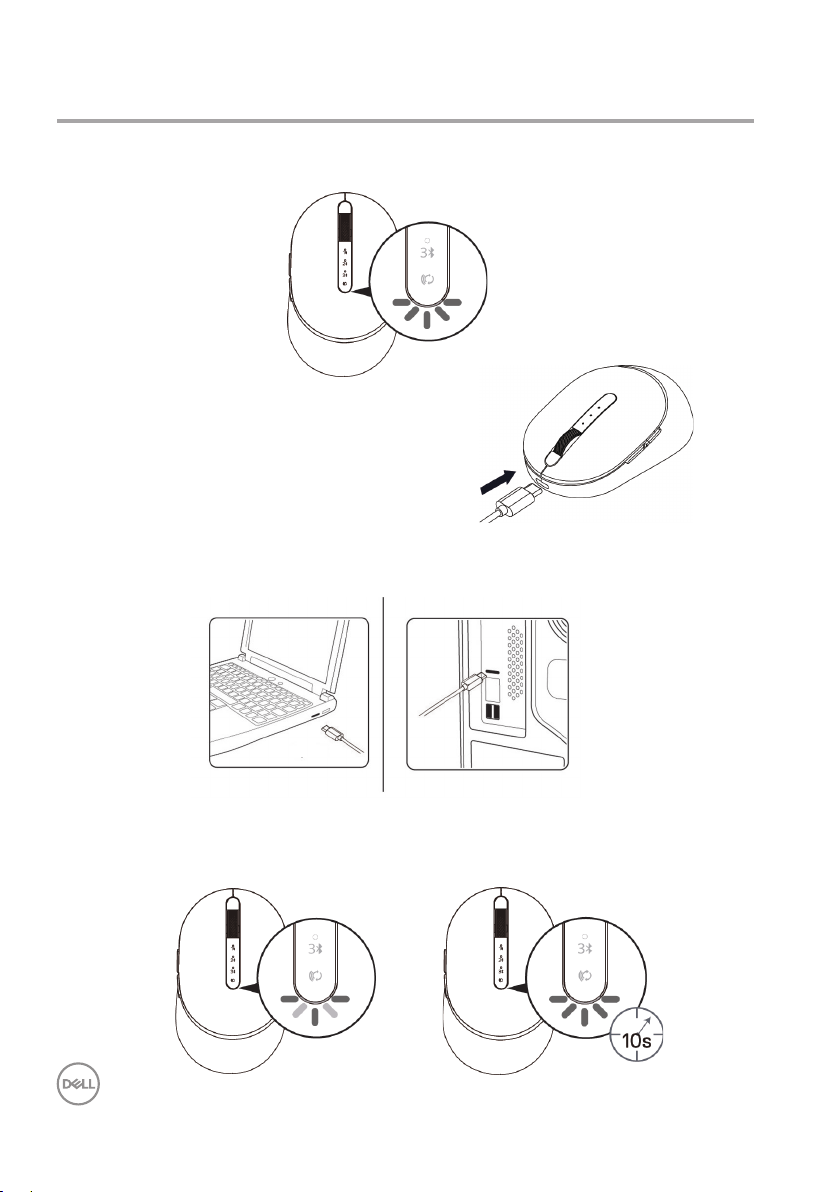
Charging your wireless mouse
1. When the amber LED of mouse blinks, you need to charge your wireless mouse.
2. Connect the USB-C cable to your wireless mouse.
3. Connect the USB-C cable to your laptop or desktop computer
Laptop
4. Battery charging
The battery LED will be breathing white to indicate charging and will turn solid white for
10sec to indicate charge completed
16 │ Charging your wireless mouse
Desktop
Page 17

Specifications
General
Mouse model number MS7421W
Connection type 2.4 GHz Wireless & Bluetooth dual
mode technology
Supported operating systems
(2.4 GHz)
Supported operating systems
(Bluetooth)
• Windows 10/8/7/XP
• Server 2008/Server 2012
• Linux 6.x, Ubuntu, Free DOS,
• Chrome and Android
• MAC OS
• Windows 10/8
• Chrome and Android
• MAC OS
Electrical
From USB host (Operating) 5 V
Battery Voltage (Operating) 3.6 V to 4.2 V
Battery Life Approximately 6 months
Battery Requirements Li-ion polymer Battery
Physical characteristics
Weight 80.20 g +/-3 g (with dongle)
Dimensions:
• Length
• Width
• Height
101.76 mm (4.0 in.)
61.88 mm (2.44 in.)
35.44 mm (1.40 in.)
Environmental
Temperature:
• Operating
• Storage
Storage humidity 95% maximum relative humidity;
0°C to 40°C (32°F to 104°F)
-40°C to 65°C (-40°F to 149°F)
non-condensing
2.4 GHz/BLE Wireless
Radio Transmission Bi-directional communication
(Transceiver)
Range Up to 10 meters
Specifications │ 17
Page 18

Troubleshooting
Problems Possible causes Possible solutions
Unable to use the
wireless mouse
The white LED indicator
at top of the wireless
mouse does not light
up when the wireless
mouse is turned on.
1. Check the battery level.
This mouse uses a
rechargeable battery, please
ensure that the battery is fully
charged.
2. Turn the wireless mouse off,
and then turn on again. Check
if the battery status light
amber pulsing for 5 sec then
dim off, flashing amber,
indicating that the battery
power is low. If the battery is
fully depleted, the batterystatus light will not turn on.
3. Ensure that the Dell Universal
Dongle is directly connected
to your computer.
Avoid using the port replicators,
USB hubs, and so on.
4. Change the USB port. Insert
the Dell Universal Dongle into
another USB port
computer.
on your
18 │ Troubleshooting
Page 19

Problems Possible causes Possible solutions
Unable to pair the
wireless mouse
to the computer
using Bluetooth
The Bluetooth icon on
the computer does not
light up when connecting
the wireless mouse to the
computer.
1. Check the battery level.
This wireless mouse uses a
rechargeable battery, please
ensure that the battery is fully
charged.
2. Turn the wireless mouse off,
and then turn it on again.
Check if the battery-status
light is flashing amber,
indicating that the battery
power is low. If the battery
is fully depleted, the batterystatus light will not turn on.
3. Restart your computer.
4. Check the operating system is
Windows 10/Windows 8/
Chrome/Android.
5. Ensure that the wireless
mouse is set to Bluetooth
Low Energy (BLE) mode
in your computer.
For more information, see the
documentation that came with
your computer.
6. Turn off then on, and then
turn on the Bluetooth.
Low Energy (BLE) mode in
your computer.
For more information, see the
documentation that came
with your computer.
Troubleshooting │ 19
Page 20

Problems Possible causes Possible solutions
Mouse pointer
does not move
Left/right buttons
does not work
Unable to pair
the wireless
mouse with the
computer
The wireless mouse
pointer is not responding
No response when the
left or right mouse button
is pressed
Wireless pairing error
message is received
while pairing the wireless
mouse with the computer
1. Check the battery level
This wireless mouse uses a
rechargeable battery, please
ensure that the battery is fully
charged.
2. Turn the wireless mouse off,
and then turn it on.
Check if the battery-status
light is flashing amber ten
times, indicating that the
battery power is low. If the
battery is fully depleted, the
battery-status light will not
turn on.
3. Restart your computer.
1. Check the battery level.
This wireless mouse uses a
rechargeable battery, please
ensure that the battery is fully
charged.
20 │ Troubleshooting
Page 21

Problems Possible causes Possible solutions
Unable to pair the
wireless mouse
with the computer
Wireless
connection is lost
Wireless pairing error
message is received
while pairing the wireless
mouse with the computer
Previously paired mouse
no longer works on the
computer
2. Turn the wireless mouse off,
and then turn it on again.
Check if the battery-status
light is flashing amber ten
times, indicating that the
battery power is low. If the
battery is fully depleted, the
battery-status light will not
turn on.
3. Restart your computer.
1. Ensure that the Dell Universal
Dongle is connected directly
to your computer.
Avoid using the port
replicators, USB hubs,
and so on.
2. Change the USB port.
Insert the Dell Universal
Dongle into another USB
port on your computer.
Troubleshooting │ 21
Page 22

Statutory information
Warranty
Limited warranty and return policies
Dell-branded products carry three-year limited hardware warranty. If purchased
together with a Dell system, it will follow the system warranty.
For U.S. customers:
This purchase and your use of this product are subject to Dell’s end user
agreement, which you can find at Dell.com/terms. This document contains a
binding arbitration clause.
For European, Middle Eastern and African customers:
Dell-branded products that are sold and used are subject to applicable national
consumer legal rights, the terms of any retailer sale agreement that you have
entered into (which will apply between you and the retailer) and Dell’s end user
contract terms.
Dell may also provide an additional hardware warranty—full details of the Dell end
user contract and warranty terms can be found by going to Dell.com, selecting
your country from the list at the bottom of the “home” page and then clicking the
“terms and conditions” link for the end user terms or the “support” link for the
warranty terms.
For non-U.S. customers:
Dell-branded products that are sold and used are subject to applicable national
consumer legal rights, the terms of any retailer sale agreement that you have
entered into (which will apply between you and the retailer) and Dell’s warranty
terms. Dell may also provide an additional hardware warranty—full details of
Dell’s warranty terms can be found by going to Dell.com, selecting your country
from the list at the bottom of the “home” page and then clicking the “terms and
conditions” link or the “support” link for the warranty terms.
22 │ Statutory information
 Loading...