

Page 1
Dell™ Workgroup Laser Printer M5200
Owner’s Manual
Look Inside For:
• Network Printing
• Installing Printer Drivers
• Installing Memory Cards
• Loading Paper
• Using Your Printer
www.dell.com/supplies | support.dell.com
Page 2

Order toner cartridges
Dell™ toner cartridges are available only through Dell. You can order toner cartridges online at
www.dell.com/supplies or by phone.
USA 877-465-2968
(877-Ink2You)
Canada 877-501-4803
Mexico 001-800-210-7607
Puerto Rico 800-805-7545
UK 0870 907 4574
Ireland 1850 707 407
France 0825387247
Italy 800602705
Spain 902120385
Germany 0800 2873355
Austria 08 20 - 24 05 30 35
Netherlands 020 - 674 4881
Belgium 02.713 1590
Sweden 08 587 705 81
Norway 231622 64
Denmark 3287 5215
Finland 09 2533 1411
Switzerland 0848 801 888
Page 3
Dell™ Workgroup Laser Printer M5200
1
2
8
7
3
4
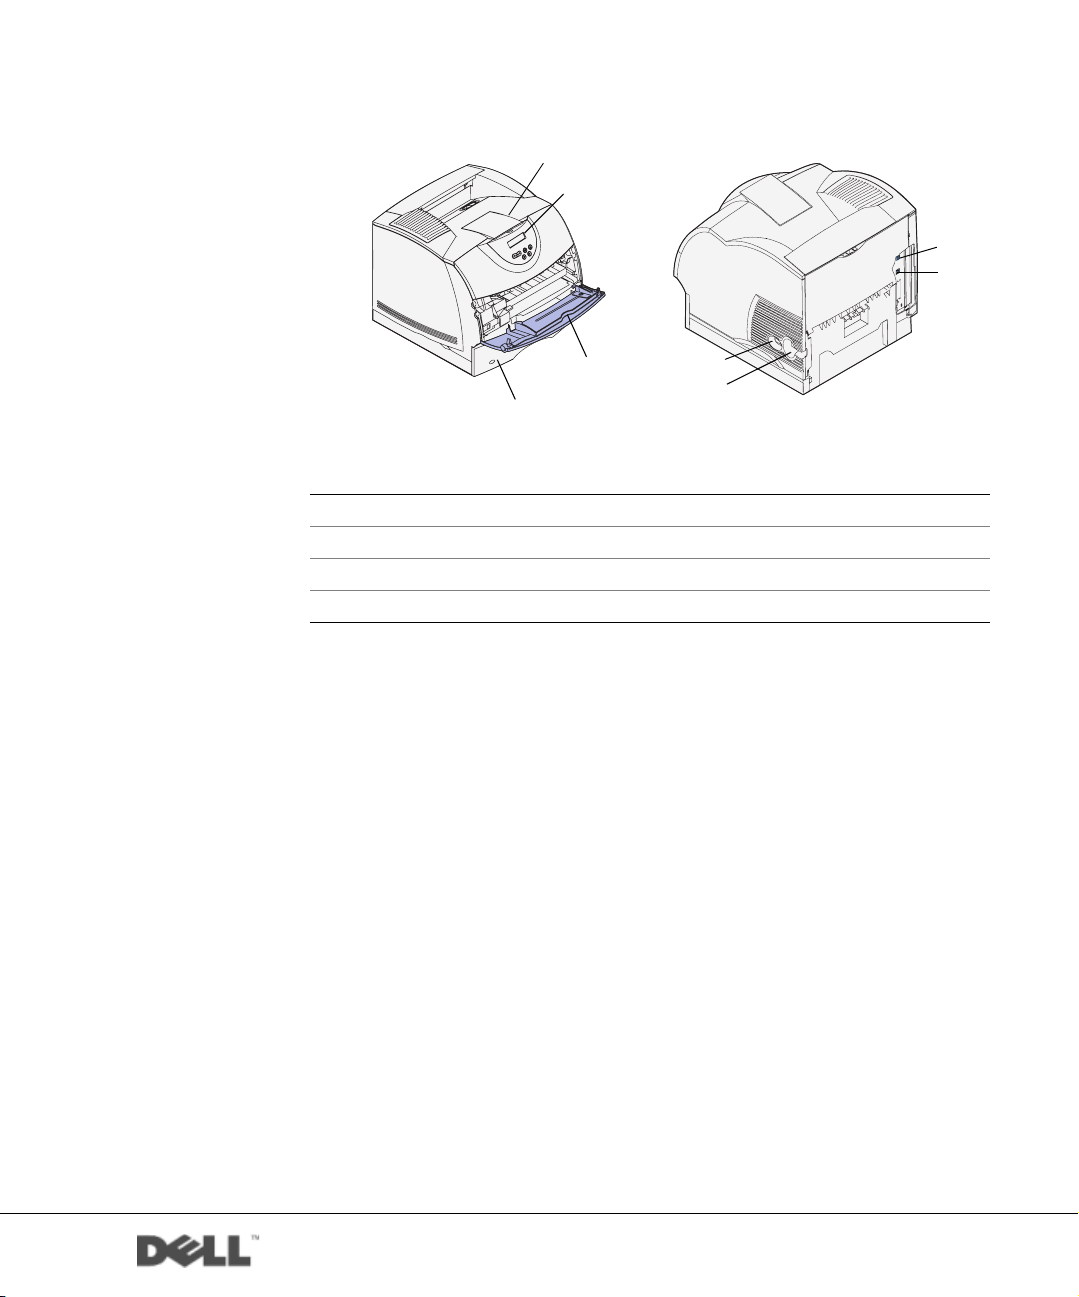
1 Standard output bin 5 On/Off switch
2 Operator panel 6 Power cord connector
3 Multipurpose feeder 7 Ethernet port
4 Standard tray (500 sheets) 8 USB port
5
6
If you purchased additional options, for example, paper trays, a duplex unit,
or an envelope feeder, refer to the User’s Guide (Start → Programs → Dell
Printers → Dell Laser Printer M5200 →User’s Guide) for installation
instructions.
www.dell.com/supplies | support.dell.com
Page 4

Notes, Notices, and Cautions
NOTE: A NOTE indicates important information that helps you make better
use of your computer.
NOTICE: A NOTICE indicates either potential damage to hardware or loss of
data and tells you how to avoid the problem.
CAUTION: A CAUTION indicates a potential for property damage,
personal injury, or death.
____________________
Information in this document is subject to change without notice.
© 2003 Dell Computer Corporation. All rights reserved.
Reproduction in any manner whatsoever without the written permission of Dell Computer
Corporation is strictly forbidden.
Trademarks used in this text: Dell and DELL logo are trademarks of Dell Computer Corporation;
Microsoft and Windows are registered trademarks of Microsoft Corporation; Novell and NetWare
are registered trademarks of Novell, Inc.; UNIX is a registered trademark of The Open Group in the
United States and other countries.
Other trade marks and trade n ames may be used in this document to refer to either t he entities claim ing
the marks and names of their products. De ll Computer Corporation disclaims any proprietary intere st
in trademarks and trade names other than its own.
UNITED STATES GOVERNMENT RESTRICTED RIGHTS
This software and documentation are provided with RESTRICTED RIGHTS. Use, duplication or
disclosure by the Government is subject to restrictions as set forth in subparagraph (c)(1)(ii) of the
Rights in Technical Data and Computer Software clause at DFARS 252.227-7013 and in applicable
FAR provisions: Dell Computer Corporation, One Dell Way, Round Rock, Texas, 78682, USA.
FCC emissions information
This equipment has been tested and found to comply with the limits for a Class B digital device, pursuant
to Part 15 of the FCC rules. Refer to the Drivers and Utilities
CD for details.
Page 5

Contents
1 Set up for network printing
Selecting your printer network setup . . . . . . . . . . . . . . . 12
Attaching locally to a print server
Complete Microsoft Plug and Play Wizard
Installing drivers in a Linux environment
Installing drivers in a Novell environment . . . . . . . . . . . . 18
Set up the queue on the print server . . . . . . . . . . . . . . . 18
Install printer drivers on one client computer
Attaching directly to the network (print server)
Locate the IP address
Set up the queue on the print server
Install printer drivers on one or more remote client computers . . 22
Attaching directly to the network (no print server) . . . . . . . . 23
Locate the IP address
Assign an IP Address . . . . . . . . . . . . . . . . . . . . . . 23
Install printer drivers . . . . . . . . . . . . . . . . . . . . . . 25
Install printer drivers on one client computer
. . . . . . . . . . . . . . . . . . . . . . 20
. . . . . . . . . . . . . . . . . . . . . . 23
. . . . . . . . . . . . . . . . . 13
2 Install optional memory cards
Accessing the printer system board . . . . . . . . . . . . . . . . 28
. . . . . . . . . . . 13
. . . . . . . . . . . . 18
. . . . . . . . . . 19
. . . . . . . . . . 20
. . . . . . . . . . . . . . . 21
. . . . . . . . . . 26
Installing printer memory . . . . . . . . . . . . . . . . . . . . . 31
Replacing the shield
. . . . . . . . . . . . . . . . . . . . . . . . 34
Contents 5
Page 6

3 Set up for local printing
Installing printer drivers . . . . . . . . . . . . . . . . . . . . . 36
4 Load paper
Loading paper and transparencies . . . . . . . . . . . . . . . . 46
In the standard tray
In the multipurpose feeder
. . . . . . . . . . . . . . . . . . . . . . 46
. . . . . . . . . . . . . . . . . . . 49
Loading envelopes
In the multipurpose feeder
5 Use your printer
Changing the language on the operator panel . . . . . . . . . . 56
Using the operator panel to change printer settings . . . . . . . 56
Restore factory default settings
Disable menus . . . . . . . . . . . . . . . . . . . . . . . . . 58
Printing a job . . . . . . . . . . . . . . . . . . . . . . . . . . . 60
Canceling a job from the printer operator panel
Utilizing additional software tools . . . . . . . . . . . . . . . . 61
Status Monitor
Status Monitor Center . . . . . . . . . . . . . . . . . . . . . 61
Printing Status window
Dell Toner Reorder Window . . . . . . . . . . . . . . . . . . 62
Dell Printer Software Uninstall . . . . . . . . . . . . . . . . 62
Driver Profiler
. . . . . . . . . . . . . . . . . . . . . . . . . 53
. . . . . . . . . . . . . . . . . . . 53
. . . . . . . . . . . . . . . . 57
. . . . . . . . . 60
. . . . . . . . . . . . . . . . . . . . . . . . . 61
. . . . . . . . . . . . . . . . . . . . 62
. . . . . . . . . . . . . . . . . . . . . . . . . 63
6 Contents
Replacing the toner cartridge
Removing the used toner cartridge
Cleaning the printer
. . . . . . . . . . . . . . . . . . . . . . 65
Installing the new toner cartridge
. . . . . . . . . . . . . . . . . . . 64
. . . . . . . . . . . . . . . 64
. . . . . . . . . . . . . . . 66
Page 7

6 Appendix
Contacting Dell . . . . . . . . . . . . . . . . . . . . . . . . . . . 70
Limited Warranties and Return Policy
. . . . . . . . . . . . . . . 81
Limited Warranty for Dell-Branded Hardware Products (U.S. Only)
81
"Total Satisfaction" Return Policy (U.S. Only) . . . . . . . . . . 84
Limited Warranty Terms for Dell-Branded Hardware Products (Canada
Only)
. . . . . . . . . . . . . . . . . . . . . . . . . . . . . . 85
"Total Satisfaction" Return Policy (Canada Only) . . . . . . . . . 89
Dell Software and Peripherals (Canada Only) . . . . . . . . . . 89
One-Year End-User Manufacturer Guarantee (Latin America and the
Caribbean Only)
. . . . . . . . . . . . . . . . . . . . . . . . . 90
Dell Computer Corporation
Ink and Toner Cartridges Limited Warranties
. . . . . . . . . . . 92
Ink and Toner Cartridges Limited Warranty (U.S. and Canada Only)
92
Ink and Toner Cartridges Limited Warranty (Latin America Only)
Dell Software License Agreement
. . . . . . . . . . . . . . . . . 94
93
Index . . . . . . . . . . . . . . . . . . . . . . . . . . . . . . . . . . . 97
.
Contents 7
Page 8

8 Contents
Page 9

CAUTION: SAFETY INFORMATION
Use the following safety guidelines to help ensure your own personal safety
and to help protect your system and working environment from potential
damage.
• Your product uses a laser.
CAUTION: Use of controls or adjustments or performance of procedures
other than those specified herein may result in hazardous radiation
exposure.
• Your product uses a printing process that heats the print media,
and heat can cause certain media to release emissions. You must
understand the section in your operating instructions that
discusses the guidelines for selecting appropriate print media to
avoid the possibility of harmful emissions.
CAUTION: If your product is not marked with this symbol , it
must be connected to an electrical outlet that is properly
grounded.
• The power cord must be connected to an electrical outlet that is
near the product and easily accessible.
• Refer service or repairs, other than those described in the
operating instructions, to a professional service person.
• This product is designed to meet safety standards with the use of
specific Dell-authorized components. The safety features of some
parts may not always be obvious. Dell disclaims liability associated
with use of non-Dell-authorized components.
9
Page 10

www.dell.com/supplies | support.dell.com
10
Page 11

SECTION 1
Set up for network printing
Selecting your printer network setup
Attaching locally to a print server
Attaching directly to the network (print server)
Attaching directly to the network (no print server)
1
Page 12
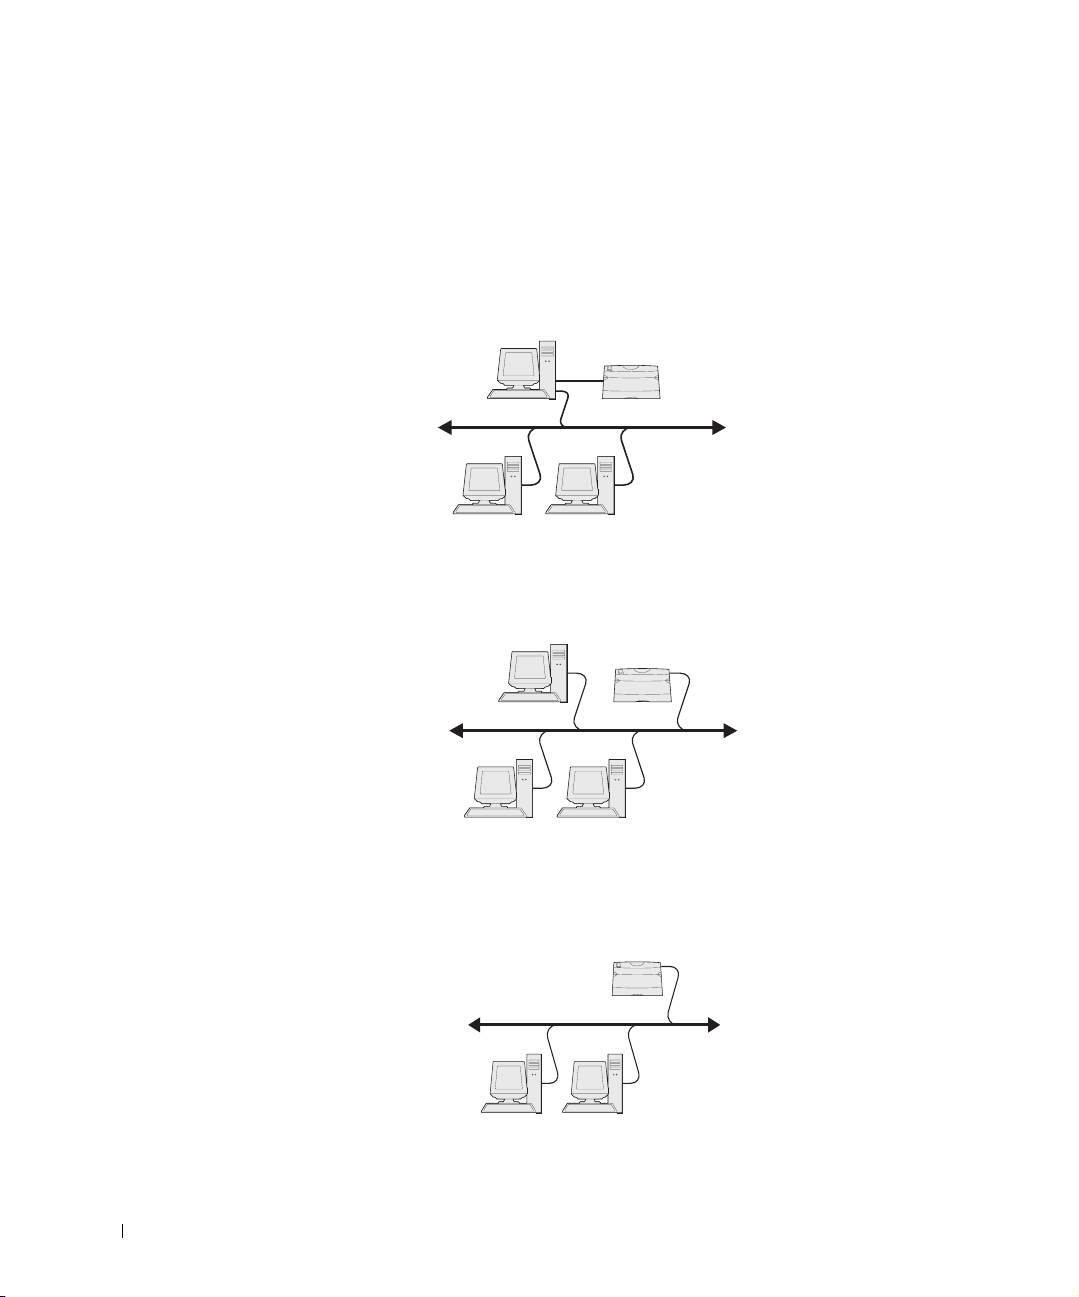
Selecting your printer network setup
Determine your network setup from the three options below.
1 Attach your printer to a print server (or other computer) with a USB cable. Go to
page 13 for instructions.
Print Server Printer
Clients
www.dell.com/supplies | support.dell.com
2 Attach your printer directly to the network with an Ethernet cable, with the print
server managing the print queue. Go to page 20 for instructions.
Print Server
3 Attach your printer directly to the network with an Ethernet cable (no print server).
Printer
Clients
Go to page 23 for instructions.
Printer
Clients
12 Set up for network printing
Page 13

Attaching locally to a print server
If you are connecting the printer to a print server with a USB cable and want to share the
printer with multiple users on the network, use this method. In this section you will:
• Complete the Microsoft Plug and Play Wizard.
• Set up the queue on the print server.
• Install printer drivers for all clients connected to the print server.
Complete Microsoft Plug and Play Wizard
When you turned on the printer and print server, the Found New Hardware Wizard screen
appeared.
Use the table below to find instructions for the operating system on the print server.
Computer operating system Go to page...
Windows XP 13
Windows 2000 14
Windows Me 14
Windows NT 15
Windows 98 16
Windows 95 17
Linux 18
Novell 18
Using Windows XP
1 Insert the Drivers and Utilities CD into your computer.
The Wizard automatically searches for an appropriate driver.
2 Scroll through the list of drivers until you see D:\drivers\win_2000\dkaag1da.inf
selected in the Location column. Instead of D:\ you will see the letter of your
CD-ROM drive.
3 Click Next.
The wizard copies all of the necessary files and installs the printer drivers.
Set up for network printing 13
Page 14

4 Click Finish when the software is installed.
5 Go to “Set up the queue on the print server” on page 18.
Using Windows 2000
1 Insert the Drivers and Utilities CD, and then click Next.
2 Select Search for a suitable driver, and then click Next.
3 Select Specify a location only, and then click Next.
4 Browse to the location of the printer driver on the Drivers and Utilities CD.
D:\Drivers\Win_2000\
Replace D:\ with the letter of your CD-ROM drive (for example, type D:\ where D is
the drive letter of your CD).
www.dell.com/supplies | support.dell.com
5 Click Open, and then click OK.
6 Click Next to install the driver that is displayed.
D:\Drivers\Win_2000\dkaag1da.inf
7 Click Finish when the software is installed.
8 Go to “Set up the queue on the print server” on page 18.
Using Windows Me
NOTE: Depending on the software and printers already installed on your computer, your screens
may vary from those in the instructions.
You must install both a USB port driver and a custom print driver.
1 Insert the Drivers and Utilities CD.
The Wizard automatically searches for the USB driver on the CD and installs it.
2 After the USB port driver is found, click Finish.
3 Select Automatic search for the best driver (recommended), and then click Next.
The wizard searches for a printer driver.
14 Set up for network printing
Page 15

4 Select your printer and driver from the list on the screen, and then click OK. Use the
following table to identify the driver for your language.
If your computer
uses this language
English D:\DRIVERS\WIN_9X\ENGLISH\LMPCL5C.INF
French D:\DRIVERS\WIN_9X\FRENCH\LMPCL5C.INF
German D:\DRIVERS\WIN_9X\GERMAN\LMPCL5C.INF
Italian D:\DRIVERS\WIN_9X\ITALIAN\LMPCL5C.INF
Spanish D:\DRIVERS\WIN_9X\SPANISH\LMPCL5C.INF
5 Click Next to install the printer driver.
6 Click Next to complete installation.
7 Use the default printer name (for example, Dell Laser Printer M5200) or type a unique
Select the driver from the list
(Replace the D:\ in the table with the letter of
your CD-ROM drive)
name for your printer, and then click Next.
8 Click Yes (recommended), and then click Finish to print a test page.
9 After the test page prints, click Yes to close the window.
10 Click Finish to complete the installation and close the wizard.
11 Go to “Set up the queue on the print server” on page 18.
Using Windows NT
NOTE: USB support is not available for Windows NT operating systems.
NOTE: You need administrative access to install printer drivers on your computer.
1
Insert the Drivers and Utilities CD.
2 Click Install the printer for Use on this Computer only (Personal Installation).
When all the files are installed on your computer, the Congratulations screen appears.
3 Click Finish to complete the installation and close the wizard.
4 Go to "Set up the queue on the print server" on page 18.
Set up for network printing 15
Page 16

Using Windows 98
NOTE: Depending on the software and printers already installed on your computer, your screens
may vary from those in the instructions.
You must install both a USB port driver and a custom print driver.
When you attached the cable and turned on the printer and computer, the Add New
Hardware Wizard screen appeared on your computer screen.
1 Insert the Drivers and Utilities CD, and then click Next.
2 Select Search for the best driver for your device (recommended), and then click Next.
3 Select CD-ROM drive only, and then click Next.
4 After the wizard finds the USB port driver, click Next.
www.dell.com/supplies | support.dell.com
5 When the USB port driver is installed, click Finish.
The wizard prompts you to search for new drivers.
6 Click Next to search for a printer driver.
7 Select Search for the best driver for your device (recommended), and then click Next.
8 Select Specify a location only and browse to the location of the printer driver on the
Drivers and Utilities CD.
Use the following table to identify the driver for your language.
If your computer uses
this language
English D:\DRIVERS\WIN_9X\ENGLISH
French D:\DRIVERS\WIN_9X\FRENCH
German D:\DRIVERS\WIN_9X\GERMAN
Italian D:\DRIVERS\WIN_9X\ITALIAN
Spanish D:\DRIVERS\WIN_9X\SPANISH
9 Highlight the driver, and then select to install the updated driver (recommended).
Select the driver from the list
(Replace the D:\ in the table with the letter
of your CD-ROM drive)
10 Click Next.
11 Click Next to complete installation.
16 Set up for network printing
Page 17

12 Use the default printer name (for example, Dell Laser Printer M5200) or type a unique
name for your printer, and then click Next.
13 Select Yes to print a test page, and then click Finish. All the necessary files are
installed on your computer.
14 After the test page prints, click Ye s to close the message window.
15 Click Finish to complete the installation.
Using Windows 95
NOTE: USB support is not available for Windows 95 operating systems.
When you attached the parallel cable and turned on the printer and computer, the Update
Device Driver wizard appeared on your computer screen.
1 Insert the Drivers and Utilities CD, and then click Next.
If a system-compatible driver is found on your operating system, the Wizard installs it.
If no compatible system driver is found on your operating system, click Other
Locations.
2 Browse to the location of the printer driver on the Drivers and Utilities CD, and then
click
OK.
Use the following table to identify the driver for your language.
If your computer uses
this language
English D:\DRIVERS\WIN_9X\ENGLISH
French D:\DRIVERS\WIN_9X\FRENCH
German D:\DRIVERS\WIN_9X\GERMAN
Italian D:\DRIVERS\WIN_9X\ITALIAN
Spanish D:\DRIVERS\WIN_9X\SPANISH
3 Highlight the appropriate driver, and then click Finish.
Select the driver from the list
(Replace the D:\ in the table with the letter
of your CD-ROM drive)
The Add Printer Wizard screen appears.
4 Use the default printer name (for example, Dell Laser Printer M5200), or type a
unique name for your printer.
Set up for network printing 17
Page 18

5 Select whether or not to use this printer as the default printer.
6 Click Next.
7 You are prompted to insert the Drivers and Utilities CD. Click OK.
A dialog box asks for the file “lexdrvin.exe”.
8 Browse to the appropriate folder on the Drivers and Utilities CD (for example,
D:\Drivers\Win_9x\English).
9 Click OK.
10 Click OK again.
All the necessary files are installed on your computer.
11 Go to "Set up the queue on the print server" on page 18.
www.dell.com/supplies | support.dell.com
Installing drivers in a Linux environment
Your printer supports Red Hat Linux versions 7.2, 7.3, and 8.0, and SuSE Linux 7.2, 7.3, and
8.0. Refer to the Unix®/packages on the Drivers and Utilities CD for instructions on
installing your printer in a Linux environment.
Installing drivers in a Novell environment
Your printer supports Novell® NetWare® versions 3.x, 4.x, 5.x, and 6.x. For information on
using your printer in a Novell environment, refer to your Novell documentation.
Set up the queue on the print server
1 Click Install the printer on the Network (Network Installation) and then click Next.
2 Click On a print server, and then click Next.
3 Select both options to install the software and the User’s Guide on the print server, and
then click Next.
4 The box to share the printer is checked. Create a share name you want to use for the
PCL driver and/or the PostScript driver. Make it an obvious name for clients to easily
find when they are browsing for a shared printer.
NOTE: You do not need to create share names for both drivers if you are only using one driver.
5
Click Next.
6 Select TCP/IP, and then click Next.
If your network also uses NetWare, click NetWare Systems as well.
18 Set up for network printing
Page 19

7 Choose the port that corresponds to the hardware port you used when you connected
the printer to the print server (or other computer). For example, USB001 represents
the USB port on the print server.
8 Click Finish.
The Congratulations screen appears.
9 Click Print a Test Page to verify the driver is installed correctly.
10 Click Finish.
If you are sitting at the print server and want to install printer drivers on one client
computer, you can go to that client computer, insert the Drivers and Utilities CD, and
follow the steps on the screen, or you can install the drivers remotely (see“Install printer
drivers on one or more remote client computers” on page 22).
Install printer drivers on one client computer
If you are connecting one client computer to the print server, go to that client computer and
insert the Drivers and Utilities CD.
1 Click Install the printer on the Network (Network installation), and then click Next.
2 Click On this client computer.
3 Click Next.
4 Select the software or documentation you want your users to have access to.
5 Select the printer protocols you want to install, and then click Next.
6 Select the Universal Network Connection (UNC) port.
7 Type the name of the print server the printer is connected to as well as the name of the
printer:
\\Server Name\PrinterShareName.
To find out the print server name, right-click your mouse and choose My Computer →
Properties → Network Identification.
8 Click Finish.
The Congratulations screen appears.
9 Click Print a Test Page to verify the driver is installed correctly.
10 Click Finish.
Set up for network printing 19
Page 20

Attaching directly to the network (print server)
If your print server is in one location (for example, a secure area) and the network printer is
in another location (for example, a printer room), use this method to install software on one
or multiple printers on the network.
In this section you will:
• Locate the IP address.
• Assign an IP address to the printer.
• Set up the queue on the print server.
• Install printer drivers for all clients connected to the print server.
Locate the IP address
www.dell.com/supplies | support.dell.com
1 Print a network setup page.
a Press the menu button on the printer until you see Utilities Menu, and then
press Select.
b Press the menu button on the printer until you see Print Net Setup, and
then press Select to print the page.
2 Under the Standard Network Card heading on the network setup page, make sure
Status is Connected.
If Status is Not Connected:
– Make sure the Ethernet cable is firmly plugged into the back of the printer.
– Plug the Ethernet cable into another wall outlet.
3 Find the IP address located under the TCP/IP heading. If the IP address equals 0.0.0.0,
wait a few minutes and print the network setup page again.
If the IP address still shows 0.0.0.0, go to “Assign an IP Address” on page 23.
If the IP address is something other than 0.0.0.0, go to "Set up the queue on the print
server" on page 21.
20 Set up for network printing
Page 21

Set up the queue on the print server
1 Insert the Drivers and Utilities CD, and then click Next.
2 Click Install the printer on the Network (Network installation), and then click Next.
3 Click On a print server, and then click Next.
4 Select both options to install the software and the User’s Guide on the print server, and
then click Next.
5 The box to share the printer is checked. Create a share name you want to use for the
PCL driver and/or the PostScript driver. Make it an obvious name for clients to easily
find when they are browsing for a shared printer.
NOTICE: You do not need to create share names for both drivers if you are only using one
driver.
Click Next.
6
7 Select TCP/IP, and then click Next.
If your network also uses NetWare, click NetWare Systems as well.
8 Set TCP/IP as the Port Type.
9 Specify a port name. Make it an obvious name for clients to easily find when they are
browsing for a shared printer.
10 Type the printer IP address, for example, 192.168.0.11 If you don’t know the IP
address, see "Locate the IP address" on page 20.
11 Click Finish.
The Congratulations screen appears.
12 Click Print a Test Page to verify the driver is installed correctly.
13 Click Finish.
If you are sitting at the print server and want to install printer drivers on several client
computers, follow the steps below. If you want to install drivers on one client computer, go
to "Install printer drivers on one client computer" on page 19.
Set up for network printing 21
Page 22

Install printer drivers on one or more remote client computers
If you are connecting client computers to the print server, run the Drivers and Utilities CD
installer again:
1 Go to Start →Run → d:\setup.exe (d represents the CD drive).
2 Click Install the printer on the Network (Network installation), and then click Next.
3 Click On one or more remote client computers.
4 Click Next.
5 Type your Administrator user name and password.
6 Specify which client computers are allowed to print to the new Dell Laser Printer
M5200 printer.
Browse or type each client’s computer name or IP address. You can specify as many
www.dell.com/supplies | support.dell.com
clients as you wish.
7 When you are finished adding clients, click Next.
8 Select the software or documentation you want your users to have access to.
9 Select the printer protocols you want to install, and then click Next.
10 Select the Universal Network Connection (UNC) port.
11 Click the Browse for Printer button or type the name of the print server the printer is
connected to as well as the name of the printer:
\\Server Name\PrinterShareName.
To find out the print server name, right-click your mouse and choose My Computer →
Properties → Network Identification.
12 Click Finish.
The Congratulations screen appears.
13 Click Finish.
22 Set up for network printing
Page 23

Attaching directly to the network (no print server)
If you are sharing your network printer in a small workgroup environment and are not using
a print server, use this method.
In this section you will:
• Locate the IP address.
• Assign an IP address to the printer.
• Install printer drivers on each client that needs to print to the new printer.
Locate the IP address
1 Print a network setup page.
a Press the menu button on the printer until you see the Utilities Menu, and
then press Select.
b Press the menu button on the printer until you see Print Net Setup, and
then press Select to print the page.
2 Under the Standard Network Card heading on the network setup page, make sure
Status is Connected.
If Status is Not Connected:
– Make sure the Ethernet cable is firmly plugged into the back of the printer.
– Plug the Ethernet cable into another wall outlet.
3 Find the IP address located under the TCP/IP heading. If the IP address equals 0.0.0.0,
wait a few minutes and print the network setup page again.
If the IP address still shows 0.0.0.0, go to “Assign an IP Address” on page 23.
If the IP address is something other than 0.0.0.0, go to "Install printer drivers" on
page 25.
Assign an IP Address
NOTE: Assigning a STATIC IP Address is considered an advanced function and is normally
performed by your system administrator.
Set up for network printing 23
Page 24

An IP Address is a unique string of numbers consisting of four (4) Octets, each Octet
separated using a period. Example: 192.168.1.108. Assigning an IP address already in use
can cause serious network performance issues.
See page 56 for details on using the Operator Control Panel.
To setup the printer to use a STATIC IP address:
1 Make sure the printer is on and the Ready message appears.
2 Press the Menu button until you see Network Menu, and then press Select.
3 Under Network Menu, the item Standard Network appears. Press Select.
4 Under Standard Network, press the Menu button until you see the item STD
NET SETUP, and then press Select.
5 Under STD NET SETUP, press the Menu button until you see the item TCP/IP, and
www.dell.com/supplies | support.dell.com
then press Select.
6 Under TCP/IP, press the Menu button until you see the item Enable BOOTP, and
then press Select.
7 Press the Menu button to select No, and then press Select. The word SAVED will
briefly display.
8 Repeat steps 6 & 7 to select No for the items ENABLE DHCP and ENABLE RARP.
9 Under TCP/IP, press the Menu button until you see the item Set IP Address,
and then press Select.
10 The number in the 1st Octet is flashing. Using the Menu button, cycle the 1st Octet
of the IP Address to the number desired, and then press Select.
11 The number in the 2nd Octet is flashing. Using the Menu button, cycle the 2nd Octet
to the number desired, and then press Select.
12 The number in the 3rd Octet is flashing. Using the Menu button, cycle the 3rd Octet
to the number desired, and then press Select.
13 The number in the 4th Octet is flashing. Using the Menu button, cycle the 4th Octet
to the number desired, and then press Select. The word SAVED will briefly display.
14 Under TCP/IP, press the Menu button until you see the item Set IP Netmask,
and then press Select.
15 Repeat steps 10 through 13 to set each Octet for Netmask.
16 Under TCP/IP, press the Menu button until you see the item Set IP Gateway,
and then press Select.
24 Set up for network printing
Page 25

17 Repeat steps 10 through 13 to set each Octet for Gateway.
A Static IP Address has been assigned to the printer. You can verify the settings by opening a
web browser on any computer on the same network and entering the IP address into the
Address line of the browser. Example: http://192.168.1.108. If the IPS address was setup
correctly, the browser should display a Web page provided by the Dell Laser Printer M5200
printer.
Install printer drivers
1 Insert the Drivers and Utilities CD.
2 Click Install the printer on the Network (Network Installation).
3 Click On one or more remote client computers.
4 Type your Administrator user name and password.
5 Specify which client computers are allowed to print to the new Dell Laser Printer
M5200 printer.
Browse or type each client’s computer name or IP address. You can specify as many
clients as you wish.
6 When you are finished adding clients, click Next.
7 Select the software and documentation you want your users to have access to.
8 Select TCP/IP, and then click Next.
If your network also uses NetWare, select NetWare Systems too.
9 Set TCP/IP Port as the Port Type.
10 Specify a port name that is meaningful in your environment. The port name
establishes a logical link between the printer and each client.
11 Type the printer IP address, for example, 192.168.0.11. If you don’t know the IP
address, see "Locate the IP address" on page 23.
12 Click Finish.
The Congratulations screen appears.
13 Click Finish.
Now all of the clients connected to this printer can select this printer to print their jobs.
Set up for network printing 25
Page 26

Install printer drivers on one client computer
1 From the client computer, insert the Drivers and Utilities CD.
2 Click Install the printer on the Network (Network installation), and then click Next.
3 Click On this client computer.
4 Click Next.
5 Select the software or documentation you want your users to have access to.
6 Select the printer protocols you want to install, and then click Next.
7 Set TCP/IP Port as the Port Type.
8 Specify a port name that is meaningful in your environment. The port name
establishes a logical link between the printer and each client.
9 Type the printer IP address, for example, 192.168.0.11. If you don’t know the IP
www.dell.com/supplies | support.dell.com
address, see "Locate the IP address" on page 23.
10 Click Finish.
The Congratulations screen appears.
11 Click Print a Test Page to verify the driver is installed correctly.
12 Click Finish.
26 Set up for network printing
Page 27

SECTION 2
Install optional memory cards
Accessing the printer system board
Installing printer memory
Replacing the shield
2
Page 28
You can increase printer memory capacity and connectivity by purchasing additional printer
memory or option cards.
NOTE: Memory options designed for other Dell printers may not work with your printer.
Accessing the printer system board
NOTE: Use a small Phillips screwdriver to remove the system board access cover and to install
some of the cards.
CAUTION: Before performing any of the procedures listed below, read and follow
the safety instructions.
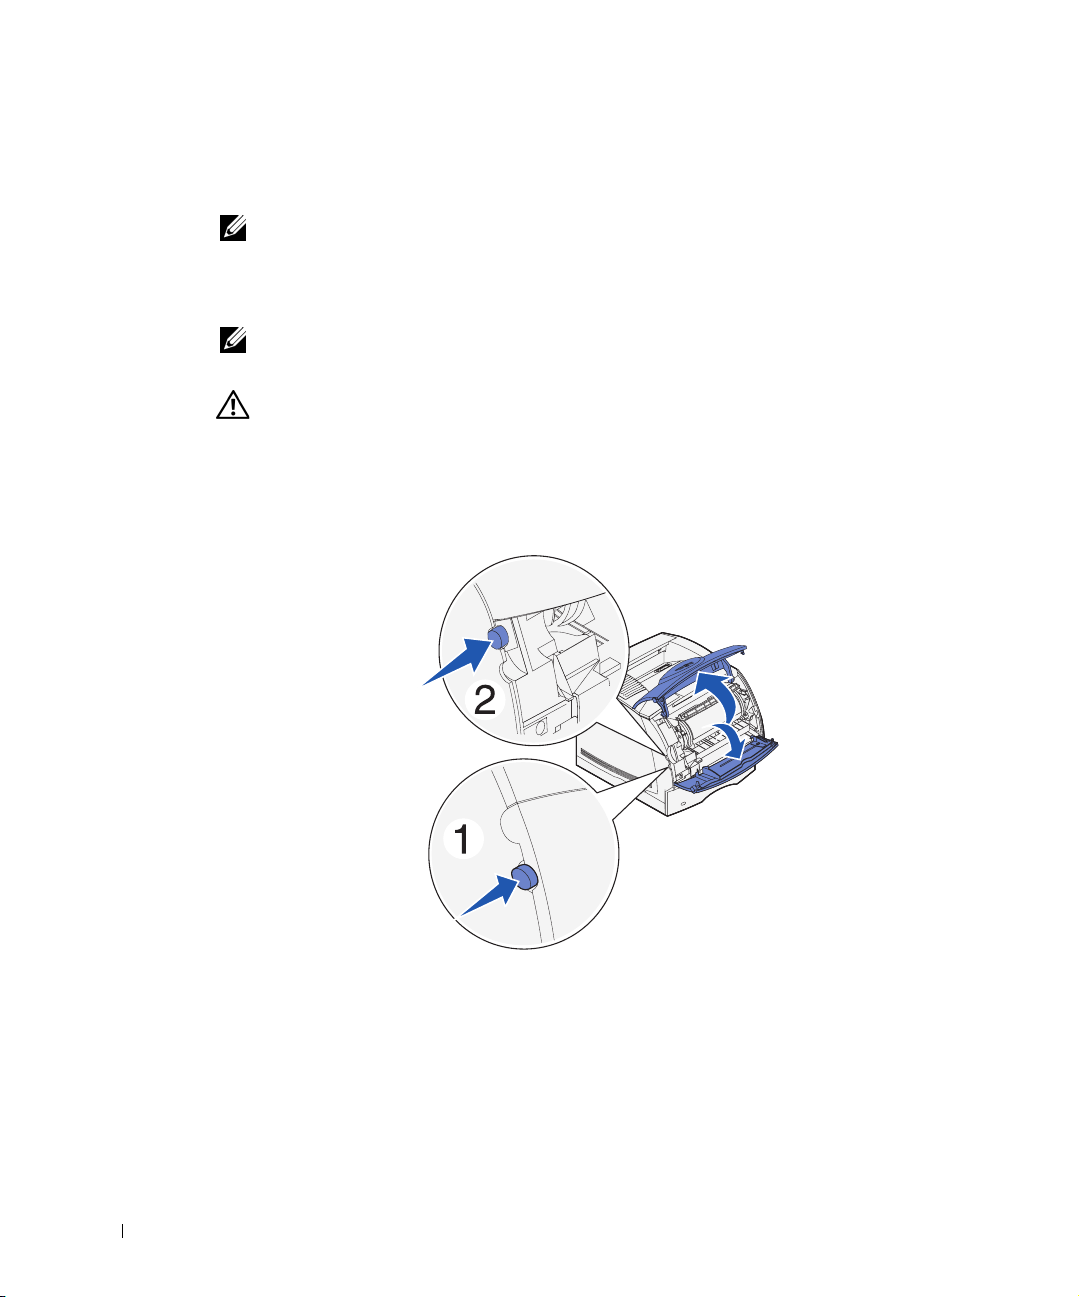
1
Turn the printer off and unplug the power cord before continuing.
2 Press latch 1 to open the lower door. Press latch 2 to open the upper door.
www.dell.com/supplies | support.dell.com
28 Install optional memory cards
Page 29
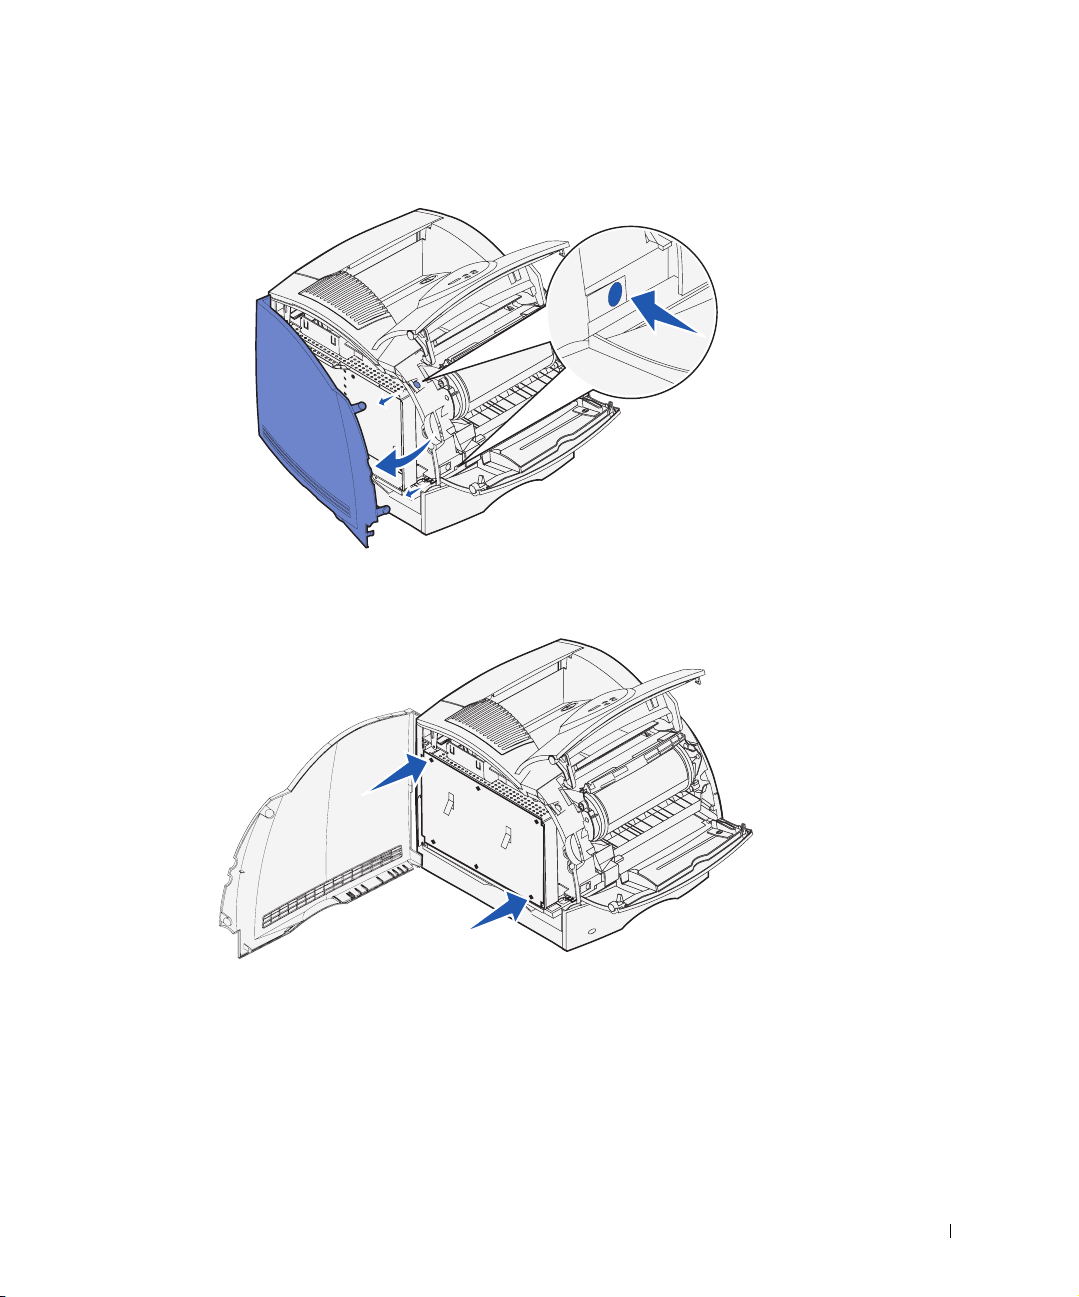
3 Press down on the side door latches and open the side door.
4 Use a small Phillips screwdriver to loosen, but not remove, the six screws on the shield.
Install optional memory cards 29
Page 30
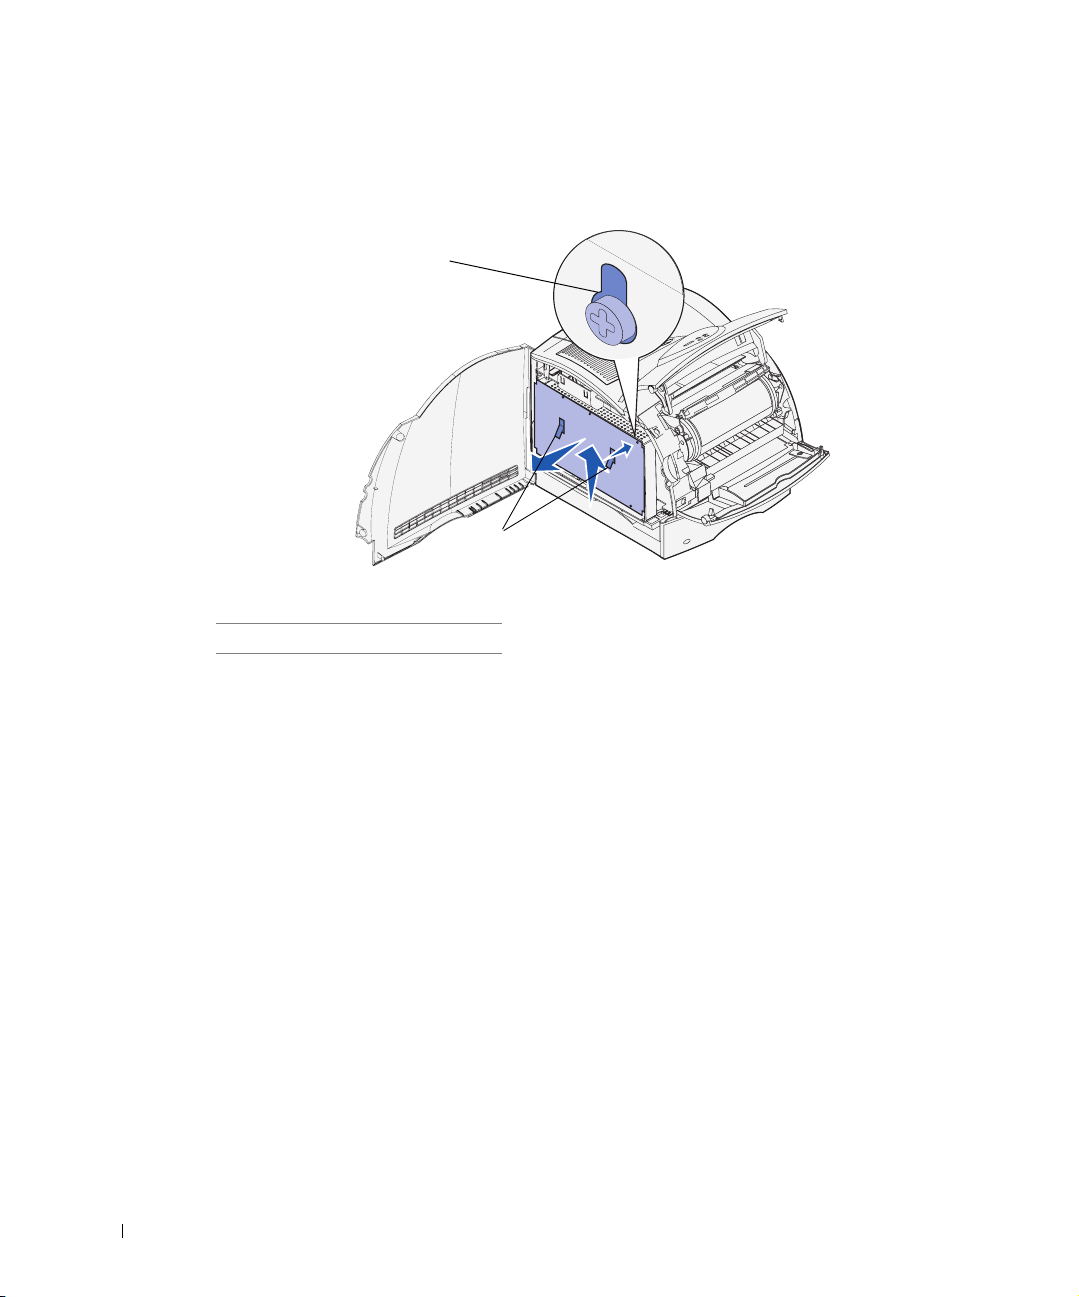
5 Use the tabs to slide the shield up until the top three screws fit into the three keyholes
on the shield.
1
www.dell.com/supplies | support.dell.com
2
1 Keyhold 2 Tabs
6 Hold the shield by the tabs and lift it off.
30 Install optional memory cards
Page 31

Installing printer memory
NOTICE: Electronic components can be damaged by static electricity. Touch something metal
on the printer before you touch the memory option.
Your printer comes with 64MB memory. You can buy optional memory cards to increase
printer memory up to 320MB.
CAUTION: Before performing any of the following procedures, read and follow
the safety instructions.
Optional Memory Cards
7Y762 KIT, PTR, MEM, UM, 16MB
7Y763 KIT, PTR, MEM, UM, 32MB
7Y764 KIT, PTR, MEM, UM, 64MB
7Y765 KIT, PTR, MEM, UM, 128MB
1
Unpack the optional printer memory card. Avoid touching the connection points
along its edge.
Install optional memory cards 31
Page 32

2 Open both latches on the connector completely.
1
2
www.dell.com/supplies | support.dell.com
1 Memory connector 1
2 Memory connector 2
3 Align the notches on the memory card with the ridges on the connector.
2
1 Ridge
2 Notch
32 Install optional memory cards
1
Page 33

4 Push the memory card straight into the connector until it snaps into place. Make sure
each latch fits over the notch located on either side of the memory card.
1
2
1 Latch
2 Notch
Install optional memory cards 33
Page 34

Replacing the shield
Follow these steps to reattach the shield and close the doors.
CAUTION: Before performing any of the procedures listed below, read and follow
the safety instructions.
Grasp the shield by the tabs and align the three keyholes on the shield with the top
1
three screws. Holding the shield by the tabs, slide it down onto the screws. Tighten all
six screws.
www.dell.com/supplies | support.dell.com
2 Close the side door.
3 Close the upper door and the lower door.
4 Plug in the power cord and turn on the printer.
34 Install optional memory cards
Page 35

SECTION 3
Set up for local printing
Installing printer drivers
3
Page 36

A local printer is a printer attached to your computer using a USB cable. If your printer is
attached to a network instead of your computer, go on to “Set up for network printing” on
page 11.
Installing printer drivers
A printer driver is software that lets your computer communicate with your printer. To
obtain all the features described in “Utilizing additional software tools” on page 61, use the
Drivers and Utilities CD to install them. Use the following table to find the instructions you
need for your operating system.
Computer operating system Go to
page...
www.dell.com/supplies | support.dell.com
Windows XP 37
Windows 2000 38
Windows Me 39
Windows NT 40
Windows 98 41
Windows 95 42
You need to complete Microsoft’s Plug and Play before installing the custom driver from
your printer drivers CD.
36 Set up for local printing
Page 37

Using Windows XP
NOTE: Business versions of Windows XP require that you have administrative access to install
printer drivers on your computer.
When you attached the cable and turned on the printer, the Found New Hardware Wizard
appeared on your computer screen.
1 Insert the Drivers and Utilities CD into your computer.
The Wizard automatically searches for an appropriate driver.
2 Scroll through the list of drivers until you see D:\drivers\win_2000\dkaag1da.inf
selected in the Location column. Instead of D:\ you will see the letter of your
CD-ROM drive.
3 Click Next.
The wizard copies all of the necessary files and installs the printer drivers.
4 Click Finish when the software is installed.
5 Launch the Drivers and Utilities CD: click Start → Run and browse your CD drive (for
example, type D:\ where D is the drive letter of your CD).
6 Select SETUP.EXE, and then click OK.
7 When the Dell Drivers and Utilities CD screen appears, click Install the printer for
Use on this Computer only (Personal Installation) to install the additional software
for your printer.
When all of the files are installed on your computer, the Congratulations screen
appears.
8 Click Print a Test Page to verify printer setup.
9 Click Finish when the test page prints successfully.
10 Click Exit on the Drivers and Utilities CD screen.
Set up for local printing 37
Page 38

Using Windows 2000
When you attached the cable and turned on the printer and computer, the Found New
Hardware Wizard screen appeared on your computer screen.
1 Insert the Drivers and Utilities CD, and then click Next.
2 Select Search for a suitable driver, and then click Next.
3 Select Specify a location only, and then click Next.
4 Browse to the location of the printer driver on the Drivers and Utilities CD.
D:\Drivers\Win_2000\
Replace D:\ with the letter of your CD-ROM drive (for example, type D:\ where D is
the drive letter of your CD).
5 Click Open, and then click OK.
www.dell.com/supplies | support.dell.com
6 Click Next to install the driver that is displayed.
D:\Drivers\Win_2000\dkaag1da.inf
7 Click Finish when the software is installed.
8 When the Dell Drivers and Utilities screen appears, choose Install the printer for Use
on this Computer only (Personal Installation) to install the additional software for
your printer.
9 If the Drivers and Utilities CD does not automatically launch, click Start → Run and
browse your CD drive (for example, type D:\ where D is the drive letter of your CD).
Select SETUP.EXE, and then click OK.
When all the files are installed on your computer, the Congratulations screen appears.
10 Click Print a Te st Pag e to verify printer setup.
11 Click Finish when the test page prints successfully.
12 Click Exit on the Drivers and Utilities CD screen.
38 Set up for local printing
Page 39

Using Windows Me
NOTE: Depending on the software and printers already installed on your computer, your screens
may vary from those in the instructions.
You must install both a USB port driver and a custom print driver.
When you attached the cable and turned on the printer and computer, the Add New
Hardware Wizard screen appeared on your computer screen.
1 Insert the Drivers and Utilities CD.
The Wizard automatically searches for the USB driver on the CD and installs it.
2 After the USB port driver is found, click Finish.
3 Select Automatic search for the best driver (recommended), and then click Next.
The wizard searches for a printer driver.
4 Select your printer and driver from the list on the screen, and then click OK. Use the
following table to identify the driver for your language.
If your computer
uses this language
English D:\DRIVERS\WIN_9X\ENGLISH\LMPCL5C.INF
French D:\DRIVERS\WIN_9X\FRENCH\LMPCL5C.INF
German D:\DRIVERS\WIN_9X\GERMAN\LMPCL5C.INF
Italian D:\DRIVERS\WIN_9X\ITALIAN\LMPCL5C.INF
Spanish D:\DRIVERS\WIN_9X\SPANISH\LMPCL5C.INF
Select the driver from the list
(Replace the D:\ in the table with the letter of
your CD-ROM drive)
Set up for local printing 39
Page 40

5 Click Next to install the printer driver.
6 Click Next to complete installation.
7 Use the default printer name (for example, Dell Laser Printer M5200) or type a unique
name for your printer, and then click Next.
8 Click Yes (recommended), and then click Finish to print a test page.
9 After the test page prints, click Yes to close the window.
10 Click Finish to complete the installation and close the wizard.
11 Launch the Drivers and Utilities CD: click Start → Run and browse your CD drive (for
example, type D:\ where D is the drive letter of your CD).
12 Select SETUP.EXE, and then click OK.
13 When the Dell Drivers and Utilities screen appears, click Install the printer for Use on
www.dell.com/supplies | support.dell.com
this Computer only (Personal Installation) to install the additional software for your
printer.
When all of the files are installed on your computer, the Congratulations screen
appears.
14 Click Exit on the Drivers and Utilities CD screen.
Using Windows NT
NOTE: USB support is not available for Windows NT operating systems.
NOTE: You need administrative access to install printer drivers on your computer.
1
Insert the Drivers and Utilities CD.
2 Click Install the printer for Use on this Computer only (Personal Installation).
When all the files are installed on your computer, the Congratulations screen appears.
3 Click Finish to complete the installation and close the wizard. You are now ready to
print.
4 Close the Drivers and Utilities CD screen.
40 Set up for local printing
Page 41

Using Windows 98
NOTE: Depending on the software and printers already installed on your computer, your screens
may vary from those in the instructions.
You must install both a USB port driver and a custom print driver.
When you attached the cable and turned on the printer and computer, the Add New
Hardware Wizard screen appeared on your computer screen.
1 Insert the Drivers and Utilities CD, and then click Next.
2 Select Search for the best driver for your device (recommended), and then click Next.
3 Select CD-ROM drive only, and then click Next.
4 After the wizard finds the USB port driver, click Next.
5 When the USB port driver is installed, click Finish.
The wizard prompts you to search for new drivers.
6 Click Next to search for a printer driver.
7 Select Search for the best driver for your device (recommended), and then click Next.
8 Select Specify a location only and browse to the location of the printer driver on the
Drivers and Utilities CD.
Use the following table to identify the driver for your language.
If your computer uses
this language
English D:\DRIVERS\WIN_9X\ENGLISH
French D:\DRIVERS\WIN_9X\FRENCH
German D:\DRIVERS\WIN_9X\GERMAN
Italian D:\DRIVERS\WIN_9X\ITALIAN
Spanish D:\DRIVERS\WIN_9X\SPANISH
9 Highlight the driver, and then select to install the updated driver (recommended).
10 Click Next.
11 Click Next to complete installation.
Select the driver from the list
(Replace the D:\ in the table with the letter
of your CD-ROM drive)
Set up for local printing 41
Page 42

12 Use the default printer name (for example, Dell Laser Printer M5200) or type a unique
name for your printer, and then click Next.
13 Select Yes to print a test page, and then click Finish.
All the necessary files are installed on your computer.
14 After the test page prints, click Yes to close the message window.
15 Click Finish to complete the installation.
16 Launch the Drivers and Utilities CD: click Start → Run and browse your CD drive (for
example, type D:\ where D is the drive letter of your CD).
17 Select SETUP.EXE, and then click OK.
18 When the Dell Drivers and Utilities CD screen appears, click Install the printer for
Use on this Computer only (Personal Installation) to install the additional software
for your printer.
www.dell.com/supplies | support.dell.com
If you are prompted to restart your computer, click Yes.
Otherwise, the Congratulations screen appears.
19 Click Exit on the Drivers and Utilities CD screen.
Using Windows 95
NOTE: USB support is not available for Windows 95 operating systems.
When you attached the parallel cable and turned on the printer and computer, the Update
Device Driver wizard appeared on your computer screen.
1 Insert the Drivers and Utilities CD, and then click Next.
If a system-compatible driver is found on your operating system, the Wizard installs it.
If no compatible system driver is found on your operating system, click Other
Locations.
2 Browse to the location of the printer driver on the Drivers and Utilities CD, and then
click
OK.
42 Set up for local printing
Page 43

Use the following table to identify the driver for your language.
If your computer uses
this language
English D:\DRIVERS\WIN_9X\ENGLISH
French D:\DRIVERS\WIN_9X\FRENCH
German D:\DRIVERS\WIN_9X\GERMAN
Italian D:\DRIVERS\WIN_9X\ITALIAN
Spanish D:\DRIVERS\WIN_9X\SPANISH
3 Highlight the appropriate driver, and then click Finish.
Select the driver from the list
(Replace the D:\ in the table with the letter
of your CD-ROM drive)
The Add Printer Wizard screen appears.
4 Use the default printer name (for example, Dell Laser Printer M5200), or type a
unique name for your printer.
5 Select whether or not to use this printer as the default printer.
6 Click Next.
7 Click Finish.
8 A test page will print automatically. Click YES when the test page prints successfully.
9 Click Finish to complete the installation. You are now ready to print.
10 You are prompted to insert the Drivers and Utilities CD. Click OK.
A dialog box asks for the file “lexdrvin.exe”.
11 Browse to the appropriate folder on the Drivers and Utilities CD (for example,
D:\Drivers\Win_9x\English).
12 Click OK.
13 Click OK again.
All the necessary files are installed on your computer.
14 Launch the Drivers and Utilities CD: click Start → Run and browse your CD drive (for
example, type D:\ where D is the drive letter of your CD).
15 Select SETUP.EXE, and then click OK.
Set up for local printing 43
Page 44

16 When the Dell Drivers and Utilities screen appears, click Install the printer for Use on
this Computer only (Personal Installation) to install the additional software for your
printer.
If you are prompted to restart your computer, click Yes.
Otherwise, the Congratulations screen appears.
17 Click Exit on the Drivers and Utilities CD screen.
www.dell.com/supplies | support.dell.com
44 Set up for local printing
Page 45

SECTION 4
Load paper
Loading paper and transparencies
Loading envelopes
4
Page 46

Loading paper and transparencies
In the standard tray
Load the print media you use for the majority of your print jobs in the standard tray.
1 Remove the tray.
www.dell.com/supplies | support.dell.com
2 Squeeze the width guide tab and the side of the guide as shown. Slide the width guide
to the far right side of the tray.
46 Load paper
Page 47

3 Squeeze the length guide lever and slide the length guide to the correct position for
the size of print media you are loading.
Before loading print media, flex the sheets back and forth to loosen them, and then fan
them. Do not fold or crease the print media. Straighten the edges of the stack on a level
surface.
4 Place the print media into the tray with the recommended print side face down for
single-sided printing and face up for double-sided printing.
Do not exceed the maximum stack height indicated by the label in the tray. Overfilling
the tray may cause jams.
Load paper 47
Page 48

5 Squeeze the width guide tab and the side of the guide together. Slide the width guide
to the left until it lightly rests against the edge of the print media stack.
www.dell.com/supplies | support.dell.com
6 Insert the tray.
NOTE: If you load any print media other than plain letter or A4 paper into the tray, make sure
you change the Paper Type and Paper Size settings for that tray from your software application.
48 Load paper
Page 49

In the multipurpose feeder
The multipurpose feeder can hold several sizes and types of print media, such as
transparencies, postcards, note cards, and envelopes. It is useful for single page printing on
letterhead or colored paper.
The icons on the multipurpose feeder show you how to load the multipurpose feeder with
paper, how to turn an envelope for printing, and how to load letterhead paper for simplex or
duplex printing. If you purchased a duplex option, refer to the User’s Guide
(Start → Programs → Dell Printers → Dell Laser Printer M5200 →User’s Guide).
Simplex
letterhead
Duplex
letterhead
Envelope
Load paper 49
Page 50

1 Push the lower release latch. The multipurpose feeder door drops open.
www.dell.com/supplies | support.dell.com
2 Locate the metal bar in the recessed area on the multipurpose feeder. Pull the bar out
far enough to accommodate the print media you will be using.
50 Load paper
Page 51

3 Slide the width guide to the far right.
4 Load paper or transparencies with the left edge of the stack against the stack height
limiter and with the recommended print side face up.
1 Stack height limiter
1
Load paper 51
Page 52

5 Gently slide the print media into the multipurpose feeder as far as it will go. Forcing
the print media may cause it to buckle.
www.dell.com/supplies | support.dell.com
6 Slide the width guide to the left until it lightly touches the stack of print media. Do
not bend the print media.
7 Select the source, size, and type from your software application and select print media
size and type from the printer operator panel.
– Make sure the Paper Size and Paper Type for the multipurpose feeder (MP Feeder
Size and MP Feeder Type) are set to the correct value for the print media you are
loading.
–Press Go to return to Ready.
For tips on recommended papers, solving printing problems, and clearing jams, refer to the
User’s Guide (Start → Programs →Dell Printers → Dell Laser Printer M5200 →User’s
Guide).
52 Load paper
Page 53

Loading envelopes
You can load envelopes in the multipurpose feeder or the optional envelope feeder. If you
purchased the optional envelope feeder, refer to the User’s Guide for loading instructions.
In the multipurpose feeder
Load envelopes flap side down with the stamp area and flap on the left. The end of the
envelope with the stamp area enters the multipurpose feeder first.
NOTICE: Never use envelopes with stamps, clasps, snaps, windows, coated linings, or self-stick
adhesives. These envelopes may severely damage the printer. The stamp is shown in the
illustration only for placement.
NOTE: If envelopes jam while printing, try reducing the number of envelopes in the
multipurpose feeder.
Load paper 53
Page 54

Closing the multipurpose feeder
1 Remove print media from the multipurpose feeder.
www.dell.com/supplies | support.dell.com
2 Push the metal bar straight back to collapse the multipurpose feeder to its
short-length position.
3 Close the multipurpose feeder door.
54 Load paper
Page 55

SECTION 5
Use your printer
Changing the language on the operator panel
Using the operator panel to change printer settings
Printing a job
Canceling a job from the printer operator panel
Utilizing additional software tools
Replacing the toner cartridge
5
Page 56

Changing the language on the operator panel
To display a different language on the operator panel:
1 Press and release Menu until you see Setup Menu, and then press Select.
2 Press and release Menu until Display Language appears, and then press Select.
3 Scroll through the languages to choose the one you want, and then press Select.
Using the operator panel to change printer settings
The diagram on page 59 shows the menu items in each menu. For detailed explanations of
the menus, refer to the User’s Guide (Start → Programs → Dell Printers → Dell Laser
www.dell.com/supplies | support.dell.com
Printer M5200 → User’s Guide).
You can select menu items and corresponding values from the operator panel. When you
first enter the printer menus from the operator panel, you see an asterisk (*) next to a value
in the menus. This asterisk indicates the factory default setting. These settings are the
original printer settings. (Factory defaults may vary for different countries.)
When you select a new setting from the operator panel, the Saved message appears.
When the Saved message disappears, an asterisk appears next to the setting to identify it as
the current user default setting. These settings are active until new ones are selected or the
factory defaults are restored.
To select a new value as a setting:
1 Make sure the printer is on and the Ready message appears on the display.
2 Press the Menu button on the printer. The menu names appear.
3 Continue to press and release Menu until you see the menu you need.
4 Press Select to select the menu or menu item on the second line of the display.
• If the selection is a menu, the menu is opened and the first printer setting in the
• If the selection is a menu item, the default setting for the menu item appears.
56 Use your printer
menu appears.
(The current user default setting has an asterisk [*] beside it.)
Page 57

Each menu item has a list of values for the menu item. A value can be:
• A phrase or word to describe a setting
• A numerical value that can be changed
• An On or Off setting
5 Press Menu to scroll to the value you need.
6 Press Select to select the value on the second line of the operator panel. An asterisk
appears beside the value to indicate that it is now the user default setting. The new
setting appears for one second, clears, displays the word Saved, and then displays the
previous list of menu items.
7 Press Return to go back to previous menus. Make additional menu selections to set
new default settings. Press Go if this is the last printer setting you want to change.
User default settings remain in effect until you save new settings or restore the factory
defaults. Settings you choose from your software application can also change or override the
user default settings you select from the operator panel.
Restore factory default settings
To restore the original printer factory default settings:
1 Make sure the printer is on and the Ready message appears.
2 Press the Menu button on the printer until you see Utilities Menu, and then
press Select.
3 Press Menu until you see Factory Defaults, and then press Select.
4 Restore appears on the second line of the display.
5 Press Select.
The message Restoring Factory Defaults appears, followed by the Ready
message.
Use your printer 57
Page 58

When you select Restore:
• No other button actions are available on the operator panel while Restoring
Factory Defaults appears.
• All downloaded resources (fonts, macros, and symbol sets) in printer memory
(RAM) are deleted. (Resources residing in flash memory or on the optional hard
disk are unaffected.)
• All menu settings are returned to the factory default values, except:
– The operator panel Display Language setting in the Setup Menu.
– All settings in the Parallel Menu, Serial Menu, Network Menu, and USB Menu.
Disable menus
– Menus Disabled may appear when you press the Menu button from the Ready
state. Disabling the menus prevents users from inadvertently changing a printer
www.dell.com/supplies | support.dell.com
default that has been set by the person managing the printer. You can still clear
messages and select items from the Job Menu when printing a job, but you cannot
change other printer settings. You can, however, use your printer driver to override
printer defaults and select settings for individual print jobs.
58 Use your printer
Page 59

Paper Menu
Paper Source
Paper Size
Paper Type
Custom Types
Universal Setup
Substitute Size
Configure MP
Envelope Enhance
Paper Texture
Paper Weight
Paper Loading*
Finishing Menu
Duplex*
Duplex Bind*
Copies
Blank Pages
Collation
Separator Sheets
Separator Source
Multipage Print
Multipage Order
Multipage View
Multipage Border
Utilities Menu
Print Menus
Print Net <x> Setup
Print Fonts
Factory Defaults
Hex Trace
Job Menu
Confidential Job**
Held Jobs**
Cancel Job**
Reset Printer
Print Buffer**
PostScript Menu
Print PS Error
Network Menu
Standard Network
PCL SmartSwitch
PS SmartSwitch
NPA Mode
Network Buffer
MAC Binary PS
STD Net Setup
PCL Emul Menu
Font Source
Font Name
Point Size
Pitch
Symbol Set
Orientation
Lines per Page
A4 Width
Tray Renumber
Auto CR after LF
Auto LF after CR
USB Menu
Standard USB
PCL SmartSwitch
PS SmartSwitch
NPA Mode
USB Buffer
MAC Binary PS
Setup Menu
Printer Language
Power Saver
Quick Start
Quality Menu
Print Resolution
Toner Darkness
PictureGrade
Resource Save
Print Timeout
Wai t Ti m eo ut
Auto Continue
Jam Recovery
Page Protect
Print Area
Display Language
Alarm Control
Tone r Al arm
* Depending on installed options, not all menu
items may be shown.
** Options are only available if a print job has
been sent to the printer.
Use your printer 59
Page 60

Printing a job
To print a job from a typical Microsoft® Windows® application:
1 Open the file you want to print.
2 From the File menu, select Print.
3 Verify that the correct printer is selected in the dialog box. Modify the printer settings
as appropriate (such as the pages you want to print or the number of copies).
4 Click Properties or Setup to change printer settings not available from the first screen,
and then click OK.
5 Click OK or Print to send the job to the printer.
Canceling a job from the printer operator panel
www.dell.com/supplies | support.dell.com
To cancel a print job after it has started printing:
1 Press the left arrow on the Menu button once. JOB MENU and Cancel Job are
displayed.
2 Press Select. Canceling Job is displayed.
60 Use your printer
Page 61

Utilizing additional software tools
Use the Drivers and Utilities CD that came with your printer to install a combination of
software applications, depending on your operating system.
Operating System Status
Monitor
Windows 2000,
Windows XP
Windows NTYYNYY
Windows 95,
Windows 98,
Windows Me
NOTE: If you purchased your printer and computer separately, you must use the Drivers and
Utilities CD to install these software applications.
YYYYY
YNNY Y
Status Monitor Center
Dell Toner
Reorder
Window
Dell
Printer
Software
Uninstall
Driver
Profiler
Status Monitor
The Status Monitor alerts you when an error or warning occurs, for example, when the top
cover is open or toner is running low.
The Status Monitor launches when you send a print job to the printer and only appears on
the computer screen when an error or warning occurs.
Status Monitor Center
Use the Status Monitor Center to manage multiple Status Monitors.
• Select a printer from the drop-down list and then select Run to open a Status Monitor
for a particular printer.
• Select Update to change the appearance of the list of printers.
• Select Help to read the online help.
Use your printer 61
Page 62

Printing Status window
The Printing Status window displays the status of the printer (Printer Ready, Printer
Offline, and Error—Check Printer) and the name of the job when you send a job to print.
The Printing Status window also displays the level of toner so you can:
• Monitor the toner level for your printer.
•Click Order Toner to order replacement toner cartridges.
See Order Toner Reorder window for more information.
Dell Toner Reorder Window
The Order Toner Cartridges dialog box can be launched from the Printing Status window,
the Programs window, or the desktop icon.
You can order toner by phone or from the Web.
www.dell.com/supplies | support.dell.com
1 Click Start → Programs → Dell Printers → Dell Laser Printer M5200 → Dell Printer
Supplies–Laser.
The Order Toner Cartridges window appears.
2 If ordering from the Web:
a Choose your printer model from the drop-down list on the screen.
Enter your Dell printer Service Tag number in the field provided.
Your Service Tag number is located inside the front door of your printer.
b Click Visit Dell’s cartridge ordering website.
3 If ordering by phone, call the number that appears under the By Telephone heading.
Dell Printer Software Uninstall
Use the Uninstall software utility to remove any currently installed printer software or
printer objects. You can access the Uninstall software utility two ways:
1 Click Start → Settings → Printers.
a Select the printer object to uninstall, and then right-click the mouse.
b Select Dell Software Uninstall.
c Select the components to uninstall, and then click Next.
d Click Uninstall Now.
e Click OK when the uninstall is complete.
62 Use your printer
Page 63

2 Click Start → Programs → Dell.
a Select Dell Printer Software Uninstall.
b Select the components to uninstall, and then click Next.
c Click Uninstall Now.
d Click OK when the uninstall is complete.
Driver Profiler
Use the Driver Profiler to create driver profiles that contain custom driver settings. A driver
profile can contain a group of saved printer driver settings and other data for things such as:
• Print orientation and N-Up (document settings)
• Installation status of an output tray (printer options)
• User-defined paper sizes (custom papers)
• Simple text and watermarks
• Overlay references
• Font references
• Form associations
Use your printer 63
Page 64

Replacing the toner cartridge
CAUTION: Before performing any of the procedures listed below, read and follow
the safety instructions.
To order replacement toner cartridges, contact Dell online or by phone (see “Order toner
cartridges” on page 2).
In addition to the toner level indicator that is displayed each time you send a job to print,
an 88 Toner Low message appears on the operator panel to alert you it’s time to order a
new toner cartridge.
To use the remaining toner, remove the toner cartridge, shake it gently back and forth, and
reinsert it. When the print fades or no longer prints satisfactorily, replace the toner
cartridge.
www.dell.com/supplies | support.dell.com
NOTE: Dell does not recommend that you use toner cartridges from a third-party refiller. Print
quality and printer reliability cannot be guaranteed if you do. For best results, use Dell supplies.
Removing the used toner cartridge
NOTE: Remove any print jobs from the output bin before opening the upper front door.
Before performing any of the procedures listed in this section, read and follow the safety
information on page 9.
64 Use your printer
Page 65

1 Press latch 1 to open the lower door. Press latch 2 to open the upper door.
2 Grasp the toner cartridge by the handle and pull it up and out.
Cleaning the printer
Using a clean, lint-free cloth, gently clean the shaded areas by wiping toward the front of the
printer.
Use your printer 65
Page 66

NOTICE: Do not touch the transfer roller.
.
1
www.dell.com/supplies | support.dell.com
1 Tran sfe r ro l ler
Installing the new toner cartridge
Remove the new cartridge from the packaging. Pull the tabs on each side of the plastic strap
to remove the packaging foam from the toner cartridge.
66 Use your printer
Page 67

NOTICE: Do not touch the photoconductor drum on the underside of the toner cartridge.
1 Gently shake the cartridge to distribute the toner.
.
Use your printer 67
Page 68

2 Align the arrows on either side of the toner cartridge with the corresponding arrows in
the printer
www.dell.com/supplies | support.dell.com
3
Guide the toner cartridge in until it snaps into place.
.
4 Close the upper door, and then the lower door.
5 Turn the printer on.
68 Use your printer
Page 69

SECTION 6
Appendix
Contacting Dell
Limited Warranties and Return Policy
Dell Computer Corporation Ink and Toner Cartridges
Limited Warranties
Dell Software License Agreement
6
Page 70

Contacting Dell
To contact Dell electronically, you can access the following websites:
• www.dell.com
• support.dell.com (technical support)
• premiersupport.dell.com (technical support for educational, government, healthcare,
and medium/large business customers, including Premier, Platinum, and Gold
customers)
For specific web addresses for your country, find the appropriate country section in the table
below.
NOTE: Toll-free numbers are for use within the country for which they are listed.
When you need to contact Dell, use the electronic addresses, telephone numbers, and
www.dell.com/supplies | support.dell.com
codes provided in the following table. If you need assistance in determining which codes to
use, contact a local or an international operator.
Country (City)
International Access Code
Country Code
City Code
Belgium (Brussels)
International Access Code: 00
Country Code: 32
City Code: 2
Department Name or Service Area,
Website and E-Mail Address
We bs it e : support.euro.dell.com
E-mail: tech_be@dell.com
E-mail for French Speaking Customers:
support.euro.dell.com/be/fr/emaildell/
Technical Support 02 481 92 88
Customer Care 02 481 91 19
Corporate Sales 02 481 91 00
Fax 02 481 92 99
Switchboard 02 481 91 00
Local Numbers, and
Area Codes,
Toll-Free Numbers
70 Appendix
Page 71

Country (City)
International Access Code
Country Code
City Code
Canada (North York, Ontario)
International Access Code: 011
Denmark (Copenhagen)
International Access Code: 00
Country Code: 45
Department Name or Service Area,
Website and E-Mail Address
Online Order Status: www.dell.ca/ostatus
AutoTech (automated technical support) toll-free: 1-800-247-9362
TechFax toll-free: 1-800-950-1329
Customer Care (Home Sales/Small Business) toll-free: 1-800-847-4096
Customer Care (med./large business, government) toll-free: 1-800-326-9463
Technical Support (Home Sales/Small Business) toll-free: 1-800-847-4096
Technical Support (med./large bus., government) toll-free: 1-800-387-5757
Sales (Home Sales/Small Business) toll-free: 1-800-387-5752
Sales (med./large bus., government) toll-free: 1-800-387-5755
Spare Parts Sales & Extended Service Sales 1 866 440 3355
We bs it e : support.euro.dell.com
E-mail Support (portable computers):
den_nbk_support@dell.com
E-mail Support (desktop computers):
den_support@dell.com
E-mail Support (servers):
Nordic_server_support@dell.com
Technical Support 7023 0182
Customer Care (Relational) 7023 0184
Home/Small Business Customer Care 3287 5505
Switchboard (Relational) 3287 1200
Fax Switchboard (Relational) 3287 1201
Switchboard (Home/Small Business) 3287 5000
Fax Switchboard (Home/Small Business) 3287 5001
Local Numbers, and
Area Codes,
Toll-Free Num b ers
Appendix 71
Page 72

Country (City)
International Access Code
Country Code
City Code
Finland (Helsinki)
International Access Code: 990
Country Code: 358
City Code: 9
www.dell.com/supplies | support.dell.com
France (Paris) (Montpellier)
International Access Code: 00
Country Code: 33
City Codes: (1) (4)
Department Name or Service Area,
Website and E-Mail Address
Local Numbers, and
Area Codes,
Toll-Free Numbers
We bs it e : support.euro.dell.com
E-mail: fin_support@dell.com
E-mail Support (servers):
Nordic_support@dell.com
Technical Support 09 253 313 60
Technical Support Fax 09 253 313 81
Relational Customer Care 09 253 313 38
Home/Small Business Customer Care 09 693 791 94
Fax 09 253 313 99
Switchboard 09 253 313 00
We bs it e : support.euro.dell.com
E-mail: support.euro.dell.com/fr/fr/emaildell/
Home and Small Business
Technical Support 0825 387 270
Customer Care 0825 823 833
Switchboard 0825 004 700
Switchboard (calls from outside of France) 0499754000
Sales 0825 004 700
Fax 0825 004 701
Fax (calls from outside of France) 0499754001
Corporate
Technical Support 0825 004 719
Customer Care 0825 338 339
Switchboard 0155947100
Sales 0155947100
Fax 0155947101
72 Appendix
Page 73

Country (City)
International Access Code
Country Code
City Code
Germany (Langen)
International Access Code: 00
Country Code: 49
City Code: 6103
Greece
International Access Code: 00
Country Code: 30
India Technical Support 1600 33 8045
Department Name or Service Area,
Website and E-Mail Address
We bs it e : support.euro.dell.com
E-mail: tech_support_central_europe@dell.com
Technical Support 06103 766-7200
Home/Small Business Customer Care 0180-5-224400
Global Segment Customer Care 06103 766-9570
Preferred Accounts Customer Care 06103 766-9420
Large Accounts Customer Care 06103 766-9560
Public Accounts Customer Care 06103 766-9555
Switchboard 06103 766-7000
We bs it e : support.euro.dell.com
E-mail: support.euro.dell.com/gr/en/emaildell/
Technical Support 080044149518
Gold Technical Support 08844140083
Switchboard 2108129800
Sales 2108129800
Fax 2108129812
Sales 1600 33 8044
Local Numbers, and
Area Codes,
Toll-Free Num b ers
Appendix 73
Page 74

Country (City)
International Access Code
Country Code
City Code
Ireland (Cherrywood)
International Access Code: 16
Country Code: 353
City Code: 1
www.dell.com/supplies | support.dell.com
Italy (Milan)
International Access Code: 00
Country Code: 39
City Code: 02
Department Name or Service Area,
Website and E-Mail Address
Local Numbers, and
Area Codes,
Toll-Free Numbers
We bs it e : support.euro.dell.com
E-mail: dell_direct_support@dell.com
Ireland Technical Support 1850 543 543
U.K. Technical Support (dial within U.K. only) 0870 908 0800
Home User Customer Care 01 204 4014
Small Business Customer Care 01 204 4014
U.K. Customer Care (dial within U.K. only) 0870 906 0010
Corporate Customer Care 1850 200 982
Corporate Customer Care (dial within U.K. only) 0870 907 4499
Ireland Sales 01 204 4444
U.K. Sales (dial within U.K. only) 0870 907 4000
Fax/SalesFax 01 204 0103
Switchboard 01 204 4444
We bs it e : support.euro.dell.com
E-mail: support.euro.dell.com/it/it/emaildell/
Home and Small Business
Technical Support 02 577 826 90
Customer Care 02 696 821 14
Fax 02 696 821 13
Switchboard 02 696 821 12
Corporate
Technical Support 02 577 826 90
Customer Care 02 577 825 55
Fax 02 575 035 30
Switchboard 02 577 821
74 Appendix
Page 75

Country (City)
International Access Code
Country Code
City Code
Latin America Customer Technical Support (Austin, Texas,
Luxembourg
International Access Code: 00
Country Code: 352
Mexico
International Access Code: 00
Country Code: 52
Department Name or Service Area,
Website and E-Mail Address
U.S.A.)
Customer Service (Austin, Texas, U.S.A.) 512 728-3619
Fax (Technical Support and Customer Service)
(Austin, Texas, U.S.A.)
Sales (Austin, Texas, U.S.A.) 512 728-4397
SalesFax (Austin, Texas, U.S.A.) 512 728-4600
We bs it e : support.euro.dell.com
E-mail: tech_be@dell.com
Technical Support (Brussels, Belgium) 3420808075
Home/Small Business Sales (Brussels, Belgium) toll-free: 080016884
Corporate Sales (Brussels, Belgium) 02 481 91 00
Customer Care (Brussels, Belgium) 02 481 91 19
Fax (Brussels, Belgium) 02 481 92 99
Switchboard (Brussels, Belgium) 02 481 91 00
Customer Technical Support 001-877-384-8979
Sales 50-81-8800
Customer Service 001-877-384-8979
Main 50-81-8800
Area Codes,
Local Numbers, and
Toll-Free Num b ers
512 728-4093
512 728-3883
or 512 728-3772
or 001-877-269-3383
or 01-800-888-3355
or 001-877-269-3383
or 01-800-888-3355
Appendix 75
Page 76

Country (City)
International Access Code
Country Code
City Code
Netherlands (Amsterdam)
International Access Code: 00
Country Code: 31
City Code: 20
www.dell.com/supplies | support.dell.com
Norway (Lysaker)
International Access Code: 00
Country Code: 47
Department Name or Service Area,
Website and E-Mail Address
Local Numbers, and
Area Codes,
Toll-Free Numbers
We bs it e : support.euro.dell.com
E-mail (Technical Support):
(Enterprise): nl_server_support@dell.com
(Latitude): nl_latitude_support@dell.com
(Inspiron): nl_inspiron_support@dell.com
(Dimension): nl_dimension_support@dell.com
(OptiPlex): nl_optiplex_support@dell.com
(Dell Precision): nl_workstation_support@dell.com
Technical Support 020 674 45 00
Technical Support Fax 020 674 47 66
Home/Small Business Customer Care 020 674 42 00
Relational Customer Care 020 674 4325
Home/Small Business Sales 020 674 55 00
Relational Sales 020 674 50 00
Home/Small Business Sales Fax 020 674 47 75
Relational Sales Fax 020 674 47 50
Switchboard 0206745000
Switchboard Fax 0206744750
We bs it e : support.euro.dell.com
E-mail Support (portable computers):
nor_nbk_support@dell.com
E-mail Support (desktop computers):
nor_support@dell.com
E-mail Support (servers):
nordic_server_support@dell.com
Technical Support 671 16882
Relational Customer Care 671 17514
Home/Small Business Customer Care 23162298
Switchboard 671 16800
Fax Switchboard 671 16865
76 Appendix
Page 77

Country (City)
International Access Code
Country Code
City Code
Poland (Warsaw)
International Access Code: 011
Country Code: 48
City Code: 22
Portug al
International Access Code: 00
Country Code: 351
Puerto Rico General Support 1-800-805-7545
Singapore (Singapore)
International Access Code: 005
Country Code: 65
Department Name or Service Area,
Website and E-Mail Address
We bs it e : support.euro.dell.com
E-mail: pl_support@dell.com
Customer Service Phone 57 95 700
Customer Care 57 95 999
Sales 5795999
Customer Service Fax 57 95 806
Reception Desk Fax 5795998
Switchboard 5795999
We bs it e : support.euro.dell.com
E-mail: support.euro.dell.com/pt/en/emaildell/
Technical Support 707200149
Customer Care 800 300 413
Sales 800 300 410 or 800 300 411 or
Fax 21 424 01 12
Technical Support toll-free: 800 6011 051
Customer Service (Penang, Malaysia) 604 633 4949
Transaction Sales toll-free: 800 6011 054
Corporate Sales toll-free: 800 6011 053
Local Numbers, and
800 300 412 or 21 422 07 10
Area Codes,
Toll-Free Num b ers
Appendix 77
Page 78

Country (City)
International Access Code
Country Code
City Code
Spain (Madrid)
International Access Code: 00
Country Code: 34
City Code: 91
www.dell.com/supplies | support.dell.com
Sweden (Upplands Vasby)
International Access Code: 00
Country Code: 46
City Code: 8
Department Name or Service Area,
Website and E-Mail Address
Local Numbers, and
Area Codes,
Toll-Free Numbers
We bs it e : support.euro.dell.com
E-mail: support.euro.dell.com/es/es/emaildell/
Home and Small Business
Technical Support 902 100 130
Customer Care 902 118 540
Sales 902 118 541
Switchboard 902 118 541
Fax 902 118 539
Corporate
Technical Support 902 100 130
Customer Care 902 118 546
Switchboard 91 722 92 00
Fax 91 722 95 83
We bs it e : support.euro.dell.com
E-mail: swe_support@dell.com
E-mail Support for Latitude and Inspiron:
Swe-nbk_kats@dell.com
E-mail Support for OptiPlex: Swe_kats@dell.com
E-mail Support for Servers:
Nordic_server_support@dell.com
Technical Support 08 590 05 199
Relational Customer Care 08 590 05 642
Home/Small Business Customer Care 08 587 70 527
Employee Purchase Program (EPP) Support 20 140 14 44
Fax Technical Support 08 590 05 594
Sales 08 590 05 185
78 Appendix
Page 79

Country (City)
International Access Code
Country Code
City Code
Switzerland (Geneva)
International Access Code: 00
Country Code: 41
City Code: 22
U.K. (Bracknell)
International Access Code: 00
Country Code: 44
City Code: 1344
Department Name or Service Area,
Website and E-Mail Address
We bs it e : support.euro.dell.com
E-mail: swisstech@dell.com
E-mail for French-speaking HSB and Corporate
Customers: support.euro.dell.com/ch/fr/emaildell/
Technical Support (Home and Small Business) 0844 811 411
Technical Support (Corporate) 0844 822 844
Customer Care (Home and Small Business) 0848 802 202
Customer Care (Corporate) 0848 821 721
Fax 0227990190
Switchboard 0227990101
We bs it e : support.euro.dell.com
Customer Care website: support.euro.dell.com/uk/en/ECare/Form/Home.asp
E-mail: dell_direct_support@dell.com
Technical Support (Corporate/Preferred
Accounts/PAD [1000+ employees])
Technical Support (direct/PAD and general) 0870 908 0800
Global Accounts Customer Care 01344 373 186
Home and Small Business Customer Care 0870 906 0010
Corporate Customer Care 01344 373 185
Preferred Accounts (500–5000 employees)
Customer Care
Central Government Customer Care 01344 373 193
Local Government & Education Customer Care 01344 373 199
Health Customer Care 01344 373 194
Home and Small Business Sales 0870 907 4000
Corporate/Public Sector Sales 01344 860 456
Local Numbers, and
Area Codes,
Toll-Free Num b ers
0870 908 0500
0870 906 0010
Appendix 79
Page 80

Country (City)
International Access Code
Country Code
City Code
U.S.A. (Austin, Texas)
International Access Code: 011
Country Code: 1
www.dell.com/supplies | support.dell.com
Department Name or Service Area,
Website and E-Mail Address
Local Numbers, and
Area Codes,
Toll-Free Numbers
Automated Order-Status Service toll-free: 1-800-433-9014
AutoTech (portable and desktop computers) toll-free: 1-800-247-9362
Consumer (Home and Home Office)
Technical Support toll-free: 1-800-624-9896
Customer Service toll-free: 1-800-624-9897
DellNet™ Service and Support toll-free: 1-877-Dellnet
(1-877-335-5638)
Employee Purchase Program (EPP) Customers toll-free: 1-800-695-8133
Financial Services website: www.dellfinancialservices.com
Financial Services (lease/loans) toll-free: 1-877-577-3355
Financial Services (Dell Preferred Accounts [DPA]) toll-free: 1-800-283-2210
Business
Customer Service and Technical Support toll-free: 1-800-822-8965
Employee Purchase Program (EPP) Customers toll-free: 1-800-695-8133
Projectors Technical Support toll-free: 1-877-459-7298
Public (government, education, and healthcare)
Customer Service and Technical Support toll-free: 1-800-456-3355
Employee Purchase Program (EPP) Customers toll-free: 1-800-234-1490
Dell Sales toll-free: 1-800-289-3355
or toll-free: 1-800-879-3355
Dell Outlet Store (Dell refurbished computers) toll-free: 1-888-798-7561
Software and Peripherals Sales toll-free: 1-800-671-3355
Spare Parts Sales toll-free: 1-800-357-3355
Extended Service and Warranty Sales toll-free: 1-800-247-4618
Fax toll-free: 1-800-727-8320
Dell Services for the Deaf, Hard-of-Hearing, or
Speech-Impaired
toll-free: 1-877-DELLTTY
(1-877-335-5889)
80 Appendix
Page 81

Limited Warranties and Return Policy
Dell-branded hardware products purchased in the U.S. or Canada come with either a 90-day, one-year, two-year,
three-year, or four-year limited warranty. To determine which warranty came with your hardware product(s), see
your packing slip or invoice. The following sections describe the limited warranties and return policy for the U.S.,
the limited warranties and return policy for Canada, and the manufacturer guarantee for Latin America and the
Caribbean.
Limited Warranty for Dell-Branded Hardware Products (U.S. Only)
What is covered by this limited warranty?
This limited warranty covers defects in materials and workmanship in your—our end-user customer's—Dellbranded hardware products, including Dell-branded peripheral products.
What is not covered by this limited warranty?
This limited warranty does not cover:
• Software, including the operating system and software added to the Dell-branded hardware products
through our factory-integration system, third-party software, or the reloading of software
• Non-Dell-branded and Solution Provider Direct products and accessories
• Problems that result from:
– External causes such as accident, abuse, misuse, or problems with electrical power
– Servicing not authorized by Dell
– Usage that is not in accordance with product instructions
– Failure to follow the product instructions or failure to perform preventive maintenance
– Problems caused by using accessories, parts, or components not supplied by Dell
• Products with missing or altered service tags or serial numbers
• Products for which we have not received payment
THIS WARRANTY GIVES YOU SPECIFIC LEGAL RIGHTS, AND YOU MAY ALSO HAVE OTHER
RIGHTS WHICH VARY FROM STATE TO STATE (OR JURISDICTION TO JURISDICTION). DELL'S
RESPONSIBILITY FOR MALFUNCITONS AND DEFECTS IN HARDWARE IS LIMITED TO REPAIR
AND REPLACEMENT AS SET FORTH IN THIS WARRANTY STATEMENT. ALL EXPRESS AND
IMPLIED WARRANTIES FOR THE PRODUCT, INCLUDING BUT NOT LIMITED TO ANY IMPLIED
WARRANTIES AND CONDITIONS OF MERCHANTABILITY AND FITNESS FOR A PARTICULAR
PURPOSE, ARE LIMITED IN TIME TO THE TERM OF THE LIMITED WARRANTY PERIOD
REFLECTED ON YOUR PACKING SLIP OR INVOICE. NO WARRANTIES, WHETHER EXPRESS OR
IMPLIED, WILL APPLY AFTER THE LIMITED WARRANTY PERIOD HAS EXPIRED. SOME STATES
DO NOT ALLOW LIMITATIONS ON HOW LONG AN IMPLIED WARRANTY LASTS, SO THIS
LIMITATION MAY NOT APPLY TO YOU.
Appendix 81
Page 82

WE DO NOT ACCEPT LIABILITY BEYOND THE REMEDIES PROVIDED FOR IN THIS LIMITED
WARRANTY OR FOR CONSEQUENTIAL OR INCIDENTAL DAMAGES, INCLUDING, WITHOUT
LIMITATION, ANY LIABILTY FOR THIRD-PARTY CLAIMS AGAINST YOU FOR DAMAGES, FOR
PRODUCTS NOT BEING AVAILABLE FOR USE, OR FOR LOST DATA OR LOST SOFTWARE. OUR
LIABILITY WILL BE NO MORE THAN THE AMOUNT YOU PAID FOR THE PRODUCT THAT IS THE
SUBJECT OF A CLAIM. THIS IS THE MAXIMUM AMOUNT FOR WHICH WE ARE RESPONSIBLE.
SOME STATES DO NOT ALLOW THE EXCLUSION OR LIMITATION OF INCIDENTAL OR
CONSEQUENTIAL DAMAGES, SO THE ABOVE LIMITATION OR EXCLUSION MAY NOT APPLY TO
YOU.
How long does this limited warranty last?
This limited warranty lasts for the time period indicated on your packing slip or invoice, except that the limited
warranty on Dell-branded batteries lasts only one year and the limited warranty on the lamps for Dell-branded
projectors lasts only ninety days. The limited warranty begins on the date of the packing slip or invoice. The
warranty period is not extended if we repair or replace a warranted product or any parts. Dell may change the
availability of limited warranties, at its discretion, but any changes will not be retroactive.
www.dell.com/supplies | support.dell.com
What do I do if I need warranty service?
Before the warranty expires, please call us at the relevant number listed in the following table. Please also have your
Dell service tag number or order number available.
Individual Home Consumers: U.S. Only
Technical Support 1-800-624-9896
Customer Service 1-800-624-9897
Individual Home Consumers who purchased through
an Employee Purchase Program:
Technical Support and Customer Service 1-800-822-8965
Home and Small Business Commercial Customers:
Technical Support and Customer Service 1-800-456-3355
Medium, Large, or Global Commercial Customers,
Healthcare Customers, and Value Added Resellers
(VARs):
Technical Support and Customer Service 1-877-459-7298
Government and Education Customers:
Technical Support and Customer Service 1-877-459-7298
Dell-Branded Memory
1-888-363-5150
What will Dell do?
During the 90 days of the 90-day limited warranty and the first year of all other limited warranties: During the 90
days of the 90-day limited warranty and the first year of all other limited warranties, we will repair any Dellbranded hardware products returned to us that prove to be defective in materials or workmanship. If we are not
able to repair the product, we will replace it with a comparable product that is new or refurbished.
82 Appendix
Page 83

When you contact us, we will issue a Return Material Authorization Number for you to include with your return.
You must return the products to us in their original or equivalent packaging, prepay shipping charges, and insure
the shipment or accept the risk if the product is lost or damaged in shipment. We will return the repaired or
replacement products to you. We will pay to ship the repaired or replaced products to you if you use an address in
the United States (excluding Puerto Rico and U.S. possessions and territories). Otherwise, we will ship the product
to you freight collect.
If we determine that the product is not covered under this warranty, we will notify you and inform you of service
alternatives that are available to you on a fee basis.
NOTE: Before you ship the product(s) to us, make sure to back up the data on the hard drive(s) and any other
storage device(s) in the product(s). Remove any confidential, proprietary, or personal information and removable
media such as floppy disks, CDs, or PC Cards. We are not responsible for any of your confidential, proprietary, or
personal information; lost or corrupted data; or damaged or lost removable media.
During the remaining years: For the remaining period of the limited warranty, we will replace any defective part
with new or refurbished parts, if we agree that it needs to be replaced. When you contact us, we will require a valid
credit card number at the time you request a replacement part, but we will not charge you for the replacement part
as long as you return the original part to us within thirty days after we ship the replacement part to you. If we do
not receive the original part within thirty days, we will charge to your credit card the then-current standard price for
that part.
We will pay to ship the part to you if you use an address in the United States (excluding Puerto Rico and U.S.
possessions and territories). Otherwise, we will ship the part freight collect. We will also include a prepaid shipping
container with each replacement part for your use in returning the replaced part to us.
NOTE: Before you replace parts, make sure to back up the data on the hard drive(s) and any other storage
device(s) in the product(s). We are not responsible for lost or corrupted data.
What if I purchased a service contract?
If your service contract is with Dell, service will be provided to you under the terms of the service agreement.
Please refer to that contract for details on how to obtain service.
If you purchased through us a service contract with one of our third-party service providers, please refer to that
contract for details on how to obtain service.
How will you fix my product?
We use new and refurbished parts made by various manufacturers in performing warranty repairs and in building
replacement parts and systems. Refurbished parts and systems are parts or systems that have been returned to Dell,
some of which were never used by a customer. All parts and systems are inspected and tested for quality.
Replacement parts and systems are covered for the remaining period of the limited warranty for the product you
bought. Dell owns all parts removed from repaired products.
Appendix 83
Page 84

What do I do if I am not satisfied?
We pride ourselves on our great customer service. If you are not satisfied with the service you receive under this
limited warranty, please let us know. We have found that the best way to resolve issues regarding our limited
warranty is to work together. If, after those discussions, you are still not satisfied, we believe arbitration is the most
expeditious way to resolve your concerns. Therefore, ANY CLAIM, DISPUTE, OR CONTROVERSY
(WHETHER IN CONTRACT, TORT, OR OTHERWISE, WHETHER PREEXISTING, PRESENT, OR
FUTURE, AND INCLUDING STATUTORY, COMMON LAW, INTENTIONAL TORT, AND EQUITABLE
CLAIMS) AGAINST DELL arising from or relating to this limited warranty, its interpretation, or the breach,
termination, or validity thereof, the relationships which result from this limited warranty (including, to the full
extent permitted by applicable law, relationships with third parties), Dell's advertising, or any related purchase
SHALL BE RESOLVED EXCLUSIVELY AND FINALLY BY BINDING ARBITRATION ADMINISTERED
BY THE NATIONAL ARBITRATION FORUM (NAF) under its Code of Procedure then in effect (available via
the Internet at www.arb-forum.com/ or via telephone at 1-800-474-2371). The arbitration will be limited solely to
the dispute or controversy between you and Dell. Any award of the arbitrator(s) shall be final and binding on each
of the parties, and may be entered as a judgment in any court of competent jurisdiction. Information may be
obtained and claims may be filed with the NAF at P.O. Box 50191, Minneapolis, MN 55405. This provision applies
only to individual home consumers and consumers who purchased through an employee purchase program. It does
not apply to small, medium, large, and global commercial customers or government, education, and healthcare
www.dell.com/supplies | support.dell.com
customers.
May I transfer the limited warranty?
Limited warranties on systems may be transferred if the current owner transfers ownership of the system and
records the transfer with us. The limited warranty on Dell-branded memory may not be transferred. You may
record your transfer by going to Dell's website:
• If you are an Individual Home Consumer, go to www.dell.com/us/en/dhs/topics/sbtopic_015_ccare.htm
• If you are a Home Office, Small, Medium, Large, or Global Commercial Customer, go to
www.dell.com/us/en/biz/topics/sbtopic_ccare_nav_015_ccare.htm
• If you are a Government, Education, or Healthcare Customer, or an Individual Home Consumer who
purchased through an employee purchase program, go to
www.dell.com/us/en/pub/topics/sbtopic_015_ccare.htm
If you do not have Internet access, call your customer care representative or call 1-800-624-9897.
84 Appendix
"Total Satisfaction" Return Policy (U.S. Only)
We value our relationship with you and want to make sure that you're satisfied with your purchases. That's why we
offer a "Total Satisfaction" return policy for most products that you—the end-user customer—purchase directly
from Dell. Under this policy, you may return to Dell products that you purchased directly from Dell for a credit or
a refund of the purchase price paid, less shipping and handling and applicable restocking fees as follows:
• New Hardware Products and Accessories — All new hardware, accessories, parts, and unopened software
still in its sealed package, excluding the products listed below, may be returned within thirty days from the
date on the packing slip or invoice. To return applications software or an operating system that has been
installed by Dell, you must return the entire computer. A different return policy applies to nondefective
products purchased through Dell's Software and Peripherals division by customers of our Small and Medium
Business divisions. Those products may be returned within thirty days from the date on the packing slip or
invoice, but a fifteen percent (15%) restocking fee will be deducted from any refund or credit. The "Total
Satisfaction" Return Policy and Software and Peripherals division return policy are not available for Dell |
EMC storage products, EMC-branded products, or enterprise software.
Page 85

• Reconditioned or Refurbished Dell-Branded Hardware Products and Parts — All reconditioned or
refurbished Dell-branded server and storage products may be returned within thirty days from the date on
the packing slip or invoice. All other reconditioned or refurbished Dell-branded hardware products and parts
may be returned within fourteen days of the date on the packing slip or invoice.
To return products, e-mail or call Dell customer service to receive a Credit Return Authorization Number within
the return policy period applicable to the product you want to return. You must obtain a Credit Return
Authorization Number in order to return the product. See "Contacting Dell" or "Getting Help" in your customer
documentation (or www.dell.com/us/en/gen/contact.htm) to find the appropriate contact information for
obtaining customer assistance.
You must ship the products to Dell within five days of the date that Dell issues the Credit Return Authorization
Number. You must also return the products to Dell in their original packaging, in as-new condition along with any
media, documentation, and all other items that were included in the original shipment, prepay shipping charges,
and insure the shipment or accept the risk of loss or damage during shipment.
Limited Warranty Terms for Dell-Branded Hardware Products (Canada Only)
What is covered by this limited warranty?
This limited warranty covers defects in materials and workmanship in your—our end-user customer's—Dellbranded hardware products, including Dell-branded peripheral products.
What is not covered by this limited warranty?
This limited warranty does not cover:
• Software, including the operating system and software added to the Dell-branded hardware products
through our factory-integration system, or the reloading of the software
• Non-Dell branded and Solution Provider Direct products and accessories
• Problems that result from:
– External causes such as accident, abuse, misuse, or problems with electrical power
– Servicing not authorized by Dell
– Usage that is not in accordance with product instructions
– Failure to follow the product instructions or failure to perform preventive maintenance
– Problems caused by using accessories, parts, or components not supplied by Dell
• Products with missing or altered service tags or serial numbers
• Products for which we have not received payment
Appendix 85
Page 86

THIS WARRANTY GIVES YOU SPECIFIC LEGAL RIGHTS, AND YOU MAY ALSO HAVE OTHER RIGHTS
WHICH VARY FROM PROVINCE TO PROVINCE. DELL'S RESPONSIBILITY FOR MALFUNCTIONS AND
DEFECTS IN PRODUCT IS LIMITED TO REPAIR AND REPLACEMENT AS SET FORTH IN THIS
WARRANTY STATEMENT, FOR THE TERM OF THE WARRANTY PERIOD REFLECTED ON YOUR
PACKING SLIP OR INVOICE. EXCEPT FOR THE EXPRESS WARRANTIES CONTAINED IN THIS
WARRANTY STATEMENT, DELL DISCLAIMS ALL OTHER WARRANTIES AND CONDITIONS, EXPRESS
OR IMPLIED, INCLUDING WITHOUT LIMITATION IMPLIED WARRANTIES AND CONDITIONS OF
MERCHANTABILITY AND FITNESS FOR A PARTICULAR PURPOSE, STATUTORY OR OTHERWISE.
SOME PROVINCES DO NOT ALLOW THE EXCLUSION OF CERTAIN IMPLIED WARRANTIES OR
CONDITIONS, OR LIMITATIONS ON HOW LONG AN IMPLIED WARRANTY OR CONDITION LASTS.
THEREFORE, THE FOREGOING EXCLUSIONS AND LIMITATIONS MAY NOT APPLY TO YOU.
WE DO NOT ACCEPT LIABILITY BEYOND THE REMEDIES PROVIDED FOR IN THIS WARRANTY
STATEMENT OR FOR SPECIAL, INDIRECT, CONSEQUENTIAL, OR INCIDENTAL DAMAGES,
INCLUDING, WITHOUT LIMITATION, ANY LIABILTY FOR THIRD-PARTY CLAIMS AGAINST YOU FOR
DAMAGES, FOR PRODUCTS NOT BEING AVAILABLE FOR USE, OR FOR LOST DATA OR LOST
SOFTWARE. OUR LIABILITY WILL BE NO MORE THAN THE AMOUNT YOU PAID FOR THE PRODUCT
THAT IS THE SUBJECT OF A CLAIM. THIS IS THE MAXIMUM AMOUNT FOR WHICH WE ARE
RESPONSIBLE.
www.dell.com/supplies | support.dell.com
SOME PROVINCES DO NOT ALLOW THE EXCLUSION OR LIMITATION OF SPECIAL, INDIRECT,
INCIDENTAL, OR CONSEQUENTIAL DAMAGES, SO THE ABOVE LIMITATION OR EXCLUSION MAY
NOT APPLY TO YOU.
How long does this limited warranty last?
This limited warranty lasts for the time period indicated on your packing slip or invoice, except that the limited
warranty on Dell-branded batteries lasts only one year and the limited warranty on the lamps for Dell-branded
projectors lasts only ninety days. The limited warranty begins on the date of the packing slip or invoice. The
warranty period is not extended if we repair or replace a warranted product or any parts. Dell may change the terms
and availability of limited warranties, at its discretion, but any changes will not be retroactive (that is, the warranty
terms in place at the time of purchase will apply to your purchase).
86 Appendix
Page 87

What do I do if I need warranty service?
Before the warranty expires, please call us at the relevant number listed in the following table. Please also have your
Dell service tag number or order number available.
Individual Home Consumers; Home Office and Small
Business Customers:
Canada Only
Technical Support and Customer Service 1-800-847-4096
Medium, Large, and Global Commercial Customers;
Government, Education, and Healthcare Customers;
and Value Added Resellers (VARs):
Technical Support 1-800-387-5757
Customer Service 1-800-326-9463
Government or Education Customers, or Individual
Home Consumers who purchased through an
Employee Purchase Program:
Technical Support 1-800-387-5757
Customer Service 1-800-326-9463 (Extension 8221 for Individual
Consumers)
Dell-Branded Memory
1-888-363-5150
What will Dell do?
During the 90 days of the 90-day limited warranty and the first year of all other limited warranties: During the 90
days of the 90-day limited warranty and the first year of all other limited warranties, we will repair any Dellbranded hardware products returned to us that prove to be defective in materials or workmanship. If we are not
able to repair the product, we will replace it with a comparable product that is new or refurbished.
When you contact us, we will issue a Return Material Authorization Number for you to include with your return.
You must return the products to us in their original or equivalent packaging, prepay shipping charges, and insure
the shipment or accept the risk if the product is lost or damaged in shipment. We will return the repaired or
replacement products to you. We will pay to ship the repaired or replaced products to you if you use an address in
Canada. Otherwise, we will ship the product to you freight collect.
If we determine that the problem is not covered under this warranty, we will notify you and inform you of service
alternatives that are available to you on a fee basis.
NOTE: Before you ship the product(s) to us, make sure to back up the data on the hard drive(s) and any other
storage device(s) in the product(s). Remove any confidential, proprietary or personal information, removable
media, such as floppy disks, CDs, or PC Cards. We are not responsible for any of your confidential, proprietary or
personal information; lost or corrupted data; or damaged or lost removable media.
During the remaining years following the first year of all limited warranties: We will replace any defective part
with new or refurbished parts, if we agree that it needs to be replaced. When you contact us, we will require a valid
credit card number at the time you request a replacement part, but we will not charge you for the replacement part
as long as you return the original part to us within thirty days after we ship the replacement part to you. If we do
not receive the original part within thirty days, we will charge to your credit card the then-current standard price for
that part.
Appendix 87
Page 88

We will pay to ship the part to you if you use an address in Canada. Otherwise, we will ship the part freight collect.
We will also include a prepaid shipping container with each replacement part for your use in returning the replaced
part to us.
NOTE: Before you replace parts, make sure to back up the data on the hard drive(s) and any other storage
device(s) in the product(s). We are not responsible for lost or corrupted data.
What if I purchased a service contract?
If your service contract is with Dell, service will be provided to you under the terms of the service contract. Please
refer to that contract for details on how to obtain service. Dell's service contracts can be found online at
www.dell.ca or by calling Customer Care at 1-800-847-4096. If you purchased through us a service contract with
one of our third-party service providers, please refer to that contract (mailed to you with your packing slip or
invoice) for details on how to obtain service.
How will you fix my product?
We use new and refurbished parts made by various manufacturers in performing warranty repairs and in building
replacement parts and systems. Refurbished parts and systems are parts or systems that have been returned to Dell,
www.dell.com/supplies | support.dell.com
some of which were never used by a customer. All parts and systems are inspected and tested for quality.
Replacement parts and systems are covered for the remaining period of the limited warranty for the product you
bought. Dell owns all parts removed from repaired products.
What do I do if I am not satisfied?
We pride ourselves on our great customer service. If you are not satisfied with the service you receive under this
limited warranty, please let us know. We have found that the best way to resolve issues regarding our limited
warranty is to work together. If, after those discussions, you are still not satisfied, we believe arbitration is the most
expeditious way to resolve your concerns. Therefore, ANY CLAIM, DISPUTE, OR CONTROVERSY
(WHETHER IN CONTRACT, TORT, OR OTHERWISE, WHETHER PREEXISTING, PRESENT OR
FUTURE, AND INCLUDING STATUTORY, COMMON LAW, INTENTIONAL TORT, AND EQUITABLE
CLAIMS) AGAINST DELL arising from or relating to this limited warranty, its interpretation, or the breach,
termination or validity thereof, the relationships which result from this limited warranty (including, to the full
extent permitted by applicable law, relationships with third parties), Dell's advertising, or any related purchase
SHALL BE RESOLVED EXCLUSIVELY AND FINALLY BY BINDING ARBITRATION ADMINISTERED
BY THE NATIONAL ARBITRATION FORUM (NAF) under its Code of Procedure then in effect (available via
the Internet at www.arb-forum.com/, or via telephone at 1-800-474-2371). The arbitration will be limited solely to
the dispute or controversy between you and Dell. Any award of the arbitrator(s) shall be final and binding on each
of the parties, and may be entered as a judgment in any court of competent jurisdiction. Information may be
obtained and claims may be filed with the NAF at P.O. Box 50191, Minneapolis, MN 55405.
88 Appendix
May I transfer the limited warranty?
Limited warranties on systems may be transferred if the current owner transfers ownership of the system and
records the transfer with us. The limited warranty on Dell-branded memory may not be transferred. You may
record your transfer by going to Dell’s website:
• For Canada-purchased computers (in-country transfers) and to transfer from one customer to another, go to
www.dell.ca/ca/en/gen/topics/segtopic_ccare_nav_013_ccare.htm
• For out-of-country transfers (outside of the original country of purchase), go to
www.dell.com/us/en/biz/topics/sbtopic_ccare_nav_016_ccare.htm
Page 89

If you do not have Internet access, call Dell at 1-800-847-4096 (Home Consumer customers) or 1-800-326-9463
(Corporate Commercial or Government customers).
"Total Satisfaction" Return Policy (Canada Only)
If you are an end-user customer who bought new products directly from Dell, you may return them to Dell up to
30 days after you receive them for a refund or credit of the product purchase price. If you are an end-user customer
who bought reconditioned or refurbished products from Dell, you may return them to Dell within 14 days after the
date on the packing slip or invoice for a refund or credit of the product purchase price. In either case, the refund or
credit will not include any shipping and handling charges shown on your packing slip or invoice and will be subject
to a fifteen percent (15%) restocking fee, unless otherwise prohibited by law. If you are an organization that bought
the products under a written agreement with Dell, the agreement may contain different terms for the return of
products than specified by this policy.
To return products, you must call Dell Customer Service at 1-800-847-4096 to receive a Credit Return
Authorization Number. To expedite the process of your refund or credit, Dell expects you to return the products to
Dell in their original packaging within five days of the date that Dell issues the Credit Return Authorization
Number. You must also prepay shipping charges and insure the shipment or accept the risk of loss or damage
during shipment. You may return software for a refund or credit only if the sealed package containing the floppy
disk(s) or CD(s) is unopened. Returned products must be in as-new condition, and all of the manuals, floppy
disk(s), CD(s), power cables, and other items included with a product must be returned with it. For customers who
want to return, for refund or credit only, either application or operating system software that has been installed by
Dell, the whole system must be returned, along with any media and documentation that may have been included
in the original shipment.
The "Total Satisfaction" Return Policy does not apply to Dell | EMC storage products. It also does not apply to
products purchased through Dell's Software and Peripherals division. For those products, please instead refer to
Dell's Software and Peripheral's then-current return policy (see the following section, "Dell Software and
Peripherals (Canada Only)").
Dell Software and Peripherals (Canada Only)
Third-Party Software and Peripherals Products
Similar to other resellers of software and peripherals, Dell does not warrant third-party products. Third-party
software and peripheral products are covered by the warranties provided by the original manufacturer or publisher
only. Third-party manufacturer warranties vary from product to product. Consult your product documentation for
specific warranty information. More information may also be available from the manufacturer or publisher.
While Dell offers a wide selection of software and peripheral products, we do not specifically test or guarantee that
all of the products we offer work with any or all of the various models of Dell computers, nor do we test or
guarantee all of the products we sell on the hundreds of different brands of computers available today. If you have
questions about compatibility, we recommend and encourage you to contact the third-party software and
peripheral product manufacturer or publisher directly.
Appendix 89
Page 90

Dell-Branded Peripheral Products
Dell does provide a limited warranty for new Dell-branded peripheral products (products for which Dell is listed as
the manufacturer) such as monitors, batteries, memory, docking stations, and projectors). To determine which
limited warranty applies to the product you purchased, see the Dell packing slip or invoice and/or the product
documentation that accompanied your product. Descriptions of Dell's limited warranties are described in
preceding sections.
Return Policy
If you are an end-user customer who bought Dell Software and Peripherals products directly from a Dell company,
you may return Dell Software and Peripherals products that are in as-new condition to Dell up to 30 days from the
date on the packing slip or invoice for a refund of the product purchase price if already paid. This refund will not
include any shipping and handling charges shown on your packing slip or invoice; you are responsible for those.
To return products, you must call Dell Customer Service at 1-800-387-5759 to receive a Credit Return
Authorization Number. You must ship the Dell Software and Peripherals products back to Dell in their original
manufacturer's packaging (which must be in as-new condition), prepay shipping charges, and insure the shipment
or accept the risk of loss or damage during shipment.
www.dell.com/supplies | support.dell.com
To qualify for refund or replacement, returned products must be in as-new condition, software products must be
unopened, and all of the manuals, floppy disk(s), CD(s), power cables, and other items included with a product
must be returned with it.
One-Year End-User Manufacturer Guarantee (Latin America and the Caribbean Only)
Guarantee
Dell Computer Corporation ("Dell") warrants to the end user in accordance with the following provisions that its
branded hardware products, purchased by the end user from a Dell company or an authorized Dell distributor in
Latin America or the Caribbean, will be free from defects in materials, workmanship, and design affecting normal
use, for a period of one year from the original purchase date. Products for which proper claims are made will, at
Dell’s option, be repaired or replaced at Dell’s expense. Dell owns all parts removed from repaired products. Dell
uses new and reconditioned parts made by various manufacturers in performing repairs and building replacement
products.
90 Appendix
Exclusions
This Guarantee does not apply to defects resulting from: improper or inadequate installation, use, or maintenance;
actions or modifications by unauthorized third parties or the end user; accidental or willful damage; or normal wear
and tear.
Page 91

Making a Claim
Claims must be made in Latin America or the Caribbean by contacting the Dell point of sale within the guarantee
period. The end user must always supply proof of purchase, indicating name and address of the seller, date of
purchase, model and serial number, name and address of the customer, and details of symptoms and configuration
at the time of malfunction, including peripherals and software used. Otherwise, Dell may refuse the guarantee
claim. Upon diagnosis of a warranted defect, Dell will make arrangements and pay for ground freight and insurance
to and from Dell’s repair/replacement center. The end user must ensure that the defective product is available for
collection properly packed in original or equally protective packaging together with the details listed above and the
return number provided to the end user by Dell.
Limitation and Statutory Rights
Dell makes no other warranty, guarantee or like statement other than as explicitly stated above, and this Guarantee
is given in place of all other guarantees whatsoever, to the fullest extent permitted by law. In the absence of
applicable legislation, this Guarantee will be the end user’s sole and exclusive remedy against Dell or any of its
affiliates, and neither Dell nor any of its affiliates shall be liable for loss of profit or contracts, or any other indirect
or consequential loss arising from negligence, breach of contract, or howsoever.
This Guarantee does not impair or affect mandatory statutory rights of the end user against and/or any rights
resulting from other contracts concluded by the end user with Dell and/or any other seller.
Dell World Trade LP
One Dell Way, Round Rock, TX 78682, USA
Dell Computadores do Brasil Ltda (CNPJ No. 72.381.189/0001-10)/
Dell Commercial do Brasil Ltda (CNPJ No. 03 405 822/0001-40)
Avenida Industrial Belgraf, 400
92990-000 - Eldorado do Sul – RS - Brasil
Dell Computer de Chile Ltda
Coyancura 2283, Piso 3- Of.302,
Providencia, Santiago - Chile
Dell Computer de Colombia Corporation
Carrera 7 #115-33 Oficina 603
Bogota, Colombia
Dell Computer de Mexico SA de CV
Paseo de la Reforma 2620 - 11° Piso
Col. Lomas Altas
11950 México, D.F.
Appendix 91
Page 92

Dell Computer Corporation Ink and Toner Cartridges Limited Warranties
The following sections describe the limited warranty for ink and toner cartridges for the U.S., Canada, and Latin
America. Refer to the appropriate limited warranty accordingly.
Ink and Toner Cartridges Limited Warranty (U.S. and Canada Only)
Dell Computer Corporation warrants to the original purchaser of genuine Dell-branded toner cartridges that they
will be free from defects in material and workmanship for the life of the cartridge and that for genuine Dellbranded ink cartridges they will be free from defects in material and workmanship for two years beginning on the
date of invoice. If this product proves defective in either material or workmanship, it will be replaced without
charge during the limited warranty period if returned to Dell. You must first call our toll-free number to get your
return authorization. In the U.S., call 1-800-822-8965; in Canada, call 1-800-387-5757. If we are not able to replace
the product because it has been discontinued or is not available, we will either replace it with a comparable
product or reimburse you for the cartridge purchase cost, at Dell’s sole option. This limited warranty does not
apply to ink or toner cartridges that have been refilled or improperly stored or due to problems resulting from
www.dell.com/supplies | support.dell.com
misuse, abuse, accident, neglect, mishandling, incorrect environments, or wear from ordinary use.
THIS WARRANTY GIVES YOU SPECIFIC LEGAL RIGHTS, AND YOU MAY ALSO HAVE OTHER RIGHTS
WHICH VARY FROM STATE TO STATE (OR JURISDICTION TO JURISDICTION). DELL’S
RESPONSIBILITY FOR MALFUNCTIONS AND DEFECTS IN HARDWARE IS LIMITED TO
REPLACEMENT AS SET FORTH IN THIS WARRANTY STATEMENT. FOR CANADIAN CUSTOMERS,
EXCEPT FOR THE EXPRESS WARRANTIES CONTAINED IN THIS WARRANTY STATEMENT, DELL
DISCLAIMS ALL OTHER WARRANTIES AND CONDITIONS, EXPRESS OR IMPLIED, STATUTORY OR
OTHERWISE, FOR THE PRODUCT. FOR U.S. CUSTOMERS, ALL EXPRESS AND IMPLIED
WARRANTIES FOR THE PRODUCT, INCLUDING BUT NOT LIMITED TO ANY IMPLIED WARRANTIES
AND CONDITIONS OF MERCHANTABILITY AND FITNESS FOR A PARTICULAR PURPOSE ARE
LIMITED IN TIME TO THE TERM OF THIS LIMITED WARRANTY. NO WARRANTIES, WHETHER
EXPRESS OR IMPLIED, WILL APPLY AFTER THE LIMITED WARRANTY PERIOD HAS EXPIRED. SOME
STATES OR JURISDICTIONS DO NOT ALLOW THE EXCLUSION OF CERTAIN IMPLIED WARRANTIES
OR CONDITIONS, OR LIMITATIONS ON HOW LONG AN IMPLIED WARRANTY OR CONDITION
LASTS, SO THIS LIMITATION MAY NOT APPLY TO YOU. THIS WARRANTY COVERAGE TERMINATES
IF YOU SELL OR OTHERWISE TRANSFER THIS PRODUCT TO ANOTHER PARTY.
DELL DOES NOT ACCEPT LIABILITY BEYOND THE REMEDIES PROVIDED FOR IN THIS LIMITED
WARRANTY OR FOR SPECIAL, INDIRECT, CONSEQUENTIAL OR INCIDENTAL DAMAGES,
INCLUDING, WITHOUT LIMITATION, ANY LIABILTY FOR THIRD-PARTY CLAIMS AGAINST YOU FOR
DAMAGES, FOR PRODUCTS NOT BEING AVAILABLE FOR USE, OR FOR LOST DATA OR LOST
SOFTWARE. DELL’S LIABILITY WILL BE NO MORE THAN THE AMOUNT YOU PAID FOR THE
PRODUCT THAT IS THE SUBJECT OF A CLAIM. THIS IS THE MAXIMUM AMOUNT FOR WHICH DELL
IS RESPONSIBLE.
SOME STATES OR JURISDICTIONS DO NOT ALLOW THE EXCLUSION OR LIMITATION OF SPECIAL,
INDIRECT, INCIDENTAL OR CONSEQUENTIAL DAMAGES, SO THE ABOVE LIMITATION OR
EXCLUSION MAY NOT APPLY TO YOU.
92 Appendix
Page 93

Ink and Toner Cartridges Limited Warranty (Latin America Only)
Dell Computer Corporation warrants to the original purchaser of genuine Dell-branded toner cartridges that the
cartridges will be free from defects resulting from material or manufacturing process for the life of the cartridge.
For the original purchaser of genuine Dell-branded ink cartridges, Dell warrants that the cartridges will be free
from defects resulting from material or manufacturing process for one year beginning from the date of delivery.
If this product presents defects resulting from either material or manufacturing process, it will be replaced without
charge during the limited warranty period if returned to Dell.
In order to obtain the necessary information to enable the replacement, call the appropriate toll-free number. In
Mexico, call 001-877-533-6230; in Puerto Rico, call 1-877-839-5123. In cases in which either the production of the
cartridge has been discontinued or the cartridge is not available, Dell reserves the right, at its sole discretion, to
choose between replacing it by a similar product or reimbursing you for the purchase cost.
This limited warranty does not apply to ink or toner cartridges that have been refilled or to defects resulting from
misuse, abuse, accident, negligence, mishandling, improper storage or exposure to inappropriate environments.
Dell’s liability for the malfunction or defect of hardware after the period of the legal warranty (and specifically the
period of the legal warranty of defective products stated in the consumer protections rules), is limited to either the
substitution of the product or the reimbursement as stated above. This warranty coverage terminates if you sell or
otherwise transfer this product to a third party.
Dell does not accept any additional liability for patrimonial, emotional or any other kind of damage caused to the
consumer and/or to a third party, which exceeds the established liability either in this limited warranty or in legal
rules that may apply.
Appendix 93
Page 94

Dell Software License Agreement
This is a legal agreement between you, the user, and Dell Products, L.P ("Dell"). This
agreement covers all software that is distributed with the Dell product, for which there is no
separate license agreement between you and the manufacturer or owner of the software
(collectively the "Software"). By opening or breaking the seal on the Software packet(s),
installing or downloading the Software, or using the Software that has been preloaded or is
embedded in your computer, you agree to be bound by the terms of this agreement. If you
do not agree to these terms, promptly return all Software items (disks, written materials,
and packaging) and delete any preloaded or embedded Software.
You may use one copy of the Software on only one computer at a time. If you have multiple
licenses for the Software, you may use as many copies at any time as you have licenses. "Use"
means loading the Software in temporary memory or permanent storage on the computer.
Installation on a network server solely for distribution to other computers is not "use" if (but
www.dell.com/supplies | support.dell.com
only if) you have a separate license for each computer to which the Software is distributed.
You must ensure that the number of persons using the Software installed on a network
server does not exceed the number of licenses that you have. If the number of users of
Software installed on a network server will exceed the number of licenses, you must
purchase additional licenses until the number of licenses equals the number of users before
allowing additional users to use the Software. If you are a commercial customer of Dell or a
Dell affiliate, you hereby grant Dell, or an agent selected by Dell, the right to perform an
audit of your use of the Software during normal business hours, you agree to cooperate with
Dell in such audit, and you agree to provide Dell with all records reasonably related to your
use of the Software. The audit will be limited to verification of your compliance with the
terms of this agreement.
94 Appendix
The Software is protected by United States copyright laws and international treaties. You
may make one copy of the Software solely for backup or archival purposes or transfer it to a
single hard disk provided you keep the original solely for backup or archival purposes. You
may not rent or lease the Software or copy the written materials accompanying the
Software, but you may transfer the Software and all accompanying materials on a
permanent basis if you retain no copies and the recipient agrees to the terms hereof. Any
transfer must include the most recent update and all prior versions. You may not reverse
engineer, decompile or disassemble the Software. If the package accompanying your
computer contains compact discs, 3.5" and/or 5.25" disks, you may use only the disks
appropriate for your computer. You may not use the disks on another computer or network,
or loan, rent, lease, or transfer them to another user except as permitted by this agreement.
Page 95

Limited Warranty
Dell warrants that the Software disks will be free from defects in materials and
workmanship under normal use for ninety (90) days from the date you receive them. This
warranty is limited to you and is not transferable. Any implied warranties are limited to
ninety (90) days from the date you receive the Software. Some jurisdictions do not allow
limits on the duration of an implied warranty, so this limitation may not apply to you. The
entire liability of Dell and its suppliers, and your exclusive remedy, shall be (a) return of the
price paid for the Software or (b) replacement of any disk not meeting this warranty that is
sent with a return authorization number to Dell, at your cost and risk. This limited warranty
is void if any disk damage has resulted from accident, abuse, misapplication, or service or
modification by someone other than Dell. Any replacement disk is warranted for the
remaining original warranty period or thirty (30) days, whichever is longer.
Dell does NOT warrant that the functions of the Software will meet your requirements or
that operation of the Software will be uninterrupted or error free. You assume responsibility
for selecting the Software to achieve your intended results and for the use and results
obtained from the Software.
DELL, ON BEHALF OF ITSELF AND ITS SUPPLIERS, DISCLAIMS ALL OTHER
WARRANTIES, EXPRESS OR IMPLIED, INCLUDING, BUT NOT LIMITED TO,
IMPLIED WARRANTIES OF MERCHANTABILITY AND FITNESS FOR A
PARTICULAR PURPOSE, FOR THE SOFTWARE AND ALL ACCOMPANYING
WRITTEN MATERIALS. This limited warranty gives you specific legal rights; you may
have others, which vary from jurisdiction to jurisdiction.
IN NO EVENT SHALL DELL OR ITS SUPPLIERS BE LIABLE FOR ANY DAMAGES
WHATSOEVER (INCLUDING, WITHOUT LIMITATION, DAMAGES FOR LOSS OF
BUSINESS PROFITS, BUSINESS INTERRUPTION, LOSS OF BUSINESS
INFORMATION, OR OTHER PECUNIARY LOSS) ARISING OUT OF USE OR
INABILITY TO USE THE SOFTWARE, EVEN IF ADVISED OF THE POSSIBILITY OF
SUCH DAMAGES. Because some jurisdictions do not allow an exclusion or limitation of
liability for consequential or incidental damages, the above limitation may not apply to you.
Appendix 95
Page 96

U.S. Government Restricted Rights
The software and documentation are "commercial items" as that term is defined at 48
C.F.R. 2.101, consisting of "commercial computer software" and "commercial computer
software documentation" as such terms are used in 48 C.F.R. 12.212. Consistent with 48
C.F.R. 12.212 and 48 C.F.R. 227.7202-1 through 227.7202-4, all U.S. Government end users
acquire the software and documentation with only those rights set forth herein.
Contractor/manufacturer is Dell Products, L.P., One Dell Way, Round Rock, Texas 78682.
General
This license is effective until terminated. It will terminate upon the conditions set forth
above or if you fail to comply with any of its terms. Upon termination, you agree that the
Software and accompanying materials, and all copies thereof, will be destroyed. This
agreement is governed by the laws of the State of Texas. Each provision of this agreement is
www.dell.com/supplies | support.dell.com
severable. If a provision is found to be unenforceable, this finding does not affect the
enforceability of the remaining provisions, terms, or conditions of this agreement. This
agreement is binding on successors and assigns. Dell agrees and you agree to waive, to the
maximum extent permitted by law, any right to a jury trial with respect to the Software or
this agreement. Because this waiver may not be effective in some jurisdictions, this waiver
may not apply to you. You acknowledge that you have read this agreement, that you
understand it, that you agree to be bound by its terms, and that this is the complete and
exclusive statement of the agreement between you and Dell regarding the Software.
96 Appendix
Page 97

Index
A
attaching the printer
directly to the network (no
queue), 23
directly to the network
(queue), 20
locally, 13
C
canceling a job, 60
changing printer settings
from the operator panel, 56
changing the language
from the operator panel, 56
D
Dell Printer Software
Uninstall, 62
Dell Toner Re-Order
Window, 62
disable menus
from the operator panel, 58
driver profiler, using, 63
drivers, installing, 36
F
factory defaults, restoring, 57
I
installing
a toner cartridge, 66
optional memory cards, 27
printer drivers, 36
for all clients, 19, 22, 26
on the network, 25
using Linux, 18
using Novell NetWare, 18
using Windows 2000, 14,
38
using Windows 95, 17, 42
using Windows 98, 16, 41
using Windows Me, 14,
39
using Windows NT, 15,
40
using Windows XP, 13, 37
IP address, locating, 20, 23
L
Linux, drivers, 18
loading paper
multipurpose feeder, 49
standard tray, 46
loading transparencies
multipurpose feeder, 49
standard tray, 46
local printing, 36
locating the IP address, 20, 23
M
maintaining the printer
cleaning the printer, 65
toner cartridge
installing, 66
memory cards, installing, 27
menus, disabled, 58
multipurpose feeder
closing, 54
icons, 49
loading paper, 49
loading transparencies, 49
N
network printing, 11
network, attaching to, 20, 23
Novell NetWare, using, 18
Index 97
Page 98

O
operator panel
changing printer settings, 56
changing the language, 56
disable menus, 58
restoring factory default
settings, 57
ordering supplies, 2
shared printing
on a print server, 18
on a server, 21
software applications
driver profiler, 63
printing status, 62
status monitor, 61
status monitor center, 61
toner re-order, 62
uninstall, 62
Windows Me, drivers, 14
Windows NT, drivers, 15
P
print server
attaching locally to, 13
shared printing, 18
printer memory, 27
printer software uninstall,
using, 62
printing
local, 35
network, 35
using a USB cable, 13
printing a job, 60
printing status window,
using, 62
R
replacing the toner
cartridge, 64
restoring factory defaults, 57
status monitor center,
using, 61
status monitor, using, 61
supplies, ordering, 2
T
toner cartridge
cleaning the printer, 65
replacing, 64
toner cartridge, installing, 66
toner re-order window,
using, 62
toner, ordering, 2
U
uninstall software, 62
W
S
safety information, 9
98 Index
warranty, 81
Windows 95, drivers, 42
Windows 98, drivers, 16
Page 99

Page 100

www.dell.com/supplies | support.dell.com
 Loading...