

Page 1

Dell™ M409WX Projector
User’s Guide
www.dell.com | support.dell.com
Page 2

Notes, Notices, and Cautions
NOTE: A NOTE indicates important information that helps you
make better use of your projector.
NOTICE: A NOTICE indicates either potential damage to
hardware or loss of data and tells you how to avoid the problem.
CAUTION: A CAUTION indicates a potential for property
damage, personal injury, or death.
____________________
Information in this document is subject to change without notice.
© 2008 Dell Inc. All rights reserved.
Reproduction in any manner whatsoever without the written permission of Dell
Inc. is strictly forbidden.
Trademarks used in this text: Dell and the DELL logo are trademarks of Dell
Inc.; DLP and DLP
Windows are either registered trademarks or trademarks of Microsoft
Corporation in the United States and/or other countries.
Other trademarks and trade names may be used in this document to refer to either
the entities claiming the marks and names or their products. Dell Inc. disclaims
any proprietary interest in trademarks and trade names other than its own.
Model M409WX
May 2008 Rev. A01
®
logo are trademarks of Texas Instruments; Microsoft and
Page 3

Contents
1 About Your Projector . . . . . . . . . . . . . . . . 5
2 Connecting Your Projector . . . . . . . . . . . . 7
Connecting a Computer . . . . . . . . . . . . . . . . . . 8
About Your Projector . . . . . . . . . . . . . . . . . 6
Connecting a DVD Player
Connecting a DVD Player using an S-video Cable
Connecting a DVD Player using a
Composite Cable
Connecting a DVD Player using a
Component Cable . . . . . . . . . . . . . . . . . . 11
Connecting a DVD Player using an HDMI Cable
. . . . . . . . . . . . . . . . . 9
. . 9
. . . . . . . . . . . . . . . . . . 10
. . 12
3 Using Your Projector . . . . . . . . . . . . . . . . 13
Turning Your Projector On . . . . . . . . . . . . . . . . 13
Turning Your Projector Off
Adjusting the Projected Image . . . . . . . . . . . . . 14
Raising the Projector Height
Lowering the Projector Height . . . . . . . . . . . 14
Adjusting the Projector Zoom and Focus . . . . . . . . 15
Adjusting Projection Image Size
. . . . . . . . . . . . . . . . 13
. . . . . . . . . . . . 14
. . . . . . . . . . . . 16
Contents 3
Page 4

Using the Control Panel . . . . . . . . . . . . . . . . . 17
Using the Remote Control
. . . . . . . . . . . . . . . . 19
Using the On-Screen Display . . . . . . . . . . . . . . 21
Main Menu
. . . . . . . . . . . . . . . . . . . . . 21
Input Select . . . . . . . . . . . . . . . . . . . . . 21
Auto-Adjust
Set Up
. . . . . . . . . . . . . . . . . . . . . 22
. . . . . . . . . . . . . . . . . . . . . . . . 22
PICTURE (in PC Mode) . . . . . . . . . . . . . . . 23
PICTURE (in Video Mode)
DISPLAY (in PC Mode)
. . . . . . . . . . . . . 23
. . . . . . . . . . . . . . . 24
DISPLAY (in Video Mode) . . . . . . . . . . . . . 25
LAMP
. . . . . . . . . . . . . . . . . . . . . . . . 26
OTHERS
. . . . . . . . . . . . . . . . . . . . . . . 27
4 Troubleshooting Your Projector . . . . . . . 31
Guiding Signals . . . . . . . . . . . . . . . . . . . . . 34
Changing the Lamp
. . . . . . . . . . . . . . . . . . . 35
5 Specifications . . . . . . . . . . . . . . . . . . . . . 37
Contacting Dell . . . . . . . . . . . . . . . . . . . . . 40
6 Appendix: Glossary . . . . . . . . . . . . . . . . . 41
4 Contents
Page 5
1
About Your Projector
Before connecting your projector ensure that all the necessary components are
available. Your projector ships with the components shown below. Contact Dell
Contacting Dell on page 40
(see
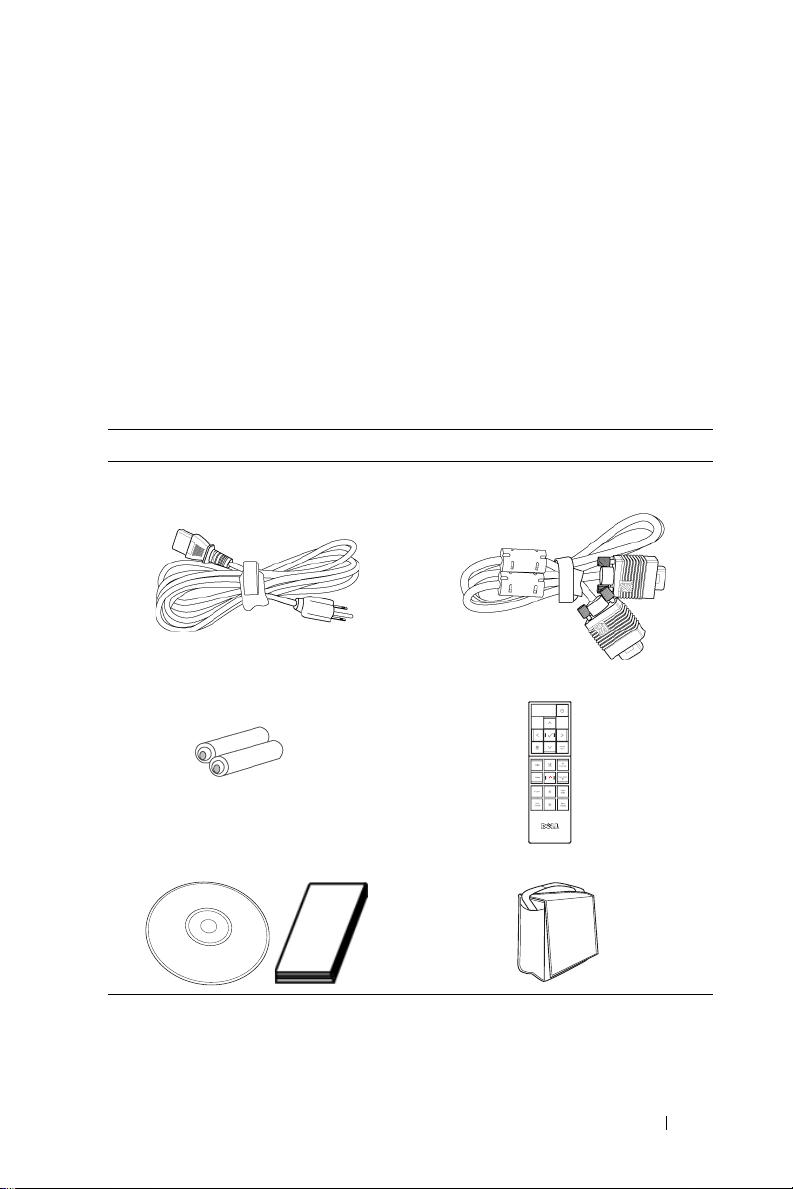
Your Dell™ M409WX projector ships with the following components:
Package Contents
Power cable 1.8m VGA cable (VGA to VGA)
AAA Batteries (2) Remote control
) if any of the components are missing.
CD User’s Guide& Documentation Carrying case
About Your Projector 5
Page 6
About Your Projector
6
1
6
5
4
2
3
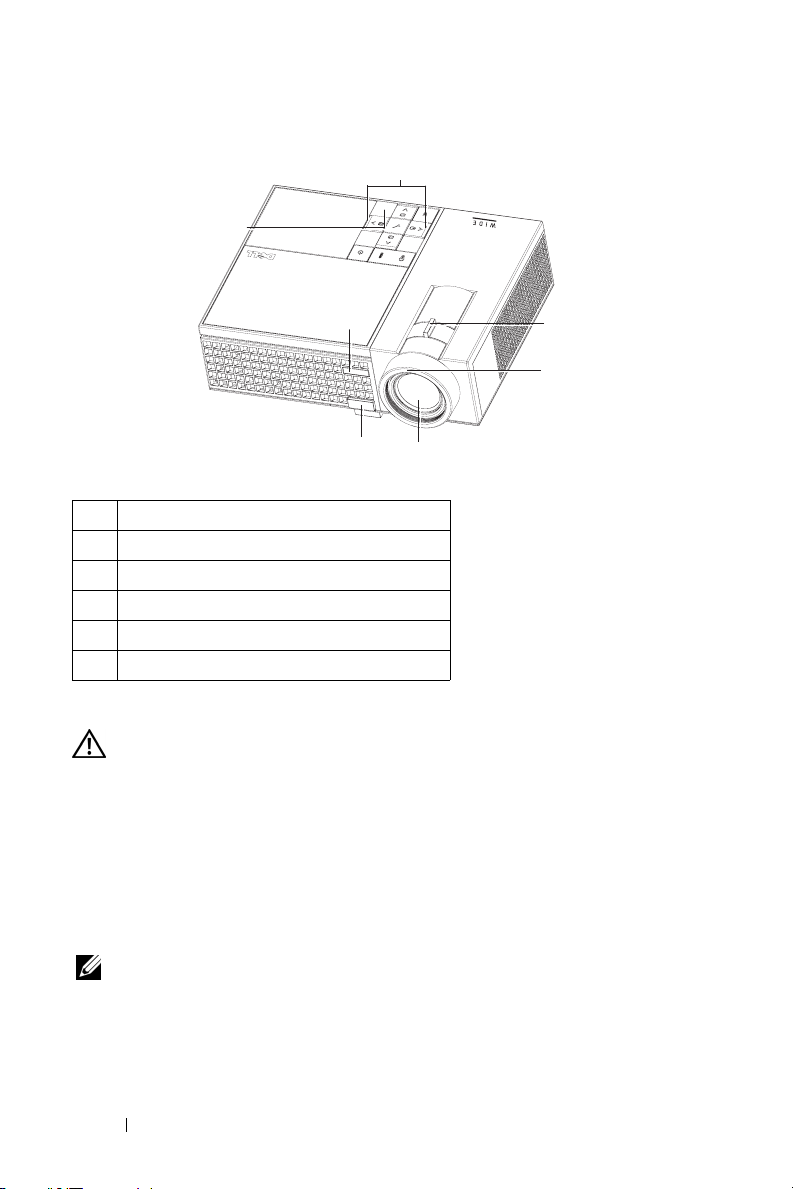
1 Control panel
2 Zoom tab
3 Focu s r ing
4 Lens
5 Elevator button
6 IR receiver
CAUTION: Safety Instructions
1
Do not use the projector near appliances that generate a lot of heat.
2
Do not use the projector in areas where there is an excessive amount of dust. The
dust may cause the system to fail and projector will automatically shutdown.
3
Ensure that the projector is mounted in a well-ventilated area.
4
Do not block the ventilation slots and openings on the projector.
5
Ensure the projector operates between ambient temperatures (5ºC to 35ºC).
NOTE: For more information, see the safety information that shipped with your
projector.
6 About Your Projector
Page 7
Connecting Your Projector
2
1
9
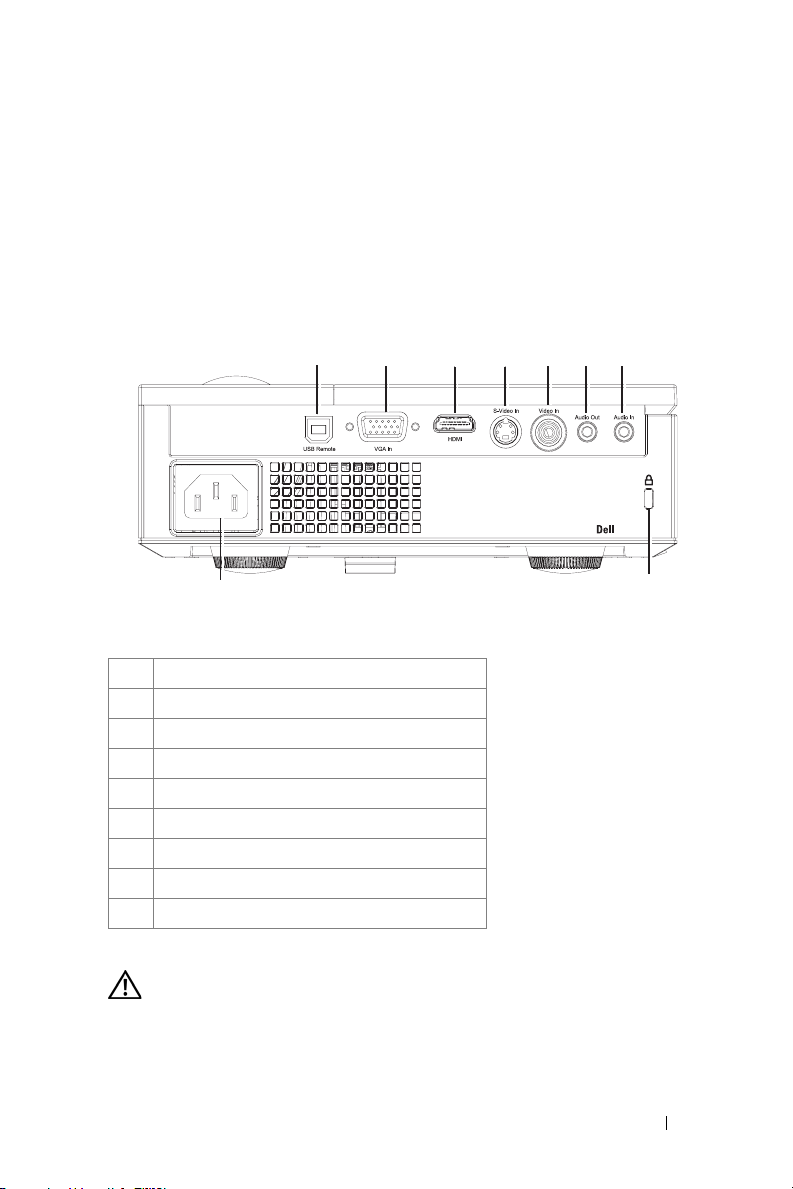
1 USB remote connector
2 VGA input connector
3 HDMI input connector
4 S-video input connector
5 Video input connector
6 Audio output connector
7 Audio input connector
8 Security cable slot
9 Power cable connector
2
3
5
4
6
7
M409WX
8
CAUTION: Before you begin any of the procedures in this section, follow the
Safety Instructions as described on page 6.
Connecting Your Projector 7
Page 8
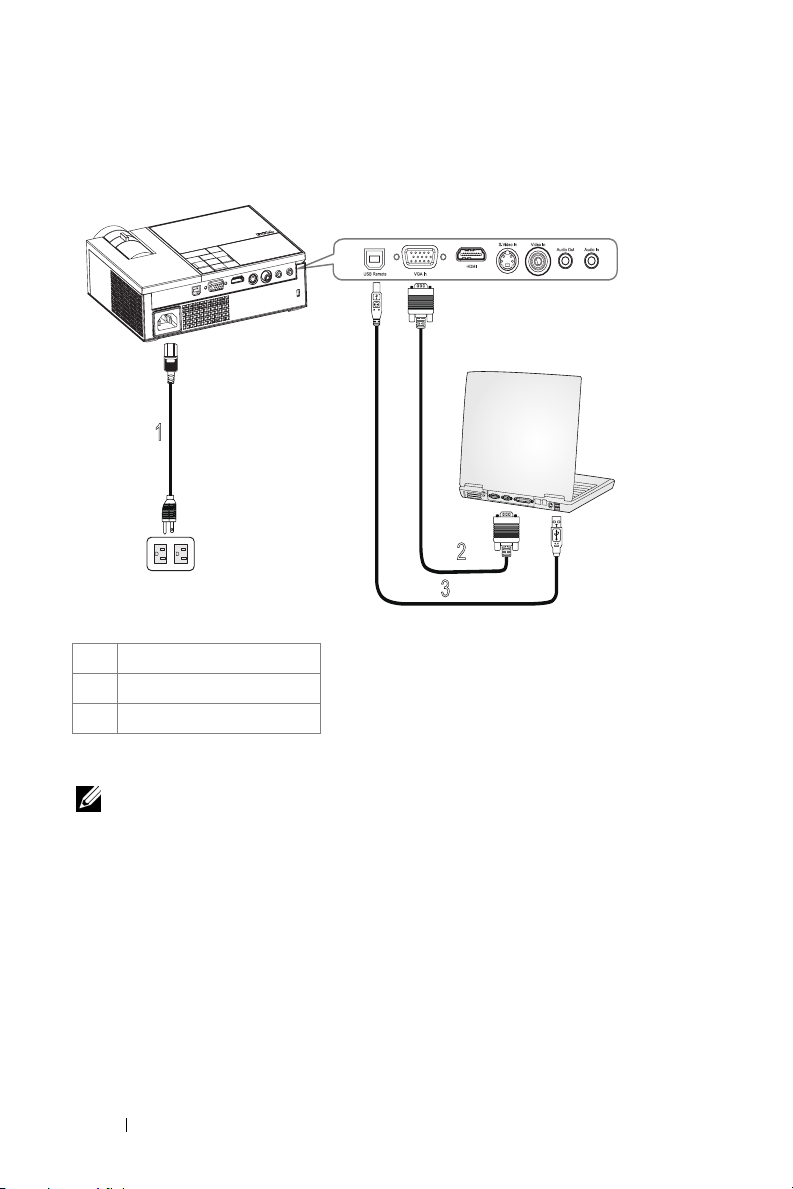
Connecting a Computer
1
1 Power cable
2 VGA to VGA cable
3 USB to USB cable
NOTE: The USB cable is not provided by Dell.
2
MOLEX
3
8 Connecting Your Projector
Page 9
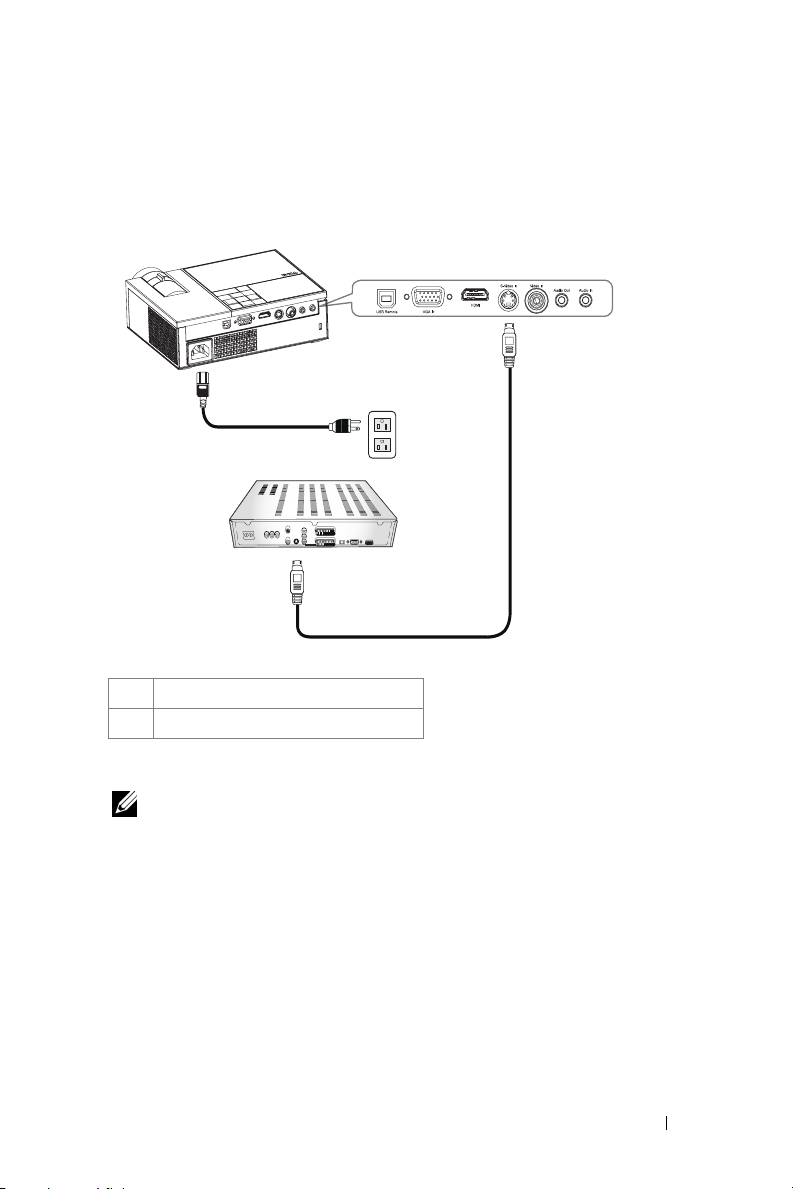
Connecting a DVD Player
Connecting a DVD Player using an S-video Cable
1
2
1 Power cable
2 S-video cable
NOTE: The S-Video cable is not provided by Dell.
Connecting Your Projector 9
Page 10
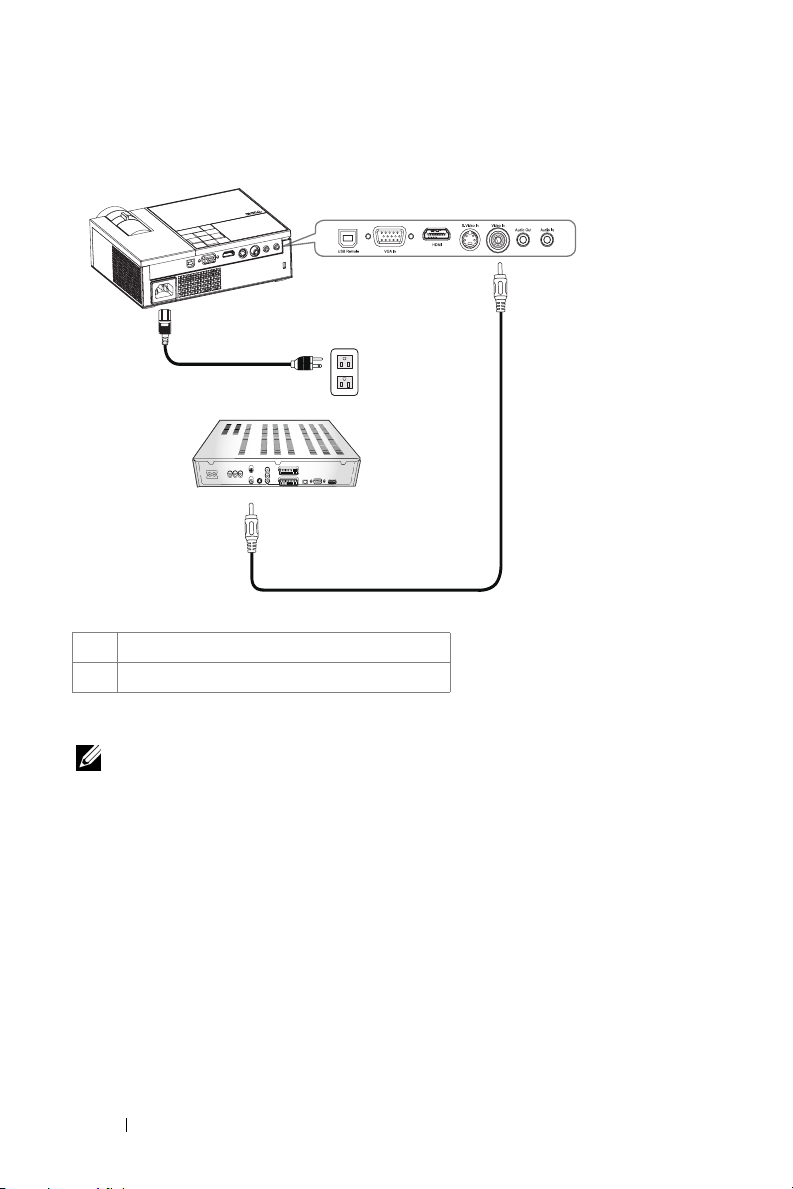
Connecting a DVD Player using a Composite Cable
2
1
2
1 Power cable
2 Composite video cable
NOTE: The Composite video cable is not provided by Dell.
10 Connecting Your Projector
Page 11
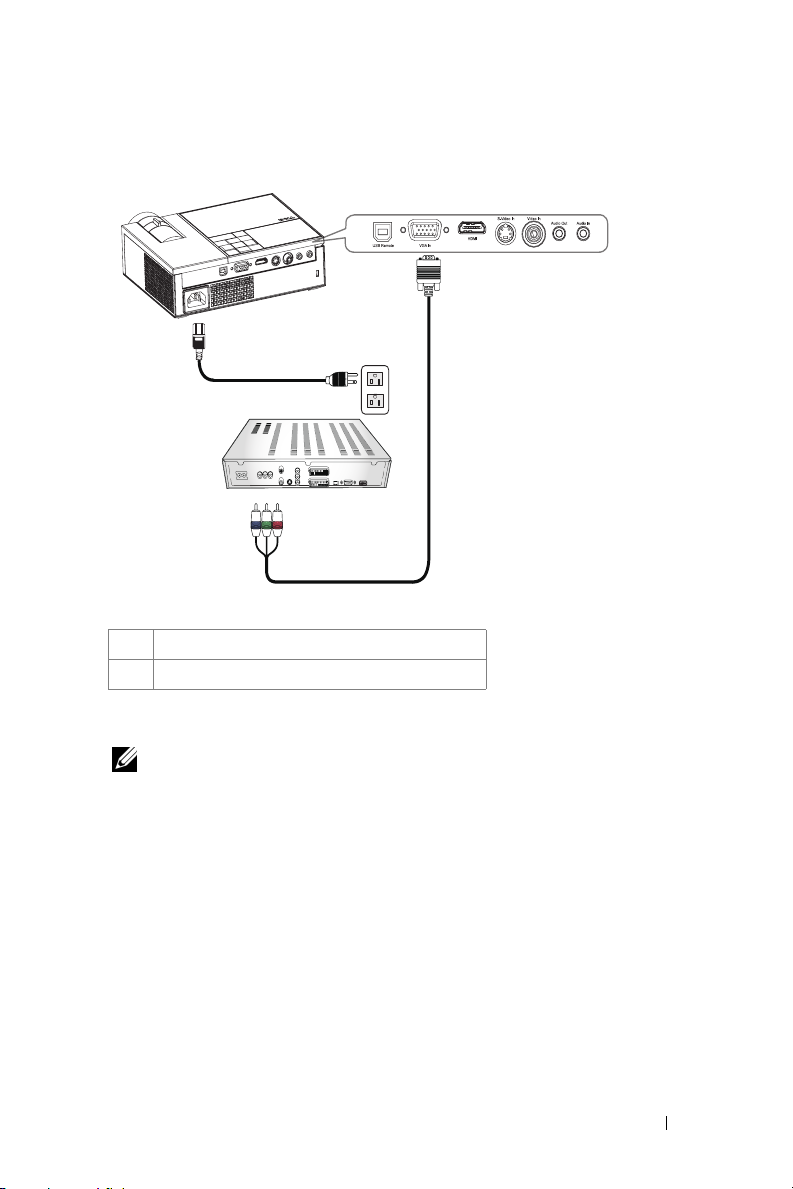
Connecting a DVD Player using a Component Cable
1
2
1 Power cable
2 D-sub to YPbPr cable
NOTE: The D-sub to YPbPr cable is not provided by Dell.
Connecting Your Projector 11
Page 12
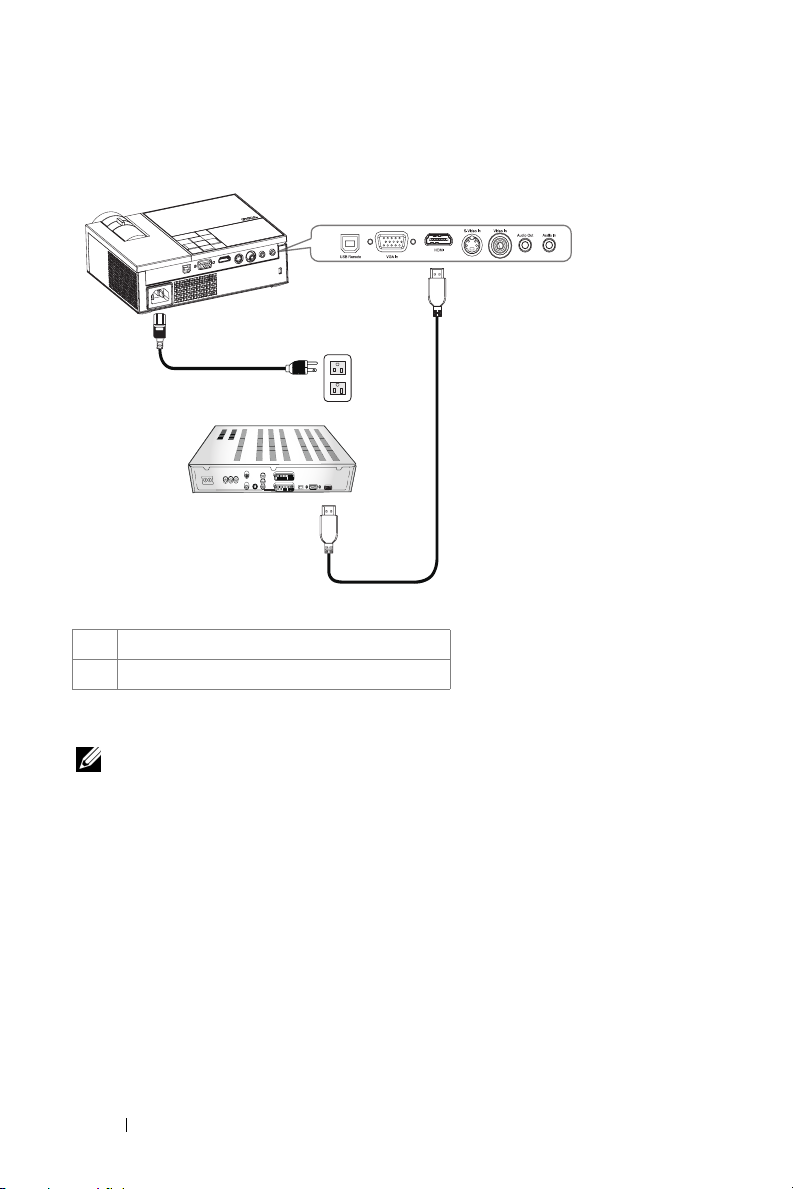
Connecting a DVD Player using an HDMI Cable
1
2
1 Power cable
2 HDMI cable
NOTE: The HDMI cable is not provided by Dell.
12 Connecting Your Projector
Page 13

3
Using Your Projector
Turning Your Projector On
NOTE: Turn on the projector before you turn on the source. The Power light
blinks blue until the Power button is pressed.
1
Remove the lens cap.
2
Connect the power cable and appropriate signal cables. For information about
connecting the projector, see Connecting Your Projector on page 7.
3
Press the projector
4
Turn on your source (computer, DVD player, etc.). The projector automatically
detects your source. If you have multiple sources connected to the projector, press
Source
the
source.
5
The projector displays the Dell logo, if it does not detect a signal.
If the "Searching for signal..." message appears on the screen, ensure that the
appropriate cables are securely connected.
Turning Your Projector Off
NOTICE: You must turn off the projector before you disconnect the power
cable from the projector.
To turn the projector off:
1
Press the
2
Press the
The projectors cooling fans are on for 90 seconds before the projector switches off
completely.
3
To quickly turn off the projector, press the Power button while the projectors
cooling fans are still running.
4
Disconnect the power cable from the electrical outlet and the projector.
Power
Power
NOTE: Wait for 60 seconds before you turn the projector on again.
Power
button (see Using the Control Panel on page 17).
button on the remote control or control panel to select the desired
button .
button again to turn off the projector.
Using Your Projector 13
Page 14
NOTE: If you press the Power button while the projector is running, the
"Press Power Button To Turn Off Projector" message appears on the screen. To
clear the message, press a button on the control panel. The message disappears after
5 seconds.
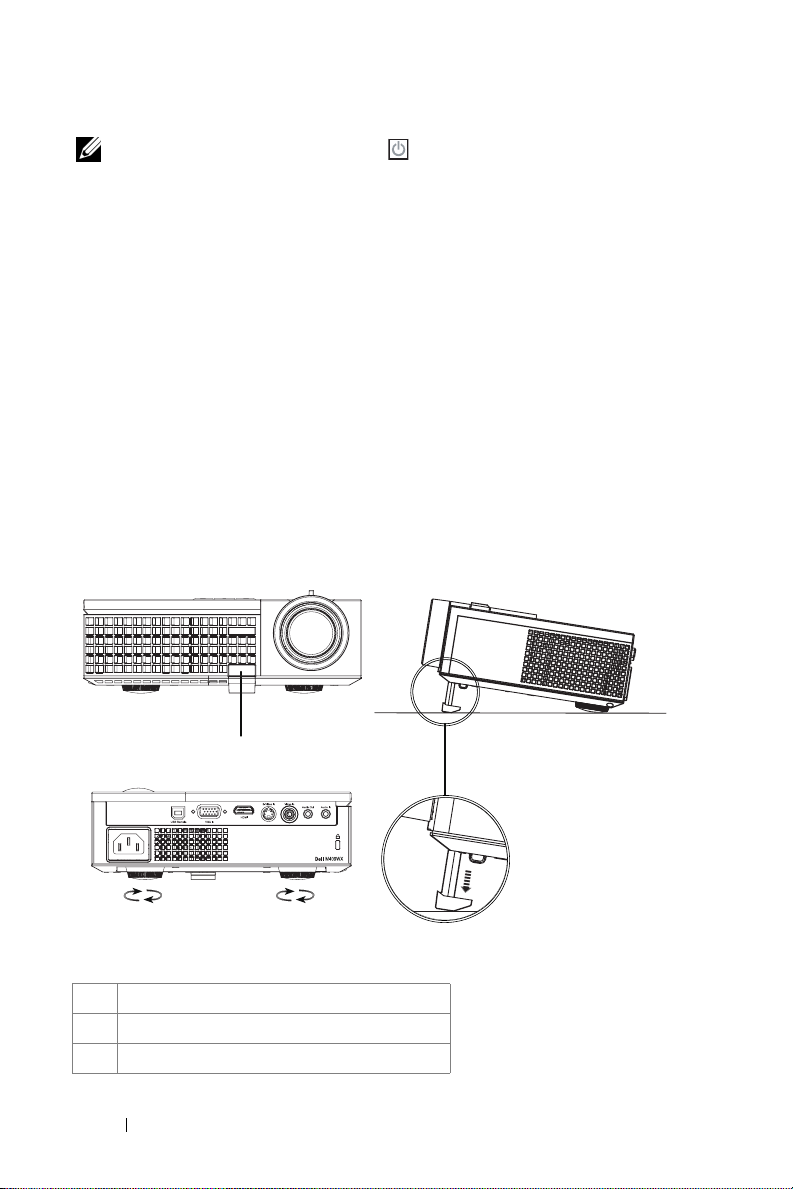
Adjusting the Projected Image
Raising the Projector Height
1
Press the
2
Raise the projector to the desired display angle, and then release the button to
lock the elevator foot into position.
3
Use the tilt adjustment wheel to fine-tune the display angle.
Lowering the Projector Height
1
Press the
2
Lower the projector, and then release the button to lock the elevator foot into
position.
Elevator
Elevator
button.
button.
1
3
1 Elevator button
2 Elevator foot
3 Tilt adjustment wheel
14 Using Your Projector
2
3
Page 15
Adjusting the Projector Zoom and Focus
CAUTION: To avoid damaging the projector, ensure that the zoom lens and
elevator foot are fully retracted before moving the projector or placing the
projector in its carrying case.
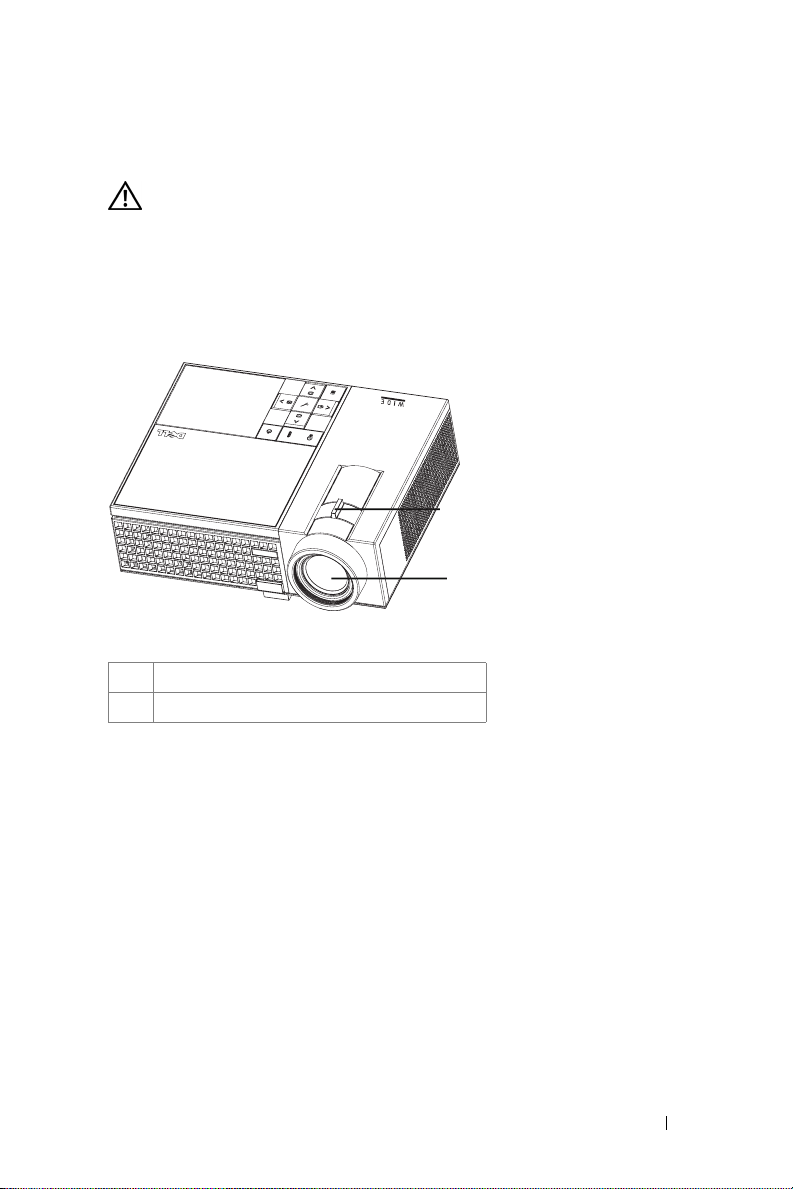
1
Rotate the zoom tab to zoom in and out.
2
Rotate the focus ring until the image is clear. The projector focuses at distances
ranging between 3.3 ft to 39.4 ft (1.0 m to 12 m).
1
2
1 Zoom tab
2 Focu s r ing
Using Your Projector 15
Page 16
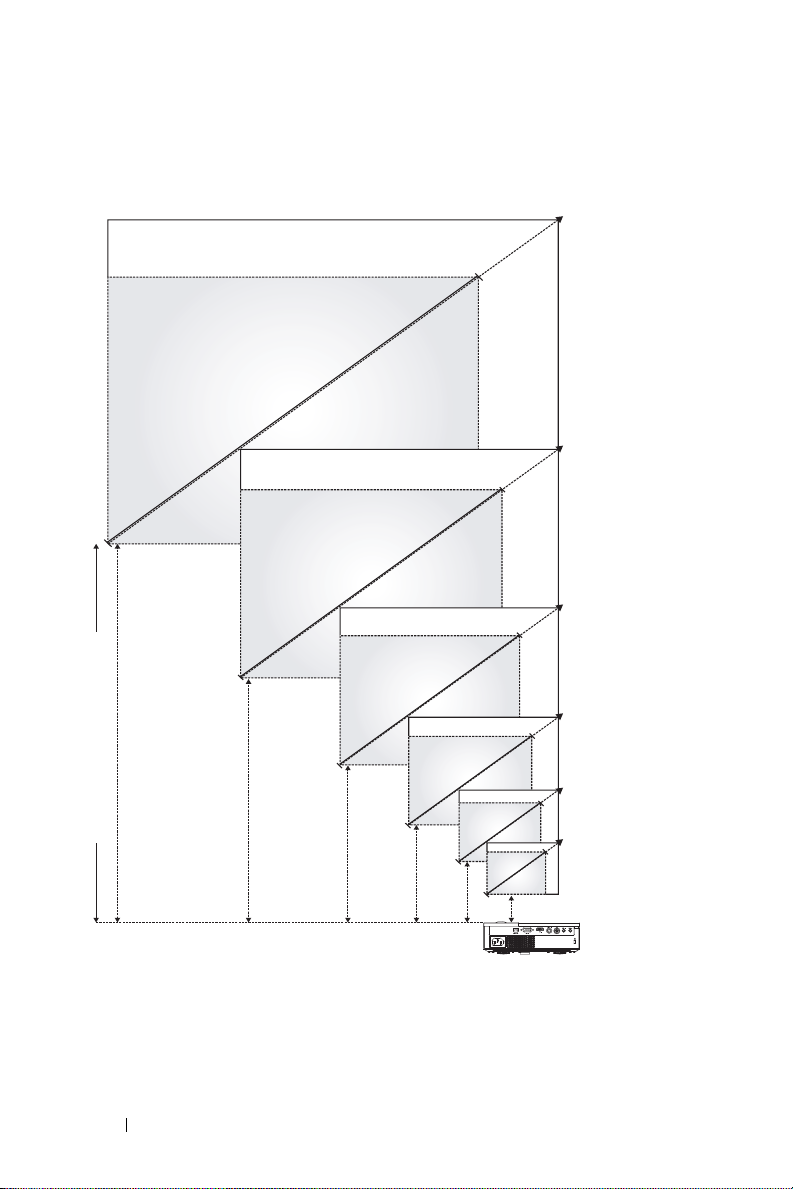
Adjusting Projection Image Size
327.7"
(832.4cm)
245.8"
(624.3cm)
191.2"
(485.6cm)
359.4"(913.0cm)
269.6"(684.7cm)
209.7"(532.6cm)
149.8"(380.4cm)
Projector to screen distance
39.4'(12.0m)
29.5'(9.0m)
16 Using Your Projector
23.0'(7.0m)
136.6"
(346.8cm)
16.4'(5.0m)
81.9"
(208.1cm)
9.8'(3.0m)
27.3"
(69.4cm)
3.3'(1.0m)
89.9"(228.2cm)
30.0 "(76.1cm)
Dell M409WX
Page 17
Screen
(Diagonal)
Screen
Size
Hd
Distance 3.3' (1.0m) 9.8' (3.0m) 16.4' (5.0m) 23.0' (7.0m) 29.5' (9.0m) 39.4' (12.0m)
* This graph is for user reference only.
Max.
Min.
Max.
(WxH)
Min.
(WxH)
Max.
Min.
30.0"
(76.1cm)
27.3"
(69.4cm)
25.4" X 15.9" 76.2" X 47.6" 127" X 79.4" 177.8" X 111.1" 228.8" X 142.9" 304.8" X 190.5"
(64.5cm X
40.3cm)
23.2" X 14.5" 69.5" X 43.4" 115.8" X 72.4" 162.1" X 101.3" 208.4" X 130.3" 277.9" X 173.7"
(58.8cm X
36.8cm)
1.97"
(5.0cm)
1.79"
(4.56cm)
89.9"
(228.2cm)
81.9"
(208.1cm)
(193.5cm X
121.0cm)
(176.5cm X
110.3cm)
5.91"
(15.0cm)
5.38"
(13.68cm)
149.8"
(380.4cm)
136.6"
(346.8cm)
(322.6cm X
201.6cm)
(294.1cm X
183.8cm)
9.84"
(25.0cm)
8.97"
(22.79cm)
209.7"
(532.6cm)
191.2"
(485.6cm)
(451.6cm X
282.3cm)
(411.8cm X
257.4cm)
13.78"
(35.0cm)
12.56"
(31.91cm)
269.6"
(684.7cm)
245.8"
(624.3cm)
(580.6cm X
362.9cm)
(529.4cm X
330.9cm)
17.72"
(45.0cm)
16.15"
(41.03cm)
359.4"
(913.0cm)
327.7"
(832.4cm)
(774.2cm X
483.9cm)
(705.9cm X
441.2cm)
23.62"
(60.0cm)
21.54"
(54.71cm)
Using the Control Panel
3
2
1
4
9
8
7
5
6
Using Your Projector 17
Page 18
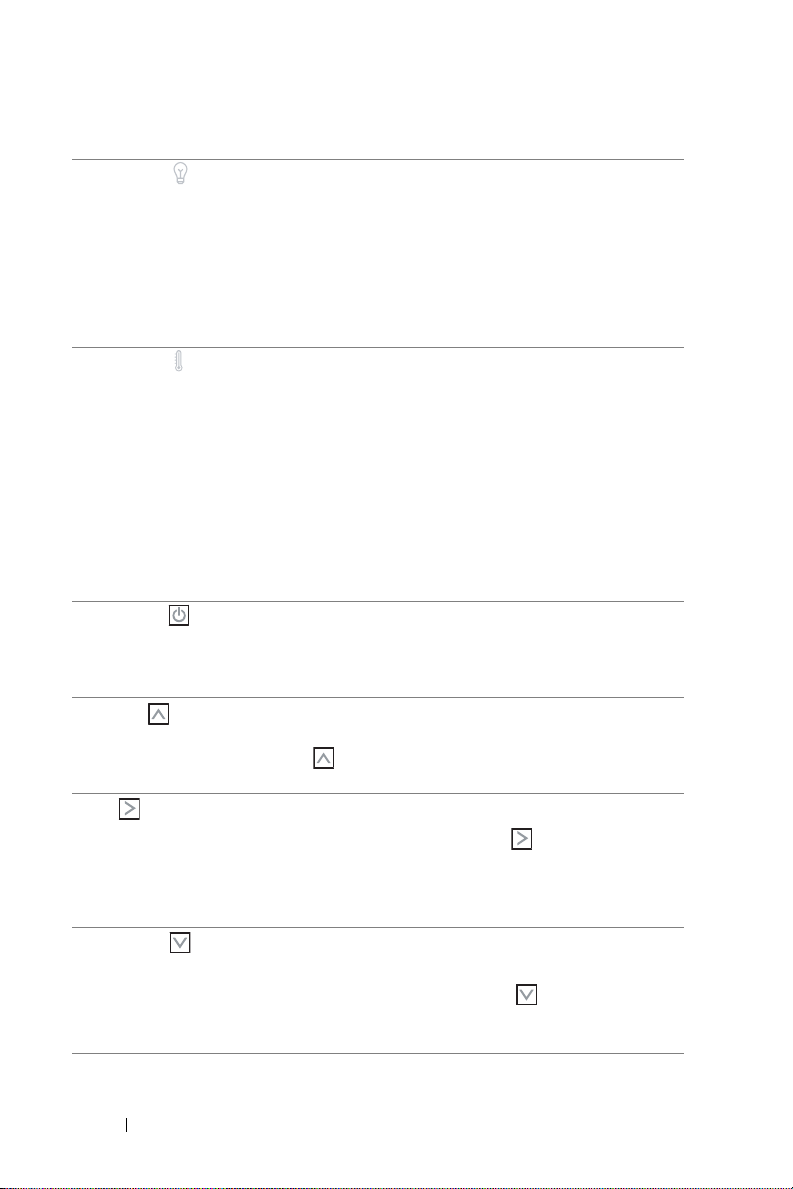
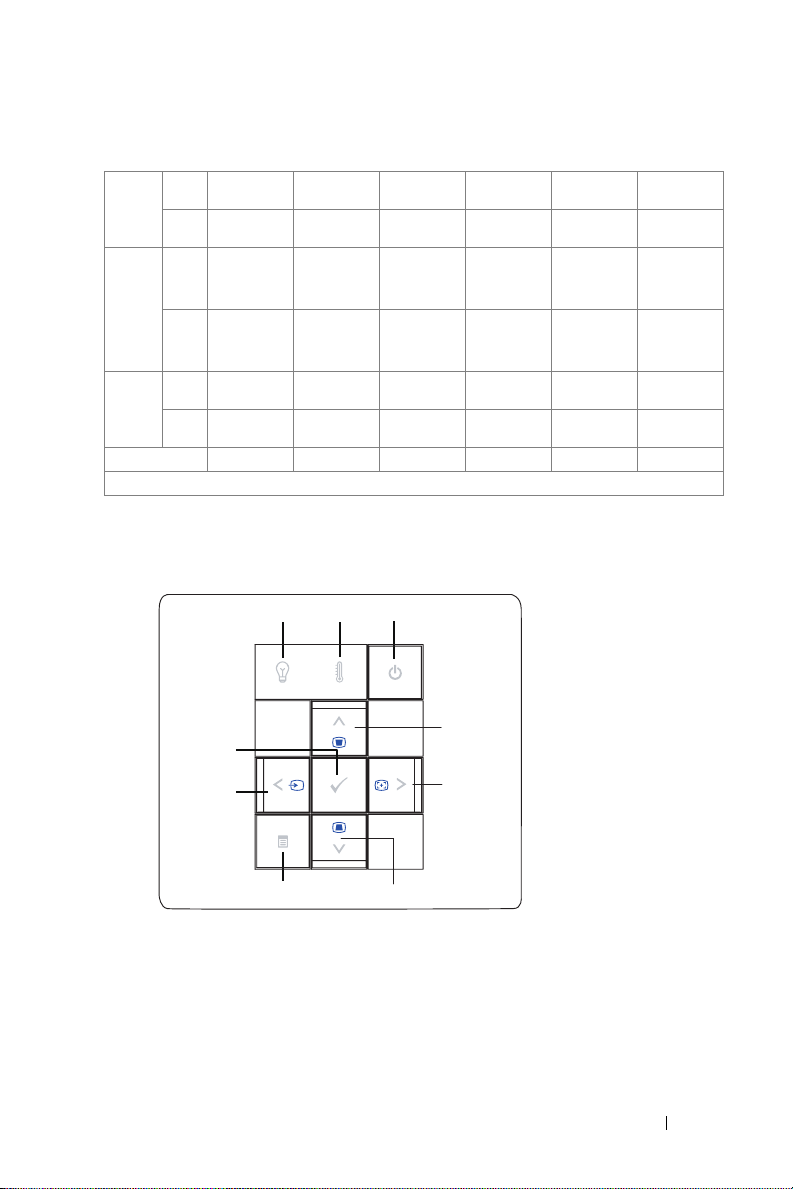
1 LAMP warning light
2 TEMP warning light
3 Power Allows you to turn the projector on and off. For
4 Up / Keystone
adjustment
5 / Auto adjust Allows you to adjust the OSD setting.
6 Down / Keystone
adjustment
• If the LAMP light is solid amber, replace the
lamp (see
this problem persists, contact Dell (see
Contacting Dell on page 40
• If the LAMP light is blinking amber, the
projector automatically shuts down indicating a
system failure. If this problem persists, contact
Dell (see
• A solid amber TEMP light indicates that the
projector is overheated. The display
automatically shuts down. Turn the display on
again after the projector cools down. If the
problem persists, contact Dell (see
Dell on page 40
• A blinking amber TEMP light indicates that the
projector fan has failed and the projector
automatically shuts down. If the problem
persists, contact Dell (see
page 40
more information, see Turning Your Projector On
on page 13 and Turning Your Projector Off on
page 13.
Allows you to select options from the On Screen
Display (OSD) menu. You can also use the Up
button to adjust the image distortion caused
by tilting the projector.
You can also use the Right button to
synchronize the projector to the input source.
Auto adjust does not operate if the OSD is
displayed.
Allows you to select options from the On Screen
Display (OSD) menu.
You can also use the Down button to adjust
the image distortion caused by tilting the
projector.
Changing the Lamp on page 35
).
Contacting Dell on page 40
Contacting
).
Contacting Dell on
).
). If
).
18 Using Your Projector
Page 19
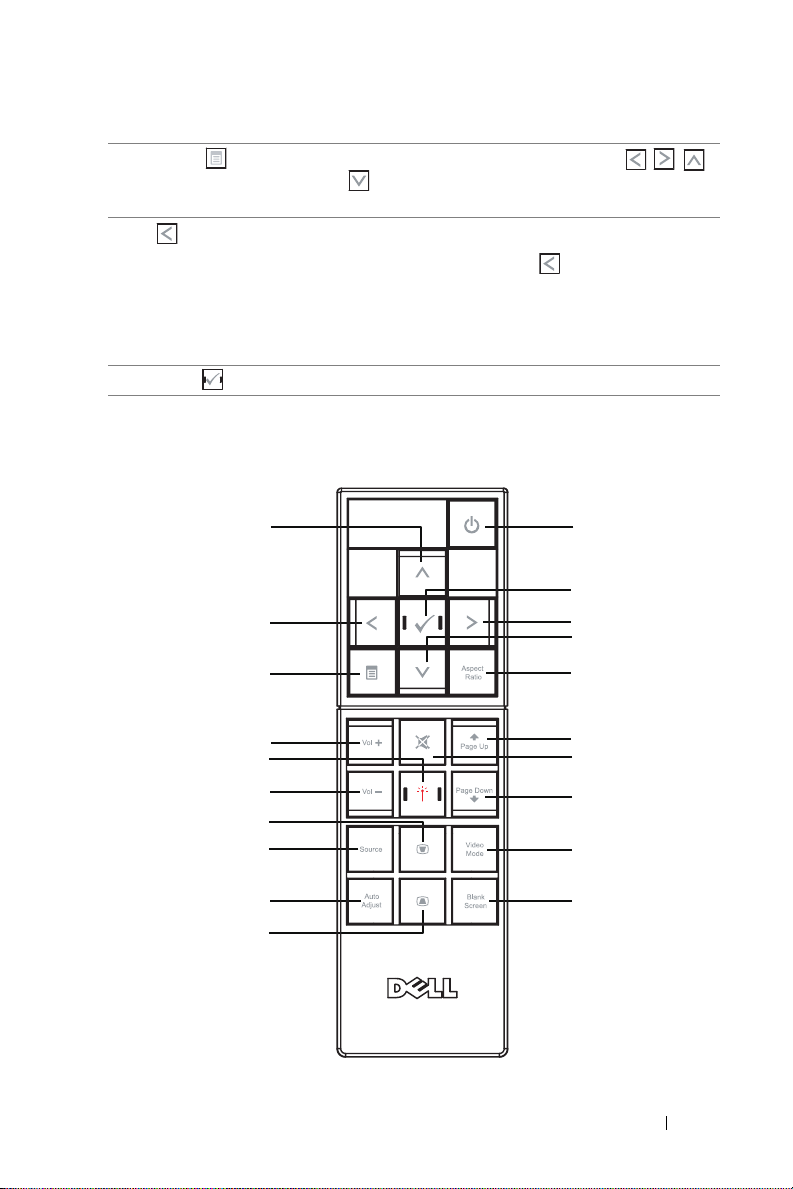
7 Menu Allows you to activate the OSD. Use
20
and the Menu button to navigate through the
OSD.
8 / Source Allows you to adjust the OSD setting.
You can also use the Left button to toggle
through Analog RGB, Composite, Component
(YPbPr, via VGA), S-video, and HDMI sources
when multiple sources are connected to the
projector.
9 Enter Allows you to confirm a selected OSD option.
Using the Remote Control
11
12
13
14
15
16
17
18
19
20
1
2
3
4
5
6
7
8
9
10
Using Your Projector 19
Page 20
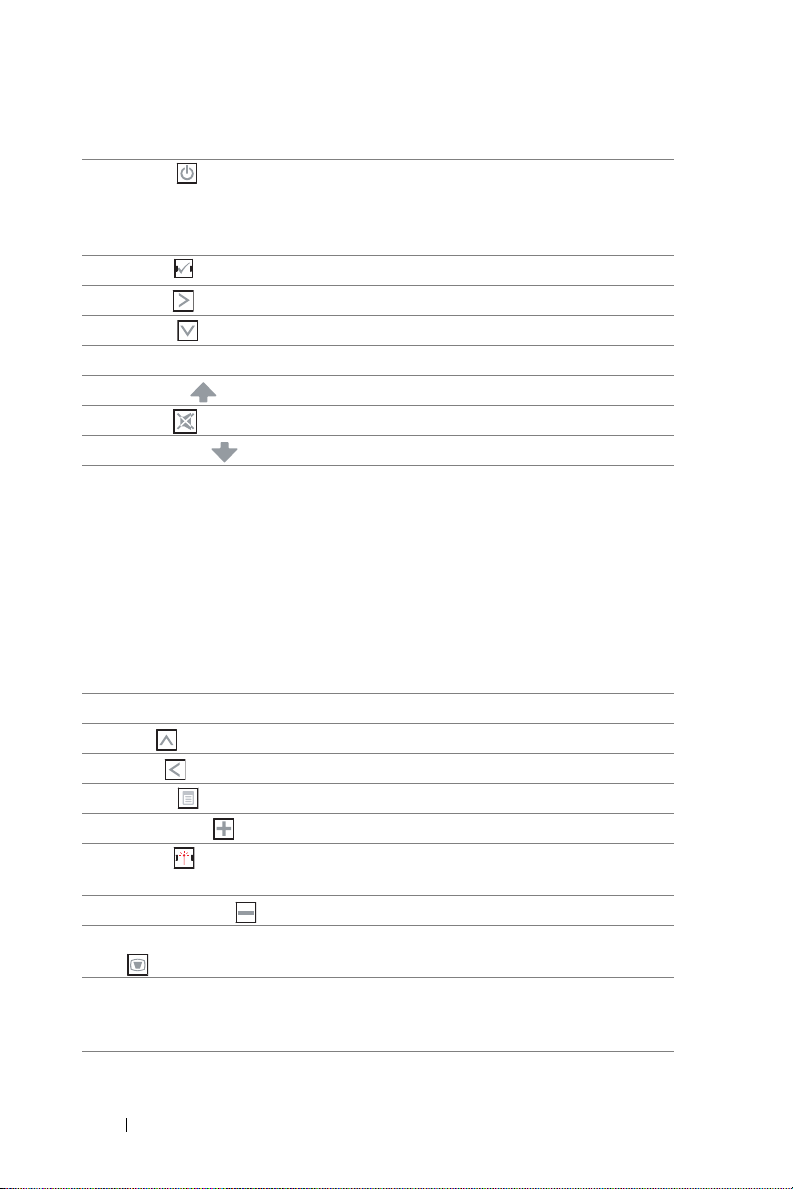
1 Power Turns the projector on and off. For more
information, see Turning Your Projector On on
page 13 and Turning Your Projector Off on
page 13.
2 Enter Press to confirm the selection.
3 Right Press to adjust the OSD setting.
4 Down Press to select OSD items.
5 Aspect Ratio Press to change aspect ratio of a displayed image.
6 Page up Press to move to previous page.
7 Mute Press to mute or un-mute the projector speaker.
8 Page down Press to move to next page.
9 Video mode The Dell M409WX Micro-projector has preset
configurations that are optimized for displaying
data (PC Graphics) or video (movies, games,
etc.). Press the Video Mode button to toggle
between PC mode, Movie mode, Game Mode,
sRGB, or CUSTOM mode (for user to setup and
save preferred settings). Pressing the Video Mode
button once will show the current display mode.
Pressing the Video Mode button again will switch
between modes.
10 Blank screen Press to hide/unhide the image.
11 Up Press to select OSD items.
12 Left Press to adjust the OSD setting.
13 Menu Press to activate the OSD.
14 Volume up Press to increase the volume.
15 Laser Point the remote control at the screen, press and
hold the laser button to activate the laser light.
16 Volume down Press to decrease the volume.
17 Keystone adjustment Press to adjust image distortion caused by tilting
the projector. (+40/-35 degrees)
18 Source Press to switch between Analog RGB, Composite,
Component (YPbPr, via VGA), HDMI, and Svideo sources.
20 Using Your Projector
Page 21
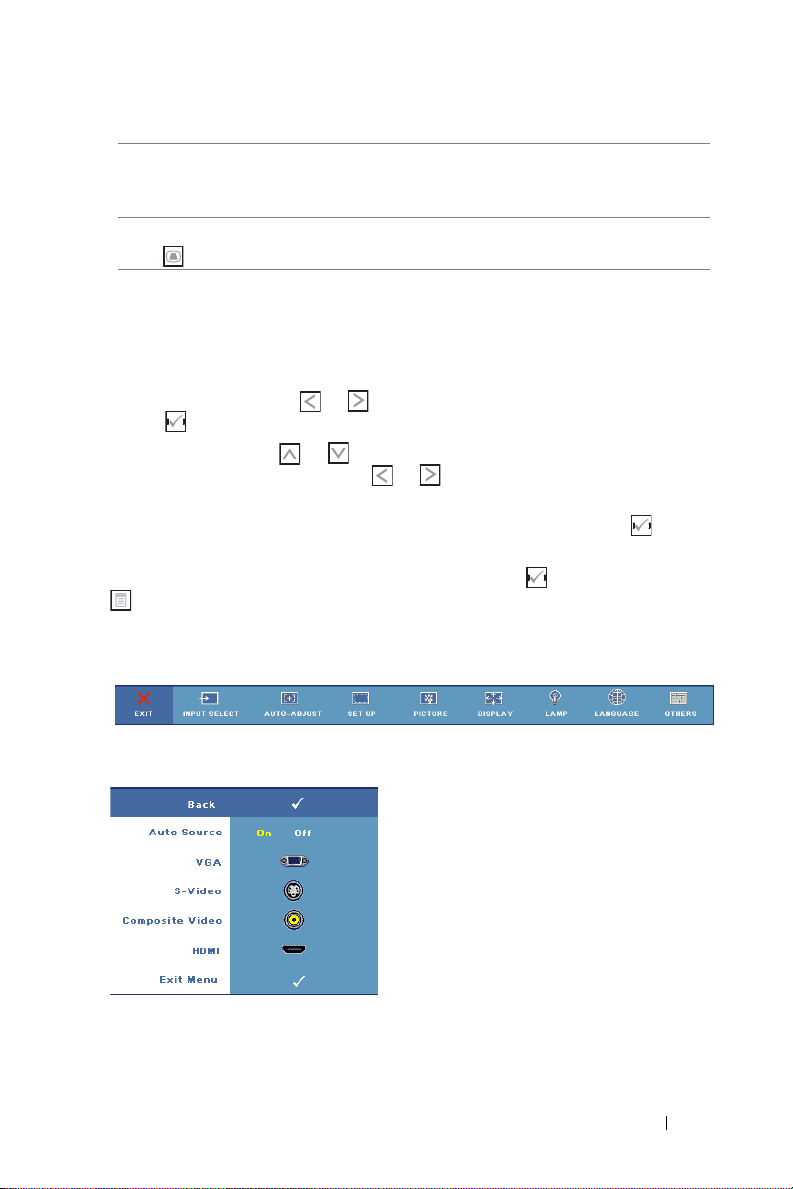
19 Auto adjust Press to synchronize the projector with the input
source. Auto adjust does not operate if the OSD
is displayed.
20 Keystone adjustment Press to adjust image distortion caused by tilting
the projector. (+40/-35 degrees)
Using the On-Screen Display
The projector has a multi-language On-Screen Display (OSD) that can be
displayed with or without an input source present.
In the Main menu, press or to navigate through the tabs. Press the Enter
button
In the submenu, press or to make a selection. When an item is selected,
the color changes to dark gray. Use or on the control panel or the remote
control to make adjustments to a setting.
To go b a c k to Main menu, go to Back tab and press the Enter button on the
control panel or the remote control.
To exit the OSD, go to Exit tab and press Enter button
Main Menu
on the control panel or the remote control to select a submenu.
on the control panel or the remote control.
or press Menu button
Input Select
AUTO SOURCE—Select On (Default) to
automatically detect the available input
signals. When On is selected and you press
Source on the control panel/remote, it
automatically finds the next available input
signal.
Select Off to lock the current input signal or
to manually select the input signal you want
to use. When Off is selected and you press
Source , you select which input signal you
want.
VGA—Press Enter to detect VGA signal.
IDEO—Press Enter to detect S-Video signal.
S-V
Using Your Projector 21
Page 22
COMPOSITE VIDEO—Press Enter to detect Composite Video signal.
HDMI—Press Enter to detect HDMI signal.
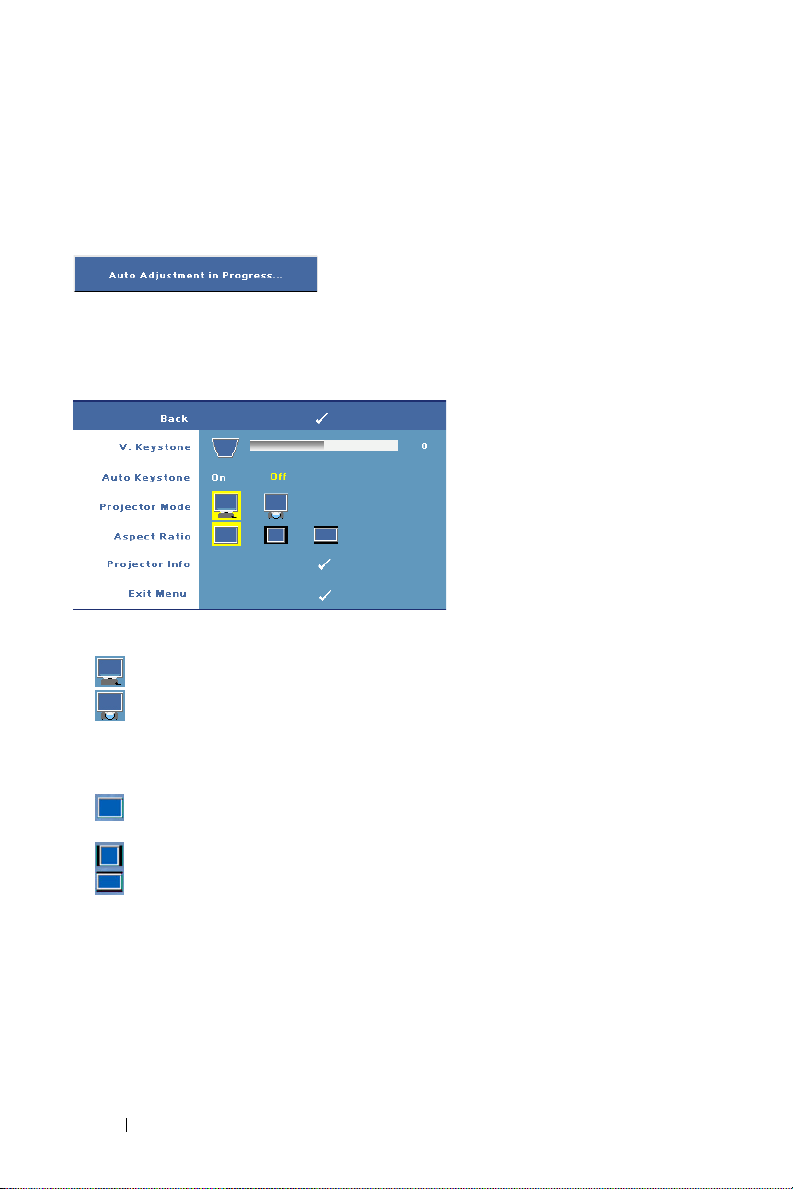
Auto-Adjust
Auto Adjust automatically adjusts the
projector's display settings. While auto
adjustment is in progress, the following
message appears on the screen: Auto Adjustment in Progress....
Set Up
V. KEYSTONE—Allows you to
adjust image distortion
caused by tilting the projector.
UTO KEYSTONE—Auto adjusts
A
the image distortion by tilting
the projector.
ROJECTOR MODE—Select how the image appears:
P
• Front Projection-Desktop (the default).
• Rear Projection-Desktop — The projector reverses the image so that you can
project the image from behind a translucent screen.
ASPECT RATIO—Allows you to select an aspect ratio to adjust how the image
appears.
• Original — The input source scales to fit the screen while keeping the aspect
ratio of the input source.
• 4:3 — The input source scales to fit the height of the screen.
• Wide — The input source scales to fit the screen.
PROJECTOR INFO—Press to show the projector model name, the present input source
and projector series number (PPID#).
22 Using Your Projector
Page 23
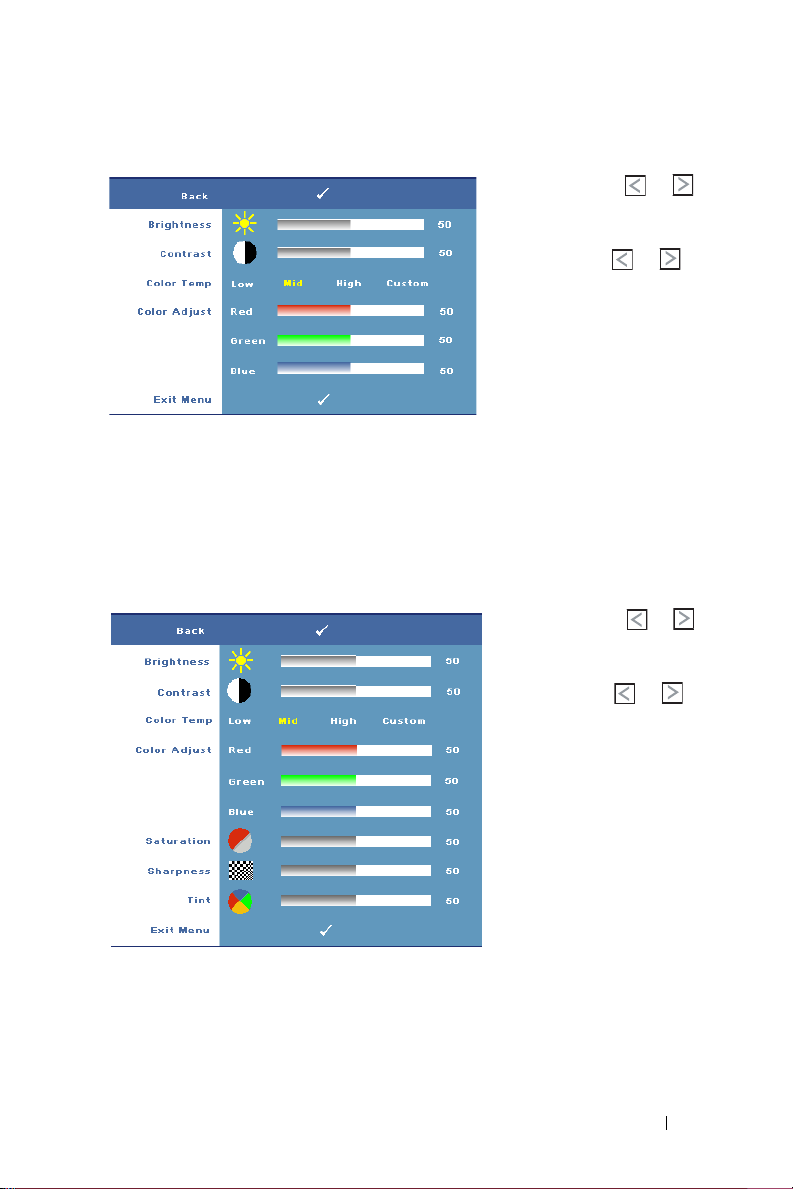
PICTURE (in PC Mode)
BRIGHTNESS—Use or to
adjust the brightness of the
image.
ONTRAST—Use or to
C
control the degree of
difference between the
brightest and darkest parts of
the picture. Adjusting the
contrast changes the amount
of black and white in the
image.
OLOR TEMP—Allows you to adjust the color temperature. The screen appears
C
cooler at higher color temperatures and warmer at lower color temperatures.
OLOR ADJUST—Allows you to manually adjust red, green, and blue color. When
C
you adjust the color value in the Color Adjust menu, the Custom mode is
activated, and the color values are saved in the Custom mode.
PICTURE (in Video Mode)
BRIGHTNESS—Use or to
adjust the brightness of the
image.
ONTRAST—Use or to
C
control the degree of
difference between the
brightest and darkest parts of
the picture. Adjusting the
contrast changes the amount
of black and white in the
image.
OLOR TEMP—Allows you to
C
adjust the color temperature.
The screen appears cooler at
higher color temperatures and
warmer at lower color
temperatures.
OLOR ADJUST—Allows you to manually adjust red, green, and blue color. When
C
you adjust the color value in the Color Adjust menu, the Custom mode is
activated, and the color values are saved in the Custom mode.
Using Your Projector 23
Page 24
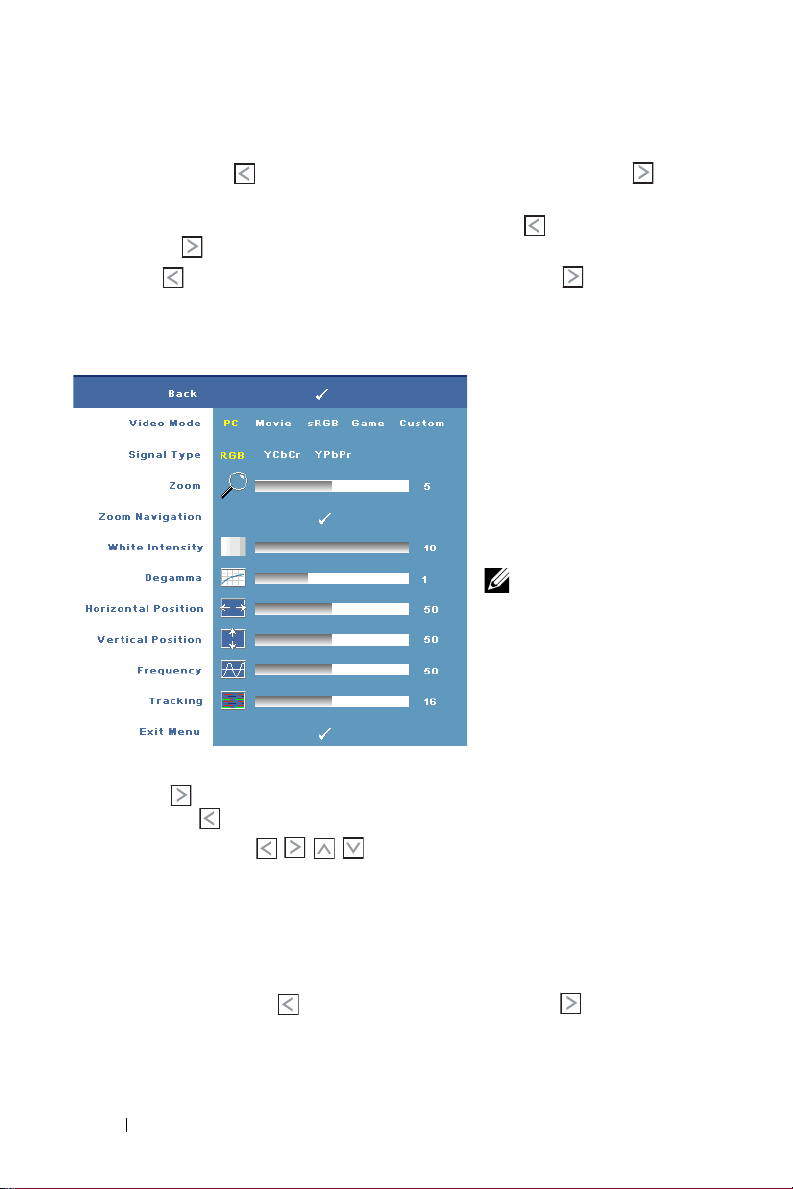
SATURATION—Allows you to adjust a video source from black and white to fully
saturated color. Press to decrease the amount of color in the image and to
increase the amount of color in the image.
HARPNESS—Allows you to adjust the image sharpness. Press
S
sharpness and
INT—Press
T
to increase the sharpness.
to increase the amount of green in the image and
to decrease the
to increase
the amount of red in the image (selectable for NTSC signal only).
DISPLAY (in PC Mode)
VIDEO MODE—Allows you to
optimize the projector's
display mode.
•PC,
Movie, sRGB
provides accurate color
representation
•
Game
, and
your preferred settings
NOTE: If you adjust
the settings for White
Intensity or Degamma, the
projector automatically
switches to Custom.
IGNAL TYPE—Allows you to
S
manually select the signal
type. You set the signal
type to RGB, YCbCr, or YPbPr.
OOM—Press to digitally magnify a default area of image in the center of the
Z
screen and press to reduce the zoomed image.
OOM NAVIGATION—Press to navigate projection screen.
Z
HITE INTENSITY—Set 0 to maximize the color reproduction and 10 to maximize
W
the brightness.
EGAMMA—Allows you to adjust the color performance of the display. You can set
D
the Degamma value to: 1, 2, 3, and 4. Adjust among the 4 preset values to change
the color performance of the display.
ORIZONTAL POSITION—Press to move the image to the left and to move the
H
image to the right.
Custom
-
- set
24 Using Your Projector
Page 25
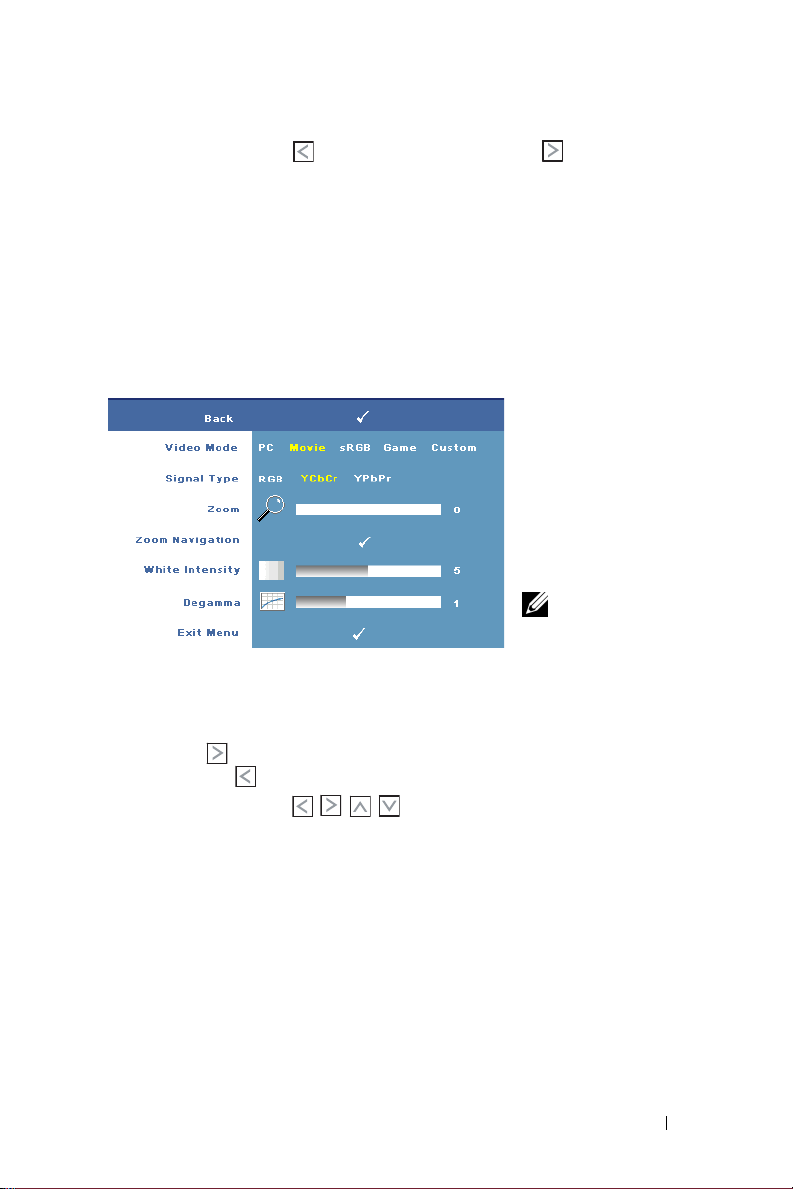
VERTICAL POSITION—Press to move the image down and to move the image
up.
REQUENCY—Allows you to change the display data clock frequency to match the
F
frequency of your computer graphics card. If you see a vertical flickering bar, use
Frequency control to minimize the bars. This is a coarse adjustment.
T
RACKING—Allows you to synchronize the phase of the display signal with the
graphic card. If you experience an unstable or flickering image, use Tra c ki n g to
correct it. This is a fine adjustment.
DISPLAY (in Video Mode)
VIDEO MODE—Allows you to
optimize the projector's
display mode.
•PC,
Movie, sRGB
provides accurate color
representation
•
Game
, and
your preferred settings
NOTE: If you adjust
the settings for White
Intensity or Degamma, the
projector automatically switches to Custom.
IGNAL TYPE—Allows you to manually select the signal type. You set the signal type
S
to RGB, YCbCr, or YPbPr.
OOM—Press to digitally magnify a default area of image in the center of the
Z
screen and press to reduce the zoomed image.
OOM NAVIGATION—Press to navigate projection screen.
Z
HITE INTENSITY—Set 0 to maximize the color reproduction and 10 to maximize
W
the brightness.
EGAMMA—Allows you to adjust the color performance of the display. You can set
D
the Degamma value to: 1, 2, 3, and 4. Adjust among the 4 preset values to change
the color performance of the display.
Custom
-
- set
Using Your Projector 25
Page 26
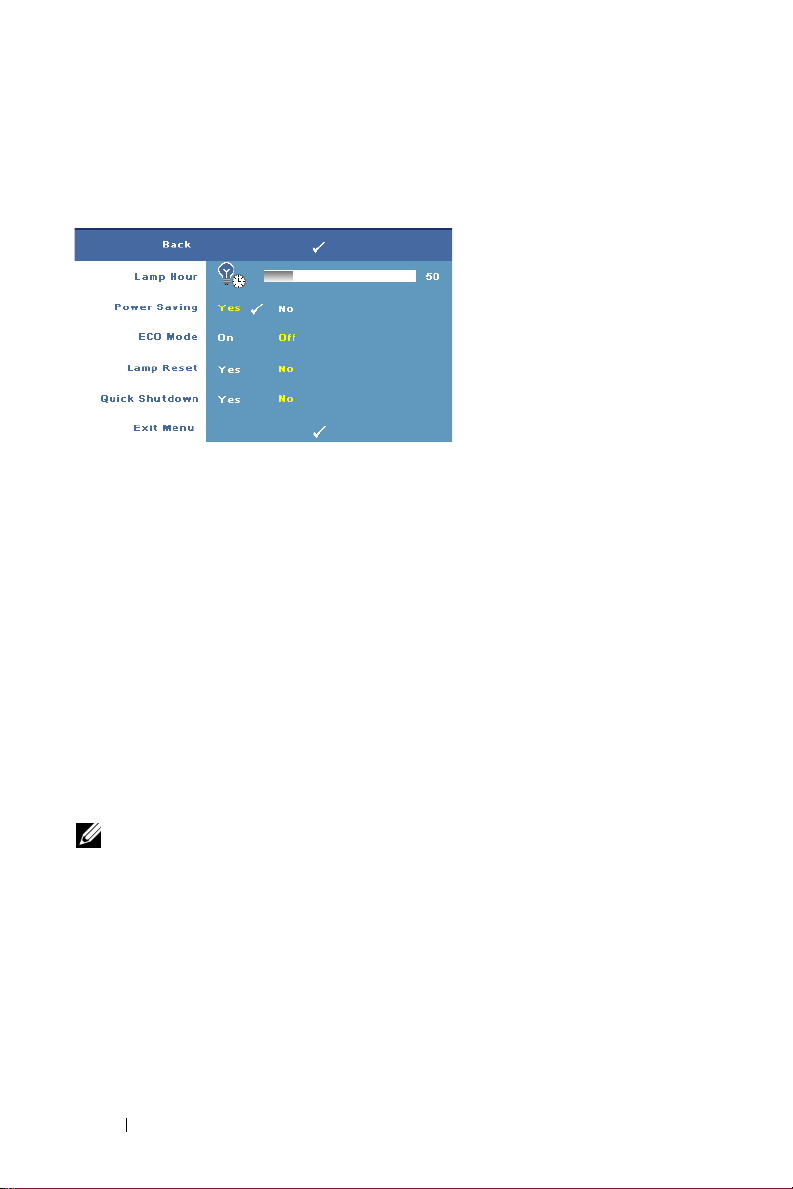
LAMP
Using the Lamp menu, you can adjust the display settings of your projectors. The
Picture menu, provides the following options:
AMP HOUR—Displays the
L
operating hours since the last
lamp timer reset.
OWER SAVING—Select Ye s to
P
set the Power Saving delay
period. The delay period is
the time you want the
projector to wait without an
input signal. By default, the
delay period is set to 120
minutes. However, you can set this to 5 minutes, 15 minutes, 30 minutes, 45
minutes, 60 minutes, or 120 minutes.
If an input signal is not detected during the delay period, the projector turns off
the lamp and goes into power saving mode. If an input signal is detected when
projector is in power saving mode, the projector automatically turns on. If an input
signal is not detected within two hours, the projector switches from Power Saving
mode to Power Off mode. To turn on the projector press the Power button.
CO MODE—Select On to use the projector at a lower power level (168 Watts).
E
Operating at lower power levels may provide longer lamp life, quieter operation,
and dimmer luminance output on the screen. Select Off to operate at normal
power level (212 Watts).
AMP RESET—After you install a new lamp, select Ye s to reset the lamp timer.
L
UICK SHUTDOWN—Select Ye s to turn off the projector with a single press of the
Q
Power button. This function allows the projector to cool down within a short
period of time by accelerating the fan speed.
NOTE: If Quick Shutdown is enabled, expect a slightly higher acoustic noise
during power off.
26 Using Your Projector
Page 27
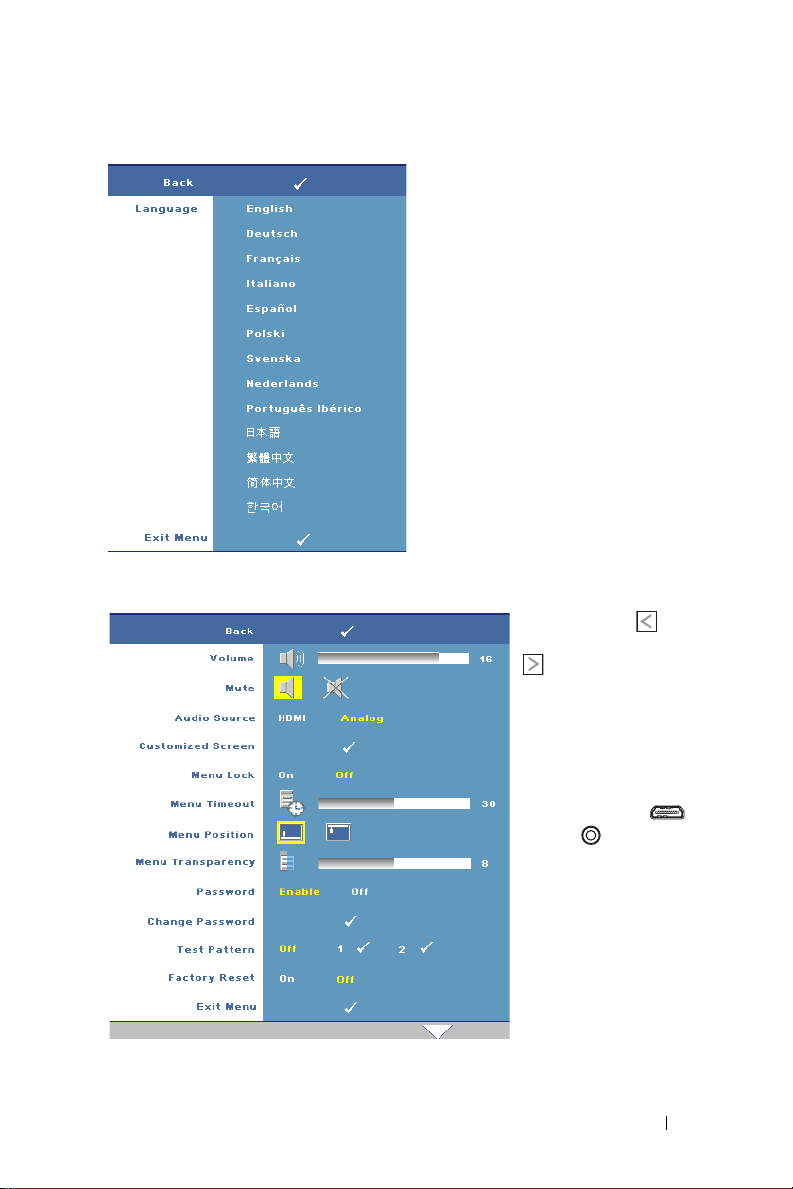
LANGUAGE
OTHERS
VOLUME—Press to
decrease the volume and
to increase the
volume.
UTE—Allows you to
M
enable/disable sound.
UDIO SOURCE—Allows you
A
to select the audio source
to either HDMI or
Analog (Audio In).
USTOMIZED SCREEN—Press
C
Enter the Customized
Screen menu appears.
Select YES to capture the
screen image as a My
Customized logo. This
Using Your Projector 27
Page 28
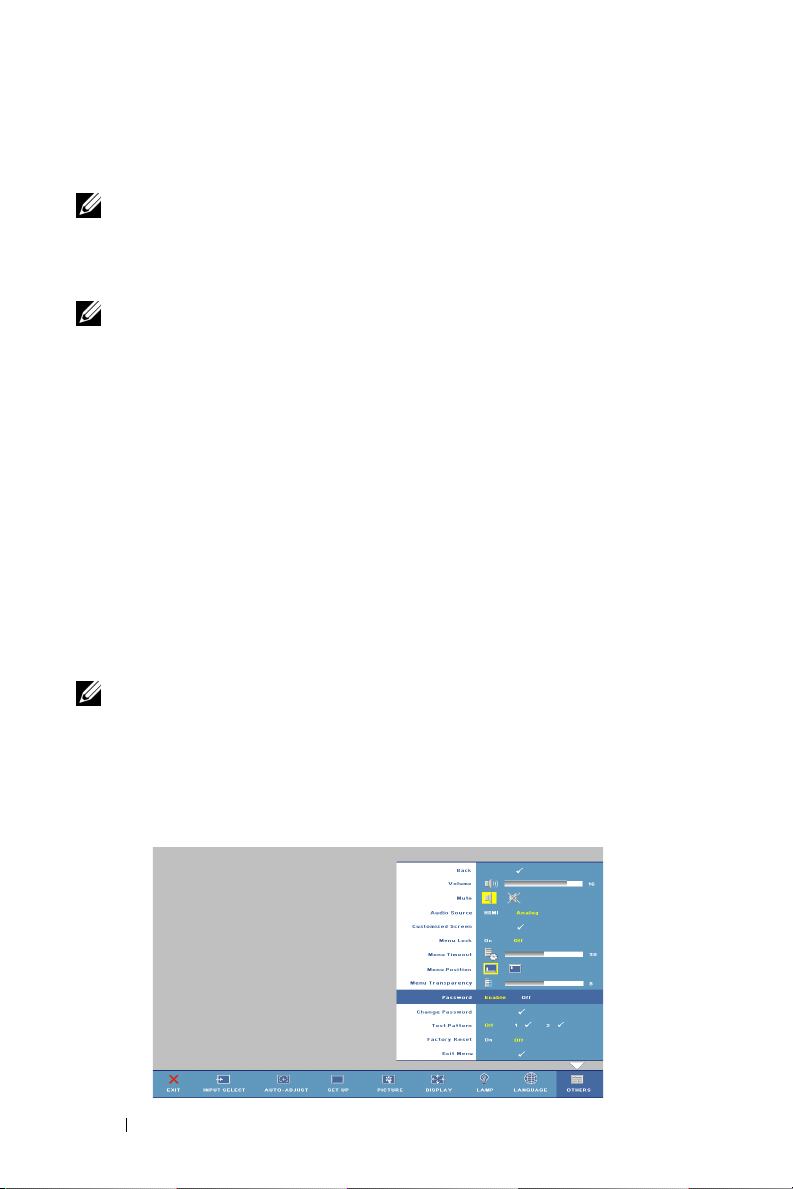
screen replaces all the original screens with the Dell logo. You can recover the
default screen by selecting Dell Logo on the pop-up screen.
NOTE: To capture a full image, ensure the input signal that is connected to
projector is 1280x800 resolution.
ENU LOCK—Select On to enable Menu Lock and hide the OSD menu. Select Off
M
to disable the Menu Lock.
NOTE: You can also disable Menu Lock by pressing the Menu button on the
control pane or remote control for 15 seconds.
ENU TIMEOUT—Allows you to adjust the time delay of the OSD Timeout. The
M
default setting is 30 seconds.
ENU POSITION—Allows you to select the location of the OSD on the screen.
M
ENU TRANSPARENCY—Allows you to select the transparency level of the OSD
M
background.
ASSWORD—Allows you to password protect the projector. This security utility
P
enables you to impose a variety of access restrictions to protect your privacy and
stop others from tampering with your projector. This means that the projector
cannot be used if it is taken without authorization, and thus serves as a theftprevention feature.
Select On to enable password protection. A Please Key In the Password screen
appears requesting you to enter a password when the projector is powered on the
next time. Select Off to disable password protection.
NOTE: Password protection is disabled by default.
If you enable this feature, you will be asked to enter the projector's password
after you turn on the projector:
1 1st time password input request:
a Go to Others menu, press Enter and then select Password to Enable the
password setting
.
28 Using Your Projector
Page 29
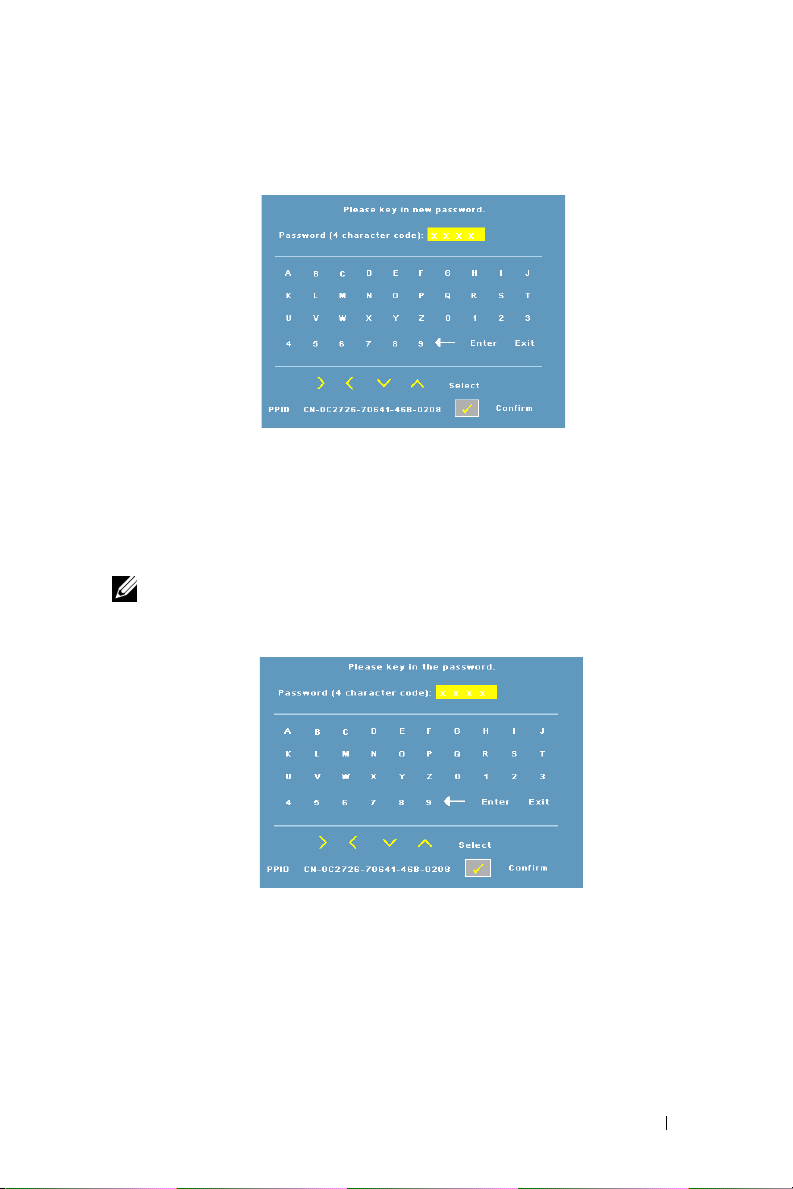
b Enable the Password function will pop-up a character screen, key in a 4-
digit number from the screen and press the Enter button.
c To confirm, enter the password again.
d If the password verification is successful, you may resume with accessing
the projector's functions and its utilities.
2 If you have entered incorrect password, you will be given another 2 chances.
After the three invalid attempts, the projector will automatically turn off.
NOTE: If you forget your password, contact Dell.
3 To cancel the password function, select OFF and enter the password to
disable the function.
Using Your Projector 29
Page 30
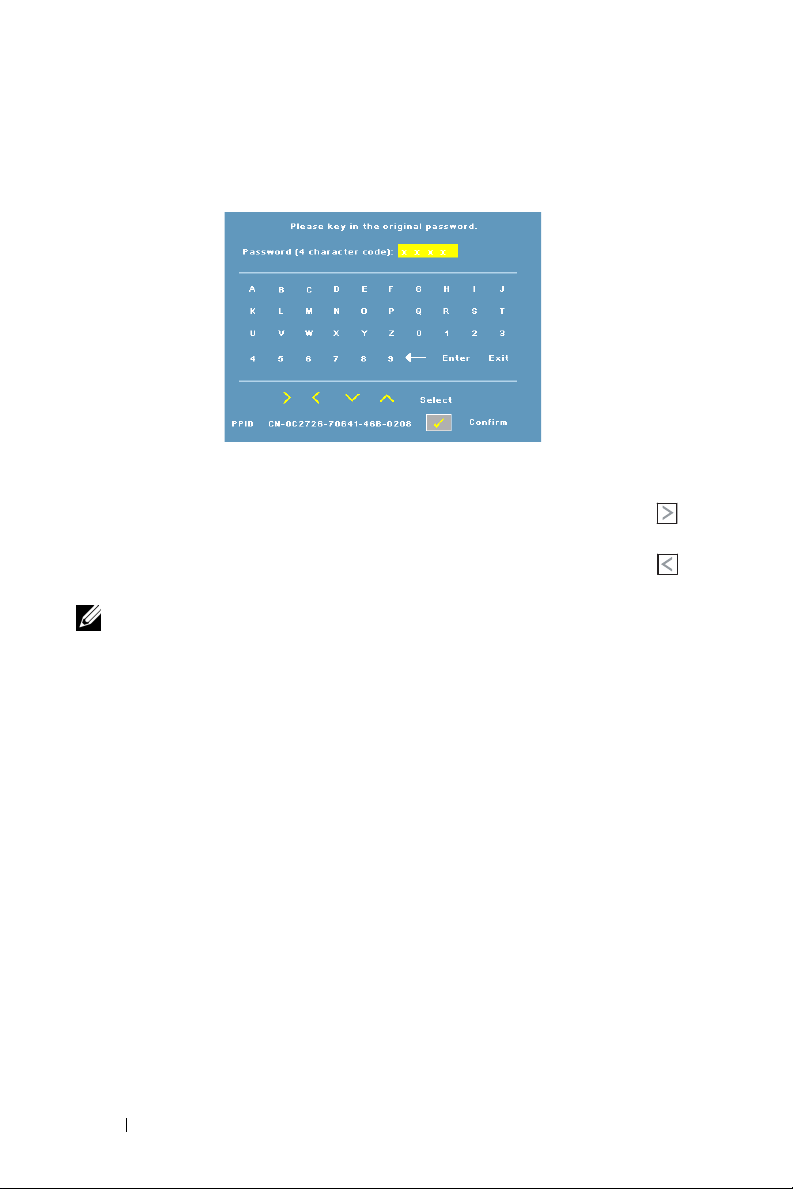
CHANGE PASSWORD—Allows you to change the password. Key in the original
password and then enter the new password. Enter the new password again to
confirm.
T
EST PATTERN—Select 1 or 2 to activate the built-in Test Pattern to test the focus
and resolution. Select Off to disable the function.
1
To run the diagnostics test pattern 1, press and hold the
Menu
button and
button on the projectors control panel simultaneously for two seconds.
2
To run the diagnostics test pattern 2, press and hold the
Menu button and
button on the projectors control panel simultaneously for two seconds.
NOTE: To enable test pattern 2, it is required to connect an input signal to
projector.
ACTORY RESET —Select On to reset the projector to its factory default settings.
F
30 Using Your Projector
Page 31

4
Troubleshooting Your Projector
If you experience problems with your projector, see the following troubleshooting
tips. If the problem persists, contact Dell (See
Problem Possible Solution
No image appears on the
screen
• Ensure that the lens cap is removed and the
projector is turned on.
• Ensure the external graphics port is enabled.
If you are using a Dell portable computer,
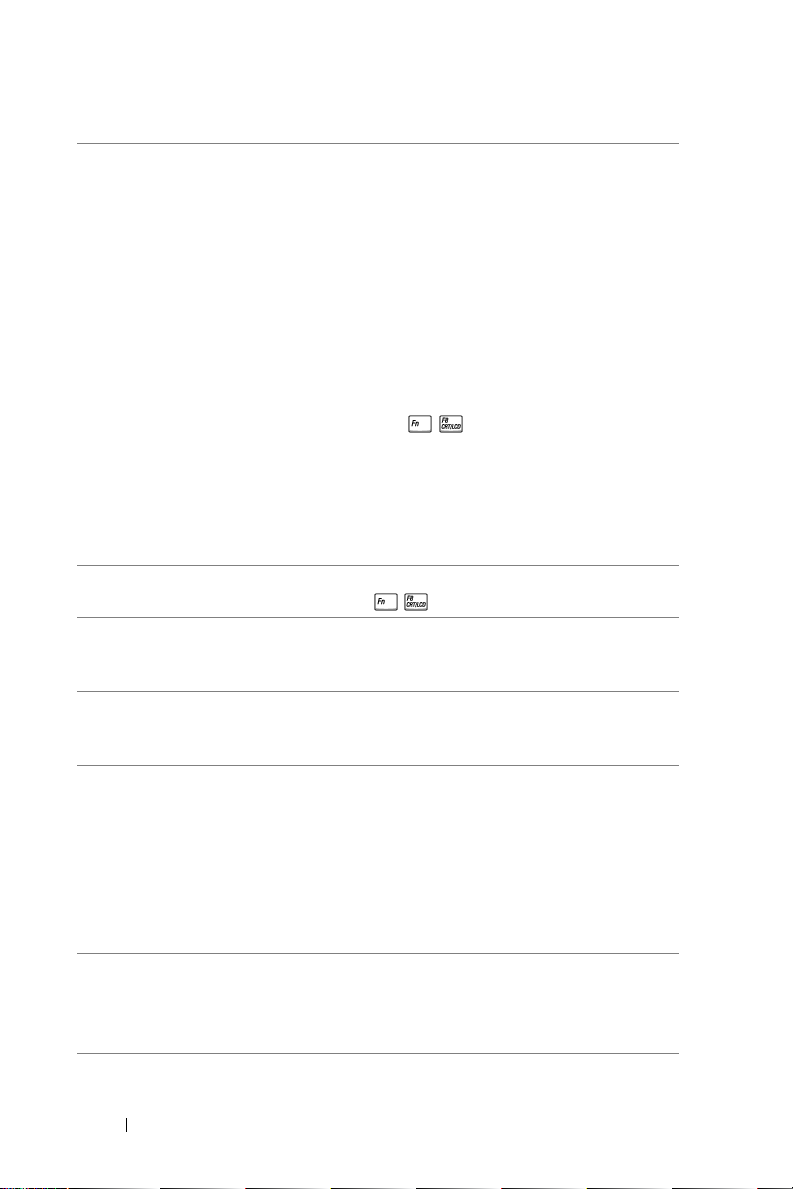
press (Fn+F8). For other
computers, see your respective
documentation.
• Ensure that all the cables are securely
connected. See Connecting Your Projector
on page 7.
• Ensure that the pins of the connectors are
not bent or broken.
• Ensure that the lamp is securely installed.
See Guiding Signals on page 34 .
•Use
Others
the test pattern are correct.
Contacting Dell on page 40
Test Pa ttern
on page 27). Ensure that the colors of
in the
Others
).
menu (see
Troubleshooting Your Projector 31
Page 32
Problem
Partial, scrolling, or
incorrectly displayed image
(continued)
Possible Solution
1
Press the
(continued)
Auto adjust
control or the control panel.
2
If you are using a Dell™ portable computer,
set the resolution of the computer to WXGA
(1280 x 800) or XGA (1024 x 768):
a
Right-lick the unused portion of your
Windows desktop, click
then select
b
Verify the setting is 1280 x 800 or 1024 x
Settings
768 pixels for the external monitor port.
c
Press (Fn+F8).
If you experience difficulty in changing
resolutions or your monitor freezes, restart all
the equipments and the projector.
If you are not using a Dell portable computer,
see your documentation for more information.
The screen does not display
your presentation
If you are using a Dell portable computer,
press
(Fn+F8)
Image is unstable or flickering Adjust the tracking (see
in the OSD Display sub-menu (in PC Mode
only).
Image has vertical flickering
bar
Adjust the frequency (see
) in the OSD Display sub-menu (in PC
25
Mode only).
Image color is not correct
• If your graphic card output signal is sync on
Green, and you would like to display VGA at
60Hz signal, please go into OSD select
Display
, select
Signal Type
RGB
.
•Use
Test Pa ttern
in the
Ensure that the colors of the test pattern are
correct.
Image is out of focus 1
Adjust the focus ring on the projector lens.
2
Ensure that the projection screen is within
the required distance from the projector
(3.3 ft [1.0 m] to 39.4 ft [12 m]).
button on the remote
Properties
and
tab.
.
Tracking on page 25
Frequency on page
and then select
Others
menu.
)
32 Troubleshooting Your Projector
Page 33

Problem
The image is stretched when
displaying a 16:9 DVD
Image is reversed Select Set Up from the OSD and adjust the
Lamp is burned out or makes
a popping sound
The OSD does not appear on
the screen
The remote control is not
operating smoothly or works
only within a limited range
(continued)
Possible Solution
The projector automatically detects the input
signal format and maintains the aspect ratio of
the projected image according to input signal
format with a default setting.
If the image is still stretched, adjust the aspect
ratio as follows:
• If you are playing a 16:9 DVD, select 4:3
aspect ratio type on your DVD player.
• If you cannot select 4:3 aspect ratio type on
your DVD player, select 4:3 aspect ratio in
Set Up
the
projector mode.
When the lamp reaches its end of life, it may
burn out and may make a loud popping sound.
If this occurs, the projector does not turn back
on. To replace the lamp, see on page 35.
Try to press the Menu button on the control
panel or remote control for 15 seconds to
unlock the OSD. Check the Menu Lock on
page 28.
The battery may be low. Check if the laser
beam transmitted from the remote is too dim.
If so, replace with 2 new AAA batteries.
(continued)
menu in the OSD.
Troubleshooting Your Projector 33
Page 34

Guiding Signals
Projector S tatus Description
Standby mode Projector in Standby mode. Ready to power on. BLUE
War mi ng up
mode
Lamp on Projector in Normal mode, ready to display an
Cooling mode
Power S avin g
mode
Cooling before
Power S avin g
mode.
Projector overheated
Lamp overheated
Lamp driver
over-heated
Fan b reakdown
Lamp driver
breakdown
Color Wheel
breakdown
Lamp failure Lamp is defective. Replace the lamp. OFF OFF OFF OFF AMBER
Faul t - DC
supply (+12V)
Faul t - DC
supplies
(secondary)
*Others: control buttons on the control panel exept Power and Menu
Projector takes some time to warm up and power
on.
image.
Note: The OSD menu is not accessed.
Projector is cooling to shutdown.
Power Saving mode has been activated. The
projector will automatically enter standby mode, if
an input signal is not detected in two hours.
The projector takes 60 seconds to cool down before
entering Power Saving mode.
Air vents might be blocked or ambient temperature
may be above 35℃. The projector automatically
shuts down. Ensure that the air vents are not
blocked and that the ambient temperature is within
operational range. If the problem persists, contact
Dell.
The lamp is over heated. The air vents may be
blocked. The projector automatically shuts down.
Turn the display on again after the projector cools
down. If problem persists, contact Dell.
The lamp driver is over heated. The air vents may
be blocked. The projector automatically shuts
down. Turn the display on again after the projector
cools down. If the problem persists, contact Dell.
One of the fans has failed. The projector
automatically shuts down. If the problem persists,
contact Dell.
The lamp driver has failed. The projector
automatically shuts down. Unplug the power cable
after three minutes then turn the display on again. If
this problem persists, contact Dell.
Color wheel cannot start. The projector has failed
and the projector automatically shuts down.
Unplug the power
turn on the projector.. If this problem persists,
contact Dell.
Power supply has been interrupted. The projector
automatically shuts down. Unplug the power cable
after three minutes and then turn on the projector. If
this problem persists, contact Dell.
Power supply has been interrupted. The projector
automatically shuts down. Unplug the power cable
after three minutes and then turn on the projector. If
this problem persists, contact Dell.
cable
after three minutes and
Control Buttons
Pow er Me nu Ot her s
Flashing
AMBER
Flashing
AMBER OFF OFF OFF OFF
AMBER OFF OFF AMBER OFF
AMBER
Flashing
AMBER
Flashing
AMBER
Flashing
OFFOFFOFFOFF
BLUE BLUE BLUE OFF OFF
BLUE BLUE OFF OFF OFF
BLUEOFFOFFOFFOFF
OFFOFFOFFOFF
OFF OFF OFF AMBER OFF
BLUE OFF OFF AMBER OFF
OFF OFF OFF
OFF OFF OFF
BLUE OFF OFF
OFF OFF AMBER AMBER
OFF OFF AMBER OFF
Indicator
TEMP
(Amber)
AMBER
Flashing
AMBER
Flashing
LAMP
(Amber)
OFF
AMBER
Flashing
AMBER
Flashing
34 Troubleshooting Your Projector
Page 35
Changing the Lamp
The following message appears on the screen when your projector lamp is
approaching end of life and requires to be changed:Lamp is approaching the end
of its useful life in full power operation. Replacement suggested.
www.dell.com/lamps
CAUTION: Before you begin any of the procedures in this section, follow the
Safety Instructions as described on page 6.
To replace the lamp:
1
Turn off the projector and disconnect the power cable.
CAUTION: The lamp becomes very hot when in use. Do not attempt to replace
the lamp until the projector has been allowed to cool down for at least 30
minutes.
2
Let the projector cool for at least 30 minutes.
3
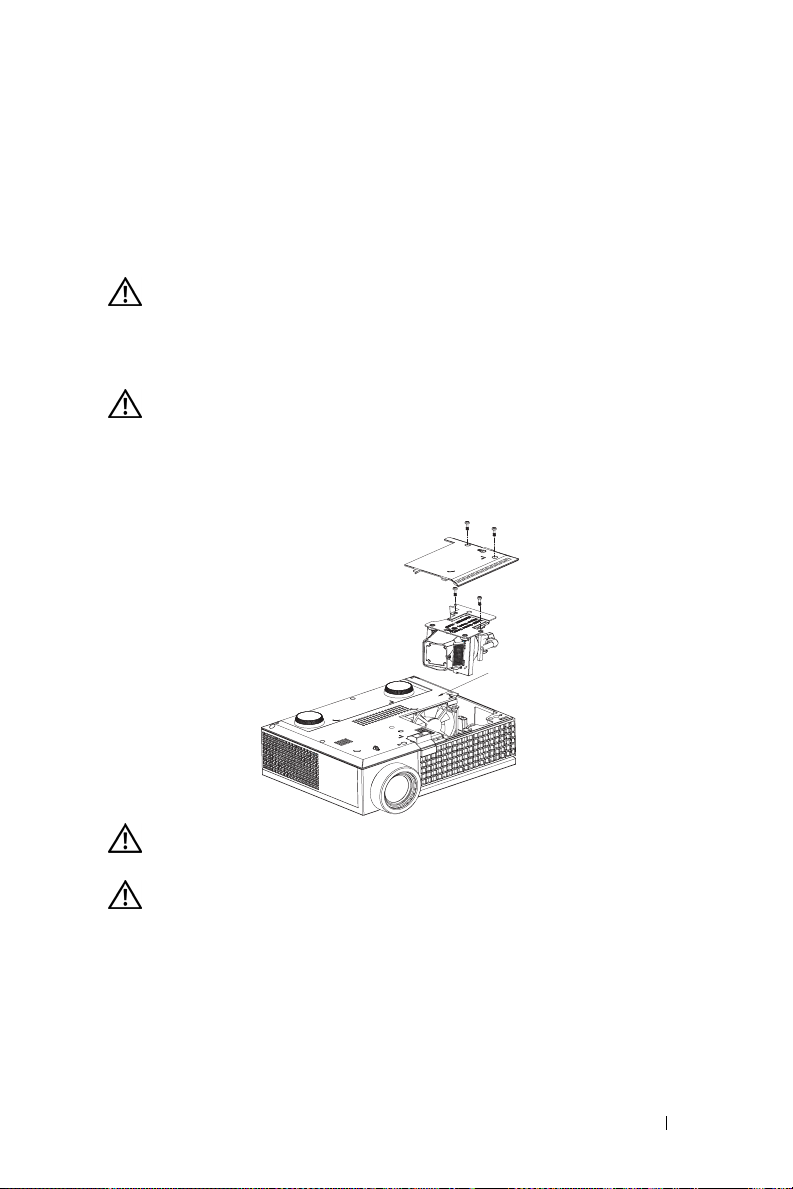
Loosen the two screws that secure the lamp cover, and remove the cover.
warning label
CAUTION: Do not touch the lamp or the lamp glass at any time. Projector
lamps are very fragile and may shatter if touched.
CAUTION: If the lamp shatters, remove all broken pieces from the projector
and dispose or recycle according to state, local, or federal law. For more
information, see www.dell.com/hg.
4
Loosen the two screws that secure the lamp.
5
Pull the lamp up by its metal handle.
6
Replace with the new lamp.
Troubleshooting Your Projector 35
Page 36

NOTE: Dell may require lamps replaced under warranty to be returned.
Otherwise, dispose or recycle the lamp. For more information, see Lamp
Disposal on page 36.
7
Tighten the two screws that secure the lamp.
8
Replace the lamp cover and tighten the two screws.
9
Reset the lamp usage time by selecting
Ye s
for
Lamp Reset
in the OSD
menu. (See Lamp menu on page 26)
CAUTION: Lamp Disposal (for the US only)
LAMP(S) INSIDE THIS PRODUCT CONTAIN MERCURY AND MUST BE
RECYCLED OR DISPOSED OF ACCORDING TO LOCAL, STATE OR FEDERAL
LAWS. FOR MORE INFORMATION, GO TO WWW.DELL.COM/HG OR CONTACT
THE ELECTRONIC INDUSTRIES ALLIANCE AT WWW.EIAE.ORG. FOR LAMP
SPECIFIC DISPOSAL INFORMATION CHECK WWW.LAMPRECYCLE.ORG.
Lamp
36 Troubleshooting Your Projector
Page 37

5
Specifications
5
Light Valve Single-chip 0.65" WXGA DMD Type A,
DarkChip™2
Brightness 2000 ANSI Lumens (Max.)
Contrast Ratio 2000:1 Typical (Full On/Full Off)
Uniformity 80% Typical (Japan Standard - JBMA)
Number of Pixels 1280 x 800 (WXGA)
Displayable Color 16.7M colors
Color Wheel Speed 100~127.5Hz (2X)
150Hz (3X) in Movie mode
Projection Lens F/2.44~2.58, f=21.8~23.8 mm with 1.1x manual
zoom lens
Projection Screen Size 27.3-359.4 inches (diagonal)
Projection Distance 3.3~39.4 ft (1.0 m~12 m)
Video Compatibility Composite Video / S-Video: NTSC (J, M, 4.43), PAL
(B, D, G, H, I, M, N, Nc, 60), SECAM (B, D, G, K,
K1, L)
Component Video via VGA & HDMI: 1080i/p,
720p, 576i/p, 480i/p
Power Supply Universal 90-264V AC 50-60Hz with PFC input
Power Consumption 212 watts in full mode, 168 watts in eco mode
< 3 watts in power off mode.
Audio 1 watt speaker
Noise Level 39 dB(A) Full-on mode, 32 dB(A) Eco-mode
Weight 2.6 lbs (1.18 kg)
Specifications 37
Page 38

Dimensions (W x D x H) External 8.07 x 6.10 x 2.85 ± 0.04 inches (205 x 155
x 72.5 ± 1 mm)
o
Environmental Operating temperature: 5
C - 35oC (41oF- 95oF)
Humidity: 80% maximum
o
Storage temperature: 0
C to 60oC
(32oF to 140oF)
Humidity: 90% maximum
Regulatory FCC, CE, VCCI, UL, cUL, Nemko-GS, ICES-003,
MIC, C-Tick, CCC, PSB, NOM, SABS, eK
I/O Connectors Power: AC power input socket
Computer input: one D-sub for analog/component,
HDTV input signals
Video input: one composite video RCA and one Svideo
Audio input: one phone jack (diameter 3.5 mm)
Audio output: one phone jack (diameter 3.5 mm)
USB port: One USB slave for remote support.
HDMI input: Support HDMI 1.1. HDCP
compliant.
Lamp 165-watt user-replaceable 3000-hour lamp (up to
5000 hours in eco mode)
NOTE: The actual operating life span of a projector lamp will vary according to
operating conditions and usage patterns. Usage of a projector in stressful
conditions which may include dusty environments, under high temperatures
and abrupt powering-off may result in a lamp's shortened operating life span or
possibly lamp failure. The lamp life specified for Dell's projectors refers to the
typical time under non-stressful operating conditions for more than 50% of a
sampling population to reduce to approximately 50% of the lamp's rated
brightness level. It is not the measure of time a lamp will cease light output.
38 Specifications
Page 39
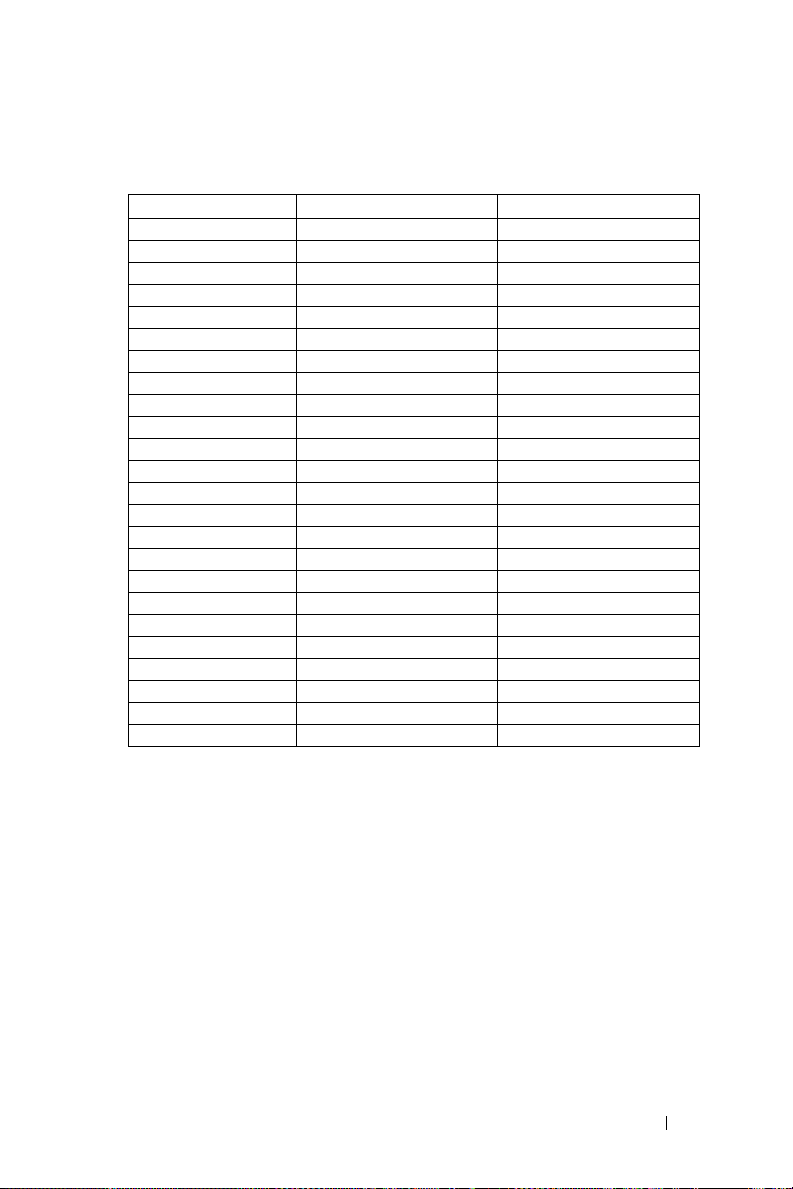
Compatibility Modes (Analog/Digital)
Resolution
640X480 59.9 31.5
640X480 75 37.5
640X480 85 43.3
720X400 70.1 31.5
720X400 85 37.9
800X600 60.3 37.9
800X600 75 46.9
800X600 85.1 53.7
848X480 60 31
1024X768 60 48.4
1024X768 75 60
1024X768 85 68.7
1152X864 75 67.5
1280X720 59.9 44.8
1280X768 59.9 47.8
1280X800 59.8 49.7
1280X1024 60 64
1280X1024 75 80
1280X1024 85 91.1
1360X768 60 47.7
1400X1050 60 65.3
1440X900 59.9 55.9
1680X1050 60 65.3
1600X1200 60 75
V. Frequency (Hz) H. Frequency (KHz)
Specifications 39
Page 40

Contacting Dell
For customers in the United States, call 800-WWW-DELL (800-999-3355).
NOTE: If you do not have an active Internet connection, you can find contact
information on your purchase invoice, packing slip, bill, or Dell product catalog.
Dell provides several online and telephone-based support and service options.
Availability varies by country and product, and some services may not be
available in your area. To contact Dell for sales, technical support, or
customer service issues:
1
Visit
support.dell.com
2
Verify your country or region in the
menu at the bottom of the page.
3
Click
Contact Us
4
Select the appropriate service or support link based on your need.
5
Choose the method of contacting Dell that is convenient for you.
.
Choose A Country/Region
on the left side of the page.
drop-down
40 Contacting Dell
Page 41

Appendix: Glossary
ANSI Lumens —A standard for measuring light output, used for comparing
projectors. A standard for measuring the brightness. It is calculated by dividing a
square meter image into nine equal rectangles, measuring the lux (or brightness)
reading at the center of each rectangle, and averaging these nine points.
Aspect Ratio —The most popular aspect ratio is 4:3 (4 by 3). Early television and
computer video formats are in a 4:3 aspect ratio, which means that the width of
the image is 4/3 times the height.
Brightness— The amount of light emitting from a display or projection display or
projection device. The brightness of projector is measured by ANSI lumens.
Color Temperature— The color appearance of white light. Low color
temperature implies warmer (more yellow/red) light while high color temperature
implies a colder (more blue) light. The standard unit for color temperature is
Kelvin (K).
Component Video—A method of delivering quality video in a format that
contains all the components of the original image. Consists of the luminance
signal and two separate chrominance signals and are defined as Y'Pb'Pr' for analog
component and Y'Cb'Cr' for digital component. Component video is available on
DVD players and projectors.
Composite Video — A video signal that combines the luma (brightness), chroma
(color), burst (color reference), and sync (horizontal and vertical synchronizing
signals) into a signal waveform carried on a single wire pair. There are three kind of
formats, namely, NTSC, PAL and SECAM.
Compressed Resolution— If the input images are of greater resolution than the
native resolution of the projector, the resulting image will be scaled to fit the
native resolution of the projector. The nature of compression in a digital device
means that some image content is lost.
Contrast Ratio— Range of light and dark values in a picture, or the ratio between
their maximum and minimum values. There are two methods used by the
projection industry to measure the ratio:
1
Full On/Off
on) and the light output of an all black (full off) image.
2
ANSI
average light output from the white rectangles is divided by the average light
output of the black rectangles to determine the
Full On/Off contrast is always a larger number than ANSI contrast for the same
projector.
— measures the ratio of the light output of an all white image (full
— measures a pattern of 16 alternating black and white rectangles. The
ANSI
contrast ratio.
Glossary 41
Page 42

dB— decibel—A unit used to express relative difference in power or intensity,
usually between two acoustic or electric signals, equal to ten times the common
logarithm of the ratio of the two levels.
Diagonal Screen— A method of measuring the size of a screen or a projected
image. It measures from one corner to the opposite corner. A 9FT high, 12FT
wide, screen has a diagonal of 15FT. This document assumes that the diagonal
dimensions are for the traditional 4:3 ratio of a computer image as per the example
above.
®
— Digital Light Processing™—Reflective display technology developed by
DLP
Texas Instruments, using small manipulated mirrors. Light passes through a color
filter is sent to the DLP mirrors which arrange the RGB colors into a picture
projected onto screen, also known as DMD.
DMD— digital Micro- Mirror Device— Each DMD consists of thousands of
tilting, microscopic aluminum alloy mirrors mounted on a hidden yoke.
Focal Length— The distance from the surface of a lens to its focal point.
Frequency— It is the rate of repetition in cycles per seconds of electrical signals.
Measured in Hz.
HDMI— High Definition Multimedia Interface, carry both uncompressed high
definition video along with digital audio and device control data in a single
connector.
Hz — Hertz, unit of frequency.
Keystone Correction— Device that will correct an image of the distortion
(usually a wide-top narrow-bottom effect) of a projected image caused by
improper projector to screen angle.
Laser pointer— A small pen or cigar sized pointer that contains small battery
powered laser, which can project small, red (typically), highly intensity beam of
light that is immediately very visible on the screen
Maximum Distance— The distance from a screen the projector can be to cast an
image that is useable (bright enough) in a fully darkened room.
Maximum Image Size— The largest image a projector can throw in a darkened
room. This is usually limited by focal range of the optics.
Minimum Distance— The closest position that a projector can focus an image
onto a screen.
NTSC— National Television Standards Committee. North American standard for
video and broadcasting, with a video format of 525 lines at 30 frames per second.
PAL— Phase Alternating Line. A European broadcast standard for video and
broadcasting, with a video format of 625 lines at 25 frames per second.
42 Glossary
Page 43

Reverse Image— Feature that allows you to flip the image horizontally. When
used in a normal forward projection environment text, graphics, etc, are
backwards. Reverse image is used for rear projection.
RGB— Red, Green, Blue— typically used to describe a monitor that requires
separate signals for each of the three colors.
S-Video—A video transmission standard that uses a 4-pin mini-DIN connector to
send video information on two signal wires called luminance (brightness, Y) and
chrominance (color, C). S-Video is also referred to as Y/C.
SECAM— A French and international broadcast standard for video and
broadcasting, closely related to PAL but with a different method of sending color
information.
SVGA— Super Video Graphics Array— 800 x 600 pixels count.
SXGA— Super Extended Graphics Array—1280 x 1024 pixels count.
UXGA— Ultra Extended Graphics Array—1600 x 1200 pixels count.
VGA— Video Graphics Array—640 x 480 pixels count.
WXGA— Wide Extended Graphics Array—1280x800 pixels count.
XGA— Extended Graphics Array— 1024 x 768 pixels count.
Zoom Lens— Lens with a variable focal length that allows operator to move the
view in or out making the image smaller or larger.
Zoom Lens Ratio— Is the ratio between the smallest and largest image a lens can
projector from a fixed distance. For example, a 1.4:1 zoom lens ratio means that a
10 foot image without zoom would be a 14 foot image with full zoom.
Glossary 43
Page 44

Index
A
Adjusting Projection Image Size 16
Adjusting the Projected Image
Adjusting the Projector Height
14
Elevator button
Elevator foot
Tilt adjustment wheel
Adjusting the Projector Zoom and
Focus
15
Focus ring
Zoom tab
15
15
14
14
14
14
C
Changing the Lamp 35
Connecting a Computer
Power cable
USB to USB cable
VGA to VGA cable
Connecting a DVD Player
Using a Component Cable
Using a Composite Cable
Using an HDMI Cable
Using an S-video Cable
8
8
8
11
D-sub to YPbPr cable
Power cable
11
10
Composite video cable
Power cable
10
12
HDMI cable
Power cable
12
12
9
11
10
Connection Ports
Audio input connector
Audio output connector
HDMI input connector
Power cable connector
Security cable slot
S-video input connector
USB remote connector
VGA input connector
Video input connector
Contact Dell
Contacting Dell
Control Panel
Enter button
Left/ Source
MENU
D
Dell
Contacting
G
Guiding Signals 34
M
Main Unit 6
Power cable
S-video cable
5, 18
40
17
19
19
19
40
9
9
7
7
7
7
7
7
7
7
7
44 Index
Page 45

Control panel 6
Elevator button
Focus ring
IR receiver
Lens
6
Zoom tab
6
6
6
6
O
On-Screen Display 21
Auto-Adjust
DISPLAY (in PC Mode)
DISPLAY (in Video Mode)
Input Select
LAMP
LANGUAGE
Main Menu
Other
PICTURE (in PC Mode)
PICTURE (in Video Mode)
Set Up
22
24
21
26
27
21
27
23
22
P
Phone numbers 40
Powering On/Off the Projector
Turning Your Projector Off
Turning Your Projector On
25
23
13
13
38
Audio
Brightness
Color Wheel Speed
Compatibility Modes
Contrast Ratio
Dimensions
Displayable Color
Environmental
I/O Connectors
Lamp
Light Valve
Noise Level
Number of Pixels
Power Consumption
Power Supply
Projection Distance
Projection Lens
Projection Screen Size
Regulatory
Uniformity
Video Compatibility
Weight
Support
Contacting Dell
37
37
38
37
38
38
37
37
38
37
37
37
38
37
38
40
T
Telephone numbers 40
37
39
37
37
37
37
R
Remote Control 19
S
Specifications
Troubleshooting
Contact Dell
31
31
Index 45
 Loading...