

Page 1

Lifecycle Controller Integration―Best Practices Specification
Lifecycle Controller Integration―Best
Practices Specification
A Dell Technical White Paper
Steven Zessin
Ganesh Viswanathan
Zhan Liu
Ajay Shenoy
1
Page 2

Lifecycle Controller Integration―Best Practices Specification
This document is for informational purposes only and may contain typographical errors and
technical inaccuracies. The content is provided as is, without express or implied warranties of any
kind.
© 2013 Dell Inc. All rights reserved. Dell and its affiliates cannot be responsible for errors or omissions
in typography or photography. Dell, the DELL logo, and the DELL badge, PowerConnect, and
PowerVault are trademarks of Dell Inc. Microsoft and WinRM are either trademarks or registered
trademarks of Microsoft Corporation in the United States and/or other countries. Other trademarks and
trade names may be used in this document to refer to either the entities claiming the marks and names
or their products. Dell Inc. disclaims any proprietary interest in trademarks and trade names other than
its own.
December 2013| Rev 1.2.00
2
Page 3

Lifecycle Controller Integration―Best Practices Specification
Contents
1 Contents ............................................................................................................ 12
1.1 How to Use this Document ............................................................................ 12
1.2 Using the Sample Scripts .............................................................................. 12
1.3 Improving winRM Enumeration Performance ....................................................... 12
1.4 Feature Discovery Procedure ......................................................................... 13
1.5 Profile Revision Number Explanation ................................................................ 14
1.6 Lifecycle Controller and Lifecycle Controller 2 Nomenclature.................................. 15
1.7 System status and Configuration Job Behavior .................................................... 15
1.7.1 RS Status and job status ............................................................................... 16
1.7.2 GetRemoteServicesAPIStatus and job status ....................................................... 17
1.7.3 11G and 12G compatibility ............................................................................ 18
1.7.4 GetRemoteServicesAPIStatus output descriptions ................................................. 19
1.8 Reference Links ......................................................................................... 20
2 Terms and Definitions ............................................................................................ 21
3 Anomalous Algorithms and Descriptions ...................................................................... 22
3.1 Setting CNA Bandwidth ................................................................................ 22
3.2 iDRAC Cloning ........................................................................................... 22
3.3 Setting NIC String Attributes to Blank ............................................................... 23
3.4 Determine NIC Card .................................................................................... 23
3.5 List of Partitionable NIC Cards for LC2 .............................................................. 24
3.6 iDRAC Telnet Attribute Enables SerialRedirection ................................................ 24
3.7 Never Unplug Hardware During Updates ............................................................ 25
3.8 Express Versus Enterprise iDRACs .................................................................... 25
3.9 CIM Query Language (CQL) Filters ................................................................... 26
3.9.1 CQL filter benefits ...................................................................................... 26
3.9.2 How to perform CQL enumerations using RECITE ................................................. 26
3.9.3 CQL filter example that enumerates all NIC attributes for a particular port/partition ..... 26
3.9.4 CQL filter example that enumerates all iDRAC attributes with a particular
GroupDisplayName and AttributeName ....................................................................... 27
3.9.5 CQL filter example that enumerates all BIOS attributes where the IsReadOnly flag is set to
TRUE 27
3.10 Ordering of iDRAC Attributes to set or apply (11Generation vs 12Generation) .............. 27
3.11 How to Determine if Server is 11Generation vs 12Generation .................................. 28
3.12 Using Special Characters in Usernames ............................................................. 28
3.13 Obtaining Updated System Inventory ............................................................... 28
3
Page 4

Lifecycle Controller Integration―Best Practices Specification
3.14
How to Determine if the System is Blade, Tower, or Rack ...................................... 30
3.15 Getting the SystemID, Model, and more ............................................................ 30
3.16 Http, CIFS, NFS, tftp, ftp Formatting ............................................................... 31
4 Workflows .......................................................................................................... 32
4.1 RAID stacking: ResetConfig, CreateVD, assign HotSpares ....................................... 32
4.2 RAID Stacking with BIOS Attributes Using Setupjobqueue ....................................... 33
4.3 Boot to Network ISO.................................................................................... 35
4.4 Boot to ISO from vFlash ................................................................................ 36
4.5 Set Hard Disk Drive to ‘first’ in Boot Order ........................................................ 37
4.6 Export (backup) Image to vFlash ..................................................................... 38
4.7 Export (backup) iImage to CIFS or NFS Share ...................................................... 38
4.8 Automatic Backup (12
th
Generation and Later Version of Servers Only) ....................... 39
4.9 Import (restore) Image from vFlash ................................................................. 40
4.10 Import (Restore) Image from CIFS or NFS Share ................................................... 40
4.11 iDRAC Firmware DUP uUpdate from CIFS or TFTP Share ......................................... 41
4.12 BIOS Firmware DUP Update from CIFS or TFTP Share ............................................ 42
4.13 USC Firmware DUP Update from CIFS or TFTP Share ............................................ 43
4.14 Automatic Firmware Update (12
4.15 Update from Repository (12
4.16 Firmware Rollback (12
4.17 Remote Diagnostics (12
th
Generation and Later Version of Servers Only) ...................... 45
th
Generation and Later Version of Servers Only) ..................... 45
th
Generation and Later Version of Servers Only) .......... 43
th
Generation and Later Version of Servers Only) ................ 44
4.18 PXE Boot using Embedded NICs (11G only) ......................................................... 46
4.19 PXE Boot using Embedded NICs (12G only) ......................................................... 48
4.20 Set NIC Attributes and iSCSI boot using setupjobqueue (11G only) ............................ 49
4.21 iSCSI Boot using NDC/Broadcom (12G only) ........................................................ 51
4.22 iSCSI Boot using QLogic (12G only)................................................................... 52
4.23 iSCSI boot using Intel (12
th
Generation only) ....................................................... 54
4.24 IO Identity ............................................................................................... 56
4.25 Export LC log ............................................................................................ 57
4.26 FCoE Boot using QLogic (12G only) .................................................................. 58
4.27 FCoE boot using Intel (12
th
Generatioin only) ...................................................... 60
4.28 FCoE boot using Broadcom (12G only) .............................................................. 63
4.29 IO Identity for QLogic (12G only) .................................................................... 64
4.30 IO Identity for Broadcom (12G only) ................................................................ 66
4.31 IO Identity for Intel (12G only) ....................................................................... 68
4
Page 5

Lifecycle Controller Integration―Best Practices Specification
4.32
Export System Configuration (12
4.33 Import System Configuration (12
th
Generation and Later Version of Servers Only) .......... 69
th
Generation and Later Version of Servers Only) .......... 69
4.34 Configurable Boot to Network ISO ................................................................... 70
5 Base Metrics Profile Use Cases ................................................................................. 71
5.1 Discovery of Base Metrics Profile Support .......................................................... 71
6 BIOS and Boot Management Profile Use Cases ............................................................... 72
6.1 Discovery of BIOS and boot Profile Support ........................................................ 72
6.2 List all BIOS Attributes ................................................................................. 73
6.3 Delete Pending BIOS Configuration .................................................................. 73
6.4 Inventory of boot Configurations in System ........................................................ 74
6.5 Get the First boot Configuration’s Information .................................................... 74
6.6 Inventory of boot Sources in System ................................................................ 75
6.7 Changing boot Order by Instance .................................................................... 75
6.8 Enable or Disable boot Source ........................................................................ 75
6.9 One Time boot .......................................................................................... 76
7 CPU Profile Use Cases ............................................................................................ 77
7.1 Discovery of CPU Profile Support .................................................................... 77
7.2 Inventory of CPUs in System .......................................................................... 78
7.3 Get the First CPU’s Information ...................................................................... 78
8 Event Filter Profile Use Cases .................................................................................. 78
8.1 Discovery of Event Filter Profile Support ........................................................... 78
8.2 Get Event Filter Configuration Service Views ...................................................... 79
8.3 Get Event Filter Views ................................................................................. 80
8.4 Get Single Event Filter’s Information ............................................................... 80
8.5 Set Event Filters by Category ......................................................................... 80
8.6 Set Event Filters by InstanceID ....................................................................... 81
9 iDRAC Card Profile Use Cases ................................................................................... 81
9.1 Discovery of iDRAC Card Profile Support............................................................ 81
9.2 Get all iDRAC Card Attributes ........................................................................ 82
9.3 Inventory of iDRAC Cards in System ................................................................. 82
9.4 Get the First iDRAC Card’s Information ............................................................. 83
9.5 Set Apply iDRAC Card Attribute(s) Immediately ................................................... 83
9.6 Schedule a set iDRAC Card Attribute(s) Operation ................................................ 84
10 Fan Profile Use Cases .................................................................................. 84
10.1 Discovery of Fan Profile Support ..................................................................... 84
5
Page 6

Lifecycle Controller Integration―Best Practices Specification
10.2
Inventory of Fans in System ........................................................................... 85
10.3 Get the First Fan’s Information ...................................................................... 85
11 Persistent Storage Profile Use Cases ................................................................ 86
11.1 Discovery of Persistent Storage Profile Support ................................................... 86
11.2 Inventory of Virtual Flash (vFlash) Media ........................................................... 86
11.3 Get the First vFlash’s Attribute Information ....................................................... 87
11.4 Inventory of Partitions on the Virtual Flash Media ................................................ 87
11.5 Initialize Virtual Flash Media ......................................................................... 88
11.6 Enable Virtual Flash (vFlash) Media ................................................................. 88
11.7 Disable Virtual Flash (vFlash) Media ................................................................. 88
11.8 Create new Partition on Virtual Flash (vFlash) Media ............................................ 89
11.9 Create new Partition Using Image ................................................................... 89
11.10 Delete Existing Partition .............................................................................. 90
11.11 Format Existing Partition .............................................................................. 90
11.12 Modify Existing Partition .............................................................................. 91
11.13 Attach Partition ......................................................................................... 91
11.14 Detach Partition ........................................................................................ 92
11.15 Export Data from Existing Partition ................................................................. 92
12 Power State Management Profile Use Cases ....................................................... 93
12.1 Discovery of Power State Management Profile Support .......................................... 93
13 Profile Registration Profile Use Cases ............................................................... 94
13.1 Discovery of Profile Registration Profile Support .................................................. 94
14 Simple RAID Profile Use Cases ........................................................................ 94
14.1 Discovery of RAID Profile Support .................................................................... 94
14.2 Inventory of RAID Controllers in System ............................................................ 95
14.3 Get the first RAID Controller’s Information ........................................................ 96
14.4 Inventory of Virtual and Physical Disk Drives in System .......................................... 96
14.5 Apply Pending Values for a RAID Configuration .................................................... 96
14.6 Delete Pending Values for a RAID Configuration................................................... 96
14.7 Clear old Configuration from Newly Added HDD ................................................... 97
14.8 Determine Available RAID Configurations .......................................................... 97
14.9 Determine Available Physical Disk Drives for a RAID Configuration ............................ 98
14.10 Check Available Virtual Disk Parameters for a given RAID Level and set of Physical Disks . 98
14.11 Create a Virtual Disk ................................................................................... 99
14.12 Determine Available Physical Disk Drives to be used as a Hot-spare ........................... 99
6
Page 7

Lifecycle Controller Integration―Best Practices Specification
14.13
Assign a Physical Disk Drive as a Hot-spare ......................................................... 99
14.14 Delete a Virtual Disk from the System .............................................................. 99
14.15 Delete all Virtual Disks and Unassign all Hot-spares ............................................. 100
14.16 Convert Physical Disk Drive to RAID State ......................................................... 100
14.17 Convert Physical Disk Drives to non-RAID State .................................................. 101
15 Record Log Profile Use Cases ........................................................................ 102
15.1 Discovery of Record Log Profile Support ........................................................... 102
15.2 List Lifecycle Record Logs ............................................................................ 103
15.3 List Lifecycle Record Log Capabilities .............................................................. 103
15.4 List Lifecycle Log Entries ............................................................................. 104
15.5 Set and get Comment in Lifecycle Log Entries .................................................... 104
15.6 List System Event Record Logs ...................................................................... 105
15.7 List System Event Record Log Capabilities ........................................................ 105
15.8 List System Event Log Entries ....................................................................... 106
16 Role-based Authorization Profile (RBAP) Use Cases .............................................. 106
16.1 Discovery of RBAP Profile Support .................................................................. 106
16.2 Discovery of Users with Assigned LAN Privileges ................................................. 107
16.3 Discovery of Users with Assigned Serial over LAN Privileges ................................... 107
16.4 Discovery of users with Assigned CLP Privileges .................................................. 108
17 Service Processor Profile Use Cases ................................................................ 108
17.1 Discovery of Service Processor Profile Support ................................................... 108
18 Simple NIC Profile Use Cases ........................................................................ 109
18.1 Discovery of Simple NIC Profile Support ........................................................... 109
18.2 Inventory of NICs in System .......................................................................... 110
18.3 Get the First NIC’s Information ..................................................................... 110
18.4 List all NIC Attributes ................................................................................. 110
18.5 Delete Pending NIC Values ........................................................................... 111
18.6 Discovery of NIC Capabilities ........................................................................ 111
19 Software Update Profile Use Cases ................................................................. 112
19.1 Discovery of Software Update Profile Support .................................................... 112
20 Job Control Profile Use Cases ....................................................................... 113
20.1 Discovery of Job Control Profile Support .......................................................... 113
20.2 List all Jobs in Job Store ............................................................................. 114
20.3 Get a Job’s Information .............................................................................. 114
20.4 Delete all Jobs from Job Store (job queue) using “JID_CLEARALL” ........................... 114
7
Page 8

Lifecycle Controller Integration―Best Practices Specification
20.5
Delete one Job from job store ...................................................................... 115
21 Memory Profile Use Cases ............................................................................ 115
21.1 Discovery of Memory Profile Support ............................................................... 115
21.2 Inventory of Memory in System...................................................................... 116
21.3 Get the first Memory’s Information ................................................................ 117
22 PCI Device Profile Use Cases ......................................................................... 117
22.1 Discovery of PCI Device Profile Support ........................................................... 117
23 Sensors Profile Use Cases ............................................................................ 118
23.1 Discovery of Sensor Profile Support ................................................................ 118
23.2 Inventory of Sensor in System ....................................................................... 119
23.3 Sensor Thresholds ..................................................................................... 119
24 Base Server and Physical Asset Profile Use Cases ................................................ 120
24.1 Discovery of Base Server and Physical Asset Profile Support ................................... 120
24.2 Discovery of Base Server and Physical Asset Profile Support [LC1.5.1] ....................... 121
24.3 List all CIM Profiles .................................................................................... 122
25 Video Profile Use Cases ............................................................................... 122
25.1 Discovery of Video Profile Support ................................................................. 122
25.2 Inventory of Video in System ........................................................................ 123
25.3 Get the first Video Instance’s Information ........................................................ 123
26 License Management Profile Use Cases ............................................................ 124
26.1 Discovery of License Management Profile Support ............................................... 124
27 Power Supply Profile Use Cases ..................................................................... 125
27.1 Discovery of Power Supply Profile Support ........................................................ 125
27.2 Inventory of Power Supply Units (PSUs) in System ............................................... 126
27.3 Get the first PSU’s Information ..................................................................... 126
27.4 Get MAC Information .................................................................................. 126
27.5 Get Blade Power ....................................................................................... 127
28 System Info Profile Use Cases ....................................................................... 127
28.1 Discovery of System Info Profile Support .......................................................... 127
28.2 Inventory of System Info View ....................................................................... 128
28.3 Get the first System info View’s Information ..................................................... 129
28.4 Inventory of all System Attributes in System ..................................................... 129
28.5 Get a Single System String Attribute ............................................................... 130
28.6 Setting and Applying System Attributes ............................................................ 130
28.7 Apply Pending System Attribute Values ............................................................ 131
8
Page 9

Lifecycle Controller Integration―Best Practices Specification
28.8
Delete Pending System Attribute Values........................................................... 131
29 Software Inventory Profile Use Cases .............................................................. 132
29.1 Instance Diagram ...................................................................................... 132
29.2 Discovery of Software Inventory Profile Support ................................................. 132
29.3 Inventory of Software in System .................................................................... 133
29.4 Get the Installed BIOS Firmware Inventory ........................................................ 133
29.5 Get the Available iDRAC Firmware Inventory ..................................................... 134
30 Simple Identity Management Profile Use Cases ................................................... 135
30.1 Discovery of Simple Identity Management Profile Support ..................................... 135
31 LC Management Profile Use Cases .................................................................. 136
31.1 Discovery of LC Management Profile Support ..................................................... 136
31.2 Inventory of LC Management Attributes in system ............................................... 137
31.3 Check and enable (or disable) Collect System Inventory on Restart (CSIOR) ................ 137
31.4 Check Version of Lifecycle Controller (LC) ........................................................ 138
31.5 Get “Part Firmware Update” Attribute ............................................................ 138
31.6 Check vFlash License Enablement .................................................................. 139
31.7 Set Configuration to “Auto Discovery Factory Defaults” ........................................ 139
31.8 Clear Provisioning Server ............................................................................. 140
31.9 Replace Auto Discovery Public Key ................................................................. 140
31.10 Replace auto Discovery Client Certificate, Private key and Password ........................ 141
31.11 Delete auto Discovery Public Key ................................................................... 141
31.12 Delete auto Discovery Client Certificate, Private Key and Password ......................... 141
31.13 Replace iDRAC Web Server Client Certificate and Private Key ................................. 141
31.14 Replace iDRAC Web Server Public Certificate .................................................... 141
31.15 Insert Comment into Lifecycle Log ................................................................. 141
31.16 Export and View the Content of the Lifecycle Log ............................................... 142
31.17 Export and View the Current Hardware Inventory ............................................... 142
31.18 Export and View the Hardware Inventory as Shipped from the Factory ...................... 142
32 OS Deployment Profile Use Cases ................................................................... 143
32.1 Discovery of OS Deployment Profile Support ...................................................... 143
32.2 Unpack and Attach Drivers ........................................................................... 144
32.3 Connect and Attach Network ISO Image ........................................................... 144
32.4 Disconnect and Detach Network ISO Image ....................................................... 144
32.5 Get ISO Image Connection Status ................................................................... 144
32.6 One-time ISO boot Skip ............................................................................... 144
9
Page 10

Lifecycle Controller Integration―Best Practices Specification
32.7
Remote File Share (RFS) Use Cases ................................................................. 145
32.7.1 Connect and Attach Network ISO Image as a USB CD-ROM device via RFS USB end point.
145
32.7.2 Disconnect and detach ISO Image exposed via RFS USB end point ........................ 145
32.7.3 Get RF ISO Image connection Status ........................................................... 145
32.8 Boot to Hard Drive (HD) .............................................................................. 146
33 Appendix ................................................................................................ 147
33.1 PYTHON scripts README .............................................................................. 147
33.1.1 Purpose.............................................................................................. 147
33.1.2 Requirements ...................................................................................... 147
33.1.3 Command line ...................................................................................... 147
33.1.4 Commands .......................................................................................... 148
33.1.5 Settable variables ................................................................................. 150
33.1.6 Internal variables .................................................................................. 151
33.2 System check information ............................................................................ 152
33.2.1 Check System Power State ....................................................................... 152
33.2.2 Check RS status .................................................................................... 152
33.2.3 Check for pending jobs ........................................................................... 152
33.2.4 Check for pending configuration ................................................................ 152
33.2.5 Check CSIOR state ................................................................................. 152
33.3 Inventory information ................................................................................. 152
33.3.1 System inventory .................................................................................. 152
33.3.2 Software inventory ................................................................................ 153
33.3.3 BIOS inventory ..................................................................................... 153
33.3.4 Boot order inventory .............................................................................. 153
33.3.5 NIC inventory ....................................................................................... 153
33.3.6 RAID inventory ..................................................................................... 153
33.4 Poll LC jobs information .............................................................................. 153
33.4.1 Timing considerations ............................................................................ 153
33.4.2 Machine reboot .................................................................................... 153
33.4.3 POST ................................................................................................. 154
33.4.4 SSM ................................................................................................... 154
33.4.5 RSStatus/JobStatus................................................................................ 155
33.4.6 Check refreshed data ............................................................................. 155
33.4.7 CSIOR ................................................................................................ 155
10
Page 11

Lifecycle Controller Integration―Best Practices Specification
33.5
iSCSI boot information ................................................................................ 155
Tables
Table 1. Generational Nomenclature ........................................................................... 15
Figures
Figure 1. Typical Life Cycle of an 11G (LC1.5.0 & LC1.5.1) Configuration Job ........................... 16
Figure 2. Typical Life Cycle of a 12G Configuration Job ..................................................... 17
Figure 3. Compatibility with 11G Workflows ................................................................... 18
Figure 4. Software Inventory: Instance Diagram .............................................................. 132
11
Page 12

Lifecycle Controller Integration―Best Practices Specification
1 Contents
1.1 How to Use this Document
This document contains the detailed steps of common workflows to perform various tasks utilizing
winRM or WSMAN. The PYTHON scripting language was used to provide a software development kit
(SDK) for Lifecycle Controller (LC) API methods. Two primary objectives are addressed: first, that
workflows documentation provides guidance to established, known, working API methodologies, and
second, that corresponding PYTHON sample scripts are separately provided. After invoking these
scripts, the output log can be used to provide approximate timing on a particular system configuration,
as well as raw winRM or WSMAN input and output.
1.2 Using the Sample Scripts
Refer to the appendix for a full text README.
Getting started:
1) Install Python 2.4 to 2.6
2) Download scripts folder to desired location; no installation necessary
Running a script:
1) cd to scripts directory
2) python recite.py (opens command prompt of application)
3) set $IP 12.34.56 (Enter actual IP)
4) log whateverfilename.log w (may use any name for filename)
5) batch bestpracticeflows\script_name.win (launches script)
Note: A .win file is simply a text file containing calls to the recite PYTHON script.
Other commands:
-help (lists all available commands)
-set (list current IP, username, password, etc.)
Notes:
File output will be placed in scripts directory
1.3 Improving winRM Enumeration Performance
When an enumeration command is executed, the default WinRM configuration gets only 20 instances at
a time and therefore slows down the system drastically. Changing the WinRM configuration to allow a
greater number, such as 50, will reduce the time taken by the enumeration operations.
Also see section 3.9 for using CQL filters on enumerations.
Execute the following command to get instances in groups of up to 50.
winrm set winrm/config @{MaxBatchItems="50"}
12
Page 13

Lifecycle Controller Integration―Best Practices Specification
Additionally, increasing the allotted maximum envelope size and timeout can also increase
performance.
winrm set winrm/config @{MaxEnvelopeSizekb="150"}
winrm set winrm/config @{MaxTimeoutms ="60000"}
Other optional WinRM configuration commands are listed below for convenience. To get the current
WinRM configuration settings, execute the following command.
winrm g winrm/config
By default, the client computer requires encrypted network traffic. To allow the client computer to
request unencrypted traffic, execute the following command:
winrm s winrm/config/Client @{AllowUnencrypted="true"}
TrustedHosts is an array that specifies the list of remote computers that are trusted. Other computers
in a workgroup or computers in a different domain should be added to this list.
Note: The computers in the TrustedHosts list are not authenticated.
Execute the following command to allow all computers to be included in TrustedHosts.
winrm s winrm/config/Client @{TrustedHosts="*"}
Basic authentication is a scheme in which the user name and password are sent in clear text to the
server or proxy. This method is the least secure method of authentication. The default is True.
Execute the following command to set client computer to use Basic authentication.
winrm s winrm/config/Client/Auth @{Basic="true"}
1.4 Feature Discovery Procedure
There are four steps recommended to determining the feature set on a given system.
1) Interop namespace – registered profile advertisement
a. winrm enumerate “cimv2/CIM_RegisteredProfile?__cimnamespace=root/interop" -
r:https://IPADDRESS/wsman -u:username -p:password -SkipCNcheck -SkipCAcheck encoding:utf-8 -a:basic -format:pretty
b. The output from above will provide the RegisteredVersion of each supported profile on
the system. The RegisteredVersion field can be used to determine the profile’s feature
set. See Section 1.4 for more information.
2) Capability properties on views (NIC example)
a. winrm enumerate "cimv2/root/dcim/DCIM_NICCapabilities" -
r:https://IPADDRESS/wsman -u:username -p:password -SkipCNcheck -SkipCAcheck encoding:utf-8 -a:basic -format:pretty
b. The output from above will provide the available properties of each view.
3) Capability Attributes (RAID example)
13
Page 14

Lifecycle Controller Integration―Best Practices Specification
a. Enumerate the DCIM_RAIDString, DCIM_RAIDEnumeration, and DCIM_RAIDInteger classes
(DCIM_RAIDString shown below)
winrm enumerate "cimv2/root/dcim/DCIM_RAIDString" -r:https://IPADDRESS/wsman=u:username -p:password -SkipCNcheck -SkipCAcheck -encoding:(utf)-8 -a:basic format:pretty
b. The output from above will provide the available attributes of each class
4) Firmware versioning
a. winrm enumerate "cimv2/root/dcim/DCIM_SoftwareIdentity" -
r:https://IPADDRESS/wsman -u:username -p:password -SkipCNcheck -SkipCAcheck encoding:utf-8 -a:basic -format:pretty
b. The output from above will list all available and installed firmwares and corresponding
firmware versions. Examining the version of these firmwares, such as Lifecycle
controller and iDRAC, can be used to determine the feature set
1.5 Profile Revision Number Explanation
Profile revision numbers are a key metric in determining the available feature set. Examples of
discovering, or obtaining, profiles are covered extensively in this document along with example output.
The example shown below is for the LC Management profile. Discovering a particular profile on a
system is a three step process.
1) Enumerate the DCIM_LCRegisteredProfile class to view all available profiles
2) Search the RegisteredName field for the desired profile
3) Search for the RegisteredVersion field, which is the characteristic used to identify the
supported features.
DCIM_LCRegisteredProfile
AdvertiseTypeDescriptions = WS-Identify
AdvertiseTypeDescriptions = Interop Namespace
AdvertiseTypes = 1
AdvertiseTypes = 1
InstanceID = DCIM:LCManagement:1.1.0
OtherRegisteredOrganization = DCIM
ProfileRequireLicense = Auto Discovery
ProfileRequireLicense = Part Replacement
ProfileRequireLicense = Remote Firmware Configu ration
ProfileRequireLicense = Remote Inventory Export
ProfileRequireLicense = Server Profile Export and Import
ProfileRequireLicenseStatus = LICENSED
ProfileRequireLicenseStatus = LICENSED
ProfileRequireLicenseStatus = LICENSED
ProfileRequireLicenseStatus = LICENSED
ProfileRequireLicenseStatus = LICENSED
RegisteredName = LC Management
RegisteredOrganization = 1
RegisteredVersion = 1.4.0
The RegisteredVersion field is in the following format:
14
Page 15

Lifecycle Controller Integration―Best Practices Specification
[major change] . [minor change] . [errata]
Increments in the major change field indicate that the profile is not backward
compatible.
Increments in the minor change field indicate that one or more new methods
have been added.
Increments in the errata field indicate that one more defects have been fixed.
1.6 Lifecycle Controller and Lifecycle Controller 2
Nomenclature
This section describes the new terminology associated with the new generation of hardware and
Lifecycle Controller firmware (including iDRAC). The new hardware platform is generically referred to
as 12G and all corresponding Lifecycle Controller firmware will be LC2 with accompanying sub releases
(i.e. 1.0.0, 1.1.0, etc.). The table below summarizes both the past and current generational
nomenclature.
NOTE: Data within table is for illustration purposes only.
Table 1. Generational Nomenclature
Hardware LifecycleControllerFirmware
11G LC1.5.0
11G LC1.5.1
11G LC1.5.2
11G LC1.x.x
12G LC21.0.0
12G LC21.0.1
12G LC21.1.0
12G LC21.1.1
12G LC21.x.x
Changes in the Lifecycle Controller firmware versions abide by the following definition:
[major change] . [minor change] . [errata]
Increments in the major change field indicate that the profile is not backward
compatible.
Increments in the minor change field indicate that one or more new methods
have been added.
Increments in the errata field indicate that one more defects have been fixed.
1.7 System status and Configuration Job Behavior
The details below describe the generational evolution of how a typical configuration job relates to the
state of the system.
15
Page 16
Lifecycle Controller Integration―Best Practices Specification
1.7.1 RS Status and job status
The details below describe how the remote service (RS) status relates to the job status. RS status is a
feature that indicates whether the system is ready to invoke WSMAN commands. It must be in a ready
state before executing any WSMAN commands.
NOTE: The RS Status method was introduced in LC1.5.0.
Figure 1. Typical Life Cycle of an 11G (LC1.5.0 & LC1.5.1) Configuration Job
16
Page 17

Lifecycle Controller Integration―Best Practices Specification
After the job is complete in Automated Task Application (previously SSM), the job status is immediately
updated in the job store. The job is moved immediately to the Completed state once it is complete in
the Automated Task Application. As seen in the timeline diagram above, after the job is Completed,
the sync happens in the configDB, and then the RS status goes to Reloading state. After all the required
populators are refreshed successfully, the RS status goes to Ready state. The user/console can see the
new values only when the RS status goes to the Ready state.
1.7.2 GetRemoteServicesAPIStatus and job status
The introduction of the new GetRemoteServicesAPIStatus method alleviates the ambiguity of the
GetRSStatus method regarding when the system is ready.
Figure 2. Typical Life Cycle of a 12G Configuration Job
Note: Dotted lines denote the old behavior. Bold red lines denote the new behavior in 12G.
After the job is complete in the Automated Task Application, those jobs that require a refresh – jobs
that have message IDs –JOB_SUCCESS and JOB_COMPLETED_ERROR will be kept in RUNNING state till
the new sync comes in and the Data Manager is moved to READY state.
Jobs that don’t require a refresh will be moved to complete immediately once the job is complete in
the Automated Task Application.
17
Page 18

Lifecycle Controller Integration―Best Practices Specification
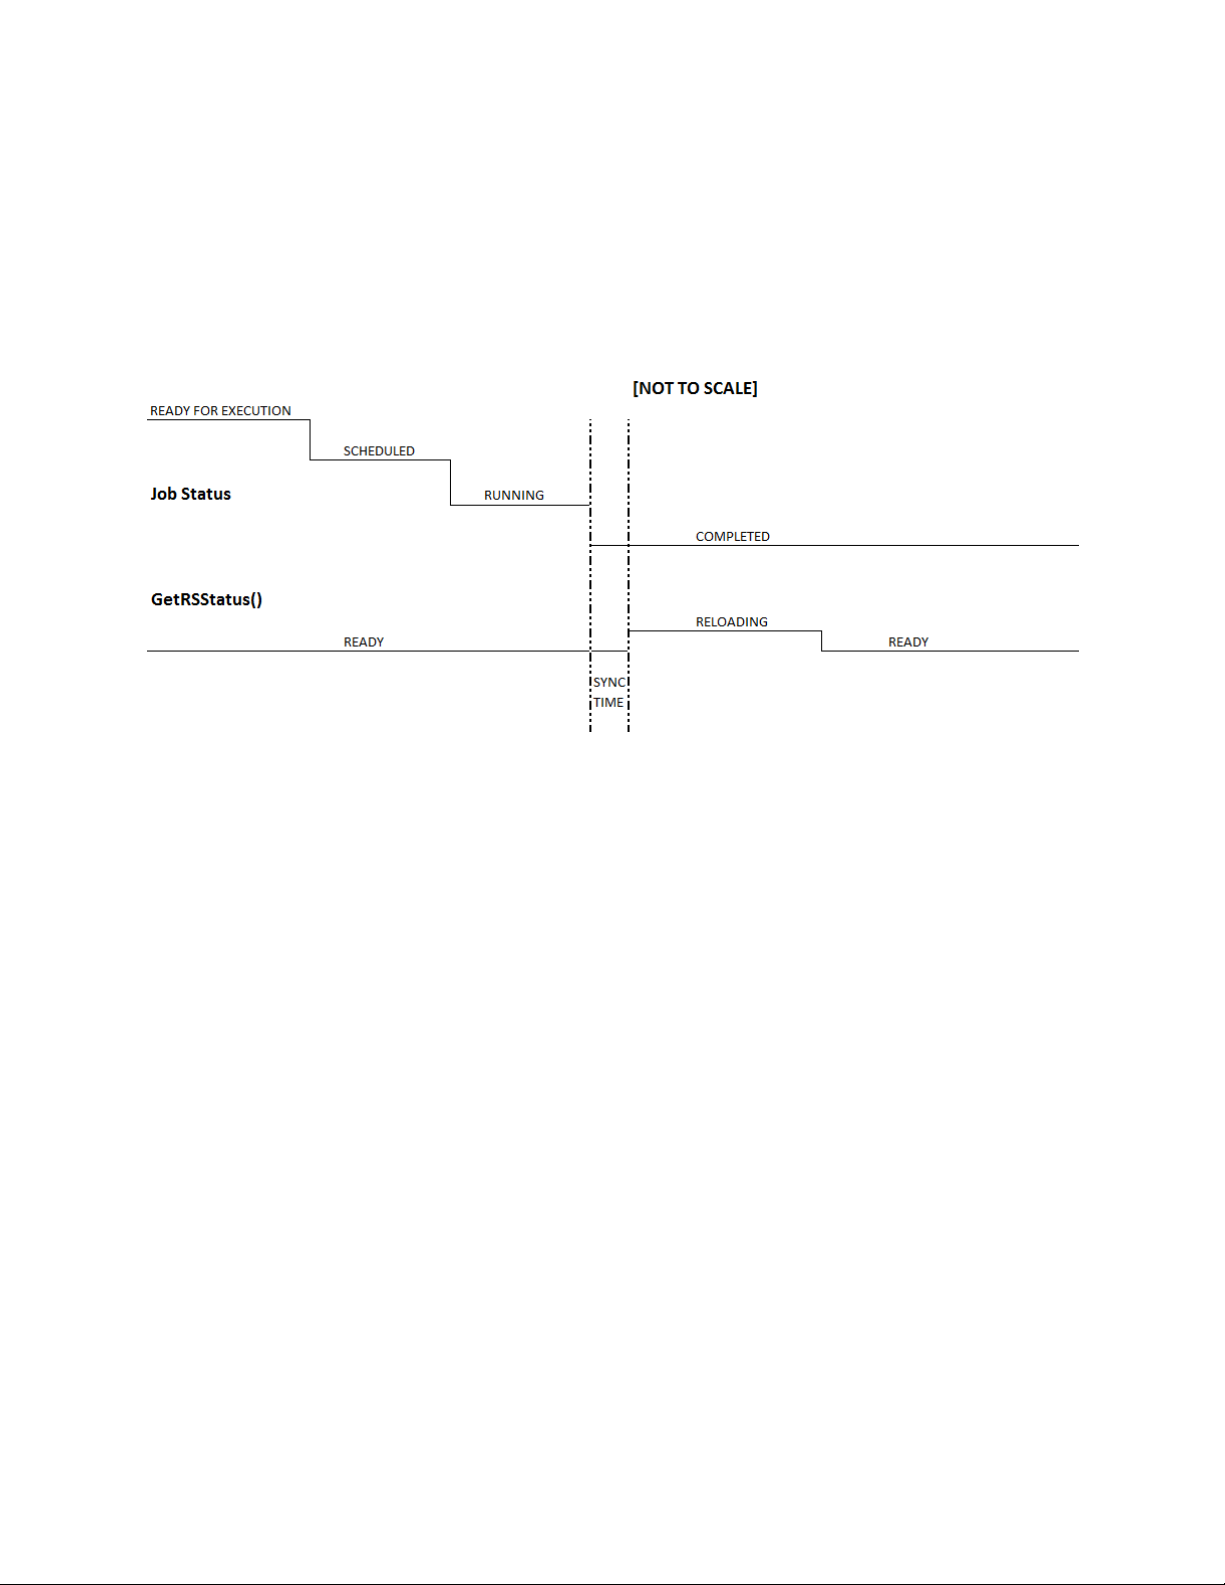
1.7.3 11G and 12G compatibility
Figure 3. Compatibility with 11G Workflows
[NOTTOSCALE]
READYFOREXECUTION
SCHEDULED
JobStatus
RUNNING
COMPLETED
GetRSStatus()
RELOADING
READY READY
SYNC
TIME
GetRemoteServicesAPIStatus()
Lif ecycleController Lif ecycl eControlle r
RemoteServi cesisnot
ready. RemoteServicesis re ady.
NOTE: Dotted lines denote the old behavior. Bold red line denotes the new behavior in 12G.
The existing 11G workflows expect the RS status to be in RELOADING state once the job is marked
COMPLETED. So to maintain the compatibility with the 11G workflows, the RS status is artificially held
in the RELOADING state for 90 seconds even though it is actually READY. This time limit was provided
by the console team.
18
Page 19

Lifecycle Controller Integration―Best Practices Specification
1.7.4 GetRemoteServicesAPIStatus output descriptions
Output
parameter
Possiblevalues Description
Name
Status
MessageID
Message
ServerStatus
LCStatus
0
(Ready)
1
(NotReady)
LC060
LC061
LifecycleControllerRemoteServices
isnot ready.
LifecycleControllerRemoteServices
isready.
0
(Power edoff)
1
(InPOST)
2
(OutofPOST)
3
(CollectingSystemInventory)
4
(AutomatedTaskExecution)
5
(LifecycleCon trol lerUnifiedServer
Configurator)
(Ready)
0
1
(NotInitialized)
2
(Reloadi ngDa ta)
3
(Disabled)
4
(InRecovery)
5
(InUs e)
LifecycleControllerRemoteServicesisready to
acceptanywebservicesrequest.
LifecycleControllerRemoteServicesiscurrentlynot
readytoacceptwebservices request.This couldbe
becausethe instrumentation iniDRACmightbe
reloading/not_readyorserverisinPOSTor
performings cheduledprovisioningrequestsor
LifecycleControllerUnifiedServerC onfiguratorisin
use.
Message
forIDLC060
MessageforIDLC061
Serveris poweredoff
Serveris performing normalPOSToperation
Serveris outofPOST
Serveris currentlyexecutingUEFICollectSystem
InventoryOnRestartapplication
Serveris currentlyexecutingscheduledjobsus ing
UEFIAutomatedTaskapplication
Serveris executingUEFILifecycleControllerUnified
ServerConfiguratorapplication
LifecycleControllerinstrumentationisuptodate
andenabled
LifecycleControllerinstrumentationisnot
initialized.Theinitializationoperationma ytakeup
toaminute.
LifecycleControllerinstrumentationiscurrently
refres hingitscachebecause ofarecent
configurationchange.Thereloadingoperation
typicallytakesfews econds andcouldtakeupto
fewminutes tocomplete.
LifecycleControllerisdisabledontheserver.
LifecycleControllercanbeenabledthruRemote
ServicesorF2iDRACconfiguration.
LifecycleControllerisinRecoverymode.Referto
iDRACusersguideoninstructionsonhowto repair
LifecycleController.
LifecycleControllerisbeing currentlyusedby
anotherprocess.
19
Page 20

Lifecycle Controller Integration―Best Practices Specification
1.8 Reference Links
Web Services Interface Guide for Windows & linux
http://www.delltechcenter.com/page/Lifecycle+Controller
Profiles
http://en.community.dell.com/techcenter/systems-management/w/wiki/1906.aspx
PCI ID reference list
http://pciids.sourceforge.net/pci.ids
Installation and Configuration for Windows Remote Management
http://msdn.microsoft.com/en-us/library/windows/desktop/aa384372(v=vs.85).aspx
20
Page 21

Lifecycle Controller Integration―Best Practices Specification
2 Terms and Definitions
2.1
LC
Lifecycle Controller
2.2
ENUMERATE
Refers to WS-MAN ENUMERATE operation as described in Section 8.2 of DSP0226_V1.1
and Section 9.1 of DSP0227_V1.0
2.3
GET
Refers to WS-MAN GET operation as defined in Section 7.3 of DSP00226_V1.1 and
Section 7.1 of DSP0227_V1.0
2.4
iDRAC
integrated Dell Remote Access Controller – management controller for blades and
monolithic servers
2.5
USC
Unified Server Configurator
2.6
iSCSi
Internet Small Computer System Interface, an Internet Protocol (IP)-based storage
networking standard for linking data storage facilities.
2.7
SSM
System Services Manager
2.8
CSIOR
Collect System Inventory on Restart
2.9
SSIB
System Services Information Block
2.10
2.11
2.12
2.13
2.14
2.15
UEFI
Unified Extensible Firmware Interface
BIOS
Basic Input / Output System
NIC
Network Interface Controller
FQDD
Fully Qualified Device Description
LCL
Lifecycle Log
WSIG
Web Services Interface Guide
21
Page 22

Lifecycle Controller Integration―Best Practices Specification
3 Anomalous Algorithms and Descriptions
3.1 Setting CNA Bandwidth
The recommended algorithm is to schedule jobs such that MinBandwidths are first reduced, and then
increased. Essentially, delta values need to be sorted, and jobs scheduled in that order.
Consider the following example:
Current: 25, 25, 25, 25
Target: 30, 30, 20, 20
Since 20, 20 are both reducing values from 25, they should be scheduled first. This makes space for
increasing the other values. Next, values being increased can be scheduled – 30, 30.
A more complex example:
FQDD: 1, 2, 3, 4
Current: 5, 5, 50, 40
Target: 40, 50, 5, 5
Deltas: -35, -45, 45, 35
Order of job FQDDs: 3, 4, 1, 2
MinBandwidth limitations are documented in the Simple NIC Profile in section 6.7.
http://attachments.wetpaintserv.us/chcAMan6fnC1y8Z8qYSnag350700
3.2 iDRAC Cloning
Blade cloning consists of a pull, enumerating attributes, and a push, applying attributes. The pull
command is a basic enumeration command using the DCIM_iDRACCardAttribute class.
Applies to: LC2+
Script: iDRACClonePull.win
A) The remote service must be in a “ready” state before executing any other WSMAN
commands. The GetRSStatus() method or the GetRemoteServicesAPIStatus() method may
be used depending on the version of the LC Management registered profile.
B) ENUMERATE the DCIM_iDRACCardAttribute class (same as DCIM_iDRACCardEnumeration
class) and store the results to be pushed. See section 2.2 for a definition of ENUMERATE .
The blade cloning push requires an extended WSMAN timeout of 120 seconds, versus the default of 60
seconds. This is needed because of the numerous amounts of attributes that need to be applied.
Below are Windows (winRM) and Linux (wsman) examples that apply all the iDRAC attributes. Replace
[IP_ADDRESS], [USER_NAME], and [PASS_WORD] with the actual IP address, username, and password.
winRM format:
22
Page 23

Lifecycle Controller Integration―Best Practices Specification
winrm i ApplyAttributes http://schemas.dmtf.org/wbem/wscim/1/cim-
schema/2/root/dcim/DCIM_iDRACCardService?SystemCreationClassName=DCIM_C
omputerSystem+CreationClassName=DCIM_iDRACCardService+SystemName=DCIM:C
omputerSystem+Name=DCIM:iDRACCardService -u: [USER_NAME] -p:[PASSWORD]
-r:https://[IP_ADDRESS]/wsman -SkipCNcheck -SkipCAcheck -encoding:utf-8
-a:basic -timeout:120000 -file:iDRAC.Embedded.1_setatts.xml
WSMAN format:
wsman invoke -a ApplyAttributes -h [IP_ADDRESS] -P 443 -u [USER_NAME]
-p [PASSWORD] -N root/dcim -c /gr2host.cert -y basic
http://schemas.dmtf.org/wbem/wscim/1/cimschema/2/root/dcim/DCIM_iDRACCardService?SystemCreationClassName="DCIM_
ComputerSystem",SystemName="DCIM:ComputerSystem",CreationClassName="DCI
M_iDRACCardService",Name="DCIM:iDRACCardService" -t 120000 -J
iDRAC.Embedded.1_setatts.xml
Partial Example of iDRAC.Embedded.1_setatts.xml
<p:ApplyAttributes_INPUT
xmlns:p="http://schemas.dmtf.org/wbem/wscim/1/cim-
schema/2/root/dcim/DCIM_iDRACCardService">
<p:Target>iDRAC.Embedded.1</p:Target>
<p:AttributeName>Info.1#Product</p:AttributeName>
<p:AttributeName>Info.1#Version</p:AttributeName>
...
<p:AttributeValue>Integrated Dell Remote Access
Controller</p:AttributeValue>
<p:AttributeValue>1.0.0</p:AttributeValue>
</p:ApplyAttributes_INPUT>
3.3 Setting NIC String Attributes to Blank
An issue exists when setting NIC String parameters, such as IscsiInitiatorName, using the NIC menu
(usually entered via ctrl-s) from a non-blank value to a blank value.
As a result, when the NIC is used for operations that utilize this parameter, such as iscsi boot, the
operation will be unsuccessful because it will use the old value instead of the one displayed through
WSMAN.
The work around for this scenario is to not set any NIC String parameters to a blank value.
3.4 Determine NIC Card
There are two different ways to determine the model/type of a NIC card:
23
Page 24

Lifecycle Controller Integration―Best Practices Specification
1)
ENUMERATE the DCIM_NICView class and note the PCID, then look up in PCID table
http://pciids.sourceforge.net/pci.ids
2) ENUMERATE the DCIM_NICString class and search for attribute ChipMdl. The
CurrentValue parameter will contain the NIC card model number.
DCIM_NICString
AttributeName = ChipMdl
CurrentValue = BCM5716 C0
DefaultValue
FQDD = NIC.Embedded.2-1
InstanceID = NIC.Embedded.2-1:ChipMdl
IsReadOnly = true
MaxLength = 0
MinLength = 0
PendingValue
3.5 List of Partitionable NIC Cards for LC2
The following is a list of partitionable NICs supported by LC2.
Broadcom
57810 bNDC – JVFVR
57810 SFP+ NIC – N20KJ
57810 Base-T NIC – W1GCR
57810 Mezz – 55GHP
57800 rNDC – MT09V
QLogic
QMD8262 bNDC – D90TX
QLE8262 NIC – JHD51
QME8262 Mezz – 9Y65N
3.6 iDRAC Telnet Attribute Enables SerialRedirection
The following behavior describes a situation where setting certain iDRAC attribute(s) causes another
iDRAC attribute to automatically and simultaneously change.
Setting any of the following Telnet attributes causes the SerialRedirection attribute to become
Enabled.
Port [ InstanceID = iDRAC.Embedded.1#Telnet.1#Port ]
Enable [ InstanceID = iDRAC.Embedded.1#Telnet.1#Enable ]
Timeout [ InstanceID = iDRAC.Embedded.1#Telnet.1#Timeout ]
24
Page 25

Lifecycle Controller Integration―Best Practices Specification
Recommendation:
Change the Telnet attributes prior to setting the SerialRedirection.Enable attribute. Or, if using
input XML, have the Telnet attributes before the SerialRedirection.Enable attribute.
3.7 Never Unplug Hardware During Updates
Users should not unplug any hardware during critical remote enablement (RE) updates. This may result
in unexpected behaviors.
As an example, unplugging a USB key during critical updates may cause a Red Screen of Death (RSOD).
3.8 Express Versus Enterprise iDRACs
There are four levels of iDRAC licensing as follows:
1) Basic
2) Express (Monolithic)
3) Express for blades(Modular)
4) Enterprise
One method of determining the level on a system is to perform an enumeration of the
DCIM_iDRACCardView class. Example results are shown for reference.
Monolithic:
DCIM_iDRACCardView
FQDD = iDRAC.Embedded.1-1
FirmwareVersion = 1.00.00
GUID = 3132334f-c0b7-3480-3510-00364c4c454
IPMIVersion = 2.0
InstanceID = iDRAC.Embedded.1-1#IDRACinfo
LANEnabledState = 1
LastSystemInventoryTime = 20120302092309.000000+000
LastUpdateTime = 20120305233206.000000+000
Model = Enterprise
PermanentMACAddress = 78:2b:cb:54:54:11
ProductDescription = This system component provides a complete set of remote management
functions
for Dell PowerEdge servers
SOLEnabledState = 1
Modular:
DCIM_iDRACCardView
FQDD = iDRAC.Embedded.1-1
25
Page 26

Lifecycle Controller Integration―Best Practices Specification
FirmwareVersion = 1.00.00
GUID = 3132334f-c0b7-3480-3510-00364c4c454
IPMIVersion = 2.0
InstanceID = iDRAC.Embedded.1-1#IDRACinfo
LANEnabledState = 1
LastSystemInventoryTime = 20120121022852.000000+000
LastUpdateTime = 20120124015120.000000+000
Model = Express for Blades
PermanentMACAddress = d0:67:e5:f4:2f:97
ProductDescription = This system component provides a complete set of remote management
functions for Dell PowerEdge servers
SOLEnabledState = 1
3.9 CIM Query Language (CQL) Filters
The CIM Query Language (CQL) is a query language for the Common Information Model (CIM) standard
from the Distributed Management Task Force (DMTF). It was designed to perform queries against the
CIM objects in a database.
3.9.1 CQL filter benefits
The two most distinct advantages of using CQL filters when performing enumerations are:
The response time of enumerations will be accelerated as only the desired data is returned,
not the full data set.
The workload on the network will be decreased as less bandwidth will be consumed per
enumeration as the amount of data being returned is less. This is more applicable to networks
that may have many systems that performing enumerations at or about the same time.
3.9.2 How to perform CQL enumerations using RECITE
Section 1.2 describes how to setup and run scripts using the RECITE PYTHON environment. Running
CQL filters requires running the CQL command directly from the RECITE command line. No scripts exist
because of the infinite number of use cases.
3.9.3 CQL filter example that enumerates all NIC attributes for a particular
port/partition
26
Page 27

Lifecycle Controller Integration―Best Practices Specification
The FQDD in the example below will be unique to a particular user’s system. The NIC FQDDs of the
system can be obtained by running the GetNICViews() command from the RECITE command line.
GetNICAttributes‐cql="select*fromDCIM_NICAttributewhere
FQDD='NIC.Integrated.1‐1‐1'"
3.9.4 CQL filter example that enumerates all iDRAC attributes with a
particular GroupDisplayName and AttributeName
The GroupDisplayName and the AttributeName in the example below will be unique to a particular
user’s system.
GetiDRACCardAttributes‐cql="select*fromDCIM_iDRACCardAttributewhere
GroupDisplayName='iDRACUsers'andAttributeName='UserName'"
3.9.5 CQL filter example that enumerates all BIOS attributes where the
IsReadOnly flag is set to TRUE
The expression below return attributes that have the IsReadOnly=TRUE flag set as the CurrentValue.
GetBIOSEnumerations‐cql="selectCurrentValuefromDCIM_BIOSEnumerationwhere
IsReadOnly=TRUE"
3.10 Ordering of iDRAC Attributes to set or apply (11Generation
vs 12Generation)
Users need to correctly set the order in which iDRAC, System, and LC attributes are applied. Incorrect
ordering of attributes may result in an error, if dependencies are violated. The DisplayOrder field of
each attribute along with the applicable references in profiles, provide direction as to the appropriate
ordering.
An example would be to create an iDRAC user account. On 11G systems, the iDRAC would
automatically re-order the the attributes before setting/applying them to create and enable a user
account. However, due to the expansion of attributes in 12G systems as well as to avoid the
anticipating the user’s intent, re-ordering of attributes was removed.
The correct order for setting iDRAC attributes when enabling a user account on both 11G and 12G is as
follows:
27
Page 28

Lifecycle Controller Integration―Best Practices Specification
1. Username
2. Password
3. <other attributes>
This ordering is applicable to both ApplyAttributes() and SetAttributes() iDRAC methods. Use the
reverse order when clearing/disabling the account.
3.11 How to Determine if Server is 11Generation vs
12Generation
In order to determine if a server is 11G or 12G irrespective of the license present on the server, the
recommendation is to look at “LifecycleControllerVersion” property from DCIM_SystemView. If this
property is not shown or the value is 1.x.y then it is 11G system. If the value is 2.x.y then it is 12G.
Section 31.4 of this document describes the workflow for enumerating the DCIM_SystemView class.
3.12 Using Special Characters in Usernames
For 11G systems, usernames may not contain the characters: <, >, ‘, /.
For 12G systems, usernames may not contain the characters: /,\, @, ., !.
When an iDRAC user has angle brackets for the username or password, they must use double quotes
around the brackets when trying to execute any WSMAN commands.
3.13 Obtaining Updated System Inventory
Use the following procedure below to refresh stale inventory or to ensure the inventory has the
most up to date information. Collect System Inventory on Restart (CSIOR) is the mechanism which
checks and updates the inventory. CSIOR is run, when enabled, during the boot process.
Applies to: LC1.3.0+
A) [LC1.5.0+] The Lifecycle Controller remote service must be in a “ready” state before
executing any other WSMAN commands. The GetRSStatus() method or the
GetRemoteServicesAPIStatus() method may be used depending on the version of the LC
Management registered profile.
B) Ensure CSIOR attribute is enabled
See Section 31.3 to Check and enable Collect System Inventory on Restart (CSIOR)
28
Page 29

Lifecycle Controller Integration―Best Practices Specification
C) Power on or reboot system
NOTE: If an operating system has been installed, the system will boot into it. It
may be desired to wait until the OS boot is complete before performing a graceful
shutdown.
D) [LC1.5.0+] The Lifecycle Controller remote service must be in a “ready” state before
executing any other WSMAN commands. The GetRSStatus() method or the
GetRemoteServicesAPIStatus() method may be used depending on the version of the LC
Management registered profile.
When the system is ready, the inventory is updated
29
Page 30

Lifecycle Controller Integration―Best Practices Specification
3.14 How to Determine if the System is Blade, Tower, or Rack
Dell has been officially using “M”, “T” and “R” letters in the Model name to distinguish between
“Modular”, “Tower” and “Rack” server respectively for the past couple of generations.
Getting the SystemGeneration attribute can be achieved by viewing the SystemView class. Section
31.4 of this document describes the workflow for enumerating the DCIM_SystemView class.
Examples below:
11G Blades: M610, M710, M910
12G Blades: M420, M520, M820
11G Towers: T310, T410, T610
12G Towers: T320, T420, T620
11G Racks: R310, R410, R610
12G Racks: R320, R520, R820
3.15 Getting the SystemID, Model, and more
Section 31.4 of this document describes the workflow for enumerating the DCIM_SystemView class.
Example data returned is shown below.
DCIM_SystemView
AssetTag = tag
BIOSReleaseDate = 08/20/2012
BIOSVersionString = 1.3.5
BaseBoardChassisSlot = NA
BatteryRollupStatus = 1
BladeGeometry = 4
BoardPartNumber = 0N051FX02
BoardSerialNumber = CN1374092O003M
CMCIP
CPLDVersion = 0.4.7
CPURollupStatus = 1
ChassisName = Main System Chassis
ChassisServiceTag = S78FGH5
ChassisSystemHeight = 1
ExpressServiceCode = 61387326761
FQDD = System.Embedded.1
FanRollupStatus = 3
HostName
InstanceID = System.Embedded.1
LastSystemInventoryTime = 20130206014757.000000+000
30
Page 31

Lifecycle Controller Integration―Best Practices Specification
LastUpdateTime = 20130206004538.000000+000
LicensingRollupStatus = 1
LifecycleControllerVersion = 2.1.0
Manufacturer = Dell Inc.
MaxCPUSockets = 2
MaxDIMMSlots = 24
MaxPCIeSlots = 3
MemoryOperationMode = MirrorMode
Model = PowerEdge R620
PSRollupStatus = 1
PlatformGUID = 3548474f-c0d3-4680-3810-00374c4c4544
PopulatedCPUSockets = 1
PopulatedDIMMSlots = 2
PopulatedPCIeSlots = 0
PowerCap = 340
PowerCapEnabledState = 3
PowerState = 2
PrimaryStatus = 3
RollupStatus = 3
ServerAllocation
ServiceTag = S78FGH5
StorageRollupStatus = 1
SysMemErrorMethodology = 6
SysMemFailOverState = NotInUse
SysMemLocation = 3
SysMemMaxCapacitySize = 786432
SysMemPrimaryStatus = 1
SysMemTotalSize = 2048
SystemGeneration = 12G Monolithic
SystemID = 1230
SystemRevision = 0
TempRollupStatus = 1
UUID = 4c4c4544-0037-3810-8046-d3c04f474835
VoltRollupStatus = 1
smbiosGUID = 44454c4c-3700-1038-8046-d3c04f474835
3.16 Http, CIFS, NFS, tftp, ftp Formatting
Various protocols are required for methods accessing and/or writing to network shares. The format for
these protocols are summarized below.
HTTP Format:
http://[IP ADDRESS]/[PATH TO FILE.exe]
CIFS or NFS Format:
cifs://[WORKGROUP_NAME]\[USERNAME]:[PASSWORD]@[URI-IP-ADDRESS]/
[FILE.exe];mountpoint=[DIRECTORYNAME]
TFTP or FTP Format:
31
Page 32

Lifecycle Controller Integration―Best Practices Specification
tftp://[IP ADDRESS]/[PATH TO FILE.exe]
ftp://[IP ADDRESS]/[PATH TO FILE.exe]
4 Workflows
The Best Practice Guide provides the detailed step-by-step Lifecycle Controller WSMAN API interactions
and algorithmic descriptions needed to implement various system management workflows.
4.1 RAID stacking: ResetConfig, CreateVD, assign HotSpares
This workflow stacks multiple RAID operations together and is applied immediately using the
TIME_NOW parameter, which requires one reboot operation. The workflow deletes existing
virtual disks and unassigns all hotspares before creating a single virtual disk, a dedicated
hotspare, and a global hotspare. Following completion of the reboot, the new virtual disk and
hotspare results will be verified. Approximate time for completion on a 12G system is 15
minutes.
Applies to: LC1.5.1+
Prerequisites for script:
Set FQDD of desired RAID controller by editing the following script
Applicable RAID controller and hard drives
Script: RAIDstacking_TIME_NOW.win
A) The Lifecycle Controller remote service must be in a “ready” state before executing any
other WSMAN commands. The GetRSStatus() method or the GetRemoteServicesAPIStatus()
method may be used depending on the version of the LC Management registered profile.
B) [LC1.5.1 only] Disable CSIOR (Collect System Inventory on Restart).
NOTE: On 11G systems, CSIOR must be disabled to circumvent a sync behavior that prohibits
successful RAID stacking.
a. SetLCAttribute(): Sets attribute to be configured [ReturnValue=0]
b. CreateConfigJob(): Creates jobID and applies configuration [ReturnValue=4096]
C) ENUMERATE the DCIM_ControllerView class to find RAID controller’s instanceID & FQDD
(They are often identical.) See section 2.2 for a definition of
a. Integrated RAID card example is ”RAID.Integrated.1-1”
ENUMERATE .
b. External RAID card example is ”RAID.Slot.1-1”
D) ResetConfig(): Delete all virtual disks and unassign all HotSpare physical disks.
[ReturnValue=0]
E) CreateVirtualDisk(): RAID 1 on physical disk 0 & 1, for example. [ReturnValue=0].
32
Page 33

Lifecycle Controller Integration―Best Practices Specification
F) AssignSpare(): Create dedicated hotspare using Create VD instanceID [ReturnValue=0].
G) AssignSpare(): Create global hotspare [ReturnValue=0].
H) CreateRAIDConfigJob(): Apply steps D) – F) [ReturnValue=4096].
I) Poll jobstatus for Completed: GET the InstanceID of from H). See section 2.3 for a
definition of
GET.
J) The Lifecycle Controller remote service must be in a “ready” state before executing any
other WSMAN commands. The GetRSStatus() method or the GetRemoteServicesAPIStatus()
method may be used depending on the version of the LC Management registered profile.
The GetRSStatus() method must first poll for ‘reloading’ then poll for ‘ready’, while
the GetRemoteServicesAPIStatus() can just poll for ‘ready.’
K) ENUMERATE the DCIM_VirtualDiskView class to ensure successful virtual disk creation.
See section 2.2 for a definition of
a. RAIDTypes parameter will be 4, for a RAID 1 configuration
b. PhysicalDiskIDS parameter will list physical disks used
ENUMERATE .
L) ENUMERATE the DCIM_PhysicalDiskView class to ensure successful hotspare assignments.
See section 2.2 for a definition of
ENUMERATE .
a. HotSpareStatus parameter of 2, indicates global hotspare
b. HotSpareStatus parameter of 1, indicates dedicated hotspare
NOTE: H200 controller is unique in that it always returns 2 for both dedicated and
global hotspares
4.2 RAID Stacking with BIOS Attributes Using Setupjobqueue
This workflow stacks multiple RAID operations together along with some BIOS attributes, which
requires one reboot operation using setupjobqueue. The workflow deletes existing virtual
disks, and unassigns all hotspares before creating a single virtual disk and a dedicated
hotspare. Multiple EmbNIC BIOS attributes are also set to Enabled. Following completion of the
reboot, the new virtual disk, hotspare, and BIOS attributes results will be verified.
Approximate time for completion on a 12G system is 15 minutes.
Applies to: LC1.5.1+
Prerequisites for script:
Set FQDD of desired RAID controller by editing the following script
Applicable RAID controller and hard drives
Script: RAIDstacking_BIOS_setupjobqueue.win
A) The Lifecycle Controller remote service must be in a “ready” state before executing any
other WSMAN commands. The GetRSStatus() method or the GetRemoteServicesAPIStatus()
method may be used depending on the version of the LC Management registered profile.
33
Page 34

Lifecycle Controller Integration―Best Practices Specification
B) [LC1.5.1 only] Disable CSIOR (Collect System Inventory on Restart).
NOTE: On 11G systems, CSIOR must be disabled to circumvent a sync behavior that
prohibits successful RAID stacking.
a. SetAttribute(): Sets attribute to be configured [ReturnValue=0]
b. CreateConfigJob(): Creates jobID and applies configuration [ReturnValue=4096]
C) ENUMERATE the DCIM_ControllerView class to find RAID controller’s instanceID & FQDD
(they are often identical.) See Section 2.2 for a definition of
a. Integrated RAID card example is ”RAID.Integrated.1-1”
b. External RAID card example is ”RAID.Slot.1-1”
D) ResetConfig(): Delete all virtual disks and unassign all HotSpare physical disks.
[ReturnValue=0].
E) CreateVirtualDisk(): RAID 1 on physical disk 0 & 1, for example. [ReturnValue=0].
F) AssignSpare(): Create dedicated hotspare using Create VD instanceID [ReturnValue=0].
G) CreateRAIDConfigJob(): Apply steps D) – F) without reboot type, without UntilTime, and
without ScheduledStartTime parameter TIME_NOW. [ReturnValue=4096].
ENUMERATE .
H) SetAttribute(): Set BIOS attribute EmbNic1Nic2 to Enabled [ReturnValue=0]
I) CreateBIOSConfigJob(): Apply step H) without reboot type, without UntilTime, and
without ScheduledStartTime parameter TIME_NOW. [ReturnValue=4096]
J) CreateRebootJob(): Pass RebootJobType of 3 parameter
1 = PowerCycle
2 = Graceful reboot without forced shutdown
3 = Graceful reboot with forced shutdown
K) SetupJobQueue(): Use RAID JID(G), BIOS JID(J), and reboot RID(K) [ReturnValue=0]
L) Poll jobstatus for Completed: GET the InstanceID of from G) or J). See section 2.3 for a
definition of
GET.
M) The Lifecycle Controller remote service must be in a “ready” state before executing any
other WSMAN commands. The GetRSStatus() method or the GetRemoteServicesAPIStatus()
method may be used depending on the version of the LC Management registered profile.
The GetRSStatus() method must first poll for ‘reloading’ then poll for ‘ready’, while
the GetRemoteServicesAPIStatus() can just poll for ‘ready.’
N) ENUMERATE the DCIM_VirtualDiskView class to ensure successful virtual disk creation.
See section 2.2 for a definition of
a. RAIDTypes parameter will be 4, for a RAID 1 configuration
ENUMERATE .
b. PhysicalDiskIDS parameter will list physical disks used
O) ENUMERATE the DCIM_PhysicalDiskView class to ensure successful hotspare assignments.
See section 2.2 for a definition of
ENUMERATE .
34
Page 35

Lifecycle Controller Integration―Best Practices Specification
a. HotSpareStatus parameter of 2, indicates global hotspare
b. HotSpareStatus parameter of 1, indicates dedicated hotspare
NOTE: H200 controller is unique in that it always returns 2 for both dedicated and
global hotspares
P) ENUMERATE the DCIM_BIOSEnumeration class to ensure BIOS settings were correctly set.
See section 2.2 for a definition of
ENUMERATE .
4.3 Boot to Network ISO
This workflow boots the host system from an image on a network share. The workflow first
removes any existing driver packs or existing attached OS, then gets available OS drivers,
unpacks the desired set of drivers, and boots from an image on a network share. Approximate
time for completion on a 12G system is 20-40 minutes depending on the size of the driver pack
that will be unpacked and the speed of the network to boot image.
Applies to: LC1.3.0+
Prerequisites for script:
Place applicable ISO image in applicable network share
Set script variables by editing script
Script: BootToNetworkISO.win
A) The Lifecycle Controller remote service must be in a “ready” state before executing any
other WSMAN commands. The GetRSStatus() method or the GetRemoteServicesAPIStatus()
method may be used depending on the version of the LC Management registered profile.
NOTE: GetRemoteServicesAPIStatus() will return “not ready” if drivers or an ISO is already
attached.
B) DetachDrivers(): Ensures any drivers are detached.
C) DetachISOImage(): Ensures all images are detached.
D) GetDriverPackInfo(): Displays available OS drivers. This is only required for end to end OS
deployment.
E) UnpackAndAttach(): Unpacks and attaches desired driver pack. The resulting concrete job
is invoked immediately. This is only required for end to end OS deployment.
F) Poll concrete job until ‘Success’.
G) BootToNetworkISO(): The resulting concrete job is invoked immediately.
H) Poll concrete job until ‘Success’.
NOTE: OS is still booting at this point, so sleep to allow completion. Steps I) through J)
are providing when the BootToNetwork image is no longer desired.
I) DetachDrivers(): [ReturnValue=0].
J) DetachISOImage(): [ReturnValue=0].
35
Page 36

Lifecycle Controller Integration―Best Practices Specification
K) RequestMonoSystemStateChange(): [ReturnValue=0].
NOTE: Modular systems (i.e. M610, M710, etc.) use RequestModSystemStateChange().
4.4 Boot to ISO from vFlash
This workflow boots the host system from an ISO image located on the vFlash. The workflow
first removes any existing driver packs or existing attached OS, then gets available OS drivers,
unpacks the desired set of drivers, and boots from an image on the vFlash. Approximate time
for completion on an 12G system is 20-40 minutes depending on the size of the driver pack to
unpack.
Applies to: LC1.3.0+
Prerequisites for script:
Place applicable ISO image in applicable network share
Set script variables by editing script
Script: BootTovFlash.win
A) The Lifecycle Controller remote service must be in a “ready” state before executing any
other WSMAN commands. The GetRSStatus() method or the GetRemoteServicesAPIStatus()
method may be used depending on the version of the LC Management registered profile.
NOTE: GetRemoteServicesAPIStatus() will return “not ready” if drivers or an ISO is already
attached.
B) DetachDrivers(): Ensures any previous drivers are detached.
C) DetachISOImage(): Ensures all previous images are detached.
D) DetachISOFromVFlash(): Ensures all previous images are detached.
E) DeleteISOFromVFlash(): Ensures all previous images are deleted.
F) DownloadISOToVFlash(): Download desired image from network to vFlash.
G) Poll concrete job until ‘Success’.
H) GetDriverPackInfo(): Displays available OS drivers. This is only required for end to end OS
deployment.
I) UnpackAndAttach(): Unpacks and attaches desired driver pack. The resulting concrete job
is invoked immediately. This is only required for end to end OS deployment.
J) Poll concrete job until ‘Success’.
K) BootToISOFromVFlash(): The resulting concrete job is invoked immediately.
L) Poll concrete job until ‘Success’.
NOTE: OS boot is complete at this point, sleep 600 seconds to allow for completion. Steps
M) through P) are providing when the BootToNetwork image is no longer desired.
M) DetachDrivers(): [ReturnValue=0].
36
Page 37

Lifecycle Controller Integration―Best Practices Specification
N) DetachISOFromVFlash(): [ReturnValue=0].
O) DeleteISOFromVFlash(): [ReturnValue=0].
P) RequestMonoSystemStateChange(): Reboot to finish removal of OS [ReturnValue=0].
NOTE: Modular systems (i.e. M610, M710, etc.) use RequestModSystemStateChange().
4.5 Set Hard Disk Drive to ‘first’ in Boot Order
This workflow will set the hard drive(c:) to the top of the boot order. If the BootMode is set to
UEFI, it will set it to BIOS. Following completion of the reboot, the hard drive will be enabled
and set to boot first. Approximate time for completion that one can expect to encounter on an
12G system is 15-25 minutes, depending on whether an additional reboot is needed to set the
BootMode parameter.
Applies to: LC1.4.0+
Prerequisites for script: None
Script: Set_HD_Boot.win
A) The Lifecycle Controller remote service must be in a “ready” state before executing any
other WSMAN commands. The GetRSStatus() method or the GetRemoteServicesAPIStatus()
method may be used depending on the version of the LC Management registered profile.
B) Change BootMode to BIOS, if current value is UEFI.
a. SetAttribute(): Sets attribute to be configured [ReturnValue=0]
b. CreateBIOSConfigJob(): Creates jobID and applies configuration [ReturnValue=4096]
C) GetBootConfigSettings(): ENUMERATE the DCIM_BootConfigSetting class to identify the
ElementName field containing BootSeq and corresponding InstanceID (IPL or UEFI). See
section 2.2 for a definition of
ElementName = Hard drive C: BootSeq
ENUMERATE .
D) GetBootSourceSettings(): ENUMERATE the DCIM_BootSourceSetting class. See section
2.2 for a definition of
a. The CurrentAssignedSequence attribute of each instance defines the instance’s
place in the zero based indexed boot sequence
b. The CurrentEnabledStatus attribute defines whether the boot source, such as the
hard drive, is enabled
ENUMERATE .
c. If the current sequence is 0 and the status is enable, skip to the end
E) ChangeBootOrderByInstanceID(): using instanceID = IPL [ReturnValue=0]
F) ChangeBootSourceState(): using instanceID = IPL and EnabledState=1 [ReturnValue=0]
G) Poll jobstatus for Completed: GET the InstanceID of from E). See section 2.3 for a
definition of
GET.
37
Page 38

Lifecycle Controller Integration―Best Practices Specification
H) The Lifecycle Controller remote service must be in a “ready” state before executing any
other WSMAN commands. The GetRSStatus() method or the GetRemoteServicesAPIStatus()
method may be used depending on the version of the LC Management registered profile.
The GetRSStatus() method must first poll for ‘reloading’ then poll for ‘ready’, while
the GetRemoteServicesAPIStatus() can just poll for ‘ready.’
I) ENUMERATE the DCIM_BootSourceSetting class. See section 2.2 for a definition of
ENUMERATE .
a. The CurrentAssignedSequence of the “Hard drive C” should be 0
b. The CurrentEnabledStatus of the “Hard drive C” should be 1
4.6 Export (backup) Image to vFlash
This workflow performs a backup, or export operation, which saves the image to the vFlash.
The TIME_NOW parameter is passed, which invokes the operation immediately. Approximate
time for completion on an 12G system is 20-50 minutes depending on the system configuration.
Applies to: LC1.5.0+
Prerequisites for script:
Valid and enabled vFlash card for licensing
[optional] Change passphrase by editing script
Script: Backup_vFlash.win
A) The Lifecycle Controller remote service must be in a “ready” state before executing any
other WSMAN commands. The GetRSStatus() method or the GetRemoteServicesAPIStatus()
method may be used depending on the version of the LC Management registered profile.
B) BackupImage(): Performs backup operation [ReturnValue=4096].
C) Poll jobstatus for Completed: GET the InstanceID of from B). See section 2.3 for a
definition of
NOTE: The available space on the SD card will be reduced by 384MB upon completion of
successful backup.
GET.
4.7 Export (backup) iImage to CIFS or NFS Share
This workflow performs a backup, or export operation, which saves the image to a CIFS or NFS
share. The TIME_NOW parameter is passed, which invokes the operation immediately.
Approximate time for completion on a 12G system is 20-50 minutes depending on the system
configuration.
NOTE: The export operation will overwrite an existing backup image on a network share if
an identical name is used.
Applies to: LC1.5.0+
38
Page 39

Lifecycle Controller Integration―Best Practices Specification
Prerequisites for script:
Valid and enabled vFlash card for licensing
Set script variables by editing script
Script: Backup_CIFS_NFS.win
A) The Lifecycle Controller remote service must be in a “ready” state before executing any
other WSMAN commands. The GetRSStatus() method or the GetRemoteServicesAPIStatus()
method may be used depending on the version of the LC Management registered profile.
B) BackupImage(): Performs backup operation [ReturnValue=4096].
C) Poll jobstatus for Completed: GET the InstanceID of from B). See section 2.3 for a
definition of
GET.
4.8 Automatic Backup (12
Servers Only)
This workflow creates a recurring schedule to perform automatic Backup Server profile and
export to vFlash or CIFS or NFS share. At the specified schedule, the server profile is backed
up and the backup image is exported to the specified target. vFlash can hold only one image
at any time. For CIFS or NFS shares, the exported images are automatically renamed and
archived. Up to 50 archived images are stored on the CIFS or NFS shares.
Applies to: LC2 1.3.0+ and iDRAC 1.50.50 +
Prerequisites for script:
A network share (CIFS/NFS) to export the backup images or a vflash card
inserted on the system slot
Script: Auto_Update.win
A software license for 12
Set script variables by editing script/XML file
The Lifecycle Controller remote service must be in the “ready” state before running
A)
any other WSMAN commands. The GetRSStatus() method or the
GetRemoteServicesAPIStatus() method may be used depending on the version of the
LC Management registered profile.
B)
SetLCAttribute(): Enable the “Automatic Backup Feature” attribute using the
SetLCAttribute() function with AttributeName = “Automatic Backup Feature”
C)
CreateConfigJob(): Create a Config job and apply this attribute.
D) SetBackupSchedule(): Set the schedule for the automatic backup using the
SetBackupchedule() function. Auto_Backup.xml file provides the input parameters
for setting the schedule of the Automatic Backups.
E) GetBackupSchedule(): Get the schedule for the automatic backup using the
GetBackupSchedule() function.
F) The Lifecycle Controller remote service must be in a “ready” state before executing
any other WSMAN commands The GetRSStatus() method or the
GetRemoteServicesAPIStatus() method may be used depending on the version of the
LC Management registered profile.
th
Generation and Later Version of
th
Generation Dell PowerEdge servers
39
Page 40

Lifecycle Controller Integration―Best Practices Specification
Note: The Automatic Backup schedule can be cleared by using the ClearBackupSchedule() function. The
Automatic Backup feature can be disabled by setting the “Automatic Backup Feature” attribute to
“Disabled” using the SetLCAttribute() function.
4.9 Import (restore) Image from vFlash
This workflow performs a restore, or import operation, which restores the image from the
vFlash. The TIME_NOW parameter is passed, which invokes the operation immediately.
Approximate time for completion on an 12G system is 30-60 minutes depending on the system
configuration.
Applies to: LC1.5.0+
Prerequisites for script:
Valid and enabled vFlash card for licensing
Backup image on SD card (vFlash)
Passphrase required if backup image used passphrase, edit script
Script: Restore_vFlash.win
A) The Lifecycle Controller remote service must be in a “ready” state before executing any
other WSMAN commands. The GetRSStatus() method or the GetRemoteServicesAPIStatus()
method may be used depending on the version of the LC Management registered profile.
B) RestoreImage(): Performs restore operation [ReturnValue=4096].
C) Poll jobstatus for Completed: GET the InstanceID of from B). See section 2.3 for a
definition of
GET.
4.10 Import (Restore) Image from CIFS or NFS Share
This workflow performs a restore, or import operation, which restores an image from the either
a CIFS or NFS share. The TIME_NOW parameter is passed, which invokes the operation
immediately. Approximate time for completion on an 12G system is 30-60 minutes depending
on the system configuration and network.
Applies to: LC1.5.0+
Prerequisites for script:
Valid and enabled vFlash card with existing image
Set script variables by editing script
Script: Restore_CIFS_NFS.win
A) The Lifecycle Controller remote service must be in a “ready” state before executing any
other WSMAN commands. The GetRSStatus() method or the GetRemoteServicesAPIStatus()
method may be used depending on the version of the LC Management registered profile.
40
Page 41

Lifecycle Controller Integration―Best Practices Specification
B) RestoreImage(): Performs restore operation [ReturnValue=4096].
C) Poll jobstatus for Completed: GET the InstanceID of from B). See section 2.3 for a
definition of
GET.
4.11 iDRAC Firmware DUP uUpdate from CIFS or TFTP Share
This workflow performs an update of the iDRAC firmware from a DUP by first downloading the
DUP to the system, then applying the update. The update of the iDRAC firmware will be
invoked after being scheduled using SetupJobQueue. Approximate time for completion is 30-60
minutes depending on the system configuration and network.
Applies to: LC1.3.0+
Prerequisites for script:
Desired DUP must be present on network share
Set script variables by editing script
Script: iDRAC_update.win
A) The Lifecycle Controller remote service must be in a “ready” state before executing any
other WSMAN commands. The GetRSStatus() method or the GetRemoteServicesAPIStatus()
method may be used depending on the version of the LC Management registered profile.
B) GetSoftwareIdentities(): ENUMERATE the DCIM_SoftwareIdentity class to list the
firmwares on the system. See section 2.2 for a definition of
ENUMERATE.
C) Search the results from B) for:
[LC1.5.0/LC1.5.1] "ElementName = iDRAC6" and note the accompanying instanceID to be
used in D).
[LC2 1.0] "ElementName = Integrated Dell Remote Access Controller" and note the
accompanying instanceID to be used in D).
Use the Software Inventory registered profile version to determine the applicable string to
search for.
D) InstallFromURI(): Invokes firmware update operation [ReturnValue=4096].
E) CreateRebootJob(): Pass parameter RebootJobType of value 3.
1 = PowerCycle
2 = Graceful reboot without forced shutdown
3 = Graceful reboot with forced shutdown
F) SetupJobQueue(): Use JID(D) and reboot RID(E) [ReturnValue=0]; The StartTimeInterval
parameter is set to TIME_NOW, meaning the operations will be invoked immediately.
G) Poll RID jobstatus for Reboot Completed: GET the InstanceID of from E). See section 2.3
for a definition of
GET.
H) Poll JID jobstatus for Completed: GET the InstanceID of from D). See section 2.3 for a
definition of
GET.
41
Page 42

Lifecycle Controller Integration―Best Practices Specification
I) The Lifecycle Controller remote service must be in a “ready” state before executing any
other WSMAN commands. The GetRSStatus() method or the GetRemoteServicesAPIStatus()
method may be used depending on the version of the LC Management registered profile.
4.12 BIOS Firmware DUP Update from CIFS or TFTP Share
This workflow performs an update of the BIOS firmware from a DUP by first downloading the
DUP to the system, then applying the update. The update of the BIOS firmware will be invoked
after being scheduled using SetupJobQueue. Approximate time for completion is 30-60 minutes
depending on the system configuration and network.
Applies to: LC1.3.0+
Prerequisites for script:
Desired DUP must be present on network share
Set script variables by editing script
Script: BIOS_update.win
A) The Lifecycle Controller remote service must be in a “ready” state before executing any
other WSMAN commands. The GetRSStatus() method or the GetRemoteServicesAPIStatus()
method may be used depending on the version of the LC Management registered profile.
B) GetSoftwareIdentities(): ENUMERATE the DCIM_SoftwareIdentity class to list the
firmwares on the system. See section 2.2 for a definition of
ENUMERATE .
C) Search the results from B) for "ElementName = BIOS" and for "Status = Installed", then note
the accompanying instanceID to be used in D)
D) InstallFromURI(): Invokes firmware update operation [ReturnValue=4096]
E) CreateRebootJob(): Pass parameter RebootJobType of value 3
1 = PowerCycle
2 = Graceful reboot without forced shutdown
3 = Graceful reboot with forced shutdown
F) SetupJobQueue(): Use JID(D) and reboot RID(E) [ReturnValue=0]; The StartTimeInterval
parameter is set to TIME_NOW, meaning the operations will be invoked immediately
G) Poll RID jobstatus for Reboot Completed: GET the InstanceID from E). See section 2.3
for a definition of
GET.
H) Poll JID jobstatus for Completed: GET the InstanceID from D). See section 2.3 for a
definition of
GET.
I) [LC1.5.0/LC1.5.1] Sleep for 5 minutes to allow reboot, POST, and CSIOR to complete
See Appendix 33.4.3 and 33.4.7 for more information about POST and CSIOR
J) The Lifecycle Controller remote service must be in a “ready” state before executing any
other WSMAN commands. The GetRSStatus() method or the GetRemoteServicesAPIStatus()
method may be used depending on the version of the LC Management registered profile.
42
Page 43

Lifecycle Controller Integration―Best Practices Specification
4.13 USC Firmware DUP Update from CIFS or TFTP Share
This workflow performs an update of the USC (LC) firmware from a DUP by first downloading
the DUP to the system, then applying the update. By design, the update of the USC firmware
will be invoked immediately following download completion and cannot be scheduled for a
later time. Approximate time for completion is 30-60 minutes depending on the system
configuration.
Applies to: LC1.3.0+
Prerequisites for script:
Desired DUP must be present on network share
Set script variables by editing script
Script: USC_LC_update.win
A) The Lifecycle Controller remote service must be in a “ready” state before executing any
other WSMAN commands. The GetRSStatus() method or the GetRemoteServicesAPIStatus()
method may be used depending on the version of the LC Management registered profile.
B) GetSoftwareIdentities(): ENUMERATE the DCIM_SoftwareIdentity class to list the
firmwares of the system. See section 2.2 for a definition of
ENUMERATE.
4.14
C) Search the results from B) for "ElementName = Dell Lifecycle Controller" and note the
accompanying instanceID to be used in D). There may be additional characters and
numbers after the substring “Controller”.
D) InstallFromURI(): Invokes firmware update operation [ReturnValue=4096]
NOTE: The USC update is applied immediately, and cannot be scheduled for a later time.
E) Poll jobstatus for Completed: GET the InstanceID of from D). See section 2.3 for a
definition of
GET.
F) RequestiDRACStateChange(): Must reset idrac for changes to take effect [ReturnValue=0]
G) [LC1.5.0/LC1.5.1]Sleep for 10 minutes to allow reboot, POST, and CSIOR to complete
See Appendix 33.4.3 and 33.4.7 for more information about POST and CSIOR
H) The Lifecycle Controller remote service must be in a “ready” state before executing any
other WSMAN commands The GetRSStatus() method or the GetRemoteServicesAPIStatus()
method may be used depending on the version of the LC Management registered profile.
Automatic Firmware Update (12th Generation and Later
Version of Servers Only)
This workflow creates a recurring schedule to perform multiple firmware updates by
specifying a network repository that contains a catalog of available updates and the
scheduling parameters. At the specified schedule, all applicable updates contained in the
repository will be applied to the system.
43
Page 44

Lifecycle Controller Integration―Best Practices Specification
Applies to: LC2 1.3.0+ and iDRAC 1.50.50 +
Prerequisites for script:
A network share (CIFS/NFS) to access the repository of firmware updates
A software license for 12
Set script variables by editing script/XML file
th
Generation Dell PowerEdge servers
Script: Auto_Update.win
A) The Lifecycle Controller remote service must be in a “ready” state before running
any other WSMAN commands. The GetRSStatus() method or the
GetRemoteServicesAPIStatus() method may be used depending on the version of the
LC Management registered profile.
B) SetLCAttribute(): Enable the “Automatic Update Feature” attribute using the
SetLCAttribute() function with AttributeName = “Automatic Update Feature”
C) CreateConfigJob(): Create a Config job and apply this attribute.
D) SetUpdateSchedule(): Set the schedule for the automatic update using the
SetUpdateSchedule() function. Auto_Update.xml file provides the input parameters
for setting the schedule of the Automatic Updates.
E) SHENOY TODO: Does this create a job ID? Check with Hari
F) GetUpdateSchedule(): Get the schedule for the automatic update using the
GetUpdateSchedule() function
G) The Lifecycle Controller remote service must be in a “ready” state before executing
any other WSMAN commands The GetRSStatus() method or the
GetRemoteServicesAPIStatus() method may be used depending on the version of the
LC Management registered profile.
Note: The Automatic Update schedule can be cleared by using the ClearUpdateSchedule() function. The
Automatic Update feature can be disabled by setting the “Automatic Update Feature” attribute to
“Disabled” using the SetLCAttribute() function.
4.15 Update from Repository (12
of Servers Only)
This workflow allows for update of firmwares using a custom repository created using the Dell
Repository Manager.
Applies to: LC2 1.3.0+ and iDRAC 1.50.50 +
Prerequisites for script:
Script: RepoUpdate.win
A software license for 12th Generation Dell PowerEdge servers
Set script variables by editing script/XML file
A network share (CIFS/NFS) to access the repository of firmware updates
A catalog file for the DUPs
A) The Lifecycle Controller remote service must be in a “ready” state before running
any other WSMAN commands. The GetRSStatus() method or the
GetRemoteServicesAPIStatus() method may be used depending on the version of the
LC Management registered profile.
th
Generation and Later Version
44
Page 45

Lifecycle Controller Integration―Best Practices Specification
B) InstallFromRepository(): Point to a network share where a catalog file is available
and initiate firmware updates from this repository.
C) SHENOY TODO: the rest of the content
D) The Lifecycle Controller remote service must be in a “ready” state before running
any other WSMAN commands The GetRSStatus() method or the
GetRemoteServicesAPIStatus() method may be used depending on the version of the
LC Management registered profile.
4.16 Firmware Rollback (12
Servers Only)
This workflow allows a firmware to be rolled back to a previous version of the firmware
provided that a previous version exists on the rollback partition.
Applies to: LC2 1.3.0+ and iDRAC 1.50.50 +
Prerequisites for script:
Script: Rollback.win
A software license for 12th Generation Dell PowerEdge servers
Set script variables by editing script/XML file
Devices must have previous/available firmware in the Rollback partition.
User should have “Server Control” privilege except for iDRAC rollback.
E) The Lifecycle Controller remote service must be in a “ready” state before running
any other WSMAN commands. The GetRSStatus() method or the
GetRemoteServicesAPIStatus() method may be used depending on the version of the
LC Management registered profile.
F) GetSoftwareIdentities(): Find all versions of the device firmwares. Firmwares which
have Installed and Available versions can be rolled back to the Available versions.
Firmwares which have only Installed versions cannot be rolled back.
G) Select the Instance ID of the firmware to be rolled back from the output of step B.
H) Invoke the InstallFromSoftwareIdentity() method of the
DCIM_SoftwareInstallationService class with Rollback.xml input file. A Job ID is
returned by this method.
I) Poll JID jobstatus for Completed: GET the InstanceID from D). See section 2.3 for a
definition of GET.
J) The Lifecycle Controller remote service must be in a “ready” state before running
any other WSMAN commands The GetRSStatus() method or the
GetRemoteServicesAPIStatus() method may be used depending on the version of the
LC Management registered profile.
th
Generation and Later Version of
4.17 Remote Diagnostics (12
Servers Only)
This workflow provides for remote invocation and execution of Hardware Diagnostics on a
Dell PowerEdge Server and exporting the results of the diagnostics execution to a CIFS/NFS
share.
Applies to: LC2 1.3.0+ and iDRAC 1.50.50 +
Prerequisites for script:
th
Generation and Later Version of
45
Page 46

Lifecycle Controller Integration―Best Practices Specification
A software license for 12
Script: RemoteDiagnostic.win
servers
Set script variables by editing script/XML file
The diagnostics partition must be populated by installing a Diagnostics DUP
A CIFS/NFS share for exporting the results of the Diagnostics execution
th
Generation and later versions of Dell PowerEdge
A) The Lifecycle Controller remote service must be in a “ready” state before running
any other WSMAN commands. The GetRSStatus() method or the
GetRemoteServicesAPIStatus() method may be used depending on the version of the
LC Management registered profile.
B) RemoteDiagnostics():This function invokes remote diagnostics and returns a job ID.
The remote_diagnostics.xml file is used to provide input parameters. The scheduled
start time, the diagnostics mode and the reboot job type can be specified via this
XML file.
C) Poll JID jobstatus for Completed: GET the InstanceID from D). See section 2.3 for a
definition of GET.
D) ExportDiagResults(): This function causes the results of the diagnostics run to be
exported to a CIFS/NFS share specified in the Export_DiagResults.xml file. This
returns a Job ID
E) Poll JID jobstatus for Completed: GET the InstanceID from D). See section 2.3 for a
definition of GET.
F) The Lifecycle Controller remote service must be in a “ready” state before executing
any other WSMAN commands The GetRSStatus() method or the
GetRemoteServicesAPIStatus() method may be used depending on the version of the
LC Management registered profile.
4.18 PXE Boot using Embedded NICs (11G only)
This workflow performs a reboot of the host OS into the PXE boot configuration by first setting
the embNic1Nic2 parent attributes and embNic1 and embNic2 child attributes. Approximate
time for completion on an 11G system is 20-40 minutes depending on the system configuration.
Applies to: LC1.5.1+
Prerequisites for script: None
Script: PXEboot_NIC1_NIC2.win
A) The Lifecycle Controller remote service must be in a “ready” state before executing any
other WSMAN commands. The GetRSStatus() method or the GetRemoteServicesAPIStatus()
method may be used depending on the version of the LC Management registered profile.
B) Enable CSIOR (Collect System Inventory on Restart)
a. SetAttribute(): Sets attribute to be configured [ReturnValue=0]
b. CreateConfigJob(): Creates jobID and applies configuration [ReturnValue=4096]
C) Call subroutine sub_setEmbNICs_NIC1_NIC2.win to perform the following:
a. GetBIOSEnumerations(): Enumerate the DCIM_BIOSEnumeration to obtain the
current values of EmbNic attributes
b. DeletePendingBIOSConfiguration(): Ensures there is no other pending BIOS
configuration
c. SetAttribute(): Set parent attribute EmbNic1Nic2 to DisabledOS [ReturnValue=0]
46
Page 47

Lifecycle Controller Integration―Best Practices Specification
d. SetAttribute(): Set child attributes EmbNic1 and EmbNic2 to Disabled
[ReturnValue=0]
e. CreateBIOSConfigJob(): Creates jobID and applies configuration immediately with
reboot job type of 3 [ReturnValue=4096]
NOTE: The following RS Status polling for SSIB task
f. The Lifecycle Controller remote service must be in a “ready” state before
executing any other WSMAN commands. The GetRSStatus() method or the
GetRemoteServicesAPIStatus() method may be used depending on the version of
the LC Management registered profile.
The GetRSStatus() method must first poll for ‘reloading’ then poll for ‘ready’,
while the GetRemoteServicesAPIStatus() can just poll for ‘ready.’
NOTE: The following RS Status polling is for PXE to be set in the boot list during CSIOR
g. The Lifecycle Controller remote service must be in a “ready” state before
executing any other WSMAN commands. The GetRSStatus() method or the
GetRemoteServicesAPIStatus() method may be used depending on the version of
the LC Management registered profile.
The GetRSStatus() method must first poll for ‘reloading’ then poll for ‘ready’,
while the GetRemoteServicesAPIStatus() can just poll for ‘ready.’
D) Call subroutine sub_setEmbNICs_NIC1_NIC2.win to perform the following:
a. GetBIOSEnumerations(): Enumerate the DCIM_BIOSEnumeration to obtain the
current values of EmbNic attributes
b. DeletePendingBIOSConfiguration(): Ensures there is no other pending BIOS
configuration
c. SetAttribute(): Set parent attribute EmbNic1Nic2 to Enabled [ReturnValue=0]
d. SetAttribute(): Set child attributes EmbNic1 and EmbNic2 to EnabledPxe
[ReturnValue=0]
e. CreateBIOSConfigJob(): Creates jobID and applies configuration immediately with
reboot job type of 3 [ReturnValue=4096]
NOTE: The following RS Status polling for SSIB task
f. The Lifecycle Controller remote service must be in a “ready” state before
executing any other WSMAN commands. The GetRSStatus() method or the
GetRemoteServicesAPIStatus() method may be used depending on the version of
the LC Management registered profile.
The GetRSStatus() method must first poll for ‘reloading’ then poll for ‘ready’,
while the GetRemoteServicesAPIStatus() can just poll for ‘ready.’
NOTE: The following RS Status polling is for PXE to be set in the boot list during CSIOR
g. The Lifecycle Controller remote service must be in a “ready” state before
executing any other WSMAN commands. The GetRSStatus() method or the
GetRemoteServicesAPIStatus() method may be used depending on the version of
the LC Management registered profile.
47
Page 48

Lifecycle Controller Integration―Best Practices Specification
The GetRSStatus() method must first poll for ‘reloading’ then poll for ‘ready’,
while the GetRemoteServicesAPIStatus() can just poll for ‘ready.’
E) Sleep 500 seconds to allow PXE boot to occur. Users would then select applicable PXE boot
options before continuing.
Proceed to step F) to disable PXE boot.
F) Call subroutine sub_setEmbNICs_NIC1_NIC2.win to perform the following:
a. GetBIOSEnumerations(): Enumerate the DCIM_BIOSEnumeration to obtain the
current values of EmbNic attributes
b. DeletePendingBIOSConfiguration(): Ensures there is no other pending BIOS
configuration
c. SetAttribute(): Set parent attribute EmbNic1Nic2 to Enabled [ReturnValue=0]
d. SetAttribute(): Set child attributes EmbNic1 and EmbNic2 to Enabled
[ReturnValue=0]
e. CreateBIOSConfigJob(): Creates jobID and applies configuration immediately with
reboot job type of 3 [ReturnValue=4096]
NOTE: The following RS Status polling for SSIB task
f. The GetRSStatus() method must first poll for ‘reloading’ then poll for ‘ready’,
while the GetRemoteServicesAPIStatus() can just poll for ‘ready.’
NOTE: The following RS Status polling is for PXE to be set in the boot list during CSIOR
g. The GetRSStatus() method must first poll for ‘reloading’ then poll for ‘ready’,
while the GetRemoteServicesAPIStatus() can just poll for ‘ready.’
4.19 PXE Boot using Embedded NICs (12G only)
This workflow performs a reboot of the host OS into the PXE boot configuration by first setting
the embNic1Nic2 parent attribute and EmbNicPort1BootProto (to Pxe) and
EmbNicPort2BootProto (to None) child attributes. Approximate time for completion on a 12G
system is 10-30 minutes depending on the system configuration.
Applies to: LC2+
Prerequisites for script: None
Script: PXEboot_NIC1_NIC2_12G.win
A) The Lifecycle Controller remote service must be in a “ready” state before executing any
other WSMAN commands.
GetRemoteServicesAPIStatus()
B) Enable CSIOR (Collect System Inventory on Restart)
a. SetAttribute(): Sets attribute to be configured [ReturnValue=0]
b. CreateConfigJob(): Creates jobID and applies configuration [ReturnValue=4096]
C) Call subroutine sub_setEmbNICs_NIC1_NIC2_12G.win to perform the following:
48
Page 49

Lifecycle Controller Integration―Best Practices Specification
a. GetBIOSEnumerations(): Enumerate the DCIM_BIOSEnumeration to obtain the
current values of EmbNic attributes
b. DeletePendingBIOSConfiguration(): Ensures there is no other pending BIOS
configuration
c. SetAttribute(): Set parent attribute EmbNic1Nic2 to Enabled [ReturnValue=0]
d. SetAttribute(): Set child attributes EmbNicPort1BootProto to Pxe and
EmbNicPort2BootProto to None [ReturnValue=0]
e. CreateBIOSConfigJob(): Creates jobID and applies configuration immediately with
reboot job type of 3 [ReturnValue=4096]
NOTE: The following polling is for SSIB task
f. The Lifecycle Controller remote service must be in a “ready” state before
executing any other WSMAN commands.
GetRemoteServicesAPIStatus()
D) Sleep 500 seconds to allow PXE boot to occur. Users would then select applicable PXE boot
options before continuing.
Proceed to step E) to disable PXE boot.
E) Call subroutine sub_setEmbNICs_NIC1_NIC2_12G.win to perform the following:
a. GetBIOSEnumerations(): Enumerate the DCIM_BIOSEnumeration to obtain the
current values of EmbNic attributes
b. DeletePendingBIOSConfiguration(): Ensures there is no other pending BIOS
configuration
c. SetAttribute(): Set parent attribute EmbNic1Nic2 to Enabled [ReturnValue=0]
d. SetAttribute(): Set child attributes EmbNicPort1BootProto to None and
EmbNicPort2BootProto to None [ReturnValue=0]
e. CreateBIOSConfigJob(): Creates jobID and applies configuration immediately with
reboot job type of 3 [ReturnValue=4096]
NOTE: The following polling is for SSIB task
f. The Lifecycle Controller remote service must be in a “ready” state before
executing any other WSMAN commands.
GetRemoteServicesAPIStatus()
4.20 Set NIC Attributes and iSCSI boot using setupjobqueue (11G
only)
This workflow sets several NIC attributes, including setup of iSCSI boot, by first setting the
required attributes for the operation, and then changing the boot order for the NIC.
49
Page 50

Lifecycle Controller Integration―Best Practices Specification
Approximate time for completion on an 11G system is 15-30 minutes depending on the system
configuration.
Applies to: LC1.5.0 & LC1.5.1
Prerequisites for script: Set script variables by editing script
Script: setNICs_iSCSI_boot.win
A) The Lifecycle Controller remote service must be in a “ready” state before executing any
other WSMAN commands. The GetRSStatus() method or the GetRemoteServicesAPIStatus()
method may be used depending on the version of the LC Management registered profile.
B) ENUMERATE the DCIM_NICView and DCIM_SoftwareIdentity classes to collect information
about the system. See section 2.2 for a definition of
C) Enable CSIOR (Collect System Inventory on Restart), if not enabled
a. SetAttribute(): Sets attribute to be configured [ReturnValue=0]
b. CreateConfigJob(): Creates jobID and applies configuration [ReturnValue=4096]
ENUMERATE .
c. Poll jobstatus for Completed:
a definition of
GET.
GET the InstanceID of from B). See section 2.3 for
D) ENUMERATE the DCIM_NICEnumeration, DCIM_NICString, DCIM_NICInteger, and
DCIM_BIOSEnumeration classes to collect information about the system. See section 2.2
for a definition of
ENUMERATE .
E) SetBIOSAttributes(): Set all the following attributes, if at least one is not set to desired
value
a. EmbNic1Nic2=Enabled
b. BootMode=BIOS
c. ProcVirtualization= Enabled
d. ErrPrompt=Disabled
e. EmbNic1=Enabled
F) CreateBIOSConfigJob(): Apply step E) with reboot type 3 and ScheduledStartTime
parameter of TIME_NOW, which invokes the operation immediately [ReturnValue=4096]
G) Poll jobstatus for Completed: GET the InstanceID of from F). See section 2.3 for a
definition of
GET.
NOTE: The following status polling for SSIB task
F) The Lifecycle Controller remote service must be in a “ready” state before executing any
other WSMAN commands. The GetRSStatus() method or the GetRemoteServicesAPIStatus()
method may be used depending on the version of the LC Management registered profile.
NOTE: The following status polling is for subsequent CSIOR
G) The Lifecycle Controller remote service must be in a “ready” state before executing any
other WSMAN commands. The GetRSStatus() method or the GetRemoteServicesAPIStatus()
method may be used depending on the version of the LC Management registered profile.
50
Page 51

Lifecycle Controller Integration―Best Practices Specification
H) ENUMERATE the DCIM_BootSourceSetting class to collect information about the system.
See section 2.2 for a definition of
ENUMERATE .
I) ChangeBootSourceState(): Loop through boot sources and set their enabled state to zero,
except for NIC [ReturnValue=4096]
J) ChangeBootOrderByInstanceID(): Set the boot order of the NIC to first
(CurrentAssignedSequence = 0) [ReturnValue=0]
K) SetAttribute(): Set BIOS attributes EmbNic1 to EnablediScsi [ReturnValue=0]
L) CreateBIOSConfigJob(): Apply steps J) – L) without reboot, without UntilTime, and without
ScheduledStartTime parameter TIME_NOW. [ReturnValue=4096]
M) SetAttribute(): Set various NIC attributes
N) CreateNICConfigJob(): Apply steps N) without reboot, without UntilTime, and without
ScheduledStartTime parameter TIME_NOW. [ReturnValue=4096]
O) CreateRebootJob(): Pass RebootJobType of 3 parameter
1 = PowerCycle
2 = Graceful reboot without forced shutdown
3 = Graceful reboot with forced shutdown
P) SetupJobQueue(): Use BIOS JID(L), NIC JID(N), and reboot RID(O) [ReturnValue=0]
Q) Poll jobstatus for Completed: GET the InstanceID of from M). See section 2.3 for a
definition of
GET.
R) Poll jobstatus for Completed: GET the InstanceID of from O). See section 2.3 for a
definition of
GET.
S) The Lifecycle Controller remote service must be in a “ready” state before executing any
other WSMAN commands. The GetRSStatus() method or the GetRemoteServicesAPIStatus()
method may be used depending on the version of the LC Management registered profile.
4.21 iSCSI Boot using NDC/Broadcom (12G only)
This workflow sets several NIC attributes, including setup of iSCSI boot, by first setting the
required attributes for the operation, and then changing the boot order for the NIC. Additional
detail is provided as setting up iSCSI boot is complex. Approximate time for completion on a
12G system is 15-30 minutes depending on the system configuration.
NOTE: Additional details of the coding steps shown below, generational differences, and other
iSCSI information can be found in Appendix: iSCSI Boot information.
Applies to: LC2+
Prerequisites for script:
Network Daughter Card (NDC) / Broadcom NIC
This script will only work using an NIC FQDD of NIC.Integrated.1-1 or
NIC.Integrated.1-1-1
51
Page 52

Lifecycle Controller Integration―Best Practices Specification
Only works with first port-partition of 12G NDC (script limitation)
System must be powered off
Edit script to set desired parameters
Script: iscsiboot-12gNDC.win
A) The Lifecycle Controller remote service must be in a “ready” state before executing any
other WSMAN commands.
GetRemoteServicesAPIStatus():
B) GetBIOSEnumerations: ENUMERATE the DCIM_BIOSEnumeration class to collect
information about the system. See section 2.2 for a definition of
C) GetNICViews: ENUMERATE the DCIM_NICVIEW class to collect information about the NIC
FQDDs. See section 2.2 for a definition of
ENUMERATE .
D) GetBootSourceSettings: ENUMERATE the DCIM_BootSourceSetting class to collect
information about the NIC FQDDs. See section 2.2 for a definition of
Check whether the FQDD and IPL fields are in the boot order
SetNICAttributes(): Set the attribute LegacyBootProto to the value “iSCSI” and the
other desired NIC attributes and values
CreateNICConfigJob(): Pass RebootJobType=1
ENUMERATE .
ENUMERATE .
E) GetBootSourceSettings(): ENUMERATE the DCIM_BootSourceSetting class to collect
information about the NICs. See section 2.2 for a definition of
Check the CurrentEnabledStatus to ensure it is enabled
F) ChangeBootSourceState(): Use InstanceID=IPL EnabledState=1 source=(instanceID from D)
G) ChangeBootOrderByInstanceID(): Use InstanceID=IPL source=(instanceID from D)
H) CreateBIOSConfigJob(): Use Target=(BIOS FQDD)
I) Poll jobstatus for Completed: GET the InstanceID of from F). See section 2.3 for a
definition of
GET.
4.22 iSCSI Boot using QLogic (12G only)
This workflow sets several NIC attributes, including setup of iSCSI boot, by first setting the
required attributes for the operation, and then changing the boot order for the NIC. Additional
detail is provided as setting up iSCSI boot is complex. Approximate time for completion on a
12G system is 15-30 minutes depending on the system configuration.
NOTE: Additional details of the coding steps shown below, generational differences, and other
iSCSI information can be found in Appendix: iSCSI Boot information.
Applies to: LC2+
ENUMERATE .
Prerequisites for script:
QLogic NIC
52
Page 53

Lifecycle Controller Integration―Best Practices Specification
Edit script to set desired parameters
FQDD must be NIC.Integrated.1-1-1 or NIC.Integrated.1-1
Script: iscsiboot-12gNDC-qlogic.win
The four high level steps, which may require four reboots, are the following:
1) If the NDC is disabled, 1 job to enable it in bios and reboot
2) Now that the card is present, if iscsi offload on 1-3 is disabled, create a job and reboot to
enable it
3) Once iSCSI is enabled, configure iSCSI, but it will not show up in the boot order until after
reboot
4) Once it is in the boot order, move it to the top of the HD list
A) The Lifecycle Controller remote service must be in a “ready” state before executing any
other WSMAN commands.
GetRemoteServicesAPIStatus():
B) GetBIOSEnumerations(): ENUMERATE the DCIM_BIOSEnumeration class to collect
information about the system. See section 2.2 for a definition of
ENUMERATE .
Ensure AttributeName of IntegratedNetwork1 is enabled
If it is not enabled, enable it as shown below
SetBIOSAttributes()
AttributeName=IntegratedNetwork1 AttributeValue=Enabled
AttributeName=BootMode AttributeValue=Bios
CreateBIOSConfigJob()
ScheduledStartTime=TIME_NOW RebootJobType=1
Poll jobstatus for Completed: GET the InstanceID of from 2).
C) GetNICViews: ENUMERATE the DCIM_NICVIEW class to collect information about the NIC
FQDDs. See section 2.2 for a definition of
ENUMERATE .
Check if specified FQDD is present in NICViews, If not, go to NICError
D) GetBootSourceSettings(): ENUMERATE the DCIM_BootSourceSetting class to collect
information about the boot sources. See section 2.2 for a definition of
Loop through all boot sources, if boot source is IPL entry, set EnabledState=0 unless
HD
ENUMERATE .
E) ChangeBootSourceState(): Use InstanceID=IPL EnabledState=0 source=(instanceID from D)
F) GetBootSourceSettings(): ENUMERATE the DCIM_BootSourceSetting class to collect
information about the boot sources. See section 2.2 for a definition of
Enable the HD boot source
ENUMERATE .
53
Page 54

Lifecycle Controller Integration―Best Practices Specification
G) ChangeBootSourceState(): Use InstanceID=IPL EnabledState=1 source=(instanceID from F)
H) GetBootSourceSettings(): ENUMERATE the DCIM_BootSourceSetting class to collect
information about the boot sources. See section 2.2 for a definition of
Change NIC boot source
I) GetBootSourceSettings(): ENUMERATE the DCIM_BootSourceSetting class to collect
information about the boot sources. See section 2.2 for a definition of
Check NIC boot order
J) ChangeBootOrderByInstanceID(): Use InstanceID=IPL source=(instanceID from I)
SetNICAttributes(): Set the attribute LegacyBootProto to the value “iSCSI” and the
other desired NIC attributes and values
K) CreateBIOSConfigJob(): Use Target=(BIOS FQDD)
ScheduledStartTime=TIME_NOW RebootJobType=1
ENUMERATE .
ENUMERATE .
L) Poll jobstatus for Completed: GET the InstanceID of from F). See section 2.3 for a
definition of
Notes:
1) QLogic will not show up in the boot list until it connects to an iSCSI target. So if iSCSI is
misconfigured, or the network is down, it does not show up.
2) RAID and SATA HDs cannot be disabled in the boot list. Either disable the controller, but then
they are not available as secondary disks, or move them down in the HD boot list.
3) It is recommended to disable the entire HD list from the boot order until iSCSI is on the top, to
prevent it from booting into another HD
4.23 iSCSI boot using Intel (12
This workflow sets several NIC attributes, including setup of iSCSI boot, by first setting the
required attributes for the operation, and then changing the boot order for the NIC. Additional
detail is provided as setting up iSCSI boot is complex. Approximate time for completion on a
12G system is 15-30 minutes depending on the system configuration.
NOTE: Additional details of the coding steps shown below, generational differences, and other
iSCSI information can be found in Appendix: iSCSI Boot information.
GET.
th
Generation only)
Applies to: LC2+
Prerequisites for script:
Intel NIC
Edit script to set desired parameters
54
Page 55

Lifecycle Controller Integration―Best Practices Specification
Script: iscsiboot-12gHBA-intel.win
A) The Lifecycle Controller remote service must be in a “ready” state before executing any
other WSMAN commands.
GetRemoteServicesAPIStatus()
B) GetNICViews: ENUMERATE the DCIM_NICVIEW class to collect information about the NIC
FQDDs. See section 2.2 for a definition of
Check if specified NIC FQDD is present in NICViews
ENUMERATE .
C) GetNICEnumerations: ENUMERATE the DCIM_NICEnumeration class to collect information
about the system. See section 2.2 for a definition of
Check if TcpIpViaDHCP=Enabled and IscsiViaDHCP=Disabled
D) GetBootSourceSettings: ENUMERATE the DCIM_BootSourceSetting class to collect
information about the NIC FQDDs. See section 2.2 for a definition of
Loop through all boot sources, if boot source is IPL entry, set CurrentEnabledStatus
=0 unless HD [Steps D)-F)]
ENUMERATE .
ENUMERATE .
E) ChangeBootSourceState(): Use InstanceID=IPL EnabledState=0 source=(instanceID from C)
Set CurrentEnabledStatus=1 for NIC FQDD boot source
F) GetBootSourceSettings(): ENUMERATE the DCIM_BootSourceSetting class to collect
information about the NICs. See section 2.2 for a definition of
Check the CurrentEnabledStatus state
ENUMERATE .
G) Configure iSCSI
CreateBIOSConfigJob(): Target=(BIOS FQDD)
SetNICAttributes(): Target=(NIC FQDD) Set the attribute LegacyBootProto to the
value iSCSIPrimary
CreateNICConfigJob(): Target=(NIC FQDD)
Poll jobstatus for Completed using instanceID from CreateNICConfigJob()
H) Move iSCSI to the top of the HD Boot List by looping through boot sources
GetBootSourceSettings()
ChangeBootSourceState(): Use InstanceID=IPL EnabledState=1 source=(instanceID
from GetBootSourceSettings())
55
Page 56

Lifecycle Controller Integration―Best Practices Specification
I) GetBootSourceSettings(): ENUMERATE the DCIM_BootSourceSetting class to collect
information about the NIC FQDDs. See section 2.2 for a definition of
Loop through boot sources to confirm the NIC FQDD and “BCV” are in an instanceID
J) Set NIC to first in boot order
GetBootSourceSettings()
ChangeBootOrderByInstanceID(): Use InstanceID=BCV and source=(instanceID from
GetBootSourceSettings())
CreateBIOSConfigJob(): Use Target=(BIOS FQDD)
ENUMERATE .
Poll jobstatus for Completed:
Notes:
1) Intel will not show up in the boot list until it connects to an
iSCSI target. So if you misconfigure iSCSI or the network is down it
does not show up.
2) You cannot disable RAID and SATA HDs in the boot list. Either
disable the controller, but then they are not available as secondary
disks or move them down in the HD boot list.
3) It may be a good idea to disable the whole HD list from the boot
order until iSCSI is on the top, to prevent it booting into another
HD
4.24 IO Identity
This workflow sets IO Identity NIC attributes by first setting the required attributes for the
operation, and then applying the changes immediately using the TIME_NOW parameter. Note
that these attributes are read-only on some NIC cards, and read-write on others (i.e. Broadcom
57712). Approximate time for completion on a 12G system is 15-30 minutes depending on the
system configuration.
GET the InstanceID of from BIOS config job
NOTE: These attributes can only be set remotely, not locally. Also, if A/C power is lost,
these settings will also be lost.
Applies to: LC1.5.0+
Prerequisites for script:
Broadcom 57712 hardware or QLogic 8262
Set FQDD of desired NIC, VirtIscsiMacAddr, and VirtMacAddr by editing the
following script
Script: IO_Identity.win
56
Page 57

Lifecycle Controller Integration―Best Practices Specification
A) The Lifecycle Controller remote service must be in a “ready” state before executing any
other WSMAN commands. The GetRSStatus() method or the GetRemoteServicesAPIStatus()
method may be used depending on the version of the LC Management registered profile.
B) ENUMERATE the DCIM_NICString class to collect information about the NIC’s attributes
and FQDD. See section 2.2 for a definition of
ENUMERATE .
C) SetAttribute(): Set various NIC attributes
D) CreateNICConfigJob(): Apply step C) [ReturnValue=4096]
E) Poll jobstatus for Completed: GET the InstanceID of from D). See section 2.3 for a
definition of
GET.
F) The Lifecycle Controller remote service must be in a “ready” state before executing any
other WSMAN commands. The GetRSStatus() method or the GetRemoteServicesAPIStatus()
method may be used depending on the version of the LC Management registered profile.
The GetRSStatus() method must first poll for ‘reloading’ then poll for ‘ready’, while
the GetRemoteServicesAPIStatus() can just poll for ‘ready.’
[Pre-LC2] NOTE: The following RS Status polling is for CSIOR, assuming its enabled
G) The Lifecycle Controller remote service must be in a “ready” state before executing any
other WSMAN commands. The GetRSStatus() method or the GetRemoteServicesAPIStatus()
method may be used depending on the version of the LC Management registered profile.
The GetRSStatus() method must first poll for ‘reloading’ then poll for ‘ready’, while
the GetRemoteServicesAPIStatus() can just poll for ‘ready.’
H) ENUMERATE the DCIM_NICString class and ensure the attributes were applied correctly.
See section 2.2 for a definition of
4.25 Export LC log
This workflow exports the LC log to either an NFS or CIFS share. Approximate time for
completion on an 12G system is 5 minutes depending on the system configuration.
Applies to: LC1.5.0+
Prerequisites for script:
Set script variables by editing script
Script: ExportLCLog.win
A) The Lifecycle Controller remote service must be in a “ready” state before running any
other WSMAN commands. The GetRSStatus() method or the GetRemoteServicesAPIStatus()
method may be used depending on the version of the LC Management registered profile.
ENUMERATE .
B) ExportLCLlog(): Invokes the export operation [ReturnValue=4096]
NOTE: The user must set applicable IP address, username, password, filename, and
workgroup of the network share.
57
Page 58

Lifecycle Controller Integration―Best Practices Specification
C) Poll jobstatus for Completed: GET the InstanceID of from D). See section 2.3 for a
definition of
Note: In iDRAC 1.50.50, there is a provision to export the full Lifecycle log (including all active
and archived logs). This allows for exceeding the previously set 64K limit. The function
ExportFullLCLlog() can be used to export the full Lifecycle log.
GET.
4.26 FCoE Boot using QLogic (12G only)
This workflow sets several NIC attributes, including setup of Fiber Channel over Ethernet
(FCoE), by first setting the attributes for the operation and then changing the boot order for
the NIC. Approximate time for completion on a 12G system is 20-30 minutes depending on the
system configuration.
The four high level steps, which may require 3 reboots, are the following:
1) If the NDC is disabled, 1 job to enable it in bios and reboot
2) Now that the card is present, if FCoE offload on 1-1-4 is disabled, enable it
Once FCoE is enabled, configure FCoE, but it will not show up in the boot order until after
reboot
3)Once it is in the boot order, move it to the top of the HD list
Notes:
1) QLogic will not show up in the boot list until it connects to an
FCoE target. So if you misconfigure FCoE or the network is down it
does not show up.
2) You cannot disable RAID and SATA HDs in the boot list. Either
disable the controller, but then they are not available as secondary
disks or move them down in the HD boot list.
3) It may be a good idea to disable the whole HD list from the boot
order until FCoE is on the top, to prevent it booting into another
HD
4) port settings are configured against partition 1
(NIC.Integrated.1-1-1) but the boot target will show up on partition 4
(BCV:BIOS.Setup.1-1#HddSeq#NIC.Integrated.1-1-4)
Applies to: LC2+
Prerequisites for script:
QLogic NDC
Set desired script variables by editing script
FQDD must be NIC.Integrated.1-1-1 (for port setting) and NIC.Integrated.1-1-4
(for boot target setting)
Script: FCoEboot-12gNDC-qlogic.win
A) The Lifecycle Controller remote service must be in a “ready” state before executing any other
WSMAN commands. The GetRSStatus() method or the GetRemoteServicesAPIStatus() method
may be used depending on the version of the LC Management registered profile.
58
Page 59

Lifecycle Controller Integration―Best Practices Specification
1. System should be power off
2. Clear all unfinished jobs
3. Clear all pending data
B) Check NDC is enabled
1. GetBIOSEnumerations(): ENUMERATE the DCIM_BIOSEnumeration class to collect
information about the system. See section 2.2 for a definition of ENUMERATE.
2. Ensure AttributeName of IntegratedNetwork1 is enabled
If it is not enabled, enable it as shown below
SetBIOSAttributes()
AttributeName=IntegratedNetwork1 AttributeValue=Enabled
AttributeName=BootMode AttributeValue=Bios
CreateBIOSConfigJob()
ScheduledStartTime=TIME_NOW RebootJobType=1
Poll jobstatus for Completed: GET the InstanceID of from 2).
C) CheckConnectFirstFCoETarge(): ENUMERATE the NIC FADD and check if
ConnectFirstFCoETarget is eabled, if not, enable ConnectFirstFCoETarget as show below
Disable all sources
Create BIOS job
SetNICAttributes()
AttributeName=ConnectFirstFCoETarget AttributeValue=Enabled
CreateNICConfigJob with RebootJobType=1
D) Configure FCoE
1. Disable all sources
2. Create BIOS job
3. Set Partition Attributes as follows:
SetNICAttributes() on NIC.Integrated.1-1-4
AttributeName=FCoEOffloadMode AttributeValue=Enabled
AttributeName=VirtFIPMacAddr AttributeValue=$VirtFIPMacAddr
AttributeName=VirtWWN AttributeValue=$VirtWWN AttributeName=VirtWWPN
AttributeValue=$VirtWWPN AttributeName=MinBandwidth
AttributeValue=$MinBandwidth AttributeName=MaxBandwidth
AttributeValue=$MaxBandwidth
4. CreateNICConfigJob()
5. Set Port Attributes as follows:
SetNICAttributes() on NIC.Integrated.1-1-1
AttributeName=FirstFCoEWWPNTarget AttributeValue=$FirstFCoEWWPNTarget
AttributeName=FirstFCoEBootTargetLUN AttributeValue=$FirstFCoEBootTargetLUN
6. CreateNICConfigJob() with RebootJobType=1
E) GetBootSourceSettings(): ENUMERATE the DCIM_BootSourceSetting class to collect information
about the boot sources. See section 2.2 for a definition of ENUMERATE .
Loop through all boot sources, if boot source is IPL entry, set EnabledState=0 unless HD.
F) ChangeBootSourceState(): Use InstanceID=IPL EnabledState=0 source=(instanceID from D)
59
Page 60

Lifecycle Controller Integration―Best Practices Specification
G) GetBootSourceSettings(): ENUMERATE the DCIM_BootSourceSetting class to collect information
about the boot sources. See section 2.2 for a definition of ENUMERATE.
H) Enable the HD boot source
I) ChangeBootSourceState(): Use InstanceID=IPL EnabledState=1 source=(instanceID from F)
GetBootSourceSettings(): ENUMERATE the DCIM_BootSourceSetting class to collect
information about the boot sources. See section 2.2 for a definition of ENUMERATE.
Change NIC boot source
J) GetBootSourceSettings(): ENUMERATE the DCIM_BootSourceSetting class to collect information
about the boot sources. See section 2.2 for a definition of ENUMERATE .
Check NIC boot order
K) ChangeBootOrderByInstanceID(): Use InstanceID=IPL source=(instanceID from I)
SetNICAttributes(): Set the attribute LegacyBootProto to the value “FCoE” and the other
desired NIC attributes and values
L) CreateBIOSConfigJob(): Use Target=(BIOS FQDD)
ScheduledStartTime=TIME_NOW RebootJobType=1
M) Poll jobstatus for Completed: GET the InstanceID of from F). See section 2.3 for a definition of
GET.
4.27 FCoE boot using Intel (12
This workflow sets several NIC attributes, including setup of Fiber Channel over Ethernet
(FCoE), by first setting the attributes for the operation and then changing the boot order for
the NIC. Approximate time for completion on a 12G system is 20-30 minutes depending on the
system configuration.
Applies to: LC2+
Prerequisites for script:
Intel NIC Mezz card
Set desired script variables by editing script
NOTES:
Make sure Mezz NIC is enabled
If not enabled, enable it and find NIC FQDD, reboot
Enable ConnectFirstFCoETarget
th
Generatioin only)
Check if ConnectFirstFCoETarget is enabled, if not enable it
Configure FCoE, reboot
Move FCoE to the top of the HD Boot List
60
Page 61

Lifecycle Controller Integration―Best Practices Specification
Script: FCoEboot-12g-IntelMezz.win
A) The Lifecycle Controller remote service must be in a “ready” state before executing any other
WSMAN commands. GetRemoteServicesAPIStatus():
1. System should be power off
2. Clear all unfinished jobs
3. Clear all pending data
B) Check NIC is enabled
1. GetBIOSEnumerations(): ENUMERATE the DCIM_BIOSEnumeration class to collect
information about the system. See section 2.2 for a definition of ENUMERATE.
2. Ensure AttributeName of Slot2 is enabled
If it is not enabled, enable it as shown below
SetBIOSAttributes()
AttributeName= Slot2 AttributeValue=Enabled
AttributeName=BootMode AttributeValue=Bios
CreateBIOSConfigJob()
ScheduledStartTime=TIME_NOW RebootJobType=1
Poll jobstatus for Completed: GET the InstanceID of from 2).
C) CheckConnectFirstFCoETarge(): ENUMERATE the NIC FADD and check if
ConnectFirstFCoETarget is eabled, if not, enable ConnectFirstFCoETarget as show below
SetNICAttributes()
AttributeName=LegacyBootProto AttributeValue=FCoE
AttributeName=ConnectFirstFCoETarget AttributeValue=Enabled
Disable all sources
Create BIOS job
SetNICAttributes()
AttributeName=ConnectFirstFCoETarget AttributeValue=Enabled
CreateNICConfigJob with RebootJobType=1
D) Configure FCoE
61
Page 62

Lifecycle Controller Integration―Best Practices Specification
1. Disable all sources
2. Create BIOS job
3. Set Attributes (VLAN etc) as follows
SetNICAttributes() on NIC.Mezzanine.2B-1
AttributeName=FCoEOffloadMode AttributeValue=Enabled
AttributeName=VirtFIPMacAddr AttributeValue=$VirtFIPMacAddr
AttributeName=VirtWWN AttributeValue=$VirtWWN AttributeName=VirtWWPN
AttributeValue=$VirtWWPN AttributeName=MinBandwidth
AttributeValue=$MinBandwidth AttributeName=MaxBandwidth
AttributeValue=$MaxBandwidth
4. CreateNICConfigJob()
5. Set Attributes (target)as follows
SetNICAttributes() on NIC.Mezzanine.2B-1
AttributeName=FirstFCoEWWPNTarget AttributeValue=$FirstFCoEWWPNTarget
AttributeName=FirstFCoEBootTargetLUN AttributeValue=$FirstFCoEBootTargetLUN
6. CreateNICConfigJob() with RebootJobType=1
E) GetBootSourceSettings(): ENUMERATE the DCIM_BootSourceSetting class to collect information
about the boot sources. See section 2.2 for a definition of ENUMERATE .
Loop through all boot sources, if boot source is IPL entry, set EnabledState=0 unless HD.
F) ChangeBootSourceState(): Use InstanceID=IPL EnabledState=0 source=(instanceID from D)
G) GetBootSourceSettings(): ENUMERATE the DCIM_BootSourceSetting class to collect information
about the boot sources. See section 2.2 for a definition of ENUMERATE.
H) Enable the HD boot source
I) ChangeBootSourceState(): Use InstanceID=IPL EnabledState=1 source=(instanceID from F)
GetBootSourceSettings(): ENUMERATE the DCIM_BootSourceSetting class to collect
information about the boot sources. See section 2.2 for a definition of ENUMERATE.
Change NIC boot source
J) GetBootSourceSettings(): ENUMERATE the DCIM_BootSourceSetting class to collect information
about the boot sources. See section 2.2 for a definition of ENUMERATE .
Check NIC boot order
62
Page 63

Lifecycle Controller Integration―Best Practices Specification
K) ChangeBootOrderByInstanceID(): Use InstanceID=IPL source=(instanceID from I)
SetNICAttributes(): Set the attribute LegacyBootProto to the value “FCoE” and the other
desired NIC attributes and values
L) CreateBIOSConfigJob(): Use Target=(BIOS FQDD)
ScheduledStartTime=TIME_NOW RebootJobType=1
M) Poll jobstatus for Completed: GET the InstanceID of from F). See section 2.3 for a definition of
GET.
4.28 FCoE boot using Broadcom (12G only)
This workflow sets several NIC attributes, including setup of Fiber Channel over Ethernet
(FCoE), by first setting the attributes for the operation and then changing the boot order for
the NIC. Approximate time for completion on a 12G system is 20-30 minutes depending on the
system configuration.
Applies to: LC2+
Prerequisites for script:
Broadcom Mezz card using slot1
Set desired script variables by editing script
Script: FCoEboot-12g-Broadcom.win
The four high level steps, which may require 3 reboots, are the follows:
1) If the NIC is disabled, 1 job to enable it in bios and reboot
2) If partition disabled, 1 job to enable partition and reboot
3) Once both NIC card and partition are enabled, set the FCoE related NIC attributes
and reboot
4) After that, the NIC will show up in the IPL list, enable it.
A) Check the NIC is enabled
1. GetBIOSEnumerations(): ENUMERATE the DCIM_BIOSEnumeration class to collect
information about the system.
2. Ensure AttributeName of $nicAttributeName is enabled
If it is not enabled, enable it as shown below
SetBIOSAttributes()
AttributeName=$nicAttributeName AttributeValue=Enabled
AttributeName=BootMode AttributeValue=Bios
63
Page 64

Lifecycle Controller Integration―Best Practices Specification
CreateBIOSConfigJob()
ScheduledStartTime=TIME_NOW RebootJobType=1
Poll jobstatus for Completed
B) Check partition is enabled, if not enable it as follows
AttributeName=NicPartitioning AttributeValue=Enabled
C) Configure FCoE
1. Disable all sources
2. Create BIOS job
3. Set the following attributes
LegacyBootProto=FCoE
ConnectFirstFCoETarget=Enabled
FCoEOffloadMode=Enabled
FCoETgtBoot=Enabled
VirtWWPN=your WWPN address
FirstFCoEWWPNTarget=your FirstFCoEWWPNTarget address
FirstFCoEBootTargetLUN=your FirstFCoEBootTargetLUN value
D) GetBootSourceSettings(): ENUMERATE the DCIM_BootSourceSetting class to collect
information about the boot sources.
E) Loop through all boot sources, until find the NIC, then enable the NIC boot source
4.29 IO Identity for QLogic (12G only)
This workflow sets IO Identity, which are the following: virtual Mac address, virtual iSCSI Mac
address, virtual FIP Mac address, virtual WWN, and virtual WWPN. This workflow is for Qlogic
cards only.
This script has been tested on Qlogic Mezz card, slot 2 with the following setting. Different
cards or different slots require modifications to the script.
$nic=NIC.Mezzanine.2B-1-1
$nic2=NIC.Mezzanine.2B-1-2
$nic3=NIC.Mezzanine.2B-1-3
$nic4=NIC.Mezzanine.2B-1-4
$nicAttributeName=Slot2
The script is an example for set IO identity for the following card setting:
Partition 1: NIC
Partition 3: iSCSI
Partition 4: FCoE
Applies to: LC2+
64
Page 65

Lifecycle Controller Integration―Best Practices Specification
Prerequisites for script:
QLogic card
Set desired script variables by editing script
Script: IO_IdentityQlogic.win
A) The Lifecycle Controller remote service must be in a “ready” state before executing
any other WSMAN commands.
GetRemoteServicesAPIStatus():
B) Check NIC is enabled
1. GetBIOSEnumerations(): ENUMERATE the DCIM_BIOSEnumeration class to collect
information about the system.
2. Ensure AttributeName of $nicAttributeName is enabled
If not enabled, enable it as shown below
SetBIOSAttributes()
AttributeName=$nicAttributeName AttributeValue=Enabled
AttributeName=BootMode AttributeValue=Bios
CreateBIOSConfigJob()
ScheduledStartTime=TIME_NOW RebootJobType=1
Poll job status for Completed.
C) Disable the FlexAddress
SetLCAttributes AttributeName=VirtualAddressManagement AttributeValue=Console
D) Set IO Identity
SetNICAttributes()
o For partition 1: AttributeName=VirtMacAddr
AttributeValue=$VirtMacAddr_value
o For partition 3: AttributeName=VirtIscsiMacAddr
AttributeValue=$VirtIscsiMacAddr_value
o For partition 4: AttributeName=VirtFIPMacAddr
AttributeValue=$VirtFIPMacAddr_value
AttributeName=VirtWWN AttributeValue=$VirtWWN_value
AttributeName=VirtWWPN AttributeValue=$VirtWWPN_value
CreateNICConfigJob() for
o Partition 1
o Partition 3
o Partition 4
o Then Reboot
65
Page 66

Lifecycle Controller Integration―Best Practices Specification
Poll job status for completion using InstanceID form CreateNICConfigJob()
4.30 IO Identity for Broadcom (12G only)
This workflow sets IO Identity for Broadcom card only.
The script is an example for setting IO Identity for the following set:
Partition Disabled
Applies to: LC2+
Prerequisites for script:
Broadcom card
Set desired script variables by editing script
Script: IO_IdentityBroadcom.win
A) The Lifecycle Controller remote service must be in a “ready” state before executing
any other WSMAN commands.
GetRemoteServicesAPIStatus():
B) Check NIC is enabled
1. GetBIOSEnumerations(): ENUMERATE the DCIM_BIOSEnumeration class to collect
information about the system.
2. Ensure the NIC is enabled
If not enabled, enable it as shown below
SetBIOSAttributes() Target = (BIOS FQDD)
CreateBIOSConfigJob() Target = (BIOS FQDD)
ScheduledStartTime=TIME_NOW RebootJobType=1
Poll job status for Completed
C) Disable the FlexAddress
D) Set IO Identity
SetLCAttributes AttributeName=VirtualAddressManagement
AttributeValue=Console
66
Page 67

Lifecycle Controller Integration―Best Practices Specification
SetNICAttributes() Target = (NIC FQDD)
CreateNICConfigJob() Target = (NIC FQDD)
Poll job status for completion using instanceID form CreateNICConfigJob()
67
Page 68

Lifecycle Controller Integration―Best Practices Specification
4.31 IO Identity for Intel (12G only)
This workflow sets IO Identity for Intel cards only. The script is an example for setting
IO Identity for the following:
Port 1
NIC
FCoE
Applies to: LC2+
Prerequisites for script:
Intel card
Set desired script variables by editing script
Intel cards have no partitions
Script: IO_IdentityIntel.win
A) The Lifecycle Controller remote service must be in a “ready” state before executing
any other WSMAN commands.
GetRemoteServicesAPIStatus():
B) Check NIC is enabled
1. GetBIOSEnumerations(): ENUMERATE the DCIM_BIOSEnumeration class to collect
information about the system.
2. Ensure the NIC is enabled
If not enabled, enable it as shown below
SetBIOSAttributes() Target = (BIOS FQDD)
CreateBIOSConfigJob()Target = (BIOS FQDD)
ScheduledStartTime=TIME_NOW RebootJobType=1
Poll job status for Completed.
C) Disable the FlexAddress
SetLCAttributes AttributeName=VirtualAddressManagement AttributeValue=Console
D) Set IO Identity
68
Page 69

Lifecycle Controller Integration―Best Practices Specification
SetNICAttributes() Target = (NIC FQDD) AttributeName= VirtMacAddr/
VirtFIPMacAddr/ VirtWWN/VirtWWPN
CreateNICConfigJob() Target = (NIC FQDD) RebootJobType=1
Poll job status for completion using instanceID form CreateNICConfigJob()
4.32 Export System Configuration (12
Version of Servers Only)
This method is used to export the system configuration from the Lifecycle Controller
to a file on a remote share.
Applies to: LC2.1+
Prerequisites for script:
Set script variables by editing script
Script: ExportSystemConfiguration.win
A) The Lifecycle Controller remote service must be in a “ready” state before running any
other WSMAN commands. The GetRemoteServicesAPIStatus() method may be used
depending on the version of the LC Management registered profile.
B) ExportSystemConfiguration(): Invokes the export operation [ReturnValue=4096]
NOTE: The user must set applicable IP address, username, password, and filename of the
network share.
th
Generation and Later
C) Poll jobstatus for Completed: GET the InstanceID of from B). See section 2.3 for a
definition of
Note: With iDRAC 1.50.50+ firmware, by providing a parameter ExportUse in the script, a cloning
template with clone and replace options. The details of the cloning feature are available in the Web
Services Interface Guide for Windows/Linux (See reference links under Section 1.2)
4.33 Import System Configuration (12
GET.
th
Generation and Later
Version of Servers Only)
This method is used to import the system configuration from the Lifecycle Controller
to a file on a remote share.
Applies to: LC2.1+
Prerequisites for script:
Set script variables by editing script
69
Page 70

Lifecycle Controller Integration―Best Practices Specification
Script: ImportSystemConfiguration.win
A) The Lifecycle Controller remote service must be in a “ready” state before executing any
other WSMAN commands. The GetRemoteServicesAPIStatus() method may be used
depending on the version of the LC Management registered profile.
B) ImportSystemConfiguration(): Invokes the import operation [ReturnValue=4096]
NOTE: The user must set applicable IP address, username, password, and filename of the
network share.
C) Poll jobstatus for Completed: GET the InstanceID of from B). See section 2.3 for a
definition of
Note: With iDRAC 1.50.50+ firmware, a preview of the errors that will be encountered on a
server if a system configuration is imported can be obtained by invoking the
ImportSystemConfigurationPreview() function instead of the ImportSystemConfiguration()
function
GET.
4.34 Configurable Boot to Network ISO
The ConfigurableBootToNetworkISO() method exposes an ISO Image present on a network share
as a CDROM device to the host server for a specified exposure duration interval or by default
for 18 hrs. Upon the successful execution, based on the ResetType parameter, the host system
shall either immediately cold boot or warm boot. Upon this reset, the system shall then boot to
the ISO Image. If ResetType specifies no immediate reboot, then upon the next host system
reset, the system shall boot to the ISO Image. Furthermore, if immediate reset is not specified,
then the system should be rebooted before the exposure duration interval expires, otherwise
the system shall fail to boot to the ISO Image.
The workflow first removes any existing driver packs or existing attached OS, then gets
available OS drivers, unpacks the desired set of drivers, and boots from an image on a network
share. Approximate time for completion on a 12G system is 20-40 minutes depending on the
size of the driver pack that will be unpacked and the speed of the network to boot image.
The workflow differs from the 4.3 Boot to Network ISO in that the reboot can be configured for
the following:
Warm boot
Cold boot
No reset
Applies to: LC2.1+
Prerequisites for script:
70
Page 71

Lifecycle Controller Integration―Best Practices Specification
Place applicable ISO image in applicable network share
Set script variables by editing script
Script: BootToNetworkISO.win
A) The Lifecycle Controller remote service must be in a “ready” state before executing any
other WSMAN commands. The GetRSStatus() method or the GetRemoteServicesAPIStatus()
method may be used depending on the version of the LC Management registered profile.
NOTE: GetRemoteServicesAPIStatus() will return “not ready” if drivers or an ISO is already
attached.
B) DetachDrivers(): Ensures any drivers are detached.
C) DetachISOImage(): Ensures all images are detached.
D) GetDriverPackInfo(): Displays available OS drivers. This is only required for end to end OS
deployment.
E) UnpackAndAttach(): Unpacks and attaches desired driver pack. The resulting concrete job
is invoked immediately. This is only required for end to end OS deployment.
F) Poll concrete job until ‘Success’.
G) BootToNetworkISO(): The resulting concrete job may be invoked immediately depending
on the reset type.
H) Poll concrete job until ‘Success’.
5 Base Metrics Profile Use Cases
5.1 Discovery of Base Metrics Profile Support
Use the following procedure below to confirm the existence of Base Metrics profile support.
NOTE: Prior to LC2.0.0, this profile resided as a CIM profile, not LC profile.
Applies to: LC1.5.1+
Prerequisites for script: none
Script: GetBaseMetricsProfile.win
A) The Lifecycle Controller remote service must be in a “ready” state before executing any
other WSMAN commands. The GetRSStatus() method or the GetRemoteServicesAPIStatus()
method may be used depending on the version of the LC Management registered profile.
B) ENUMERATE the applicable class to view all registered profiles. See section 2.2 for a
definition of
[LC1.5.0/LC1.5.1]GetCIMRegisteredProfiles():
[LC2.0.0]GetLCRegisteredProfiles():
ENUMERATE .
71
Page 72

Lifecycle Controller Integration―Best Practices Specification
C) Search for “RegisteredName= Role Based Authorization” and note its instanceID to use in
step D)
D) GET the applicable instance using the InstanceID from C). See Section 2.3 for a definition
GET.
of
[LC1.5.0/LC1.5.1] GetCIMRegisteredProfile():
[LC2.0.0] GetLCRegisteredProfile():
Results for the InstanceID of DCIM:BaseMetrics:1.0.0 shown below. If no instance is returned,
the profile is not supported.
DCIM_LCRegisteredProfile
AdvertiseTypeDescriptions = WS-Identify
AdvertiseTypeDescriptions = Interop Namespace
AdvertiseTypes = 1
AdvertiseTypes = 1
InstanceID = DCIM:BaseMetrics:1.0.0
OtherRegisteredOrganization = DCIM
ProfileRequireLicense = Power Monitoring
ProfileRequireLicenseStatus = LICENSED
RegisteredName = Base Metrics
RegisteredOrganization = 1
RegisteredVersion = 1.0.0
6 BIOS and Boot Management Profile Use Cases
6.1 Discovery of BIOS and boot Profile Support
Use the following procedure below to confirm the existence of BIOS and boot profile support.
Applies to: LC1.5.0+
Prerequisites for script: none
Script: GetBIOSandBootProfile.win
A) The Lifecycle Controller remote service must be in a “ready” state before executing any
other WSMAN commands. The GetRSStatus() method or the GetRemoteServicesAPIStatus()
method may be used depending on the version of the LC Management registered profile.
B) GetLCRegisteredProfiles(): ENUMERATE the DCIM_LCRegisteredProfile class to view all
registered profiles. See section 2.2 for a definition of
C) Search for “RegisteredName= BIOS and Boot Management” and note its instanceID to use in
step D)
D) GetLCRegisteredProfile(): GET the DCIM_LCRegisteredProfile instance using the
InstanceID from C). See Section 2.3 for a definition of
ENUMERATE .
GET.
72
Page 73

Lifecycle Controller Integration―Best Practices Specification
Results for the InstanceID of DCIM:BIOSandBootManagement:1.0.0 shown below. If no instance
is returned, the profile is not supported.
DCIM_LCRegisteredProfile
AdvertiseTypeDescriptions = WS-Identify
AdvertiseTypeDescriptions = Interop Namespace
AdvertiseTypes = 1
AdvertiseTypes = 1
InstanceID = DCIM:BIOSandBootManagement:1.0.0
OtherRegisteredOrganization = DCIM
ProfileRequireLicense = Remote Firmware Configu ration
ProfileRequireLicenseStatus = LICENSED
RegisteredName = BIOS and Boot Management
RegisteredOrganization = 1
RegisteredVersion = 1.2.0
6.2 List all BIOS Attributes
Use the following procedure below to view all available instances of the
DCIM_BIOSEnumeration class, DCIM_BIOSInteger class, and DCIM_BIOSString classes in the system.
Applies to: LC1.5.0+
Prerequisites for script: none
Script: GetAllBIOSAttributes.win
A) The Lifecycle Controller remote service must be in a “ready” state before executing any
other WSMAN commands. The GetRSStatus() method or the GetRemoteServicesAPIStatus()
method may be used depending on the version of the LC Management registered profile.
B) ENUMERATE the following classes to view all instances. See section 2.2 for a definition
ENUMERATE .
of
GetBIOSEnumerations(): Returns instance information from DCIM_BIOSEnumeration class
GetBIOSIntegers(): Returns instance information from DCIM_BIOSInteger class
GetBIOSStrings(): Returns instance information from DCIM_BIOSString class
The instance information of all available BIOS attributes will be returned.
6.3 Delete Pending BIOS Configuration
Use the following procedure below to delete pending BIOS configurations/values set by the
setAttribute(s) method.
Applies to: LC1.5.0+
Prerequisites for script: none
73
Page 74

Lifecycle Controller Integration―Best Practices Specification
Script: DeletePendingBIOSConfiguration.win
A) The Lifecycle Controller remote service must be in a “ready” state before executing any
other WSMAN commands. The GetRSStatus() method or the GetRemoteServicesAPIStatus()
method may be used depending on the version of the LC Management registered profile.
B) GetBIOSEnumerations (): ENUMERATE the DCIM_BIOSEnumeration class to view all
available BIOS FQDDs. See section 2.2 for a definition of
ENUMERATE .
C) DeletePendingBIOSConfiguration(): Deletes the pending BIOS configuration, using a target
FQDD such as BIOS.Setup.1-1.
A return message of “No pending data present to delete” indicates that there is no pending
BIOS configuration to delete for the respective FQDD.
6.4 Inventory of boot Configurations in System
Use the following procedure below to view all available instances of the
DCIM_BootConfigSetting class.
Applies to: LC1.5.0+
Prerequisites for script: none
Script: GetBootConfigurations.win
A) The Lifecycle Controller remote service must be in a “ready” state before executing any
other WSMAN commands. The GetRSStatus() method or the GetRemoteServicesAPIStatus()
method may be used depending on the version of the LC Management registered profile.
B) GetBootConfigSettings(): ENUMERATE the DCIM_BootConfigSetting class to view all
instances. See section 2.2 for a definition of
The instance information of all available boot configurations will be returned.
ENUMERATE .
6.5 Get the First boot Configuration’s Information
Use the following procedure to get a single boot configuration instance. The URI for getting
particular instance information is deterministic (i.e the InstanceID will be unique for each
instance).
Applies to: LC1.5.0+
Prerequisites for script:
Set desired instanceID by editing script (default is IPL)
Script: GetBootConfiguration.win
A) The Lifecycle Controller remote service must be in a “ready” state before executing any
other WSMAN commands. The GetRSStatus() method or the GetRemoteServicesAPIStatus()
method may be used depending on the version of the LC Management registered profile.
74
Page 75

Lifecycle Controller Integration―Best Practices Specification
B) GetBootConfigSetting(): GET the DCIM_BootConfigSetting instance using the
InstanceID=IPL. See Section 2.3 for a definition of
The instance of DCIM_BootConfigSetting that contains the information on the first boot
configuration will be returned
GET.
6.6 Inventory of boot Sources in System
Use the following procedure below to view all available instances of the
DCIM_BootSourceSetting class.
Applies to: LC1.5.0+
Prerequisites for script: none
Script: GetBootSources.win
A) The Lifecycle Controller remote service must be in a “ready” state before executing any
other WSMAN commands. The GetRSStatus() method or the GetRemoteServicesAPIStatus()
method may be used depending on the version of the LC Management registered profile.
B) GetBootSourceSettings(): ENUMERATE the DCIM_BootSourceSetting class to view all
instances. See section 2.2 for a definition of
The instance information of all available boot sources will be returned.
ENUMERATE .
6.7 Changing boot Order by Instance
See Section “4.5: Set hard drive to first in boot order” for a comprehensive example.
6.8 Enable or Disable boot Source
This workflow can enable[1] (or disable[0]) the hard drive(c:). If the BootMode is set to UEFI,
it will change it to BIOS. Following completion of the reboot, the hard drive will be enabled
(or disabled). Approximate time for completion that one can expect to encounter on an 11G
system is about 15-25 minutes, depending on whether an additional reboot is needed to set the
BootMode parameter.
Applies to: LC1.5.0+
Prerequisites for script:
Set the desired boot source state to enable(1) or disable(0)
Script: EnableBootSource.win
A) The Lifecycle Controller remote service must be in a “ready” state before executing any
other WSMAN commands. The GetRSStatus() method or the GetRemoteServicesAPIStatus()
method may be used depending on the version of the LC Management registered profile.
B) Change BootMode to BIOS, if current value is UEFI
a. SetAttribute(): Sets attribute to be configured [ReturnValue=0]
75
Page 76

Lifecycle Controller Integration―Best Practices Specification
b. CreateConfigJob(): Creates jobID and applies configuration [ReturnValue=4096]
C) GetBootConfigSettings(): ENUMERATE the DCIM_BootConfigSetting class to identify the
ElementName field containing BootSeq and corresponding InstanceID (IPL or UEFI). See
section 2.2 for a definition of
ElementName = Hard drive C: BootSeq
ENUMERATE .
D) GetBootSourceSettings(): ENUMERATE the DCIM_BootSourceSetting class. See section
2.2 for a definition of
a. The CurrentEnabledStatus attribute defines whether the boot source is enabled or
disabled
b. If the CurrentEnabledStatus is desired value, skip to the end
ENUMERATE .
E) ChangeBootSourceState(): using instanceID = IPL and EnabledState=1 [ReturnValue=0]
F) Poll jobstatus for Completed: GET the InstanceID of from E). See section 2.3 for a
definition of
GET.
I) The Lifecycle Controller remote service must be in a “ready” state before executing any
other WSMAN commands. The GetRSStatus() method or the GetRemoteServicesAPIStatus()
method may be used depending on the version of the LC Management registered profile.
The GetRSStatus() method must first poll for ‘reloading’ then poll for ‘ready’, while the
GetRemoteServicesAPIStatus() can just poll for ‘ready.’
G) ENUMERATE the DCIM_BootSourceSetting class. See section 2.2 for a definition of
ENUMERATE .
The CurrentEnabledStatus of the “Hard drive C” should be 1 for enable (or 0 for
disable)
6.9 One Time boot
This workflow sets a one-time boot for vFlash, IPL, or UEFI. This example uses IPL.
Approximate time for completion that one can expect to encounter is about 15-25 minutes.
Applies to: LC1.5.0+
Prerequisites for script:
none
Script: OneTimeBoot.win
A) The Lifecycle Controller remote service must be in a “ready” state before executing any
other WSMAN commands. The GetRSStatus() method or the GetRemoteServicesAPIStatus()
method may be used depending on the version of the LC Management registered profile.
B) GetBootConfigSettings(): ENUMERATE the DCIM_BootConfigSetting class to identify the
ElementName field containing BootSeq and corresponding InstanceID (IPL or UEFI).
ElementName = Hard drive C: BootSeq
76
Page 77

Lifecycle Controller Integration―Best Practices Specification
C) GetBootSourceSettings(): ENUMERATE the DCIM_BootSourceSetting class and identify
the desired one time boot source: vFlash, IPL, or UEFI
D) ChangeBootOrderByInstanceID(): using instanceID = OneTime and Source=instanceID from
C)
E) GetBootConfigSettings(): ENUMERATE the DCIM_BootConfigSetting class.
The OneTime entry should have an IsNext value of 3, which means “Is Next for
Single Use”
F) GetBootSourceSettings(): ENUMERATE the DCIM_BootSourceSetting class.
Verify that an additional entry for that DCIM_BootSourceSetting appears with
an InstanceID prefixed with “OneTime:”, such as InstanceID =
OneTime:IPL:HardDisk.List.1-1:c9203080df84781e2ca3d512883dee6f.
After the reboot, the boot list reverts to the original boot list.
The job will be marked ‘Completed’ after the successful one time boot to the device.
7 CPU Profile Use Cases
7.1 Discovery of CPU Profile Support
Use the following procedure below to confirm the existence of CPU profile support.
Applies to: LC1.5.0+
Prerequisites for script: none
Script: GetCPUProfile.win
A) The Lifecycle Controller remote service must be in a “ready” state before executing any
other WSMAN commands. The GetRSStatus() method or the GetRemoteServicesAPIStatus()
method may be used depending on the version of the LC Management registered profile.
B) GetLCRegisteredProfiles(): ENUMERATE the DCIM_LCRegisteredProfile class to view all
registered profiles. See section 2.2 for a definition of
C) Search for “RegisteredName=CPU” and note its instanceID to use in step D)
D) GetLCRegisteredProfile(): GET the DCIM_LCRegisteredProfile instance using the
InstanceID from C). See Section 2.3 for a definition of
Results for the InstanceID of DCIM:CPU:1.0.0 shown below. If no instance is returned, the
profile is not supported.
ENUMERATE .
GET.
DCIM_LCRegisteredProfile
AdvertiseTypeDescriptions = WS-Identify, Interop Namespace
AdvertiseTypes = 1, 1
InstanceID = DCIM:CPU:1.0.0
OtherRegisteredOrganization = DCIM
ProfileRequireLicense = Remote Inventory
77
Page 78

Lifecycle Controller Integration―Best Practices Specification
ProfileRequireLicenseStatus = LICENSED
RegisteredName = CPU
RegisteredOrganization = 1
RegisteredVersion = 1.0.0
7.2 Inventory of CPUs in System
Use the following procedure below to list the inventory of all CPUs in the system.
Applies to: LC1.5.0+
Prerequisites for script: none
Script: GetCPUViews.win
A) The Lifecycle Controller remote service must be in a “ready” state before executing any
other WSMAN commands. The GetRSStatus() method or the GetRemoteServicesAPIStatus()
method may be used depending on the version of the LC Management registered profile.
B) GetCPUViews(): ENUMERATE the DCIM_CPUView class to view all instances. See section
2.2 for a definition of
The instance information of all available CPUs will be returned.
ENUMERATE .
7.3 Get the First CPU’s Information
Use the following procedure to get a single CPU instance. The URI for getting particular
instance information is deterministic (i.e the InstanceID will be unique for each instance).
Applies to: LC1.5.0+
Prerequisites for script:
Set desired instanceID by editing script
Script: GetCPUView.win
A) The Lifecycle Controller remote service must be in a “ready” state before executing any
other WSMAN commands. The GetRSStatus() method or the GetRemoteServicesAPIStatus()
method may be used depending on the version of the LC Management registered profile.
B) GetCPUView(): GET the DCIM_CPUView instance using the InstanceID=CPU.Socket.1. See
Section 2.3 for a definition of
The instance of DCIM_CPUView that contains the information on the first CPU will be returned.
GET.
8 Event Filter Profile Use Cases
8.1 Discovery of Event Filter Profile Support
Use the following procedure below to confirm the existence of Event Filter profile support.
This profile is currently not supported prior to LC2.
78
Page 79

Lifecycle Controller Integration―Best Practices Specification
Applies to: LC2+
Prerequisites for script: none
Script: GetEventFilterProfile.win
A) The Lifecycle Controller remote service must be in a “ready” state before executing any
other WSMAN commands.
GetRemoteServicesAPIStatus():
B) GetLCRegisteredProfiles(): ENUMERATE the DCIM_LCRegisteredProfile class to view all
registered profiles. See section 2.2 for a definition of
C) Search for “RegisteredName=Event Filter” and note its instanceID to use in step D)
D) GetLCRegisteredProfile(): GET the DCIM_LCRegisteredProfile instance using the
InstanceID from C). See Section 2.3 for a definition of
Results for the InstanceID of DCIM:EventFilter:1.0.0 shown below. If no instance is returned,
the profile is not supported.
DCIM_LCRegisteredProfile
AdvertiseTypeDescriptions = WS-Identify
AdvertiseTypeDescriptions = Interop Namespace
AdvertiseTypes = 1
AdvertiseTypes = 1
InstanceID = DCIM:EventFilter:1.0.0
OtherRegisteredOrganization = DCIM
ProfileRequireLicense = Remote Firmware Configu ration
ProfileRequireLicenseStatus = LICENSED
RegisteredName = Event Filter
RegisteredOrganization = 1
RegisteredVersion = 1.0.0
ENUMERATE .
GET.
8.2 Get Event Filter Configuration Service Views
Enumerate the DCIM_EFConfigurationService class to view all available instances of the class.
Applies to: LC2+
Prerequisites for script: none
Script: GetEFConfigurationServiceViews.win
A) The Lifecycle Controller remote service must be in a “ready” state before executing any
other WSMAN commands.
GetRemoteServicesAPIStatus():
B) GetEFConfigurationServiceViews(): ENUMERATE the DCIM_EFConfigurationService class
to view all instances. See section 2.2 for a definition of
The instance information will be returned.
ENUMERATE .
79
Page 80

Lifecycle Controller Integration―Best Practices Specification
8.3 Get Event Filter Views
Enumerate the DCIM_EventFilter class to view all available instances of the class.
Applies to: LC2+
Prerequisites for script: none
Script: GetEventFilterViews.win
A) The Lifecycle Controller remote service must be in a “ready” state before executing any
other WSMAN commands.
GetRemoteServicesAPIStatus():
B) GetEventFilters(): ENUMERATE the DCIM_EventFilter class to view all instances. See
section 2.2 for a definition of
All available instance information will be returned.
ENUMERATE .
8.4 Get Single Event Filter’s Information
Use the following procedure to get a single Event Filter instance. The URI for getting particular
instance information is deterministic (i.e the InstanceID will be unique for each instance).
Applies to: LC2+
Prerequisites for script:
Set desired instanceID by editing script
Script: GetEventFilterView.win
A) The Lifecycle Controller remote service must be in a “ready” state before executing any
other WSMAN commands.
GetRemoteServicesAPIStatus():
B) GetEventFilterView(): GET the DCIM_EventFilter instance. See Section 2.3 for a
definition of
The desired instance information will be returned.
GET.
8.5 Set Event Filters by Category
This workflow is used to set the action and notifications for all the event filters that belong to
a particular category, subcategory and severity.
Applies to: LC2+
Prerequisites for script: Set variables by editing script
Script: SetEventFilterByCategory.win
80
Page 81

Lifecycle Controller Integration―Best Practices Specification
A) The Lifecycle Controller remote service must be in a “ready” state before executing any
other WSMAN commands.
GetRemoteServicesAPIStatus():
B) SetEventFilterByCategory(): Sets the action and notifications for the event filters
8.6 Set Event Filters by InstanceID
This workflow is used to set the action and notifications for all the event filters that belong to
a particular set of InstanceIDs.
Applies to: LC2+
Prerequisites for script: Set variables by editing script
Script: SetEventFilterByInstanceIDs.win
A) The Lifecycle Controller remote service must be in a “ready” state before executing any
other WSMAN commands.
GetRemoteServicesAPIStatus():
B) GetEventFilters(): ENUMERATE the DCIM_EventFilter class to view all available instances
to use in C). See section 2.2 for a definition of
ENUMERATE .
C) SetEventFilterByInstanceIDs(): Sets the action and notifications for the event filters
9 iDRAC Card Profile Use Cases
9.1 Discovery of iDRAC Card Profile Support
Use the following procedure below to confirm the existence of iDRAC Card profile support.
Applies to: LC1.5.0+
Prerequisites for script: none
Script: GetiDRACCardProfile.win
A) The Lifecycle Controller remote service must be in a “ready” state before executing any
other WSMAN commands. The GetRSStatus() method or the GetRemoteServicesAPIStatus()
method may be used depending on the version of the LC Management registered profile.
B) GetLCRegisteredProfiles(): ENUMERATE the DCIM_LCRegisteredProfile class to view all
registered profiles. See section 2.2 for a definition of
C) Search for “RegisteredName=iDRAC Card” and note its instanceID to use in step D)
D) GetLCRegisteredProfile(): GET the DCIM_LCRegisteredProfile instance using the
InstanceID from C). See Section 2.3 for a definition of
ENUMERATE .
GET.
81
Page 82

Lifecycle Controller Integration―Best Practices Specification
Results for the InstanceID of DCIM:iDRACCard:1.0.0 shown below. If no instance is returned, the
profile is not supported.
DCIM_LCRegisteredProfile
AdvertiseTypeDescriptions = WS-Identify
AdvertiseTypeDescriptions = Interop Namespace
AdvertiseTypes = 1
AdvertiseTypes = 1
InstanceID = DCIM:iDRACCard:1.0.0
OtherRegisteredOrganization = DCIM
ProfileRequireLicense = Remote Firmware Configu ration
ProfileRequireLicense = Remote Inventory
ProfileRequireLicense = Virtual Console
ProfileRequireLicense = Virtual Media
ProfileRequireLicense = Two-Factor Authentication
ProfileRequireLicense = Directory Services
ProfileRequireLicense = IPv6
ProfileRequireLicense = Dynamic DNS
ProfileRequireLicenseStatus = LICENSED
ProfileRequireLicenseStatus = LICENSED
ProfileRequireLicenseStatus = LICENSED
ProfileRequireLicenseStatus = LICENSED
ProfileRequireLicenseStatus = LICENSED
ProfileRequireLicenseStatus = LICENSED
ProfileRequireLicenseStatus = LICENSED
ProfileRequireLicenseStatus = LICENSED
RegisteredName = iDRAC Card
RegisteredOrganization = 1
RegisteredVersion = 1.2.0
9.2 Get all iDRAC Card Attributes
Use the following procedure below to list all of the attributes from all of the iDRAC Card class
in the system.
Applies to: LC1.5.0+
Prerequisites for script: none
Script: GetAlliDRACCardAttributes.win
A) The Lifecycle Controller remote service must be in a “ready” state before executing any
other WSMAN commands. The GetRSStatus() method or the GetRemoteServicesAPIStatus()
method may be used depending on the version of the LC Management registered profile.
B) GetiDRACCardAttributes(): ENUMERATE the DCIM_iDRACCardAttribute class to view all
attributes. See section 2.2 for a definition of
ENUMERATE .
9.3 Inventory of iDRAC Cards in System
Use the following procedure below to list the inventory of all iDRAC Cards in the system.
82
Page 83

Lifecycle Controller Integration―Best Practices Specification
Applies to: LC1.5.0+
Prerequisites for script: none
Script: GetiDRACCardViews.win
A) The Lifecycle Controller remote service must be in a “ready” state before executing any
other WSMAN commands. The GetRSStatus() method or the GetRemoteServicesAPIStatus()
method may be used depending on the version of the LC Management registered profile.
B) GetiDRACCardViews(): ENUMERATE the DCIM_iDRACCardView class to view all instances.
See section 2.2 for a definition of
The instance information of all available iDRAC cards will be returned.
ENUMERATE .
9.4 Get the First iDRAC Card’s Information
Use the following procedure to get a single iDRAC instance. The URI for getting particular
instance information is deterministic (i.e the InstanceID will be unique for each instance).
Applies to: LC1.5.0+
Prerequisites for script:
Set desired instanceID by editing script
Script: GetiDRACCardView.win
A) The Lifecycle Controller remote service must be in a “ready” state before executing any
other WSMAN commands. The GetRSStatus() method or the GetRemoteServicesAPIStatus()
method may be used depending on the version of the LC Management registered profile.
B) GetiDRACCardView(): GET the DCIM_ iDRACCardView instance using the InstanceID=
iDRAC.Embedded.1. See Section 2.3 for a definition of
The instance of DCIM_iDRACCardView that contains the information on the first iDRAC card will
be returned.
GET.
9.5 Set Apply iDRAC Card Attribute(s) Immediately
Use the following procedure to set a iDRAC attributes(s) immediately using the ApplyAttributes
method. It is not necessary to invoke the CreateTargetConfigJob method as with the
SetAttributes method.
Applies to: LC1.5.0+
Prerequisites for script: Set desired values by editing script
Script: ApplyiDRACCardAttributes.win
A) The Lifecycle Controller remote service must be in a “ready” state before executing any
other WSMAN commands. The GetRSStatus() method or the GetRemoteServicesAPIStatus()
method may be used depending on the version of the LC Management registered profile.
B) GetiDRACCardAttributes(): ENUMERATE the DCIM_iDRACCardAttribute class to view all
available attributes. See section 2.2 for a definition of
ENUMERATE .
83
Page 84

Lifecycle Controller Integration―Best Practices Specification
C) Confirm the IsReadOnly field is set to false
D) ApplyAttributes(): Invoke method to apply attribute(s)
E) GetiDRACCardAttributes(): ENUMERATE the DCIM_iDRACCardAttribute class to view all
available attributes and confirm the changes were successful. See section 2.2 for a
definition of
ENUMERATE .
9.6 Schedule a set iDRAC Card Attribute(s) Operation
Use the following procedure to set a iDRAC attribute(s) using the SetAttributes and
CreateTargetConfigJob methods. This example sets the attribute immediately using the
TIME_NOW parameter, however the job can be scheduled for execution at a later time.
Applies to: LC2.0+
Prerequisites for script: Set desired values by editing script
Script: SetiDRACCardAttribute.win
A) The Lifecycle Controller remote service must be in a “ready” state before executing any
other WSMAN commands.
GetRemoteServicesAPIStatus():
B) GetiDRACCardAttributes(): ENUMERATE the DCIM_iDRACCardAttribute class to view all
available attributes. See section 2.2 for a definition of
C) Confirm the IsReadOnly field is set to false for desired instances
D) SetAttributes(): Invoke method [ReturnValue = 0]
E) CreateiDRACConfigJob(): Apply pending values using TIME_NOW paramter
F) GetiDRACCardAttributes(): ENUMERATE the DCIM_iDRACCardAttribute class to view all
available attributes and confirm the changes were successful. See section 2.2 for a
definition of
ENUMERATE .
10 Fan Profile Use Cases
10.1 Discovery of Fan Profile Support
Use the following procedure below to confirm the existence of fan profile support.
Applies to: LC1.5.0+
ENUMERATE .
Prerequisites for script: none
Script: GetFanProfile.win
A) The Lifecycle Controller remote service must be in a “ready” state before executing any
other WSMAN commands. The GetRSStatus() method or the GetRemoteServicesAPIStatus()
method may be used depending on the version of the LC Management registered profile.
84
Page 85

Lifecycle Controller Integration―Best Practices Specification
B) GetLCRegisteredProfiles(): ENUMERATE the DCIM_LCRegisteredProfile class to view all
registered profiles. See section 2.2 for a definition of
C) Search for “RegisteredName=Fan” and note its instanceID to use in step D)
D) GetLCRegisteredProfile(): GET the DCIM_LCRegisteredProfile instance using the
InstanceID from C). See Section 2.3 for a definition of
Results for the InstanceID of DCIM:Fan:1.0.0 shown below. If no instance is returned, the
profile is not supported.
DCIM_LCRegisteredProfile
AdvertiseTypeDescriptions = WS-Identify, Interop Namespace
AdvertiseTypes = 1, 1
InstanceID = DCIM:Fan:1.0.0
OtherRegisteredOrganization = DCIM
ProfileRequireLicense = Remote Inventory
ProfileRequireLicenseStatus = LICENSED
RegisteredName = Fan
RegisteredOrganization = 1
RegisteredVersion = 1.0.0
ENUMERATE .
GET.
10.2 Inventory of Fans in System
Use the following procedure below to list the inventory of all fans in the system.
Applies to: LC1.5.0+
Prerequisites for script: none
Script: GetFanViews.win
A) The Lifecycle Controller remote service must be in a “ready” state before executing any
other WSMAN commands. The GetRSStatus() method or the GetRemoteServicesAPIStatus()
method may be used depending on the version of the LC Management registered profile.
B) GetFanViews(): ENUMERATE the DCIM_FanView class to view all instances. See section
2.2 for a definition of
The instance information of all available fans will be returned.
ENUMERATE .
10.3 Get the First Fan’s Information
Use the following procedure to get a single fan instance. The URI for getting particular
instance information is deterministic (i.e the InstanceID will be unique for each instance).
Applies to: LC1.5.0+
Prerequisites for script:
Set desired instanceID by editing script
Script: GetFanView.win
85
Page 86

Lifecycle Controller Integration―Best Practices Specification
A) The Lifecycle Controller remote service must be in a “ready” state before executing any
other WSMAN commands. The GetRSStatus() method or the GetRemoteServicesAPIStatus()
method may be used depending on the version of the LC Management registered profile.
B) GetCPUView(): GET the DCIM_FanView instance using the InstanceID=Fan.embedded.1.
See Section 2.3 for a definition of
The instance of DCIM_FanView that contains the information on the first fan will be returned.
GET.
11 Persistent Storage Profile Use Cases
11.1 Discovery of Persistent Storage Profile Support
Use the following procedure below to confirm the existence of Persistent Storage profile support.
Applies to: LC1.4.0+
Prerequisites for script: none
Script: GetPersistentStorageProfile.win
A) The Lifecycle Controller remote service must be in a “ready” state before executing any
other WSMAN commands. The GetRSStatus() method or the GetRemoteServicesAPIStatus()
method may be used depending on the version of the LC Management registered profile.
B) GetLCRegisteredProfiles(): ENUMERATE the DCIM_LCRegisteredProfile class to view all
registered profiles. See section 2.2 for a definition of
ENUMERATE .
C) Search for “RegisteredName=Persistent Storage” and note its instanceID to use in step D)
D) GetLCRegisteredProfile(): GET the DCIM_LCRegisteredProfile instance using the
InstanceID from C). See Section 2.3 for a definition of
Results for the InstanceID of DCIM:PersistentStorage:1.0.0 shown below. If no instance is
returned, the profile is not supported.
DCIM_LCRegisteredProfile
AdvertiseTypeDescriptions = WS-Identify
AdvertiseTypeDescriptions = Interop Namespace
AdvertiseTypes = 1
AdvertiseTypes = 1
InstanceID = DCIM:PersistentStorage:1.0.0
OtherRegisteredOrganization = DCIM
ProfileRequireLicense = Virtual Flash Partitions
ProfileRequireLicense = Remote Inventory
ProfileRequireLicenseStatus = LICENSED
ProfileRequireLicenseStatus = LICENSED
RegisteredName = Persistent Storage
RegisteredOrganization = 1
RegisteredVersion = 1.0.0
GET.
11.2 Inventory of Virtual Flash (vFlash) Media
Use the following procedure below to list the inventory of all vFlash in the system.
86
Page 87

Lifecycle Controller Integration―Best Practices Specification
Applies to: LC1.5.0+
Prerequisites for script: none
Script: GetvFlashViews.win
A) The Lifecycle Controller remote service must be in a “ready” state before executing any
other WSMAN commands. The GetRSStatus() method or the GetRemoteServicesAPIStatus()
method may be used depending on the version of the LC Management registered profile.
B) GetvFlashViews(): ENUMERATE the DCIM_VFlashView class to view all instances. See
section 2.2 for a definition of
The instance information of all available virtual flash media will be returned.
ENUMERATE .
11.3 Get the First vFlash’s Attribute Information
The URI for getting particular instance information is deterministic (i.e the InstanceID will be
unique for each instance)
Applies to: LC1.5.0+
Prerequisites for script:
Set desired instanceID by editing script
Script: GetVFlashView.win
A) The Lifecycle Controller remote service must be in a “ready” state before executing any
other WSMAN commands. The GetRSStatus() method or the GetRemoteServicesAPIStatus()
method may be used depending on the version of the LC Management registered profile.
B) GetVFlashView(): GET the DCIM_VFlashView instance using the InstanceID=
Disk.vFlashCard.1. See Section 2.3 for a definition of
The instance of DCIM_VFlashView that contains the information on the first vFlash will be
returned
GET.
11.4 Inventory of Partitions on the Virtual Flash Media
Use the following procedure below to list the inventory of all vFlash partitions in the system.
Applies to: LC1.5.0+
Prerequisites for script: none
Script: GetVFlashPartitionViews.win
A) The Lifecycle Controller remote service must be in a “ready” state before executing any
other WSMAN commands. The GetRSStatus() method or the GetRemoteServicesAPIStatus()
method may be used depending on the version of the LC Management registered profile.
B) GetVFlashPartitionViews(): ENUMERATE the DCIM_OpaqueManagementData class to view
all instances. See section 2.2 for a definition of
The instance information of all available partitions will be returned.
ENUMERATE .
87
Page 88

Lifecycle Controller Integration―Best Practices Specification
11.5 Initialize Virtual Flash Media
This method is used to initialize or format the virtual flash media device.
Applies to: LC1.5.0+
Prerequisites for script: none
Script: InitVFlash.win
A) The Lifecycle Controller remote service must be in a “ready” state before executing any
other WSMAN commands. The GetRSStatus() method or the GetRemoteServicesAPIStatus()
method may be used depending on the version of the LC Management registered profile.
B) GetVFlashViews(): ENUMERATE the DCIM_VFlashView class to view the current value of
InitializedState. See section 2.2 for a definition of
C) InitializeMedia(): Invokes the InitializeMedia method on the class
DCIM_PersistentStorageService
D) Poll jobstatus for Completed: GET the InstanceID of from C). See section 2.3 for a
definition of
GET.
ENUMERATE .
E) GetVFlashViews(): ENUMERATE the DCIM_VFlashView class to confirm the new value of
InitializedState. See section 2.2 for a definition of
11.6 Enable Virtual Flash (vFlash) Media
This method is used to enable the virtual flash media device.
Applies to: LC1.5.0+
Prerequisites for script: none
Script: EnableVFlash.win
A) The Lifecycle Controller remote service must be in a “ready” state before executing any
other WSMAN commands. The GetRSStatus() method or the GetRemoteServicesAPIStatus()
method may be used depending on the version of the LC Management registered profile.
B) GetVFlashViews(): ENUMERATE the DCIM_VFlashView class to view the current value of
VFlashEnabledState property. See section 2.2 for a definition of
C) VFlashStateChange(): Invokes the VFlashStateChange method on the class
DCIM_PersistentStorageService
D) Repeat B) to confirm successful execution of the method
ENUMERATE .
ENUMERATE .
11.7 Disable Virtual Flash (vFlash) Media
This method is used to disable the virtual flash media device.
Applies to: LC1.5.0+
Prerequisites for script: none
88
Page 89

Lifecycle Controller Integration―Best Practices Specification
Script: DisableVFlash.win
A) The Lifecycle Controller remote service must be in a “ready” state before executing any
other WSMAN commands. The GetRSStatus() method or the GetRemoteServicesAPIStatus()
method may be used depending on the version of the LC Management registered profile.
B) GetVFlashViews(): ENUMERATE the DCIM_VFlashView class to view the current value of
VFlashEnabledState property. See section 2.2 for a definition of
ENUMERATE .
C) VFlashStateChange(): Invokes the VFlashStateChange method on the class
DCIM_PersistentStorageService
D) Repeat B) to confirm successful execution of the method
11.8 Create new Partition on Virtual Flash (vFlash) Media
This method is used to create a new partition on the virtual flash media device.
Applies to: LC1.5.0+
Prerequisites for script: set variables by editing script
Script: VFlashCreatePartition.win
A) The Lifecycle Controller remote service must be in a “ready” state before executing any
other WSMAN commands. The GetRSStatus() method or the GetRemoteServicesAPIStatus()
method may be used depending on the version of the LC Management registered profile.
B) GetVFlashPartitionViews(): ENUMERATE the DCIM_OpaqueManagementData class to view
the current partitions. See section 2.2 for a definition of
C) VFlashStateChange(): Enable vFlash if it is disabled
D) CreatePartition(): Invokes the CreatePartition method on the class
DCIM_PersistentStorageService
E) Poll jobstatus for Completed: GET the InstanceID of from E). See section 2.3 for a
definition of
GET.
F) Repeat B) to confirm successful execution of the method
11.9 Create new Partition Using Image
This method is used to create a new partition on the virtual flash media device using an image
from a network share.
Applies to: LC1.5.0+
ENUMERATE .
Prerequisites for script: set variables by editing script
Script: VFlashCreatePartitionUsingImage.win
A) The Lifecycle Controller remote service must be in a “ready” state before executing any
other WSMAN commands. The GetRSStatus() method or the GetRemoteServicesAPIStatus()
method may be used depending on the version of the LC Management registered profile.
89
Page 90

Lifecycle Controller Integration―Best Practices Specification
B) GetVFlashPartitionViews(): ENUMERATE the DCIM_OpaqueManagementData class to view
the current partitions. See section 2.2 for a definition of
C) CreatePartitionUsingImage(): Invokes the CreatePartitionUsingImage method on the class
DCIM_PersistentStorageService
D) Poll jobstatus for Completed: GET the InstanceID of from C). See section 2.3 for a
definition of
GET.
E) Repeat B) to confirm successful execution of the method
11.10 Delete Existing Partition
This method is used to delete a partition from the virtual flash media device.
Applies to: LC1.5.0+
Prerequisites for script: set variables by editing script
Script: VFlashDeletePartition.win
A) The Lifecycle Controller remote service must be in a “ready” state before executing any
other WSMAN commands. The GetRSStatus() method or the GetRemoteServicesAPIStatus()
method may be used depending on the version of the LC Management registered profile.
ENUMERATE .
B) GetVFlashPartitionViews(): ENUMERATE the DCIM_OpaqueManagementData class to view
the current partitions. See section 2.2 for a definition of
C) DeletePartition(): Invokes the DeletePartition method on the class
DCIM_PersistentStorageService
D) GetVFlashPartitionViews(): ENUMERATE the DCIM_OpaqueManagementData class to view
the current partitions and confirm successful operation. See section 2.2 for a definition of
ENUMERATE .
11.11 Format Existing Partition
This method is used to format a partition on the virtual flash media device.
Applies to: LC1.5.0+
Prerequisites for script: set variables by editing script
Script: VFlashFormatPartition.win
A) The Lifecycle Controller remote service must be in a “ready” state before executing any
other WSMAN commands. The GetRSStatus() method or the GetRemoteServicesAPIStatus()
method may be used depending on the version of the LC Management registered profile.
B) GetVFlashViews(): ENUMERATE the DCIM_VFlashView class to view the current
partitions, enable vFlash if disabled. See section 2.2 for a definition of
ENUMERATE .
ENUMERATE .
C) FormatPartition(): Invokes the FormatPartition method on the class
DCIM_PersistentStorageService
90
Page 91

Lifecycle Controller Integration―Best Practices Specification
D) Poll jobstatus for Completed: GET the InstanceID of from C). See section 2.3 for a
definition of
GET.
E) GetVFlashPartitionViews(): ENUMERATE the DCIM_OpaqueManagementData class to view
the current partitions and confirm successful operation. See section 2.2 for a definition of
ENUMERATE .
11.12 Modify Existing Partition
This method is used to modify a partition on the virtual flash media device.
Applies to: LC1.5.0+
Prerequisites for script: set variables by editing script
Script: VFlashModifyPartition.win
A) The Lifecycle Controller remote service must be in a “ready” state before executing any
other WSMAN commands. The GetRSStatus() method or the GetRemoteServicesAPIStatus()
method may be used depending on the version of the LC Management registered profile.
B) GetVFlashViews(): ENUMERATE the DCIM_VFlashView class to view the current
partitions. See section 2.2 for a definition of
C) ModifyPartition(): Invokes the ModifyPartition method on the class
DCIM_PersistentStorageService
D) GetVFlashPartitionViews(): ENUMERATE the DCIM_OpaqueManagementData class to view
the current partitions and confirm successful operation. See section 2.2 for a definition of
ENUMERATE .
11.13 Attach Partition
This method is used to attach a partition on the virtual flash media device.
Applies to: LC1.5.0+
Prerequisites for script: set variables by editing script
Script: VFlashAttachPartition.win
A) The Lifecycle Controller remote service must be in a “ready” state before executing any
other WSMAN commands. The GetRSStatus() method or the GetRemoteServicesAPIStatus()
method may be used depending on the version of the LC Management registered profile.
B) AttachPartition(): Invokes the AttachPartition method on the class
DCIM_PersistentStorageService
ENUMERATE .
C) Poll jobstatus for Completed: GET the InstanceID of from B). See section 2.3 for a
definition of
GET.
91
Page 92

Lifecycle Controller Integration―Best Practices Specification
D) GetVFlashPartitionViews(): ENUMERATE the DCIM_OpaqueManagementData class to view
the current partitions and confirm successful operation. See section 2.2 for a definition of
ENUMERATE .
11.14 Detach Partition
This method is used to detach a partition on the virtual flash media device.
Applies to: LC1.5.0+
Prerequisites for script: set variables by editing script
Script: VFlashDetachPartition.win
A) The Lifecycle Controller remote service must be in a “ready” state before executing any
other WSMAN commands. The GetRSStatus() method or the GetRemoteServicesAPIStatus()
method may be used depending on the version of the LC Management registered profile.
B) DetachPartition(): Invokes the DetachPartition method on the class
DCIM_PersistentStorageService
C) Poll jobstatus for Completed: GET the InstanceID of from B). See section 2.3 for a
definition of
GET.
D) GetVFlashPartitionViews(): ENUMERATE the DCIM_OpaqueManagementData class to view
the current partitions and confirm successful operation. See section 2.2 for a definition of
ENUMERATE .
11.15 Export Data from Existing Partition
This method is used to export data from a partition on the virtual flash media device to a
network share.
Applies to: LC1.5.0+
Prerequisites for script: set variables by editing script
Script: VFlashExportDataFromPartition.win
A) The Lifecycle Controller remote service must be in a “ready” state before executing any
other WSMAN commands. The GetRSStatus() method or the GetRemoteServicesAPIStatus()
method may be used depending on the version of the LC Management registered profile.
B) ExportDataFromPartition(): Invokes the ExportDataFromPartition method on the class
DCIM_PersistentStorageService
C) Poll jobstatus for Completed: GET the InstanceID of from B). See section 2.3 for a
definition of
GET.
D) GetVFlashPartitionViews(): ENUMERATE the DCIM_OpaqueManagementData class to view
the current partitions and confirm successful operation. See section 2.2 for a definition of
ENUMERATE .
92
Page 93

Lifecycle Controller Integration―Best Practices Specification
12 Power State Management Profile Use Cases
12.1 Discovery of Power State Management Profile Support
Use the following procedure below to confirm the existence of Power State Management profile
support. NOTE: Prior to LC2.0.0, this profile resided as a CIM profile, not LC profile.
Applies to: LC1.5.0+
Prerequisites for script: none
Script: GetPowerStateMGMTProfile.win
A) The Lifecycle Controller remote service must be in a “ready” state before executing any
other WSMAN commands. The GetRSStatus() method or the GetRemoteServicesAPIStatus()
method may be used depending on the version of the LC Management registered profile.
B) [LC1.5.0/LC1.5.1]GetCIMRegisteredProfiles():
[LC2.0.0]GetLCRegisteredProfiles():
ENUMERATE the applicable class to view all registered profiles. See section 2.2 for a
definition of
ENUMERATE .
C) Search for “RegisteredName=Power State Management” and note its instanceID to use in
step D)
D) [LC1.5.0/LC1.5.1] GetCIMRegisteredProfile():
[LC2.0.0] GetLCRegisteredProfile():
GET the applicable instance using the InstanceID from C). See Section 2.3 for a definition of
GET.
Results for the InstanceID of DCIM:PowerStateManagement:1.0.0 shown below. If no instance is
returned, the profile is not supported.
DCIM_LCRegisteredProfile
AdvertiseTypeDescriptions = WS-Identify
AdvertiseTypeDescriptions = Interop Namespace
AdvertiseTypes = 1
AdvertiseTypes = 1
InstanceID = DCIM:PowerStateManagement:1.0.0
OtherRegisteredOrganization = DCIM
ProfileRequireLicense
ProfileRequireLicenseStatus
RegisteredName = Power State Management
RegisteredOrganization = 1
RegisteredVersion = 1.0.0
93
Page 94

Lifecycle Controller Integration―Best Practices Specification
13 Profile Registration Profile Use Cases
13.1 Discovery of Profile Registration Profile Support
Use the following procedure below to confirm the existence of profile registration profile
support.
Applies to: LC2+
Prerequisites for script: none
Script: GetProfileRegistrationProfile.win
A) The Lifecycle Controller remote service must be in a “ready” state before executing any
other WSMAN commands.
GetRemoteServicesAPIStatus():
B) GetLCRegisteredProfiles(): ENUMERATE the DCIM_LCRegisteredProfile class to view all
registered profiles. See section 2.2 for a definition of
C) Search for “RegisteredName=Profile Registration” and note its instanceID to use in step D)
ENUMERATE .
D) GetLCRegisteredProfile(): GET the DCIM_LCRegisteredProfile instance using the
InstanceID from C). See Section 2.3 for a definition of
Results for the InstanceID of DCIM:ProfileRegistrationProfile shown below. If no instance is
returned, the profile is not supported.
DCIM_LCRegisteredProfile
AdvertiseTypeDescriptions = WS-Identify
AdvertiseTypeDescriptions = Interop Namespace
AdvertiseTypes = 1
AdvertiseTypes = 1
InstanceID = DCIM:ProfileRegistrationProfile
OtherRegisteredOrganization = DCIM
ProfileRequireLicense
ProfileRequireLicenseStatus
RegisteredName = Profile Registration
RegisteredOrganization = 1
RegisteredVersion = 1.0.0
14 Simple RAID Profile Use Cases
GET.
14.1 Discovery of RAID Profile Support
Use the following procedure below to confirm the existence of RAID profile support.
Applies to: LC1.5.0+
94
Page 95

Lifecycle Controller Integration―Best Practices Specification
Prerequisites for script: none
Script: GetRAIDProfile.win
A) The Lifecycle Controller remote service must be in a “ready” state before executing any
other WSMAN commands. The GetRSStatus() method or the GetRemoteServicesAPIStatus()
method may be used depending on the version of the LC Management registered profile.
B) GetLCRegisteredProfiles(): ENUMERATE the DCIM_LCRegisteredProfile class to view all
registered profiles. See section 2.2 for a definition of
C) Search for “RegisteredName=Simple RAID” and note its instanceID to use in step D)
D) GetLCRegisteredProfile(): GET the DCIM_LCRegisteredProfile instance using the
InstanceID from C). See Section 2.3 for a definition of
Results for the InstanceID of DCIM:SimpleRAID:1.0.0 shown below. If no instance is returned,
the profile is not supported.
DCIM_LCRegisteredProfile
AdvertiseTypeDescriptions = WS-Identify
AdvertiseTypeDescriptions = Interop Namespace
AdvertiseTypes = 1
AdvertiseTypes = 1
InstanceID = DCIM:SimpleRAID:1.0.0
OtherRegisteredOrganization = DCIM
ProfileRequireLicense = Remote Firmware Configu ration
ProfileRequireLicense = Remote Inventory
ProfileRequireLicenseStatus = LICENSED
ProfileRequireLicenseStatus = LICENSED
RegisteredName = Simple RAID
RegisteredOrganization = 1
RegisteredVersion = 1.2.0
ENUMERATE .
GET.
14.2 Inventory of RAID Controllers in System
Use the following procedure below to list the inventory of all RAID controllers in the system.
Applies to: LC1.5.0+
Prerequisites for script: none
Script: GetRAIDControllerViews.win
A) The Lifecycle Controller remote service must be in a “ready” state before executing any
other WSMAN commands. The GetRSStatus() method or the GetRemoteServicesAPIStatus()
method may be used depending on the version of the LC Management registered profile.
B) GetControllerViews(): ENUMERATE the DCIM_ControllerView class to view all instances.
See section 2.2 for a definition of
The instance information of all available RAID controllers will be returned
ENUMERATE .
95
Page 96

Lifecycle Controller Integration―Best Practices Specification
14.3 Get the first RAID Controller’s Information
Use the following procedure to get a single RAID controller instance. The URI for getting
particular instance information is deterministic (i.e the InstanceID will be unique for each
instance).
Applies to: LC1.5.0+
Prerequisites for script:
Set desired instanceID by editing script
Script: GetRAIDControllerView.win
A) The Lifecycle Controller remote service must be in a “ready” state before executing any
other WSMAN commands. The GetRSStatus() method or the GetRemoteServicesAPIStatus()
method may be used depending on the version of the LC Management registered profile.
B) GetControllerView(): GET the DCIM_ControllerView instance using the desired
instanceID. See Section 2.3 for a definition of
The instance of DCIM_ControllerView that contains the information on the first RAID controller
will be returned.
GET.
14.4 Inventory of Virtual and Physical Disk Drives in System
Use the following procedure below to list the inventory of all virtual disks and physical disks in
the system.
Applies to: LC1.5.0+
Prerequisites for script: none
Script: GetRAIDDiskInventory.win
A) The Lifecycle Controller remote service must be in a “ready” state before executing any
other WSMAN commands. The GetRSStatus() method or the GetRemoteServicesAPIStatus()
method may be used depending on the version of the LC Management registered profile.
B) GetVirtualDiskViews(): ENUMERATE the DCIM_VirtualDiskView class to view all
instances. See section 2.2 for a definition of
ENUMERATE .
C) GetPhysicalDiskViews(): ENUMERATE the DCIM_PhysicalDiskView class to view all
instances. See section 2.2 for a definition of
The instance information of all available virtual disks and physical disks will be returned.
ENUMERATE .
14.5 Apply Pending Values for a RAID Configuration
View the CreateRAIDConfigJob() step in the RAID stacking workflows in Section 4 for a
comprehensive example.
14.6 Delete Pending Values for a RAID Configuration
Use the following procedure below to delete pending RAID configurations/values method.
Applies to: LC1.5.0+
96
Page 97

Lifecycle Controller Integration―Best Practices Specification
Prerequisites for script:
Set desired RAID FQDD by editing script
Script: DeletePendingRAIDConfiguration.win
A) The Lifecycle Controller remote service must be in a “ready” state before executing any
other WSMAN commands. The GetRSStatus() method or the GetRemoteServicesAPIStatus()
method may be used depending on the version of the LC Management registered profile.
B) GetControllerViews(): ENUMERATE the DCIM_ControllerView class to view all available
RAID FQDDs. See section 2.2 for a definition of
ENUMERATE .
C) DeletePendingRAIDConfiguration(): Deletes the pending configuration for a particular RAID
controller, using a target FQDD.
14.7 Clear old Configuration from Newly Added HDD
Use the following procedure below to clear old configuration from newly added hard drives.
Applies to: LC1.5.0+
Prerequisites for script:
Set desired RAID FQDD by editing script
Script: ClearForeignConfig.win
A) The Lifecycle Controller remote service must be in a “ready” state before executing any
other WSMAN commands. The GetRSStatus() method or the GetRemoteServicesAPIStatus()
method may be used depending on the version of the LC Management registered profile.
B) GetControllerViews(): ENUMERATE the DCIM_ControllerView class to view all available
RAID FQDDs. See section 2.2 for a definition of
ENUMERATE .
C) ClearForeignConfig(): Clears the configuration for a particular RAID controller, using a
target FQDD.
D) CreateRAIDConfigJob(): Apply step C) [ReturnValue=4096].
E) Poll jobstatus for Completed: GET the InstanceID of from D). See section 2.3 for a
definition of
GET.
F) The Lifecycle Controller remote service must be in a “ready” state before executing any
other WSMAN commands. The GetRSStatus() method or the GetRemoteServicesAPIStatus()
method may be used depending on the version of the LC Management registered profile.
The GetRSStatus() method must first poll for ‘reloading’ then poll for ‘ready’, while
the GetRemoteServicesAPIStatus() can just poll for ‘ready.’
14.8 Determine Available RAID Configurations
Use the following procedure below to list the available RAID level configurations for a given set
of physical disks.
97
Page 98

Lifecycle Controller Integration―Best Practices Specification
Applies to: LC1.5.0+
Prerequisites for script:
Set desired RAID FQDD by editing script
Script: GetRAIDLevels.win
A) The Lifecycle Controller remote service must be in a “ready” state before executing any
other WSMAN commands. The GetRSStatus() method or the GetRemoteServicesAPIStatus()
method may be used depending on the version of the LC Management registered profile.
B) GetControllerViews(): ENUMERATE the DCIM_ControllerView class to view all available
RAID FQDDs. See section 2.2 for a definition of
ENUMERATE .
C) GetRAIDLevels(): Invoke this method to return desired data
The output will contain the available RAID level configurations for the given physical disk
selection
14.9 Determine Available Physical Disk Drives for a RAID
Configuration
Use the following procedure below to list the available physical disks for a given RAID level
configurations.
Applies to: LC1.5.0+
Prerequisites for script:
Set desired RAID FQDD by editing script
Script: GetRAIDAvailableDisks.win
A) The Lifecycle Controller remote service must be in a “ready” state before executing any
other WSMAN commands. The GetRSStatus() method or the GetRemoteServicesAPIStatus()
method may be used depending on the version of the LC Management registered profile.
B) GetControllerViews(): ENUMERATE the DCIM_ControllerView class to view all available
RAID FQDDs. See section 2.2 for a definition of
ENUMERATE .
C) GetAvailableDisks(): Invoke this method which will return the desired data
The output will contain the available physical disks for the given RAID level.
14.10 Check Available Virtual Disk Parameters for a given RAID
Level and set of Physical Disks
Use the following procedure below to list the available sizes and default values for a given RAID
level configurations.
Applies to: LC1.5.0+
Prerequisites for script:
98
Page 99

Lifecycle Controller Integration―Best Practices Specification
Set desired RAID controller FQDD, physical disk FQDDs, and RAID level
parameters by editing script
Script: CheckVDValues.win
A) The Lifecycle Controller remote service must be in a “ready” state before executing any
other WSMAN commands. The GetRSStatus() method or the GetRemoteServicesAPIStatus()
method may be used depending on the version of the LC Management registered profile.
B) GetControllerViews(): ENUMERATE the DCIM_ControllerView class to view all available
RAID FQDDs. See section 2.2 for a definition of
C) GetPhysicalDiskViews(): ENUMERATE the DCIM_PhysicalDiskView class to view all
available physical disk FQDDs. See section 2.2 for a definition of
D) CheckVDValues(): Invoke this method to return desired data
The output will contain the available sizes and default values for the given RAID level and
set of physical disks
14.11 Create a Virtual Disk
View the RAID stacking workflows in Section 4 for a comprehensive example.
ENUMERATE .
ENUMERATE .
14.12 Determine Available Physical Disk Drives to be used as a
Hot-spare
The GetDHSDisks() method is used to determine possible physical disks to be used as a
hotspare.
Applies to: LC1.5.0+
Prerequisites for script:
Set desired RAID controller FQDD, physical disk FQDDs, and RAID level
parameters by editing script
Script: GetDHSDisks.win
A) The Lifecycle Controller remote service must be in a “ready” state before executing any
other WSMAN commands. The GetRSStatus() method or the GetRemoteServicesAPIStatus()
method may be used depending on the version of the LC Management registered profile.
B) GetControllerViews(): ENUMERATE the DCIM_ControllerView class to view all available
RAID FQDDs. See section 2.2 for a definition of
C) GetDHSDisks(): Invoke this method to return desired data
The output will contain the available physical disks for use as a hotspare.
ENUMERATE .
14.13 Assign a Physical Disk Drive as a Hot-spare
View the RAID stacking workflows in Section 4 for a comprehensive example.
14.14 Delete a Virtual Disk from the System
99
Page 100

Lifecycle Controller Integration―Best Practices Specification
The following script can be used to delete an existing virtual disk from a system.
Applies to: LC1.5.0+
Prerequisites for script:
Set desired RAID virtual disk FQDD by editing script
Script: DeleteVirtualDisk.win
A) The Lifecycle Controller remote service must be in a “ready” state before executing any
other WSMAN commands. The GetRSStatus() method or the GetRemoteServicesAPIStatus()
method may be used depending on the version of the LC Management registered profile.
B) GetControllerViews(): ENUMERATE the DCIM_ControllerView class to view all available
RAID FQDDs. See section 2.2 for a definition of
C) GetVirtualDiskViews(): ENUMERATE the DCIM_VirtualDiskView class to view all available
virtual disk FQDDs. See section 2.2 for a definition of
D) DeleteVirtualDisk (): Invoke this method to delete the VD
E) CreateRAIDConfigJob(): Apply step D) [ReturnValue=4096]
ENUMERATE .
ENUMERATE .
F) Poll jobstatus for Completed: GET the InstanceID of from E). See section 2.3 for a
definition of
GET.
G) The Lifecycle Controller remote service must be in a “ready” state before executing any
other WSMAN commands. The GetRSStatus() method or the GetRemoteServicesAPIStatus()
method may be used depending on the version of the LC Management registered profile.
The GetRSStatus() method must first poll for ‘reloading’ then poll for ‘ready’, while
the GetRemoteServicesAPIStatus() can just poll for ‘ready.’
H) ENUMERATE the DCIM_VirtualDiskView class to ensure successful virtual disk deletion.
See section 2.2 for a definition of
Confirm successful execution of the method by listing the virtual disks. The deleted virtual
disk should not be displayed.
ENUMERATE .
14.15 Delete all Virtual Disks and Unassign all Hot-spares
View the RAID stacking workflows in Section 4 for a comprehensive example.
14.16 Convert Physical Disk Drive to RAID State
The ConvertToRAID() method is used to convert a physical disks in Non-RAID state to a state usable
for RAID. After the method is successfully executed the PendingValue property of RAIDPDState should
reflect the pending changes. After the CreateTargetedConfigJob method is successfully executed the
100
 Loading...