

Page 1
About Warning
WARNING: A WARNING indicates a potential for property damage, personal injury,
or death.
Dell™ Latitude™ XT2
Setup and Features Information
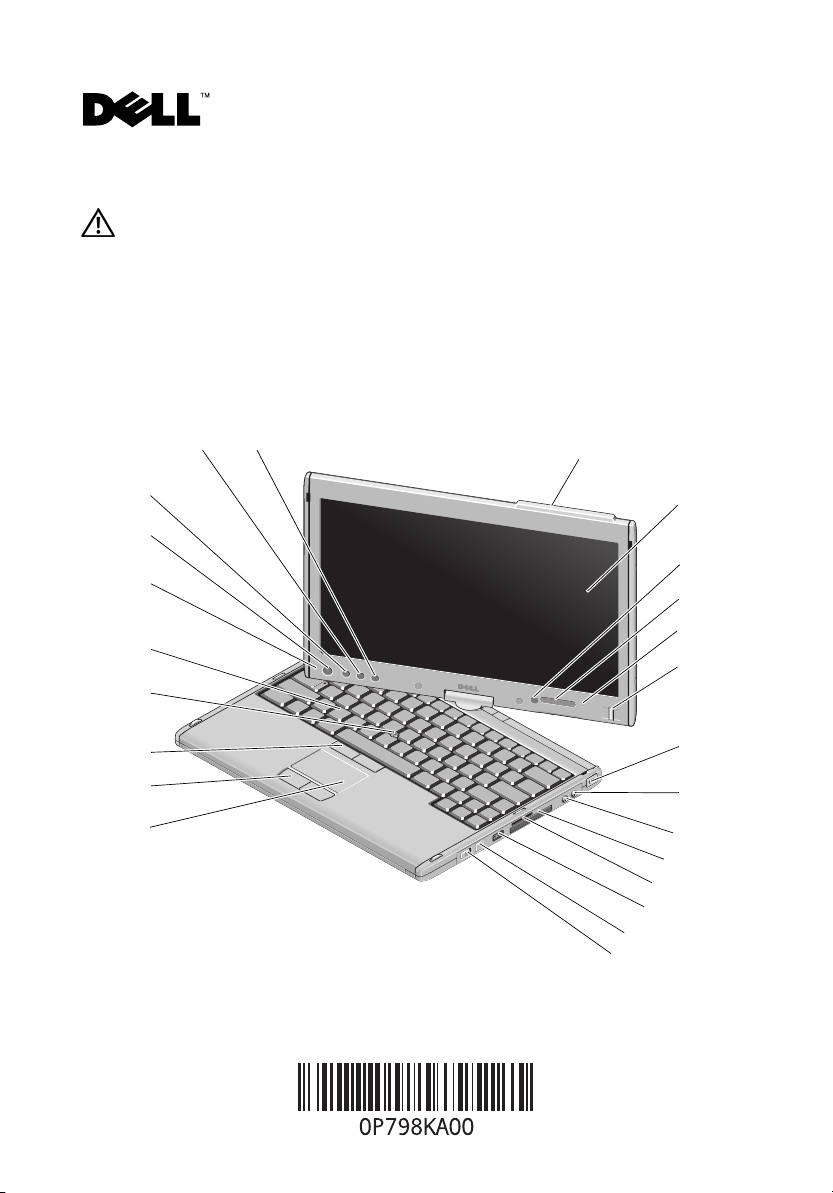
Front and Right View
24
23
1
22
21
20
19
18
17
16
15
December 2008
2
3
4
5
6
7
8
9
10
11
12
13
14
Model PP12S
Page 2

1 antenna bump (WWAN enabled) 2 display
3 ambient light sensor 4 device status lights
5 digital array microphone 6 biometric reader
7 security cable slot 8 microphone connector
9 headphones connector 10 ExpressCard slot
11 Secure Digital (SD) card slot 12 USB/e-SATA combo connector
13 Wi-Fi Catcher™ button 14 wireless radio on/off switch
15 touch pad 16 touch pad buttons
17 track stick buttons 18 track stick
19 keyboard 20 digital array microphone
®
21 power button 22 Windows
security button
23 screen rotate button 24 Dell Control Point (DCP) button
NOTE: The Antenna Bump is available only on WWAN enabled systems. In the absence
of the Antenna Bump, there will be a Grip on top of the display.
NOTE: Press <Fn><F9> to toggle between WLAN and WWAN. Latitude XT2 does not
support simultaneous operation of WLAN and WWAN modes.
Page 3
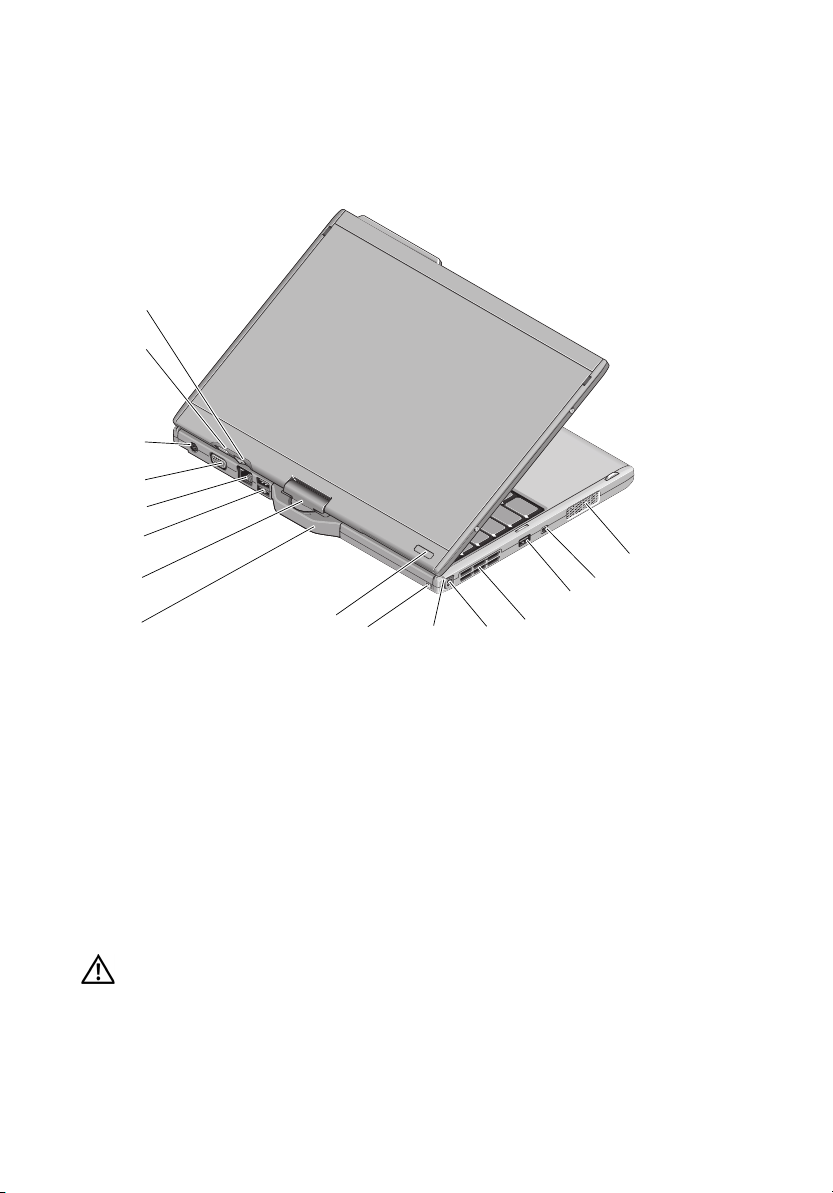
Back and Left View
16
15
14
13
12
11
10
9
1 speaker 2 IEEE 1394 connector
3 USB connector (for power
share)
5 pen 6 pen indicator LED
7 pen tether slot 8 power HDD indicator
9 tablet grip 10 rotating hinge
11 powered USB connector 12 network connector
13 video connector 14 AC adapter connector
15 tablet back button 16 scroll control button
8
7
6
4 air vent
5
1
2
3
4
WARNING: Do not block, push objects into, or allow dust to accumulate in the
air vents. Do not store your Dell™ computer in a low-airflow environment, such as
a closed briefcase, while it is running. Restricting the airflow can damage the
computer or cause a fire. The computer turns on the fan when the computer gets hot.
Fan noise is normal and does not indicate a problem with the fan or the computer.
Page 4

Quick Setup
WARNING: Before you begin any of the procedures in this section, read the safety information
that shipped with your computer. For additional best practices information see
www.dell.com/regulatory_compliance.
WARNING: The AC adapter works with electrical outlets worldwide. However, power
connectors and power strips vary among countries. Using an incompatible cable or improperly
connecting the cable to the power strip or electrical outlet may cause fire or equipment damage.
CAUTION: When you disconnect the AC adapter cable from the computer, grasp the connector,
not the cable itself, and pull firmly but gently to avoid damaging the cable. When you wrap the AC
adapter cable, ensure that you follow the angle of the connector on the AC adapter to avoid
damaging the cable.
NOTE: Some devices may not be included if you did not order them.
1
Connect the AC adapter to the AC adapter connector on the computer and to the
electrical outlet.
2
Connect the network cable.
Page 5

3
Connect USB devices, such as a mouse or keyboard.
4
Connect IEEE 1394 devices, such as a DVD player.
5
Open the computer display and press the power button to turn on the computer.
Power button
Battery charge indicator
NOTE: It is recommended that you turn on and shut down your computer at least once before
you install any cards or connect the computer to a docking device or other external device,
such as a printer.
Page 6

Specifications
NOTE: Offerings may vary by region. For more information regarding the configuration of
your computer, click Start→ Help and Support and select the option to view information
about your computer.
Video
Video type: integrated on system board, hardware accelerated
Data bus
Video controller
Video memory up to 256 MB shared video memory
Battery
Type 4-cell "smart" lithium ion (28 WHr)
Dimensions:
Depth
Height
Weight 0.26 kg (0.57 lb) (4 cell)
Voltage 11.1 VDC
Temperature range:
Operating
Storage
Coin-cell battery CR-2025
integrated video
Intel® Integrated "Cantiga" UMA Graphics
6-cell "smart" lithium ion (42 WHr)
96.84 mm (3.81 inches)
13.7 mm (0.54 inch)
0.34 kg (0.74 lb) (6 cell)
0° to 35°C (32° to 95°F)
–40° to 65°C (–40° to 149°F)
AC Adapter
Input voltage 100–240 VAC
Input current (maximum) 1.5 A
Input frequency 50–60 Hz
Output current 2.31 A
2.34 A (optional)
4.62 A (optional)
Page 7

AC Adapter (continued)
Output power 45 W, 65W(optional) or 90W(optional)
Rated output voltage 19.5 VDC
Dimensions:
Height
Width
Depth
16.0 mm (0.63 inches)
63.0mm (2.48 inches)
88.0 mm (3.46 inches)
Temperature range:
Operating
Storage
Physical
0° to 40°C (32° to 1.04°F)
–10° to 70°C (–50° to 158°F)
Height 25.4 mm (1.0 inch)
Width 297.0 mm (11.7 inches)
Depth 218.6 mm (8.6 inches)
Weight 1.66 kg (3.66 lb) (with 4-cell battery/LED
standard configuration)
1.737 kg (3.83 lb) (with 6-cell battery/DLV
standard configuration)
Environmental
Temperature range:
Operating
Storage
0° to 35°C (32° to 95°F)
–40° to 65°C (–40° to 149°F)
Relative humidity (maximum):
Operating
Storage
10% to 90% (noncondensing)
5% to 95% (noncondensing)
Altitude (maximum):
Operating
Storage
–15.2 to 3048 m (–50 to 10,000 ft)
–15.2 to 10,668 m (–50 to 35,000 ft)
Page 8

Finding More Information and Resources
If you need to: See:
find safety best practices information
for your computer review
Warranty information, Terms and
Conditions(U.S only), Safety instructions,
Regulatory information, Ergonomics
information, and End User License
Agreement.
the safety and regulatory documents that
shipped with your computer and also see the
Regulatory Compliance Homepage at
ww.dell.com/regulatory_compliance.
____________________
Information in this document is subject to change without notice.
© 2008 Dell Inc. All rights reserved. Printed in the U.S.A.
Reproduction of these materials in any manner whatsoever without the written permission of Dell Inc.
is strictly forbidden.
Trademarks used in this text: Dell, Latitude, Dell, Wi-Fi Catcher, and the DELL logo are trademarks of
Dell Inc.; Intel is a registered trademark of Intel Corporation in the U.S. and other countries; Windows is
a registered trademark of Microsoft Corporation in the United States and/or other countries.
Other trademarks and trade names may be used in this document to refer to either the entities claiming the
marks and names or their products. Dell Inc. disclaims any proprietary interest in trademarks and trade
names other than its own.
 Loading...