

Page 1

Dell™ Latitude™ XT2 Media Base
Dell™ Latitude™ XT2 Base para medios
Station d'accueil de Dell™ Latitude™ XT2
Base de mídia Dell™ Latitude™ XT2
Page 2

Page 3

Dell™ Latitude™ XT2 Media Base
Model PR12S
Page 4

Notes, Cautions, and Warnings
NOTE: A NOTE indicates important information that helps you make better use of your
computer.
CAUTION: A CAUTION indicates either potential damage to hardware or loss of data
and tells you how to avoid the problem.
WARNING: A WARNING indicates a potential for property damage, personal injury,
or death.
____________________
Information in this document is subject to change without notice.
© 2008 Dell Inc. All rights reserved.
Reproduction of these materials in any manner whatsoever without the written permission of Dell Inc.
is strictly forbidden.
Trademarks used in this text: Dell, the DELL logo, and Latitude are trademarks of Dell Inc.; Microsoft and
Windows are registered trademarks of Microsoft Corporation in the United States and/or other countries.
Other trademarks and trade names may be used in this document to refer to either the entities claiming the
marks and names or their products. Dell Inc. disclaims any proprietary interest in trademarks and trade
names other than its own.
Model PR12S
November 2008 P/N J304N Rev. A00
Page 5
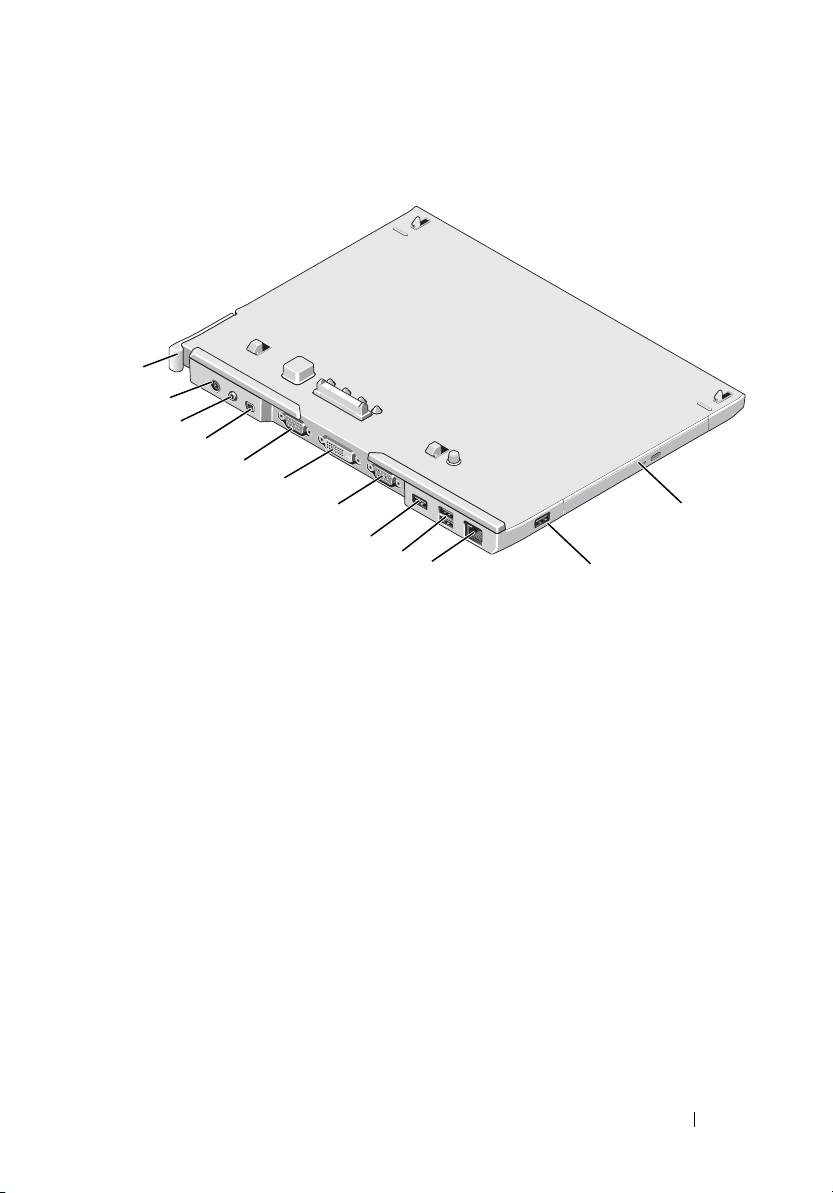
Media Base
Back and Left View Features
1
2
3
4
5
6
7
8
9
10
1 Tablet-PC release lever 2 AC adapter connector
3 audio connector 4 IEEE 1394
5 VGA video connector 6 digital video interface (DVI) connector
7 serial connector 8 USB connector
9 powered USB connector 10 network connector
11 USB connector 12 optical drive in media bay
11
12
Media Base 3
Page 6
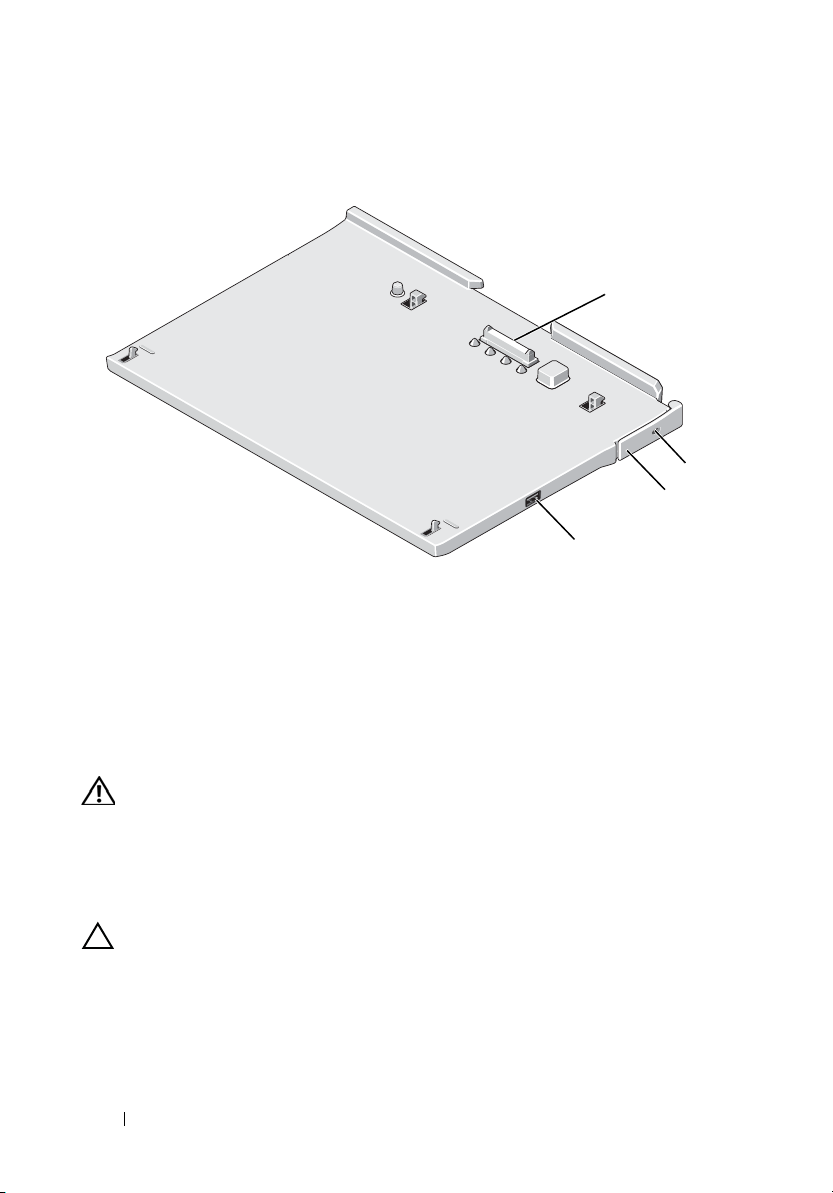
Top and Right View Features
1
3
4
1 docking connector 2 security cable slot
3 Tablet-PC release lever 4 USB connector
Before Docking or Undocking Your Tablet-PC to
2
the Media Base
WARNING: If you are using a multiple-outlet power strip, use caution when you
plug the AC adapter power cable into the power strip. Some power strips may
allow you to insert the connector incorrectly. Incorrect insertion of the power
connector could result in permanent damage to your media base as well as
electric shock and/or fire. Ensure that you insert the ground prong of the power
plug into the mating ground contact of the power strip.
CAUTION: Always use the Dell AC adapter that came with the media base. If you
use any other commercially available AC adapter—or the AC adapter from earlier
models of Dell computers—you may damage the media base or the Tablet-PC.
4 Media Base
Page 7
CAUTION: When you disconnect the Dell AC adapter cable from the Tablet-PC or
media base, hold the connector, not the cable itself, and pull firmly but gently to
avoid damaging the cable. When you wrap the AC adapter cable, ensure that you
follow the angle of the connector on the AC adapter to avoid damaging the cable.
CAUTION: Use the Latitude™ XT2 media base with your Latitude XT2 only. If you
use a media base from earlier models of Dell computers you may damage the
media base or the Tablet-PC.
Before Docking Your Tablet-PC
1
Save and close any open files, and exit any open programs.
2
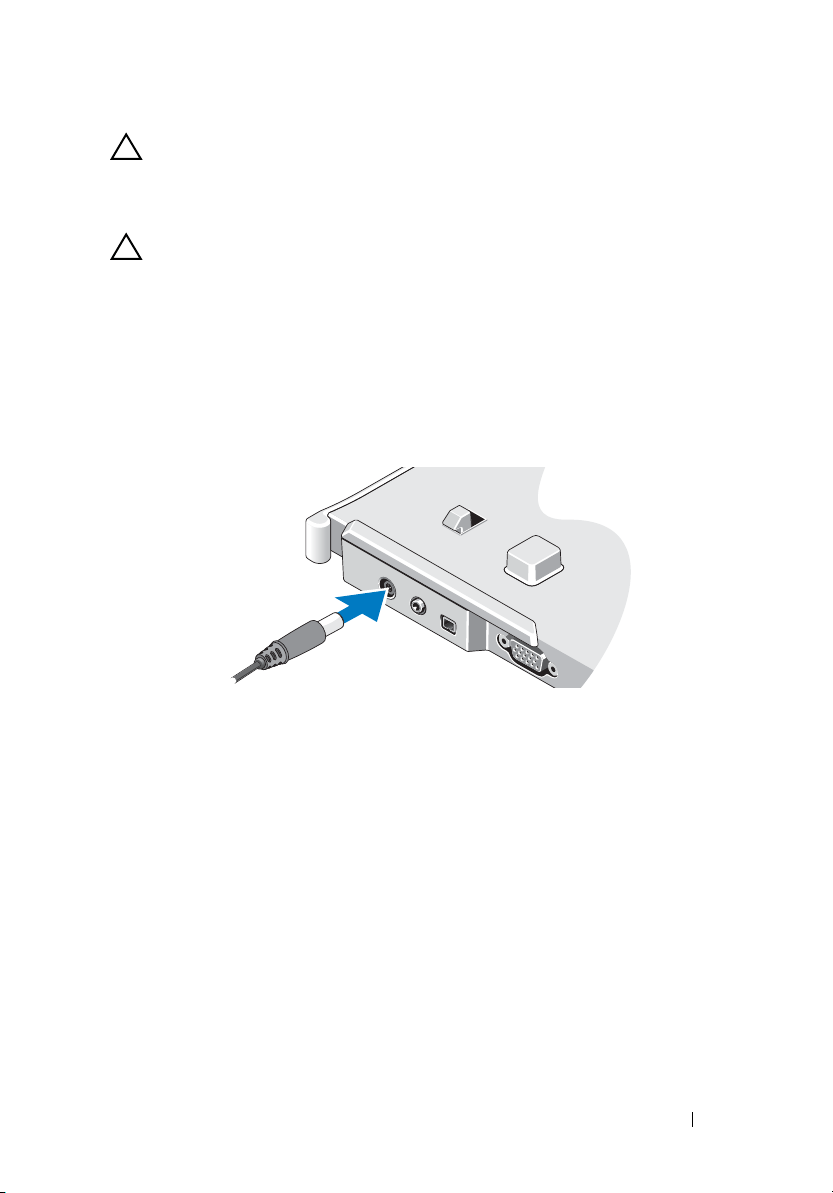
Connect the AC adapter to the AC adapter connector on the media base
and to an electrical outlet.
3
Before you dock your Tablet-PC to the media base for the
first time
the Tablet-PC operating system must have completed its setup process:
a
Ensure that the Tablet-PC is
not
connected (docked) to the media
base or to the battery slice.
b
Turn on the Tablet-PC.
c
Verify that the Microsoft® Windows® desktop appears.
d
Shut down the Tablet-PC
.
,
Media Base 5
Page 8

Before Undocking Your Tablet-PC
1
Save and close any open files, and exit any open programs.
2
Set your Tablet-PC power management settings to ensure that the
Tablet-PC does not enter sleep, standby, or hibernate mode when you
close (lower) the display:
a
Click the Windows
the
Power
b
Click
More power options
c
Under the
icon pop-up window.
When I close the lid
Power
icon
in the Notification area to display
.
drop-down menu, select
Do nothing.
Securing the Media Base
NOTE: If the Tablet-PC is docked to the media base and the media base is secured,
you cannot undock the Tablet-PC without first removing the antitheft device.
Attach a commercially available antitheft device to the security cable slot on
the media base.
Antitheft devices usually include a segment of metal-stranded cable with an
attached locking device and associated key. For instructions on installing this
kind of antitheft device, see the documentation that accompanied the device.
Docking Your Tablet-PC to the Media Base
CAUTION: If you are docking your Tablet-PC for the first time, complete the steps
in "Before Docking or Undocking Your Tablet-PC to the Media Base" on page 4,
before your proceed.
NOTE: After docking the Tablet-PC for the first time, the Tablet-PC battery or the
Tablet-PC AC adapter connection can power the media base if the media base is
not connected to an AC adapter.
1
Follow the procedures in "Before Docking or Undocking Your Tablet-PC to
the Media Base" on page 4.
2
If this is the first time it is being docked to the media base, ensure that
your Tablet-PC is turned off .
3
Align the back of the Tablet-PC with the back of the media base, and lower
the Tablet-PC onto the media base.
6 Media Base
Page 9
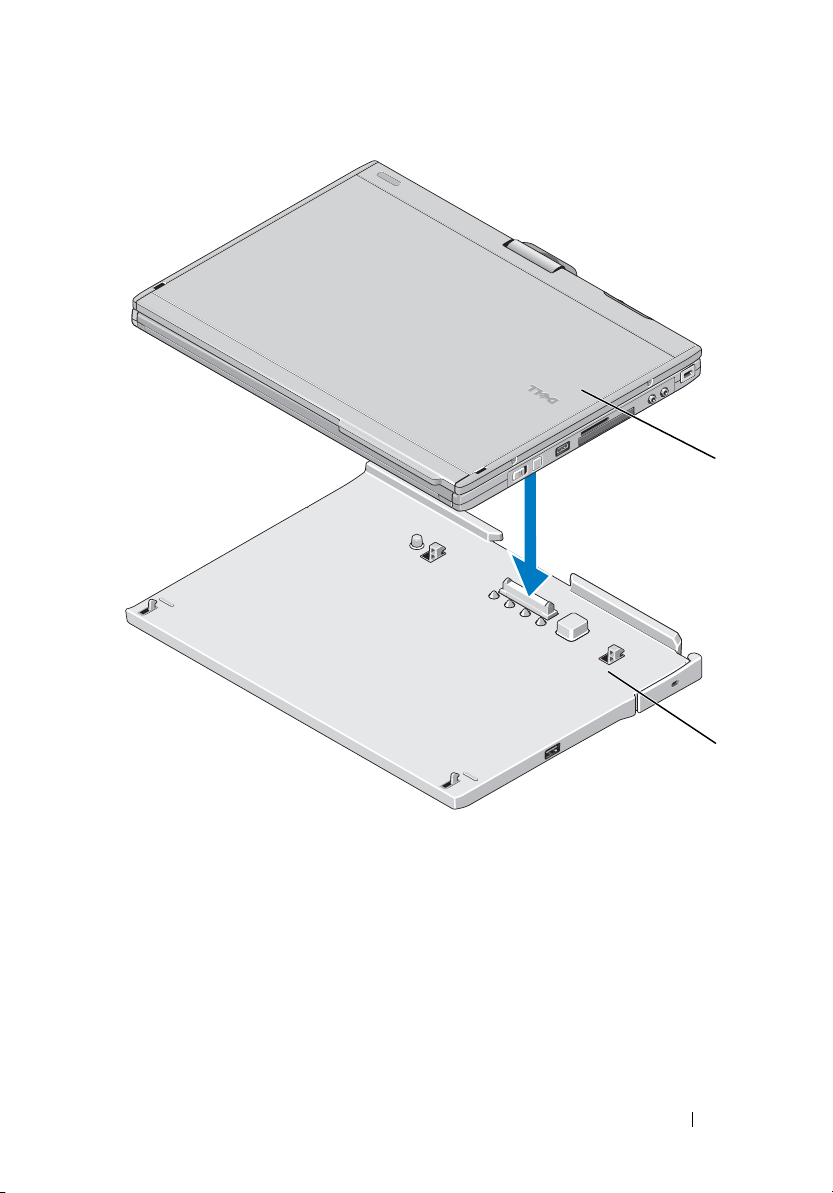
1 Tablet-PC 2 media base
4
Press the Tablet-PC onto the media base until it clicks and the Tablet-PC
is firmly seated.
5
Turn on the Tablet-PC.
The operating system recognizes the media base.
1
2
Media Base 7
Page 10
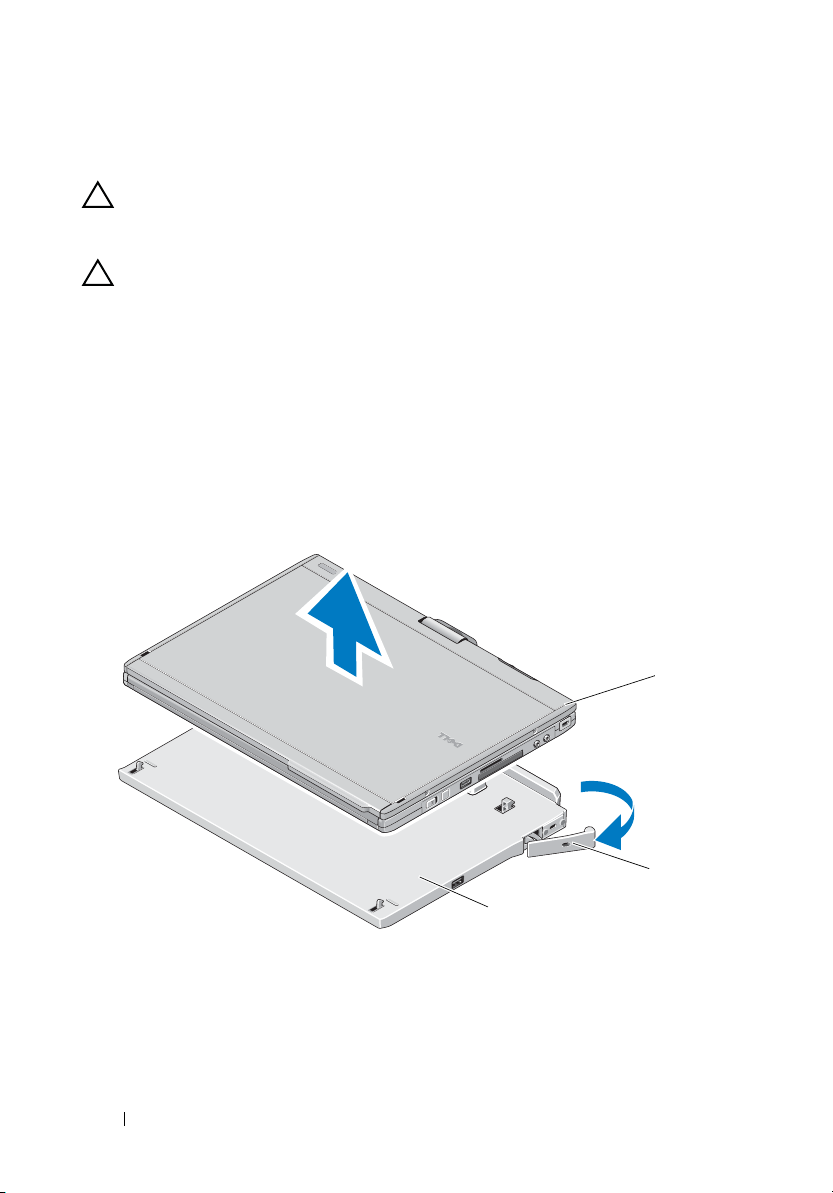
Undocking Your Tablet-PC From the Media Base
CAUTION: Never undock the Tablet-PC without first preparing the Tablet-PC for
undocking. If you undock before preparing the Tablet-PC, you will lose data and
the Tablet-PC may not recover normal operation for several minutes, if at all.
CAUTION: If the Tablet-PC does not have a charged battery in the battery bay, you
must shut down the Tablet-PC through the Windows Start menu and then undock
the Tablet-PC. If you undock the Tablet-PC without a battery before shutting it
down, you will lose data and the Tablet-PC may not recover normal operation for
several minutes, if at all.
1
Follow the procedures in "Before Docking or Undocking Your Tablet-PC to
the Media Base" on page 4.
2
If your media base is secured using an anti-theft device, unlock it.
3
Disconnect the AC adapter connector from the media base.
4
Pull the Tablet-PC release lever forward to release the Tablet-PC from the
media base.
1
3
1 Tablet-PC 2
3 media base
5
Lift the back of the Tablet-PC up and slide the Tablet-PC out towards the
release lever
back of the media base.
8 Media Base
2
Page 11
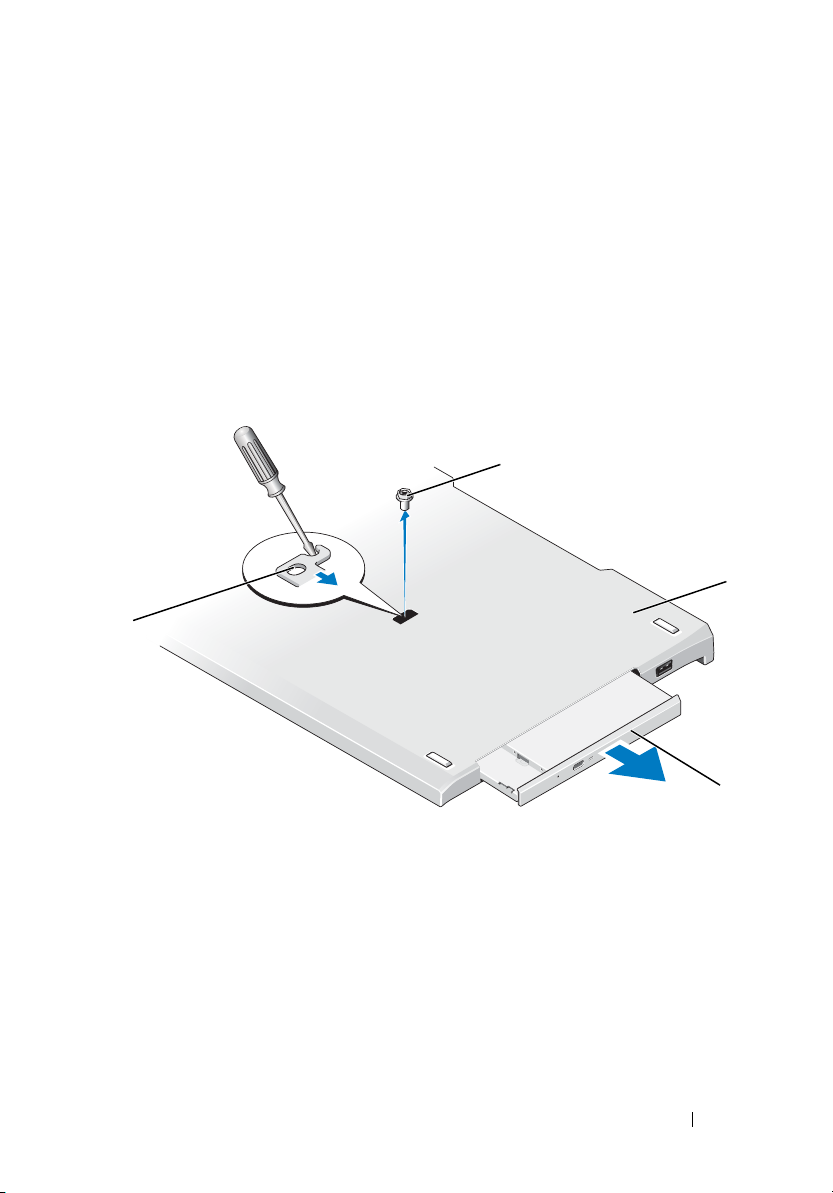
Removing and Installing the Optical Drive From
the Media Base
1
Undock the media base (see "Undocking Your Tablet-PC From the Media
Base" on page 8).
2
Save and close any open files or programs, and turn off the Tablet-PC.
3
To remove the optical drive:
a
Remove the screw that secures the optical drive to the media base.
b
Use your screwdriver to slide the drive out of the media bay.
1
4
2
1 screw 2 media base
3 optical drive 4 screw hole
4
To install the optical drive:
a
Insert the optical drive into the media bay on the media base.
b
Insert the securing screw that holds the optical drive in place.
5
Turn on the Tablet-PC.
The operating system automatically recognizes the new drive.
Media Base 9
3
Page 12

Media Base Specifications
Physical
Height 12.8 mm (0.50 inches)
Width 295.31 mm (11.63 inches)
Depth 222.56 mm (8.76 inches)
Weight (without optical drive) 0.488 kg (1.076 lb)
Storage
Optical Drive (optional) DVD-ROM/DVD+RW
Ports and Connectors
Network RJ-45 port for 10/100/1000 Mbits/second
Ethernet
USB three 4-pin USB-2.0 compliant connectors
Powered USB one 9-pin USB-2.0 compliant connector
Video
VGA connector
DVI connector
Serial 9-pin connector; 16550C-compatible UART
Audio headphone/speaker (line-out) mini connector
IEEE 1394a 4-pin serial connector
Docking 100-pin connector
15-pin VGA connector
24-hole connector
with 16-byte buffer
10 Media Base
Page 13

Dell™ Latitude™ XT2 Base para medios
Modelo PR12S
Page 14

Notas, precauciones y advertencias
NOTA: Una NOTA proporciona información importante que le ayudará a utilizar mejor
el ordenador.
PRECAUCIÓN: UnaPRECAUCIÓN indica la posibilidad de daños en el hardware o
pérdida de datos, y le explica cómo evitar el problema.
ADVERTENCIA: una ADVERTENCIA indica un posible riesgo de daño material, lesión
corporal o muerte.
____________________
La información contenida en este documento puede modificarse sin notificación previa.
© 2008 Dell Inc. Todos los derechos reservados.
La reproducción por cualquier medio de este documento sin el consentimiento por escrito de Dell Inc.
está terminantemente prohibida.
Marcas comerciales utilizadas en este texto: Dell, el logotipo de DELL y Latitude son marcas comerciales
de Dell Inc.; Microsoft y Windows son marcas comerciales registradas de Microsoft Corporation en los
Estados Unidos o en otros países.
Este documento puede incluir otras marcas y nombres comerciales para referirse a las entidades que son
propietarias de las mismas o a sus productos. Dell Inc. renuncia a cualquier interés sobre la propiedad de
marcas y nombres comerciales que no sean los suyos.
Modelo PR12S
Noviembre de 2008 N /P J304N Rev. A00
Page 15

Base para medios
Características de las vistas posterior e izquierda
1
2
3
4
5
6
7
8
9
10
11
12
1 Palanca de desbloqueo del
Tablet-PC
3 Conector de audio 4 IEEE 1394
5 Conector de vídeo VGA 6 Conector de interfaz de vídeo digital
7 Conector serie 8 Conector USB
9 Conector USB con alimentación 10 Conector de red
11 Conector USB 12 Dispositivo óptico en compartimento de
2 Conector del adaptador de CA
(DVI)
medios
Base para medios 13
Page 16

Características de la vistas posterior y derecha
1
2
3
4
1 Conector de acoplamiento 2 Ranura para cable de seguridad
3 Palanca de desbloqueo de Tablet-PC 4 Conector USB
Antes de acoplar o desacoplar su Tablet-PC a la
base para medios
ADVERTENCIA: Si utiliza una regleta de enchufes, proceda con precaución
cuando conecte el cable de alimentación de CA del adaptador a la regleta. En
algunas regletas es posible introducir incorrectamente el conector. La
introducción incorrecta del conector de corriente puede provocar daños
irreparables en la base para medios, además del riesgo que supone de descarga
eléctrica o incendio. Asegúrese de que la clavija de toma de tierra del enchufe de
alimentación está insertada en la conexión de toma de tierra de la regleta.
PRECAUCIÓN: Utilice siempre el adaptador de CA de Dell que se incluye con la
base para medios. Si usa cualquier otro adaptador de CA disponible en los
comercios, o el adaptador de modelos de equipos Dell anteriores, podría dañar la
base para medios o el Tablet-PC.
14 Base para medios
Page 17

PRECAUCIÓN: Cuando desconecte el cable del adaptador de CA del Tablet-PC o
de la base para medios, sujete el conector (no el cable) y tire de él firmemente
pero con cuidado, procurando no dañar el cable. Cuando enrolle el cable del
adaptador de CA, asegúrese de seguir el ángulo del conector del adaptador de CA
para evitar que se dañe el cable.
PRECAUCIÓN: Utilice la base para medios Latitude™ XT2 sólo con su Latitude
XT2. Si utiliza una base para medios de modelos anteriores de equipos Dell, podría
dañar la base para medios o el Tablet-PC.
Antes de acoplar su Tablet-PC
1
Guarde y cierre los archivos abiertos y salga de todos los programas activos.
2
Conecte el adaptador de CA al conector del adaptador de CA de la base
para medios y a la toma de alimentación eléctrica.
3
Antes de acoplar su Tablet-PC a la base para medios por
primera vez
sistema operativo del Tablet-PC debe haber finalizado su proceso de
instalación:
a
Asegúrese de que el Tablet-PC no está conectado (acoplado) a la base
para medios o a la batería.
b
Encienda el Tablet-PC.
c
Compruebe que se muestra el escritorio de Microsoft® Windows®.
d
Apague el Tablet-PC
.
, el
Base para medios 15
Page 18

Antes de desacoplar su Tablet-PC
1
Guarde y cierre los archivos abiertos y salga de todos los programas activos.
2
Establezca los valores de gestión de energía de su Tablet-PC para
asegurarse de que no entre en modo de suspensión, espera o hibernación al
cerrar (bajar) la pantalla:
a
Haga clic en el
aparezca la ventana emergente del icono
b
Haga clic en
c
En el menú desplegable
seleccione
icono
Más opciones de energía
Do nothing (No hacer nada)
Energía
When I close the lid (Al cerrar la tapa)
en el área de notificación para que
Energía
.
.
.
,
Fijación de la base para medios
NOTA: Si el Tablet-PC está acoplado a la base para medios y la base para medios
está fijada, no podrá desacoplar el Tablet-PC si no retira antes el dispositivo
antirrobo.
Fije un dispositivo antirrobo de los que se venden en los establecimientos
comerciales a la ranura del cable de seguridad de la base para medios.
Los dispositivos antirrobo por lo general incluyen una sección de cable de
filamentos metálicos que tiene sujeto un dispositivo de bloqueo que se abre
con una llave asociada. Para obtener instrucciones sobre la instalación de este
tipo de dispositivos antirrobo, consulte la documentación que acompaña al
dispositivo.
Acoplamiento de su Tablet-PC a la base para
medios
PRECAUCIÓN: Si está acoplando su Tablet-PC por primera vez, complete los
pasos que aparecen en "Antes de acoplar o desacoplar su Tablet-PC a la base
para medios" en la página 14 antes de continuar.
NOTA: Cuando haya acoplado por primera vez el Tablet-PC, la batería del Tablet-
PC o la conexión del adaptador de CA del Tablet-PC pueden activar la base para
medios si ésta no está conectada a un adaptador de CA.
16 Base para medios
Page 19

1
Realice los procedimientos descritos en "Antes de acoplar o desacoplar su
Tablet-PC a la base para medios" en la página 14.
2
Si se trata de la primera vez que realiza el acoplamiento a la base para
medios, asegúrese de que el Tablet-PC está apagado.
3
Alinee la parte trasera del Tablet-PC con la parte trasera de la base para
medios y descienda el Tablet-PC hasta la base para medios.
1
1 Tablet-PC 2 Base para medios
Base para medios 17
2
Page 20

4
Presione el Tablet-PC contra la base para medios hasta que se ajuste con
un sonido que determinará que ha quedado completamente fijado.
5
Encienda el Tablet-PC.
El sistema operativo reconoce la base para medios.
Desacoplamiento de Tablet-PC de la base para
medios
PRECAUCIÓN: No desacople nunca el Tablet-PC sin prepararlo primero para
ello. Si lo desacopla antes de preparar el Tablet-PC, perderá datos y puede que el
equipo no recupere el funcionamiento normal durante varios minutos.
PRECAUCIÓN: Si el Tablet-PC no dispone de una batería cargada en el
compartimento de baterías, deberá apagar el Tablet-PC con el menú Inicio de
Windows para desacoplar el Tablet-PC. Si desacopla el Tablet-PC sin batería
antes de apagarlo, perderá datos y puede que el equipo no recupere el
funcionamiento normal durante varios minutos.
1
Realice los procedimientos descritos en "Antes de acoplar o desacoplar su
Tablet-PC a la base para medios" en la página 14.
2
Si la base para medios se ha fijado mediante un dispositivo antirrobo,
desbloquéelo.
3
Desconecte el adaptador de CA de la base para medios.
18 Base para medios
Page 21

4
Tire de la palanca hacia atrás para desbloquear el Tablet-PC de la base para
medios.
2
3
1
1 Tablet-PC 2
3 Base para medios
5
Levante la parte trasera del Tablet-PC y deslícelo hacia la parte trasera de
la base para medios.
Palanca de liberación
Retirada e instalación del dispositivo óptico en la
base para medios
1
Desacople la base para medios (consulte "Desacoplamiento de Tablet-PC
de la base para medios" en la página 18).
2
Guarde y cierre los archivos o programas abiertos y apague el Tablet-PC.
3
Para extraer el dispositivo óptico:
a
Quite el tornillo que fija el dispositivo óptico a la base para medios.
b
Utilice el destornillador para deslizar el dispositivo hacia fuera del
compartimento de medios.
Base para medios 19
Page 22

1
4
1 Tornillo 2 Base para medios
3 Unidad óptica 4 Orificio para el tornillo
4
Para instalar el dispositivo óptico:
a
Inserte el dispositivo óptico dentro del compartimento para medios en
la base para medios.
b
Inserte el tornillo que fija el dispositivo óptico.
5
Encienda el Tablet-PC.
El sistema operativo reconoce automáticamente la nueva unidad.
2
3
20 Base para medios
Page 23

Especificaciones de la base para medios
Características físicas
Altura 12,8 mm (0,50 pulgadas)
Anchura 295,31 mm (11,63 pulgadas)
Profundidad 222,56 mm (8,76 pulgadas)
Peso (sin dispositivo óptico) 0,488 kg (1,076 libras)
En almacenamiento
Dispositivo óptico (opcional) DVD-ROM/DVD+RW
Puertos y conectores
Red Puerto RJ-45 para 10/100/1000 Mb/segundo
Ethernet
USB Tres conectores de 4 patas compatibles con
USB 2.0
USB alimentado Un conector de 9 patas compatible con
USB-2.0
Vídeo
Conector VGA
Conector DVI
Serie Conector de 9 patas; compatible con el
Audio Miniconector (line-out) para
IEEE 1394a Conector serie de 4 patas
Acoplamiento Conector de 100 patas
Conector VGA de 15 patas
Conector de 24 orificios
estándar 16550C UART con búfer de 16
bytes
auriculares/micrófonoo
Base para medios 21
Page 24

22 Base para medios
Page 25

Station d'accueil de Dell™ Latitude™ XT2
Modèle PR12S
Page 26

Remarques, précautions et avertissements
REMARQUE : Une REMARQUE indique des informations importantes qui vous aident à
mieux utiliser votre ordinateur.
PRECAUTION : Une PRECAUTION vous avertit d'un risque d'endommagement du
matériel ou de perte de données et vous indique comment éviter le problème.
AVERTISSEMENT : Un AVERTISSEMENT vous signale un risque d'endommagement
du matériel, de blessure corporelle ou de mort.
____________________
Les informations de ce document sont sujettes à modification sans préavis.
© 2008 Dell Inc. Tous droits réservés.
La reproduction de ce document de quelque manière que ce soit sans l'autorisation écrite de Dell Inc. est
strictement interdite.
Marques mentionnées dans ce document : Dell, le logo DELL et Latitude sont des marques de Dell Inc. ;
Microsoft et Windows sont des marques déposées de Microsoft Corporation aux Etats-Unis et/ou dans
d'autres pays.
Les autres marques et noms de produits pouvant être mentionnés dans ce document sont reconnus comme
appartenant à leurs propriétaires respectifs. Dell Inc. décline tout intérêt dans l'utilisation des marques
déposées et des noms de marques ne lui appartenant pas.
Modèle PR12S
Novembre 2008 P/N J304N Rév. A00
Page 27

Station d'accueil
Fonctionnalités vue arrière gauche
1
2
3
4
5
6
7
8
9
10
1
Levier de dégagement du Tablet PC
3 Connecteur audio 4 IEEE 1394
5 Connecteur vidéo VGA 6 Connecteur d'interface vidéo
7 connecteur série 8 connecteur USB
9 connecteur USB alimenté 10 connecteur réseau
11 connecteur USB 12 lecteur optique dans la baie de média
2 Connecteur d'adaptateur secteur
numérique (DVI)
11
12
Station d'accueil 25
Page 28

Fonctionnalités vue supérieure droite
1
4
1 connecteur d'amarrage 2 fente pour câble de sécurité
3 Levier de dégagement du Tablet PC 4 connecteur USB
Avant de connecter ou de déconnecter votre
2
3
Tablet PC à la station d'accueil
AVERTISSEMENT : Si vous utilisez une prise multiple, soyez prudent lorsque
vous y raccordez le câble d'alimentation de l'adaptateur CA. Certaines prises
multiples peuvent permettre l'insertion incorrecte d'une prise. L'insertion
incorrecte de la prise de courant peut provoquer un dommage irréparable sur
votre station d'accueil ainsi qu'un risque de choc électrique et/ou d'incendie.
Veillez à bien insérer le contact de mise à la terre de la prise de courant dans le
contact de mise à la terre correspondant de la prise multiple.
PRECAUTION : Utilisez exclusivement l'adaptateur CA Dell livré avec la station
d'accueil. En cas d'utilisation de tout autre adaptateur CA disponible dans le
commerce ou de l'adaptateur CA d'un ancien modèle d'ordinateur Dell, vous
pouvez endommager la station d'accueil ou le Tablet PC.
26 Station d'accueil
Page 29

PRECAUTION : Lorsque vous déconnectez le câble de l'adaptateur CA Dell du
Tablet PC ou de la station d'accueil, saisissez le connecteur, pas le câble luimême, et tirez dessus fermement mais sans forcer, afin d'éviter d'endommager le
câble. Lorsque vous enroulez le câble de l'adaptateur CA, vérifiez que vous suivez
l'angle du connecteur sur l'adaptateur CA afin d'éviter d'endommager le câble.
PRECAUTION : Utilisez la station d'accueil Latitude™ XT2 uniquement avec
votre Latitude XT2. Si vous utilisez une station d'accueil d'un ancien modèle
d'ordinateur Dell, vous risquez d'endommager la station d'accueil ou le Tablet PC.
Avant d'amarrer votre Tablet PC à la station d'accueil
1
Enregistrez et fermez tous les fichiers et quittez tous les programmes.
2
Reliez l'adaptateur CA au connecteur de l'adaptateur CA de la station
d'accueil et à une prise électrique.
3
Avant que vous n'amarriez votre Tablet PC à la station d'accueil pour la
première fois
, le système d'exploitation du Tablet PC doit avoir achevé son
processus d'installation :
a
Assurez-vous que le Tablet PC n'est
pas
connecté (amarré) à la station
d'accueil ou à la batterie de portable.
b
Enclenchez le Tablet PC.
c
Vérifiez que le bureau Microsoft® Windows® apparaît.
d
Eteignez le Tablet PC
.
Station d'accueil 27
Page 30

Avant de déconnecter votre Tablet PC de la station d'accueil
1
Enregistrez et fermez tous les fichiers et quittez tous les programmes.
2
Définissez les paramètres de gestion de l'alimentation électrique de votre
Tablet PC afin qu'il n'entre pas en mode veille ou veille prolongée lorsque
vous fermez (abaissez) l'écran :
a
Cliquez sur l'
icône
Alimentation
de Windows dans la zone de
notification pour afficher la fenêtre contextuelle de l'icône
Alimentation
b
Cliquez sur
c
Dans le menu déroulant
couvercle)
.
More power options (plus d'options d'alimentation)
When I close the lid (Lorsque je ferme le
, sélectionnez
Do nothing (Ne rien faire).
.
Protéger la station d'accueil
REMARQUE : Si le Tablet PC est amarré à la station d'accueil et que cette dernière
est protégée, vous ne pouvez pas déconnecter le Tablet PC avant d'avoir
préalablement enlevé le dispositif antivol.
Attachez un dispositif antivol disponible dans le commerce à l'emplacement
pour le câble de sécurité de la station d'accueil.
Les dispositifs antivol sont généralement composés d'un câble galvanisé avec
un dispositif de fermeture et une clé associée. Des instructions détaillées sur
l'installation de ce type de dispositif antivol sont généralement fournies avec
le dispositif.
Connecter votre Tablet PC à la station d'accueil
PRECAUTION : Si c'est la première fois que vous amarrez votre Tablet PC,
complétez d'abord les étapes décrites dans "Avant de connecter ou de
déconnecter votre Tablet PC à la station d'accueil" à la page 26 avant de continuer.
REMARQUE : Après avoir amarré le Tablet PC une première fois, la batterie du
Tablet PC ou la connexion de l'adaptateur AC du Tablet PC peuvent alimenter la
station d'accueil si elle n'est pas connectée à un adaptateur AC.
28 Station d'accueil
Page 31

1
Suivez les procédures décrites dans la section "Avant de connecter ou de
déconnecter votre Tablet PC à la station d'accueil" à la page 26.
2
Si vous amarrez votre Tablet PC à la station d'accueil pour la première fois,
assurez-vous qu'il soit éteint.
3
Alignez l'arrière du Tablet PC avec l'arrière de la station d'accueil, puis
poser le Tablet PC sur la station d'accueil.
1
1 Tablet PC 2 périphérique d'amarrage
Station d'accueil 29
2
Page 32

4
Maintenez le Tablet PC sur la station d'accueil jusqu'à ce que le déclic se
fasse et que le Tablet PC soit bien fixé.
5
Enclenchez le Tablet PC.
Le système d'exploitation reconnaît la station d'accueil.
Déconnecter votre Tablet PC de la station
d'accueil
PRECAUTION : Ne déconnecter jamais le Tablet PC de la station d'accueil avant
de l'y avoir préalablement préparé. Si vous déconnectez le Tablet PC sans l'y avoir
préalablement préparé, vous allez perdre des données et le Tablet PC risque de ne
pas reprendre un fonctionnement normal pendant plusieurs minutes, voire plus du
tout.
PRECAUTION : Si le Tablet PC n'a pas de batterie chargée dans la baie de
batterie, vous devez l'éteindre depuis le menu Démarrer de Windows puis
l'enlever de la station d'accueil. Si vous déconnectez le Tablet PC sans batterie
avant de l'éteindre, vous perdrez des données et le Tablet PC risque de ne pas
reprendre un fonctionnement normal pendant plusieurs minutes, voire plus du tout.
1
Suivez les procédures décrites dans la section "Avant de connecter ou de
déconnecter votre Tablet PC à la station d'accueil" à la page 26.
2
Si votre station d'accueil est protégée par un dispositif antivol,
déverrouillez-le.
3
Déconnectez le connecteur de l'adaptateur CA de la station d'accueil.
30 Station d'accueil
Page 33

4
Tirer le levier de dégagement du Tablet PC vers l'avant afin de
désolidariser le Tablet PC de la station d'accueil.
3
1
2
1 Tablet PC 2
3 périphérique d'amarrage
5
Soulever l'arrière du Tablet PC et retirez-le de la station d'accueil.
levier de dégagement
Station d'accueil 31
Page 34

Enlever et installer le lecteur optique de la
station d'accueil
1
Déconnectez la station d'accueil (voir"Déconnecter votre Tablet PC de la
station d'accueil" à la page 30).
2
Enregistrez et fermez tous les fichiers et programmes, puis éteignez votre
Tab l e t P C .
3
Pour enlever le lecteur optique :
a
Retirez la vis qui fixe le lecteur optique à la baie de média.
b
Utilisez votre tournevis pour ôter le lecteur de la baie de média.
1
4
2
1 vis 2 station d'accueil
3 lecteur optique 4 trou de vis
4
Pour installer le lecteur optique :
a
Insérez le lecteur optique dans la baie de média de la station d'accueil.
b
Insérez la vis de sécurité qui maintient le lecteur optique en place.
5
Enclenchez le Tablet PC.
Le système d'exploitation reconnaît automatiquement le nouveau lecteur.
32 Station d'accueil
3
Page 35

Spécifications de la station d'accueil
Spécifications physiques
Hauteur 12,8 mm
Largeur 295,31 mm
Profondeur 222,56 mm
Poids (sans le lecteur optique) 0,488 kg
Stockage
Lecteur optique (en option) DVD-ROM/DVD+RW
Ports et connecteurs
Réseau port RJ-45 pour Ethernet
10/100/1000 Mbits/seconde
USB trois connecteurs à 4 broches conformes à la
norme USB 2.0
USB alimenté un connecteur à 9 broches conforme à la
norme USB 2.0
Vidéo
connecteur VGA
connecteur DVI
Série connecteur à 9 broches ; UART compatible
Audio Connecteur miniature pour écouteurs/haut-
IEEE 1394a connecteur série à 4 broches
Station d'accueil Connecteur à 100 broches
connecteur VGA à 15 broches
connecteur à 24 trous
16550C avec une mémoire tampon de 16
octets
parleurs (sortie ligne)
Station d'accueil 33
Page 36

34 Station d'accueil
Page 37

Base de mídia Dell™ Latitude™ XT2
Modelo PR12S
Page 38

Notas, Avisos e Advertências
NOTA: uma NOTA indica informações importantes para utilizar melhor o computador.
ADVERTÊNCIA: Um AVISO indica possíveis danos ao hardware ou a perda de dados
e ensina como evitar o problema.
AVISO: Um AVISO indica um potencial de danos à propriedade, de lesões corporais
ou mesmo de morte.
____________________
As informações deste documento estão sujeitas a alteração sem aviso prévio
© 2008 Dell Inc. Todos os direitos reservados.
É terminantemente proibida qualquer forma de reprodução deste produto sem a permissão por escrito da
Dell Inc.
Marcas comerciais usadas neste texto: Dell, o logo da DELL e Latitude são marcas comerciais registradas
da Dell Inc.; Microsoft e Windows são marcas comerciais registradas da Microsoft Corporation nos Estados
Unidos e/ou outros países.
Os demais nomes e marcas comerciais podem ser usados neste documento como referência às entidades
detentoras de tais marcas e nomes ou aos seus produtos. A Dell Inc. declara que não tem interesse de
propriedade quanto a nomes e marcas comerciais de terceiros.
Modelo PR12S
Novembro de 2008 P/N J304N Rev. A00
Page 39

base de mídia
Recursos da vista traseira e esquerda
1
2
3
4
5
6
7
8
9
10
1
Alavanca de liberação do Tablet PC
3 conector de áudio 4 IEEE 1394
5 conector de vídeo VGA 6 conector de interface vídeo digital (DVI)
7 conector serial 8 conector USB
9 conector USB energizado 10 conector de rede
11 conector USB 12 unidade óptica na baia de mídia
2 conector do adaptador CA
11
12
base de mídia 37
Page 40

Recursos da vista superior e direita
1
2
3
4
1 conector de encaixe 2 slot do cabo de segurança
3 Alavanca de liberação de Tablet PC 4 conector USB
Antes de acoplar ou desacoplar seu Tablet PC da
base de mídia
AVISO: Se você estiver utilizando um filtro de linha com várias tomadas elétricas,
conecte o cabo de alimentação do adaptador CA ao filtro com cuidado. Alguns
filtros de linha podem permitir a inserção incorreta do conector. A inserção
incorreta do conector de energia pode resultar em dano permanente à base de
mídia, bem como em risco de choque elétrico e/ou incêndio. Verifique se o pino de
aterramento do plugue de energia está inserido no contato de aterramento
correspondente do filtro de linha.
ADVERTÊNCIA: Sempre use apenas o adaptador CA da Dell fornecido com a
base de mídia. Se você usar outro adaptador CA disponível no mercado ou o
adaptador CA de modelos mais antigos de computadores Dell, você pode danificar
a base de mídia ou o Tablet PC.
38 base de mídia
Page 41

ADVERTÊNCIA: Ao desconectar o cabo do adaptador CA Dell do Tablet PC ou da
base de mídia, segure o conector, e não o cabo em si, e puxe com firmeza, mas
delicadamente, para não danificar o cabo. Quando você enrolar o cabo do
adaptador CA, certifique-se de seguir o ângulo do conector no adaptador CA para
evitar danificar o cabo.
ADVERTÊNCIA: Utilize apenas a base de mídia Latitude™ XT2 com seu Latitude
XT2. A utilização de uma base de mídia de modelos anteriores de computadores
Dell poderá danificar a base de mídia ou o Tablet PC.
Antes de acoplar seu Tablet PC
1
Salve e feche todos os arquivos e programas abertos.
2
Conecte o adaptador CA ao respectivo conector da base de mídia e à
tomada elétrica.
3
Antes de acoplar seu Tablet PC à base de mídia pela
primeira vez
, o sistema
operacional do Tablet PC deve ter concluído seu processo de instalação:
a
Verifique se o Tablet PC
não
está conectado (acoplado) à base de
mídia ou bateria.
b
Ligue o Tablet PC.
c
Verifique se a área de trabalho do Microsoft® Windows® aparece.
d
Desligue o Tablet PC
.
base de mídia 39
Page 42

Antes de desacoplar seu Tablet PC
1
Salve e feche todos os arquivos e programas abertos.
2
Faça as configurações de gerenciamento de energia do Tablet PC para
assegurar que este não entre em modo de repouso, espera ou hibernação ao
fechar (abaixar) o monitor:
a
Clique no
para exibir a janela pop-up do ícone
b
Clique em
c
No menu suspenso
selecione
ícone
de
energia do Windows na área de Notificação
Mais opções de energia
When I close the lid
Não fazer nada.
Energia
.
.
(Quando eu fechar a tampa),
Proteção da base de mídia
NOTA: Se o Tablet PC estiver acoplado à base de mídia e esta estiver protegida,
não será possível desacoplar o Tablet PC sem antes remover o dispositivo antifurto.
Conecte um dispositivo antifurto disponível comercialmente ao encaixe do
cabo de segurança na base de mídia.
Os dispositivos antifurto normalmente contêm um segmento de cabo de
revestimento metálico com um dispositivo de travamento e a respectiva
chave. Para obter instruções sobre como instalar este tipo de dispositivo
antifurto, consulte a documentação fornecida com o dispositivo.
Acoplamento do Tablet PC à base de mídia
ADVERTÊNCIA: Se estiver acoplando o Tablet PC pela primeira vez, conclua as
etapas em "Antes de acoplar ou desacoplar seu Tablet PC da base de mídia" na
página 38 antes de prosseguir.
NOTA: Depois de acoplar o Tablet PC pela primeira vez, sua bateria ou conexão do
adaptador CA pode alimentar a base de mídia, caso esta não esteja conectada a
um adaptador CA.
1
Execute os procedimentos descritos em "Antes de acoplar ou desacoplar
seu Tablet PC da base de mídia" na página 38.
2
Se esta for a primeira vez que o Tablet PC é acoplado à base de mídia,
verifique se ele está desligado.
40 base de mídia
Page 43

3
Alinhe a traseira do Tablet PC à traseira da base de mídia e o abaixe sobre a
base de mídia.
1
1 Tablet PC 2 base de mídia
4
Pressione o Tablet PC sobre a base de mídia até ouvir um clique e o Tablet
PC estar assentado com firmeza.
5
Ligue o Tablet PC.
O sistema operacional reconhece a base de mídia.
base de mídia 41
2
Page 44

Desacoplamento do Tablet PC da base de mídia
ADVERTÊNCIA: Nunca desacople o Tablet PC sem antes prepará-lo para o
desacoplamento. Ao desacoplar o Tablet PC sem antes prepará-lo, você perderá
dados e o Tablet PC talvez não recupere a operação normal durante algum tempo,
podendo inclusive não ser capaz de recuperá-la permanentemente.
ADVERTÊNCIA: Se não houver uma bateria carregada no respectivo
compartimento do Tablet PC, desligue o Tablet PC usando o menu Iniciar do
Windows e, em seguida, desacople o Tablet PC. Ao desacoplar o Tablet PC sem
uma bateria antes de desligá-lo, você perderá os dados e o Tablet PC talvez não
recupere a operação normal durante algum tempo, podendo inclusive não ser
capaz de recuperá-la permanentemente.
1
Execute os procedimentos descritos em "Antes de acoplar ou desacoplar
seu Tablet PC da base de mídia" na página 38.
2
Se sua base de mídia estiver protegida com um dispositivo antifurto,
destrave-o.
3
Desconecte o conector do adaptador CA da base de mídia.
4
Puxe a alavanca de liberação do Tablet PC para a frente, para soltá-lo da
base de mídia.
1
3
1 Tablet PC 2
3 base de mídia
5
Erga a traseira do Tablet PC e deslize-o em direção à traseira da base de mídia.
alavanca de liberação
42 base de mídia
2
Page 45

Remoção e instalação da unidade óptica na base
de mídia
1
Desacople a base de mídia (consulte "Desacoplamento do Tablet PC da
base de mídia" na página 42).
2
Salve e feche os arquivos ou programas abertos e desligue o Tablet PC.
3
Para remover a unidade óptica:
a
Remova o parafuso que prende a unidade óptica à base de mídia.
b
Use a chave de fenda para deslizar a unidade para fora do
compartimento de mídia.
1
2
4
1 parafuso 2 base de mídia
3 unidade óptica 4 orifício do parafuso
4
Para instalar a unidade óptica:
a
Insira a unidade óptica na baia de mídia da base de mídia.
b
Insira o parafuso de fixação que mantém a unidade óptica no lugar.
5
Ligue o Tablet PC.
O sistema operacional reconhece a nova unidade automaticamente.
base de mídia 43
3
Page 46

Especificações da base de mídia
Características físicas
Altura 12,8 mm
Largura 295,31 mm
Profundidade 222,56 mm
Peso (sem a unidade óptica) 0,488 kg
De armazenamento
Unidade óptica (opcional) DVD-ROM/DVD+RW
Portas e conectores
Rede Porta RJ-45 para Ethernet de 10/100/1000
Mbits/segundo
USB Três conectores de 4 pinos compatíveis com
USB 2.0
USB com energia Um conector de 9 pinos compatível com
USB-2.0
Vídeo
conector VGA
conector DVI
Serial conector de 9 pinos - com UART compatível
Áudio miniconector de fone de ouvido/alto-falante
IEEE 1394a conector serial de 4 pinos
Acoplamento conector de 100 pinos
conector de vídeo VGA de 15 pinos
Conector de 24 furos
com 16550C e buffer de 16 bytes
(saída de linha)
44 base de mídia
Page 47

Page 48

Printed in the U.S.A.
Impreso en los EE. UU.
Imprimé aux Etats-Unis.
Impresso nos EUA
www.dell.com | support.dell.com
 Loading...