

Dell Latitude XT2 User Manual [zh]
About Warnings and Cautions
A WARNING indicates a potential for property damage, personal injury, or death.
Battery Slice
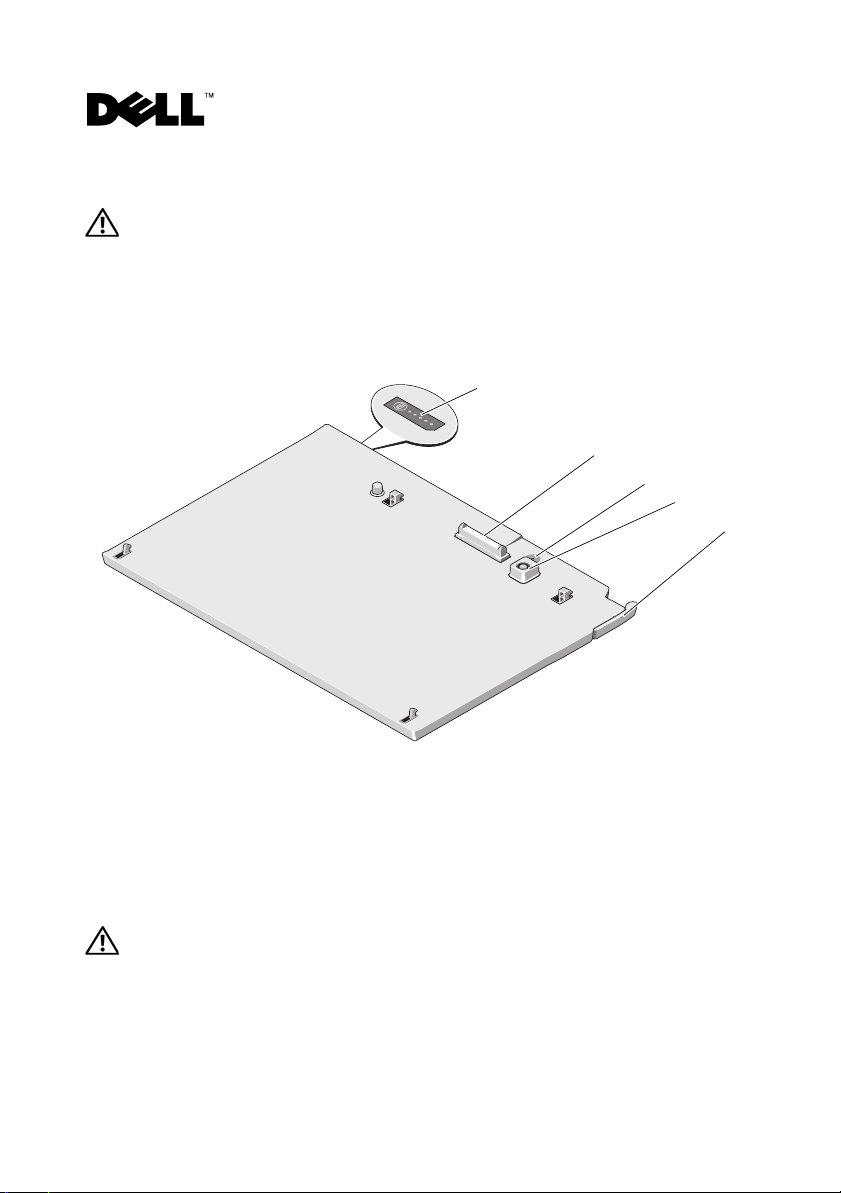
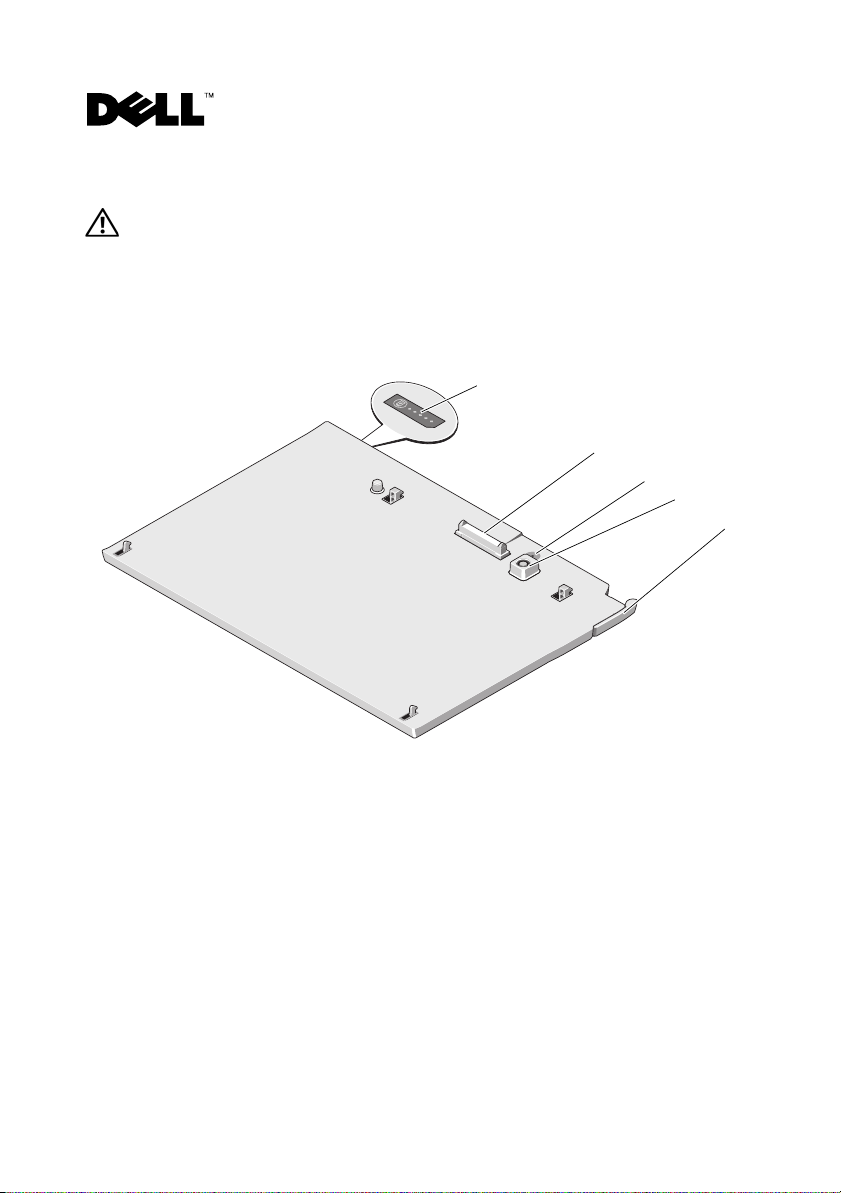
Features
1
2
3
4
5
1 battery-slice status LED 2 docking connector
3 power status light 4 AC adapter connector
5 release lever
Setting Up Your Battery Slice
WARNING: The AC adapter works with electrical outlets worldwide. However,
power connectors and power strips vary among countries. Using an incompatible
cable or improperly connecting the cable to the power strip or electrical outlet may
cause fire or damage the equipmentt.
November 2008
CAUTION: Always use the Dell AC adapter that came with your Tablet-PC. If you use
any other commercially available AC adapter—or the AC adapter from earlier models
of Dell computers—you may damage the battery slice or the Tablet-PC.
CAUTION: Use the Latitude™ XT2 battery slice with your Latitude XT2 only. If you use
a battery slice from other models of Dell computers you may damage the battery slice
or the Tablet-PC.
CAUTION: When you disconnect the Dell AC adapter cable from the Tablet-PC, grasp
the connector, not the cable itself, and pull firmly but gently to avoid damaging the
cable. When you wrap the AC adapter cable, ensure that you follow the angle of the
connector on the AC adapter to avoid damaging the cable.
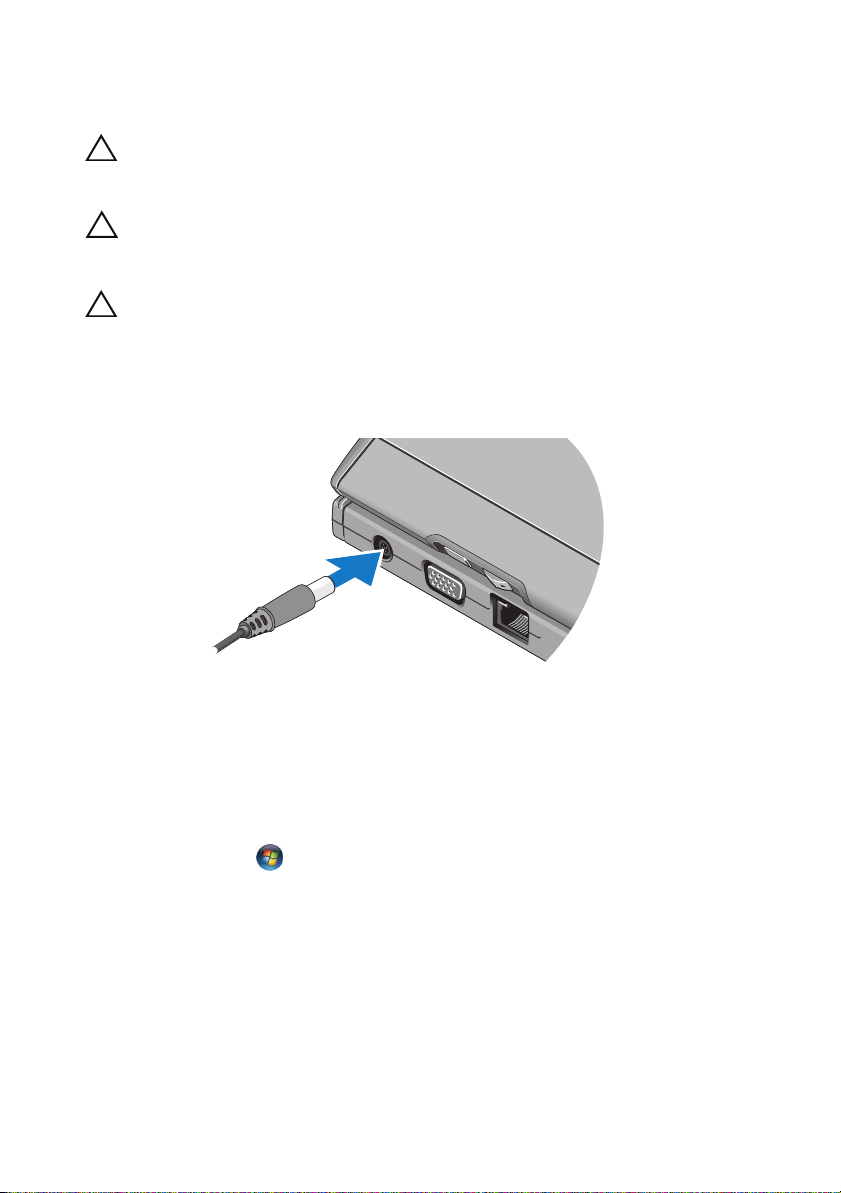
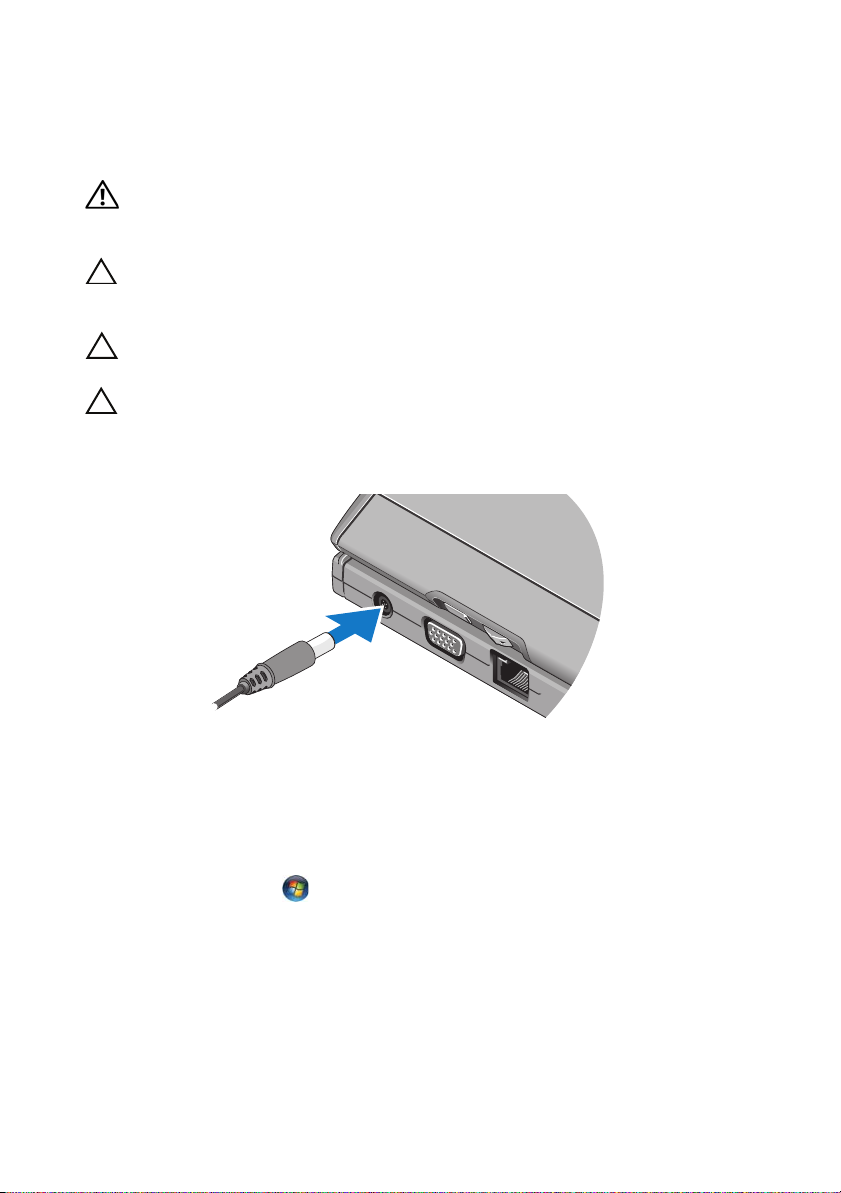
1
Connect the AC adapter to the AC adapter connector on your Tablet-PC and
to an electrical outlet.
2
Before you dock or undock your Tablet-PC from the battery slice, save and
close any open files, and exit any open programs.
3
Before you undock your Tablet-PC, set your Tablet-PC power management
settings so that the Tablet-PC does not enter sleep, standby, or hibernate
mode when you close (lower) the display:
Windows Vista
®
a
Click
Start →
Control Panel→ Mobile PC→ Power Options
Change what closing the lid does
b
Under the
Windows
a
Click
Options
b
Under the
Do nothing
When I close the lid
®
XP
Start→ Control Panel→ Performance and Maintenance→ Power
→
Advanced
.
When I close the lid of my portable computer
.
.
drop-down menu, select
→
Do nothing.
, select

Docking Your Tablet-PC to the Battery Slice
NOTE: After docking the Tablet-PC to the battery slice, the Tablet-PC AC adapter will
also charge the battery slice.
1
Follow the procedures in "Setting Up Your Battery Slice" on page 1.
2
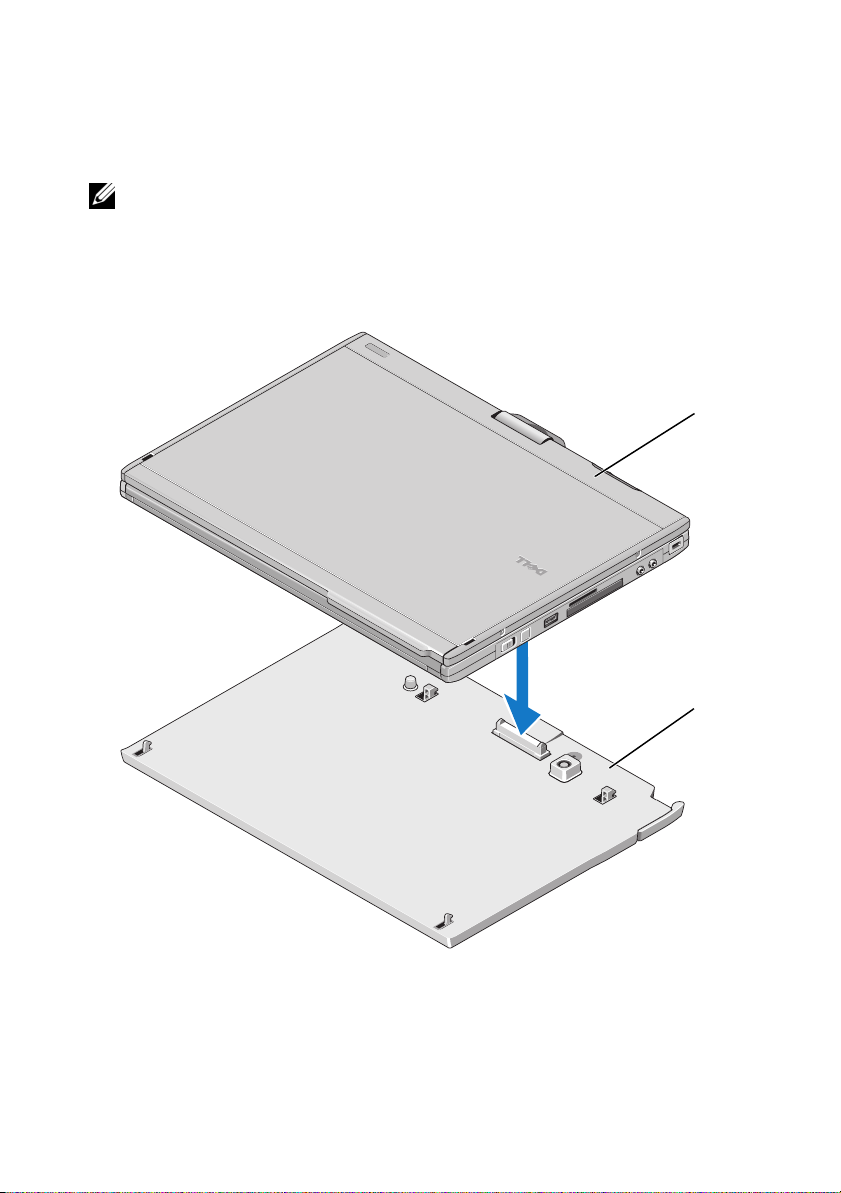
Align the back of the Tablet-PC with the back of the battery slice, and lower
the front of the Tablet-PC onto the
battery slice
.
1
2
1 Tablet-PC 2 battery slice
3
Press the Tablet-PC onto the
battery slice
until you feel a click and the
Tablet-PC is firmly seated.
4
Turn on the Tablet-PC.
The operating system recognizes the
battery slice
.
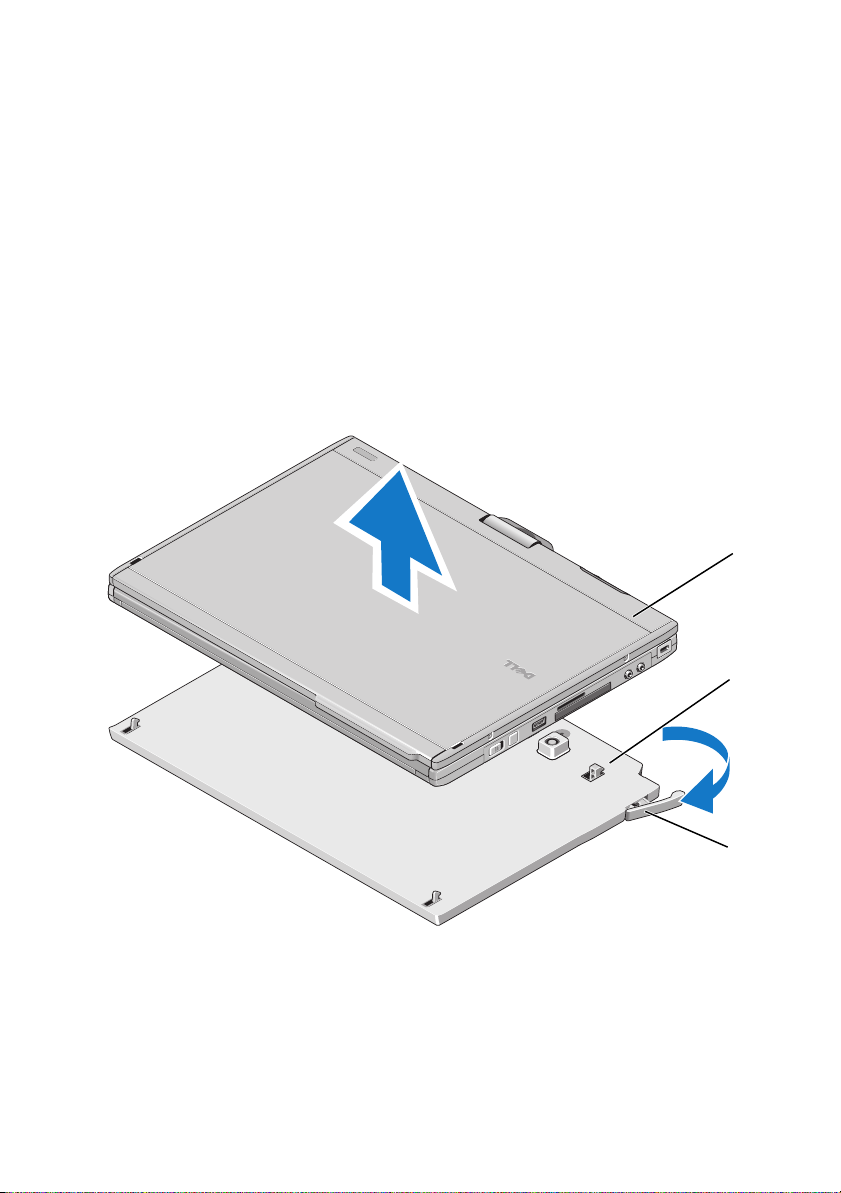
Undocking Your Tablet-PC From the Battery Slice
1
Follow the procedures in "Setting Up Your Battery Slice" on page 1.
2
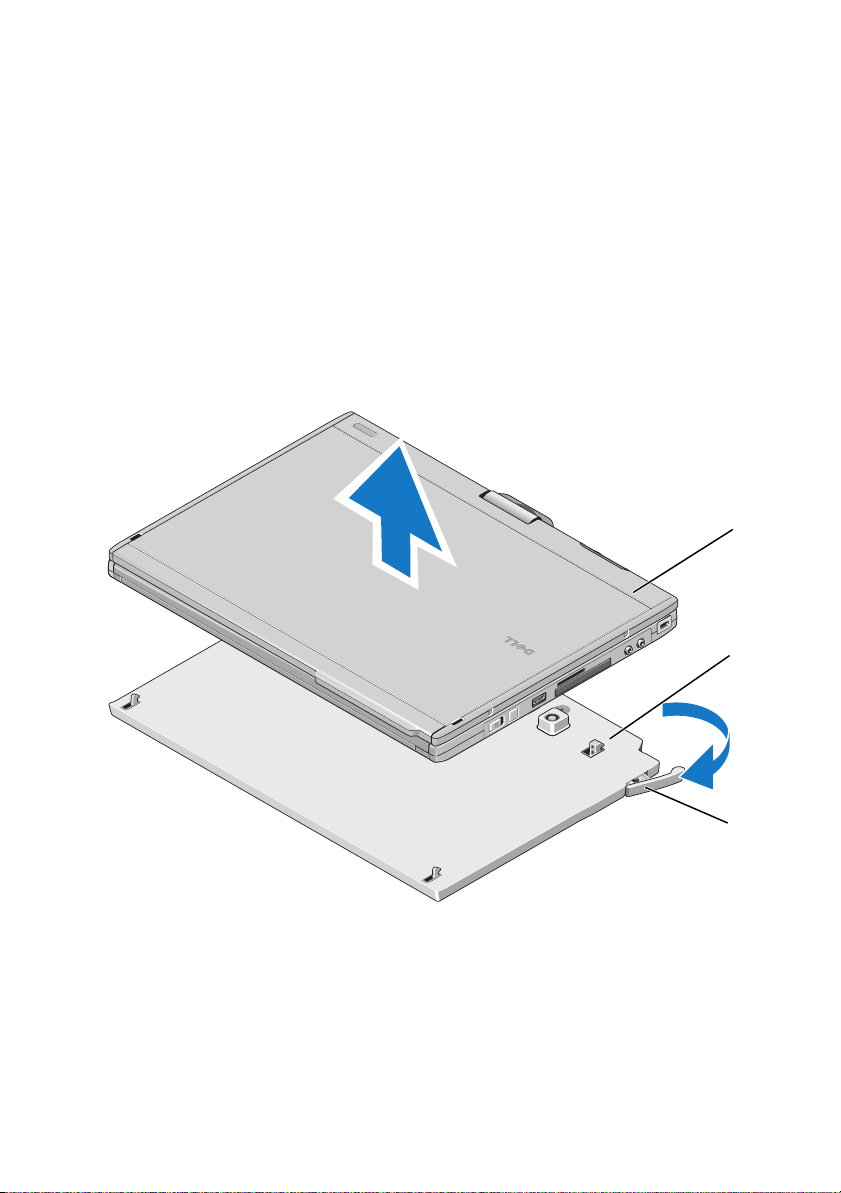
Pull the Tablet-PC release lever (see "Features" on page 1 for more
information) to release the Tablet-PC from the battery slice.
1
2
1 Tablet-PC 2 battery slice
release lever
3
3
Lift the back of the Tablet-PC up and slide the Tablet-PC out towards the
back of the battery slice.
3

Charging Your Battery Slice
You can recharge your battery slice independent of the Tablet-PC using the
AC adapter that shipped with your Tablet-PC. Your battery slice will also
recharge whenever it is docked to the Tablet-PC and the Tablet-PC is attached
to the electrical outlet using the AC adapter.
Battery-Slice Power-Status LED Codes
Your battery slice includes a power status LED that can indicate the following
states:
LED Codes Status
Blinking amber, off, blue, off,
amber, off, blue, off
Blinking amber, off, amber, off,
amber, off, amber, off, long blue,
long off
Blinking amber, off, amber, off,
amber, off, amber, off
LED off Battery in full charge mode with
Steady blue light Battery in charge mode with AC adapter
You are trying to use an unsupported,
non-Dell AC adapter to power your
tablet-PC.
Temporary battery failure with AC
adapter present.
Fatal battery failure with AC adapter
present.
AC adapter present.
present.
Battery Slice Specifications
Physical
Height 8.5 mm (0.33 inches)
Width 295.32 mm (11.63 inches)
Depth 213.32 mm (8.4 inches)
Weight 0.60 kg (1.32 lb)

AC Adapter
Input voltage 100–240 VAC
Input current (maximum) 1.5 A
Input frequency 50–60 Hz
Output current (maximum) 3.34 A
Output power 65 W
Rated output voltage 19.5 VDC
Dimensions and weight:
Height
Width
Depth
28.3 mm (1.11 inches)
57.8 mm (2.28 inches)
137.2 mm (5.40 inches)
Weight (with cables) 0.36 kg (.79 lb)
Ports and Connectors
Docking 100-pin connector
____________________
Information in this document is subject to change without notice.
© 2008 Dell Inc. All rights reserved.
Reproduction of this material in any manner whatsoever without the written permission of Dell Inc. is
strictly forbidden.
Trademarks used in this text: Dell, the DELL logo, and Latitude are trademarks of Dell Inc.; Microsoft,
Windows, Windows Vista, and the Windows Vista start button are either trademarks or registered trademarks
of Microsoft Corporation in the United States and/or other countries.
Other trademarks and trade names may be used in this document to refer to either the entities claiming the
marks and names or their products. Dell Inc. disclaims any proprietary interest in trademarks and trade
names other than its own.
关于警告和注意
“警告”表示可能会造成财产损失、人身伤害甚至死亡。
电池片
部件
1
2
3
4
5
1
电池片状态 LED
3
电源状态指示灯
5
释放拉杆
2008 年 11 月
2
对接连接器
4
交流适配器连接器
安装电池片
警告: 此交流适配器可以与世界各地的电源插座配合使用。但是,电源连接器
和配电盘会因国家 / 地区的不同而有所差异。使用不符合标准的电缆或未正确
地将电缆连接至配电盘或电源插座可能会引起火灾或损坏设备。
注意: 请始终使用 Tablet PC 附带的 Dell 交流适配器。如果您使用其它任何可从
市面上购买的交流适配器,或者早期型号的 Dell 计算机上的交流适配器,可能
会损坏电池片或 Tablet PC。
注意: Latitudd™ XT2 电池片仅可与 Latitude XT2 配合使用。如果您使用其他型号
的 Dell 计算机中的电池片,则可能会损坏电池片或 Tablet PC。
注意: 从 Tablet PC 上拔下 Dell 交流适配器电缆时,请握住连接器 (而不是电
缆本身),并稳而轻地将其拔出,以免损坏电缆。当您缠绕交流适配器电缆时,
请确保顺着交流适配器连接器的角度进行,以免损坏电缆。
1
将交流适配器连接至
Tablet PC
上的交流适配器连接器和电源插座。
2将 Ta b l e t P C
对接至电池片或断开对接之前,请保存并关闭所有打开的文
件,并且退出所有打开的程序。
3
在将
Tablet PC
断开对接之前,设置您的
您合上 (放低)显示屏时,
Windows Vista
a
单击 “开始” →“控制面板”→“移动
®
“更改关闭盖的作用”。
b
从 “关闭盖子时”下拉式菜单中,选择 “不采取任何措施”。
Windows® XP
a
单击 “开始”→“控制面板”→“性能和维护”→“电源选项”
“高级”。
b
从 “在合上便携式计算机时”中,选择 “不采取任何措施”。
Ta b l e t P C
Tablet PC
电源管理设置,以便当
不会进入睡眠、待机或休眠模式:
PC”→
“电源选项”
→
→
将您的 Tablet PC 对接至电池片
注: 将 Tablet PC 对接至电池片后, Tablet PC 交流适配器也将为电池片充电。
1
请按照第
2将 Ta b l e t P C
池片
8
页上的 “安装电池片”中的步骤进行操作。
的后端与电池片的后端对齐,然后放低
上。
Tablet PC
的前端至
1
2
电
1 Tablet PC 2
电池片
3将 Ta b l e t P C 按到电池片
4
打开
Tablet PC
操作系统将识别
。
电池片
上,直到听到咔嗒声并且
。
断开 Tablet PC 与电池片的对接
1
请按照第
2
拉动
从电池片释放
8
页上的 “安装电池片”中的步骤进行操作。
Tablet PC
释放拉杆 (请参阅第
Tablet PC
。
7
页上的 “部件”获取详细信息)以
Ta b l e t P C
已稳固就位。
1
2
1 Tablet PC 2
3
释放拉杆
3
向上提起
Ta b l e t P C
的后端,并使
电池片
Ta b l e t P C
3
向电池片后端滑出。
 Loading...