

Page 1

Dell™ Latitude™ XT
Quick Reference Guide
Model PP12S
www.dell.com | support.dell.com
Page 2

Notes, Notices, and Cautions
NOTE: A NOTE indicates important information that helps you make better use of
your computer.
NOTICE: A NOTICE indicates either potential damage to hardware or loss of data
and tells you how to avoid the problem.
CAUTION: A CAUTION indicates a potential for property damage, personal injury,
or death.
____________________
Information in this document is subject to change without notice.
© 2007 Dell Inc. All rights reserved.
Reproduction in any manner whatsoever without the written permission of Dell Inc. is strictly
forbidden.
Trademarks used in this text: Dell, the DELL logo, Wi-Fi Catcher, ExpressCharge, and Latitude are
trademarks of Dell Inc.; Microsoft, Windows, and Windows Vista are either trademarks or registered
trademarks of Microsoft Corporation in the United States and/or other countries.
Other trademarks and trade names may be used in this document to refer to either the entities claiming
the marks and names or their products. Dell Inc. disclaims any proprietary interest in trademarks and
trade names other than its own.
Model PP12S
December 2007 P/N DR977 Rev. A01
Page 3

Contents
Resources . . . . . . . . . . . . . . . . . . . . . . . . . 5
Finding Information
. . . . . . . . . . . . . . . . . . 5
Setting Up Your Computer
. . . . . . . . . . . . . 12
About Your Tablet-PC
Front View
Left Side View
Right Side View
Back View
Bottom View
Pen View
Using a Battery
Battery Performance
Checking the Battery Charge
Charging the Battery
Removing the Battery
Storing a Battery
. . . . . . . . . . . . . . . . . . 12
. . . . . . . . . . . . . . . . . . . . . 13
. . . . . . . . . . . . . . . . . . . 14
. . . . . . . . . . . . . . . . . . 15
. . . . . . . . . . . . . . . . . . . . . 15
. . . . . . . . . . . . . . . . . . . . 16
. . . . . . . . . . . . . . . . . . . . . . 17
. . . . . . . . . . . . . . . . . . . . . 17
. . . . . . . . . . . . . . . . 18
. . . . . . . . . . . 19
. . . . . . . . . . . . . . . . 21
. . . . . . . . . . . . . . . 22
. . . . . . . . . . . . . . . . . . 23
Troubleshooting . . . . . . . . . . . . . . . . . . . . . 23
Lockups and Software Problems
Dell Diagnostics
. . . . . . . . . . . . . . . . . . 25
. . . . . . . . . 23
Index . . . . . . . . . . . . . . . . . . . . . . . . . . . . . . . 31
Contents 3
Page 4

4 Contents
Page 5

Resources
Finding Information
NOTE: Some features or media may be optional and may not ship with your Tablet-
PC. Some features or media may not be available in certain countries.
NOTE: Additional information may ship with your Tablet-PC.
NOTE: You must use the optical drive in the D/Bay or the optional media base to
access the Driver’s and Utilities media.
What Are You Looking For? Find It Here
• A diagnostic program for my Tablet-PC
• Drivers for my Tablet-PC
• My device documentation
Drivers and Utilities Media
NOTE: The Drivers and Utilities media may
be optional and may not ship with your
Tablet-PC.
Quick Reference Guide 5
Page 6
What Are You Looking For? Find It Here
• Notebook System Software (NSS)
Documentation and drivers are already
installed on your Tablet-PC. You can use
the Drivers and Utilities media to reinstall
drivers (see “Reinstalling Drivers and
Utilities” in your User’s Guide) or to run
the Dell Diagnostics (see "Dell
Diagnostics" on page 25).
Readme files may be included on your
media to provide last-minute updates
about technical changes to your TabletPC or advanced technical-reference
material for technicians or experienced
users.
NOTE: Drivers and documentation updates
can be found at support.dell.com.
• How to remove and replace parts
• Specifications
• How to configure system settings
• How to troubleshoot and solve problems
Dell™ Latitude™ XT User’s Guide
Microsoft Windows XP and Windows
Vista™ Help and Support Center
1
Click
Start (
→ Help and Support→ Dell User
XP)
and System Guides
2
Click the
computer.
or
Start
→
User’s Guide
in Windows
System Guides
for your
.
6 Quick Reference Guide
Page 7
What Are You Looking For? Find It Here
• Warranty information
• Terms and Conditions (U.S. only)
• Safety instructions
• Regulatory information
• Ergonomics information
• End-User License Agreement
Dell™ Product Information Guide
• How to set up my Tablet-PC
• Summary of your Tablet-PC features
• Available accessories for your Tablet-PC
Quick Reference Card
Quick Reference Guide 7
Page 8
What Are You Looking For? Find It Here
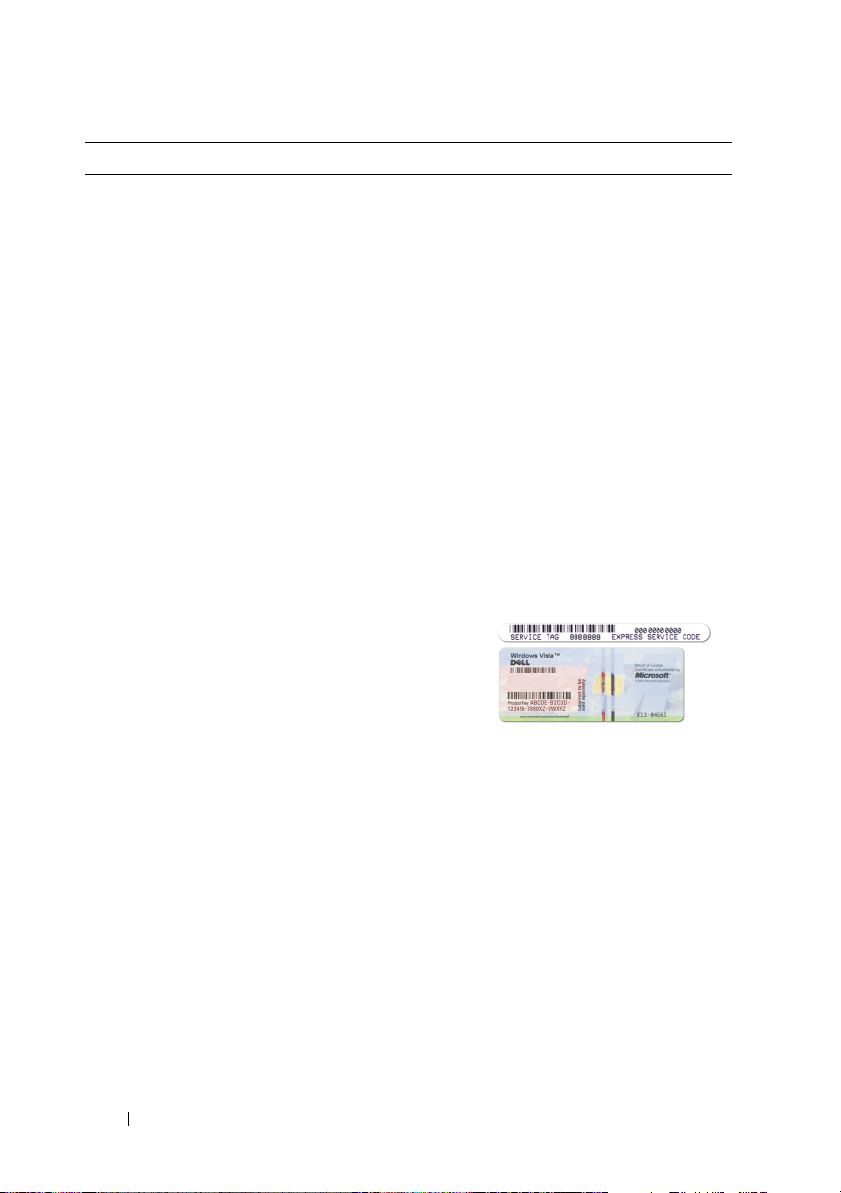
• Service Tag and Express Service Code
• Microsoft
®
Windows® License Label
Service Tag and Microsoft Windows
License
NOTE: Your Tablet-PC’s Service Tag label is
located on the bottom of your Tablet-PC
near the memory and mini-card cover (see
"Bottom View" on page 16).
NOTE: You can also find your Service Tag
information through the System Setup
program. See “System Setup Screens” in
your User’s Guide.
Your Tablet-PC’s Service Tag contains
both a Service Tag number and an Express
Service Code.
• Use the Service Tag to identify your
Tablet-PC when you use
support.dell.com
• Enter the Express Service Code to direct
your call when contacting support.
or contact support.
8 Quick Reference Guide
NOTE: Your Tablet-PC’s Microsoft
Windows
®
License label is located under
®
the main battery in the battery bay of your
Tablet-PC (see "Removing the Battery" on
page 22).
• Use the product key on the license label
if you need to reinstall your operating
system.
NOTE: As an increased security measure,
the newly designed Microsoft Windows
License incorporates a missing portion or
“hole” to discourage removal of the label.
Page 9

What Are You Looking For? Find It Here
• Solutions — Troubleshooting hints and
tips, articles from technicians, and
online courses, frequently asked
questions
Dell Support Website — support.dell.com
NOTE: Select your region or business
segment to view the appropriate support
site.
• Community — Online discussion with
other Dell customers
• Upgrades — Upgrade information for
components, such as memory, the hard
drive, and the operating system
• Customer Care — Contact information,
service call and order status, warranty,
and repair information
• Service and Support — Service call
status and support history, service
contract, online discussions with
technical support
• Dell Technical Update Service —
Proactive e-mail notification of software
and hardware updates for my Tablet-PC
• Reference — Tablet-PC documentation,
details on my Tablet-PC configuration,
product specifications, and white papers
• Downloads — Certified drivers, patches,
and software updates
• Notebook System Software (NSS) — If
you reinstall the operating system for
your Tablet-PC, you should also reinstall
the NSS utility. NSS provides critical
updates for your operating system and
support for processors, optical drives,
USB devices, and so on. NSS is necessary
for correct operation of your Dell TabletPC. The software automatically detects
your Tablet-PC and operating system,
and installs the updates appropriate for
your configuration.
To download Notebook System Software:
1
Go to
support.dell.com
Drivers & Downloads.
2
Enter your Service Tag or Product Type
and Product Model, and click
3
Scroll to
Utilities
Software
4
Select
Go
click
NOTE: The support.dell.com user interface
may vary depending on your selections.
and click
Go
System and Configuration
→
Dell Notebook System
and click
Drivers & Downloads
Download Now
and
.
.
.
Quick Reference Guide 9
Page 10
What Are You Looking For? Find It Here
• Software upgrades and troubleshooting
hints — Frequently asked questions, hot
topics, and general health of your
computing environment
Dell Support Utility
The Dell Support Utility is an automated
upgrade and notification system installed
on your Tablet-PC. This support provides
real-time health scans of your computing
environment, software updates, and
relevant self-support information. Access
the Dell Support Utility from the
icon in the Windows Notification area. For
more information, see “Dell Support
Utility” in your
• How to find information about your
Tablet-PC and its components
• How to connect to the Internet
• How to add user accounts for different
people
• How to transfer files and settings from
another Tablet-PC
Windows Welcome Center
The Windows Welcome Center
automatically appears when you use the
Tablet-PC for the first time. You can
choose to have it appear every time you
start your Tablet-PC, or turn it off. Once
turned off, to access the Welcome Center:
Windows Vista — Click Start
Welcome Center.
Windows XP — Click Start→ Help and
Support→Welcome to Tablet PC.
• How to use Microsoft Windows Vista™
and Windows XP
• How to work with programs and files
• How to personalize my desktop
Windows Help and Support
1
Click
Start (
XP)
→ Help and Support
2
In
Search Help
describes your problem, and then press
<Enter> or click the magnifying glass.
3
Click the topic that describes your
problem.
4
Follow the instructions on the screen.
User’s Guide
or
Start
.
→
in Windows
.
, type a word or phrase that
10 Quick Reference Guide
Page 11
What Are You Looking For? Find It Here
• Information on tablet features and
functionality, network activity, the Power
Management Wizard, hotkeys, and
other items controlled by Dell QuickSet
Dell QuickSet Help
To view
Dell QuickSet Help
QuickSet tablet settings button (see "Front
" on page 13
View
QuickSet icon in the Microsoft
Windows
Help. The Windows Notification area is
located in the lower-right corner of your
screen.
• How to reinstall my operating system
Operating System Media
The operating system is already installed
on your Tablet-PC. To reinstall your
operating system, use the Operating
System media. See “Using the Operating
System Media” in your User’s Guide.
, press the
), or
right-click the
®
Notification area, and select
®
After you reinstall your operating system,
use the Drivers and Utilities media to
reinstall drivers for the devices that came
with your Tablet-PC.
Your operating system product key is on
the Microsoft
®
Windows® License Label
located in your Tablet-PC’s main battery
bay (see "Removing the Battery" on
page 22).
NOTE: The color of your media varies
based on the operating system you ordered.
Quick Reference Guide 11
Page 12
Setting Up Your Computer
CAUTION: Before you begin any of the procedures in this section, follow the
safety instructions in the Product Information Guide.
1
Unpack the accessories box.
2
Set aside the contents of the accessories box, which you will need to
complete the setup of your computer.
The accessories box also contains user documentation and any software or
additional hardware (such as PC Cards, drives, or batteries) that you have
ordered.
3
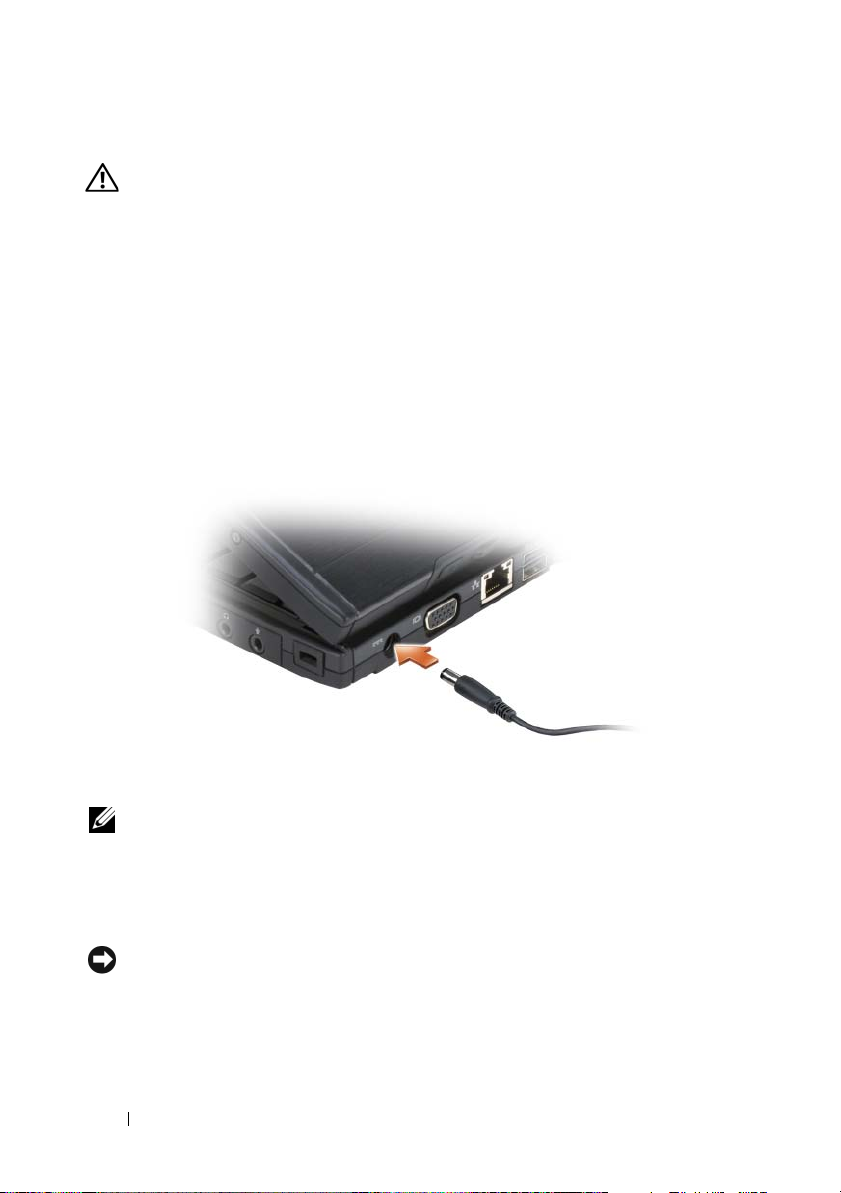
Connect the AC adapter to the AC adapter connector on the computer
and to the electrical outlet.
4
Open the computer display and press the power button to turn on the
computer (see "Front View" on page 13).
NOTE: It is recommended that you turn on and shut down your computer at least
once before you install any cards or connect the computer to a docking device or
other external device, such as a printer.
About Your Tablet-PC
NOTICE: To avoid damaging your display, ensure that your Tablet-PC is in notebook
mode and that the display is closed when you travel.
12 Quick Reference Guide
Page 13
Front View
1
18
17
16
15
14
13
12
11
10
9
8
1grip 2display
3 ambient light sensor (with Dual-bulb
CCFL LCD option only)
5 digital array microphone 6 biometric reader
7 touch pad 8 touch pad buttons
9 track stick buttons 10 keyboard
11 track stick 12 rotating hinge
13 digital array microphone 14 power button
®
15 Windows
17 QuickSet tablet settings button 18 e-mail application shortcut button
security button 16 screen rotate button
4 device status lights
2
3
4
5
6
7
Quick Reference Guide 13
Page 14
Left Side View
4675
321
1 pen indicator LED 2 pen
3 external wireless WAN antenna
NOTE: The external antenna is only
provided with WWAN cards and is
not included in the standard system
configuration. The system comes
with a plug that needs to be removed
prior to installing the antenna and
WWAN card.
5 USB connector 6 air vent
7 speaker
4 IEEE 1394 connector
14 Quick Reference Guide
Page 15
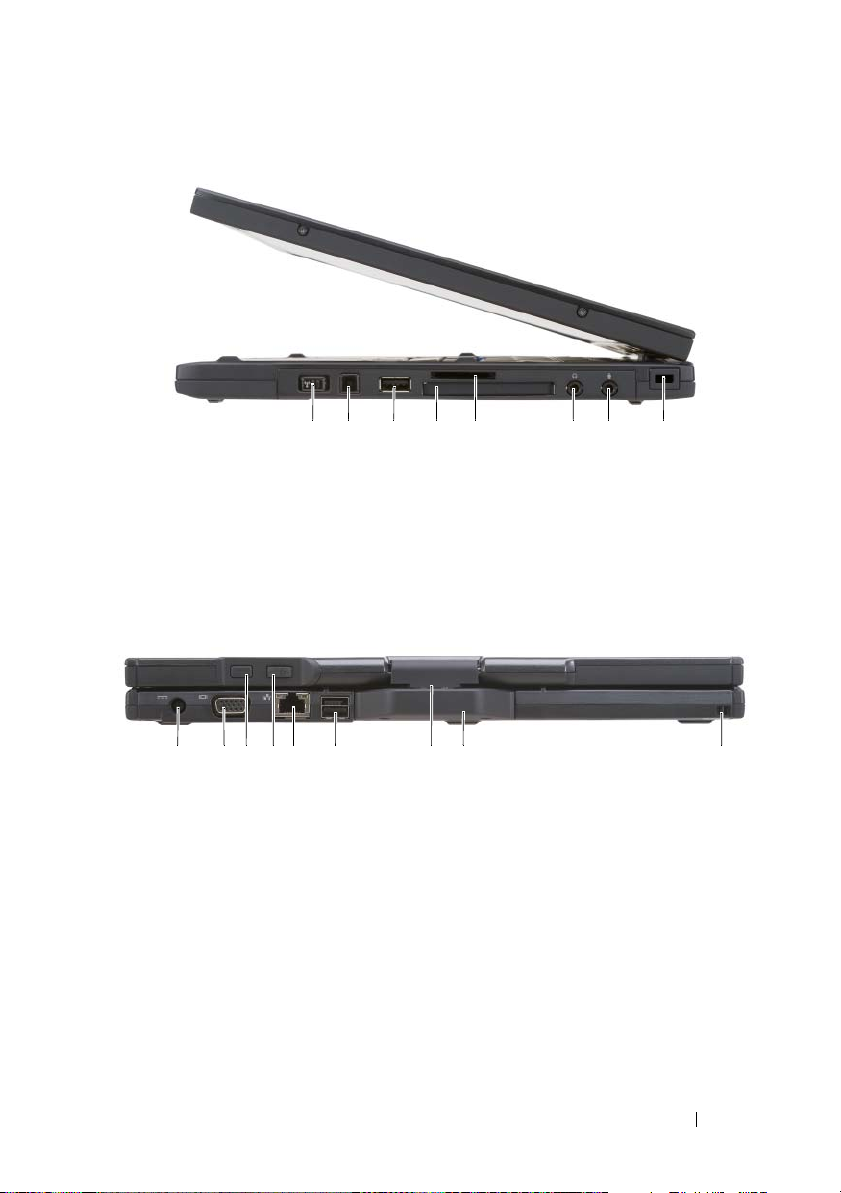
Right Side View
1 4 5 82 3 76
1 wireless radio on/off switch 2 Wi-Fi Catcher™ button
3 USB connector 4 ExpressCard slot
5 Secure Digital (SD) card slot 6 headphones connector
7 microphone connector 8 security cable slot
Back View
1 253
1 AC adapter connector 2 video connector
3 tablet back button 4 scroll control button
5 network connector 6 powered USB connector
7 rotating hinge 8 tablet grip
9 pen tether slot
4 6 97
8
Quick Reference Guide 15
Page 16
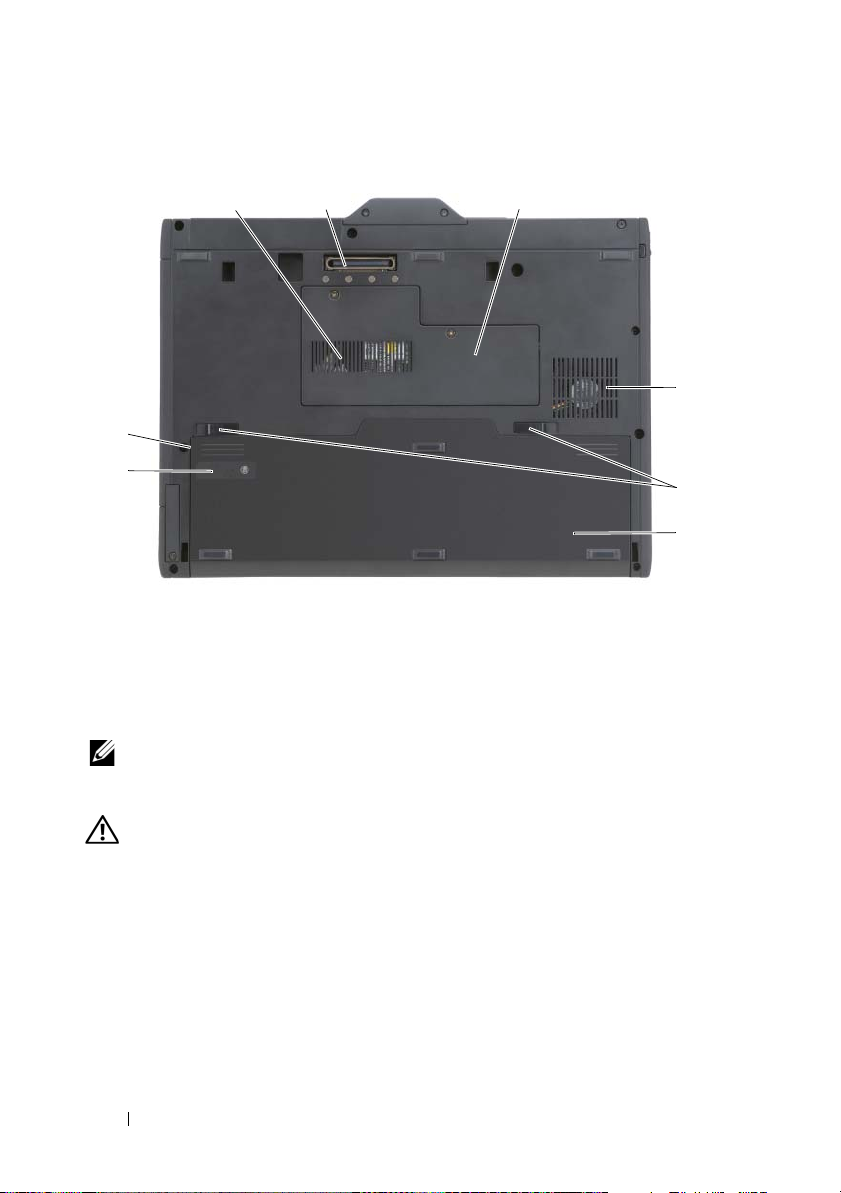
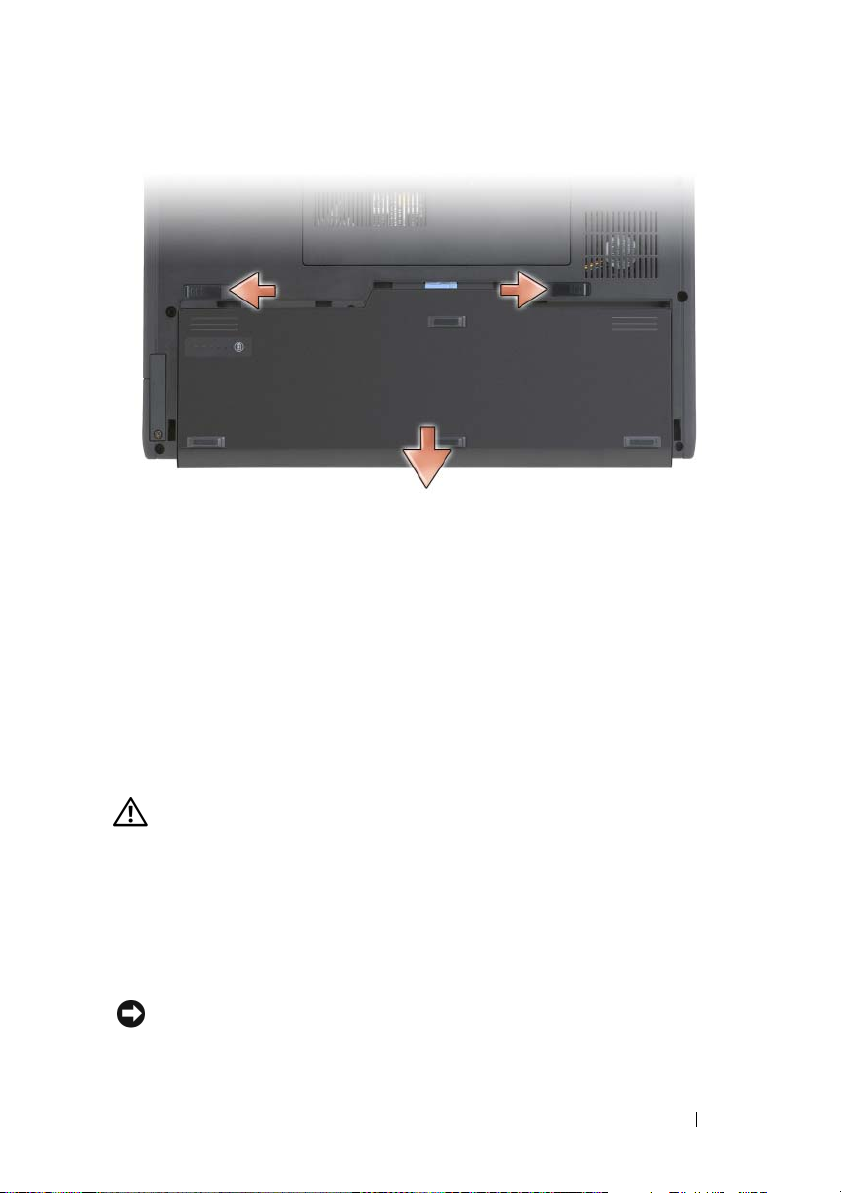
Bottom View
1
8
7
1 air vent 2 docking-device connector
3 memory module and mini-card cover 4 fan vent
5 battery-bay latch releases (2) 6 main battery
7 battery charge gauge/health gauge 8 battery bay (beneath main battery)
NOTE: Your Tablet-PC’s Microsoft® Windows® License label is located under the
main battery in the battery bay of your Tablet-PC (see "Removing the Battery" on
page 22).
2 3
4
5
6
CAUTION: Do not block, push objects into, or allow dust to accumulate in the air
vents. Do not store your Tablet-PC in a low-airflow environment, such as a closed
briefcase, while it is running. Restricting the airflow can damage the Tablet-PC or
cause a fire. The Tablet-PC turns on the fan when the Tablet-PC gets hot. Fan noise
is normal and does not indicate a problem with the fan or the Tablet-PC.
16 Quick Reference Guide
Page 17
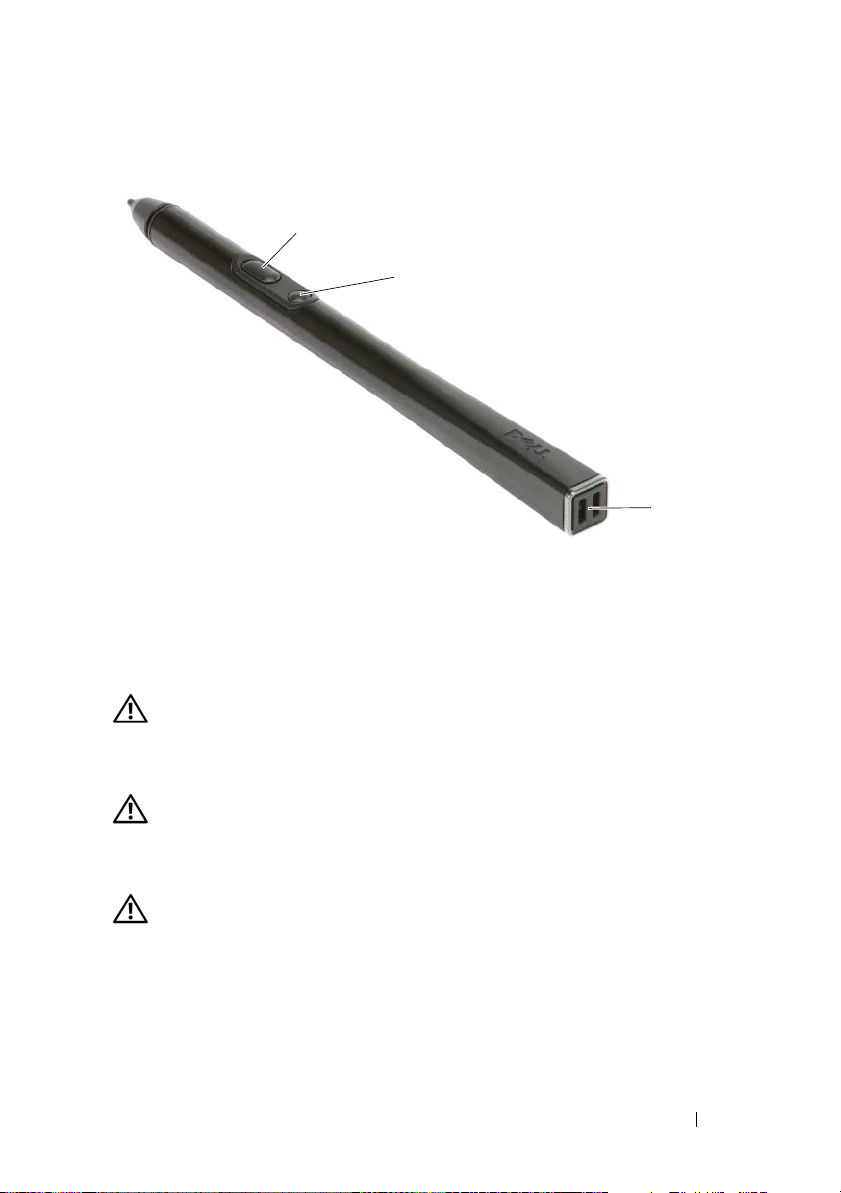
Pen View
2
3
1 pen tether slots 2 right-click pen button
3 erase pen button
Using a Battery
CAUTION: Using an incompatible battery may increase the risk of fire or
explosion. Replace the battery only with a compatible battery purchased from
Dell. The battery is designed to work with your Dell computer. Do not use a battery
from other computers with your computer.
1
CAUTION: Do not dispose of batteries with household waste. When your battery
no longer holds a charge, call your local waste disposal or environmental agency
for advice on disposing of a lithium-ion battery. See “Battery Disposal” in the
Product Information Guide.
CAUTION: Misuse of the battery may increase the risk of fire or chemical burn.
Do not puncture, incinerate, disassemble, or expose the battery to temperatures
above 65°C (149°F). Keep the battery away from children. Handle damaged or
leaking batteries with extreme care. Damaged batteries may leak and cause
personal injury or equipment damage.
Quick Reference Guide 17
Page 18

Battery Performance
NOTE: For information about the Dell warranty for your computer, see the Product
Information Guide or separate paper warranty document that shipped with your
computer.
For optimal computer performance and to help preserve BIOS settings,
operate your Dell™ Tablet-PC with the main battery installed at all times.
One battery is supplied as standard equipment in the battery bay.
NOTE: Because the battery may not be fully charged, use the AC adapter to
connect your new computer to an electrical outlet the first time you use the
computer. For best results, operate the computer with the AC adapter until the
battery is fully charged. To view battery charge status, check the Power Meter in
Power Options (see “Accessing Power Options Properties” in your User’s Guide.)
NOTE: Battery operating time varies depending on operating conditions.
NOTE: It is recommended that you connect your computer to an electrical outlet
when writing to a CD or DVD.
Operating time on battery power is significantly reduced when you perform
operations including, but not limited to, the following:
• Using optical drives.
• Using wireless communications devices, PC Cards, Express Cards, media
memory cards, or USB devices.
• Using high-brightness display settings, 3D screen savers, or other powerintensive programs such as complex 3D graphics applications.
• Running the computer in maximum performance mode. See “Configuring
Power Management Settings” in your
accessing Windows Power Options Properties or Dell QuickSet, which you
can use to configure power management settings.
You can check the battery charge before you insert the battery into the
computer. You can also set power management options to alert you when the
battery charge is low.
User’s Guide
for information about
18 Quick Reference Guide
Page 19

Checking the Battery Charge
The following features provide information on the battery charge:
• Dell QuickSet Battery Meter
• Microsoft Windows
Windows Vista and
Power Meter
in Windows XP)
• Battery charge gauge and health gauge
• Low-battery warning
Dell™ QuickSet Battery Meter
If Dell QuickSet is installed, press <Fn><F3> to display the QuickSet
Battery Meter. The Battery Meter displays status, battery health, charge level,
and charge completion time for the battery in your computer.
For more information about QuickSet, right-click the QuickSet icon in the
taskbar, and click Help.
Charge Gauge
By using the charge gauge on the battery, you can check:
• Battery charge (check by pressing and
• Battery health (check by pressing and
The battery operating time is largely determined by the number of times it is
charged. After hundreds of charge and discharge cycles, batteries lose some
charge capacity—or battery health. That is, a battery can show a status of
“charged” but maintain a reduced charge capacity (health).
window and
releasing
holding
Power icon
(
the status button)
the status button)
in
Check the Battery Charge
To check the battery charge, press and release the status button on the battery
charge gauge to illuminate the charge-level lights. Each light represents
approximately 20 percent of the total battery charge. For example, if the
battery has 80 percent of its charge remaining, four of the lights are on. If no
lights appear, the battery has no charge.
Quick Reference Guide 19
Page 20

Check the Battery Health
NOTE: You can check battery health in one of two ways: by using the charge gauge
on the battery as described below or by using the Battery Meter in Dell QuickSet.
For information about QuickSet, right-click the icon in the taskbar, and click Help.
To check the battery health using the charge gauge, press and hold the status
button on the battery charge gauge for at least 3 seconds. If no lights appear,
the battery is in good condition, and more than 80 percent of its original
charge capacity remains. Each light represents an incremental degradation. If
five lights appear, less than 60 percent of the charge capacity remains, and you
should consider replacing the battery. See "Using a Battery" on page 17 for
more information about the battery operating time.
Low-Battery Warning
NOTICE: To avoid losing or corrupting data, save your work immediately after a
low-battery warning, then connect the computer to an electrical outlet. If the
battery runs completely out of power, hibernate mode begins automatically.
A pop-up window warns you when the battery charge is approximately
90 percent depleted. If two batteries are installed, the low-battery warning
means that the combined charge of both batteries is approximately
90 percent depleted. The computer enters hibernate mode when the battery
charge is at a critically low level.
You can change the settings for the battery alarms in QuickSet or the Power
Options Properties window. See “Configuring Power Management Settings”
in your User’s Guide for information about accessing QuickSet or the Power
Options Properties window.
To manually enter hibernate mode in Windows Vista, click the Windows
Vista Start button , and move your mouse over the right triangle beside
the Lock icon to open the Power Options Properties window, and then click
Hibernate.
To manually enter hibernate mode in Windows XP, you must first enable
Hibernate mode.
To enable Hibernate mode:
1
Click
Start→ Control Panel→ Performance and Maintenance→ Power
Options
2
Click the
.
Hibernate
tab.
20 Quick Reference Guide
Page 21

3
Select
4
Enable hibernation
Click
Apply
and OK.
.
To enter Hibernate mode:
Type the <Ctrl><Alt><Del> key sequence.
1
2
Select
Shut Down→ Hibernate
.
If you have set you set the power management options to Hibernate in the
Power Options Properties window or the QuickSet Power Management
Wizard, you may also use one of the following methods to enter hibernate
mode:
• Press the power button.
• Close the display.
• Press <Fn><Esc>.
NOTE: Some PC Cards or Express Cards may not operate correctly after the
computer exits hibernate mode. Remove and reinsert the card, or simply restart
(reboot) your computer.
To exit hibernate mode, press the power button. The computer may take a
short time to exit hibernate mode. You cannot make the computer exit
hibernate mode by pressing a key or touching the touch pad or track stick. For
more information on hibernate mode, see the documentation that came with
your operating system.
Charging the Battery
When you connect the computer to an electrical outlet or install a battery
while the computer is connected to an electrical outlet, the computer checks
the battery charge and temperature. If necessary, the AC adapter then charges
the battery and maintains the battery charge.
NOTE: With Dell™ ExpressCharge™, when the computer is turned off, the AC
adapter charges a completely discharged battery to 80 percent in about 1 hour and
to 100 percent in approximately 2 hours. Charge time is longer with the computer
turned on. You can leave the battery in the computer for as long as you like. The
battery’s internal circuitry prevents the battery from overcharging.
If the battery is hot from being used in your computer or being in a hot
environment, the battery may not charge when you connect the computer to
an electrical outlet.
Quick Reference Guide 21
Page 22
The battery is too hot to start charging if the light flashes alternately
green and orange. Disconnect the computer from the electrical outlet and
allow the computer and the battery to cool to room temperature. Then
connect the computer to an electrical outlet to continue charging the battery.
For information about resolving problems with a battery, see “Power
Problems” in your User’s Guide.
Removing the Battery
CAUTION: Using an incompatible battery may increase the risk of fire or
explosion. Replace the battery only with a compatible battery purchased from
Dell. The battery is designed to work with your Dell™ computer. Do not use a
battery from other computers with your computer.
CAUTION: Before performing these procedures, turn off the computer, disconnect
the AC adapter from the electrical outlet and the computer, disconnect the modem
from the wall connector and computer, and remove any other external cables from
the computer.
NOTICE: You must remove all external cables from the computer to avoid possible
connector damage.
NOTICE: If you choose to replace the battery with the computer in standby mode,
you have up to 1 minute to complete the battery replacement before the computer
shuts down and loses any unsaved data.
To remove the battery:
1
If the computer is connected to a docking device (docked), undock it. See
the documentation that came with your docking device for instructions.
2
Ensure that the computer is turned off or hibernated in a power
management mode.
3
Slide the battery-bay latch release on the bottom of the computer, and
then remove the battery from the bay.
22 Quick Reference Guide
Page 23
To replace the battery, follow the removal procedure in reverse order.
Storing a Battery
Remove the battery when you store your computer for an extended period of
time. A battery discharges during prolonged storage. After a long storage
period, fully recharge the battery (see "Charging the Battery" on page 21)
before you use it.
Troubleshooting
Lockups and Software Problems
CAUTION: Before you begin any of the procedures in this section, follow the
safety instructions in the Product Information Guide.
The Tablet-PC does not start up
ENSURE THAT THE POWER CABLE IS FIRMLY CONNECTED TO THE TABLET-PC AND
TO THE ELECTRICAL OUTLET
The Tablet-PC stops responding
NOTICE: You may lose data if you are unable to perform an operating system
shutdown.
Quick Reference Guide 23
Page 24

TURN THE TABLET-PC OFF — If you are unable to get a response by pressing a
key on your keyboard or touching your display with the pen or your finger,
press and hold the power button for at least 8 to 10 seconds (until the TabletPC turns off), and then restart your Tablet-PC.
A program stops responding
END THE PROGRAM —
1
Press <Ctrl><Shift><Esc> simultaneously to access the Task Manager.
2
Click the
3
Click to select the program that is no longer responding.
4
Click
A program crashes repeatedly
NOTE: Most software includes installation instructions in its documentation, or on
a CD or DVD.
HECK THE SOFTWARE DOCUMENTATION — If necessary, uninstall and then
C
Applications
End Task
tab.
.
reinstall the program.
A program is designed for an earlier Windows operating system
RUN THE PROGRAM COMPATIBILITY WIZARD — The Program Compatibility
Wizard configures a program so that it runs in an environment similar to
previous versions of Windows.
Windows Vista
1
Click
Start → Control Panel→ Programs→ Use an older program with
this version of Windows.
2
In the welcome screen, click
3
Follow the instructions on the screen.
Windows XP
1
Click
Start→
Help and Support→ Fixing a problem→ Application and
software problems.
2
Click
Run Software that Worked with previous versions
24 Quick Reference Guide
Next
.
.
Page 25

3
In the welcome screen, click
4
Follow the instructions on the screen.
Next
.
A solid blue screen appears
TURN THE TABLET-PC OFF — If you are unable to get a response by pressing a
key on your keyboard or touching your display with the pen or your finger,
press and hold the power button for at least 8 to 10 seconds (until the TabletPC turns off), and then restart your Tablet-PC.
Other software problems
CHECK THE SOFTWARE DOCUMENTATION OR CONTACT THE SOFTWARE
MANUFACTURER FOR TROUBLESHOOTING INFORMATION —
• Ensure that the program is compatible with the operating system installed
on your Tablet-PC.
• Ensure that your Tablet-PC meets the minimum hardware requirements
needed to run the software. See the software documentation for
information.
• Ensure that the program is installed and configured properly.
• Verify that the device drivers do not conflict with the program.
• If necessary, uninstall and then reinstall the program.
BACK UP YOUR FILES IMMEDIATELY
USE A VIRUS-SCANNING PROGRAM TO CHECK THE HARD DRIVE, CDS , OR DVDS
SAVE AND CLOSE ANY OPEN FILES OR PROGRAMS AND SHUT DOWN YOUR TABLET-
PC
THROUGH THE START MENU
Dell Diagnostics
CAUTION: Before you begin any of the procedures in this section, follow the
safety instructions in the Product Information Guide.
NOTICE: The Dell Diagnostics works only on Dell™ computers.
NOTE: You must use the optical drive in the D/Bay or the optional media base to
access the Driver’s and Utilities media.
Quick Reference Guide 25
Page 26

When to Use the Dell Diagnostics
If you experience a problem with your Tablet-PC, perform the checks in
Lockups and Software Problems (see "Lockups and Software Problems" on
page 23), and run the Dell Diagnostics before you contact Dell for technical
assistance.
It is recommended that you print these procedures before you begin.
See “Using the System Setup Program” in your User’s Guide to review your
Tablet-PC’s configuration information, and ensure that the device that you
want to test displays in the system setup program and is active.
Start the Dell Diagnostics from your hard drive or from the Drivers and
Utilities media.
NOTE: The Drivers and Utilities media is optional and may not ship with your
Tablet-PC.
Starting the Dell Diagnostics From Your Hard Drive
The Dell Diagnostics is located on a hidden diagnostic utility partition on
your hard drive.
NOTE: If your Tablet-PC does not display a screen image, contact Dell (see
“Contacting Dell” in your User’s Guide).
NOTE: If the Tablet-PC is connected to a docking device (docked), undock it. See
“Undocking Your Tablet-PC From the Media Base” and “Undocking Your Tablet-PC
From the Battery Slice” in your User’s Guide for instructions if applicable.
1
Ensure that the Tablet-PC is connected to an electrical outlet that is
known to be working properly.
2
Turn on (or restart) your Tablet-PC.
3
Start the Dell Diagnostics in one of the following two ways:
NOTE: If you wait too long and the operating system logo appears, continue
to wait until you see the Microsoft
Tablet-PC and try again.
®
Windows® desktop; then, shut down your
– When the DELL™ logo appears, press <F12> immediately. Select
Diagnostics
NOTE: Before attempting the following option, the Tablet-PC must be
powered down completely.
from the boot menu and press <Enter>.
– Press and hold the <Fn> key while powering the Tablet-PC on.
26 Quick Reference Guide
Page 27
The Tablet-PC runs the Pre-boot System Assessment (PSA), a series of
initial tests of your system board, keyboard, display, memory, hard drive, etc.
• During the assessment, answer any questions that appear.
• If failures are detected during the Pre-boot System Assessment,
write down the error code(s) and contact Dell (see “Contacting
Dell” in your
User’s Guide
).
If the Pre-boot System Assessment completes successfully, the following
message appears: “
Partition.Press any key to continue
4
Press any key to start the Dell Diagnostics from the diagnostics utility
Booting Dell Diagnostic Utility
.”
partition on your hard drive.
NOTE: If you see a message stating that no diagnostics utility partition has
been found, run the Dell Diagnostics from the Drivers and Utilities media.
5
When the Dell Diagnostics Main Menu appears, select the test you want
to run. See "Dell Diagnostics Main Menu" on page 28.
Starting the Dell Diagnostics From the Drivers and Utilities Media
1
Insert the
2
Shut down and restart the Tablet-PC.
Drivers and Utilities media
.
When the DELL logo appears, press <F12> immediately.
NOTE: If you wait too long and the operating system logo appears, continue
to wait until you see the Microsoft
Tablet-PC and try again.
NOTE: The next steps change the boot sequence for one time only. On the
next start-up, the Tablet-PC boots according to the devices specified in the
system setup program.
3
When the boot device list appears, highlight
®
Windows® desktop; then, shut down your
CD/DVD/CD-RW
<Enter>.
4
Select the
Boot from CD-ROM
option from the menu that appears and
press <Enter>.
5
Ty p e 1 to start the CD menu and press <Enter> to proceed.
6
Select
Run the 32 Bit Dell Diagnostics
from the numbered list. If
multiple versions are listed, select the version appropriate for your
Tablet-PC.
Quick Reference Guide 27
and press
Page 28
7
When the Dell Diagnostics
Main Menu
appears, select the test you want
to run.
Dell Diagnostics Main Menu
1
After the Dell Diagnostics loads and the
Main Menu
appears, click the
button for the option you want.
NOTE: It is recommended that you select Test System to run a complete test
on your Tablet-PC.
Option Function
Test Memory Run the stand-alone memory test
Test System Run System Diagnostics
Exit Exit the Diagnostics
2
After you have selected the
Test S ys te m
option from the main menu, the
following menu appears:
NOTE: It is recommended that you select Extended Test from the menu below to
run a more thorough check of devices in the Tablet-PC.
Option Function
Express Test Performs a quick test of devices in the
system. This typically can take 10 to
20 minutes.
Extended Test Performs a thorough check of devices in
the system. This typically can take an
hour or more.
Custom Test Use to test a specific device or
customize the tests to be run.
Symptom Tree This option allows you to select tests
based on a symptom of the problem you
are having. This option lists the most
common symptoms.
28 Quick Reference Guide
Page 29

3
If a problem is encountered during a test, a message appears with an error
code and a description of the problem. Write down the error code and
problem description and contact Dell (see “Contacting Dell” in your
User’s Guide
NOTE: The Service Tag for your Tablet-PC is located at the top of each test
screen. If you contact Dell, technical support will ask for your Service Tag.
4
If you run a test from the
).
Custom Test or Symptom Tree
option, click the
applicable tab described in the following table for more information.
Tab Function
Results Displays the results of the test and any
error conditions encountered.
Errors Displays error conditions encountered,
error codes, and the problem
description.
Help Describes the test and may indicate
requirements for running the test.
Configuration Displays your hardware configuration
for the selected device.
The Dell Diagnostics obtains
configuration information for all
devices from system setup, memory, and
various internal tests, and it displays
the information in the device list in
the left pane of the screen. The device
list may not display the names of all
the components installed on your
Tablet-PC or all devices attached to
your Tablet-PC.
Parameters Allows you to customize the test by
changing the test settings.
5
When the tests are complete, close the test screen to return to the
Menu
screen. To exit the Dell Diagnostics and restart the Tablet-PC, close
the
Main Menu
6
Remove the Dell
screen.
Drivers and Utilities media
(if applicable).
Quick Reference Guide 29
Main
Page 30

30 Quick Reference Guide
Page 31

Index
B
battery
charge gauge, 19
charging, 21
checking the charge, 19
performance, 18
removing, 22
storing, 23
C
computer
crashes, 23, 25
stops responding, 23
D
Dell Diagnostics, 25
Dell support site, 9
diagnostics
Dell, 25
documentation
End User License Agreement, 7
ergonomics, 7
online, 9
Product Information Guide, 7
regulatory, 7
safety, 7
documentation (continued)
User’s Guide, 6
warranty, 7
Drivers and Utilities media
Dell Diagnostics, 25
E
End User License Agreement, 7
ergonomics information, 7
H
hardware
Dell Diagnostics, 25
L
labels
Microsoft Windows, 8
Service Tag, 8
M
media
operating system, 11
Index 31
Page 32

O
operating system
reinstalling, 11
Operating System media, 11
Starting the Dell Diagnostics
From the Drivers and
Utilities Media, 27
Starting the Dell Diagnostics
From Your Hard Drive, 26
support website, 9
P
problems
blue screen, 25
computer crashes, 23, 25
computer stops responding, 23
Dell Diagnostics, 25
general, 23
program crashes, 24
program stops responding, 24
software, 24-25
Product Information Guide, 7
Q
QuickSet Help, 11
R
regulatory information, 7
S
system views
back, 15
bottom, 16
front, 13
left side, 14
right side, 15
T
troubleshooting
Dell Diagnostics, 25
U
User’s Guide, 6
W
warranty information, 7
Windows Vista
reinstalling, 11
safety instructions, 7
Service Tag, 8
software
problems, 24-25
32 Index
Page 33

Dell™ Latitude™ XT
Hurtig referenceguide
Model PP12S
www.dell.com | support.dell.com
Page 34

BEMÆRK, VARSEL og ADVARSEL
BEMÆRK: Angiver vigtige oplysninger, som du kan bruge for at udnytte
computeren optimalt.
VARSEL: Angiver enten en mulig beskadigelse af hardware eller tab af data og
oplyser dig om, hvordan du kan undgå dette problem.
ADVARSEL: Angiver mulig tingskade, legemsbeskadigelse eller død.
____________________
Oplysningerne i dette dokument kan ændres uden varsel.
© 2007 Dell Inc. Alle rettigheder forbeholdes.
Enhver form for gengivelse uden skriftlig tilladelse fra Dell Inc. er strengt forbudt.
Anvendte varemærker i denne tekst: Dell, DELL-logoet, Wi-Fi Catcher, ExpressCharge og Latitude
er varemærker tilhørende Dell Inc.; Microsoft, Windows og Windows Vista er enten varemærker eller
registrerede varemærker tilhørende Microsoft Corporation i USA og/eller andre lande.
Andre varemærker og firmanavne kan være brugt i de tte dokument til at hen vise til enten de fysiske eller
juridiske personer, som gør krav på mærkerne og navnene, eller til deres produkter. Dell Inc. fraskriver
sig enhver tingslig rettighed, for så vidt angår varemærker og firmanavne, som ikke er deres egne.
Model PP12S
December 2007 P/N DR977 Rev. A01
Page 35

Indholdsfortegnelse
Resourcer . . . . . . . . . . . . . . . . . . . . . . . . 37
Sådan findes information
Opstilling af computeren
. . . . . . . . . . . . . 37
. . . . . . . . . . . . . . 44
Lidt om din tablet-pc
Visning forfra
Visning fra venstre
Visning fra højre
Visning bagfra
Visning af bunden
Visning af pennen
Anvendelse af et batteri
Batteriydelse
Kontrol af batteriopladning
Opladning af batteriet
Udskiftning af batteri
Opbevaring af batteri
. . . . . . . . . . . . . . . . . . 44
. . . . . . . . . . . . . . . . . . . . 45
. . . . . . . . . . . . . . . . . 46
. . . . . . . . . . . . . . . . . . 47
. . . . . . . . . . . . . . . . . . . 47
. . . . . . . . . . . . . . . . . 48
. . . . . . . . . . . . . . . . . 49
. . . . . . . . . . . . . . . . . 49
. . . . . . . . . . . . . . . . . . . . 50
. . . . . . . . . . . . . 51
. . . . . . . . . . . . . . . 53
. . . . . . . . . . . . . . . . 54
. . . . . . . . . . . . . . . . 55
Problemløsning . . . . . . . . . . . . . . . . . . . . . 55
Baglås- og softwareproblemer
Dell Diagnostics (Dell diagnosticering)
. . . . . . . . . . 55
. . . . . . 57
Indeks . . . . . . . . . . . . . . . . . . . . . . . . . . . . . . 63
Indholdsfortegnelse 35
Page 36

36 Indholdsfortegnelse
Page 37

Resourcer
Sådan findes information
BEMÆRK: Nogle elementer eller medier er ekstraudstyr og medfølger måske ikke
din tablet-pc. Nogle elementer vil måske ikke være tilgængelige i visse lande.
BEMÆRK: Yderligere information kan blive afsendt med tablet-pc'en.
BEMÆRK: Du skal bruge det optiske drev i D/Bay eller den valgfrie mediebase for
at få adgang til mediet Driver’s and Utilities (Drivere og hjælpeværktøjer).
Hvad søger du efter? Find det her
• Et diagnosticeringsprogram til min
tablet-pc
• Drivere til min tablet-pc
• Dokumentation til enheden
Mediet Drivers and Utilities
(Drivere og hjælpeværktøjer)
BEMÆRK: Mediet Drivers and Utilities
(Drivere og hjælpeværktøjer) er ekstraudstyr
og leveres muligvis ikke med din tablet-pc.
Hurtig referenceguide 37
Page 38

Hvad søger du efter? Find det her
• Notebook System Software (NSS)
Dokumentationen og driverne er allerede
installeret på tablet-pc'en. Du kan bruge
mediet Drivers and Utilities (Drivere og
hjælpeværktøjer) til at geninstallere drivere
(se "Geninstallation af Drivers and Utilities
(Drivere og hjælpeværktøjer)" i
Brugervejledning) eller til at køre Dell
Diagnostics (Dell diagnosticering) (se "Dell
Diagnostics (Dell diagnosticering)" på
side 57).
Readme files (Vigtigt-filer) kan være
inkluderet på mediet til at give sidste
øjebliksopdateringer om tekniske ændringer
eller avanceret teknisk referencemateriale til
teknikere eller erfarne brugere.
38 Hurtig referenceguide
BEMÆRK: Drivere og
dokumentationsopdateringer kan findes på
support.dell.com.
Page 39

Hvad søger du efter? Find det her
• Afmontering og udskiftning af dele
• Specifikationer
• Konfiguration af systemindstillinger
• Fejlfinding og løsning af problemer
Dell™ Latitude™ XT Brugervejledning
Microsoft Windows XP og Windows
Vista™ Hjælp og support
1 Klik på Start (eller Start i
Windows XP)
Dell User and System Guides (Dell
bruger- og systemhåndbøger)
Guides (Systemhåndbøger).
2
Klik på
din computer.
• Garantioplysninger
Dell™ Produktinformationsvejledning
• Handelsbetingelser (kun USA)
• Sikkerhedsinstruktioner
• Kontrolinformation
• Ergonomi-information
• Licensaftale for slutbrugere
→
Hjælp og support→
User's Guide
→
System
(Brugerhåndbog) for
• Opsætning af tablet-pc'en
• Oversigt over tablet-pc'ens
funktioner
• Tilgængeligt tilbehør til tablet-pc'en
Hurtigt referencekort
Hurtig referenceguide 39
Page 40

Hvad søger du efter? Find det her
• Servicemærke og
ekspressservicekode
• Microsoft
®
Windows®-licensmærke
Servicemærke og Microsoft Windows Licens
BEMÆRK: Tablet-pc'ens servicemærke er
placeret i bunden af tablet-pc'en, i nærheden
af dækslet til hukommelsen og minikortet (se
"Visning af bunden" på side 48).
BEMÆRK: Du kan også finde din
servicemærkeinformation gennem
programmet Systeminstallation. Se "System
Setup Screens" (Systemopsætning) i User’s
Guide (Brugervejledning).
Tablet-pc'ens servicemærke indeholder både
et servicemærkenummer og en
ekspresservicekode.
• Anvend servicemærket til at identificere
tablet-pc'en, når du bruger
support.dell.com
• Indtast ekspressservicekoden for at anvise
opkaldet, når du kontakter teknisk support.
eller kontakter support.
40 Hurtig referenceguide
BEMÆRK: Tablet-pc’ens etiket med
Microsoft
®
Windows®-licens er anbragt
under hovedbatteriet i batteribåsen på tabletpc'en (se "Udskiftning af batteri" på side 54).
• Anvend produktnøglen på licensetiketten,
hvis du får brug for at geninstallere
operativsystemet.
BEMÆRK: Som en ekstra
sikkerhedsforanstaltning består den nyligt
designede Microsoft Windows-licens af en
manglende del eller "hul" for at modvirke
fjernelse af etiketten.
Page 41

Hvad søger du efter? Find det her
• Løsninger — Problemløsning og tips,
tekniske artikler og onlinekurser
samt ofte stillede spørgsmål
• Kundeforum — Online-diskussion
med andre Dell-kunder
Dell Support-website — support.dell.com
BEMÆRK: Vælg dit område eller
forretningssegment for at se den pågældende
supportside.
• Opgraderinger —
Opgraderingoplysninger om
komponenter, f.eks. hukommelse,
harddisk og operativsystem
• Kundepleje — Kontaktoplysninger,
serviceopkald og ordrestatus, garantiog reparationsoplysninger
• Service og support — Status på
serviceopkald og supporthistorie,
servicekontrakt, online-diskussioner
med teknisk support
• Dells tekniske opdateringsservice —
giver proaktiv e-mail-besked om
software- og hardware-opdateringer
til tablet-pc'en
• Reference — Tablet-pcdokumentation, detaljer om min
tablet-pc-konfiguration,
produktspecifikationer og hvidbøger
• Overførsler — Godkendte drivere,
programrettelser og
softwareopdateringer
• Notebook System Software (NSS) —
Hvis du geninstallerer
operativsystemet på tablet-pc'en,
skal du også geninstallere NSShjælpeværktøjet. NSS giver vigtige
opdateringer til operativsystemet og
support til processorer, optiske drev,
USB-enhder, osv. NSS er nødvendig
for korrekt drift af Dell tablet-pc'en.
Softwaren opdager automatisk
tablet-pc'en og styresystemet og
installerer de opdateringer, der passer
til konfigurationen.
Sådan hentes Notebook System-softwaren:
1
Gå til
support.dell.com
& Downloads (Drivere og downloads).
2
Angiv Servicekode eller produkttype og
produktmodel og klik på
3
Rul til
System and Configuration Utilities
(System- og indstillingsværktøjer)
Notebook System Software
(Systemsoftware til Dell bærbar computer)
og klik på
4
Væ lg
Drivere og overførsler
BEMÆRK: support.dell.com-
brugergrænseflade kan variere alt efter dine
valg.
og klik på Drivers
Download Now
Næste
.
→
(Overfør nu).
, og klik på
Dell
Kør
.
Hurtig referenceguide 41
Page 42

Hvad søger du efter? Find det her
• Software-opgradering og
fejlfindingsoplysninger— Ofte stille
spørgsmål, top-ti og generel tilstand
af dit computermiljø
Programmet Dell support
Programmet Dell Support er et automatisk
opgraderings- og beskedsystem, der er
installeret på din tablet-pc. Denne support
giver tidstro tilstandsscanning af dit
computermiljø, software-opgradering og
relevant selvhjælpsinformation. Tag adgang
til programmet Dell support fra ikonet
på Windows meddelelsesområdet. For
nærmere oplysninger, se "Programmet Dell
support" i
• Sådan finder du information om din
tablet-pc og dens komponenter
• Sådan oprettes der forbindelse til
internettet
• Sådan tilføjes der brugerkonti for
forskellige personer
• Sådan overfører du filer og
indstillinger fra en anden tablet-pc
Windows Velkomst
Windows Velkomst vises automatisk, når du
bruger tablet-pc'en den første gang. Du kan
vælge, om det skal vises hver gang, du starter
tablet-pc'en, eller du kan slå det fra. Når
først det er slået fra, kan du tage adgang til
Velkomst:
Windows Vista — Klik på Start
Ve lk om s t.
Windows XP — Klik på Start→ Hjælp og
support→ Velkommen til tablet-pc.
• Sådan bruges Microsoft Windows
Vista™ og Windows XP
• Sådan bruges programmer og filer
• Sådan personliggør jeg mit
skrivebord
Windows Hjælp og support
1 Klik på Start (eller Start i
Windows XP)→ Hjælp og support.
2
I
Søg i Hjælp
sætning, som beskriver problemet, og
derefter trykkes på <Enter> eller der
klikkes på forstørrelsesglasset.
3
Klik på det emne, der beskriver problemet.
4
Følg vejledningen på skærmen.
Brugerhåndbog
, indtastes et ord eller
.
→
42 Hurtig referenceguide
Page 43

Hvad søger du efter? Find det her
• Information om tablet-egenskaber
og funktionalitet, netværksaktivitet,
guiden strømstyring, genvejstaster
og andre elementer, som bliver styret
af Dell QuickSet
Dell QuickSet (Dell kvikopsætning) Hjælp
For a t se
Dell QuickSet Help
på knappen QuickSet-tabletindstillinger (se),
eller "Visning forfra" på side 45
ikonet QuickSet i Microsoft
meddelelsesområdet og vælge Help (Hjælp).
Windows meddelelsesområdet kan findes i
nederste højre hjørne på skærmen.
• Geninstallation af operativsystemet
Mediet operativsystem
Operativsystemet er allerede installeret på
tablet-pc'en. Hvis operativsystemet skal
installeres igen, anvendes mediet Operating
System (Operativsystem). Se “Brug af
mediet Operativsystem” i
Brugervejledningen.
, skal du trykke
højreklikke
®
Windows®
Efter du installerer operativsystemet igen,
skal du bruge mediet Drivers and Utilities
(Drivere og hjælpeværktøjer) for at
geninstallere driverne til de enheder, der blev
leveret sammen med tablet-pc'en.
Operativsystemets produktnøgle er på
Microsoft
®
Windows®-licensetiketten, som
er placeret på tablet-pc'ens hovedbatteribås
(se "Udskiftning af batteri" på side 54).
BEMÆRK: Farven på dit medie kan variere,
afhængig af det operativsystem, som du
bestilte.
Hurtig referenceguide 43
Page 44

Opstilling af computeren
ADVARSEL: Før udførelse af nogle af procedurerne i dette afsnit, skal
sikkerhedsinstruktionerne i Produktinformationsguiden følges.
1
Åbn æsken med tilbehør, og tag delene ud.
2
Tag de dele fra, som du skal bruge til opsætning af din computer.
Æsken med tilbehør indeholder også brugerdokumentation, programmer
og ekstra hardware (f.eks. pc-kort, drev eller batterier), som du har bestilt.
3
Tilslut vekselstrømsadapteren til vekselstrømsadapterstikket på
computeren og til stikkontakten.
4
Tænd for computerskærmen, og tryk på tænd/sluk-knappen for at tænde
computeren (se "Visning forfra" på side 45).
BEMÆRK: Det anbefales, at du tænder og slukker computeren mindst en gang, før
du installerer nogen kort eller tilslutter computeren til en docking-station eller
anden ekstern enhed, som f.eks. en printer.
Lidt om din tablet-pc
VARSEL: For at undgå beskadigelse af skærmen, skal det sikres, at din tablet-pc er
i bærbar computertilstand, og at skærmen er lukket, når du rejser.
44 Hurtig referenceguide
Page 45

Visning forfra
1
18
17
16
15
14
13
12
11
10
9
8
1 greb 2 skærm
3 navigationslysføler (kun med Dual-bulb
CCFL LCD)
5 digital array mikrofon 6 fingeraftrykslæser
7 berøringsplade 8 knapper til berøringsplade
9 knapper til pegepind 10 tastatur
11 pegepind 12 rotationshængsel
13 digital array mikrofon 14 tænd/sluk-knap
®
15 Windows
17 knap til QuickSet-tabletindstillinger 18 genvejsknap til e-mail-program
sikkerhedsknap 16 knap til skærmrotation
4 enhedsstatuslamper
2
3
4
5
6
7
Hurtig referenceguide 45
Page 46

Visning fra venstre
4675
321
1 lysdiode for pen-indikator 2 pen
3 ekstern trådløs WAN-antenne
BEMÆRK: Den udvendige antenne
leveres kun med WWAN-kort og
følger ikke med standard
systemkonfigurationen. Systemet
leveres med en prop, som skal
fjernes før installation af antennen og
WWAN-kortet.
5 USB-stik 6 luftventilation
7 højttaler
4 IEEE 1394-stik
46 Hurtig referenceguide
Page 47

Visning fra højre
1 4 5 82 3 76
1 til/fra-knap til trådløs radio 2 Wi-Fi Catcher™-knap
3 USB-stik 4 ExpressCard-rille
5 stik til sikkert digitalkort (SD) 6 stik til hovedtelefoner
7 mikrofonstik 8 stik til sikkerhedskabel
Visning bagfra
1 253
1 vekselstrømsadapterstik 2 videostik
3 tablet tilbageknap 4 kontrolknap til rulning
5 netværksstik 6 strømdrevet USB-stik
7 rotationshængsel 8 tabletgreb
9 stik til snor til pen
4 6 97
8
Hurtig referenceguide 47
Page 48

Visning af bunden
1
8
7
1 luftventilation 2 stik til docking-enhed
3 hukommelsesmodul og minikortdæksel 4 luftventilation
5 udløserpaler til batteri-bås (2) 6 hovedbatteri
7 batteriopladningsmåler/tilstands-måler 8 batteribås (under hovedbatteriet)
BEMÆRK: Tablet-pc’ens etiket med Microsoft® Windows®-licens er anbragt
under hovedbatteriet i batteribåsen på tablet-pc'en (se "Udskiftning af batteri" på
side 54).
2 3
4
5
6
ADVARSEL: Undgå at blokere, skubbe genstande ind i eller lade støv samle sig i
ventilationshullerne. Opbevar ikke computeren et sted med lav
luftgennemstrømning, f.eks. en lukket mappe, når den er tændt. Dette kan
beskadige tablet-pc'en eller forårsage brand. Tablet-pc'en tænder for
ventilationen, når den bliver varm. Støj fra ventilatoren er normal og indikerer
ikke, at der er et problem med ventilatoren eller tablet-pc'en.
48 Hurtig referenceguide
Page 49

Visning af pennen
2
3
1 til snor til pen 2 højreklik penknap
3 penknap til sletning
Anvendelse af et batteri
ADVARSEL: Brug af et inkompatibelt batteri kan øge risikoen for eksplosion.
Udskift kun batteriet med et kompatibelt batteri købt af Dell. Batteriet er beregnet
til at fungere sammen med din Dell-computer. Brug ikke et batteri fra andre
computere sammen med din computer.
1
ADVARSEL: Batterier bør ikke bortskaffes sammen med køkkenaffald. Når dit
batteri ikke længere holder opladningen, skal du kontakte din lokale renovatør
eller genbrugsstation for råd vedrørende bortskaffelse af et Lithium-ion-batteri. Se
"Bortskaffelse af batterieri" i Produktionformationsguiden.
ADVARSEL: Misbrug af batteriet kan øge risikoen for brand eller kemisk
forbrænding. Punktér, brænd eller adskil ikke batteriet eller udsæt det for
temperaturer over 65°C (149°F). Batteriet opbevares utilgængeligt for børn.
Håndtér beskadigede eller lækkende batterier med ekstrem omhu. Beskadigede
batterier kan lække og medføre personskade eller skade på udstyr.
Hurtig referenceguide 49
Page 50

Batteriydelse
BEMÆRK: For oplysninger om Dell-garanti for computeren, se afsnittet i Product
Information Guide (Produktinformationsvejledning) eller det separate
garantidokument, der blev fremsendt sammen med computeren.
For optimal computerydelse og hjælp til bevaring af BIOS-opsætning og
betjening af din Dell™ tablet-pc skal du altid bruge den sammen med det
installerede batteri. Der medfølger et batteri som standardudstyr i
batterirummet.
BEMÆRK: Da batteriet måske ikke er fuldt opladet, skal du bruge vekselstrøms-
adapteren til at tilslutte din nye computer til en elektrisk stikkontakt, første gang du
skal bruge computeren. For bedste resultater, så brug computeren med
vekselstrømsadapteren, indtil batteriet er fuldt opladet. For at kontrollere batteriets
opladningsstatus, skal du se på Spændingsmåler i Strømstyring (se "Adgang til
Egenskaber for strømstyring" i Brugerhåndbog.)
BEMÆRK: Batterilevetid varierer alt afhængig af vilkårene for anvendelsen.
BEMÆRK: Det anbefales, at computeren tilsluttes en stikkontakt, når der skrives til
en cd eller dvd.
Brugstiden på batteri reduceres væsentligt, hvis du bruger den til noget, der
indebærer og ikke blot begrænses til følgende:
• Brug af optiske drev.
• Brug af trådløse kommunikationsenheder, pc-kort, ExpressCards,
hukommelseskort eller USB-enheder.
• Brug af skærmindstillinger med høj lysintensitet, 3D-pauseskærme eller
andre strømforbrugende programmer, som f.eks. komplekse 3Dgrafikprogrammer.
• Bruger computeren i maksimal ydelsesfunktion. Se "Konfiguration af
strømstyringsopsætning" i din
Brugerhåndbog
adgang til Egenskaber for strømstyring eller Dell QuickSet, som du kan
bruge til at konfigurere strømstyringsindstillinger.
Du kan kontrollere batteriets opladning, før du sætter batteriet i computeren.
Du kan også indstille strømstyringsindstillingerne til at gøre dig opmærksom,
når batteriopladningen er lav.
for nærmere oplysninger om
50 Hurtig referenceguide
Page 51

Kontrol af batteriopladning
De følgende funktioner giver information om batteriopladningen:
• Dell QuickSet batterimåler
• Microsoft Windows vinduet
Windows Vista og
Spændingsmåler
i Windows XP)
• Batteriopladningsmåler og tilstandsmåler
• Advarsel om lavt batteri
Dell™ QuickSet-batterimåler
Hvis Dell QuickSet er installeret, trykkes på <Fn><F3>for at få vist
QuickSet-batterimåler. Batterimåler-vinduet viser status, batteritilstand,
opladningsniveau og opladningstid for batteriet i din computer.
For nærmere oplysninger om QuickSet skal du højreklikke på QuickSet-ikonet
på menubjælken og klikke på Hjælp.
Opladningsmåler
Med opladningsmåleren kan du kontrollere:
• Batteriopladning (kontroller ved at trykke og
• Batteritilstand (kontroller ved at trykke og
Batteriets funktionstid er stort set bestemt af det antal gange, det oplades. Efter
hundredvis af op- og afladningscyklusser mister batterier noget
opladningskapacitet—eller batteritilstand. Det vil være f.eks. hvis et batteri viser
status "opladet", men opretholder en nedsat opladningskapacitet (tilstand).
og ikonet
udløse
statusknappen)
holde
på statusknappen)
Effekt
(
i
Kontrol af batteriopladning
For at kontrollere batteriopladningen, skal du trykke på og udløse
statusknappen på batteriopladningsmåleren for at tænde lysene med
opladningsniveauet. Hvert lys repræsenterer ca. 20 % af total
batteriopladning. Hvis batteriet f.eks. har 80 % af opladningen tilbage, vil fire
lys være tændt. Hvis ingen lys vises, er batteriet ikke opladet.
Hurtig referenceguide 51
Page 52

Kontrol af batteritilstand
BEMÆRK: Du kan kontrollere batteritilstanden på en af to følgende måder: Ved
hjælp af opladningsmåleren på batteriet, som beskrevet nedenfor, eller vha.
Batterimåleren i Dell QuickSet. For nærmere oplysninger om QuickSet skal du
højreklikke på -ikonet på proceslinjen og klikke på Hjælp.
For at kontrollere batteritilstanden vha. opladningsmåleren, skal du trykke og
holde på statusknappen på batteriopladningsmåleren i mindst 3 sekunder.
Hvis der ikke vises nogen lys, fungerer batteriet fint, og mere end 80 % af dens
oprindelige opladningskapacitet er tilbage. Hvert lys viser en trinvis
forringelse. Hvis fem lys vises, er mindre en 60 % af opladningskapaciteten
tilbage, og du bør overveje at udskifte batteriet. Se "Anvendelse af et batteri"
på side 49 for nærmere oplysninger om batteribrugstid.
Advarsel om lavt batteri
VARSEL: For at undgå tab af data eller beskadigelse af data, skal du gemme dit
arbejde med det samme efter en advarsel om lavt batteri og derefter kan du slutte
computeren til en stikkontakt. Hvis batteriet løber helt tør for strøm, så starter
dvalefunktionen automatisk.
Et pop-up-vindue advarer dig, når batteriopladningen er ca. 90 % brugt. Hvis
der er installeret to batterier, betyder en advarsel om lavt batteri, at den
samlede ladning på begge batterier er 90 % brugt. Computeren går i
dvalefunktion, når batteriladningen er nået til et kritisk lavt niveau.
Du kan ændre indstillinger for batterialarmer i QuickSet (Kvik-opsætning)
eller i vinduet Strømstyring. Se "Konfiguration af strømstyringsindstillinger" i
din Brugerhåndbog for nærmere oplysninger om adgang til QuickSet eller
vinduet Egenskaber for strømstyring.
For manuelt at gå i Dvaletilstand i Windows Vista, skal du klikke på Windows
Vista Start-knappen , og flytte musen over den højre triangel ved siden at
ikonet Lås for at åbne vinduet Egenskaber for strømstyring, og derefter klikke
på Dvale.
For manuelt at gå i Dvaletilstand i Windows XP, skal du først aktivere
Dvaletilstand.
Sådan aktiveres Dvaletilstand:
1
Klik på
Strømstyring
2
Klik på fanebladet
Start→ Kontrolpanel→ Præstation og vedligeholdelse
.
Dvale
.
→
52 Hurtig referenceguide
Page 53

3
Væ lg
4
Aktiver dvale
Klik på
Anvend
.
og OK.
Sådan startes Dvaletilstand:
Indtast tastesekvensen <Ctrl><Alt><Del>.
1
2
Væ lg
Luk computeren→ Dvale
.
Hvis du har indstillet strømstyringsindstillingerne til Dvale i vinduet
Egenskaber for strømstyring eller med guiden QuickSet strømstyring, kan du
også bruge en af de følgende metoder til at starte dvaletilstand:
• Tryk på strømknappen.
• Luk skærmen.
• Tryk på <Fn><Esc>.
BEMÆRK: Visse pc-kort eller Express Cards fungerer muligvis ikke korrekt, når
computeren afslutter dvale-tilstand. Fjern og geninstaller kortet, eller genstart
(reboot) blot computeren.
Tryk på strømknappen for at afslutte dvale-tilstand. Det kan tage lidt tid,
inden computeren afslutter dvaletilstanden. Computeren kan ikke afslutte
dvaletilstanden ved at trykke på en tast eller røre på pegefeltet eller pegepind.
For mere information om dvale-tilstand henvises til dokumentationen, som
fulgte med operativsystemet.
Opladning af batteriet
Når du tilslutter din computer til en stikkontakt eller isætter et batteri, mens
computeren er tilsluttet til en stikkontakt, vil computeren kontrollere
batteriopladning og temperatur. Om nødvendigt vil vekselstrømsadapteren
oplade batteriet og opretholde batteriopladningen.
BEMÆRK: Med Dell™ ExpressCharge™, når computeren slukkes, kan
vekselstrømsadapteren oplade et fuldt afladet batteri til 80 % på ca. 1 time og til
100 % på ca. 2 timer. Opladningstiden er længere, når computeren er tændt. Du kan
lade batteriet sidde i computeren, så længe du vil. Batteriets interne kredsløb
forhindrer, at batteriet bliver overbelastet.
Hvis batteriet er varmt efter at være brugt i din computer eller anvendes i
varme omgivelser, kan det ske, at batteriet ikke oplades, når du tilslutter
computeren til en stikkontakt.
Hurtig referenceguide 53
Page 54

Batteriet er for varmt til at starte opladning, hvis -lampen blinker skiftevis
grønt og orange. Fjern computeren fra stikkontakten, og lad computer og
batteri afkøle til stuetemperatur. Tilslut derefter computeren til en
stikkontakt for at fortsætte opladning.
For nærmere oplysninger om løsning af batteriproblemer, se
"Strømproblemer" i Brugerhåndbogen.
Udskiftning af batteri
ADVARSEL: Brug af et inkompatibelt batteri kan øge risikoen for eksplosion.
Udskift kun batteriet med et kompatibelt batteri købt af Dell. Batteriet er beregnet
til din Dell™-computer. Brug ikke et batteri fra andre computere sammen med din
computer.
ADVARSEL: Før du udfører disse procedurer skal du slukke for computeren,
fjerne vekselstrømsadapteren fra stikkontakten og computeren, fjerne modemmet
fra vægstikket og computeren, og fjerne alle eksterne kabler fra computeren.
VARSEL: Du skal fjerne alle eksterne kabler fra computeren for at undgå risiko for
beskadigelse af stikkene.
VARSEL: Hvis du vælger at udskifte batteriet, mens computeren er i
standbytilstand, har du op til 1 minut til at udskifte batteriet i, før computeren
slukkes, og du mister ikke-gemte data.
Fjernelse af batteriet:
1
Hvis computeren er tilsluttet til en dockingenhed, skal du tage den ud af
enheden. Se den dokumentation, der fulgte med docking-enheden, hvis
du ønsker yderligere oplysninger.
2
Kontroller, at der er slukket for computeren, eller at den dvaler i
strømstyringstilstand.
3
Flyt batteribåsens låsudløser på undersiden af computeren og tag derefter
batteriet ud af båsen.
54 Hurtig referenceguide
Page 55

For at isætte batteriet skal du følge udskiftningsproceduren i modsat
rækkefølge.
Opbevaring af batteri
Fjern batteriet, når du skal opbevare din computer i en længere periode. Et
batteri aflades under længerevarende opbevaring. Efter en lang
opbevaringsperiode skal batteriet oplades helt (se "Opladning af batteriet" på
side 53) før du bruger det.
Problemløsning
Baglås- og softwareproblemer
ADVARSEL: Før udførelse af nogle af procedurerne i dette afsnit, skal
sikkerhedsinstruktionerne i Produktinformationsguiden følges.
Tablet-pc'en starter ikke
KONTROLLER, AT STRØMKABLET SIDDER GODT FAST I TABLET- PC'EN OG TIL
STIKKONTAKTEN
Tablet-pc'en reagerer ikke
VARSEL: Du kan risikere at miste data, hvis du ikke kan udføre en lukning af
operativsystemet.
Hurtig referenceguide 55
Page 56

SLUK FOR TABLET-PC'EN — Hvis du ikke kan få nogen reaktion ved at trykke på
en tast på tastaturet eller ved at flytte musen, skal du trykke og holde
afbryderknappen i mindst 8 til 10 sekunder (til tablet-pc'en slukker), og
derefter genstarte tablet-pc'en.
Et program svarer ikke
AFSLUT PROGRAMMET —
1
Tryk på <Ctrl><Shift><Esc> samtidigt for at få adgang til Jobliste.
2
Klik på fanen
3
Klik for at vælge det program, der ikke længere svarer.
4
Klik på
Et program lukker ned gentagne gange
BEMÆRK: De fleste software inkluderer installationsinstruktioner i
dokumentationen eller på en cd eller dvd.
ONTROLLER SOFTWARE-DOKUMENTATION — Om nødvendigt afinstalleres og
K
Afslut
Programmer
.
.
geninstalleres programmet.
Et program er beregnet til et tidligere Windows-operativsystem
KØR GUIDEN PROGRAMKOMPATIBILITET — Guiden programkompatibilitet
konfigurerer et program, så det kører i et miljø svarende til tidligere versioner
af Windows.
Windows Vista
1
Klik på
Start → Kontrolpanel→ Programmer→ Brug et ældre program
med denne version af Windows
2
På velkomstskærmen klikkes på
3
Følg vejledningen på skærmen.
Windows XP
1
Klik på
Start→
Hjælp og support→ Løsning af et problem
Applikations- og softwareproblemer.
2
Klik på
Kør software som fungerede med tidligere versioner
56 Hurtig referenceguide
.
Næste
.
→
.
Page 57

3
På velkomstskærmen klikkes på
4
Følg vejledningen på skærmen.
Næste
.
Der vises en helt blå skærm
SLUK FOR TABLET-PC'EN — Hvis du ikke kan få nogen reaktion ved at trykke på
en tast på tastaturet eller ved at flytte musen, skal du trykke og holde
afbryderknappen i mindst 8 til 10 sekunder (til tablet-pc'en slukker), og
derefter genstarte tablet-pc'en.
Andre softwareproblemer
SE I SOFTWAREDOKUMENTATIONEN, ELLER KONTAKT SOFTWAREFABRIKANTEN FOR
OPLYSNINGER OM PROBLEMLØSNING —
• Kontroller, at programmet er kompatibelt med det operativsystem, der er
installeret på din tablet-pc.
• Kontroller, at tablet-pc'en opfylder de nødvendige minimumskrav, der
behøves til at køre softwaren. Se i softwaredokumentationen for
oplysninger.
• Kontroller, at programmet er installeret og konfigureret rigtigt.
• Undersøg, at enhedsdriverne ikke er i konflikt med programmet.
• Om nødvendigt afinstalleres og geninstalleres programmet.
LAV STRAKS BACKUP AF DINE FILER
BRUG ET VIRUSSCANNINGSPROGRAM TIL AT KONTROLLERE HARDDREVET, CD'ER
ELLER DVD'ER
GEM OG LUK ALLE ÅBNE FILER ELLER PROGRAMMER, OG LUK NED FOR TABLET-
PC'EN VIA START-MENUEN
Dell Diagnostics (Dell diagnosticering)
ADVARSEL: Før udførelse af nogle af procedurerne i dette afsnit, skal
sikkerhedsinstruktionerne i Produktinformationsguiden følges.
VARSEL: Dell Diagnostics (Dell-diagnosticering) fungerer kun på Dell™-
computere.
BEMÆRK: Du skal bruge det optiske drev i D/Bay eller den valgfrie mediebase for
at få adgang til mediet Driver’s and Utilities (Drivere og hjælpeværktøjer).
Hurtig referenceguide 57
Page 58

Hvornår Dell Diagnostics (Dell-diagnosticering) skal anvendes
Hvis du kommer ud for et problem med tablet-pc'en, skal du foretage eftersyn
i Lockup- og softwareproblemer (se "Baglås- og softwareproblemer" på
side 55), og køre Dell-diagnosticering, før du kontakter Dell for teknisk hjælp.
Det anbefales at udskrive disse procedurer, før du begynder.
Se "Brug af programmet Systeminstallation" i User’s Guide
(Brugervejledning) for at gennemse informationen om tablet-pc'ens
konfiguration og sørge for, at enheden, som du vil teste, vises i systemets
opsætning og er aktiv.
Start Dell Diagnostics (Dell Diagnosticering) fra harddisken eller fra mediet
Drivers and Utilities (Drivere og hjælpeværktøjer).
BEMÆRK: Mediet Drivers and Utilities (Drivere og hjælpeværktøjer) er ekstra og
leveres muligvis ikke med tablet--pc'en.
Start af Dell-diagnosticering fra harddisken
Dell Diagnostics (Dell-diagnosticering) findes på en skjult partition med
diagnosticeringsværktøjer på harddisken.
BEMÆRK: Hvis tablet-pc'en ikke viser et skærmbillede, skal du kontakte Dell (se
"Sådan kontaktes Dell" i User’s Guide (Brugervejledning)).
BEMÆRK: Hvis tablet-pc'en er tilsluttet til en dockingenhed, skal du tage den ud af
enheden. Se om nødvendigt "Undocking af tablet-pc'en fra mediebasen" og
"Undocking af tablet-pc'en fra batteriudsnittet" i User’s Guide (Brugervejledning) for
instruktioner
1
Sørg for, at tablet-pc'en er sluttet til en stikkontakt, som virker korrekt.
2
Tænd (eller genstart) din tablet-pc.
3
Start Dell Diagnostics (Dell-diagnosticering) på en af to måder:
BEMÆRK: Hvis du venter for længe, og operativsystemets logo kommer
frem, skal du fortsætte med at vente, til du ser Microsoft
skrivebordet og derefter lukke computeren ned og forsøge igen.
®
– Når DELL™-logoet vises, skal du trykke <F12> med det samme.
Vælg
Diagnostics (Diagnoser)
BEMÆRK: Computeren skal være slukket helt, før den følgende mulighed
forsøges.
fra bootmenuen, og tryk på <Enter>.
– Tryk og hold på tasten <Fn>, mens du tænder for tablet-pc'en.
58 Hurtig referenceguide
Windows®-
Page 59

Tablet-pc'en kører en vurdering af systemet før start (PSA), dvs. en række
tests af systemkort, tastatur, skærm, hukommelse, harddisk, osv.
• Besvar eventuelle spørgsmål, der stilles under testen.
• Hvis der registreres fejl under en vurdering af systemet før start,
skal du notere fejlkoden/fejlkoderne ned og "Contacting Dell"
(Kontakt Dell) i
User’s Guide
(Brugervejledning)).
Hvis vurderingen af systemet før start bliver færdig uden problemer, bliver
den følgende meddelelse vist: “
Booting Dell Diagnostic
Utility Partition.Press any key to continue
programmet Dell Diagnostics (Dell-diagnosticering). Tryk på en vilkårlig
tast for at fortsætte).
4
Tryk på en vilkårlig tast for at starte Dell Diagnostics (Delldiagnosticering) fra partitionen med diagnosticeringsværktøjet på
harddisken.
BEMÆRK: Hvis du ser en meddelelse om, at der ikke blev fundet en partition
med diagnosticeringsværktøjet, køres Dell-diagnosticering fra mediet
Diagnostics (Diagnosticering) fra mediet Drivers and Utilities (Drivere og
hjælpeværktøjer).
5
Når Dell-diagnosticering Hovedmenu vises, vælges den test, som du vil
køre. Se "Dell Diagnostics Main Menu (Hovedmenu for Dell-diagnoser)"
på side 60.
Start af Dell-diagnosticering fra mediet Drivers and Utilities (Drivere og
hjælpeværktøjer)
1
Sæt mediet
2
Luk tablet-pc'en, og genstart den.
Drivers and Utilities (Drivere og hjælpeværktøjer) i
Når DELL-logoet vises, skal du trykke på <F12> med det samme.
” (Starter
.
BEMÆRK:
skal du fortsætte med at vente, til du ser Microsoft
derefter lukke computeren ned og forsøge igen.
BEMÆRK: De næste trin ændrer kun boot-sekvensen denne ene gang. Ved
den næste opstart starter tablet-pc'en op i overensstemmelse med
enhederne, der er angivet i systemets opsætningsprogram.
3
Når startenhedslisten kommer frem, fremhæves
Hvis du venter for længe, og operativsystemets logo kommer frem,
®
Windows®-skrivebordet og
CD/DVD/CD-RW
trykkes på <Enter>.
Hurtig referenceguide 59
, og der
Page 60

4
Vælg optionen
Boot from CD-ROM (Start fra cd-rom)
fra den menu, der
vises, og tryk på <Enter>.
5
Skriv 1 for at starte cd-menuen og tryk på <Enter> for at fortsætte.
6
Vælg
Kør 32 Bit Dell-diagnosticering
fra den nummererede liste. Hvis der
er anført flere versioner, vælges versionen, som er passende for computeren
tablet-pc'en.
7 Når Dell-diagnosticering Hovedmenu vises, vælges den test, som du vil
køre.
Dell Diagnostics Main Menu (Hovedmenu for Dell-diagnoser)
1
Når Dell Diagnostics (Dell diagnosticering) indlæser, og
Main Menu
(Hovedmenu) bliver vist, skal du klikke på knappen for den ønskede
indstilling.
BEMÆRK: Det anbefales, at du vælger Test System for at køre en
fuldstændig test på tablet-pc'en.
Valgmulighed Funktion
Test Memory
(Test hukommelse)
Test System
(Test system)
Exit (Afslut) Afslut Diagnosticering
2
Når du har valgt funktionen
Kør den separate hukommelsestest
Kør Systemdiagnosticering
Test S ys te m
fra hovedmenuen, bliver den
følgende menu vist:
BEMÆRK: Det anbefales, at du vælger Extended Test (Udvidet test) fra menuen
nedenfor for at køre en mere grundig undersøgelse af enhederne i tablet-pc'en.
Valgmulighed Funktion
Express Test
(Ekspressstest)
Extended Test
(Udvidet test)
Custom Test
(Brugerdefineret test)
Symptom Tree
(Liste over symptomer)
Udfører en hurtig test af enheder i systemet. Dette varer
typisk 10 til 20 minutter.
Foretager en grundigt kontrol af enheder i systemet.
Dette varer som regel 1 time eller længere.
Brug til at teste en specifik enhed eller tilpas testerne,
som skal køres.
Med denne funktion kan du vælge testerne baseret på et
symptom i computeren. Denne mulighed angiver de
mest almindelige symptomer.
60 Hurtig referenceguide
Page 61

3
Hvis der opdages et problem under en test, vises der en meddelelse med en
fejlkode og en beskrivelse af problemet. Skriv fejlkoden og
problembeskrivelsen ned, og kontakt Dell (se "Sådan kontaktes Dell" i
User’s Guide
BEMÆRK: Servicemærket til tablet-pc'en findes øverst på hver testskærm.
Hvis du kontakter Dell, vil teknisk support bede om servicemærket.
4
Hvis du kører en test via indstillingen
(Brugervejledning)).
Brugerdefineret test
eller via Liste
over symptomer, skal du klikke på den relevante fane, som er beskrevet i
nedenstående tabel, for at få yderligere oplysninger.
Fane Funktion
Results (Resultater) Her vises testresultaterne og eventuelle fejl, som opstod.
Errors (Fejl) Her vises, hvilke fejl der opstod, fejlkoder og beskrivelser
af problemet.
Help (Hjælp) Her får du en beskrivelse af testen og evt. hvilke krav, der
stilles til udførelse af testen.
Configuration
(Konfiguration)
Parameters
(Parametre)
Her vises hardwarekonfigurationen for den valgte enhed.
Dell-diagnosticering henter konfigurationsoplysningerne
for alle enheder fra systemets installation, hukommelse
og forskellige interne tests samt viser oplysningerne i
enhedslisten i den venstre rude på skærmen. Det er ikke
sikkert, at alle komponenter, som er installeret på tabletpc'en eller alle enheder, som er sluttet til tablet-pc'en,
vises på listen over enheder.
Giver dig mulighed for at tilpasse testen ved at ændre
testindstillingerne.
5
Når testerne er færdige, skal du lukke testskærmen for at vende tilbage til
skærmen
diagnosticering) og genstarte tablet-pc'en, lukkes skærmen
Hovedmenu
. For at forlade Dell Diagnostics (Dell
Main Menu
(Hovedmenu).
6
Fjern eventuelt mediet Dell
hjælpeværktøjer)
.
Drivers and Utilities (Drivere og
Hurtig referenceguide 61
Page 62

62 Hurtig referenceguide
Page 63

Indeks
B
Batteri
kontrol af batteriopladning, 51
batteri
fjernelse, 54
opbevaring, 55
opladning, 53
opladningsmåler, 51
ydelse, 50
Brugervejledning, 39
C
computer
går ned, 55
lukker ned, 57
reagerer ikke, 55
D
Dell Diagnostics (Dell
diagnosticering), 57
Dell-supportside, 41
diagnosticering
Dell, 57
dokumentation
Brugervejledning, 39
ergonomi, 39
garanti, 39
Licensaftale for slutbrugere, 39
online, 41
Produktinformationsvejledning,
39
regulerende, 39
sikkerhed, 39
E
ergonomi-information, 39
F
fejlfinding
Dell Diagnostics (Dell
diagnosticering), 57
G
garantiinformation, 39
H
hardware
Dell Diagnostics (Dell
diagnosticering), 57
Indeks 63
Page 64

L
R
Licensaftale for slutbrugere, 39
M
mærker
Microsoft Windows, 40
Servicemærke, 40
medie
operativsystem, 43
mediet Drivers and Utilities
(Drivere, 57
mediet operativsystem, 43
O
operativsystem
geninstallation, 43
P
problemer
blå skærm, 57
computer går ned, 55
computer lukker ned, 57
computer reagerer ikke, 55
computeren går ned, 55
Dell Diagnostics (Dell
diagnosticering), 57
generelt, 55
program svarer ikke, 56
programnedlukning, 56
software, 56-57
regulerende information, 39
S
Servicemærke, 40
sikkerhedsinstrukser, 39
software
problemer, 56-57
Start af Dell Diagnostics (Dell
Diagnosticering) fra
harddisken, 58
Start af Dell-diagnosticering fra
mediet Drivers and Utilities
(drivere og
hjælpeværktøjer), 59
support-website, 41
systemvisning
venstre side, 46
systemvisninger
bagfra, 47
bund, 48
bunden, 48
forfra, 45
højre side, 47
W
Windows Vista
geninstallation, 43
Produktinformationsvejledning,
39
64 Indeks
Page 65

Dell™ Latitude™ XT -pikaopas
Malli PP12S
www.dell.com | support.dell.com
Page 66

Huomautukset, varoitukset ja vaarat
HUOMAUTUS: HUOMAUTUKSET ovat tärkeitä tietoja, joiden avulla voit käyttää
tietokonetta entistä paremmin.
VAROITUS : VAROITUKSET ovat ilmoituksia tilanteista, joissa laitteisto voi
vahingoittua tai joissa tietoja voidaan menettää. Niissä kerrotaan myös, miten nämä
tilanteet voidaan välttää.
VAARA: VAARAT kertovat tilanteista, joihin saattaa liittyä omaisuusvahinkojen,
loukkaantumisen tai kuoleman vaara.
____________________
Tämän asiakirjan tiedot voivat muuttua ilman erillistä ilmoitusta.
© 2007 Dell Inc. Kaikki oikeudet pidätetään.
Tämän tekstin kaikenlainen kopioiminen ilman Dell Inc:n kirjallista lupaa on jyrkästi kielletty.
Tekstissä käytetyt tavaramerkit: Dell, DELL-logo, Wi-Fi Catcher, ExpressCharge ja Latitude ovat
Dell Inc:n tavaramerkkejä; Microsoft, Windows ja indows Vista ovat Microsoft Corporationin
tavaramerkkejä tai rekisteröityjä tavaramerkkejä Yhdysvalloissa ja/tai muissa maissa.
Muut tekstissä mahdollisesti käytetyt tavaramerkit ja tuotenimet viittaavat joko merkkien ja nimien
haltijoihin tai näiden tuotteisiin. Dell Inc. kiistää omistusoikeuden muihin kuin omiin
tavaramerkkeihinsä ja tuotenimiinsä.
Malli PP12S
Joulukuu 2007 Tuotenro DR977 Versio A01
Page 67

Sisällys
Resurssit . . . . . . . . . . . . . . . . . . . . . . . . . 69
Tietojen etsiminen
Tietokoneen käyttöönotto
. . . . . . . . . . . . . . . . . 69
. . . . . . . . . . . . . 76
Tietoja Tablet-PC:stä
Näkymä edestä
Näkymä vasemmalta
Näkymä oikealta
Näkymä takaa
Näkymä pohjasta
Kynänäkymä
Akun käyttö
. . . . . . . . . . . . . . . . . . . . . . . 81
Akun suoritusteho
Akun latauksen tarkistus
Akun lataaminen
Akun irrottaminen
Akun säilytys
. . . . . . . . . . . . . . . . . . 76
. . . . . . . . . . . . . . . . . . . 77
. . . . . . . . . . . . . . . . 78
. . . . . . . . . . . . . . . . . . 79
. . . . . . . . . . . . . . . . . . . 79
. . . . . . . . . . . . . . . . . . 80
. . . . . . . . . . . . . . . . . . . . 81
. . . . . . . . . . . . . . . . . 82
. . . . . . . . . . . . . . 83
. . . . . . . . . . . . . . . . . . 85
. . . . . . . . . . . . . . . . . 86
. . . . . . . . . . . . . . . . . . . . 87
Vianmääritys . . . . . . . . . . . . . . . . . . . . . . . 87
Lukkiutumiset ja ohjelmisto-ongelmat
Dell-diagnostiikkaohjelma
. . . . . . . . . . . . . 89
. . . . . . . 87
Hakemisto . . . . . . . . . . . . . . . . . . . . . . . . . . . 95
Sisällys 67
Page 68

68 Sisällys
Page 69

Resurssit
Tietojen etsiminen
HUOMAUTUS: Jotkin ominaisuudet tai tietovälineet voivat olla valinnaisia, eikä
niitä välttämättä toimiteta Tablet-PC:n mukana. Jotkin ominaisuudet tai tietovälineet
eivät välttämättä ole saatavana kaikissa maissa.
HUOMAUTUS: Tablet-PC:n kanssa voidaan toimittaa lisätietoja.
HUOMAUTUS: Driver’s and Utilities -levyn käyttämiseen tarvitaan D/Bay-
asemapaikassa oleva optinen asema tai valinnainen tietovälineasema.
Mitä etsit? Tietolähde:
• Tablet-PC:n diagnostiikkaohjelma
• Tablet-PC:n ajurit
• Laitteen ohjekirjat
• Notebook System Software (NSS)
Drivers and Utilities -levyltä
HUOMAUTUS: Drivers and Utilities -levy
voi olla valinnainen, eikä sitä välttämättä
toimiteta Tablet-PC:n mukana.
Ohjeet ja ajurit on asennettu TabletPC:hen valmiiksi. Voit asentaa ajurit
uudelleen Drivers and Utilities -levyn
avulla (katso Käyttöoppaan kohtaa Ajurien
ja apuohjelmien asentaminen uudelleen)
tai suorittaa Dell-diagnostiikkaohjelman
(katso Dell-diagnostiikkaohjelma,
sivulla 89).
Levyllä saattaa olla Lueminut-tiedostoja,
joissa on viimeisimpiä päivityksiä TabletPC:n teknisistä muutoksista tai teknisiä
lisätietoja teknikoille tai kokeneille
käyttäjille.
HUOMAUTUS: Ajuri- ja
dokumentaatiopäivityksiä on osoitteessa
support.dell.com.
Pikaopas 69
Page 70

Mitä etsit? Tietolähde:
• Osien poistaminen ja vaihtaminen
• Tekniset tiedot
• Järjestelmäasetusten määrittäminen
• Vianmääritys ja ongelmien
ratkaiseminen
• Takuutiedot
• Ehdot (vain Yhdysvallat)
• Turvallisuusohjeet
• Viranomaissäädöksiä koskevat tiedot
• Ergonomiaa koskevat tiedot
• Loppukäyttäjän lisenssisopimus
Dell™ Latitude™ XT -käyttöopas
Microsoft Windows XP ja Windows
Vistan™ ohje- ja tukikeskus
1
Valitse
Windows XP:ssä)
käyttö- ja järjestelmäoppaat
Järjestelmäoppaat
2
Valitse tietokonetta vastaava
Dellin™ Tuotetieto-opas
Käynnistä (tai Käynnistä
→ Ohje ja tuki→ Dell-
→
.
käyttöopas
.
• Tablet-PC:n asetusten määrittäminen
• Tablet-PC:n ominaisuudet lyhyesti
• Tablet-PC:n lisävarusteet
70 Pikaopas
Pikaopaskortti
Page 71

Mitä etsit? Tietolähde:
• Huoltotunnus ja pikahuoltokoodi
®
• Microsoft
Windows®
-käyttöoikeustarra
Huoltotunnus ja Microsoft Windows
-käyttöoikeus
HUOMAUTUS: Tablet-PC:n huoltotunnus on
Tablet-PC:n pohjassa lähellä muistin ja
minikorttien kantta (katso kohtaa Näkymä
pohjasta, sivulla 80).
HUOMAUTUS: Huoltotunnuksen tiedot
löytyvät myös järjestelmän
asennusohjelmasta. Lisätietoja on
Käyttöoppaan kohdassa Järjestelmän
asennusnäyttö.
Tablet-PC:n huoltotunnuksessa on sekä
huoltonumero että pikahuoltokoodi.
• Huoltotunnuksen avulla voit tunnistaa
Tablet-PC:si, kun käytät
support.dell.com
yhteyden tekniseen tukeen.
• Anna pikahuoltokoodi, joka ohjaa
puheluasi ottaessasi yhteyden tukeen.
-sivustoa tai otat
HUOMAUTUS: Tablet-PC:n Microsoft
Windows
®
License -käyttöoikeustarra
®
sijaitsee pääakun alla Tablet-PC:n
akkupaikassa (katso Akun irrottaminen,
sivulla 86).
• Käytä Microsoft Windows
-käyttöoikeustarran numeroa, jos asennat
käyttöjärjestelmän uudelleen.
HUOMAUTUS: Uudelleen suunnitellussa
Microsoft Windows -käyttöoikeustarrassa
on lisäsuojana reikä, jonka avulla koetetaan
estää tarran poistoyritykset.
Pikaopas 71
Page 72

Mitä etsit? Tietolähde:
• Solutions (ratkaisuja) —
vianmääritysvihjeitä, teknikoiden
kirjoittamia artikkeleja, online-kursseja,
usein kysyttyjä kysymyksiä
• Community (yhteisö) — onlinekeskustelua muiden Dellin asiakkaiden
kanssa
• Upgrades (päivitykset) —
komponenttien päivitysohjeita,
esimerkiksi muistin, kiintolevyaseman
ja käyttöjärjestelmän päivitysohjeet
• Customer Care (asiakaspalvelu) —
yhteystiedot, palvelupyyntöjen ja
tilausten tiedot sekä takuu- ja
korjaustiedot
• Service and support (palvelut ja
tuki) — palvelupuhelujen tila ja
tukitapahtumat, palvelusopimukset,
online-keskustelut teknisen tuen
kanssa
• Dellin tekninen päivityspalvelu —
sähköposti-ilmoitukset Tablet-PC:n
ohjelmiston ja laitteiston päivityksistä
• Reference (viittaukset) — Tablet-PC:n
ohjeet, laitekokoonpanon tiedot,
tuotetekniset tiedot ja white paper
-raportit
• Downloads (ladattavat tiedostot) —
sertifioidut ajurit, korjaustiedostot ja
ohjelmapäivitykset
Dell-tukisivusto — support.dell.com
HUOMAUTUS: Valitse alueesi tai
yritysosastosi, jolloin pääset oikeaan
tukisivustoon.
72 Pikaopas
Page 73

Mitä etsit? Tietolähde:
• Notebook System Software (NSS) —
Jos käyttöjärjestelmä asennetaan
uudelleen Tablet-PC:hen, myös NSSapuohjelma pitää asentaa uudelleen.
NSS-apuohjelman avulla saat
esimerkiksi tärkeitä käyttöjärjestelmän
päivityksiä ja suorittimia, optisia
asemia ja USB-laitteita koskevaa tukea.
NSS tarvitaan, jotta Dellin Tablet-PC
toimisi asianmukaisesti. Tämä ohjelma
tunnistaa automaattisesti Tablet-PC:n
ja käyttöjärjestelmän ja asentaa niiden
kokoonpanojen mukaiset päivitykset.
Notebook System Software -ohjelmiston
lataaminen:
1
Siirry osoitteeseen
valitse Ajurit ja ladattavat tiedostot.
2
Kirjoita huoltotunnus tai tuotteen tyyppi
ja malli ja napsauta sitten
painiketta.
3
Vieritä kohtaan
kokoonpanon apuohjelmat
kannettavien tietokoneiden ohjelmistot
ja napsauta
4
Valitse
valitse sitten
HUOMAUTUS: Support.dell.com-sivuston
käyttöliittymä voi vaihdella valintojesi
mukaan.
• Ohjelmapäivityksiä ja
vianmääritysaiheita — Usein kysyttyjä
kysymyksiä, ajankohtaisia aiheita ja
tietokoneympäristön yleinen tila
Dell Support -apuohjelma
Dell Support -apuohjelma on TabletPC:hen asennettu automaattinen päivitysja ilmoitusjärjestelmä. Tämä
tukiapuohjelma tekee ajantasaisia
tietokoneympäristön terveystarkastuksia,
sisältää ohjelmistopäivityksiä ja asiaan
kuuluvia itsetukititietoja. Avaa Dell
Support -apuohjelma Windowsin
ilmaisinalueen
Lisätietoja on
Support -apuohjelma.
support.dell.com
Siirry
-
Järjestelmän ja
→
Dellin
Lataa nyt
-painiketta.
Ajurit ja ladattavat tiedostot
Siirry
.
-kuvakkeesta.
Käyttöoppaan
kohdassa Dell
ja
ja
Pikaopas 73
Page 74

Mitä etsit? Tietolähde:
• Tablet-PC:hen ja sen komponentteihin
liittyvien tietojen etsiminen
• Internet-yhteyden muodostaminen
• Käyttäjätilien lisääminen eri henkilöille
• Tiedostojen ja asetusten siirtäminen
toisesta Tablet-PC:stä
Windowsin Aloituskeskus
Windowsin Aloituskeskus tulee
automaattisesti näyttöön, kun käytät
Tablet-PC:tä ensimmäistä kertaa. Voit
valita, tuleeko Aloituskeskus näkyviin aina,
kun Tablet-PC käynnistetään.
Kun Aloituskeskus on suljettu, voit avata
sen seuraavasti:
Windows Vista — Valitse Käynnistä
Aloituskeskus.
Windows XP — Valitse Käynnistä→ Ohje
ja tuki→ Tervetuloa: Tablet-PC.
• Microsoft Windows Vista-™ ja
Windows XP -käyttöjärjestelmien
käyttäminen
• Ohjelmien ja tiedostojen käyttäminen
• Työpöydän mukauttaminen
Windowsin ohje- ja tukikeskus
1 Va l it s e
Windows XP:ssä)
2 Kirjoita ongelmaasi kuvaava sana tai
lause kohtaan Etsi ja paina <Enter>painiketta tai napsauta suurennuslasin
kuvaa.
3 Napsauta ohjeaihetta, joka kuvaa
ongelmaa.
4 Noudata näytön ohjeita.
• Tablet-PC:n ominaisuuksia ja
toimintoja, verkon toimintaa, ohjattua
virrankulutuksen hallintatoimintoa,
pikanäppäimiä ja muita Dell Quickset
-ohjelman hallitsemia toimintoja
koskevia tietoja
Dell QuickSet -ohje
Voit katsella
painamalla Tablet-PC:n asetusten QuickSetpainiketta (katso Näkymä edestä, sivulla 77)
napsauttamalla hiiren
tai
kakkospainikkeella QuickSet-kuvaketta
Microsoft
ja valitsemalla Ohje-vaihtoehdon.
Windowsin ilmaisinalue sijaitsee näytön
oikeassa alakulmassa.
Käynnistä
Dell QuickSet -ohjetta
®
Windowsin® ilmaisinalueelta
(tai Käynnistä
→ Ohje ja tuki
.
→
74 Pikaopas
Page 75

Mitä etsit? Tietolähde:
• Käyttöjärjestelmän
uudelleenasentaminen
Käyttöjärjestelmälevy
Käyttöjärjestelmä on jo asennettu TabletPC:hen. Jos haluat asentaa
käyttöjärjestelmän uudelleen, käytä
Käyttöjärjestelmä-levyä. Katso lisätietoja
Käyttöoppaan kohdasta Käyttöjärjestelmän
käyttäminen.
Kun käyttöjärjestelmä on asennettu
uudelleen, asenna uudelleen Tablet-PC:n
mukana toimitettujen laitteiden ajurit
käyttämällä Drivers and Utilities -levyä.
Käyttöjärjestelmän Product Key -tunnus
on Microsoft
-käyttöoikeustarrassa Tablet-PC:n
pääakkupaikassa (katso kohtaa Akun
irrottaminen, sivulla 86).
HUOMAUTUS: Levyn väri vaihtelee
tilaamasi käyttöjärjestelmän mukaan.
®
Windows®
Pikaopas 75
Page 76

Tietokoneen käyttöönotto
VAARA: Ennen kuin teet mitään tässä osiossa mainittuja toimia, noudata
Tuotetieto-oppaassa olevia turvallisuusohjeita.
1
Pura lisävarusteet pakkauksesta.
2
Aseta pakkauksessa olevat lisävarusteet esille. Tarvitset niitä
valmistellessasi tietokonetta käyttöönottoa varten.
Lisävarustepakkauksessa on lisäksi käyttöohjeita sekä tilaamiasi muita
ohjelmistoja tai laitteita (PC-kortteja, levyasemia tai akkuja).
3
Kytke verkkolaite tietokoneen verkkolaiteliittimeen ja pistorasiaan.
4
Avaa tietokoneen näyttö ja käynnistä tietokone painamalla virtapainiketta
(katso kohtaa Näkymä edestä, sivulla 77).
HUOMAUTUS: On suositeltavaa, että sammutat tietokoneen virran ja käynnistät
sen vähintään kerran, ennen kuin asennat kortteja tai liität tietokoneen
telakointilaitteeseen tai muuhun ulkoiseen laitteeseen, kuten tulostimeen.
Tietoja Tablet-PC:stä
VAROITUS: Näytön vahingoittumisen välttämiseksi varmista, että Tablet-PC on
kannettava tietokone -tilassa ja että näyttö on suljettuna, kun kuljetat tietokonetta
mukanasi.
76 Pikaopas
Page 77

Näkymä edestä
1
18
17
16
15
14
13
12
11
10
9
8
1 kahva 2 näyttö
3 vallitsevan valon tunnistin (vain
kaksilamppuinen CCFL LCD
-vaihtoehto)
5 Digital Array -mikrofoni 6 biometrinen lukija
7 kosketuslevy 8 ohjaussauvan painikkeet
9 ohjaussauvan painikkeet 10 näppäimistö
11 ohjaussauva 12 pyörivä sarana
13 Digital Array -mikrofoni 14 virtapainike
®
15 Windows
17 QuickSet-asetuspainike 18 sähköpostisovelluksen pikapainike
Security -painike 16 näytön kääntöpainike
4 laitteen tilavalot
2
3
4
5
6
7
Pikaopas 77
Page 78

Näkymä vasemmalta
4675
321
1 kynän LED-ilmaisin 2 kynä
3 ulkoinen langattoman laaja-
alueverkon antenni
HUOMAUTUS: Ulkoinen antenni
toimitetaan vain WWAN-korttien
mukana, eikä se sisälly järjestelmän
vakiokokoonpanoon. Järjestelmässä
on tulppa, joka täytyy irrottaa ennen
antennin ja WWAN-kortin
asentamista.
5 USB-liitin 6 ilmanpoistoaukko
7 kaiutin
4 IEEE 1394 -liitin
78 Pikaopas
Page 79

Näkymä oikealta
1 4 5 82 3 76
1 langaton radio-on/off-kytkin 2 Wi-Fi Catcher™ -painike
3 USB-liitin 4 ExpressCard-paikka
5 Secure Digital (SD) -korttipaikka 6 kuulokeliitin
7 mikrofoniliitin 8 suojakaapelin paikka
Näkymä takaa
1 253
1 verkkolaitteen liitin 2 videoliitin
3 Tablet-PC:n Back (Takaisin) -painike 4 vierityksen hallintapainike
5 verkkoliitin 6 virrallinen USB-liitin
7 pyörivä sarana 8 Tablet-PC:n kahva
9 kynän kiinnityspaikka
4 6 97
8
Pikaopas 79
Page 80

Näkymä pohjasta
1
8
7
1 tuuletusaukko 2 telakointilaitteen liitin
3 muistimoduulin ja minikorttipaikan
kansi
5 akkupaikan salvan vapauttimet (2) 6 pääakku
7 akun latausmittari/tilamittari 8 akkupaikka (pääakun alla)
HUOMAUTUS: Tablet-PC:n Microsoft® Windows® License -käyttöoikeustarra
sijaitsee pääakun alla Tablet-PC:n akkupaikassa (katso Akun irrottaminen,
sivulla 86).
2 3
4 tuulettimen aukko
4
5
6
VAARA: Älä peitä ilma-aukkoja, älä työnnä niihin esineitä äläkä anna pölyn
kerääntyä niihin. Älä säilytä käynnissä olevaa Tablet-PC:tä ilmatiiviissä tilassa,
kuten suljetussa salkussa. Jos ilman vaihtuminen estetään, Tablet-PC voi
vahingoittua tai voi syttyä tulipalo. Tuuletin käynnistyy, kun Tablet-PC kuumenee.
Tuulettimesta aiheutuva melu on normaalia, eikä se ole merkki tuulettimen tai
Tablet-PC:n viasta.
80 Pikaopas
Page 81

Kynänäkymä
2
3
1
1 kynän kiinnityspaikat 2 kynän kakkospainikkeella napsauttamisen painike
3 kynän poistopainike
Akun käyttö
VAARA: Yhteensopimattoman akun käyttö voi lisätä tulipalon tai räjähdyksen
vaaraa. Vaihda akku vain Delliltä hankkimaasi yhteensopivaan akkuun. Akku on
suunniteltu toimimaan Dell-tietokoneen kanssa. Älä käytä toisen tietokoneen
akkua omassa tietokoneessasi.
VAARA: Älä hävitä akkuja talousjätteen mukana. Kun akkusi ei enää lataudu, ota
yhteys paikalliseen jätehuolto- tai ympäristöviranomaiseen ja kysy tietoja litiumioniakun hävittämisestä. Lisätietoja on Tuotetieto-oppaan kohdassa Akun
hävittäminen.
VAARA: Akun väärä käyttö voi lisätä tulipalon tai kemiallisen palovamman
vaaraa. Älä riko, polta tai pura akkua, äläkä altista sitä yli 65 °C:n lämpötiloille.
Pidä akku poissa lasten ulottuvilta. Käsittele vahingoittunutta tai vuotavaa akkua
erittäin huolellisesti. Vahingoittuneet akut voivat vuotaa ja aiheuttaa
ruumiinvammoja tai aineellisia vahinkoja.
Pikaopas 81
Page 82

Akun suoritusteho
HUOMAUTUS: Katso Tuotetieto-oppaasta tai tietokoneen mukana toimitetusta
erillisestä takuupaperiasiakirjasta, mitä tietokoneesi Dell-takuu kattaa.
Parhaiten tietokone toimii ja BIOS-asetukset säilyvät, kun pääakku on aina
asennettuna Dellin™ Tablet-PC:tä käytettäessä. Tietokoneen mukana
toimitetaan yksi akku vakiovarusteena ja akkupaikkaan asennettuna.
HUOMAUTUS: Koska akku ei ehkä ole täyteen ladattu, kytke uusi tietokone
sähköpistorasiaan verkkolaitteen avulla, kun käytät tietokonetta ensimmäisen
kerran. Parhaiten laite toimii, kun käytät tietokonetta verkkolaitteen avulla, kunnes
akku on latautunut täyteen. Saat tietää akun lataustilan Virranhallinta-asetuksetikkunan Akkumittari-asetuksista (katso Käyttöoppaassa virranhallinta-asetusten
käyttöä koskevaa kohtaa).
HUOMAUTUS: Akun käyttöaika vaihtelee käyttöolojen mukaan.
HUOMAUTUS: On suositeltavaa, että liität tietokoneen pistorasiaan, kun kirjoitat
CD- tai DVD-asemaan.
Akun käyttöaika lyhenee huomattavasti, kun teet esimerkiksi seuraavia
toimia:
• käytät optisia asemia
• käytät langattomia tietoliikennelaitteita, PC-kortteja, Express-kortteja,
mediamuistikortteja tai USB-laitteita
• käytät erittäin kirkkaita näyttöasetuksia, 3D-näytönsäästäjiä tai muita
virtaa paljon käyttäviä ohjelmia, kuten monimutkaisia 3Dgrafiikkasovelluksia
• käytät tietokonetta enimmäistehotilassa. Katso
Virranhallinta-asetusten määrittäminen lisätietoja Windowsin
virranhallinta-asetuksista tai Dell QuickSet -ohjelmistosta, joita voit
käyttää virranhallinta-asetusten määrittämiseen.
Voit tarkistaa akun latauksen, ennen kuin asetat akun tietokoneeseen. Voit
myös määrittää virranhallinta-asetukset ilmoittamaan, kun akun lataus on
loppumassa.
Käyttöoppaan
kohdasta
82 Pikaopas
Page 83

Akun latauksen tarkistus
Seuraavat toiminnot antavat tietoja akun latauksesta:
• Dell QuickSet -akkumittari
• Microsoft Windowsin
Vistassa ja
Windows XP:ssä)
Akkumittari
• Akun latausmittari ja tilamittari
• Akun tyhjentymisvaroitus
Dell™ QuickSet -akkumittari
Jos Dell QuickSet on asennettu, tuo QuickSet-akkumittari näyttöön
painamalla näppäimiä <Fn><F3>. Akkumittari-ikkunassa näkyy
tietokoneen akun tila, käyttöikä, lataustaso ja latauksen päättymisaika.
Lisätietoja QuickSet-ohjelmistosta saat napsauttamalla hiiren
kakkospainikkeella tehtäväpalkin QuickSet-kuvaketta ja valitsemalla Ohje.
Latausmittari
Akussa olevan latausmittarin avulla voit tarkistaa
• akun latauksen (tarkista painamalla ja
• akun käyttöiän (tarkista painamalla tilapainiketta ja
Akun käyttöaika määräytyy paljolti sen mukaan, miten monta kertaa se on
ladattu. Satojen lataus- ja käyttökertojen jälkeen akut menettävät osan
varauskapasiteetistaan eli käyttöiästään. Akku voi siis näyttää olevan ladattu,
mutta sen latauskapasiteetti (käyttöikä) on rajallinen.
-ikkuna ja
vapauttamalla
Virta-kuvake
tilapainike)
pitämällä se alhaalla
(
Windows
).
Akun latauksen tarkistus
Voit tarkistaa akun latauksen painamalla akun latausmittarin tilapainiketta ja
vapauttamalla sen, jolloin lataustason ilmaisinvalot syttyvät. Kukin ilmaisin
vastaa noin 20:tä prosenttia akun kokonaislatauksen määrästä. Esimerkiksi jos
akussa on 80 prosenttia latauksesta jäljellä, neljä ilmaisinta palaa. Jos valot
eivät pala, akku on tyhjä.
Akun käyttöiän tarkistus
HUOMAUTUS: Voit tarkistaa akun käyttöiän jommallakummalla seuraavista
tavoista: käytä akun latausmittaria seuraavan ohjeen mukaisesti tai käytä Dell
QuickSet -ohjelmiston akkumittaria. Tietoja QuickSet-ohjelmistosta saat
napsauttamalla tehtäväpalkin kuvaketta hiiren kakkospainikkeella ja valitsemalla
Ohje.
Pikaopas 83
Page 84

Voit tarkistaa akun käyttöiän latausmittarin avulla painamalla akun
latausmittarin tilapainiketta ja pitämällä sitä painettuna vähintään
kolme sekuntia. Jos yhtään ilmaisinvaloa ei syty, akku on hyvässä kunnossa, ja
yli 80 prosenttia alkuperäisestä latauskapasiteetista on vielä jäljellä. Mitä
useampi ilmaisin palaa, sitä lyhyempi on käyttöikä. Jos viisi ilmaisinvaloa
syttyy, latauskapasiteetista on jäljellä alle 60 prosenttia ja on aika alkaa miettiä
uuden akun ostoa. Lisätietoja akun käyttöiästä on käyttöoppaan kohdassa
Akun käyttö, sivulla 81.
Akun lataus on vähissä -varoitus
VAROITUS: Jotta tietosi eivät katoaisi tai vioittuisi, tallenna ne heti, kun olet saanut
varoituksen akun latauksen loppumisesta, ja kytke sitten tietokone
sähköpistorasiaan. Jos akku tyhjenee kokonaan, tietokoneen lepotila alkaa
automaattisesti.
Näyttöön avautuva ikkuna varoittaa, kun noin 90 prosenttia akun latauksesta
on kulunut. Jos tietokoneeseen on asennettu kaksi akkua, akun
tyhjenemisvaroitus tarkoittaa sitä, että molemmissa akuissa on yhteensä
jäljellä enää 10 prosenttia tehoa. Tietokone siirtyy lepotilaan, kun akun
lataustaso on hälyttävän alhainen.
Voit vaihtaa akkuvaroitusten asetuksia QuickSet-ohjelmistossa tai
Virranhallinta-asetukset-ikkunassa. Lisätietoja QuickSetin tai Virranhallintaasetusten ominaisuudet -ikkunan käyttämisestä on Käyttöoppaan kohdassa
Virranhallinta-asetusten määrittäminen.
Siirry horrostilaan Windows Vistassa napsauttamalla Vistan
käynnistyspainiketta ja siirtämällä hiiri lukitusvaihtoehdon vieressä
olevan oikean kolmion päälle, niin että Virranhallinta-asetukset-ikkuna
avautuu. Valitse sitten Lepotila.
Lepotilaan siirtyminen Windows XP:ssä edellyttää sitä, että lepotila on otettu
käyttöön.
Lepotilan ottaminen käyttöön:
Valitse
1
Käynnistä→ Ohjauspaneeli→ Suorituskyky ja ylläpito
Virranhallinta-asetukset
2
Napsauta
3
Valitse
4
Valitse
Lepotila
Ota lepotila käyttöön
Käytä
ja OK.
.
-välilehteä.
.
→
84 Pikaopas
Page 85

Siirtyminen lepotilaan:
1
Paina näppäinyhdistelmää <Ctrl><Alt><Del>.
2
Va li t se
Sammuta→ Lepotila
.
Jos olet määrittänyt virranhallinta-asetukseksi Lepotila Virranhallinta-
asetukset-ikkunassa tai QuickSet-ohjelman ohjatussa
virranhallintatoiminnossa, voit siirtyä lepotilaan myös jollakin seuraavista
tavoista:
• Paina virtapainiketta.
• Sulje näyttö.
• Paina <Fn><Esc>-näppäinyhdistelmää.
HUOMAUTUS: Jotkin PC Card -kortit tai ExpressCard-kortit eivät välttämättä toimi
oikein, kun tietokone on palannut lepotilasta. Ota kortti pois ja aseta se sitten
takaisin tai käynnistä tietokone uudelleen.
Poistu lepotilasta painamalla virtapainiketta. Lepotilasta poistuminen voi
kestää jonkin aikaa. Tietokonetta ei saa poistettua lepotilasta painamalla
näppäimiä tai koskettamalla kosketuslevyä tai ohjaussauvaa. Lisätietoja
lepotilasta on käyttöjärjestelmän mukana toimitetuissa ohjeissa.
Akun lataaminen
Kun liität tietokoneen pistorasiaan tai asennat akun tietokoneen ollessa
liitettynä pistorasiaan, tietokone tarkistaa akun latauksen ja lämpötilan.
Verkkolaite lataa akun tarvittaessa ja ylläpitää sen latausta.
HUOMAUTUS: Kun käytössä on Dell™ ExpressCharge™ ja tietokoneen virta on
sammutettu, verkkolaite lataa täysin tyhjentyneen akun 80-prosenttisesti täyteen
noin tunnissa ja 100-prosenttisesti täyteen noin kahdessa tunnissa. Latausaika on
pitempi, jos tietokone on käynnissä. Voit jättää akun tietokoneeseen niin pitkäksi
aikaa kuin haluat. Akun sisäiset piirit estävät sen ylilatauksen.
Jos akku on kuuma sen jälkeen, kun sitä on käytetty tietokoneessa tai
kuumassa ympäristössä, akku ei ehkä lataudu, kun tietokone liitetään
pistorasiaan.
Akku on liian kuuma ladattavaksi, jos -valo vilkkuu vuorotellen vihreänä ja
oranssina. Irrota tietokone pistorasiasta ja anna tietokoneen ja akun jäähtyä
huoneenlämpöisiksi. Liitä sitten tietokone pistorasiaan ja jatka akun
lataamista.
Lisätietoja akkuongelmien ratkaisemisesta on Käyttöoppaan kohdassa
Virtaongelmat.
Pikaopas 85
Page 86

Akun irrottaminen
VAARA: Yhteensopimattoman akun käyttö voi lisätä tulipalon tai räjähdyksen
vaaraa. Vaihda akku vain Delliltä hankkimaasi yhteensopivaan akkuun. Akku on
suunniteltu toimimaan Dell™-tietokoneen kanssa. Älä käytä toisen tietokoneen
akkua omassa tietokoneessasi.
VAARA: Ennen kuin suoritat nämä toimet, sammuta tietokone, irrota verkkolaite
sähköpistorasiasta ja tietokoneesta, irrota modeemi seinäliittimestä ja
tietokoneesta ja irrota tietokoneen kaikki muutkin ulkoiset kaapelit.
VAROITUS: Sinun täytyy irrottaa kaikki ulkoiset kaapelit tietokoneesta
mahdollisten liitinvaurioiden välttämiseksi.
VAROITUS: Jos vaihdat akun tietokoneen ollessa valmiustilassa, akun vaihtoon on
käytettävissä enintään minuutti, ennen kuin tietokone sammuu ja tallentamatta
jääneet tiedot menetetään.
Akun irrotus:
Jos tietokone on kiinnitetty telakointilaitteeseen, irrota se telakoinnista.
1
Lisätietoja saat käyttämäsi telakointilaitteen ohjeesta.
2
Varmista, että tietokone on sammutettu tai lepo- tai virranhallintatilassa.
3
Liu'uta tietokoneen pohjassa olevaa akkupaikan vapautinta ja poista sitten
akku akkupaikasta.
Vaihda akku käymällä läpi poisto-ohjeet päinvastaisessa järjestyksessä.
86 Pikaopas
Page 87

Akun säilytys
Irrota akku, jos et käytä tietokonettasi pitkään aikaan. Akku tyhjenee pitkän
säilytyksen aikana. Lataa akku täyteen pitkän säilytysajan jälkeen (katso Akun
lataaminen, sivulla 85), ennen kuin käytät sitä.
Vianmääritys
Lukkiutumiset ja ohjelmisto-ongelmat
VAARA: Ennen kuin teet mitään tässä osiossa mainittuja toimia, noudata
Tuotetieto-oppaassa olevia turvallisuusohjeita.
Tablet-PC ei käynnisty.
VARMISTA, ETTÄ VERKKOLAITE ON ASIANMUKAISESTI LIITETTY TIETOKONEESEEN
JA PISTORASIAAN.
Tablet-PC lakkaa vastaamasta.
VAROITUS: Voit menettää tietoja, jos et pysty sammuttamaan käyttöjärjestelmää.
AMMUTA TABLET-PC — Jos Tablet-PC:ssä ei tapahdu mitään, kun painat
S
näppäintä tai kosketat näyttöä sormella tai kynällä, paina virtapainiketta
vähintään 8–10 sekuntia (kunnes tietokone sammuu) ja käynnistä sitten
tietokone uudelleen.
Ohjelma lakkaa toimimasta.
LOPETA OHJELMA —
1
Avaa Tehtävienhallinta painamalla samanaikaisesti <Ctrl>-, <Shift>- ja
<Esc>-näppäimiä.
2
Va li t se
Sovellukset
3
Valitse ohjelma, joka ei enää vastaa.
4
Va li t se
Lopeta tehtävä
Ohjelma kaatuu toistuvasti.
HUOMAUTUS: Ohjelmista on yleensä asennusohjeet niiden oppaissa, CD-levyillä
tai DVD-levyillä.
T
ARKISTA OHJELMAN OHJEET — Poista ohjelma ja asenna se tarvittaessa
-välilehti.
.
uudelleen.
Pikaopas 87
Page 88

Ohjelma on tarkoitettu Windows-käyttöjärjestelmän vanhemmalle versiolle
SUORITA OHJATTU OHJELMAN YHTEENSOPIVUUDEN VARMISTAMINEN.— Ohjattu
ohjelman yhteensopivuuden varmistaminen määrittää ohjelman, joten se
toimii ympäristössä, joka muistuttaa Windowsin aiempia versioita.
Windows Vista
1
Valitse
Käynnistä → Ohjauspaneeli→
ohjelmaa tämän Windows-version kanssa
2
Valitse Tervetuloa-ikkunassa
3
Noudata näytön ohjeita.
Windows XP
1
Valitse
Käynnistä→
ohjelmisto-ongelmat
2
Valitse
Suorita ohjelmisto, joka toimi aiemmissa versiossa
3
Valitse Tervetuloa-ikkunassa
4
Noudata näytön ohjeita.
Näyttö muuttuu siniseksi.
SAMMUTA TABLET-PC — Jos Tablet-PC:ssä ei tapahdu mitään, kun painat
Ohje ja tuki→ Korjataan ongelma→ Sovellus- ja
.
Seuraava
Seuraava
Ohjelmat→ Käytä vanhaa
.
.
.
.
näppäintä tai kosketat näyttöä sormella tai kynällä, paina virtapainiketta
vähintään 8–10 sekuntia (kunnes tietokone sammuu) ja käynnistä sitten
tietokone uudelleen.
Muita ohjelmaongelmia
TARKISTA OHJELMAN OHJEET TAI PYYDÄ VIANMÄÄRITYSTIETOJA OHJELMAN
VALMISTAJALTA.
• Varmista, että ohjelma on yhteensopiva Tablet-PC:n käyttöjärjestelmän
kanssa.
• Varmista, että Tablet-PC vastaa ohjelman vähimmäisvaatimuksia. Katso
tietoja ohjelmiston ohjeista.
• Varmista, että ohjelma on asennettu ja määritetty oikein.
• Tarkista, että laitteen ajurit eivät ole ristiriidassa ohjelman kanssa.
• Poista ohjelma ja asenna se tarvittaessa uudelleen.
88 Pikaopas
Page 89

TEE HETI VARMUUSKOPIOT TIEDOSTOISTASI.
ARKISTA KIINTOLEVY, CD-LEVYT TAI DVD-LEVYT
T
VIRUSTENTORJUNTAOHJELMALLA.
T
ALLENNA JA SULJE KAIKKI AVATUT TIEDOSTOT TAI OHJELMAT JA SAMMUTA
TIETOKONE KÄYNNISTÄ-VALIKOSTA.
Dell-diagnostiikkaohjelma
VAARA: Ennen kuin teet mitään tässä osiossa mainittuja toimia, noudata
Tuotetieto-oppaassa olevia turvallisuusohjeita.
VAROITUS: Dell-diagnostiikkaohjelma toimii vain Dell™-tietokoneissa.
HUOMAUTUS: Driver’s and Utilities -levyn käyttämiseen tarvitaan D/Bay-
asemapaikassa oleva optinen asema tai valinnainen tietovälineasema.
Dell-diagnostiikan käyttäminen
Jos sinulla on tietokoneongelmia, tee kohdassa Lukitukset ja ohjelmistoongelmat esitellyt tarkistukset (katso lisätietoja kohdasta Lukkiutumiset ja
ohjelmisto-ongelmat, sivulla 87) ja suorita Dell-diagnostiikkaohjelma, ennen
kuin pyydät teknistä tukea Delliltä.
Suosittelemme näiden ohjeiden tulostamista ennen aloittamista.
Katso Käyttöoppaan kohtaa Järjestelmän asennusohjelma ja tarkista Tablet-
PC:n kokoonpanotiedot. Varmista, että testattava laite näkyy järjestelmän
asennusohjelmassa ja että se on käytössä.
Käynnistä Dell-diagnostiikkaohjelma kiintolevyltä tai Drivers and Utilities
-levyltä.
HUOMAUTUS: Drivers and Utilities -levy on valinnainen, eikä sitä välttämättä
toimiteta Tablet-PC:n mukana.
Dell-diagnostiikkaohjelman käynnistäminen kiintolevyasemasta
Dell-diagnostiikkaohjelma sijaitsee kiintolevyllä piilotettuna olevassa
Diagnostic utility -osiossa.
HUOMAUTUS: Jos Tablet-PC:n näytössä ei näy mitään, ota yhteys Delliin (katso
Dellin yhteystiedot Käyttöoppaasta).
HUOMAUTUS: Jos Tablet-PC on kiinnitetty telakointilaitteeseen, irrota se
telakoinnista. Lisäohjeita on Käyttöoppaan Tablet-PC:n irrottamista ja lisäakkua
käsittelevissä kohdissa.
Pikaopas 89
Page 90

1
Varmista, että Tablet-PC on kytketty virtalähteeseen, jonka tiedät toimivan
oikein.
2
Käynnistä (tai käynnistä uudelleen) Tablet-PC.
3
Käynnistä Dell-diagnostiikkaohjelma jommallakummalla seuraavista
tavoista:
HUOMAUTUS: Jos odotat liian kauan ja käyttöjärjestelmän logo tulee
näyttöön, odota, kunnes näyttöön tulee Microsoft
Katkaise tämän jälkeen tietokoneen virta ja yritä uudelleen.
®
Windows® -työpöytä.
– Kun DELL™-logo tulee näkyviin, paina heti <F12>-näppäintä.
Valitse käynnistysvalikosta
Diagnostics
(Diagnostiikka) ja paina
<Enter>-näppäintä.
HUOMAUTUS: Tietokone on sammutettava kokonaan, ennen kuin seuraavaa
toimintoa yritetään.
– Paina <Fn>-näppäintä ja pidä sitä alhaalla, kun käynnistät
tietokoneen.
Tablet-PC suorittaa Pre-boot System Assessment -toiminnon, joka on sarja
emolevyn, näppäimistön, näytön, muistin ja kiintolevyn toimintaa
alustavasti testaavia diagnostiikkaohjelmia.
• Testin aikana sinun on ehkä vastattava joihinkin kysymyksiin.
• Jos PSA (Pre-boot System Assessment) -toiminnon aikana
havaitaan virheitä, kirjoita virhekoodi(t) muistiin ja ota yhteys
Delliin (katso Dellin yhteystiedot
Käyttöoppaasta
).
Jos PSA-toiminto suoritetaan loppuun asti, näyttöön tulee seuraava
sanoma: “
Press any key to continue
Booting Dell Diagnostic Utility Partition.
” (Käynnistetään Dellin
diagnostiikka-apuohjelman osiota. Jatka painamalla jotain näppäintä).
4
Painamalla jotain näppäintä käynnistät Dell-diagnostiikkaohjelman
kiintolevyn Diagnostics Utility -osiosta.
HUOMAUTUS: Jos näyttöön tulee sanoma, joka ilmaisee, että diagnostiikka-
apuohjelman osiota ei löydy, suorita Dell-diagnostiikkaohjelma Drivers and
Utilities -levyltä.
5
Kun Dell-diagnostiikkaohjelman päävalikko tulee näkyviin, valitse
suoritettava testi. Katso kohtaa Dell-diagnostiikkaohjelman päävalikko,
sivulla 91.
90 Pikaopas
Page 91

Dell-diagnostiikkaohjelman käynnistäminen Drivers and Utilities -levyltä
1
Aseta
Drivers and Utilities -levy asemaan.
2
Sammuta Tablet-PC ja käynnistä se sitten uudelleen.
Kun DELL-logo tulee näkyviin, paina heti <F12>-näppäintä.
HUOMAUTUS: Jos odotat liian kauan ja käyttöjärjestelmän logo tulee
näyttöön, odota, kunnes näyttöön tulee Microsoft
Sammuta tämän jälkeen tietokone ja yritä uudelleen.
HUOMAUTUS: Seuraavat ohjeet muuttavat käynnistysjakson vain yhdeksi
kerraksi. Seuraavan kerran tietokonetta käynnistettäessä se käynnistää
järjestelmäasetusohjelmassa määritetyt laitteet.
3
Kun käynnistyslaiteluettelo tulee näyttöön, korosta kohta
CD-RW
4
Valitse näyttöön tulevasta valikosta vaihtoehto
CD-RW-asemasta
5
Pain a 1-näppäintä niin, että CD-valikko käynnistyy, ja jatka painamalla
ja paina <Enter>-näppäintä.
ja paina <Enter>-näppäintä.
®
Windows® -työpöytä.
CD/DVD/
Käynnistä CD/DVD/
<Enter>-näppäintä.
6
Va li t se
Run the 32 Bit Dell Diagnostics
(Suorita 32-bittinen Delldiagnostiikkaohjelma) numeroidusta luettelosta. Jos luettelossa on useita
versioita, valitse Tablet-PC:lle sopiva versio.
7
Kun Dell-diagnostiikkaohjelman
päävalikko
tulee näkyviin, valitse
suoritettava testi.
Dell-diagnostiikkaohjelman päävalikko
1
Kun Dell-diagnostiikkaohjelma on latautunut ja
päävalikko
avautuu,
napsauta haluamaasi vaihtoehtoa.
HUOMAUTUS: On suositeltavaa suorittaa kaikki tietokonetta koskevat testit
valitsemalla Test System (Testaa järjestelmä).
Vaihtoehto Toiminto:
Test Memory
(Testaa muisti)
Test System
(Testaa järjestelmä)
Exit
(Lopeta) Lopettaa diagnostiikkaohjelman.
Suorittaa yksittäisen muistin testauksen.
Suorittaa järjestelmän diagnostiikkatestin.
Pikaopas 91
Page 92

2
Kun olet valinnut päävalikosta vaihtoehdon
Test S ys te m
(Testaa
järjestelmä), näyttöön tulee seuraava valikko:
HUOMAUTUS: On suositeltavaa valita seuraavasta valikosta Extended Test (Laaja
testi) -vaihtoehto ja suorittaa Tablet-PC:ssä olevien laitteiden perusteellinen
tarkistus.
Vaihtoehto Toiminto:
Express Test
(Pikatesti)
Extended Test
(Laaja testi)
Custom Test
(Mukautettu testi)
Symptom Tree
(Ilmenemispuu)
3
Jos ongelma löydetään testin aikana, näyttöön tulee sanoma, jossa
Testaa järjestelmän laitteet nopeasti. Testaaminen vie
yleensä 10–20 minuuttia.
Testaa laitteet läpikotaisin. Testi kestää yleensä vähintään
tunnin.
Testaa tietyn laitteen tai mukauttaa suoritettavia testejä.
Voit valita testin, joka perustuu ongelman
ilmenemistapaan. Näyttää luettelon tavallisimmista
virheen ilmenemistavoista.
ilmoitetaan virhekoodi ja ongelman kuvaus. Kirjoita virhekoodi ja
ongelman kuvaus muistiin ja ota yhteys Delliin (katso Dellin yhteystiedot
Käyttöoppaasta
HUOMAUTUS: Tablet-PC:n huoltotunnus näkyy kunkin näytön yläosassa. Jos
otat yhteyttä Delliin, tekninen tuki kysyy huoltotunnustasi.
4
Jos suoritat testin käyttämällä
Symptom Tree
).
Custom Test
(Mukautettu testi)
(Ongelmapuu) -vaihtoehtoa, saat lisätietoja
tai
napsauttamalla seuraavassa taulukossa kuvattuja välilehtiä.
92 Pikaopas
Page 93

Välilehti: Toiminto:
Results
Errors
Help
Configuration
(Kokoonpano)
Parameters
(Parametrit)
5
(Tulokset) Näyttää testin tulokset ja havaitut virhetilanteet.
(Virheet) Näyttää havaitut virhetilanteet, virhekoodit ja ongelman
kuvauksen.
(Ohje) Sisältää kuvauksen testistä ja saattaa ilmoittaa testin
suorittamiseen liittyviä vaatimuksia.
Näyttää valitun laitteen laitteistokokoonpanon.
Dell-diagnostiikkaohjelma saa kaikkien laitteiden
kokoonpanotiedot järjestelmän asennusohjelmasta,
muistista ja sisäisistä testeistä. Kaikki tiedot näkyvät
näytön vasemmassa reunassa olevassa laiteluettelossa.
Laiteluettelossa ei välttämättä ole kaikkien Tablet-PC:hen
asennettujen komponenttien tai siihen liitettyjen
laitteiden nimiä.
Voit mukauttaa testiä muuttamalla testiasetuksia.
Kun testit on tehty, palaa
Päävalikkoon
sulkemalla testinäyttö. Voit
lopettaa Dell-diagnostiikkaohjelman käytön ja käynnistää tietokoneen
uudelleen sulkemalla
6
Poista Dell
Drivers and Utilities -levy
päävalikkonäytön
asemasta (jos se on asemassa).
.
Pikaopas 93
Page 94

94 Pikaopas
Page 95

Hakemisto
A
akku
irrottaminen, 86
lataaminen, 85
latauksen tarkistus, 83
latausmittari, 83
säilytys, 87
suoritusteho, 82
D
Dell-diagnostiikan
käynnistäminen
Drivers and Utilities
-CD-levyltä, 91
Dell-diagnostiikan
käynnistäminen
kiintolevyasemasta, 89
Dell-diagnostiikkaohjelma, 89
Dell-tukisivusto, 72
diagnostiikka
Dell, 89
Drivers and Utilities -levy
Dell-diagnostiikkaohjelma, 89
H
huoltotunnus, 71
J
järjestelmänäkymät
edestä, 77
oikea puoli, 79
pohja, 80
takaa, 79
vasen puoli, 78
K
käyttöjärjestelmä
uudelleenasennus, 75
käyttöjärjestelmälevy, 75
käyttöopas, 70
L
laitteisto
Dell-diagnostiikkaohjelma, 89
levy
käyttöjärjestelmä, 75
E
ergonomiaa koskevat tiedot, 70
Loppukäyttäjän
käyttöoikeussopimus, 70
Hakemisto 95
Page 96

O
ohjeet
ergonomia, 70
käyttöopas, 70
Loppukäyttäjän
käyttöoikeussopimus, 70
online, 72
takuu, 70
Tuotetieto-opas, 70
turvallisuus, 70
viranomaissäädökset, 70
ohjelma
ongelmat, 87-88
ongelmat
Dell-diagnostiikkaohjelma, 89
ohjelma, 87-88
ohjelma kaatuu, 87
ohjelma lakkaa toimimasta, 87
sininen näyttö, 88
tietokone kaatuu, 87-88
tietokone lakkaa vastaamasta, 87
yleiset, 87
tietokone
kaatumiset, 87-88
lakkaa vastaamasta, 87
tukisivusto, 72
Tuotetieto-opas, 70
turvallisuusohjeet, 70
V
vianmääritys
Dell-diagnostiikkaohjelma, 89
viranomaissäädöksiä koskevat
tiedot, 70
W
Windows Vista
uudelleenasennus, 75
Q
QuickSet-ohje, 74
T
takuutiedot, 70
tarrat
huoltotunnus, 71
Microsoft Windows, 71
96 Hakemisto
Page 97

Dell™ Latitude™ XT
Συνοπτικός οδηγός
Μοντέλο PP12S
www.dell.com | support.dell.com
Page 98

Σηµείωση, ειδοποίηση και προσοχή
ΣΗΜΕΙΩΣΗ:
βοηθούν να χρησιµοποιείτε καλύτερα τον υπολογιστή σας.
ΕΙ∆ΟΠΟΙΗΣΗ:
απώλεια δεδοµένων και υποδεικνύει τον τρόπο µε τον οποίο µπορείτε να αποφύγετε
το πρόβληµα.
ΠΡΟΣΟΧΗ:
ή θανάτου.
Η ΣΗΜΕΙΩΣΗ υποδεικνύει σηµαντικές πληροφορίες που σας
Η ΕΙ∆ΟΠΟΙΗΣΗ υποδηλώνει είτε δυνητική βλάβη υλικού είτε
Η ΠΡΟΣΟΧΗ επισηµαίνει κίνδυνο βλάβης υλικού, τραυµατισµού
____________________
Οι πληροφορίες αυτού του εγγράφου µπορεί να αλλάξουν χωρίς προειδοποίηση.
© 2007 Dell Inc. Με επιφύλαξη παντός δικαιώµατος.
Απαγορεύεται αυστηρά η αναπαραγωγή µε οποιοδήποτε τρόπο χωρίς τη γραπτή άδεια της Dell Inc.
Εµπορικά σήµατα που χρησιµοποιούνται στο παρόν έγγραφο: Η ονοµασία Dell, το λογότυπο DELL,
οι ονοµασίες Wi-Fi Catcher, ExpressCharge και Latitude είναι εµπορικά σήµατα της Dell Inc. Οι
ονοµασίες Microsoft, Windows
Microsoft Corporation στις ΗΠΑ ή/και σε άλλες χώρες.
Άλλα εµπορικά σήµατα και εµπορικές ονοµασίες µπορεί να χρησιµοποιούνται στο παρόν έγγραφο
αναφερόµενα είτε στους κατόχους των σηµάτων και των ονοµάτων είτε στα προϊόντα τους. Η Dell Inc.
παραιτείται από κάθε δικαίωµα σε εµπορικά σήµατα και
Μοντέλο PP12S
∆εκέµβριος 2007 P/N DR977 Αναθ. A01
και W indows Vista είναι εµπορικά σήµατα ή σήµατα κατατεθέντα της
εµπορικές ονοµασίες τρίτων.
Page 99

Περιεχόµενα
Πόροι
. . . . . . . . . . . . . . . . . . . . . . . . . .
Εύρεση πληροφοριών
Ρύθµιση του υπολογιστή σας
. . . . . . . . . . . . . . .
. . . . . . . . . . .
101
101
109
Πληροφορίες για το Tablet-PC
Χρήση της µπαταρίας
Αντιµετώπιση προβληµάτων
Ευρετήριο
. . . . . . . . . . . .
Μπροστινή όψη
Αριστερή όψη
∆εξιά όψη
Πίσω όψη
Κάτω όψη
Όψη γραφίδας
Απόδοση µπαταρίας
Έλεγχος του φορτίου της µπαταρίας
Φόρτιση της µπαταρίας
Αφαίρεση της µπαταρίας
Αποθήκευση της µπαταρίας
Κλειδώµατα και προβλήµατα λογισµικού
∆ιαγνωστικό πρόγραµµα της Dell
. . . . . . . . . . . . . . . . . . . . . . . . . . .
. . . . . . . . . . . . . . . . . .
. . . . . . . . . . . . . . . . . . .
. . . . . . . . . . . . . . . . . . . . . .
. . . . . . . . . . . . . . . . . . . . . .
. . . . . . . . . . . . . . . . . . . . . .
. . . . . . . . . . . . . . . . . . .
. . . . . . . . . . . . . . . . .
. . . . . . . . . . . . . . . .
. . . . . . . .
. . . . . . . . . . . . . .
. . . . . . . . . . . . . .
. . . . . . . . . . . .
. . . . . . . . . . . . .
. . . . .
. . . . . . . . .
109
110
111
112
112
113
114
114
115
116
119
119
120
121
121
123
129
Περιεχόµενα
99
Page 100

100
Περιεχόµενα
 Loading...