

Page 1

Dell™ Latitude™ D630/D630c
User’s Guide
Model PP24L
www.dell.com | support.dell.com
Page 2

Notes, Notices, and Cautions
NOTE: A NOTE indicates important information that helps you make better use of your computer.
NOTICE: A NOTICE indicates either potential damage to hardware or loss of data and tells you how to
avoid the problem.
CAUTION: A CAUTION indicates a potential for property damage, personal injury, or death.
If you purchased a Dell™ n Series computer, any references in this document to Microsoft
Windows® operating systems are not applicable.
®
____________________
Information in this document is subject to change without notice.
© 2007–2008 Dell Inc. All rights reserved.
Trademarks used in this text: Dell, the DELL logo, Latitude , ExpressC har ge, TravelLite, Strike Zone , W i-Fi Catcher, and Client
Manager are trademarks of Dell Inc.; Core, Active Management Technology, Centrino, and Intel are registered trademarks of
Intel Corporation; Microsoft, Outlook, Windows, Windows Vista are either registered trademarks or trademarks of Microsoft
Corporation in the United States and/or other countries; Bluetooth is a registered tradem ark owned by Bluetooth SIG, Inc. and
is used by Dell under license; TouchStrip is a trademark of UPEK, Inc.; EMC is a registered trademark of EMC Corporation;
ENERGY STAR is a registered trademark of the U.S. Environmental Protection Agency. As an ENERGY STAR partner, Dell
Inc. has determined that this product meets the ENERGY STAR guidelines for energy efficiency.
Other trademarks and trade names may be used in this document to refer to either the entities claiming the marks and names or
their products. Dell Inc. disclaims any proprietary interest in trademarks and trade names other than its own.
Model PP24L
September 2009 P/N HN566 Rev. A04
Page 3

Contents
1 Finding Information
2 About Your Computer
Front View. . . . . . . . . . . . . . . . . . . . . . . . . . . . . . . . . . . 17
Left Side View
Right Side View
Back View
Bottom View
. . . . . . . . . . . . . . . . . . . . . . . . . . . . . . . . . 21
. . . . . . . . . . . . . . . . . . . . . . . . . . . . . . . . 23
. . . . . . . . . . . . . . . . . . . . . . . . . . . . . . . . . . . 24
. . . . . . . . . . . . . . . . . . . . . . . . . . . . . . . . . . 26
3 Transferring Information to a New Computer
Microsoft® Windows® XP. . . . . . . . . . . . . . . . . . . . . . . . . . . 29
Running the Files and Settings Transfer Wizard With the
Operating System Media . . . . . . . . . . . . . . . . . . . . . . . . . 29
Running the Files and Settings Transfer Wizard Without the
Operating System Media
Microsoft Windows Vista
. . . . . . . . . . . . . . . . . . . . . . . . . 30
®
. . . . . . . . . . . . . . . . . . . . . . . . . . 31
Easy Transfer Cable for Windows Vista . . . . . . . . . . . . . . . . . . 31
4 Using a Battery
Battery Performance . . . . . . . . . . . . . . . . . . . . . . . . . . . . . 33
Checking the Battery Charge
Dell™ QuickSet Battery Meter
®
Microsoft
Charge Gauge
Windows® Power Meter. . . . . . . . . . . . . . . . . . . 34
. . . . . . . . . . . . . . . . . . . . . . . . . . . . . . 34
Low-Battery Warning . . . . . . . . . . . . . . . . . . . . . . . . . . 35
Conserving Battery Power
. . . . . . . . . . . . . . . . . . . . . . . . . 34
. . . . . . . . . . . . . . . . . . . . . . 34
. . . . . . . . . . . . . . . . . . . . . . . . . . . 35
Contents 3
Page 4

Power Management Modes . . . . . . . . . . . . . . . . . . . . . . . . . . 36
Standby and Sleep Mode
Hibernate Mode
. . . . . . . . . . . . . . . . . . . . . . . . . . . . . 36
. . . . . . . . . . . . . . . . . . . . . . . . . 36
Configuring Power Management Settings
Accessing Power Options Properties
Charging the Battery
Replacing the Battery
Storing a Battery
Battery Errors
. . . . . . . . . . . . . . . . . . . . . . . . . . . . . 37
. . . . . . . . . . . . . . . . . . . . . . . . . . . . . 38
. . . . . . . . . . . . . . . . . . . . . . . . . . . . . . . 39
. . . . . . . . . . . . . . . . . . . . . . . . . . . . . . . . . 39
. . . . . . . . . . . . . . . . . . . 37
. . . . . . . . . . . . . . . . . . . 37
5 Using the Keyboard
Numeric Keypad . . . . . . . . . . . . . . . . . . . . . . . . . . . . . . . 41
Key Combinations
System Functions
Battery
Display Functions
Power Management . . . . . . . . . . . . . . . . . . . . . . . . . . . 42
Microsoft® Windows® Logo Key Functions
Touch Pad
. . . . . . . . . . . . . . . . . . . . . . . . . . . . . . . . . . . 43
Customizing the Touch Pad and Track Stick
. . . . . . . . . . . . . . . . . . . . . . . . . . . . . . . 42
. . . . . . . . . . . . . . . . . . . . . . . . . . . . . 42
. . . . . . . . . . . . . . . . . . . . . . . . . . . . . . . . . . 42
. . . . . . . . . . . . . . . . . . . . . . . . . . . . 42
. . . . . . . . . . . . . . . 42
. . . . . . . . . . . . . . . . 44
6 Using the Display
4 Contents
Changing the Track Stick Cap
. . . . . . . . . . . . . . . . . . . . . . . . . 44
Adjusting Brightness . . . . . . . . . . . . . . . . . . . . . . . . . . . . . 47
Using the Ambient Light Sensor
Switching the Video Image
Setting Display Resolution and Refresh Rate
Dual Independent Display Mode
Swapping Primary and Secondary Displays
. . . . . . . . . . . . . . . . . . . . . . . . 47
. . . . . . . . . . . . . . . . . . . . . . . . . . 48
. . . . . . . . . . . . . . . . . . 49
. . . . . . . . . . . . . . . . . . . . . . . . 49
. . . . . . . . . . . . . . . . . . 50
Page 5

7 Setting Up and Using Networks
Connecting a Network or Broadband Modem Cable . . . . . . . . . . . . . . 51
®
Setting Up a Network in the Microsoft
Windows® XP Operating System . . . 52
Setting Up a Network in the Microsoft Windows Vista
Wireless Local Area Network
. . . . . . . . . . . . . . . . . . . . . . . . . 52
What You Need to Establish a WLAN Connection
Checking Your Wireless Network Card
. . . . . . . . . . . . . . . . . . 53
®
Operating System. . . 52
. . . . . . . . . . . . . 52
Setting Up a New WLAN Using a Wireless Router and a
Broadband Modem
. . . . . . . . . . . . . . . . . . . . . . . . . . . . 53
Connecting to a WLAN . . . . . . . . . . . . . . . . . . . . . . . . . . 54
Mobile Broadband (or Wireless Wide Area Network)
. . . . . . . . . . . . . 56
What You Need to Establish a Mobile Broadband Network Connection
Checking Your Dell Mobile Broadband Card
Connecting to a Mobile Broadband Network
. . . . . . . . . . . . . . . 57
. . . . . . . . . . . . . . . 57
Enabling/Disabling the Dell™ Mobile Broadband Card . . . . . . . . . . 58
Managing Your Network Settings Through the Dell QuickSet
Location Profiler
Dell Wi-Fi Catcher™ Network Locator
Microsoft
®
Windows® Firewall . . . . . . . . . . . . . . . . . . . . . . . . 59
. . . . . . . . . . . . . . . . . . . . . . . . . . . . . 58
. . . . . . . . . . . . . . . . . . . . . 58
. . 56
8 Using Multimedia
Playing Media . . . . . . . . . . . . . . . . . . . . . . . . . . . . . . . . . 61
Copying Media
How to Copy Media
Using Blank Media
Helpful Tips
Adjusting the Volume
Adjusting the Picture
Microsoft® Windows® XP Operating System
Microsoft Windows Vista® Operating System
. . . . . . . . . . . . . . . . . . . . . . . . . . . . . . . . 63
. . . . . . . . . . . . . . . . . . . . . . . . . . . 63
. . . . . . . . . . . . . . . . . . . . . . . . . . . . 63
. . . . . . . . . . . . . . . . . . . . . . . . . . . . . . . 64
. . . . . . . . . . . . . . . . . . . . . . . . . . . . . 65
. . . . . . . . . . . . . . . . . . . . . . . . . . . . . 66
. . . . . . . . . . . . . . 66
. . . . . . . . . . . . . . 66
Contents 5
Page 6

9 Using Cards
Card Types . . . . . . . . . . . . . . . . . . . . . . . . . . . . . . . . . . 67
PC Cards
ExpressCards
Smart Cards . . . . . . . . . . . . . . . . . . . . . . . . . . . . . . . 67
Card Blanks
Extended Cards
. . . . . . . . . . . . . . . . . . . . . . . . . . . . . . . . . 67
. . . . . . . . . . . . . . . . . . . . . . . . . . . . . . 67
. . . . . . . . . . . . . . . . . . . . . . . . . . . . . . . 67
. . . . . . . . . . . . . . . . . . . . . . . . . . . . . 68
Installing a PC Card or ExpressCard
. . . . . . . . . . . . . . . . . . . . . . 68
PC Card . . . . . . . . . . . . . . . . . . . . . . . . . . . . . . . . . 68
ExpressCards . . . . . . . . . . . . . . . . . . . . . . . . . . . . . . 69
Removing a Card or Blank
. . . . . . . . . . . . . . . . . . . . . . . . . . . 69
10 Securing Your Computer
Security Cable Lock . . . . . . . . . . . . . . . . . . . . . . . . . . . . . . 71
Smart Card
Passwords
Trusted Platform Module (TPM)
. . . . . . . . . . . . . . . . . . . . . . . . . . . . . . . . . . 71
About Smart Cards . . . . . . . . . . . . . . . . . . . . . . . . . . . . 72
Installing a Smart Card . . . . . . . . . . . . . . . . . . . . . . . . . . 72
. . . . . . . . . . . . . . . . . . . . . . . . . . . . . . . . . . 73
About Passwords
Using a Primary (or System) Password
Using an Administrator Password
. . . . . . . . . . . . . . . . . . . . . . . . . . . . 74
. . . . . . . . . . . . . . . . . . 74
. . . . . . . . . . . . . . . . . . . . 75
Using a Hard Drive Password . . . . . . . . . . . . . . . . . . . . . . 75
. . . . . . . . . . . . . . . . . . . . . . . . 76
Enabling the TPM Feature
. . . . . . . . . . . . . . . . . . . . . . . . 76
Security Management Software
Activating the Security Management Software
Using the Security Management Software
Computer Tracking Software
If Your Computer Is Lost or Stolen
Cleaning Your Computer
Computer, Keyboard, and Display
Touch Pad
Mouse
. . . . . . . . . . . . . . . . . . . . . . . . . . . . . . . . 79
. . . . . . . . . . . . . . . . . . . . . . . . . . . . . . . . . . 79
6 Contents
. . . . . . . . . . . . . . . . . . . . . . . . 77
. . . . . . . . . . . . . . 77
. . . . . . . . . . . . . . . . 77
. . . . . . . . . . . . . . . . . . . . . . . . . 77
. . . . . . . . . . . . . . . . . . . . . . . 78
. . . . . . . . . . . . . . . . . . . . . . . . . . . . 79
. . . . . . . . . . . . . . . . . . . . . 79
Page 7

Floppy Drive . . . . . . . . . . . . . . . . . . . . . . . . . . . . . . . 80
CDs and DVDs
. . . . . . . . . . . . . . . . . . . . . . . . . . . . . . 80
11 Troubleshooting
Diagnostic Lights . . . . . . . . . . . . . . . . . . . . . . . . . . . . . . . 81
Diagnostic Light Codes During POST . . . . . . . . . . . . . . . . . . . 81
Dell™ Technical Update Service
Dell Diagnostics
. . . . . . . . . . . . . . . . . . . . . . . . . . . . . . . . 83
When to Use the Dell Diagnostics
Starting the Dell Diagnostics From Your Hard Drive
Starting the Dell Diagnostics from the Drivers and Utilities Media
. . . . . . . . . . . . . . . . . . . . . . . . 83
. . . . . . . . . . . . . . . . . . . . 83
. . . . . . . . . . . . 84
. . . . 85
Dell Diagnostics Main Menu . . . . . . . . . . . . . . . . . . . . . . . 85
Dell Support Utility
Accessing the Dell Support Utility
Clicking the Dell Support Icon
Double-Clicking the Dell Support Icon
Drive Problems
. . . . . . . . . . . . . . . . . . . . . . . . . . . . . . 86
. . . . . . . . . . . . . . . . . . . . 86
. . . . . . . . . . . . . . . . . . . . . . 87
. . . . . . . . . . . . . . . . . . 87
. . . . . . . . . . . . . . . . . . . . . . . . . . . . . . . . 87
Media drive problems . . . . . . . . . . . . . . . . . . . . . . . . . . 88
If you cannot eject the CD, CD-RW, DVD, or DVD+RW drive tray . . . . . 88
If you hear an unfamiliar scraping or grinding sound
Hard drive problems
E-Mail, Modem, and Internet Problems
Error Messages
. . . . . . . . . . . . . . . . . . . . . . . . . . . . . . . . 90
. . . . . . . . . . . . . . . . . . . . . . . . . . . 88
. . . . . . . . . . . . . . . . . . . . 89
. . . . . . . . . . . 88
IEEE 1394 Device Problems
Keyboard Problems
. . . . . . . . . . . . . . . . . . . . . . . . . . . . . . 94
External Keyboard problems . . . . . . . . . . . . . . . . . . . . . . . 94
Unexpected characters . . . . . . . . . . . . . . . . . . . . . . . . . 95
Lockups and Software Problems
The computer does not start up
The computer stops responding
A program stops responding or crashes repeatedly
A program is designed for an earlier Microsoft® Windows®
operating system
A solid blue screen appears
. . . . . . . . . . . . . . . . . . . . . . . . . . 94
. . . . . . . . . . . . . . . . . . . . . . . 95
. . . . . . . . . . . . . . . . . . . . . 95
. . . . . . . . . . . . . . . . . . . . . 95
. . . . . . . . . . . 96
. . . . . . . . . . . . . . . . . . . . . . . . . . . . . 96
. . . . . . . . . . . . . . . . . . . . . . . 96
Contents 7
Page 8

Other software problems . . . . . . . . . . . . . . . . . . . . . . . . . 96
Memory Problems
Network Problems
. . . . . . . . . . . . . . . . . . . . . . . . . . . . . . . 97
. . . . . . . . . . . . . . . . . . . . . . . . . . . . . . 97
General . . . . . . . . . . . . . . . . . . . . . . . . . . . . . . . . . 98
Wireless Local Area Network (WLAN) . . . . . . . . . . . . . . . . . . 98
Mobile Broadband (Wireless Wide Area Network)
PC Card Problems
Power Problems
. . . . . . . . . . . . . . . . . . . . . . . . . . . . . . . 99
. . . . . . . . . . . . . . . . . . . . . . . . . . . . . . . . 99
. . . . . . . . . . . . 98
Ensuring Sufficient Power for Your Computer. . . . . . . . . . . . . . 100
Docking Power Considerations. . . . . . . . . . . . . . . . . . . . . 100
Printer Problems
Scanner Problems
Sound and Speaker Problems
. . . . . . . . . . . . . . . . . . . . . . . . . . . . . . 101
. . . . . . . . . . . . . . . . . . . . . . . . . . . . . . 101
. . . . . . . . . . . . . . . . . . . . . . . . 102
No sound from integrated speakers . . . . . . . . . . . . . . . . . . 102
No sound from external speakers . . . . . . . . . . . . . . . . . . . 102
No sound from headphones
Touch Pad or Mouse Problems
. . . . . . . . . . . . . . . . . . . . . . 103
. . . . . . . . . . . . . . . . . . . . . . . 103
Video and Display Problems
. . . . . . . . . . . . . . . . . . . . . . . . . 104
If the display is blank . . . . . . . . . . . . . . . . . . . . . . . . . . 104
If the display is difficult to read . . . . . . . . . . . . . . . . . . . . . 104
If only part of the display is readable
. . . . . . . . . . . . . . . . . . 105
12 Intel® Active Management Technology
13 System Setup Program
Overview . . . . . . . . . . . . . . . . . . . . . . . . . . . . . . . . . . 111
Viewing the System Setup Screens
System Setup Screens
Commonly Used Options
. . . . . . . . . . . . . . . . . . . . . . . . . . . . 112
. . . . . . . . . . . . . . . . . . . . . . . . . . . 112
Changing the Boot Sequence
Changing Printer Modes
Changing COM Ports
. . . . . . . . . . . . . . . . . . . . . . . . . . 113
. . . . . . . . . . . . . . . . . . . . . 111
. . . . . . . . . . . . . . . . . . . . . 112
. . . . . . . . . . . . . . . . . . . . . . . . 113
8 Contents
Page 9

14 Reinstalling Software
Drivers . . . . . . . . . . . . . . . . . . . . . . . . . . . . . . . . . . . 115
What Is a Driver?
Identifying Drivers
Reinstalling Drivers and Utilities . . . . . . . . . . . . . . . . . . . . 116
. . . . . . . . . . . . . . . . . . . . . . . . . . . . 115
. . . . . . . . . . . . . . . . . . . . . . . . . . . 115
Using the Hardware Troubleshooter Tool
Microsoft Windows XP
Microsoft Windows Vista
Restoring Your Operating System
Using Microsoft
. . . . . . . . . . . . . . . . . . . . . . . . . 119
. . . . . . . . . . . . . . . . . . . . . . . . 119
. . . . . . . . . . . . . . . . . . . . . . 119
®
Windows® System Restore . . . . . . . . . . . . . 119
Using the Operating System Media
. . . . . . . . . . . . . . . . . . 119
. . . . . . . . . . . . . . . . . . . 121
15 Adding and Replacing Parts
Before You Begin . . . . . . . . . . . . . . . . . . . . . . . . . . . . . . 123
Recommended Tools . . . . . . . . . . . . . . . . . . . . . . . . . . 123
Turning Off Your Computer . . . . . . . . . . . . . . . . . . . . . . . 123
Before Working Inside Your Computer
Hinge Cover
Keyboard
Internal Card With Bluetooth
Coin-Cell Battery
. . . . . . . . . . . . . . . . . . . . . . . . . . . . . . . . . 125
. . . . . . . . . . . . . . . . . . . . . . . . . . . . . . . . . . 126
®
Wireless Technology. . . . . . . . . . . . . 127
. . . . . . . . . . . . . . . . . . . . . . . . . . . . . . 128
. . . . . . . . . . . . . . . . . 124
Memory
. . . . . . . . . . . . . . . . . . . . . . . . . . . . . . . . . . . 129
Wireless Local Area Network (WLAN) Card
Mobile Broadband Card
Subscriber Identity Module (SIM) Card
Hard Drive
Media Bay
. . . . . . . . . . . . . . . . . . . . . . . . . . . . . . . . . . 141
. . . . . . . . . . . . . . . . . . . . . . . . . . . . . . . . . 142
Removing Media Bay Devices
FCM (Flash Cache Module)
. . . . . . . . . . . . . . . . . 134
. . . . . . . . . . . . . . . . . . . . . . . . . . . 137
. . . . . . . . . . . . . . . . . . . 140
. . . . . . . . . . . . . . . . . . . . . 142
. . . . . . . . . . . . . . . . . . . . . . . . . 143
Contents 9
Page 10

16 Dell™ QuickSet
17 Traveling With Your Computer
Identifying Your Computer . . . . . . . . . . . . . . . . . . . . . . . . . . 149
Packing the Computer
Travel Tips
. . . . . . . . . . . . . . . . . . . . . . . . . . . . . . . . . . 150
Traveling by Air
. . . . . . . . . . . . . . . . . . . . . . . . . . . . 149
. . . . . . . . . . . . . . . . . . . . . . . . . . . . . 150
18 Specifications
19 Getting Help
Obtaining Assistance . . . . . . . . . . . . . . . . . . . . . . . . . . . . 159
Technical Support and Customer Service
DellConnect
Online Services
. . . . . . . . . . . . . . . . . . . . . . . . . . . . . . 160
. . . . . . . . . . . . . . . . . . . . . . . . . . . . 160
AutoTech Service . . . . . . . . . . . . . . . . . . . . . . . . . . . 161
Automated Order-Status Service
Problems With Your Order
Product Information
. . . . . . . . . . . . . . . . . . . . . . . . . . . . . 161
. . . . . . . . . . . . . . . . . . . . . . . . . . 161
. . . . . . . . . . . . . . . . . . . . 161
Returning Items for Warranty Repair or Credit
. . . . . . . . . . . . . . . . 159
. . . . . . . . . . . . . . . . 161
Before You Call
Contacting Dell
. . . . . . . . . . . . . . . . . . . . . . . . . . . . . . . 162
. . . . . . . . . . . . . . . . . . . . . . . . . . . . . . . 164
20 Appendix
FCC Notice (U.S. Only) . . . . . . . . . . . . . . . . . . . . . . . . . . . . 165
FCC Class B
. . . . . . . . . . . . . . . . . . . . . . . . . . . . . . 165
Macrovision Product Notice
Glossary . . . . . . . . . . . . . . . . . . . . . . . . . . . . . . . . . . . 167
10 Contents
. . . . . . . . . . . . . . . . . . . . . . . . . 166
Page 11
Finding Information
NOTE: Some features or media may be optional and may not ship with your computer. Some features or
media may not be available in certain countries.
NOTE: Additional information may ship with your computer.
What Are You Looking For? Find It Here
1
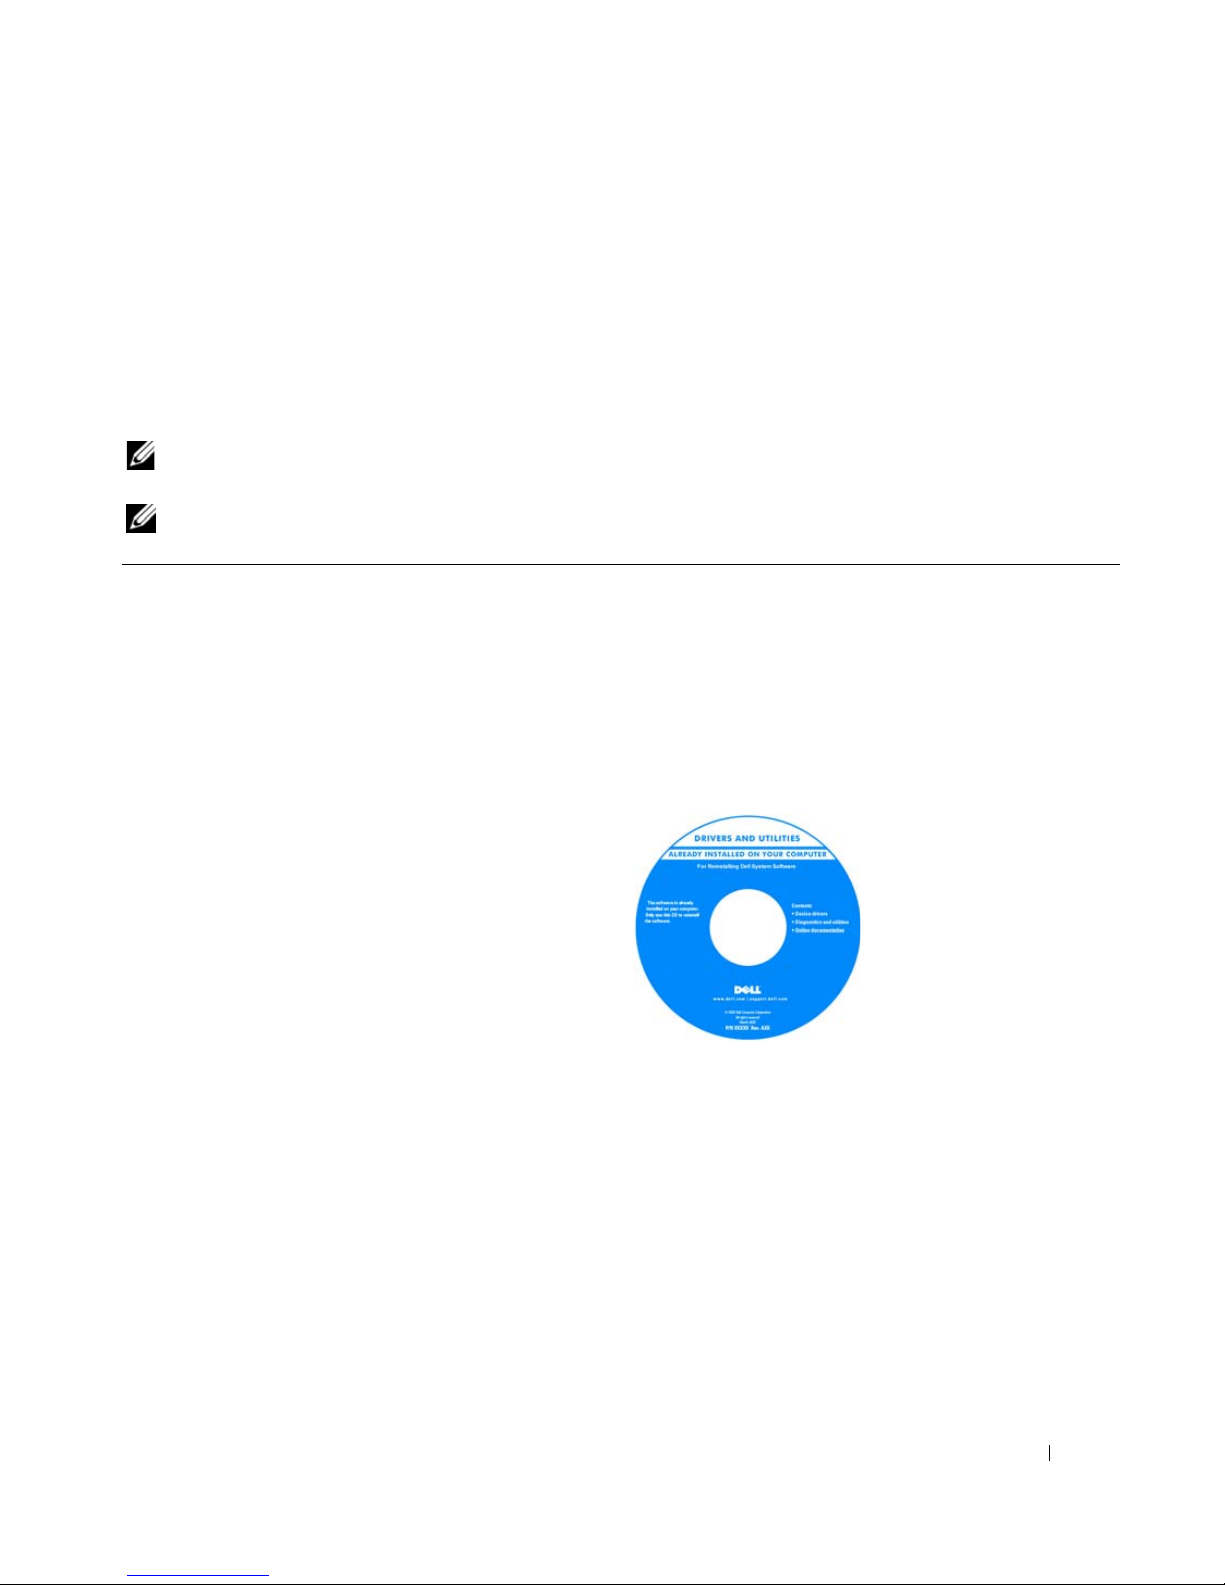
• A diagnostic program for my computer
• Drivers for my computer
• My device documentation
• Notebook System Software (NSS)
Drivers and Utilities Media
NOTE: The Drivers and Utilities media may be optional and
may not ship with your computer.
Documentation and drivers are already installed on your
computer. You can use the media to reinstall drivers (see
"Reinstalling Drivers and Utilities" on page 116) or to run the
Dell Diagnostics (see "Dell Diagnostics" on page 83).
Readme files may be
included on your media to
provide last-minute
updates about technical
changes to your computer
or advanced technicalreference material for
technicians or experienced
users.
NOTE: Drivers and documentation updates can be found at
support.dell.com.
Finding Information 11
Page 12
What Are You Looking For? Find It Here
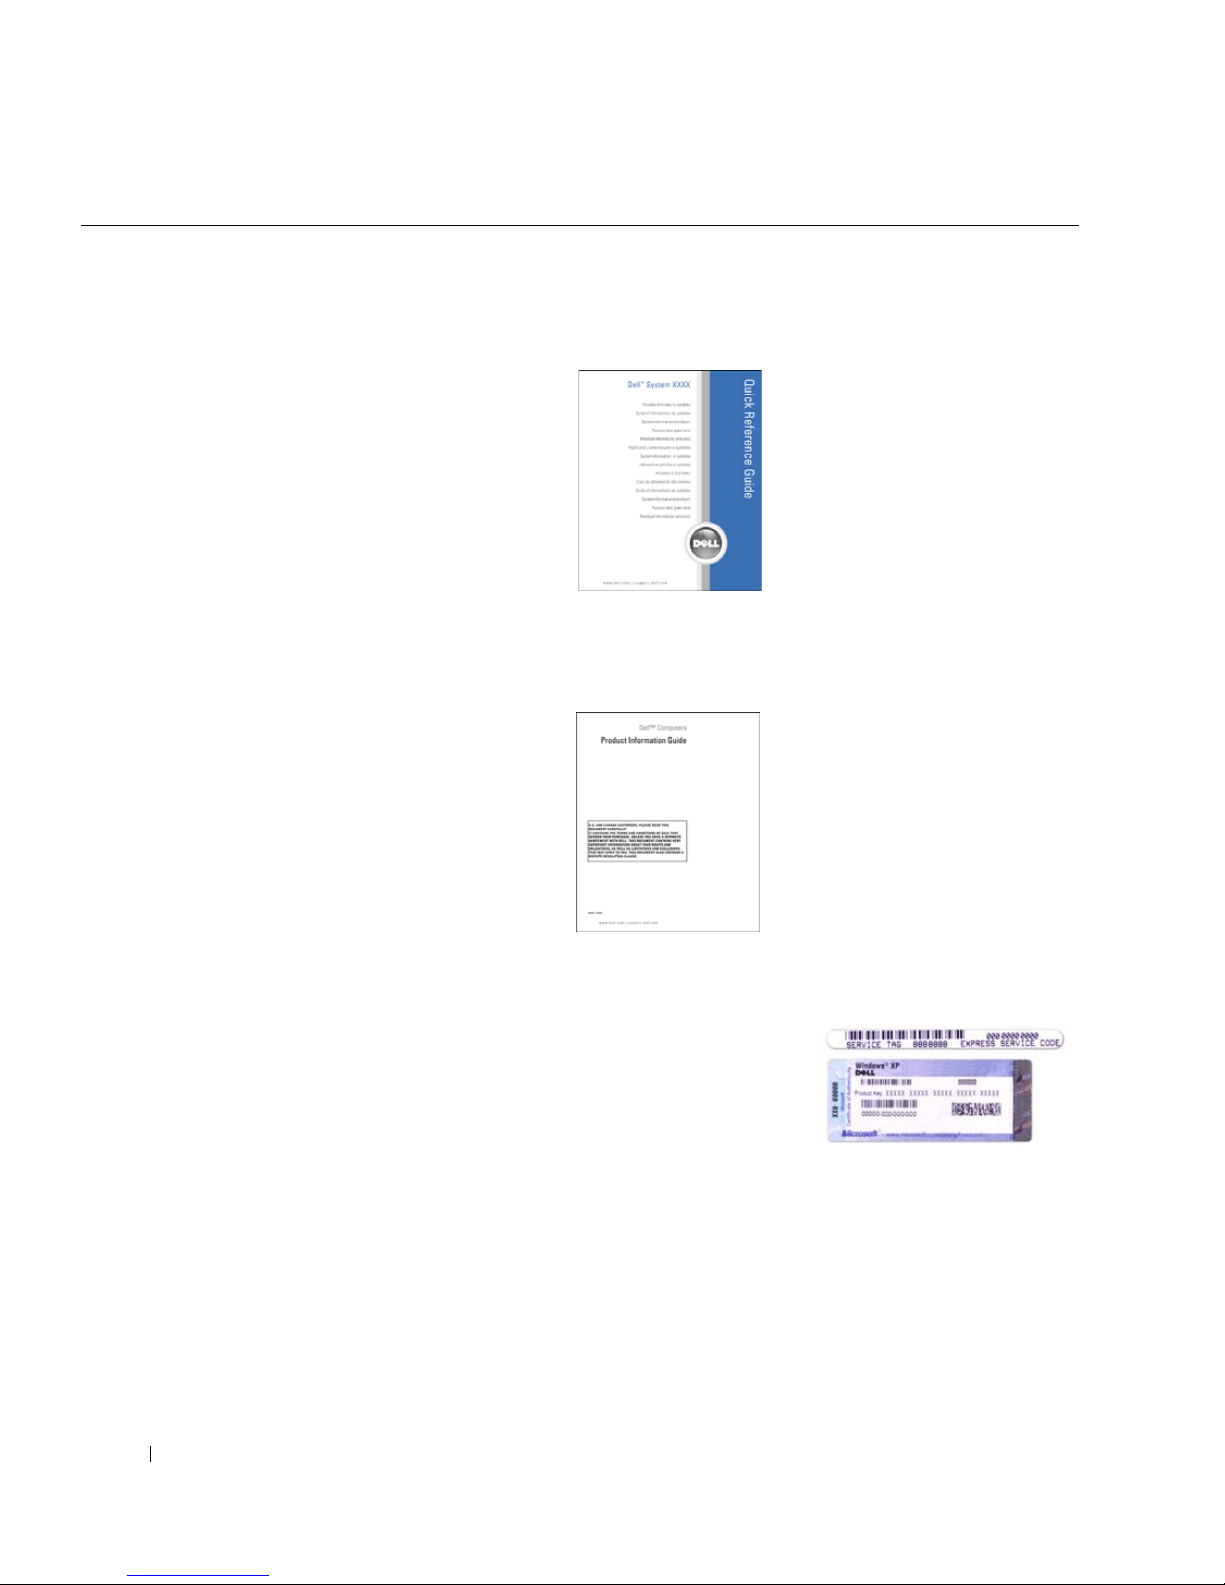
• How to set up my computer
• Basic troubleshooting information
• How to run the Dell Diagnostics
• How to open my computer
www.dell.com | support.dell.com
• Warranty information
• Terms and Conditions (U.S. only)
• Safety instructions
• Regulatory information
• Ergonomics information
• End User License Agreement
Quick Reference Guide
NOTE: This document may be optional and may not ship with
your computer.
NOTE: This document is available as a PDF at
support.dell.com.
Dell™ Product Information Guide
• Service Tag and Express Service Code
• Microsoft Windows License Label
12 Finding Information
Service Tag and Microsoft® Windows® License
These labels are located on your computer:
• Use the Service Tag to identify your computer when you
support.dell.com
use
or contact support.
• Enter the Express Service Code to direct your call when
contacting support.
Page 13

What Are You Looking For? Find It Here
• Solutions — Troubleshooting hints and tips, articles
from technicians, and online courses, frequently asked
questions
• Community — Online discussion with other Dell
customers
• Upgrades — Upgrade information for components, such
as memory, the hard drive, and the operating system
• Customer Care — Contact information, service call and
order status, warranty, and repair information
• Service and support — Service call status and support
history, service contract, online discussions with
technical support
• Dell Technical Update Service — Proactive e-mail
notification of software and hardware updates for your
computer
• Reference — Computer documentation, details on my
computer configuration, product specifications, and
white papers
• Downloads — Certified drivers, patches, and software
updates
• Notebook System Software (NSS)— If you reinstall the
operating system for your computer, you should also
reinstall the NSS utility. NSS provides critical updates
for your operating system and support for processors,
optical drives, USB devices, and so on. NSS is necessary
for correct operation of your Dell computer. The
software automatically detects your computer and
operating system and installs the updates appropriate
for your configuration.
Dell Support Website — support.dell.com
NOTE: Select your region or business segment to view the
appropriate support site.
To download Notebook System Software:
1
Go to
support.dell.com
, select your region or business
segment, and enter your Service Tag.
2
Select
Drivers & Downloads
3
Click your operating system and search for the keyword
Notebook System Software
and click Go.
.
NOTE: The support.dell.com user interface may vary
depending on your selections.
• Software upgrades and troubleshooting hints —
Frequently asked questions, hot topics, and general
health of your computing environment
• How to use Windows XP
• How to work with programs and files
• How to personalize my desktop
Dell Support Utility
The Dell Support Utility is an automated upgrade and
notification system installed on your computer. This support
provides real-time health scans of your computing
environment, software updates, and relevant self-support
information. Access the Dell Support Utility from the
icon in the taskbar.
Windows Help and Support Center
1
Click
Start→
2
Type a word or phrase that describes your problem and
Help and Support
.
click the arrow icon.
3
Click the topic that describes your problem.
4
Follow the instructions on the screen.
Finding Information 13
Page 14

What Are You Looking For? Find It Here
• Information on network activity, the Power Management
Wizard, hotkeys, and other items controlled by Dell
QuickSet.
• How to reinstall my operating system
www.dell.com | support.dell.com
Dell QuickSet Help
To view
icon in the Microsoft
Dell QuickSet Help
®
Windows® taskbar.
, right-click the QuickSet
For more information on Dell QuickSet, see "Dell™
QuickSet" on page 147.
Operating System Media
NOTE: The Operating System media may be optional and may
not ship with your computer.
The operating system is already installed on your computer.
To reinstall your operating system, use the
media (see "Reinstalling Windows" on page 121).
After you reinstall your
operating system, use the
optional
Utilities
drivers for the devices that
came with your computer.
Your operating system
product key label is located
on your computer.
Operating System
Drivers and
media to reinstall
NOTE: The color of your
media varies based on the operating system you ordered.
•Intel® Active Management Technology (iAMT) features
and management
14 Finding Information
Systems Management Administrator’s Guide
NOTE: iAMT is available for Dell™ Latitude™ D630c
computers with iAMT capability only.
To view the
support.dell.com
to
Systems Management Administrator’s Guide
.
, go
Page 15
About Your Computer
Front View
13
12
1
1
2
3
11
10
9
4
5
8
7
6
About Your Computer 17
Page 16
www.dell.com | support.dell.com
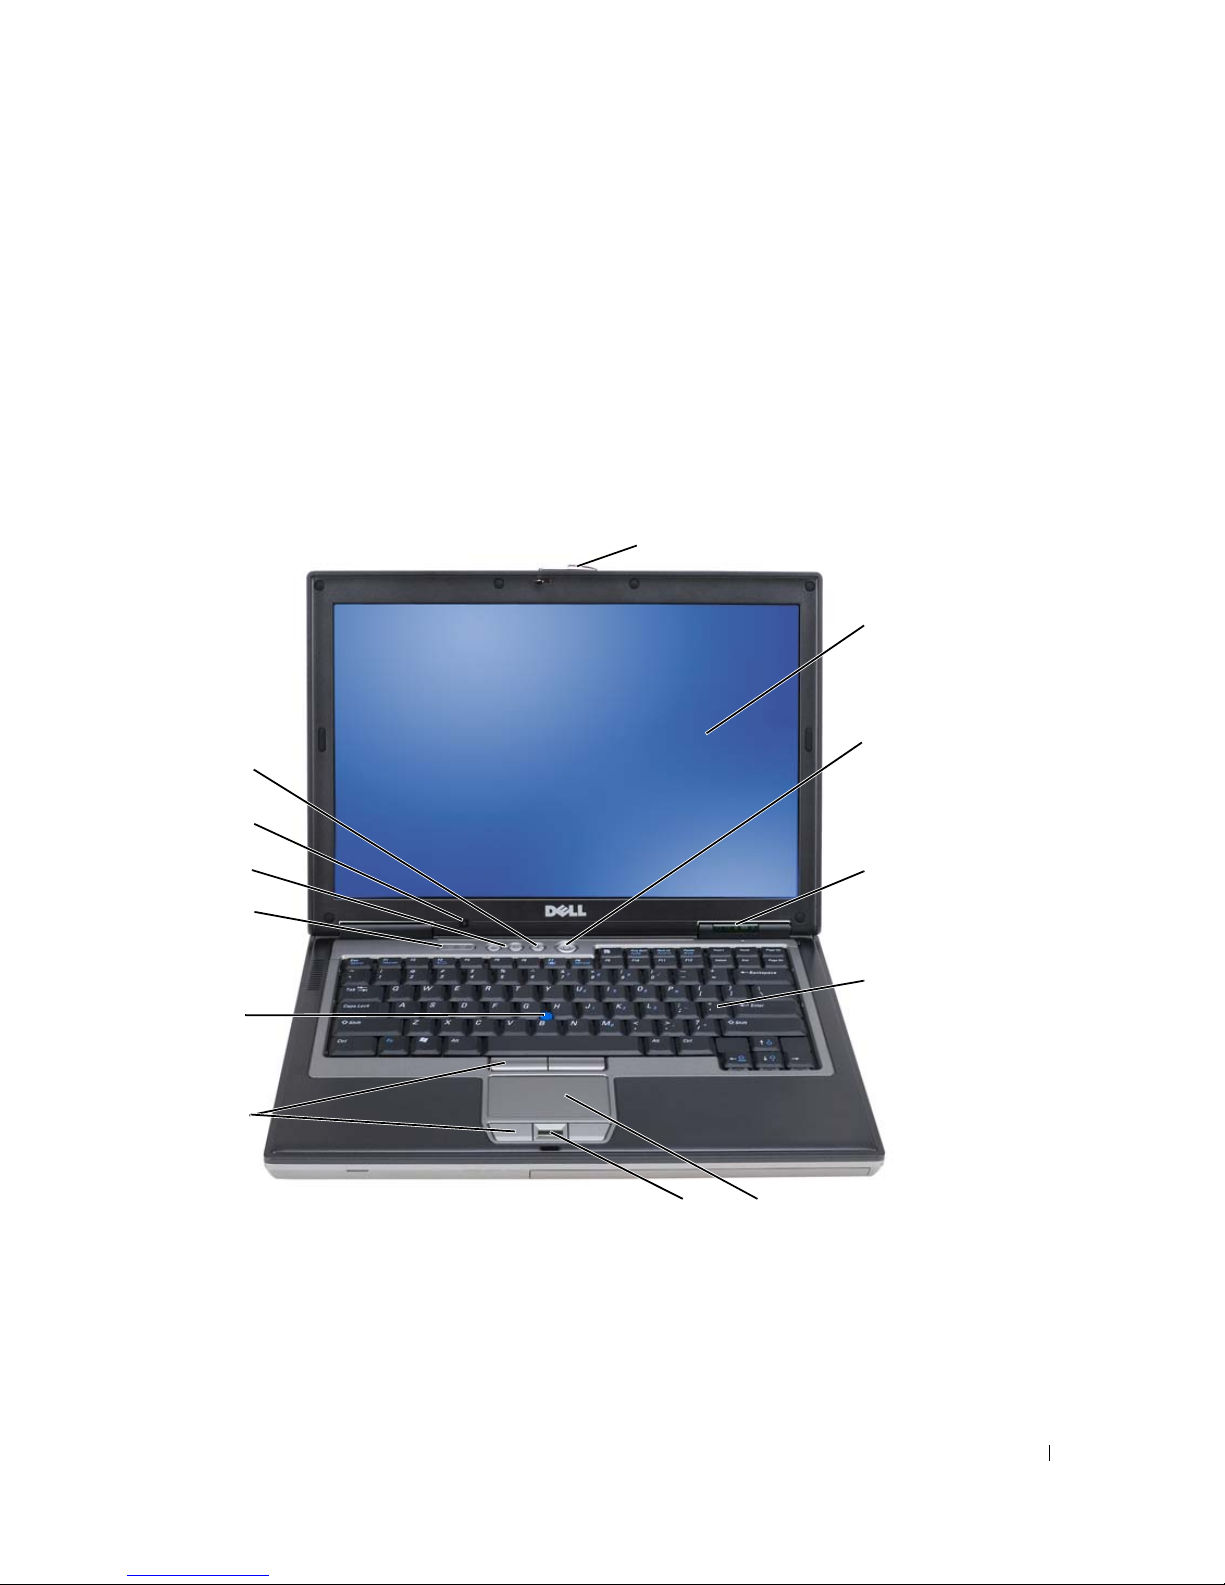
1
display latch
4
device status lights
7
fingerprint reader (optional)
10
keyboard status lights
13
mute button
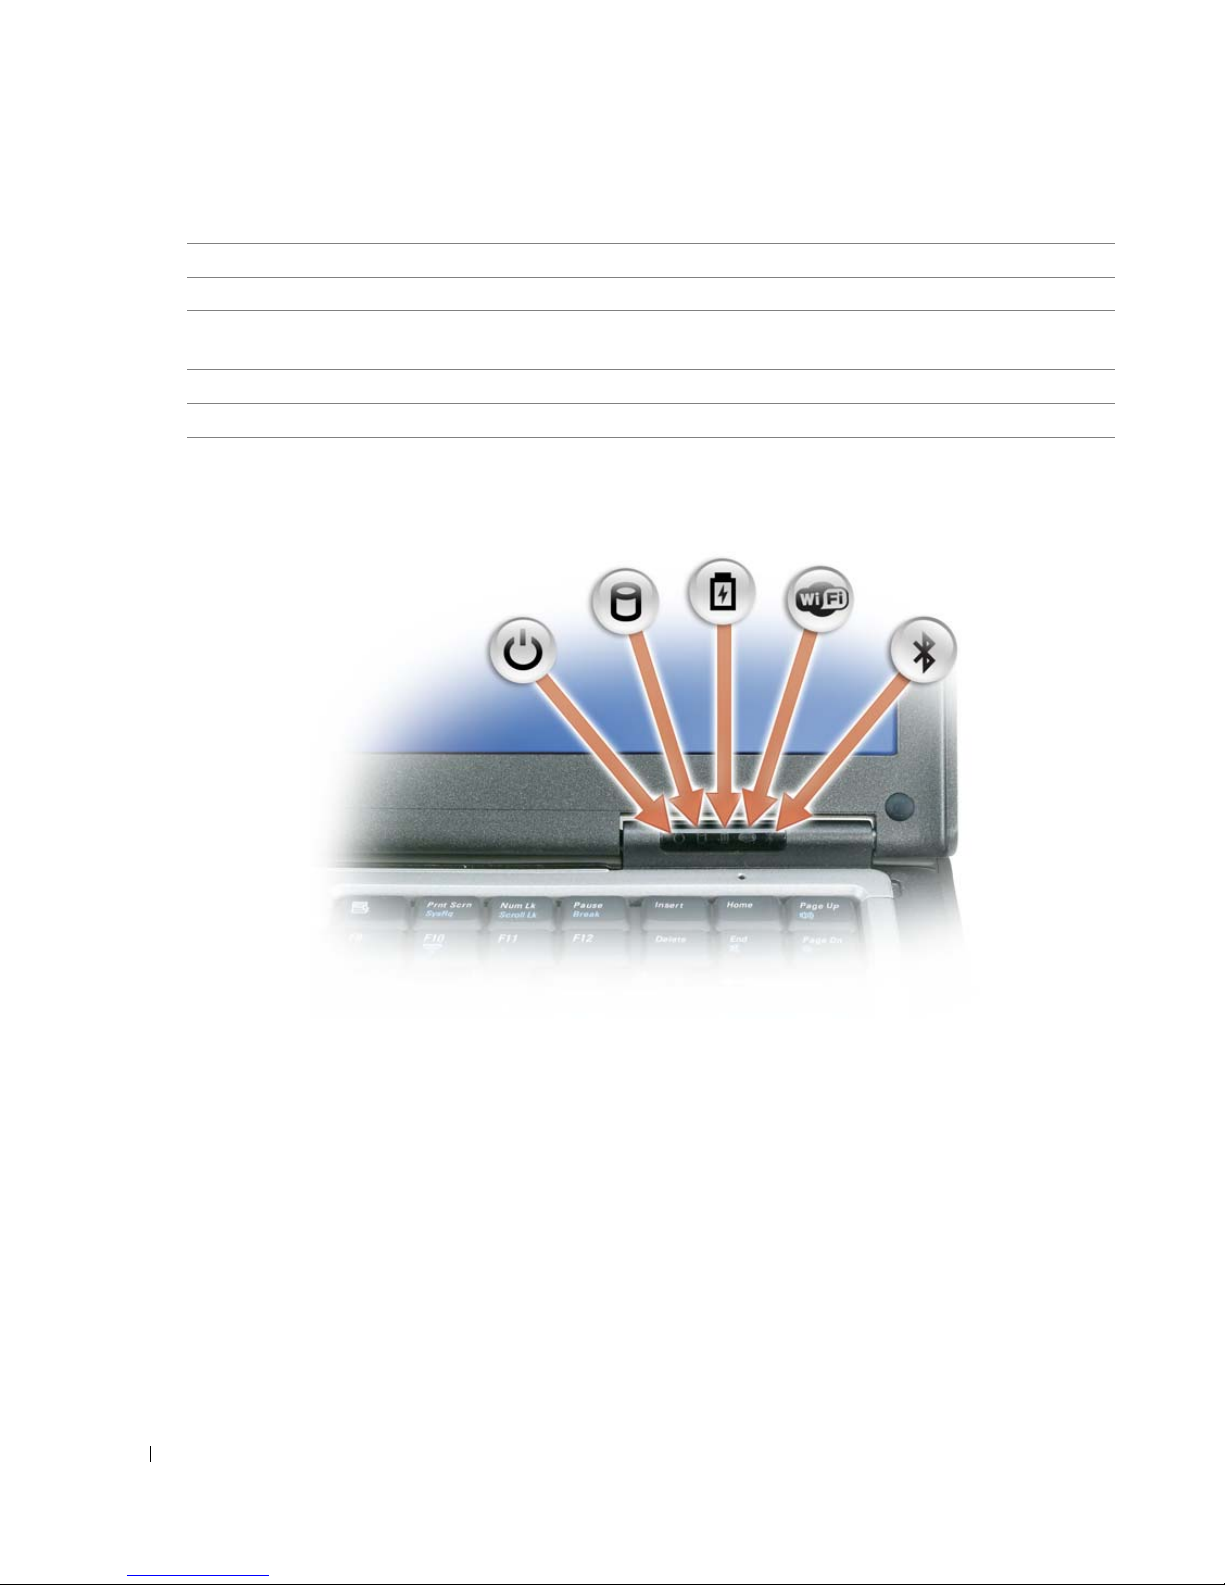
DEVICE STATUS LIGHTS
2
display
5
keyboard
8
touch pad buttons/track stick
buttons
11
volume control buttons
3
power button
6
touch pad
9
track stick
12
ambient light sensor
18 About Your Computer
Page 17
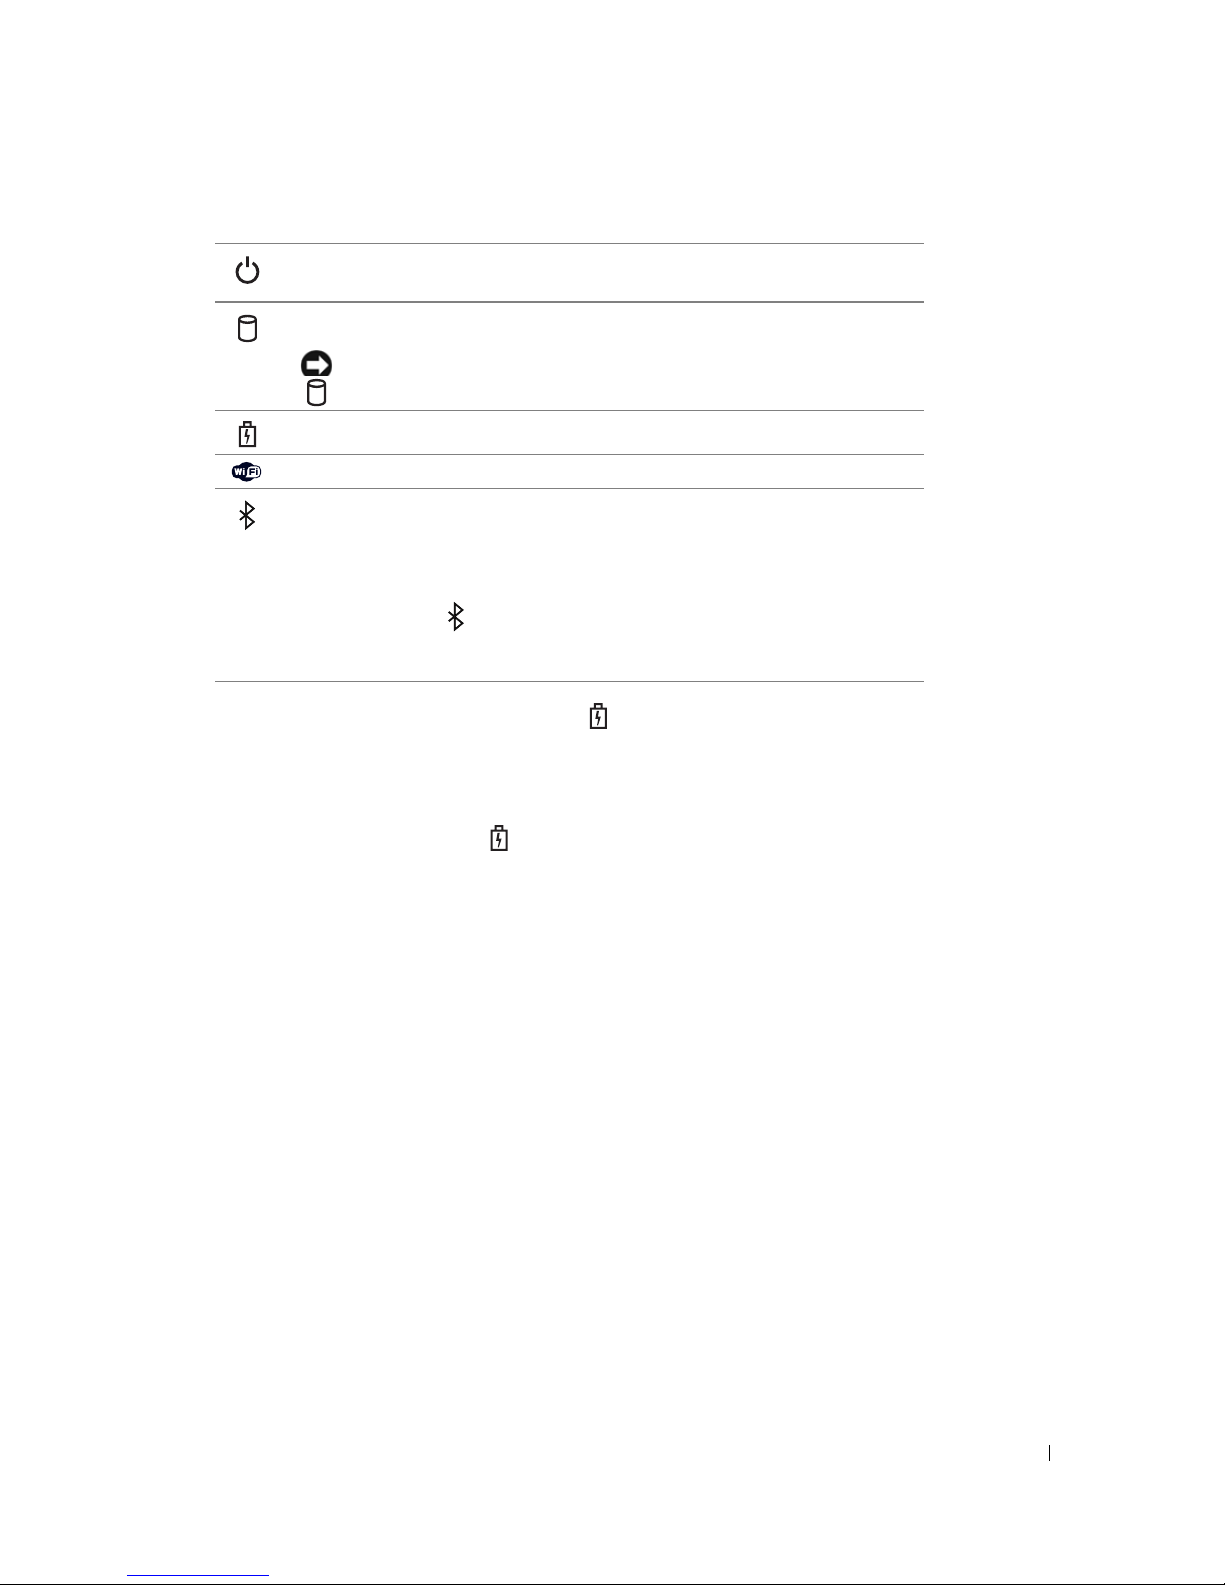
Turns on when you turn on the computer and blinks when the computer is
in a power management mode.
Turns on when the computer reads or writes data.
NOTICE: To avoid loss of data, never turn off the computer while the
light is flashing.
Turns on steadily or blinks to indicate battery charge status.
Turns on when wireless devices are enabled.
Turns on when Bluetooth®
wireless technology is enabled. To enable or
disable Bluetooth wireless technology, move the wireless switch to the "on"
position. See "wireless switch" on page 22 for more information.
NOTE: Bluetooth wireless technology is an optional feature on your
computer, so the icon turns on only if you ordered Bluetooth wireless
technology with your computer. For more information, see the documentation
that came with your Bluetooth wireless technology.
If the computer is connected to an electrical outlet, the light operates as follows:
– Solid green: The battery is charging.
– Flashing green: The battery is almost fully charged.
– Off: The battery is adequately charged (or external power is not available to charge the battery).
If the computer is running on a battery, the light operates as follows:
– Off: The battery is adequately charged (or the computer is turned off).
– Flashing orange: The battery charge is low.
– Solid orange: The battery charge is critically low.
DISPLAY—For more information about your display, see "Using the Display" on page 47.
DISPLAY LATCH—Keeps the display closed.
DISPLAY LATCH BUTTON—Press this button to release the display latch and open the display.
KEYBOARD—The keyboard includes a numeric keypad as well as the Microsoft
information on supported keyboard shortcuts, see "Using the Keyboard" on page 41.
®
Windows® logo key. For
About Your Computer 19
Page 18
www.dell.com | support.dell.com
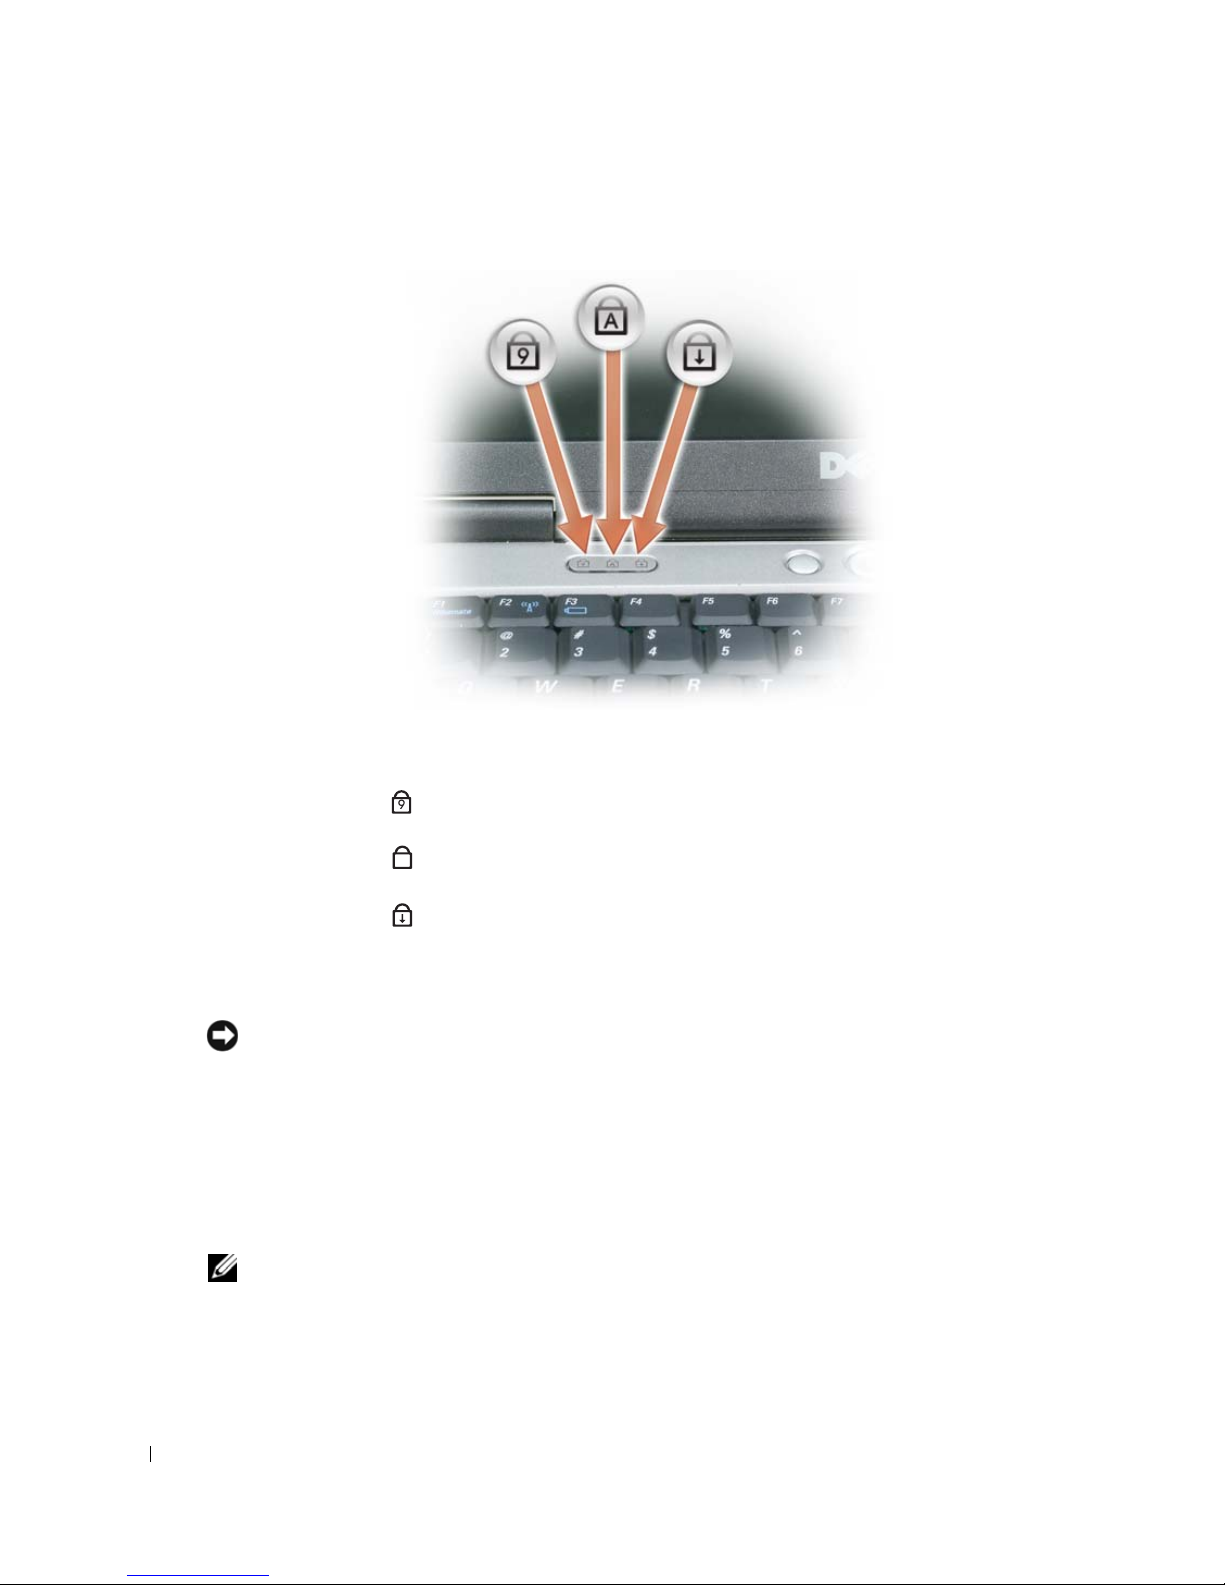
KEYBOARD STATUS LIGHTS
The green lights located above the keyboard indicate the following:
9
A
Turns on when the numeric keypad is enabled.
Turns on when the uppercase letter function is enabled.
Turns on when the scroll lock function is enabled.
POWER BUTTON—Press the power button to turn on the computer or to enter or exit a power management
mode.
NOTICE: To avoid losing data, shut down your computer instead of pressing the power button.
FINGERPRINT READER (OPTIONAL)—Helps to keep your Dell™ computer secure. When you slide your finger over
the reader, it uses your unique fingerprint to authenticate your user identity. For information on how to
activate and use the security management software that controls the fingerprint reader, see "Security
Management Software" on page 77.
AMBIENT LIGHT SENSOR—Detects available environmental light and automatically increases or decreases the
display backlighting to compensate for low-light and high-light environments. Press the <Fn> and leftarrow keys to enable or disable the sensor ("Using the Ambient Light Sensor" on page 47).
NOTE: The ambient light sensor is disabled when your computer is connected to AC power.
20 About Your Computer
Page 19
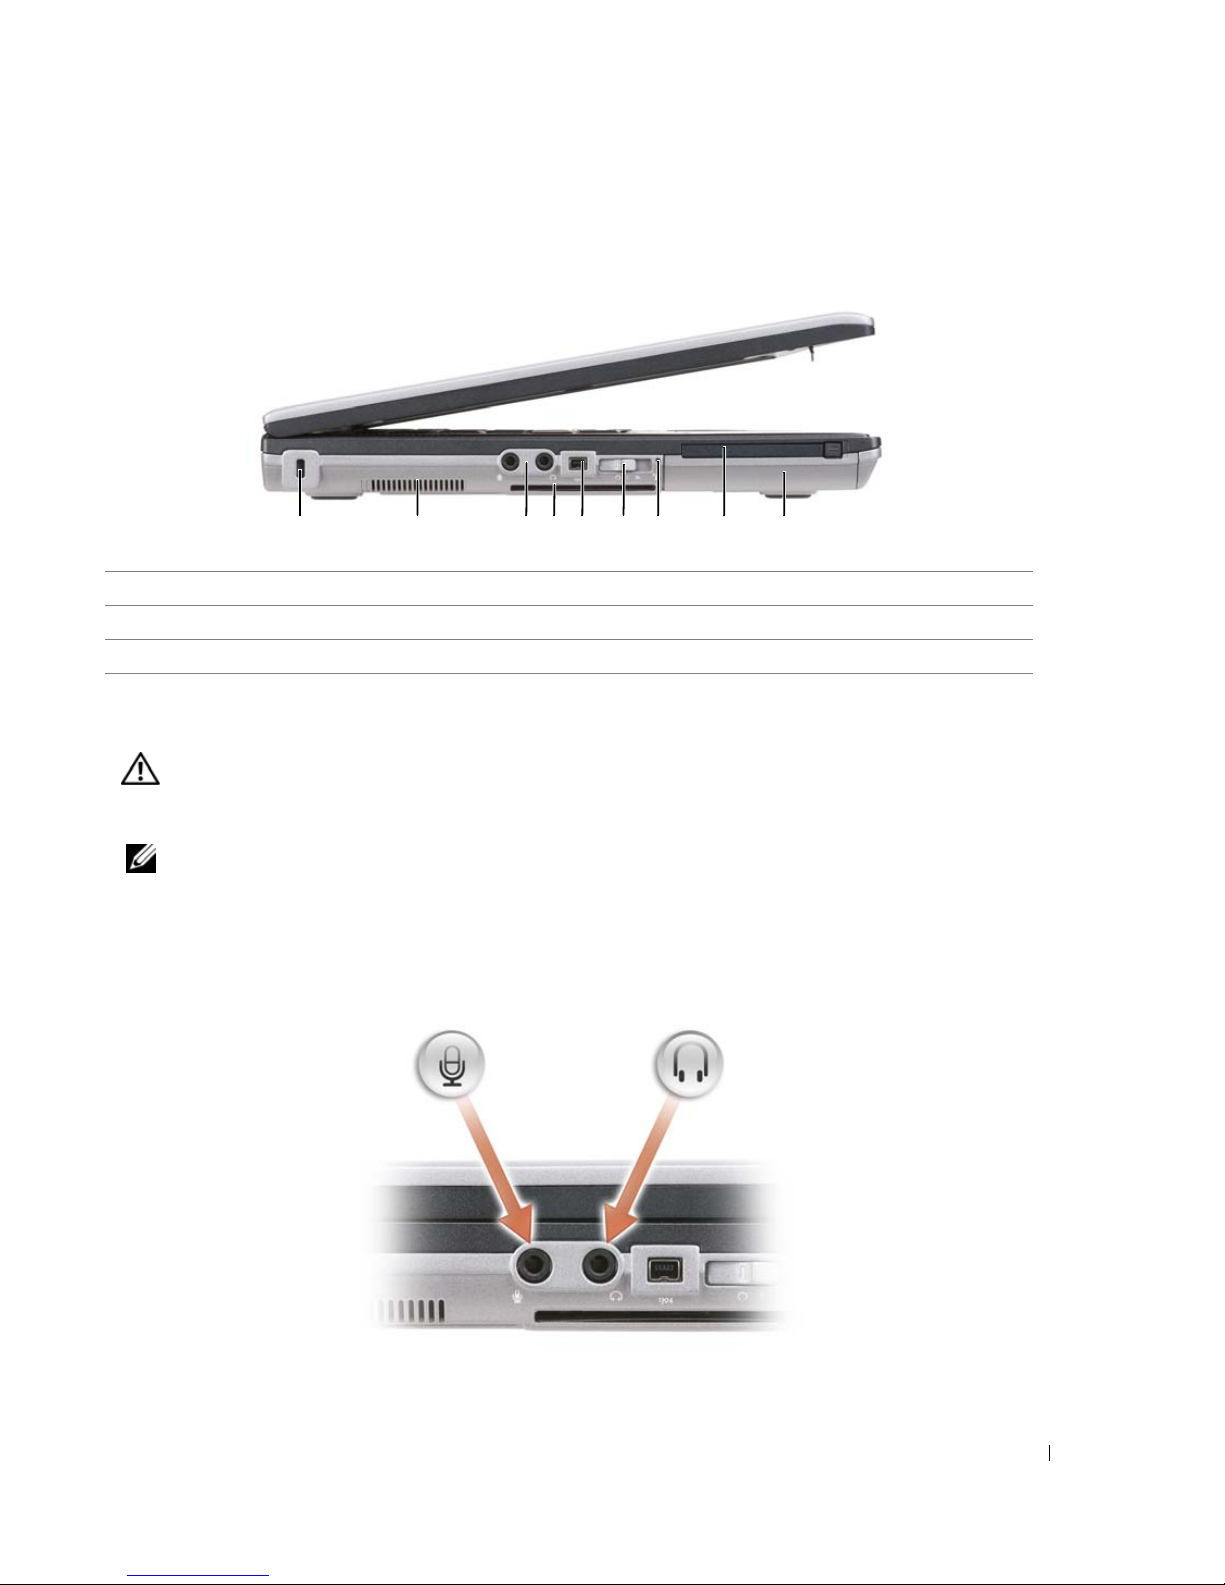
Left Side View
1 2 3 65 7 84 9
1
security cable slot
4
smart card slot (with blank)
7
Wi-Fi Catcher™ light
AIR VENTS—The computer uses an internal fan to create airflow through the vents, which prevents the
computer from overheating.
CAUTION: Do not block, push objects into, or allow dust to accumulate in the air vents. Do not store
your Dell computer in a low-airflow environment, such as a closed briefcase, while it is running.
Restricting the airflow can damage the computer or cause a fire.
2
air vents
5
1394 connector
8
PC Card slot
3
audio connectors (2)
6
wireless switch
9
hard drive
NOTE: The computer turns on the fan when the computer gets hot. Fan noise is normal and does not
indicate a problem with the fan or the computer.
SECURITY CABLE SLOT—Lets you attach a commercially available antitheft device to the computer (see
"Security Cable Lock" on page 71).
AUDIO CONNECTORS
About Your Computer 21
Page 20
www.dell.com | support.dell.com
Attach headphones or speakers to the connector.
Attach a microphone to the connector.
SMART CARD SLOT (WITH BLANK)—Supports one smart card. Smart cards provide a variety of functions,
including security features and data storage. The blank prevents foreign matter from entering the interior
of the computer when a smart card is not installed in the smart card slot. For more information and
instructions on removing the blank, see "Smart Cards" on page 67.
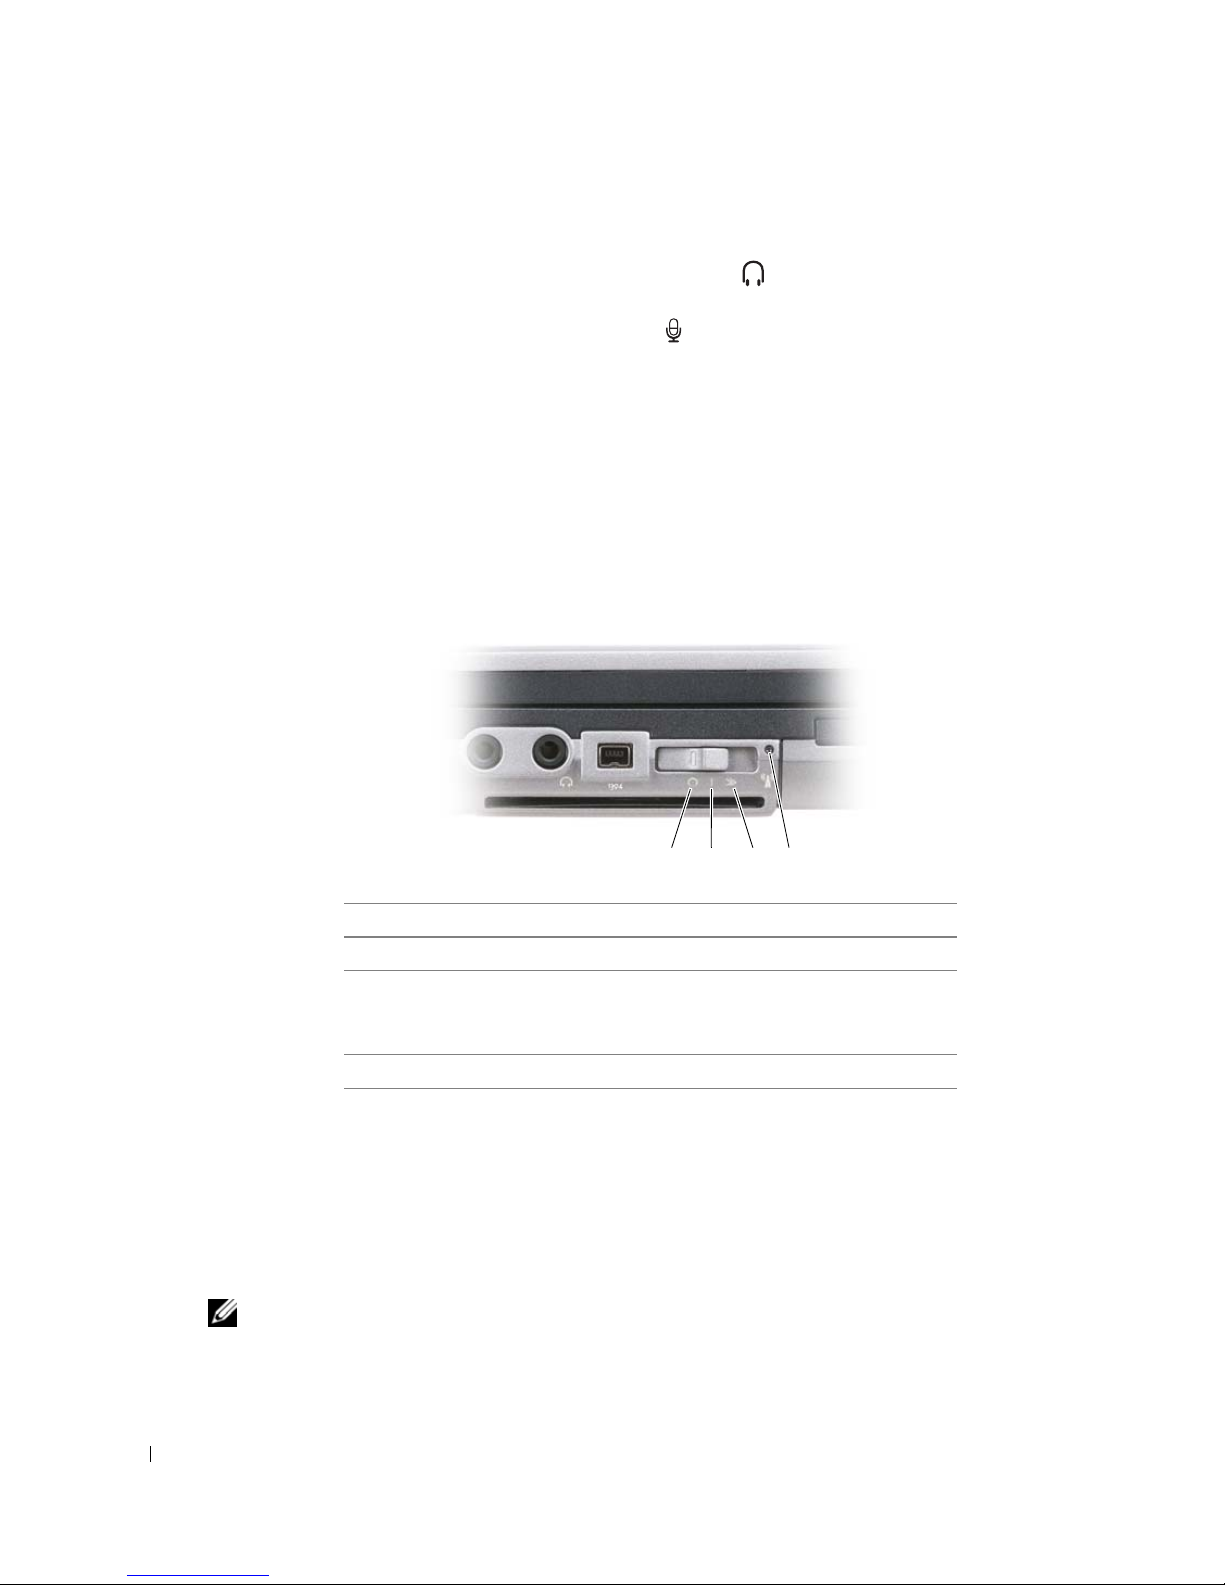
WIRELESS SWITCH—When enabled through Dell QuickSet, this switch can scan for a wireless LAN (WLAN)
in your vicinity. You can also use it to rapidly turn off or on any wireless devices such as WLAN cards and
internal cards with Bluetooth wireless technology (see "Dell Wi-Fi Catcher™ Network Locator" on
page 58).
1 2 3 4
1
"off" position
"on" position
2
"momentary" position
3
Disables wireless devices
Enables wireless devices
Scans for WLAN networks (see
"Dell Wi-Fi Catcher™ Network
Locator" on page 58)
Wi-Fi Catcher light
4
I-FI CATCHER
W
™
LIGHT—The light operates as follows:
– Flashing green: Searching for networks
– Solid green: Strong network found
– Solid yellow:
Weak network found
– Flashing yellow: Error
– Off: No signal found
NOTE: The Dell Wi-Fi Catcher Network Locator light appears only when the computer is turned off and
wireless networking is activated in the system setup program. While working in Microsoft Windows
operating systems, the light is designed not to appear.
22 About Your Computer
Page 21
PC CARD SLOT—Supports one PC Card, such as a modem or network adapter. The computer ships with a
blank installed in the slot to prevent foreign matter from entering the computer interior when a card is not
installed (see "Card Types" on page 67).
NOTE: Your computer does not have an ExpressCard slot. To use an ExpressCard, use an adapter for the
PC Card slot.
HARD DRIVE—Stores software and data.
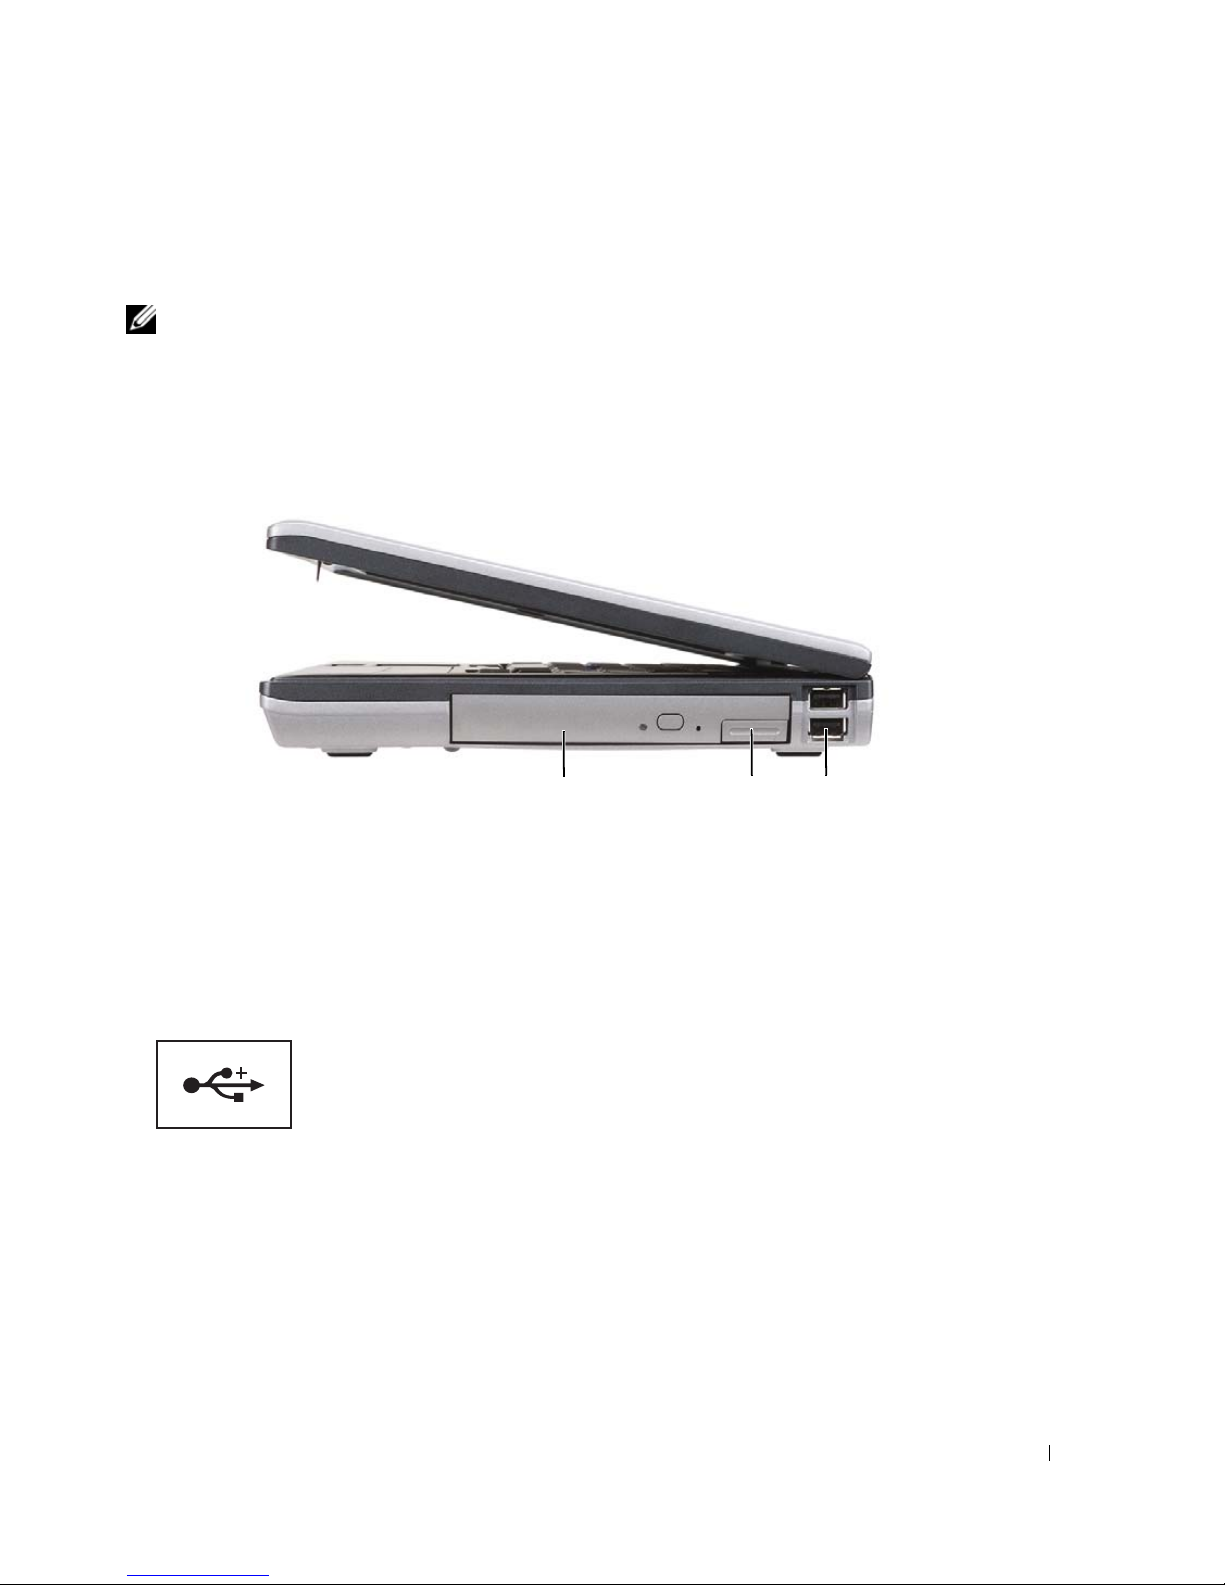
Right Side View
1
1
optical drive in media bay
MEDIA BAY—Supports a floppy or an optical drive, second battery, second hard drive, or a Dell TravelLite™
2
media-bay device latch release
2 3
3
USB connectors (2)
module (see "Using Multimedia" on page 61).
DEVICE LATCH RELEASE—Press the latch release to eject any device installed in the media bay.
CONNECTORS
USB
Connect USB devices, such as a mouse, keyboard, or printer.
About Your Computer 23
Page 22
www.dell.com | support.dell.com
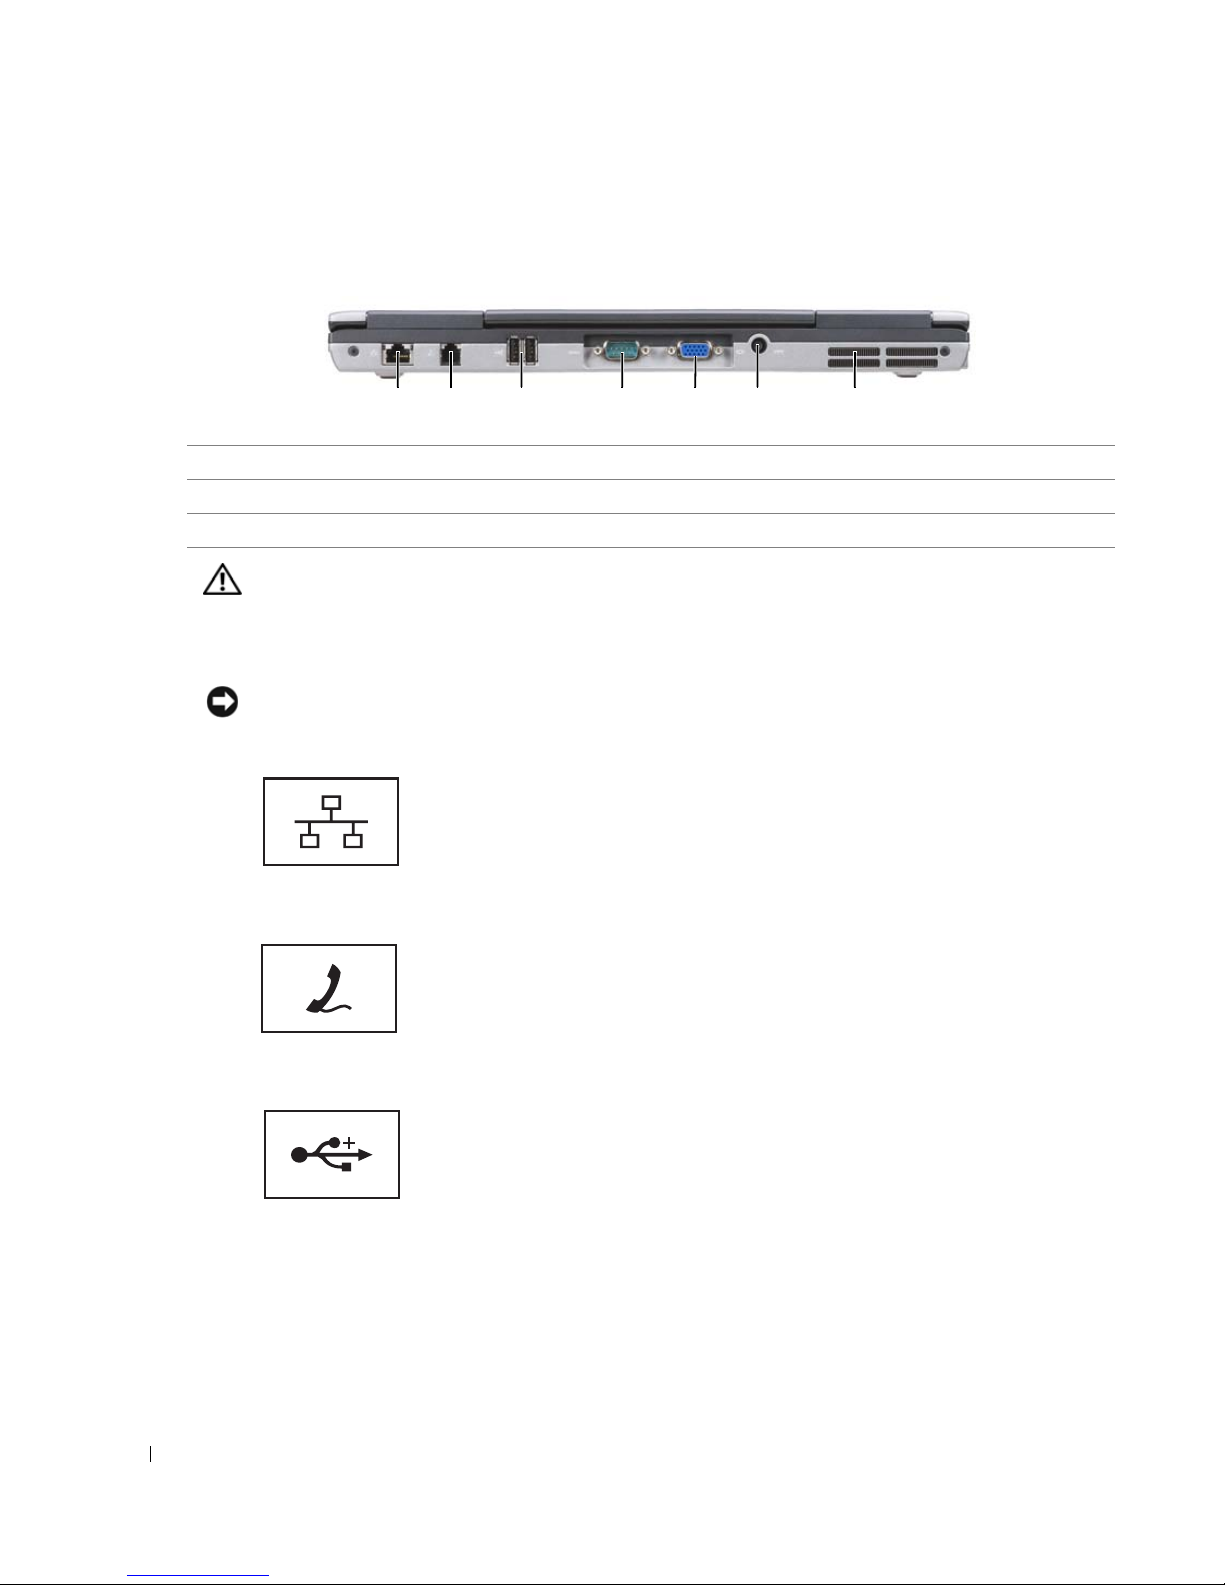
Back View
1 2 63 4 75
1
network connector (RJ-45)
4
serial connector
7
air vents
CAUTION: Do not block, push objects into, or allow dust to accumulate in the air vents. Do not store
your computer in a low-airflow environment, such as a closed briefcase, while it is running. Restricting
the airflow can damage the computer or cause a fire.
NETWORK CONNECTOR (RJ-45)
NOTICE: The network connector is slightly larger than the modem connector. To avoid damaging the
computer, do not plug a telephone line into the network connector.
2
modem connector (RJ-11)
5
video connector
Connects the computer to a network. The two lights next to the connector
indicate status and activity for wired network connections.
For information on using the network adapter, see the device user’s guide
supplied with your computer.
3
USB connectors (2)
6
AC adapter connector
MODEM CONNECTOR (RJ-11)
CONNECTORS
USB
24 About Your Computer
Connect the telephone line to the modem connector.
For information on using the modem, see the online modem documentation
supplied with your computer (see "Finding Information" on page 13).
Connects USB devices, such as a mouse, keyboard, or printer.
Page 23
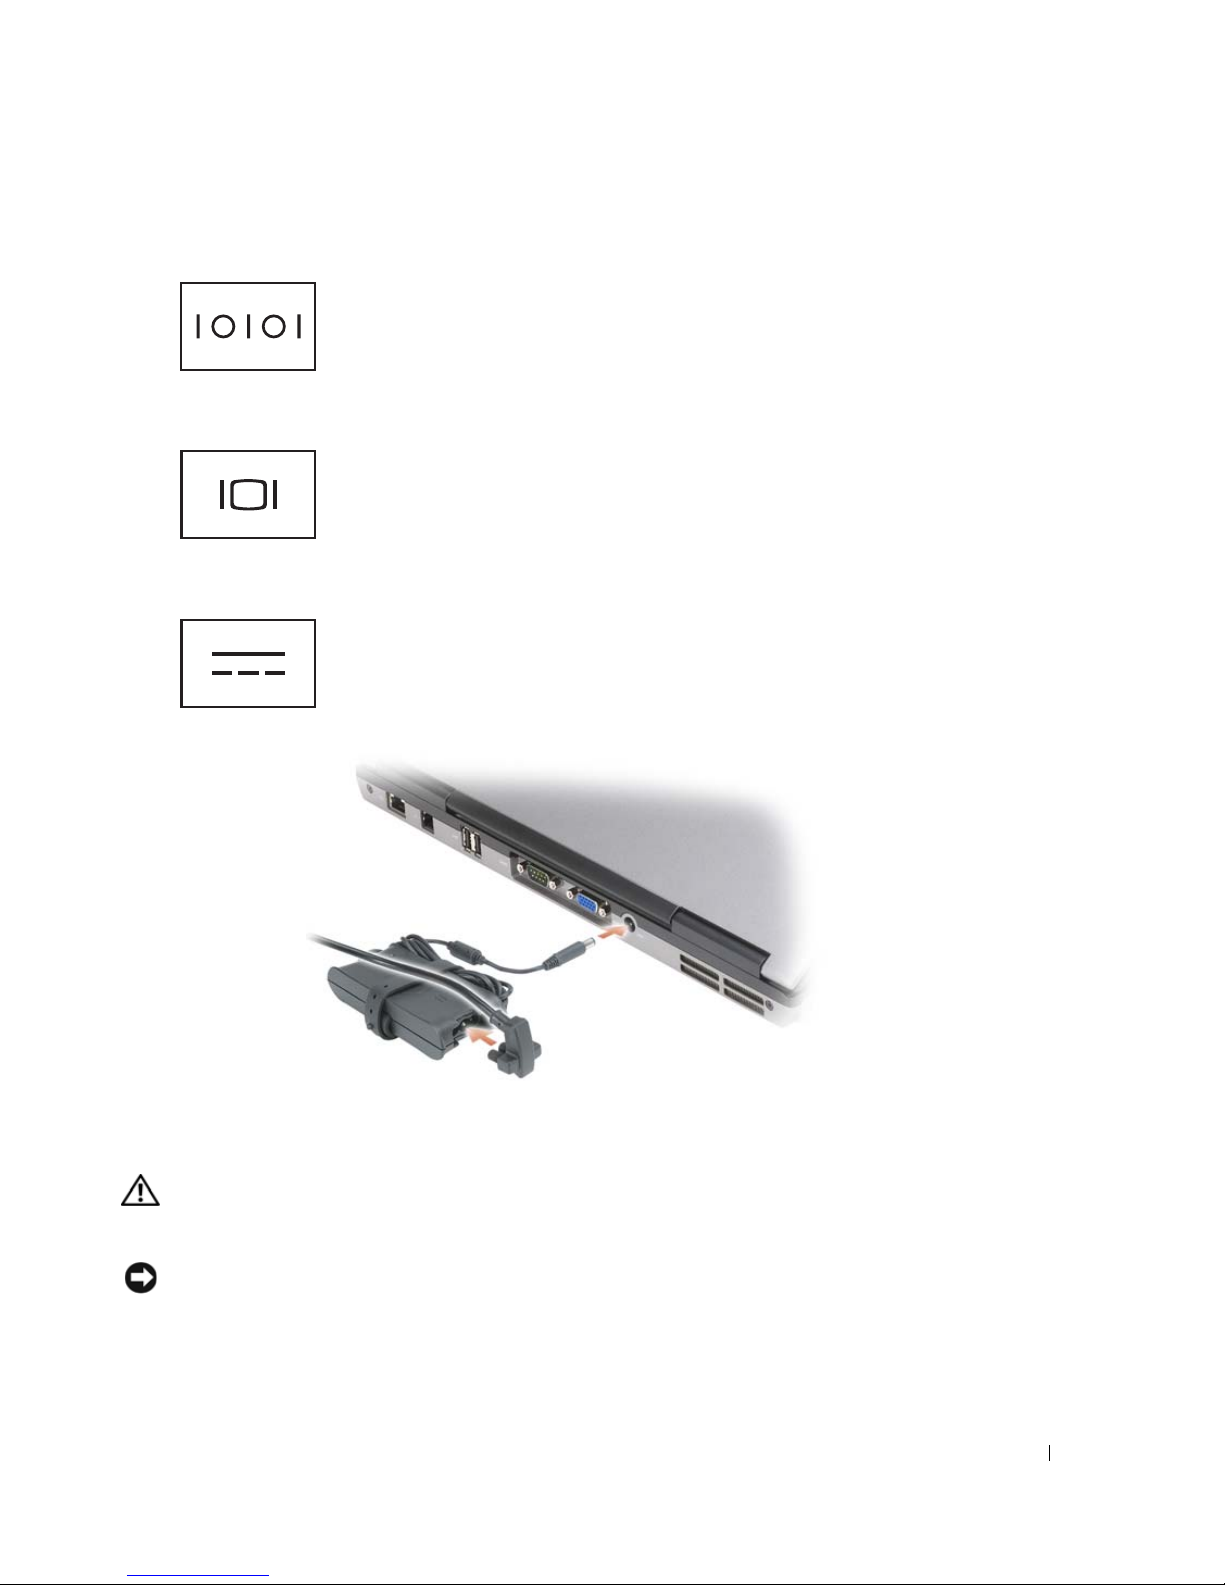
SERIAL CONNECTOR
CONNECTOR
VIDEO
AC ADAPTER CONNECTOR
Connects serial devices, such as a mouse or handheld device.
Connects video devices, such as a monitor.
Connects an AC adapter to the computer.
1
The AC adapter converts AC power to the DC power required by the computer. You can connect the AC
adapter with your computer turned either on or off.
CAUTION: The AC adapter works with electrical outlets worldwide. However, power connectors and
power strips vary among countries. Using an incompatible cable or improperly connecting the cable to
the power strip or electrical outlet may cause fire or equipment damage.
NOTICE: When you disconnect the AC adapter cable from the computer, grasp the connector, not the
cable itself, and pull firmly but gently to avoid damaging the cable. When you wrap the AC adapter cable,
ensure that you follow the angle of the connector on the AC adapter to avoid damaging the cable.
About Your Computer 25
Page 24
AIR VENTS—The computer uses an internal fan to create airflow through the vents, which prevents the
computer from overheating.
CAUTION: Do not block, push objects into, or allow dust to accumulate in the air vents. Do not store
your computer in a low-airflow environment, such as a closed briefcase, while it is running. Restricting
the airflow can damage the computer or cause a fire.
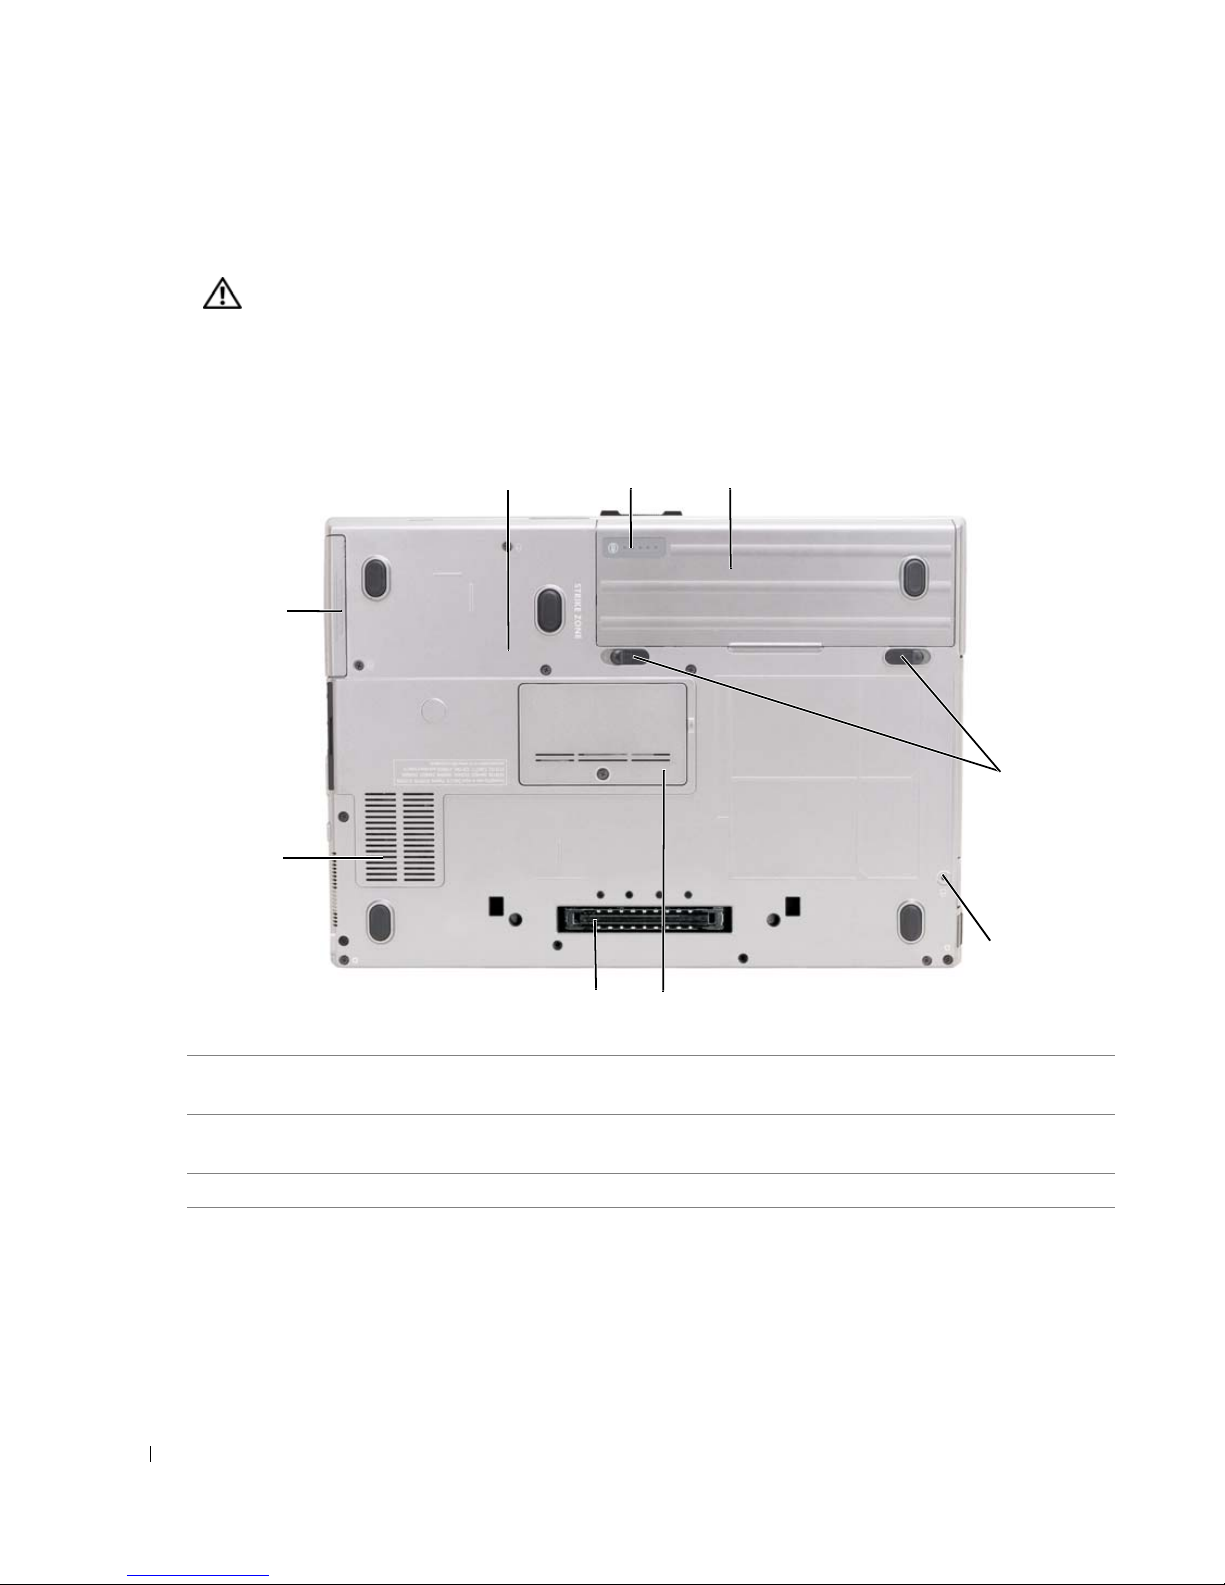
Bottom View
www.dell.com | support.dell.com
9
1
2
8
3
7
4
6
5
battery charge gauge/health
1
gauge
4
device locking screw (if
present)
7
air vents
BATTERY CHARGE GAUGE/HEALTH GAUGE—Provides information on the battery charge (see "Checking the Battery
Charge" on page 34).
BATTERY—When a battery is installed, you can use the computer without connecting the computer to an
electrical outlet (see "Using a Battery" on page 33).
BATTERY-BAY LATCH RELEASES—Releases the battery (see "Replacing the Battery" on page 38 for instructions).
26 About Your Computer
2
battery
5
memory module cover
8
hard drive
3
battery-bay latch releases (2)
6
docking-device connector
9
device locking screw
Page 25

DEVICE LOCKING SCREW—If present, locks devices, such as an optical drive, in place.
DOCKING-DEVICE CONNECTOR—Lets you attach your computer to a docking device. See the Dell
documentation that came with your docking device for more information.
About Your Computer 27
Page 26

www.dell.com | support.dell.com
MEMORY MODULE COVER—Covers the compartment that contains the second memory module connector
(DIMM B) (see "Memory" on page 129).
AIR VENTS—The computer uses an internal fan to create airflow through the fan air vents, which prevents
the computer from overheating.
28 About Your Computer
Page 27

1
Transferring Information to a New Computer
You can use your operating system wizards to help you transfer files and other data from one
computer another. For instructions, see the following section that corresponds to the operating
system your computer is running.
Microsoft® Windows® XP
The Microsoft Windows XP operating system provides the Files and Settings Transfer wizard to
move data from a source computer to a new computer. You can transfer data such as:
• E-mail messages
• Toolbar settings
•Window sizes
• Internet bookmarks
You can transfer the data to the new computer over a network, serial connection, or on removable
media such as a writable CD.
NOTE: You can transfer information from the old computer to the new computer by directly connecting a
serial cable to the input/output (I/O) ports of the two computers. To transfer data over a serial connection,
you must access the Network Connections utility from the Control Panel and perform additional
configuration steps, such as setting up an advanced connection and designating the host computer and
the guest computer.
For instructions on setting up a direct cable connection between two computers, see Microsoft
Knowledge Base 87uArticle #305621, titled How to Set Up a Direct Cable Connection Between Two
Computers in Windows XP. This information may not be available in some countries.
For transferring information to a new computer, you must run the Files and Settings Transfer
Wizard. You can use the optional
wizard disk with the Files and Settings Transfer Wizard.
Running the Files and Settings Transfer Wizard With the Operating System Media
NOTE: This procedure requires the Operating System media. This media is optional and may not be
included with all computers.
To prepare the new computer for the file transfer:
1
Start the
Files and Settings Transfer Wizard.
Operating System
media for this process or you can create a
Transferring Information to a New Computer 29
Page 28

www.dell.com | support.dell.com
2
When the
3
On the
4
On the
Windows XP CD
5
When the
Do
not
Files and Settings Transfer Wizard
Which computer is this?
screen, click
Do you have a Windows XP CD?
and click
Next
.
Now go to your old computer
click
Next
at this time.
To copy data from the old computer:
1
On the old computer, insert the Windows XP
2
3
4
5
6
7
On the
Under
On the
On the
On the
On the
Next
Welcome to Microsoft Windows XP
What do you want to do?
, click
Files and Settings Transfer Wizard
Which computer is this?
Select a transfer method
screen, click
screen, click the transfer method you prefer.
What do you want to transfer?
.
welcome screen appears, click
New Computer
screen, click
I will use the wizard from the
and click
Next
Next
.
.
screen appears, go to your old or source computer.
Operating System
screen, click
Transfer files and settings
welcome screen, click
Old Computer
media.
Perform additional tasks
.
Next
.
and click
Next
.
.
screen, select the items you want to transfer and click
After the information has been copied, the
8
Click
Finish
.
Completing the Collection Phase
screen appears.
To transfer data to the new computer:
1
On the
2
On the
your settings and files and click
Now go to your old computer
screen on the new computer, click
Where are the files and settings?
Next
.
Next
.
screen, select the method you chose for transferring
The wizard reads the collected files and settings and applies them to your new computer.
When all of the settings and files have been applied, the
3
Click
Finished
and restart the new computer.
Finished
screen appears.
Running the Files and Settings Transfer Wizard Without the Operating System Media
To run the Files and Settings Transfer Wizard without the
create a wizard disk that will allow you to create a backup image file to removable media.
To create a wizard disk, use your new computer with Windows XP and perform the following steps:
1
Click
Start→ Files and Settings Transfer Wizard
2
When the
3
On the
Files and Settings Transfer Wizard
Which computer is this?
screen, click
welcome screen appears, click
New Computer→
Operating System
.
Next
media, you must
Next
.
.
4
On the
following drive
Do you have a Windows XP CD?
→
30 Transferring Information to a New Computer
Next.
screen, click
I want to create a Wizard Disk in the
Page 29

5
Insert the removable media, such as a writable CD, and click OK.
6
When the disk creation completes and the
appears,
7
Go to the old computer.
do not
click
Next
.
Now go to your old computer
To copy data from the old computer:
1
On the old computer, insert the wizard disk.
2
Click the
3
In the
removable media) and click
4
On the
5
On the
6
On the
7
On the
Next
Start→
Open
Run
.
field on the
Run
window, browse to the path for
OK
.
Files and Settings Transfer Wizard
Which computer is this?
Select a transfer method
screen, click
screen, click the transfer method you prefer.
What do you want to transfer?
.
welcome screen, click
Old Computer→
screen, select the items you want to transfer and click
fastwiz
Next
Next
message
(on the appropriate
.
.
After the information has been copied, the
8
Click
Finish
.
Completing the Collection Phase
screen appears.
To transfer data to the new computer:
1
On the
2
On the
your settings and files and click
Now go to your old computer
screen on the new computer, click
Where are the files and settings?
Next
. Follow the instructions on the screen.
Next
.
screen, select the method you chose for transferring
The wizard reads the collected files and settings and applies them to your new computer.
When all of the settings and files have been applied, the
3
Click
Finished
NOTE: For more information about this procedure, search support.dell.com for document #PA1089586
(How Do I Transfer Files From My Old Computer to My New Dell Computer Using the Microsoft®
Windows
NOTE: Access to the Dell™ Knowledge Base document may not be available in some countries.
Microsoft Windows Vista
and restart the new computer.
®
XP Operating System?).
®
Finished
screen appears.
Easy Transfer Cable for Windows Vista
1
Insert the Easy Transfer Cable for Windows Vista Application Software media into the
computer you are transferring data from.
2
Follow the on-screen instructions until you are prompted to connect the Transfer Cable.
Transferring Information to a New Computer 31
Page 30

www.dell.com | support.dell.com
3
Connect the Easy Transfer Cable to the source computer.
You are prompted to select a device option.
4
Continue until you are prompted to plug the other end of the Easy Transfer Cable into the
destination computer.
The screen indicates that a connection has been made.
5
At the computer you are transferring data from, follow the on-screen instructions to select the
settings and files you want to transfer.
6
You will come to a screen that indicates you are ready to transfer files.
7
From the destination computer, view the transfer and wait for the indication that the transfer
is complete.
8
Select
Close
.
You are prompted to restart the computer.
9
Select
Yes
.
The computer reboots and the transfer is complete.
32 Transferring Information to a New Computer
Page 31

1
Using a Battery
Battery Performance
NOTE: For information about the Dell warranty for your computer, see the Product Information Guide or
separate paper warranty document that shipped with your computer.
For optimal computer performance and to help preserve BIOS settings, operate your Dell™
portable computer with the main battery installed at all times. One battery is supplied as standard
equipment in the battery bay.
NOTE: Because the battery may not be fully charged, use the AC adapter to connect your new computer
to an electrical outlet the first time you use the computer. For best results, operate the computer with the
AC adapter until the battery is fully charged. To view battery charge status, check the Power Meter in
Power Options (see "Accessing Power Options Properties" on page 37).
Battery operating time varies depending on operating conditions. You can install an optional
second battery in the media bay to significantly increase operating time.
NOTE: Battery operating time (the time the battery can hold a charge) decreases over time. Depending
on how often the battery is used and the conditions under which it is used, you may need to purchase a
new battery during the life of your computer.
NOTE: It is recommended that you connect your computer to an electrical outlet when writing to a CD or
DVD.
Operating time is significantly reduced when you perform operations including, but not limited to,
the following:
•Using optical drives.
• Using wireless communications devices, PC Cards, media memory cards, or USB devices.
• Using high-brightness display settings, 3D screen savers, or other power-intensive programs
such as complex 3D graphics applications.
• Running the computer in maximum performance mode. See "Configuring Power
Management Settings" on page 37 for information about accessing Windows Power Options
Properties or Dell QuickSet, which you can use to configure power management settings.
You can check the battery charge before you insert the battery into the computer. You can also set
power management options to alert you when the battery charge is low.
Using a Battery 33
Page 32
CAUTION: Using an incompatible battery may increase the risk of fire or explosion. Replace the
battery only with a compatible battery purchased from Dell. The battery is designed to work with your
Dell computer. Do not use a battery from other computers with your computer.
CAUTION: Do not dispose of batteries with household waste. When your battery no longer holds a
charge, call your local waste disposal or environmental agency for advice on disposing of a lithium-ion
battery. See "Battery Disposal" in the
CAUTION: Misuse of the battery may increase the risk of fire or chemical burn. Do not puncture,
incinerate, disassemble, or expose the battery to temperatures above 65°C (149°F). Keep the battery
away from children. Handle damaged or leaking batteries with extreme care. Damaged batteries may
leak and cause personal injury or equipment damage.
Product Information Guide
.
www.dell.com | support.dell.com
Checking the Battery Charge
The Dell QuickSet Battery Meter, the Microsoft Windows
icon ( or ), the battery charge gauge and health gauge, and the low-battery warning provide
information on the battery charge.
Dell™ QuickSet Battery Meter
If Dell QuickSet is installed, press <Fn><F3> to display the QuickSet Battery Meter. The
Battery Meter displays status, battery health, charge level, and charge completion time for the
battery in your computer.
For more information about QuickSet, right-click the QuickSet icon in the taskbar, and click
Microsoft® Windows® Power Meter
The Windows Power Meter indicates the remaining battery charge. To check the Power Meter,
double-click the battery meter icon ( or ) on the taskbar.
If the computer is connected to an electrical outlet, a icon appears.
Charge Gauge
By either pressing once or
battery, you can check:
pressing and holding
the status button on the charge gauge on the
Power Meter
window and battery meter
Help
.
• Battery charge (check by pressing and
• Battery health (check by pressing and
The battery operating time is largely determined by the number of times it is charged. After
hundreds of charge and discharge cycles, batteries lose some charge capacity—or battery health.
That is, a battery can show a status of "charged" but maintain a reduced charge capacity (health).
34 Using a Battery
releasing
holding
the status button)
the status button)
Page 33

Check the Battery Charge
To check the battery charge,
press and release
the status button on the battery charge gauge to
illuminate the charge-level lights. Each light represents approximately 20 percent of the total
battery charge. For example, if the battery has 80 percent of its charge remaining, four of the lights
are on. If no lights appear, the battery has no charge.
Check the Battery Health
NOTE: You can check battery health in one of two ways: by using the charge gauge on the battery as
described below and by using the Battery Meter in Dell QuickSet. For information about QuickSet, rightclick the icon in the taskbar, and click Help.
To check the battery health using the charge gauge,
press and hold
the status button on the battery
charge gauge for at least 3 seconds. If no lights appear, the battery is in good condition, and more
than 80 percent of its original charge capacity remains. Each light represents incremental
degradation. If five lights appear, less than 60 percent of the charge capacity remains, and you
should consider replacing the battery. See "Charge Gauge" on page 34 for more information about
the battery operating time.
Low-Battery Warning
NOTICE: To avoid losing or corrupting data, save your work immediately after a low-battery warning.
Then connect the computer to an electrical outlet, or install a second battery in the media bay. If the
battery runs completely out of power, hibernate mode begins automatically.
A pop-up window warns you when the battery charge is approximately 90 percent depleted. If two
batteries are installed, the low-battery warning means that the combined charge of both batteries is
approximately 90 percent depleted. The computer enters hibernate mode when the battery charge
is at a critically low level.
You can change the settings for the battery alarms in QuickSet or the
Power Options Properties
window. See "Configuring Power Management Settings" on page 37 for information about
accessing QuickSet or the
Power Options Properties
window.
Conserving Battery Power
Perform the following actions to conserve battery power:
• Connect the computer to an electrical outlet when possible because battery life is largely
determined by the number of times the battery is used and recharged.
• Place the computer in standby mode or hibernate mode when you leave the computer
unattended for long periods of time. See "Power Management Modes" on page 36.
• Use the Power Management Wizard or the
options to optimize your computer’s power usage. These options can also be set to change
when you press the power button, close the display, or press <Fn><Esc>.
Power Options Properties
window to select
Using a Battery 35
Page 34

NOTE: See "Configuring Power Management Settings" on page 37 for information on conserving battery
power.
Power Management Modes
Standby and Sleep Mode
Standby mode (sleep mode in Microsoft Windows Vista®) conserves power by turning off the
display and the hard drive after a predetermined period of inactivity (a time-out). When the
computer exits standby or sleep mode, it returns to the same operating state it was in before
entering standby or sleep mode.
www.dell.com | support.dell.com
NOTICE: If your computer loses AC and battery power while in standby or sleep mode, it may lose data.
To enter standby mode in Windows XP, click the
click
Stand by
.
Start
button, click
Turn off computer
, and then
To enter sleep mode in Windows Vista, click the Windows Vista Start button, , and then click
Sleep
.
Depending on how you set the power management options in the
Power Options Properties
window or the QuickSet Power Management Wizard, you may also use one of the following
methods:
• Press the power button.
• Close the display.
• Press <Fn><Esc>.
To exit standby or sleep mode, press the power button or open the display, depending on how you
set the power management options. You cannot make the computer exit standby or sleep mode by
pressing a key or touching the touch pad or track stick.
Hibernate Mode
Hibernate mode conserves power by copying system data to a reserved area on the hard drive and
then completely turning off the computer. When the computer exits hibernate mode, it returns to
the same operating state it was in before entering hibernate mode.
NOTICE: You cannot remove devices or undock your computer while your computer is in hibernate
mode.
Your computer enters hibernate mode if the battery charge level becomes critically low.
To manually enter hibernate mode in Windows XP, click
<Shift>, and click
Hibernate
For information about the hibernate mode in Windows Vista, search for the keyword
Windows Help and Support (click
36 Using a Battery
.
Start→
Start→
Help and Support
Tur n o ff com p u ter
).
, press and hold
hibernate
in
Page 35

Depending on how you set the power management options in the
window or the QuickSet Power Management Wizard, you may also use one of the following
methods to enter hibernate mode:
• Press the power button.
• Close the display.
• Press <Fn><F1>.
NOTE: Some PC Cards may not operate correctly after the computer exits hibernate mode. Remove and
reinsert the card (see "Removing a Card or Blank" on page 69), or simply restart (reboot) your computer.
To exit hibernate mode, press the power button. The computer may take a short time to exit
hibernate mode. You cannot make the computer exit hibernate mode by pressing a key or touching
the touch pad or track stick. For more information on hibernate mode, see the documentation that
came with your operating system.
Power Options Properties
Configuring Power Management Settings
You can use the QuickSet Power Management Wizard or Windows Power Options Properties to
configure the power management settings on your computer. For more information about
QuickSet, right-click the QuickSet icon in the taskbar and click
Accessing Power Options Properties
Help
.
Windows XP
Click
Start→
Windows Vista
Click
Start→
Control Panel→
Control Panel→
Performance and Maintenance→
System and Maintenance→
Power Options
Power Options
.
.
Charging the Battery
When you connect the computer to an electrical outlet or install a battery while the computer is
connected to an electrical outlet, the computer checks the battery charge and temperature. If
necessary, the AC adapter then charges the battery and maintains the battery charge.
NOTE: With Dell™ ExpressCharge™, when the computer is turned off, the AC adapter charges a
completely discharged battery to 80 percent in about 1 hour and to 100 percent in approximately 2 hours.
Charge time is longer with the computer turned on. You can leave the battery in the computer for as long
as you like. The battery’s internal circuitry prevents the battery from overcharging.
If the battery is hot from being used in your computer or being in a hot environment, the battery
may not charge when you connect the computer to an electrical outlet.
Using a Battery 37
Page 36
www.dell.com | support.dell.com
The battery is too hot to start charging if the light flashes alternately green and orange.
Disconnect the computer from the electrical outlet and allow the computer and the battery to cool
to room temperature. Then connect the computer to an electrical outlet to continue charging the
battery.
For information about resolving problems with a battery, see "Power Problems" on page 99.
Replacing the Battery
CAUTION: Using an incompatible battery may increase the risk of fire or explosion. Replace the
battery only with a compatible battery purchased from Dell. The battery is designed to work with your
Dell™ computer. Do not use a battery from other computers with your computer.
CAUTION: Before performing these procedures, turn off the computer, disconnect the AC adapter from
the electrical outlet and the computer, disconnect the modem from the wall connector and computer,
and remove any other external cables from the computer.
NOTICE: You must remove all external cables from the computer to avoid possible connector damage.
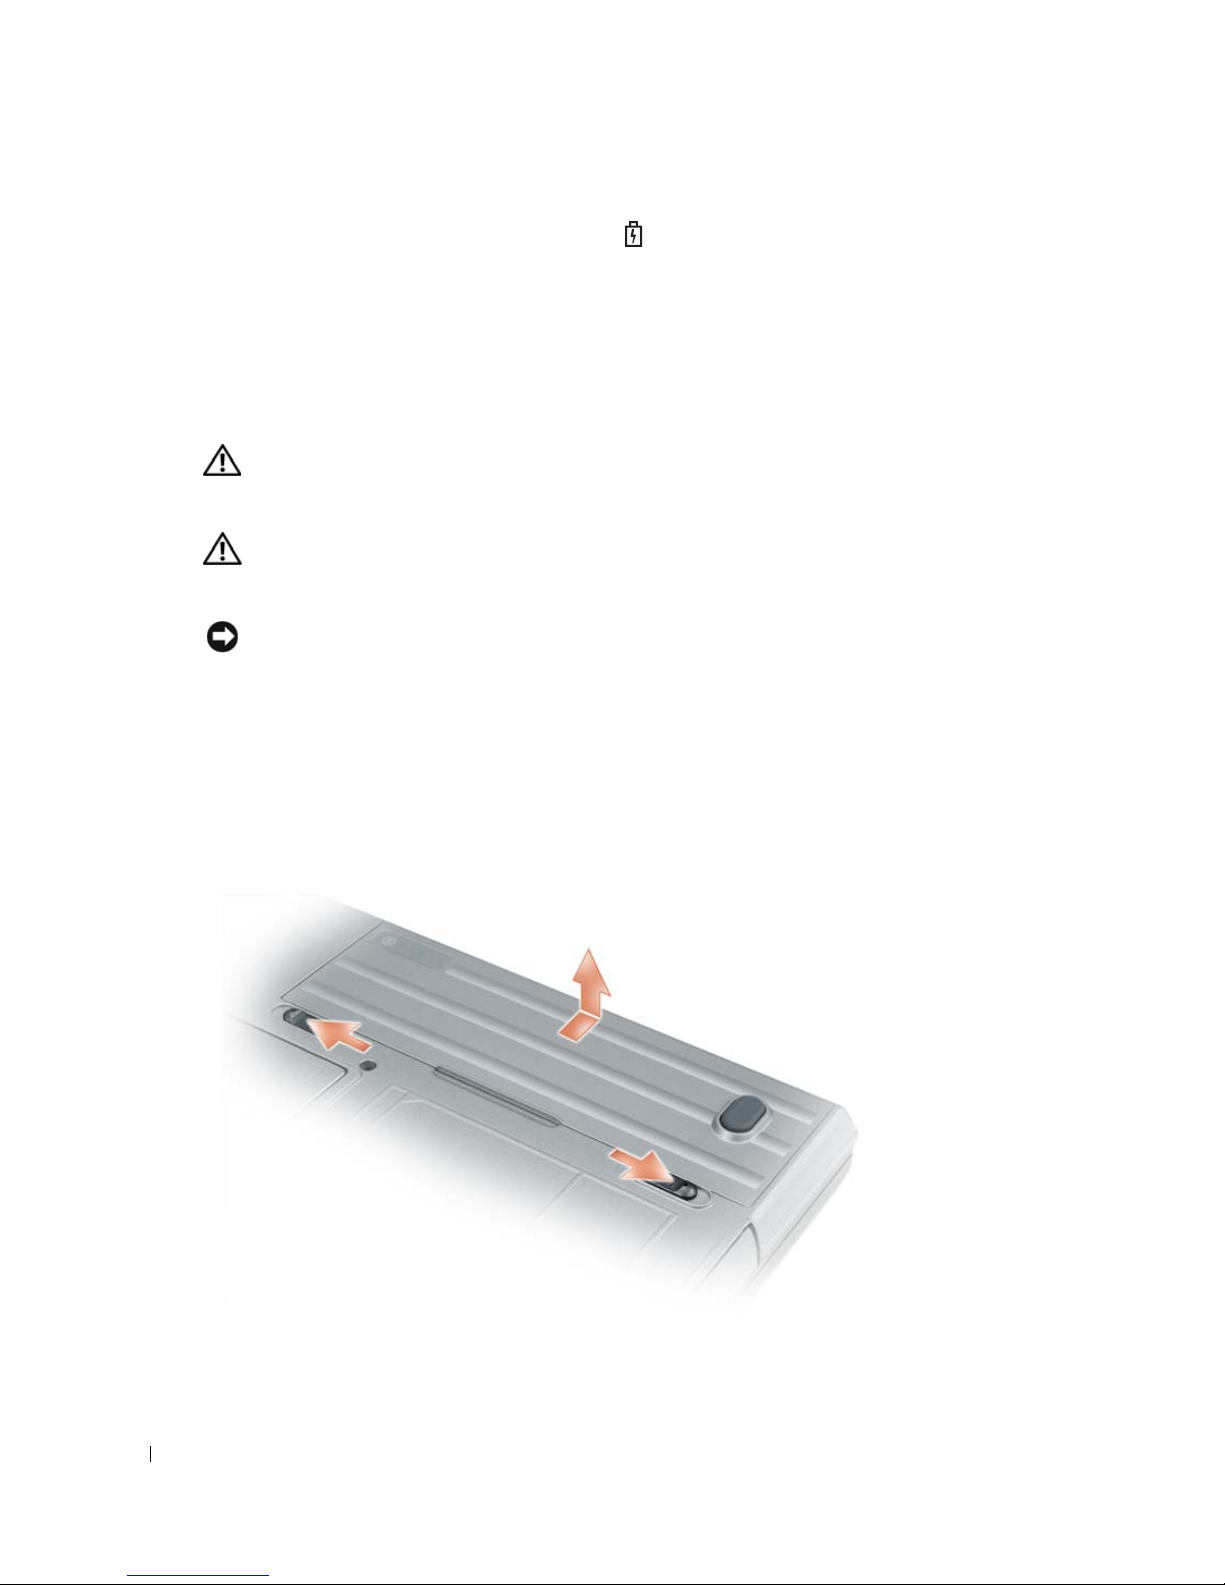
To remove the battery:
1
If the computer is connected to a docking device (docked), undock it. See the documentation
that came with your docking device for instructions.
2
Ensure that the computer is turned off.
3
Slide the two latch releases on the bottom of the computer, and then remove the battery from
the bay.
To replace the battery, follow the removal procedure in reverse order.
38 Using a Battery
Page 37

Storing a Battery
Remove the battery when you store your computer for an extended period of time. A battery
discharges during prolonged storage. After a long storage period, recharge the battery fully (see
"Charging the Battery" on page 37) before you use it.
Battery Errors
To address error codes generated by the battery, refer to "Error Messages" on page 90.
Using a Battery 39
Page 38

www.dell.com | support.dell.com
40 Using a Battery
Page 39
Using the Keyboard
Numeric Keypad
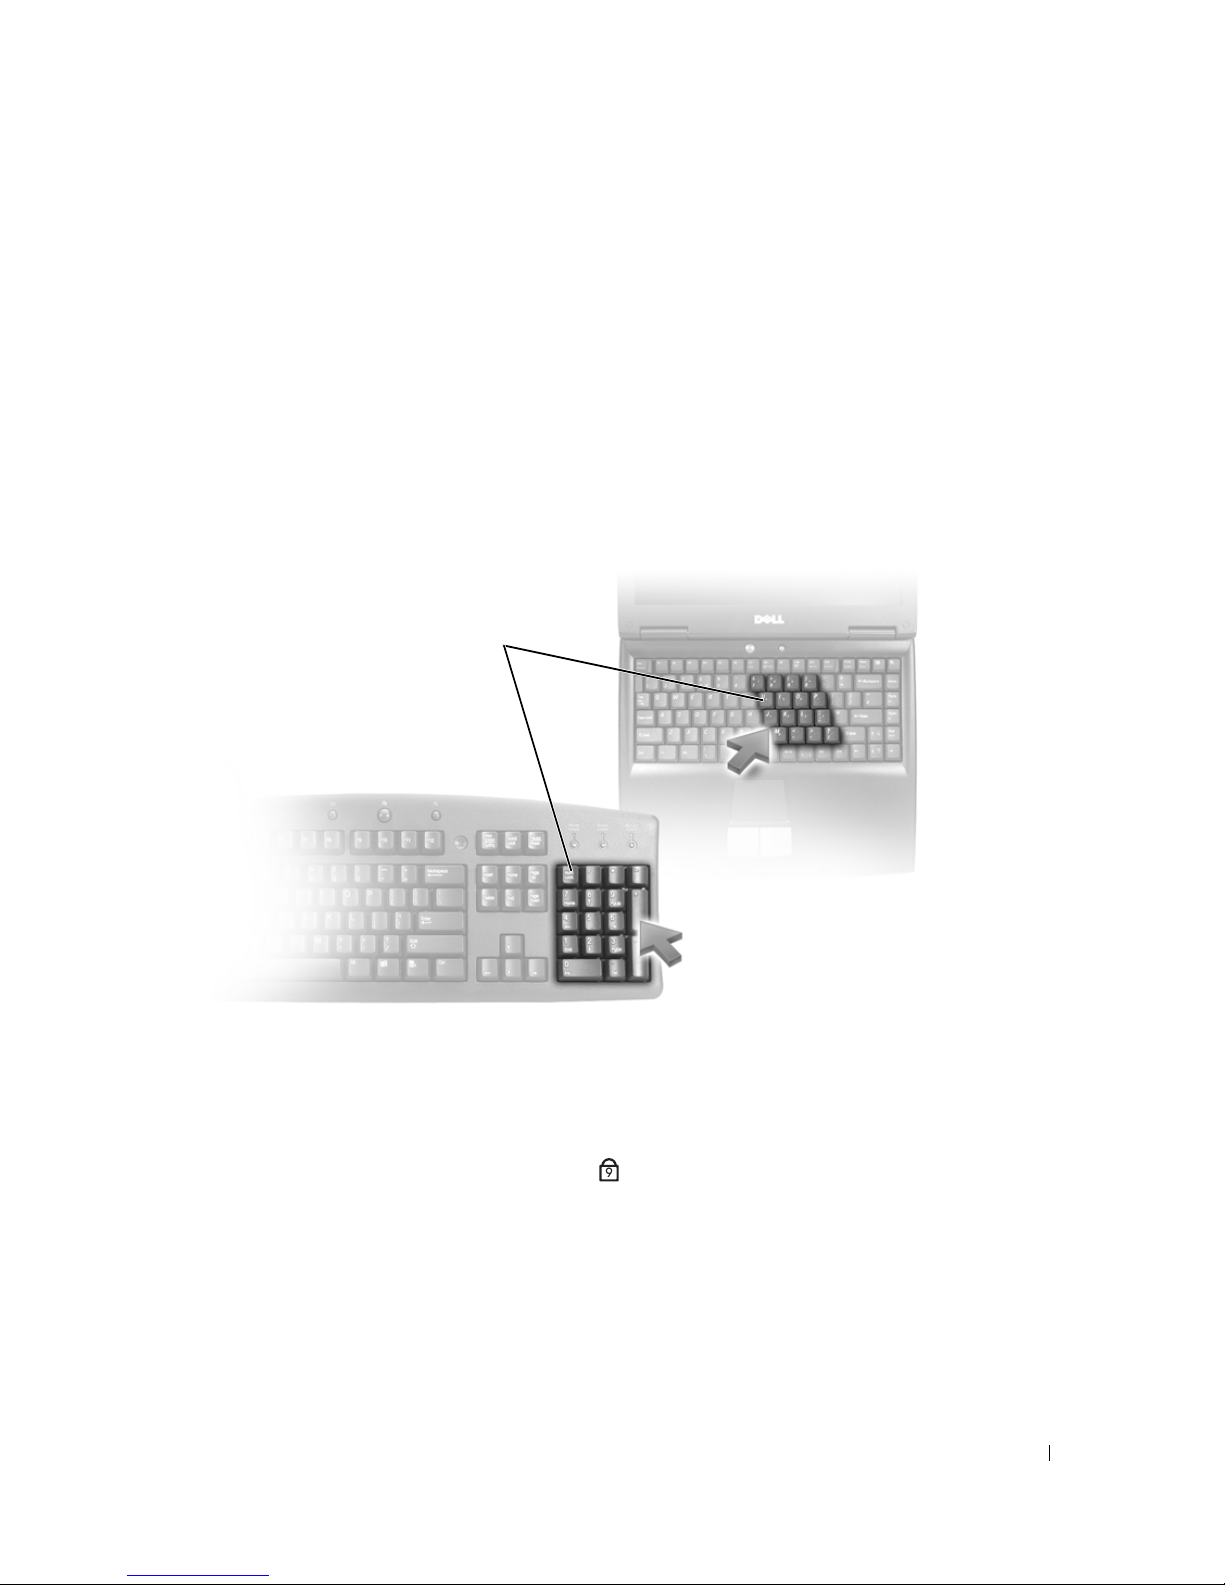
numeric keypad
1
The numeric keypad functions like the numeric keypad on an external keyboard. Each key on the
keypad has multiple functions. The keypad numbers and symbols are marked in blue on the right of
the keypad keys. To type a number or symbol, hold down <Fn> and press the desired key.
• To enable the keypad, press <Num Lk>. The light indicates that the keypad is active.
• To disable the keypad, press <Num Lk> again.
9
Using the Keyboard 41
Page 40

Key Combinations
System Functions
www.dell.com | support.dell.com
<Ctrl><Shift><Esc> Opens the
Task Manager
window.
Battery
<Fn><F3> Displays the Dell™ QuickSet Battery Meter (see "Dell™
QuickSet Battery Meter" on page 34).
Display Functions
<Fn><F8> Switches the video image to the next display option. The
options include the integrated display, an external monitor,
and both displays simultaneously.
<Fn><F7> Scales between wide-screen and standard aspect ratio
video resolutions.
<Fn> and left-arrow key Activates the ambient light sensor, which controls
brightness of the display based on light level in the current
environment.
<Fn> and up-arrow key Increases brightness on the integrated display only (not on
an external monitor).
<Fn> and down-arrow key Decreases brightness on the integrated display only (not
on an external monitor).
Power Management
<Fn><Esc> Activates a power management mode. You can reprogram
<Fn><F1> Puts the computer into hibernate mode. Dell QuickSet is
®
Microsoft
Windows logo key and <m> Minimizes all open windows.
42 Using the Keyboard
Windows® Logo Key Functions
this keyboard shortcut to activate a different power
management mode using the
Options Properties
Properties" on page 37).
required (see "Dell™ QuickSet" on page 147).
window (see "Accessing Power Options
Advanced
tab in the
Power
Page 41
Windows logo key and <Shift><m> Restores all minimized windows. This key combination
functions as a toggle to restore minimized windows
following the use of the Windows logo key and <m>
key combination.
Windows logo key and <e> Runs Windows Explorer.
Windows logo key and <r> Opens the
Windows logo key and <f> Opens the
Windows logo key and <Ctrl><f> Opens the
computer is connected to a network).
Windows logo key and <Pause> Opens the
Run
dialog box.
Search Results
Search Results-Computer
System Properties
dialog box.
dialog box.
dialog box (if the
To adjust keyboard operation, such as the character repeat rate, open the Control Panel, click
Printers and Other Hardware
the Help and Support Center (click
, and click
Start→
Keyboard
. For information about the Control Panel, access
Help and Support
).
Touch Pad
The touch pad detects the pressure and movement of your finger to allow you to move the cursor
on the display. Use the touch pad and touch pad buttons as you would use a mouse.
• To move the cursor, lightly slide your finger over the touch pad.
• To select an object, lightly tap once on the surface of the touch pad or use your thumb to
press the left touch-pad button.
Using the Keyboard 43
Page 42
• To select and move (or drag) an object, position the cursor on the object and tap twice on the
touch pad. On the second tap, leave your finger on the touch pad and move the selected
object by sliding your finger over the surface.
• To double-click an object, position the cursor on the object and tap twice on the touch pad or
use your thumb to press the left touch-pad button twice.
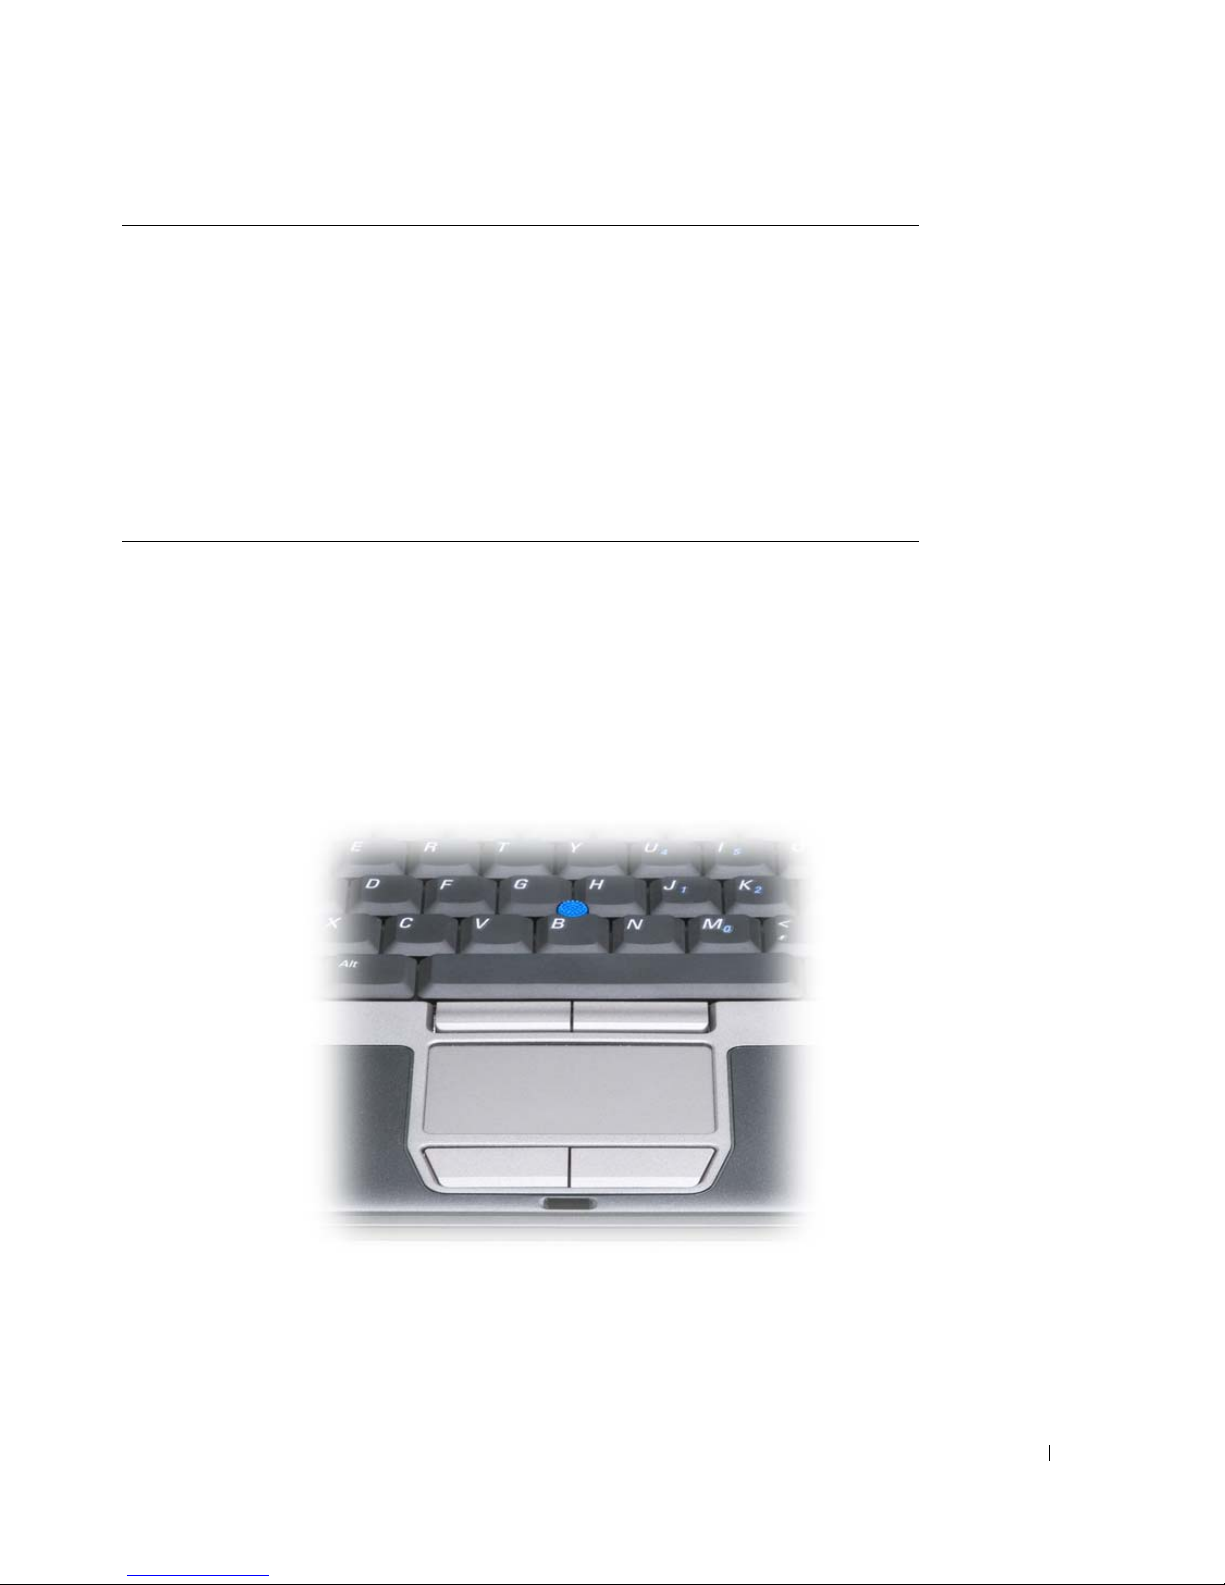
You can also use the track stick to move the cursor. Press the track stick left, right, up, or down to
change the direction of the cursor on the display. Use the track stick and track stick buttons as you
would use a mouse.
Customizing the Touch Pad and Track Stick
www.dell.com | support.dell.com
You can use the
Mouse Properties
window to disable the touch pad and track stick or adjust their
settings.
1
Open the Control Panel, and then click
Mouse
. For information about the Control Panel,
access the Help and Support Center (click Start→ Help and Support).
2
In the
•Click the
•Click the
3
Click OK to save the settings and close the window.
Mouse Properties
Device Select
Touch Pa d
window:
tab to disable the touch pad and track stick.
tab to adjust touch pad and track stick settings.
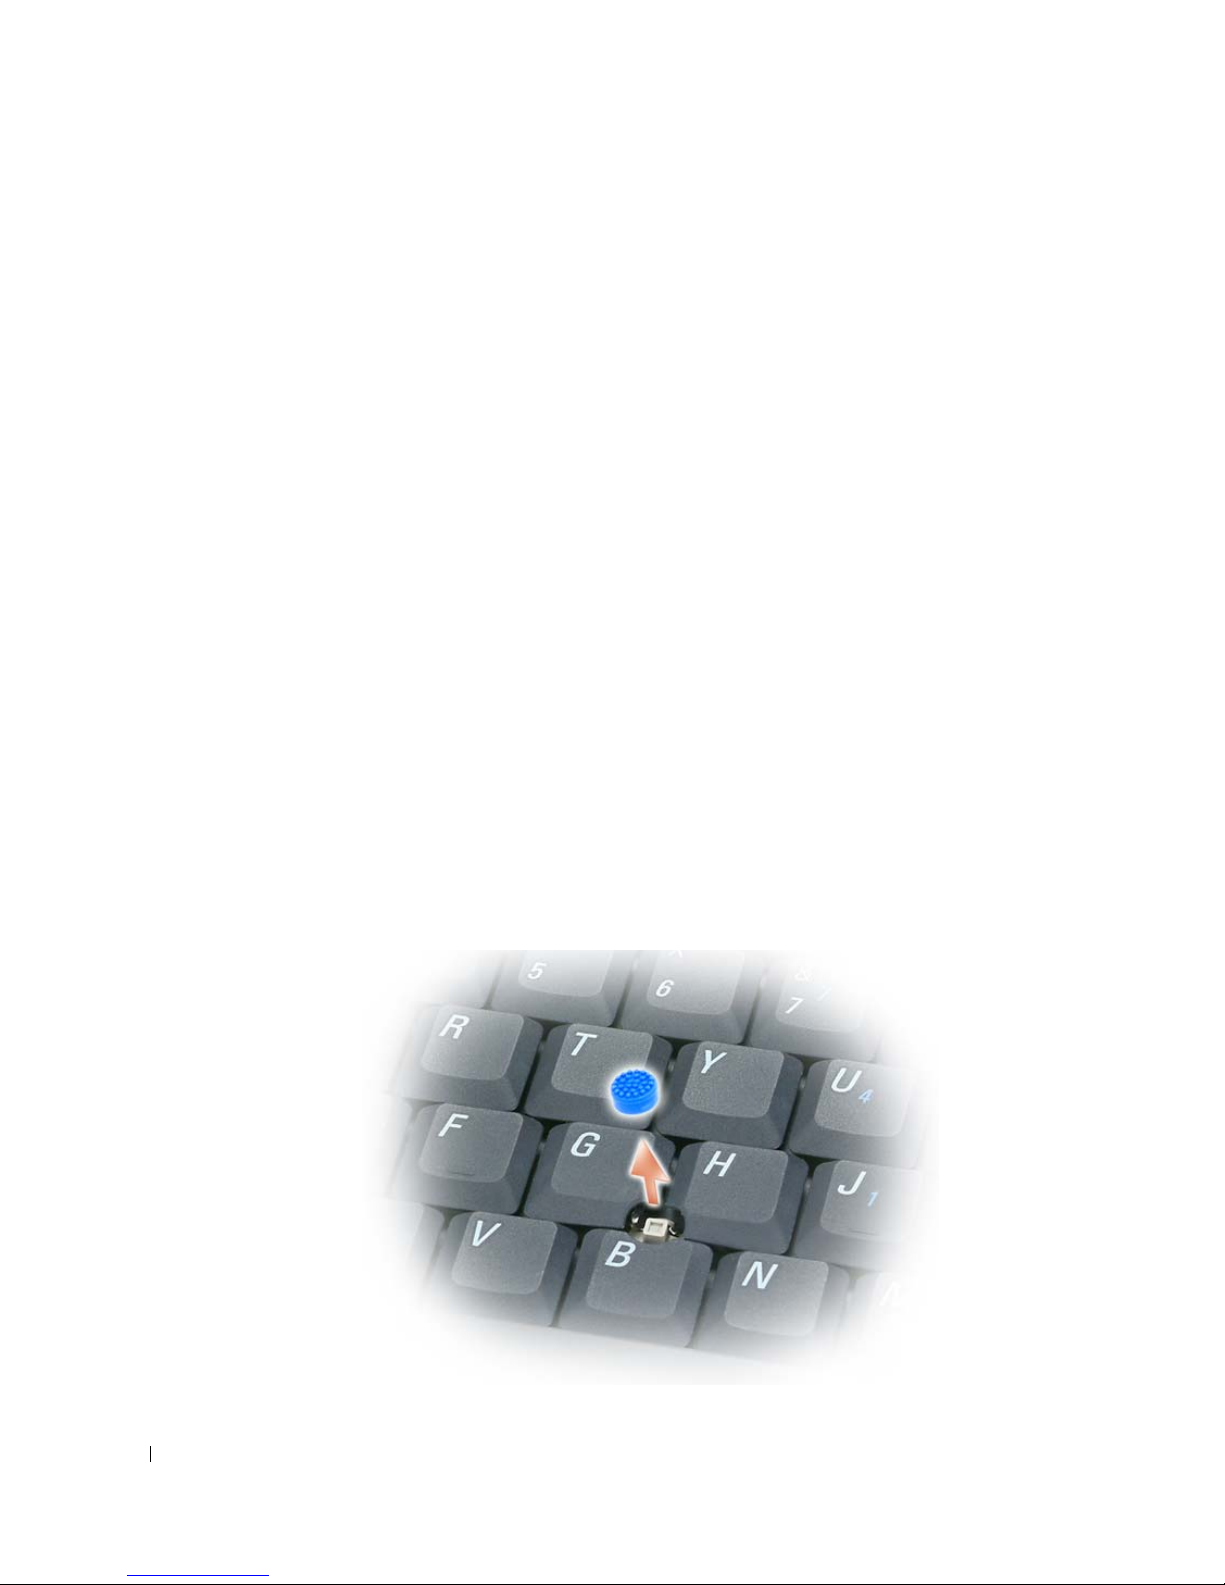
Changing the Track Stick Cap
You can replace your track stick cap if it wears down from prolonged use or if you prefer a different
color. You can purchase additional caps by visiting the Dell website at
dell.com
.
44 Using the Keyboard
Page 43

1
Pull the cap off the track stick.
2
Align the new cap over the square track stick post and gently press the cap down onto the
post.
NOTICE: The track stick can damage the display if it is not properly seated on the post.
3
Test the track stick to ensure that the cap is seated properly.
Using the Keyboard 45
Page 44

www.dell.com | support.dell.com
46 Using the Keyboard
Page 45

1
Using the Display
Adjusting Brightness
When a Dell™ computer is running on battery power, you can conserve power by setting the
brightness to the lowest comfortable setting by pressing <Fn> and the up- or down-arrow key on
the keyboard.
NOTE: Brightness key combinations only affect the display on your portable computer, not monitors or
projectors that you attach to your portable computer or docking device. If your computer is connected to
an external monitor and you try to change the brightness level, the Brightness Meter may appear, but the
brightness level on the external device does not change.
You can press the following keys to adjust display brightness:
• Press <Fn> and the up-arrow key to increase brightness on the integrated display only (not
on an external monitor).
• Press <Fn> and the down-arrow key to decrease brightness on the integrated display only
(not on an external monitor).
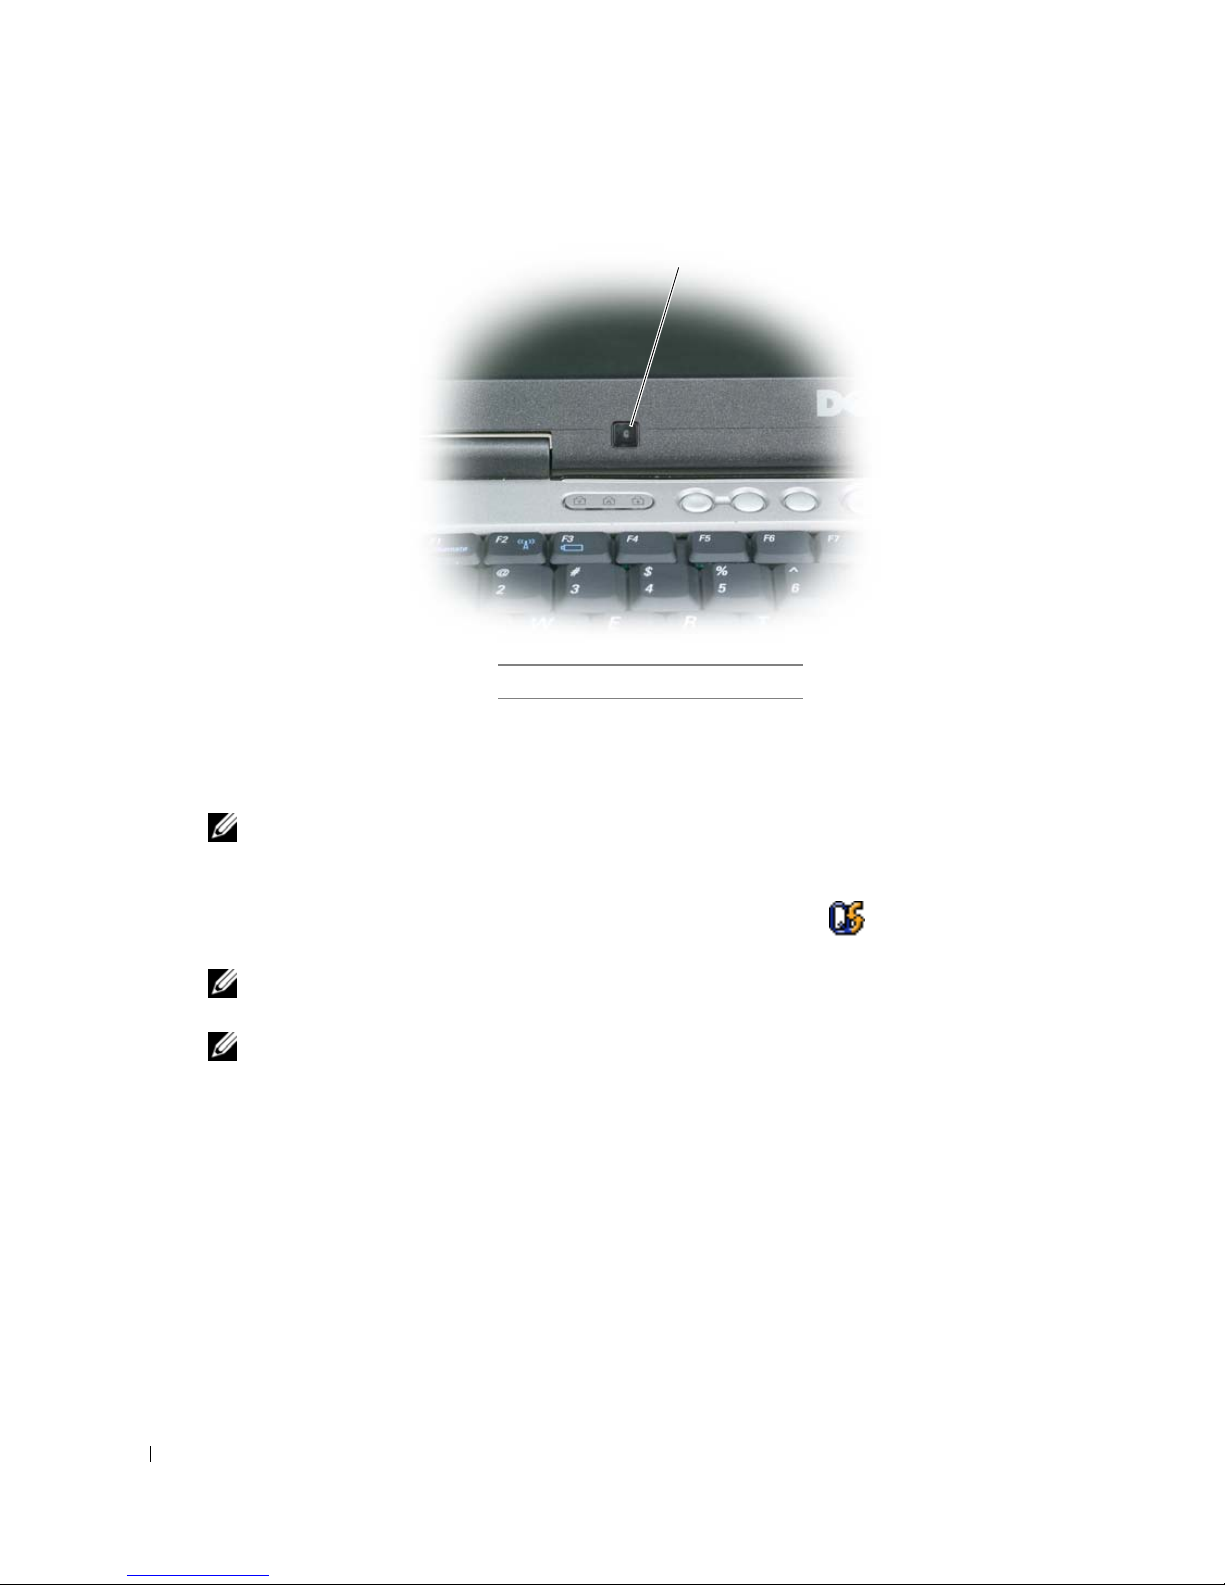
Using the Ambient Light Sensor
The ambient light sensor is located on the bottom of the computer display panel. The ambient
light sensor detects available environmental light and automatically increases or decreases the
display backlighting to compensate for low-light and high-light environments.
You can enable or disable the ambient light sensor by pressing the <Fn> and left-arrow key
combination.
NOTE: Do not cover the ambient light sensor with any adhesive labels. If covered up, the ambient light
sensor automatically sets the display brightness to the minimum level.
Using the Display 47
Page 46
www.dell.com | support.dell.com
1
1
ambient light sensor
The ambient light sensor is disabled when your computer is shipped to you. If you enable the
ambient light sensor and then use any of the display brightness key combinations, the ambient
light sensor is disabled and the display brightness is increased or decreased accordingly.
NOTE: The ambient light sensor is disabled when your computer is connected to an electrical outlet.
Dell™ QuickSet allows you to enable or disable the ambient light sensor. You can also adjust
maximum and minimum brightness settings that are activated when you enable the ambient light
sensor feature. For more information about QuickSet, right-click the icon in the taskbar, and
click
Help
.
NOTE: Rebooting the computer returns the ambient light sensor to the last setting of enabled or
disabled.
NOTE: The ambient light sensor adjusts the display backlighting on your portable computer only. It does
not control the brightness on any external monitors or projectors.
Switching the Video Image
When you start the computer with an external device (such as an external monitor or projector)
attached and turned on, the image may appear on either the computer display or the external
device.
Press <Fn><F8> to switch the video image between the display only, the external device only, or
the display and the external device simultaneously.
48 Using the Display
Page 47

Setting Display Resolution and Refresh Rate
To display a program at a specific resolution, both the graphics card and the display must support
the program, and the necessary video drivers must be installed.
Before you change any of the default display settings, make a note of the default settings for future
reference.
NOTE: Use only the Dell-installed video drivers, which are designed to offer the best performance with
your Dell-installed operating system.
If you choose a resolution or color palette that is higher than the display supports, the settings
adjust automatically to the closest supported values.
1
Click the
2
Under
3
Under
click
4
In the Display Properties window, click the
5
Try different settings for
NOTE: As the resolution increases, icons and text appear smaller on the screen.
If the video resolution setting is higher than that supported by the display, the computer enters pan
mode. In pan mode, the entire screen cannot be displayed at one time. For example, the taskbar
that usually appears at the bottom of the desktop may no longer be visible. To view the rest of the
screen, use the touch pad or track stick to pan up, down, left, and right.
Start
button and click
Pick a category
Pick a task...
Display
.
Control Panel
, click
Appearance and Themes
.
.
, click the area you want to change, or under
Color quality
Settings
and
Screen resolution
tab.
.
or pick a Control Panel icon
,
NOTICE: You can damage an external monitor by using an unsupported refresh rate. Before adjusting
the refresh rate on an external monitor, see the user’s guide for the monitor.
Dual Independent Display Mode
You can attach an external monitor or projector to your computer and use it as an extension of your
display (known as "dual independent display" or "extended desktop" mode). This mode allows you
to use both screens independently and drag objects from one screen to the other, effectively
doubling the amount of viewable work space.
1
Connect the external monitor, TV, or projector to the computer.
2
Under
3
Under
click
4
In the
NOTE: If you choose a resolution or color palette that is higher than the display supports, the settings
adjust automatically to the closest supported values. For more information, see your operating system
documentation.
Pick a category
Pick a task...
Display
.
, click the area you want to change, or under
Display Properties
, click
Appearance and Themes
window, click the
Settings
.
or pick a Control Panel icon
tab.
Using the Display 49
,
Page 48

www.dell.com | support.dell.com
5
Click the monitor 2 icon, click the
box, and then click
6
Change
7
If prompted to restart the computer, click
click
8
If prompted, click OK to resize your desktop.
9
If prompted, click
10
Click OK to close the
Screen resolution
OK
.
Apply
.
to the appropriate sizes for both displays and click
Yes
to keep the settings.
Display Properties
Extend my Windows desktop onto this monitor
Apply
Apply the new color setting without restarting
window.
check
.
To disable dual independent display mode:
1
Click the
2
Click the monitor 2 icon, uncheck the
option, and then click
Settings
tab in the
Apply
Display Properties
Extend my Windows desktop onto this monitor
.
window.
If necessary, press <Fn><F8> to bring the screen image back to the computer display.
Swapping Primary and Secondary Displays
To swap your primary and secondary display designations (for example, to use your external
monitor as your primary display after docking):
1
Click the
Start
button and click
Control Panel
.
and
2
Under
3
Under
click
4
Click the
Pick a category
Pick a task...
Display
.
Settings
, click
Appearance and Themes
.
, click the area you want to change, or under
tab→
Advanced→
Displays
tab.
or pick a Control Panel icon
See the documentation that came with your video card for additional information.
,
50 Using the Display
Page 49
Setting Up and Using Networks
Setting up a computer network provides connectivity between your computer and the Internet,
another computer, or a network. For example, with a network set up in a home or small office you
can print to a shared printer, access drives and files on another computer, browse other networks, or
access the Internet. You can set up a local area network (LAN) using a network or broadband
modem cable, or set up a wireless LAN (WLAN).
The Windows XP and Windows Vista operating systems provide wizards to help guide you through
the process of networking computers. For more information about Networking, access the Help and
Support Center (click
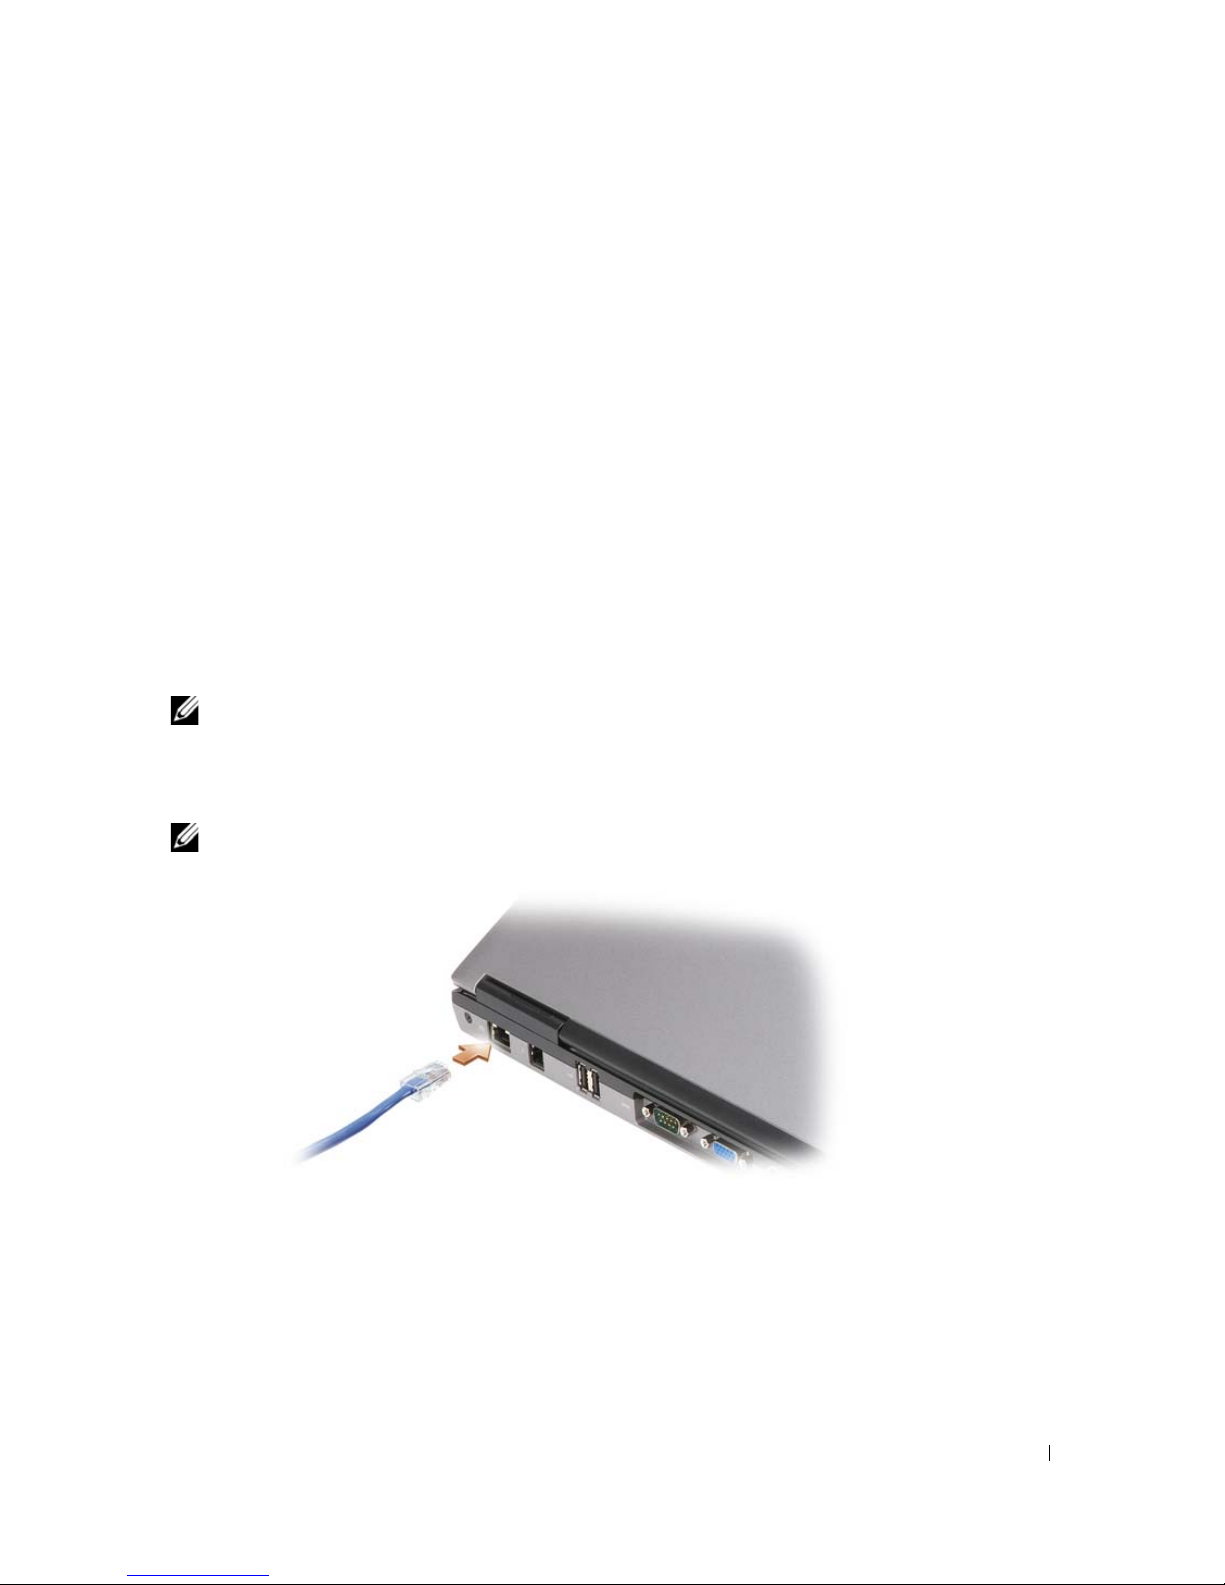
Connecting a Network or Broadband Modem Cable
Before you connect your computer to a network, the computer must have a network adapter
installed and a network cable connected to it.
1
Connect the network cable to the network adapter connector on the back of your computer.
NOTE: Insert the cable connector until it clicks into place, and then gently pull the cable to ensure
that it is securely attached.
Connect the other end of the network cable to a network connection device or a network wall
2
connector.
Start→
Help and Support
).
NOTE: Do not use a network cable with a telephone wall connector.
Setting Up and Using Networks 51
Page 50

Setting Up a Network in the Microsoft® Windows® XP
Operating System
1
Click
Start→
Next→ Checklist for creating a network
NOTE: Selecting the connection method labeled This computer connects directly to the Internet
enables the integrated firewall provided with Windows XP Service Pack 2 (SP2).
2
Complete the checklist.
3
Return to the Network Setup Wizard and follow the instructions in the wizard.
All Programs→ Accessories→ Communications→
.
Network Setup Wizard
→
www.dell.com | support.dell.com
Setting Up a Network in the Microsoft Windows Vista®
Operating System
1
Click the Windows Vista Start button
network
2
Select an option under
3
Click
.
Choose a connection option
Next
, and then follow the instructions in the wizard.
, ,
and click
.
Connect To→ Set up a connection or
Wireless Local Area Network
A wireless local area network (WLAN) is a series of interconnected computers that communicate
with each other over the air waves rather than through a network cable connected to each
computer. In a WLAN, a radio communications device called an access point or wireless router
connects network computers and provides Internet, or network, access. The access point or wireless
router and the wireless network card in the computer communicate by broadcasting data from their
antennas over the air waves.
What You Need to Establish a WLAN Connection
Before you can set up a WLAN, you need:
• High-speed (broadband) Internet access (such as cable or DSL)
• A broadband modem that is connected and working
• A wireless router or access point
• A wireless network card for each computer that you want to connect to your WLAN
• A network cable with a network (RJ-45) connector
52 Setting Up and Using Networks
Page 51

Checking Your Wireless Network Card
Depending on what you selected when you purchased your computer, the computer has a variety of
configurations. To confirm that your computer has a wireless network card and to determine the
type of card, use one of the following:
•The
Start
button and the
Connect To
option
• The order confirmation for your computer
Start Button and Connect To Option
In Microsoft Windows XP
In Microsoft Windows Vista
, click
Start→ Connect To→
, click
Start→ Connect To→
Show all connections
.
View network computers and devices
.
If Wireless Network Connection does not appear under LAN or High-Speed Internet, you may not
have a wireless network card.
If Wireless Network Connection appears, you have a wireless network card. To view detailed
information about the wireless network card:
1
Right-click
2
Click
The
Wireless Network Connection Properties
name and model number are listed on the
NOTE: If your computer is set to the Classic Start menu option, you can view network connections
The Order Confirmation for Your Computer
Wireless Network Connection
Properties
.
.
window appears. The wireless network card’s
General
by clicking the Start→ Settings→ Network Connections. If Wireless Network Connection does not
appear, you may not have a wireless network card.
tab.
The order confirmation that you received when you ordered your computer lists the hardware and
software that shipped with your computer.
Setting Up a New WLAN Using a Wireless Router and a Broadband Modem
1
Contact your Internet service provider (ISP) to obtain specific information about the
connection requirements for your broadband modem.
2
Ensure that you have wired Internet access through your broadband modem before you
attempt to set up a wireless Internet connection (see "Connecting a Network or Broadband
Modem Cable" on page 51).
3
Install any software required for your wireless router. Your wireless router may have been
shipped with an installation media. Installation media usually contain installation and
troubleshooting information. Install the required software according to the instructions
provided by the router manufacturer.
4
Shut down your computer and any other wireless-enabled computers in the vicinity through
the
Start
or menu.
Setting Up and Using Networks 53
Page 52

www.dell.com | support.dell.com
5
Disconnect your broadband modem power cable from the electrical outlet.
6
Disconnect the network cable from the computer and the modem.
7
Disconnect the AC adapter cable from your wireless router to ensure that there is no power
connected to the router.
NOTE: Wait for a minimum of 5 minutes after disconnecting your broadband modem before you continue
with the network setup.
Insert a network cable into the network (RJ-45) connector on the unpowered broadband
8
modem.
9
Connect the other end of the network cable into the Internet network (RJ-45) connector on
the unpowered wireless router.
10
Ensure that no network or USB cables, other than the network cable connecting the modem
and the wireless router, are connected to the broadband modem.
NOTE: Restart your wireless equipment in the order described below to prevent a potential connection
failure.
11
Tur n on
only
your broadband modem and wait for at least 2 minutes for the broadband
modem to stabilize. After 2 minutes, proceed to step 12.
12
Turn on your wireless router and wait for at least 2 minutes for the wireless router to stabilize.
After 2 minutes, proceed to the step 13.
13
Start your computer and wait until the boot process completes.
14
See the documentation that came with your wireless router to do the following in order to set
up the wireless router:
• Establish communication between your computer and your wireless router.
• Configure your wireless router to communicate with your broadband router.
• Find out your wireless router’s broadcast name. The technical term for the name of your
router’s broadcast name is Service Set Identifier (SSID) or network name.
15
If necessary, configure your wireless network card to connect to the wireless network (see
"Connecting to a WLAN" on page 54).
Connecting to a WLAN
NOTE: Before you connect to a WLAN, ensure that you have followed the instructions in "Wireless Local
Area Network" on page 52.
NOTE: The following networking instructions do not apply to internal cards with Bluetooth® wireless
technology or cellular products.
This section provides general procedures for connecting to a network using wireless technology.
Specific network names and configuration details vary. See "Wireless Local Area Network" on
page 52 for more information about how to prepare for connecting your computer to a WLAN.
54 Setting Up and Using Networks
Page 53

Your wireless network card requires specific software and drivers for connecting to a network. The
software is already installed.
NOTE: If the software is removed or corrupted, follow the instructions in the user documentation for
your wireless network card. Verify the type of wireless network card installed in your computer and then
search for that name on the Dell™ Support website at support.dell.com. For information on the type of
wireless network card that is installed in your computer, see "Checking Your Wireless Network Card" on
page 53.
Determining the Wireless Network Device Manager
Depending on the software installed on your computer, different wireless configuration utilities
may manage your network devices:
• Your wireless network card’s client utility
• The Windows XP or Windows Vista operating system
To determine which wireless configuration utility is managing your wireless network card in
Windows XP:
1
Click
Start→
2
Right-click the
Networks
If the
Choose a wireless network
Settings→
Control Panel→
Wireless Network Connection
.
window states
Network Connections
icon, and then click
.
View Available Wireless
Windows cannot configure this connection
, the
wireless network card’s client utility is managing the wireless network card.
If the
Choose a wireless network
wireless network in range or to get more information
window states
Click an item in the list below to connect to a
, the Windows XP operating system is
managing the wireless network card.
To determine which wireless configuration utility is managing your wireless network card in
Windows Vista:
1
Click
Start→ Connect To→ Manage wireless networks.
2
Double-click a profile to open the wireless network properties screen.
For specific information about the wireless configuration utility installed on your computer, see
your wireless network documentation in the Windows Help and Support Center (click
Help and Support
Completing the Connection to the WLAN
).
Start→
When you turn on your computer and a network (for which your computer is not configured) is
detected in the area, a pop-up appears near the network icon in the notification area (in the lowerright corner of the Windows desktop).
Follow the instructions provided in any utility prompts that appear on your screen.
Once you have configured your computer for the wireless network that you selected, another popup notifies you that your computer is connected to that network.
Setting Up and Using Networks 55
Page 54

www.dell.com | support.dell.com
Thereafter, whenever you log on to your computer within the range of the wireless network that you
selected, the same pop-up notifies you of the wireless network connection.
NOTE: If you select a secure network, you must enter a WEP or WPA key when prompted. Network
security settings are unique to your network. Dell cannot provide this information.
NOTE: Your computer can take up to 1 minute to connect to the network.
Monitoring the Status of the Wireless Network Card Through Dell QuickSet
The wireless activity indicator provides you with an easy way to monitor the status of your
computer’s wireless devices. To turn the wireless activity indicator on or off, click the QuickSet
icon in the taskbar and select
the indicator is on. If
Wireless Activity Indicator Off
Hotkey Popups
. If
Wireless Activity Indicator Off
is checked, the indicator is off.
is not checked,
The wireless activity indicator displays whether your computer’s integrated wireless devices are
enabled or disabled. When you turn the wireless networking function on or off, the wireless activity
indicator changes to display the status.
For more information about the Dell QuickSet wireless activity indicator, right-click the QuickSet
icon in the taskbar and select
Help
.
Mobile Broadband (or Wireless Wide Area Network)
A Mobile Broadband network, also known as a Wireless Wide Area Network (WWAN), is a highspeed digital cellular network that provides Internet access over a much wider geographical area
than a WLAN, which typically covers only from 100 to 1000 feet. Your computer can maintain
Mobile Broadband network access as long as the computer is within a cellular-data coverage zone.
Contact your service provider for coverage of a high-speed digital cellular network.
NOTE: Even if you are able to make a call from your cellular phone in a specific geographical location,
that location may not necessarily be within a cellular-data coverage zone.
What You Need to Establish a Mobile Broadband Network Connection
NOTE: Depending on your computer, you can use a Mini Card to establish a Mobile Broadband network
connection.
To set up a Mobile Broadband network connection, you need:
• A Mini Card
• An activated Subscriber Identity Module (SIM) for your service provider
NOTE: Only Cingular and Vodafone need a SIM card. Verizon, Sprint, and Telus do not use a SIM.
• The Dell Mobile Broadband Card Utility (already installed on your computer if you
purchased the card when you purchased your computer, or on the media that accompanied
your card if purchased separately from your computer)
If the utility is corrupted or deleted from your computer, see the Dell Mobile Broadband Card
Utility user’s guide for instructions. The user’s guide is available through the Windows Help
56 Setting Up and Using Networks
Page 55

and Support Center
(click Start→ Help and Support)
or on the media that accompanied
your card if you purchased it separately from your computer.
Checking Your Dell Mobile Broadband Card
Depending on what you selected when you purchased your computer, the computer has a variety of
configurations. To determine your computer configuration, see one of the following:
• Your order confirmation
• Microsoft Windows Help and Support Center
To check your Mobile Broadband card in the Windows Help and Support Center:
1
Click
Start→
diagnose problems
2
Under
Tools
installed on this computer.
Help and Support→
.
, click
My Computer Information→
Use Tools to view your computer information and
Find information about the hardware
On the
My Computer Information - Hardware
screen, you can view the type of Mobile Broadband
card installed in your computer as well as other hardware components.
NOTE: The Mobile Broadband card is listed under Modems.
Connecting to a Mobile Broadband Network
NOTE: These instructions only apply to Mini-Cards. They do not apply to internal cards with wireless
technology.
NOTE: Before you connect to the Internet, you must activate Mobile Broadband service through your
cellular service provider. For instructions and for additional information about using the Dell Mobile
Broadband Card Utility, see the user's guide available through the Windows Help and Support Center
(click Start→ Help and Support).
support.dell.com and on the media included with your Mobile Broadband card if you purchased the card
separately from your computer.
Use the Dell Mobile Broadband Card Utility to establish and manage a Mobile Broadband network
connection to the Internet:
1
Click the
Dell Mobile Broadband Card Utility icon
utility.
2
Click
Connect
NOTE: The Connect button changes to the Disconnect button.
.
The user's guide is also available on the Dell Support website at
on the Windows desktop, to run the
3
Follow the instructions on the screen to manage the network connection with the utility.
Or
1
Click
Start→ All Programs→
2
Click
Dell Wireless Broadband
Dell Wireless
.
and follow the instructions on the screen.
Setting Up and Using Networks 57
Page 56

www.dell.com | support.dell.com
Enabling/Disabling the Dell™ Mobile Broadband Card
NOTE: If you are unable to connect to a Mobile Broadband network, ensure that you have all the
components for establishing a Mobile Broadband connection (see "What You Need to Establish a Mobile
Broadband Network Connection" on page 56), and then verify that your Mobile Broadband card is
enabled by verifying the setting of the wireless switch.
You can turn your Mobile Broadband card on and off using the wireless switch on your computer.
You can turn your computer’s wireless devices on and off with the wireless switch on the left side of
the computer (see "Left Side View" on page 21).
If the switch is in the "on" position, move the switch to the "off" position to disable the switch and
the Mobile Broadband card. If the switch is in the "off" position, move the switch to the "on"
position to enable the switch and the Dell Mobile Broadband card. For information about the
wireless switch positions, see "wireless switch" on page 22.
To monitor the status of your wireless device, see "Monitoring the Status of the Wireless Network
Card Through Dell QuickSet" on page 56.
Managing Your Network Settings Through the Dell QuickSet Location Profiler
The Dell QuickSet Location Profiler helps you manage network settings that correspond to your
computer’s physical location. It includes two categories of profile settings:
• Location Profile Settings
• General Mobility Settings
You can use
computer in your office, home, or other public places with Internet services.
Settings
Location Profile Settings
to create profiles for accessing the Internet with your
General Mobility
allows you to change the way network connections are handled. The profiles consist of
different network settings and equipment that you need when using your computer in different
locations.
For more information about Dell QuickSet, right-click the QuickSet icon in the taskbar and select
Help
.
Dell Wi-Fi Catcher™ Network Locator
The wireless switch on your Dell computer uses the Dell Wi-Fi Catcher Network Locator to scan
specifically for WiFi WLAN in your vicinity. For more information about the wireless switch, see
"wireless switch" on page 22.
To scan for WiFi WLAN, slide and hold the switch in the "momentary" position for a few seconds.
The Wi-Fi Catcher Network Locator functions regardless of whether your computer is turned on or
off, in hibernate mode, or in standby mode, as long as the switch is configured through Dell
QuickSet or the BIOS (system setup program) to control WiFi network connections.
58 Setting Up and Using Networks
Page 57

Because the Wi-Fi Catcher Network Locator is disabled and not configured for use when your
computer is shipped to you, you must first use Dell QuickSet to enable and configure the switch to
control WiFi network connections.
NOTE: The Dell Wi-Fi Catcher Network Locator light appears only when the computer is turned off and
wireless networking is activated in the system setup program. While working in Microsoft Windows
operating systems, the light is designed not to appear.
For more information on the Wi-Fi Catcher Network Locator and to enable the feature through
Dell QuickSet, right-click the QuickSet icon in the taskbar and select
Help
.
Microsoft
Windows Firewall provides basic protection from unauthorized access to your computer while it is
connected to the Internet. Windows Firewall is automatically enabled when you run the Network
Setup Wizard.
When Windows Firewall is enabled for a network connection, the firewall icon appears with a red
background in the
NOTE: Enabling Windows Firewall does not reduce the need for virus-checking software.
For more information, click
Help and Support Center (click
®
Windows
Network Connections
®
Firewall
section of the Control Panel.
Start→ Control Panel→ Security→ Windows Firewall
Start→
Help and Support
).
, or access the
Setting Up and Using Networks 59
Page 58

www.dell.com | support.dell.com
60 Setting Up and Using Networks
Page 59
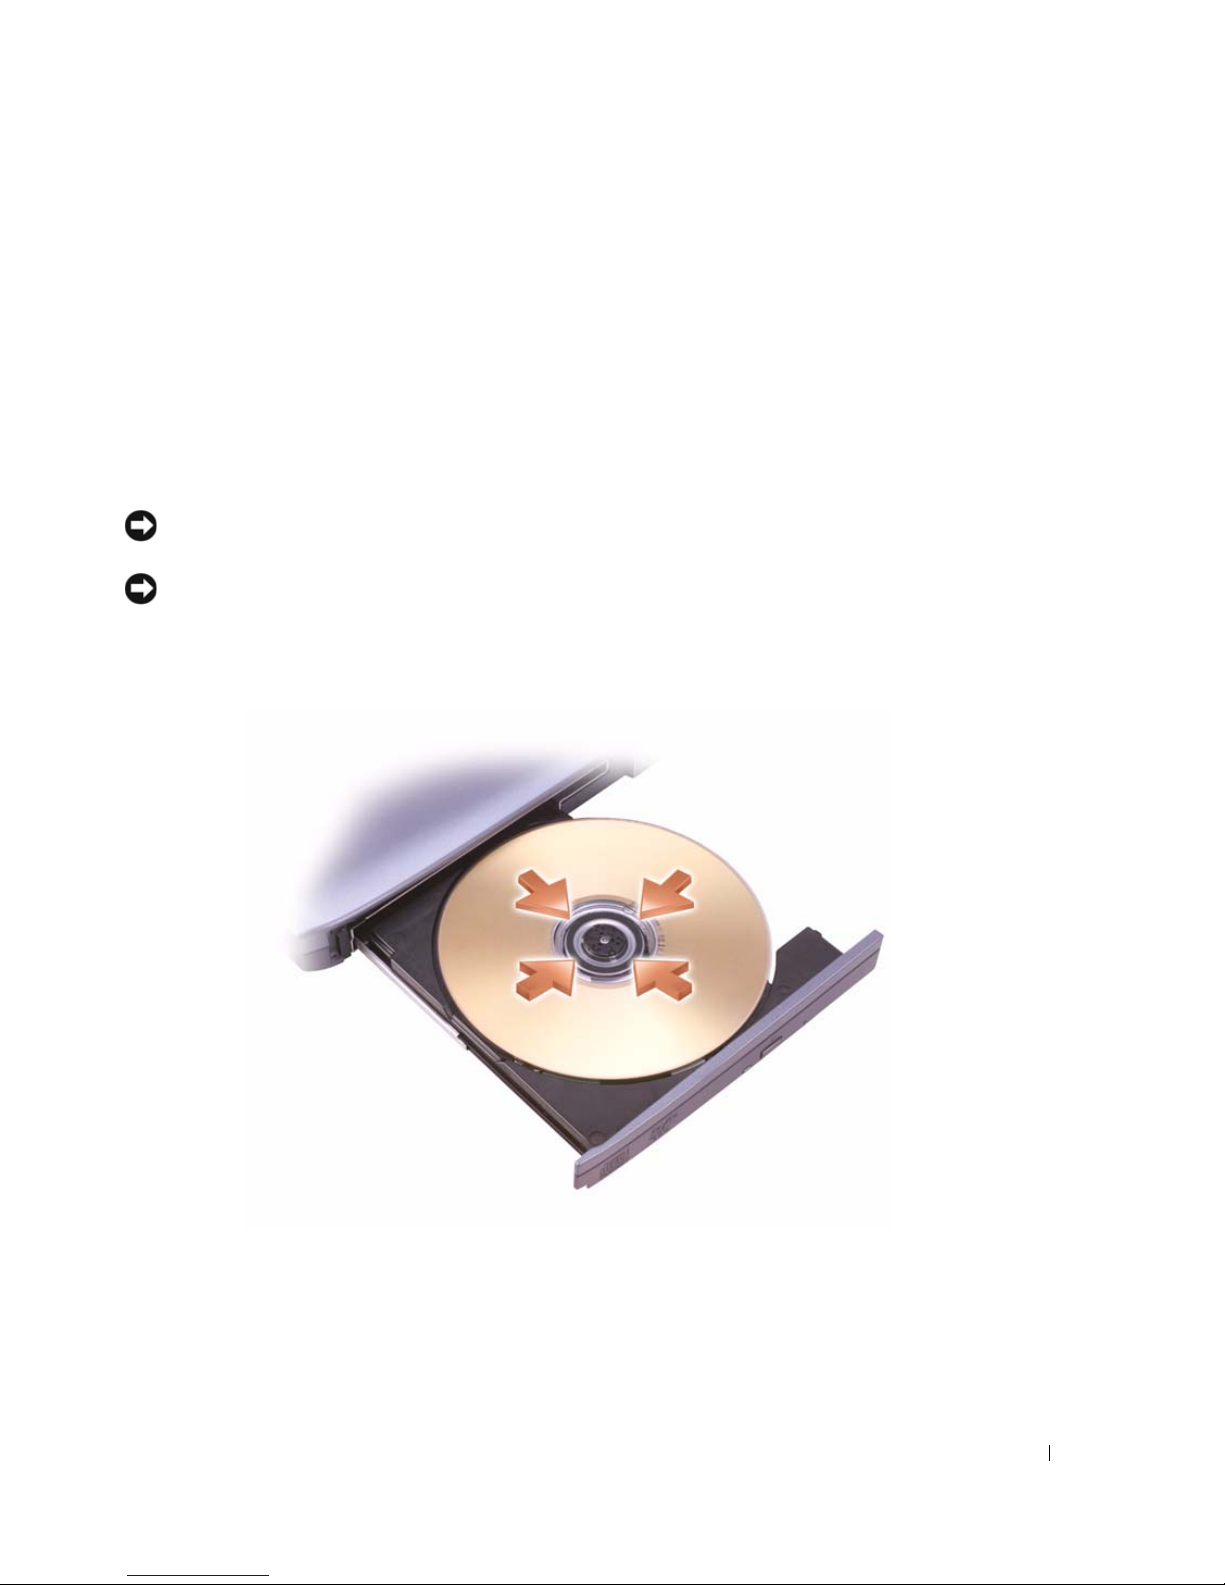
Using Multimedia
Playing Media
NOTICE: Do not press down on the media tray when you open or close it. Keep the tray closed when you
are not using the drive.
NOTICE: Do not move the computer while playing media.
1
Press the eject button on the front of the drive.
2
Pull out the tray.
1
3
Place the disc, label side up, in the center of the tray and snap the disc onto the spindle.
Using Multimedia 61
Page 60
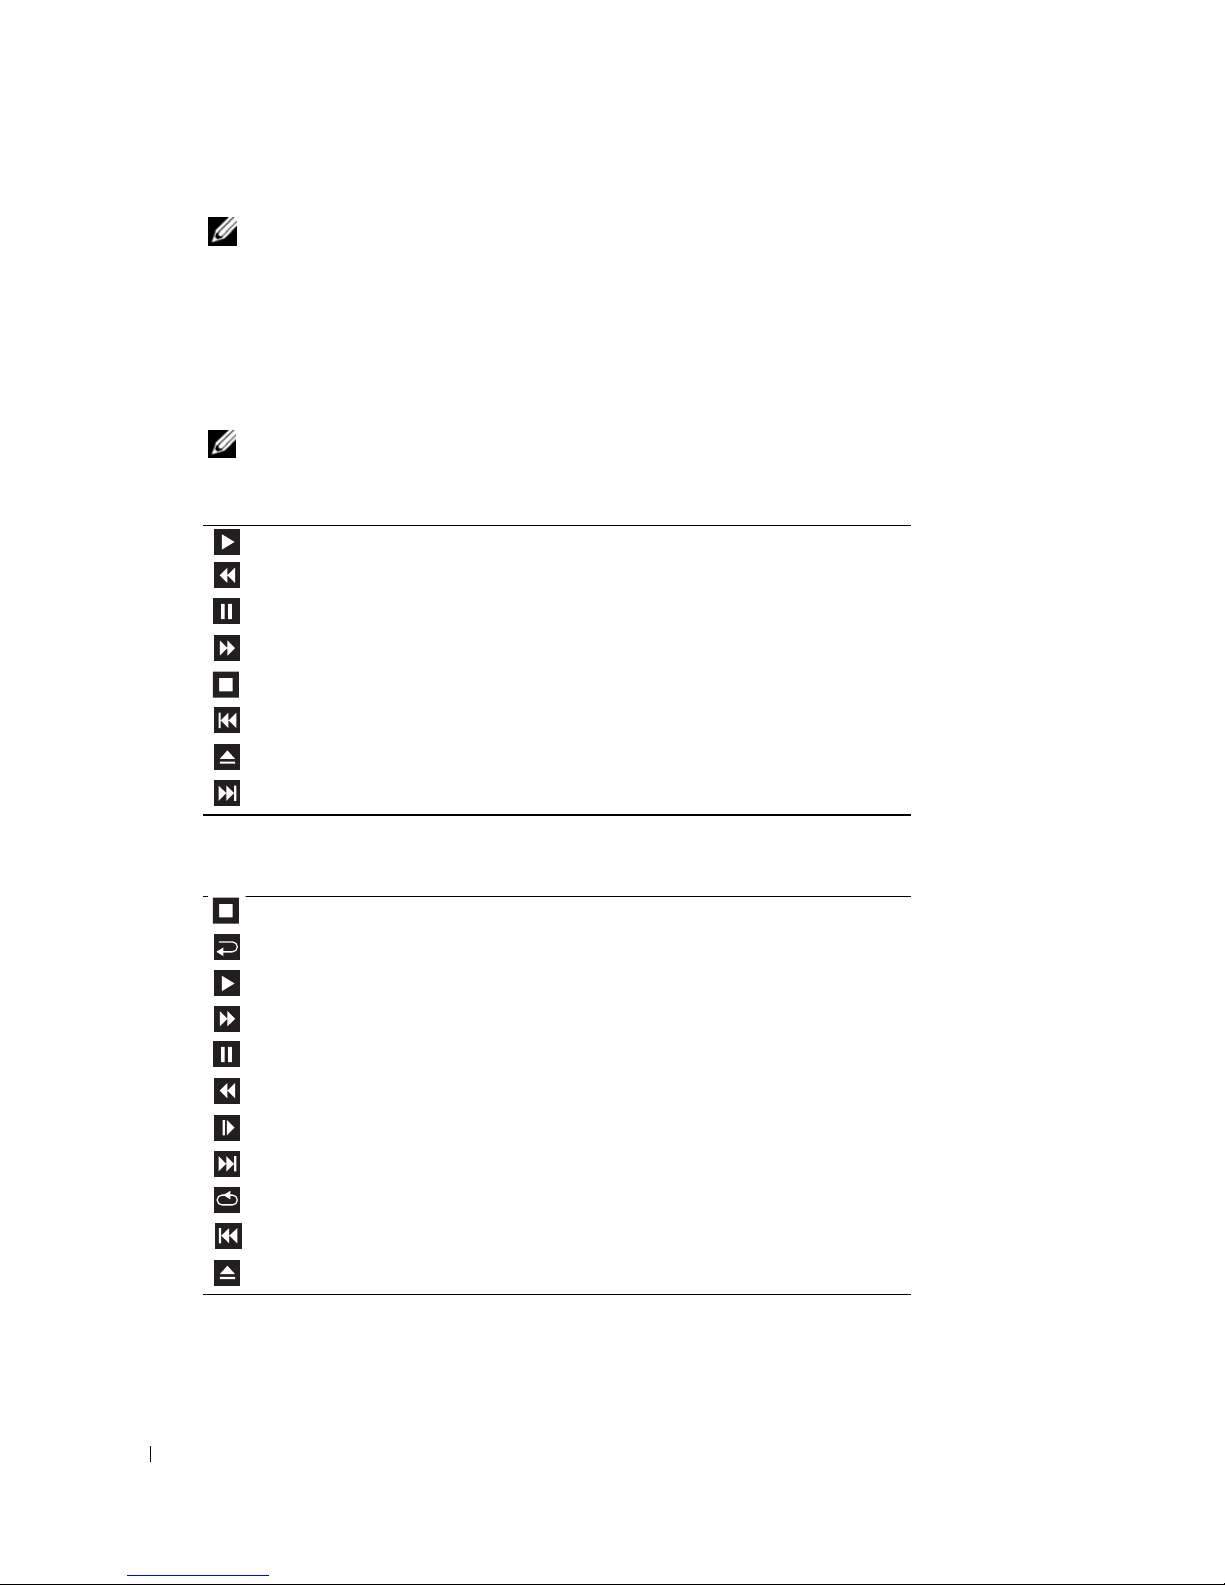
NOTE: If you use a module that shipped with another computer, you need to install the drivers and
software necessary to play DVDs or write data. For more information, see the Drivers and Utilities media
(the Drivers and Utilities media is optional and may not be available for your computer or in certain
countries).
Push the tray back into the drive.
4
To format media for storing data, to create music media, or to copy media, see the media software
that came with your computer.
NOTE: Ensure that you follow all copyright laws when you create media.
A CD player includes the following basic buttons:
www.dell.com | support.dell.com
Play.
Move backward within the current track.
Pause.
Move forward within the current track.
Stop.
Go to the previous track.
Eject.
Go to the next track.
A DVD player includes the following basic buttons:
Stop.
Restart the current chapter.
Play.
Fast forward.
Pause.
Fast reverse.
For more information on playing media, click
62 Using Multimedia
Advance a single frame while in pause mode.
Go to the next title or chapter.
Continuously play the current title or chapter.
Go to the previous title or chapter.
Eject.
Help
on the CD or DVD player (if available).
Page 61

Copying Media
NOTE: Ensure that you observe all copyright laws when creating media.
This section applies only to computers that have a CD-RW, DVD+/-RW, or CD-RW/DVD
(combo) drive.
NOTE: The types of media drives offered by Dell may vary by country.
The following instructions explain how to make a copy using Roxio Creator Plus - Dell Edition. You
can also use Roxio Creator Plus for other purposes, such as creating music CDs from audio files
stored on your computer or backing up important data. For help, open Roxio Creator Plus, and
then click the question mark icon in the upper-right corner of the window.
How to Copy Media
NOTE: CD-RW/DVD combo drives cannot write to DVD media. If you have a CD-RW/DVD combo drive
and you experience recording problems, check for available software patches on the Sonic support
website at sonic.com.
The DVD-writable drives installed in Dell™ computers can write to and read DVD+/-R,
DVD+/-RW and DVD+R DL (dual layer) media, but cannot write to and may not read
DVD-RAM or DVD-R DL media.
NOTE: Most commercial DVDs have copyright protection and cannot be copied using Roxio Creator
Plus.
Open Roxio Creator Plus.
1
2
Under the
3
To copy med i a :
•
Copy
tab, click
Disc Copy
If you have one media drive
.
, ensure that the settings are correct, and then click
Disc Copy
The computer reads your source media and copies the data to a temporary folder on your
computer hard drive.
When prompted, insert a blank media into the drive and click
•
If you have two media drives
media, and then click
, select the drive into which you have inserted your source
Disc Copy
. The computer copies the data from the source media to
OK
.
the blank one.
Once you have finished copying the source media, the media that you have created
automatically ejects.
Using Blank Media
CD-RW drives can write to CD recording media only (including high-speed CD-RW media) while
DVD-writable drives can write to both CD and DVD recording media.
.
Using Multimedia 63
Page 62

www.dell.com | support.dell.com
Use blank CD-Rs to record music or permanently store data files. After the maximum storage
capacity of a CD-R is reached, you cannot write to that CD-R again (see the Sonic documentation
for more information). Use blank CD-RWs if you plan to erase, rewrite, or update information on
the CD later.
Blank DVD+/-Rs can be used to permanently store large amounts of data. After you create a
DVD+/-R disc, you may not be able to write to that disc again if the disc is
finalized
or
closed
during the final stage of the disc creation process. Use blank DVD+/-RWs if you plan to erase,
rewrite, or update information on the disc later.
CD-Writable Drives
Media Type Read Write Rewritable
CD-R Yes Yes No
CD-RW Yes Yes Yes
DVD-Writable Drives
Media Type Read Write Rewritable
CD-R Yes Yes No
CD-RW Yes Yes Yes
DVD+R Yes Yes No
DVD-R Yes Yes No
DV D+R W Yes Ye s Yes
DV D-R W Yes Ye s Yes
DVD+R DL Yes Yes No
DVD-R DL Maybe No No
DVD-RAM Maybe No No
Helpful Tips
• Use Microsoft® Windows® Explorer to drag and drop files to a CD-R or CD-RW only after
you start Roxio Creator Plus and open a Creator project.
• Use CD-Rs to burn music CDs that you want to play in regular stereos. CD-RWs may not
play in many home or car stereos.
• You cannot create audio DVDs with Roxio Creator Plus.
• Music MP3 files can be played only on MP3 players or on computers that have MP3 software
installed.
64 Using Multimedia
Page 63
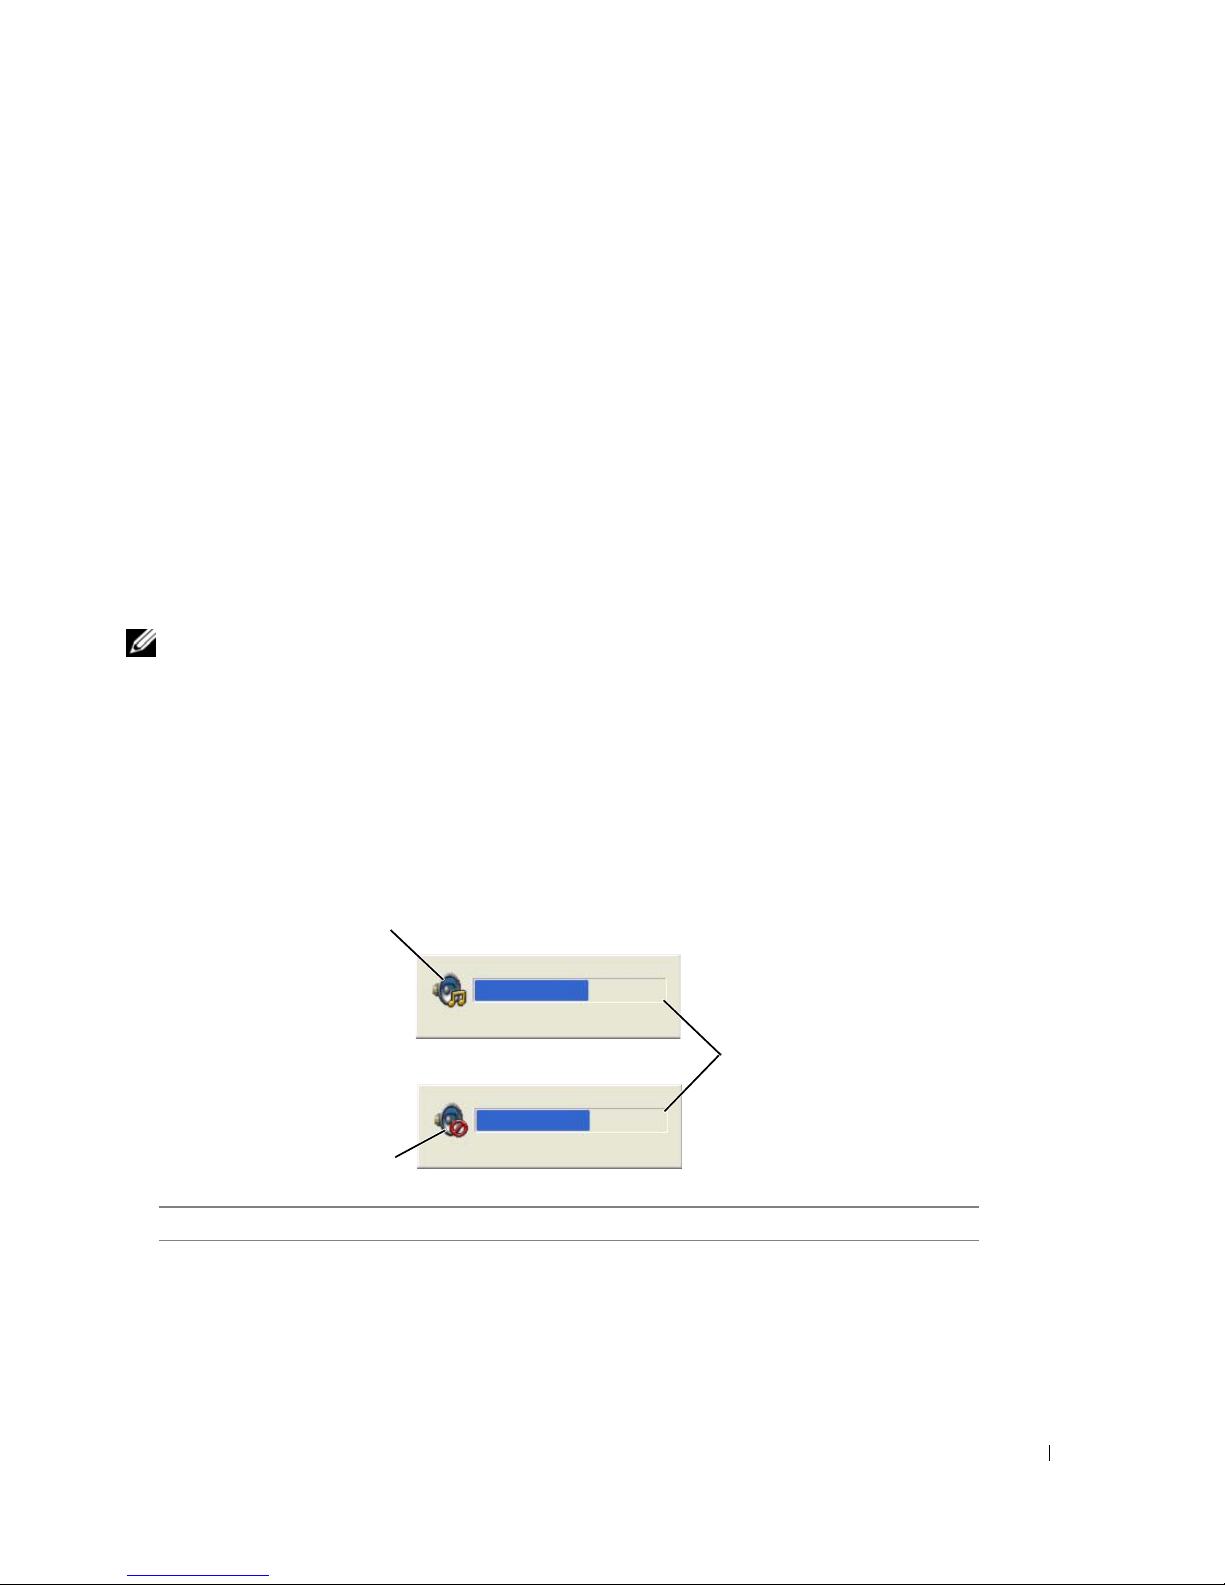
• Commercially available DVD players used in home theater systems may not support all
available DVD formats. For a list of formats supported by your DVD player, see the
documentation provided with your DVD player or contact the manufacturer.
• Do not burn a blank CD-R or CD-RW to its maximum capacity; for example, do not copy a
650-MB file to a blank 650-MB CD. The CD-RW drive needs 1–2 MB of blank space to
finalize the recording.
• Use a blank CD-RW to practice CD recording until you are familiar with CD recording
techniques. If you make a mistake, you can erase the data on the CD-RW and try again. You
can also use blank CD-RWs to test music file projects before you record the project
permanently to a blank CD-R.
• See the Sonic website at
sonic.com
for additional information.
Adjusting the Volume
NOTE: When the speakers are muted, you do not hear the media playing.
1
Open the
2
Click and drag the bar in the
decrease the volume.
For more information on volume control options, click
The Volume Meter displays the current volume level, including mute, on your computer. Either
click the QuickSet icon in the taskbar and select or deselect
press the volume control buttons to enable or disable the Volume Meter on the screen.
Volume C o ntrol
1
window.
Volume C o ntrol
column and slide it up or down to increase or
Help
in the
Volume Control
window.
Disable On Screen Volume Meter
2
, or
3
1
volume icon
When the meter is enabled, adjust the volume with the volume control buttons.
For more information about QuickSet, right-click the icon in the taskbar and click
2
Volu m e Met er
3
mute icon
Help
.
Using Multimedia 65
Page 64

www.dell.com | support.dell.com
Adjusting the Picture
If an error message notifies you that the current resolution and color depth are using too much
memory and preventing DVD playback, adjust the display properties.
Microsoft® Windows® XP Operating System
1
Click
Start→
2
Under
3
Under
4
In the drop-down menu under
5
Click OK.
Pick a task...
Screen resolution
Microsoft Windows Vista® Operating System
1
Click the Windows Vista Start button
Personalization
2
Under
3
Under
4
In the drop-down menu under
Personalization
Resolution:
Control Panel→ Appearance and Themes
, click
Change the screen resolution
.
.
, click and drag the bar to reduce the resolution setting.
Color quality
, ,
, click
Medium (16 bit).
and click
Control Panel→
.
, click
Adjust Screen Resolution
.
click and drag the bar to reduce the resolution setting.
Colors
, click
Medium (16 bit)
and click OK.
Appearance and
66 Using Multimedia
Page 65

1
Using Cards
NOTE: Electrical and electronic devices are sensitive to electrostatic discharge (ESD). If a substantial
ESD occurs, the device may reset and the device software may attempt to reinitialize a connection. If the
software is not operational after an ESD occurrence, restart the modem software program.
Card Types
PC Cards
See "PC Card" on page 151 for information on supported PC Cards.
NOTE: A PC Card is not a bootable device.
The PC Card slot has one connector that supports a single Type I or Type II card. The PC Card slot
supports CardBus technology and extended PC Cards. "Type" of card refers to its thickness, not its
functionality.
ExpressCards
See "PC Card" on page 151 for information on supported ExpressCards.
NOTE: An ExpressCard is not a bootable device.
ExpressCards leverage PC Card technology to provide a fast and convenient way to add memory,
wired and wireless network communications (including Mobile Broadband network [also known as
WWAN] communications), multimedia, and security features to your computer. To use an
ExpressCard in the PC Card slot, you must use an adapter (optional).
Smart Cards
Smart cards provide valuable tools for security, data storage, and special programs (see "Smart
Card" on page 71).
Card Blanks
Your computer shipped with a plastic blank installed in the card slots. Blanks protect unused slots
from dust and other particles. Save the blank for use when no card is installed in the slots; blanks
from other computers may not fit your computer.
To remove a blank, see "Removing a Card or Blank" on page 69.
Using Cards 67
Page 66
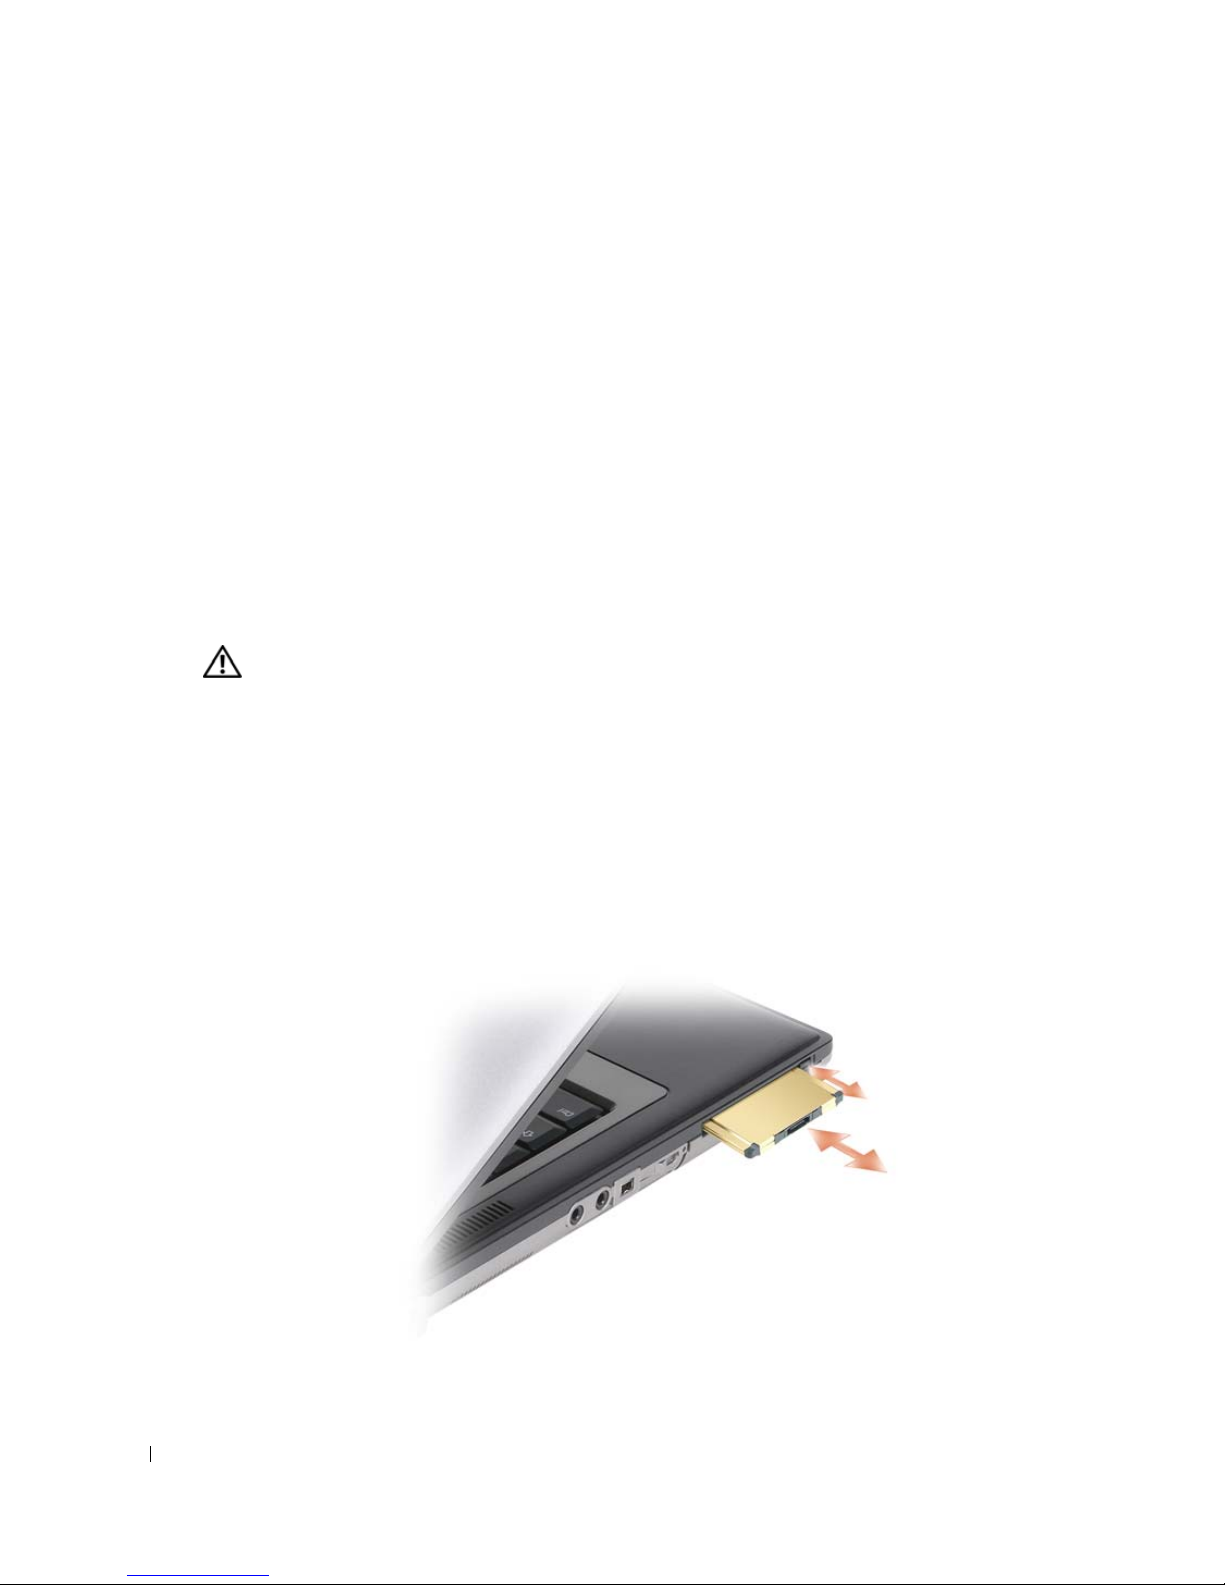
www.dell.com | support.dell.com
Extended Cards
An extended PC Card (for example, a wireless network adapter) is longer than a standard PC Card
and extends outside the computer. Follow these precautions when using extended PC Cards:
• Protect the exposed end of an installed card. Striking the end of the card can damage the
system board.
• Always remove an extended PC Card before you pack the computer in its carrying case.
Installing a PC Card or ExpressCard
You can install a PC Card or ExpressCard in the computer while the computer is running. The
computer automatically detects the card.
PC Cards and ExpressCards are generally marked with a symbol (such as a triangle or an arrow) to
indicate which end to insert into the slot. The cards are keyed to prevent incorrect insertion. If card
orientation is not clear, see the documentation that came with the card.
CAUTION: Before you begin any of the procedures in this section, follow the safety instructions in the
Product Information Guide
PC Card
1
Hold the card with its orientation symbol pointing into the slot and the top side of the card
facing up. The latch may need to be in the "in" position before you insert the card.
.
2
Slide the card into the slot until the card is completely seated in its connector.
If you encounter too much resistance, do not force the card. Check the card orientation and
try again.
68 Using Cards
Page 67
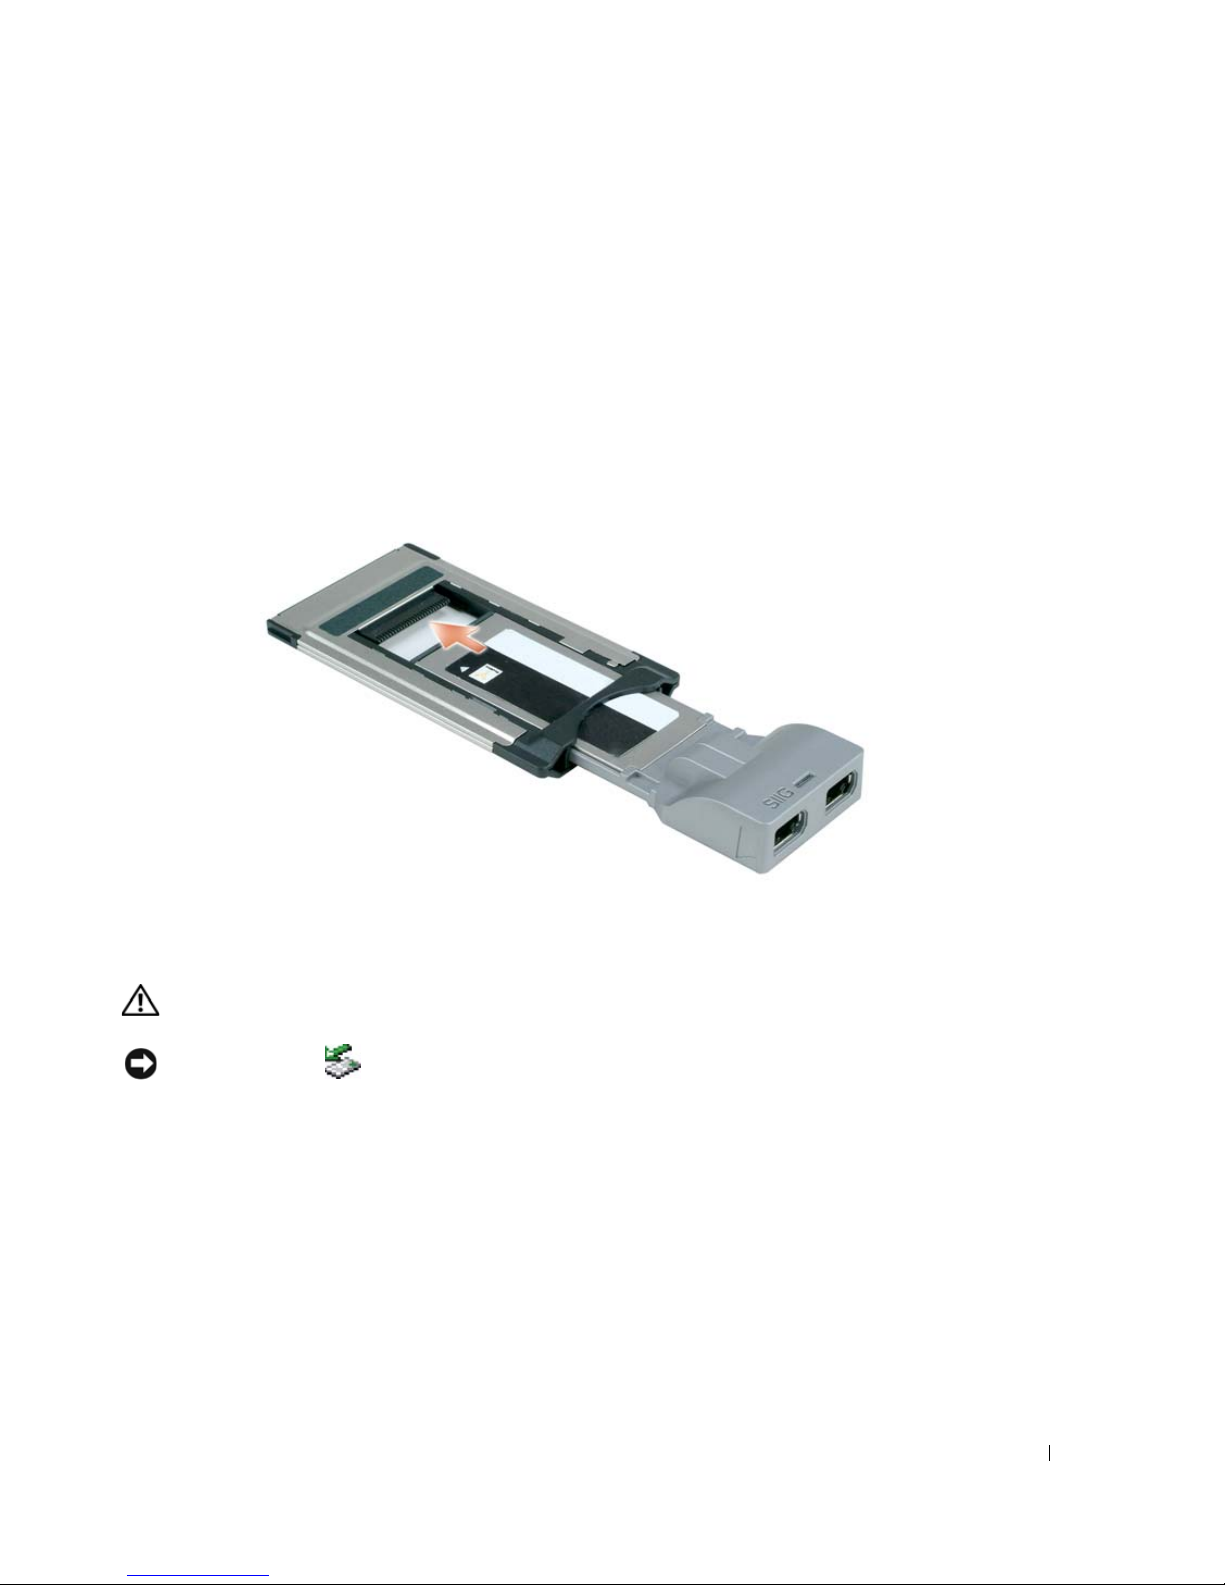
The computer recognizes most PC Cards and automatically loads the appropriate device driver. If
the configuration program tells you to load the manufacturer's drivers, use the floppy disk or CD
that came with the PC Card.
ExpressCards
1
Place the ExpressCard in the adapter (the adapter is included with the ExpressCard).
2
Install the ExpressCard with the adapter the same way as a PC Card. (See "PC Cards" on
page 67)
Removing a Card or Blank
CAUTION: Before you begin any of the procedures in this section, follow the safety instructions in the
Product Information Guide
NOTICE: Click the icon in the taskbar to select a card and stop it from functioning before you
remove it from the computer. If you do not stop the card in the configuration utility, you could lose data.
Do not attempt to eject a card by pulling its cable, if one is attached.
Press the latch and remove the card or blank. For some latches, you must press the latch twice: once
to pop the latch out, and then a second time to pop the card out.
.
Using Cards 69
Page 68

www.dell.com | support.dell.com
70 Using Cards
Page 69
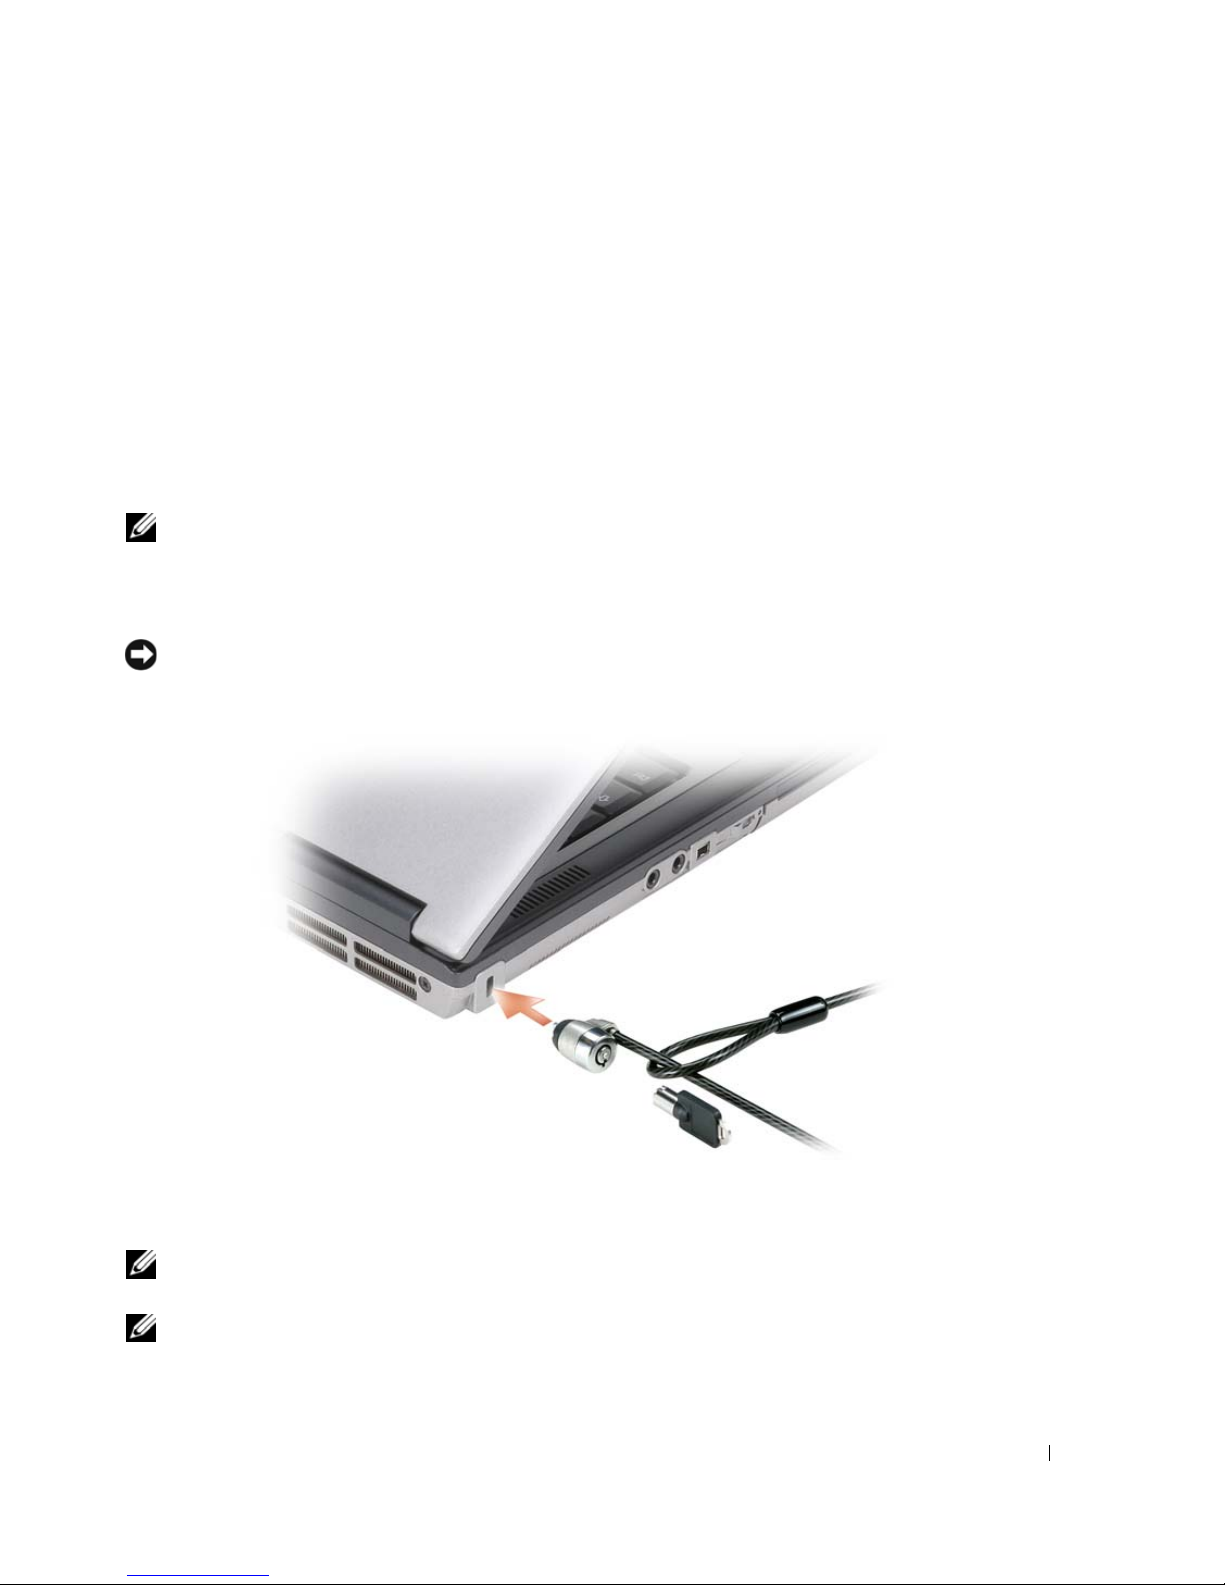
1
Securing Your Computer
Security Cable Lock
NOTE: Your computer does not ship with a security cable lock.
A security cable lock is a commercially available antitheft device. To use the lock, attach it to the
security cable slot on your Dell™ computer. For more information, see the instructions included
with the device.
NOTICE: Before you buy an antitheft device, ensure that it will work with the security cable slot on your
computer.
Smart Card
NOTE: For information on how to secure your computer while traveling, see "Traveling With Your
Computer" on page 149.
NOTE: The smart card feature may not be available on your computer.
Securing Your Computer 71
Page 70
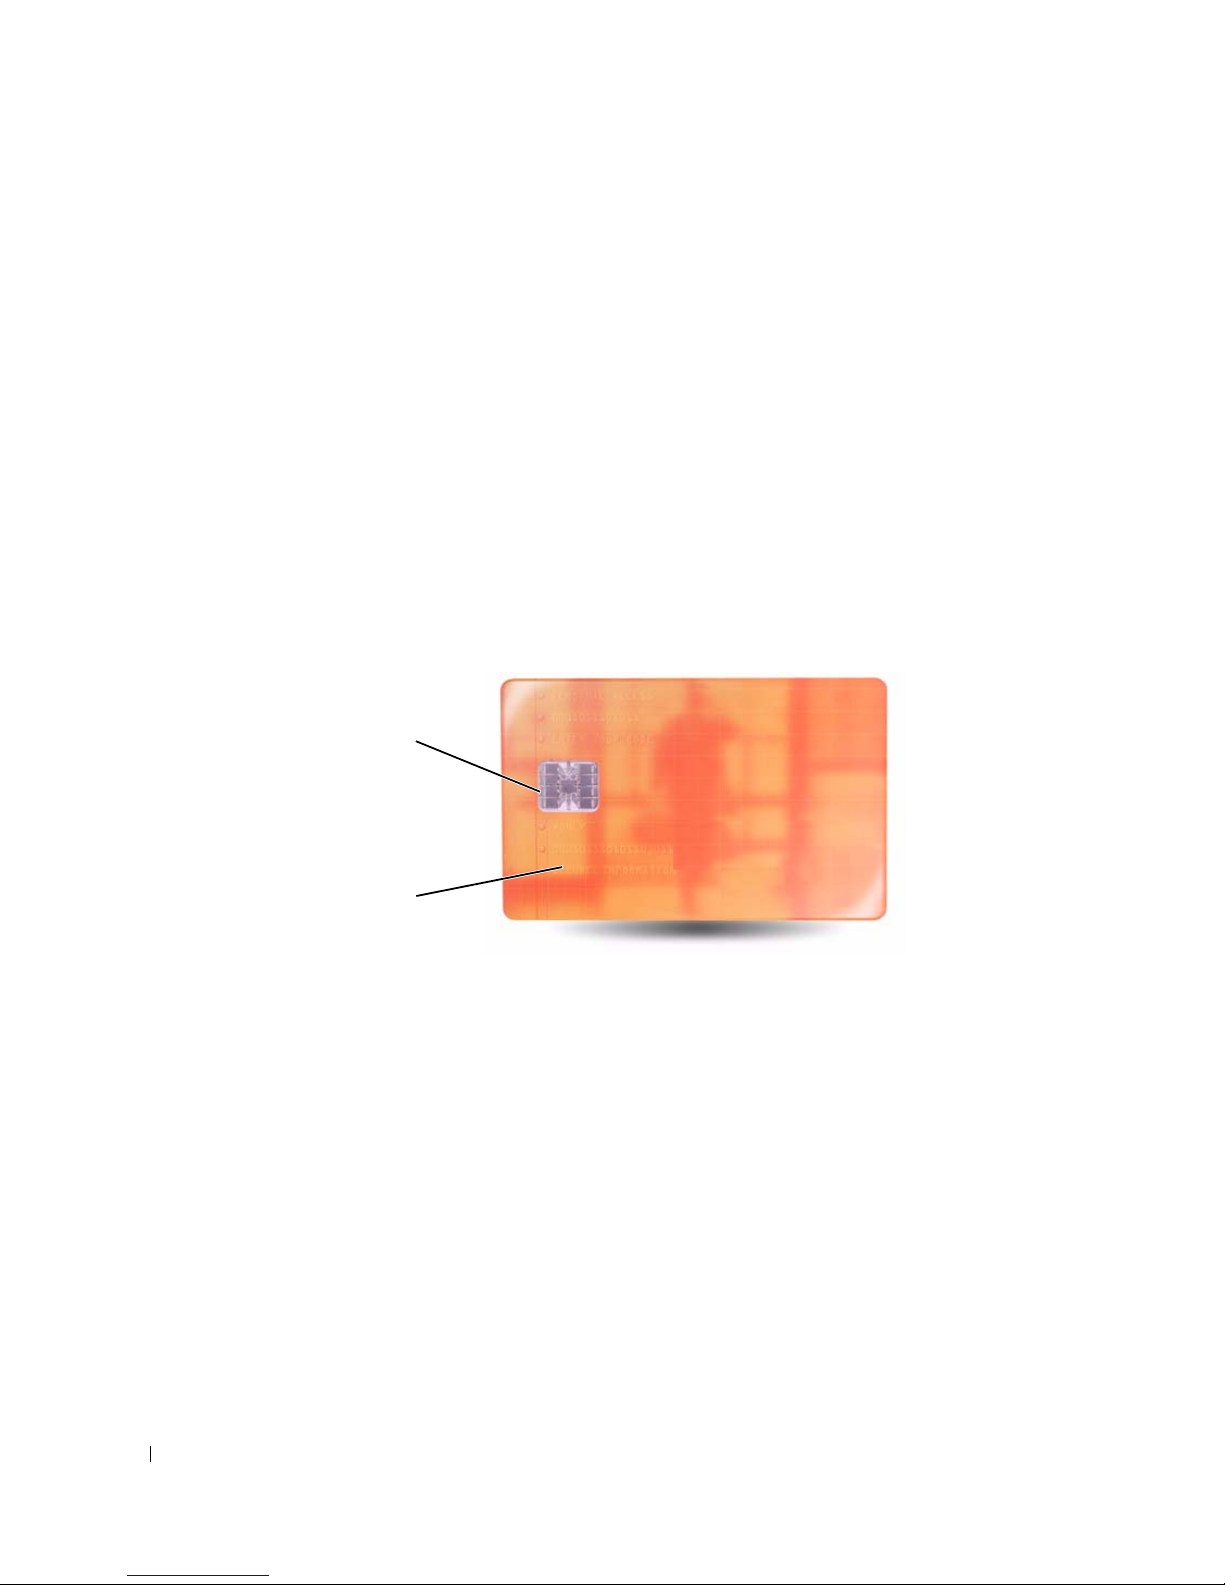
www.dell.com | support.dell.com
About Smart Cards
Smart cards are portable credit-card shaped devices with internal integrated circuits. The top
surface of the smart card usually contains an embedded processor under the gold contact pad. The
combination of the small size and integrated circuits make smart cards valuable tools for security,
data storage, and special programs. Using smart cards can improve system security by combining
something a user has (the smart card) with something only the user should know (a PIN) to provide
more secure user-authentication than passwords alone.
Installing a Smart Card
You can install a smart card in the computer while the computer is running. The computer
automatically detects the card.
To install a smart card:
1
Hold the card so that the gold contact pad is facing upward and pointing toward the smart
card slot.
1
1
gold contact pad
2
Slide the smart card into the smart card slot until the card is completely seated in its
connector. The smart card will protrude approximately 1/2 inch from the slot. The smart card
slot is located below the PC Card slot.
If you encounter too much resistance, do not force the card. Check the card orientation and
try again.
72 Securing Your Computer
2
2
smart card (top)
Page 71
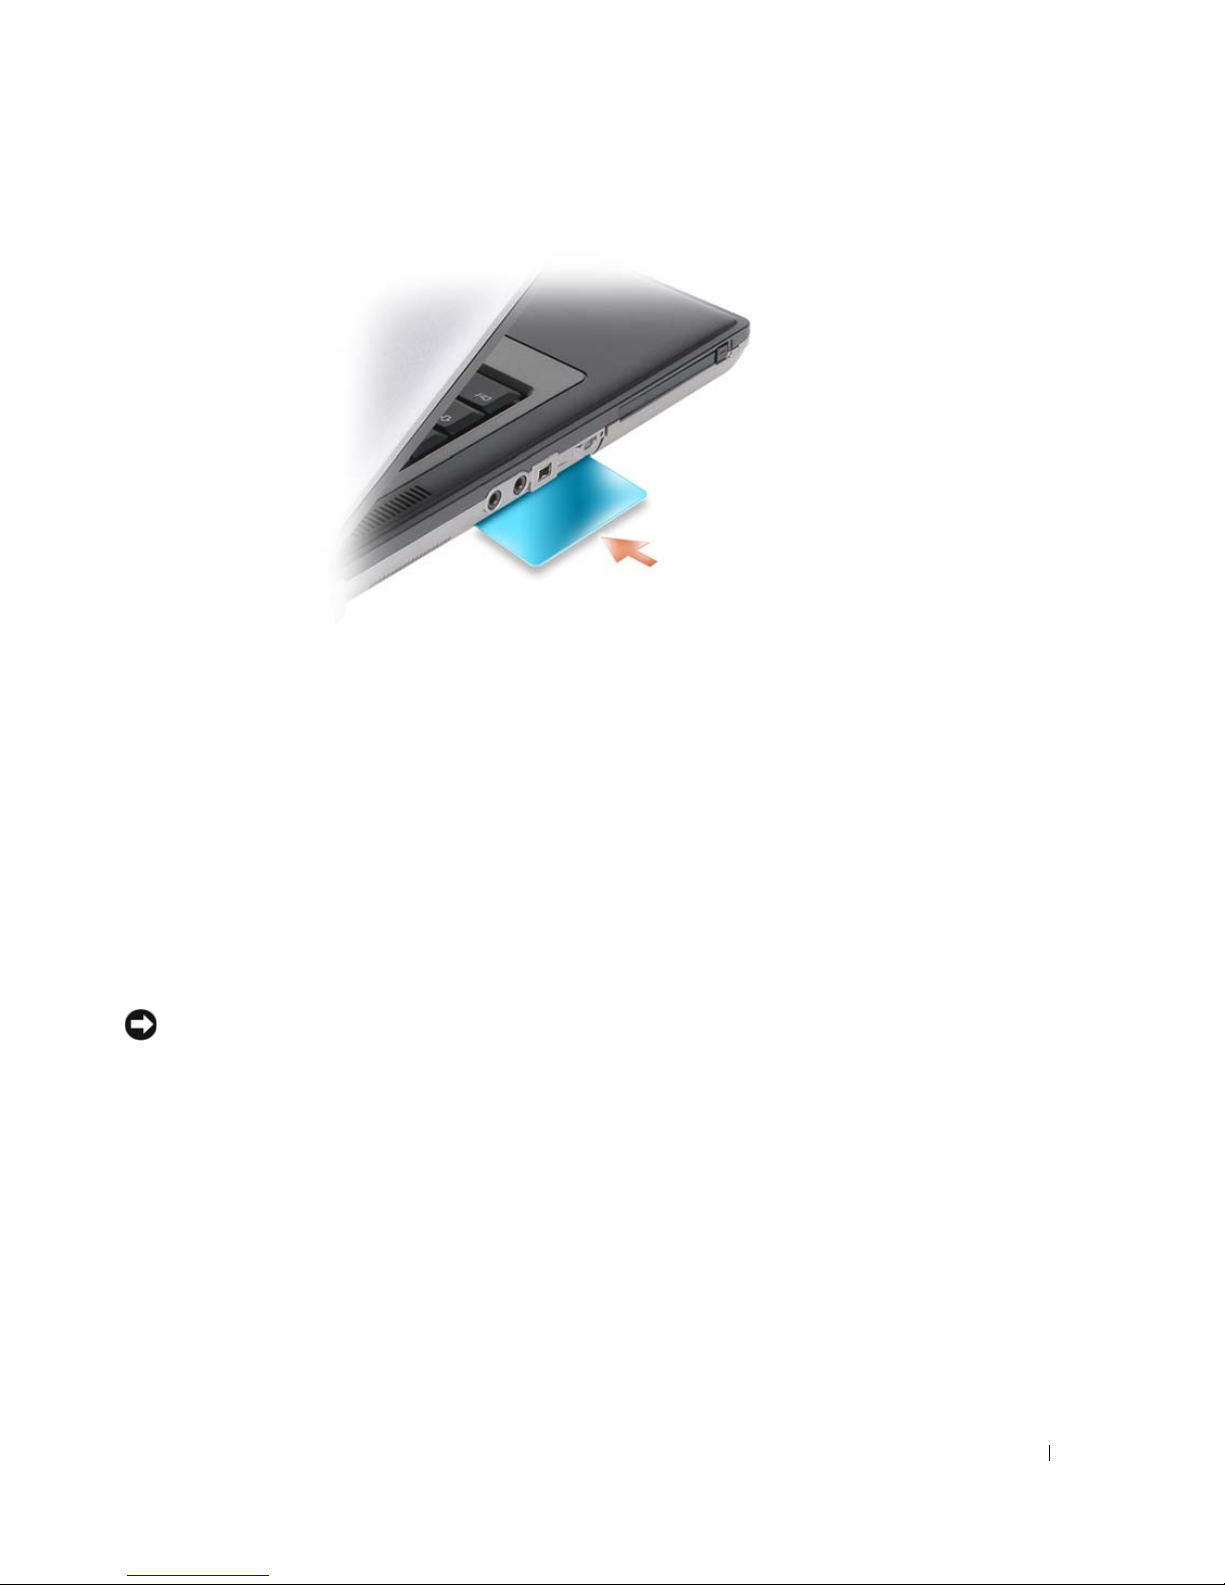
Passwords
Passwords prevent unauthorized access to your computer. When using passwords, observe the
following guidelines:
• Choose a password that you can remember, but not one that is easy to guess. For example, do
not use the names of family members or pets for passwords.
• It is recommended that you do not write down your password. If you do write it down,
however, ensure that the password is stored in a secure place.
• Do not share your password with other people.
• Ensure that people are not watching you when you type your password.
NOTICE: Passwords provide a high level of security for data in your computer or hard drive. However,
they are not foolproof. If you require more security, obtain and use additional forms of protection, such as
smart cards, data encryption programs, or PC Cards with encryption features.
Use the
User Accounts
option in the Control Panel in the Microsoft® Windows® operating system
to create user accounts or to change passwords. Once you create a user password, you must enter it
each time you turn on or unlock your computer. If you do not enter a password within 2 minutes,
the computer returns to its previous operating state.
For more information, see your Windows documentation.
Securing Your Computer 73
Page 72

www.dell.com | support.dell.com
About Passwords
NOTE: Passwords are disabled when you receive your computer.
A primary (or system) password, an administrator password, and a hard drive password all prevent
unauthorized access to your computer in different ways. The following table identifies types and
features of passwords available on your computer.
Type of Password Features
Primary (or system) • Protects the computer from unauthorized access
Administrator • Gives system administrators or service technicians
access to computers for repair or reconfiguration
• Allows you to restrict access to system setup in the same
way a primary password restricts access to the computer
• Can be used instead of the primary password
Hard drive • Helps protect the data on your hard drive from
unauthorized access
NOTE: Some hard drives do not support hard drive passwords.
NOTE: Passwords provide a high level of security for data in your computer or hard drive. However, they
are not foolproof. For security, the Dell Latitude
When using passwords, observe the following guidelines:
™ D630/630c ships with a smart card reader.
• Choose passwords that you can remember, but not ones that are easy to guess. For example,
do not use the names of family members or pets for passwords.
• It is recommended that you do not write down passwords. If you do write it down, however,
ensure that the password is stored in a secure place.
• Do not share passwords with other people.
• Ensure that people are not watching you when you type your password(s).
NOTICE: Passwords provide a high level of security for data in your computer or hard drive. However,
they are not foolproof. If you require more security, obtain and use additional forms of protection, such as
smart cards, data encryption programs, or PC Cards with encryption features.
If you forget any of your passwords, contact Dell (see "Contacting Dell" on page 164). For your
protection, Dell technical support staff will ask you for proof of your identity to ensure that only an
authorized person can use the computer.
Using a Primary (or System) Password
The primary password allows you to protect the computer from unauthorized access.
When you first start your computer, you must assign a primary password at the prompt.
If you do not enter a password within 2 minutes, the computer returns to its previous operating
state.
74 Securing Your Computer
Page 73

NOTICE: If you disable the administrator password, the primary password is also disabled.
To add or change passwords, access
User Accounts
from the
Control Panel
.
If you have assigned an administrator password, you can use it instead of the primary password. The
computer does not specifically prompt you for the administrator password.
Using an Administrator Password
The administrator password is designed to give system administrators or service technicians access
to computers for repair or reconfiguration. The administrators or technicians can assign identical
administrator passwords to groups of computers, allowing you to assign a unique primary password.
To set or change administrator passwords, access
When you set an administrator password, the
setup. The
Configure Setup
option allows you to restrict access to system setup in the same way
that a primary password restricts access to the computer.
The administrator password can be used instead of the primary password. Whenever you are
prompted to enter the primary password, you can enter the administrator password.
NOTICE: If you disable the administrator password, the primary password is also disabled.
NOTE: The administrator password provides access to the computer, but it does not provide access to
the hard drive when a hard drive password is assigned.
If you forget the primary password and do not have an administrator password assigned, or if you
have both a primary and an administrator password assigned but forget them both, contact your
system administrator or contact Dell (see "Obtaining Assistance" on page 159).
User Accounts
Configure Setup
from the Control Panel.
option becomes available in system
Using a Hard Drive Password
The hard drive password helps protect the data on your hard drive from unauthorized access.
To assign or change a hard drive password, enter system setup (see "System Setup Program" on
page 111).
After assigning a hard drive password, you must enter it each time you turn on the computer and
each time you restore the computer to normal operation from standby
If the hard drive password is enabled, you must enter it each time you turn on the computer: A
message appears asking for the hard drive password.
To continue, enter your password (with no more than eight characters) and press <Enter>.
If you do not enter a password within two minutes, the computer returns to its previous operating
state.
If you enter the wrong password, a message tells you that the password is invalid. Press <Enter> to
try again.
mode.
Securing Your Computer 75
Page 74

If you do not enter the correct password in three attempts, the computer tries to start from another
bootable device if the
another device. If the
Boot First Device
Boot First Device
option in system setup is set to allow start-up from
option is not set to allow the computer to start from
another device, the computer returns to the operating state it was in when you turned it on.
If the hard drive password, the external hard-drive password, and the primary password are the
same, the computer prompts you only for the primary password. If the hard drive password is
different from the primary password, the computer prompts you for both. Two different passwords
provide greater security.
NOTE: The administrator password provides access to the computer, but it does not provide access to
the hard drive when a hard drive password is assigned.
www.dell.com | support.dell.com
Trusted Platform Module (TPM)
NOTE: Computers shipping into China are not equipped with the TPM feature.
NOTE: The TPM feature may not be supported in all countries.
NOTE: The TPM feature supports encryption only if the operating system supports TPM. For more
information, see the TPM software documentation and the help files that came with the software.
TPM is a hardware-based security feature that can be used to create and manage computergenerated encryption keys. When combined with security software, the TPM enhances existing
network and computer security by enabling features such as file protection capabilities and
protected e-mail. The TPM feature is enabled through a system setup option.
NOTICE: To secure your TPM data and encryption keys, follow the backup procedures documented in
the Broadcom Secure Foundation Getting Started Guide. In the event of these backups being incomplete,
lost, or damaged, Dell will be unable to assist in the recovery of encrypted data.
Enabling the TPM Feature
1
Enable the TPM software:
a
Restart the computer and press <F2> during the Power On Self Test to enter the
system setup program.
b
Select
Security→
TPM Security
and press <Enter>.
c
Under
d
Press <Esc> to exit the setup program.
e
If prompted, click
2
Activate the TPM setup program:
a
Restart the computer and press <F2> during the Power On Self Test to enter the
TPM Security
system setup program.
b
Select
Security→
c
Under
TPM Activation
76 Securing Your Computer
, select On.
Save/Exit
.
TPM Activation
, select
Activate
and press <Enter>.
and press <Enter>.
Page 75

NOTE: You only need to activate the program once.
d
Once the process is complete, the computer either restarts automatically or prompts you
to restart your computer.
Security Management Software
The security management software is designed to utilize four different features to help you secure
your computer:
• Log-in management
• Pre-boot authentication (using a fingerprint reader, smart card, or password)
•Encryption
• Private information management
Activating the Security Management Software
NOTE: You must first enable the TPM in order for the security management software to have full
functionality.
Enable the TPM feature (see "Enabling the TPM Feature" on page 76).
1
2
Load the security management software:
a
Turn on (or restart) your computer.
b
When the DELL™ logo appears, press <F2> immediately. If you wait too long and the
Windows logo appears, continue to wait until you see the Windows desktop. Then shut
down your computer and try again.
c
In the drop-down menu, select
Wave EMBASSY Trust Suite
and press <Enter> to
create the icons for the software components on the computer desktop.
d
Press <Esc> to exit the setup program.
e
If prompted, click
Save/Exit
.
Using the Security Management Software
For information about how to use the software and the different security features, see the
Started Guide
Click
Start→ All Programs→ Wave EMBASSY Trust Suite→ Getting Started Guide
for the software:
Getting
.
Computer Tracking Software
Computer tracking software may enable you to locate your computer if it is lost or stolen. The
software is optional and may be purchased when you order your Dell™ computer, or you can
contact your Dell sales representative for information about this security feature.
Securing Your Computer 77
Page 76

www.dell.com | support.dell.com
NOTE: Computer tracking software may not be available in certain countries.
NOTE: If you have computer tracking software and your computer is lost or stolen, you must contact the
company that provides the tracking service to report the missing computer.
If Your Computer Is Lost or Stolen
• Call a law enforcement agency to report the lost or stolen computer. Include the Service Tag
in your description of the computer. Ask that a case number be assigned and write down the
number, along with the name, address, and phone number of the law enforcement agency. If
possible, obtain the name of the investigating officer.
NOTE: If you know where the computer was lost or stolen, call a law enforcement agency in that area. If
you do not know, call a law enforcement agency where you live.
• If the computer belongs to a company, notify the security office of the company.
• Contact Dell customer service to report the missing computer. Provide the computer Service
Tag, the case number, and the name, address, and phone number of the law enforcement
agency to which you reported the missing computer. If possible, give the name of the
investigating officer.
The Dell customer service representative will log your report under the computer Service Tag and
record the computer as missing or stolen. If someone calls Dell for technical assistance and gives
your Service Tag, the computer is identified automatically as missing or stolen. The representative
will attempt to get the phone number and address of the caller. Dell will then contact the law
enforcement agency to which you reported of the missing computer.
78 Securing Your Computer
Page 77

Cleaning Your Computer
CAUTION: Before you begin any of the procedures in this section, follow the safety instructions in the
Product Information Guide
Computer, Keyboard, and Display
CAUTION: Before you clean your computer, disconnect the computer from the electrical outlet and
remove any installed batteries. Clean your computer with a soft cloth dampened with water. Do not use
liquid or aerosol cleaners, which may contain flammable substances.
• Use a can of compressed air to remove dust from between the keys on the keyboard.
NOTICE: To avoid damaging the computer or display, do not spray cleaning solution directly onto the
display. Only use products specifically designed for cleaning displays, and follow the instructions that are
included with the product.
• Moisten a soft, lint-free cloth with either water or a display cleaner, and wipe the display until
it is clean.
NOTICE: To prevent damage to the antiglare coating, do not wipe the display with soap or alcohol.
• Moisten a soft, lint-free cloth with water and wipe the computer and keyboard. Do not allow
water from the cloth to seep between the touch pad and the surrounding palm rest.
• To clean your monitor screen, lightly dampen a soft, clean cloth with water. You can also use a
special screen-cleaning tissue or solution suitable for the monitor’s antistatic coating.
.
• Wipe the keyboard, computer, and monitor plastics with a soft cleaning cloth moistened with
a solution of three parts water and one part dishwashing detergent.
Do not soak the cloth or let water drip inside your computer or keyboard.
Touch Pad
1
Shut down and turn off your computer.
2
Disconnect any attached devices from the computer and from their electrical outlets.
3
Remove any installed batteries (see "Replacing the Battery" on page 38).
4
Moisten a soft, lint-free cloth with water, and wipe it gently across the surface of the touch
pad. Do not allow water from the cloth to seep between the touch pad and the surrounding
palm rest.
Mouse
NOTICE: Disconnect the mouse from the computer before cleaning the mouse
If your screen cursor skips or moves abnormally, clean the mouse.
Cleaning a Non-Optical Mouse
1
Clean the outside casing of the mouse with a cloth moistened with a mild cleaning solution.
79
Page 78

www.dell.com | support.dell.com
2
Turn the retainer ring on the underside of your mouse counterclockwise, and then remove the
ball.
3
Wipe the ball with a clean, lint-free cloth.
4
Blow carefully into the ball cage or use a can of compressed air to dislodge dust and lint.
5
If the rollers inside the ball cage are dirty, clean the rollers with a cotton swab moistened
lightly with isopropyl alcohol.
6
Recenter the rollers in their channels if they are misaligned. Ensure that fluff from the swab is
not left on the rollers.
7
Replace the ball and retainer ring, and turn the retainer ring clockwise until it clicks into
place.
Cleaning an Optical Mouse
Clean the outside casing of the mouse with a cloth moistened with a mild cleaning solution.
Floppy Drive
NOTICE: Do not attempt to clean drive heads with a swab. You might accidentally misalign the heads
which prevents the drive from operating.
Clean your floppy drive using a commercially available cleaning kit. These kits contain pretreated
floppy disks to remove contaminants that accumulate during normal operation.
CDs and DVDs
NOTICE: Always use compressed air to clean the lens in the CD/DVD drive, and follow the instructions
that come with the compressed-air product. Never touch the lens in the drive.
If you notice problems, such as skipping, with the playback quality of your CDs or DVDs, try
cleaning the discs.
1
Hold the disc by its outer edge. You can also touch the inside edge of the center hole.
NOTICE: To avoid damaging the surface, do not wipe in a circular motion around the disc.
With a soft, lint-free cloth, gently wipe the bottom of the disc (the unlabeled side) in a
2
straight line from the center to the outer edge of the disc.
For stubborn dirt, try using water or a diluted solution of water and mild soap. You can also
purchase commercial products that clean discs and provide some protection from dust,
fingerprints, and scratches. Cleaning products for CDs are also safe to use on DVDs.
80
Page 79

1
Troubleshooting
Diagnostic Lights
CAUTION: Before you begin any of the procedures in this section, follow the safety instructions that
shipped with your computer.
Your computer has three keyboard status lights located above the keyboard. During normal
operation, the keyboard status lights display the current status (
Lock, and Scroll Lock features. If the computer starts without error, the lights flash, and then turn
off. If the computer malfunctions, however, you can use the status of the lights to help identify the
problem.
NOTE: After the computer completes POST, the Num Lock light may remain on, depending on your BIOS
settings. For more information on using the system setup program, see "System Setup Program" on
page 111.
Diagnostic Light Codes During POST
To troubleshoot a problem with your computer, read the sequence of the keyboard status lights in
order from left to right (Num Lock, Caps Lock, and then Scroll Lock). If the computer
malfunctions the individual lights display a status of either
On
on
or
,
Off
off
) of the Num Lock, Caps
, or
Flashing
.
Troubleshooting 81
Page 80

Light Pattern Problem Description Suggested Resolution
www.dell.com | support.dell.com
No memory modules
are detected.
Memory modules are
detected, but a
memory failure has
occurred.
• If two or more memory modules are
installed, remove the modules, then
reinstall one module and restart the
computer. If the computer starts
normally, continue to install
additional memory modules (one at a
time) until you have identified a
faulty module or reinstalled all
modules without error (see "Memory"
on page 129).
• If available, install working memory of
the same type into your computer (see
"Memory" on page 129).
• If the problem persists, contact Dell
Support.
• If two or more memory modules are
installed, remove the modules, then
reinstall one module and restart the
computer. If the computer starts
normally, continue to install
additional memory modules (one at a
time) until you have identified a
faulty module or reinstalled all
modules without error (see "Memory"
on page 129).
• If available, install working memory of
the same type into your computer (see
"Memory" on page 129).
• If the problem persists, contact Dell
Support.
System board failure
has occurred.
A possible processor
failure has occurred.
82 Troubleshooting
Contact Dell Support.
• Reseat the processor (see "Memory"
on page 129).
• If the problem persists, contact Dell
Support.
Page 81
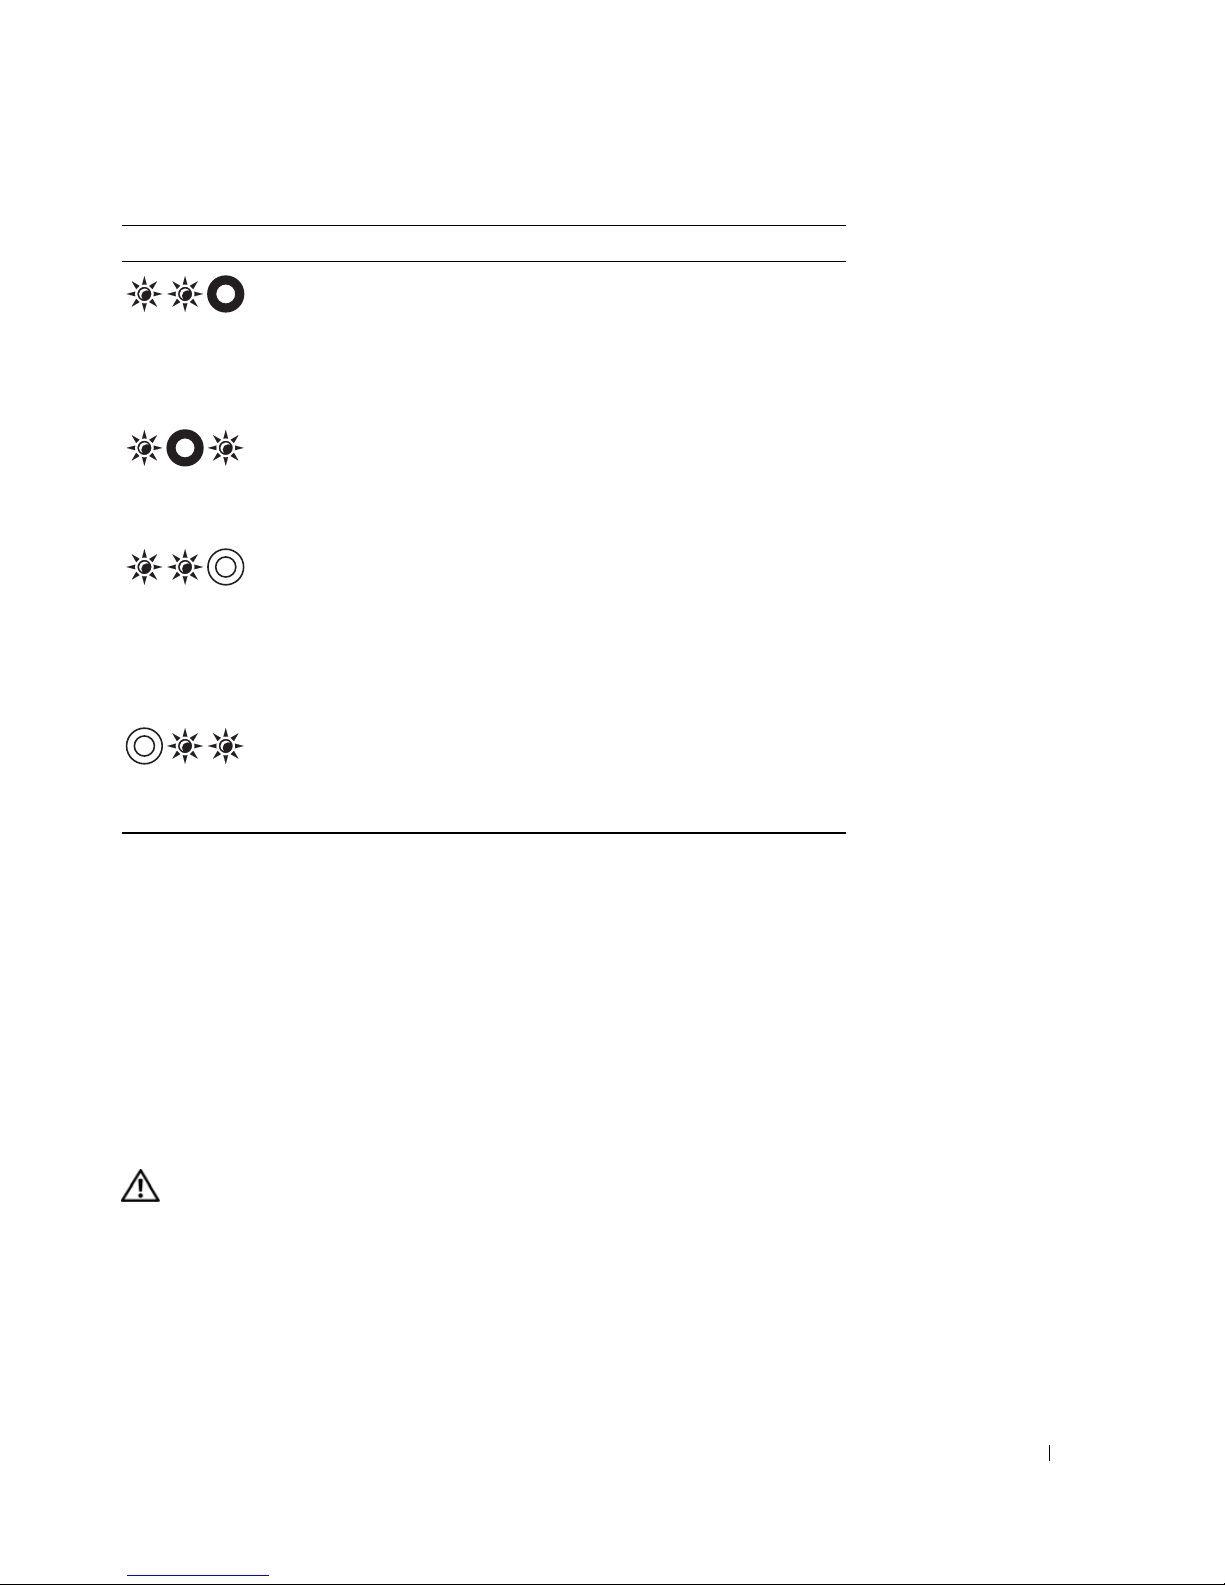
Light Pattern Problem Description Suggested Resolution
A possible graphics
card/video failure has
occurred.
A possible LCD failure
has occurred.
A possible keyboard
failure has occurred.
A possible modem
failure has occurred.
• Reseat any installed graphics cards.
• If available, install a working graphics
card into your computer.
• If the problem persists, contact Dell
Support.
• Reseat the LCD cable (see your
computer’s
• If the problem persists, contact Dell
Support.
• Reseat the keyboard (see "Keyboard"
on page 126).
• If available, connect an external
keyboard.
• If the problem persists, contact Dell
Support.
• If available, install a working modem
into your computer.
• If the problem persists, contact
contact Dell Support.
Service Manual
).
Dell™ Technical Update Service
The Dell Technical Update service provides proactive e-mail notification of software and hardware
updates for your computer. The service is free and can be customized for content, format, and how
frequently you receive notifications.
To enroll for the Dell Technical Update service, go to
http://support.dell.com/technicalupdate
.
Dell Diagnostics
Fill out the Diagnostics Checklist (see "Diagnostics Checklist" on page 163) as you complete these
checks.
CAUTION: Before you begin any of the procedures in this section, follow the safety instructions in the
Product Information Guide
When to Use the Dell Diagnostics
If you experience a problem with your computer, perform the checks in "Lockups and Software
Problems" on page 95 and run the Dell Diagnostics before you contact Dell for technical assistance.
It is recommended that you print these procedures before you begin.
.
Troubleshooting 83
Page 82

NOTICE: The Dell Diagnostics works only on Dell™ computers.
NOTE: The Drivers and Utilities media is optional and may not ship with your computer.
Enter the System Setup Program (see "System Setup Program" on page 111), review your
computer’s configuration information, and ensure that the device you want to test displays in
system setup and is active.
www.dell.com | support.dell.com
Start the Dell Diagnostics from your hard drive or from the
Drivers and Utilities
media.
Starting the Dell Diagnostics From Your Hard Drive
The Dell Diagnostics is located on a hidden diagnostic utility partition on your hard drive.
NOTE: If your computer cannot display a screen image, contact Dell (see "Contacting Dell" on page 164).
1
If the computer is connected to a docking device (docked), undock it. See the documentation
that came with your docking device for instructions. Ensure the computer is connected to a
known good electrical outlet.
2
Turn on (or restart) your computer.
3
Diagnostics can be invoked one of two ways:
a
When the DELL™ logo appears, press <F12> immediately. Select Diagnostics from the
boot menu and press <Enter>.
NOTE: If you wait too long and the operating system logo appears, continue to wait until you see
the Microsoft
NOTE: Before attempting option B, the computer must be powered down completely.
b
Press and hold the <Fn> key while powering the computer on.
NOTE: If you see a message stating that no diagnostics utility partition has been found, run the Dell
Diagnostics from the Drivers and Utilities media.
®
Windows® desktop; then, shut down your computer and try again.
The computer runs the Pre-boot System Assessment, a series of initial tests of your system
board, keyboard, display, memory, hard drive, etc.
• During the assessment, answer any questions that appear.
• If a failure is detected, the computer stops and beeps. To stop the assessment and restart
the computer, press <N>; to continue to the next test, press <Y>; to retest the
component that failed, press <R>.
• If failures are detected during the Pre-boot System Assessment, write down the error
code(s) and contact Dell.
If the Pre-boot System Assessment completes successfully, you will receive the following
message:
Booting Dell Diagnostic Utility Partition. Press any key
to continue.
4
Press any key to start the Dell Diagnostics from the diagnostics utility partition on your
hard drive.
84 Troubleshooting
Page 83

Starting the Dell Diagnostics from the Drivers and Utilities Media
1
Insert the
2
Shut down and restart the computer.
When the DELL logo appears, press <F12> immediately.
Drivers and Utilities
NOTE: If you wait too long and the operating system logo appears, continue to wait until you see
the Microsoft® Windows® desktop; then, shut down your computer and try again.
media.
NOTE: The next steps change the boot sequence for one time only. On the next start-up, the
computer boots according to the devices specified in the system setup program.
When the boot device list appears, highlight
3
Drive
and press <Enter>.
4
Select the
5
Ty p e 1 to start the media menu and press <Enter> to proceed.
6
Select
Boot from CD-ROM
option from the menu that appears and press <Enter>.
Run the 32 Bit Dell Diagnostics
IDE CD-ROM DeviceCD/DVD/CD-RW
from the numbered list. If multiple versions are listed,
select the version appropriate for your computer.
7
When the Dell Diagnostics
Main Menu
appears, select the test you want to run.
Dell Diagnostics Main Menu
1
After the Dell Diagnostics loads and the
option you want.
Option Function
Express Test Performs a quick test of devices. This test typically takes 10
to 20 minutes and requires no interaction on your part.
Express Test
Run
the problem quickly.
Extended Test Performs a thorough check of devices. This test typically
takes 1 hour or more and requires you to answer questions
periodically.
Main Menu
first to increase the possibility of tracing
screen appears, click the button for the
Custom Test Tests a specific device. You can customize the tests you
want to run.
Symptom Tree Lists the most common symptoms encountered and allows
you to select a test based on the symptom of the problem
you are having.
2
If a problem is encountered during a test, a message appears with an error code and a
description of the problem. Write down the error code and problem description and follow
the instructions on the screen.
Troubleshooting 85
Page 84

If you cannot resolve the error condition, contact Dell (see "Obtaining Assistance" on
page 159).
NOTE: The Service Tag for your computer is located at the top of each test screen. If you contact
Dell, technical support will ask for your Service Tag.
3
If you run a test from the
Custom Test
or
Symptom Tree
option, click the applicable tab
described in the following table for more information.
Tab Function
Results Displays the results of the test and any error conditions
encountered.
www.dell.com | support.dell.com
Errors Displays error conditions encountered, error codes, and the
problem description.
Help Describes the test and may indicate requirements for
running the test.
Configuration Displays your hardware configuration for the selected
device.
The Dell Diagnostics obtains configuration information
for all devices from system setup, memory, and various
internal tests, and it displays the information in the device
list in the left pane of the screen. The device list may not
display the names of all the components installed on your
computer or all devices attached to your computer.
Parameters Allows you to customize the test by changing the test
settings.
4
When the tests are completed, if you are running the Dell Diagnostics from the
Utilities
5
When the tests are complete, close the test screen to return to the
the Dell Diagnostics and restart the computer, close the
media, remove the media.
Main Menu
Main Menu
screen.
Drivers and
screen. To exit
Dell Support Utility
The Dell Support Utility is installed on your computer and available from the Dell Support icon on
the taskbar or from the
updates, and health scans of your computing environment.
Accessing the Dell Support Utility
Access the Dell Support Utility from the Dell Support icon on the taskbar or from the
If the Dell Support icon does not appear in your taskbar:
1
Click the
86 Troubleshooting
Start
button and point to
Start
button. Use this support utility for self-support information, software
Start
Programs
.
menu.
Page 85
2
Click
Dell Support
3
Ensure that the
NOTE: If the Dell Support Utility is not available from the Start menu, go to support.dell.com and
download the software.
and point to
Dell Support Settings
Show icon on the taskbar
.
option is checked.
The Dell Support Utility is customized for your computing environment.
The Dell Support icon in the taskbar functions differently when you click, double-click, or rightclick the icon.
Clicking the Dell Support Icon
Click or right-click the icon to perform the following tasks:
• Check your computing environment
• View the Dell Support Utility settings
• Access the help file for the Dell Support Utility
• View frequently asked questions
• Learn more about the Dell Support Utility
• Turn the Dell Support Utility off
Double-Clicking the Dell Support Icon
Double-click the icon to manually check your computing environment, view frequently asked
questions, access the help file for the Dell Support Utility, and view Dell Support settings.
For more information about the Dell Support Utility, click the question mark
(?)
at the top of the
Dell Support screen.
Drive Problems
Fill out the Diagnostics Checklist (see "Diagnostics Checklist" on page 163) as you complete these
checks.
CAUTION: Before you begin any of the procedures in this section, follow the safety instructions in the
Product Information Guide
E
NSURE THAT MICROSOFT
Computer
. If the floppy, CD, or DVD drive is not listed, perform a full scan with your antivirus
®
WINDOWS® RECOGNIZES THE DRIVE—
software to check for and remove viruses. Viruses can sometimes prevent Windows from
recognizing the drive.
TEST THE DRIVE—
• Insert another floppy disk, CD, or DVD to eliminate the possibility that the original one is
defective.
• Insert a bootable floppy disk and restart the computer.
.
Click the
Start
button and click
My
Troubleshooting 87
Page 86

www.dell.com | support.dell.com
CLEAN THE DRIVE OR DISK.
NSURE THAT THE CD IS SNAPPED ONTO THE SPINDLE.
E
HECK THE CABLE CONNECTIONS.
C
HECK FOR HARDWARE INCOMPATIBILITIES.
C
UN THE DELL DIAGNOSTICS—
R
See "Dell Diagnostics" on page 83.
Media drive problems
NOTE: High-speed media drive vibration is normal and may cause noise, which does not indicate a
defect in the drive or the media.
NOTE: Because of different regions worldwide and different disc formats, not all DVD titles work in all
DVD drives.
Problems writing to a CD/DVD-RW drive
CLOSE OTHER PROGRAMS—
The CD/DVD-RW drive must receive a steady stream of data when writing.
If the stream is interrupted, an error occurs. Try closing all programs before you write to the
CD/DVD-RW.
TURN OFF STANDBY MODE IN WINDOWS BEFORE WRITING TO A CD/DVD-RW DISC—
Search for the keyword
standby
in the Windows Help and Support Center for information on power management modes. To access
the Help and Support Center, click
CHANGE THE WRITE SPEED TO A SLOWER RATE—
Start→
Help and Support
.
See the help files for your media creation software.
If you cannot eject the CD, CD-RW, DVD, or DVD+RW drive tray
1
Ensure that the computer is shut down.
2
Straighten a paper clip and insert one end into the eject hole at the front of the drive; push
firmly until the tray is partially ejected.
3
Gently pull out the tray until it stops.
If you hear an unfamiliar scraping or grinding sound
• Ensure that the sound is not caused by the program that is running.
• Ensure that the disk or disc is inserted properly.
Hard drive problems
ALLOW THE COMPUTER TO COOL BEFORE TURNING IT ON—
from starting. Try allowing the computer to return to room temperature before turning it on.
RUN CHECK DISK—
1
Click the
2
Right-click
Start
button and click
Local Disk C:
88 Troubleshooting
.
A hot hard drive may prevent the operating system
My Computer
.
Page 87

3
Click
4
Click the
5
Under
6
Click
7
Click
Properties
Error-checking
Scan for and attempt recovery of bad sectors
Start
Tools
.
.
tab.
, click
Check Now
.
.
E-Mail, Modem, and Internet Problems
Fill out the Diagnostics Checklist (see "Diagnostics Checklist" on page 163) as you complete these
checks.
CAUTION: Before you begin any of the procedures in this section, follow the safety instructions in the
Product Information Guide
NOTE: Connect the modem to an analog telephone jack only. The modem does not operate while it is
connected to a digital telephone network.
.
CHECK THE MICROSOFT OUTLOOK® EXPRESS SECURITY SETTINGS—
1
In Outlook Express, click
2
Click
Do not allow attachments
CHECK THE TELEPHONE LINE CONNECTION.
HECK THE TELEPHONE JACK.
C
ONNECT THE MODEM DIRECTLY TO THE TELEPHONE WALL JACK.
C
SE A DIFFERENT TELEPHONE LINE—
U
Tools
, click
Options
to remove the checkmark.
•Verify that the telephone line is connected to the jack on the
If you cannot open your e-mail attachments:
, and then click
Security
.
modem. (The jack has either a green label or a connector-shaped icon next to it.)
• Ensure that you hear a click when you insert the telephone line connector into the modem.
• Disconnect the telephone line from the modem and connect it to a telephone. Listen for a
dial tone.
• If you have other telephone devices sharing the line, such as an answering machine, fax
machine, surge protector, or line splitter, then bypass them and connect the modem directly
to the telephone wall jack. If you are using a line that is 3 m (10 ft) or more in length, try a
shorter one.
RUN THE MODEM DIAGNOSTIC TOOL—
Modem Diagnostic Tool
Click the
Start
button, point to
All Programs
and then click
. Follow the instructions on the screen to identify and resolve modem
problems.
VERIFY THAT THE MODEM IS COMMUNICATING WITH WINDOWS—
1
Click the
2
Click
3
Click
Start
button and click
Printers and Other Hardware
Phone and Modem Options
Control Panel
.
.
.
Troubleshooting 89
Page 88

4
Click the
5
Click the COM port for your modem.
6
Click
Modems
Properties
tab.
, click the
Diagnostics
tab, and then click
Query Modem
modem is communicating with Windows.
If all commands receive responses, the modem is operating properly.
to verify that the
www.dell.com | support.dell.com
ENSURE THAT YOU ARE CONNECTED TO THE INTERNET—
provider. With the Outlook Express e-mail program open, click
Ensure that you have subscribed to an Internet
File
. If
Work O ffline
has a
checkmark next to it, click the checkmark to remove it and connect to the Internet. For help,
contact your Internet service provider.
SCAN THE COMPUTER FOR SPYWARE —
If you are experiencing slow computer performance, you frequently
receive pop-up advertisements, or you are having problems connecting to the Internet, your
computer might be infected with spyware. Use an anti-virus program that includes anti-spyware
protection (your program may require an upgrade) to scan the computer and remove spyware. For
more information, go to
support.dell.com
and search for the keyword
spyware
.
Error Messages
Fill out the Diagnostics Checklist (see "Diagnostics Checklist" on page 163) as you complete these
checks.
CAUTION: Before you begin any of the procedures in this section, follow the safety instructions in the
Product Information Guide
If the message is not listed, see the documentation for the operating system or the program that
was running when the message appeared.
AUXILIARY DEVICE FAILURE—
mouse, check the cable connection. Enable the Pointing Device option in the system setup
program. If the problem persists, contact Dell (see "Obtaining Assistance" on page 159).
.
The touch pad, track stick, or external mouse may be faulty. For an external
BAD COMMAND OR FILE NAME—
proper place, and used the correct pathname.
CACHE DISABLED DUE TO FAILURE—
Dell (see "Obtaining Assistance" on page 159).
CD DRIVE CONTROLLER FAILURE—
"Dell Support Utility" on page 86).
DATA ERROR—
DECREASING AVAILABLE MEMORY—
The hard drive cannot read the data (see "Dell Support Utility" on page 86).
Reinstall the memory modules and, if necessary, replace them (see "Memory Problems" on
page 97).
DISK C: FAILED INITIALIZATION—
Diagnostics (see "Dell Diagnostics" on page 83).
90 Troubleshooting
Ensure that you have spelled the command correctly, put spaces in the
The primary cache internal to the microprocessor has failed. Contact
The CD drive does not respond to commands from the computer (see
One or more memory modules may be faulty or improperly seated.
The hard drive failed initialization. Run the hard drive tests in the Dell
Page 89

DRIVE NOT READY—
The operation requires a hard drive in the bay before it can continue. Install a hard
drive in the hard drive bay (see "Drive Problems" on page 87).
ERROR READING PCMCIA CARD—
The computer cannot identify the PC Card. Reinsert the card or try
another PC Card (see "Installing a PC Card or ExpressCard" on page 68).
EXTENDED MEMORY SIZE HAS CHANGED—
The amount of memory recorded in NVRAM does not match the
memory installed in the computer. Restart the computer. If the error appears again, contact Dell
(see "Obtaining Assistance" on page 159).
THE FILE BEING COPIED IS TOO LARGE FOR THE DESTINATION DRIVE—
The file that you are trying to copy is too
large to fit on the disk, or the disk is too full. Try copying the file to a different disk or use a larger
capacity disk.
A FILENAME CANNOT CONTAIN ANY OF THE FOLLOWING CHARACTERS: \ / : * ? “ < > |—
Do not use these characters
in filenames.
GATE A20 FAILURE—
A memory module may be loose. Reinstall the memory modules and, if necessary,
replace them (see "Memory Problems" on page 97).
GENERAL FAILURE—
followed by specific information—for example,
The operating system is unable to carry out the command. The message is usually
Printer out of paper
.
Take the appropriate
action.
HARD-DISK DRIVE CONFIGURATION ERROR—
The computer cannot identify the drive type. Shut down the
computer, remove the hard drive (see "Hard drive problems" on page 88), and boot the computer
from media. Then shut down the computer, reinstall the hard drive, and restart the computer. Run
the Hard-Disk Drive tests in the Dell Diagnostics (see "Dell Diagnostics" on page 83).
HARD-DISK DRIVE CONTROLLER FAILURE 0—
The hard drive does not respond to commands from the
computer. Shut down the computer, remove the hard drive (see "Hard drive problems" on page 88),
and boot the computer from media. Then shut down the computer, reinstall the hard drive, and
restart the computer. If the problem persists, try another drive. Run the Hard-Disk Drive tests in
the Dell Diagnostics (see "Dell Diagnostics" on page 83).
HARD-DISK DRIVE FAILURE—
The hard drive does not respond to commands from the computer. Shut
down the computer, remove the hard drive (see "Hard drive problems" on page 88), and boot the
computer from media. Then shut down the computer, reinstall the hard drive, and restart the
computer. If the problem persists, try another drive. Run the Hard-Disk Drive tests in the Dell
Diagnostics (see "Dell Diagnostics" on page 83).
HARD-DISK DRIVE READ FAILURE—
The hard drive may be defective. Shut down the computer, remove the
hard drive (see "Hard drive problems" on page 88), and boot the computer from media. Then shut
down the computer, reinstall the hard drive, and restart the computer. If the problem persists, try
another drive. Run the Hard-Disk Drive tests in the Dell Diagnostics (see "Dell Diagnostics" on
page 83).
INSERT BOOTABLE MEDIA—
The operating system is trying to boot to nonbootable media. Insert bootable
media.
Troubleshooting 91
Page 90

INVALID CONFIGURATION INFORMATION-PLEASE RUN SYSTEM SETUP PROGRAM—
The system configuration
information does not match the hardware configuration. The message is most likely to occur after a
memory module is installed. Correct the appropriate options in the system setup program (see
"System Setup Program" on page 111).
www.dell.com | support.dell.com
KEYBOARD CLOCK LINE FAILURE—
Controller
KEYBOARD CONTROLLER FAILURE—
test in the Dell Diagnostics (see "Dell Diagnostics" on page 83).
For external keyboards, check the cable connection. Run the Keyboard
For external keyboards, check the cable connection. Restart the
computer, and avoid touching the keyboard or the mouse during the boot routine. Run the
Keyboard Controller test in the Dell Diagnostics (see "Dell Diagnostics" on page 83).
KEYBOARD DATA LINE FAILURE—
For external keyboards, check the cable connection. Run the Keyboard
Controller test in the Dell Diagnostics (see "Dell Diagnostics" on page 83).
KEYBOARD STUCK KEY FAILURE—
For external keyboards or keypads, check the cable connection. Restart
the computer, and avoid touching the keyboard or keys during the boot routine. Run the Stuck Key
test in the Dell Diagnostics (see "Dell Diagnostics" on page 83).
MEMORY ADDRESS LINE FAILURE AT ADDRESS, READ VALUE EXPECTING VALUE—
A memory module may be faulty or
improperly seated. Reinstall the memory modules and, if necessary, replace them (see "Memory
Problems" on page 97.
MEMORY ALLOCATION ERROR—
The software you are attempting to run is conflicting with the operating
system, another program, or a utility. Shut down the computer, wait 30 seconds, and then restart it.
Try to run the program again. If the error message still appears, see the software documentation.
MEMORY DATA LINE FAILURE AT ADDRESS, READ VALUE EXPECTING VALUE—
A memory module may be faulty or
improperly seated. Reinstall the memory modules (see "Memory Problems" on page 97) and, if
necessary, replace them.
MEMORY DOUBLE WORD LOGIC FAILURE AT ADDRESS, READ VALUE EXPECTING VALUE—
A memory module may be
faulty or improperly seated. Reinstall the memory modules (see "Memory Problems" on page 97)
and, if necessary, replace them.
MEMORY ODD/EVEN LOGIC FAILURE AT ADDRESS, READ VALUE EXPECTING VALUE—
or improperly seated. Reinstall the memory modules (see "Memory Problems" on page 97) and, if
necessary, replace them.
MEMORY WRITE/READ FAILURE AT ADDRESS, READ VALUE EXPECTING VALUE—
improperly seated. Reinstall the memory modules (see "Memory Problems" on page 97) and, if
necessary, replace them.
NO BOOT DEVICE AVAILABLE—
device, ensure that the drive is installed, properly seated, and partitioned as a boot device.
NO BOOT SECTOR ON HARD DRIVE—
Assistance" on page 159).
NO TIMER TICK INTERRUPT—
A chip on the system board may be malfunctioning. Run the System Set
tests in the Dell Diagnostics (see "Dell Diagnostics" on page 83).
92 Troubleshooting
A memory module may be faulty
A memory module may be faulty or
The computer cannot find the hard drive. If the hard drive is your boot
The operating system may be corrupted. Contact Dell (see "Obtaining
Page 91

NOT ENOUGH MEMORY OR RESOURCES. EXIT SOME PROGRAMS AND TRY AGAIN—
Close all windows and open the program that you want to use.
You have too many programs open.
OPERATING SYSTEM NOT FOUND—
Reinstall the hard drive (see "Drive Problems" on page 87). If the
problem persists, contact Dell (see "Obtaining Assistance" on page 159).
OPTIONAL ROM BAD CHECKSUM—
The optional ROM apparently failed. Contact Dell (see "Obtaining
Assistance" on page 159).
A REQUIRED .DLL FILE WAS NOT FOUND—
The program that you are trying to open is missing an essential
file. Remove and then reinstall the program.
1
Click the Start button and click
2
Click
Add or Remove Programs
3
Select the program you want to remove.
4
Click
Remove
5
See the program documentation for installation instructions.
SECTOR NOT FOUND—
or
Change/Remove
The operating system cannot locate a sector on the hard drive. You may have a
Control Panel
.
.
and follow the prompts on the screen.
defective sector or corrupted FAT on the hard drive. Run the Windows error-checking utility to
check the file structure on the hard drive. For instructions, access the Help and Support Center
(click
Start→
Help and Support
). If a large number of sectors are defective, back up the data (if
possible), and then reformat the hard drive.
SEEK ERROR—
SHUTDOWN FAILURE—
The operating system cannot find a specific track on the hard drive.
A chip on the system board may be malfunctioning. Run the System Set tests in
the Dell Diagnostics (see "Dell Diagnostics" on page 83).
TIME-OF-DAY CLOCK LOST POWER—
System configuration settings are corrupted. Connect your computer
to an electrical outlet to charge the battery. If the problem persists, try to restore the data by
entering the system setup program. Then immediately exit the program. If the message reappears,
contact Dell (see "Obtaining Assistance" on page 159).
TIME-OF-DAY CLOCK STOPPED—
The reserve battery that supports the system configuration settings may
require replacement (see "Coin-Cell Battery" on page 128).
TIME-OF-DAY NOT SET-PLEASE RUN THE SYSTEM SETUP PROGRAM—
program does not match the system clock. Correct the settings for the
The time or date stored in the system setup
Date
and
Time
options (see
"System Setup Program" on page 111).
TIMER CHIP COUNTER 2 FAILED—
A chip on the system board may be malfunctioning. Run the System Set
tests in the Dell Diagnostics (see "Dell Diagnostics" on page 83).
UNEXPECTED INTERRUPT IN PROTECTED MODE—
The keyboard controller may be malfunctioning, or a
memory module may be loose. Run the System Memory tests and the Keyboard Controller test in
the Dell Diagnostics (see "Dell Diagnostics" on page 83).
X:\ IS NOT ACCESSIBLE. THE DEVICE IS NOT READY—
Insert a disk into the drive and try again.
Troubleshooting 93
Page 92

WARNING: BATTERY IS CRITICALLY LOW—
The battery is running out of charge. Replace the battery, or
connect the computer to an electrical outlet. Otherwise, activate hibernate mode or shut down the
computer.
IEEE 1394 Device Problems
Fill out the Diagnostics Checklist (see "Diagnostics Checklist" on page 163) as you complete these
checks.
CAUTION: Before you begin any of the procedures in this section, follow the safety instructions in the
Product Information Guide
NSURE THAT THE IEEE 1394 DEVICE IS RECOGNIZED BY WINDOWS—
E
.
www.dell.com | support.dell.com
1
Click the
2
Click
Start
button and click
Control Panel
Printers and Other Hardware
.
.
If your IEEE 1394 device is listed, Windows recognizes the device.
IF YOU HAVE PROBLEMS WITH A DELL-PROVIDED IEEE 1394 DEVICE—
F YOU HAVE PROBLEMS WITH AN IEEE 1394 DEVICE NOT PROVIDED BY DELL—
I
Contact Dell (
E
NSURE THAT THE
see "Obtaining Assistance" on page 159)
IEEE 1394
DEVICE IS PROPERLY INSERTED INTO THE CONNECTOR
or the IEEE 1394 device manufacturer.
.
Keyboard Problems
Fill out the Diagnostics Checklist (see "Diagnostics Checklist" on page 163) as you complete these
checks.
CAUTION: Before you begin any of the procedures in this section, follow the safety instructions in the
Product Information Guide
NOTE: Use the integrated keyboard when running the Dell Diagnostics or the system setup program.
When you attach an external keyboard, the integrated keyboard remains fully functional.
External Keyboard problems
NOTE: When you attach an external keyboard, the integrated keyboard remains fully functional.
HECK THE KEYBOARD CABLE—
C
damage, and firmly reconnect the cable.
.
Shut down the computer. Disconnect the keyboard cable and check it for
If you are using a keyboard extension cable, disconnect it and connect the keyboard directly to the
computer.
CHECK THE EXTERNAL KEYBOARD—
1
Shut down the computer, wait 1 minute, and turn it on again.
2
Verify that the numbers, capitals, and scroll lock lights on the keyboard blink during the boot
routine.
94 Troubleshooting
Page 93

3
From the Windows desktop, click the
and click
4
Type some characters on the external keyboard and verify that they appear on the display.
Notepad
.
Start
button, point to
Programs
, point to
Accessories
If you cannot verify these steps, you may have a defective external keyboard.
TO VERIFY THAT THE PROBLEM IS WITH THE EXTERNAL KEYBOARD, CHECK THE INTEGRATED KEYBOARD—
1
Shut down the computer.
2
Disconnect the external keyboard.
3
Turn on the computer.
4
From the Windows desktop, click the
and click
5
Type some characters on the internal keyboard and verify that they appear on the display.
Notepad
.
Start
button, point to
Programs
, point to
Accessories
If the characters appear now but did not with the external keyboard, you may have a defective
external keyboard. Contact Dell (see "Obtaining Assistance" on page 159).
,
,
RUN THE KEYBOARD DIAGNOSTICS TESTS—
Run the PC-AT Compatible Keyboards tests in the Dell
Diagnostics (see "Dell Diagnostics" on page 83). If the tests indicate a defective external keyboard,
contact Dell (see "Obtaining Assistance" on page 159).
Unexpected characters
DISABLE THE NUMERIC KEYPAD—
displayed instead of letters. Verify that the numbers lock light is not lit.
Press <Num Lk> to disable the numeric keypad if numbers are
Lockups and Software Problems
Fill out the Diagnostics Checklist (see "Diagnostics Checklist" on page 163) as you complete these
checks.
CAUTION: Before you begin any of the procedures in this section, follow the safety instructions in the
Product Information Guide
The computer does not start up
ENSURE THAT THE AC ADAPTER IS FIRMLY CONNECTED TO THE COMPUTER AND TO THE
ELECTRICAL OUTLET.
The computer stops responding
.
NOTICE: You might lose data if you are unable to perform an operating system shutdown.
URN THE COMPUTER OFF—
T
If you are unable to get a response by pressing a key on your keyboard or
moving your mouse, press and hold the power button for at least 8 to 10 seconds until the
computer turns off. Then restart your computer.
Troubleshooting 95
Page 94

A program stops responding or crashes repeatedly
NOTE: Software usually includes installation instructions in its documentation or on a floppy disk or CD.
ND THE PROGRAM—
E
1
Press <Ctrl><Shift><Esc> simultaneously.
2
Click
Tas k M anag e r
3
Click the program that is no longer responding.
4
Click
End Task
.
.
www.dell.com | support.dell.com
CHECK THE SOFTWARE DOCUMENTATION—
If necessary, uninstall and then reinstall the program.
A program is designed for an earlier Microsoft® Windows® operating system
RUN THE PROGRAM COMPATIBILITY WIZARD—
it runs in an environment similar to non-Windows operating system environments.
1
Click
Start→
2
Follow the instructions on the screen.
All Programs→ Accessories→
The Program Compatibility Wizard configures a program so
Program Compatibility Wizard→ Next
.
A solid blue screen appears
TURN THE COMPUTER OFF—
moving your mouse, press and hold the power button for at least 8 to 10 seconds until the
computer turns off. Then restart your computer.
If you are unable to get a response by pressing a key on your keyboard or
Other software problems
CHECK THE SOFTWARE DOCUMENTATION OR CONTACT THE SOFTWARE MANUFACTURER FOR TROUBLESHOOTING
INFORMATION—
• Ensure that the program is compatible with the operating system installed on your computer.
• Ensure that your computer meets the minimum hardware requirements needed to run the
software. See the software documentation for information.
• Ensure that the program is installed and configured properly.
• Verify that the device drivers do not conflict with the program.
• If necessary, uninstall and then reinstall the program.
BACK UP YOUR FILES IMMEDIATELY.
SE A VIRUS-SCANNING PROGRAM TO CHECK THE HARD DRIVE, FLOPPY DISKS, OR CDS.
U
AVE AND CLOSE ANY OPEN FILES OR PROGRAMS AND SHUT DOWN YOUR COMPUTER
S
96 Troubleshooting
Page 95

THROUGH THE Start MENU.
CAN THE COMPUTER FOR SPYWARE —
S
If you are experiencing slow computer performance, you frequently
receive pop-up advertisements, or you are having problems connecting to the Internet, your
computer might be infected with spyware. Use an anti-virus program that includes anti-spyware
protection (your program may require an upgrade) to scan the computer and remove spyware. For
more information, go to
support.dell.com
and search for the keyword
spyware
.
RUN THE DELL DIAGNOSTICS—
See "Dell Diagnostics" on page 83. If all tests run successfully, the error
condition is related to a software problem.
Memory Problems
Fill out the Diagnostics Checklist (see "Diagnostics Checklist" on page 163) as you complete these
checks.
CAUTION: Before you begin any of the procedures in this section, follow the safety instructions in the
Product Information Guide
F YOU RECEIVE AN INSUFFICIENT MEMORY MESSAGE—
I
• Save and close any open files and exit any open programs you are not using to see if that
resolves the problem.
• See the software documentation for minimum memory requirements. If necessary, install
additional memory (s
• Reseat the memory modules to ensure that your computer is successfully communicating
with the memory (see "Memory Problems" on page 97).
• Run the Dell Diagnostics (see "Dell Diagnostics" on page 83).
IF YOU EXPERIENCE OTHER MEMORY PROBLEMS—
• Reseat the memory modules (see "Memory Problems" on page 97) to ensure that your
computer is successfully communicating with the memory.
.
ee "Memory Problems" on page 97).
• Ensure that you are following the memory installation guidelines (see "Memory Problems" on
page 97).
• Run the Dell Diagnostics
(see "Dell Diagnostics" on page 83)
Network Problems
Fill out the Diagnostics Checklist (see "Diagnostics Checklist" on page 163) as you complete these
checks.
CAUTION: Before you begin any of the procedures in this section, follow the safety instructions in the
Product Information Guide
.
.
Troubleshooting 97
Page 96

General
www.dell.com | support.dell.com
CHECK THE NETWORK CABLE CONNECTOR—
Ensure that the network cable is firmly inserted into both the
network connector on the back of the computer and the network connector.
CHECK THE NETWORK LIGHTS ON THE NETWORK CONNECTOR—
No light indicates that no network
communication exists. Replace the network cable.
RESTART THE COMPUTER AND LOG ON TO THE NETWORK AGAIN.
HECK YOUR NETWORK SETTINGS—
C
Contact your network administrator or the person who set up your
network to verify that your network settings are correct and that the network is functioning.
Wireless Local Area Network (WLAN)
For information about troubleshooting wireless local area networks, see "Wireless Local Area
Network" on page 52.
Mobile Broadband (Wireless Wide Area Network)
NOTE: The Dell Mobile Broadband Card Utility user’s guide is available through the Windows Help and
→
Support Center. To access the Help and Support Center, click Start
download the Dell Mobile Broadband Card Utility user’s guide from support.dell.com.
NOTE: Remove any network cables from the computer and disable the WLAN card. To disable the WLAN
→
card, click Start
NOTE: The icon appears on the Windows desktop if the computer has a Dell Mobile Broadband
card installed. Double-click the icon to launch the utility. Once the utility has launched, the icon appears
in the notification area.
ANNOT CONNECT—
C
Connect To→ Wireless Network Connection→ Disable.
The Dell Mobile Broadband Card must be activated on the network in order to
connect. Once the Dell Mobile Broadband Card Utility has been launched, position the mouse
over the icon in the taskbar to read the status of the connection. If the status indicates the
mobile broadband card is not activated, see "Activate your Mobile Broadband card" on page 99 for
more information. If problems persist, contact your Mobile Broadband service carrier for details on
your plan.
Help and Support. You can also
CHECK YOUR MOBILE BROADBAND NETWORK SERVICE—
verify coverage plan and supported services.
CHECK THE STATUS IN THE DELL MOBILE BROADBAND CARD UTILITY—
desktop to launch the utility. Check the status in the main window:
•
No card detected
Radio Off
•
– Ensure the Mobile Broadband card is enabled by viewing the status in the
Dell Mobile Broadband Card Utility. If the card is disabled, enable the Mobile Broadband
card by clicking the
Card Utility.
•
Searching
– The Dell Mobile Broadband Card Utility has not yet located a Mobile
Broadband network. If the searching state persists, ensure that the signal strength is adequate.
98 Troubleshooting
Contact your Mobile Broadband service carrier to
Click the icon on the Windows
– Restart the computer and launch the utility again.
Turn R adio O n
button in the main screen of the Dell Mobile Broadband
Page 97

•
No service
– The Dell Mobile Broadband Card Utility did not locate a Mobile Broadband
network. Ensure that the signal strength is adequate. Restart the Dell wireless utility or
contact your Mobile Broadband network provider.
•
Check your Mobile Broadband Network Service
– Contact your Mobile
Broadband network service provider to verify coverage plan and supported services.
ACTIVATE YOUR MOBILE BROADBAND CARD—
Before you connect to the Internet, you must activate the
Mobile Broadband service through your cellular service provider. For instructions and for additional
information about using the Dell Mobile Broadband Card Utility, see the user's guide available
through the Windows Help and Support Center (click
guide is also available on the Dell Support website at
Start→
Help and Support
support.dell.com
). The user's
and on the media included
with your Mobile Broadband card if you purchased the card separately from your computer.
PC Card Problems
Fill out the Diagnostics Checklist (see "Diagnostics Checklist" on page 163) as you complete these
checks.
CAUTION: Before you begin any of the procedures in this section, follow the safety instructions in the
Product Information Guide
HECK THE CARD—
C
ENSURE THAT THE CARD IS RECOGNIZED BY WINDOWS—
Ensure that the card is properly inserted into the connector.
Windows taskbar. Ensure that the card is listed.
IF YOU HAVE PROBLEMS WITH A DELL-PROVIDED CARD—
page 159).
IF YOU HAVE PROBLEMS WITH A CARD NOT PROVIDED BY DELL—
.
Double-click the
Safely Remove Hardware
icon in the
Contact Dell (see "Obtaining Assistance" on
Contact the card manufacturer.
Power Problems
Fill out the Diagnostics Checklist (see "Diagnostics Checklist" on page 163) as you complete these
checks.
CAUTION: Before you begin any of the procedures in this section, follow the safety instructions in the
Product Information Guide
HECK THE POWER LIGHT—
C
When the power light is lit or blinking, the computer has power. If the power
light is blinking, the computer is in standby mode—press the power button to exit standby mode.
If the light is off, press the power button to turn on the computer.
CHARGE THE BATTERY—
1
Reinstall the battery.
2
Use the AC adapter to connect the computer to an electrical outlet.
3
Turn on the computer.
The battery charge may be depleted.
.
Troubleshooting 99
Page 98

NOTE: Battery operating time (the time the battery can hold a charge) decreases over time. Depending
on how often the battery is used and the conditions under which it is used, you may need to purchase a
new battery during the life of your computer.
HECK THE BATTERY STATUS LIGHT—
C
If the battery status light flashes orange or is a steady orange the
battery charge is low or depleted. Connect the computer to an electrical outlet.
If the battery status light flashes green and orange, the battery is too hot to charge. Shut down the
computer, disconnect the computer from the electrical outlet, and then let the battery and
computer cool to room temperature.
If the battery status light rapidly flashes orange, the battery may be defective. Contact Dell (see
"Obtaining Assistance" on page 159).
www.dell.com | support.dell.com
CHECK THE BATTERY TEMPERATURE—
If the battery temperature is below 0° C (32° F), the computer will
not start up.
TEST THE ELECTRICAL OUTLET—
Ensure that the electrical outlet is working by testing it with another
device, such as a lamp.
CHECK THE AC ADAPTER—
Check the AC adapter cable connections. If the AC adapter has a light,
ensure that the light is on.
CONNECT THE COMPUTER DIRECTLY TO AN ELECTRICAL OUTLET—
Bypass power protection devices, power strips,
and the extension cable to verify that the computer turns on.
ELIMINATE POSSIBLE INTERFERENCE—
Turn off nearby fans, fluorescent lights, halogen lamps, or other
appliances.
ADJUST THE POWER PROPERTIES—
RESEAT THE MEMORY MODULES—
See "Configuring Power Management Settings" on page 37.
If the computer power light turns on but the display remains blank,
reinstall the memory modules (see "Memory Problems" on page 97).
Ensuring Sufficient Power for Your Computer
Your computer is designed to use a 65-W or higher AC adapter.
Using AC adapters that are less-powerful than 65 W will cause you to receive a
Docking Power Considerations
WARNING
message.
Due to the extra power consumption when a computer is docked to the Dell D/Dock, normal
computer operation is not possible on battery power alone. Ensure that the AC adapter is
connected to your computer when the computer is docked to the Dell D/Dock.
Docking While the Computer Is Running
If a computer is connected to the Dell D/Dock or Dell D/Port while the computer is running,
presence of the docking device is ignored until the AC adapter is connected to the computer.
100 Troubleshooting
Page 99

AC Power Loss While the Computer Is Docked
If a computer loses AC power while docked to the Dell D/Dock or Dell D/Port, the computer
immediately goes into low-performance mode.
Printer Problems
Fill out the Diagnostics Checklist (see "Diagnostics Checklist" on page 163) as you complete these
checks.
CAUTION: Before you begin any of the procedures in this section, follow the safety instructions in the
Product Information Guide
NOTE: If you need technical assistance for your printer, contact the printer’s manufacturer.
NSURE THAT THE PRINTER IS TURNED ON.
E
HECK THE PRINTER CABLE CONNECTIONS—
C
• See the printer documentation for cable connection information.
• Ensure that the printer cables are securely connected to the printer and the computer.
.
TEST THE ELECTRICAL OUTLET—
Ensure that the electrical outlet is working by testing it with another
device, such as a lamp.
VERIFY THAT THE PRINTER IS RECOGNIZED BY WINDOWS—
1
Click the
2
Click
If the printer is listed, right-click the printer icon.
3
Click
following port(s):
the following port(s):
REINSTALL THE PRINTER DRIVER—
Start
button, click
Control Panel
View installed printers or fax printers
Properties
and click the
setting is
LPT1 (Printer Port)
setting is
Ports
tab. For a parallel printer, ensure that the
USB
.
See the printer documentation for instructions.
, and then click
Printers and Other Hardware
.
. For a USB printer, ensure that the
.
Print to the
Print to
Scanner Problems
Fill out the Diagnostics Checklist (see "Diagnostics Checklist" on page 163) as you complete these
checks.
CAUTION: Before you begin any of the procedures in this section, follow the safety instructions in the
Product Information Guide
NOTE: If you need technical assistance for your scanner, contact the scanner’s manufacturer.
HECK THE SCANNER DOCUMENTATION—
C
information.
.
See the scanner documentation for setup and troubleshooting
UNLOCK THE SCANNER—
Ensure that your scanner is unlocked if it has a locking tab or button.
Troubleshooting 101
Page 100

RESTART THE COMPUTER AND TRY THE SCANNER AGAIN.
HECK THE CABLE CONNECTIONS—
C
• See the scanner documentation for cable connection information.
• Ensure that the scanner cables are securely connected to the scanner and the computer.
VERIFY THAT THE SCANNER IS RECOGNIZED BY MICROSOFT WINDOWS—
1
Click
2
Start→
Click
Scanners and Cameras
Control Panel→
.
Printers and Other Hardware
.
If your scanner is listed, Windows recognizes the scanner.
www.dell.com | support.dell.com
REINSTALL THE SCANNER DRIVER—
See the scanner documentation for instructions.
Sound and Speaker Problems
Fill out the Diagnostics Checklist (see "Diagnostics Checklist" on page 163) as you complete these
checks.
CAUTION: Before you begin any of the procedures in this section, follow the safety instructions in the
Product Information Guide
No sound from integrated speakers
ADJUST THE WINDOWS VOLUME CONTROL—
screen. Ensure that the volume is turned up and that the sound is not muted. Adjust the volume,
bass, or treble controls to eliminate distortion.
ADJUST THE VOLUME USING KEYBOARD SHORTCUTS—
integrated speakers.
REINSTALL THE SOUND (AUDIO) DRIVER—
No sound from external speakers
ENSURE THAT THE SUBWOOFER AND THE SPEAKERS ARE TURNED ON—
speakers. If your speakers have volume controls, adjust the volume, bass, or treble to eliminate
distortion.
.
Double-click the speaker icon in the lower-right corner of your
Press <Fn><End> to disable (mute) or reenable the
See "Reinstalling Drivers and Utilities" on page 116.
See the setup diagram supplied with the
ADJUST THE WINDOWS VOLUME CONTROL—
of your screen. Ensure that the volume is turned up and that the sound is not muted.
DISCONNECT HEADPHONES FROM THE HEADPHONE CONNECTOR—
disabled when headphones are connected to the computer’s front-panel headphone connector.
TEST THE ELECTRICAL OUTLET—
device, such as a lamp.
ELIMINATE POSSIBLE INTERFERENCE—
for interference.
REINSTALL THE AUDIO DRIVER—
102 Troubleshooting
Click or double-click the speaker icon in the lower-right corner
Sound from the speakers is automatically
Ensure that the electrical outlet is working by testing it with another
Turn off nearby fans, fluorescent lights, or halogen lamps to check
See "Reinstalling Drivers and Utilities" on page 116.
 Loading...