

Page 1

Dell™ Latitude™ D530
Quick Reference Guide
Model PP17L
www.dell.com | support.dell.com
Page 2

Notes, Notices, and Cautions
NOTE: A NOTE indicates important information that helps you make better use of
your computer.
NOTICE: A NOTICE indicates either potential damage to hardware or loss of data
and tells you how to avoid the problem.
CAUTION: A CAUTION indicates a potential for property damage, personal injury,
or death.
____________________
Information in this document is subject to change without notice.
© 2007 Dell Inc. All rights reserved.
Reproduction in any manner whatsoever without the written permission of Dell Inc. is strictly
forbidden.
Trademarks used in this text: Dell, the DELL logo, Latitude, ExpressCharge, and Undock & Go are
trademarks of Dell Inc.; Microsoft, Windows, Outlook, and Windows Vista are either trademarks or
registered trademarks of Microsoft Corporation in the United States and/or other countries; Bluetooth
is a registered trademark owned by Bluetooth SIG, Inc. and is used by Dell under license.
Other trademarks and trade names may be used in this document to refer to either the entities claiming
the marks and names or their products. Dell Inc. disclaims any proprietary interest in trademarks and
trade names other than its own.
Model PP17L
September 2007 P/N NM070 Rev. A00
Page 3

Contents
Finding Information . . . . . . . . . . . . . . . . . . . . 5
Setting Up Your Computer
. . . . . . . . . . . . . . . . 11
Transferring Information to a New
Computer
Turning Off Your Computer
. . . . . . . . . . . . . . . . . . . . . . 11
. . . . . . . . . . . . . 16
About Your Computer . . . . . . . . . . . . . . . . . . 17
Front View
Left Side View
Right Side View
Back View
Bottom View
Using a Battery
Battery Performance
Checking the Battery Charge
Power Management Modes
Configuring Power Management Settings
. . . . . . . . . . . . . . . . . . . . . 17
. . . . . . . . . . . . . . . . . . . 18
. . . . . . . . . . . . . . . . . . 18
. . . . . . . . . . . . . . . . . . . . . 19
. . . . . . . . . . . . . . . . . . . . 20
. . . . . . . . . . . . . . . . . . . . . 21
. . . . . . . . . . . . . . . . 21
. . . . . . . . . . . 22
. . . . . . . . . . . . 24
. . . . . 26
Troubleshooting
Index . . . . . . . . . . . . . . . . . . . . . . . . . . . . . . . 35
Accessing Power Options Properties
Charging the Battery
Replacing the Battery
Storing a Battery
. . . . . . . . . . . . . . . . . . . . . 28
Lockups and Software Problems
Dell Diagnostics
. . . . . . . . . . . . . . . . 26
. . . . . . . . . . . . . . . 27
. . . . . . . . . . . . . . . . . . 28
. . . . . . . . . 29
. . . . . . . . . . . . . . . . . . 30
. . . . . . . 26
Contents 3
Page 4

4 Contents
Page 5
Finding Information
NOTE: Some features or media may be optional and may not ship with your
computer. Some features or media may not be available in certain countries.
NOTE: Additional information may ship with your computer.
What Are You Looking For? Find It Here
• A diagnostic program for my computer
• Drivers for my computer
• My device documentation
• Notebook System Software (NSS)
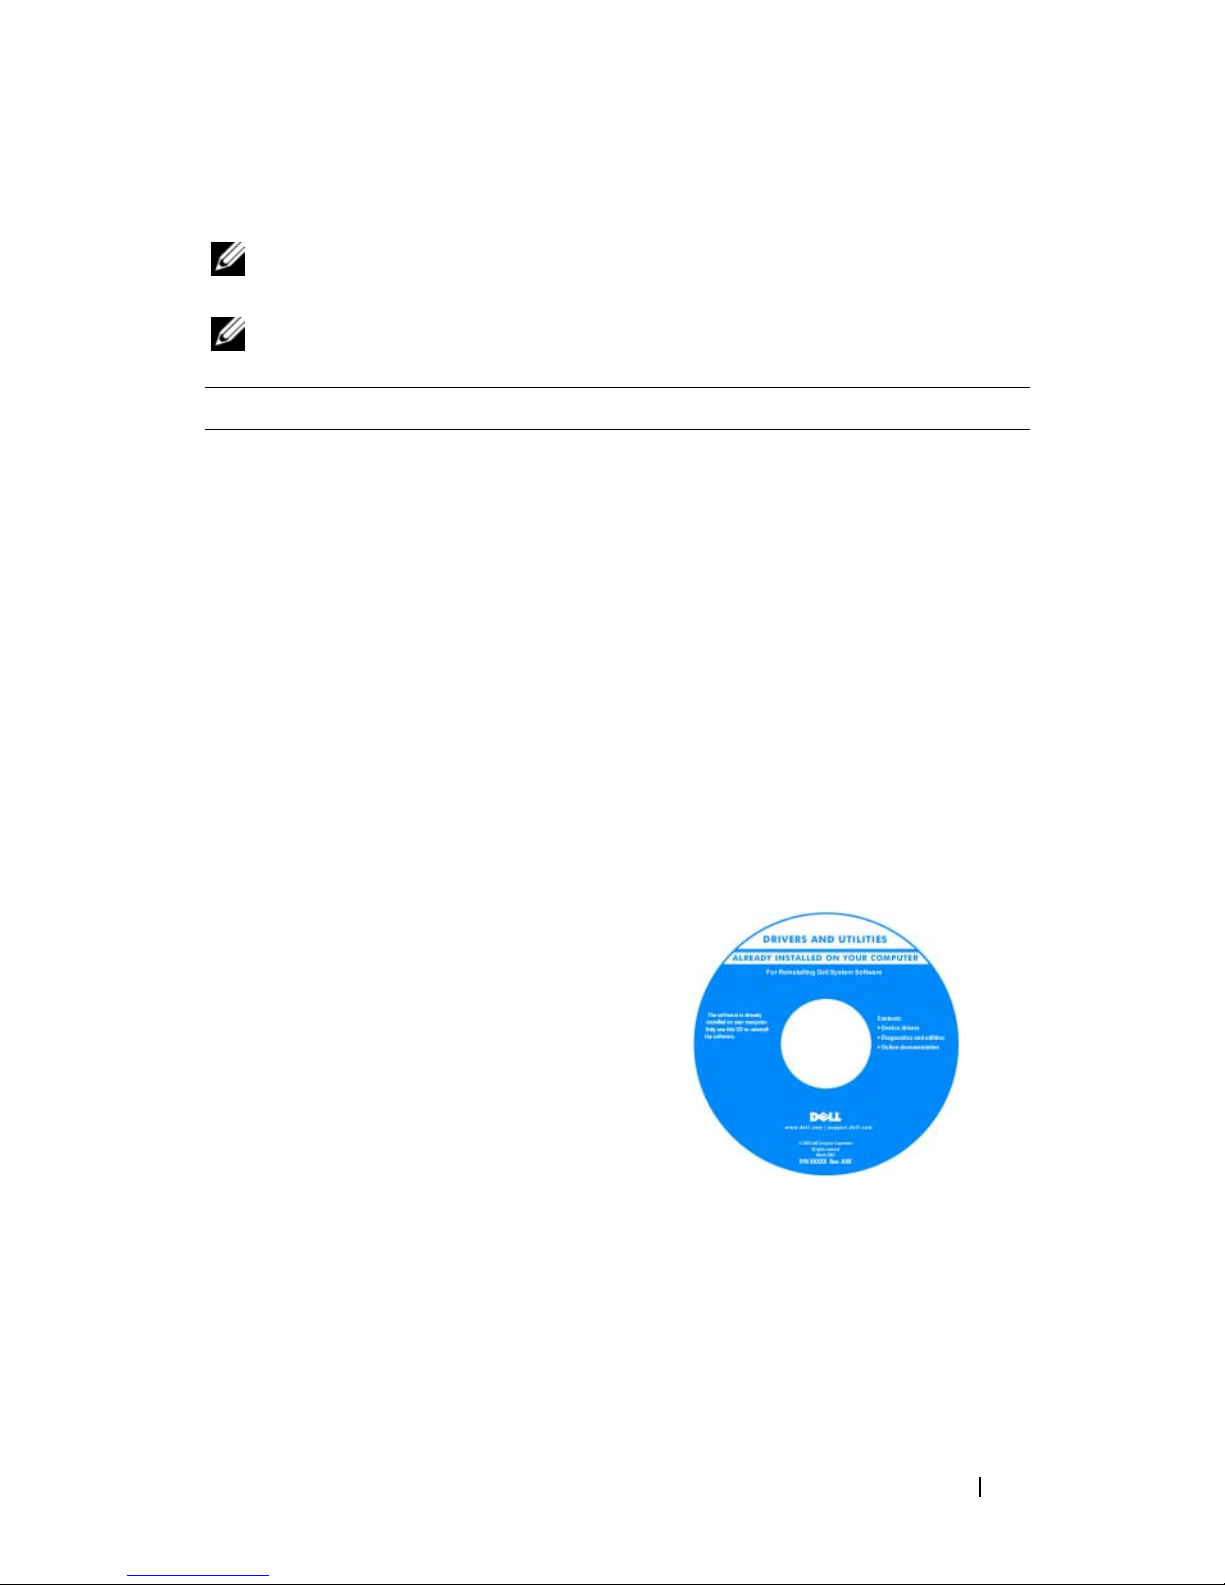
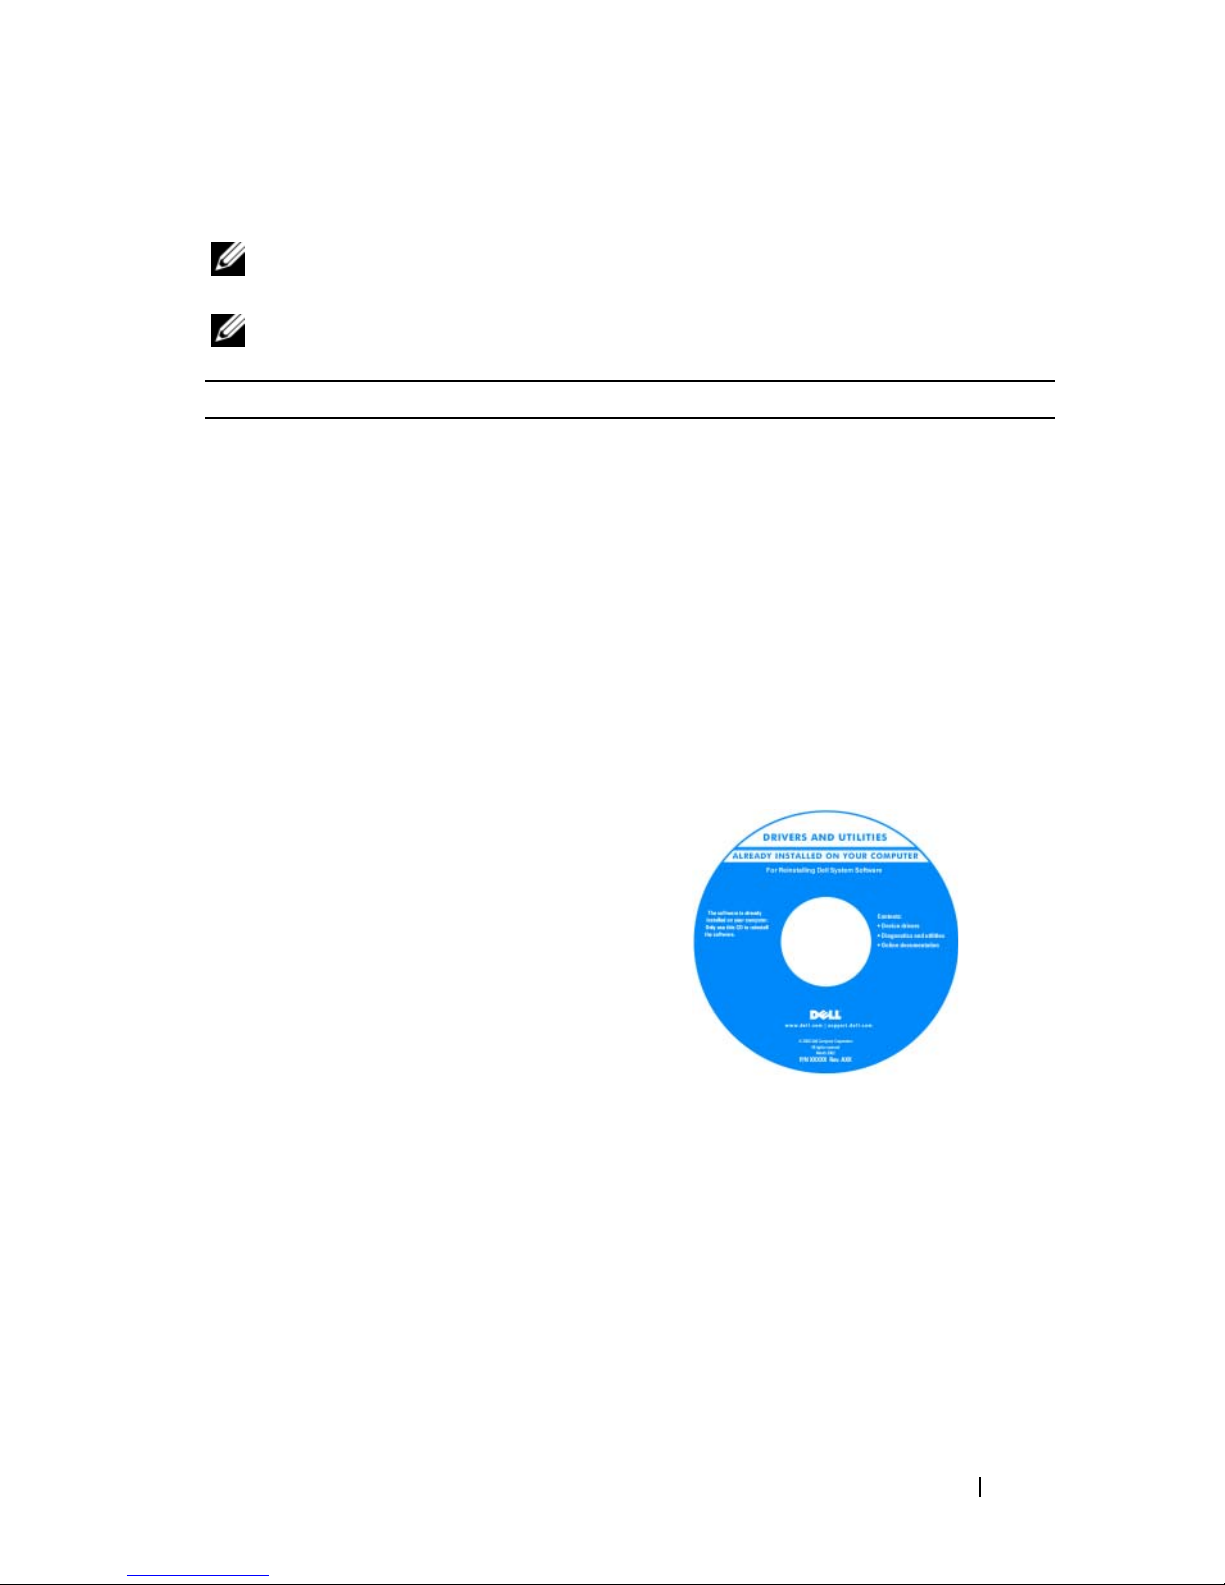
Drivers and Utilities Disc
Documentation and drivers are already
installed on your computer. You can use
the disc to reinstall drivers (see
"Reinstalling Drivers and Utilities" in
your User’s Guide) or to run the Dell
Diagnostics (see "Starting the Dell
Diagnostics From the Optional Drivers
and Utilities Disc" on page 32).
Readme files may be included on your
disc to provide last-minute updates
about technical changes to your
computer or advanced technicalreference material for technicians or
experienced users.
NOTE: Drivers and documentation
updates can be found at support.dell.com.
NOTE: The Drivers and Utilities disc may
be optional and may not ship with your
computer.
Quick Reference Guide 5
Page 6
What Are You Looking For? Find It Here
• Warranty information
• Terms and Conditions (U.S. only)
• Safety instructions
• Regulatory information
• Ergonomics information
• End User License Agreement
• Specifications
• How to configure system settings
• How to troubleshoot and solve
problems
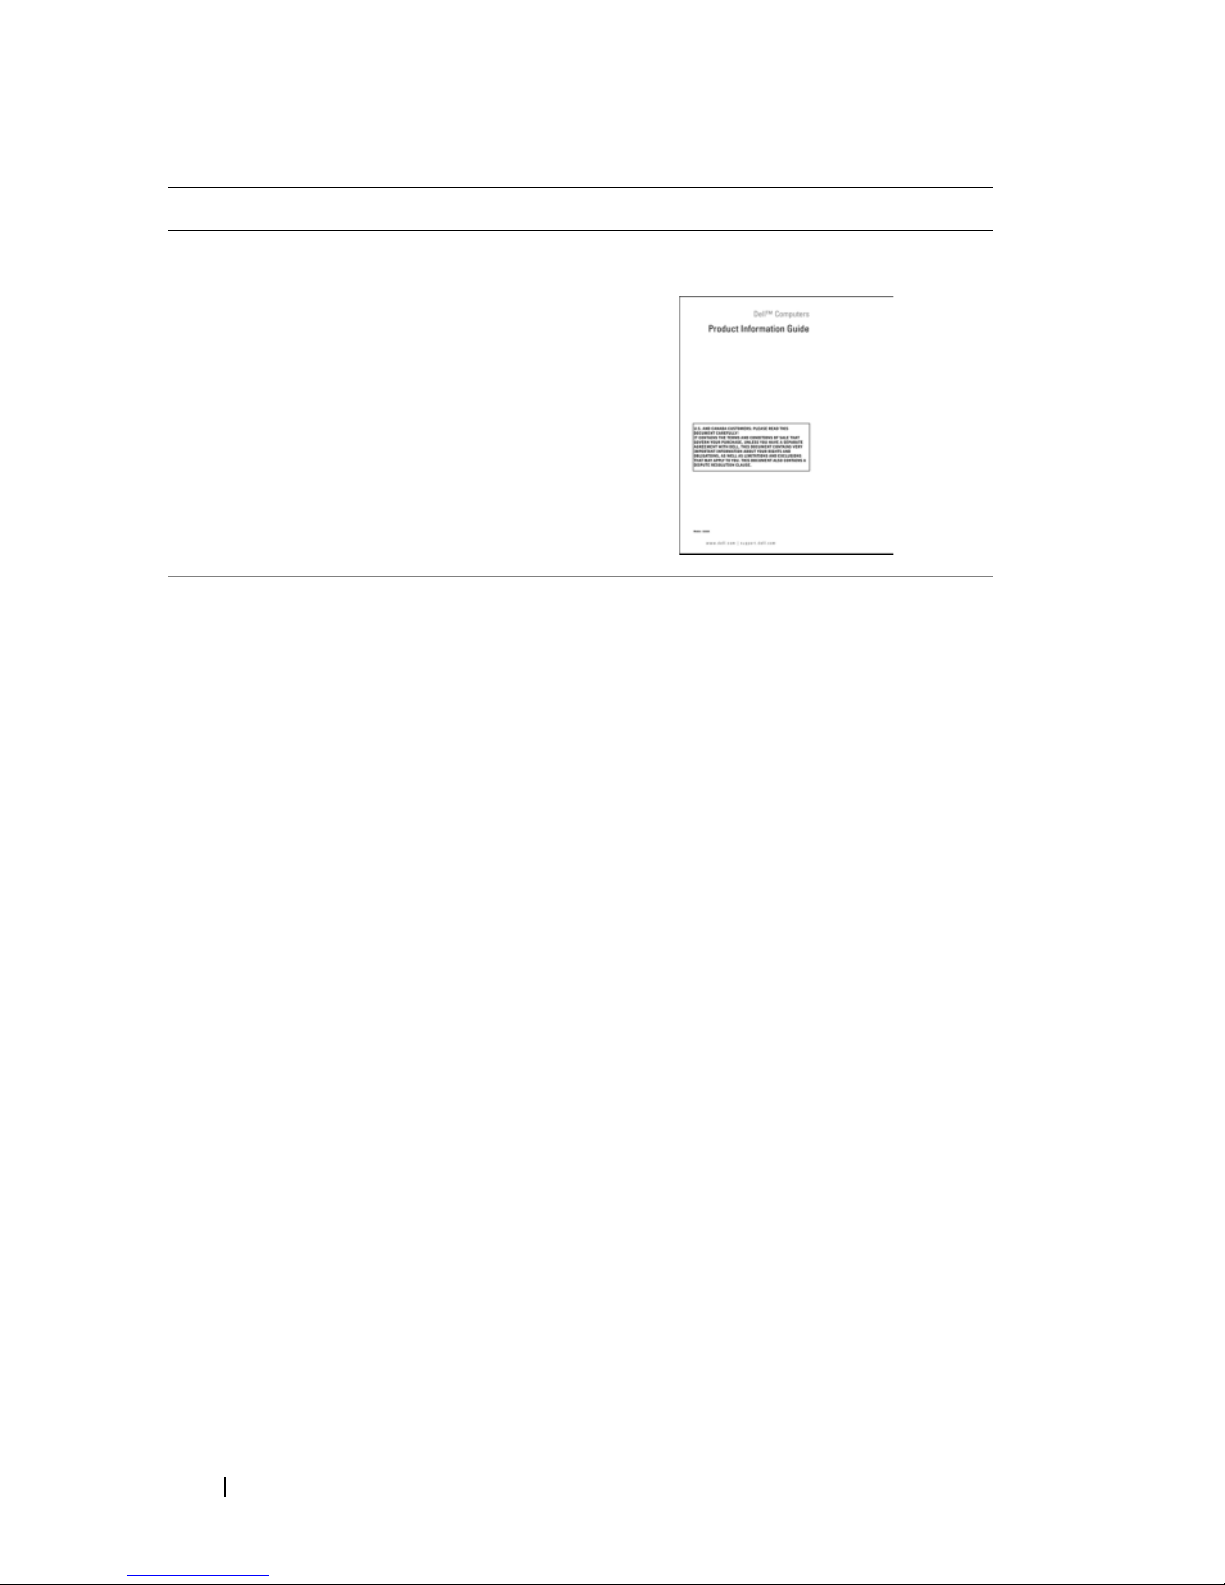
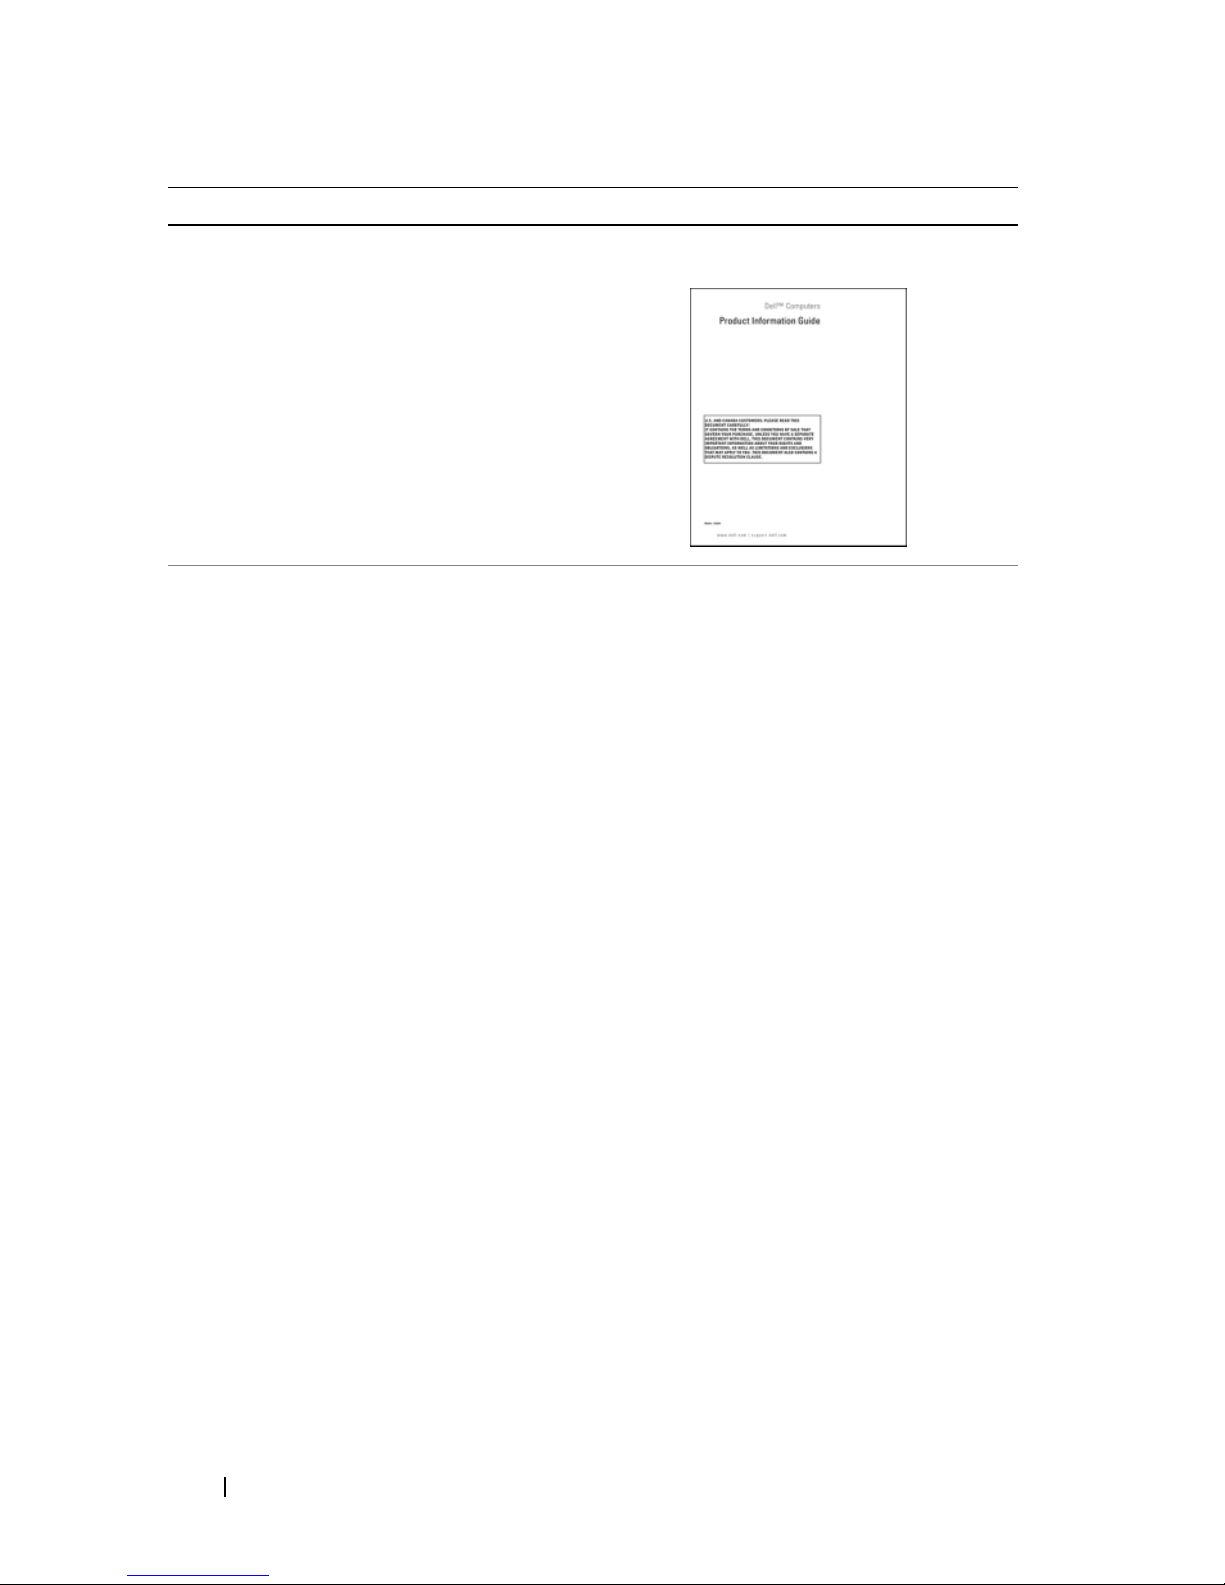
Dell™ Product Information Guide
Dell Latitude™ User’s Guide
®
Microsoft
Windows® XP and Windows
Vista™ Help and Support Center
1
Click
Start→
Help and Support→
Dell User and System Guides
System Guides
2
Click the
.
User’s Guide
for your
computer.
→
6 Quick Reference Guide
Page 7
What Are You Looking For? Find It Here
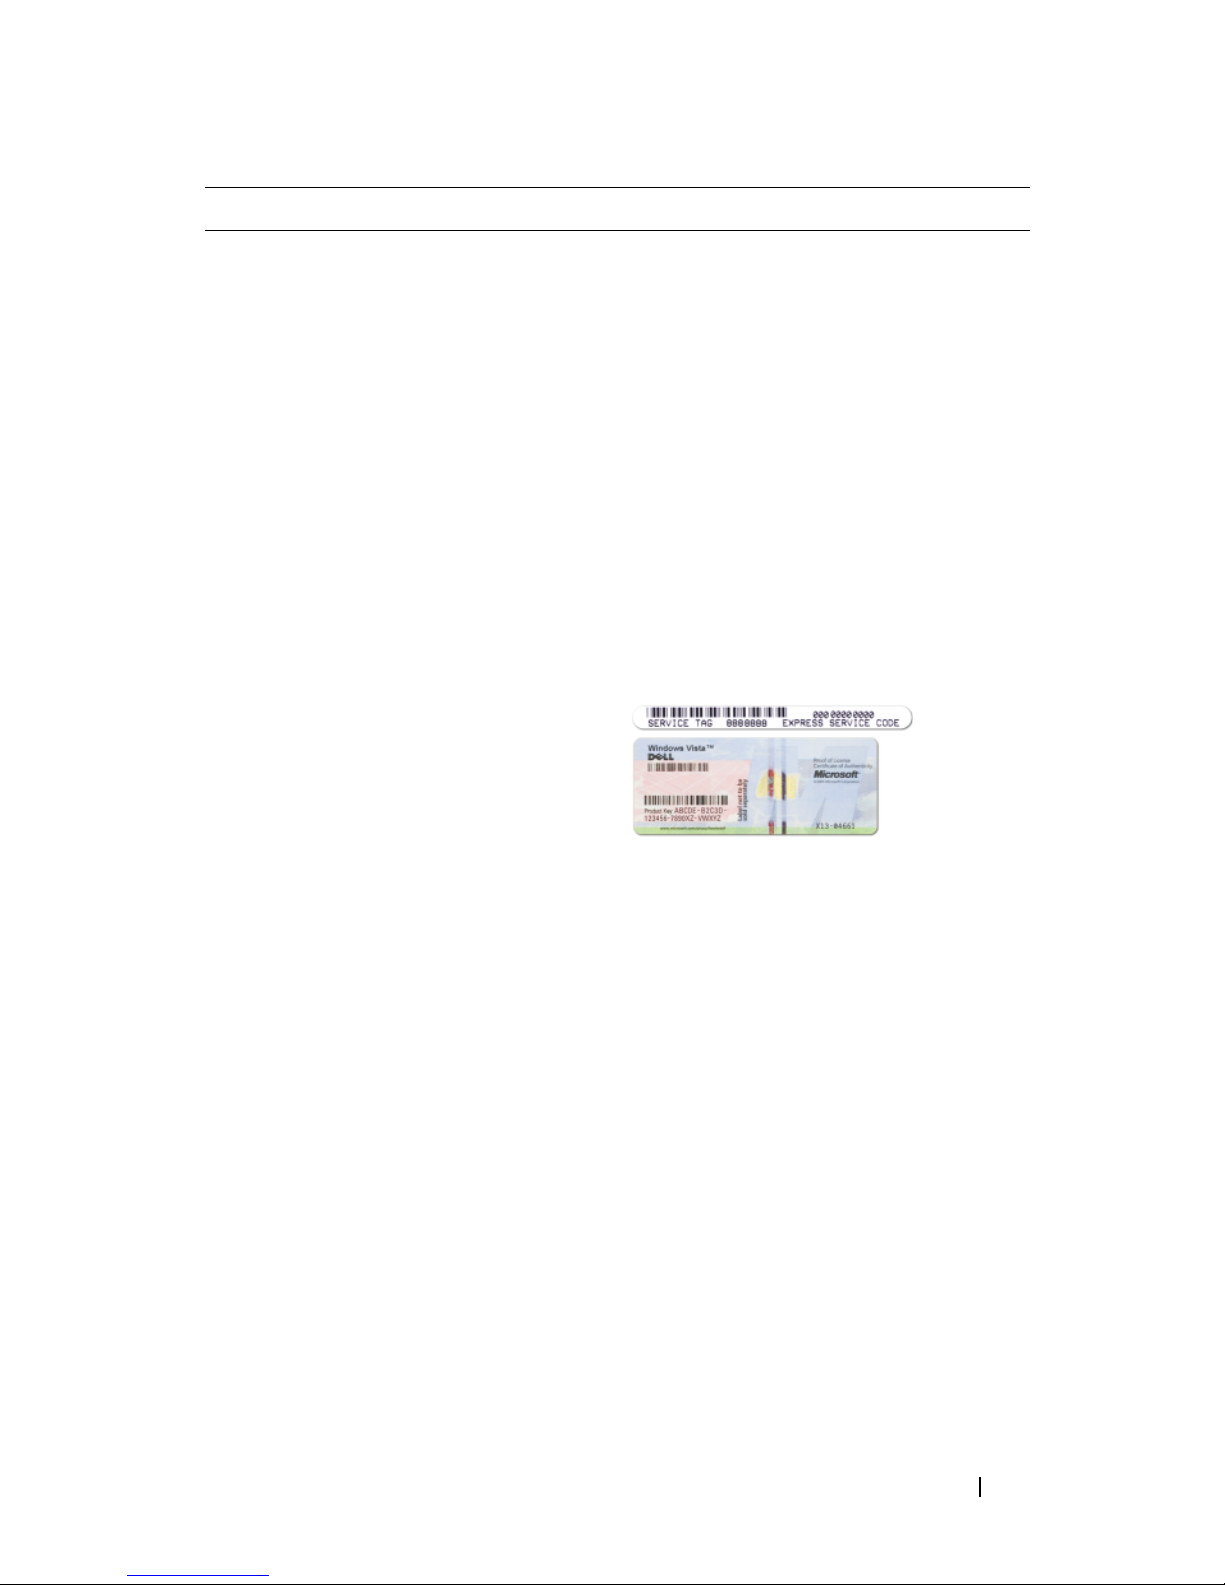
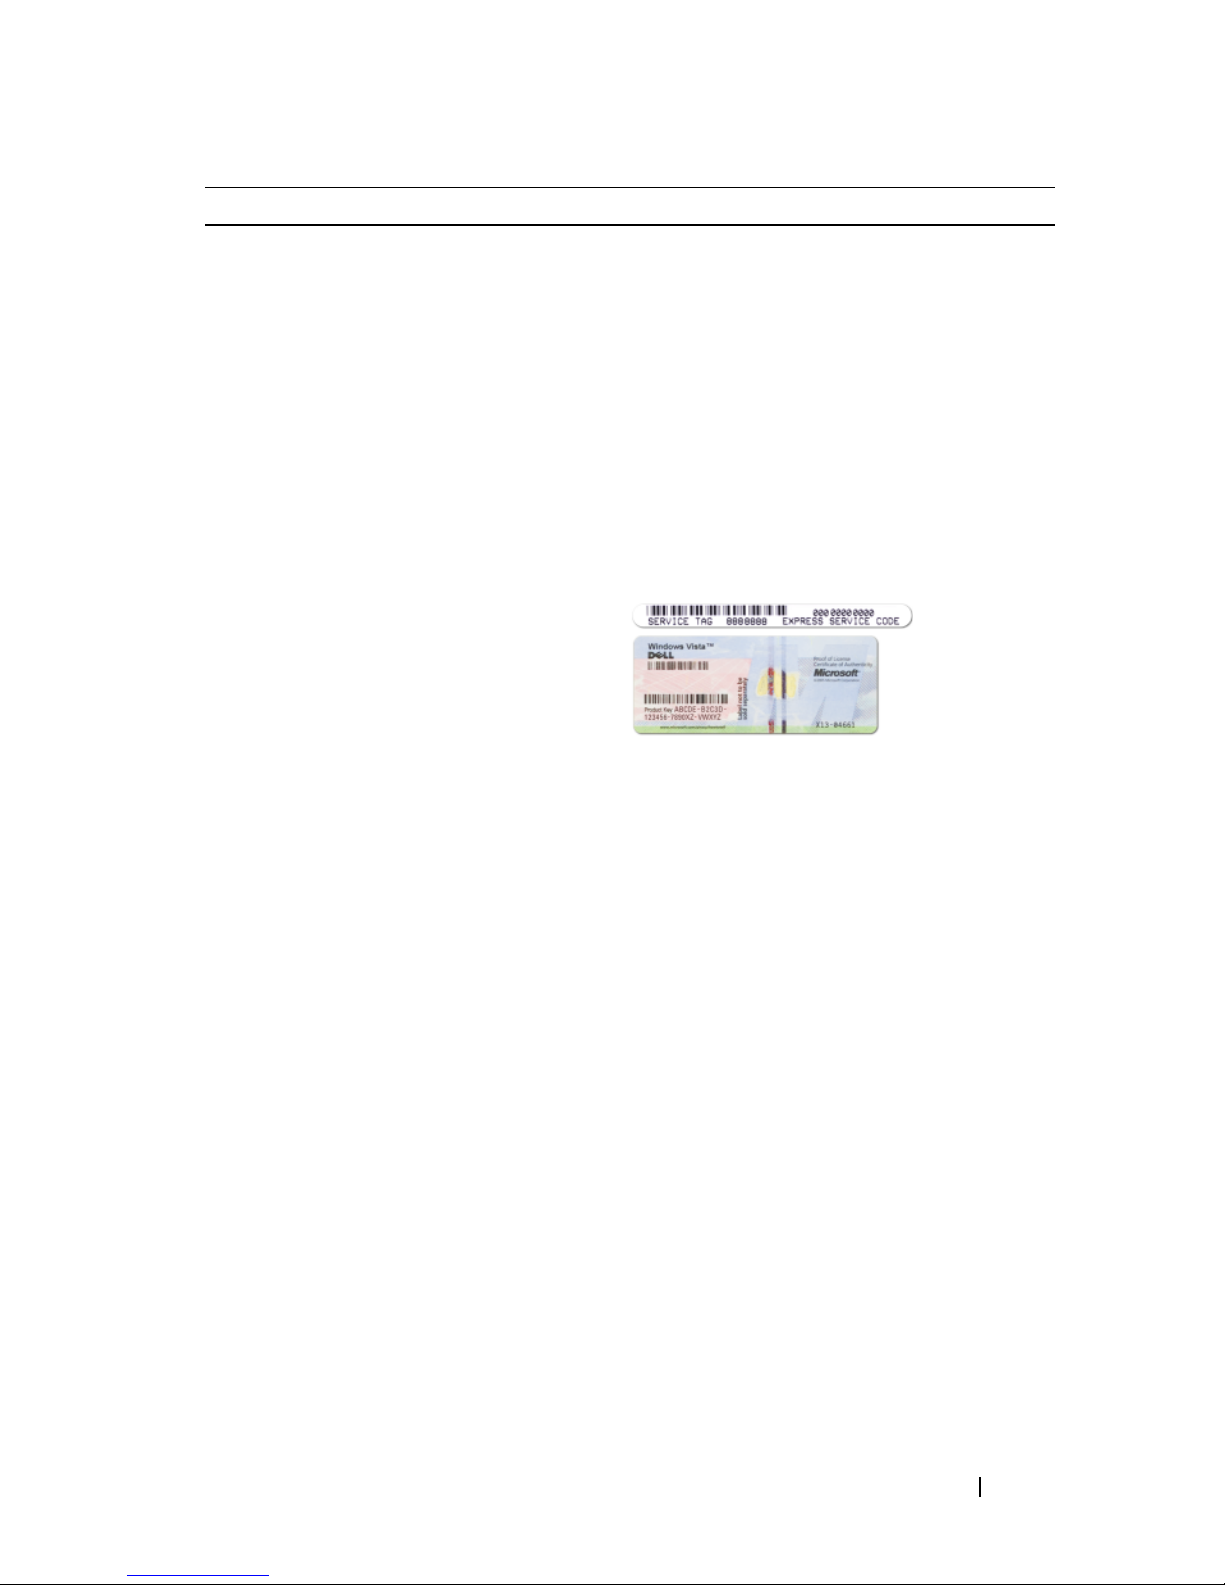
• Service Tag and Express Service Code
• Microsoft Windows License Label
Service Tag and Microsoft® Windows®
License
NOTE: Your computer’s Service Tag and
Microsoft Windows License labels are
located on your computer.
Your computer’s Service Tag contains
both a Service Tag number and an
Express Service Code.
• Use the Service Tag to identify your
computer when you use
support.dell.com
• Enter the Express Service Code to
direct your call when contacting
support.
or contact support.
• Use the product key on the License
Label if you need to reinstall your
operating system.
NOTE: As an increased security measure,
the newly designed Microsoft Windows
license label incorporates a missing
portion or "hole" to discourage removal of
the label.
Quick Reference Guide 7
Page 8

What Are You Looking For? Find It Here
• Solutions — Troubleshooting hints
and tips, articles from technicians, and
online courses, frequently asked
questions
• Community — Online discussion with
other Dell customers
• Upgrades — Upgrade information for
components, such as memory, the hard
drive, and the operating system
• Customer Care — Contact
information, service call and order
status, warranty, and repair
information
• Service and support — Service call
status and support history, service
contract, online discussions with
technical support
• Dell Technical Update Service —
Proactive e-mail notification of
software and hardware updates for
your computer
Dell Support Website — support.dell.com
NOTE: Select your region or business
segment to view the appropriate support
site.
• Reference — Computer
documentation, details on my
computer configuration, product
specifications, and white papers
• Downloads — Certified drivers,
patches, and software updates
8 Quick Reference Guide
Page 9

What Are You Looking For? Find It Here
• Notebook System Software (NSS) —
If you reinstall the operating system
for your computer, you should also
reinstall the NSS utility. NSS provides
critical updates for your operating
system and support for processors,
optical drives, USB devices, and so on.
NSS is necessary for correct operation
of your Dell computer. The software
automatically detects your computer
and operating system and installs the
updates appropriate for your
configuration.
• Software upgrades and
troubleshooting hints — Frequently
asked questions, hot topics, and
general health of your computing
environment
To download Notebook System
Software:
1
Go to
Drivers & Downloads
2
Enter your Service Tag and click Go, or
support.dell.com
.
and click
select your Product Type and Product
Model and click
3
Click the plus sign (
Utilities
Software
4
Click
, click
, and click
Run
Confirm
+)
.
by
Notebook System
Download Now
to run the utility.
System
.
NOTE: The support.dell.com user
interface may vary depending on your
selections.
Dell Support Utility
The Dell Support Utility is an
automated upgrade and notification
system installed on your computer. This
support provides real-time health scans
of your computing environment,
software updates, and relevant selfsupport information. Access the Dell
Support Utility from the
taskbar.
icon in the
• How to find information about my
computer and its components
• How to connect to the Internet
• How to add user accounts for different
people
• How to transfer files and settings from
another computer
Windows Welcome Center
The Windows Welcome Center
automatically appears when you use the
computer for the first tme. You can
choose to have it appear every time you
start your PC by placing a check in the
Run at startup checkbox. Another
method of accessing the Welcome
Center is to click the Windows Vista
Start button , and then click
Welcome Center
.
Quick Reference Guide 9
Page 10

What Are You Looking For? Find It Here
• How to use Microsoft Windows XP
• How to use Microsoft Windows Vista
• How to work with programs and files
• How to personalize my desktop
Windows Help and Support
Microsoft Windows XP:
1
Click the
and Support
2
Either select one of the topics listed, or
Start
button and click
.
type a word or phrase that describes
your problem into the
Search
box,
click the arrow icon, and then click the
topic that describes your problem.
3
Follow the instructions on the screen.
Microsoft Windows Vista:
1
Click the Windows Vista Start button
, and then click
2
In
Search Help
Help and Support
, type a word or phrase
that describes your problem, and then
press <Enter> or click the magnifying
glass.
3
Click the topic that describes your
problem.
Help
.
• Information on network activity, the
Power Management Wizard, hotkeys,
and other items controlled by Dell
QuickSet.
• How to reinstall my operating system
4
Follow the instructions on the screen.
Dell QuickSet Help
To view
Dell QuickSet Help, right-click
the QuickSet icon in the Microsoft
Windows taskbar, and select Help. The
taskbar is located in the lower-right
corner of your screen.
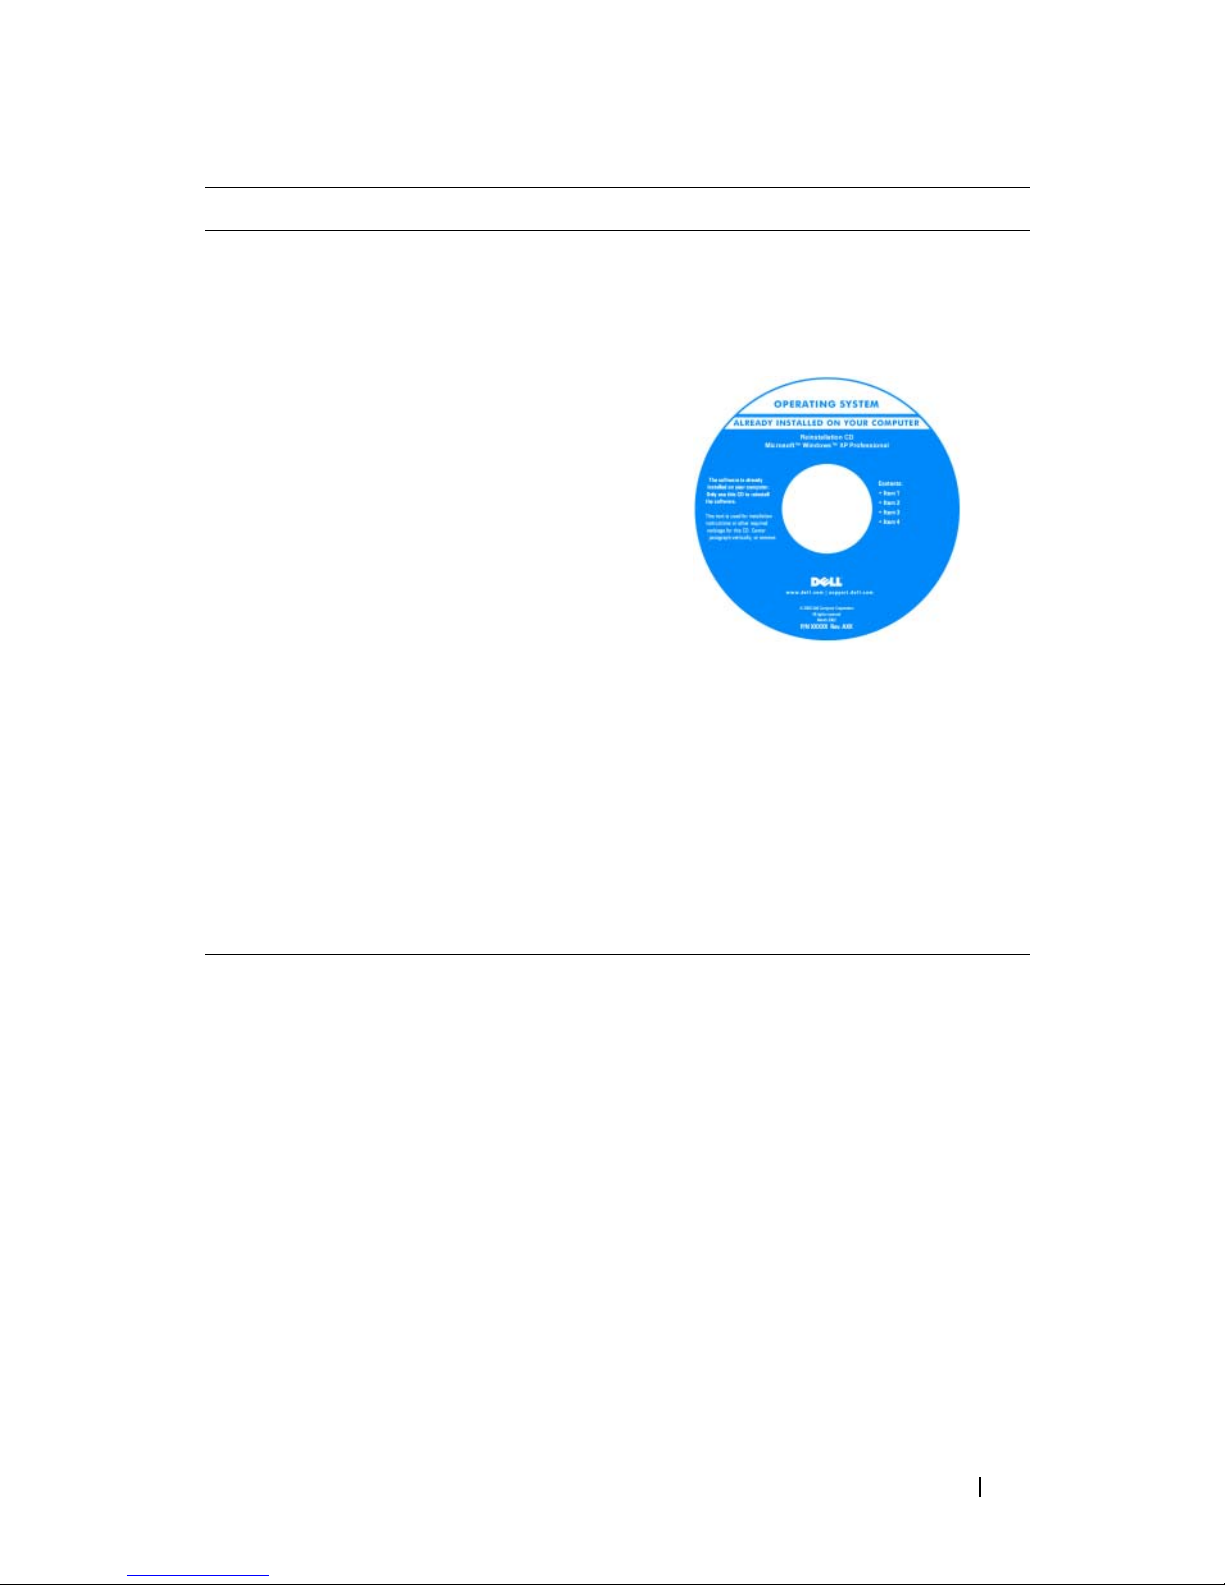
Operating System Disc
NOTE: The Operating System disc may be
optional and may not ship with your
computer.
NOTE: Pre-installed operating systems
include a recover partition to restore your
PC operating system.
10 Quick Reference Guide
Page 11
What Are You Looking For? Find It Here
The operating system is already installed
on your computer. To reinstall your
operating system, use the Operating
System disc.
After you reinstall your operating
system, use the Drivers and Utilities disc
to reinstall drivers for the devices that
came with your computer.
Your operating system product key label
is located on your computer.
NOTE: The color of your disc varies
based on the operating system you
ordered.
Setting Up Your Computer
Transferring Information to a New Computer
You can use your operating system "wizards" to help you transfer files and
other data from one computer to another—for example, from an old
computer to a new computer. For instructions, see the following section that
corresponds to the operating system that your computer is running.
Quick Reference Guide 11
Page 12

Microsoft Windows XP
The Microsoft Windows XP operating system provides the Files and Settings
Transfer Wizard to move data from a source computer to a new computer.
You can transfer data, such as:
• E-mail messages
• Toolbar settings
• Window sizes
• Internet bookmarks
You can transfer the data to the new computer over a network or serial
connection, or you can store it on removable media, such as a writable CD,
for transfer to the new computer.
NOTE: You can transfer information from an old computer to a new computer by
directly connecting a serial cable to the input/output (I/O) ports of the two
computers. To transfer data over a serial connection, you must access the Network
Connections utility from the Control Panel and perform additional configuration
steps, such as setting up an advanced connection and designating the host
computer and the guest computer.
For instructions on setting up a direct cable connection between two computers,
see Microsoft Knowledge Base Article #305621, titled How to Set Up a Direct Cable
Connection Between Two Computers in Windows XP. This information may not be
available in certain countries.
For transferring information to a new computer, you must run the Files and
Settings Transfer Wizard. You can use the optional Operating System disc for
this process or you can create a wizard disk with the Files and Settings
Transfer Wizard.
Running the Files and Settings Transfer Wizard With the Operating System Disc
NOTE: This procedure requires the Operating System disc. This disc is optional and
may not be included with certain computers.
To prepare a new computer for the file transfer:
1
Open the Files and Settings Transfer Wizard: click
Accessories→ System Tools→
2
When the
click
Next
Files and Settings Transfer Wizard
.
Files and Settings Transfer Wizard
Start→
All Programs→
.
welcome screen appears,
12 Quick Reference Guide
Page 13

3
On the
4
On the
from the Windows XP CD
5
When the
source computer. Do
Which computer is this?
screen, click
Do you have a Windows XP CD?
→
Next
Now go to your old computer
not
click
Next
To copy data from the old computer:
1
On the old computer, insert the Windows XP
2
On the
additional tasks
3
Under
4
On the
5
On the
Welcome to Microsoft Windows XP
.
What do you want to do?
Which computer is this?
Select a transfer method
, click
screen, click
screen, click the transfer method you
prefer.
6
On the
transfer and click
What do you want to transfer?
Next
.
New Computer→
screen, click
I will use the wizard
Next
.
screen appears, go to your old or
at this time.
Operating System
screen, click
Perform
disc.
Transfer files and settings→ Next
Old Computer→
Next
screen, select the items you want to
.
.
.
After the information has been copied, the
7
Phase
Click
screen appears.
Finish
.
Completing the Collection
To transfer data to the new computer:
On the
1
Next
2
On the
chose for transferring your settings and files and click
Now go to your old computer
.
Where are the files and settings?
screen on the new computer, click
screen, select the method you
Next
.
The wizard reads the collected files and settings and applies them to your
new computer.
When all of the settings and files have been applied, the
Finished
appears.
3
Click
Finished
and restart the new computer.
screen
Quick Reference Guide 13
Page 14

Running the Files and Settings Transfer Wizard Without the Operating System
Disc
To run the Files and Settings Transfer Wizard without the Operating System
disc, you must create a wizard disc that will allow you to create a backup
image file to removable media.
To create a wizard disk, use your new computer with Windows XP and
perform the following steps:
1
Open the Files and Settings Transfer Wizard: click
Accessories→ System Tools→
2
When the
click
3
On the
4
On the
Next
Files and Settings Transfer Wizard
.
Which computer is this?
Do you have a Windows XP CD?
Wizard Disk in the following drive
5
Insert the removable media, such as a writable CD, and click OK.
6
When the disk creation completes and the
computer
message appears,
Files and Settings Transfer Wizard
screen, click
screen, click
→
Next.
Now go to your old
do not
click
Next
Start→
All Programs→
.
welcome screen appears,
New Computer→
Next
.
I want to create a
.
7
Go to the old computer.
To copy data from the old computer:
1
On the old computer, insert the wizard disk.
2
3
Click
In the
Start→
Open
Run
.
field on the
Run
window, browse to the path for
the appropriate removable media) and click
4
5
6
On the
On the
On the
Files and Settings Transfer Wizard
Which computer is this?
Select a transfer method
screen, click
screen, click the transfer method you
prefer.
7
On the
transfer and click
What do you want to transfer?
Next
.
After the information has been copied, the
screen appears.
Finish
.
8
Phase
Click
fastwiz
OK
.
welcome screen, click
Old Computer→
Next
Next
(on
.
.
screen, select the items you want to
Completing the Collection
14 Quick Reference Guide
Page 15

To transfer data to the new computer:
1
On the
Next
2
On the
chose for transferring your settings and files and click
Now go to your old computer
.
Where are the files and settings?
screen on the new computer, click
screen, select the method you
Next
. Follow the
instructions on the screen.
The wizard reads the collected files and settings and applies them to your
new computer.
When all of the settings and files have been applied, the
Finished
screen
appears.
3
Click
NOTE: For more information about this procedure, search support.dell.com for
document #154781 (What Are The Different Methods To Transfer Files From My Old
Computer To My New Dell™ Computer Using the Microsoft
Operating System?).
NOTE: Access to the Dell Knowledge Base document may not be available in
certain countries.
Microsoft Windows Vista
1
Click the Windows Vista Start button , and then click
and settings
2
In the
3
Click
Finished
and restart the new computer.
→
Start Windows Easy Transfer
User Account Control
Start a new transfer
or
®
Windows® XP
Transfer files
.
dialog box, click
Continue
.
Continue a transfer in progress
.
Follow the instructions provided on the screen by the Windows Easy Transfer
wizard.
Quick Reference Guide 15
Page 16
Turning Off Your Computer
NOTICE: To avoid losing data, save and close all open files and exit all open
programs before you turn off your computer.
1
Shut down the operating system:
a
Save and close all open files and exit all open programs.
b
In the Microsoft Windows XP operating system
Down
→
Shut down
.
, click
Start→
Shut
In the Microsoft Windows Vista™ operating system,
click the Windows
Vista Start button , click the arrow in the lower-right corner of the
Start menu as shown below, and then click
Shut Down
.
The computer turns off after the operating system shutdown process
is complete.
2
Ensure that the computer and all attached devices are turned off. If your
computer and attached devices did not automatically turn off when you
shut down your operating system, press and hold the power button for
about 4 seconds to turn them off.
16 Quick Reference Guide
Page 17
About Your Computer
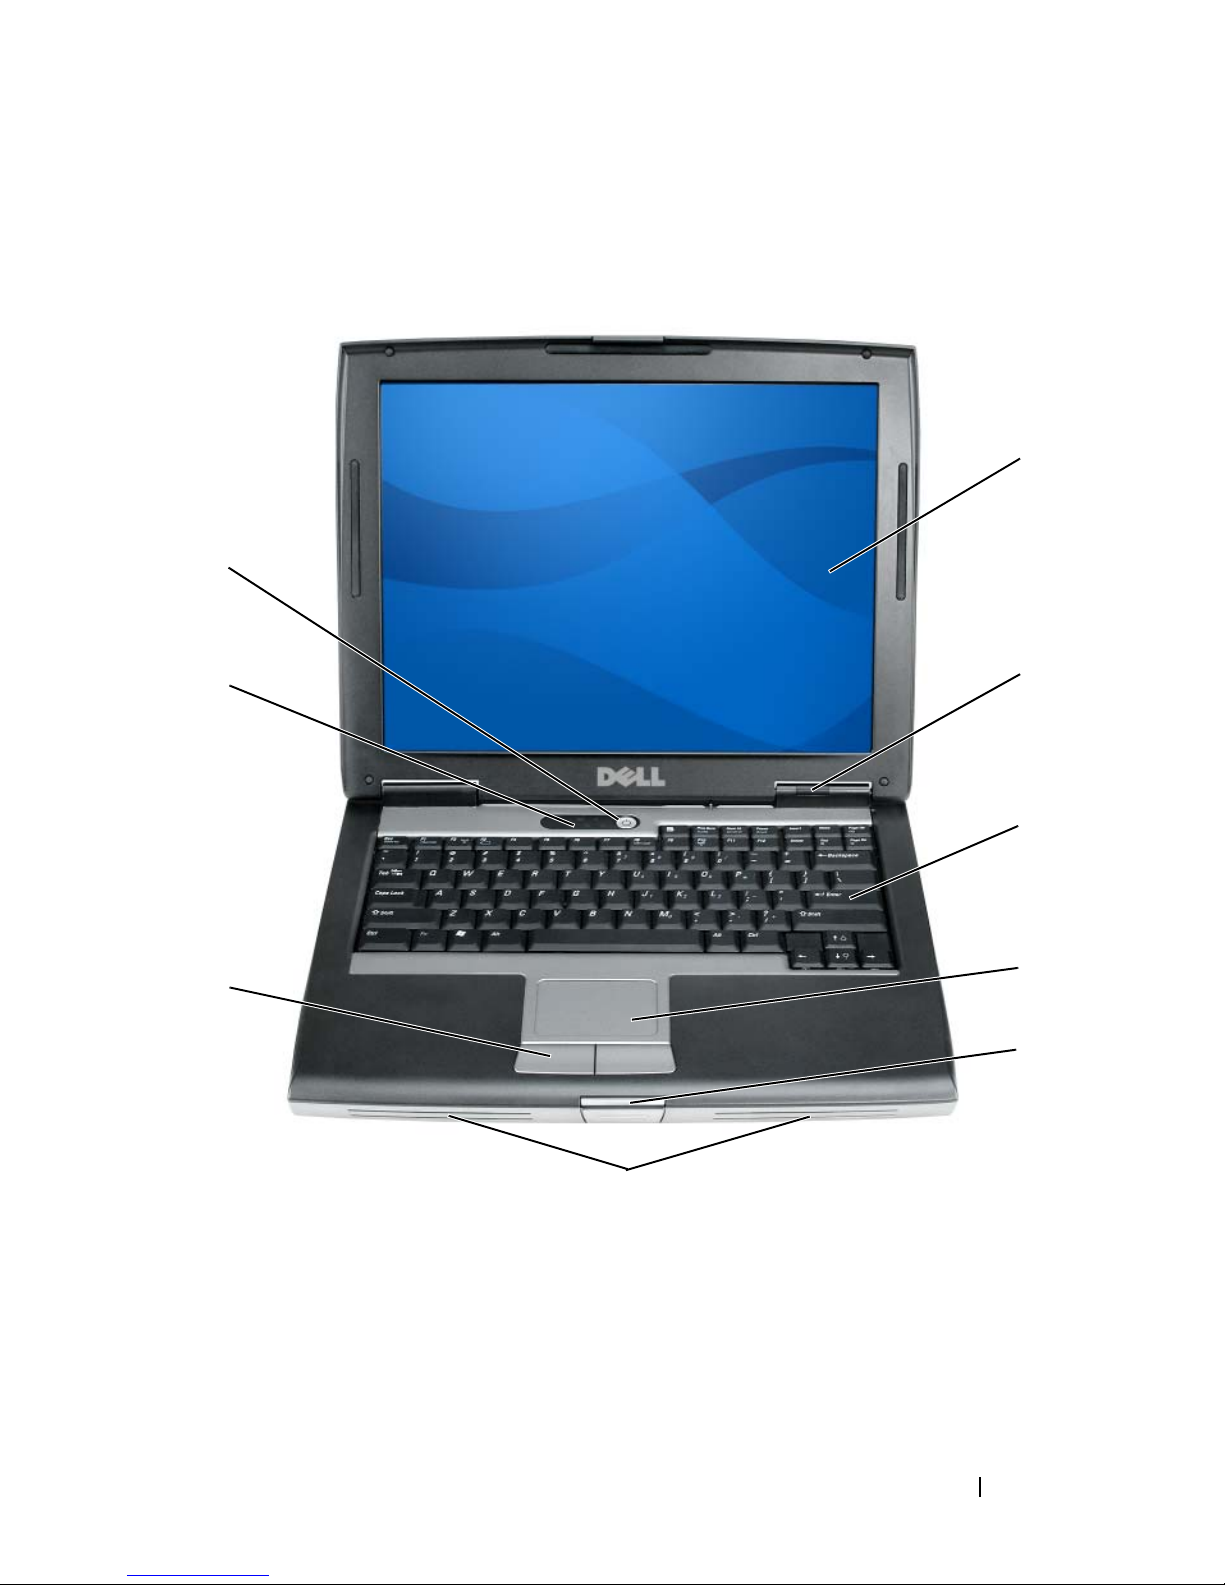
Front View
9
1
8
7
6
1 display 2 device status lights
2
3
4
5
3 keyboard 4 touch pad
5 display latch 6 speaker
7 touch pad buttons 8 keyboard status lights
9 power button
Quick Reference Guide 17
Page 18
Left Side View
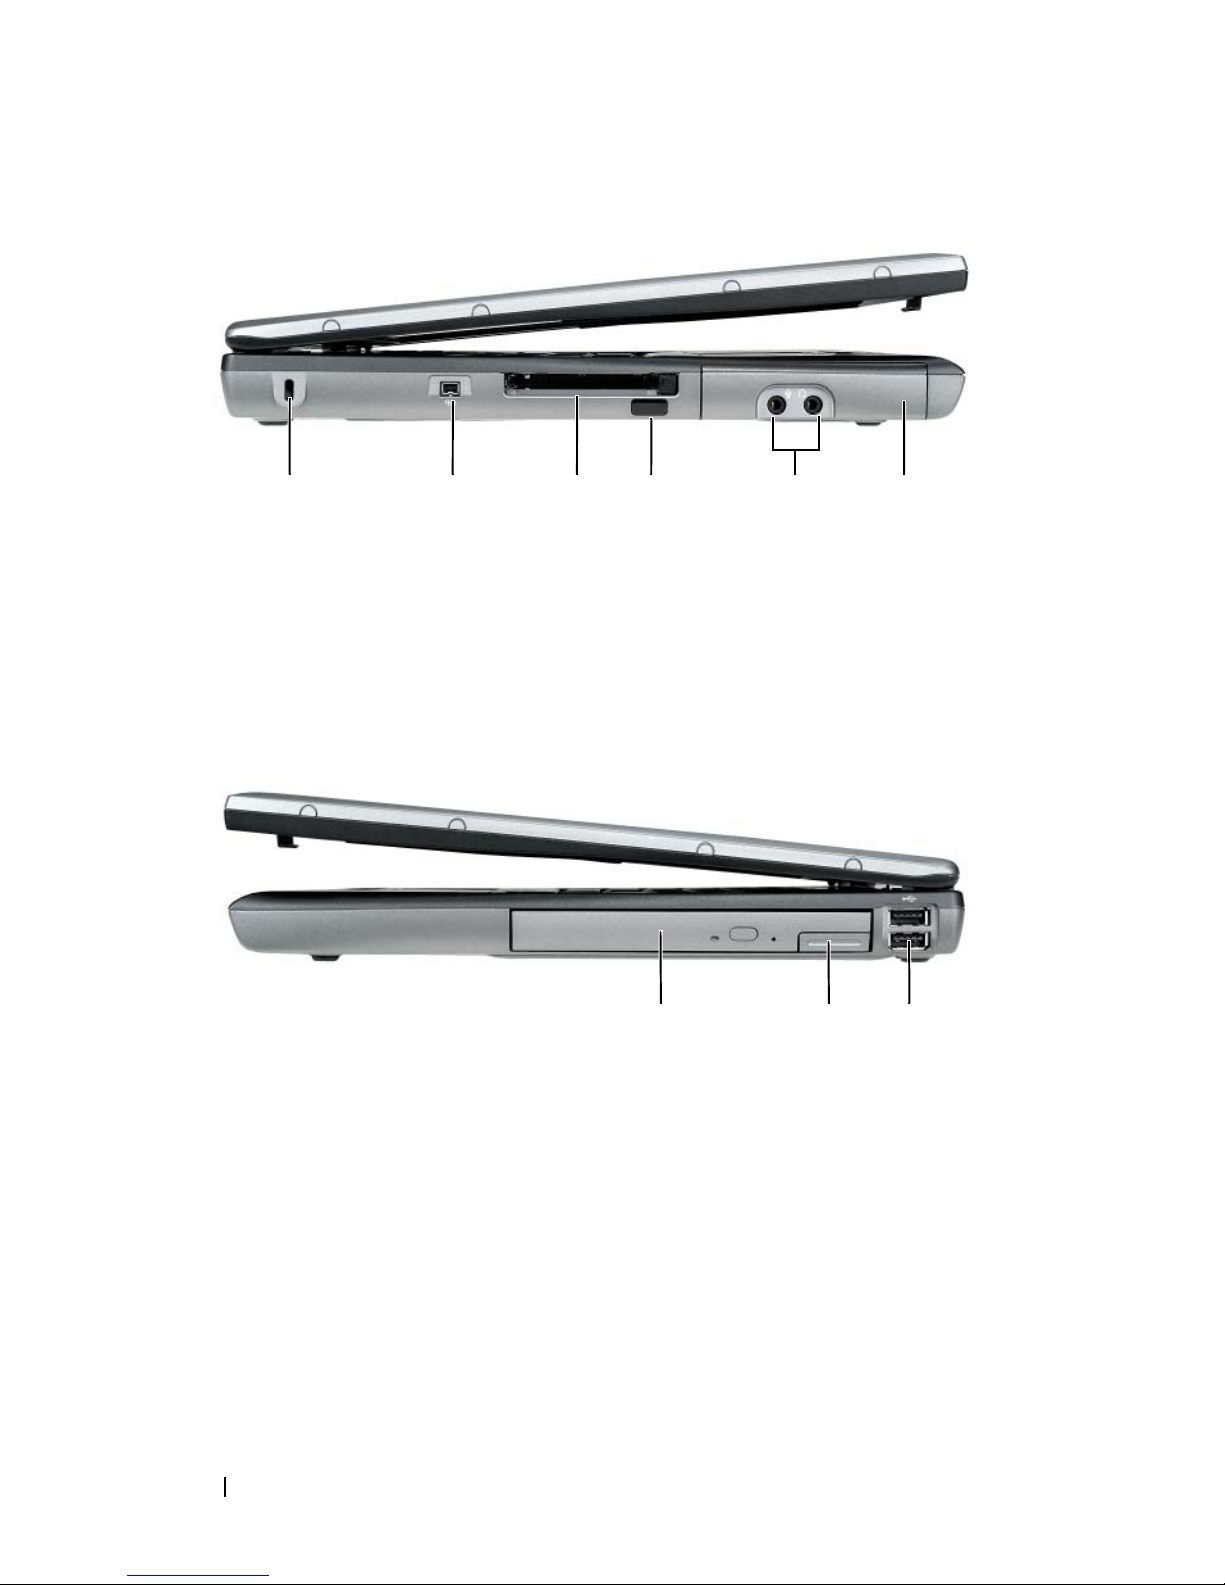
1 security cable slot 2 IEEE 1394 Connector
3 PC Card/ExpressCard slot 4 infrared sensor
5 audio connectors (2) 6 hard drive
Right Side View
352 41 6
1 media bay 2 device latch release
3 USB connectors (2)
18 Quick Reference Guide
1 23
Page 19
Back View
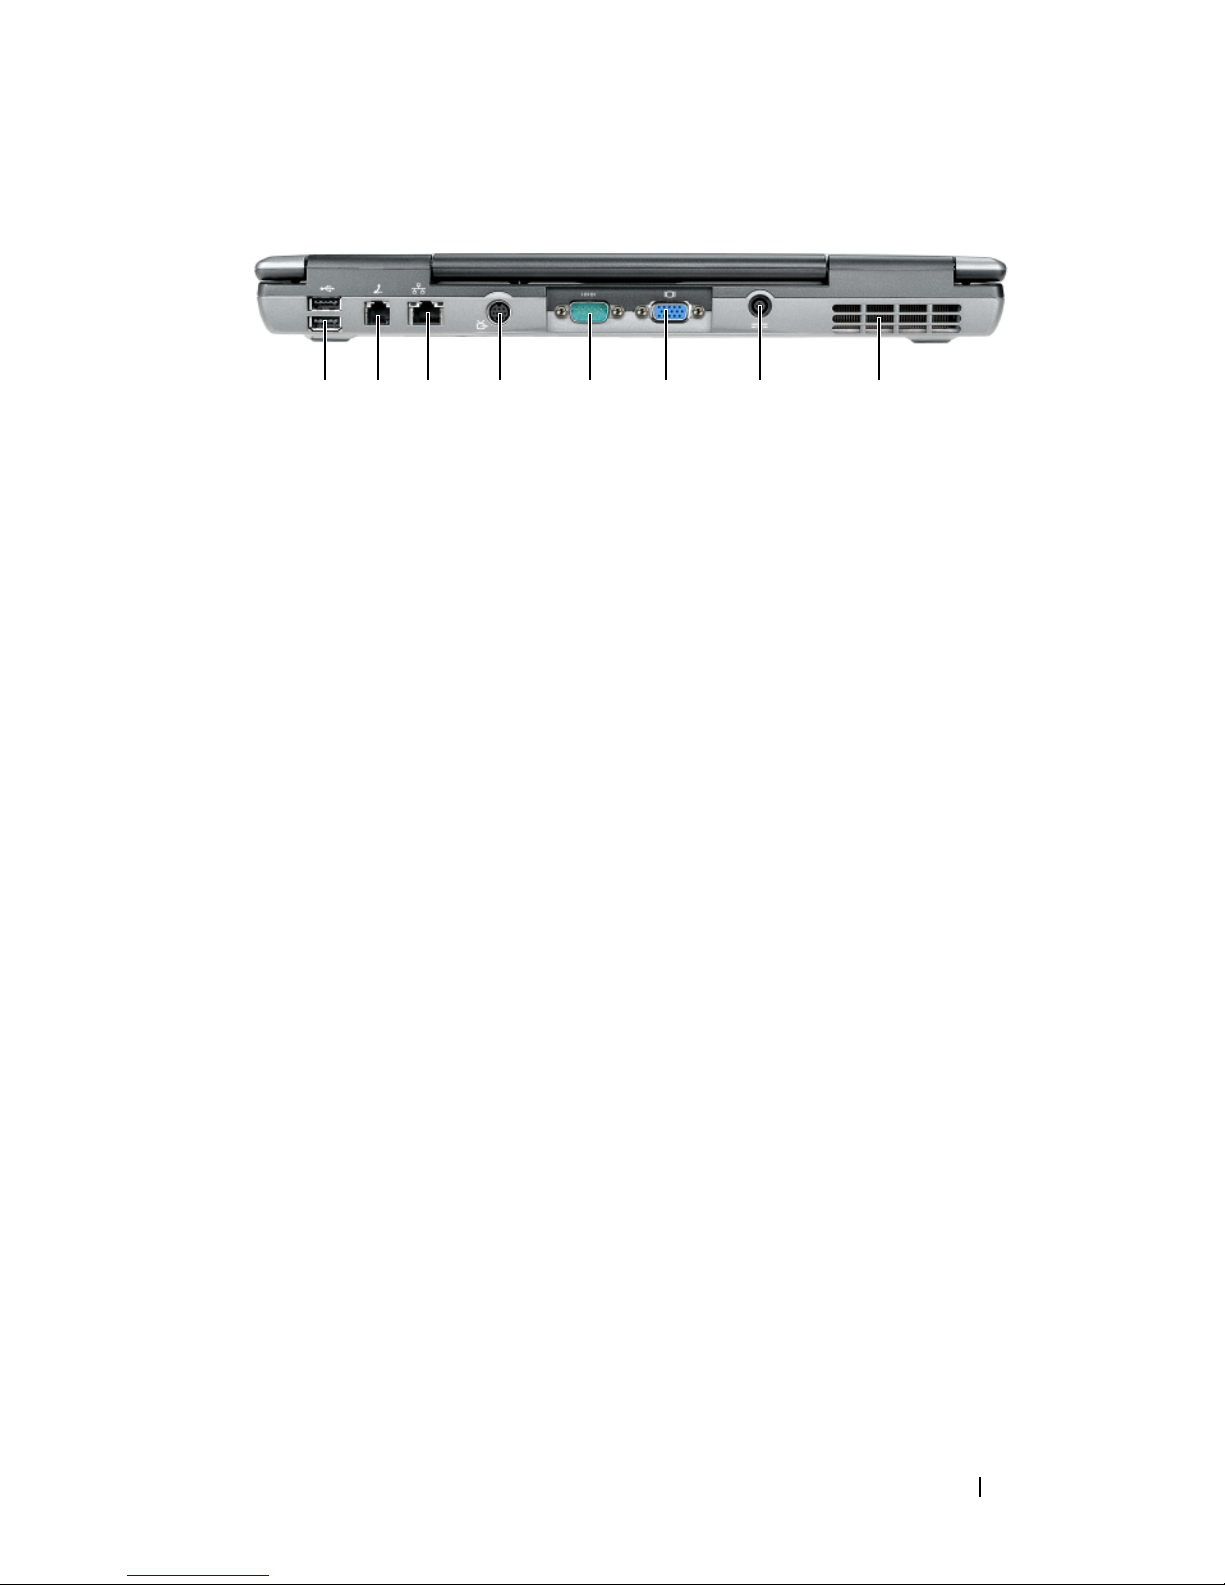
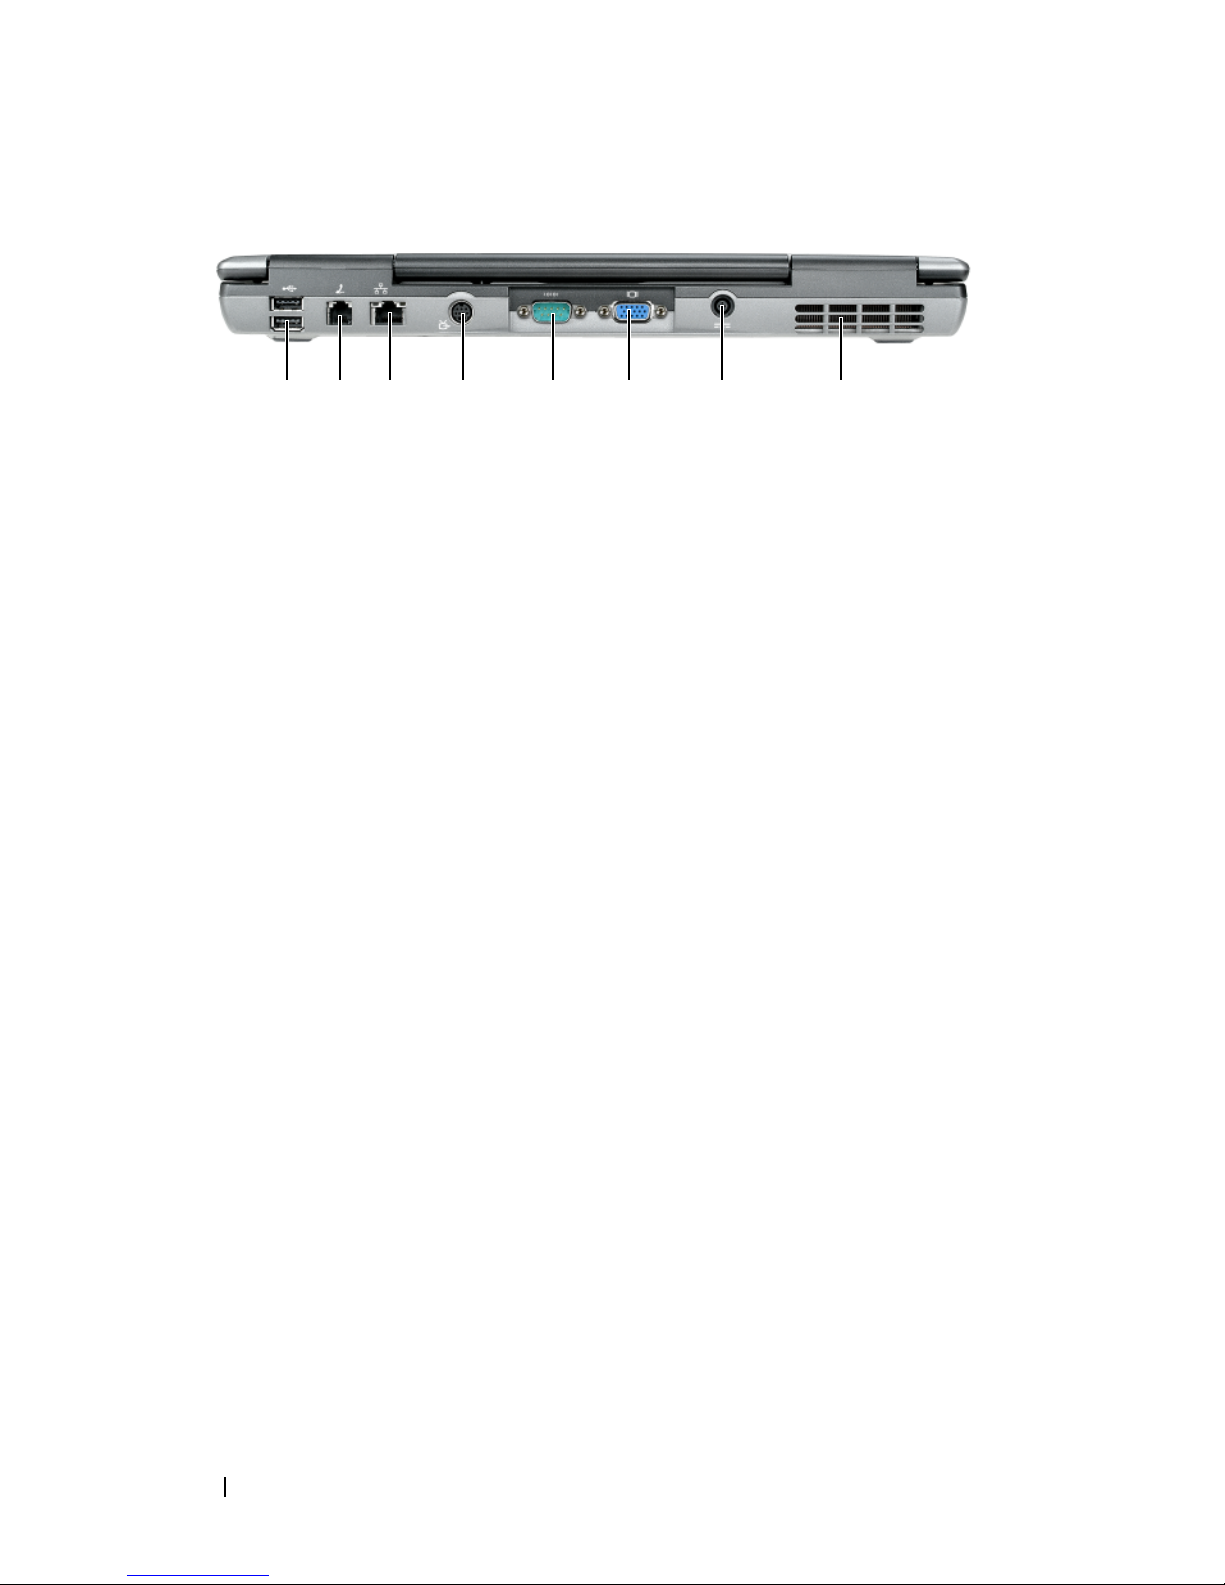
1 USB connectors (2) 2 modem connector (RJ-11)
3 network connector (RJ-45) 4 S-video TV-out connector
5 serial connector 6 video connector
7 AC adapter connector 8 air vents
8123 4 5 6 7
Quick Reference Guide 19
Page 20
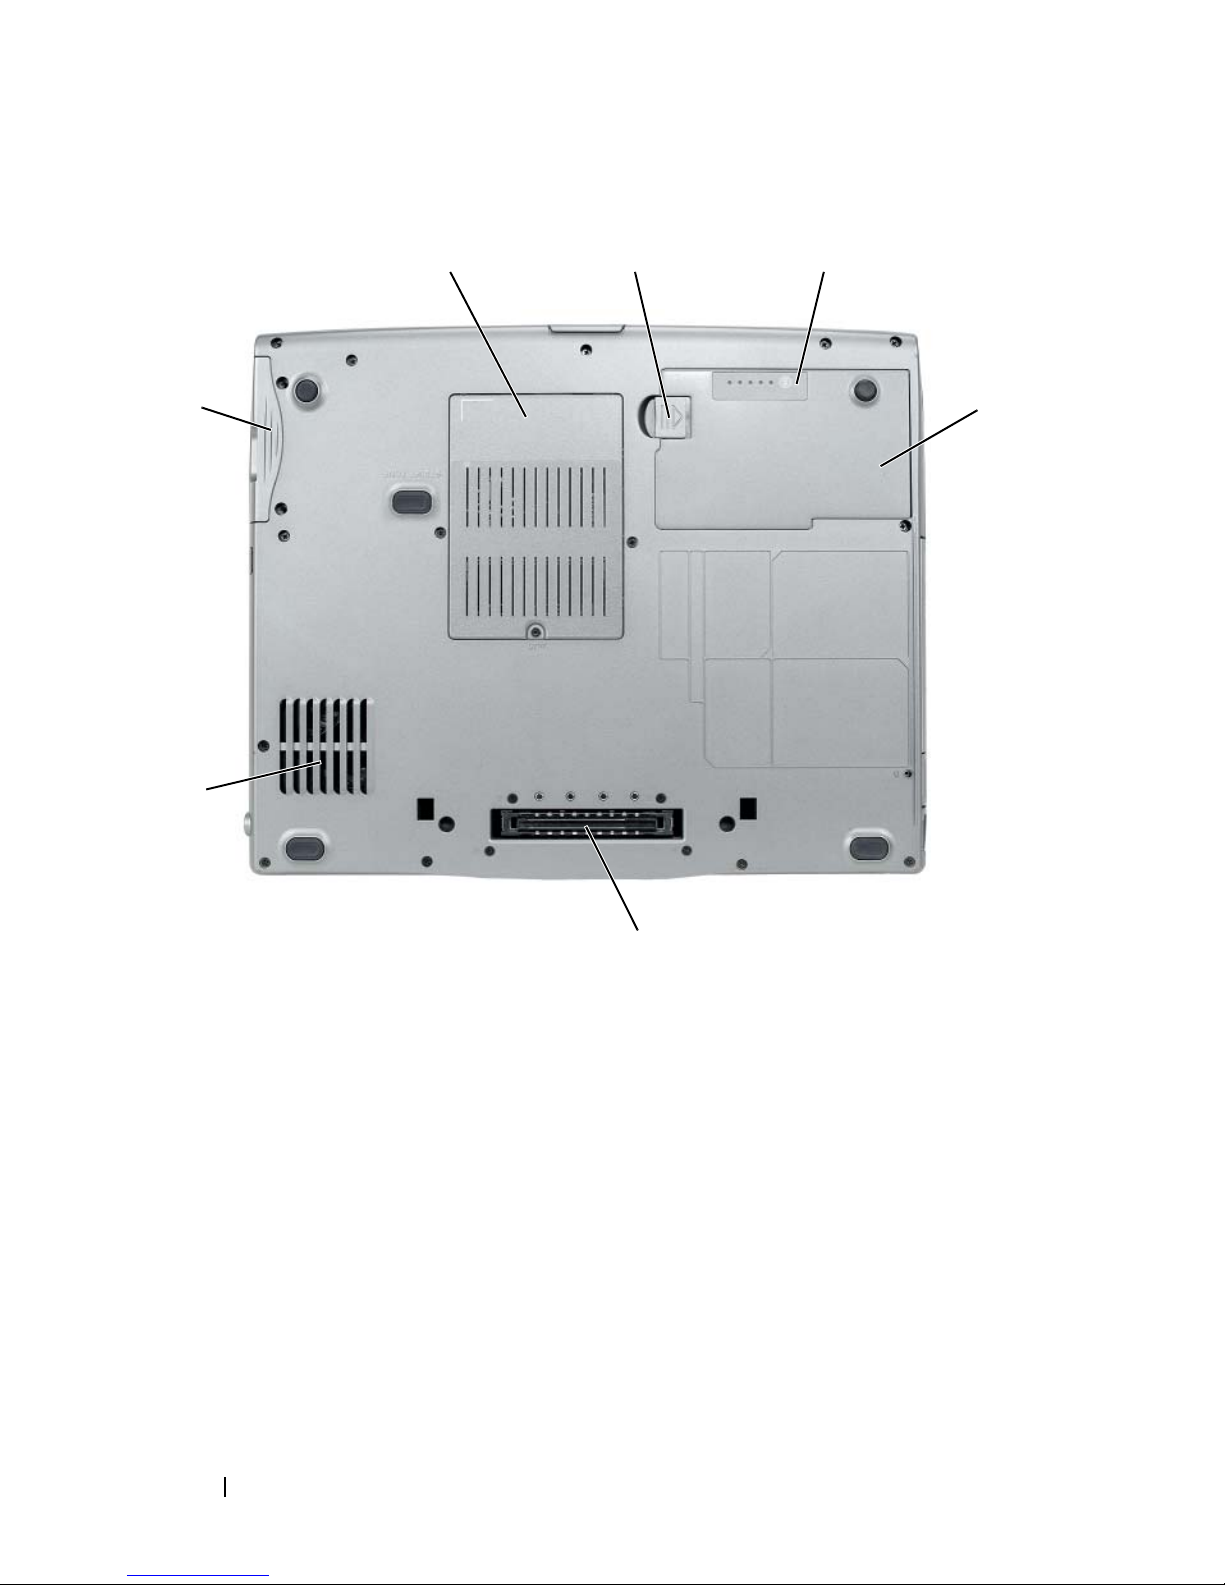
Bottom View
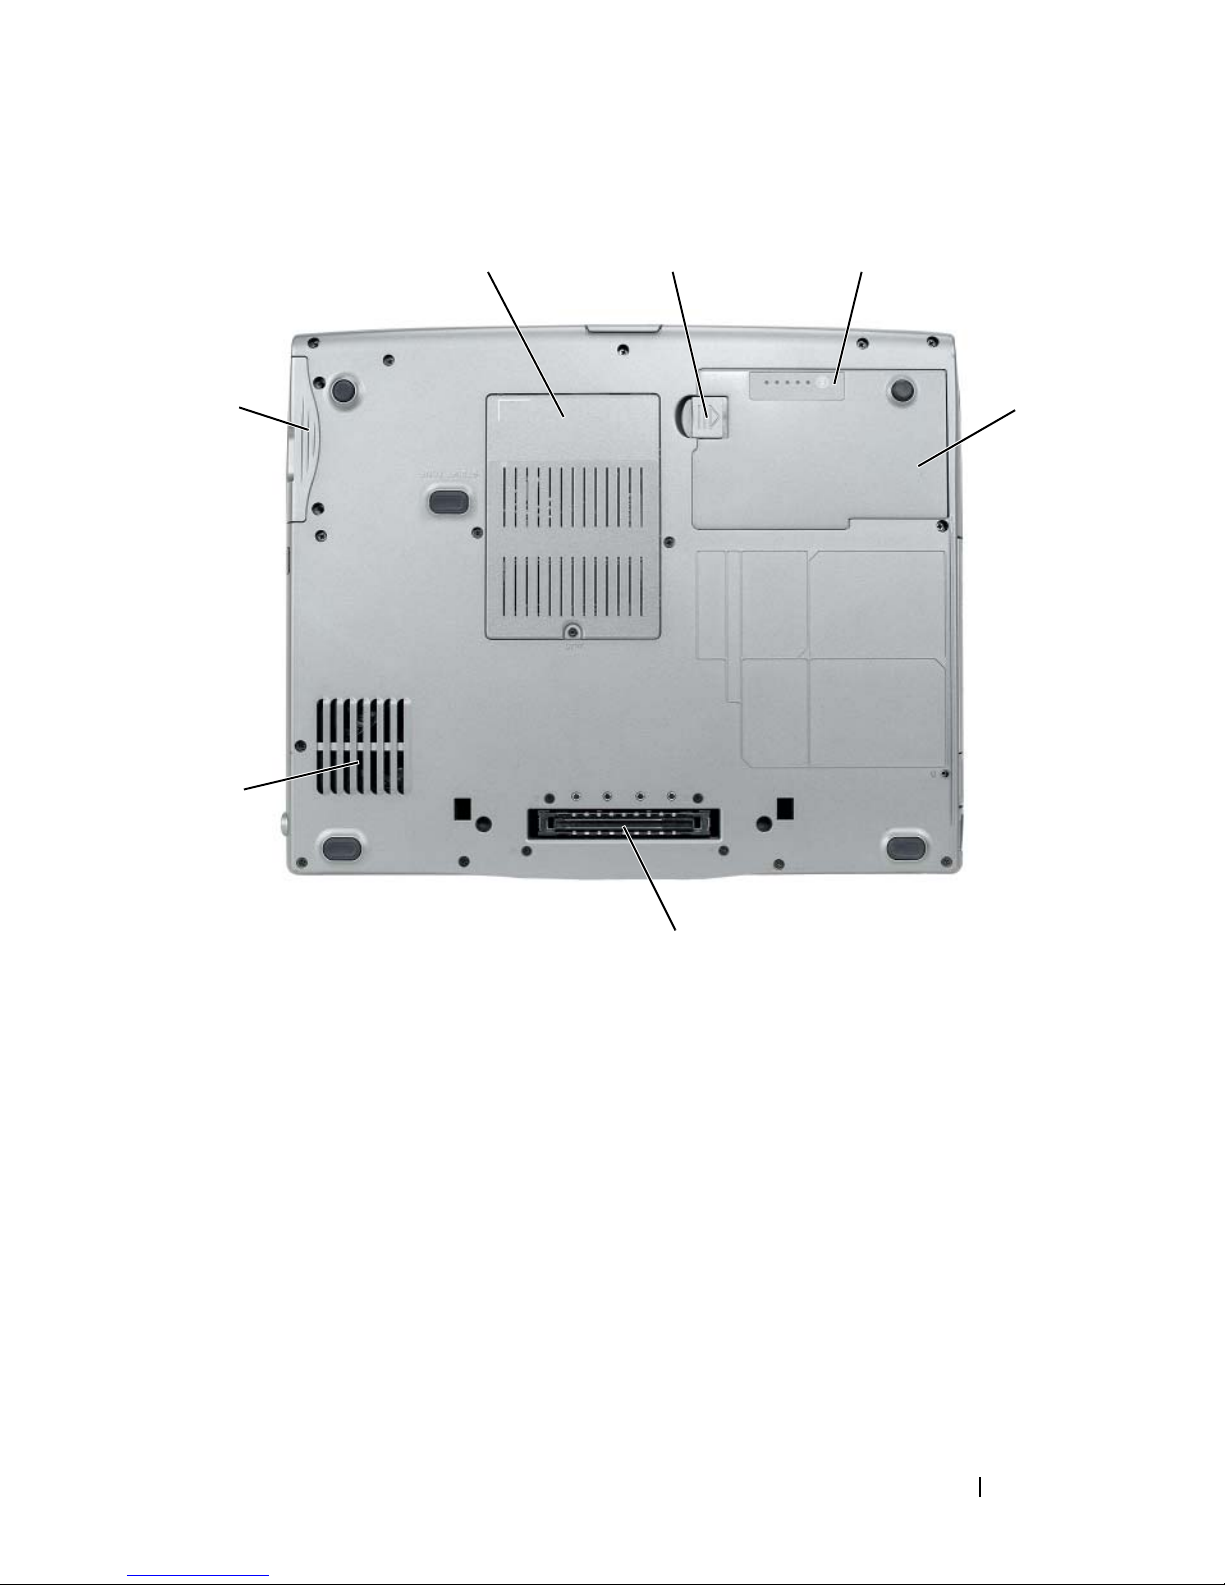
1
7
6
2
3
4
1 memory module/modem/WLAN
Mini-Card/coin-cell battery
cover
3 battery charge gauge/health
gauge
5 docking-device connector 6 air vents
7 hard drive
2 battery-bay latch release
4battery
20 Quick Reference Guide
5
Page 21

Using a Battery
Battery Performance
NOTE: For information about the Dell warranty for your computer, see the Product
Information Guide or separate paper warranty document that shipped with your
computer.
For optimal computer performance and to help preserve BIOS settings,
operate your Dell portable computer with the main battery installed at all
times. One battery is supplied as standard equipment in the battery bay.
NOTE: Because the battery may not be fully charged, use the AC adapter to
connect your new computer to an electrical outlet the first time you use the
computer. For best results, operate the computer with the AC adapter until the
battery is fully charged. To view battery charge status, check the Power Meter in
Power Options (see "Accessing Power Options Properties" on page 26).
NOTE: Battery operating time (the time the battery can hold a charge) decreases
over time. Depending on how often the battery is used and the conditions under
which it is used, you may need to purchase a new battery during the life of your
computer.
NOTE: It is recommended that you connect your computer to an electrical outlet
when writing to a CD or DVD.
Operating time is significantly reduced when you perform operations
including, but not limited to, the following:
• Using optical drives.
• Using wireless communications devices, PC Cards, Express Cards, media
memory cards, or USB devices.
• Using high-brightness display settings, 3D screen savers, or other powerintensive programs such as complex 3D graphics applications.
• Running the computer in maximum performance mode. See "Configuring
Power Management Settings" on page 26 for information about accessing
Windows Power Options Properties or Dell QuickSet, which you can use
to configure power management settings.
You can check the battery charge before you insert the battery into the
computer. You can also set power management options to alert you when the
battery charge is low.
Quick Reference Guide 21
Page 22

CAUTION: Using an incompatible battery may increase the risk of fire or
explosion. Replace the battery only with a compatible battery purchased from
Dell. The battery is designed to work with your Dell computer. Do not use a battery
from other computers with your computer.
CAUTION: Do not dispose of batteries with household waste. When your battery
no longer holds a charge, call your local waste disposal or environmental agency
for advice on disposing of a lithium-ion battery. See "Battery Disposal" in the
Product Information Guide.
CAUTION: Misuse of the battery may increase the risk of fire or chemical burn.
Do not puncture, incinerate, disassemble, or expose the battery to temperatures
above 65°C (149°F). Keep the battery away from children. Handle damaged or
leaking batteries with extreme care. Damaged batteries may leak and cause
personal injury or equipment damage.
Checking the Battery Charge
The Dell QuickSet Battery Meter, the Microsoft Windows Power Meter
window and icon, the battery charge gauge and health gauge, and the
low-battery warning provide information on the battery charge.
Dell QuickSet Battery Meter
If Dell QuickSet is installed, press <Fn><F3> to display the QuickSet
Battery Meter. The Battery Meter displays status, battery health, charge level,
and charge completion time for the battery in your computer.
For more information about QuickSet, right-click the QuickSet icon in the
taskbar, and click Help.
Microsoft Windows Power Meter
The Windows Power Meter indicates the remaining battery charge. To check
the Power Meter, double-click the icon on the taskbar.
If the computer is connected to an electrical outlet, a icon appears.
Charge Gauge
By either pressing once or pressing and holding the status button on the
charge gauge on the battery, you can check:
• Battery charge (check by pressing and
releasing
the status button)
• Battery health (check by pressing and
22 Quick Reference Guide
holding
the status button)
Page 23

The battery operating time is largely determined by the number of times it is
charged. After hundreds of charge and discharge cycles, batteries lose some
charge capacity—or battery health. That is, a battery can show a status of
"charged" but maintain a reduced charge capacity (health).
Check the Battery Charge
To check the battery charge, press and release the status button on the battery
charge gauge to illuminate the charge-level lights. Each light represents
approximately 20 percent of the total battery charge. For example, if the
battery has 80 percent of its charge remaining, four of the lights are on. If no
lights appear, the battery has no charge.
Check the Battery Health
NOTE: You can check battery health in one of two ways: by using the charge gauge
on the battery as described below and by using the Battery Meter in Dell QuickSet.
For information about QuickSet, right-click the icon in the taskbar, and click Help.
To check the battery health using the charge gauge, press and hold the status
button on the battery charge gauge for at least 3 seconds. If no lights appear,
the battery is in good condition, and more than 80 percent of its original
charge capacity remains. Each light represents incremental degradation. If
five lights appear, less than 60 percent of the charge capacity remains, and you
should consider replacing the battery. See "Using a Battery" on page 21 for
more information about the battery operating time.
Low-Battery Warning
NOTICE: To avoid losing or corrupting data, save your work immediately after a
low-battery warning. Then connect the computer to an electrical outlet, or install a
second battery in the media bay. If the battery runs completely out of power,
hibernate mode begins automatically.
A pop-up window warns you when the battery charge is approximately
90 percent depleted. If two batteries are installed, the low-battery warning
means that the combined charge of both batteries is approximately
90 percent depleted. The computer enters hibernate mode when the battery
charge is at a critically low level.
Quick Reference Guide 23
Page 24

You can change the settings for the battery alarms in QuickSet or the Power
Options Properties window. See "Configuring Power Management Settings"
on page 26 for information about accessing QuickSet or the Power Options
Properties window.
Conserving Battery Power
Perform the following actions to conserve battery power:
• Connect the computer to an electrical outlet when possible because
battery life is largely determined by the number of times the battery is
used and recharged.
• Place the computer in standby mode or hibernate mode when you leave
the computer unattended for long periods of time. See "Power
Management Modes" on page 24.
• Use the Power Management Wizard or the
Power Options Properties
window to select options to optimize your computer’s power usage. These
options can also be set to change when you press the power button, close
the display, or press <Fn><Esc>.
NOTE: See "Configuring Power Management Settings" on page 26 for information
on conserving battery power.
Power Management Modes
Standby and Sleep Mode
Standby mode (sleep mode in Microsoft Windows Vista) conserves power by
turning off the display and the hard drive after a predetermined period of
inactivity (a time-out). When the computer exits standby or sleep mode, it
returns to the same operating state it was in before entering standby or sleep
mode.
NOTICE: If your computer loses AC and battery power while in standby or sleep
mode, it may lose data.
To enter standby mode in Windows XP, click the Start button, click Turn off
computer, and then click Stand by.
To enter sleep mode in Windows Vista, click the Windows Vista Start button
, and then click Sleep.
24 Quick Reference Guide
Page 25

Depending on how you set the power management options in the Power
Options Properties window or the QuickSet Power Management Wizard, you
may also use one of the following methods:
• Press the power button.
• Close the display.
• Press <Fn><Esc>.
To exit standby or sleep mode, press the power button or open the display,
depending on how you set the power management options. You cannot make
the computer exit standby or sleep mode by pressing a key or touching the
touch pad.
Hibernate Mode
Hibernate mode conserves power by copying system data to a reserved area on
the hard drive and then completely turning off the computer. When the
computer exits hibernate mode, it returns to the same operating state it was
in before entering hibernate mode.
NOTICE: You cannot remove devices or undock your computer while your
computer is in hibernate mode.
Your computer enters hibernate mode if the battery charge level becomes
critically low.
To manually enter hibernate mode in Windows XP, click the Start button,
click Turn off computer, press and hold <Shift>, and then click Hibernate.
To manually enter hibernate mode in Windows Vista, click the Windows
Vista Start button , and then click Hibernate.
Depending on how you set the power management options in the Power
Options Properties window or the QuickSet Power Management Wizard, you
may also use one of the following methods to enter hibernate mode:
• Press the power button.
• Close the display.
• Press <Fn><Esc>.
NOTE: Some PC Cards or Express Cards may not operate correctly after the
computer exits hibernate mode. Remove and reinsert the card, or simply restart
(reboot) your computer.
Quick Reference Guide 25
Page 26

To exit hibernate mode, press the power button. The computer may take a
short time to exit hibernate mode. You cannot make the computer exit
hibernate mode by pressing a key or touching the touch pad. For more
information on hibernate mode, see the documentation that came with your
operating system.
Configuring Power Management Settings
You can use the QuickSet Power Management Wizard or Windows Power
Options Properties to configure the power management settings on your
computer. For more information about QuickSet, right-click the QuickSet
icon in the taskbar and click Help.
Accessing Power Options Properties
Windows XP
Click the Start button, point to Control Panel→ Performance and
Maintenance, and then click Power Options
Windows Vista
Click the Windows Vista Start button , click Control Panel, click System
and Maintenance, and then click Power Options.
Charging the Battery
When you connect the computer to an electrical outlet or install a battery
while the computer is connected to an electrical outlet, the computer checks
the battery charge and temperature. If necessary, the AC adapter then charges
the battery and maintains the battery charge.
NOTE: With Dell ExpressCharge™, when the computer is turned off, the AC
adapter charges a completely discharged battery to 80 percent in about 1 hour and
to 100 percent in approximately 2 hours. Charge time is longer with the computer
turned on. You can leave the battery in the computer for as long as you like. The
battery’s internal circuitry prevents the battery from overcharging.
If the battery is hot from being used in your computer or being in a hot
environment, the battery may not charge when you connect the computer to
an electrical outlet.
26 Quick Reference Guide
Page 27
The battery is too hot to start charging if the light flashes alternately
green and orange. Disconnect the computer from the electrical outlet and
allow the computer and the battery to cool to room temperature. Then
connect the computer to an electrical outlet to continue charging the battery.
For information about resolving problems with a battery, see "Power Problems
in your User’s Guide.
Replacing the Battery
CAUTION: Using an incompatible battery may increase the risk of fire or
explosion. Replace the battery only with a compatible battery purchased from
Dell. The battery is designed to work with your Dell™ computer. Do not use a
battery from other computers with your computer.
CAUTION: Before performing these procedures, turn off the computer, disconnect
the AC adapter from the electrical outlet and the computer, disconnect the modem
from the wall connector and computer, and remove any other external cables from
the computer.
NOTICE: You must remove all external cables from the computer to avoid possible
connector damage.
For information about replacing the second battery, which is located in the
media bay, see the User’s Guide for your system on support.dell.com.
To remove the battery:
1
If the computer is connected to a docking device (docked), undock it. See
the documentation that came with your docking device for instructions.
2
Ensure that the computer is turned off.
3
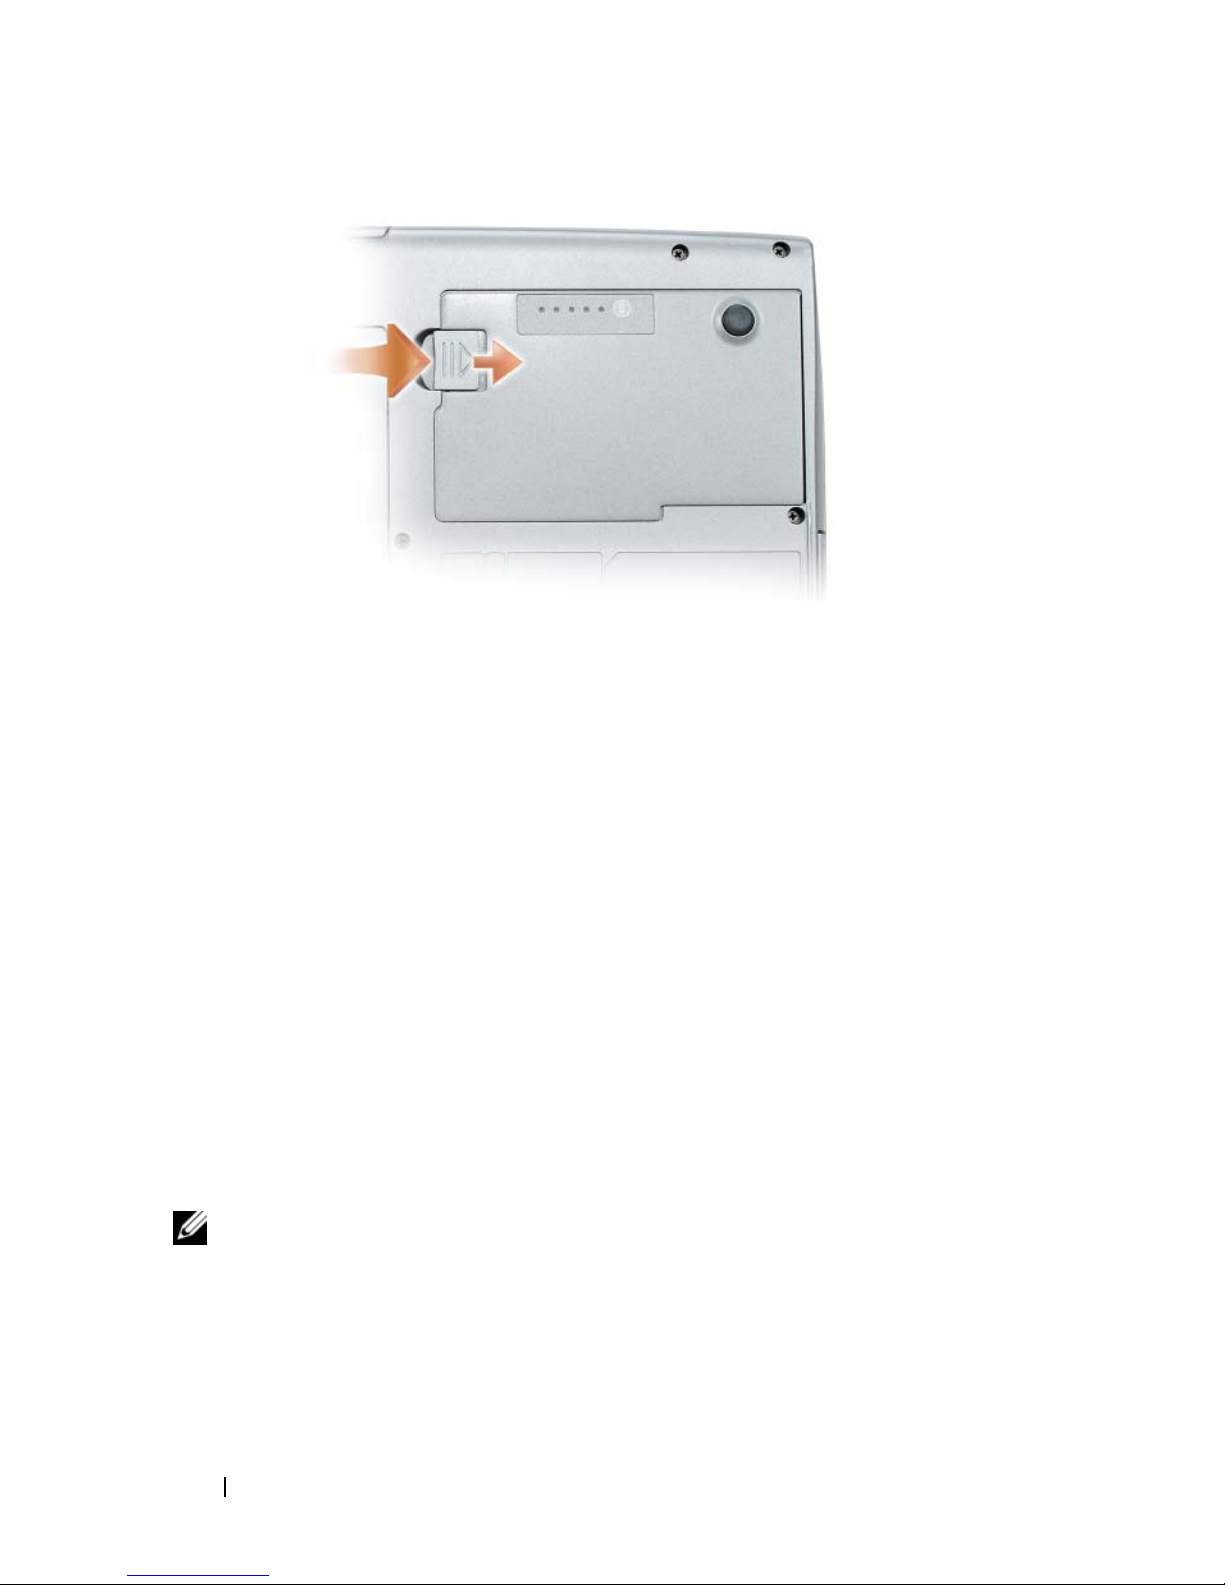
Slide the battery-bay latch release on the bottom of the computer, and
then remove the battery from the bay.
Quick Reference Guide 27
Page 28
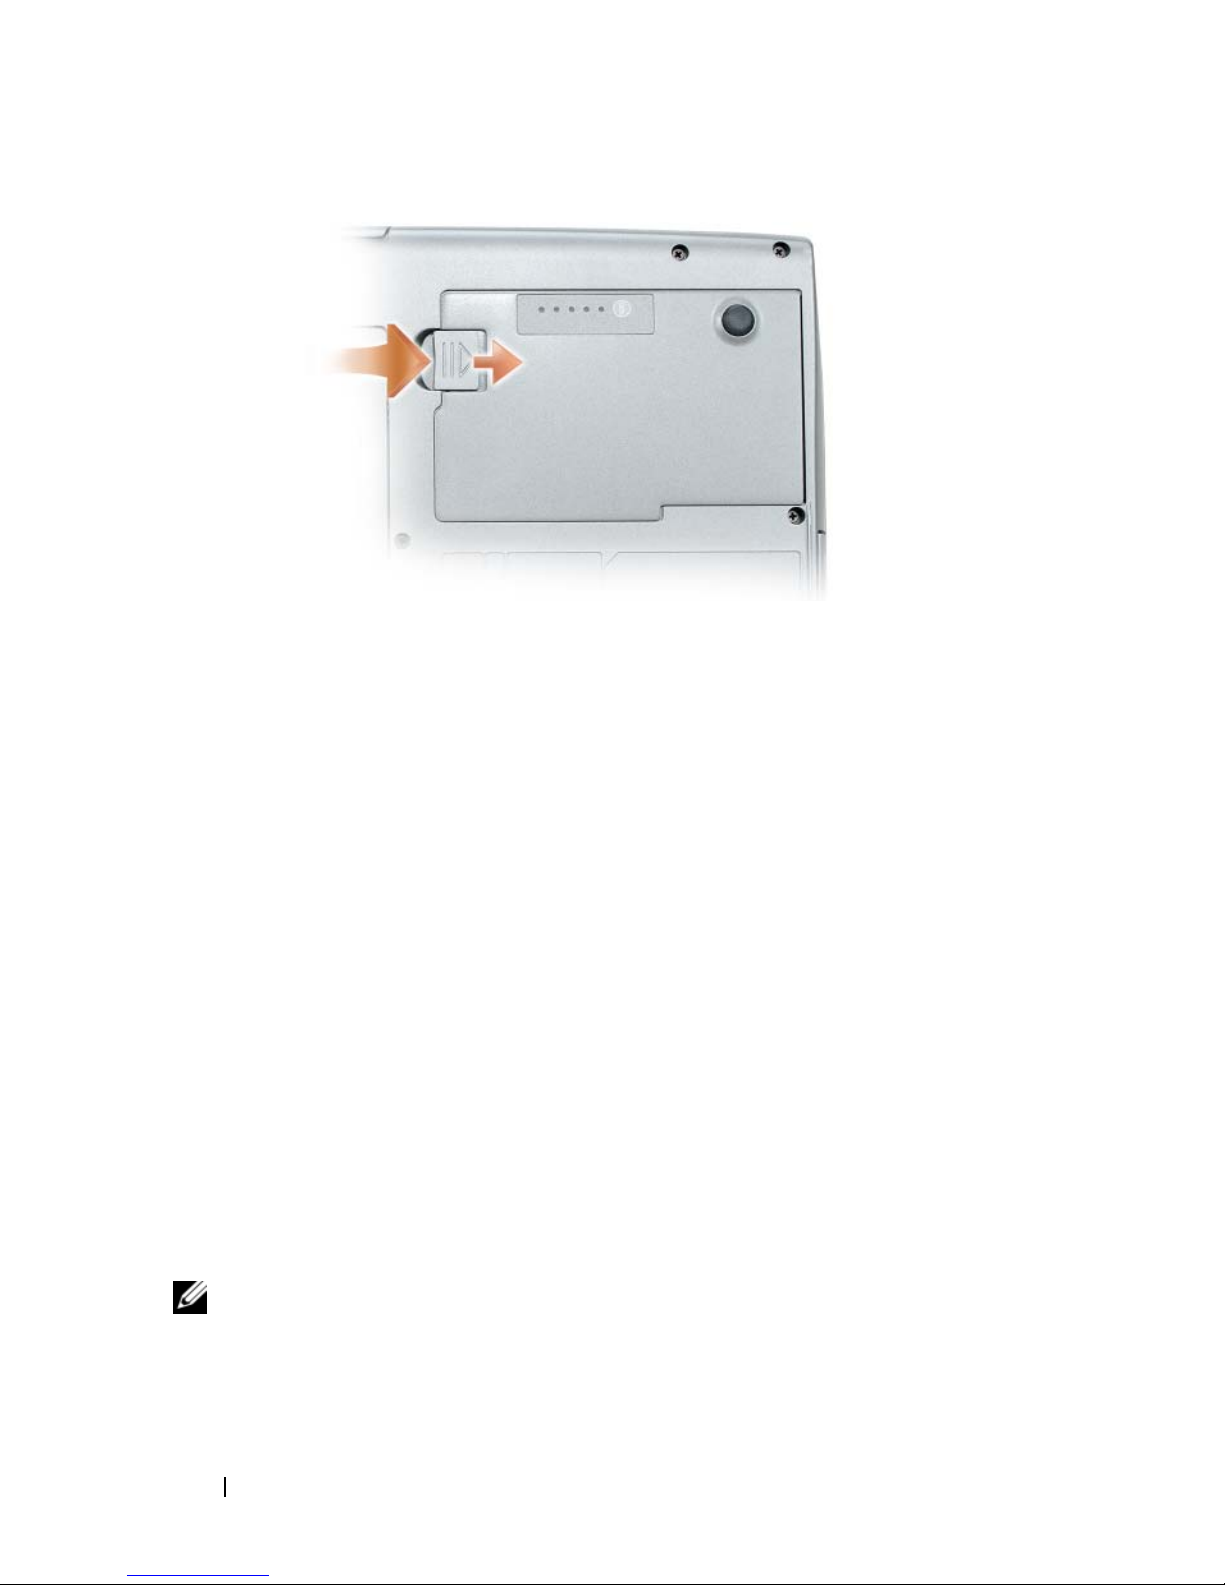
To replace the battery, follow the removal procedure in reverse order and press
down until the battery-bay latch release fully engages.
Storing a Battery
Remove the battery when you store your computer for an extended period of
time. A battery discharges during prolonged storage. After a long storage
period, recharge the battery fully (see "Charging the Battery" on page 26)
before you use it.
Troubleshooting
Follow these tips when you troubleshoot your computer:
• If you added or removed a part before the problem started, review the
installation procedures and ensure that the part is correctly installed.
• If a peripheral device does not work, ensure that the device is properly
connected.
• If an error message appears on the screen, write down the exact message.
This message may help support personnel diagnose and fix the problem(s).
• If an error message occurs in a program, see the program’s documentation.
NOTE: The procedures in this document were written for the Windows default
view, so they may not apply if you set your Dell computer to the Windows Classic
view.
28 Quick Reference Guide
Page 29

Lockups and Software Problems
CAUTION: Before you begin any of the procedures in this section, follow the
safety instructions in the Product Information Guide.
The computer does not start up
ENSURE THAT THE POWER CABLE IS FIRMLY CONNECTED TO THE COMPUTER AND TO
THE ELECTRICAL OUTLET
The computer stops responding
NOTICE: You may lose data if you are unable to perform an operating system
shutdown.
URN THE COMPUTER OFF — If you are unable to get a response by pressing a key on
T
your keyboard or moving your mouse, press and hold the power button for at least 8 to
10 seconds (until the computer turns off), and then restart your computer.
A program stops responding
END THE PROGRAM —
1
Press <Ctrl><Shift><Esc> simultaneously to access the Task Manager.
2
Click the
3
Click to select the program that is no longer responding.
4
Click
Applications
End Task
tab.
.
A program crashes repeatedly
NOTE: Most software includes installation instructions in its documentation or on a
floppy disk, CD, or DVD.
HECK THE SOFTWARE DOCUMENTATION — If necessary, uninstall and then reinstall
C
the program.
A program is designed for an earlier Windows operating system
RUN THE PROGRAM COMPATIBILITY WIZARD —
Windows XP:
The Program Compatibility Wizard configures a program so that it runs in an
environment similar to non-XP operating system environments.
1
Click
Start→
All Programs→ Accessories→ Program Compatibility Wizard→ Next
.
2
Follow the instructions on the screen.
Quick Reference Guide 29
Page 30

Windows Vista:
The Program Compatibility Wizard configures a program so that it runs in an
environment similar to non-Windows Vista operating system environments.
1
Click
Start
→
Control Panel→ Programs→ Use an older program with this
version of Windows.
2
In the welcome screen, click
3
Follow the instructions on the screen.
Next
.
A solid blue screen appears
TURN THE COMPUTER OFF — If you are unable to get a response by pressing a
key on your keyboard or moving your mouse, press and hold the power button
for at least 8 to 10 seconds (until the computer turns off), and then restart
your computer.
Other software problems
CHECK THE SOFTWARE DOCUMENTATION OR CONTACT THE SOFTWARE
MANUFACTURER FOR TROUBLESHOOTING INFORMATION —
• Ensure that the program is compatible with the operating system installed on your
computer.
• Ensure that your computer meets the minimum hardware requirements needed to
run the software. See the software documentation for information.
• Ensure that the program is installed and configured properly.
• Verify that the device drivers do not conflict with the program.
• If necessary, uninstall and then reinstall the program.
BACK UP YOUR FILES IMMEDIATELY
USE A VIRUS-SCANNING PROGRAM TO CHECK THE HARD DRIVE, FLOPPY DISKS,
S , OR DVDS
CD
SAVE AND CLOSE ANY OPEN FILES OR PROGRAMS AND SHUT DOWN YOUR
COMPUTER THROUGH THE START MENU
Dell Diagnostics
CAUTION: Before you begin any of the procedures in this section, follow the
safety instructions in the Product Information Guide.
30 Quick Reference Guide
Page 31

When to Use the Dell Diagnostics
If you experience a problem with your computer, perform the checks in
"Lockups and Software Problems" on page 29 and run the Dell Diagnostics
before you contact Dell for technical assistance.
It is recommended that you print these procedures before you begin.
NOTICE: The Dell Diagnostics works only on Dell computers.
NOTE: The Drivers and Utilities disc is optional and may not ship with your
computer.
Start the Dell Diagnostics from either your hard drive or from the optional
Drivers and Utilities disc.
Starting the Dell Diagnostics From Your Hard Drive
The Dell Diagnostics is located on a hidden diagnostic utility partition on
your hard drive.
NOTE: If your computer cannot display a screen image, contact Dell (see
"Contacting Dell" in your User’s Guide).
1
Shut down the computer.
2
If the computer is connected to a docking device (docked), undock it. See
the documentation that came with your docking device for instructions.
3
Connect the computer to an electrical outlet.
4
The Dell Diagnostics can be invoked in one of two ways:
• Turn on the computer. When the DELL™ logo appears, press <F12>
immediately. Select
Diagnostics
from the boot menu and press
<Enter>.
NOTE: If you wait too long and the operating system logo appears, continue to
wait until you see the Microsoft Windows desktop. Then shut down your
computer and try again.
• Press and hold the <Fn> key while powering the computer on.
NOTE: If you see a message stating that no diagnostics utility partition has
been found, run the Dell Diagnostics from the optional Drivers and Utilities
disc.
The computer runs the Pre-boot System Assessment, a series of initial
tests of your system board, keyboard, hard drive, and display.
Quick Reference Guide 31
Page 32

• During the assessment, answer any questions that appear.
• If a failure is detected, the computer stops and beeps. To stop the
assessment and restart the computer, press <Esc>; to continue to the
next test, press <y>; to retest the component that failed, press <r>.
• If failures are detected during the Pre-boot System Assessment, write
down the error code(s) and contact Dell (see "Contacting Dell" in
your
User’s Guide
)
.
If the Pre-boot System Assessment completes successfully, you receive the
message
Press any key to continue
5
Press any key to start the Dell Diagnostics from the diagnostics utility
Booting Dell Diagnostic Utility Partition.
.
partition on your hard drive.
Starting the Dell Diagnostics From the Optional Drivers and Utilities Disc
1
Insert the
2
Shut down and restart the computer.
Drivers and Utilities
disc.
When the DELL logo appears, press <F12> immediately.
If you wait too long and the Windows logo appears, continue to wait until
you see the Windows desktop. Then shut down your computer and try
again.
NOTE: The next steps change the boot sequence for one time only. On the
next start-up, the computer boots according to the devices specified in the
system setup program.
3
When the boot device list appears, highlight
CD/DVD/CD-RW Drive
and press <Enter>.
4
Select the
Boot from CD-ROM
option from the menu that appears and
press <Enter>.
5
Ty p e 1 to start the menu and press <Enter> to proceed.
6
Select
Run the 32 Bit Dell Diagnostics
from the numbered list. If
multiple versions are listed, select the version appropriate for your
computer.
7
When the Dell Diagnostics
Main Menu
appears, select the test that you
want to run.
32 Quick Reference Guide
Page 33
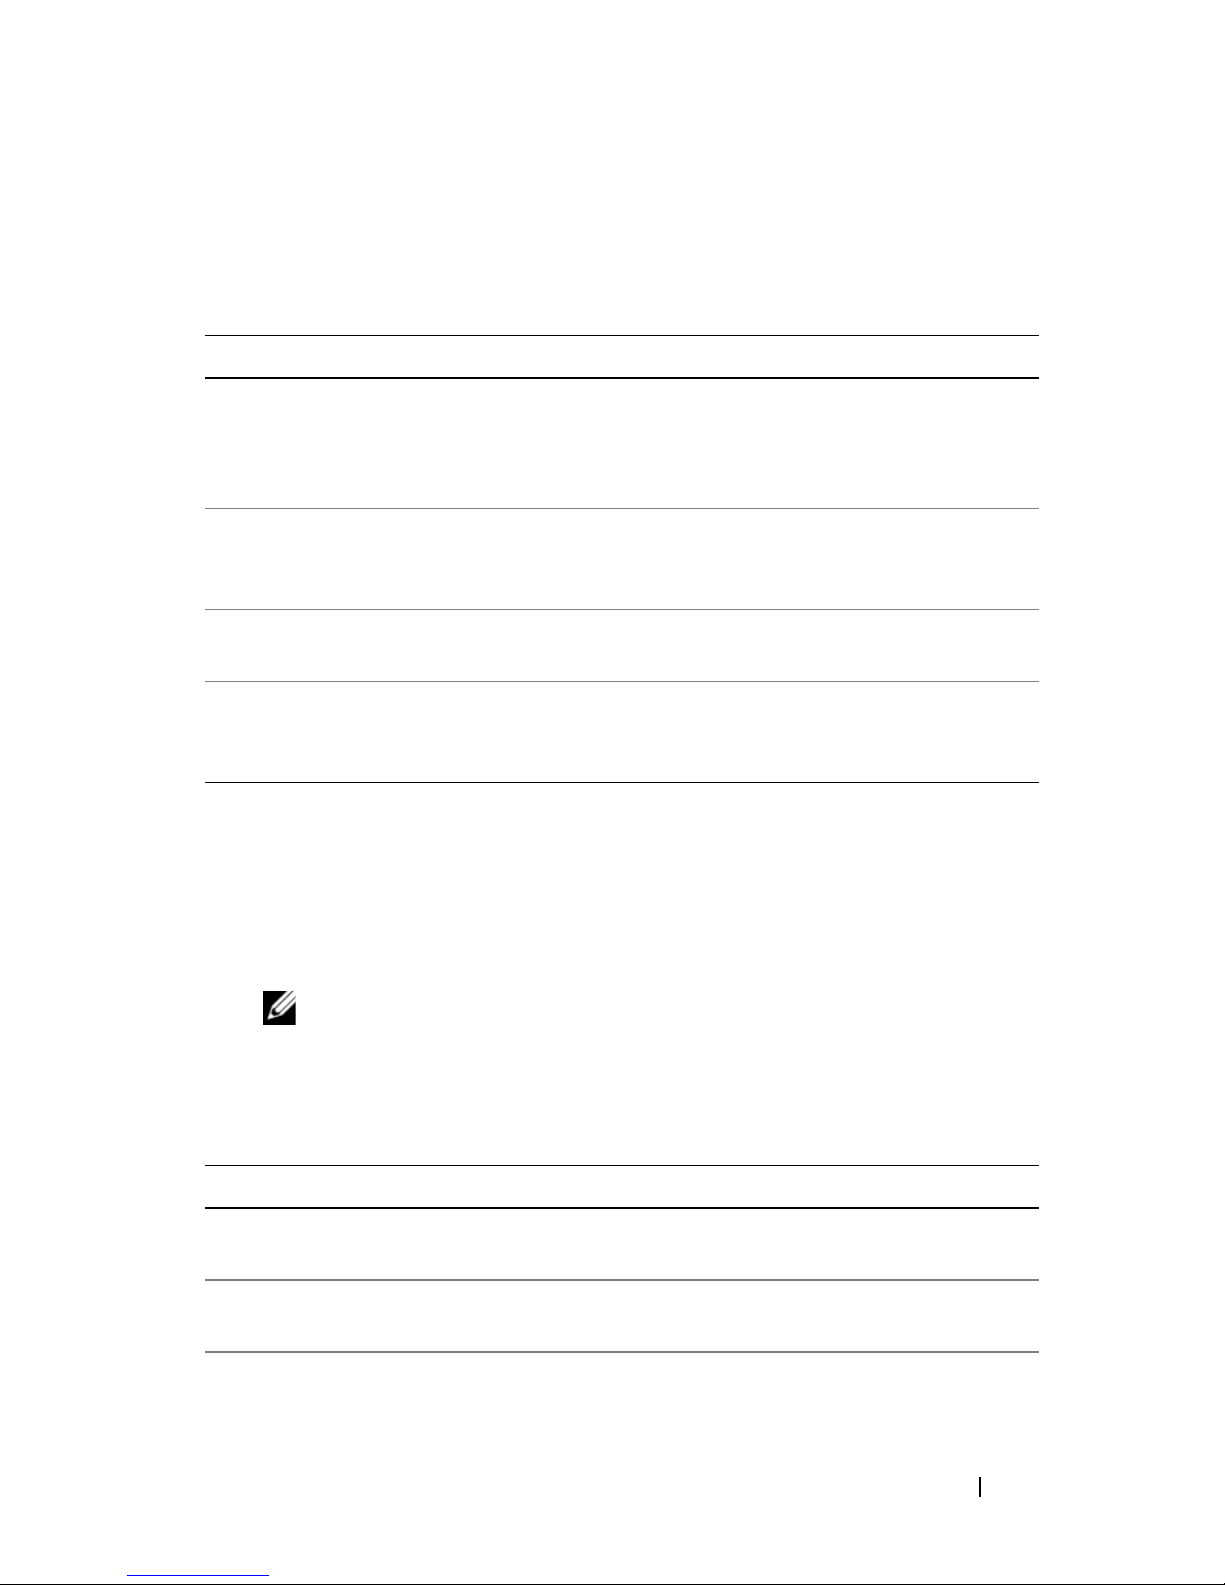
Dell Diagnostics Main Menu
1
After the Dell Diagnostics loads and the
Main Menu
screen appears, click
the button for the option you want.
Option Function
Express Test Performs a quick test of devices. The test typically takes
10 to 20 minutes and requires no interaction on your
part. Run Express Test first to increase the possibility of
tracing the problem quickly.
Extended Test Performs a thorough check of devices. The test typically
takes 1 hour or more and requires you to answer
questions periodically
Custom Test Tests a specific device. You can customize the tests you
want to run.
Symptom Tree Lists the most common symptoms encountered and
allows you to select a test based on the symptom of the
problem you are having.
2
If a problem is encountered during a test, a message appears with an error
code and a description of the problem. Write down the error code and
problem description and follow the instructions on the screen.
If you cannot resolve the error condition, contact Dell (see "Contacting
Dell" in your
NOTE: The Service Tag for your computer is located at the top of each test
screen. If you contact Dell, technical support will ask for your Service Tag.
3
If you run a test from the
User’s Guide
).
Custom Test
or
Symptom Tree
option, click the
applicable tab described in the following table for more information.
Tab Function
Results Displays the results of the test and any error conditions
encountered.
Errors Displays error conditions encountered, error codes, and
the problem description.
Help Describes the test and may indicate requirements for
running the test.
Quick Reference Guide 33
Page 34

Tab Function
Configuration Displays your hardware configuration for the selected
device.
The Dell Diagnostics obtains configuration information
for all devices from system setup, memory, and various
internal tests, and it displays the information in the
device list in the left pane of the screen. The device list
may not display the names of all the components
installed on your computer or all devices attached to your
computer.
Parameters Allows you to customize the test by changing the test
settings.
4
When the tests are completed, if you are running the Dell Diagnostics
from the
5
When the tests are complete, close the test screen to return to the
Menu
the
Drivers and Utilities
screen. To exit the Dell Diagnostics and restart the computer, close
Main Menu
screen.
disc, remove the disc.
Main
34 Quick Reference Guide
Page 35

Index
B
battery
charge gauge, 22
charging, 26
checking the charge, 22
performance, 21
power meter, 22
removing, 27
storing, 28
C
computer
crashes, 29-30
stops responding, 29
documentation (continued)
User’s Guide, 6
warranty, 6
Drivers and Utilities disc
Dell Diagnostics, 30
E
End User License Agreement, 6
ergonomics information, 6
H
hardware
Dell Diagnostics, 30
D
Dell Diagnostics, 30
Dell support site, 8
diagnostics
Dell, 30
documentation
End User License Agreement, 6
ergonomics, 6
online, 8
Product Information Guide, 6
regulatory, 6
safety, 6
hibernate mode, 25
I
installing parts
turning off your computer, 16
L
labels
Microsoft Windows, 7
Service Tag, 7
Index 35
Page 36

O
S
operating system
reinstalling, 10
Operating System disc, 10
P
power
hibernate mode, 25
standby mode, 24
problems
blue screen, 30
computer crashes, 29-30
computer stops responding, 29
Dell Diagnostics, 30
general, 29
program crashes, 29
safety instructions, 6
Service Tag, 7
software
problems, 29-30
standby mode
about, 24
Starting the Dell Diagnostics
From the Drivers and
Utilities Disc, 32
Starting the Dell Diagnostics
From Your Hard Drive, 31
support website, 8
T
program stops responding, 29
software, 29-30
Product Information Guide, 6
Q
QuickSet Help, 10
R
regulatory information, 6
troubleshooting
Dell Diagnostics, 30
U
User’s Guide, 6
W
warranty information, 6
Windows 2000
hibernate mode, 25
standby mode, 24
36 Index
Page 37

Windows Vista
reinstalling, 10
Windows XP
hibernate mode, 25
reinstalling, 10
standby mode, 24
Index 37
Page 38

38 Index
Page 39

Dell™ Latitude™ D530
快速参考指南
型号 PP17L
www.dell.com | support.dell.com
Page 40

注、注意和警告
注 : " 注 " 表示可以帮助您更好地使用计算机的重要信息。
注意 : " 注意 " 表示硬件的潜在损坏或数据丢失,并且告诉您如何避免此类
问题。
警告 : " 警告 " 表示可能导致财产损失、人身伤害或死亡的潜在危险。
____________________
本说明文件中的信息如有更改,恕不另行通知。
© 2007 Dell Inc. 版权所有,翻印必究。
未经 Dell Inc. 书面许可,严禁以任何方式进行复制。
本文件中使用的商标: Dell、 DELL 徽标、 Latitude、 ExpressCharge 和 Undock & Go 是
Dell Inc. 的商标; Microsoft、 Windows、 Outlook 和 Windows Vista 是 Microsoft Corporation
在美国和 / 或其它国家或地区的商标或注册商标。Bluetooth 是 Bluetooth SIG, Inc. 拥有的注册
商标并由 Dell 在许可证下使用。
本说明文件中述及的其它商标和商品名称是指拥有相应标记和名称的公司或其制造的产品。
Dell Inc. 对不属于自己的商标和商品名称不拥有任何所有权。
型号 PP17L
2007 年 9 月 P/N NM070 修订版 A00
Page 41

目录
查找信息 . . . . . . . . . . . . . . . . . . . . . . . . 43
安装计算机
. . . . . . . . . . . . . . . . . . . . . . . 48
转移信息到一台新的计算机
关闭计算机
关于您的计算机
正面视图
左侧视图
右侧视图
背面视图
底部视图
使用电池
. . . . . . . . . . . . . . . . . . . . . . . . 58
电池性能
检查电池电量
电源管理模式
. . . . . . . . . . . . . . . . . . . . 53
. . . . . . . . . . . . . . . . . . . . 54
. . . . . . . . . . . . . . . . . . . . . . 54
. . . . . . . . . . . . . . . . . . . . . . 55
. . . . . . . . . . . . . . . . . . . . . . 55
. . . . . . . . . . . . . . . . . . . . . . 56
. . . . . . . . . . . . . . . . . . . . . . 57
. . . . . . . . . . . . . . . . . . . . . . 58
. . . . . . . . . . . . . . . . . . . 59
. . . . . . . . . . . . . . . . . . . 61
配置电源管理设置
访问电源选项属性
为电池充电
. . . . . . . . . . . . . . . . . . . . 62
. . . . . . . . . . . 48
. . . . . . . . . . . . . . . . 62
. . . . . . . . . . . . . . . . 62
故障排除
索引 . . . . . . . . . . . . . . . . . . . . . . . . . . . . . . . . 71
更换电池
储存电池
锁定和软件问题
Dell 诊断程序
. . . . . . . . . . . . . . . . . . . . . . 63
. . . . . . . . . . . . . . . . . . . . . . 64
. . . . . . . . . . . . . . . . . . . . . . . . 64
. . . . . . . . . . . . . . . . . 65
. . . . . . . . . . . . . . . . . . . 66
目录 41
Page 42

42 目录
Page 43
查找信息
注 : 一些功能或介质可能为可选项,并且可能不会随您的计算机提供。 一些
功能或介质对于您的计算机或在某些国家或地区可能不适用。
注 : 其它信息可能随计算机提供。
要查找的内容 在此处查找
•
适用于我的计算机的诊断程序
•
适用于我的计算机的驱动程序
•
我的设备的说明文件
•
笔记本电脑系统软件 (
NSS
)
驱动程序和公用程序光盘
您的计算机已经安装了说明文件和驱动
程序。 您可以使用光盘来重新安装驱动
程序 (请参阅 《用户指南》中的 “重新
安装驱动程序和公用程序”)或运行 Dell
诊断程序 (请参阅第 68 页上的 “从可
选的 Drivers and Utilities 光盘启动 Dell
诊断程序”)。
您的光盘可能包含自述文件,这些文件
提供有关计算机技术更改的最新更新,
或为技术人员或有经验的用户提供高级
技术参考资料。
注 : 驱动程序和说明文件更新可以在
support.dell.com 上找到。
注 : 驱动程序和公用程序 光盘可能为可
选项,并且可能不会随您的计算机提供。
快速参考指南 43
Page 44
要查找的内容 在此处查找
•
保修信息
•
条款和条件 (仅限于美国)
•
安全说明
•
管制信息
•
人机工程学信息
•
最终用户许可协议
•
规格
•
如何配置系统设置
•
如何查找及排除故障并解决问题
Dell™ 《产品信息指南》
Dell Latitude™ 《用户指南》
Microsoft
®
Vista™ 帮助和支持中心
1
单击 Start
Support
and System Guides
指南)
(系统指南)。
Windows® XP 和 Windows
(开始)→
Help and
(帮助和支持)→ Dell User
(
Dell
用户和系统
→ System Guides
2
单击适用于您的计算机的 《用户指
南》。
44 快速参考指南
Page 45
要查找的内容 在此处查找
•
服务编号和快速服务代码
• Microsoft® Windows®
许可证标签
服务编号和 Microsoft® Windows®
许可证
注 : 您的计算机服务编号和 Microsoft
Windows 许可证标签位于您的计算机上。
计算机的服务编号包含服务标签号码和
快速服务代码。
•
当您使用 support.dell.com 以联系支持
部门时,请使用 “服务编号”来标识
您的计算机。
•
当联系支持部门时,请输入 “快速服
务代码”来导向您的呼叫。
•
如果您要重新安装操作系统,请使用许
可证标签上的产品密钥。
注 : 作为一种更安全的方法,新设计的
Microsoft Windows 许可证标签包含了丢
失的部分或一个 “洞”,从而避免移除
标签。
快速参考指南 45
Page 46

要查找的内容 在此处查找
•
解决方案
来自技术人员的文章以及在线课程和
常见问题
•
团体
—
—
故障排除提示和技巧、
与其他
Dell
客户进行在线
Dell 支持 Web 站点 — support.dell.com
注 : 选择您的区域或业务分段以查看相
应的支持站点。
讨论
•
升级
—
组件如内存、硬盘驱动器和
操作系统的升级信息
•
客户服务中心
—
联系人信息、服务
电话和订购状态、担保和修复信息
•
服务和支持
—
服务通话状态和支持
历史、服务合同、与技术支持部门的
在线讨论
• Dell
技术更新服务
—
为您的计算机
提供软件和硬件更新的预先电子邮件
通知
•
参考
—
计算机说明文件、有关计算
机配置的详情、产品规格和白皮书
•
下载
—
经过认证的驱动程序、增补
软件和软件更新
•
笔记本电脑系统软件 (
NSS)—
如果您的计算机重新安装了操作系
NSS
统,则还应重新安装
为您的操作系统提供重要更新,
NSS
并为处理器,光盘驱动器和
备等提供支持。
计算机所必需的。 该软件将自动
Dell
NSS
公用程序。
USB
是正确操作您的
检测您的计算机和操作系统,并安装
适合于您的配置的更新。
要下载笔记本电脑系统软件:
1
登录 support.dell.com 并单击
设
Downloads
2
输入服务编号并单击执行,或选择产品
类型和产品型号并单击
(确认)。
3
单击 System Utilities
旁边的加号
软件,再单击
(驱动程序和下载)。
(
+)
单击 笔记本电脑系统
Download Now
下载)。
4
单击 Run
(运行)以运行公用程序。
Drivers &
Confirm
(系统公用程序)
(立即
46 快速参考指南
注 : support.dell.com 用户界面随您的选择
而不同。
Page 47
要查找的内容 在此处查找
•
软件升级和故障排除提示
题、热门话题、计算环境的一般性能
—
常见问
Dell 支持公用程序
“Dell 支持公用程序”是安装在您计算机
上的一个自动化升级和通知系统。 该支
持提供对您的计算环境、软件升级和相
关自我支持信息的实时健康扫描。 从任
务栏中的
程序”。
图标访问 “
Dell
支持公用
如何查找关于我的计算机和组件的
•
信息
•
如何连接至互联网
•
如何为不同的人添加用户账户
•
如何从另一台计算机来转移文件和
设置
•
如何使用
如何使用
•
•
如何使用程序和文件
•
如何使我的桌面个性化
Microsoft Windows XP
Microsoft Windows Vista
Windows 欢迎中心
当您第一次使用本计算机时 Windows 欢
迎中心自动出现。您可以通过选中 Run
at startup (启动时运行)复选框来选择
在每次启动 PC 时显示它。 另一个访问欢
迎中心的方法是单击 Windows Vista Start
(开始)按钮 , 然后单击 Welcome
Center
(欢迎中心)。
Windows 帮助和支持
Microsoft Windows XP:
1
单击 Start
Help and Support
2
从列出的主题中挑选一个,或 在 Search
(开始)按钮,然后单击
(帮助和支持)。
(搜索)框中键入描述您的问题的字或
词组,单击箭头图标,然后单击描述您
的问题的主题。
3
遵循屏幕上的说明进行操作。
Microsoft Windows Vista:
1
单击
Windows Vista 的 Start
按钮
,并单击 Help and Support
(开始)
(帮助和支持)。
2
在 查找帮助中,键入描述您的问题的
字或词组,然后按
<Enter>
键或单击
放大镜。
3
单击说明问题的主题。
4
遵循屏幕上的说明进行操作。
快速参考指南 47
Page 48
要查找的内容 在此处查找
•
有关由
动、电源管理向导、热键和其它项目
的信息。
•
如何重新安装操作系统
Dell QuickSet
控制的网络活
Dell QuickSet 帮助
要查看 Dell QuickSet Help(Dell
QuickSet
Windows® 任务栏,再选择 Help。 任务
栏在屏幕右下角。
操作系统光盘
帮助),
注 : 操作系统光盘可能为可选项,并且
可能不会随您的计算机提供。
注 : 预安装的操作系统包括一个还原分
区以恢复您的 PC 操作系统。
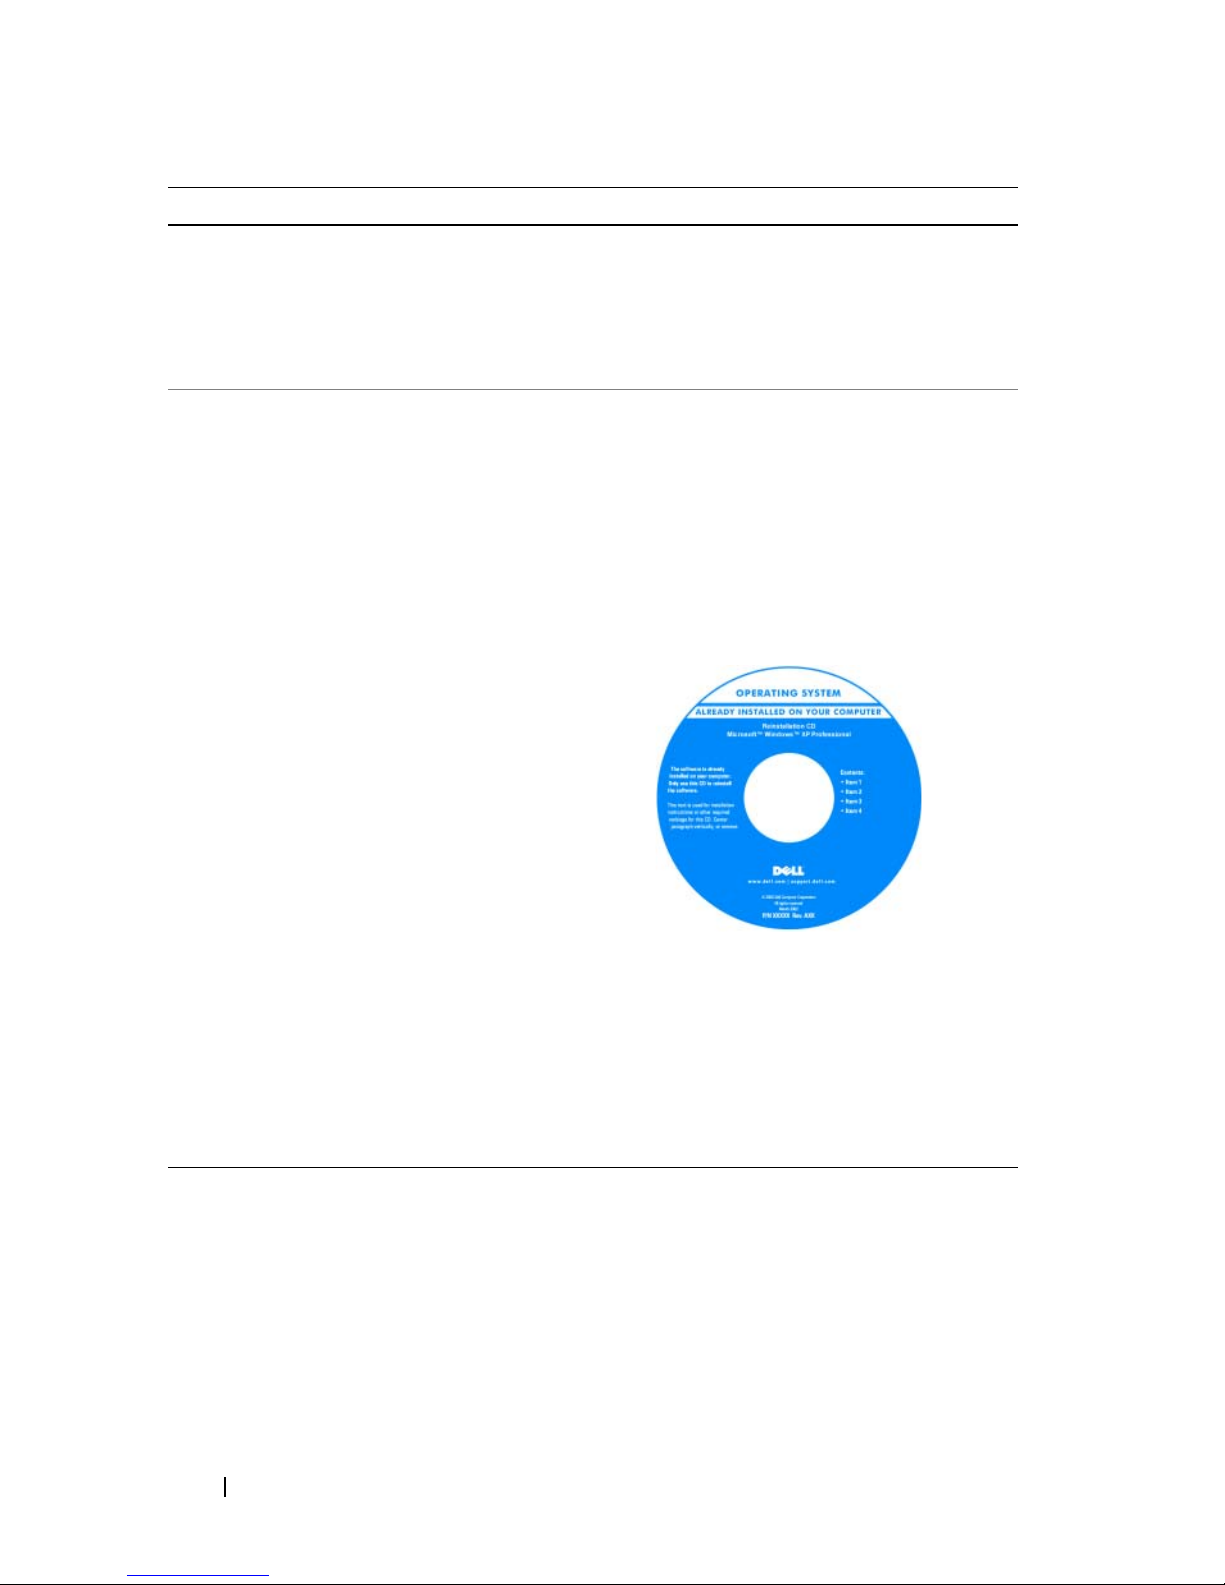
您的计算机上已经安装了操作系统。
要重新安装操作系统,请使用 Operating
System (操作系统)光盘。
右键单击 Microsoft®
重新安装操作系统后,使用 Drivers and
Utilities 光盘为计算机随附的设备重新安
装驱动程序。
您的操作系统产品密钥标签位于您的计
算机上。
注 : 您的光盘的颜色取决于您所订购的
操作系统。
安装计算机
转移信息到一台新的计算机
您可以使用操作系统 “向导”来帮助您将文件和其它数据从一台计算机
转移到另一台 — 例如,从一台旧计算机转移到一台新计算机上。 有关说
明,请参阅与您的计算机运行的操作系统对应的如下小节。
48 快速参考指南
Page 49

Microsoft Windows XP
Microsoft® Windows® Vista™ 操作系统提供了 Files and Settings Transfer
(文件和数据转移)向导,用于将数据从源计算机转移到新计算机上。
可以转移的数据包括:
•
电子邮件信息
•
工具栏设置
•
窗口大小
•
互联网书签
您可以通过网络或串行连接将数据转移到新计算机上,或者将数据存储在
可移动介质 (如可写光盘)中,然后转移到新计算机上。
注 : 您可通过直接连接串行电缆到两台计算机的输入 / 输出 (I/O) 端口将信息
从一台旧的计算机转移到一台新的计算机。要通过串行连接转移数据,您必
须从控制面板访问网络连接公用程序,并执行附加的配置步骤,例如设置高
级连接和指定主机和访客计算机。
关于有关在两台计算机之间设置直接电缆连接的说明,请参阅 Microsoft 知
识库文章 #305621,标题为 How to Set Up a Direct Cable Connection Between
Two Computers in Windows XP (如何在两台 Windows XP 计算机之间设置直接
电缆连接)。此信息在某些国家或地区可能不适用。
要转移信息到新的计算机,您必须运行文件和设置转移向导。您可以使用
该处理的可选的 操作系统光盘或创建一个带有文件和设置转移向导的向
导磁盘。
有操作系统光盘时运行文件和设置转移向导
注 : 此过程需要操作系统光盘。此光盘是可选的,某些计算机可能未提供。
要准备一台供文件转移的新计算机:
1
打开文件和设置转移向导:单击 Start
程序)
→ Accessories
and Settings Transfer Wizard
2
当 Files and Settings Transfer Wizard
幕出现时,单击
3
在 Which computer is this?
Computer
(新计算机)→
(附件)→ System Tools
(文件和设置转移向导)。
Next
(下一步)。
(这是哪台计算机?)屏幕上,单击 New
Next
(开始)→
All Programs
(系统工具)→
(文件和设置转移向导)欢迎屏
(下一步)。
(所有
Files
快速参考指南 49
Page 50

4
在 Do you have a Windows XP CD?
屏幕上,单击
用
Windows XP
5
当 Now go to your old computer (现在到您的旧计算机)屏幕出现时,
I will use the wizard from the Windows XP CD
光盘上的向导)→
转到您的旧的或源计算机。此时请勿
(您有
Next
(下一步)。
单击 Next
Windows XP
(下一步)。
光盘吗?)
要从旧的计算机复制数据:
1
在旧的计算机上,插入
2
在 Welcome to Microsoft Windows XP
Windows XP
)屏幕上,单击 Perform additional tasks
Windows XP
操作系统光盘。
(欢迎使用
Microsoft
(执行更多
任务)。
3
在 What do you want to do?
and settings
4
在 Which computer is this?
计算机
5
在 Select a transfer method
(转移文件和设置)→ Next
→ Next
(下一步)。
(您打算做什么)下,单击 Transfer files
(下一步)。
(这是哪台计算机?)屏幕上,单击 旧的
(选择转移方法)屏幕上,单击您喜好的转
移方法。
(我将使
6
在 What do you want to transfer?
要转移的项目并单击
在信息被复制之后,
Next
(下一步)。
Completing the Collection Phase (完成收集
(您要转移什么?) 屏幕上, 选择您
阶段)屏幕出现。
7
单击 Finish
(完成)。
要转移数据到新的计算机:
1
在新计算机的 Now go to your old computer
屏幕上,单击 Next
2
在 Where are the files and settings?
(下一步)。
(哪里有文件和设置)屏幕上。选
择您用来转移文件和设置的方法并单击
(现在转到您的旧计算机)
Next
(下一步)。
向导读取收集到的文件和设置将它们应用到您的新计算机。
当所有设置和文件被应用后,
3
单击 Finished (已完成)并重新启动新计算机。
Finished
(已完成)屏幕会出现。
50 快速参考指南
Page 51

在没有操作系统光盘时运行文件和设置转移向导
要在没有操作系统光盘时运行文件和设置转移向导,您必须创建一个向导
光盘,它将让您创建一个备份映像文件到可移动介质。
要创建一个向导光盘,使用您带有 Windows XP 的新计算机并执行以下
步骤:
1
打开文件和设置转移向导:单击 Start
程序)
→ Accessories
and Settings Transfer Wizard
2
当 Files and Settings Transfer Wizard
幕出现时,单击
3
在 Which computer is this?
Computer
4
在 Do you have a Windows XP CD?
(新计算机)→
屏幕上,单击
I want to create a Wizard Disk in the following drive
(附件)→ System Tools
(文件和设置转移向导)。
Next
(下一步)。
(这是哪台计算机?) 屏幕上,单击 New
Next
(我要在下列驱动器上创建向导光盘)→ Next
5
插入可移动介质,例如可写
6
当创建光盘完成了,出现 Now go to your old computer
CD
,并单击 OK
(现在请到您的旧计算机)信息,请勿 单击 Next
(开始)→
All Programs
(系统工具)→
(文件和设置转移向导) 欢迎屏
(下一步)。
(您有
Windows XP
光盘吗?)
(下一步)。
(确认)。
(下一步)。
(所有
Files
7
转到旧的计算机。
要从旧的计算机复制数据:
1
在旧的计算机上插入向导光盘。
2
单击 Start
3
在 Run
(在相应的可移动介质上)并单击
4
在 Files and Settings Transfer Wizard (文件和设置转移向导)欢迎屏
幕上,单击
5
在
Which computer is this?
Computer
6
在
Select a transfer method (选择转移方法)屏幕上,单击您喜好的转
(开始)→
Run
(运行)。
(运行)窗口的 Open
Next
(下一步)。
(这是哪台计算机?) 屏幕上,单击 Old
(旧的计算机)→
(打开)字段中,浏览到 fastwiz 路径
OK
(确认)。
Next
(下一步)。
移方法。
7
在 What do you want to transfer?
Next
转移的项目并单击
在复制了信息之后,
阶段)
屏幕出现。
(下一步)。
Completing the Collection Phase
(您要转移什么?) 屏幕上,选择您
(完成收集
8
单击 Finish
(完成)。
快速参考指南 51
Page 52

要转移数据到该新计算机:
1
在新计算机的 Now go to your old computer
屏幕上,单击
2
在 Where are the files and settings?
Next
(下一步)。
(哪里有文件和设置?)屏幕上,
选择您要用来转移文件和设置的方法并单击
(转到您的旧计算机)
Next
(下一步)。 遵循屏
幕上的说明进行操作。
向导读取收集到的文件和设置并将它们应用到您的新计算机上。
当所有设置和文件被应用后,
3
单击 Finished
注 : 有关此步骤的详细信息,在 support.dell.com 上搜索 #154781 (What Are
The Different Methods To Transfer Files From My Old Computer To My New Dell™
Computer Using the Microsoft
机转移文件到使用 MicroSoft Windows XP 的新计算机上有何不同的方法?)
说明文件。
注 : 访问 Dell 知识库说明文件在某些国家或地区可能不适用。
Microsoft Windows Vista
1
单击
Windows Vista Start
and settings
2
在 User Account Control (用户帐户控制)对话框中,单击 Continue
(已完成)并重新启动新计算机。
(转移文件和设置)→
Finished
®
Windows® XP Operating System? 从我的旧计算
(开始)按钮
(已完成)屏幕会出现。
,然后单击 Transfer files
启动
Windows Easy Transfer
(继续)。
3
单击 Start a new transfer (开始一个新的转移)或 Continue a transfer
in progress
(继续一个正在进行的转移)。
请遵循由 Windows Easy Transfer 向导提供在屏幕上的指令。
。
52 快速参考指南
Page 53
关闭计算机
注意 : 为避免丢失数据,关闭计算机前请保存并关闭所有打开的文件,并退
出所有打开的程序。
关闭操作系统:
1
a
保存并关闭
b
在
Microsoft Windows XP
Down
所有
打开的文件并退出
(关闭)→
操作系统中,单击 Start
Shut down
所有
打开的程序。
(关闭)。
(开始)→
Shut
Microsoft Windows Vista™
在
Start
头,然后单击
(开始)按钮
Shut Down
操作系统中,单击
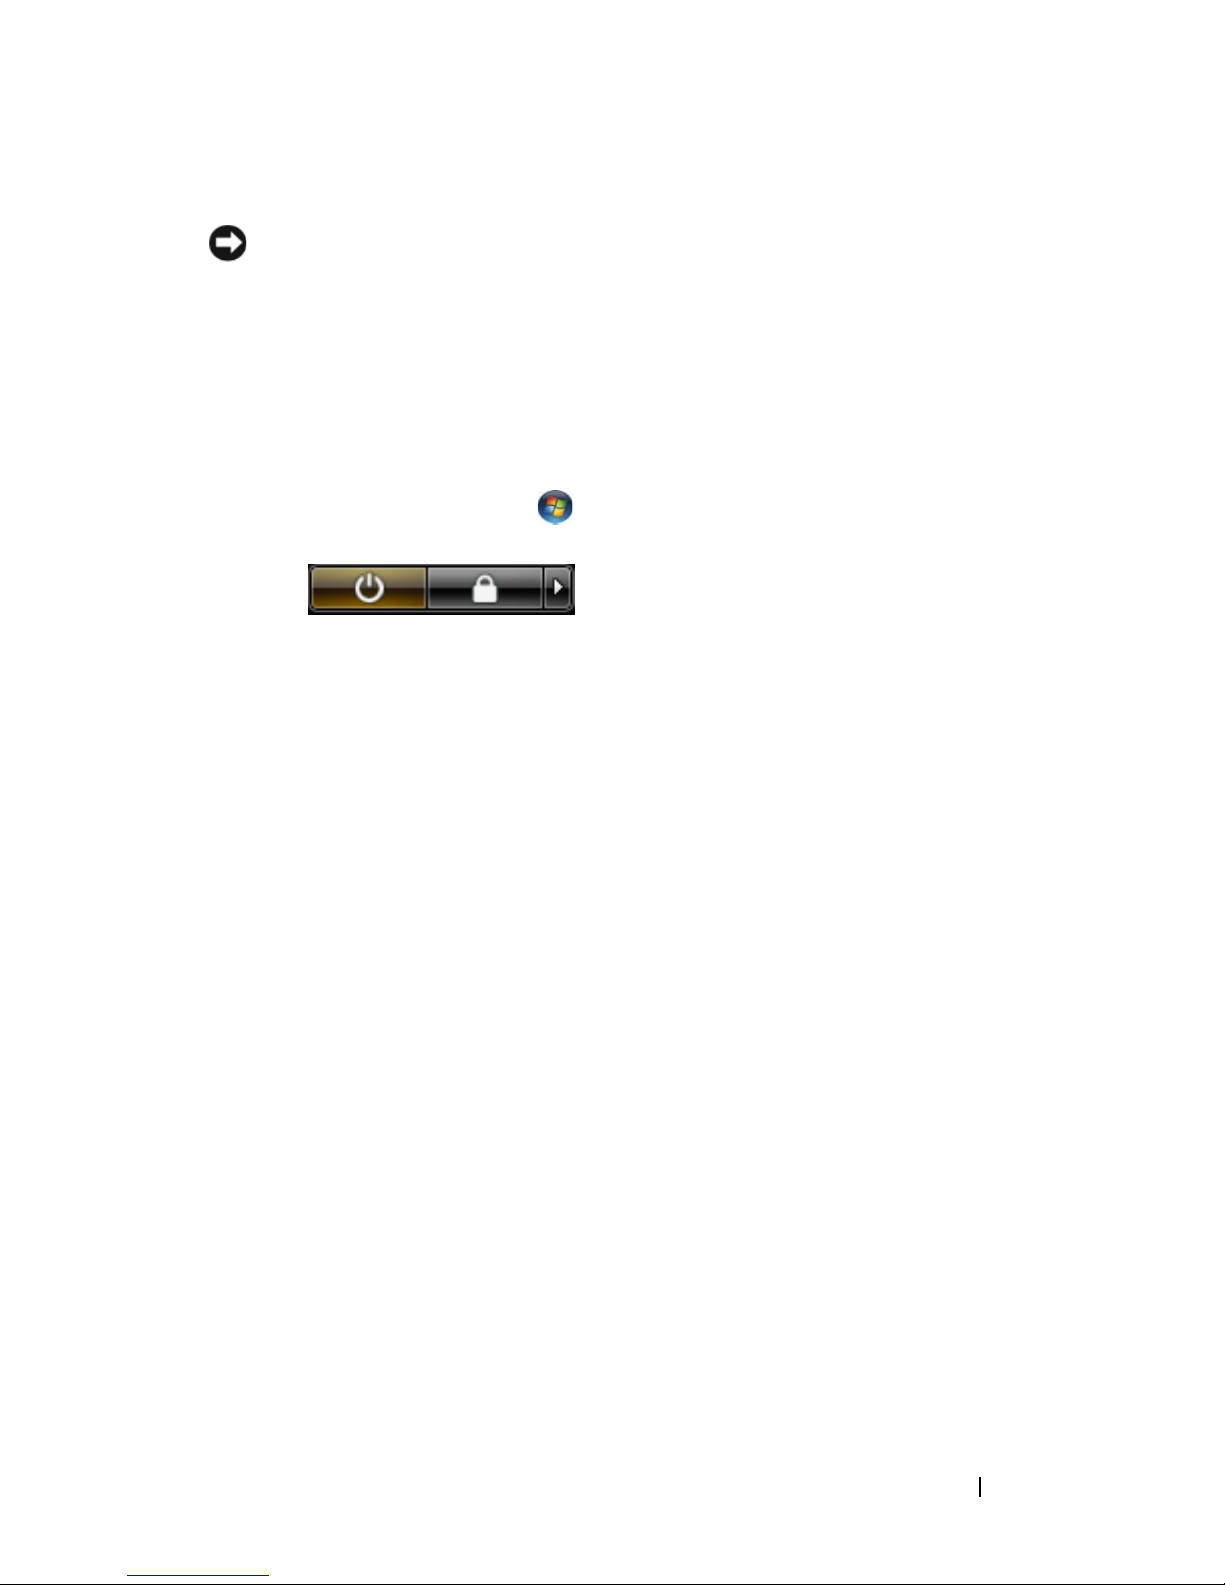
Windows Vista
,单击如下显示在开始菜单的右下角的箭
(关闭)。
计算机会在操作系统的关机程序结束后关闭。
2
确保关闭了计算机和所有与之连接的设备。当关闭操作系统时,如果
计算机和与之连接的设备并未自动关闭,则请按住电源按钮约
4
以将计算机和这些设备关闭。
秒钟,
快速参考指南 53
Page 54
关于您的计算机
正面视图
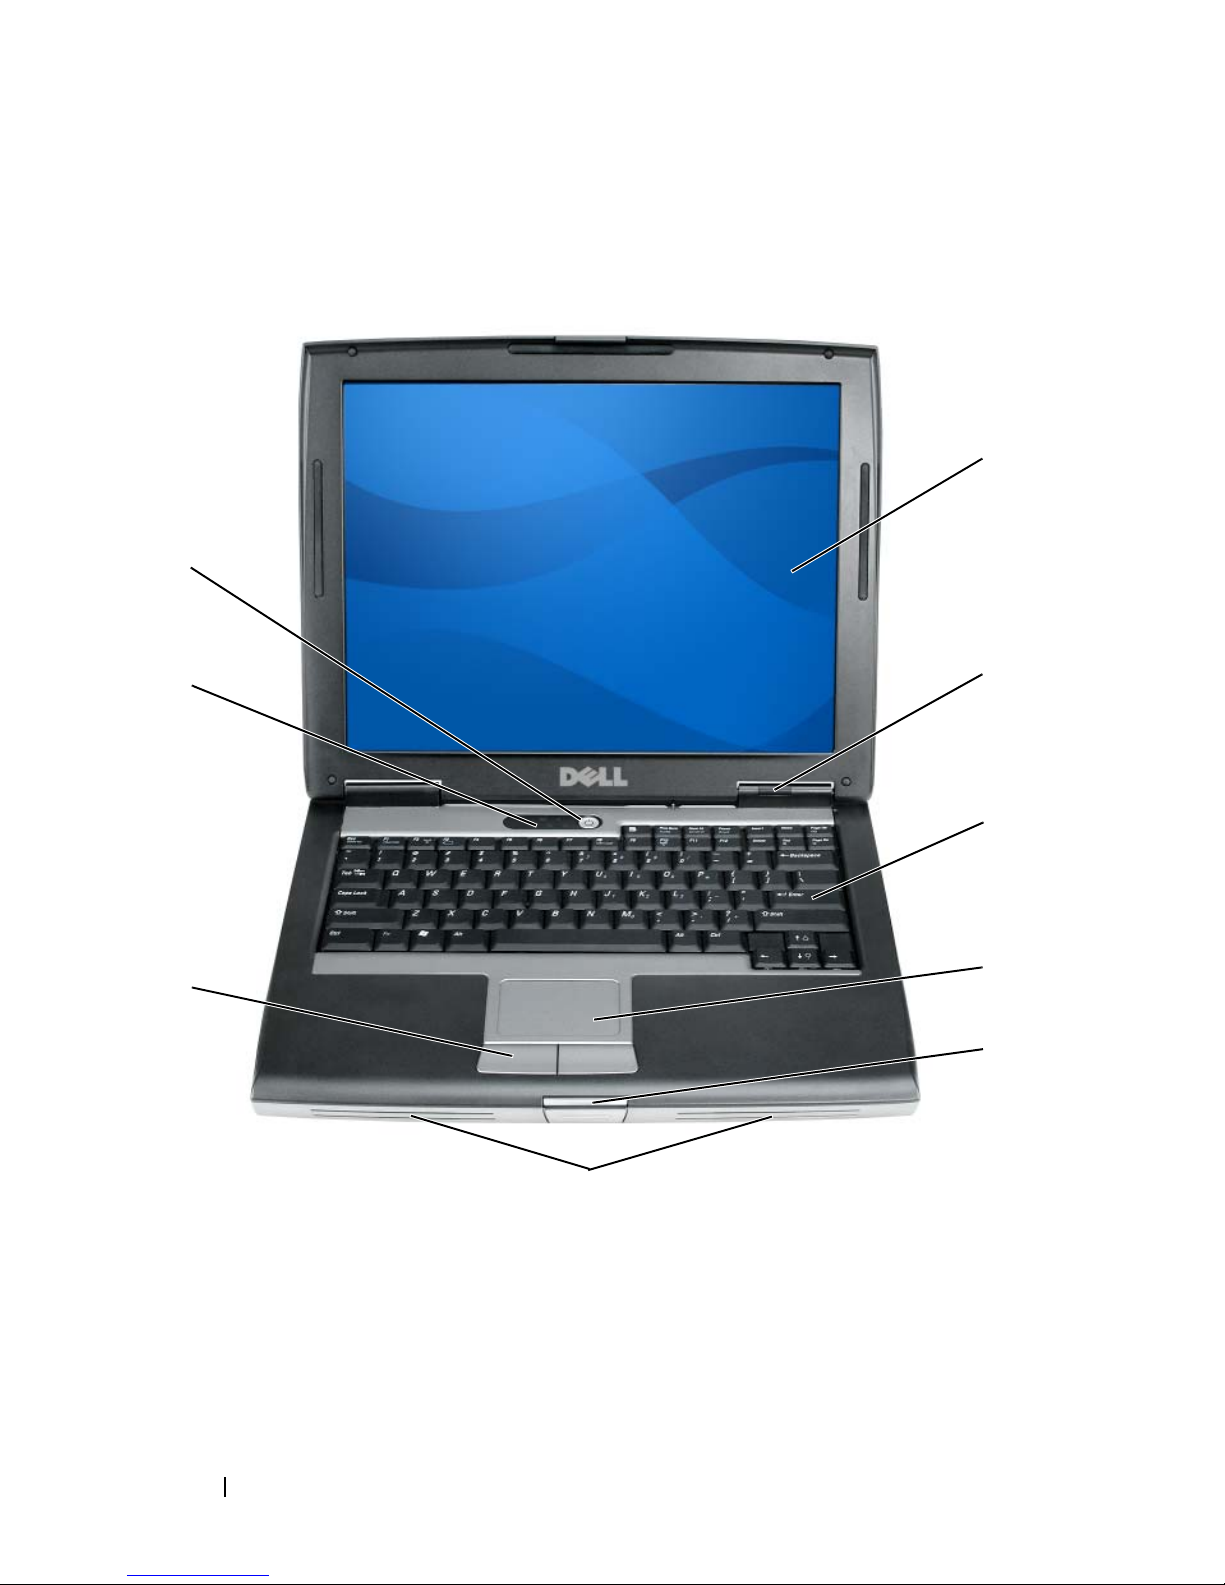
9
1
8
7
6
1
显示屏
2
设备状态指示灯
2
3
4
5
3
键盘
5
显示屏闩锁
7
触摸板按钮
9
电源按钮
54 快速参考指南
4
触摸板
6
扬声器
8
键盘状态指示灯
Page 55
左侧视图
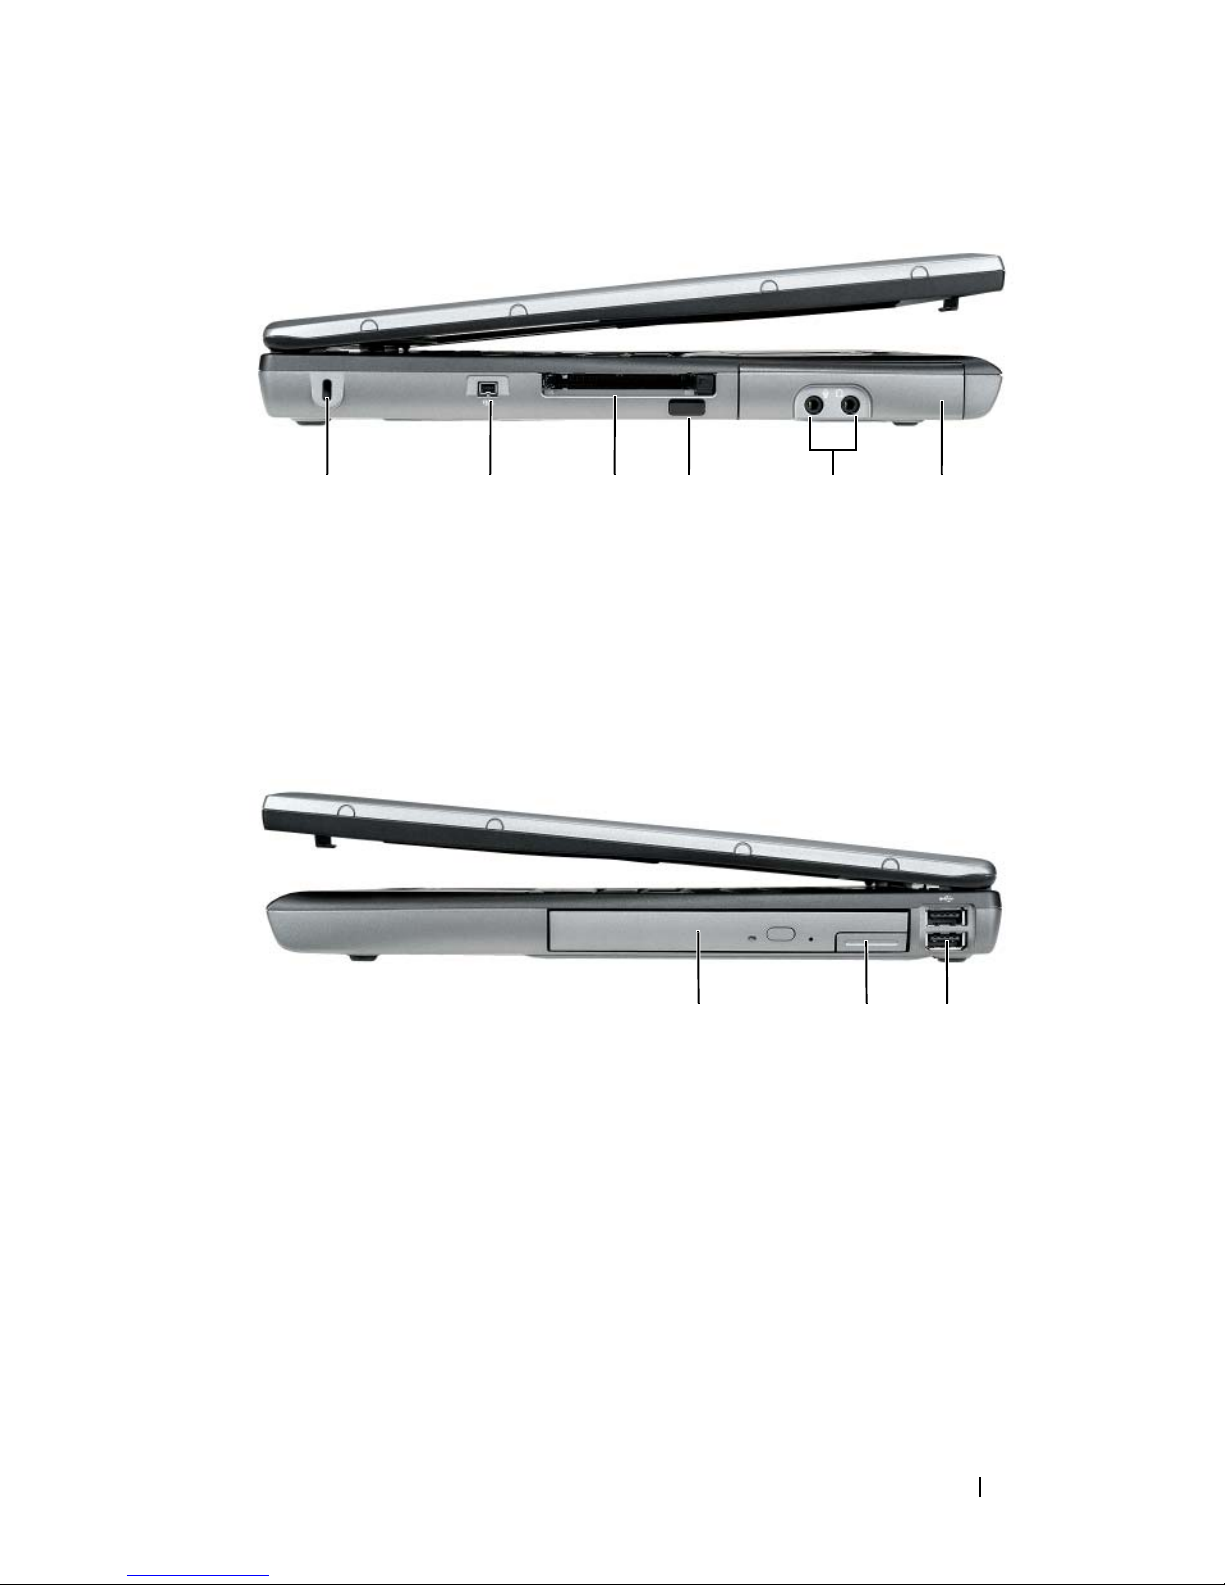
352 41 6
1
3
5
右侧视图
1
3
安全缆线插槽
PC 卡 /ExpressCard 插槽
音频连接器 ( 2 个)
介质托架
USB 连接器 ( 2 个)
2
IEEE 1394 连接器
4
红外线感应器
6
硬盘驱动器
1 23
2
设备释放闩锁
快速参考指南 55
Page 56
背面视图
8123 4 5 6 7
1
USB 连接器 (2 个)
3
网络连接器 (RJ-45)
5
串行连接器
7
交流适配器连接器
2
调制解调器连接器 (RJ-11)
4
S 视频电视输出连接器
6
视频连接器
8
通风孔
56 快速参考指南
Page 57
底部视图
1
7
2
3
4
6
1
内存模块 / 调制解调器 /WLAN
小型卡 / 币形电池盖板
3
电池电量表 / 性能状态表
5
对接设备连接器
7
硬盘驱动器
5
2
电池槽释放闩锁
4
电池
6
通风孔
快速参考指南 57
Page 58
使用电池
电池性能
注 : 有关 Dell 对您计算机的担保信息,请参阅 《产品信息指南》或计算机
附带的单独书面担保文档。
为了获得最佳的计算机性能并帮助保存 BIOS 设置,请始终在装有主电池
的情况下操作 Dell 便携式计算机。 在电池槽中提供了作为标准设备的一
块电池。
注 : 由于电池可能没有完全充电,因此在第一次使用计算机时请使用交流适
配器将您的新计算机和电源插座相连接。 为获得最佳结果,请在电池完全充
电之前使用交流适配器。 要查看电池充电状态,请检查在电源选项中的电源
表 (请参阅第 62 页上的 “访问电源选项属性”)。
注 : 电池使用时间 (电池存有电量的时间)将随时间的延长而减少。 根据电
池的使用频率和使用条件,在计算机的使用寿命内您可能需要购买新的
电池。
注 : 当写入 CD 或 DVD 时,建议您将计算机连接到电源插座上。
如果执行某些操作,包括但不限于以下操作,则使用时间将大大减少:
•
使用光盘驱动器。
•
使用无线通信设备、
•
使用高亮度显示设置、
3D
杂
•
在最高性能模式下运行计算机。 有关访问
Properties
图形应用程序)。
(电源选项属性)或
设置)的信息,请参阅第
PC
3D
卡、
Express
卡、介质存储器卡或
USB
设备。
屏幕保护程序或其它电源密集型程序 (如复
Windows Power Options
Dell QuickSet
62
页上的 “配置电源管理设置”。
(可用来配置电源管理
将电池插入计算机之前,可以检查电池的电量。 您还可以将电源管理选项
设置为在电池电量不足时向您发出警报。
警告 : 使用不兼容的电池可能会增加起火或爆炸的危险。 请仅使用从 Dell 购
买的兼容电池来更换旧电池。 电池专为您的 Dell 计算机而设计。 请勿在您的
计算机上使用其它计算机的电池。
警告 : 请勿将电池与生活垃圾一起处理。 如果电池无法再充电,请致电本地
废品处理机构或环保机构,以获得有关如何处理锂离子电池的建议。 请参阅
《产品信息指南》中的 “电池处理”。
警告 : 不正确地使用电池可能会增加起火或被化学品灼伤的危险。 请勿刺
穿、焚烧、分解电池或使其暴露于 65° C (149° F)以上的高温中。 请将电池
放置在远离儿童的地方。 小心谨慎地处理损坏或发生泄漏的电池。 损坏的电
池可能会发生泄漏,并导致人身伤害或设备损坏。
58 快速参考指南
Page 59

检查电池电量
Dell QuickSet 电池表、 Microsoft Windows Power Meter (电源表)窗口
和 图标、电池电量表和性能状态表,以及电池低电量警告提供有关
电池电量的信息。
Dell QuickSet 电池表
如果安装了 Dell QuickSet,则按 <Fn><F3> 组合键可显示 “QuickSet
电池表”。“电池表”显示计算机中电池的状态、性能、充电级别和充电
完成时间。
有关 QuickSet 的详情,请在任务栏中的 QuickSet 图标上单击鼠标右键,
然后单击 Help (帮助)。
Microsoft Windows 电源表
“Windows 电源表”指示剩余的电池电量。 要检查电源表,请双击任务栏
上的 图标。
如果计算机连接到电源插座上,将出现 图标。
电量表
通过按一次或按住 电池中电量表上的状态按钮,可检查:
•
电池电量 (通过按压并释放状态按钮来检查)
•
电池性能状态 (通过按压并按住 状态按钮来检查)
电池使用时间在很大程度上取决于充电次数。 在经过数百次的反复充电和
放电之后,电池的蓄电量 — 或电池的性能状态会有所下降。 即,电池可
能显示 “已充电”状态但充电容量 (性能)已降低。
检查电池电量
要检查电池电量,按压并释放 电池电量表上的状态按钮以点亮充电级别
指示灯。 每个指示灯代表约百分之二十的电池总电量。 例如,如果电池剩
余百分之八十的电量,则会亮起四个指示灯。 如果没有指示灯亮起,则表
示电池电量已耗尽。
快速参考指南 59
Page 60

检查电池性能状态
注 : 您可用下列两种方式之一来检查电池性能状态: 使用如下文描述的电池
上的电量表,或使用 Dell QuickSet 中的电池表。 有关 QuickSet 的信息,请在
任务栏中的图标上单击鼠标右键,然后单击 Help (帮助)。
要使用电量表检查电池的性能状态,请按住电池电量表上的状态按钮至少
3 秒钟。 如果未出现任何指示灯,则表明电池状况良好,并且其原始蓄电
量仍保持在百分之八十以上。 每个指示灯均代表电量的递减。 如果显示五
个指示灯,则表明电池的蓄电量剩下不足百分之六十,此时应考虑更换
电池。 请参阅 第 58 页上的“使用电池” 以获得更多关于电池使用时间的
信息。
电池低电量警告
注意 : 为避免丢失或损坏数据,请在出现电池低电量警告后立即保存您的工
作, 然后将计算机连接至电源插座,或在介质托架中安装备用电池。 如果电
池的电量耗尽,计算机则会自动进入休眠模式。
当电池电量消耗达到约百分之九十时,屏幕将显示弹出式窗口以进行警
告。 如果安装了两块电池,则电池低电量警告表示这两块电池的总电量已
经消耗了大约百分之九十。 如果电池电量下降到临界水平,则计算机将进
入休眠模式。
您可以在 QuickSet 或 Power Options Properties (电源选项属性)窗口中
更改用于电池警报的设置。 有关访问 QuickSet 或 第 62 页上的 “配置电
源管理设置” Power Options Properties (电源选项属性)窗口的信息,
请参阅。
节省电池电量
执行以下操作以节省电池电量。
•
只要可能,请将计算机连接到电源插座上,因为电池的寿命在很大程
度上取决于电池的使用次数和充电次数。
•
当长期不使用计算机时,将计算机置于待机模式或休眠模式。 请参阅
61
第
•
可以使用 “电源管理向导”或 “电源选项属性”窗口来选择计算机的
页上的 “电源管理模式”。
电源管理设置使用最佳化的选项。当按电源按钮、关闭显示屏或按
<Fn><Esc>
注 : 请参阅第 62 页上的 “配置电源管理设置” 以获得更多关于节省电池电
量的信息。
组合键时,这些选项也可被设置为变更。
60 快速参考指南
Page 61

电源管理模式
待机和休眠模式
在一段非活动的时段之后 (超时),待机模式(在 Microsoft Windows
Vista 中是休眠模式)通过关闭显示器和硬盘驱动器来节省电源。 当计算
机退出待机模式或休眠模式时,系统将恢复至进入待机模式或休眠模式之
前的运行状态。
注意 : 在待机或休眠模式时,如果您的计算机失去交流电源和电池电源,
数据可能会丢失。
要进入 Windows XP 的待机模式,单击 Start (开始)按钮,单击 Tu rn
off computer (关闭计算机),然后单击 Stand by (待机)。
要进入 Windows Vista 的休眠模式,单击 Windows Vista Start (开始)
按钮 , 然后单击 Sleep (休眠)。
根据您在 Power Options Properties (电源选项属性)窗口或 QuickSet
电源管理向导中设置的电源管理选项,您还可意使用以下方法之一:
•
按电源按钮。
•
关闭显示屏。
•
按
<Fn><Esc>
键。
要退出待机模式或休眠模式,根据所设置的电源管理选项按电源按钮或打
开显示屏。 不能通过按某个键或触摸触摸板来使计算机退出待机模式或休
眠模式。
休眠模式
休眠模式节省电量的方式是:将系统数据复制到硬盘驱动器上的保留区
域,然后完全关闭计算机电源。 当计算机退出休眠模式时,系统将恢复至
进入待机模式之前的运行状态。
注意 : 不能在计算机处于休眠模式时卸下设备或断开对接计算机。
如果电池充电级别变得非常低,则计算机会进入休眠模式。
要手动进入 Windows XP 的休眠模式,单击 Start (开始)按钮,单击
Turn off computer (关闭计算机),按住 <Shift>,然后单击 Hibernate
(休眠)。
要手动进入 Windows Vista 的休眠模式,单击 Windows Vista Start
(开始)按钮 ,然后单击 Hibernate (休眠)。
快速参考指南 61
Page 62

根据您在 Power Options Properties (电源选项属性)窗口或 QuickSet
电源管理向导中设置的电源管理选项,也可以使用以下方法之一进入休眠
模式:
•
按电源按钮。
•
关闭显示屏。
•
按
<Fn><Esc>
注 : 计算机退出休眠模式后,某些 PC 卡或 Express Card 可能无法正确操作。
取出并再插入该卡,或简单地重新启动(重新引导)您的计算机。
键。
要退出休眠模式,按电源按钮。 计算机可能需要一小段时间才能退出休眠
模式。 不能通过按某个键或触摸触摸板来使计算机退出休眠模式。 有关休
眠模式的详细信息,请参阅操作系统随附的说明文件。
配置电源管理设置
可以使用 “QuickSet 电源管理向导”或 “Windows 电源选项属性”来配
置计算机的电源管理设置。 有关 QuickSet 的详情,请在任务栏中的
QuickSet 图标上单击鼠标右键,然后单击 Help (帮助)。
访问电源选项属性
Windows XP
单击 Start (开始)按钮,指向 Control Panel (控制面板) →
Performance and Maintenance (性能和维护),然后单击 Power Options
(电源选项)。
Windows Vista
单击 Windows Vista Start (开始)按钮 ,单击 Control Panel (控制
面板),单击 System and Maintenance (系统和维护),然后单击 Power
Options (电源选项)。
为电池充电
当将计算机连接到电源插座或者在计算机已连接到电源插座的情况下安装
电池时,计算机会检查电池的电量和温度。 如有必要,交流适配器将为电
池充电并维持电池电量。
62 快速参考指南
Page 63
注 : 使用 Dell™ ExpressCharge™ ,当计算机关闭时,交流适配器可将一个电
量完全消耗的电池在大约 1 个小时内充至 80% 的电量,在大约 2 个小时内充
至 100% 的电量。 在开启计算机的情况下,充电时间会较长。 将电池留在计
算机中的时间可随意而定。 电池的内部电路可防止电池过量充电。
如果电池因计算机使用而变烫或者正处于高温环境中,则当您将计算机连
接到电源插座时电池可能不会充电。
如果 指示灯以绿色和橙色交替闪烁,则表示电池过热而无法开始充
电。 将计算机与电源插座断开并使计算机和电池冷却到室温。 然后,再将
计算机连接到电源插座继续为电池充电。
有关解决电池问题的详情,请参阅 《用户指南》中的 “电源问题”
部分。
更换电池
警告 : 使用不兼容的电池可能会增加起火或爆炸的危险。 请仅使用从 Dell 购
买的兼容电池来更换旧电池。 电池专为您的 Dell™ 计算机而设计。 请勿在您
的计算机上使用其它计算机的电池。
警告 : 在执行这些程序之前,关闭计算机,断开交流适配器与电源插座和计
算机的连接,断开调制解调器与壁装连接器和计算机的连接,然后将任何其
它外部电缆从计算机上卸下。
注意 : 您必须将所有外部电缆从计算机上卸下以避免对连接器造成可能的
损坏。
有关更换位于介质托架中的备用电池的信息,请参阅在 support.dell.com
上您的系统的 《用户指南》。
卸下电池:
1
如果计算机已连接 (对接)至对接设备,请断开对接。 有关说明,
请参阅您的对接设备随附的说明文件。
2
请确保已关闭计算机。
3
滑动并按住计算机底部的电池槽释放闩锁,然后从电池槽中取出电池。
快速参考指南 63
Page 64
要更换电池,请遵循与取出相反的步骤顺序,并按下直至电池槽释放闩锁
完全到位。
储存电池
如果您准备将计算机长期储存,请将电池卸下。 电池在长时间的储存过程
中会释放电量。 电池在经过长时间的储存之后,应先将其充满电,然后再
使用 (请参阅第 62 页上的 “为电池充电”)。
故障排除
对计算机进行故障排除时,请遵循以下提示:
•
如果您在出现问题之前添加或卸下了一个部件,请查看安装步骤并确
保正确安装了部件。
•
如果外围设备无法工作,请确保正确连接了此设备。
•
如果屏幕上显示错误信息,请记下此信息。 此信息可能有助于技术支
持人员诊断和解决问题。
•
如果程序中出现错误信息,请参阅此程序的说明文件。
注 : 本说明文件中的步骤适用于 Windows 默认视图,因此如果您将 Dell™ 计
算机设置为 Windows 经典视图,这些步骤可能不适用。
64 快速参考指南
Page 65

锁定和软件问题
警告 : 在开始执行本节中的任何步骤之前,请遵循 《产品信息指南》中的
安全说明。
计算机不启动
确保电源电缆已稳固地连接至计算机和电源插座
计算机停止响应
注意 : 如果您无法执行操作系统关闭,则可能会丢失数据。
关闭计算机电源 — 如果您在按键盘上的键或移动鼠标时无法获得响应,请按
住电源按钮至少 8 至 10 秒钟直到计算机关闭为止,然后重新启动计算机。
程序停止响应
结束该程序 —
1
请同时按
2
单击 Applications
3
单击以选择已经不再响应的程序。
<Ctrl><Shift><Esc>
(应用程序)选项卡。
键以访问任务管理器。
4
单击 End Task
(结束任务)。
程序反复崩溃
注 : 很多软件在其说明文件或在软盘、 CD 或 DVD 中包括安装说明。
检查软件说明文件 — 如果有必要,请卸载并重新安装该程序。
程序是专为较早版本的 Windows 操作系统而设计的
运行程序兼容性向导 —
Windows XP:
“程序兼容性向导”将配置一个程序,使其在类似于非 XP 操作系统环境中运行。
1
单击 Start
Program Compatibility Wizard
2
遵循屏幕上的说明进行操作。
(开始)→ All Programs
(程序兼容性向导)→ Next
(所有程序)→ Accessories
(下一步)。
(附件)→
快速参考指南 65
Page 66

Windows Vista:
“程序兼容性向导”将配置一个程序,使其在类似于非 Windows Vista 操作系统环
境中运行。
1
单击
Start
(开始)
Use an older program with this version of Windows
旧版程序)。
2
在欢迎屏幕中,单击 Next
3
遵循屏幕上的说明进行操作。
→ Control Panel
(下一步)。
(控制面板)→ Programs
(配合此版本的
(程序)
Windows
→
使用
出现蓝屏
关闭计算机电源 — 如果您在按键盘上的键或移动鼠标时无法获得响应,请按
住电源按钮至少 8 至 10 秒钟直到计算机关闭为止,然后重新启动计算机。
其它软件问题
请查看软件说明文件或与软件制造商联系,以获取故障排除信息 —
•
确保程序与您计算机上所安装的操作系统兼容。
•
确保您的计算机满足运行该软件所需的最低硬件要求。 有关信息,请参阅软件说
明文件。
•
确保程序安装和配置正确。
•
确认设备驱动程序与程序不冲突。
•
如果有必要,请卸载并重新安装该程序。
立即备份文件
使用病毒扫描程序检查硬盘驱动器、软盘、 CD 或 DVD
保存并关闭任何打开的文件或程序,然后通过 S
算机
TART (开始)菜单关闭计
Dell 诊断程序
警告 : 在开始执行本节中的任何步骤之前,请遵循 《产品信息指南》中的
安全说明。
何时使用 Dell 诊断程序
如果在使用计算机时遇到问题,请在联系 Dell 获得技术帮助之前,先执
行在第 65 页上的 “锁定和软件问题”中的检查并运行 “Dell 诊断程
序”。
建议您在开始之前先打印这些步骤。
66 快速参考指南
Page 67

注意 : Dell 诊断程序只能在 Dell 计算机上运行。
注 : Drivers and Utilities 光盘为可选项,可能不会随您的计算机提供。
从硬盘驱动器或从可选的 Drivers and Utilities 光盘启动 Dell 诊断程序。
从硬盘驱动器启动 Dell 诊断程序
“Dell 诊断程序”位于硬盘驱动器上一个隐藏的诊断公用程序分区内。
注 : 如果您的计算机不能显示屏幕图象,请联系 Dell (请参阅 《用户指南》
中的“联系 Dell”)。
关闭计算机。
1
2
如果计算机已连接 (对接)至对接设备,请断开对接。 有关说明,
请参阅您的对接设备随附的说明文件。
3
将计算机连接至电源插座。
4
Dell
诊断程序可以下列两种方式之一调用:
•
开启计算机。 当出现
导菜单中选择
注 : 如果等待时间过长,并且出现了操作系统徽标,请继续等待,直到
看见 Microsoft Windows 桌面。 然后关闭计算机,并且再试一次。
•
在给计算机加电启动过程中,按住
注 : 如果显示一条信息说明未找到任何诊断公用程序分区,则从可选的
Drivers and Utilities 光盘 运行“Dell 诊断程序”。
Diagnostics
DELL™
(诊断程序),然后按
徽标时,请立即按
<Fn>
键。
<F12>
键。 从引
<Enter>
计算机将运行 “预先引导系统评估”,即对系统板、键盘、硬盘驱动
器和显示屏进行的一系列初始测试。
•
在评估期间,请回答所出现的任何问题。
键。
•
如果检测到故障,则计算机将停止并发出哔声。 要停止评估并重新
启动计算机,请按
键;要重新测试发生故障的组件,请按
•
如果在 “预先引导系统评估”期间检测到故障,请记下错误代码
并与
Dell
如果 “预先引导系统评估”成功完成,您将收到如下信息:
Dell Diagnostic Utility Partition.
continue
5
按任意键从硬盘驱动器上的诊断公用程序分区启动 “
(引导
程序”。
<Esc>
键;要继续执行下一步测试,请按
<r>
键。
联系 (请参阅您的 《用户指南》中的 “联系
Press any key to
Dell
诊断公用程序分区。请按任意键继续。)
Dell
快速参考指南 67
<y>
Dell
”)。
Booting
诊断
Page 68
从可选的 Drivers and Utilities 光盘启动 Dell 诊断程序
1
插入 Drivers and Utilities
2
关闭并重新启动计算机。
当
DELL
徽标出现时,请立即按
光盘。
<F12>
键。
如果等待时间过长,并且屏幕上出现了
直到看见
注 : 后面的步骤只会更改一次引导顺序。 当下一次启动时,计算机将根
当引导设备列表出现之后,高亮度显示 CD/DVD/CD-RW Drive
3
(
CD/DVD/CD-RW
4
从显示的菜单中选择
然后按
5
键入 1 以启动菜单,并按
6
从编号列表中选择 Run the 32 Bit Dell Diagnostics
断程序)。
7
当
Dell
Windows
据系统设置程序中指定的设备进行引导。
桌面。 然后关闭计算机,并且再试一次。
驱动器),并按
Boot from CD-ROM
<Enter>
键。
<Enter>
如果列出了多个版本,请选择适用于您的计算机的版本。
诊断程序 Main Menu (主菜单)出现时,请选择想要运行的
Windows
<Enter>
(从
键以继续。
徽标,请继续等待,
键。
CD-ROM
(运行
测试。
Dell 诊断程序主菜单
1
在
Dell
诊断程序载入并且 MainMenu
(主菜单)屏幕出现之后,请单
击所需选项的按钮。
引导)选项,
32 位 Dell
诊
选项 功能
Express Test
(快速测试)
Extended Test
(扩展测试)
Custom Test
(自定义测试)
Symptom Tree
(症状树)
对设备执行快速测试。 测试通常需要 10 到 20 分钟,
并且不需要人工介入。 先运行 Express Test (快速测试)
可迅速增大追踪问题的可能性。
对设备执行全面检查。 测试通常需要 1 小时或更长时间,
并且需要您不时地回答问题。
测试特定设备。 您可以自定义要运行的测试。
列出了最常遇到的一些症状,并使您可以根据所遇到的
问题的症状选择不同的测试。
68 快速参考指南
Page 69

2
如果在检测过程中遇到问题,将显示一条包含错误代码和问题说明的
信息。
请记下错误代码和问题说明,并遵循屏幕上的说明操作。
如果无法解决错误,请联系
Dell
”)。
注 : 您计算机的 “服务编号”位于每个测试屏幕的顶部。 当您联系 Dell
时,技术支持部门人员会要求您提供 “服务编号”。
如果您从 Custom Test
3
Dell
(请参阅 《用户指南》中的 “联系
(自定义测试)或 Symptom Tree
(症状树)
选项运行测试,请单击下表中说明的相应选项卡来了解详情。
选项卡 功能
Results (结果) 显示测试结果和遇到的任何错误状态。
Errors (错误) 显示遇到的错误状态、错误代码和问题说明。
Help (帮助) 对测试进行说明,并可能会指出运行测试的要求。
Configuration (配置) 显示选定设备的硬件配置。
“Dell 诊断程序”从系统设置、内存和各种内部测试
获得所有设备的配置信息,并在屏幕左窗格的设备列
表中显示这些信息。 设备列表可能不会显示计算机中
安装的所有组件或与计算机连接的所有设备的名称。
Parameters (参数) 使您可以通过更改检测设置自定义检测。
4
当测试完成之后,如果您是从 Drivers and Utilities
光盘运行 “
断程序”的,则请移除该光盘。
5
完成测试后,请关闭测试屏幕以返回 Main Menu
Dell
要退出 “
诊断程序”并重新启动计算机,请关闭 Main Menu
(主菜单)屏幕。
(主菜单)屏幕。
Dell
诊
快速参考指南 69
Page 70

70 快速参考指南
Page 71

索引
A
安全说明 ,44
安装部件
关闭计算机 ,53
B
标签
服务编号 ,45
C
操作系统
重新安装 ,48
操作系统光盘 ,48
电池
充电 ,62
储存 ,64
电量表 ,59
电源表 ,59
检查电量 ,59
卸下 ,63
性能 ,58
电源
待机模式 ,61
休眠模式 ,61
F
服务编号 ,45
产品信息指南 ,44
D
Dell 诊断程序 ,66
Dell 支持站点 ,46
Drivers and Utilities 光盘
Dell 诊断程序 ,66
待机模式
关于 ,61
担保信息 ,44
G
故障排除
Dell 诊断程序 ,66
管制信息 ,44
J
计算机
崩溃 , 65-66
停止响应 ,65
计算机停止响应 ,65
索引 71
Page 72

Q
问题
QuickSet 帮助 ,48
R
人机工程学信息 ,44
软件
问题 , 65-66
S
说明文件
安全 ,44
产品信息指南 ,44
担保 ,44
管制 ,44
人机工程学 ,44
用户指南 ,44
在线 ,46
Dell 诊断程序 ,66
程序崩溃 ,65
程序停止响应 ,65
计算机崩溃 ,65
计算机停止响应 ,65
蓝屏 ,66
软件 , 65-66
一般说明 ,65
X
休眠模式 ,61
Y
硬件
Dell 诊断程序 ,66
用户指南 ,44
最终用户许可协议 ,44
W
Windows 2000
待机模式 ,61
休眠模式 ,61
Windows Vista
重新安装 ,48
Windows XP
待机模式 ,61
休眠模式 ,61
重新安装 ,48
72 索引
Z
支持 Web 站点 ,46
最终用户许可协议 ,44
Page 73

Dell™ Latitude™ D530
快速參考指南
機型 PP17L
www.dell.com | support.dell.com
Page 74

註、注意與警告
註 : 註是表示能幫助您更好使用電腦的資訊。
注意 : 注意是表示可能的硬體損壞或數據遺失,並告訴您如何避免這些問
題。
警告 : 警告表示可能的財產損失、人身傷害或死亡。
____________________
本文件中的資訊如有變更,恕不另行通知。
© 2007 Dell Inc. 版權所有,翻印必究。
未經 Dell Inc. 的書面許可,不得以任何形式進行複製。
本文件中使用的商標: Dell, DELL 徽標 , Latitude, ExpressCharge, 與 Undock & Go 是 Dell Inc.
的商標 ; Microsoft,Windows, Outlook, 與 Windows Vista 是 Microsoft Corporation 在美國與 / 或其
它國家的商標或是註冊商標 ; Bluetooth 是 Bluetooth SIG, Inc. 所擁有的註冊商標而 Dell 是在經
過授權的情況下使用的。
本文件中使用的其他商標與商品名稱是指擁有這些標誌及名稱的公司或其產品。 Dell Inc. 對
不屬於自己的商標與商品名稱不擁有任何專有權益。
型號 PP17L
9 月 2007 年 P/N NM070 修訂版 A00
Page 75

目錄
尋找資訊 . . . . . . . . . . . . . . . . . . . . . . . . 77
安裝電腦
. . . . . . . . . . . . . . . . . . . . . . . . 82
將資訊轉移至新電腦
關閉電腦
關於您的電腦
前視圖
左側視圖
右側視圖
後視圖
底視圖
使用電池
電池效能
. . . . . . . . . . . . . . . . . . . . . . 86
. . . . . . . . . . . . . . . . . . . . . . 87
. . . . . . . . . . . . . . . . . . . . . . . 87
. . . . . . . . . . . . . . . . . . . . . . 88
. . . . . . . . . . . . . . . . . . . . . . 88
. . . . . . . . . . . . . . . . . . . . . . . 89
. . . . . . . . . . . . . . . . . . . . . . . 90
. . . . . . . . . . . . . . . . . . . . . . . . 90
. . . . . . . . . . . . . . . . . . . . . . 90
檢查電池電量
電源管理模式
設定電源管理設定
存取電源選項性能
. . . . . . . . . . . . . . . 82
. . . . . . . . . . . . . . . . . . . 92
. . . . . . . . . . . . . . . . . . . 93
. . . . . . . . . . . . . . . . 95
. . . . . . . . . . . . . . . . 95
疑難排解
索引 . . . . . . . . . . . . . . . . . . . . . . . . . . . . . . 103
為電池充電
更換電池
儲存電池
. . . . . . . . . . . . . . . . . . . . . . . . 96
鎖定與軟體問題
Dell 診斷程式
. . . . . . . . . . . . . . . . . . . . 95
. . . . . . . . . . . . . . . . . . . . . . 95
. . . . . . . . . . . . . . . . . . . . . . 96
. . . . . . . . . . . . . . . . . 97
. . . . . . . . . . . . . . . . . . . 98
目錄 75
Page 76

76 目錄
Page 77
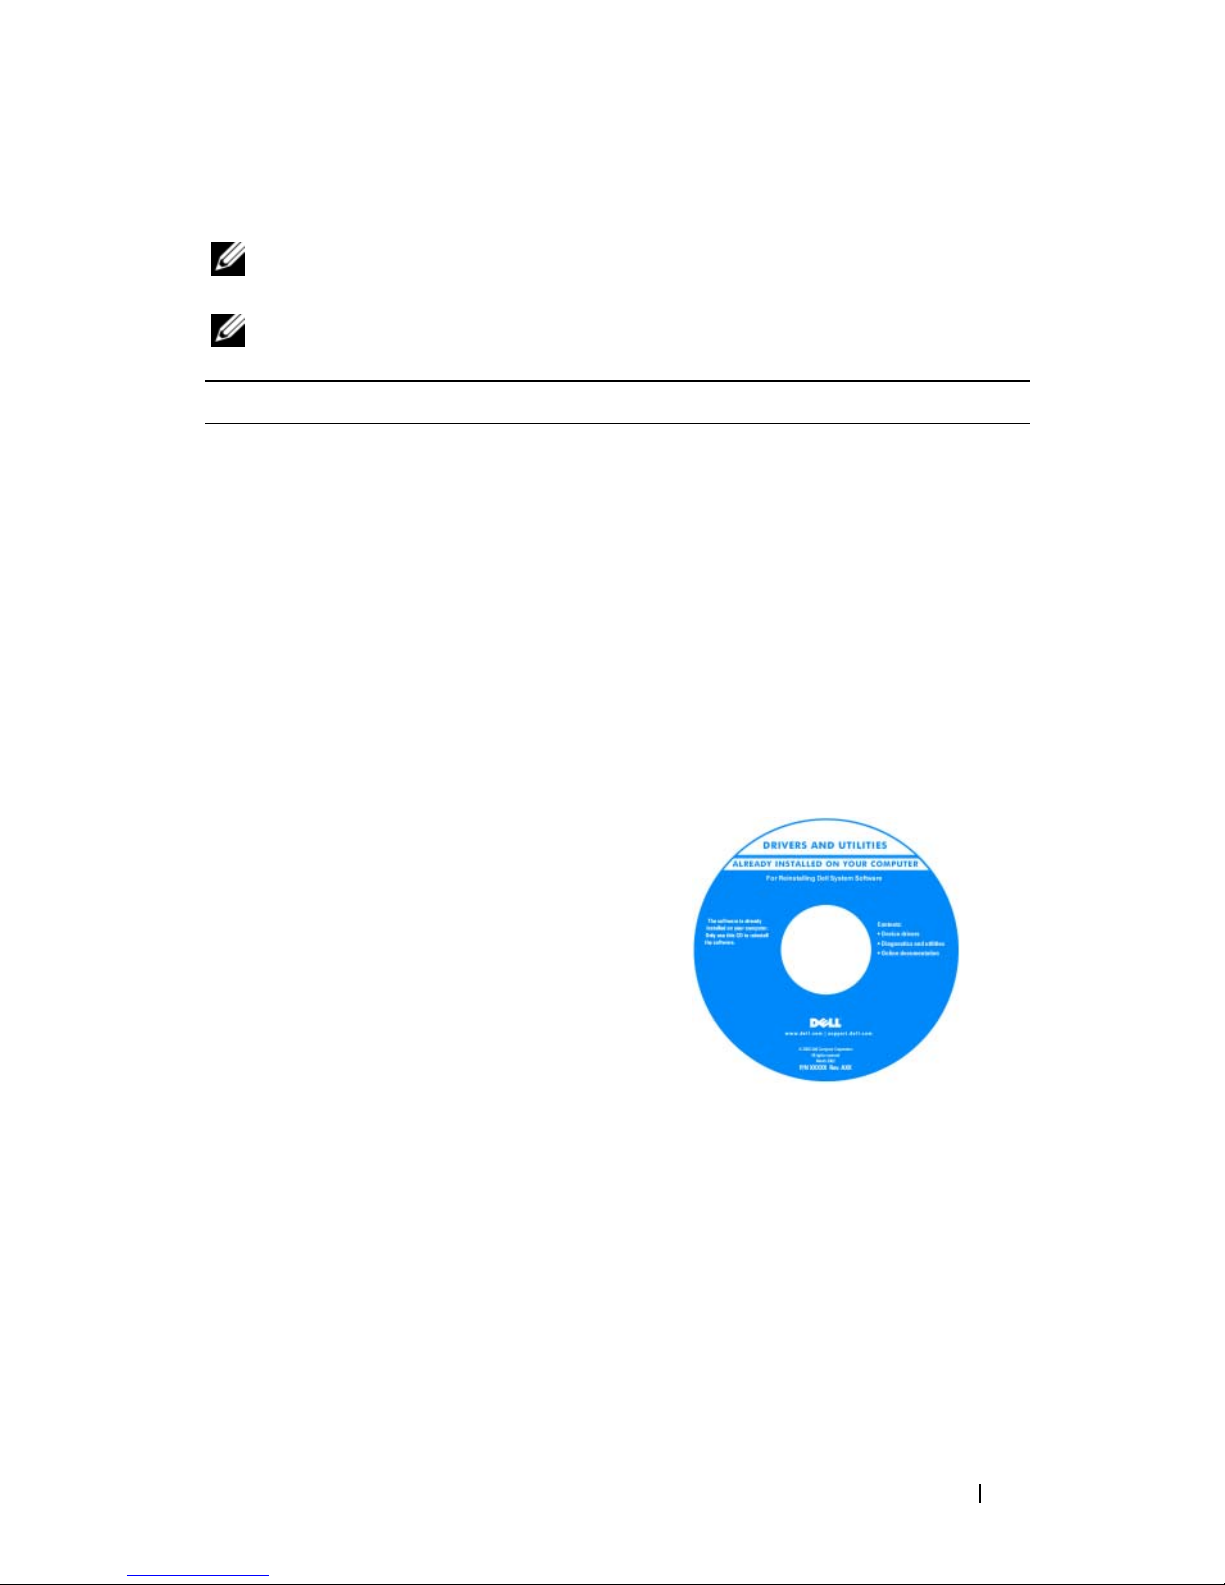
尋找資訊
註 : 有些功能或媒體可能是另選的而可能不會隨您的電腦一起提供。 有些功
能或媒體可能在特定國家或地區沒有。
註 : 其他資訊可能會隨附於您的電腦。
您在尋找什麼? 在此查找
•
我的電腦的診斷程式
•
我的電腦的驅動程式
•
我的裝置說明文件
•
筆記型電腦系統軟體
(NSS)
Drivers and Utilities 光碟
說明文件與驅動程式已安裝於您的電
腦上。 您可以使用光碟來重新安裝驅
動程式 ( 請參閱 「重新安裝 Drivers
and Utilities」 在您的使用者指南 ) 或
執行 Dell 診斷程式 ( 請參閱 第 100 頁
上「從可選 Drivers and Utilities 光碟
開始 Dell 診斷程式」 )。
讀我檔案可能包含在您的光碟上,以
提供關於您的電腦中的技術更新或專
為技術人員或極具經驗的使用者參考
的進階技術參考資料之最新更新。
註 : 驅動程式和說明文件更新可以在
support.dell.com 中找到。
註 : Drivers and Utilities 光碟能是可選
的且可能不會隨您的電腦一起提供。
快速參考指南 77
Page 78
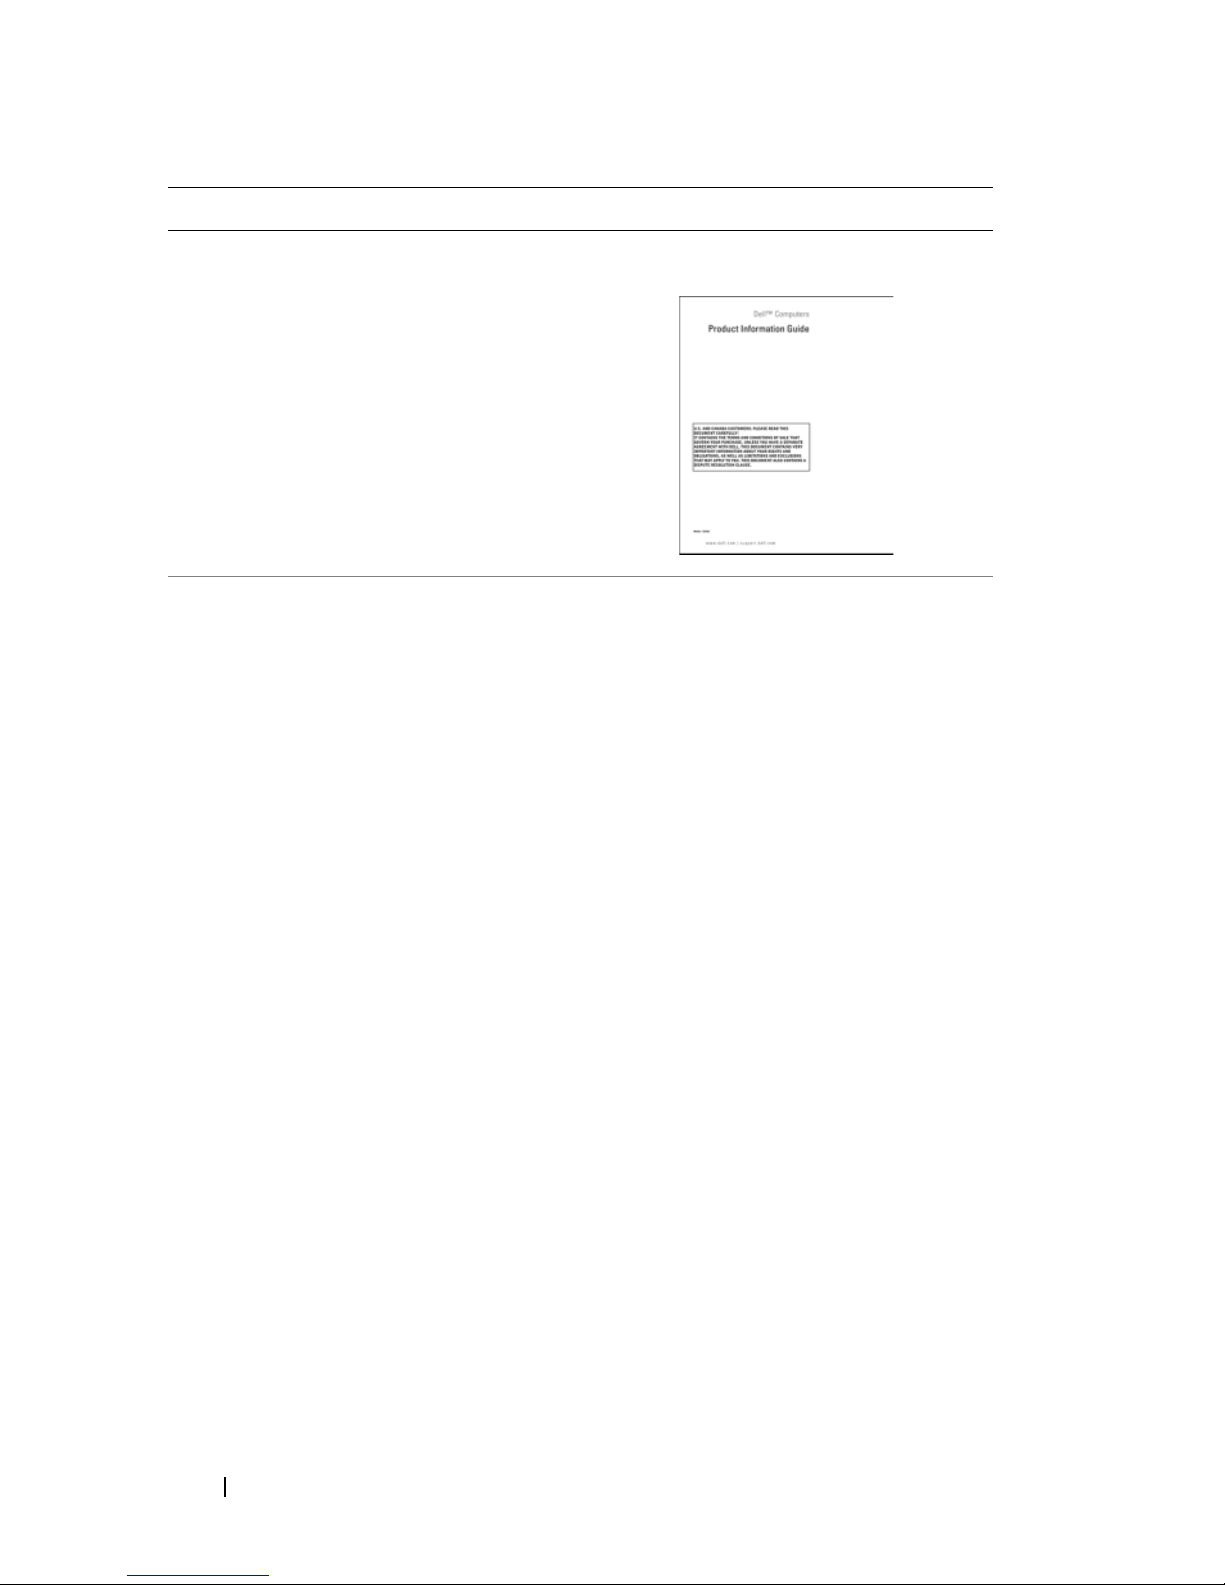
您在尋找什麼? 在此查找
•
保固資訊
•
條款與條件 (僅限美國
•
安全說明
•
管制資訊
•
人體工學資訊
•
一般使用者授權合約
•
規格
•
如何組態系統設定
•
如何排解疑難與解決問題
)
Dell™ 產品資訊指南
Dell Latitude™ 使用者指南
Microsoft
Vista™ 說明與支援中心
1
單按啟動→ 說明與支援
者與系統指南
2
為您的電腦單按 User's Guide (使用者
指南
®
Windows® XP 與 Windows
→ Dell
→ 系統指南。
)
。
使用
78 快速參考指南
Page 79
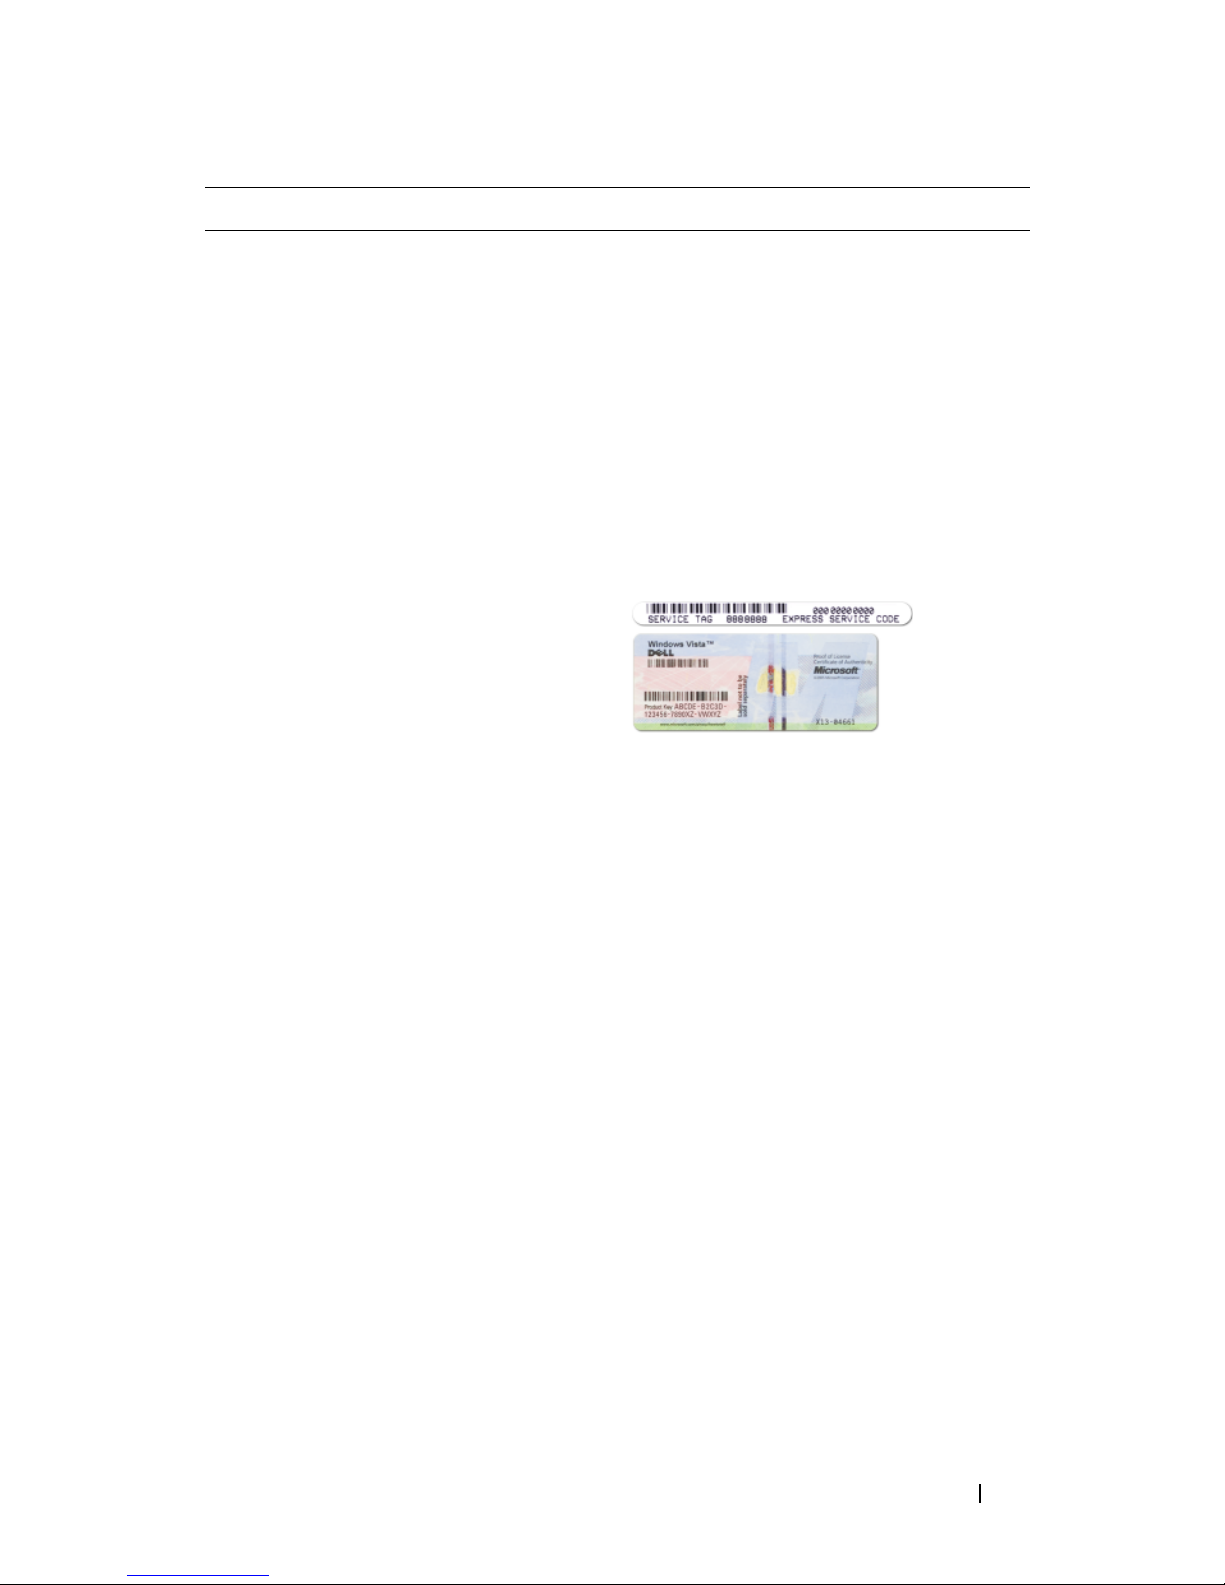
您在尋找什麼? 在此查找
•
服務標籤與快速服務代碼
服務標籤和 Microsoft® Windows® 授權
• Microsoft® Windows® 授權標籤
註 : 您的電腦的服務標籤與 Microsoft
Windows 授權標籤是可在您的電腦上
找到。
您的電腦的服務標籤包含一個服務標
簽號碼與一個快速服務代碼。
•
當您使用
support.dell.com
或聯絡支
援時,使用服務標籤來識別您的電
腦。
當聯絡支援時,輸入快速服務代碼來
•
直接您的電話。
•
如果您需要重新安裝您的作業系統,
請使用在授權標籤上的的產品號碼。
註 : 為增加安全保護的考量,新設計
的 Microsoft Windows 授權標籤具有一
不完整的部份或 「小洞」以防止標簽
脫落。
快速參考指南 79
Page 80

您在尋找什麼? 在此查找
•
解決方案
技術人員文章以及線上課程、常見問
題集
•
社群
—
—
疑難排解提示與秘訣、
與其他
Dell
顧客進行線上討
Dell 支援網站 — support.dell.com
註 : 選取您的地域或企業部分來檢視
適宜的支援站台。
論
•
升級
—
元件 (例如記憶體、硬碟機
與作業系統)的升級資訊
•
客戶關懷中心
—
聯絡資訊、服務呼
叫與訂購狀態、保固和維修資訊
•
服務與支援
—
服務呼叫狀態與支援
記錄、服務合約、與技術支援人員的
線上討論
• Dell Technical Update Service —
到軟體電子郵件通知和您的電腦硬體
更新
•
參考
—
電腦說明文件、電腦組態的
詳細資料、產品規格和白皮書
•
下載
—
認可的驅動程式、修補程式
和軟體更新
•
筆記型電腦系統軟體
(NSS)—
如果您
為您的電腦重新安裝作業系統,您應
該也重新安裝
公用程式。
NSS
NSS
為您的作業系統提供重要的更新與支
USB
援處理器、光碟機、
NSS
其它裝置。
確作業所必需的。
是您的
軟體會自動偵測您
裝置、等
Dell
電腦正
的電腦和作業系統,並安裝適合於您
的組態的更新。
關係
下載筆記型電腦系統軟體:
1
跳至 support.dell.com
並單按驅動程
式及下載。
2
輸入您的服務標籤與單按執行, 或選
取您的產品類型與產品型號然後單按
確認。
3
由系統公用程式單按加號符號(+)
單按筆記型電腦系統軟體,然後單按
現在下載。
4
單按執行來執行公用程式。
註 : support.dell.com 將依據您的選擇,
用戶介面可能不一樣。
,
80 快速參考指南
Page 81
您在尋找什麼? 在此查找
•
軟體升級和故障排除提示
題集、熱門話題以及電腦環境的整體
性能
—
常見問
Dell 支援公用程式
Dell 支援公用程式是電腦內建的自動
化升級和通知系統。 此支援程式可提
供即時的電腦環境性能掃描、軟體更
新以及相關的自我支援資訊。 從在工
作列的
程式。
圖示,存取
Dell
支援公用
如何查找關於我的電腦與自身元件的
•
資訊
•
如何連接至網路
•
如何替不同的使用者新增帳戶
•
如何從另一個電腦傳輸檔案與設定
•
如何使用
•
如何使用
•
如何使用程式和檔案
•
如何將我的桌面個人化
Microsoft Windows XP
Microsoft Windows Vista
Windows 歡迎中心
當您第一次使用電腦,Windows 歡迎
中心將自動出現。藉由設置
開始檢查
對話框,您可以在每次開始您的 PC 出
現此對話框。另一個方式存取歡迎中
心是單按 Windows Vista 開始按鈕
,然後單按
歡迎中心。
Windows 說明與支援
Microsoft Windows XP:
1
單按開始按鈕,然後單按說明與支
援。
2
選取其一的列出標題,或鍵入一文字
或片語其敘述您的問題,以進入搜尋
方塊,單按箭頭圖示,然後單按敘述
您問題的標題。
3
依螢幕指示操作。
Microsoft Windows Vista:
1
單按
Windows Vista
啟動按鈕 ,並
單按說明與支援。
•
在網路活動上的資訊、電源管理精
靈、快捷鍵、和
Dell QuickSet
的其它項目。
控制
2
在搜尋協助,鍵入一文字或片語其敘
述您問題,然後按下
<Enter>
或單
按放大鏡
3
單按描述問題的主題。
4
依螢幕指示操作。
Dell QuickSet Help
檢視
Dell QuickSet Help,請單按在
Microsoft Windows 工作列的 QuickSet
說明
圖示,然後選取
。您的工作列位
於螢幕右下角。
快速參考指南 81
Page 82
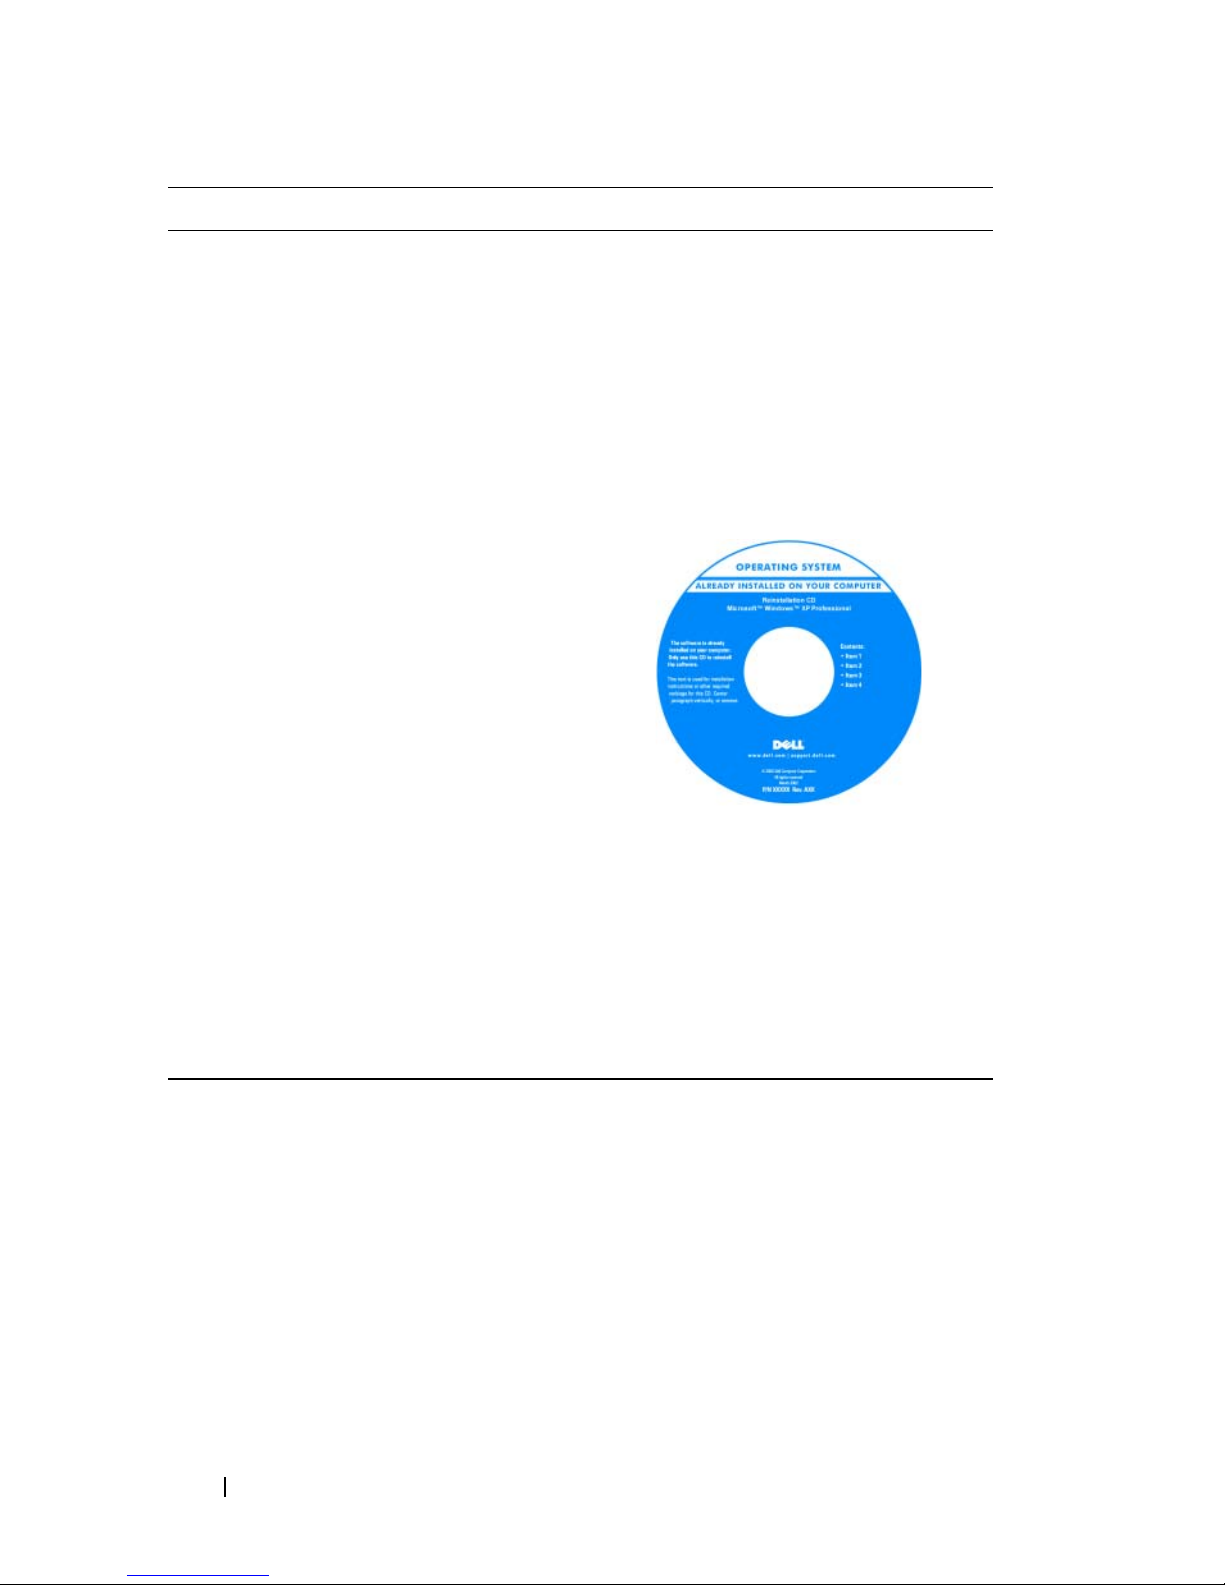
您在尋找什麼? 在此查找
•
如何重新安裝我的作業系統
作業系統光碟
註 : 作業系統 光碟可能是選購的且可
能不會隨您的電腦一起提供。
註 : 預先安裝的操作系統包括一個恢
復分割區來重新安裝您的 PC 作業系
統。
作業系統已安裝於您的電腦中。 如要
重新安裝您的作業系統,請使用作業
系統光碟。
重新安裝作業系統後,請使用 Drivers
and Utilities 光碟 重新安裝電腦隨附的
裝置驅動程式。
您的作業系統的產品號碼標籤位於您
的電腦上。
註 : 光碟的顏色會因您訂購的作業系
統而有所不同。
安裝電腦
將資訊轉移至新電腦
您可以使用作業系統的 「精靈」協助您將檔案與資料從一台電腦轉移至
另一台電腦 — 例如,從舊電腦轉移至新電腦。 關於操作說明,請參閱下
列章節與您電腦執行的作業系統相對應的步驟。
82 快速參考指南
Page 83

Microsoft Windows XP
Microsoft Windows XP 作業系統提供檔案及設定轉移精靈,可將資料從來
源電腦轉移至新電腦。您可以轉移資料,例如:
•
電子郵件訊息
•
工具列設定
•
視窗大小
•
網際網路書籤
您可以透過網路或序列連線將資料轉移至新電腦,或儲存在卸除式媒體
(例如可寫入的光碟)中,然後再轉移至新電腦。
註 : 您可以直接使用序列線連接兩部電腦的輸入/輸出 (I/O) 連接埠,將舊電
腦的資訊轉移至新電腦。 您必須使用控制台的網路連線公用程式並執行其他
組態步驟,例如設定進階連線並指定主機電腦與來賓電腦,以序列連線的方
式轉移資料。
關於設定兩台電腦之間的直接連線,請參閱 Microsoft 知識庫文件 #305621:
「如何在 Windows XP 中設定兩部電腦之間的直接連接線連線。」 某些國家可
能無提供此資訊。
您必須執行檔案及設定轉移精靈才可將資訊轉移至新電腦。 您可以選擇可
用的作業系統 光碟進行此程序,或以檔案及設定轉移精靈建立精靈磁片。
以作業系統光碟執行檔案及設定轉移精靈
註 : 此程序要求作業系統光碟。此光碟為選購配備,部分電腦可能未附此媒
體。
準備新電腦進行檔案轉移:
1
開啟檔案及設定轉移精靈: 單按開始→
→
工具
2
出現檔案及設定轉移精靈歡迎畫面時,單按下一步。
3
在 這是哪一部電腦? 畫面上單按新電腦→
4
在您有
的精靈
5
出現現在請到您的舊電腦畫面時,請到您的舊或來源電腦。 此時請勿
檔案及設定轉移精靈。
Windows XP CD 嗎?
→ 下一步。
畫面上單按我將使用
程式集→
下一步。
附屬應用程式→系統
Windows XP CD
上
單按下一步。
快速參考指南 83
Page 84

從舊電腦複製資料:
1
在舊電腦上,插入
2
在歡迎使用
3
在您要做什麼?下單按轉移檔案及設定→ 下一步。
4
在 這是哪一部電腦? 畫面上單按舊電腦→
5
在請選擇轉移的方式畫面上單按您喜好的轉移方式。
6
在您要轉移哪些項目?畫面上選取您想要轉移的項目並單按 下一步。
Microsoft Windows XP 畫面上單按執行其他工作。
Windows XP
作業系統光碟。
下一步。
資訊完成複製後,將出現即將完成收集階段畫面。
7
單按 完成。
轉移資料到新電腦:
1
在新電腦出現的 現在請到您的舊電腦 畫面上單按 下一步。
2
在 檔案及設定在哪裡?畫面上選取您選擇轉移您的設定與檔案的方
法,然後單按
下一步。
精靈即讀取收集的檔案與設定,然後套用至您的新電腦上。
當所有設定與檔案套用完成時,將會出現完成畫面。
3
單按完成並重新啟動新電腦。
在無作業系統光碟的情況下執行檔案及設定轉移精靈
您必須建立可讓您在卸除式媒體中建立備份映像檔的精靈磁片,才可在無
作業系統光碟,您必須建立的情況下執行檔案及設定轉移精靈。
請使用安裝 Windows XP 的新電腦進行以下步驟,以建立精靈磁片:
1
開啟檔案及設定轉移精靈: 單按 開始→
工具
→
檔案及設定轉移精靈。
2
出現檔案及設定轉移精靈歡迎畫面時,單按 下一步。
3
在 這是哪一部電腦?畫面上單按 新電腦→
4
在 您有
精靈磁片
5
插入卸除式媒體,例如可寫入的
6
當磁片建立完成,出現
您的舊電腦
Windows XP CD
→
下一步。
Now go to your old computer (
)
訊息時,請勿單按下一步。
嗎?畫面上單按我想在以下磁碟機建立一個
CD
程式集→
附屬應用程式→系統
下一步。
,然後單按 確定。
現在請到
7
到舊電腦。
84 快速參考指南
Page 85

從舊電腦複製資料:
1
將精靈磁片插入舊電腦。
2
單按 開始→
3
在 Run
視窗的開啟欄位中瀏覽至 fastwiz
執行。
的路徑(在合適的卸除式媒體
上)並單按確定。
4
在檔案及設定轉移精靈歡迎畫面上單按 下一步。
5
在 這是哪一部電腦?畫面上單按舊電腦→
6
在請選擇轉移的方式畫面上單按您喜好的轉移方式。
7
在您要轉移哪些項目?畫面上選取您想要轉移的項目並單按 下一步。
下一步。
資訊完成複製後,將出現即將完成收集階段畫面。
8
單按 完成。
轉移資料到新電腦:
1
在新電腦出現的現在請到您的舊電腦畫面上單按 下一步。
2
在 檔案及設定在哪裡? 畫面上選取您選擇轉移您的設定與檔案的方
法,然後單按
下一步。 依螢幕指示操作。
精靈即讀取收集的檔案與設定,然後套用至您的新電腦上。
當所有設定與檔案套用完成時,將會出現
3
單按 完成 並重新啟動新電腦。
註 : 關於此步驟的更多資訊,請搜尋 support.dell.com 以取得文件 #154781
( 如何使用 Microsoft® Windows® XP 作業系統以不同的方法將我的舊電腦的
檔案轉移到我的新 Dell™ 電腦 ?)。
註 : 某些國家無法存取 Dell 知識庫文件。
Microsoft Windows Vista
1
單按
Windows Vista
Windows
2
在 使用者帳戶控制 對話方塊單按 繼續。
3
單按 啟動新傳送 或 繼續 正在執行的傳送。
輕鬆傳輸。
開始按鈕 ,然後單按 轉移檔案及設定→
完成 畫面。
根據螢幕上由 Windows 輕鬆傳輸精靈提供的說明操作。
啟動
快速參考指南 85
Page 86

關閉電腦
注意 : 為避免遺失資料,請在關閉電腦之前儲存並關閉所有開啟的檔案結束
所有開啟的程式。
關閉作業系統:
1
a
儲存與關閉所有開啟檔案與結束所有已開啟程式。
b
在
Microsoft Windows XP
在
Microsoft Windows Vista™
動按鈕
,單按如下顯示的啟動選單的右下角,然後單按關機。
在作業系統關機處理程序完成後,關閉電腦。
2
確定電腦及所有連接的裝置已關閉。如果您的電腦和已連接裝置不自
動關閉當您關閉您的作業系統時,請按住電源按鈕大約
它們。
作業系統,單按 開始→
作業系統,請單按
Windows Vista
關閉→
4
秒鐘以關閉
關閉。
啟
86 快速參考指南
Page 87
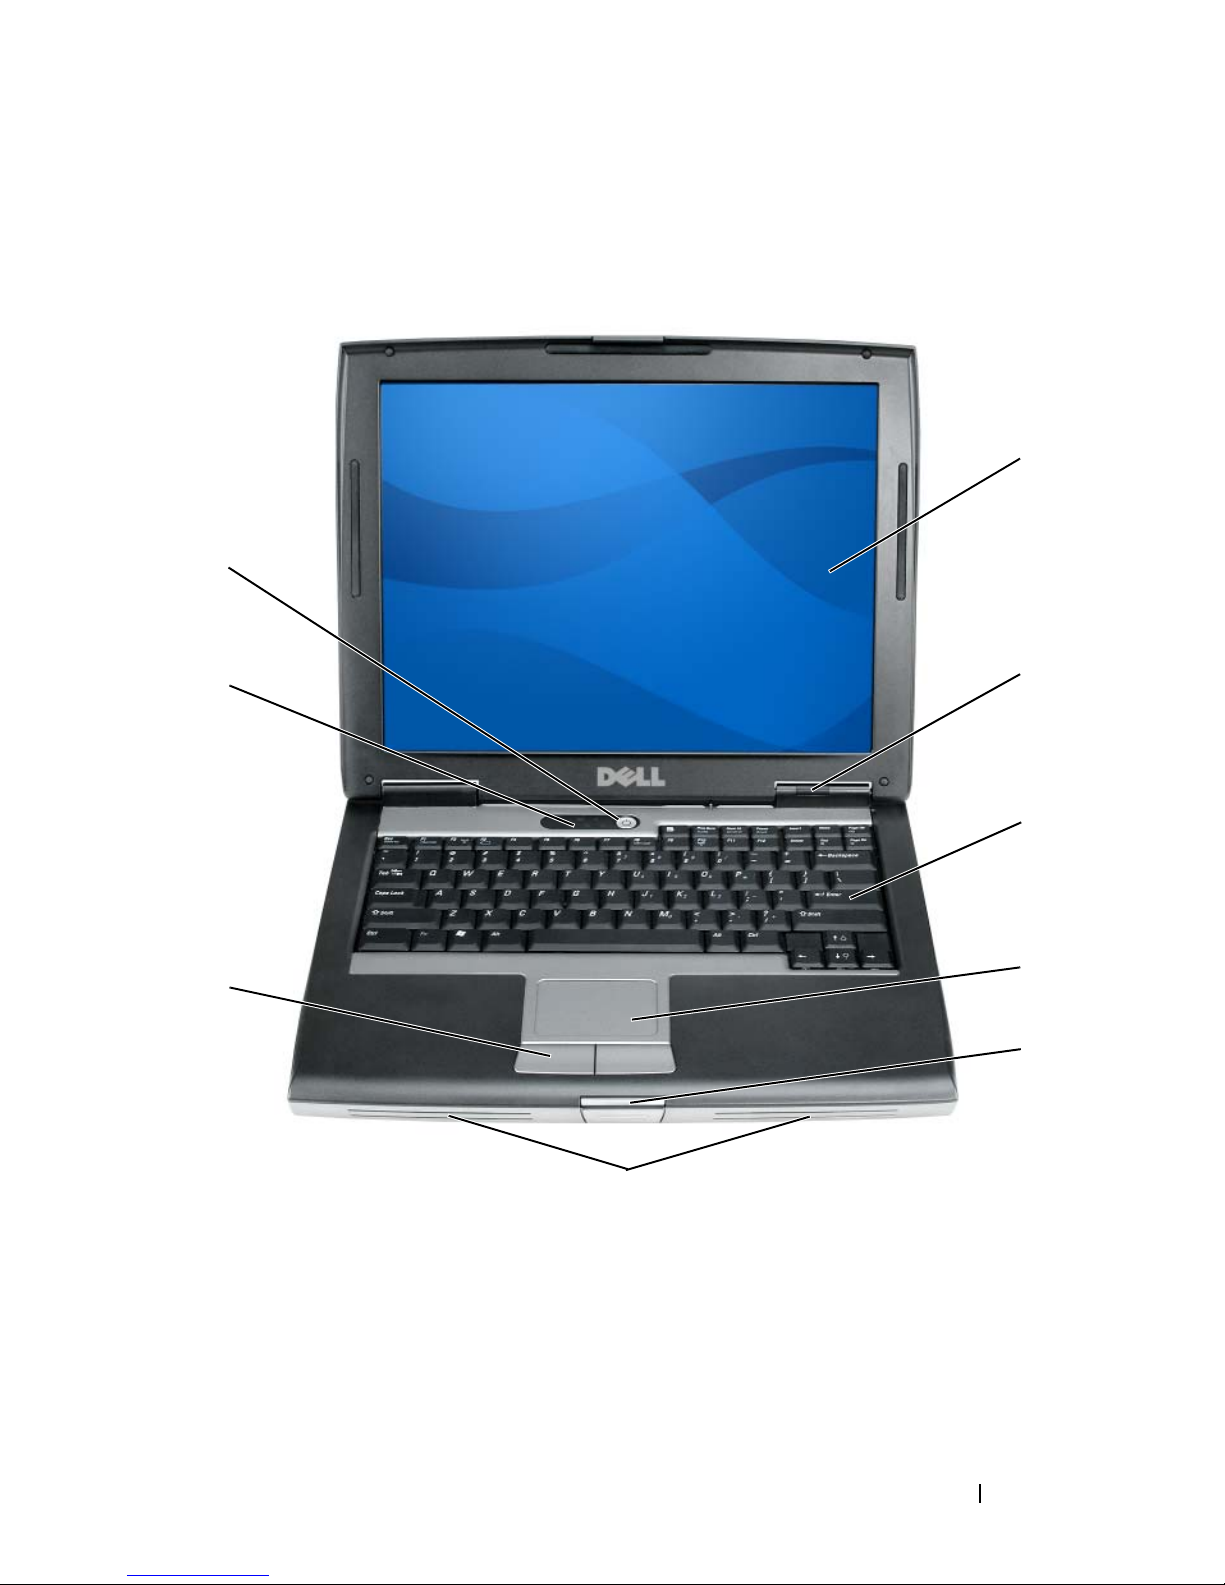
關於您的電腦
前視圖
9
1
8
7
6
1
顯示幕
2
裝置狀態指示燈
2
3
4
5
3
鍵盤
5
顯示幕閂鎖
7
觸控墊按鈕
9
電源按鈕
4
觸控墊
6
喇叭
8
鍵盤狀態指示燈
快速參考指南 87
Page 88
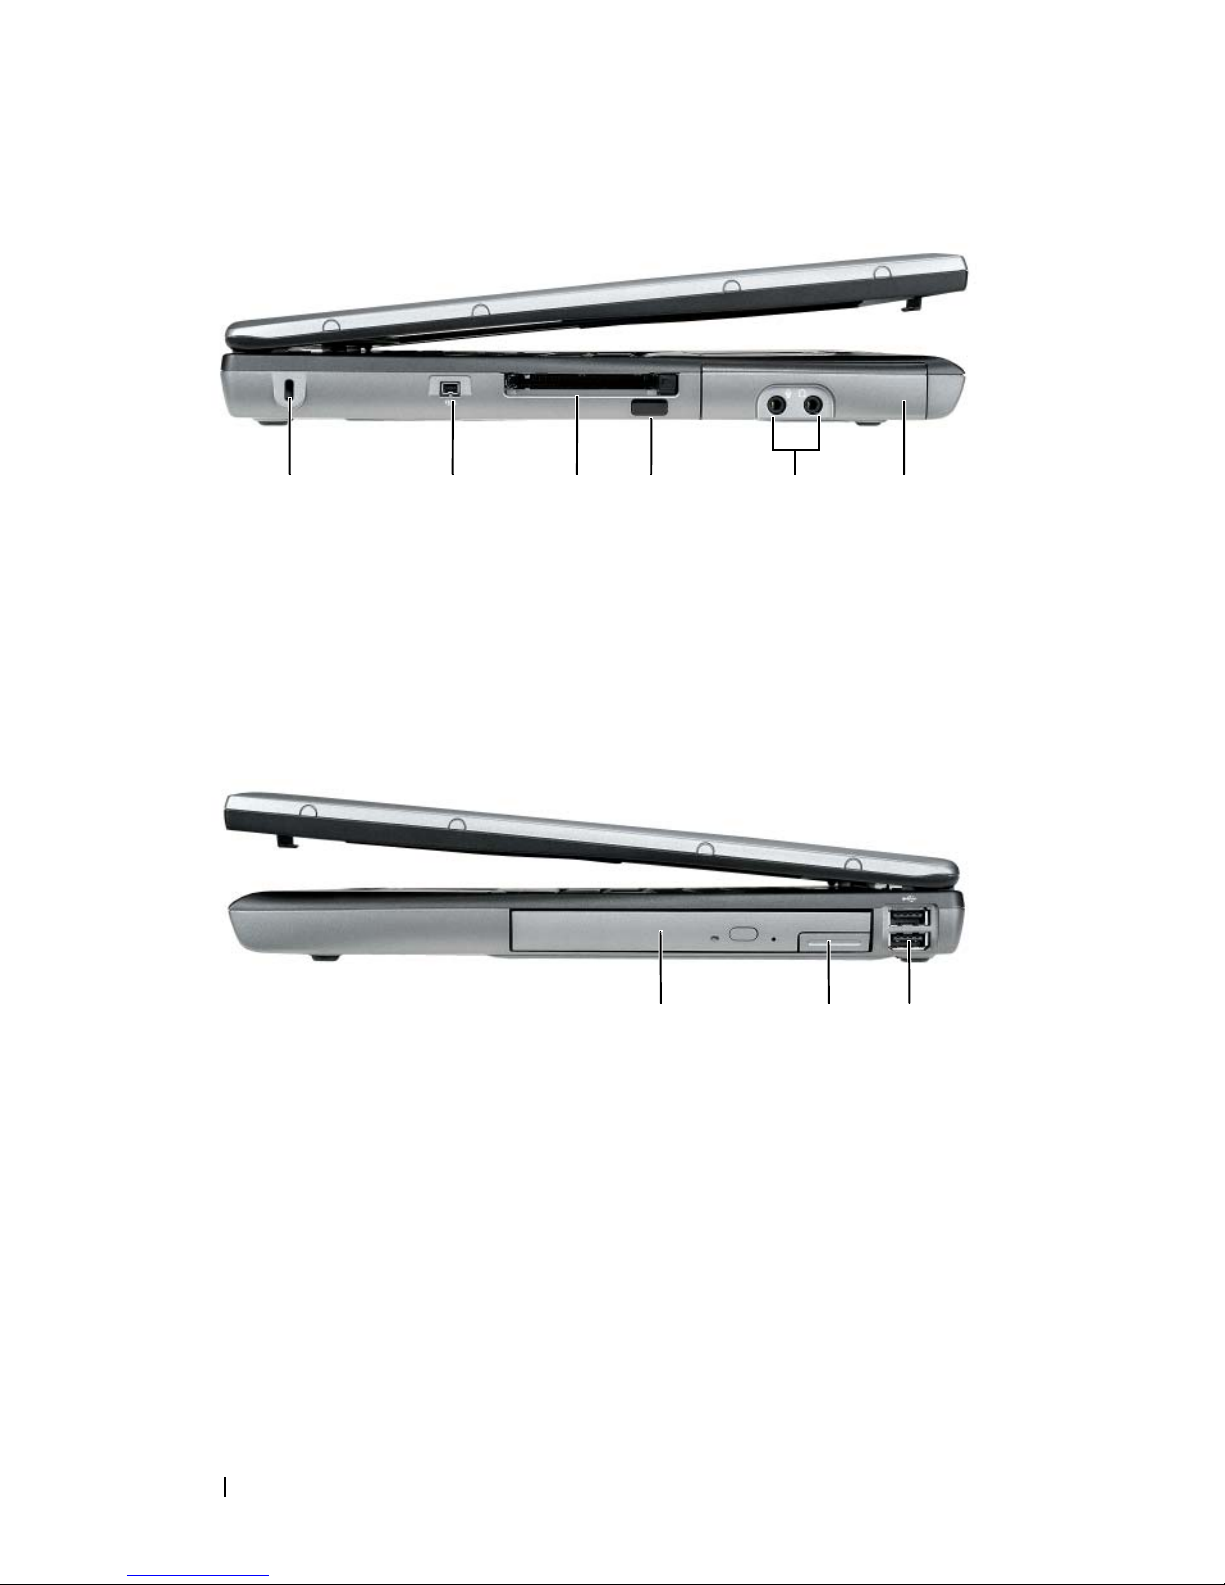
左側視圖
352 41 6
1
3
5
右側視圖
1
3
安全纜線插槽
PC 卡 /ExpressCard 插槽
音效連接器 (2 個 )
媒體凹槽
USB 連接器 (2 個 )
2
IEEE 1394 連接器
4
紅外線感應器
6
硬碟機
1 23
2
設備釋放閂鎖
88 快速參考指南
Page 89
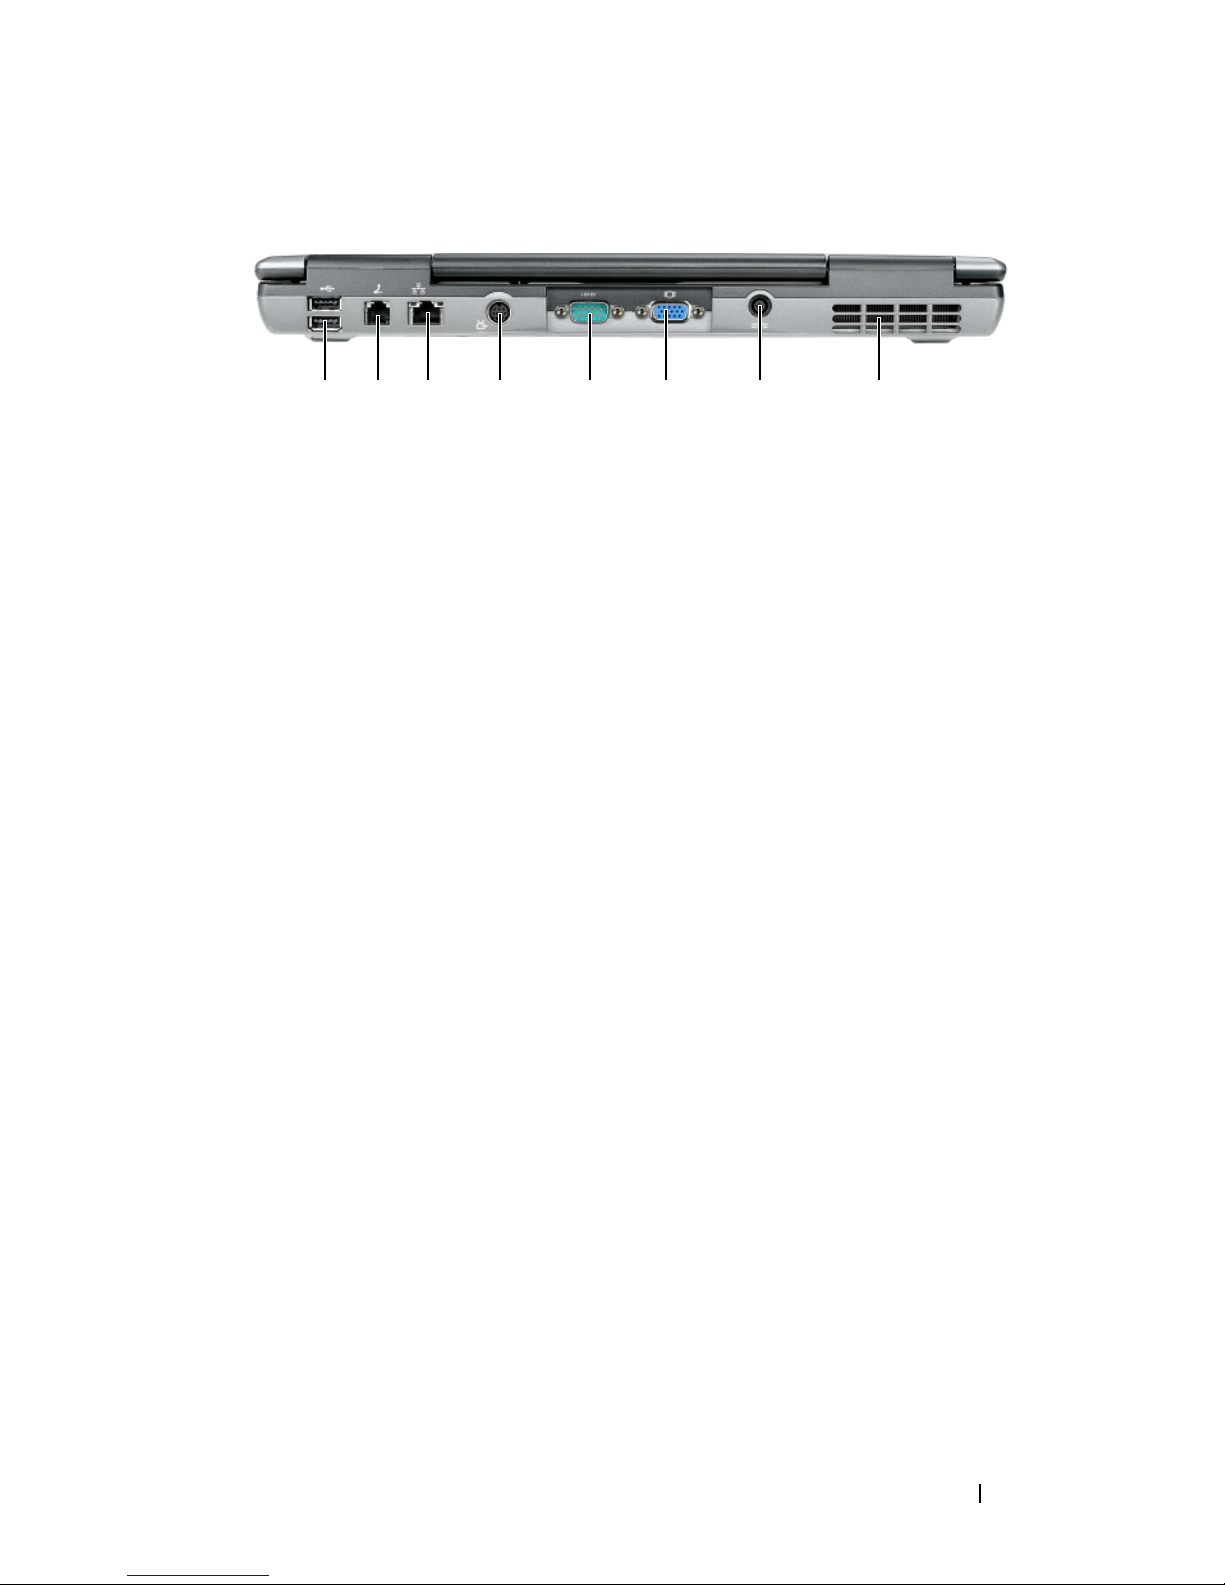
後視圖
8123 4 5 6 7
1
USB 連接器 (2 個 )
3
網路連接器 (RJ-45)
5
序列連接器
7
交流電變壓器連接器
2
數據機連接器 (RJ-11)
4
分離式影像電視輸出連接器
6
影像連接器
8
通風口
快速參考指南 89
Page 90
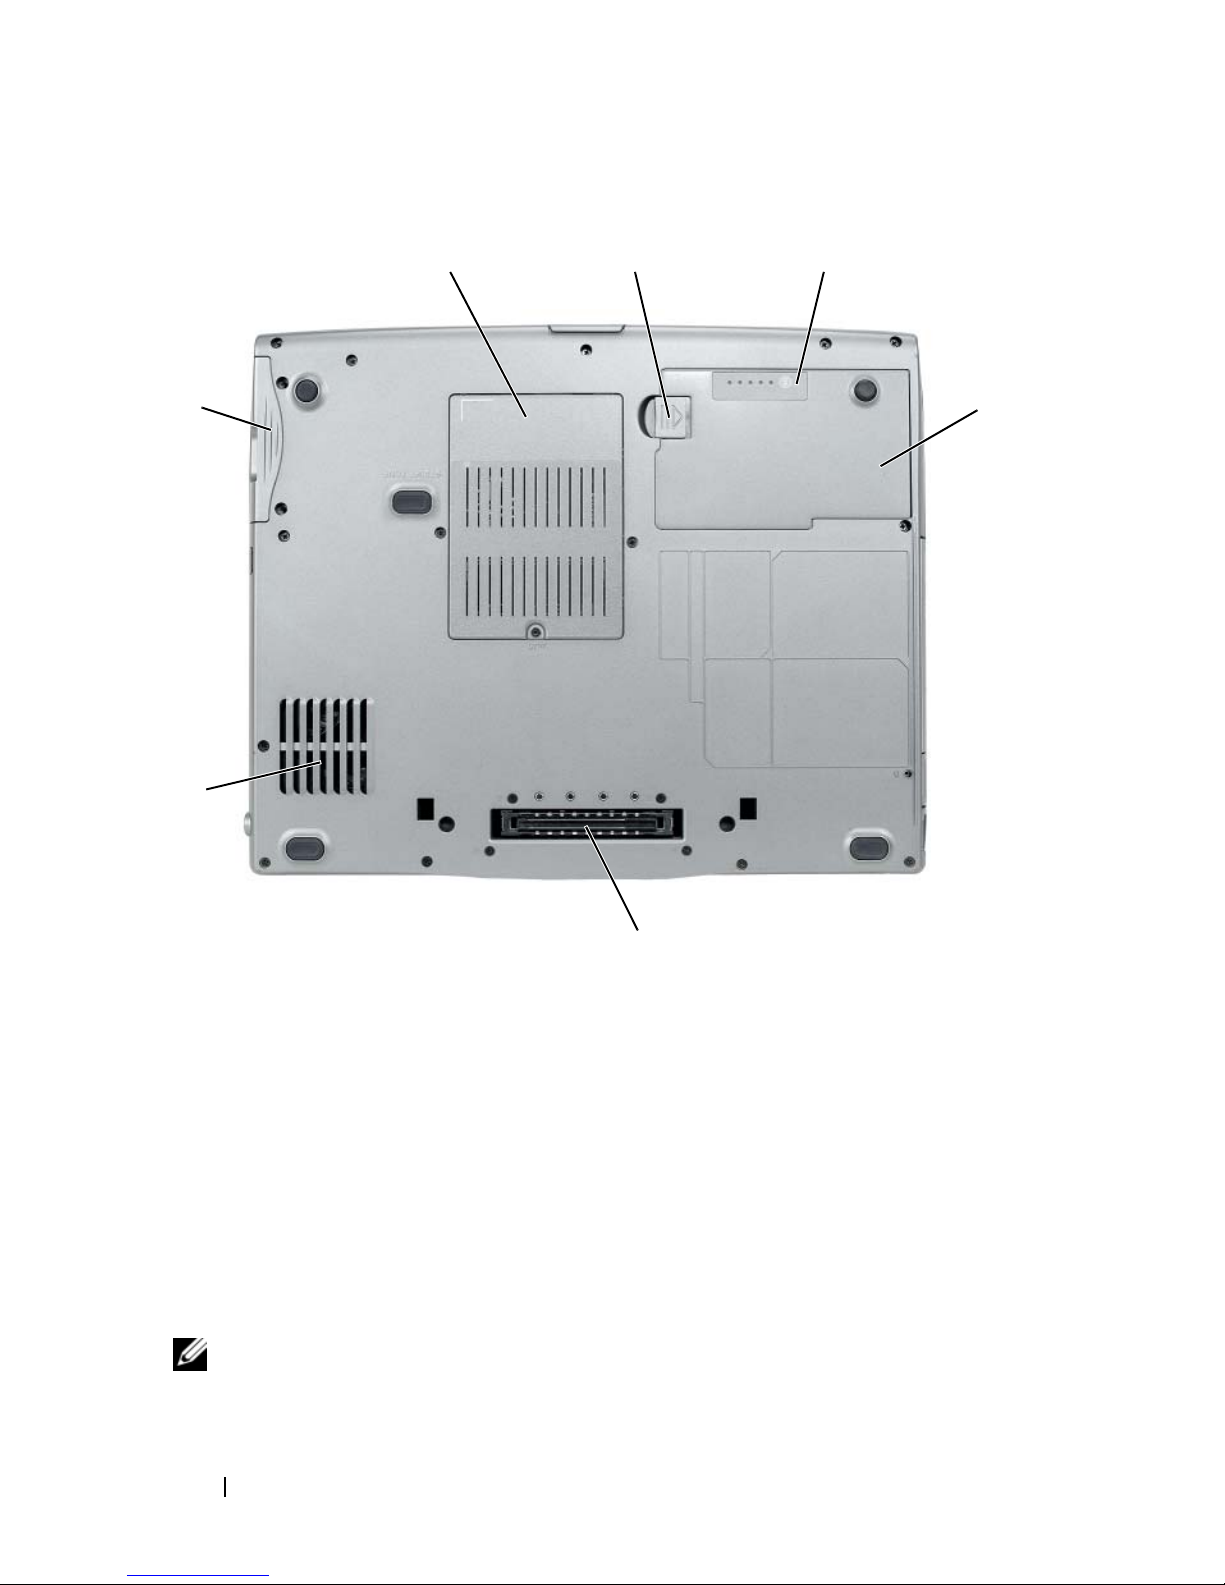
底視圖
1
7
6
2
3
4
5
1
記憶體模組 / 數據機 /WLAN 迷你插卡 /
鎳幣式電池蓋板
3
電池充電電量計量器 / 性能狀態計量器
5
連線裝置連接埠
7
硬碟機
2
電池凹槽釋放閂鎖
4
電池
6
通風口
使用電池
電池效能
註 : 如需有關 Dell 對您的電腦的保固期的資訊,請參閱產品資訊指南或電腦
隨附的單獨的書面保固文件。
90 快速參考指南
Page 91
為另選的電腦效能和協助保留 BIOS 設定,請在主要電池安裝時操作您的
Dell 筆記型電腦。 在電池凹槽中會提供一個電池作為標準設備。
註 : 因為電池可能不完全充電,當您第一次使用電腦時,使用交流電變壓器
來連接您的新電腦至一個電源插座。 為達最佳效果,請將電池充飽後,再以
交流電變壓器操作電腦。 檢視電池充電狀態,請檢查在電源選項的電能計量
器 ( 請參閱第 95 頁上 「存取電源選項性能」 )。
註 : 電池的使用時間 ( 電池的儲電時間 ),會隨著時間而減少。 視電池使用
的頻率以及使用的狀況,在電腦的使用壽命期間,您可能需要購買新的電
池。
註 : 在寫入 CD 或 DVD 時,建議您將電腦連接至電源。
當您執行包括但不限於下列操作時,電池的使用時間會明顯減少:
•
使用光碟機。
•
使用無線通訊裝置、
PC
卡、快速插卡、媒體記憶體插卡、或
USB
裝
置。
•
使用高亮度顯示設定、
3D
圖形應用程式。
3D
螢幕保護程式或其他耗電的程式,如複雜的
•
以最大的效能模式執行電腦。 參閱第95頁上 「設定電源管理設定」 關
於存取
Windows
QuickSet
之相關資訊。
電源選項性能或您可以使用組態電源管理設定的
Dell
您可以先檢查電池充電的狀況,然後再將電池插入電腦中。 您也可以設定
電源管理選項,以便在電池電量不足時警告您。
警告 : 使用不相容的電池可能會增加引發火災或爆炸的風險。 您只可以更換
自 Dell 購得的相容電池。 電池乃專為您的 Dell 電腦所設計。 請勿將其他電腦
的電池用於本電腦。
警告 : 請勿將不用的電池與家庭廢棄物一起處理。 當您的電池已經無法繼續
充電,請與當地的廢棄物處理或環境機構聯絡,以瞭解有關處理鋰離子電池
的相關建議。 請參閱 產品資訊指南 中的 「電池處理」。
警告 : 不正確地使用電池可能會增加引發火災或化學物質燃燒的風險。 請勿
刺穿、燃燒、分解或是使電池曝露於攝氏 65 度 ( 華氏 149 度 ) 的高溫。 請勿
讓兒童接觸電池。 在處理已損壞或洩露的電池時必須特別小心。 損壞的電池
可能會洩漏,造成人員受傷或設備損壞。
快速參考指南 91
Page 92
檢查電池電量
Dell QuickSet 電池計量器,
Microsoft Windows
Power Meter (電能計量器
視窗和 圖示,在電池充電上提供此電池充電電量計量器,性能狀態計
量器,和電池電能不足警告相關資訊。
Dell QuickSet 電池計量器
如果已安裝 Dell QuickSet,按下 <Fn><F3> 以顯示 QuickSet 電池計量
器。 您的電腦的電池的電池計量器狀態、電池健康度、充電層級、和充電
完成時間。
更多資訊關於 QuickSet,請在工作列 QuickSet 圖示單按滑鼠右鍵,然後
單按說明。
Microsoft Windows 電能計量器
Windows 電能計量器指示剩餘的電池電量。 若要檢查電能計量器,請連
按兩下工作列上的 圖示。
如果將電腦連接至電源插座,會出現一個 圖示。
充電電量計量器
請選擇其一 按下一次或 pressing and holding (按住) 此
狀態按鈕在電池上
的充電電量計量器,您可以檢查:
)
•
電池充電量 (按下和
電池健康度 (按下和
•
releasing (放開
holding (按住
)
狀態按鈕以檢查
)
狀態按鈕以檢查
)
)
電池的使用時間主要由其充電次數所決定。 經過幾百次的充放電循環後,
電池的充電容量電池效能將會降低。 也就是說,電池可顯示 「充電後」
的狀態,但其充電容量 ( 性能 ) 已經有所降低。
檢查電池充電
要檢查電池充電量,press ( 按下 ) 和 release ( 釋放 ) 在電池充電電量計量
器上的狀態按鈕來使充電層級指示燈照亮。 每個指示燈都代表大約總電池
電量的百分之二十。 例如,如果電池還剩餘電量的百分之八十,則會有四
個指示燈亮起。 如果沒有指示燈出現,則表示電池已無電量。
檢查電池健康度
註 : 您可以用下列兩種方法其一檢查電池健康度 : 如下說明一般使用在電池
上充電電量計量器且此使用在 Dell QuickSet 的電池計量器。 更多關於
QuickSet 的資訊,單按在工作列滑鼠右鍵的圖示和單按 說明。
92 快速參考指南
Page 93

使用充電電量計量器來檢查此電池健康度,press and hold ( 按住 ) 在電池
充電電量計量器上的狀態按鈕至少 3 秒鐘。 如果沒有指示燈出現,則表示
電池是處於良好的狀態,而且還剩餘百分之八十以上的原始電量。 每個指
示燈都代表電量的遞減。 如果出現五個指示燈,則表示剩下不到百分之六
十的電量,您應該考慮更換電池。 更多資訊關於電池的使用時間,請參
閱第 90 頁上 「使用電池」。
電池電量不足
注意 : 若要避免資料遺失或損毀,請在收到電池電量不足警告之後立即儲存
您的工作。 然後連接電腦至一個電源插座,或安裝一個備用電池在媒體凹槽
內。 如果電池電量完全耗盡,休眠模式將自動開始。
當電池電量已耗損將近百分之九十時,會出現一個突現視窗警告您。如果
安裝有兩個電池,電池電量不足的警告表示兩個電池合併起來的電量已經
耗損約百分之九十左右。當電池的電量相當低時,電腦會進入休眠模式。
可到 QuickSet 或 電源選項特性 視窗變更電池警報設定。 參閱資訊關於存
取 QuickSet 或 第 95 頁上 「設定電源管理設定」 電源選項性能 視窗。
節省電池電能
請執行下列動作以便節省電池電源:
•
由於電池壽命大多取決於於電池的使用以及重複充電次數,因此請盡
量將電腦連接至電源插座。
•
若長時間不使用電腦,請將電腦設為 待命模式 或 休眠模式。 請參閱第
93
頁上 「電源管理模式」。
•
使用電源管理精靈或電源選項特性視窗來組態在您電腦上的電源管理
設定。
也可在按下電源按鈕、關閉顯示器或按下
<Fn><Esc>
時,對
這些選項進行變更。
註 : 參閱第 95 頁上 「設定電源管理設定」 在節省電池電能上的資訊。
電源管理模式
待命與休眠模式
待命模式 (Microsoft Windows Vista 的休眠模式 ),在預先決定的無活動
( 逾時 ) 周期之後,藉由關閉顯示器來節省電源與硬碟機。當電腦結束待
命或休眠模式,它將回到進入待命或休眠模式之前相同的操作狀態。
注意 : 在待命或休眠模式,如果您的電腦失去 AC 與電池電源,將導致資料
遺失。
快速參考指南 93
Page 94

在 Windows XP 進入待命模式,單按 開始 按鈕,然後單按 關閉電腦,然
後單按 待命。
在 Windows Vista 進入休眠模式,請單按 Windows Vista 開始按鈕 ,然
後單按 休眠。
根據您在 電源選項性能 視窗或 QuickSet 電源管理精靈如何設定電源管理
選項,您也可以使用下列一種方式來進入休眠模式:
•
按下電源按鈕。
•
關閉顯示幕。
•
按下
<Fn><Esc>
。
根據您如何設定電源選項來結束待命或休眠模式,請按下電源按鈕或開啟
顯示器。您不可以藉由按下一個按鍵或觸碰觸控墊來結束待命或休眠模
式。
休眠模式
休眠模式透過將系統資料複製到硬碟機上的專用保留區域,然後完全關閉
電腦來節省電能。 當電腦結束休眠模式,它將回到進入休眠模式之前的操
作狀態。
注意 : 當您的電腦是在休眠模式,您不可以卸下裝置或切斷您的電腦連線。
如果電池充電層級變的非常低時,您的電腦進入休眠模式。
在 Windows XP 手動進入休眠模式,請單按 開始 按鈕或單按 關閉電腦,
請按住 <Shift>,然後單按休眠。
在 Windows Vista 手動進入休眠模式,單按 Windows Vista 開始按鈕 ,
然後單按 休眠。
根據您在 電源選項性能 視窗或 QuickSet 電源管理精靈如何設定電源管理
選項,您也可以使用下列一種方式來進入休眠模式 :
•
按下電源按鈕。
•
關閉顯示幕。
•
按下
<Fn><Esc>
註 : 在電腦結束休眠模式之後,一些 PC 卡或 Express Cards 可能不能正常操
作。卸下與重新插入插卡,或簡易地重新啟動您的電腦。
。
結束休眠模式,按下電源按鈕。 電腦可能花上一段時間來結束休眠模式。
您不可以藉由按下一個按鍵或觸碰觸控墊來結束休眠模式。更多關於休眠
模式的資訊,請參閱隨附您的作業系統的說明文件。
94 快速參考指南
Page 95

設定電源管理設定
您可以使用 QuickSet 電源管理精靈或 Windows 電源選項性能來組態在您
電腦上的電源管理設定。 更多資訊關於 QuickSet,請在工具列的
QuickSet 圖示單按滑鼠右鍵,然後單按說明。
存取電源選項性能
Windows XP
單按 開始 按鈕,指向控制台 → 效能與維護,然後單按電源選項。
Windows Vista
單按 Windows Vista 開始按鈕 ,單按控制台,單按系統與維護,然後
單按電源選項。
為電池充電
當您將電腦連接至電源插座或是在電腦連接至電源插座時安裝電池,電腦
會檢查電池的電量與溫度。 如有必要,交流電變壓器會為電池充電,並維
持電池的電量。
註 : 若使用 Dell ExpressCharge™ ,則電腦關機後,交流電變壓器可在大約 1
個小時內將完全放電的電池充滿百分之八十的電力,並再約 2 個小時內將電
池充飽。 開啟電腦時充電會需要較長的充電時間。 可將電池保留在電腦上,
不需拆下。 電池內部的電路會避免電池過度充電。
如果電池因在電腦中使用而過熱或是處於過熱的環境中,當您將電腦連接
至電源插座時,電池可能無法進行充電。
如果 指示燈以綠色和橘色交替閃爍,則表示電池過熱而無法進行充
電。 請斷開電腦與電源插座的連接,並讓電腦和電池冷卻至室溫。 然後再
將電腦連接至電源插座繼續為電池充電。
更多資訊關於解決電池問題,請參閱在您的使用者指南的「電源問題」。
更換電池
警告 : 使用不相容的電池可能會增加引發火災或爆炸的風險。 您只可以更換
自 Dell 購得的相容電池。 電池乃專為您的 Dell™ 電腦設計。 請勿將其他電腦
的電池用於本電腦。
警告 : 執行上述步驟前,請先關閉電腦,將交流電變壓器自電源插座和電腦
上拆下,拔下數據機與電腦之間的電源連接線,然後卸除電腦上所有外接式
纜線。
快速參考指南 95
Page 96
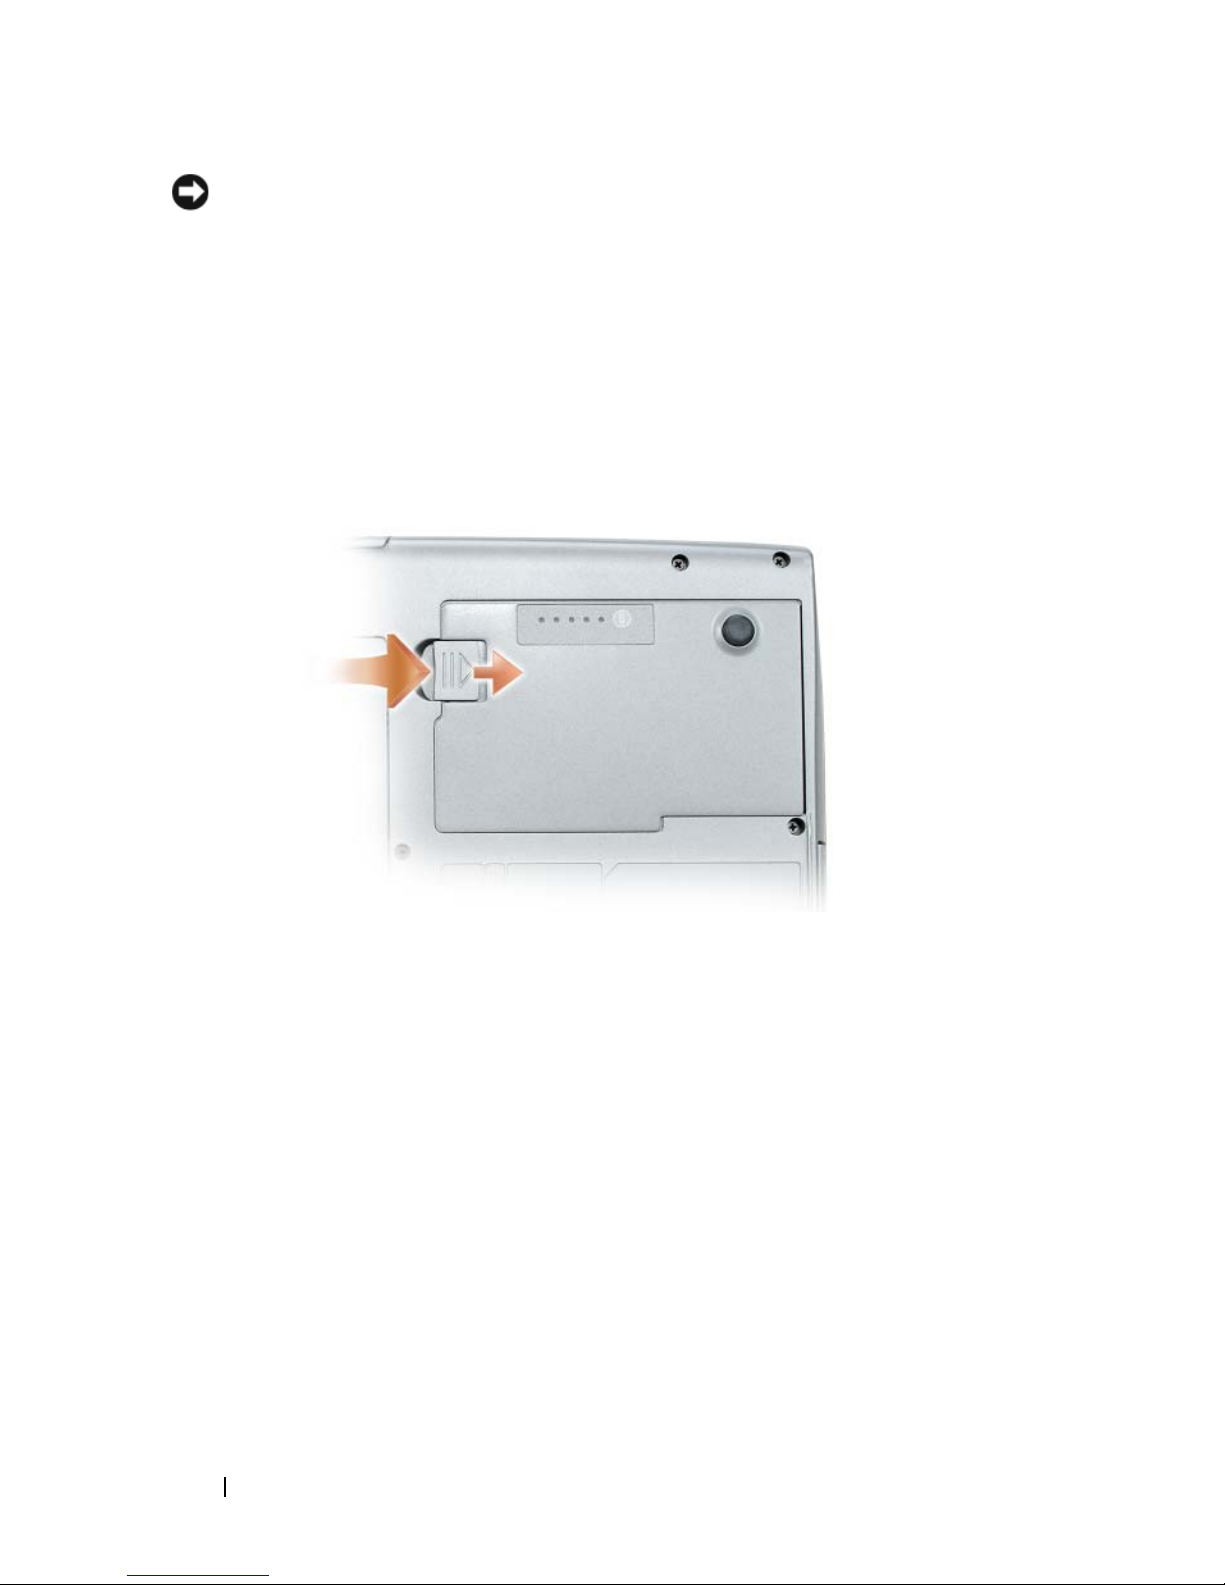
注意 : 請務必卸下電腦上所有的外接式纜線,以免連接埠受損。
關於更換備用電池的資訊,是位於媒體凹槽中,請參閱在
support.dell.com
上的使用者指南。
卸下電池:
1
若電腦與連線裝置連接(已連接),請將其連線切斷。 請參閱連線裝置隨
附的文件說明。
2
請確定電腦的電源已經關閉。
3
滑動電腦底部的電池凹槽釋放閂鎖,然後從電池凹槽中取出電池。
如欲更換電池,請遵循移除程序之相反順序與按下直到電池凹槽釋放閂鎖
完全接合為止。
儲存電池
如果電腦需要長時間儲存,請將電池取出。 在長時間的儲存過程中,電池
會放電。 在存放長時間之後,在您使用之前,請將電池重新充電至最滿
( 請參閱第 95 頁上 「為電池充電」 )。
疑難排解
對電腦進行故障排除時,請遵循以下秘訣:
•
如果您在出現問題前新增或卸下了零件,請查看安裝程序,並確定該
零件安裝正確。
•
如果週邊裝置無法作業,請確定該裝置已正確連接。
96 快速參考指南
Page 97

•
如果螢幕上出現錯誤訊息,請準確記下該訊息。 該訊息可能有助於支
援人員診斷和解決問題。
•
如果程式中出現錯誤訊息,請參閱該程式的說明文件。
註 : 本文件中的程序是針對 Windows 預設檢視撰寫的,因此,如果您將 Dell
電腦設定為 Windows 傳統檢視,則這些程序可能會不適用。
鎖定與軟體問題
警告 : 在您開始執行本章節中的任何程序之前,請遵循 產品資訊指南 中的
安全說明。
電腦無法啟動
確定電源線已穩固地連接至電腦和電源插座
電腦停止回應
注意 : 如果您未能執行作業系統關機程序,可能會遺失資料。
關閉電腦 — 如果您在您的鍵盤上按下任一鍵得不到任何回應,請按住電源按鈕
至少 8 至 10 秒鐘 ( 直到電腦關閉 ),然後重新啟動您的電腦。
程式停止回應
結束程式 —
1
同時按下
2
單按應用程式卡舌。
3
單按選取未回應的程式。
4
單按結束工作。
<Ctrl><Shift><Esc>
來存取工作管理員。
程式持續當機
註 : 軟體通常會在其說明文件或在其軟碟、CD、或 DVD 中包括安裝說明。
查看軟體說明文件 — 如有必要,請先解除安裝程式,然後再重新安裝。
此程式是為較早的 Windows 作業系統而設計的
請執行程式相容性精靈 —
Windows XP:
程式相容精靈設定一個程式所以它執行一個環境相似於非 XP 的作業系統環境。
1
單按 開始 → 全部程式 → 附屬應用程式 → 程式相容精靈→下一步。
2
依螢幕指示操作。
快速參考指南 97
Page 98

Windows Vista:
程式相容精靈設定一個程式所以它執行一個環境相似於非 Windows Vista 的作業
系統環境。
1
單按開始
2
在歡迎畫面中,單按下一步。
3
依螢幕指示操作。
→ 控制台→ 程式→ 使用舊版本的
Windows
。
出現全藍色的螢幕
關閉電腦 — 如果您在您的鍵盤上按下任一鍵得不到任何回應,請按住電
源按鈕至少 8 至 10 秒鐘 ( 直到電腦關閉 ),然後重新啟動您的電腦。
其它軟體問題
請查看軟體說明文件或與軟體製造廠商聯絡,以獲得有關故障排除的資
訊 —
•
確定程式與電腦上安裝的作業系統相容。
•
確定電腦符合執行該軟體所需的最低硬體要求。 請參閱軟體說明文件,以獲得有
關資訊。
•
確定已正確安裝並組態程式。
•
確認裝置驅動程式不會與此程式發生衝突。
•
如有必要,請先解除安裝程式,然後再重新安裝。
立即備份您的檔案
使用病毒掃描程式檢查硬碟機、軟式磁碟、CD、DVD
儲存並關閉任何開啟的檔案或程式,並使用開始選單關閉電腦
Dell 診斷程式
警告 : 在您開始執行本章節中的任何程序之前,請遵循產品資訊指南中的安
全說明。
何時使用 Dell 診斷程式
如果您在使用您的電腦遭遇一個問題,在第 97 頁上 「鎖定與軟體問題」
和在您聯絡 Dell 技術援助之前,執行 Dell 診斷程式。
建議您在開始前先列印這些程序。
注意 : Dell 診斷程式只適用於 Dell 電腦。
註 : 驅動程式與公用程式光碟是可選的且可能不會隨您的電腦一起提供。
98 快速參考指南
Page 99

從您的 硬碟機從硬碟機或從 Drivers and Utilities 光碟 ( 可選 CD),開始
Dell 診斷程式。
從您的硬碟機啟動 Dell 診斷程式
Dell 診斷程式位於硬碟機中隱藏的診斷公用程式分割區中。
註 : 如果您的電腦不能顯示一個螢幕影像,請聯絡 Dell ( 請參閱在您的線上
使用者指南的「聯絡 Dell」 )。
關閉電腦。
1
2
若電腦與連線裝置連接(已連接),請將其連線切斷。 請參閱連線裝置隨
附的文件說明。
3
將電腦連接至電源插座。
4
Dell
診斷程式可以由這兩個方式其一開啟
•
開啟電腦。 當出現
選取診斷程式,然後按下
註 : 如果等待過長時間而出現 Windows 作業系統徽標,請繼續等待直
到看見 Microsoft Windows 桌面。 然後關閉電腦並再試一次。
•
當電源開啟時,按住
註 : 如果您看到一個沒有找到診斷程式公用程式分割區的訊息,從可選
的 Drivers and Utilities 光碟,執行 Dell 診斷程式。
Dell™
<Fn>
徽標時,立即按下
<Enter>
按鍵。
。
:
<F12>。
從啟動選單
電腦會執行預啟動系統評估,它是一系列針對主機板、鍵盤、硬碟機
和顯示器所進行的初始測試。
•
在評估期間,請回答出現的任何問題。
•
如果偵測到故障,電腦會停止並發出嗶聲。 若要停止評估並重新啟
動電腦,請按
新測試失敗的元件,請按
如果在初始啟動系統評估偵測到故障,寫下錯誤代碼和聯絡
•
參閱 「聯絡
(
如果預啟動系統評估順利完成,您會收到下列訊息
Diagnostic Utility Partition. Press any key to
continue.
正在啟動
5
請按任何鍵以從硬碟機中的診斷公用程式分割區啟動
(
Dell
<Esc>
;若要繼續下一項測試,請按
<y>
<r>。
Dell」
在您的使用者指南)。
Booting Dell
啟動
Dell
診斷程式公用程式分割區。請按任何鍵繼續。
診斷公用程式分割區。) 請按任何鍵繼續。
Dell
快速參考指南 99
;若要重
Dell
診斷程式。
Page 100

從可選 Drivers and Utilities 光碟開始 Dell 診斷程式
1
插入
Drivers and Utilities
2
關機並重新啟動電腦。
光碟。
當出現
如果等待過長時間而
見
當出現啟動裝置清單時,請反白顯示 CD/DVD/CD-RW
3
按
4
從出現的選單選取從
5
鍵入 1 來啟動選單和按下
6
從編號清單中選取 執行 32
DELL
Windows
註 : 以下步驟僅能對開機順序作單次變更。 在下次啟動時,電腦會根據
在系統設定中指定的裝置來啟動。
<Enter>
徽標時,立即按下
Windows
<F12>
。
作業系統徽標出現,請繼續等待直到看
桌面。 然後關閉電腦並再試一次。
。
CD-ROM
<Enter>
啟動然後按下
位元
Dell
來繼續進行。
診斷程式。 如果列出了多種版本,
請為您的電腦選取適當的版本。
7
當
Dell
診斷程式
Main Menu (主選單)出現,選取您想要執行測試程
式。
Dell 診斷程式主選單
1
在載入
Dell
診斷程式而且 主選單 螢幕出現之後,單按您想要的選項按
鈕。
<Enter>
磁碟機,然後
。
100 快速參考指南
 Loading...