

Page 1

Dell Lasso Version 4.2
User's Guide
Page 2

Notes, Cautions, and Warnings
NOTE: A NOTE indicates important information that helps you make better use of your computer.
CAUTION: A CAUTION indicates either potential damage to hardware or loss of data and tells you how to avoid the
problem.
WARNING: A WARNING indicates a potential for property damage, personal injury, or death.
Copyright
© 2012 Dell Inc. All Rights Reserved.
Trademarks used in this text: Dell™, the Dell logo, Dell Boomi™, Dell Precision™ , OptiPlex™ Latitude™, PowerEdge™, PowerVault™,
PowerConnect™, OpenManage™, EqualLogic™, Compellent™, KACE™, FlexAddress™, Force10™ and Vostro™ are trademarks of Dell
Inc. Intel®, Pentium®, Xeon®, Core® and Celeron® are registered trademarks of Intel Corporation in the U.S. and other countries. AMD
is a registered trademark and AMD Opteron™, AMD Phenom™ and AMD Sempron™ are trademarks of Advanced Micro Devices, Inc.
Microsoft®, Windows®, Windows Server®, MS-DOS®, Windows Vista®, and Active Directory® are either trademarks or registered
trademarks of Microsoft Corporation in the United States and/or other countries. Red Hat Enterprise Linux® and Enterprise Linux® are
registered trademarks of Red Hat, Inc. in the United States and/or other countries. Novell® is a registered trademark and SUSE™ is a
trademark of Novell Inc. in the United States and other countries. Oracle® is a registered trademark of Oracle Corporation and/or its
affiliates. Citrix®, Xen®, XenServer® and XenMotion® are either registered trademarks or trademarks of Citrix Systems, Inc. in the
United States and/or other countries. VMware®, Virtual SMP®, vMotion®, vCenter® and vSphere® are registered trademarks or
trademarks of VMware, Inc. in the United States or other countries. IBM® is a registered trademark of International Business Machines
Corporation.
2012 - 10
®
Rev. A00
Page 3

1
Introduction
Lasso is a Windows-based client and server utility that automates the collection of hardware, software, and storage
logs and configuration from servers, disk arrays (EqualLogic, PowerVault MD-Series, and EMC), Fibre Channel switches
(Brocade, McData, and Cisco), tape libraries, Ethernet, and FCoE Switches.
After Lasso collects the data, it parses the data into XML and HTML formats that is packaged along with the collected
.zip
data and encrypted. The collected data is saved as a
automatically upload the report to Dell Technical Support.
Dell uses this data as part of the Systems Maintenance Service (SMS) to determine hardware, software, and firmware
versions for compatibility, troubleshoot problems in storage devices, and upgrading of the existing equipment. By
default, upto 10 collections (one collection per device) are run in parallel. Lasso tracks and waits for completion of each
process and notifies the user of any failures during collection.
For information or assistance, contact US_Lasso_Support@Dell.com.
What's New In This Release
• Support time out value option for Windows host. Collection on Windows host is automatically terminated if the
host times out.
• Support for automatic upgrade to new version of Lasso using GUI or CLI without uninstalling the current or
earlier version.
• Support for firmware version 6.0 (Glenlivet) on Dell EqualLogic Arrays.
• Enable the following methods to automatically upload the report collection to Dell Technical Support site:
file on the local system. Optionally, you can enable Lasso to
– Authenticated Proxy
– Non-Authenticated Proxy
– Pass through Authentication
• Store the device report collected in multiple files in a single folder or in a .zip file.
• Support for the following devices:
– Dell M1000 Enclosure
– Dell Blade Switch M8428-k (Brazos)
– HITKIT for VMware
– Storage Array MD3600i (FatBob)
• Support to parse the Broadcom NIC information when running in Host Bus Adapter (HBA) mode using the
Broadcom Advanced Server Program (BASP) software.
• Support to parse Converged Network Adapter (CNA) card information using Broadcom command Line Utility
(BCU) installed on Windows Hosts attached to EqualLogic, MD Series, and Compellent.
• Support to collect and parse Host Integration Tool Kit data for VMWare hosts in the EqualLogic, MD Series, and
Compellent SAN using Management and Monitoring window in the Lasso GUI.
• Support to collect and parse the following iSCSI HBA attributes from Windows, Linux and VMWare Hosts
attached to EqualLogic, MD Series, and Compellent:
– ExecThrottle
– TCP_Nagle
3
Page 4

– AFW_Delayed_ACK
– Large_Frames
• Support to collect VMware support logs in case of EqualLogic SAN using advanced mode.
• The "Secure Site (Removes Customer Identification Information (CII)) option is renamed to "Enable Report
Filtering". The "Learn More" link option provides information about the feature when selected.
• Time and speed used to perform the “Ping test” to test the connectivity between the EqualLogic devices is the
same as used by Putty.
• Support to collect diagnostics information from Cisco Nexus switches.
• Support to collect and parse the value for the “TCP Delayed ACK” Windows setting from Windows Host
attached to EqualLogic, MDSeries, and Compellent SAN.
• Provide Ethernet Switch Type as:
– PowerConnect — collect and parse all the Power Connect switches and PowerConnect M8428K. Only
collect for all PowerConnect B8000 switches.
– Brocade Ethernet — collect for all Brocade B8000 switches.
• Display the build version of Lasso used for collection on the top of the HTML report.
• Provide the error code and the message when process fails during collection, parsing, or report upload for a
SAN device.
• Collect and parse the output from “esxcli iscsi networkportal list" command of the iSCSI Network cards for
VMware version 5.0 and later.
Key Features
The key features are:
• Collect and parse Qlogic FC HBA information for Windows and Linux hosts attached to Compellent.
• Optional user name and password credentials when PowerConnect ethernet switch is configured.
• Raw data collection support for Enclosures.
• Data collection and parsing support for HITKIT for VMware.
• Encrypted password support while running Lasso in the CLI mode.
• Collect diagnostic information from the Group Lead and member, when member IP address is provided.
• Option to automatically upload the report to Dell Technical Support site.
• Support for the PS 4110 and PS 6110 devices.
• Collect and parse Host Integration Tool Kit data in the EqualLogic SAN for Windows, Linux and, vSphere hosts.
• Option to provide the Delta Service Request number and Project Manager ID and include in the XML and HTML
reports.
• Parser support for the following devices:
– EqualLogic FS7500
– Force 10 S50/S60/S4810 switches
– Xen server
– PowerVault NX3500
• Solution for error 904 (Collection of EQL Details Failed) for the EqualLogic Array.
• Parser support for MaxRequestHoldtime for all the Windows hosts in EqualLogic and MDSeries SAN.
• Collect and parse Broadcom NIC information when running in Host Bus Adapter (HBA) mode under the control
of Broadcom Advanced Server Program (BASP) software.
• Collect NAS Appliance information from the EQL group.
• Support for firmware version 5.2 and 6.0 on Dell EqualLogic Arrays.
• Collect and parse the attributes ROM Level and Last Boot Time from EqualLogic Array.
4
Page 5

• Support for Array ping test between the members within an EqualLogic Group.
• Collect and parse the Qlogic iSCSI adapter information from Windows, Linux, and VMware hosts attached to
Compellent.
• Collect Emulex information from Windows, Linux, and VMware hosts attached to Compellent.
• Collect and parse SAS HBA information from Windows and Linux (32-bit only) hosts attached to PowerVault MD
Series and Compellent.
• Validate user input for Ethernet Switch type in the related GUI pages.
• Include Collection Date - Collection Time - Build Version attributes in the HTML report.
• Enhance user interface in compliance with Dell's lucidity usability requirement.
• Validate the PC Ethernet Switch, when configured with only user name.
• Raw data collection and parsing for the PowerConnect ethernet switches in simple and normal mode.
• Correct parsing of service tag information for all the models of EqualLogic Arrays upon v5.1 Firmware upgrade.
• Solution for error 105 (failed to retrieve completed collection from remote system) for the Windows 2008 R2 host
attached to EqualLogic Array.
• Option to re-validate the devices when imported from an existing configuration.
• Use of Forced multi-threaded mode of execution for enhanced Lasso performance.
• Solution to parse EqualLogic Array if the EqualLogic IP Address last octet is single digit issue.
• Secure Site option in the Your Company Information window of the Lasso GUI to remove Customer Identification
Information (CII) from XML format of the collection.
• Raw data collection and parser support for the following devices:
– Cisco switches 3750E/3750X and 4948
– PowerConnect ethernet switches 7024/7048
– vSphere 5.0 hosts attached to EqualLogic and MD Series arrays
– Pirates 1GB - PS4100/PS6100
• Raw data collection support for Force10 (S50N/S481) Switches.
• Correct parsing of PowerConnect ethernet switches upon v4.1 Firmware upgrade.
• Display information only related to EqualLogic iSCSI volumes in vSphere iSCSI VMFS section.
• Collect and parse Hit Kit data for Linux Hosts in EqualLogic SAN.
• Include ehcmcli -d command output as part of Linux collection.
• Display the applicable attributes for non-configured Ethernet ports of EqualLogic Arrays.
• Raw data collection and limited parsing for PowerVault NX3500 and EqualLogic FS7500.
• Display the iSCSI network for different subnet masks.
• Collect the applicable attributes for vSphere Hosts for all possible path selection policies.
• Parse the attributes related to Port Channel for Power Connect and Cisco Switches.
• Option to choose SSH or Telnet protocol in case of Ethernet Switches.
• Report the updated version for vSphere host by Lasso.
• Parse all the iSCSI virtual machine network interface cards in the vSphere environment.
• Parse and display cluster name and Is Cluster member attributes for clustered windows host.
• Support for Power Connect 7024, 8024, 8024F, M8024F, M8024-k, M6220, M6348 with version 4.1 firmware.
• Solution for the Interface Name under iSCSINode for Linux Hosts in the XML format of collection issue.
Supported Storage Devices
The following table provides the types of supported storage devices:
5
Page 6

Storage Device Types of Devices
Storage Arrays
Fibre Channel Switches Brocade and McData switches — Blade switches Cisco
Tape Libraries
• Dell EMC Storage processors
– CX3 series— Tackhammer (CX3–10),
Jackhammer (CX3–20), Sledgehammer
(CX3–40), and Mallet (CX3–80)
– CX4 (Fleet) series— Nautilus (CX4–120),
Ironclad (CX4–240), Trident (CX4–480), and
Dreadnought (CX4–960)
– AX series — Mamba (AX4–5F, AX4–5i,
and AX4–5FX)
• PowerVault MD Series arrays — MD3000,
MD3000i, MD3200, MD3220, MD3200i, MD3220i,
and MD3600i
• EqualLogic PS series
• Dell EMC Celerra Storage devices (NAS)
• EqualLogic Fluid File System (NAS)
• PowerVault Fluid File System (NAS)
9124 and except director class switches.
Telnet must be enabled on all McData
NOTE:
switches for Lasso to collect the data.
• PV136T
• PV132T
• TL 2000
• TL 4000
• ML 6000
Ethernet & FCoE Switches
Enclosures Dell M1000e
6
• Dell PC 5424/5448
• Dell PC 6224/6248
• Dell PC 7024/7048
• Dell PC M6220
• Dell PC 8024/8024F
• Dell PC M8024/M8024K
• Dell PC M6348
• Dell PC M8428K
• Dell PowerConnect B-Series 8000
• Cisco 2960
• Cisco 4948
• Cisco CBS 3130
• Cisco CBS 3030
• Cisco 3750E/3750X
• Cisco Catalyst 3750E
• Nexus 5020
• Force10 S50/S60/S2410/S4810
Page 7

Supported Server Operating Systems For Attached Hosts
The following table provides the supported server operating systems for attached hosts:
Operating System Operating System Name
Windows Systems
• Windows Server 2003 (RTM, SP1, SP2) and
Windows 2008 (RTM, SP1, SP2).
• For Windows 2008 (R2), if the correct account
(Administrator) is not specified during collection,
the registry on that remote host should be edited.
Use the Windows 2008 configuration registry
script, or manually add the DWORD value in
LocalAccountTokenFilterPolicy and set the data to
1 in HKEY_LOCAL_MACHINE\SOFTWARE
\Microsoft\Windows\CurrentVersion\Policies
\system\key , then reboot. It is recommended to
use the Administrator account to prevent the
modification and reboot.
NOTE:
– For adequate disk space to store a
copy of all event logs and other
system data, see ftp://
ftp.emc.com/pub/emcgrab/
Windowsdirectory for more
information.
– admin$ and c$ share must be
enabled for remote commands to
execute the program embedded in
xCmd.exe may be detected as
Lasso.
a threat by the remote host if McAfee
or AVG are installed. On both the
systems that Lasso is installed and
the remote host, add xCmd.exe to the
trusted programs if using McAfee or
the PUP exception list if using AVG.
– In case of EqualLogic and MD series
SAN .Net
required on the remote Windows
host for the successful Windows host
collection. If later version is installed,
then Lasso still requires version 2.0.
– Windows Server Core is not
supported.
• Windows 2003 R2 32 bit and 64 bit.
framework 2.0 or later is
UNIX systems
• Linux — GNU/Linux system
• Solaris — SUN Solaris system
• HP-UX — HP-UX system
• AIX — IBM AIX system
• Secured Shell (SSH) is installed and configured.
Normal user credentials are required to establish
SSH session, and root password is required to run
the commands as root.
• For adequate disk space to store a copy of all logs
and system data to be collected, see the
Readme
7
Page 8

Operating System Operating System Name
file available at ftp://ftp.emc.com/pub/emcgrab/
. In case of ESX, see the
Unix
at ftp://ftp.emc.com/pub/emcgrab/ESX/
VMware systems VMware ESX 3.0 server and later
See also:
Prerequisites For Data Collection
Readme
file available
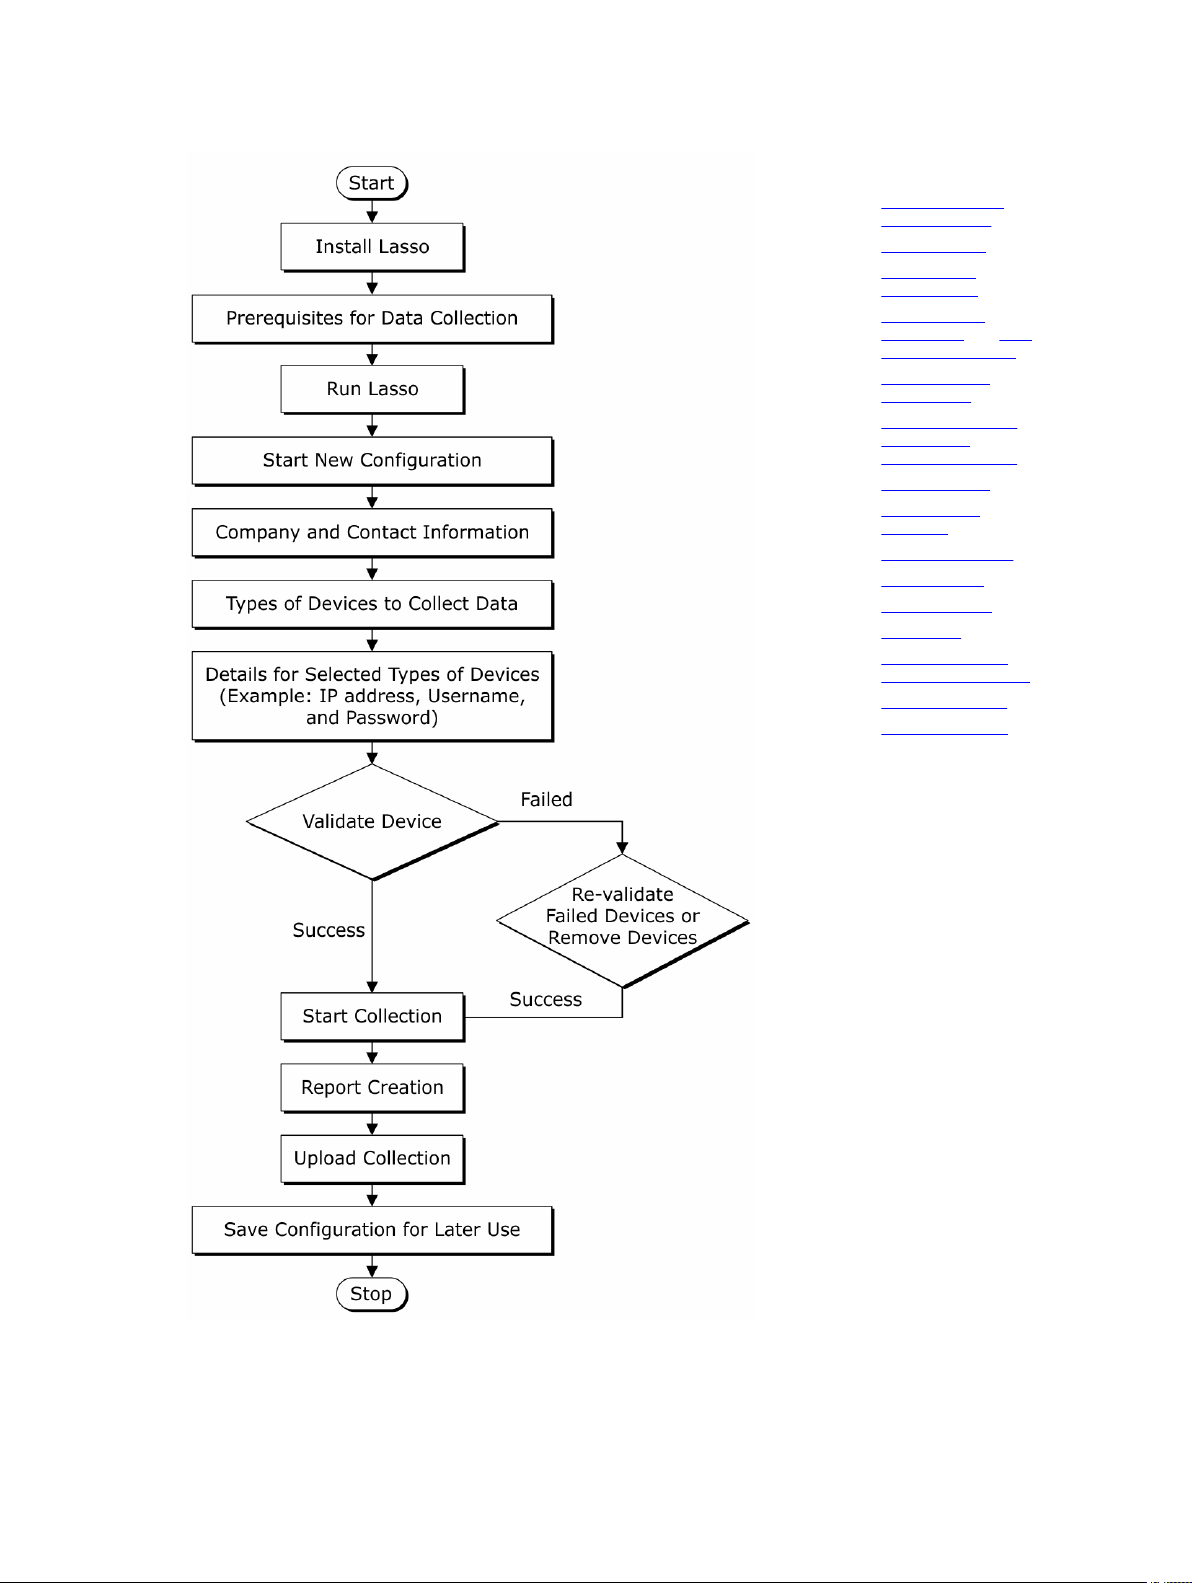
Work Flow
The following figure provides the steps to run Lasso, create and upload the report to Dell Technical Support site, and
save the configuration for later use.
8
Page 9
See Also:
• Prerequisites For
Data Collection
• Running Lasso
• Starting New
Configuration
• Your Company
Information and Your
Company Contacts
• Your Hardware
Environment
• Supported Storage
Devices and
Operating Systems
• Storage Arrays
• Fibre Channel
Switches
• Ethernet Switches
• Tape Libraries
• Attached Hosts
• Enclosures
• Management and
Monitoring Software
• Device Collection
• Upload Collection
9
Page 10

Contacting Dell
If you do not have an active Internet connection, you can find contact information on your purchase invoice,
NOTE:
packing slip, bill, or Dell product catalog.
Dell provides several online and telephone-based support and service options. Availability varies by country and
product, and some services may not be available in your area. To contact Dell for sales, technical support, or customer
service issues:
1. Visit support.dell.com.
2. Select your support category.
3. If you are not a U.S. customer, select your country code at the bottom of the support.dell.com page, or select All to
see more choices.
4. Select the appropriate service or support link based on your need.
You can also write to the US Lasso support at US_Lasso_Support@Dell.com.
10
Page 11

Installing And Uninstalling Lasso
This section provides information to install, modify, repair, and uninstall Lasso. Lasso can be installed using GUI or CLI
mode.
Prerequisites
Before installing Lasso, make sure that the following prerequisites are met:
• The user account has Administrator privileges.
• The system has any of the following Windows (32 bit or 64 bit) operating system:
– Windows XP
– Windows Vista
– Windows 7
– Windows Server 2003
– Windows 2008 R2
– Windows 2003 R2
– Windows 2000 Advanced Server
– Windows Server 2008
NOTE: Windows Server Core is not supported.
2
Installing Lasso Using GUI
To install Lasso:
1. Double click the .msi file.
The
Welcome to the Dell Lasso Installation Wizard is displayed.
2. Click Next
If you already have an earlier version of Lasso, then the message “A previous version of Lasso was detected on
your system. Continuing the installation will upgrade Lasso <current version> to Lasso <latest version>.
Upgrading to the latest version of Lasso provides several benefits.
Would you like to proceed with the upgrade?“ window is displayed.
Click Upgrade to upgrade to the latest version. Else, click Cancel to exit installation.
The
3. Click I accept the license agreement and click Next.
The
4. Click Next
The Destination Folder window is displayed.
5. Click Next
The Security Level window is displayed.
.
Dell Software License Agreement
Readme
information is displayed.
.
to accept the default directory path or click Browse to specify another location, and click Next.
is displayed.
11
Page 12

6. Select one of the following options and click Next:
– Save Environment, Username, and Password — Saves all SAN configuration details, user name, and
password. It is recommended to use this option to run Lasso multiple times and avoid re-entering
configuration and security details.
– Save Environment and Username only — Saves all SAN configuration details and the user name. The
password is not saved.
– Save Environment only — Saves all SAN configuration details. The user name and password is not saved.
Select this option to skip saving any security related details.
– Do not save any information — Does not save any configuration details of the environment, user name, and
password. Select this option to save configuration and security details, or if the location from where you
run Lasso does not allow saving any details.
The Prerequisites
Lasso to collect the data after installation is complete.
7. Click Next
The Ready to Install the Application window is displayed.
8. Click Next
The Lasso has been successfully installed window is displayed.
9. Click Finish to close the installation wizard.
window is displayed. The window provides the list of prerequisites that must be met to enable
.
to continue with the installation.
Installing Lasso Using CLI
To install, at the command prompt, set the directory to LassoMSIPath
msiexec /qn /i <LassoMSIName>/log install.txt
The installation messages are logged in the install.txt file.
NOTE:
If msiexec is not recognized as an internal or external command, include %SystemDrive%:\Windows
\System32
path variable.
(x86 bit operating system) or
%SystemDrive%\Windows\SysWOW64 (x64 bit operating system) to the
and run the command:
Modifying Lasso Installation
After installing Lasso, you can modify the components that are installed.
To modify the components:
1. Double-click on the .msi
The Application Maintenance window is displayed.
2. Select Modify and click
The Ready to Modify the Application window is displayed.
3. Click Next.
Updating System window is displayed.
The
4. Click Finish
to exit Lasso.
file.
Next.
Repairing Lasso Installation
You can also reinstall the corrupt files, registry keys, and shortcuts to the Lasso application.
To repair Lasso:
1. Double-click the .msi file.
12
Page 13

The Application Maintenance
2. Select Repair
The Ready to Repair the Application window is displayed.
3. Click Nex
The Updating System window is displayed.
4. Click Finish
and click Next.
t.
to exit Lasso.
window is displayed.
Uninstalling Lasso
Lasso can be uninstalled using the GUI or the CLI option.
See also:
• Using GUI
• Using CLI
Using GUI
To uninstall Lasso using the GUI, use one of the following options:
• Start Menu
• Windows Add Or Remove Programs Wizard
From Start Menu
To uninstall Lasso from the Start Menu:
1. Click Start → Programs (or All Programs) → Dell → Lasso → Uninstall
Are you sure you want to uninstall this product prompt is displayed.
The
Yes
2. Click
to uninstall Lasso.
.
From Windows Add Or Remove Programs Wizard
To uninstall Lasso from the Windows Add or Remove Programs wizard on Windows operating systems:
1. Click Start → Control Panel → Add or Remove Programs .
NOTE:
This option differs based on the operating system.
2. Select Dell Lasso
3. On the Are you sure you want to uninstall Dell Lasso? prompt, click
(version number) and click Remove.
Yes to uninstall Dell Lasso.
From the Application Maintenance Window
To uninstall Lasso from the Application Maintenance
.msi
1. Double-click the installed
The Application Maintenance window is displayed.
2. Select the Remove
The Lasso Uninstall window is displayed.
3. Click Next
The Updating System
4. Click Finish on the
.
option and click Next.
Lasso has been successfully uninstalled window.
file.
window is displayed.
window:
13
Page 14

Using CLI
To uninstall, at the command prompt, set the directory to LassoInstDir
msiexec /qn /x Lasso<version number>.msi/log Uninstall.txt
NOTE:
Before running the .msi file, make sure that the file is available in the directory.
and run the command:
14
Page 15

3
Security
Lasso is designed to automate data collections from remote systems and depends on network access to these systems.
You can run Lasso from a local system that is on the same subnet as the target remote systems.
For the successful remote data collection, make sure that there are no firewalls, group policies, security enhanced Linux
policies, or other security issues.
Passwords
To execute scripts for data collection from remote systems, administrator rights are required to login to remote systems.
On local systems, during installation select the Save Environment, Username, and Password options to store the
password in an encrypted vault.
You can either create a new user ID dedicated for Lasso collection or change the password for the current collection.
The user id can be disabled or deleted after running Lasso.
Network Ports
Lasso requires network ports to execute the scripts for data collection.
The following table describes the scripts and the corresponding network ports:
Scripts Network Port
UNIX/VMware collections SSH (Port 22)
Switch collections SSH (Port 22) and Telnet (Port 23)
Tape collections SSH (Port 22) and Telnet (Port 23)
StorageProcessor collections Navisphere CLI (emc112310 lists ports 6389 and 80/443 or
2162/2163)
CAUTION:
processor collection cannot be performed.
NOTE:
the Storage Processor (SP) on Windows XP,
Windows 2003, Windows 2008, and Windows Vista,
the firewalls display the prompt to allow this
connection.
EqualLogic collection SNMP default port 161 (SNMP messages) and port 162
(SNMP traps)
NOTE:
enabled with public access for inventory collection.
If the connection is denied, the storage
When retrieving the completed collection from
From EqualLogic array, SNMP should be
15
Page 16

Scripts Network Port
Windows Collection (UDP ports) 137/138 (NetBIOS), TCP ports 139 (NetBIOS)
and 445 (SMB)
EqualLogic FluidFS NAS collection SSH (Port 22), FTP (Port 44421)
PowerVault FluidFS NAS Collection SSH (Port 22), FTP (Port 44421)
Windows uses the utility xCmd
139 (NetBIOS) and 445 (SMB).
For more information on Windows Port usage, see Microsoft support site.
. The xCmd uses standard Windows file sharing (UDP ports 137/138 (NetBIOS), TCP ports
16
Page 17

Using Lasso
Lasso compiles information for all the devices in the SAN. It also includes company and site contact information. You
can save this information as a configuration file (.xml
and generates a report that can be uploaded to Dell Technical Support site.
This section provides information to use Lasso to collect data from the various storage devices in your SAN.
Prerequisites For Data Collection
Before using Lasso to collect data, make sure that the following prerequisites are met:
• IP connectivity is available for the required devices.
• For PowerVault MDSeries devices, MD Storage Manager software is installed on the system where Lasso is
running.
• For data collection in XML and HTML format, Lasso requires .Net Framework 2.0 or later. If later version is
installed, then Lasso still requires version 2.0.
• For EqualLogic, and MD series, Net framework 2.0 or later should be installed on the remote Windows host. If
later version is installed, then Lasso still requires version 2.0.
• For EMC SAN, use a system that is not a fibre channel attached host.
• For EqualLogic, Compellent, and MD series devices, the SAN Surfer CLI (iSCSI) software should be installed on
the remote Windows, Linux, and VMware hosts to successfully collect iSCSI HBA information.
• For a Compellent SAN, the SAN Surfer CLI (FC) should be installed on the remote Windows, Linux, and VMware
hosts to successfully collect Qlogic FC HBA information.
• For Compellent SAN, the HBAnyware CLI should be installed on the remote Windows, Linux, and VMware host
to successfully collect Emulex FC HBA collection.
Lasso should be installed on a Windows system that has IP connectivity to all the devices in the
NOTE:
SAN environment.
format) for later use. Lasso collects data for the selected devices
4
Running Lasso
You can run Lasso in the following modes:
• GUI
– Start a new configuration
– Use an existing configuration
– Load the configuration file
– Upload an existing collection
• CLI
– Single Device Collection
17
Page 18

Starting New Configuration
Use this option to create a new configuration and generate a report.
To collect data using GUI:
1. Click Start → Programs (or All Programs) → Dell → Lasso and click Lasso.
Welcome to Lasso window is displayed.
The
2. Select Start with a new configuration
The Your Company Information window is displayed.
3. Select Enable Report Filtering
confirmation message displayed to exclude the information. Else, click No.
Click Learn More link to display the window with the information about the data that is filtered. The data that is
filtered are:
– iSCSI network configuration information such as IP address, Gateway, Subnet Mask, and Domain.
– Host identification information such as host names.
– iSCSI configuration information such as Volume Names and IQN names.
NOTE:
It is recommended to not select the Enable Report Filtering option, if the Lasso collection is performed
for technical support or proactive maintenance support.
Click Close to close the window.
Enter the required information in the Company Information and Dell Technical Support Information section and click
Continue
The
4. Enter the required information and click Continue
The Your Hardware Environment window is displayed.
5. Select the devices (one or multiple devices depending on your requirement and SAN) for which Lasso must collect
data and click Continue.
The device-specific Your Hardware Environment windows are displayed.
6. For each device, enter the required information. Click Continue
selected device.
The Device Collection
7. Make sure that the displayed devices are the selected devices for which data must be collected and click Start
Collection.
The status bar displays the collection status.
8. Click the Clock icon next to each device to view the progress.
9. Click Continue
The collected data is packaged and the Your Upload Options window is displayed.
10. You can select the following and click Continue
.
Your Company Contacts window is displayed.
window is displayed.
once collection is complete.
and click Continue.
to exclude Customer Identification Information (CII) in the report. Click Yes in the
.
until you complete providing information for each
.
– To access the collected data file, click Open Location
For example, c:\Users\<username>\Dell\Lasso\results\. For information on the collected files, see
Generated File Formats.
– To immediately upload the collection package to Dell, select Yes
– To save the configuration details with a password for later use, select Yes. Else, select No.
Following actions are performed based on the selection:
18
. By default, it is saved in the user profile directory.
. Else, select No.
Page 19

– If you have selected Yes to upload the report, the collection uploads to Dell Technical Support site.
– If you have selected No, the Save Lasso Configuration dialog box is displayed. Click Browse and save the
file in the required location with the password.
The Confirmation window is displayed.
11. To see the SAN configuration, select View Your SAN Configuration and click Finish.
Lasso tool is closed and the report is opened in the internet browser.
Related Links:
• Welcome To Lasso
• Your Company Information
• Your Company Contacts
• Your Hardware Environment
• Storage Arrays
• Fibre Channel Switches
• Ethernet Switches
• Tape Libraries
• Attached Hosts
• Enclosures
• Management and Monitoring Software
• Device Collection
• Upload Collection
• Confirmation
Use Existing Configuration
Before using this option, make sure that a configuration is saved in the Lasso installation directory.
Loading configuration files from Lasso 3.8 and earlier may result in loss of some device authentication
NOTE:
information.
To use an existing configuration:
1. Click Start → Programs (or All Programs) → Dell
The
Welcome to Lasso
2. Select Use an existing configuration.
A drop-down box with the available configurations is displayed. A dialog box displays indicating that background
validation is in-progress.
3. Click Continue
A message requesting for password is displayed. Enter the password.
The Your Company Information window is displayed.
4. Edit the existing information or add new information. Perform the steps from 4 to step 11 mentioned in the Starting
New Configuration section.
window is displayed.
Lasso and click Lasso.
→
Loading Configuration File
Use this option if the configuration file is located in a directory other than the Lasso user profile directory.
19
Page 20

Loading configuration files from Lasso 3.8 and earlier may result in loss of some device authentication
NOTE:
information.
To load an existing configuration:
1. Click Start → Programs (or All Programs) → Dell → Lasso and click Lasso.
The Welcome to Lasso
2. Select Load a configuration file and click Browse. Specify the file and click Continue.
A dialog box displays indicating that background validation is in progress.
The Your Company Information window is displayed.
3. Edit the information or add new information. Perform the steps from 4 to step 11 mentioned in the Starting New
Configuration section.
window is displayed.
Upload Existing Collection
To upload an existing configuration:
1. Click Start → Programs (or All Programs) → Dell → Lasso and click Lasso.
The Welcome to Lasso
2. Select Upload an existing collection.
3. Select from the following geographical location:
– Europe, Middle East, or Asia
– All Other Countries
4. Select the Upload full collection
select the report to be uploaded.
For more information on the report formats, see
5. Select Authenticated Proxy
Enter the following details:
window is displayed.
option to upload the collection to Dell Technical Support site. Click Browse to
Generated File Formats.
option to upload the report using proxy.
– IP/Hostname — Enter the IP address or hostname of the proxy server (optional).
– Port — Enter the port number. Default port is 80.
– Username — Enter the user name (optional).
– Password — Enter the password (optional).
NOTE: IP/Hostname information is mandatory, if the port used is other than the default.
6. Click Continue
A message is displayed indicating that uploading to Dell is in-progress.
7. Click Finish
.
when the confirmation message is displayed to close the tool.
Lasso GUI — Fields And Descriptions
This section provides information about the fields that are available in the Lasso Graphical User Interface (GUI)
windows:
• Welcome To Lasso
• Your Company Information
• Your Company Contacts
• Your Hardware Environment
20
Page 21

• Storage Arrays
• Fibre Channel Switches
• Ethernet Switches
• Tape Libraries
• Attached Hosts
• Enclosures
• Management and Monitoring Software
• Device Collection
• Upload Collection
• Confirmation
Welcome to Lasso
Use Lasso to collect configuration and diagnostics data for the storage devices in the SAN and upload the report to Dell
Technical Support site.
Select one of the following options and click Continue
Field Description
Start with a new configuration Select this option to start with a new configuration. Before
Use an existing configuration Select this option to use the configuration file saved in the
.
saving the configuration, if you navigate back to select
this option, then the configuration is lost.
Lasso installation directory. From the drop-down menu,
select the required configuration file.
Load a configuration file Select this option to use the configuration file saved in a
location other than the Lasso user profile directory.
Click Browse
Upload an existing collection Select this option to upload the collected information from
the SAN to Dell Technical Support.
Select your geographic location from the following
options:
• Europe, Middle East, or Asia
• All Other Countries
Select Upload full collection option to upload the
collection to Dell Technical Support site. Click
select the report to be uploaded.
Select Authenticated Proxy
using proxy. Specify the following proxy details:
• IP/ hostname
• Port number
• Username
to load the configuration file.
If the configuration file has array attached
NOTE:
Windows-based hosts, a background validation
process is automatically run for a few seconds using
the host credentials that is locally cached.
Browse to
option to upload the collection
21
Page 22

Field Description
• Password
NOTE: IP/Hostname is mandatory, if the port used is
other than default.
Your Company Information
In this page, provide your company information, Dell Technical Support information, and click Continue.
Fields with an asterisk are mandatory.
NOTE:
Select the Enable Sensitive Data Filtering option to exclude Customer Identification Information (CII) from the report.
NOTE:
If this option is selected, only Company Name is mandatory.
Click the Learn More
link to display the list of sensitive data that is filtered.
Company Information
Field Description
Company Name Enter your company information.
Installation Address Enter SAN location address.
City Enter the name of the city where the company is located.
Postal Code Enter the postal code of the city where the company is
located.
Region From the drop-down menu, select one of the following
regions:
• North America
• EMEA
• APJ
• Latin America
Country From the drop-down menu, select the country where the
company is located.
Sub Region/State Enter the sub-region or state where the company is
located.
Dell Technical Support Information
Field Description
Case Number Enter service request number. This is optional
Dell PM Mail ID Enter Dell PM email ID. This is optional.
Click Previous to display the
22
Welcome to Lasso page.
Page 23

Your Company Contacts
In this page, provide the company contact details, edit the contact details, and click Continue.
Fields with an asterisk are mandatory.
NOTE:
Your Company Contacts
To edit the information of the company contact, click Edit
click Update Contact to save the updates. Else, click Cancel.
To remove a contact, click Delete
Contact information for <contact name>?” to remove. Else, click No.
available next to the contact. Click Yes in the “Do you wish to delete the Customer
Edit Contact Information
Field Description
Name Enter the company contact name.
Title Enter the designation of the contact.
Email Address Enter the E-mail address of the contact.
Primary Phone Number Enter the primary phone number of the contact. Select the
Secondary Phone Number Enter the secondary phone number of the contact. Select
available next to the contact. Update the required fields and
type of phone number entered from the drop down list.
the type of phone number entered from the drop down list.
Click Save New Contact to save the entered information. Else, click Cancel
Company Contacts section.
Click Previous to display the
Your Company Information page.
. The saved contact is displayed in the Your
Your Hardware Environment
In this page, select the type of devices in your SAN environment for Lasso to collect the data and click Continue.
Field Description
Storage Arrays Select this option to collect data for the storage arrays.
Fibre Channel Switches Select this option to collect data for the fibre channel
switches.
Ethernet & FCoE Switches Select this option to collect data for the ethernet and FCoE
switches.
Tape Libraries Select this option to collect data for the tape libraries.
Attached Hosts Select this option to collect data for the attached hosts.
Enclosures Select this option to collect data for the enclosure(s).
Management & Monitoring Software Select this option to collect data for the management and
monitoring software.
To collect more details, the required device page is displayed for each selected device.
23
Page 24
If previous configuration of Lasso is used and you want to add a specific device, then select the required device option.
If you remove an already selected device, then “ The option you have selected will result in all <type of devices> being
removed from the configuration. Do you wish to continue?” message is displayed. Click Yes
click No.
Click Previous to display the Your Company Contacts page.
to remove the device. Else,
Your Hardware Environment: Storage Arrays
In this page, select the type of storage array(s) in your SAN environment, enter the details, and click Continue.
Storage Arrays in your environment
Clicking the image next to the Storage Array provides the validation status. If validation is successful,
image is displayed. Else, image is displayed.
To edit the selected storage array, click Edit
Update Storage Array to save the updates. Else, click Cancel.
To delete a Storage Array, click Delete available next to the array.
To verify the storage array(s) from the existing user configuration, select the required storage array(s) and click
Revalidate Selected Storage Arrays.
Add/Modify Storage Array information
To add or modify the storage array, select the type of storage from the drop down list and enter information in the
required fields. Click Save New Storage Array
Arrays in your environment section and the validation starts for the saved array.
available next to the Storage Array. Update the required fields and click
to save. Else, click Cancel
. The saved array(s) is displayed in the Storage
Field Description
Type of Storage Array Select from the following type of Storage Array(s):
• Celerra
• CLARiiON
• EqualLogic
• EQL FluidFS NAS
• MD Series
• PV FluidFS NAS
Celerra Enter the details for the following fields:
• CS IP/Hostname
• Username
• Password
CLARiiON Enter the details for the following fields:
• SPA IP/Hostname
• SPB IP/Hostname
• Username
• Password
24
Page 25

Field Description
• Discover Array Attached Hosts- This option is
selected by default. if the
is selected in the Your Hardware Environment
page.
When this option is selected and if the user
credentials match with the discovered Windows
host, then the login credentials of the host is not
required. Lasso automatically validates the
credentials.
EqualLogic Enter the details for the following fields:
• Group/Mgmt IP
• Community String
• Username
• Password
• Gather Diagnostic Data — Select this option to
gather diagnostic data. If this option is selected,
then login credentials are required.
EQL FluidFS NAS Enter the details for the following fields:
• Management IP
• Username
• Password
MD Series Enter the details for the following fields:
Attached Hosts device
• RAID Ctrl Mgmt 0 IP
• RAID Ctrl Mgmt 1 IP
PV FluidFS NAS Enter the details for the following fields:
• Management IP
• Username
• Password
Save as the default Username & Password for additional
arrays
Use this as the default storage array type Select this option for the selected storage array to be the
Click Previous to display the
Your Hardware Environment page.
Select this option to save the user name and password
authentication information as default for the included
arrays.
This option is disabled when MD Series type is
NOTE:
selected.
default type.
Your Hardware Environment: Fibre Channel Switches
In this page, select the type of fiber channel switch(es) in your SAN environment, enter the details, and click Continue.
25
Page 26
Switches in your environment
Clicking the image next to the switch provides the validation status. If validation is successful, image is
displayed. Else,
To edit the selected Fibre Channel Switch, click
Update Switch to save the updates. Else, click Cancel.
To delete a Fibre Channel Switch, click Delete
To verify the Fibre Channel Switch(es) from the existing user configuration, select the required switch(es) and click
Revalidate Selected Fibre Channel Switches
image is displayed.
Edit
available next to the switch. Update the required fields and click
available next to the switch(es).
.
Add/Modify Switch Information
To add or modify the switch information, select the type of switch from the drop down list and enter the data in the
required fields. Click Save New Switch to save, display the information in the Switches in your environment
start validation of the switch. Else, click Cancel.
Field Description
Type of Switch Select from the following type of switch(es):
• Brocade
• Cisco
• McData
• McDataBlade
IP/Hostname Enter the IP address or host name of the selected type of
switch.
Username Enter the user name .
section, and
Password Enter the password .
Use this as the default switch type Select this option to make the selected type of switch as
the default.
Save as the default Username & Password for additional
switches
Click Previous
to display the Your Hardware Environment page.
Select this option to save the user name and password
authentication information as default for all the switches
of the same type.
Your Hardware Environment: Ethernet Switches
In this page, select the type of Ethernet Switches in your SAN environment, enter the details, and click Continue.
Switches in your environment
Clicking the image next to the Ethernet Switch provides the validation status. If validation is successful,
image is displayed. Else, image is displayed.
26
Page 27

To edit the selected Ethernet Switch, click Edit available next to the Ethernet Switch. Update the required fields and click
Update Switch to save the updates. Else, click
To delete a Ethernet Switch, click Delete available next to the Ethernet Switch.
To verify Ethernet Switch(es) from the existing user configuration, select the required switch(es), and click
Selected Ethernet Switches.
Cancel.
Revalidate
Add/Modify Ethernet Switch information
To add or modify Ethernet Switch information, select the type of Ethernet Switch from the drop down list and enter the
data in the required fields. Click Save New Ethernet Switch to save, display the information in the
environment section, and start validation of the Ethernet Switch. Else, click Cancel.
Field Description
Type of Ethernet Switch Select from the following type of Ethernet Switch(es):
• Cisco Ethernet
• Cisco FCoE
• PowerConnect — Select this for all types of
PowerConnect Ethernet, B8000, and M8428K
switches.
• Brocade Ethernet — Select this for the Brocade
B-Series switches.
• Force10
IP/hostname Enter the IP address or the host name of the switch.
Username Enter the user name for the IP address or host name.
Switches in your
Password Enter the password.
Enable Password Enter the password.
Use this as the default Ethernet switch type Select this option to make the selected type of ethernet
switch as the default.
Save as the default Username & Password for additional
Ethernet switches
NOTE: Username
Switches.
Click Previous to display the Your Hardware Environment page.
Password, and Enable Password credentials are optional for Cisco Ethernet type of Ethernet
,
Select this option to save the user name and password
authentication as default for additional ethernet switches.
Your Hardware Environment: Tape Libraries
In this page, select the type of Tape Library in your SAN environment, enter the details, and click Continue.
Tape Libraries in your environment
Clicking the image next to the Tape Library provides the validation status. If validation is successful,
image is displayed. Else, image is displayed.
To edit the selected Tape Library, click Edit available next to the Tape Library. Update the required fields and click
Update Tape Library to save the updates. Else, click Cancel.
27
Page 28

To delete a Tape Library, click Delete
To verify the tape devices from the existing user configuration, select the tape device and select Revalidate Selected
Tape Libraries option.
available next to the tape library.
Add/Modify Tape Library Information
To add or modify Tape Library information, select the type of Tape Library from the drop down list and enter the data in
the required fields. Click
environment
Field Description
Type of Tape Library Select from the following type of Tape Library(s):
IP/hostname Enter the IP address or the host name for the selected
Username Enter the user name.
Password Enter the password.
section, and start validation of the Tape Library. Else, click Cancel.
Save New Tape Library to save, display the information in the Tape Libraries in your
• ML6000
• PV132T
• PV136T
• TL2000
• TL4000
type of Tape Library.
Save as the default Username & Password for additional
Tape Libraries
Only IP address or host name is required for TL2000 and TL 4000.
NOTE:
NOTE:
Only IP address or host name and password required for ML6000.
Click Previous
to display the Your Hardware Environment page.
Select this option to save the user name and password
authentication information as default for additional Tape
Libraries.
Your Hardware Environment: Hosts
In this page, select the type of host operating system in your SAN environment, enter the details, and click Continue.
Hosts in your environment
Clicking the
displayed. Else,
To edit the selected host operating system, click Edit
Update Host to save the updates. Else, click Cancel.
To delete a host operating system, click Delete available next to the host.
To verify the hosts attached to storage arrays from the existing user configuration, select the hosts and click Revalidate
Selected Hosts.
image next to the host provides the validation status. If validation is successful, image is
image is displayed.
available next to the host. Update the required fields and click
28
Page 29

Add/Modify Host information
To add or modify host information, select the type of host operating system from the drop down list and enter the data in
the required fields. Click Save New Host to save, display the information in the Hosts in your environment section, and
start validation of the host. Else, click
Field Description
Type of Host OS Select from the following Type of Host OS:
IP/hostname Enter the IP address or the host name for the selected
Username Enter the user name.
Password Enter the password.
Root Password Enter the root password.
Type of Storage Array Select from the following type of Storage Array(s):
Cancel
.
• AIX
• HP-UX
• Linux
• Solaris
• VMware
• Windows
type of host operating system.
• Celerra
• CLARiiON
• EqualLogic
• MD Series
• Compellent
When a storage array is selected, then the array
information related to the selected host OS is collected.
Use this as the default host type Select this option to save the selected host type as the
default.
All of the hosts on my SAN can be accessed with this
Username & Password
Domain This field is displayed when the selected type of host OS is
Sudo User with admin rights The option is displayed when the host type VMware
Collect advance logs The option is displayed when the host type VMware
Select this option if the user name and password is the
same for all the hosts in your SAN environment.
Windows. Enter the domain information.
or
Linux and the storage array type EqualLogic, MD Series,
or Compellent is selected.
Select this option to collect the data using Sudo user
credentials.
Enter the root password if the Sudo user is set for target
password.
and
the storage array type EqualLogic, MD Series, or
29
Page 30

Field Description
Compellent is selected. Select this option to collect
additional log information.
Click Previous
to display the Your Hardware Environment page.
Your Hardware Environment: Enclosures
In this page, enter the details for the selected type of Enclosure in your SAN environment and click Continue.
Enclosures in your environment
Clicking the image next to the enclosure provides the validation status. If validation is successful, image
is displayed. Else,
To edit the selected enclosure, click Edit available next to the enclosure. Update the required fields and click Update
Enclosure to save the updates. Else, click Cancel
To delete, click Delete available next to the enclosure(s).
Add/Modify Enclosure information
To add or modify the enclosure information, enter the data in the required fields for the selected type of enclosure. Click
Save New Enclosure
of the enclosure. Else, click
Field Description
Type of Enclosure M1000e — This type of enclosure is selected by default.
image is displayed.
.
to save, display the information in the Enclosures in your environment section, and start validation
Cancel.
IP/Hostname Enter the IP address or host name of the selected type of
enclosure.
Username Enter the user name.
Password Enter the password.
Save as the default Username & Password for additional
Enclosures
Click Previous
to display the Your Hardware Environment page.
Select this option to save the user name and password
authentication information for all the enclosures.
Your Hardware Environment: Management & Monitoring Software
In this page, enter the details for the selected type of software in your SAN environment and click Continue
Management & Monitoring Software in your environment
Clicking the image next to the software provides the validation status. If validation is successful, image is
displayed. Else, image is displayed.
30
.
Page 31

To edit the selected software, click Edit available next to the software. Update the required fields and click Update
Software
To delete a software, click Delete available next to the software(s).
To verify the software(s) from the existing user configuration, select the required software(s) and click Revalidate
Selected Management & Monitoring Software.
to save the updates. Else, click Cancel.
Add/Modify Management & Monitoring Software Information
To add or modify the software information, enter the data in the required fields for the selected type of software. Click
Save New Software
section, and start validation of the software. Else, click
Field Description
Type of Software HIT Kit for VMware — This type is selected by default.
IP/hostname Enter the IP address or host name of the selected type of
Username Enter the user name .
Password Enter the password .
Collect ASM/VE logs Select this option to collect the ASM/VE logs for VMware.
to save, display the information in the Management & Monitoring Software in your environment
Cancel.
software.
Save as the default Username & Password for additional
Software
Click Previous
to display the Your Hardware Environment page.
Select this option to save the user name and password
authentication information as default for the software.
Device Collection
This page displays all the selected types of devices. The validated device has image next to the device name.
The devices that failed validation has
remove from the list.
Validation of device is necessary for collection to be completed.
NOTE:
To validate the device before collection, click Edit next to the device. In the displayed device page, edit the details and
re-validate the device. Click the
To delete a device, click Edit
After all the devices are verified and validated, click Start Collection to start the collection. Click the image to
check the status of the collection.
Click Cancel Collection to cancel the collection.
Click Continue to parse the data and generate XML and HTML output. The generated files are added to the original
collection .zip file. The data that is uploaded to the Dell Technical Support site is encrypted.
next to the device. In the displayed device page, click Delete available next to the device.
image next to the device name. You can either re-validate these devices or
image next to the device to check the validation status.
31
Page 32

Upload
Use this page to upload the collected files to Dell Technical Support site.
To upload the collected files, the options are:
Options Description
Open Location Click to open the location where the collected files are
saved.
Upload Full Collection Select this option to automatically upload the collection
files to Dell Technical Support site.
NOTE:
If this option is selected, the zip.gpg file is
uploaded.
Authenticated Proxy Select this option to upload the collection files to Dell
Technical Support site using proxy.
IP/Hostname Enter the IP address or hostname.
Port number Enter the port information.
Username Enter the user name.
Password Enter the password.
Select Yes
file to Dell Technical Support site. Else, select No.
In the “Lasso can save your usernames and passwords in an encrypted password vault for future re-use. If the
password vault is not used, no usernames or passwords will be saved and will require re-entry to run the Lasso
collection again. Would you like to save it?”, select Yes to save. Else, select No. If saved, the vault is secured as a local
file in the %USERPROFILE%\Dell\Lasso directory.
Click Continue
in the “Would you like to automatically upload the collection package to Dell?” to automatically upload the
NOTE: The extent of information saved depends on the security level selected during the installation of Lasso.
to upload the file. The Confirmation page is displayed.
Confirmation
This page displays the status of the file upload.
is selected in the Upload page, instructions to upload the collection is displayed.
If No
To view the HTML file created during parsing the data, select the View your SAN Configuration
open the report.
option. Click Finish to
Log Files
The following log files are generated when using Lasso:
• Validate.log — When devices are validated.
• Collect.log — When data is collected.
The validation log file <DeviceCategory>_<DeviceType>_<IP>_validate.log is available at %USERPROFILE%\Dell\Lasso
location.
\logs\
32
Page 33

The collection log file <DeviceCategory>_<DeviceType>_<IP>_validate.log
\logs\ location.
The device log file for Lasso is available at %USERPROFILE%\Dell\Lasso\logs\ location and the Lasso user interface log
file is available at %USERPROFILE%\ Dell\ Lasso\ lasso.log location.
is available at %USERPROFILE%\Dell\Lasso
Generated File Formats
Lasso generates raw data files, TXT, XML, and HTML files:
• Raw Data Files — Lasso generates two types of raw data files:
– Raw data file with a .zip extension.
– Encrypted raw data file with a .gpg extension.
• TXT files — Lasso generates
• XML and HTML files — Lasso parses the data collected into XML and HTML files.
The XML files are:
– An XML output file with an .xml extension.
– An encrypted XML output file with a .gpg extension.
The HTML files are:
– A HTML output file called SANconfiguration.html.
.txt file that contains the logs.
To access the XML and HTML files, go to USERPROFILE%\Dell\Lasso\results
directory.
Viewing Reports
To view the report, perform any of the following:
• After Lasso collects the information, on the Confirmation page select View Your SAN Configuration option and
• Open the files that are saved at the default location c:\Users\<username>\Dell\Lasso\results\ or in the specified
Finish. Lasso tool is closed and the report is opened in the internet browser.
click
location. For information about the file formats, see Generated File Formats.
33
Page 34

34
Page 35

5
Manual Collection
If you are not able to collect data using Lasso GUI, then you can manually collect the data. To perform manual collection,
login to the required device and run the device specific commands. You can manually collect data for the following
devices:
• Storage Arrays
• Fibre Channel Switches
• Ethernet and FCoE Switches
• Tape Libraries
• Attached Hosts
• Enclosures
• Management and Monitoring Software
Manually Collecting Data For Storage Arrays
You can collect the information for the following types of Storage Arrays:
• Celerra
• CLARiiON
• MD Series
• EqualLogic
• EQL FluidFS NAS
• PV FluidFS NAS
Manually Collecting Data For Celerra Device
Make sure that the following environment variables are set:.
• NAS_DB=/nas
• export NAS_DB
• PATH=$PATH:$NAS_DB/bin
• export PATH
To collect Celerra device information manually:
1. Using SSH, login to Celerra device as a root user.
2. Run the following command:
/nas/tools/collect_support_materials
The server and event log collection file (support_materials*.zip) is generated in the
3. Run the following command:
/nas/tools/.get_spcollect
/nas/var/emcsupport/ directory.
35
Page 36

The raid group, volume access, host LUNs, storage groups and SP ports collection file (SPCOLLECT.zip) is
generated in the /nas/var/log/ directory.
4. Run the following command:
/nas/sbin/log_config -d
The collection file (log_config*.gz
additional information and used for troubleshooting purposes.
The log_config -d command is functional only if you log in as root user to the Celerra device.
NOTE:
) is generated in the /nas/var/log/ directory. The file includes array related
Manually Collecting Data For CLARiiON Device
Before manually collecting, make sure that the following prerequisites are met:
• Navisphere CLI is installed on your system. By default, it is installed at %SystemDrive%\Program Files\EMC
\Navisphere CLI location, but may differ depending on the system.
NOTE:
Navisphere CLI is installed during Lasso installation.
• Path of the Navisphere CLI is set to InstallDir\bin\NavisphereCLI
To collect the information for CLARiiON manually:
1. Determine the agent revision version using one of the following commands:
– navicli -h SPAIPAddress/SPBIPAddress getagent
– naviseccli -user <username> -password <password> -scope 0 -h
SPAIPAddress/SPBIPAddress getagent
The version 6.x, where x is the release version of Navisphere CLI, is displayed.
2. Get SPcollect by using the following command.
– For releases 19 and later:
naviseccli -user <username> -password <password> -scope 0 -h
SPAIPAddress/SPBIPAdress spcollect
– For releases 6 to 18:
navicli -h SPAIPAddress/SPBIPAdress spcollect -messner
– For releases earlier than 6, Lasso does not support validation or collection .
3. Check the progress of SPcollect using the following command:
before executing the commands.
– For releases 19 and later:
naviseccli -user <username> -password <password> -scope 0 -h
SPAIPAddress/SPBIPAddress managefiles -list
– For releases 6 to 18:
navicli -h SPAIPAddress/SPBIPAddress managefiles -list
This command lists *data.zip
initially creates *_runlog.txt file, that gets listed when this command is executed. Continue to check the progress of
the SPCollect (using this command) until *_runlog.txt is deleted and corresponding
Copy the created *data.zip file to the current working directory using one of the following commands:
– For releases 19 and later:
naviseccli -user <username> -password <password> -scope 0 -h
SPAIPAddress/SPBIPAddress managefiles -retrieve -file <*data.zip>
36
files, where * is the current system date on the array. The command spcollect
*data.zip file is created.
Page 37

– For releases 6 to 18:
navicli -h SPAIPAddress/SPBIPAddress managefiles -retrieve -file
<*data.zip>
4. Capture resume data using the following command:
– For releases 19 and later:
naviseccli -user <username> -password <password> -scope 0 -h
SPAIPAddress/SPBIPAddress getresume > ./SPIPAddress.resume.txt
– For releases 6 to 18:
navicli -h SPAIPAddress/SPBIPAddress getresume > ./
SPIPAddress.resume.txt
This command copies the *resume.txt file to current working directory.
You may need to connect using Navisphere Manager and use the web GUI to collect the SPCollect. To do this,
connect to the SP using the IP Address in the web browser. Right-click on the SP and select SPCollect. Use the File
Transfer Manager
NOTE:
directory and increase the polls to be allowed. Example: total.polls.allowed = 70 which is 50 by
default.
to transfer the SPCollect to the system.
When the collection of a Storage Array times out, go to the SAC.properties file in the installation
Manually Collecting Data For MDSeries Device
To collect information for MD Series device manually:
1. Make sure that ModularDiskStorageManager (MDSM) software is installed on the system. By default, it is installed
in %SystemDrive%:\Program Files\Dell\MD Storage Manager\client\ location, but may differ depending on the
system.
2. Make sure that the path of MDSM software is set before executing the commands.
3. Run the following command:
SMcli -c "show storagearray profile;" <IPAddress of MD Array> >
<USERPROFILE Dir>\Results\Hostname.txt
The Hostname.txt
NOTE:
file in the InstallDir and change or increase the timeout value.
Example:
4. Run the following command: SMcli.exe -c "save storageArray SupportData file=
\"<USERPROFILE Dir>\Results\Hostname.zip\";"<IP Address of MD Array> to save the
Hostname.zip
file is generated at <USERPROFILE Dir>\Results\ location.
When the validation or collection operation of a Storage Array times out, go to the DasArray.properties
– mdseries.timeout.value.collection = 200000 which is 120000 by default
– mdseries.timeout.value.collection = 60000 which is 60000 by default
file at the
<USERPROFILE Dir>\Results\ location.
Manually Collecting Data For EqualLogic Device
To collect information for EqualLogic device manually:
1. Open a SSH session on the array.
2. Capture the output for each of the following commands to a .txt file.
37
Page 38

– show - Provides high level information for the members, groups, volumes, pools, replication , and so on for
the array. This information is required to run the following commands:
* member show – Lists the number of members in the array group, their version, status, and so on.
* member select <MEMBERNAME> show – Lists network information for the respective
member.
* member select <MEMBERNAME> show controllers – Lists controller information for
the respective member.
* member select <MEMBERNAME> show disks – Lists disk information for the respective
member.
– grpparams show — Lists all group related information.
– volume select <VOLUMENAME> show — Lists information for the corresponding volume, whose
name is specified as part of the command.
– volume select <VOLUMENAME> show connections — Displays the connections and allows
you to know the connection of the volume to the related initiator, its connection uptime and other details.
– diags “-b —n”— Collects the diagnostics information.
Manually Collecting Data For PowerVault Or EqualLogic FluidFS NAS Device
To collect information for PowerVault or EqualLogic FluidFS NAS device manually:
1. For PowerVault FluidFS NAS device, log in to PV FluidFS NAS and for EqualLogic FluidFS NAS device, log in to EQL
FluidFS NAS using root privilege through SSH.
2. Run the command diag start GeneralSystemDiagnostic.
The output file is generated in the FTP site at ftp://<IPaddress>:44421 location.
3. In Windows Explorer window, type ftp://<username>@<IPaddress>:44421. For example, ftp://
admin@10.10.25.21:44421
4. Enter the password when prompted.
The contents of the ftp site is displayed. You can access the collection file (*.tar.gz) in the diagnostics/archive/
results__diagnostic. GeneralSystemDiagnostic _XXXX (timestamp) directory.
Example of a collection file:
.
diagnostic.GeneralSystemDiagnostic.25_07_2011-06_42_09.tar.gz
NOTE:
On SAN consisting of many devices, you may need to increase the time out value. By default, time out
value for this device is 15 minutes. You can modify the value nas.timeout.value (in milliseconds) in the
NAS.properties file available in the Lasso install directory.
Manually Collecting Data For Attached Hosts
You can collect the information manually for the following Attached Hosts:
• Windows
• Unix
• VMware
Manually Collecting Data For Windows OS
You can manually collect the information for the following:
• EMC SAN
• EqualLogic SAN
38
Page 39

• MDSeries
• CLARiiON
• Celerra
• Compellent
You can configure time out for Windows attached hosts using winhc.properties file. The default property
NOTE:
value is 15 minutes. Set the property for the following types of devices as:
• Compellent, MD Series, and EqualLogic — whc.eql.timeout.value = 1800000
• CLARiiON and Celerra — whc.emc.timeout.value = 900000
Collecting Storage Device Information From Windows OS For EMC SAN
1. Copy the appropriate EMCReport.exe file from the <LassoInstallDir>\bin\ to the target Windows system. The default
Lasso installation directory is
For 32–bit and 64–bit operating systems use Emcrpts_x86_v36.exe.
NOTE:
2. Log in as an administrator to the target Windows system.
3. Run the
The output .zip file is generated in %SystemRoot%\EMCReports\Collection\zip\ directory.
.exe
file.
%Systemdrive%\Program Files\Dell\Lasso\.
Collecting Storage Device Information From Windows OS For EqualLogic SAN
1. Log in as administrator to the target Windows system.
:
For 32–bit and 64–bit operating systems use DellCollector.exe. Before running Dellcollector.exe, make
NOTE
sure that the Windows Management Instrumentation (WMI) service is running.
2. Copy the
Windows system. The files can be found in the Lasso installation directory in the \Dell\Lasso\Bin\ location.
3. Run the
The output .zip
ICSharpCode.SharpZipLib.dll and DellCollector.exe
file.
.exe
file is generated in <SystemRoot>\DellCollector\Collection\zip\ directory.
files from the <LassoInstallDir>\bin\ folder to the target
Collecting Storage Device Information For UNIX OS
1. Using any secure ftp client (example: scp), copy the appropriate EMCGrab from the <LassoInstallDir>\Bin directory
to the target UNIX system. By default, the Lasso installation directory is <SystemDrive>\Dell\Lasso\Bin\.
2. Log in to the target UNIX system using root privilege through SSH.
NOTE:
Use dual mode authentication if SSH is not enabled for root.
3. Untar the script: tar xvf emcgrab*.tar
4. Run EMCGrab: /emcgrab.sh -autoexec
5. Accept the license agreement.
The output file is generated in /tmp/emcgrab/outputs/ directory and you can copy it to the local system using the
secure ftp client.
When the collection operation of host times out, go to the UnixHC.properties file in the installation
NOTE:
directory and change or increase the time out value. Example: hc.timeout.value = 3600000 which
is 1800000 by default.
Automating Service Tag Collection On Linux OS
1. Copy the sysreport
2. Change the file access permission to r-x
utility to the remote system.
(read and executable) for root.
39
Page 40

3. Log in to the remote system to collect the service tag with sysreport | grep Service Tag and include it in the
%USERPROFILE%\Dell\Lasso\results\[timestamp]\Host_Linux_IPAddress.svctag.txt
file.
Collecting Storage Device Information For VMware (ESX/ESXi OS)
1. Log in to the VMware server using root privilege through SSH
2. Run the following command:
vm-support -n
The output file is saved in the /root/
3. Copy the output file to the local system using any secure ftp client.
When the collection operation of host times out, go to the UnixHC.properties file in the InstallDir and
NOTE:
change or increase the time out value. Example: hc.timeout.value = 3600000 which is 1800000 by
default.
directory.
Manually Collecting Data For Tape Library Device
You can collect information for the following tape library devices using Lasso:
• PV136T
• PV132T
• TL2000
• TL4000
• ML6000
Manually Collecting Data For PV136T, PV132T, TL2000, And TL4000 Tape Library Device
1. Connect to the tape library using:
telnet -f Lasso\Results\hostname.txt <hostname or IP address>
NOTE:
On Windows 2000, use HyperTerminal and manually capture your telnet session.
2. Run the commands specific to the type of tape library:
– For PV132T or PV136T — supportDump or loggerDump
– For TL2000 or TL4000 — dumpall
Determining Service Port IP For ML6000 Data Collection
To determine service port IP:
1. Navigate to GUI panel of ML6000 library.
2. Log in to the web client. Enter the credentials
3. In the home page, click the
4. Select the Network Management
5. Select the IP version 4 and click Next.
If the tape library is already assigned to a IP, the IP address is displayed. If not, assign a static or DHCP IP to the tape
library. The displayed IP address is called the Service Port IP.
40
tab available in the tool bar.
setup
option.
admin
for username and
password
for password.
Page 41

Collecting Logs Manually For ML6000 Device
To manually collect logs:
ilinkacc
1. Connect to the Service port IP address of ML6000 using SSH (putty), and providing the credentials
name and
2. Run the command cat/proc/net/arp and get the I/O mode IP address (The IP other than default gateway).
3. Add Telnet to one of the I.O.Module IP addresses by running the command "telnet" <I.O.Module IP>
4. Run the command supportDump.
Logs collected using the option
obtained by running the command supportDump.
From this super set, to locate the
files and the snap.gz
contains the same information as the one when you run the command supportDump.
password
for password.
Capture Snapshot gathers log files from the library are a super set of the logs
supportDumpinformation, save the super set to the local folder. Extract the log
file located in \var\ log\ < vendor_name>\ < IO_Module_name> \ . Locate the file snap. This file
for user
Collecting Logs Using Web Client
To collect logs using web client:
1. Connect to the IPAddress of ML6000 in the web browser.
2. Log in using admin user credentials and navigate to Tools → Capture SnapShot .
3. Select the Download the file using the browser option and click Apply
After the snapshot is captured, a popup window is displayed to save the snapshot (.tar)
.
Manually Collecting Data For Ethernet and FCoE Switches
To collect information for switches:
1. Connect to the switch using Telnet:
telnet -f %USERPROFILE%\Dell\Lasso\results\hostname.txt hostname
On Windows 2000, use HyperTerminal and manually capture the telnet session.
NOTE:
2. After logging in, enter the command relevant to the type of switch.
– PowerConnect B-Series, Brocade B-Series, and M8428K:
* To run the commands, see List Of Commands For PowerConnect B-Series, Brocade B-Series, and
M8428K
– PowerConnect Ethernet:
* To run the commands, see List Of Commands For PowerConnect Ethernet
– Cisco Ethernet:
* terminal length 0
* To run the commands, see List Of Commands For Cisco Ethernet
– Cisco FCoE:
* terminal length 0
* show startup-config
41
Page 42

* To run the sub-commands, see List Of Commands For Cisco FCoE
Manually Collecting Data For Cisco Ethernet Device
To collect for Cisco Ethernet manually:
1. Log in to Cisco Ethernet switch through telnet.
2. Run the following command to enter the required mode: .
– Exec — enable
– Configuration — config
3. For CEE information, run the command do show tech-support .
4. Capture the console output
NOTE: On a SAN consisting of many Cisco Ethernet switches, you may need to increase the time out value. By
default, the time out value for these switches is 3 minutes (in milliseconds). This value (
can be modified in the file ESC.properties located in the Lasso install directory.
Manually Collecting Data For Cisco FCoE Device
Lasso provides support to Nexus 5020 FCoE switch.
To collect manually:
1. Login to Cisco FCoE switch through telnet
2. Run the command config
3. Run the following commands
.
ciscoethernet.timeout
)
– show port-channel summary
– show hostname
– show version
– show running-config
– show environment
– show module
– show policy-map
– show spanning-tree
– show switchname
– show system uptime
– show system resources
– show vpc
– show vlan
– show clock
– show feature
– show fex
– show fex detail
– show hardware internal cpu-mac mgmt stats
– show interface
– show interface brief
42
Page 43

– show interface fex-fabric
– show interface transceiver
– show interface flowcontrol
– show interface priority-flow-control
– show interface switchport
– show interface trunk
– show interface description
– show interface status
– show inventory
– show lldp neighbors
– show mac-list
– show mac-address-table
– show class-map
– show license usage
– show lacp neighbor
– show lacp port-channel
– show port-channel capacity
– show port-channel load-balance
– show port-channel usage
– show port-channel traffic
– show queuing interface
– show system internal ethpm info all
4. For CEE information, run the command do show tech-support
5. Capture the console output
On SAN having many Cisco FCoE switches, you may need to increase the time out value. By default, the
NOTE:
time out value for these switches is five minutes (in milliseconds). This value (
modified in the file ESC.properties located in the Lasso install directory.
ciscofcoe.timeout
) can be
Manually Collecting Data For PowerConnect, Brocade B-Series, And M8428K Devices
To collect data for PowerConnect B-Series manually:
1. Log in to Power Connect B-Series FCoE switch through telnet
2. Run the command supportShow to display FC information.
3. To display CEE information, run the command show tech-support.
If the command fails, in the case of older switch firmware, then run the following commands:
– show running-config
– show startup-config
– show system
–
show version
– show vlan brief
– show media
– show lldp
– show lldp neighbors
43
Page 44

– show interface
– show interface switchport
– show port-channel
– show mac-address-table
– show spanning-tree brief
– show spanning-tree
– show cee maps
– show vlan fcoe
– show ip interface brief
– show interface switchport
– show lldp statictics
– show port-channel summary
– show mac-address-table count
– show spanning-tree mst brief
– show qos rcv-queue multicast all
– show qos interface all
– show fcoe-map
– fos switchshow
– fos cfgshow
– fos zoneshow
– chassisshow
4. Capture the console output .
NOTE:
On SAN having many PowerConnect B-Series switches, you need to increase the time out value. By
default, time out value for these switches is 12 minutes (in milliseconds). This value (
series.timeout
) can be modified in the file ESC.properties located in the Lasso install directory.
powerconnectb-
Manually Collecting Data For PowerConnect Ethernet And M8428K Device
To collect information for PowerConnect Ethernet manually:
1. Log in to Power Connect Ethernet switch through Telnet.
2. Run the command show tech-support to display CEE information. If the command fails, in the case of older
switch firmware, then run the following commands
– show running
– show vlan
– show spanning-tree
– show interfaces configuration
– show interfaces status
– show interface port-channel
– show system id
– show stack-port
– show storm-control
– show storm-control all
– show system
44
Page 45

– show system flowcontrol
– show version
– show switch
– show arp
– show bridge address-table
– show mac address-table
– show port-aggregator vlan summary
– show port-aggregator port summary
– show switch stack-ports
3. Capture the console output
On SAN having many PowerConnect Ethernet switches, you may need to increase the time out value.
NOTE:
By default, time out value for these switches is 3 minutes (in milliseconds). This value
(
powerconnectethernet.timeout
directory.
) can be modified in the file ESC.properties located in the Lasso install
Manually Collecting Data For Switches
To collect information, connect to the switch using SSH or Telnet.
If you are using SSH, then:
1. Start putty and enter the hostname or IP address.
2. Enter Port as 22.
3. Select the protocol option as SSH and click Open.
4. In the displayed prompt, enter the login credentials to the switch.
If you are using Telnet to connect, then go to telnet -f %USERPROFILE%\Dell\Lasso\results
\hostname.txt hostname. Enter the commands relevant to the type of switch.
On Windows 2000, use HyperTerminal and manually capture your telnet session.
NOTE:
The commands to collect the data for the types of switches are:
– Brocade:
* supportShow
– McData:
* show all
* If this command fails, see List of commands
– McDataBlade:
* If the show allcommand fails. see List of commands
– Cisco:
* terminal length 0
* show running-config
* show flogi database
* show startup-config
45
Page 46

Manually Collecting Data For Brocade Device
To collect manually:
1. Log in to Brocade Fibre channel switch through SSH
2. Run the command supportShow.
3. Capture the console output
On SAN having many Brocade switches, you need to increase the default time out value of 3 minutes
NOTE:
(in milliseconds). This value (
install directory.
brocade.timeout
) can be modified in the FCSC.properties file located in the Lasso
Manually Collecting Data For Cisco Device
To collect manually:
1. Log in to Cisco Fibre channel switch through SSH
2. Run the commands
– do show running-config
– do show flogi database
– do show startup-config
– do show inventory
3. Capture the console output
Manually Collecting Data For McData Device
The following sub-commands are included in the show all command. In some older switch firmware, the
command may not work. In this case Lasso attempts a manual collection using the commands:
• show ip ethernet
• show system
• show switch
• show port config
• show frus
• show zoning
• show port state
• show port info
• show port technology
• show port exit
• show loginserver
• show feature
• show security portbinding
• show security switchbinding
• show openTrunking config
• show thresholdAlerts alerts
show all
46
Page 47

• show fabric topology
• show fabric nodes
Manually Collecting Data For McDataBlade Device
The following sub-commands are included in the show all command. In some older switch firmware, the show all
command may not work. In this case Lasso attempts a manual collection using these commands.
• show about
• show chassis
• show donor
• show interface
• show mem
• show perf
• show setup mfg
• show setup radius
• show setup services
• show setup snmp
• show setup system
• show version
• show config port
• show config switch
• show config zoning
• show fabric
• show topology
• show switch
• show domains
Manually Collecting Data For Enclosures — M1000e
Connect to the M1000e using SSH or Telnet to collect the data.
To collect manually:
1. Start putty and enter the hostname or IP address.
2. In the displayed prompt, enter the login credentials to the M1000e.
3. Run the command: racdump.
4. Capture the console output.
On SAN having many M1000e, you need to increase the default time out value of 5 minutes (in
NOTE:
milliseconds). This value (enclosure.timeout.value) can be modified in the Enclosure.properties file
located in the Lasso install directory.
Manually Collecting Data For HITKIT Appliance
To collect manually:
47
Page 48

1. Login to the HITKIT VM using root privilege through SSH.
2. Select the Diagnostics
List of items is displayed.
3. Select Gather support Information from the list of items.
The output file is saved in the CIFS share —
4. Run the command: net use \\<share IP>\database\USER:<share IP>\<username>
<password> to connect to the appliance from the local system.
5. Run the command: CMD /C MOVE /Y\\<share IP>\database\<logsfile.zip> “<User
selected path>” to copy the logs to the local system.
6. Run the command net use \\<share IP>\database /d to disconnect the appliance from the local
system.
option in the Hitkit VMware
\\<share IP>\database\<logsfile.zip> file.
Manually Uploading Data Collection To HTTPs Site
The Lasso Java user interface can be used to assist in manual upload of the Lasso collection to the https site.
Before uploading, click
To automatically upload the collection, select the Yes and Upload Full Collection options. Click
panel.
To manually upload the collection, use the following details:
Open Location to view the collection. The folder where the collection is saved is displayed.
Upload available in the
• HTTPS location:
• Contact Dell representative for the user name and password information.
NOTE
on the site is secured and are not downloadable from the server. Access to files is strictly limited to
authorized Dell personnel using a different tool. This site is a dropbox only.
https://dtxdropbox.dell.com
User name and password is case sensitive and active for 7 days for the web site. The files displayed
:
48
Page 49

6
Collecting Data Using CLI
Lasso is normally run from the shortcut that calls a batch file. This batch file launches the Java UI. Once the environment
is configured and validated, then Lasso Java UI calls individual scripts to automate the collections. The Java UI process
can be automated with Java CLI options.
To start Lasso using CLI, it requires JRE 1.6 or later installed in the system.
Create the configuration file using the GUI, before running Lasso using CLI.
Before running, make sure to set the java, Navisphere CLI and <LassoInstallDir> \ bin
installer.
path, if not already set by the
To start collection, run the following command from <LassoInstallDir> \ bin
java -jar lasso.jar <options>
Where options
• -Q — quiet mode; not using GUI. When this is not specified it will operate in normal GUI mode.
• -F<filename> — customer config xml file, absolute path
• -S#<Security Level> — device configuration and credentials
• -P<password> — required to unlock password vault
• -OF<Output Filename> — outPut file name for collection
• -IP<Internet Protocol> — IP address of the device
• -DT<Device Type>— device type
• -UN<UserName> — user name of the device
• -PD<Password> — password of the device
• -RP<RootPassword> — root password of the device
• -A — HitKit collection for Advanced mode
• -ST<Storage Array> — type of storage array
• -SU<SudoUser> — sudo user
• -D<DomainName> — domain name
• -UX — upload xml collection only
• -UZ — upload full collection
• -SECURED — securing CII information
• -deltaSR — delta service request number
• -PMMail — Dell PM mail id
• -GD — gather diagnostic data. Include this argument for EqualLogic collection to gather diagnostic data. The
value is False by default.
• -EP — enable password for Ethernet Switches. If the Ethernet switches are configured with enable password,
then –EP argument is mandatory in the command.
• -EFD — display advance user options
• -NS — avoid scanning devices
• -DEMO — operation in demo mode. No device calls
• DEBUG — all log entries to console
are:
path:
49
Page 50

• -PI<Proxy IP/Hostname> — proxy server's IP address or hostname
• -PN<Proxy Port number> — proxy server's port number
• -PU<Proxy Username> — proxy server's user name
• -PP<Proxy Password> — proxy server's password
NOTE: -UZ argument cannot be used when
While running Lasso in CLI mode, the -p<password> argument in the command is optional. When this argument is not
entered, the “Please enter the device password:” message is displayed. Enter the password to start the collection.
NOTE:
Authentication of proxy is optional. If proxy is entered, then IP address, port number, user name, and
password arguments are optional. If port number is not provided, then default port 80 is used. If proxy user name is
included and password is not included, then a prompt requesting for password is displayed. If port number is other
than default(80), then IP address is mandatory.
Following are examples of the commands to run lasso:
• The command to run Lasso: java -jar lasso.jar -Q -F<absolute path of customer
config XML file> -P<Password to unlock config XML file>
• The command to run with secure site option: java -jar lasso.jar -Q -F<absolute path of
customer config XML file> —P<Password to unlock config XML file> —S#
<security level> -SECURED
• The command to run with Delta Service Request number and PM e-mail id options: java -jar lasso.jar
-Q -F<absolute path of customer config XML file> —P<Password to unlock
config XML file> -deltaSR<10 digit number> PMMail<US_Lasso_Support@dell.com>
• The command to run with input stream option: java -jar lasso.jar -Q -F<absolute path of
customer config XML file>
-Securedoption is used.
Collecting For Single Device Using CLI
For single device collection, run the command: java -jar lasso.jar -Q -OF <O/P FileName> -IP
<Device IP> -DT <DeviceType> -UN <User Name> —PD <Password> -D <Domain Name> SECURED
NOTE: -OF
NOTE:
The following table provides the device types supported by Lasso for single device collection
Devices Device Types Parameters Required
Storage Arrays CLARiiON -IP <IP/HostName>, -UN <UserName>,
50
argument is optional in the command.
If password is not entered in the command, then the input stream is prompted to enter the password.
-PD <Password>, -DT<DeviceType>
EqualLogic -IP <Group/Mgmt IP>, Community
String, -DT<DeviceType>
Celerra -IP <CS IP/HostName>, -UN
<UserName>, -PD <Password>, DT<DeviceType>
MDSeries -IP <IP/HostName>, -DT<DeviceType>
EQLFluidFSNAS -IP <Mgmt IP>, -UN <UserName>, -PD
<Password>, -DT<DeviceType>
Page 51

Devices Device Types Parameters Required
PVFluidFSNAS -IP <Mgmt IP>, -UN <UserName>, -PD
<Password>, -DT<DeviceType>
Fibre Switches Brocade -IP <IP/HostName>, -UN <UserName>,
-PD <Password>, -DT<DeviceType>
McData -IP <IP/HostName>, -UN <UserName>,
-PD <Password>, -DT<DeviceType>
McDataBlade -IP <IP/HostName>, -UN <UserName>,
-PD <Password>, -DT<DeviceType>
Cisco -IP <IP/HostName>, -UN <UserName>,
-PD <Password>, -DT<DeviceType>
Ethernet & FCoE Switches CiscoEthernet -IP <IP/HostName>, -UN <UserName>,
-PD <Password>, -DT<DeviceType>, EP<Enable Password>
CiscoFCoE -IP <IP/HostName>, -UN <UserName>,
-PD <Password>, -DT<DeviceType>
PowerConnect -DT <DeviceType> -IP <IP/Hostname>
-UN<UserName> -PD<Password> EP<Enable Password>
Force10 -OF <O/P FileName> -IP <IP/
HostName>, -UN <UserName>, -PD
<Password>, -DT<DeviceType>, EP<Enable Password>
Brocade Ethernet -DT <DeviceType> -IP <IP/Hostname>
-UN<UserName> -PD<Password> EP<Enable Password>
NOTE: -EP is optional. If the PowerConnect Ethernet switch is configured,
then password is required for Lasso to perform the collection.
NOTE: -EP is not required for PowerConnect B-Series and and M8428K.
Tape Libraries PV132T -IP <IP/HostName>, -UN <UserName>,
-PD <Password>, -DT<DeviceType>
PV136T -IP <IP/HostName>, -UN <UserName>,
-PD <Password>, -DT<DeviceType>
TL2000 -IP <IP/HostName>, -DT<DeviceType>
TL4000 -IP <IP/HostName>, -DT<DeviceType>
ML6000 -IP <IP/HostName>, -PD <Password>,
-DT<DeviceType>
Attached Hosts Windows -ST <Storage Array Type>, -IP <IP/
HostName>, -UN <UserName>, -PD
51
Page 52

Devices Device Types Parameters Required
<Password>, -DT<DeviceType>, -D
<Domain>
Linux -ST <Storage Array Type>, -IP <IP/
HostName>, -UN <UserName>, -PD
<Password>, -DT<DeviceType>, -RP
<RootPassword>, -SU
Solaris -ST <Storage Array Type>, -IP <IP/
HostName>, -UN <UserName>, -PD
<Password>, -DT<DeviceType>
HP-UX -ST <Storage Array Type>, -IP <IP/
HostName>, -UN <UserName>, -PD
<Password>, -DT<DeviceType>
AIX -ST <Storage Array Type>, -IP <IP/
HostName>, -UN <UserName>, -PD
<Password>, -DT<DeviceType>
VMware -ST <Storage Array Type>, -IP <IP/
HostName>, -UN <UserName>, -PD
<Password>, -DT<DeviceType>, -RP
<RootPassword>, -A, -SU
NOTE:
-A is used to collect advanced logs (VM support logs) information.
NOTE:
To provide the Sudo user credentials in Lasso for collecting data
from Linux or VMware, the switch -SU is mandatory.
NOTE: -ST can have Celerra, CLARiiON, EqualLogic, MD Series or
Compellent types of storage array.
Enclosures M1000e -DT<Device Type> -IP<HostName> -
UN<UserName> -PD<Password>
Management and Monitoring
Software
The following examples provide the command for single device collection for various devices.
• java -jar lasso.jar -Q -OF OutPutFileName -IP 10.94.26.217 -DT Windows -ST
CLARiiON -UN admin -PD password
• java -jar lasso.jar -Q -IP 10.94.216.158,10.94.216.159 -DT CLARiiON -UN
admin -PD password
• java -jar lasso.jar -Q -IP 10.94.102.52,public -DT EqualLogic
• java -jar lasso.jar -Q -IP 10.10.78.131 -DT EQLFluidFSNAS -UN admin -PD
admin
• java -jar lasso.jar -Q -IP 10.10.78.132 -DT PVFluidFSNAS -UN admin -PD
admin -SECURED
• Java –jar Lasso.jar –Q –DT EqualLogic –IP 10.94.100.9,public –UN grpadmin
–PD $ervices1 –SECURED
HIT Kit for VMware -Q -DT<Device Type> HITKITVM -
IP<HostName> -UN<UserName> PD<Password> -A or -B
52
Page 53

• java -jar lasso.jar -Q -IP 10.10.78.132 -DT Linux -ST equallogic -UN lasso
-PD $ervices1 -SU
• java -jar lasso.jar -Q -IP 10.10.78.132 -DT Linux -ST equallogic -UN root
-PD $ervices1 -deltaSR 1234567890 -PMMail US_Lasso_Support@dell.com
• java -jar lasso.jar -Q -DT M1000e -IP 10.94.217.100 -UN root -PD calvin
• Java –jar Lasso.jar –Q –DT PowerConnect –IP 10.94.100.10 –UN root –PD
password –EP password
• Java –Jar Lasso.jar –Q –DT PowerConnect -IP 10.94.100.10 –UN root –PD
password
• Java -jar Lasso.jar -Q -DT M1000e -IP 10.94.217.100 -UN root -PD calvin
• Java -jar Lasso.jar -Q -DT HITKITVM -IP 10.94.218.162 -UN root -PD eql -A
• Java -jar Lasso.jar -Q -DT HITKITVM -IP 10.94.218.162 -UN root -PD eql -B
Where options
• -Q is quiet mode and is mandatory for all devices.
• -OF is the output file name for collection and is optional for all devices.
53
Page 54

54
Page 55

Troubleshooting
Lasso may receive errors when trying to automate validation and collection.
When a collection fails, click the Error Found icon and review the log. The error code and the description are available
at the end of the log.
Try to run the collection again. For this, select the required device and click Start Collection.
If the problem persists, try to run one of the commands related to the device type. To only collect the data and not
troubleshoot, see Manual Collection.
When there are many Storage Arrays, Switches, and Attached Hosts, then run the collection in multi
NOTE:
threaded mode. For this, change the thread level value to 0 in the Parser.properties file located in the InstallDir.
thread.level = 0 — Lasso runs in Forceful multi thread mode.
thread.level = 1 — Lasso runs in normal mode.
thread.level = -1 (default) — Lasso runs in system configuration.
Troubleshooting Unix Host Collection
7
To complete the Unix host collection, Lasso uses SSH. The EMCGrab
access.
The following are required for SSH connection/collection:
• Root credentials — Lasso uses this to connect to the system through SSH protocol.
• Normal user credentials and root password — Lasso uses this to connect to the system through the SSH
protocol.
• Sudo user credentials — Lasso uses this to connect to the system through the SSH protocol. The root password
is not required for Sudo user with admin rights.
For EqualLogic and MD Series SAN, the Sudo user credentials are applicable only to Linux and
NOTE:
vSphere.
or vm-support command requires root level
Allowing Root Access To Unix Server
To allow root access to a UNIX server, make the change directly to the configuration file. To do this:
1. Login to the system console (or SSH as user and type su to gain root access).
2. Edit the file /etc/ssh/sshd_config.
3. Change the setting from PermitRootLogin no to
4. Change the setting from PasswordAuthentication no to PasswordAuthentication yes.
:
In a few Unix systems, the PasswordAuthentication is set to yes by default.
NOTE
PermitRootLogin yes.
5. Run the command service sshd restart.
55
Page 56

Allowing Root Access Using Multi User Interface (MUI) On VMware
The Multi User Interface (MUI) on VMware ESX 3.0/4.0 can also be used to allow root access. When using the MUI, do
the following:
1. Select the ESX server in the VI Client
2. Select Configuration
3. Select Security Profile
4. Choose Properties
5. Select SSH Server and place a check in the box
6. Retry Lasso against this host
:
In few UNIX systems including VMware ESX 3.0, SSH is disabled as root by default. This default
NOTE
behavior prevents Lasso from executing the command through SSH remotely if root credentials are used. For
more information, see
Prerequisites For Data Collection.
Troubleshooting MD Series
To troubleshoot MD Series, make sure that:
• MDSM software is installed in the system or you can download this from %SystemDrive%:\Program Files\Dell
\MD Storage Manager\client\ location. However, the location may vary depending on the system.
• The path of MDSM software is defined before executing commands.
To troubleshoot:
MD Series validation
Run the command
If the IP address is validated successfully, the SMcli executed successfully message is displayed. Else, SMcli failed
message is displayed.
:
SMcli -A <IPAddress of MD Series Array>. Example:SMcli -A 10.15.216.101
NOTE:
When a new MD Series array is added, the device is always validated. This assists in quick connection to
each Raid Core 0 IP or Raid Core 1 IP.
Click Validated or Error Found to view the validation status.
MD Series collection:
Before troubleshooting, also make sure that the RAID controller module firmware is compatible with the MD Storage
Manager software on the management station. If the RAID controller module firmware is upgraded, then upgrade the
MD Storage Manager software. Else, there may not be access to the storage array.
1. Run the command SMcli -c “show storagearray profile;” < IPAddress of MD
Array><USERPROFILE Dir\Results\Hostname.txt>
The command output is generated in the Hostname.txt file in the USERPROFILE Dir\Results\ location.
2. Run the command SMcli -c "save storageArray SupportData file=\"USERPROFILE Dir\Results\Hostname.zip\";" <
IPAddress of MD Array>
The command output is generated in the Hostname.zip file in the USERPROFILE Dir\Results\ location.
When the validation or collection operation of a Storage Array is timed out, then check the
NOTE:
DasArray.properties file in the InstallDir location and increase the timeout value.
For example: mdseries.timeout.value.collection = 200000. The value is 120000 by default.
56
Page 57

To view the collection status, click Collected
or Error Found.
Troubleshooting EqualLogic
For successful validation or collection, make sure that SNMP is enabled on the EqualLogic. To enable, connect to the
array using a browser and provide the <GROUP/Network Management IP Address>.
To troubleshoot:
1. In the EqualLogic Array UI, click Group Configuration.
2. Navigate to SNMP tab and add a SNMP community string.
NOTE:
The string is case sensitive.
If validation or collection fails when the Group IP or Member IP of the array is provided, then make sure that the IP
is correct and available. If yes, to verify that the IP is listed:
a) Connect to the EqualLogic array using the browser and enter http://groupIPAddress in the URL. The array GUI is
displayed.
b) Click the Members
c) Click Network tab and verify that the Member IP provided is in the list.
tab and select the required member.
Troubleshooting Storage Processor
The following section includes troubleshooting for Storage Processor validation and collection.
To troubleshoot:
Storage Processor validation
1. Connect to the storage processor using Navisphere Manager by entering http://hostname_or_ipaddress/.
2. Check if the administrative access to the processor is available with the provided username and password.
3. Make sure that NaviCLI.exe is installed in your system and available at the correct path. To verify this run
NaviCLI.exe at the command prompt.
If error is displayed, then verify that
Navisphere by selecting the option Install Classic CLI in Navisphere CLI Optional Features page of the installer.
Storage Processor Collection
1. Use http://hostname_or_ipaddress/
2. Right click SPA or SPB to check the SP event logs.
3. Clear all the old SP collection using File Transfer Manager.
4. Clear all listed Privileged Users to open access to all users.
NOTE: This is the default for CX arrays.
5. Add the entry for the system running Lasso to the array. This will limit access to only the listed users.
AX arrays have one entry by default. Therefore, SPCollects always fail on AX arrays unless the system running
Lasso is added as a privileged user.
6. Connect to Navisphere Manager manually and run the SPCollect.
7. Copy the collection to %USERPROFILE%\Dell\Lasso\results\
While troubleshooting collectio, to edit privilege user on:
– CX array, see Edit Privilege User on CX array.
– AX Array, see Edit Privilege User on AX Array.
NaviCLI.exe is available in Navisphere install directory. If not, reinstall
to connect to SP through Navisphere Manager.
57
Page 58

Edit Privilege User On CX Array
To edit privileged users on CX array:
1. Use http://ip.address.of.sp to login to the setup of the array.
2. Expand the Array tree
3. Right-click on the SP and choose Properties.
4. Select the required Agent
5. Clear any entry in the list. The access is now available to all or you can add the system that is running Lasso in the
form of username@host . Example: samus_aran@some.system
.
Edit Privilege User On AX Array
To edit privileged user on AX array:
1. Use http://ip.address.of.sp/Setup
2. Select Set Privileged Users
samus_aran@some.system
The list of available privileged users cannot be viewed but user is available on all AX Arrays. Therefore,
NOTE:
by default SPCollects will not work on the AX array unless an entry is included.
to login to the setup for the Array.
option or add the system that is running Lasso as username@host. Example:
Troubleshooting Switches
To reproduce the steps Lasso performs when automating Switch validation or collection, add SSH/Telnet to each switch
to make sure that the user name/password credentials are correct and the prompt requesting for password change is
not displayed.
MCData switches have different password databases for the web UI and CLI. If the CLI administrator password cannot
be used, a password reset may be needed. Refer to
procedure.
To add a user (newuser) to the authentication database using the CLI, run the following commands at the prompt:
1.
config security authentication user add newuser web cli
2. config security authentication user role newuser Administrator
3. config security authentication user show cli
The following table provides the list of user name, interfaces, and the user role:
Interface: CLI
Username Interfaces Role
McData’s documentation for password reset procedures
for the
Administrator Web, CLI Administrator
newuser Web, CLI Administrator
Troubleshooting Ethernet Switch
To reproduce the steps Lasso performs when automating Ethernet Switch validation or collections:
1. Add Telnet to each switch to make sure that username/password credentials are correct and the prompt such as
password change request is not displayed.
58
Page 59

2. Enter the execute mode to make sure that the enabled password is available.
Troubleshooting Tape Library
To reproduce the steps Lasso performs when automating Tape Library validations or collections:
1. Add Telnet to each switch to make sure that username/password credentials are correct and the prompt such as
password change request is not displayed.
2. Test the actual command Lasso runs.
For the commands, see
Manual Collection for Tape Libraries.
Troubleshooting Unix
Validation or collection uses the provided username and password to make a remote connection to the target device
and execute a simple command.
• If validation or collection fails for Lasso, error messages are displayed.
• If error is displayed on validation or collection, try running the Lasso commands.
• To test the command, use putty or other SSH client to login to the remote system. Use the same credentials as
Lasso. If a non-root id is used to login to the system, run su-
correct. If root prompt is displayed, log out and close putty.
If you wish to collect the data manually, see Manual Unix Collection or Manual VMware Collection.
to make sure that the root password entered is
Troubleshooting Windows
Validation or collection uses the provided username and password to make a remote connection to the target device
and execute a simple command.
• If validation or collection fails for Lasso, error messages are displayed.
• If error is displayed on validation or collection, try running the Lasso commands.
To test the command:
1. From Start menu open the command prompt window.
2. At the prompt, change to the bin directory where Lasso is installed. To do this, enter:cd c:\Program Files
\Dell\Lasso\bin\.
3. For collection, copy from mkdir \\Device_Hostname\c$\temp\Dell\Lasso\EMCReports\ the appropriate EMCReport to
the remote system using the command
temp\ Dell\ Lasso\ EMCReports\. For both validation and collection, run the command xCmd.exe \
\hostname /user:<Your_Username> /pwd:<Your_Passwd> hostname. For collection, run the
command xcopy /y /f \\Device_Hostname\c$\Win*\SystemRoot\EMCReports
\collection\zip\*.zip %USERPROFILE%\Dell\Lasso\Results
The output should be the hostname of the system you are connecting to and the original prompt should be
displayed.
If errors are displayed, then the system cannot connect to the remote device.
If you wish to just collect data manually, see Manual Windows Collection
copy EMCRPTS_*_V30.EXE \\ Device_Hostname \c$\
Troubleshooting Enclosures
To reproduce the steps Lasso performs when automating Enclosures validation or collection:
59
Page 60

• Telnet or SSH to each Enclosure to make sure that user name/password credentials are correct
Troubleshooting HITKIT Collection
To complete the Hitkit software collection, Lasso uses SSH.
The root credentials are required for SSH connection. Lasso uses this to connect to the system through SSH protocol.
Troubleshooting PowerVault FluidFS NAS Collection
If validation fails when the Management IP of the array is provided for validation, make sure that the provided IP is
correct and available. Also make sure that the FTP connection to the Management IP is established from the Windows
host on which Lasso is installed.
Troubleshooting EqualLogic FluidFS NAS Collection
If validation fails when the Management IP of the array is provided for validation, make sure that the provided IP is
correct and available. Also, make sure that the FTP connection to the Management IP is established from the Windows
host on which Lasso is installed.
For more information, see Manual EqualLogic FluidFS NAS Collection
Troubleshooting Celerra Collection
To troubleshoot:
• Use http://hostname_or_ipaddress/ to connect to the Celerra control station.
State
• If you are not using root credentials, then verify that the user name has the
nasadmin (operator)
, and groups are
fullnas (nasadmin)
.
enabled, primary group is
Troubleshooting VMware Collection
To display the error messaged received during collection, try to run the Lasso commands.
Lasso collection uses the provided user name and password to make a remote connection to the target device and
execute a command. If collection fails in Lasso, test the command using the following steps:
1. Use a secure telnet client like putty to login to vmware system using root privilege.
For steps to allow root access, see Allowing Root Access To Unix Server.
If root access is not enabled through SSH, use dual mode authentication.
NOTE:
2. Run vm-support-n and use secure ftp client to transfer the collection created in the root user’s home directory.
The collection is transferred to the
To collect the data manually and not troubleshoot, see
%USERPROFILE\ Dell\ Lasso\ results folder.
Manual VMware Collection.
60
Page 61

Error Codes
The following table provides the error codes and the messages.
Error Code Error Message
-20 UPLOAD_UNKNOWN_ERROR
Unknown error while uploading.
-21 UPLOAD_OPTION_ERROR
Upload option provided is not found. Check the option
provided to upload the file.
-22 UPLOAD_FILE_SIZE_ERROR
File size is large. Ensure that the file size does not exceed
the expected limit.
-23 UPLOAD_CERTIFICATE_ERROR
Certificate authentication failed. Ensure that the client
certificate is valid and able to authenticate to the server.
-24 UPLOAD_CHUNK_ERROR
Not able to split the file into chunks. Ensure that the file
size is not equivalent to zero KB.
-25 UPLOAD_SERVER_ERROR
Not able to receive acknowledgement for the chunk sent.
Ensure that the server is responding to the client's
requests.
-26 UPLOAD_INVALID_FILE_ERROR
File not found. Ensure that the file is available to upload.
-27 UPLOAD_TIMEOUT_ERROR
The upload has timed out. Check the network connection.
-28 UPLOAD_MODULE_INIT_FAILED
Failed during the module initialization.
-29 UPLOAD_MODULE_PROXY_ERROR
Unable to reach Proxy server. Check the proxy settings in
the browser.
-30 UPLOAD_MODULE_PROXY_UNSUPPORTED_AUTH_SCHE
ME
Unsupported type of authentication scheme.
-31 AUTHENTICATION_FAILED
Authentication for proxy has failed.
0 Operation completed normally.
8
61
Page 62

Error Code Error Message
1 Unable to complete operation. Check the log file.
2 Undefined device subtype. Check the log file.
3 Undefined device type. Check the log file.
4 Operation in progress.
5 One or more collection failed.
This is applicable only in case of multiple device collection
and not for single device collection. When you invoke
Lasso in quiet mode (CLI) with a customer configuration
file, and if any one of the device collection fails, Lasso will
exit with this error.
6 Collection and upload failed.
If the collection failed and also the upload, Lasso will exit
with this error code.
9 Unknown option. Check the log file.
10 Parameter is already specified for the session. Check the
log file.
101 %emcExecutable% not found. The package is either
corrupt or not installed correctly. Try to reinstall Lasso. If
this error persists, contact Dell at
US_Lasso_Support@Dell.com.
102 %dsetExecutable% not found.
103 Failed to determine remote system drive and remote
system root.
The xCmd.exe
system's drive. Also check the device security settings to
verify if the settings are preventing Lasso from running
automated scripts.
NOTE:
Windows 2008 server R2 (x64), then validation and
collection on Windows 2000 remote server will fail.
104 Failed to create temporary directory on remote host.
The xCmd.exe program is unable to determine the remote
system's drive. Also check the device security to verify if
the settings are preventing Lasso from running automated
scripts.
105 Failed to retrieve completed collection from remote
system.
Lasso is unable to copy the completed collection from the
remote system. Make sure that dot net version 2.0 or later
is installed on the remote system to run Dell Collector and
create the collection file. Try to run Lasso again.
106 Failed to copy EMC Reports to remote host.
Lasso is unable to copy the script from the remote system
and the script may be suspended. Try to reboot the remote
program is unable to determine the remote
If Lasso is running on Windows 7 (x64) or
62
Page 63

Error Code Error Message
host. If rebooting failed, try to navigate to Task Manager
on the remote host and find an
terminate it.
107 Host collection execution failed.
Lasso is unable to copy the script from the remote system
and the script may be suspended. Try to reboot the remote
host. If reboot failed, try to navigate to Task Manager on
the remote host and find the
terminate it.
108 Failed to retrieve completed collection from remote host.
Lasso is unable to copy the completed collection from the
remote system. Try to run Lasso again. If this error
persists, check the %SystemRoot%\EMCReports
\collection\zip\
system.
109 Another collection process may already be running on the
host.
Wait for the process to complete. If the error persists,
then the remote script may be suspended. Try to reboot
the remote host system. If rebooting failed, try to terminate
the EMCReport.exe/DellCollector.exe or
dellcollector.sh process by navigating to Task Manager in
Windows or ps -elf in the remote host system.
118 Failed to copy HyperVRecognize.exe
Lasso is unable to copy the script from the remote system
and the script may be suspended. Try to reboot the remote
host. If rebooting failed, try to navigate to Task Manager
on the remote host and find the
and terminate it.
directory for a .zip file in the remote host
EMCReport
EMCReport
process and
emcgrab.sh/
to remote host.
HyperVRecognize
process and
process
119 Host collection execution failed during HyperV
Recognition.
Lasso is unable to copy the script from the remote system
and the script may be suspended. Try to reboot the remote
host. If rebooting failed, try to navigate to Task Manager
on the remote host and find the
and terminate it.
120 Failed to retrieve completed collection from remote host.
Lasso is unable to copy the completed collection from the
remote system. Try to run Lasso again. If the error
persists, check for the .txt
\Dell\Lasso\HyperV\ sub directories on the remote host
system.
121 Failed to find debug log file in remote host.
Lasso is unable to find the debug log file in the remote
host. Try to run Lasso again. If the error persists, check
the %SystemRoot%\temp\Dell\Lasso\DellCollector\
directories for a .txt file.
122 Failed to retrieve debug log file from remote host.
Lasso is unable to copy the debug log file from the remote
system. Try to run Lasso again. If the error persists, check
HyperVRecognize
file in the %SystemRoot%\temp
process
sub
63
Page 64

Error Code Error Message
the %SystemRoot%\temp\Dell\Lasso\DellCollector\ sub
directories for a
197 Authentication validation failed for HitKit appliance.
Make sure that the HitKit password entered is correct.
198 xCmd.exe not found.
Check for the
installation directory. If the file is not found, then reinstall
Lasso.
199 Authentication validation failed!
Check user name and password again.
NOTE:
Windows 2008 server R2 (x64 system), then validation
on Windows 2000 remote server will fail.
200 plink.exe not found.
201 pscp.exe not found.
202 Lasso_grab.sh not found.
The error occurs when the package is either corrupt or
not installed correctly. Try to reinstall Lasso. If the error
persists, contact Dell at
203 EMC executable not found.
The error occurs when the package is either corrupt or
not installed correctly. Try to reinstall Lasso. If the error
persists, contact Dell at US_Lasso_Support@Dell.com .
205 VMware execution failed.
The command vm-support
collection may have timed out. Try to collect again or try to
collect manually.
.txt file in the remote host.
xCmd.exe file in the bin folder in Lasso
If Lasso is running on Windows 7 (x64) or
US_Lasso_Support@Dell.com.
failed for reason such as the
206 Failed to retrieve completed collection.
Check the remote host at the /tmp/Dell/Lasso/[timestamp]
location for the collection.
207 Failed to copy EMC executable to remote host.
Check the validation and run the collection again or
collect manually.
208 Failed to copy Lasso_grab.sh
Check the validation and run the collection again or
collect manually.
209 Failed to execute Lasso_grab.sh
The error occurs when the collection has timed out. Check
the validation and run the collection again or collect
manually.
210 Failed to determine name of collection file to retrieve.
Check /tmp/Dell/Lasso/[timestamp]
collection results.
64
to remote host.
remotely.
location for the
Page 65

Error Code Error Message
297 Failed to get Service Tag Information.
Refer to Manual UNIX collection and Linux Service Tag
Collection.
298 Connection was refused!
The remote host did not respond to the connection
attempt.
299 Authentication validation failed!
Try to validate and check the user name and password.
Try to connect manually and verify. Make sure that root
has SSH access, SSH is running and the firewall allows
SSH.
300 NaviCLI.exe was not found.
The file should be in the
CLI location by default. If file is not found, run the installer
again.
301 NaviCli version could not be determined.
Make sure that Navisphere CLI is installed. Run the
installer again. The installer will check and install.
302 Navisphere CLI command failed trying to retrieve Agent
Revision.
Verify that SP is accessible on the network, and the
firewalls are not blocking the access. See the
Troubleshooting section for more details.
303 Failed to retrieve completed SP Collect from SP.
Connect to SP through Navisphere Manager and use the
File Manager to get the SP Collect.
304 Failed to collect getall.
Make sure that the SP is available and running. Also,
connect to Navisphere Manager setup page and restart
the management server.
305 Failed to collect getlog.
Make sure that the SP is available and running. Also,
connect to
the management server.
Navisphere Manager setup page and restart
C:\Program Files\EMC\Navisphere
306 NaviCLI getagent failed.
Make sure that the SP is available and running. Also,
connect to Navisphere Manager setup page and restart
the management server.
307 Failed to create .zip
Manually, you may need to compress the getall and
getlog into a .zip file. Then include it in another .zip file
so Wrangler can read it.
308 SP collection timed out.
Try the collection again. If the error persists, make sure
that you have the latest Navisphere CLI. To verify this, run
the installer. Also, try to collect the SP Manually. Finally,
file out of getall and getlog.
65
Page 66

Error Code Error Message
make sure that the firewall is not blocking Navisphere
from retrieving the collection. For more information, see
Network Ports.
309 Non-supported SP version found.
310 NaviSECCli.exe was not found.
The .exe
CLI by default. If it is not found in this location, try to run
the installer again.
311 No LUNs found on Storage Array.
Configure at least 1 LUN or Hot Spare. Else Dell cannot
parse the SPCollect.
312 Not a Valid SPA or SPB Identifier.
The IP address entered may not be the Storage Processor
A in an EMC array. Verify that the IP address is SPA (and
not SPB).
313 Export command is not supported.
314 Navisphere CLI command failed to determine whether
EMC Array is having Navisphere Express or Navisphere
Manager.
315 Upgrade of Celerra is in progress.
should be in C:\Program Files\EMC\Navisphere
397 One or more commands that were run as part of device
collection failed.
398 SPCollect could not be automated. However, getall/
getlog was collected. Wrangler can still parse this data,
but no Layered Application information will be loaded. You
may need to manually connect to Navisphere Manager
and collect an SPCollect.
399 Authentication validation failed! Try validation again, and
verify the user name and password.
400 SMcli.exe was not found in the path!
411 Switch collection was complete, but collection file not
found!
You may try to collect switch data manually.
412 Tape Library collection was complete, but collection file
not found!
You may try to collect tape library data manually.
413 Switch collection file not moved properly!
You may try to collect switch manually.
415 Could not open connection to the Specified IP Address!
416 Manually telnet to the device to make sure it is
responsive.
66
Page 67

Error Code Error Message
417 Collection timed out.
Try to run the collection when the system is not loaded.
418 Switch collection failed.
You may try to collect switch manually.
419 Timed out during validation.
420 Collection Failed.
421 Make sure that MDSM software has valid permissions.
422 Failed to retrieve diagnostic files from FTP Site.
489 I/O module does not have any IP that is used for telnet
session to be established.
499 Authentication validation failed!
Try validation again, and check username and password.
500 For information, see
• Troubleshooting
• Manual Collection
501 Unable to bind to the Controller specified.
Verify the IP Address.
601 Vault password is incorrect.
602 Connection failed!
Make sure that the IP/device is valid and reachable.
700 Failed to copy Dell Collector
The remote host may be preventing the copy of the script.
Lasso has tried to copy the script and it is possible that the
remote script is suspended. You may need to reboot the
remote host. If rebooting fails, try to use the Task Manager
on the remote host and try to terminate the DellCollector
process.
701 Failed to copy dependant DLL which are used for zipping
the collection files on the remote host.
702 Host collection execution failed.
The remote host may be preventing the execution of the
script. Lasso has tried to copy the script and it is possible
that the remote script is suspended. You may need to
reboot the remote host. If rebooting fails, try to use the
Task Manager on the remote host and try to terminate the
DellCollector process.
703 Failed to rename Collection File name on the remote host.
704 Failed to move the Collection File from temp directory to
%System%\DellCollector directory on the remote host.
705 Failed to delete the temporary folder from the remote host.
to remote host.
67
Page 68

Error Code Error Message
706 Unable to find DellCollector.exe
Station.
Verify if this file is available after the installation of Lasso
in the Management Station
707 Windows host collection timed out!
801 Authentication validation failed.
Make sure that:
• Dell M1000e of Enclosure is available and
credentials are correct.
• Switch does not have an active SSH and telnet
console open.
802 Another collection process may already be running on the
host.
803 Collection timed out for M1000e
804 The IP/hostname and credentials provided for M1000e
type of Enclosure are not valid.
805 Collection has failed for M1000e type of Enclosure due to
wrong IP/hostname and credentials.
806 Authentication validation failed!
Make sure that HITKIT is available, credentials are
correct, and does not have an active SSH console open.
807 Another collection process may already be running on the
host
on the Management
808 HitKit for VMware collection has timed out.
809 The IP/hostname and credentials provided for the HITKIT
type are not valid.
810 Collection has failed for the HITKIT type due to wrong IP/
hostname and credentials.
811 Unable to retrieve the collection files as the .zip file does
not exist.
812 Collection has failed for HitKit for VMware.
900 Validation successful.
Make sure that the HITKIT is available and credentials are
correct. Also, make sure that the HITKIT does not have an
active SSH console open to it.lidation successful.
901 Validation failed.
902 Invalid operation requested.
903 Collection of one or more EqualLogic details failed.
904 Collection of EqualLogic details failed.
68
Page 69

Error Code Error Message
905 QLogic SANSurferCLI.exe is not found.
999 Demo Mode Failure.
Lasso is running in DEMO mode. Remove command line
parameter -DEMO to run in live mode.
69
Page 70

70
Page 71

9
Use Case Scenario
Using Lasso GUI, collect data for devices such as PowerConnect switches, CLARiiON and EqualLogic storage arrays in
your SAN environment and upload the collection to Dell Technical Support.
To do this:
1. Before running Lasso, make sure:
– You have the following details for each device:
* PowerConnect Ethernet Switch — IP address, Username, and Password.
* CLARiiON — SPA IP address, SPB IP address, Username, and Password
* EqualLogic — Group IP address, Management IP address, and Member IP address.
– Prerequisites are met for data collection. For details, see Prerequisites For Data Collection.
2. Run Lasso. For details, see Running Lasso.
3. In the Welcome to Lasso
4. In the Your Company Information page, enter your company details and click Continue.
5. In the Your Company Contacts page, enter your company contact details and click Continue.
6. In the Your Hardware Environment page, select Ethernet & FCoE Switches and Storage Arrays options and click
Continue.
7. In the Your Hardware Environment: Storage Arrays
following storage arrays, enter the information for each array as mentioned in the following table and click Save
New Storage Array to validate and save the device:
page, select the Start with a new configuration option and click Continue.
page, from the Type of Storage Array drop down list, select the
Type of Storage Array Fields
CLARiiON
EqualLogic
NOTE:
The table provides sample values for the fields.
If validation fails, edit the information for the device and update to re-validate. Click Continue.
8. In the Your Hardware Environment: Ethernet Switches
PowerConnect switch, enter the following information and click Save New Ethernet Switch to validate and save the
device:
– IP/Hostname — 10.94.XXX.YY
– Username — testuser
page, from the Type of Ethernet Switch drop down list, select
– SPA IP/Hostname — 10.94.XXX.YYY
– SPB IP/Hostname — 10.94.XXX.YY
– Username — testuser
– Password — testpassword
– Group/Mgmt IP — 10.94.XXX.YY
– Community String — public
– Username — testuser
– Password —testpassword
71
Page 72

– Password — testpassword
– Enable Password — enablepassword
If validation fails, edit the information for the device and update to re-validate the device. Click
9. In the Device Collection
validation, edit and re-validate the devices or remove them from the list. For more details see
10. Click Start Collection to start the data collection.
11. Click Continue
File Formats.
12. In the Upload
Support site. For more details, see
13. The Confirmation page displays the status of the file upload.
14. To view the HTML file created during parsing the data, select the View your SAN Configuration option. Click Finish
to open the report.
to parse the data and generate the Lasso report. For more information on file formats, see
page, click Open Location to view the reports. Click Continue to upload the report to Dell Technical
page, all the selected devices are displayed. If there are devices that have failed
Upload Collection.
Continue.
Device Collection.
Generated
72
Page 73

Frequently Asked Questions
This section has the following types of frequently asked questions:
• FAQ — About Lasso
• FAQ — Passwords and Security
• FAQ — Dealing with errors
FAQ — About Lasso
• What is Lasso?
– Lasso is a stand alone collection utility that automates the collection of all pertinent hardware and
software configuration details from the target SAN attached servers, Dell Storage Arrays, Fibre Channel,
Ethernet and FCoE Switches, and Tape Libraries.
• What is Wrangler?
– Wrangler is a program that gathers the data collected by Lasso, parse the data, and build a SAN object
that is uploaded to the Dell database accessed by Dell employees.
• What are the uses of Lasso?
– Lasso helps to automate data collection from a number of devices, and can decrease the overall time
taken to perform the collections. Example: Lasso can be used efficiently to collect data from 3 arrays, 4
switches, and 20 hosts. The collections are run in parallel and hence collected efficiently.
NOTE: The data collection by Lasso can also be done manually.
10
NOTE: The configuration of the SAN environment will assist Lasso to collect the data successfully.
.
• Which language is used to develop Lasso?
– The Lasso user interface and the collection logic is developed in Java. The parser component is in C#.
• Which third party software is used by Lasso?
– Lasso uses open-source and free software to complete various tasks. Lasso also uses programs such
as GPG, GNU zip/unzip, xCmd, EMCReport, and various EMCGrab scripts.
• Where should Lasso be installed?
– Lasso can be installed on any Windows OS that has IP connectivity to the SAN with the following
caveats:
* For EMC SANs, install on a computer that is not attached to the SAN.
NOTE: Use a workstation whose credentials match with the SAN server credentials. This
results in automatic discovery and validation of Windows Hosts and saves time.
* EqualLogic SANs are sometimes in an isolated network, and may require connecting a
computer to that network to run Lasso.
• How does Lasso operate?
73
Page 74

– Lasso initiates scripts against all defined devices. The scripts collect specific information about the
devices. Lasso then captures the output of individual process separately for each device. This helps to
simultaneously complete the collection. If the time taken for manual login, copy collection
(example:EMCReports) for a host is 5minutes, Lasso can collect data against 10 hosts for the same time.
NOTE: The limit for simultaneous processes is 10. The limit can be modified in the LassoConfig.xml
file.
• What is the time taken by Lasso to run?
– The time taken is approximately 30 minutes for a normal run. Many factors can modify the estimated
time. The approximate time is determined by adding the following:
* Time taken to input profile and environment information (dependent on the user).
* Time taken to copy EMCReports/emcgrab to the remote device (less than 2MB file size. It is fast
on a LAN but slow if remote).
* Time taken by the longest device. It is 5-10 for hosts, but may be over 20 minutes on a busy host.
For SPCollects, the time taken is approximately 10 minutes, but on a busy SP it is 30 minutes or
higher. For switches, less than 5 minutes, but on large switches with error logs, may be 20
minutes or higher.
* Time taken to copy the collection data from the remote device (may be fast on a LAN but slow if
remote).
* Time taken to zip and encrypt the data (may be less than a few minutes).
* Time taken to upload the data to Dell's FTP site (may be the longest time depending on the size
of the environment and the speed of the Internet connection).
Using the above guidelines, assuming that the profile and environment information is already entered, all
devices are on a LAN, the longest device takes 15 minutes, a few minutes to zip/encrypt, and the
Internet connection is fast, the entire collection should be completed in less than 30 minutes.
If there are environment specific settings that prevent remote execution of some of the scripts, then
troubleshooting may take more time.
• What is Navisphere CLI and where is it available?
– Lasso uses EMC's Navisphere CLI to initiate commands to CX and AX Storage Processors. Among these
commands are SPCollect, getall, and getlog. Navisphere CLI is available at http://powerlink.emc.com
and also provided with the Lasso package.
• What types of devices are supported by Lasso?
– For the list of supported types of devices and operating systems, see Supported Storage Devices and
Operating Systems.
• What are the system requirements to run Lasso?
– For information on the system requirements to run Lasso, see Prerequisites For Data Collection.
• How to get support for Lasso?
– Try one of the following options:
* Verify that the error can be duplicated.
* List the steps to reproduce the error.
* Refer to the other FAQ sections or the relevant section in the online help for solution.
* Use the troubleshooting steps.
* Compile the information including screen shots, details of the systems running Lasso and the
intended remote systems, and all relevant logs.
* Email to
NOTE: Dell employees can view the online training modules and videos on Lasso.
74
US_Lasso_Support@Dell.com
Page 75

• How can the timeout value for FC Switches be modified?
– On a SAN having many Brocade and McData switches, increase the timeout value. By default, timeout
value for the switch is 3 minutes (in milliseconds). This value can be modified in the file FCSC.properties
available in the Lasso install directory.
• How can the timeout value for Unix hosts be modified?
– On a SAN having Linux, Solaris, HP-UX, and AIX hosts, the collection process may exceed the default
timeout value of 30 minutes (in milliseconds). Therefore, increase the timeout value in UnixHC.properties
file, available in the Lasso install directory.
• How can the time out value for validating automatically discovered hosts be modified?
– On a SAN having many attached hosts, increase the timeout value for the successful completion of
automatic validation in:
* SAC.properties— while automatically discovering hosts attached to arrays.
* WinHC.properties— while validating already discovered hosts in the background. This happens
when the customer configuration file is open.
• What are the Storage Arrays supported by Lasso?
– Lasso collects data from the following Storage Arrays:
* CLARiiON
* EqualLogic
* Celerra
* Power Vault MD Series
* EqualLogic Fluid File System (NAS)
* PowerVault Fluid File System (NAS)
• How to collect data from EqualLogic Storage Arrays?
– To collect data from EqualLogic Arrays in the SAN, install Lasso on a system that has access to the
array using the IP address. If the array is on a non-routable iSCSI network, then install Lasso on one of
the iSCSI server or add an additional system to the network to ensure connectivity.
FAQ — Passwords and Security
• Why is password mandatory?
– Lasso executes scripts that need access to administrative level resources. This requires remote login to
the systems to execute the scripts. Lasso does not save the entered passwords as it is captured from
the input and deleted after the connection. Blank password can also be used. The processes (net use,
putty, telnet and so on) that launch will prompt for the password . Enter the password multiple times for
each device. To avoid this, create a new user dedicated to run Lasso. This user can be deleted after
running Lasso. See
• How to ensure that the password is secured?
– Search for a word or phrase used in your password in the c:\Program Files\Dell\Lasso file. Also, create a
specific user for Lasso that can be disabled after running Lasso.
• Why should administrative Windows password be used?
– The collection script EMCReports requires system access to obtain information about the system. See
the directory ftp://ftp.emc.com/pub/emcgrab/Windowsfor more information.
• Why should UNIX Root password be used?
– The collection script emcgrab requires root level system access to obtain information about the system.
See the directory ftp://ftp.emc.com/pub/emcgrab/Unixfor more information.
Readme
for more information.
75
Page 76

• What are the other options instead of using UNIX Root password?
– Enter a blank password, when prompted by the SSH session, before Lasso prompts this authentication.
The password may be entered several times for each UNIX host in the spawned windows. Add a new
user with root access, or change the password temporarily for the Lasso run. It is not recommended to
use central authentication scheme. Future versions of Lasso will allow SSH from a normal user that can
then "su" or "sudo" the script.
• How does Lasso provide security and privacy protection?
– Lasso creates a single .zip file that is 2048-bit encrypted (unless this option is disabled, or Lasso is
running in a non-exportable country). Only an authorized Dell representative with a valid Wrangler
processing utility can load the file and decrypt the contents. Lasso uploads the file to the Dell's ftp site
and provides high level of privacy protection and security. This site has "write-only" access to Lasso and
the public, and has no read access.
• Who can view the uploaded data collection?
– From version 2.9.0 and later, a "write-only" ftp site is used and "view" or "read" permission are not
available. The data can be uploaded, but no other collections can be viewed. Only a Dell Employee with
an administrative login can access the files, and only the Wrangler tool can decrypt these files.
• What network ports does Lasso use?
– For more information, see Network Ports
• What is Secure Site option?
– The Secure Site option is used to remove the Customer Identification Information (CII) such as company
name, company address, IP address, MAC address, iSCSI volume names, and Host names from the
Lasso output .xml file.
The customer sensitive data is replaced by tokens in the
customer sensitive data is maintained in an encrypted .XML file. This data is secured when the .XML file
is uploaded to Dell's FTP site.
.XML file. Mapping between the tokens and
FAQ — Dealing With Errors
• What is the description of the error code?
– For information on the error code and descriptions, see Error Codes
• Why does the Switch password fail each time even though the login to the Switch Web UI is successful?
– All Switch collections use SSH/Telnet user name and password. For McData switches, if a user name is
accepted with the Web UI, it does not automatically work with the CLI.. The access should be granted
specifically. To verify that the password enter is valid, telnet into the switch and try the user name/
password. To do this, go to Start → Run and enter telnet hostnameor ip address. If SSH interface is
used by lasso and fails, connect to the switch using putty and try the user name/password to manually
execute the command(s). See the documentation on the Switch for instructions to configure the user
name or see troubleshooting section for more information.
• How to troubleshoot device errors on collection?
– Make sure to validate the devices. If the devices are already validated and using a saved configuration,
then validate them again. The password may have changed. Click Error found icon to view the log of the
device. This will include the reason for the device to fail collection. Also see the troubleshooting section
for steps to run the collections using the CLI to verify or collect the data manually.
• Why is the collection against a VMware ESX 3.0 server failing?
– To troubleshoot, see VMware Root Access
• Does Lasso work on a 64-bit system?
– Yes, Lasso can collect against a 64-bit system. Lasso version 3.5 and later can be installed and run on a
64-bit system with limited support. For more information, see
Readme
.
76
Page 77

• What is error code 398 and why is it only a warning?
– Error code 398 describes that a full SPCollect was not obtained from the Storage Processor. A full
getalland getlogis collected. Wrangler can process the data only for basic storage configuration
and layered application configurations is available. For information on complete SP collect, see
Collection For CLARiiON.
• Why should Lasso be used when the time taken to troubleshoot problems is longer than manually collecting the
data with Lasso?
– Lasso automates the collection process. The data collected remotely is dependent on the network
configuration of the environment . If the access to the system running Lasso to the target devices is
blocked, then the scripts can not complete the collection. If all the devices are unavailable, then run the
collection scripts manually. Example: If the "admin$" share is disabled on Windows through a Group
Policy, then Lasso can not execute the EMCReports remotely and is a limitation in Lasso.
• How to troubleshoot a failed device?
– If the Lasso full collection is failing, then manually collect the remaining devices. If there are many
devices, then modify the security settings to resolve. Also, report the error for more assistance.
• How to run Lasso against a Meditech host that displayed a blue screen?
– A Meditech system is not Windows system. EMCReports fails when running on a Meditech system.
Lasso automatically runs the EMCReports and the issue can occur if run against a Meditech system. Do
not manually or using Lasso, run the EMCReports against a Meditech system. For more details, see the
ftp://ftp.emc.com/pub/emcgrab/Windows directory.
Manual
77
Page 78

78
Page 79

11
License
Various programs are used throughout Lasso, and may have different licenses.
Dell: Export Compliance Disclaimer
By downloading from Dell's Web site, you are agreeing that you will not use or otherwise export or reexport, directly or
indirectly, this Software and/or Technology except as authorized by U.S. law and the laws of the jurisdiction in which the
Software and/or Technology was obtained. The Software and/or Technology may not be exported or reexported (i) to
any U.S. embargoed country (currently Cuba, Iran, Libya, North Korea, Sudan and Syria) or (ii) to an end-user or end-use
prohibited by U.S. law or the laws of the jurisdiction in which the Software and/or Technology was obtained. By
downloading the Software and/or Technology, you represent and warrant that you are not located in, under the control
of, or a national or resident of any such country and are not a prohibited end-user or engaged in a prohibited end-use.
Dell Software Disclaimer
TO USERS OF DELL'S SERVICE & SUPPORT WEB SITE: DELL INC. ("DELL") DOES NOT WARRANT THE FILES (INCLUDING
ANY FIXES AND UPDATES) PROVIDED IN THE DOWNLOADABLE FILE LIBRARY AREA(S) OF THE DELL SERVICE &
SUPPORT WEB SITE (THE "SITE"). ALL FILES AVAILABLE FOR DOWNLOAD (THE "FILES") FROM THE SITE ARE PROVIDED
"AS IS." IN CONNECTION WITH THE FILES, DELL MAKES NO WARRANTIES OF ANY KIND, EITHER EXPRESS OR
IMPLIED, INCLUDING BUT NOT LIMITED TO WARRANTIES OF MERCHANTABILITY, FITNESS FOR A PARTICULAR
PURPOSE, OF TITLE, OR OF NON-INFRINGEMENT OF THIRD PARTY RIGHTS. USE OF THE FILES BY A USER IS AT THE
USER'S RISK AND IS DEEMED ACCEPTANCE OF THESE TERMS. IN NO EVENT SHALL DELL BE LIABLE TO THE USER FOR
ANY DAMAGES ARISING FROM USE OF OR INABILITY TO USE THE FILES, INCLUDING ANY DAMAGES AS A RESULT OF
VIRUS INFECTION OR OTHER CONTAMINATION, INCLUDING ANY LOST PROFITS, LOST SAVINGS, OR OTHER
INCIDENTAL OR CONSEQUENTIAL DAMAGES, EVEN IF DELL HAS BEEN ADVISED OF THE POSSIBILITY OF SUCH
DAMAGES, OR FOR ANY CLAIM BY ANOTHER PARTY.
THE DRIVERS PROVIDED FOR DOWNLOAD ON DELL'S WEBSITE ARE THE LATEST ONES THAT HAVE BEEN VALIDATED
BY DELL. FOR ANY GIVEN HARDWARE COMPONENT, NEWER DRIVERS MAY EXIST ON THE RESPECTIVE
MANUFACTURER'S SITE. PLEASE NOTE THAT DELL HAS NOT VALIDATED ANY DRIVERS NOT DIRECTLY AVAILABLE
FROM DELL'S WEBSITE, AND CAN THEREFORE MAKE NO REPRESENTATIONS AS TO THEIR EFFECTIVENESS,
STABILITY, APPROPRIATENESS OR SAFETY . IF YOU WISH TO DOWNLOAD AND INSTALL ANY NON-VALIDATED
DRIVER, DELL STRONGLY RECOMMENDS THAT YOU MAKE A BACKUP OF YOUR CURRENT WORKING CONFIGURATION
SO THAT YOU HAVE SOME ABILITY TO RETURN TO A KNOWN WORKING STATE IF THE NEW DRIVER FAILS TO
FUNCTION PROPERLY OR CAUSES SYSTEM PROBLEMS. ANY PROBLEMS ENCOUNTERED WITH NON-VALIDATED
DRIVERS SHOULD BE ADDRESSED TO THE RESPECTIVE MANUFACTURER(S) -- DELL WILL NOT HAVE INFORMATION
ON ANY NON-VALIDATED DRIVERS.
Dell Software Copyright
EACH ONE OF THE FILES (AS DEFINED IN THE "DISCLAIMER" SUBSECTION ABOVE) IS THE COPYRIGHTED WORK OF
EITHER DELL OR OF THE THIRD-PARTY VENDOR SUPPLYING THE DOWNLOADABLE FILE. USE OF THE FILES IS
79
Page 80

SUBJECT TO COPYRIGHT LAWS OF THE UNITED STATES. USE OF ANY OF THE FILES IN ANY MANNER THAT WOULD
VIOLATE THE COPYRIGHT LAWS OF THE UNITED STATES IS EXPRESSLY FORBIDDEN.
EMCGrab: ftp://ftp.emc.com/pub/emcgrab/Unix/Readme_EMCGrab_v3.8.txt
EMCReport: ftp://ftp.emc.com/pub/emcgrab/Windows/EMCRPTS_V28_README.TXT
GNU GENERAL PUBLIC
Version 2, June 1991
Copyright (C) 1989, 1991 Free Software Foundation, Inc. 51 Franklin St, Fifth Floor, Boston, MA 02110-1301 USA Everyone
is permitted to copy and distribute verbatim copies of this license document, but changing it is not allowed.
Preamble
The licenses for most software are designed to take away your freedom to share and change it. By contrast, the GNU
General Public License is intended to guarantee your freedom to share and change free software--to make sure the
software is free for all its users. This General Public License applies to most of the Free Software Foundation's software
and to any other program whose authors commit to using it. (Some other Free Software Foundation software is covered
by the GNU Library General Public License instead.) You can apply it to your programs, too.
When we speak of free software, we are referring to freedom, not price. Our General Public Licenses are designed to
make sure that you have the freedom to distribute copies of free software (and charge for this service if you wish), that
you receive source code or can get it if you want it, that you can change the software or use pieces of it in new free
programs; and that you know you can do these things.
To protect your rights, we need to make restrictions that forbid anyone to deny you these rights or to ask you to
surrender the rights. These restrictions translate to certain responsibilities for you if you distribute copies of the
software, or if you modify it.
For example, if you distribute copies of such a program, whether gratis or for a fee, you must give the recipients all the
rights that you have. You must make sure that they, too, receive or can get the source code. And you must show them
these terms so they know their rights.
We protect your rights with two steps: (1) copyright the software, and (2) offer you this license which gives you legal
permission to copy, distribute and/or modify the software.
Also, for each author's protection and ours, we want to make certain that everyone understands that there is no
warranty for this free software. If the software is modified by someone else and passed on, we want its recipients to
know that what they have is not the original, so that any problems introduced by others will not reflect on the original
authors' reputations.
Finally, any free program is threatened constantly by software patents. We wish to avoid the danger that redistributors
of a free program will individually obtain patent licenses, in effect making the program proprietary. To prevent this, we
have made it clear that any patent must be licensed for everyone's free use or not licensed at all.
The precise terms and conditions for copying, distribution and modification follow.
GNU GENERAL PUBLIC LICENSE
TERMS AND CONDITIONS FOR COPYING, DISTRIBUTION AND
MODIFICATION
1. This License applies to any program or other work which contains a notice placed by the copyright holder saying it
may be distributed under the terms of this General Public License. The "Program", below, refers to any such
program or work, and a "work based on the Program" means either the Program or any derivative work under
copyright law: that is to say, a work containing the Program or a portion of it, either verbatim or with modifications
80
Page 81

and/or translated into another language. (Hereinafter, translation is included without limitation in the term
"modification".) Each licensee is addressed as "you".
Activities other than copying, distribution and modification are not covered by this License; they are outside its
scope. The act of running the Program is not restricted, and the output from the Program is covered only if its
contents constitute a work based on the Program (independent of having been made by running the Program).
Whether that is true depends on what the Program does.
2. You may copy and distribute verbatim copies of the Program's source code as you receive it, in any medium,
provided that you conspicuously and appropriately publish on each copy an appropriate copyright notice and
disclaimer of warranty; keep intact all the notices that refer to this License and to the absence of any warranty;
and give any other recipients of the Program a copy of this License along with the Program.
You may charge a fee for the physical act of transferring a copy, and you may at your option offer warranty
protection in exchange for a fee.
3. You may modify your copy or copies of the Program or any portion of it, thus forming a work based on the Program,
and copy and distribute such modifications or work under the terms of Section 1 above, provided that you also
meet all of these conditions:
a. You must cause the modified files to carry prominent notices stating that you changed the files and the date
of any change.
b. You must cause any work that you distribute or publish, that in whole or in part contains or is derived from the
Program or any part thereof, to be licensed as a whole at no charge to all third parties under the terms of this
License.
c. If the modified program normally reads commands interactively when run, you must cause it, when started
running for such interactive use in the most ordinary way, to print or display an announcement including an
appropriate copyright notice and a notice that there is no warranty (or else, saying that you provide a
warranty) and that users may redistribute the program under these conditions, and telling the user how to
view a copy of this License. (Exception: if the Program itself is interactive but does not normally print such an
announcement, your work based on the Program is not required to print an announcement.)
These requirements apply to the modified work as a whole. If identifiable sections of that work are not
derived from the Program, and can be reasonably considered independent and separate works in
themselves, then this License, and its terms, do not apply to those sections when you distribute them as
separate works. But when you distribute the same sections as part of a whole which is a work based on the
Program, the distribution of the whole must be on the terms of this License, whose permissions for other
licensees extend to the entire whole, and thus to each and every part regardless of who wrote it.
Thus, it is not the intent of this section to claim rights or contest your rights to work written entirely by you;
rather, the intent is to exercise the right to control the distribution of derivative or collective works based on
the Program.
In addition, mere aggregation of another work not based on the Program with the Program (or with a work
based on the Program) on a volume of a storage or distribution medium does not bring the other work under
the scope of this License.
4. You may copy and distribute the Program (or a work based on it, under Section 2) in object code or executable
form under the terms of Sections 1 and 2 above provided that you also do one of the following:
a. Accompany it with the complete corresponding machine-readable source code, which must be distributed
under the terms of Sections 1 and 2 above on a medium customarily used for software interchange; or,
b. Accompany it with a written offer, valid for at least three years, to give any third party, for a charge no more
than your cost of physically performing source distribution, a complete machine-readable copy of the
corresponding source code, to be distributed under the terms of Sections 1 and 2 above on a medium
customarily used for software interchange; or,
c. Accompany it with the information you received as to the offer to distribute corresponding source code. (This
alternative is allowed only for noncommercial distribution and only if you received the program in object code
or executable form with such an offer, in accord with Subsection b above.)
The source code for a work means the preferred form of the work for making modifications to it. For an
executable work, complete source code means all the source code for all modules it contains, plus any
81
Page 82

associated interface definition files, plus the scripts used to control compilation and installation of the
executable. However, as a special exception, the source code distributed need not include anything that is
normally distributed (in either source or binary form) with the major components (compiler, kernel, and so on)
of the operating system on which the executable runs, unless that component itself accompanies the
executable.
If distribution of executable or object code is made by offering access to copy from a designated place, then
offering equivalent access to copy the source code from the same place counts as distribution of the source
code, even though third parties are not compelled to copy the source along with the object code.
5. You may not copy, modify, sublicense, or distribute the Program except as expressly provided under this License.
Any attempt otherwise to copy, modify, sublicense or distribute the Program is void, and will automatically
terminate your rights under this License. However, parties who have received copies, or rights, from you under this
License will not have their licenses terminated so long as such parties remain in full compliance.
6. You are not required to accept this License, since you have not signed it. However, nothing else grants you
permission to modify or distribute the Program or its derivative works. These actions are prohibited by law if you do
not accept this License. Therefore, by modifying or distributing the Program (or any work based on the Program),
you indicate your acceptance of this License to do so, and all its terms and conditions for copying, distributing or
modifying the Program or works based on it.
7. Each time you redistribute the Program (or any work based on the Program), the recipient automatically receives a
license from the original licensor to copy, distribute or modify the Program subject to these terms and conditions.
You may not impose any further restrictions on the recipients' exercise of the rights granted herein. You are not
responsible for enforcing compliance by third parties to this License.
8. If, as a consequence of a court judgment or allegation of patent infringement or for any other reason (not limited to
patent issues), conditions are imposed on you (whether by court order, agreement or otherwise) that contradict the
conditions of this License, they do not excuse you from the conditions of this License. If you cannot distribute so as
to satisfy simultaneously your obligations under this License and any other pertinent obligations, then as a
consequence you may not distribute the Program at all. For example, if a patent license would not permit royaltyfree redistribution of the Program by all those who receive copies directly or indirectly through you, then the only
way you could satisfy both it and this License would be to refrain entirely from distribution of the Program.
If any portion of this section is held invalid or unenforceable under any particular circumstance, the balance of the
section is intended to apply and the section as a whole is intended to apply in other circumstances.
It is not the purpose of this section to induce you to infringe any patents or other property right claims or to contest
validity of any such claims; this section has the sole purpose of protecting the integrity of the free software
distribution system, which is implemented by public license practices. Many people have made generous
contributions to the wide range of software distributed through that system in reliance on consistent application of
that system; it is up to the author/donor to decide if he or she is willing to distribute software through any other
system and a licensee cannot impose that choice.
This section is intended to make thoroughly clear what is believed to be a consequence of the rest of this License.
9. If the distribution and/or use of the Program is restricted in certain countries either by patents or by copyrighted
interfaces, the original copyright holder who places the Program under this License may add an explicit
geographical distribution limitation excluding those countries, so that distribution is permitted only in or among
countries not thus excluded. In such case, this License incorporates the limitation as if written in the body of this
License.
10. The Free Software Foundation may publish revised and/or new versions of the General Public License from time to
time. Such new versions will be similar in spirit to the present version, but may differ in detail to address new
problems or concerns.
Each version is given a distinguishing version number. If the Program specifies a version number of this License
which applies to it and "any later version", you have the option of following the terms and conditions either of that
version or of any later version published by the Free Software Foundation. If the Program does not specify a
version number of this License, you may choose any version ever published by the Free Software Foundation.
11. If you wish to incorporate parts of the Program into other free programs whose distribution conditions are
different, write to the author to ask for permission. For software which is copyrighted by the Free Software
Foundation, write to the Free Software Foundation; we sometimes make exceptions for this. Our decision will be
82
Page 83

guided by the two goals of preserving the free status of all derivatives of our free software and of promoting the
sharing and reuse of software generally.
12. NO WARRANTY
BECAUSE THE PROGRAM IS LICENSED FREE OF CHARGE, THERE IS NO WARRANTY FOR THE PROGRAM, TO THE
EXTENT PERMITTED BY APPLICABLE LAW. EXCEPT WHEN OTHERWISE STATED IN WRITING THE COPYRIGHT
HOLDERS AND/OR OTHER PARTIES PROVIDE THE PROGRAM "AS IS" WITHOUT WARRANTY OF ANY KIND, EITHER
EXPRESSED OR IMPLIED, INCLUDING, BUT NOT LIMITED TO, THE IMPLIED WARRANTIES OF MERCHANTABILITY
AND FITNESS FOR A PARTICULAR PURPOSE. THE ENTIRE RISK AS TO THE QUALITY AND PERFORMANCE OF THE
PROGRAM IS WITH YOU. SHOULD THE PROGRAM PROVE DEFECTIVE, YOU ASSUME THE COST OF ALL
NECESSARY SERVICING, REPAIR OR CORRECTION.
13. IN NO EVENT UNLESS REQUIRED BY APPLICABLE LAW OR AGREED TO IN WRITING WILL ANY COPYRIGHT
HOLDER, OR ANY OTHER PARTY WHO MAY MODIFY AND/OR REDISTRIBUTE THE PROGRAM AS PERMITTED
ABOVE, BE LIABLE TO YOU FOR DAMAGES, INCLUDING ANY GENERAL, SPECIAL, INCIDENTAL OR
CONSEQUENTIAL DAMAGES ARISING OUT OF THE USE OR INABILITY TO USE THE PROGRAM (INCLUDING BUT
NOT LIMITED TO LOSS OF DATA OR DATA BEING RENDERED INACCURATE OR LOSSES SUSTAINED BY YOU OR
THIRD PARTIES OR A FAILURE OF THE PROGRAM TO OPERATE WITH ANY OTHER PROGRAMS), EVEN IF SUCH
HOLDER OR OTHER PARTY HAS BEEN ADVISED OF THE POSSIBILITY OF SUCH DAMAGES.
END OF TERMS AND CONDITIONS
How to Apply These Terms to Your New Programs
If you develop a new program, and you want it to be of the greatest possible use to the public, the best way to achieve
this is to make it free software which everyone can redistribute and change under these terms.
To do so, attach the following notices to the program. It is safest to attach them to the start of each source file to most
effectively convey the exclusion of warranty; and each file should have at least the "copyright" line and a pointer to
where the full notice is found.
one line to give the program's name and a brief idea of what it does.> Copyright (C) <year> <name of author>
This program is free software; you can redistribute it and/or modify it under the terms of the GNU General Public License
as published by the Free Software Foundation; either version 2 of the License, or (at your option) any later version.
This program is distributed in the hope that it will be useful, but WITHOUT ANY WARRANTY; without even the implied
warranty of MERCHANTABILITY or FITNESS FOR A PARTICULAR PURPOSE. See the GNU General Public License for
more details.
You should have received a copy of the GNU General Public License along with this program; if not, write to the Free
Software Foundation, Inc., 51 Franklin St, Fifth Floor, Boston, MA 02110-1301 USA
Also add information on how to contact you by electronic and paper mail.
If the program is interactive, make it output a short notice like this when it starts in an interactive mode:
Gnomovision version 69, Copyright (C) year name of author
Gnomovision comes with ABSOLUTELY NO WARRANTY; for details type `show w'. This is free software, and you are
welcome to redistribute it under certain conditions; type `show c' for details.
The hypothetical commands `show w' and `show c' should show the appropriate parts of the General Public License. Of
course, the commands you use may be called something other than `show w' and `show c'; they could even be mouseclicks or menu items--whatever suits your program.
You should also get your employer (if you work as a programmer) or your school, if any, to sign a "copyright disclaimer"
for the program, if necessary. Here is a sample; alter the names:
Yoyodyne, Inc., hereby disclaims all copyright interest in the program `Gnomovision' (which makes passes at compilers)
written by James Hacker.
<signature of Ty Coon>, 1 April 1989
Ty Coon, President of Vice
83
Page 84

This General Public License does not permit incorporating your program into proprietary programs. If your program is a
subroutine library, you may consider it more useful to permit linking proprietary applications with the library. If this is
what you want to do, use the GNU Library General Public License instead of this License.
84
 Loading...