

Page 1

Dell G7 17 7700
Setup and Specifications
Reg ula tor y M ode l: P46 E
Reg ula tor y T ype : P 46E 001
Sep tem ber 20 20
Rev . A 02
Page 2

Notes, cautions, and warnings
NOTE: A NOTE indicates important information that helps you make better use of your product.
CAUTION: A CAUTION indicates either potential damage to hardware or loss of data and tells you how to avoid
the problem.
WARNING: A WARNING indicates a potential for property damage, personal injury, or death.
© 2020 Dell Inc. or its subsidiaries. All rights reserved. Dell, EM C, and other trademarks are trademarks of Dell Inc. or its subsidiaries. Oth er
trademarks may be trademarks of their respective owners.
Page 3

Contents
Chapter 1: Set up your Dell G7 17 7700.......................................................................................... 4
Chapter 2: Views of Dell G7 17 7700...............................................................................................6
Right....................................................................................................................................................................................... 6
Left..........................................................................................................................................................................................6
Back.........................................................................................................................................................................................7
Base........................................................................................................................................................................................ 8
Display.................................................................................................................................................................................... 9
Bottom..................................................................................................................................................................................10
Chapter 3: Specifications of Dell G7 17 7700.................................................................................11
Dimensions and weight......................................................................................................................................................11
Processor..............................................................................................................................................................................11
Chipset..................................................................................................................................................................................12
Operating system............................................................................................................................................................... 12
Memory.................................................................................................................................................................................12
External ports......................................................................................................................................................................13
Internal slots........................................................................................................................................................................ 13
Communications................................................................................................................................................................. 14
Audio..................................................................................................................................................................................... 14
Storage................................................................................................................................................................................. 15
Intel Optane memory.........................................................................................................................................................16
Media-card reader............................................................................................................................................................. 16
Keyboard.............................................................................................................................................................................. 17
Camera..................................................................................................................................................................................17
Touchpad............................................................................................................................................................................. 18
Power adapter.................................................................................................................................................................... 18
Battery..................................................................................................................................................................................19
Display...................................................................................................................................................................................19
Fingerprint reader (optional).......................................................................................................................................... 20
GPU—Integrated.............................................................................................................................................................. 20
GPU—Discrete...................................................................................................................................................................21
Operating and storage environment..............................................................................................................................21
Chapter 4: Keyboard shortcuts.................................................................................................... 22
Chapter 5: Getting help and contacting Dell................................................................................ 25
Contents 3
Page 4
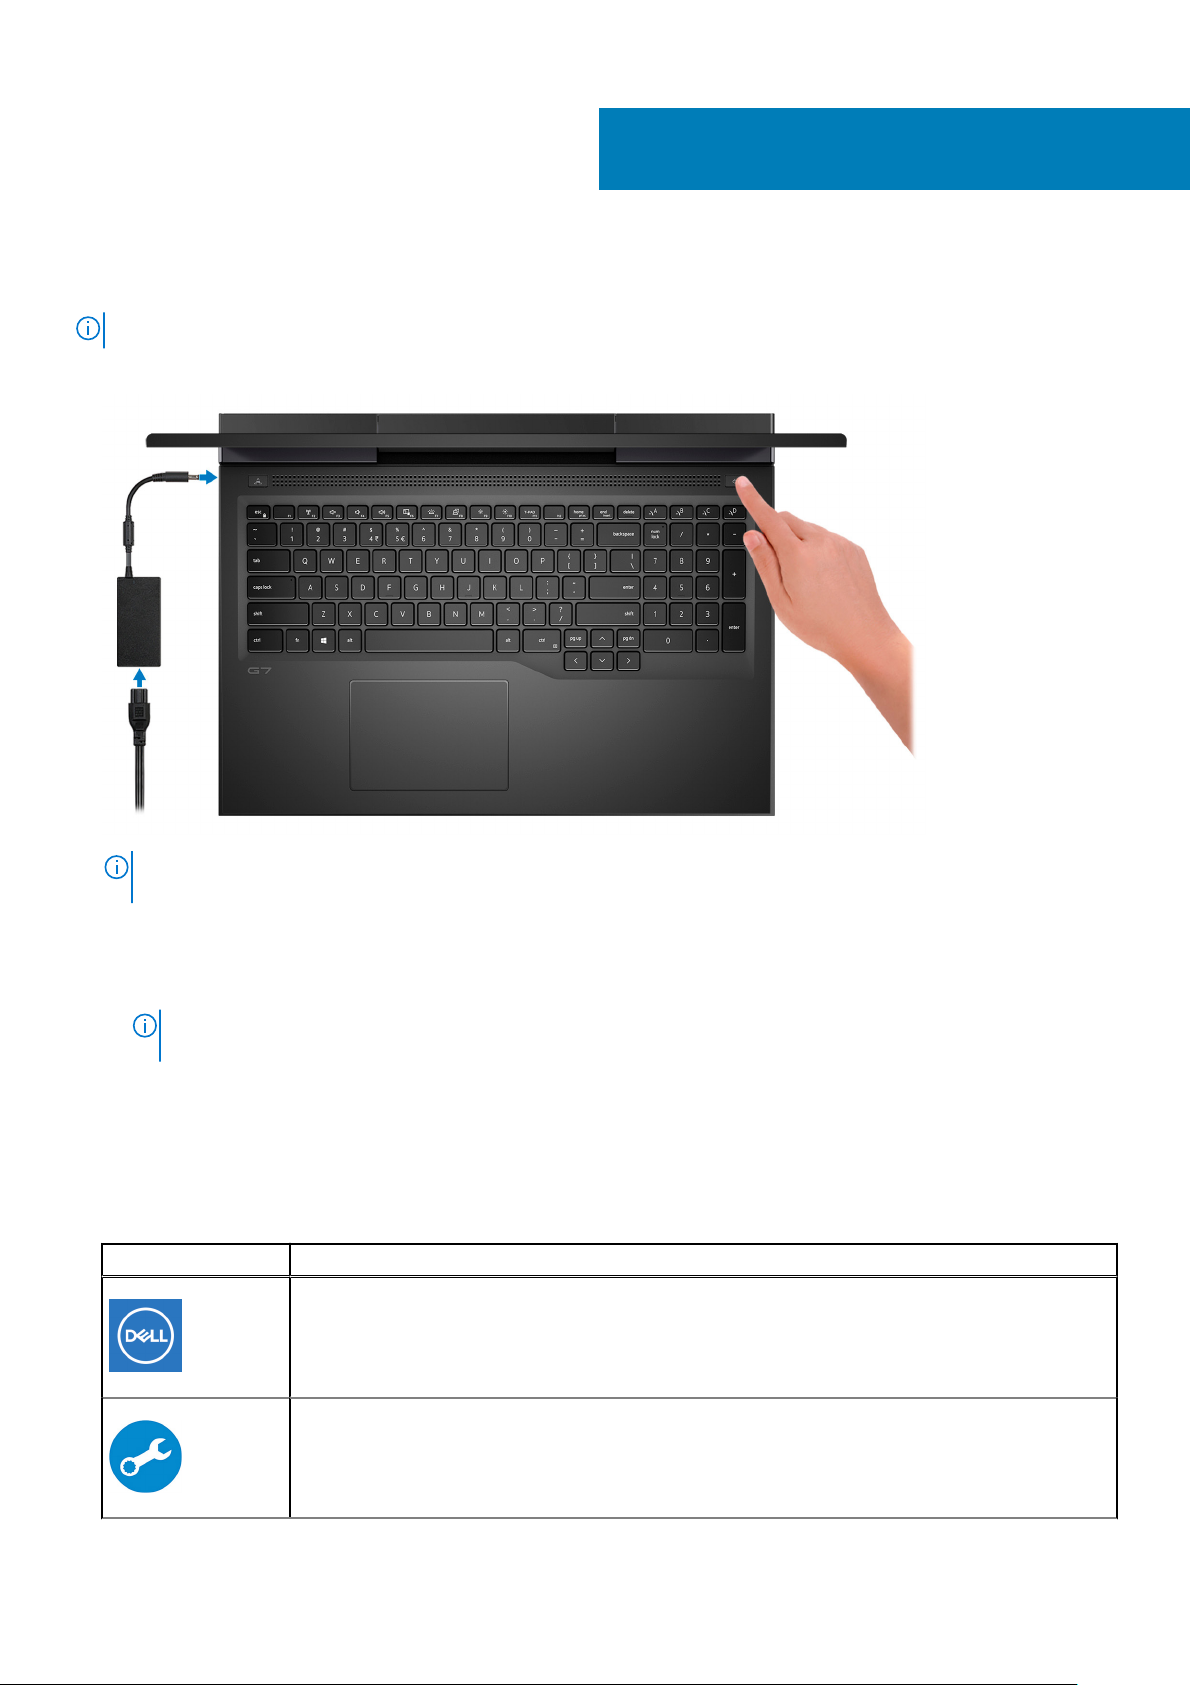
Set up your Dell G7 17 7700
NOTE: The images in this document may differ from your computer depending on the configuration you ordered.
1. Connect the power adapter and press the power button.
1
NOTE: The battery may go into power-saving mode during shipment to conserve charge on the battery. Ensure that the
power adapter is connected to your computer when it is turned on for the first time.
2. Finish Windows setup.
Follow the on-screen instructions to complete the setup. When setting up, Dell recommends that you:
● Connect to a network for Windows updates.
NOTE:
If connecting to a secured wireless network, enter the password for the wireless network access when
prompted.
● If connected to the Internet, sign in with or create a Microsoft account. If not connected to the Internet, create an
offline account.
● On the Support and Protection screen, enter your contact details.
3. Locate and use Dell apps from the Windows Start menu—Recommended.
Table 1. Locate Dell apps
Resources Description
My Dell
Centralized location for key Dell applications, help articles, and other important information about
your computer. It also notifies you about the warranty status, recommended accessories, and
software updates if available.
SupportAssist
Proactively checks the health of your computer’s hardware and software. The SupportAssist OS
Recovery tool troubleshoots issues with the operating system. For more information, see the
SupportAssist documentation at www.dell.com/support.
4 Set up your Dell G7 17 7700
Page 5

Table 1. Locate Dell apps (continued)
Resources Description
NOTE: In SupportAssist, click the warranty expiry date to renew or upgrade your warranty.
Dell Update
Updates your computer with critical fixes and latest device drivers as they become available. For
more information about using Dell Update, see the knowledge base article SLN305843 at
www.dell.com/support.
Dell Digital Delivery
Download software applications, which are purchased but not pre-installed on your computer. For
more information about using Dell Digital Delivery, see the knowledge base article 153764 at
www.dell.com/support.
Set up your Dell G7 17 7700 5
Page 6
Views of Dell G7 17 7700
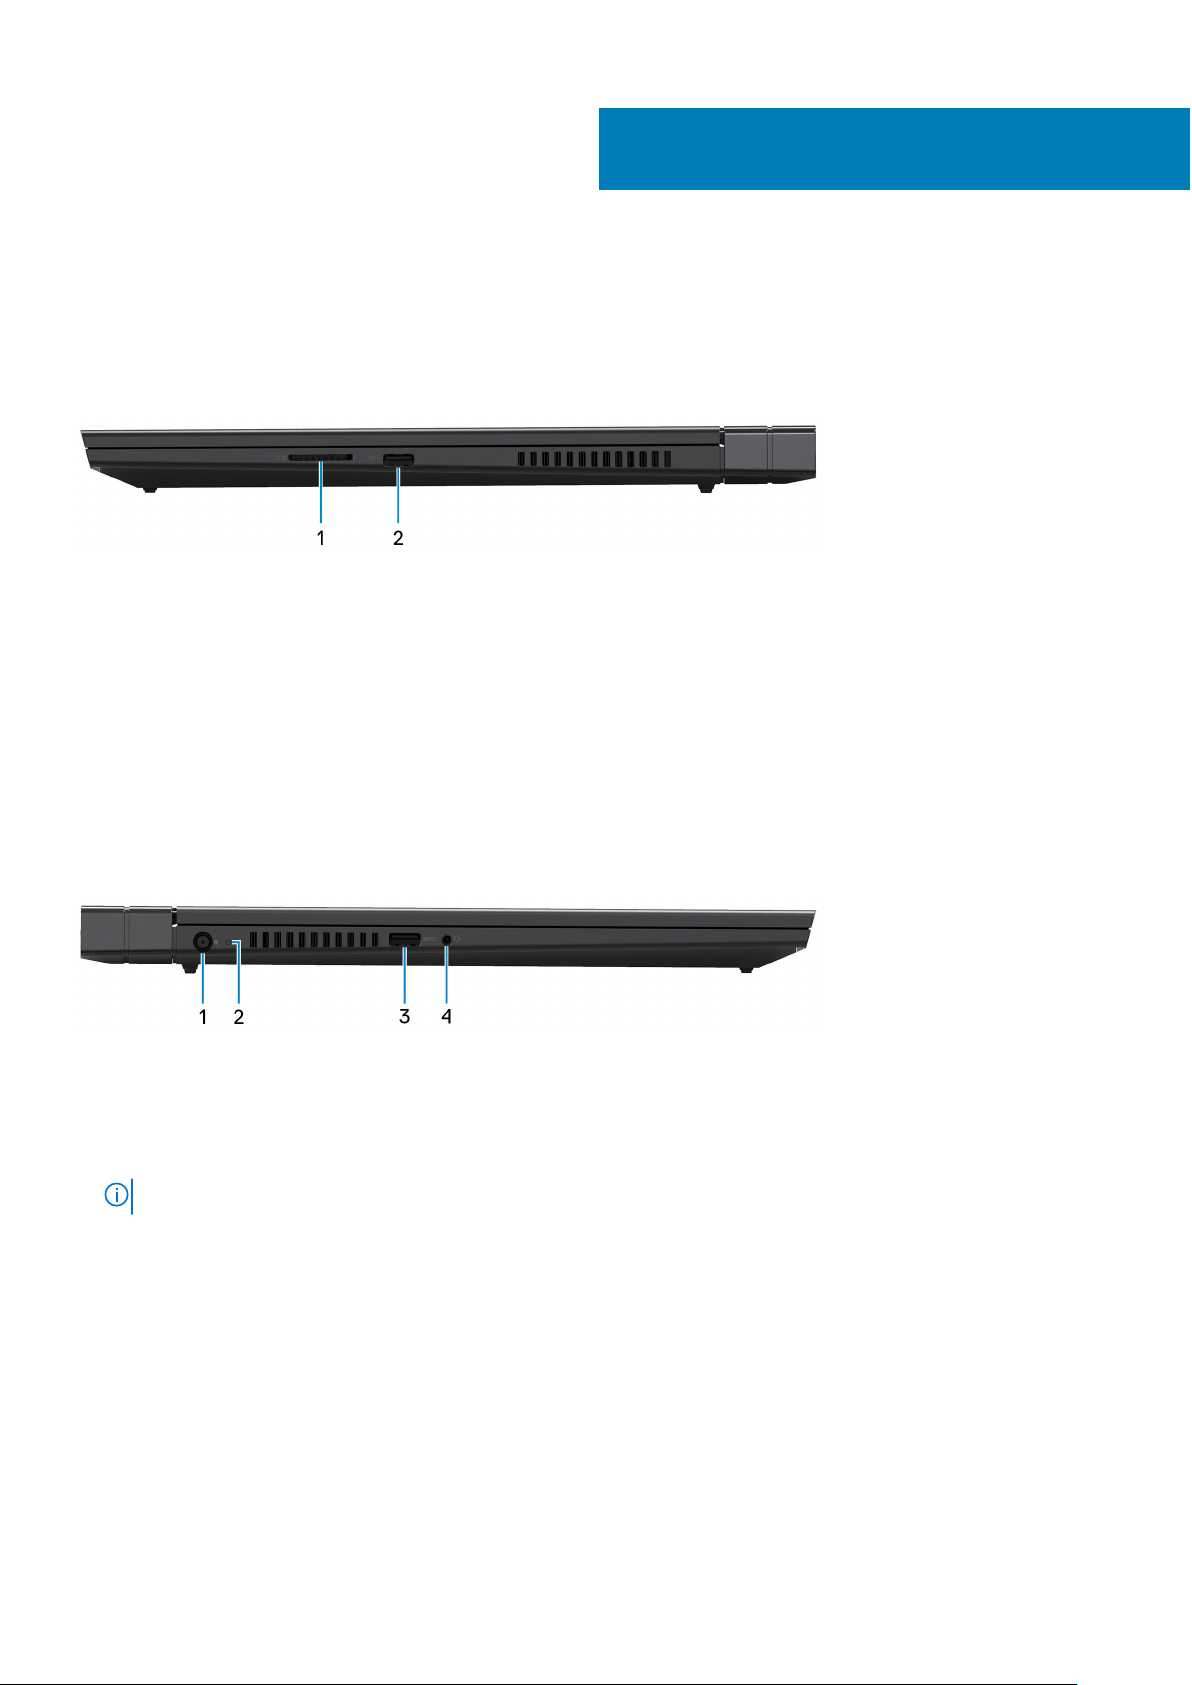
Right
1. SD-card slot
Reads from and writes to the SD card. The computer supports the following card types:
● Secure Digital (SD)
● Secure Digital High Capacity (SDHC)
● Secure Digital Extended Capacity (SDXC)
2. USB 3.2 Gen 1 port
Connect devices such as external storage devices and printers. Provides data transfer speeds up to 5 Gbps.
2
Left
1. Power-adapter port
Connect a power adapter to provide power to your computer and charge the battery.
2. Power and battery-status light/hard-drive activity light
Indicates the battery-charge status or the hard-drive activity.
NOTE: Press Fn+H to toggle between the power and battery-status light, and hard-drive activity light.
Hard-drive activity light (for computers shipped with a hard drive)
Turns on when the computer reads from or writes to the hard drive.
Power and battery-status light
Indicates the power and battery-charge status.
Solid white — Power adapter is connected and the battery has more than 5% charge.
Amber — Computer is running on battery and the battery has less than 5% charge.
Off
● Power adapter is connected and the battery is fully charged.
● Computer is running on battery and the battery has more than 5% charge.
6 Views of Dell G7 17 7700
Page 7
● Computer is in sleep state, hibernation, or turned off.
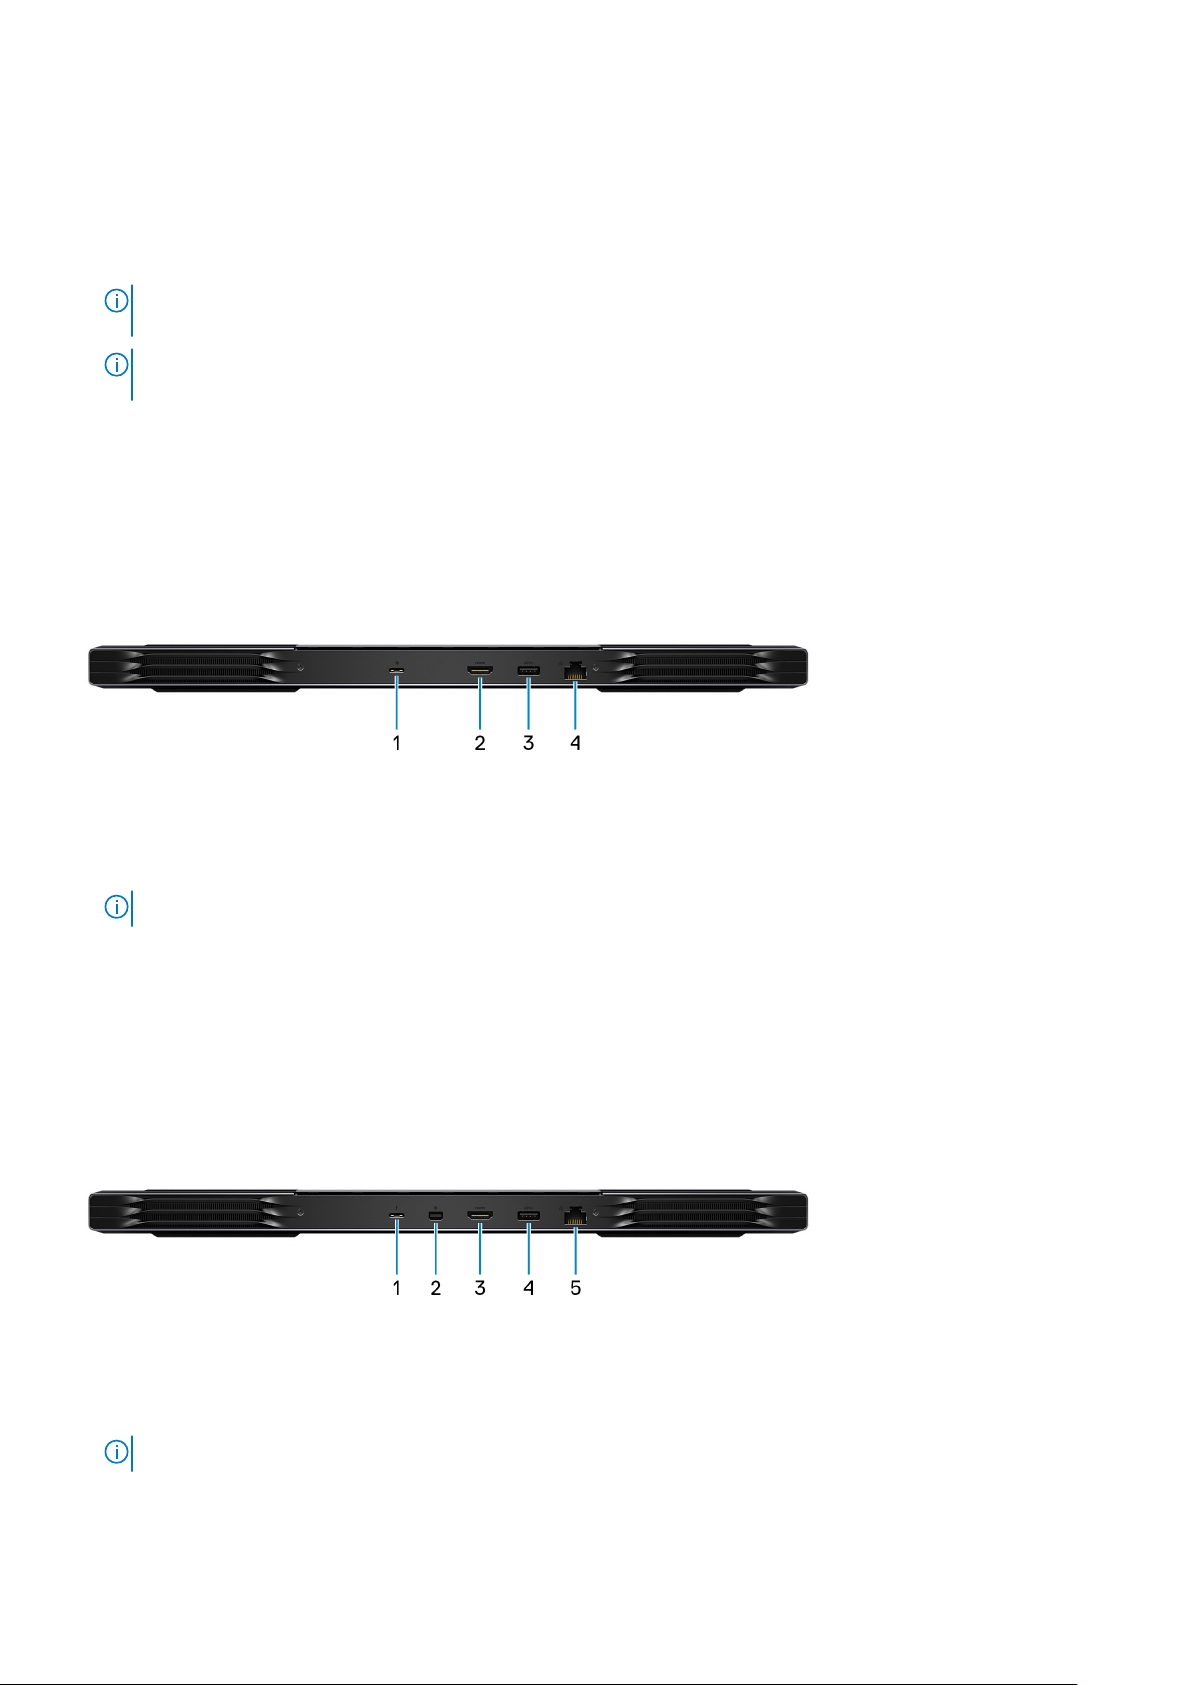
3. USB 3.2 Gen 1 port with PowerShare
Connect devices such as external storage devices and printers.
Provides data transfer speeds up to 5 Gbps. PowerShare enables you to charge your USB devices even when your computer
is turned off.
NOTE: If your computer is turned off or in hibernate state, you must connect the power adapter to charge your devices
using the PowerShare port. You must enable this feature in the BIOS setup program.
NOTE: Certain USB devices may not charge when the computer is turned off or in sleep state. In such cases, turn on
the computer to charge the device.
4. Headset port
Connect headphones or a headset (headphone and microphone combo).
Back
Computers shipped with NVIDIA GeForce GTX 1650 Ti
1. USB 3.2 Gen 2 Type-C port with DisplayPort
Connect peripherals such as external storage devices, printers, and external displays. Provides data transfer rate of up to 10
Gbps.
Supports DisplayPort 1.4 and also enables you to connect an external display using a USB Type-C to DisplayPort adapter.
NOTE: A USB Type-C to DisplayPort adapter (sold separately) is required to connect a DisplayPort device.
2. HDMI port
Connect to a TV or another HDMI-in enabled device. Provides video and audio output.
3. USB 3.2 Gen 1 port
Connect devices such as external storage devices and printers. Provides data transfer speeds up to 5 Gbps.
4. Network port
Connect an Ethernet (RJ45) cable from a router or a broadband modem for network or Internet access.
Computers shipped with NVIDIA GeForce GTX 1660 Ti, RTX 2060, RTX 2070, or RTX 2070 Super
1. Thunderbolt 3 USB Type-C port
Connect peripherals such as external storage devices, printers, and external displays. Provides data transfer rate of up to 40
Gbps.
Supports DisplayPort 1.4 and also enables you to connect an external display using a USB Type-C to DisplayPort adapter.
NOTE: A USB Type-C to DisplayPort adapter (sold separately) is required to connect a DisplayPort device.
2. Mini DisplayPort
Views of Dell G7 17 7700
7
Page 8
Connect to a TV or another DisplayPort-in enabled device. Provides video and audio output.
3. HDMI port
Connect to a TV or another HDMI-in enabled device. Provides video and audio output.
4. USB 3.2 Gen 1 port
Connect devices such as external storage devices and printers. Provides data transfer speeds up to 5 Gbps.
5. Network port
Connect an Ethernet (RJ45) cable from a router or a broadband modem for network or Internet access.
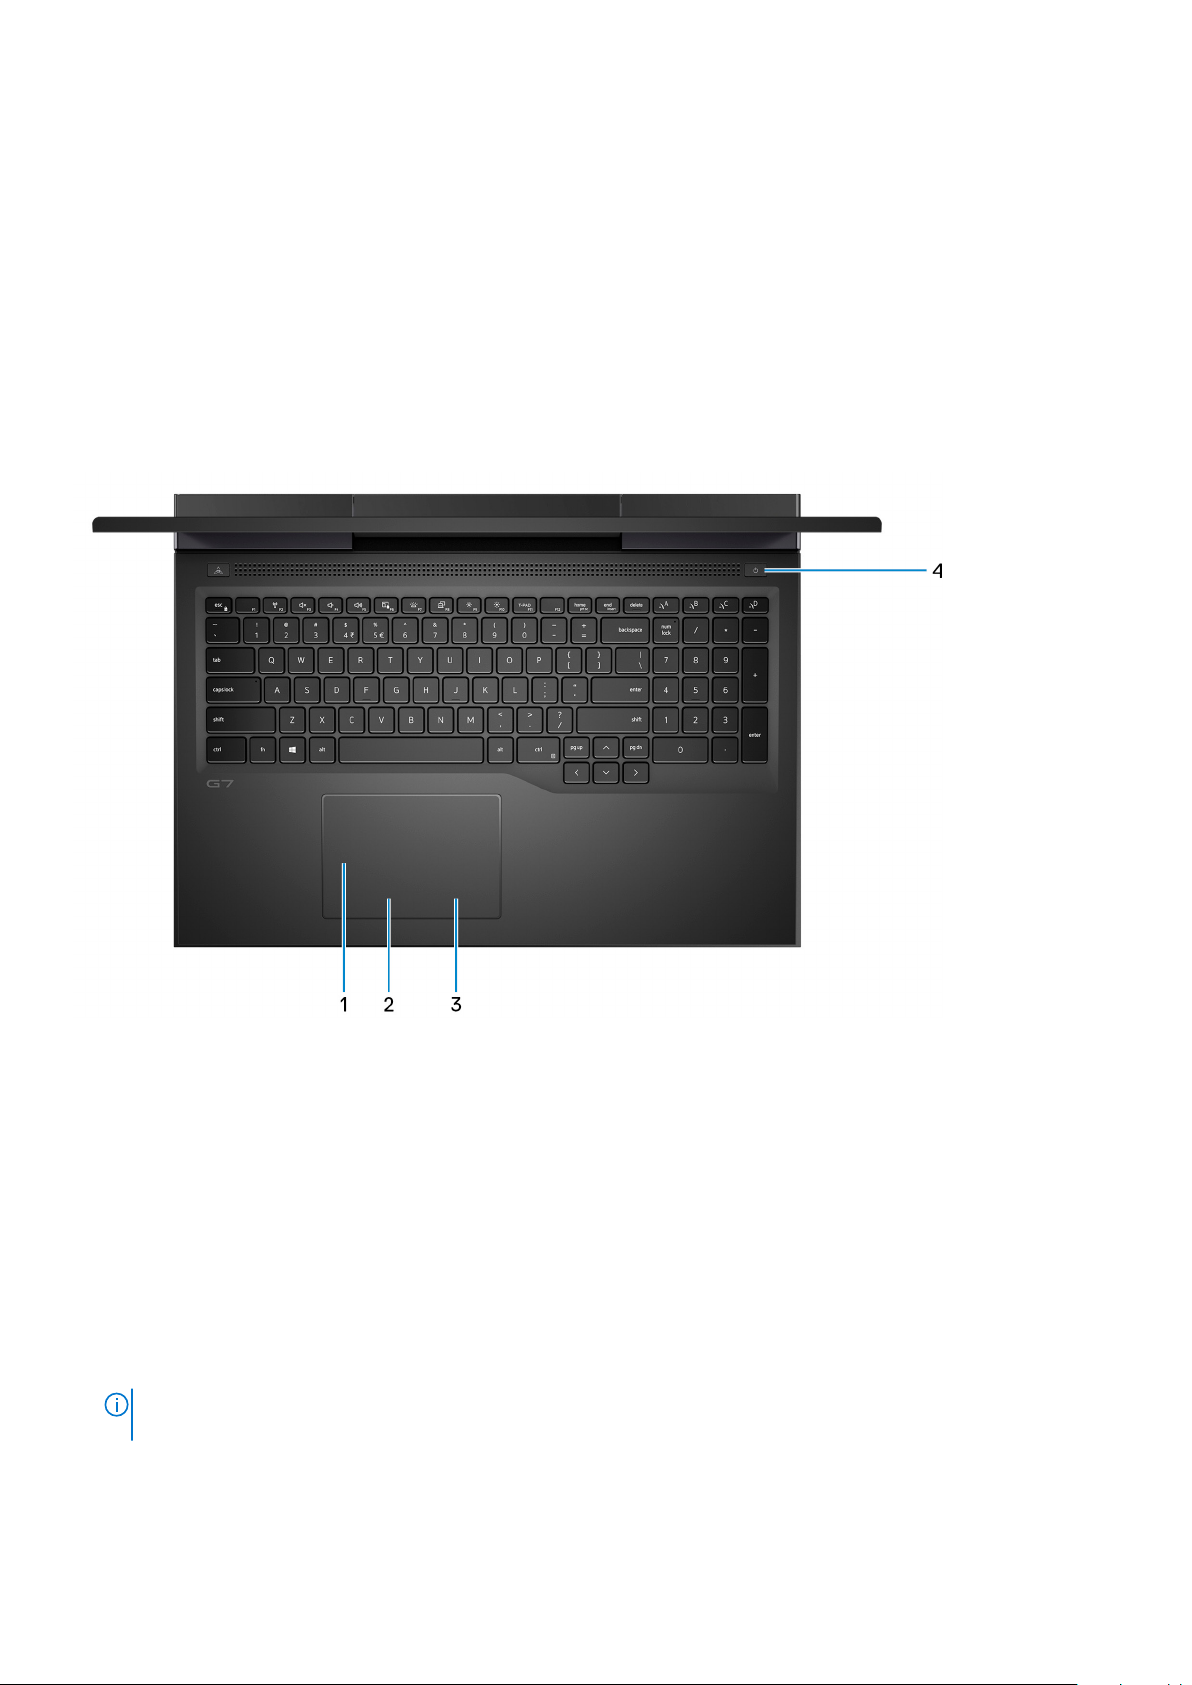
Base
1. Touchpad
Move your finger on the touchpad to move the mouse pointer. Tap to left-click and two finger tap to right-click.
2. Left-click area
Press to left-click.
3. Right-click area
Press to right-click.
4. Power button with optional fingerprint reader
Press to turn on the computer if it is turned off, in sleep state, or in hibernate state.
When the computer is turned on, press the power button to put the computer into sleep state; press and hold the power
button for 4 seconds to force shut-down the computer.
If the power button has a fingerprint reader, place your finger on the power button to log in.
You can customize power-button behavior in Windows. For more information, see Me and My Dell at
NOTE:
www.dell.com/support/manuals.
8 Views of Dell G7 17 7700
Page 9
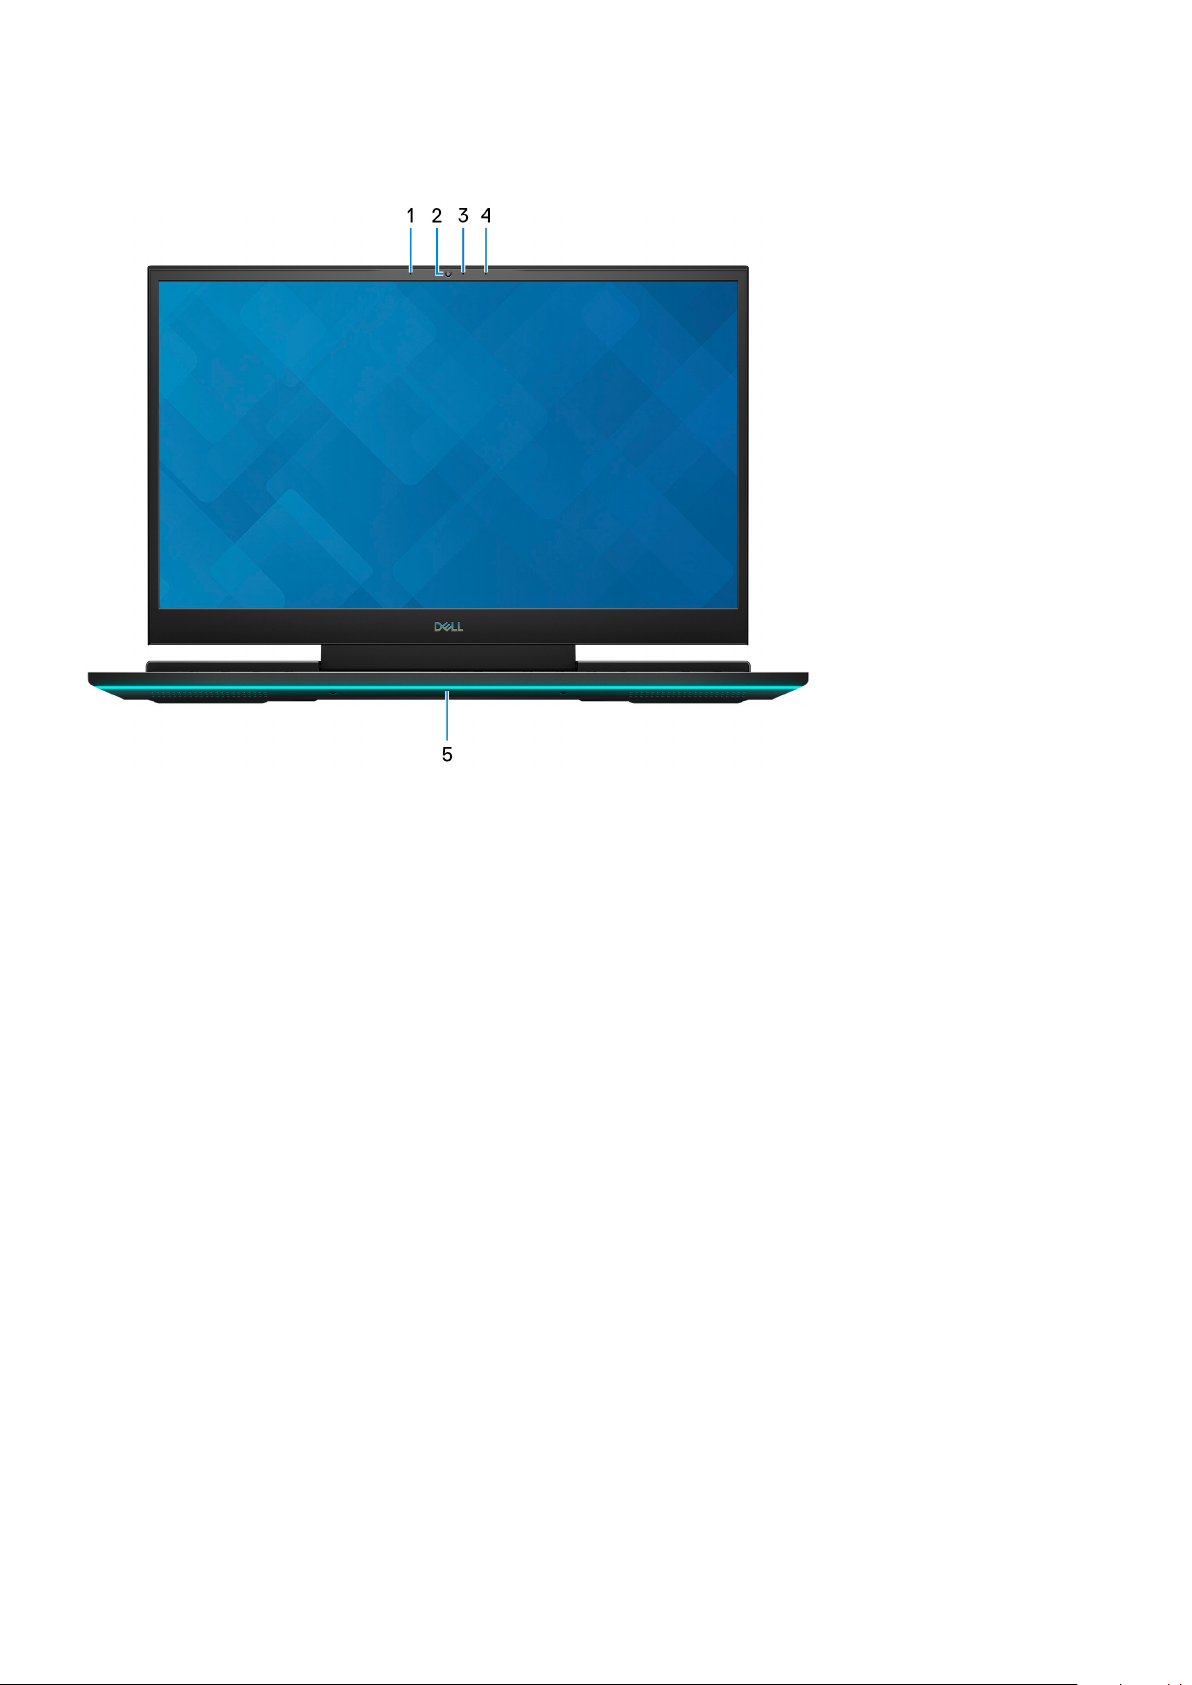
Display
1. Left microphone
Provides digital sound input for audio recording and voice calls.
2. Camera
Enables you to video chat, capture photos, and record videos.
3. Camera-status light
Turns on when the camera is in use.
4. Right microphone
Provides digital sound input for audio recording and voice calls.
5. Dynamic chassis light
Dynamic lighting that can be controlled using the Alienware Command Center.
Views of Dell G7 17 7700
9
Page 10
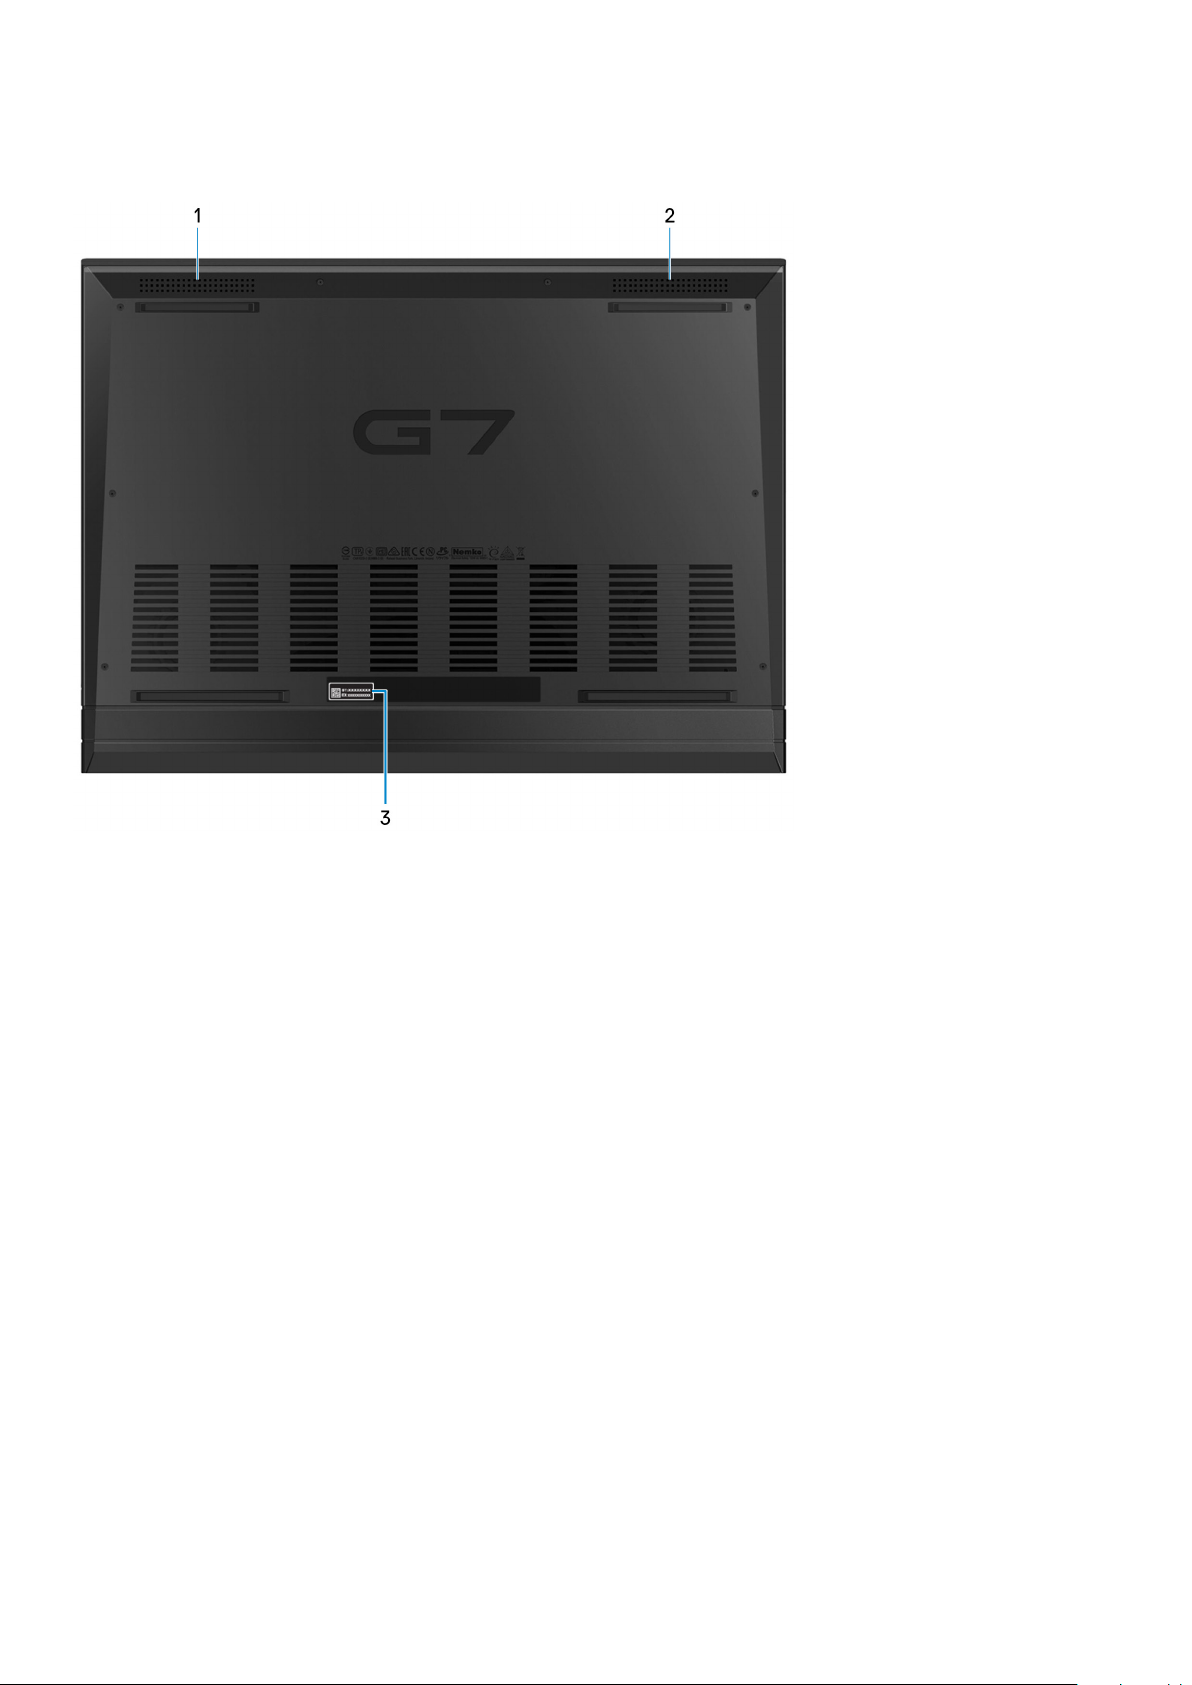
Bottom
1. Left speaker
Provides audio output.
2. Right speaker
Provides audio output.
3. Service Tag label
The Service Tag is a unique alphanumeric identifier that enables Dell service technicians to identify the hardware
components in your computer and access warranty information.
10
Views of Dell G7 17 7700
Page 11
Specifications of Dell G7 17 7700
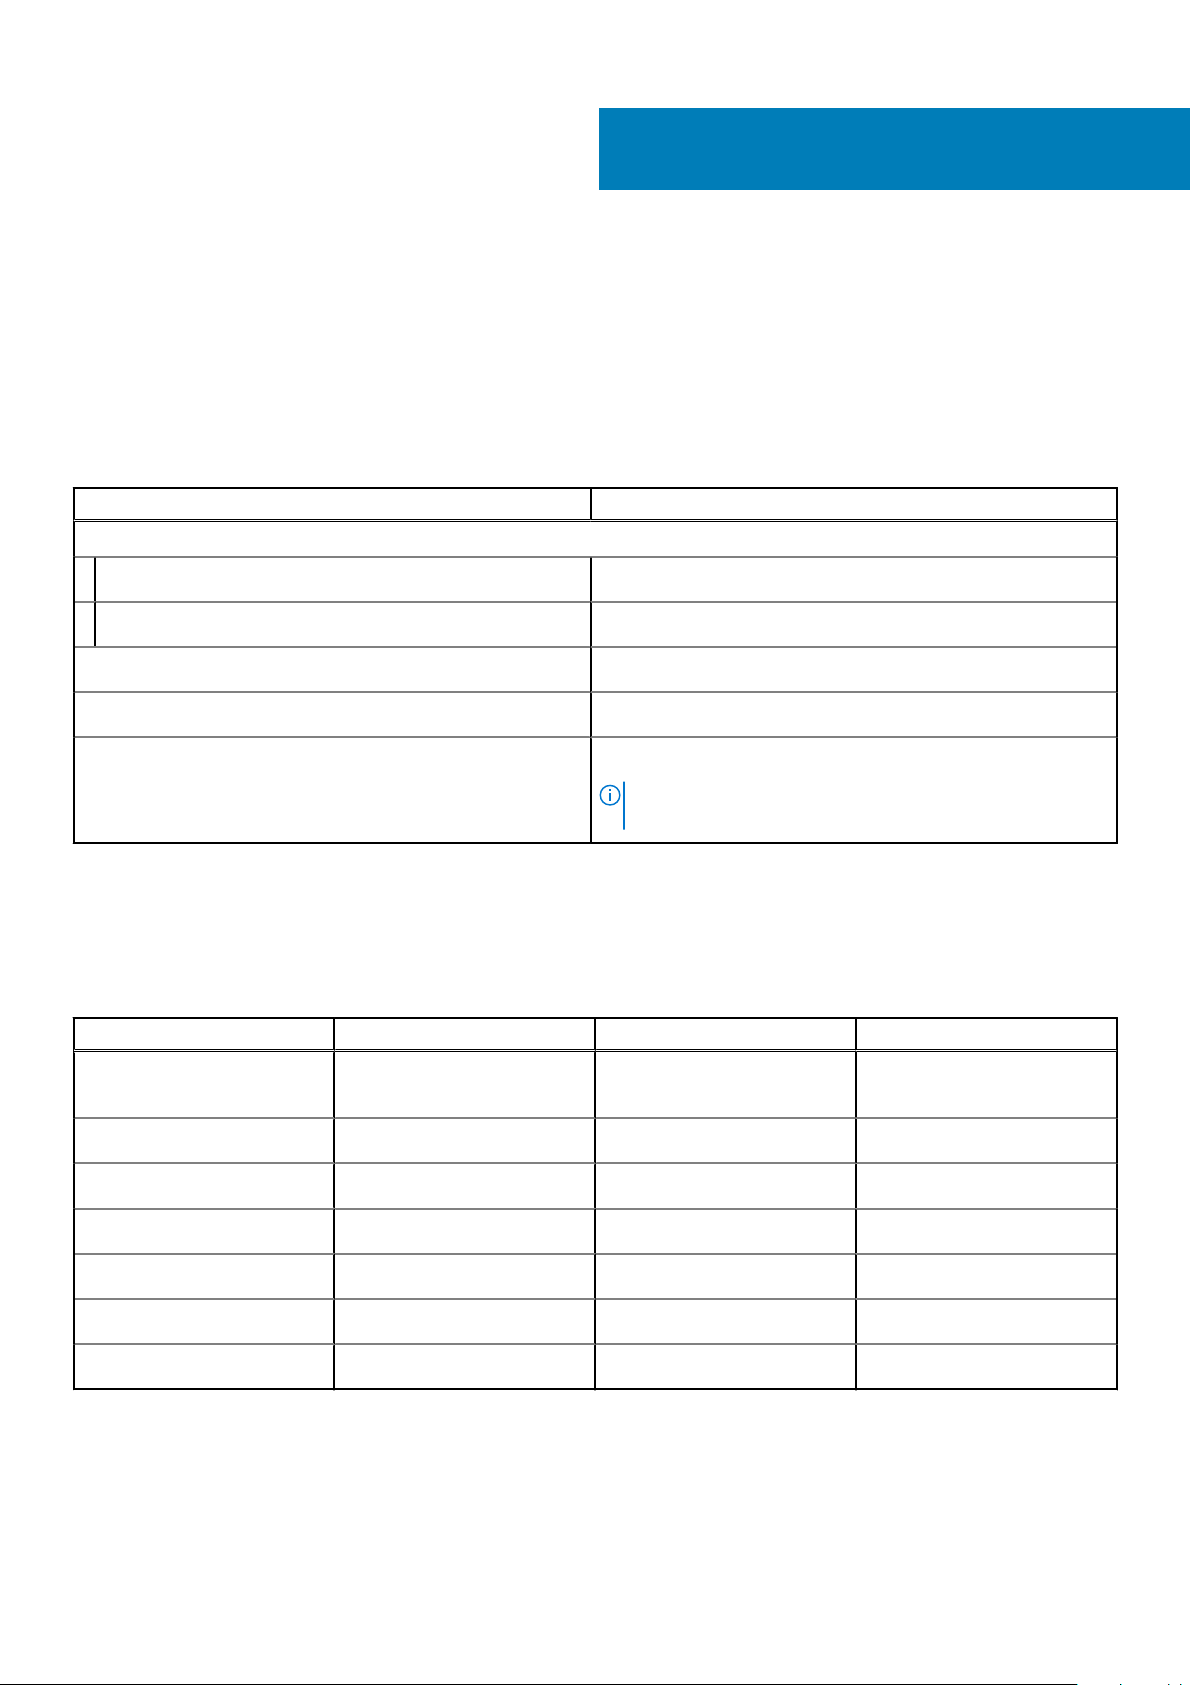
Dimensions and weight
The following table lists the height, width, depth, and weight of your Dell G7 17 7700.
Table 2. Dimensions and weight
Description Values
Height:
3
Front height
Rear height
Width
Depth
Weight (maximum)
19.30 mm (0.76 in.)
20.70 mm (0.81 in.)
398.20 mm (15.68 in.)
290 mm (11.42 in.)
3.29 kg (7.25 lb)
NOTE: The weight of your computer depends on the
configuration ordered and manufacturing variability.
Processor
The following table lists the details of the processors supported by your Dell G7 17 7700.
Table 3. Processor
Description Option one Option two Option three
Processor type
Processor wattage
10th Generation Intel Core
i5-10300H
45 W 45 W 45 W
10th Generation Intel Core
i7-10750H
10th Generation Intel Core
i9-10885H
Processor core count
Processor thread count
Processor speed
Processor cache
Integrated graphics
4 6 8
8 12 16
Up to 4.5 GHz Up to 5 GHz Up to 5.3 GHz
8 MB 12 MB 16 MB
Intel UHD Graphics Intel UHD Graphics Intel UHD Graphics
Specifications of Dell G7 17 7700 11
Page 12
Chipset
The following table lists the details of the chipset supported by your Dell G7 17 7700.
Table 4. Chipset
Description Values
Chipset
Processor
DRAM bus width
Flash EPROM
PCIe bus
HM470
10th Generation Intel Core i5/i7/i9
64-bit
24 MB
Up to Gen3
Operating system
Your Dell G7 17 7700 supports the following operating systems:
● Windows 10 Home, 64-bit
● Windows 10 Professional, 64-bit
Memory
The following table lists the memory specifications of your Dell G7 17 7700.
Table 5. Memory specifications
Description Values
Memory slots
Memory type
Memory speed
Maximum memory configuration
Minimum memory configuration
Memory size per slot
Memory configurations supported
Two SODIMM slots
Dual-channel DDR4
2933 MHz
32 GB
8 GB
4 GB, 8 GB, 16 GB
● 8 GB, 2 x 4 GB, DDR4, 2933 MHz, SODIMM, dual-channel
● 16 GB, 2 x 8 GB, DDR4, 2933 MHz, SODIMM, dual-
channel
● 32 GB, 2 x 16 GB, DDR4, 2933 MHz, SODIMM, dualchannel
12 Specifications of Dell G7 17 7700
Page 13
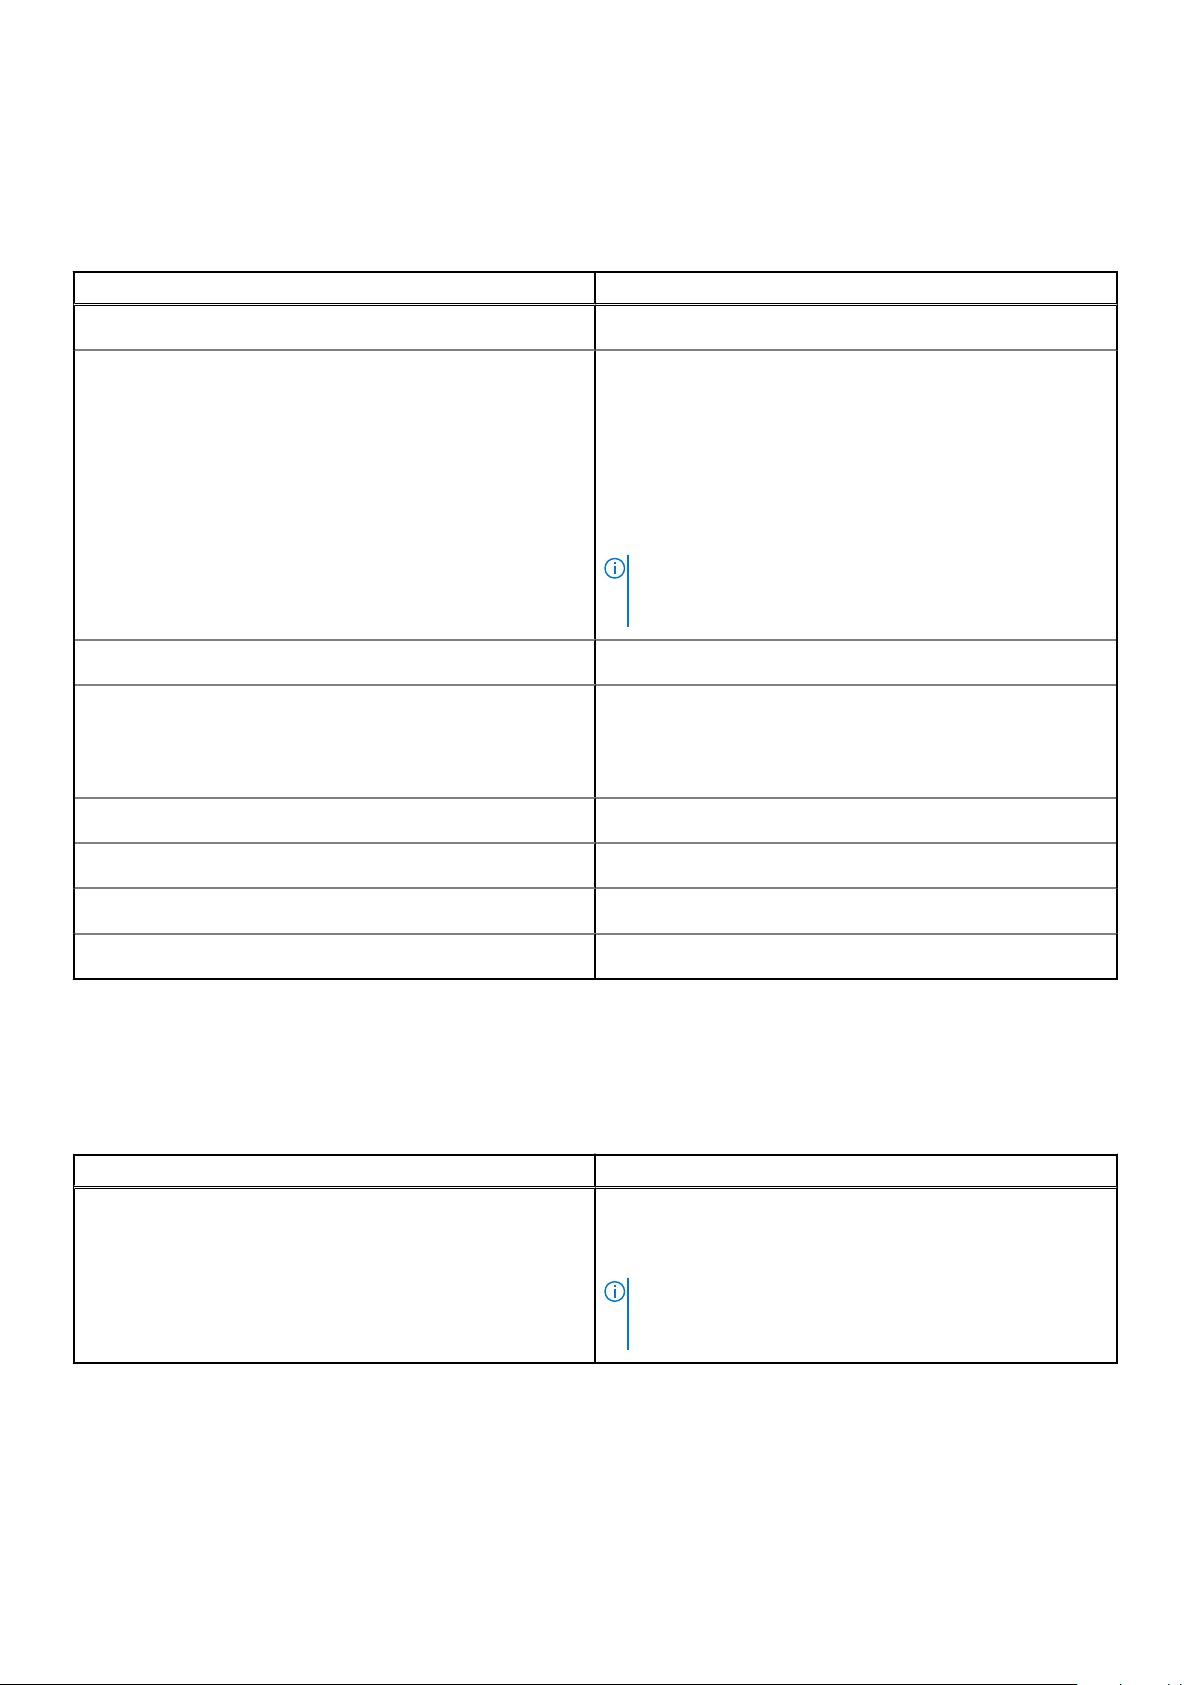
External ports
The following table lists the external ports of your Dell G7 17 7700.
Table 6. External ports
Description Values
Network port
USB ports
Audio port
Video port
Media-card reader
Docking port
One RJ45 port
● One USB 3.2 Gen 1 port with PowerShare
● Two USB 3.2 Gen 1 ports
● One USB 3.2 Gen 2 Type-C port with Power Delivery and
DisplayPort (only in computers shipped with NVIDIA
GeForce GTX 1650Ti graphics card)
● One Thunderbolt 3 Type-C port (only in computers
shipped with NVIDIA GeForce GTX 1660Ti, RTX 2060, RTX
2070, or RTX 2070 Super graphics card)
NOTE: Your computer supports either one USB 3.2 Gen 2
(Type-C) port with Power Delivery and DisplayPort or one
Thunderbolt 3 port.
One headset (headphone and microphone combo) port
● One HDMI 2.0 port
● One Mini DisplayPort 1.4 (only in computers shipped with
NVIDIA GeForce GTX 1660Ti, RTX 2060, RTX 2070, or
RTX 2070 Super graphics card)
One SD-card slot
Supported through USB Type-C port
Power-adapter port
Security
One 7.4 mm x 5.1 mm power-adapter port
Not supported
Internal slots
The following table lists the internal slots of your Dell G7 17 7700.
Table 7. Internal slots
Description Values
M.2
● One M.2 2230 slot for WiFi and Bluetooth combo card
● One M.2 2230/2280 slot for solid-state drive/Intel Optane
memory
NOTE: To learn more about the features of different
types of M.2 cards, see the knowledge base article
SLN301626 at www.dell.com/support.
Specifications of Dell G7 17 7700 13
Page 14
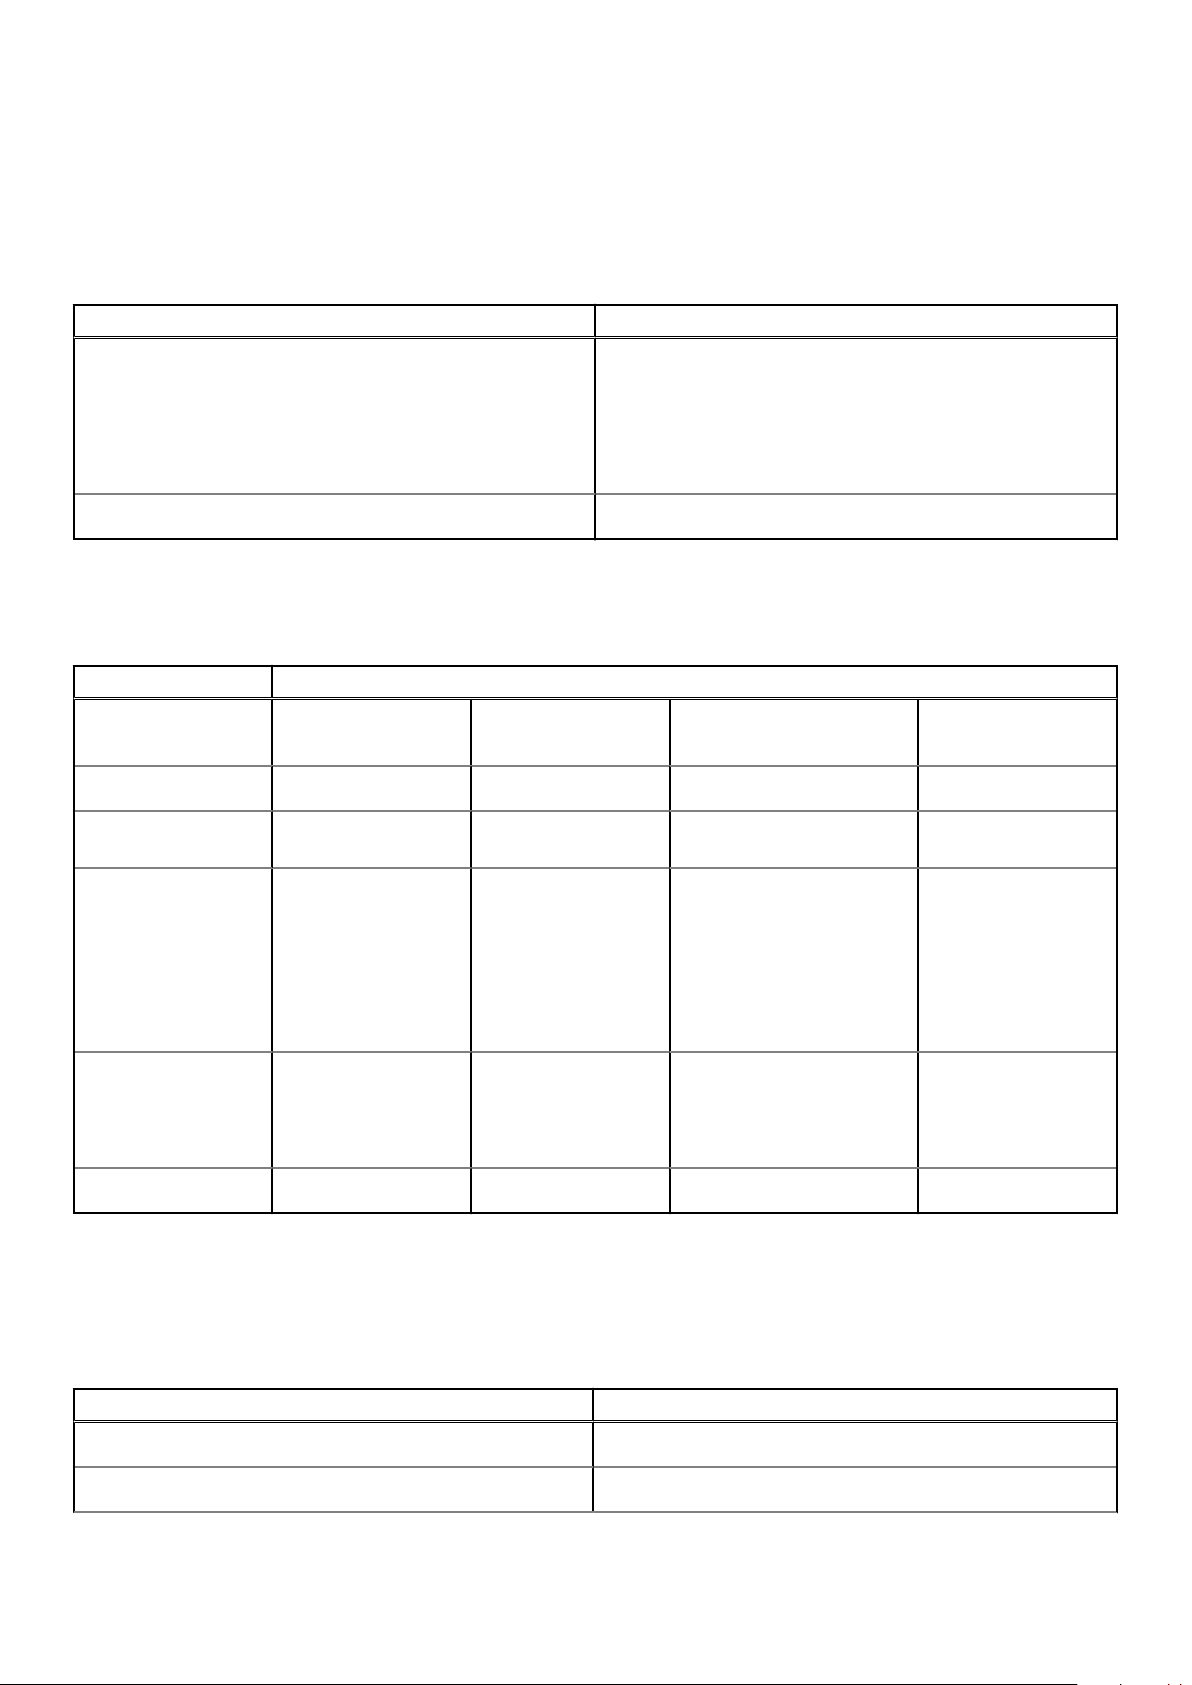
Communications
Ethernet
Table 8. Ethernet specifications
Description Values
Model number
Transfer rate
● Realtek RTL8111H Gigabit ethernet controller (only in
computers shipped with NVIDIA GeForce GTX 1650Ti
graphics card)
● Killer E2500V2 PCI-e Gigabit ethernet controller (only in
computers shipped with NVIDIA GeForce GTX 1660Ti, RTX
2060, RTX 2070, or RTX 2070 Super graphics card)
10/100/1000 Mbps
Wireless module
Table 9. Wireless module specifications
Description Options
Model number
Transfer rate
Frequency bands
supported
Wireless standards
Killer 1650i Intel AX201 Intel 9560 Qualcomm QCA61x4A
Up to 2400 Mbps Up to 2400 Mbps Up to 1733 Mbps Up to 867 Mbps
2.4 GHz/5 GHz 2.4 GHz/5 GHz 2.4 GHz/5 GHz 2.4 GHz/5 GHz
● WiFi 802.11a/b/g
● Wi-Fi 4 (WiFi
802.11n)
● Wi-Fi 5 (WiFi
802.11ac)
● Wi-Fi 6 (WiFi
802.11ax)
● WiFi 802.11a/b/g
● Wi-Fi 4 (WiFi
802.11n)
● Wi-Fi 5 (WiFi
802.11ac)
● Wi-Fi 6 (WiFi
802.11ax)
● WiFi 802.11a/b/g
● Wi-Fi 4 (WiFi 802.11n)
● Wi-Fi 5 (WiFi 802.11ac)
(DW1820)
● WiFi 802.11a/b/g
● Wi-Fi 4 (WiFi
802.11n)
● Wi-Fi 5 (WiFi
802.11ac)
Encryption
Bluetooth
● 64-bit/128-bit
WEP
● AES-CCMP
● TKIP
Bluetooth 5.1 Bluetooth 5.1 Bluetooth 5.0 Bluetooth 5.0
● 64-bit/128-bit
WEP
● AES-CCMP
● TKIP
Audio
The following table lists the audio specifications of your Dell G7 17 7700.
Table 10. Audio specifications
Description Values
Audio controller
Stereo conversion
14 Specifications of Dell G7 17 7700
Realtek ALC3281 with Nahimic 3D Audio for Gamers
Supported
● 64-bit/128-bit WEP
● AES-CCMP
● TKIP
● 64-bit/128-bit
WEP
● AES-CCMP
● TKIP
Page 15
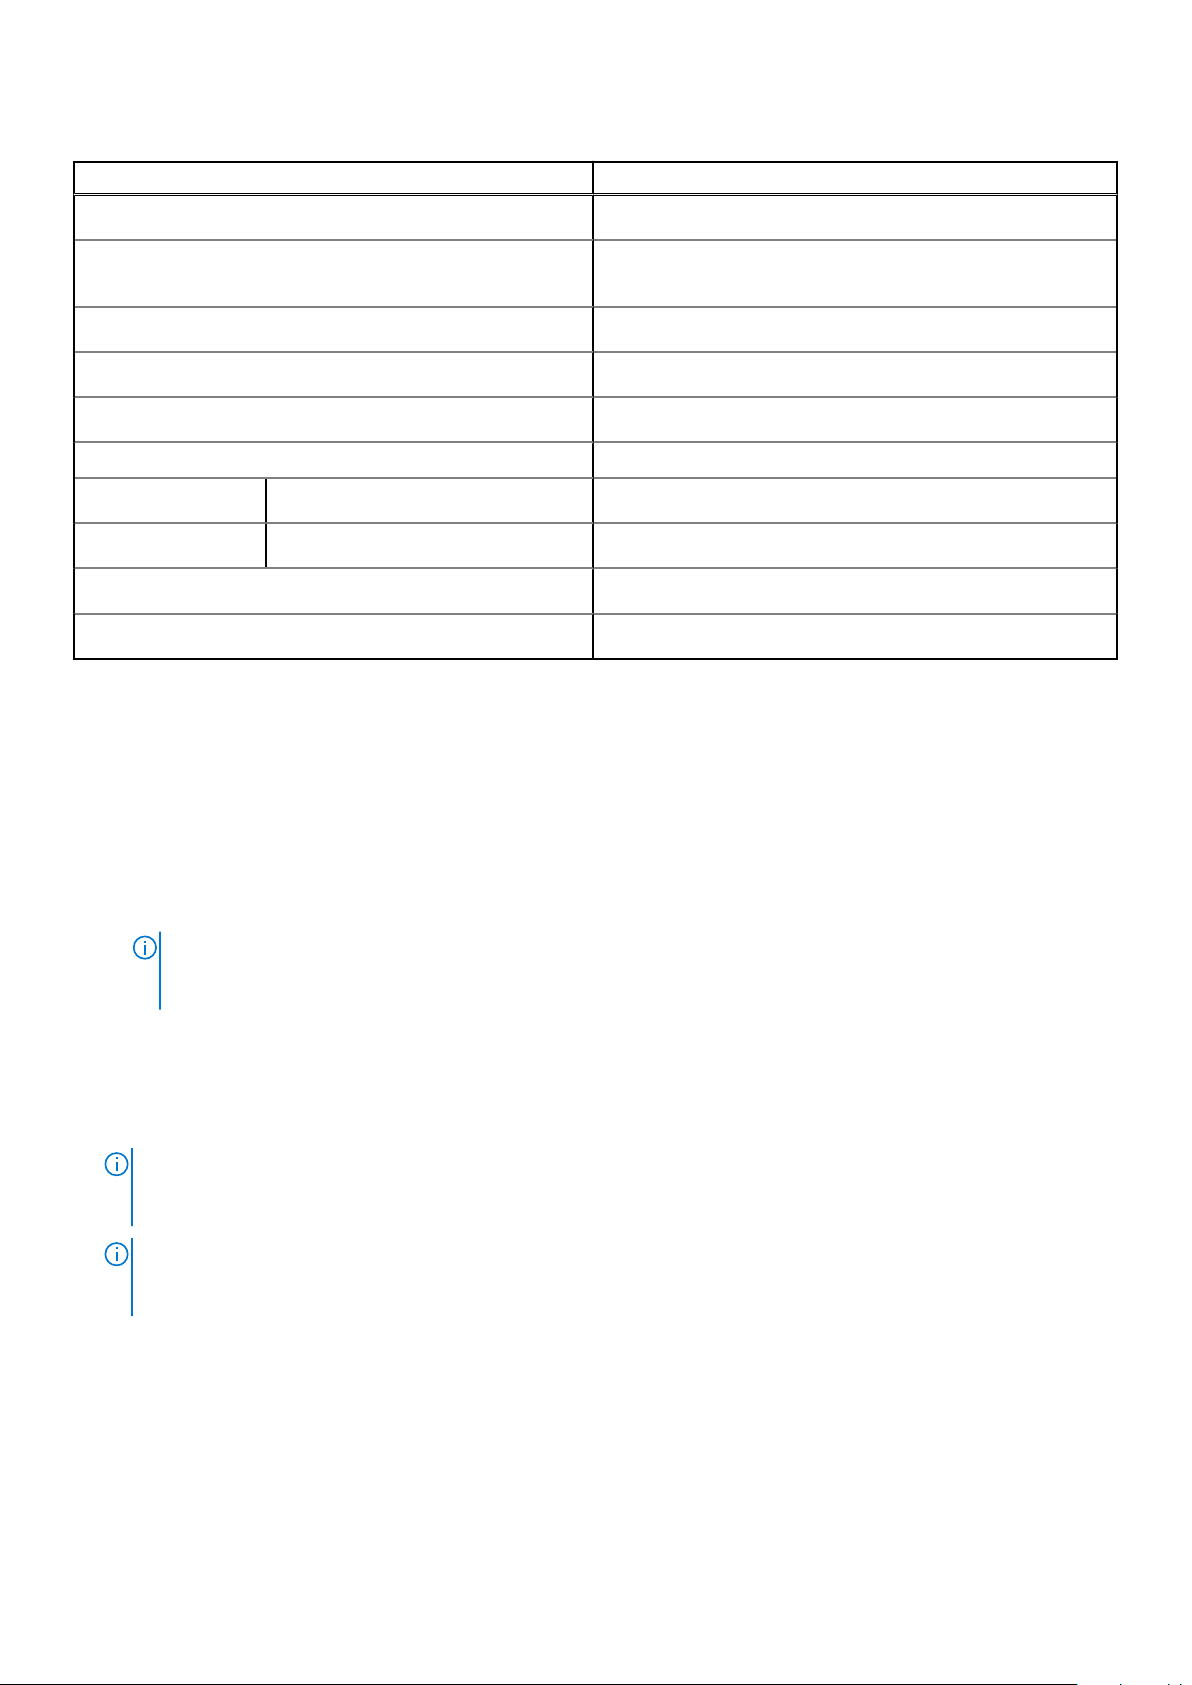
Table 10. Audio specifications (continued)
Description Values
Internal audio interface
External audio interface
Number of speakers
Internal-speaker amplifier
External volume controls
Speaker output:
Average speaker output
Peak speaker output
Subwoofer output
Microphone
Intel High-Definition Audio (HDA) via HDMI
Headset combo connector/Digital-array microphone input on
camera module
Two
Supported (audio codec built-in amplifier)
Keyboard shortcut controls
2 W
2.5 W
Not supported
Dual-array microphones
Storage
This section lists the storage options on your Dell G7 17 7700.
Your Dell G7 17 7700 supports various storage configurations, depending on the computer configuration ordered.
● If your computer is shipped with NVIDIA GeForce GTX 1650Ti graphics card, it has one of the following storage options:
○ One 2.5-inch hard drive (for computers shipped with 3-cell, 56 WHr battery)
○ One 2.5-inch hard drive and one Intel Optane Memory M10 (for computers shipped with 3-cell, 56 WHr battery)
○ One M.2 2230 or M.2 2280 solid-state drive (for computers shipped with 3-cell, 56 WHr or 6-cell, 97 WHr battery)
NOTE:
The solid-state drive is secured to the system board by a solid-state drive bracket that is specific to the form
factor of the solid-state drive. If you are replacing a solid-state drive, ensure that the new solid-state drive has the
same form factor. For example, replace an M.2 2280 solid-state drive with an M.2 2280 solid-state drive.
● If your computer is shipped with NVIDIA GeForce GTX 1660Ti, RTX 2060, RTX 2070, or RTX 2070 Super graphics card, it
has one of the following storage options:
○ Up to two M.2 2230 solid-state drives
○ Up to two M.2 2280 solid-state drives
○ One M.2 2230 solid-state drive and one M.2 2280 solid-state drive
NOTE:
The solid-state drive is secured to the system board by a solid-state drive bracket that is specific to the form
factor of the solid-state drive. If you are replacing a solid-state drive, ensure that the new solid-state drive has the same
form factor. For example, replace an M.2 2280 solid-state drive with an M.2 2280 solid-state drive.
NOTE: If you have ordered only one solid-state drive, it can be upgraded to the solid-state drive of the same form
factor but an additional solid-state drive is not supported. If you have ordered two solid-state drives, they can be
upgraded to the solid-state drives of the same form factor respectively.
The primary drive of your Dell G7 17 7700 varies with the storage configuration. For computers:
● with an M.2 solid-state drive, the M.2 solid-state drive is the primary drive
● without an M.2 solid-state drive, the 2.5-inch hard drive is the primary drive
Specifications of Dell G7 17 7700
15
Page 16
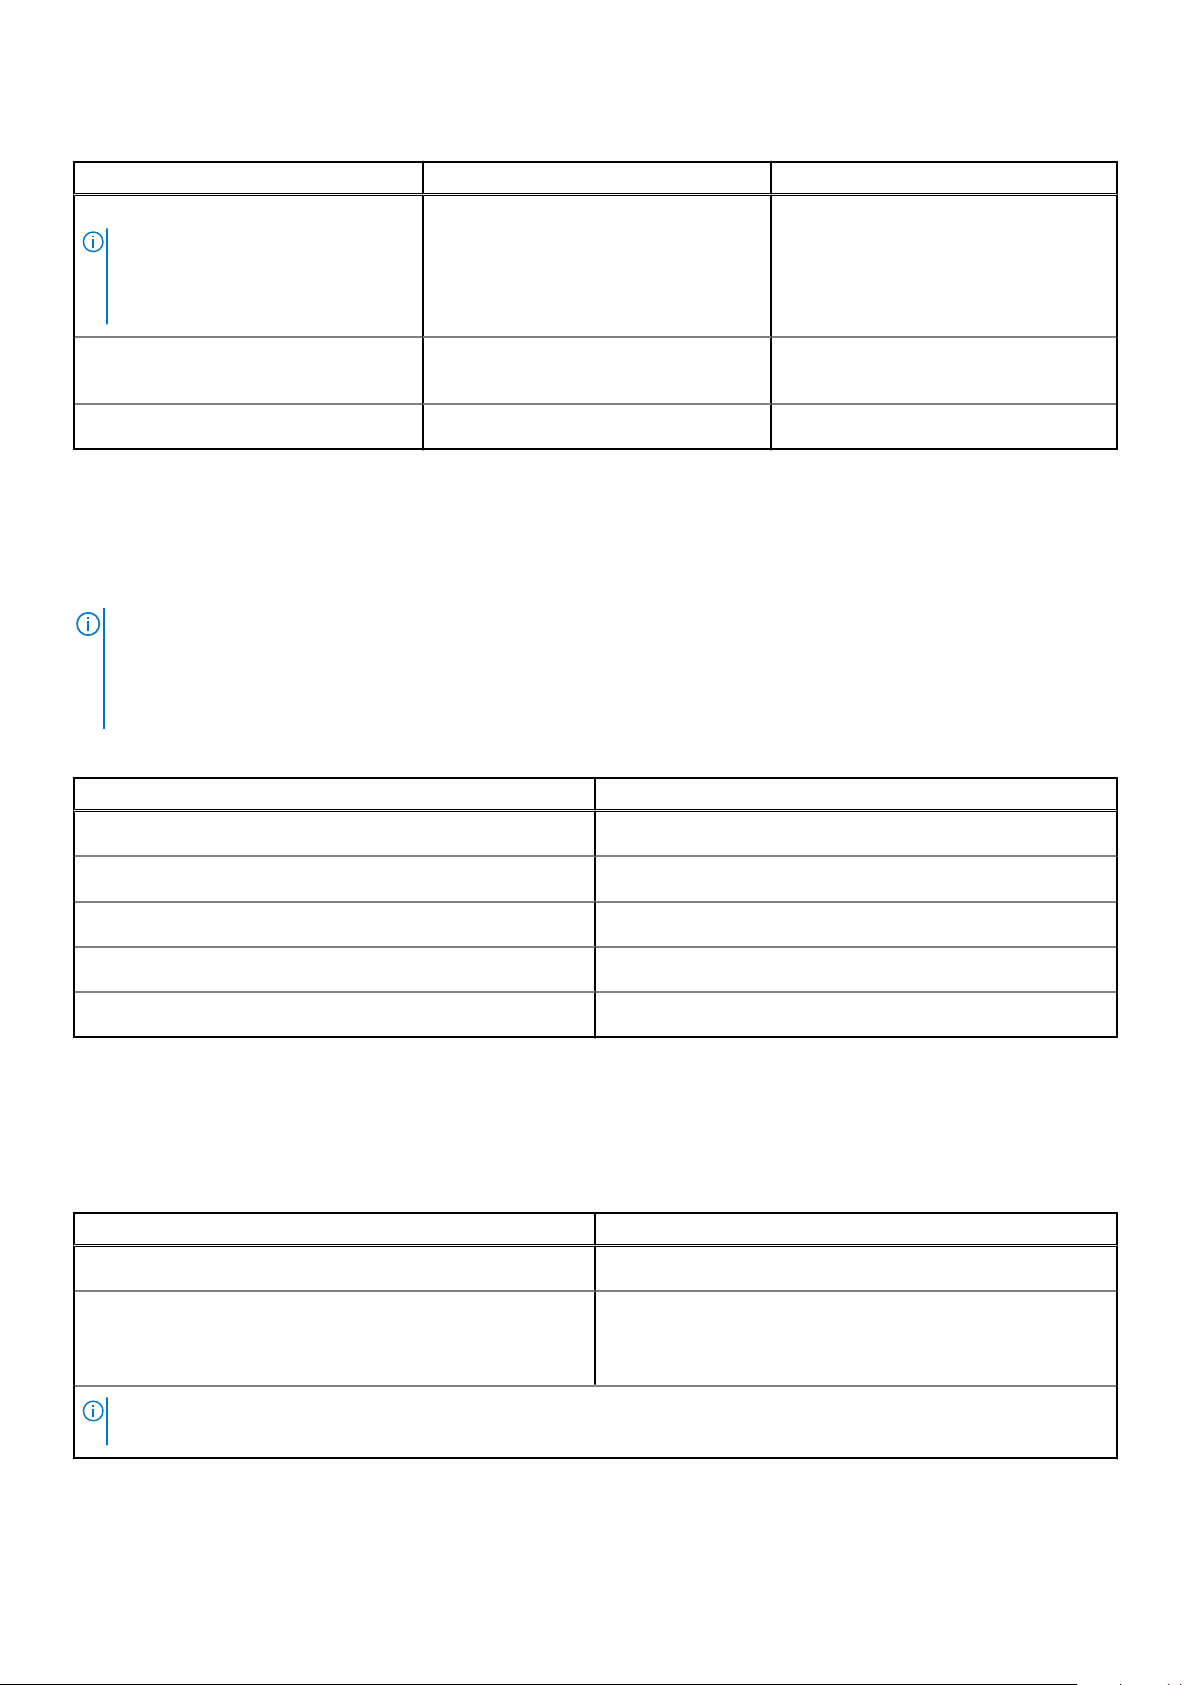
Table 11. Storage specifications
Storage type Interface type Capacity
2.5-inch hard drive
NOTE: Applies only to computers
shipped with NVIDIA GeForce GTX
1650Ti graphics card and 3-cell, 56
Wh battery)
M.2 2230/2280 solid-state drive PCIe Gen3 x4 NVMe Up to 1 TB (M.2 2230) and 2 TB (M.2
M.2 2280 Intel Optane memory PCIe Gen3 x2 NVMe Up to 32 GB
SATA AHCI, up to 6 Gbps Up to 2 TB
2280)
Intel Optane memory
Intel Optane memory functions only as a storage accelerator. It neither replaces nor adds to the memory (RAM) installed on
your computer.
NOTE: Intel Optane memory is supported on computers that meet the following requirements:
● 7th Generation or higher Intel Core i3/i5/i7 processor
● Windows 10 64-bit version or higher (Anniversary Update)
● Latest version of Intel Rapid Storage Technology driver
Table 12. Intel Optane memory
Description Values
Type
Interface
Connector
Configurations supported
Capacity
Storage accelerator
PCIe 3.0x2
M.2 2280
32 GB
32 GB
Media-card reader
The following table lists the media cards supported by your Dell G7 17 7700.
Table 13. Media-card reader specifications
Description Values
Media-card type
Media-cards supported
One SD card
● Secure Digital (SD)
● Secure Digital High Capacity (SDHC)
● Secure Digital Extended Capacity (SDXC)
NOTE: The maximum capacity supported by the media-card reader varies depending on the standard of the media card
installed in your computer.
16 Specifications of Dell G7 17 7700
Page 17
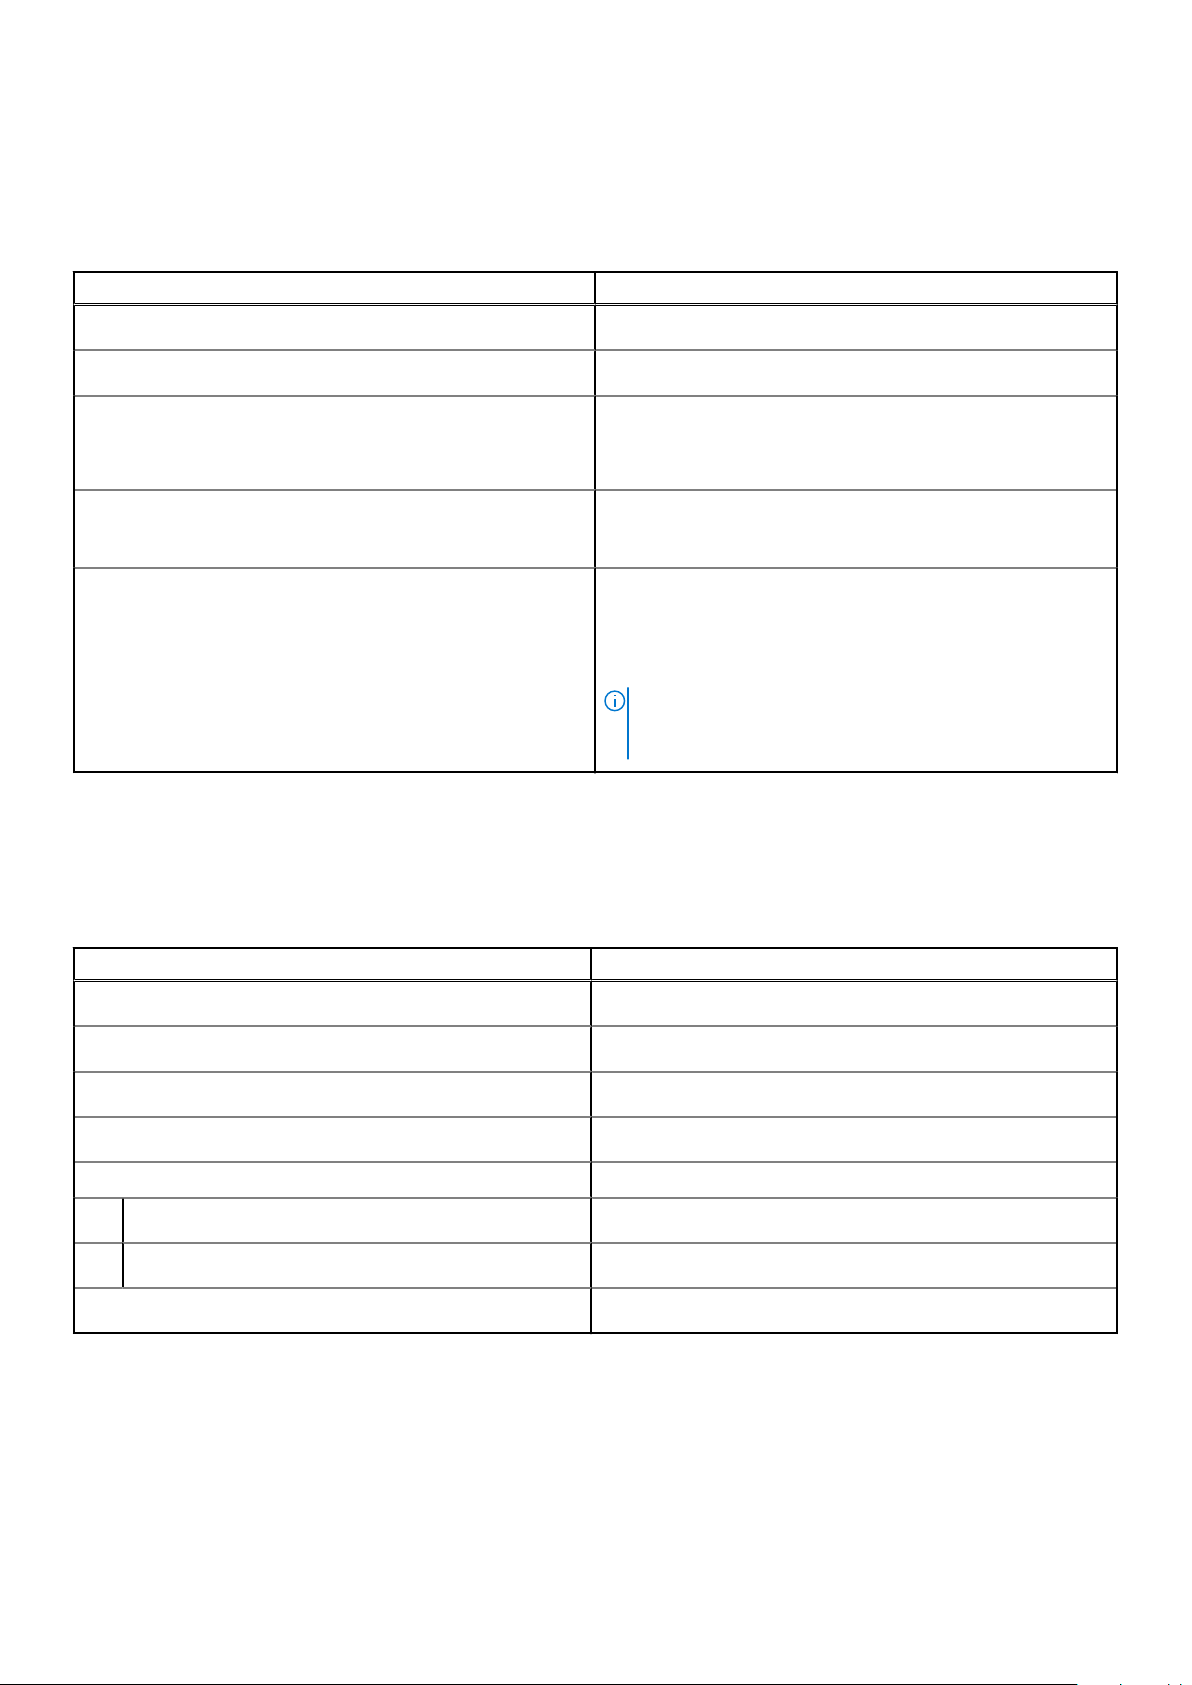
Keyboard
The following table lists the keyboard specifications of your Dell G7 17 7700.
Table 14. Keyboard specifications
Description Values
Keyboard type
Keyboard layout
Number of keys
Keyboard size
Keyboard shortcuts
Four-zone RGB backlit keyboard
QWERTY
● United States and Canada: 103 keys
● United Kingdom: 104 keys
● Japan: 107 keys
X=19.05 mm key pitch
Y=19.05 mm key pitch
Some keys on your keyboard have two symbols on them.
These keys can be used to type alternate characters or to
perform secondary functions. To type the alternate character,
press Shift and the desired key. To perform secondary
functions, press the fn key and the desired key.
NOTE: You can define the primary behavior of the
function keys (F1–F12) changing Function Key Behavior
in BIOS setup program.
Camera
The following table lists the camera specifications of your Dell G7 17 7700.
Table 15. Camera specifications
Description Values
Number of cameras
Camera type
Camera location
Camera sensor type
Camera resolution:
Still image
Video
Diagonal viewing angle:
One
HD RGB camera
Front
CMOS sensor technology
0.92 megapixel
1280 x 720 (HD) at 30 fps
74.9 degrees
Specifications of Dell G7 17 7700 17
Page 18
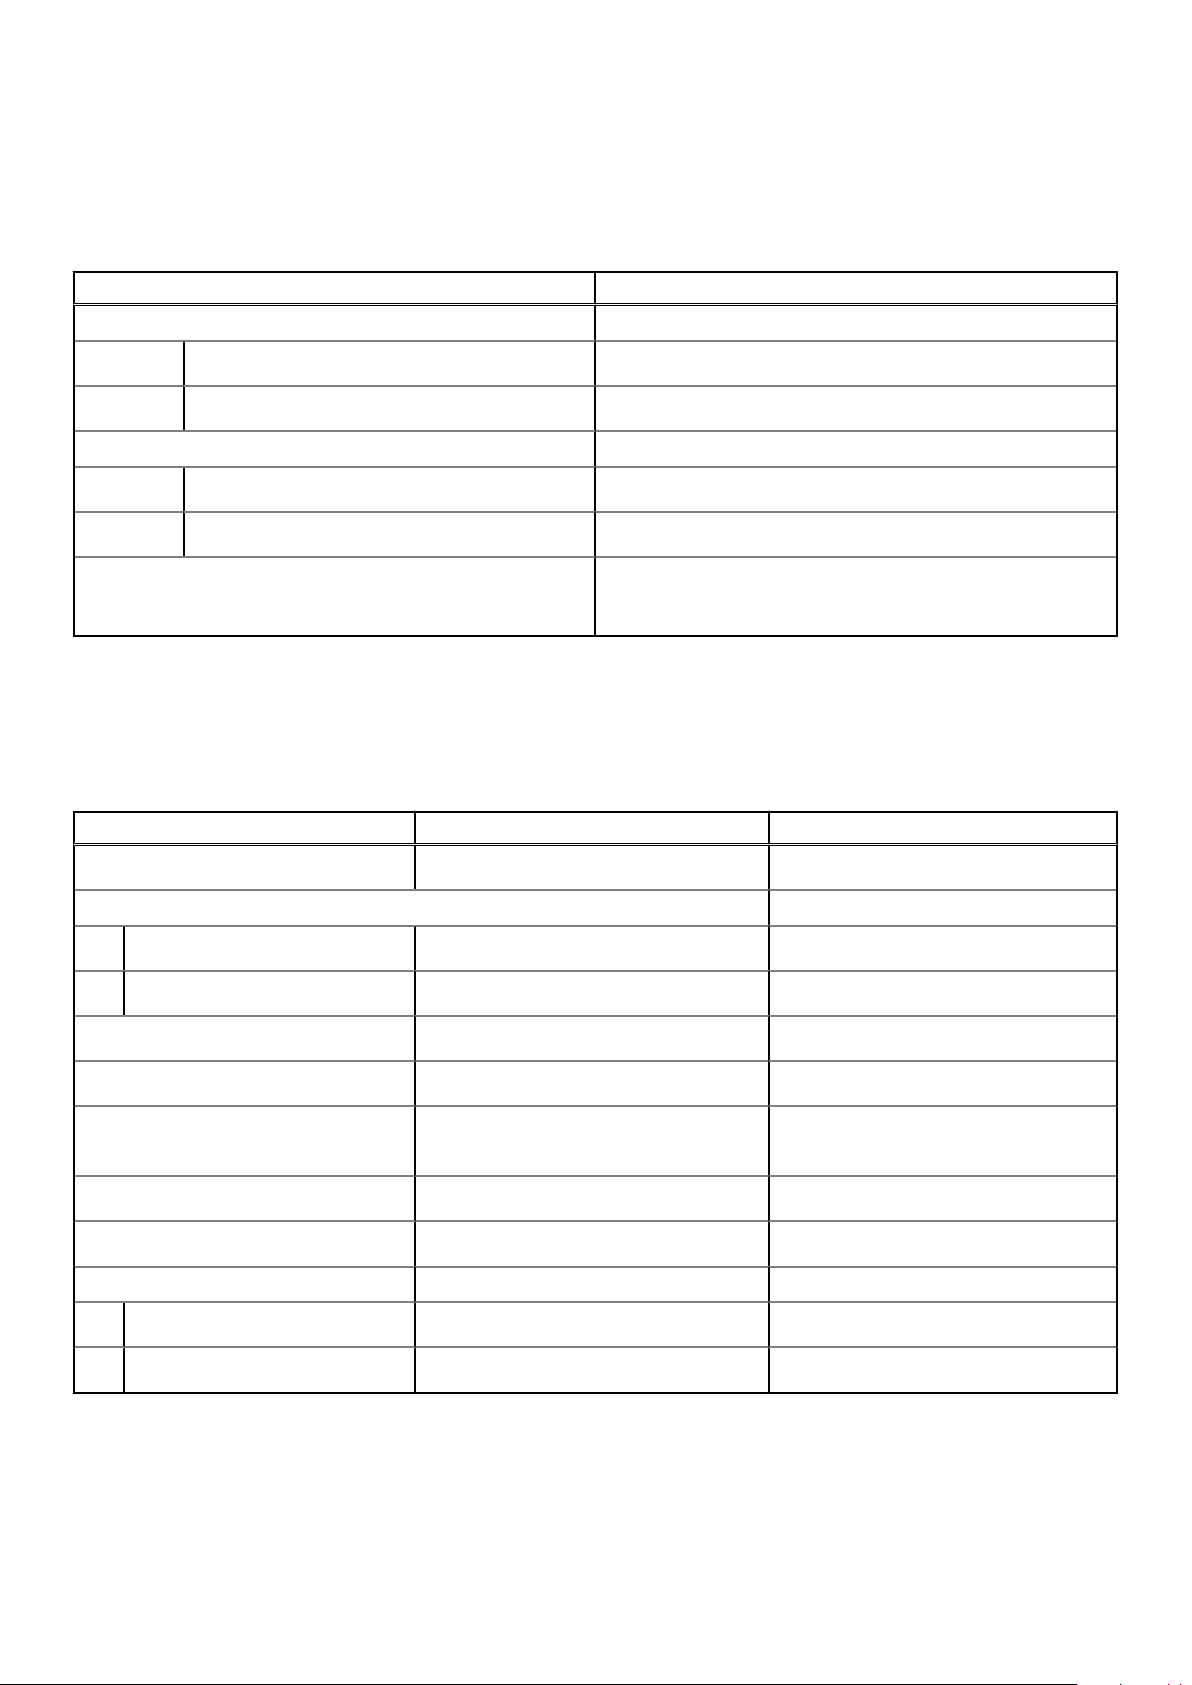
Touchpad
The following table lists the touchpad specifications of your Dell G7 17 7700.
Table 16. Touchpad specifications
Description Values
Touchpad resolution:
Horizontal
Vertical
Touchpad dimensions:
Horizontal
Vertical
Touchpad gestures For more information about touchpad gestures available on
1349
929
115 mm (4.53 in.)
80 mm (3.15 in.)
Windows 10, see the Microsoft knowledge base article
4027871 at support.microsoft.com.
Power adapter
The following table lists the power adapter specifications of your Dell G7 17 7700.
Table 17. Power adapter specifications
Description Option one Option two
Type
Connector dimensions:
E4 130 W E4 240 W
External diameter
Internal diameter
Input voltage
Input frequency
Input current (maximum)
Output current (continuous)
Rated output voltage
Temperature range:
Operating
Storage
7.40 mm 7.40 mm
5.10 mm 5.10 mm
100 VAC–240 VAC 100 VAC–240 VAC
50 Hz–60 Hz 50 Hz–60 Hz
● 1.80 A
● 2.50 A
6.70 A 12.31 A
19.50 VDC 19.50 VDC
0°C to 40°C (32°F to 104°F) 0°C to 40°C (32°F to 104°F)
-40°C to 70°C (-40°F to 158°F) -40°C to 70°C (-40°F to 158°F)
3.50 A
18 Specifications of Dell G7 17 7700
Page 19
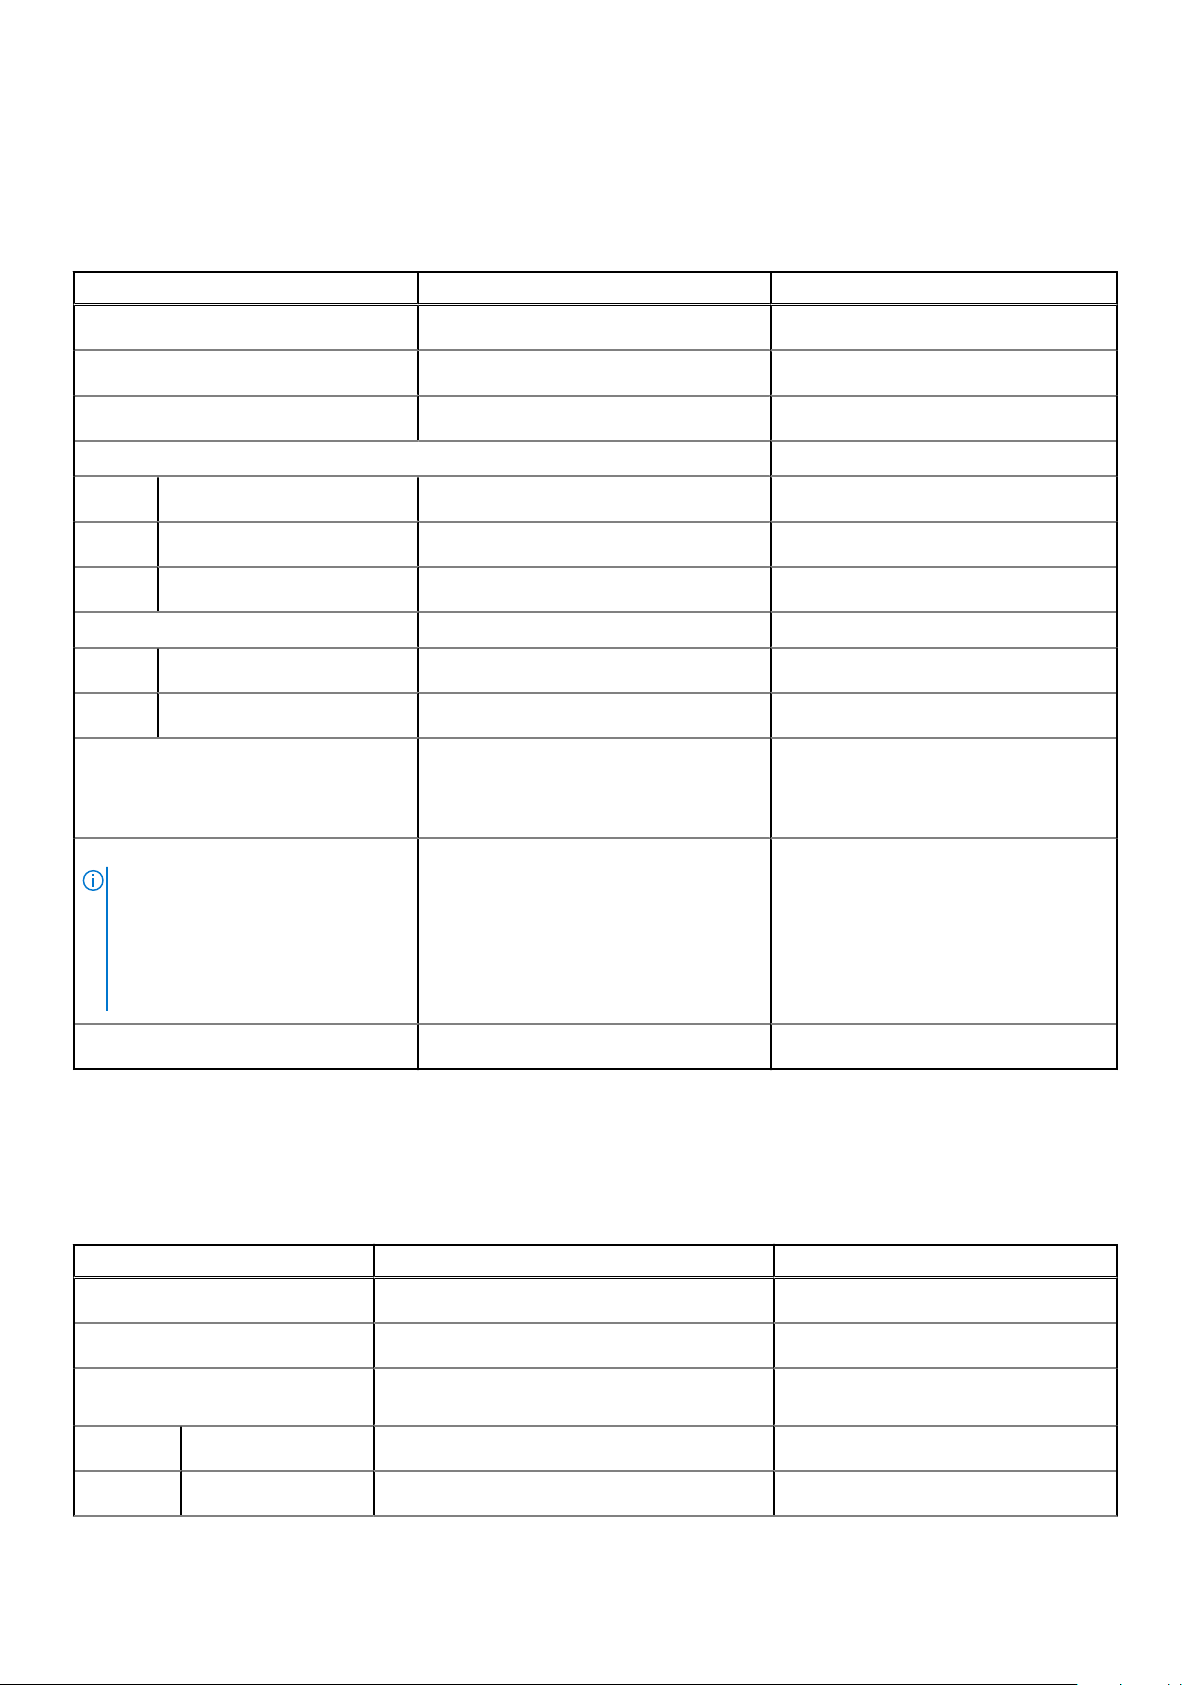
Battery
The following table lists the battery specifications of your Dell G7 17 7700.
Table 18. Battery specifications
Description Option one Option two
Battery type
Battery voltage
Battery weight (maximum)
Battery dimensions:
Height
Width
Depth
Temperature range:
Operating
Storage
Battery operating time Varies depending on operating conditions
Battery charging time (approximate)
NOTE: Control the charging time,
duration, start and end time, and so
on using the Dell Power Manager
application. For more information on
the Dell Power Manager see, Me and
My Dell on www.dell.com.
3-cell (56 Wh) "smart" lithium-ion 6-cell (97 Wh) "smart" lithium-ion
11.40 VDC 11.40 VDC
0.24 kg (0.53 lb) 0.34 kg (0.75 lb)
7.20 mm (0.28 in.) 7.20 mm (0.28 in.)
71.80 mm (2.83 in.) 71.80 mm (2.83 in.)
223.20 mm (8.79 in.) 330.50 mm (13.01 in.)
0°C to 35°C (32°F to 95°F) 0°C to 35°C (32°F to 95°F)
-40°C to 65°C (-40°F to 149°F) -40°C to 65°C (-40°F to 149°F)
and can significantly reduce under certain
power-intensive conditions.
● 4 hours (when the computer is off)
● 2 hours (ExpressCharge)
Varies depending on operating
conditions and can significantly reduce
under certain power-intensive
conditions.
4 hours (when the computer is off)
Coin-cell battery
CR2032 CR2032
Display
The following table lists the display specifications of your Dell G7 17 7700.
Table 19. Display specifications
Description Option one Option two
Display type
Display-panel technology
Display-panel dimensions (active
area):
Height
Width
Full High Definition (FHD) Full High Definition (FHD)
Wide-Viewing Angle (WVA) Wide-Viewing Angle (WVA)
214.81 mm (8.46 in.) 214.81 mm (8.46 in.)
381.99 mm (15.04 in.) 381.99 mm (15.04 in.)
Specifications of Dell G7 17 7700 19
Page 20
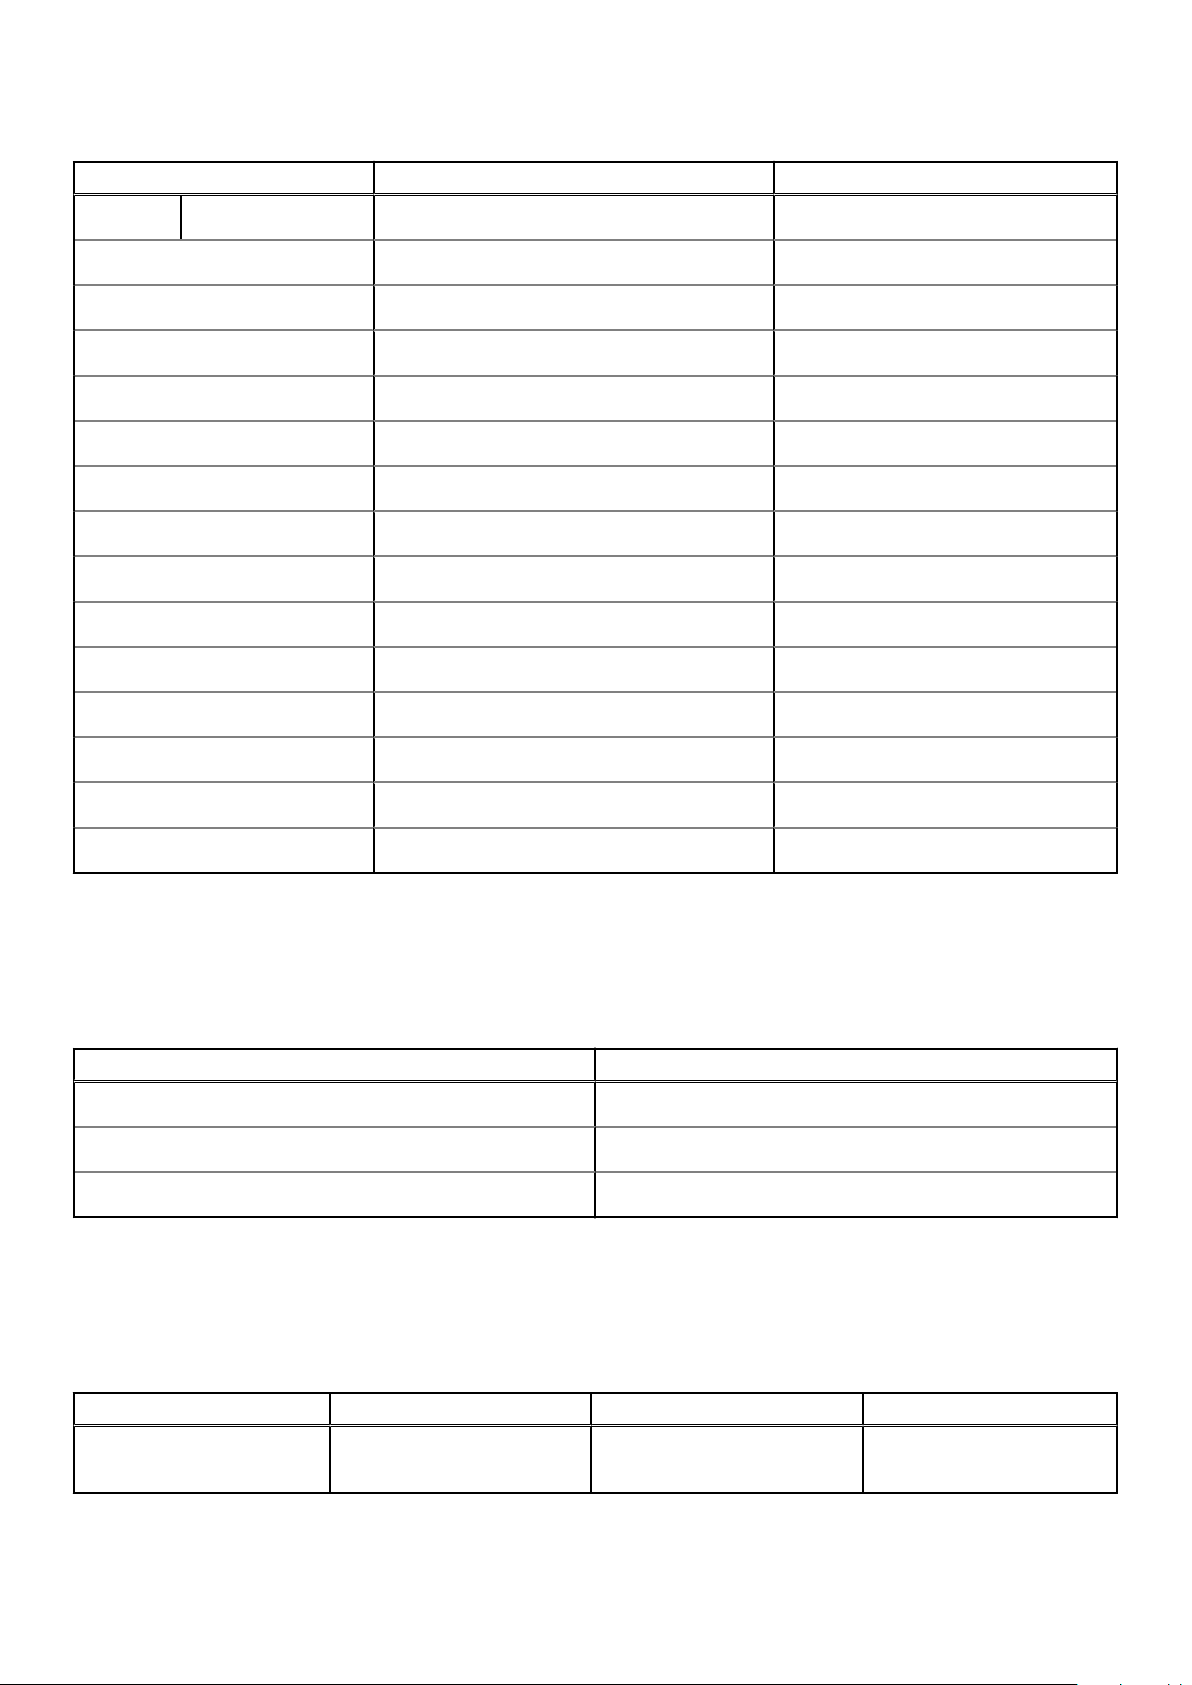
Table 19. Display specifications (continued)
Description Option one Option two
Diagonal
Display-panel native resolution
Luminance (typical)
Megapixels
Color gamut
Pixels Per Inch (PPI)
Contrast ratio (min)
Response time (typ)
Refresh rate
Horizontal view angle
Vertical view angle
Pixel pitch
Power consumption (maximum)
438.16 mm (17.25 in.) 438.16 mm (17.25 in.)
1920 x 1080 1920 x 1080
300 nits 300 nits
2.07 2.07
72% NTSC (Typical) 72% NTSC (Typical)
127 127
600 : 1 600 : 1
25 ms 19 ms
60 Hz 144 Hz
+/- 85 degrees +/- 85 degrees
+/- 85 degrees +/- 85 degrees
0.1989 mm 0.1989 mm
8 W 8.50 W
Anti-glare vs glossy finish
Touch options
Anti-glare Anti-glare
No No
Fingerprint reader (optional)
The following table lists the specifications of the optional fingerprint-reader of your Dell G7 17 7700.
Table 20. Fingerprint reader specifications
Description Values
Fingerprint-reader sensor technology
Fingerprint-reader sensor resolution
Fingerprint-reader sensor pixel size
Capacitive
500 dpi
80 x 64
GPU—Integrated
The following table lists the specifications of the integrated Graphics Processing Unit (GPU) supported by your Dell G7 17 7700.
Table 21. GPU—Integrated
Controller External display support Memory size Processor
Intel UHD Graphics HDMI 1.4 port Shared system memory 10th Generation Intel Core
i5/i7/i9
20 Specifications of Dell G7 17 7700
Page 21
GPU—Discrete
The following table lists the specifications of the discrete Graphics Processing Unit (GPU) supported by your Dell G7 17 7700.
Table 22. GPU—Discrete
Controller External display support Memory size Memory type
NVIDIA GeForce GTX 1650 Ti HDMI 2.0 port 4 GB GDDR5
NVIDIA GeForce GTX 1660 Ti ● HDMI 2.0 port
● Mini DisplayPort 1.4 port
NVIDIA GeForce RTX 2060 ● HDMI 2.0 port
● Mini DisplayPort 1.4 port
NVIDIA GeForce RTX 2070 ● HDMI 2.0 port
● Mini DisplayPort 1.4 port
NVIDIA GeForce RTX 2070
Super
● HDMI 2.0 port
● Mini DisplayPort 1.4 port
6 GB GDDR6
6 GB GDDR6
8 GB GDDR6
8 GB GDDR6
Operating and storage environment
This table lists the operating and storage specifications of your Dell G7 17 7700.
Airborne contaminant level: G1 as defined by ISA-S71.04-1985
Table 23. Computer environment
Description Operating Storage
Temperature range
Relative humidity (maximum)
0°C to 35°C (32°F to 95°F) -40°C to 65°C (-40°F to 149°F)
10% to 90% (non-condensing) 0% to 95% (non-condensing)
Vibration (maximum)
Shock (maximum)
Altitude range
* M eas ure d u sin g a ra ndo m v ibr ati on spectrum that simulates user en vir onm ent .
† M eas ure d u sin g a 2 ms hal f-s ine pulse when the hard drive is i n u se.
*
0.66 GRMS 1.30 GRMS
110 G† 160 G†
-15.2 m to 3,048 m (-49.87 ft to 10,000
ft)
-15.2 m to 10,668 m (-49.87 ft to 35,000
ft)
Specifications of Dell G7 17 7700
21
Page 22
4
Keyboard shortcuts
Function keys
NOTE: Keyboard characters may differ depending on the keyboard language configuration. Keys used for shortcuts remain
the same across all language configurations.
Some keys on your keyboard have two symbols on them. These keys can be used to type alternate characters or to perform
secondary functions. The symbol shown on the lower part of the key refers to the character that is typed out when the key is
pressed. If you press Shift and the key, the symbol shown on the upper part of the key is typed out. For example, if you press
2, 2 is typed out; if you press Shift + 2, @ is typed out.
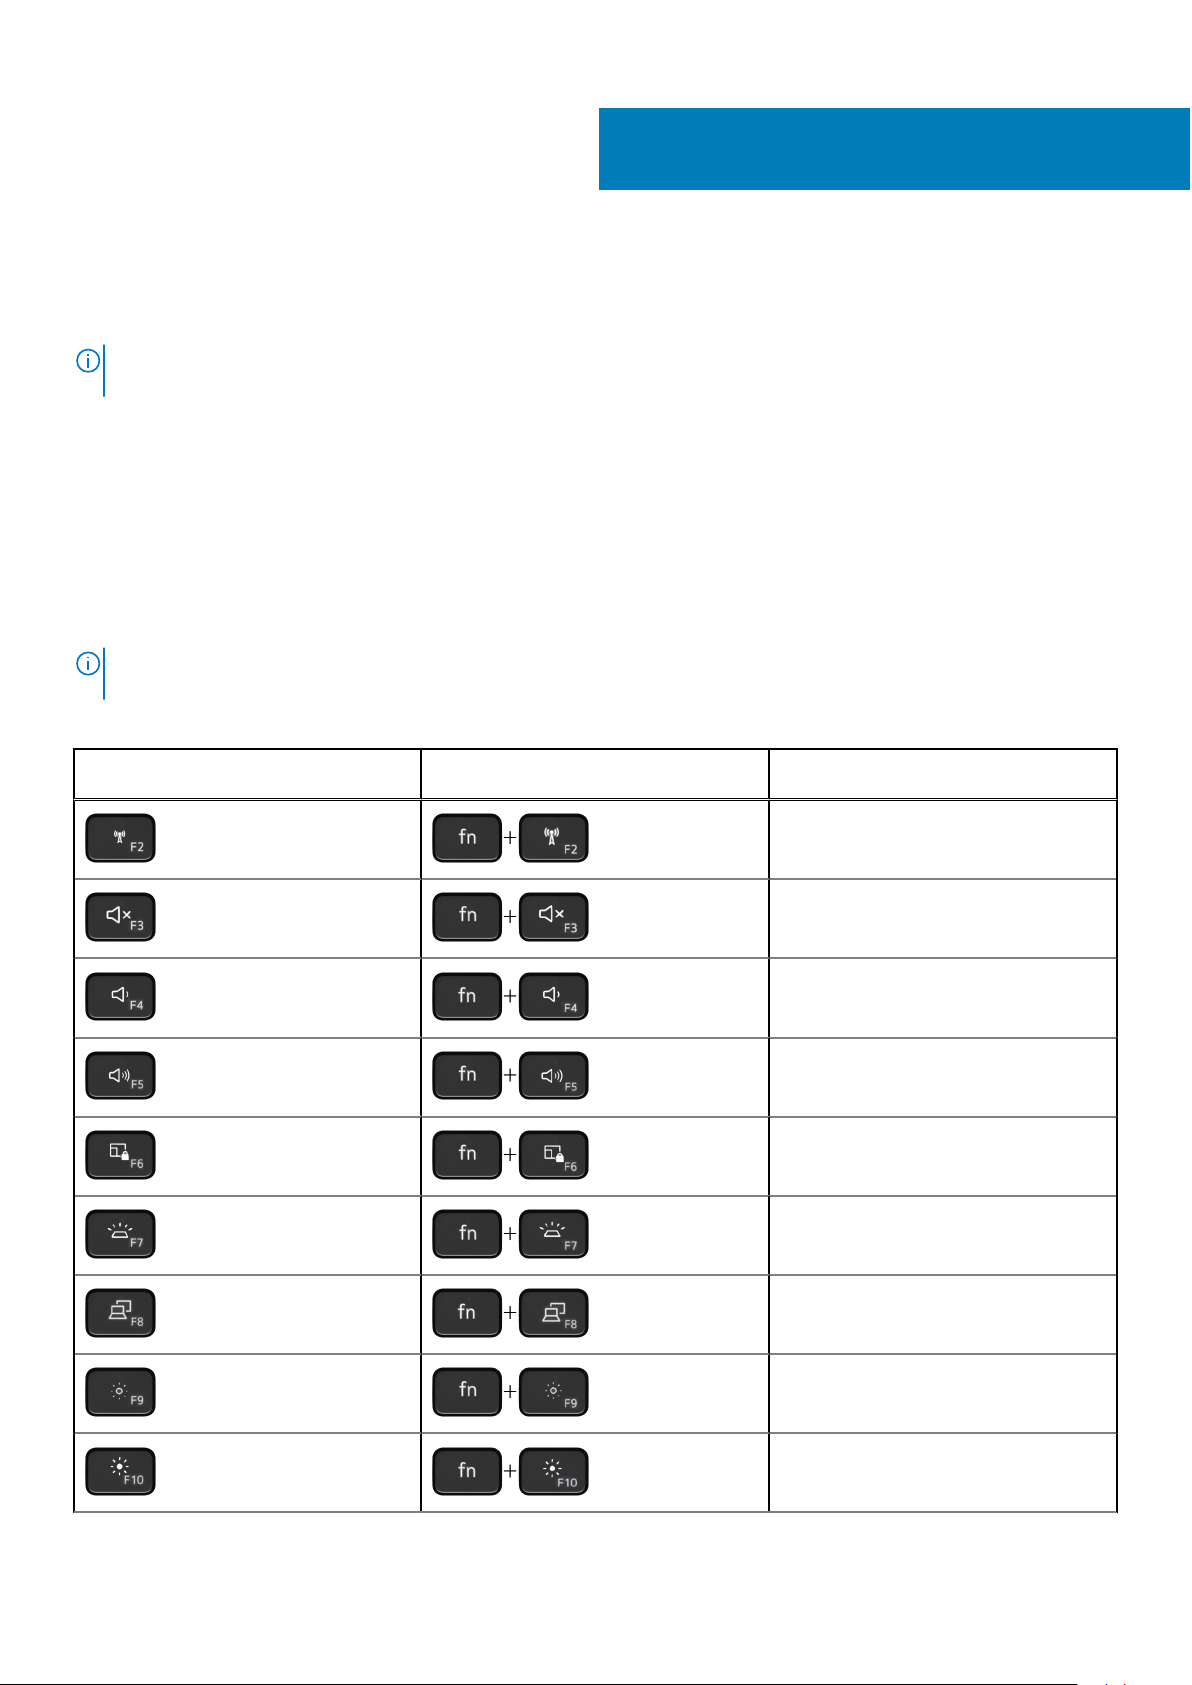
The keys F1 to F12 at the top row of the keyboard are function keys for multi-media control, as indicated by the icon at the
bottom of the key. Press the function key to invoke the task represented by the icon. For example, pressing F3 mutes the audio
(refer to the table below).
However, if the function keys F1 to F12 are needed for specific software applications, multi-media functionality can be disabled
by pressing fn + Esc. Subsequently, multi-media control can be invoked by pressing fn and the respective function key. For
example, mute audio by pressing fn + F3.
NOTE: You can also define the primary behavior of the function keys (F1 to F12) by changing Function Key Behavior in
the BIOS setup program.
Table 24. List of keyboard shortcuts
Function key Redefined key (for multimedia
control)
Behavior
Toggle between enabling and disabling
wireless connection
Toggle between muting and unmuting
audio
Decrease volume
Increase volume
Toggle between enabling and disabling
the Windows key
Toggle between turning keyboard
backlight on and off
Switch to external display
22 Keyboard shortcuts
Decrease brightness
Increase brightness
Page 23
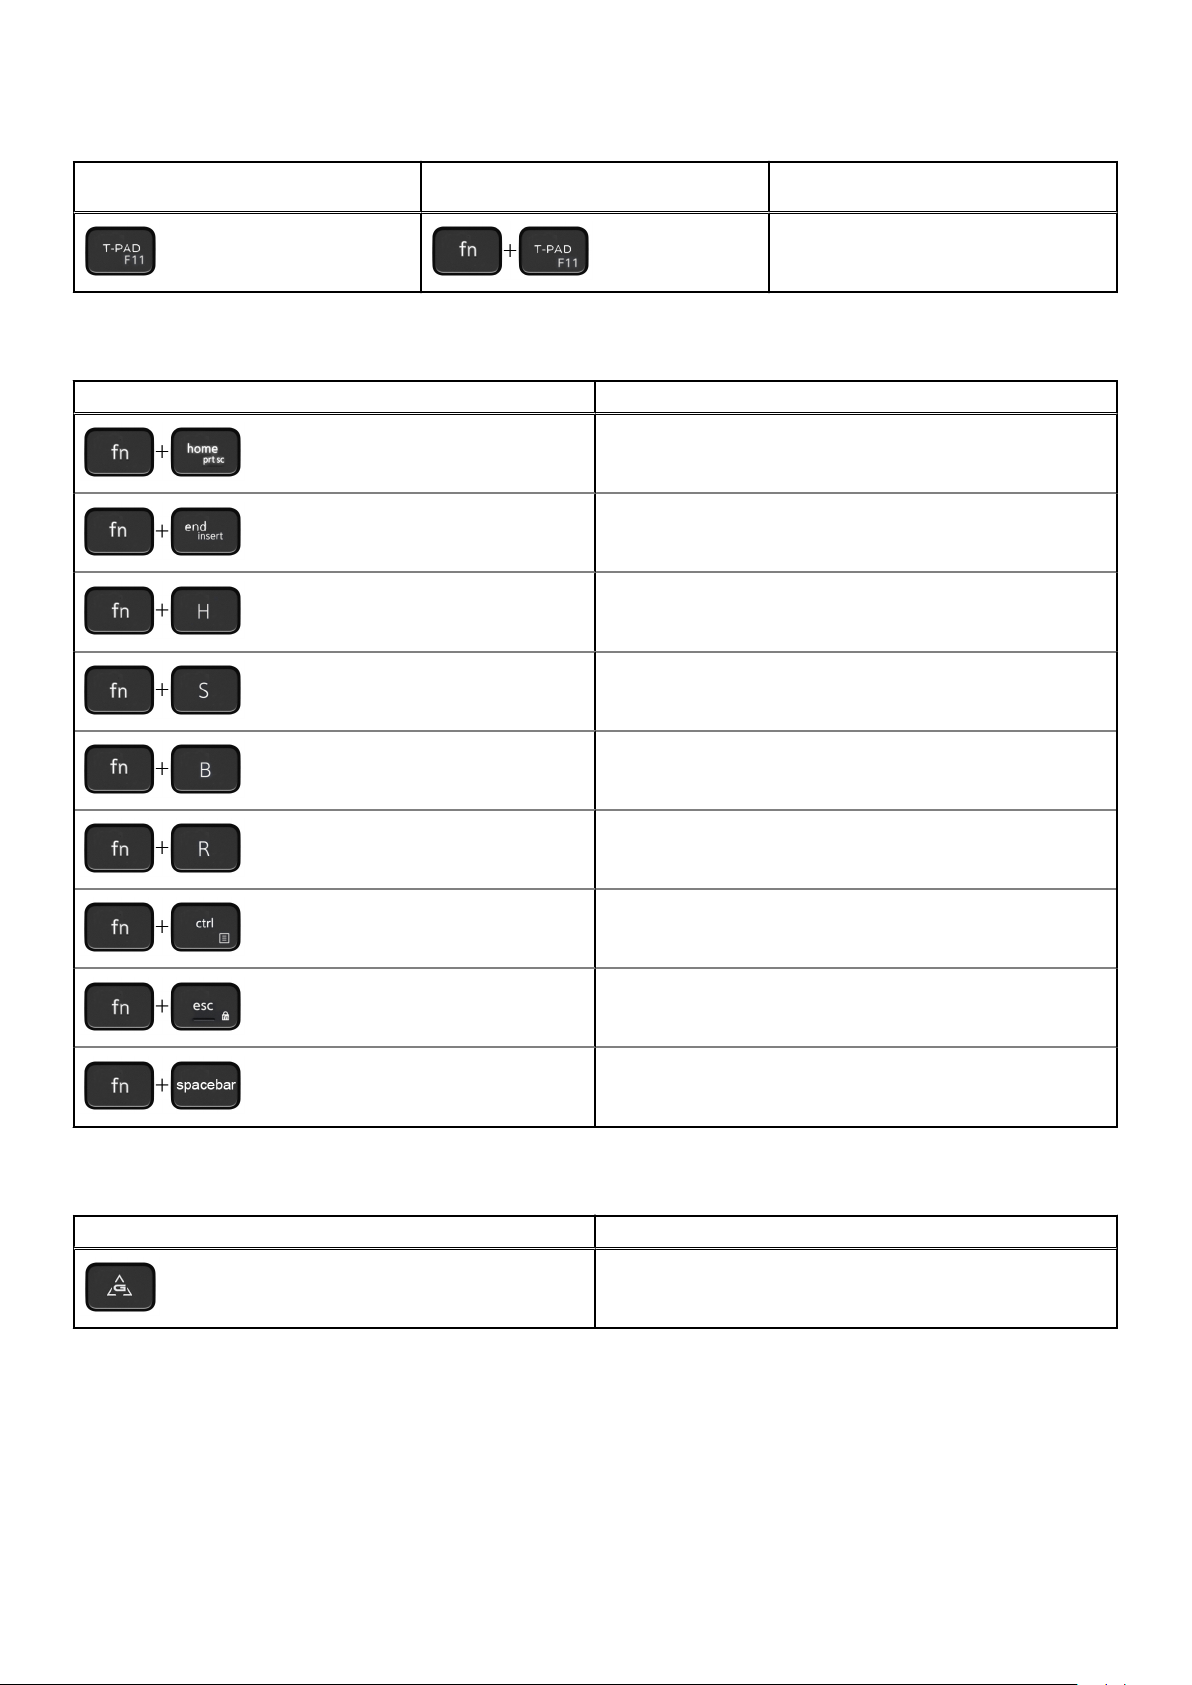
Table 24. List of keyboard shortcuts (continued)
Function key Redefined key (for multimedia
control)
The fn key is also used with selected keys on the keyboard to invoke other secondary functions.
Behavior
Toggle between enabling and disabling
the touchpad
Table 25. List of keyboard shortcuts
Function key Behavior
Print screen
Insert
Toggle between power and battery-status light/hard-drive
activity light
Toggle between scroll lock on and scroll lock off
Toggle between Break and Pause
Initiate system request
Open application menu
Toggle between locking and unlocking the fn key
Open the Emoji window
G key
Table 26. G key
Function key Behavior
Toggle between Windows power settings and the thermal
setting for optimal gaming performance.
Macro keys
Macro keys can be configured to execute different gaming tasks.
Keyboard shortcuts
23
Page 24
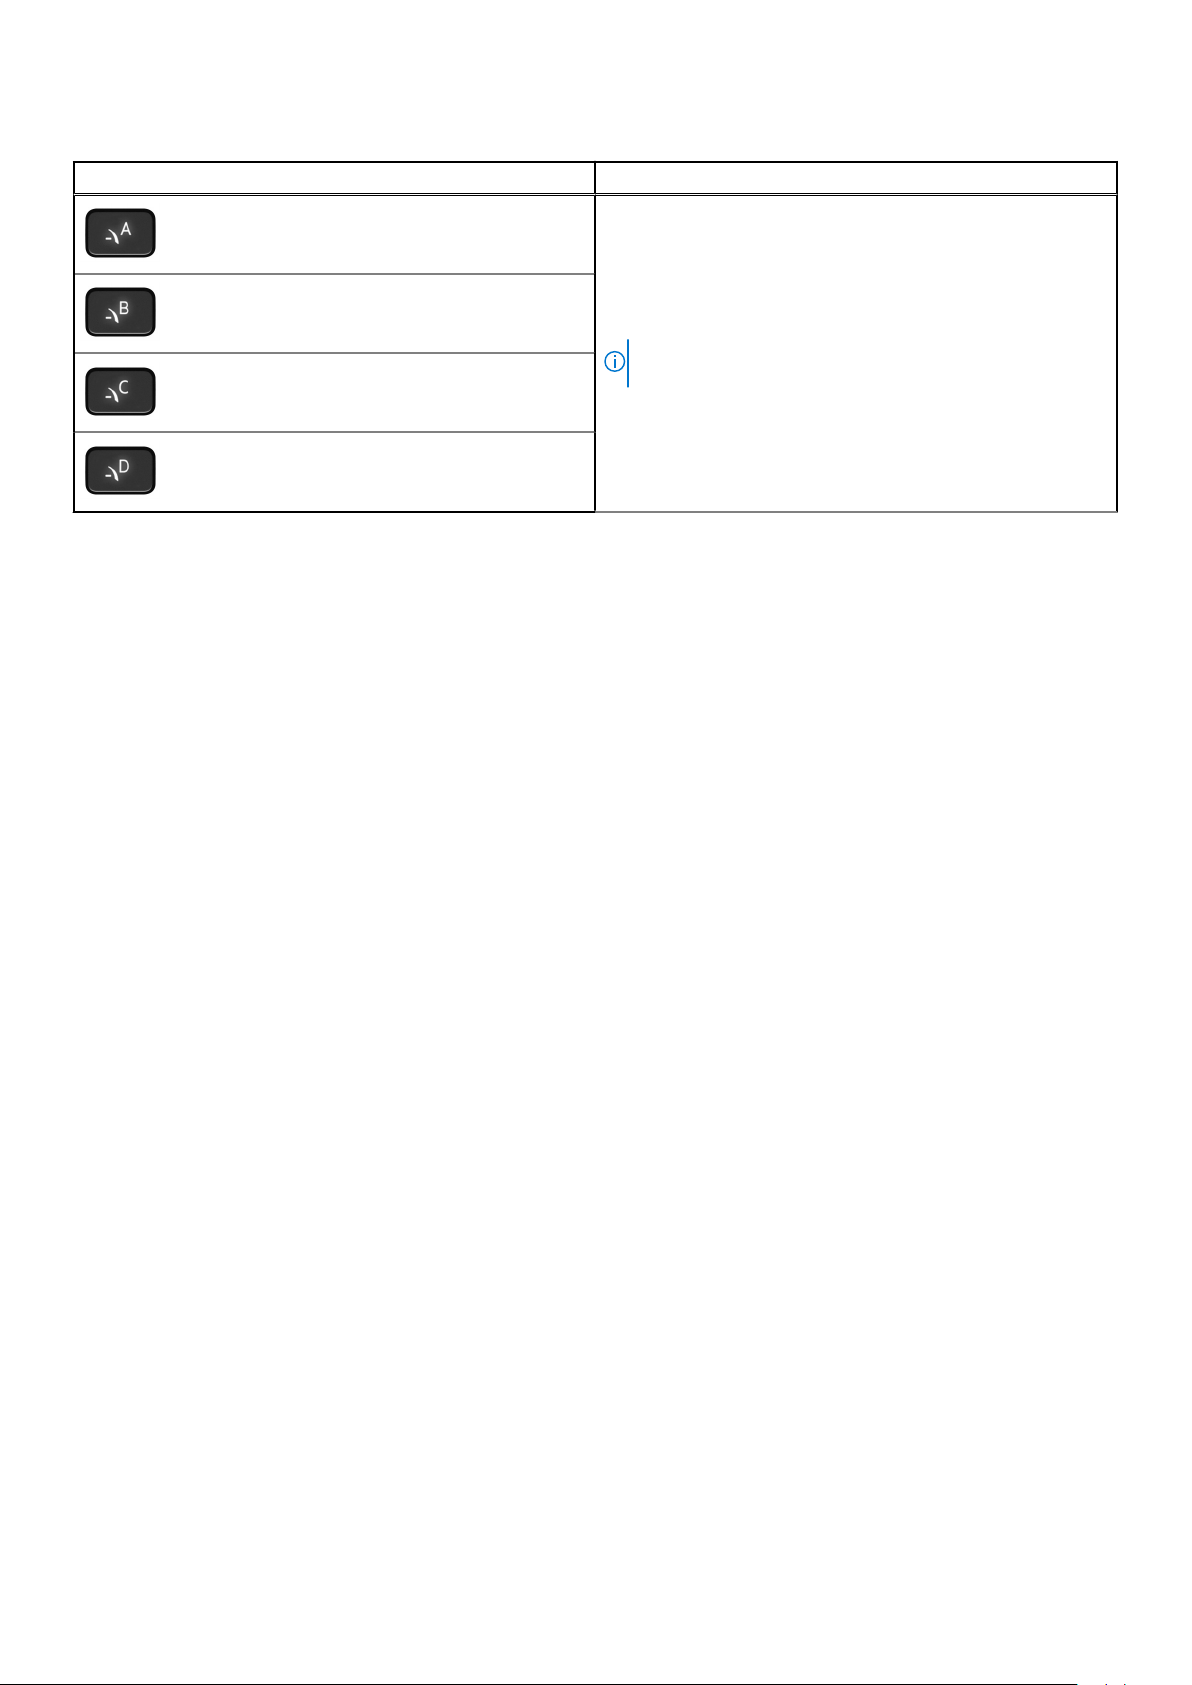
Table 27. List of macro keys
Keys Description
Macro keys
NOTE: You can configure modes and assign multiple tasks
to the macro keys on the keyboard.
24 Keyboard shortcuts
Page 25
Getting help and contacting Dell
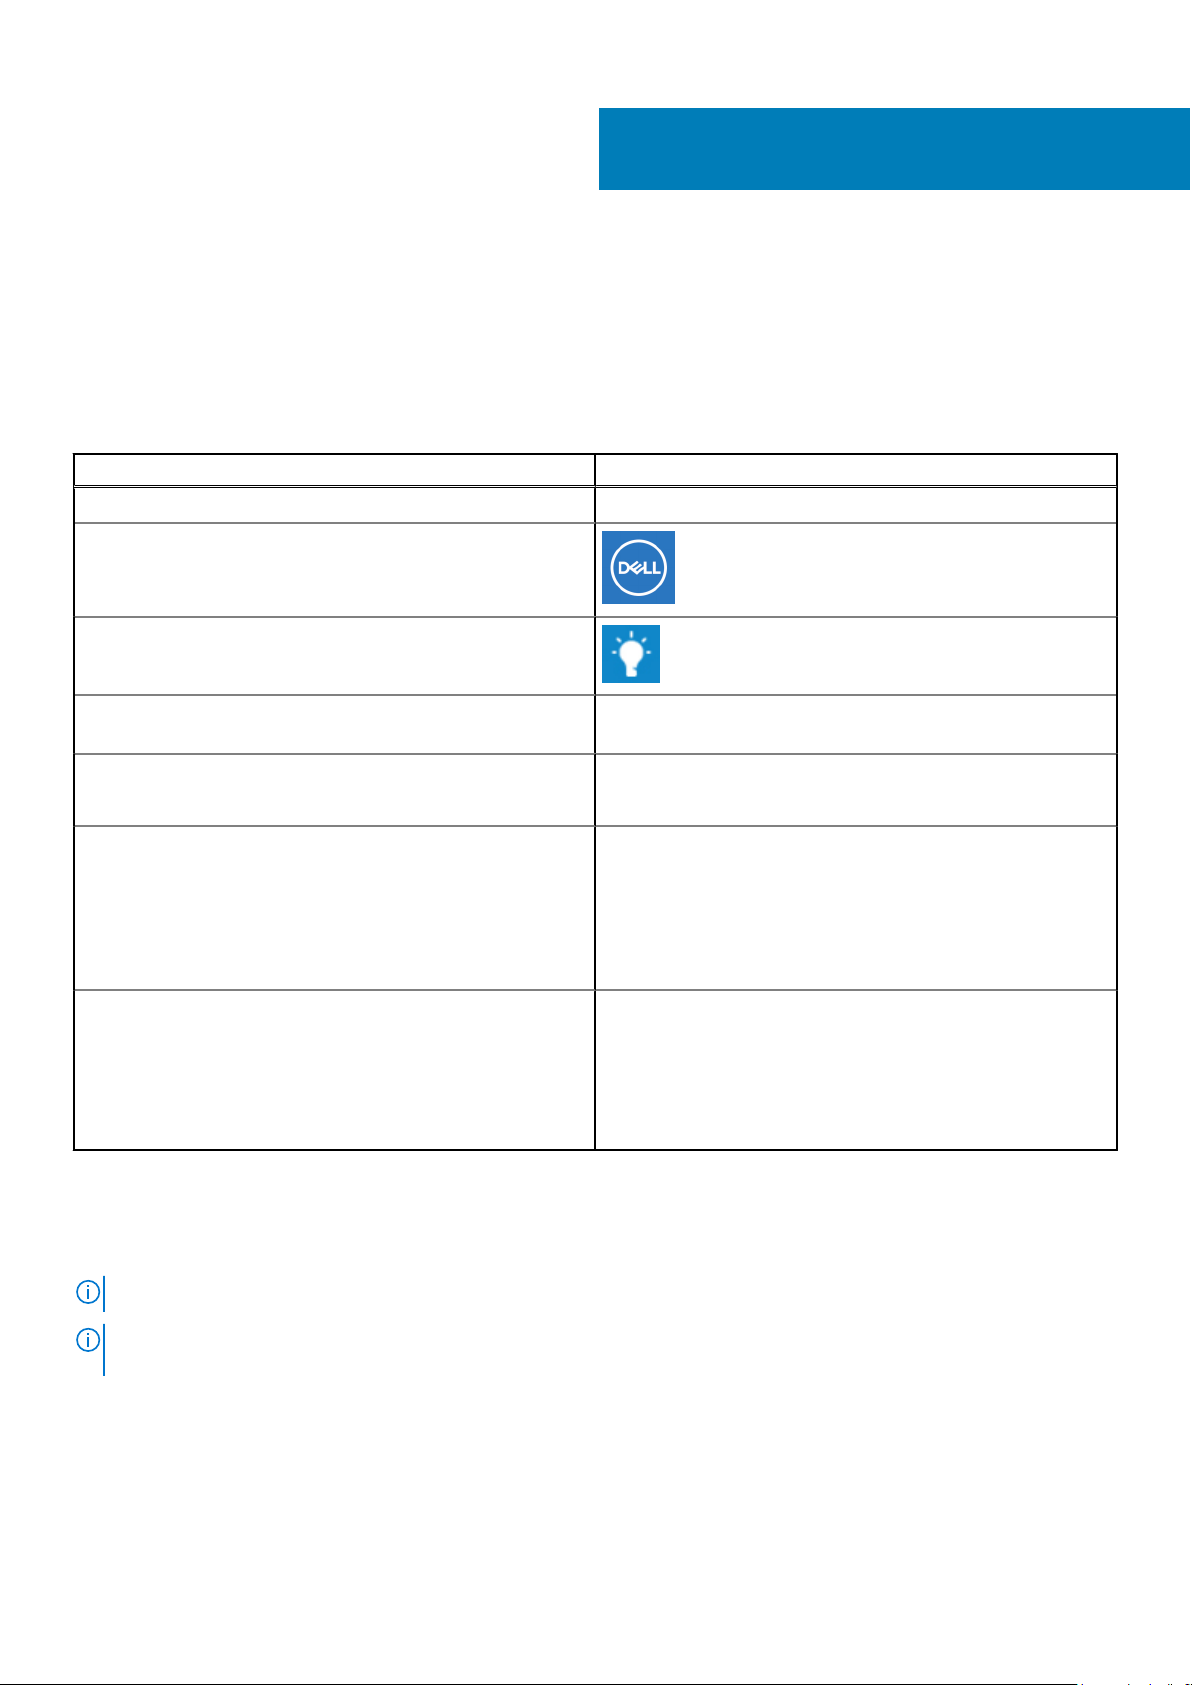
Self-help resources
You can get information and help on Dell products and services using these self-help resources:
Table 28. Self-help resources
Self-help resources Resource location
Information about Dell products and services www.dell.com
My Dell
Tips
Contact Support In Windows search, type Contact Support, and press
Enter.
5
Online help for operating system www.dell.com/support/windows
www.dell.com/support/linux
Access top solutions, diagnostics, drivers and downloads, and
learn more about your computer through videos, manuals and
documents.
Dell knowledge base articles for a variety of computer
concerns
Your Dell computer is uniquely identified by a Service Tag or
Express Service Code. To view relevant support resources for
your Dell computer, enter the Service Tag or Express Service
Code at www.dell.com/support.
For more information on how to find the Service Tag for your
computer, see Locate the Service Tag for your Dell Laptop.
1. Go to www.dell.com/support.
2. On the menu bar at the top of the Support page, select
Support > Knowledge Base.
3. In the Search field on the Knowledge Base page, type the
keyword, topic, or model number, and then click or tap the
search icon to view the related articles.
Contacting Dell
To contact Dell for sales, technical support, or customer service issues, see www.dell.com/contactdell.
NOTE: Availability varies by country/region and product, and some services may not be available in your country/region.
NOTE: If you do not have an active Internet connection, you can find contact information about your purchase invoice,
packing slip, bill, or Dell product catalog.
Getting help and contacting Dell 25
 Loading...