

Dell Intel PRO Family of Adapters, EtherExpress Pro/10+ Quick Manual

Intel EtherExpress Pro/10+ PCI LAN Adapter
Specifications
Jumpers
Tech Notes
Graphics
Initial release: 19 Dec 1997
Cabling: Intel EtherExpress Pro/10+ PCI LAN Adapter
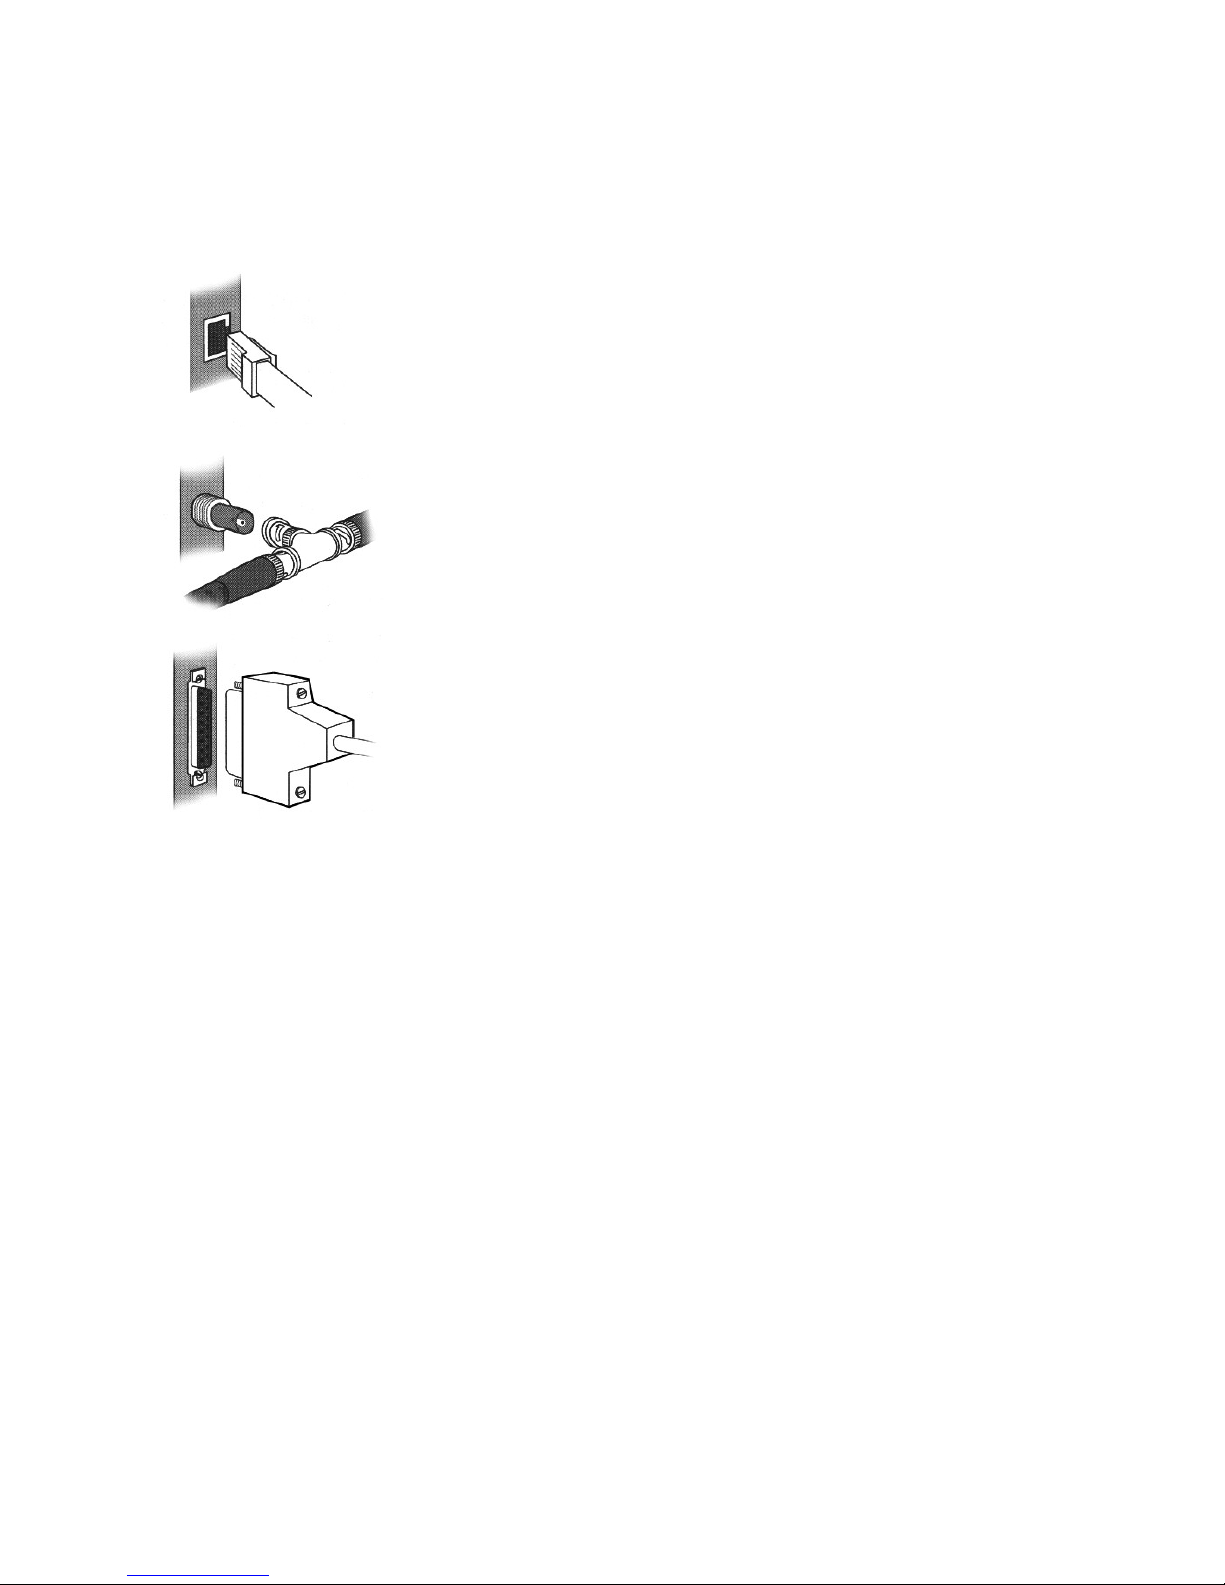
Connect a single network cable to the adapter. Your adapter may have only a single twisted-pair ethernet (TPE) connector, or it may have all three of the types shown
in the following illustrations:
TPE — Use Category 3, 4, or 5 cables with an RJ-45 connector.
Thin ethernet (BNC) — Use a T-connector attached to an RG-58 cable. Turn the cable barrel clockwise to secure. Do
not remove the attached cables from the T-connector if the network is running. If the connection is the last one on a
network, attach a 50-ohm termination plug to one side of the T-connector.
Attachment Unit Interface (AUI) — Use a DB-15 ethernet connector. Secure the connector to the adapter with screws
or a clip.

Software Configuration: Intel EtherExpress Pro/10+ PCI LAN Adapter
Overview | Microsoft®Windows®95 | Manually Adding an Adapter in Windows 95 | Windows NT®4.0 | Windows NT 3.51 | MS-DOS®and Windows 3.x for
Novell®NetWare®Clients | Other Operating Systems
Overview
PCI systems automatically detect and configure PCI-compliant adapters. It is not necessary to run a configuration program. Start the system and it automatically
configures the adapter while it boots. If there is an error, see PCI Common Solutions.
Microsoft Windows 95
1. After installing the adapter in the computer, turn on the system.
2. At the New Hardware Found dialog box, click Driver From Disk Provided by Hardware Manufacturer and then click OK.
If the New Hardware Found dialog box does not appear, see Manually Adding an Adapter in Windows 95.
3. Insert the Intel configuration and drivers diskette in the diskette drive, type a: in the Path box, and click OK.
Windows 95 copies the driver files to the computer.
4. Restart the computer when prompted.
5. Click on the Network Neighborhood icon to see if the computer is connected to the network.
Manually Adding an Adapter in Windows 95
1. Click Start, point to Settings, and click Control Panel.
2. Double-click the System icon.
3. Click the Device Manager tab, double-click Other Devices, and double-click PCI Ethernet Controller.
4. Click the Driver tab, and then click Change Driver.
5. Click Network Adapters and click OK.
6. Click Have Disk, insert the Intel configuration and drivers diskette in the diskette drive, and click OK.
7. Restart the computer when prompted.
Windows NT 4.0
1. After installing the adapter in the computer, turn on the system.
2. Insert the Windows NT CD into the CD-ROM drive.
3. Click Start, point to Settings, and click Control Panel.
4. Double-click the Network icon.
5. Click Add.
A list of adapters appears.
6. Click Intel EtherExpress PRO/10+ PCI Adapter and click OK.
The Intel drivers and the PROSet utility are installed, and PROSet launches. You can use PROSet to configure and test your adapter and display the resources assigned when the
adapter was installed.
7. Click OK in the PROSet window to return to Windows NT.
The Intel adapter appears on the list in the Network window.
8. Click Close.
9. Restart when prompted.
Windows NT 3.51
1. After installing the adapter in the computer, turn on the system.
2. Double-click the Control Panel icon in the Main window.
3. Double-click the Network icon.
4. Click Add Adapter.
A list of adapters appears.
5. Click <Other> Requires Disk From Manufacturer.
6. Insert the Intel configuration and drivers diskette in the diskette drive and click OK.
The Intel drivers and the PROSet utility are installed, and PROSet launches. You can use PROSet to configure and test your adapter and display the resources assigned when the
adapter was installed.
7. Click OK in the PROSet window to return to Windows NT.
8. Click OK in the Network Settings window and remove the diskette.
9. Restart the system when prompted.
NOTE: To run PROSet at any time, double-click the Intel PROSet icon in the Control Panel window or click the Adapter Properties button.
NOTE: To run PROSet at any time, double-click the Intel PROSet icon in the Control Panel window.

MS-DOS and Windows 3.x for Novell NetWare Clients
1. Turn on the system. If the system already has EtherExpress Pro/10+ PCI LAN Adapter drivers installed, restart the system without loading the drivers.
If the drivers are loaded from autoexec.bat, edit the file and add REM in front of each line that loads a driver.
2. Insert the Intel configuration and drivers diskette into a diskette drive, change to that drive, and type setup at the MS-DOS prompt.
3. If you have more than one adapter installed, an adapter selection menu appears. Select the adapter you want by ethernet address.
4. Select Automatic Setup from the Main menu and follow the instructions on the screen.
5. Select the driver you want to install from the Install Network Drivers screen.
Other Operating Systems
For other operating systems, refer to the readme files on the Intel configuration and drivers diskette. Insert the diskette into the diskette drive, type
setup /readme, and press <Enter>.

Duplex Mode: Intel EtherExpress Pro/10+ PCI LAN Adapter
Overview | Microsoft®Windows®95 | Windows NT® | Novell®NetWare® | DOS ODI, NDIS 2.01 Clients | Other Operating Systems
Overview
Duplexing is a performance option that lets you choose how the adapter sends and receives packets over the network.
There are two duplex modes available when using the twisted-pair ethernet (TPE) connector:
l Half duplex — The adapter performs one operation at a time; it either sends or receives. This is the default mode.
l Full duplex — The adapter sends and receives packets at the same time when connected to an ethernet switch, increasing network performance.
Microsoft Windows 95
1. Click Start, point to Settings, and click Control Panel.
2. Double-click the Intel PROSet icon.
PROSet displays the Adapter Setup window.
3. If you have multiple adapters, click the adapter you are configuring.
Each adapter must be configured separately. For more information, see Installing Multiple Adapters.
4. Click Change.
5. From the Adapter Setup window, click the menu for Network Speed.
6. Click the menu for Duplex Mode and click Full.
7. Click OK, and click OK to reboot.
Windows NT
1. Double-click the Intel PROSet icon in Control Panel.
PROSet displays the Adapter Setup window.
2. If you have multiple adapters, click Show All Adapters and select the adapter you are configuring.
Each adapter must be configured separately. For more information, see Installing Multiple Adapters.
3. Click Change.
4. From the Adapter Setup window, click the menu for Network Speed.
5. Click the menu for Duplex Mode and click Full.
6. Click OK, and click OK to reboot.
Novell NetWare
In autoexec.bat, load e100b.lan and add FORCEDUPLEX=2. For more information, refer to the readme files on the Intel configuration and drivers diskette. Insert
the diskette into the diskette drive, type setup /readme, and press <Enter>.
DOS ODI, NDIS 2.01 Clients
Add FORCEDUPLEX 2 under the Link Driver section of the net.cfg or protocol.ini file.
Other Operating Systems
For other operating systems, refer to the readme files on the Intel configuration and drivers diskette. Insert the diskette into the diskette drive, type
setup /readme, and press <Enter>.
 Loading...