

PS Series Storage Arrays
Step 1: Install the Host Integration Tools
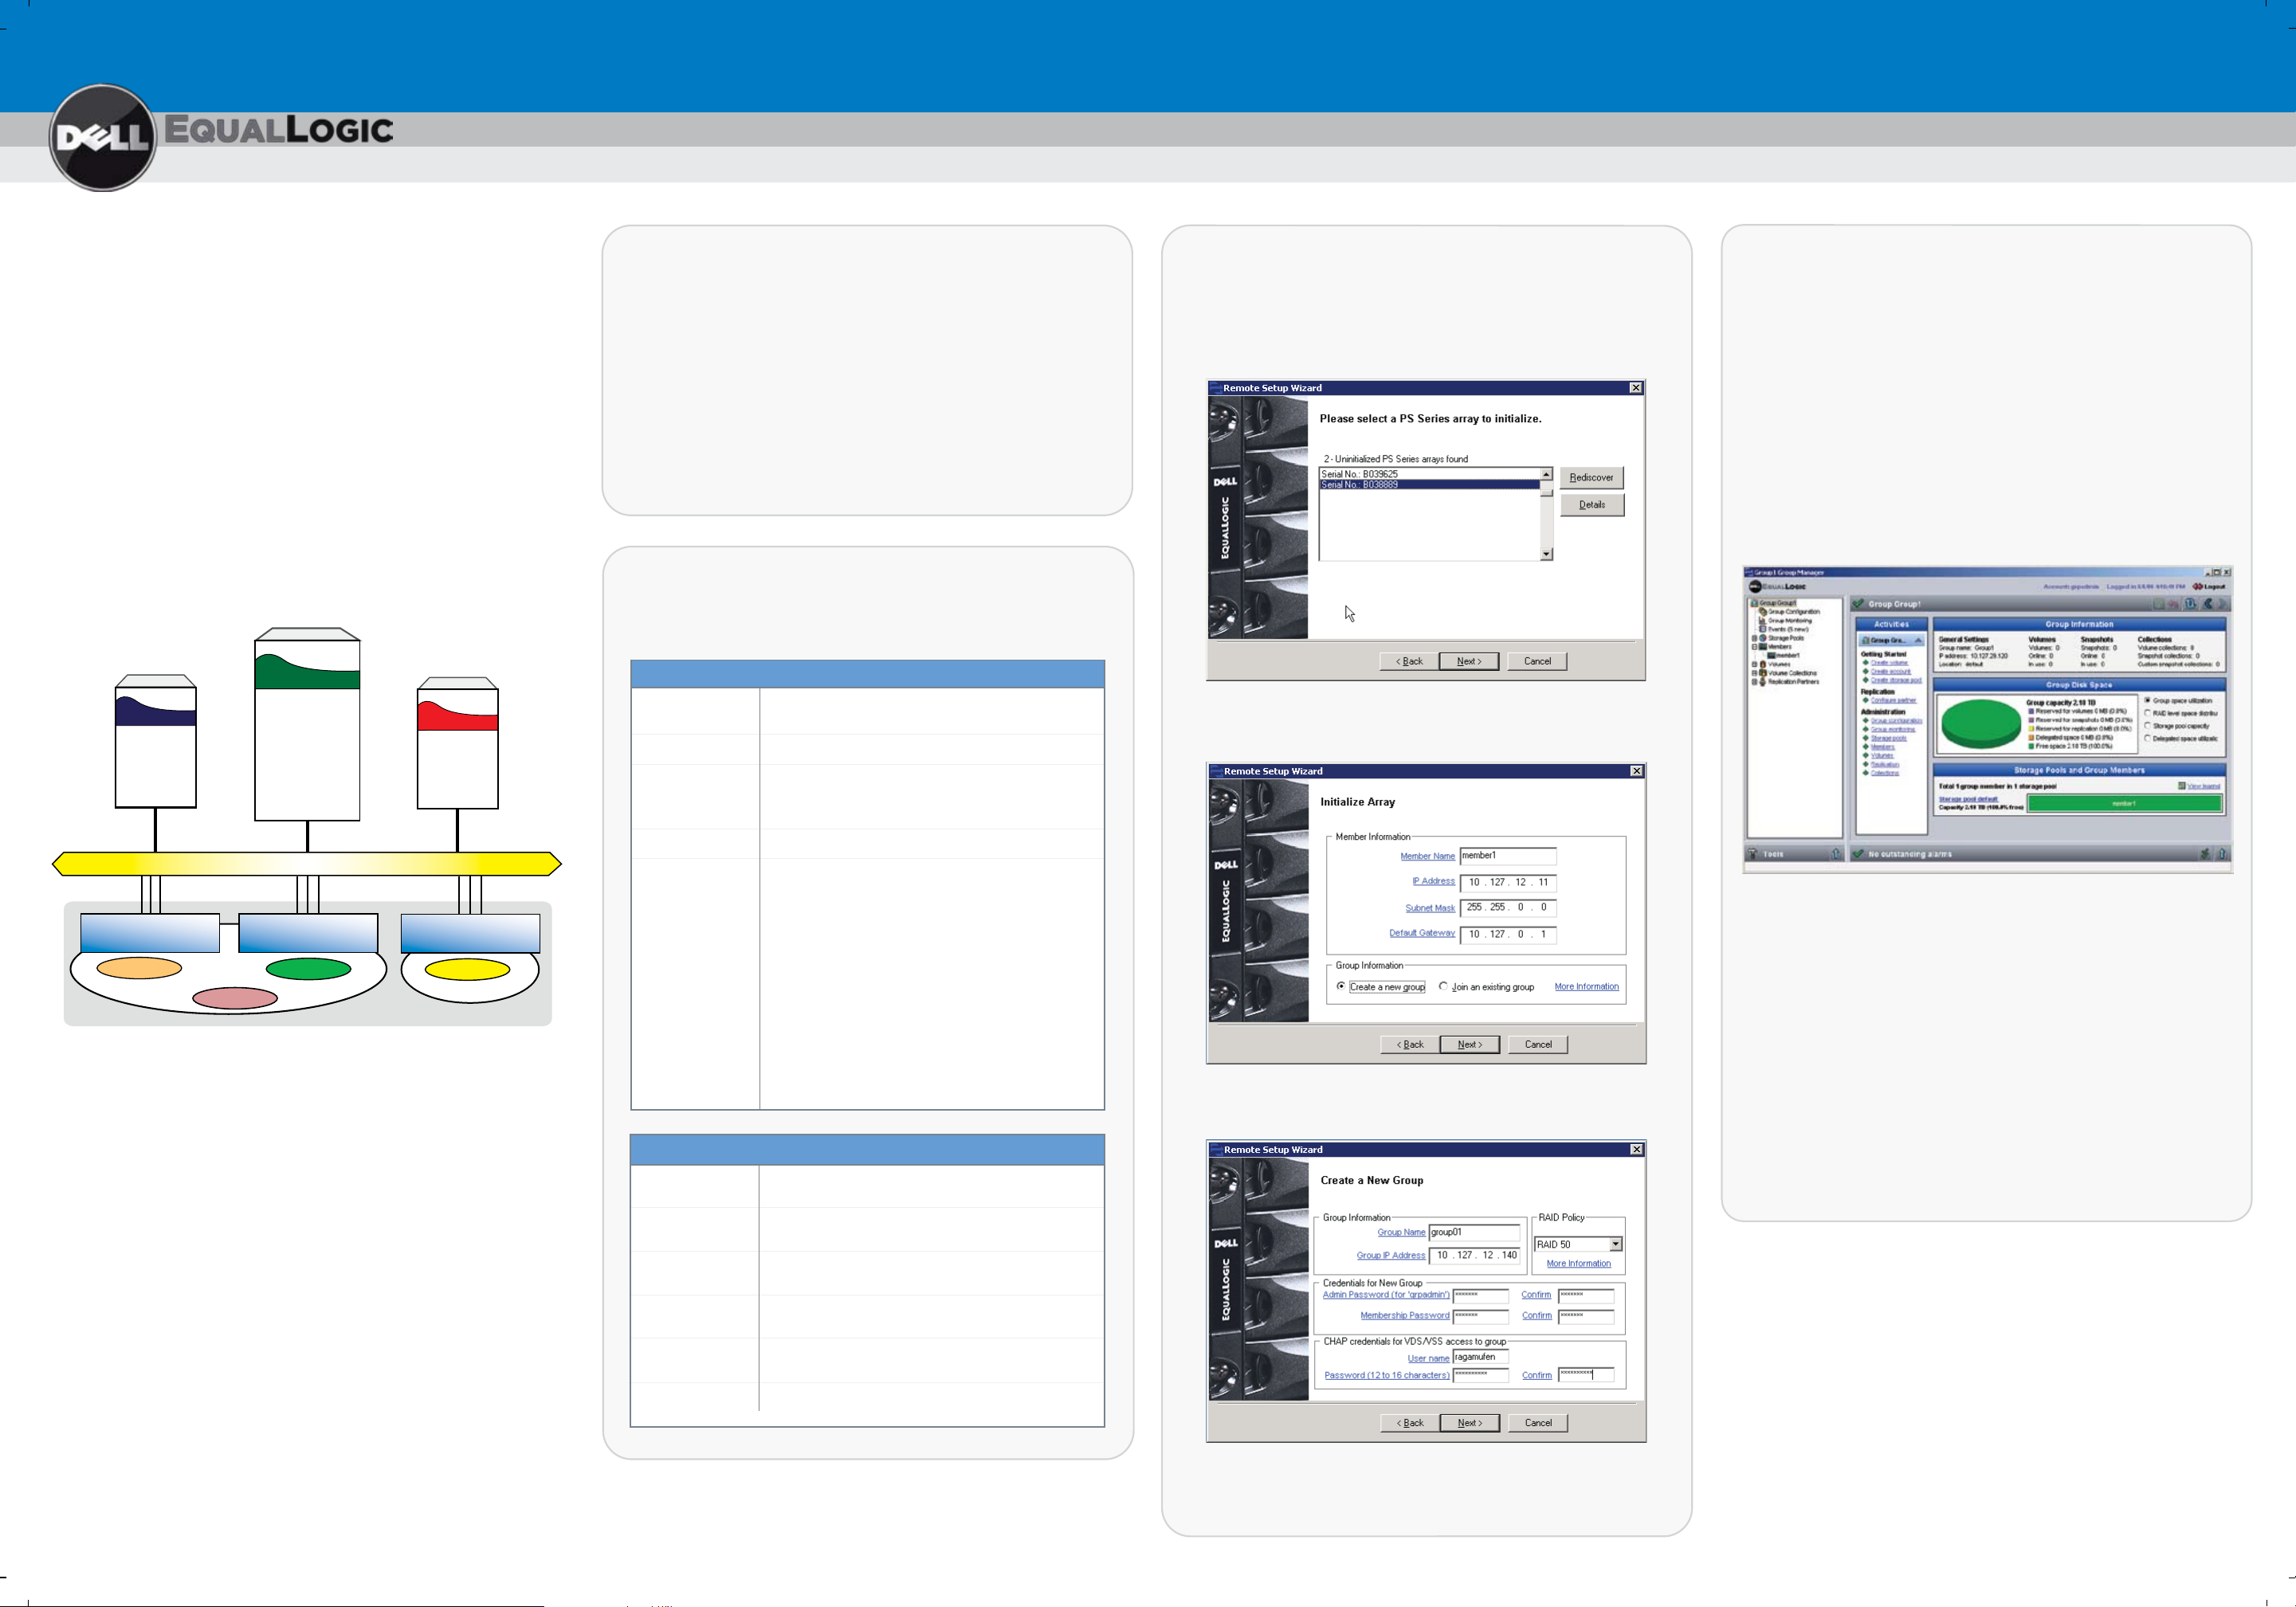
Step 3: Run the Remote Setup Wizard
Step 4: Start Using the SAN
Software Configuration
PS Series Groups
A PS Series group is an easy-to-use, highly-scalable storage
area network (SAN).
After you install the array hardware, you must initialize the array.
Then, create a group with the array as the first member or add
the array to an existing group. When you expand a group,
capacity and performance increase, with no disruption to users.
For the latest documentation, including the PS Series Release Notes,
see the support website: www.support.dell.com/equallogic.
Multi-Member PS Series Group
The Host Integration Tools CD-ROM is shipped with the array.
1. Insert the CD-ROM in a Windows computer.
2. In the dialog boxes, follow the installation instructions.
3. Accept the installation defaults.
The Host Integration Tools documentation provides detailed
information about using the tools.
Step 2: Collect Configuration Information
To configure the PS Series software, you need the information
in the following tables.
Array Configuration
Member name
Array IP address
One to 63 letters, numbers, or hyphens. The first
character must be a letter or number.
Must be in the same subnet as the group IP address.
1. Click Start > Programs > EqualLogic > Remote Setup Wizard
2. Choose to initialize an array and click Next.
3. Select the array that you want to initialize and click Next.
4. Enter the array information, and then click either
Create a New Group or Join an existing group.
To allocate SAN storage space to users, create a volume. To
connect to a volume, a computer must have an iSCSI initiator
and must match the volume’s access controls.
Note: If you added the array to an existing group, the array’s
storage space will not be available until you use the
Group Manager GUI to set the RAID policy.
To create and connect to a volume:
1. Start the Group Manager GUI by entering the group IP address
in a web browser. See the PS Series Release Notes for the
latest browser requirements.
Network
Member3Member1 Member2
Volume3
Pool2
Group1
Volume2
Pool1
Volume4
Volume1
Software Configuration Methods
The Remote Setup Wizard facilitates server access to group
storage space and is the recommended method of configuring
the PS Series software.
Requirements include:
®
• A computer running Microsoft
®
Windows Server
Windows Server
2003 SP1, Windows Server
®
2008.
Windows XP ®, Windows Vista ®,
®
2003 R2, or
Subnet mask
Default gateway
RAID policy
RAID policy
Group name
Group IP address
Administration
password
Address that combines with the IP address to identify
the subnet on which the array network interface
resides (default is 255.255.255.0).
Must be in the same subnet as the group IP address.
RAID level and spare disk drive configuration for the
array. The actual number of RAID sets and spare
drives depends on the number of drives in the array:
•
RAID 10 - Striping on top of multiple RAID 1
(mirrored) sets.
•
RAID 50 - Striping on top of multiple RAID 5
(distributed-parity) sets. Each RAID 5 set has one
parity drive.
•
RAID 5 - Distributed-parity sets.
•
RAID 6 - Multiple dual distributed-parity sets.
Group Configuration
One to 63 letters, numbers, or hyphens. The first
character must be a letter.
An IP address used by iSCSI storage and management
and by group administrators to access a group.
Three to 16 letters or numbers, case-sensitive.
Overrides the default grpadmin account password.
5. If creating a new group, specify the group configuration and
click Next.
2. Click Create Volume in the Activities panel.
3. In the dialog boxes, enter the volume name, size, and access
controls (iSCSI initiator name or IP address).
4. Use the computer’s iSCSI initiator to discover the iSCSI
targets (volumes) in the group.
If the computer is not the one from which you configured
the software, enter the group IP address as the target
discovery address in order to discover the group volumes.
5. Select the target associated with the volume and log in.
Note: If you cannot log in to a volume, make sure the computer
matches the volume’s access controls.
• The computer must have one of these configurations:
– Connected to the same Ethernet segment as the array.
Membership
password
CHAP user name
Do not block Layer 2 multicasting between the devices.
– Connected to Ethernet 0 on the array using an RJ45 cable.
CHAP password
If you do not meet the Remote Setup Wizard requirements, use
the setup utility to configure the PS Series software. See the
PS Series Installation and Setup manual for information.
For support, visit www.support.dell.com/equallogic or call 1-800-945-3355.
Three to 16 letters or numbers, case-sensitive.
Used when expanding an existing group.
Three to 63 letters or numbers. Used by
Microsoft services for group access.
Twelve to 16 letters or numbers. Used by
Microsoft services for group access.
6. Click Finish to exit the Remote Setup Wizard.
The array initialization and group configuration are now complete.
Where to Go Next
See the PS Series Online Help to customize the group
and use all its features. If your computer has an Internet
connection, you can access the online help from the
Group Manager GUI. Start the GUI, expand Tools in
the lower-left corner and select Online Help.
Visit www.support.dell.com/equallogic for the latest
information about PS Series arrays.
R716M Rev. A00
 Loading...