

Page 1
Dell
E770s Color Monitor
Quick Setup Guide
Safety Instructions
Observe the following safety guidelines when connecting and using your monitor.
• Be sure your monitor is electrically rated to operate with the AC power available in your location.
• Locate your monitor near an easily accessible electrical outlet.
• Place the monitor on a solid surface and treat it carefully. The screen can be damaged if dropped,
sharply hit, or touched with a sharp or abrasive implement.
• Put your monitor in a location with low humidity and a minimum of dust.
• Never use your monitor if the power cable has been damaged. Do not allow anything to rest on the
power cable, and keep the cable away from wh ere peop le could trip over it .
• Never insert anything metallic into the monitor openings. Doing so may create the danger of electric
shock.
• To avoid electric shock, never touch the inside of the monitor. Only a qualified technician should open
the monitor's case.
• Be sure to hold the plug, not the cable, when disconnecting the monitor from an electrical outlet.
• Op ening s in th e moni tor cabi net are pr ovided for ventil ation. To preven t over heatin g, these o pening s
should not be blocked or covered. Also, avoid using the monitor on a bed, sofa, rug, or other soft
surface. Doing so may block the ventilation op enings in the bottom of the c abinet. If you put the monitor
in a bookcase or some other enclosed space, be sure to provide adequate ventilation.
• Do not expose the monitor to rain or use it near water. If the monitor accidentally gets wet, unplug it and
con tac t an a ut hor ized dea ler imm edi a tel y. Yo u c an cl ean th e ext eri or of th e m onit o r wi th a d amp cl oth
when necessary, but be sure to unplug the monitor first.
•
If your monitor does not operate normally - in particular, if there are any unusual sounds or smells
coming from it - unplug the monitor immediately and contact an authorized dealer or service center.
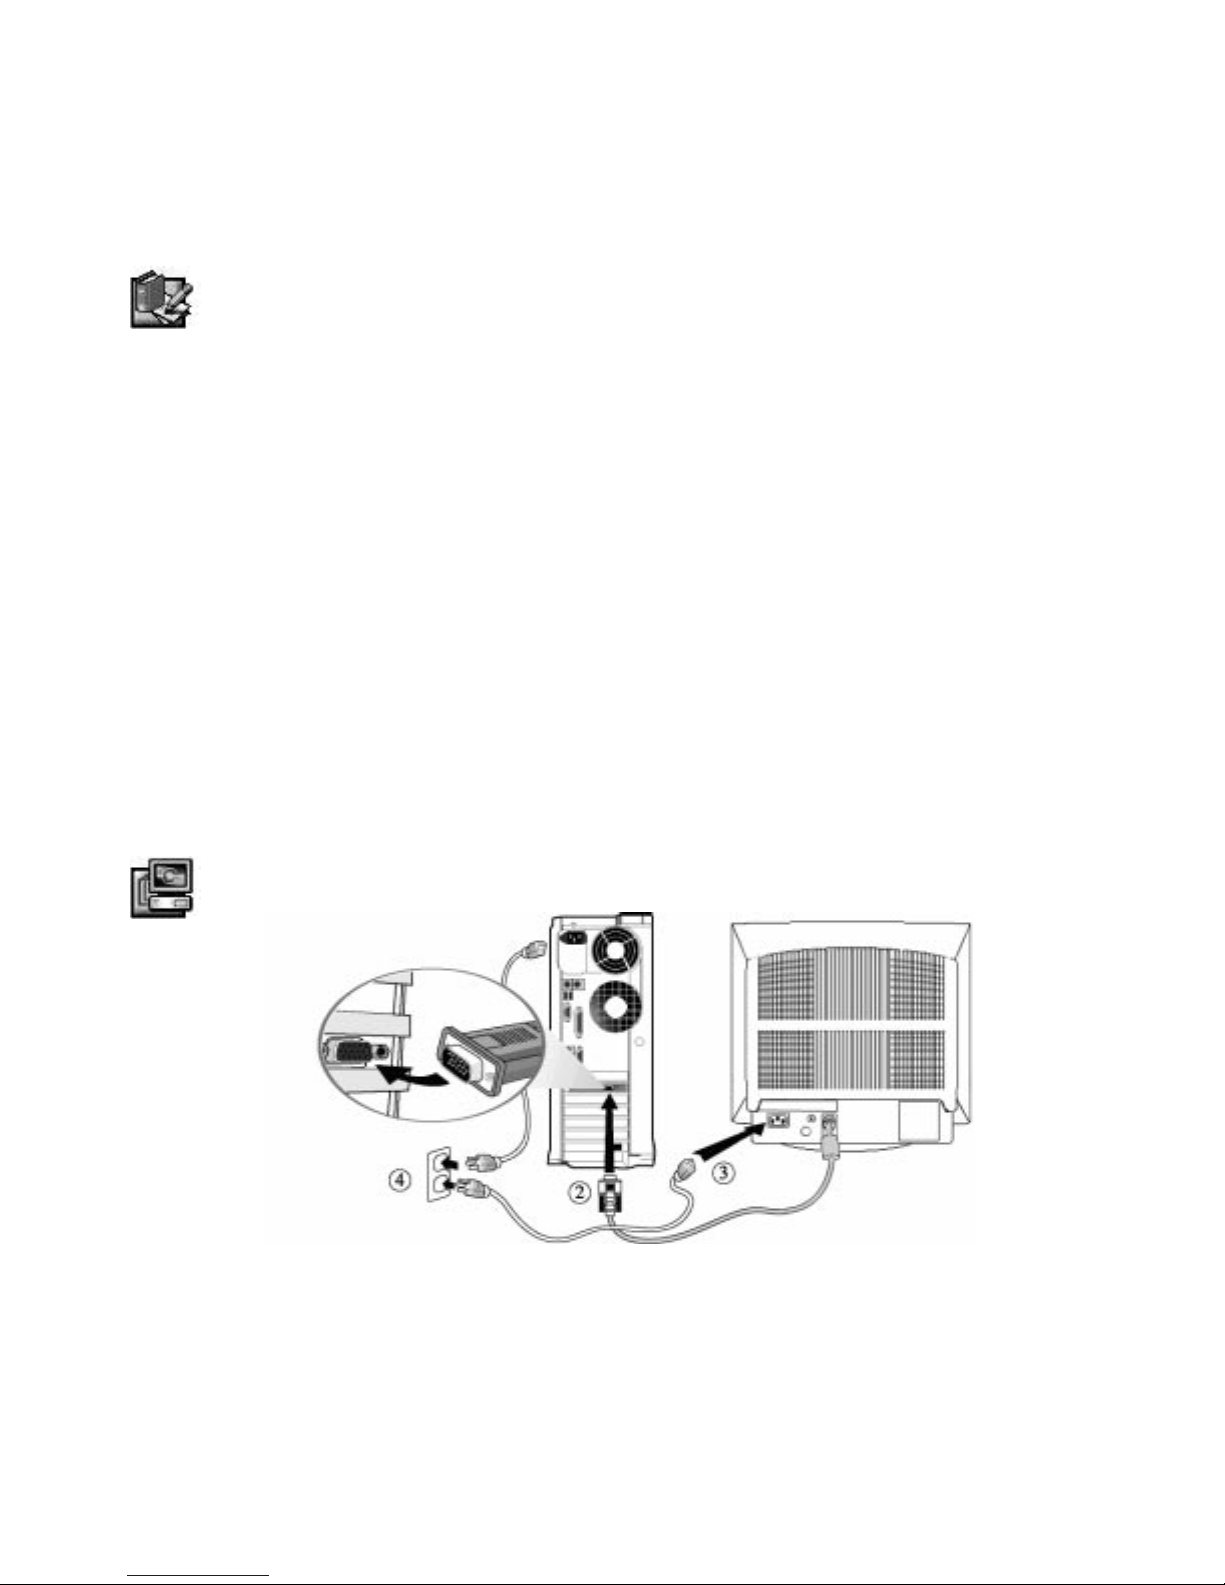
Connecting Your Monitor to a Computer
1. Turn off your computer and unplug your computer's power cable.
2. Connect the blue connector of the monitor's signal cable to the blue video connector on the back of your
computer. Tighten the connector screws finger-tight. Do not over tighten.
3. F ully i nsert the monitor po wer ca ble int o the pow er port on the b ack of th e monit or.
4. Plug the power cables of your computer and your monitor into a nearby electrical outlet.
5. Turn on your computer and monitor. If the monitor does not display an image, refer to the
troubleshooting section of this guide.
Dell E770s Color Monit or Q uic k Setup Guide
1
Page 2
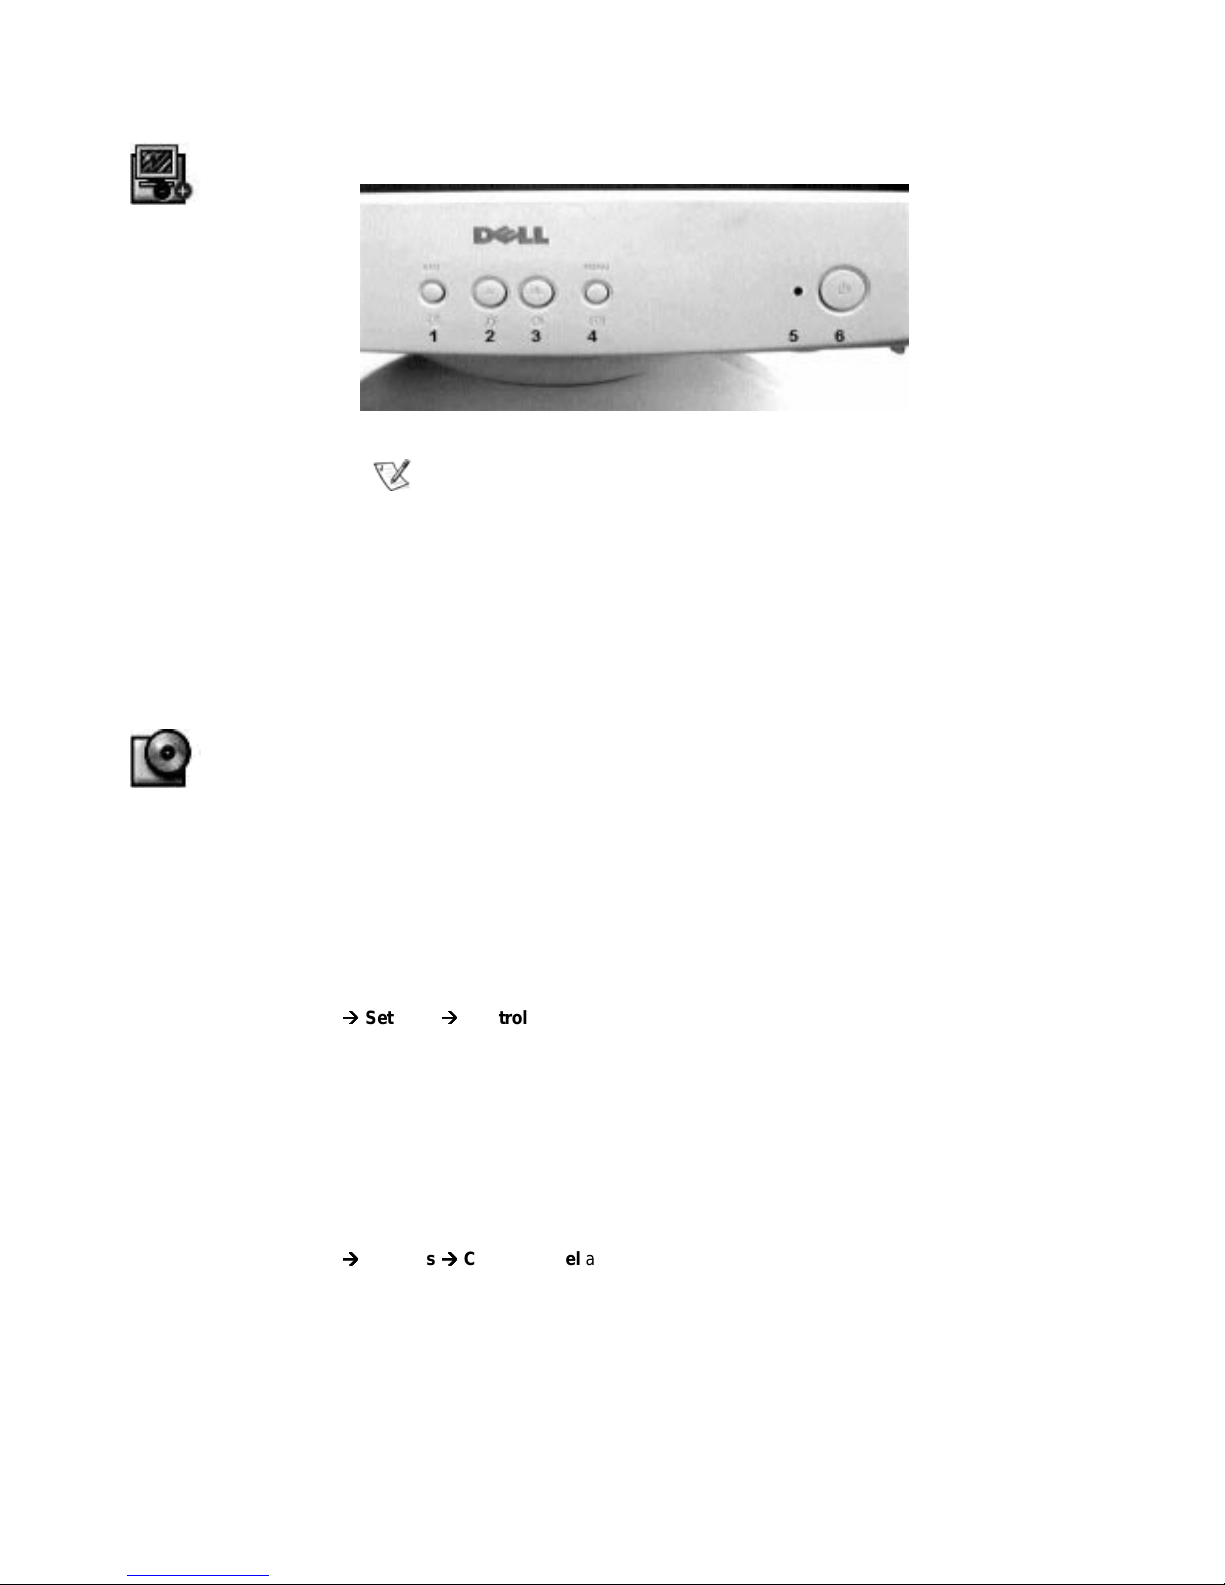
Monitor Controls and Indicators
1 EXIT
button
2,3
- / +
buttons
4 MENU
button
5 Power
Indicator
6 Power
button
This button closes the on-screen display (OSD). If the current OSD shows a sub-menu,
this button returns the previous OSD.
NOTE: Holding in the EXIT button for longer than 5 seconds erases all data in
the User Settings memory.
These buttons allow you to select and adjust items using the on-screen display. When
adjusting an item using the OSD, the - (mi nus) bu tto n lower s th e valu e of th e sel ected
function. The + (pl us) bu tton r aises the val ue of the s elect ed fu nctio n. Th ese bu ttons
are also used as direct access buttons for the Contrast and Brightness feature controls.
This button is used With the OSD system to activate a highlighted function for
adjustment.
This lig ht glows green du ring normal operation.
Use this button to turn the monitor on and off.
Driver Installation
Use the monitor CD to install the appropriate monitor drive for your operating system.
Microsoft Windows 98 Operating System
Windows 98 automatically dete cts the ne w monitor and displays the Add New Hardware Wizard dialog box
if the monitor driver is not already instal led.
1. Ins ert the m onitor C D into th e CD-ROM dri ve, and click Next> twice when the Add New Hardware
Wizar d dialog box appears.
2. Click the CD-ROM drive box to install the drivers from the CD and then click Next>.
3. Confir m that t he driver was f ound on the CD, and click Next> twic e t o install the d r iver.
4. Click Finish to exit the Add New Hardware Wizar d dialog box.
To manually install or update the driver, perform the following steps:
1. Click Start
2. In the Di splay Properties window, click the Settings tab, and then click Advanced.
3. Click the Monitor tab, and then click Change.
4. When the Update Device Driver Wizard dialog box appears, follow the steps in the previous
paragraph.
Settings
Control Panel and then double-click Display.
Microsoft Windows 95 Operating System
First determine the Windows 95 version installed on your computer by right- clicking the My Co mp u ter icon
on the desktop and selecting Properties. The version number is listed under System. Perform the steps for
the appropriate version.
Version 4.00.950A
1. Click Start
2. In the Di splay Properties window, click the Settings tab, and then click Change Display Type.
3. In the Change Display Type window, click Change and then click Have Disk.
4. Insert the monitor CD into the CD-ROM drive, type d:\ (change the drive letter to match your CD-ROM
drive if it is not drive D) in the Copy manu facture's files from: box, and cl ick OK.
5. In the Select Device window, click the appropriate monitor model and then click OK.
6. In the Change Display Type window, click Close.
7.
In the Display Properties window, click OK.
Dell E770s Color Monit or Q uic k Setup Guide
2
Settings
Control Panel and then double-click Display.
Page 3
Version 4.00.950B
1. Click Start
2. In the Di splay Properties window, click the Settings tab, and then click Advanced Properties.
3. In the Advanced Display Properties window, click the Monitor and then click Change.
4. In the Select Device window, click Have Disk.
5. Insert the monitor CD into the CD-ROM drive, type d:\ (change the drive letter to match your CD-ROM
drive if it is not drive D) in the Copy manu facture's files from: box, and cl ick OK.
6. In the Select Device window, click the appropriate monitor model and then click OK.
7. In the Change Display Type window, click Close.
8. In the Di splay Properties window, click OK.
Settings
Control Panel and then double-click Display.
Accessing the User's Guide Online or via CD.
To view the la test mon itor Us e r's Guide, acces s the SUP PORT se ction of the Dell Web S ite (http://support.dell.com).
if you do not have internet access the guide on the monitor CD
1. Insert the monitor CD into your CD-ROM drive.
A start-up document should launch automatically; however, if the start-up document does not launch
automatically, click Start--> Run, type D:\monitor.htm, and click OK.(Substitute the correct CD-ROM
drive lett er if it is not the D drive)
2. Click the appropriate icon to open the User's Guide in the desired language.
NOTE: All applicable warranty and regulatory information regarding your monitor is contained in the User's
Guide on your CD.
Troubleshooting Tips
Monitor Has No Power
If the monitor's power indicator is off and no image appears on the display, perform the following checks:
• Ens ure that the power cable is f ully inserted in the monit or's p ower por t and the electrical outlet.
• Test the electrical o utlet b y plugging in a w orking electric al devi ce such as a lamp.
• Ensure that the power button has been depressed, and wait for the power indicator to light.
• Try another power cable on the monitor. Use the computer's power cable and turn monitor with the
signal cable disconnected. If the monitor is working correctly, a self-test pattern appears.
No Image Is Displayed on the Monitor
If the monitor power indicator is on but no image appears on the display, perform the following checks:
• Ensure that the video connector is seated properly. Tighten the connector screws securely with your
fi ngers.
• Ensure that the computer is on.
• Increase brightness and contrast controls .
• Turn off the monitor and unplug the signal cable. Check the cable connector for bent or broken pins.
• With the signal cable still disconnected, turn on the monitor. If the Monitor is working correctly, a self-
test pattern appears.
• Perform a monitor reset or recall.
Dell E770s Color Monit or Q uic k Setup Guide
3
Page 4

IMPORTANT!
Before contacting Dell for technical assistan ce, refer to th e Troubleshoo ting section in the
User's Guide
most monitor problems.
Information in this document is subject to change without notice.
1999 Dell Computer Corporation. All rights reserved.
Reproduction in any manner whatever without the written permission of Dell Computer Corporation is strictly forbidden.
Trademarks used in this text: Dell and the DELL log are trademarks of Dell Computer Corporation; Microsoft and
Windows are register ed t r ademarks of Mic rosoft Corp or at i on.
Other tr ademarks and tr ade names m ay be used in this doc ument to ref er to eit her the ent ity claimi ng the m arks and
names or th eir products . Dell Computer Corporati on disclai ms any propr ietary int erest in tr ademarks and trad e names
other th an its own.
December 1999 P/N 2010V, 3010V Rev. A00
on your monitor CD. This section contains detail ed information fo r resolving
Dell E770s Color Monit or Q uic k Setup Guide
4
 Loading...