

Page 1
1
'HOO(PP&RORU0RQLWRU
4XLFN6HWXS*XLGH
6DIHW\ ,QVWUXFWLRQV
Observe the following safety guide lin es when connecting and using your monitor:
Be sure that your monitor is electrically rated to operate with the AC power available in your
•
location.
Locate your monitor near an easily accessible electrical outlet.
•
Place the monitor on a so lid surface and treat it carefu lly . The screen can be damaged if
•
dropped, sharply hit, or touched with a sharp or abrasive implement.
Put your monitor in a location with low humidity and a minimum of dust.
•
Never use your monitor if the power cable has been damaged. Do not allow anything to rest on
•
the power cable, and keep the cable away from where people could trip over it.
Never insert anything metallic int o the mon itor openings. Doing so may create the danger of
•
electric shock.
To avoid electric shock, ne ve r tou ch the insid e of the monitor. Only a qualified technicia n should
•
open the monitor’s cas e .
Be sure to hold the plug, not the cable, when disconnecting the monitor from an electrical outlet.
•
Openings in the monitor cabinet are p rov id ed for ve ntilation. To prevent overheatin g, th ese
•
openings should not be blocked or covered. Also, avoid using the monitor on a bed, sofa, rug, or
other soft surface. Doing so may block th e ven tilation openings in the bottom of the cabinet. If
you put the monitor in a bookcase or some other enclosed space, be sure to provide adequate
ventilation.
Do not expose the monitor to rain or use it near water. If the monitor accidentally gets wet,
•
unplug it and contact an authorized dealer immediately. You can clean the exterior of the
monitor with a damp cloth when necessary, but be sure to unplug the monitor first.
If your monitor does not operat e norma lly — in particular, if there are any un us ual sounds or smells
•
coming from it— unplug the monitor immediately and contact an au thorized dealer or service
center.
&RQQHFWLQJ <RXU 0RQLWRU WR D &RPSXWHU
Turn off your computer and unplug your computer’s power cable.
1.
Connect the blue co nnector of the monitor ’s signal cable to the blue video connector on the
2.
back of your computer. Tighten the connector screws finger-tight. Do not overtighten.
Connect the green audio connector to the green connector on the back of your computer.
3.
Connect the pink microphone connector to the pink connector on the back of your computer.
4.
Fully insert the monitor power cable into the power port on the back of the monitor.
5.
Dell E550mm Color Monitor Quick Setup Guide
Page 2
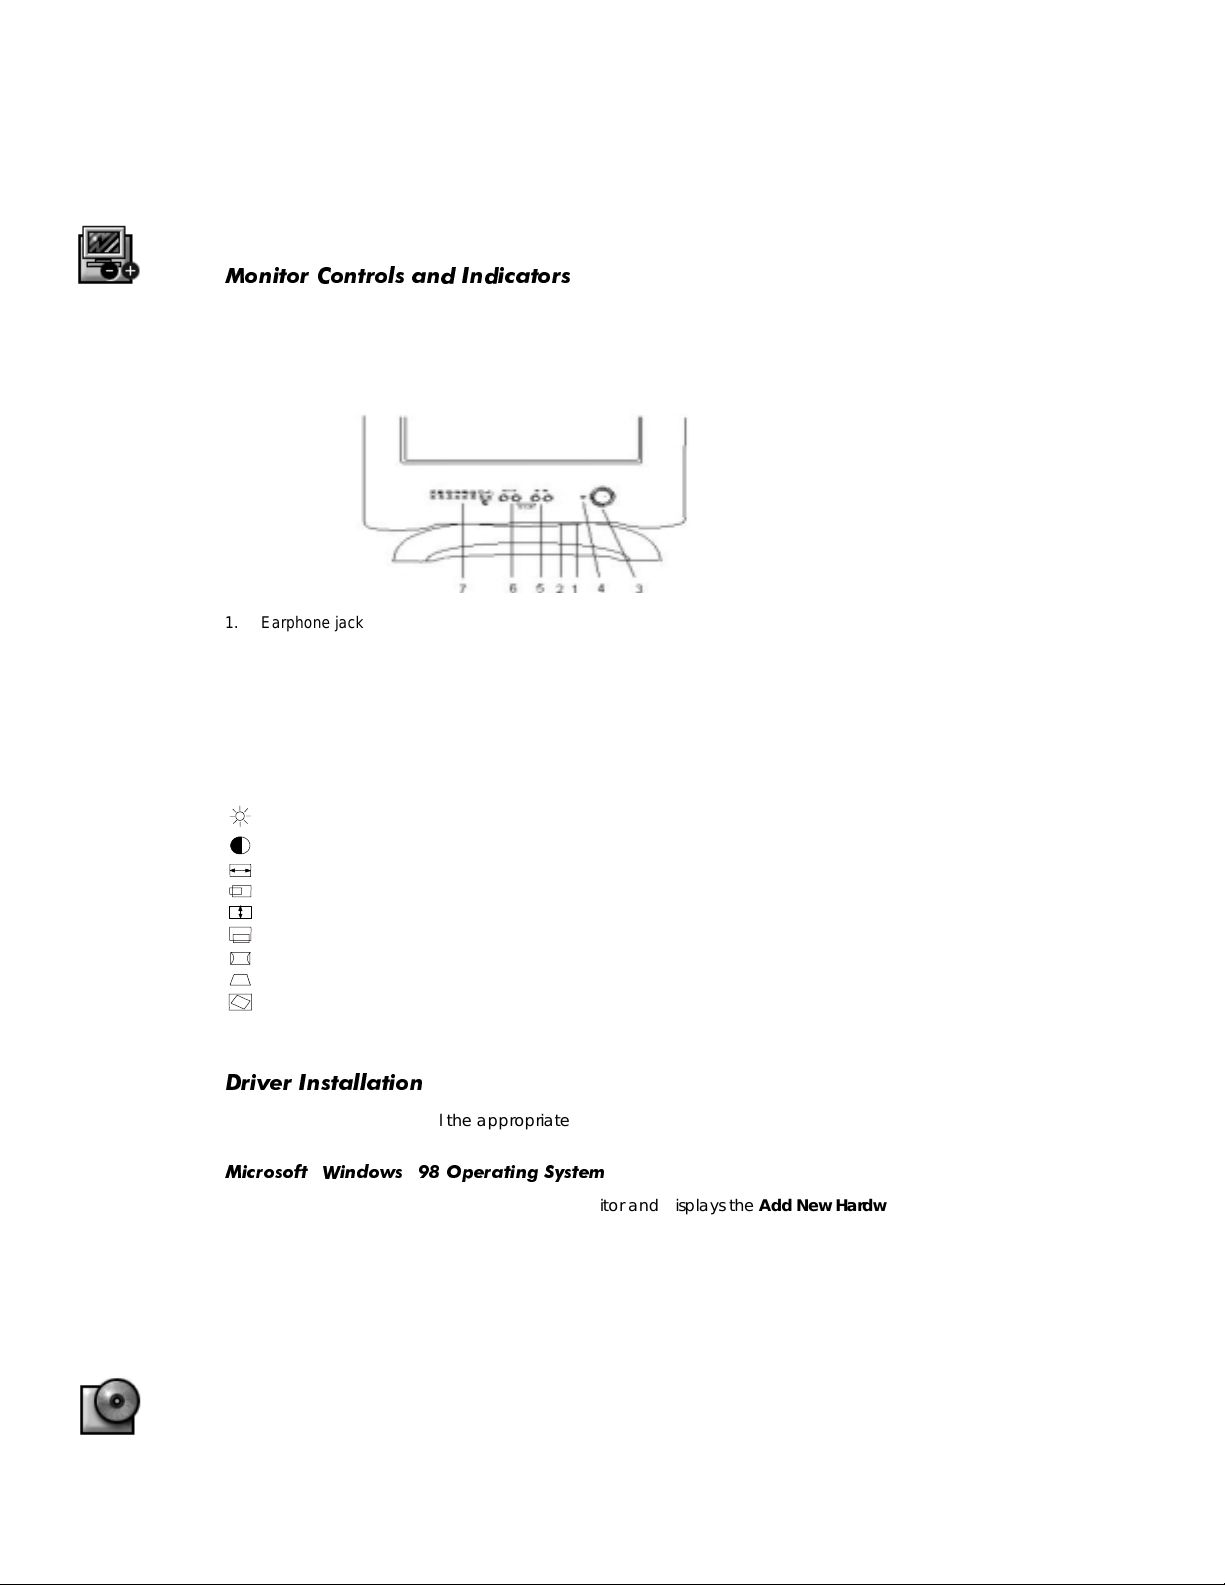
Plug the power cables of your computer and your monitor into a nearby electrical outlet.
6.
Turn on your computer and monitor. If the monitor does not display an image, refer to the
7.
troubleshooting section of this gu ide.
0RQLWRU &RQWUROV DQG ,QGLFDWRUV
1. Earphone jack This jack is for an optional earphone
2. Volume control Use this wheel to adjust audio volume.
3. Power button Use this button to turn the monitor on and off.
4. Power indicator This light glows green during normal operation.
5. ADJUST -/+ These buttons allow you to adjust the settings to lower or higher value of the
selected function.
6. SELECT -/+ These buttons allow you to select from the various functions.
7. Function indicators The indicator will turn green when you select the respective function.
The description of function indicators is as below:
Brightness:
Contrast:
Horizontal size:
Horizontal position:
Vertical size:
Vertical position:
Pincushion:
Trapezoid:
Rotation:
adjusts the background brightness of the screen image.
adjusts the contrast between the foreground and background of the screen image.
adjusts screen width.
moves screen image to the left or right.
adjusts screen height.
moves screen image up or down.
straightens the left and right vertical edges of the display.
adjusts the width of the top and bottom of the screen.
adjusts the viewing area when it is tilted left or right.
'ULYHU ,QVWDOODWLRQ
Use the monitor CD to install the appropriate monitor driver for your operating system.
0LFURVRIW:LQGRZV 2SHUDWLQJ 6\VWHP
Windows 98 automatically detects the new monitor and displays the
dialog box if the monitor driver is not already installed.
1. Insert the monitor CD into the CD-ROM drive, and click
dialog box appears.
Wizard
Click the
Confirm that the driver was found on the CD, and click
Click
To manually install or updat e th e d r iver, perform the following steps :
1. Click
In the
Click the
CD-ROM drive
to exit the
Finish
Start−> Settings−> Control Panel
Display Properties
Monitor
box to install the drivers from the CD and then click
Add New Hardware Wizard
window, click the
tab, and then click
Change
dialog box.
and then double-click
tab, and then click
Settings
.
Next>
Next>
Add New Hardware Wizard
twice when the
twice to install the driver.
.
Display
Advanced
Add New Hard wa r e
.
Next>
.
2
Dell E550mm Color Monitor Quick Setup Guide
Page 3
3
When the
paragraph.
Update Device Driver Wizard
dialog box appears, follow the st eps in the previous
0LFURVRIW :LQGRZV 2SHUDWLQJ 6\VWHP
First determine the Windows 95 version installed on your computer by right-clicking the
icon on the desktop and select in g
steps for the appropriate version.
Properties
. The version number is listed under
System
9HUVLRQ $
1. Click
In the
In the
Insert the monit or CD into the CD-ROM drive, type
In the
In the
In the
Start−> Settings−> Control Panel
Display Properties
Change Display Type
ROM drive if it is not drive D) in the
Select Device
Change Display Type
Display Properties
window, click the
window, click
window, click the appropriate mon itor model and then click OK.
window, click
window, click OK.
and then double-click
tab and then click
Settings
Change
Copy manufacturer’s files from:
Close
and then click
(change the drive letter to match your CD-
d:\
.
Display
Have Disk
.
Change Display Type
.
box, and click OK.
9HUVLRQ %
1. Click
In the
In the
In the
Insert the monit or CD into the CD-ROM drive, type
In the
In the
In
the Display Properties
Start−> Settings−> Control Panel
Display Properties
Advanced Display Properties
Select Device
ROM drive if it is not drive D) in the
Select Device
Advanced Display Properties
window, click the
window, click
window, click the appropriate mon itor model and then click OK.
window, click OK.
and then double-click
tab and then click
Settings
window, click the
Have Disk
window, click
.
Copy manufacturer’s files from:
Monitor
(change the drive letter to match your CD-
d:\
.
Close
.
Display
Advanced Properties
tab and then click
box, and click OK.
Change
My Computer
. Perform the
.
.
.
$FFHVVLQJ WKH 8VHU·V *XLGH 2QOLQH RU YLD &'
To view the late st monitor User’s Guide, access the
(
http://support.dell.com
If you do not have Internet access, you can access the guide on the monitor CD:
1. Insert the monitor CD into your CD-ROM drive.
A start-up document should launch automatically; however, if the start-up document does not
launch automatically, click
correct CD-ROM drive letter if it is not t he D drive.)
Click the appropriate icon to open the User’s Guide in the desired language.
NOTE: All applicable warranty and regulatory information regarding your monitor is contained in the
User’s Guide on your CD.
).
Start−> Run
, type
SUPPORT
D:\monitor.htm
section of the Dell Web site
, and click OK. (Substitute the
7URXEOHVKRRWLQJ 7LSV
0RQLWRU +DV 1R 3RZHU
If the monitor’s power indicator is off and no image appears on the display, perform the following
checks:
Ensure that the power cable is f ully inserted in the monitor’s power port and the electrical outlet.
•
Test the electrical outlet by plugging in a working electrical device such as a lamp.
•
Ensure that the power button has been depressed, and wait for the power indicator to light.
•
Try another power cable on the monitor. Use the computer’s power cable and turn on the
•
monitor with the signal cable disconnected. If the monitor is working correctly, a self-test pattern
appears.
Dell E550mm Color Monitor Quick Setup Guide
Page 4
1R ,PDJH ,V 'LVSOD\HG RQ WKH 0RQLWRU
If the monitor power indicator is on but no image app ea r s on the display, perform the following
checks:
Ensure that the video connector is seated properly. Tighten the connector screws securely with
•
your fingers.
Ensure that the computer is on.
•
Increa se brightnes s and contrast control s.
•
Turn off the monitor and unplug the signal cable. Check the cable connector for bent or broken
•
pins.
With the signal cable still disconnected, turn on the monitor. If the monitor is workin g correctly, a
•
self-test pa ttern appears.
Perform a monitor reset or recall.
•
$XGLR 3UREOHPV
Ensure that the volume control is on, if the re is no audio f rom speak ers.
•
Ensure that the connector is seated properly, if there is no audio from Headphone.
•
Turn off the microphone if speakers produce noise.
•
Ensure that the speakers are in mute mode or turn off the speakers, if microphone produces
•
noise.
Turn down the volume if you the mon itor starts vibrating.
•
,03257$17
%HIRUH FRQWDFWLQJ 'HOO IRU WHFKQLFDO DVVLVWDQFH UHIHU WR WKH 7URXEOHVKRRWLQJ VHFWLRQ LQ WKH
\RXU PRQLWRU &' 7KLV VHFWLRQ FRQWDLQV GHWDLOHG LQIRUPDWLRQ IRU UHVROYLQJ PRVW PRQLWRU SUREOHPV
8VHU·V *XLGH
RQ
____________________________________
Information in this document is subject to change without notice.
1999 Dell Computer Corporation. All rights reserved.
Reproduction in any manner whatsoever without the written permission of Dell Computer Corporation
is strictly forbidden.
Trademarks used in this text: Dell and the DELL logo are trademarks of Dell Computer Corporation;
Microsoft and Windows are registered trademarks of Microsoft Corporation.
Other trademarks and trade names may be used in this document to refer to either the entities
claiming the marks and names or their produc t s. De ll Compu te r Corpo ration disclaims any proprietary
interest in trademarks and trade names other than its own.
November 1999 P/N 3853T Rev. A00
4
Dell E550mm Color Monitor Quick Setup Guide
 Loading...