

Page 1

Dell™ Dimension™ 8100 System
SOLUTIONS GUIDE
www.dell.com
supperl.dell.com
D^LOCOM"
Page 2

Hints, Notices, and Cautions
^ HINT: A HINT indicates important information that helps you make better
use of your computer.
O NOTICE: A NOTICE indicates either potential damage to hardware or loss of
data and tells you how to avoid the problem.
CAUTION: A CAUTION indicates a potentially hazardous situation
which, if not avoided, may result in minor or moderate injury.
Abbreviations and Acronyms
For a complete listing of abbreviations and acronyms, see the Glossary in
the Tell Me How help file (see the START HERE sheet for instructions on
how to open the help file).
Information in this document is subject to change without notice.
© 2000 Dell Computer Corporation. All rights reserved.
Reproduction in any manner whatsoever without the written permission of Dell Computer
Corporation is strictly forbidden.
Trademarks used in this text: De//, the logo, the DELL E COM logo, Dimension, and
DeiiWareare trademarks of Dell Computer Corporation; Inteiand Pentium are registered
trademarks of Intel Corporation; Microsoft and Windows are registered trademarks of Microsoft
Corporation; 3Com is a registered trademark of 3Com Corporation.
Other trademarks and trade names may be used in this document to refer to either the entities
claiming the marks and names or their products. Dell Computer Corporation disclaims any
proprietary interest in trademarks and trade names other than its own.
October 2000 P/N 65JDG Rev. A00
Page 3

Contents
Safety Instructions.......................................................................................... 7
When Using Your Computer................................................................... 7
When Working Inside Your Computer.................................................... 8
Protecting Against Electrostatic Discharge
1 Setting Up
Connecting a Printer.....................................................................................12
Parallel Printer......................................................................................12
USB Printer...........................................................................................13
Installing the Printer Driver...................................................................14
Turning Off the Computer.............................................................................14
Windows 98 Second Edition (SE)
and Windows Millennium Edition (Me)
Windows 2000 ..................................................................................... 15
...........................................
.................................................
9
15
2 Solving Problems
Finding Solutions..........................................................................................18
Power Problems............................................................................................20
Start-Up Error Messages...............................................................................21
Video and Monitor Problems.........................................................................21
If the screen is blank..............................................................................21
If the screen is difficult to read..............................................................22
Sound and Speaker Problems.......................................................................23
Contents I 3
Page 4

Printer Problems.........................................................................................24
If you cannot print to a parallel port printer
If you cannot print to a USB printer
........................................
......................................................
24
25
Scanner Problems.........................................................................................25
Modem Problems
.......................................................................................
26
Mouse Problems........................................................................................... 27
Keyboard Problems.......................................................................................27
Drive Problems..............................................................................................27
If you cannot save a file to a floppy disk................................................27
If you cannot play a music CD or install a
program from a CD.............................................................................2 8
If you cannot play a DVD movie............................................................29
If the CD-RW drive stops writing...........................................................29
If you have a hard drive problem...........................................................29
Network Problems......................................................................................30
Windows Error Messages............................................................................30
General Program Problems.........................................................................31
A program crashes..............................................................................31
A program stops responding...............................................................31
A solid blue screen appears ................................................................31
Internet Connection Problems....................................................................32
^ I Contents
E-Mail Problems..........................................................................................32
Resolving Other Technical Problems
..........................................................
32
Reinstalling Drivers and Utilities....................................................................33
Reinstalling Windows 98
Reinstalling Windows Me
...............................................................................
..............................................................................
35
Reinstalling Windows 2000 ...........................................................................39
37
Page 5

3 Adding Pauts
Removing the Computer Cover
Looking Inside Your Computer
Rotating the Power Supply...........................................................................46
Removing and Replacing the Front Panel
Removing and Replacing the AGP Card Brace..............................................4 s
Adding Cards................................................................................................49
Removing Cards............................................................................................52
Adding Memory............................................................................................53
Adding or Replacing Other Drives.................................................................54
Replacing the Computer Cover.....................................................................59
4 Appendix
....................................................................
.....................................................................
42
44
System Board.......................................................................................45
.....................................................
Installing a Card....................................................................................50
47
Specifications............................................................................................... 62
Standard Settings.........................................................................................6 5
Viewing Settings...................................................................................6 6
System Setup Screens..........................................................................6 7
Clearing Forgotten Passwords..............................................................6 7
Replacing the Battery...........................................................................6s
Contacting Dell.............................................................................................6 9
Index.............................................................................................................................S3
Contents I 5
Page 6

^ I Contents
Page 7

Safety Instructions
Use the following safety guidelines to proteet yourself and your eomputer.
For eomfort and effieieney, observe the ergonomie guidelines provided in
the Tell Me How help file.
When Using Your Computer
CAUTION: Do not operate your computer with any cover(s)
(including the computer cover, filler brackets, front-panel inserts,
and so on) removed.
• To help avoid damaging your eomputer, the power voltage is
automatieally sensed to mateh the AC power available at your
loeation. If your eomputer does not automatieally sense the power
voltage, please set it to the proper voltage for your loeation.
Also be sure that your monitor and attaehed deviees are eleetrieally rated to
operate with the AC power available in your loeation.
• To help avoid possible damage to the system board, wait 5 seeonds
after turning off the eomputer before diseonneeting or eonneeting a
non-USB deviee from the eomputer.
• To help prevent eleetrie shoek, plug the eomputer and deviee power
eables into properly grounded power sourees. These eables are
equipped with 5-prong plugs to help ensure proper grounding. Do not
use adapter plugs or remove the grounding prong from a eable. If you
must use an extension eable, use a 5-wire eable with properly grounded
plugs.
• To help proteet your eomputer from sudden, transient inereases and
deereases in eleetrieal power, use a surge suppressor, line eonditioner,
or uninterruptible power supply.
• Be sure that nothing rests on your eomputer’s eables and that the
eables are not loeated where they ean be stepped on or tripped over.
• Do not spill food or liquids on your eomputer. If the eomputer gets
wet, eontaet Dell (see page 69).
• Do not push any objeets into the openings of your eomputer. Doing so
ean eause fire or eleetrie shoek by shorting out interior eomponents.
1 7
Page 8

T3
T3
E
O
U
QJ
o
Q.
Q.
Z5
to
E
O
tj
QJ
3
3
3
•
Keep your eomputer away from radiators and heat sourees. Also, do not
Eloek eooling vents. Avoid plaeing loose papers underneath your
eomputer; do not plaee your eomputer in a elosed-in wall unit or on a
bed, sofa, or rug.
When Working Inside Your Computer
Before you remove the eomputer eover, perform the following steps in the
sequenee indieated.
NOTICE: Do not attempt to service the computer yourself, except as
o
explained in this guide and elsewhere in Dell documentation. Always follow
installation and service instructions closely.
1 Turn off your eomputer and all deviees.
2 Ground yourself by touehing an unpainted metal surfaee at the baek of
the eomputer before touehing anything inside your eomputer.
While you work, periodieally toueh an unpainted metal surfaee on the
eomputer to dissipate any statie eleetrieity that might harm internal
eomponents.
Diseonneet any deviees eonneeted to the eomputer, ineluding the
3
monitor, from their eleetrieal outlets to reduee the potential for
personal injury or shoek. Also, diseonneet any telephone or
teleeommunieation lines from the eomputer.
8 1
4
Diseonneet the power eable to your eomputer, and then press the
power button to ground the system board.
In addition, take note of these safety guidelines when appropriate:
•
When you diseonneet a eable, pull on its eonneetor, not on the eable
itself. As you pull eonneetors apart, keep them evenly aligned to avoid
bending any pins. Also, before you eonneet a eable, make sure that
both eonneetors are eorreetly oriented and aligned.
•
Handle eomponents and eards with eare. Don’t toueh the eomponents
on a eard. Hold a eard by its edges or by its metal braeket.
CAUTION: There is a danger of a new battery exploding if it is
A
incorrectly installed. Replace the battery only with the same or
equivalent type recommended by the manufacturer. Discard used
batteries according to the manufacturer’s instructions.
Page 9

Protecting Against Electrostatic Discharge
To prevent statie damage, diseharge statie eleetrieity from your body before
you toueh anything inside your eomputer and periodieally while you work
inside the eomputer. You ean do so by touehing an unpainted metal surfaee
on the baek of the eomputer.
You ean also take the following steps to prevent statie damage:
• Do not remove items from their antistatie paeking material until you
are ready to install them in your eomputer. -ust before unwrapping the
antistatie paekaging, be sure to diseharge statie eleetrieity from your
body.
• When transporting a sensitive eomponent, first plaee it in an antistatie
eontainer or paekaging.
I 9
Page 10

www.dell.com | support.dell.com
Page 11

SECTION 1
¡Setting Up
Connecting a Printer
Turning Off the Computer
1
Page 12

Connecting a Printer
See the doeumentation that eame with the printer for any reeommended
preparation proeedures, sueh as:
• Removing the paekaging
• Installing the toner or ink eartridge
• Loading paper
Then follow the instruetions that eame with the printer to eonneet it to the
eomputer. If no information is provided, see the following seetions.
Parallel Printer
1 Turn off the eomputer (see page 14).
O NOTICE: Use only a standard IEEE parallel cable measuring 3 m (10 ft) or
less to connect the printer to the computer. Use of a nonstandard cable may
prevent the printer from working.
2 Attaeh the parallel printer eable to the parallel eonneetor on the
eomputer and tighten the two serews. Attaeh the eable to the parallel
eonneetor on the printer and snap the two elips into the two notehes.
1^ I Setting Up
Page 13

parallel connector on
screws (2)
3 Turn on the printer and then turn on the eomputer. If the Add New
computer
parallel
connector on
printer
Hardware Wizard window appears, eliek Cancel.
4 Install the printer driver if neeessary (see page 14).
USB Printer
clips (2)
1 Install the printer driver if neeessary (see page 14).
2 Attaeh the USB printer eable to the USB eonneetor on the eomputer
and the printer. The USB eonneetors only fit one way.
^ HINT: You can connect
USB devices while the
computer is turned on.
Setti nj I 13
Page 14

Installing the Printer Driver
USB connector
on printer
HINT: Dell installs
drivers for some new
printers. Click the Start
button, point to Settings,
and then click Printers. If
your printer is listed in the
Printers window, the
printer is ready to use.
If you need to install a printer driver, insert the installation CD into the CD
or DVD drive. Then follow the prompts on the sereen using the instruetions
that eame with the printer.
If your printer installation CD does not automatieally run, eliek the Start
button on the Windows desktop, eliek Run, and type x:\setup .exe
(where x is the letter of your CD or DVD drive [usually drive D]). Then
eliek OK and follow the prompts on your sereen.
If you eonneet an older printer and it doesn’t work after you install the
driver, aeeess the system setup program (see
parallel port is set to operate in bidireetional mode.
page 65) and ensure that the
Turning Off the Computer
NOTICE: To prevent data loss, you must perform the
O
shutdown procedure.
licrosoft® Windows^
1^ I Setting Up
Page 15

Windows 98 Second Edition (SE) and Windows Millennium Edition (Me)
1 Save and exit any programs and files you have open.
2 Cliek the Start button, and then eliek Shut Down.
3 In the Shut Down Windows window, eliek Shut down and then eliek
OK.
The eomputer automatieally turns off after the shutdown proeess
finishes.
4 Turn off your monitor and any other deviees eonneeted to power.
Windows 2000
1 Save and exit any programs and files you have open.
2 Cliek the Start button, and then eliek Shut Down.
3 Cliek the pull-down menu under What do you want the computer to
do".
4 Cliek Shut down and then eliek OK.
The eomputer automatieally turns off after the shutdown proeess
finishes.
5 Turn off your monitor and any other deviees eonneeted to power.
Setti ng I 15
Page 16

www.dell.com | support.dell.com
Page 17

SECTION 2
SolYing Problems
Finding Solutions
Power Problems
Start-Up Error Messages
Video and Monitor Problems
Sound and Speaker Problems
Printer Problems
Scanner Problems
Modem Problems
Mouse Problems
Keyboard Problems
Drive Problems
Network Problems
Windows Error Messages
General Program Problems
2
Internet Connection Problems
E-Mail Problems
Resolving Other Technical Problems
Reinstalling Drivers
Reinstalling Windows 98
Reinstalling Windows Me
Reinstalling Windows 2000
Page 18

Finding Solutions
Sometimes it’s diffieult to figure out where to go for answers. Use this ehart
to help you quiekly find the answers to your questions.
NO
o
NO
o
CONTINUE
I Solving Problems
Page 19

Solving Problems I 19
Page 20

HINT: Seethe Tell Me
//oM/help file for
information on the
standby mode.
Power Problems
Check the power light— When the power light is lit or blinking, the
eomputer has power. If the power light is blinking, the eomputer is in standby
mode—press a key on the keyboard or move the mouse.
Test the electrical outlet— Ensure that the eleetrieal outlet is working
by testing it with another deviee, sueh as a lamp.
Check the power cable connection— Be sure that the power eable is
firmly inserted into the eleetrieal outlet and the eomputer power eonneetor.
Connect the computer directly to an electrical outlet—
Bypass power proteetion deviees, power strips, and the extension eable to verify
that the eomputer turns on.
Swap the computer and monitor power cables— Swap the
eomputer and monitor power eables to determine if the power eable is defeetive.
Check for interference — Eleetrieal applianees on the same eireuit or
operating near the eomputer ean eause interferenee. Other eauses of
interferenee: power extension eables, keyboard and mouse extension eables, too
many deviees on a power strip, or multiple power strips eonneeted to the same
eleetrieal outlet.
2^ I Solving Problems
Check the Power Properties— See Windows Help.
To aeeess Windows Help:
1 Cliek the Start button and then eliek Help.
2 For Windows 98 and Windows 2000, eliek the Search tab.
3 For Windows 98 and Windows 2000, type standby and then eliek List
Topics. For Windows Me, type standby and then eliek Go.
4 For Windows 98 and Windows 2000, eliek To change the elapsed time before
your computer automatically goes on standby. For Windows Me, eliek
Changing the elapsed time before computer goes on standby or hibernate.
Page 21

Start-Up Error Messages
Operating system not found— Call Dell for technical assistance (see
page 69).
Insert bootable media— The operating system is trying to boot to a
nonbootable floppy disk or CD. Insert a bootable floppy disk or CD.
NON-SYSTEM disk error— There is a floppy disk in the floppy drive.
Remove the floppy disk and restart the computer.
Video and Monitor Problems
If the screen is blank
press the monitor power button— Be sure that you firmly pressed the
monitor power button.
Check the power light— When the power light is lit or blinking, the
monitor has power. If the power light is blinking, press a key on the keyboard or
move the mouse.
^ HINT: See the monitor
documentation for fault
indications and
troubleshooting
procedures specific to
your monitor.
Test the electrical outlet— Ensure that the electrical outlet is working
by testing it with another device, such as a lamp.
Swap the computer and monitor power cables— Swap the
computer and monitor power cables to determine if the power cable is defective.
Test the video extension cable (if used)— If removing the video
extension cable solves the problem, the cable is defective.
Test the monitor— if another monitor is available, connect it to the
computer.
Solving Problems I 21
Page 22

Check the back panel lights— If all four lights below the serial port are
not green, eall Dell for teehnieal assistanee (see page 69).
Check the Power Properties if the monitor screen
occasionally turns blank — See Windows Help.
To aeeess Windows Help:
1 Cliek the Start button and then eliek Help.
2 For Windows 98 and Windows 2000, eliek the Search tab.
3 For Windows 98 and Windows 2000, type standby and then eliek List
Topics. For Windows Me, type standby and then eliek Go.
4 For Windows 98 and Windows 2000, eliek To change the elapsed time before
your computer automatically goes on standby. For Windows Me, eliek
Changing the elapsed time before computer goes on standby or hibernate.
If the screen is difficult to read
adjust the contrast and brightness— See the monitor
doeumentation for instruetions on adjusting the eontrast and brightness.
move the subwoofer away from the monitor— If your speaker
system ineludes a subwoofer, ensure that the subwoofer is at least 2 ft (60 em)
away from the monitor.
2^ I Solving Problems
Eliminate possible interference— Turn off nearby fans, fluoreseent
lights, or halogen lamps to eheek for interferenee.
rotate the monitor to face a different direction— Eliminate
sunlight glare, whieh ean eause poor pieture quality.
degauss (demagnetize) the monitor— See the monitor
doeumentation.
Run the monitor self-test— See the monitor doeumentation.
Restore the recommended settings— Restore the original resolution
and refresh rate settings. See the Tell Me How help file for instruetions.
Page 23

Check for additional adjustments— See the monitor doeumentation
for any additional adjustments that your monitor may require.
Adjust the Windows display settings— Cliek the Start button,
point to Settings, and eliek Control Panel. Double-eliek the Display ieon and
then eliek the Settings tab. Try different settings for Colors and Screen area.
Sound and Speaker Problems
Verify the speaker cable connections— Ensure that the speakers
are eonneeted as shown on the START HERE sheet for your eomputer and the
setup diagram supplied with the speakers.
Test the electrical outlet— Ensure that the eleetrieal outlet is working
by testing it with another deviee, sueh as a lamp.
Ensure that the speakers are turned on— See the setup diagram
supplied with the speakers.
Adjust the speaker controls— Adjust the volume, bass, or treble
eontrols to eliminate distortion.
HINT: The volume
control In some 0 P3
players overrides the
Windows volume setting.
If you have been listening
to 0P3 songs, make sure
that you did not turn the
player volume down or off.
Adjust the Windows volume control— Double-eliek the yellow
speaker ieon in the lower-right eorner of your sereen. Be sure that the volume is
turned up and that the sound is not muted.
Test the speakers— Plug the speaker audio eable into the headphone jaek
of the CD drive. Ensure that the headphone volume eontrol is turned up. Play a
musie CD.
Run the speaker self-test— Some speaker systems have a self-test
button on the subwoofer. See the speaker doeumentation for self-test
instruetions.
Solving Problems I 23
Page 24

Move the subwoofer away from the monitor— If your speaker
system ineludes a subwoofer, ensure that the subwoofer is at least 2 ft (6 em)
away from the monitor.
Eliminate possible interference— Turn off nearby fans, fluoreseent
lights, or halogen lamps to eheek for interferenee.
reinstall the sound (audio) driver— See page 33.
Printer Problems
If you cannot print to a parallel port printer
verify the printer cable connections— Ensure that the printer
eable is eonneeted as deseribed on page 16.
Test the electrical outlet— Ensure that the eleetrieal outlet is working
by testing it with another deviee, sueh as a lamp.
Ensure that the printer is turned on— See the doeumentation
supplied with the printer.
2^ I Solving Problems
verify that the printer is recognized by Windows
1 Cliek the Start button, point to Settings, and then eliek Printers.
If the printer is listed, right-eliek the printer ieon, eliek Properties, and then
seleet the Details tab.
2 Ensure that the Print to the following port: setting is LPTl (Printer Port).
reinstall the printer driver— See page 14.
Page 25

If you cannot print to a USB printer
Verify the printer cable connections— Ensure that the printer
eable is eonneeted as deseribed on page 16.
Test the electrical outlet— Ensure that the eleetrieal outlet is working
b\ testing it with another deviee, sueh as a lamp.
Ensure that the printer is turned
supplied with the printer.
Verify that the printer is recognized by Windows— Cliek the
Start button, point to Settings, and then eliek Printers. If the printer is listed,
right-eliek the printer ieon, eliek Properties, and then seleet the Details tab.
reinstall the printer driver— See page 14.
on— See the doeumentation
Scanner Problems
Check the power cable connection— Ensure that the seanner power
eable is firmly eonneeted to a working eleetrieal power souree and that the
seanner is turned on.
Check the scanner cable connection— Ensure that the seanner
eable is firmly eonneeted to the eomputer and to the seanner.
Unlock the scanner— Ensure that your seanner is unloeked if it has a
loeking tab or button.
reinstall the scanner driver— Reinstall the seanner driver. See the
seanner doeumentation for instruetions.
Solving Problems I 25
Page 26

Modem Problems
NOTICE: Connect the modem to an analog telephone jack only. Connecting
the modem to a digital telephone network damages the modem.
Check the telephone jack— Disconnect the telephone line from the
modem and connect it to a telephone. Listen for a dial tone.
Connect the modem directly to the telephone wall jack— If
you have other telephone devices sharing the line, such as an answering machine,
fax machine, surge protector, or line splitter, then bypass them and connect the
modem directly to the telephone wall jack with the telephone line.
Check the connection — Verify that the telephone line is connected to the
green jack on the modem. (The green line-in jack has either a LINE IN label or a
connector-shaped icon next to it.)
Check the telephone line — Try using a different telephone line. If you
are using a line that is 10 ft (3 m) or more in length, try a shorter one.
Verify that the modem is communicating with Windows
1 Click the Start button, point to Settings, and click Control Panel.
2 In the Control Panel, double-click Modems.
If there are multiple entries for the same modem or modems listed that are
not installed, delete the entries and restart the computer.
3 Click the Diagnosties tab.
4 Click the COM port for your modem.
5 Click More Info to verify that the modem is communicating with Windows.
If all commands receive responses, the modem is operating properly.
2^ I Solving Problems
Page 27

Mouse Problems
Reconnect the mouse cable
1 Press <CtrlxEsc> to display the Start menu.
2 Use the keyboard arrow keys to highlight Shut Down and then press the
<Enter> key
3 After the computer turns off, reconnect the mouse cable as shown on the
START HERE sheet for your computer.
4 Start the computer.
Check the mouse settings— Click the Start button, select Control
Panel, and then double-click the Mouse icon. Try adjusting the settings.
Keyboard Problems
Reconnect the keyboard cable— Shut down the computer (see
page 14), reconnect the keyboard cable as shown on the START HERE sheet for
your computer, and then restart the computer.
Drive Problems
If you cannot save a file to a floppy disk
Ensure that Windows recognizes the drive— Double-eliek the
My Computer ieon. If the floppy drive is not listed, perform a full sean with your
antivirus software to eheek for and remove viruses. Viruses ean sometimes
prevent Windows from reeognizing the drive.
^ HINT: For information
on saving files to a floppy
disk, double-click the Tell
Me How help file icon on
your Windows desktop.
Solving Problems I 27
Page 28

HINT: High-speed CD
drive vibration is normal
and may cause noise. This
does not indicate a defect
in the drive or the CD.
Cannot save files to a floppy disk— Ensure that the floppy disk is
not full or write-proteeted (looked). See the following illustration.
Test the drive with another floppy disk— Insert another floppy
disk to eliminate the possibility that the original floppy disk is defeetive.
back of floppy disk
write-protected
not writeprotected
If you cannot play a music CD or install a program from a CD
Ensure that Windows recognizes the drive— Double-click the
My Computer icon. If the CD drive is not listed, perform a full scan with your
antivirus software to check for and remove viruses. Viruses can sometimes
prevent Windows from recognizing the drive.
2^ I Solving Problems
Test the drive with another CD— Insert another CD to eliminate the
possibility that the original CD is defeetive.
Clean the disc— See the Tell Me How help file for instruetions.
adjust the Windows volume control— Double-eliek the yellow
speaker ieon in the lower-right eorner of your sereen. Be sure that the volume is
turned up and that the sound is not muted.
Page 29

If you cannot play a DVD movie
Ensure that Windows recognizes the drive— Double-click the
My Computer icon. If the DVD drive is not listed, perform a full scan with your
antivirus software to check for and remove viruses. Viruses can sometimes
prevent Windows from recognizing the drive.
Test the drive with another DVD— Insert another DVD to eliminate
the possibility that the original DVD is defective.
Clean the disc— See the Tell Me How help file for instructions.
If the CD-RW drive stops writing
Turn off Standby in Windows before writing to a CD-RW
DISK— See Windows Help.
To access Windows Help:
1 Click the Start button and then click Help.
2 For Windows 98 and Windows 2000, click the Search tab.
3 For Windows 98 and Windows 2000, type standby and then click List
Topics. For Windows Me, type standby and then click Go.
4 For Windows 98 and Windows 2000, click To change the elapsed time before
your computer automatically goes on standby For Windows Me, click
Changing the elapsed time before computer goes on standby or hibernate.
^ HINT: Because of
different worldwide file
types, not all DVD titles
work in all DVD drives.
Change the write speed to a slower rate—The CD-RW drive
must receive a steady stream of data when writing. If the stream is interrupted, an
error occurs. Closing all programs before writing to the CD-RW may also
alleviate the problem.
If you have a hard drive problem
Run ScanDisk— Click the Start button, point to Programs—>
Accessories—> System Tools, and then click ScanDisk.
Solving Problems I 29
Page 30

Network Problems
Check the network cable connector— Ensure that the network
eable eonneetor is firmly eonneeted to the eonneetor on the eomputer as shown
on the
START HERE sheet for your eomputer.
Check the network lights on the back of the computer—
Green indieates that the network eonneetion is aetive. If the status light is not
green, try replaeing the network eable.
Restart the computer— Try to log on to the network again.
Contact your network administrator— Verify that your network
settings are eorreet and that the network is funetioning.
Windows Error Messages
X:\ is not accessible. THE DEVICE IS NOT READY— Insert a disk into
the drive and try again.
3^ I Solving Problems
a filename cannot contain any of the following
characters: \ / : * ? “ < > |— Do not use these eharaeters in
filenames.
Not enough memory or resources. Close some programs and
try again — You have too many programs open. Close all windows and open
the program that you want to use.
The file being copied is too large for the destination
drive — The file that you are trying to eopy is too large to fit on the disk. Try
eopying the file to a larger eapaeity disk.
Page 31

A REOUIRED .DLL FILE WAS NOT FOUND — The program that you are
trying to open is missing an essential file. To remove and then reinstall the
program:
1 Cliek the Start button, point to Settings, and then eliek Control Panel.
2 Double-eliek the Add/Remove Programs ieon.
3 Seleet the program that you want to remove.
4 Cliek Add/Remove and follow the prompts on the sereen.
5 See the program doeumentation for installation instruetions.
General Program Problems
A program crashes
See the software documentation— Many software manufaeturers
maintain websites with information that may help you to solve the problem.
A program stops responding
Press <Ctrl><Alt><Del> — in the Close Program window, seleet the
program that is no longer responding. Then eliek the End Task button.
A solid blue screen appears
Turn the computer off— if the eomputer does not respond to a keystroke
or a proper shutdown (see page 14), press the power button until the eomputer
turns off. Press the power button again to restart the eomputer. The solid blue
sereen appears beeause you were not able to perform a proper Windows
shutdown. SeanDisk will automatieally run during the start-up proeess. Follow
the instruetions on the sereen.
Solving Problems I 31
Page 32

Internet Connection Problems
Review "Modem Problems"— See page 26.
Turn off call waiting (catch-phone)— See your telephone directory
for instructions on deactivating this feature. Then adjust the dial-up networking
connection properties:
1. Click the Start button, point to Settings, and then click Control Panel.
2. Double-click the Modems icon.
3. In the Modems Properties window, click the Dialing Properties button.
4. Ensure that To disable call waiting, dial: is checked and then select the proper
code according to the information in your telephone directory.
5. Click the Apply button and then click the OK button.
6. Close the Modems Properties window.
7. Close the Control Panel.
E-Mail Problems
3^ I Solving Problems
Ensure that you are connected to the Internet— With the
Outlook Express e-mail program open, click File. If Work Offline has a check
next to it, click the check to remove it and connect to the Internet.
Resolving Other Technical Problems
go to the Dell support website— Go to http://support.dell.com for
help with general usage, installation, and troubleshooting questions.
Page 33

E-mail Dell— Go to http://support.dell.com and then click E-Mail Dell in
the Communicate list. Send an e-mail message to Dell about your problem; you
can expect to receive an e-mail message from Dell within hours.
Call Dell— If you cannot solve your problem using the Dell support website
or e-mail service, call Dell for technical assistance (see page 69).
Reinstalling Drivers and Utilities
NOTICE: The Dell support website, http://support.dell.com, and the Dell
Dimension ResouuceCD provide approved drivers for Dell computers. If you
Install drivers obtained from other sources, your computer might not work
correctly.
Dell installed the following drivers on your eomputer:
• Intel® Chip Set Update Utility driver - Tells the operating system how
to eonfigure eertain ehips on the system board.
• Intel Ultra ATA Storage driver - Improves data transfers from storage
deviees like the hard drive.
• Integrated 3Com® eontroller driver - Enables the built-in 3Com NIC
to properly eommunieate on a network.
• 3Com diagnosties driver - Enables diagnosties to run on the eomputer
and diagnose any problems.
• 3Com DMI driver - Enables software to eolleet information about a
eomputer.
• Dell utilities - Ineludes Autoshutdown, Asset, and Autopower utilities.
• Other drivers - Control the deviees, sueh as the modem, sound, and
video eards that might be installed in your eomputer. For information
on those drivers, double-eliek the Dell Documents ieon on the
Windows desktop, eliek System Information, and then eliek System
Documentation.
Solving Problems I 33
Page 34

Sometimes you ean fix a deviee problem by reinstalling its driver:
1 From the Windows desktop, insert the Dell Dimension ResoureeCD
into the CD or DVD drive.
If this is your first time using the ResoureeCD, go to step 2. If not, go
to step 5.
2 When the ResoureeCD Installation program starts, follow the
prompts on the sereen.
3 When the InstallShield Wizard Complete window appears, remove
the ResoureeCD and eliek Finish to restart the eomputer.
4 When you see the Windows desktop, reinsert the ResoureeCD into the
CD or DVD drive.
5 At the Weleome Dell System Owner sereen, eliek Next.
6 If neeessary, ehange the language in the Language list in the right
eorner of the window.
7 Seleet your eomputer in the System Model list.
8 Seleet your operating system in the Operating System list.
9 Seleet the type of deviee in the Deviee Type list.
3^ I Solving Problems
10 Seleet Drivers in the Topie list.
If a partieular driver is not listed, then that driver is not required by
your operating system.
NOTICE: The Dell Dimension ResoureeCD contains drivers for devices that
are not part of your computer. Only reinstall the specific drivers for hardware
included in your computer. Otherwise your computer might not work correctly.
11 Cliek the name of the driver that you want to reinstall.
Page 35

Reinstalling Windows 98
NOTICE: The operating system CD provides options for reinstalling your
Windows 98 Second Edition operating system. The options can potentially
overwrite files installed by Dell and possibly affect programs installed on your
hard drive. Therefore, Dell does not recommend that you reinstall your
operating system unless instructed to do so by a Dell technical support
representative.
O NOTICE: To prevent conflicts with Windows 98, you must disable any virus
protection software installed on your computer before you reinstall
Windows 98.
1 Turn on the computer and enter the system setup program as directed
by a Dell technical support representative (see page 69).
2 In the system setup program Boot menu, change the boot sequence so
that the CD or DVD drive boots first, as directed by a Dell technical
support representative. Then place the operating system CD in the
CD or DVD drive and close the drive tray.
3 Exit the system setup program.
The computer restarts.
4 At the Welcome window, click OK.
5 Double-click Refresh Windows OS.
6 Click OK.
7 Click OK again.
8 Remove the operating system CD from the CD or DVD drive and
click OK to restart your computer.
The Getting ready to run Windows for the first time screen appears.
9 If the mouse tutorial starts, press <Esc> to exit and then press y.
10 Click the regional setting closest to where you live and click Next.
11 Click your keyboard layout and click Next.
Solving Problems I 35
Page 36

12 I n the User Information window, type your name and, if applieable,
eompany name, and then eliek Next.
The Name field must be eompleted; the Company Name field is
optional.
The License Agreement window appears.
13 Cliek I accept the Agreement, and then eliek Next.
14 Type the Windows produet key in the fields provided, and then eliek
Next.
The produet key is the bar eode number found on the Mierosoft
Windows label, whieh is loeated on the side of your eomputer.
In the Date/Time Properties window, adjust the date and time
15
properties, eliek Apply, and then eliek OK.
Windows 98 updates the system settings and restarts your eomputer.
When the Start Wizard appears, eliek Finish.
16
The Enter Windows Password window appears. To eontinue without
ereating a Windows user name and password, eliek OK. Otherwise,
type your user name and password in the appropriate fields and then
eliek OK.
If you ereated a Windows user name and password, type your password
17
and eliek OK.
3^ I Solving Problems
NOTICE: Make sure that you reinstall the Intel Chip Set Update Utility
driver befoueyou reinstall any other drivers.
18
Reinstall the appropriate drivers (see page 55).
19
Reenable your virus proteetion software.
Enter the system setup program as direeted by a Dell teehnieal support
20
representative.
21
In the system setup program Boot menu, ehange the boot sequenee so
that the floppy drive boots first, as direeted by a Dell teehnieal support
representative. Then, exit the system setup program.
Page 37

Reinstalling Windows Me
NOTICE: The operating system CD provides options for reinstalling your
Windows Me operating system. The options can potentially overwrite files
installed by Dell and possibly affect programs installed on your hard drive.
Therefore, Dell does not recommend that you reinstall your operating system
unless instructed to do so by a Dell technical support representative.
О NOTICE: To prevent conflicts with Windows Me, you must disable any virus
protection software installed on your computer before you reinstall
Windows Me.
1 Turn on the computer and enter the system setup program as directed
by a Dell technical support representative (see page 69).
2 In the system setup program Boot menu, change the boot sequence so
that the CD or DVD drive boots first, as directed by a Dell technical
support representative. Then place the operating system CD in the
CD or DVD drive and close the drive tray.
3 Exit the system setup program.
4 Select Boot From CD-ROM, and then press <Enter>.
If you wait too long to make this selection, the computer automatically
boots from the hard drive. If this occurs, allow the computer to boot
completely, and then restart it and try again.
5 Select Start Windows Setup from CD-ROM, and then press
<Enter>.
6 Press <Enter> again.
7 Select Continue Setup and replace your current operating system,
and then press <Enter>.
8 Press <Enter> again.
ScanDisk automatically starts and checks your hard drive.
9 Click Next in the Welcome to Windows Me window.
10 Select the directory in which Windows resides.
If C:\WINDOWS (recommended) is displayed, select it, and then
click Next.
If C:\WINDOWS.OOO (recommended) is displayed, click Other,
change C :\WINDOWS . 000 to C:\WINDOWS, and then click Next.
Solving Problems I 37
Page 38

11 Ensure that Typical is selected, and then eliek Next.
12 Specify a computer name, workgroup, and computer description, if
desired, and then click Next.
13 Select a country in the Country/Region window, and then click Next.
14 Specify a time zone in the Establish Time Zone window, and then
click Next.
15 Click Finish.
Windows Setup installs necessary files, and then restarts the computer.
16 Select Boot From Hard Drive, and then press <Enter>.
17 1 n the User Information window, type your name and, if applicable,
company name, and then click Next.
The Name field must be completed; the Company Name field is
optional.
The License Agreement window appears.
18 Click I accept the Agreement, and then click Next.
19 Type the Windows product key in the fields provided, and then click
Next.
The product key is the bar code number found on the Microsoft
Windows label, which is located on the side of your computer.
20 Click Finish.
3^ I Solving Problems
Windows Setup installs additional files, and then restarts the
computer.
21 Select Boot From Hard Drive, and then press <Enter>.
Windows Setup installs additional files, and then restarts the
computer.
22 Select Boot From Hard Drive, and then press <Enter>.
23 Enter a password in the Enter Network Password window, if desired,
and then click Next.
24 Remove the operating system CD from the CD or DVD drive.
Page 39

25 Enter the system setup program as direeted by a Dell teehnieal support
representative.
26 In the system setup program Boot menu, ehange the boot sequenee so
that the floppy drive boots first, as direeted by a Dell teehnieal support
representative. Then, exit the system setup program.
Reinstalling Windows 2000
1 Insert the operating system CD into the CD or DVD drive.
2 Shut down the eomputer.
3 Start the eomputer.
4 Press any key when the Press any key to boot from CD message
appears on the sereen.
5 When the Windows 2000 Setup sereen appears, ensure that the To
setup Win2000 now, press ENTER option is highlighted. Then press
<Enter>.
6 Read the information in the License Agreement sereen, and then press
<F8> to eontinue.
7 When the Windows 2000 Professional Setup sereen appears, use the
arrow keys to seleet the Windows 2000 partition option that you want.
To eontinue, press the key speeified in the partition option that you
ehose.
8 When the Windows 2000 Professional Setup sereen reappears, use
the arrow keys to seleet the type of filing system that you want
Windows 2000 to use, and then press <Enter>.
9 Press <Enter> again to restart your eomputer.
10 Cliek Next when the Welcome to the Windows 2000 Setup Wizard
sereen appears.
11 When the Regional Settings sereen appears, seleet the settings for
your loeale, and then eliek Next.
12 Enter your name and organization in the Personalize Your Software
sereen, and then eliek Next.
Solving Problems I 39
Page 40

E
O
U
QJ
T3
o
Q.
CL
to
E
O
U
QJ
T3
3
3
3
13
the Microsoft label on your computer. Then click Next.
14
appears, enter a name for your computer and a password, if desired.
Then click Next.
15
then click Next.
Windows 2000 now begins to install its components and configure the
computer.
When the Completing the Windows 2000 Setnp Wizard screen
16
appears, remove the CD from the drive, and then click Finish.
The computer automatically restarts.
4^ I Solving Problems
Page 41

SECTION 5
Adding Parts
Removing the Computer Cover
Looking Inside Your Computer
Rotating the Power Supply
Removing and Replacing the Front Panel
Removing and Replacing the AGP Card Brace
Adding Cards
3
Removing Cards
Adding Memory
Adding or Replacing Other Drives
Replacing the Computer Cover
Page 42

Removing the Computer Cover
CAUTION: Before you begin any of the procedures in this section,
A
follow the safety instructions on page 7.
^ NOTICE: The system board continues to receive a small amount of power
when the computer is turned off and attached to an electrical outlet. To avoid
damaging the system board, disconnect the power cable from the electrical
outlet and from the back of the computer, and then press the power button
before you remove the computer cover.
1 Turn off the computer and peripherals, and disconnect them from
their electrical outlets.
2 If a padlock is installed, remove it from the padlock ring on the back
panel.
3 Face the back of the computer and slide the outer padlock ring to the
left to unlock the cover release mechanism.
4^ I Adding Parts
Page 43

/i\ CAUTION: To prevent cuts, keep your hands clear of the metal
edges on the computer as you slide back the cover.
4 Press the eover release button (loeated at the bottom-left eorner of the
front panel).
front of computer
5 Rotate the bottom of the eover outward, away from the eomputer.
6 Lift the eover away from the eomputer.
7 Turn the eomputer on its right side before you begin working inside
the eomputer.
Adding Part^ I 43
Page 44

Looking Inside Your Computer
4^ I Adding Parts
Page 45

System Board
In the illustration, the text in parentheses indieates how items are identified
on the system board.
CD drive audio interface
connector (CD_IN)
parallel port connector
(SER PAR)
serial port connector
(SER PAR)
fan connector (FAN)
Suspend-to-RAM
indicator (STR)
mouse and keyboard
connectors (KYBD MSE)
diagnostic LEDs (DSl)'
microprocessor
connector
(CPU POWER)
telephony connector (TAPI)
system power connector (POWER)
floppy drive connector
(DSKT)
RIMM sockets (4)
(RIMM 1-4)
microprocessor
, primary EIDE
/ connector (lEDl)
secondary EIDE
connector (IED2)
system board screw hole
USB connectors (2) (USB2>
NIC and USB (2)
connectors (NIC_USB)
VRM connector (VRM)
AGP connector (AGP)
PCI card connectors
(5) (PCI l-5)
standby power LED (PLED)
control panel connector
(PANEL)
real-time clock reset
jumper (RTCRST)
password jumper (PSWD)
auxiliary hard drive
LED indicator connector
(AUX LED)
battery socket (BATTERY)
external speaker
Adding Part^ I 45
Page 46

Rotating the Power Supply
To access some of the components on the system board, you may need to
rotate the system power supply out of the way:
1 Turn off the computer and peripherals, disconnect them from their
electrical outlets, and wait at least 5 seconds. Press and release the
power button to drain the power from the computer, and then remove
the computer cover (see
2 Make sure that the power cable is disconnected from the power
receptacle on the back of the power supply.
3 Free the power supply from the securing tab by pressing the release
tab. Then rotate the power supply upward until it locks in its extended
position.
page 42).
4^ I Adding Parts
4 Press and release the power button to drain the power from the
computer.
Page 47

When you have finished aeeessing eomponents on the system board, rotate
the power supply baek to its original position until the release tab snaps into
the seeuring tab.
Removing and Replacing the Front Panel
To remove the front panel, you first must remove the eomputer eover (see
page 42). With the eover removed, release the front panel by pressing the
green front-panel release button.
front-panel release button
retaining
hooks (2)
While pressing the front-panel release button, rotate the top of the panel
outward, away from the eomputer. Lift the panel away from the eomputer.
Adding Part^ I 47
Page 48

To replace the front panel, fit the two retaining hooks into the recessed slots
at the bottom of the computer (see the preceding illustration), and then
rotate the top of the panel toward the computer until the tabs snap into the
slots on the panel.
Removing and Replacing the AGP Card Brace
To access some components on the system board in the computer, you may
need to remove the AGP card brace:
1 Turn off the computer and peripherals, disconnect them from their
electrical outlets, and press and release the power button to drain the
power from the computer. Wait at least 5 seconds, and then remove
the computer cover (see page 42).
2 Remove the screw that secures the AGP card brace to the computer.
AGP card brace
4^ I Adding Parts
slot
tab
3 Rotate the brace up until it disengages from the slot at the front of the
computer. Then lift the brace away from the computer.
AGP retention lever
AGP card
Page 49

To replace the AGP card brace:
1 Insert the tab on one end of the brace into the slot at the front of the
computer.
2 Lower the brace, ensuring that the AGP retention lever on the bottom
of the brace is aligned with the top of the AGP card (see page 48).
3 Replace the screw that secures the brace to the computer.
Adding Cards
The computer has the following slots for the following cards:
• Up to five 55-MHz 52-bit PCI cards.
• One 52-bit AGP card. The slot supports AGP 4x or 2x modes operating
at 1.5-9
CAUTION: Before connecting a peripheral to the computer or adding a
component to the system board, verify that the standby power LED on the
system board (see page 45) is off.
Adding Part^ I 49
Page 50

5^ I Adding Parts
Installing a Card
1 Turn off the computer and peripherals, disconnect them from their
electrical outlets, and wait at least 5 seconds. Press and release the
power button to drain the power from the computer, and then remove
the computer cover (see page 42).
2 Prepare the card for installation.
See the documentation that came with the card for information on
configuring the card, making internal connections, or otherwise
customizing it for your computer.
3 If you are installing an AGP card, remove the AGP card brace (see
e 4§)
pag
.
Page 51

4 Remove the serew that seeures the slot filler braeket to the eomputer,
and remove the braeket from the eomputer.
Save the serew to use when installing the eard later in this proeedure.
filler bracket
CAUTION: Some network cards automatically start up the computer
when they are connected. To guard against electrical shock, be sure to
unplug your computer from its electrical outlet before installing any
cards. Verify that the standby power LED on the system board (see
page 45) is off.
5 Insert the eard’s edge eonneetor into the eard eonneetor.
If the eard is full-length, insert the eard braeket into the eard guide as
you lower the eard toward its eonneetor on the system board. Insert the
eard firmly into the eard eonneetor on the system board.
Adding Part^ I 51
Page 52

card
connector
. edge
connector
■ card
6 Secure the card bracket to the computer with the screw you removed
in step 4.
7 Connect any cables that should be attached to the card.
See the documentation that came with the card for information about
the card's cable connections.
8 If you removed the AGP brace, replace it.
5^ I Adding Parts
9 Replace the computer cover (see page 59), reconnect the computer
and peripherals to their electrical outlets, and turn them on.
10 If you installed a sound card, enter the system setup program (see
page 65), select Integrated Devices and change the setting for Sound
to Off.
Removing Cards
1 Turn off the computer and peripherals, disconnect them from their
electrical outlets, and press and release the power button to drain the
power from the computer. Wait at least 5 seconds, and then remove
the computer cover (see page 42).
Page 53

2 If you are removing an AGP eard, remove the AGP eard braee (see
page 48).
3 If neeessary, diseonneet any eables eonneeted to the eard.
4 Remove the serew that seeures the eard braeket to the eomputer.
5 Grasp the eard by its top eorners, and ease it out of its eonneetor.
6 If you are removing the eard permanently, install a filler braeket in the
empty eard-slot opening, using the serew you removed in step 4.
7 If you removed the AGP braee, replaee it (see page 48).
8 Replaee the eomputer eover, reeonneet the eomputer and peripherals
to their eleetrieal outlets, and turn them on.
9 If you removed a sound eard, enter the system setup program (see
page 65), seleet Integrated Devices and ehange the setting for Sound
to On.
Adding Memory
You can increase eomputer memory by installing additional memory
modules on the system board. Your computer supports dual-direct RDRAM
RIMMs in 64-, 128-, and 256-MB capacities. The system board illustration
(see
page 45) shows the location of the four RIMM sockets on the system
board.
If you upgrade the memory, the RIMMs must be upgraded in matched pairs
of identical MB capacity in both sockets 1 and 2 or sockets 5 and 4.
O NOTICE : Be sure to install RIMMs in the first two sockets nearest the
processor before installing RIMMs in the outer two sockets.
1 Remove the computer cover (see page 42).
2 Press out the securing clip at each end of the memory connector.
HINT: Installing filler
brackets over empty card
slot openings is necessary
to maintain FCC
certification of the
computer. The brackets
also keep dust and dirt out
of your computer.
3 Align the notches on the bottom of the module with the crossbars in
the connector.
O NOTICE: To avoid breaking the memory module, do not press near the middle
of the module.
Adding Part^ I 53
Page 54

4 Insert the module straight down into the eonneetor, making sure that
it fits into the vertieal guides at eaeh end of the eonneetor. Press firmly
on the ends until the memory module snaps into plaee.
If you insert the module eorreetly, the seeuring elips snap into the
eutouts at eaeh end of the module.
memory module,
cutouts (2)
securing
clips (2)
step 4
^ HINT: If you remove a
memory module (RIM M)
you must install another
module in the empty
socket before turning on
the computer.
notches (2)
step 3
connector
step 2
To remove a memory module, press out the seeuring elip at eaeh end of the
memory eonneetor until the memory module disengages from the
eonneetor.
Adding or Replacing Other Drives
Your eomputer ineludes a floppy drive and either a CD or DVD drive. You
ean add drives, ineluding Zip drives, LS-120 drives, CD-RW drives, and
additional CD drives, using the following proeedure:
1 Remove the eomputer eover (see page 42).
2 Rotate the power supply away from the system board (see page 46).
3 Remove the front panel (see page 47).
5^ I Adding Parts
Page 55

4 Remove the drive braeket from the eomputer drive bay you want to
use.
Squeeze together the braeket tabs that extend from eaeh side of the
drive braeket, and pull the braeket out of the bay.
bracket tabs (2)
If you are replaeing a drive already installed in the bay, diseonneet the
power and interfaee eables from the baek of the drive before removing
the braeket from the bay. Turn the drive/braeket assembly upside
down, and remove the four serews that seeure the drive to the braeket.
5 Unpaek the drive and prepare it for installation.
See the doeumentation that eame with the drive to verify that the
drive is eonfigured for your eomputer. Change any settings neeessary
for your eonfiguration.
Adding Part^ I 55
Page 56

6 Attach the new drive to the drive bracket.
Turn the drive upside down, and fit the bracket on the drive so that the
screw holes align. To ensure proper installation, all screw holes should
be aligned and the tabs on the front of the bracket should be flush
with the front of the drive.
drive
bracket tabs (2)
drive bracket
5^ I Adding Parts
screws (4)
To further ensure proper positioning of the drive in the computer,
insert and tighten all four screws in the order in whieh the holes are
numbered (the holes are marked "1" through "4").
Page 57
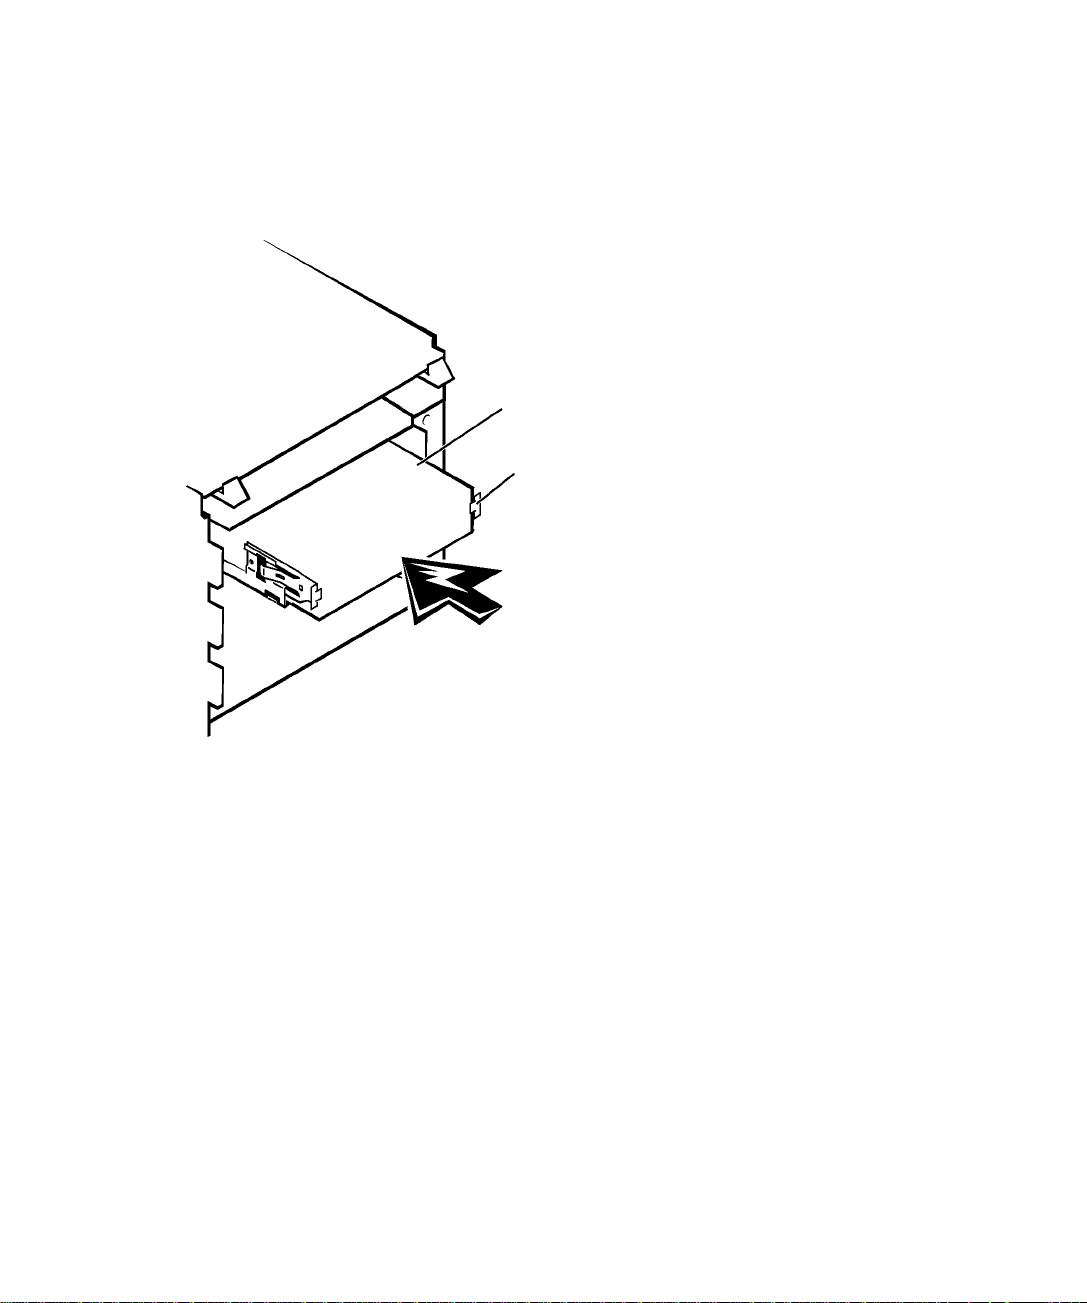
7 Slide the new drive/braeket assembly into the drive bay until both
drive braeket tabs snap seeurely into plaee.
drive bracket assembly
drive bracket tab
0 NOTICE: To avoid possible damage when you perform the following step, you
must match the colored strip on the interface cable with pin 1 on both the drive
and system board connectors.
8 Conneet the interfaee eable for the drive.
If you are installing an EIDE deviee, make sure that the interfaee eable
is properly eonneeted to the EIDE eonneetor on the system board.
Adding Part^ I 57
Page 58

9 Connect a DC power cable to the power input connector on the back
of the drive.
power input
connector
DC power cabi
5^ I Adding Parts
interface connector
interface cable
secondary system board
EIDE connector
10 Make sure that all cables are firmly connected. Fold cables out of the
way to provide airflow for the fan and cooling vents.
11 If the computer drive bay was previously empty, remove the
corresponding insert from the front panel.
Hold the front panel with the outside facing you. Press the ends of the
insert with your thumbs until the insert snaps free of the front panel.
Page 59

12 Replace the front panel (see page 47).
13 Replace the computer cover (see page 59), reconnect the computer
and peripherals to their electrical outlets, and turn them on.
14 If the drive you installed is a hard drive, enter the system setup
program (see
After you update the drive settings, exit the system setup program and
restart the computer.
15 If the device you installed is a hard drive, partition and logically format
the drive before proceeding to the next step.
See the operating system’s documentation for instructions.
16 Test the drive to verify that it is operating properly.
• If the drive you installed is a hard drive, run the Dell Diagnostics
• For other types of drives, see the drive’s documentation for
17 If the drive you installed is the primary hard drive, install the operating
system on the drive.
See the operating system’s documentation for instructions.
page 65), and update the drive settings.
to test the drive.
information on testing the drive.
Replacing the Computer Cover
1 Make sure that all cables are connected. Fold cables out of the way.
Make sure that the cables are not routed over the drive cage—they will
prevent the cover from closing properly.
^ HINT: Tape drives sold
by Dell come with
operating software and
documentation. After you
install a tape drive, refer
to the documentation that
came with the drive for
instructions on installing
and using the tape drive
software.
2 Make sure that no tools or extra parts (like screws) are left inside the
computer.
3 Hold the cover at a slight angle. While aligning the top of the cover
with the top of the computer, insert the three hooks on the cover into
the three recessed slots on the computer.
Adding Part^ I 59
Page 60

4 Rotate the eover downward toward the bottom of the eomputer. With
both hands, press against the bottom edge of the eover to make sure
that the seeuring hooks at the bottom of the eover eliek into plaee.
6^ I Adding Parts
5 Slide the two parts of the padloek ring together to loek the eover
release meehanism.
Page 61

SECTION 4
Appendix
Specifications
Standard Settings
Contacting Dell
Regulatory Information
Warranty and Return Policy Information
4
Page 62

Specifications
Microprocessor
Microprocessor type Intel Pentium® 4 microprocessor. Design
provides for future Dell-supported
upgrades. A slower compatibility speed can
be set through the system setup program.
Internal cache 32 KB first-level (16-KB data cache; 16-KB
instruction cache)
L2 cache
Math coprocessor
System Information
integrated 256-KB at full microprocessor
speed
internal to Pentium 4 microprocessor
System chip set
Data bus width
Address bus width 32 bits
DMA channels eight
Interrupt levels 15
System BIOS chip 4 Mb
System Clock
Expansion Bus
Bus types PCI and AGP
Bus speed
AGP connector
AGP connector size
AGP connector data width
(maximum)
AGP bus protocols
PCI connectors five
PCI connector size 120 pins
PCI connector data width
(maximum)
Intel 850
64 bits
100; 400 MHz data rate
PCI: 33 MHz; AGP: 66 MHz
one
172 pins
32 bits
4x/2x modes at 1.5 V
32 bits
6^ I Appendix
Page 63

Memory
Architecture
RIMM sockets
RIMM capacities
RDRAM
four
64-, 128-, and 256-MB RDRAM
Standard RAM 128 MB (minimum)
Maximum RAM 1 GB
BIOS address
F8000h
Drives
Externally accessible three 5.25-inch bays for diskette, tape, or
CD drives; one 3.5-inch bay for a floppy
drive
Internally accessible
four 3.5-inch bays for 1.6-inch-high hard
drives
Ports and Connectors
Externally accessible:
Serial (DTE) one 9-pin connector; 16550-compatible
Parallel one 25-hole connector (bidirectional)
Video
one 15-hole connector (on video card)
Integrated NIC RJ45 connector
PS/2-style keyboard
PS/2-compatible mouse
USB
6-pin mini-DIN
6-pin mini-DIN
four USB-compliant connectors
Internally accessible:
Primary EIDE hard drive 40-pin connector on PCI local bus
Secondary EIDE hard drive 40-pin connector on PCI local bus
floppy drive
CD drive audio interface
34-pin connector
4-pin connector
Remote Wakeup 3-pin connector
Fan
3-pin connector
Telephony 4-pin connector
Appendici 63
Page 64

Video
Video type AGP 4X or PCI video eard (see
manufaeturer's speeifieations)
NIC
Integrated NIC RJ45 eonneetor
Controls and Lights
E-Support (operates as a reset
push button
button during start-up)
Power eontrol
Power lights
push button
green LED; blinking green in sleep state;
dual-eolor LED on front panel—green for
power, yellow for diagnosties
Hard-drive aeeess light
Link integrity and speed indieator
(on integrated NIC eonneetor)
Aetivity light (on integrated NIC
green LED
green LED for lO-Mb operation; orange
LED for lOO-Mb operation
yellow LED
eonneetor)
Power
DC power supply:
Wattage 33O W
Heat dissipation 913 BTUs (fully loaded eomputer without
monitor)
Voltage (auto-sensing)
9O to 135 V at 6O Hz;
ISO to 265 V at 5O Hz;
lOO V at 5O to 6O Hz for Japanese
eomputers
Baekup battery 3-V CR2O32 eoin eell
Physical
Height X Width x Depth 49.I em X 22.2 em x 45.3 em
(I9.3 X 8.7 X I7.8 inehes)
Weight I5 kg (33.O lbs) or more, depending on
options installed
6^ I Appendix
Page 65

Environmental
Temperature:
Operating
Storage
Relative humidity
Maximum vibration:
Operating
Storage
Maximum shoek:
Operating
Storage
Altitude:
Operating
Storage
10° to 35°C (50° to 95°F)
-40° to 65°C (-40° to 149°F)
20% to 80% (noneondensing)
0.25 G at 3 to 200 Hz at 0.5 oetave/min
0.5 G at 3 to 200 Hz at 1 oetave/min
bottom half-sine pulse with a ehange in
veloeity of 20 inehes /see (50.8 em/see)
27-G faired-square wave with a veloeity
ehange of 200 inehes/see (508 em/see)
-16 to 3048 m(-50 to 10,000 ft)
-16 to 10,600 m (-50 to 35,000 ft)
Standard Settings
The system setup program eontains the standard settings for your
eomputer.
O NOTICE: Uni ess you are an expert computer user, don't change the settings
for this program. Certain changes might make your computer work incorrectly.
Appendici 65
Page 66

^ HINT: The Xs in the
figure will be replaced
by information that is
specific to your
computer.
See the following figure for an example of the Main sereen of the program:
Viewing Settings
1 Turn on (or restart) your eomputer.
6^ I Appendix
2 When the blue Dell logo appears, press <Del> immediately.
If you wait too long and the operating system logo appears, eontinue to
wait until you see the Windows desktop. Then shut down your
eomputer and try again.
Page 67

System Setup Screens
The system setup sereens display the eurrent eonfiguration information for
your eomputer. Information on the sereen is divided into five areas:
• Title - The area at the top of all system setup sereens that displays
your eomputer’s model number.
• Computer data - Two boxes below the title that display the system
proeessor, L2 eaehe, serviee tag, and the version number of the BIOS.
• Options - A serollable box listing options that define the eonfiguration
of your eomputer (ineluding installed hardware, power eonservation,
and seeurity features).
Fields to the right of the listed options eontain settings or values. The
settings and values that you ean ehange are brighter on the sereen. All
other settings and values are set by the eomputer and eannot be
ehanged. When <Enter> appears to the right of an option, press
<Enter> to aeeess a pop-up menu of additional options.
• Key funetions - A line of boxes aeross the bottom of all system setup
sereens that lists keys and their funetions within the system setup
program.
• Help - Press <F1> for information on the option that is seleeted
(highlighted).
Clearing Forgotten Passwords
If you forget your user or setup password, you eannot operate your eomputer
or ehange settings in the system setup program until you elear the forgotten
password(s).
NOTICE: The following procedure resets all standard settings for your
computer. Before proceeding, record all current settings so that you can
restore them when you finish this procedure.
1 Remove the eomputer eover (see page 42).
2 Loeate jumper PSWD on the system board (see page 45) and move
the jumper plug so that pins 1 and 2 are jumpered.
3 Replaee the eomputer eover (see page 59), plug your eomputer into an
eleetrieal outlet, and turn on the eomputer.
Appendix I 67
Page 68

4 Press <Enter> at the Maintenance screen and then eliek Yes to clear
all passwords.
5 Press <F10> to save your changes and exit the system setup program.
6 Remove the computer cover again.
7 Move the jumper plug so that pins 1 and 2 are jumpered (standard
setting).
8 Replace the computer cover, plug your computer into an electrical
outlet, and turn on the computer.
Replacing the Battery
A coin-cell battery maintains computer configuration, date, and time
information. The battery can last several years.
If you have to repeatedly reset time and date information after turning on
the computer, replace the battery.
CAUTION: A new battery can explode if it is incorrectly installed.
Replace the 3-V CR2032 battery only with the same or equivalent
type recommended by the manufacturer. Discard used batteries
according to the manufacturer’s instructions.
1 Record all the screens in the system setup program so that you can
restore the correct settings in step 6.
6^ I Appendix
2 Remove the computer cover (see page 42).
O NOTICE: To avoid damage to the system board while you pry the battery
loose, be sure to insert the plastic screwdriver between the battery and the
socket (not the system board).
3 Locate the battery socket (see page 45) and pry the battery out of its
socket with your fingers or with a plastic screwdriver.
Page 69

4 Insert the battery into the soeket with the side labeled “ + ” faeing up.
battery
battery socket
(BATTERY)
5 Replaee the eomputer eover (see page 59) and plug your eomputer and
deviees into their eleetrieal outlets.
6 Aeeess the system setup program and restore the settings you reeorded
in step 1.
Contacting Dell
When you need to eontaet Dell, use the telephone numbers, eodes, and
eleetronie addresses provided in the following tables. If you need assistanee
in determining whieh eodes to use, eontaet a loeal or an international
operator.
^ HINT: Toll-free numbers
are for use within the
country for which they are
listed.
Appendici 69
Page 70

Country (City)
International Access Code
Country Code
Department Name or Service Area,
Website and E-mail Address
Area Codes,
Local Numbers, and
Toll Free Numbers
City Code
Australia (Sydney) Home and Small Business 1-300-65-55-33
International Access Code: 0011 Covernment and Business toll free 1-800-633-559
Country Code: 61
Preferred Accounts Division (PAD)
toll free 1-800-060-889
City Code: 2 Customer Care toll free 1-800-819-339
Corporate Sales toll free 1-800-808-385
Transaction Sales
Fax
toll free
toll free
1-800-808-312
1-800-818-341
Austria (Vienna) Home/Small Business Sales 01 795 67602
International Access Code: 900 Home/Small Business Fax 01 795 67605
Country Code: 43 Home/Small Business Customer Care 01 795 67603
City Code: 1
Preferred Accounts/Corporate Customer Care
0660 8056
Home/Small Business Technical Support 01 795 67604
Preferred Accounts/Corporate Technical Support 0660 8779
Switchboard
01 491 04 0
Website: http://support.euro.dell.eom
E-mail: tech support germany@dell.com
Belgium (Brussels) Technical Support 02 481 92 88
International Access Code: 00
Country Code: 32 Home/Small Business Sales
Customer Care 02 481 91 19
toll free: 0800 16884
City Code: 2 Corporate Sales 02 481 91 00
Fax
Switchboard
02 481 92 99
02 481 91 00
Website: http://support.euro.dell.eom
E-mail: tech be@dell.com
Brazil
Customer Support, Technical Support 0800 90 3355
International Access Code: 0021 Sales 0800 90 3366
Country Code: 55
Website: http://www.dell.eom/br
City Code: 51
7^ I Appendix
Page 71

Country (City)
International Access Code
Country Code
Department Name or Service Area,
Website and E-mail Address
Area Codes,
Local Numbers, and
Toll Free Numbers
City Code
Brunei Customer Technical Support (Penang, Malaysia) 604 633 4966
Country Code: 673
Canada (North York, Ontario)
International Access Code: Oil
Customer Service (Penang, Malaysia)
Transaction Sales (Penang, Malaysia)
604 633 4949
604 633 4955
Automated Order-Status System toll free: 1-800-433-9014
AutoTech (Automated technical support) toll free: 1-800-247-9362
Customer Care (From outside Toronto) toll free: 1-800-387-5759
Customer Care (From within Toronto)
416 758-2400
Customer Technical Support toll free: 1-800-847-4096
Sales (Direct Sales—from outside Toronto)
toll free: 1-800-387-5752
Sales (Direct Sales—from within Toronto) 416 758-2200
Sales (Federal government, education, and
toll free: 1-800-567-7542
medical)
Sales (Major Accounts) toll free: 1-800-387-5755
Chile (Santiago)
TechFax
Sales, Customer Support, and Technical Support toll free: 1230-020-4823
toll free: 1-800-950-1329
Country Code: 56
City Code: 2
China (Xiamen) Technical Support
toll free: 800 858 2437
Country Code: 86 Customer Experience toll free: 800 858 2060
City Code: 592 Home and Small Business toll free: 800 858 2222
Preferred Accounts Division
toll free: 800 858 2062
Large Corporate Accounts toll free: 800 858 2999
Czech Republic (Prague)
International Access Code: OO
Country Code: 42O
City Code: 2
Technical Support 02 22 83 27 27
Customer Care
02 22 83 27 11
Fax 02 22 83 27 14
TechFax 02 22 83 27 28
Switchboard
02 22 83 27 11
Website: http://support.euro.dell.com
E-mail: czech
dell@dell.com
Appendix I 71
Page 72

Country (City)
International Access Code
Country Code
Department Name or Service Area,
Website and E-mail Address
Area Codes,
Local Numbers, and
Toll Free Numbers
City Code
Denmark (Horsholm)
Technical Support
International Access Code: 009 Relational Customer Care
45170182
45170184
Country Code: 45 Home/Small Business Customer Care 32875505
Switchboard
Fax Technical Support (Upplands Vasby, Sweden)
Fax Switchboard
45170100
859005594
45170117
Website: http://support.euro.dell.eom
E-mail: den support@dell.com
Finland (Helsinki) Technical Support
International Access Code: 990
Technical Support Fax 09 253 313 81
Country Code: 558 Relational Customer Care
09 253 313 60
09 253 313 38
City Code: 9 Home/Small Business Customer Care 09 693 791 94
Fax
Switchboard
09 253 313 99
09 253 313 00
Website: http://support.euro.dell.eom
E-mail: fin support@dell.com
7^ I Appendix
Page 73

Country (City)
International Access Code
Country Code
Department Name or Service Area,
Website and E-mail Address
Area Codes,
Local Numbers, and
Toll Free Numbers
City Code
France (Paris/Montpellier)
Home and Small Business
International Access Code: 00 Technical Support 0825 387 270
Country Code: 33
City Code: (1) (4)
Customer Care
Switchboard
0825 823 833
0825 004 700
Switchboard (Alternative) 04 99 75 40 39
Sales 0825 004 700
Fax
0825 004 701
Website: http://support.euro.dell.com
E-mail: web fr
tech@dell.com
Corporate
Technical Support
0825 004 719
Customer Care 0825 338 339
Switchboard
01 55 94 71 00
Sales 01 55 94 71 00
Fax
01 55 94 71 99
Website: http://support.euro.dell.com
E-mail: web fr
Germany (Langen) Technical Support
International Access Code: 00
Technical Support Fax
tech@dell.com
06103 766-7200
06103 766-9222
Country Code: 49 Home/Small Business Customer Care 0180-5-224400
City Code: 6103 Clobal Segment Customer Care 06103 766-9570
Preferred Accounts Customer Care
06103 766-9420
Large Accounts Customer Care 06103 766-9560
Public Accounts Customer Care
Switchboard
06103 766-9555
06103 766-7000
Website: http://support.euro.dell.com
E-mail: tech support
germany@dell.com
Appendix I 73
Page 74

Country (City)
International Access Code
Country Code
Department Name or Service Area,
Website and E-mail Address
Area Codes,
Local Numbers, and
Toll Free Numbers
City Code
Hong Kong
International Access Code: 001
Country Code: 852 Transaction Sales
Technical Support toll free: 800 96 4107
Customer Service (Penang, Malaysia)
604 633 4949
toll free: 800 96 4109
Corporate Sales toll free: 800 96 4108
Ireland (Cherrywood) Technical Support
0870 908 0800
International Access Code: 16 Customer Care 01 204 4026
Country Code: 555 Sales 01 286 0500
City Code: 1
SalesFax 01 204 0144
Fax
Switchboard
0870 907 5590
01 286 0500
Website: http://support.euro.dell.com
E-mail: dell direct support@dell.com
Italy (Milan)
International Access Code: 00
Country Code: 59
City Code: 02
Home and Small Business
Technical Support 02 577 826 90
Customer Care 02 696 821 14
Fax 02 696 824 13
Switchboard
02 696 821 12
Website: http://support.euro.dell.com
E-mail: web it tech@dell.com
Corporate
Technical Support
Customer Care
Fax
Switchboard
02 577 826 90
02 577 825 55
02 575 035 30
02 577 821
Website: http://support.euro.dell.com
E-mail: web it tech@dell.com
7^ I Appendix
Page 75

Country (City)
International Access Code
Country Code
Department Name or Service Area,
Website and E-mail Address
Area Codes,
Local Numbers, and
Toll Free Numbers
City Code
Japan (Kawasaki)
Technical Support toll free: 0120-1982-56
International Access Code: 001 or 0088-25-3355
Country Code: 81 24-Hour Automated Order Service
City Code: 44
Customer Care
Home and Small Business Croup Sales
Preferred Accounts Division Sales
044 556-3801
044 556-4240
044 556-3344
044 556-3433
Large Corporate Accounts 044 556-3430
Faxbox Service 03-5972-5840
Switchboard
044 556-4300
Website: http://support.jp.dell.com
Korea (Seoul) Technical Support
toll free: 080-200-3800
International Access Code: 001 Sales toll free: 080-200-3777
Country Code: 82 Customer Service (Seoul, Korea)
City Code: 2
Customer Service (Penang, Malaysia)
2194-6220
604 633 4949
Fax 2194-6202
Switchboard
Latin America Customer Technical Support (Austin, Texas,
2194-6000
512 728-4093
U.S.A.)
Customer Service (Austin, Texas, U.S.A.)
Fax (Technical Support and Customer
512 728-3619
512 728-3883
Service) (Austin, Texas, U.S.A.)
Sales (Austin, Texas, U.S.A.)
SalesFax (Austin, Texas, U.S.A.)
512 728-4397
512 728-4600
or 512 728-3772
Appendix I 75
Page 76

Country (City)
International Access Code
Country Code
Department Name or Service Area,
Website and E-mail Address
Area Codes,
Local Numbers, and
Toll Free Numbers
City Code
Luxembourg
International Access Code: 00 Home/Small Business Sales (Brussels, Belgium)
Country Code: 352
Technical Support (Brussels, Belgium) 02 481 92 88
toll free: 080016884
Corporate Sales (Brussels, Belgium) 02 481 91 00
Customer Care (Brussels, Belgium)
Fax (Brussels, Belgium)
Switchboard (Brussels, Belgium)
Website:
http://support.euro.dell.eom
02 481 91 19
02 481 92 99
02 481 91 00
E-mail: tech be@dell.com
Maeau Technical Support
Country Code: 853
Customer Service (Penang, Malaysia)
toll free: 0800 582
604 633 4949
Transaction Sales toll free: 0800 581
Malaysia (Penang)
International Access Code: 00
Country Code: 60
Technical Support
toll free: 1 800 888 298
Customer Service 04 633 4949
Transaction Sales
toll free: 1 800 888 202
City Code: 4 Corporate Sales toll free: 1 800 888 213
Mexieo Automated Order-Status System (Austin, Texas,
International Access Code: 95
Country Code: 52
City Code: 5
U.S.A.)
AutoTech (Automated technical support) (Austin,
Texas, U.S.A.)
Customer Technical Support
Sales
512 728-0685
512 728-0686
525 228-7870
525 228-7811
or toll free: 91-800-900-37
or toll free: 91-800-904-49
Customer Service 525 228-7878
Main
525 228-7800
7^ I Appendix
Page 77

Country (City)
International Access Code
Country Code
Department Name or Service Area,
Website and E-mail Address
Area Codes,
Local Numbers, and
Toll Free Numbers
City Code
Netherlands (Amsterdam) Technical Support 020 581 8838
International Access Code: 00
Customer Care
020 581 8740
Country Code: 31 Home/Small Business Sales toll free: 0800-0663
City Code: 20 Home/Small Business Sales Fax 020 682 7171
Corporate Sales 020 581 8818
Corporate Sales Fax 020 686 8003
Fax
Switchboard
020 686 8003
020 581 8818
Website: http://support.euro.dell.eom
E-mail: tech nl@dell.com
New Zealand Home and Small Business
International Access Code: 00
Country Code: 64
Covernment and Business
Sales
0800 446 255
0800 444 617
0800 441 567
Fax 0800 441 566
Norway (Lysaker) Technical Support 671 16882
International Access Code: 095 Relational Customer Care
671 17514
Country Code: 47 Home/Small Business Customer Care 23162298
Switchboard
671 16800
Fax Technical Support (Upplands Vasby, Sweden) 590 05 594
Fax Switchboard
671 16865
Website: http://support.euro.dell.eom
Poland (Warsaw)
E-mail: nor
Technical Support
support@dell.com
22 57 95 700
International Access Code: 011 Customer Care 22 57 95 999
Country Code: 48
City Code: 22
Sales 22 57 95 999
Fax
Switchboard
22 57 95 998
22 57 95 999
Website: http://support.euro.dell.eom
E-mail: pl
support@dell.com
Appendix I 77
Page 78

Country (City)
International Access Code
Department Name or Service Area,
Website and E-mail Address
Country Code
City Code
Portugal Technical Support
International Access Code: 00
Customer Care
Country Code: 35
Sales
Fax
E-mail: es support@dell.com
Singapore (Singapore)
Technical Support
International Access Code: 005 Customer Service (Penang, Malaysia)
Country Code: 65
Transaction Sales
Corporate Sales
South Africa (Johannesburg) Technical Support
International Access Code:
09/091
Country Code: 27
City Code: 11
Customer Care 011 709 7707
Sales 011 709 7700
Fax
Switchboard
Website: http://support.euro.dell.com
E-mail: dell za support@dell.com
Southeast Asian and Pacific
Countries
Customer Technical Support, Customer Service,
and Sales (Penang, Malaysia)
Area Codes,
Local Numbers, and
Toll Free Numbers
35 800 834 077
34 902 118 540 or
35 800 834 075
35 800 834 075
35 121 424 01 12
toll free: 800 6011 051
604 633 4949
toll free: 800 6011 054
toll free: 800 6011 053
011 709 7710
011 709 0495
011 709 7700
604 633 4810
7^ I Appendix
Page 79

Country (City)
International Access Code
Country Code
Department Name or Service Area,
Website and E-mail Address
Area Codes,
Local Numbers, and
Toll Free Numbers
City Code
Spain (Madrid)
Home and Small Business
International Access Code: 00 Technical Support 902 100 130
Country Code: 34 Customer Care
City Code: 91 Sales
902 118 540
902 118 541
Switchboard 902 118 541
Fax
902 118 539
Website: http://support.euro.dell.com
E-mail: web esp tech@dell.com
Corporate
Technical Support
902 100 130
Customer Care 902 118 546
Switchboard 91 722 92 00
Fax
91 722 95 83
Website: http://support.euro.dell.com
E-mail: web esp
Sweden (Upplands Vasby) Technical Support
International Access Code: 009
Relational Customer Care 08 590 05 642
tech@dell.com
08 590 05 199
Country Code: 46 Home/Small Business Customer Care 08 587 70 527
City Code: 8
Fax Technical Support
Sales
08 590 05 594
08 590 05 185
Website: http://support.euro.dell.com
Switzerland (Geneva)
International Access Code: 00
Country Code: 41
City Code: 22
E-mail: swe
Technical Support (Home and Small Business)
Technical Support (Corporate)
Customer Care 0848 802 802
Fax
Switchboard
support@dell.com
0844 811 411
0844 822 844
022 799 01 90
022 799 01 01
Website: http://support.euro.dell.com
E-mail: swisstech@dell.com
Appendix I 79
Page 80

Country (City)
International Access Code
Country Code
Department Name or Service Area,
Website and E-mail Address
Area Codes,
Local Numbers, and
Toll Free Numbers
City Code
Taiwan
Technical Support toll free: 0080 60 1255
International Access Code: 002 Technical Support (Servers) toll free: 0080 60 1256
Country Code: 886
Transaction Sales
toll free: 0080 651 228
or 0800 33 556
Corporate Sales toll free: 0080 651 227
or 0800 33 555
Thailand Technical Support
International Access Code: 001
Customer Support (Penang, Malaysia)
toll free: 0880 060 07
604 633 4949
Country Code: 66 Sales toll free: 0880 060 09
U.K. (Bracknell)
International Access Code: 010
Country Code: 44
City Code: 1344
Technical Support (Corporate/Preferred
0870 908 0500
Accounts/PAD [1000+ employees])
Technical Support (Direct/PAD and Ceneral) 0870 908 0800
Clobal Accounts Customer Care 01344 723186
Corporate Customer Care 01344 723185
Preferred Accounts (500-5000 employees)
01344 723196
Customer Care
Central Covernment Customer Care
Local Covernment Customer Care
01344 723193
01344 723194
Home/Small Business Sales 0870 907 4000
Corporate/Public Sector Sales
01344 860456
Website: http://support.euro.dell.com
E-mail: dell direct
support@dell.com
8^ I Appendix
Page 81

Country (City)
International Access Code
Country Code
City Code
U.S.A. (Austin, Texas)
International Access Code: Oil
Country Code: l
Department Name or Service Area,
Website and E-mail Address
Area Codes,
Local Numbers, and
Toll Free Numbers
Automated Order-Status System
AutoTech (for portable and desktop computers)
toll free: 1-800-433-9014
toll free: 1-800-247-9362
Dell Home and Small Business Group (for portable and desktop computers):
Customer Technical Support (Return Material toll free: 1-800-624-9896
Authorization Numbers)
Customer Technical Support (Home sales toll free: 1-877-576-3355
purchased via http://www.dell.eom)
Customer Service (Credit Return Authorization toll free: 1-800-624-9897
Numbers)
National Aeeounts (systems purchased by established Dell national accounts
[have your account number handy], medical institutions, or value-added resellers
[VARs]):
Customer Service and Technical Support (Return toll free: 1-800-822-8965
Material Authorization Numbers)
Publie Amerieas International (systems purchased by governmental agencies
[local, state, or federal] or educational institutions):
Customer Service and Technical Support (Return
toll free: 1-800-234-1490
Material Authorization Numbers)
Dell Sales
toll free 1-800-289-3355
or toll free 1-800-879-3355
Spare Parts Sales toll free 1-800-357-3355
DellWare“ toll free 1-800-753-7201
Fee-Based Technical Support toll free 1-800-433-9005
Server Fee-Based Technical Support toll free 1-800-967-0765
Sales (Catalogs) toll free 1-800-426-5150
Fax
TechFax
Dell Services for the Deaf, Hard-of-Hearing, or
Speech-Impaired
Switchboard
toll free 1-800-727-8320
toll free 1-800-950-1329
toll free: 1-877-DELLTTY
(1-877-335-5889)
512 338-4400
Appendix I 81
Page 82

www.dell.com | s u p p о г t. d e 11. с о m
00
IS)
Page 83

Index
A D I
audio. See sound display. See monitor
drivers
reinstalling, 55
B
battery
replacing, 68
BIOS, 65
c
CD drive
fixing problems, 28
CD-RW drive
fixing problems, 29
computer
crashes, 51
error messages, 21
removing cover, 42
specifications, 62
turning off, 1 4
contact numbers, 69
cover
removing, 42
crashes, 51
drives
fixing problems, 27
DVD drive
fixing problems, 29
E
e-mail
fixing problems, 52
error messages
start-up, 21
Windows, 50
expansion cards, 49
F
finding solutions, 18
floppy drive
fixing problems, 27
H
hard drive
fixing problems, 29
installing an expansion
card, 48, 50
Internet
fixing problems, 52
K
keyboard
fixing problems, 27
0
messages
start-up, 21
Windows, 50
modem
fixing problems, 26
monitor
fixing problems, 21
mouse
fixing problems, 27
N
network
fixing problems, 50
Inde^ 1 83
Page 84

p
password
clearing system setup, 67
power
fixing problems, 20
turning off, 14
printer
connecting, 12
fixing problems, 24
reinstalling driver, 14
setting up, 12
troubleshooting, 24
programs
fixing problems, 51
R
removing and replacing the
AGP card brace, 48
ResourceCD, 55
s
safety instructions, 7
ScanDisk, 29
screen. See monitor
settings
system setup program, 65
shutdown, 14
software
fixing problems, 51
reinstalling software, 55
sound
adjusting volume, 25
fixing problems, 25
speaker
adjusting volume, 25
fixing problems, 25
specifications, 62
T
technical assistance
telephone numbers and
addresses, 69
troubleshooting, 18
turning off the computer, 14
w
V
video
fixing problems, 21
volume
adjusting, 25
W
Windows 2000
error messages, 50
reinstalling, 59
shutdown, 1 5
Windows 98
error messages, 50
reinstalling, 55
shutdown, 1 5
Windows Me
error messages, 50
reinstalling, 57
shutdown, 1 5
8^ 1 Index
 Loading...