

Page 1

Model No.: D2216H
Regulatory model: D2216Hc
User’s Guide
Dell D2216H
Page 2

2
TABLE OF CONTENT
FOR YOUR SAFETY �������������������������������������������������������������������������������������������������������������� 3
PRECAUTIONS �������������������������������������������������������������������������������������������������������������������3
SPECIAL NOTES ON LCD MONITORS ����������������������������������������������������������������������� 4
BEFORE YOU OPERATE THE MONITOR ����������������������������������������������������������������������5
FEATURES ����������������������������������������������������������������������������������������������������������������������������5
PACKING LIST ��������������������������������������������������������������������������������������������������������������������� 5
INSTALLATION INSTRUCTIONS ����������������������������������������������������������������������������������6
CONTROLS AND CONNECTORS �������������������������������������������������������������������������������8
ADJUSTING THE VIEWING ANGLE ������������������������������������������������������������������������������ 9
OPERATING INSTRUCTIONS ��������������������������������������������������������������������������������������� 10
GENERAL INSTRUCTIONS ������������������������������������������������������������������������������������������ 10
FRONT PANEL CONTROL ������������������������������������������������������������������������������������������� 11
HOW TO ADJUST A SETTING������������������������������������������������������������������������������������� 12
ADJUSTING THE PICTURE ������������������������������������������������������������������������������������������� 13
PLUG AND PLAY�������������������������������������������������������������������������������������������������������������� 14
TROUBLESHOOTING ������������������������������������������������������������������������������������������������������ 15
ERROR MESSAGE AND POSSIBLE SOLUTION ����������������������������������������������������� 16
APPENDIX ��������������������������������������������������������������������������������������������������������������������������� 17
SPECIFICATIONS ������������������������������������������������������������������������������������������������������������� 17
FACTORY PRESET TIMING TABLE ������������������������������������������������������������������������������ 18
CONNECTOR PIN ASSIGNMENT������������������������������������������������������������������������������ 19
Page 3

3
FOR YOUR SAFETY
Before operating the monitor, please read this manual thoroughly� This manual should be
retained for future reference�
WARNING:
To prevent fire or shock hazard, do not expose the monitor to rain or moisture�
Dangerously high voltages are present inside the monitor� Do not open the cabinet� Refer
servicing to qualified personnel only�
PRECAUTIONS
• Do not use the monitor near water, e�g� near a bathtub, washbowl, kitchen sink,
laundry tub, swimming pool or in a wet basement�
• Do not place the monitor on an unstable cart, stand, or table� If the monitor falls, it
can injure a person and cause serious damage to the appliance� Use only a cart or
stand recommended by the manufacturer or sold with the monitor� If you mount
the monitor on a wall or shelf, use a mounting kit approved by the manufacturer and
follow the kit instructions�
• Slots and openings in the back and bottom of the cabinet are provided for ventilation�
To ensure reliable operation of the monitor and to protect it from overheating, be
sure these openings are not blocked or covered� Do not place the monitor on a bed,
sofa, rug, or similar surface� Do not place the monitor near or over a radiator or heat
register� Do not place the monitor in a bookcase or cabinet unless proper ventilation
is provided�
• The monitor should be operated only from the type of power source indicated on
the label� If you are not sure of the type of power supplied to your home, consult
your dealer or local power company�
• The monitor is equipped with a three-pronged grounded plug, a plug with a third
(grounding) pin� This plug will fit only into a grounded power outlet as a safety feature�
If your outlet does not accommodate the three-wire plug, have an electrician install
the correct outlet, or use an adapter to ground the appliance safely� Do not defeat
the safety purpose of the grounded plug�
• Unplug the unit during a lightening storm or when it will not be used for long periods
of time� This will protect the monitor from damage due to power surges�
• Do not overload power strips and extension cords� Overloading can result in fire or
electric shock�
• Never push any object into the slot on the monitor cabinet� It could short circuit
parts causing a fire or electric shock� Never spill liquids on the monitor�
Page 4

4
• Do not attempt to service the monitor by yourself; opening or removing covers can
expose you to dangerous voltages and other hazards� Please refer all servicing to
qualified service personnel�
• To ensure satisfactory operation, use the monitor only with UL listed computers
which have appropriate configured receptacles marked between 100 - 240V AC, Min�
5A�
• The wall socket should be installed near the equipment and should be easily
accessible�
SPECIAL NOTES ON LCD MONITORS
The following symptoms are normal with LCD monitors and do not indicate a problem�
NOTES
• You may find slightly uneven brightness on the screen depending on the desktop
pattern you use�
• The LCD screen has effective pixels of 99�99% or more� It may include blemishes of
0�01% or less such as a missing pixel or a pixel lit all of the time�
• Due to the nature of the LCD screen, an afterimage of the previous screen may
remain after switching the image when the same image has been displayed for a long
time� The monitor will slowly recover from this�
• When the screen becomes black or flashing, or cannot illuminate any more, contact
your dealer or service center to replace parts� Do not repair the screen by yourself!
Page 5

5
BEFORE YOU OPERATE THE MONITOR
FEATURES
• 546�1mm (21�5’’) TFT Color LCD Monitor
• Crisp, Clear Display for Windows 7, Windows 8, Windows 8�1 and Windows 10
• Recommend Resolutions: 1920 x 1080@60Hz
• Ergonomic Design
• Space Saving, Compact Case Design
PACKING LIST
The product package should include the following items:
1� LCD Monitor
2� Drivers and Documentation media (CD)
3� Quick Setup Guide
4� Safety and Regulatory Information
5� Power Cord
6� D-SUB Cable
7� Stand Riser (attached on the LCD monitor)
8� Base
Page 6
6
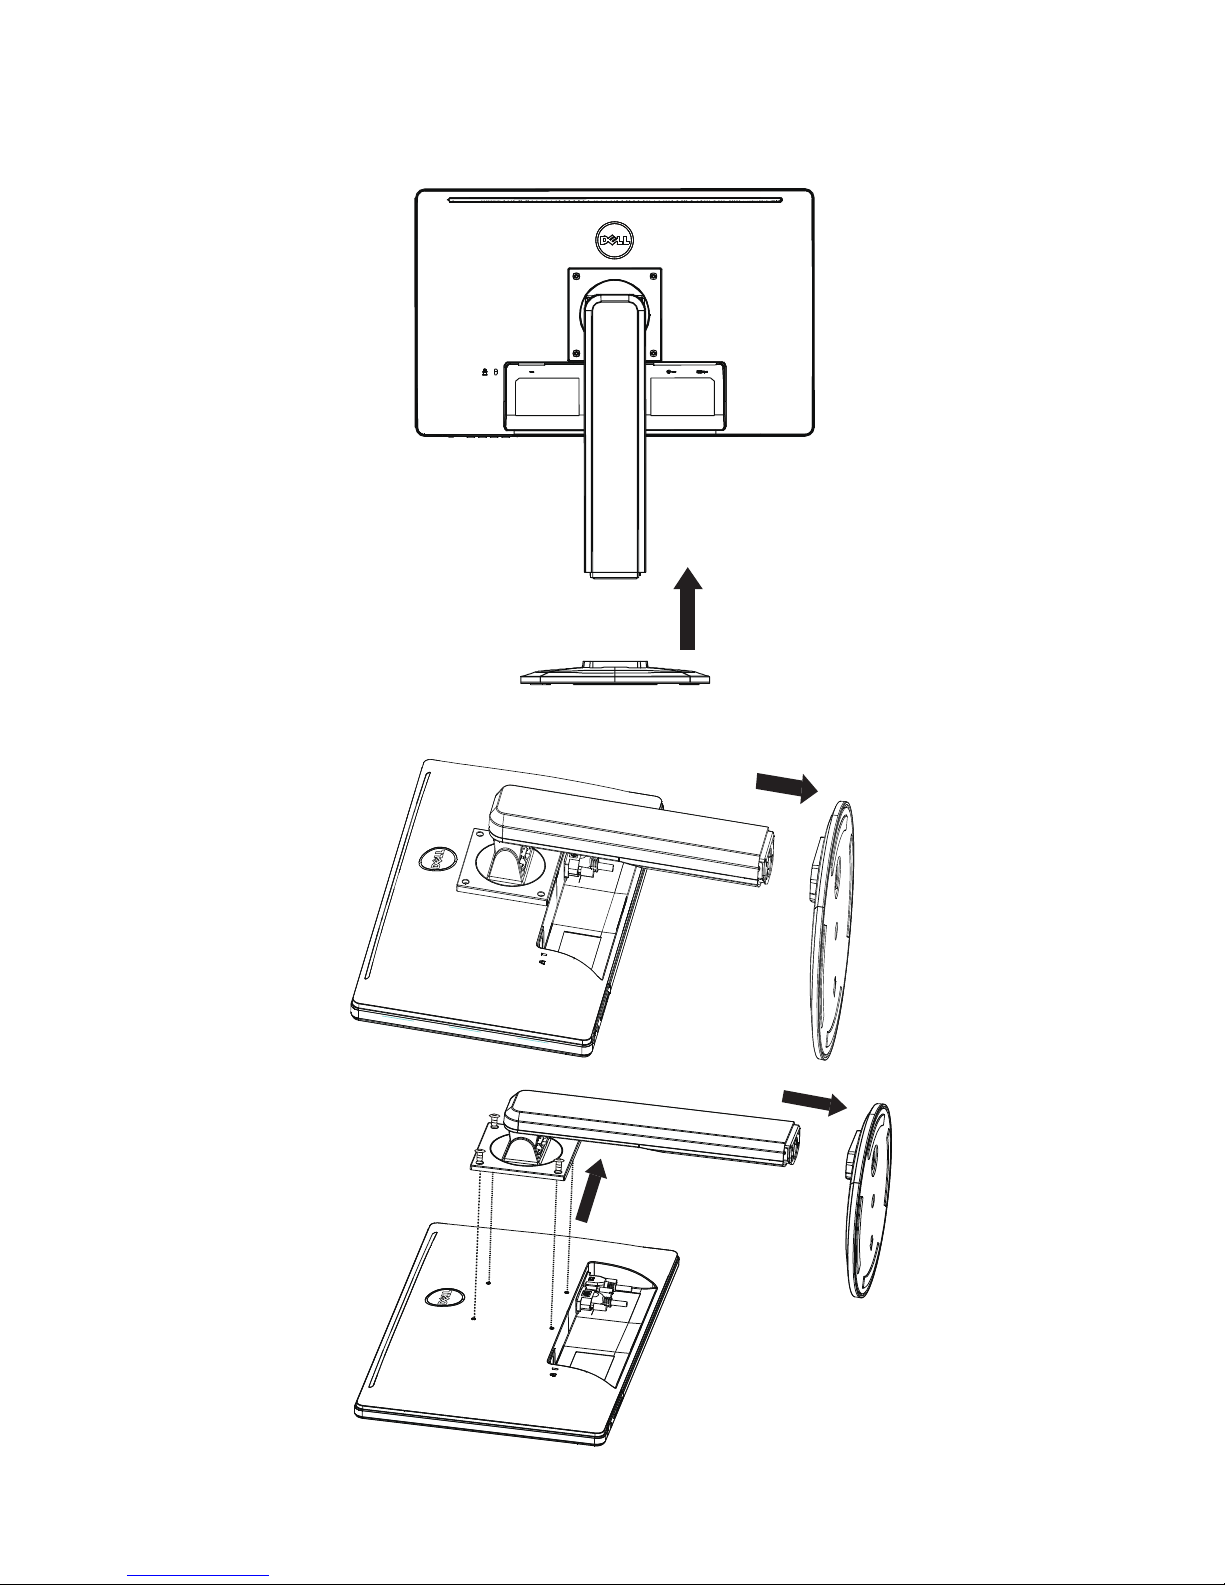
INSTALLATION INSTRUCTIONS
Attach base:
Detach base:
Page 7

7
POWER CORD
Power Source:
1� Please ensure you are using the correct power cord in your area�
2� This LCD monitor allows operation in either 100/120V AC or 220/240V AC voltage
area (No user adjustment is required�)
3� Connect the AC-power cord into your LCD monitor’s power input socket� The AC-
power cord may be connected to either a wall power outlet or the power outlet
socket on your PC, depending on the type of power cord supplied with your LCD
monitor�
Page 8
8
CONTROLS AND CONNECTORS
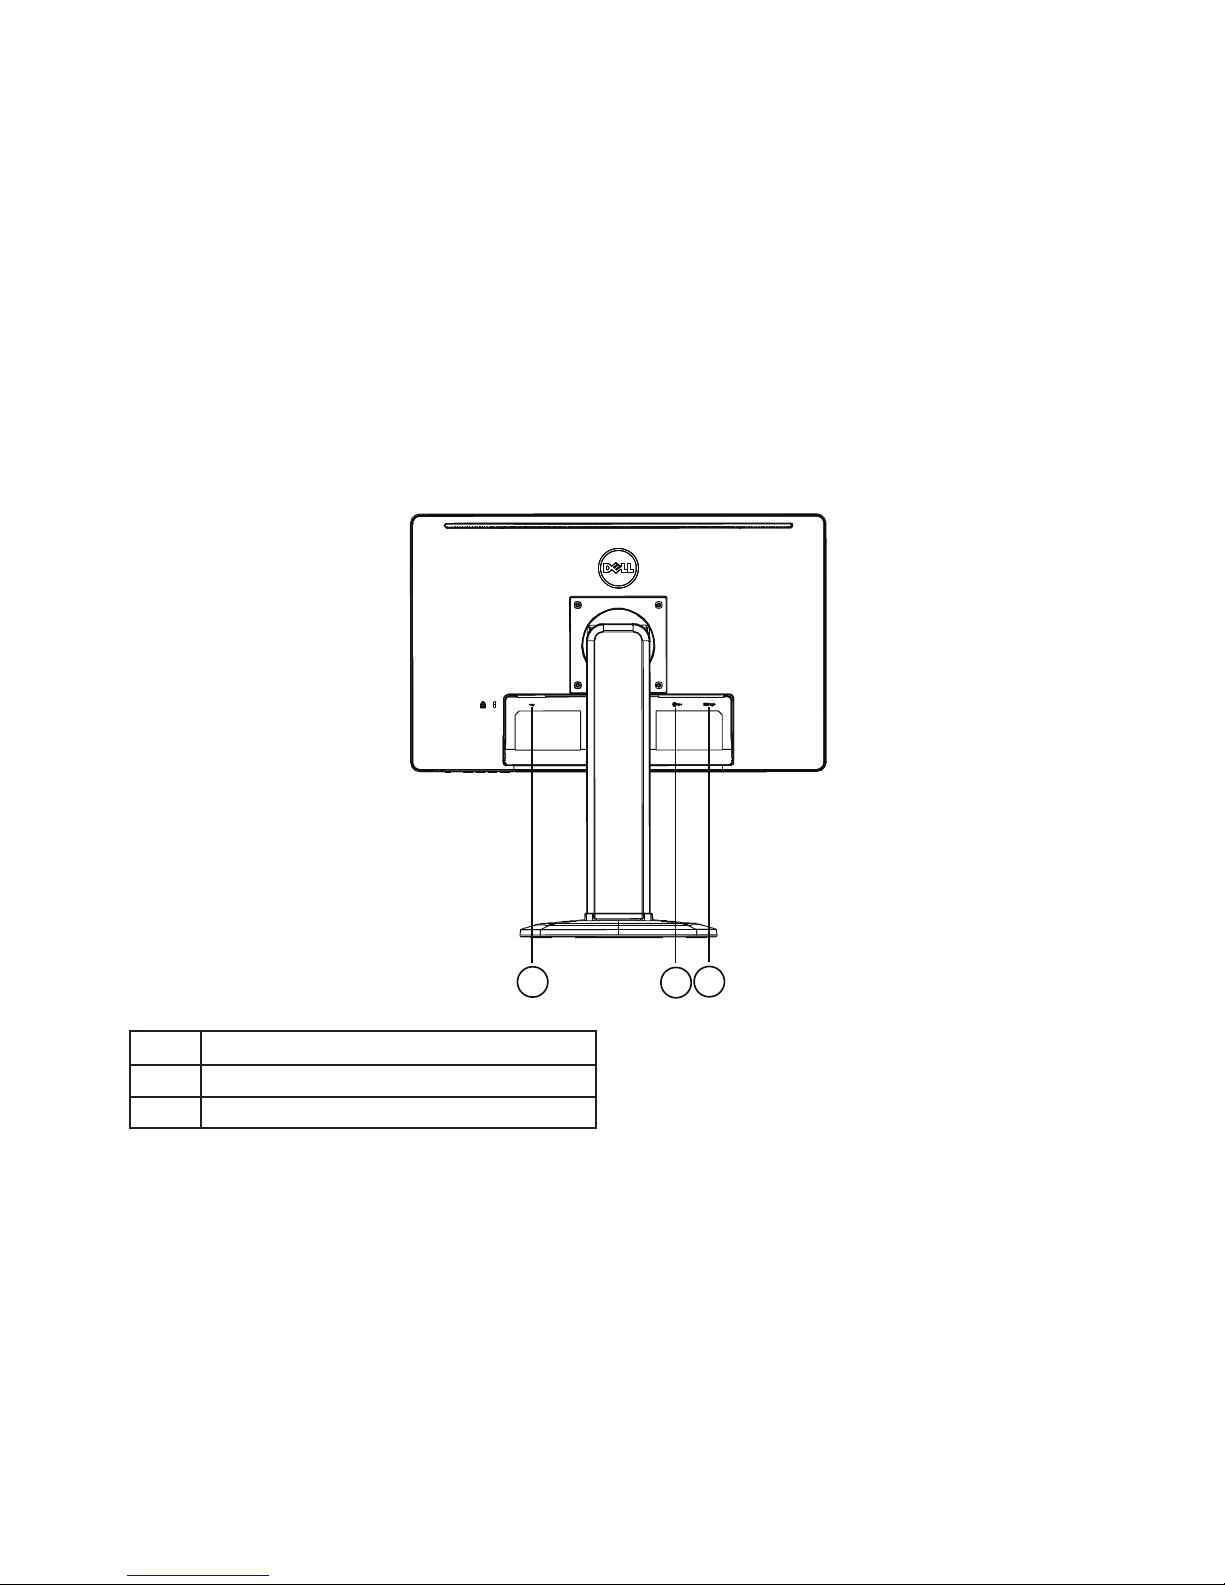
SIGNAL CABLE
• Connecting the Signal Cable: Connect the 15-pin VGA cable to the back of the
monitor and the computer’s VGA port�
• Connecting the Power Cord: Connect the AC-power cord to the LCD monitor’s
AC input socket and the wall outlet�
• Connecting the DVI Cable: Connect the 24-pin DVI cable (not supplied) to the
back of the monitor and the computer’s DVI port�
• Caution: If the AC wall outlet is not grounded (with three holes), install the proper
grounding adapter (not supplied)�
3
2
1
1. Power input
2. DVI Signal input
3. D-SUB Signal input
Page 9
9
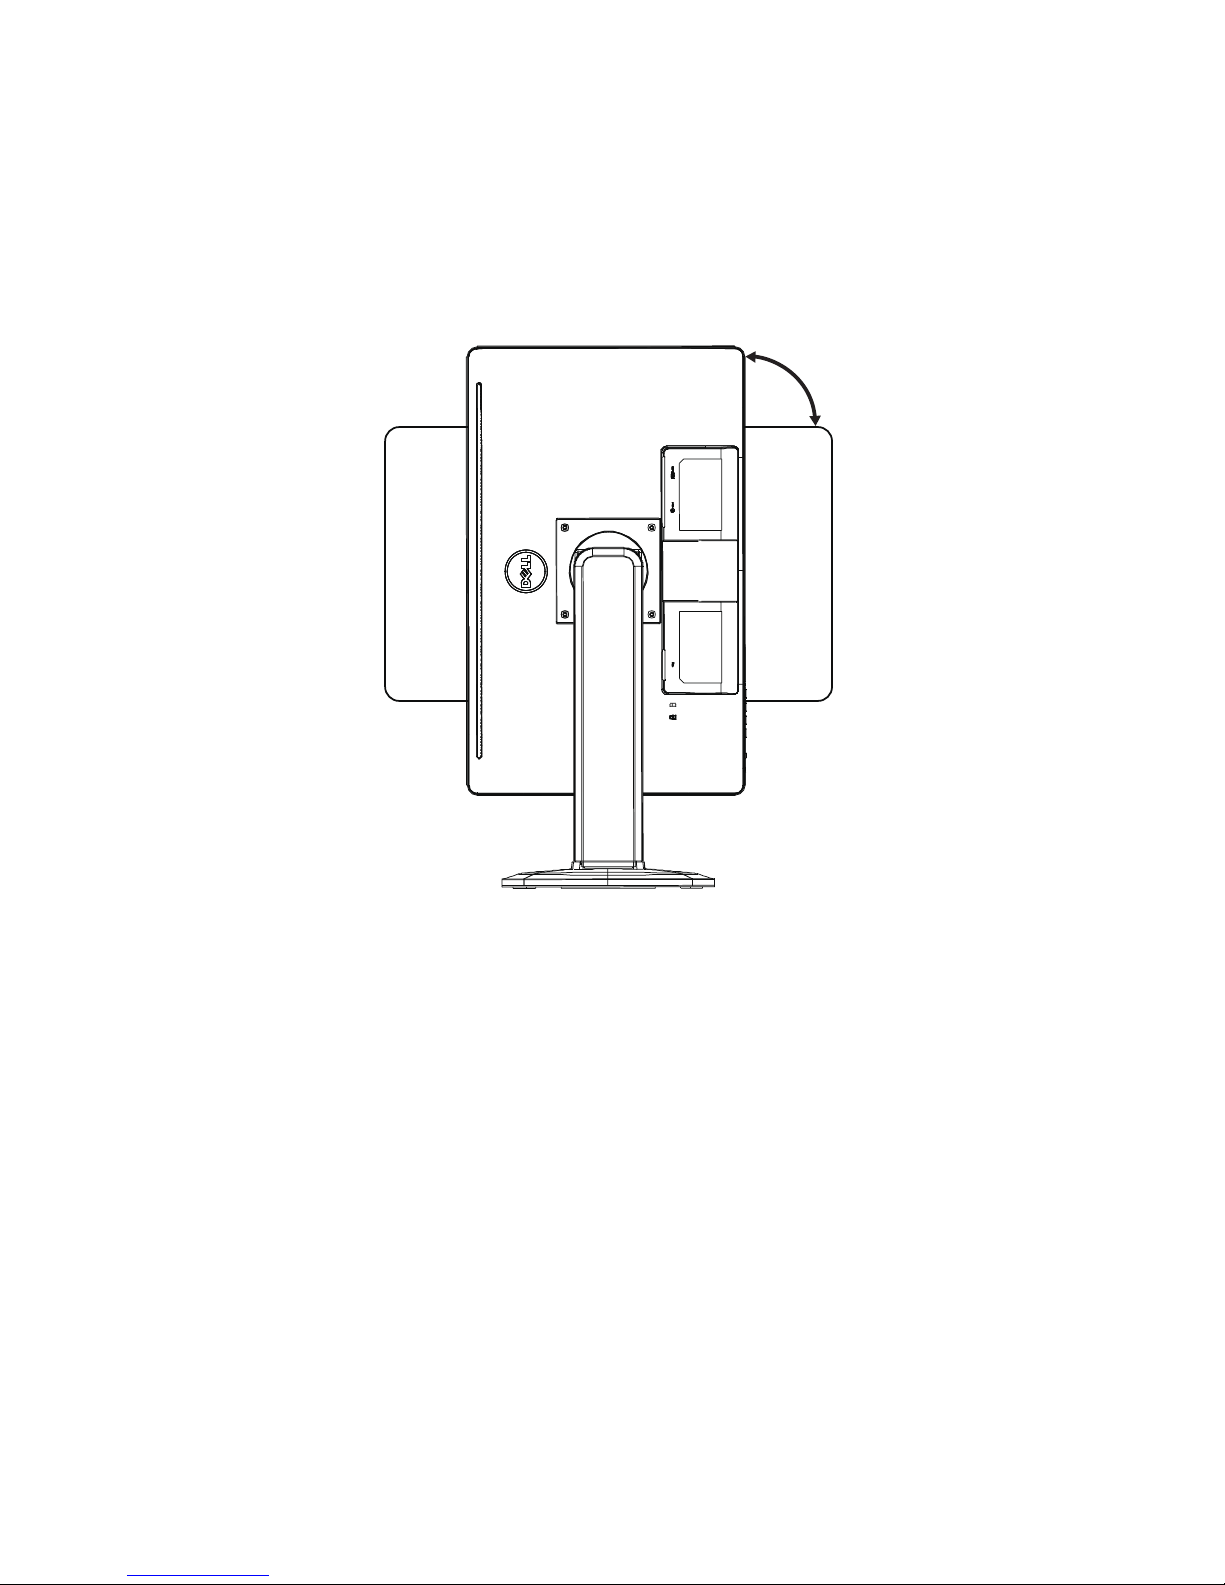
ADJUSTING THE VIEWING ANGLE
• For optimal viewing, it is recommended to look at the full face of the monitor and
then adjust the monitor’s angle to your own preference�
• Hold the stand so you do not topple the monitor when you adjust the monitor’s
angle�
• You can adjust the tilted angle from 0° to 90°�
90
o
NOTES
• Do not touch the LCD screen when you adjust the angle� It may cause damage or break the
LCD screen�
• Careful attention is required not to catch your fingers or hands when you adjust the angle�
Page 10
10
OPERATING INSTRUCTIONS
GENERAL INSTRUCTIONS
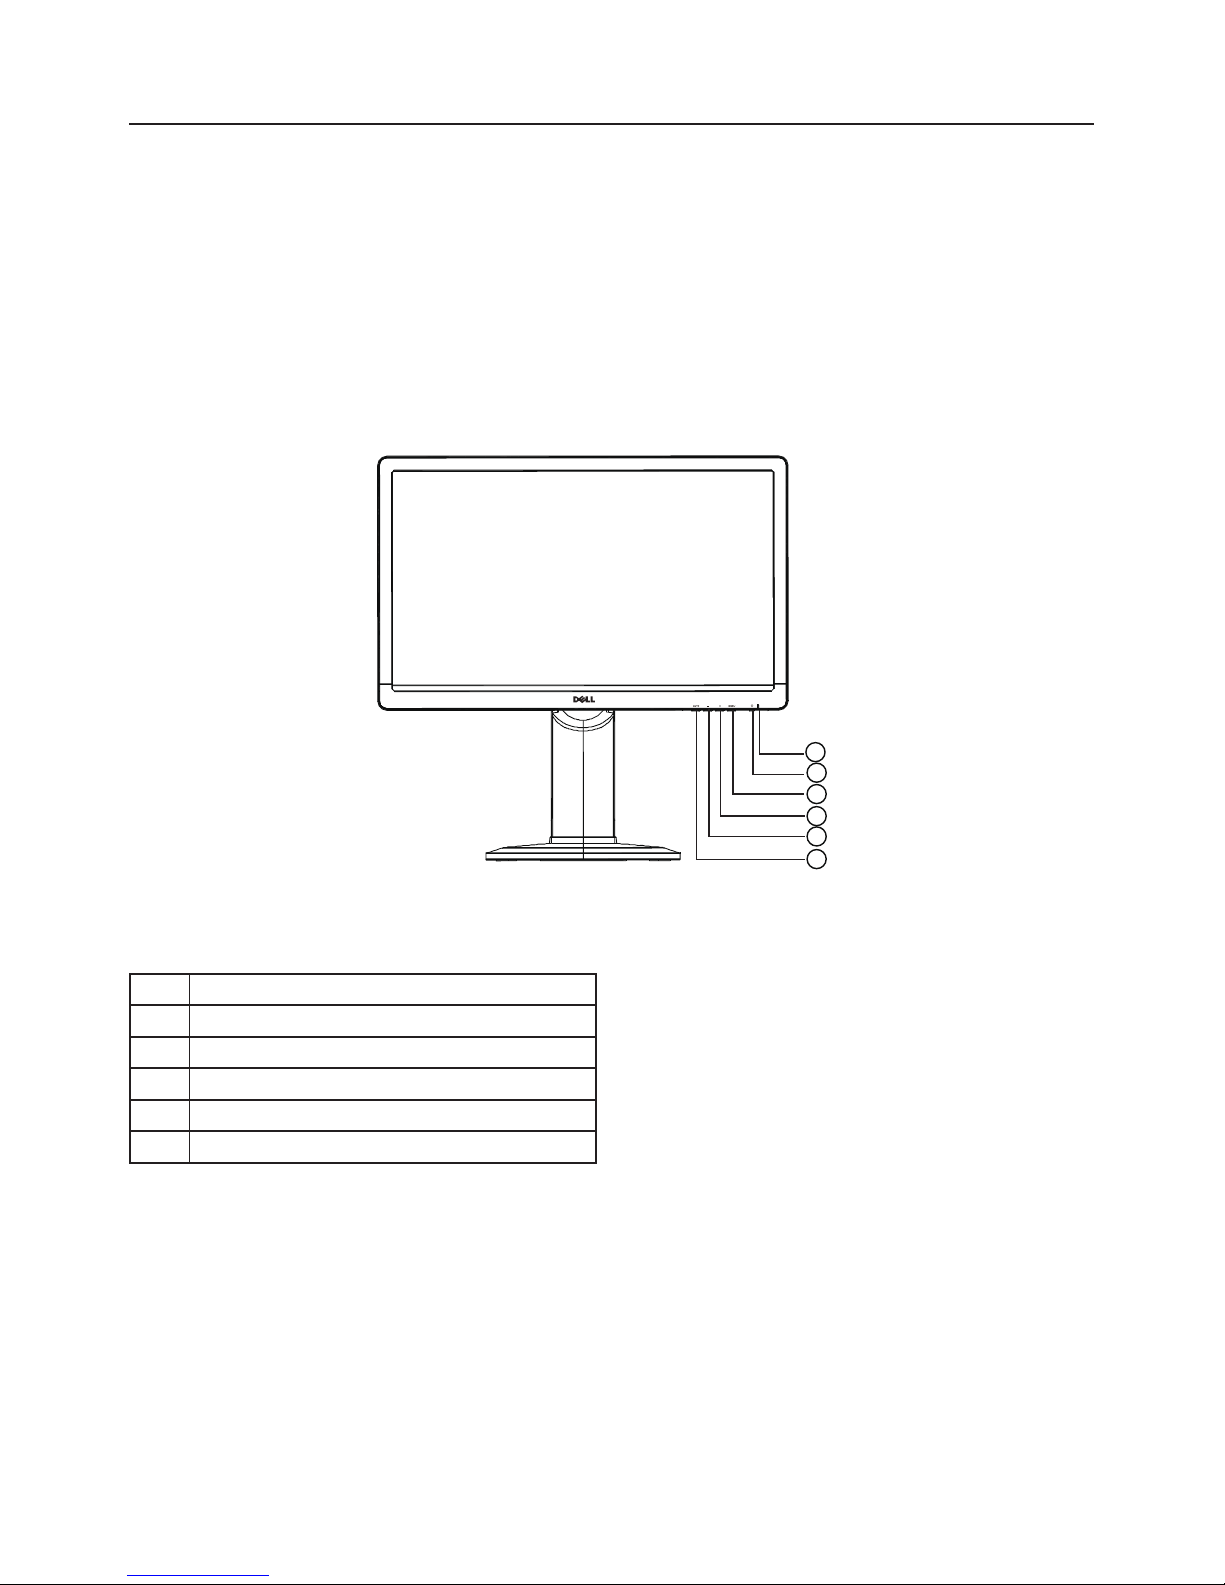
Press the power button to turn the monitor on or off� The other control buttons are
located on the side of the monitor� By changing these settings, the picture can be adjusted
to your personal preferences�
• The power cord should be connected�
• Connect the video cable from the monitor to the computer�
• Press the power button to turn on the monitor� The power indicator will light up�
2
3
4
5
6
1
EXTERNAL CONTROLS
1. Power indicator
2. Power button
3. MENU / ENTER
4. + / Image Ratio
5. - / ECO
6. Auto Config� button / Input Select / Exit
Page 11

11
FRONT PANEL CONTROL
• Power Button:
Press to switch the monitor on or off�
• Power Indicator:
Blue — Power On mode�
Orange — Standby mode�
LED off — Off mode�
• MENU / ENTER:
Activate OSD menu or function adjust confirm or Exit OSD menu when in
Brightness/Contrast OSD status�
• + / Image Ratio:
Activate the Image Ratio control when the OSD is OFF, navigate through
adjustment icons when OSD is ON, or adjust a function when function is activated�
• - / ECO:
Activate the ECO function when the OSD is OFF, navigate through adjustment
icons when OSD is ON, or adjust a function when function is activated�
• Auto Config. button / Input Select / Exit:
1� When OSD menu is off, press and hold to activate the Auto Adjustment
function (only for VGA source)�
The Auto Adjustment function is used to optimize the H�Pos, V�Pos, Clock and
Focus�
2� When OSD menu is off, press to select input source;
3� When OSD menu is on, press to exit the OSD menu�
OSD Lock Function: To lock the OSD, press and hold the MENU button while the
monitor is off and then press power button to turn the monitor on� To un-lock the OSD,
press and hold the MENU button while the monitor is off and then press power button
to turn the monitor on�
NOTES
• Do not install the monitor in a location near heat sources such as radiators or air ducts, or in
a place subject to direct sunlight, or excessive dust or mechanical vibration or shock�
• Save the original shipping carton and packing materials, as they will come in handy if you ever
have to ship your monitor�
• For maximum protection, repackage your monitor as it was originally packed at the factory�
• To keep the monitor looking new, periodically clean it with a soft cloth� Stubborn stains may
be removed with a cloth lightly dampened with a mild detergent solution� Never use strong
solvents such as thinner, benzene, or abrasive cleaners, since these will damage the cabinet� As
a safety precaution, always unplug the monitor before cleaning it�
• Do not scratch the screen with hard things; it may cause permanent damage�
• Do not spill liquids into the monitor which will result in the damage to components�
Page 12
12
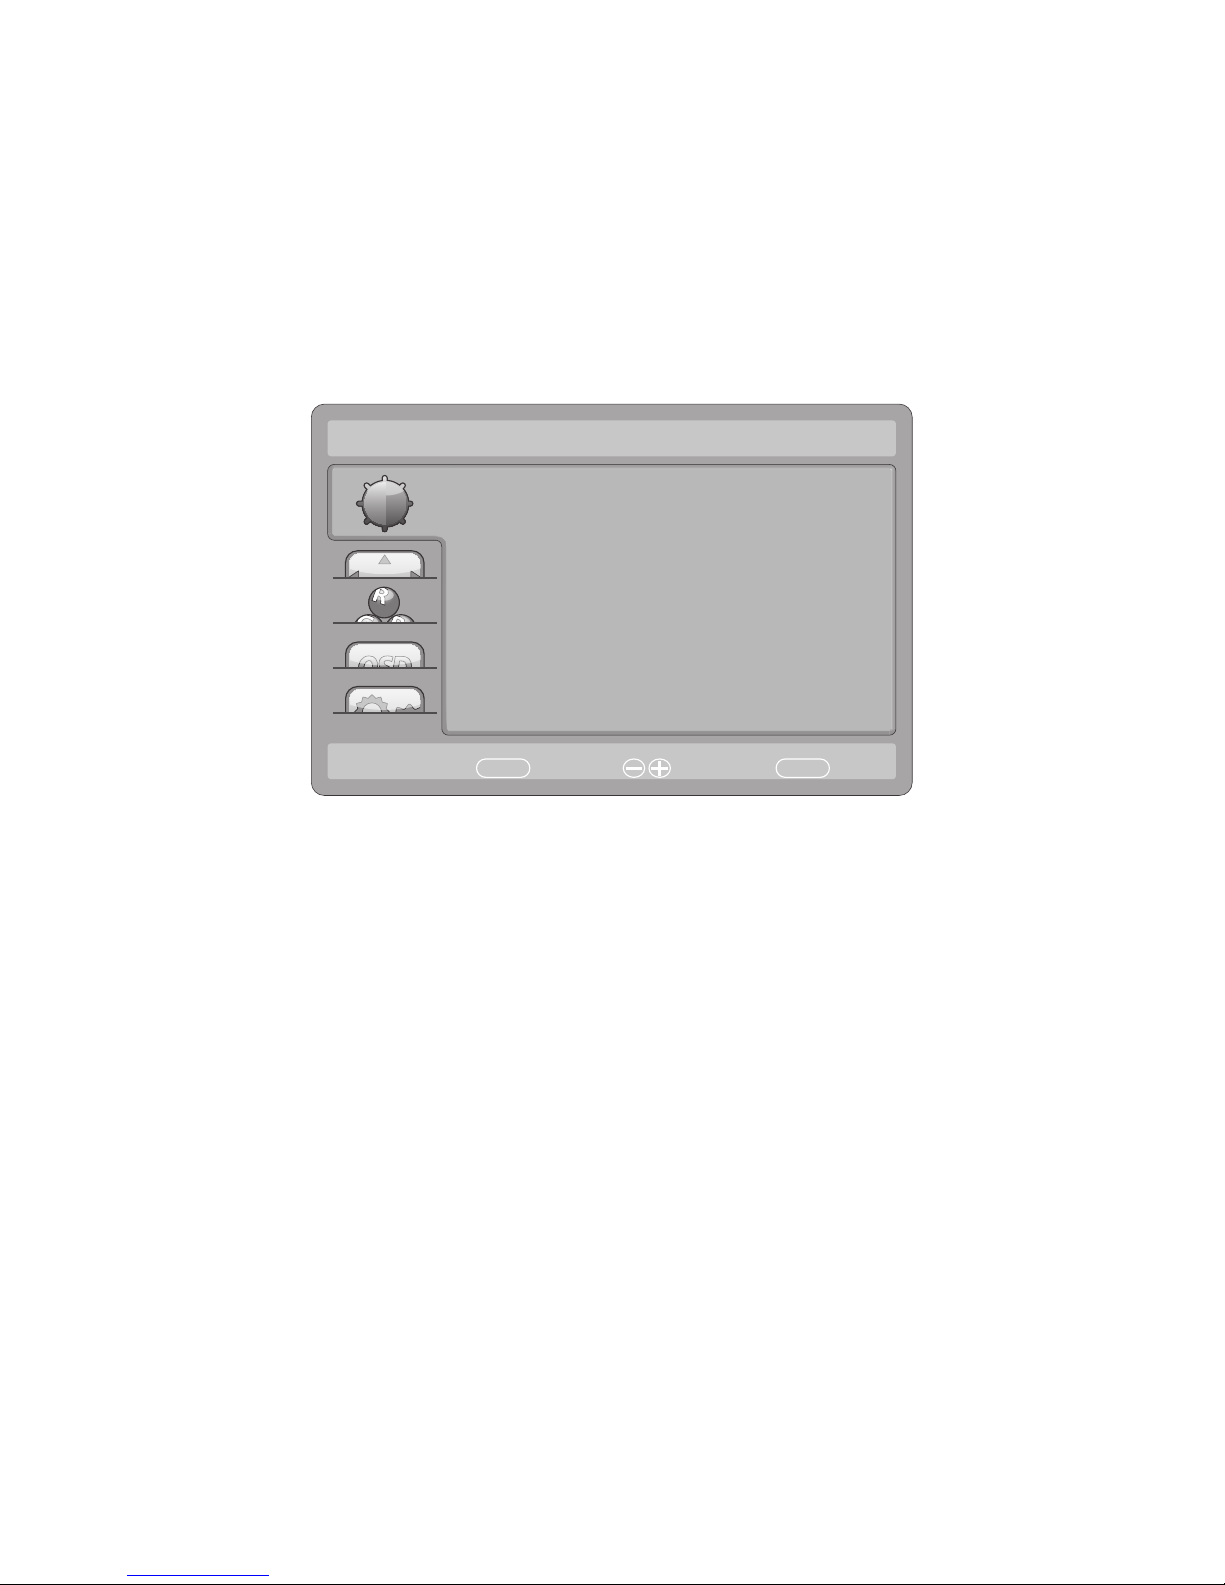
HOW TO ADJUST A SETTING
1� Press the MENU-button to display the OSD menu�
2� Press + or - to navigate through the menu items� Once the desired item is highlighted,
press the MENU-button to enter� Press + or - again to navigate through the sub-menu�
Once the desired item is highlighted, press MENU-button to activate it�
3� Press + or - to adjust the setting�
4� To exit and save, press the EXIT-button� If you would like to adjust other settings,
please repeat steps 2-3�
Luminance
Contrast
Brightness
Eco Mode
AUTO
:Exit
50
90
Standard
MENU
:Select:Move
Page 13
13
ADJUSTING THE PICTURE
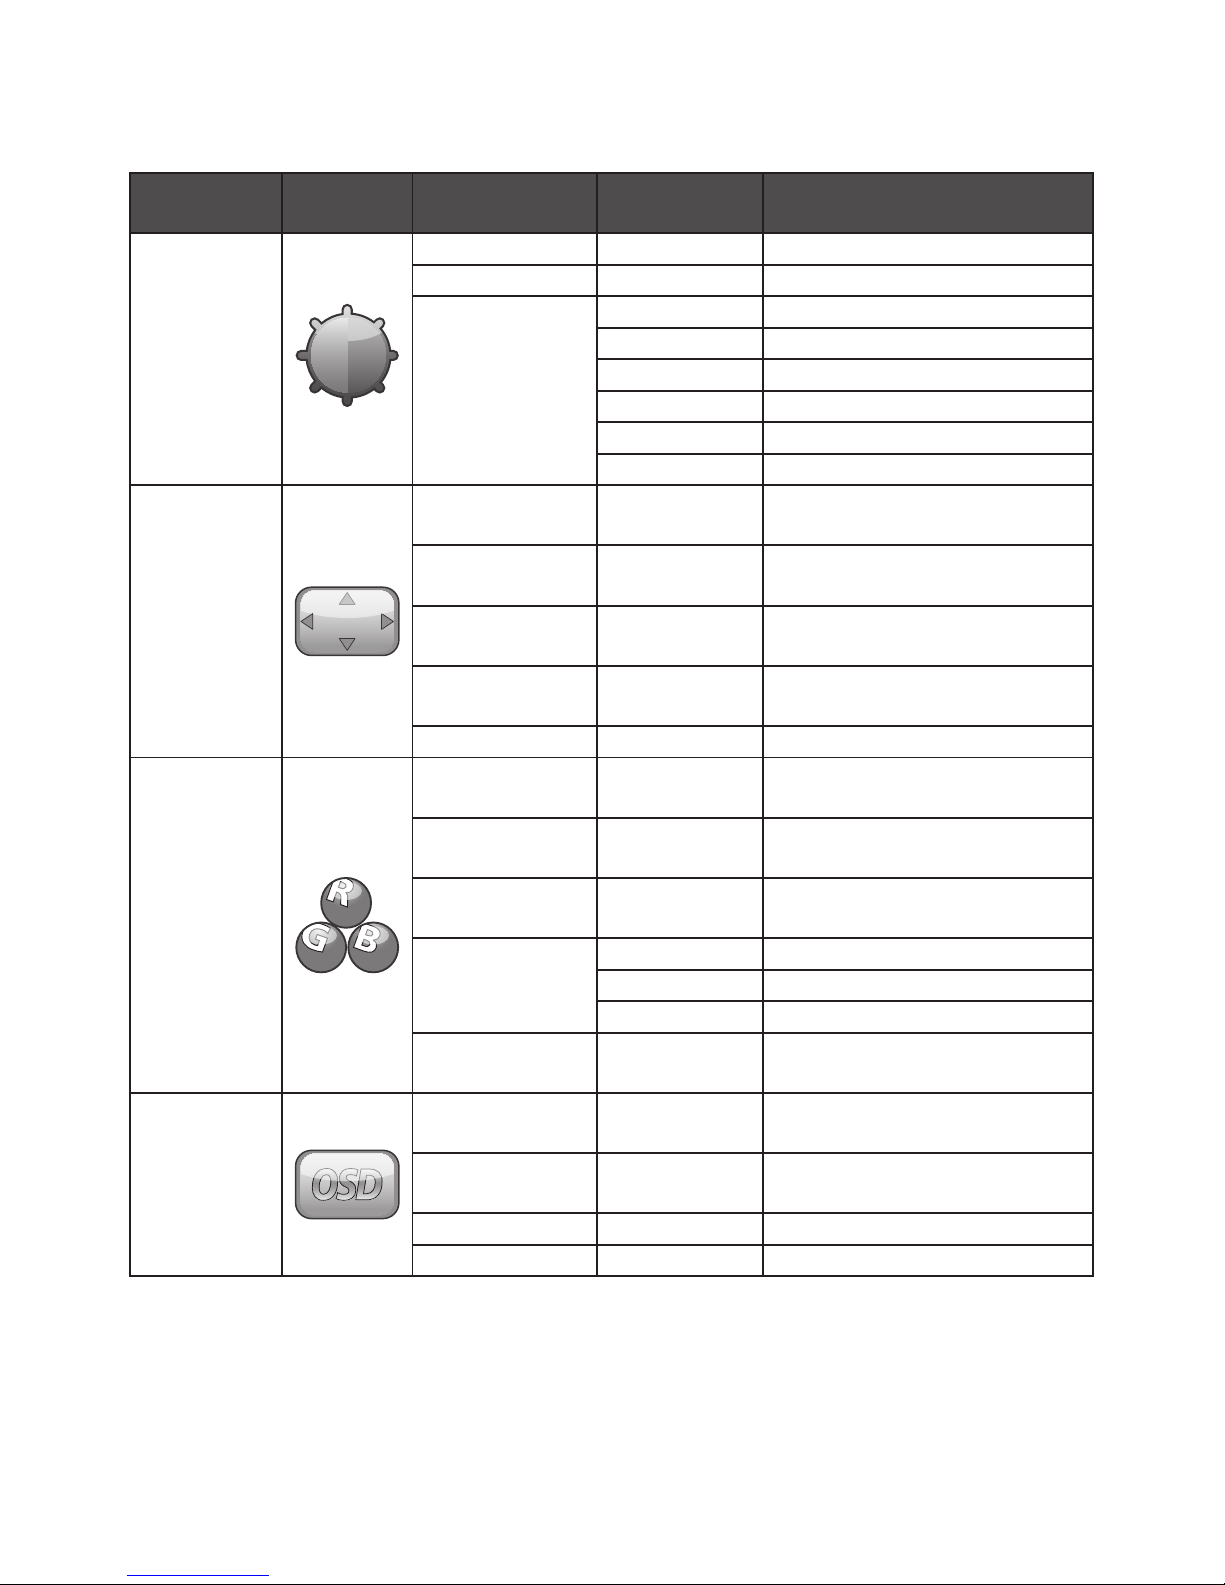
The descriptions for function control:
Main Menu
Item
Main Menu
Icon
Sub Menu Item Sub Menu Description
Luminance
Contrast* Contrast adjustment
Brightness*
Brightness adjustment
Eco
Standard Standard Mode
Text Text Mode
Internet Internet Mode
Game Game Mode
Movie Movie Mode
Sports
Sports Mode
Image Setup
Clock
Adjust picture Clock to reduce
Vertical-Line noise�
Phase
Adjust Picture Phase to reduce
Horizontal-Line noise
H�Position
Adjust the horizontal position
of the picture�
V�Position
Adjust the vertical position of
the picture�
Image Ratio** Wide/4:3 Select Picture wide and 4:3
Color Temp�
Warm
Recall Warm Color
Temperature from EEPROM�
Normal
Recall Normal Color
Temperature from EEPROM�
Cool
Recall Cool Color Temperature
from EEPROM�
User
Red Red gain adjustment
Green Green gain adjustment
Blue Blue gain adjustment
sRGB
Recall SRGB Color Temperature
from EEPROM�
OSD Setup
H�Position
Adjust the horizontal position
of OSD
V�Position
Adjust the vertical position of
OSD
Timeout Adjust the OSD Timeout
Language Select the OSD language
Page 14
14
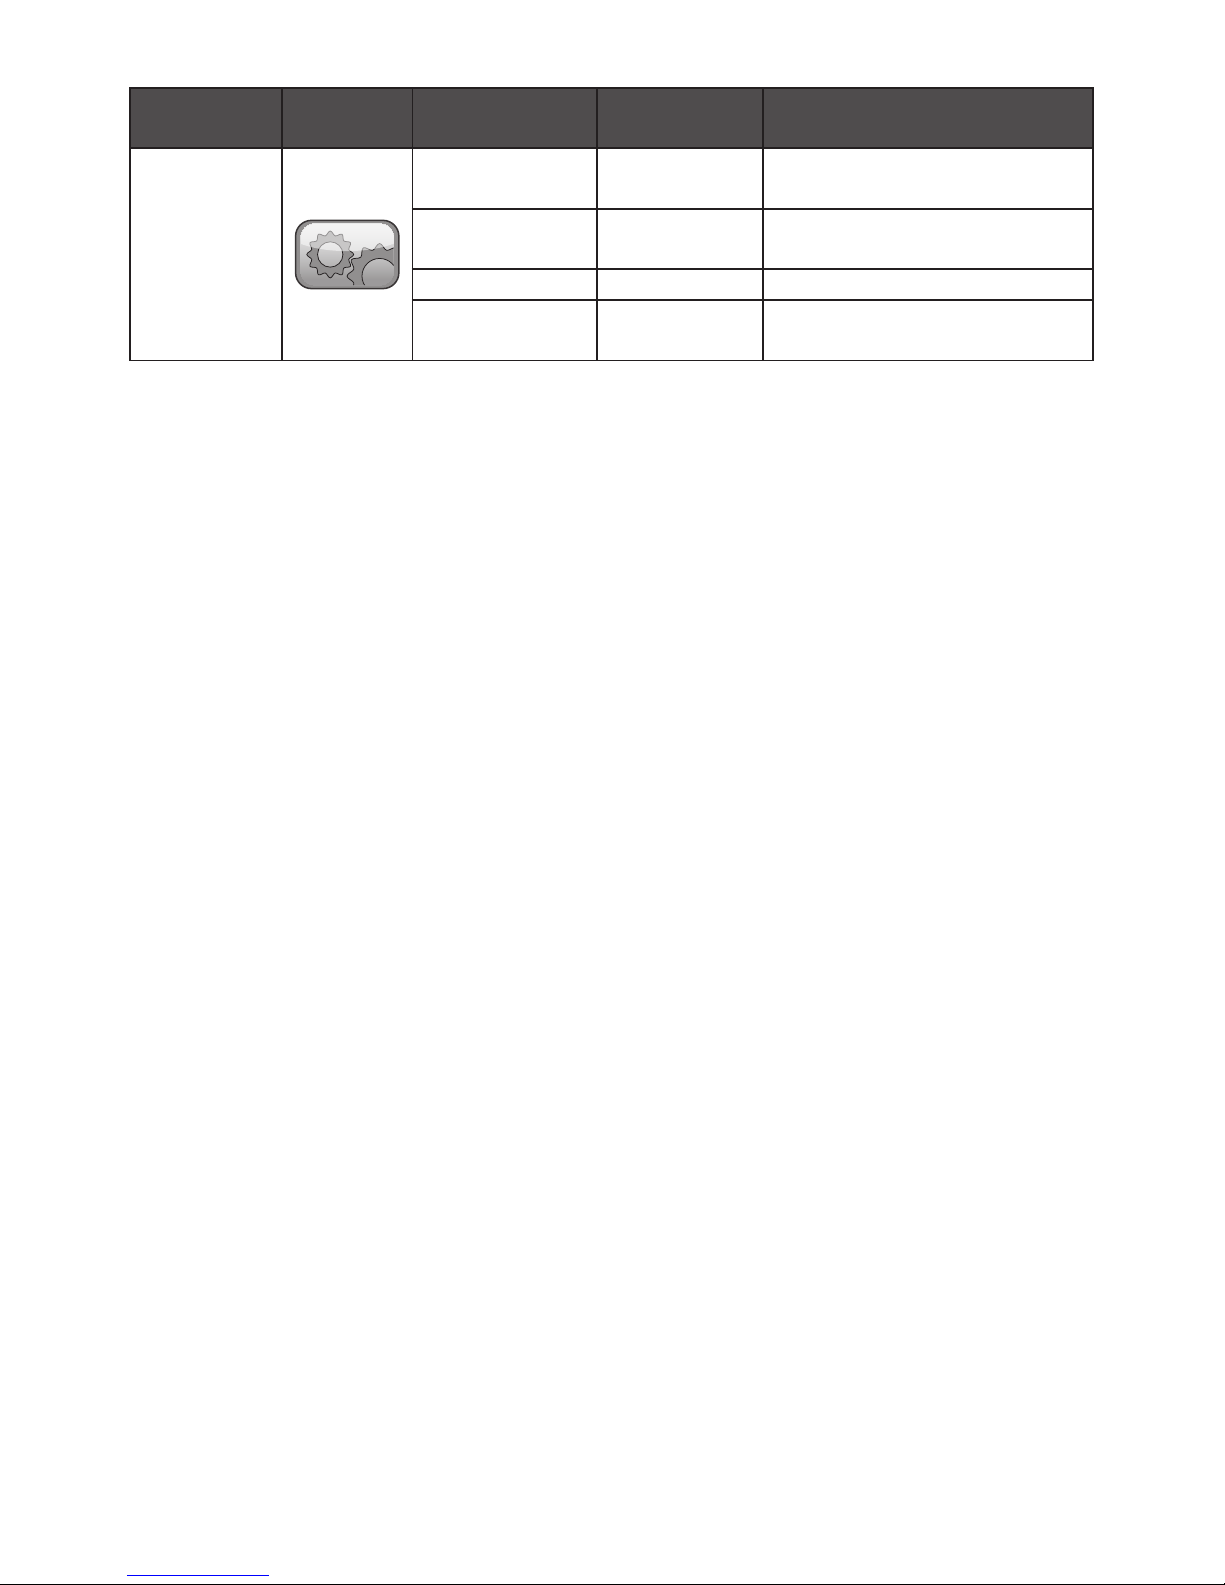
Main Menu
Item
Main Menu
Icon
Sub Menu Item Sub Menu Description
Extra
Input Select VGA/DVI
Select input source VGA and
DVI
DDC/CI
Turn ON/OFF DDC/CI
Support
Reset yes or no Reset the menu to default�
Information
Show the information of the
main image source�
* Contrast / Brightness only can be adjusted under Standard Mode�
** Image Ratio function will be greyed out if not available for a resolution�
PLUG AND PLAY
Plug & Play DDC2B Feature
This monitor is equipped with VESA DDC2B capabilities according to the VESA DDC
STANDARD� It allows the monitor to inform the host system of its identity and,
depending on the level of DDC used, communicate additional information about its
display capabilities�
The DDC2B is a bidirectional data channel based on the I²C protocol� The host can
request EDID information over the DDC2B channel�
THIS MONITOR WILL APPEAR TO BE NON-FUNCTIONAL IF THERE IS
NO VIDEO INPUT SIGNAL. IN ORDER FOR THIS MONITOR TO OPERATE
PROPERLY, THERE MUST BE A VIDEO INPUT SIGNAL.
This monitor meets the Green monitor standards as set by the Video Electronics
Standards Association (VESA) and The Swedish Confederation Employees� This feature is
designed to conserve electrical energy by reducing power consumption when there is no
video-input signal present� When there is no video input signal this monitor, following a
time-out period, will automatically switch to an Standby mode� This reduces the monitor’s
internal power supply consumption� After the video input signal is restored, full power is
restored and the display is automatically redrawn� The appearance is similar to a “Screen
Saver” feature except the display is completely off� The display is restored by pressing a
key on the keyboard, or clicking the mouse�
Page 15
15
TROUBLESHOOTING
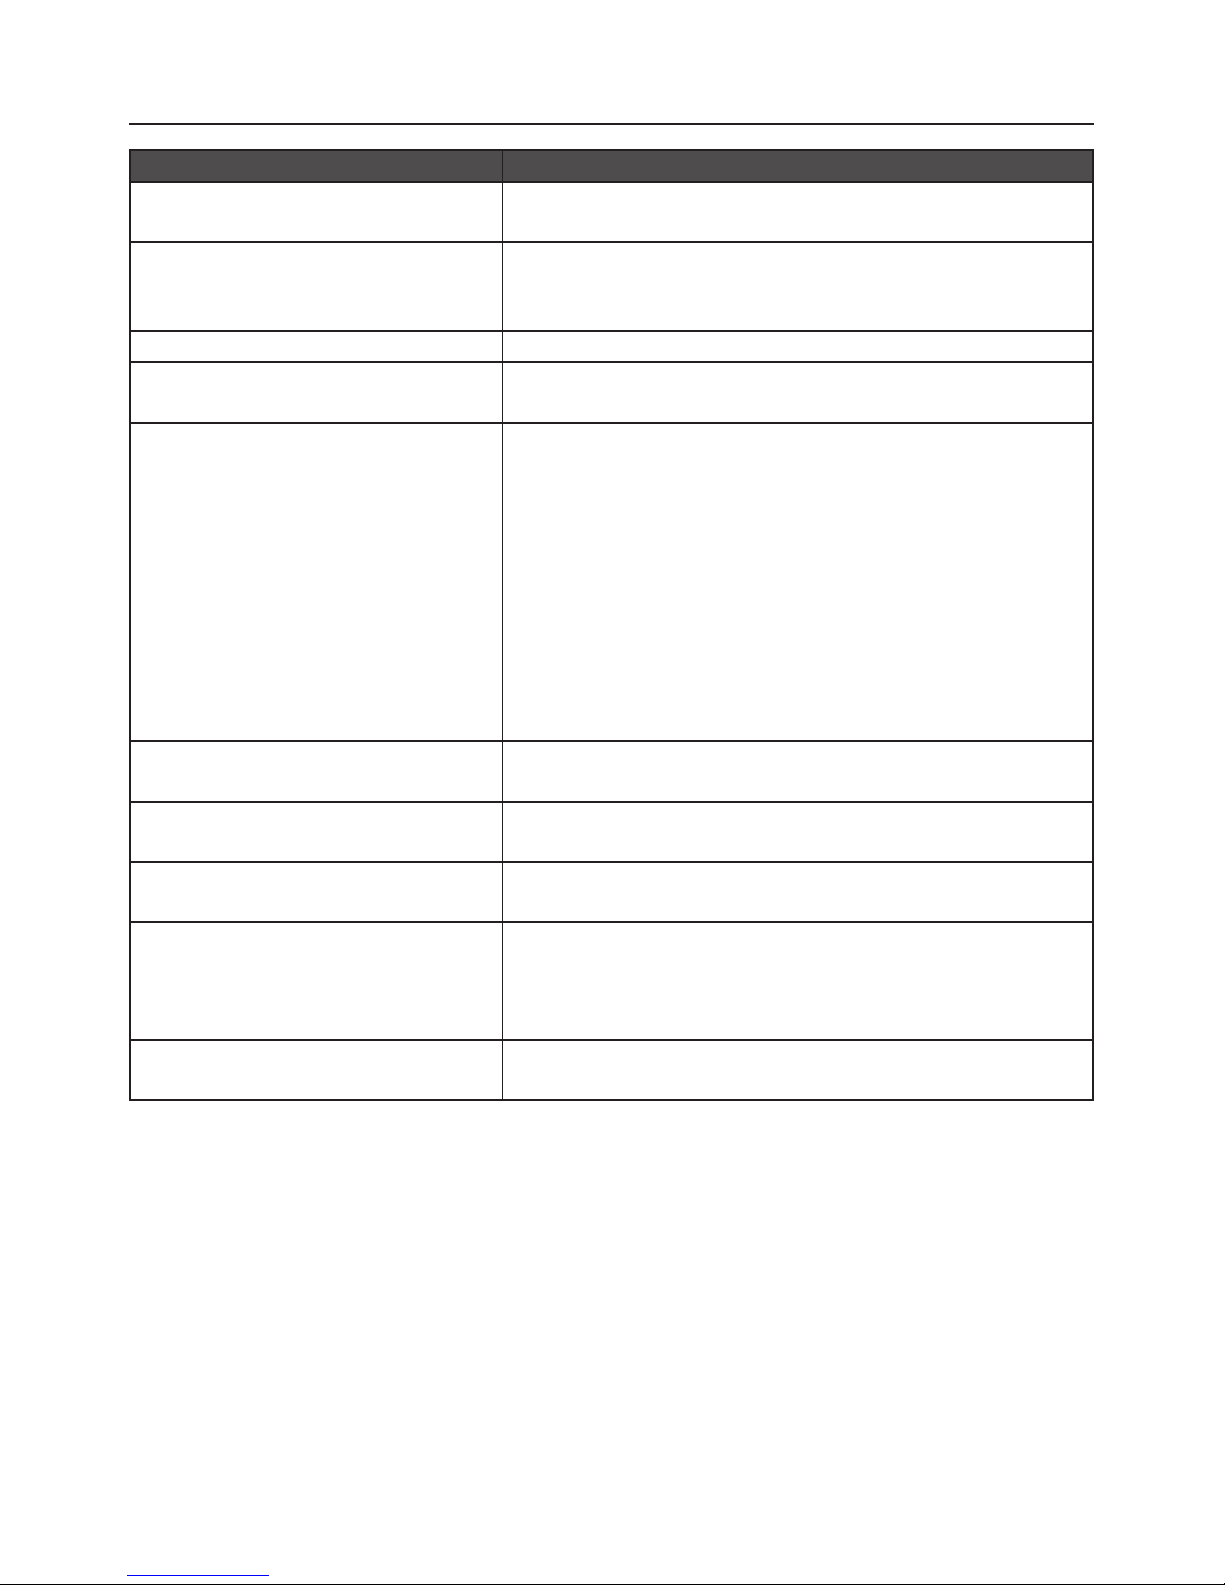
Problem & Question Possible Solution
Power LED is not on
• Check if the Power Switch is in the ON position�
• Power Cord should be connected�
No Plug & Play
• Check if the PC system is Plug & Play compatible�
• Check if the Video Card is Plug & Play compatible�
• Check if the D-15 plug pin of Video Cable is bent�
Picture is fuzzy • Adjust the Contrast and Brightness Controls�
Picture bounces or a wave pattern
is present in the picture
• Move electrical devices that may cause electrical
interference�
The power LED is ON (blue) but
there is no video or no picture�
• Computer Power Switch should be in the ON position�
• Computer Video Card should be snugly seated in its
slot�
• Make sure monitor’s video cable is properly connected
to the computer�
• Inspect monitor’s video cable and make sure none of
the pins are bent�
• Make sure computer is operational by pressing the
CAPS LOCK key on the keyboard while observing the
CAPS LOCK LED� The LED should either turn ON or
OFF after pressing the CAPS LOCK key�
Missing one of the primary colors
(RED, GREEN, or BLUE)
• Inspect the monitor’s video cable and make sure that
none of the pins are bent�
Screen image is not centered or
sized properly�
• Adjust pixel frequency (CLOCK) and PHASE or press
hot-key (auto adjustment)�
Picture has color defects (white
does not look white)
• Adjust RGB color or select color temperature�
Poor brightness or contrast
• When the brightness of the screen lowers after being
used for a certain period and the function of the display
is affected, send it to our authorized service center for
repair�
Horizontal or vertical disturbances
on the screen
• Adjust CLOCK and PHASE or perform hot- key (auto
adjustment)�
CLOCK (pixel frequency) controls the number of pixels scanned by one horizontal
sweep� If the frequency is not correct, the screen shows vertical stripes and the picture
does not have correct width�
PHASE adjusts the phase of the pixel clock signal� With a wrong phase adjustment the
picture has horizontal disturbances in light picture�
For PHASE and CLOCK adjustment best to use “dot-pattern”�
Page 16

16
ERROR MESSAGE AND POSSIBLE SOLUTION
NO SIGNAL
1� Check that the signal-cable is properly connected� If the connector is loose, tighten
the connector’s screws�
2� Check the signal-cable’s connection pins for damage�
INPUT NOT SUPPORTED
Your computer has been set to unsuitable display mode� Set the computer to display
mode given in the table on page 18�
Page 17
17
APPENDIX
SPECIFICATIONS
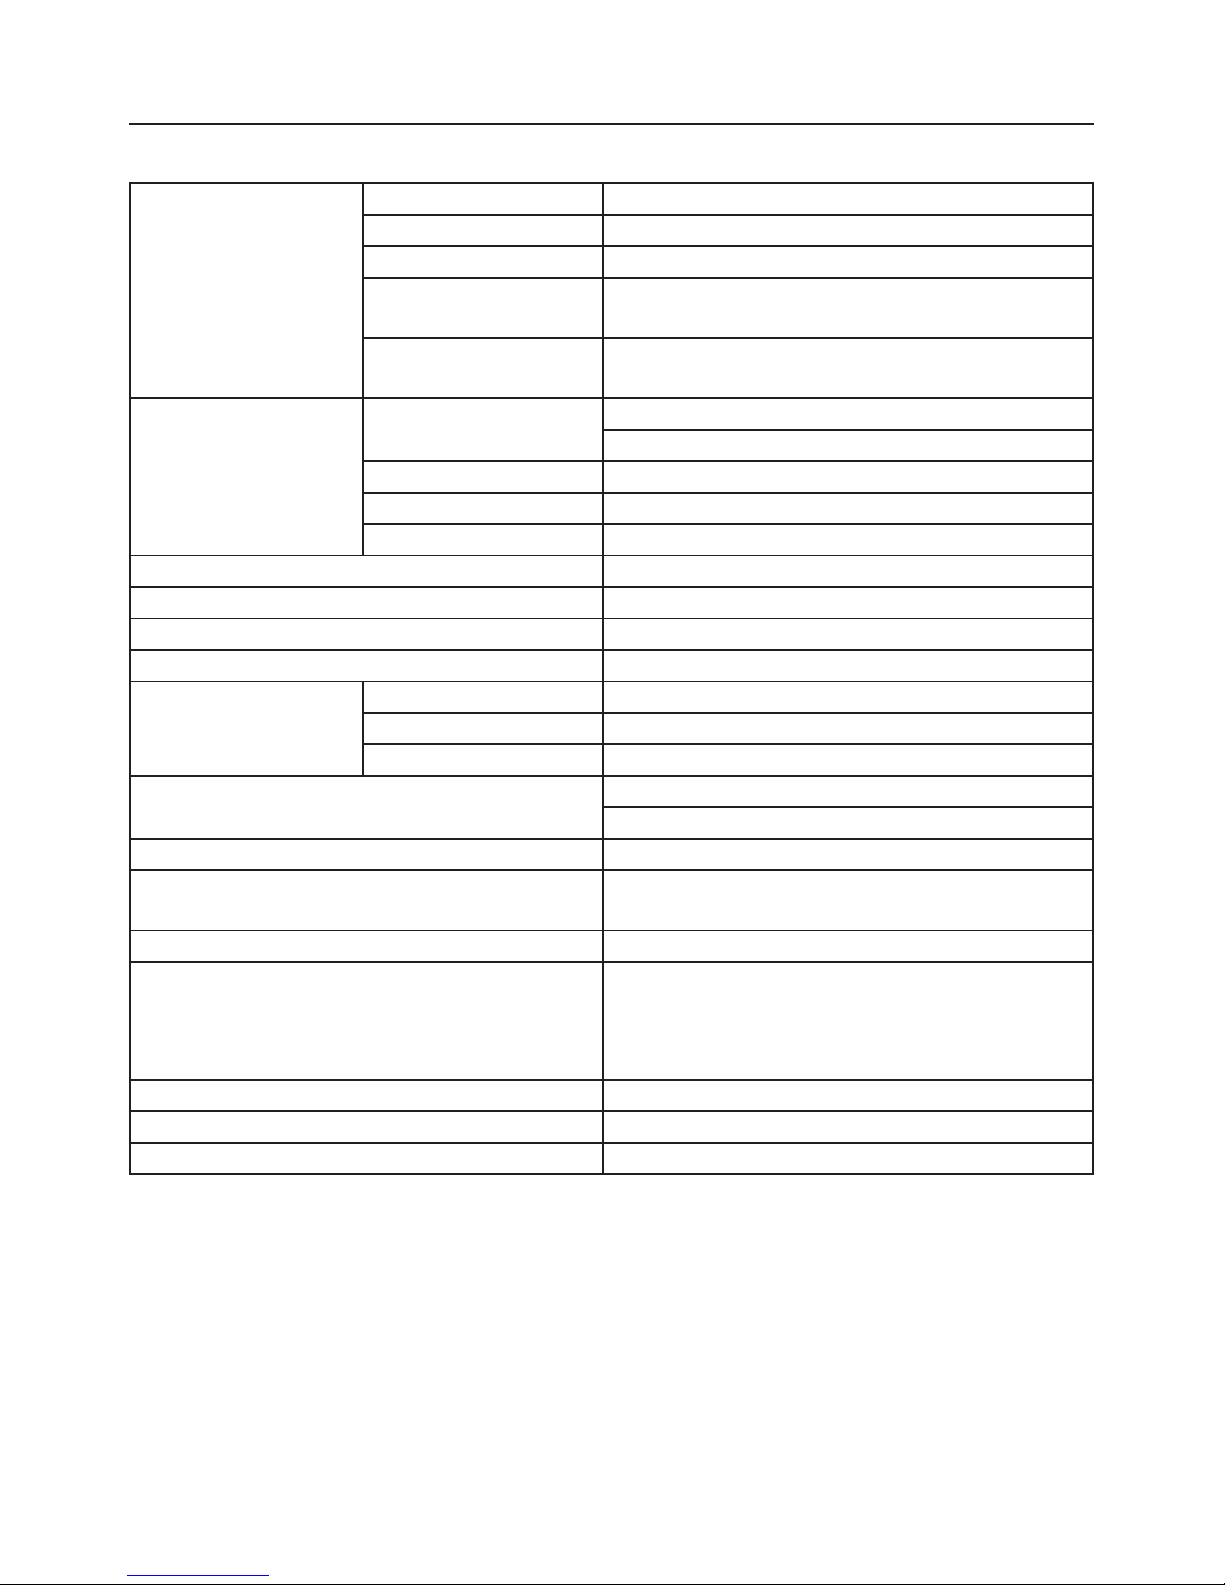
LCD Panel
Driving system 21�5” TFT Color LCD
Size 546�1 mm diagonal
Pixel Pitch 0�2482 mm(H)×0�2482 mm(V)
Response Time
(trise + tfall)
5ms (typ�)
Luminance of White
at Center
250 cd/m2 (typ�)
Input
Video
R, G, B Analog Interface
Digital
Separate Sync� H/V TTL
H-Frequency 30 kHz – 83 kHz
V-Frequency 56 Hz - 76 Hz
Display Colors 16�7 M Colors
Dot Clock 170 MHz
Max� Resolution 1920 x 1080 @ 60Hz
Plug & Play VESA DDC2B™
Power Consumption
ON Mode
≤
25 W
Standby Mode
≤
0�5 W
OFF Mode
≤
0�5 W
Input Connector
D-Sub 15 pin
DVI 24 pin
Input Video Signal Analog: 0�7Vp-p(standard), 75 OHM, Positive
Maximum Screen Size
Horizontal: 476�64 mm
Vertical: 268�11 mm
Power Source 100~240 VAC, 50/60 Hz
Environmental Considerations
Operating Temp: 0° to 40°C
Operating Height: 0~3658 m
Storage Temp�: -20° to 60°C
Operating Humidity: 20% to 80%
Dimensions 516�4(W) x 510�2(H) x 244�5(D) mm
Weight (N� W�): 4�80 kg
Weight (with packaging): 6�20 kg
Page 18
18
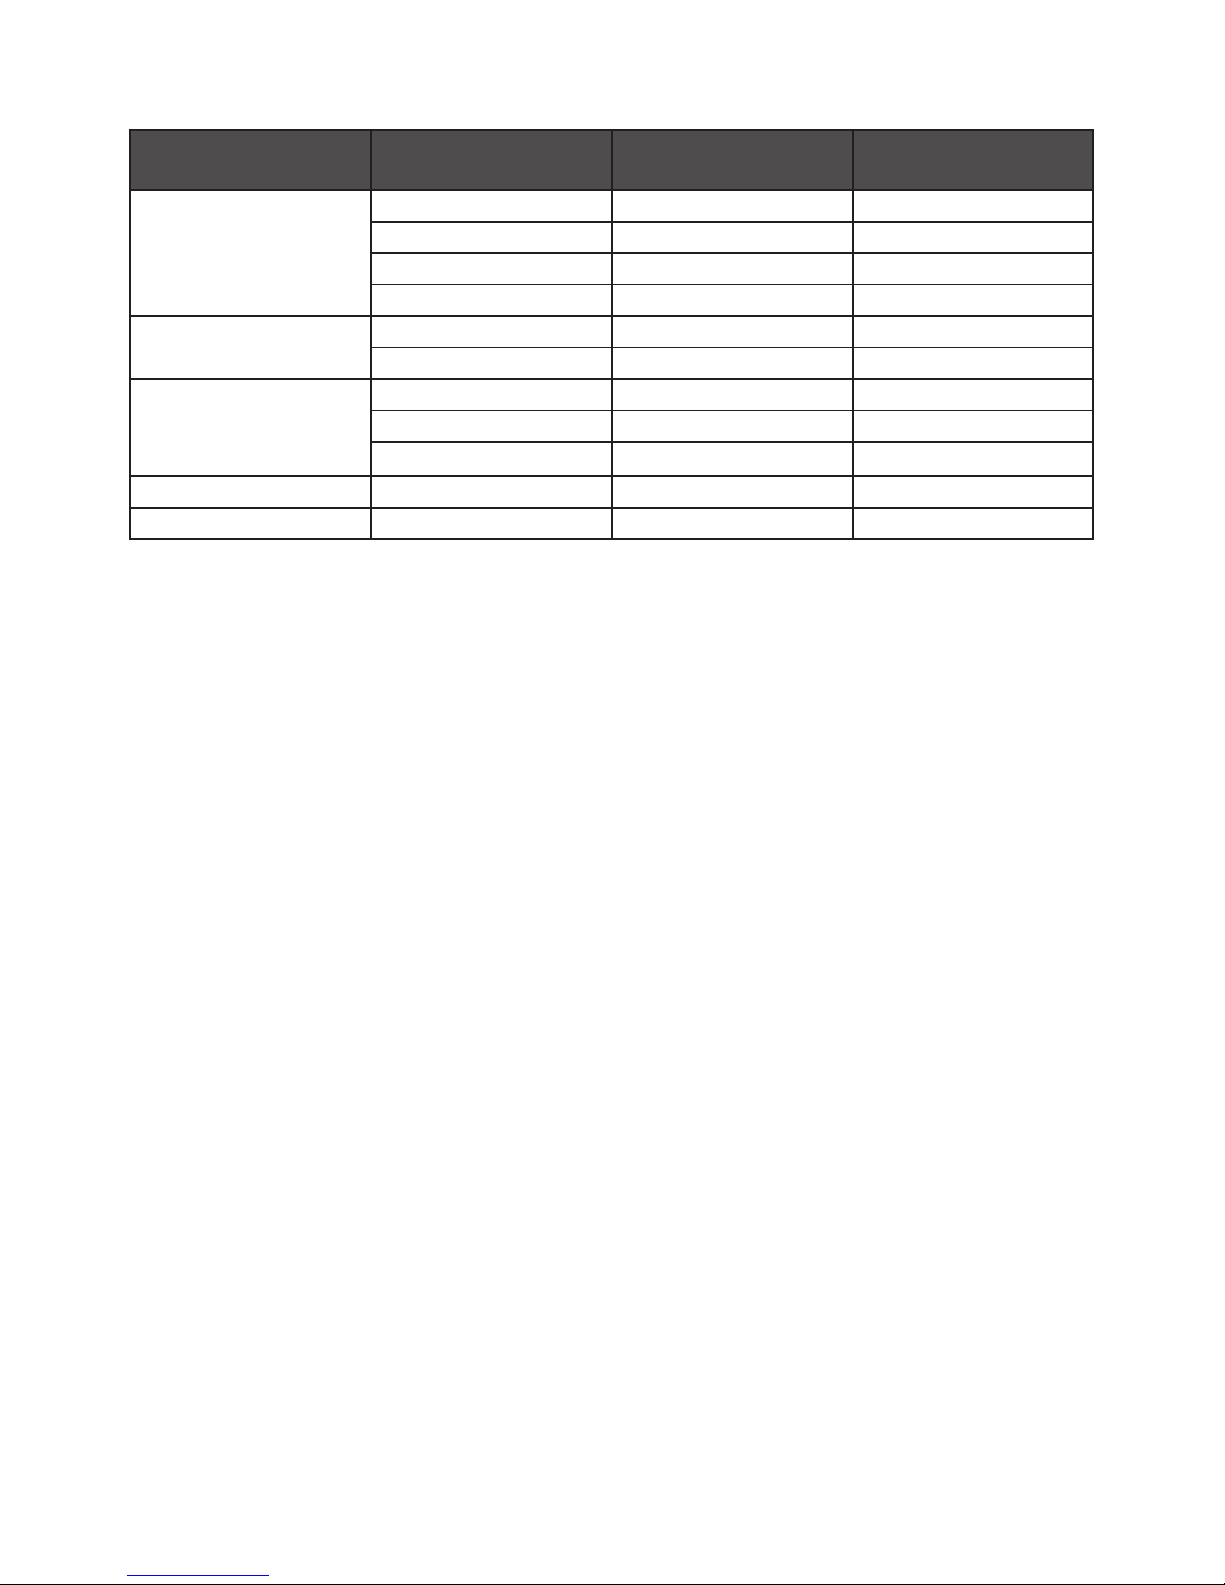
FACTORY PRESET TIMING TABLE
STANDARD RESOLUTION
HORIZONTAL
FREQUENCY (KHz)
VERTICAL
FREQUENCY (Hz)
VGA
640 × 480@60Hz 31�469 59�940
640 × 480@75Hz
37�500 75�000
800 × 600@60Hz
37�879 60�317
800 × 600@75Hz 46�875 75�000
XGA
1024 × 768@60Hz 48�363 60�004
1024 × 768@75Hz 60�023 75�029
SXGA
1280 ×1024@60Hz 63�981 60�000
1280 ×1024@75Hz
79�976
75�025
1152 ×864@75Hz 67�500 75�000
FULL HD 1920 x 1080@60Hz 67�500 60�000
DOS 720 x 400@70Hz 31�469 70�087
Page 19
19
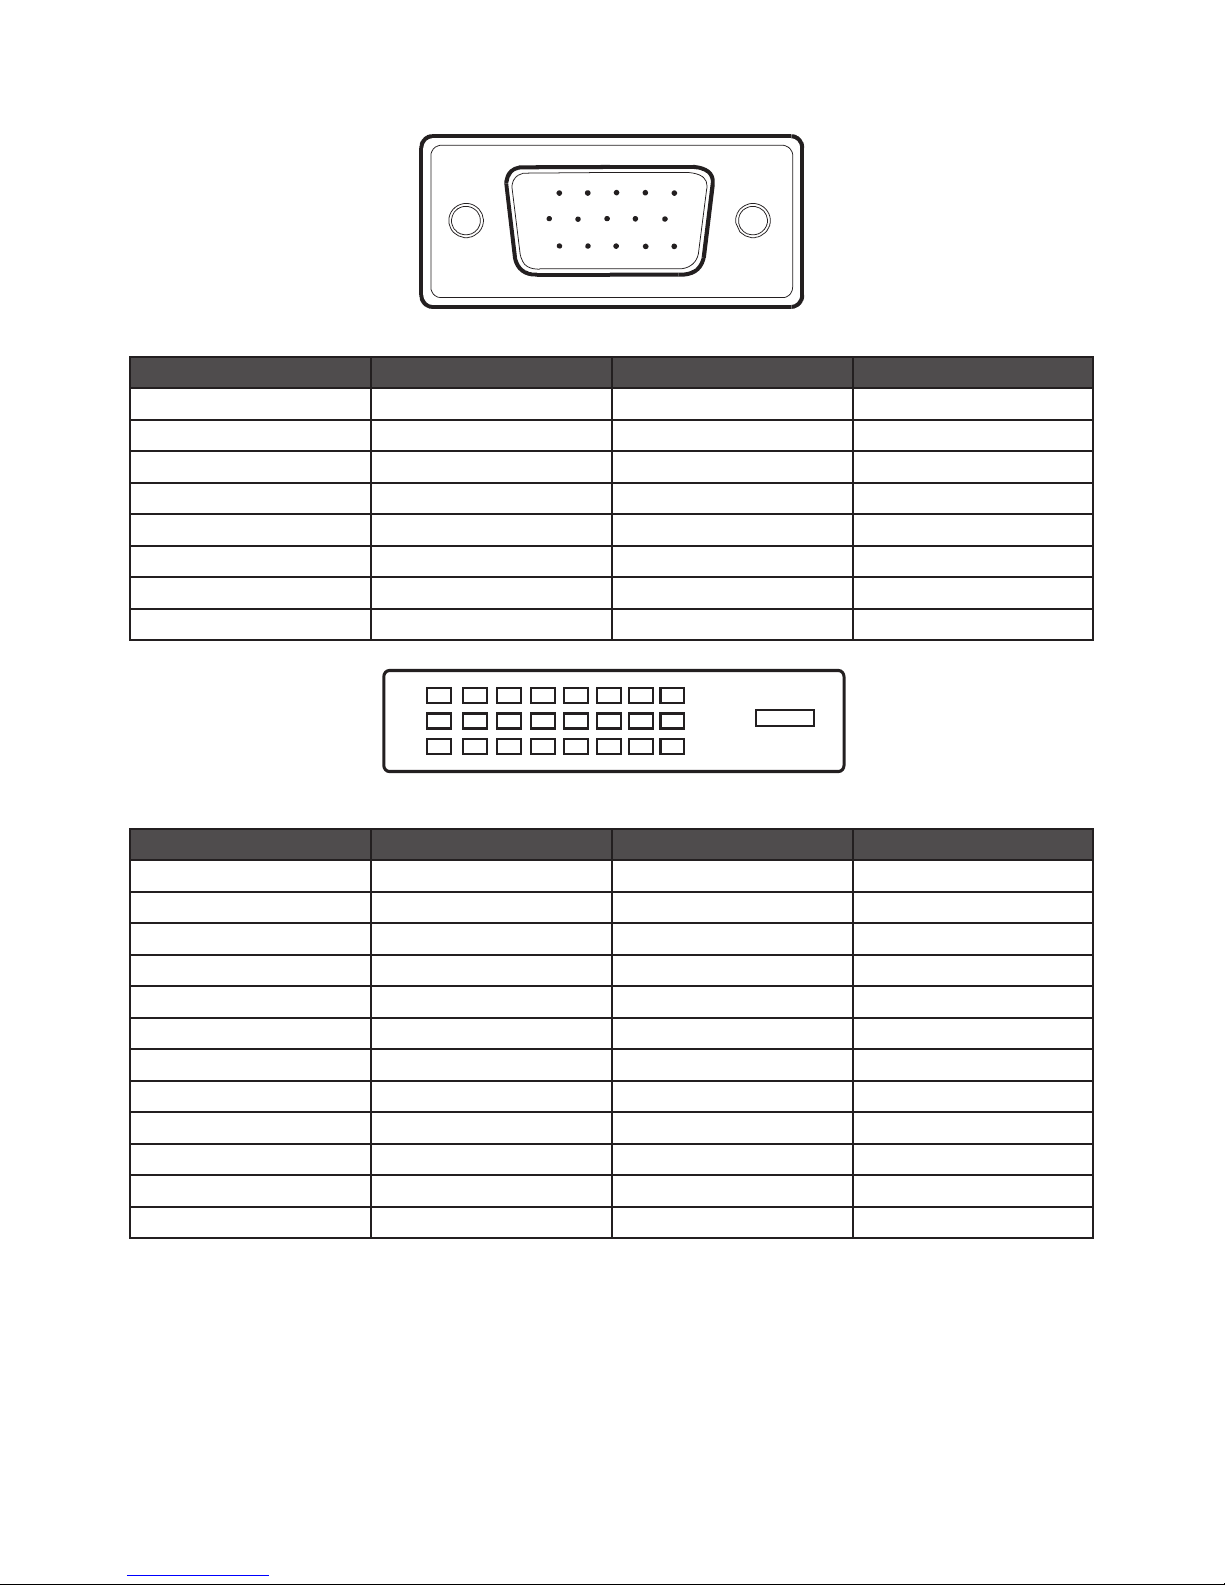
CONNECTOR PIN ASSIGNMENT
1 5
6
10
11 15
15 - Pin Color Display Signal Cable
PIN NO. DESCRIPTION PIN NO. DESCRIPTION
1. Red 9. +5V
2. Green 10. Ground
3. Blue 11. Ground
4. Ground 12. DDC-Serial Data
5. Detect Cable 13. H-Sync
6. R-Ground 14. V-Sync
7. G-Ground 15. DDC-Serial Clock
8. B-Ground
1
9
17
8
16
24
24 - Pin Color Display Signal Cable
PIN NO. DESCRIPTION PIN NO. DESCRIPTION
1. TMDS Data 2- 13. TMDS Data 3+
2. TMDS Data 2+ 14. +5V Power
3. TMDS Data 2/4 Shield 15. Ground(for+5V)
4. TMDS Data 4- 16. Hot Plug Detect
5. TMDS Data 4+ 17. TMDS Data 0-
6. DDC Clock 18. TMDS Data 0+
7. DDC Data 19. TMDS Data 0/5 Shield
8. N�C� 20. TMDS Data 5-
9. TMDS Data 1- 21. TMDS Data 5+
10. TMDS Data 1+ 22. TMDS Clock Shield
11. TMDS Data 1/3 Shield 23. TMDS Clock +
12. TMDS Data 3- 24. TMDS Clock -
 Loading...