

Page 1

Dell C2422HE
Dell C2722DE
Dell C3422WE Curved
Video Conferencing Monitor
User’s Guide
Model: C2422HE/C2722DE/C3422WE
Regulatory model: C2422HEt/C2722DEt/C3422WEt
Page 2
NOTE: A NOTE indicates important information that helps you make
better use of your computer.
CAUTION: A CAUTION indicates potential damage to hardware or loss of
data if instructions are not followed.
WARNING: A WARNING indicates a potential for property damage,
personal injury, or death.
Copyright © 2020 Dell Inc. or its subsidiaries. All rights reserved. Dell, EMC, and other trademarks
are trademarks of Dell Inc. or its subsidiaries. Other trademarks may be trademarks of their respective
owners.
Reproduction of these materials in any manner whatsoever without the written permission of Dell Inc. is
strictly forbidden.
Trademarks used in this text: Dell and the DELL logo are trademarks of Dell Inc.; Microsoft and Windows
are either trademarks or registered trademarks of Microsoft Corporation in the United States and/or other
countries. ENERGY STAR is a registered trademark of the U.S. Environmental Protection Agency. As an
ENERGY STAR partner, Dell Inc. has determined that this product meets the ENERGY STAR guidelines for
energy efficiency.
Other trademarks and trade names may be used in this document to refer to either the entities claiming the
marks and names or their products. Dell Inc. disclaims any proprietary interest in trademarks and trade names
other than its own.
2020 – 12
Rev. A00
Page 3

Contents
Safety instructions..............................6
About your monitor .............................7
Package contents . . . . . . . . . . . . . . . . . . . . . . . . . 7
Product features. . . . . . . . . . . . . . . . . . . . . . . . . .8
Identifying parts and controls. . . . . . . . . . . . . . . . . . 10
Front view. . . . . . . . . . . . . . . . . . . . . . . . . . . . . . . . . . .10
Back view . . . . . . . . . . . . . . . . . . . . . . . . . . . . . . . . . . .12
Bottom view . . . . . . . . . . . . . . . . . . . . . . . . . . . . . . . . . 13
Monitor specifications. . . . . . . . . . . . . . . . . . . . . . 14
Resolution specifications . . . . . . . . . . . . . . . . . . . . . . . . . . 17
Preset display modes. . . . . . . . . . . . . . . . . . . . . . . . . . . . .18
DP Multi-Stream Transport (MST) Modes . . . . . . . . . . . . . . . . . 21
USB-C Multi-Stream Transport (MST) Modes . . . . . . . . . . . . . . . 21
Unified Communications (UC) Platform Compatibility List . . . . . . . .22
Electrical specifications . . . . . . . . . . . . . . . . . . . . . . . . . . .23
Webcam – microphone specifications . . . . . . . . . . . . . . . . . . . .24
Speaker Specifications. . . . . . . . . . . . . . . . . . . . . . . . . . . .24
Physical characteristics . . . . . . . . . . . . . . . . . . . . . . . . . . .24
Environmental characteristics . . . . . . . . . . . . . . . . . . . . . . . .26
Pin assignments . . . . . . . . . . . . . . . . . . . . . . . . . . . . . . .27
Plug-and-Play . . . . . . . . . . . . . . . . . . . . . . . . . . 34
LCD monitor quality and pixel policy . . . . . . . . . . . . . . 34
Ergonomics . . . . . . . . . . . . . . . . . . . . . . . . . . . 35
Handling and moving your display. . . . . . . . . . . . . . . . 37
Maintenance guidelines . . . . . . . . . . . . . . . . . . . . . 38
Cleaning your monitor . . . . . . . . . . . . . . . . . . . . . . . . . . . .38
Setting up the monitor..........................39
Connecting the stand . . . . . . . . . . . . . . . . . . . . . . 39
Using the tilt, swivel, and vertical extension . . . . . . . . . . 42
Contents | 3
Page 4

Tilt, swivel and vertical extension . . . . . . . . . . . . . . . . . . . . . .42
Rotating the Display (C2422HE/C2722DE only) . . . . . . . . 43
Configuring the display settings on your computer after
rotation (C2422HE/C2722DE only) . . . . . . . . . . . . . . . 44
Operating the monitor webcam . . . . . . . . . . . . . . . . . 45
Connecting your monitor . . . . . . . . . . . . . . . . . . . . 46
Dell Power Button Sync (DPBS) . . . . . . . . . . . . . . . . 50
Connecting the monitor for DPBS for the first time . . . . . . . . . . . .52
Using DPBS function . . . . . . . . . . . . . . . . . . . . . . . . . . . . .53
Connecting the monitor for USB-C Multi-Stream Transport (MST)
function (C2422HE/C2722DE only) . . . . . . . . . . . . . . . . . . . . .55
Connecting the monitor for USB-C . . . . . . . . . . . . . . . . . . . . .56
Organizing your cables . . . . . . . . . . . . . . . . . . . . . 58
Securing your monitor using Kensington lock (optional) . . . 58
Removing the monitor stand . . . . . . . . . . . . . . . . . . 59
Wall mounting (Optional) . . . . . . . . . . . . . . . . . . . . 60
Operating the monitor ..........................61
Power on the monitor . . . . . . . . . . . . . . . . . . . . . . 61
Using the joystick control . . . . . . . . . . . . . . . . . . . . 61
Using the rear-panel controls . . . . . . . . . . . . . . . . . . 62
Using the OSD lock function . . . . . . . . . . . . . . . . . . 63
Front-panel button . . . . . . . . . . . . . . . . . . . . . . . . . . . . . .66
Using the On-Screen Display (OSD) Menu . . . . . . . . . . . 67
Accessing the menu system . . . . . . . . . . . . . . . . . . . . . . . . .67
OSD warning messages . . . . . . . . . . . . . . . . . . . . . . . . . . . 82
Setting the maximum resolution. . . . . . . . . . . . . . . . . . . . . . .87
Setting the KVM USB Switch . . . . . . . . . . . . . . . . . . . . . . . .88
Setting the Auto KVM . . . . . . . . . . . . . . . . . . . . . . . . . . . . 91
Setting up Windows Hello . . . . . . . . . . . . . . . . . . . . 93
Setting up the monitor webcam as default setting. . . . . . . 97
Setting up the monitor speaker as default setting . . . . . . .101
4 | Contents
Page 5

Troubleshooting ..............................104
Self-test . . . . . . . . . . . . . . . . . . . . . . . . . . . . .104
Built-in diagnostics . . . . . . . . . . . . . . . . . . . . . . .105
Common Problems. . . . . . . . . . . . . . . . . . . . . . . .106
Product specific problems . . . . . . . . . . . . . . . . . . . 108
Universal Serial Bus (USB) specific problems . . . . . . . . . 113
Appendix.................................... 114
FCC notices (U.S. only) and other regulatory information . . .114
Contacting Dell . . . . . . . . . . . . . . . . . . . . . . . . . 114
EU product database for energy label and product information
sheet . . . . . . . . . . . . . . . . . . . . . . . . . . . . . . . 114
Contents | 5
Page 6
Safety instructions
WARNING: Use of controls, adjustments, or procedures other than those
specified in this documentation may result in exposure to shock, electrical
hazards, and/or mechanical hazards.
• Place the monitor on a solid surface and handle it carefully. The screen is fragile
and can be damaged if dropped or hit sharply.
• Always be sure that your monitor is electrically rated to operate with the AC
power available in your location.
• Keep the monitor in room temperature. Excessive cold or hot conditions can have
an adverse effect on the liquid crystal of the display.
• Do not subject the monitor to severe vibration or high impact conditions. For
example, do not place the monitor inside a car trunk.
• Unplug the monitor when it is going to be left unused for an extended period of
time.
• To avoid electric shock, do not attempt to remove any cover or touch the inside
of the monitor.
For information on safety instructions, see the Safety, Environmental, and Regulatory
Information (SERI).
6 | Safety instructions
Page 7
About your monitor
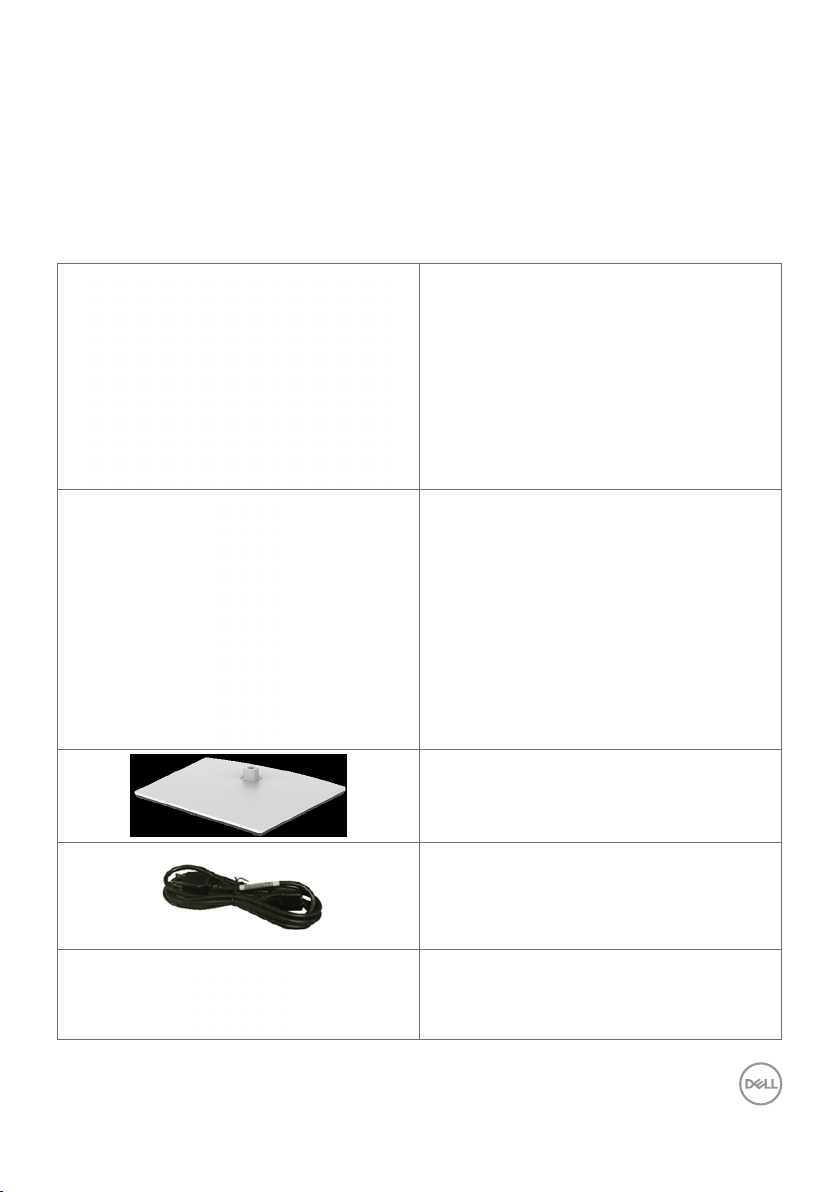
Package contents
Your monitor ships with the components shown in the table below. If any component is
missing, contact Dell. For more information, see Contact Dell.
NOTE: Some components may be optional and may not ship with your
monitor. Somefeatures may not be available in certain countries.
Display
Stand riser
Stand base
Power cable (varies by country)
DisplayPort cable (DisplayPort to
DisplayPort)
About your monitor | 7
Page 8
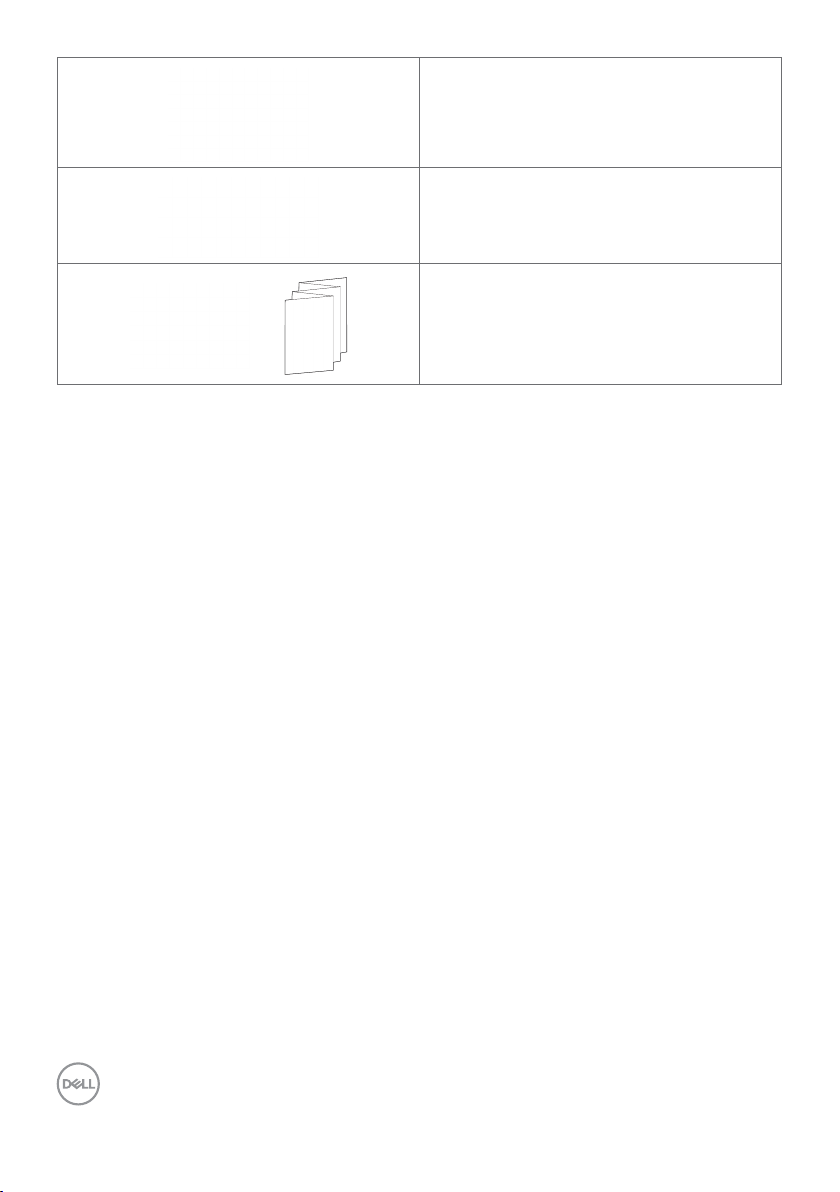
USB 3.2 Gen1 Type-A to Type-B upstream
cable
USB Type-C cable (C to C)
• Quick Setup Guide
• Safety, Environmental, and Regulatory
Information
Product features
The Dell C2422HE/C2722DE/C3422WE monitor has an active matrix, Thin-Film
Transistor (TFT), Liquid Crystal Display (LCD), and LED backlight. The monitor features
include:
• C2422HE: 60.47 cm (23.8 in.) active area display (Measured diagonally) 1920 x
1080 (16:9) resolution, plus full-screen support for lower resolutions.
• C2722DE: 68.47 cm (27.0 in.) active area display (Measured diagonally) 2560 x
1440 (16:9) resolution, plus full-screen support for lower resolutions.
• C3422WE: 86.71 cm (34.14 in.) active area display (Measured diagonally) 3440 x
1440 (21:9) resolution, plus full-screen support for lower resolutions.
• Wide viewing angles with 99% sRGB color.
• C2422HE/C2722DE:Tilt, swivel, pivot and vertical extension adjustment
capabilities.
• C3422WE:Tilt, swivel and vertical extension adjustment capabilities.
• Built-in speakers (2 x 5 W).
• Removable pedestal stand and Video Electronics Standards Association (VESA™)
100 mm mounting holes for flexible mounting solutions.
• Ultra-thin bezel minimizes the bezel gap during multi-monitor usage, enabling
easier set up with an elegant viewing experience.
• Extensive digital connectivity with DP helps future-proof your monitor.
• Single USB Type-C to supply power to compatible notebook while receiving video
signal.
• USB-C and RJ45 ports enable a single-cable, network-connected experience.
• Plug and play capability if supported by your computer.
• On-Screen Display (OSD) adjustments for ease of set-up and screen
optimization.
8 | About your monitor
Page 9
• Power and OSD buttons lock.
• Security lock slot.
• C2422HE/C2722DE: ≤ 0.3 W in Standby Mode.
• C3422WE: ≤ 0.5 W in Standby Mode.
• Supports Picture by Picture (PBP) Select mode on C3422WE.
• Allow user to switch USB KVM function in PBP mode on C3422WE.
• The monitor is designed with Dell Power Button Sync (DPBS) feature to control
PC system power state from monitor power button.*
• Premium Panel Exchange for peace of mind.
• Optimize eye comfort with a flicker-free screen minimizes hazard blue light
emission.
• The monitor use Low Blue Light panel and compliance with TUV Rheinland
(Hardware Solution) at factory reset/default setting model.
• Decreases the level of hazard blue light emitted from the screen to make viewing
more comfortable for your eyes.
• The monitor adopts Flicker-Free technology, which clears the eye visible flicker
, brings comfort viewing experience and preventing users suffer from eye strain
and fatigue.
®
• Certified for Microsoft Teams
• Certified for Windows Hello
.
®
(Face Authentication) and supports Microsoft
Cortana®.
* PC system that supports DPBS is the Dell OptiPlex 7090/3090 Ultra platform.
WARNING: The possible long-term effects of blue light emission from the
monitor may cause damage to the eyes, including eye fatigue or digital eye
strain.
About your monitor | 9
Page 10
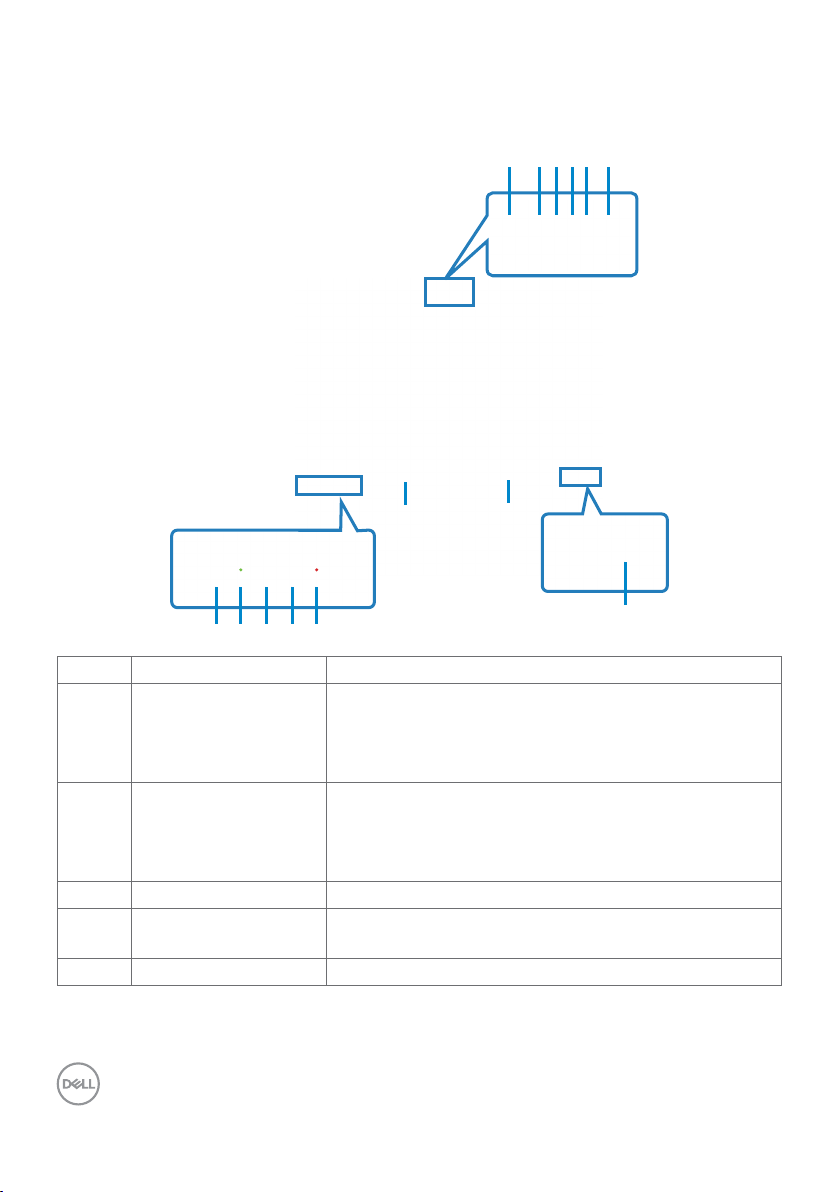
Identifying parts and controls
13
8 9 10 11 12
7
7
1 2 3 4 5 6
Front view
Label Description Use
1,6 Microphones Monitor microphones (Mic).
3 Webcam lens Transmits your image in a video conference.
2,4 IR LED Indicator of infrared (IR).
5 Webcam LED
indicator
7 Built-in speakers To output the sound from audio input.
10 | About your monitor
Mic is enabled when the webcam & Mic module is
popped up.
Mic is disabled when the module is retracted.
Webcam is enabled when the webcam & mic module
is popped up.
Webcam is disabled when the module is retracted.
Indicator of Webcam. It will light up in white when
webcam is in use.
Page 11
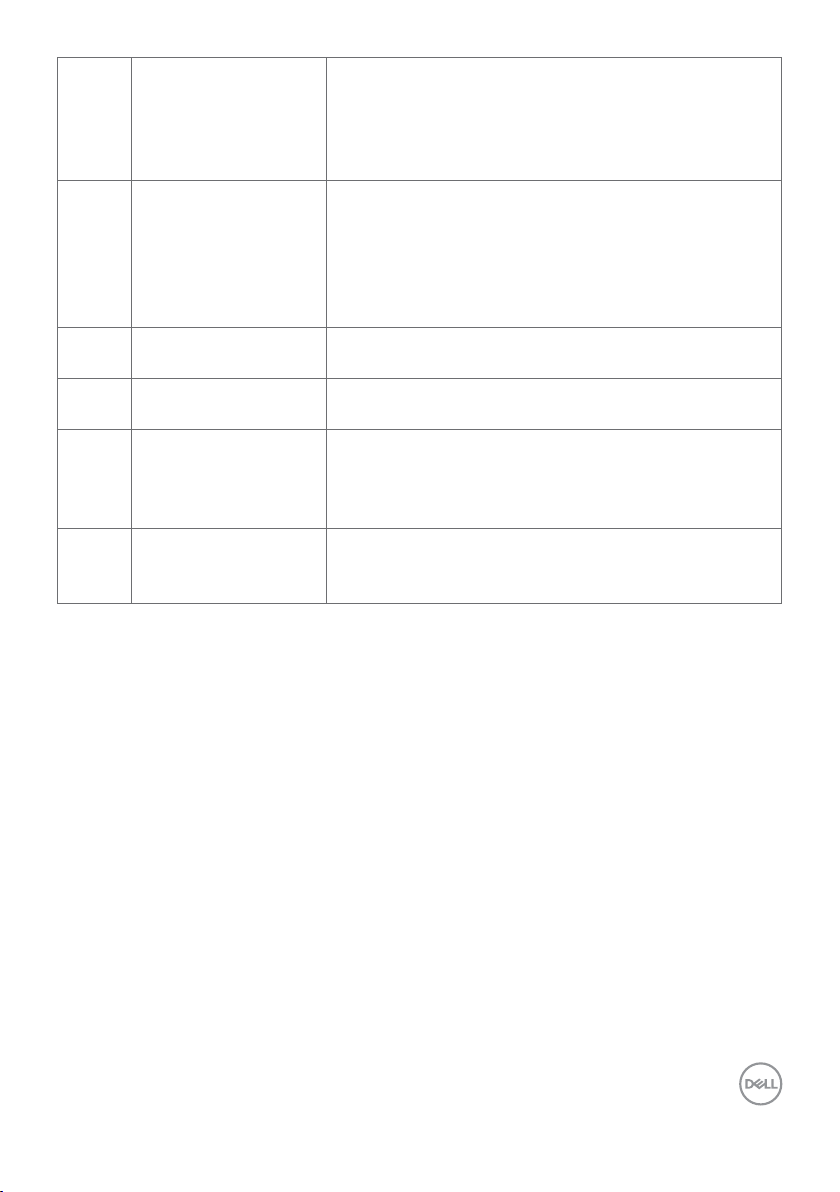
8 Teams button & LED LED will light in static white when Microsoft Teams®
is signed in and running.
LED will blink when there is a Teams notification.
Short press on the button to bring up Teams and
open notification.
9 Hookswitch & LED LED will blink in green when there is an incoming
Teams/Skype for Business (SfB) call.
LED will light up in static green during Teams/Skype
for Business (SfB) call.
Short press to answer / end call.
Long press to reject incoming call.
10 Volume down & LED Short press for 2 unit volume decrement.
Long press for continuous volume decrement.
11 Volume up & LED Short press for 2 unit volume increment.
Long press for continuous volume increment.
12 Microphone mute &
LED
13 Power LED indicator Solid white light indicates the monitor is turned
Press to mute and unmute microphone.
LED will light up in static red when mic is muted or
when the webcam & mic module is retracted.
LED will go dark when mic is enabled/unmuted.
on and functioning normally. Breathing white light
indicates the monitor is in Standby Mode.
About your monitor | 11
Page 12
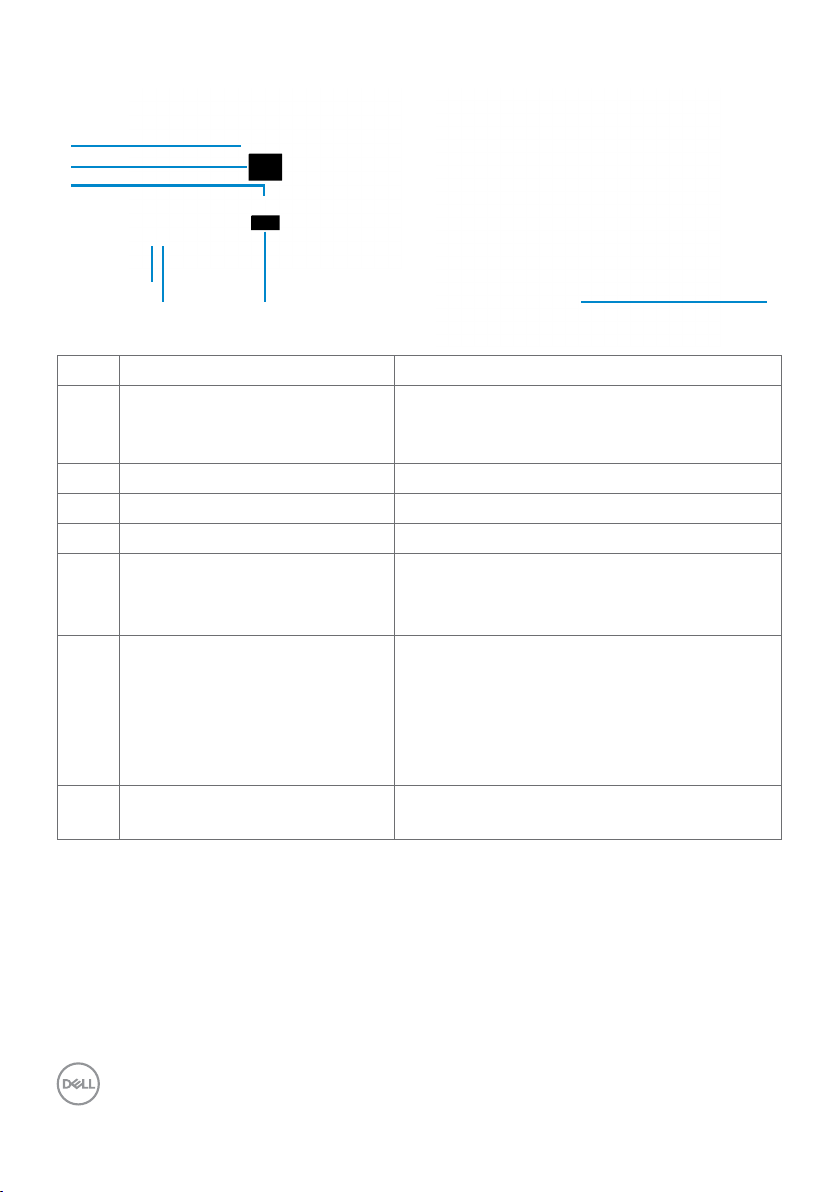
Back view
7
1
2
3
4
5
Label Description Use
1 VESA mounting holes (100 mm
x 100 mm-behind attached
VESA cover)
2 Regulatory label Lists the regulatory approvals.
3 Stand release button Releases stand from the monitor.
4 Power On/Off button To turn the monitor on or off.
5 Joystick Use it to control the OSD menu.
6 Mac address, Barcode, serial
number, and Service Tag label
7 Cable-management slot Use to organize cables by inserting them
6
Wall mount monitor using VESAcompatible wall mount kit (100 mm x 100
mm).
For more information, see Operating the
Monitor.
Refer to this label if you need to contact Dell
for technical support. The Service Tag is a
unique alphanumeric identifier that enables
Dell service technicians to identify the
hardware components in your computer and
access warranty information.
through the slot.
12 | About your monitor
Page 13
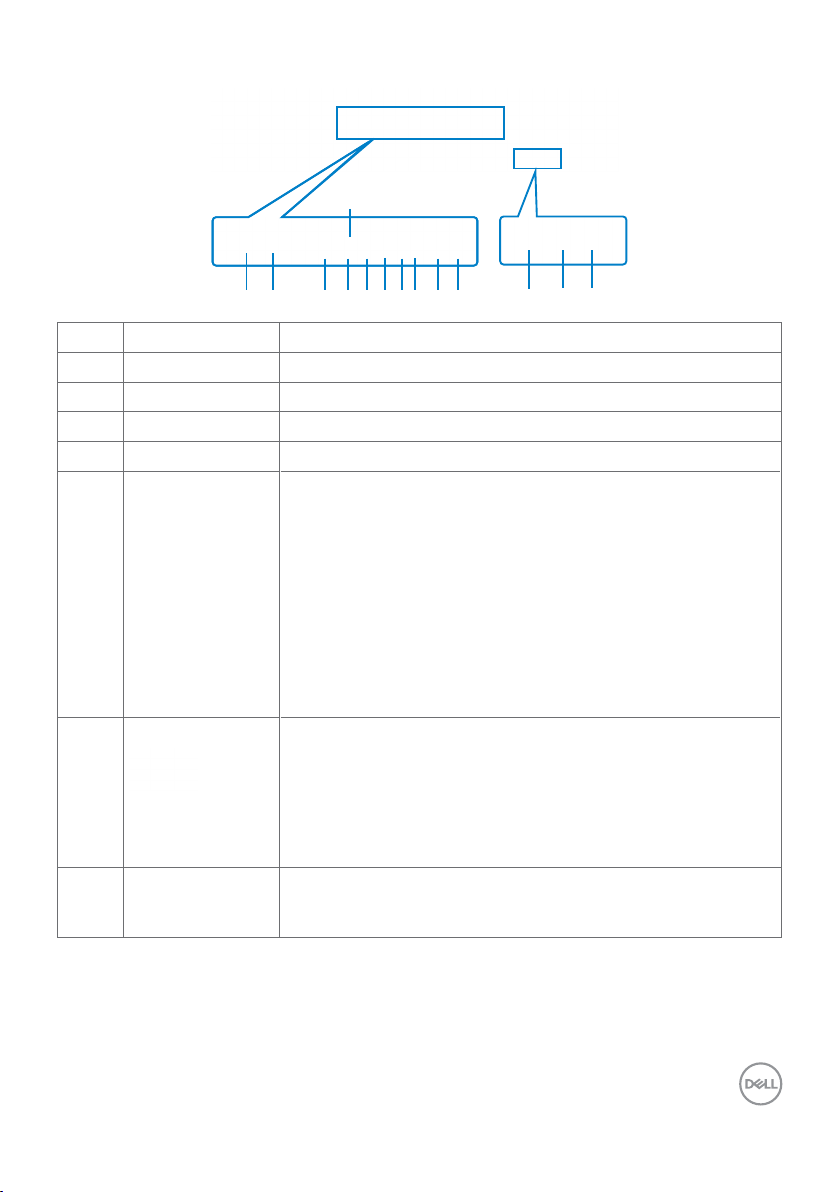
Bottom view
99
14
1 4 5 6 7 8
32
9
10
11 12
13
Label Description Use
1 Security lock slot Secures monitor with security cable lock (sold separately).
2 Power connector Connect the power cable.
3 HDMI port Connect your computer with the HDMI cable.
4 DisplayPort in Connect your computer with the DisplayPort cable.
5 USB Type-C
upstream/
DisplayPort
Connect to your computer using the USB Type-C cable.
The USB Type-C port offer the fastest transfer rate (USB
3.2 Gen 1) and the alternate mode with DP 1.2 (C2422HE/
C3422WE) / DP 1.4 (C2722DE) support the following, and
PD 20 V/4.5 A, 15 V/3 A, 9 V/3 A, 5 V/3 A.
• C2422HE maximum resolution of 1920 x 1080 at 60 Hz
• C2722DE maximum resolution of 2560 x 1440 at 60 Hz
• C3422WE maximum resolution of 3440 x 1440 at 60 Hz
NOTE: USB Type-C is not supported on Windows versions
that are prior to Windows 10.
6 DP port (out)
DP output for MST (multi-stream transport) capable
monitor. To enable MST, refer to instruction on section
“Connecting the Monitor for DP MST Function”.
NOTE: Remove the rubber plug when using DP out
connector.
NOTE: The port is only for C2422HE/C2722DE.
7 USB-B upstream
port
Connect the USB cable that comes with your monitor to
the computer. Once this cable is connected, you can use
the USB downstream connectors on the monitor.
About your monitor | 13
Page 14
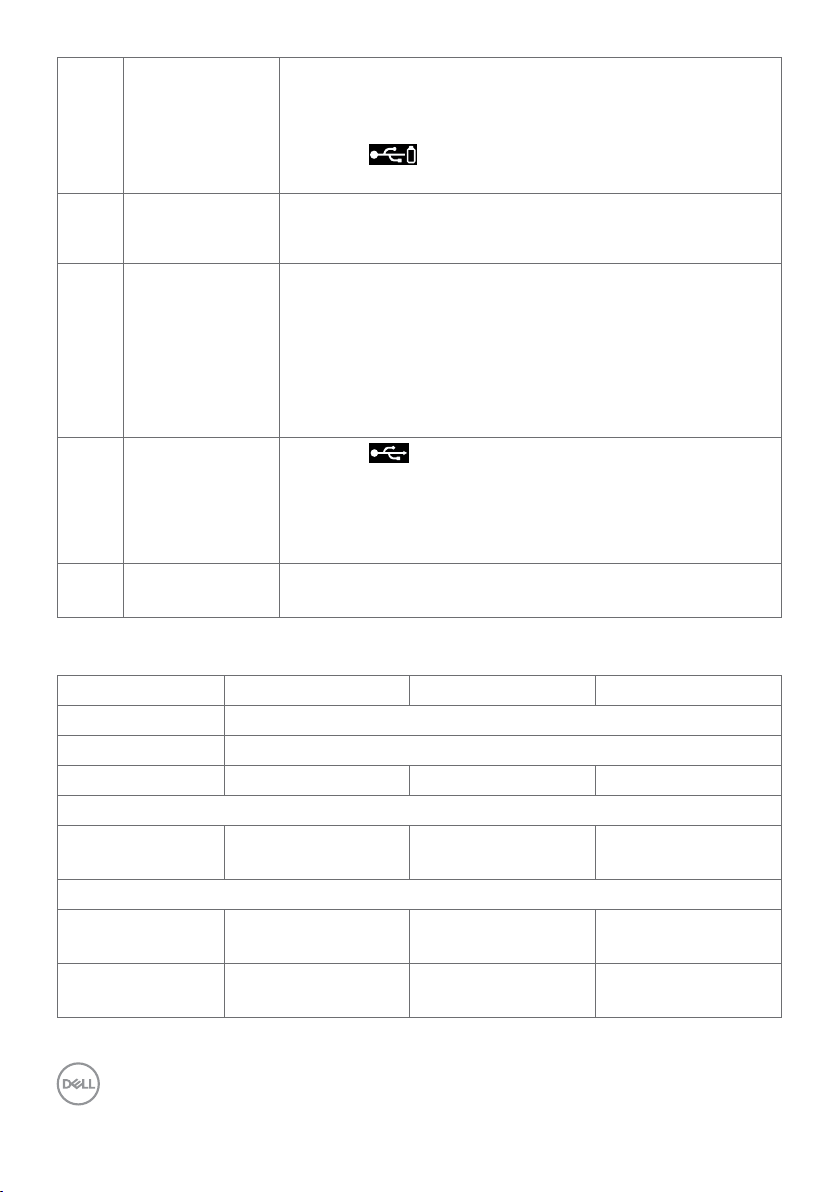
8,9,11 super speed USB
5 Gbps (USB 3.2
Gen1) (3)
10 RJ-45 connector Connect Internet. You can surf Internet via RJ45 only after
12 Headphone jack Connect headphones or headset to playback audio through
13 USB Type-C
downstream port
14 Stand lock Lock the stand to the monitor using a M3 x 6 mm screw
Connect your USB device. You can use these ports only
after you have connected the USB cable (Type-A to
Type-B or Type-C to Type-C) from the computer to the
monitor.
Port with battery icon supports Battery Charging
Rev. 1.2.
you have connected the USB cable(Type-A to Type-B or
Type-C to Type-C) from the computer to the monitor.
HDMI or DisplayPort or USB Type-C audio channels.
NOTE: Excessive sound pressure from earphones
or headphones can cause hearing damage or loss.
Adjustment of the equalizer to maximum increases
the earphones and headphones output voltage and
therefore the sound pressure level.
Port with
Connect your USB device. You can use these ports only
after you have connected the USB cable (Type-A to
Type-B or Type-C to Type-C) from the computer to the
monitor.
(screw not included).
icon supports 5 V/3 A.
Monitor specifications
Model C2422HE C2722DE C3422WE
Screen type Active matrix - TFT LCD
Panel Type In-plane switching Technology
Aspect ratio 16:9 16:9 21:9
Viewable image dimensions
Diagonal 60.47 cm
(23.8 in.)
Active Area
Horizontal 52 7.0 4 mm
(20.7 5 in.)
Vertical 296.46 mm
(11.67 in.)
14 | About your monitor
68.47 cm (27 in.) 86.71 cm (34.14 in.)
596.74 mm
(23.49 in.)
335.66 mm
(13.22 in.)
799.8 mm
(31.49 in.)
334.80 mm
(13.18 in.)
Page 15
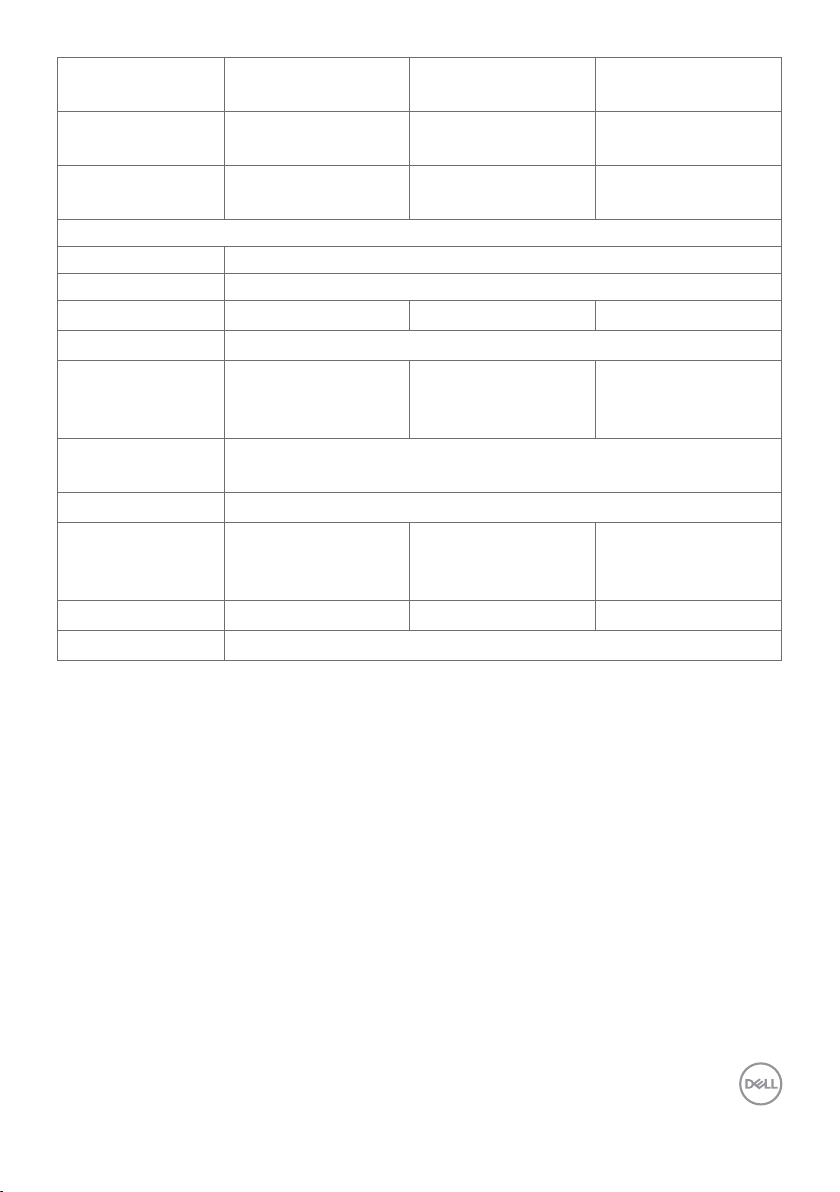
Area 156246.28 mm
(242.18 in.2)
Pixel pitch 0.2745(H) mm x
0.2745 (V) mm
Pixel per inch
92.56 108.79 109.68
2
200301.75 mm2
(310.47 in.2)
0.2331 (H) mm x
0.2331 (V) mm
267773.04 mm2
(415.05 in.2)
0.2325(H) mm x
0.2325(V) mm
(PPI)
Viewing angle
Horizontal 178° (typical)
Vertical 178° (typical)
Brightness 250 cd/m² (typical) 350 cd/m² (typical) 300 cd/m² (typical)
Contrast ratio 1000 to 1 (typical)
Curvature
NA NA 3800R (typical)
(Only for
C3422WE)
Display screen
Anti-glare treatment of the front polarizer (3H) hard coating
coating
Backlight LED
Response Time
(Gray to Gray)
Color depth 16.78 million colors 16.78 million colors 1.07 billion colors
Color gamut
2
6 ms (Fast mode)
8 ms (Normal
mode)
99% sRGB
6 ms (Fast mode)
8 ms (Normal
mode)
5 ms (Fast mode)
8 ms (Normal
mode)
1
About your monitor | 15
Page 16
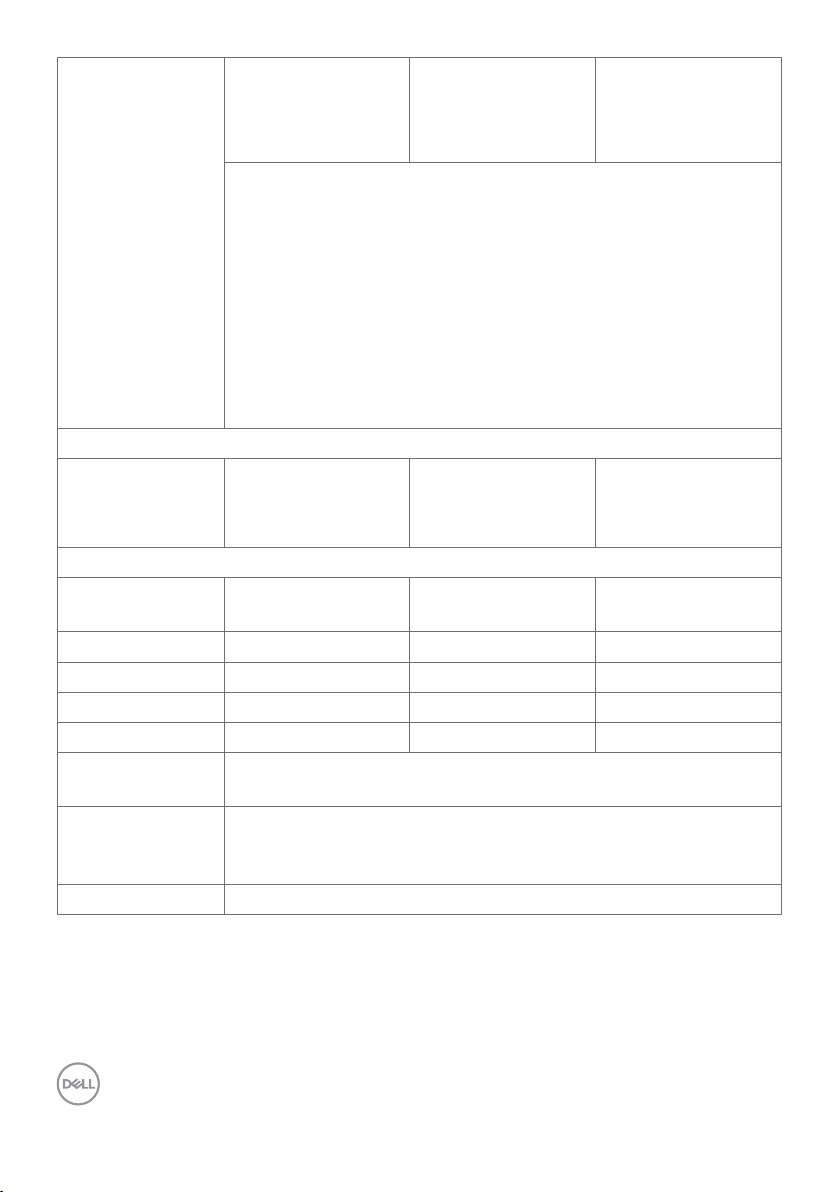
Connectivity • 1 x DP 1.2
(HDCP1.4)
• 1 x HDMI1 .4
(HDCP1.4)
• 1 x DP 1.4
(HDCP1.4)
• 1 x HDMI1 .4
(HDCP1.4)
• 1 x DP 1.2
(HDCP2.2)
• 1 x HDMI2.0
(HDCP2.2)
• 1 x USB Type-B (USB 3.2 Gen 1 upstream port)
• 1 x USB Type-C (Alternate mode with DisplayPort 1.4/1.2, USB
3.2 Gen 1 upstream port, Power Delivery PD up to 90 W)
• 1 x USB Type-C downstream (15 W), USB 3.2 Gen 1 (5 Gbps)
• 1 x DP (Out) with MST (only for C2422HE/C2722DE)
• 2 x super speed USB 5 Gbps (USB 3.2 Gen 1)
• 1 x super speed USB 5 Gbps (USB 3.2 Gen 1) with BC 1.2
charging capability at 2 A (max)
• 1 x 3.5 mm headphone jack
• 1 x RJ45
Border width (edge of monitor to active area)
To p
Left/Right
Bottom
5.80 mm
5.80 mm
50.89 mm
7.80 mm
7.80 mm
51.97 mm
8.03 mm
8.03 mm
56.60 mm
Adjustability
Height adjustable
140 mm 120 mm 120 mm
stand
Tilt -5° to 21° -5° to 21° -5° to 21°
Swivel -45° to 45° -45° to 45° -30° to 30°
Pivot -90° to 90° -90° to 90° NA
Slant adjust NA NA -4° to 4°
Cable
Yes
management
Dell Display
Manager (DDM)
Easy Arrange
and other key features
Compatibility
Security Security lock slot (cable lock sold separately)
1
Video output from DP/HDMI port at maximum resolution 3440x1440 at 60Hz is 1.07
billion colors. Video output from USB-C port at maximum resolution 3440x1440 at
60Hz is 16.78 million colors.
2
At panel native only, under Custom Mode preset.
16 | About your monitor
Page 17
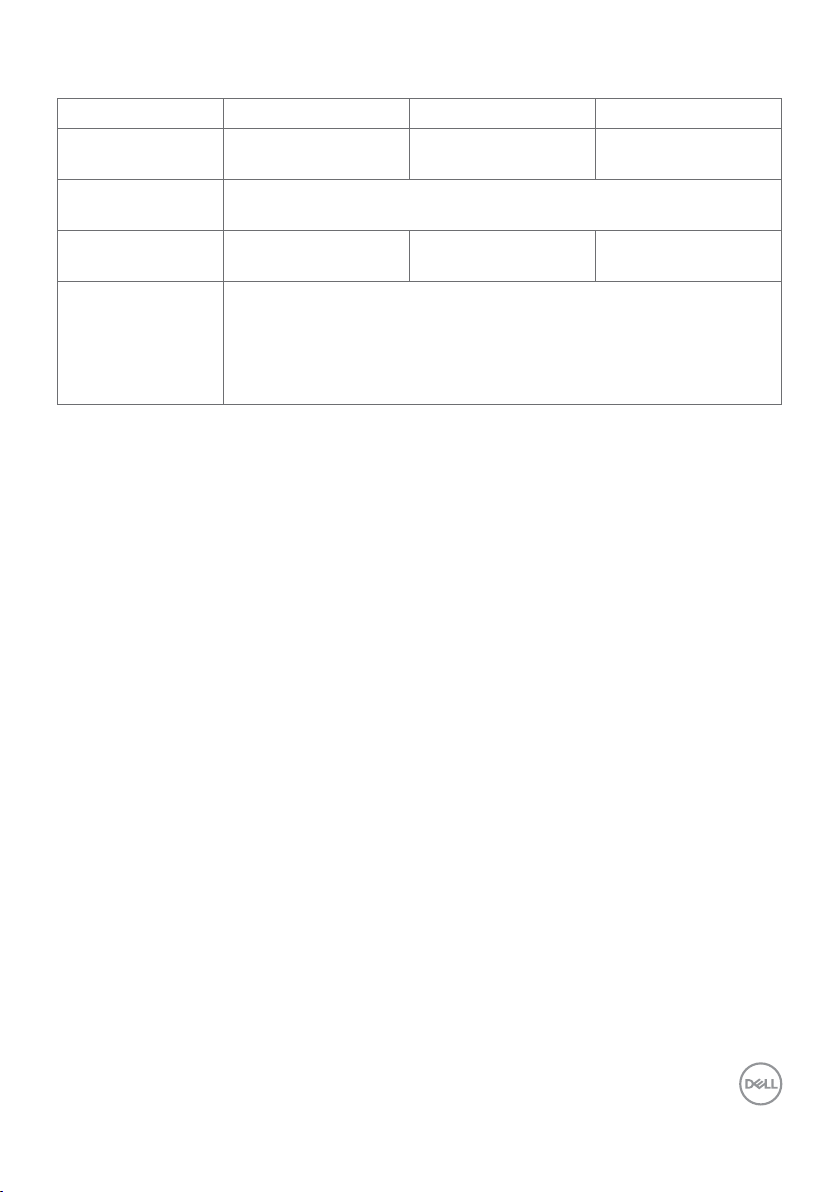
Resolution specifications
Model C2422HE C2722DE C3422WE
Horizontal scan
30 kHz to 83 kHz 30 kHz to 90 kHz 30 kHz to 90 kHz
range
Vertical scan
56 Hz to 76 Hz
range
Maximum preset
1920 x 1080 at 60 Hz 2560 x 1440 at 60 Hz 3440 x 1440 at 60 Hz
resolution
Video display
480i, 480p, 576i, 560p, 720p, 1080i, 1080p
capabilities (HDMI
& DP & USB
Type-C alternate
mode)
About your monitor | 17
Page 18
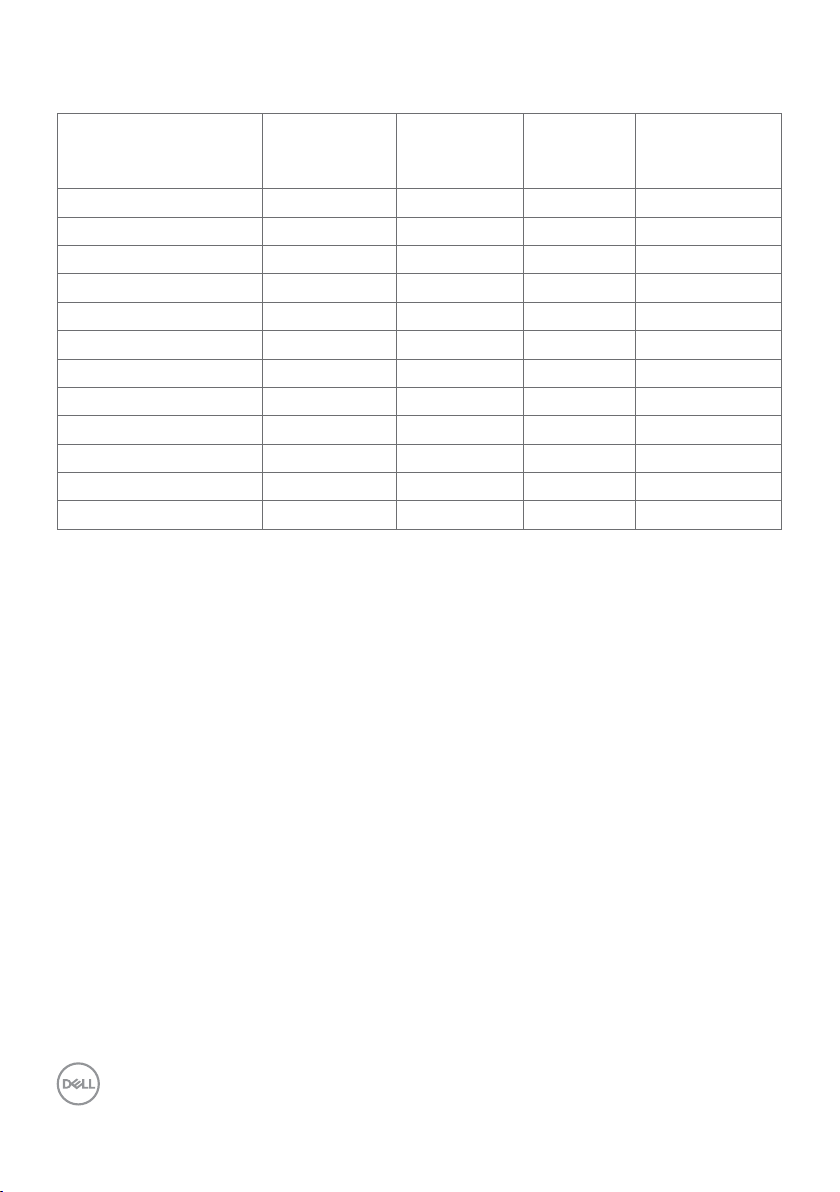
Preset display modes
(kHz)
(Hz)
(MHz)
Vertical)
VESA, 640 x 480
31.47
60
25.17
-/-
VESA, 1152 x 864
67.5 0
75
108
+/+
C2422HE
Display mode Horizontal
frequency
VESA, 720 x 400 31.47 70 28.32 -/+
VESA, 640 x 480 3 7.5 0 75 31.5 -/VESA, 800 x 600 37.8 8 60 40 +/+
VESA, 800 x 600 46.88 75 49.5 + /+
VESA, 1024 x 768 48.36 60 65 - /VESA, 1024 x 768 60.02 75 78.75 +/+
VESA, 1280 x 1024 64.0 60 108 +/+
VESA,1280 x 1024 80.0 75 135 +/+
VESA, 1600 x 900 55.99 60 118.25 +/+
VESA, 1920 x 1080 67.50 60 148.50 +/+
Vertical
frequency
Pixel
clock
Sync polarity
(Horizontal/
18 | About your monitor
Page 19
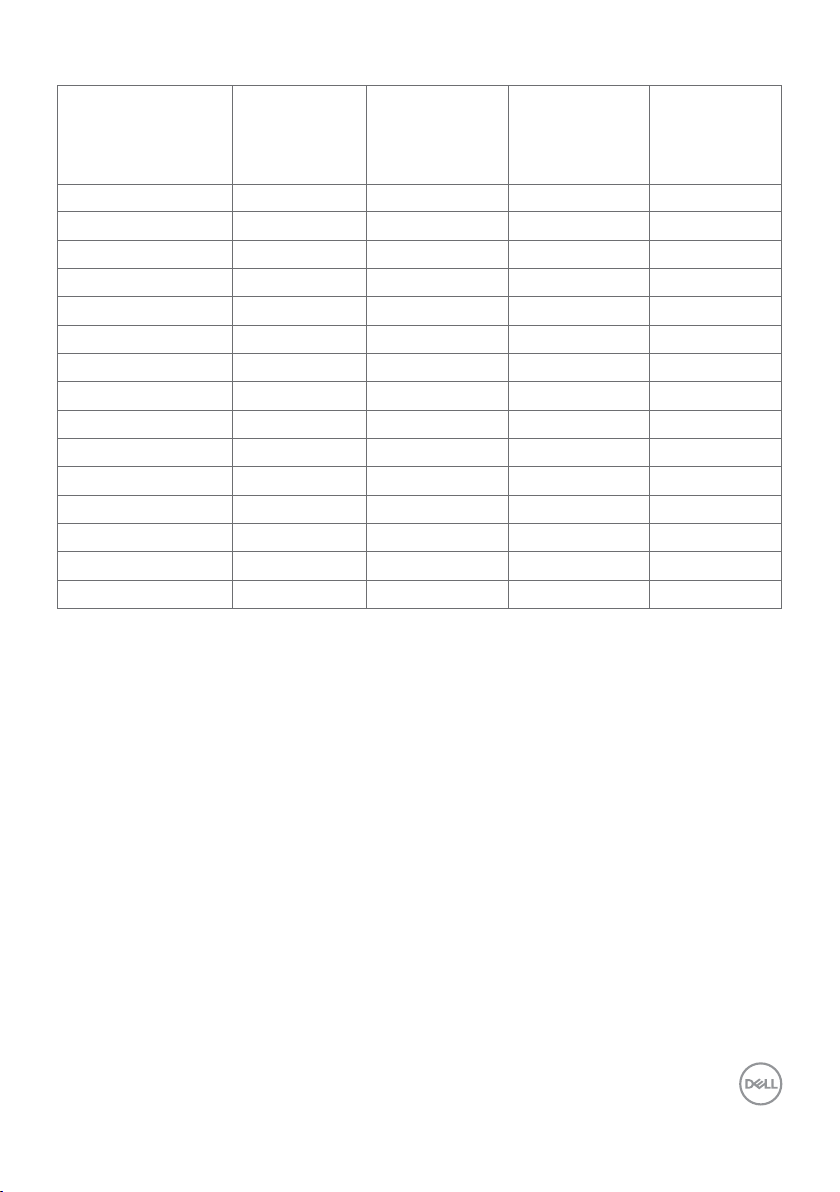
C2722DE
Vertical)
VESA, 1024 x 768
48.40
60.0
65.0
-/-
VESA, 1920 x 1080
67.5 0
60.0
148.5
+/+
Display Mode Horizontal
Frequency
(kHz)
VESA, 720 x 400 31.50 70.0 28.30 -/+
VESA, 640 x 480 31.50 60.0 25.20 -/-
VESA, 640 x 480 37.5 0 75.0 31.50 - /VESA, 800 x 600 37.9 0 60.30 40.0 +/+
VESA, 800 x 600 46.90 75.0 49.50 +/+
VESA, 1024 x 768 60.0 75.0 78.80 + /+
VESA, 1152 x 864 67.5 0 75.0 108.0 +/+
VESA, 1280 x 1024 64.0 60.0 108.0 + /+
VESA, 1280 x 1024 80.0 75.0 135.0 +/+
VESA, 1600 x 1200 75.0 60.0 162.0 +/+
VESA, 2048 x 1080 58.23 26.37 23.99 + /VESA, 2048 x 1080 66.58 60.0 147.16 +/VESA, 2560 x 1440 88.80 60.0 241.50 +/-
Vertical
Frequency
(Hz)
Pixel Clock
(MHz)
Sync
Polarity
(Horizontal/
About your monitor | 19
Page 20
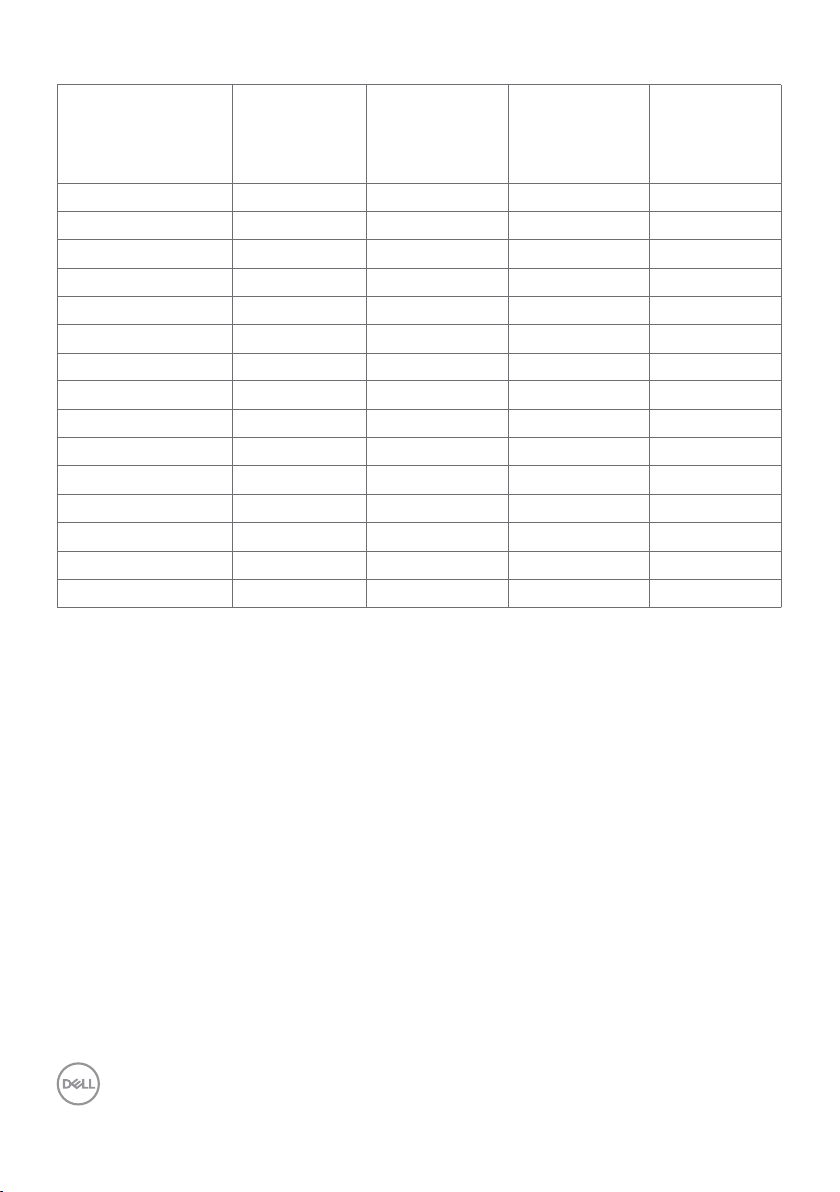
C3422WE
Vertical)
VESA, 720 x 400
31.50
70.0
28.30
-/+
VESA, 1024 x 768
60.0
75.0
78.80
+/+
VESA, 2560 x 1440
88.80
60.0
241.50
+/-
Display Mode Horizontal
Frequency
(kHz)
VESA, 640 x 480 31.50 60.0 25.20 -/-
VESA, 640 x 480 37.5 0 75.0 31.50 - /VESA, 800 x 600 37.9 0 60.30 40.0 + /+
VESA, 800 x 600 46.90 75.0 49.50 +/+
VESA, 1024 x 768 48.40 60.0 65.0 - /-
VESA, 1152 x 864 67.5 0 75.0 108.0 + /+
VESA, 1280 x 1024 64.0 60.0 108.0 +/+
VESA, 1280 x 1024 80.0 75.0 135.0 + /+
VESA, 1600 x 1200 75.0 60.0 162.0 +/+
VESA, 1920 x 1080 67.50 60.0 148.50 +/+
VESA, 2048 x 1080 66.58 60.0 147.16 +/-
CVT, 3440 x 1440 88.81 60.0 319.75 +/-
Vertical
Frequency
(Hz)
Pixel Clock
(MHz)
Sync
Polarity
(Horizontal/
20 | About your monitor
Page 21
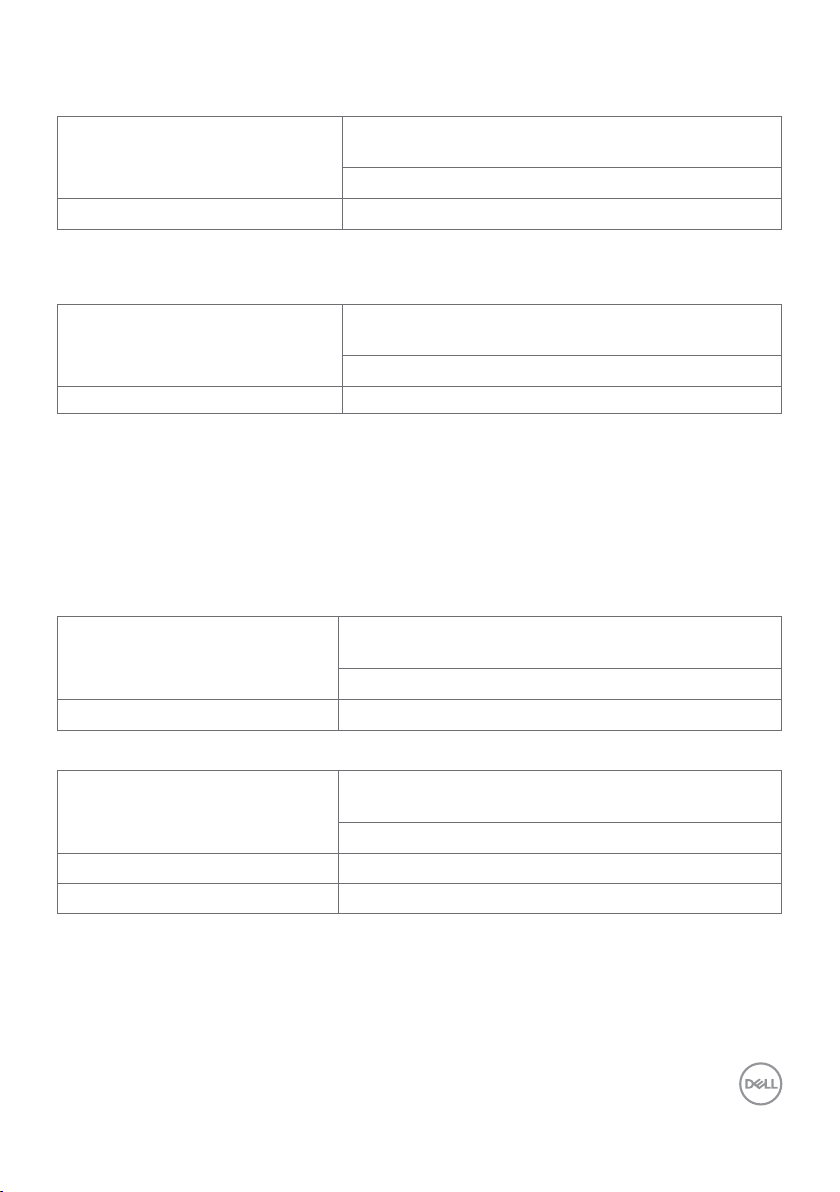
DP Multi-Stream Transport (MST) Modes
C2422HE
MST Source Monitor Maximum number of external monitors that can be
supported
1920 x 1080 at 60 Hz
1920 x 1080 at 60 Hz 3
NOTE: Maximum external monitor resolution supported is 1920 x 1080 at 60 Hz only.
C2722DE
MST Source Monitor Maximum number of external monitors that can be
supported
2560 x 1440 at 60 Hz
2560 x 1440 at 60 Hz 1
NOTE: Maximum external monitor resolution supported is 2560 x 1440 at 60 Hz only.
NOTE: USB 3.2 Gen1 reduce to USB2.0
If want to maintain USB 3.2 Gen1 bandwidth, please change to USB 3.2 Gen2 cable
(1m)
USB-C Multi-Stream Transport (MST) Modes
C2422HE
MST Source Monitor
Maximum number of external monitors that can be
supported
1920 x 1080 at 60 Hz
1920 x 1080 at 60 Hz
1
C2722DE
OSD Display Info: Link
rate(current)
Maximum number of external monitors that can be
supported
2560 x 1440 at 60 Hz
HBR3(DP 1.4) 1
HBR2(DP 1.2) 0
NOTE: DP output for MST is supported on C2422HE and C2722DE only.
About your monitor | 21
Page 22
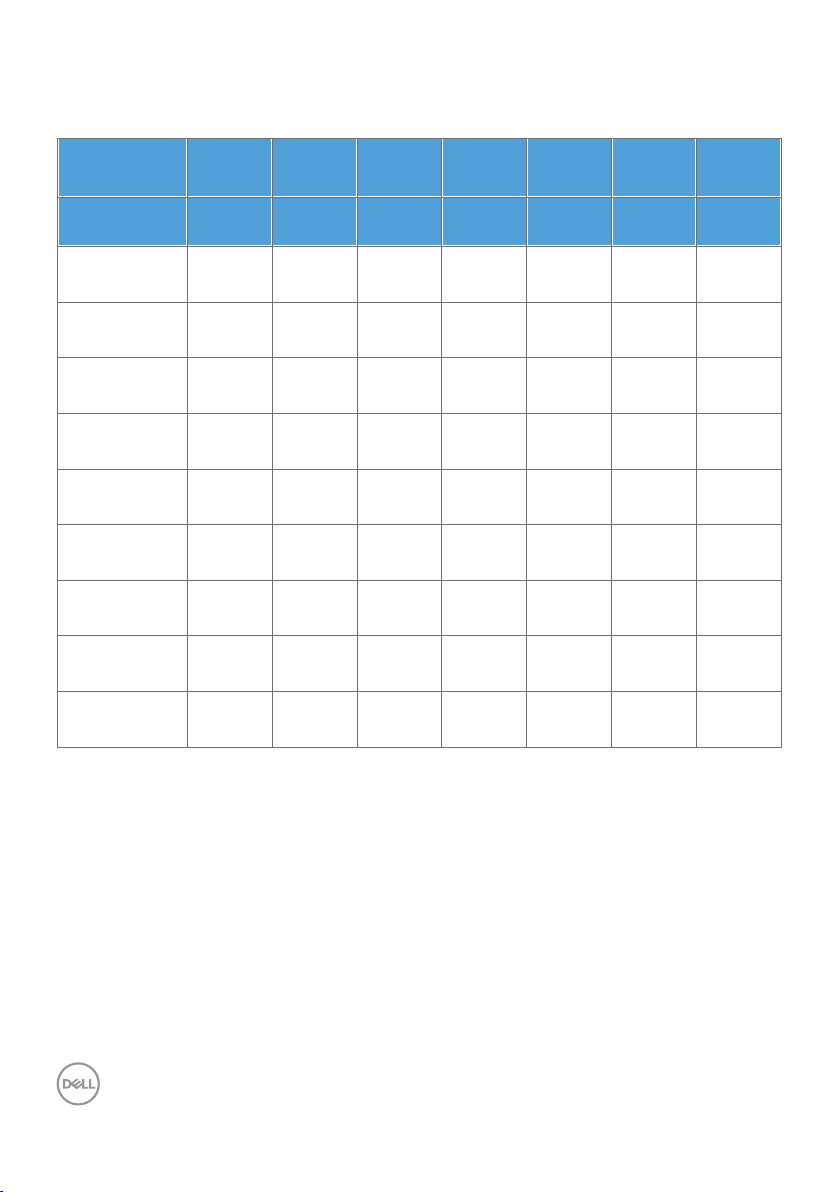
Unified Communications (UC) Platform Compatibility List
The table below highlights the call functions that work on the Dell Video Conferencing
Monitor – C2422HE, C2722DE and C3422WE when using the following UC platforms#.
Call Functions
Button
Microsoft
Bring up
Microsoft
Teams
Teams Hookswitch Hookswitch Hookswitch Volume
√ √ √ √ √ √ √
Teams
Skype for
× √ √ √ √ √ √
Business
Zoom × × × × √ √ √
Answer call End call Reject call Adjust
Speaker
volume down
Down
Adjust
Speaker
volume up
Volume Up Mute
Mute/
Unmute
Microphone
*
Google
× × × × √ √ √
*
Hangouts
BlueJeans × × × × √ √ √
Cisco Webex × × × × √ √ √
FaceTime × × × × √ √ √
Slack × × × × √ √ √
GoToMeeting × × × × √ √ √
*
*
*
*
*
√ Call function on the Dell C2422HE/C2722DE/C3422WE works with the UC
platform
× Call function on the Dell C2422HE/C2722DE/C3422WE does not work with the
UC platform
*
Mute function on the Dell C2422HE/C2722DE/C3422WE works by pressing
the Mute button, but the Mute Icon on the UC platform is not sync (Icon shows
unmute).
#
On Windows 10 64 Bit OS
22 | About your monitor
Page 23
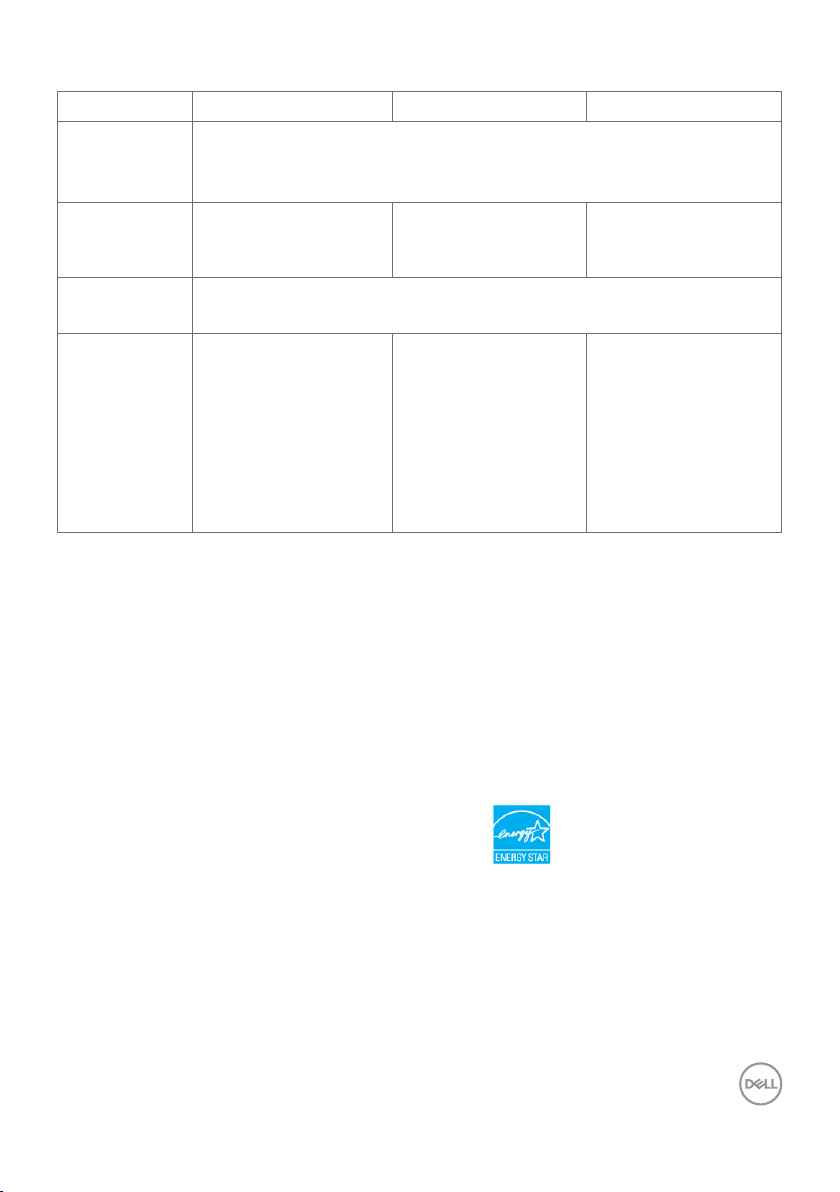
Electrical specifications
Model C2422HE C2722DE C3422WE
Video input
signals
• Digital video signal for each dierential line
Per dierential line at 100 ohm impedance
• DP/HDMI/USB Type-C signal input support
Input voltage/
frequency/
current
100-240 VAC / 50 or
60 Hz ± 3 Hz / 2.3 A
(maximum)
100-240 VAC / 50 or
60 Hz ± 3 Hz / 2.5 A
(maximum)
100-240 VAC / 50 or
60 Hz ± 3 Hz / 2.8 A
(maximum)
Inrush current 120 V: 42 A (Max.)
240 V: 80 A (Max.)
Power
Consumption
0.2 W (Off Mode)
0.2 W (Standby
1
Mode)
18 W (On Mode)
195 W (Max)
13.81 W (Pon)
48.60 kWh (TEC)
1
As dened in EU 2019/2021 and EU 2019/2013.
2
Max brightness and contrast setting with maximum power loading on all USB ports.
3
Pon: Power consumption of On Mode as dened in Energy Star 8.0 version.
1
0.2 W (Off Mode)
0.3 W (Standby
1
Mode)
1
2
3
26.50 W (On Mode)
210 W (Max)
19.45 W (Pon)
3
64.64 kWh (TEC)
1
0.3 W (Off Mode)
0.4 W (Standby
1
Mode)
1
32.50 W (On Mode)
2
3
220 W (Max)
27.70 W (Pon)
3
89.08 kWh (TEC)
2
3
TEC: Total energy consumption in kWh as dened in Energy star 8.0 version.
1
1
3
This document is informational only and reects laboratory performance. Your product may perform dierently, depending on the software, components and peripherals
you ordered and shall have no obligation to update such information. Accordingly, the
customer should not rely upon this information in making decisions about electrical
tolerances or otherwise. No warranty as to accuracy or completeness is expressed or
implied.
NOTE: This monitor is ENERGY STAR certied.
This product qualies for ENERGY STAR in the factory default settings which can be
restored by “Factory Reset” function in the OSD menu. Changing the factory default
settings or enabling other features may increase power consumption that could exceed
the ENERGY STAR specied limit.
About your monitor | 23
Page 24
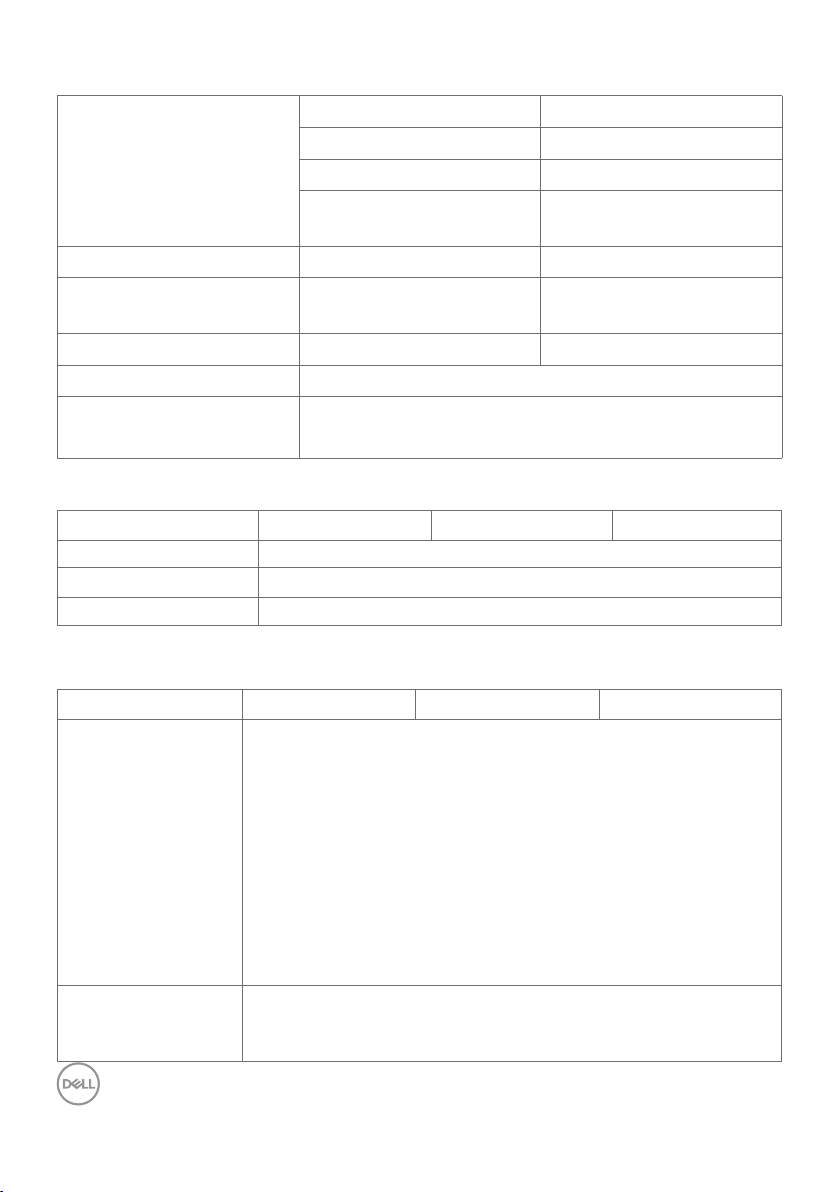
Webcam – microphone specifications
Lens Field of view 75.4° for 2560 x 1920
Focus mode Fixed Focus
Focus area 35 cm~1.5 m
Focusing distance (normal
70 cm
mode)
Image Sensor Active array size 5 mega-pixel
Video Specication Video frame rate 1920 x 1080 (Full HD)- up
to 30 frames per second
Audio Specication Microphone type Digital microphone x 2
Interface USB 2.0 High Speed
Power Supply 3.3 volts +/- 5% for USB and Microphone
5 volts +/- 5% for IR camera
Speaker Specifications
Model C2422HE C2722DE C3422WE
Speaker rated power 2 x 5 W
Frequency Response
Impedance
200 Hz - 16 kHz
8 ohm
Physical characteristics
Model C2422HE C2722DE C3422WE
Connector type • DP connector (DP in and DP out on C2422HE/C2722DE. Only DP in
on C3422WE)
• HDMI connector
• USB Type-C connector
• Audio jack
• RJ45 connector
• USB upstream connector x 2
• USB 3.2 Gen 1 downstream connector x 3
• USB Type-C downstream connector
Signal cable type DP to DP 1.8 M cable
USB 3.2 Gen 1 Type-A to B 1.8 M cable
USB 3.2 Gen 1 Type-C to C 1.8 M cable
24 | About your monitor
Page 25
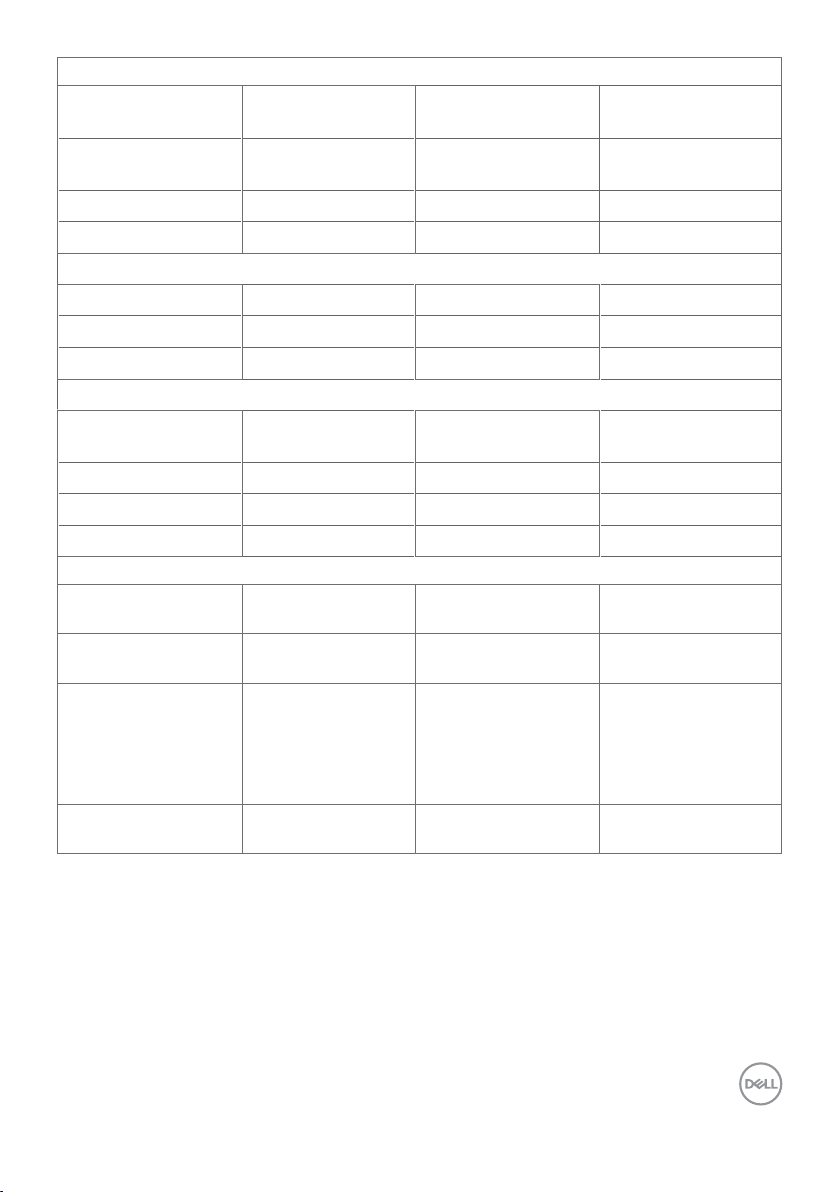
Dimensions (with stand)
Height (extended) 544.08 mm (21.40
in.)
Height (compressed) 404.08 mm (15.90
in.)
Width
Depth
Dimensions (without stand)
Height
Width
Depth
Stand dimensions
Height (extended) 428.30 mm (16.90
Height (compressed)
Width
Depth
Weight
Weight with
packaging
Weight with stand
assembly and cables
Weight without
stand assembly (For
wall mount or VESA
mount considerations
- no cables)
Weight of stand
assembly
538.64 mm (21.21 in.) 612.34 mm (24.11 in.) 815.85 mm (32.10 in.)
185.00 mm (7.30 in.) 230.00 mm (9.10 in.) 234.95 mm (9.30 in.)
383.15 mm (13.90 in.) 425.43 mm (16.75 in.) 434.43 mm (17.08 in.)
538.64 mm (21.21 in.) 612.34 mm (24.11 in.) 815.85 mm ( 32.10 in.)
51.24 mm (2 in.) 53.93 mm (2.10 in.) 81.08 mm (3.20 in.)
in.)
381.50 mm (15.02 in.) 381.50 mm (15.02 in.) 386.50 mm (15.20 in.)
267.68 mm (10.50 in.) 300.01 mm (11.81 in.) 306.91 mm (12.10 in.)
185 mm (7.30 in.) 230 mm (9.10 in.) 234.95 mm (9.25 in.)
8.82 kg (19.50 lb) 12.62 kg (27.80 lb) 16 kg (35.20 lb)
6.53 kg (14.40 lb) 9.21 kg (20.30 lb) 11.35 kg (25 lb)
4.33 kg (9.60 lb) 5.74 kg (12.70 lb) 7.30 kg (16.06 lb)
1.79 kg (3.90 lb) 3.06 kg (6.70 lb) 3.54 kg ( 7.79 lb)
565.57 mm (22.30 in.) 576.20 mm (22.68 in.)
445.57 mm (17.54 in.) 456.20 mm ( 17.96 in.)
428.30 mm (16.90 in.) 433.32 mm (17.10 in.)
About your monitor | 25
Page 26
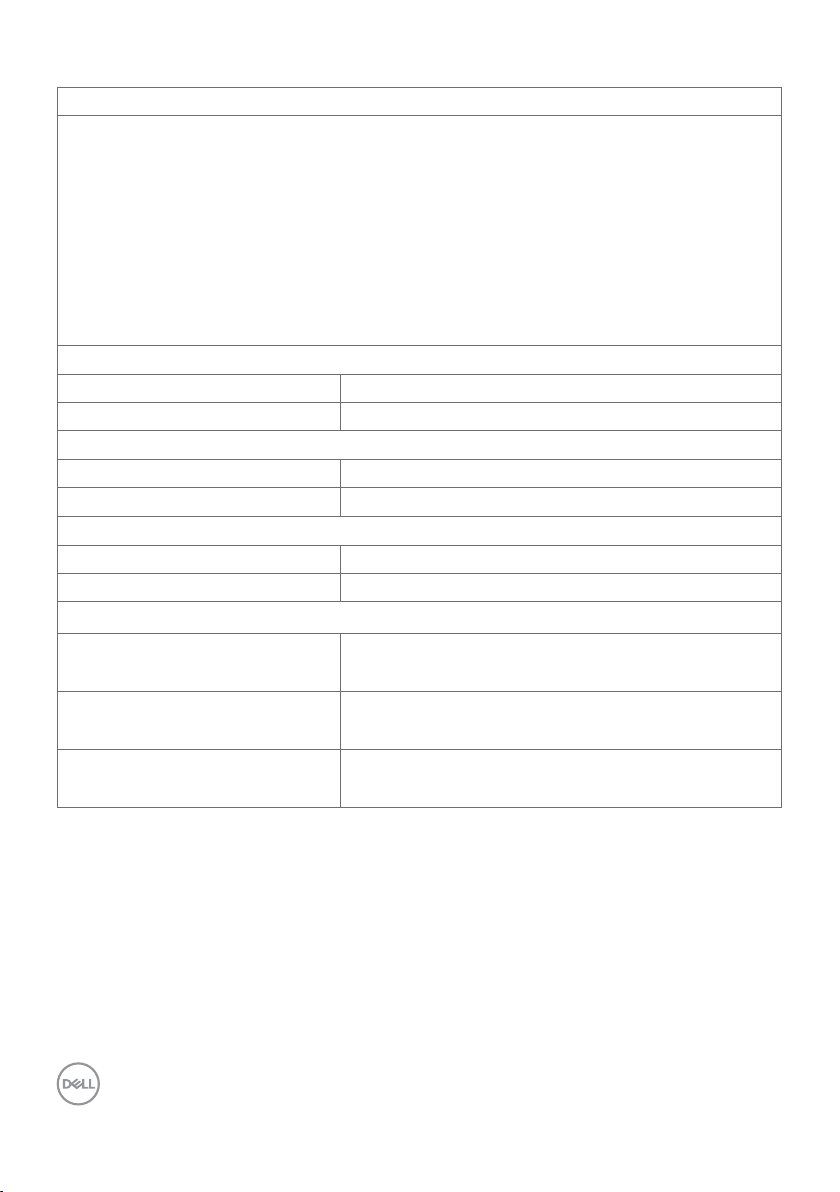
Environmental characteristics
Compliant Standards
• ENERGY STAR certified Monitor.
• EPEAT registered where applicable. EPEAT registration varies by country.
See https://www.epeat.net for registration status by country.
• TCO and TCO Edge Certified Displays.
• RoHS Compliant.
• BFR/PVC Free monitor (excluding external cables).
• Meets NFPA 99 leakage current requirements.
• Arsenic-Free glass and Mercury-Free for the panel only.
Temperature
Operating 0°C to 40°C (32°F to 104°F)
Non-operating –20°C to 60°C (–4°F to 140°F)
Humidity
Operating 10% to 80% (non-condensing)
Non-operating 5% to 90% (non-condensing)
Altitude
Operating 5,000 m (16,404 ft) (maximum)
Non-operating 12,192 m (40,000 ft) (maximum)
Thermal dissipation
C2422HE 665.37 BTU/hour (maximum)
61.42 BTU/hour (on mode)
C2722DE 716.55 BTU/hour (maximum)
90.42 BTU/hour (on mode)
C3422WE 750.67 BTU/hour (maximum)
108.44 BTU/hour (on mode)
26 | About your monitor
Page 27
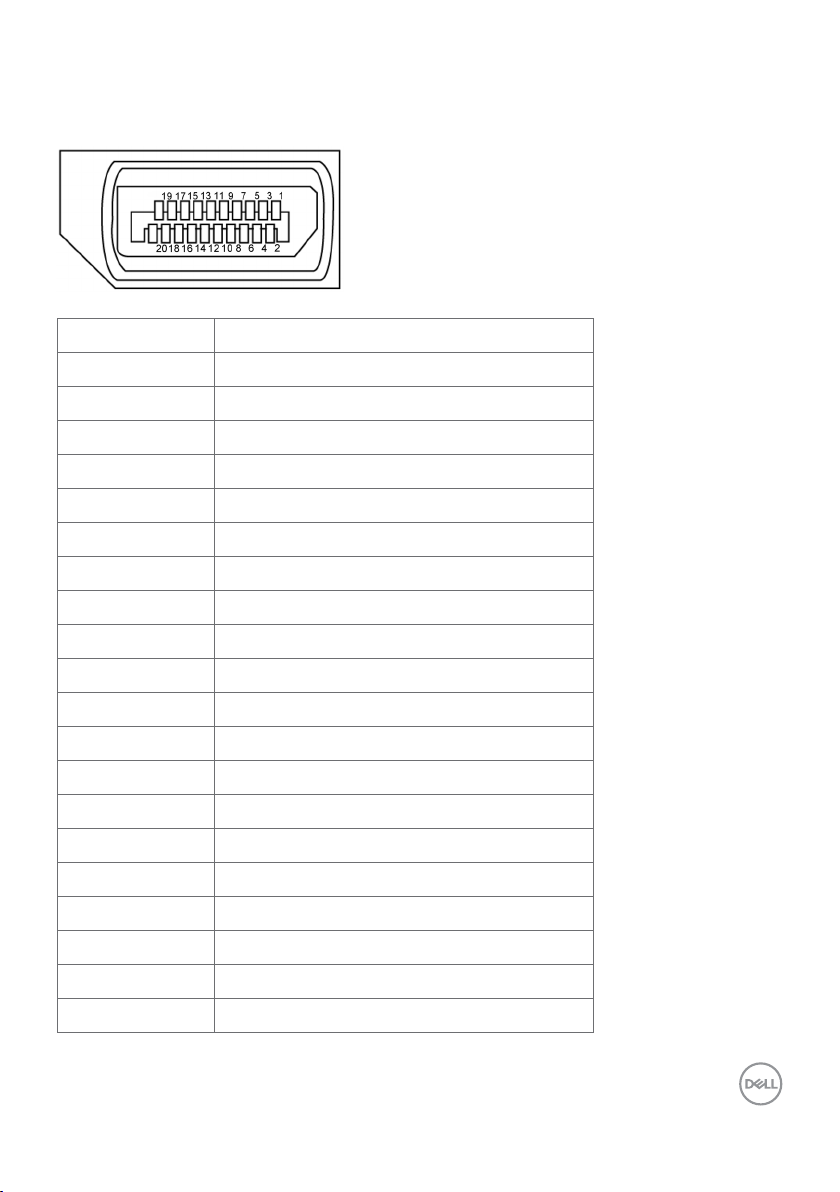
Pin assignments
DP port (in)
Pin number 20-pin side of theconnected signal cable
1 ML3(n)
2 GND
3 ML3(p)
4 ML2(n)
5 GND
6 ML2(p)
7 ML1(n)
8 GND
9 ML1(p)
10 ML0(n)
11 GND
12 ML0(p)
13 CONFIG1
14 CONFIG2
15 AUX CH (p)
16 GND
17 AUX CH (n)
18 Hot Plug Detect
19 Return
20 DP_PWR
About your monitor | 27
Page 28
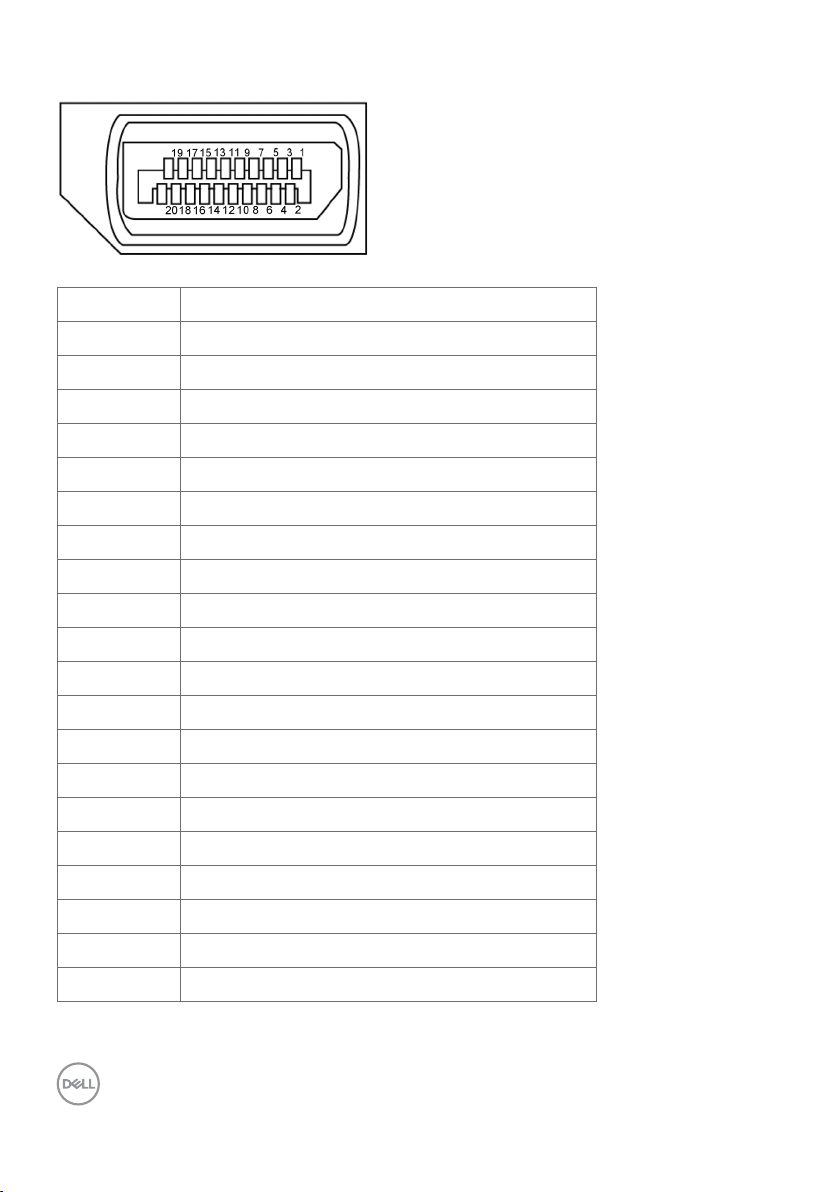
DP port (out)
Pin number 20-pin side of theconnected signal cable
1 ML0(p)
2 GND
3 ML0(n)
4 ML1(p)
5 GND
6 ML1(n)
7 ML2(p)
8 GND
9 ML2(n)
10 ML3(p)
11 GND
12 ML3(n)
13 CONFIG1
14 CONFIG2
15 AUX CH(p)
16 GND
17 AUX CH(n)
18 Hot Plug Detect
19 Return
20 DP_PWR
28 | About your monitor
Page 29
HDMI port
Pin number 19-pin side of theconnected signal cable
1 TMDS DATA 2+
2 TMDS DATA 2 SHIELD
3 TMDS DATA 2-
4 TMDS DATA 1+
5 TMDS DATA 1 SHIELD
6 TMDS DATA 1-
7 TMDS DATA 0+
8 TMDS DATA 0 SHIELD
9 TMDS DATA 0-
10 TMDS CLOCK+
11 TMDS CLOCK SHIELD
12 TMDS CLOCK-
13 CEC
14 Reserved (N.C. on device)
15 DDC CLOCK (SCL)
16 DDC DATA (SDA)
17 DDC/CEC Ground
18 +5 V POWER
19 HOT PLUG DETECT
About your monitor | 29
Page 30
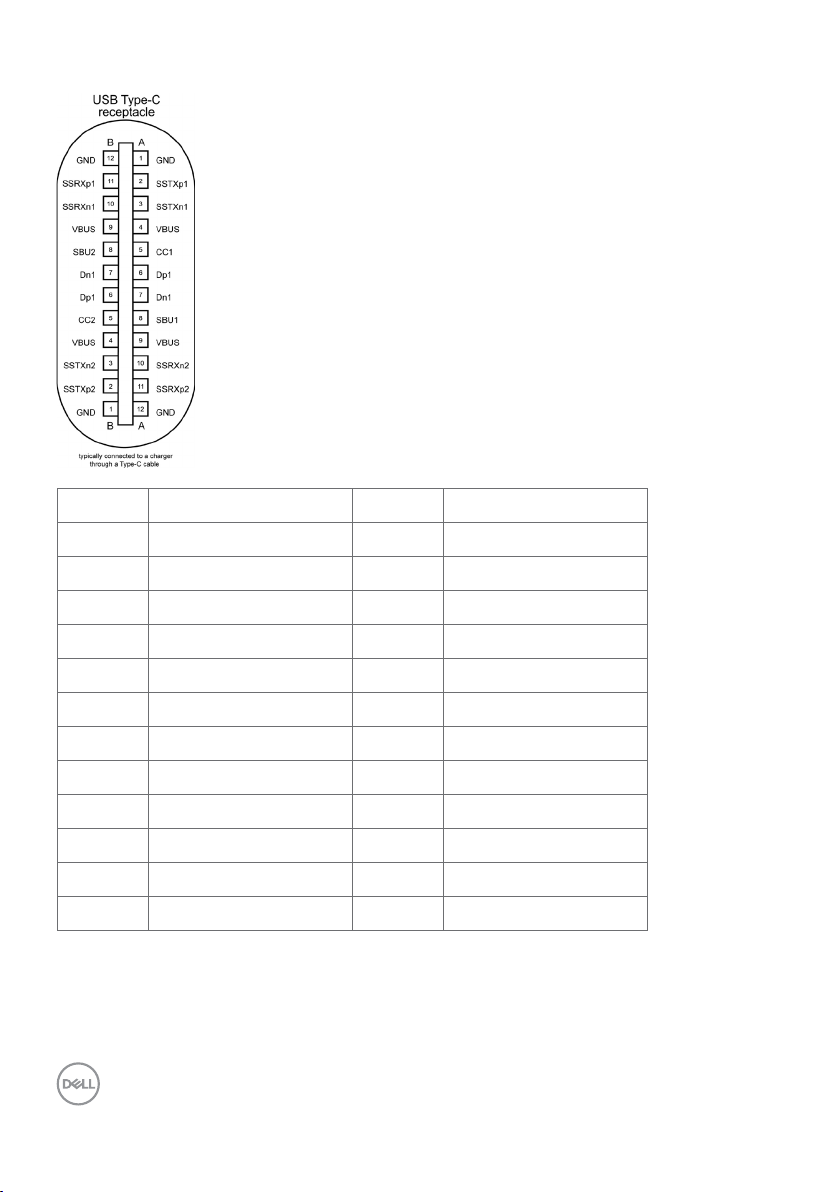
USB Type-C port
Pin Signal Pin Signal
A1 GND B12 GND
A2 SSTXp1 B11 SSRXp1
A3 SSTXn1 B10 SSRXn1
A4 VBUS B9 VBUS
A5 CC1 B8 SBU2
A6 Dp1 B7 Dn1
A7 Dn1 B6 Dp1
A8 SBU1 B5 CC2
A9 VBUS B4 VBUS
A10 SSRXn2 B3 SSTXn2
A11 SSRXp2 B2 SSTXp2
A12 GND B1 GND
30 | About your monitor
Page 31
Universal Serial Bus (USB)
This section gives you information about the USB ports available on your monitor.
NOTE: Up to 2 A on USB downstream port (port with battery icon) with
BC 1.2 compliance devices; up to 0.9 A on the other 2 USB downstream ports;
Up to 3 A on USB Type-C downstream port (port with
icon) with 5 V/3 A
compliance devices.
Your computer has the following USB ports:
• 2 upstream - at rear.
• 4 downstream - 2 at bottom, 2 at rear.
Power Charging Port - the ports with battery icon supports fast current
charging capability if the device is BC 1.2 compatible.The USB Type-C downstream
port with icon supports fast current charging capability if the device is 5V/3A
compatible.
NOTE: The monitor’s USB ports work only when the monitor is on or on in
Standby Mode. On in Standby Mode, if the USB cable (Type-C to Type-C) is
plugged in, the USB ports can work normally. Otherwise, follow the OSD setting
of Other USB Charging, if the setting is “On in Standby Mode” then USB work
normally, otherwise USB is disabled. If you turn off the monitor and then turn it on,
the attached peripherals may take a few seconds to resume normal functionality.
Transfer speed Data rate Maximum power consumption (each port)
super speed 5 Gbps 4.5 W
hi speed 480 Mbps 2.5 W
full speed 12 Mbps 2.5 W
USB upstream port USB downstreamport
Pin number Signal name Pin number Signal name
1 VBUS 1 VBUS
2 D- 2 D-
3 D+ 3 D+
4 GND 4 GND
5 StdB_SSTX- 5 StdA_SSRX-
6 StdB_SSTX+ 6 StdA_SSRX+
7 GND_DRAIN 7 GND_DRAIN
8 StdB_SSRX- 8 StdA_SSTX-
9 StdB_SSRX+ 9 StdA_SSTX+
Shell Shield Shell Shield
About your monitor | 31
Page 32
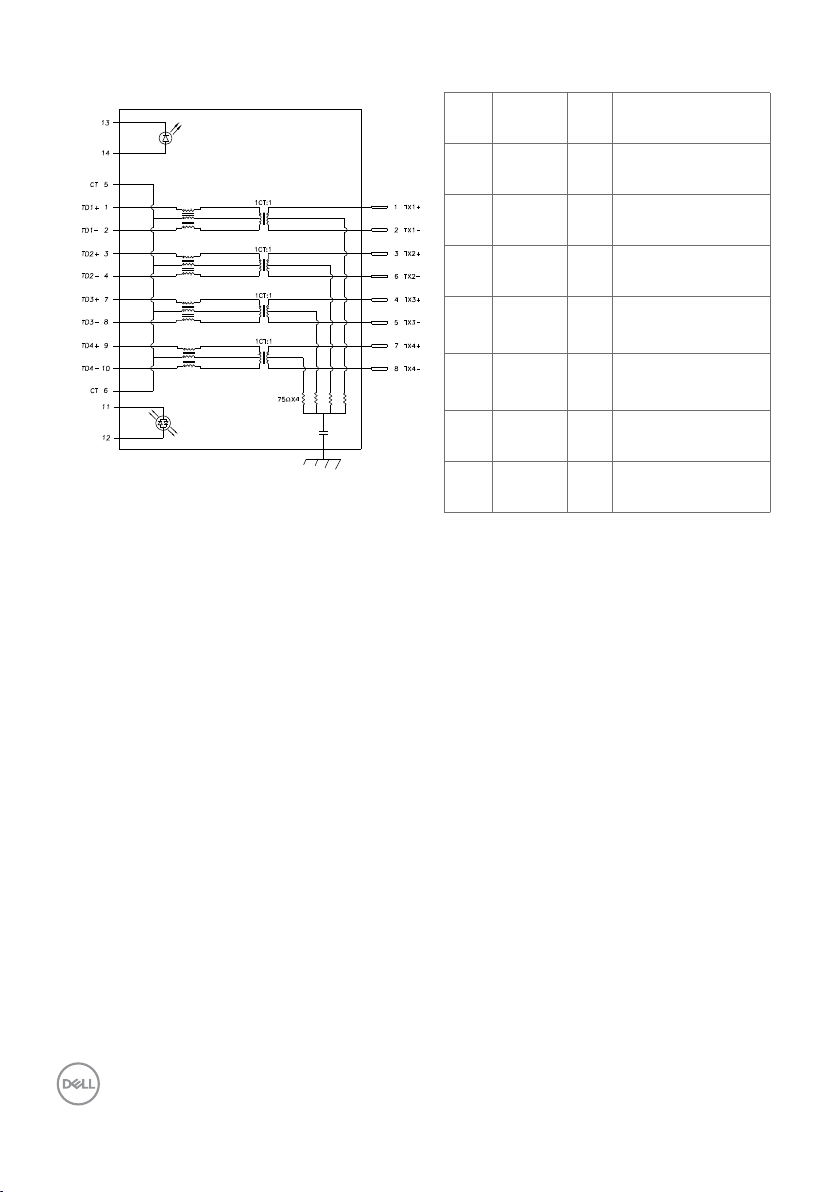
RJ45 port (connector side)
PHY SIDE
CABLE SIDE
RJ45
GREEN
GREEN
ORANGE
SHIELD
GROUND
2kV, 1000pF
Pin Signal Pin Signal
1 TD1 + 8 TD3 -
2 TD1 - 9 TD4 +
3 TD2 + 10 TD4 -
4 TD2 - 11 GREEN_OR-
ANGE
5 CT 12 GREEN_OR-
ANGE
6 CT 13 GREEN
7 TD3 + 14 GREEN
Driver installation
Install the Realtek USB GBE Ethernet Controller Driver available for your system. This
is available for download at https://www.dell.com/support under the “Driver and
download” section.
Network (RJ45) data rate via USB-C max speed is 1000 Mbps.
NOTE: This LAN port is 1000Base-T IEEE 802.3az compliant, supporting Mac
Address (Printed on model label) Pass-thru, Wake-on-LAN (WOL) from standby
mode (S3 only) and PXE Boot function, these 3 features depend on BIOS setting
and OS version.
32 | About your monitor
Page 33
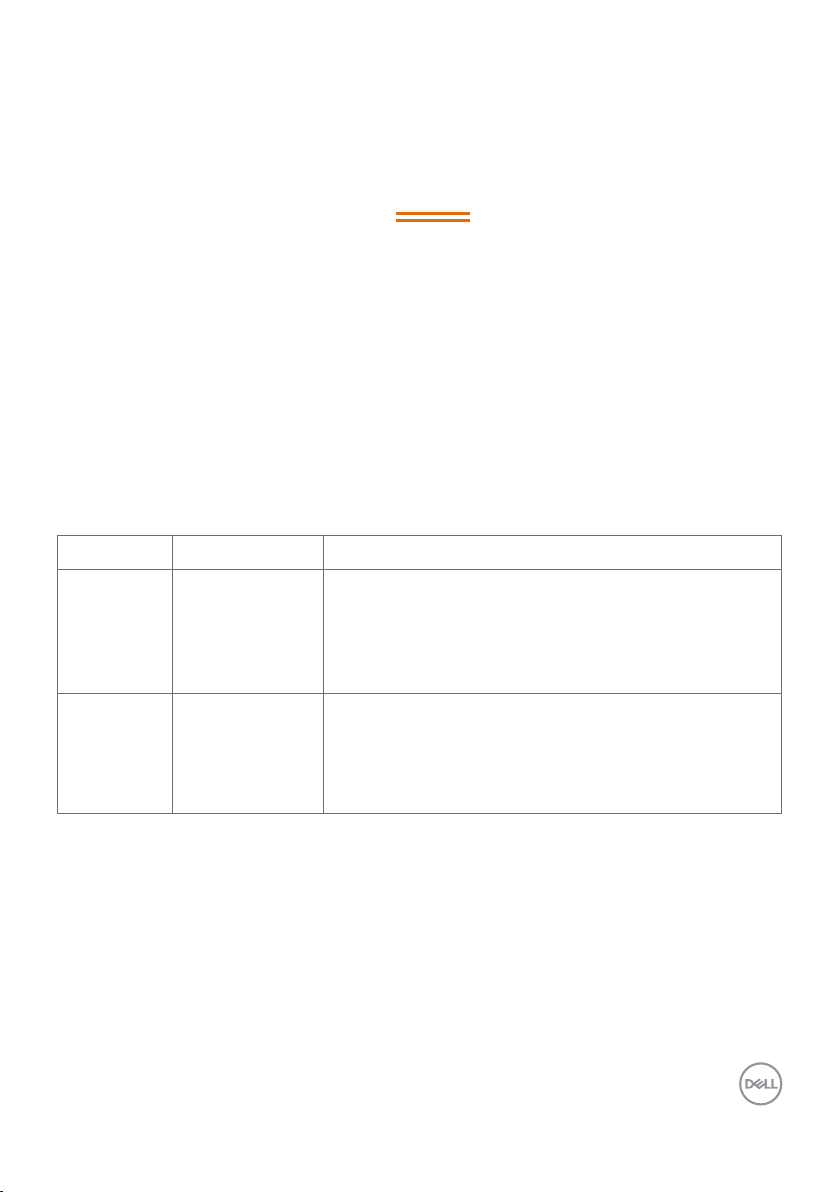
RJ45 Connector LED status:
LED Color Description
Right LED Amber or Green Speed indicator:
• Amber On - 1000 Mbps
• Green On - 100 Mbps
• Off - 10 Mbps
Right LED
Left LED
Left LED Green Link / Activity indicator:
• Blinking - Activity on the port.
• Green On - Link is being established.
• Off - Link is not established.
NOTE: RJ45 cable is non in-box standard accessory.
About your monitor | 33
Page 34

Plug-and-Play
You can install the monitor in any Plug-and-Play-compatible system. The monitor
automatically provides the computer system with its extended display identification
data (EDID) using display data channel (DDC) protocols so the computer can configure
itself and optimize the monitor settings. Most monitor installations are automatic;
you can select different settings if desired. For more information about changing the
monitor settings, see Operating the Monitor.
LCD monitor quality and pixel policy
During the LCD monitor manufacturing process, it is not uncommon for one or more
pixels to become fixed in an unchanging state which are hard to see and do not affect
the display quality or usability. For more information on LCD Monitor Pixel Policy, see
Dell support site at:https://www.dell.com/pixelguidelines.
34 | About your monitor
Page 35
Ergonomics
CAUTION: Improper or prolonged usage of keyboard may result in injury.
CAUTION: Viewing the monitor screen for extended periods of time may
result in eye strain.
For comfort and efficiency, observe the following guidelines when setting up and using
your computer workstation:
• Position your computer so that the monitor and keyboard are directly in front of
you as you work. Special shelves are commercially available to help you correctly
position your keyboard.
• To reduce the risk of eye strain and neck/arm/back/shoulder pain from using the
monitor for long periods of time, we suggest you to:
1. Set the distance of the screen between 20 to 28 in. (50 - 70 cm) from your
eyes.
2. Blink frequently to moisten your eyes or wet your eyes with water after
prolonged usage of the monitor.
3. Take regular and frequent breaks for 20 minutes every two hours.
4. Look away from your monitor and gaze at a distant object at 20 feet away for
at least 20 seconds during the breaks.
5. Perform stretches to relieve tension in the neck, arm, back, and shoulders
during the breaks.
• Make sure that the monitor screen is at eye level or slightly lower when you are
sitting in front of the monitor.
• Adjust the tilt of the monitor, its contrast, and brightness settings.
• Adjust the ambient lighting around you (such as overhead lights, desk lamps, and
the curtains or blinds on nearby windows) to minimize reflections and glare on the
monitor screen.
• Use a chair that provides good lower-back support.
• Keep your forearms horizontal with your wrists in a neutral, comfortable position
while using the keyboard or mouse.
• Always leave space to rest your hands while using the keyboard or mouse.
• Let your upper arms rest naturally on both sides.
• Ensure that your feet are resting flat on the floor.
• When sitting, make sure that the weight of your legs is on your feet and not
on the front portion of your seat. Adjust your chair’s height or use a footrest if
necessary to maintain a proper posture.
• Vary your work activities. Try to organize your work so that you do not have to sit
and work for extended periods of time. Try to stand or get up and walk around at
regular intervals.
About your monitor | 35
Page 36

• Keep the area under your desk clear of obstructions and cables or power cords
that may interfere with comfortable seating or present a potential trip hazard.
monitor screen at or
below eye level
monitor and
keyboard
positioned
directly in front
of the user
wrists relaxed
and at
feet at on the
oor
36 | About your monitor
Page 37

Handling and moving your display
To ensure the monitor is handled safely when lifting or moving it, follow the guidelines
mentioned below:
• Before moving or lifting the monitor, turn off your computer and the monitor.
• Disconnect all cables from the monitor.
• Place the monitor in the original box with the original packing materials.
• Hold the bottom edge and the side of the monitor firmly without applying
excessive pressure when lifting or moving the monitor.
• When lifting or moving the monitor, ensure the screen is facing away from you
and do not press on the display area to avoid any scratches or damage.
• When transporting the monitor, avoid any sudden shock or vibration to it.
About your monitor | 37
Page 38
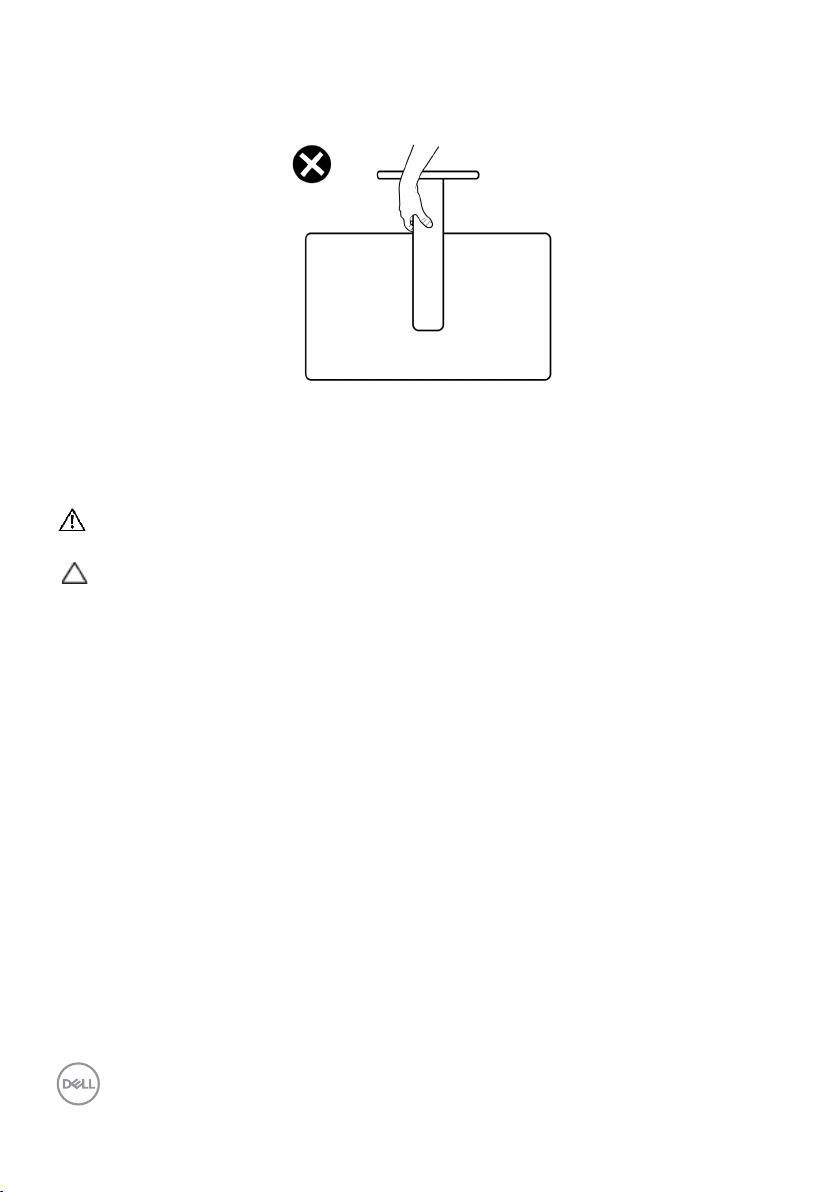
• When lifting or moving the monitor, do not turn the monitor upside down while
holding the stand base or stand riser. This may result in accidental damage to the
monitor or cause personal injury.
Maintenance guidelines
Cleaning your monitor
WARNING: Before cleaning the monitor, unplug the monitor power cable
from the electrical outlet.
CAUTION: Read and follow the Safety Instructions before cleaning the
monitor.
For best practices, follow these instructions in the list below while unpacking, cleaning,
or handling your monitor:
• To clean your anti-static screen, lightly dampen a soft, clean cloth with water. If
possible, use a special screen-cleaning tissue or solution suitable for the antistatic coating. Do not use benzene, thinner, ammonia, abrasive cleaners, or
compressed air.
• Use a lightly-dampened, soft cloth to clean the monitor. Avoid using detergent of
any kind as some detergents leave a milky film on the monitor.
• If you notice white powder when you unpack your monitor, wipe it off with a
cloth.
• Handle your monitor with care as a darker-colored monitor may get scratched
and show white scuff marks more than a lighter - colored monitor.
• To help maintain the best image quality on your monitor, use a dynamically
changing screen saver and turn off your monitor when not in use.
38 | About your monitor
Page 39
Setting up the monitor
Connecting the stand
NOTE: The stand riser and stand base are detached when the monitor is
shipped from the factory.
NOTE: The following instructions are applicable only for the stand that
was shipped with your monitor. If you are connecting a stand that you
purchased from any other source, follow the set up instructions that were
included with the stand.
To attach the monitor stand:
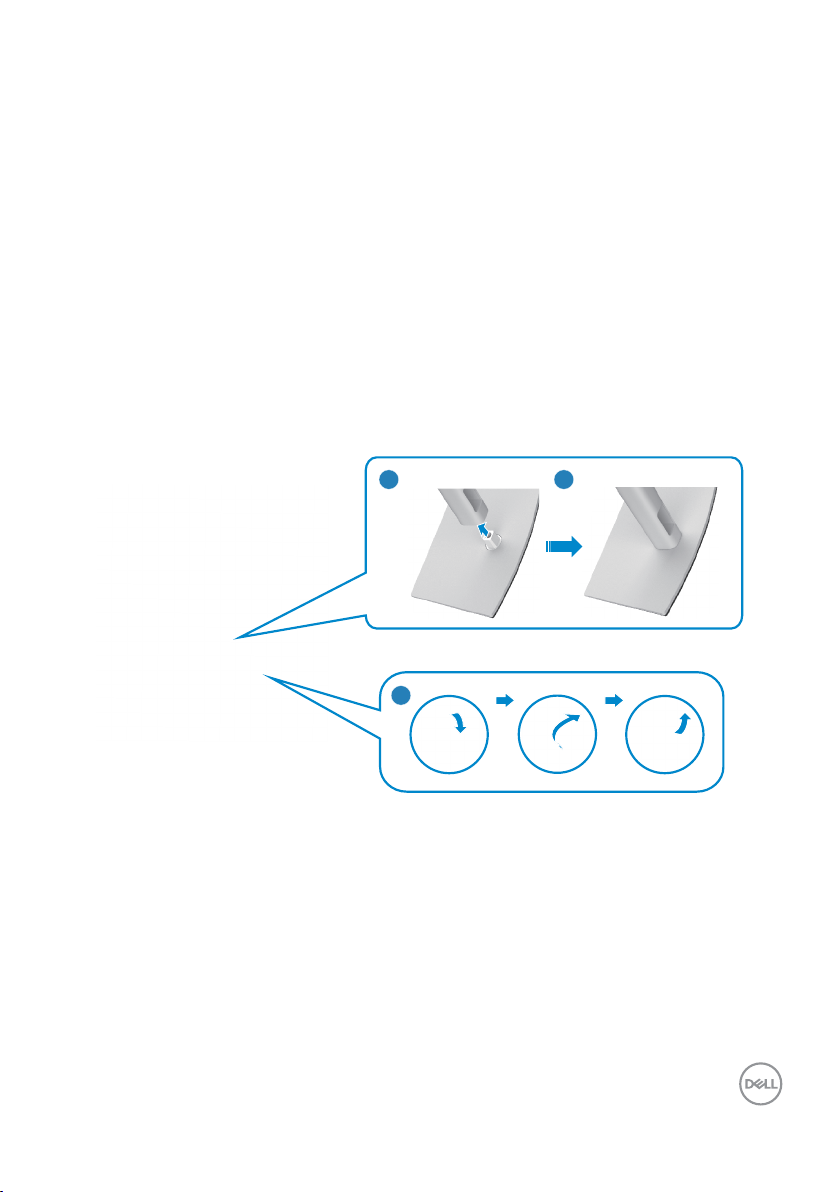
1. Align and place the stand riser on the stand base.
2. Open the screw handle at the bottom of the stand base and turn it clockwise to
secure the stand assembly.
3. Close the screw handle.
1
3
2
Setting up the monitor | 39
Page 40

4. Open the protective cover on the monitor to access the VESA slot on the
monitor.
5. Slide the tabs on the stand riser into the slots on the display back cover and
lower the stand assembly to snap it into place.
40 | Setting up the monitor
Page 41
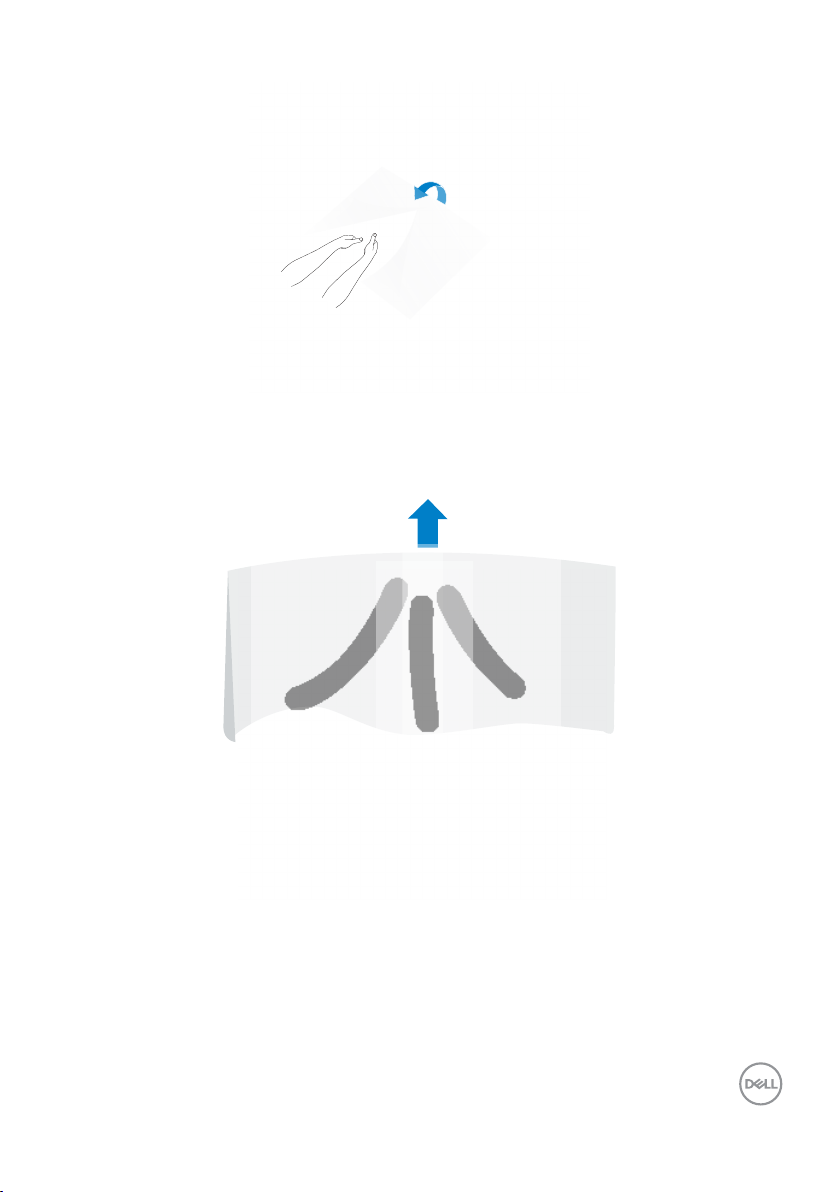
6. Hold the stand riser and lift the monitor carefully, then place it on a at surface.
NOTE: Hold the stand riser firmly when lifting the monitor to avoid any
accidental damage.
7. Lift the protective cover from the monitor.
Setting up the monitor | 41
Page 42
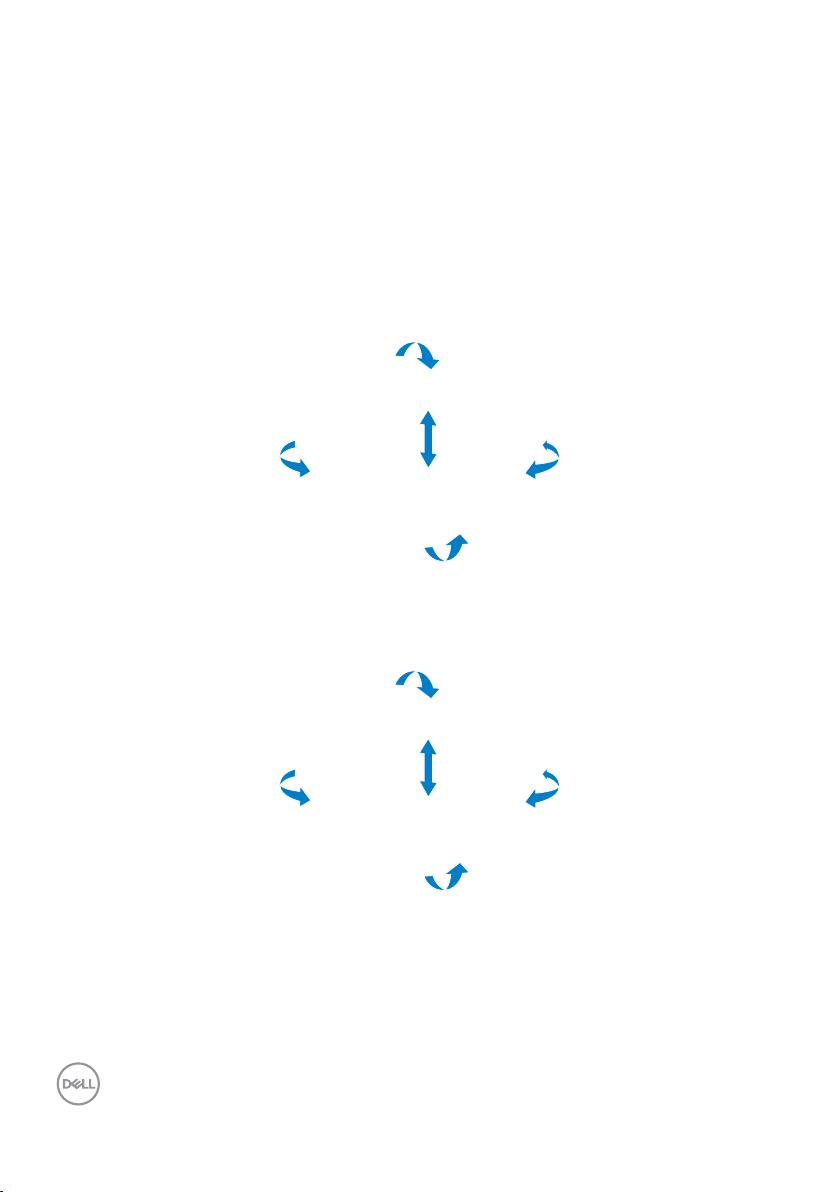
Using the tilt, swivel, and vertical extension
5°
45
°
5°
45
°
NOTE: The following instructions are applicable only for the stand that
was shipped with your monitor. If you are connecting a stand that you
purchased from any other source, follow the set up instructions that were
included with the stand.
Tilt, swivel and vertical extension
With the stand attached to the monitor, you can tilt the monitor for the most
comfortable viewing angle.
C2422HE
140 mm
° 45
21°
C2722DE
42 | Setting up the monitor
120 mm
° 45
21°
Page 43
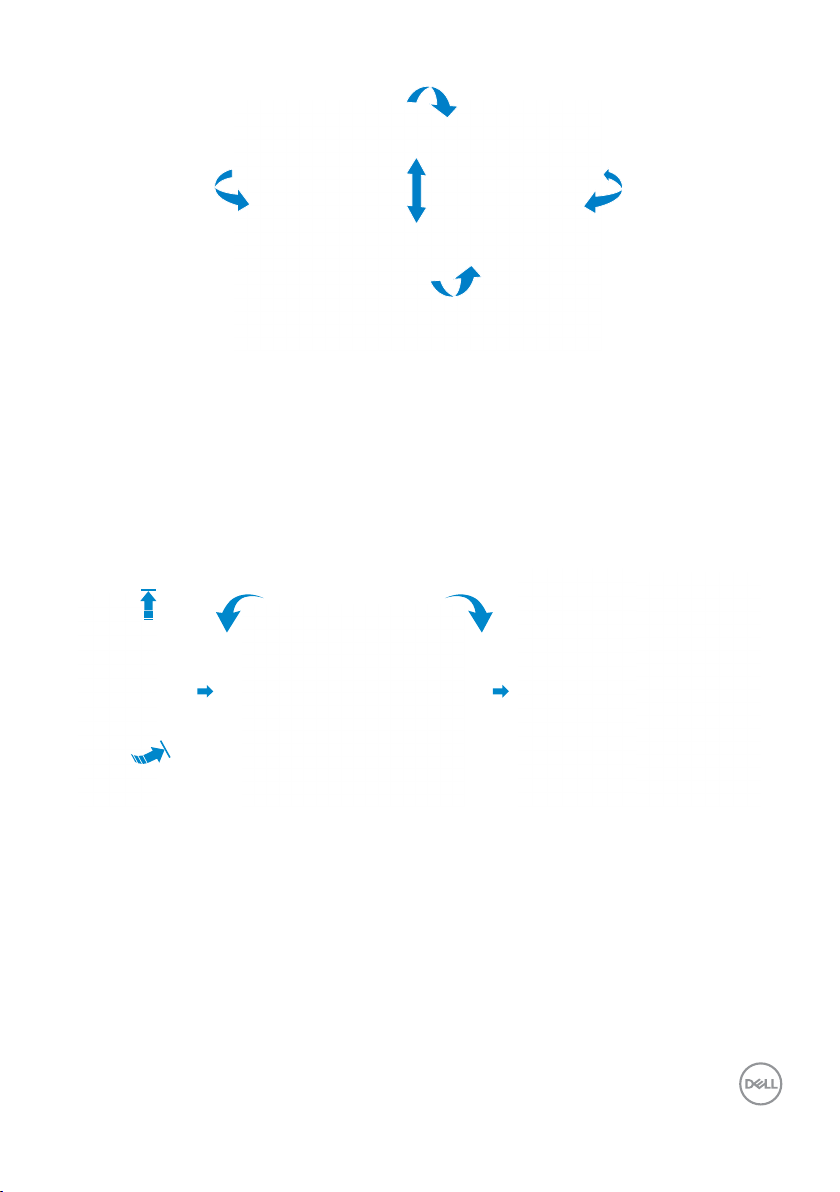
C3422WE
5°
30
°
° 30
120 mm
21°
NOTE: The stand is detached when the monitor is shipped from the
factory.
Rotating the Display (C2422HE/C2722DE only)
Before you rotate the display, extend the display vertically until the top of the stand
riser and then tilt the display backwards until the maximum to avoid hitting the bottom
edge of the display.
1
90°
2
90°
NOTE: To toggle the display setting on your Dell computer between landscape and
portrait when rotating the display, download and install the latest graphics driver.
To download, go to https://www.dell.com/support/drivers and search for the
appropriate driver.
NOTE: When the display is in portrait mode, you may experience performance
degradation when using graphic-intensive applications such as 3D gaming.
Setting up the monitor | 43
Page 44

Configuring the display settings on your computer after rotation (C2422HE/C2722DE only)
After you have rotated the display, complete the procedure given below to configure
the display settings on your computer.
NOTE: If you are using the monitor with a non-Dell computer, go to the graphics
card manufacturer’s website or your computer manufacturer website for
information on how to rotate the contents of your display.
To configure the Display Settings:
1. Right-click on the Desktop and click Properties.
2. Select the Settings tab and click Advanced.
3. If you have an AMD graphics card, select the Rotation tab and set the
preferred rotation.
4. If you have an nVidia graphics card, click the nVidia tab, in the left-hand
column select NVRotate, and then select the preferred rotation.
5. If you have an Intel
Properties, select the Rotation tab, and then set the preferred rotation.
NOTE: If you do not see the rotation option or it is not working correctly, go to
https://www.dell.com/support and download the latest driver for your graphics
card.
®
graphics card, select the Intel graphics tab, click Graphic
44 | Setting up the monitor
Page 45
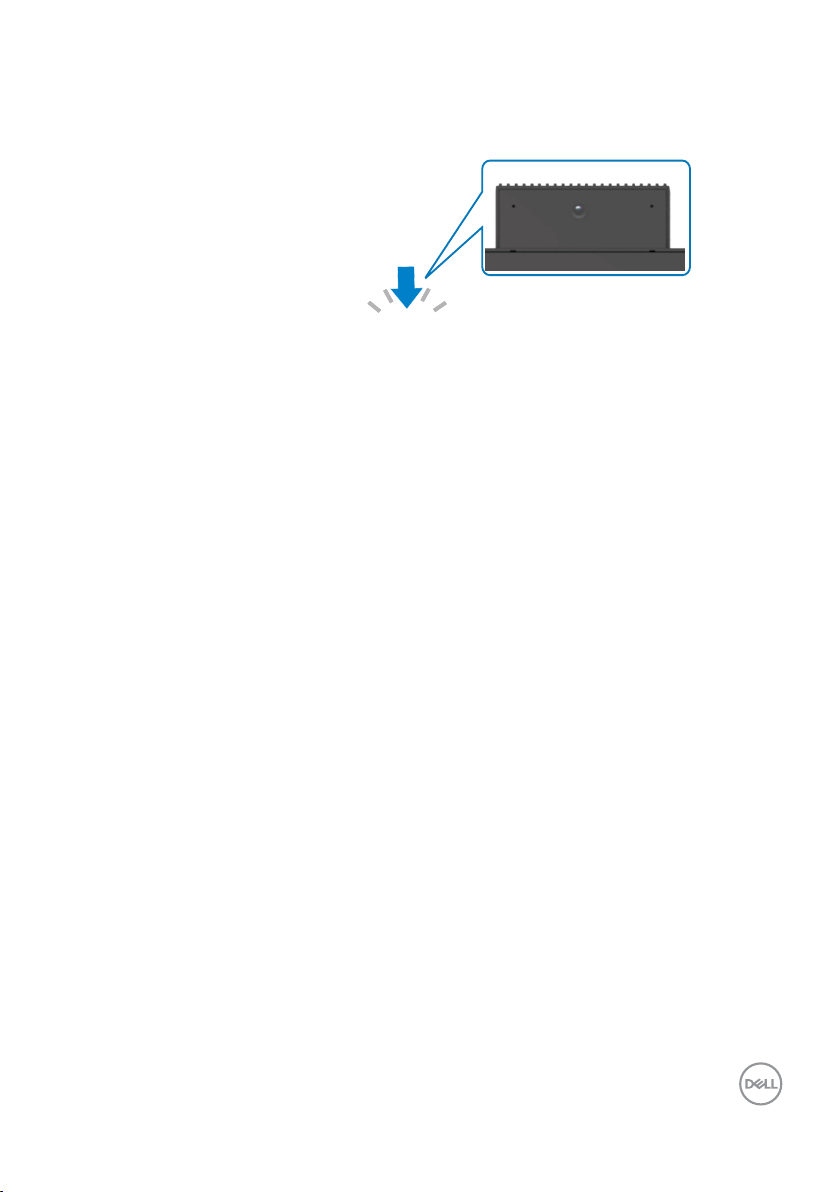
Operating the monitor webcam
When you want to use the monitor built-in webcam and microphone, press down on
the webcam module and then release. The webcam module will pop up.
Setting up the monitor | 45
Page 46
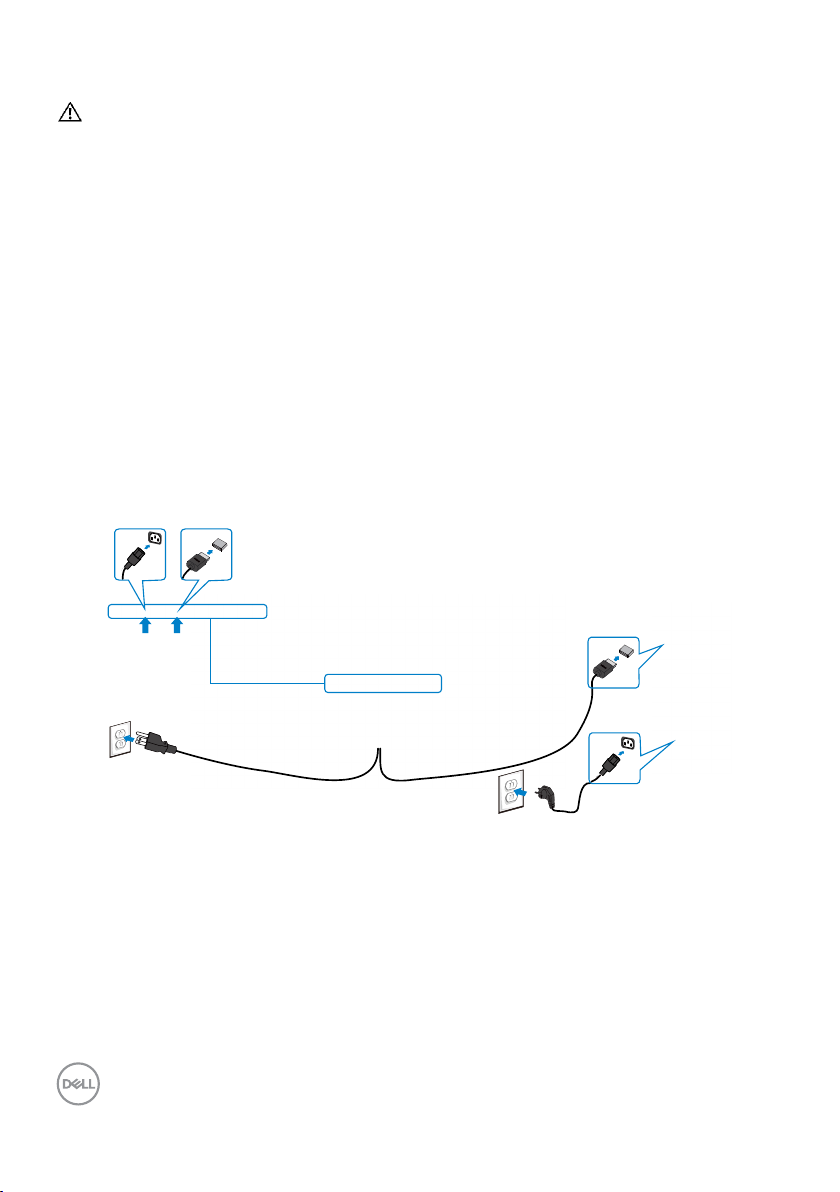
Connecting your monitor
WARNING: Before you begin any of the procedures in this section, follow
the Safety Instructions.
To connect your monitor to the computer:
1. Turn o your computer.
2. Connect the DisplayPort or USB cable, and the USB Type-C cable from your
monitor to the computer.
3. Turn on your monitor.
4. Select the correct input source from the OSD Menu on your monitor and then
turn on your computer.
NOTE: C2422HE/C3422WE default setting is DisplayPort 1.2, C2722DE
default setting is DisplayPort 1.4. A DisplayPort 1.1 Graphic card may not
display normally. Please refer to “product specific problems – No image
when using DP connection to the PC” to change default setting.
Connecting the HDMI cable (Optional)
HDMI
HDMI
46 | Setting up the monitor
Page 47
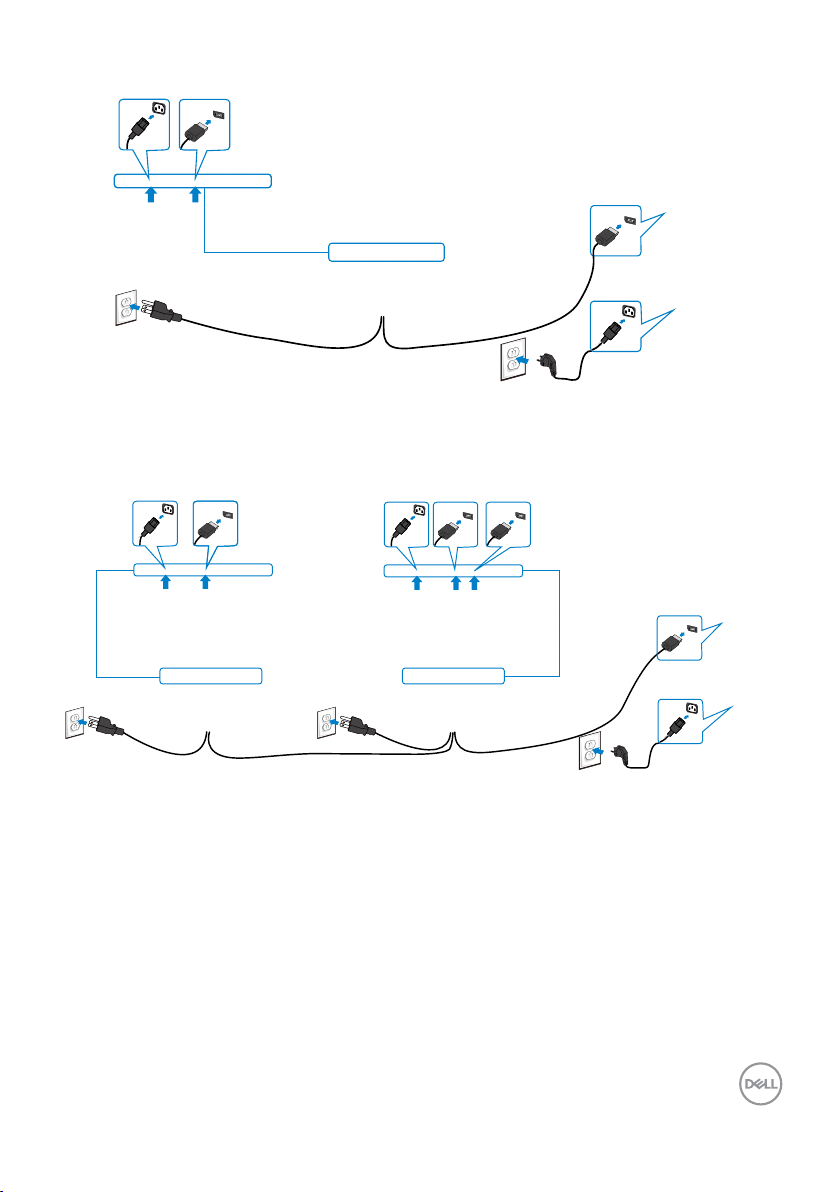
Connecting the DP cable
DP
DP
Connecting the monitor for DP Multi-Stream Transport (MST)
function (C2422HE/C2722DE only)
DP
DP out
DP
DP
NOTE: Supports the DP MST feature. To make use of this feature, your PC
Graphics Card must be certified to at least DP1.2 with MST option.
NOTE: Remove the rubber plug when using DP out connector.
Setting up the monitor | 47
Page 48
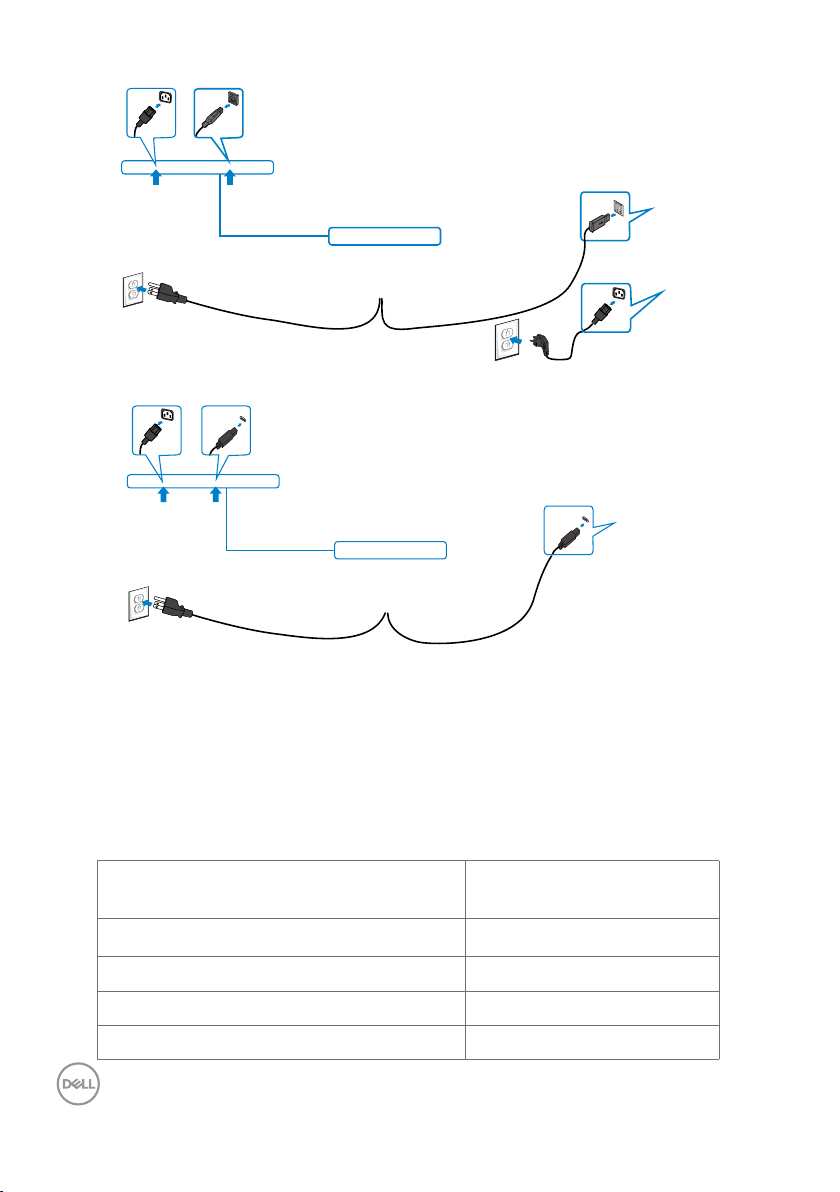
Connecting the USB cable
USB
USB
Connecting the USB Type-C cable
USB Type-C
USB
USB Type-C
The USB Type-C port on your monitor:
• Can be used as USB Type-C, DisplayPort 1.4 (C2722DE) or DisplayPort 1.2
(C2422HE/C3422WE), alternatively.
• Supports USB Power Delivery (PD), with profiles up to 90 W.
NOTE: Regardless of the power requirement/actual power consumption
of your laptop, or the remaining power runtime in your battery, the Dell
C2422HE/C2722DE/C3422WE monitor is designed to supply power delivery
of up to 90 W to your laptop.
Rated power (on laptops that have USB
Maximum charging power
Type-C with Power Delivery)
45 W 45 W
65 W 65 W
90 W 90 W
130 W Not supported
48 | Setting up the monitor
Page 49
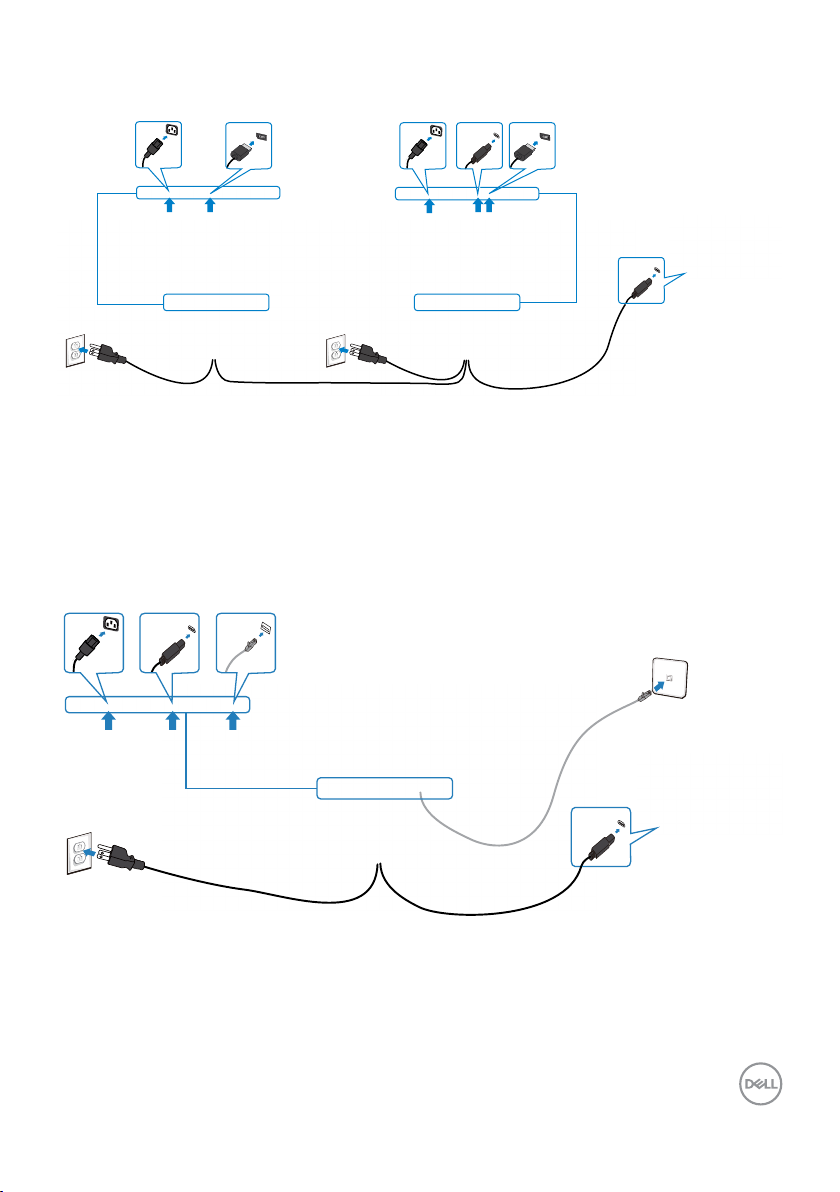
Connecting the monitor for USB-C Multi-Stream Transport
(MST) function (C2422HE/C2722DE only)
USB Type-C
DP in
DP out
USB Type-C
NOTE: The maximum number of supported C2422HE/C2722DE via MST
is subjected to the bandwith of the USB-C source. Please refer to “product
specific problems –No image when using USB Type-C MST”.
NOTE: Remove the rubber plug when using DP out connector.
Connecting the monitor for RJ45 Cable (Optional)
USB Type-C
RJ45
USB Type-C
Setting up the monitor | 49
Page 50
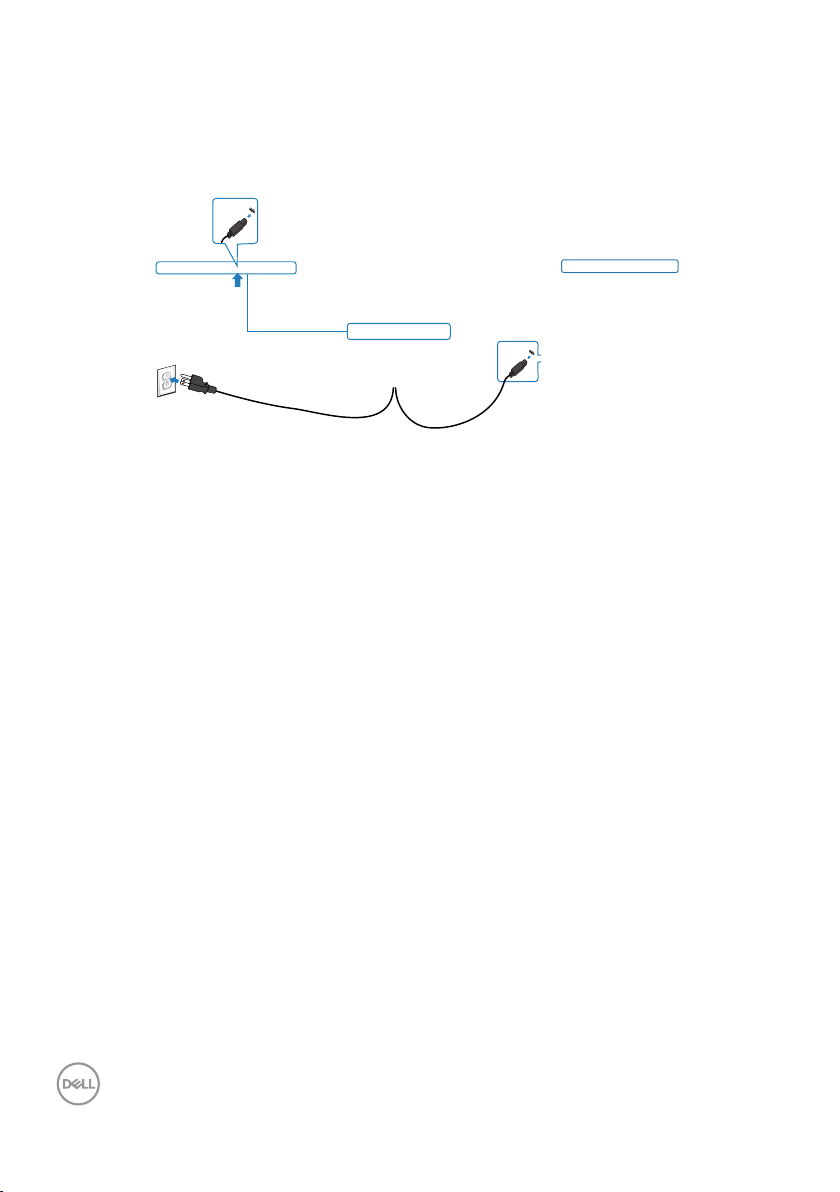
Dell Power Button Sync (DPBS)
• The C2422HE/C2722DE/C3422WE monitor is designed with Dell power button
sync (DPBS) feature to allow you to control PC system power state from the
monitor power button. This feature is compatible with Dell OptiPlex 7090/3090
Ultra platform, and is only supported over USB-C interface.
USB Type-C
OptiPlex 7090/3090 Ultra
USB Type-C
• To make sure the DPBS function works for the first time, you should do the
following steps for Dell OptiPlex 7090/3090 Ultra platform in the Control Panel
first.
Go to Control Panel.
Select Hardware and Sound, followed by Power Options.
50 | Setting up the monitor
Page 51

Go to System Settings
In the drop-down menu of When I press the power button, there are a few options
for selection namely Do nothing/Sleep/Hibernate/Shut down, and you can select
Sleep/Hibernate/Shut down.
NOTE: Do not select Do nothing, otherwise monitor power button cannot
sync with PC system power state.
Setting up the monitor | 51
Page 52
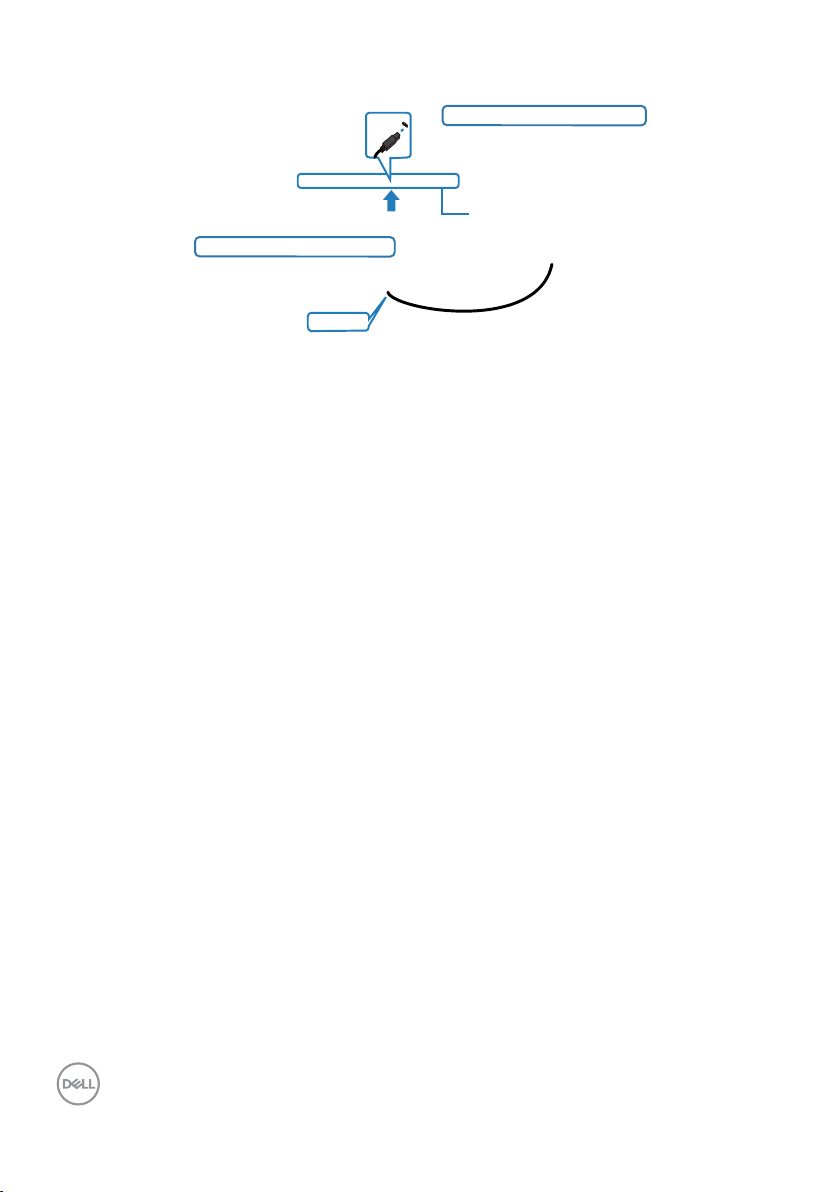
Connecting the monitor for DPBS for the first time
USB Type-C
Initial system power state(OFF)
USB Type-C
Initial monitor power state(OFF)
For the first time setting up the DPBS function, please follow below steps:
1. Make sure both the PC and monitor is OFF.
2. Connect the USB Type-C cable from the PC to the monitor.
3. Press the monitor power button to turn ON the monitor.
4. Both the monitor and PC will turn ON momentarily. Wait for a while (approximately 6
seconds) and both the PC and monitor will turn OFF.
5. Press either the monitor power button or PC power button, both the PC and
monitor will turn ON. The PC system power state is in sync with the monitor power
button.
NOTE: When the monitor and PC are both at power OFF state at first time,
it is recommended that you turn ON the monitor first, then connect the USB
Type-C cable from the PC to the monitor.
NOTE: You can power the OptiPlex 7090/3090 Ultra platform using its DC
adaptor jack. Alternatively, you can power the OptiPlex 7090/3090 Ultra
platform using the monitor’s USB-C cable via Power Delivery (PD); please set
USB-C Charging to On in Off Mode.
52 | Setting up the monitor
Page 53
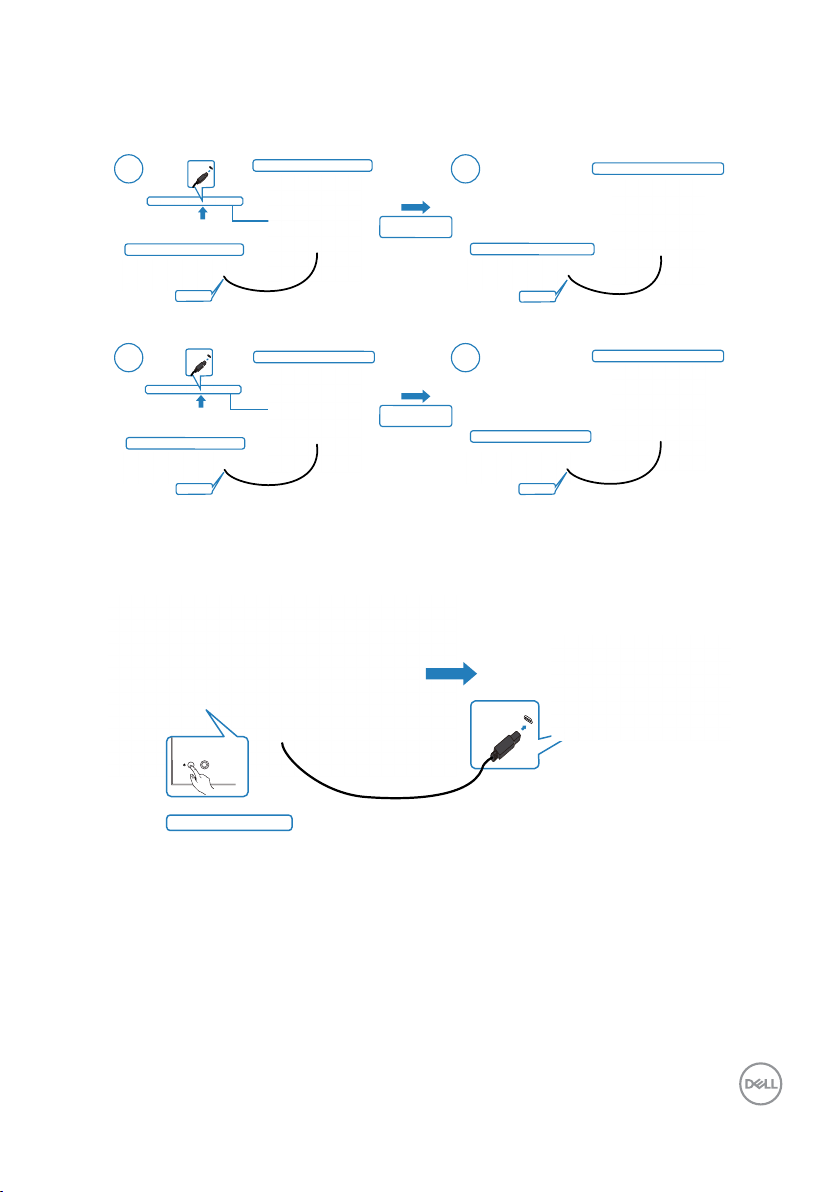
Using DPBS function
When you press the monitor power button or PC power button, the Monitor / PC
state is as follows:
1 2
Initial system power state(ON)
USB Type-C
Initial monitor power state(ON)
Press PC/Monitor
power button
New power state of monitor(OFF)
New power state of system(OFF)
USB Type-C
1
USB Type-C
Initial system power state(OFF)
USB Type-C
Initial monitor power state(OFF)
Press PC/Monitor
power button
2
USB Type-C
New power state of monitor(ON)
New power state of system(ON)
USB Type-C
When the monitor and PC power state are both ON, while you press and hold 4
seconds on monitor power button, the screen prompt will ask if you would like to shut
down the PC.
USB Type-C
Press and hold 4s
Setting up the monitor | 53
Page 54
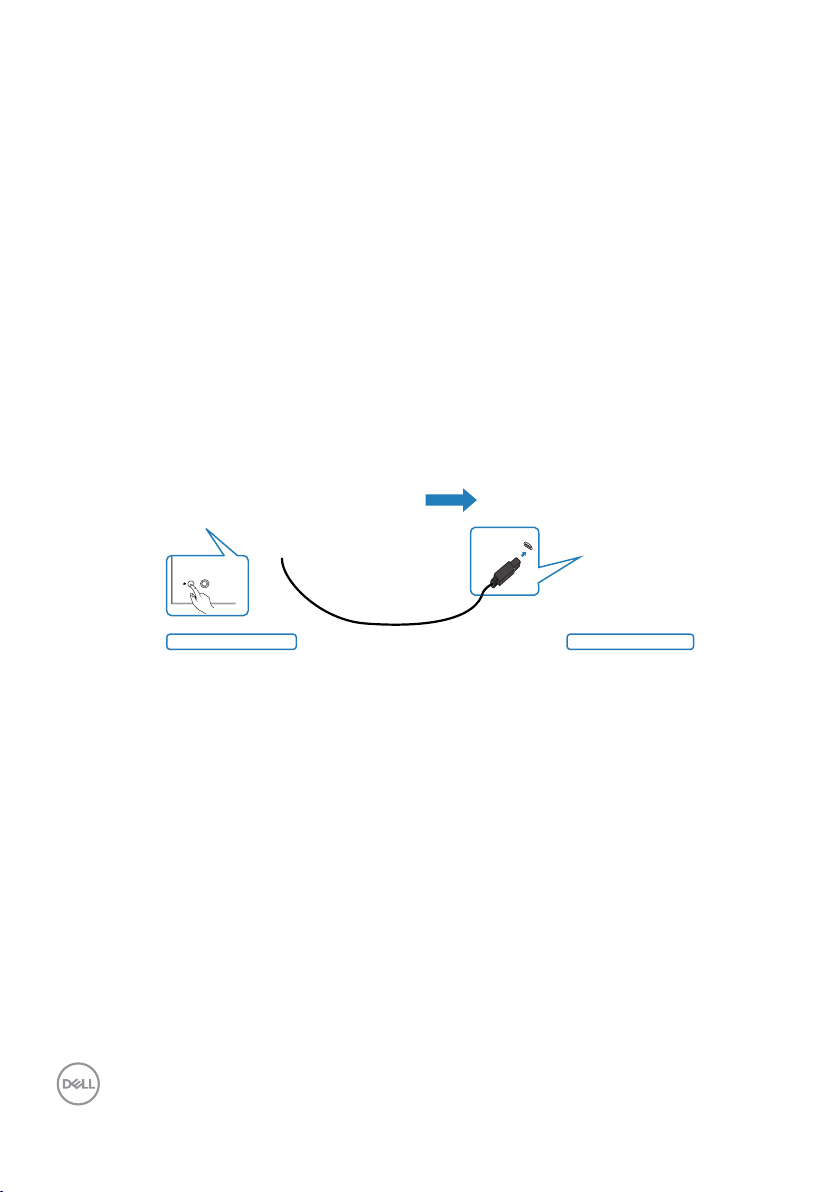
Slide to shut down your PC
When the monitor and PC power state are both ON, while you press and hold 10
seconds on monitor power button, the PC will shut down.
USB Type-C
PC will shut downPress and hold 10s
54 | Setting up the monitor
Page 55
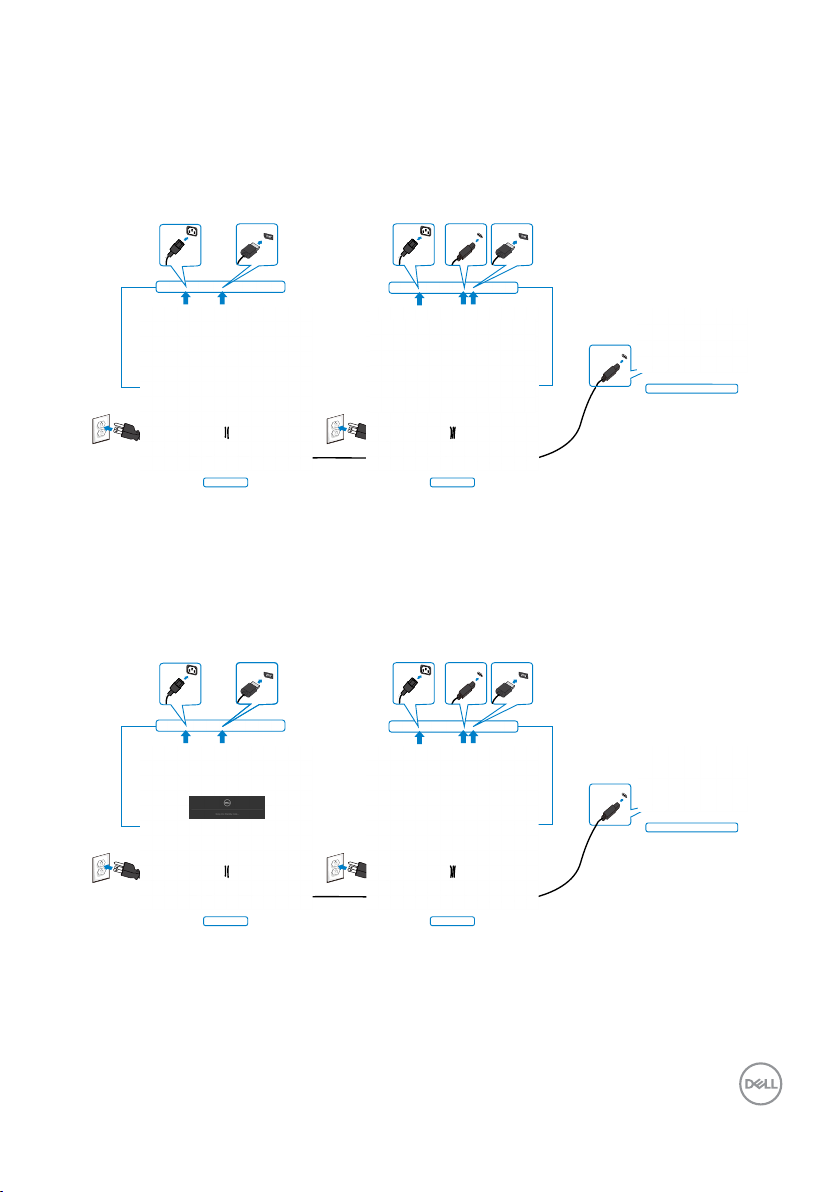
Connecting the monitor for USB-C Multi-Stream Transport (MST) function (C2422HE/C2722DE only)
A PC is connected to two monitors in an initially OFF power state, and the PC system
power state is in sync with Monitor 1 power button. When you press the Monitor 1 or
PC power button, both the Monitor 1 and PC turns ON. Meanwhile the Monitor 2 will
remain OFF. You need to manually press the power button on Monitor 2 to turn it ON.
Monitor 1Monitor 2
USB Type-C
DP out
USB Type-C
System power state(ON)
DP in
Similarly, a PC is connected to two monitors in an initially ON power state, and the
PC system power state is in sync with Monitor 1 power button. When you press the
Monitor 1 or PC power button, both the Monitor 1 and PC turns OFF. Meanwhile the
Monitor 2 will be in Standby mode. You need to manually press the power button on
Monitor 2 to turn it OFF.
Going into Standby mode...
DP in
USB Type-C
DP out
USB Type-C
System power state(OFF)
Monitor 1Monitor 2
Setting up the monitor | 55
Page 56
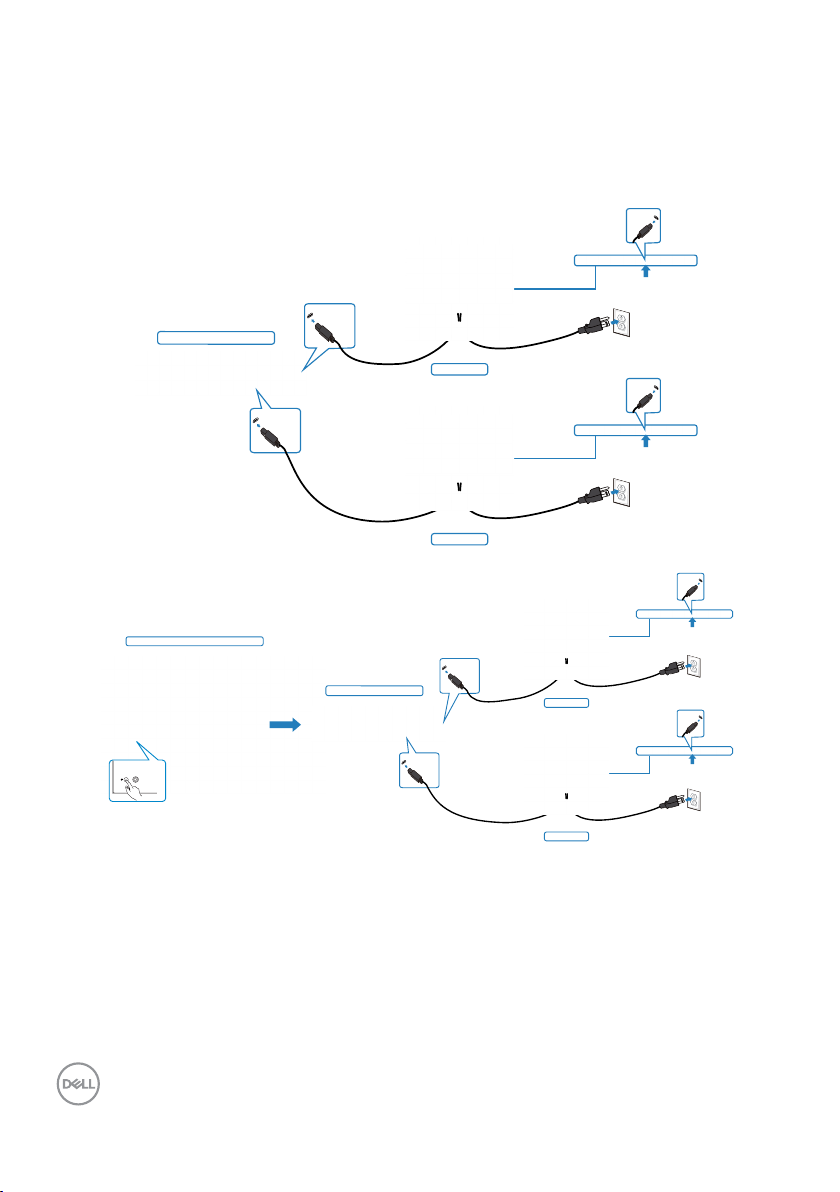
Connecting the monitor for USB-C
The Dell OptiPlex 7090 Ultra platform has two USB-C ports, so both Monitor 1 and
Monitor 2 power state can sync with the PC.
While the PC and two monitors are in an initially ON power state, by pressing the
power button on Monitor 1 or Monitor 2 will turn OFF the PC, Monitor 1, and Monitor 2.
USB Type-C
USB Type-C
port1
System power state(ON)
Pressing power button on Monitor 1 or 2
USB Type-C
port2
System power state(OFF)
Monitor 1
Monitor 2
USB Type-C
port1
Monitor 1
USB Type-C
USB Type-C
USB Type-C
56 | Setting up the monitor
USB Type-C
port2
Monitor 2
Page 57
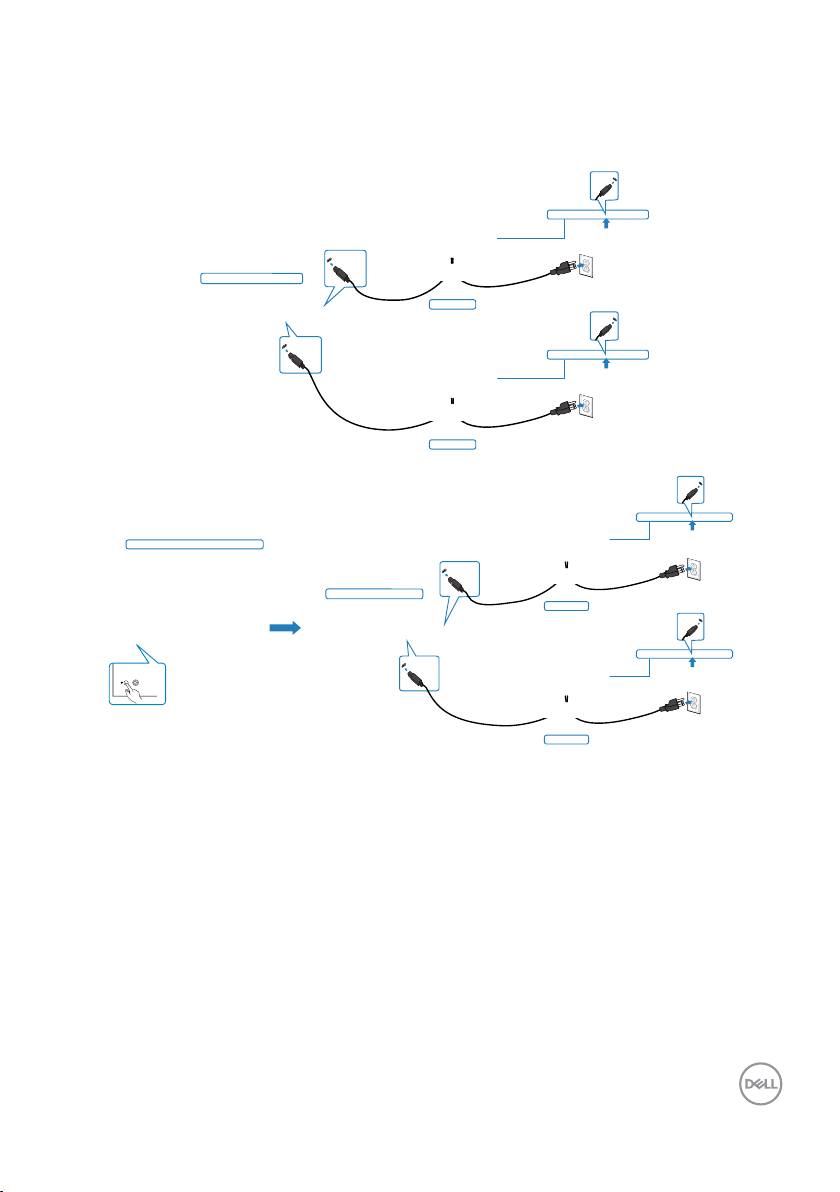
Make sure to set USB-C Charging to On in Off Mode. While the PC and two
monitors are in an initially OFF power state, by pressing the power button on Monitor 1
or Monitor 2 will turn ON the PC, Monitor 1, and Monitor 2.
USB Type-C
USB Type-C
USB Type-C
port2
port1
System power state(ON)
Monitor 1
Monitor 2
USB Type-C
port1
Monitor 1
USB Type-C
USB Type-C
USB Type-C
System power state(OFF)
Pressing power button on Monitor 1 or 2
USB Type-C
port2
Monitor 2
Setting up the monitor | 57
Page 58
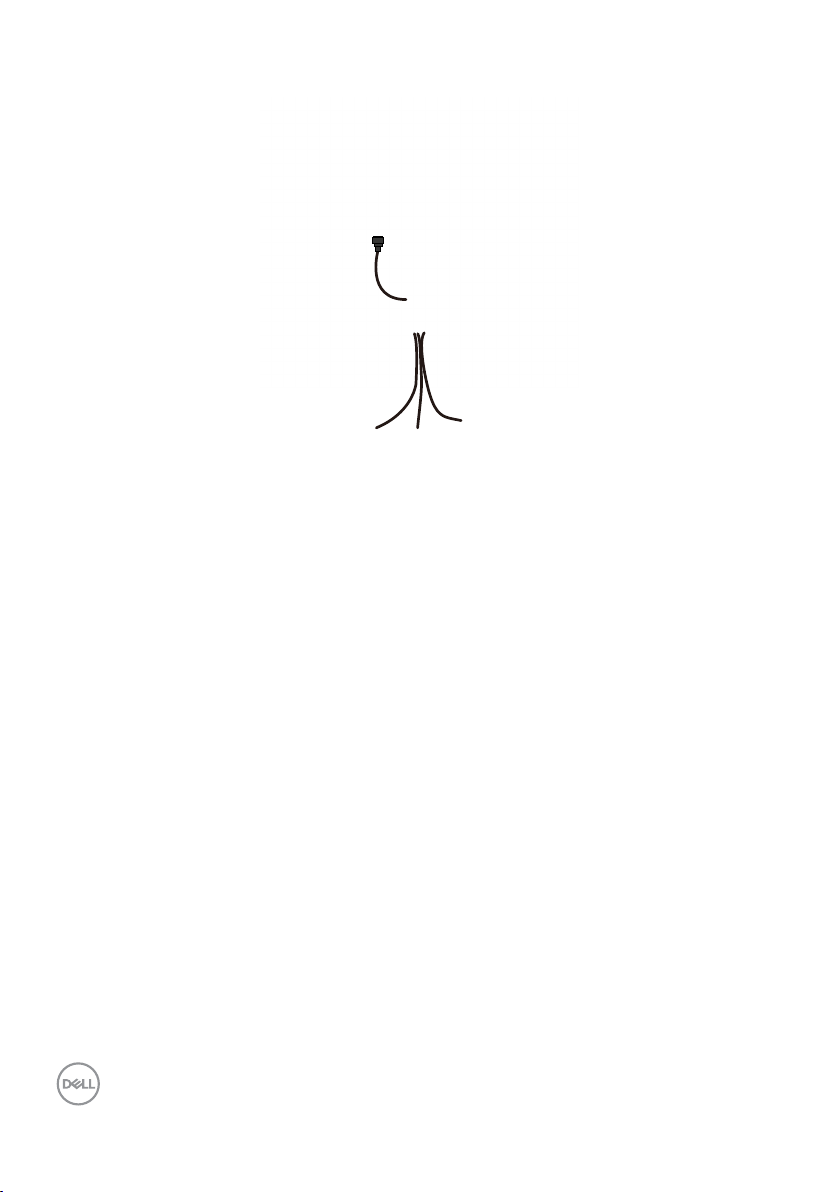
Organizing your cables
After attaching all necessary cables to your monitor and computer, (see Connecting
Your Monitor for cable attachment) organize all cables as shown above.
Securing your monitor using Kensington lock (optional)
The security lock slot is located at the bottom of the monitor. (See Security lock
slot)
For more information on using the Kensington lock (purchased separately), see the
documentation that is shipped with the lock.
Secure your monitor to a table using the Kensington security lock.
NOTE: The image is for the purpose of illustration only. Appearance of the
lock may vary.
58 | Setting up the monitor
Page 59
Removing the monitor stand
CAUTION: To prevent scratches on the LCD screen when removing the
stand,ensure that the monitor is placed on a soft, clean surface.
NOTE: The following instructions are applicable only for the stand that
was shipped with your monitor. If you are connecting a stand that you
purchased from any other source, follow the set up instructions that were
included with the stand.
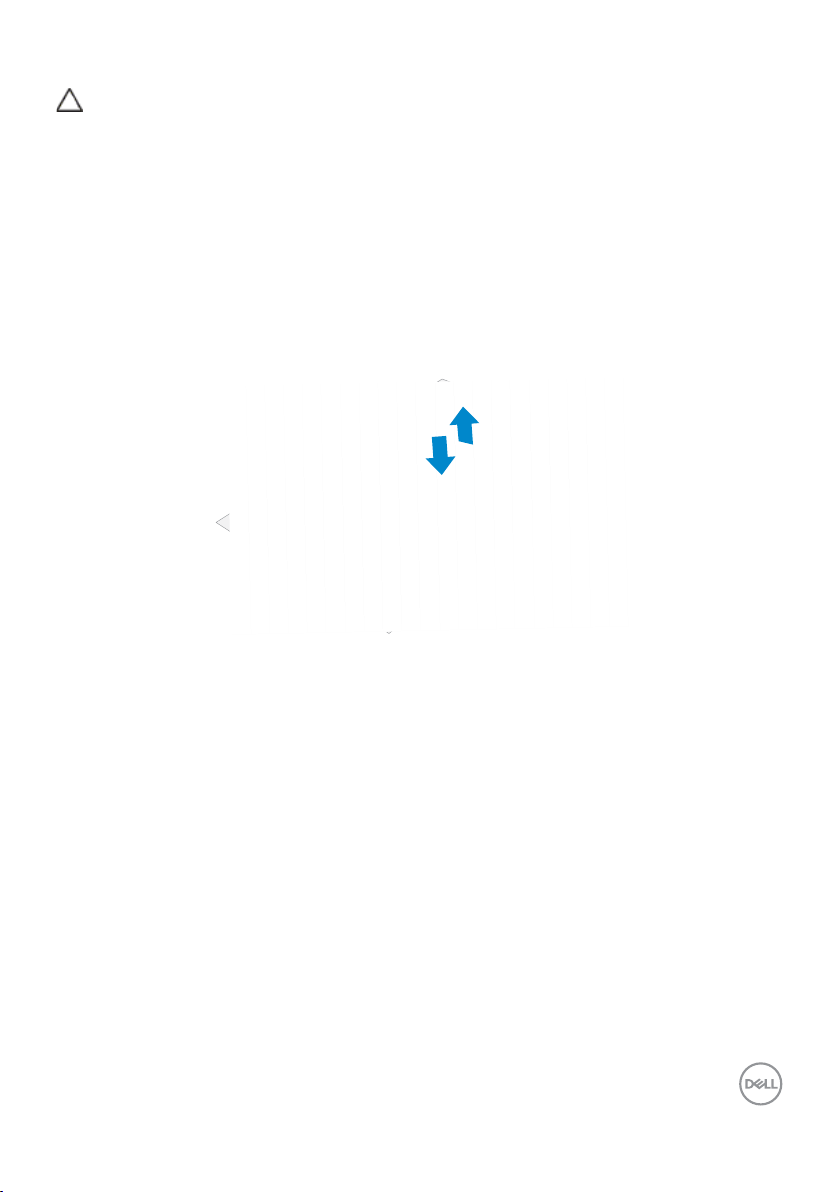
To remove the stand:
1. Place the monitor on a soft cloth or cushion.
2. Press and hold the stand-release button.
3. Lift the stand up and away from the monitor.
3
2
Setting up the monitor | 59
Page 60
Wall mounting (Optional)
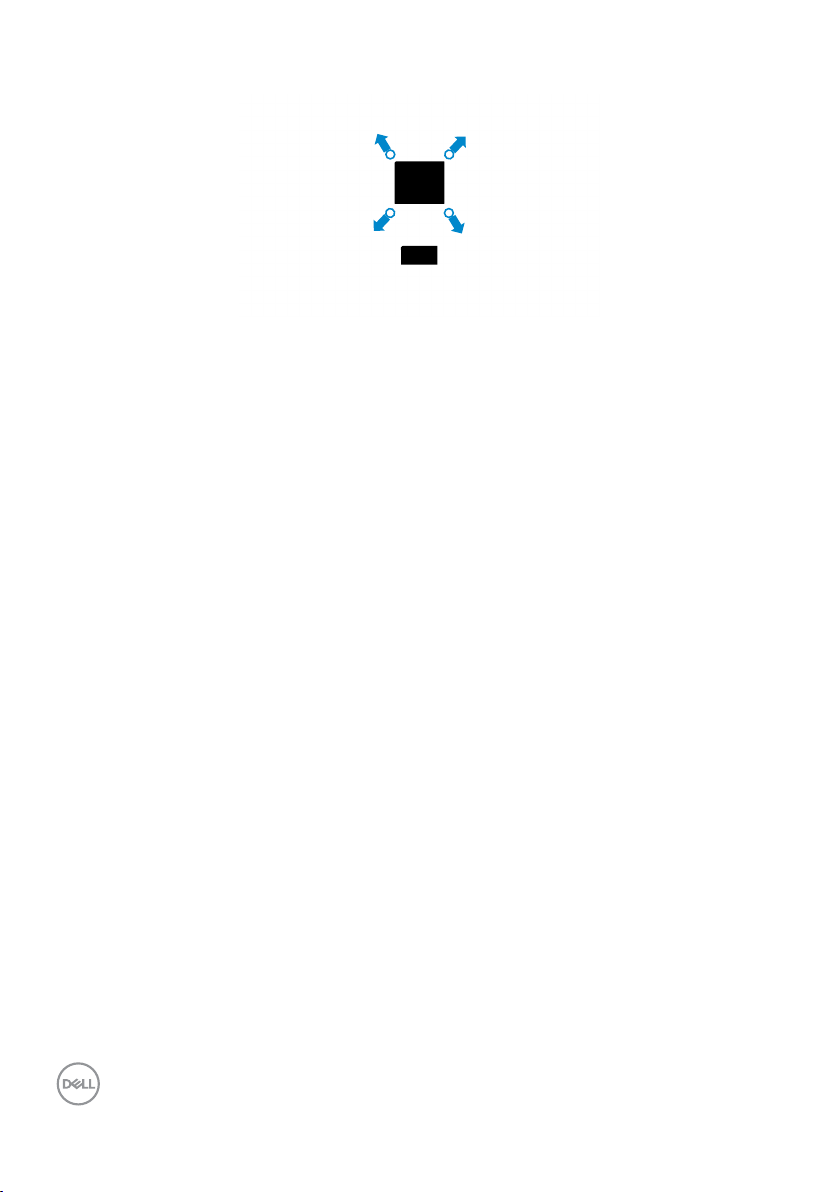
NOTE: Use M4 x 11 mm screws to connect the monitor to the wall-
mounting kit.
Refer to the instructions that come with the VESA-compatible wall mounting kit.
1. Place the monitor on a soft cloth or cushion on a stable flat table.
2. Remove the stand.
3. Use a Phillips crosshead screwdriver to remove the four screws securing the
plastic cover.
4. Attach the mounting bracket from the wall mounting kit to the monitor.
5. Mount the monitor on the wall as instructed in the documentation that shipped
with the wall-mounting kit.
NOTE: For use only with UL or CSA or GS-listed wall mount bracket with
minimum weight/load bearing capacity of 17.32 kg (38.40 lb) (C2422HE) /
22.96 kg (50.80 lb) (C2722DE) / 29.20 kg (64.24 lb) (C3422WE).
60 | Setting up the monitor
Page 61
Operating the monitor
Power on the monitor
Press the button to turn on the monitor.
Using the joystick control
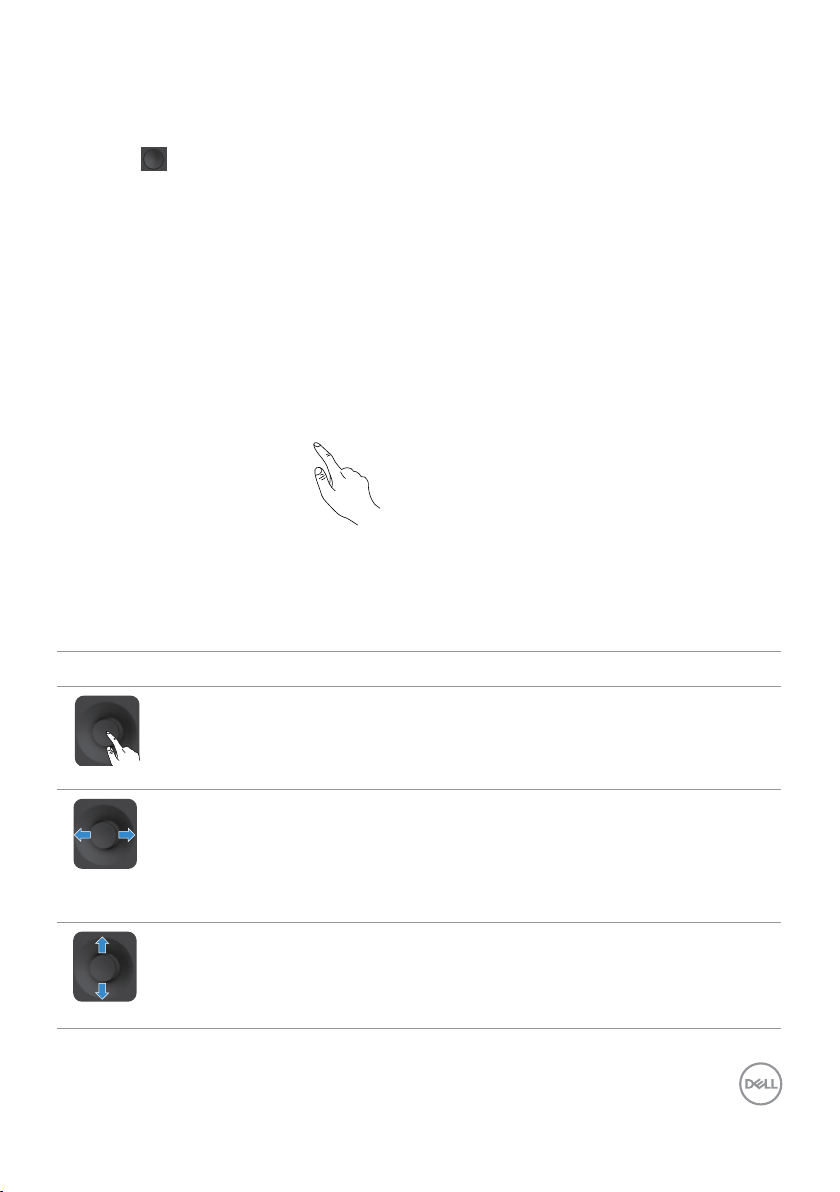
Use the joystick control on the rear of the monitor to make OSD adjustments.
1. Press the joystick button to launch the OSD main menu.
2. Move the joystick up/down/left/right to toggle between options.
3. Press the joystick button again to confirm the settings and exit.
Joystick Description
• When the OSD menu is on, press the button to confirm the selection
or save the settings.
• When the OSD menu is off, press the button to launch the OSD main
menu. See Accessing the menu system.
• For 2-way (right and left) directional navigation.
• Move right to enter the submenu.
• Move left to exit from the submenu.
• Increases (right) or decreases (left) the parameters of selected menu
item.
• For 2-way (up and down) directional navigation.
• Toggles between the menu items.
• Increases (up) or decreases (down) the parameters of selected menu
item.
Operating the monitor | 61
Page 62
Using the rear-panel controls
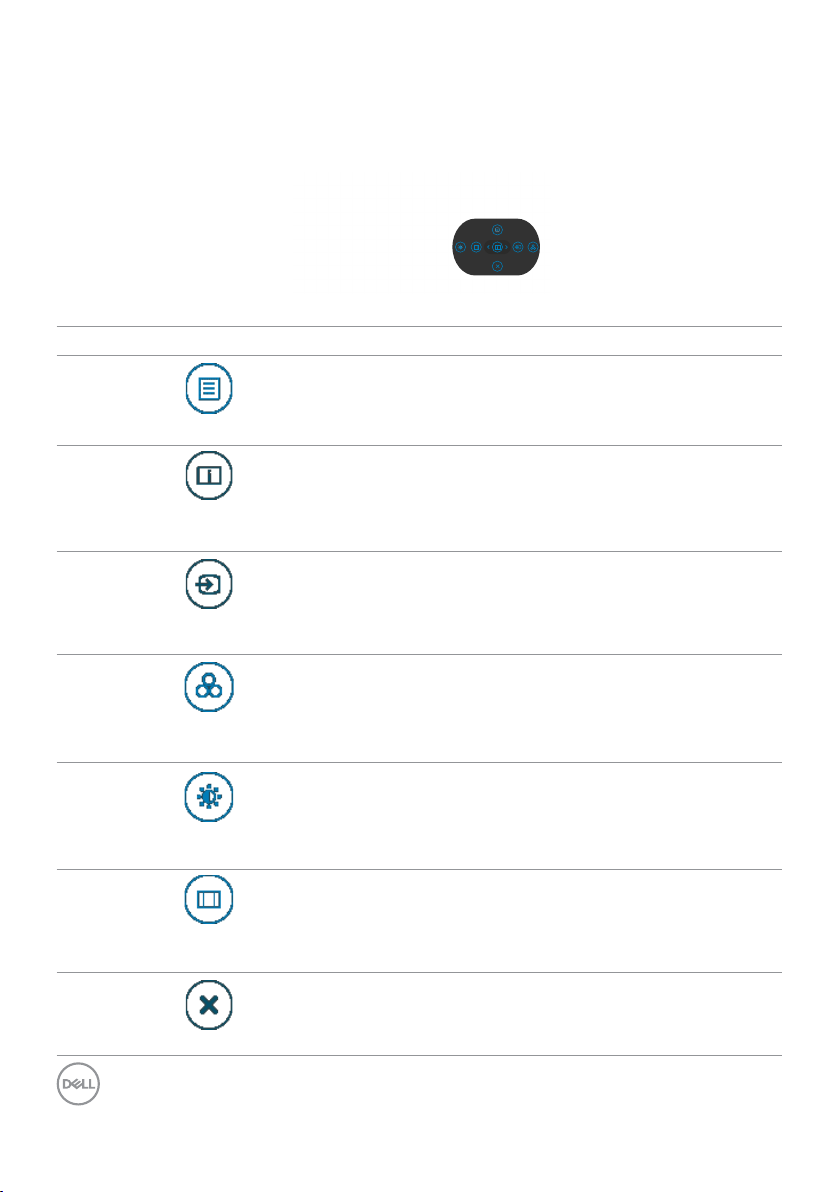
Use the joystick control on the rear of the monitor to adjust the display settings. As
you use the button to adjust the settings, an OSD shows the numeric values of each
feature as they change.
Display Info
The following table describes the rear-panel buttons:
Options Description
1
Use this Menu button to launch the on-screen
display (OSD) and select the OSD menu.
Shortcut key: Menu
2
See Accessing the menu system
Use this button to choose from a list of Display
Info.
Shortcut key:
Display Info
3
Use this button to choose from a list of Input
Source.
Shortcut key: Input
Source
4
Use this button to choose from a list of preset
colormodes.
Shortcut key:
Preset Modes
5
To directly access the Brightness/Contrast
adjustment sliders.
Shortcut key:
Brightness/Contrast
6
Use this button to choose from a list of Aspect
Ratio.
Shortcut key:
Aspect Ratio
7
Use this button to go back to the main menu or
exit the OSD main menu.
Exit
62 | Operating the monitor
Page 63
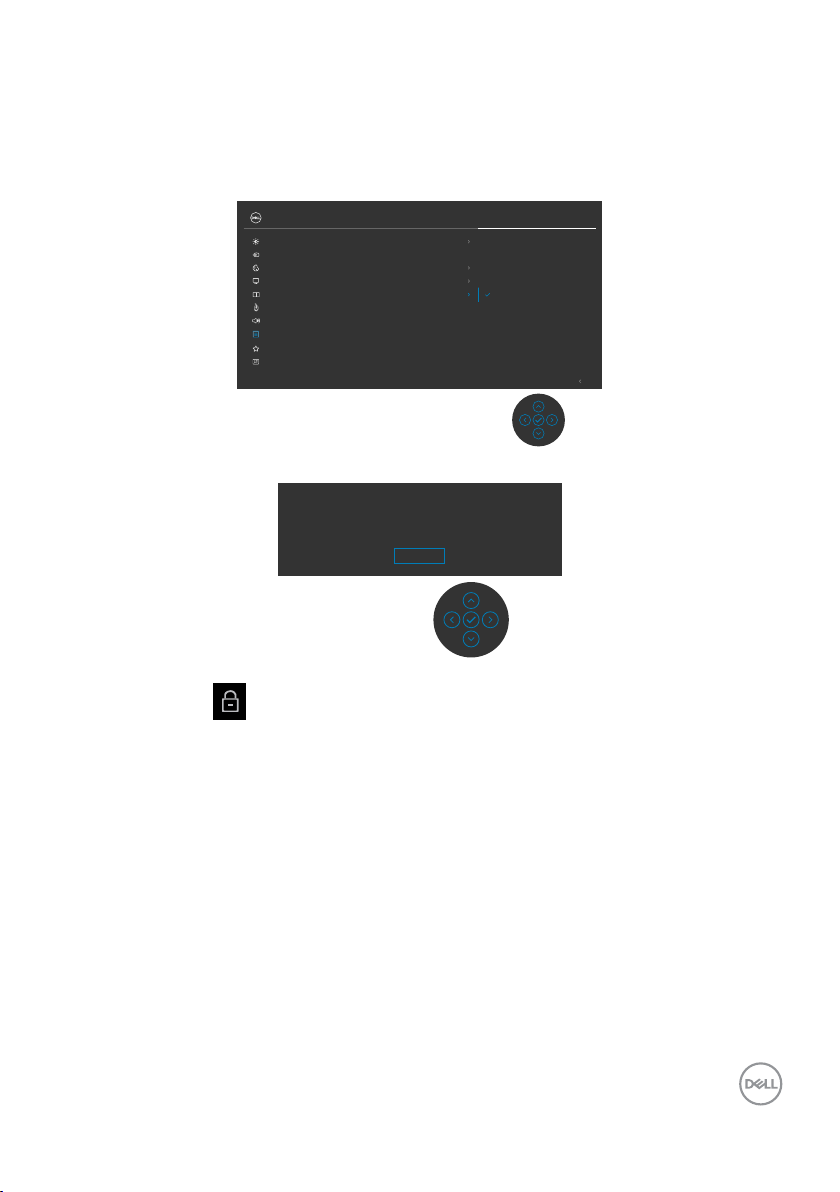
Using the OSD lock function
You can lock the front-panel control buttons to prevent access to the OSD menu and/
or power button.
Use the Lock menu to lock the button(s).
1. Select one of the following options.
24/27/34 Monitor
Brightness/Contrast
Input Source
Color
Display
PIP/PBP
USB
Audio
Menu
Personalize
Others
2. The following message appears.
Language
Rotation
Transparency
Timer
Reset Menu
Are you sure you want to lock the Menu Buttons?
To unlock the Button, refer to the User’s Guide.
Yes
No
Menu ButtonsLock
Power Button
Menu + Power Buttons
Disable
Exit
3. Select Yes to lock buttons. Once locked, pressing any control button will display
the lock icon .
Operating the monitor | 63
Page 64
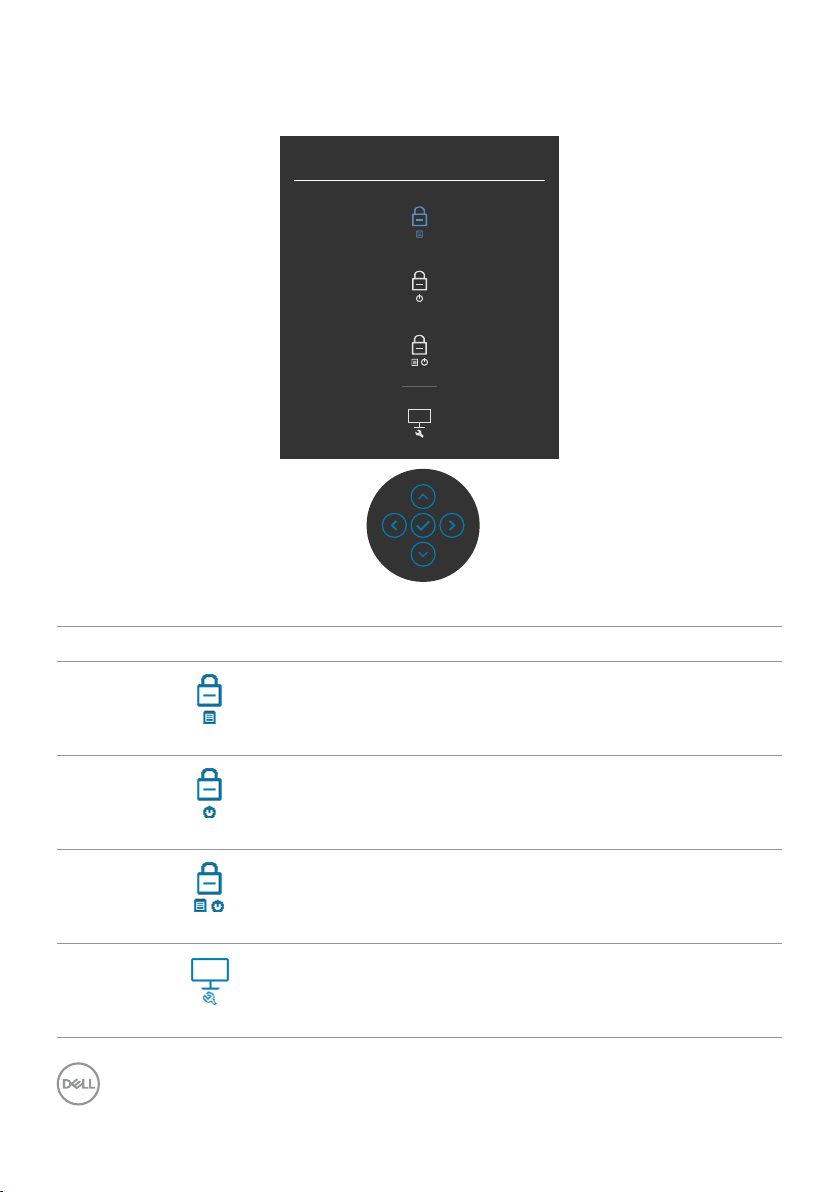
Use the Joystick to lock the button(s).
Press the left directional navigation of Joystick for four seconds, a menu appears on
the screen.
Select Option:
Select one of the following options:
Options Description
1
Select this option to lock OSD menu function.
Menu Button lock
2
Power Button lock
3
Menu and Power Button lock
4
Built-in Diagnostics
64 | Operating the monitor
Use this option to lock power button. This will
prevent the user to turn off the monitor using the
power button.
Use this option to lock OSD menu and power
button to turn off the monitor.
Use this option to run the built-in diagnostics, see
Built-in Diagnostics.
Page 65
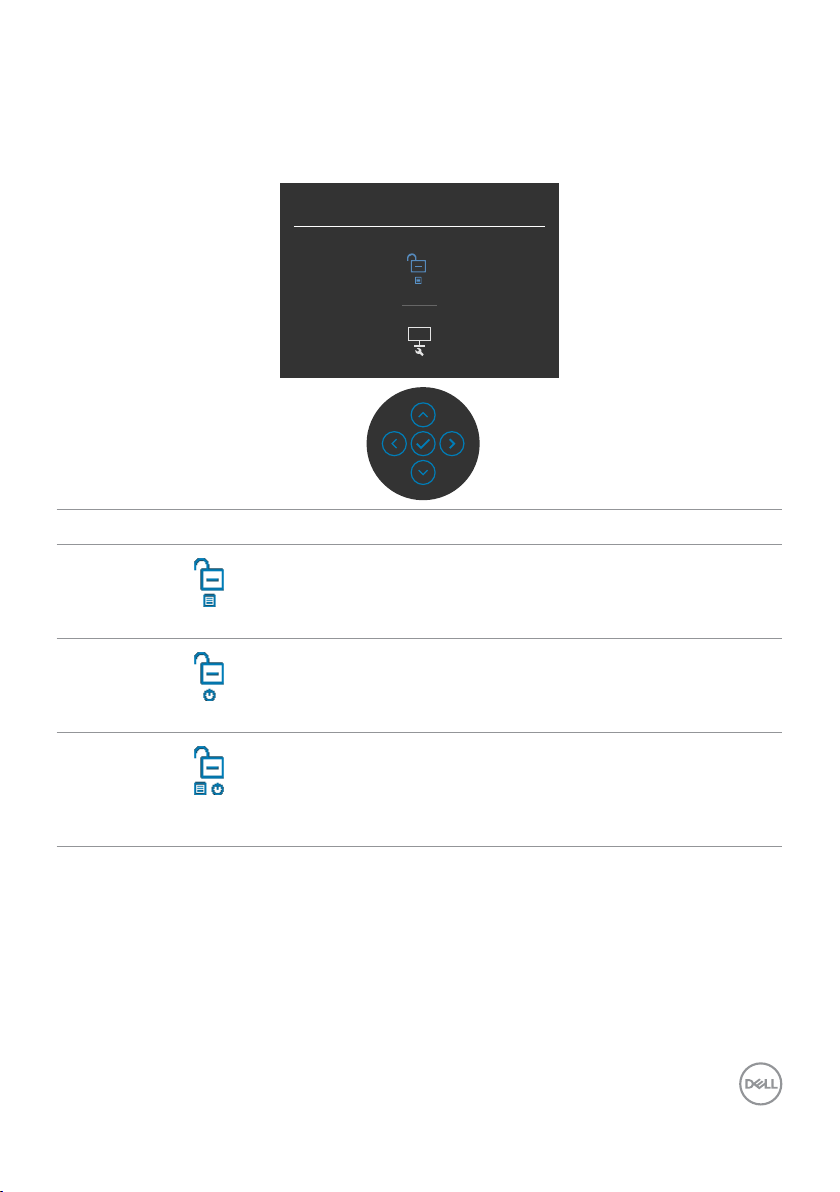
To unlock the button(s).
Press the left directional navigation of Joystick for four seconds until a menu appears
on the screen. The following table describes the options to unlock the front-panel
control buttons.
Select Option:
Options Description
1
Menu Button unlock
2
Use this option to unlock OSD menu function.
Use this option to unlock power button to turn off
the monitor.
Power Button unlock
3
Menu and Power Button
unlock
Use this option to unlock OSD menu and power
button to turn off the monitor.
Operating the monitor | 65
Page 66
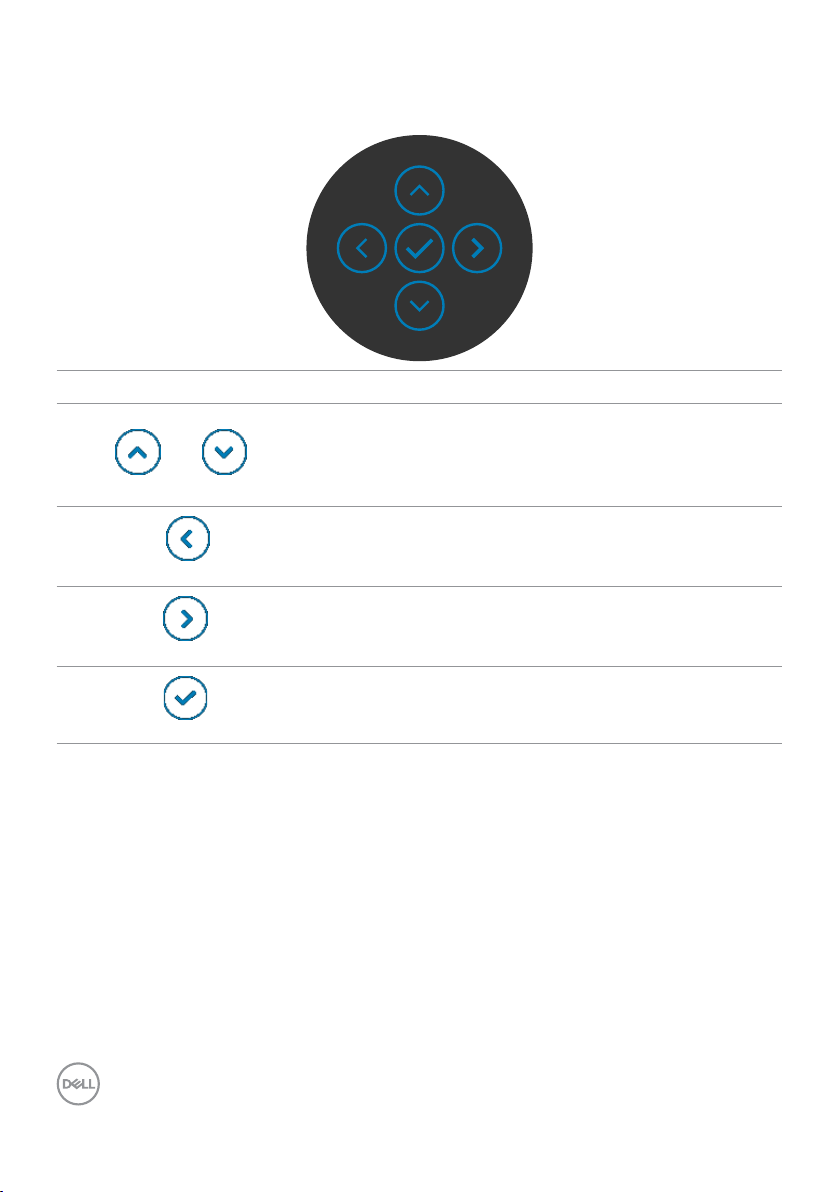
Front-panel button
Use the buttons on the front of the monitor to adjust the image settings.
Front Panel Description
1
Up Down
2
Previous
3
Use the Up (increase) and Down (decrease) buttons to
adjust items in the OSD menu.
Use the Previous button to go back to the previous
menu.
Use the Next button to confirm your selection.
Next
4
Tick
Use the Tick button to confirm your selection.
66 | Operating the monitor
Page 67
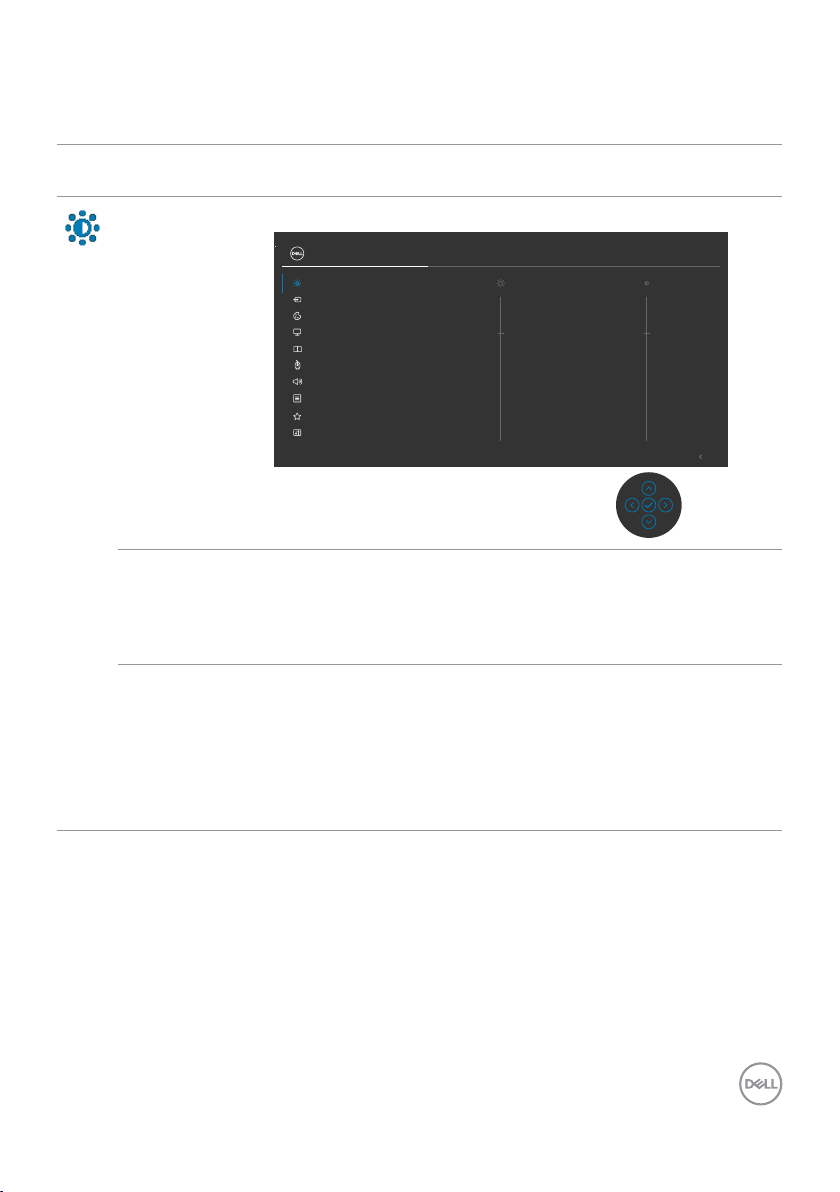
Using the On-Screen Display (OSD) Menu
Accessing the menu system
Icon Menu and
Submenus
Brightness/
Contrast
Brightness Brightness adjusts the luminance of the backlight
Contrast Adjust the Brightness first, and then adjust Contrast only
Description
Use this menu to activate Brightness/Contrast adjustment.
24/27/34 Monitor
Brightness/Contrast
Input Source
Color
Display
PIP/PBP
USB
Audio
Menu
Personalize
Others
75% 75%
Exit
(minimum 0; maximum 100).
Move the joystick up to increase brightness.
Move the joystick down to decrease brightness.
if further adjustment is necessary.
Move the joystick up to increase contrast and Move the
joystick down to decrease contrast (between 0 and 100).
The Contrast function adjusts the degree of difference
between darkness and lightness on the monitor screen.
Operating the monitor | 67
Page 68
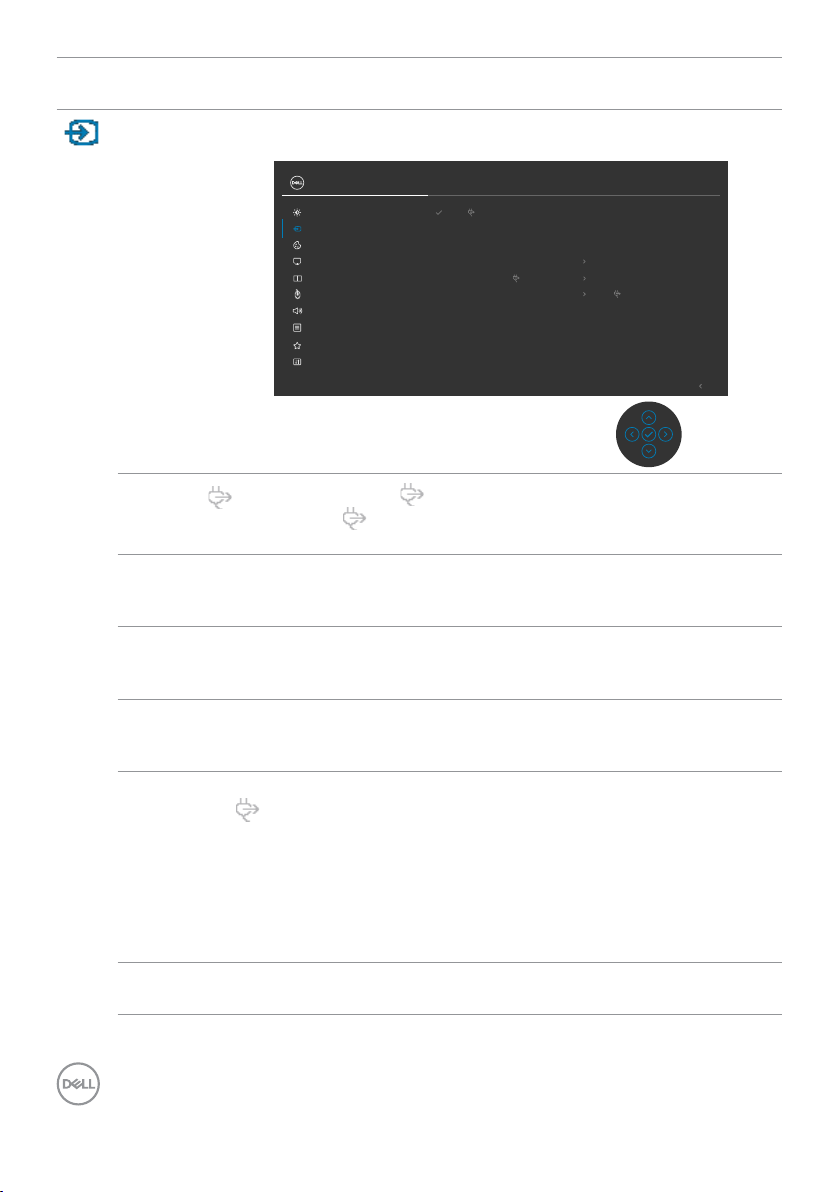
Icon Menu and
Description
Submenus
Input Source Use the Input Source menu to select between different
video inputs that are connected to your monitor.
24/27/34 Monitor
Brightness/Contrast
Input Source
Color
Display
PIP/PBP
USB
Audio
Menu
Personalize
Others
USB-C 90W
DP
HDMI
Auto Select On
Auto Select for USB-C 90W Prompt for Multiple Inputs
Rename Inputs
Reset Input Source
USB-C 90W
Exit
USB-C
90 W
Select USB-C 90 W input when you are using the
USB-C 90 W connector. Press the joystick button to
confirm the selection.
DP Select DP input when you are using the DP (DisplayPort)
connector. Press the joystick button to confirm the
selection.
HDMI Select the HDMI input when you are using the HDMI
connector. Press the joystick button to confirm the
selection.
Auto Select Turn on the function to allow the monitor to automatically
scan for available input sources. Press the joystick button to
confirm the selection.
Auto Select
for USB-C
90 W
Allows you to set Auto Select for USB Type-C to:
• Prompt for Multiple Inputs: always show Switch to
USB Type-C Video Input message for user to choose
whether to switch or not.
• Yes: The monitor always switch to USB Type-C video
without asking while USB Type-C connected.
• No: The monitor will NOT auto switch to USB Type-C
video from another available input.
Rename
Allows you to Rename Inputs.
Inputs
68 | Operating the monitor
Page 69
Icon Menu and
Description
Submenus
Reset Input
Source
Resets all settings under the Input Source menu to the
factory defaults.
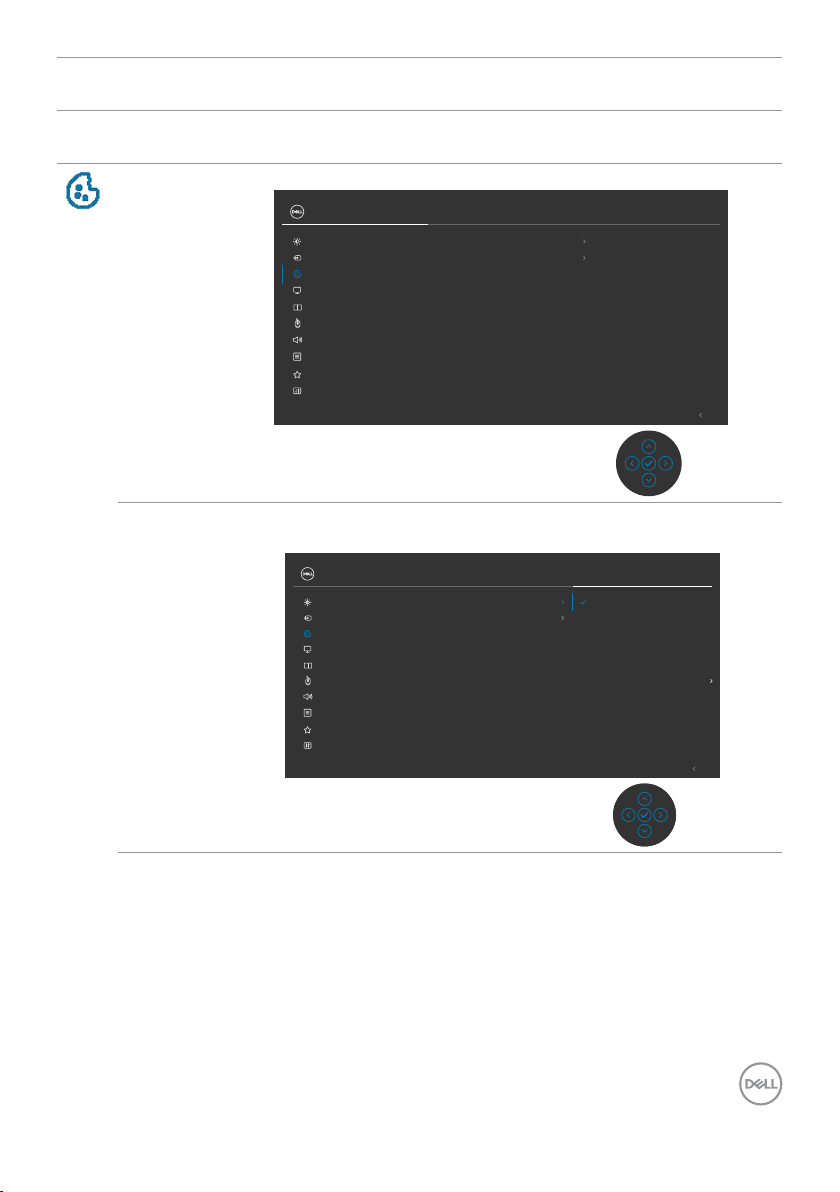
Color Use the Color menu to adjust the color setting mode.
24/27/34 Monitor
Brightness/Contrast
Input Source
Color
Display
PIP/PBP
USB
Audio
Menu
Personalize
Others
Preset Modes
Reset Color
Standard
RGBInput Color Format
Preset Modes When you select Preset Modes, you can choose Standard,
Movie, Game, Warm, Cool or Custom Color from the list.
24/27/34 Monitor
Brightness/Contrast
Input Source
Color
Display
PIP/PBP
USB
Audio
Menu
Personalize
Others
Preset Modes
Input Color Format
Hue
Saturation
Reset Color
Standard
Movie
Game
Warm
Cool
Custom Color
Exit
Exit
Operating the monitor | 69
Page 70
Icon Menu and
Submenus
Input Color
Format
Description
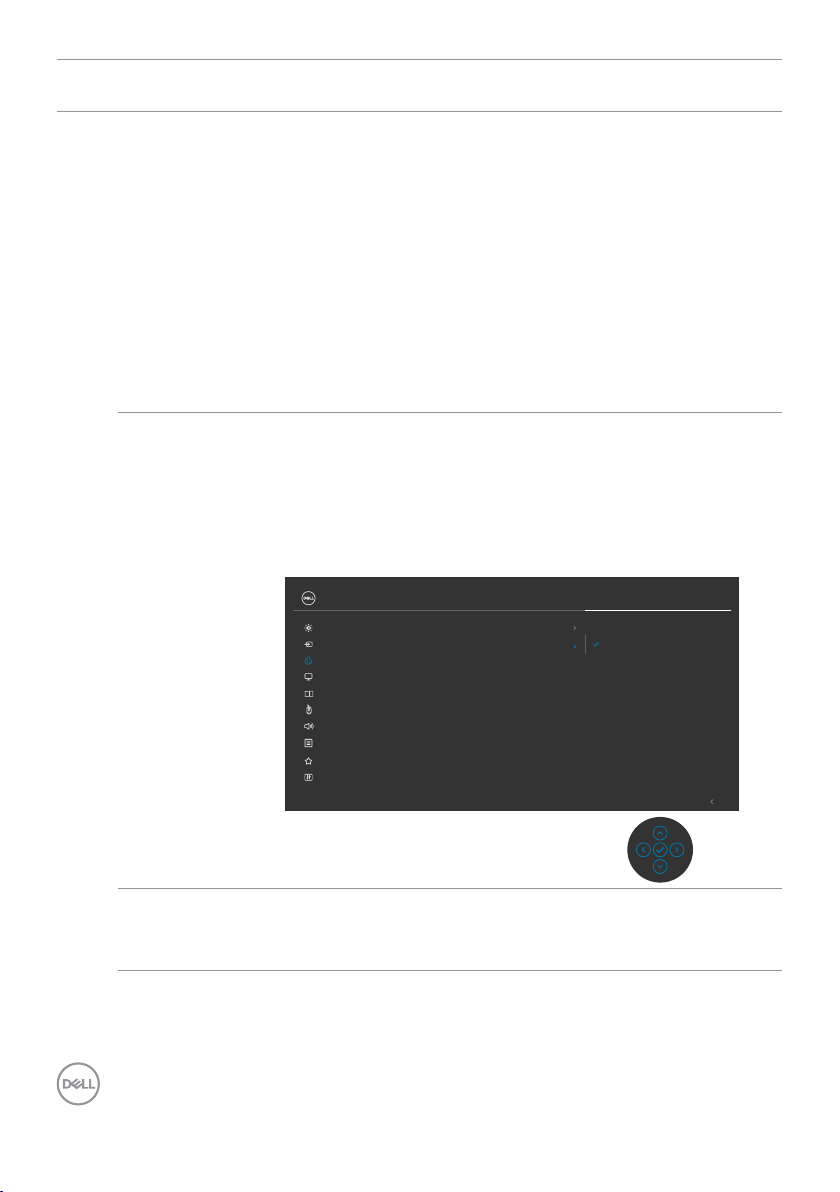
• Standard: Default Color setting, This monitor uses a low
blue light panel, and is certied by TUV to reduce blue
light output and create a more relaxing and less stimulating
image while reading content on the screen.
• Movie: Ideal for movies.
• Game: Ideal for most gaming applications.
• Warm: Presents colors at lower color temperatures. The
screen appears warmer with a red/yellow tint.
• Cool: Presents colors at higher color temperatures. The
screen appears cooler with a blue tint.
• Custom Color: Allows you to manually adjust the color
settings. Press the joystick left and right buttons to adjust
the Red, Green, and Blue values and create your own
preset color mode.
Allows you to set the video input mode to:
• RGB: Select this option if your monitor is connected to
a computer (or DVD player) using the USB Type-C, DP,
HDMI cable.
• YPbPr: Select this option if your DVD player supports only
YPbPr output.
24/27/34 Monitor
Brightness/Contrast
Input Source
Color
Display
PIP/PBP
USB
Audio
Menu
Personalize
Others
Preset Modes
Input Color Format
Hue
Saturation
Reset Color
RGB
YPbPr
Exit
Hue Use joystick up or down to adjust the hue from 0 to 100.
NOTE: Hue adjustment is available only for Movie and
Game mode.
70 | Operating the monitor
Page 71
Icon Menu and
Description
Submenus
Saturation Use joystick up or down to adjust the saturation from 0 to
100.
NOTE: Saturation adjustment is available only for Movie
and Game mode.
Reset Color Resets your monitor’s color settings to the factory defaults.
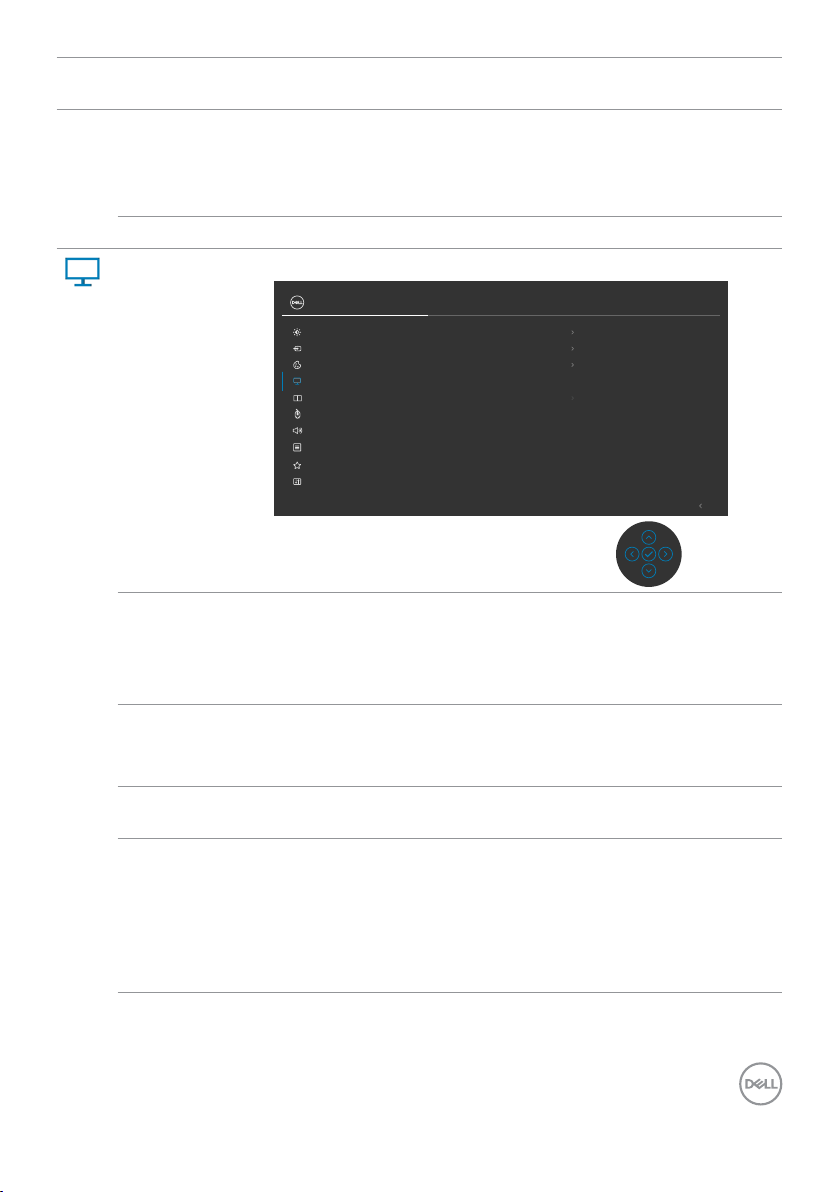
Display Use the Display menu to adjust image.
24/27/34 Monitor
Brightness/Contrast
Input Source
Color
Display
PIP/PBP
USB
Audio
Menu
Personalize
Others
Aspect Ratio
Response Time
MST
Reset Display
Aspect Ratio C2422HE: Adjust the image ratio to 16:9, 4:3, 5:4.
C2722DE: Adjust the image ratio to 16:9,Auto Resize, 4:3,
1:1.
C3422WE: Adjust the image ratio to 21:9,4:3, 5:4.
Sharpness Makes the image look sharper or softer.
Move the joystick up and down to adjust the sharpness
from ‘0’ to ‘100’.
Response
Allows you to set the Response Time to Normal or Fast.
Time
MST
(C2422HE/
C2722DE
only)
DP Multi Stream Transport, Set to ON enables MST(DP
out), Set to OFF disables MST function.
NOTE: When DP/USB Type-C upstream cable and DP
downstream cable is connected, monitor will set MST =
ON automatically, this action will only be done once after
Factory Reset or Display Reset.
16:10
50Sharpness
Normal
High ResolutionUSB-C Prioritization
Exit
Operating the monitor | 71
Page 72
Icon Menu and
Submenus
USB-C
Prioritization
(C2722DE
only)
Reset Display Resets all settings under the Display menu to the factory
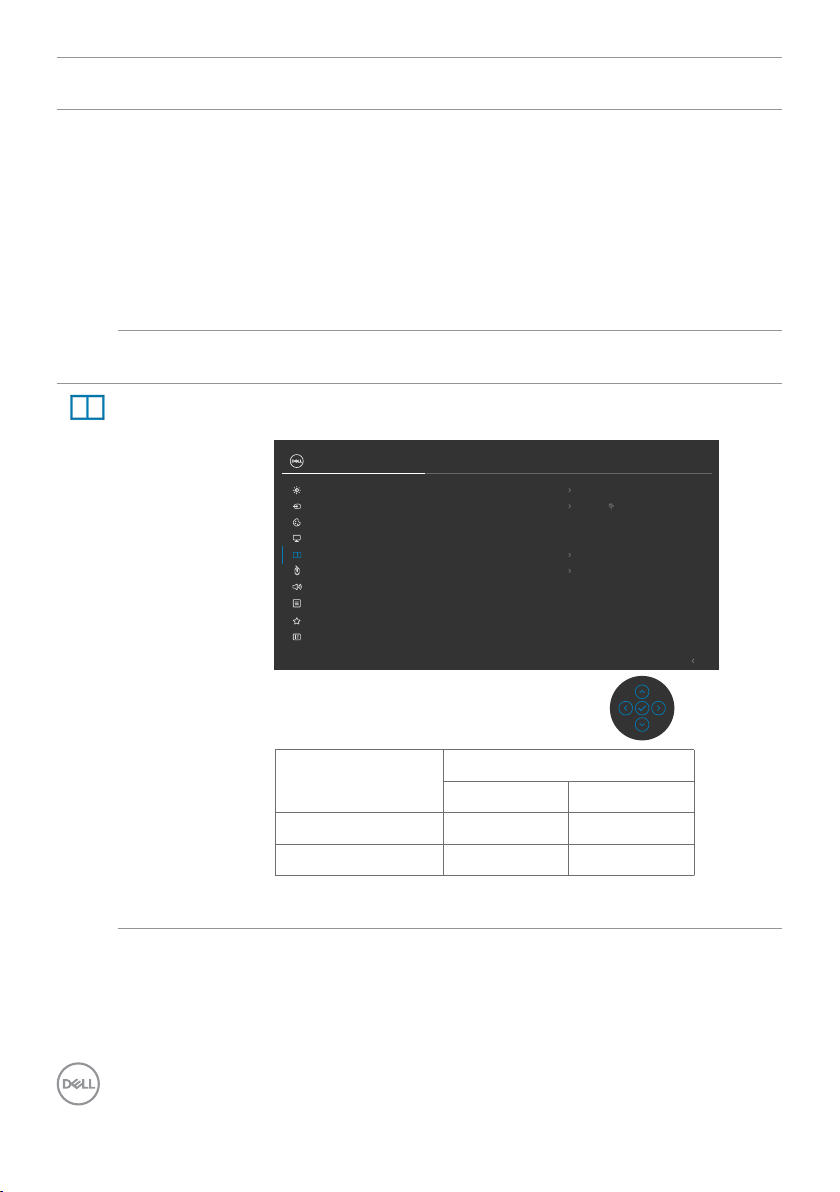
PIP/PBP
(C3422WE
only)
Description
Allows you to specify the priority to transfer the data with
high resolution (High Resolution) or high speed (High Data
Speed) when using the USB Type-C port/DisplayPort.
NOTE: If your PC does not have a built-in battery pack
and is powered directly from the monitor USB Type-C port
(such as the Dell OptiPlex Ultra Desktop), changing USB-C
Prioritization on the fly would interrupt the power from
monitor to the PC. Please set USB-C Charging to On
During Power Off.
defaults.
This function brings up a window displaying image from
another input source.
24/27/34 Monitor
Brightness/Contrast
Input Source
Color
Display
PIP/PBP
USB
Audio
Menu
Personalize
Others
PIP/PBP Mode O
PIP/PBP (Sub)
USB Switch
Video Swap
Audio
Contrast (Sub)
USB-C 90 W
Main
75
Exit
Main Window Sub-Window
USB Type-C √ √
DP √ √
NOTE: The images under PBP will be displayed at the
center of the screen, not full screen.
72 | Operating the monitor
USB Type-C DP
Page 73
Icon Menu and
Submenus
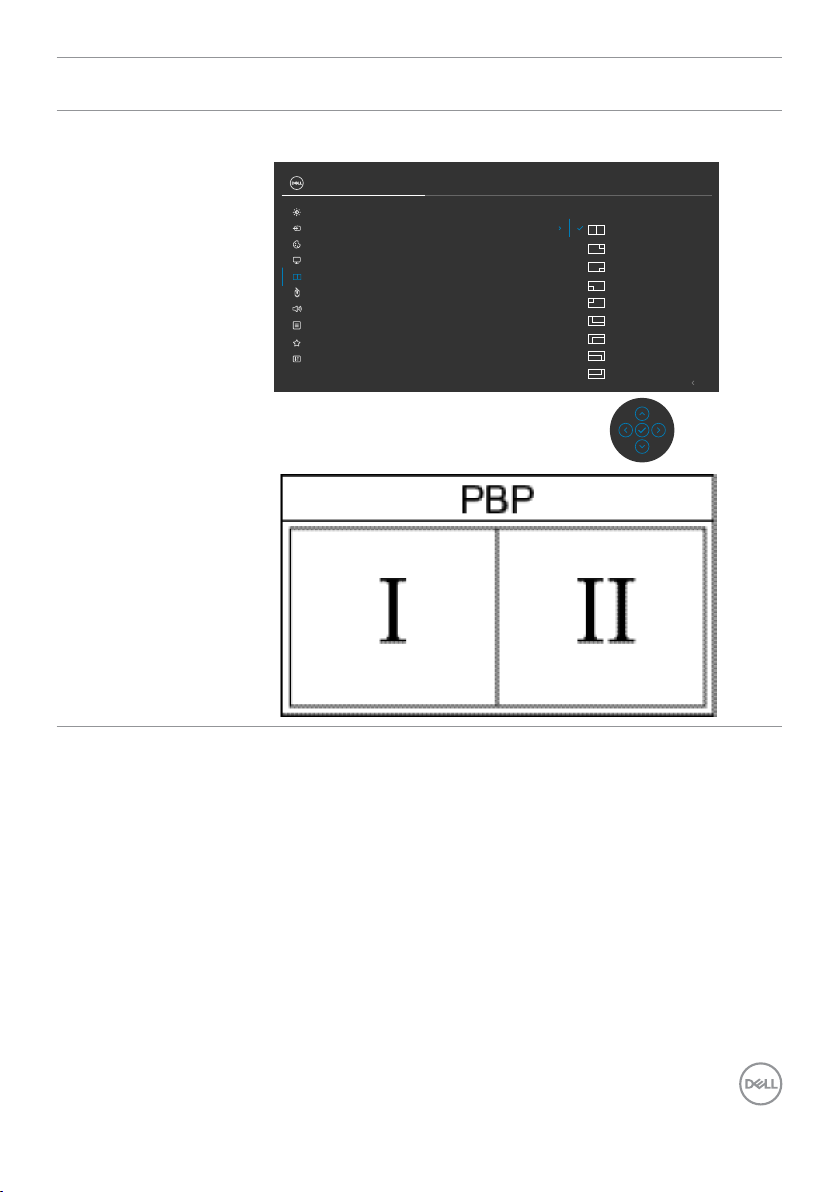
PIP/PBP
Mode
Description
Adjusts the PIP or PBP (Picture by Picture) mode.
You can disable this feature by selecting Off.
24/27/34 Monitor
Brightness/Contrast
Input Source
Color
Display
PIP/PBP
USB
Audio
Menu
Personalize
Others
PIP/PBP Mode O
PIP/PBP (Sub)
USB Switch
Video Swap
Audio
Contrast (Sub)
Exit
Operating the monitor | 73
Page 74
Icon Menu and
Submenus
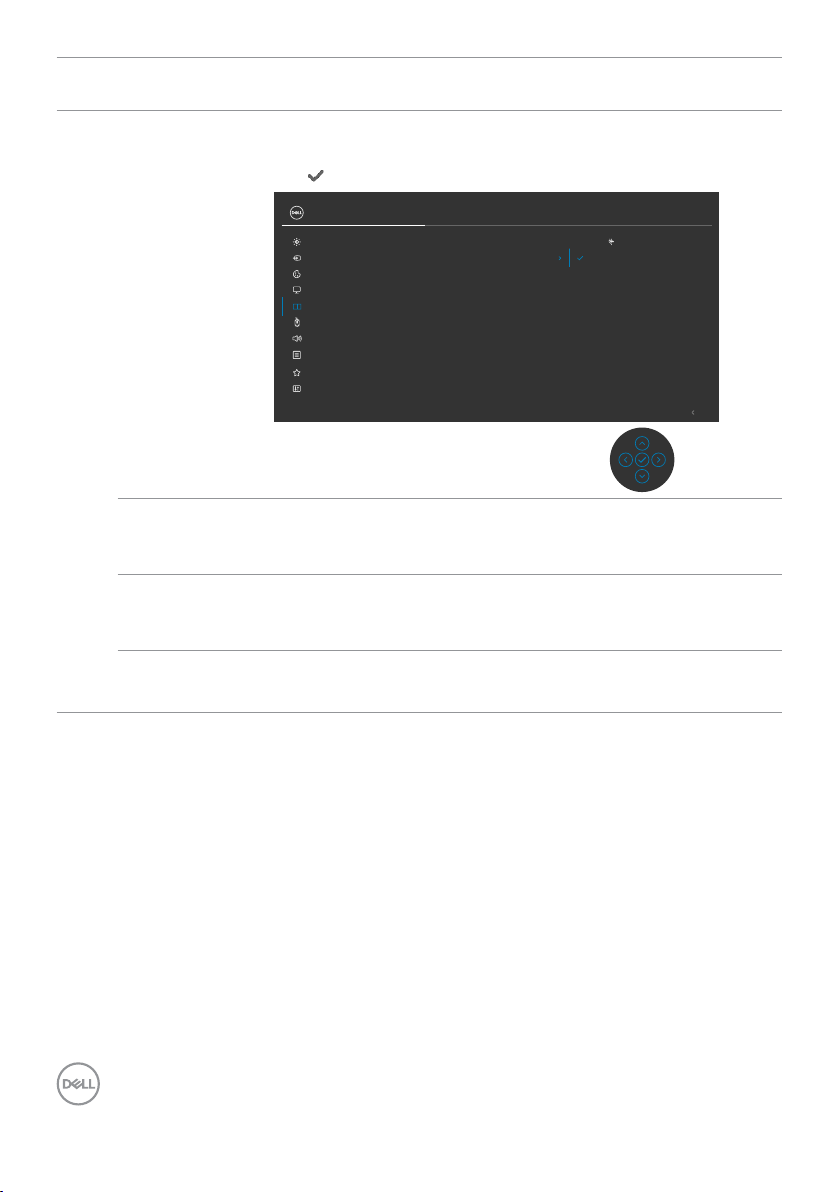
PIP/PBP
(Sub)
USB Switch Select to switch between the USB upstream sources in PBP
Video Swap Select to swap videos between main window and sub-
Contrast
(Sub)
Description
Select between the different video signals that may be
connected to your monitor for the PBP sub-window. Press
button to select the PBP sub-window source signal.
the
24/27/34 Monitor
Brightness/Contrast
Input Source
Color
Display
PIP/PBP
USB
Audio
Menu
Personalize
Others
PIP/PBP Mode
PIP/PBP (Sub)
USB Switch
Video Swap
Audio
Contrast (Sub)
USB-C 90 W
DP
HDMI
Exit
mode. Move the joystick to switch among USB upstream
sources in PBP mode.
window in PBP mode. Move the joystick to swap main
window and sub-window.
Adjust the contrast level of the picture in PBP Mode.
Move the joystick to increase or decrease the contrast.
74 | Operating the monitor
Page 75
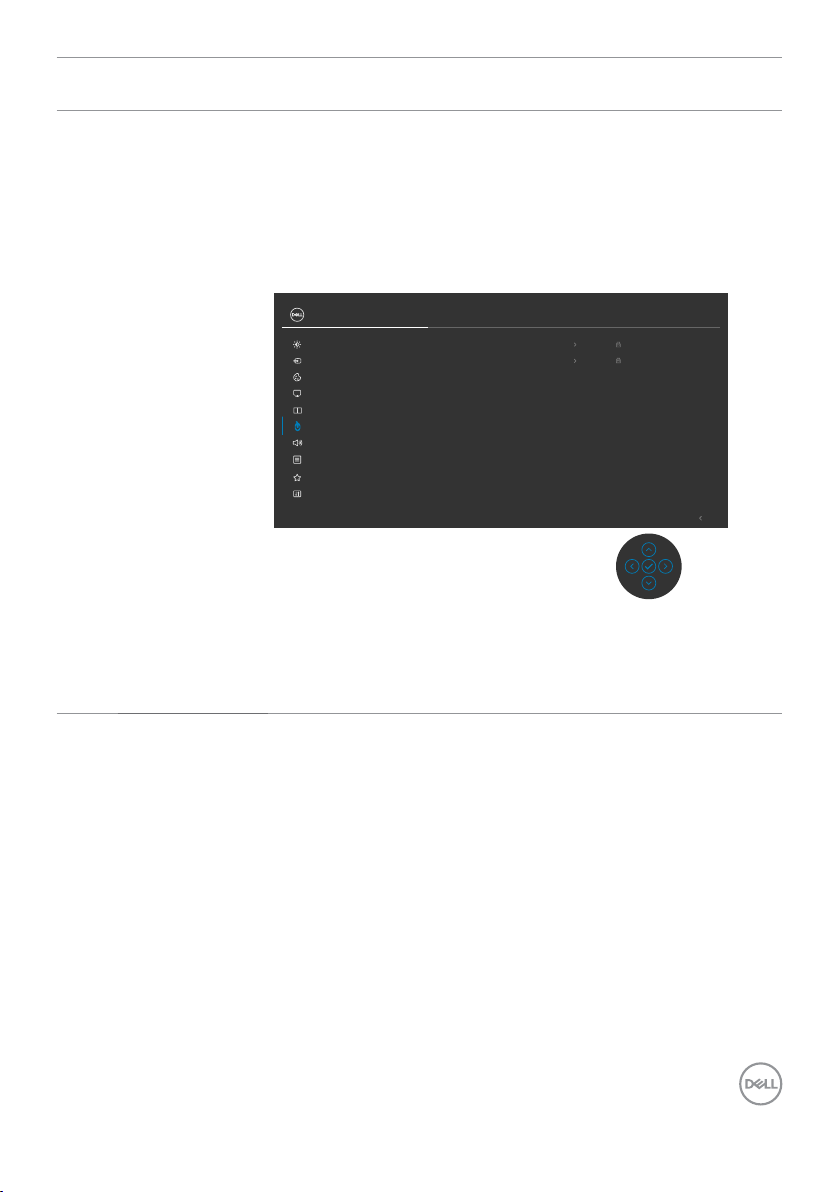
Icon Menu and
Description
Submenus
USB Allows you to set the USB upstream port for the DP input
signals, thus the monitor’s USB downstream port (eg.
keyboard and mouse) can be used by the current input
signals when you connect a computer to either one of the
upstream ports.
When you use only one upstream port, the connected
upstream port is active.
24/27/34 Monitor
Brightness/Contrast
Input Source
Color
Display
PIP/PBP
USB
Audio
Menu
Personalize
Others
DP assign to USB-B
HDMI assign to
USB-B
NOTE: To prevent data damage or loss, before changing
USB upstream ports, make sure that NO USB storage
devices are in use by the computer connected to the
monitor’s USB upstream port.
Exit
Operating the monitor | 75
Page 76
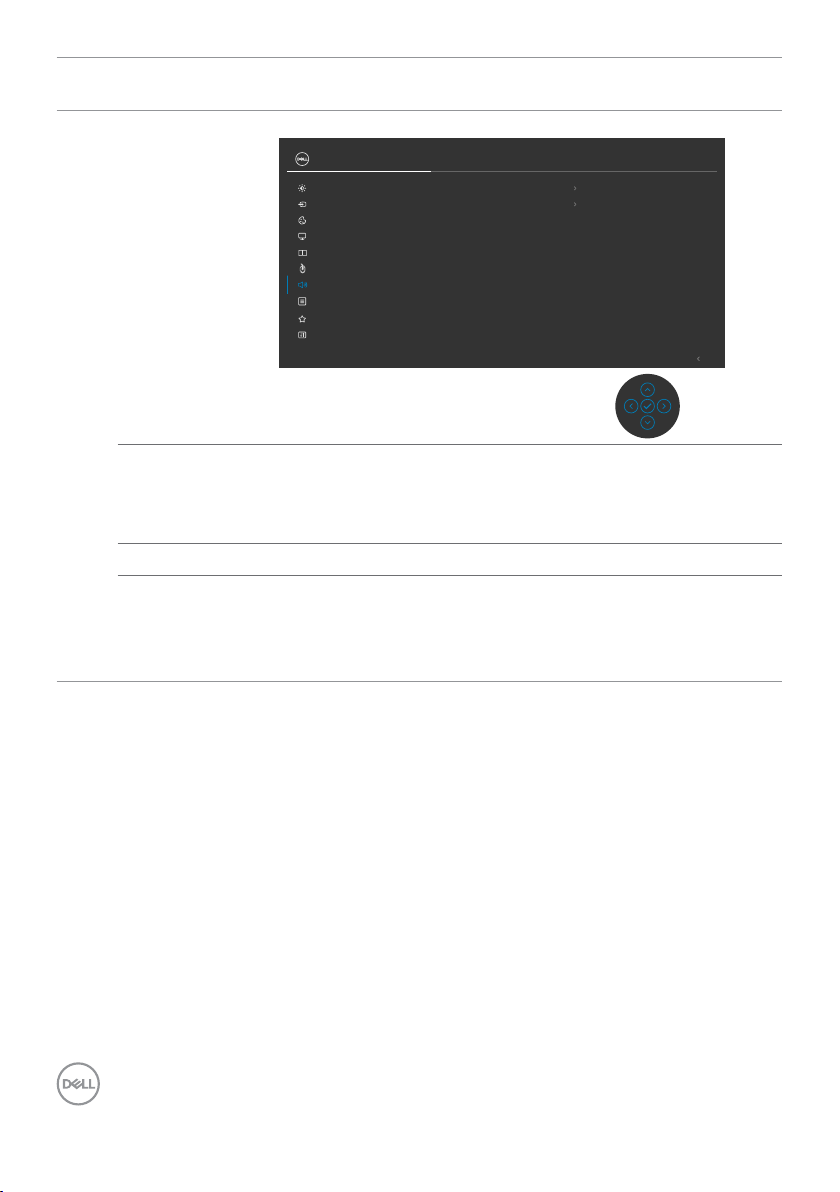
Icon Menu and
Submenus
Audio
Volume
Speaker
Reset Audio
Description
Use the Audio Settings menu to adjust the audio settings.
24/27/34 Monitor
Brightness/Contrast
Input Source
Color
Display
PIP/PBP
USB
Audio
Menu
Personalize
Others
Volume
Speaker
Reset Audio
100
On
Exit
Allows you to increase the speaker volume.
Move the joystick up and down to adjust the volume from
‘0’ to ‘100’.
Select On or Off the Speaker function.
Resets all settings under the Audio menu to the factory
defaults.
NOTE:With the USB cable audio volume sync with
windows volume and not to defult settings.
76 | Operating the monitor
Page 77
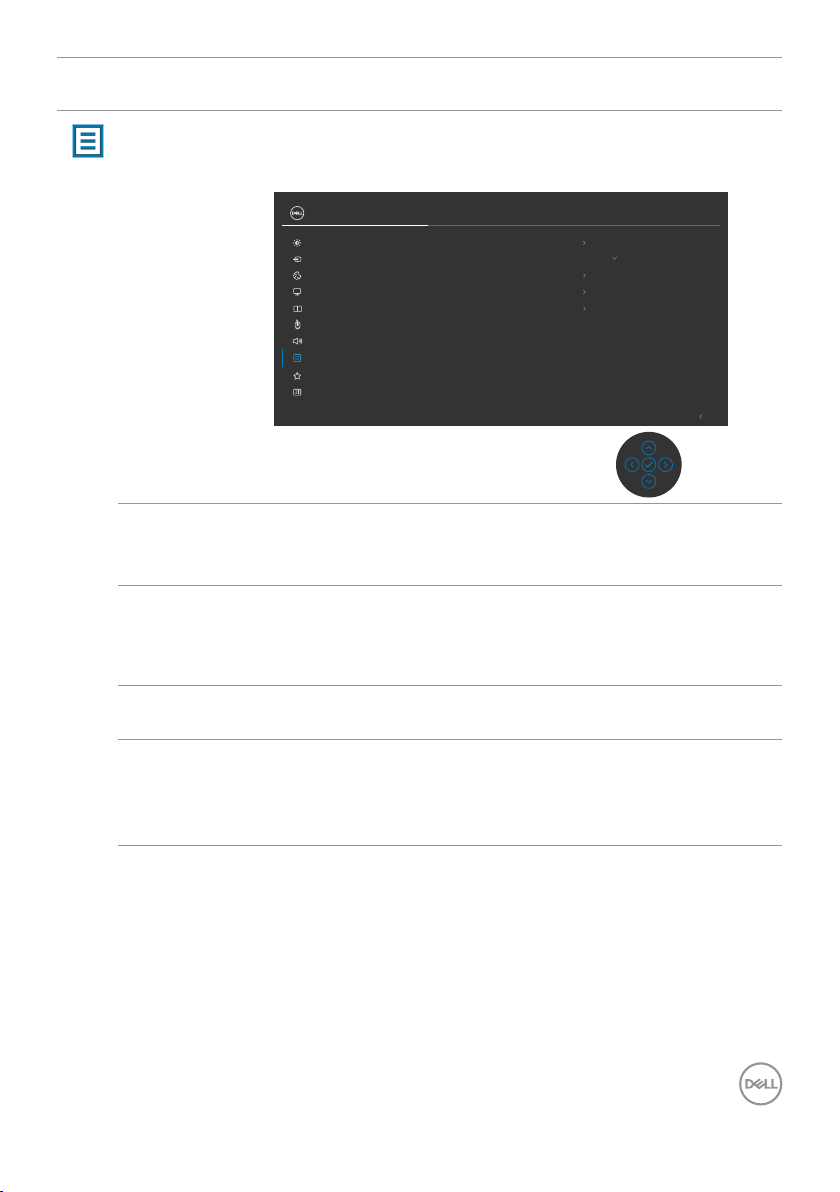
Icon Menu and
Description
Submenus
Menu Select this option to adjust the settings of the OSD, such
as the languages of the OSD, the amount of time the menu
remains on screen, and so on.
24/27/34 Monitor
Brightness/Contrast
Input Source
Color
Display
PIP/PBP
USB
Audio
Menu
Personalize
Others
Language
Rotation
Transparency
Timer
Lock
Reset Menu
English
Select
20
20s
Disable
√
Language Set the OSD display to one of eight languages.
(English, Spanish, French, German, Brazilian Portuguese,
Russian, Simplified Chinese, or Japanese).
Rotation
(C2422HE /
Rotates the OSD by 0/90/270 degrees.
You can adjust the menu according to your display rotation.
C2722DE
only)
Transparency Select this option to change the menu transparency by
moving the joystick up or down (min. 0/max. 100).
Timer OSD Hold Time: Sets the length of time the OSD remains
active after you press a button.
Move the joystick to adjust the slider in 1-second
increments, from 5 to 60 seconds.
Exit
Operating the monitor | 77
Page 78
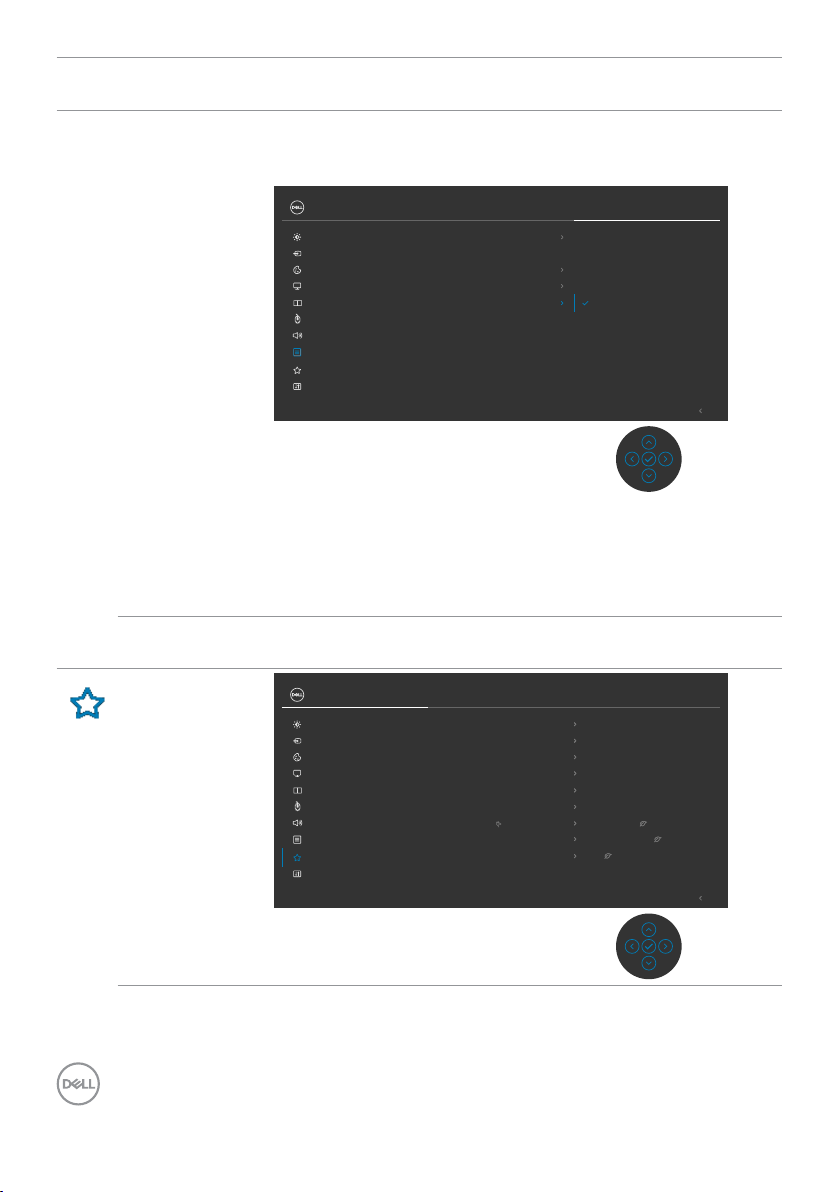
Icon Menu and
Submenus
Lock With the control buttons on the monitor locked, you can
Reset Menu Resets all settings under the Reset menu to the factory
Personalize
Description
prevent people from accessing the controls. It also prevents
accidental activation in multiple monitors side-by-side setup.
24/27/34 Monitor
Brightness/Contrast
Input Source
Color
Display
PIP/PBP
USB
Audio
Menu
Personalize
Others
Language
Rotation
Transparency
Timer
Reset Menu
Menu ButtonsLock
Power Button
Menu + Power Buttons
Disable
Exit
• Menu Buttons: Through OSD to lock the Menu buttons.
• Power Button: Through OSD to lock the Power button.
• Menu + Power Buttons: Through OSD to lock the all of
Menu and Power buttons.
• Disable: Move the Joystick left and hold for 4 seconds.
defaults.
24/27/34 Monitor
Brightness/Contrast
Input Source
Color
Display
PIP/PBP
USB
Audio
Menu
Personalize
Others
Shortcut Key 1
Shortcut Key 2
Shortcut Key 3
Shortcut Key 4
Shortcut Key 5
Power Button LED
USB-C Charging 90W
Other USB Charging
Fast Wakeup
Reset Personalization
Aspect Ratio
Input Source
Preset Modes
Brightness/Contrast
Display Info
On in On Mode
O in O Mode
O in Standby Mode
O
Exit
78 | Operating the monitor
Page 79
Icon Menu and
Submenus
Shortcut
key 1
Shortcut key
2
Shortcut key
3
Shortcut key
4
Shortcut key
5
Power Button
LED
USB-C
Charging
90 W
Other USB
Charging
Fast Wakeup
(C3422WE
only)
Reset
Personalization
Description
Select from Preset Modes, Brightness/Contrast, Input
Source, Aspect Ratio, Rotation, Display Info set as
shortcut key.
Allows you to set the state of the power light to save
energy.
Allows you to enable or disable USB-C Charging
charging function during monitor power off mode.
Allows you to enable or disable Other USB Charging
function during monitor Standby mode.
Speed up recovery time from sleep mode.
Resets all settings under the Personalize menu to the
factory preset values.
90 W
Operating the monitor | 79
Page 80
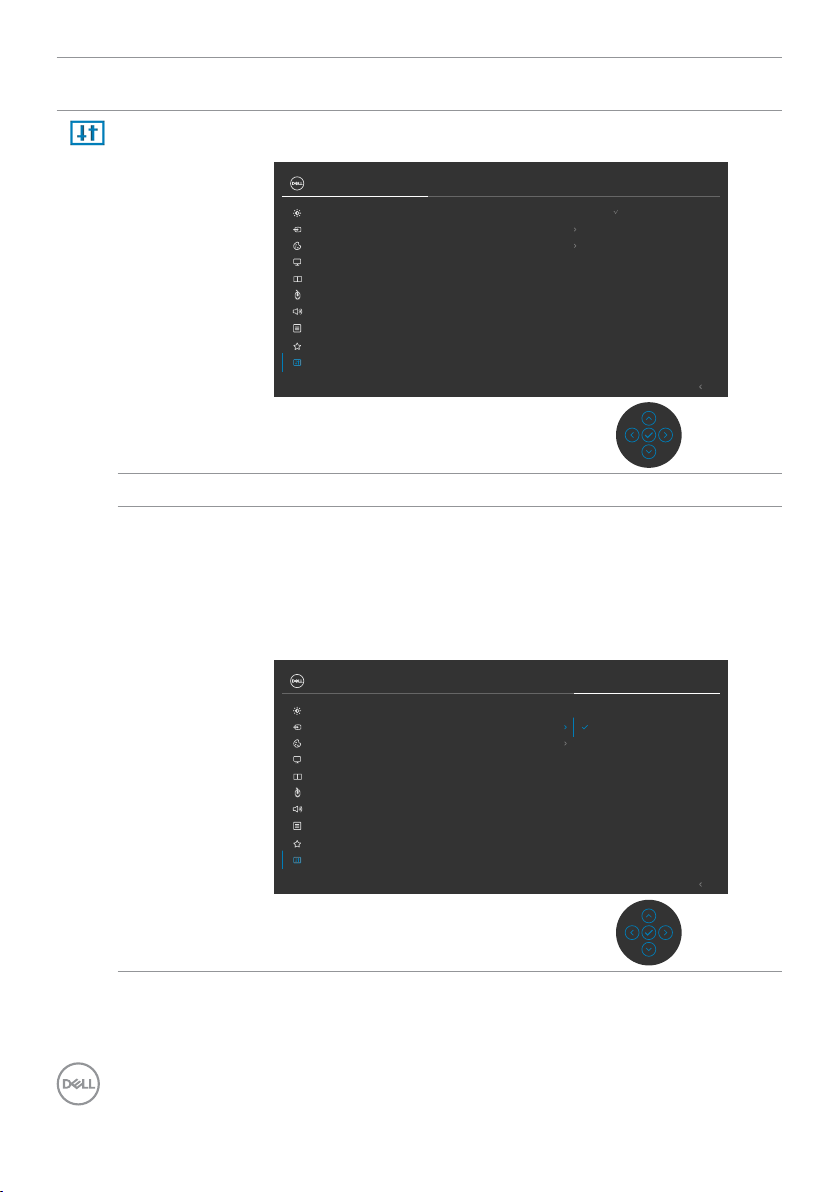
Icon Menu and
Description
Submenus
Others Select this option to adjust the OSD settings suchas the
DDC/CI, LCD conditioning, and so on.
24/27/34 Monitor
Brightness/Contrast
Input Source
Color
Display
PIP/PBP
USB
Audio
Menu
Personalize
Others
Display Info
DDC/CI On
LCD Conditioning O
Firmware M2T101
Service Tag ABCDEFG
Reset Others
Factory Reset
Select
ENERGY STAR
√
Display Info Displays the monitor’s current settings.
DDC/CI DDC/CI (Display Data Channel/Command Interface) allows
your monitor parameters (brightness, color balance, and
etc.) to be adjustable via the software on your computer.
You can disable this feature by selecting Off. Enable this
feature for best user experience and optimum performance
of your monitor.
®
Exit
24/27/34 Monitor
Brightness/Contrast
Input Source
Color
Display
PIP/PBP
USB
Audio
Menu
Personalize
Others
80 | Operating the monitor
Display Info
DDC/CI On
LCD Conditioning O
Firmware
Service Tag
Reset Others
Factory Reset
Exit
Page 81
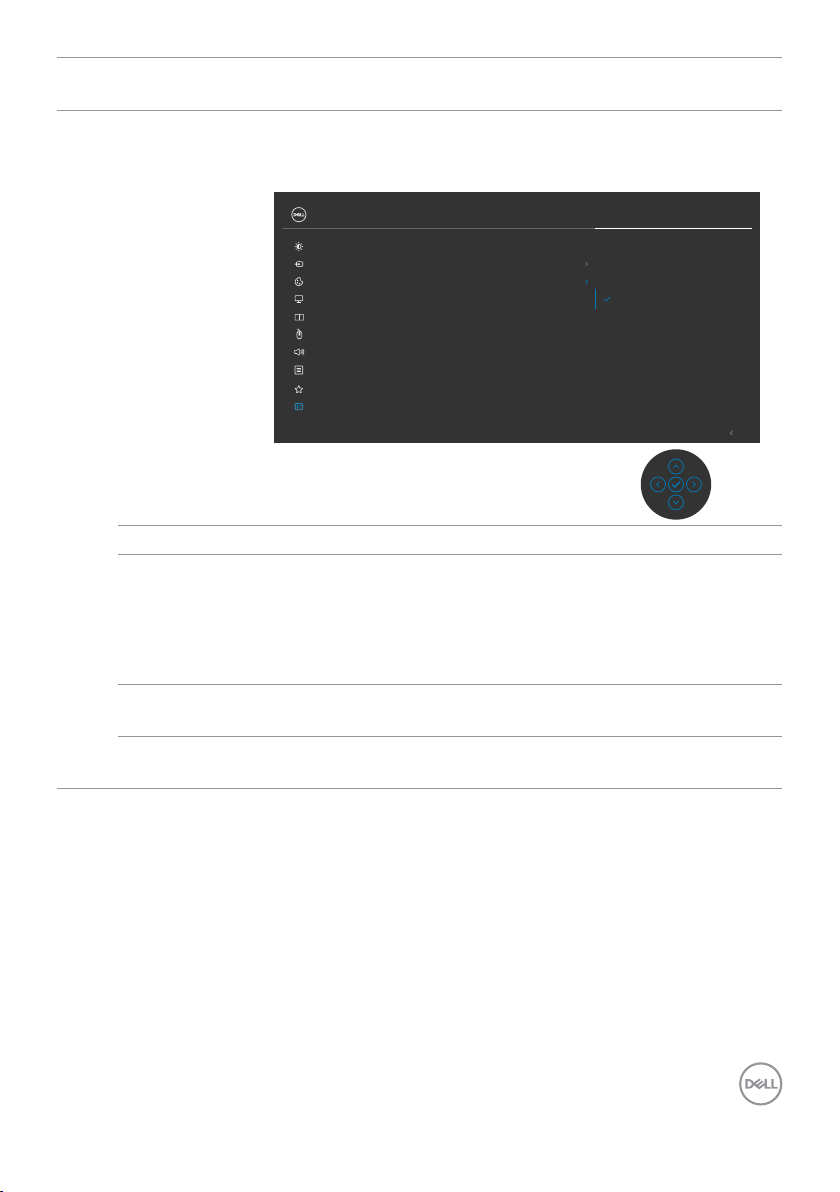
Icon Menu and
Submenus
LCD
Conditioning
Firmware Displays the firmware version of your monitor.
Service Tag Displays the Service Tag. The Service Tag is a unique
Reset Others Resets all settings under the Others menu to the factory
Factory
Reset
Description
Helps reduce minor cases of image retention. Depending on
the degree of image retention, the program may take some
time to run. You can enable this feature by selecting On.
24/27/34 Monitor
Brightness/Contrast
Input Source
Color
Display
PIP/PBP
USB
Audio
Menu
Personalize
Others
Display Info
DDC/CI
Firmware
Service Tag
Reset Others
Factory Reset
OnLCD Conditioning
O
Exit
alphanumeric identifier that allows Dell to identify the
product specifications and access warranty information.
NOTE: The Service Tag is also printed on a label located at
the back of the cover.
defaults.
Restores all preset values to the factory default settings.
Operating the monitor | 81
Page 82
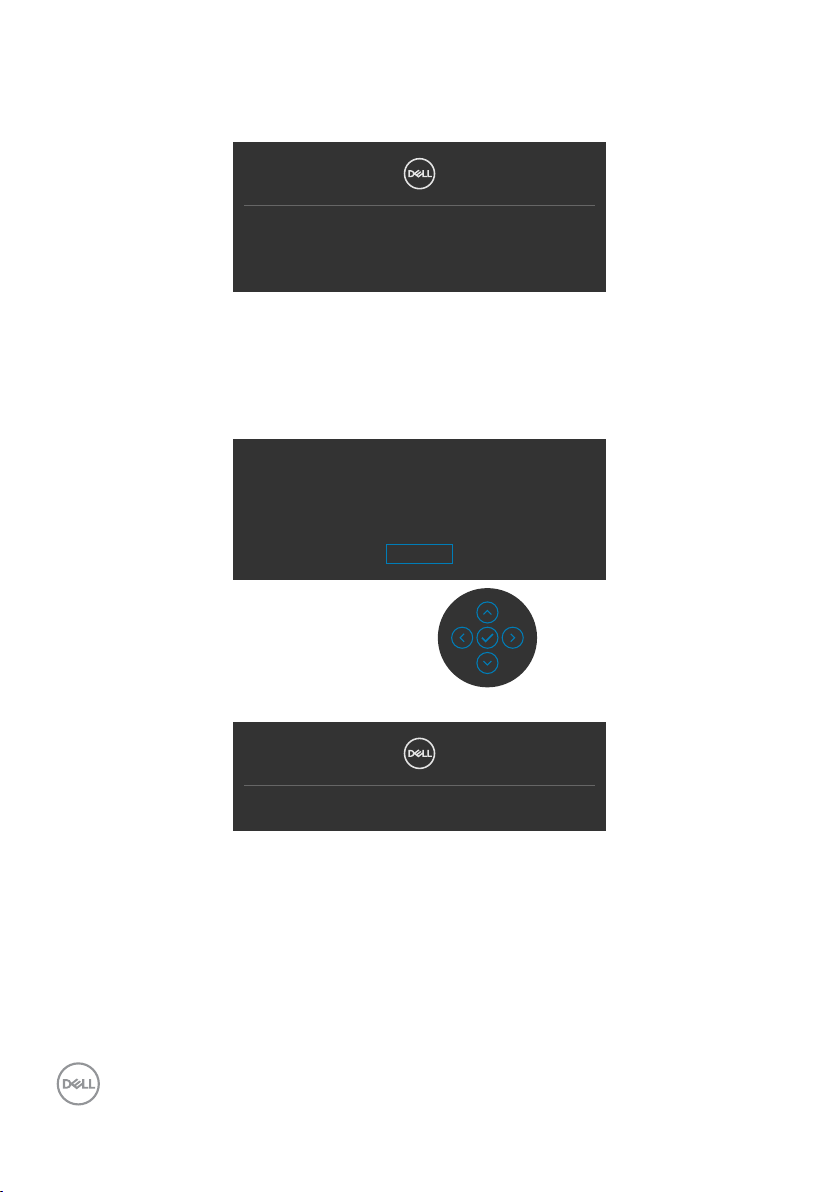
OSD warning messages
When the monitor does not support a particular resolution mode, you can see the
following message:
The current input timing is not supported by the monitor display.
Please change your input timing to 1920x1080/2560x1440/3440x1440, 60Hz
or any other monitor listed timing as per monitor specications.
This means that the monitor cannot synchronize with the signal that it is receiving
from the computer. See Monitor Specifications for the Horizontal and Vertical
frequency ranges addressable by this monitor. Recommended mode is 1920 x 1080
(C2422HE) / 2560 x 1440 (C2722DE) / 3440 x 1440 (C3422WE).
You can see the following message before the DDC/CI function is disabled:
The function of adjusting display setting using PC application will be
Do you wish to disable DDC/CI function?
disabled.
Yes
No
When the monitor enters the Standby mode, the following message will appear:
Going into Standby mode...
Activate the computer and wake up the monitor to gain access to the OSD.
82 | Operating the monitor
Page 83
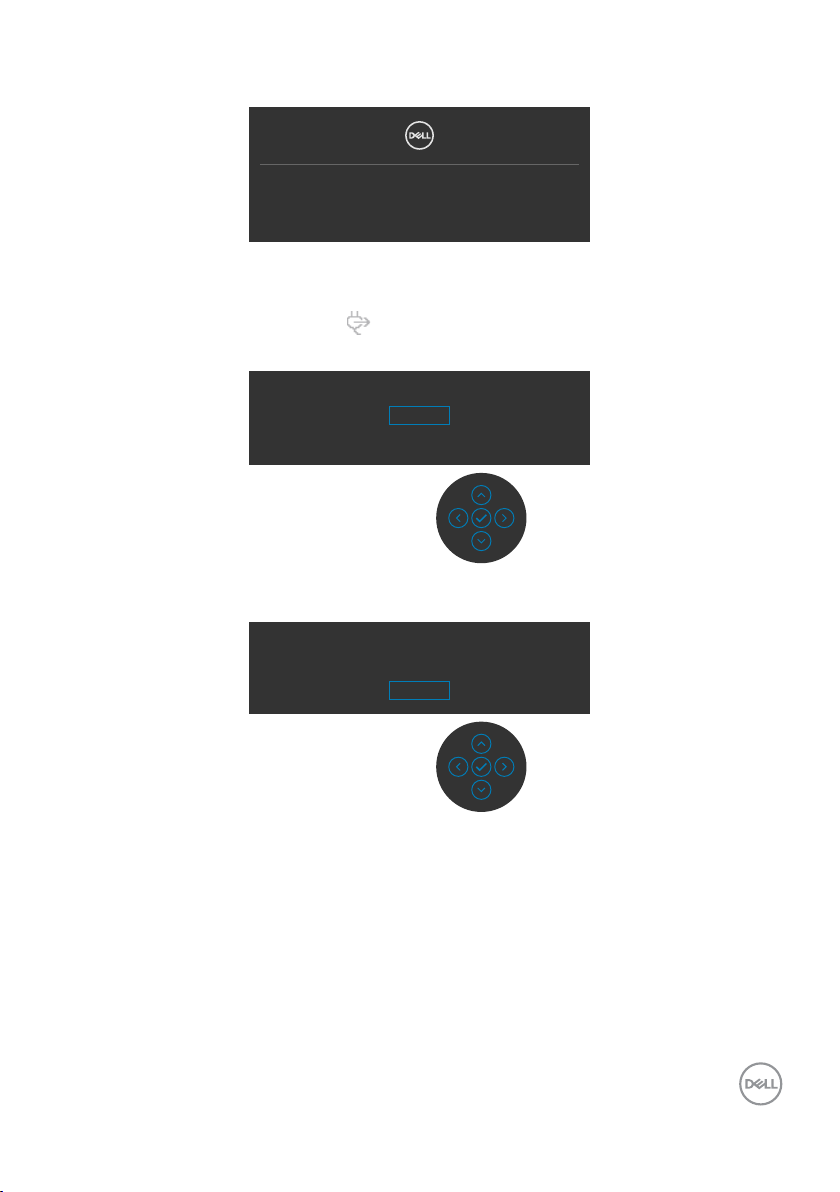
If you press any button other than the power button, the following messages will
No DP Signal form your device.
Press any key on the keyboard to wake up.
If there is no display, press the monitor joystick
to select input source.
appear depending on the selected input:
A message is displayed while the cable supporting DP alternate mode is connected to
the monitor under the following conditions:
• When Auto Select for USB-C
90 W is set to Prompt for Multiple Inputs.
• When the USB-C cable is connected to the monitor.
Switch to USB-C Video Input:
Yes
No
Select OSD items of Factory Reset in Other feature, the following message will
appear:
Are you sure you want to reset to default settings?
Yes
No
Operating the monitor | 83
Page 84
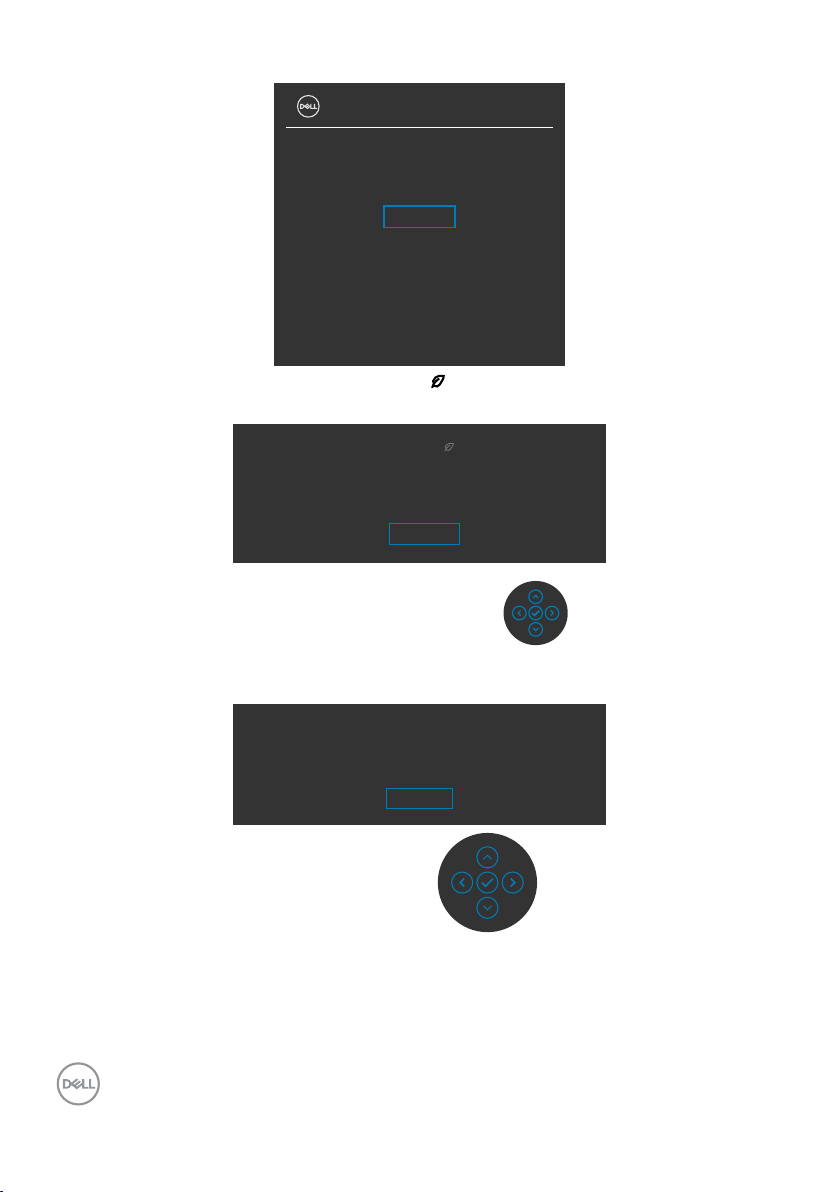
When you select ‘Yes ‘ to reset to default settings, the following message will appear:
24/27/34 Monitor
Select ‘Yes’ to enable the following function(s):
.
Always on USB-C Charging
.
Other USB Charging
Yes
No
When ‘Yes’ is selected, power consumption will
increase. When ‘No’ is selected, it will comply
with ENERGY STAR requirements.
Individual settings of the functions can be
changed in the Menu.
Select OSD items of On in Standby Mode in Personalize feature, the following
message will appear:
Changing to this setting ( without symbol) will increase
power consumption. Do you want to continue?
Yes
No
If adjust the Brightness level above the default level over 75%, the following message
will appear:
Adjusting to this value will increase power consumpiton above the
default level. Do you want to continue?
Yes
No
• When user selects “Yes”, the power message is displayed only once.
• When user select ‘No’, the power warning message will pop-up again.
• The power warning message will appear again only when the user does a Factory
Reset from the OSD menu.
84 | Operating the monitor
Page 85
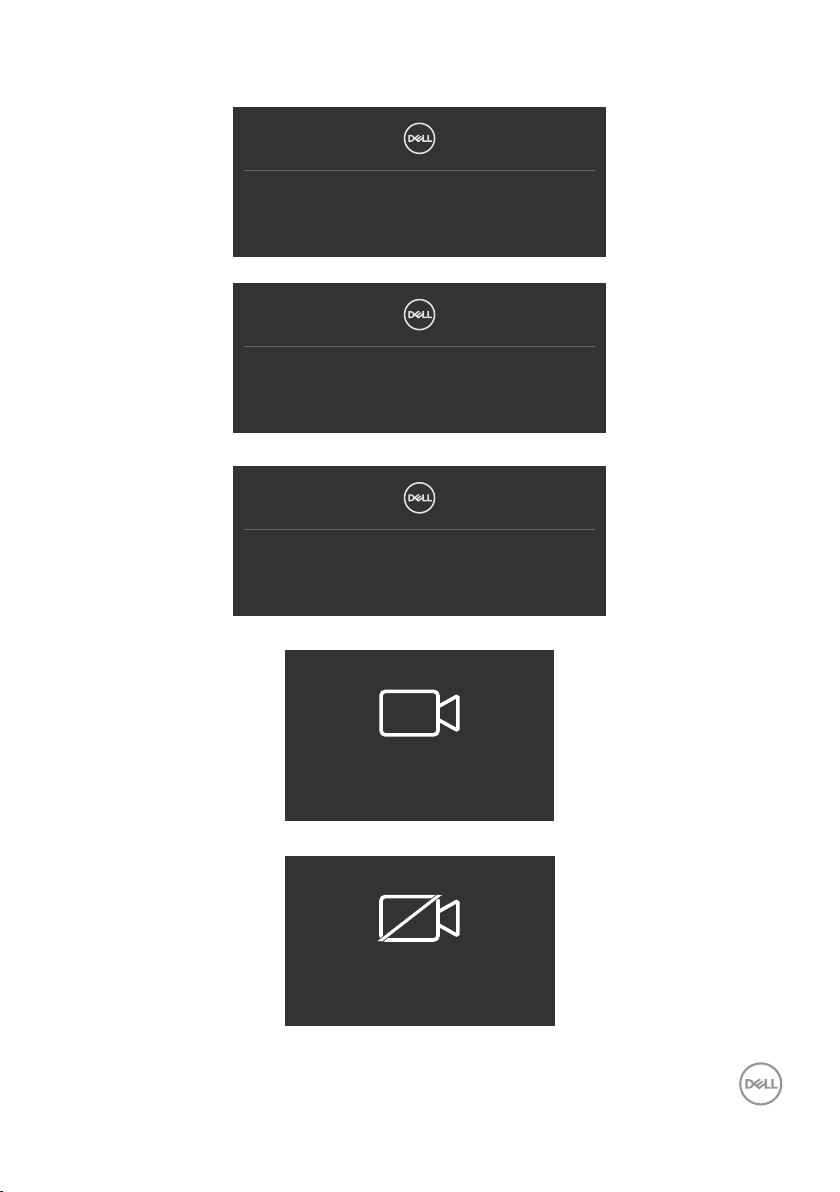
If either USB Type-C / DP / HDMI input is selected and the corresponding cable is not
connected, a floating dialog box as shown below appears.
No DP Cable
The display will go into Standby Mode in 4 minutes.
www.dell.com/C24/27/3422XE
or
No USB-C Cable
The display will go into Standby Mode in 4 minutes.
www.dell.com/C24/27/3422XE
or
No HDMI Cable
The display will go into Standby Mode in 4 minutes.
www.dell.com/C24/27/3422XE
When the webcam module pop out, the the following message will appear:
Webcam + Mic: Enable
When the webcam module pop in (retracted), the following message will appear:
Webcam + Mic: Disabled
Operating the monitor | 85
Page 86

If the webcam is pop in (retracted) and you press the Mute button, the following
message will appear:
Please pop up webcam + mic module
to enable your mic
When the USB upstream cable is not connected, and you press the Teams/
Hookswitch/ Mute button, the following message will appear:
This function is inactive.
you need to connect USB upstream to the monitor.
To enable it,
NOTE: For the Teams/ Hookswitch/ Volume down/ Volume up/ Mute
buttons to work, you need to connect the USB upstream cable (Type-A to
Type-B or Type-C to Type-C) from the PC to the monitor.
See Troubleshooting for more information.
86 | Operating the monitor
Page 87

Setting the maximum resolution
To set the maximum resolution for the monitor:
In Windows 7, Windows 8 or Windows 8.1:
1. For Windows 8 or Windows 8.1 only, select the Desktop tile to switch to classic
desktop. For Windows Vista and Windows 7, skip this step.
2. Right-click on the desktop and click Screen Resolution.
3. Click the Dropdown list of the Screen Resolution and select 1920 x 1080
(C2422HE) / 2560 x 1440 (C2722DE) / 3440 x 1440 (C3422WE).
4. Click OK.
In Windows 10:
1. Right-click on the desktop and click Display Settings.
2. Click Advanced display settings.
3. Click the dropdown list of Resolution and select 1920 x 1080 (C2422HE) /
2560 x 1440 (C2722DE) / 3440 x 1440 (C3422WE).
4. Click Apply.
If you do not see 1920 x 1080 (C2422HE) / 2560 x 1440 (C2722DE) / 3440
x 1440 (C3422WE) as an option, you may need to update your graphics driver.
Depending on your computer, complete one of the following procedures:
If you have a Dell desktop or portable computer:
• Go to https://www.dell.com/support, enter your service tag, and download
the latest driver for your graphics card.
If you are using a non-Dell computer (laptop or desktop):
• Go to your computer manufacturer’s support website and download the latest
graphic drivers.
• Go to your graphics card manufacturer’s website and download the latest graphic
drivers.
Operating the monitor | 87
Page 88
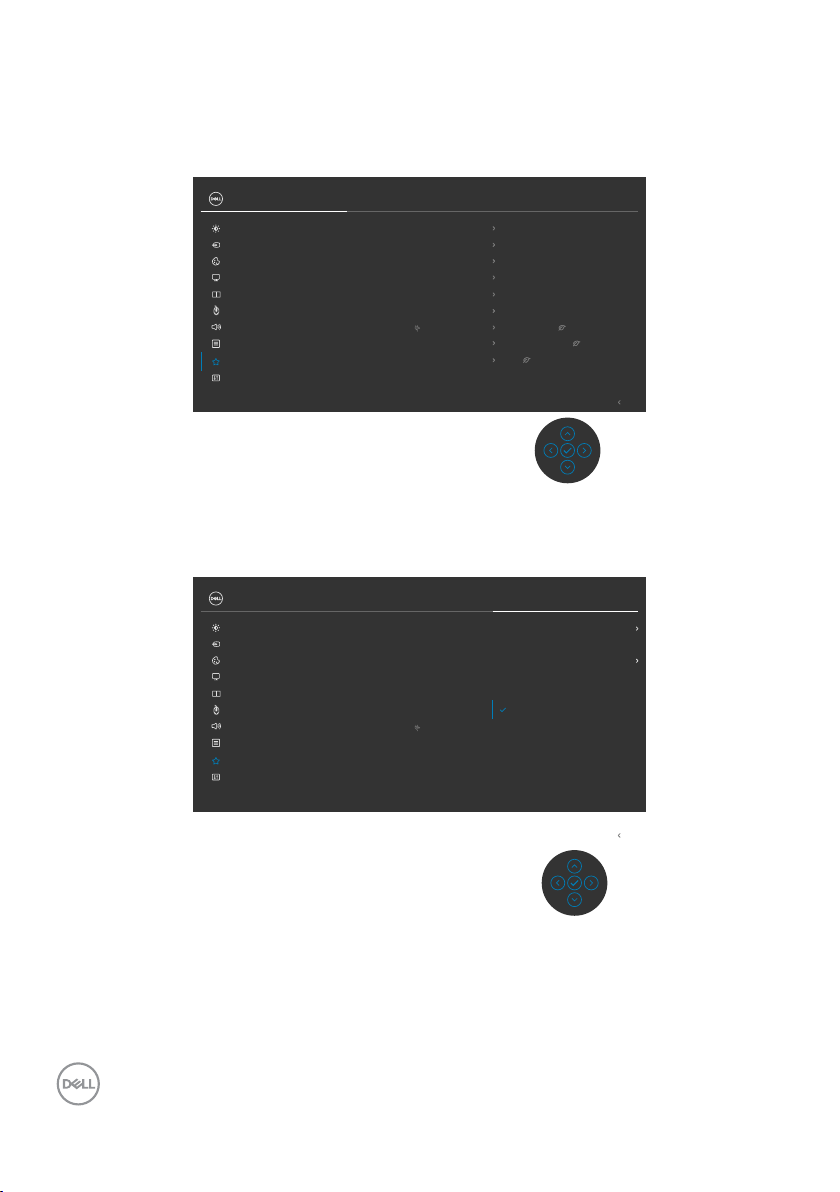
Setting the KVM USB Switch
To set the KVM USB Switch as Shortcut Key for the monitor:
1. Press the joystick button to launch the OSD main menu.
2. Move the joystick to select Personalize.
24/27/34 Monitor
Brightness/Contrast
Input Source
Color
Display
PIP/PBP
USB
Audio
Menu
Personalize
Others
Shortcut Key 1
Shortcut Key 2
Shortcut Key 3
Shortcut Key 4
Shortcut Key 5
Power Button LED
USB-C Charging 90W
Other USB Charging
Fast Wakeup
Reset Personalization
Aspect Ratio
Input Source
Preset Modes
Brightness/Contrast
Display Info
On in On Mode
O in O Mode
O in Standby Mode
O
3. Move the joystick right to activate the highlighted option.
4. Move the joystick right to activate the Shortcut Key 1 option.
5. Move the joystick up or down to select USB Switch.
Dell 24/27/34 Monitor
Brightness/Contrast
Input Source
Color
Display
PIP/PBP
USB
Audio
Menu
Personalize
Others
Shortcut Key 1
Shortcut Key 2
Shortcut Key 3
Shortcut Key 4
Shortcut Key 5
Power Button LED
USB-C Charging 90W
Other USB Charging
Fast Wakeup
Reset Personalization
Preset Modes
Brightness/Contrast
Input Source
Aspect Ratio
PIP/PBP Mode
USB Switch
Video Swap
Display Info
Exit
Exit
6. Press the joystick to confirm selection.
NOTE: KVM USB Switch function only work under PBP Mode (Only for
C3422WE).
88 | Operating the monitor
Page 89
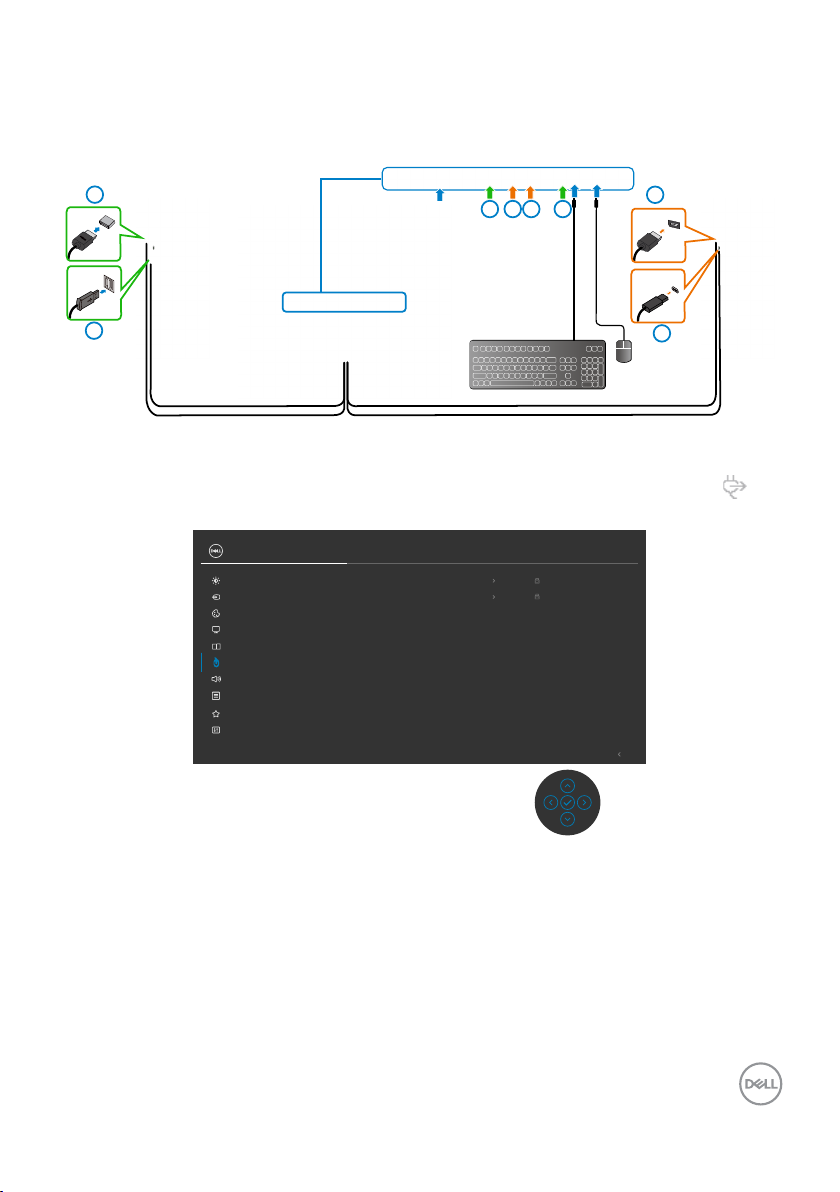
The following are illustrations of several connection scenarios and their USB Selection
menu settings, as illustrated in corresponding color frames.
1. When connecting HDMI + USB-B to computer 1 and DP + USB A to C to
computer 2:
HDMI
USB-B
1
1
3
2
4
3
2
DP
USB A to C
4
NOTE: The USB Type-C connection currently supports only data transfer.
Ensure USB Selection for HDMI is set to USB-B and DP is set to USB-C
W.
24/27/34 Monitor
Brightness/Contrast
Input Source
Color
Display
PIP/PBP
USB
Audio
Menu
Personalize
Others
DP assign to USB-B
HDMI assign to
USB-B
Exit
90
Operating the monitor | 89
Page 90
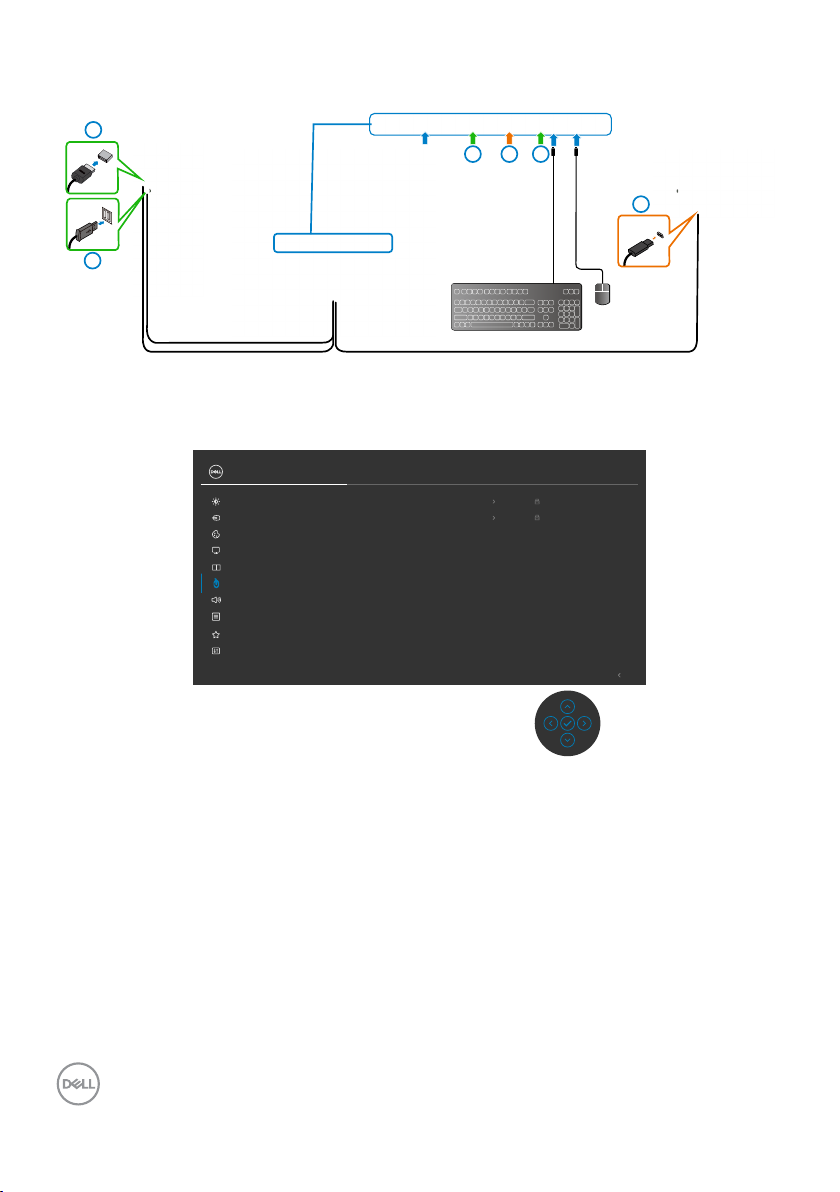
2. When connecting HDMI + USB-B to computer 1 and USB Type-C to computer
2:
1
HDMI
1 3
2
USB-B
2
USB Type-C
3
NOTE: The USB Type-C connection currently supports video and data
transfer.
Ensure USB Selection for HDMI is set to USB-B.
24/27/34 Monitor
Brightness/Contrast
Input Source
Color
Display
PIP/PBP
USB
Audio
Menu
Personalize
Others
DP assign to USB-B
HDMI assign to
USB-B
Exit
NOTE: As the USB Type-C port supports the DisplayPort Alternate Mode,
there is no need to set USB Selection for USB Type-C.
NOTE: When connecting to different video input sources not shown
above, follow the same method to make correct settings for USB Selection
to pair the ports.
90 | Operating the monitor
Page 91
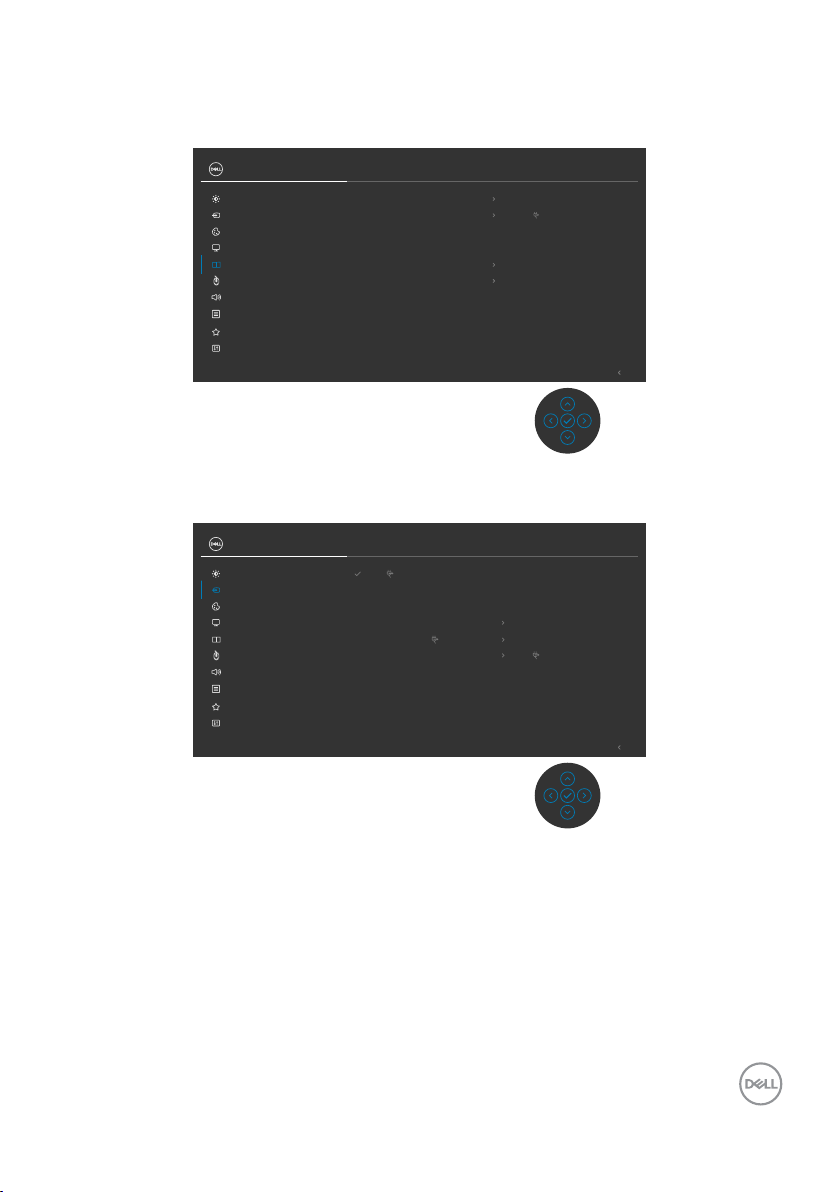
Setting the Auto KVM
You can follow below instruction to set up Auto KVM for your monitor:
1. Ensure that PIP/PBP Mode is Off.
24/27/34 Monitor
Brightness/Contrast
Input Source
Color
Display
PIP/PBP
USB
Audio
Menu
Personalize
Others
PIP/PBP Mode O
PIP/PBP (Sub)
USB Switch
Video Swap
Audio
Contrast (Sub)
USB-C 90 W
Main
75
NOTE: This PIP/PBP function is for C3422WE only.
2. Ensure that Auto Select is On and Auto Select for USB-C is Yes.
24/27/34 Monitor
Brightness/Contrast
Input Source
Color
Display
PIP/PBP
USB
Audio
Menu
Personalize
Others
USB-C 90W
DP
HDMI
Auto Select On
Auto Select for USB-C 90W Prompt for Multiple Inputs
Rename Inputs
Reset Input Source
USB-C 90W
Exit
Exit
Operating the monitor | 91
Page 92
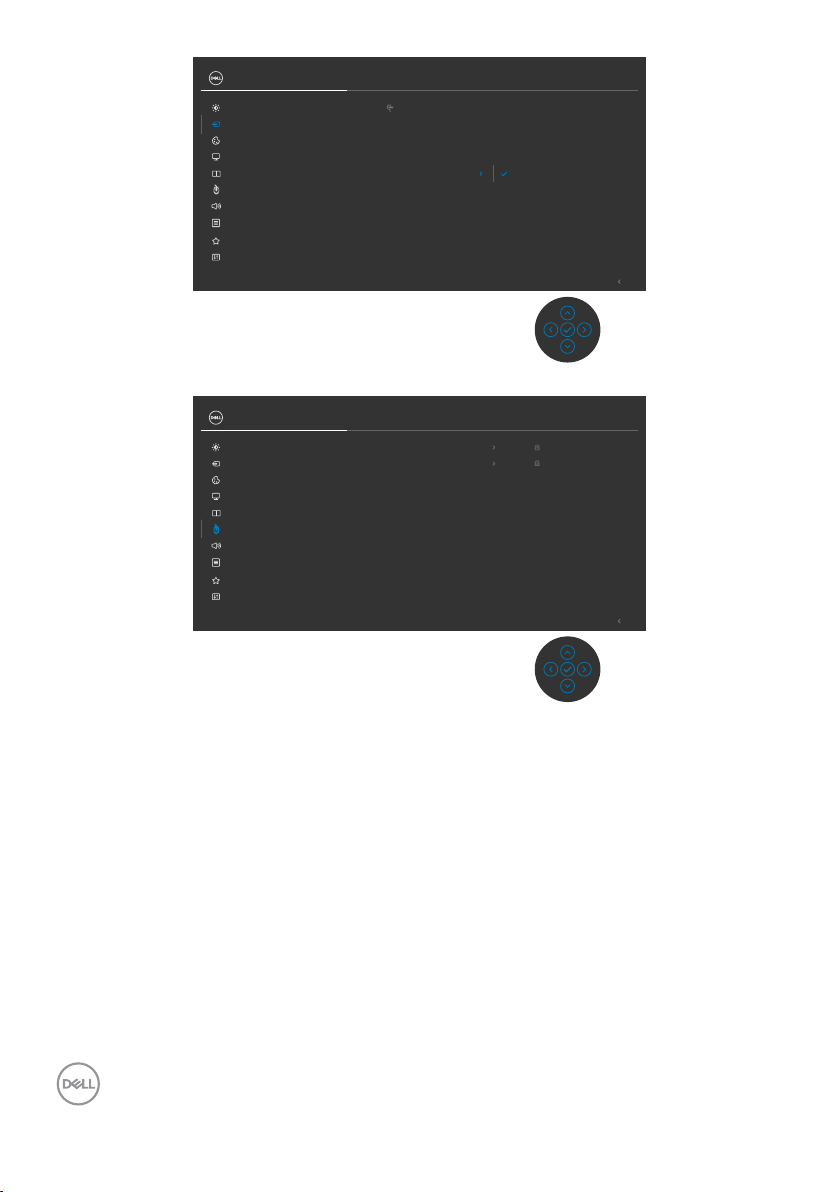
24/27/34 Monitor
Brightness/Contrast
Input Source
Color
Display
PIP/PBP
USB
Audio
Menu
Personalize
Others
USB-C 90W
DP
HDMI
Auto Select Prompt for Multiple Inputs
Auto Select for USB-C Yes
Rename Inputs
Reset Input Source
No
Exit
3. Ensure that the USB ports and the video inputs are paired accordingly.
24/27/34 Monitor
Brightness/Contrast
Input Source
Color
Display
PIP/PBP
USB
Audio
Menu
Personalize
Others
DP assign to USB-B
HDMI assign to
USB-B
Exit
NOTE: For USB Type-C connection, there is no further setting required.
92 | Operating the monitor
Page 93
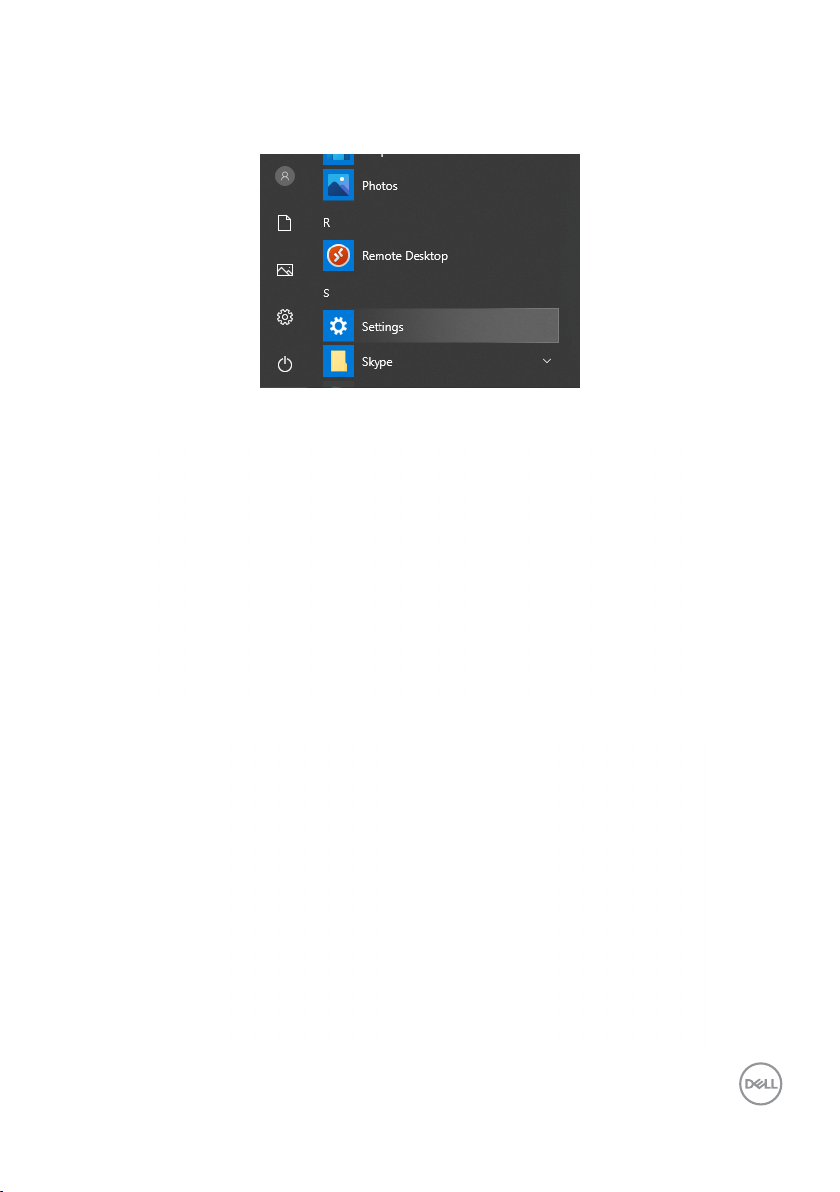
Setting up Windows Hello
In Windows® 10:
Click Windows start menu, click Settings.
Click Accounts.
Click Sign-in options. You must set up a PIN before you can enroll in Windows Hello.
Operating the monitor | 93
Page 94
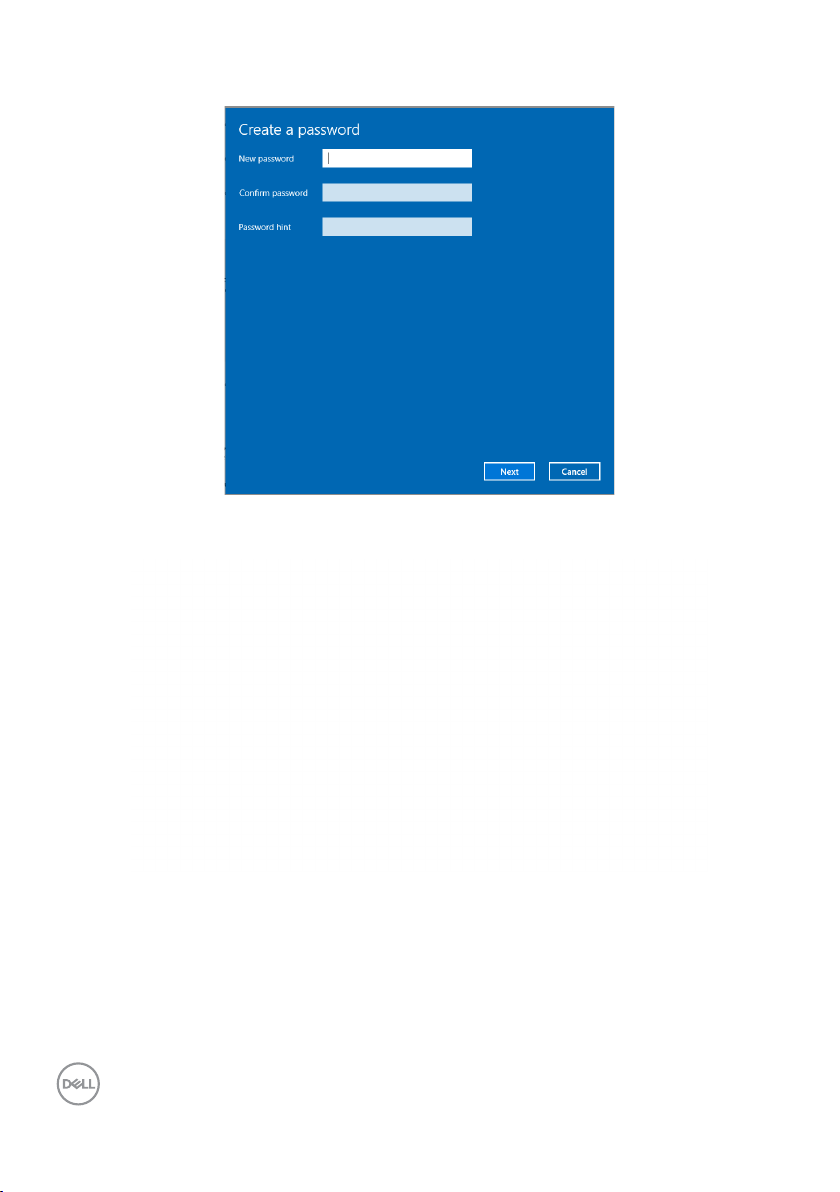
Click Add under PIN enter to Set up a PIN. Enter New PIN and Confirm PIN, and
thenclick OK.
Once you’ve done that, the options to set up Windows Hello will unlock. Click Set up
under Windows Hello, enter to Windows Hello setup.
94 | Operating the monitor
Page 95
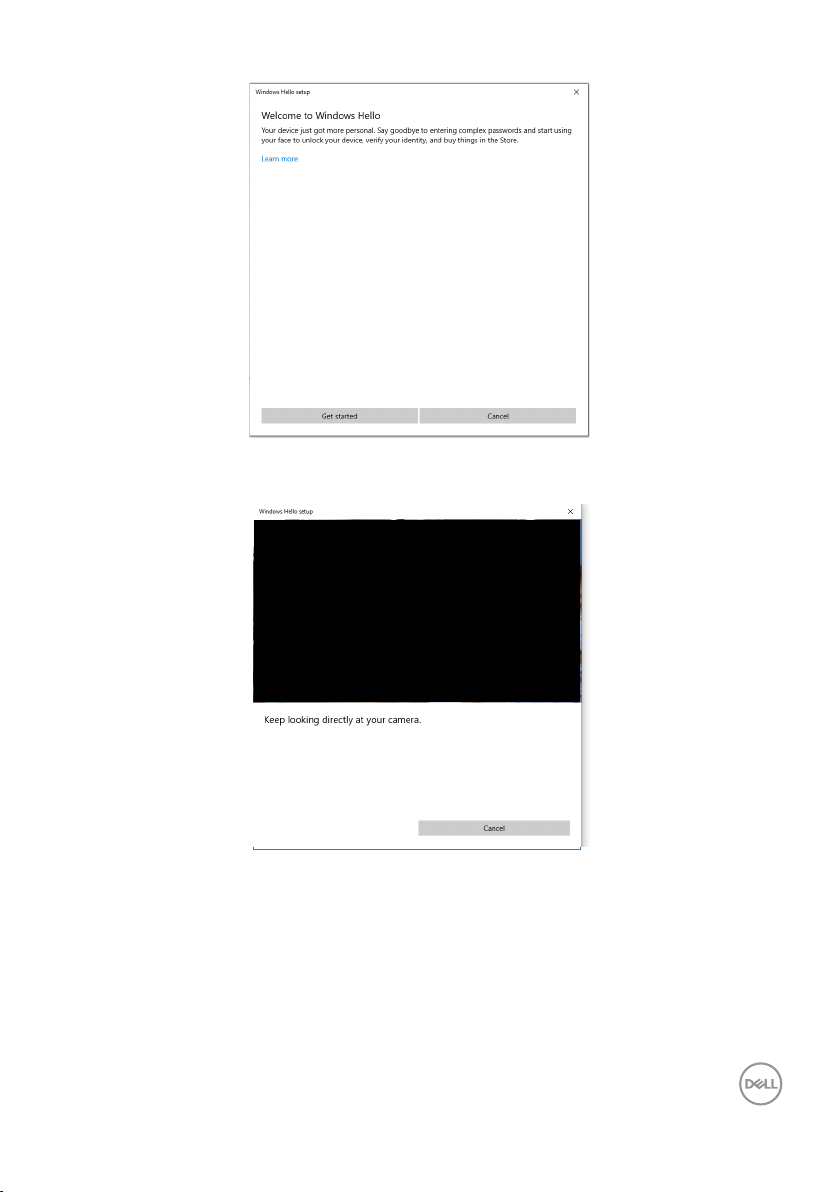
The following message is displayed, click Get started.
Keep looking directly at your screen and position yourself so that your face is in the
center of the frame that appears on screen. The webcam will then register your face.
Operating the monitor | 95
Page 96
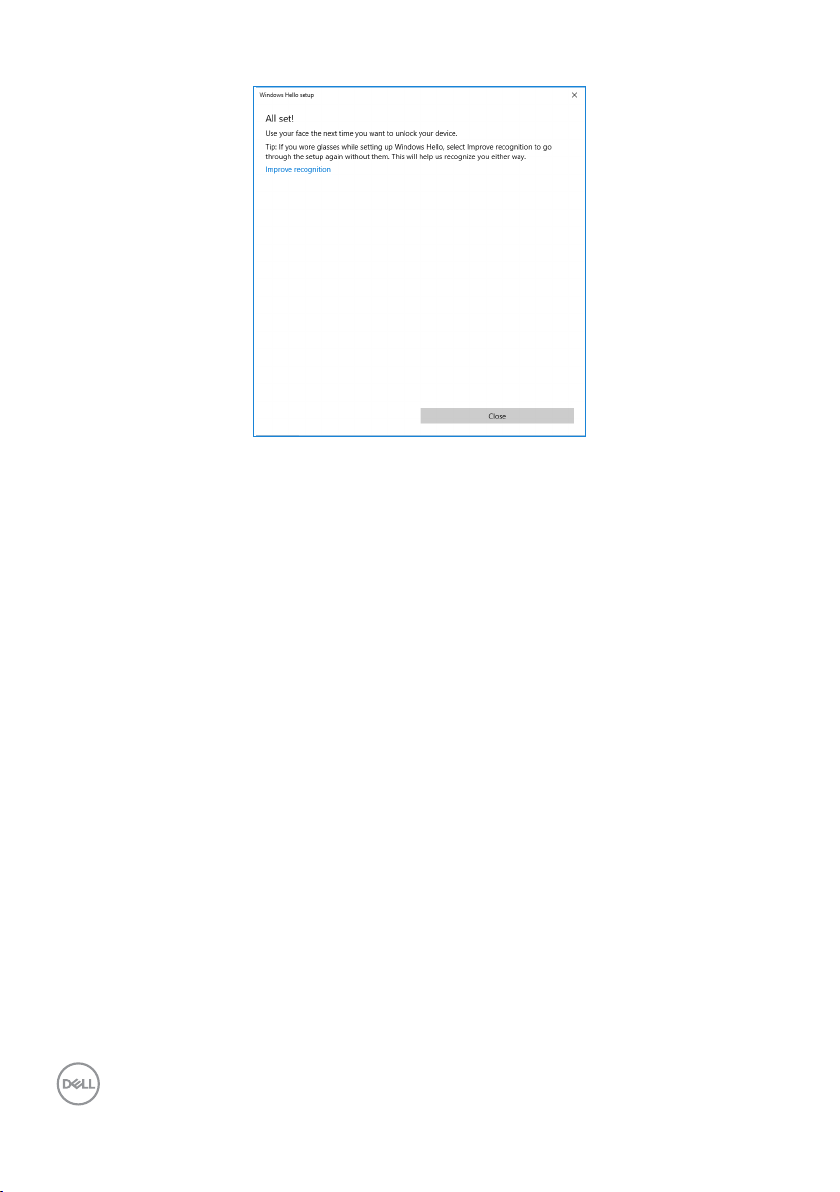
When the following message is displayed, click Close to exit Windows Hello setup.
Once you have set up, you have another option to improve the recognition. Click
Improve recognition if necessary.
96 | Operating the monitor
Page 97

Setting up the monitor webcam as default setting
When using a notebook with built-in webcam to connect this monitor, in the device
manager interface, you can find the notebook built-in webcam and the monitor
webcam. Normally, they are in enable status, and the default setting is using notebook
built-in webcam.
If you want to set up the monitor webcam as default setting, you need disable the
notebook built-in webcam. To identify the notebook built-in webcam and disable it,
please follow below instructions:
Right-click Dell Monitor IR Webcam, and click Properties to open the Dell Monitor
IR Webcam Properties.
Operating the monitor | 97
Page 98
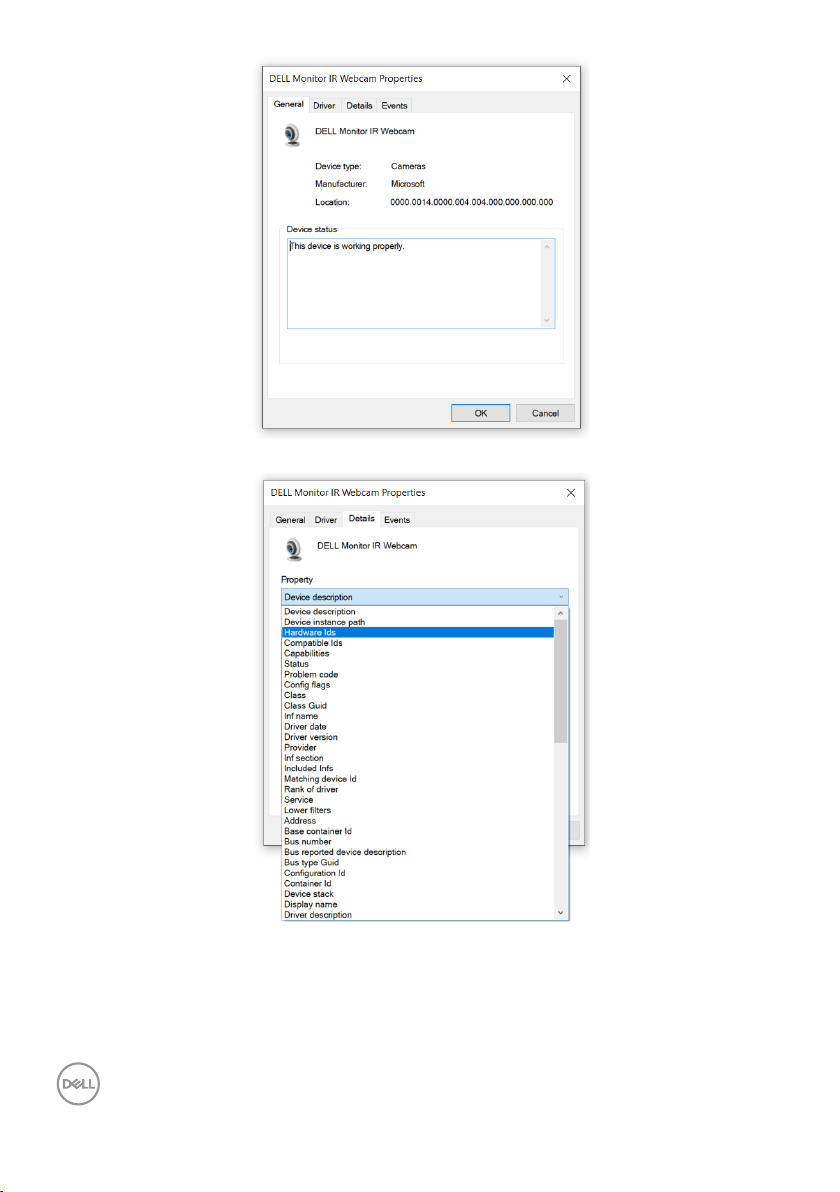
Click Details > Property and select Hardware Ids.
98 | Operating the monitor
Page 99
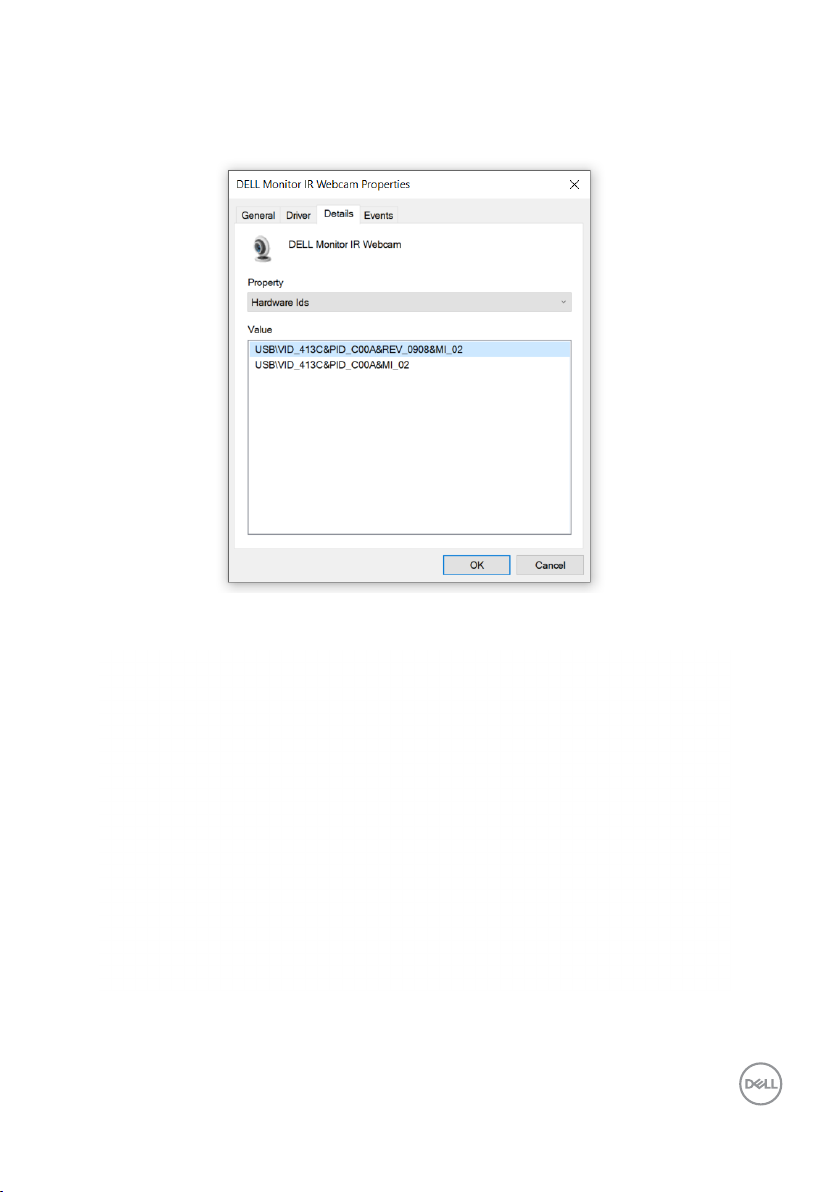
The Value will show the detail hardware ids of this Dell Monitor IR Webcam. The
hardware ids of the notebook built-in webcam and the monitor webcam are different.
For C2422HE/C2722DE/C3422WE, the monitor webcam hardware ids will show as
below:
Right click the PC/Notebook webcam which has different hardware ids , and then
click Disable.
Operating the monitor | 99
Page 100
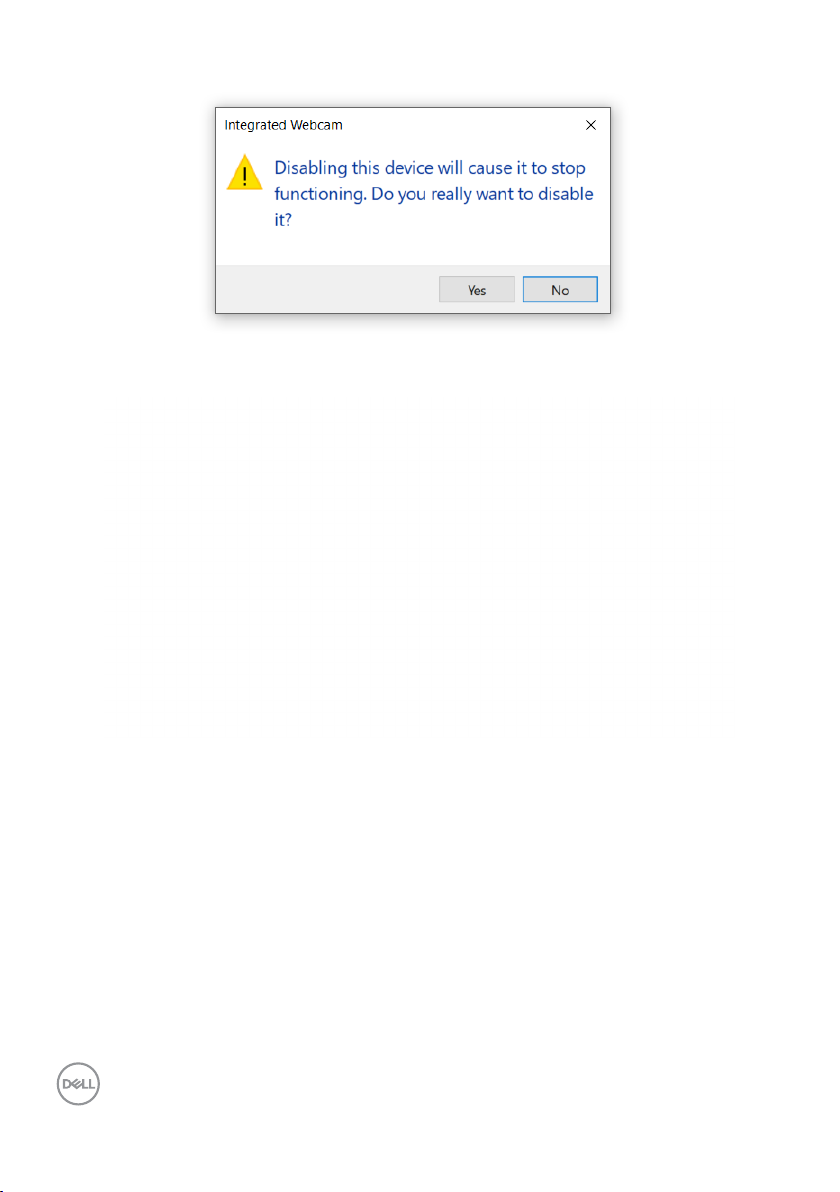
The following message is displayed:
Click Yes. The notebook webcam is now disabled and the monitor webcam will be used
as the default setting. Restart the notebook.
100 | Operating the monitor
 Loading...