

Dell Axim X30 HC02U, Axim X30 HC02U-B, Axim X30 HD03U, Axim X30 HC02U-C, Axim X30 HC02U-W Owner's Manual
...
Dell™ Axim™ X30
Owner’s Manual
Models HC02U, HC02U-C, HC02U-B, HC02U-W, HD03U
www.dell.com | support.dell.com

Notes, Notices, and Cautions
NOTE: A NOTE indicates important information that helps you
make better use of your computer.
NOTICE: A NOTICE indicates either potential damage to
hardware or loss of data and tells you how to avoid the problem.
CAUTION: A CAUTION indicates a potential for property
damage, personal injury, or death.
Abbreviations and Acronyms
For a complete list of abbreviations and acronyms, see the
"Glossary" on page 165.
____________________
Information in this document is subject to change without notice.
© 2004 Dell Inc. All rights reserved.
Reproduction in any manner whatsoever without the written permission of Dell
Inc. is strictly forbidden.
Trademarks used in this text: Dell, the DELL logo, Axim, TrueMobile,
Dimension, Inspiron, OptiPlex, Latitude, Dell Precision, PowerApp,
PowerVault, PowerEdge, PowerConnect, and DellNet are trademarks of Dell
Inc.; Intel, Pentium, and Celeron are registered trademarks and XScale and
StrataFlash are trademarks of Intel Corporation; Microsoft, Windows, Windows
Media, and ActiveSync are registered trademarks and Windows Mobile is a
trademark of Microsoft Corporation; Bluetooth is a trademark owned by
Bluetooth SIG, Inc. and is used by Dell Inc. under license.
Other trademarks and trade names may be used in this document to refer to either
the entities claiming the marks and names or their products. Dell Inc. disclaims
any proprietary interest in trademarks and trade names other than its own.
Models HC02U, HC02U-C, HC02U-B, HC02U-W, HD03U
May 2004 P/N C5024 Rev. A01

Contents
CAUTION: Safety Instructions . . . . . . . . . . 11
SAFETY: General
SAFETY: Power
SAFETY: Battery
SAFETY: Air Travel
SAFETY: Electromagnetic Compatibility
Instructions
. . . . . . . . . . . . . . . 11
. . . . . . . . . . . . . . . 12
. . . . . . . . . . . . . . . 12
. . . . . . . . . . . . . . 13
. . . . . . . . . . . . . . . . . . 13
When Using Your Device
SAFETY: Ergonomic Computing Habits
SAFETY: Protecting Against Electrostatic
Discharge
. . . . . . . . . . . . . . . . . . . 15
SAFETY: Battery Disposal
Finding Information
1 About Your Device
Front, Side, and Back Views . . . . . . . . . . . 18
Front and Side Views
Back View
Using the Battery
Installing and Removing the Battery
Charging the Battery
. . . . . . . . . . . . . . . . . . 20
. . . . . . . . . . . . . . . . . 21
. . . . . . . . . . . . . 14
. . . . 14
. . . . . . . . . . 15
. . . . . . . . . . . . . . . 15
. . . . . . . . . . . . . 18
. . . . . 21
. . . . . . . . . . . . . 22
Contents 3

Connecting to a Computer . . . . . . . . . . . . 23
Using the Cradle
Using the Sync Cable
. . . . . . . . . . . . . . . . 23
. . . . . . . . . . . . . 26
Checking Built-In Storage
Using Secure Digital Memory Cards
Performing a Reset
Soft Reset
Hard Reset
. . . . . . . . . . . . . . . . . . . 28
. . . . . . . . . . . . . . . . . . . 29
. . . . . . . . . . . . 27
. . . . . . . 27
. . . . . . . . . . . . . . . . 28
2 Using Microsoft®
Windows Mobile™ 2003 Second Edition
Device Buttons and the Stylus . . . . . . . . . . 32
Today Screen
Status Icons
Programs
Program Buttons
Switcher Bar
Navigation Bar and Command Bar
Pop-Up Menus
. . . . . . . . . . . . . . . . . . . 32
. . . . . . . . . . . . . . . . . . . . 34
. . . . . . . . . . . . . . . . . . . . . 35
. . . . . . . . . . . . . . . . 35
. . . . . . . . . . . . . . . . . . 36
. . . . . . . . 37
. . . . . . . . . . . . . . . . . . . 38
4 Contents
Finding and Organizing Information
Backing Up Data
. . . . . . . . . . . . . . . . . . 40
. . . . . . . 39

3 Entering Information
Entering Text Using the Input Panel . . . . . . . 42
Typing With the Soft Keyboard
Letter Recognizer
Block Recognizer
Transcriber
Editing Typed Text
. . . . . . . . . . . . . . . 43
. . . . . . . . . . . . . . . 44
. . . . . . . . . . . . . . . . . . 44
. . . . . . . . . . . . . . 45
. . . . . . . . 43
Writing on the Screen
Editing Written Text
Drawing on the Screen
Creating a Drawing
Editing a Drawing
Recording a Message
Using My Text
. . . . . . . . . . . . . . . . . . . 51
. . . . . . . . . . . . . . 45
. . . . . . . . . . . . . 46
. . . . . . . . . . . . . . 49
. . . . . . . . . . . . . . 49
. . . . . . . . . . . . . . . 50
. . . . . . . . . . . . . . . 50
4 Adjusting Settings
Personal Tab . . . . . . . . . . . . . . . . . . . 54
System Tab
Connections Tab
. . . . . . . . . . . . . . . . . . . . 54
. . . . . . . . . . . . . . . . . 55
5 Using Microsoft® ActiveSync
About ActiveSync . . . . . . . . . . . . . . . . . 58
®
Installing and Using ActiveSync
. . . . . . . . . 59
Contents 5

6 Scheduling and Communicating
About Microsoft® Pocket Outlook . . . . . . . . 62
Calendar
Contacts
Tasks
Notes
Messaging
. . . . . . . . . . . . . . . . . . . . . . 62
Using the Summary Screen
Creating Meeting Requests
. . . . . . . . . . . . . . . . . . . . . . 65
Finding a Contact
. . . . . . . . . . . . . . . 66
Using the Summary Screen
. . . . . . . . . . . . . . . . . . . . . . . . 66
. . . . . . . . . . . . . . . . . . . . . . . . 68
. . . . . . . . . . . . . . . . . . . . . 69
Synchronizing E-Mail Messages
. . . . . . . . . . 64
. . . . . . . . . . . 64
. . . . . . . . . . 66
. . . . . . . . 69
Connecting Directly to an E-Mail Server
Using the Message List
Composing Messages
. . . . . . . . . . . . 70
. . . . . . . . . . . . . . 72
Managing E-Mail Messages and Folders
Notifications
. . . . . . . . . . . . . . . . . . . . 74
7 Adding and Removing Programs
. . . . 70
. . . . 73
6 Contents
Adding Programs Using Microsoft®
ActiveSync
®
. . . . . . . . . . . . . . . . . . . . 76
Downloading Programs From the Internet
. . . . 77

Adding a Program to the Start Menu . . . . . . 78
Using File Explorer on the Device
Using ActiveSync on the Computer
. . . . . . . 78
. . . . . . 78
Removing Programs
. . . . . . . . . . . . . . . 79
8 Using Companion Programs
Microsoft® Pocket Word . . . . . . . . . . . . . 82
Pocket Excel
Tips for Working in Pocket Excel
MSN Messenger
Setting Up
Working With Contacts
Chatting With Contacts
Windows Media
. . . . . . . . . . . . . . . . . . . 84
. . . . . . . 86
. . . . . . . . . . . . . . . . . 86
. . . . . . . . . . . . . . . . . . 87
. . . . . . . . . . . . 87
. . . . . . . . . . . . 88
®
Player for Pocket PC . . . . . 88
9 Using Microsoft® Pocket Internet
Explorer
Mobile Favorites . . . . . . . . . . . . . . . . . 90
Conserving Memory
Mobile Favorites Folder
Favorite Links
. . . . . . . . . . . . . . 91
. . . . . . . . . . . . 91
. . . . . . . . . . . . . . . . . 91
Using AvantGo Channels
. . . . . . . . . . . . . 92
Browsing Mobile Favorites and the Web
. . . . . 92
Contents 7

10 Getting Connected
Using Infrared . . . . . . . . . . . . . . . . . . . 96
Using Bluetooth
Using Wi-Fi (802.11b)
Creating a Modem Connection
Creating an Ethernet Connection
Creating a VPN Connection
Ending a Connection
Connecting Directly to an E-Mail Server
Getting Help on Connecting
11 Appendix
Specifications . . . . . . . . . . . . . . . . . . 104
Regulatory Notices
FCC Notices (U.S. Only)
IC Notice (Canada Only)
CE Notice (European Union)
EN 55022 Compliance
(Czech Republic Only)
Australia and New Zealand
VCCI Notice (Japan Only)
MIC Notice (Republic of Korea Only)
Polish Center for Testing and
Certification Notice
. . . . . . . . . . . . . . . . . . 97
. . . . . . . . . . . . . . . 97
. . . . . . . . . . 98
. . . . . . . . . 99
. . . . . . . . . . . 100
. . . . . . . . . . . . . . 101
. . . . 102
. . . . . . . . . . . 102
. . . . . . . . . . . . . . . 108
. . . . . . . . . . . 109
. . . . . . . . . . . 110
. . . . . . . . . 111
. . . . . . . . . . . . 111
. . . . . . . . . 112
. . . . . . . . . . 112
. . . . . 113
. . . . . . . . . . . . . 114
8 Contents

BSMI Notice (Taiwan Only) . . . . . . . . . . 117
NOM Information (Mexico Only)
. . . . . . . 119
Wireless Regulatory Information
. . . . . . . . . 119
Europe—CE Declaration of Conformity
Japan Standard
. . . . . . . . . . . . . . . . 122
Canada—Industry Canada (IC)
FCC Standard
Mexico
. . . . . . . . . . . . . . . . . 123
. . . . . . . . . . . . . . . . . . . . 124
Singapore—Approved by IDA for Use in
Singapore
Korea
Brazil
Radio Approvals
Contacting Dell
Limited Warranties
. . . . . . . . . . . . . . . . . . . 124
. . . . . . . . . . . . . . . . . . . . . 124
. . . . . . . . . . . . . . . . . . . . . 124
. . . . . . . . . . . . . . . 125
. . . . . . . . . . . . . . . . . . 125
. . . . . . . . . . . . . . . . 153
Limited Warranty for Dell-Branded
Hardware Products (U.S. Only)
Limited Warranty Terms for Dell-Branded
Hardware Products (Canada Only)
Dell Software and Peripherals
(Canada Only)
. . . . . . . . . . . . . . . . . 161
1-Year End-User Manufacturer Guarantee
(Latin America and the Caribbean Only)
. . . . 120
. . . . . . . . 123
. . . . . . . . 153
. . . . . . 157
. . . . 162
Index . . . . . . . . . . . . . . . . . . . . . . . . . . 167
Glossary . . . . . . . . . . . . . . . . . . . . . . 165
Contents 9

10 Contents

CAUTION: Safety Instructions
Use the following safety guidelines to help ensure your own personal safety and to help
protect your device and working environment from potential damage.
SAFETY: General
• Do not attempt to service the device yourself unless you are a trained service
technician. Always follow installation instructions closely.
• If you use an extension power cable with your AC adapter, ensure that the total
ampere rating of the products plugged in to the extension power cable does not exceed
the ampere rating of the extension cable.
• Do not push objects into air vents or openings of your device. Doing so can cause fire
or electric shock by shorting out interior components.
• Keep your device away from radiators and heat sources. Also, do not block cooling
vents. Avoid placing loose papers underneath your device; do not place your device in
a closed-in wall unit or on a bed, sofa, or rug.
• Place the AC adapter in a ventilated area, such as a desk top or on the floor, when you
use it to run the device or to charge the battery. Do not cover the AC adapter with
papers or other items that will reduce cooling; also, do not use the AC adapter inside a
carrying case.
• The AC adapter may become hot during normal operation of your device. Use care
when handling the adapter during or immediately after operation.
• Do not use your device in a wet environment, for example, near a bath tub, sink, or
swimming pool or in a wet basement.
• If your device includes an integrated or optional (PC Card) modem, disconnect the
modem cable if an electrical storm is approaching to avoid the remote risk of electric
shock from lightning via the telephone line.
• To help avoid the potential hazard of electric shock, do not connect or disconnect any
cables or perform maintenance or reconfiguration of this product during an electrical
storm. Do not use your device during an electrical storm unless all cables have been
disconnected and the device is operating on battery power.
• If your device includes a modem, the cable used with the modem should be
manufactured with a minimum wire size of 26 American wire gauge (AWG) and an
FCC-compliant RJ-11 modular plug.
• PC Cards may become very warm during normal operation. Use care when removing
PC Cards after their continuous operation.
• Before you clean your device, disconnect the device from the electrical outlet. Clean
your device with a soft cloth dampened with water. Do not use liquid or aerosol
cleaners, which may contain flammable substances.
CAUTION: Safety Instructions 11

SAFETY: Power
• Use only the Dell-provided AC adapter approved for use with this device. Use of
another AC adapter may cause a fire or explosion.
• Before you connect the device to an electrical outlet, check the AC adapter voltage
rating to ensure that the required voltage and frequency match the available power
source.
• To remove the device from all power sources, turn the device off, disconnect the AC
adapter from the electrical outlet, and remove the battery installed in the battery bay.
• To help prevent electric shock, plug the AC adapter and device power cables into
properly grounded power sources. These power cables may be equipped with 3-prong
plugs to provide an earth grounding connection. Do not use adapter plugs or remove
the grounding prong from the power cable plug. If you use a power extension cable,
www.dell.com | support.dell.com
use the appropriate type, 2-prong or 3-prong, to mate with the AC adapter power
cable.
• Be sure that nothing rests on your AC adapter’s power cable and that the cable is not
located where it can be tripped over or stepped on.
• If you are using a multiple-outlet power strip, use caution when plugging the AC
adapter’s power cable into the power strip. Some power strips may allow you to insert
the plug incorrectly. Incorrect insertion of the power plug could result in permanent
damage to your device, as well as risk of electric shock and/or fire. Ensure that the
ground prong of the power plug is inserted into the mating ground contact of the
power strip.
SAFETY: Battery
• Use only Dell™ battery modules that are approved for use with this device. Use of
other types may increase the risk of fire or explosion.
• Do not carry a battery pack in your pocket, purse, or other container where metal
objects (such as car keys or paper clips) could short-circuit the battery terminals. The
resulting excessive current flow can cause extremely high temperatures and may result
in damage to the battery pack or cause fire or burns.
• The battery poses a burn hazard if you handle it improperly. Do not disassemble it.
Handle a damaged or leaking battery pack with extreme care. If the battery is
damaged, electrolyte may leak from the cells and may cause personal injury.
• Keep the battery away from children.
• Do not store or leave your device or battery pack near a heat source such as a radiator,
fireplace, stove, electric heater, or other heat-generating appliance or otherwise expose
it to temperatures in excess of 60ºC (140ºF). When heated to excessive temperatures,
battery cells could explode or vent, posing a risk of fire.
12 CAUTION: Safety Instructions

• Do not dispose of your device’s battery in a fire or with normal household waste.
Battery cells may explode. Discard a used battery according to the manufacturer’s
instructions or contact your local waste disposal agency for disposal instructions.
Dispose of a spent or damaged battery promptly.
SAFETY: Air Travel
• Certain Federal Aviation Administration regulations and/or airline-specific restrictions
may apply to the operation of your Dell device while you are on board an aircraft. For
example, such regulations/restrictions may prohibit the use of any personal electronic
device (PED) that has the capacity for intentional transmission of radio frequency or
other electromagnetic signals while on an aircraft.
– In order to best comply with all such restrictions, if your Dell portable device is
equipped with Dell TrueMobile™ or some other wireless communication device,
please disable this device before you board the aircraft and follow all instructions
provided by airline personnel with regard to such device.
– Additionally, the use of any PED, such as a portable device, may be prohibited in
aircraft during certain critical phases of flight, for example, takeoff and landing.
Some airlines may further define the critical flight phase as any time the aircraft
is below 3050 m (10,000 ft). Please follow the airline’s specific instructions as to
when the use of a PED is allowed.
SAFETY: Electromagnetic Compatibility Instructions
Use shielded signal cables to ensure that you maintain the appropriate electromagnetic
compatibility classification for the intended environment. For parallel printers, a cable is
available from Dell. If you prefer, you can order a cable from Dell at its worldwide website at
www.dell.com.
Static electricity can harm electronic components inside your device. To prevent static
damage, discharge static electricity from your body before you touch any of your device’s
electronic components, such as a memory module. You can do so by touching an unpainted
metal surface.
WARNING:
accessories sold with this product, will expose you to lead, a chemical known
to the State of California to cause birth defects or other reproductive harm.
Wash your hands after handling the cord
Handling the cord on this product, or cords associated with
.
CAUTION: Safety Instructions 13

When Using Your Device
Observe the following safe-handling guidelines to prevent damage to your device:
• When setting up the device for work, place it on a level surface.
• When traveling, do not check the device as baggage. You can put your device through
an X-ray security machine, but never put your device through a metal detector. If you
have the device checked by hand, be sure to have a charged battery available in case
you are asked to turn on the device.
• When traveling, do not place the device in overhead storage compartments where it
could slide around. Do not drop your device or subject it to other mechanical shocks.
• Protect your device, battery, and hard drive from environmental hazards such as dirt,
dust, food, liquids, temperature extremes, and overexposure to sunlight.
• When you move your device between environments with very different temperature
www.dell.com | support.dell.com
and/or humidity ranges, condensation may form on or within the device. To avoid
damaging the device, allow sufficient time for the moisture to evaporate before using
the device.
NOTICE: When taking the device from low-temperature conditions into a warmer
environment or from high-temperature conditions into a cooler environment, allow the
device to acclimate to room temperature before turning on power.
• When you disconnect a cable, pull on its connector or on its strain-relief loop, not on
the cable itself. As you pull out the connector, keep it evenly aligned to avoid bending
any connector pins. Also, before you connect a cable make sure both connectors are
correctly oriented and aligned.
• Handle components with care. Hold a component such as a memory module by its
edges, not its pins.
• Clean the display with a soft, clean cloth and water. Apply the water to the cloth; then
stroke the cloth across the display in one direction, moving from the top of the display
to the bottom. Remove moisture from the display quickly and keep the display dry.
Long-term exposure to moisture can damage the display. Do not use a commercial
window cleaner to clean your display.
SAFETY: Ergonomic Computing Habits
CAUTION: Improper or prolonged keyboard use may result in injury.
CAUTION: Viewing the display or external monitor screen for extended periods of
time may result in eye strain.
14 When Using Your Device

SAFETY: Protecting Against Electrostatic Discharge
Static electricity can harm electronic components inside your device. To prevent static
damage, discharge static electricity from your body before you touch any of your device’s
electronic components, such as a memory module. You can do so by touching an unpainted
metal surface.
You can also take the following steps to prevent damage from electrostatic discharge (ESD):
• When unpacking a static-sensitive component from its shipping carton, do not
remove the component from the antistatic packing material until you are ready to
install the component. Just before unwrapping the antistatic packaging, be sure to
discharge static electricity from your body.
• When transporting a sensitive component, first place it in an antistatic container or
packaging.
• Handle all sensitive components in a static-safe area. If possible, use antistatic floor
pads and workbench pads.
SAFETY: Battery Disposal
Your device uses a lithium-ion battery and a rechargeable NiMH battery. For
instructions about replacing the batteries in your device, see "Using the Battery"
on page 21.
Do not dispose of the battery along with household waste. Contact your local
waste disposal agency for the address of the nearest battery deposit site.
Finding Information
What Are You Looking For? Find It Here:
How to set up my device and
information on the connectors and
The setup diagram and the Dell™
Owner’s Manual
buttons on my device
Information on using my device Dell Owner’s Manual and Pocket PC
Help.
To view Help, tap the Start button and
tap Help.
Additional programs that can be
Dell Companion CD
installed on my device
Information on using programs on my
device
Pocket PC Help and, if available, tap
Help within a specific program
Finding Information 15

What Are You Looking For? Find It Here:
Connecting to and synchronizing with
a computer
Dell Owner’s Manual and Microsoft®
ActiveSync
®
Help on your computer.
To view Help, click Help and click
Microsoft ActiveSync Help.
Last-minute updates and detailed
technical information
The readme files, located in the
ActiveSync folder on the computer and
on the Dell Companion CD.
Up-to-date information on your
www.microsoft.com/windowsmobile
Pocke t PC
My Service Tag Label located in the battery slot
www.dell.com | support.dell.com
(remove the battery)
16 Finding Information

About Your Device
Front, Side, and Back Views
Using the Battery
Connecting to a Computer
Checking Built-In Storage
Using Secure Digital Memory Cards
Performing a Reset
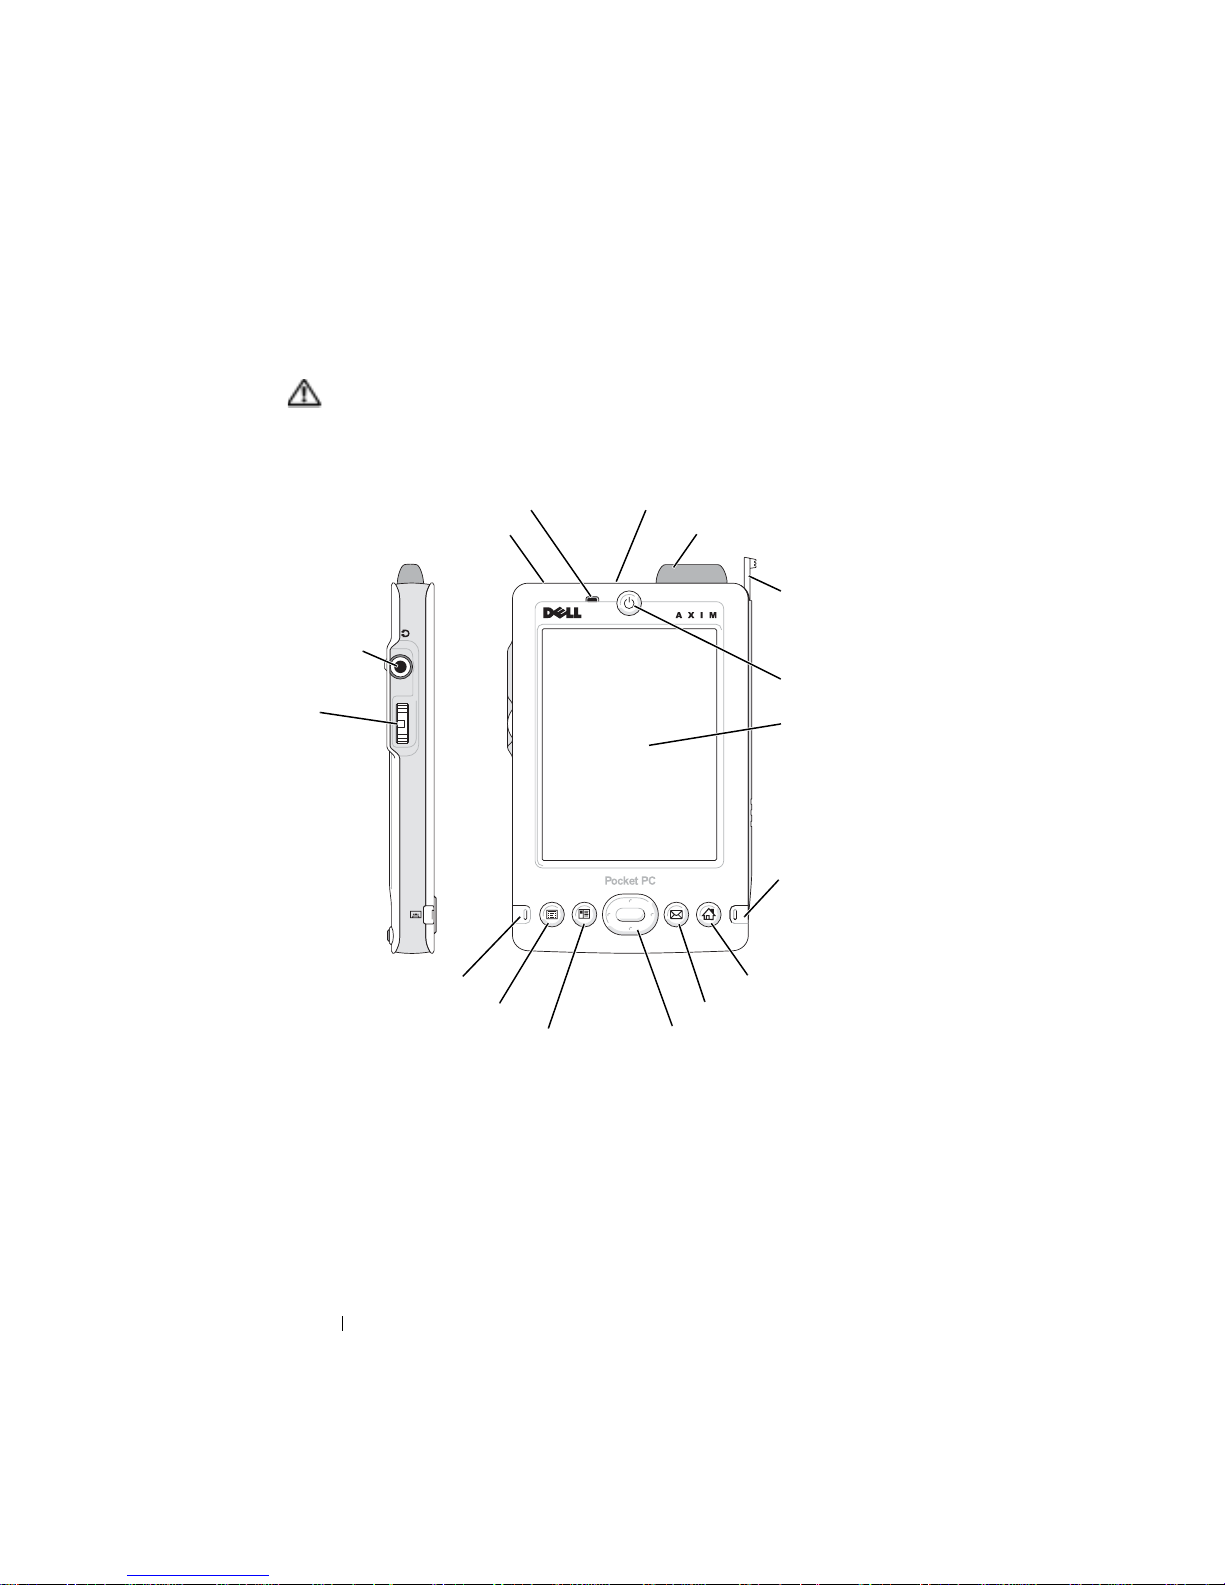
Front, Side, and Back Views
)
CAUTION: Before performing any of the procedures in this section, read and
follow the safety instructions on page 11.
Front and Side Views
microphone
infrared sensor (top)
headphone
www.dell.com | support.dell.com
connector
scroll
dial
record button
Calendar button
Contacts button
INFRARED SENSOR—The infrared sensor lets you transfer files from your device to
another infrared-compatible device without using cable connections.
MICROPHONE—Allows you to record audio.
S
ECURE DIGITAL CARD SLOT—See "Using Secure Digital Memory Cards" on page 27
for information on using Secure Digital memory cards.
Secure Digital card slot (top
wireless antenna (optional)
stylus
(extended)
power button
touch screen
wireless/
Windows Media
Player on/off
button
Home button
Messaging button
navigator button
18 About Your Device

WIRELESS ANTENNA—Allows you to transmit data (optional).
• When Bluetooth is in use, the antenna lights blue.
• When Wi-Fi is in use, the antenna lights green.
STYLUS—Use the stylus to write or draw on the screen. To remove the stylus, pull it
straight up and out of the holder. To avoid losing the stylus, store the stylus in the
holder when you are not using it. Ensure that the stylus is oriented correctly when
you replace it in the slot.
POWER BUTTON—Press the power button to turn the device on or off. Press and hold
the power button to dim the display. Repeat to light the display.
• When the device is connected to external power and the main battery is fully
charged, the power button light is solid green.
• When the main battery charge is low, the power button light flashes amber.
• When the battery is being charged, the power button light is solid amber.
• When the device relays a notification, the power button light rapidly flashes
green.
TOUCH SCREEN—Use the touch screen and the stylus to enter information into your
device. See "Entering Information" on page 41.
WIRELESS OR MICROSOFT
®
WINDOWS MEDIA® PLAYER ON/OFF BUTTON—On wireless devices,
the button turns the wireless module on and off. Turn off the module to conserve
power. On non-wireless devices, the button turns Windows Media Player on and off.
OME BUTTON—Press this button to launch Home or to turn on the device.
H
M
ESSAGING BUTTON—Press this button to launch Messaging or to turn on the
device.
NAVIGATOR BUTTON—Press the right, left, top, or bottom of the navigator button to
move the cursor on the screen. Press the center to enter a selection.
C
ONTACTS BUTTON—Press this button to launch Contacts or to turn on the device.
ALENDAR BUTTON—Press this button to launch Calendar or to turn on the device.
C
RECORD BUTTON—See "Recording a Message" on page 50 for information on using
the record button.
SCROLL DIAL
• Press the scroll dial to perform actions similar to pressing <Enter> on a keyboard.
• Rotate the scroll dial up or down to perform actions similar to using the up- and
down-arrow keys on a keyboard.
For information on the functionality of the scroll dial within programs, see Pocket
PC Help on your device.
HEADPHONE CONNECTOR—Attach headphones.
About Your Device 19
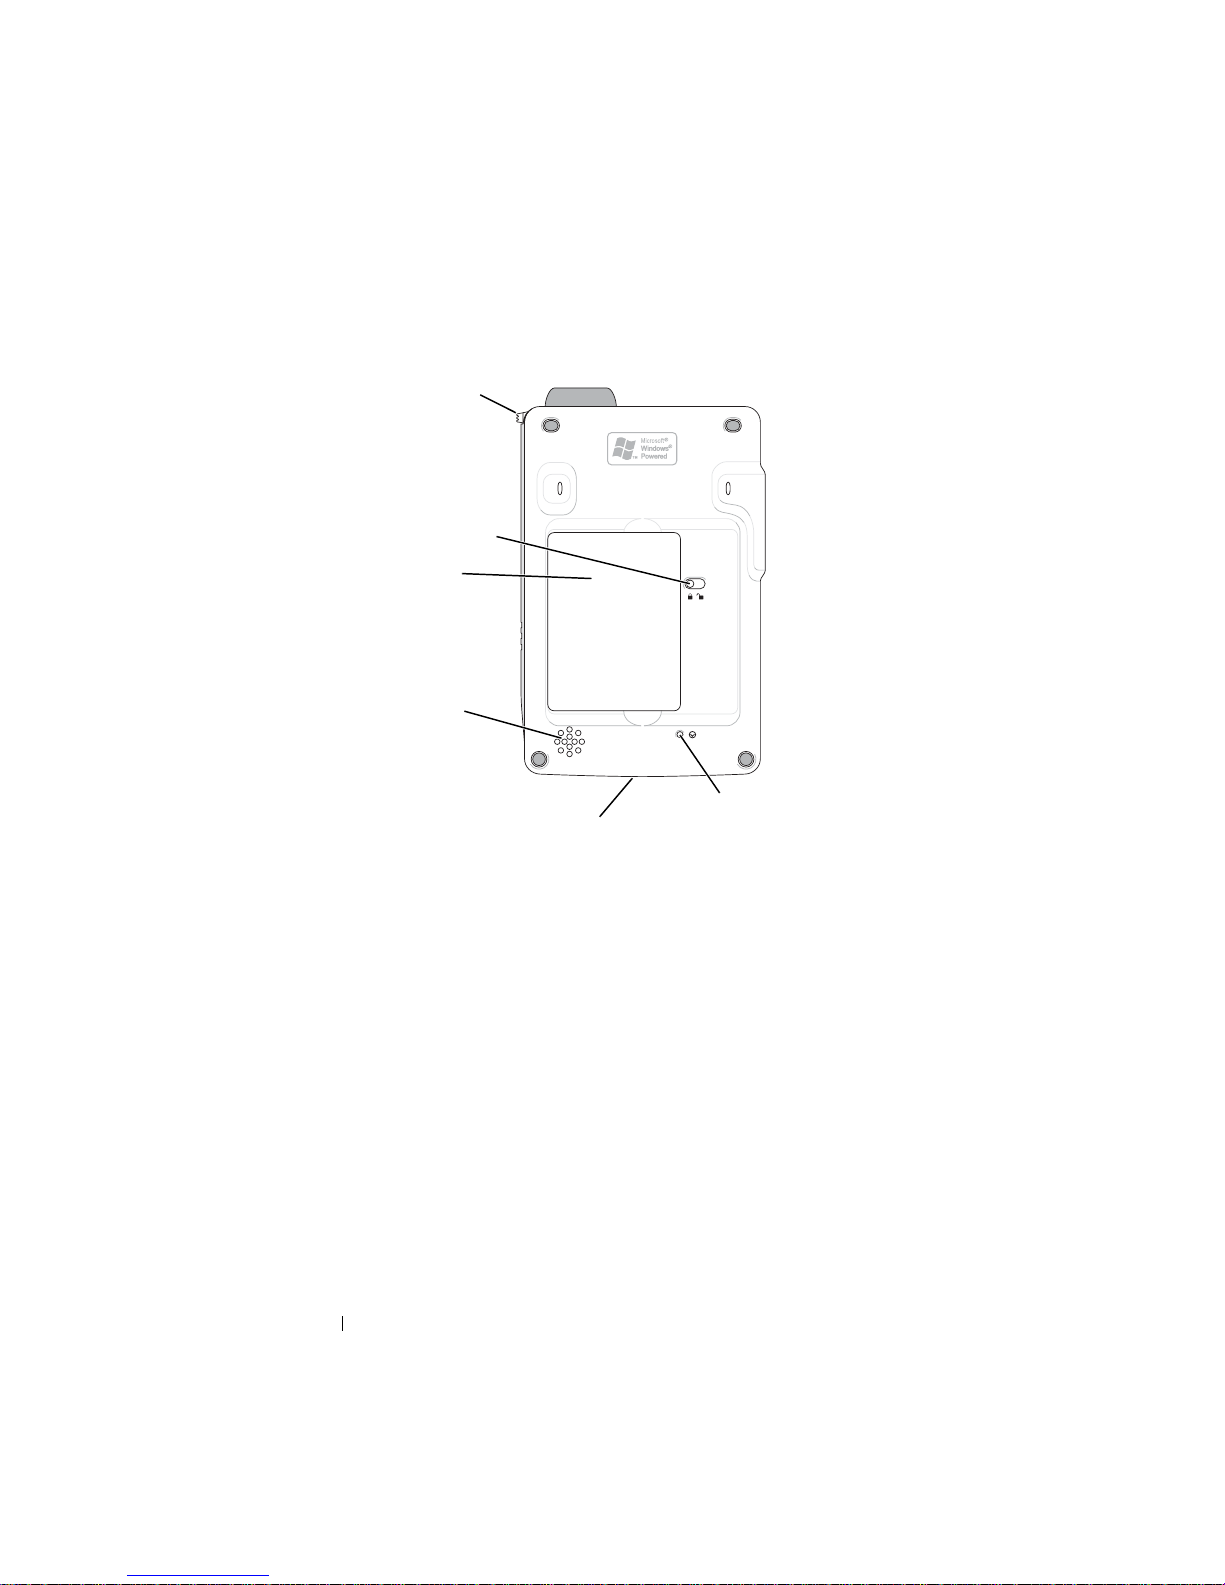
Back View
stylus (secured)
battery lock
battery
www.dell.com | support.dell.com
speaker
cradle/sync cable
reset button
connector (bottom)
BATTERY LOCK—
Use this switch to release and remove the main battery. See "Installing
and Removing the Battery" on page 21.
BATTERY—See "Using the Battery" on page 21 for information on the main battery.
SPEAKER—Tap the speaker icon to adjust the volume.
CRADLE/SYNC CABLE CONNECTOR—Connect a cradle or sync cable. See "Connecting to
a Computer" on page 23.
RESET BUTTON—See "Performing a Reset" on page 28 for information on using the
reset button.
20 About Your Device
Using the Battery
NOTICE: Do not use your device until you have charged the main battery for at
least 8 hours for the first charge.
Before you use your device for the first time, you must install and charge the
battery. Once the battery is charged, use the power properties to monitor the
battery charge. See Pocket PC Help on the device for more information.
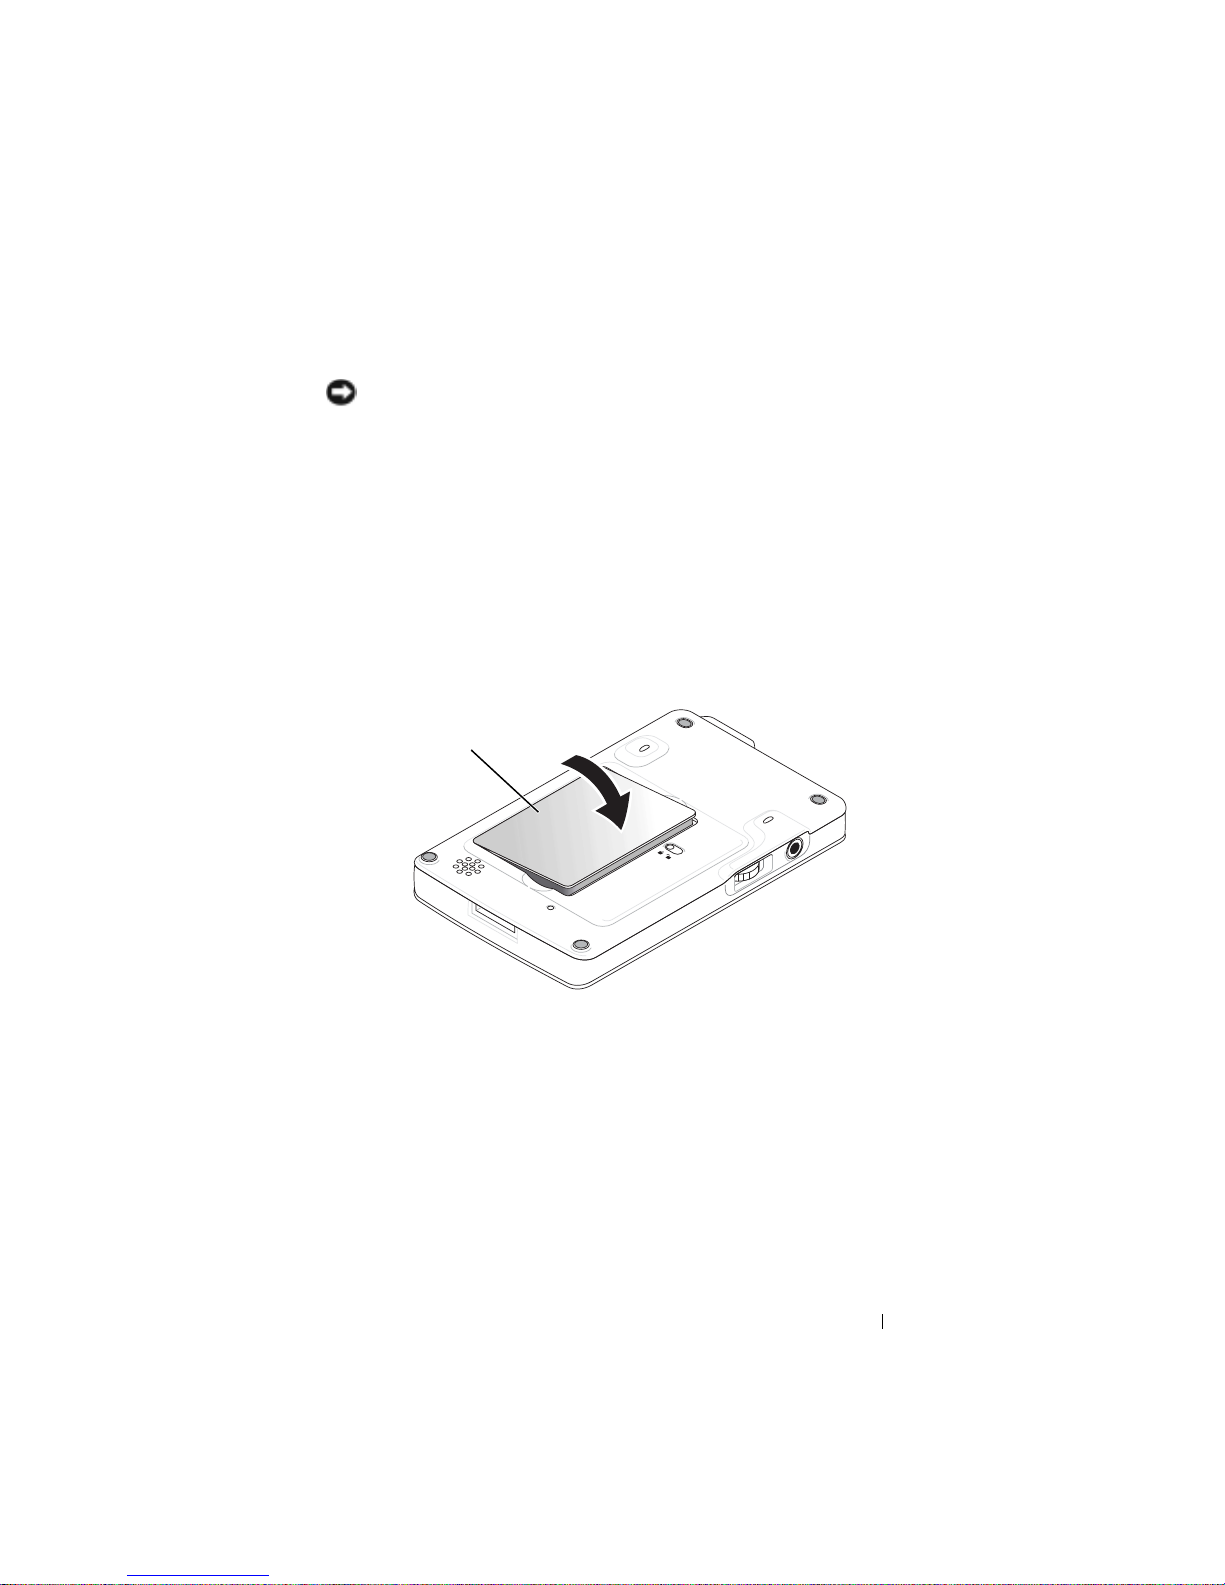
Installing and Removing the Battery
To install the battery:
1
Ensure that the device is turned off.
2
Insert the left side of the battery into the battery slot at an angle, and
lower the right side into the slot until it clicks.
battery
About Your Device 21

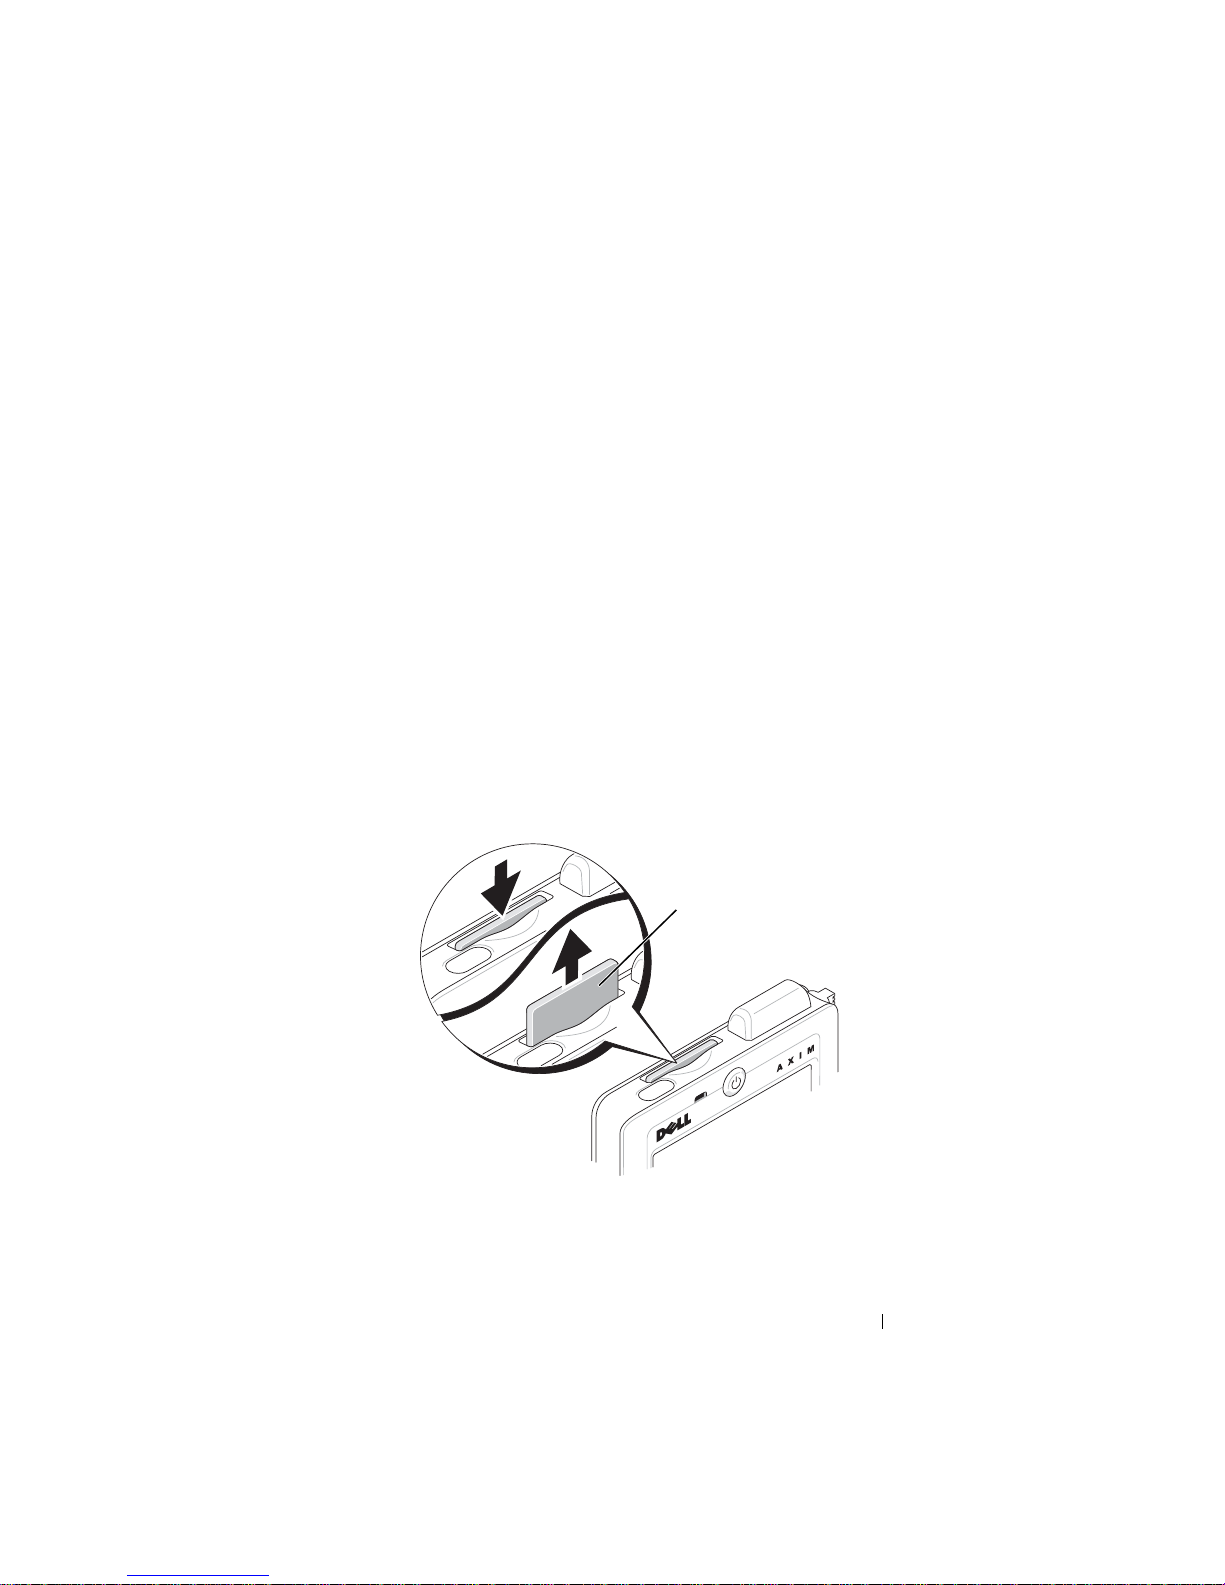
To remove the battery:
1
Insert the tip of the stylus into the battery lock.
2
Slide and hold the lock in the unlock position.
3
Lift the battery out of the slot.
stylus
battery
www.dell.com | support.dell.com
battery lock
NOTE: Your Service Tag is located underneath the battery. You need your
Service Tag if you access Dell Support at support.dell.com or if you call Dell for
customer service or technical support.
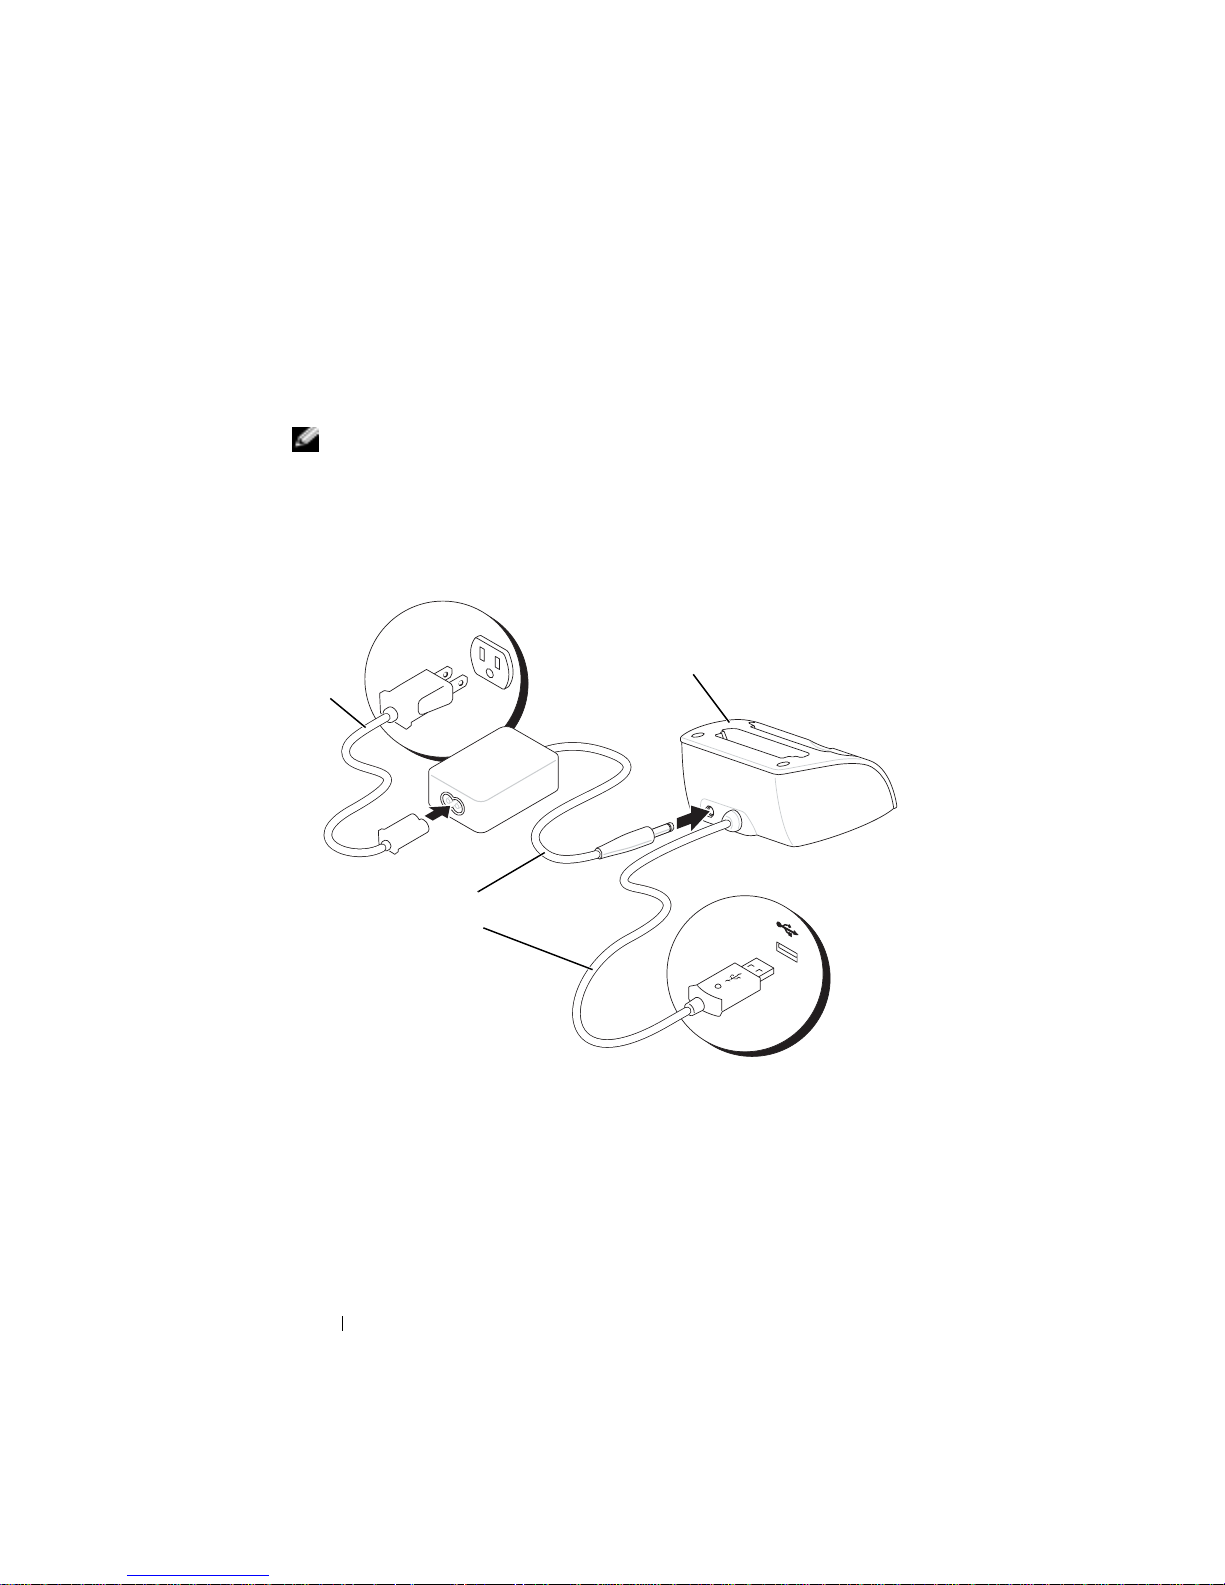
Charging the Battery
Use one of the following options to charge the main battery:
• Connect the AC adapter directly to the charger adapter and then to the
device and to an electrical outlet.
• Connect the AC adapter directly to the sync cable and then to the
device and to an electrical outlet.
• Connect the AC adapter to the cradle, and insert the device into the
cradle. See "Using the Cradle" on page 23 for more information.
Charging the main battery and internal backup battery from empty to full
takes 8 hours the first time and 4 hours thereafter, whether the device is on
or off.
22 About Your Device

If the main battery is critically low, the device enters "deep sleep" mode and
the device is powered off.
To recover from a critically low battery:
1
Plug in the AC adapter or replace the main battery with a non-empty
battery.
2
Press the power button to power on.
If you remove the main battery, the internal backup battery can last for up to
30 minutes in "deep sleep" mode. Do not remove the main battery if the
backup battery power is low.
With normal use, the device will power off if the device is left unused for a
user-defined period of time. See "System Tab" on page 54 for information
about
Power
to set the amount of time that the device can remain idle
before it turns off.
Connecting to a Computer
You either connect your device to a computer using a cradle or directly to a
computer using a sync cable. Connect your device to a computer to:
• Add programs to your device. See "Adding Programs Using Microsoft
ActiveSync
®
" on page 76 for more information.
• Synchronize data on your device with data on your computer.
For information on synchronizing your data, see the following resources:
®
• "Using Microsoft
ActiveSync®" on page 57
• ActiveSync Help on your computer
• ActiveSync Help on your device
®
Using the Cradle
NOTE: Depending on the configuration of your device, the cradle is optional.
You can use the cradle to:
• Synchronize the data on your device with the data on your computer.
• Power the device with AC power to conserve battery power.
About Your Device 23
• Charge the main battery. See "Using the Battery" on page 21 for more
information.
• Charge a spare battery.
NOTE: Before connecting your device to a computer for the first time, ensure
that you install ActiveSync on the computer from the Dell™ Companion CD.
To connect your device to the cradle:
1
Place the cradle on a flat, level surface near your computer.
2
Connect the cradle cable to the USB connector on your computer.
www.dell.com | support.dell.com
power
cord
cradle
AC adapter
cradle cable
USB connection
to the computer
24 About Your Device
3
Connect the AC adapter to the cradle and to an electrical outlet.
spare battery
charger
stylus holder (2)
front of
cradle
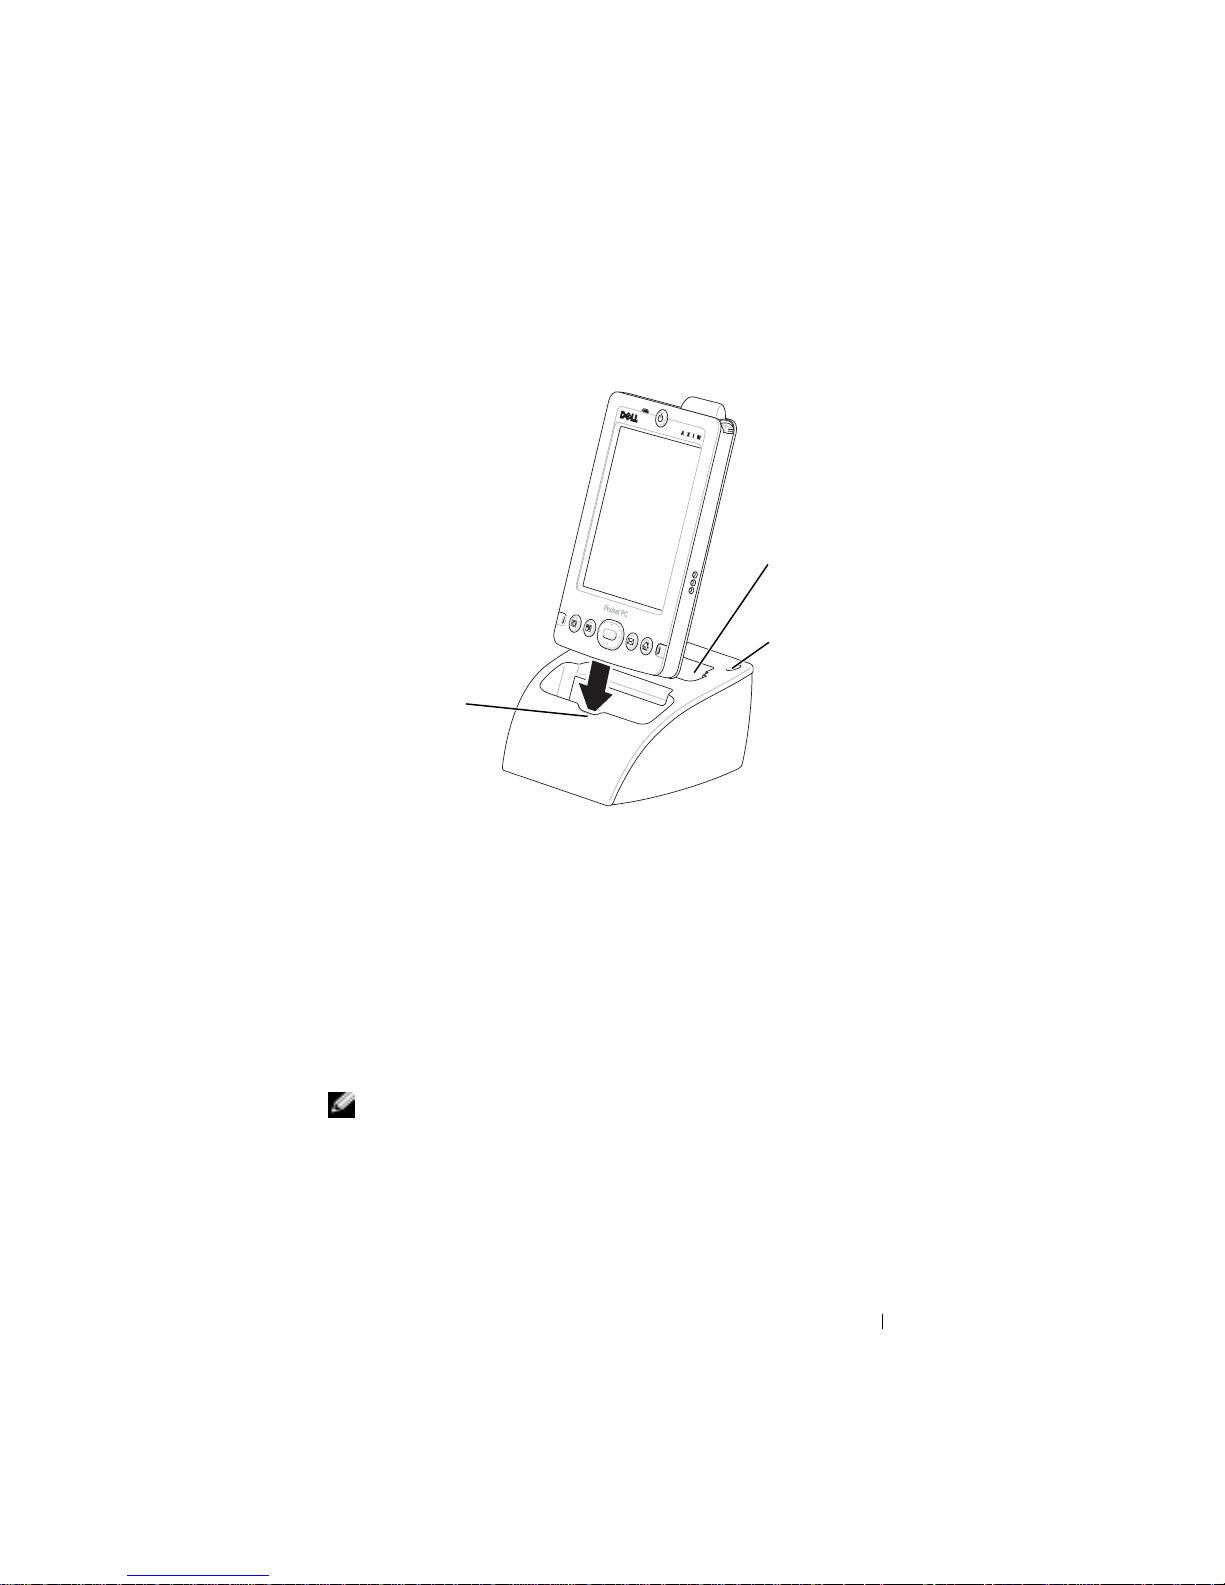
4
Align the connector on the bottom of the device with the connector on
the cradle, and, keeping the front of the device flush with the front of
the cradle, lower the device onto the cradle.
When the device is docked in the cradle, the DELL™ logo on the cradle
lights up and the connection status icon appears on the command bar (see
page 33).
The spare battery status light on the cradle operates as follows:
• Green — The spare battery is fully charged.
• Amber — The spare battery is charging.
NOTE: The power button on the device indicates the charge status of the main
battery. See the description of the power button lights on page 19 for more
information.
To remove the device from the cradle, pull the device straight up and out of
the cradle.
About Your Device 25

Using the Sync Cable
Use the sync cable to connect your device directly to the computer without
using the cradle.
NOTE: Depending on the configuration of your device, the sync cable is
optional.
To connect the sync cable:
1
Connect one end of the cable to the USB connector on your computer.
2
Connect the other end of the cable to your device.
NOTICE: To avoid damaging the connector, press the two buttons on the sides
www.dell.com | support.dell.com
of the connector to release the self-lock structure before pulling the connector
out of the device.
power
cord
buttons (2)
device connector
sync cable connector
AC adapter
sync cable
USB connection
to the computer
26 About Your Device
Checking Built-In Storage
The amount of on-board flash memory in your device is dependent on the
device configuration and the operating-system image size. The memory is
non-volatile, so the data saved here is not lost even if the device is totally out
of power.
To check the available non-volatile memory space on your device:
1
Tap th e
2
Tap th e
3
Tap th e
drop-down menu to display the available space.
Start
button and tap
System
Storage Card
tab and tap
Settings
Memory
tab, and then select
.
.
Built-in Storage
from the
Using Secure Digital Memory Cards
Use Secure Digital memory cards to save or back up data.
To install a Secure Digital memory card:
1
If a card is already installed, press in the card to release it, and then
remove it.
blank
About Your Device 27
2
Ensure that the card is oriented correctly, and slide it into the slot until
you feel a click.
NOTICE: Do not force the card. If you feel resistance, remove the card, check
the orientation, and reinsert it.
See the documentation that came with the card for information on using the
card.
Performing a Reset
Soft Reset
When you perform a soft reset, the device deletes any data that has not been
www.dell.com | support.dell.com
saved but saves any data that has been stored in memory. Try performing a
soft reset if the device does not respond when you tap the display or press a
button.
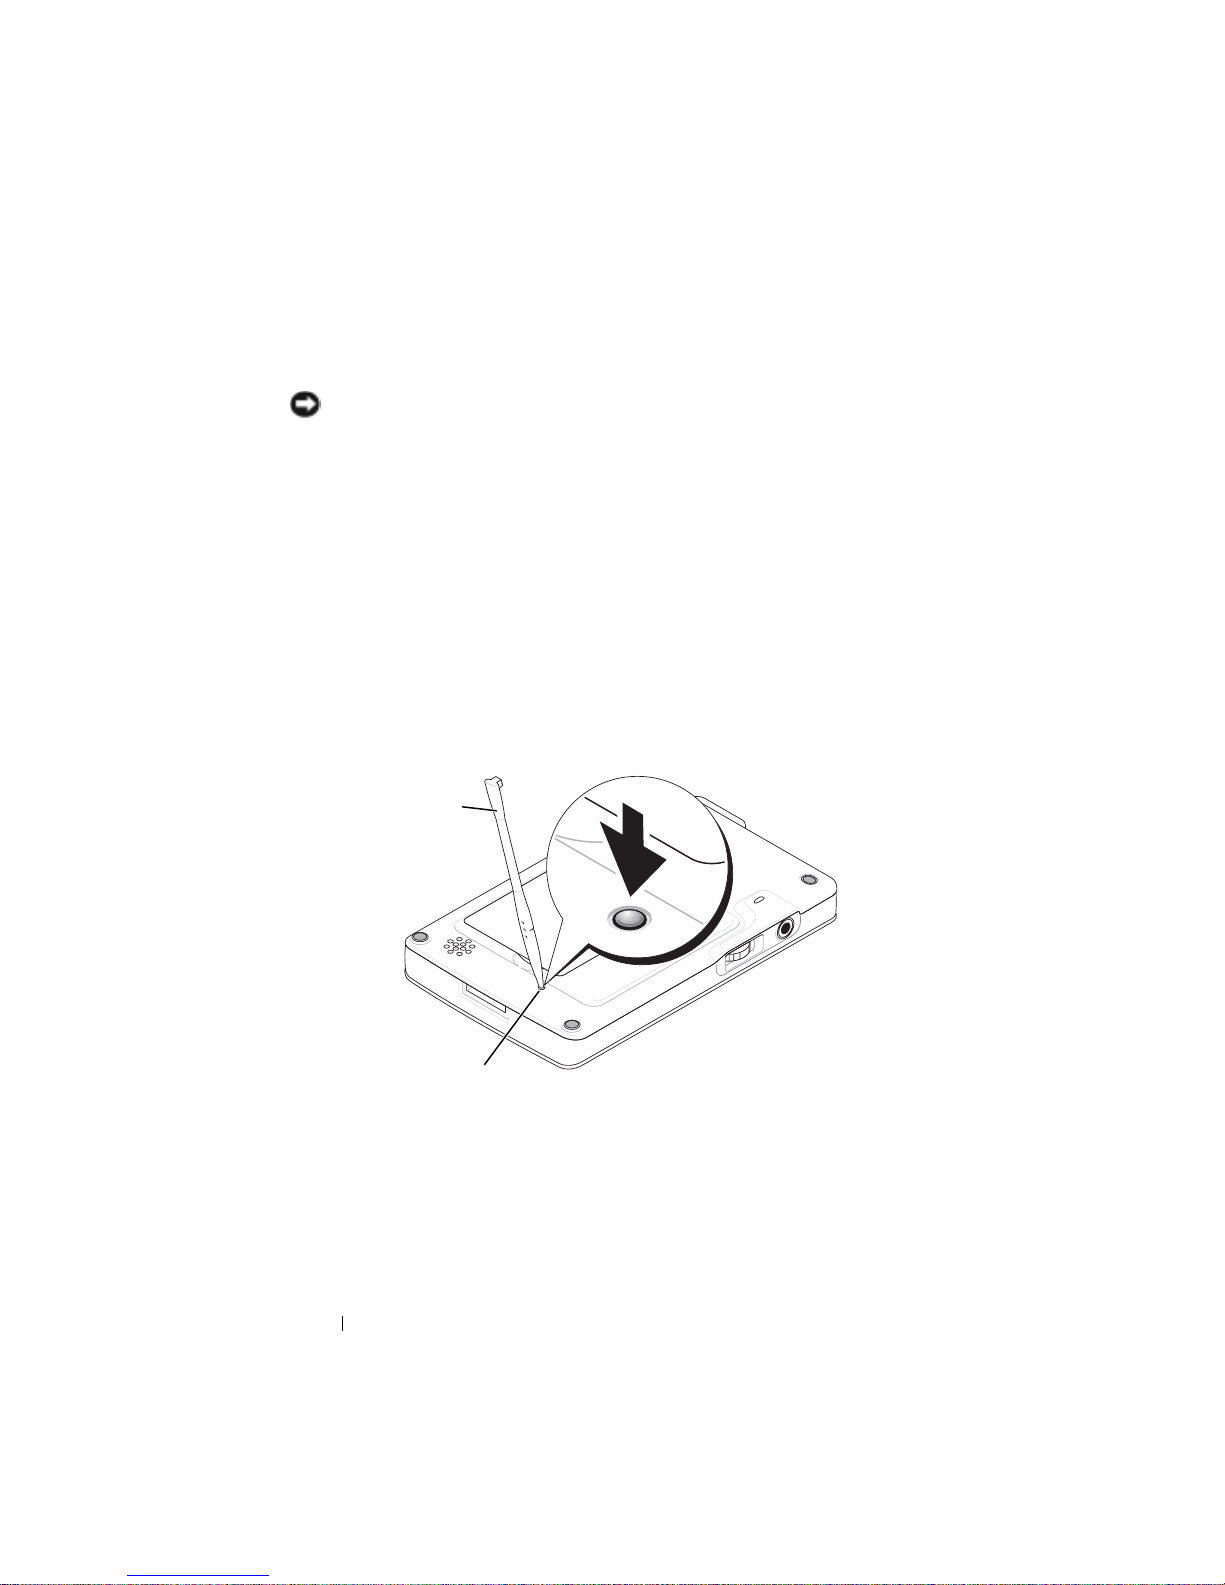
To perform a soft reset, use the stylus to press the reset button.
stylus
reset button
28 About Your Device

Hard Reset
NOTICE: When you perform a hard reset, you lose all the data stored and any
programs you installed on your device.
Perform a hard reset if:
• You want to delete all the data stored on your device.
• You forget your password and need to clear it.
• Your device is experiencing severe operational problems and you have
already attempted a soft reset.
NOTICE: It is strongly recommended that you back up your data before you
perform a hard reset. See ActiveSync Help on your computer for more
information.
To perform a hard reset:
1
Press and hold the power button.
2
With the stylus, hold the reset button for about 2 seconds.
3
Follow the instructions on the screen.
About Your Device 29

www.dell.com | support.dell.com
30 About Your Device
 Loading...