

Page 1

Alienware 510M RGB Gaming Mouse
User Guide
Mouse Model: AW510M
Regulatory Model: AW510M
Page 2

Notes, cautions, and warnings
NOTE: A NOTE indicates important information that helps you make
better use of your computer.
CAUTION: A CAUTION indicates potential damage to hardware or loss
of data if instructions are not followed.
WARNING: A WARNING indicates a potential for property damage,
personal injury, or death.
Copyright © 2019 Dell Inc. or its subsidiaries. All rights reserved. Dell, EMC, and other
trademarks are trademarks of Dell Inc. or its subsidiaries. Other trademarks may be trademarks of
their respective owners.
2019 – 08
Rev. A00
Page 3

Contents
What’s in the box................................4
Features .......................................5
Adjustable DPI . . . . . . . . . . . . . . . . . . . . . . . . . . 5
Scrolling count . . . . . . . . . . . . . . . . . . . . . . . . . . 6
Setting up your gaming mouse ....................6
Connecting the mouse. . . . . . . . . . . . . . . . . . . . . . 6
Alienware Command Center (AWCC) Application ...8
Installing AWCC through Windows Update . . . . . . . . . 8
Installing AWCC from the Dell Support website . . . . . . 8
Troubleshooting.................................9
| 3
Page 4
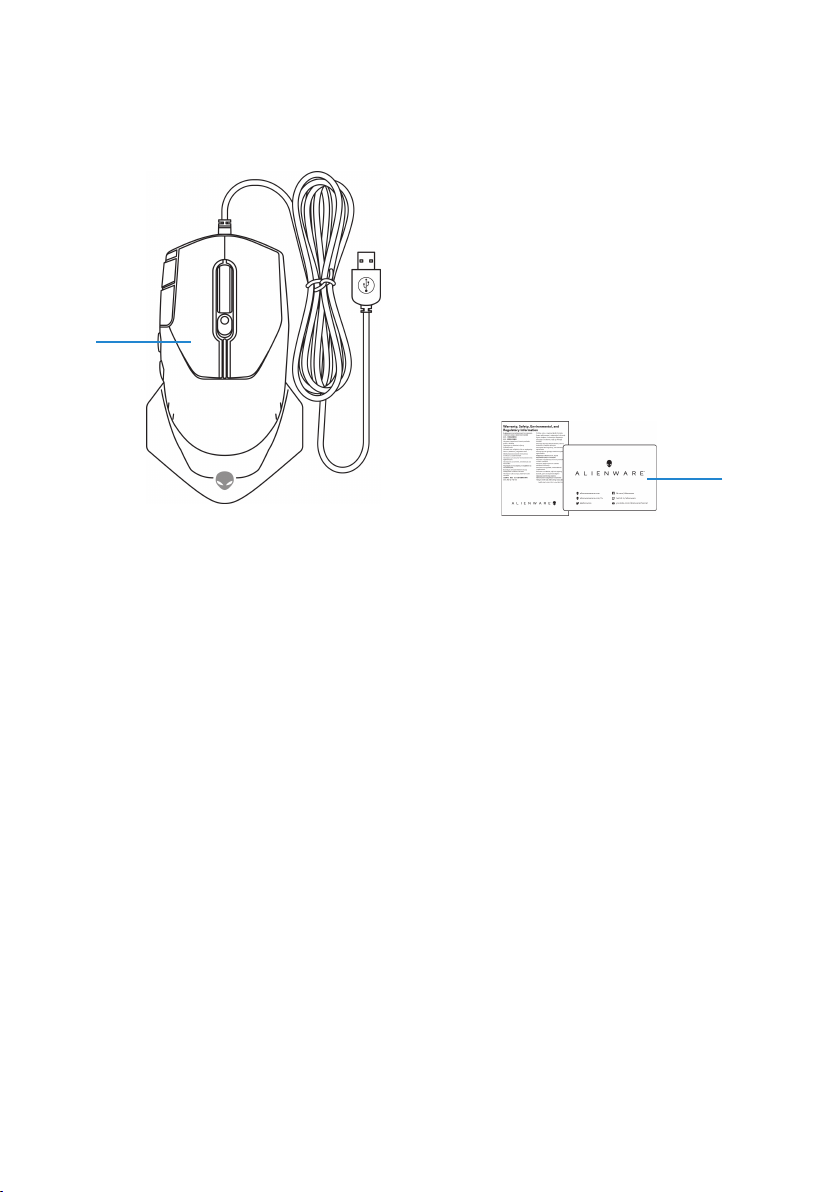
What’s in the box
1
1. Mouse 2. Documents
2
4 | What’s in the box
Page 5

Features
Top
1
2
3
4
1. Left button 2. Continuous scroll up
3. Continuous scroll down 4. DPI indicators
5. Right button 6. Scroll wheel
7. DPI adjustment slider 8. Scroll wheel adjustment switch
9. Forward button 10. DPI clutch button
11. Backward button
5
6
7
10
8
Side
119
Bottom
Adjustable DPI
Press the DPI adjustment button to instantly change the mouse
tracking resolution. DPI setting is indicated by the DPI indicator color.
The default five DPI settings available are as follows:
• 800: Blue ( )
• 1800: Green ( ) (Out-of-box default)
• 3500: Yellow ( )
• 9000: Orange ( )
• 16000: Red ( )
Features | 5
Page 6

You can change the default DPI settings and customize the DPI stages and LED
colors with the Alienware Command Center (AWCC) application.
Scrolling count
Push the scroll wheel adjustment switch up to set the number of steps to 12 or
down to set the number of steps to 24.
Setting up your gaming mouse
Connecting the mouse
1. Turn the mouse over.
6 | Setting up your gaming mouse
Page 7

2. Remove the protective sheet.
3. Connect the mouse USB cable to an available USB A port on your desktop
or laptop.
Desktop
Laptop
Setting up your gaming mouse | 7
Page 8

Alienware Command Center (AWCC) Application
Alienware Command Center (AWCC) application provides a single interface to
customize and enhance the gaming experience.
NOTE: For more information, see the Alienware Command Center
(AWCC) application Online Help.
Installing AWCC through Windows Update
1. Connect your Alienware peripheral to your computer through the USB
port. The AWCC application is downloaded and installed automatically.
AWCC installation may take up to 10 minutes to complete.
2. Navigate to the program folder to ensure that the AWCC installation is
complete.
3. Launch AWCC and perform the following steps to download the
additional software components:
• In the Settings window, click Windows Update, and then click Check
for updates to check the Alienware driver update progress.
• If the driver update is not responding in your computer, install AWCC
from the Dell Support website.
Installing AWCC from the Dell Support website
1. Download the latest version of the following applications from
www.dell.com/support/drivers.
• Alienware Command Center
• Alienware Gaming Peripheral driver
2. Navigate to the folder where you saved the setup les.
3. Double-click the setup le and follow the on-screen instructions to install
the application.
NOTE: You can customize the mouse features and lighting effects by
using the Alienware Command Center (AWCC) application.
8 | Alienware Command Center (AWCC) Application
Page 9

Troubleshooting
Problems Possible solutions
Mouse is not functioning 1. Connect the mouse USB cable to
another USB A port. A notication
may appear indicating that the
driver installation is in progress.
If so, wait until a notication to
appear indicating that the drivers
are installed before you use the
mouse.
2. Restart the computer.
Mouse lights do not turn on 1. Press any button to wake the mouse
from sleep mode.
2. Connect the mouse USB cable to
another USB A port. A notication
may appear indicating that the
driver installation is in progress.
If so, wait until a notication to
appear indicating that the drivers
are installed before you use the
mouse.
3. Restart the computer.
Mouse is not running based on
the configuration selected in
the Alienware Command Center
(AWCC) application.
1. Ensure that the Alienware
Command Center (AWCC)
application is installed on your
computer.
2. Open the Alienware Command
Center (AWCC) application
and ensure that the selected
conguration is set up and saved.
Troubleshooting | 9
Page 10

Problems Possible solutions
Resolving cursor issues 1. Connect the mouse USB cable to
another USB A port. A notication
may appear indicating that the
driver installation is in progress.
If so, wait until a notication to
appear indicating that the drivers
are installed before you use the
mouse.
2. Ensure that the sensor is not
obstructed or dirty.
3. Glass or very smooth glossy surfaces
are not suitable for the mouse
sensor to capture movement. Using
a dark colored fabric mouse pad
can improve the tracking.
4. Save any data, close any open
program(s), and then restart the
laptop/desktop. When you do not
have another mouse or touchscreen,
you may have to hold the power
button down for at least 15 seconds
to turn the laptop/desktop o. You
may lose any data that is not saved.
Resolving mouse button issues 1. Ensure that there is nothing
preventing the mouse buttons from
moving. Most mouse buttons make a
clicking noise when pressed down.
2. Connect the mouse USB cable to
another USB A port. A notication
may appear indicating that the
driver installation is in progress.
If so, wait until a notication to
appear indicating that the drivers
are installed before you use the
mouse.
10 | Troubleshooting
Page 11

Problems Possible solutions
Resolving mouse button issues
(continued)
Troubleshooting a slow moving cursor 1. Ensure that the sensor is not
Troubleshooting lift off distance
(LOD) surface calibration issues
3. Save any data, close any open
program(s), and then restart the
laptop/desktop. When you do not
have another mouse or touchscreen,
you may have to hold the power
button down for at least 15 seconds
to turn the laptop/desktop o. You
may lose any data that is not saved.
obstructed or dirty.
2. Glass or very smooth glossy surfaces
are not suitable for the mouse
sensor to capture movement. Using
a dark colored fabric mouse pad
can improve the tracking.use pad
can improve the tracking.
3. Change the mouse settings to adjust
the pointer speed.
Click on the tab that matches the
Operating System (OS) installed on
your laptop/desktop and perform
the steps within that section to
change the settings.
• In the Search box, type main.cpl.
• Click or tap main.cpl in the list
of programs.
• Click or tap the Pointer Options tab.
• Move the slider under Select
a Pointer Speed to adjust the
cursor speed to the desired level.
• Click or tap OK.
The LOD surface calibration depends
on the surface characteristics and may
not work on all surfaces.
Using a dark colored fabric mouse
pad might improve LOD calibration.
Troubleshooting | 11
 Loading...