


Dell EMC Avamar for SQL Server
Version 19.2
User Guide
302-005-838
REV 01
November 2019

Copyright © 2001-2019 Dell Inc. or its subsidiaries. All rights reserved.
Dell believes the information in this publication is accurate as of its publication date. The information is subject to change without notice.
THE INFORMATION IN THIS PUBLICATION IS PROVIDED “AS-IS.” DELL MAKES NO REPRESENTATIONS OR WARRANTIES OF ANY KIND
WITH RESPECT TO THE INFORMATION IN THIS PUBLICATION, AND SPECIFICALLY DISCLAIMS IMPLIED WARRANTIES OF
MERCHANTABILITY OR FITNESS FOR A PARTICULAR PURPOSE. USE, COPYING, AND DISTRIBUTION OF ANY DELL SOFTWARE DESCRIBED
IN THIS PUBLICATION REQUIRES AN APPLICABLE SOFTWARE LICENSE.
Dell Technologies, Dell, EMC, Dell EMC and other trademarks are trademarks of Dell Inc. or its subsidiaries. Other trademarks may be the property
of their respective owners. Published in the USA.
Dell EMC
Hopkinton, Massachusetts 01748-9103
1-508-435-1000 In North America 1-866-464-7381
www.DellEMC.com
2 Dell EMC Avamar for SQL Server User Guide

CONTENTS
Preface
Chapter 1
7
Introduction 11
Architecture...................................................................................................... 12
Avamar components............................................................................. 12
How Avamar connects to SQL Server...................................................13
Failover Cluster Instances.....................................................................13
AlwaysOn availability groups.................................................................16
Database mirroring............................................................................... 21
Data Domain system support................................................................ 21
Server virtualization............................................................................. 22
Backup..............................................................................................................22
Backup types....................................................................................... 22
Backups in AlwaysOn availability groups.............................................. 25
Mixed backup storage..........................................................................25
Multistreaming.....................................................................................26
Database log truncation....................................................................... 26
Backups with other tools......................................................................26
Restore............................................................................................................. 27
Restore to the original location............................................................ 27
Restore to a new database in the original instance...............................27
Restore to a different instance on the original server...........................27
Restore to an instance on a different server........................................ 28
Restore to a file....................................................................................28
Restore to an AlwaysOn availability group............................................28
Restore of a database with an intact log file........................................ 30
Restore of system databases............................................................... 30
Tail-log backup..................................................................................... 31
Point-in-time restore............................................................................ 31
SQL Server recovery operations.......................................................... 32
Year 2038.............................................................................................33
Table level recovery.......................................................................................... 33
Disaster recovery..............................................................................................33
Chapter 2
Installation 35
Preparing to install the SQL Server plug-in.......................................................36
System requirements........................................................................... 36
Preparing a stand-alone server............................................................. 41
Preparing a cluster................................................................................41
Downloading the software....................................................................42
Verifying the environment....................................................................43
Installing the Avamar Plug-in for SQL Server....................................................44
Installing the Avamar client software................................................................ 45
Installation road maps.......................................................................... 45
Installing the Avamar Client for Windows.............................................45
Installing the Avamar Plug-in for SQL Server....................................... 46
Silent installation of Itempoint for SQL.................................................47
Dell EMC Avamar for SQL Server User Guide 3

Contents
Registering the client........................................................................... 47
Configuring the cluster client in a failover cluster................................ 48
Configuring the cluster client for an AlwaysOn availability group......... 49
Configuring the cluster client for an AlwaysOn availability group on
Amazon Web Services and Azure......................................................... 51
Upgrading the Avamar client software..............................................................53
Upgrading on a stand-alone server.......................................................53
Upgrading in a cluster.......................................................................... 53
Uninstalling the Avamar client software............................................................54
Uninstall road map............................................................................... 54
Uninstalling the cluster client in a failover cluster................................ 55
Uninstalling the cluster client for an AlwaysOn availability group......... 55
Chapter 3
Chapter 4
Backup 57
Perform an on-demand SQL backup by using AUI ............................................58
Configure the SQL server policy....................................................................... 59
Scheduling backups using the AUI Policy wizard...............................................60
Creating a dataset................................................................................ 61
Creating a backup policy...................................................................... 62
Enabling a scheduled backup for a backup policy................................. 62
Monitoring backups.......................................................................................... 62
Cancel backups.................................................................................................63
Verifying backups............................................................................................. 63
Enforcement of backups to Data Domain..........................................................64
Application Consistent SQL Virtual Machine Image Backup 65
Managing advanced policies............................................................................. 66
Prerequisites.....................................................................................................66
Add an advanced group policy.......................................................................... 66
Configure a source............................................................................... 67
Configure the SQL server policy.......................................................... 67
Configure members..............................................................................68
Configure a proxy for the image backup.............................................. 69
Remove an advanced policy..............................................................................69
Edit an advanced policy.................................................................................... 69
View advanced policy details.............................................................................70
Migrate existing Backup Policy to an Advanced Policy......................................70
View logs...........................................................................................................70
Chapter 5
4 Dell EMC Avamar for SQL Server User Guide
Restore 73
Restore requirements........................................................................................74
Determine the restore size for an SQL server database.................................... 76
Restore features available by using the AUI...................................................... 77
Software requirements for restore.......................................................74
Tail-log backup and point-in-time restore requirements.......................75
Requirements to restore secondary database files............................... 75
Requirements to restore the Report Server database.......................... 76
SQL Server write permission requirements.......................................... 76
Determine the space required to restore the system database.............76
Determine the space required to restore a single SQL server database....
76
Determine the space required to restore multiple SQL server databases
.............................................................................................................77
Restoring a database to the original client............................................77

Contents
Restoring a database to a different client or instance.......................... 78
Restoring to a new database in the original instance............................80
Restore SQL instance or database to a file.......................................... 82
Table Level restore...............................................................................84
Restore features available by using Avamar Administrator................................86
Finding a backup.................................................................................. 86
Restoring to the original location......................................................... 89
Restoring to a file................................................................................. 91
Restoring system databases.................................................................97
Restoring to an AlwaysOn availability group....................................... 103
Restoring a database with an intact log file........................................ 106
Setting restore options....................................................................... 107
Restore only on primary replica........................................................... 116
Monitor restores.............................................................................................. 116
Cancel restores................................................................................................ 117
Chapter 6
Appendix A
Appendix B
Disaster Recovery 119
Preparing for disaster recovery....................................................................... 120
Performing disaster recovery.......................................................................... 120
SQL Plug-in Options 121
How to set plug-in options...............................................................................122
SQL plug-in backup options.............................................................................122
Backup options................................................................................................126
SQL plug-in restore options.............................................................................132
SQL TLR plug-in options..................................................................................137
SQL TLR plug-in browse options.........................................................137
SQL TLR plug-in restore options.........................................................137
Command Line Interface 139
Overview of the SQL Server plug-in CLI..........................................................140
Command reference........................................................................................ 140
Synopsis............................................................................................. 140
Operations..........................................................................................140
Options...............................................................................................142
Specifying command line options.................................................................... 158
Password encoding......................................................................................... 159
Performing command line operations in a failover cluster................................159
Performing command line operations in an AlwaysOn environment................. 159
CLI examples................................................................................................... 160
Example browse commands................................................................160
Example backup commands................................................................ 161
Example restore commands................................................................164
avsqltlr command reference............................................................................ 170
avsqltlr synopsis................................................................................. 170
avsqltlr options................................................................................... 170
Monitoring CLI activities..................................................................................170
Appendix C
Troubleshooting 171
Backup problems and solutions........................................................................172
Restore problems and solutions....................................................................... 173
Upgrade problems and solutions...................................................................... 173
Dell EMC Avamar for SQL Server User Guide 5

Contents
Appendix D
Appendix E
Glossary
Cluster Configuration Tool CLI 175
Cluster Configuration Tool CLI Overview.........................................................176
Plugins.............................................................................................................176
Operations....................................................................................................... 177
SQL plugin configure options.............................................................. 177
SQL plugin remove options................................................................. 178
SQLAlwayson plugin configure options............................................... 179
SQLAlwayson plugin remove options.................................................. 180
Cluster Configuration Tool CLI examples..........................................................181
ItemPoint for Microsoft SQL Server Notes 183
Supported environments for ItemPoint for Microsoft SQL Server...................184
Limitations for ItemPoint for Microsoft SQL Server........................................ 185
187
6 Dell EMC Avamar for SQL Server User Guide

Preface
As part of an effort to improve the product lines, revisions of the software and hardware are
periodically released. Therefore, some functions that are described in this document might not be
supported by all versions of the software or hardware currently in use. The product release notes
provide the most up-to-date information on product features.
Contact the technical support professional when a product does not function correctly or does not
function as described in this document.
Note: This document was accurate at publication time. To find the latest version of this
document, go to Online Support (https://support.EMC.com).
Purpose
This guide describes how to install Avamar in a Microsoft SQL Server database environment, and
how to back up and restore SQL Server databases.
Audience
The information in this guide is primarily intended for:
l
System administrators who are responsible for installing software and maintaining servers and
clients on a network
l
Microsoft SQL Server administrators who are responsible for backing up and maintaining
Microsoft SQL Servers
Persons using this guide should have current practical experience with the following topics:
l
Operating system shell commands on the SQL Server platform (root permission required)
l
The specific version of Microsoft SQL Server currently deployed at the site
Revision history
The following table presents the revision history of this document.
Revision history
Table 1
Revision history
Revision Date Description
01 November 15, 2019 GA release of Avamar 19.2
Related documentation
The following publications provide additional information:
l
E-LAB Navigator
l
Avamar Release Notes
l
Avamar Administration Guide
l
Avamar for Windows Server User Guide
l
Avamar and Data Domain System Integration Guide
l
Avamar Operational Best Practices Guide
l
Avamar for Hyper-V VSS User Guide
at https://elabnavigator.emc.com/eln/elnhome
Dell EMC Avamar for SQL Server User Guide
7

Preface
l
Avamar for VMware User Guide
Special notice conventions used in this document
These conventions are used for special notices.
DANGER Indicates a hazardous situation which, if not avoided, results in death or serious
injury.
WARNING Indicates a hazardous situation which, if not avoided, could result in death or
serious injury.
CAUTION Indicates a hazardous situation which, if not avoided, could result in minor or
moderate injury.
NOTICE Addresses practices that are not related to personal injury.
Note: Presents information that is important, but not hazard-related.
Typographical conventions
These type style conventions are used in this document.
Table 2 Typographical conventions
Bold Used for names of interface elements, such as names of windows,
dialog boxes, buttons, fields, tab names, key names, and menu paths
(what the user specifically selects or clicks)
Italic
Monospace
Monospace italic
Monospace bold
[ ] Square brackets enclose optional values
| Vertical bar indicates alternate selections - the bar means “or”
{ } Braces enclose content that the user must specify, such as x or y or
... Ellipses indicate nonessential information that is omitted from the
Used for full titles of publications that are referenced in text
Used for:
l
System code
l
System output, such as an error message or script
l
Pathnames, filenames, prompts, and syntax
l
Commands and options
Used for variables
Used for user input
z
example
Where to get help
The Avamar support page provides access to licensing information, product documentation,
advisories, and downloads, as well as how-to and troubleshooting information. This information
may resolve a product issue before contacting Customer Support.
To access the Avamar support page:
1. Go to https://www.dell.com/support/home/us/en/19.
2. Type a product name in the Enter a Service Tag, Serial Number, Service Request, Model,
or Keyword search box.
8 Dell EMC Avamar for SQL Server User Guide

Preface
3. Select the product from the list that appears. When you select a product, the Product
Support page loads automatically.
4. (Optional) Add the product to the My Products list by clicking Add to My Saved Products in
the upper right corner of the Product Support page.
Documentation
The Avamar product documentation provides a comprehensive set of feature overview, operational
task, and technical reference information. To supplement the information in product administration
and user guides, review the following documents:
l
Release notes provide an overview of new features and known limitations for a release.
l
Technical notes provide technical details about specific product features, including step-bystep tasks, where necessary.
l
White papers provide an in-depth technical perspective of a product or products as applied to
critical business issues or requirements.
Knowledgebase
The Knowledgebase contains applicable solutions that you can search for either by solution
number (for example, KB000xxxxxx) or by keyword.
To search the Knowledgebase:
1. Go to https://www.dell.com/support/home/us/en/19.
2. Under the Support tab, click Knowledge Base.
3. Type either the solution number or keywords in the search box. Optionally, you can limit the
search to specific products by typing a product name in the search box and then selecting the
product from the list that appears.
Online communities
Go to Community Network at http://community.EMC.com for peer contacts, conversations, and
content on product support and solutions. Interactively engage online with customers, partners,
and certified professionals for all products.
Live chat
To engage Customer Support by using live interactive chat, click Join Live Chat on the Service
Center panel of the Avamar support page.
Service Requests
For in-depth help from Customer Support, submit a service request by clicking Create Service
Requests on the Service Center panel of the Avamar support page.
Note:
To open a service request, you must have a valid support agreement. Contact a sales
representative for details about obtaining a valid support agreement or with questions about an
account.
To review an open service request, click the Service Center link on the Service Center panel, and
then click View and manage service requests.
Enhancing support
It is recommended to enable ConnectEMC and Email Home on all Avamar systems:
l
ConnectEMC automatically generates service requests for high priority events.
l
Email Home sends configuration, capacity, and general system information to Customer
Support.
Dell EMC Avamar for SQL Server User Guide 9

Preface
Comments and suggestions
Comments and suggestions help to continue to improve the accuracy, organization, and overall
quality of the user publications. Send comments and suggestions about this document to
DPAD.Doc.Feedback@emc.com.
Please include the following information:
l
Product name and version
l
Document name, part number, and revision (for example, 01)
l
Page numbers
l
Other details to help address documentation issues
10 Dell EMC Avamar for SQL Server User Guide

CHAPTER 1
Introduction
This chapter includes the following topics:
l
Architecture...........................................................................................................................12
l
Backup.................................................................................................................................. 22
l
Restore..................................................................................................................................27
l
Table level recovery...............................................................................................................33
l
Disaster recovery.................................................................................................................. 33
Dell EMC Avamar for SQL Server User Guide 11
Introduction
Architecture
You can use Avamar to back up and restore data in a variety of Microsoft SQL Server
environments.
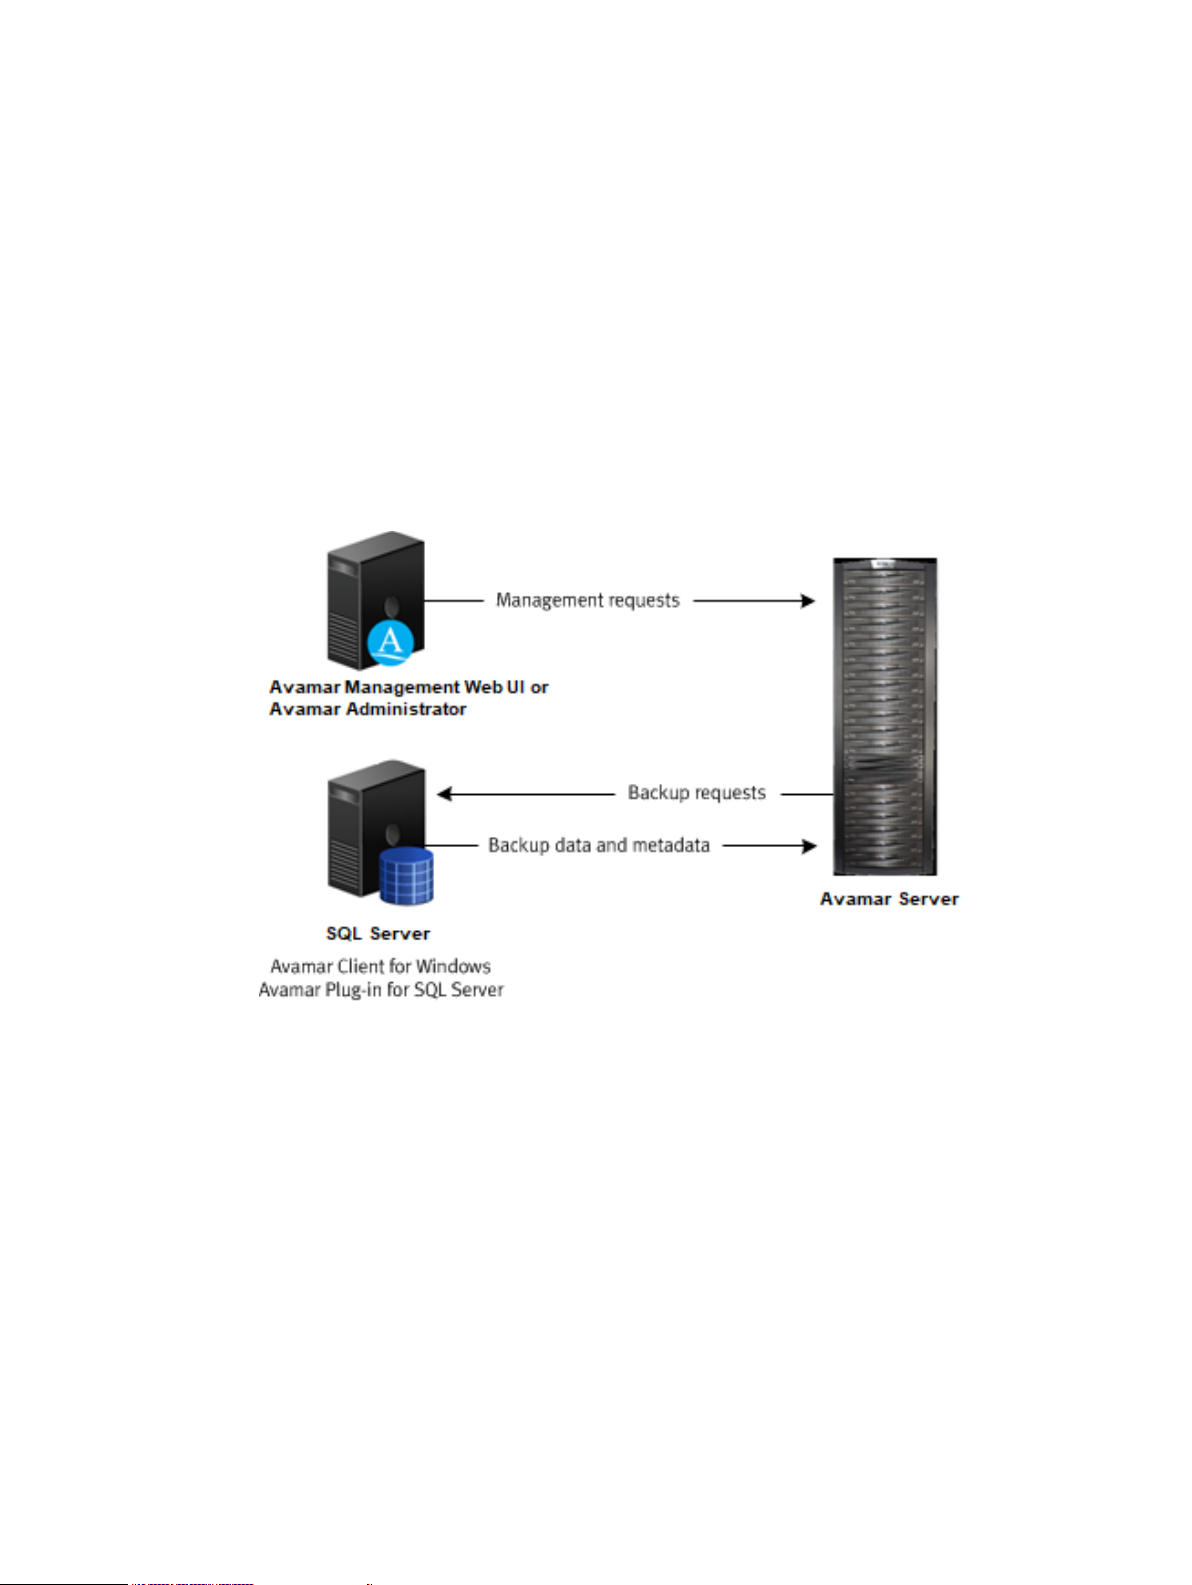
Avamar components
Required Avamar software components in a SQL Server environment include the Avamar Client for
Windows, the Avamar Plug-in for SQL Server, and the Avamar Management Web UI (AUI) or
Avamar Administrator.
The following figure illustrates a basic system architecture, including required Avamar software
components, when you use Avamar to back up a SQL Server environment.
Figure 1 Avamar architecture with SQL Server
Install the Avamar Client for Windows and the Avamar Plug-in for SQL Server on the computer
that is running SQL Server. Access the AUI as a web browser and/or install Avamar Administrator
on either the computer that is running SQL Server or on a separate computer, as shown in the
figure.
Avamar Client for Windows
The Avamar Client for Windows installation includes the Avamar Plug-in for Windows File System
and the Avamar agent, which is required for the Avamar Plug-in for SQL Server. You can use the
Windows File System plug-in to back up operating system and SQL Server binary files, which are
required for disaster recovery.
Avamar Plug-in for SQL Server
The SQL Server plug-in enables you to back up and restore SQL Server instances and databases.
12 Dell EMC Avamar for SQL Server User Guide

Avamar Administrator
Avamar Administrator is a graphical management console software application for remote
administration of an Avamar system from a supported Windows or Linux client computer. You can
configure, perform, monitor, and manage backups and restores using the AUI or Avamar
Administrator . The
using each interface.
Avamar Administration Guide
How Avamar connects to SQL Server
The Avamar Plug-in for SQL Server uses the SQL Server virtual device interface (VDI) to back up
and restore databases and transaction logs.
Backup process overview
1. The SQL Server plug-in creates one or more VDI devices, and then executes the necessary
SQL commands to back up the database to the VDI devices.
The number of VDI devices that the SQL Server plug-in creates depends on the number of
data streams that you configure for a backup. Each data stream corresponds to a VDI device.
2. The Avamar avtar program is spawned in a standard input/output (stdio) mode.
3. The SQL Server plug-in reads data read from the VDI device and writes data to avtar
standard input.
4. The avtar program reads and sends the data to either the Avamar server or a configured Data
Domain system.
Introduction
provides complete instructions for accessing and
Restore process overview
During a restore, the SQL Server plug-in reads data from standard output and writes the data to
the VDI device, which communicates with SQL Server to restore the databases.
Authentication
Avamar connects to SQL Server for backup or restore by using either Windows authentication or
SQL Server authentication.
With Windows authentication, Avamar connects to SQL Server by using the Windows system
service account (NT AUTHORITY\SYSTEM), which has privileges in SQL Server. The account
must have the sysadmin server-level role.
With SQL Server authentication, Avamar connects to SQL Server by using a SQL Server login
account. The account must have the sysadmin server-level role. You must select the mixed
authentication mode for the Database Engine when you configure SQL Server.
If you do not specify an authentication method, then the SQL Server plug-in uses NT
authentication and logs in with the Windows system service account. This account has the public
and sysadmin server-level roles in SQL Server by default in SQL Server 2008 and 2008 R2. In SQL
Server 2012, 2014, and 2016, you must add the account to the SQL Server administrators group.
Adding sysadmin server-level role in SQL Server Management Studio on page 37 provides more
instructions on adding sysadmin server-level role in SQL Server Management Studio.
Failover Cluster Instances
You can install SQL Server in a Windows Server Failover Clustering (WSFC) cluster with two or
more nodes.
With Failover Cluster Instances (FCIs), SQL Server databases and log files are on storage that is
shared between the nodes. If one of the nodes fails, then the applications
another node. When the failed node comes back online, you can
other node.
Dell EMC Avamar for SQL Server User Guide 13
fail back
fail over
the applications from the
to and run on
Introduction
SQL Server can run as either active/passive or active/active in a cluster.
Active/passive cluster environments
In an active/passive configuration, SQL Server runs on the active node, which is the primary node.
The passive node is a standby node. SQL Server does not run on the passive node.
If a failure occurs on the primary active node, then SQL Server fails over to the passive node. The
passive node becomes the active node. When the primary active node comes back online, you can
fail back SQL Server from the standby node to the primary active node. The passive node returns
to its standby role.
Avamar can perform both on-demand and scheduled backups of SQL Server data while SQL
Server is running on either the primary active node or on a standby node.
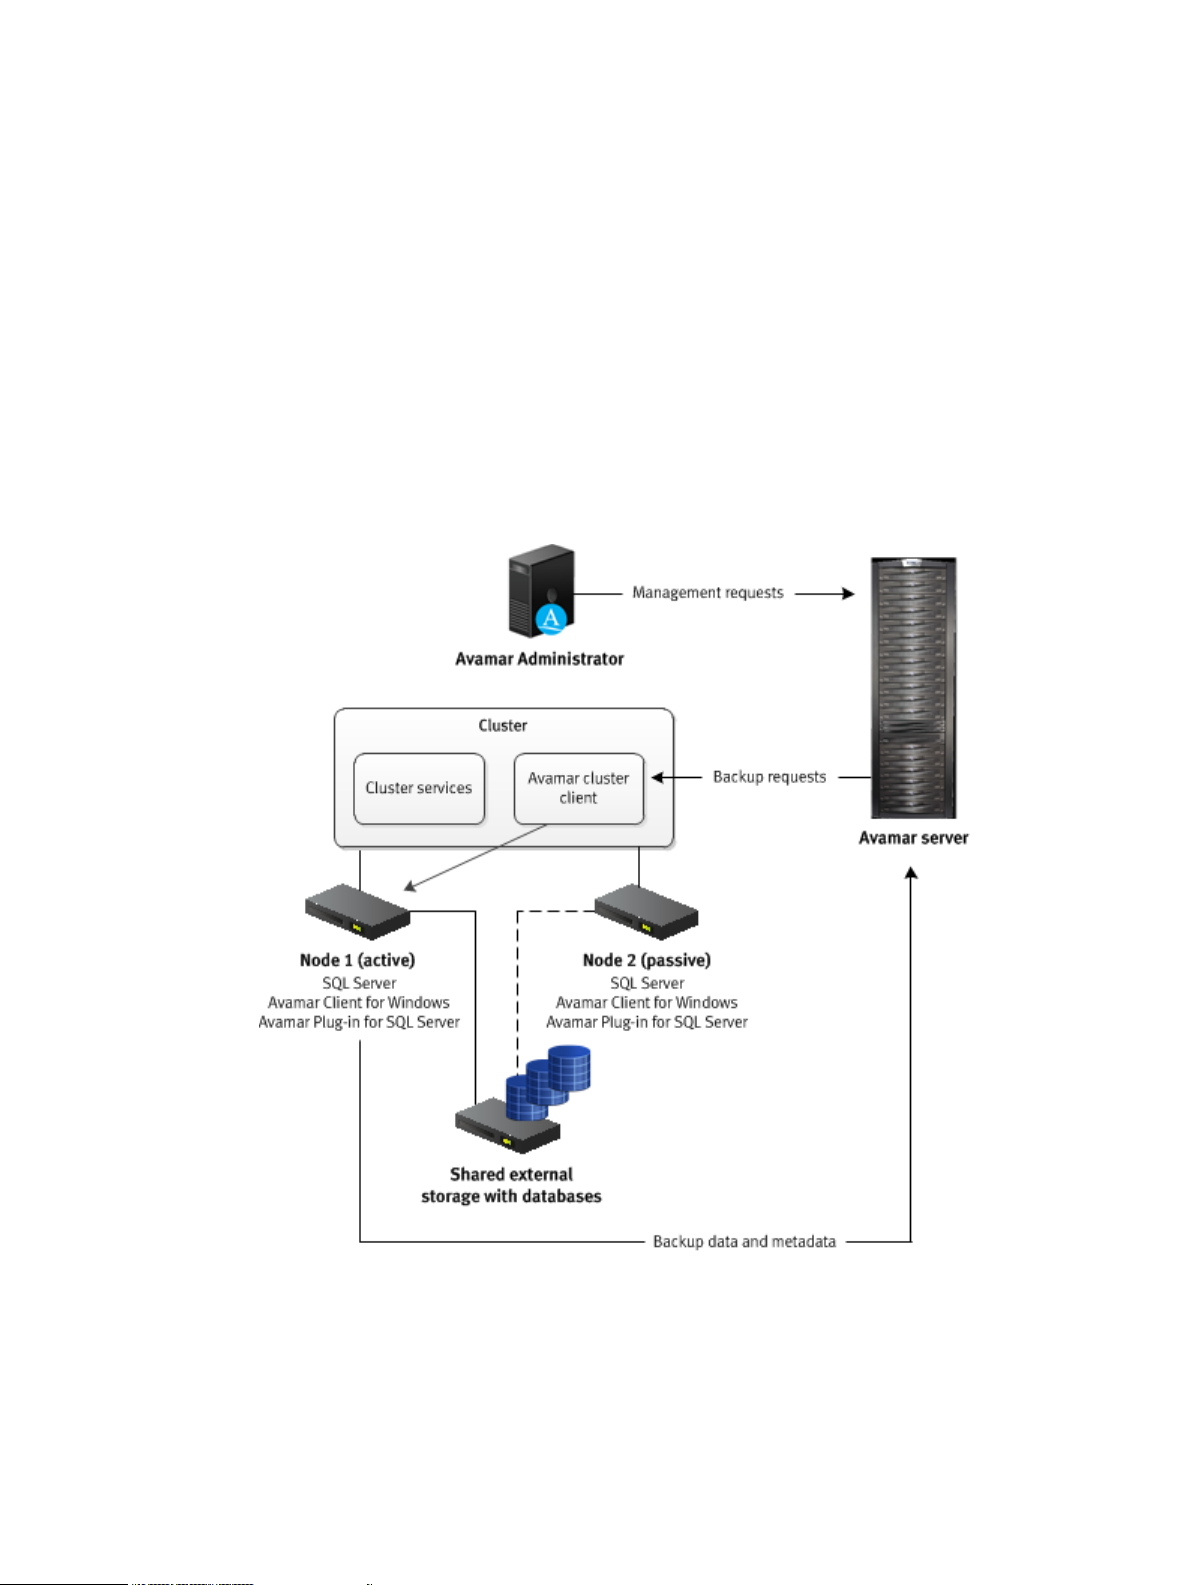
The following figure illustrates an active/passive cluster environment with SQL Server and
Avamar.
Figure 2 Avamar architecture with SQL Server in an active/passive cluster
Install the Avamar Client for Windows and the Avamar Plug-in for SQL Server on each node in the
cluster. Then run the Cluster Configuration Tool to configure the Avamar cluster client.
The Avamar server sends backup requests to the Avamar cluster client, which passes the request
to the SQL Server plug-in on the active node. The plug-in on the active node sends the backup
data and metadata to the Avamar server.
On Windows Server 2012 R2, the Avamar Plug-in for SQL Server supports storage of SQL Server
databases and log files in an active/passive cluster on shared disks, clustered shared volumes
14 Dell EMC Avamar for SQL Server User Guide
(CSVs), and shared virtual hard disk (VHDX) files. Shared VHDX files must be on either a CSV or
on a Server Message Block (SMB) 3.0 file share.
Note: For a SQL cluster on CSV, the CSV disk does not display as part of the SQL Cluster in
the Avamar Windows Cluster Configuration wizard. This is because the powershell
commands do not provide the associated disk for the SQL cluster in a CSV environment. To
configure a client for the SQL cluster, a non-csv disk needs to be assigned to the SQL Server
role.
Active/active cluster environments
In an active/active configuration, SQL Server runs on both nodes. The SQL Server installation on
each node manages its own separate databases.
If a failure occurs on one of the nodes, then the SQL Server installation on the other node assumes
responsibility for managing the databases for both nodes. When the failed node comes back online,
you can return the management responsibility for the databases to the original SQL Server
installation on each node.
Avamar can perform both on-demand and scheduled backups of SQL Server data regardless of
which active node is managing the data at the time of the backup.
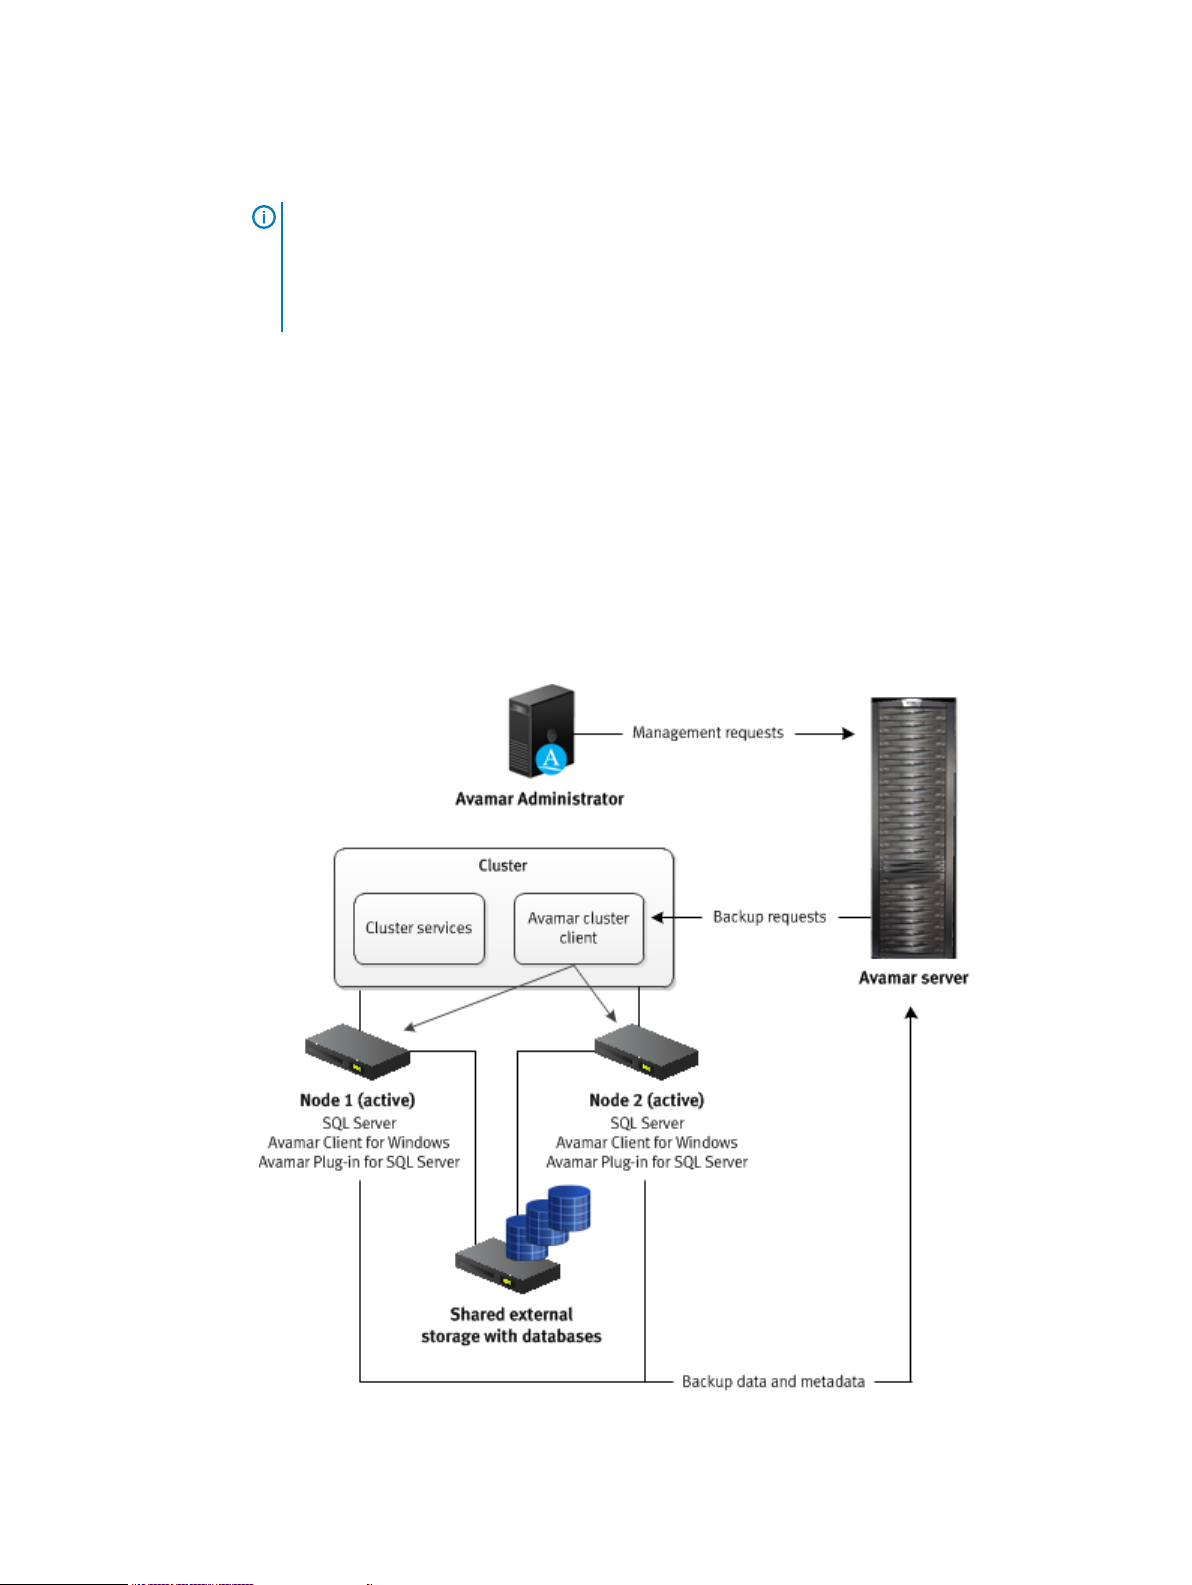
The following figure illustrates an active/active cluster environment with SQL Server and Avamar.
Figure 3 Avamar architecture with SQL Server in an active/active cluster
Introduction
You install the Avamar Client for Windows and the Avamar Plug-in for SQL Server on each node in
the cluster. Then you run the Cluster Configuration Tool to configure the Avamar cluster client.
Dell EMC Avamar for SQL Server User Guide 15

Introduction
When you perform a backup or restore, you select the cluster client as the client to back up or the
target client for the restore.
The Avamar server sends backup requests to the Avamar cluster client, which passes the request
to the SQL Server plug-in on both active nodes. The plug-ins on the active nodes back up the SQL
Server data that they are managing to the Avamar server.
AlwaysOn availability groups
You can configure high availability of groups of databases by using AlwaysOn availability groups
(AGs) in SQL Server 2012, 2014, and 2016.
With AGs, SQL Server is installed in a WSFC cluster, but the data is not stored on a shared drive.
Instead, the data is stored on each node, and SQL Server synchronizes the data from the primary
version of the database to any secondary versions on other nodes.
You can group user databases together in an availability group. Databases in an availability group
must use the full recovery model. All databases in an availability group fail over together from one
node to another.
A SQL Server instance on a cluster node that hosts an availability group is called an
replica
. Each availability replica of an availability group must reside on a different node of the same
cluster. There are two types of availability replicas: one primary replica and one or more secondary
replicas. The primary replica handles read/write activity from clients and sends transaction log
updates to the secondary replicas. Each secondary replica applies the transaction log updates to
its databases.
During failover of an AG, the target secondary replica assumes the primary role and becomes the
new primary replica. The target secondary replica brings its databases online as the primary
databases, and client applications can connect to them. When the former primary replica is
available, it assumes the secondary role and becomes a secondary replica.
availability
NOTICE
groups on an availability replica that is hosted by a SQL Server Failover Cluster Instance (FCI).
To back up databases in such an environment, you must install the Avamar client software on
the node with the primary replica as a stand-alone client, and then perform backups on only
that node.
The Avamar Plug-in for SQL Server does not support backups of AlwaysOn availability
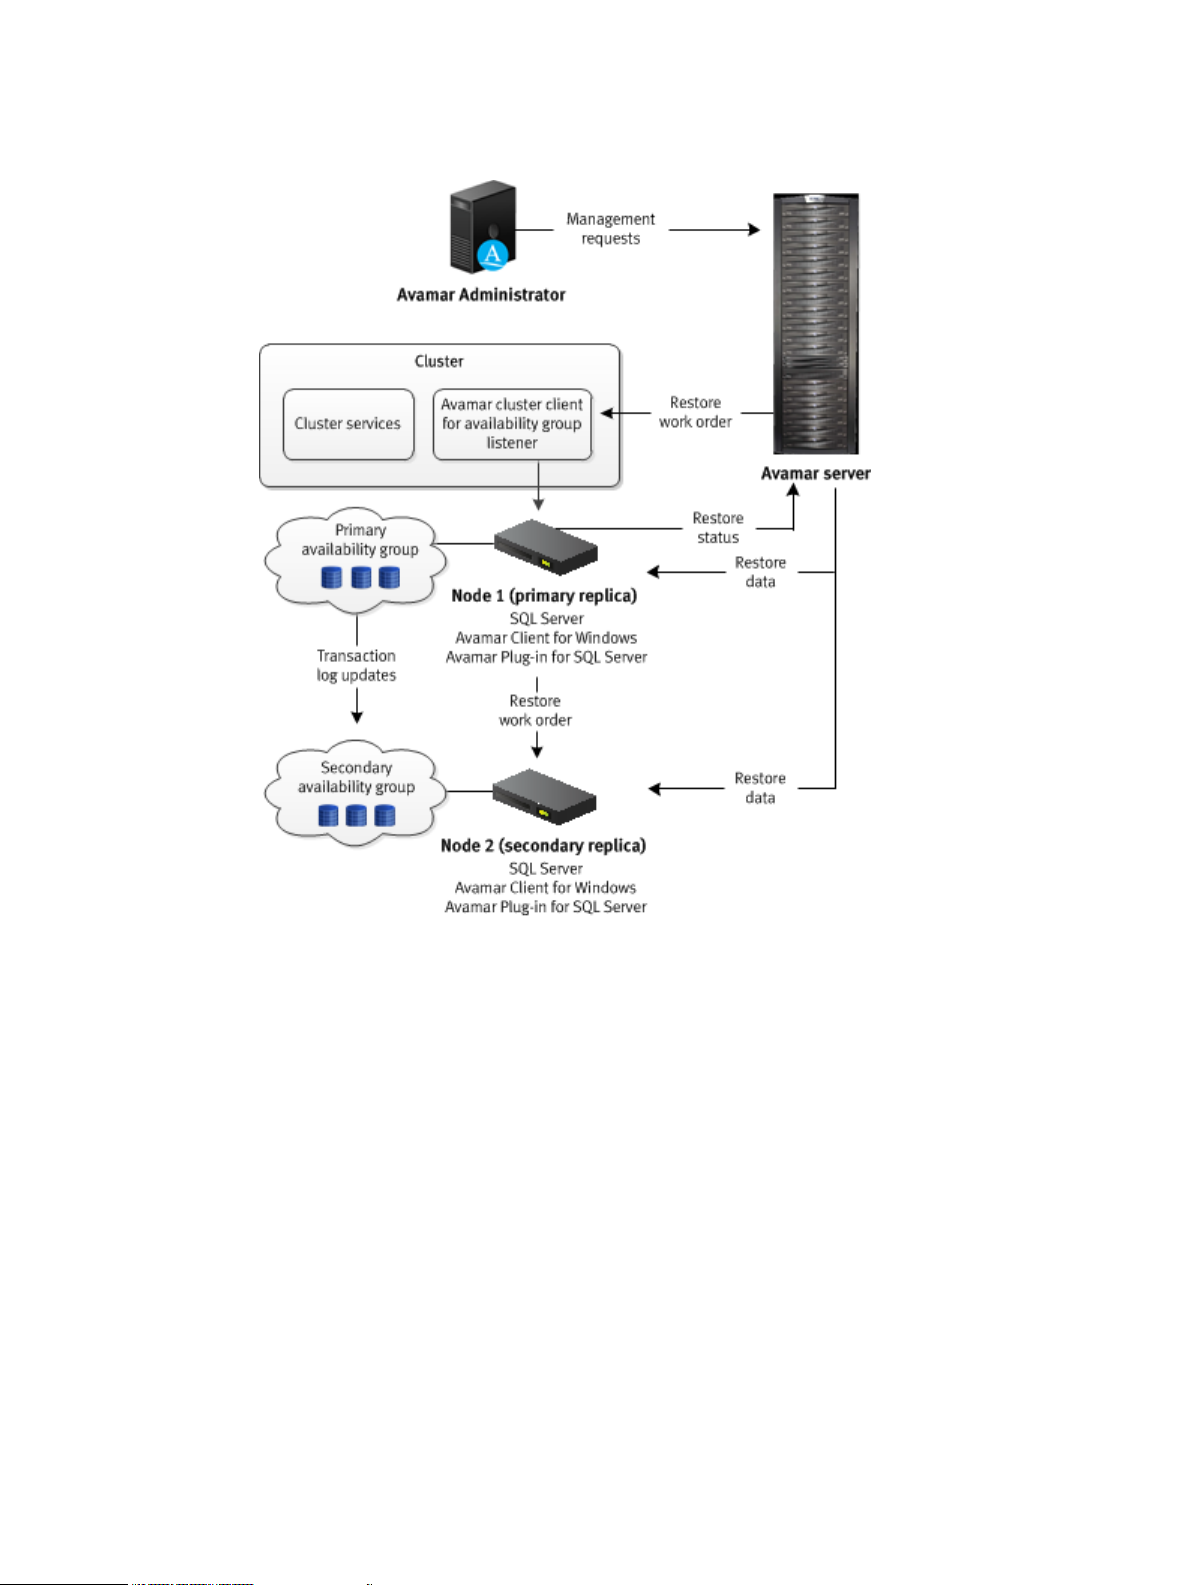
Architecture and workflow of backups in AlwaysOn availability groups
Avamar can perform both on-demand and scheduled backups of databases in either the primary
replica or a secondary replica for an availability group.
Install the Avamar Client for Windows and the Avamar Plug-in for SQL Server on each node in the
cluster. Then run the Cluster Configuration Tool to configure the Avamar cluster client for the
availability group listener. When you perform a backup or restore, select the cluster client for the
availability group listener as the client to back up or the target client for the restore.
Backups on the primary replica
The following figure illustrates the data workflow of SQL Server plug-in backups on the primary
replica.
16 Dell EMC Avamar for SQL Server User Guide

Figure 4 Backup workflow on a primary replica in an AlwaysOn environment
Introduction
The Avamar server sends a backup request to the Avamar cluster client for the availability group
listener, which passes the request to the primary replica. The SQL Server plug-in on the node with
the primary replica performs the backup and sends the backup data and metadata to the Avamar
server.
Backups on the secondary replica
The following figure illustrates the data workflow of SQL Server plug-in backups on a secondary
replica.
Dell EMC Avamar for SQL Server User Guide 17
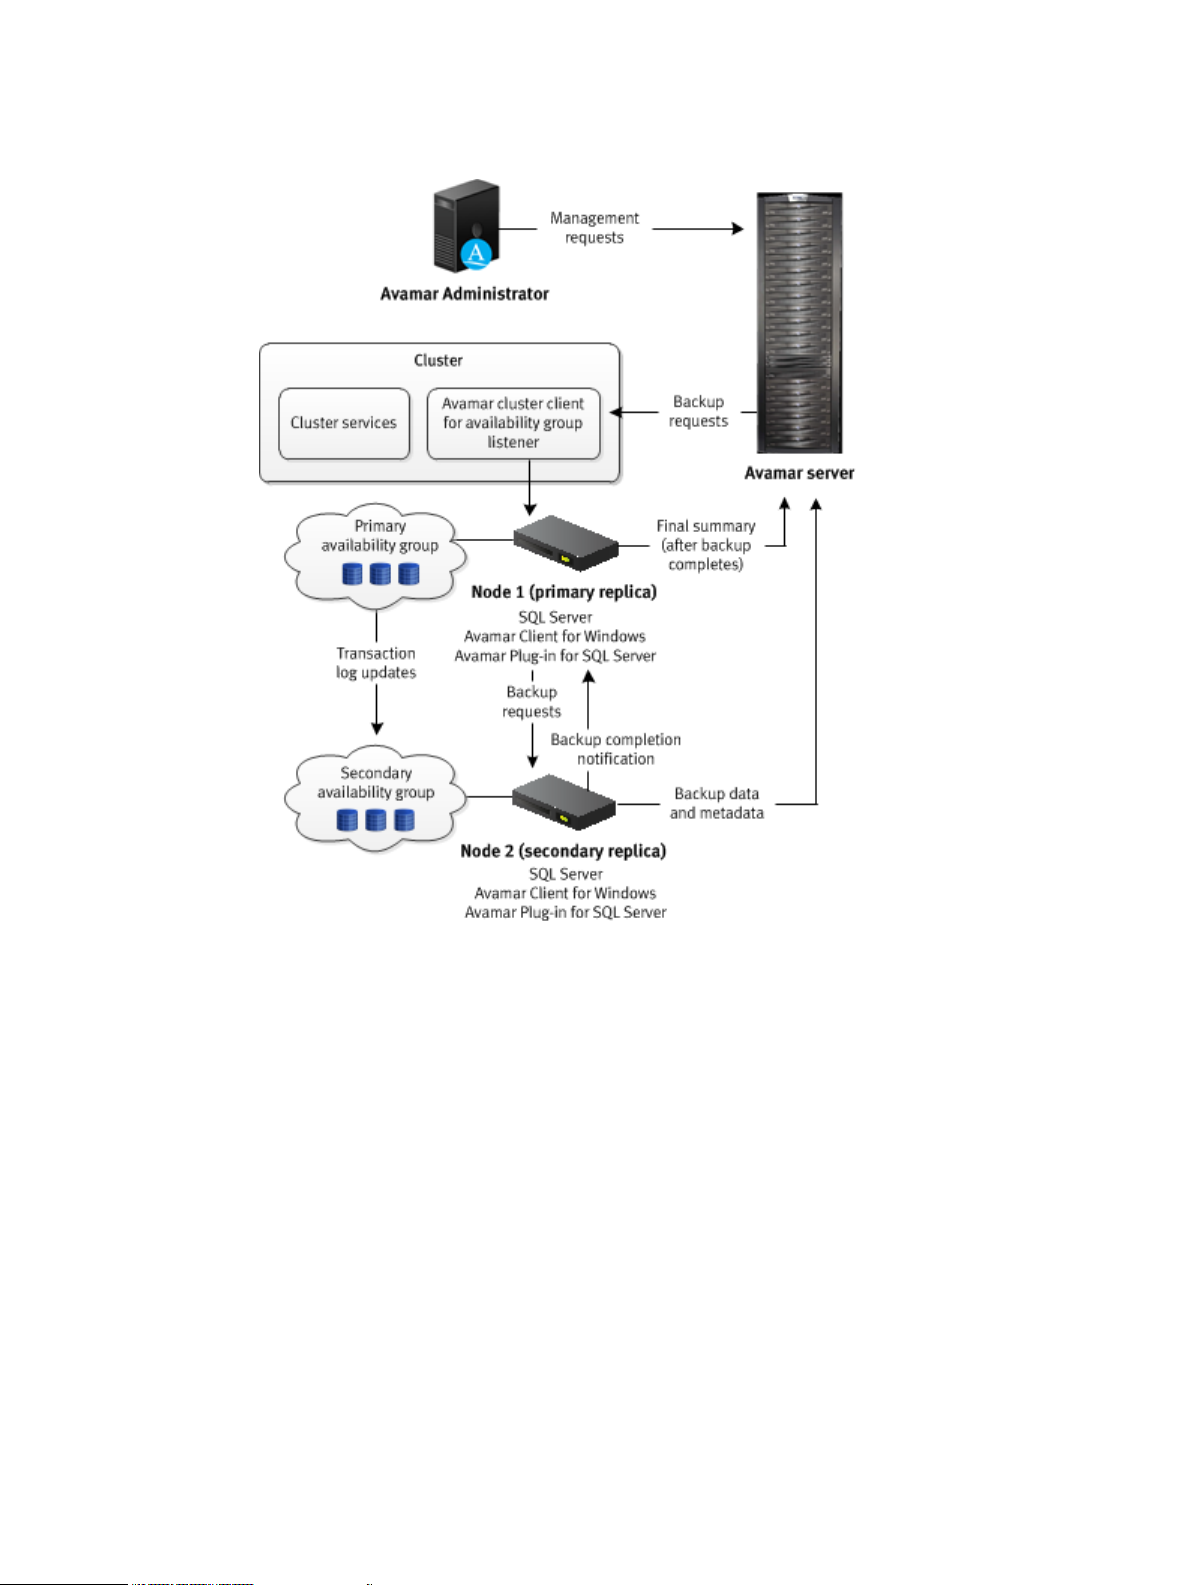
Introduction
Figure 5 Backup workflow on a secondary replica in an AlwaysOn environment
The Avamar server sends a backup request to the Avamar cluster client for the availability group
listener, which passes the request to the primary replica. The SQL Server plug-in on the node with
the primary replica determines the secondary replica on which to perform the backup, and
forwards the backup request to the SQL Server plug-in on the node with the secondary replica.
The plug-in on the node with the secondary replica performs the backup and then sends the
backup data to the Avamar server. The plug-in on the secondary replica then sends the metadata
to the Avamar server and notifies the plug-in on the primary replica whether the backup completed
successfully. The primary replica sends the final summary to the Avamar server.
Architecture and workflow of restores in AlwaysOn availability groups
You can use the backup from either the primary replica or a secondary replica to restore the
databases in an AlwaysOn availability group. You can restore to only the primary replica, or restore
to both the primary and secondary replicas.
Restore to only the primary replica
The following figure illustrates the process to restore to only the primary replica in an AlwaysOn
availability group.
18 Dell EMC Avamar for SQL Server User Guide

Figure 6 Restore workflow to only the primary replica in an AlwaysOn environment
Introduction
The Avamar server sends a restore work order to the cluster client for the availability group
listener, which passes the work order to the SQL Server plug-in on the node with the primary
replica. The plug-in on the primary replica removes the databases that you are restoring from the
availability group and restores the databases. After the restore completes, the plug-in on the
primary replica adds the restored databases to the availability group and sends information about
the restore to the Avamar server.
If there is a corresponding database on the secondary replicas when you restore a database only
on the primary replica, then the database on the secondary replicas is in a restoring state. To
restore the databases on the secondary replicas as part of the availability group, manually prepare
and restore the databases, and join them to the availability group on the secondary replica.
You can also set the database on a secondary replica online without rejoining it to the availability
group by restoring the database with the RECOVERY recovery operation (RESTORE database
WITH RECOVERY). The SQL Server documentation on the Microsoft TechNet website provides
details.
Restore to both the primary and secondary replicas
The following figure illustrates the process to restore to both the primary and secondary replicas.
Dell EMC Avamar for SQL Server User Guide 19
Introduction
Figure 7 Restore workflow to the primary and secondary replicas in an AlwaysOn environment
During the restore, the Avamar server sends a restore work order to the SQL Server plug-in on the
node with the primary replica. The plug-in on the node with the primary replica then sends the
restore work order to the plug-in on the nodes with the secondary replicas. The plug-ins on the
primary and secondary replicas remove the databases that you are restoring from the availability
group and restore the databases.
After the restore completes, the plug-in on the node with the primary replica adds the restored
databases to the availability group. Then the plug-ins on the nodes with the secondary replicas join
the restored databases to the availability groups. When the entire restore process completes on all
replicas, the plug-in on the node with the primary replica sends information about the restore to
the Avamar server.
Hybrid IT environments with AlwaysOn availability groups and Microsoft Azure
The Avamar Plug-in for SQL Server can perform both on-demand and scheduled backups of
databases in AlwaysOn availability groups in hybrid IT environments with Microsoft Azure.
The backup can occur on either the primary replica or the secondary replica of the availability
group, but the replica on which the backup occurs must be on-premise. Avamar cannot back up
databases on a replica on a Microsoft Azure virtual machine.
The Avamar installation process is the same in a hybrid IT environment as in a traditional AlwaysOn
availability group environment. Install the Avamar Client for Windows and the Avamar Plug-in for
20 Dell EMC Avamar for SQL Server User Guide

SQL Server on each node in the cluster, including the Microsoft Azure nodes. Then run the Cluster
Configuration Tool to configure the Avamar cluster client for the availability group listener.
When you perform a backup or restore, select the availability group listener as the client to back
up or the target client for the restore. Ensure that backups occur on an on-premise replica by
using SQL Server and Avamar settings.
If the primary replica is on-premise, restore data to only the primary replica. Do not attempt to
restore to both the primary and secondary replicas. If there is a corresponding database on the
secondary replicas when you restore a database only on the primary replica, then the database on
the secondary replicas is in a restoring state. To restore the databases on the secondary replicas
as part of the availability group, manually prepare and restore the databases, and join them to the
availability group on the secondary replica.
If the primary replica is on a Microsoft Azure virtual machine, then restore the database to
operating system files and then use SQL Server tools to restore the database to the availability
group.
Database mirroring
Database mirroring maintains multiple copies of a single database that must reside on different
SQL Server instances. Typically, these server instances reside on computers in different locations.
The principal server serves the database to clients, while the mirror servers serve as standby
servers.
Implement mirroring settings individually for each database.
Mirroring works only with databases that use the full recovery model. The simple and bulk-logged
recovery models do not support database mirroring, and you cannot mirror the master, msdb,
tempdb, or model databases.
You can use the Avamar Plug-in for SQL Server to back up mirrored SQL Server databases.
However, several conditions apply:
l
The SQL Server version must be 2008 or greater.
l
Perform backups of only the principal database, not the mirrors.
l
Use only the Avamar Plug-in for SQL Server to perform backups. If you use other backup
products in addition to the Avamar Plug-in for SQL Server, then log chain breaks may occur.
l
Backup and database administrators must use extra care. Some mirror operations cause log
chain breaks that cannot be detected.
l
When database mirroring is established, either initially or as the result of failover and failback,
then you must manually perform a new full backup. Otherwise, incremental and differential
backups that occur after the establishment of database mirroring are not valid for restore.
After you perform the full backup in this case, you cannot perform point-in-time recoveries to
a point in time before the full backup.
l
To restore a database, you must break the SQL mirror.
Introduction
Data Domain system support
You can store backups on either the Avamar server or a Data Domain® system. Backup metadata
is stored on the Avamar server.
Before you can store backups on a Data Domain system, add the Data Domain system to the
Avamar configuration by using Avamar Administrator. Then select the Data Domain system in the
plug-in options when you perform an on-demand backup or when you create a dataset for a
scheduled backup. You can also use the command line interface (CLI) to perform backups to a
Data Domain system.
Dell EMC Avamar for SQL Server User Guide 21

Introduction
The steps to restore backups are the same whether you restore from the Avamar server or a Data
Domain system. The restore process determines the location of the backup and restores the
backup.
Avamar also supports Data Domain Cloud Tier. DD Cloud Tier moves data from Data Domain to the
cloud. From the Avamar Administrator, you can configure cloud tiering to move Avamar backups
from Data Domain to the cloud, and perform seamless recovery of these backups.
The
Avamar and Data Domain System Integration Guide
Domain systems in an Avamar environment, including detailed steps to add a Data Domain system
to the Avamar configuration.
Server virtualization
You can install SQL Server in a server virtualization environment such as VMware or Microsoft
Hyper-V. There are multiple ways that you can install and use Avamar to back up and restore SQL
Server data in a server virtualization environment.
The
Avamar for Hyper-V VSS User Guide
additional system requirements, as well as installation and configuration procedures.
Backup
provides more information about Data
and
Avamar for VMware User Guide
provide details on
Backup types
When you perform a backup with the Avamar Plug-in for SQL Server, you can back up either all
SQL Server data on a specific server, one or more instances, or one or more databases.
You cannot use the Avamar Plug-in for SQL Server to back up individual filegroups, files, or tables.
To back up individual files, use the Avamar Client for Windows.
The SQL Server plug-in can back up both user databases and system databases such as the
master, msdb, and model databases. Backup of system databases in a SQL Server replication
environment, such as the publication, distribution, and subscription databases, is also supported.
The SQL Server plug-in does not support backup of either the Resource or tempdb database
because Microsoft SQL Server does not support backup and restore of those system databases.
Avamar can back up databases that use any of the three recovery models: simple, full, or bulklogged. However, the recovery model may determine the type of backup that you can perform of
the database.
The SQL Server plug-in provides the ability to include and exclude data from the backup dataset.
You can include and exclude data when creating or editing a policy, or when creating or editing a
dataset in the Settings pane. The
Note:
The Avamar AUI is only supported in stand-alone Windows and Linux environments only.
The Avamar Plug-in for SQL Server supports full, differential, transaction log (incremental), and
copy-only database backups.
The following figure illustrates the different types of data that are included in each of the backup
types.
Avamar Administration Guide
provides more information.
22 Dell EMC Avamar for SQL Server User Guide

Figure 8 Types of database backups
Introduction
Full backups
Full backups include the entire database, including all objects, system tables, and data. As the
backup operation progresses, it copies the transaction logs. The timing of the transaction log
backup ensures that you can recover the complete database to the state it was in when the
backup finished.
Differential backups
Differential backups include data that changed after the last full backup. The backup operation
also copies relevant portions of the transaction logs.
When you select a differential backup to restore a database, the restore process restores the last
full backup, followed by the differential backups performed after the full backup. Because a
differential backup only saves changes to data, the backup is smaller and faster than a full backup.
Therefore, you can perform a differential backup more often than a full backup.
Differential backups are used primarily in heavily utilized systems where you must bring a failed
database back online as quickly as possible. Differential backups are smaller than full backups, and
so have less effect on the system where they run.
Transaction log (incremental) backups
By default, transaction log backups only back up the transaction logs. Transaction logs are serial
records of all database modifications.
The logs are used in recovery operations to update the database with complete transactions and
roll back incomplete transactions. When you back up a transaction log, the backup stores all
changes after the last transaction log backup. Transaction log backups record the state of the
transaction log at the start of the backup (unlike full and differential backups, which record the
state of the data at the end of the backup).
When a transaction log backup is complete, the log truncates to remove any transactions that are
committed to the database. When restoring the database, restore the data to the state it was in at
Dell EMC Avamar for SQL Server User Guide 23

Introduction
the end of the last full or differential backup, and then sequentially restore the transaction log
backups in order.
To fully restore data from a transaction log backup, at least one full backup must exist. To ensure
data integrity, the Avamar Plug-in for SQL Server software always checks for the presence of a
full backup on the server. If there is a full backup, the transaction log backup proceeds (that is, the
backup includes only transaction logs). If there is no full backup and you select the Force full
backup option (the default setting), then the Avamar Plug-in for SQL Server software forces a full
backup to ensure data integrity.
Copy-only backups
Copy-only backups are special-purpose full backups that are created independently of the
sequence of full, differential, and transaction log backups. After you perform a copy-only backup,
the next differential or transaction log backup is based on the last full backup, not the new copyonly backup.
Copy-only backups are supported for all recovery models, and for performing backups at the
database, instance and stripe levels. Restoring from a copy-only backup is the same as restoring
from a full backup.
Copy-only backups cannot be used as a base for differential backups and do not truncate the
transaction log. If you perform a copy-only backup on a database without a current full backup, the
Avamar Plug-in for SQL Server software promotes the next differential or transaction log backup
to a full backup. Promotion to full is indicated in the Activity Window of the Avamar Administrator
with the status Completed with Promotion. When only some of the databases in the backup are
promoted to full, the status will still be indicated as Completed with Promotion.
Previous versions of Avamar identify copy-only backups as type Unknown.
Supported backup types for different recovery models
The type of database backup that you can perform depends on the recovery model of the
database.
You can perform full backups of all databases, regardless of the recovery model (simple, full, or
bulk-logged).
If the database uses the simple recovery model, then you cannot perform a transaction log backup
of the database. Databases with the simple recovery model do not support transaction log
backups. System databases such as the master and msdb databases typically use the simple
recovery model.
Microsoft SQL Server also does not allow differential backups of the master database. You can
only create full backups of the master database.
If a transaction log backup includes databases with the simple recovery model and databases with
other recovery models, then you can select how Avamar handles the databases with the simple
recovery model. You can exclude the databases with the simple recovery model and log either a
warning or an error message in the log, or you can automatically perform a full backup of the
databases. When you perform the backup, the For simple recovery model databases option
controls this behavior.
Databases in AlwaysOn availability groups must use the full recovery model.
If you change the recovery model of a database, perform a full backup before you try to perform a
differential or transaction log backup.
24 Dell EMC Avamar for SQL Server User Guide

Backups in AlwaysOn availability groups
Avamar can perform both on-demand and scheduled backups of databases in either the primary
replica or a secondary replica for an availability group. You can increase performance of the
primary replica when you perform backups on a secondary replica.
Settings in SQL Server and in Avamar enable you to specify a preference for the replica on which
the backup occurs:
l
Always on the primary replica
l
Always on a secondary replica
l
On a secondary replica if possible, otherwise on the primary replica
l
No preference defined
In a hybrid IT environment with Microsoft Azure and AlwaysOn availability groups, use these
settings to ensure that the backup occurs on an on-premise replica. Avamar cannot back up
databases on a replica on a Microsoft Azure virtual machine.
If you do not specify a preference, then other factors contribute to the selection of the replica for
backup, including the backup priority, operational status, and connection status of each replica.
If you perform the backup on a secondary replica, then the replica must meet the following
requirements:
l
The replica must be in a synchronized state.
l
The replica role setting in SQL Server must allow either read-only connections or all
connections.
l
If there are multiple secondary replicas, then set the priority for which secondary replica to use
for the backup.
If you select the option to perform the backup only on a secondary replica and no secondary
replicas that meet the requirements are available, then the backup fails with an error.
You can perform full, differential, and transaction log backups on the primary replica. You can
perform only full and transaction log backups on a secondary replica. If you try to perform a
differential backup on a secondary replica, then the backup fails with an error message.
SQL Server does not support system databases in an availability group. To back up system
databases with Avamar, you must perform a separate backup. During the backup, select the server
name of the physical node as the client to back up, and then select the system databases.
Introduction
Mixed backup storage
You can store backups on either the Avamar server or a Data Domain system. However, the full
backup for a client and all subsequent transaction log (incremental) and differential backups must
be stored on either the Avamar server or a single Data Domain system.
Avamar does not support the following scenarios:
l
Full backup on a Data Domain system, and transaction log or differential backups on the
Avamar server
l
Full backup on the Avamar server, and transaction log or differential backups on a Data Domain
system
l
Full backup on one Data Domain system, and transaction log or differential backups on another
Data Domain system
Dell EMC Avamar for SQL Server User Guide 25

Introduction
As a result, if you change the server on which backups for a client are stored, then you must
perform a full backup before any further transaction log or differential backups.
If you change the backup storage from one Data Domain system to another Data Domain system,
you can restore to a point in time between the two full backups.
Multistreaming
Multistreaming enables you to improve backup and restore performance by backing up and
restoring SQL Server data by using multiple parallel data streams.
You can either back up multiple databases in parallel with one stream per database, or back up a
single database with multiple parallel streams.
If you use multiple data streams to send backup data for a single database to the Avamar server or
Data Domain system, then the backup for the database is stored as multiple files. As a result, the
restore uses the same number of streams that you use for the backup.
You can specify a maximum of 10 streams for each backup, and the minimum size of a stream.
NOTICE An exception to this restriction is if you perform a tail-log backup during a restore.
The tail-log backup is stored on the Avamar server even if the other backups for the client are
stored on a Data Domain system.
Database log truncation
The Avamar Plug-in for SQL Server truncates the database transaction log after an incremental
(transaction log) backup of the database.
You can truncate the database transaction log by performing an incremental backup automatically
after a full backup in SQL Server 2008 and later.
You also can prevent truncation of database transaction logs after backups.
The Truncate database log option controls whether truncation occurs. To automatically perform
an incremental backup after a full backup, select the Force incremental backup after full backup
option.
When the backup process successfully truncates the log file, LOG_BACKUP appears in the header
of the database.
Note:
Truncation does not reduce the physical size of a log file. To reduce the physical size of
a log file, shrink the log file. The Microsoft TechNet website provides information on log
shrinking in SQL Server.
Backups with other tools
Issues can occur when you perform backups with other tools in addition to backups with the
Avamar Plug-in for SQL Server.
Backups with multiple tools can break the backup chain for all of the tools, especially if the
backups are truncating the database transaction log. Consider the following scenario:
1. You perform a transaction log backup of a database with the SQL Server plug-in. The backup
process truncates the log.
2. The next day you perform transaction log backup with SQL Server management tools. The
backup process truncates the log.
3. The next time that a transaction log backup with the SQL Server plug-in occurs, the backup is
missing the transactions from the last Avamar backup through the SQL Server backup.
Exclusive backups with the Avamar Plug-in for SQL Server are recommended to avoid breaks in
the backup chain.
26 Dell EMC Avamar for SQL Server User Guide

Restore
The Avamar Plug-in for SQL Server supports a variety of restore options to accommodate a wide
range of data recovery needs.
The SQL Server plug-in performs only offline restores of SQL Server data. Online restore is not
supported.
Note: The Avamar AUI is only supported in stand-alone Windows and Linux environments only.
Restore to the original location
There are two options when you use the Avamar Plug-in for SQL Server to restore a SQL Server
instance, database, or filegroup to its original location:
l
Perform a standard restore with a tail-log backup and recovery.
l
Use the SQL Server REPLACE option to completely overwrite the database.
A standard restore with a tail-log backup is perhaps the most common restore procedure. During
this procedure, a tail-log backup is created to capture transactions that are not in a backup. Then
Avamar restores the database from the most recent full backup and any differential or transaction
log backups.
You may need to use the SQL Server REPLACE option for a restore, for example, if a previous
database restore exited with the following SQL Server error in the Avamar SQL restore log:
Introduction
One or more devices or files already exist.
Reissue the statement using the WITH REPLACE
option to overwrite these files and devices.
NOTICE
an SQL WITH REPLACE clause statement to the restore Transact-SQL command. Use of this
statement overrides a SQL Server safety check to prevent you from accidentally overwriting a
different database or file. The
information about the safety check in the RESTORE command section.
When you use the Avamar plug-in option for the SQL Server REPLACE option, it adds
Microsoft Transact-SQL Reference Manual
Restore to a new database in the original instance
You can use the Avamar Plug-in for SQL Server to restore a backup of a database to its original
instance, but with a new name that creates a database in the instance.
When you restore to a new database in the original instance, you can perform a tail-log backup and
recovery to recover transactions that were not in the backup. You also can specify the path for the
database and log files.
If the database uses the full recovery model, then you can restore to either a specific date and
time or to a named mark in the transaction log.
Restore to a different instance on the original server
You can use the Avamar Plug-in for SQL Server to restore an instance, database, filegroup, or file
to a different instance on the original server.
When you restore to a different instance on the original server, you cannot perform a tail-log
backup. However, you can specify the path for the database and log files.
provides more
Dell EMC Avamar for SQL Server User Guide 27

Introduction
If you are restoring a database, you can leave the original database name or restore the database
with a new name. You can also restore to either a specific date and time or to a named mark in the
transaction log.
Restore to an instance on a different server
You can use the Avamar Plug-in for SQL Server to restore an instance, database, filegroup, or file
to an instance on a different server.
When you restore to an instance on a different server, you cannot perform a tail-log backup.
However, you can specify the path for the database and log files.
If you are restoring a database, you can leave the original database name or restore the database
with a new name. You also can restore to either a specific date and time or to a named mark in the
transaction log.
Restore to a file
If the Avamar Plug-in for SQL Server is not installed on the target server, or you want to use the
standard SQL Server restore tools for other features, then you can restore user or system
databases to operating system files. You can then use SQL Server tools, such as SQL Server
Management Studio, a Transact-SQL RESTORE command, or the Microsoft SQL Server sqlcmd
utility, to restore the databases.
The SQL Server plug-in restores the backup as one or more files to the specified destination in the
following path:
destination\client\instance\database\file
where:
l
destination
l
client
l
instance
l
database
l
file
is the name of the file.
is the destination for the files that you specified in the Set Destination dialog box.
is the name of the computer on which SQL Server is installed.
is the name of the SQL Server instance from the backup.
is the name of the database from the backup.
A single backup may include multiple files, depending on the number of streams in the backup.
The file name for each file is composed of the backup type and the stream number:
n
f-0 indicates a full backup.
n
d-n indicates a differential backup.
n
i-n indicates a transaction log (incremental) backup.
where n is the sequential number of the differential or incremental backup after the preceding
full backup.
For example, a full backup with two streams results in two files: f-0.stream0 and
f-0.stream1.
Restore to an AlwaysOn availability group
When you back up a database in an AlwaysOn availability group, you can restore the database to
the following locations:
l
To the original availability group
l
To a new database in the original availability group
l
To a different availability group
28 Dell EMC Avamar for SQL Server User Guide

l
To a different instance that does not use availability groups
l
To a file
You can restore an entire database, a filegroup, or a file. You also can perform point-in-time
restore of databases that use the full recovery model.
These restore options are available regardless of whether the backup was on the primary replica or
a secondary replica.
Restore to the original availability group
When you restore to the original availability group, the restore process can automatically restore
the databases on both the primary replica and the secondary replicas.
You can also restore databases only on the primary replica. When you restore a database only on
the primary replica, the corresponding database on the secondary replicas is in a restoring state.
To restore the databases on the secondary replicas as part of the availability group, manually
prepare and restore the databases, and join them to the availability group on the secondary
replicas.
You can also set the databases on a secondary replica online without rejoining them to the
availability group by restoring the databases with the RECOVERY recovery operation. The SQL
Server documentation on the Microsoft TechNet website provides details.
Introduction
Restore to a new database in the original availability group
You can restore a database to the original AlwaysOn availability group, but with a new name that
creates database in the availability group.
When you restore to a new database in the original instance, the restore process restores the
database to only the primary replica. You must then join the new database to the availability group.
To restore the database on the secondary replicas as part of the availability group, manually
restore the database and join the database to the availability group on each secondary replica.
Restore to a different availability group
When you restore a database to an availability group on a different server, the restore process
restores the database to only the primary replica.
To restore the database on the secondary replicas as part of the availability group, manually
restore the database and join the database to the availability group on each secondary replica.
NOTICE
You cannot restore a database to a different availability group in the same cluster.
Restore fails with an error message that indicates the existence of the database.
Restore to a different instance that does not use availability groups
You can restore a database to a different SQL Server instance that does not use AlwaysOn
availability groups. The steps are the same whether you restore from a backup of databases on a
stand-alone server, in a cluster, or in an availability group.
Restore of a database from an availability group to a file
You can restore a database from a backup of an availability group to operating system files. This
type of restore may be necessary if the Avamar Plug-in for SQL Server is not installed on the
target server, or you want to use the standard SQL Server restore tools for other features. The
steps are the same whether you restore from a backup of databases on a stand-alone server, in a
cluster, or in an availability group.
Dell EMC Avamar for SQL Server User Guide 29

Introduction
Restore to hybrid IT environments with Microsoft Azure
In a hybrid IT environment with AlwaysOn availability groups and Microsoft Azure, the steps to
restore a database depend on the location of the primary replica.
If the primary replica is on-premise, restore data to only the primary replica. Do not attempt to
restore to both the primary and secondary replicas. If there is a corresponding database on the
secondary replicas when you restore a database only on the primary replica, then the database on
the secondary replicas is in a restoring state. To restore the databases on the secondary replicas
as part of the availability group, manually prepare and restore the databases, and join them to the
availability group on the secondary replica.
If the primary replica is on a Microsoft Azure virtual machine, then restore the database to
operating system files and then use SQL Server tools to restore the database to the availability
group.
Restore of a database with an intact log file
If a database becomes corrupt or is otherwise lost but an intact database log file is available, you
can restore the database and use the log file to recover transactions after the most recent Avamar
backup.
To restore the database, perform a transaction log backup by using a Transact-SQL command.
Then, restore the database from the most recent Avamar backup by using Avamar Administrator.
Finally, restore the transaction log backup by using Transact-SQL commands.
Restore of system databases
Restore of only system databases is rare but may be necessary if one or more system databases
are damaged. It is more likely that you must restore system databases when you restore user
databases. When you select both system and user databases for restore, the system databases
restore first.
When you restore system databases, the Avamar Plug-in for SQL Server can automatically restore
the databases in the correct order and manage SQL Server services. However, you can also
restore individual system databases and manually manage the services.
NOTICE
SQL Server replication environment, including the publication, distribution, and subscription
databases. The SQL Server plug-in can automatically restore the replication system databases
in the correct order and manage SQL Server services. The "Back Up and Restore Replicated
Databases" topic in the SQL Server documentation on the MSDN website provides details on
backup strategies and the steps to manually restore databases in different types of replication
environments.
Automatic restore of system databases
When you restore multiple system databases, Avamar automatically restores the databases in the
correct order: master, msdb, and model.
Avamar can also automatically manage the stop and restart of the necessary SQL Server services
during the restore. For example:
l
When you restore the master database, Avamar can automatically stop the SQL Server
instance, including dependent services such as the SQL Server agent service and the Analysis
Service, and restart the instance in single-user mode before the restore. After the restore,
Avamar automatically restarts the instance.
The Avamar Plug-in for SQL Server can back up and restore system databases in a
30 Dell EMC Avamar for SQL Server User Guide

l
When you restore the msdb database, Avamar can automatically stop the SQL Server agent
service, and then restart it when the restore is complete.
Manual restore of system databases
When you restore system databases manually, you must manage the services and restore the
databases in the correct order.
1. Shut down the SQL Server instance and then restart the instance in single-user mode.
2. Restore the master database.
3. Restart the SQL Server service.
4. Stop the SQL Server Agent service.
5. Restore the msdb and model databases.
6. Restart the SQL Server Agent service.
Tail-log backup
With a tail-log backup, Avamar backs up the tail of the transaction log during the restore process
to capture the log records that are not in a backup. After the database restore, Avamar uses the
tail-log backup to recover the transactions that were not in the backup.
To perform a tail-log backup, the database must be online and using either the full or bulk-logged
recovery model. As a result, you cannot perform a tail-log backup of system databases such as the
master and msdb databases because those databases use the simple recovery model.
When you are restoring a user-defined filegroup or secondary data file and you perform a tail-log
backup, you must select the most recent backup as the backup from which to restore. Otherwise,
the restore fails and an error message is written to the log file.
You can perform a tail-log backup when you are restoring an instance, database, filegroup, or file
to its original location without the SQL WITH REPLACE option.
Introduction
You can also perform a tail-log backup when you are restoring a database to the original instance
but with a new database name.
If you are performing a point-in-time restore and the point in time that you are restoring to is after
the most recent transaction log backup, then you must perform a tail-log backup.
A tail-log backup is also necessary if you restore a file from a user-defined filegroup to its original
location.
Do not perform a tail-log backup if you are performing a redirected restore to a different SQL
Server instance.
NOTICE
the log file to determine the cause of the failure. Correct the problem, and then restart the
restore. Keep in mind that if you clear the Tail-log backup checkbox to prevent the tail-log
backup from occurring, then the restore includes only the transactions up to the selected
backup. Any transactions in the tail of the log are lost.
Point-in-time restore
You can restore a database with the full recovery model to a specific date and time or to a named
mark in the transaction log.
You cannot perform a point-in-time restore of system databases such as the master and msdb
databases because those databases use the simple recovery model.
To restore to a specific point in time, you must provide the transaction date and time or named
mark to which to recover. This information is available in the SQL Server transaction log. The SQL
If the tail-log backup fails to complete, then the restore cannot take place. Review
Dell EMC Avamar for SQL Server User Guide 31

Introduction
Server documentation on the Microsoft TechNet website provides details on how to access
transaction log information.
The point in time to which you are restoring must be after the finish time for the most recent full
backup. In addition, if the point in time is before the start time of the most recent transaction log
(incremental) backup, then a tail-log backup is not necessary. However, a tail-log backup is
required if the point in time is after the most recent transaction log backup.
When you specify the point in time for restore, do not specify the start time of the selected
transaction log backup if it is not the last backup in the backup sequence. Otherwise, the restore
fails, and a tail-log backup does not occur even if you select the Tail-log backup checkbox.
SQL Server recovery operations
You can control the recovery operation that occurs after the restore by using restore options in
the Avamar Plug-in for SQL Server.
Table 3 Recovery operation options
Recovery operation Description
RECOVERY
NORECOVERY
STANDBY
The database is fully recovered and online
after the restore. This operation is the default
setting.
The database remains in a restoring state
after the restore. This feature enables you to
perform additional manual restore tasks, such
as applying additional SQL transaction log
files.
The database is in standby (read-only) mode
after the restore. This mode enables you to
bring up a database for read-only access
between transaction log restores. You may
need to use this option with either warm
standby server situations or special recovery
situations in which it is useful to inspect the
database between log restores.
This option also creates a file with recovery
changes. You can use the file to revert the
recovery changes, if required.
You can specify the recovery operation in the following restore scenarios:
l
You are restoring an instance, database, filegroup, or file to its original location.
l
You are restoring a database to the original instance but with a new database name.
l
You are restoring an instance, database, filegroup, or file to a different instance on either the
original server or a different server.
l
You are restoring one or more system databases. Keep in mind the following points, however:
n
If you are restoring the master or model database, then you must select the RECOVERY
option. Do not use either the NORECOVERY or STANDBY options.
n
If you are restoring the msdb database, then you can select any of the recovery operation
options. However, if you select NORECOVERY or STANDBY, then all databases become
inaccessible until the restore of the msdb database is complete.
32 Dell EMC Avamar for SQL Server User Guide

Year 2038
Introduction
n
If you are restoring the system databases, then you must select the RECOVERY option. Do
not use either the NORECOVERY or STANDBY options.
The Avamar subsystem supports backup retention until February 2106. However, for older
releases, the Avamar subsystem does not start after January 2038 due to the signed 32-bit integer
time format of UNIX and Linux operating systems, and therefore cannot restore backup data after
this date.
Newer Avamar releases offer support for longer retention periods:
l
For Avamar 19.1 and later, the Avamar server subsystem uses an unsigned 32-bit integer and
continues to start until 2106.
l
For Avamar 19.1 and earlier, the Avamar client and plug-ins subsystem uses a signed 32-bit
integer and retains data until 2038.
l
For Avamar 19.2 and later, the Avamar client and plug-ins subsystem uses an unsigned 32-bit
integer and retains data until 2106.
l
Backup retention after 2038 is successful when all Avamar subsystems use unsigned 32-bit
integers.
Therefore, with both Avamar 19.2 and later, and an Avamar 19.2 or later client, backup retention
succeeds after 2038.
Avamar 19.2 and later clients also support restoring backups where the retention time is after
2038, and where the local (server and client) time is after 2038. Earlier client releases do not
support this.
For backups of Windows or Linux clients, do not assign a retention period for a date after February
7, 2106.
Table level recovery
You can restore individual tables from a backup of an SQL database by performing a table level
recovery.
Table level recovery (TLR) from an SQL database uses the Avamar Plug-in for SQL TLR with
ItemPoint for Microsoft SQL Server, which is installed during installation of the Avamar Plug-in for
SQL TLR. Single-stream as well as multiple streams are supported.
During a recovery operation when the Avamar Plug-in for SQL TLR is selected, the selected
database backup is mounted as a virtual mounted drive. Once the database backup is mounted,
ItemPoint for Microsoft SQL Server is used to perform the table level recovery.
Disaster recovery
To ensure sufficient preparation for disaster recovery of a SQL Server environment, you must
perform ongoing backups of the Windows server and all system and user databases. Disaster
Recovery on page 119 provides high-level procedures for preparing for and performing disaster
recovery.
Dell EMC Avamar for SQL Server User Guide 33

Introduction
34 Dell EMC Avamar for SQL Server User Guide

CHAPTER 2
Installation
This chapter includes the following topics:
l
Preparing to install the SQL Server plug-in........................................................................... 36
l
Installing the Avamar Plug-in for SQL Server........................................................................ 44
l
Installing the Avamar client software.....................................................................................45
l
Upgrading the Avamar client software.................................................................................. 53
l
Uninstalling the Avamar client software................................................................................ 54
Dell EMC Avamar for SQL Server User Guide 35

Installation
Preparing to install the SQL Server plug-in
Review the system requirements for the Avamar Plug-in for SQL Server, and ensure that the
environment meets the requirements before you install Avamar client software. The Avamar Config
Checker for Microsoft Windows provides an additional automated verification of the environment.
You also must download the Avamar Client for Windows and the Avamar Plug-in for SQL Server
installation packages from the Avamar server.
System requirements
The environment must meet client compatibility requirements before you install Avamar client
software.
See the
client compatibility requirements and supported operating systems and application versions.
The Avamar file system client and the plug-ins that you install on the host must have the same
version number.
Installation of SQL Server 2008 or SQL Server 2008 R2 in a Windows Server 2012 cluster requires
SQL Server 2008 SP3 or later, or SQL Server 2008 R2 SP1.
On Windows Server 2012, the Avamar Plug-in for SQL Server does not support backup and restore
of SQL Server data on Server Message Block (SMB) 3.0 file shares. However, on Windows Server
2012 R2, the SQL Server plug-in supports storage of SQL Server databases and log files in an
active/passive cluster on shared virtual hard disk (VHDX) files on an SMB 3.0 file share.
The Avamar Plug-in for SQL Server does not support backup and restore of the Windows Internal
Database, which is also referred to as SQL Server Embedded Edition.
The environment must also meet other requirements, including hardware requirements, security
requirements, and SQL Server feature and configuration requirements.
Hardware requirements
The following table lists the hardware requirements for the Avamar Plug-in for SQL Server.
Table 4
Requirement Minimum and recommended
E-lab Navigator
Minimum and recommended hardware requirements
at https://elabnavigator.emc.com/eln/modernHomeDataProtection for
RAM 512 MB (2 GB recommended).
Hard drive space 2 GB permanent hard drive space for software
Network interface 10BaseT minimum; 100BaseT or higher
36 Dell EMC Avamar for SQL Server User Guide
installation.
The Avamar Plug-in for SQL Server software
also requires an additional 12 MB of
permanent hard drive space for each 64 MB
of physical RAM. This space is necessary for
local cache files.
recommended, configured with the latest
drivers for the environment.

Security requirements
When Avamar connects to SQL Server for backup or restore, you can use either Windows (NT)
authentication or SQL Server authentication.
With Windows authentication, Avamar connects to SQL Server by using the Windows system
service account (NT AUTHORITY\SYSTEM), which has privileges in SQL Server. The account
must have the sysadmin server-level role.
Note: To use the Windows authentication method, select NT authentication in the plug-in
options for the Avamar Plug-in for SQL Server.
With SQL Server authentication, Avamar connects to SQL Server by using a SQL Server login
account. The account must have the sysadmin server-level role. You must select the mixed
authentication mode for the Database Engine when you configure SQL Server.
If you do not specify an authentication method, then the SQL Server plug-in uses NT
authentication and logs in with the Windows system service account. This account has the public
and sysadmin server-level roles in SQL Server by default in SQL Server 2008 and 2008 R2. In SQL
Server 2012, 2014, and 2016, you must add the account to the SQL Server administrators group.
Adding sysadmin server-level role in SQL Server Management Studio
Procedure
Installation
1. In SQL Server Management Studio, expand the Security node and then the Logins node for
the instance in the Object Explorer.
2. Right-click the user to whom you want to assign the sysadmin server role and select
Properties.
The Login Properties dialog box appears.
3. Select the Server Roles page from the list in the left pane.
4. In the right pane, select the checkbox next to the sysadmin server role.
5. Click OK.
SQL Server requirements
The SQL Server installation and environment must meet the requirements for the Avamar Plug-in
for SQL Server.
SQL Server feature installation requirements
The Avamar Plug-in for SQL Server requires installation of SQL Server Management Objects
(SMO). To install SMO, install the Client Tools SDK when you install SQL Server. Alternatively,
install SMO from the SQL Server feature pack.
You also must install Management Tools and the SQL Client Connectivity SDK when you install
SQL Server.
Note:
For Windows authentication, select the NT AUTHORITY\SYSTEM user account.
Database name requirements
Use only valid file name characters in database names. Avoid any of the following characters,
which are known to interfere with proper operation of the SQL Server plug-in: asterisk (*),
forward slash (/), backward slash (\), colon (:), semicolon (;), question mark (?), right angle
bracket (>), left angle bracket (<), vertical bar (|), or number (#).
Dell EMC Avamar for SQL Server User Guide 37

Installation
Do not end the database name with a period (.). If you end a database name with a period and then
you restore the database, you receive an access violation when you try to open the folder for the
restored database.
Transaction log marking requirements
The Avamar Plug-in for SQL Server cannot successfully back up and restore databases in which
database transaction log marks contain leading or trailing white space.
System database requirements
The SQL Server plug-in can back up both user databases and system databases such as the
master, msdb, and model databases.
The SQL Server Resource database is a read-only database that contains copies of all system
objects that ship with SQL Server. The Avamar Plug-in for SQL Server cannot back up the
Resource database, mssqlsystemresource.mdf, or its log file, mssqlsystemresource.ldf,
because SQL Server cannot back up the Resource database. To back up Resource database files,
use the Avamar Client for Windows.
The tempdb database is a temporary system database that is re-created every time you restart a
SQL Server instance. The SQL Server plug-in cannot back up the tempdb system database
because SQL Server does not support backup of the tempdb database.
The Avamar Plug-in for SQL Server can back up and restore system databases in a SQL Server
replication environment, including the publication, distribution, and subscription databases. The
SQL Server plug-in can automatically restore the replication system databases in the correct order
and manage SQL Server services. The "Back Up and Restore Replicated Databases" topic in the
SQL Server documentation on the MSDN website provides details on backup strategies and the
steps to manually restore databases in different types of replication environments.
Alias requirements
A SQL Server alias is a name that you configure on the client computer that points to a server,
instance, or database on either the local server or on a different computer. You can use an alias to
connect with a certain network protocol, such as TCP/IP, Named Pipes, or Shared Memory.
An alias can improve the convenience and speed of connecting to SQL Server. However, improper
use of an alias can result in connectivity issues that are difficult to isolate and troubleshoot.
If you plan to use a SQL Server alias, review the requirements and configuration steps on the
Microsoft website for setting up an alias. Also, review best practices for using and troubleshooting
aliases. These best practices are available in the blogs and Support knowledgebase articles on the
Microsoft website.
AlwaysOn availability group requirements
In a SQL Server AlwaysOn environment, you can back up databases on either the primary or
secondary replica for an availability group. There must be an availability group listener for each
availability group. The following sections list additional requirements in an AlwaysOn environment.
Requirements for backups on a secondary replica
If you perform the backup on a secondary replica, then the replica must meet the following
requirements:
l
The replica must be in a synchronized state.
l
The replica role setting in SQL Server must allow either read-only connections or all
connections:
n
When you create a replica in SQL Server Management Studio, select either Read-intent
only or Yes from the Readable secondary list on the Replicas tab in the Add Replica
Wizard.
38 Dell EMC Avamar for SQL Server User Guide

Installation
n
When you edit the configuration for an availability group in SQL Server Management
Studio, select either Read-intent only or Yes from the Readable secondary list on the
Availability Replica Properties dialog box.
n
Specify either READ_ONLY or ALL for the SECONDARY_ROLE option when you issue the
CREATE AVAILABILITY GROUP or ALTER AVAILABILITY GROUP Transact-SQL
command.
l
If there are multiple secondary replicas, then set the priority for which secondary replica to use
for the backup:
n
When you create a replica in SQL Server Management Studio, specify a value between 1
and 100 in the Backup Priority field in the Add Replica Wizard.
n
When you edit the configuration for an availability group in SQL Server Management
Studio, specify a value between 1 and 100 in the Backup Priority field on the Availability
Replica Properties dialog box.
n
Specify a numeric value for the BACKUP_PRIORITY option when you issue the CREATE
AVAILABILITY GROUP or ALTER AVAILABILITY GROUP Transact-SQL command.
A value of 1 indicates the lowest priority, and a value of 100 indicates the highest priority.
System databases in an availability group
SQL Server does not support system databases in an availability group. To back up system
databases with Avamar, you must perform a separate backup. During the backup, select the server
name of the physical node as the client to back up, and then select the system databases.
Requirements for the var directory
The var directory for the SQL AlwaysOn Cluster Plug-in must meet the following requirements:
l
Must have greater than 2 GB of available space.
l
For a local directory, the local full path to the var directory must be the same on all nodes in
the cluster where the Availability group is selected.
l
For a shared location:
n
The full path to the shared location must be available on all nodes in the cluster where the
Availability group is selected.
n
During registration, the shared \var folder must be specified as a UNC path.
n
Mounted shared locations which are available only to the primary replica are not supported.
n
The account running the avagent service must have modify permission level (including
read/write access) to the shared var folder.
Hybrid IT environments with Microsoft Azure and AlwaysOn availability groups
In a hybrid IT environment with Microsoft Azure and AlwaysOn availability groups, ensure that the
backup occurs on an on-premise replica. Avamar cannot back up databases on a replica on a
Microsoft Azure virtual machine.
AlwaysOn availability groups and FCIs
The Avamar Plug-in for SQL Server does not support backups of AlwaysOn availability groups on
an availability replica that is hosted by a SQL Server Failover Cluster Instance (FCI). To back up
databases in such an environment, you must install the Avamar client software on the node with
the primary replica as a stand-alone client, and then perform backups on only that node.
Dell EMC Avamar for SQL Server User Guide 39

Installation
Database mirroring requirements
You can use the Avamar Plug-in for SQL Server to back up SQL Server databases that are
mirrored.
The following conditions apply when you use the SQL Server plug-in in an environment with
database mirroring:
l
The SQL Server version must be 2008 or greater.
l
Perform backups of only the principal database, not the mirrors.
l
Use only the Avamar Plug-in for SQL Server to perform backups. If you use other backup
products in addition to the Avamar Plug-in for SQL Server, then log chain breaks may occur.
l
Backup and database administrators must use extra care. Some mirror operations cause log
chain breaks that cannot be detected.
l
When database mirroring is established, either initially or as the result of failover and failback,
then you must manually perform a new full backup. Otherwise, incremental and differential
backups that occur after the establishment of database mirroring are not valid for restore.
After you perform the full backup in this case, you cannot perform point-in-time recoveries to
a point in time before the full backup.
l
To restore a database, you must break the SQL mirror.
Transparent Data Encryption requirements
When you protect Avamar backups of SQL Server 2008 or later databases with Transparent Data
Encryption (TDE), the backups intentionally do not include the Database Encryption Key (DEK).
Including the DEK defeats one of the primary reasons for using TDE, which is to encrypt exported
data such as backups.
When you perform an Avamar backup of TDE-protected databases, manually back up the DEK. The
article “Understanding Transparent Data Encryption (TDE),” available on the Microsoft TechNet
website, provides additional details.
FILESTREAM requirements
The SQL Server FILESTREAM feature enables you to configure a database to store binary large
object (BLOB) data as files on the file system instead of in the database. The Avamar Plug-in for
SQL Server supports backups of SQL Server databases with FILESTREAM data for SQL Server
2008 and later.
Backing up and restoring a database with FILESTREAM data by using either Avamar Administrator
or the avsql command line interface (CLI) are the same as backing up and restoring other
databases.
Known issues with FILESTREAM support
You might encounter the following issues when you back up or restore a SQL Server database with
FILESTREAM data.
FILESTREAM data restores to the database folder during redirected restore
FILESTREAM data restores to the folder with the database files, even if the FILESTREAM data
was originally in a different folder than the database files, when the following conditions are true:
l
You are restoring the database to a different location than the original location at the time of
the backup.
l
You specify the new location by using the Alternate database location box on the Restore
Command Line Options dialog box.
To avoid this issue, specify the restore location for both the database files and the FILESTREAM
data in the Set Destination dialog box.
40 Dell EMC Avamar for SQL Server User Guide

Installation
Restore fails when the folder with FILESTREAM data is open
Restore of a database with FILESTREAM data fails when the folder with FILESTREAM data is
open in a program such as Windows Explorer.
To avoid this issue, close the program that is accessing the folder with the FILESTREAM before
you perform the restore. However, if the FILESTREAM folder is open and the restore fails, then
perform the restore again and select the WITH REPLACE option to force the restore and bring the
database online.
FILESTREAM datafiles appear as Rows Data in Avamar Administrator
FILESTREAM datafiles appear with a description of Rows Data on the Restore tab of the Backup,
Restore and Manage window in Avamar Administrator. The description in Avamar Administrator is
different than the Filestream data description that appears in SQL Server Management Studio.
SQL Server Analysis Service (SSAS) requirements
The Avamar Plug-in for SQL Server cannot back up SSAS databases. However, you can back up
the SSAS databases by using SQL Server Management Studio (SSMS) or the XMLA Query Editor.
Then use the Avamar Client for Windows to back up the flat file that results from the SSMS or
XMLA query backup.
The Microsoft website provides instructions on using SSMS or an XMLA query to back up SSAS
databases.
Considerations for the number of databases
The Avamar Management Console Server (MCS) may not be able to display all databases when
you browse for data to back up or restore on a SQL Server installation with many databases.
When this issue occurs, a Browse Timeout message appears and enables you to either set a new
time limit in seconds or to view partial results. If you view partial results, no entries appear. The
Avamar Plug-in for SQL Server does not support this option.
Preparing a stand-alone server
You must perform SQL Server installation and configuration steps before you install Avamar client
software on a stand-alone server.
Procedure
1. Install and configure Microsoft SQL Server.
2. Install Microsoft .NET Framework 4. This software is required to install the Avamar Plug-in
for SQL Server. Search the Microsoft Download Center for “Microsoft .NET Framework 4"
to find downloads and additional information.
3. If you are using Microsoft SQL Server 2012, 2014, or 2016, then add the Windows system
service account to the SQL Server administrators group. Adding sysadmin server-level role
in SQL Server Management Studio on page 37 provides instructions.
Preparing a cluster
You must perform SQL Server installation and configuration steps before you install Avamar client
software in a cluster.
Procedure
1. Install and prepare the cluster.
2. If you are installing SQL Server 2008 or SQL Server 2008 R2 in a Windows Server 2012
cluster, enable the COM-based MsClust.dll library on each node.
Dell EMC Avamar for SQL Server User Guide 41

Installation
If you do not enable this library on the cluster node, then the SQL Server setup on the node
fails with an error that cluster service verification failed.
To enable the library, enable the Failover Cluster Automation Server feature by using one of
the following methods on each node in the cluster:
l
In Server Manager, expand Remote Server Administration Tools > Feature
Administration Tools > Failover Clustering Tools, and then select the Failover Cluster
Automation Server checkbox.
l
Run the following Windows PowerShell cmdlet from an elevated command prompt:
add-windowsfeature RSAT-Clustering-AutomationServer
3. If you are installing SQL Server 2008 or SQL Server 2008 R2 in a Windows Server 2012
cluster, install SQL Server 2008 SP3 or later, or SQL Server 2008 R2 SP1 or later.
Otherwise, a “Windows Server 2003 FILESTREAM Hotfix Check” error appears when you
install and configure SQL Server in the cluster.
To ensure that you are installing the service pack version of SQL Server, you may need to
perform one of the following steps:
l
Download the correct service pack package, and run the service pack setup on each of
the cluster nodes to pre-patch the nodes with setup binaries.
The setup process closes automatically after you install setup support files. You must
reopen the setup wizard to perform the SQL Server installation.
NOTICE
currently installed on the node, uninstall SQL Server before you run the service pack
setup to install latest SQL Support Files.
l
Create a slipstream package that includes the service pack, and use that to install the
service pack version of SQL Server on each node. Microsoft knowledgebase article
955392, “How to update or slipstream an installation of SQL Server 2008,” which is
available on the Microsoft website, provides instructions on creating a slipstream
package.
4. Install and configure Microsoft SQL Server on each node.
5. Install Microsoft .NET Framework 4 on each node. This software is required to install the
Avamar Plug-in for SQL Server. Search the Microsoft Download Center for “Microsoft .NET
Framework 4" to find downloads and additional information.
Microsoft .NET Framework 4 is pre-installed on Windows Server 2012.
6. If you are using Microsoft SQL Server 2012, 2014, or 2016, then add the Windows system
service account to the SQL Server administrators group. Adding sysadmin server-level role
in SQL Server Management Studio on page 37 provides instructions.
Downloading the software
Download the installation packages for the Avamar Client for Windows, the Avamar Plug-in for
SQL Server, and the Avamar Config Checker from the Avamar server. Then save the installation
packages to a temporary folder.
Procedure
If the SQL Support Files from SQL Server 2008 or SQL Server 2008 R2 are
1. Log in to the computer that is running SQL Server as an administrator.
2. Log in to the
42 Dell EMC Avamar for SQL Server User Guide
application_name
server as an administrator.

Installation
3. Open a web browser and type the following URL:
https://Avamar_server/dtlt/home.html
where
Avamar_server
The Avamar Web Restore page appears.
4. Click Downloads.
The Downloads list appears.
5. Click + next to the operating system headings until the applicable software installation
packages appear.
6. Click the Avamar Client for Windows installation package, AvamarClient-windows-
x86_64-version.msi
where
version
7. Click the link for the SQL Server plug-in installation package, AvamarSQL-windows-
x86_64-version.exe.
where
version
NOTICE Ensure that you select the correct installation package for the operating
system.
is the Avamar client version.
is the SQL Server plug-in version.
is the DNS name or IP address of the Avamar server.
8. Save the SQL Server plug-in installation package to a temporary folder.
9. Click the Avamar Config Checker installation package,
Avamar_ConfigChecker_win_x64.zip.
Verifying the environment
Use the Avamar Config Checker for Microsoft Windows to verify that you correctly configured the
Windows environment for Avamar backup and recovery. The Config Checker checks the
configuration for problems that can lead to installation, backup, or recovery failures. These failures
can affect the operating system for the application host or the application itself.
About this task
You can run the Avamar Config Checker either before or after you install Avamar software on the
client computer.
The Config Checker supports only English language operating systems.
Procedure
1. Unzip the Avamar Config Checker installation package. To install the software, run the
setup program.
2. Start the Config Checker:
a. Open the Start screen.
b. Select Avamar Config Checker.
3. Click Next on the welcome page.
The Avamar Application and User Settings page appears.
4. Select the version number from the Avamar version list.
5. In the application list, select the checkbox next to the applications on the client computer.
Specify credentials, if required.
6. Click Next.
Dell EMC Avamar for SQL Server User Guide 43

Installation
7. Review the summary information.
8. Click Run Tests.
When the verification completes, the Config Check Results window appears.
9. Save or open the results in HTML format.
NOTICE The Config Checker does not automatically save the results. If you do not save
the results, you must rerun the Config Checker to view them.
10. Click Finish to exit the Config Checker.
11. Review the HTML result file, and correct all failed checks.
12. Rerun the Config Checker to ensure that all the checks are successful.
The
Avamar Config Checker for Microsoft Windows Technical Note
Support at https://support.EMC.com, provides troubleshooting information and details
about the results that appear for each application.
Installing the Avamar Plug-in for SQL Server
The SQL Server plug-in enables you to back up and restore SQL Server data.
, available on Online
About this task
A setup wizard leads you through the steps to install the plug-in. If UAC is enabled on the client
computer, then you must start the setup wizard by using administrator privileges. Otherwise, the
software does not install correctly. This procedure provides one method to bypass UAC. The
Microsoft documentation provides other methods and additional information.
The plug-in automatically installs in the same folder as the Avamar Client for Windows.
Procedure
1. Log in to the computer that is running SQL Server as an administrator.
2. Go to the temporary folder that contains the Avamar installation files that you downloaded.
3. Start the setup wizard:
l
If UAC is disabled, double-click the installation file to open it.
l
If UAC is enabled, open a command prompt as an administrator, change directory to the
location of the installation package, and then type one of the following commands:
msiexec /i AvamarSQL-windows-x86_64-version.exe
where
version
is the Avamar plug-in version.
The installation wizard opens at the welcome page.
4. (Optional) To enable support for table lever recovery (TLR) select TLR using ItemPoint for
SQL. Click Next.
This step installs both the Avamar Plug-in for SQL TLR and the ItemPoint software.
Note:
Installing the Avamar Plug-in for SQL TLR will also automatically install ItemPoint
for Microsoft SQL Server. TLR using Itempoint for SQL is selected by default in Avamar
18.1. You can unselect the option if you do not wish to install TLR using Itempoint for
SQL.
The Ready to Install Avamar Backup Plug-in for SQL Server page appears.
5. Click Install.
44 Dell EMC Avamar for SQL Server User Guide

Note: The SQL Server plug-in automatically installs to the same folder as the Avamar
Client for Windows.
6. When the installation completes, click Finish.
Installing the Avamar client software
To install the Avamar client software, install the Avamar Client for Windows and the plug-in on the
client computer. Then register the client with the Avamar server. In a cluster environment, perform
these steps on each node, and then configure the cluster client.
Installation road maps
The steps to install the Avamar software on a client computer depend on whether the environment
is a stand-alone server or a cluster.
Stand-alone installation road map
To install the Avamar client software on a stand-alone server, install the Windows client and the
plug-in on the server, and then register the client with the Avamar server.
Procedure
Installation
1. Install the Avamar Client for Windows on the computer that is running SQL Server.
2. Install the Avamar Plug-in for SQL Server on the computer that is running SQL Server.
3. Register the computer that is running SQL Server as a client with the Avamar server.
Cluster installation road map
To install the Avamar client software in a cluster, install the Windows client and the plug-in on each
node, register each node, and then configure the Avamar cluster client.
Procedure
1. Install the Avamar Client for Windows in the same folder on each node in the cluster.
2. Install the Avamar Plug-in for SQL Server in the same folder on each node in the cluster.
3. Register each node in the cluster with the Avamar server.
4. Use the Cluster Configuration Tool to configure the Avamar cluster client.
In a failover cluster, run the tool on the active node in the cluster. In an AlwaysOn availability
group environment, run the tool on the node that is hosting the primary replica.
Installing the Avamar Client for Windows
The Avamar Client for Windows includes the Avamar agent and the Avamar Plug-in for Windows
File System. The Avamar agent is required for backups and restores with application plug-ins. You
can use the Windows File System plug-in to back up operating system and application binary files,
which are required for disaster recovery.
About this task
A setup wizard leads you through the steps to install the Windows client. If the User Account
Control (UAC) feature is enabled on the client computer, then you must start the setup wizard by
using administrator privileges. Otherwise, the software does not install correctly. This procedure
provides one method to bypass UAC. The Microsoft documentation provides other methods and
additional information.
Dell EMC Avamar for SQL Server User Guide 45

Installation
Procedure
1. Log in to the computer that is running SQL Server as an administrator.
2. Go to the temporary folder that contains the Avamar installation files that you downloaded.
3. Start the setup wizard:
l
If UAC is disabled, double-click the installation file to open it.
l
If UAC is enabled, open a command prompt as an administrator, change directory to the
location of the installation package, and then type one of the following command:
msiexec /i AvamarClient-windows-x86_64-version.msi
where
version
is the Avamar client version.
The welcome page appears.
4. Click Next.
The End-User License Agreement page appears.
5. Review the license agreement.
6. Select the checkbox to accept the terms in the license agreement, and click Next.
The Custom Setup page appears.
7. Ensure that Avamar Client User Interface is selected for installation.
8. (Optional) To specify a folder for the Avamar client installation, click Browse and select a
location.
9. Click Next on the Custom Setup page.
The Ready to Install Avamar for Windows page appears.
10. Click Install.
11. When the installation completes, click Finish.
12. In a cluster environment, repeat these steps to install the Windows client on each node.
Installing the Avamar Plug-in for SQL Server
The SQL Server plug-in enables you to back up and restore SQL Server data.
About this task
A setup wizard leads you through the steps to install the plug-in. If UAC is enabled on the client
computer, then you must start the setup wizard by using administrator privileges. Otherwise, the
software does not install correctly. This procedure provides one method to bypass UAC. The
Microsoft documentation provides other methods and additional information.
The plug-in automatically installs in the same folder as the Avamar Client for Windows.
Procedure
1. Log in to the computer that is running SQL Server as an administrator.
2. Go to the temporary folder that contains the Avamar installation files that you downloaded.
3. Start the setup wizard:
l
If UAC is disabled, double-click the installation file to open it.
l
If UAC is enabled, open a command prompt as an administrator, change directory to the
location of the installation package, and then type one of the following commands:
msiexec /i AvamarSQL-windows-x86_64-version.exe
where
version
46 Dell EMC Avamar for SQL Server User Guide
is the Avamar plug-in version.

The installation wizard opens at the welcome page.
4. (Optional) To enable support for table lever recovery (TLR) select TLR using ItemPoint for
SQL. Click Next.
This step installs both the Avamar Plug-in for SQL TLR and the ItemPoint software.
Note: Installing the Avamar Plug-in for SQL TLR will also automatically install ItemPoint
for Microsoft SQL Server. TLR using Itempoint for SQL is selected by default in Avamar
18.1. You can unselect the option if you do not wish to install TLR using Itempoint for
SQL.
The Ready to Install Avamar Backup Plug-in for SQL Server page appears.
5. Click Install.
Note: The SQL Server plug-in automatically installs to the same folder as the Avamar
Client for Windows.
6. When the installation completes, click Finish.
Silent installation of Itempoint for SQL
Installation
Procedure
1. Open Command Prompt and run the commands in the next step.
2. You can select Itempoint to be installed or not installed depending on the parameter that is
passed to the Avamar SQL application during silent installation.
l
To install Itempoint for SQL, run the following command:
l
To install Itempoint for SQL, run the following command:
Registering the client
Before you can back up or restore data on a server, you must register the server as a client with
the Avamar server. Specify the name of the Avamar server, the Avamar domain for the client, and
the port on the Avamar server for client/server communication. Avamar domains enable you to
group clients and limit backup, restore, and monitoring privileges for the group to certain accounts.
About this task
In a cluster environment, register all nodes in the cluster as Avamar clients.
AvamarSQL-windows-x86_64-18.0.100-xx.exe /q
AvamarSQL-windows-x86_64-18.0.100-xx.exe /q /ComponentArgs
"EMCItemPoint":"noipinstall"
Procedure
1. Log in to the server.
2. Right-click the Avamar client system tray icon, and select Manage > Activate Client.
The Activate Client Setup dialog box appears.
3. In the Administrator Server Address box, type the DNS name for the Avamar server.
4. In the Administrator Server Port box, specify the port on the Avamar server for client/
server communication.
Dell EMC Avamar for SQL Server User Guide 47

Installation
5. In the Client Domain box, type the name of the Avamar domain for the client.
The default domain is clients. Do not use a slash (/) as the first character when you type a
subdomain. If you use a slash, an error occurs and you cannot register the client.
6. Click Activate.
A confirmation message appears.
7. Click OK.
Configuring the cluster client in a failover cluster
The Avamar cluster client in a failover cluster enables you to back up and restore SQL Server data
on shared storage in the cluster, regardless of which node is managing the data at the time of the
backup or restore. The Avamar Cluster Configuration Tool provides the steps to configure the
Avamar cluster client for the SQL Server plug-in in a failover cluster.
Procedure
1. Log in to the active node in the cluster as a domain administrator. The account must also be
a member of the local Administrators group on each cluster node.
2. Start the Cluster Configuration Tool by opening the Start screen and select Cluster
Configuration Tool.
The welcome page appears.
3. Click Next.
The Plug-Ins page appears.
4. Select SQL and click Next.
The Cluster Nodes page appears with a list of nodes and their status.
5. Ensure that the environment meets the following requirements:
l
The status for each SQL Server node is Up.
l
The installation status of the Windows client software for each node is Installed.
l
The installation status of the SQL Server plug-in on each node is Installed.
6. Click Next.
The Operations page appears.
7. Select Configure a new cluster client for all nodes, and then click Next.
The Prerequisites page appears. A check mark next to a prerequisite indicates that the
environment meets the prerequisite.
8. Ensure that the environment meets all prerequisites on the Prerequisites page.
If the environment does not meet a prerequisite, then exit the wizard, resolve the issue, and
restart the wizard.
9. Select the IP version that the environment uses, and then click Next.
The SQL Settings page appears.
10. Select the cluster role for the cluster client from the Cluster role for cluster client list.
11. Specify whether to automatically bring the cluster client online and activate it with the
Avamar server by selecting or clearing the Bring the cluster client online and activate it
with the Avamar server checkbox.
12. Click Next.
The Server Settings page appears.
48 Dell EMC Avamar for SQL Server User Guide

13. Specify the settings for the Avamar server:
a. Type either the DNS name of the Avamar server in the Name box or the IP address in the
IPv4/IPv6 address box.
b. Type the name of the Avamar domain in the Avamar client domain for the cluster client
box.
Installation
To specify a domain at the root level, type /domain, where
To specify a subdomain, type /domain/subdomain, where
and
subdomain
c. Type the data port for Avamar client/server communication in the Port number box.
Note: Port 28001 is the default port that the Avamar client uses to communicate
with the Avamar server.
14. Click Next.
The Client Settings page appears.
15. Type the name of the shared network folder or volume in the Cluster client’s var directory
box, or click Browse to select a folder.
The var directory should reside on the cluster disk, and is used to store the cluster client
configuration and log files. All nodes in the cluster must have write access to directory.
NOTICE Select a volume that the cluster owns instead of a remote pathname on the
network.
16. Type the name of the client's SYSDIR directory, in the Cluster client’s SYSDIR directory
box, or click Browse to select a local folder or a shared network folder or volume.
The SYSDIR directory must have > 2 GB of available space, and can be either a local folder
or a folder on a shared network drive or volume.
is the subdomain name.
domain
domain
is the domain name.
is the domain name
17. Review the configuration settings, and then click Configure.
The Progress page provides the status of the configuration. When the configuration is
complete, the Results page appears.
18. Click Close.
Configuring the cluster client for an AlwaysOn availability group
The Avamar cluster client for an AlwaysOn availability group enables you to back up and restore
SQL Server databases in an availability group. The Avamar Cluster Configuration Tool walks you
through the steps to configure the Avamar cluster client for the SQL Server plug-in in an
AlwaysOn availability group.
Procedure
1. Log in to the node that is hosting the primary replica as a domain administrator. The account
must also be a member of the local Administrators group on each cluster node.
2. Start the Cluster Configuration Tool by opening the Start screen and select Cluster
Configuration Tool.
The welcome page appears.
3. Click Next.
The Plug-Ins page appears.
4. Select SQL AlwaysOn and click Next.
The Cluster Nodes page appears with a list of nodes and their status.
Dell EMC Avamar for SQL Server User Guide 49

Installation
5. Ensure that the environment meets the following requirements:
l
The status for each SQL Server node is Up.
l
The installation status of the Windows client software for each node is Installed.
l
The installation status of the SQL Server plug-in on each node is Installed.
6. Click Next.
The Operations page appears.
7. Select Configure a new cluster client for all nodes, and then click Next.
The Prerequisites page appears. A check mark next to a prerequisite indicates that the
environment meets the prerequisite.
8. Ensure that the environment meets all prerequisites on the Prerequisites page.
If the environment does not meet a prerequisite, then exit the wizard, resolve the issue, and
restart the wizard.
9. Select the IP version that the environment uses, and then click Next.
The SQL AlwaysOn Settings page appears.
10. Select the cluster role for the cluster client from the Cluster role for cluster client list.
The name of the cluster client appears in the Cluster client name box.
Note: You must configure an availability group listener for each availability group. Do not
configure a cluster client for an availability group that does not have a listener.
11. Specify whether to automatically bring the cluster client online and activate it with the
Avamar server by selecting or clearing the Bring the cluster client online and activate it
with the Avamar server checkbox.
12. Click Next.
The Server Settings page appears.
13. Specify the settings for the Avamar server:
a. Type either the DNS name of the Avamar server in the Name box or the IP address in the
IPv4/IPv6 address box.
b. Type the name of the Avamar domain in the Avamar client domain for the cluster client
box.
To specify a domain at the root level, type /domain, where
To specify a subdomain, type /domain/subdomain, where
and
subdomain
is the subdomain name.
domain
domain
is the domain name.
is the domain name
c. Type the data port for Avamar client/server communication in the Port number box.
Note:
Port 28001 is the default port that the Avamar client uses to communicate
with the Avamar server.
14. Click Next.
The Client Settings page appears.
15. Type the name of the shared network folder or volume in the Cluster client’s var directory
box, or click Browse to select a folder.
The var directory should reside on the cluster disk, and is used to store the cluster client
configuration and log files. All nodes in the cluster must have write access to directory.
50 Dell EMC Avamar for SQL Server User Guide

NOTICE Select a volume that the cluster owns instead of a remote pathname on the
network.
16. Type the name of the client's SYSDIR directory, in the Cluster client’s SYSDIR directory
box, or click Browse to select a local folder or a shared network folder or volume.
The SYSDIR directory must have > 2 GB of available space, and can be either a local folder
or a folder on a shared network drive or volume.
17. Click Next.
The Summary page appears.
18. Review the configuration settings, and then click Configure.
The Progress page provides the status of the configuration. When the configuration is
complete, the Results page appears.
19. Click Close.
Configuring the cluster client for an AlwaysOn availability group on Amazon Web Services and Azure
You can configure the Avamar cluster client for SQL Server in an AlwaysOn availability group,
which resides on Amazon Web Services or Microsoft Azure. The Avamar cluster client for an
AlwaysOn availability group enables you to back up and restore SQL Server databases in an
availability group. The Avamar Cluster Configuration Tool walks you through the steps to configure
the Avamar cluster client for the SQL Server plug-in in an AlwaysOn availability group.
Procedure
Installation
1. Log in to the node that is hosting the primary replica as a domain administrator. The account
must also be a member of the local Administrators group on each cluster node.
2. Start the Cluster Configuration Tool by opening the Start screen and select Cluster
Configuration Tool.
The welcome page appears.
3. Click Next.
The Plug-Ins page appears.
4. Select SQL AlwaysOn and click Next.
The Cluster Nodes page appears with a list of nodes and their status.
5. Ensure that the environment meets the following requirements:
l
The status for each SQL Server node is Up.
l
The installation status of the Windows client software for each node is Installed.
l
The installation status of the SQL Server plug-in on each node is Installed.
6. Click Next.
The Operations page appears.
7. Select Configure a new cluster client for all nodes, and then click Next.
The Prerequisites page appears. A check mark next to a prerequisite indicates that the
environment meets the prerequisite.
8. Ensure that the environment meets all prerequisites on the Prerequisites page.
If the environment does not meet a prerequisite, then exit the wizard, resolve the issue, and
restart the wizard.
Dell EMC Avamar for SQL Server User Guide 51

Installation
9. Select the IP version that the environment uses, and then click Next.
The SQL AlwaysOn Settings page appears.
10. Select the cluster role for the cluster client from the Cluster role for cluster client list.
The name of the cluster client appears in the Cluster client name box.
Note: You must configure an availability group listener for each availability group. Do not
configure a cluster client for an availability group that does not have a listener.
11. Clear theBring the cluster client online and activate it with the Avamar server checkbox.
12. Click Next.
The Server Settings page appears.
13. Specify the settings for the Avamar server:
a. Type either the DNS name of the Avamar server in the Name box or the IP address in the
IPv4/IPv6 address box.
b. Type the name of the Avamar domain in the Avamar client domain for the cluster client
box.
To specify a domain at the root level, type /domain, where
To specify a subdomain, type /domain/subdomain, where
and
subdomain
is the subdomain name.
domain
domain
is the domain name.
is the domain name
c. Type the data port for Avamar client/server communication in the Port number box.
Note:
Port 28001 is the default port that the Avamar client uses to communicate
with the Avamar server.
14. Click Next.
The Client Settings page appears.
15. Type the name of the shared network folder or volume in the Cluster client’s var directory
box, or click Browse to select a folder.
The var directory should reside on the cluster disk, and is used to store the cluster client
configuration and log files. All nodes in the cluster must have write access to directory.
NOTICE
Select a volume that the cluster owns instead of a remote pathname on the
network.
16. Type the name of the client's SYSDIR directory, in the Cluster client’s SYSDIR directory
box, or click Browse to select a local folder or a shared network folder or volume.
The SYSDIR directory must have > 2 GB of available space, and can be either a local folder
or a folder on a shared network drive or volume.
17. Click Next.
The Summary page appears.
18. Review the configuration settings, and then click Configure.
The Progress page provides the status of the configuration. When the configuration is
complete, the Results page appears.
19. Click Close.
20. On the primary node, launch Microsoft Failover Cluster Manager.
21. Select the Cluster instance > Roles > AAG group under Configuration.
22. Under Resources, select EMC Avamar Backup Agent resource for XXX.
52 Dell EMC Avamar for SQL Server User Guide

23. Right click Properties and select Startup parameters.
24. Remove the flag --netbind=.
25. Edit the flag --sysdir=”C:\Program Files\avs\aag\etc” (or the existing local
folder).
26. Click Save and Close.
27. On all the SQL nodes, create the SYSDIR folder, if it does not already exists.
28. On each SQL AlwaysOn availability group node, create the avagent.cmd file in the var
(C:\Program Files\avs\AAG\var) folder with the --netbind=<
option .
29. On the primary SQL node, bring the resource EMC Avamar Backup Agent resource for
XXX online.
30. On all the SQL secondary nodes, copy the cid.bin file from the primary var folder
(C:\Program Files\avs\AAG\var) to all the secondary nodes var folder.
Upgrading the Avamar client software
Upgrading steps depend on whether the installation is on a stand-alone server or in a cluster.
localhostIP
Installation
>
Upgrading on a stand-alone server
Procedure
1. Uninstall the current version of the Avamar client and plug-in:
a. Uninstall the ItemPoint software, if it has been installed.
b. Uninstall the earlier version of the Avamar Plug-in for SQL Server.
c. Uninstall the earlier version of the Avamar Client for Windows.
2. Install the new version of the Avamar Client for Windows.
3. Install the new version of the Avamar Plug-in for SQL Server.
4. Perform a full backup of all SQL Server data with the Force Incremental After Full
option cleared, to ensure that you have a current full backup with the new version.
Restore of data from a backup with an earlier release may fail, especially when you restore
from a differential or incremental backup. The
elabnavigator.emc.com/eln/modernHomeDataProtection provides details on supported
versions and any version compatibility issues.
Upgrading in a cluster
When you upgrade Avamar client and plug-in software in a cluster, you must uninstall the current
Avamar clients and plug-ins from each node, and then install the new version.
E-LAB Navigator
at https://
Before you begin
l
Ensure that the environment meets all system requirements for the new version.
l
Ensure that no backups are in progress or scheduled to take place during the upgrade.
Otherwise, Avamar client software files may be locked during the upgrade and you may need to
restart the computer after the upgrade.
Procedure
1. Uninstall the current version of the Avamar client and plug-in:
Dell EMC Avamar for SQL Server User Guide 53

Installation
a. Use the earlier version of the Cluster Configuration Tool to uninstall the Avamar cluster
client.
b. Uninstall the ItemPoint software, if it has been installed.
c. Uninstall the earlier version of the Avamar Plug-in for SQL Server.
d. Uninstall the earlier version of the Avamar Client for Windows.
The plug-in guide for the earlier version provides instructions for each of these steps.
2. Install the new version of the Avamar client and plug-in:
a. Install the Avamar Client for Windows in the same folder on each node in the cluster.
b. Install the Avamar Plug-in for SQL Server in the same folder on each node in the cluster.
c. Register each node in the cluster with the Avamar server.
d. Configure the Avamar Cluster Client.
3. Perform a full backup of all SQL Server data with the Force Incremental After Full
option cleared, to ensure that you have a current full backup with the new version.
Restore of data from a backup with an earlier release may fail, especially when you restore
from a differential or incremental backup. The
E-LAB Navigator
at https://
elabnavigator.emc.com/eln/modernHomeDataProtection provides details on supported
versions and any version compatibility issues.
Uninstalling the Avamar client software
When you uninstall Avamar plug-in and client software from a client computer, scheduled backups
no longer occur for the client. You cannot restore backups to the client after you uninstall the
software.
About this task
When you uninstall the Avamar client software, you can keep or delete the backups for the client:
l
To keep the backups for the client so that you can restore the backups to a different client,
retire the client by using Avamar Administrator.
l
To delete the backups for the client, delete the client by using Avamar Administrator.
Retire or delete the client either before or after you uninstall the plug-in. The
Guide
provides more information.
Uninstall road map
To uninstall Avamar client and plug-in software from a stand-alone server, uninstall the plug-in and
Windows client by using standard Windows uninstall features. In a cluster, first uninstall the
Avamar cluster client. Then uninstall the plug-in and Windows client on each node.
Procedure
1. (Cluster only) Uninstall the Avamar cluster client.
2. Uninstall the Avamar Plug-in for SQL Server by using Programs and Features.
3. Uninstall the Avamar Client for Windows by using Programs and Features.
4. (Cluster only) Repeat step 2 and step 3 on each node.
Avamar Administration
54 Dell EMC Avamar for SQL Server User Guide

Uninstalling the cluster client in a failover cluster
To uninstall the Avamar cluster client in a failover cluster, run the Cluster Configuration Tool on an
active node in the cluster, and select the removal option.
Procedure
1. Log in to the active node in the cluster as a domain administrator. The account must be a
member of the local Administrators group on each cluster node.
2. Start the Cluster Configuration Tool by opening the Start screen and selecting Cluster
Configuration Tool
The welcome page appears.
3. Click Next.
The Plug-ins page appears.
4. Select SQL and click Next.
The Cluster Nodes page appears with a list of nodes and their status.
5. Ensure that the status of each SQL Server node is Up, and then click Next.
The Operations page appears.
6. Select Remove the cluster client from all nodes, and then click Next.
Installation
The Prerequisites page appears. A check mark next to a prerequisite indicates that the
environment meets the prerequisite.
7. Ensure that the environment meets all prerequisites on the page, and click Next.
The Uninstall SQL page appears.
8. Select the cluster role, service, or group that contains the cluster client from the Cluster
role/service/group for cluster client list, and then click Next.
9. Select the cluster client from the Cluster client name list.
10. Select the shared volume for the cluster client from the Shared volume for the cluster
client list.
11. Click Next.
The Summary page appears.
12. Review the summary information, and then click Uninstall.
The Progress page provides the status of the uninstall. When the uninstall is complete, the
Results page appears.
13. Click Close.
Uninstalling the cluster client for an AlwaysOn availability group
To uninstall the Avamar cluster client from an AlwaysOn availability group, run the Cluster
Configuration Tool on the primary replica, and select the removal option.
Procedure
1. Log in to the cluster node with the primary replica as a domain administrator. The account
must also be a member of the local Administrators group on each cluster node.
2. Start the Cluster Configuration Tool by opening the Start screen and selecting Cluster
Configuration Tool
The welcome page appears.
Dell EMC Avamar for SQL Server User Guide 55

Installation
3. Click Next.
The Plug-ins page appears.
4. Select SQL AlwaysOn and click Next.
The Cluster Nodes page appears with a list of nodes and their status.
5. Ensure that the status of each SQL Server node is Up, and click Next.
The Operations page appears.
6. Select Remove the cluster client from all nodes, and then click Next.
The Prerequisites page appears. A check mark next to a prerequisite indicates that the
environment meets the prerequisite.
7. Ensure that the environment meets all prerequisites on the page, and click Next.
The Uninstall Settings page appears.
8. Select the cluster role or service that contains the cluster client from the Cluster role/
service for cluster client list, and then click Next.
The Summary page appears.
9. Review the summary information, and then click Uninstall.
The Progress page provides the status of the uninstall. When the uninstall is complete, the
Results page appears.
10. Click Close.
56 Dell EMC Avamar for SQL Server User Guide

CHAPTER 3
Backup
This chapter includes the following topics:
l
Perform an on-demand SQL backup by using AUI ................................................................ 58
l
Configure the SQL server policy............................................................................................59
l
Scheduling backups using the AUI Policy wizard................................................................... 60
l
Monitoring backups...............................................................................................................62
l
Cancel backups..................................................................................................................... 63
l
Verifying backups..................................................................................................................63
l
Enforcement of backups to Data Domain.............................................................................. 64
Dell EMC Avamar for SQL Server User Guide 57

Backup
Perform an on-demand SQL backup by using AUI
An on-demand backup is a user-initiated backup of specific data that you select. Perform an ondemand backup for the first backup of the client immediately after you install the Avamar client
software, and before system maintenance, software installations, or software upgrades.
Procedure
1.
In the AUI navigation pane on the left, click , and then click Asset Management.
The Asset Management window is displayed.
2. Select the domain that contains the host of the SQL server.
A list of Avamar clients is displayed in the pane under the domains list.
3. In the list of clients, select the computer that is running the SQL Server.
Keep the following points in mind when you select a client:
l
To back up databases in an AlwaysOn availability group, select the cluster client for the
availability group listener.
l
To back up databases on shared storage in a failover cluster, select the cluster client for
the virtual server.
l
You can only view clients in the domain for the login account. To view all clients, log in to
the root domain.
4. Click the Backup tab.
The Backup wizard is displayed. In the Plugin pane, a list of plug-ins on the client is
displayed.
5. In the Plugins pane, perform the following steps:
a. Select the
Windows SQL
plug-in.
b. Browse to and select one or more databases for the backup.
Table 5
Steps to backup data
Data to select for backup Selection steps
All data on the client In the Plugin pane, select Windows SQL.
Specific instances or databases on
the client
To browse to the instances or databases:
a. Expand the Windows SQL plug-in node.
b. Select the SQL Server instance that contains the
databases to back up.
A list of the databases for that instance is displayed in the
right pane.
c. To back up all databases in the instance, select the
instance.
c. Click NEXT.
The Basic Configuration window is displayed.
6. Select the backup retention policy settings:
58 Dell EMC Avamar for SQL Server User Guide

l
To automatically delete this backup from the Avamar server after a specific amount of
time, select Retention period. Specify the number of days, weeks, months, or years for
the retention period.
l
To automatically delete this backup from the Avamar server on a specific calendar date,
select End date and browse to that date on the calendar.
l
To keep this backup for as long as this client remains active in the Avamar server, select
No end date.
7. From the Avamar encryption method list, select the encryption method to use for data
transfer between the client and the Avamar server during the backup.
The encryption technology and bit strength for a client/server connection depends on
several factors, including the client operating system and Avamar server version. The
Avamar Product Security Guide
provides additional information.
8. From the Optionally select a proxy to perform backup list, select the proxy.
The default setting is Automatic, which enables the Avamar server to choose the best proxy
for this operation.
9. Click NEXT.
The More Options window is displayed.
Backup
10. Set the plug-in options.
SQL plug-in backup options provides more information about the basic backup options.
11. (Optional) Toggle the Show Advanced Options switch to view advanced configuration
options.
SQL plug-in backup options provides more information about the advanced backup options.
12. Click FINISH.
Configure the SQL server policy
A policy contains all the information necessary to perform backups of groups of instances.
About this task
Policy objects contain three child objects:
l
Schedule—A policy that controls the frequency and the start and end time each day for
backups of clients. A schedule is a persistent and reusable Avamar policy that can be named
and attached to multiple policies.
l
Retention—A policy that defines how long the backup is stored in the backup appliance.
l
Dataset—A policy that defines a set of files, directories, and file systems for each supported
platform that are included or excluded in backups across a group of clients. A dataset is a
persistent and reusable Avamar policy that can be named and attached to multiple policies.
From the Overview page, perform the following steps.
To access the Source page of the Policy wizard, in the AUI navigation pane on the left, click
click Advanced Policy , and then click ADD to create a policy.
Procedure
1. In the Advanced Policy Type field, select SQL Server .
2.
To add a backup group, click , and then select a backup group type from the list.
Dell EMC Avamar for SQL Server User Guide 59
,

Backup
3. In the Schedule column, select a schedule for each backup group.
To ensure that backups occur on an ongoing basis, scheduled backups run automatically.
You can schedule backups to run daily, weekly, or monthly.
Alternatively, you can add a schedule by selecting Create in the drop-down list. The Create
Schedule wizard is displayed and opens to the Basic Configuration page.
4. In the Dataset column, select a dataset for each backup group.
A dataset specifies the data to include in a scheduled backup and the options to use for the
backup. Create at least one dataset for scheduled backups on a client or group of clients. To
segregate client data, create multiple datasets.
Alternatively, you can add a dataset by selecting Create in the drop-down list. The Create
DataSet wizard is displayed.
5. In the Retention column, select a retention policy for each backup group.
Retention is the time setting to automatically delete backups on an Avamar server.
Retention can be set to permanent for backups that should not be deleted from an Avamar
server.
Alternatively, you can add a retention policy by selecting Create in the drop-down list. The
Add Retention Policy wizard is displayed.
6. Click NEXT.
Scheduling backups using the AUI Policy wizard
Scheduled backups run automatically to ensure that backups occur on an ongoing basis. You can
schedule backups to run daily, weekly, or monthly.
About this task
You can schedule backups by using the Policy wizard to create a backup policy.
Perform the following steps within the Policy wizard.
Procedure
1. Assign members to the new backup policy.
2. Assign a dataset to the new backup policy.
To create a dataset, use the Policy wizard or select Settings > Dataset > Add.
3. Assign a schedule to the new backup policy.
To create a schedule, use the Policy wizard or select Settings > Schedule > Add.
4. Assign a retention policy to the new backup policy.
To create a retention policy, use the Policy wizard or select Settings > Retention > Add.
5. Enable scheduling for the backup policy.
60 Dell EMC Avamar for SQL Server User Guide

Creating a dataset
A dataset specifies the data to include in a scheduled backup and the options to use for the
backup. Create at least one dataset for scheduled backups on a client or group of clients. Create
multiple datasets to segregate client data.
Procedure
1.
2. Click the Dataset tab.
3. Click ADD.
4. In the Dataset Name field, type a name for the dataset.
Backup
In the AUI navigation pane on the left, click , and then click Settings.
The Setting pane is displayed.
The Create Dataset window is displayed.
The name can include alphanumeric characters (A-Z, a-z, 0–9) and the following special
characters: period (.), hyphen (-), and underscore (_), and space. Do not use Unicode
characters or the following special characters: ` ~ ! @ # $ % ^ & * ( ) = + [ ] { } | \ / ; : ' " <
> , ?
5. From the Plugins list, select the Windows SQL plug-in.
6. Click the Options tab, and perform the following steps:
a. To view advanced options, select the Show Advanced Options check box.
b. Set the plug-in options. SQL plug-in backup options provides details on each option.
7. Click the Source Data tab and then select the data to include in the dataset:
l
To include all SQL server data on a client, select SQL.
l
To specify instances or databases on a client, perform the following steps:
a. Select Select Files and/or Folders.
b. In the File/Folder Path field, type the file path by using the following format:
hostname\sql_instance/database_name or hostname\sql_instance
c. Click ADD.
l
To back up only specific databases in an instance, perform the following steps:
a. Select the Exclusions tab, and then select the instance for the databases that you
want to back up.
b. In the File/Folder Path field, type the file path by using the following format:
hostname\sql_instance/database_name or hostname\sql_instance
c. Click ADD.
d. Select the Inclusions tab, and then select the databases that you want to include in
the back up.
e. In the File/Folder Path field, type the file path by using the following format:
hostname\sql_instance/database_name or hostname\sql_instance
f. Click ADD.
8. Click SUBMIT.
Dell EMC Avamar for SQL Server User Guide 61

Backup
Creating a backup policy
A backup policy is a collection of Avamar clients that use the same dataset, schedule, and
retention settings to implement scheduled backups.
About this task
Member clients must all be in the same Avamar domain. When you create a backup policy, you
define the dataset, schedule, and retention settings that apply for scheduled backups. These
settings comprise the backup policy, which controls backup behavior for all members of the
backup policy unless you override these settings at the client level.
The
Avamar Administration Guide
provides information about creating and editing backup policies,
schedules, or retention settings.
Enabling a scheduled backup for a backup policy
Scheduled backups occur only for enabled backup policies. Backup policies are disabled by default
unless you select the Enabled check box on the first page of the New Policy wizard. If you did not
enable the backup policy when you created it, use the menu options in the Policy window to
enable backups.
Procedure
1.
In the AUI navigation pane on the left, click
The Policy page is displayed.
2. In the domain tree, select a domain or subdomain for the backup policy.
To select a subdomain for the backup policy, toggle the Include Sub-domain switch to on.
3. Select a backup policy from the list.
4. To enable a backup policy, click MORE ACTIONS > Enable Policy.
5. To disable a backup policy, click MORE ACTIONS > Disable Policy.
Monitoring backups
You can monitor and view status information for backup and restore operations by using the
Activity Monitor.
About this task
To access the Activity Monitor, open the navigation pane, and then click Activity. The Activity
Monitor appears with a list of all activities.
Note:
The AUI Activity Monitor window has been optimized for at least 1366 pixels-wide
screens. Display issues might occur for smaller screens. To properly display the AUI, ensure
that your display is at least 1366 pixels wide.
The Activity Monitor provides you with options to filter the information that appears:
l
Filter activities by duration—By default, the Activity Monitor displays the most recent 5,000
client activities. To select a different duration, in the Filter activities by duration drop-down
list, select Last 24 hours or Last 72 hours.
l
Filter activities by domain—By default, the Activity Monitor displays all activities regardless
of domain. To display only the activities for a specific domain, in the Filter activities by
domain drop-down list, select a domain or subdomain.
l
Filter activities by status—By default, the Activity Monitor displays all activities regardless of
status.
, and then click Backup Policy.
62 Dell EMC Avamar for SQL Server User Guide

Backup
To display only activities with a specific status, at the top of the Activity Monitor, select one
of the following options:
n
Completed
n
Failed
n
Running
n
Waiting
To filter activities by client, start time, plug-in, or type, click
The Activity Monitor displays the date and time that an activity began, and the total number of
bytes examined during an activity.
To view activity details, expand the Details pane, by clicking .
Cancel backups
You can cancel a backup any time before it completes. The cancellation might take 5 minutes or
longer. The backup might complete before the cancellation finishes.
Procedure
1.
In the AUI navigation pane on the left, click , and then click Activity.
The Activity Monitor appears with a list of activities.
2. Select the backup from the list.
3. Click CANCEL.
A confirmation dialog box is displayed.
4. Click YES.
Verifying backups
in their respective column.
You can use the VerifyOnly restore option to verify a backup without performing a restore.
About this task
The verify-only restore feature supports the following configurations:
l
Database-level backup
l
Multiple databases, using database-level backup
l
Instance-level backup
n
Instance level restore validates the system database backups also, without performing the
SQL Service restart in single user mode.
l
Availability Group (AG) database or level backup
n
Verify-only restore can be performed by using redirected restore. AG restores to the same
client are not supported.
If the backup verification succeeds, the restore is marked as successful. If the backup verification
is unsuccessful, the restore is marked as failed, or if the backup being verified is an AG backup, and
instance backup, or involves multiple databases, the restore is marked as "partial success /
failure."
Dell EMC Avamar for SQL Server User Guide 63

Backup
Enforcement of backups to Data Domain
If the Avamar server is configured to enforce backups to a Data Domain system, the server rejects
backups that are not destined for the Data Domain. This enforcement covers backups that you
configure through the Avamar Administrator and the AUI, as well as from command-line interfaces
and other tools.
These backups must have additional flags that indicate the storage target. The
Domain System Integration Guide
related client version requirements. Backup enforcement is disabled by default.
provides more information about backup enforcement and the
Avamar and Data
64 Dell EMC Avamar for SQL Server User Guide

CHAPTER 4
Application Consistent SQL Virtual Machine Image Backup
This section includes the following topics:
l
Managing advanced policies..................................................................................................66
l
Prerequisites......................................................................................................................... 66
l
Add an advanced group policy...............................................................................................66
l
Remove an advanced policy.................................................................................................. 69
l
Edit an advanced policy.........................................................................................................69
l
View advanced policy details................................................................................................. 70
l
Migrate existing Backup Policy to an Advanced Policy.......................................................... 70
l
View logs............................................................................................................................... 70
Dell EMC Avamar for SQL Server User Guide
65

Application Consistent SQL Virtual Machine Image Backup
Managing advanced policies
Configure an advanced policy to manage application-consistent SQL virtual machine backups,
including automatic SQL discovery, automatic backup policy management, and automatic client
SQL plug-in installation and registration. In an advanced policy, you can also enable the Cloud DR
function for SQL virtual machine backups.
Prerequisites
Review the following prerequisites before setting up an advanced policy for application-consistent
SQL virtual machine protection.
l
Both administrator users and local users with the administrator role can perform advanced
application-consistent SQL virtual machine backups. However, due to the introduction of User
Account Control (UAC) in Microsoft Windows 7 and later versions, a local user with the
administrator role must additionally turn off Admin Approval Mode in the UAC settings for the
admin group on the guest operating system. Otherwise, the Advanced Policy Builder fails to
install/upgrade/register client agents on SQL virtual machines.
l
If the vCenter inventory name of the Virtual Machine (VM) is same as the guest computer
name, change the mcserver.xml setting to <entry
key="allow_duplicate_client_names" value="true" />. If you do not change the
setting, the registration might fail during Avamar client registration with MCS.
Add an advanced group policy
Procedure
1. To start the Avamar Web User Interface, open a web browser and type the following URL:
https://Avamar_server/aui
where
Avamar_server
Note:
If your environment does not meet HTTPS certificate validation requirements, the
certificate validation fails and an error message appears asking if you want to continue
to download packages. Ignoring certificate validation might cause security issues.
a. In the Avamar Username field, type a username with administrative privileges.
b. In the Avamar Password field, type the password for the administrative user.
c. Select Avamar as the Auth Type.
d. Click Log In.
2.
In the AUI navigation pane on the left, click
The Advanced Policy window is displayed.
3. In the domain tree, select a domain or subdomain for the client.
4. To add an advanced policy, click ADD.
The Advanced Policy wizard is displayed.
5. Name the advanced policy.
6. To enable the advanced policy, clear the Disable this Advanced Policy check box.
7. Click NEXT.
is the DNS name or IP address of the Avamar server.
, and then click Advanced Policy .
66 Dell EMC Avamar for SQL Server User Guide

Configure a source
About this task
From the Source page, perform the following steps.
To access the Source page of the Policy wizard, in the AUI navigation pane on the left, click ,
click Advanced Policy , click , and then click Source.
Procedure
1. In the vCenter field, select a target vCenter or add a target vCenter.
2.
Application Consistent SQL Virtual Machine Image Backup
Note: If the vCenter is not in the list, ensure that the domain under which the policy is
being created can access the domain where the vCenter was originally added.
To create a vCenter, click :
The New vCenter Client wizard is displayed.
a. Complete the following information in the wizard.
l
Client information, including client type and client name or IP address
l
vCenter information, including username, password, and port number.
l
Optional information
b. Review the summary.
c. Click ADD.
3. On the Advanced Policy Builder page, click NEXT.
Configure the SQL server policy
A policy contains all the information necessary to perform backups of groups of instances.
About this task
Policy objects contain three child objects:
l
Schedule—A policy that controls the frequency and the start and end time each day for
backups of clients. A schedule is a persistent and reusable Avamar policy that can be named
and attached to multiple policies.
l
Retention—A policy that defines how long the backup is stored in the backup appliance.
l
Dataset—A policy that defines a set of files, directories, and file systems for each supported
platform that are included or excluded in backups across a group of clients. A dataset is a
persistent and reusable Avamar policy that can be named and attached to multiple policies.
From the Overview page, perform the following steps.
To access the Source page of the Policy wizard, in the AUI navigation pane on the left, click
click Advanced Policy , and then click ADD to create a policy.
Procedure
,
1. In the Advanced Policy Type field, select SQL Server .
2.
To add a backup group, click , and then select a backup group type from the list.
3. In the Schedule column, select a schedule for each backup group.
To ensure that backups occur on an ongoing basis, scheduled backups run automatically.
You can schedule backups to run daily, weekly, or monthly.
Dell EMC Avamar for SQL Server User Guide 67

Application Consistent SQL Virtual Machine Image Backup
Alternatively, you can add a schedule by selecting Create in the drop-down list. The Create
Schedule wizard is displayed and opens to the Basic Configuration page.
4. In the Dataset column, select a dataset for each backup group.
A dataset specifies the data to include in a scheduled backup and the options to use for the
backup. Create at least one dataset for scheduled backups on a client or group of clients. To
segregate client data, create multiple datasets.
Alternatively, you can add a dataset by selecting Create in the drop-down list. The Create
DataSet wizard is displayed.
5. In the Retention column, select a retention policy for each backup group.
Retention is the time setting to automatically delete backups on an Avamar server.
Retention can be set to permanent for backups that should not be deleted from an Avamar
server.
Alternatively, you can add a retention policy by selecting Create in the drop-down list. The
Add Retention Policy wizard is displayed.
6. Click NEXT.
Configure members
About this task
From the Members page, perform the following steps.
Note:
performance impact. To improve performance, adjust the Avamar throttling settings for
vCenter and Esxi.
Access the following Avamar throttling settings at /usr/local/avamar/bin/vabm/
vabm.cfg:
l
l
l
Procedure
1. To automatically install, upgrade, or register client agents on these virtual machines:
2. To force register the client agent from the previous Avamar server to the target Avamar
server, select Force register client agents to this Avamar.
Pushing clients to a group of target virtual machines simultaneously might cause a
vabm_esxi_throttling allows the maximum number of installation jobs to run
simultaneously for each Esxi.
vabm_vcenter_throttling allows the maximum number of vCenter requests to run
simultaneously for each vCenter
vabm_cache_timeout allows the maximum minutes of detection cache. The detection
result of operating system and plugin version is cached in Avamar for a specific time.
a. Ensure that the UpgradeClientDownloads package has been installed on the Avamar
server.
b. Select the Install/Upgrade/Register client agents on these VMs automatically check
box.
The target client is force registered to the current Avamar server.
3. In the Rule to apply field, select an option.
68 Dell EMC Avamar for SQL Server User Guide

Application Consistent SQL Virtual Machine Image Backup
If no rule is listed in the drop-down list, ensure that the domain under which the policy is
being created can access the domain where the rule was originally created. One rule maps
to one policy. Ensure that the rule is not already used for another advanced policy.
4. Type the username for the virtual machine's guest operating system.
When selecting a username for the virtual machine, consider the following information:
l
If the target virtual machine UAC is enabled, use the administrator account or the
administrative account with Admin Approval Mode turned off.
l
If the target virtual machine UAC is disabled, use the administrator account or the
administrative account.
Note: If you have not added the object BUILTIN\users to the SQL login, the advanced
policy cannot automatically add the sysadmin role to the NT AUTHORITY\SYSTEM
object. To use NT authentication for SQL backup, manually add the sysadmin role
before proceeding. For more information, see the SQL server documentation.
5. Type the password of the virtual machine.
6. To manually push the client agents on these virtual machines, click RETRY INSTALLATION.
7. To display the list of members and view information for a virtual machine, click REFRESH.
This action scans all the virtual machines under the configured vCenter, evaluates the rule
matched members, and then detects the member information. This process might take
some time to complete.
8. Click NEXT.
Configure a proxy for the image backup
About this task
From the Members page, perform the following steps. To access the Source page of the Policy
wizard, in the AUI navigation pane on the left, click
click Proxies.
Procedure
1. To enable Auto proxy mapping, select the checkbox.
2. Select a proxy from the list.
3. To start the plugin installation and registration, click SUBMIT.
Remove an advanced policy
Procedure
1.
In the AUI navigation pane on the left, click
The Advanced Policy window appears.
2. In the domain tree, select a domain or subdomain for the client.
3. Select the solution that you want to remove, and then click the Delete button.
, click Advanced Policy , click , and then
, and then click Advanced Policy .
Edit an advanced policy
About this task
Do not re-configure individual policies that were created as part of an advanced policy.
Dell EMC Avamar for SQL Server User Guide 69

Application Consistent SQL Virtual Machine Image Backup
Procedure
1.
In the AUI navigation pane on the left, click , and then click Advanced Policy .
The Advanced Policy window appears.
2. In the domain tree, select a domain or subdomain for the client.
3. Select the policy that you want to edit, and then click the Edit button.
The Advanced Policy wizard appears.
Note: When editing an advanced policy, you cannot change the policy name or select a
different vCenter.
View advanced policy details
Procedure
1.
In the AUI navigation pane on the left, click , and then click Advanced Policy .
The Advanced Policy window appears and lists the configured policies.
2. Review the policy details.
3. To view detailed information for advanced policy members, click the VIEW VM LIST button.
Migrate existing Backup Policy to an Advanced Policy
Procedure
1. Ensure that the old policy contains SQL Server virtual machines.
Advanced policy is only for SQL Server virtual machines. If the old policy does not contain
only SQL Server virtual machines, split the policy.
2. Design the rule to match the virtual machines in the old policy.
For example, you can add new tag for these virtual machines and use tags in your rule.
3. Create an advanced policy with the rule that your created in the previous step.
4. Push the agent manually.
5. Move the client to the advanced policy directory.
6. If required, delete the old policy.
View logs
Procedure
1.
In the AUI navigation pane on the left, click , and then click Advanced Policy .
The Advanced Policy window appears and lists the configured policies.
2.
To view the logs for a policy, select a policy from the list, and then click
.
The VM list window appears.
3. Select a virtual machine from the list, and then click View Logs.
4. To view system logs, browse to /usr/local/avamar/var/vabm/log/daemon/.
70 Dell EMC Avamar for SQL Server User Guide

Application Consistent SQL Virtual Machine Image Backup
5. To view a detailed log for each virtual machine, browse to /usr/local/avamar/var/
vabm/log/<vm-uuid>/<vm-uuid.log>.
Dell EMC Avamar for SQL Server User Guide 71

Application Consistent SQL Virtual Machine Image Backup
72 Dell EMC Avamar for SQL Server User Guide

CHAPTER 5
Restore
This chapter includes the following topics:
l
Restore requirements............................................................................................................ 74
l
Determine the restore size for an SQL server database.........................................................76
l
Restore features available by using the AUI...........................................................................77
l
Restore features available by using Avamar Administrator.................................................... 86
l
Monitor restores...................................................................................................................116
l
Cancel restores.....................................................................................................................117
Dell EMC Avamar for SQL Server User Guide 73

Restore
Restore requirements
To ensure a successful restore, ensure that the environment meets the necessary requirements.
The Avamar Plug-in for SQL Server performs only offline restores of SQL Server data. Online
restore is not supported. The Avamar Plug-in for SQL Server does not support the restore of
individual files, except by restoring partial files from an SQL backup into the same instance and
database when the database is online during the restore.
To perform table level recovery (TLR), the Avamar Plug-in for SQL TLR is required. When the
Avamar Plug-in for SQL TLR is installed, the ItemPoint for Microsoft SQL Server is also installed.
Software requirements for restore
To restore an instance, database, filegroup, or file to SQL Server by using the Avamar Plug-in for
SQL Server, ensure that the software in the environment meets the necessary requirements.
l
The following software must be running on both the source and destination systems:
n
Microsoft SQL Server
n
Avamar Client for Windows
n
Avamar Plug-in for SQL Server
If the Avamar Plug-in for SQL Server is not installed on the target server, or you want to use
the standard SQL Server restore tools for features that the Avamar Plug-in for SQL Server
does not provide, then you can restore a SQL Server database from an Avamar backup to
operating system files. You can then use SQL Server tools to restore the database.
l
To perform table level recovery, the Avamar Plug-in for SQL TLR must be installed.
l
To restore a system database, the target SQL Server installation for the restore must have the
same SQL Server version and service pack as the SQL Server installation on which the backup
occurred. Otherwise, restore fails. The "You cannot restore system database backups to a
different build of SQL Server" article on the Microsoft Support website provides details.
l
To restore a user database, the target SQL Server installation for the restore must have the
same or a newer SQL Server version and service pack as the SQL Server installation on which
the backup occurred. Restore fails when you attempt to restore from a newer SQL Server
version to an earlier SQL Server version. For example, you can restore a backup of a SQL
Server 2008 user database to a SQL Server 2012 instance. However, restore of a SQL Server
2012 user database to a SQL Server 2008 instance is not supported. This compatibility
requirement is enforced by Microsoft SQL Server and is not an Avamar limitation.
NOTICE
Restore of a user database to a newer SQL Server version (for example, restore
from SQL Server 2012 to SQL Server 2014) should work in most cases that are based on
SQL Server version compatibility guidelines. However, not all restore scenarios with the
SQL Server plug-in have been validated.
l
The destination server must be registered with the same Avamar server as the source.
l
If the SQL Server installation is in a failover cluster, then you configured the Avamar cluster
client for all SQL Server cluster nodes.
l
If you enabled AlwaysOn availability groups, then you configured the Avamar cluster client for
the availability group listener.
74 Dell EMC Avamar for SQL Server User Guide

Tail-log backup and point-in-time restore requirements
Review the requirements to perform a tail-log backup or point-in-time restore to ensure successful
completion of the restore.
l
To perform a tail-log backup during the restore process, the database must be online and using
either the full or bulk-logged recovery model. To perform a point-in-time restore, the database
must be using the full recovery model. As a result, you cannot perform either a tail-log backup
or a point-in-time restore of system databases such as the master and msdb databases
because those databases use the simple recovery model.
l
To restore to a specific point in time, you must provide the transaction date and time or named
mark to which to recover from the SQL Server transaction log. The SQL Server documentation
on the Microsoft website provides details on how to access transaction log information.
l
The point in time that you are restoring to must be after the finish time for the most recent full
backup. In addition, if the point in time is before the start time of the most recent transaction
log (incremental) backup, then a tail-log backup is not required. However, a tail-log backup is
required if the point in time is after the most recent transaction log backup.
l
When you specify the point in time for restore, do not specify the start time of the selected
transaction log backup if it is not the last backup in the backup sequence. Otherwise, the
restore fails and a tail-log backup does not occur even if you select the Tail-log backup option.
Restore
Requirements for point-in-time restore after changing the backup storage
You can restore to a point in time between two full backups when you change the backup storage
from one Data Domain system to another Data Domain system.
To restore to a point in time between a full backup on the first Data Domain system and the first
full backup to the new Data Domain system, select the Force incremental backup checkbox when
you perform the first full backup to the new Data Domain system. Otherwise, clear the Force
incremental backup checkbox.
When you select the Force incremental backup checkbox, a restore error appears because full
backup on one Data Domain system and incremental (transaction log) backup on another Data
Domain system is not supported. As a result, the backup process creates a single backup set that
includes both the new full backup and the forced incremental backup.
To restore the database to a point in time between the full backup on the first Data Domain system
and the full backup on the second Data Domain system:
1. Restore the full backup from the Data Domain system to a file.
2. Restore the forced incremental (transaction log) backup from the second Data Domain system
to a file.
3. Use those files to restore the database to the necessary point in time by using SQL Server
tools such as SQL Server Management Studio or the Microsoft SQL Server sqlcmd utility.
The Microsoft website also provides full details on how to use SQL Server Management Studio
to restore a database backup to a specific point in time.
Requirements to restore secondary database files
When you restore the secondary data files of a database to the original location, the restore must
meet the following requirements.
l
You must select the most recent backup of the database for the restore.
l
You must perform a tail-log backup.
l
You must perform the restore with a single restore operation.
Dell EMC Avamar for SQL Server User Guide 75

Restore
You cannot restore additional secondary data files after you perform a restore with a tail-log
backup.
To restore the secondary data files of a database with two different restore operations, restore
the backup to a file and then use SQL Server management tools to perform the restores.
Requirements to restore the Report Server database
Stop the SQL Server Reporting Services before you restore the Report Server database.
Otherwise, the Report Server database does not restore correctly.
SQL Server write permission requirements
SQL Server must have write permissions to the location to which you restore data. Otherwise, the
restore fails with an Access is denied error.
Determine the restore size for an SQL server database
Use the following procedures to determine the disk space requirements of individual databases in
the backup set as well as the total space requirements. These procedures determine the restore
size for a database without downloading the complete backup content. The backup header is
downloaded to fetch the sizing information.
Note: Performing this operation might result in a log entry that the operation was externally
canceled and the Restore interrupted warning message appears. This warning can be
ignored.
Determine the space required to restore the system database
To determine the space required to restore the database, use the --print-restore-size flag.
About this task
Note:
To determine the restore size for the system database, use the --restoresystem flag.
Determine the space required to restore a single SQL server database
Before restoring a single SQL server database "DB1", determine the disk space requirements by
using the CLI.
About this task
At a command prompt, type the following command:
avsql --operation=restore --server=12.34.56.78 --id=AvamarAdmin --ap=password -path=/SQL/SQLServer1 --print-restore-size --hostname-sql=SQLServer1 -labelnum=28 "(local)/DB1"
Output similar to the following appears:
==================================================
Size of the Database (local)\DB1: 3.000 MB
Size of the Database (local)\DB1_log: 1.000 MB
--------------------------------------------------------------------------------
-------Total require restore size: 4.000 MB
==================================================
In this example, DB1 is the name of the database that is being restored.
76 Dell EMC Avamar for SQL Server User Guide

Determine the space required to restore multiple SQL server databases
Before restoring multiple SQL server databases, determine the disk space requirements by using
the CLI.
About this task
At a command prompt, type the following command:
avsql --operation=restore --server=12.34.56.78 --id=AvamarAdmin --ap=password -path=/SQL/SQLServer1 --print-restore-size --hostname-sql=SQLServer1 -labelnum=28 "(local)/DB2" "(local)/DB3"
Output similar to the following appears:
==================================================
Size of the Database (local)\DB2: 2.489 GB
Size of the Database (local)\DB2_log: 984.4 MB
Size of the Database (local)\DB3: 3.000 MB
Size of the Database (local)\DB3_log: 1.000 MB
--------------------------------------------------------------------------------
------- Total require restore size: 3.454 GB
==================================================
Restore
Restore features available by using the AUI
This section describes the restore features that are available by using the AUI.
Restoring a database to the original client
You can restore SQL databases to the original directory on the original client.
Procedure
1.
In the AUI navigation pane on the left, click
The Asset Management window is displayed.
2. In the domain tree, select the domain that contains the SQL server.
You cannot view clients outside the domain for the login account. To view all clients, log in
to the root domain.
A list of Avamar clients is displayed in the pane below the domains list.
3. From the list of clients, select the client that runs the SQL server.
4. To locate backups by date:
a. In the right pane, click VIEW MORE.
b. Click SEARCH.
c. In the Date field, select a day or range of days.
, and then click Asset Management.
d. Click RETRIEVE.
The list of backups for the selected dates is displayed.
5. Select the desired backup, and then click Restore.
The Restore wizard opens on the Destination Client pane.
Note:
If you click Restore before selecting a backup, the wizard opens on the Backup
List pane, where you can then make the backup selection.
Dell EMC Avamar for SQL Server User Guide 77

Restore
6. In the Destination Client pane, perform the following steps:
a. Select Restore to original client.
b. Click NEXT.
The Backup Content pane is displayed.
7. In the Backup Content pane, perform the following steps:
a. In the left pane, select the SQL instance from the tree.
The Backup Content pane displays a list of databases within the backup.
b. Select the databases that you want to restore.
c. Click NEXT.
The Destination Location pane is displayed.
8. In the Destination Location pane, perform the following steps:
a. Select Restore to the original location.
b. Click NEXT.
The More Options pane is displayed.
9. In the More Options pane, set the plug-in options:
(Optional) Toggle the Show Advanced Options switch to view advanced configuration
options.
SQL plug-in restore options provides more information about the basic restore options.
SQL Restore Options provides more information about the advanced restore options.
10. Click NEXT.
The Summary pane is displayed.
11. Review the provided information, and then click FINISH.
Restoring a database to a different client or instance
You can restore SQL databases to a different client or instance.
Before you begin
Procedure
1.
In the AUI navigation pane on the left, click
The Asset Management window is displayed.
2. In the domain tree, select the domain that contains the SQL server.
You cannot view clients outside the domain for the login account. To view all clients, log in
to the root domain.
, and then click Asset Management.
A list of Avamar clients is displayed in the pane below the domains list.
3. From the list of clients, select the client that runs the SQL server.
4. To locate backups by date:
a. In the right pane, click VIEW MORE.
b. Click SEARCH.
78 Dell EMC Avamar for SQL Server User Guide

c. In the Date field, select a day or range of days.
d. Click RETRIEVE.
The list of backups for the selected dates is displayed.
5. Select the desired backup, and then click Restore.
The Restore wizard opens on the Destination Client pane.
Note: If you click Restore before selecting a backup, the wizard opens on the Backup
List pane, where you can then make the backup selection.
6. In the Destination Client pane, perform the following steps:
a. Select Restore to a different client.
b. In the domain tree, select the domain for the client.
c. In the list of clients, select the destination client.
The client is displayed in the Destination Client field.
d. Click NEXT.
The Backup Content pane is displayed.
Restore
7. In the Backup Content pane, perform the following steps:
a. In the left pane, select the SQL instance from the tree.
The Backup Content pane displays a list of databases within the backup.
b. Select the databases that you want to restore.
c. Click NEXT.
The Destination Location pane is displayed.
8. In the Destination Location pane, perform the following steps:
a. Select Restore to a different SQL Server instance or location.
b. In the Instance Location field, click CHOOSE... to browse to the SQL instance available
on the destination client.
c. In the Alternate database location field, type an alternate location in the destination
client where the database will be restored. For example, C:\restore.
d. Click NEXT.
The More Options pane is displayed.
9. In the More Options pane, set the plug-in options:
(Optional) Toggle the Show Advanced Options switch to view advanced configuration
options.
SQL plug-in restore options provides more information about the basic restore options.
SQL Restore Options provides more information about the advanced restore options.
10. Click NEXT.
The Summary pane is displayed.
11. Review the provided information, and then click FINISH.
Dell EMC Avamar for SQL Server User Guide 79

Restore
Restoring to a new database in the original instance
You can restore a database to the original SQL Server instance on the same SQL Server client but
with a new database name.
Procedure
1. Ensure that the environment meets the guidelines in Restore requirements on page 74.
2.
In the AUI navigation pane on the left, click , and then click Asset Management.
The Asset Management window is displayed.
3. In the domain tree, select the domain that contains the SQL server.
You cannot view clients outside the domain for the login account. To view all clients, log in
to the root domain.
A list of Avamar clients is displayed in the pane below the domains list.
4. From the list of clients, select the client that runs the SQL server.
5. To locate backups by date:
a. In the right pane, click VIEW MORE.
b. Click SEARCH.
c. In the Date field, select a day or range of days.
d. Click RETRIEVE.
The list of backups for the selected dates is displayed.
6. Select the desired backup, and then click Restore.
The Restore wizard opens on the Destination Client pane.
Note:
If you click Restore before selecting a backup, the wizard opens on the Backup
List pane, where you can then make the backup selection.
7. In the Destination Client pane, perform the following steps:
a. Select Restore to original client.
b. Click NEXT.
The Backup Content pane is displayed.
8. In the Backup Content pane, perform the following steps:
a. In the left pane, select the SQL instance from the tree.
The Backup Content pane displays a list of databases within the backup.
b. Select the databases that you want to restore.
c. Click NEXT.
The Destination Location pane is displayed.
9. In the Destination Location pane, perform the following steps:
a. Select Restore to the original location.
b. Click NEXT.
The More Options pane is displayed.
80 Dell EMC Avamar for SQL Server User Guide

Restore
10. In the More Options pane:
a. From the Encryption method from Data Domain system list, select the encryption
method for data transfer during the restore if the backup was stored on a Data Domain
system.
b. Leave the Use SQL REPLACE option checkbox clear.
c. Specify whether to perform a tail-log backup during the restore by selecting or clearing
the Tail-log backup checkbox.
d. If you are restoring in an AlwaysOn availability group and you want to restore the
database with the new name on only the primary replica, select the Restore only on
primary replica checkbox.
11. Move the Show Advanced Options slider to the right, and then perform the following under
Redirected Restore:
a. In the New Database Name field, type the new database name.
b. In the Alternate database location field, specify the path to which to restore the
database files, or leave the box blank to restore the files to the original location.
c. From the Alternate log location list:
l
To restore the log files to the same location as the database, select Same as alternate
database.
l
To restore the log files to a different location than the database, select Different
location than database, and then specify the path for the log files in the Path to
alternate log location field.
12. Leave the System Databases options unselected. These options are only necessary when
you restore a system database.
13. (Optional) Set other plug-in options as discussed in the following topics:
l
Recovery operation options on page 112
l
Authentication options on page 114
l
Point-in-time recovery options on page 115
14. Click NEXT.
The Summary pane is displayed.
15. Review the provided information, and then click FINISH.
After you finish
l
If you perform a tail-log backup and the tail-log backup fails to complete, then the restore
cannot take place. Review the log file to determine the cause of the failure. Correct the
problem, and then restart the restore.
Keep in mind that if you clear the Tail-log backup checkbox to prevent the tail-log backup
from occurring, then the restore includes only the transactions up to the selected backup. You
may lose any transactions in the tail of the log.
l
After the restore completes successfully, perform a full backup of the database and clear the
Force incremental backup after full backup checkbox in the plug-in options for the backup.
If the checkbox is selected when a full backup occurs after a restore, then the transaction log
backup that occurs automatically after the full backup fails.
Dell EMC Avamar for SQL Server User Guide 81

Restore
Restore SQL instance or database to a file
You can restore an instance or database to operating system files by using the Avamar Plug-in for
SQL Server.
Procedure
1. Ensure that the environment meets the guidelines in Restore requirements on page 74.
2.
In the AUI navigation pane on the left, click , and then click Asset Management.
The Asset Management window is displayed.
3. In the domain tree, select the domain that contains the SQL server.
You cannot view clients outside the domain for the login account. To view all clients, log in
to the root domain.
A list of Avamar clients is displayed in the pane below the domains list.
4. From the list of clients, select the client that runs the SQL server.
5. To locate backups by date:
a. In the right pane, click VIEW MORE.
b. Click SEARCH.
c. In the Date field, select a day or range of days.
d. Click RETRIEVE.
The list of backups for the selected dates is displayed.
6. Select the desired backup, and then click Restore.
The Restore wizard opens on the Destination Client pane.
Note:
If you click Restore before selecting a backup, the wizard opens on the Backup
List pane, where you can then make the backup selection.
7. ***Ensure that Windows SQL appears in the Restore Plug-in list.****
JT: I do not see this in the UI. Should I remove this step?
8. In the Destination Client pane, choose one of the following options:
l
Select Restore to original client, and then click NEXT.
l
Select Restore to a different client, and then perform the following:
a. In the domain tree, select the domain for the client.
b. In the list of clients, select the destination client.
The client is displayed in the Destination Client field.
c. Click NEXT.
The Backup Content pane is displayed.
9. In the Backup Content pane, perform the following steps:
a. In the left pane, select the SQL instance from the tree.
The Backup Content pane displays a list of databases within the backup.
b. Select the databases that you want to restore.
82 Dell EMC Avamar for SQL Server User Guide

Restore
c. Click NEXT.
The Destination Location pane is displayed.
10. In the Destination Location pane, perform the following steps:
a. Select Restore SQL Server backup as files to the file system.
b. In the Restore Location field, click CHOOSE... to browse to the desired location on the
destination client.
The Choose Restore Location window is displayed.
c. In the Plugin panel, select Windows File System.
d. In the Browse panel, browse to and then select the radio button next to the folder where
you want to restore the files.
e. Click OK to exit the window and return to the Destination Location pane.
f. Click NEXT.
The More Options pane is displayed.
11. From the Encryption method from Data Domain system list, select the encryption method
for data transfer during the restore if the backup was stored on a Data Domain system.
12. Ignore the other options that do not apply when restoring to a file.
13. To view additional options, move the Show Advanced Options slider to the right.
14. Click NEXT.
The Summary pane is displayed.
15. Review the provided information, and then click FINISH.
Results
The backup restores as one or more files to the specified destination in the path destination
\client\instance\database\file, where:
l
destination
l
client
l
instance
l
database
l
file
is the name of the file.
is the destination for the files that you specified in the Set Destination dialog box.
is the name of the computer on which SQL Server is installed.
is the name of the SQL Server instance from the backup.
is the name of the database from the backup.
A single backup can include multiple files, depending on the number of streams in the backup. The
file name for each file is composed of the backup type and the stream number:
l
f-0 for full backups
l
d-n for differential backups
l
i-n for transaction log (incremental) backups
where
n
is the sequential number of the differential or incremental backup since the preceding full
backup. For example, a full backup with two streams results in two files: f-0.stream0 and
f-0.stream1.
After you finish
l
Ensure that the SQL backup format files that you restored are accessible to SQL Server. You
may need to make the data visible to SQL Server or copy the data.
Dell EMC Avamar for SQL Server User Guide 83

Restore
l
Manually restore the database by using SQL Server tools.
Table Level restore
The SQL plug-in supports table level restore (TLR) of full, transaction log, and differential
backups.
Procedure
1.
In the AUI navigation pane on the left, click
, and then click Asset Management.
The Asset Management window appears.
2. In the Domain pane, select clients, and then select the desired client.
3. To locate backups by date:
a. In the right pane, click VIEW MORE.
b. Click SEARCH.
c. In the Date field, select a day or range of days.
d. Click RETRIEVE.
The list of backups for the selected dates is displayed.
4. Select the desired backup, and then click Restore.
Note:
When selecting differential backups to perform table level recovery, select only
the full backup and the required differential backup. Selecting multiple differential
backups is not supported.
The Restore wizard opens on the Destination Client pane.
Note:
If you click Restore before selecting a backup, the wizard opens on the Backup
List pane, where you can then make the backup selection.
5. In the Destination Client pane, choose one of the following options:
l
Select Restore to original client, and then click NEXT.
l
Select Restore to a different client, and then perform the following:
a. In the domain tree, select the domain for the client.
b. In the list of clients, select the destination client.
The client is displayed in the Destination Client field.
c. Click NEXT.
The Backup Content pane is displayed.
6. In the Backup Content pane, move the TLR slider to the right.
7. In the left pane, select the drive letter on which to mount the backups, and then select the
database in the right pane. Click NEXT.
Note:
TLR can be performed on physical nodes only. In the case of a failover of a cluster
or an AlwaysOn availability group, restore must beredirected to a physical node that has
TLR installed.
8. In the More Options pane:
a. For Drive letter or mount path, enter the drive letter that will be used to mount the SQL
backup data or enter a forward slash (/) or backslash (\) to mount the drive using the
first available drive letter, beginning with Z:.
84 Dell EMC Avamar for SQL Server User Guide

This option is not case sensitive. If there is already a drive mounted on the letter
specified, and that drive is not controlled by the Avamar Plug-in for SQL TLR, the mount
operation will fail. If the Avamar Plug-in for SQL TLR has already mounted a drive on this
letter, the existing drive will be unmounted and the new one will be mounted.
b. For Amount of time to leave AvFS mounted, select when to automatically dismount the
drive. If the amount of time needs to be extended during the recovery, use the
avsqltlr command.
c. Move the Show Advanced options slider to the right, and then select the Enable
debugging messages check box in order to obtain detailed logs.
9. Click NEXT, and then click FINISH.
The mount operation might take several minutes to complete. When the mount is complete,
the message Retrieving backup contents of client completed. The mount
disk avaliable now on target client appears.
10. On the SQL server, open Itempoint for MS SQL Server.
11. For Source Type, select Folder, and then select the drive on which the backups are
mounted.
12. Click NEXT.
13. Select the files that you want to restore:
l
To restore full or incremental backups, select all files.
l
To restore differential backups, remove the incremental files (\i-n files).
Restore
Figure 9
Select Source Data Wizard for Differential Restore
14. Click FINISH.
15. Select the target SQL instance.
16. Drag and drop, or copy and paste, the tables from the source database to the target
database.
Dell EMC Avamar for SQL Server User Guide 85

Restore
17. Close Itempoint for MS SQL Server.
Restore features available by using Avamar Administrator
This section describes the restore features that are available by using Avamar Administrator.
Note: Any Avamar Administrator task that has an AUI equivalent procedure has been
removed from this guide and replaced with the corresponding AUI task. For the full list of
Avamar Administrator restore features, see the Avamar 18.1 documentation set.
Finding a backup
The first step to restore data is to find the backup with the data that you want to restore. You can
find Avamar client backups by searching for a specific date.
About this task
Locate backups by date when one or more of the following situations apply:
l
You have saved all data for the client in a single backup set.
l
The exact pathname or name of the data to restore is unknown.
l
The backup that you want to restore is before a specific date or event. For example, you know
the approximate date when data was lost or corrupted. in which you can search for a backup
before that date.
l
The specific types of backups are known. For example, scheduled disaster recovery backups
are running every Wednesday and Saturday night and full volume backups daily. When
rebuilding a server, select the disaster recovery backup with the date closest to the event that
caused the loss of data.
Finding a backup by content
Procedure
1. In Avamar Administrator, click the Backup & Restore launcher link button.
The Backup, Restore and Manage window appears.
2. Click the Restore tab.
The upper left pane contains a list of domains.
3. Select the domain that contains the client.
You cannot view clients outside the domain for the login account. To view all clients, log in
to the root domain.
A list of Avamar clients appears in the pane under the domains list.
4. From the list of clients, select the computer that is running SQL Server. Keep the following
points in mind when you select a client:
l
If you are restoring databases in an AlwaysOn availability group, then select the cluster
client for the availability group listener.
l
If you are restoring databases on shared storage in a failover cluster, then select the
cluster client for the virtual server.
l
You cannot view clients outside the domain for the login account. To view all clients, log
in to the root domain.
5. Click the Restore tab.
6. Click the By File/Folder tab.
86 Dell EMC Avamar for SQL Server User Guide

7. In the Enter path to retrieve history for text box, specify the path to the instance or
database by using one of the methods in the following table.
Table 6 Enter path to retrieve history for text box
Method Steps to specify the path
Restore
Browse to the instance or database
a. Click Browse.
The Select File or Folder dialog box
appears.
b. Select the client from the Clients tree in
the left pane.
c. In the middle pane, expand the Windows
SQL plug-in node.
d. Under the Windows SQL plug-in node,
select the SQL Server instance that
contains the databases for restore.
A list of the databases for that instance
appears in the right pane of the Select
File or Folder dialog box.
e. To select all databases in an instance,
select the checkbox next to the instance
in the middle pane. Or, to select an
individual database, select the checkbox
next to the database in the right pane.
f. Click OK.
Type the path to the instance or database Type the full path to the client folder or file in
the Enter path to retrieve history for text
box using one of the following formats:
l
To restore the local instance, type
(local).
l
To restore a database in the local
instance, type (local)/database/.
l
To restore a named instance, type
client\instance/.
l
To restore a database in a named instance,
type client\instance/database/.
l
To restore a database if there is only one
instance on the client and it is not the
local instance, type client/database/.
where
client
is the name of the computer that
is running SQL Server,
the named instance, and
instance
database
is the name of
is the name
of the database.
8. Click Retrieve.
The Version History table lists all versions and sizes of the content in backups for the
client.
9. Select the version in the Version History table.
Dell EMC Avamar for SQL Server User Guide 87

Restore
All backups for the client that contain the version appear in the Backups table next to the
Version History table.
10. Select the backup to restore from the Backups table.
Keep in mind the following points when you select the backup:
Figure 10 Backup, Restore and Manage window
l
In the Type column in the lower-right pane, f-0 indicates a full backup, d-n indicates a
differential backup, and i-n indicates a transaction log (incremental) backup.
l
If you are restoring from a transaction log or differential backup, select the backup that
corresponds to the date and time to which you want to recover.
During the restore process, Avamar automatically restores any necessary data from the
full backup, then restores and applies the intervening backup files as necessary. In other
words, you do not need to select the full backup in addition to the transaction log or
differential backup.
l
Select the most recent backup if you plan to perform a tail-log backup and recover to a
point in time since that last backup. A tail-log backup includes only transactions that
have not been included yet in a backup.
11. In the two bottom panes of the Backup, Restore and Manage window, select the data to
restore:
l
To restore everything listed for the instance, select the checkbox next to the instance in
the folder tree in the lower-left pane.
l
To restore a database and its logs, expand the node for the instance in the folder tree in
the lower-left pane, and then select the checkbox next to the database.
l
To restore a filegroup, expand the node for the instance in the folder tree in the lowerleft pane, select the database in the lower-left pane, and then select the checkbox next
to the files in the filegroup in the lower-right pane.
If there are multiple files in the filegroup, ensure that you select the checkbox next to
each file to ensure that you restore the entire filegroup.
The name of the filegroup to which a file belongs appears in the Filegroup column of the
lower-right pane.
88 Dell EMC Avamar for SQL Server User Guide

If you are restoring from a transaction log or differential backup and you plan to restore
the files to a different instance, ensure that you select the checkbox next to all files in all
filegroups. You cannot restore individual files from a transaction log or differential
backup to a different instance.
Note: You cannot accurately determine the exact size of a restored database until after
the restore operation completes. As a result, database sizes that appear in Avamar
Administrator when you perform a restore may be smaller than when you perform a
backup.
12. Continue with the restore as described in the following topics:
l
Restoring to the original location on page 89
l
Restoring to a new database in the original instance
l
Restoring to a different instance
l
Restoring to a file on page 91
l
Restoring system databases on page 97
Restoring to the original location
You can restore a SQL Server instance, database, filegroup, or file to its original location.
Restore
About this task
NOTICE
If you are restoring to the original location in an AlwaysOn availability group, use the
instructions in Restoring to an AlwaysOn availability group on page 103.
There are two restore options when you restore a SQL Server instance, database, or filegroup to
its original location.
l
A standard restore with a tail-log backup is the most common restore procedure. During this
procedure, a tail-log backup occurs to capture transactions that are not yet in a backup. Then
the database is restored from the most recent full backup and any differential or transaction
log backups.
l
A restore with the SQL Server REPLACE option that completely overwrites the database might
be necessary, for example, if a previous database restore exited with the following SQL Server
error in the Avamar SQL restore log:
One or more devices or files already exist.
Reissue the statement using the WITH REPLACE
option to overwrite these files and devices.
NOTICE
When you select the Avamar option to use the SQL Server REPLACE option, it
adds an SQL WITH REPLACE clause statement to the restore Transact-SQL command.
This statement overrides a SQL Server safety check to prevent you from accidentally
overwriting a different database or file. The Microsoft Transact-SQL documentation
provides more information in the RESTORE command section.
Procedure
1. Ensure that the environment meets the guidelines in Restore requirements on page 74.
2. In Avamar Administrator, click the Backup & Restore launcher link button.
The Backup, Restore and Manage window appears.
3. Find the backup to restore:
l
Finding a backup by date
Dell EMC Avamar for SQL Server User Guide 89

Restore
l
Finding a backup by content on page 86
The backup to restore is selected in the Backups table.
4. Select Actions > Restore Now.
The Restore Options dialog box appears.
5. Ensure that Windows SQL appears in the Restore Plug-in list.
6. From the Avamar encryption method list, select the encryption method to use for data
transfer between the Avamar server and the client during the restore.
The encryption technology and bit strength for a client/server connection depend on
several factors, including the client operating system and Avamar server version. The
Avamar Product Security Guide
provides additional information.
7. Leave the default selection of Restore to the original location.
8. Click More Options.
The Restore Command Line Options dialog box appears.
9. Select the restore and recovery options:
l
To create a tail-log backup and perform a direct restore with recovery, leave the Use
SQL REPLACE option checkbox clear and the Tail-log backup checkbox selected.
l
To perform a direct restore with REPLACE, select the Use SQL REPLACE option
checkbox and clear the Tail-log backup checkbox.
10. If you are restoring in an AlwaysOn availability group and you want to restore on only the
primary replica, select the Restore only on primary replica checkbox.
Leave the checkbox clear to automatically restore to both the primary replica and any
secondary replicas.
11. From the Encryption method from Data Domain system list, select the encryption method
for data transfer during the restore if the backup was stored on a Data Domain system.
12. To restore system databases, set the plug-in options as discussed in System database
restore options on page 113.
13. (Optional) Select Show Advanced Options, and set the advanced options as discussed in
the following topics:
l
Recovery operation options on page 112
l
Authentication options on page 114
l
Point-in-time recovery options on page 115
14. Disregard the redirected restore options, which are only necessary when you restore to a
different location.
15. Click OK on the Restore Command Line Options dialog box.
16. Click OK on the Restore Options dialog box.
The following status message appears: Restore initiated.
17. Click OK.
After you finish
l
If you perform a tail-log backup and the tail-log backup fails to complete, then the restore
cannot take place. Review the log file to determine the cause of the failure. Correct the
problem, and then restart the restore.
90 Dell EMC Avamar for SQL Server User Guide

Keep in mind that if you clear the Tail-log backup checkbox to prevent the tail-log backup
from occurring, then the restore includes only the transactions up to the selected backup. You
may lose any transactions in the tail of the log.
l
After the restore completes successfully, perform a full backup of the database and clear the
Force incremental backup after full backup checkbox in the plug-in options for the backup.
If the checkbox is selected when a full backup occurs after a restore, then the transaction log
backup that occurs automatically after the full backup fails.
Restoring to a file
You can restore SQL Server user and system databases from an Avamar backup to operating
system files.
About this task
You may want to perform this type of restore in the following situations:
l
The Avamar Plug-in for SQL Server is not installed on the target server.
l
You want to use the standard SQL Server restore tools for features that the SQL Server plugin does not provide.
You can use either the Avamar Plug-in for SQL Server or the Avamar Plug-in for the Windows File
System to restore a database to a file. You can then use SQL Server tools to restore the data to
SQL Server.
Restore
Restoring to a file with the Windows File System plug-in
You can restore an instance or database to operating system files by using the Avamar Plug-in for
the Windows File System.
Procedure
1. Ensure that the environment meets the guidelines in Restore requirements on page 74.
2. In Avamar Administrator, click the Backup & Restore launcher link button.
The Backup, Restore and Manage window appears.
3. Find the backup to restore:
l
Finding a backup by date
l
Finding a backup by content on page 86
The backup to restore is selected in the Backups table.
4. Select Actions > Restore Now
The Restore Options dialog box appears.
5. Select Windows File System from the Restore Plug-in list.
6. From the Avamar encryption method list, select the encryption method to use for data
transfer between the Avamar server and the client during the restore.
The encryption technology and bit strength for a client/server connection depend on
several factors, including the client operating system and Avamar server version. The
Avamar Product Security Guide
provides additional information.
7. Specify the destination client in the Restore Destination Client box:
l
To restore to the original client, leave the default setting of the original client domain and
name.
l
To restore to a different client, click Browse and then browse to the client.
8. Select Restore everything to a different location.
Dell EMC Avamar for SQL Server User Guide 91

Restore
9. Set the destination file path for the database and log files to restore:
a. Click Set Destination.
The Set Destination dialog box appears.
b. Click Browse.
The Browse for File, Folder, or Directory dialog box appears.
c. Select Windows File System.
d. In the right pane, browse to and select the radio button for the folder to which to restore
the selected files.
e. Click OK to return to the Set Destination dialog box.
f. Click NEXT to proceed to the More Options pane.
10. (Optional) Click More Options and set plug-in options for the restore. The
Windows Server User Guide
provides details on the available plug-in options.
Avamar for
11. Click OK on the Restore Options dialog box.
The following status message appears: Restore initiated.
12. Click OK.
Results
The backup restores as one or more files to the specified destination in the path destination
\client\instance\database\file, where:
l
destination
l
client
l
instance
l
database
l
file
is the name of the file.
is the destination for the files that you specified in the Set Destination dialog box.
is the name of the computer on which SQL Server is installed.
is the name of the SQL Server instance from the backup.
is the name of the database from the backup.
A single backup can include multiple files, depending on the number of streams in the backup. The
file name for each file is composed of the backup type and the stream number:
l
f-0 for full backups
l
d-n for differential backups
l
i-n for transaction log (incremental) backups
where n is the sequential number of the differential or incremental backup since the preceding full
backup. For example, a full backup with two streams results in two files: f-0.stream0 and
f-0.stream1.
After you finish
l
Ensure that the SQL backup format files that you restored are accessible to SQL Server. You
may need to make the data visible to SQL Server or copy the data.
l
Manually restore the database by using SQL Server tools.
Restoring a database with SQL Server tools
After you use either the SQL Server plug-in or the Windows file system plug-in to restore a SQL
Server backup to a file, you can use SQL Server tools to restore a database to SQL Server.
92 Dell EMC Avamar for SQL Server User Guide

Restore
Supported methods include SQL Server Management Studio, a Transact-SQL RESTORE command,
and the sqlcmd utility.
Restoring a database with SQL Server Management Studio
You can restore a database from a SQL formatted backup file to SQL Server by using the user
interface in SQL Server Management Studio. The Microsoft website provides full details on how to
use SQL Server Management Studio to restore a database backup.
About this task
This procedure provides details on using SQL Server Management Studio for SQL Server 2008 to
restore a database from SQL formatted backup files. The steps for other SQL Server versions may
be different.
Procedure
1. Restore the database backup to a file by using the instructions in one of the following
topics:
l
Restoring to a file with the SQL Server plug-in
l
Restoring to a file with the Windows File System plug-in on page 91
2. Ensure that the SQL backup format files that you restored are accessible to SQL Server.
You may need to make the data visible to SQL Server or copy the data.
3. Restore the full backup (f-0 file) to SQL Server:
a. Open the Restore Database window.
l
If the database already exists, then right-click the database in the Object Explorer
and select Tasks > Restore > Database.
l
If the database has been lost, then right-click the Databases node in the Object
Explorer and select Restore Database.
b. On the General page of the Restore Database window, select From device.
c. Click the ... button.
The Specify Backup dialog box appears.
d. Click Add.
The Locate Backup File dialog box appears.
e. Select the folder in which the full backup files are located.
f. From the Files of type list, select All files(*).
g. Select the full backup (f-0) file.
h. Click OK.
i. If there are multiple full backup files from multi-streaming (such as f-0.stream0,
f-0.stream1, f-0.stream2, and so on), then repeat step d through step h to add
each file.
j. Click OK on the Specify Backup dialog box.
k. On the General page of the Restore Database window, select the checkboxes next to
the backup files to restore.
l. In the left pane, click Options to open the Options page.
m. In the Restore the database files as list, select each file and click the ... button to
specify the location to which to restore the files.
Dell EMC Avamar for SQL Server User Guide 93

Restore
n. For Recovery state, select RESTORE WITH NORECOVERY.
o. Click OK to begin the restore.
4. Restore the differential (d-n) or transaction log (i-n) files in order from the oldest to the
most recent:
a. In the Object Explorer, right-click the database and select Tasks > Restore > Database.
b. On the General page of the Restore Database window, select From device.
c. Click the ... button.
The Specify Backup dialog box appears.
d. Click Add.
The Locate Backup File dialog box appears.
e. Select the folder in which the differential or transaction log backup files are located.
f. From the Files of type list, select All files(*).
n
g. Select the differential (d-n) or transaction log (i-n) backup file, where
is the
sequential number of the differential or incremental backup since the preceding full
backup.
h. Click OK.
i. If there are multiple differential or transaction log backup files from multi-streaming
(such as d-3.stream0, d-3.stream1, d-3.stream2, or i-6.stream0,
i-6.stream1, i-6.stream2, and i-6.stream3), then repeat step d through step h
to add each file.
j. Click OK on the Specify Backup dialog box.
k. On the General page of the Restore Database window, select the checkboxes next to
the backup files to restore.
l. In the left pane, click Options to open the Options page.
m. In the Restore the database files as list, select each file and click the ... button to
specify the location to which to restore the files.
n. For Recovery state, select RESTORE WITH NORECOVERY for all except the most
recent backup file. When you restore the most recent backup file, select RESTORE
WITH RECOVERY.
o. Click OK to begin the restore.
5. If the database is not already listed in SQL Server Management Studio, then refresh the list
or connect to the database.
After you finish
After the restore completes successfully, perform a full backup of the database and clear the
Force incremental backup after full backup checkbox in the plug-in options for the backup. If
the checkbox is selected when a full backup occurs after a restore, then the transaction log
backup that occurs automatically after the full backup fails.
94 Dell EMC Avamar for SQL Server User Guide

Restore
Restoring a database with a Transact-SQL RESTORE command
You can issue a Transact-SQL RESTORE command to restore a database from a SQL formatted
backup file to SQL Server. The Microsoft website provides full details on how to issue a TransactSQL command, including details on the available options for the RESTORE command.
Procedure
1. Restore the database backup to a file by using the instructions in one of the following
topics:
l
Restoring to a file with the SQL Server plug-in
l
Restoring to a file with the Windows File System plug-in on page 91
2. Ensure that the SQL backup format files that you restored are accessible to SQL Server.
You may need to make the data visible to SQL Server or copy the data.
3. Restore the full backup (f-0 file) to SQL Server by using a Transact-SQL command similar
to the following command:
RESTORE DATABASE dbname
FROM DISK = 'drive:\folder\f-0.stream0'
WITH
MOVE 'dbname_data' TO 'drive:\folder\dbname.mdf',
MOVE 'dbname_logfile' TO 'drive:\folder\dbname.ldf',
NORECOVERY
where:
l
dbname
l
The FROM DISK clause specifies the backup file from which to restore, and
\f-0.stream0
l
The MOVE clauses specify the path and file name for the restored files:
n
n
n
n
l
The NORECOVERY option specifies that the database will remain in the restoring state,
is the name of the database to restore.
is the path and file name of the full backup file.
dbname_data
drive:\folder\dbname.mdf
dbname_logfile
drive:\folder\dbname.ldf
is the name of the database data file in the backup.
is the path and file name for the restored database file.
is the name of the database log file in the backup.
is the path and file name for the restored database log file.
drive:\folder
which enables you to restore additional backups before setting the database online.
4. Restore all but the most recent differential (d-n) or transaction log (i-n) backup files,
starting with the oldest file, by using a Transact-SQL command similar to the command in
the previous step. However, replace the
f-0.stream0
file name in the FROM DISK clause
with the file name for the differential or transaction log backup file.
5. Restore the most recent differential or transaction log backup file by using a Transact-SQL
command similar to the following command:
RESTORE DATABASE dbname
FROM DISK = 'drive:\folder\i-7.stream0'
WITH
MOVE 'dbname_data' TO 'drive:\folder\dbname.mdf',
MOVE 'dbname_logfile' TO 'drive:\folder\dbname.ldf',
RECOVERY
where:
Dell EMC Avamar for SQL Server User Guide 95

Restore
l
dbname
l
The FROM DISK clause specifies the backup file from which to restore, and
\i-7.stream0
l
The MOVE clauses specify the path and file name for the restored files:
n
n
n
n
l
The RECOVERY option sets the database online after the restore.
is the name of the database to restore.
is the path and file name of the most recent transaction log backup file.
dbname_data
drive:\folder\dbname.mdf
dbname_logfile
drive:\folder\dbname.ldf
is the name of the database data file in the backup.
is the path and file name for the restored database file.
is the name of the database log file in the backup.
is the path and file name for the restored database log file.
drive:\folder
6. If the database is not already listed in SQL Server Management Studio, then refresh the list
or connect to the database.
After you finish
After the restore completes successfully, perform a full backup of the database and clear the
Force incremental backup after full backup checkbox in the plug-in options for the backup. If
the checkbox is selected when a full backup occurs after a restore, then the transaction log
backup that occurs automatically after the full backup fails.
Restoring a database with the sqlcmd utility
The sqlcmd utility is a command line utility for entering Transact-SQL statements and scripts. You
can restore a database from a backup file by specifying the Transact-SQL RESTORE statements
with the sqlcmd utility. The Microsoft website provides full details on using the sqlcmd utility.
Note:
You can use the Microsoft SQL Server osql utility, but Microsoft recommends the
sqlcmd utility.
Restoring a single database from a single full backup file
sqlcmd -S server -E
1> restore database dbname
2> from disk = 'drive:\folder\f-0.stream0'
3> with recovery;
4> go
where:
l
server
is the server that is running SQL Server, and optionally, the instance, to which to
restore the backup.
l
dbname
l
drive:\folder\f-0.stream0
database.
Determining the number and names of files in the database to restore
is the database to restore.
is the path and file name of the backup file from which to restore the
sqlcmd -S server -E
1> restore filelistonly
2> from disk = 'drive:\folder\f-0.stream0'
3> go
1> restore database dbname
2> from disk = 'drive:\folder\f-0.stream0'
3> with norecovery,
4> move 'dbname_data' to 'drive:\dbname.mdf',
96 Dell EMC Avamar for SQL Server User Guide

5> move 'dbname_log' to 'drive:\dbname.ldf'
6> go
Restoring a database to a point in time by using STOPAT syntax
RESTORE DATABASE dbname
FROM disk= 'drive:\folder\f-0.stream0'
WITH NORECOVERY, STOPAT = 'Apr 25, 2014 12:00 AM’
go
RESTORE LOG dbname
FROM disk= 'drive:\folder\i-1.stream0'
WITH RECOVERY, STOPAT = 'Apr 25, 2013 12:00 AM'
go
where:
l
dbname
l
drive:\folder\f-0.stream0
is the database to restore.
is the path and file name of the full backup file from which to restore
the database.
l
drive:\folder\i-1.stream0
is the path and file name of the transaction log backup file from
which to restore.
Restore
Performing a full backup after the restore
After the restore completes successfully, perform a full backup of the database and clear the
Force incremental backup after full backup checkbox in the plug-in options for the backup. If
the checkbox is selected when a full backup occurs after a restore, then the transaction log
backup that occurs automatically after the full backup fails.
Restoring system databases
It is rare that you need to restore only system databases. One possible scenario for restoring only
system databases is if damage occurs to one or more system databases. When you restore system
databases, the Avamar Plug-in for SQL Server can automatically restore the databases in the
correct order and manage SQL Server services. If necessary, however, you can restore individual
system databases and manually manage the services.
About this task
NOTICE
and subscription databases. The steps to restore these databases and other system databases
in a SQL Server replication environment depend on the replication configuration. The SQL
Server plug-in can automatically restore the databases in the correct order and manage SQL
Server services. The steps to manually restore databases in a replication environment are
beyond the scope of this guide. Review the "Back Up and Restore Replicated Databases" topic
in the SQL Server documentation on the MSDN website for detailed steps to manually restore
system databases in a replication environment.
System databases in a replication environment include the publication, distribution,
Restoring system databases automatically to the original location
When you restore multiple system databases to the original location, the Avamar Plug-in for SQL
Server automatically restores the databases in the correct order. The SQL Server plug-in can also
automatically manage the stop and restart of the necessary SQL Server services during the
restore.
Before you begin
l
Ensure that the environment meets the guidelines in Restore requirements on page 74.
Dell EMC Avamar for SQL Server User Guide 97

Restore
l
Close all instances of SQL Server Management Studio, and disable any other possible
connections to the system databases. If there are other connections to the system databases,
then Avamar may not be able to restore the master database.
Procedure
1. In Avamar Administrator, click the Backup & Restore launcher link button.
The Backup, Restore and Manage window appears.
2. Find the backup and select the system databases to restore:
l
Finding a backup by date
l
Finding a backup by content on page 86
3. Select Actions > Restore Now.
The Restore Options dialog box appears.
4. Ensure that Windows SQL appears in the Restore Plug-in list.
5. From the Avamar encryption method list, select the encryption method to use for data
transfer between the Avamar server and the client during the restore.
The encryption technology and bit strength for a client/server connection depend on
several factors, including the client operating system and Avamar server version. The
Avamar Product Security Guide
provides additional information.
6. Leave the default selection of Restore to the original location.
If you plan to restore the system databases to a file, follow the steps in Restoring to a file on
page 91 instead of the steps in this procedure.
7. Click More Options.
The Restore Command Line Options dialog box appears.
8. Select the Use SQL REPLACE option checkbox.
9. Clear the Tail-log backup checkbox.
10. From the Encryption method from Data Domain system list, select the encryption method
for data transfer during the restore if the backup was stored on a Data Domain system.
11. Select the Restore system databases checkbox.
12. Select the Manage SQL services automatically during restore checkbox.
13. (Optional) Select the Show Advanced Options checkbox, and set other plug-in options as
discussed in the following topics:
l
Recovery operation options on page 112
l
Authentication options on page 114
14. Disregard the redirected restore options, which are only necessary when you are restoring
to a different location.
15. Disregard the point-in-time recovery options, which are only supported for databases that
use the full recovery model.
16. Click OK on the Restore Command Line Options dialog box.
17. Click OK on the Restore Options dialog box.
The following status message appears: Restore initiated.
18. Click OK.
98 Dell EMC Avamar for SQL Server User Guide

Restoring system databases manually to the original location
When you restore system databases to the original location manually, you must manage the
services and restore the databases in the correct order.
About this task
NOTICE The steps to restore system databases in a SQL Server replication environment
depend on the replication configuration and are beyond the scope of this guide. Review the
"Back Up and Restore Replicated Databases" topic in the SQL Server documentation on the
MSDN website for detailed steps to manually restore system databases in a replication
environment.
Procedure
1. Shut down the SQL Server instance, and ensure that dependent services stop, such as the
SQL Server Agent service and the Analysis Service.
2. Close all instances of SQL Server Management Studio, and disable any other possible
connections to the system databases.
If there are other connections to the system databases, then Avamar may not be able to
restore the master database.
Restore
3. Start the SQL Server instance in single-user mode by running the sqlservr.exe
application with the -m and -c options:
l
To start the default instance in single-user mode, open a command prompt and type the
following command:
cd \MSSQLPATH\Binn
sqlservr.exe -m -c
l
To start a named instance in single-user mode, open a command prompt and type the
following command:
cd \MSSQLPATH\Binn
sqlservr.exe instance -m -c
where
\MSSQLPATH\Binn
is the path to the Binn folder for the instance, and
instance
the name of the instance to start.
4. Wait for the Recovery Complete message to appear on the console.
If you log in to the SQL Server computer as a local or domain administrator with the SQL
services running under the Local System account, then the sqlservr.exe command may
fail to correctly start SQL services in single-user mode. If that occurs, complete step 4.a on
page 99 through step 4.e on page 99 instead of running sqlservr.exe from the
command line. Otherwise, go to step 5 on page 100.
Complete the following steps if SQL services do not start in single-user mode correctly:
is
a. Shut down the SQL service. If SQL Server is installed on a standalone server, then use
the Windows Services console. If SQL Server is installed in a cluster, use Cluster
Manager.
b. Right-click the SQL service in the Windows Services console, and then click Properties.
c. In the Start parameters box, type -m -c.
d. Click Start to start the service.
e. Click OK to close the Properties dialog box.
Dell EMC Avamar for SQL Server User Guide 99

Restore
5. Restore the master database to the original location:
a. Ensure that the environment meets the guidelines in Restore requirements on page 74.
b. In Avamar Administrator, click the Backup & Restore launcher link button.
The Backup, Restore and Manage window appears.
c. Find the backup and select the master database to restore:
l
Finding a backup by date
l
Finding a backup by content on page 86
d. Select Actions > Restore Now
The Restore Options dialog box appears.
e. Ensure that Windows SQL appears in the Restore Plug-in list.
f. From the Avamar encryption method list, select the encryption method to use for data
transfer from the Avamar server to the client during the restore.
The encryption technology and bit strength for a client/server connection depend on
several factors, including the client operating system and Avamar server version. The
Avamar Product Security Guide
provides additional information.
g. Leave the default selection of Restore to the original location.
h. Click More Options.
The Restore Command Line Options dialog box appears.
i. Select the checkbox next to the Use SQL REPLACE option and Restore system
databases options.
j. Clear the Tail-log backup checkbox.
k. (Optional) Select Show Advanced Options, and set the authentication options as
discussed in Authentication options on page 114.
l. Disregard the remaining restore options, which do not apply when you restore the master
database.
m. Click OK on the Restore Command Line Options dialog box.
n. Click OK on the Restore Options dialog box.
The following status message appears: Restore initiated.
o. Click OK.
After you restore the master database, the SQL Server service is stopped automatically.
6. Restart the SQL Server service:
l
To start the default instance of SQL Server, open a command prompt and type net
start MSSQLServer.
l
To start a named instance of SQL Server, open a command prompt and type net start
MSSQL$instance, where
instance
is the name of the instance.
7. Restore the msdb and model databases:
a. Ensure that the environment meets the guidelines in Restore requirements on page 74.
b. In Avamar Administrator, click the Backup & Restore launcher link button.
The Backup, Restore and Manage window appears.
100 Dell EMC Avamar for SQL Server User Guide
 Loading...