

Dell Avamar Security Guide

Dell EMC Avamar
Product Security Guide
18.2
Dell Inc.
June 2020
Rev. 06

Notes, cautions, and warnings
NOTE: A NOTE indicates important information that helps you make better use of your product.
CAUTION: A CAUTION indicates either potential damage to hardware or loss of data and tells you how to avoid the
problem.
WARNING: A WARNING indicates a potential for property damage, personal injury, or death.
© 2001 - 2020 Dell Inc. or its subsidiaries. All rights reserved. Dell, EMC, and other trademarks are trademarks of Dell Inc. or its subsidiaries. Other
trademarks may be trademarks of their respective owners.

Contents
Figures.......................................................................................................................................... 7
Tables............................................................................................................................................8
Preface.........................................................................................................................................12
Chapter 1: Introduction.................................................................................................................. 15
Security patches.................................................................................................................................................................. 15
Periodic security updates for multiple components...................................................................................................15
Remedying security patch compatibility issues.......................................................................................................... 15
Email home notification using ConnectEMC.................................................................................................................... 15
Remote access..................................................................................................................................................................... 16
Avamar security features.................................................................................................................................................... 16
Avamar firewall hardening.............................................................................................................................................16
Chapter 2: Authentication.............................................................................................................. 17
About authentication............................................................................................................................................................17
Overview of Avamar user accounts...................................................................................................................................17
Login security settings.........................................................................................................................................................18
Login banner configuration........................................................................................................................................... 18
Configure login security.................................................................................................................................................18
Failed login behavior.......................................................................................................................................................19
Configure failed login behavior..................................................................................................................................... 19
Authentication types and setup......................................................................................................................................... 21
Avamar internal authentication.....................................................................................................................................21
Directory service authentication...................................................................................................................................21
Common Access Card and Personal Identity Verification........................................................................................23
Unauthenticated interfaces .........................................................................................................................................35
Selecting the authentication source........................................................................................................................... 35
User and credential management......................................................................................................................................36
Pre-loaded user accounts.............................................................................................................................................36
Customer Support password....................................................................................................................................... 38
Removing local account................................................................................................................................................38
Disabling Avamar server account................................................................................................................................ 38
Password complexity.................................................................................................................................................... 39
Secure credential requirements....................................................................................................................................41
Authentication to external systems................................................................................................................................... 41
Configuring remote connections.................................................................................................................................. 41
Remote component authentication.............................................................................................................................44
Credential security.........................................................................................................................................................60
Chapter 3: Authorization............................................................................................................... 62
About authorization.............................................................................................................................................................62
Contents 3

Default roles......................................................................................................................................................................... 62
Administrator roles........................................................................................................................................................ 62
Operator roles................................................................................................................................................................ 63
User roles........................................................................................................................................................................64
Role-based access control and the AUI........................................................................................................................... 64
Role mapping....................................................................................................................................................................... 66
External role associations................................................................................................................................................... 66
Default authorizations.........................................................................................................................................................66
Running commands with elevated privileges.............................................................................................................66
Entitlement export.............................................................................................................................................................. 69
Actions that do not require authorization.........................................................................................................................70
Chapter 4: Network Security.......................................................................................................... 71
Network exposure................................................................................................................................................................71
Terminology.....................................................................................................................................................................71
Utility node ports............................................................................................................................................................ 71
Storage node ports........................................................................................................................................................77
Avamar client ports........................................................................................................................................................78
Avamar Downloader Service host ports.....................................................................................................................80
Ports when using a Data Domain system...................................................................................................................80
NDMP accelerator node ports......................................................................................................................................81
Remote management interface ports.........................................................................................................................83
Avamar VMware Combined Proxy ports....................................................................................................................84
Ports when using Avamar Virtual Edition................................................................................................................... 86
Communication security..................................................................................................................................................... 87
External Web interfaces................................................................................................................................................87
Network access control................................................................................................................................................88
Firewall settings................................................................................................................................................................... 88
Controlling the firewall daemon................................................................................................................................... 88
Editing the Firewall in Avamar......................................................................................................................................89
Configuring the Avamar firewall.................................................................................................................................. 90
Adding the NAS IP address to the NDMP firewall table.......................................................................................... 96
Chapter 5: Data Security and Integrity............................................................................................99
About Data-in-flight encryption.........................................................................................................................................99
Data-in-flight encryption.............................................................................................................................................. 99
Data-in-flight encryption in Avamar versions 7.1 through 7.4................................................................................ 100
Unencrypted data-in-flight.......................................................................................................................................... 101
Client/server encryption behavior..............................................................................................................................101
Increasing Avamar server cipher strength ...............................................................................................................102
SHA-2 SSL security certificates................................................................................................................................ 102
Data-at-rest encryption.................................................................................................................................................... 102
Internal data-at-rest encryption key management..................................................................................................103
Avamar Key Manager.................................................................................................................................................. 103
Data integrity...................................................................................................................................................................... 103
Data erasure....................................................................................................................................................................... 104
Requirements for securely deleting backups............................................................................................................104
Securely deleting a backup......................................................................................................................................... 105
4
Contents

Chapter 6: System Monitoring, Auditing, and Logging.................................................................... 107
Auditing and logging...........................................................................................................................................................107
Monitoring server status............................................................................................................................................. 107
Monitoring system events...........................................................................................................................................107
Event notification profiles........................................................................................................................................... 108
Email home notification............................................................................................................................................... 108
Auditing......................................................................................................................................................................... 109
Audit logging................................................................................................................................................................. 109
Logs...................................................................................................................................................................................... 110
Single-node system log files........................................................................................................................................ 110
Utility node log files........................................................................................................................................................111
Storage node log files...................................................................................................................................................112
Spare node log file........................................................................................................................................................ 113
Avamar NDMP Accelerator log files...........................................................................................................................113
Access node log files.................................................................................................................................................... 113
Avamar Administrator client log files.......................................................................................................................... 113
Backup client log files................................................................................................................................................... 114
Monitoring server status and statistics......................................................................................................................114
Event monitoring..........................................................................................................................................................125
Log management............................................................................................................................................................... 132
Server monitoring with syslog.................................................................................................................................... 132
Server monitoring with SNMP................................................................................................................................... 137
Logging format...................................................................................................................................................................139
Monitoring server status............................................................................................................................................. 139
Monitoring system events.......................................................................................................................................... 139
Email home notification............................................................................................................................................... 140
Auditing..........................................................................................................................................................................140
Server monitoring with syslog.....................................................................................................................................141
Alerting................................................................................................................................................................................. 141
Server monitoring with SNMP................................................................................................................................... 142
Automatic notifications to Avamar Support............................................................................................................. 144
Email Home................................................................................................................................................................... 145
ConnectEMC................................................................................................................................................................ 146
Chapter 7: Server Security Hardening........................................................................................... 150
Overview.............................................................................................................................................................................150
STIG compliance.......................................................................................................................................................... 150
Server security hardening levels................................................................................................................................ 150
Level-1 security hardening................................................................................................................................................ 150
Advanced Intrusion Detection Environment (AIDE)................................................................................................150
The auditd service.........................................................................................................................................................151
sudo implementation.................................................................................................................................................... 151
Command logging........................................................................................................................................................ 152
Locking down single-user mode on RHEL servers.................................................................................................. 152
Disabling Samba........................................................................................................................................................... 152
Removing suid bit from non-essential system binaries on RHEL...........................................................................153
Preventing unauthorized access to GRUB configuration.......................................................................................153
Preventing the OS from loading USB storage......................................................................................................... 154
Contents
5

Level-2 security hardening............................................................................................................................................... 155
Additional operating system hardening..................................................................................................................... 155
Additional password hardening...................................................................................................................................156
Additional firewall hardening (avfirewall).................................................................................................................. 158
Installing level-2 security hardening features........................................................................................................... 158
Custom ssh banner not supported............................................................................................................................ 159
Complexity and aging configuration changes for password hardening................................................................ 159
Preventing host header injection vulnerabilities on Apache web server................................................................161
Level-3 security hardening................................................................................................................................................ 161
Disabling Apache web server...................................................................................................................................... 161
Stopping the EMT........................................................................................................................................................162
Disabling Dell OpenManage web server....................................................................................................................162
Disabling SSLv2 and weak ciphers.............................................................................................................................163
Updating OpenSSH......................................................................................................................................................164
Disabling RPC............................................................................................................................................................... 164
Configuring the firewall to block access to port 9443............................................................................................ 165
Changing file permissions............................................................................................................................................165
Preparing for a system upgrade.................................................................................................................................166
Chapter 8: Intelligent Platform Management Interface ...................................................................167
IPMI subsystem security................................................................................................................................................... 167
Finding all LAN channels................................................................................................................................................... 168
Disabling privileges for Cipher Suite 0.............................................................................................................................169
Securing anonymous logins.............................................................................................................................................. 169
Creating strong passwords for BMC accounts..............................................................................................................170
Additional BMC security tasks...........................................................................................................................................171
Appendix A: IAO Information......................................................................................................... 172
System-level accounts...................................................................................................................................................... 172
Files with SUID bit and SGID bit.......................................................................................................................................172
Permissions within /var folder..........................................................................................................................................173
Appendix B: Enterprise Authentication.......................................................................................... 174
Enterprise authentication..................................................................................................................................................174
Supported components and systems........................................................................................................................ 174
Configuring Enterprise authentication.............................................................................................................................175
Configuring an LDAP interface...................................................................................................................................175
Configuring an NIS interface.......................................................................................................................................177
Enabling certificate authorization for PostgreSQL........................................................................................................179
Configuring DTLT to use PostgreSQL certificate authorization mode.......................................................................179
Appendix C: Avamar internal certificate usage and note...................................................................181
Avamar internal mcssl certificate usage and note..........................................................................................................181
Appendix D: Manage Certificates.................................................................................................. 182
Importing commercially signed security certificates for Apache................................................................................. 182
Importing commercially signed security certificates for Tomcat DTLT and Jetty.....................................................184
6
Contents

Figures
1. Users in Avamardomains.............................................................................................................................................. 17
2. PIN Authentication dialog box..................................................................................................................................30
3. Certificate Confirmation dialog box.......................................................................................................................30
4. Insert Smart Card dialog box.....................................................................................................................................31
5. Avamar Administrator Login window.....................................................................................................................31
6. Avamar Administrator Login window....................................................................................................................32
7. Logout dialog box...........................................................................................................................................................33
Figures 7

Tables
1. Revision history.................................................................................................................................................................12
2. Typographical conventions.........................................................................................................................................13
3. Avamar user account information........................................................................................................................... 17
4. STIG requirements satisfied by the additional OS hardening package.................................................. 18
5. STIG requirements satisfied by additional password hardening................................................................19
6. Parameters that control behavior of failed logins...........................................................................................20
7. Supported directory service types..........................................................................................................................21
8. Key values......................................................................................................................................................................... 26
9. Properties.......................................................................................................................................................................... 26
10. Avamar Web Restore interfaces that do not require authentication...................................................35
11. Avamar server Linux OS default user accounts..............................................................................................36
12. Avamar server software default user account............................................................................................... 36
13. MCS default user accounts..................................................................................................................................... 37
14. MCS PostgreSQL database default user accounts......................................................................................37
15. Proxy virtual machine Linux OS default user account.................................................................................37
16. Parameters that control the password complexity and length...............................................................39
17. Software version requirements..............................................................................................................................45
18. Port requirements........................................................................................................................................................46
19. Default expiration periods and regeneration methods................................................................................ 47
20. Communication security setting...........................................................................................................................50
21. Mapping security and encryption settings to a communication protocol........................................... 51
22. Mapping security and encryption settings to source work order flags............................................... 51
23. Mapping security and encryption settings to destination work order flags..................................... 52
24. Alternative commands.............................................................................................................................................. 53
25. General fields.................................................................................................................................................................54
8 Tables

26. Fields................................................................................................................................................................................. 58
27. Fields................................................................................................................................................................................. 59
28. Administrator roles......................................................................................................................................................62
29. Operator roles...............................................................................................................................................................63
30. User roles........................................................................................................................................................................64
31. AUI feature pane access by administrator user role.................................................................................... 65
32. AUI feature pane access by operator user role............................................................................................. 65
33. Commands authorized for sudo........................................................................................................................... 66
34. Actions that do not require authorization........................................................................................................ 70
35. Required inbound ports on the utility node......................................................................................................72
36. Optional inbound ports on the utility node.......................................................................................................75
37. Required outbound ports for the utility node................................................................................................. 75
38. Required inbound ports on each storage node.............................................................................................. 77
39. Required outbound ports for each storage node..........................................................................................78
40. Required inbound ports on an Avamar client..................................................................................................79
41. Required outbound ports for an Avamar client.............................................................................................. 79
42. Required inbound port on an Avamar Downloader Service host...........................................................80
43. Required outbound ports for an Avamar Downloader Service host.................................................... 80
44. Required ports when using a Data Domain system......................................................................................81
45. Required inbound ports for each accelerator node......................................................................................81
46. Required outbound ports for each accelerator node..................................................................................82
47. Inbound ports for the remote management interface on all Gen4T-based nodes........................ 83
48. Inbound ports for the remote management interface on all Gen4S-based nodes........................83
49. Outbound ports for the remote management interface on all Avamar nodes................................ 84
50. Required inbound ports for the Avamar VMware Combined Proxy.................................................... 84
51. Required outbound ports for the Avamar VMware Combined Proxy..................................................85
52. Required ports for the Avamar vSphere Combined Proxy...................................................................... 85
Tables
9

53. Inbound ports for the Azure network security group.................................................................................86
54. Outbound ports for the Azure network security group.............................................................................87
55. Firewall customization.............................................................................................................................................. 89
56. Cipher levels and associated OpenSSL suites............................................................................................... 99
57. Component log files on a single-node Avamar system..............................................................................110
58. Component log files on a utility node................................................................................................................. 111
59. Component log files on a storage node............................................................................................................112
60. Component log file on a spare node.................................................................................................................. 113
61. Component log files for the NDMP Accelerator........................................................................................... 113
62. Component log files on an access node...........................................................................................................113
63. Component log files on an Avamar Administrator client...........................................................................113
64. Component log files for an Avamar backup client.......................................................................................114
65. Node details on the Avamar tab of the Server Monitor...........................................................................115
66. CPU details on the Avamar tab of the Server Monitor............................................................................ 115
67. Network details on the Avamar tab of the Server Monitor.................................................................... 115
68. Disk details on the Avamar tab of the Server Monitor..............................................................................115
69. Node details on the Data Domain tab of the Server Monitor................................................................ 116
70. CPU details on the Data Domain tab of the Server Monitor..................................................................116
71. Disk (KB/S) details on the Data Domain tab of the Server Monitor................................................... 116
72. Network (KB/S) details on the Data Domain tab of the Server Monitor.........................................116
73. Data display based on selections on the Server Management tab...................................................... 117
74. Bytes Protected Summary properties on the Server Management tab............................................117
75. Server Details on the Server Management tab............................................................................................ 117
76. Maintenance Activities Details on the Server Management tab...........................................................118
10
77. Garbage Collection Details on the Server Management tab...................................................................119
78. Module properties on the Server Management tab .................................................................................. 119
79. Status indicators on the Node Information part of Server Management.........................................119
Tables

80. Server details on the Node Information part of Server Management.............................................. 120
81. OS details on the Node Information part of Server Management........................................................121
82. Hardware details on the Node Information part of Server Management.........................................121
83. Status indicators on the Partition Information part of Server Management..................................122
84. Server Details on the Node Information part of Server Management.............................................. 122
85. Data Domain system properties on the Server Management tab.......................................................122
86. Event information...................................................................................................................................................... 125
87. Example of a batch email notification message........................................................................................... 126
88. Mappings of syslog fields to Avamar event data........................................................................................ 133
89. Locations for the Avamar MIB definition file.................................................................................................137
90. Mappings of syslog fields to Avamar event data.........................................................................................141
91. Locations for the Avamar MIB definition file..................................................................................................142
92. STIG requirements satisfied by AIDE................................................................................................................150
93. STIG requirements satisfied by the auditd service..................................................................................... 151
94. STIG requirements satisfied by the implementation of sudo..................................................................151
95. STIG requirements satisfied by the additional OS hardening package............................................. 155
96. STIG requirements satisfied by additional password hardening...........................................................156
97. Cipher levels and associated OpenSSL suites.............................................................................................. 163
98. Descriptions of security tasks for the IPMI subsystem............................................................................167
99. Supported external authentication systems..................................................................................................174
100. Certificate details.....................................................................................................................................................182
Tables
11

Preface
As part of an effort to improve the product lines, revisions of the software and hardware are periodically released. Therefore, some
functions that are described in this document might not be supported by all versions of the software or hardware currently in use. The
product release notes provide the most up-to-date information on product features.
Contact the technical support professional when a product does not function correctly or does not function as described in this
document.
NOTE: This document was accurate at publication time. To find the latest version of this document, go to Online
Support (https://www.dell.com/support).
Purpose
This guide discusses various aspects of Avamar product security.
Audience
This publication is primarily intended for Field Engineers, contracted representatives, and business partners who are responsible for
configuring, troubleshooting, and upgrading Avamar systems at customer sites, as well as system administrators or application integrators
who are responsible for installing software, maintaining servers and clients on a network, and ensuring network security.
Revision history
The following table presents the revision history of this document.
Table 1. Revision history
Revision Date Description
06 June, 2020 Added port information in the Avamar VMware Combined Proxy inbound ports
section.
05 April, 2020 Added Appendix D: Manage Certificates
04 March 20, 2020 Added vSphere as a destination for port 443 with the Avamar Combined
VMware Proxy.
03 November 15, 2019
02 August 28, 2019 Updated the Required ports when using a Data Domain system section.
This revision includes the following updates:
• Required outbound ports for the Avamar VMware Combined Proxy
updates.
• Utility node required inbound ports updates.
• Importing commercially signed security certificates for Tomcat DTLT and
Jetty updates.
• Added steps to verify the Avamar firewall version and add the NAS IP
address to the NDMP firewall.
• Added steps for configuring LDAPS.
01 December 14, 2018 First release of this document for Avamar 18.2.
Related documentation
The following publications provide additional information:
• Avamar Release Notes
• Avamar Administration Guide
12 Preface

• Avamar Operational Best Practices Guide
The following other publications also provide information:
• US Department of Defense (DoD) Security Technical Implementation Guide (STIG) for Unix
Typographical conventions
These type style conventions are used in this document.
Table 2. Typographical conventions
Bold Used for names of interface elements, such as names of windows, dialog boxes, buttons, fields, tab
names, key names, and menu paths (what the user specifically selects or clicks)
Italic Used for full titles of publications that are referenced in text
Monospace
Monospace italic Used for variables
Monospace bold
[ ] Square brackets enclose optional values
| Vertical bar indicates alternate selections - the bar means "or"
{ } Braces enclose content that the user must specify, such as x or y or z
... Ellipses indicate nonessential information that is omitted from the example
Used for:
• System code
• System output, such as an error message or script
• Pathnames, filenames, prompts, and syntax
• Commands and options
Used for user input
Where to get help
The Avamar support page provides access to licensing information, product documentation, advisories, and downloads, as well as how-to
and troubleshooting information. This information may resolve a product issue before contacting Customer Support.
To access the Avamar support page:
1. Go to https://www.dell.com/support.
2. Type a product name in the Enter a Service Tag, Serial Number, Service Request, Model, or Keyword search box.
3. Select the product from the list that appears. When you select a product, the Product Support page loads automatically.
4. (Optional) Add the product to the My Products list by clicking Add to My Saved Products in the upper right corner of the Product
Support page.
Documentation
The Avamar product documentation provides a comprehensive set of feature overview, operational task, and technical reference
information. To supplement the information in product administration and user guides, review the following documents:
• Release notes provide an overview of new features and known limitations for a release.
• Technical notes provide technical details about specific product features, including step-by-step tasks, where necessary.
• White papers provide an in-depth technical perspective of a product or products as applied to critical business issues or requirements.
Knowledgebase
The Knowledgebase contains applicable solutions that you can search for either by solution number (for example, KB000xxxxxx) or by
keyword.
To search the Knowledgebase:
1. Go to https://www.dell.com/support.
2. Under the Support tab, click Knowledge Base.
Preface
13

3. Type either the solution number or keywords in the search box. Optionally, you can limit the search to specific products by typing a
product name in the search box and then selecting the product from the list that appears.
Live chat
To engage Customer Support by using live interactive chat, click Join Live Chat on the Service Center panel of the Avamar support
page.
Service Requests
For in-depth help from Customer Support, submit a service request by clicking Create Service Requests on the Service Center panel
of the Avamar support page.
NOTE: To open a service request, you must have a valid support agreement. Contact a sales representative for details
about obtaining a valid support agreement or with questions about an account.
To review an open service request, click the Service Center link on the Service Center panel, and then click View and manage
service requests.
Enhancing support
It is recommended to enable ConnectEMC and Email Home on all Avamar systems:
• ConnectEMC automatically generates service requests for high priority events.
• Email Home sends configuration, capacity, and general system information to Customer Support.
Comments and suggestions
Comments and suggestions help to continue to improve the accuracy, organization, and overall quality of the user publications. Send
comments and suggestions about this document to DPAD.Doc.Feedback@emc.com.
Please include the following information:
• Product name and version
• Document name, part number, and revision (for example, 01)
• Page numbers
• Other details to help address documentation issues
14
Preface

1
Introduction
Topics:
• Security patches
• Email home notification using ConnectEMC
• Remote access
• Avamar security features
Security patches
Each Avamar release is available with a set of up-to-date security patches.
Periodic security updates for multiple components
Security updates are periodically provided for components of the Avamar system’s host operating system. These periodic updates
combine patches and updates that the operating system’s company (Red Hat or SUSE) released since the previous Avamar periodic
security update. The updates also include relevant kernel-level and OS-level security patches and changes.
The periodic updates are cumulative. Install each periodic update that is issued for the Avamar system in order of release, starting with the
first periodic update issued after the release of the Avamar system software.
Each periodic update is announced through a Security Advisory (ESA). The ESA provides details about the contents of the periodic update
and installation instructions. Go to https://www.dell.com/support/home/us/en/04/product-support/product/avamar-server/overview
to view these advisories and to register for email notifications.
Periodic updates are provided as Avamar update packages that can normally be installed through Avamar Installation Manager.
Remedying security patch compatibility issues
About this task
If you separately install other security patches or security applications that are found to be incompatible with Avamar:
1. Remove the separately installed patches or applications.
2. Restore the Avamar system to its previous working configuration.
3. File a support case with Avamar Customer Support that includes a specific description of the separately installed patches or
applications.
NOTE:
It is the responsibility of the customer to ensure that the Avamar system is configured to protect against
unauthorized access. Back up all important files before you apply new security patches, applications, or updates.
Email home notification using ConnectEMC
When configured and enabled, the “email home” feature automatically emails configuration, capacity, and general system information to
Avamar Customer Support using ConnectEMC. Summary emails are sent once daily; critical alerts are sent in near-real time on an as
needed basis.
The Avamar Administration Guide provides details on how to enable the email home feature.
Introduction 15

Remote access
If Avamar Customer Support must connect to a customer system to perform analysis or maintenance, the customer can initiate a web
conference using a web-based conferencing application such as WebEx.
Additionally, customers can install a Secure Remote Support (ESRS) gateway to allow Customer Support to access their systems without
WebEx.
Avamar security features
Installing or upgrading the Avamar server software installs hardening and firewall packages that improve security capabilities on the
Avamar server. Installation of the hardening package does not restrict supported server functionality. Installation of the firewall package
prevents unencrypted backups from running. These packages cannot be uninstalled.
If you are upgrading from an older version and the scheduled backups are unencrypted, follow the instructions in Permitting unencrypted
data-in-flight on page 101 to enable unencrypted backups. For some other tasks, Customer Support provides the steps and tools that are
required to complete the task (for instance, FTP capabilities for downloading packages to the server).
Avamar firewall hardening
Starting in Avamar 7.2, the Avamar firewall blocks outgoing FTP access. Commands such as wget and curl fail to reach the target hosts
or download any files.
About this task
To download hotfixes and other updates from FTP sites, you must disable the Avamar firewall for the duration of the transfer and then reenable the firewall after the transfer completes.
Steps
1. Open a command shell and log in by using one of the following methods:
• For a single-node server, log in to the server as admin.
• For a multi-node server, log in to the utility node as admin.
2. Switch user to root by typing the following command:
su -
3. Disable the Avamar firewall by typing the following command:
service avfirewall stop
4. Enable FTP access by typing the following command:
/usr/local/avamar/lib/admin/security/ftp_service
5. Change directory by typing the following command:
cd /usr/local/avamar/src/
6. Download the required file by typing the following command on one line:
curl --disable-eprt -P `hostname -i`:35000-35010 -O <url>
where <url> is the location of the required file.
7. After the transfer completes, enable the Avamar firewall by typing the following command:
service avfirewall start
16
Introduction

2
Authentication
Topics:
• About authentication
• Overview of Avamar user accounts
• Login security settings
• Authentication types and setup
• User and credential management
• Authentication to external systems
About authentication
The concept of authentication governs the identification of all users who are permitted to take action within an Avamar server.
Authentication prescribes certain users as possessing credentials that enable the Avamar server to recognize their identity and, later, grant
any authorized permissions.
This chapter describes how users log in to an Avamar server, including means of preventing unauthorized access, and how to manage and
configure both user and component authentication.
The Avamar Administration Guide provides specific tasks to add, configure, and delete Avamar user accounts, and to configure directory
service authentication.
Overview of Avamar user accounts
A user account in Avamar can administer a domain or client. The user account defines the authentication system that is used to grant
users access to the Avamar server. It also defines the role for the user, which controls the operations that a user can perform.
You can add user accounts to domains or individual clients. When you add a user account to a domain, the account can administer that
domain and any subdomains beneath it. When you add a user account to an individual client, the account can perform backups and
restores of that client, and access backups belonging to that client in the system.
In Avamar, users are entries in a domain or client access list. When you add a user account to the Avamar system, you are adding an entry
to a domain or client user access list.
In the following example, the user “Gretchen” has been added to both the Accounting domain and a computer. However, the
authentication system and role are completely separate user accounts that happen to have the same username.
Figure 1. Users in Avamardomains
The following table describes the information that comprises an Avamar user account.
Table 3. Avamar user account information
Information Description
Username The username depends on the authentication system and must be
in the format that the authentication system accepts. For example,
the internal authentication system uses case-sensitive usernames,
Authentication 17

Table 3. Avamar user account information (continued)
Information Description
whereas Windows Active Directory usernames are caseinsensitive. Usernames cannot be longer than 31 characters.
Authentication system An authentication system is a username/password system that is
used to grant users access to the Avamar server.
Role Roles define the allowable operations for each user account.
Login security settings
The following sections provide information on configuring the login security settings for Avamar.
Login banner configuration
This section provides information on configuring the login banners for Avamar.
STIG requirement GEN005550 requires that the ssh protocol support a customer banner. However, the Avamar system is not compliant
with this requirement. Custom ssh banners are not supported.
Configure login security
This topic provides information about the login behavior for Avamar components.
Most login security configuration options are part of level-2 security hardening features that you can install during Avamar server software
installation, or manually after server software installation. Level-2 security features also provide additional behaviors described elsewhere in
this guide.
Level-2 security hardening
The additional OS hardening package provides the following capabilities that are specific to server logins:
• Setting terminal timeout at 15 minutes
• Removal of unnecessary default accounts and groups
This package satisfies the following STIG requirements that relate to server logins:
Table 4. STIG requirements satisfied by the additional OS hardening package
Requirement ID Requirement title
GEN000460 Unsuccessful Login Attempts - Account Disabled
GEN000480 Unsuccessful Login Attempts - Fail Delay
GEN000500 Terminal Lockout
GEN000980 Root Console Access
GEN001000 Remote Consoles Defined
GEN001020 Direct Root Login
GEN001120 Encrypting Root Access
Level-2 additional password hardening
You can configure Avamar servers to provide additional password hardening features, such as:
• Aging — how long a password can be used before it must be changed
• Complexity — required number and type of characters in passwords
• Reuse — number of previously used passwords that can be recycled
18
Authentication

NOTE: Password hardening is not appropriate for all customers. Successful implementation of this feature requires
structures and policies that enforce changes to all operating system user accounts every 60 days, and require users to
log in to those accounts at least once every 35 days. Failure to implement proper structures and policies before
installing the password hardening feature might cause you to be locked out of your Avamar server.
NOTE: Recent versions of Avamar require the passwords for system user accounts, and the admin and root accounts, to
expire every 60 days. The SSH console prompts users to change the password.
You can also change the current complexity configuration and aging rules. User and credential management on page 36 provides more
information. However, use the same caution when changing any password configuration details to ensure successful implementation, and
perform a backup of the configuration files before making any changes.
Additional password hardening satisfies the following STIG requirements that relate to server logins:
Table 5. STIG requirements satisfied by additional password hardening
Requirement ID Requirement title
GEN000540 Password Change 24 Hours
GEN000560 Password Protect Enabled Accounts
GEN000580 Password Length
GEN000600 Password Character Mix
GEN000620 Password Character Mix
GEN000640 Password Character Mix
GEN000660 Password Contents
GEN000680 Password Contents
GEN000700 Password Change Every 60 Days
GEN000740 Password Change Every Year
GEN000760 Inactive Accounts are not locked
GEN000780 Easily Guessed Passwords
GEN000800 Password Reuse
GEN000820 Global Password Configuration Files
GEN000840 Root Account Access
Following successful installation and configuration, the Avamar server enforces the following rules for all local Avamar server operating
system user accounts and passwords:
• Password aging
• Password complexity, length, and reuse
Failed login behavior
You can configure the maximum allowed number of failed login attempts for the Avamar server. When a user reaches the failed login
attempt threshold, the server locks the user out of the system.
The default threshold value is five failed attempts. The server automatically unlocks after a configurable interval. By default, the interval is
5 minutes, however the admin user can also reset the lock by restarting the MCS.
Configure failed login behavior
Configuring actions on reaching the authentication failure threshold is a level-2 security feature.
About this task
The documentation for pam_tally provides more information about parameters and values.
Authentication
19

Steps
1. Open a command shell and log in by using one of the following methods:
• For a single-node server, log in to the server as admin, and then switch user to root by typing su -.
• For a multi-node server, log in to the utility node as admin, and then switch user to root by typing su -.
2. Back up the login configuration file by typing the following command:
cp /etc/pam.d/common-auth /etc/pam.d/common-auth.`date +%s`
3. Using a Linux text editor, such as vi, open the file /etc/pam.d/common-auth.
4. Locate the line that begins with auth required pam_tally2.so.
For example: auth required pam_tally2.so deny=3 lock_time=5
a. If this line does not exist, or is commented out, insert a new line with the necessary parameters after the comment # BEGIN
Avamar modifications, before the remaining lines.
5. Update the parameters that control the behavior for failed logins, which are listed in the following table:
Table 6. Parameters that control behavior of failed logins
Parameter Description
deny The threshold for failed authentication attempts, after which the operating system locks the user
account.
lock_time The duration for which the operating system prevents login to the user account after each
authentication failure. The operating system locks the user account for this duration even if the user
has not reached the authentication failure threshold. Use this parameter to rate-limit failed logins.
unlock_time The interval for which the operating system should wait before re-enabling the specified user
account, after a user reaches the authentication failure threshold.
magic_root Do not track the number of failed authentication attempts for the root user account.
even_deny_root_accountAllow the operating system to disable access to the root user account after reaching the
authentication failure threshold. Dell EMC does not recommend using this parameter.
Do not modify the configuration values on other lines.
Note that user accounts which reach the authentication failure threshold are permanently locked, unless you specify the
unlock_time parameter or manually unlock the user account.
6. Save and close the file.
Example
For example:
• To configure a policy that denies login for five seconds after each authentication failure, triggers lockout after six failed attempts, and
requires an administrator to manually enable locked user accounts:
# BEGIN Avamar modifications
auth required pam_tally2.so deny=6 lock_time=5
• To configure a policy that denies login for five seconds after each authentication failure, triggers lockout after three failed attempts,
and automatically restores access after five minutes:
# BEGIN Avamar modifications
auth required pam_tally2.so deny=3 lock_time=5 unlock_time=300
Next steps
For a multi-node server, repeat this task on all storage nodes.
To manually enable a user account, type the following command as the root user:
pam_tally2 -u AccountName --reset
20
Authentication

Authentication types and setup
An authentication system is a username/password system that is used to grant domain and client users access to the Avamar server.
Avamar supports its own internal authentication system (“Avamar authentication” or “avs”), as well as directory service authentication.
Directory service authentication uses an existing LDAP v.3 directory service or an existing Network Information Service (NIS) to provide
authentication.
The following topics provide information on the available authentication types and configuration options.
Avamar internal authentication
With Avamar internal authentication, you define the username and password for Avamar user accounts, and Avamar stores the
information. Usernames are case-sensitive and cannot be longer than 31 characters.
No additional steps are required to use internal Avamar authentication to authenticate user accounts. You define the username and
password for each account when you add the user in Avamar Administrator or the AUI.
Directory service authentication
Use directory service authentication to authenticate and assign roles to Avamar users by using information from an existing directory
service. Directory service authentication works with specific LDAP directory services and provides additional functionality when used with
an OpenLDAP directory service. Directory service authentication also works with a Network Information Service (NIS), on its own or with
one of the supported LDAP directory services.
Avamar products that use directory service authentication
The following Avamar products can use directory service authentication to authenticate and authorize users:
• Avamar Administrator
• Avamar Web Restore
• Avamar client web UI (Avamar Desktop/Laptop)
Avamar product that uses directory service client records
Avamar Client Manager does not use directory service authentication to authenticate and authorize user logins. However, Avamar Client
Manager can use the directory service mechanism to obtain information about computers that are potential Avamar clients. Avamar Client
Manager queries the directory service to obtain information about clients and, if available, directory service organizational units, such as
directory domains, and directory groups.
Directory services types
Directory service authentication supports the following types of directory services:
Table 7. Supported directory service types
Type Supported implementations
LDAP
• Active Directory for Windows Server 2003
• Active Directory Domain Services for Windows Server 2008
• Active Directory Domain Services for Windows Server 2012
• Active Directory Domain Services for Windows Server 2016
• 389 Directory Server version 1.1.35
OpenLDAP SUSE OpenLDAP version 2.4
NIS Network Information Service
Avamar supports encrypted LDAP and OpenLDAP directory service authentication via SSL/TLS. By default, Avamar uses TLS 1.2 if
supported by the LDAP or OpenLDAP server. Otherwise, Avamar falls back to a supported version of SSL/TLS. However, the Avamar
server does not provide an SSL/TLS certificate to the LDAP or OpenLDAP server for client authentication.
Authentication
21

LDAP maps
Directory service authentication uses LDAP maps to form a group of Avamar domain users by using information from a directory service.
Link Avamar authorization levels to mapped directory service user accounts to create LDAP maps. The Adding an LDAP map section
provides more information.
NOTE: Deleting an Avamar domain removes the LDAP maps that rely on that Avamar domain for access. However,
removing LDAP maps does not affect the directory service groups or the directory service user records that are
associated with the removed maps.
Add a secure LDAP directory service
Avamar supports encrypted LDAP directory service authentication over SSL (LDAPS). To configure an Avamar system to use an LDAPS
directory service for authentication, complete the following steps.
Prerequisites
The following information is required:
• Domain name of the LDAP server (for example, mydomain.com)
• FQDN or IP address of the LDAP server (for example, dc-server.mydomain.com)
• The certificate that is used on the Domain Controller in base64 format (for example, dc-server.cer).
Export the Domain Controller's certificate and upload it to the Avamar Server /tmp directory.
Configure LDAP directory authentication (non-LDAPS). The Avamar Administration Guide provides more information.
About this task
This procedure uses the following examples:
• mydomain.com
where mydomain.com is the domain name of the LDAP server.
• dc-server.mydomain.com
where dc-server.mydomain.com is the FQDN or IP address of the LDAP server.
• dc-server.cer
where dc-server.cer is the LDAP server certificate.
Steps
1. Open a command shell and log in by using one of the following methods:
• For a single-node server, log in to the server as admin.
• For a multi-node server, log in to the utility node as admin.
2. Switch user to root by typing the following command:
su -
3. Back up the existing LDAP files by typing the following commands:
cp /usr/local/avamar/etc/ldap.properties /usr/local/avamar/etc/ldap.properties.`date -I`
cp /usr/local/avamar/etc/krb5.conf /usr/local/avamar/etc/krb5.conf.`date -I`
4. Log in to the root domain in Avamar Administrator.
5. In Avamar Administrator, click the Administration launcher link.
The Administration window is displayed.
6. Click the LDAP Management tab.
7. Add the LDAPS server by completing the procedure for a regular LDAP server.
To add a supported LDAP directory service, follow the steps in the Avamar Administration Guide.
The subsequent steps modify the ldap.properties file to convert the configuration to LDAPS.
8. Click Close to close the Directory Service Management window.
9. Click Edit LDAP file:
10. Locate the following section:
22
Authentication

ldap.qualified-name-default=MyDomain.com
ldap.url.MyDomain.com=ldap\://dc-server.MyDomain.com\:389
11. Change the ldap.url.MyDomain.com parameter from ldap to ldaps.
12. Change the port number to 636.
13. Add the following line:
ldap.sasl.authentication=false
14. Save and close the ldap.properties file.
The LDAP file resembles the following:
ldap.qualified-name-default=MyDomain.com
ldap.url.MyDomain.com=ldaps\://dc-server.MyDomain.com\:636
ldap.sasl.authentication=false
15. Click Edit KRB5 file.
16. Locate the following lines in the [libdefaults] section.
default_tkt_enctypes = rc4-hmac des3-cbc-sha1-kd des-cbc-crc des-cbc-md5
default_tgs_enctypes = rc4-hmac des3-cbc-sha1-kd des-cbc-crc des-cbc-md5
17. Add the aes256-cts parameter to each line.
18. Save and close the ldap.properties file.
The KRB5 file resembles the following:
default_tkt_enctypes = aes256-cts rc4-hmac des3-cbc-sha1-kd des-cbc-crc des-cbc-md5
default_tgs_enctypes = aes256-cts rc4-hmac des3-cbc-sha1-kd des-cbc-crc des-cbc-md5
19. Copy the LDAP server certificate to the /tmp directory on the Avamar utility node or single-node server.
20. Ensure that you are still logged in as the root user.
21. Back up rmi_ssl_keystore by typing the following command on one line:
cp -p /usr/local/avamar/lib/rmi_ssl_keystore /usr/local/avamar/lib/rmi_ssl_keystore-backup
22. Import the LDAP server certificate to the keystore by typing the following command:
keytool -importcert -file /tmp/dc-server.cer -keystore /usr/local/avamar/lib/rmi_ssl_keystore
-storepass password
The default keystore password is changeme.
23. Restart the MCS and the backup scheduler by typing the following commands:
su - admin
mcserver.sh --stop
mcserver.sh --start
dpnctl start sched
24. Verify that you can login to Avamar Administrator as an LDAPS user.
Common Access Card and Personal Identity Verification
Avamar supports user authentication by using a Common Access Card (CAC) for United States Department of Defense (DoD) personnel
or a Personal Identity Verification (PIV) smart card for US federal government employees and contractors.
About CAC/PIV authentication
Avamar implements CAC/PIV authentication by presenting alternative login prompts for Avamar Installation Manager and Avamar
Administrator. After an administrator configures the Avamar server for CAC/PIV authentication, the following actions occur:
1. The Avamar software displays the CAC/PIV authentication prompts and requires the insertion of a smart card in the smart card reader
before proceeding.
2. When prompted, the user supplies a PIN to unlock the list of security certificates that are stored on the smart card.
3. The user selects a security certificate with appropriate authorization.
4. The Avamar software or web browser retrieves the security certificate from the smart card.
5. The validation authority (VA) service verifies the security certificate.
6. Avamar extracts login credentials from the security certificate.
Authentication
23

7. An external LDAP server provides the LDAP groups that are associated with the login credentials.
8. Avamar maps these LDAP groups to a corresponding Avamar authorization.
When CAC/PIV authentication is configured, use the login procedures in this appendix whenever a procedure directs you to log in to the
Avamar Installation Manager or to Avamar Administrator.
The topics in this appendix assume the following:
• You have a general understanding of the principles of operation for smart cards and LDAP authentication.
• You have configured Avamar for LDAP directory service authentication and the LDAP server contains appropriate users and roles.
The Avamar Administration Guide provides more information.
• You have configured a VA server to validate user security certificates.
• You have the CA issuer certificate that signed the end-user security certificates, in .pem, .cer, or .p7b format.
You may also optionally supply a CAC/PIV security certificate for the Avamar server, in .pem, .cer, or .p7b format.
NOTE:
This optional server-specific CAC/PIV certificate is unique to each Avamar server and signed by the CA issuer.
Either security certificate can be used to secure communication between the Avamar server and CAC/PIV-enabled
clients. However, supplying a server-specific CAC/PIV certificate configures CAC/PIV-enabled clients to trust only
communication with this specific Avamar server.
• You know the details of your site implementation of CAC/PIV authentication, including:
○ The hostnames and IP addresses of the LDAP and VA servers.
○ The LDAP search username, password, and filter.
A Microsoft TechNet article provides details about configuring Windows behavior in the event of smart card removal: https://
technet.microsoft.com/en-us/library/jj852235(v=ws.11).aspx.
Important information
CAC/PIV authentication presents the following requirements:
• Avamar 7.4.1 or later.
• Microsoft Windows operating system.
• Internet Explorer 8 or later.
• OpenSC libraries, version 0.16 or later.
CAC/PIV authentication is not compatible with Network Information Service (NIS) or Kerberos authentication.
Before you enable or disable CAC/PIV authentication, ensure that the following additional prerequisites are met:
• The Avamar Installation Manager is not configuring or installing workflow packages.
• There are no active or waiting backup jobs.
Some Avamar interfaces do not support CAC/PIV authentication, including:
• The Avamar Installation Manager command line interface.
• The management console command line interface (MCCLI).
• The management console software development kit (MCSDK) interface for simple object access protocol (SOAP) web services.
• The Avamar Downloader Service.
• SSH console access.
• The local console service ports on ADS Gen4S and Gen4T nodes.
• Interfaces for third-party resources, such as vCenter.
Log file locations
The following logs contain information related to CAC/PIV authentication:
• cac.pl script:
/usr/local/avamar/var/log/cac.log
• Avamar Installation Manager:
/usr/local/avamar/var/avi/server_log/avinstaller.log.0
/usr/local/avamar/var/avi/webserv_log/jetty.log
• Management console server:
24
Authentication

/usr/local/avamar/var/mc/server_log/mcserver.log.0
• Avamar Administrator client:
C:\Users\username\.avamardata\var\mc\gui_log\mcclient.log.0
• VA service:
/opt/vas/logs/vas.log
• Apache:
/var/log/apache2/access_log
/var/log/apache2/error_log
/var/log/apache2/ssl_request_log
• Avamar software upgrade workflows:
/usr/local/avamar/var/avi/server_data/package_data/AvamarUpgrade-version/workflow.log
Enabling CAC/PIV authentication
Enabling CAC/PIV authentication on an Avamar server is a multi-step process that consists of the following tasks:
• Updating the server configuration files.
• Opening the appropriate ports in the Avamar firewall.
• Enabling the CAC/PIV feature, which includes:
○ Importing the security certificates into the keystore.
○ Enabling two-way client authentication.
○ Configuring the VA service to start automatically on system startup.
○ Configuring the Apache web server.
○ Restarting the AvInstaller, management console, VA, and Apache services.
NOTE:
When you enable CAC/PIV authentication, the Avamar REST API and Avamar User Interface (AUI) authentication
is disabled and you will not be able to log in using these methods.
Updating server configuration files
This task updates two configuration files that provide the Avamar software with access to the VA server.
Steps
1. Open a command shell and log in by using one of the following methods:
• For a single-node server, log in to the server as admin.
• For a multi-node server, log in to the utility node as admin.
2. Switch user to root by typing the following command:
su -
3. Copy the CA issuer and optional server-specific CAC/PIV security certificates to /root.
4. Edit mcserver.xml with a text editor, such as vi, by typing the following command:
vi /usr/local/avamar/var/mc/server_data/prefs/mcserver.xml
5. Search for the cac node. The following example shows key/value pairs for an unconfigured server:
<node name="cac">
<map>
<entry key="san_index" value="" />
<entry key="ldap_login_ap" value="" />
<entry key="ldap_domain_mapping" value="" />
<entry key="ldap_search_filter" value="userPrincipalName" />
<entry key="ldap_login_user" value="" />
<entry key="cac_settings_path" value="/usr/local/avamar/lib/cac/settings.properties" />
<entry key="vas_url" value="http://localhost:7480/validation/cert" />
</map>
</node>
6. Configure the following keys with appropriate values, as listed in the following table:
Authentication
25

Table 8. Key values
Key name Value description
ldap_login_user The username for LDAP authorization.
ldap_login_ap The password for LDAP authorization.
ldap_search_filter The filter to use when searching for LDAP authorization.
san_index Specify which Subject Alternative Name (SAN) to use in the certificate if multiple SANs are available.
By default, Avamar MCS loops the SANs to discover the first qualified one.
ldap_domain_mapping If the certificate contains a SAN that ends with a uPNSuffix instead of an actual domain that contains
the user, use this key to specify the actual LDAP domain so that the domain that contains the user
can be discovered.
When you enable CAC/PIV authentication, Avamar encrypts the plaintext password.
NOTE: Ensure that the appropriate user entries exist on the LDAP server and that the proper roles are assigned to
each user. After validating the security certificate, Avamar consults the LDAP server to determine a role for the
user. LDAP directory searches use the value of the security certificate's subjectAltName field.
7. Save and close the file.
8. Edit vas.properties with a text editor, such as vi, by typing the following command:
vi /opt/vas/config/vas.properties
Output similar to the following appears:
# VA server configuration
va.use.https.communication=false
va.http.host=localhost
va.http.port=7080
va.https.port=7043
va.signing.cert.path=/opt/vas/config/va.cer
va.hashing.algorithm.oid=1.2.840.113549.1.1.11
va.ocsp.nonce.ext=true
va.ocsp.response.cache=false
va.max.cache.size=300
va.max.cache.time=3600
va.verify.response.signature=true
va.ssl.cert.path=/opt/vas/config/va_ssl.cer
# Cert configuration
issuer.cert.path=/opt/vas/config/issuer.cer
cert.store.path=/root/.keystore
cert.store.pass=password
crl.repo.url=http://localhost/CRLD/ca_crl.crl
crl.local.path=/opt/vas/config/ca_crl.crl
end.cert.upload.repo=/tmp
# cert validation methods [OCSP, SCVP, CRL]
cert.validation.method=OCSP
9. Configure the properties that are listed in the following table with appropriate values:
Table 9. Properties
Property name Value description
va.http.host The hostname or IP address of the VA server.
va.http.port The port number of the VA server.
va.signing.cert.path The local path to the server certificate.
issuer.cert.path The local path to the CA issuer certificate.
Note the port numbers that you configure for the va.http.port and va.https.port properties.
10. Save and close the file.
26
Authentication

Configuring the Avamar firewall
This task opens two ports in the Avamar firewall for the VA service to communicate with the VA server.
Steps
1. Change directory by typing the following command:
cd /usr/local/avamar/lib/admin/security
2. Run the firewall rules script by typing the following command:
./edit-firewall-rules.sh
The following output appears:
Choose an Action
----------------
1) Add a custom rule
2) Remove a custom rule
3) List Current Custom Rules
4) Exit
5) Save & Exit
Enter desired action:
3. Type 1 to add a custom rule and press Enter.
The following output appears:
Firewall Rule Types
-------------------
1) IPv4 Rule
2) IPv6 Rule
Enter Firewall Rule Type:
4. Type the number that corresponds to the addressing system in use and press Enter.
The following output appears:
Firewall Chains
---------------
1) OUTPUT
2) INPUT
3) LOGDROP
4) FORWARD
Select Chain:
5. Type 1 to add an output rule and press Enter.
The following output appears:
Protocol
--------
1) TCP
2) UDP
3) ICMP
Enter Protocol:
6. Type 1 to select TCP and press Enter.
The following output appears:
Enter source IP (leave blank for none):
7. Type the IP address of this Avamar server and press Enter.
The following output appears:
Enter source port (leave blank for none):
8. Leave this field blank and press Enter.
The following output appears:
Enter Destination IP Address (leave blank for none):
9. Type the IP address of the VA server that you specified in the va.http.host property for vas.properties and press Enter.
If you specified a hostname for the va.http.host property, type the corresponding IP address in this field.
The following output appears:
Authentication
27

Enter Destination Port (leave blank for none):
10. Type the VA server port number that you specified in the va.http.port property for vas.properties and press Enter.
The following output appears:
Targets
-------
1) ACCEPT
2) REJECT
3) DROP
4) LOGDROP
Select Target:
11. Type 1 to allow packets that are destined for the VA server and press Enter.
The following output appears:
Node Types
----------
1) ALL
2) DATA
3) UTILITY
4) ACCELERATOR
Select node type to apply rule to:
12. Type 3 to select the utility node and press Enter.
Output similar to the following appears:
Add rule |7080|10.7.100.105||tcp||ACCEPT|OUTPUT|UTILITY to file? (Y/N):
13. Type Y to save the new rule and press Enter.
The script writes the new rule to avfwb_custom_config.txt.
Output similar to the following appears:
Adding |7080|10.7.100.105||tcp||ACCEPT|OUTPUT|UTILITY to file...
Add another rule? (Y/N):
14. Repeat the preceding steps to add another new rule for the same VA server and the va.https.port property.
At the completion of the process, output similar to the following appears:
Adding |7043|10.7.100.105||tcp||ACCEPT|OUTPUT|UTILITY to file...
Add another rule? (Y/N):
15. Type N and press Enter.
The following output appears:
Return to main menu? (Y/N):
16. Type N and press Enter.
The following output appears:
Save and execute rules now? (Y/N):
17. Type Y to save the new firewall rules and press Enter.
The script saves the new rules to the system firewall tables and automatically restarts the Avamar firewall, then exits.
Output similar to the following appears:
Rules have been saved to /usr/local/avamar/lib/admin/security/avfwb_custom_config.txt
|7080|10.7.100.105||tcp||ACCEPT|OUTPUT|UTILITY will be applied
|7043|10.7.100.105||tcp||ACCEPT|OUTPUT|UTILITY will be applied
Applying rule /usr/sbin/iptables -A OUTPUT -p tcp --dport 7080 -d 10.6.197.105 -j ACCEPT
Applying rule /usr/sbin/iptables -A OUTPUT -p tcp --dport 7043 -d 10.6.197.105 -j ACCEPT
Enabling the CAC/PIV feature
This task imports the security certificates and enables CAC/PIV authentication prompts.
Prerequisites
Ensure that you are still logged in as the root user.
28
Authentication

It is recommended but not required to import the optional server-specific CAC/PIV security certificate into the keystore.
Steps
1. Change directory by typing the following command:
cd /root
2. Enable the CAC/PIV feature and import the security certificates into the keystore by typing the following command:
cac.pl --enable --cacert <cacert> --cert <servercert> --force
where:
• <cacert> is the filename of the CA issuer security certificate.
• <servercert> is the filename of the optional server-specific CAC/PIV security certificate.
NOTE:
If you do not have a server-specific CAC/PIV security certificate, omit the --cert <servercert> argument.
3. Verify that Avamar has enabled CAC/PIV authentication by typing the following command:
cac.pl --status
When CAC/PIV authentication is enabled, the following output appears:
cac: enabled
4. Check the status of the CAC/PIV components by typing the following command:
cac.pl --report
Output similar to the following appears:
cac.enabled=true
client.auth=true
server-cert-exists=false
issuer-cert-exists=true
vas-installed=true
vas-running=true
vas-autostart-enabled=true
mc-running=true
apache-installed=true
apache-running=true
apache-secure=true
The value of server-cert-exists may be true or false, depending on whether you imported a server-specific CAC/PIV security
certificate.
Logging in using CAC/PIV authentication
Before trying to log into Avamar Installation Manager or Avamar Administrator by using CAC/PIV authentication, take the following
actions:
• Enable CAC/PIV authentication on the Avamar server.
• Install Avamar Administrator on the local computer. This installs the necessary smart card libraries.
Ensure that the local computer meets all other prerequisites that are listed in the Avamar Administration Guide.
• Connect a supported smart card reader to the local computer.
• Insert a smart card into the smart card reader.
NOTE: CAC/PIV authentication is not supported when launching Avamar Administrator from the web interface.
Smart card reader libraries
Review the following information before logging in using CAC/PIV authentication.
Avamar Administrator provides an option to install the required OpenSC smart card driver during installation of the management console
software. The Avamar Desktop/Laptop interface also provides a stand-alone OpenSC driver.
If the site uses Gemalto smart card readers, you must obtain and install a Gemalto smart card driver. Ensure that the driver is compatible
with the release of the JRE that is included with the Avamar software.
The OpenSC or Gemalto DLL file must reside in one of the following locations:
Authentication
29
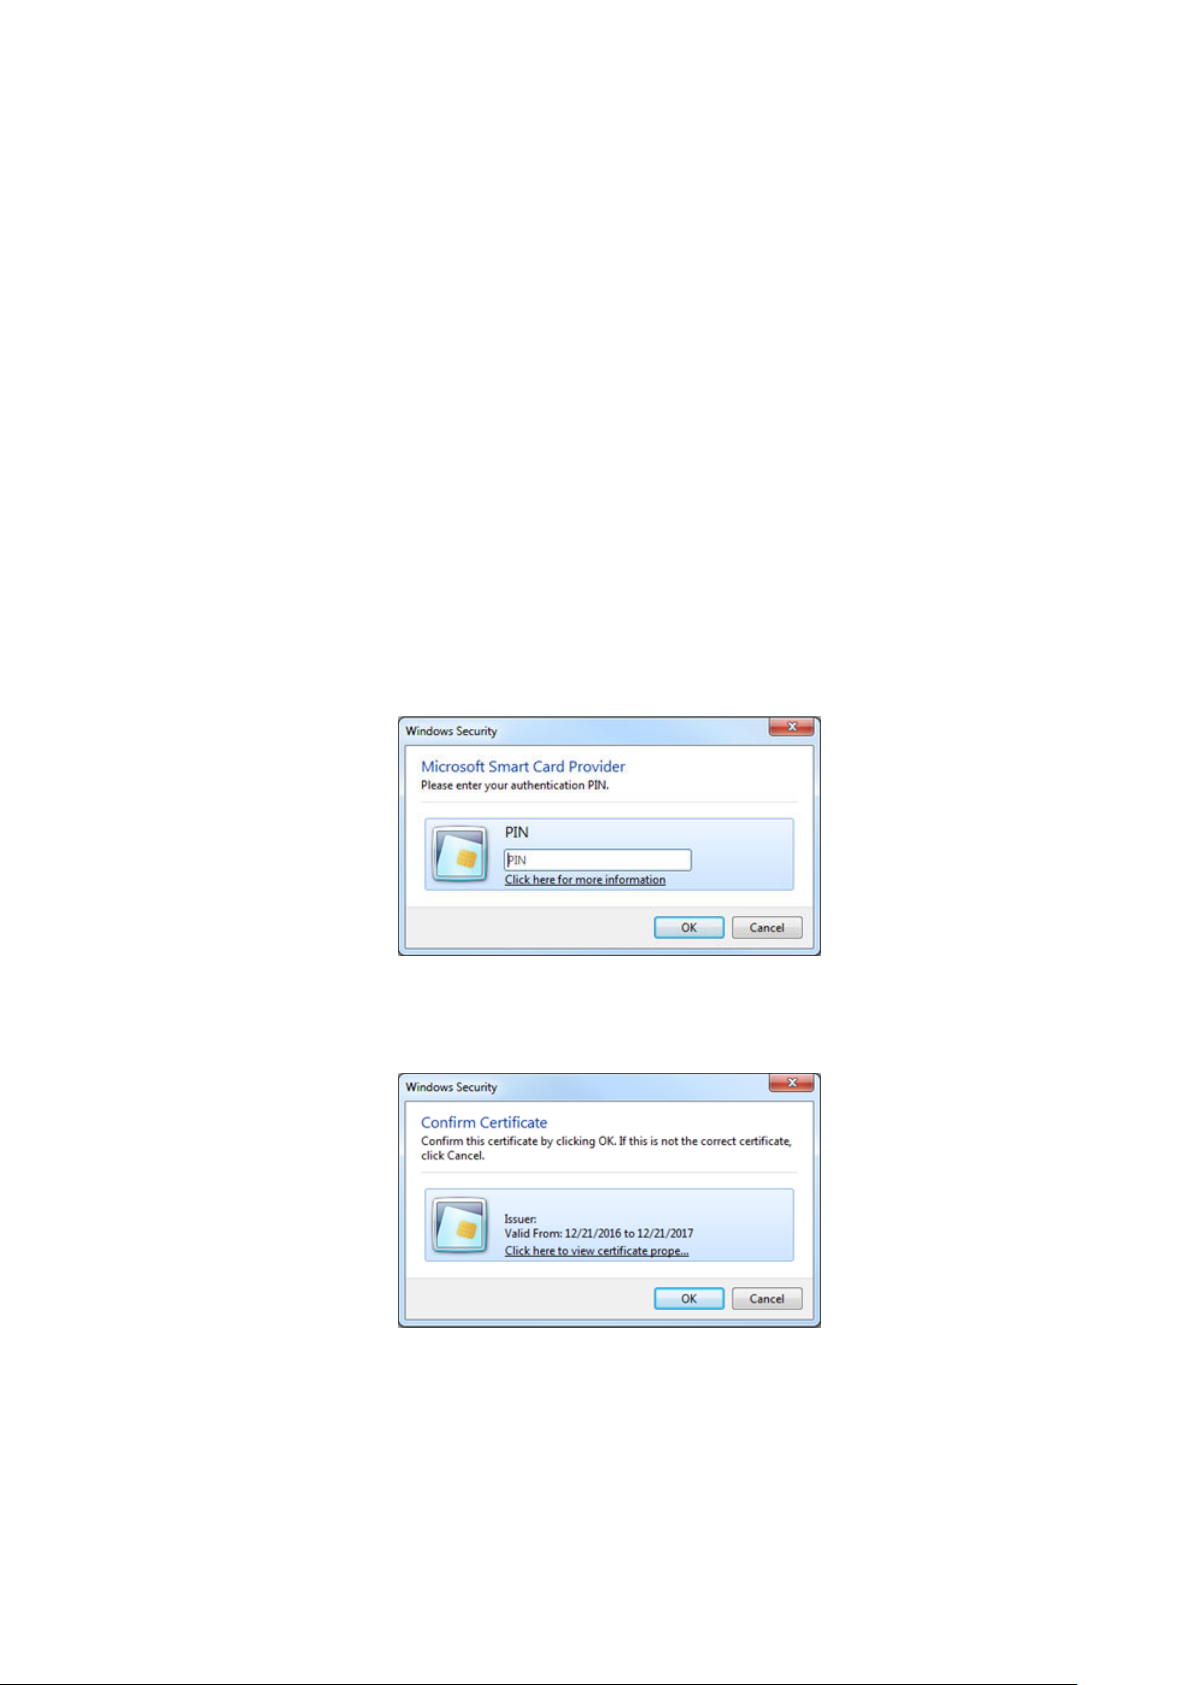
• A user-defined path that is specified in the pkcs11_library key in mcclient.xml
• For 64-bit Windows installations:
○ C:\Program Files\OpenSC Project\PKCS11-Spy\pkcs11-spy.dll
○ C:\Program Files (x86)\Gemalto\IDGo 800 PKCS#11\IDPrimePKCS1164.dll
• For 32-bit Windows installations:
○ C:\Program Files (x86)\OpenSC Project\PKCS11-Spy\pkcs11-spy.dll
○ C:\Program Files (x86)\Gemalto\IDGo 800 PKCS#11\IDPrimePKCS11.dll
If the Avamar client software cannot locate the DLL file, the client prompts the user for the file's location, and then stores this information
for the next session.
Logging in to the Avamar Installation Manager with CAC/PIV authentication
When CAC/PIV authentication is enabled, use the following steps to log in to the Avamar Installation Manager.
Steps
1. In a supported web browser, type:
https://<AvamarServer>/avi
where <AvamarServer> is the hostname (as defined in DNS) or the IP address of the Avamar server. Ensure that you type the s in
https.
You may be required to acknowledge a browser warning regarding self-signed certificates before continuing.
A Windows Security dialog box appears, prompting the user to type the authentication PIN for the smart card.
Figure 2. PIN Authentication dialog box
2. Type the PIN that is assigned to the smart card and click OK.
3. Confirm the details of the security certificate from the smart card and click OK. The security certificate must correspond to an
account with administrator permissions.
Figure 3. Certificate Confirmation dialog box
The Avamar server validates the security certificate with the VA server and interfaces with the LDAP server to complete the login
process.
The Avamar Installation Manager window appears.
30
Authentication
 Loading...