

Page 1

Dell Precision™ Workstations
Setup and Quick Reference Guide
www.dell.com | support.euro.dell.com
Page 2

Notes, Notices, and Cautions
NOTE: A NOTE indicates important information that helps you make better use of your computer.
NOTICE: A NOTICE indicates either potential damage to hardware or loss of data and tells you
how to avoid the problem.
CAUTION: A CAUTION indicates a potential for property damage, personal injury,
or death.
____________________
Information in this document is subject to change without notice.
© 2001–2002 Dell Computer Corporation. All rights reserved.
Reproduction in any manner whatsoever without the written permission of Dell Computer Corporation is strictly
forbidden.
Trademarks used in this text: Dell, the DELL logo, and Dell Precision are trademarks of Dell Computer Corporation;
Microsoft, Windows, and Windows NT are registered trademarks of Microsoft Corporation.
Other trademarks and trade names may be used in this document to refer to either the entities claiming the marks and
names or their products. Dell Computer Corporation disclaims any proprietary interest in trademarks and trade names
other than its own.
December 2002 P/N 7F867 Rev. A03
Page 3

Contents
Finding Information and Assistance . . . . . . . . . . . . . . . . 5
Setting Up Your Mini-Tower Computer
Dual Monitors
. . . . . . . . . . . . . . . . . . . . . . . . . . 18
. . . . . . . . . . . . . . . 9
Setting Up Your Small Desktop Computer
Dual Monitors
. . . . . . . . . . . . . . . . . . . . . . . . . . 28
Safety First—For You and Your Computer
Opening the Computer Cover
Opening the Cover
. . . . . . . . . . . . . . . . . . . . . . . . 30
Inside Your Computer
Removing and Installing Parts
Adding Devices and Software
. . . . . . . . . . . . . . . . . . . 29
. . . . . . . . . . . . . . . . . . . . . . . 32
. . . . . . . . . . . . . . . . . . . 34
. . . . . . . . . . . . . . . . . . 34
Problems With Additional Devices and Software
Frequently Asked Questions
Solving Problems
. . . . . . . . . . . . . . . . . . . . . . . . . . 39
. . . . . . . . . . . . . . . . . . . . 36
Using the Dell Precision ResourceCD
When to Use the Dell Diagnostics
Starting the Dell Diagnostics
Messages and Codes
. . . . . . . . . . . . . . . . . . . . . . . 44
. . . . . . . . . . . . . . . . 41
. . . . . . . . . . . . . . . . . . 42
. . . . . . . . . . . . . 19
. . . . . . . . . . . . . 29
. . . . . . . . 35
. . . . . . . . . . . . . . 40
Contents 3
Page 4

4 Contents
Page 5

Finding Information and Assistance
The following table lists the resources that Dell provides as support tools.
Additional resources may be shipped with your computer.
What Are You Looking For? Find it Here
• A diagnostic program for my computer
• Drivers for my computer
• My computer documentation
• My device documentation
• How to set up my computer
• Troubleshooting information
• Tools and utilities
Drivers and Utilities CD (also known as the
ResourceCD)
You can use this CD to access documentation, reinstall drivers, or run
diagnostics tools.
Setup and Quick Reference Guide
Setup and Quick Reference Guide 5
Page 6

What Are You Looking For? Find it Here
• Express Service Code and
Express Service Code and Product Key
Service Tag Number
• Microsoft
®
Windows® License Label
The labels are located on your computer under the front-panel door.
• How to reinstall my operating system Operating System CD and Installation Guide
www.dell.com | support.euro.dell.com
If you reinstall your operating system, use the Drivers and Utilities CD
to reinstall drivers for the devices that came with your computer.
6 Setup and Quick Reference Guide
Page 7

What Are You Looking For? Find it Here
• How to remove and replace parts
• Technical specifications
• How to configure system settings
• How to troubleshoot and solve problems
• Latest drivers for my computer
• Answers to technical service and support
questions
• Online discussions with other users and
technical support
• Documentation for my computer
• Service call status
• Top technical issues for my computer
• Frequently asked questions
• File downloads
• Details on my computer’s configuration
• Service contract for my computer
User’s Guide Icon
Depending on your operating system, double-click the User’s Guides
icon on your desktop or click the Start button and then click Help and
Support to access the electronic documentation stored on your
hard drive.
Dell Support Website — support.euro.dell.com
The Dell Support website provides several online tools, including:
• Knowledge Base — Hints, tips, and online courses
• Customer Forum — Online discussion with other Dell customers
• Upgrades — Upgrade information for components, such as memory,
the hard drive, and the operating system
• Customer Care — Contact information, order status, warranty, and
repair information
• Downloads — Drivers, patches, and software updates
• Reference — Computer documentation, product specifications, and
white papers
Dell Premier Support Website —
premiersupport.dell.com
The Dell Premier Support website is customized for corporate,
government, and education customers. This website may not be
available in all regions.
Setup and Quick Reference Guide 7
Page 8

What Are You Looking For? Find it Here
• System board connectors System Information Label
• Warranty Information Dell System Information Guide
www.dell.com | support.euro.dell.com
• How to use Windows XP
• Documentation for my computer and
devices
8 Setup and Quick Reference Guide
Windows XP Help and Support Center
1 Click the Start button and then click Help and Support.
2 Type a word or phrase that describes your problem and click the
arrow icon.
3 Click the topic that describes your problem.
4 Follow the instructions shown on the screen.
Page 9

Setting Up Your Mini-Tower Computer
You must complete all steps to properly set up your computer.
Mini-Tower Computer Features
5
1
4
NOTE: The numbers in
the figures correspond to
the setup tasks.
7
6
2
3
Setup and Quick Reference Guide 9
Page 10

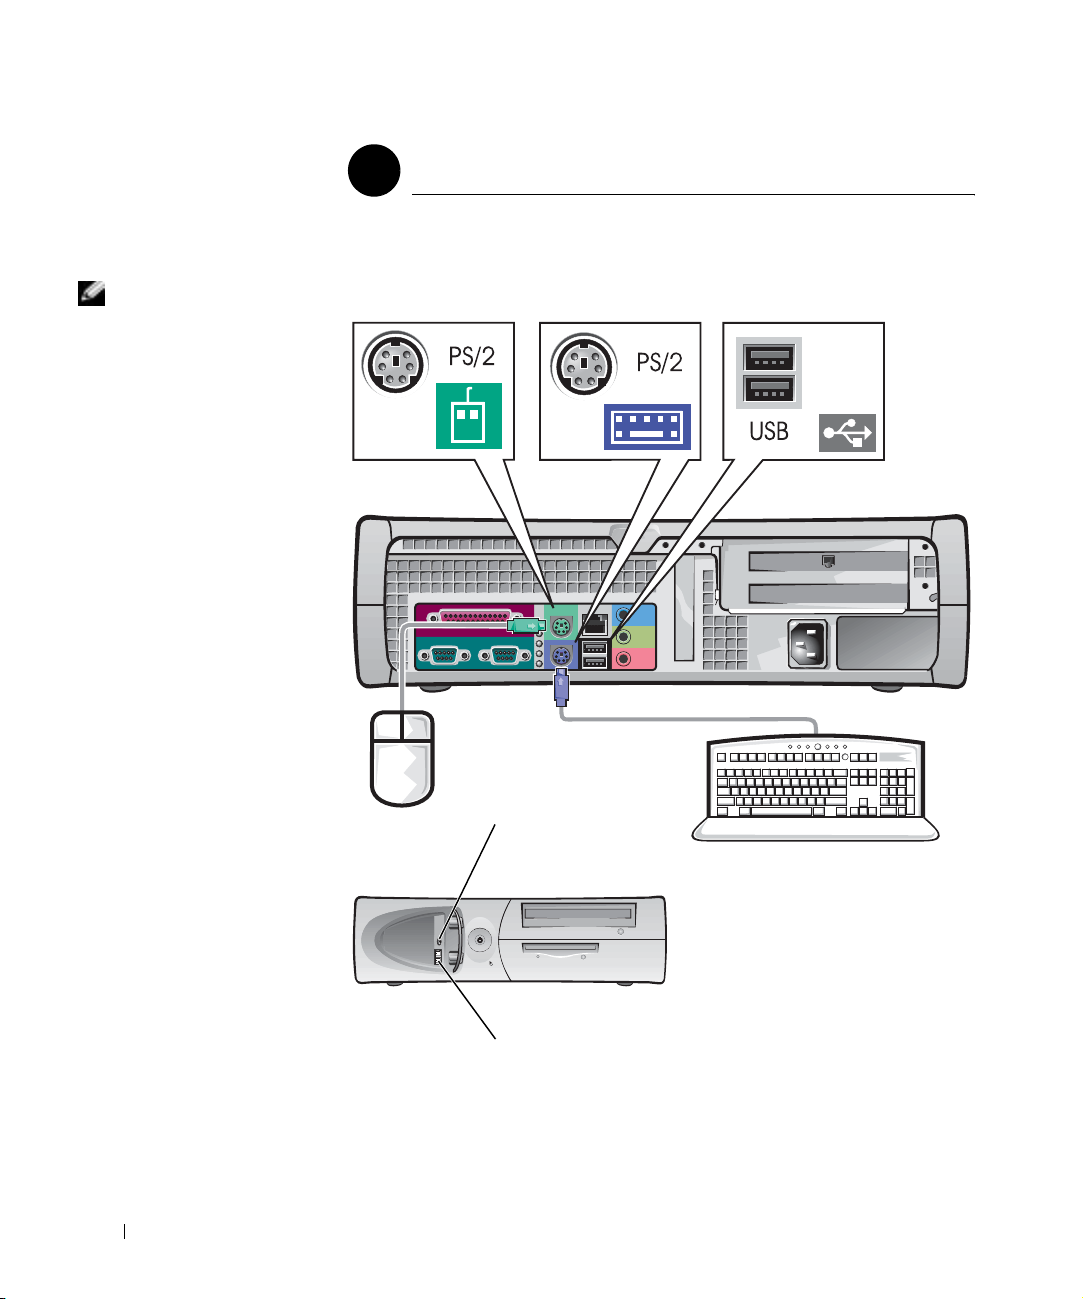
Connect the keyboard and mouse as shown. Do not connect a Universal
Serial Bus (USB) mouse or keyboard to the USB connectors on the front of
the computer.
NOTE: Do not attempt
to operate a PS/2 mouse
and a USB mouse
simultaneously.
www.dell.com | support.euro.dell.com
Keyboard and Mouse
1
10 Setup and Quick Reference Guide
USB connectors (2)
headphones/speakers
connector
Page 11

Network Adapter and Modem
2
Insert the network cable, not the phone line, into the network connector.
If you have an optional modem, connect the phone line to the modem.
NOTICE: Do not connect a modem cable to the network adapter. Voltage
from telephone communications can cause damage to the network adapter.
NOTE: If your computer
has a network expansion
card installed, connect the
network cable to the
network card, not to the
connector on the
computer back panel.
Setup and Quick Reference Guide 11
Page 12

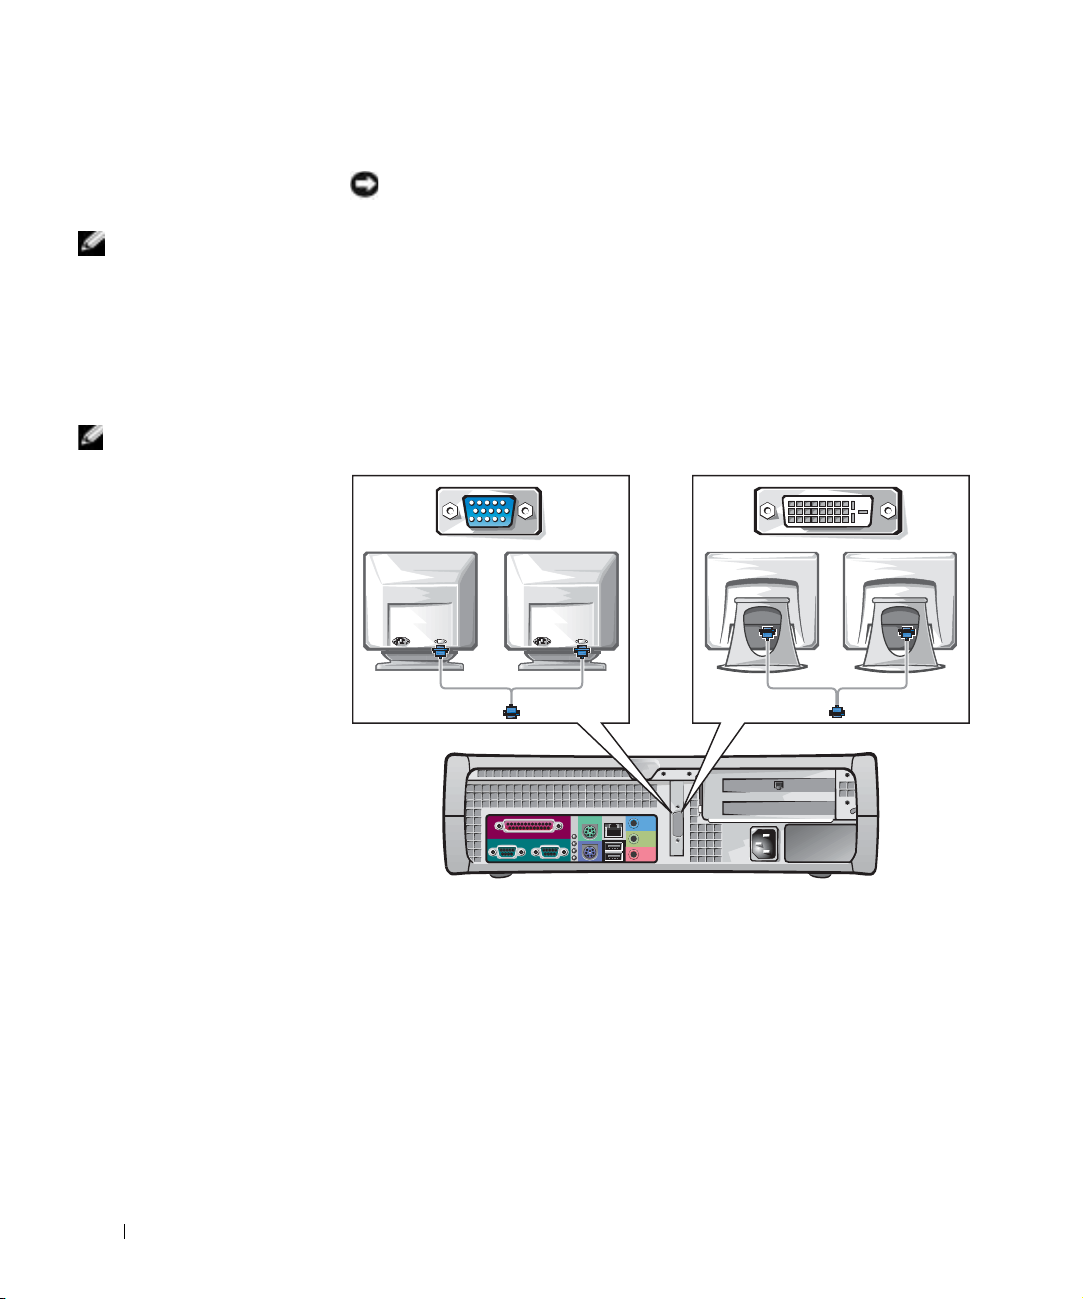
Monitor
3
Align and gently insert the monitor cable to avoid bending connector pins.
Then tighten the thumbscrews on the cable connectors.
Use the primary port if you are using one monitor with an optional dualmonitor card.
NOTE: Some flat-panel
displays and graphic
cards support Digital
Visual Interface (DVI).
If your monitor and card
www.dell.com | support.euro.dell.com
have DVI connectors, Dell
recommends that you use
DVI instead of VGA.
For setting up dual monitors, see "Dual Monitors" on page 18.
12 Setup and Quick Reference Guide
Page 13
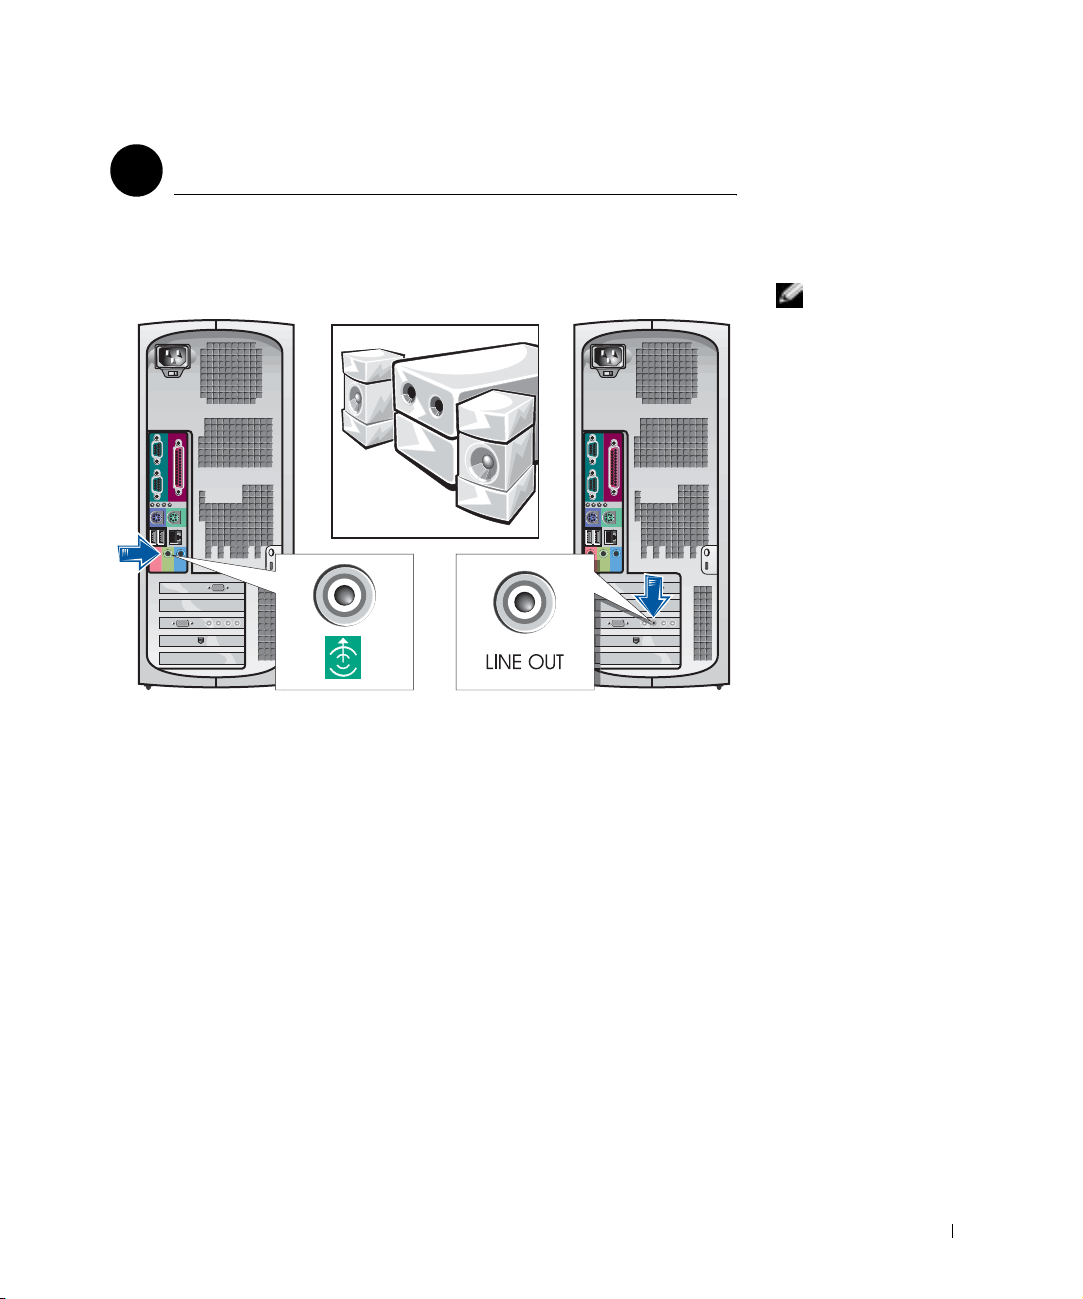
Speakers
4
Connect the speakers to the computer as shown on the instructions
supplied with the speakers.
NOTE: If your computer
has an audio expansion
card installed, connect
external audio devices to
the sound card, not to the
connectors on the
computer back panel.
Setup and Quick Reference Guide 13
Page 14

Plug in the computer and the monitor to their electrical outlets.
www.dell.com | support.euro.dell.com
Power Connection
5
14 Setup and Quick Reference Guide
Page 15

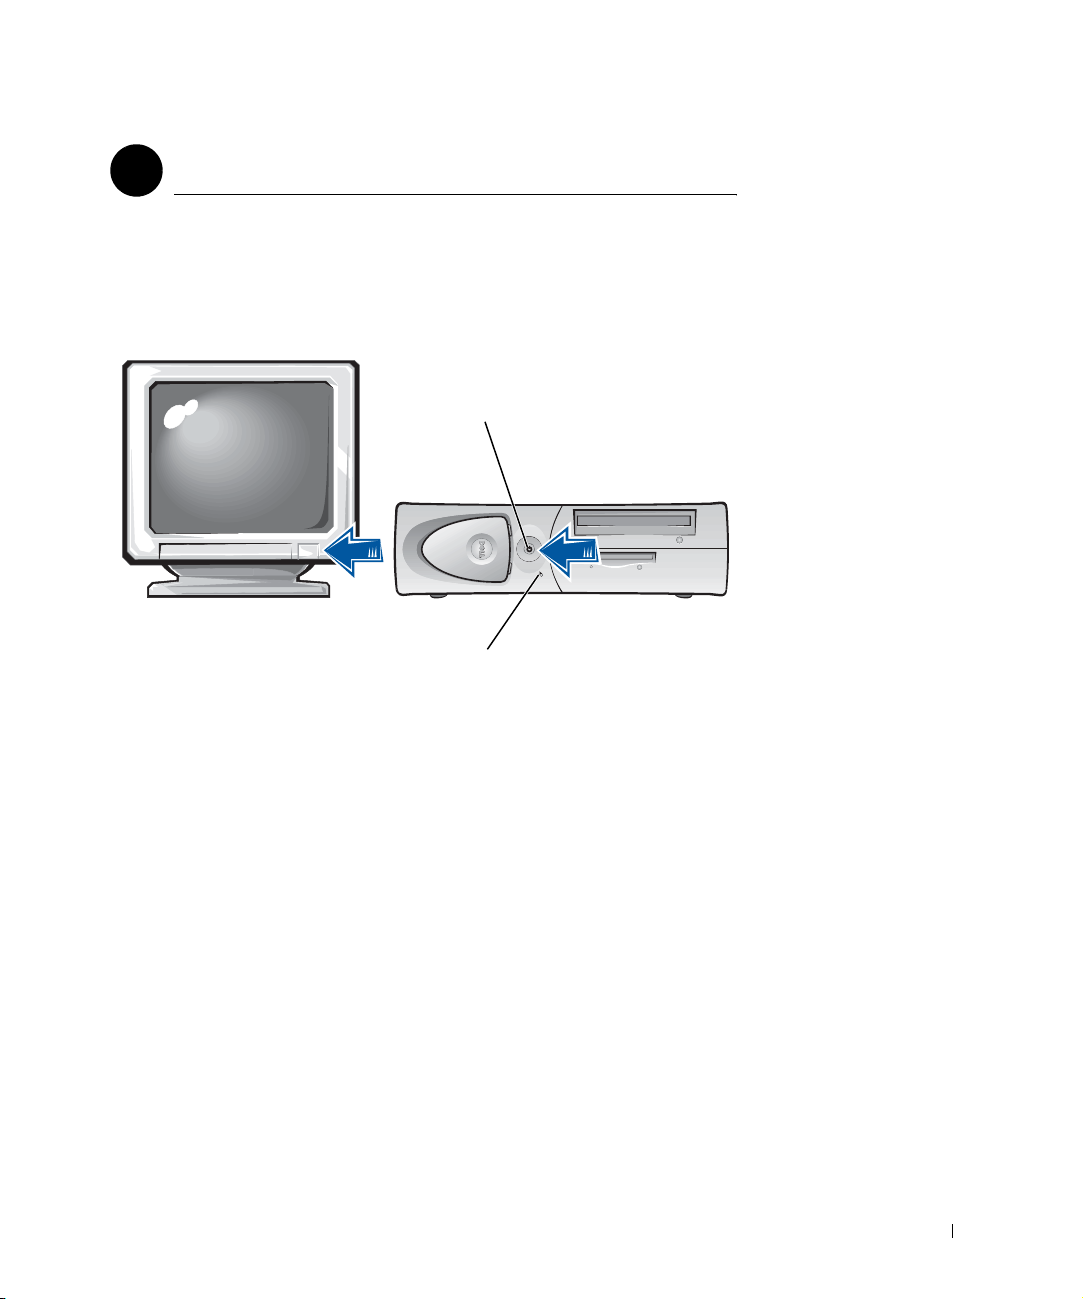
Power On
6
Press the power button on your computer and monitor to turn them on.
hard-drive
access light
power light
Setup and Quick Reference Guide 15
Page 16

When you start the computer for the first time, a few system start-up
messages may appear, including one that shows your Service Tag and
Express Service Code.
Your computer is preconfigured with the operating system already installed.
Before turning on your computer for the first time, you must complete all
the previous setup steps, connecting all devices for your computer.
The initial setup of the operating system is automatic and may take several
minutes. Additional setup time may be required, depending on your
system’s internal and external devices.
www.dell.com | support.euro.dell.com
Follow the operating system prompts to complete setup. You may be
prompted to enter the Windows Product Key (also called the Product ID or
COA) to complete the registration. You can find this above the service tag
on your computer.
Operating System
7
NOTE: For more
information on setting up
the operating system, see
the operating system
installation guide.
For future reference, write the number below:
Product Key (ID or COA): ________________________________________
16 Setup and Quick Reference Guide
Page 17

Additional Devices and Software
8
Before you install any devices or software that did not ship with your
computer, read the documentation that came with the software or device or
contact the vendor to verify that the software or device is compatible with
your computer and operating system. See "Adding Devices and Software" on
page 34.
Congratulations! You have completed the setup for your computer.
Setup and Quick Reference Guide 17
Page 18

Dual Monitors
NOTICE: Do not use any other cables or attach the monitor cable directly to
the dual-monitor graphic card.
NOTE: Some flat-panel
displays and graphic
cards support Digital
Visual Interface (DVI).
If your monitor and card
have DVI connectors, Dell
recommends that you use
DVI instead of VGA.
NOTE: A second monitor
is optional and requires a
www.dell.com | support.euro.dell.com
multimonitor graphics
adapter card.
The dual-monitor cable is color coded; the blue connector is for the primary
monitor, and the black connector is for the secondary monitor. Attach
the appropriate monitor cable to the dual-monitor cable. To enable
dual-monitor support, both monitors must be attached when the computer
starts. See "Frequently Asked Questions" on page 36 for more information.
OR
18 Setup and Quick Reference Guide
Page 19
Setting Up Your Small Desktop Computer
You must complete all steps to properly set up your computer.
Small Desktop Computer Features
2
1
6
NOTE: The numbers in
the figures correspond to
the setup tasks.
34 5
7
Setup and Quick Reference Guide 19
Page 20
Connect the keyboard and mouse as shown. Do not connect a USB mouse
or keyboard to the USB connectors on the front of the computer.
NOTE: Do not attempt
to operate a PS/2 mouse
and a USB mouse
simultaneously.
www.dell.com | support.euro.dell.com
Keyboard and Mouse
1
20 Setup and Quick Reference Guide
headphone/speaker
connector
USB connectors (2)
Page 21

Network Adapter and Modem
2
Insert the network cable, not the phone line, into the network connector.
If you have an optional modem, connect the phone line to the modem.
NOTICE: Do not connect a modem cable to the network adapter. Voltage
from telephone communications can cause damage to the network adapter.
NOTE: If your computer
has a network expansion
card installed, connect the
network cable to the
network card, not to the
connector on the
computer back panel.
Setup and Quick Reference Guide 21
Page 22

Monitor
3
Align and gently insert the monitor cable to avoid bending connector pins.
Then tighten the thumbscrews on the cable connectors.
Use the primary port if you are using one monitor with an optional
dual-monitor card.
NOTE: Some flat-panel
displays and graphic
cards support Digital
Visual Interface (DVI).
If your monitor and card
www.dell.com | support.euro.dell.com
have DVI connectors, Dell
recommends that you use
DVI instead of VGA.
For setting up dual monitors, see "Dual Monitors" on page 28.
22 Setup and Quick Reference Guide
Page 23

Speakers
4
Connect the speakers to the computer as shown on the instructions
supplied with the speakers.
NOTE: If your computer
has an audio expansion
card installed, connect
external audio devices to
the sound card, not to the
connectors on the
computer back panel.
Setup and Quick Reference Guide 23
Page 24

Plug in the computer and the monitor to their electrical outlets.
www.dell.com | support.euro.dell.com
Power Connection
5
24 Setup and Quick Reference Guide
Page 25
Power On
6
Press the power button on your computer and monitor to turn them on.
power light
hard-drive
access light
Setup and Quick Reference Guide 25
Page 26

When you start the computer for the first time, a few system start-up
messages may appear, including one that shows your Service Tag and
Express Service Code.
Your computer is preconfigured with the operating system already installed.
Before turning on your computer for the first time, you must complete all
the previous setup steps, connecting all devices for your computer.
The initial setup of the operating system is automatic and may take several
minutes. Additional setup time may be required, depending on your
system’s internal and external devices.
www.dell.com | support.euro.dell.com
Follow the operating system prompts to complete setup. You may be
prompted to enter the Windows Product Key (also called the Product ID or
COA) to complete the registration. You can find this above the service tag
on your computer.
Operating System
7
NOTE: For more
information on setting up
the operating system, see
the operating system
installation guide.
For future reference, write the number below:
Product Key (ID or COA): ________________________________________
26 Setup and Quick Reference Guide
Page 27

Additional Devices and Software
8
Before you install any devices or software that did not ship with your
computer, read the documentation that came with the software or device or
contact the vendor to verify that the software or device is compatible with
your computer and operating system. See "Adding Devices and Software" on
page 34.
Congratulations! You have completed the setup of your computer.
Setup and Quick Reference Guide 27
Page 28
Dual Monitors
NOTICE: Do not use any other cables or attach the monitor cable directly to
the dual-monitor graphic card.
NOTE: Some flat-panel
displays and graphic
cards support Digital
Visual Interface (DVI).
If your monitor and card
have DVI connectors, Dell
recommends that you use
DVI instead of VGA.
NOTE: A second monitor
is optional and requires a
www.dell.com | support.euro.dell.com
multimonitor graphics
adapter card.
The dual-monitor cable is color coded; the blue connector is for the primary
monitor, and the black connector is for the secondary monitor. Attach
the appropriate monitor cables to the dual-monitor cable. To enable
dual-monitor support, both monitors must be attached when the computer
starts. See "Frequently Asked Questions" on page 36 for more information.
OR
28 Setup and Quick Reference Guide
Page 29

Safety First—For You and Your Computer
While working inside your computer, do not attempt to service the
computer except as explained in this guide and elsewhere in Dell
documentation. Always follow the instructions closely.
Working inside your computer is safe—if you observe the following
precautions.
CAUTION: FOR YOUR PERSONAL SAFETY AND PROTECTION OF
THE EQUIPMENT
Before you start to work on the computer, perform the following steps in the
sequence indicated:
1 Tu r n o f f the computer and all devices.
2 Touch an unpainted metal surface on the computer, such as the metal
around the card-slot openings at the back of your computer, before
touching anything inside your computer.
3 Disconnect the computer and devices from their electrical outlets.
Doing so reduces the potential for personal injury or shock. Also
disconnect any telephone or telecommunication lines from the
computer.
While you work, periodically touch an unpainted metal surface on the
computer to dissipate any static electricity that might harm internal
components.
In addition, Dell recommends that you periodically review the safety
instructions in the documentation that came with your computer.
Opening the Computer Cover
You may need to open the computer cover if you are going to remove or
install a part, reset a forgotten password, or diagnose a computer problem.
CAUTION: Before you perform this procedure, see "Safety First—
For You and Your Computer" on page 29.
Setup and Quick Reference Guide 29
NOTE: Before
disconnecting a device
from the computer or
removing a component
from the system board,
verify that the standby
power light on the system
board has turned off. See
the interior service label
located on the inside of
the cover to locate the
standby power light.
Page 30

Opening the Cover
1 Turn off the computer and devices, disconnect them from their
electrical outlets, and wait 10 to 20 seconds.
2 If you have installed a padlock through the padlock ring on the back
panel, remove the padlock.
3 Open the computer cover:
NOTE: On the small
desktop computer, remove
the stand before you open
the cover. On the minitower computer, place the
computer on its side
www.dell.com | support.euro.dell.com
before you open the cover.
Mini-Tower Computer
a Press the two release buttons until the cover is free to swing up.
b Raise the back of the cover, and pivot it toward the front of the
computer.
NOTICE: To prevent damage to the system board of the mini-tower computer,
open the cover until it catches at a 45-degree angle. Then remove the optical
drive data cable and/or the hard-drive data cable from the system board and
open the cover to a 90-degree angle.
30 Setup and Quick Reference Guide
Page 31

Small Desktop Computer
Setup and Quick Reference Guide 31
Page 32

Inside Your Computer
Mini-Tower Computer
removable media drive
floppy drive
hard drive
www.dell.com | support.euro.dell.com
AC power
connector
power supply
padlock ring
back-panel
connectors
speaker
chassis intrusion
switch
system board
microprocessor airflow shroud
PCI expansion-card slots
32 Setup and Quick Reference Guide
Page 33

Small Desktop Computer
floppy drive
system board
memory modules
microprocessor
back-panel
connectors
padlock ring
low profile AGP slot
removable media drive
hard drive
speaker
chassis intrusion
switch
power supply
expansion-card cage
AC power connector PCI expansion-card slots
Setup and Quick Reference Guide 33
Page 34

Removing and Installing Parts
Instructions for removing and installing various parts are located in the
User’s Guide. You can replace such parts as:
•memory
• hard drive or other externally accessible drive
• PCI expansion card
•graphic card
• microprocessor
To access the User’s Guide from your hard drive:
www.dell.com | support.euro.dell.com
NOTE: You can also
access the User’s Guide
from the Dell Precision
ResourceCD or
support.euro.dell.com.
See "Finding Information
and Assistance" on
page 5.
To print the entire User’s Guide from Internet Explorer, select Print all
linked documents in the Print window.
Adding Devices and Software
Before you install any devices or software that did not ship with your
computer, read the documentation that came with the software or device or
contact the vendor to verify that the software or device is compatible with
your computer and operating system.
1 Depending on your operating system, double-click the User’s Guides
icon or click the Start button and select Help and Support.
Click Removing and Installing Parts.
2
3 Select Print from the File menu to print the procedure before you
begin working.
34 Setup and Quick Reference Guide
Page 35

Problems With Additional Devices and Software
If you have installed additional software or devices and are experiencing
problems with your computer, use the following procedures to solve the
problem:
• Remove or uninstall the device or software.
See the documentation that came with the device or software for
information on removing and uninstalling.
• Set your computer to Last Known Good Configuration.
®
For Windows NT
spacebar NOW to invoke Hardware Profile/Configuration
Recovery Menu
Profile/Configuration Recovery Menu, press <L> to switch to the
last known good setting, and then select your operating system.
For Windows 2000 and Windows XP, restart your computer and press
<F8> when the message
to start
appears. Highlight Last Known Good Setting, press
<Enter>, press <L>, and then select your operating system when
prompted.
See your operating system installation guide for more information.
• For Windows NT, if the first two procedures did not work, run ZZTop.
, press the spacebar when the message Press the
appears during system startup. In the Hardware
Please select the operating system
NOTICE: The following process has the potential to erase some or all of the
information on the hard drive.
To run ZZTOP, insert the ResourceCD, select Start Resource CD
Menu from the main menu, and then select Start ZZTOP
Imaging SW.
See "Using the Dell Precision ResourceCD" on page 40 for more
information on using the ResourceCD.
NOTICE: The following process erases all of the information on your
hard drive.
Setup and Quick Reference Guide 35
Page 36

• If the previous procedures did not work, run a low-level format of your
hard drive.
See your operating system installation guide for more information.
• Reinstall your operating system using the operating system installation
guide and operating system CD.
NOTE: Your operating
system may have a
compatibility mode, which
may help resolve issues
between older
applications and your
operating system. See
your operating system
www.dell.com | support.euro.dell.com
documentation for more
information.
See "Finding Information and Assistance" on page 5.
If you have verified that the device or software that you want to install is
compatible with your computer and operating system, reinstall the device or
software.
Frequently Asked Questions
Problem? Try... Or try the Dell Precision
ResourceCD
How do I use my Dell
Precision ResourceCD?
Where can I find a
detailed User’s Guide
for my computer?
See "Using the Dell Precision
ResourceCD" on page 40 for
more information.
Depending on your
operating system, doubleclick the User’s Guides icon
or click the Start button and
select Help and Support.
Documentation such as the
User’s Guide is available on
your hard drive.
Go to the main menu on the
Dell Precision ResourceCD.
Click User’s Guides in the
Topic pull-down menu and
click Dell Precision
ResourceCD Guide.
Go to the main menu on the
Dell Precision ResourceCD.
Click User’s Guides in the
Topic pull-down menu and
click the user’s guide
appropriate for your computer.
Or try the Dell Support Site
Go to support.euro.dell.com.
At the Welcome page, click Dell
Documents. Make selections
appropriate for your computer to
access your User’s Guide.
36 Setup and Quick Reference Guide
Page 37

Problem? Try... Or try the Dell Precision
ResourceCD
Where can I find a
warranty statement for
my computer?
Where can I find the
Product Key (also
called the Product ID
or Certificate of
Authenticity [COA])
Depending on your
operating system, doubleclick the User’s Guides icon
or click the Start button and
select Help and Support.
See the "Limited Warranty
and Return Policy" section in
your User’s Guide.
See page 16 of this
document for the minitower computer or page 26
of this document for the
small desktop computer.
Go to the main menu on the
Dell Precision ResourceCD.
Click User’s Guides in the
To pi c pull-down menu, click
the user’s guide appropriate
for your computer, and then
see "Limited Warranty and
Return Policy."
for the operating
system registration?
How do I find
technical
specifications for my
computer?
Depending on your
operating system, doubleclick the User’s Guides icon
or click the Start button, and
then select Help and
Support.
See the "Technical
Go to the main menu on the
Dell Precision ResourceCD.
Click User’s Guides in the
To pi c pull-down menu, click
the user’s guide appropriate
for your computer, and then
see "Technical Specifications."
Specifications" section in
your User’s Guide.
I have a computer with
a dual-monitorcapable graphics card.
How do I set up my
second monitor?
Depending on your
operating system, doubleclick the User’s Guides icon
or click the Start button and
select Help and Support and
search for dual monitor.
Go to the main menu on the
Dell Precision ResourceCD.
Click User’s Guides in the
To pi c pull-down menu and
click the user’s guide
appropriate for your computer.
A step-by-step procedure for
setting up dual monitors is
located in the video
controller User’s Guide.
Or try the Dell Support Site
Go to support.euro.dell.com. At
the Welcome page, click Dell
Documents. Make selections
appropriate for your computer to
access your User’s Guide. See
"Limited Warranty and Return
Policy" in the User’s Guide.
Go to support.euro.dell.com. At
the Welcome page, click Ask
Dudley! and search using the
keywords Product Key.
Go to support.euro.dell.com. At
the Welcome page, click Dell
Documents. Make selections
appropriate for your computer to
access your User’s Guide. See
"Technical Specifications" in the
User’s Guide.
Setup and Quick Reference Guide 37
Page 38

Problem? Try... Or try the Dell Precision
ResourceCD
If I need a driver for
my graphics card,
network adapter,
sound card, small
computer system
interface (SCSI)
software, or some
other device, where do
See "Drivers for Your
Computer" on page 41.
You may also have a CD
specifically for the device. If
so, search the contents of the
CD for documentation and
appropriate driver(s).
See the Dell Precision
ResourceCD Guide for more
information.
I locate it?
How do I open the
computer?
See "Opening the Computer
Cover" on page 29.
Go to the main menu on the
Dell Precision ResourceCD.
Click User’s Guides in the
www.dell.com | support.euro.dell.com
Topic pull-down menu, click
the user’s guide appropriate
for your computer, and then
see "Removing and Installing
Parts."
The monitor is blank
and the power light is
blinking green. How
do I resume operations
with my computer?
The computer is in a
reduced power or sleep state.
Depending on your
operating system you can
wake the computer by
moving the PS/2 mouse or
pressing the power button.
Go to the main menu on the
Dell Precision ResourceCD.
Click User’s Guides in the
Topic pull-down menu, click
the appropriate user’s guide
for your computer, and then
see "Power Management."
To learn more about power
management mode see your
User’s Guide. Depending on
your operating system,
double-click the User’s
Guides icon or click the
Start button and select Help
and Support.
How do I install
additional hardware on
my computer?
See "Removing and
Installing Parts" on page 34.
Go to the main menu on the
Dell Precision ResourceCD.
Click User’s Guides in the
Topic pull-down menu, click
the user’s guide appropriate
for your computer, and then
see "Removing and Installing
Parts."
Or try the Dell Support Site
Go to support.euro.dell.com. At
the Welcome Page, click
Downloads for Your Dell. Enter
your System Service Tag or make
the appropriate selections for your
computer and operating system to
locate drivers.
Go to support.euro.dell.com for
help with general usage,
installation, and troubleshooting
instructions.
Go to support.euro.dell.com. At
the Welcome page, click Dell
Documents. Make selections
appropriate for your computer to
access your User’s Guide. See
"Power Management" in the
User’s Guide.
Go to support.euro.dell.com. At
the Welcome page, click Dell
Documents. Make selections
appropriate for your computer to
access your User’s Guide. See
"Removing and Installing Parts" in
the User’s Guide.
38 Setup and Quick Reference Guide
Page 39

Problem? Try... Or try the Dell Precision
ResourceCD
How do I reinstall my
operating system?
See the operating system
installation guide for
information on reinstalling
your operating system.
Solving Problems
Your computer includes the following tools that can help you solve a
problem:
DELL DIAGNOSTICS — The Dell Precision ResourceCD contains Dell
Diagnostics that tests various components on your computer and helps identify
the cause of computer problems. For more information, see "When to Use the
Dell Diagnostics" on page 41.
SYSTEM LIGHTS — Located on the front of the computer, these lights can
indicate a computer problem. For more information, see "System Lights" on
page 45.
DIAGNOSTIC LIGHTS — Located on the front of the computer, these lights
can indicate a computer problem. For more information, see "Diagnostic Lights"
on page 46.
Or try the Dell Support Site
SYSTEM MESSAGES — The computer reports these messages to warn you of
current or possible failure. For more information, see "System Messages" on
page 49.
BEEP CODES — A series of audible beep codes emitted by your computer can
help identify a problem. For more information, see "Beep Codes" on page 49.
Setup and Quick Reference Guide 39
Page 40

If a computer problem occurs that you are unable to resolve through the
steps in this section or the procedures in "Finding Solutions" in your
User’s Guide, complete the following steps before you contact Dell:
See "Finding Information and Assistance" on page 5 for an example of the
express service code and the service tag numbers.
Using the Dell Precision ResourceCD
www.dell.com | support.euro.dell.com
To use the Dell Precision ResourceCD from within the Windows
operating system:
1 Write a detailed description of the error, beep code, or diagnostic
light problem.
2 Record your Express Service Code and Service Tag Number.
3 Contact Dell from the same location as your computer.
NOTE: To access
device drivers and user
documentation, you must
use the ResourceCD while
you are running Windows.
1 Insert the Dell Precision ResourceCD into the CD drive.
If you are using the Dell Precision ResourceCD for the first time on this
computer, the ResourceCD Installation window opens to inform you
that the ResourceCD is about to begin installation.
2 Click OK to continue.
To complete the installation, respond to the prompts offered by the
installation program.
3 Click Next at the Welcome Dell System Owner screen.
4 Select the appropriate System Model, Operating System, Device
Ty p e , and Topic.
To access the Dell Precision ResourceCD Guide, click User’s Guides in the
Topic pull-down menu and click Dell Precision ResourceCD.
40 Setup and Quick Reference Guide
Page 41

Drivers for Your Computer
To display a list of device drivers for your computer:
1 Click My Drivers in the Topic pull-down menu.
The ResourceCD scans your computer’s hardware and operating
system, and then a list of device drivers for your system configuration
is displayed on the screen.
2 Click the appropriate driver and follow the instructions to download
the driver for your computer.
To view a list of all the available drivers for your computer, click Drivers
from the Topic pull-down menu.
When to Use the Dell Diagnostics
If you experience a problem with your computer, perform the checks in
"Finding Solutions" in your User’s Guide and run the Dell Diagnostics
before you contact Dell for technical assistance. Running the Dell
Diagnostics may help you resolve the problem without contacting Dell. If
you do contact Dell, the test results can provide important information for
Dell's service and support personnel.
The Dell Diagnostics allows you to:
• Perform express, extended, or custom tests on one or all devices
• Select tests based on a symptom of the problem you are having
• Choose how many times a test is run
• Display test results
• Suspend testing if an error is detected
• Access online help information that describes the tests and devices
• Receive status messages that tell you whether tests completed
successfully
• Receive error messages if problems are detected
Setup and Quick Reference Guide 41
Page 42

Starting the Dell Diagnostics
It is recommended that you print these procedures before you begin.
NOTICE: Only use the Dell Diagnostics to test your Dell™ computer. Using
this program with other computers can result in error messages.
Enter system setup, review your computer’s configuration information, and
ensure that the device you want to test displays in system setup and is
active.
Start the Dell Diagnostics from either your hard drive or from the Drivers
and Utilities CD (also known as the ResourceCD).
Starting the Dell Diagnostics From Your Hard Drive
www.dell.com | support.euro.dell.com
NOTE: If you receive a
message stating that no
Diagnostics utility
partition has been found,
follow the instructions to
run the Dell Diagnostics
from your Drivers and
Utilities CD.
Starting the Dell Diagnostics From the Drivers and Utilities CD
NOTE: This feature
changes the boot sequence
for one time only. On the
next start-up, the
computer boots according
to the devices specified in
system setup.
1 Shut down and restart the computer.
2 When the DELL logo appears, press <F12> immediately.
If you wait too long and the Windows logo appears, continue to wait
until you see the Windows desktop. Then shut down your computer
through the Start menu and try again.
3 When the boot device list appears, highlight Boot to Utility Partition
and press <Enter>.
4 When the Dell Diagnostics Main Menu appears, select the test you
want to run.
1 Insert the Drivers and Utilities CD into the CD drive.
2 Shut down and restart the computer.
When the DELL logo appears, press <F12> immediately.
If you wait too long and the Windows logo appears, continue to wait
until you see the Windows desktop. Then shut down your computer
through the Start menu and try again
3 When the boot device list appears, highlight IDE CD-ROM Device
and press <Enter>.
4 Select the IDE CD-ROM Device option from the CD boot menu.
5 Select the Boot from CD-ROM option from the menu that appears.
6 Type 1 to start the ResourceCD menu.
42 Setup and Quick Reference Guide
Page 43

7 Ty p e 2 to start the Dell Diagnostics.
8 Select Run the 32 Bit Dell Diagnostics from the numbered list. If
multiple versions are listed, select the version appropriate for your
platform.
9 When the Dell Diagnostics Main Menu appears, select the test you
want to run.
Dell Diagnostics Main Menu
1 After the Dell Diagnostics loads and the Main Menu screen appears,
click the button for the option you want.
Option Function
Express
Test
Extended
Test
Custom
Test
Symptom
Tr ee
Performs a quick test of devices. This test typically takes
10 to 20 minutes and requires no interaction on your part.
Run Express Test first to increase the possibility of tracing
the problem quickly.
Performs a thorough check of devices. This test typically
takes an hour or more and requires you to answer questions
periodically.
Tests a specific device. You can customize the tests you
want to run.
Lists the most common symptoms encountered and allows
you to select a test based on the symptom of the problem
you are having.
NOTE: The Service Tag
number for your computer
is located at the top of
each test screen.
If a problem is encountered during a test, a message displaying the
2
error code and a description of the problem appear. Write down the
error code and problem description and follow the instructions on the
screen.
If you cannot resolve the error condition, contact Dell.
Setup and Quick Reference Guide 43
Page 44

www.dell.com | support.euro.dell.com
3 If you run a test from the Custom Test or Symptom Tree option, click
the applicable tab described in the following table for more
information.
Tab Function
Results Displays the results of the test and any error conditions
encountered.
Errors Displays error conditions encountered, error codes, and
problem description.
Help Describes the test and may indicate requirements for
running the test.
Configuration Displays your hardware configuration for the selected
device.
The Dell Diagnostics obtains your configuration
information for all devices from system setup, memory,
and various internal tests and displays it in the device
list in the left pane of the screen. The device list may
not display the names of all the components installed on
your computer or all devices attached to your computer.
Parameters Allows you to customize the test by changing the test
settings.
4 When the tests are completed, if you are running the Dell Diagnostics
from the Drivers and Utilities CD, remove the CD.
5 Close the test screen to return to the Main Menu screen. To exit the
Dell Diagnostics and restart the computer, close the Main Menu
screen.
Messages and Codes
Your application programs, operating system, and computer can identify
problems and alert you to them. When a problem occurs, a message may
appear on your monitor screen, a beep code may sound, or a light code may
be generated. The following subsections present information about
messages, beep codes, and light codes.
When a message appears, write it down; if possible, look up the message in
your User’s Guide. Report the message if you need to call technical support.
44 Setup and Quick Reference Guide
Page 45

System Lights
Your computer has a number of lights that can help you analyze and solve
problems. To locate these lights, see "Mini-Tower Computer Features" on
page 9 or "Small Desktop Computer Features" on page 19.
The following table lists the codes for the system lights, gives probable
causes, and suggests corrective actions.
System Light Codes
Power Light Hard-Drive Light Cause Corrective Action
Solid green N/A Power is on, and the computer is
operating normally.
Blinking green Blank The computer is in the suspended
state (Windows 2000 and XP).
Blinks green several
times and then
turns off
Solid yellow N/A The Dell Diagnostics is running a
Blinking yellow Blank A power supply or system board
Blinking yellow Solid green A system board failure exists. Check the diagnostic lights to see if
N/A A configuration error exists. Check the diagnostic lights to see if
test, or a device on the system board
may be faulty or incorrectly installed.
failure exists.
No corrective action is required.
Press the power button, move the
mouse, or press a key on the keyboard
to wake the computer. See "Power
Management" in the User’s Guide for
more information.
the specific problem is identified.
See the User’s Guide for more
information.
If the Dell Diagnostics is running,
allow the testing to complete.
Check the diagnostic lights to see if
the specific problem is identified.
Also, see "System Board Problems" in
the User’s Guide.
If the computer does not boot,
contact Dell for technical assistance.
Check the diagnostic lights to see if
the specific problem is identified. See
"Power Problems" and "System Board
Problems" in the User’s Guide.
the specific problem is identified.
Also, see "System Board Problems" in
the User’s Guide.
Setup and Quick Reference Guide 45
Page 46

System Light Codes (continued)
Power Light Hard-Drive Light Cause Corrective Action
Solid green and a
beep code during
POST
Solid green power
light and no beep
code and no video
during POST
Solid green power
light and no beep
code but the
www.dell.com | support.euro.dell.com
computer locks up
during POST
N/A A problem was detected while the
BIOS was executing.
N/A The monitor or the graphics card may
be faulty or incorrectly installed.
N/A An integrated system board device
may be faulty.
See "Beep Codes" on page 49 for
instructions on diagnosing the beep
code. Also, check the diagnostic lights
to see if the specific problem is
identified.
Check the diagnostic lights to see if
the specific problem is identified.
Also, see "Video Problems" in the
User’s Guide.
Check the diagnostic lights to see if
the specific problem is identified. If
the problem is not identified, contact
Dell for technical assistance.
Diagnostic Lights
When you turn on your computer, it performs a series of self-diagnostic
tests. A successful power-on self-test (POST) ends with a single beep that
signifies the start of normal operation. If the computer fails to complete the
POST, a series of lights located on the computer can help you understand
which test failed or why the computer stopped responding. These lights
communicate problems encountered before and during POST only, not
during normal operation. To locate the diagnostic lights, see "Back Panel" on
page 46.
The following table lists the code for the diagnostic lights, gives probable
causes, and suggests corrective actions. The lights are labeled to help you
match the pattern on your computer with ones shown in the table.
Back Panel
diagnostic lights
46 Setup and Quick Reference Guide
Page 47

Diagnostic Light Codes During POST
Light Pattern Cause
A
B
C
D
off
off
off
off
No electrical power is supplied to the computer.
A
B
C
D
A
B
C
D
A
B
C
D
A
B
C
D
A
B
C
D
yellow
yellow
green
yellow
yellow
yellow
green
green
yellow
green
yellow
yellow
yellow
green
yellow
green
yellow
green
green
yellow
Possible microprocessor failure.
Possible memory failure.
Possible expansion card failure or conflict.
Possible video card failure.
Possible floppy drive or hard drive failure.
= yellow
= green
= off
Setup and Quick Reference Guide 47
Page 48

Diagnostic Light Codes During POST (continued)
Light Pattern Cause
A
B
C
D
A
B
C
D
www.dell.com | support.euro.dell.com
A
B
C
D
A
B
C
D
A
B
C
D
green
green
green
yellow
green
yellow
yellow
green
green
yellow
green
green
green
green
yellow
yellow
yellow
green
green
green
After video initialization, an alert was found. Check
the computer screen for an error message.
Possible system board resource and/or hardware failure.
Possible system board resource and/or hardware failure.
Possible expansion card failure or conflict.
Possible USB failure.
A
B
C
D
= yellow
= green
= off
48 Setup and Quick Reference Guide
green
green
green
green
Normal operating condition after POST.
Page 49

System Messages
If an error occurs during start-up, a message may be reported on the
monitor identifying the problem. If a system message is displayed, look it up
under "System Messages" in the User’s Guide for suggestions on resolving
any problems. The system messages are listed alphabetically.
Beep Codes
If an error occurs during start-up that cannot be reported on the monitor,
your computer may emit a beep code that identifies the problem. The beep
code is a pattern of sounds: for example, one beep, followed by a second
beep, and then a burst of three beeps (code 1-1-3) means that the computer
was unable to read the data in nonvolatile random-access memory
(NVRAM).
If a beep code is emitted, write it down and look it up under "System Beep
Codes" in the User’s Guide.
NOTE: If the system
message you received is
not listed in the User’s
Guide, check the
documentation for the
application program that
you were running at the
time the message
appeared and/or the
operating system
documentation for an
explanation of the
message and a
recommended action.
Setup and Quick Reference Guide 49
Page 50

www.dell.com | support.euro.dell.com
50 Setup and Quick Reference Guide
Page 51

Dell Precision™ WorkStation
Installations- og hurtig referencevejledning
www.dell.com | support.euro.dell.com
Page 52

Bemærkninger, meddelelser og forholdsregler
BEMÆRKNING: BEMÆRKNING tilkendegiver vigtige oplysninger, som hjælper dig med at få
større udbytte af din computer.
MEDDELELSE: MEDDELELSE tilkendegiver enten en potentiel skade på hardware eller tab af
data og fortæller dig, hvordan du kan undgå problemet.
FORHOLDSREGEL: FORHOLDSREGEL tilkendegiver en potentiel farlig situation,
som, hvis den ikke undgås, kan resultere i mindre eller moderat skade.
____________________
Oplysningerne i dette dokument kan gøres til genstand for ændring uden varsel.
© 2001-2002 Dell Computer Corporation. Alle rettigheder forbeholdes.
Reproduktion i nogen som helst form uden skriftlig tilladelse fra Dell Computer Corporation er strengt forbudt.
Varemærker anvendt i denne tekst: Dell, Dell-logoet, og Dell Precision er varemærker tilhørende
Dell Computer Corporation; Microsoft, Windows og Windows NT er registrerede varemærker tilhørende
Microsoft Corporation.
Andre varemærker og varebetegnelser kan være brugt i dette dokument enten for at henvise til de firmaer, der ejer
disse varemærker og varebetegnelser, eller til disse firmaers produkter. Dell Computer Corporation frasiger sig enhver
ejendomsmæssig interesse i varemærker og varebetegnelser som ikke er deres egne.
December 2002 P/N 7F867 Rev. A03
Page 53

Indhold
Oplysninger og assistance . . . . . . . . . . . . . . . . . . . . . 55
Opstilling af mini-tower-computer
Dobbelte skærme
. . . . . . . . . . . . . . . . . . . . . . . . 68
Opstilling af lille skrivebordscomputer
Dobbelte skærme
. . . . . . . . . . . . . . . . . . . . . . . . 78
. . . . . . . . . . . . . . . . . 59
. . . . . . . . . . . . . . . 69
Sikkerhed først — For dig og din computer
Åbning af computerdækslet
Åbning af dækslet
Inden i computeren
. . . . . . . . . . . . . . . . . . . . . . . . . 82
. . . . . . . . . . . . . . . . . . . . 79
. . . . . . . . . . . . . . . . . . . . . . . . 80
Fjernelse og installation af komponenter
Tilføjelse af periferiudstyr og software
. . . . . . . . . . . . . . 84
Problemer med ekstra periferiudstyr og software
Ofte stillede spørgsmål
Fejlfinding
. . . . . . . . . . . . . . . . . . . . . . . . . . . . . 89
Brug af Dell Precision ResourceCD’en
. . . . . . . . . . . . . . . . . . . . . . . 86
. . . . . . . . . . . . . . 90
Hvornår skal Dell Diagnostik anvendes
Start Dell Diagnostik
Meddelelser og koder
. . . . . . . . . . . . . . . . . . . . . . 92
. . . . . . . . . . . . . . . . . . . . . . 95
. . . . . . . . . . . . 79
. . . . . . . . . . . . . 84
. . . . . . . . 85
. . . . . . . . . . . . . 91
Indhold 53
Page 54

54 Indhold
Page 55

Oplysninger og assistance
Følgende tabel angiver de ressourcer, som Dell stiller til rådighed som
supportredskaber. Yderligere ressourcer kan være sendt med computeren.
Hvad søger du? Find det her
• Et diagnoseprogram til computeren
• Drivere til computeren
• Dokumentation til computeren
• Dokumentation til enheder
• Sådan foretages installation af computeren
• Information om fejlfinding
• Diagnoseværktøjer og hjælpeprogrammer
Drivers and Utilities CD (også kendt som
ResourceCD)
Med denne CD kan du finde frem til dokumentation, geninstallere
drivere eller bruge diagnoseværktøjer.
Installations- og hurtig referencevejledning
Installations- og hurtig referencevejledning 55
Page 56

Hvad søger du? Find det her
• Kode til ekspresservice og servicenummer
• Microsoft
®
Windows® License Label
Express Service Code og Product Key
Disse mærkater er placeret på computeren under frontpanelets dør.
• Sådan geninstalleres operativsystemet Operativsystem CD og Installationshåndbog
www.dell.com | support.euro.dell.com
Hvis du geninstallerer operativsystemet, skal du bruge Drivers and
Utilities CD'en til at geninstallere drivere for de enheder, der fulgte
med computeren.
56 Installations- og hurtig referencevejledning
Page 57

Hvad søger du? Find det her
• Sådan fjerner og udskifter du dele
• Tekniske specifikationer
• Sådan konfigurer du systemets indstillinger
• Sådan finder du fejl og løser problemer
• De nyeste drivere til computeren
• Svar på spørgsmål vedr. teknisk service og
support
• Onlinediskussioner med andre brugere og
teknisk support
• Dokumentation til computeren
• Servickaldstatus
• Vigtigste tekniske problemer pr. produkt
• Ofte stillede spørgsmål
• Download af filer
• Detaljer vedr. computerens konfiguration
• Servicekontrakt for computeren
Ikonet Brugerhåndbog
Afhængig af operativsystemet skal du enten dobbeltklikke på ikonet
User’s Guides (Brugerhåndbog) på skrivebordet eller klikke på knappen
Start og derefter på Help and Support (Hjælp og Support) for at få
adgang til den elektroniske dokumentation, som ligger lagret på
harddisken.
Dell Support Website — support.euro.dell.com
På Dell Supports hjemmeside finder du en række onlineværktøjer,
herunder:
• Videnbase — råd, tips og onlinekurser
• Kundeforum — onlinediskussioner med andre Dell-kunder
• Opgraderinger — information vedr. opgraderinger af komponenter
som f.eks. hukommelse, harddisk og operativsystem
• Kundepleje — kontaktinformation, ordrestatus, garanti og
information vedr. reparationer
• Downloads — drivere, programrettelser og opdateringer af software
• Referencer — computerdokumentation, produktspecifikationer og
vigtige oplysninger
Dell Premier Support Website —
premiersupport.dell.com
Dell Premier Support website er tilpasset firmakunder, offentlige
kunder og kunder, der har tilknytning til uddannelse. Denne service er
ikke tilgængelig alle steder.
Installations- og hurtig referencevejledning 57
Page 58

Hvad søger du? Find det her
• Stik på systemkort Systeminformations-mærkat
• Information vedr. garanti Dell System Informationshåndbog
www.dell.com | support.euro.dell.com
• Sådan bruger du Windows XP
• Dokumentation vedr. computeren og
enheder
Windows XP Hjælp og Support Center
1 Klik på knappen Start og klik derefter på Hjælp og Support.
2 Indtast et ord eller en sætning, der beskriver problemet, og klik på
pil-ikonet.
3 Klik på det emne, som beskriver problemet.
4 Følg instruktionerne, som bliver vist på skærmen.
58 Installations- og hurtig referencevejledning
Page 59

Opstilling af mini-tower-computer
Du skal fuldføre alle trinnene for at opstille computeren korrekt.
Funktioner på mini-tower-computer
5
1
4
BEMÆRKNING:
Tallene på nedenstående
illustrationer svarer
til opstillingstrinene.
7
6
2
3
Installations- og hurtig referencevejledning 59
Page 60

Tilslut tastaturet og musen som vist i illustrationen. Tilslut ikke en
USB-mus eller et USB-tastatur til USB-stikkene (Universal Serial Bus) foran
på computeren.
BEMÆRKNING:
Forsøg ikke at betjene en
PS/2-mus og en USB-mus
samtidigt.
www.dell.com | support.euro.dell.com
Tastatur og mus
1
60 Installations- og hurtig referencevejledning
USB-stik (2)
stik til
hovedtelefoner/højttalere
Page 61

Netværksadapter og modem
2
Indsæt netværkskablet, ikke telefonlinien, i netværksstikket.
Hvis du har et modem (ekstraudstyr), skal du tilslutte telefonlinien
til modemet.
MEDDELELSE: Tilslut ikke et modemkabel til netværksadapteren.
Spændingen fra telefonkommunikationen kan beskadige netværksadapteren.
BEMÆRKNING: Hvis
der er installeret et
netværksindstikskort i
computeren, tilslut da
netværkskablet til
netværkskortet, ikke til
stikket på computerens
bagpanel.
Installations- og hurtig referencevejledning 61
Page 62

Skærm
3
Hold skærmkablet lige og indsæt det forsigtigt for at undgå at bøje stikkets
ben. Stram derefter fingerskruerne på kabelstikkene.
Benyt den primære port, hvis du bruger en skærm med et dobbelt
skærmkort.
BEMÆRKNING: Visse
flade dataskærme og
grafikkort understøtter
DVI (Digital Visual
Interface). Hvis din
www.dell.com | support.euro.dell.com
skærm og dit kort har
DVI-stik, anbefaler Dell,
at du benytter DVI i
stedet for VGA.
Oplysninger om opstilling af dobbelte skærme findes under "Dobbelte
skærme" på side 68.
62 Installations- og hurtig referencevejledning
Page 63

Højttalere
4
Tilslut højttalerne til computeren som vist på de instruktioner, som fulgte
med højttalerne.
BEMÆRKNING: Hvis
der er installeret et
lydindstikskort i din
computer, skal du tilslutte
eksterne lydenheder til
lydkortet, ikke til stikkene
på computerens bagpanel.
Installations- og hurtig referencevejledning 63
Page 64

Tilslut computeren og skærmen til deres stikkontakter.
www.dell.com | support.euro.dell.com
Strømtilslutning
5
64 Installations- og hurtig referencevejledning
Page 65

Tænding
6
Tryk på strømafbryderen på computeren og skærmen for at tænde for dem.
adgangsindikator
for harddrev
strømindikator
Installations- og hurtig referencevejledning 65
Page 66

Operativsystem
7
Når du starter computeren for første gang, vil der måske blive vist nogle få
systemopstartsmeddelelser, inklusive en der viser dit servicenummer og
kode til ekspresservice.
Din computer er konfigureret med et præinstalleret operativsystem. Før du
tænder computeren første gang, skal du udføre alle de foregående
opsætningstrin, så alle enheder er tilsluttet computeren.
Startopsætningen af operativsystemet sker automatisk og kan vare flere
minutter. Der kan kræves yderligere opsætningstid, afhængigt af dit systems
interne og eksterne enheder.
www.dell.com | support.euro.dell.com
BEMÆRKNING:
Yderligere oplysninger
om opstilling af
operativsystemet findes i
installationsvejledningen
til operativsystemet.
Følg operativsystemets anvisninger for at fuldføre opsætningen. Du kan
blive bedt om at indtaste Microsoft Windows produktnøgle (også kaldet
produkt-ID eller COA) for at fuldføre registreringen. Du kan finde dette
over servicemærket på din computer.
Skriv nummeret herunder til fremtidig brug:
Produktnøgle (ID eller COA): _____________________________________
66 Installations- og hurtig referencevejledning
Page 67

Ekstra periferiudstyr og software
8
Før du installerer eventuelt periferiudstyr eller software, som ikke blev sendt
med computeren, bedes du læse den dokumentation, som fulgte med
softwaren eller periferiudstyret, eller kontakte leverandøren for at sikre dig,
at softwaren eller periferiudstyret er kompatibelt med computeren og
operativsystemet. Se "Tilføjelse af periferiudstyr og software" på side 84.
Til lykke! Du har fuldført opstillingen af din computer.
Installations- og hurtig referencevejledning 67
Page 68

Dobbelte skærme
MEDDELELSE: Brug ikke nogen andre kabler, og tilslut ikke skærmkablet
direkte til grafikkortet til de dobbelte skærme.
BEMÆRKNING: Visse
flade dataskærme og
grafikkort understøtter
DVI (Digital Visual
Interface). Hvis din
skærm og dit kort har
DVI-stik, anbefaler Dell,
at du benytter DVI i
stedet for VGA.
BEMÆRKNING:
www.dell.com | support.euro.dell.com
En ekstra skærm er
ekstraudstyr og kræver et
multiskærmgrafikkort.
Kablet til de dobbelte skærme er farvekodet; det blå stik er til den primære
skærm, og det sorte stik er til den sekundære skærm. Tilslut det korrekte
skærmkabel til kablet til de dobbelte skærme. For at sikre understøttelse til
de dobbelte skærme, skal begge skærme være tilsluttet, når computeren
starter. Se "Ofte stillede spørgsmål" på side 86 for at få yderligere
oplysninger.
OR
68 Installations- og hurtig referencevejledning
Page 69

Opstilling af lille skrivebordscomputer
Du skal fuldføre alle trinnene for at opstille computeren korrekt.
Funktioner på lille skrivebordscomputer
2
1
34 5
6
BEMÆRKNING:
Tallene på nedenstående
illustrationer svarer til
opstillingstrinene.
7
Installations- og hurtig referencevejledning 69
Page 70

Tilslut tastaturet og musen som vist i illustrationen. Tilslut ikke en
USB-mus eller et USB-tastatur til USB-stikkene foran på computeren.
BEMÆRKNING:
Forsøg ikke at betjene en
PS/2-mus og en USB-mus
samtidigt.
www.dell.com | support.euro.dell.com
Tastatur og mus
1
stik til
hovedtelefoner/højttalere
USB-stik (2)
70 Installations- og hurtig referencevejledning
Page 71

Netværksadapter og modem
2
Indsæt netværkskablet, ikke telefonlinien, i netværksstikket.
Hvis du har et modem (ekstraudstyr), skal du tilslutte telefonlinien til
modemet.
MEDDELELSE: Tilslut ikke et modemkabel til netværksadapteren.
Spændingen fra telefonkommunikationen kan beskadige netværksadapteren.
BEMÆRKNING: Hvis
der er installeret et
netværksindstikskort i
computeren, skal du
tilslutte netværkskablet
til netværkskortet, ikke til
stikket på computerens
bagpanell.
Installations- og hurtig referencevejledning 71
Page 72

Skærm
3
Hold skærmkablet lige og indsæt det forsigtigt for at undgå at bøje stikkets
ben. Stram derefter fingerskruerne på kabelstikkene.
Benyt den primære port, hvis du bruger en skærm med et dobbelt
skærmkort.
BEMÆRKNING: Visse
flade dataskærme og
grafikkort understøtter
DVI (Digital Visual
Interface). Hvis din
www.dell.com | support.euro.dell.com
skærm og dit kort har
DVI-stik, anbefaler Dell,
at du benytter DVI i
stedet for VGA.
Oplysninger om opstilling af dobbelte skærme findes under "Dobbelte
skærme" på side 78.
72 Installations- og hurtig referencevejledning
Page 73

Højttalere
4
Tilslut højttalerne til computeren som vist på de instruktioner, som fulgte
med højttalerne.
BEMÆRKNING: Hvis
der er installeret et
lydindstikskort i din
computer, skal du tilslutte
eksterne lydenheder til
lydkortet, ikke til stikkene
på computerens bagpanel.
Installations- og hurtig referencevejledning 73
Page 74

Tilslut computeren og skærmen til deres stikkontakter.
www.dell.com | support.euro.dell.com
Strømtilslutning
5
74 Installations- og hurtig referencevejledning
Page 75

Tænding
6
Tryk på strømafbryderen på computeren og skærmen for at tænde for dem.
strømindidator
adgangsindikator
for harddrev
Installations- og hurtig referencevejledning 75
Page 76

Operativsystem
7
Når du starter computeren for første gang, vil der måske blive vist nogle få
systemopstartsmeddelelser, inklusive en der viser dit servicenummer og
kode til ekspresservice.
Din computer er konfigureret med et præinstalleret operativsystem. Før du
tænder computeren første gang, skal du udføre alle de foregående
opsætningstrin, så alle enheder er tilsluttet computeren.
Startopsætningen af operativsystemet sker automatisk og kan vare flere
minutter. Der kan kræves yderligere opsætningstid, afhængigt af dit systems
interne og eksterne enheder.
www.dell.com | support.euro.dell.com
BEMÆRKNING:
Yderligere oplysninger
om opstilling af
operativsystemet findes i
installationsvejledningen
til operativsystemet.
Følg operativsystemets anvisninger for at fuldføre opsætningen. Du kan
blive bedt om at indtaste Microsoft Windows produktnøgle (også kaldet
produkt-ID eller COA) for at fuldføre registreringen. Du kan finde dette
over servicemærket på din computer.
Skriv nummeret herunder til fremtidig brug:
Produktnøgle (ID eller COA): _____________________________________
76 Installations- og hurtig referencevejledning
Page 77

Ekstra periferiudstyr og software
8
Før du installerer eventuelt periferiudstyr eller software, som ikke blev sendt
med computeren, bedes du læse den dokumentation, som fulgte med
softwaren eller periferiudstyret, eller kontakte leverandøren for at sikre dig,
at softwaren eller periferiudstyret er kompatibelt med computeren og
operativsystemet. Se "Tilføjelse af periferiudstyr og software" på side 84.
Til lykke! Du har fuldført opstillingen af din computer.
Installations- og hurtig referencevejledning 77
Page 78

Dobbelte skærme
MEDDELELSE: Brug ikke nogen andre kabler, og tilslut ikke skærmkablet
direkte til grafikkortet til de dobbelte skærme.
BEMÆRKNING: Visse
flade dataskærme og
grafikkort understøtter
DVI (Digital Visual
Interface). Hvis din
skærm og dit kort har
DVI-stik, anbefaler Dell,
at du benytter DVI i
stedet for VGA.
BEMÆRKNING:
www.dell.com | support.euro.dell.com
En ekstra skærm er
ekstraudstyr og kræver et
multiskærmgrafikkort.
Kablet til de dobbelte skærme er farvekodet; det blå stik er til den primære
skærm, og det sorte stik er til den sekundære skærm. Tilslut det korrekte
skærmkabel til kablet til de dobbelte skærme. For at sikre understøttelse til
de dobbelte skærme, skal begge skærme være tilsluttet, når computeren
starter. Se "Ofte stillede spørgsmål" på side 86 for at få yderligere
oplysninger.
OR
78 Installations- og hurtig referencevejledning
Page 79

Sikkerhed først — For dig og din computer
Mens du arbejder inde i computeren, må du ikke forsøge at udføre service
på computeren, undtagen som forklaret i denne vejledning og andet steds i
Dell-dokumentationen. Følg altid instruktionerne nøje.
Det er sikkert at arbejde inde i computeren — hvis du overholder følgende
forholdsregler.
FORHOLDSREGEL: FOR DIN PERSONLIGE SIKKERHED OG
BESKYTTELSE AF UDSTYRET
Før du begynder at arbejde på computeren, skal følgende trin udføres i den
angivne rækkefølge:
1 Sluk for computeren og alt periferiudstyr.
2 Rør en ikke-malet metaloverflade på computeren, f.eks. metallet rundt
om åbningerne til kortstikkene på bagsiden af computeren, før du rør
ved noget inde i computeren.
3 Frakobl computeren og periferiudstyret fra deres stikkontakter. Dette
reducerer potentialet for personskade eller elektrisk stød. Frakobl også
eventuelle telefon- eller telekommunikationslinier fra computeren.
Mens du arbejder, skal du med mellemrum røre ved en ikke-malet
metaloverflade på computeren for at aflede eventuel statisk
elektricitet, som kan beskadige interne komponenter.
Derudover anbefaler Dell, at du med mellemrum gennemgår
sikkerhedsinstruktionerne i den dokumentation, som fulgte med
computeren.
Åbning af computerdækslet
Det kan blive nødvendigt at fjerne computerdækslet, hvis du skal fjerne
eller installere en komponent, nulstille en glemt adgangskode eller
diagnosticere et computerproblem.
FORHOLDSREGEL: Før du udfører denne procedure, bedes du se
"Sikkerhed først — For dig og din computer" på side 79.
Installations- og hurtig referencevejledning 79
BEMÆRKNING: Før
du kobler periferiudstyr
fra computeren eller
fjerner en komponent fra
systemkortet, skal du
sikre dig, at standbystrømindikatoren på
systemkortet er slukket.
Se den indvendige
serviceetiket, som findes
på indersiden af dækslet
for at finde standbystrømindikatoren.
Page 80

Åbning af dækslet
1 Sluk computeren og enhederne, tag ledningerne til dem ud af
stikkontakten, og vent 10 til 20 sekunder.
2 Fjern eventuel installeret hængelås fra hængelåsringen på bagpanelet.
3 Åbn computerdækslet:
a Tryk på de to udløserknapper, indtil dækslet frit kan svinges opad.
b Hæv bagsiden af dækslet, og drej det mod computerens forside.
BEMÆRKNING:
På den lille
skrivebordscomputer, skal
du fjerne sokkelen, før
www.dell.com | support.euro.dell.com
dækslet åbnes. På
mini-tower-computeren
skal du anbringe
computeren på siden,
før dækslet åbnes.
Mini-tower-computer
MEDDELELSE: For at forhindre beskadigelse af systemkortet på
mini-tower- computeren, skal du åbne dækslet, indtil det når en vinkel på
45 grader. Fjern derefter laserdrevsdatakabel og/eller harddrevsdatakablet fra
systemkortet og åbn dækslet i en vinkel på 90 grader.
80 Installations- og hurtig referencevejledning
Page 81

Lille skrivebordscomputer
Installations- og hurtig referencevejledning 81
Page 82

Inden i computeren
Mini-tower-computer
udtageligt mediedrev
diskettedrev
harddrev
www.dell.com | support.euro.dell.com
strømforsyning
ring til hængelås
vekselstrøms-stik
bagpanelstik
højttaler
chassisintrusionskontakt
systemkort
ventilationsdæksel til microprocessor
stik til PCI-indstikskort
82 Installations- og hurtig referencevejledning
Page 83

Lille skrivebordscomputer
diskettedrev
systemkort
hukommelsesmoduler
microprocessor
udtageligt mediedrev
harddrev
højttaler
chassisintrusionskontakt
bagpanelstik
ring til hængelås
lav profil AGP-stik
vekselstrømsstik
strømforsyning
holder til indstikskort
stik til PCI-indstikskort
Installations- og hurtig referencevejledning 83
Page 84

Fjernelse og installation af komponenter
Instruktioner til fjernelse og installation af forskellige komponenter findes i
din Brugervejledning. Du kan udskifte komponenter såsom:
• Hukommelse
• Harddrev eller andet drev, hvortil der er ekstern adgang
• PCI-indstikskort
• Grafikkort
• Microprocessor
www.dell.com | support.euro.dell.com
BEMÆRKNING: Du
kan også få adgang til
din Brugervejledning
fra Dell Precision
ResourceCD’en eller
support.euro.dell.com. Se
"Oplysninger og
assistance" på side 55.
Sådan får du adgang til din Brugervejledning fra harddrevet:
Hvis du vil udskrive den hele Brugervejledning fra Microsoft Internet
Explorer, vælger du Print all linked documents (Udskriv alle
sammenkædede dokumenter) i vinduet Udskriv.
Tilføjelse af periferiudstyr og software
Før du installerer eventuelt periferiudstyr eller software, som ikke blev sendt
med computeren, bedes du læse den dokumentation, som fulgte med
softwaren eller periferiudstyret, eller kontakte leverandøren for at sikre dig,
at softwaren eller periferiudstyret er kompatibelt med computeren og
operativsystemet.
1 Afhængig af operativsystemet skal du enten dobbeltklikke på ikonet
Brugerhåndbøger eller klikke på knappen Start og vælge Hjælp og
Support.
Klik på Removing and Installing Parts (Fjernelse og installation af
2
komponenter).
3 Væ lg Print (Udskriv) fra menuen File (Filer) for at udskrive
proceduren, før du begynder.
84 Installations- og hurtig referencevejledning
Page 85

Problemer med ekstra periferiudstyr og software
Hvis du har installeret ekstra software eller periferiudstyr og har problemer
med computeren, kan du følge nedenstående procedurer for at løse
problemet:
• Fjern eller afinstaller periferiudstyret eller softwaren.
Se den dokumentation, som fulgte med periferiudstyret eller softwaren
for at få oplysninger om fjernelse og afinstallering.
• Indstil computeren til Last Known Good Configuration (Sidst kendte
gode konfiguration).
®
I Windows NT
meddelelsen
Hardware Profile/Configuration Recovery Menu
(Tryk på mellemrumstasten NU for at aktivere
Hardwareprofil/Konfigurationsgendannelsesmenu)
under systemopstarten. På Hardware Profile/Configuration
Recovery Menu (Hardwareprofil/Konfigurationsgendannelsesmenu)
trykker du på <L> for at skifte til den sidst kendte gode indstilling, og
vælger derefter dit operativsystem.
I Windows 2000 og Windows XP genstarter du computeren og trykker
på <F8>, når meddelelsen
system to start (Vælg det operativsystem, som skal
starte)
vises. Fremhæv Last Known Good Setting (Sidst kendte
gode indstilling), tryk på <Enter>, tryk <L>, og vælg derefter dit
operativsystem, når du bliver bedt om det.
Se installationsvejledningen til operativsystemet for at få yderligere
oplysninger.
, trykker du på mellemrumstasten, når
Press the spacebar NOW to invoke
vises
Please select the operating
• I Windows NT kan du køre ZZTop, hvis de første to procedurer
ikke virker.
MEDDELELSE: Følgende proces kan potentielt slette nogle eller alle
oplysninger på harddrevet.
Du kan køre ZZTOP ved at indsætte ResourceCD’en, vælge Start
Resource CD Menu (Start ResourceCD-menu) fra hovedmenuen og
derefter vælge Start ZZTOP Imaging SW.
Se "Brug af Dell Precision™ ResourceCD’en" på side 90 for af få
yderligere oplysninger om brug af ResourceCD’en.
MEDDELELSE: Den følgende proces sletter alle informationer på
harddisken.
Installations- og hurtig referencevejledning 85
Page 86

• Hvis de tidligere procedurer ikke virker, kør da en grundformatering af
harddrevet.
Se installationsvejledningen til operativsystemet for at få yderligere
oplysninger.
• Geninstaller operativsystemet ved brug af installationsvejledningen til
operativsystemet og operativsystem-CD’en.
BEMÆRKNING:
Måske har dit
operativsystem en
kompatibilitetsmodus,
som kan hjælpe med at
løse problemer imellem
ældre programmer og dit
www.dell.com | support.euro.dell.com
operativsystem. Se
dokumentationen til dit
operativsystem for at få
yderligere oplysninger.
Se "Oplysninger og assistance" på side 55.
Når du har konstateret, at det periferiudstyr eller den software, som du
ønsker at installere, er kompatibel med computeren og operativsystemet,
kan du geninstallere periferiudstyret eller softwaren.
Ofte stillede spørgsmål
Problem? Prøv... Eller prøv Dell Precision
ResourceCD
Hvordan bruger jeg
min Dell Precision
ResourceCD?
Hvor kan jeg finde
en detaljeret
Brugervejledning til
min computer?
Se "Brug af Dell Precision™
ResourceCD’en" på side 90
for at få yderligere
oplysninger.
Alt efter hvilket
operativsystem du har,
dobbeltklikker du på
ikonet Brugervejledninger
eller klikker på Start og
vælger Hjælp og support.
Dokumentation f.eks.
Brugervejledning er til
rådighed på harddrevet.
Gå til hovedmenuen på
Dell Precision ResourceCD’en.
Klik på User’s Guides
(Brugervejledninger) i
rullemenuen Topic (Emne),
og klik på Dell Precision
ResourceCD Guide
(Vejledning til Dell's
Præcisions-RessourceCD).
Gå til hovedmenuen på
Dell Precision ResourceCD’en.
Klik på Brugervejledninger på
rullemenuen Emne. Klik på
den relevante Brugervejledning
til din computer.
Eller prøv Dell Support Site
Gå til support.euro.dell.com.
På siden Welco me (Velkommen)
klikker du på Dell Documents
(Dell-dokumenter). Foretag de
relevante valg til din computer for
at få adgang til din
Brugervejledning.
86 Installations- og hurtig referencevejledning
Page 87

Problem? Prøv... Eller prøv Dell Precision
ResourceCD
Hvor kan jeg finde et
garantibevis til min
computer?
Hvor kan jeg finde
produktnøglen (kaldes
også produkt-ID eller
Certificate of
Authenticity [COA])
til registrering af
operativsystemet?
Hvordan finder
jeg tekniske
specifikationer til
min computer?
Alt efter hvilket
operativsystem du har,
dobbeltklikker du på
ikonet Brugervejledninger
eller klikker på Start og
vælger Hjælp og support.
Se afsnittet
"Begrænset garanti og
returneringspolitik" i din
Brugervejledning.
Se side 66 i dette dokument
for at få oplysninger til
mini-tower-computeren eller
side 76 i dette dokument for
at få oplysninger til den lille
skrivebordscomputer.
Afhængig af
operativsystemet skal du
enten dobbeltklikke på
ikonet Brugerhåndbøger
eller klikke på knappen Start
og derefter vælge Hjælp og
Support.
Se afsnittet "Tekniske
Gå til hovedmenuen på
Dell Precision ResourceCD’en.
Klik på Brugerhåndbøger i
rullemenuen Emne, klik på
den brugerhåndbog, som
svarer til computeren, og se
derefter "Limited Warranty
and Return Policy"
("Begrænset garanti og
returpolitik").
Gå til hovedmenuen på
Dell Precision ResourceCD’en.
Klik på Brugerhåndbøger i
rullemenuen Emne, klik på
den brugerhåndbog, som
svarer til computeren, og se
derefter "Tekniske
specifikationer".
specifikationer" i din
Brugervejledning.
Jeg har en computer
med et grafikkort med
mulighed for dobbelt
skærm. Hvordan
opstiller jeg min anden
skærm?
Afhængig af
operativsystemet skal du
enten dobbeltklikke på
ikonet Brugerhåndbøger
eller klikke på knappen Start,
vælge Hjælp og Support og
Gå til hovedmenuen på
Dell Precision ResourceCD’en.
Klik på Brugervejledninger på
rullemenuen Emne og klik på
den relevante Brugervejledning
til din computer.
søge efter dual monitor
(dobbeltskærm).
I din Brugervejledning til
videokontrolenheden findes
der en trinvis procedure til
opstilling af dobbelte
skærme.
Eller prøv Dell Support Site
Gå til support.euro.dell.com.
På siden Velkommen klikker du
på Dell-dokumenter. Foretag de
relevante valg til din computer
for at få adgang til din
Brugervejledning. Se "Begrænset
garantí og returneringspolitik" i
din Brugervejledning.
Gå til support.euro.dell.com.
På siden Velkommen, klikker du
på Ask Dudley! (Sprøg Dudley!)
og søger ved brug af
nøgleordene Product Key
(Produktnøgle).
Gå til support.euro.dell.com.
På siden Velkommen klikker du
på Dell-dokumenter. Vælg de
menupunkter, som passer til din
computer for at få adgang til din
Brugervejledning. Se "Tekniske
specifikationer" i din
Brugervejledning.
Installations- og hurtig referencevejledning 87
Page 88

Problem? Prøv... Eller prøv Dell Precision
ResourceCD
Hvis jeg skal bruge en
driver til grafikkortet,
netværksadapteren,
lydkortet,
SCSI-softwaren
(small computer
system interface) eller
til en anden enhed,
hvor finder jeg det så?
Hvordan åbner jeg min
computer?
www.dell.com | support.euro.dell.com
Se "Drivere til din computer"
på side 91.
Du har måske også en
speciel CD til enheden. Hvis
det er tilfældet, skal du søge
på CD’en efter
dokumentation og de/den
relevante driver(e).
Se "Åbning af
computerdækslet" på
side 79.
Se Dell Precision ResourceCD
Guide for at få yderligere
oplysninger.
Gå til hovedmenuen på
Dell Precision ResourceCD’en.
Klik på Brugerhåndbøger i
rullemenuen Emne, klik på
den brugerhåndbog, som
passer til computeren, og se
derefter "Fjern og installer
dele".
Skærmen er tom, og
netlampen blinker
grønt. Hvordan
kommer jeg i gang
med min computer
igen?
Computeren er i en tilstand
med reduceret strømforbrug,
eller "hvile".
Alt efter hvilket
operativsystem du har, kan
du "vække" computeren ved
Gå til hovedmenuen på
Dell Precision ResourceCD’en.
Klik på Brugerhåndbøger i
rullemenuen Emne, klik på
den brugerhåndbog, som svarer
til computeren, og se derefter
"Strømstyring".
at bevæge PS/2-musen eller
trykke på strømafbryderen.
Du kan få yderligere
oplysninger om
strømstyringsmodus i din
Brugervejledning. Alt efter
hvilket operativsystem du
har, dobbeltklikker du på
ikonet Brugervejledninger
eller klikker på Start og
vælger Hjælp og support.
Hvordan installerer jeg
yderligere hardware på
min computer?
Se "Fjernelse og installation
af komponenter" på
side 1-32.
Gå til hovedmenuen på
Dell Precision ResourceCD’en.
Klik på Brugerhåndbøger i
rullemenuen Emne, klik på
den brugerhåndbog, som svarer
til computeren, og se derefter
"Fjern og installer dele".
Eller prøv Dell Support Site
Gå til support.euro.dell.com.
På siden Velkommen klikker du
på Downloads for Your Dell
(Downloads til din Dell). Indtast
dit systemservicenummer eller
vælg menupunkter, der passer til
computeren og operativsystemet
for at finde drivere.
Gå til support.euro.dell.com og
søg hjælp om almindelig brug,
installation og fejlfinding.
Gå til support.euro.dell.com.
På siden Velkommen klikker
du på Dell-dokumenter.
Foretag de relevante valg for
din computer for at få adgang
til din Brugervejledning.
Se "Strømstyring" i din
Brugervejledning.
Gå til support.euro.dell.com.
På siden Velkommen klikker du
på Dell-dokumenter. Foretag de
relevante valg til din computer
for at få adgang til din
Brugervejledning. Se "Fjernelse og
installation af komponenter" i din
Brugervejledning.
88 Installations- og hurtig referencevejledning
Page 89

Problem? Prøv... Eller prøv Dell Precision
ResourceCD
Hvordan
geninstallerer jeg mit
operativsystem?
Yderligere oplysninger
om geninstallation af
operativsystemet finder du i
installationsvejledningen til
operativsystemet.
Fejlfinding
Computeren inkluderer følgende hjælpeværktøjer, der kan hjælpe dig med
at løse et problem:
DELL-FEJLFINDING — Dell Precision ResourceCD'en indeholder Dell
Diagnostik, som kan bruges til at teste forskellige komponenter i computeren og
hjælpe med til at finde årsagen til computerproblemer. Der findes yderligere
oplysninger i "Hvornår skal Dell Diagnostik anvendes" på side 91.
SYSTEMLYSDIODER — Disse lysdioder, som er placeret på forsiden af
computeren, kan angive et computerproblem. Du kan få yderligere oplysninger
under "Systemlysdioder" på side 95.
Eller prøv Dell Support Site
DIAGNOSELYSDIODER — Disse lysdioder, som er placeret på forsiden af
computeren, kan angive et computerproblem. Du kan få yderligere oplysninger
under "Diagnoselysdioder" på side 97.
SYSTEMMEDDELELSER — Disse meddelelser rapporteres af computeren for
at advare dig om aktuelle eller mulige fejl. Du kan få yderligere oplysninger under
"Systemmeddelelser" på side 99.
BIPKODER — En serie af hørbare bipkoder afgives af computeren og kan
hjælpe med at identificere et problem. Du kan få yderligere oplysninger under
"Bipkoder" på side 100.
Installations- og hurtig referencevejledning 89
Page 90

Hvis der opstår et computerproblem, som du ikke kan løse ved hjælp af
trinnene i dette afsnit eller procedurerne i "Problemløsning
Brugervejledning, bedes du fuldføre følgende trin, før du kontakter Dell:
Se "Oplysninger og assistance" på side 55 for at se et eksempel på koden til
ekspresservice og servicenummeret.
Brug af Dell Precision ResourceCD’en
www.dell.com | support.euro.dell.com
Hvis du vil bruge Dell Precision ResourceCD'en under Windows
operativsystemet, skal du gøre følgende:
" i din
1 Skriv en detaljeret beskrivelse af fejlen, bipkoden eller
diagnoselysdiodekoden.
2 Notér din kode til ekspresservice og dit servicenummer.
3 Kontakt Dell mens du sidder i nærheden af computeren.
BEMÆRKNING: Hvis
du vil have adgang til
enhedsdrivere og
brugerdokumentation,
skal du bruge
ResourceCD’en, mens
Windows kører.
Indsæt Dell Precision ResourceCD’en i CD-drevet.
1
Hvis du benytter Dell Precision ResourceCD’en for første gang på
denne computer, åbnes vinduet ResourceCD Installation
(RessourceCD Installation) og informerer dig om, at ResourceCD’en
er ved at begynde installationen.
2 Klik på OK for at fortsætte.
Svar på de instruktioner, som installationsprogrammet giver, for at
fuldføre installationen.
3 Klik på Next (Næste) på skærmbilledet Welcome Dell System Owner
(Velkommen Dell-systemejere).
4 Vælg relevant System Model (Systemmodel), Operating System
(Operativsystem), Device Type (Enhedstype) og Emne.
Du får adgang til Dell Precision ResourceCD Guide ved at klikke på
Brugervejledninger på rullemenuen Emne og klikke på Dell Precision
ResourceCD.
90 Installations- og hurtig referencevejledning
Page 91

Drivere til din computer
Udfør disse trin for at se en liste over enhedsdrivere til din computer:
1 Klik på My Drivers (Mine drivere) på rullemenuen Emne.
ResourceCD’en scanner computerens hardware og operativsystem, og
viser derefter en liste over enhedsdrivere til din systemkonfiguration på
skærmen.
2 Klik på den relevante driver og følg instruktionerne for at downloade
driveren til din computer.
Du kan se en liste over alle de disponible drivere til din computer ved at
klikke på Drivers (Drivere) fra rullemenuen Emne.
Hvornår skal Dell Diagnostik anvendes
Hvis der opstår problemer i computeren, skal du foretage de kontroller, der
findes i "Find løsninger" i Brugerhåndbogen, og køre Dell Diagnostik, inden
du kontakter Dell for at få teknisk assistance. Hvis du kører Dell Diagnostik,
kan det måske løse problemet, uden at du behøver at kontakte Dell. Hvis du
kontakter Dell, kan testresultaterne forsyne personalet i Dell's service og
support med vigtige oplysninger.
Med Dell Diagnostik kan du:
• udføre Express, Extended eller Custom test af en eller af alle enheder
• udvælge en bestemt test i relation til problemets symptomer
• vælge, hvor mange gange en test skal udføres
• få vist testresultater
• afbryde en test, når der bliver konstateret en fejl
• kalde online hjælpeinformationer frem, som beskriver de forskellige
test og enheder
• modtage statusmeddelelser, som fortæller, om en test er blevet
gennemført korrekt
• modtage fejlmeddelelser, hvis der konstateres problemer
Installations- og hurtig referencevejledning 91
Page 92

Start Dell Diagnostik
Du kan med fordel udskrive disse procedurer, inden du begynder.
MEDDELELSE: Brug kun Dell Diagnostik til at teste en Dell™ computer.
Hvis dette program bruges på andre computere, kan det resultere i
fejlmeddelelser.
Gå ind i systeminstallationen og læs informationerne om computerens
konfiguration igennem. Kontroller, at den enhed, der skal testes, bliver vist i
systeminstallationen og er aktiv.
Start Dell Diagnostik enten fra harddisken eller fra Drivers and Utilities
CD'en (også kendt som ResourceCD'en).
www.dell.com | support.euro.dell.com
Start Dell Diagnostik fra harddisken
BEMÆRKNING:
Hvis der kommer en
meddelelse, som fortæller,
at der ikke blev
fundet en Diagnostik
hjælpepartition, skal du
følge instruktionerne om
at køre Dell Diagnostik
fra Drivers and Utilities
CD'en.
Start Dell Diagnostik fra Drivers and Utilities CD'en
1 Luk computeren ned og genstart den.
2 Når DELL logoet vises, skal du trykke på <F12> med det samme.
Hvis du er for længe om det, og Windows logoet når at komme frem,
skal du vente, til du kan se Windows skrivebord. Luk derpå
computeren ned via menuen Start, og prøv igen.
3 Når listen over startenheder kommer frem, skal du fremhæve Boot to
Utility Partition (Boot til hjælpepartition) og derefter trykke
på <Enter>.
4 Når hovedmenuen i Dell Diagnostik kommer frem, skal du vælge den
test, du vil udføre.
1 Sæt Drivers and Utilities CD'en i CD-drevet.
2 Luk computeren ned og genstart den.
Når DELL logoet vises, skal du trykke på <F12> med det samme.
Hvis du er for længe om det, og Windows logoet når at komme frem,
skal du vente, til du kan se Windows skrivebord. Luk derpå
computeren ned via menuen Start, og prøv igen.
92 Installations- og hurtig referencevejledning
Page 93

Når listen over startenheder kommer frem, skal du fremhæve IDE
3
CD-ROM Device (IDE CD-ROM enheden) og derefter trykke
på <Enter>.
4 Vælg indstillingen IDE CD-ROM enhed i CD'ens startmenu.
5 Vælg indstillingen Boot from CD-ROM (Boot fra CD-ROM) i
menuen, der kommer frem.
6 Ta s t 1 for at starte menuen ResourceCD.
7 Ta s t 2 for at starte Dell Diagnostik.
8 Væ lg Run the 32 Bit Dell Diagnostics (Kør 32 Bit Dell Diagnostik)
på den nummererede liste. Hvis der findes flere versioner på listen, skal
du vælge den version, der svarer til din platform.
9 Når hovedmenuen i Dell Diagnostik kommer frem, skal du vælge den
test, du vil udføre.
Dell Diagnostik Hovedmenu
1 Når Dell Diagnostik er indlæst, og skærmen viser Main Menu
(Hovedmenuen), skal du klikke på knappen for den funktion, som du
vil udføre.
Indstilling Funktion
Express Test
(Eksprestest)
Extended Test
(Udvidet test)
Custom Test
(Brugerdefineret
test)
Symptom Tree
(Symptomtræ)
Udfører en hurtig test af enheder. Denne test varer typisk
10 til 20 minutter og kræver ingen indgriben fra din side.
Begynd med at køre Eksprestest, fordi denne test muligvis
kan finde frem til problemet på kort tid.
Udfører en fuldstændig test af enheder. Denne test varer
typisk en time eller mere og kræver, at du med mellemrum
besvarer spørgsmål.
Tester en bestemt enhed. Du kan selv sammensætte de
test, du ønsker at køre.
Viser en liste over de mest almindelige symptomer, som
blev konstateret, så du kan vælge en test, der svarer til
problemets symptom.
BEMÆRKNING: Denne
funktion ændrer kun
startsekvensen denne ene
gang. Ved næste opstart
vil computeren starte
ifølge de enheder, som er
specificeret i
systemopstillingen.
BEMÆRKNING:
Computerens
servicenummer er
placeret øverst på hver
testskærm.
Installations- og hurtig referencevejledning 93
Page 94

www.dell.com | support.euro.dell.com
2 Hvis der under en test konstateres et problem, vises en meddelelse
med en fejlkode og en beskrivelse af problemet. Skriv fejlkoden og
beskrivelsen ned og følg instruktionerne på skærmen.
Kontakt Dell, hvis du ikke selv kan finde en løsning på fejlen.
3 Hvis du kører en test under indstillingen Custom Test eller Symptom
Tr ee , kan du få yderligere oplysninger ved at klikke på de forskellige
faner, som er beskrevet i tabellen herunder.
Fane Funktion
Results
(Resultater)
Errors (Fejl) Viser alle konstaterede fejl med fejlkode og
Help (Hjælp) Beskriver testen og kan angive diverse krav til testens
Configuration
(Konfiguration)
Parameters
(Parametre)
Viser resultaterne fra testen og alle konstaterede fejl.
problembeskrivelse.
udførelse.
Viser hardwarekonfigurationen for den valgte enhed.
Dell Diagnostik henter informationer om
konfigurationen af alle enheder fra
systeminstallationsprogrammet, hukommelsen og fra
forskellige interne test og viser dem på en liste over
enhederne i det venstre panel på skærmen. Det er ikke
sikkert, at navnene på alle komponenter, der er
installeret på computeren, bliver vist på listen over
enheder, eller at alle enheder, som er tilsluttet
computeren, er med på listen.
Giver mulighed for at udforme testen individuelt ved
at ændre testindstillingerne.
4 Hvis Dell Diagnostik bliver kørt fra Drivers and Utilities CD, skal
CD'en tages ud, når testene er afsluttet.
5 Luk testskærmen for at vende tilbage til Hovedmenuen. Luk
Hovedmenuen, så Dell Diagnostik bliver afsluttet, og genstart
computeren.
94 Installations- og hurtig referencevejledning
Page 95

Meddelelser og koder
Dine applikationsprogrammer, dit operativsystem og din computer kan
identificere fejl og gøre dig opmærksom på dem. Når der opstår et problem,
vises der måske en meddelelse på skærmen, der lyder muligvis en bipkode,
eller der genereres eventuelt en lyskode. De følgende underafsnit giver
oplysninger om meddelelser, bipkoder og lysdiodekoder.
Skriv meddelelsen ned, når den vises; slå om muligt meddelelsen op i din
Brugervejledning. Rapportér meddelelsen, hvis det bliver nødvendigt at
ringe til teknisk support.
Systemlysdioder
Din computer er forsynet med et antal lysdioder, der kan hjælpe dig med at
analysere og rette fejl. Se "Funktioner på mini-tower-computer" på side 59
eller "Funktioner på lille skrivebordscomputer" på side 69 for at få
oplysninger om, hvor du finder disse lysdioder.
Den følgende tabel indeholder en oversigt over koderne for
systemlysdioderne, angiver mulige årsager og foreslår afhjælpning.
Systemlysdioder
Spændingslampe Harddisklampe Årsag Afhjælpning
Konstant grøn I/R Strømmen er tilsluttet, og
computeren fungerer normalt.
Blinker grønt Slukket Computeren er i pause-tilstand
(Windows 2000 og XP).
Blinker grønt flere
gange og slukkes
derefter
I/R Der er opstået en konfigurationsfejl. Kontrollér diagnoselysdioderne for at
Ingen afhjælpning nødvendig.
Tryk på strømafbryderen, bevæg
musen, eller tryk på en tast på
tastaturet for at "vække"
computeren. Se "Strømstyring" i din
Brugervejledning for at få yderligere
oplysninger.
se, om en bestemt fejl er identificeret.
Se din Brugervejledning for at få
yderligere oplysninger.
Installations- og hurtig referencevejledning 95
Page 96

Systemlysdioder (fortsættes)
Spændingslampe Harddisklampe Årsag Afhjælpning
Konstant gul I/R Dell-fejlfinding kører en test, eller en
enhed på systemkortet kan være
fejlbehæftet eller forkert installeret.
Hvis Dell-fejlfinding kører, skal testen
gøres færdig.
Kontrollér diagnoselysdioderne for at
se, om en bestemt fejl er identificeret.
Se også "Problemer med systemkort" i
din Brugervejledning.
Kontakt Dell for at få teknisk
assistance, hvis computeren ikke
starter.
Blinker gult Slukket Der er fejl i strømforsyningen eller på
systemkortet.
Kontrollér diagnoselysdioderne for at
se, om en bestemt fejl er identificeret.
Se også "Strømproblemer" og
www.dell.com | support.euro.dell.com
"Problemer med systemkort" i din
Brugervejledning.
Blinker gult Konstant grøn Der er fejl på systemkortet. Kontrollér diagnoselysdioderne for at
se, om en bestemt fejl er identificeret.
Se også "Problemer med systemkort" i
din Brugervejledning.
Konstant grøn og en
bipkode under
POST
I/R Der er opstået et problem under
BIOS-kørslen.
Se "Bipkoder" på side 100 for at få
vejledning i bipkoden. Kontrollér også
diagnoselysdioderne for at se, om en
bestemt fejl er identificeret.
Konstant grøn
spændingslampe og
ingen bipkode og
ingen skærmbillede
I/R Skærmen eller grafikkortet kan være
fejlbehæftet eller forkert installeret.
Kontrollér diagnoselysdioderne for at
se, om en bestemt fejl er identificeret.
Se også "Skærmproblemer" i din
Brugervejledning.
under POST
Konstant grøn
spændingslanpe og
ingen bipkode, men
comnputeren ser ud
til at køre under
I/R Der kan være fejl på en integreret
enhed på systemkortet.
Kontrollér diagnoselysdioderne for at
se, om en bestemt fejl er identificeret.
Kontakt Dell for at få teknisk
assistance, hvis fejlen ikke kan
identificeres.
POST
96 Installations- og hurtig referencevejledning
Page 97

Diagnoselysdioder
Når du tænder for computeren, udfører den en række selvtest. En vellykket
POST (Power-On Self Test) afsluttes med et enkelt bip, der angiver starten
på normal funktion. Hvis computeren ikke gennemfører POST, kan en
række lysdioder på computeren hjælpe med at finde ud af, hvilke test der
fejlede, eller hvorfor computeren ikke reagerede. Disse lysdioder viser kun
fejl, der er opstået før og under POST, ikke under normal drift. Se
"Bagpanel" på side 97 for at få oplysninger om, hvor du finder
diagnoselysdioderne.
Den følgende tabel indeholder en oversigt over koderne for
diagnoselysdioderne, angiver mulige årsager og foreslår afhjælpning.
Lysdioderne er mærket, så du kan sammenligne mønstret på din computer
med et af dem, der er vist i tabellen.
Bagpanel
diagnoselysdioder
Diagnoselysdiodekoder under POST
Indikatormønster Årsag
A
B
C
D
slukket
slukket
slukket
slukket
Computeren forsynes ikke med strøm.
=gul
=grøn
=slukket
Installations- og hurtig referencevejledning 97
Page 98

www.dell.com | support.euro.dell.com
Diagnoselysdiodekoder under POST (fortsættes)
Indikatormønster Årsag
A
B
C
D
A
B
C
D
A
B
C
D
A
B
C
D
A
B
C
D
A
B
C
D
gul
gul
grøn
gul
gul
gul
grøn
grøn
gul
grøn
gul
gul
gul
grøn
gul
grøn
gul
grøn
grøn
gul
grøn
grøn
grøn
gul
Mulig fejl med microprocessor.
Mulig fejl med hukommelse.
Mulig fejl eller konflikt med indstikskort.
Mulig fejl med videokort.
Mulig fejl med diskettedrev eller harddrev.
Der kom et advarselssignal, da videoen blev
initialiseret. Se efter, om der er en
fejlmeddelelse på computerens skærm.
=gul
=grøn
=slukket
98 Installations- og hurtig referencevejledning
Page 99

Diagnoselysdiodekoder under POST (fortsættes)
Indikatormønster Årsag
A
B
C
D
A
B
C
D
A
B
C
D
A
B
C
D
A
B
C
D
grøn
gul
gul
grøn
grøn
gul
grøn
grøn
grøn
grøn
gul
gul
gul
grøn
grøn
grøn
grøn
grøn
grøn
grøn
Mulig fejl med systemkortressource og/eller
hardware.
Mulig fejl med systemkortressource og/eller
hardware.
Mulig fejl eller konflikt med indstikskort.
Mulig fejl med USB.
Normal driftstilstand efter POST.
=gul
=grøn
=slukket
Systemmeddelelser
Hvis der opstår en fejl under opstarten, vises der måske en meddelelse på
skærmen, der identificerer problemet. Hvis der vises en systemmeddelelse,
se da tabellen "Systemmeddelelser" i din Brugervejledning for at få forslag til
løsning af eventuelle problemer. Systemmeddelelserne er angivet i alfabetisk
rækkefølge.
Installations- og hurtig referencevejledning 99
Page 100

BEMÆRKNING: Hvis
den systemmeddelelse, du
har modtaget, ikke findes
i din Brugervejledning,
kontrollér da
dokumentationen til det
applikationsprogram, som
du kørte, da meddelelsen
blev vist, og/eller
dokumentationen til
operativsystemet for at få
en forklaring på
meddelelsen og en
anbefalet handling.
www.dell.com | support.euro.dell.com
Bipkoder
Når der opstår fejl under en startrutine, som muligvis ikke rapporteres på
skærmen, kan computeren afgive en række biplyde, der hjælper med at
identificere problemet. Bipkoden er et mønster af lyde: f.eks. et bip
efterfulgt af et andet bip og derefter en serie af tre biplyde (kode 1-1-3)
betyder, at computeren ikke kunne læse dataene i NVRAM (NonVolatile
Random-Access Memory).
Hvis der afgives en bipkode, skal du nedskrive den og se under
"Systembipkoder" i din Brugervejledning.
100 Installations- og hurtig referencevejledning
 Loading...